Page 1
Division / Business Unit: Enterprise Services
Function: Operations
Document Type: Guideline
This document is uncontrolled when printed. Version Number: 1.2 Date Reviewed: 8 Jun 2018 Page 1 of 85
Network Information Book
South CTC
Mile End (exc) to Wolseley (inc)
OGW-30-07
Applicability
Interstate Network
Publication Requirement
Internal / External
Primary Source
Route Access Standard - Defined Interstate Rail Network Section Pages D3
Document Status
Version # Date Reviewed Prepared by Reviewed by Endorsed Approved
1.2 8 Jun 2018 Configuration
Management
Administrator
Configuration
Manager
Standards
Manager
GM Technical Standards
21 Jun 18
Amendment Record
Amendment
Version #
Date Reviewed Clause Description of Amendment
1.0 22 Jan 16 Initial Issue
1.1 20 Apr 16 Correction of minor errors and removal of ARTC Addendum
reference and Passive LX at Balhannah.
1.2
8 Jun 2018 Various
Shunting GWA tracks added to Tailem Bend text section 2.12.
Coomandook signal aspects information added to section
2.13. Corrections to various diagrams including kms, signals &
level crossing protection type. Diagram legend updated.
Page 2
Mile End (exc) to Wolseley (inc)
OGW-30-07
Table of Contents
This document is uncontrolled when printed. Version Number: 1.2 Date Reviewed: 8 Jun 2018 Page 2 of 85
Table of Contents
Table of Contents ............................................................................................................................................. 2
1 General Information ............................................................................................................................... 4
1.1 Board Extent................................................................................................................................... 4
1.2 Safe Working System ..................................................................................................................... 4
1.3 Applicable Rules ............................................................................................................................ 4
1.3.1 Index to CoP and ARTC Addendum ............................................................................................... 4
1.4 Adjacent Train Control Centres .................................................................................................... 10
1.5 Section Operating Equipment ...................................................................................................... 11
1.5.1 Motorised Point Machines ............................................................................................................ 11
1.5.2 Outlying Switch Locks & HLM Point Locks ................................................................................... 14
1.6 Train Braking Requirements ........................................................................................................ 17
1.7 Level Crossings Mile End to Wolseley ......................................................................................... 18
1.8 Emergency Local Releases ......................................................................................................... 23
1.9 Maximum Permanent Speeds and Permanent Speed Restrictions ............................................. 23
1.10 Maximum Train Length ................................................................................................................ 23
1.11 Structure Clearances ................................................................................................................... 24
1.12 Tunnels ......................................................................................................................................... 25
1.13 Communications .......................................................................................................................... 25
1.14 Wayside Monitoring Systems ....................................................................................................... 26
1.15 Ruling Gradients .......................................................................................................................... 26
1.16 Curve and Gradient Data ............................................................................................................. 26
1.17 Drawing Legend ........................................................................................................................... 27
2 Locations and Sections Information .................................................................................................. 29
2.1 Mile End (MED) ............................................................................................................................ 29
2.1.1 Mile End – Goodwood – Belair Section ........................................................................................ 31
2.2 Belair (BEL) .................................................................................................................................. 34
2.3 Mount Lofty (MTL) ........................................................................................................................ 37
2.4 Ambleside(AMB) .......................................................................................................................... 40
2.5 Balhannah (BAL) .......................................................................................................................... 42
2.6 Mount Barker Junction (MBJ) ....................................................................................................... 44
2.6.1 Signal Failures at Balhannah End of Yard .................................................................................... 44
2.7 Petwood(PEW) ............................................................................................................................. 47
2.8 Callington (CGT) .......................................................................................................................... 49
Page 3
Mile End (exc) to Wolseley (inc)
OGW-30-07
Table of Contents
This document is uncontrolled when printed. Version Number: 1.2 Date Reviewed: 8 Jun 2018 Page 3 of 85
2.9 Monarto South (MSU) .................................................................................................................. 51
2.10 Murray Bridge (MUB) ................................................................................................................... 55
2.11 Monteith (MTO) ............................................................................................................................ 57
2.12 Tailem Bend(TBD) ....................................................................................................................... 59
2.13 Coomandook (CDK) ..................................................................................................................... 62
2.14 Coonalpyn (CYN) ......................................................................................................................... 66
2.15 Tintinara (TIN) .............................................................................................................................. 69
2.16 Coombe (CZE) ............................................................................................................................. 72
2.17 Keith (KTH) ................................................................................................................................... 75
2.18 Wirrega (WEG) ............................................................................................................................. 78
2.19 Bordertown (BOT) ........................................................................................................................ 81
2.20 Wolseley (WSL)............................................................................................................................ 84
Page 4
Mile End (exc) to Wolseley (inc)
OGW-30-07
General Information
This document is uncontrolled when printed. Version Number: 1.2 Date Reviewed: 8 Jun 2018 Page 4 of 85
1 General Information
1.1 Board Extent
Mile End to Wolseley 3.4km to 307km with kilometres starting at 3.4 km at Mile End.
Contact Numbers:
Phone: (08) 8217 4453
Train Transit Manager: (08) 8217 4540
TTM Emergency: (08) 8231 4506
1.2 Safe Working System
Centralised Train Control (CTC)
Interface procedures are documented for the various locations that ARTC network control
interfaces with Public Transport Services (PTS) (formerly Trans Adelaide) control or the
entrances to yards owned by the train operators.
1.3 Applicable Rules
The CoP and ARTC Addendum apply to the sections covered by this Information Book
1.3.1 Index to CoP and ARTC Addendum
Index to CoP and ARTC Addendum NCOP Addendum
A
ABS working - train working advice 3.10. 24.5
Assisting a disabled train in section 3.17
Authority limit overrun 3.15 28
Automatic train brake 12
Axle loads 9
Axle loads - Rollingstock Table 5
B
Brake - automatic train 12
Brake examination standards Table 8-10
Brake holding tests for rearmost vehicles 13
Braking performance of trains 15
C
Cancelling a train authority 3.9.13
Clearance point marker (fouling point) 3.1.4E 33.3
Communications Nil 17
Communications protocols 3.7
Communications requirements - locomotive Table 6
Page 5
Mile End (exc) to Wolseley (inc)
OGW-30-07
General Information
This document is uncontrolled when printed. Version Number: 1.2 Date Reviewed: 8 Jun 2018 Page 5 of 85
Condition Affecting the Network (CAN) 40, 41
Crew changeover 3.9.15
Crew changeover - Train authority working 3.9.15 24.4
Crossing locations - typical layout Nil 7
D
Derail and catchpoint indicators Nil 13
Detonating signals 3.5
Documentation - Train 5.9
Driver Only Operation Nil 27
E
Electronic authority systems 3.6
Emergency Responses Nil 29
Emergency Responses - incident management plan Nil 29.1
F
Fire on train 5.10
Fixed signals 3.3
Fixed signals - passing at stop 3.4
Flag commands 3.8
G
Gang whistle sign Nil 33.1
Grade control valves 15.8
H
Hand commands
Headlight - locomotive
I
Identification of trains, rollingstock ,track vehicles etc 16
Incident management plan - Emergency Responses Nil 29.1
Infrastructure Booking Advice (IBA) 43, 44, 45
Issue of train authority to moving train 3.9.7
J
K
L
Level Crossing keepers Nil 21
Level crossing predictor warning sign Nil 33.2
Level crossing procedures Nil 20
Light commands 3.8
Page 6
Mile End (exc) to Wolseley (inc)
OGW-30-07
General Information
This document is uncontrolled when printed. Version Number: 1.2 Date Reviewed: 8 Jun 2018 Page 6 of 85
Light indicator and associated point failures Nil 15
Light indicators Nil 14
Limit of Authority overrun 3.15 28
Load compensating equipment 15.9
Local Possession 3.11.6
Locomotive communication requirements Table 6
Locomotive equipment 5.2
Locomotive headlight 5.6
Locomotive speedometer 5.3
Locomotive vigilance control 5.2
Locomotive warning device 5.5
Locomotive warning device - failure 5.5.2
Locomotive warning device - normal use 5.5.1
Locomotives - general 11
M
Maximum train speeds for particular locations and circumstances Nil 19
N
NAR 3.11.24
No Authority Required (NAR) 3.11.24
O
Operations of locations as an attended station Nil 22
P
Parallel Lines Nil 25
Parallel Lines - Locations on ARTC territory Nil 25.3
Parallel Lines - TOA limits Nil 25.4
Parallel lines - TOA occupancy rules 3.11 25.5
Parallel Lines - Track work Nil 25.1
Parallel Lines - Train failure and other incidents Nil 25.2
Permanent speed signs 3.1.4k 32
Phonetic alphabet 3.7.7
Phonetic numerals 3.7.8
Points Nil 16
Points indicators Nil 12
Pushing train back on the main line 3.19
Q
R
Page 7
Mile End (exc) to Wolseley (inc)
OGW-30-07
General Information
This document is uncontrolled when printed. Version Number: 1.2 Date Reviewed: 8 Jun 2018 Page 7 of 85
Radio - standard terms 3.7.6
Radio protocols 3.7
Radio, hand, light and flag commands 3.8
Reporting to train control before network entry 3.12
Reporting train clear at block posts 3.9.12 11
Reporting train clear of section at attended location 3.9.12 8
Reporting train clear of section in TOW 3.9.12
Reporting train departure from attended and unattended locations 3.13 9
Reporting train progress, delay reasons and consist changes 3.13 10
Resumption of normal speed Nil 34
Roll-by inspections 14
Roll-by when trains cross or pass on single lines 5.11
Rollingstock 10
Rollingstock axle loads Table 5
Rollingstock incl. track vehicles or machines stabling at an unattended
location
Nil 18
Rollingstock outline 7
S
Self-restoring points Nil 6.9
Shunting unattended locations 3.22 26
Sign - Gang whistle Nil 33.1
Sign - level crossing predictor warning Nil 33.2
Signals - fixed 3.3
Signals - fixed - passing at stop 3.4
Signs - permanent speed 3.1.4k 32
Signs - warning Nil 33
Signs- TSR and their meanings 3.2 31
Signs-Track side signs and their meanings 3.1 30
Single line working over double or multiple lines 3.23
Speed signs - permanent .1.4k 32
Speed Restrictions During Hot Weather 42
Speedometer - locomotive 5.3
Speeds for particular locations and circumstances Nil 19
T
Temporary Speed Restriction (TSR) 3.14.1
Time 18
TOA 3.11.12
Page 8
Mile End (exc) to Wolseley (inc)
OGW-30-07
General Information
This document is uncontrolled when printed. Version Number: 1.2 Date Reviewed: 8 Jun 2018 Page 8 of 85
TOA limits - Parallel lines Nil 25.4
TOA occupancy rules - Parallel lines Nil 25.5
Tonnage maximums for trains 8
Track force working Nil 23
Track force working - defining locations and train identifications Nil 23.1
Track force working - movement of track machines as trains Nil 23.3
Track force working - requirements for NAR working Nil 23.2
Track force working - track machines working in section as a train Nil 23.3.4
Track Occupancy Authority (TOA) 3.11.12
Track or infrastructure unsafe 3.14
Track or infrastructure work on or near running lines 3.11.2
Track out of service 3.14.2
Track side signs and their meanings 3.1 30
Track suspected to be unsafe 3.14.3
Track vehicles and machines 6.4
Track vehicles and machines - maximum speeds 6.4.6
Track vehicles and machines - movement over level crossings 6.4.3
Track vehicles and machines - movement over points 3.11.5
Track vehicles and machines - travelling in convoy 6.4.5
Track vehicles or machines stabling at an unattended location Nil 18
Track work - local possession 3.11.6
Track work - movement over points 3.11.5
Track work - Parallel Lines Nil 25.1
Track work at attended block locations 3.11.4
Track Work Authority (TWA) 3.11.16
Track work communications 3.11.1
Track work movements by rail to or from attended block location 3.11.3
Track work protocols 3.11
Track work within yard limits 6.3
Track worker competency 6.1
Track worker in charge of safety 6.5
Track workers - protection from approaching movements 6.2
Train assisting a disabled train in section 3.17
Train authority - changing supporting information 3.9.14
Train authority - crew changeover 3.9.15
Train authority cancellation 3.9.13
Page 9
Mile End (exc) to Wolseley (inc)
OGW-30-07
General Information
This document is uncontrolled when printed. Version Number: 1.2 Date Reviewed: 8 Jun 2018 Page 9 of 85
Train authority examples for TOW 3.9.4
Train authority format 3.9.10
Train authority issue to moving train 3.9.7
Train authority preparation 3.9.6
Train authority protocols 3.9
Train authority working 3.9 24
Train authority working - crew changeover 3.9.15 24.4
Train authority working - issue of T/As from a location prior to Train
Authority territory
Nil 24.2
Train authority working - issue of T/As from terminal locations Nil 24.1
Train authority working - line to be taken 3.9.4B 24.3
Train authority working - train working advice 3.10 24.5
Train crew and locomotive equipment 5.2
Train crew fatigue 5.8
Train crew verifying authorities and other in formation 5.7
Train crew vigilance 5.4
Train Crossing or Passing Nil 6
Train Crossing or Passing - on ABS territory Nil 6.2
Train Crossing or Passing - on ABS territory locations equipped with self-
restoring points
Nil 6.6
Train Crossing or Passing - on ABS territory locations not equipped with
self-restoring points
Nil 6.7
Train Crossing or Passing - on CTC territory Nil 6.1
Train Crossing or Passing - on Train Order territory Nil 6.3
Train Crossing or Passing - on Train Order territory equipped with manual
points
Nil 6.10
Train Crossing or Passing - on Train Order territory equipped with self-
restoring points
Nil 6.9
Train Crossing or Passing - on Train Order territory equipped with signals
and self-restoring points
Nil 6.8
Train disabled in section 3.16
Train dividing in the section 3.18
Train documentation 17
Train documentation and other instructions 5.9
Train driving rules 5
Train failure and other incidents - Parallel Lines Nil 25.2
Train on fire 5.10
Train passing permissive signals at stop at entrance to crossing location Nil 6.5
Page 10
Mile End (exc) to Wolseley (inc)
OGW-30-07
General Information
This document is uncontrolled when printed. Version Number: 1.2 Date Reviewed: 8 Jun 2018 Page 10 of 85
Train progress, reporting delay reasons and consist changes 3.13 10
Train pushing back on the main line 3.19
Train reporting clear at block posts 3.9.12 11
Train reporting clear of section in TOW 3.9.12
Train Running Information (TRI) 3.11.20
Train speeds for particular locations and circumstances Nil 19
Train working advice - Train Authority and ABS working 3.10 24.5
Trains working or stabling at intermediate sidings in TOW section 3.21
TRI 3.11.20
TSR 3.14.1
TSR signs and their meanings 3.2 31
TWA 3.11.16
U
Unattended location - Stabling of track vehicles or machines Nil 18
Unattended locations - Shunting 3.22 26
Unsafe track or infrastructure 3.14
V
Vigilance - train crew 5.4
Vigilance control - locomotive 5.2(e & f)
W
Warning device - locomotive 5.5
Warning device - locomotive - failure 5.5.2
Warning device - locomotive - normal use 5.5.1
Warning signs Nil 33
Whistle sign - gang Nil 33.1
Work train working in section 3.20.
X
Y
Z
1.4 Adjacent Train Control Centres
GWA: (08) 8343 7732, (08) 8343 7730, (08) 8262 5424
PTS: (08) 8218 2301, (08) 8218 2302
Page 11
Mile End (exc) to Wolseley (inc)
OGW-30-07
General Information
This document is uncontrolled when printed. Version Number: 1.2 Date Reviewed: 8 Jun 2018 Page 11 of 85
1.5 Section Operating Equipment
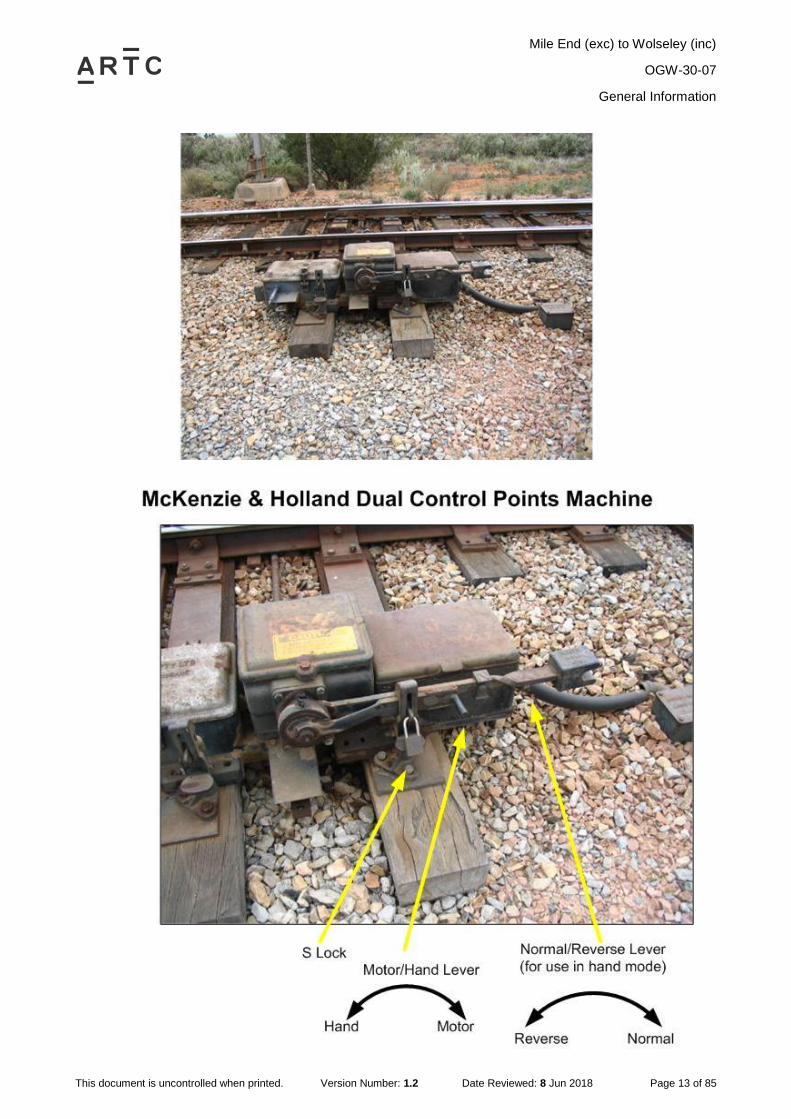
1.5.1 Motorised Point Machines
Motorised points that require a crank handle have a special key attached to the crank handle to
access the point machine cover.
Page 12
Mile End (exc) to Wolseley (inc)
OGW-30-07
General Information
This document is uncontrolled when printed. Version Number: 1.2 Date Reviewed: 8 Jun 2018 Page 12 of 85
M70 points machine as used in Mile End.
M23 A MkII Selector Level Hand throw lever
Dual Control (motor hand operation)
Page 13
Mile End (exc) to Wolseley (inc)
OGW-30-07
General Information
This document is uncontrolled when printed. Version Number: 1.2 Date Reviewed: 8 Jun 2018 Page 13 of 85
Page 14
Mile End (exc) to Wolseley (inc)
OGW-30-07
General Information
This document is uncontrolled when printed. Version Number: 1.2 Date Reviewed: 8 Jun 2018 Page 14 of 85
1.5.2 Outlying Switch Locks & HLM Point Locks
Page 15
Mile End (exc) to Wolseley (inc)
OGW-30-07
General Information
This document is uncontrolled when printed. Version Number: 1.2 Date Reviewed: 8 Jun 2018 Page 15 of 85
Typical OSL as used on South line with indicator at caution and lever locked.
No through route set and OSL available for release.
OSL with indicator at stop and lever locked.
Route set through yard or train on point circuit. OSL not available for release.
Page 16
Mile End (exc) to Wolseley (inc)
OGW-30-07
General Information
This document is uncontrolled when printed. Version Number: 1.2 Date Reviewed: 8 Jun 2018 Page 16 of 85
Indicator at caution, lever unlocked.
OSL released and points may now be turned.
Page 17
Mile End (exc) to Wolseley (inc)
OGW-30-07
General Information
This document is uncontrolled when printed. Version Number: 1.2 Date Reviewed: 8 Jun 2018 Page 17 of 85
1.6 Train Braking Requirements
Train braking and holding test are covered in the CoP and can be found by using the CoP and
addendum index, however these are included here for quick reference.
BRAKE HOLDING TESTS FOR THE REARMOST VEHICLES (RETENTION TESTS)
The following apply:
1. The operator shall put into place systems for conducting brake holding tests.
2. The number of vehicles (or for articulated or permanently coupled vehicles the number of
triple valve control units) required to conform to the requirements of this sub-section shall be:
a. Three (3) for freight trains operated in New South Wales;
b. Two (2) for freight trains not entering New South Wales; and
c. One (1) for all passenger trains where a guard is provided or three (3) for passenger trains
without guards.
3. The vehicle operator shall ensure that air and hand brakes operate correctly.
4. The air brakes on the vehicles shall remain effectively applied for a period of time, based on
train length, considered sufficient for a member of the train (locomotive) crew to reach the
vehicles and secure handbrakes in the event of a breakaway en route.
5. This time shall be ten (10) minutes plus three (3) minutes for each 100 metres or part
thereof of train length. For example, a train 1240 metres long will require a holding (retention)
time of 13 x 3 + 10 = 49 minutes.
6. If any of the required number of vehicles (as specified in item (2) above) fail the above test
(as specified in item (5) above), generally known as a holding or retention test, the faulty
vehicle(s) shall be repaired or the train remarshalled to ensure compliance with the requirements
of items (3) and (4) above.
7. Brake holding tests successfully completed will remain valid for the departure within a period
of 24 hours from completion of the test. After that period, the vehicles shall be re-tested.
FREIGHT TRAINS
On freight trains, the maximum number of inoperative or isolated brakes permitted on a train
shall be either of the following:
1. One conventional two-bogie vehicle for every ten (10) vehicles in the train where the vehicle
is isolated as a unit.
2. One bogie for every ten (10) bogies in the train where individual bogies can be isolated or
the isolation of triple valve control units affects more than two (2) bogies. This applies, only on the
proviso that the total un-braked mass of the train shall not exceed 10% of the total train mass
(excluding the mass of the hauling locomotives).
Item (1) above applies where the only vehicles isolated are conventional two-bogie vehicles. In all
other cases, the requirements of item (2) shall be followed.
For the purposes of this clause, a four-wheel (two-axle) vehicle shall be counted as one bogie,
and locomotives under power shall not be counted as train vehicles.
Page 18
Mile End (exc) to Wolseley (inc)
OGW-30-07
General Information
This document is uncontrolled when printed. Version Number: 1.2 Date Reviewed: 8 Jun 2018 Page 18 of 85
1.7 Level Crossings Mile End to Wolseley
Number Road Name Line Segment KM Traffic
Type
Access Control Type
3 Leader Street Belair Line 4.630 Road Public Half Boom
Flashing Lights
553 Victoria Street Belair Line 5.192 Road Public Half Boom
Flashing Lights
2 Cross Rd Belair Line 6.900 Road Public Half Boom
Flashing Lights
543 Sussex Tce Belair Line 7.262 Road Public Half Boom
Flashing Lights
544 Angas Rd Belair Line 8.020 Road Public Half Boom
Flashing Lights
89 Grange Road Belair Line 8.390 Road Public Half Boom
Flashing Lights
55 Wattlebury Rd Belair Line 8.790 Road Public Half Boom
Flashing Lights
545 Barretts Rd Belair Line 10.520 Road Public Half Boom
Flashing Lights
546 Brighton Pde Belair Line 17.340 Road Public Half Boom
Flashing Lights
42 Main Rd
Blackwood
Belair Line 17.840 Road Public Half Boom
Flashing Lights
1 Main Rd
Glenalta
Belair Line 19.390 Road Public Half Boom
Flashing Lights
1988 Belair station
Adelaide end
Belair Line 21.450 Pedestrian Public Maze
1989 Belair station
Belair end
Belair Line 21.570 Pedestrian Public Maze
967 Lodge Track Adelaide - Wolseley 23.284 Road Private
968 Yulti Track Adelaide - Wolseley 23.968 Road Private
969 Tilti Track Adelaide - Wolseley 25.373 Road Private
970 Ballast Pit Track Adelaide - Wolseley 26.503 Road Private
971 Saddle Hill Road Adelaide - Wolseley 27.480 Road Private
973 HiRail Access Adelaide - Wolseley 30.966 Road Private
566 Cricklewood Rd Adelaide - Wolseley 33.710 Road Public Primary Flashing
Lights
567 Yatina Rd Adelaide - Wolseley 35.545 Road Public Primary Flashing
Lights
Page 19
Mile End (exc) to Wolseley (inc)
OGW-30-07
General Information
This document is uncontrolled when printed. Version Number: 1.2 Date Reviewed: 8 Jun 2018 Page 19 of 85
Number Road Name Line Segment KM Traffic
Type
Access Control Type
568 Kain Ave Adelaide - Wolseley 36.312 Road Public Primary Flashing
Lights
569 Carey Gully -
Bridgewater
Adelaide - Wolseley 37.161 Road Public Primary Flashing
Lights
975 Occupational
Crossing
Adelaide - Wolseley 43.496 Road Private
27 Spoehr Road Adelaide - Wolseley 43.962 Road Public Primary Flashing
Lights
570 Onkaparinga
Valley Road
Adelaide - Wolseley 44.440 Road Public Half Boom
Flashing Lights
976 HiRail Access Adelaide - Wolseley 45.821 Road Private
977 Junction Road Adelaide - Wolseley 45.978 Road Public Half Boom
Flashing Lights
24 Wenzel Road Adelaide - Wolseley 46.579 Road Public Primary Flashing
Lights
23 Mattner Road Adelaide - Wolseley 47.400 Road Public Primary Flashing
Lights
571 Daniels Road Adelaide - Wolseley 48.782 Road Private Stop Signs
572 Altmanns Road Adelaide - Wolseley 49.513 Road Public Primary Flashing
Lights
979 Cottage Lane Adelaide - Wolseley 50.245 Road Private Stop Signs
980 Wilhelm Road Adelaide - Wolseley 51.395 Road Private Stop Signs
573 Norris Road Adelaide - Wolseley 51.891 Road Public Primary Flashing
Lights
981 Blakiston Road Adelaide - Wolseley 52.503 Road Public Primary Flashing
Lights
982 Woodside –
Nairne Road
Adelaide - Wolseley 55.355 Road Public Primary Flashing
Lights
983 Old Princes Hwy Adelaide - Wolseley 55.814 Road Public Primary Flashing
Lights
984 Jeffery Street Adelaide - Wolseley 56.310 Road Public Primary Flashing
Lights
985 Bartley Street Adelaide-Wolseley 56.815 Road Public Primary Flashing
Lights
987 Ironstone Range
Road
Adelaide - Wolseley 63.490 Road Public Primary Flashing
Lights
78 Back Callington
Road
Adelaide - Wolseley 68.024 Road Public Stop Signs
60 Eclair Mine Road Adelaide - Wolseley 68.480 Road Public Stop Signs
Page 20
Mile End (exc) to Wolseley (inc)
OGW-30-07
General Information
This document is uncontrolled when printed. Version Number: 1.2 Date Reviewed: 8 Jun 2018 Page 20 of 85
Number Road Name Line Segment KM Traffic
Type
Access Control Type
80 Callington RS
Road
Adelaide - Wolseley 69.560 Road Public Half Boom
Flashing Lights
989 Private Road Adelaide - Wolseley 70.134 Road Private
79 Callington Road Adelaide - Wolseley 72.507 Road Public Primary Flashing
Lights
990 East Tce Adelaide - Wolseley 73.173 Road Public Primary Flashing
Lights
991 Jaensch Road Adelaide - Wolseley 75.347 Road Public Stop Signs
992 Ferries -
McDonald Road
Adelaide - Wolseley 82.425 Road Public Primary Flashing
Lights
993 Old Princes
Highway
Adelaide - Wolseley 84.676 Road Public Primary Flashing
Lights
994 Maurice Rd Adelaide - Wolseley 89.024 Road Public Stop Signs
995 Private Road Adelaide - Wolseley 90.275 Road Private Stop Signs
996 Netley Rd Adelaide - Wolseley 93.019 Road Public Stop Signs
997 Cypress Terrace Adelaide - Wolseley 94.467 Road Public Primary Flashing
Lights
48 Mannum Road Adelaide - Wolseley 95.657 Road Public Primary Flashing
Lights
998 Private Road Adelaide - Wolseley 101.142 Road Private Stop Signs
999 Pfeiler Road Adelaide - Wolseley 101.670 Road Public Stop Signs
1000 Orland Road Adelaide - Wolseley 110.250 Road Public Stop Signs
1001 Westbrook Road Adelaide - Wolseley 114.759 Road Public Primary Flashing
Lights
1002 Private Road Adelaide - Wolseley 117.191 Road Private
84 North Terrace Adelaide - Wolseley 119.892 Road Public Half Boom
Flashing Lights
1003 Trevena Road Adelaide - Wolseley 120.760 Road Public Half Boom
Flashing Lights
1004 Magpie Drive Adelaide - Wolseley 122.335 Road Public Half Boom
Flashing Lights
1005 Unknown Road Adelaide - Wolseley 127.137 Road Private
1006 Private Road Adelaide - Wolseley 132.611 Road Private
1007 Johncock Road Adelaide - Wolseley 134.431 Road Public Stop Signs
81 Darwin Road
Cooke Plains
Adelaide - Wolseley 137.094 Road Public Primary Flashing
Lights
1008 Hender Road Adelaide - Wolseley 140.196 Road Public Stop Signs
Page 21
Mile End (exc) to Wolseley (inc)
OGW-30-07
General Information
This document is uncontrolled when printed. Version Number: 1.2 Date Reviewed: 8 Jun 2018 Page 21 of 85
Number Road Name Line Segment KM Traffic
Type
Access Control Type
1009 Ifould Road Adelaide - Wolseley 142.587 Road Public Stop Signs
1010 Hannah Well
Road
Adelaide - Wolseley 150.209 Road Public Primary Flashing
Lights
1011 Williams Road Adelaide - Wolseley 153.960 Road Public Stop Signs
1012 Private Road Adelaide - Wolseley 156.686 Road Private
1013 Yumali Road Adelaide - Wolseley 160.420 Road Public Primary Flashing
Lights
1014 Private Road Adelaide - Wolseley 162.541 Road Private Stop Signs
1015 Frost Rd Adelaide - Wolseley 168.323 Road Public Stop Signs
1016 Nicholson Road Adelaide - Wolseley 175.788 Road Public Stop Signs
1017 Private Road Adelaide - Wolseley 179.495 Road Private Stop Signs
1018 Railway Terrace
(North)
Adelaide - Wolseley 182.869 Road Public Primary Flashing
Lights
1019 Railway Terrace
(South)
Adelaide - Wolseley 184.141 Road Public Stop Signs
1020 Jacobs Rd
Coonalpyn
Adelaide - Wolseley 187.208 Road Public Stop Signs
1021 Todd Road Adelaide - Wolseley 191.481 Road Public Stop Signs
1022 Boothby Road Adelaide - Wolseley 199.438 Road Public Stop Signs
1023 Jaeschke Road Adelaide - Wolseley 201.370 Road Public Stop Signs
1024 Fulwood Avenue Adelaide - Wolseley 211.052 Road Public Primary Flashing
Lights
1025 Kings Road Adelaide - Wolseley 212.551 Road Public Half Boom
Flashing Lights
1026 Private Road Adelaide - Wolseley 217.977 Road Private
1027 Golf Club Road Adelaide - Wolseley 221.185 Road Public Stop Signs
1028 Private Road Adelaide - Wolseley 222.879 Road Private No Control
1029 Coombe Road Adelaide - Wolseley 225.130 Road Public Stop Signs
1030 Siding Road Adelaide - Wolseley 228.783 Road Public Stop Signs
1031 Snoswell Road Adelaide - Wolseley 232.896 Road Public Stop Signs
1032 Private Road Adelaide - Wolseley 236.676 Road Private
1033 Banealla East
Road
Adelaide - Wolseley 241.179 Road Public Stop Signs
1034 Hender Rd Adelaide - Wolseley 245.821 Road Private Stop Signs
1035 Emu Flat Rd Adelaide - Wolseley 247.954 Road Public Half Boom
Flashing Lights
Page 22
Mile End (exc) to Wolseley (inc)
OGW-30-07
General Information
This document is uncontrolled when printed. Version Number: 1.2 Date Reviewed: 8 Jun 2018 Page 22 of 85
Number Road Name Line Segment KM Traffic
Type
Access Control Type
47 Densley Road Adelaide - Wolseley 249.302 Road Public Primary Flashing
Lights
1036 Zwars Road Adelaide - Wolseley 250.695 Road Public Stop Signs
1037 Unknown Road
Name
Adelaide - Wolseley 252.669 Road Public Stop Signs
1038 Eckerts Rd Adelaide - Wolseley 261.616 Road Public Stop Signs
1039 Unknown Road
Name
Adelaide - Wolseley 264.050 Road Private Stop Signs
1040 Unknown Road
Name
Adelaide - Wolseley 267.670 Road Private Stop Signs
1041 Wirrega North
Road
Adelaide - Wolseley 273.666 Road Public Primary Flashing
Lights
1042 Ngarkat Highway Adelaide - Wolseley 282.565 Road Public Primary Flashing
Lights
1043 Unknown Road
Name
Adelaide - Wolseley 285.018 Road Public Stop Signs
1044 Barts Pastoral Adelaide - Wolseley 285.776 Road Private Stop Signs
1045 Aerodrome Road Adelaide - Wolseley 288.277 Road Public Stop Signs
1046 Golf Course
Road
Adelaide - Wolseley 293.216 Road Public Primary Flashing
Lights
1047 North Terrace Adelaide - Wolseley 293.661 Road Public Primary Flashing
Lights
1048 Creecoona
Terrace
Adelaide - Wolseley 295.023 Road Public Half Boom
Flashing Lights
1049 Sullivans Road Adelaide - Wolseley 298.946 Road Public Stop Signs
(duplicated)
49 Tatiara Road Adelaide - Wolseley 300.210 Road Public Half Boom
Flashing Lights
1050 Williams Road Adelaide - Wolseley 304.291 Road Public Give Way Signs
1051 Private Road Adelaide - Wolseley 305.168 Road Private
1052 West Terrace Adelaide - Wolseley 307.315 Road Public Half Boom
Flashing Lights
1053 Tatiara Parade Adelaide - Wolseley 308.210 Road Public Stop Signs
1054 Colwill Road Adelaide - Wolseley 313.120 Road Public Give Way Signs
Page 23
Mile End (exc) to Wolseley (inc)
OGW-30-07
General Information
This document is uncontrolled when printed. Version Number: 1.2 Date Reviewed: 8 Jun 2018 Page 23 of 85
1.8 Emergency Local Releases
All yards with Goods Loops have a yard release which can be accessed by train crews if the
outlying switch locks will not release.
1.9 Maximum Permanent Speeds and Permanent Speed Restrictions
Refer the Route Access Standard - Defined Interstate Rail Network Section Pages D3 for all speed
information.
1.10 Maximum Train Length
The maximum train length is 1800 metres.
Page 24
Mile End (exc) to Wolseley (inc)
OGW-30-07
General Information
This document is uncontrolled when printed. Version Number: 1.2 Date Reviewed: 8 Jun 2018 Page 24 of 85
1.11 Structure Clearances
Refer Route Access Standards for Rolling Stock Outlines.
.KM LOCATION TYPE
0.800 Hilton Rd bridge Concrete abutment
3.400 Passenger Terminal Rd. bridge. Reinforced earth
3.800 Keswick footbridge Steel columns
3.850 Anzac Highway bridge. Conc.column/abutment
4.900 Tram Bridge Goodwood Steel columns
9.800 Springbank Rd. overbridge
12.071 Sleeps Hill tunnel Masonry
14.100 Eden Hills overway bridge Steel columns
14.896 Brickworks tunnel Masonry
16.500 Coromandel footbridge Steel columns
17.700 Coromandel Pde.o/w bridge Steel columns
20.500 Pinera Main Rd. o/w bridge
21.300 Upper Sturt Rd. o/w bridge
21.800 National Park entrance o/w bridge Steel columns
24.629 National Park Tunnel Masonry
27.039 Long Gully tunnel Masonry
29.408 Upper Sturt tunnel Masonry
31.000 Mt Lofty footbridge Steel columns
31.000 Avenue Rd o/w bridge
38.400 Onkaparinga Rd. o/w bridge
38.440 SE Freeway up track Concrete columns
38.470 SE Freeway down track Concrete columns
39.850 Ambleside tunnel Masonry
41.200 Beaumonts Rd. o/w bridge
96.847 Murray Bridge Tunnel Concrete
97.070 Murray River bridge. Steel truss
102.950 Princess Hwy o/w bridge Concrete column
123.850 Highway Overpass
217.000 Highway Overpass Concrete column
293.000 Tolmer Overpass
Page 25
Mile End (exc) to Wolseley (inc)
OGW-30-07
General Information
This document is uncontrolled when printed. Version Number: 1.2 Date Reviewed: 8 Jun 2018 Page 25 of 85
1.12 Tunnels
NAME FROM KM TO KM
ADELAIDE TO WOLSELEY
Sleep‟s Hill Tunnel 12.071 12.809
Eden Hills Tunnel 14.896 15.052
National Park Tunnel 24.629 24.822
Long Gully Tunnel 27.039 27.234
Upper Sturt Tunnel 29.408 29.605
Ambleside Tunnel 39.850 40.022
Murray Bridge Tunnel 96.847 96.936
1.13 Communications
The National Train Communications System (NTCS) is the Primary communications system for
the ARTC controlled rail network and is mandatory for all operators to operate their locomotives
using a NTCS ICE (In-Cabin Equipment) Unit as the primary communications device.
A standard ICE unit is installed with the following components
Telstra NextG™ transceiver
Iridium satellite transceiver
UHF Radio
GPS
The ICE unit primary communications is via the Telstra NextG™ and backup communications is
provided via the Iridium Satellite network. The ICE unit will automatically call the Mile End
network control centre when the routine and emergency buttons are pressed.
The UHF radio is used for the Local train Radio - Train to Train and train to track Side
communications.
UHF Local Train Radio (LTR) frequency details
Frequency: 418.425 MHz (UHF),
Bandwidth: 12.5 KHz,
EIRP: 41W (remote/low density areas), 8.3W (medium & high density areas)
Tx CTCSS: 162.2 Hz
Rx CTCSS: 162.2 Hz
Selcall: disabled
Alternate Communication for this section is by mobile or satellite phones.
The UHF radio transmitter is located at Mount Lofty.
Page 26
Mile End (exc) to Wolseley (inc)
OGW-30-07
General Information
This document is uncontrolled when printed. Version Number: 1.2 Date Reviewed: 8 Jun 2018 Page 26 of 85
1.14 Wayside Monitoring Systems
At the location of Heathfield, there is a RailSQAD (Squeal Acoustic Detector) and an AOA (Angle
of Attack) at the 32.8 kilometre mark.
1.15 Ruling Gradients
Mile End to Tailem Bend 1 in 45
Tailem Bend to Wolseley 1 in 80
1.16 Curve and Gradient Data
For all Curve and Gradient data, refer to the ARTC Internet.
https://extranet.artc.com.au/eng_network-config_cd.html
Page 27
Mile End (exc) to Wolseley (inc)
OGW-30-07
General Information
This document is uncontrolled when printed. Version Number: 1.2 Date Reviewed: 8 Jun 2018 Page 27 of 85
1.17 Drawing Legend
Standard gauge
track
Passive
Protection Level
Crossing
Dual gauge track
Active
Protection Level
Crossing –
Flashing Lights
Broad gauge track
Active
Protection Level
Crossing –
Lights and
Boom
Crossover
Pedestrian
Crossing
Derail
Bridge or
Overpass
Points
Underpass
Advisory Sign or
Location Sign
River/Creek or
Significant river
bridge or
Viaduct
75
80
20
4.6
63
Km
(D
M)
X80
X80
115NOR125XPT
NOR
XPT
Speed sign Station
Passenger Platform
Station or
Platform
Light Indicators
Dwarf Signals
LED Signals
74
.59
2 k
m
6
6D
10
9.1
28
km
4
Signal number
reference
Page 28
Mile End (exc) to Wolseley (inc)
OGW-30-07
General Information
This document is uncontrolled when printed. Version Number: 1.2 Date Reviewed: 8 Jun 2018 Page 28 of 85
Page 29
Mile End (exc) to Wolseley (inc)
OGW-30-07
Locations and Sections Information
This document is uncontrolled when printed. Version Number: 1.2 Date Reviewed: 8 Jun 2018 Page 29 of 85
2 Locations and Sections Information
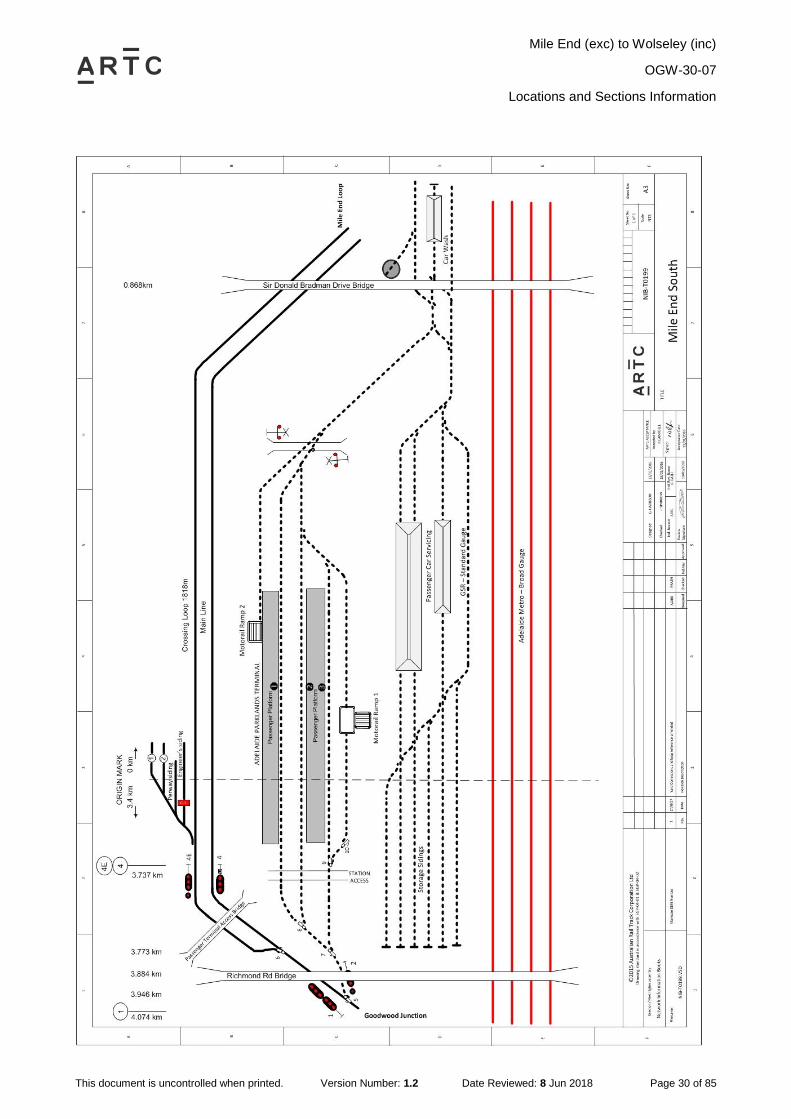
2.1 Mile End (MED)
The South CTC board boundary is Sig 4 & 4E at Mile End 3.737 km.
Refer Network Information Book OGW-30-08 Adelaide Metro – Mile End (inclusive) to Dry Creek
(inclusive) for information pertaining to Mile End.
Page 30
Mile End (exc) to Wolseley (inc)
OGW-30-07
Locations and Sections Information
This document is uncontrolled when printed. Version Number: 1.2 Date Reviewed: 8 Jun 2018 Page 30 of 85
Page 31
Mile End (exc) to Wolseley (inc)
OGW-30-07
Locations and Sections Information
This document is uncontrolled when printed. Version Number: 1.2 Date Reviewed: 8 Jun 2018 Page 31 of 85
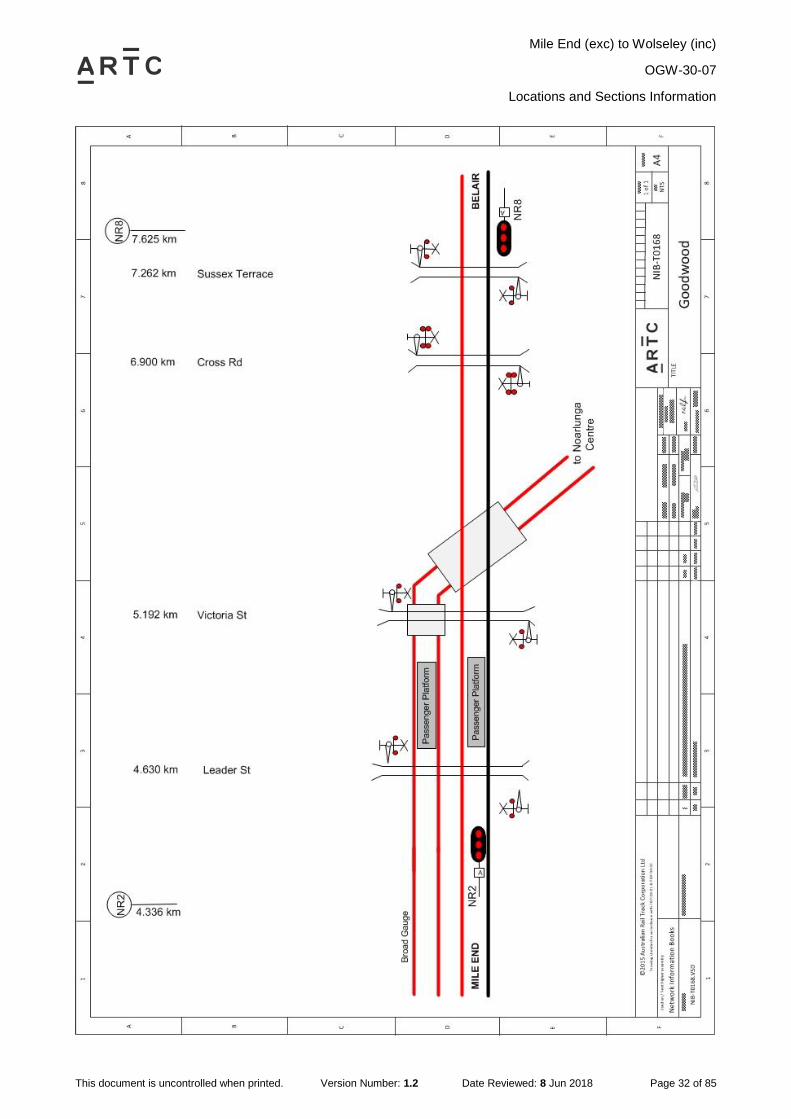
2.1.1 Mile End – Goodwood – Belair Section
Adjacent lines:
Between Mile End and Belair the Standard gauge track is parallel and adjacent to the Public
Transport Services (PTS) broad gauge to Belair. The level crossings are all common to both
tracks and so any signal or level crossing operating faults are reported to the PTS Signal
Maintainers whose job it is to fix them.
Because the broad and standard tracks are so close together, it is imperative that any incident
that could possibly cause fouling or damage to the other track be reported as soon as possible to
PTS Train Control via the emergency phone. If a train crew report having lost their air it could
mean that a vehicle has derailed and is fouling the adjoining track. Also a track misalignment like
a heat buckle could reduce the distance to the adjacent track and cause a danger of fouling.
Track force working Mile End to Belair (see Safety Interface Agreement IA4012)
Track force working on either the broad or standard gauge tracks must be undertaken in
compliance with the track force working procedures of the track owner concerned, but if the work
is to intrude closer than two metres from the other track then the permission of the controller in
charge of the other track must be obtained and all requirements adhered to.
There are a series of footbridges for pedestrian access to the stations between Mile End to Belair.
Page 32
Mile End (exc) to Wolseley (inc)
OGW-30-07
Locations and Sections Information
This document is uncontrolled when printed. Version Number: 1.2 Date Reviewed: 8 Jun 2018 Page 32 of 85
Page 33
Mile End (exc) to Wolseley (inc)
OGW-30-07
Locations and Sections Information
This document is uncontrolled when printed. Version Number: 1.2 Date Reviewed: 8 Jun 2018 Page 33 of 85
Page 34
Mile End (exc) to Wolseley (inc)
OGW-30-07
Locations and Sections Information
This document is uncontrolled when printed. Version Number: 1.2 Date Reviewed: 8 Jun 2018 Page 34 of 85
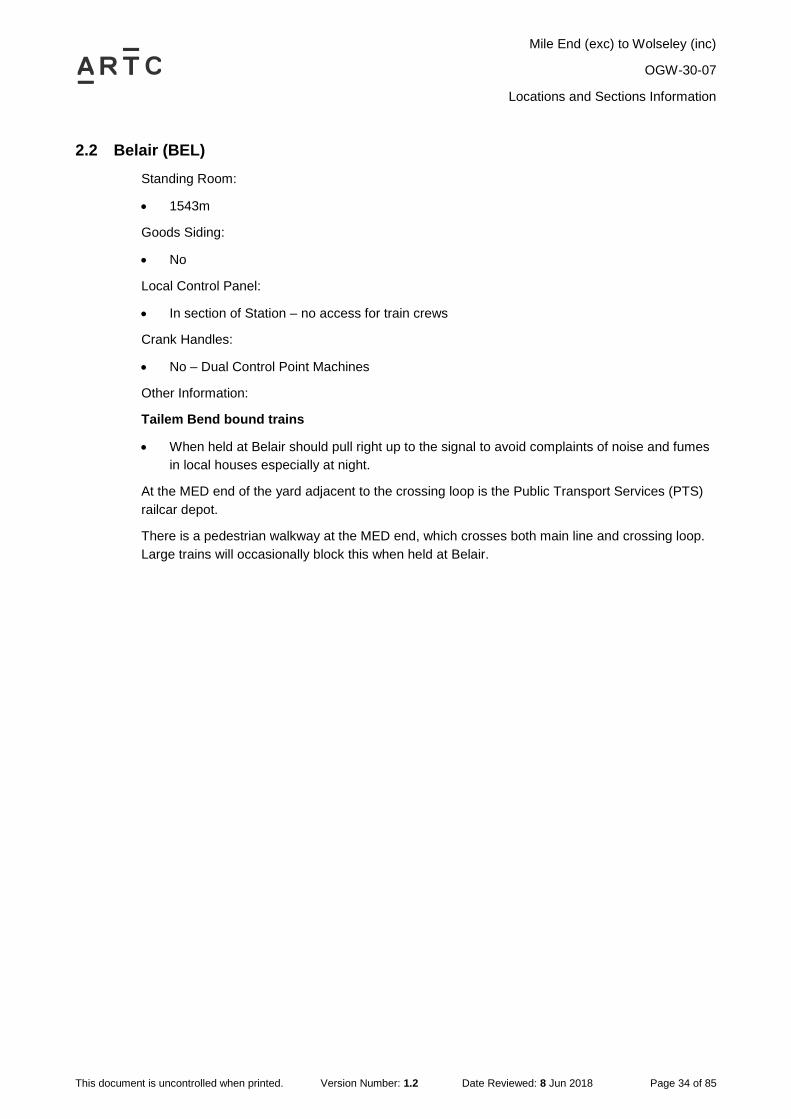
2.2 Belair (BEL)
Standing Room:
1543m
Goods Siding:
No
Local Control Panel:
In section of Station – no access for train crews
Crank Handles:
No – Dual Control Point Machines
Other Information:
Tailem Bend bound trains
When held at Belair should pull right up to the signal to avoid complaints of noise and fumes
in local houses especially at night.
At the MED end of the yard adjacent to the crossing loop is the Public Transport Services (PTS)
railcar depot.
There is a pedestrian walkway at the MED end, which crosses both main line and crossing loop.
Large trains will occasionally block this when held at Belair.
Page 35
Mile End (exc) to Wolseley (inc)
OGW-30-07
Locations and Sections Information
This document is uncontrolled when printed. Version Number: 1.2 Date Reviewed: 8 Jun 2018 Page 35 of 85
Page 36
Mile End (exc) to Wolseley (inc)
OGW-30-07
Locations and Sections Information
This document is uncontrolled when printed. Version Number: 1.2 Date Reviewed: 8 Jun 2018 Page 36 of 85
Page 37
Mile End (exc) to Wolseley (inc)
OGW-30-07
Locations and Sections Information
This document is uncontrolled when printed. Version Number: 1.2 Date Reviewed: 8 Jun 2018 Page 37 of 85
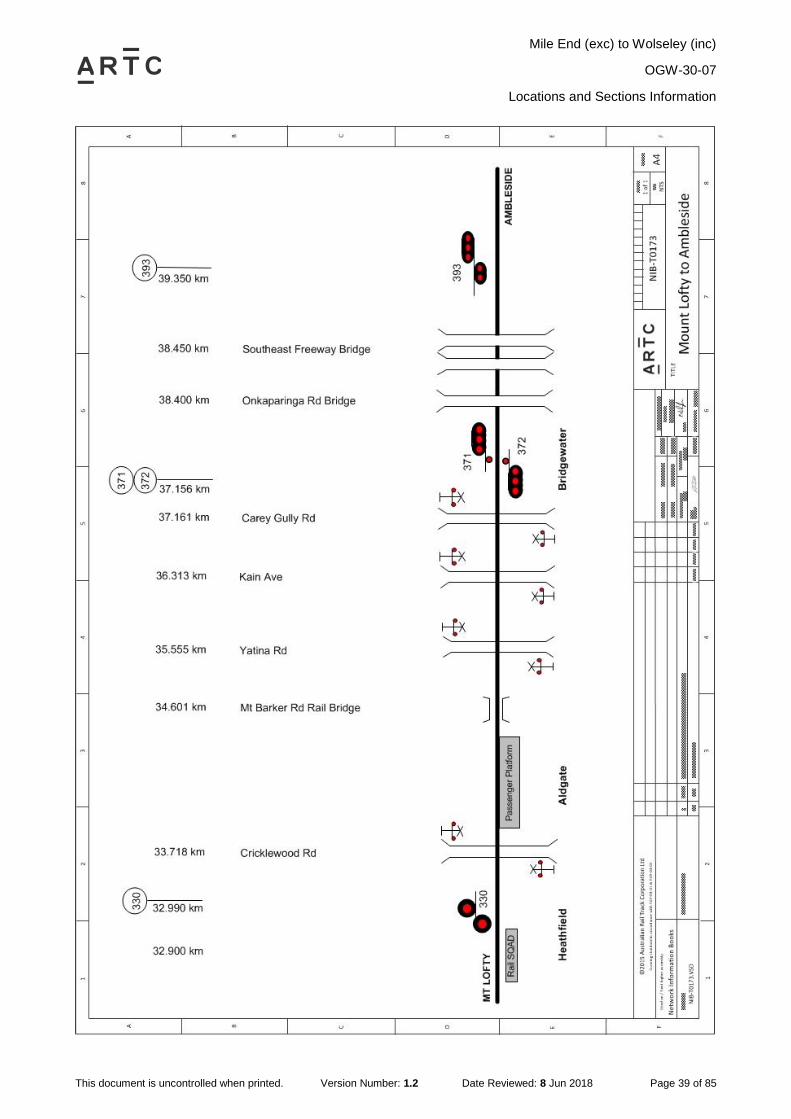
2.3 Mount Lofty (MTL)
Standing Room:
642m (crossing loop)
639m (main line)
Goods Siding:
Yes 220 metres long.
Local Control Panel:
Local control panel under signal cabin in old station – no access for train crews
Crank Handles:
No- Dual Control Point Machines.
Other Information:
The highest point on the route is roughly in the middle of the yard with a steep up grade into the
yard from both ends.
MTL is unique in having the goods siding located between the mainline and crossing loop, access
to which is controlled remotely by the train controller. This goods siding is used for stabling track
machines and also for detaching disabled vehicles from trains. The track machines should be
stabled in the middle of the siding to allow emergency detaches to be made.
There are absolute signals facing each way part way along the crossing loop and only the UP
direction signal (#12) has a low speed indication.
If an over length cross is to take place it is often best for the Adelaide bound train to be given the
crossing loop to take advantage of the low speed aspect.
To obtain a normal or medium speed signal into the main line or crossing loop respectively all the
points must be set for a through route i.e. Either both ends set in the same position – either
normal or reverse.
Heathfield 32.8 km Rail Acoustic Squeal Detector, Angle of Attack
Page 38
Mile End (exc) to Wolseley (inc)
OGW-30-07
Locations and Sections Information
This document is uncontrolled when printed. Version Number: 1.2 Date Reviewed: 8 Jun 2018 Page 38 of 85
Page 39
Mile End (exc) to Wolseley (inc)
OGW-30-07
Locations and Sections Information
This document is uncontrolled when printed. Version Number: 1.2 Date Reviewed: 8 Jun 2018 Page 39 of 85
Page 40
Mile End (exc) to Wolseley (inc)
OGW-30-07
Locations and Sections Information
This document is uncontrolled when printed. Version Number: 1.2 Date Reviewed: 8 Jun 2018 Page 40 of 85
2.4 Ambleside (AMB)
Standing Room:
1850m (minimum)
Goods Siding:
No
Local Control Panel:
No. Local Control via laptop only.
Crank Handles:
No. Dual control point machines
Other Information:
Woodside Rd. is in the Ambleside to Balhannah section only 560m from 24 Signal. Do not block.
Count down boards have been commissioned approaching 4, 4E, 23 and 23E signals to
assist train crews.
Spoehr Road has been updated to a Predictor crossing for up train movements. For Down
Train movements, the Crossing will activate prior to the Train passing Ambleside 23 or 23E
Signal.
Onkaparinga Valley Rd has been updated to a Predictor crossing
The Phoenix Screen will also display an Oil Sump alarm which will activate when excess Oil has
been detected in the Sump adjacent to Onkaparinga River Bridge at 43.496 km.
When activated, the network controller is to contact the Track Maintainer to remove the excess
Oil.
Signals 23 & 23E provide “Reduce to Medium Speed” indication for Balhannah when Balhannah
is set for the crossing loop.
Page 41
Mile End (exc) to Wolseley (inc)
OGW-30-07
Locations and Sections Information
This document is uncontrolled when printed. Version Number: 1.2 Date Reviewed: 8 Jun 2018 Page 41 of 85
Page 42
Mile End (exc) to Wolseley (inc)
OGW-30-07
Locations and Sections Information
This document is uncontrolled when printed. Version Number: 1.2 Date Reviewed: 8 Jun 2018 Page 42 of 85
2.5 Balhannah (BAL)
Standing Room:
694m
Goods Siding:
Yes. Single ended with access from MBJ end only. 180 metres long.
Outlying Switchlock Release:
Mounted on the outside of 10 SW Loc Hut opposite 10 points
Local Control Panel:
Located inside 10 SW Loc Hut. No access for train crews.
Crank Handles:
No. Dual control point machines
Other Information:
Junction Rd level crossing is in the middle of the yard and has active protection. When crossing
trains at this location it is best to hold the first train to arrive there outside until the opposing train
is nearly there to avoid lengthy blocking of the road crossing.
Woodside Rd. is in the Ambleside to Balhannah section only 1200m from 3 Signal. Do not block.
Signals 4 & 4E provide “Reduce to Medium Speed” indication for Ambleside when Ambleside is
set for the crossing loop.
Page 43
Mile End (exc) to Wolseley (inc)
OGW-30-07
Locations and Sections Information
This document is uncontrolled when printed. Version Number: 1.2 Date Reviewed: 8 Jun 2018 Page 43 of 85
Page 44
Mile End (exc) to Wolseley (inc)
OGW-30-07
Locations and Sections Information
This document is uncontrolled when printed. Version Number: 1.2 Date Reviewed: 8 Jun 2018 Page 44 of 85
2.6 Mount Barker Junction (MBJ)
Standing Room:
1550m
Goods Siding:
No
Local Control Panel:
No
Crank Handles:
No. Dual control point machines.
Other Information:
This is a Computer Based Interlocking location. The CBI also contains the level crossing
equipment.
There is a broad gauge track adjacent to and parallel with the crossing loop which serves a
passenger platform. This is the Steam Ranger line to Mt Barker and Victor Harbour.
Signal 34 has been placed so that trains can be held if required and still keep Blakiston Road
level crossing clear for road traffic.
2.6.1 Signal Failures at Balhannah End of Yard
Altmanns Rd level crossing is very close to Signal 3 and if Signal 3 has failed and a train is
advanced past it by train authority the loco will be partly foul of the road before the crossing
operates.
Prior to passing Signal 3 at stop and AFTER having been issued with a train authority, the crew
must operate the test switch and activate the crossing before the train passes the signal.
Once the train is on the point circuit the crossing will operate normally so the crew can turn off the
test switch and re-join the train.
Page 45
Mile End (exc) to Wolseley (inc)
OGW-30-07
Locations and Sections Information
This document is uncontrolled when printed. Version Number: 1.2 Date Reviewed: 8 Jun 2018 Page 45 of 85
Page 46
Mile End (exc) to Wolseley (inc)
OGW-30-07
Locations and Sections Information
This document is uncontrolled when printed. Version Number: 1.2 Date Reviewed: 8 Jun 2018 Page 46 of 85
Page 47
Mile End (exc) to Wolseley (inc)
OGW-30-07
Locations and Sections Information
This document is uncontrolled when printed. Version Number: 1.2 Date Reviewed: 8 Jun 2018 Page 47 of 85
2.7 Petwood (PEW)
Standing Room:
1052m
Goods Siding:
No
Local Control Panel:
In relay room by signals at South end of yard. Accessible by train crews.
Crank Handles:
No. Dual control point machines
Other Information:
To obtain a normal or medium speed signal into the main line or crossing loop respectively all the
points must be set for a through route i.e. Either both ends set in the same position – either
normal or reverse.
There is a Very Steep gradient through yard and also some curves.
Page 48
Mile End (exc) to Wolseley (inc)
OGW-30-07
Locations and Sections Information
This document is uncontrolled when printed. Version Number: 1.2 Date Reviewed: 8 Jun 2018 Page 48 of 85
Page 49
Mile End (exc) to Wolseley (inc)
OGW-30-07
Locations and Sections Information
This document is uncontrolled when printed. Version Number: 1.2 Date Reviewed: 8 Jun 2018 Page 49 of 85
2.8 Callington (CGT)
Standing Room:
1850m
Goods Siding:
Yes, siding 300m
Local Control Panel:
No
Crank Handles:
No, Dual Control Point Machines.
Other Information:
Note: The Outlying Switch Lock (OSL) 8 associated with the turnout leading from the Crossing
Loop to the Ballast Siding at 72.020 km. HLM Point Lock operated.
The following level crossings are equipped with Grade Crossing Predictors:
Ironstone Range Road, Petwood level crossing at 63.52 km
East Terrace, Callington level crossing at 73.198 km
Page 50
Mile End (exc) to Wolseley (inc)
OGW-30-07
Locations and Sections Information
This document is uncontrolled when printed. Version Number: 1.2 Date Reviewed: 8 Jun 2018 Page 50 of 85
Page 51
Mile End (exc) to Wolseley (inc)
OGW-30-07
Locations and Sections Information
This document is uncontrolled when printed. Version Number: 1.2 Date Reviewed: 8 Jun 2018 Page 51 of 85
2.9 Monarto South (MSU)
Standing Room:
1550m
Goods Siding:
Yes. (Leased to GWA. See IA 31 for details).
Goods Loop No. 1 (into dead end) 435 metres.
Goods Loop No. 2 (into dead end) 355 metres.
Goods Loop No. 1 (in clear of crossing loop) 255 metres.
Goods Loop No. 2 (in clear of No. 1 goods loop) 225 metres.
Block 1 to No. 2 dead end 203 metres.
Block 1 to west end derail 232 metres.
Block 2 to No. 2 dead end 103 metres.
Block 2 to west end derail 132 metres.
No. 2 dead end (in clear) 91 metres.
No. 1 dead end (in clear) 30 metres.
Local Control Panel:
No- Computer based interlocking so local control by lap top only. OSL release is in box on
the side of 24G Cabinet adjacent to # 22 signal.
Crank Handles:
No. Dual control point machines
Other Information:
Signal interlocking will only allow signals to be cleared for one movement at a time over Ferries
McDonald Rd.
The Apamurra line runs off the Murray Bridge End of the crossing loop.
This branch line is owned by GWA and is the subject of an interface agreement (Interface
Agreement IA 31)
Trains departing Monarto South for Apamurra must hold a train authority issued by GWA control
for the Monarto South to Apamurra section before signal 21 can be cleared for the train‟s
departure. If the train authority for the Apamurra section has been issued and signal 21 has failed
then a train authority to pass signal 21 may be issued by ARTC control.
Trains arriving at Monarto South from Apamurra will be admitted by clearing signal 22. If this
signal fails the ARTC controller will authorise it to be passed at stop by Train authority.
Track machines working in the Monarto South yard will do so under the direction of ARTC control.
When proceeding to or from the branch line they will do it under the direction of both ARTC and
GWA control.
Page 52
Mile End (exc) to Wolseley (inc)
OGW-30-07
Locations and Sections Information
This document is uncontrolled when printed. Version Number: 1.2 Date Reviewed: 8 Jun 2018 Page 52 of 85
Grain:
Set up grain hoppers either side of loading chutes or as per instructions from Grain Agent.
Wagons load in either direction.
Page 53
Mile End (exc) to Wolseley (inc)
OGW-30-07
Locations and Sections Information
This document is uncontrolled when printed. Version Number: 1.2 Date Reviewed: 8 Jun 2018 Page 53 of 85
Page 54
Mile End (exc) to Wolseley (inc)
OGW-30-07
Locations and Sections Information
This document is uncontrolled when printed. Version Number: 1.2 Date Reviewed: 8 Jun 2018 Page 54 of 85
Page 55
Mile End (exc) to Wolseley (inc)
OGW-30-07
Locations and Sections Information
This document is uncontrolled when printed. Version Number: 1.2 Date Reviewed: 8 Jun 2018 Page 55 of 85
2.10 Murray Bridge (MUB)
Standing Room:
961m
Goods Siding:
Yes. (Leased to GWA. See IA 31 for details).
Goods Loop No. 1 (clear) 206 metres.
Block 1 to dead end (via No. 1 goods loop) 253 metres.
Block 2 to dead end (via No. 1 goods loop) 303 metres.
Local Control Panel:
In station building – not available to train crews.
Crank Handles:
No. Dual control point machines
Other Information:
OSL emergency release in grey metal box with raised “T” on door situated on station platform
side front wall.
When trains are required to shunt the goods sidings they must be admitted to the crossing loop
with a low speed signal. If the train is admitted to the loop with a medium speed signal then the
OSLs will not release. If this occurs, either the OSL emergency release must be operated or the
complete train shunted out of the crossing loop and re-admitted with a low speed signal.
To obtain a normal or medium speed signal into the main line or crossing loop respectively all the
points must be set for a through route i.e. Either both ends set in the same position – either
normal or reverse.
A long passenger platform is located on main line.
Grain:
Set up grain hoppers Monarto South side of loading chutes or as per instructions from Grain
Agent. Wagons load towards Tailem Bend.
Block 1 is Adelaide end, Block 2 is Melbourne end.
Page 56
Mile End (exc) to Wolseley (inc)
OGW-30-07
Locations and Sections Information
This document is uncontrolled when printed. Version Number: 1.2 Date Reviewed: 8 Jun 2018 Page 56 of 85
Page 57
Mile End (exc) to Wolseley (inc)
OGW-30-07
Locations and Sections Information
This document is uncontrolled when printed. Version Number: 1.2 Date Reviewed: 8 Jun 2018 Page 57 of 85
2.11 Monteith (MTO)
Standing Room:
1850m (minimum)
Goods Siding:
No
Local Control Panel:
No. Local Control via laptop only.
Crank Handles:
No. Dual control point machines
Page 58
Mile End (exc) to Wolseley (inc)
OGW-30-07
Locations and Sections Information
This document is uncontrolled when printed. Version Number: 1.2 Date Reviewed: 8 Jun 2018 Page 58 of 85
Page 59
Mile End (exc) to Wolseley (inc)
OGW-30-07
Locations and Sections Information
This document is uncontrolled when printed. Version Number: 1.2 Date Reviewed: 8 Jun 2018 Page 59 of 85
2.12 Tailem Bend (TBD)
Standing Room:
2054m
Goods Siding:
GWA yard complex (Leased to GWA. See IA 31 for details).
Local Control Panel:
No. Local Control via laptop only.
Crank Handles:
No. Dual control point machines
Other Information:
Tailem Bend CTC is comprised of two locations TBD north and TBD south.
Local control panels:
North end panel in hut adjacent to #4 signal – not available to crews. OSL release for # 8
points in box on side of hut.
OSL release for # 9 points in grey T box on pole between main line and crossing loop
adjacent to # 9 points.
South end panel in hut adjacent to North Terrace crossing by # 23 signal – no access for
train crews. OSL release for 11 points and crossing test switch in box on the side of this hut.
The Pinnaroo and Loxton branch lines depart from the yard and so do not directly interface with
the ARTC running lines.
Trains or track machines entering the Tailem Bend yard must do so under GWA Yard Access
Authority. Trains or track machines departing the yard onto ARTC running lines must do so with
the approval of ARTC control. Movements in both directions must have ARTC control‟s approval
to operate the OSLs and must report them as restored to normal when the movement is
completed.
The passenger platform is in the Coomandook section adjacent to signal 24.
Grain:
Set up grain hoppers Murray Bridge side of loading chutes or as per instructions from Grain
Agent. Wagons load towards Tailem Bend Yard.
Block 1 is Melbourne end, Block 2 is in the middle and Block 3 is Adelaide end.
Shunting on GWA Tracks to the east end yard limit board
Until further notice any movement traversing the North Terrace Level Crossing (119.975 km) or
the Trevena Road Level Crossing (120.775 km) on the GWA line towards Pinnaroo must utilise
the Test Switch to operate the crossing due to rail head contamination.
Access by rail and shunt crews to the existing „Push Button‟ operation boxes will be withdrawn.
Page 60
Mile End (exc) to Wolseley (inc)
OGW-30-07
Locations and Sections Information
This document is uncontrolled when printed. Version Number: 1.2 Date Reviewed: 8 Jun 2018 Page 60 of 85
Page 61
Mile End (exc) to Wolseley (inc)
OGW-30-07
Locations and Sections Information
This document is uncontrolled when printed. Version Number: 1.2 Date Reviewed: 8 Jun 2018 Page 61 of 85
Page 62
Mile End (exc) to Wolseley (inc)
OGW-30-07
Locations and Sections Information
This document is uncontrolled when printed. Version Number: 1.2 Date Reviewed: 8 Jun 2018 Page 62 of 85
2.13 Coomandook (CDK)
Standing Room:
1960m
Goods Siding:
Yes. (Leased to GWA. See IA 31 for details).
Goods Loop No. 1 (in clear) 376 metres.
Block 1 to western derail 261 metres.
Block 2 to western derail 188 metres.
Block 1 to eastern derail 286 metres.
Block 2 to eastern derail 359 metres.
Local Control Panel:
No. Local Control via laptop only.
Crank Handles:
No. Dual control point machines
Other Information:
The emergency release for the Outlying Switch Locks (OSL) at 8 and 11 points will be relocated
and mounted within enclosures located on the side of the signalling equipment boxes adjacent to
8 points and 11 points.
Grain:
Set up grain hoppers Tailem Bend side of loading chutes or as per instructions from Grain Agent.
Wagons load towards Coonalpyn.
Block 1 is Melbourne end, Block 2 is Adelaide end.
Coomandook Signal Aspects
Signal aspect alterations were undertaken affecting the operation of Permissive Signal 156 and
Absolute Signal 16 when Absolute Signal 4 is at Stop during the crossing loop extension works.
The alterations apply to Adelaide bound movements only.
Permissive Signal 156 displays „Stop‟, „Caution Normal Speed‟, „Clear Normal Speed‟ and
„Reduce to Medium Speed‟ aspects dependent on the aspect displayed on Absolute Signal 16
and the condition of the track immediately ahead of Permissive Signal 156.
Absolute Signal 16 displays „Stop‟, „Low Speed‟, „Caution Normal Speed‟ and „Clear Normal
Speed‟ when the route is set for the main line and „Stop‟, „Low Speed‟, „Caution Medium Speed‟
or „Clear Medium Speed‟ when the route is set for the Crossing Loop.
Absolute Signal 4 displays „Stop‟, „Caution Normal Speed‟ and „Clear Normal Speed‟.
The following Route Signalling will now apply:
For Main Line Movements with 7 and 12 Points set for the Main Line: -
When Absolute Signal 4 is at „Stop‟, Permissive Signal 156 and Absolute Signal 16 will display
„Caution Normal Speed‟ aspects.
Page 63
Mile End (exc) to Wolseley (inc)
OGW-30-07
Locations and Sections Information
This document is uncontrolled when printed. Version Number: 1.2 Date Reviewed: 8 Jun 2018 Page 63 of 85
When Absolute Signal 4 is displaying a „Normal Speed‟ aspect Permissive Signal 156 and
Absolute Signal 16 will display „Clear Normal Speed‟ aspects.
For Movements into the Crossing Loop with 12 Points reverse: -
When Absolute Signal 16 displays „Caution Medium Speed‟ or „Clear Medium Speed‟ when the
route is set for the Crossing Loop Permissive Signal 156 will display a „Reduce to Medium Speed‟
aspect.
Page 64
Mile End (exc) to Wolseley (inc)
OGW-30-07
Locations and Sections Information
This document is uncontrolled when printed. Version Number: 1.2 Date Reviewed: 8 Jun 2018 Page 64 of 85
Page 65
Mile End (exc) to Wolseley (inc)
OGW-30-07
Locations and Sections Information
This document is uncontrolled when printed. Version Number: 1.2 Date Reviewed: 8 Jun 2018 Page 65 of 85
Page 66
Mile End (exc) to Wolseley (inc)
OGW-30-07
Locations and Sections Information
This document is uncontrolled when printed. Version Number: 1.2 Date Reviewed: 8 Jun 2018 Page 66 of 85
2.14 Coonalpyn (CYN)
Standing Room:
1550m
Goods Siding:
Yes. (Leased to GWA. See IA 31 for details).
Goods Loop No. 1 (in clear) 577 metres.
Block 1 to western derail 261 metres.
Block 2 to western derail 340 metres.
Block 1 to eastern derail 316 metres.
Block 2 to eastern derail 237 metres.
Local Control Panel:
No. Local Control via laptop only.
Crank Handles:
No. Dual control point machines
Other Information:
OSL release and crossing test switch in box on the side of the cabinet at the level crossing.
Local Control: Computer Based Interlocking with the CBI unit in the silver cabinet adjacent to the
level crossing at the Coomandook end of the yard
Grain:
Set up grain hoppers Tintinara side of loading chutes or as per instructions from Grain Agent.
Wagons load towards Coomandook.
Block 1 is Melbourne end, Block 2 is Adelaide end.
Page 67
Mile End (exc) to Wolseley (inc)
OGW-30-07
Locations and Sections Information
This document is uncontrolled when printed. Version Number: 1.2 Date Reviewed: 8 Jun 2018 Page 67 of 85
Page 68
Mile End (exc) to Wolseley (inc)
OGW-30-07
Locations and Sections Information
This document is uncontrolled when printed. Version Number: 1.2 Date Reviewed: 8 Jun 2018 Page 68 of 85
Page 69
Mile End (exc) to Wolseley (inc)
OGW-30-07
Locations and Sections Information
This document is uncontrolled when printed. Version Number: 1.2 Date Reviewed: 8 Jun 2018 Page 69 of 85
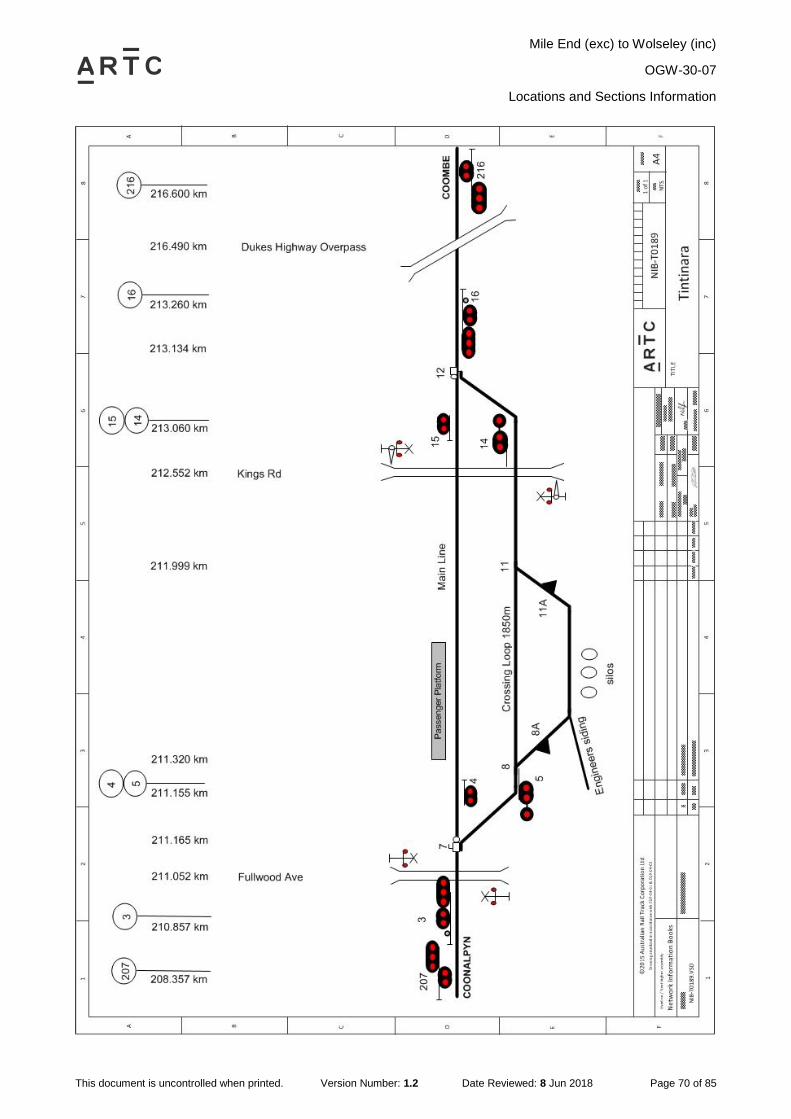
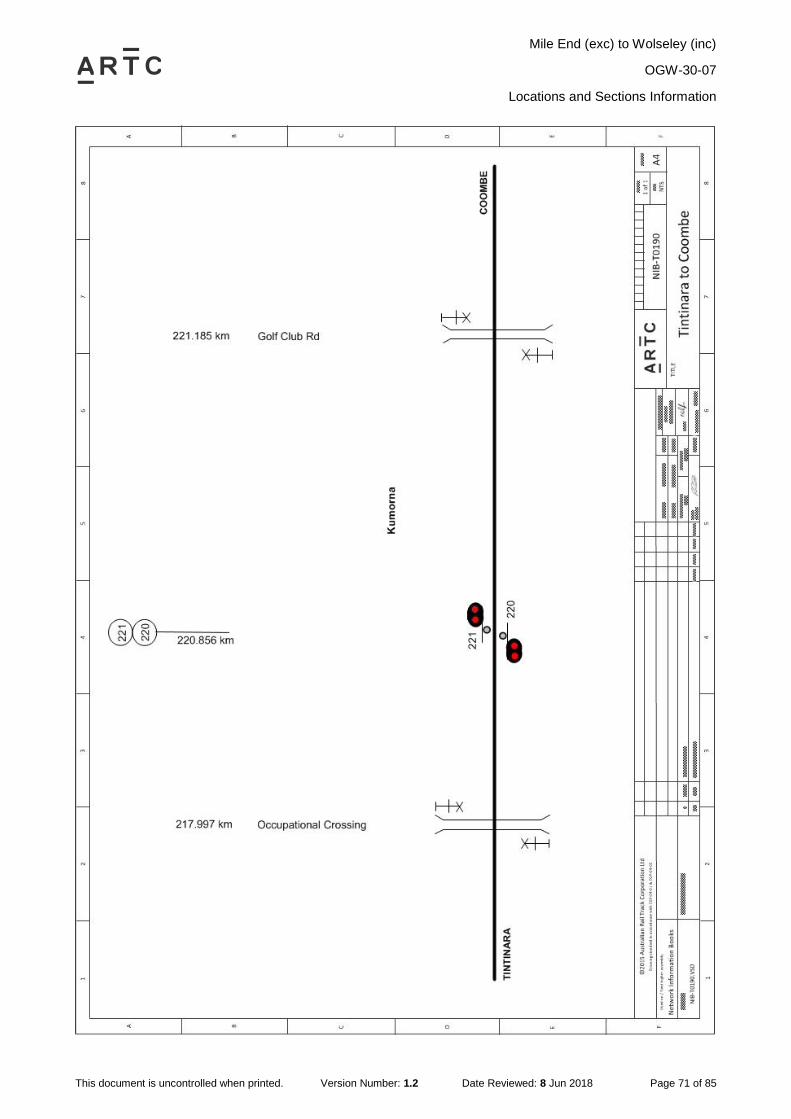
2.15 Tintinara (TIN)
Standing Room:
1850m
Goods Siding:
Yes. (Leased to GWA. See IA 31 for details).
Goods Loop No. 1 (in clear) 607 metres.
Block 1 to western derail 234 metres.
Block 2 to western derail 217 metres.
Block 1 to eastern derail 373 metres.
Block 2 to eastern derail 390 metres.
Local Control Panel:
No. Local Control via laptop only.
Crank Handles:
No. Dual Control Point Machines.
Other Information:
OSL release and crossing test switch in box on the side of the cabinet at the Fulwood Avenue
level crossing.
Local Control: Computer Based Interlocking with the CBI unit in the silver cabinet adjacent to the
level crossing at the Coomandook end of the yard.
Grain:
Set up grain hoppers Keith side of loading chutes or as per instructions from Grain Agent.
Wagons load towards Coonalpyn.
Block 1 is Melbourne end, Block 2 is Adelaide end.
King Road level crossing at 212.590 Km has been upgraded and fitted with flashing lights and
boom barriers.
Page 70
Mile End (exc) to Wolseley (inc)
OGW-30-07
Locations and Sections Information
This document is uncontrolled when printed. Version Number: 1.2 Date Reviewed: 8 Jun 2018 Page 70 of 85
Page 71
Mile End (exc) to Wolseley (inc)
OGW-30-07
Locations and Sections Information
This document is uncontrolled when printed. Version Number: 1.2 Date Reviewed: 8 Jun 2018 Page 71 of 85
Page 72
Mile End (exc) to Wolseley (inc)
OGW-30-07
Locations and Sections Information
This document is uncontrolled when printed. Version Number: 1.2 Date Reviewed: 8 Jun 2018 Page 72 of 85
2.16 Coombe (CZE)
Standing Room:
1550m
Goods Siding:
Yes. Single ended with access from Tintinara end. No Silos, usually used as an engineer‟s
siding.
Local Control Panel:
No. Local Control via laptop only.
Crank Handles:
No. Dual Control Point Machines.
Other Information:
OSL release is in box on the side of 16G cabinet adjacent to South end points.
Page 73
Mile End (exc) to Wolseley (inc)
OGW-30-07
Locations and Sections Information
This document is uncontrolled when printed. Version Number: 1.2 Date Reviewed: 8 Jun 2018 Page 73 of 85
Page 74
Mile End (exc) to Wolseley (inc)
OGW-30-07
Locations and Sections Information
This document is uncontrolled when printed. Version Number: 1.2 Date Reviewed: 8 Jun 2018 Page 74 of 85
Page 75
Mile End (exc) to Wolseley (inc)
OGW-30-07
Locations and Sections Information
This document is uncontrolled when printed. Version Number: 1.2 Date Reviewed: 8 Jun 2018 Page 75 of 85
2.17 Keith (KTH)
Standing Room:
1871m
Goods Siding:
Accessible from the crossing loop on the Melbourne end. (Leased to GWA. See IA 31 for
details).
Goods Loop No. 1 (in clear) 431 metres.
Goods Loop No. 2 (in clear) 197 metres.
Silo road to eastern dead end 444 metres.
Block 1 to eastern derail (via goods loop 2) 611 metres.
Block 2 to eastern derail (via goods loop 2) 547 metres.
Block 3 to eastern derail (via goods loop 2) 678 metres.
Block 1 to western derail 285 metres.
Block 2 to western derail 349 metres.
Former crossing loop from Signal 18 to dead end 1285 metres.
Local Control Panel:
No. Local Control via laptop only.
Crank Handles:
No. Dual Control Point Machines.
Other Information:
Intermediate signals have been relocated to 236.012km & 236.212km to split the section and
become signals 235 & 236.
Grain:
Set up grain hoppers Wirrega side of loading chutes or as per instructions from Grain Agent.
Wagons load towards Coombe.
Block 1 is in the middle, Block 2 is Melbourne end and Block 3 is Adelaide end.
Page 76
Mile End (exc) to Wolseley (inc)
OGW-30-07
Locations and Sections Information
This document is uncontrolled when printed. Version Number: 1.2 Date Reviewed: 8 Jun 2018 Page 76 of 85
Page 77
Mile End (exc) to Wolseley (inc)
OGW-30-07
Locations and Sections Information
This document is uncontrolled when printed. Version Number: 1.2 Date Reviewed: 8 Jun 2018 Page 77 of 85
Page 78
Mile End (exc) to Wolseley (inc)
OGW-30-07
Locations and Sections Information
This document is uncontrolled when printed. Version Number: 1.2 Date Reviewed: 8 Jun 2018 Page 78 of 85
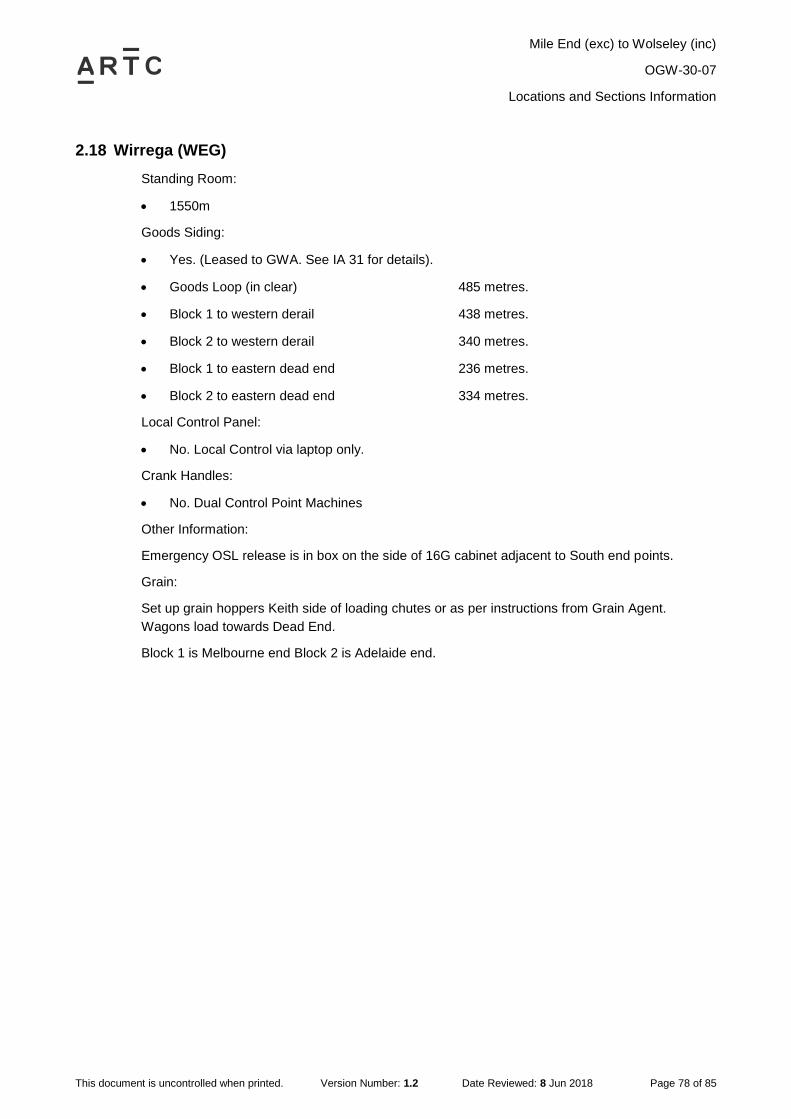
2.18 Wirrega (WEG)
Standing Room:
1550m
Goods Siding:
Yes. (Leased to GWA. See IA 31 for details).
Goods Loop (in clear) 485 metres.
Block 1 to western derail 438 metres.
Block 2 to western derail 340 metres.
Block 1 to eastern dead end 236 metres.
Block 2 to eastern dead end 334 metres.
Local Control Panel:
No. Local Control via laptop only.
Crank Handles:
No. Dual Control Point Machines
Other Information:
Emergency OSL release is in box on the side of 16G cabinet adjacent to South end points.
Grain:
Set up grain hoppers Keith side of loading chutes or as per instructions from Grain Agent.
Wagons load towards Dead End.
Block 1 is Melbourne end Block 2 is Adelaide end.
Page 79
Mile End (exc) to Wolseley (inc)
OGW-30-07
Locations and Sections Information
This document is uncontrolled when printed. Version Number: 1.2 Date Reviewed: 8 Jun 2018 Page 79 of 85
Page 80
Mile End (exc) to Wolseley (inc)
OGW-30-07
Locations and Sections Information
This document is uncontrolled when printed. Version Number: 1.2 Date Reviewed: 8 Jun 2018 Page 80 of 85
Page 81
Mile End (exc) to Wolseley (inc)
OGW-30-07
Locations and Sections Information
This document is uncontrolled when printed. Version Number: 1.2 Date Reviewed: 8 Jun 2018 Page 81 of 85
2.19 Bordertown (BOT)
Standing Room:
2180m
Goods Siding:
Accessible from the crossing loop on the Adelaide end. (Leased to GWA. See IA 31 for
details).
Goods Loop 1 or 2 (in clear) 385 metres.
Block 1 to western derail 160 metres.
Block 2 to western derail 291 metres.
Block 3 to western derail 263 metres.
Block 4 to western derail 246 metres.
Block 1 to eastern derail (either goods loop) 323 metres.
Block 2 to eastern derail 185 metres.
Block 3 to eastern derail 236 metres.
Block 4 to eastern derail 134 metres.
Local Control Panel:
No. Local Control via laptop only.
Crank Handles:
No. Dual Control Point Machines
Grain:
Set up grain hoppers Wolseley side of loading chutes or as per instructions from Grain Agent.
Wagons load towards Wirrega.
Block 1 is Adelaide end, Block 2 is Melbourne end, Block 3 is in the middle Block 4 is opposite
Block 3 in the middle of the yard.
Bordertown Platform is on the main line in the Bordertown to Wirrega section.
Crecoona Terrace level Crossing has been fitted with Boom barriers.
Golf Course Road and North Terrace level crossings at Bordertown have become predictor
controlled crossings.
Page 82
Mile End (exc) to Wolseley (inc)
OGW-30-07
Locations and Sections Information
This document is uncontrolled when printed. Version Number: 1.2 Date Reviewed: 8 Jun 2018 Page 82 of 85
Page 83
Mile End (exc) to Wolseley (inc)
OGW-30-07
Locations and Sections Information
This document is uncontrolled when printed. Version Number: 1.2 Date Reviewed: 8 Jun 2018 Page 83 of 85
Page 84
Mile End (exc) to Wolseley (inc)
OGW-30-07
Locations and Sections Information
This document is uncontrolled when printed. Version Number: 1.2 Date Reviewed: 8 Jun 2018 Page 84 of 85
2.20 Wolseley (WSL)
Standing Room:
1005 m
Goods Siding:
Yes. (Leased to GWA. See IA 31 for details).
Goods Loop 1 (in clear) 249 metres.
Block 1 to eastern dead end 332 metres.
Block 2 to western dead end 366 metres.
Block 3 to western dead end 624 metres.
Block 4 to western dead end 228 metres.
Block 1 to level crossing 392 metres.
Block 2 to level crossing 359 metres.
Block 3 to level crossing 100 metres.
Block 4 to level crossing 463 metres.
Crank Handles:
No. Dual Control Point Machines.
Grain:
Set up grain hoppers Naracoorte side of loading chutes or as per instructions from Grain Agent.
Wagons load towards Bordertown.
Block 1 is Adelaide end, Block 2 is Melbourne end, Block 3 is in the middle Block 4 is opposite
Block 3 in the middle of the yard.
Wolseley Platform is on the main line in the Wolseley to Leeor Loop section.
Local Control Panel: in relay room at north side of station on platform. No access for train crews.
Access to the goods siding is controlled by network controller. Signals 16 and 16D are yard
departure dwarf signals only and will not clear onto the crossing loop if it is occupied.
The dead end is the end of the Mt. Gambier line. The rest is still broad gauge.
Interface location for Victorian North West CTC.
Page 85
Mile End (exc) to Wolseley (inc)
OGW-30-07
Locations and Sections Information
This document is uncontrolled when printed. Version Number: 1.2 Date Reviewed: 8 Jun 2018 Page 85 of 85