68
NETWRIX FILE SERVER CHANGE REPORTER ADMINISTRATOR’S GUIDE Copyright © 2012 NetWrix Corporation. All Rights Reserved. April/2012 Product Version: 3.3
NETWRIX FILE SERVER CHANGE
REPORTER
ADMINISTRATOR’S GUIDE
Copyright © 2012 NetWrix Corporation. All Rights Reserved.
April/2012
Product Version: 3.3
NetWrix File Server Change Reporter Administrator’s Guide
Page 2 of 68
Copyright © 2012 NetWrix Corporation. All Rights Reserved
Suggestions or comments about this document? www.netwrix.com/feedback
Legal Notice
The information in this publication is furnished for information use only, and does not constitute a
commitment from NetWrix Corporation of any features or functions discussed. NetWrix Corporation
assumes no responsibility or liability for the accuracy of the information presented, which is subject
to change without notice.
NetWrix is a registered trademark of NetWrix Corporation. The NetWrix logo and all other NetWrix
product or service names and slogans are registered trademarks or trademarks of NetWrix
Corporation. Active Directory is a trademark of Microsoft Corporation. All other trademarks and
registered trademarks are property of their respective owners.
Disclaimers
This document may contain information regarding the use and installation of non-NetWrix products.
Please note that this information is provided as a courtesy to assist you. While NetWrix tries to
ensure that this information accurately reflects the information provided by the supplier, please
refer to the materials provided with any non-NetWrix product and contact the supplier for
confirmation. NetWrix Corporation assumes no responsibility or liability for incorrect or incomplete
information provided about non-NetWrix products.
© 2012 NetWrix Corporation.
All rights reserved.
www.netwrix.com

NetWrix File Server Change Reporter Administrator’s Guide
Page 3 of 68
Copyright © 2012 NetWrix Corporation. All Rights Reserved
Suggestions or comments about this document? www.netwrix.com/feedback
Table of Contents
1. INTRODUCTION ................................................................................ 5
1.1. Overview ............................................................................ 5
1.2. How This Guide is Organized ..................................................... 5
2. PRODUCT OVERVIEW .......................................................................... 6
2.1. Key Features ....................................................................... 6
2.2. How It Works ....................................................................... 6
2.3. Licensing ............................................................................ 8
3. GETTING STARTED ............................................................................. 9
3.1 Installation Prerequisites ......................................................... 9
3.1.1 Hardware Requirements ................................................... 9
3.1.2 Software Requirements ................................................... 10
3.1.3 Target File Server Requirements ........................................ 10
3.1.4 Requirements to the Security Event Log Maximum Size .............. 10
3.1.5 Supported Microsoft SQL Server Versions .............................. 11
3.1.6 Required Rights and Permissions ........................................ 11
3.2 Installing NetWrix File Server Change Reporter .............................. 12
3.3 Configuring Audit on File Servers ............................................... 12
3.3.1 Configuring Default Audit Settings on File Shares .................... 13
3.3.2 Configuring Audit Object Access Policy ................................ 15
4. WORKING WITH THE STANDARD CONFIGURATION MODE ...................................... 18
4.1 Configuring Basic Settings ....................................................... 18
4.2 Data Collection and Reporting .................................................. 22
4.2.1 Running Data Collection Task ............................................ 22
4.2.2 Running On-Demand Reports ............................................. 24
4.3 Advanced Reporting .............................................................. 25
4.3.1 Configuring Advanced Reporting Settings .............................. 25
5 WORKING WITH THE ENTERPRISE CONFIGURATION MODE ..................................... 28
5.1 Creating New Managed Object .................................................. 28
5.2 Modifying Managed Object Settings ............................................ 38
5.2.1 Editing Managed Computers List ........................................ 38
5.2.2 Modifying Feature Settings ............................................... 38
5.3 Configuring Global Settings ..................................................... 39
5.3.1 Configuring Task Schedule ............................................... 40
5.3.2 Configuring E-mail Settings .............................................. 41

NetWrix File Server Change Reporter Administrator’s Guide
Page 4 of 68
Copyright © 2012 NetWrix Corporation. All Rights Reserved
Suggestions or comments about this document? www.netwrix.com/feedback
5.3.3 Configuring Repository Settings ......................................... 42
5.3.4 Configuring Reporting Settings .......................................... 43
5.4 Data Collection and Reporting .................................................. 44
5.4.1 Running Data Collection Task ............................................ 44
5.4.2 Viewing Task Session Results ............................................. 45
5.4.3 Viewing Scheduled Reports .............................................. 47
5.4.4 Running Ad-hoc Reports .................................................. 48
5.5 Advanced Reporting .............................................................. 48
5.5.1 Configuring Default Advanced Reporting Settings .................... 49
5.5.2 Modifying Advanced Reporting Settings ................................ 52
6 ADDITIONAL CONFIGURATION ................................................................. 54
6.1 Network Traffic Compression ................................................... 54
6.2 Large Servers Support ............................................................ 56
6.3 Using File Versioning and Rollback Capabilities .............................. 57
6.4 Editing Report Delivery Schedule............................................... 58
6.5 Including and Excluding Data from Reports ................................... 63
6.6 Importing Changes That Occurred Between Two Snapshots ................ 63
6.7 Creating Custom Reports ........................................................ 64
A APPENDIX: MONITORED OBJECT TYPES AND ATTRIBUTES ..................................... 67
B APPENDIX: RELATED DOCUMENTATION ....................................................... 68
NetWrix File Server Change Reporter Administrator’s Guide
Page 5 of 68
Copyright © 2012 NetWrix Corporation. All Rights Reserved
Suggestions or comments about this document? www.netwrix.com/feedback
1. INTRODUCTION
1.1. Overview This guide is intended for system administrators and integrators who are going to install and configure NetWrix File Server Change Reporter.
From this guide you will learn:
What functionality NetWrix File Server Change Reporter provides;
What settings are required for your environment to use NetWrix File Server Change
Reporter successfully;
How to configure options and settings available in NetWrix File Server Change
Reporter;
How to start using NetWrix File Server Change Reporter and view reports.
1.2. How This Guide is Organized This section explains how this guide is organized and provides a brief overview of each chapter.
Chapter 1 Introduction: the current chapter. It explains the purpose of this document
and explains its structure.
Chapter 2 Product Overview: gives description of the product key features, benefits,
workflow, and provides license information.
Chapter 3 Getting Started: lists all product requirements and the requirements to the
monitored environment, explains how to install NetWrix File Server Change Reporter
and configure audit policies on the monitored servers.
Chapter 4 Working with the Standard Configuration Mode: provides a description of
the Standard Configuration mode options, instructions on how to configure the mode
settings and start using the reporting functionality.
Chapter 5 Working with the Enterprise Configuration Mode: provides a description of
the Enterprise Configuration mode options, instructions on how to configure the
mode settings and start using the reporting functionality.
Chapter 6 Additional Configuration: provides a description of the additional
configuration options available in NetWrix File Server Change Reporter.
A Appendix: Monitored Object Types and Attributes: contains a full list of all object
types and attributes that can be monitored by NetWrix File Server Change Reporter.
B Appendix: Related Documentation: contains a list of all documentation published to
support NetWrix File Server Change Reporter.
NetWrix File Server Change Reporter Administrator’s Guide
Page 6 of 68
Copyright © 2012 NetWrix Corporation. All Rights Reserved
Suggestions or comments about this document? www.netwrix.com/feedback
2. PRODUCT OVERVIEW File server auditing is a critical requirement for organizations that rely on file servers to store their documents and network applications. Unauthorized and accidental changes to the files and folders structure, permissions, file shares, and other objects can significantly impact users and company infrastructure by facilitating data theft and security threats.
NetWrix File Server Change Reporter audits important file server changes and sends reports on:
Successful and/or failed read access attempts;
Successful and/or failed object modification attempts, including modifications of
files, folders, shares, and permissions.
2.1. Key Features NetWrix File Server Change Reporter helps you carry out the following auditing and reporting tasks:
Detect and report on successful/failed object read access and successful/failed change attempts. Reports include information about events telling the user what was done, who accessed an object or made changes, where this happened and when.
Report on the previous and current values for every change.
Generate on-demand Web-based reports.
Create custom reports (can also be ordered at NetWrix).
Store collected audit data and enable historical reporting for any period of time.
The product supports the following file server types: Windows® Server, NetApp® filer, and EMC VNX/VNXe/Celerra (please note: NetApp® filer and EMC VNX/VNXe/Celerra are only configurable and available in the NetWrix File Server Change Reporter Standard configuration mode of the Enterprise Edition).
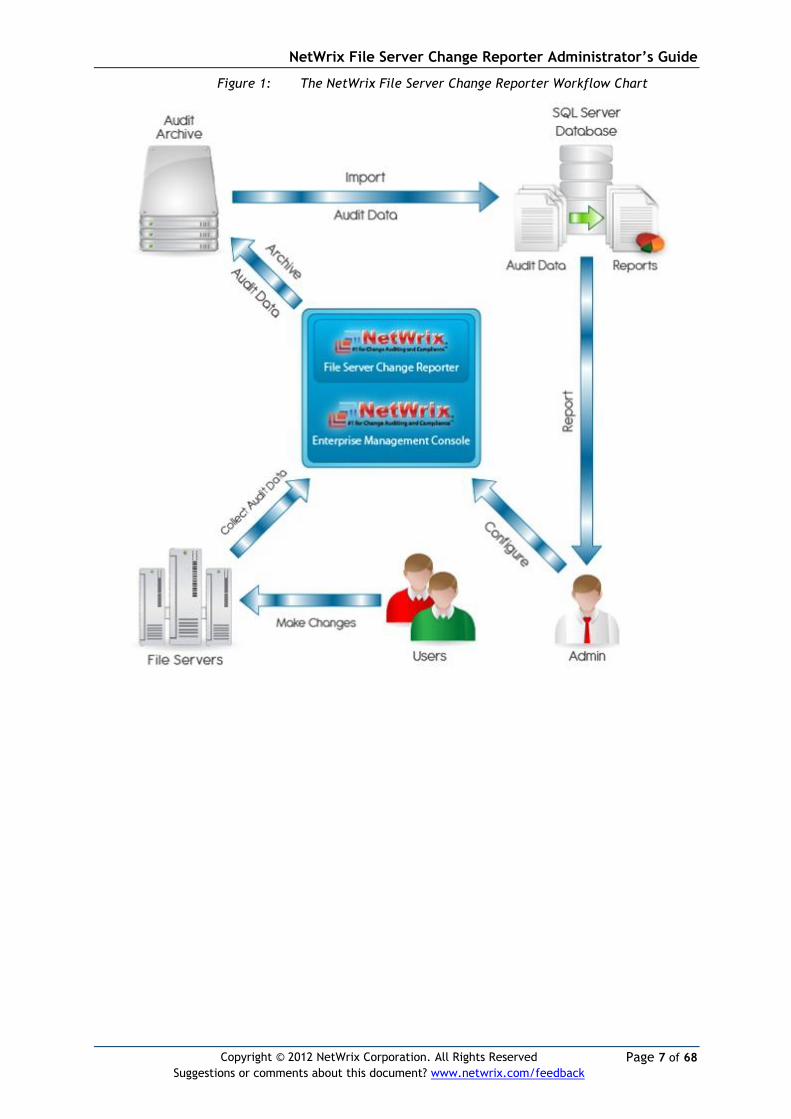
2.2. How It Works
NetWrix File Server Change Reporter data collection and reporting workflow is as follows:
1. The user launches the configuration utility and sets the parameters for automated data collection and reporting, choosing whether to report on:
Successful modifications
Failed modification attempts
Successful read access
Failed read access attempts
2. A dedicated scheduled task which is launched periodically (every day, at 3 AM by default; it can also be launched manually when needed) collects file server snapshots and/or audit data, and sends an email with a report to the specified recipients. The task name is NetWrix Management Console - File Server Change Reporter - <your Managed Object name>.
3. In the Enterprise Edition, if Advanced Reports are enabled and configured, the task will also enable saving information about the file server changes into a specified Microsoft SQL Server database (you can use the Database Importer tool to import data on demand, for details refer to Section 6.6 Importing Changes That Occurred Between Two Snapshots). You can run and view reports in the Report Manager through a web browser or via NetWrix Management Console.
4. Additionally, you can generate and view on-demand reports through NetWrix Management Console or via the Report Viewer utility.
NetWrix File Server Change Reporter Administrator’s Guide
Page 7 of 68
Copyright © 2012 NetWrix Corporation. All Rights Reserved
Suggestions or comments about this document? www.netwrix.com/feedback
Figure 1: The NetWrix File Server Change Reporter Workflow Chart
NetWrix File Server Change Reporter Administrator’s Guide
Page 8 of 68
Copyright © 2012 NetWrix Corporation. All Rights Reserved
Suggestions or comments about this document? www.netwrix.com/feedback
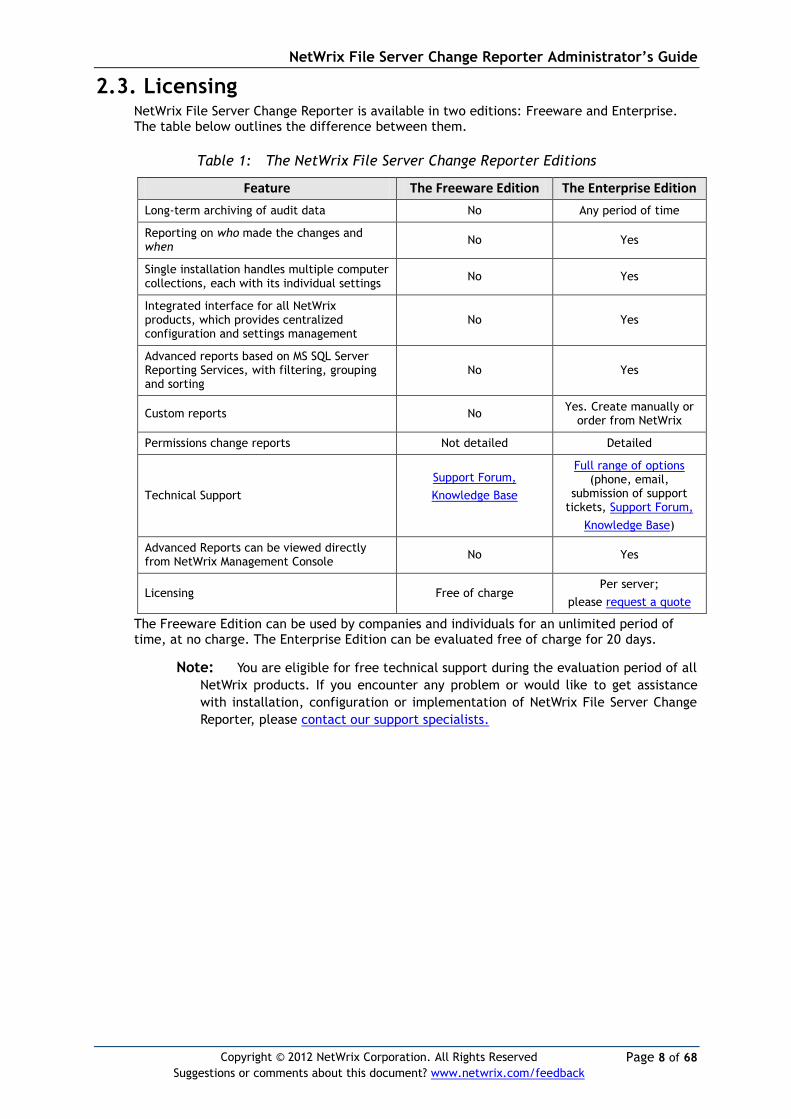
2.3. Licensing NetWrix File Server Change Reporter is available in two editions: Freeware and Enterprise. The table below outlines the difference between them.
Table 1: The NetWrix File Server Change Reporter Editions
Feature The Freeware Edition The Enterprise Edition
Long-term archiving of audit data No Any period of time
Reporting on who made the changes and when
No Yes
Single installation handles multiple computer collections, each with its individual settings
No Yes
Integrated interface for all NetWrix products, which provides centralized configuration and settings management
No Yes
Advanced reports based on MS SQL Server Reporting Services, with filtering, grouping and sorting
No Yes
Custom reports No Yes. Create manually or
order from NetWrix
Permissions change reports Not detailed Detailed
Technical Support
Support Forum,
Knowledge Base
Full range of options (phone, email,
submission of support tickets, Support Forum,
Knowledge Base)
Advanced Reports can be viewed directly from NetWrix Management Console
No Yes
Licensing Free of charge Per server;
please request a quote
The Freeware Edition can be used by companies and individuals for an unlimited period of time, at no charge. The Enterprise Edition can be evaluated free of charge for 20 days.
Note: You are eligible for free technical support during the evaluation period of all
NetWrix products. If you encounter any problem or would like to get assistance
with installation, configuration or implementation of NetWrix File Server Change
Reporter, please contact our support specialists.

NetWrix File Server Change Reporter Administrator’s Guide
Page 9 of 68
Copyright © 2012 NetWrix Corporation. All Rights Reserved
Suggestions or comments about this document? www.netwrix.com/feedback
3. GETTING STARTED
This chapter describes the necessary prerequisites for the NetWrix File Server Change Reporter installation.
3.1 Installation Prerequisites
3.1.1 Hardware Requirements
Before installing NetWrix File Server Change Reporter, make sure that your system meets the following hardware requirements:
Table 2: The NetWrix File Server Change Reporter Hardware Requirements
Component Minimum Recommended
Processor Intel or AMD 32 bit, 2GHz Intel or AMD 64 bit, 3GHz
Memory 512MB RAM 2GB RAM
Disk 50MB physical disk space for the installation
See recommendations below
To estimate the approximate size of the disk space required for the Audit Archive, follow the procedure below:
Procedure 1. To estimate approximate disk space required for the Audit Archive
1. Calculate the audit data volume generated per hour. To do this, define the total time of the retention period for events in your security log, starting from the time of the first event up to the time of the last event. Divide the current size of the security log
by the time range in hours, for example:
700 (MB, the current security log size) ∕ 7 (the period of time (in hours) during which events were written to the security log) = 100. The audit data volume generated per hour equals 100 MB.
2. Calculate the audit data volume generated per day. To do this, multiply the audit data volume generated per hour by 24, for example:
100 (MB, the audit data volume generated per hour) × 24 = 2400. The audit data volume generated per day equals to 2400 MB.
3. Calculate the approximate disk space size required per day. To do this, define the compressed size of the audit data volume generated per day. Divide the audit data volume by 30, for example:
2400 (MB, the audit data volume generated per day) ∕ 30 = 80. The compressed size of the audit data volume generated per day equals 80 MB.
Note: Please make sure that the TEMP folder has enough space to keep the
amount of data equivalent to the security logs volume generated between data
collections. All calculations above are approximate. The actual repository disk
space consumption depends on user access activity and selected audit types (file
modifications only or file reads as well).

NetWrix File Server Change Reporter Administrator’s Guide
Page 10 of 68
Copyright © 2012 NetWrix Corporation. All Rights Reserved
Suggestions or comments about this document? www.netwrix.com/feedback
3.1.2 Software Requirements
Before installing NetWrix File Server Change Reporter, make sure that your system meets the following software requirements:
Table 3: The NetWrix File Server Change Reporter Software Requirements
Component Requirement
Operating System Windows XP SP3 or later
Framework .NET Framework 2.0, 3.0 or 3.5
3.1.3 Target File Server Requirements
The following requirements apply to the monitored file servers:
Table 4: File Server Requirements
File Server Type Requirements
Microsoft Windows File Server Operating System: Windows 2000 SP4 or later
.NET Framework* 2.0, 3.0 or 3.5.
NetApp filer (CIFS configuration only)
CIFS Network Protocol support
EMC VNX/VNXe/Celerra families (CIFS configuration only)
CIFS Network Protocol support
* .NET Framework is only required if you are going to use the network traffic compression
option, for details about this option refer to the Section 6.1 Network Traffic Compression.
Note: NetApp filer and EMC VNX/VNXe/Celerra are only configurable in the
NetWrix File Server Change Reporter Standard configuration mode.
3.1.4 Requirements to the Security Event Log Maximum Size
The following requirements apply to the maximum size of the security event log on your target file server:
Table 5: Security Event Log Requirements for Windows Operating Systems
Operating System on the computer Network Traffic Compression
option is enabled
Security log auto archiving
is enabled
Security Event Log Maximum Size
where NetWrix File Server Change
Reporter is installed
which is monitored by NetWrix File Server
Change Reporter
Windows 2000/XP/2003/
Vista/7/2008/2008 R2
Windows 2000/XP/2003
Yes /No Yes /No 300 MB
Windows 2000/XP/2003 Windows
Vista/7/2008/2008 R2 No No 300 MB
Windows 2000/XP/2003 Windows
Vista/7/2008/2008 R2 No Yes
Configuration is not supported
Windows 2000/XP/2003 Windows
Vista/7/2008/2008 R2 Yes Yes/No 4 GB
Windows Vista/7/2008/2008 R2
Windows Vista/7/2008/2008 R2
Yes/ No Yes/No 4 GB
If you monitor computers with NetApp or EMC VNX/VNXe/Celerra data storage system installed, the following size is recommended:

NetWrix File Server Change Reporter Administrator’s Guide
Page 11 of 68
Copyright © 2012 NetWrix Corporation. All Rights Reserved
Suggestions or comments about this document? www.netwrix.com/feedback
Table 6: Security Event Log Requirements for Data Storage Systems
Operating System where NetWrix File Server Change Reporter
is installed Data Storage System
Security Event Log Maximum Size
Windows 2000/XP/2003 Net App filer EMC VNX/VNXe/Celerra
300 MB
Windows Vista/7/2008/2008 R2 Net App filer 4 GB (300 MB is recommended,
depending on productivity)
Windows Vista/7/2008/2008 R2 EMC VNX/VNXe/Celerra 4 GB
Note: If you move security log files from the default system folder to a non-
default one, you must reboot your target server for the reporting functionality to
work properly.
3.1.5 Supported Microsoft SQL Server Versions
For the Advanced Reporting feature, which is only supported in the Enterprise Edition, you need to have Microsoft SQL Server 2005, 2008 or 2008 R2 with Reporting Services configured. SQL Server 2005 Express Edition with Advanced Services can be installed and configured automatically. For your convenience, we have provided instructions on the manual installation of SQL Server with Reporting Services required for NetWrix File Server Change Reporter. For a step-by-step procedure, please refer to the following technical article: Installing Microsoft SQL Server and Configuring the Reporting Services. For full installation and configuration details, refer to documentation provided by Microsoft.
3.1.6 Required Rights and Permissions
For data collection and reports generation, NetWrix File Server Change Reporter uses the account under which the scheduled task is run. This account must be granted the following permissions:
Read access to the monitored shared folders
“Manage auditing and security log” policy enabled
The account under which NetWrix File Server Change Reporter is run, must comply with the following requirements:
If the computer with NetWrix File Server Change Reporter installed and the
monitored file server belong to the same domain, this account must be assigned the
domain administrator permissions;
If the computer with NetWrix File Server Change Reporter installed and the
monitored file server belong to a workgroup or different domains, the file server
must have accounts with the same name and password as the account under which
NetWrix File Server Change Reporter is run. All these accounts must be assigned the
local administrator permissions.
In the Enterprise Edition, for proper performance of the Advanced Reporting functionality, the account used by users to view reports, as well as the account for running the scheduled task, must be assigned the Content Manager role for the SSRS Home folder. To assign the Content Manager role to an account, follow the procedure below:
Procedure 2. To assign the Content Manager role to an account
1. Run the Report Manager, open the Properties tab of the Home folder, and click New Role Assignment (the path can vary slightly depending on your SQL Server version).
2. Specify the necessary group or user account in the following format: domain\user. The account should be in the same domain or in a trusted domain.

NetWrix File Server Change Reporter Administrator’s Guide
Page 12 of 68
Copyright © 2012 NetWrix Corporation. All Rights Reserved
Suggestions or comments about this document? www.netwrix.com/feedback
3. Select Content Manager.
4. Click OK to save the role assignments.
3.2 Installing NetWrix File Server Change Reporter To install NetWrix File Server Change Reporter, run the setup program on any computer in the domain where the monitored file servers are located. If the selected computer is running Windows Server 2008, 2008 R2, Windows Vista or Windows 7, make sure User Account Control (UAC) is turned off.
To install NetWrix File Server Change Reporter, follow the procedure below:
Procedure 3. To install NetWrix File Server Change Reporter
1. Download NetWrix File Server Change Reporter.
2. Run the setup package called fscrfree_setup.msi (for the Freeware Edition) or
fscrfull_setup.msi (for the Enterprise Edition).
3. Follow the instructions of the wizard. When prompted, accept the license agreement
and specify the installation folder.
4. On the last step, click Finish to complete the installation procedure. For the Enterprise Edition, select the configuration mode before clicking Finish (the Enterprise configuration mode is recommended).
Figure 2: The NetWrix File Server Change Reporter Installation Wizard
To learn how to configure and use NetWrix File Server Change Reporter, please refer to the corresponding sections of this guide:
The Standard configuration mode is used in the Freeware and Enterprise Editions. For details, refer to the Section 4 Working with the Standard Configuration Mode.
The full featured Enterprise configuration mode is used in the Enterprise Edition only. For details, refer to the Section 5 Working with the Enterprise Configuration Mode.
3.3 Configuring Audit on File Servers To collect audit data, you need to configure Audit Policy Settings on your target file servers. This chapter describes how to configure Audit settings for Microsoft Windows file servers. For details on how to monitor NetApp file server, refer to the following technical article: How to Configure NetWrix File Server Change Reporter to Monitor NetApp Filer CIFS Shares. For
NetWrix File Server Change Reporter Administrator’s Guide
Page 13 of 68
Copyright © 2012 NetWrix Corporation. All Rights Reserved
Suggestions or comments about this document? www.netwrix.com/feedback
details on how to monitor EMC VNX/VNXe/Celerra file server, refer to the following technical article: How to Configure NetWrix File Server Change Reporter to Monitor EMC
. VNX/VNXe/Celerra CIFS Shares
Note: NetApp filer and EMC VNX/VNXe/Celerra are only configurable in the NetWrix File Server Change Reporter Standard configuration mode.
3.3.1 Configuring Default Audit Settings on File Shares
Before configuring the audit settings, consider that if you have multiple file shares frequently accessed by a significant number of users, it is reasonable to audit objects modification only. Tracking all access events may result in too much data written to the audit logs, whereas only some part of it may be of any interest. Please note that audit flags must be set on every file share you want to audit.
If you are going to monitor an entire computer, consider the following:
If you specify a single computer name, NetWrix File Server Change Reporter will monitor
all shared folders on this computer except the folders whose name ends with the $ symbol
(which are either hidden or administrative/system folders). In order for the report
functionality to work properly, you need to configure audit settings for each share folder
on the computer separately. Otherwise, reports will contain limited data and warning
messages.
For your convenience, if your file shares are stored within one folder (or disk drive), you
can configure audit settings for this folder only. As a result, you will receive reports on all
required access types applied to all file shares within this folder. Please note that it is not
recommended to configure audit settings for system disks.
To configure the default Audit settings, follow the procedure below:
Procedure 4. To configure the default audit settings on file shares
1. Navigate to the required file share, right-click it and select Properties from the pop-up menu. The <Share_Name> Properties form will open.
2. Select the Security tab and click the Advanced button. The Advanced Security Settings for <Share_Name> form will open.
3. Go to the Auditing tab, select the Everyone group (or another user-defined group of the selected users granted special permissions) and click Edit. The Advanced Security Settings for <Share_Name> form will open as a separate dialog:
NetWrix File Server Change Reporter Administrator’s Guide
Page 14 of 68
Copyright © 2012 NetWrix Corporation. All Rights Reserved
Suggestions or comments about this document? www.netwrix.com/feedback
Figure 3: Advanced Security Settings
Note: You can specify any other required user group, but in this case the current version of NetWrix File Server Change Reporter will send you email reports with warnings about the audit configuration. This will not affect the reporting functionality and the product will only monitor user accounts that belong to the selected group.
4. Select the Everyone group and click the Edit button. The Auditing Entry for <Share_Name> dialog will appear.
5. Select the Success and Failed check-boxes for the following Access options:
To monitor successful read access and failed read access attempts:
o List Folder / Read Data
To monitor successful modifications and failed modification attempts:
o Create Files / Write Data
o Create Folders / Append Data
o Write Attributes
o Write Extended Attributes
o Delete Subfolders and Files
o Delete
o Change Permissions
o Take Ownership

NetWrix File Server Change Reporter Administrator’s Guide
Page 15 of 68
Copyright © 2012 NetWrix Corporation. All Rights Reserved
Suggestions or comments about this document? www.netwrix.com/feedback
Figure 4: Audit Entry for <Share_Name> Dialog
6. Make sure that the Apply onto parameter is set to This folder, subfolders and files, and the Apply these auditing entries to objects and/or containers within this container only check box is cleared.
7. Click OK to save the changes and close the dialog.
Note: If no data is present in reports, or the Who changed field contains the
‘system’ value, refer to NetWrix File Server Change Reporter Troubleshooting
Guide.
3.3.2 Configuring Audit Object Access Policy
To collect data from the monitored file servers, you must configure the Audit object access policy on the file servers. You must be logged on as a member of the Administrators group or you must be granted the Manage auditing and security log permission in Group Policy to perform this procedure.
To configure the Audit object access policy, follow the procedure below. This procedure provides you with one of several possible ways to configure the Audit object access policy:
Procedure 5. To configure Audit object access policy
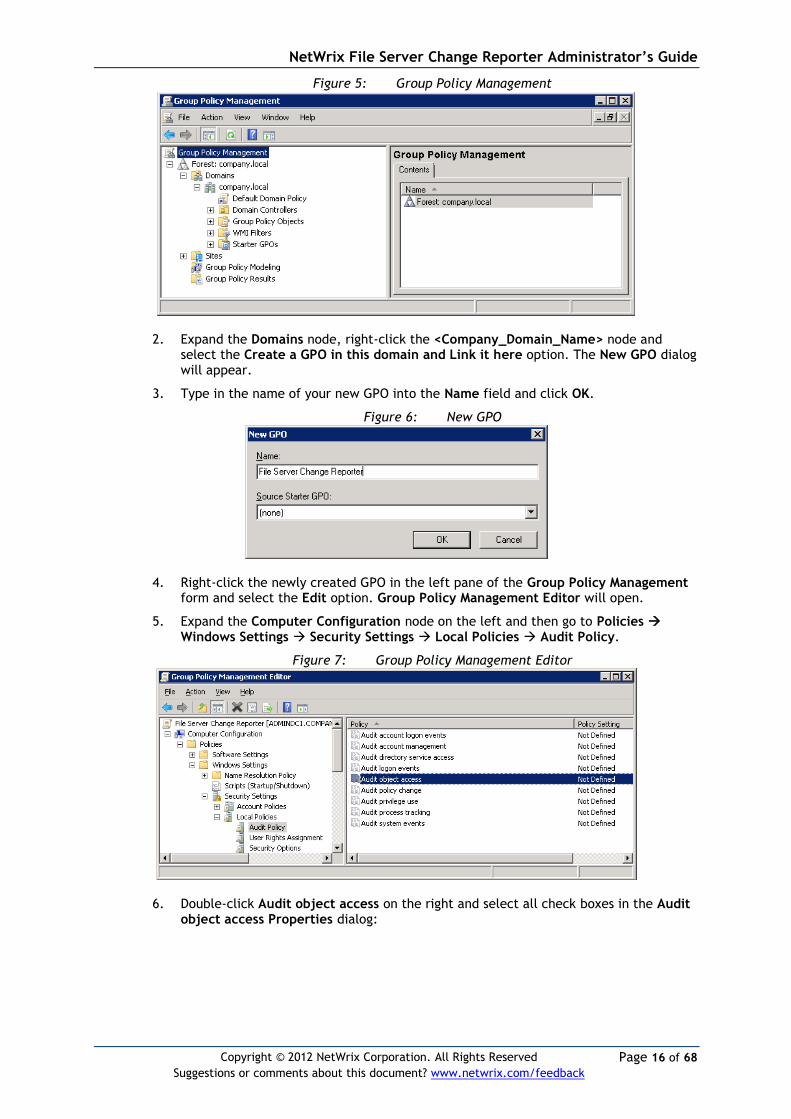
1. Navigate to Start Programs Administrative Tools Group Policy Management. The Group Policy Management dialog will open:
NetWrix File Server Change Reporter Administrator’s Guide
Page 16 of 68
Copyright © 2012 NetWrix Corporation. All Rights Reserved
Suggestions or comments about this document? www.netwrix.com/feedback
Figure 5: Group Policy Management
2. Expand the Domains node, right-click the <Company_Domain_Name> node and select the Create a GPO in this domain and Link it here option. The New GPO dialog will appear.
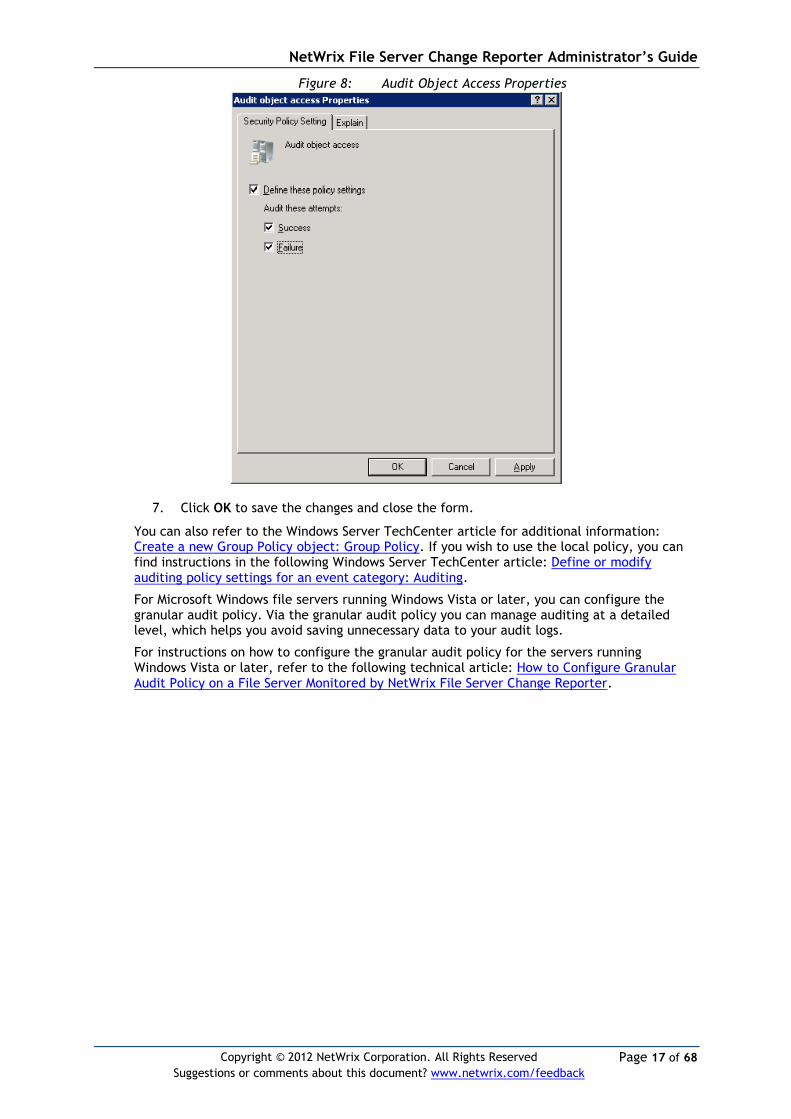
3. Type in the name of your new GPO into the Name field and click OK.
Figure 6: New GPO
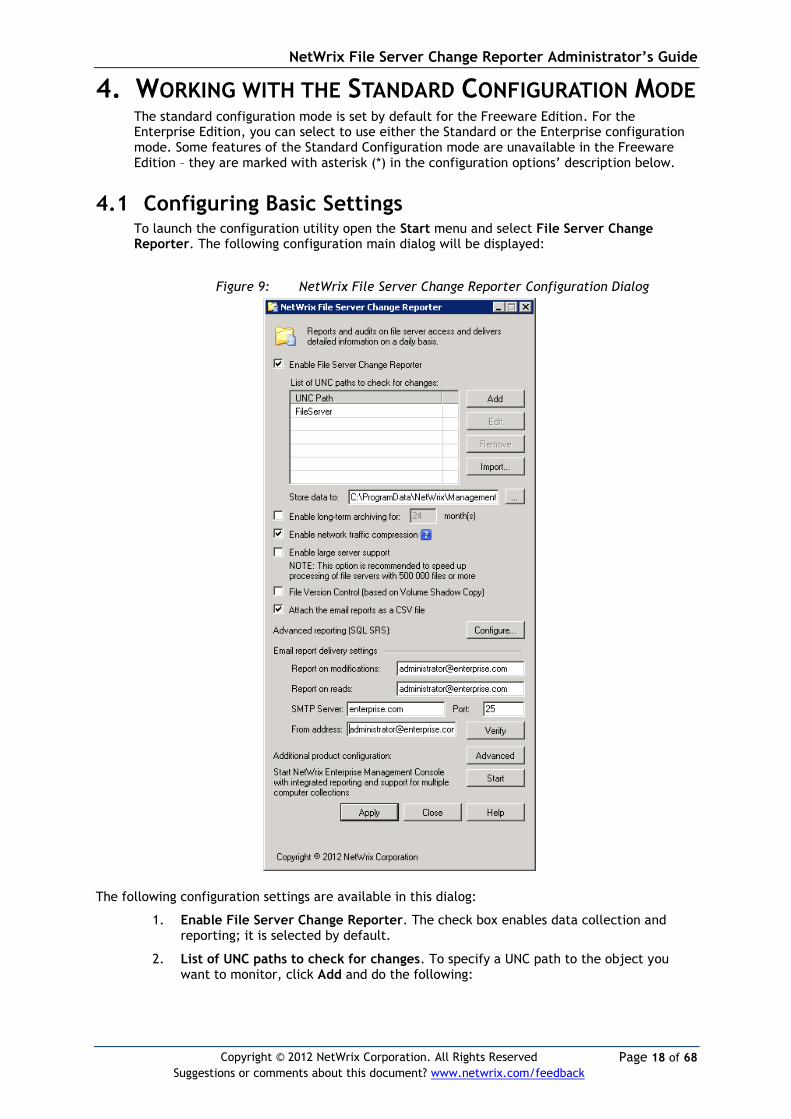
4. Right-click the newly created GPO in the left pane of the Group Policy Management form and select the Edit option. Group Policy Management Editor will open.
5. Expand the Computer Configuration node on the left and then go to Policies Windows Settings Security Settings Local Policies Audit Policy.
Figure 7: Group Policy Management Editor
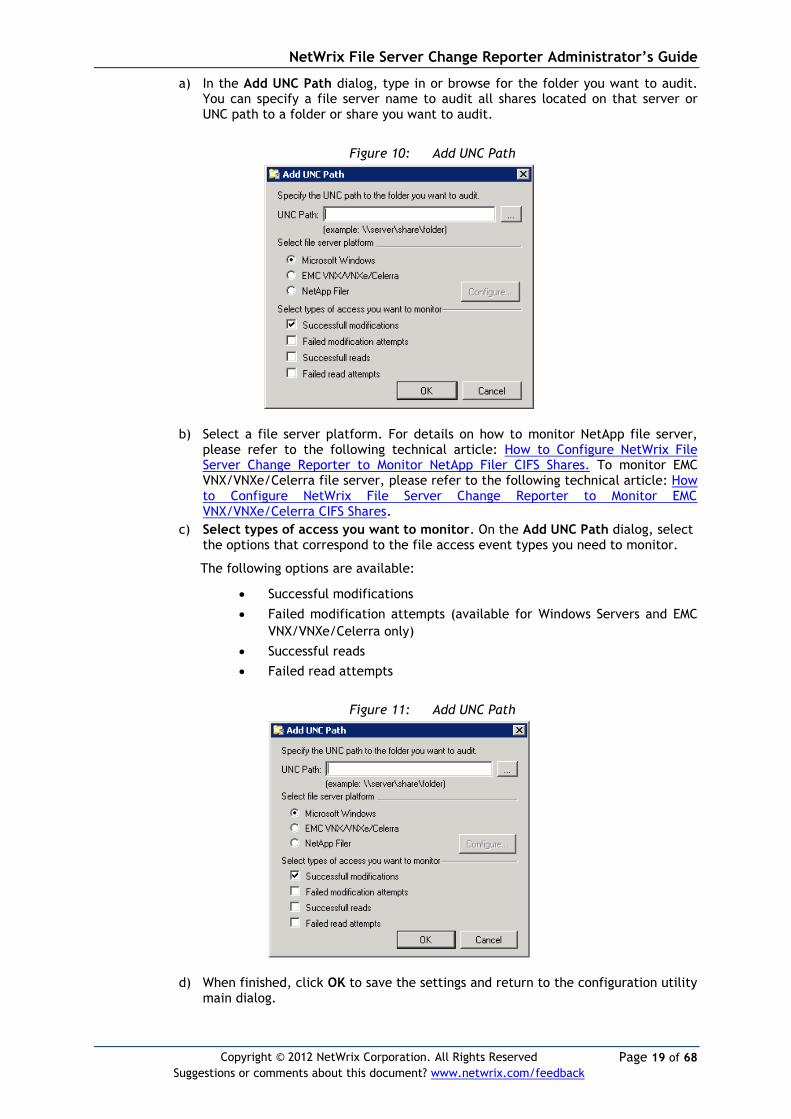
6. Double-click Audit object access on the right and select all check boxes in the Audit object access Properties dialog:
NetWrix File Server Change Reporter Administrator’s Guide
Page 17 of 68
Copyright © 2012 NetWrix Corporation. All Rights Reserved
Suggestions or comments about this document? www.netwrix.com/feedback
Figure 8: Audit Object Access Properties
7. Click OK to save the changes and close the form.
You can also refer to the Windows Server TechCenter article for additional information: Create a new Group Policy object: Group Policy. If you wish to use the local policy, you can find instructions in the following Windows Server TechCenter article: Define or modify auditing policy settings for an event category: Auditing.
For Microsoft Windows file servers running Windows Vista or later, you can configure the granular audit policy. Via the granular audit policy you can manage auditing at a detailed level, which helps you avoid saving unnecessary data to your audit logs.
For instructions on how to configure the granular audit policy for the servers running Windows Vista or later, refer to the following technical article: How to Configure Granular Audit Policy on a File Server Monitored by NetWrix File Server Change Reporter.
NetWrix File Server Change Reporter Administrator’s Guide
Page 18 of 68
Copyright © 2012 NetWrix Corporation. All Rights Reserved
Suggestions or comments about this document? www.netwrix.com/feedback
4. WORKING WITH THE STANDARD CONFIGURATION MODE The standard configuration mode is set by default for the Freeware Edition. For the Enterprise Edition, you can select to use either the Standard or the Enterprise configuration mode. Some features of the Standard Configuration mode are unavailable in the Freeware Edition – they are marked with asterisk (*) in the configuration options’ description below.
4.1 Configuring Basic Settings To launch the configuration utility open the Start menu and select File Server Change Reporter. The following configuration main dialog will be displayed:
Figure 9: NetWrix File Server Change Reporter Configuration Dialog
The following configuration settings are available in this dialog:
1. Enable File Server Change Reporter. The check box enables data collection and reporting; it is selected by default.
2. List of UNC paths to check for changes. To specify a UNC path to the object you want to monitor, click Add and do the following:
NetWrix File Server Change Reporter Administrator’s Guide
Page 19 of 68
Copyright © 2012 NetWrix Corporation. All Rights Reserved
Suggestions or comments about this document? www.netwrix.com/feedback
a) In the Add UNC Path dialog, type in or browse for the folder you want to audit. You can specify a file server name to audit all shares located on that server or UNC path to a folder or share you want to audit.
Figure 10: Add UNC Path
b) Select a file server platform. For details on how to monitor NetApp file server, please refer to the following technical article: How to Configure NetWrix File Server Change Reporter to Monitor NetApp Filer CIFS Shares. To monitor EMC VNX/VNXe/Celerra file server, please refer to the following technical article: How to Configure NetWrix File Server Change Reporter to Monitor EMC VNX/VNXe/Celerra CIFS Shares.
c) Select types of access you want to monitor. On the Add UNC Path dialog, select the options that correspond to the file access event types you need to monitor.
The following options are available:
Successful modifications
Failed modification attempts (available for Windows Servers and EMC
VNX/VNXe/Celerra only)
Successful reads
Failed read attempts
Figure 11: Add UNC Path
d) When finished, click OK to save the settings and return to the configuration utility main dialog.
NetWrix File Server Change Reporter Administrator’s Guide
Page 20 of 68
Copyright © 2012 NetWrix Corporation. All Rights Reserved
Suggestions or comments about this document? www.netwrix.com/feedback
3. Import UNC paths list*. Use the Import button to import a .txt file containing a list of UNC paths to the file servers, one entry per line.
4. Specify the data storage path. Populate the Store data to text box. All snapshots made by NetWrix products you are using will be stored in the corresponding subfolders of this folder. For example, snapshots made by NetWrix File Server Change Reporter will be stored in the FS Changes subfolder.
5. Enable long-term archiving*. By default, NetWrix File Server Change Reporter stores data collected for the last two days. Select the Enable long-term archiving for <n> months option if you need tracking for longer periods, and specify its value. It affects only the local repository and not the SQL database.
6. Enable network traffic compression. To increase data collection speed and effectiveness, check the Enable network traffic compression box. This option can only be applied to the monitored servers with a Windows operating system installed. For details on how the option works, please refer to Section 6.1 Network Traffic Compression of this document.
7. Enable large server support*. If you want to speed up processing of file servers with a large number of files (500 000 and more), it is highly recommended to select the Enable large server support option.
8. Enable File Version Control*. This option allows creating rollback points using the Volume Shadow Copy technology. This will enable you to roll back incorrect or unwanted modifications on your monitored file shares. You can access the native MS Windows Volume Shadow Copying feature by right-clicking your volume icon and opening the Properties dialog. On the Shadow Copies tab, a list of a maximum of 64 shadow copies is stored with the selection of back-up points. There is also a link to the corresponding help file with description of the feature’s benefits and usage scenarios. Please note, that this option results in creation of a great number of extra records in the security log. For details on how to restore files or folders, please refer to the following technical article: How to Perform File System Backup and Restore with NetWrix File Server Change Reporter.
9. Enable attachment of email reports as a CSV file. If this option is selected, reports will be attached to your emails. Otherwise, you will receive reports as a part of the emails body.
10. Enable advanced reporting based on SQL Server Reporting Services (SSRS) *. Click the Configure button next to this option. For details, refer to Section 4.3 Advanced Reporting of this guide.
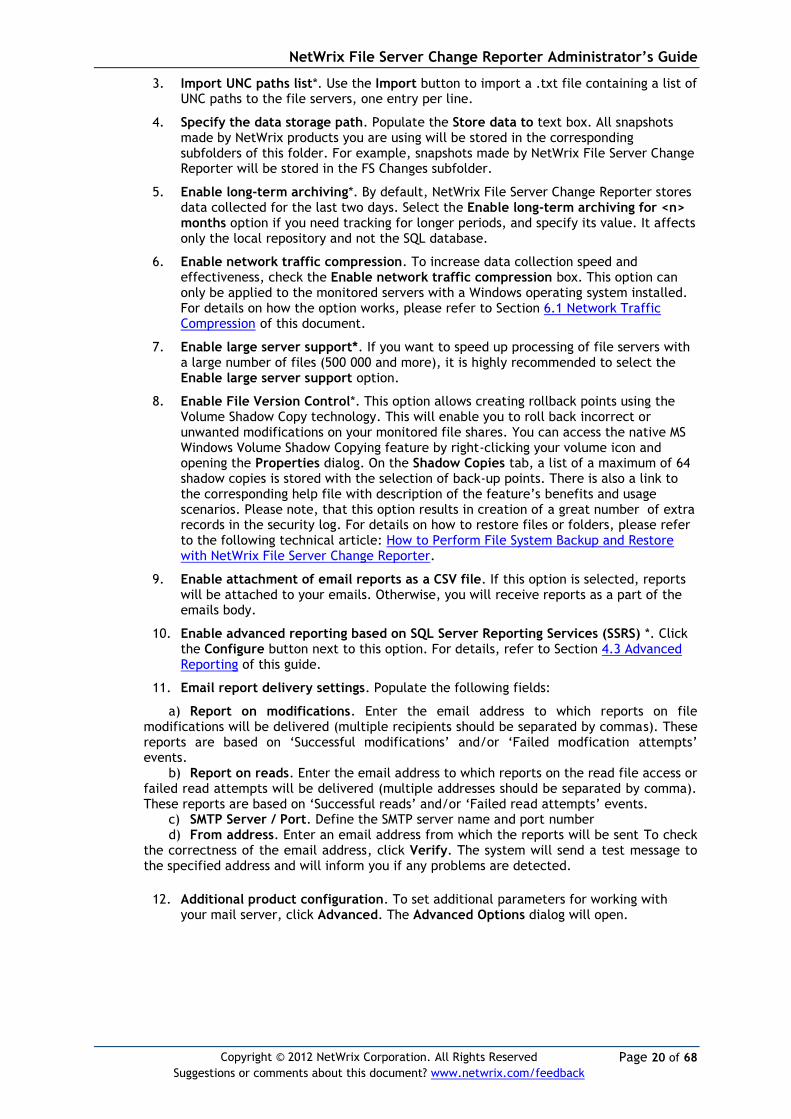
11. Email report delivery settings. Populate the following fields:
a) Report on modifications. Enter the email address to which reports on file modifications will be delivered (multiple recipients should be separated by commas). These reports are based on ‘Successful modifications’ and/or ‘Failed modfication attempts’ events.
b) Report on reads. Enter the email address to which reports on the read file access or failed read attempts will be delivered (multiple addresses should be separated by comma). These reports are based on ‘Successful reads’ and/or ‘Failed read attempts’ events.
c) SMTP Server / Port. Define the SMTP server name and port number d) From address. Enter an email address from which the reports will be sent To check
the correctness of the email address, click Verify. The system will send a test message to the specified address and will inform you if any problems are detected.
12. Additional product configuration. To set additional parameters for working with your mail server, click Advanced. The Advanced Options dialog will open.

NetWrix File Server Change Reporter Administrator’s Guide
Page 21 of 68
Copyright © 2012 NetWrix Corporation. All Rights Reserved
Suggestions or comments about this document? www.netwrix.com/feedback
Figure 12: Advanced Options
a) Report delivery schedule. By default, reports are generated and delivered at 3.00 AM every day. Click Change to modify the schedule. On the displayed dialog, click New.
Figure 13: NetWrix File Server Change Reporter dialog
To set additional schedule options, click Advanced. On the Advanced Schedule Options dialog, set parameters for the new task.
Figure 14: Advanced Schedule Options
b) Use SMTP authentication or SSL. Enable the options depending on your mail server configuration.

NetWrix File Server Change Reporter Administrator’s Guide
Page 22 of 68
Copyright © 2012 NetWrix Corporation. All Rights Reserved
Suggestions or comments about this document? www.netwrix.com/feedback
13. Start NetWrix Enterprise Management Console with integrated reports and support for multiple computer collections*. Click Start to launch the Console.
14. Click Apply to save your configuration.
On clicking Apply, you will be prompted to enter the credentials for data collection and report generation:
Figure 15: Scheduled Task Credentials
Specify the account under which the scheduled task (named NetWrix Management Console - File Server Change Reporter - <Your Managed Object name>) will collect your file server’s data and send emails with reports to the specified recipients. Make sure that the account you specify has the sufficient privileges. For details refer to Section 3.1.6 Required Rights and Permissions of this guide.
Note: The Freeware Edition only reports on the fact of a file system permission
change (the information about who made the change, what was changed and
when it was changed is not available in this Edition). If you have selected an
option which is unavailable in the Freeware Edition, you will be presented with
the following system message.
Figure 16: System message
4.2 Data Collection and Reporting This chapter explains how to manually launch a data collection task and generate reports using NetWrix File Server Change Reporter Standard Configuration mode.
4.2.1 Running Data Collection Task
By default, NetWrix File Server Change Reporter performs data collection at 3:00 AM daily, and generates reports on all selected access types that were detected. However, you can manually launch the task named NetWrix Management Console - File Server Change Reporter - <Your Managed Object name> using the Task Scheduler. Also, you can use the Task Scheduler to modify the task’s properties (for example, schedule, account, etc.) Each time the task is run, it collects file server snapshots together with audit data, and sends reports by email with data on the specified events (successful/failed read access, successful/failed modification attempts) to the corresponding recipients. The audit data is also saved to the
NetWrix File Server Change Reporter Administrator’s Guide
Page 23 of 68
Copyright © 2012 NetWrix Corporation. All Rights Reserved
Suggestions or comments about this document? www.netwrix.com/feedback
SQL Server database (if Advanced Reporting is configured) for further advanced reports generation.
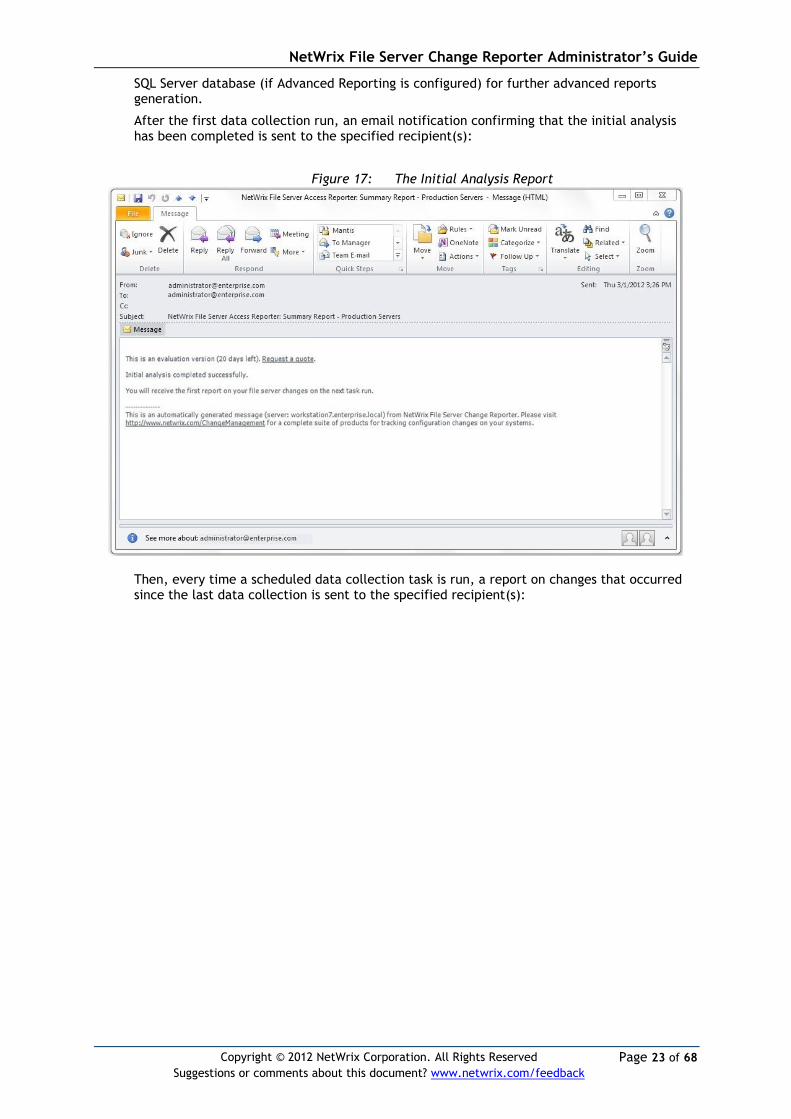
After the first data collection run, an email notification confirming that the initial analysis has been completed is sent to the specified recipient(s):
Figure 17: The Initial Analysis Report
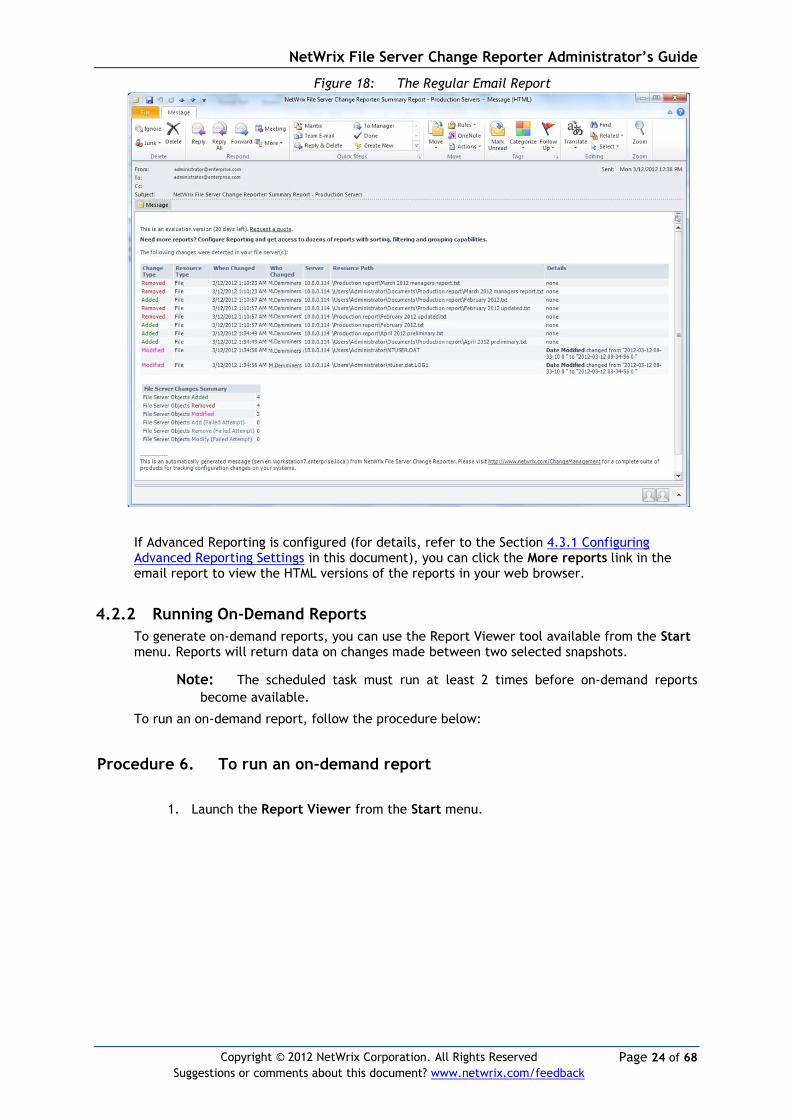
Then, every time a scheduled data collection task is run, a report on changes that occurred since the last data collection is sent to the specified recipient(s):
NetWrix File Server Change Reporter Administrator’s Guide
Page 24 of 68
Copyright © 2012 NetWrix Corporation. All Rights Reserved
Suggestions or comments about this document? www.netwrix.com/feedback
Figure 18: The Regular Email Report
If Advanced Reporting is configured (for details, refer to the Section 4.3.1 Configuring Advanced Reporting Settings in this document), you can click the More reports link in the email report to view the HTML versions of the reports in your web browser.
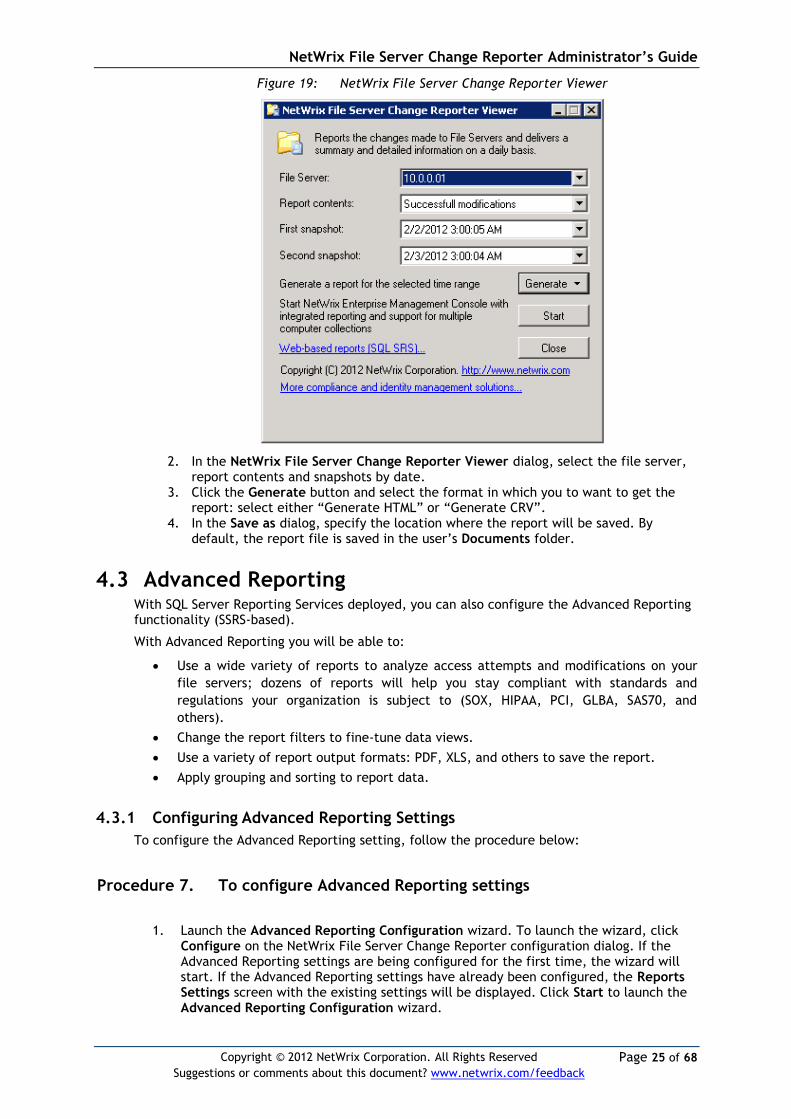
4.2.2 Running On-Demand Reports
To generate on-demand reports, you can use the Report Viewer tool available from the Start menu. Reports will return data on changes made between two selected snapshots.
Note: The scheduled task must run at least 2 times before on-demand reports
become available.
To run an on-demand report, follow the procedure below:
Procedure 6. To run an on-demand report
1. Launch the Report Viewer from the Start menu.
NetWrix File Server Change Reporter Administrator’s Guide
Page 25 of 68
Copyright © 2012 NetWrix Corporation. All Rights Reserved
Suggestions or comments about this document? www.netwrix.com/feedback
Figure 19: NetWrix File Server Change Reporter Viewer
2. In the NetWrix File Server Change Reporter Viewer dialog, select the file server, report contents and snapshots by date.
3. Click the Generate button and select the format in which you to want to get the report: select either “Generate HTML” or “Generate CRV”.
4. In the Save as dialog, specify the location where the report will be saved. By default, the report file is saved in the user’s Documents folder.
4.3 Advanced Reporting With SQL Server Reporting Services deployed, you can also configure the Advanced Reporting functionality (SSRS-based).
With Advanced Reporting you will be able to:
Use a wide variety of reports to analyze access attempts and modifications on your
file servers; dozens of reports will help you stay compliant with standards and
regulations your organization is subject to (SOX, HIPAA, PCI, GLBA, SAS70, and
others).
Change the report filters to fine-tune data views.
Use a variety of report output formats: PDF, XLS, and others to save the report.
Apply grouping and sorting to report data.
4.3.1 Configuring Advanced Reporting Settings
To configure the Advanced Reporting setting, follow the procedure below:
Procedure 7. To configure Advanced Reporting settings
1. Launch the Advanced Reporting Configuration wizard. To launch the wizard, click Configure on the NetWrix File Server Change Reporter configuration dialog. If the Advanced Reporting settings are being configured for the first time, the wizard will start. If the Advanced Reporting settings have already been configured, the Reports Settings screen with the existing settings will be displayed. Click Start to launch the Advanced Reporting Configuration wizard.
NetWrix File Server Change Reporter Administrator’s Guide
Page 26 of 68
Copyright © 2012 NetWrix Corporation. All Rights Reserved
Suggestions or comments about this document? www.netwrix.com/feedback
2. On the first step of the wizard, select whether you want to proceed with the automatic installation and configuration of SQL Server 2005 Express Edition with Advanced Services, or use an existing SQL Server instance.
Note: If you use an existing SQL Server instance, make sure that the Reporting Services feature is installed and configured for this server. For instructions on the manual installation of SQL Server with Reporting Services required for NetWrix File Server Change Reporter, please refer to the following technical article: Installing Microsoft SQL Server and Configuring the Reporting Services. For full installation and configuration details, please refer to documentation provided by Microsoft.
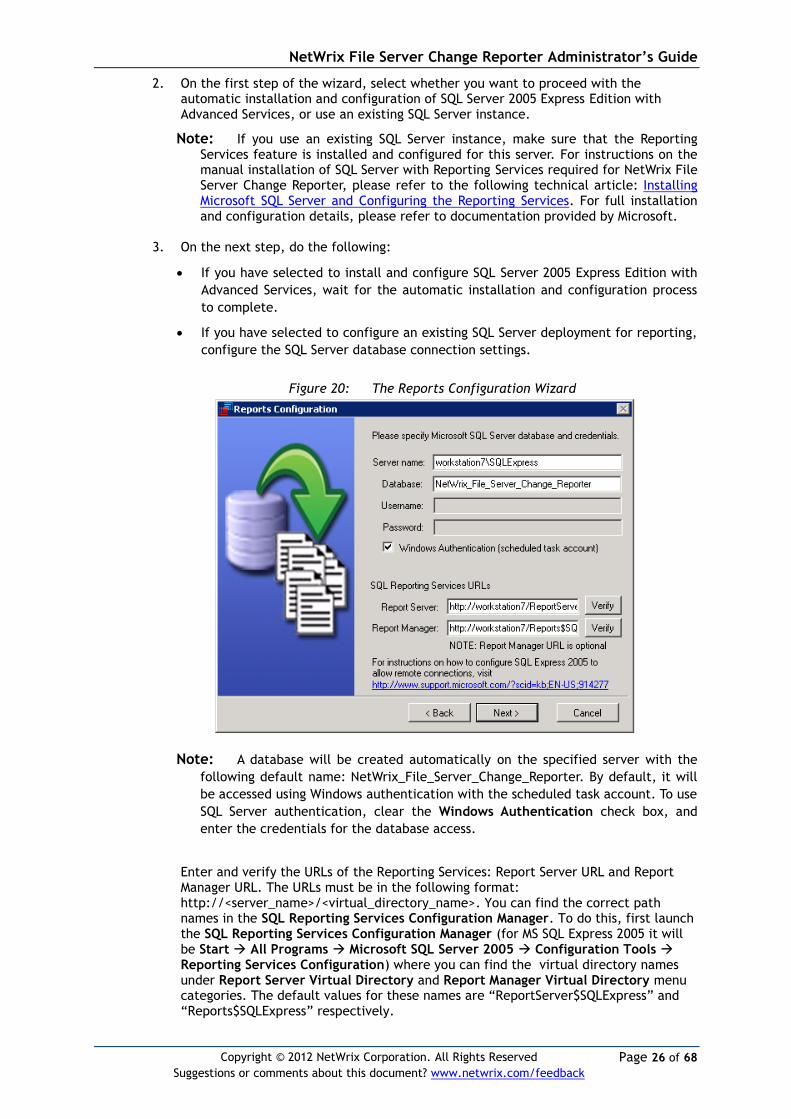
3. On the next step, do the following:
If you have selected to install and configure SQL Server 2005 Express Edition with
Advanced Services, wait for the automatic installation and configuration process
to complete.
If you have selected to configure an existing SQL Server deployment for reporting,
configure the SQL Server database connection settings.
Figure 20: The Reports Configuration Wizard
Note: A database will be created automatically on the specified server with the
following default name: NetWrix_File_Server_Change_Reporter. By default, it will
be accessed using Windows authentication with the scheduled task account. To use
SQL Server authentication, clear the Windows Authentication check box, and
enter the credentials for the database access.
Enter and verify the URLs of the Reporting Services: Report Server URL and Report Manager URL. The URLs must be in the following format: http://<server_name>/<virtual_directory_name>. You can find the correct path names in the SQL Reporting Services Configuration Manager. To do this, first launch the SQL Reporting Services Configuration Manager (for MS SQL Express 2005 it will be Start All Programs Microsoft SQL Server 2005 Configuration Tools Reporting Services Configuration) where you can find the virtual directory names under Report Server Virtual Directory and Report Manager Virtual Directory menu categories. The default values for these names are “ReportServer$SQLExpress” and “Reports$SQLExpress” respectively.

NetWrix File Server Change Reporter Administrator’s Guide
Page 27 of 68
Copyright © 2012 NetWrix Corporation. All Rights Reserved
Suggestions or comments about this document? www.netwrix.com/feedback
4. Click Next to save your configuration.
5. On the final screen, review your settings and click Finish. Make sure the account under which you plan to view reports has sufficient rights for the Home folder.
Figure 21: The Advanced Report Example
To change the Advanced Reporting settings, launch the Advanced Reporting Configuration Wizard via the Configure button in the configuration utility main window.
NetWrix File Server Change Reporter Administrator’s Guide
Page 28 of 68
Copyright © 2012 NetWrix Corporation. All Rights Reserved
Suggestions or comments about this document? www.netwrix.com/feedback
5 WORKING WITH THE ENTERPRISE CONFIGURATION
MODE The full-featured Enterprise configuration mode is available in the product Enterprise Edition. Operations with NetWrix File Server Change Reporter are performed via NetWrix Management Console (implemented as an MMC snap-in) which enables flexible configuration and management capabilities. With NetWrix Management Console, you can:
Handle numerous Managed Objects (domains, OUs, multiple server collections) with a
single installation;
Manage all NetWrix products configuration and settings via an integrated interface;
Enable management features for the selected objects in bulk, for example, specify
report generation frequency;
Use Advanced Reporting with lots of predefined out-of-the-box reports.
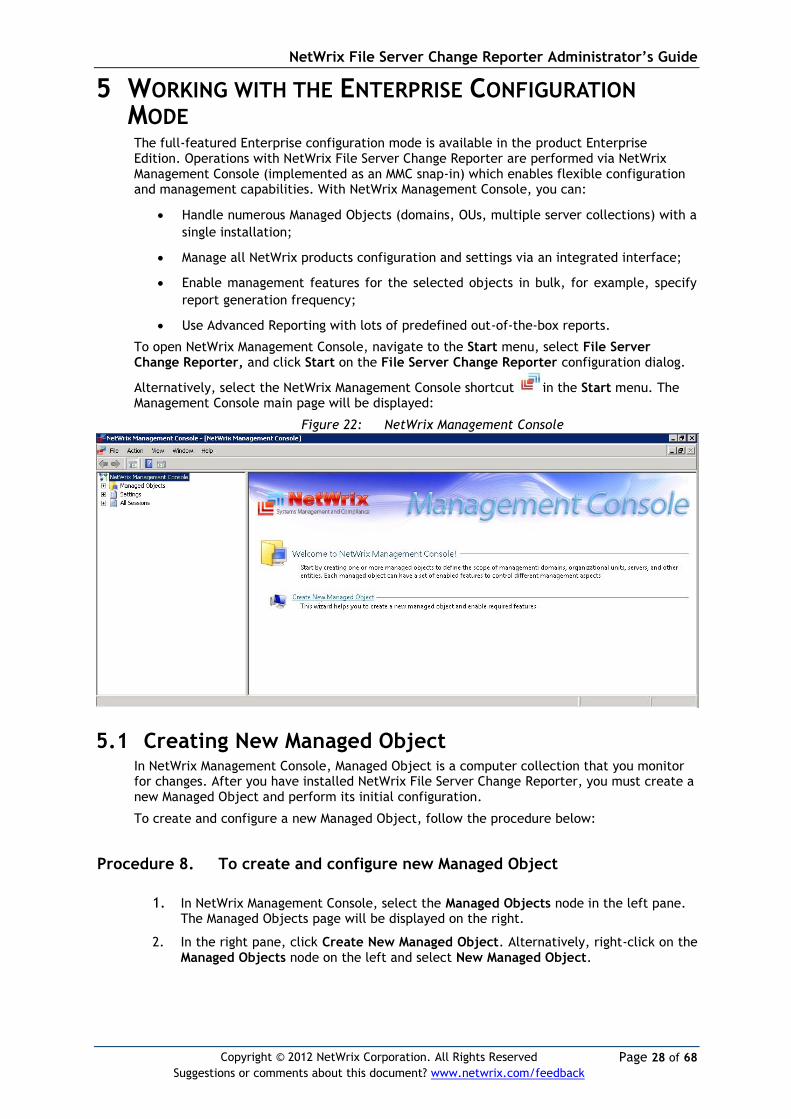
To open NetWrix Management Console, navigate to the Start menu, select File Server Change Reporter, and click Start on the File Server Change Reporter configuration dialog.
Alternatively, select the NetWrix Management Console shortcut in the Start menu. The Management Console main page will be displayed:
Figure 22: NetWrix Management Console
5.1 Creating New Managed Object In NetWrix Management Console, Managed Object is a computer collection that you monitor for changes. After you have installed NetWrix File Server Change Reporter, you must create a new Managed Object and perform its initial configuration.
To create and configure a new Managed Object, follow the procedure below:
Procedure 8. To create and configure new Managed Object
1. In NetWrix Management Console, select the Managed Objects node in the left pane. The Managed Objects page will be displayed on the right.
2. In the right pane, click Create New Managed Object. Alternatively, right-click on the Managed Objects node on the left and select New Managed Object.

NetWrix File Server Change Reporter Administrator’s Guide
Page 29 of 68
Copyright © 2012 NetWrix Corporation. All Rights Reserved
Suggestions or comments about this document? www.netwrix.com/feedback
Figure 23: The New Managed Object Creation Option
Note: For your convenience, you can group Managed Objects into folders. To do
this, right-click on the Managed Objects node, select New Folder, specify folder
name, and then create new Managed Object inside this folder. You cannot move
existing Managed Objects into the folders once they have been created.
3. The New Managed Object wizard will open. On the Select Managed Object Type screen, select Computer Collection as a new Managed Object type and click Next.
Figure 24: New Managed Object Wizard
4. On the Default Data Processing Account screen, click the Specify Account button to set a default account (<domain name>\<account name>). This account will be used by NetWrix File Server Change Reporter for data collection and reports generation.

NetWrix File Server Change Reporter Administrator’s Guide
Page 30 of 68
Copyright © 2012 NetWrix Corporation. All Rights Reserved
Suggestions or comments about this document? www.netwrix.com/feedback
Figure 25: The Default Data Processing Account screen
When selecting the account, remember that it must be granted the necessary access rights (see the Section 3.1.6 Required Rights and Permissions in this document).
You can change the default data processing account later if needed. To change the account for all Managed Objects in bulk, select Schedule under the Settings node in the Management Console tree. On the Report Delivery Schedule page, click Change to open the Default Data Processing Account dialog and edit the account’s credentials:
Figure 26: The Default Data Processing Account dialog
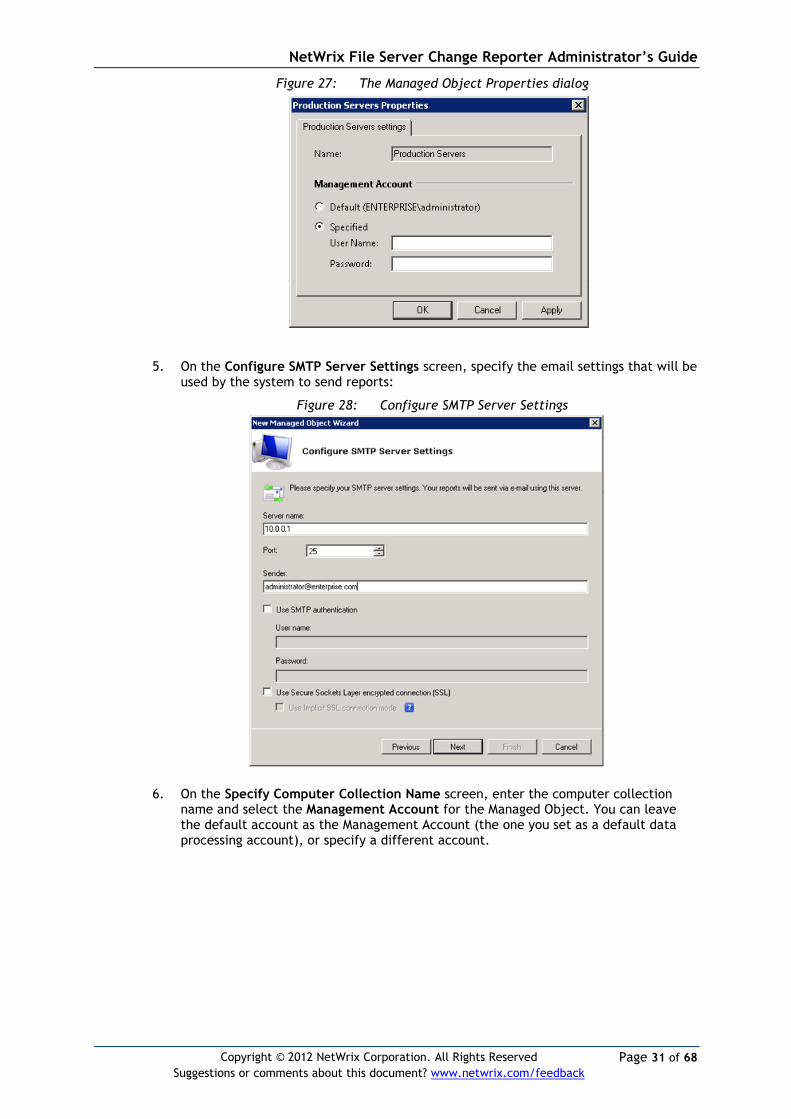
To change the default data processing account for each Managed Object individually, select the required Managed Object in the Management Console tree, right-click it and select Properties. On the Managed Object Properties dialog, enter new credentials:
NetWrix File Server Change Reporter Administrator’s Guide
Page 31 of 68
Copyright © 2012 NetWrix Corporation. All Rights Reserved
Suggestions or comments about this document? www.netwrix.com/feedback
Figure 27: The Managed Object Properties dialog
5. On the Configure SMTP Server Settings screen, specify the email settings that will be used by the system to send reports:
Figure 28: Configure SMTP Server Settings
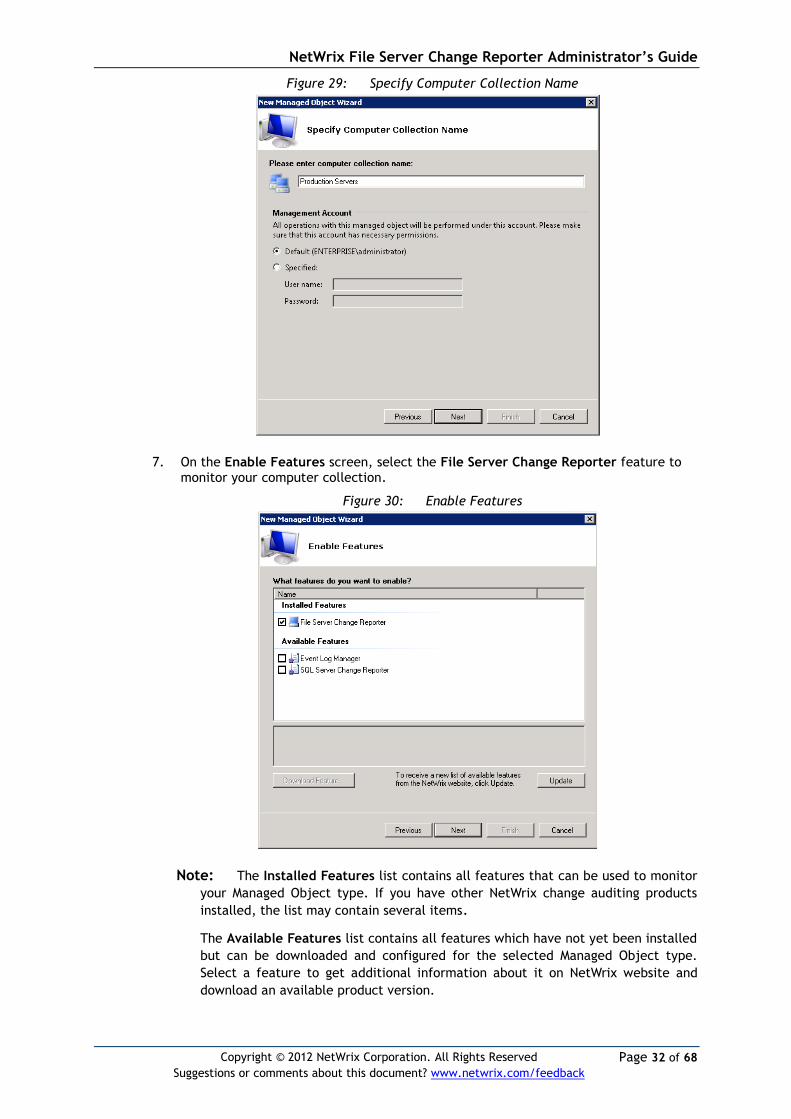
6. On the Specify Computer Collection Name screen, enter the computer collection name and select the Management Account for the Managed Object. You can leave the default account as the Management Account (the one you set as a default data processing account), or specify a different account.
NetWrix File Server Change Reporter Administrator’s Guide
Page 32 of 68
Copyright © 2012 NetWrix Corporation. All Rights Reserved
Suggestions or comments about this document? www.netwrix.com/feedback
Figure 29: Specify Computer Collection Name
7. On the Enable Features screen, select the File Server Change Reporter feature to monitor your computer collection.
Figure 30: Enable Features
Note: The Installed Features list contains all features that can be used to monitor
your Managed Object type. If you have other NetWrix change auditing products
installed, the list may contain several items.
The Available Features list contains all features which have not yet been installed
but can be downloaded and configured for the selected Managed Object type.
Select a feature to get additional information about it on NetWrix website and
download an available product version.
NetWrix File Server Change Reporter Administrator’s Guide
Page 33 of 68
Copyright © 2012 NetWrix Corporation. All Rights Reserved
Suggestions or comments about this document? www.netwrix.com/feedback
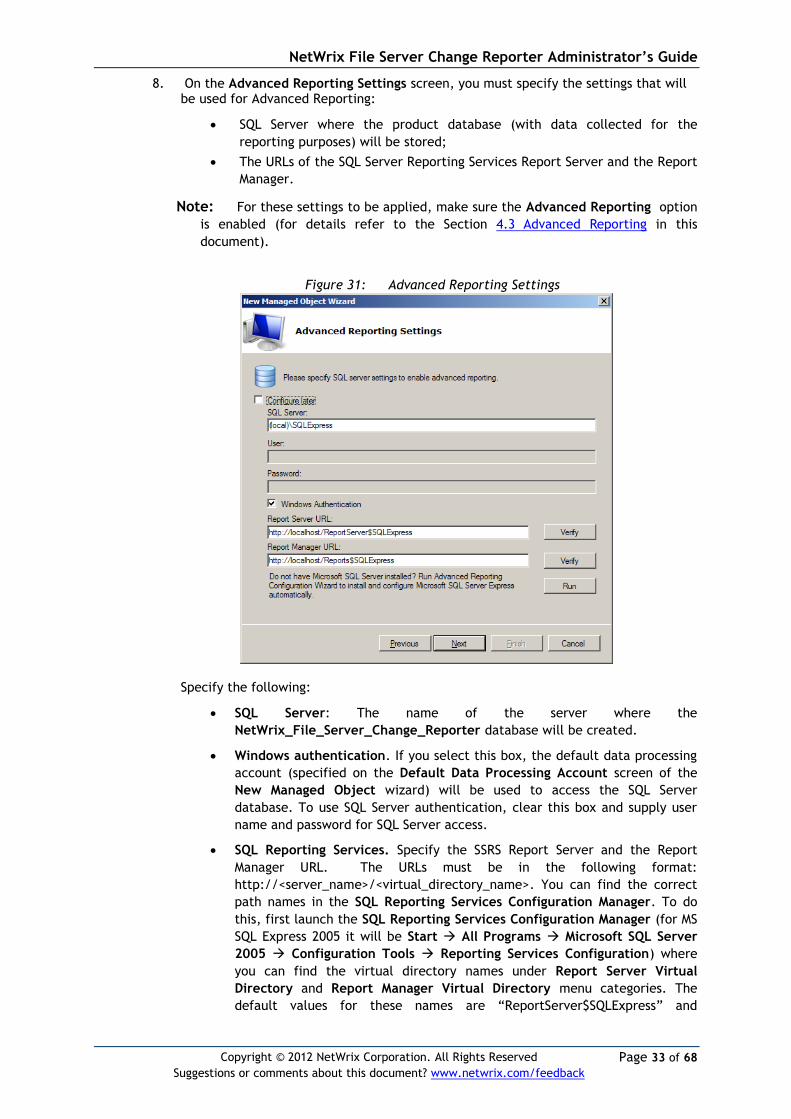
8. On the Advanced Reporting Settings screen, you must specify the settings that will be used for Advanced Reporting:
SQL Server where the product database (with data collected for the
reporting purposes) will be stored;
The URLs of the SQL Server Reporting Services Report Server and the Report
Manager.
Note: For these settings to be applied, make sure the Advanced Reporting option
is enabled (for details refer to the Section 4.3 Advanced Reporting in this
document).
Figure 31: Advanced Reporting Settings
Specify the following:
SQL Server: The name of the server where the
NetWrix_File_Server_Change_Reporter database will be created.
Windows authentication. If you select this box, the default data processing
account (specified on the Default Data Processing Account screen of the
New Managed Object wizard) will be used to access the SQL Server
database. To use SQL Server authentication, clear this box and supply user
name and password for SQL Server access.
SQL Reporting Services. Specify the SSRS Report Server and the Report
Manager URL. The URLs must be in the following format:
http://<server_name>/<virtual_directory_name>. You can find the correct
path names in the SQL Reporting Services Configuration Manager. To do
this, first launch the SQL Reporting Services Configuration Manager (for MS
SQL Express 2005 it will be Start All Programs Microsoft SQL Server
2005 Configuration Tools Reporting Services Configuration) where
you can find the virtual directory names under Report Server Virtual
Directory and Report Manager Virtual Directory menu categories. The
default values for these names are “ReportServer$SQLExpress” and
NetWrix File Server Change Reporter Administrator’s Guide
Page 34 of 68
Copyright © 2012 NetWrix Corporation. All Rights Reserved
Suggestions or comments about this document? www.netwrix.com/feedback
“Reports$SQLExpress” respectively. To check correctness of your entered
values, click Verify.
Advanced Reporting Configuration Wizard. If you wish to install a SQL
Server, click Run to launch the Reports Configuration wizard which allows
you to install and automatically configure the SQL Server 2005 Express
Edition with Advanced Services.
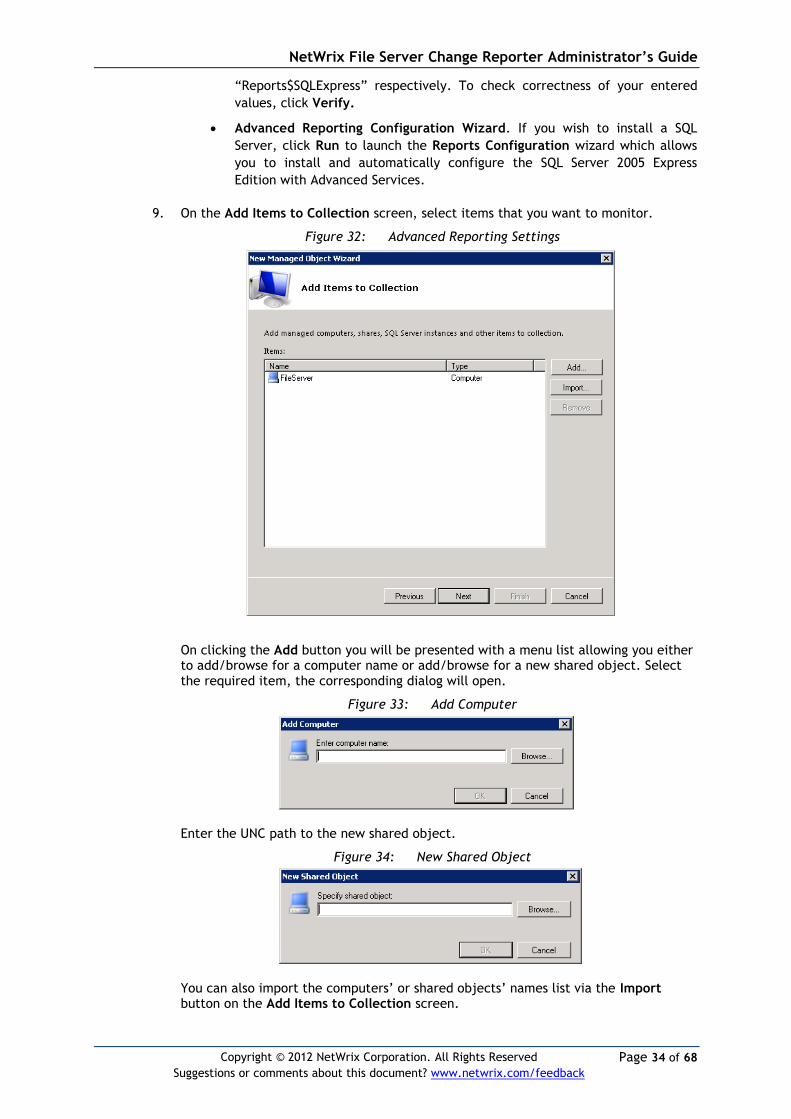
9. On the Add Items to Collection screen, select items that you want to monitor.
Figure 32: Advanced Reporting Settings
On clicking the Add button you will be presented with a menu list allowing you either to add/browse for a computer name or add/browse for a new shared object. Select the required item, the corresponding dialog will open.
Figure 33: Add Computer
Enter the UNC path to the new shared object.
Figure 34: New Shared Object
You can also import the computers’ or shared objects’ names list via the Import button on the Add Items to Collection screen.

NetWrix File Server Change Reporter Administrator’s Guide
Page 35 of 68
Copyright © 2012 NetWrix Corporation. All Rights Reserved
Suggestions or comments about this document? www.netwrix.com/feedback
NetWrix File Server Change Reporter supports audit of DFS and clustered file servers. For details on how to configure these options, refer to the following Knowledge Base articles: Does NetWrix File Server Change Reporter support DFS? and How to configure the File Server Change Reporter to audit a clustered file server?
Note: The Enterprise Configuration mode of the Enterprise Edition supports adding
of Windows file shares only. NetApp filer and EMC VNX/VNXe/Celerra are only
configurable and available in the NetWrix File Server Change Reporter Standard
configuration mode of the Enterprise Edition.
10. On the Configure File Server Change Reporter Settings screen, specify the reports recipients and configure the advanced settings if required.
Figure 35: Configure File Server Change Reporter Settings
The Enable File Server Change Reporting box is selected by default; this makes the product start monitoring your Managed Object as soon as the current configuration via the wizard is completed. You can also clear this box. In this case you will have to enable this feature manually later on the File Server Change Reporter general settings page.
Enter email addresses of reports recipients. There are two types of reports: file and folder changes (successful and failed attempts) and file and folder read access (successful and failed attempts). You can have both sent to the same email. The report recipients grids are enabled depending on the types of events you have selected for monitoring: successful modifications, successful reads, failed modification attempts, failed read attempts.
Clicking the Advanced button will open the Advanced Settings form with additional options which you can apply to the monitored Managed Object.

NetWrix File Server Change Reporter Administrator’s Guide
Page 36 of 68
Copyright © 2012 NetWrix Corporation. All Rights Reserved
Suggestions or comments about this document? www.netwrix.com/feedback
Figure 36: Advanced Settings
The following settings are available:
Network Traffic Compression
Large Servers Support
Using File Versioning and Rollback Capabilities
Attach the email reports as a CSV file
11. On the Completing the New Managed Object Wizard screen, check the details and click Finish.
Figure 37: Completing the New Managed Object Wizard
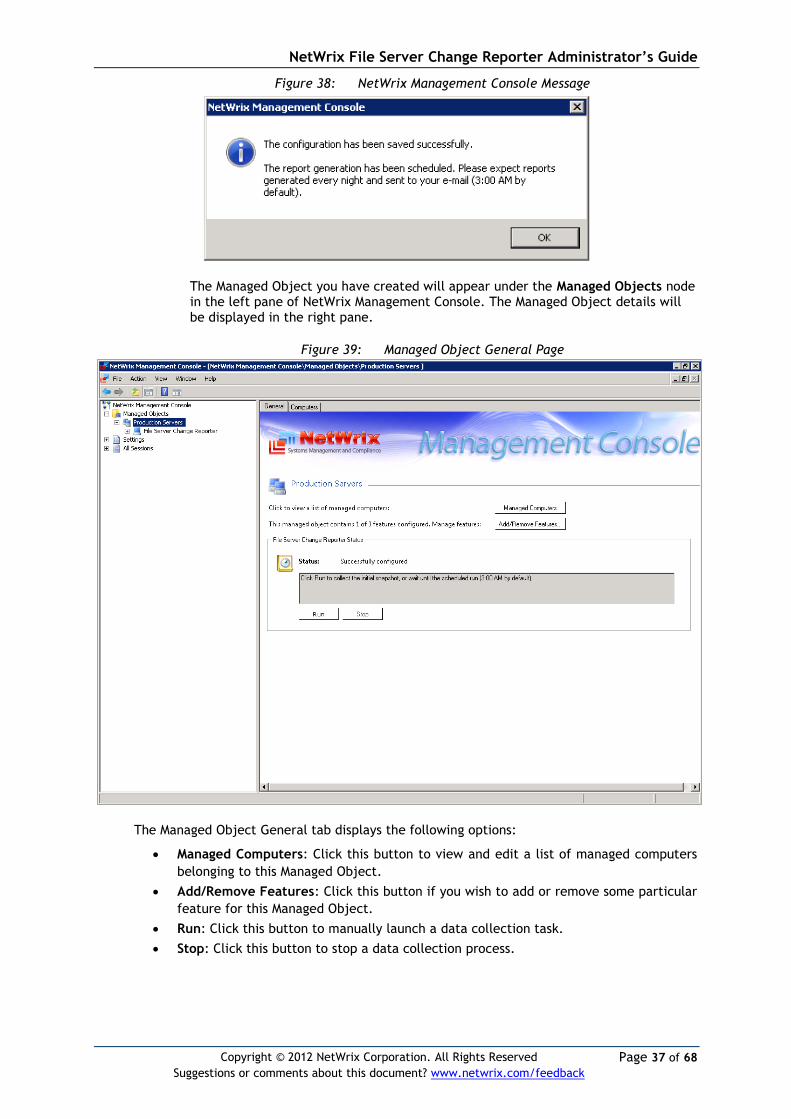
As a result, you will be presented with the message informing about successful configuration completion.
NetWrix File Server Change Reporter Administrator’s Guide
Page 37 of 68
Copyright © 2012 NetWrix Corporation. All Rights Reserved
Suggestions or comments about this document? www.netwrix.com/feedback
Figure 38: NetWrix Management Console Message
The Managed Object you have created will appear under the Managed Objects node in the left pane of NetWrix Management Console. The Managed Object details will be displayed in the right pane.
Figure 39: Managed Object General Page
The Managed Object General tab displays the following options:
Managed Computers: Click this button to view and edit a list of managed computers
belonging to this Managed Object.
Add/Remove Features: Click this button if you wish to add or remove some particular
feature for this Managed Object.
Run: Click this button to manually launch a data collection task.
Stop: Click this button to stop a data collection process.

NetWrix File Server Change Reporter Administrator’s Guide
Page 38 of 68
Copyright © 2012 NetWrix Corporation. All Rights Reserved
Suggestions or comments about this document? www.netwrix.com/feedback
5.2 Modifying Managed Object Settings This section explains how to change the settings of an existing Managed Object (computer collection).
5.2.1 Editing Managed Computers List
To edit the list of computers added to a selected Managed Object:
Procedure 9. To edit managed computers list
1. In the left pane of NetWrix Management Console, expand the Managed Objects node and select the required Managed Object. Its details will be displayed in the right pane. Select the Computers tab or click the Managed Computers button. The list of computer collection items currently added to the Managed Object will be shown on the Computers page.
Figure 40: Computer Collection Page
2. Use the following buttons to edit the list:
Add: Click this button to add a new computer to the collection.
Import: Click this button to import computer names from a file (a *.txt file with one
entry per line).
Remove: Use this button to delete a computer from the list.
5.2.2 Modifying Feature Settings
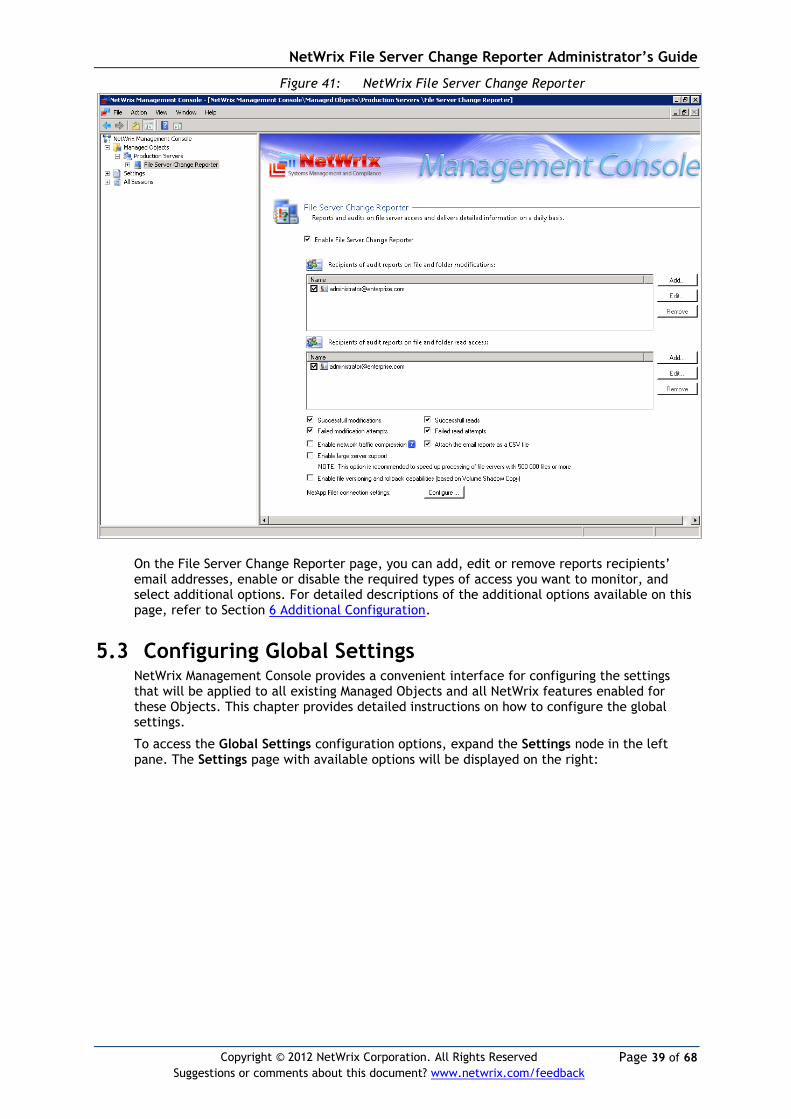
In the left pane of NetWrix Management Console, expand the Managed Objects node, expand the required Managed Object’s node and select File Server Change Reporter. The page with general feature settings will be displayed on the right:
NetWrix File Server Change Reporter Administrator’s Guide
Page 39 of 68
Copyright © 2012 NetWrix Corporation. All Rights Reserved
Suggestions or comments about this document? www.netwrix.com/feedback
Figure 41: NetWrix File Server Change Reporter
On the File Server Change Reporter page, you can add, edit or remove reports recipients’ email addresses, enable or disable the required types of access you want to monitor, and select additional options. For detailed descriptions of the additional options available on this page, refer to Section 6 Additional Configuration.
5.3 Configuring Global Settings NetWrix Management Console provides a convenient interface for configuring the settings that will be applied to all existing Managed Objects and all NetWrix features enabled for these Objects. This chapter provides detailed instructions on how to configure the global settings.
To access the Global Settings configuration options, expand the Settings node in the left pane. The Settings page with available options will be displayed on the right:
NetWrix File Server Change Reporter Administrator’s Guide
Page 40 of 68
Copyright © 2012 NetWrix Corporation. All Rights Reserved
Suggestions or comments about this document? www.netwrix.com/feedback
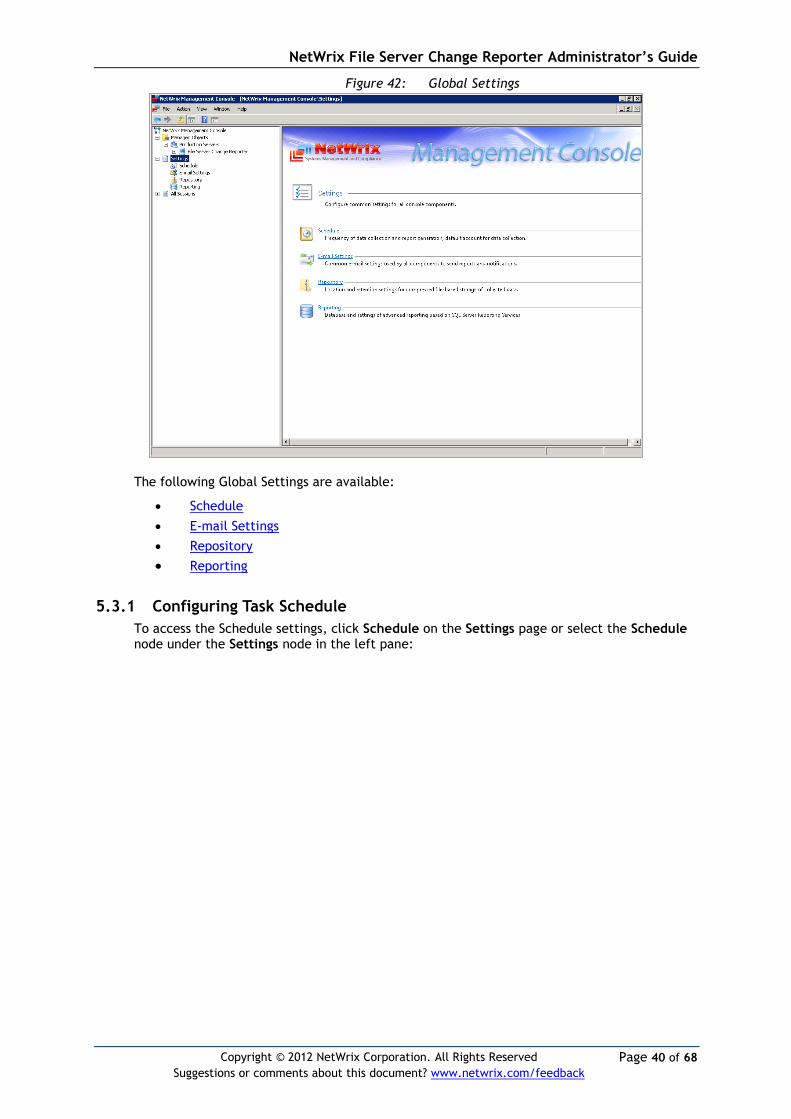
Figure 42: Global Settings
The following Global Settings are available:
Schedule
E-mail Settings
Repository
Reporting
5.3.1 Configuring Task Schedule
To access the Schedule settings, click Schedule on the Settings page or select the Schedule node under the Settings node in the left pane:

NetWrix File Server Change Reporter Administrator’s Guide
Page 41 of 68
Copyright © 2012 NetWrix Corporation. All Rights Reserved
Suggestions or comments about this document? www.netwrix.com/feedback
Figure 43: Schedule Settings
By default, data collection and report delivery is scheduled to run daily at 3:00 am.
To add a new schedule task click Change. If you want the task to run from a specific account, modify the Default Processing Account by clicking the corresponding Change button.
5.3.2 Configuring E-mail Settings
To access the SMTP settings, click E-mail Settings on the Settings page or select the E-mail Settings node under the Settings node in the left pane.
Figure 44: E-mail Settings
Click Configure to open the Configure SMTP Settings dialog:

NetWrix File Server Change Reporter Administrator’s Guide
Page 42 of 68
Copyright © 2012 NetWrix Corporation. All Rights Reserved
Suggestions or comments about this document? www.netwrix.com/feedback
Figure 45: Configure SMTP Settings
Populate the fields with the relevant data. If your SMTP server needs authentication, check Use SMTP authentication and enter the required user name and password. If your SMTP server needs an SSL-encrypted connection, select the corresponding option.
5.3.3 Configuring Repository Settings
Data collected by the product is saved locally in Audit Archive, a file-based storage, for the archiving purpose in accordance with the retention period you specify. To access the Repository settings, click Repository on the Settings page or select the Repository node under the Settings node in the left pane.
Figure 46: Repository Settings
Specify the path to the repository (default is <%All users\Application
Data%>\NetWrix\Management Console\Data).
To change data retention settings, select Enable long-term archiving for <n>
months, and specify the required value (default is 24 months).
NetWrix File Server Change Reporter Administrator’s Guide
Page 43 of 68
Copyright © 2012 NetWrix Corporation. All Rights Reserved
Suggestions or comments about this document? www.netwrix.com/feedback
You can also use the Session retention field to specify the period when the data is available for review (default is 60 days).
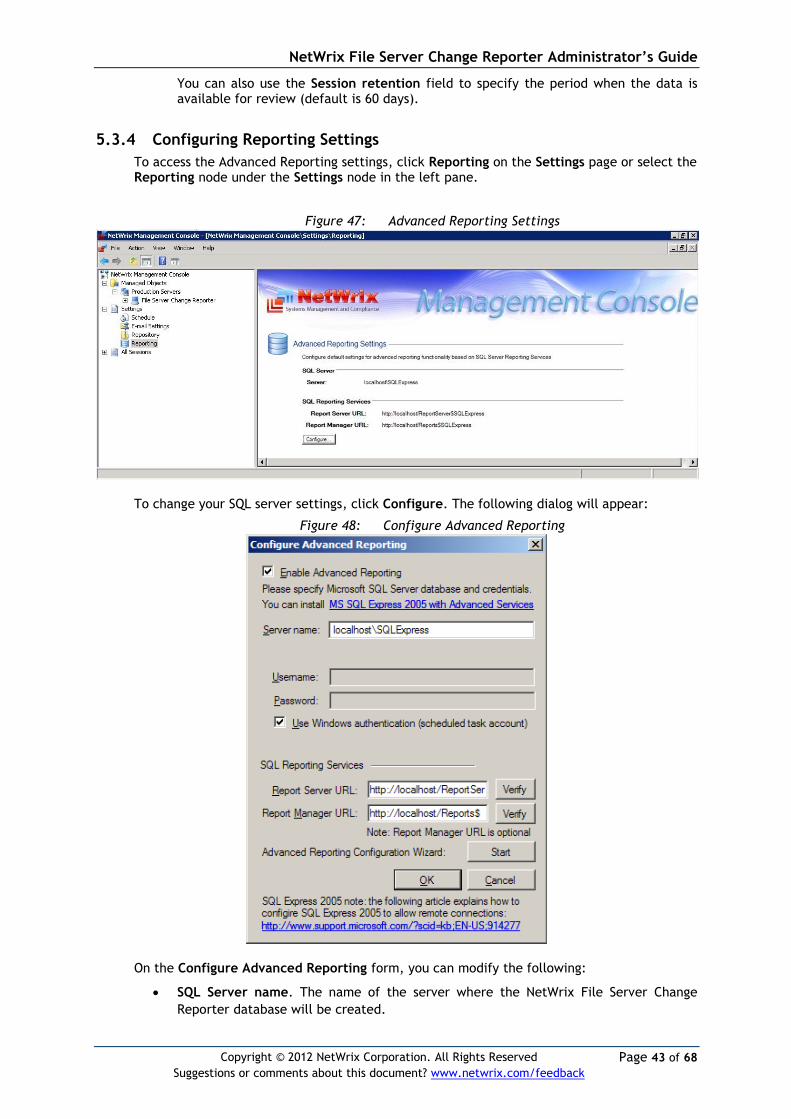
5.3.4 Configuring Reporting Settings
To access the Advanced Reporting settings, click Reporting on the Settings page or select the Reporting node under the Settings node in the left pane.
Figure 47: Advanced Reporting Settings
To change your SQL server settings, click Configure. The following dialog will appear:
Figure 48: Configure Advanced Reporting
On the Configure Advanced Reporting form, you can modify the following:
SQL Server name. The name of the server where the NetWrix File Server Change
Reporter database will be created.

NetWrix File Server Change Reporter Administrator’s Guide
Page 44 of 68
Copyright © 2012 NetWrix Corporation. All Rights Reserved
Suggestions or comments about this document? www.netwrix.com/feedback
Use Windows authentication. If you select this box, the default data processing
account (specified on the Default Data Processing Account screen of the New
Managed Object wizard) will be used to access the SQL Server database. To use SQL
Server authentication, clear this box and supply user name and password for the SQL
Server access.
SQL Reporting Services. Specify the SSRS Report Server and the Report Manager URL.
The URLs must be in the following format:
http://<server_name>/<virtual_directory_name>. You can find the correct path
correct folder names in the SQL Reporting Services Configuration Manager. To do this,
first launch the SQL Reporting Services Configuration Manager (for MS SQL Express
2005 it will be Start All Programs Microsoft SQL Server 2005 Configuration
Tools Reporting Services Configuration) where you can find the virtual directory
names under Report Server Virtual Directory and Report Manager Virtual Directory
menu categories. The default values for these names are “ReportServer$SQLExpress”
and “Reports$SQLExpress” respectively. To check correctness of your entered values,
click Verify.
Advanced Reporting Configuration wizard. If you wish to install a SQL Server, click
Start to launch the Reports Configuration wizard which allows you to install and
automatically configure SQL Server 2005 Express Edition with Advanced Services.
5.4 Data Collection and Reporting This chapter provides instructions on how to perform data collection and generate reports using NetWrix Management Console.
5.4.1 Running Data Collection Task
By default, NetWrix File Server Change Reporter runs data collection (scans the monitored servers for changes) at 3:00 AM every day, and generates reports on all changes that were detected.
To manually start a data collection task, expand the Managed Objects node in NetWrix Management Console, select your Managed Object and click Run on the Managed Object General tab in the right pane:

NetWrix File Server Change Reporter Administrator’s Guide
Page 45 of 68
Copyright © 2012 NetWrix Corporation. All Rights Reserved
Suggestions or comments about this document? www.netwrix.com/feedback
Figure 49: Managed Object General Settings
Then file server audit data will be collected and reports will be sent by email to the specified recipients. The task session information can be examined using NetWrix Management Console, as described in Section 5.4.2 Viewing Task Session Results.
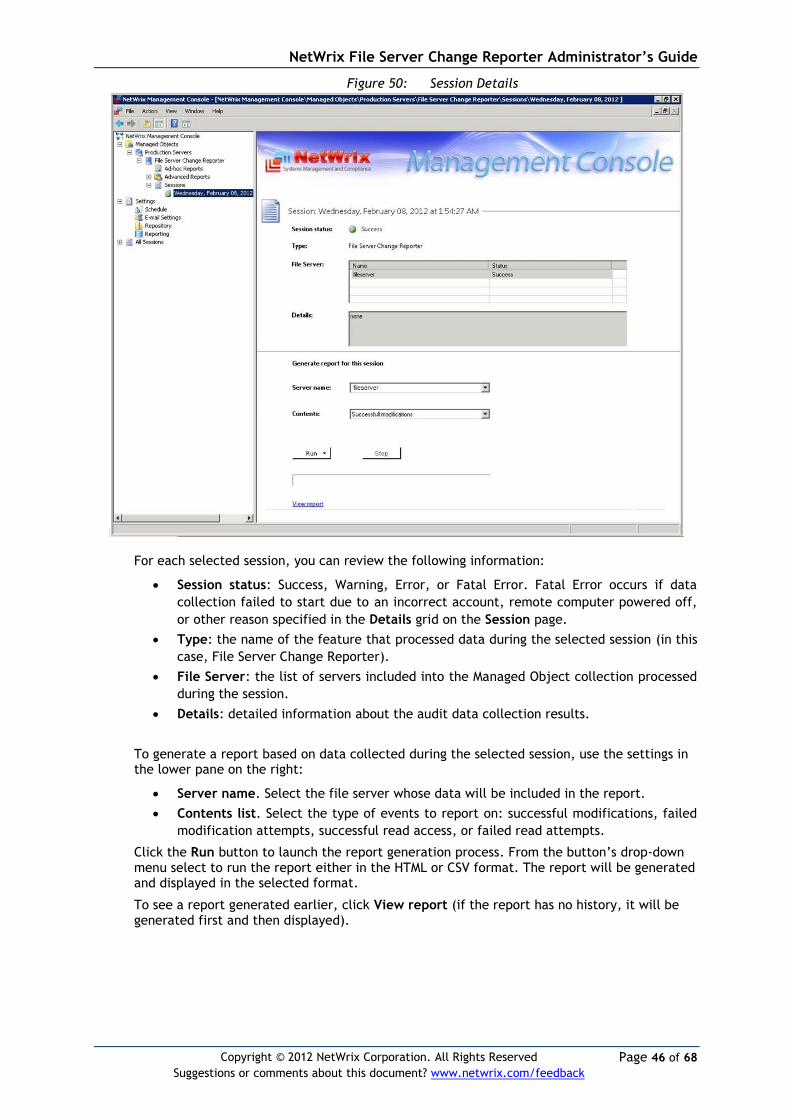
5.4.2 Viewing Task Session Results
All task operation information is shown in NetWrix Management Console under the Sessions node.
To view a session’s details, expand the Managed Object node in the Console left pane, then navigate to <your Managed Object> node File Server Change Reporter Sessions and pick a particular session. The Session page will be displayed with the details and options available.
NetWrix File Server Change Reporter Administrator’s Guide
Page 46 of 68
Copyright © 2012 NetWrix Corporation. All Rights Reserved
Suggestions or comments about this document? www.netwrix.com/feedback
Figure 50: Session Details
For each selected session, you can review the following information:
Session status: Success, Warning, Error, or Fatal Error. Fatal Error occurs if data
collection failed to start due to an incorrect account, remote computer powered off,
or other reason specified in the Details grid on the Session page.
Type: the name of the feature that processed data during the selected session (in this
case, File Server Change Reporter).
File Server: the list of servers included into the Managed Object collection processed
during the session.
Details: detailed information about the audit data collection results.
To generate a report based on data collected during the selected session, use the settings in the lower pane on the right:
Server name. Select the file server whose data will be included in the report.
Contents list. Select the type of events to report on: successful modifications, failed
modification attempts, successful read access, or failed read attempts.
Click the Run button to launch the report generation process. From the button’s drop-down menu select to run the report either in the HTML or CSV format. The report will be generated and displayed in the selected format.
To see a report generated earlier, click View report (if the report has no history, it will be generated first and then displayed).
NetWrix File Server Change Reporter Administrator’s Guide
Page 47 of 68
Copyright © 2012 NetWrix Corporation. All Rights Reserved
Suggestions or comments about this document? www.netwrix.com/feedback
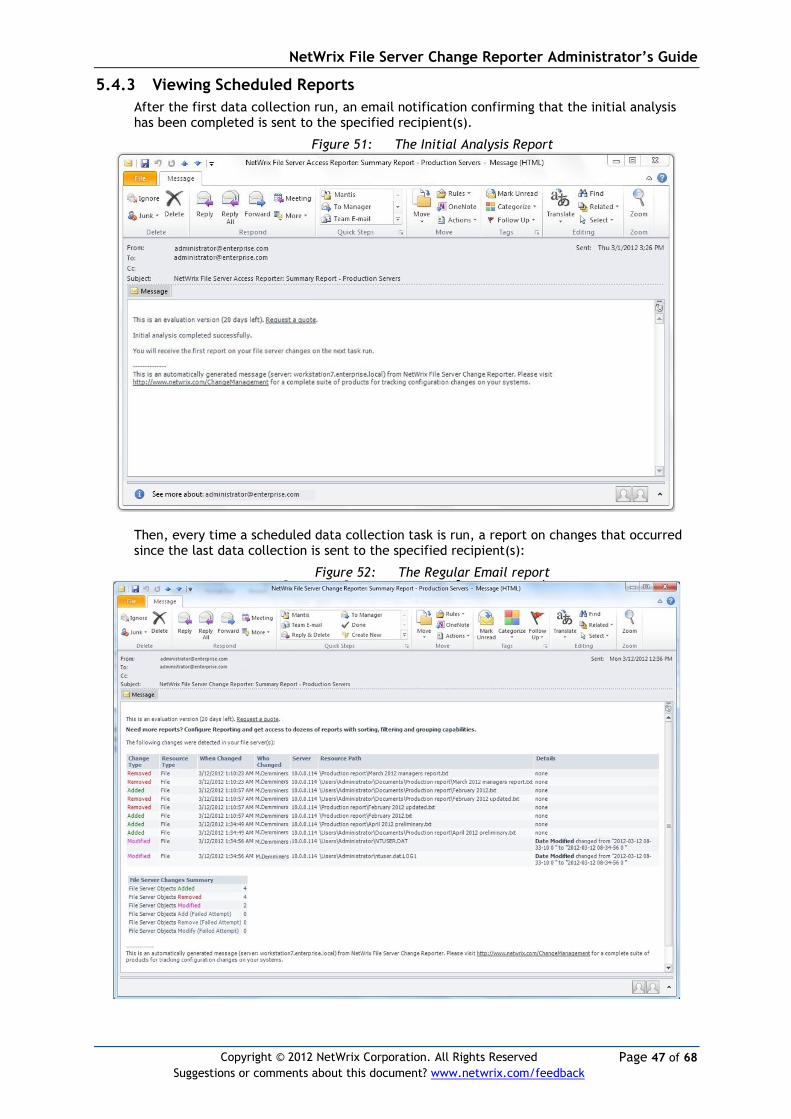
5.4.3 Viewing Scheduled Reports
After the first data collection run, an email notification confirming that the initial analysis has been completed is sent to the specified recipient(s).
Figure 51: The Initial Analysis Report
Then, every time a scheduled data collection task is run, a report on changes that occurred since the last data collection is sent to the specified recipient(s):
Figure 52: The Regular Email report
NetWrix File Server Change Reporter Administrator’s Guide
Page 48 of 68
Copyright © 2012 NetWrix Corporation. All Rights Reserved
Suggestions or comments about this document? www.netwrix.com/feedback
If Advanced Reporting has been configured (as described in the Section 5.5 Advanced Reporting of this document), you can click the More reports link from this email report to view HTML reports in your web browser.
5.4.4 Running Ad-hoc Reports
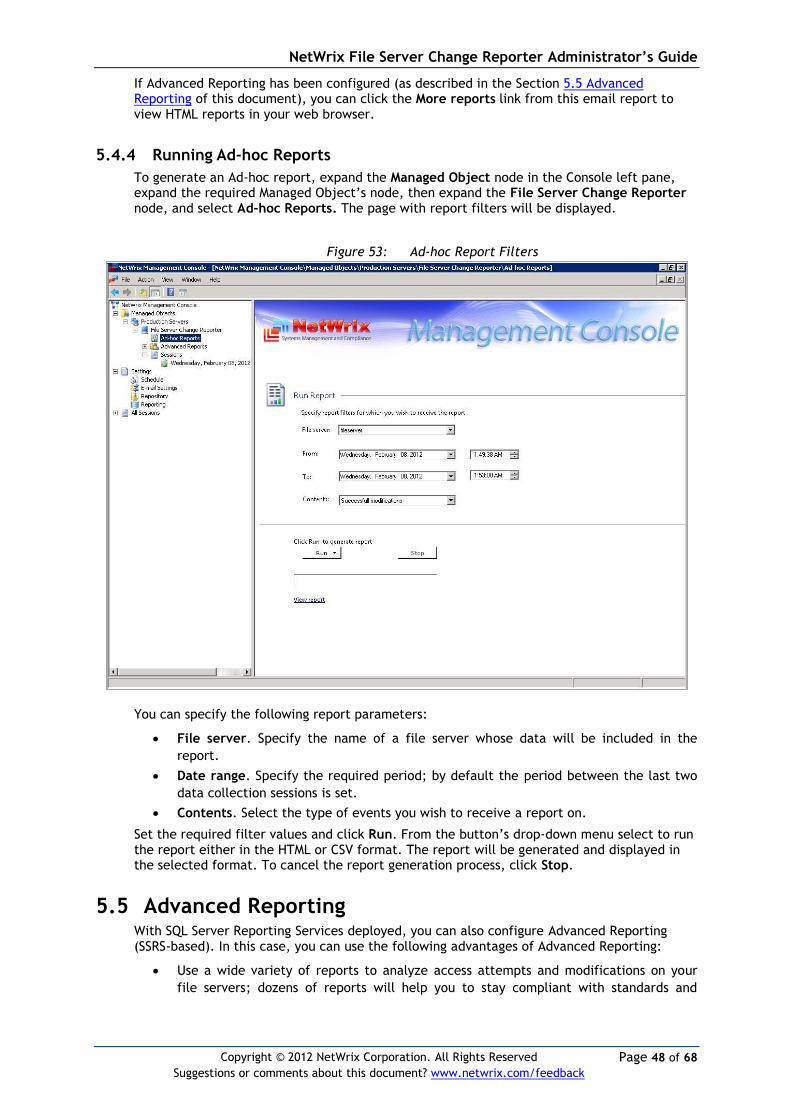
To generate an Ad-hoc report, expand the Managed Object node in the Console left pane, expand the required Managed Object’s node, then expand the File Server Change Reporter node, and select Ad-hoc Reports. The page with report filters will be displayed.
Figure 53: Ad-hoc Report Filters
You can specify the following report parameters:
File server. Specify the name of a file server whose data will be included in the
report.
Date range. Specify the required period; by default the period between the last two
data collection sessions is set.
Contents. Select the type of events you wish to receive a report on.
Set the required filter values and click Run. From the button’s drop-down menu select to run the report either in the HTML or CSV format. The report will be generated and displayed in the selected format. To cancel the report generation process, click Stop.
5.5 Advanced Reporting With SQL Server Reporting Services deployed, you can also configure Advanced Reporting (SSRS-based). In this case, you can use the following advantages of Advanced Reporting:
Use a wide variety of reports to analyze access attempts and modifications on your
file servers; dozens of reports will help you to stay compliant with standards and
NetWrix File Server Change Reporter Administrator’s Guide
Page 49 of 68
Copyright © 2012 NetWrix Corporation. All Rights Reserved
Suggestions or comments about this document? www.netwrix.com/feedback
regulations your organization is subject to (SOX, HIPAA, PCI, GLBA, SAS70, and
others).
Change report filters to fine-tune the data view according to your needs.
Apply one of the most commonly used formats: PDF, XLS and others to save a report.
Apply grouping and sorting to report data, and so on.
5.5.1 Configuring Default Advanced Reporting Settings
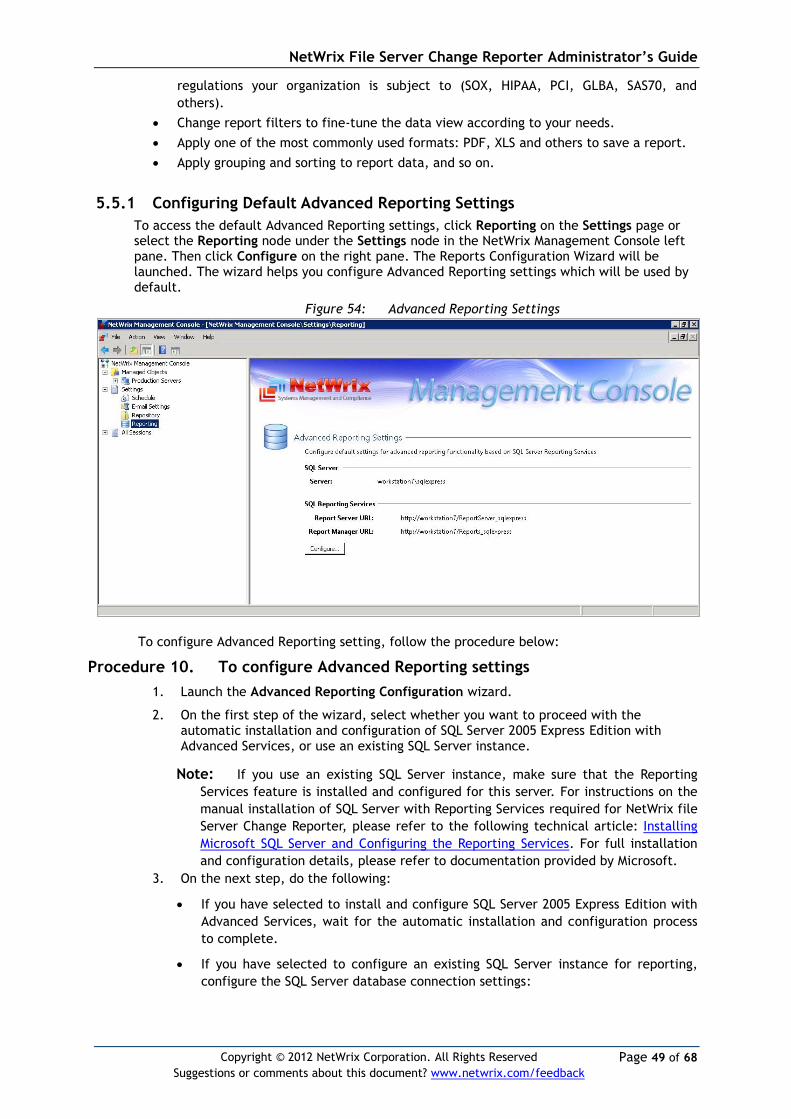
To access the default Advanced Reporting settings, click Reporting on the Settings page or select the Reporting node under the Settings node in the NetWrix Management Console left pane. Then click Configure on the right pane. The Reports Configuration Wizard will be launched. The wizard helps you configure Advanced Reporting settings which will be used by default.
Figure 54: Advanced Reporting Settings
To configure Advanced Reporting setting, follow the procedure below:
Procedure 10. To configure Advanced Reporting settings
1. Launch the Advanced Reporting Configuration wizard.
2. On the first step of the wizard, select whether you want to proceed with the automatic installation and configuration of SQL Server 2005 Express Edition with Advanced Services, or use an existing SQL Server instance.
Note: If you use an existing SQL Server instance, make sure that the Reporting
Services feature is installed and configured for this server. For instructions on the
manual installation of SQL Server with Reporting Services required for NetWrix file
Server Change Reporter, please refer to the following technical article: Installing
Microsoft SQL Server and Configuring the Reporting Services. For full installation
and configuration details, please refer to documentation provided by Microsoft.
3. On the next step, do the following:
If you have selected to install and configure SQL Server 2005 Express Edition with
Advanced Services, wait for the automatic installation and configuration process
to complete.
If you have selected to configure an existing SQL Server instance for reporting,
configure the SQL Server database connection settings:

NetWrix File Server Change Reporter Administrator’s Guide
Page 50 of 68
Copyright © 2012 NetWrix Corporation. All Rights Reserved
Suggestions or comments about this document? www.netwrix.com/feedback
Figure 55: The Reports Configuration Wizard
Note: A database will be created automatically on the specified server with the
following default name: NetWrix_File_Server_Change_Reporter. By default, it will
be accessed using Windows authentication with the scheduled task account. To use
SQL Server authentication, clear the Windows Authentication check box, and
enter the credentials for the database access.
Enter and verify the URLs of the Reporting Services: Report Server URL and Report Manager URL. The URLs must be in the following format: http://<server_name>/<virtual_directory_name>. You can find the correct path names in the SQL Reporting Services Configuration Manager. To do this, first launch the SQL Reporting Services Configuration Manager (for MS SQL Express 2005 it will be Start All Programs Microsoft SQL Server 2005 Configuration Tools Reporting Services Configuration) where you can find the virtual directory names under Report Server Virtual Directory and Report Manager Virtual Directory menu categories. The default values for these names are “ReportServer$SQLExpress” and “Reports$SQLExpress” respectively.
4. Click Next to save your configuration.
5. On the final step, review your settings and click Finish. Make sure the account under which you plan to view the reports has sufficient rights for the Home folder.
You can also configure Advanced Reporting Settings via the Advanced Reporting Settings page in the Management Console. To access the page, in the left Console pane expand the Managed Object node, then expand <your Managed Object name> node, select File Server Change Reporter and then Advanced Reports. Open the Settings tab on the right pane:

NetWrix File Server Change Reporter Administrator’s Guide
Page 51 of 68
Copyright © 2012 NetWrix Corporation. All Rights Reserved
Suggestions or comments about this document? www.netwrix.com/feedback
Figure 56: Advanced Reporting Settings
On the Advanced Reporting Settings screen, you can modify the required settings by selecting the relevant option as well as run the Reports Configuration wizard.
You can view the reports either on the Management Console page or by using your web browser. On the Advanced Reporting Settings page, click Navigate under Web-based Reporting. The SQL Database Access page will be displayed.
Figure 57: SQL Server Reporting Services
Select the folder of the report you want to generate and set the required parameters. Click View Report to get the report:
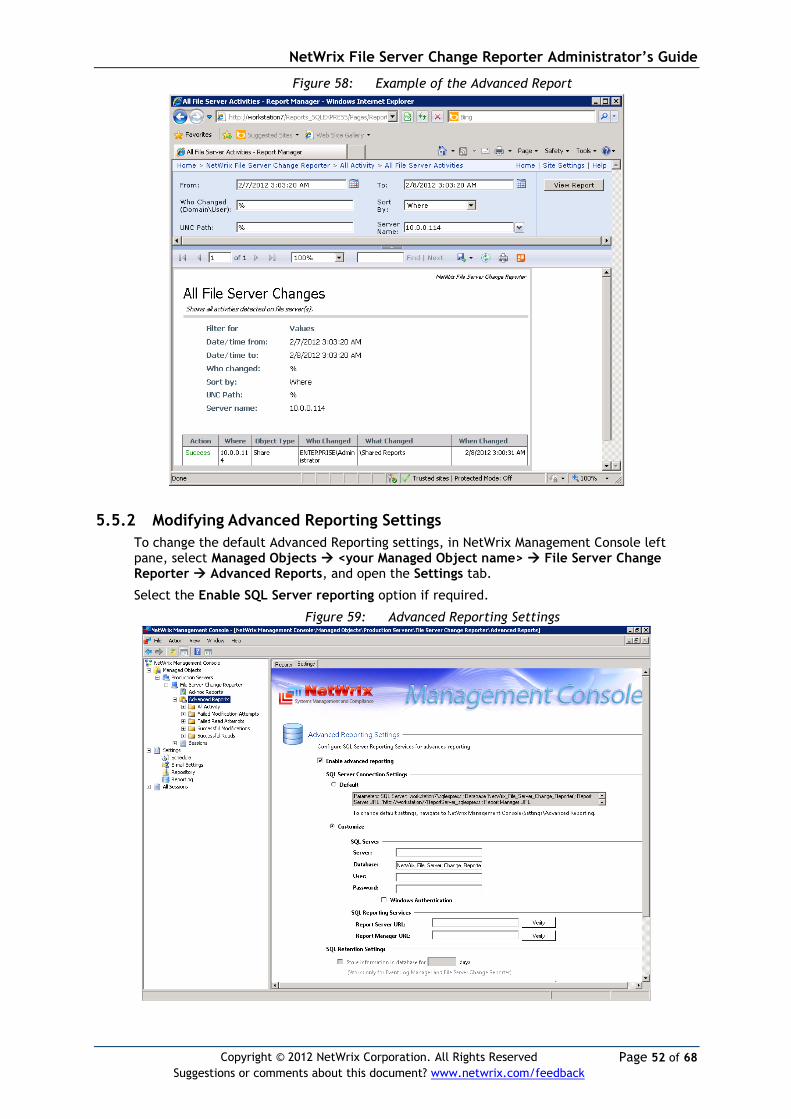
NetWrix File Server Change Reporter Administrator’s Guide
Page 52 of 68
Copyright © 2012 NetWrix Corporation. All Rights Reserved
Suggestions or comments about this document? www.netwrix.com/feedback
Figure 58: Example of the Advanced Report
5.5.2 Modifying Advanced Reporting Settings
To change the default Advanced Reporting settings, in NetWrix Management Console left pane, select Managed Objects <your Managed Object name> File Server Change Reporter Advanced Reports, and open the Settings tab.
Select the Enable SQL Server reporting option if required.
Figure 59: Advanced Reporting Settings

NetWrix File Server Change Reporter Administrator’s Guide
Page 53 of 68
Copyright © 2012 NetWrix Corporation. All Rights Reserved
Suggestions or comments about this document? www.netwrix.com/feedback
The following options are available:
To customize the current values, select the Customize option, then specify the necessary values: o Enter SQL Server and product database names
Note: If you have multiple NetWrix products deployed, consider that each of them must use a separate database. Databases can be located on the same SQL server.
o If you want to connect to the database using SQL Server authentication, supply access credentials
Note: Alternatively, you can use Windows Authentication to connect to the database – if this option is selected, the account specified at Run As for the scheduled task will be used.
o Enter the SSRS Report Server and Report Manager URLs and click Verify. o You can also click Run Wizard and follow the wizard’s steps (for example, to
install SQL Server Express). For details, refer to the Section 5.5.1 Configuring Default Advanced Reporting Settings.
To upload a set of predefined report templates to the Report Server, in the Web-based Reporting section, click Upload.
To launch a web browser and open the reports in Report Viewer, click Navigate. To save the updated configuration, click Apply.
NetWrix File Server Change Reporter Administrator’s Guide
Page 54 of 68
Copyright © 2012 NetWrix Corporation. All Rights Reserved
Suggestions or comments about this document? www.netwrix.com/feedback
6 ADDITIONAL CONFIGURATION
The following additional configuration options are available:
Network traffic compression
Large server support
File versioning and rollback capabilities (based on Volume Shadow Copy)
Editing Report Delivery Schedule
Including and Excluding Data From Reports
Importing Changes That Occurred Between Two Snapshots
Creating Custom Reports
6.1 Network Traffic Compression The network traffic compression option is recommended for slow connections and distributed multi-site networks. When enabled, a light-weight agent is executed remotely on each file server to collect and compress audit data before transfer. The program is executed only on schedule and completes quickly (usually, it takes several minutes). This results in almost 100 times less data transferred with minimal impact on target computers’ performance.
To enable this option in the Freeware Edition select the option in the configuration dialog:

NetWrix File Server Change Reporter Administrator’s Guide
Page 55 of 68
Copyright © 2012 NetWrix Corporation. All Rights Reserved
Suggestions or comments about this document? www.netwrix.com/feedback
Figure 60: NetWrix File Server Change Reporter Configuration
To enable the option in the Enterprise Edition you can either select this option on the configuration dialog, or on the NetWrix File Server Change Reporter settings page. To access the page, in the NetWrix Management Console left pane, select Managed Objects <your Managed Object name> File Server Change Reporter. The NetWrix File Server Change Reporter settings for the selected Managed Object will be displayed on the right:
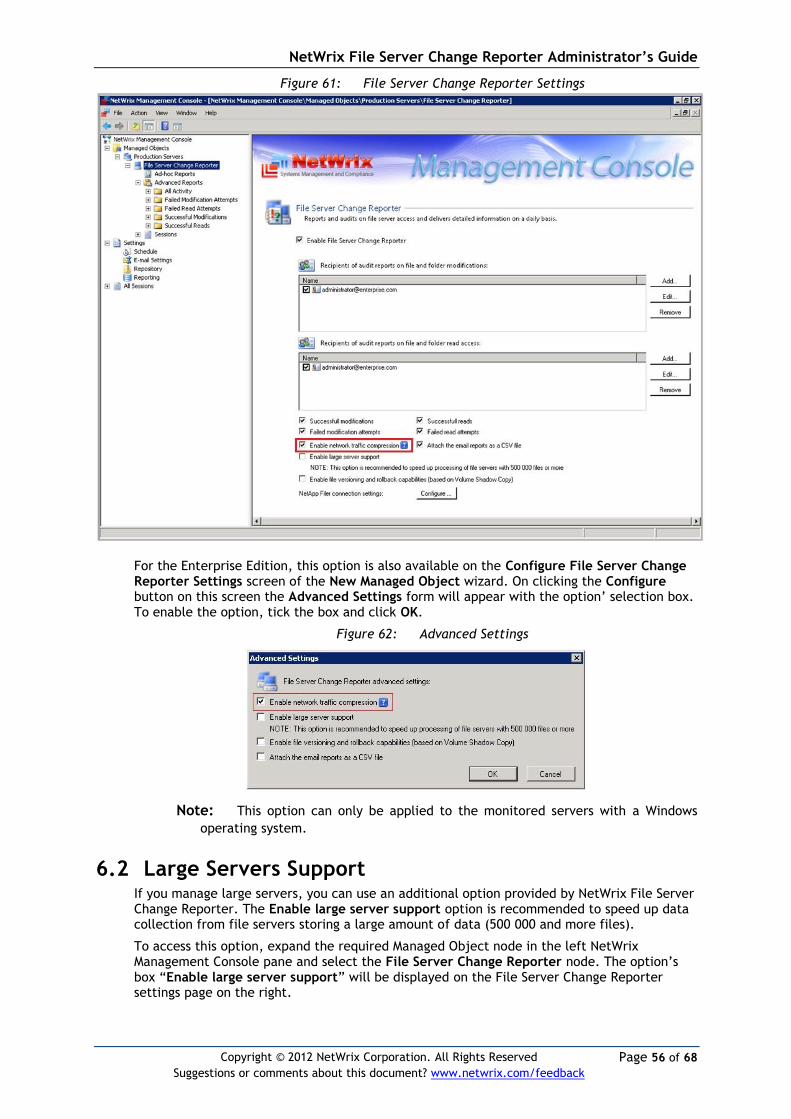
NetWrix File Server Change Reporter Administrator’s Guide
Page 56 of 68
Copyright © 2012 NetWrix Corporation. All Rights Reserved
Suggestions or comments about this document? www.netwrix.com/feedback
Figure 61: File Server Change Reporter Settings
For the Enterprise Edition, this option is also available on the Configure File Server Change Reporter Settings screen of the New Managed Object wizard. On clicking the Configure button on this screen the Advanced Settings form will appear with the option’ selection box. To enable the option, tick the box and click OK.
Figure 62: Advanced Settings
Note: This option can only be applied to the monitored servers with a Windows
operating system.
6.2 Large Servers Support If you manage large servers, you can use an additional option provided by NetWrix File Server Change Reporter. The Enable large server support option is recommended to speed up data collection from file servers storing a large amount of data (500 000 and more files).
To access this option, expand the required Managed Object node in the left NetWrix Management Console pane and select the File Server Change Reporter node. The option’s box “Enable large server support” will be displayed on the File Server Change Reporter settings page on the right.
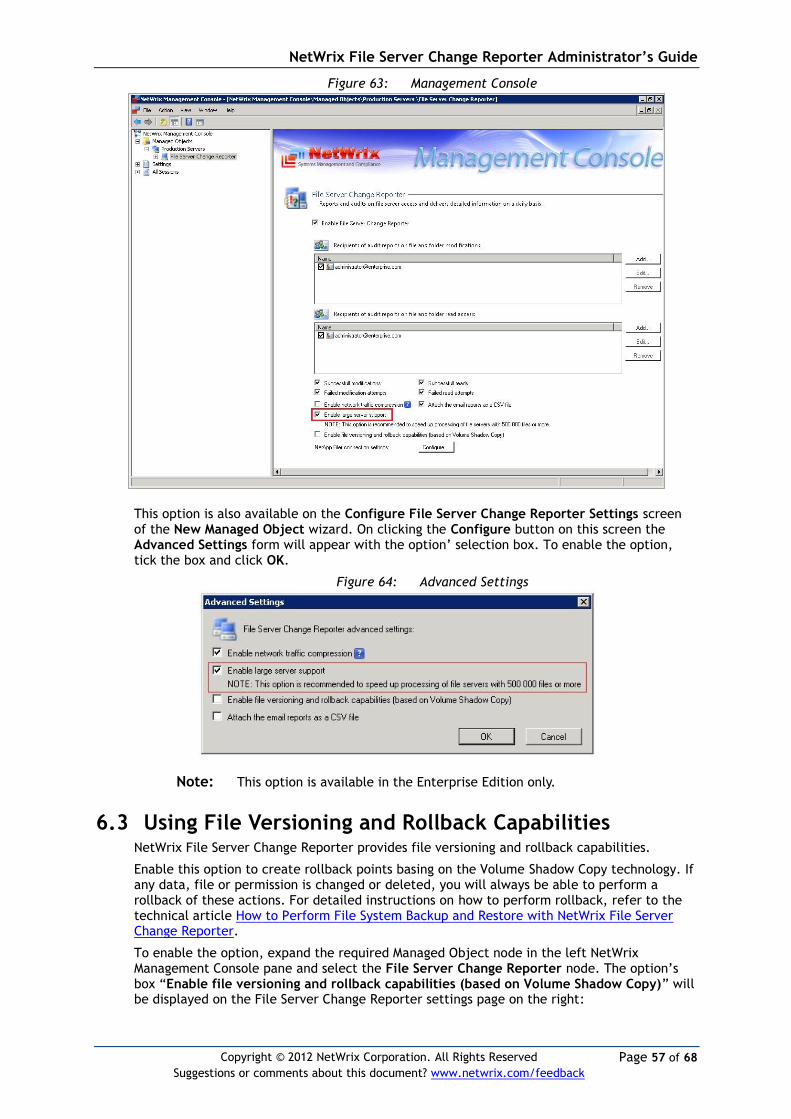
NetWrix File Server Change Reporter Administrator’s Guide
Page 57 of 68
Copyright © 2012 NetWrix Corporation. All Rights Reserved
Suggestions or comments about this document? www.netwrix.com/feedback
Figure 63: Management Console
This option is also available on the Configure File Server Change Reporter Settings screen of the New Managed Object wizard. On clicking the Configure button on this screen the Advanced Settings form will appear with the option’ selection box. To enable the option, tick the box and click OK.
Figure 64: Advanced Settings
Note: This option is available in the Enterprise Edition only.
6.3 Using File Versioning and Rollback Capabilities NetWrix File Server Change Reporter provides file versioning and rollback capabilities.
Enable this option to create rollback points basing on the Volume Shadow Copy technology. If any data, file or permission is changed or deleted, you will always be able to perform a rollback of these actions. For detailed instructions on how to perform rollback, refer to the technical article How to Perform File System Backup and Restore with NetWrix File Server Change Reporter.
To enable the option, expand the required Managed Object node in the left NetWrix Management Console pane and select the File Server Change Reporter node. The option’s box “Enable file versioning and rollback capabilities (based on Volume Shadow Copy)” will be displayed on the File Server Change Reporter settings page on the right:
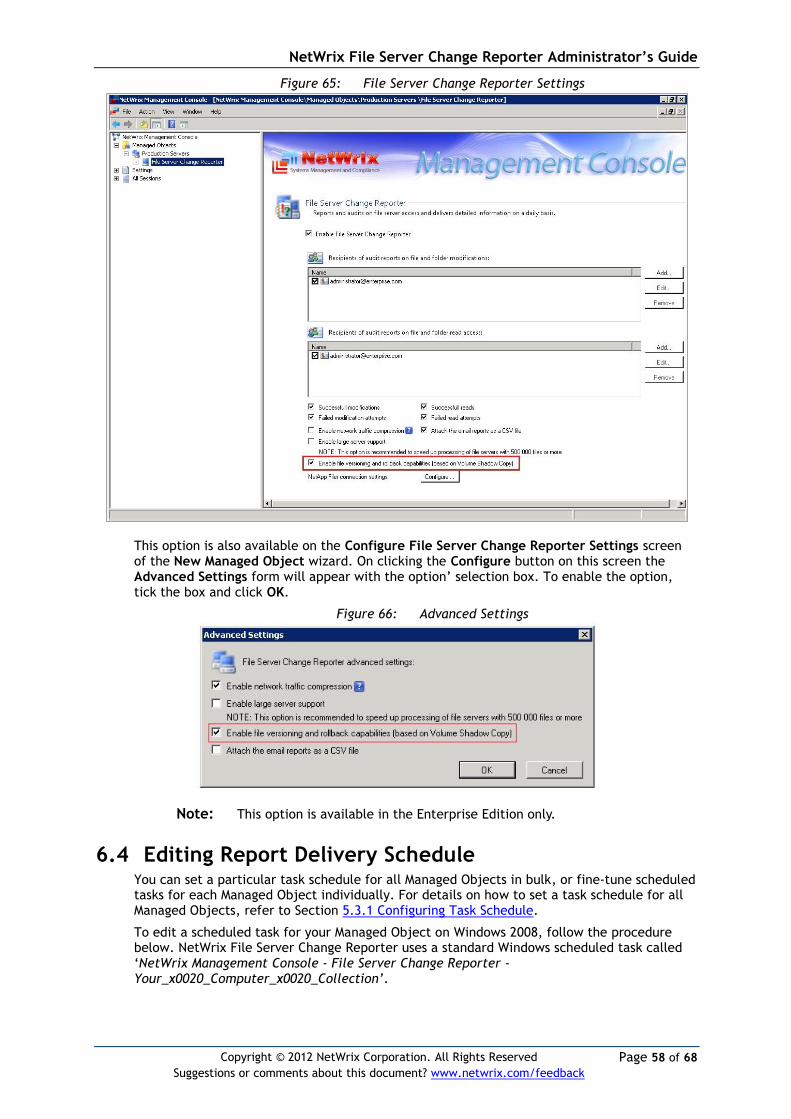
NetWrix File Server Change Reporter Administrator’s Guide
Page 58 of 68
Copyright © 2012 NetWrix Corporation. All Rights Reserved
Suggestions or comments about this document? www.netwrix.com/feedback
Figure 65: File Server Change Reporter Settings
This option is also available on the Configure File Server Change Reporter Settings screen of the New Managed Object wizard. On clicking the Configure button on this screen the Advanced Settings form will appear with the option’ selection box. To enable the option, tick the box and click OK.
Figure 66: Advanced Settings
Note: This option is available in the Enterprise Edition only.
6.4 Editing Report Delivery Schedule You can set a particular task schedule for all Managed Objects in bulk, or fine-tune scheduled tasks for each Managed Object individually. For details on how to set a task schedule for all Managed Objects, refer to Section 5.3.1 Configuring Task Schedule.
To edit a scheduled task for your Managed Object on Windows 2008, follow the procedure below. NetWrix File Server Change Reporter uses a standard Windows scheduled task called ‘NetWrix Management Console - File Server Change Reporter - Your_x0020_Computer_x0020_Collection’.

NetWrix File Server Change Reporter Administrator’s Guide
Page 59 of 68
Copyright © 2012 NetWrix Corporation. All Rights Reserved
Suggestions or comments about this document? www.netwrix.com/feedback
Procedure 11. To edit scheduled task on Windows 2008
1. Navigate to the Start menu Administrative Tools Task Scheduler and select the required NetWrix Management Console task.
Figure 67: Task Scheduler
2. Double-click the task, and go to the Triggers tab on the displayed Properties form. Click the Edit button.
Figure 68: Task Properties
3. On the Edit Trigger form, define the required settings to fine-tune your task schedule.
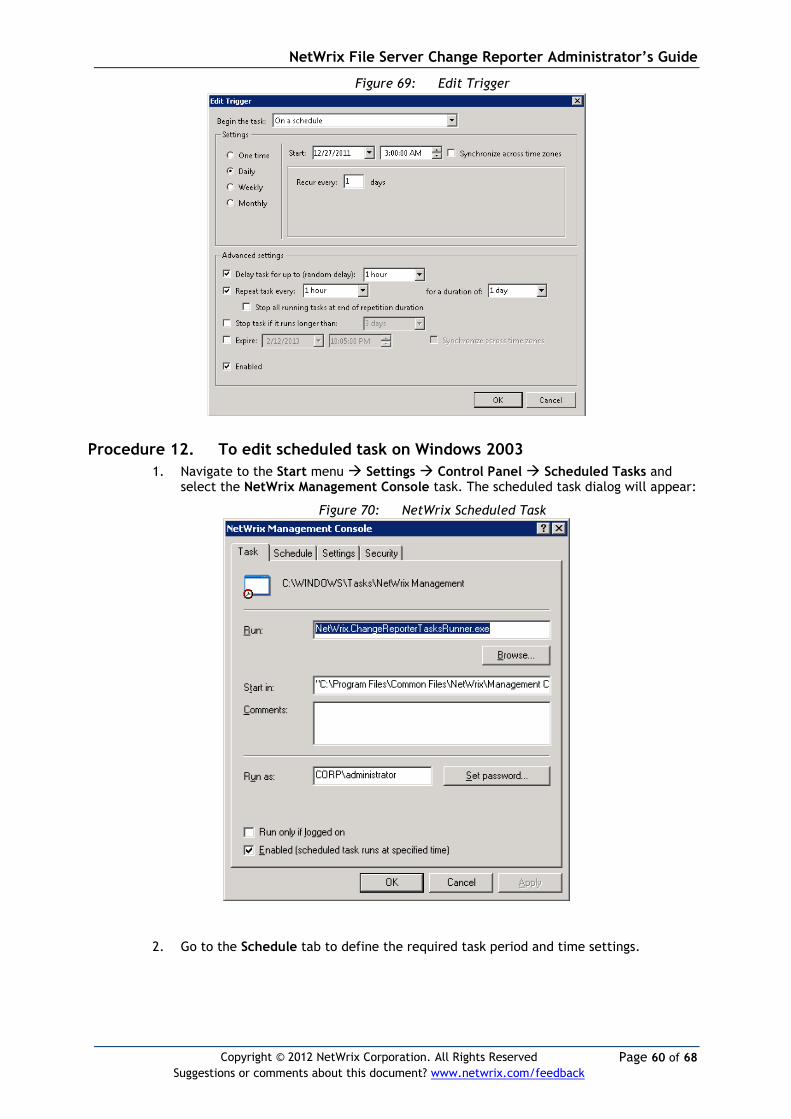
NetWrix File Server Change Reporter Administrator’s Guide
Page 60 of 68
Copyright © 2012 NetWrix Corporation. All Rights Reserved
Suggestions or comments about this document? www.netwrix.com/feedback
Figure 69: Edit Trigger
Procedure 12. To edit scheduled task on Windows 2003
1. Navigate to the Start menu Settings Control Panel Scheduled Tasks and select the NetWrix Management Console task. The scheduled task dialog will appear:
Figure 70: NetWrix Scheduled Task
2. Go to the Schedule tab to define the required task period and time settings.

NetWrix File Server Change Reporter Administrator’s Guide
Page 61 of 68
Copyright © 2012 NetWrix Corporation. All Rights Reserved
Suggestions or comments about this document? www.netwrix.com/feedback
Figure 71: NetWrix Scheduled Task
3. Click Advanced to access advanced schedule options.
Figure 72: Advanced Schedule Options
4. Click OK to apply the changes and close the form.
For the Freeware Edition, you can modify task schedule by selecting the Advanced button for the Additional product configuration on the Configuration utility dialog.
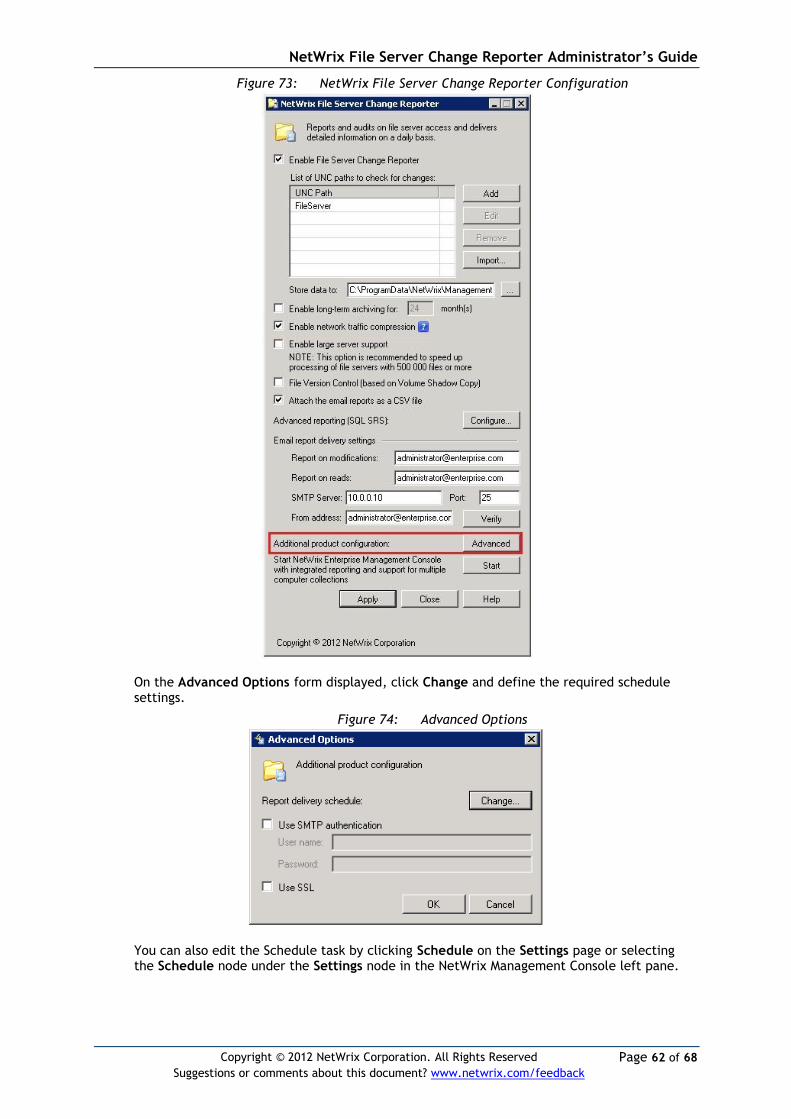
NetWrix File Server Change Reporter Administrator’s Guide
Page 62 of 68
Copyright © 2012 NetWrix Corporation. All Rights Reserved
Suggestions or comments about this document? www.netwrix.com/feedback
Figure 73: NetWrix File Server Change Reporter Configuration
On the Advanced Options form displayed, click Change and define the required schedule settings.
Figure 74: Advanced Options
You can also edit the Schedule task by clicking Schedule on the Settings page or selecting the Schedule node under the Settings node in the NetWrix Management Console left pane.
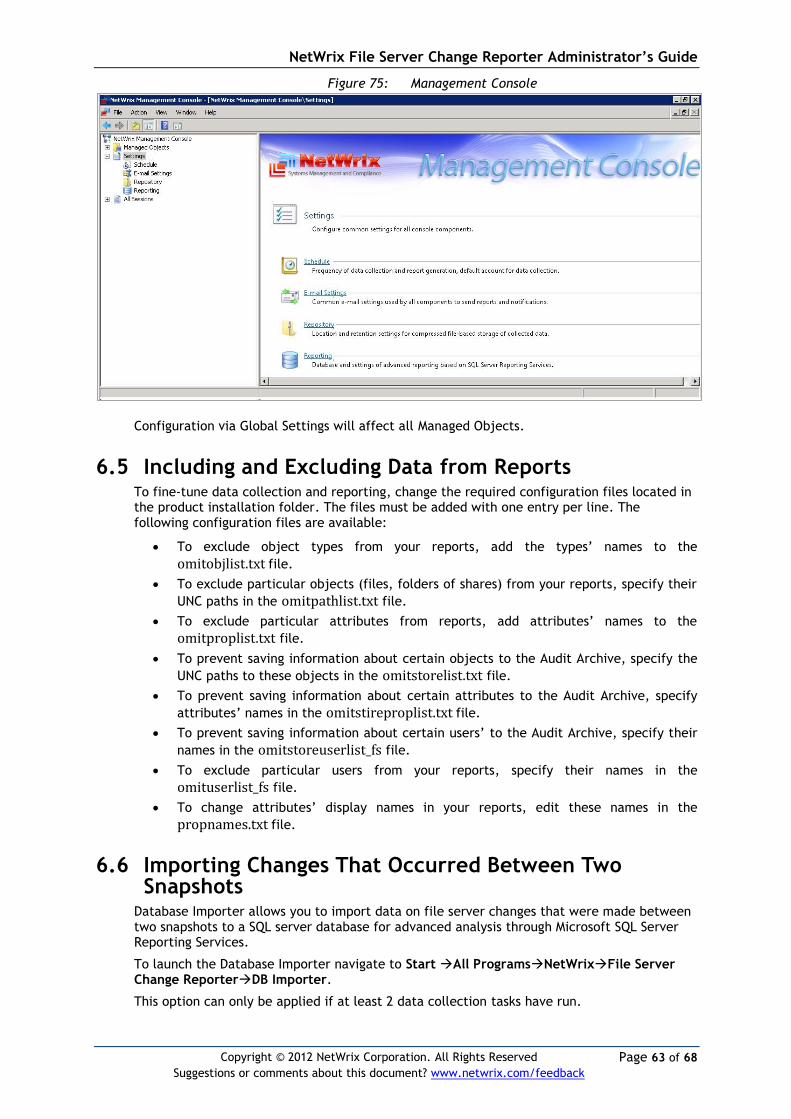
NetWrix File Server Change Reporter Administrator’s Guide
Page 63 of 68
Copyright © 2012 NetWrix Corporation. All Rights Reserved
Suggestions or comments about this document? www.netwrix.com/feedback
Figure 75: Management Console
Configuration via Global Settings will affect all Managed Objects.
6.5 Including and Excluding Data from Reports To fine-tune data collection and reporting, change the required configuration files located in the product installation folder. The files must be added with one entry per line. The following configuration files are available:
To exclude object types from your reports, add the types’ names to the
omitobjlist.txt file.
To exclude particular objects (files, folders of shares) from your reports, specify their
UNC paths in the omitpathlist.txt file.
To exclude particular attributes from reports, add attributes’ names to the
omitproplist.txt file.
To prevent saving information about certain objects to the Audit Archive, specify the
UNC paths to these objects in the omitstorelist.txt file.
To prevent saving information about certain attributes to the Audit Archive, specify
attributes’ names in the omitstireproplist.txt file.
To prevent saving information about certain users’ to the Audit Archive, specify their
names in the omitstoreuserlist_fs file.
To exclude particular users from your reports, specify their names in the
omituserlist_fs file.
To change attributes’ display names in your reports, edit these names in the
propnames.txt file.
6.6 Importing Changes That Occurred Between Two Snapshots
Database Importer allows you to import data on file server changes that were made between two snapshots to a SQL server database for advanced analysis through Microsoft SQL Server Reporting Services.
To launch the Database Importer navigate to Start All ProgramsNetWrixFile Server Change ReporterDB Importer.
This option can only be applied if at least 2 data collection tasks have run.
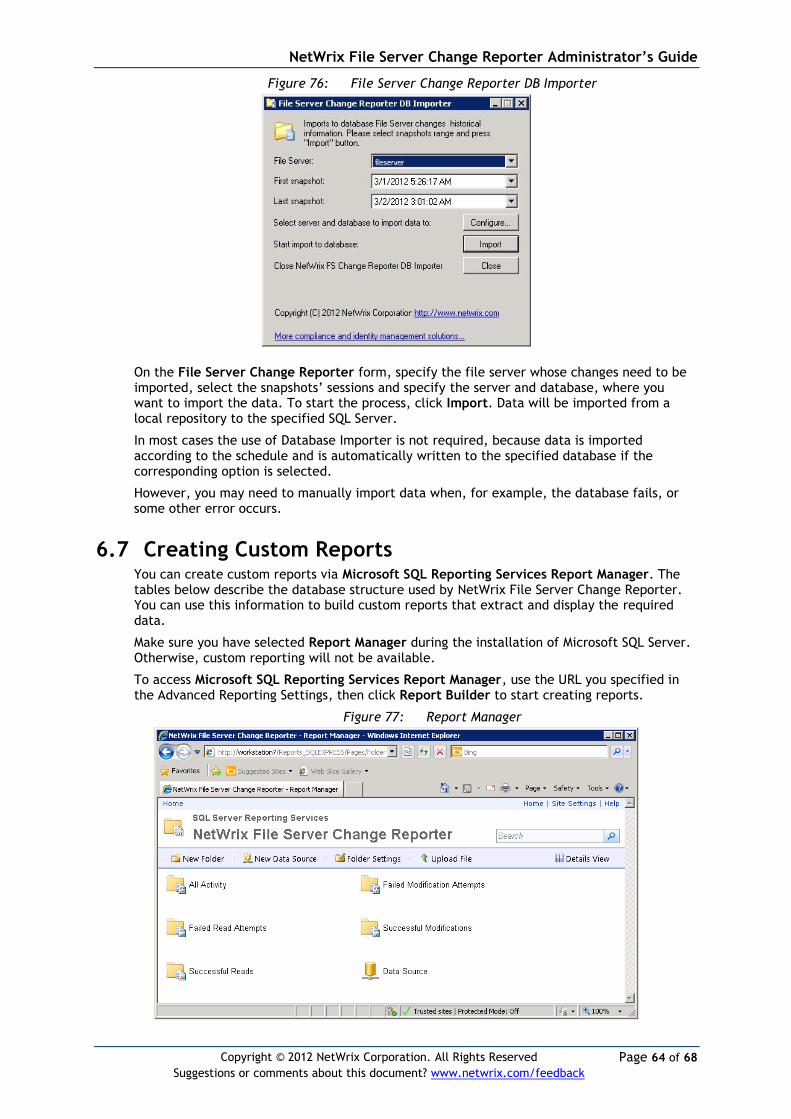
NetWrix File Server Change Reporter Administrator’s Guide
Page 64 of 68
Copyright © 2012 NetWrix Corporation. All Rights Reserved
Suggestions or comments about this document? www.netwrix.com/feedback
Figure 76: File Server Change Reporter DB Importer
On the File Server Change Reporter form, specify the file server whose changes need to be imported, select the snapshots’ sessions and specify the server and database, where you want to import the data. To start the process, click Import. Data will be imported from a local repository to the specified SQL Server.
In most cases the use of Database Importer is not required, because data is imported according to the schedule and is automatically written to the specified database if the corresponding option is selected.
However, you may need to manually import data when, for example, the database fails, or some other error occurs.
6.7 Creating Custom Reports You can create custom reports via Microsoft SQL Reporting Services Report Manager. The tables below describe the database structure used by NetWrix File Server Change Reporter. You can use this information to build custom reports that extract and display the required data.
Make sure you have selected Report Manager during the installation of Microsoft SQL Server. Otherwise, custom reporting will not be available.
To access Microsoft SQL Reporting Services Report Manager, use the URL you specified in the Advanced Reporting Settings, then click Report Builder to start creating reports.
Figure 77: Report Manager

NetWrix File Server Change Reporter Administrator’s Guide
Page 65 of 68
Copyright © 2012 NetWrix Corporation. All Rights Reserved
Suggestions or comments about this document? www.netwrix.com/feedback
NetWrix File Server Change Reporter database structure includes the following tables:
DBVersion
Sessions
Changes
PropChanges
DBVersion
Identifies the database format version. Used for compatibility checking.
Column Data Type Description
ProductId int Primary key
ProductName nvarchar(255) Contains the product name that has collected the data to this database: File Server Change Reporter.
DBVersion int Database format version. The current version must be 1.
Sessions
Contains all data collection sessions (new session is created every day by default). All detected changes are linked to sessions.
Column Data Type Description
SessionId int Primary key
ProductId int Contains the product ID that has collected the data during this session. For NetWrix File
Server Change Reporter this value is 1.
Date DATETIME Data collection session start time.
Changes
Contains details of all changes (object name, type, who changed, when changed, etc.) made to all file server objects.
Column Data Type Description
ChangeId int Primary key
ProductId int For NetWrix File Server Change Reporter this value is 1
SessionId int Foreign key to Sessions.SessionId.
ObjectPath nvarchar(255) Full file server object path.
ObjectType nvarchar(255) Active Directory object class (e.g. user, organizationalUnit, etc.).
What int
Change type:
1. Added 2. Removed 3. Modified 4. Add (Failed Attempt) 5. Remove (Failed Attempt) 6. Modify (Failed Attempt) 7. Successful reads
8. Failed read attempts
NetWrix File Server Change Reporter Administrator’s Guide
Page 66 of 68
Copyright © 2012 NetWrix Corporation. All Rights Reserved
Suggestions or comments about this document? www.netwrix.com/feedback
Who nvarchar(255) User account under which the change was made.
Where nvarchar(255) Name of the file server to which the change was made.
When DATETIME Date and time when the change was made.
PropChanges
Contains changed attributes and values for modified file server objects.
Column Data Type Description
PropChangeId int Primary key
ChangeId int Foreign key to Changes.ChangeId
PropName nvarchar(255) Changed file server attribute name
PropNameInt nvarchar(255)
NOT NULL
Internal attribute name
IsMultiValue int Attribute type. This value defines meaning of BeforeValue and AfterValue fields
BeforeValue ntext For single-valued attributes contains previous attribute value, for multi-valued contains
removed items (e.g. removed group members)
AfterValue ntext For single-valued attributes contains new attribute value, for multi-valued contains added
items (e.g. added group members)
NetWrix offers you the Custom Reporting Pay Service, via which you can order any custom report directly from NetWrix. Contact NetWrix for details.
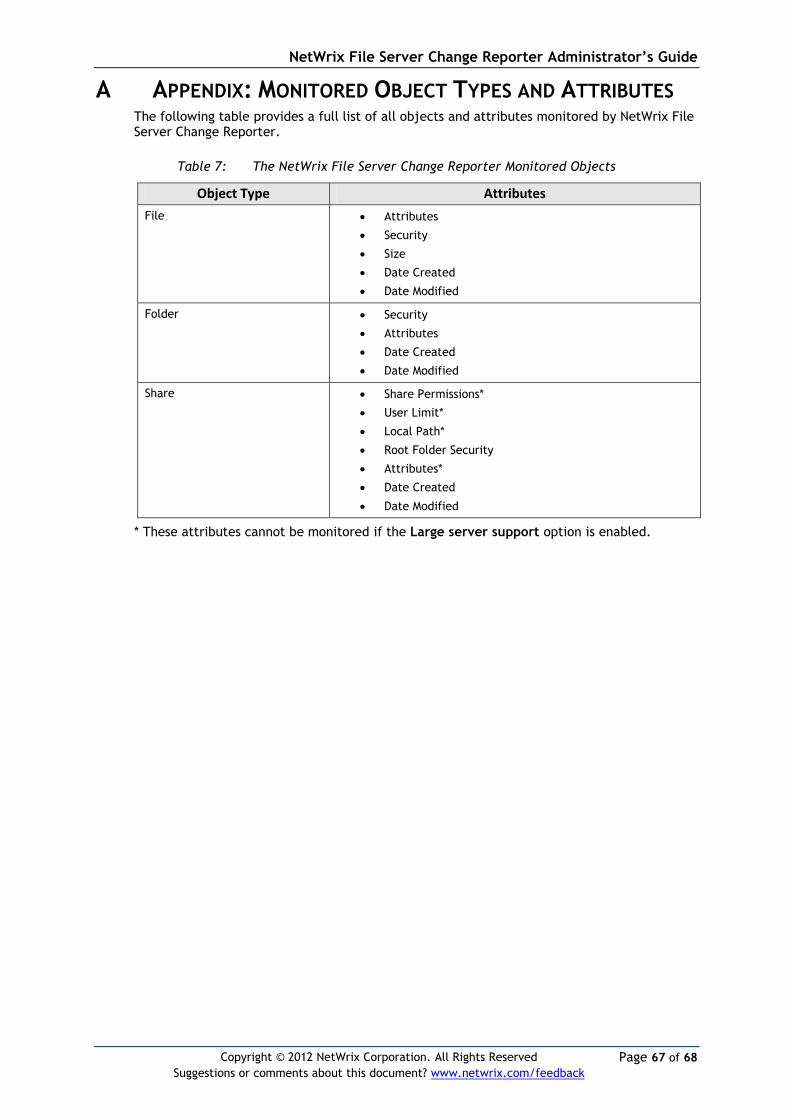
NetWrix File Server Change Reporter Administrator’s Guide
Page 67 of 68
Copyright © 2012 NetWrix Corporation. All Rights Reserved
Suggestions or comments about this document? www.netwrix.com/feedback
A APPENDIX: MONITORED OBJECT TYPES AND ATTRIBUTES The following table provides a full list of all objects and attributes monitored by NetWrix File Server Change Reporter.
Table 7: The NetWrix File Server Change Reporter Monitored Objects
Object Type Attributes
File Attributes
Security
Size
Date Created
Date Modified
Folder Security
Attributes
Date Created
Date Modified
Share Share Permissions*
User Limit*
Local Path*
Root Folder Security
Attributes*
Date Created
Date Modified
* These attributes cannot be monitored if the Large server support option is enabled.
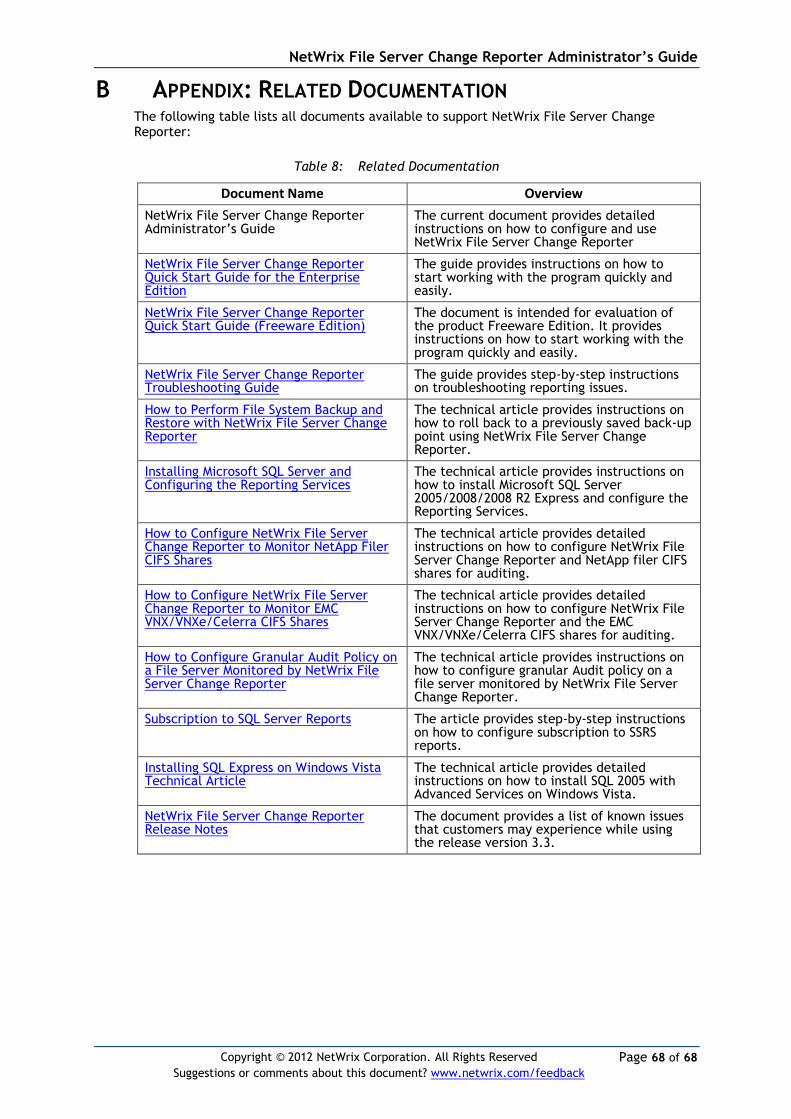
NetWrix File Server Change Reporter Administrator’s Guide
Page 68 of 68
Copyright © 2012 NetWrix Corporation. All Rights Reserved
Suggestions or comments about this document? www.netwrix.com/feedback
B APPENDIX: RELATED DOCUMENTATION The following table lists all documents available to support NetWrix File Server Change Reporter:
Table 8: Related Documentation
Document Name Overview
NetWrix File Server Change Reporter Administrator’s Guide
The current document provides detailed instructions on how to configure and use NetWrix File Server Change Reporter
NetWrix File Server Change Reporter Quick Start Guide for the Enterprise Edition
The guide provides instructions on how to start working with the program quickly and easily.
NetWrix File Server Change Reporter Quick Start Guide (Freeware Edition)
The document is intended for evaluation of the product Freeware Edition. It provides instructions on how to start working with the program quickly and easily.
NetWrix File Server Change Reporter Troubleshooting Guide
The guide provides step-by-step instructions on troubleshooting reporting issues.
How to Perform File System Backup and Restore with NetWrix File Server Change Reporter
The technical article provides instructions on how to roll back to a previously saved back-up point using NetWrix File Server Change Reporter.
Installing Microsoft SQL Server and Configuring the Reporting Services
The technical article provides instructions on how to install Microsoft SQL Server 2005/2008/2008 R2 Express and configure the Reporting Services.
How to Configure NetWrix File Server Change Reporter to Monitor NetApp Filer CIFS Shares
The technical article provides detailed instructions on how to configure NetWrix File Server Change Reporter and NetApp filer CIFS shares for auditing.
How to Configure NetWrix File Server Change Reporter to Monitor EMC VNX/VNXe/Celerra CIFS Shares
The technical article provides detailed instructions on how to configure NetWrix File Server Change Reporter and the EMC VNX/VNXe/Celerra CIFS shares for auditing.
How to Configure Granular Audit Policy on a File Server Monitored by NetWrix File Server Change Reporter
The technical article provides instructions on how to configure granular Audit policy on a file server monitored by NetWrix File Server Change Reporter.
Subscription to SQL Server Reports The article provides step-by-step instructions on how to configure subscription to SSRS reports.
Installing SQL Express on Windows Vista Technical Article
The technical article provides detailed instructions on how to install SQL 2005 with Advanced Services on Windows Vista.
NetWrix File Server Change Reporter Release Notes
The document provides a list of known issues that customers may experience while using the release version 3.3.


