1st GEAR INTRODUCTION The information contained in this document is essential to your success as a parent/in-car teacher. A simple review and understanding of 1 st GEAR will enable you to establish the confidence, trust and credibility with your son/daughter, essential ingredients to their success and survival. If after reviewing 1 st GEAR, you have questions, please email us at [email protected]and we will assist you in your effort to provide the most effective, in-car driver education training possible. Whether you have questions regarding teaching techniques (parallel parking) , how to affect your young drivers attitude in order to improve driving behavior or questions about improving the young drivers defensive driving skills, do not hesitate to contact Curb Buster. Our interest and concern for your young driver extends beyond purchasing of our course. Our partnership is essential for your young driver to acquire the driving skills to “Drive and Survive”. The Clary Foundation 1
Transcript
1st GEAR
INTRODUCTION
The information contained in this document is essential to your success as a
parent/in-car teacher. A simple review and understanding of 1st GEAR will
enable you to establish the confidence, trust and credibility with your
son/daughter, essential ingredients to their success and survival.
If after reviewing 1st GEAR, you have questions, please email us at
[email protected] and we will assist you in your effort to provide the most
effective, in-car driver education training possible.
Whether you have questions regarding teaching techniques (parallel parking) ,
how to affect your young drivers attitude in order to improve driving behavior or
questions about improving the young drivers defensive driving skills, do not
hesitate to contact Curb Buster.
Our interest and concern for your young driver extends beyond purchasing of our
course. Our partnership is essential for your young driver to acquire the driving
skills to “Drive and Survive”.
The Clary Foundation
1
TABLE OF CONTENTS
Unit 1A Frequently Asked Questions
Unit 2B Obtaining a Hard Ship License
Unit 3C Grading Scale & Driving Progress Log
Unit 4D Techniques & Strategies
Unit 5E Learning Environments
Unit 6F Limitations & Capabilities
Unit 7G Student Management Techniques
Unit 8H DPS General Driving Procedures
Unit 9I BTW Instructional Phase/Risk Factors
Unit 10J The Physical & Mental Aspects of Driving
2
UNIT 1
FREQUENTLY ASKED QUESTIONS
3
Q. How does Texas State law regarding driver education affect my Young Driver?
A. Young Driver's under age 18 must hold an instruction permit or hardship license for a minimum of six (6) months before a Texas driver's license is issued.
The legal driving age in Texas is 16, although an applicant may still apply for a Texas learners permit at age 15. The licensed operator accompanying the young driver in the front seat must be at least 21 years of age.
Upon receiving a Texas driver's license, driving privileges are restricted for the first twelve (12) months of issuance. The Young Driver may not have more than one passenger under 21 years of age who is not a family member, or operate a vehicle after midnight and before 5 a.m. unless driving is necessary for employment, medical emergency, school or school related activity.
A law officer cannot use this law as probable cause for a traffic stop
Q. Is your course approved for Block and Concurrent?
A. Programs are not approved as block or concurrent. Whether you wish to teach block or concurrent is the parents choosing. However, we strongly discourage the block method simply because too much time lapses from the time the first classroom lesson commences till the student's first driving lesson. It is imperative that the young driver be able to understand the topics covered in the classroom and relate that knowledge to the behind the wheel training. The concurrent method of training is by far, the most efficient and effective, especially when attempting to mold the minds of young driver’s attitudes and driving behaviors.
Q. When may we begin driver education training ? A.
Only after receiving the DPS Driver Education Packet Q.
How do I request the Driver Education Packet?
A. Complete the enclosed DPS request for a Parent Taught Driver Education Packet (form DL-92) and return to DPS with a non- returnable fee of $20. If the DL-92 request form was inadvertently missing from this mailing you may download the form by visiting our web-site and linking to DPS administrative forms.
PARENTAL NOTICE: If DPS declines for any reason to allow you as the parent, guardian, step parents, or grandparents to provide parent taught driver education to your Young Driver, the Clary Foundation will refund your tuition in full and only charge for the returned shipping.
5
UNIT 2
OBTAINING A “HARDSHIP LICENSE”
6
OBTAINING A HARDSHIP TEXAS "HARDSHIP" LICENSE
Procedures and Requirements
NEED TO KNOW: The Department of Public Safety may issue a driver license to any minor who satisfies the requirements if the Department finds that;
(1) failure or refusal to issue such license will result in an unusual economic hardship on the family of the applicant or;
(2) the license should be granted to the minor because of sickness or illness of family members of the applicant or;
(3) a license should be granted to the minor because he/she is regularly enrolled in a vocational education program and requires a driver license to pursue the program and has completed an approved driver education course.
An unusual economic hardship must be confirmed and include evidence that the family is being denied the basic necessities for existence. Such hardships include but are not limited to the following:
1) The minor is married and maintaining a separate household from the parents or guardians. Proof required in form of food stamps, government or outside agency assistance, current or past due bills and etc.
2) The minor is the head of the household, other than as a married person. Proof such as lease agreement, utility bill in the minors name, etc.
7
3) The minor has dependent children and must drive to ensure the welfare of the children. Proof such as birth certificates, physician's letter of treatment, disability requirements, etc.
4) The minor is the only person in the household eligible for a driver's license and the hardship is for the parent's or minor's work. A letter from the parent's and/or minor’s employer on company letterhead showing hours and days of work schedule and signed by the employer.
5) The minor needs transportation to and from school. A letter upon school letterhead signed by the school principal stating that the family lives more than two miles away and no bus transportation is provided. Also required is proof of the parent's work schedule as needed in #4 above. Travel to participate in school activities such as sports, band, etc. will not be considered a sufficient reason to establish hardship.
6) The minor is engaged in farm or ranch work for parents or guardian. Proof such as corporation charter, income tax documents, etc.
7) Sickness or illness of family members. Proof in the form of a signed statement from the attending physician attesting to the fact that the family member in question should not drive because of the medical condition and a description of the nature of the illness.
8) Enrollment in vocational educational co-op and proof must consist of a TEA required work agreement and signed by the school principal attesting to:
• enrollment of the minor and the course approved under Section 21.101 of the Texas Education Code and;
• the course being recognized by the school for academic credit and; • the necessity of the minor driving to be able to pursue the program, and; • the student's being currently employed.
9) Economic Emergencies---- An Individual must present evidence that immediate temporary relief is necessary to prevent the minor's family from being denied the basic necessities for existence. (layoff notice, etc.)
10) Family Illness or Disability----The minor must provide a family member with transportation to receive medical attention or to sustain the household.
8
A letter from the attending physician attesting to the fact that the parent cannot drive because of temporary illness or disability and the family member must be seen for treatment. The letter must contain the expected duration of the illness or disability.
COMPLETION OF A STATE APPROVED, DRIVER EDUCATION COURSE IS MANDATORY FOR ALL THESE CIRCUMSTANCES.
9
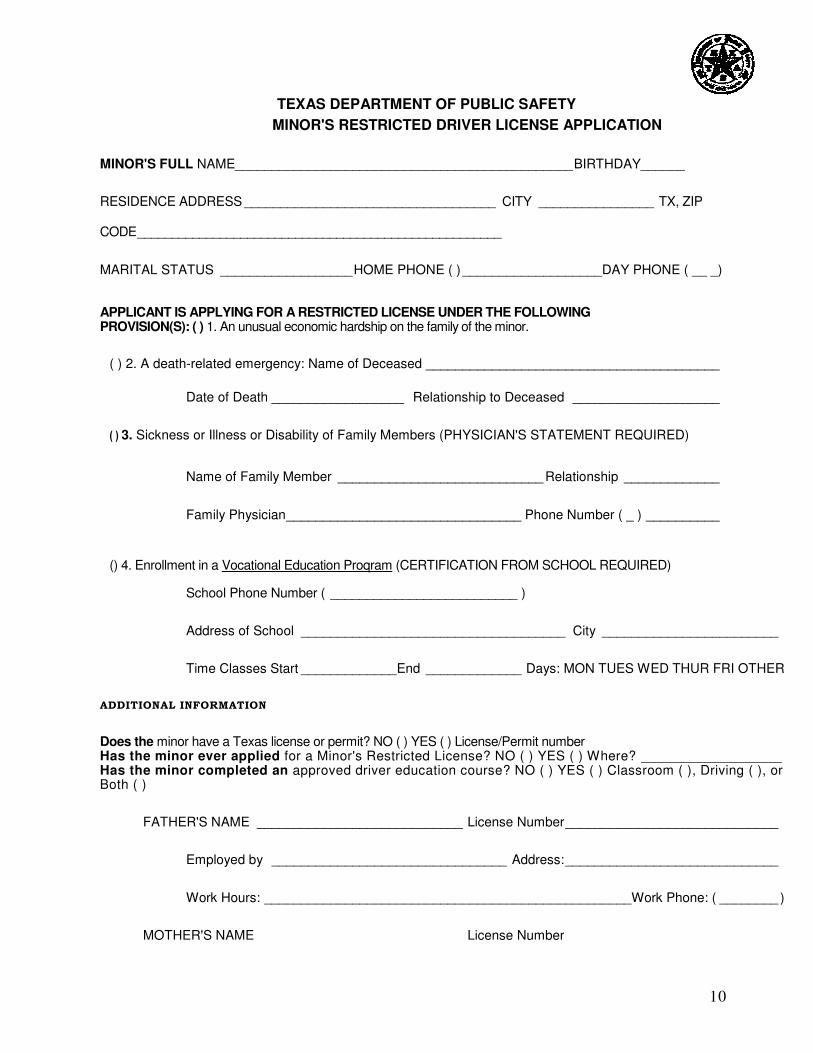
TEXAS DEPARTMENT OF PUBLIC SAFETY
MINOR'S RESTRICTED DRIVER LICENSE APPLICATION
MINOR'S FULL NAME______________________________________________BIRTHDAY______
RESIDENCE ADDRESS ___________________________________ CITY ________________ TX, ZIP
APPLICANT IS APPLYING FOR A RESTRICTED LICENSE UNDER THE FOLLOWING PROVISION(S): ( ) 1. An unusual economic hardship on the family of the minor.
( ) 2. A death-related emergency: Name of Deceased ________________________________________
Date of Death __________________ Relationship to Deceased ____________________
( ) 3. Sickness or Illness or Disability of Family Members (PHYSICIAN'S STATEMENT REQUIRED)
Name of Family Member ____________________________ Relationship _____________
Family Physician________________________________ Phone Number ( _ ) __________
() 4. Enrollment in a Vocational Education Proqram (CERTIFICATION FROM SCHOOL REQUIRED)
School Phone Number ( __________________________ )
Address of School ____________________________________ City ________________________
Time Classes Start _____________End _____________ Days: MON TUES WED THUR FRI OTHER
ADDITIONAL INFORMATION
Does the minor have a Texas license or permit? NO ( ) YES ( ) License/Permit number Has the minor ever applied for a Minor's Restricted License? NO ( ) YES ( ) Where? __________________ Has the minor completed an approved driver education course? NO ( ) YES ( ) Classroom ( ), Driving ( ), or Both ( )
FATHER'S NAME ____________________________ License Number_____________________________
Employed by ________________________________ Address:_____________________________
Work Hours: __________________________________________________Work Phone: ( ________ )
MOTHER'S NAME License Number
10
Employed by __________________________________ Address:
Name License # ______________________ Relationship
Explain in detail necessary driving of minor and why others cannot perform this function: NOTE: TRAVEL TO PARTICIPATE IN SCHOOL ACTIVITIES SUCH AS BAND, SPORTS, ETC., WILL NOT BE CONSIDERED A SUFFICIENT REASON TO ESTABLISH AN UNUSUAL ECONOMIC HARDSHIP.
A false or fictitious address in any application for driver license or any renewal or duplicate thereof, or knowingly to make a false statement or knowingly conceal a material fact or otherwise commit fraud in any such application
TO THE PARENT: In making this application as parent or guardian of __________________________ I take full responsibility for the authorization of said minor to be issued a driver license. I understand that the Department may make any investigation necessary to confirm or deny any information contained in this application or information concerning early enrollment authority in a driver education course as provided in Article 6687b, Sec. 12, V.T.C.S.
I DO SOLEMNLY SWEAR OR AFFIRM THE INFORMATION HEREIN IS TRUE AND CORRECT TO THE BEST OF MY KNOWLEDGE AND BELIEF.
Signature of Parent or Guardian Signature of Minor
VERIFICATION
SWORN TO AND SUBSCRIBED BEFORE ME THIS ______ DAY OF____________, 2004
Notary Public in and for the state of Texas/Authorized Officer
11
UNIT 3
Grading Scale and Driving Log
If you have not received your class and In-Car instruction
logs by US mail, feel free to contact us 1-877-449-7530
12
UNIT 4
Techniques, And Strategies For Conducting In-Car Instruction
13
Parents: Carefully read the following pages before and during the time you provide in-car instruction to your student driver.
Easy to follow graphics will assist you with the teaching techniques of the following tasks: • legal stops • right turn and left turn lane usage • lane change procedures • legal use of center lane • entering and exiting freeway • how to approach a YIELD sign
• angle, parallel, and perpendicular parking
If at anytime you encounter a problem and cannot seem to provide a solution or reasonable justification, don't hesitate to call Curb Buster toll free at 877—449-7530
14
IMPORTANT READING Before providing in-car instruction
Don't be lulled into a false sense of security just because your teen driver has good physical skills and is able to brake, steer, and accelerate the vehicle. The ability to brake, steer, and accelerate is not rocket science. Possessing good physical skills, though essential, does not constitute being a good driver.
As a general rule, it is the "good driver" who will catch you off guard and get you into an unexpected emergency situation for the simple reason that the teacher will take a mental vacation when a student with good physical skills is behind the wheel. During the time the poor driver is operating the vehicle, the teacher tends to be more alert, both physically and mentally.
Please note that the Learners Permit must be in the possession of the student driver while the student is operating the vehicle.
Parents, for your peace of mind, sanity, consistency, and organization, plan the in-car instruction around trips to:
Prior to providing in-car instructions to your student driver, it is strongly encouraged that you as the Parent/Teacher perform the following tasks:
1. Drive the vehicle in order to know and understand the vehicle's limitations and capabilities, in other words, how the vehicle handles, brakes, steers, and accelerates. Knowing and understanding the vehicles limitations and capabilities will
15
enable you to accurately evaluate the in-car performance of your student driver. Examples:
a. When braking, does the vehicle grab left/right?
b. Is the vehicle equipped with ABS? Do they work properly?
Do you understand how they should work?
c. Is the horn operable?
d. Do the wipers, signal lights, headlights, and hazard lights work?
e. Does the vehicle drift left/right, when steering wheel is released? This
indicates possible alignment problems.
If you criticize the student driver's performance or fail to identify when the vehicle's contributory problems may actually inhibit the student from accomplishing a task or performing poorly, any credibility you have established as a teacher will be destroyed, thereby eliminating any foundation of trust previously established.
2. Visually confirm that your student driver possesses a currently valid Learners Permit before beginning any in-car instruction.
Teaching Tip:
• Highlight the student driver's permit number (8 digits), expiration date, and restriction code. This ensures that the document you are observing is the actual permit and not a friend's or the DPS receipt.
• Place the DPS receipt in the "important drawer" at home and keep completely separate from the permit. (see sample)
• This attention to detail establishes your credibility as a teacher and encourages the student to become responsible and disciplined as a Young Driver.
No Permit-No Driving Practice!!!!!
The parent/teacher must maintain a classroom atmosphere in the vehicle at all times. Inappropriate behavior should be dealt with
16
immediately and responsibly.
Radio Usage is left to the discretion of the teacher. However, the teacher should control the volume and balance. Don't ever become involved in circumstances where the student driver uses the excuse that "I couldn't understand what you said or wanted because the radio was too loud."
Safety Belt Use is required in accordance with State law.
Progress: Do not allow the student driver to progress from one driving lesson to the next unless you are completely satisfied with their performance.
Review the previous lesson if you determine that the student driver's performance was less than adequate or simply to evaluate retention.
Ensure that the student driver receives the required 14 hours of in-car instruction as stipulated by DPS.
In-Car Instruction should not be administered nor should a student receive such instruction if neither the parent/teacher or student driver is physically, emotionally, or mentally capable of performing in a safe manner.
DON'T CRITICIZE IF YOU CAN'T PROVIDE A SOLUTION
17
State law requires that the student driver receive a specific number of driving hours in various driving environments, however, State law does not specify during which lesson or hour certain objectives should occur.
The decision as to when to expose your student driver to more complex and demanding driving environments is influenced by:
1. the student driver's physical ability
2. the student driver's decision making abilities
3. the student driver's emotional state
4. the parent/teacher's comfort level.
Parents: If in doubt, don't!
18
UNIT 5
LEARNING ENVIRONMENTS
19
Recommended Driving Environments for the Initial 7
hours of In-Car Instruction
Hour 1:
Objective: To evaluate how well the student driver brakes, steers, and accelerates, allowing the student to gain an understanding of the vehicle's limitations and capabilities, and enabling the Parent/Teacher to identify the student driver's strengths and weaknesses.
Recommended Environment: Residential Area or Parking Lot
Recommended Activities: This pre-driving check is recommended prior to every in-car instruction.
1. Upon approaching the vehicle, look at the direction the front wheels are turned, scan for obstacles under or around the tires, and look for evidence of leaks from the vehicle. Examples:
a. Water leakage in the area under the vehicle behind the right front tire is normal as this is where the air conditioner emits moisture.
b. In cold weather and prior to starting the vehicle, sound the horn or tap firmly upon the hood. This will alarm any cats, skunks, or neighborhood animals resting in the warm engine compartment so they will leave.
20
2. Upon entering the vehicle, have the student driver perform the following task:
a. place key in the ignition
b. lock the door
c. adjust seat and head restraints
d. adjust mirrors
e. fasten safety belts
Performing this simple task on a regular basis develops good, safe driving habits and attitudes and results in responsible driving behaviors.
3. While traveling at a speed of 5 to 10 mph, have the student driver perform the following actions:
a. Brake and stop the vehicle at a pre-designated point. **
b. Use the parking brake to stop the vehicle at a pre-designated point.
c. Brake hard and firm at a pre-designated point. d. For approximately 100 feet, steer slightly left, right, left, etc. e. For approximately 100 feet, depress accelerator,
release, depress, release, etc.
These techniques allow the student driver to become familiar with how the vehicle brakes, steers, and accelerates prior to entering traffic. They also allow the Parent/Teacher to gauge the student's physical skills.
*Note: When testing the brakes, never brake without first
glancing in the rear view mirror for traffic to the rear.
4. Have the student driver perform the following tasks.
a. right and left turns
b. legally designated stops:
• behind the solid white line
21
• behind the cross walk
• at the imaginary line extending from curb to curb if the stop line and cross walk are not present.
State law does not require that a driver stop behind the STOP sign, only that the vehicle comes to a complete stop at the areas designated above.
Note to the Parent/Teacher: Within 15 to 20 minutes, you will be able to determine if the student driver's physical skills and attitude allow them to graduate to a light traffic environment.
Continued practice within the residential environment or parking lot may be necessary to attain the physical skills necessary to move into light to moderate traffic.
Important: If at anytime during any lesson, the student driver reverts to previously developed bad habits or needs an "attitude adjustment," simply return to the parking lot or residential environment. This serves two purposes:
1. It is a disciplinary action, not punishment, and 2. it affects the student driver's attitude, fostering responsibility
and the self-discipline required for good driving behavior.
Word of Warning: Do not threaten an action that you are not willing or able to enforce. This destroys or damages your credibility with your student.
22
Hour 2:
Objective: To determine if earlier skills have been retained and graduate student to light to moderate traffic as appropriate.
Recommended Environment: Light/Moderate traffic
Recommended Activities: Have the student driver perform the following tasks:
1. right and left turns
2. lane changes
3. determine right of way
4. demonstrate proper and safe following distance
5. demonstrate simple decision making skills
6. demonstrate constant mirror use
7. parallel parking
Remember, Parent/Teacher, try using the technique of
• Directing the student to perform a task (e.g., lane change) then,
• Observe how the student driver performs the task, then
• Provide instruction and solutions.
Critical Information: The most difficult mental task for a student driver to perform is the ability to judge speed and distance. Therefore, lane changes, entering and exiting the freeway, and attempting to cross intersections is extremely difficult and dangerous. It takes time to develop these skills. Be patient and supportive. And remember! If in doubt, don't!
End Hour 2 on a positive note by having the student driver parallel park.
23
The three driving tasks which student drivers dread the most are:
• Parallel Parking
• Getting on the Freeway
• Backing Up
•
So, why try parallel parking so early in the training session? If taught properly and demonstrated by the parent/teacher, preferably from the passenger seat, the student driver will be successful upon the third attempt.
For the timid student driver or the student driver lacking in confidence and self-esteem, performing even a somewhat successful parallel parking maneuver goes a long way towards developing driving confidence, performance, and self-esteem.
An additional byproduct is that the parent/teacher has established trust and credibility.
24
Hour 3
Objective: To determine if previous information has been retained
and if the physical skills have improved or regressed.
Recommended Activities: Have the student driver perform the following tasks:
1. demonstrate proper lane use on right and left turns
2. demonstrate proper mirror use whenever they're foot goes to the brake. (approximately 5 — 7 seconds before the turn)
3. demonstrate proper lane position when approaching oncoming vehicles, curves, and hills
4. demonstrate proper eye movement at railroads crossings and intersections
Critical Information: If the physical skills appear to have regressed, try to determine why. Consider the following reasons:
• different vehicle? • negative attitude? • student driver's emotional or physical state? • over-confidence because of physical abilities?
25
Hour 4 Objective: To determine if previous information has been retained and if the physical skills have improved.
Recommended Environment: Heavy City/Frontage/Service Roads
Recommended Activities: Have the student driver perform the following task:
1. demonstrate proper and safe following distance
2. demonstrate correct decision-making skills
3. demonstrate proper risk acceptance
4. demonstrate knowledge and skill at YIELD signs
5. demonstrate complex reaction abilities
Critical Information: How the student driver demonstrates speed control, following distances, and proper approach at YIELD signs is a prime indicator of their knowledge, risk acceptance, judgment, and defensive driving skills.
26
Hour 5 Objective: To determine if previous knowledge has been retained and if the physical and mental skills have improved.
Recommended Environment: Heavy City/Freeway
Recommended Activities: Parent/teacher chooses a destination. Have the student driver perform the following tasks:
1. demonstrate complex reaction abilities by deciding what actions to take and when it is safe to take them
2. demonstrate the proper methods of entering the freeway 3. demonstrate the methods for proper lane use 4. demonstrate constant mirror use 5. demonstrate the methods for properly exiting the freeway
27
Hours 6 and 7
Objective: To determine if previous knowledge has been retained and if decision making skills have improved.
Recommended Environment: Choose a variety of locations.
Recommended Activities: Direct the student driver to unfamiliar destinations and geographical areas. Parent/teacher provides only general directions as needed.
Critical Information: Most student drivers have attained the physical skills necessary to operate a motor vehicle safely by the fifth hour of in-car instruction. Remember, good physical skills alone do not make a good driver. Like most drivers, student drivers tend to drive better in areas they know. Exposing the student driver to unfamiliar territory demonstrates to the student and the parent/teacher how confusion, stress, and frustration can affect driving performance, behavior, and attitude.
These two lessons may reduce some of the cockiness or over-confidence the student driver has developed while driving in familiar surroundings and allow him or her to become more responsible, mature driver.
Remember that your child has been observing how you drive for at least 15 years. You are the role model for your child and your student driver's reactions and driving behavior regarding the use of safety belts, drinking and driving, aggressive driving, etc. are an indictment of you.
Completion of the First Seven Hours: We don't send students to art school for 14 hours and expect them to become Rembrandts. Nor should we expect to produce an expert driver after only 14 hours of instruction. The remaining seven hours of in-car training allows the parent/teacher to supervise the in-car performance of their
28
student driver. Do not hesitate to provide constructive criticism or elaborate as needed.
Parents: You may feel bombarded by this small portion of our 30 years of driver education experience. But Curb Buster understands your frustration with driving schools that "promise but don't perform." It is our goal to prepare you with useful, valid information as you approach the endeavor of teaching your son or daughter to become responsible drivers.
While waiting for the DPS packet during the next 2-3 weeks, review this information again. You cannot hope to have digested it by reading it only once. So visit Curb Buster as often as you can so you, as the parent/teacher, feel mentally prepared for the challenge that awaits you.
29
UNIT 6
LIMITATIONS & CAPABILITIES
30
LIMITATIONS AND CAPABILITIES OF THE YOUNG DRIVER, PARENT/TEACHER AND AUTOMOBILE
It is essential that the parent/teacher understand and remember one important piece of "need to know" information. Simply because a Young Driver possesses the ability to brake, steer and accelerate a motor vehicle does not constitute their achieving good driver status.
Shockingly, many state licensed, driver education teachers, some parents, and most Young Drivers believe that simply because they possess the ability to physically control a vehicle, that they are “good drivers”.
Additionally, communication problems may retard a “Young Driver’s progress which may be compounded by the parent/teachers lack of understanding the vehicles limitations and capabilities.
Those limitations and capabilities are discussed in the following pages as:
• The Vehicle • The Young Driver • The Teacher
31
THE VEHICLE
Young Driver's and parent/teacher's should understand the vehicle's limitations and capabilities.
1. Sensitivity of the brakes, steering and accelerator.
2. Function of ABS and the parking brake
3. Location, purpose and procedures of the steering column cruise control, console, and gears.
Key Reminder for Success: For the nervous and inexperienced Young Driver, it may take 2-3 hours for them to just become comfortable with attaining the physical skills. The "simple" skills must be mastered before the "complex" skills can be introduced and achieved.
THE YOUNG DRIVER
Their limitations and capabilities are determined in part, by:
• Your son/daughter has been observing your driving habits and driving attitude for 15+ years.
• over/lack of confidence • emotional state at time of lesson • attitude (accepting, know it all, indifferent) • knowledge of Texas traffic laws and driving procedures • familiarity with the vehicle (s) • their height and vision • comfortable clothing and footwear • Adjustment of seat
32
THE PARENT/TEACHER
As the parent/teacher, you should be aware of the following potential limitations:
• lack of knowledge regarding Texas traffic laws and driving procedures
• pre conceived ideas as to how a person looks indicates how they will perform.
• your own familiarity as to how the vehicle responds when accelerating, braking, and accelerating
• procedures to becoming comfortable which in turn relaxes the Young Driver.
• your own bad habits such as eating, writing, or drinking while providing instruction.
IMPORTANT : The most dangerous moment for a parent/teacher is when you become comfortable with the Young Drivers physical skills, causing both of to become over confident, resulting in the parent/teacher taking a "mental vacation" and the results can be hazardous.
Remember, the majority of automobile collisions occur, not as a result of a Young Driver's physical skills but their lack of the development in their mental and decision making skills.
Understanding the concepts of limitations and capabilities is essential to the progress of your young driver. To further expand on those elements which impede a young drivers progress, ineffective communication and terminology are explained further.
33
IN-CAR TERMINOLOGY
Proper terminology and communication is vital in order to expect and achieve a balance between the young drivers' physical and mental development. Confusion breeds frustration, anger, and emotional trauma resulting in physical and mental errors by the young driver. The following information is designed to reduce your anxiety as a teacher and ensure maximum performance.
Always provide location first and direction second
Example: At the traffic light, red barn, yield sign, McDonald’s, or the next street, turns right/left.
Do not say, at the signal light turn right/left. Why? Signal light sounds like "signal right" to a nervous and confused young driver.
Providing the direction you desire your young driver to travel before you give the location may result in the young driver turning up a one way street the wrong way or a myriad of other problems.
When asking your young driver to “accelerate” especially if they have misjudged the speed or distance of an oncoming vehicle, refrain from using the following words, unless you know your son/daughter understand the meaning.
Get on It
Floor It
Punch It
Failure of your young driver to understand the meaning of these words may further delay a correct response with dire consequences.
34
The survey in Unit 7 may demonstrate the influence which their friends influence their driving behavior or as mentioned earlier, how much influence your own driving behavior and attitude has had on your son/daughter.
It’s too late to say, Do as I Say, Not as I Do.
35
UNIT 7
STUDENT MANAGEMENT TECHNIQUES
36
STRESS MANAGEMENT FOR THE IN-CAR EXPERIENCE
STRESS: A parent's anxiety and stress will greatly affect the student's driving performance. The following helpful hints may assist in reducing or eliminating your stress after a long day.
Managing Stress 1. Plan the in-car instruction of your teenage driver on your off
or lax working days. 2. Plan the student driver's in-car instruction in "real time" as
opposed to scheduled driving times. You can easily combine your instructional times with trips to the following areas:
the mall
the gym
school
work
the library
church
Reducing Stress
Good nutrition
Exercise
Practice time management
Listen to music you like
KISS — Keep It Simple, Stupid
Try to keep personal problems outside the car.
Be patient, even-tempered, and understanding.
Show respect if you wish to receive it.
Use humor when appropriate.
Be immediate, fair and consistent
State expectations and consequences 37
Perform a personal "pre-trip" analysis.
Preventing Tension — Parents, ask yourself the following questions before beginning your in-car instruction with your child:
Have you left your personal problems outside the
car? Are you physically and mentally alert?
Are you ready to meet the teaching task with even temperament and a smile?
If stressed out or running late, have you taken a few moments to relax?
Benson's Relaxation Techniques
This is a great method of relaxation, which will help calm
your mind.
a. Place feet flat on the floor in a comfortable position
b. Place hands on thighs.
c. Close your eyes.
Relax muscles.
d. Be mindful of your breathing.
e. After each exhale, repeat a word or phrase that keeps your mind focused such as calm, -peace, -om, etc.
Parents, remember:
Teenagers are concerned with dignity.
Teenagers wish to be treated as adults.
Teenagers do not act like adults.
Teenagers want to fit in.
38
Personal Aggressiveness Survey
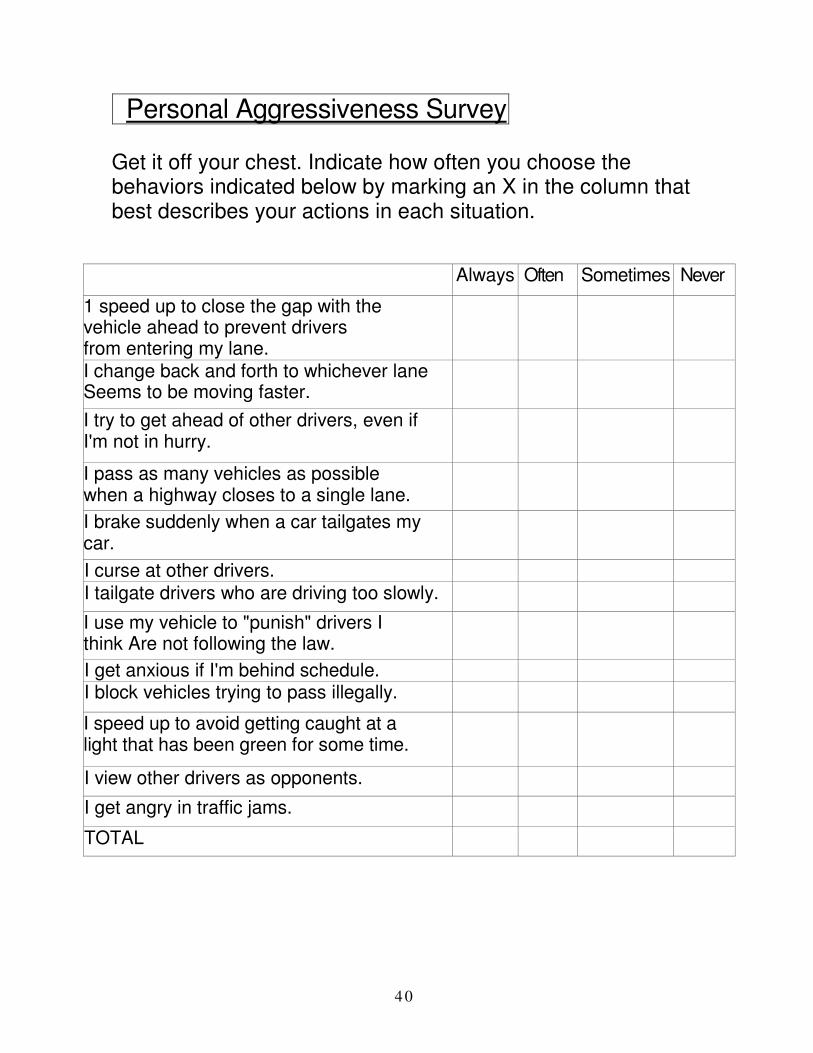
Parents, the following "Personal Aggressiveness Survey" is an excellent tool to determine the risk level of your young driver. The results of the survey will help reinforce the level of risk acceptance upon your child.
Though you probably already have a good idea of your young driver's risk level; you may not realize how your driving behavior has affected the attitude and driving behavior of your child.
Step One: Parents complete the survey first, without sharing it with the student driver.
Step Two: The student driver completes the same survey.
Step Three: Compare and share the results of both completed surveys.
Results: The higher the numbers in the Always, Often, and Sometimes categories, the greater the chance for driver behavior and attitude to result in traffic fines, collisions, and fatalities.
39
Personal Aggressiveness Survey
Get it off your chest. Indicate how often you choose the behaviors indicated below by marking an X in the column that best describes your actions in each situation.
Always Often Sometimes Never
1 speed up to close the gap with the vehicle ahead to prevent drivers from entering my lane.
I change back and forth to whichever lane Seems to be moving faster.
I try to get ahead of other drivers, even if I'm not in hurry.
I pass as many vehicles as possible when a highway closes to a single lane.
I brake suddenly when a car tailgates my car.
I curse at other drivers.
I tailgate drivers who are driving too slowly.
I use my vehicle to "punish" drivers I think Are not following the law.
I get anxious if I'm behind schedule.
I block vehicles trying to pass illegally.
I speed up to avoid getting caught at a light that has been green for some time.
I view other drivers as opponents.
I get angry in traffic jams.
TOTAL
4 0
Allowing your young driver the best chance of early success during the in-car phase of instruction is essential to his or her progress and to your sanity. Early success breeds confidence in your child and establishes your credibility as a teacher. To assist you in this endeavor, an understanding of the three learning domains inherent in the learning process of all individuals is vital.
As a parent, you probably already understand the method by which your child learns best. The following information may reinforce your teaching techniques and strategies
To further understand how and why your young driver responds to certain situations, you must first understand the three (3) learning domains.
Understanding these domains will allow you to better facilitate your young drivers progress both physically, emotionally and behaviorally.
Three Learning Domains
Inherent in the development of an appropriate curriculum is the knowledge that different kinds of learning influence and interact with each other. Behaviorist Benjamin Bloom has identified three domains of learning: cognitive, affective, and psychomotor.
Cognitive: Learning classified as cognitive is concerned with the development of knowledge, comprehension, and intellectual skills. It is in this domain that most curriculums have taken place. Objectives can be clearly identified and defined for your teenage driver. Therefore, this domain is central in the driver preparation process.
41
Affective: Very closely associated with cognitive learning is affective learning, which is concerned with interest, attitudes, values, and the development of appreciation. For instructional purposes in driver and traffic safety education, it is difficult to separate affective learning from cognitive. When an attempt is made to develop knowledge (cognitive learning), appropriate attitude modification (affective learning) usually follows.
Psychomotor: Psychomotor learning is related primarily to the development of motor skills.
To simplify a young drivers tendencies, the following information will gain your attention.
42
The Top Five Novice Driving Errors
#1 - Inattention ....20.8%
#2 - Too Fast for Conditions ....13.7%
#3 - Too Fast through Curves . . . 6.6%
#4 - Inadequate Search at Intersections ....6.3%
#5 - Lack of Attention at Intersections ....6.1 %
43
UNIT 8
General Driving Procedures
(DPS Resource Guide for Driver Education Teachers)
4 4
Four-Way STOP Signs
1. If traffic at an intersection-is controlled by STOP signs at four entrances to the intersection, the most orderly procedure to follow in leaving the STOP signs is for the vehicle that arrived first to leave first. Then the vehicle that arrived second to leave, etc. This procedure is simple courtesy.
2. If two cars arrive at two STOP signs at about the same time, the driver on the left might yield to the driver on the right. This procedure simulates the open intersection law to which drivers are accustomed and aids in preventing delays.
3. If traffic is heavy on all approaches priority might be given to commercial vehicles, especially large heavy trucks. If you do not intend to yield to a vehicle that arrived at the intersection after you did, you may indicate your intention by giving and holding a distinct STOP signal with hand and arm or make direct eye contact.
4. If traffic is heavy on one street and you are the only driver waiting on the other street, you might yield to two or three cars before you enter the intersection, in order to reduce congestion.
5. The four-way STOP sign intersection presents a procedure problem that does not lend itself to a precise mechanical solution. The best defensive procedure is to yield to a vehicle that is moving inside the intersection legally while you are still stopped. A vehicle is moving legally if the driver stopped before entering, gives proper signals, if required, and is moving in the proper position.
45
Approaching and Driving Through Intersections Where there is a Stop and Go Light Present.
6 When the green light is showing, reduce your speed enough to stop behind the nearest crosswalk (without locking your brakes) should the light change to amber before you enter the intersection.
If the light changes to amber when you are just entering the intersection, or after it is too late for you to stop behind the nearest crosswalk without locking your brakes, proceed through the intersection cautiously.
The longer the green light has been on while a driver is approaching an intersection, the more likely the driver will meet with trouble if an attempt is made to beat the light by accelerating. The defensive driver watches the green lights ahead and covers the brake as he or she approaches the intersection.
Common Turning Errors
7 Improper Position Of Vehicle On The Approach To A Turn
• Failure to maneuver your vehicle into the proper position or lane for the turn early enough to indicate to pedestrians or drivers (front, rear and side) that you are intending to turn.
• Failure to give a distinct turn signal early enough for pedestrians or drivers to react and maneuver to help you make the turn safely.
• Approaching an intersection for a left turn and failing to yield the right of way to a vehicle coming straight through the intersection, when the vehicle is too close to slow down safely.
• Approaching an intersection to go straight through and failing to slow down to let a waiting vehicle proceed to make a left turn, when slowing down a little would provide ample time for the vehicle to turn left.
• Driving to left of the centerline on the approach to a left turn at
4 6
an intersection or a private driveway.
• Failure to wait for opposing traffic to pass before turning left into a private driveway.
• Driving on left side of street on approach to a right turn into a private driveway.
• Drivers hit curbs on right turns usually because they turn about two feet too soon or they turn too slowly for the speed of the car. They turn too early because they do not realize that the front wheels are located about a yard from the front bumper, and the long hood makes them feel that the front wheels are into the cross street farther than they are.
• Drivers make right turns too wide usually because they are going too fast or they do not turn the wheels fast enough for the speed of the car. They may turn the wheel too slowly because they do not have their hands in positions on the steering wheel that will enable them to exert enough leverage for fast turning.
• Drivers sometimes stop, or almost stop, when they are halfway around the corner on a right turn. This trick has caused many rear end collisions. The driver who does this may need practice on close-in maneuvers or may need second gear as he approaches the corner.
• So many drivers cannot make right turns properly that a smart defensive driver will, upon seeing a right turn signal ahead, give a slow signal, if there is traffic following, and slow down early in preparation for a quick stop.
8 Unsafe Speed Of Vehicle On Approach For A Turn
• A fast approach indicates to other drivers that you do not intend to turn. The other drivers may become confused and not be able to maneuver properly to help you turn safely.
• If approach speed is too fast for a right turn, you may be forced to make a wide right turn across the centerline on
47
• If approach speed is too fast for a left turn, you will be forced to cross the centerline before you reach the intersection or you may be forced into a vehicle parked at the curb on the cross street.
General Parking Rules
9 Always set the parking brake, stop the engine, and remove the keys. It's the law. In a majority of all automobile thefts, the drivers invite theft by leaving car keys in parked cars. Furthermore, the keys invite children to start the car.
10 Illegal Parking Practices:
Parking in an intersection or double parking in a traffic lane. These areas are for moving vehicles.
• Parking on the left side of the street (except on a one-way street).
• Parking in a fire lane. The lane may be a narrow street and extend for a block or more.
• Parking within 15 feet of a fireplug. Firemen may have to work around the plug with fire fighting equipment.
• Parking within the block where fire apparatus has stopped to answer a fire alarm. This area must be open for fire truck maneuvers.
• Parking in front of a theater, hotel, or other populated building may be prohibited in some cities.
• Parking within 20 feet of an intersection. This area must be left open to enable drivers approaching the intersection to see one another and to prevent congestion by providing more room for vehicles to maneuver.
• Parking within 30 feet of any traffic control signal or STOP sign.
48
• Parking so as to block an alley, private driveway, or entrance to a filling station, garage, or parking lot.
• Parking on a sidewalk or pedestrian crosswalk
• Parking so as to occupy parts of two parking spaces
• Parking within 50 feet of a railroad crossing
11 Speed
• Cruise at a constant rate of speed. This does not mean you may not alter the rate occasionally to reduce fatigue from monotony.
• Alter speed to conform to the traffic pattern and to compensate for hazards.
• High speeds force you to commit position violations that cause collisions. Examples of position violations are failing to yield at intersections, passing in no passing zones and crossing the centerline on curves.
12 Following Another Vehicle
• Use the 4-second rule (below) when following another vehicle.
• When following another vehicle, pick a fixed object on the side of the road use a sign, overpass, or bridge railing. When the rear bumper of the car you are following reaches the point you have selected, count, one-one thousand, two-one thousand, three-one thousand and four-one thousand. When your front bumper reaches the same fixed point, stop counting.
• If you are 4-seconds or more away from the vehicle in front of you and driving conditions are normal, you following distance should be adequate.
• For every adverse condition, add an additional second
49
Miscellaneous Problems
13 School Bus
• When there are flashing red lights displayed on a school bus and you are approaching from either direction, you must come to a complete stop. If the road is physically divided, drivers approaching from the opposite direction of a stopped school bus are not required to stop.
• You are required by law to remain stopped and not proceed until
1. the bus resumes motion,
2. the bus driver signals you to continue. or
3. the flashing red lights are no longer actuated.
• The greatest danger in approaching a school bus is from the vehicles behind you.
14 Night Driving
• The National Safety Council estimates that on a vehicle mileage basis, two to three times as many traffic collision fatalities occur at night than in daytime.
• Night hazards increase as a driver's ability to identify objects decreases. When light conditions are poor the eye sees more slowly which causes the brain to lag in making decisions.
• A driver must compensate for this brain lag by reducing speed and concentrating both eye and mind attention upon the roadway. Concentrating eye attention does not mean fixing your eyes on an object, but rather keeping your eyes moving over the traffic scene.
• City Driving At Night
• State law requires that you keep lights on low beam when vehicles meeting you are within 500 feet. Unless an ordinance of the city in which you are driving requires low beam at all times, high beams may be used when there are no approaching
50
drivers meeting you.
• Parking on a sidewalk or pedestrian crosswalk • Parking so as to occupy parts of two parking spaces.
• Parking within 50 feet of a railroad
crossing. 15 Speed
• Cruise at a constant speed. This does not mean you may not alter the rate occasionally to reduce fatigue from monotony.
• Alter speed to conform to the traffic pattern and to compensate for hazards.
• High speeds force you to commit position violations that cause collisions. Examples of position violations are failing to yield at intersections, passing in no passing zones, and crossing the centerline on curves.
16. Driving In Fog
• There are three different factors limiting the top safe speed of a vehicle in fog:
• perception time of the driver, • reaction time and braking distance of the vehicle. • Perception time is the most important factor because of
how fast traffic conditions can change.
Slick Conditions on the Road
17 Anticipating Slick Places
• The initial 10 minutes of a rainfall are the most dangerous time due to the mixture of water, oil, and other traffic film.
51
• In freezing weather approach bridges cautiously, even if the adjoining pavement is dry. Water may have condensed on the cooler bridge and frozen.
18 Preventing Skids On Slick Places
• Lower the cruising speed and increase and decrease your speed at a slow rate. Pump brakes slowly, except on ice.
• Reduce speed for short turns so you can turn the wheels gradually.
• Ease off the gas while your car is crossing a slick place in the roadway.
• Ease off the gas when you feel the drive wheels losing traction.
• Brake Application: At all cost, try to avoid locking your wheels in an emergency. Locked wheels:
a. can burn rubber in spots and thus throw a wheel out of balance.
b. cause complete loss of directional control.
c. can cause a spin and overturn if brakes are not equalized.
d. may start a spin if the front wheels are turned or if the road is wet.
52
Under a condition of an impending collision (which frequently is a result of inattention to the roadway or of poor planning), locking wheels becomes necessary. All drivers should be conditioned to apply brakes hard as an act of last resort to avoid striking a fixed object a vehicle, or an animal.
19 Yielding Right Of Way To Emergency Vehicles
• Ambulances, law enforcement vehicles, fire department cars and trucks, and voluntary fireman in private vehicles responding to emergency calls are classified as emergency vehicles.
• When an emergency vehicle sounding a siren or displaying a red light on the front approaches on a two way street, drive as far to the right as you can and stop.
• On a one-way street, go to the nearest curb. If you are unable to get to a curb because of other vehicles, stop where you can leave a passage open and remain stopped until the emergency vehicle has passed.
• Make certain that no other emergency vehicle is approaching before you reenter traffic.
20 Efficient use of time
Organize and conduct in-car instruction to provide maximal time for student practice of safe driving skills and techniques.
All material that can be dealt with effectively in the classroom should be covered there and not be allowed to consume valuable in-car driving time.
21 Teaching in an inherently dangerous environment
In making all decisions relative to the planning and conducting of in-car instruction, take in account the inherent danger of the teaching environment. Never expose students to unreasonable risk of harm.
53
Be alert to the emotional strain that can affect any teacher and/of student and to the potentially disastrous consequences of such strain.
Be alert to the possibility that many driver education students approach the driving task with considerable fear and anxiety. Make an effort to identify these students and to treat them accordingly.
22 Individualized Instruction
Keep records of the driving performance and progress of your son/daughter. It is a motivator and enhances performances.
Use periodic teacher/student conferences to discuss performance and plans for improvement.
Use study assignments if motivation is lacking
23 Methods In Relation To Content
Select methods that are best suited to the content being taught.
24 Determining The Amount And Distribution Of Practice
Be prepared to adjust the amount of practice time on each skill to suit the individual learning capacities of the student.
Provide the student with sufficient practice on a given skill to enable him/her to perform it correctly on several successive trials.
Periodically check to see that skills that were learned earlier have been retained and, when necessary, provide additional practice.
Avoid continuous and repetitive practice of the same skill to the point where the student loses his/her motivation.
25 Control Of The Automobile
Assume verbal or physical control of the vehicle whenever an accident
54
is imminent or there is reason to believe that the student is unaware of or unable to cope with the danger.
Continually be in a ready position that facilitates the assumption of control through application of the steering wheel, park brake, and verbal commands.
Make every attempt to equip your car with a second inside mirror for your use. Vanity mirrors may suffice but the sun-visor may impede your forward vision.
Avoid over-controlling (verbally or physically) by over-reacting in non-dangerous situations.
Use a tape recorder to review your own ability to understand your instructions and directions.
To confirm that the student understands what you expect, have the student restate what you just said.
26 Providing Directions
Whenever possible, plan the driving route in advance and communicate the plan to your son/daughter before the lesson begins.
Develop and practice a direction-giving technique that includes a repertoire of clear and concise directions.
Provide directions well in advance to permit the student to get mentally and physically ready to perform.
When appropriate, allow your student an opportunity to direct their own driving and make their own decisions.
55
27 Demonstrating
Demonstrations should be models of expert performance and should be carried out at appropriate speeds.
The demonstration should be accompanied by appropriate comments that point to the critical elements of performance.
Demonstrations of complex maneuvers and techniques should emphasize only the most critical aspects of performance.
28 Verbal Cues
Provide verbal cues only when they are necessary to help the student correctly perform a skill, maneuver, or technique that he/she would otherwise perform incorrectly.
Be ready to use verbal cues during the student's initial performance of a complex skill, especially when the student repeats a specific error in difficult situations.
Recognize that the need for verbal clues diminishes as the student's driving ability increases.
29 Guiding The Student's In-Car Performance
Be in a position to observe all the important elements of the student's performance including those elements that are not reflected in the movement of the vehicle.
Analyze all elements of the student's performance to determine the underlying cause of poor or improper performance.
When the student is not aware of his/her error, clearly identify the error to him/her.
56
Verbal feedback should be immediate and precise.
Limit the amount of feedback in terms of your son/daughter's ability to absorb it.
When necessary, as a part of the feedback process, indicate the appropriate corrective action.
Provide the student with an immediate opportunity to correct errors by repeating the skill or maneuver again.
Verbally reinforce the student's performance.
30 Evaluation Of In-Car Performance
Observe, and then teach. Most teachers/parents tend to talk too much, especially during the initial stages of in-car instruction.
Let the student get a feel for the car. — how it brakes, steers, and accelerates. This will enable the student to relax to a certain degree, enhancing performance and improving confidence.
By the sixth and seventh driving hours, the student driver should have acquired the physical skills necessary to operate the vehicle. During this time allow the student to gradually begin making driving decisions. More often than not, mental skills get a driver in trouble, not their physical skills.
57
The Parent's Role as Teacher
Here are some "nice to know" tips for your upcoming role as teacher:
Remember to keep your "parent Emotions" under control
• Don't just direct (left, right, straight etc.) — Teach!
• Control vehicle at all times (verbally and physically).
• Anticipate problems.
Always expect the worst.
Identify problems.
• Provide solutions.
• Decide which solution is appropriate.
• Provide a classroom atmosphere in the car.
• Record times and dates of instruction on Curb Buster form.
• Provide a learning environment for the student
• Remain in control of your emotions
Parent/Teacher Attitude
You can be a "thermostat" or "thermometer." In other words, you can control the learning environment or become a victim of it.
Your attitude affects how you feel about teaching your son/daughter.
Your attitude can positively or negatively affect your child's driving ability and behavior.
Your attitude can set the stage for the progress — or lack of it — in the student's in-car behavior and performance.
Your attitude while instructing your child directly affects his or her attitude about driving. Remember, your young driver has been observing your driving conduct and attitude for nearly 15 years.
58
UNIT 9
BEHIND THE WHEEL
INSTRUCTIONAL PHASE
59
The following pages will provide vital information designed to have the young driver gain an understanding and fully appreciate the risk factors of driving and the strategies to identify and reduce risk factors.
Understanding and recognizing those factors in various driving environments(residential, rural, city, and freeways) is essential to the young driver in order to drive and survive. Developing the mental skills to implement a strategy of defensive driving to include a space management system comprised of understanding their own limitations and capabilities as well as the vehicles limitations and capabilities is essential in their development.
As the young driver becomes more comfortable (over confident) in their driving ability, many tend to take more risk. During this period of time “distracted driving” is a huge factor in the frequency which the young driver is involved in automobile collisions.
Distractions involving multi-tasking (signaling lane changes, adjusting the radio, turning on the wipers, eating, drinking) while driving in medium and high risk driving environments can be reduced with an effective driving plan.
60
Recommended Teaching Methods To Introduce A New Task Or Maneuver
Reduce the opportunity for confusion, mistakes, collisions, and excuses by employing the following strategy:
1. Emphasize to the student driver to not worry about the route. Avoid the student's asking, 'Which way do I go at the stop sign, traffic light, intersection etc." by supplying instructions prior to the lesson. Tell the student something like this: "Continue straight ahead at any intersection, unless instructed otherwise."
This simple technique serves two purposes:
• It removes or reduces the anxiety and trepidation the student may have.
• It allows the student to concentrate upon making intelligent and informed driving decisions.
2. Eliminate "too much talk." Bombarding the student with too much information too early or unnecessarily may result in a nervous, unsure, and poor performing student.
Gradually Enhancing the Student Driver's Performance:
1ST Level: Student driver performs maneuvers only as, when, and how directed by the teacher.
2nd Level: Student driver performs maneuvers when requested by the parent/teacher but only after the student driver has determined that the action can be accomplished safely.
3'd Level: Student Driver makes all decisions and performs all physical tasks after being provided the location or specific destination.
Level 3 is to be attempted by the student driver only after the teacher has complete confidence in both their mental and physical development and progress
61
Parents, as you are about to embark upon your most significant accomplishment since giving birth to your son or daughter, keep in mind one important fact: TEENAGERS DON'T CHANGE. PARENTS CHANGE.
Parents, on a scale of 0 to 10, how much would you trust a new student beginning in-car instruction?
The correct answer is O. You can expect many students to have acquired the ability to brake, steer, and accelerate, but do not allow their ability to physically control the vehicle lull you into a false sense of security. There is a reason they are called YOUNG DRIVERS.
A young driver's physical skills are not the reason that traffic collisions are the #1 killer of teenagers. The attitude and behavior you teach your child while driving will more greatly affect his driving skill that any physical ability he or she has.
62
Young Drivers shall receive a total of 34 hours of in-car instruction. Ten (10) of those hours must be at night.
Recommended driving environments as indicated on the driving log:
The 1st in-car lesson is the most important as it sets the stage for your expectations.
The final in-car lesson is the most critical as it leaves an impression upon the young driver that “I am not invincible”.
This builds an attitude of responsible driving behavior a vital skill for a young driver to “Drive & Survive”.
63
Understanding the Risk Factors of Driving
Risk is defined as the “chance of injury, damage, or loss.”
The ability to recognize and respond to risk is essential to a young driver’s ability to drive and survive.
Simply possessing the physical skills to operate a motor vehicle does not necessarily compute in becoming a good driver. An explanation as to why young drivers are over-represented in motor vehicle crashes is that as a group, they have been found to have a high risk factor. Unfortunately, in most instances, young drivers do not have the ability to either access or to respond correctly to complex situations. Driving behavior is often based on the perception of risk rather than the level of the actual risk.
Participation in the HTS involves constant risk that must be predicted, analyzed, and minimized including the effect a driver’s actions have on vulnerable roadway users. The benefits of using this risk reduction strategy is that it allows the driver to minimize both real and potential risk factors.
The ability to access risk involves one essential element; we refer to as “possessing knowledge”. For inexperienced or novice drivers there are drive to survive skills which help you assess risk more accurately.
• Is it legal • Is it necessary • Is it safe • If there is any doubt or hesitation, that is nature’s way
warning you not to attempt the risk. • Is there an escape route • Always expect the worst
64
The ability to identify hazards, predict what may occur, decide corrective action and execute the action is a benefit to minimize both real and potential hazards.
Real risk involves the high probability that a collision is imminent. A potential hazard is the probable possibility that a collision may result.
To predict and analyze hazardous driving environments, identify the hazard and determine whether the threat may increase or decrease. Secondly, predict how your path of travel will be affected and the action you should employ.
To minimize these risks and reduce the threat consider the following strategies.
1. Adjust speed for conditions (driver, weather, road and vehicle)
2. Drive defensively 3. Always wear your safety belts 4. Use your I-P-D-E skills 5. Isolate and Stabilize 6. Separate and Compromise Risk
What factors contribute to collisions?
Per the Texas Department of Public Safety, the following seven behaviors contribute to vehicle collisions and are listed according to frequency of occurrences.
• Speeding is the #1 cause of vehicle collisions in Texas which includes driving above the posted speed limit and driving too fast for conditions.
65
• Failure to Yield Right of Way is the second leading cause of collisions.
• Driving While intoxicated is the 3rd leading cause. • Following Too Closely is the 4th leading cause of
collisions. Novice drivers tend to leave shorter following distances than experienced drivers.
• Disregarding stop and go signal is the 5th leading cause. Can be attributed to inattention, attempting to beat the light or rolling thru the stop sign.
• Improper Turns such as turning too wide, cutting corners or failure to control speed can all result in improper turns.
• Unsafe passing involves illegal or unsafe passing.
Just as deadly can be driving while distracted. Typical distractions include:
• Cell Phone Usage • Eating or drinking • Putting on make-up • Changing the radio station or CD player • Passengers or Pets
How to predict real and potential risk factors in controlled, low, moderate, and complex risk environments.
Usually, low risk environments are limited to speed of under 40 mph accompanied with uncontrolled intersections in urban and rural settings.
Risk Factors Inherent to Low Risk Environments include: • Pedestrians • School Zones • School buses • Parks & Zoos
• Children
66
• Obstructed Intersections
Moderate Risk Environments is limited to speeds under 60 mph with controlled intersections in urban, and rural settings. Features include:
Risk Factors in a Moderate Risk Environment include:
• Line of sight limitations • Pedestrians • Changing Speed Limits • Pedestrians in crosswalks • Path of travel restrictions • Service Stations
Complex Risk Environment is limited to speeds under 70 mph consisting of controlled and limited access interchanges. Heavy traffic flow and unpredictable actions by drivers.
• Following Too Closely • Failure of understanding the Risk • Distractions • Emotions • Not understanding your vehicles limitations
and capabilities • Not understanding your own limitations and capabilities
The top 5 leading causes of traffic fatalities in Texas include: 1. Failure to yield ROW 2. Wrong Side-Not Passing 3. DWI 4. Speed Over the Limit 5. Speed Under the Limit
Driver errors committed by 16 year olds in traffic collisions include:
• inattention • Following too closely • Not utilizing defensive driving skills • Excessive speed for conditions • Improper evasive action • Failure of using their I-P-D-E strategies
68
Factors which reduce the effectiveness of a risk reduction strategy include:
• Condition of the Driver • Condition of the Vehicle • Weather Conditions • Fatigue • Emotions • Alcohol and Drugs
Determining whether a risk is “acceptable” or “unacceptable”
When accepting a risk, you must have the knowledge about the potential errors and consequences if you choose to perform the risk. Good visual habits (scanning) and understanding your own limitations and the vehicles as well are essential in your success of performing reduced risk driving.
Compensation for risk involves the ability to recognize potential errors and compensating for those errors to reduce speed, adjust lane position and to communicate appropriately. (signals, horn, lights, flashers, etc)
Decision making us the most vital skill any driver can posses in the driving environment. For new and inexperienced drivers the problem is compounded by the fact that the two most difficult task to perform is to judge speed and distance.
To assist in this endeavor it is vital that a young driver understand and utilize a space management system.
A space management system is a method to organize information in categories which will enable drivers to distinguish between simple and complex driving situations and react correctly.
69
To understand the process, the young driver must know where. When and how to search for in the traffic environment. Knowing where to search involves constantly moving the eyes (scanning) both inside and outside the vehicle in 360 degrees. Searching also involves paying special attention in the immediate path of travel (4-8 seconds ahead) while also concentrating a more extensive search of some 12-15 seconds ahead of your intended path of travel.
When to search requires consciously making an effort to determine the conditions both in and around your vehicle before initiating change of speed or direction.
How to search involves developing a systematic pattern of commencing and completing your search. The advantage of developing such a pattern results in forming a habit which will ensure an effective search pattern.
A space management system include a four (4) step process. These four steps must become habit in order for you to develop the mental skills to drive and survive.
Identify the traffic situation. This simply means to recognize and understand the traffic around you. Speed, risk takers, driver inattention and density of traffic.
Predict what the other drivers are going to do. Rule of thumb, always expect the worst and prepare.
Decide what action you may need to perform. Do you need to adjust your speed without braking? Do you need to brake? Do you need to perform a lane change? Do you need to engage your wipers, headlights, hazard lights, sound your horn, tap your brakes?
70
Execute. In other words, implement the action which you have decided is appropriate.
Conducting a 20-30 second traffic pattern search is difficult to attain especially for new drivers but it is the only technique available to a driver which will enable them to determine a safe path of travel, identify hazards and make safe and responsible decisions. In many instances, a drivers search is only 4-5 seconds ahead of their vehicle which doesn’t always prepare them for an unexpected emergency.
When scanning 12-15 seconds ahead you have ample time to adjust speed or direction, buying you more time to identify potential hazardous situations. Depending on the driver’s attention level and where that attention is directed, 4-8 seconds should provide ample time to establish control of your vehicles speed and direction.
While establishing an understanding of the scanning process it is essential that you also comprehend as to how you can utilize the space around you that you have established.
By controlling the space to the front and rear of your, you can control such space by: * Controlling your speed while moving * Adjusting speed as applicable * Placement of your vehicle as you come to a stop.
Time and distance variables are designed under the most favorable driving conditions.
• A Two second following distance on a dry surface normally provides a driver the s time to avoid a collision if travelling at a speed of 35 mph.
71
• Maintaining a 4-second following distance allows the driver, if travelling on dry surfaces to avoid a collision at speeds of 70 mph.
Foremost, a three to four second following distance is the minimum time under good driving conditions.
Tips for Safer “Space Free” Driving
When you’re the 1st vehicle stopped at a Red Traffic Light * When the light turns green, before moving, glance left, glance right and then again, check left. This will take approximately 2 seconds and provide you the safety advantage you need in order to avoid a red light runner.
Why check left last? Because this vehicle will be the 1st vehicle you encounter as you proceed across the intersection. It’s good defensive driving.
Space to the Rear. When stopping behind the vehicle in front of you, leave enough room so you can drive around them without backing up. A clue is to stop your vehicle where you can see their rear tires touching the pavement. This can also be of benefit in case of an attempted car jacking.
Finally, a good defensive driving technique is to check your rear view mirror:
• Every-time you foot goes to the brake • Just as you come to a complete stop in traffic • Continuously glancing in the rear view until a vehicle
stops behind you, thus blocking traffic from your rear. • Anytime you stop or prepare to turn
72
Understanding the Concepts of Perception & Reaction Times
Perception time is the time it takes for a driver to identify a traffic situation as a hazard. Perception time can be from 1/2 of a second to Never.
Reaction time is the time it takes the driver to take corrective action. The time it takes for your brain to tell your foot to hit the brake. The average reaction time is 3/4 of a second. Reaction time may be altered by fatigue, illness, medications, alcohol, inexperience, and illness. A driver can reduce reaction time by covering the brake when identifying a potential hazard.
• Assumptions that because I have the ROW I have no worries. (complacency)
When controlling space to the front, a driver has three options. • Speed Adjustment • Lane position • Communicating with other traffic (flashing head
lights, sounding horn )
Strategies when deciding to perform maneuvers consist of knowing the time element involved as follows:
73
• For Passing. You need to be travelling at least 10 mph faster than the vehicle you are passing in order to complete the pass in 10 seconds at 70 mph.
• An 8-second gap when merging in traffic • Crossing a 4-lane road you will need a 6-7 second gap • If turning left, you need a 9 second gap to the right and
a 7 second gap to the left. • Turning right, a 7-9 second gap to the left
Techniques for Managing Space on Multiple Lane Roadways
• Reduce speed when roadway conditions warrant. (tunnels, bridges, construction zones etc)
• When being tailgated, change lanes while maintaining an adequate following distance from the vehicles in front of you.
• Allow room for vehicles entering the roadway from an entrance ramp by speed adjustment or making a lane change.
• Maintain a 4-second following distance when merging on the roadway, changing lanes, and exiting the freeway.
• Adjust the vehicles position and speed to the road and weather conditions in order to allow more time and distance for braking, accelerating, and steering.
To ensure that you have an understanding of the importance of space management driving, it is essential that the concept of zones is relevant to your training.
There are 7 areas of a vehicles operating space which we refer to as zones.
A zone refers to one of the six spaces around your vehicle. It is
74
the width of a traffic lane and extends as far as you can see. There are three (3) types of zones, open, closed or changing.
An Open Zone is a space where you may drive without restriction to either your line of sight or path of travel.
A Closed Zone is the area that is not available for your vehicle’s path of travel or there is a restriction to the driver’s line of sight.
Changing Zones refers to a zone whose conditioning is worsening. It is often an open zone that is diminishing to a closed zone as a result of line of sight issues or additional problems are developing. Sand
Environmental Driving Characteristics & Factors
Young drivers will legally and responsibly perform reduced risk driving practices by identifying and analyzing driving environments and minimizing environmental risk.
The following traffic environments may present both simple to complex risk to drivers. The characteristics of low, moderate, and complex risk areas encompass the following and are based on:
• Traffic Flow • Traffic Volume • Line of Sight • Path of Travel • Distractions
• Right of Way
75
Driving Environments
Residential driving environments consist of the following characteristics:
• Line of sight limitations • Parking on both sides of the street • Speed Bumps • Narrow streets • Driveways • Controlled/Uncontrolled intersections • Pedestrians, children, and bicyclist
Residential neighborhoods generally have lower traffic volume which travel of speeds of 15 to 3o mph. Risk inherent to residential streets are:
• Children playing in streets and driveways • School buses • School zones • Animals • Line of sight restricted • Path of travel diminished
Risk Behaviors include:
• Speeding • Failing to wear safety belts • Failure to yield ROW • Ignoring speed bumps • Improper search patterns for oncoming vehicles,
children bicyclist • Distractions
76
Motorized and Non-Motorized Users:
Motorized • Pick-Ups • Motorcycles • Garbage trucks • Delivery vehicles • Trains • Post Office vehicles • Oversized trucks • Motor homes
To Manage these risk a driver will: • Time the divided attention task • Utilize occupant protection • Apply knowledge and understanding • Use reference points • Maintain vehicle balance • Utilize driver readiness
The Urban Driving Environment consist of areas with light traffic, congested traffic, low and high speed traffic designed to move traffic throughout the city.
Characteristics of Urban Environments • Road signs, billboards and pedestrians • Vulnerable users • Controlled intersections • Stores • Starting and Stopping Traffic • Special events • Work Zones • Construction • Parked Vehicles
Techniques to make reduced risk decisions • Adhere to the posted speed limit • Wear your safety belt • Utilize defensive driving strategies • Avoid frequent lane changes • Plan ahead
78
Reducing Risk with good driving habits • Watch for distracted pedestrians • Avoid travelling in lanes next to parked vehicles • Use signals and communicate • Glance at uncontrolled intersections
• Maintain a safe following distance
Travelling on Rural Roads
Rural roads account for approximately 50% of the total fatalities on roadways across the nation.
Rural road collisions are generally more severe than crashes on urban roads due to changes in speed and traffic enforcement.
Characteristics of Rural Road Collisions include: • Collisions at intersections • Head –on collisions • Single vehicle collisions
These three (3) collisions account for approximately 79% of rural crashes. Of the three collisions, single vehicle collisions are the most common as a result of driver error, the vehicle and the road.
Head-on collisions account for nearly 24% of all fatal crashes on rural roads. Contributing factors include fatigue and alcohol usage.
When approaching a hill crest, position your vehicle near the right edge of the pavement. At night, prior to cresting the top of the hill, flash your headlights which will allow your bright lights to bounce off the roadway and surrounding vegetation, warning oncoming traffic of your presence.
79
Vehicles in crashes as a result of running off the road account for 1/3 of all traffic fatalities and 2/3 of those crashes occur in rural areas.
Expressway Driving
An expressway is a limited-access or controlled access highway designed for reduced risk high speed travel.
Characteristics of an Expressway
• 70 mph speed limit • Generally divided by a barrier • Multiple lanes • Controlled access
The following factors contribute to the low crash/injury/fatality rate on freeways:
• Cross traffic eliminated • Enter and exit at designated interchanges only • Median or barrier between opposing lanes • Pedestrians and non-motorized vehicles not permitted • Wide shoulders and underpasses
Interacting with Trucks and Tractor Trailers
Trucks and tractor Trailers are longer, higher and wider than other vehicles They accelerate slowly and require greater stopping and turning distances. Additionally, these vehicles have blind spots where collisions are likely to occur.
When following a large truck, increase following distance to allow a clear line of distance sight. If the side view mirror(s) of the truck
80
cannot be seen, the driver of the truck can’t see you.
If stopped behind a truck on the upgrade, leave space in case the truck drifts slightly back when it begins to move forward.
When passing a truck, let the driver know you intend on passing by flashing your headlights, especially at night.
The Driving Plan
A Driving Plan incorporates the Knowledge and Skills of the young driver which the student may develop and sustain legal and reduced risk driving strategies.
Safety or the reduction of risk or injury. Legal and responsible driving practices.
Economy or the reduction in the use of our environmental resources. Consumer responsibility, conversation, environmental protection, and litter prevention.
Civility or the increase of polite and respectful acts-Share the Road.
DISTRACTIONS
Distracted driving is any non-driving activity a person engages in while operating a motor vehicle.
The Risk of Distracted Driving
• A distracted driver is inattentive as he/she takes a “mental vacation” while performing both simple and complex maneuvers.
81
• Does not allow the driver to visually or mentally concentrate on the vehicles path or travel and may restrict the line of sight which can limit the driver’s ability to respond correctly in an emergency.
• More than 40,000 people are killed in motor vehicle collisions and over three million injured.
• Driver distraction is a contributing factor in more than 25 percent of all collisions.
Per the NHTSA, there are three types of distraction: • Cognitive- ---taking your mind off of the driving task • Manual - taking your hands off the wheel • Visual ---- taking your eyes off the road
In 2008, nearly 6,000 people died in collisions involving distracted driving. The driving task requires a driver’s full attention. In some instances, even a split second of taking your eyes and attention off the driving task can be the difference from being able to avoid a collision.
Of special concern is texting. The percentage of young driver’s texting or using other hand held devices has increased since 2007. Available research indicates that cell phone use while driving, whether hands free or hand-held, inhibits a driver’s performance. The driver is more likely to miss a key visual or audio cue needed to avoid a collision.
The primary responsibility of the driver is to operate a motor vehicle safely. To do this, a driver must concentrate his/her full attention to the driving task. The safest option for a driver is to refrain from cell phone use while driving.
82
Cell Phone Facts
• Drivers under age 20 are most likely to be involved in distracted driving crashes.
• This is nearly 50% more likely than the next group at ages of 30-49 years of age.
Why the Over involvement? • Lack of driving experience • Lack of experiencing with multi-tasking • Increased risk taking
• Lack of vehicle familiarity
Driving distraction has the potential to cause a young driver to experience a crash; several distractions have been identified as especially hazardous to young drivers under the age of 20:
• Adjusting radio/CD’s • Outside person or event • Other occupants
Potential dangers of using a cell phone while driving • Diverting attention away from the driving task • Inhibits ability to respond to an emergency • Inhibits ability to make quick decisions • Taking your eyes off the road
• Unable to perceive potential collisions
Cell phone benefits • Allows one to summon road side assistance • Ability to contact law enforcement • Ability to contact emergency services
• Ability to confirm family members location
83
Multi-Tasking & Driving
Distractions are a bigger challenge for new drivers than an experienced driver who has learned how to multi-task, such as dividing attention from the path of travel to check mirrors, check lane position, or check speedometer.
Actions which require multi-tasking include: • Operating windshield wipers • Operating cruise control • Using turn signals/hazard lights • Maintaining vehicle control and position • Perform lane changes
Driving is a responsibility that requires multi-task performances to ensure that the job is performed legally, responsibly, and safely. Failure to correctly divide attention produces unsafe driving.
Techniques to divide attention between multi-task performances is critical which is the reason that a driver should never look away from the path of travel for more than Y2 second at a time. Any such activity which tends to lower one’s level of alertness has an adverse effect on steering.
Counter measures to effectively time the multi-task performance reduces the risk. A driver must apply time management techniques to execute these performances. It is so critical that the driver never look away for more than Y2 a second from the path of travel. If more time is needed to complete the task, a driver should use more than one glance and always remember to return visual and mental attention back to the original path of travel.
84
Risk Factors in a Moderate Risk Environment include: • Line of sight limitations • Pedestrians • Changing Speed Limits • Pedestrians in crosswalks • Path of travel restrictions
• Service Stations
Complex Risk Environment is limited to speeds under 70 mph consisting of controlled and limited access interchanges. Heavy traffic flow and unpredictable actions by drivers.
Features include: • Rumble strips • Crowned Roadways • Guard Rails • Banked Roadways • Protected left and right turns
• Following Too Closely • Failure of understanding the Risk • Distractions
• Emotions
85
• Not understanding your vehicles limitations and capabilities
• Not understanding your own limitations and capabilities
The top 5 leading causes of traffic fatalities in Texas include:
6. Failure to yield ROW 7. Wrong Side-Not Passing 8. DWI 9. Speed Over the Limit 10. Speed Under the Limit
Driver errors committed by 16 year olds in traffic collisions include:
• inattention • Following too closely • Not utilizing defensive driving skills • Excessive speed for conditions • Improper evasive action • Failure of using their I-P-D-E strategies
Factors which reduce the effectiveness of a risk reduction strategy include:
• Condition of the Driver • Condition of the Vehicle • Weather Conditions • Fatigue • Emotions • Alcohol and Drugs
Determining whether a risk is “acceptable” or “unacceptable”
When accepting a risk, you must have the knowledge about the potential errors and consequences if you choose to perform the
86
risk. Good visual habits (scanning) and understanding your own limitations and the vehicles as well are essential in your success of performing reduced risk driving.
Compensation for risk involves the ability to recognize potential errors and compensating for those errors to reduce speed, adjust lane position and to communicate appropriately. (signals, horn, lights, flashers, etc)
Decision making us the most vital skill any driver can posses in the driving environment. For new and inexperienced drivers the problem is compounded by the fact that the two most difficult task to perform is to judge speed and distance.
To assist in this endeavor it is vital that a young driver understand and utilize a space management system.
A space management system is a method to organize information in categories which will enable drivers to distinguish between simple and complex driving situations and react correctly.
To understand the process, the young driver must know where. When and how to search for in the traffic environment. Knowing where to search involves constantly moving the eyes (scanning) both inside and outside the vehicle in 360 degrees. Searching also involves paying special attention in the immediate path of travel (4-8 seconds ahead) while also concentrating a more extensive search of some 12-15 seconds ahead of your intended path of travel.
When to search requires consciously making an effort to determine the conditions both in and around your vehicle before initiating change of speed or direction.
How to search involves developing a systematic pattern of
commencing and completing your search. The 87 88
advantage of developing such a pattern results in forming a habit which will ensure an effective search pattern.
A space management system include a four (4) step process. These four steps must become habit in order for you to develop the mental skills to drive and survive.
Identify the traffic situation. This simply means to recognize and understand the traffic around you. Speed, risk takers, driver inattention and density of traffic.
Predict what the other drivers are going to do. Rule of thumb, always expect the worst and prepare.
Decide what action you may need to perform. Do you need to adjust your speed without braking? Do you need to brake? Do you need to perform a lane change? Do you need to engage your wipers, headlights, hazard lights, sound your horn, tap your brakes?
Execute. In other words, implement the action which you have decided is appropriate.
Conducting a 20-30 second traffic pattern search is difficult to attain especially for new drivers but it is the only technique available to a driver which will enable them to determine a safe path of travel, identify hazards and make safe and responsible decisions. In many instances, a drivers search is only 4-5 seconds ahead of their vehicle which doesn’t always prepare them for an unexpected emergency.
When scanning 12-15 seconds ahead you have ample time to adjust speed or direction, buying you more time to identify
potential hazardous situations. Depending on the driver’s attention level and where that attention is directed, 4-8 seconds should provide ample time to establish control of your vehicles speed and direction.
While establishing an understanding of the scanning process it is essential that you also comprehend as to how you can utilize the space around you that you have established.
By controlling the space to the front and rear of your, you can control such space by: * Controlling your speed while moving * Adjusting speed as applicable * Placement of your vehicle as you come to a stop.
Time and distance variables are designed under the most favorable driving conditions.
• A Two second following distance on a dry surface normally provides a driver the s time to avoid a collision if travelling at a speed of 35 mph.
• Maintaining a 4-second following distance allows the driver, if travelling on dry surfaces to avoid a collision at speeds of 70 mph.
Foremost, a three to four second following distance is the minimum time under good driving conditions.
Tips for Safer “Space Free” Driving
When you’re the 1st vehicle stopped at a Red Traffic Light * When the light turns green, before moving, glance left, glance right and then again, check left. This will take approximately 2 seconds and provide you the safety advantage you need in order
89
to avoid a red light runner.
Why check left last? Because this vehicle will be the 1st vehicle you encounter as you proceed across the intersection. It’s good defensive driving.
Space to the Rear. When stopping behind the vehicle in front of you, leave enough room so you can drive around them without backing up. A clue is to stop your vehicle where you can see their rear tires touching the pavement. This can also be of benefit in case of an attempted car jacking.
Finally, a good defensive driving technique is to check your rear view mirror:
• Every-time you foot goes to the brake
• Just as you come to a complete stop in traffic
• Continuously glancing in the rear view until a vehicle stops behind you, thus blocking traffic from your rear.
• Anytime you stop or prepare to turn
Understanding the Concepts of Perception & Reaction Times
Perception time is the time it takes for a driver to identify a traffic situation as a hazard. Perception time can be from 1/2 of a second to Never.
Reaction time is the time it takes the driver to take corrective action. The time it takes for your brain to tell your foot to hit the brake. The average reaction time is 3/4 of a second. Reaction time may be altered by fatigue, illness, medications, alcohol, inexperience, and illness. A driver can reduce reaction time by covering the brake when identifying a potential hazard.
• Assumptions that because I have the ROW I have no worries. (complacency)
When controlling space to the front, a driver has three options. • Speed Adjustment • Lane position
• Communicating with other traffic (flashing head lights, sounding horn )
Strategies when deciding to perform maneuvers consist of knowing the time element involved as follows:
• For Passing. You need to be travelling at least 10 mph faster than the vehicle you are passing in order to complete the pass in 10 seconds at 70 mph.
• An 8-second gap when merging in traffic • Crossing a 4-lane road you will need a 6-7 second gap • If turning left, you need a 9 second gap to the right and
a 7 second gap to the left. • Turning right, a 7-9 second gap to the left
Techniques for Managing Space on Multiple Lane Roadways
• Reduce speed when roadway conditions warrant. (tunnels, bridges, construction zones etc)
• When being tailgated, change lanes while maintaining an adequate following distance from the vehicles in front of you.
91
• Allow room for vehicles entering the roadway from an entrance ramp by speed adjustment or making a lane change.
• Maintain a 4-second following distance when merging on the roadway, changing lanes, and exiting the freeway.
• Adjust the vehicles position and speed to the road and weather conditions in order to allow more time and distance for braking, accelerating, and steering.
To ensure that you have an understanding of the importance of space management driving, it is essential that the concept of zones is relevant to your training.
There are 7 areas of a vehicles operating space which we refer to as zones.
A zone refers to one of the six spaces around your vehicle. It is the width of a traffic lane and extends as far as you can see. There are three (3) types of zones, open, closed or changing.
An Open Zone is a space where you may drive without restriction to either your line of sight or path of travel.
A Closed Zone is the area that is not available for your vehicle’s path of travel or there is a restriction to the driver’s line of sight.
Changing Zones refers to a zone whose conditioning is worsening. It is often an open zone that is diminishing to a closed zone as a result of line of sight issues or additional problems are developing. Sand
92
Environmental Driving Characteristics & Factors
Young drivers will legally and responsibly perform reduced risk driving practices by identifying and analyzing driving environments and minimizing environmental risk.
The following traffic environments may present both simple to complex risk to drivers. The characteristics of low, moderate, and complex risk areas encompass the following and are based on:
• Traffic Flow • Traffic Volume • Line of Sight • Path of Travel • Distractions • Right of Way
Driving Environments
Residential driving environments consist of the following characteristics:
• Line of sight limitations • Parking on both sides of the street • Speed Bumps • Narrow streets • Driveways • Controlled/Uncontrolled intersections
• Pedestrians, children, and bicyclist
Residential neighborhoods generally have lower traffic volume which travel of speeds of 15 to 3o mph. Risk inherent to residential streets are:
93
• Children playing in streets and driveways • School buses • School zones • Animals • Line of sight restricted • Path of travel diminished
Risk Behaviors include: • Speeding • Failing to wear safety belts • Failure to yield ROW • Ignoring speed bumps • Improper search patterns for oncoming vehicles,
children bicyclist • Distractions
Motorized and Non-Motorized Users:
Motorized • Pick-Ups • Motorcycles • Garbage trucks • Delivery vehicles • Trains • Post Office vehicles • Oversized trucks • Motor homes
Distractions Include: • eating or drinking • Other occupants in vehicle • Cell Phone usage • Texting • Adjusting controls
Multi-Tasking resulting in divided attention includes: • Changing gears • Checking speed limit • Turning on radio, wipers, hazard lights etc • Performing lane change • Checking road signs
• Checking mirrors
To Manage these risk a driver will: • Time the divided attention task • Utilize occupant protection • Apply knowledge and understanding • Use reference points • Maintain vehicle balance • Utilize driver readiness
The Urban Driving Environment consist of areas with light traffic, congested traffic, low and high speed traffic designed to move traffic throughout the city.
Characteristics of Urban Environments • Road signs, billboards and pedestrians • Vulnerable users
• Controlled intersections
95
• Stores • Starting and Stopping Traffic • Special events • Work Zones • Construction • Parked Vehicles
Techniques to make reduced risk decisions • Adhere to the posted speed limit • Wear your safety belt • Utilize defensive driving strategies • Avoid frequent lane changes • Plan ahead
Reducing Risk with good driving habits • Watch for distracted pedestrians • Avoid travelling in lanes next to parked vehicles • Use signals and communicate • Glance at uncontrolled intersections • Maintain a safe following distance
Travelling on Rural Roads
Rural roads account for approximately 50% of the total fatalities on roadways across the nation.
Rural road collisions are generally more severe than crashes on urban roads due to changes in speed and traffic enforcement.
Characteristics of Rural Road Collisions include: • Collisions at intersections • Head –on collisions • Single vehicle collisions
96
These three (3) collisions account for approximately 79% of rural crashes. Of the three collisions, single vehicle collisions are the most common as a result of driver error, the vehicle and the road.
Head-on collisions account for nearly 24% of all fatal crashes on rural roads. Contributing factors include fatigue and alcohol usage.
When approaching a hill crest, position your vehicle near the right edge of the pavement. At night, prior to cresting the top of the hill, flash your headlights which will allow your bright lights to bounce off the roadway and surrounding vegetation, warning oncoming traffic of your presence.
Vehicles in crashes as a result of running off the road account for 1/3 of all traffic fatalities and 2/3 of those crashes occur in rural areas.
Expressway Driving
An expressway is a limited-access or controlled access highway designed for reduced risk high speed travel.
Characteristics of an Expressway
• 70 mph speed limit • Generally divided by a barrier • Multiple lanes • Controlled access
The following factors contribute to the low crash/injury/fatality rate on freeways:
• Cross traffic eliminated
• Enter and exit at designated interchanges only
97
• Median or barrier between opposing lanes • Pedestrians and non-motorized vehicles not permitted
• Wide shoulders and underpasses
Interacting with Trucks and Tractor Trailers
Trucks and tractor Trailers are longer, higher and wider than other vehicles They accelerate slowly and require greater stopping and turning distances. Additionally, these vehicles have blind spots where collisions are likely to occur.
When following a large truck, increase following distance to allow a clear line of distance sight. If the side view mirror(s) of the truck cannot be seen, the driver of the truck can’t see you.
If stopped behind a truck on the upgrade, leave space in case the truck drifts slightly back when it begins to move forward.
When passing a truck, let the driver know you intend on passing by flashing your headlights, especially at night.
The Driving Plan
A Driving Plan incorporates the Knowledge and Skills of the young driver which the student may develop and sustain legal and reduced risk driving strategies.
Safety or the reduction of risk or injury. Legal and responsible driving practices.
Economy or the reduction in the use of our environmental resources. Consumer responsibility, conversation, environmental protection, and litter prevention.
98
Civility or the increase of polite and respectful acts-Share the Road.
DISTRACTIONS
Distracted driving is any non-driving activity a person engages in while operating a motor vehicle.
The Risk of Distracted Driving
• A distracted driver is inattentive as he/she takes a “mental vacation” while performing both simple and complex maneuvers.
• Does not allow the driver to visually or mentally concentrate on the vehicles path or travel and may restrict the line of sight which can limit the driver’s ability to respond correctly in an emergency.
• More than 40,000 people are killed in motor vehicle collisions and over three million injured.
• Driver distraction is a contributing factor in more than 25 percent of all collisions.
Per the NHTSA, there are three types of distraction: • Cognitive- ---taking your mind off of the driving task • Manual - taking your hands off the wheel • Visual ---- taking your eyes off the road
In 2008, nearly 6,000 people died in collisions involving distracted driving. The driving task requires a driver’s full attention. In some instances, even a split second of taking your eyes and attention off the driving task can be the difference from being able to avoid a collision.
99
Of special concern is texting. The percentage of young driver’s texting or using other hand held devices has increased since 2007. Available research indicates that cell phone use while driving, whether hands free or hand-held, inhibits a driver’s performance. The driver is more likely to miss a key visual or audio cue needed to avoid a collision.
The primary responsibility of the driver is to operate a motor vehicle safely. To do this, a driver must concentrate his/her full attention to the driving task. The safest option for a driver is to refrain from cell phone use while driving.
Cell Phone Facts • Drivers under age 20 are most likely to be involved
in distracted driving crashes. • This is nearly 50% more likely than the next group at
ages of 30-49 years of age.
Why the Over involvement? • Lack of driving experience • Lack of experiencing with multi-tasking • Increased risk taking • Lack of vehicle familiarity
Driving distraction has the potential to cause a young driver to experience a crash; several distractions have been identified as especially hazardous to young drivers under the age of 20:
• Adjusting radio/CD’s • Outside person or event • Other occupants
Potential dangers of using a cell phone while driving • Diverting attention away from the driving task • Inhibits ability to respond to an emergency
100
• Inhibits ability to make quick decisions • Taking your eyes off the road
• Unable to perceive potential collisions
Cell phone benefits • Allows one to summon road side assistance • Ability to contact law enforcement • Ability to contact emergency services
• Ability to confirm family members location
Multi-Tasking & Driving
Distractions are a bigger challenge for new drivers than an experienced driver who has learned how to multi-task, such as dividing attention from the path of travel to check mirrors, check lane position, or check speedometer.
Actions which require multi-tasking include: • Operating windshield wipers • Operating cruise control • Using turn signals/hazard lights • Maintaining vehicle control and position • Perform lane changes
Driving is a responsibility that requires multi-task performances to ensure that the job is performed legally, responsibly, and safely. Failure to correctly divide attention produces unsafe driving.
Techniques to divide attention between multi-task performances is critical which is the reason that a driver should never look away from the path of travel for more than 1/2 second at a time. Any such activity which tends to lower one’s level of alertness has an adverse effect on steering.
101
Counter measures to effectively time the multi-task performance reduces the risk. A driver must apply time management techniques to execute these performances. It is so critical that the driver never look away for more than 1/2 a second from the path of travel. If more time is needed to complete the task, a driver should use more than one glance and always remember to return visual and mental attention back to the original path of travel.
102
UNIT 10
The Physical & Mental Aspects of Driving
103
The information contained in the following pages are derived from over 50 years of driver education experiences.
Though, we cannot expect you to effectively grasp many of the teaching concepts, language or dialog, it is of significance that we provide you as much information as reasonable in order for you to provide your young driver the best driver education possible. The following concepts and strategies in the ensuing pages will do just that.
Concept #1: Defensive Driving begins with maintaining your automobile in a safe operational manner. Maintenance of your vehicle should take place on a daily, monthly, and yearly basis.
Concept #2: Ensure that the young driver understands the use and location of all vehicle operating control and warning devices. Again, a defensive driver is knowledgeable of all aspects of driving.
Concept #3: A defensive driver knows that the main purpose of a safety belt is to keep the driver behind the wheel in the event of an emergency. You cannot very well perform an evasive maneuver if your are thrown in the back seat or out of your vehicle.
Concept #4: Describe how roll, pitch, and yaw affect vehicle balance and movement and the necessity for maintaining vehicle balance.
Concept #5: Though, it is not necessary for a young driver to verbalize their understanding of what a reference point is, it is the main method for you as the parent to ensure that your young driver the meaning and location of reference points when turning, stopping, backing, and parking as well as performing all maneuvers from simple to complex..
104
Young Drivers are anxious to start driving once they have obtained an instruction permit. Many young drivers, parents and unfortunately, Texas, state licensed driver education teachers think that when the young driver attains the physical skills to successfully accelerate, brake and steer an automobile, they are now “good drivers”.
The parent can establish credibility by expecting and demanding that their young driver take the driving task seriously. The first step in reaching this objective is to ensure that their son/daughter is both physically and mentally prepared fro the driving task. It is essential that the young driver understand and use the skills to drive and survive by preparing themselves, their passengers and their vehicle are all safe for driving.
The information provided in the following pages will involve commitment to the responsibilities involved with the operation of an automobile.
Defensive Driving Begins With Maintenance of the Automobile
All drivers have the responsibility of ensuring that their vehicle is safe for everyday operation. Your vehicle owner’s manual is an excellent source of information about how you can keep the vehicle in optimum operating condition by performing periodic maintenance checks and scheduled vehicle service. Performing these task will contribute to vehicle safety and dependability.
Learning about vehicle maintenance starts when you acquire a vehicle and read the owner’s manual. Unfortunately, many drivers fail to read their owner’s manuals until the circumstances
105
require them to do so. For example, most drivers do not confirm the location of the spare tire, or is their sufficient air in the tire. Additionally, they do no check the operations of the jack or lug wrench in order to remove the tire in the case of a flat. Consequently, they remain unaware of their vehicles’ maintenance needs and do not know how to operate their vehicles’ safety features.
Maintenance Checks
Preventative maintenance is the everyday care which you give your vehicle. Maintenance checks include checking air pressure, engine oil, coolant level and fluid levels.
Check your owners manual for a schedule as to how often (mileage or months) maintenance is recommended.
The following vehicle checks should be conducted as indicated in your owners manual.
Make these checks on a weekly basis Tire Pressure, Tire Wear, and Damage
Maximum pressure is listed on the tire side-wall (do not use this as your guide for proper pressure)
Inflate tires to vehicle manufacturer’s pressure recommended in your owner’s manual
Look for tire tread wear, damage, or wear bars showing
Check for cuffing (uneven wear on inside or outside tread
areas) Look for bald spots, bald center, or worn side treads
106
Examine tires for cuts, stones, metal fragments, or other damage
Vehicle Safety, Communication Devices, and
Accessories Headlights, tail lights, and turn signals
Emergency lights and
markers Emergency kit
Windshield wiper blades, operation, and washer fluid
Heating, ventilation, and air conditioner systems (HVAC)
Safety warning lamps (brake, ABS, air bag, safety belt)
Brake pads/shoes/rotors/drums, brake lines, hoses, and parking brake system
Engine cooling system
Steering linkage, suspension and, if equipped, drive shaft and ball joints
Air filter replacement, if equipped
Service Every 30,000 Miles
Exhaust system and heat shield
Engine air filter and fuel filter replacement
Accessory drive belts
108
Self-Check (Twice Per Year)
Air pressure in spare tire
Power steering fluid level
Parking brake for proper operation
Hinges, latches, door weather strips, and outside locks (check and lubricate)
Body and door drain holes (check and
clean) Cooling system coolant strength
Battery connections (clean if necessary)
Transmission fluid level
Getting to Know the Meaning, Location and Use of Warning Symbols and Control Devices
Initially, your vehicle’s controls may at first appear to be a little confusing. If in doubt, again refer to your owners manual. It is important to understand that the primary vehicle controls perform the same operation in all vehicles regardless of their location and design.
Operating Vehicle Control Devices
Knowing how the vehicle control devices in your vehicle function will allow you to operate the different devices without being distracted from the driving task.
Knowing the location and operational use of your vehicles
109
controls is essential as all your attention should be on your immediate path of travel. Performing multiple task often results in catastrophic results.
Alert/ Warning Symbols and Control Devices
Battery/Alternator Warning Light This light monitors the electronic system voltage. The light should come on momentarily as the engine is started. If the light stays on or comes on while driving, it indicates there is a problem with the charging system. Immediate service should be obtained. Fog Lamps Displays when fog lamps are on. Fog lamps are used for better vision in foggy or misty conditions. Parking lamps or low-beam headlamps must be on for your fog lamps to work. Fog lamps will go off when high-beam headlamps are turned on. Safety Belt Reminder When the key is turned to START the engine, the Seat Belt Reminder light will come on (in some vehicles it is accompanied by a chime). It will remain on for about 20 seconds and flash before it turns off or when the driver and/or passengers fastens their safety belts. Temperature Indicator This gauge shows the engine coolant temperature. Any temperature reading within the normal range indicates the cooling system is operating satisfactorily.
If the gauge moves into the red zone, your engine is too hot! Driving with an overheated system could cause serious engine damage. If the temperature gauge reads “HOT,” pull over and stop the vehicle. Let the engine run on idle with the air conditioner turned off. Turn the temperature control to maximum heat — this allows the heater core to act as a supplement to the radiator and aids in removing heat from the cooling system. If the temperature indicator still does not begin to
110
drop back into the normal range, but remains in the hot zone or continues to rise, turn off the engine and call for service.
Low Oil Pressure Warning Light This light shows engine oil pressure. The light should come on momentarily when the engine is started. If the light comes on and remains on, or if the light comes on while driving, there is insufficient engine oil pressure. STOP the vehicle and shut off the engine as soon as possible, and call for service.
Turn Signal / Windshield Wipers The turn signal lever has two settings: (1) lift the lever up and the right turn signal will flash on the right front and rear of the vehicle (2) press down and the left turn signal will flash on the left front and rear of the vehicle.
The windshield wipers and washer are operated by a switch on the wiper control lever. Turn the knob at the end of the handle to select the desired wiper speed. (On some vehicles the turn signal and windshield wiper are on separate levers)
Fuel Indicator The fuel indicator light will come on briefly when you start and turn your engine off. When the low fuel light remains on, it is warning the driver that the vehicle fuel levels are low and more fuel will soon be needed. Interior Light Adjustment Controls the interior lights of your vehicle. Auto setting — will allow interior lights to turn on when the
vehicle’s doors are opened, and shut off when doors are closed.
Manual setting — allow the occupants in the vehicle to turn the interior lights on and off when someone requires light. (Remember to turn the light off when finished or the interior
light will remain on even after the vehicle is turned off and drain the vehicle battery.) Never leave interior lights on when driving at night.
Fan Speed Indicator A knob on the heating/cooling system control panel controls the fan speed. To increase airflow, turn the knob clockwise. To decrease airflow, turn it counterclockwise.
Hood Release To open the hood, you must first pull the handle located inside the vehicle on the lower left side of the instrument panel. Then go to the front of the vehicle to release the secondary hood safety latch. (Review Owner’s Manual for location in your vehicle)
Power Window Controls If your vehicle is equipped with power windows, there will be power window controls located in the door’s armrest or in the middle console (if equipped). The controls on the driver’s door will operate all windows. On all other doors, the power window controls will operate only that door window. (The ignition switch must be on for the power window controls to work.)
Adjust Left/Right Side Mirror This control allows you to adjust both exterior side mirrors from one location. Move the upper control to the left or right to choose the mirror, then press the arrows located on the lower control pad to adjust the mirror.
Parking Lamp Indicator When the parking brake is engaged, the parking lamp indicator light is on. When the parking brake is released, the light will turn off.
112
Overdrive On/Off Indicator When the ignition switch is turned “ON” in a 4-speed automatic transmission with a 4-speed mode, (3-speed plus over-drive) the indicator light briefly comes on to let the driver know the bulb is working. When the transmission is put in 3-speed mode, (overdrive is off) the indicator light comes on and stays on.
Warning Symbols and Control Devices
Exterior Lights All the lights, except the hazard warning lights, are controlled by this switch. The settings are: parking lights are on and the headlights are OFF headlights and parking lights are all on all lights are OFF lights are set on “auto” to turn on automatically
Left/Right Signal Indicator An arrow on the instrument panel will flash in the direction of the turn signal. The flashing arrow is activated with the turn signal lever is shifted up or down and then the exterior signal lights flash. If the direction arrow light stays on and does not flash, it means one of the vehicle’s exterior signal light bulbs is blown and will need to be changed.
Trunk Release This light will come on to notify you that the trunk lid is open or not completely closed.
Steering Wheel Height Adjustment If you have a tilt steering wheel, you can adjust the steering wheel before you drive. This feature allows you to raise the steering wheel to its highest level to give your legs more room when you enter and exit the vehicle. Adjust the steering wheel so that the air bag is aimed at your chest.
113
Do not adjust the steering wheel height while driving.
Cruise Control Device With cruise control, you can maintain a constant speed of about 25 mph or more without having to keep your foot on the accelerator. Applying the brake or clutch will shut it off. If you are traveling below 25 mph, the cruise control device will not work.
Rear Defroster Indicator Pressing this button will turn on the rear window defroster. A control light will illuminate to indicate that the defroster is on. In some vehicles, the defroster will automatically turn off after 10 minutes of operation and the light will go out.
Electronic Traction Control System (ETS)
The ETS OFF indicator light will come on momentarily when the ignition switch is first turned on or when:
the traction control switch has been used to turn the system
off the traction control system malfunctions
extended heavy use of traction control system causes the brake system to overheat,
and the traction control system deactivates to prevent damage to the brake system.
Windshield Washer When the windshield washer fluid level is low, the Low Fluid Light illuminates. When you refill the windshield washer reservoir the Low Fluid Light will turn off.
Windshield Wipers The windshield wipers and washer are operated by a switch in the
114
turn signal lever. Turn the knob at the end of the handle to select the desired wiper speed.
Front Windshield Defroster This setting directs most of the air through the windshield defroster outlets and some through the heater outlets.
Theft-Deterrent System Activation This light tells you that the theft-deterrent system is activated. The theft deterrent light will flash as you open the door if your ignition is off. In some vehicles, after you close all doors the theft light will go out after approximately 30 seconds. The alarm will not be armed until the theft light goes out. In some vehicles, it will continue to flash until you put the key in the ignition. Check the owner’s manual for exact instructions on the theft-deterrent system for your vehicle.
Engine Immobilizer System — This is a theft prevention system. On vehicles equipped with this system, the engine will start only when the electronic code in the key’s transponder chip corresponds to the registered ID code for the vehicle. The system is set automatically when the key is removed from the ignition switch. An indicator light will flash to show that the system is set.
Antilock Brake System Activation This light monitors the anti-lock brake system. The light will come on when you start the engine and may stay on for several seconds (4 - 5 seconds). If the light continues to stays on, or comes on when you are driving, the anti-lock portion of the brake system is not functioning and service is required.
Air Bag Activation (Air Bag Readiness Light) This checks the air bag's electronic system for malfunctions. The light should flash for a few seconds when you turn the ignition key to start the engine, and then go out. This means the system is
115
functioning properly. If the light stays on, it is warning you there is a problem, and you will need to have it checked and repaired.
Air Bag On/Off Switch This switch turns off the right front passenger air bag. It should only be used if the right front passenger is an infant, child age 1 to 12, or a person with a medical condition.
Headlights/High Beam Indicator When this indicator light is on, it tells the driver that the vehicle’s high-beam headlamps are on. When low-beam headlamps are on this light is off.
Drive Wheel Selector When operating a 4-wheel drive vehicle, the drive wheel selector is used to shift into and out of four-wheel drive. You can choose among three driving settings: 2 HI, 4 HI, and 4 LO.
Horn The horn is generally operated by pressing a button located on the steering wheel cross bar, or a pad on the lower half of the steering wheel above or below the air bag cover.
Emergency Flashers Hazard flashers warn other drivers you have a problem or make them aware that your vehicle is disabled. The switch is usually located on the top or right side of the steering column or somewhere on the dashboard. When turned “ON,” both front and rear turn signal lights flash.
Active Restraints
Every vehicle is equipped with safety devices to help protect the driver and passengers in the event of a collision or a drastic change of balance during an evasive driving maneuver.
116
Before starting your vehicle, fasten your safety belt and check all passengers to ensure they have also fastened their safety belts.
Place your lower back firmly against the seat and sit up-right. If your vehicle is equipped with an adjustable center post mounting for shoulder belt height, adjust it to the proper height setting so the belt does not rub against your neck.
Grab the latch plate and pull the belt across you. Make sure it is not twisted the shoulder belt may lock if you jerk it too quickly. If this happens, ease the belt back slightly to unlock it and then smoothly pull the belt across your body.
Push the latch into the buckle until you hear it click. Check to make sure the latch is secured. To make sure the lap belt is snug; pull down on the buckle end of the belt as you pull up on the shoulder belt.
The lap part of the belt should be worn low and snug on the hips, barely touching the thighs. If a crash were to occur, the force would then be applied to the strong pelvic bones and not the abdomen, reducing the chance of serious internal injuries.
The shoulder belt should go over the shoulder and across the chest and rest against the body. If a crash were to occur and a person had not taken the slack out of the shoulder belt, the extra forward movement of the body will increase the chance of injury.
Exterior Side-view Mirrors
The exterior side-view mirrors are located on the doors of your vehicle (driver’s door and passenger door). Their purpose is to allow you to see the adjacent lanes along the sides of your vehicle.
117
Adjusting the Left Side-view Mirrors
Position your head against the driver’s side window
Look in LEFT side-view mirror
Align the mirror so that you can barely see the left side of your vehicle
Adjusting the Right Side-view Mirrors
To adjust the right side mirror, lean toward the middle of the vehicle
Look in RIGHT Side-view mirror
Align the mirror so that you can barely see the right side of your vehicle (if you do not have electronic mirror controls, have the passenger help you adjust the right side mirror)
Safety Tip
When a vehicle passes you it will appear in your side-view mirror before it disappears from your rearview mirror. But always beware of blind spot areas!
Blind Spots are the areas that do not reflect in your mirrors and are not visible in your Peripheral Vision Area. Setting side-view mirrors 15 degrees out will increase lane viewing area to the sides of the vehicle but will not entirely eliminate blind spot areas. Quickly glance over your shoulder to check this area before changing lanes.
118
Vehicle Balance
The distribution of the weight of the vehicle on the tires as they meet the ground is referred to as vehicle balance. This down-force of the tire patch to the roadway is affected by tire pressure and suspension geometry. The ideal tire patch size and balance for a vehicle is only reached when the vehicle is motionless.
When motion occurs actions such as acceleration, deceleration, cornering, or any combination of these will result in a transfer of weight from one point of the vehicle to another.
Vehicle Balance (Roll, Pitch, and Yaw)
Roll: vehicle moves side to side
Pitch: vehicle moves forward or backward
Yaw: vehicle moves left or right
Vehicle Movement
Best balance is at rest with no movement
Based on weight/suspension/tire pressure
Specific amount of weight or down force on each tire patch
Creates changes to vehicle balance due to suspension and weight changes
119
Requirements for Maintaining Vehicle Balance
Steering or speed adjustments to compensate for vehicle suspension changes and weight transfers are often necessary to maintain vehicle balance. The weight of a vehicle can be concentrated on one of four points on the chassis depending on speed changes:
1) the front of the chassis (over the front tire patches) 2) the rear of the chassis (over the rear tire patches) 3) the center of the chassis (distributed equally over the
front and rear tire patches), or it can be concentrated on one of two points on the chassis based on steering or surface changes
4) to the right of center (right two tire patches) or the left of center (left two tire patches).
The magnitude of these weight changes and the driver’s ability to maintain control of the vehicle is influenced by the rate of acceleration, brake application pressure, steering input, surface traction, or combinations of these factors.
Balance is maintained through precise steering movements, smooth and progressive acceleration, and controlled brake application.
In a vehicle with an automatic transmission vehicle, the right foot operates the accelerator and service brake pedals. The heel of the right foot remains in contact with the floorboard and pivots between both pedals. The left foot should be placed on the “dead pedal” (an area vehicle manufacture’s have designated for the left foot to balance the driver.)
120
Seating Position —Seating position plays an important part in driving and operating the controls of your vehicle. It is also important in establishing vehicle balance and improving the driver’s ability to see. Drivers should sit in a comfortable, upright position squarely behind the steering wheel.
Adjust seat height so that the top of the steering wheel is in line with the top of the shoulders. The top of the wheel should never be more than one inch higher than the top of the shoulders.
Proper distance from the steering wheel can be determined by extending the arm straight forward and adjusting the position of the seat, forward or backward, until the top of the steering wheel is in line with the wrist joint.
Vehicle Reference Points The following information will provide you the knowledge to :
Assess and analyze the path of travel of a vehicle and the line of sight while seated in a vehicle.
Define visual target with regard to path of travel.
compare and contrast traditional mirror settings and contemporary mirror settings with regard to blind spot elimination and glare elimination.
Many drivers cannot get a good view of the road ahead because their dashboard and the hood of their vehicle interferes with their line of sight. As a result, they are unable to see the actual position of his/her vehicle in relation to the roadway, In order to overcome this vision limitation and to know where your vehicle is actually positioned on a roadway, learning how to use your reference points is critical.
121
Reference points are tools for the driver to receive accurate feedback about the vehicle’s position. To gain consistent results and establish a reference point a driver must look (from the driver’s seat) at a part of the vehicle as it relates to a part of the roadway.
Standard Reference Points
Depending on the type of vehicle, the driver’s height and seating position, some minor adjustments to the standard reference point may be needed. When you have established a new reference point make a mental note in order to obtain consistent results in the future.
In the following illustrations, you will learn the standard reference points including:
Entry Reference Points for Parking
Rear Limitation
Front Limitation
Right Side Limitation
Left Side Limitation
Changing Vehicle Balance from Side to Side (Roll)
Sudden steering, acceleration, or braking inputs can affect vehicle balance from side to side (vehicle roll).
Steering Movements — Weight or center of mass shifts to the left or right side of vehicle depending on speed, traction,
122
and amount of steering input. Depending on the speed and slope of the roadway occupants may or may not feel forward lifting movement from the corner of the vehicle opposite the direction of the turn.
Brake and Steering Combinations — Depending on the degree of steering and brake input, braking may improve traction, such as in trail braking through a turn, when performed at an appropriate speed. However, applying the brakes when cornering at too high a speed has little effect relative to slowing the vehicle, but may have a very noticeable effect of producing traction loss due to severe weight shift to the front tire on the outside of the curve.
Changing Vehicle Balance from Front to Rear (Pitch)
Sudden steering, acceleration, or braking inputs can affect vehicle balance from front to rear. When acceleration is applied, weight or center of mass is transferred toward the rear of the vehicle. If acceleration is sudden and hard, there is a noticeable drop of the rear of the vehicle and occupants feel a rearward weight thrust.
Releasing Brake — Simply releasing pressure from the brake pedal results in a shift of weight to the rear.
Covering Accelerator — The purpose of covering the accelerator is to provide a smooth transition from brake release to progressive acceleration. It is similar to trail braking in that speed and vehicle balance are maintained prior to braking.
Light Accelerator Pressure — The purpose of light accelerator pressure is to maintain weight balance while maintaining slow forward motion or reducing speed
123
gradually with minimal weight shift.
Progressive Accelerator Pressure — Firm, steady acceleration will increase speed and gradually shift the balance of vehicle to the rear suspension. This action eases steering control and improves rear wheel traction moving out of a turn or curve.
Thrust Accelerator Pressure — A firm push or thrust of accelerator is used to shift more weight to the rear wheels for traction, or to cause a shift to a lower gear in a vehicle with an automatic transmission to increase the rate of acceleration. This process is sometimes needed when passing or changing lanes in higher speed traffic situations.
Changing Vehicle Load from Rear to Front (Pitch)
Sudden steering, acceleration, or braking inputs can affect vehicle balance from rear to front. When brakes are applied, weight or center of mass is transferred to the front of the vehicle. If braking is hard, there is a noticeable drop of the hood and rise of the rear of the vehicle and occupants feel forward movement of their bodies. The most efficient way to slow or stop your vehicle is to brake while traveling in a straight line. This allows the braking force to have an evenly distributed effect on all four wheels.
The ability to apply the correct brake pedal pressure is learned through experience and practice. However, each vehicle has a different “feel” with which a driver must become familiar. Apply too little pressure and the vehicle will not stop at the desired spot or within the distance available. Apply too much pressure and the brakes may lock up, and traction and directional control may be lost.
124
The key to good braking technique is to stabilize the foot and control brake pressure with the forces of the ankle and toes rather than the thigh muscles. To facilitate this action, place the heel of the foot on the floor in front of the brake pedal in such a manner that the foot forward of the ball makes contact with the pedal. This position better enables drivers to use the toes to make fine adjustments to pedal pressure and to pivot the foot more smoothly back and forth between the brake and accelerator. This also allows the driver to rest the right side of the foot against the center console for better control of speed while the foot is on the accelerator.
Changing Vehicle Load from Rear to Front (Pitch)
Releasing Accelerator — Simply releasing pressure on the accelerator results in a shift of weight to the front tires. The weight transfer resulting from a reduction in speed tends to be more noticeable in vehicles with rear wheel drive than in front wheel drive vehicles equipped with transaxles.
Cover Brake — The purpose of covering the brake is to provide a smooth transition from acceleration to braking. It is similar to trail braking in that speed and vehicle balance are maintained prior to braking.
Controlled Braking (Squeeze On) — This procedure is done with sufficient brake pressure to slow the vehicle, while maintaining balance to avoid traction loss to front or rear wheels. Remember that directional control (steering) becomes more difficult when using hard brake pressure.
Threshold Braking — Threshold braking is used to maximize the braking effect of the vehicle, lifting (unloading) the rear suspension, and lowering (loading) the front suspension, to provide maximum traction to the front tires for braking just
125
short of lock up. If lock up does occur, steering control is regained by releasing brake pressure very slightly (2-3 degrees). As with controlled braking, control of the brake pedal is best maintained if the heel is on the floor.
Trail Braking (Squeeze Off) — Trail braking is used to maintain speed and balance of the vehicle when steering input is required prior to turning at an intersection or in a curve. This technique is often used in combination with or at the end of controlled or threshold braking.
Hand Over Hand Steering — Hand-over-hand steering is useful when maneuvering in a space with limited sightlines, such as perpendicular parking in a congested shopping center. When using hand-over-hand steering, quick movements of the hands are needed upon commencement of the maneuver, with smooth slow movements when returning the wheel upon completion of the maneuver.
Drivers should be aware that employing hand-over-hand steering under all conditions does expose the driver to additional risk of excessive steering input and injury to arms, hands, and/or face in the event of a crash that results in air bag inflation. Use of hand-over-hand as the primary steering technique also raises the risk of over steering to correct off-road recovery situations and can result in a serious crash.
To avoid over-steer, adjust your speed before the curve, and remember to be sensitive to the feel of the back of the vehicle. By anticipating trouble, you will be ready to respond if the rear end of the vehicle starts to swing out.
Speed of travel and steering input have a direct influence on the level (increase) of weight transferred to the front corner opposite the direction of the turn with a reduction in the weight to the rear,
126
particularly on the side in the direction of the turn.
When an error has been committed and closure is occurring at higher speeds, the quickness and amount of steering input needed to make a 12-foot lane change increases. Unless dampened by a smooth, rapid, and controlled steering effort, the additional sudden steering input, coupled with the speed of travel, is capable of generating sufficient weight transfer to cause a loss of directional control.
Arm Position
Proper distance from the steering wheel can be determined by extending the arm straight forward until the top of the steering wheel is in line with the shoulders (by adjusting the position of the seat forward or back).
Allow for a minimum distance of 10 inches to the chest to reduce the chance of injury in the event of air bag inflation. Your arms should be slightly bent, allowing you to firmly but gently grip the lower section of the steering wheel in a comfortable position.
Seating Position
In order to establish vehicle balance, improve visibility, and vehicle control, a driver needs to sit in a comfortable, upright position squarely behind the steering wheel. Arms, feet, and hands should be able to operate all controls comfortably.
Adjust the seat so that there is at least ten inches between your chest and the steering wheel.
If the steering wheel is adjustable, adjust it so the airbag is aimed at your chest instead of your head and neck.
127
A driver under five feet five inches in height, or with short legs, may require brake and accelerator pedal extensions to be able reach and efficiently operate the pedals and still have 10 inches between the chest and steering wheel.
A driver whose chin is not higher than the top of the steering wheel will need to use a wedge-shaped driver’s seat cushion to position his/her body high enough to see over the hood of the car.
Hand Position
Placing the left hand at the 9 or 8 o’clock position, and the right hand at the 3 or 4 o’clock position with the upper arms resting near the rib cage, improves stability by lowering the body’s center of gravity, and reduces unintended and excessive steering wheel movement.
Changing Vehicle Balance from Left to Right (Yaw) is caused by:
sudden braking;
sudden or excessive acceleration;
sudden or excessive steering;
road tilted to right; or
traction loss to right rear.
128
Changing Vehicle Load from Right to Left (Yaw) is caused by:
sudden braking;
sudden or excessive acceleration;
sudden or excessive steering;
road tilted to left; or
Traction loss to left rear.
Remember to be alert and sensitive to the feel of your vehicle. By sensing changes in vehicle balance, you will be ready to respond if a problem should arise. Sudden steering or improper combinations of braking and steering will affect vehicle balance and the resulting load transfer can create a dangerous situation, regardless of whether you are traveling at a high or low speed.
Using proper steering techniques will help you maintain proper control of the vehicle. To steer when turning and moving forward, use both hands—one pushing and the other pulling. In general, when backing and turning, use one hand. Four types of steering movements will be used during various driving maneuvers. They are:
hand-to-hand, limited evasive steering, hand-over-hand, and one-hand steering.
129
Targeting and Visual Requirements
The concept of “targeting” is simply to first decide where you want the vehicle to travel. Then aim for an object in the center of that path of travel.
Targeted line of sight, paths of travel — Searching the target area for driving related information is more important than trying to identify a specific target. Referencing a path of travel allows a driver to scan the entire scene for anything that might come into their vehicle’s path.
Open, Changing, or Closed Target Area Target area searching requires identification of the condition of the target area in the following strategies:
Open is an area where you can drive without restriction Changing is an area that may or may not be restricted Closed is an area you that is within your line of sight or path of travel
Dealing with these areas:
Asses the situation up to 12-15 seconds ahead to identify zone changes which may affect your target path.
Make assessments and select desirable lane position and vehicle speed which allows you to minimize the risk.
To safely operate your vehicle, you must understand the vision and perception requirements. Your field of vision includes all the areas around you that you can see while looking straight ahead. Information is collected through three basic vision areas and is then used to reference the vehicle’s path of travel.
130
Focus (Focal) Vision is used to read and identify distinct objects, and covers about three percent of one’s visual field
Central (Limited Fringe) Vision is used to judge depth and position
Peripheral Vision is conical in shape around the other vision fields
Developing the Skills for Defensive Driving
An inadequate or improper visual search often results in a failure to respond, or a delayed response to a threatening object or condition that leads to driver crash involvement.
It is important for you to maintain an open line of sight. Your line of sight is the distance you can see ahead in the direction you are looking. This ability to have an unrestricted line of sight is the visual basis for determining safe speed and steering adjustments.
Your path of travel is the path your vehicle will take as it is directed towards the target area.
The target is a fixed object that is located ahead of the vehicle, in the center of the path of travel, and is what the driver steers toward. The target can be a car, a block ahead, a traffic signal, the crest of a hill, etc. The target area should be 12-15 seconds ahead in city or residential areas and between 20 to 30 seconds ahead for expressway or freeway driving.
131
Path of Travel Central Vision
The closer you get to the target area, you re-evaluate the condition of the target area and begin assessing your next target area and the zone changes that you will encounter.
What Are the Advantages of Targeting ? helps you to develop skid avoidance skills
allows you to plan ahead
allows you to visualize the space you intend to occupy
helps you to begin learning to use a search process gets
you to look far ahead, rather than close to the vehicle
increases steering precision and reduces steering reversals
Reference Points
Front Reference Point — When learning to establish a front reference point you may need to check and see if this standard is suitable for you. Get out of the vehicle and check to see whether the front bumper is 3-6 inches from the curb. If it is not positioned correctly, adjust the vehicle position and then reestablish the window reference point.
132
Establishing front reference points will allow you to know where the front end of your vehicle is. This is necessary when you are stopping at intersections, or stopping when perpendicular parking.
Rear Bumper Reference Points — To align the rear bumper three to six inches from a line or curb, you need to stop when the line or curb appears near the middle of the rear right window when looking over the right shoulder.
To align the rear bumper three feet from a curb when backing around a corner to the right, the driver looks over the right shoulder and should see the curb in the rear side window near the window corner post.
Establishing rear reference points will allow you to know where the rear end of your vehicle is when you are backing into a perpendicular parking space or when placing the back bumper of vehicle so it is lined up with any rear line or curb.
Right-side reference point: To align the vehicle 3-6 inches from a pavement line or curb on the passenger’s side of the vehicle, you need to stop when the pavement line appears to intersect the center of the vehicle hood.
The student should safely get out of the vehicle to check whether the tires are 3-6 inches from the line, and make adjustments as needed.
133
Establishing reference points for right side limitation will allow you to:
know where the curb is when parking on the right side of the street
park close to a white line, curb, or straight line to the right side of the vehicle by using the center of the hood to the line or curb as your reference
place the right side of the vehicle three feet from a white line or the curb
place the right side of the vehicle six feet away from a line or curb
Left Side Limitation
Left-side reference point — To align the vehicle 3-6 inches from a pavement line or curb on the driver’s side of the vehicle, you need to stop when the line or curb appears to intersect a point located about 6-8 inches from the left edge of the hood of the car.
After stopping the vehicle, the student should place it in park, engage the parking brake, and get out of the vehicle to check whether the tires are 3-6 inches from the desired stopping point. If they are not, you need to adjust the vehicle until the wheels are 3-6 inches from the pavement line and then re-establish a reference point.
Establishing reference points for left side limitation will allow for Parking next to a curb on the left side (i.e. on a one-way street).
134
Steering — The steering wheel is always turned in the direction you want the vehicle to move, whether moving forward or in reverse.
However, the amount of steering input and energy needed will vary according to the type of steering, power assistance, and speed of travel. Targeting the vehicle’s path of travel before steering will help a driver determine amount of steering input. The driver should never place one hand at the top of the wheel when moving forward because any upper body movement may cause you to move the steering wheel unintentionally and there is an increased chance of air bag injury.
Steering Techniques
Hand-to-Hand Steering — Just like there is more than one way to teach parallel parking, there is more than one way to teach your young driver the techniques to steer the car when turning left or right.
Steering with the Hand over Hand Method
Hand over hand steering permits the driver to make steering inputs ranging from one to two degrees up to a half turn of the wheel, while keeping both hands on the wheel for precision adjustments.
While driving thru a slight curve, both hands will typically retain their original grip on the wheel, making only slight finger or wrist adjustments as necessary to maintain path of travel.
Hand over hand steering is recommended for new drivers, especially when steering through curves, intersection entry and
135
exit, and front wheel traction loss control (vehicle under-steer — under-steer occurs when the front tires lose traction and slide).
If an under-steer occurs, follow these steps:
1) Do Not Panic 2) Get the Big Picture (look ahead) 3) Maintain steering control 4) Release pressure on the accelerator 5) Do Not Brake
As the vehicle’s weight shifts forward, it will load the front tires, improving their grip while you carefully decrease the steering angle. This improved grip and the slower speed should allow you to steer smoothly back into the path of travel.
Parking Brake — The parking brake is sometimes mistakenly referred to as an emergency brake. The purpose of the parking brake is to hold a vehicle in place when it is parked and to protect the transaxle, constant velocity joints, or transmission. Many new vehicle owner manuals now recommend setting the brake before putting the gear selector in “(P)ark”.
The parking brake may be either a foot-operated pedal located on the far left side of the driver or a hand-operated lever located to the right of the steering column or to the right of the driver on the floor or center console.
To set a foot-operated parking brake, hold the regular brake pedal down with your right foot and push down firmly on the parking brake pedal with your left foot. Depending on the vehicle, one of two methods is used to release the foot-operated brake. In some vehicles, the pedal is pushed down until a click is
136
heard, then the pedal is released. In other vehicles, the brake release lever is located above the foot-operated pedal on the underside of the dashboard.
To set a floor or console mounted hand-parking brake, hold the regular brake pedal down and simply pull back firmly on the parking brake lever. To release the brake, press down the button located on the top of the lever with the thumb and lower the lever.
Brake Pedal — This pedal is located to the left of the accelerator. The driver slows and stops the vehicle tires by applying a squeezing pressure on the pedal with the heel of the foot on the floor. (Depressing this pedal also illuminates the brake lights in the back of the vehicle.) How much and how rapidly the vehicle slows is determined by how much pressure the driver applies to the brake pedal and the friction between the tires and road surface.
Drivers with special needs may have a vehicle with electronic hand controls instead of foot pedals. Brake pedal extensions are available for short-statured drivers, which allow them to sit at least 10” away from the airbag.
Accelerator Pedal — This foot-operated pedal is suspended from the firewall on the right side of the driver’s seating position and is used to control the amount of fuel to the vehicle’s carburetor or fuel injectors that power the engine. Vehicle speed is controlled by adjusting the pressure on the pedal. While resting your heel on the floor, gradually depress the pedal to increase speed and let up on the pedal to reduce speed and slow down.
Drivers with special needs may have a vehicle with electronic hand controls instead of foot pedals. Accelerator pedal extensions are also available to assist short drivers in reaching the pedals and maintaining a safe distance from the airbag.
137
Gear Selector Lever — In a vehicle with an automatic transmission, the gear selector lever is located either on the steering column or on a console located between the front seats.
In a vehicle with a manual transmission, the shifting lever is located on the center console, on the floor to the right of the driver, or, in older vehicles, on steering column. Most vehicles have a lock release button to prevent miss-shifting.
P — Parking (engine starting, and key removal
R — Reverse
N — Neutral
D — Normal driving (O/D overdrive on/off switch)
2 — Stronger engine power
L — Maximum engine torque
In some vehicles, the brake pedal must be depressed to shift gears.
The overdrive switch is for selecting either three-speed or four- speed transmission operation.
Cruise/Speed Control — This device allows a driver to select and travel at a set speed without having to keep a foot on the accelerator. Cruise control allows you to cruise at speeds over 25 mph. A driver can disengage or cancel the cruise control at any time by lightly tapping the brake pedal or turning the cruise control switch to the off position.
138
Cruise control can be dangerous in congested traffic conditions when you are unable to drive at a steady speed. Cruise control can be dangerous on slippery roads. On such roads quick changes in tire traction can cause needless wheel spinning, and loss of control.
DO NOT use cruise control on slippery roads.
Ignition Switch — This switch locks the steering wheel and gear selector, and enables the driver to start and turn off the engine or use the accessories. The ignition is located on the right side of the steering column near the dashboard or in the dashboard.
Door Locks If your vehicle has power door locks, the lock switches are located on the door armrests. The master control is usually located on the driver side door armrest. To lock all vehicle doors remove the ignition key and press LOCK. (Child safety rear door locks are an option on many vehicles.) In vehicles equipped with manual locks, each door has its own locking device.
Safety Alert Symbol This caution symbol is usually black on a yellow or red background. Safety warnings and symbols notify the vehicle occupants of hazards in or on the vehicle. Consult your owner’s manual so you know what to do to avoid or reduce the hazard. Remember, the safety alert symbol may indicate there is something that could harm you or others.
Brake Warning Light This light should come on briefly when you turn on the ignition key. If it doesn’t come on, have the brake system inspected right away. If the warning light comes on while you are driving, there could be a problem with the brake system.
139
Head Restraint — All new vehicles are equipped with head restraints to help reduce whiplash injuries if the vehicle is struck from the rear. If your vehicle is equipped with a head restraint that can be adjusted up or down, you should position the restraint at the “ball “ or “bump” behind the middle of your head.
Door Locks — In vehicles equipped with manual locks, each door has its own locking device. An additional master control is usually located on the driver-side arm rest in vehicles with electric door locks. Remove the key and press LOCK to lock all doors at once. To unlock press the raised area next to the key symbol. Child safety rear door locks are also an option on many vehicles.
Turn Signal Lever — The turn signal lever has two uses. Located on the left side of the steering column, the lever is moved up to signal a movement to the right and down for a movement to the left.
While the signal will cancel after a turn, the driver may have to cancel the signal manually after a slight turn. The signal is used to indicate a lane change by moving the lever halfway up or down with the thumb hooked on the steering wheel.
Trunk Release — An option in some vehicles is to have a trunk release lever located on the floor just to the left of the driver’s seat. In other vehicles, the release mechanism is a button located in the glove box, or is a feature included on a keyless entry remote control mechanism.
Heater, Ventilation, and Air Conditioner (HVAC) — The heating and air conditioning system warms and cools the inside of your vehicle. The control switches are located in a cluster on the instrument panel.
140
Seat Adjustment Controls — If manually controlled, the adjustment lever to move the seat forward or back is typically located at the lower front or right side of the driver’s seat. A second lever or knob located on the left side of the seat in some vehicles allows the driver to change the angle of the seat back.
Power Windows — If you have power windows, the controls are on each of the side doors and will work only when the ignition switch is in the “on” position. Some vehicles have an automatic operation feature for the driver’s side window. The window will open all the way when pushed down.
Window Lock Switch — If you push in the window lock switch, the passengers’ windows can not be operated.
Check the owners manual for the location and proper operation of the control devices available on your vehicle before you drive.
Hazard Flasher — The purpose of the hazard flashers is to warn other drivers of a problem and to increase their awareness of the presence of your vehicle. The switch for the lights is usually located on the top or right side of the steering column or on the dashboard. When operated, both front and rear turn signal lights flash.
Windshield Wipers and Washers — This control is frequently located on the turn signal lever. Two switches are often involved, one that controls the speed of the wipers and a second that controls the washer fluid.
Vehicle Lights — Some vehicles are equipped with daylight running lights, which may operate the headlights without having the taillights on.
141
It is recommended by the National Highway Traffic Safety Administration (NHTSA) to use the headlights whenever the vehicle is moving, especially when not equipped with the daylight running lights. The light switch is often located on a steering column or on the dash panel to the left and is often a multi-purpose switch for parking lights, headlights, high beam, or low beam.
Automatic light control sensors are available on some vehicles and turn headlights on or off depending on the darkness of the surroundings. Front fog lights are an option on some vehicles and come on only when headlights are on low beam.
Hood Release — This lever is usually located on the left side of the driver’s compartment under the instrument panel. In some vehicles, it is located under or just to the right of the steering column. To open the hood, a second latch located under the hood of the vehicle must be released.
Safety Belts — While safety belts protect occupants in a crash, they serve an equally important role of keeping the driver firmly in place behind the steering wheel, allowing for better control of the vehicle. For maximum protection, the safety belt should be positioned under jackets, coats, sweaters, etc., as low on the hips as possible. After fastening the belt, grasp the shoulder belt and pull upward to take up the slack in the belt across the hips. It is the drivers responsibility to make sure that all passengers are properly buckled.
When to use your horn:
The horn is generally operated by pressing a button located on a steering wheel cross bar or on the pad on the lower half of the steering wheel above or below the air bag cover. This allows you to honk the horn without taking your hands completely off the
142
steering wheel. It is usually marked with the horn symbol to indicate its location.
When approaching blind or narrow curves or when exiting a narrow alley to alert approaching vehicles or pedestrians of your presence.
To get the attention of another driver or pedestrian who cannot see you.
To avoid a collision.
If you lose control of your vehicle to warn others that they need to get out of the way.
NOTE: A working horn that can be heard up to 200 feet away is required by law.
Visual Needs
While operating a vehicle, a driver must be able to respond to all situations that may arise. This process starts when you enter your vehicle, adjust your seat to see clearly out of the front window (chin above steering wheel) and then adjust your mirrors to maximize your viewing area.
Mirrors
Adjust rear view mirror settings (200 feet to rear)
Adjust side view mirror settings
Should be adjusted to view side areas rather than behind the vehicle
143
Mirrors (Rearview and Side-view) — All vehicles come equipped with interior and exterior mirrors. These mirrors must be properly adjusted to minimize the blind spot areas. Many of the newer vehicles are equipped with remote controlled outside mirrors. These controls may be located on the left side of the dash, the driver’s side arm rest, or center console. However, no matter how the mirrors are adjusted, there are areas that cannot be seen (blind spots) and require drivers to turn their heads slightly to check their peripheral vision area prior to making a move to the left or right.
The interior rearview mirror has a night driving position to reduce headlight glare. Pull the tab under the mirror towards you to reduce glare from vehicle headlamps behind you after dark. Push the tab away from you for normal daytime operation.
(For a more in-depth look at mirror settings refer to you owners manual).
Mirror Views and Blind Spots
To drive defensively you must be aware of what is happening around your vehicle at all times. Your vehicle mirrors are designed to aid you in this process by helping you see what is taking place to the rear and the sides of the vehicle.
Most vehicles have two types of mirrors, the interior rearview mirror and exterior Side-view mirrors. The inside rearview mirror provides you with the widest field of vision and by far the most important information about traffic to the rear (see illustration “Rear Mirror View”). For this reason a driver should consider the inside rearview mirror as their primary mirror.
144
Your vehicle mirrors also play a key role when you need to change lanes. To change lanes safely, a driver must not rely solely on what he/she sees in the vehicle mirrors or peripheral vision area. The driver must glance quickly (turn head, chin to shoulder) into the areas referred to as “blind spots” just beyond his/her peripheral vision to see if a vehicle is there.
Eliminating Blind Spots and Mirror Glare
In traditional mirror settings, blind spots are the area which the mirrors do not display an object.
To reduce this blind spot in contemporary mirror settings, the two outside mirrors are simply rotated outward (15º) to look into the blind spot areas instead of looking along the sides of the car. This mirror adjustment has only four mini blind spots but none large enough to hide a vehicle. All that is required is a glance at the outside mirror and over your shoulder peripheral area to see if a vehicle is there.
Five Major Advantages of Contemporary Mirror Settings:
1) Looking over your shoulder into the blind spot is uncomfortable, annoying, and no longer necessary.
2) Only a brief glance at the mirror is required to view the blind spot, as opposed to the longer time required when turning the head. At highway speeds, turning your head takes your eyes off the road for about 100 feet.
3) Glancing at the mirror leaves the forward scene in your peripheral view, while turning your head completely eliminates the forward view.
4) The blind spot can be easily included in your visual
145
scanning.
5) At night, glare from the outside mirrors is virtually eliminated. This is because the following vehicle’s headlamps are not visible until the vehicle moves into the blind spot, and at that point, the high intensity portion of the headlamp’s beam does not hit the mirror.
Positioning of interior and exterior mirrors:
Interior Rearview Mirror — allows you to see directly behind your vehicle. It is a rectangular shaped mirror that is either suspended from the roof of the vehicle or attached to the front windshield. To see clearly, you must adjust the mirror for your height and seating position.
Adjusting the rearview mirror
1) sit in the proper driving position
2) move your eyes, not your head, to look in the rearview mirror
3) adjust the mirror so that it frames the entire rear window
Most rearview mirrors are equipped with a day/night adjustment. This lever allows you to switch the angle of the mirror to reduce headlight glare at night and sunlight glare during the day when the sun is directly behind you.
146
Pre-Drive Inspection
It is important that the young driver get in the habit of performing these checks in the same sequence each time they prepare to drive, for two reasons. One, it allows the young driver into the habit of forming responsible behavior. Secondly, habitually forming this habit, the driver is less likely to overlook signs of possible problems.
Before driving prepare yourself mentally, physically, and emotionally to drive. If your are not prepared, the best decision would be not to drive.
Approaching the Vehicle
Carry your keys in your hands. For added safety, devices with automatic door locking and unlocking, or emergency buttons should always be in your hand when approaching your vehicle. Be on the look out for people whom look out of place.
Check outside of vehicle.
Check for obvious fluid leakage. Identify the source of any leaking fluids (coolant, air conditioner condensation, brake, motor oil, transmission fluid).
Check for tire inflation, position, and damage.
Check for obvious physical damage to the vehicle’s body or glass.
Approach driver’s door from the front when parked next to the curb.
Store all valuables in the trunk or secure them on the floor of vehicle.
147
Look into the vehicle and check traffic flow.
Unlock doors and enter the vehicle with the keys in your hand.
After entering the vehicle, immediately lock the door to prevent unauthorized entry. Place key in ignition.
Sit directly behind the steering wheel and allow for comfortable access to brake pedal and accelerator, while keeping the heel of your foot on floorboard.
Adjust head restraints. To minimize neck injury, level head restraint directly across from the top of the ears. Recognize that a lowered head restraint may cause injury in a crash and encourages whiplash.
Fasten lap and shoulder restraint. Protect yourself from being thrown around or out of the vehicle by adjusting lap and shoulder restraints snugly across hips and chest.
Adjust mirrors to gain maximum field of vision and sight distance from rear and side view mirrors, and to reduce or eliminate mirror blind spots.
Starting Your Vehicle
Use your key to turn the ignition switch to one of five different positions.
1. Accessory — this position lets you use items such as the radio, windshield wipers, power windows, etc., and other electrical equipment when the engine is turned off.
148
2. This position locks your ignition, steering wheel, and transmission. (You can only remove the key when the ignition switch is in the LOCK position.)
3. This position lets you turn off the engine and still turn the steering wheel. Use the OFF position when the vehicle is in motion while the engine is off (i.e., when the vehicle is being towed).
4. The key stays in the “ON” position when the engine is running.
5. This is the position to start your engine.
Check parking brake. Parking brake should be firmly set. If not, set it.
Place and keep right foot on the service brake pedal.
Put key in ignition (the key is necessary to unlock the steering wheel and start the vehicle).
Gear selector in “Park” or “Neutral.”
Know if your vehicle has fuel injection or an automatic choke (check owner's manual if you are unsure). - if your vehicle has fuel injection, keep your foot off the
accelerator - if your vehicle has a carburetor, press the accelerator pedal
to the floor once to set the automatic choke and then press it down slightly.
Turn key to “ON” position.
Check alert lights and gauges.
149
Turn key to start engine. - note position of ignition switch and watch engine information lights for indication that the engine is on. - be careful not to turn and hold the key longer than a few seconds (check owner’s manual for guidelines). - release the key when the engine starts.
After starting engine
Check for warning lights and gauges. The gauges provide information concerning the mechanical condition of the vehicle and warn the driver about any vehicle problems.
Set accessories — Turn on or adjust accessories (i.e., ventilation system, daylight running lights, headlights, wipers, defrosters, radio, or other devices). Daylight running lights are becoming standard equipment on General Motors vehicles. Studies indicate that fewer crashes occur when vehicles are more visible.
Stopping and Securing Your Vehicle
Stop within a legal, secure parking space - park within appropriate distances of a fire hydrant, intersection, railroad crossing, legal parking zone, etc. - keep foot on service brake
Set Parking Brake - recommended in most new vehicle owner’s manuals - prevents unexpected or abrupt movements
150
Place gear selector in “Park.” - never shift to park until the vehicle is completely stopped - place in recommended gear for standard shift transmission (check owner’s manual)
Turn off any vehicle accessories - check owner’s manual for recommendations
Turn ignition switch to “OFF” - shut engine off after turning accessories off
Lock ignition switch and remove key - required in order to remove the key in most vehicles
Remove occupant restraints - some shoulder restraints operate when the door is opened
Check traffic and exit the vehicle - check traffic flow to rear prior to opening the door - rear child safety door locks may need to be opened from the driver’s door control switch
Secure doors and windows - protects valuables and unauthorized entry by others - do not leave the keys in the vehicle
Responsibilities When Exiting Your Vehicle
* Never leave your car keys where children can get them. * Keep car doors and trunks locked at all times, even in the
garage or driveway. * Teach children not to play in or around cars. * Never leave your child unattended in a car, even if the windows
are down and a windshield shade is in place or even just to run
151
a quick errand. * Make sure all children leave the vehicle when you reach your
destination. * Don't overlook sleeping infants! * Make sure that the seat belt and seat surface are not too hot
before buckling up your child. * Keep the rear fold-down seats closed to prevent kids from
getting into the trunk from inside the car. * Contact your auto dealership about getting your vehicle
retrofitted with a trunk release mechanism. * Be wary of child-resistant locks--make sure they function. * If your child does get locked inside a car, get him or her out as
soon as possible. If you can't get him or her out yourself, call 911 or your local emergency number immediately.