+ All Categories
Home > Documents > New Fascia Bracket & Post Installation Guide · 08/12/15 Secure post to fascia bracket with 4...

New Fascia Bracket & Post Installation Guide · 08/12/15 Secure post to fascia bracket with 4...

Date post: 20-Jul-2018
Category:
Upload: lydung
View: 216 times
Download: 0 times
Share this document with a friend
1
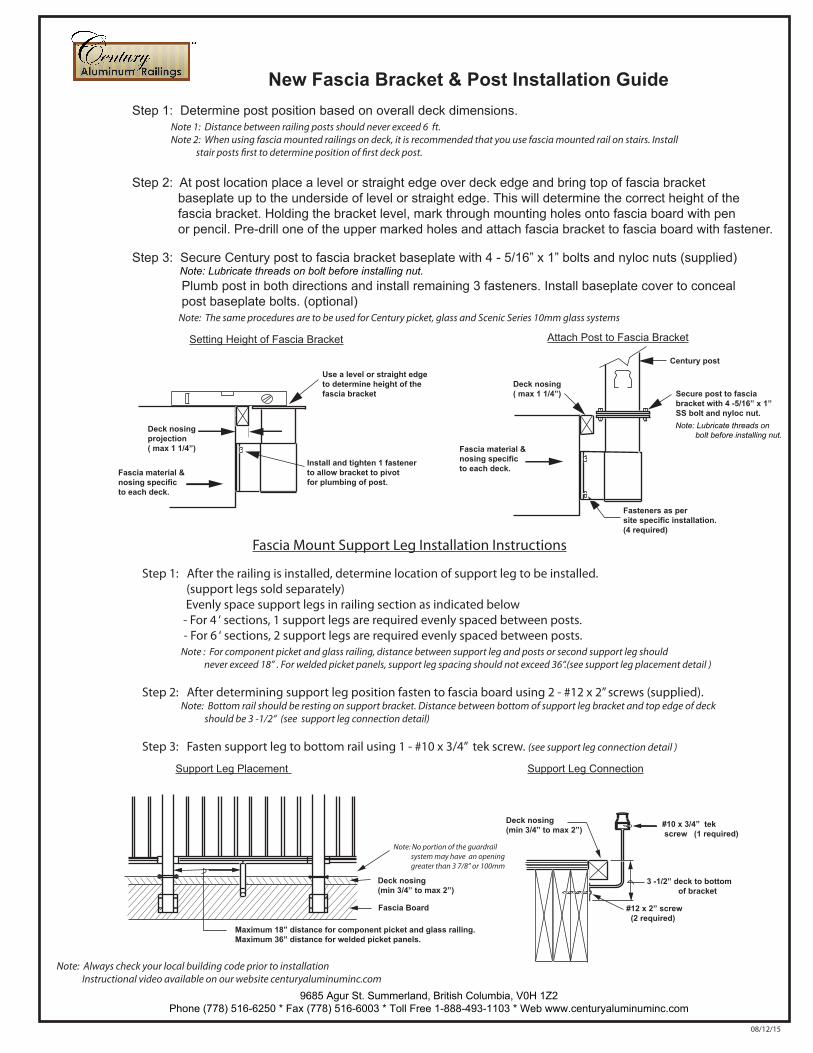
08/12/15 Secure post to fascia bracket with 4 -5/16” x 1” SS bolt and nyloc nut. Fasteners as per site specific installation. (4 required) Deck nosing ( max 1 1/4”) Attach Post to Fascia Bracket New Fascia Bracket & Post Installation Guide Step 1: Determine post position based on overall deck dimensions. Note 1: Distance between railing posts should never exceed 6 ft. Note 2: When using fascia mounted railings on deck, it is recommended that you use fascia mounted rail on stairs. Install stair posts first to determine position of first deck post. Step 2: At post location place a level or straight edge over deck edge and bring top of fascia bracket baseplate up to the underside of level or straight edge. This will determine the correct height of the fascia bracket. Holding the bracket level, mark through mounting holes onto fascia board with pen or pencil. Pre-drill one of the upper marked holes and attach fascia bracket to fascia board with fastener. Step 3: Secure Century post to fascia bracket baseplate with 4 - 5/16” x 1” bolts and nyloc nuts (supplied) Note: Lubricate threads on bolt before installing nut. Plumb post in both directions and install remaining 3 fasteners. Install baseplate cover to conceal post baseplate bolts. (optional) Note: The same procedures are to be used for Century picket, glass and Scenic Series 10mm glass systems Fascia material & nosing specific to each deck. Setting Height of Fascia Bracket Step 1: After the railing is installed, determine location of support leg to be installed. (support legs sold separately) Evenly space support legs in railing section as indicated below - For 4 ‘ sections, 1 support legs are required evenly spaced between posts. - For 6 ‘ sections, 2 support legs are required evenly spaced between posts. Note : For component picket and glass railing, distance between support leg and posts or second support leg should never exceed 18” . For welded picket panels, support leg spacing should not exceed 36“.(see support leg placement detail ) Step 2: After determining support leg position fasten to fascia board using 2 - #12 x 2” screws (supplied). Note: Bottom rail should be resting on support bracket. Distance between bottom of support leg bracket and top edge of deck should be 3 -1/2“ (see support leg connection detail) Step 3: Fasten support leg to bottom rail using 1 - #10 x 3/4” tek screw. (see support leg connection detail ) Fascia Board Deck nosing (min 3/4” to max 2”) Maximum 18” distance for component picket and glass railing. Maximum 36” distance for welded picket panels. 3 -1/2” deck to bottom of bracket #10 x 3/4” tek screw (1 required) #12 x 2” screw (2 required) Deck nosing (min 3/4” to max 2”) Support Leg Connection Support Leg Placement Fascia Mount Support Leg Installation Instructions Use a level or straight edge to determine height of the fascia bracket Deck nosing projection ( max 1 1/4”) Fascia material & nosing specific to each deck. Install and tighten 1 fastener to allow bracket to pivot for plumbing of post. Century post Note: Always check your local building code prior to installation Instructional video available on our website centuryaluminuminc.com 9685 Agur St. Summerland, British Columbia, V0H 1Z2 Phone (778) 516-6250 * Fax (778) 516-6003 * Toll Free 1-888-493-1103 * Web www.centuryaluminuminc.com Note: Lubricate threads on bolt before installing nut. Note: No portion of the guardrail system may have an opening greater than 3 7/8” or 100mm
Transcript

08/12/15

Secure post to fasciabracket with 4 -5/16” x 1”SS bolt and nyloc nut.

Fasteners as persite specific installation.(4 required)

Deck nosing( max 1 1/4”)

Attach Post to Fascia Bracket

New Fascia Bracket & Post Installation GuideStep 1: Determine post position based on overall deck dimensions. Note 1: Distance between railing posts should never exceed 6 ft. Note 2: When using fascia mounted railings on deck, it is recommended that you use fascia mounted rail on stairs. Install stair posts �rst to determine position of �rst deck post.

Step 2: At post location place a level or straight edge over deck edge and bring top of fascia bracket baseplate up to the underside of level or straight edge. This will determine the correct height of the fascia bracket. Holding the bracket level, mark through mounting holes onto fascia board with pen or pencil. Pre-drill one of the upper marked holes and attach fascia bracket to fascia board with fastener.

Step 3: Secure Century post to fascia bracket baseplate with 4 - 5/16” x 1” bolts and nyloc nuts (supplied) Note: Lubricate threads on bolt before installing nut. Plumb post in both directions and install remaining 3 fasteners. Install baseplate cover to conceal post baseplate bolts. (optional) Note: The same procedures are to be used for Century picket, glass and Scenic Series 10mm glass systems

Fascia material &nosing specificto each deck.

Setting Height of Fascia Bracket

Step 1: After the railing is installed, determine location of support leg to be installed. (support legs sold separately) Evenly space support legs in railing section as indicated below - For 4 ‘ sections, 1 support legs are required evenly spaced between posts. - For 6 ‘ sections, 2 support legs are required evenly spaced between posts. Note : For component picket and glass railing, distance between support leg and posts or second support leg should never exceed 18” . For welded picket panels, support leg spacing should not exceed 36“.(see support leg placement detail )

Step 2: After determining support leg position fasten to fascia board using 2 - #12 x 2” screws (supplied). Note: Bottom rail should be resting on support bracket. Distance between bottom of support leg bracket and top edge of deck should be 3 -1/2“ (see support leg connection detail)

Step 3: Fasten support leg to bottom rail using 1 - #10 x 3/4” tek screw. (see support leg connection detail )

Fascia Board

Deck nosing(min 3/4” to max 2”)

Maximum 18” distance for component picket and glass railing.Maximum 36” distance for welded picket panels.

3 -1/2” deck to bottom of bracket

#10 x 3/4” tek screw (1 required)

#12 x 2” screw (2 required)

Deck nosing(min 3/4” to max 2”)

Support Leg ConnectionSupport Leg Placement

Fascia Mount Support Leg Installation Instructions

Use a level or straight edgeto determine height of the fascia bracket

Deck nosingprojection( max 1 1/4”)

Fascia material &nosing specificto each deck.

Install and tighten 1 fastenerto allow bracket to pivot for plumbing of post.

Century post

Note: Always check your local building code prior to installation Instructional video available on our website centuryaluminuminc.com

9685 Agur St. Summerland, British Columbia, V0H 1Z2Phone (778) 516-6250 * Fax (778) 516-6003 * Toll Free 1-888-493-1103 * Web www.centuryaluminuminc.com

Note: Lubricate threads on bolt before installing nut.

Note: No portion of the guardrail system may have an opening greater than 3 7/8” or 100mm

Recommended