racle Financials for India Basic Setups Oracle Financials for India Basic Setups Set Up E-Business Tax Regime to Rates Setup E-Business Tax Regime to Rates setup needs to be performed in order to use India Localization features in Order Management and Receivables. EbTax replaces the old Receivables tax engine. Please refer detailed description in this document on how to perform this setup step. See Also: Define Customer Additional Information, India Local Order Management Chapter of India Localization User’s Reference Manual Enable Triggers (For New Customers Only) Post R12 upgrade Oracle Financials for India triggers will be created in a disabled state. Once the upgrade is completed run adpatch providing the driver as jai5188052.drv Driver present in JA_TOP/patch/115/driver This will enable Oracle Financials for India triggers. For existing Oracle Financials for India customers, the triggers will be automatically created and enabled on completion of upgrade steps. Hence no manual post-upgrade steps are required for these customers. Enable India Distributions Global Descriptive Flexfield segment Usage of earlier Invoice Distributions Descriptive Flexfield has been discontinued and the same functionality has been implemented through India Distributions Global Descriptive Flexfield. The users should ensure that at least one segment of this India Distributions Global Descriptive Flexfield is marked as ‘Enabled’. The users should not make any of the segments as ‘Required’. Following are the details of the Global Descriptive Flexfield: Application: Regional Localizations Title: JG_AP_INVOICE_DISTRIBUTIONS
Transcript
racle Financials for India Basic Setups
Oracle Financials for India Basic Setups
Set Up E-Business Tax Regime to Rates Setup
E-Business Tax Regime to Rates setup needs to be performed in order to use India Localization features in Order Management and Receivables. EbTax replaces the old Receivables tax engine. Please refer detailed description in this document on how to perform this setup step.
See Also: Define Customer Additional Information, India Local Order Management Chapter of India Localization User’s Reference Manual
Enable Triggers (For New Customers Only)
Post R12 upgrade Oracle Financials for India triggers will be created in a disabled state.
Once the upgrade is completed run adpatch providing the driver as jai5188052.drv
Driver present in JA_TOP/patch/115/driver
This will enable Oracle Financials for India triggers.
For existing Oracle Financials for India customers, the triggers will be automatically created and enabled on completion of upgrade steps. Hence no manual post-upgrade steps are required for these customers.
Enable India Distributions Global Descriptive Flexfield segment
Usage of earlier Invoice Distributions Descriptive Flexfield has been discontinued and the same functionality has been implemented through India Distributions Global Descriptive Flexfield.
The users should ensure that at least one segment of this India Distributions Global Descriptive Flexfield is marked as ‘Enabled’. The users should not make any of the segments as ‘Required’.
Following are the details of the Global Descriptive Flexfield:
Application: Regional Localizations
Title: JG_AP_INVOICE_DISTRIBUTIONS
Context Field Values:
Code: JA.IN.APXINWKB.DISTRIBUTIONS
Name: Invoice Distributions
Description: Asia/Pacific Invoice Distributions Information
Apart from the above, there are no changes from a user perspective in the TDS functionality due to migration of the Descriptive Flexfield to Global Descriptive Flexfield.
Defining Additional Organization Information
The additional organization information is the basic data for all Excise related setups.
While creating the additional organization information, you must create two set of records, one with a blank location and another with a location. If multiple organizations are defined within the same excise registered premises, then you can define one organization and location combination as master organization and the rest as child organizations having reference to the master organization based on the ECC code. In such a setup, the master organization is the organization where excise registers are generated only from the master organization.
Important: The master child relationship is used only to generate consolidated excise registers at master organization level. You need to run the India Master Org RG request set to consolidate excise registers at the master organization.
Defining Tax Information
Navigate to the Organization Tax Information window. The following table describes the Tax Info tab.
Field Description Description
Master Organization Flag
This check box decides whether the organization is a master organization or a child organization. If it is a child organization, you must attach this to the master organization. Consolidated excise registers can be generated from the master organization.
Important: In the Master Organization Information block you have to specify whether the Organization represents an Excise Licensed Organization or a Child Organization. If you select a Child Organization, you need to specify the Excise Licensed Organization that the Child Organization belongs to. For a Master Organization and Location
combination enable the Master Organization Flag with Location specified. The ECC number defined for the Master Organization defaults to all Child Organizations when Master Organization is selected.
Field Description Description
Excise Block The following information is related to Excise Registration for an Inventory Organization Location which is of Manufacturing or Trading organization. If No Values are entered in this block, then the Organization Location is considered as Trading organization.
Excise Range Details of the Jurisdictional Central Excise Range Office of the Organization can be entered in this block. Values given in this field will be taken while printing all Excise related documents.
Excise Division Details of the jurisdictional Central Excise Division Office of the Organization can be entered in this block. Values given in this field will be taken while printing all Excise related documents.
Excise Registration Number
Central Excise Registration Certificate Number can be entered in this field. This information will be taken while printing all Excise related documents.
Excise Zone This is an additional field provided where in the user can record some information which he needs to print in all excise related documents.
Excise Region This is an additional field provided where in the user can record some information which he needs to print in all excise related documents.
Excise Circle This is an additional field provided where in the user can record some information which he needs to print in all excise related documents.
Excise Collectorate
Details of the jurisdictional office of the Central Excise Commissioner of the Organization can be entered in this block. Values given in this field will be taken while printing all Excise related documents.
EC Code Use this field to enter Excise Control Code of an Inventory Organization Location. This would be printed on all the documents that are required under Excise Rules.
Excise Invoice at ECC Code
Check this field in case you wish to generate Excise Invoice at Master Organization level. In case you have multiple internal Inventory Organizations / Warehouses existing within the same Excise registered premises and if you opt for Excise Invoice number generation at the Master Organization level then, check this option child organization location.
Export Oriented Use this field to indicate whether the Organization / Location is a
Unit Export Oriented Unit. On checking this flag the CENVAT liability arising on shipment would be matched component-wise with the credit available for that Excise Component. You would not be able to complete shipment if the credit available for Excise Component is inadequate.
Sales Tax Block
CST Reg. No. Use this field to enter Central Sales Tax Registration Number of an Inventory Organization Location. This would be printed on all the documents that are required under Sales Tax Act.
LST Reg. No Use this field to enter State Sales Tax Registration Number of an Inventory Organization Location. This would be printed on all the documents that are required under Sales Tax Act.
Income Tax Block
PAN No Use this field to enter Permanent Account No of an Inventory Organization Location. This would be printed on all the documents that are required under Income Tax Act.
TAN No Use this field to enter TDS Account No of an Inventory Organization Location. This would be printed on all the documents that are required under Income Tax Act.
WARD No Use this field to enter Ward No of an Inventory Organization Location. This would be printed on all the documents that are required under Income Tax Act.
VAT Reg No. Use this field to enter VAT Registration No of an Inventory Organization Location.
Important: If an Inventory Organization Location is a Manufacturing unit (not Trading) and you enter details in the Tax Info Block, then you will not be allowed to enter any information in the Excise - Trading Information Block through Trading Information Tab.
Defining Accounting Information
You would assign the appropriate General Ledger Accounts to which the Localization Taxes have to be posted in the Account Information tab of the Organization Additional Information screen. The values entered in the Parameters region would determine the behavior of localization taxes calculated for certain transactions.
Ensure that you specify appropriate general ledger accounts in the Accounts Information tab. This information will be used to account for Localization transactions. All fields are mandatory. Each of these fields is discussed in detail below.
In Oracle Financials for India, navigate to Setup > Organization > Additional Organization Information > Accounting Info. The table provides a detailed field-wise description of the screen:
Field Description Description
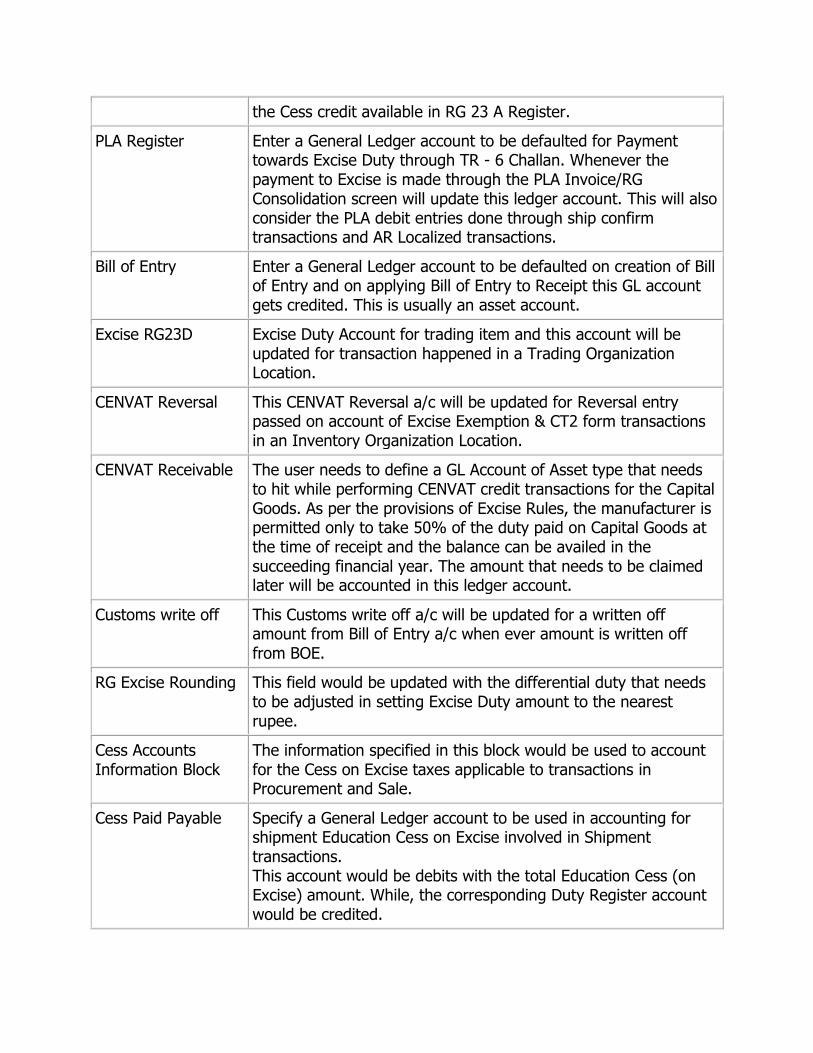
Excise Account Information Block
These accounting information are necessary for an Inventory Organization through which all the charges related to an item on taxes will charged to respective accounting flex fields. The user needs to define separate accounting flexfields for OSP Excise a/c, Excise expenses, Excise receivable, CENVAT on Raw Material, CENVAT on Capital Goods, Personal Ledger Account, Excise - RG23D, Bill of entry, Scrap cost, CENVAT Reversal, Customs write off a/c.
OSP Excise This account will be used to pay the Excise Duty on goods sent for Outside Processing (OSP). This is usually a Expenses Account.
Excise Expenses Enter a General Ledger Account for Excise Expenses Account. This default account is being used to track the Excise duty due from the excise department on account of customer returns treated as FG return or scrap.
Excise Payable/paid Enter a default General Ledger account to be defaulted on all AR transaction entry windows for Accounting Excise Duty paid on delivery of goods. This account will debit for the total Excise amount whenever shipment is confirmed to a customer and AR Invoice is raised.
CENVAT RM Enter a General Ledger account to be defaulted on all transaction entry windows for CENVAT Raw Material account. This is the default GL account that will hit while performing a receipt with CENVAT Credit (inputs) This is usually an asset account. This account would be credited on shipment when the excise liability arising from the shipment transaction is met by utilizing the Cess credit available in RG 23 A Register.
CENVAT CG Enter a General Ledger account to be defaulted on all transaction entry windows for CENVAT Capital Goods account. This is the default GL account that will hit while performing a receipt with CENVAT credit (Capital Goods). This is usually an asset account. This account would be credited on shipment when the excise liability arising from the shipment transaction is met by utilizing
the Cess credit available in RG 23 A Register.
PLA Register Enter a General Ledger account to be defaulted for Payment towards Excise Duty through TR - 6 Challan. Whenever the payment to Excise is made through the PLA Invoice/RG Consolidation screen will update this ledger account. This will also consider the PLA debit entries done through ship confirm transactions and AR Localized transactions.
Bill of Entry Enter a General Ledger account to be defaulted on creation of Bill of Entry and on applying Bill of Entry to Receipt this GL account gets credited. This is usually an asset account.
Excise RG23D Excise Duty Account for trading item and this account will be updated for transaction happened in a Trading Organization Location.
CENVAT Reversal This CENVAT Reversal a/c will be updated for Reversal entry passed on account of Excise Exemption & CT2 form transactions in an Inventory Organization Location.
CENVAT Receivable The user needs to define a GL Account of Asset type that needs to hit while performing CENVAT credit transactions for the Capital Goods. As per the provisions of Excise Rules, the manufacturer is permitted only to take 50% of the duty paid on Capital Goods at the time of receipt and the balance can be availed in the succeeding financial year. The amount that needs to be claimed later will be accounted in this ledger account.
Customs write off This Customs write off a/c will be updated for a written off amount from Bill of Entry a/c when ever amount is written off from BOE.
RG Excise Rounding This field would be updated with the differential duty that needs to be adjusted in setting Excise Duty amount to the nearest rupee.
Cess Accounts Information Block
The information specified in this block would be used to account for the Cess on Excise taxes applicable to transactions in Procurement and Sale.
Cess Paid Payable Specify a General Ledger account to be used in accounting for shipment Education Cess on Excise involved in Shipment transactions. This account would be debits with the total Education Cess (on Excise) amount. While, the corresponding Duty Register account would be credited.
CESS RM Specify a General Ledger account that would be used to Account for the Education Cess recovered on purchase of raw material. This account would be credited on shipment when the excise liability arising from the shipment transaction is met by utilizing the Cess credit available in RG 23 A Register.
CESS CG Specify a General Ledger account that would be used to Account for the Education Cess recovered on purchase of Capital Goods. This account would be credited on shipment when the excise liability arising from the shipment transaction is met by utilizing the Cess credit available in RG 23 C Register.
Excise Cess Rounding
Specify an account that would be used in accounting the rounding differences arising from the Education Cess on Purchasing transactions. This account would be debited when the Cess rounding amount for the Excise Invoice is a negative amount. Similarly, this account would be credited when the Cess rounding amount for the Excise Invoice is a positive amount.
CESS Receivable Account
The GL Account specified here would be used in accounting for Cess included in purchase of Capital Goods. As per the CENVAT Credit Rules, the manufacturer is permitted only to take 50% of the duty paid on capital goods at the time of receipt and the balance can be availed in the succeeding financial year. The amount that needs to be claimed later will be debited in this account.
Secondary and Higher Education Cess Information Block
The information specified in this block would be used to account for the Secondary and Higher Education Cess on Excise taxes applicable to transactions in Procurement and Sales Module.
SHE Cess Paid Payable
Specify a general ledger account to be used in accounting for Secondary and Higher Education Cess on Excise involved in Shipment transactions.
SHE Cess RM Specify a general ledger account that would be used to Account for the SHE Cess recovered on purchase of raw material. This account would be credited when the excise liability arising from the shipment transaction is met by utilizing the SH Education Cess credit available in RG 23 A Regsiter.
SHE Cess CG Specify a general ledger account that would be used to Account for the SHE Cess recovered on purchase of Capital Goods. This account would be credited when the excise liability arising from the shipment transaction is met by utilizing the SH Education
Cess credit available in RG 23 C Regsiter.
SHE Cess Receivable The GL Account specified here would be used in accounting for Secondary and Higher Education Cess on purchase of Capital Goods for the deffered portion. As per the CENVAT Credit Rules, the manufacturer is permitted only to take 50% of the duty paid on capital goods at the time of receipt and the balance can be availed in the succeeding financial year. The amount that needs to be claimed later will be debited in this account.
SHE Cess Rounding Specify an account that would be used in accounting the rounding differences arising from the SHE Cess on Purchasing transactions. This account would be debited when the SHE Cess rounding amount for the Excise Invoice is a negative amount. Similarly, this account would be credited when the Secondary and Higher Education Cess rounding amount for the Excise Invoice is a positive amount.
Expense Excise Taxes on RTV
Debit this field with different duties to be paid in an RTV Transaction. You should have also checked the RTV Account Flag checkbox in this window. This account is also debited with third-party customs and CVD tax amounts included in the RTV transaction.
Defining Preferences
Organization Preferences check whether a specific transaction is carried out within the stipulated time span specified by relevant tax laws. You can enter the data to control the transaction from the respective tax point of view.
Field Description Description
Parameters Block
OSP Return days
Enter the number of days within which the OSP goods should come back to the Inventory Organization under 57F4. As per the Excise Rule it is 180 days.
OSP Excise percentage
Enter the rate of Excise duty charged for an OSP transaction. Since there is no need to pay duty while sending goods. While sending goods for sub contracted operations, the user needs to input zero in this field. If any other value is given in this fields, appropriate duty will
get calculated whenever he cuts a 57 F4 Challan. Important: Since no duty needs to be paid while sending goods for sub contracting, user needs to ensure that the value against this field is always 0.
Days allowed for 173(L)
Enter the number of days allowed for a transaction under 173(L) of Excise Act in the case of Sales Return.
Sales tax return days
Enter the number of days within which the Sales Return Goods should reach the Inventory Organization from the date of Sale as per Sales Tax Act. As per the Sales Tax Act, it is 180 days.
MODVAT Reversal (%)
This value is the default percentage, which will be considered by the system whenever it performs a duty debit under Rule 57 CC of the Central Excise Rules. You should enter the CENVAT recovery percentage in this field. For example, currently, the percentage of CENVAT recovered is 8% on all excise exempted transaction. Thus, 8 should be entered into this field.
Defining Register Preferences
This parameter decides the preference of hitting the duty payment register while performing a ship confirm transaction in Order Management or a Transaction Localized in the AR Module. You are not permitted to debit duty from different duty paying registers for a single transaction.
VAT Return Days
Enter the number of days within which the sales return goods should reach the Inventory Organization from the date of delivery as per VAT act in each state.
Receipts Block
Update Qty register Event
This event lets you update the Quantity register on Receive and Amount register on claim of CENVAT.
Allow Tax Change on WMS Receipts Allow Tax Change on Receipts Allow Tax Change on ROI Receipts
Bill only workflow Block
Default Location
This is mainly required for bill only workflows for determining location.
Negative balance in PLA
If the balance available in each of the CENVAT Registers and PLA is less than Excise Duty liability arising from the ship confirms transaction, then the ‘Interface Trip Stop’
request completes with error and the shipment transaction remains incomplete. In case of monthly Excise settlement, you can ship the goods with inadequate CENVAT Credit. To meet such situations you can enable ‘allow negative balance in PLA’ and set PLA preference to 1. On doing this, all excise payments are done through PLA register and periodic adjustments towards payment of excise duty can be done through RG Consolidation screen. In such type of setup, the CENVAT registers will have entries only for the credit availed and the adjustments made while computing the exact excise liability (fund transfer from CENVAT register to PLA register).
Important: You should get necessary concurrence from the local excise authorities before rolling down with the new system.
On RTV, the registers will be updated based on the preferences.
Trading Information
Inventory Organization locations are further classified as trading organization in the case where only Trading activity is happening in an organization Location.
India Local Inventory > Setup > Organization > Additional Information
Trading Registration Details
Use this window to enter and maintain the registration information of Organization and/or Location of Trading Nature under Central Excise Rule. The information entered here would be printed on all relevant reports and invoices raised from this Organization.
Use Trading Information Button to enter Excise Registration details of a Registered Dealer.
In the trading information region, the user needs to give information only if the organization/Location is registered under the Central Excise Rules as a Dealer/Depot.
If the Organization/Location is an Excise registered premises, the user needs to give the following information against the respective fields. This information will be used while generating the Excise related documents generated from the system. User needs to ensure that he do not put any values in the Excise related information region of the main additional organization information screen which is meant for manufacturing Organization/Location.
Range Details of the Jurisdictional Range.
Division Details of the Jurisdictional Division
Zone/Region/Circle These fields can be used to key in additional Information that
needs to be printed in the excise related documents generated from the system.
Collectorate
ECC Number ECC Number allotted for the Trading Activities
Excise in RG23D This flag enables to indicate whether the Receipt excise tax is inventorised or accounted to RG23 D account specified in the Organization Additional information setup. If the flag is Checked (Yes), the Receipt Excise amount shall be Debited to the RG23 D Account on receipt of material. If the flag is Unchecked (Default) the excise amount is added to the Inventory cost and debited to Inventory material account on Delivery of material.
Order Price Excise Inclusive
This flag enables to indicate whether the Sales Order price for shipments from a Trading Organization - Location is inclusive of the Excise tax. If the flag is Checked (Yes), the Excise tax is not added to the Receivables when the AR Invoice is created after Autoinvoice and India Localization program to interface Order Lines to AR. If the flag is Unchecked (default), Excise tax attached to the Shipment is added to the Receivables of the AR Invoice. Credit is given against the Account defined in the Excise Tax definition.
Tax Calendar
Localization taxes would be calculated only when the transaction falls within the active year. You can keep only one Year active at a time. The Tax Calendar defined for an Organization NULL location would be defaulted to the other Organization Additional Information records created for the Locations with this Organization.
Define Sub Inventory Locations
Before you start using Oracle Financials for India Inventory, the Sub-inventories have to be associated with Organization/Location combination. Excise related transactions and records will be updated only for those Sub inventories, which are identified as bonded for Manufacturing Organizations and as Trading for Trading Organizations. By considering the transactions of a Sub Inventory, the check box for bonded/traded needs to be enabled.
Important: It is mandatory to complete this setup, irrespective of the fact that the Sub inventory is not bonded. You can leave the ‘Bonded’ checkbox blank, if the Sub inventory is non-bonded.
In Oracle Financials for India, navigate to Setup > Organization > Sub Inventory Locations. The table below provides field-wise description of the Assign Sub Inventories screen.
Field Description Description
Header Level
Organization Name/Location
Inventory Organization’s Name and Location to be selected by the user from the LOV.
Line Level
Sub-Inventory You can select the Sub-Inventory name from the LOV
Description The Description for the selected Sub-Inventory will be displayed here.
Bonded (Flag) You need to specify whether a Sub Inventory belonging to the specified Organization and location is Excise Bonded or Duty Paid. When this Flag is enabled the Sub Inventory is considered as Bonded.
Trading (Flag) You need to specify whether a Sub-Inventory belonging to the specified Organization and Location is Trading. When this Flag is enabled the Sub-Inventory is considered as Trading. If the Organization Location has a Manufacturing setup, this field is disabled.
Important: The above Sub Inventory setup is mandatory in nature & missing the same will result in shipping getting stopped.
Defining Bond Register
The calculation of Excise Duty and updates of Excise Registers are based on the setup made in the define bond register. Before making this set up you need to define the Order Types and Transaction Sources. Excise transactions are classified into the following categories:
Domestic with Excise Domestic without Excise Export with Excise Bond Register (Export under Bond)
Excise transactions need to be identified based on the Organization/Location combination and against each Excise Transaction multiple Order Types and Transaction
Sources can be assigned. Order Type need to be assigned to Excise related transactions from Order Management Module and Transaction Source need to be assigned for all Excise related transactions through the Stand Receivable Module. If the Organization/Location is of ‘Manufacturing’ type, excise related transactions for manufacturing set up need to be associated. Like wise, if the Organization/Location is ‘Trading’ excise related transactions for trading need to be associated.
By associating the Order Types to the excise transactions for an Inventory Organization and Location, the related Excise Record entries will be passed based on the nature of goods cleared.
Generating Excise Invoice Numbers
For generating user defined prefixes for Excise Invoices, the Excise transaction type association needs to be mapped in the “Excise Generation” region of Additional Organization Information screen.
India Localization provides maintenance of multiple Bond Registers for exports.
Recording Export under Bond
Rule 19 of The Central Excise Rules, 2002 provides for Export without payment of duty subject to the conditions and procedures specified by the notifications by the Central Board of Excise and Customs. In exercise of the powers conferred under these rules, the Central Board of Excise and Customs has notified through Central Excise (N.T.) Notification No.42/2001 and Notification No.44/2001 the conditions and procedures for export of all excisable goods. These notifications provide for taking on a Bond/Letter of Undertaking (LUT) for the export made to all countries other than Nepal and Bhutan and another Bond/LUT for the exports made to Nepal and Bhutan. To comply with the procedures specified under these notifications, an organization will have to maintain multiple Bond Registers in order to keep track of exports under bond to all countries other than Nepal & Bhutan, exports to Nepal and Bhutan and exports under Letter of Undertaking. Under each of these categories, there would also be a possibility for taking multiple bonds where total of Export made, without proof of exports, is greater than the Bond Amount.
Using Bond Registers in Oracle Financials for India, you can maintain multiple Bond Registers for a combination of Organization and Location.
On taking a Bond for export you will have to create the required setup before you start creating export transactions against the Bond. The only setup step would be to record the Bond details. To do this, navigate to ‘Define Bond Register’ window. Select organization, Location for which the Bond would be applicable, pick up the Type ‘Bond Register’, and enter Bond Number, Expiry Date and the Bond Amount. On the lines, select the Order Types that would be used for export transactions.
In case export is made against the Letter of Undertaking (LUT), there would not be a Bond Amount. Hence, you can leave the Bond Amount field blank. However, it would be mandatory for you to capture the details of the Bond Number (LUT No.) and the Bond Expiry Date. In addition to this, check the LUT checkbox to indicate that the Bond Type is LUT.
Details of exports made under bond would be recorded. This information would be used to track Bond utilization.
Define Excise Invoice Generation
To generate Excise Invoices with pre-definable prefixes (Alpha/Numeric), you need to complete Excise Invoice Generation Setup. If this setup is not done, system will generate only two series of Excise Invoices, one for Domestic Clearances and the other for Export Clearances and no prefixes for the numbers generated can be maintained.
Prerequisites
Before you enter the Excise Invoice Generation - Organization Additional Information, you must:
Define Organizations Define Locations Organization Additional Information
In Oracle Financials for India, navigate to India Local Inventory > Organization Additional Information.
1. Query for the Organization Location you wish to set up. 2. Click Tax Calendar > Excise Generation. 3. Create a new record for the Excise Invoice serial number to be generated for the
Organization, Location, and Transaction Type and Order/Invoice Type combination.
4. This Excise Invoice Serial will be generated when Shipment & RTV is made from a Particular Inventory Organization Location.
The table below details the setup options:
Field Description Description
Transaction Type
Choose one of the options from: Order: On selecting this option in combination with the Order Type, the Excise Invoice Number generated on shipping the delivery created
with this Order Type would be based on the definition specified for this record. Return To Vendor: The document sequence defined here would be applicable to Excise Invoice Numbers generated for a Return to Vendor Transaction. Domestic: The Document Sequence defined here would be applicable to Excise Invoice Numbers generated for a Domestic Transaction. This would be applicable to all the Order/Invoice Types that are Define Bond Register: Chosen for the Organization / Location with the Register Type as ‘Domestic with Excise’ AND This Order Type is not chosen in the Excise creation India Localization screen for the Organization, Location. Invoice: On selecting this option in combination with the Invoice Type, the Excise Invoice Number generated on saving an AR Invoice would be based on the definition specified for this record. Export: The document sequence defined here would be applicable to Excise Invoice Numbers generated for a Export Transaction. This would be applicable to all the Order/Invoice Types that are Define Bond Register: Chosen for the Organization / Location with Register Type ‘Export with Excise’. This Order Type is not chosen in the Excise creation India Local screen for the Organization, Location.
Order/Invoice Type
The relevant Order Type/Invoice type related for a Inventory Organization Location have to be selected here from the LOV.
Register Code The appropriate Register Code for an Order/Invoice Type has to be selected here from the LOV.
Prefix Any alpha-numeric code that would be prefixed to the Excise Invoice number.
Start No You can specify the Start Number for a specific Excise Invoice Serials which are to be generated from a particular Inventory Organization Location for a specific Order/Invoice Type
Jump by You can decide chronological series for Excise Invoice Numbers by specifying Jump by Number.
End No The User can specify the End Number for a specific Excise Invoice Serials, which are to be generated from a particular Inventory Organization Location for a specific Order/Invoice Type & Register Code.
Before defining user prefixes and Excise Invoice Numbers, appropriate setups need to be done in define Bond Register to associate an Order type for all Transactions Order Management Module. In addition, Transaction source for all transactions from Accounts Receivable Module needs to be defined. The Order Type and Transaction Source will be associated with different type of excise removals (like domestic with excise, Bond, Export with excise etc.). Only after associating an Order Type/Transaction source with an excise related transaction type, user should define the user definable prefixes and Excise Invoice Numbers in this region.
It is not mandatory to define Excise Invoice Generation Serial Number. If you do not define the Excise Invoice Generation Screen, then auto generated system numbers will be allotted to the Excise Invoice as stipulated under Rule 52 A of the Central Excise Rules (one sequence for Domestic transactions and another for Exports).
Defining Bond Register
In Oracle Financials for India, navigate to India Local Order Management > Registers > Define Bond Register.
From the look-ups you need to select the appropriate excise transactions. Options for Manufacturing Organization are:
Domestic with Excise Domestic without Excise, Export with Excise Bond Register (For Exports)
Options for Trading Organization are:
Trading Domestic with excise Trading Domestic without Excise Trading Export with Excise Trading Bond Register (For Exports)
Important: You need to specify the Bond credit available in his running Bond account maintained for export purposes.
Field Description Description
Operating Unit The Operating Unit for which the Bond Register is being entered.
Organization/Location You can select Organization and its Location from LOV for which the Register setup is to be made.
Order/Invoice Information
Bond Number This would be an enterable field. User can enter Bond Number here. This number can be alpha-numeric.
Bond Expiry Date The User can enter the Bond Expiry Date here. The system would raise application error where the Shipment date is greater than the Bond Expiry Date.
Letter of Undertaking This field would be checked whenever the Bond Type is a LUT (Letter of Undertaking).
Bond Amount Enter the Bond Amount here. The value in this field can be entered only while creating a new Bond. Once the Bond details are saved, these values cannot be updated.
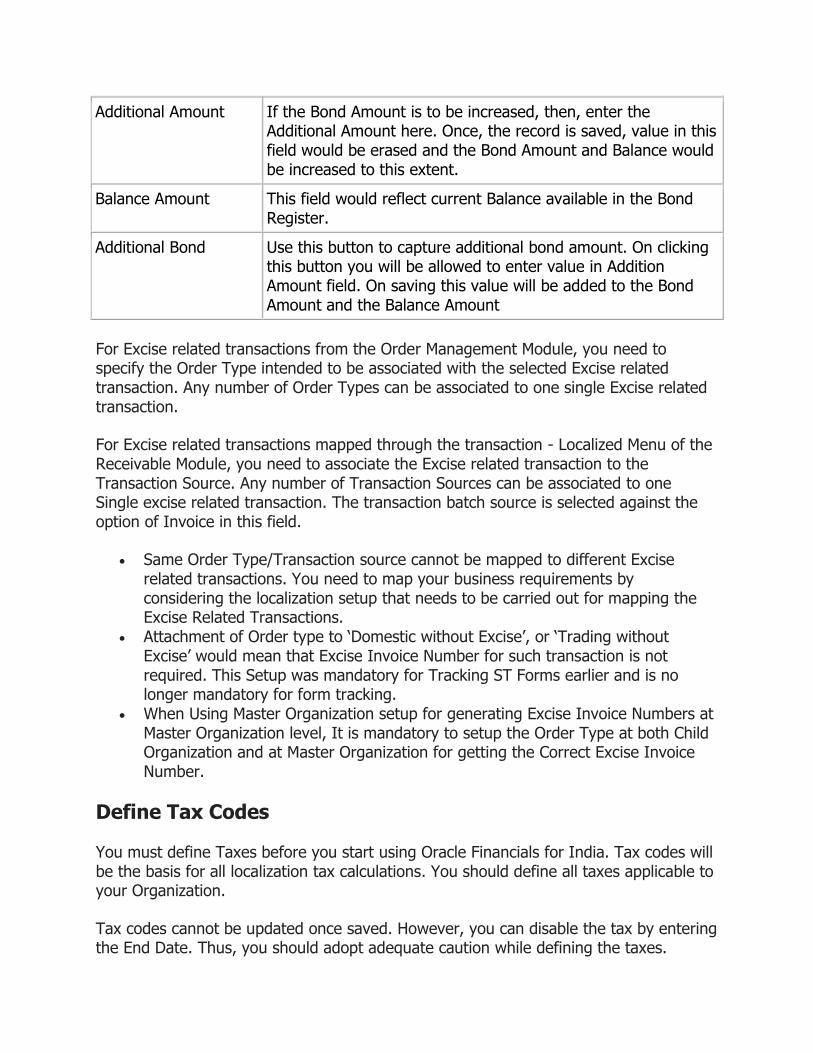
Additional Amount If the Bond Amount is to be increased, then, enter the Additional Amount here. Once, the record is saved, value in this field would be erased and the Bond Amount and Balance would be increased to this extent.
Balance Amount This field would reflect current Balance available in the Bond Register.
For excise related transactions from the Order Management Module, you need to specify the Order Type intended to be associated with the selected Excise related transaction. Any number of Order Types can be associated to one single Excise related transaction.
For Excise related transactions mapped through the Transaction - Localized menu of the Receivable Module, you need to associate the excise related transaction to the Transaction Source. Any number of Transaction Sources can be associated to one Single Excise Related Transaction. The transaction batch source is selected against the option of Invoice in this field.
Same Order Type/Transaction source cannot be mapped to different Excise Related Transactions. You need to map your business requirements by considering the localization setup that needs to be carried out for mapping the Excise Related Transactions.
Attachment of Order Type to ‘Domestic without Excise’, or ‘Trading without Excise’ would mean that Excise Invoice Number for such transaction is not required. This Setup was mandatory for Tracking ST Forms earlier and is no longer mandatory for form tracking.
When using Master Organization setup for generating Excise Invoice Numbers at Master Org level, it is mandatory to setup the order type at both Child
Organization and at Master Organization for generating the Correct Excise Invoice Number.
Recording Export under Bond
Rule 19 of The Central Excise Rules, 2002 provides for Export without payment of duty subject to the conditions and procedures specified by the notifications by the Central Board of Excise and Customs. In exercise of the powers conferred under these rules, the Central Board of Excise and Customs has notified through Central Excise (N.T.) Notification No.42/2001 and Notification No.44/2001 the conditions and procedures for export of all excisable goods. These notifications provide for taking on a Bond/Letter of Undertaking (LUT) for the export made to all countries other than Nepal and Bhutan and another Bond/LUT for the exports made to Nepal and Bhutan. To comply with the procedures specified under these notifications, an Organization will have to maintain multiple Bond Registers in order to keep track of exports under bond to all countries other than Nepal & Bhutan, exports to Nepal and Bhutan and exports under Letter of Undertaking. Under each of these categories, there would also be a possibility for taking multiple bonds where total of Export made, without proof of exports, is greater than the Bond Amount.
Using Bond Registers in Oracle Financials for India, you can maintain multiple Bond Registers for a combination of Organization and Location.
On taking a Bond for export you will have to create the required setup before you start creating export transactions against the Bond. The only setup step would be to record the Bond details. To do this, navigate to ‘Define Bond Register’ window. Select organization, Location for which the Bond would be applicable, pick up the Type ‘Bond Register’, and enter Bond Number, Expiry Date and the Bond Amount. On the lines, select the Order Types that would be used for export transactions.
In case export is made against the Letter of Undertaking (LUT), there would not be a Bond Amount. Hence, you can leave the Bond Amount field blank. However, it would be mandatory for you to capture the details of the Bond Number (LUT No.) and the Bond Expiry Date. In addition to this, check the LUT checkbox to indicate that the Bond Type is LUT.
Details of exports made under bond would be recorded. This information would be used to track Bond utilization.
Prerequisites
Before you enter the Bond Register Details, you must:
Define Organizations
Define Locations Define Organization Additional Information Define Transaction Types
In Oracle Financials for India, navigate to the India Local Associate Register Types from India Local Order Management > Setup > Registers > Define Bond Register.
The field wise description for the screen is given below. From the look-ups you need to select the appropriate Excise Transactions. Options in Manufacturing Organization are:
Domestic with Excise Domestic without Excise, Export with Excise Bond Register (For Exports)
Options in Trading Organization are:
Trading Domestic with Excise Trading Domestic without Excise Trading Export with Excise Trading Bond Register (For Exports)
Important: You need to specify the Bond Credit available in his running Bond account maintained for export purposes.
Field Description Description
Organization/Location You can select Organization and its Location from LOV for which the Register setup is to be made.
Order/Invoice Information
Bond Number This would be an enterable field. User can enter Bond Number here. This number can be alphanumeric.
Bond Expiry Date The User can enter the Bond Expiry Date here. The system would raise application error where the Shipment Date is greater than the Bond Expiry Date.
Letter of Undertaking This field would be checked whenever the Bond Type is a LUT (Letter of Undertaking).
Bond Amount Enter the Bond Amount here. The value in this field can be entered only while creating a New Bond. Once the Bond details are saved, these values cannot be updated.
Additional Amount If the Bond Amount is to be increased, then, enter the Additional Amount here. Once, the record is saved, value in this field would be erased and the Bond Amount and Balance would be increased to this extent.
Balance Amount This field would reflect current Balance available in the Bond Register.
Additional Bond Use this button to capture additional bond amount. On clicking this button you will be allowed to enter value in Addition Amount field. On saving this value will be added to the Bond Amount and the Balance Amount
For Excise related transactions from the Order Management Module, you need to specify the Order Type intended to be associated with the selected Excise related transaction. Any number of Order Types can be associated to one single Excise related transaction.
For Excise related transactions mapped through the transaction - Localized Menu of the Receivable Module, you need to associate the Excise related transaction to the Transaction Source. Any number of Transaction Sources can be associated to one Single excise related transaction. The transaction batch source is selected against the option of Invoice in this field.
Same Order Type/Transaction source cannot be mapped to different Excise related transactions. You need to map your business requirements by considering the localization setup that needs to be carried out for mapping the Excise Related Transactions.
Attachment of Order type to ‘Domestic without Excise’, or ‘Trading without Excise’ would mean that Excise Invoice Number for such transaction is not required. This Setup was mandatory for Tracking ST Forms earlier and is no longer mandatory for form tracking.
When Using Master Organization setup for generating Excise Invoice Numbers at Master Organization level, It is mandatory to setup the Order Type at both Child Organization and at Master Organization for getting the Correct Excise Invoice Number.
Define Tax Codes
You must define Taxes before you start using Oracle Financials for India. Tax codes will be the basis for all localization tax calculations. You should define all taxes applicable to your Organization.
Tax codes cannot be updated once saved. However, you can disable the tax by entering the End Date. Thus, you should adopt adequate caution while defining the taxes.
In Oracle Financials for India, navigate to Setup > Tax Setup > Taxes. The taxes are relevant to a particular Operating Unit in case of a Multi-Org setup. Once the screen is selected from the navigator menu, you have to select the Organization from the list, so that the taxes can be related to the corresponding Operating Unit.
The table below provides field-wise description for the Tax Definition screen.
Field Description Description
Tax Name Enter a short tax name/tax code in this field. It is recommend that you follow a naming convention for defining taxes so that the tax name defines the usage of tax. For example, CST-4%-C: this means the tax type is of type Central Sales Tax, Rate is 4%, and requires C-Form
Type Select type of tax from list of values. This will indicate how to treat the tax at transaction level. The options available are:
Note: You can review modify existing tax and item categories to include the VAT Reversal Tax Type based on your business requirement. This tax code can also be manually added on Sales Orders and AR transactions.
Tax Type determines the type of treatment or procedure that needs to be initiated to calculat, record or update tax records. You should ensure that you associate Tax Codes with appropriate Tax Types, in tune with your Organizations requirements. For example, while defining a tax code/name for Sales Tax you should be using either CST or Sales tax as Tax Type. You should take adequate care in selecting tax type.
Important: Apart from the normal tax types like Excise, Customs, Sales Tax etc. which are widely used in the industry, Localization provides for additional tax types like Insurance, freight, any other tax and Modvat Reversal.
Modvat Recovery - Modvat Reversal:
Modvat Reversal needs to be mapped as per the requirements under Rule 57 CC of the Central Excise Rules.
Freight, Insurance and Any Other Tax:
Can be used for Accounting for any expense incidental to the Purchase transaction. Any tax (cost component) defined under these categories will be taken into consideration for the calculation item cost, subject to the condition that the Credit Percentage is not specified.
Third Party Taxes:
In the Procure to Pay Cycle, you can make use of the functionality of third Party taxes. This can be setup by specifying the Vendor Name and Vendor Site for the Tax Code. After receipt, you have to run the Third party taxes concurrent to generate AP Invoices for all third part taxes included in the Receipt. While computing the cost of the item, these costs also will be considered.
Handling Discounts:
You can use ‘Any other Tax’ type of taxes with negative Percentage or Unit Rate to handle discounts. Oracle Financials for India will also handle any other debit/credit that needs to be done for any transaction.
Additional CVD:
Assign this Tax Type to Tax Categories having Basic Customs and CVD Tax. When Additional CVD is not recoverable, credit percentage at the time of tax definition needs to be maintained at ‘0’ or NULL.
Field Description Description
Description Enter meaningful description for the Tax you define. This should describe the Tax Name in detail. Description can have maximum length of 100 characters (including spaces).
Account You can enter the account code by using accounting flex-field on which the respective taxes will be charged and whenever a particular Tax is used in a transaction, this respective General Ledger Account will be debited or credited. In the Order to Cash Cycle this account will be used to account for the Tax transactions. In Procure to Pay Cycle, this account will be charged for the recoverable portion of the taxes specified for tax types other than Excise and Add. Customs. For example, for a Sales Tax Type of tax you have defined, tax as 10% and credit % as 50%. During delivery, sales tax to the tune of 50% will be considered for Item Cost and the balance 50% (of recoverable tax amount) will hit this account. It is suggested to have dedicated Tax Names for Procure to Pay Cycle and then you need to define the credit percentage.
Vendor Name You can specify the Vendor Name here for a Tax Type other than Excise-Basic, Excise Additional, Excise-Special, Customs Duty, and Customs Duty- Additional. This is a required field in the case where Tax Type is Tax Deduction at Source. In case of a 'TDS' Type of Tax, Vendors of type 'TDS Authorities' will be displayed in the list, for all other types of tax, vendors of type other than 'TDS Authorities', 'Customs', 'Excise' will be displayed in the list. The vendor name appearing here will be defaulted in the PO tax lines and it can be changed if the user enables the update Vendor Flag at the Additional Organization Information.
While creating an III Party Tax (that can be used in Procure to Pay Cycle), you need to attach a Supplier to whom the payment needs to be done on receipt of the goods. For example: for a ‘Freight’ type of tax, you attach ABC Transport Company (should have defined this Vendor in the Supplier Master), and attach this tax to a PO. On receipt of the goods, system by considering the values at the time of receipt creates an invoice to ABC Transport company automatically. At the same time, for costing purpose, the freight will be considered.
Vendor Site The user can enter relevant Vendor Site for the above selected Vendor Name.
Rate Block Tax can be defined as based on any one of the Rates, Unit rate, Unit of Measure or adhoc type.
Rate Enter the Tax Rate at which the Tax will be calculated. The user can either enter Tax rate based on amount or per unit or on Adhoc basis. Discounts can be specified as Negative Taxes. But this works only when the Tax Types is ‘Any Other Tax’.
Unit Rate If the Tax is charged per unit then the user needs to specify the Tax Rate Per Unit, then the Tax will be Number of units times Rate per unit. This field will be disabled whenever the Tax Type is Tax Deduction at Source.
Unit of Measure Amount Per Unit based taxes can be used with items having UOM belonging to same base class of UOM as that of UOM in tax definition, unless you have defined interclass conversion rate for that item. In Precedence calculation this type of tax will not depend on any other tax, however other taxes of rate basis can be dependent on result of this tax. Example: If a unit tax rate is defined as Rs.10 per KG you cannot use the same with item purchased in Meters unless the conversion rate between Kg and meter for that item.
Duty Drawback Credit Percentage
This percentage is applicable for Taxes of Type Excise- Basic / Additional / Special or Customs Duty or CVD. This percentage will be used to calculate Duty drawback.
Adhoc Adhoc basis of tax can be used to define tax amount, which will be known only at transaction level (i.e. Freight). You can change these taxes at transaction level. In Precedence calculation amount of such type of tax will not depend on any other tax whereas other taxes will be dependent on amount of this tax type. When adhoc basis is enabled, then other fields in the Rate Block will get disabled.
Field Description Description
Credit percentage For all input type of taxes, this field determines the percentage of recoverable and irrecoverable taxes.
Form Name/Certificate
This column is relevant only for Sales Tax & TDS Tax Types. You can enter the relevant Tax form name like C Form or Form 17 in the case of Sales Tax and based on this information, the Sales Tax Forms tracking will done for the Customers as and when transactions have this tax levied. The user can take out reports on transactions for which these forms are to be issued/received. This field is enabled only when the tax type is Sales Tax, Central Sales Tax and Tax Deduction at Source.
TDS Section No. You can specify the respective TDS section for which a particular tax
is being charged on. Since the TDS returns needs to be submitted in accordance with their corresponding section , the user can generate TDS reports made for the respective TDS sections. This field is enabled only when the tax type is Tax Deduction at Source.
Field Description Description
Original Tax Percent
If the Concessional Tax Rate has been used for a particular Tax Code then the user can specify the actual and Original Tax Percent in this field. The user can identify the amount of Tax benefits or concession for all the transaction done through Concessional Tax Rate. This field will be enabled only when the Sales Tax Form Name or TDS Certificate name is specified otherwise the user cannot enter any rate in this field.
Important: In case of Excise and Add Customs (CVD) type of taxes, where you can take CENVAT Credit under Rule 57 of the Central Excise Rules, you must specify the CENVAT Credit percentage permitted on that tax. As per the Rules, total credit on the duty paid by the supplier can be claimed. Hence for all Excise Type of Taxes you must record 100% in this field.
In case of Tax Types other than Excise and Add Customs, you can specify the percentage of tax that can be recovered. The non-recoverable portion will be accounted in the tax / account defined.
Field Description Description
Rounding Factor
Rounding factor differs for different Tax Codes. The user can specify the required rounding factor for a particular Tax based on the legal requirement. If this field is left blank, then the calculated Tax figure will be rounded to the nearest Rupee.
Update Vendor
This flag is providing flexibility to the user to change the Vendor Name at the transaction tax lines while entering a transaction. But this Flag cannot be checked for Customs, Additional Customs, and TDS Type of Taxes since the respective tax dues needs to be paid to the respective Department Authorities. For Example: When the tax amount needs to be paid to the respective Tax Authorities instead to the Vendor, then the user needs to enable this flag and in effect he can change the Vendor Name appearing in the tax lines and the tax liability will be booked the respective Tax Authority - Account. By enabling this option, at the time of receipt, user will be allowed to change the Vendor. For example, In the purchase order, for freight is considered as III Party Tax and Vendor attached to the PO is
ABC Transport Company. On receipt, if the goods were not transported through ABC Transport Company and were brought by TVS, user will be able to change the Tax Vendor from ABC Transport Company to TVS.
Update Currency
By enabling this flag the user can change the currency code from the document currency to the functional currency if both are different. For Example: Assuming a case where the PO is raised in Foreign Currency (USD) but the tax like Customs needs to be paid in functional currency (INR). By enabling this Update Currency Flag the document currency amount will be converted into functional currency amount for the calculation tax.
Update Transaction
By enabling this flag the tax transaction lines can be updated or modified whenever any changes are required at the transaction level.
CESS % age Cess on TDS
Start Date, End Date
By default the start date is always current date and end date should be greater than the start date or it can be left blank. The period between start and end date specifies the effective period of the tax and when the end date is null, then it is in effect indefinitely from the start date. If you enter end date for a tax, then the tax will become ineffective from that date.
Define Tax Categories
This is a mandatory setup to enable Tax defaulting and automatic calculation at the transaction line level. Tax Categories will be based on the taxes that will be applicable to the transaction and the Tax Base Amount calculation will be determined.
You can associate an Item Class to the Tax category. This Tax category will apply to all items under this class.
Tax Category is a group of relevant Tax Codes with precedence applicable to them.
In Oracle Financials for India, navigate to Setup > Tax Setup > Tax Categories. The table provides field-wise descriptions of the Tax Categories screen.
Field Description Description
Header level
Tax Category Enter a Unique name for Tax Category. The Tax Category Name should be Suggestive, so that the User should be able to identify the applicability of the Tax Category.
Description Enter meaningful description for the Tax Category you define. This should describe the Tax Category Name in detail.
Item Class Code
If a Tax Category is associated to a particular Inventory item class then the respective Inventory class code can be entered here.
Item Class Optionally enter item class. One Tax Category cannot be applied to more than one Item Class and vice-versa. The Tax Category defined with an Item class defaults at the transaction level based on the Item Class that has been associated to the transaction level 'Item Attribute'. Once an Item Class (Predefined by Oracle Financials for India) is associated to a Tax Category, the same Item Class CANNOT BE associated to any other Tax category. Based on this Item Class the Excise Register updation will be done for an item.
Line Level
Line No. Auto generated line number will be displayed here. This is the value used to define precedence.
Tax Name Use this column to enter Tax Names from LOV. You can associate any number of Tax Names to a Tax category. A Tax Name can be associated in any number of Tax Categories, however you cannot use same Tax Name more than once in a Tax Category. The Tax Rate applicable on transaction date will be applicable for that transaction.
Tax Precedence 1- 10
Precedence refers to the manner in which the tax will be applied. The Tax Rate may be applied on the transaction base value or on another tax line or compounding them or combination of all. The base amount or material sale value is by default given a precedence value of '0'. The subsequent precedence are assigned to the Tax Names' respective Line Numbers. A maximum of five levels of precedence are permitted. The Taxes included in Tax Category would default on a transaction line. But, you would also have a provision to add new tax lines manually. Tax precedence for Additional CVD Tax Type should be set to the Tax on which it is calculated. If a tax name is defined as adhoc or as Amount Per Unit of measure then the Precedence has no Relevance in tax computation of such tax, however, calculation of other taxes can be based on this tax. A tax cannot be dependent on itself. However, interdependent taxes can be set up in precedence e.g. tax at line 1 can depend on tax at line 2. Similarly, tax on line 2 can depend on tax at line 1. For example Define a Tax Category for a Item A purchased for Location B and the following taxes are applicable. Step 1 - Define the above Tax Names and percentages in the Tax Name Definition. Step 2 - Associate the above Tax Names in the Tax Categories window
accordingly for tax calculations. At this point, the dependence of tax on other tax needs to be defined in the system. If Sales Tax needs to be calculated on both line price and Excise Duty, the same can be defined in this screen. If ‘0’ is defined then tax will get calculated only on the line price. In the 2nd line if it is 0 and 1, then the 2 nd line tax will be calculated on the line price and the I st tax.
In this example line amount is Rs. 1000/-. The taxes mentioned below are applicable.
Tax Calculation
Excise duty 16% to be worked on the line amount
Sales tax 4% to be worked on line price and Excise Duty
Freight Rs.100 Adhoc tax not depending on other taxes
Insurance 2% to be worked on the line amount
Tax name Tax Calculation
Excise duty 16% to be worked on the line amount/Assessable value
Sales tax 4% to be worked on line price and Excise Duty
Freight - Adhoc Adhoc amount - no precedence needs to be attached
Insurance 2% to be worked on the line amount
To implement SHE Cess solution, you must update the Tax Categories to include the newly defined Tax Codes. For detailed information on new Tax Codes, see Defining Accounting Information for Organization, Oracle Financials for India User Guide.
Define Item Categories
Item Category List associates the Tax Category to an Inventory Item in an Organization. The user can add many items in a list and select relevant Tax Category for them. There can be many such item category lists defined and associated to the Vendor/Customer sites.
If the Item Category is attached to the Additional Customer/Supplier Information, the Item Category will get defaulted whenever a transaction is done with the Customer/Supplier.
Use this form to associate Inventory items to Tax Categories.
In Oracle Financials for India, navigate to Setup > Tax Setup > Item Categories.
The table below details field-wise descriptions of the Item Categories screen.
Field Description Description
Header level
Name The user has to specify the unique Item Category List Name.
Description Enter a description for the Item Category List. This should describe the Item Category List Name in detail.
Line level
Item Select the Items from the LOV.
Tax Category Select the relevant Tax Category from the LOV.
Important: By assigning this Tax Category list to a Supplier Site in the Supplier Tax Information - India Local window, the tax lines for a particular Vendor/Vendor Site or Customer / Customer Site, for a particular Item will get defaulted according to the precedence set in the Tax Category. The user should use a unique Item Category List Name and meaningful description.
Define Assessable Price Lists
When the Taxable basis for the calculation of the Excise Duty is different from the Price at which the Item is transferred, then you will have to create additional Price Lists with the Item Excise Assessable Price. This price list has to be attached to the Internal Customer / Customer Site. The Assessable Price would be considered only for calculation of the Excise Duty. Assessable Price Lists needs to be defined separately for Excise and VAT if the taxable basis is different.


![[MS-OFFDI]: Microsoft Office File Format Documentation … · 2017-09-19 · Microsoft Word 97 Microsoft Word 2000 Microsoft Word 2002 Microsoft Office Word 2003 Microsoft Office](https://static.documents.pub/doc/80x56/5edde022ad6a402d66691993/ms-offdi-microsoft-office-file-format-documentation-2017-09-19-microsoft-word.jpg)


