122
1 NYC Department of Health & Mental Hygiene Bureau of Immunization March 2015 New York City Citywide Immunization Registry (CIR): Online Registry - Guide
1
NYC Department of Health & Mental Hygiene Bureau of Immunization March 2015
New York City Citywide Immunization Registry (CIR):
Online Registry - Guide
2
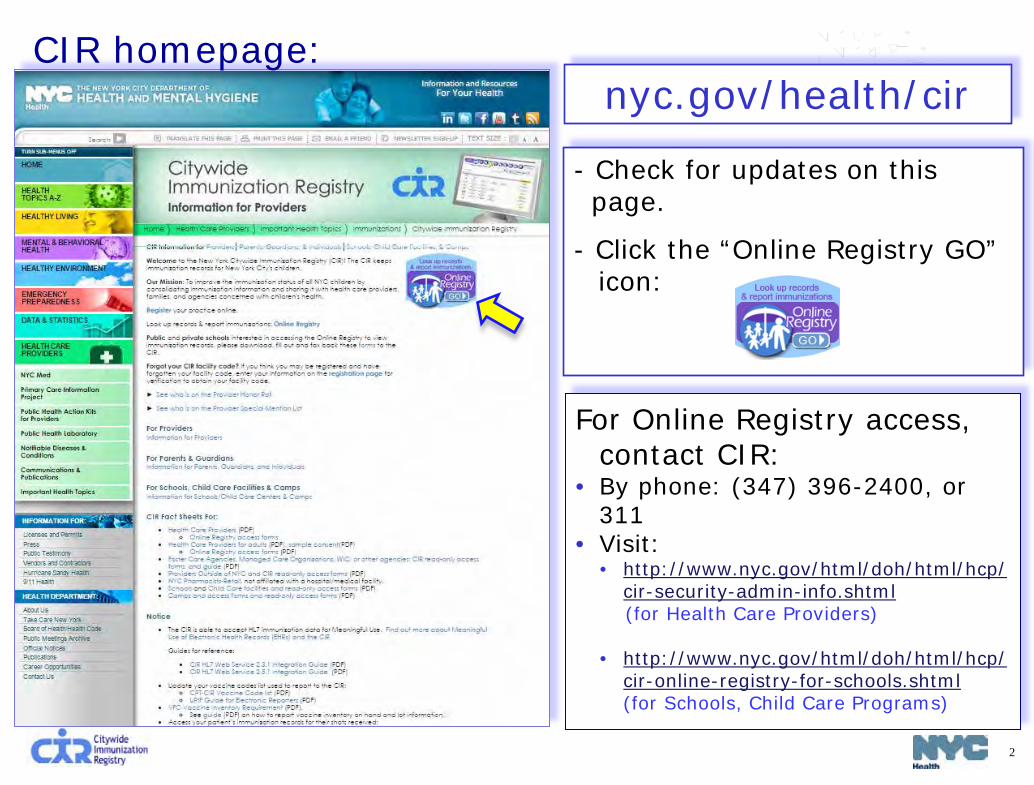
CIR homepage: nyc.gov/health/cir
- Check for updates on this page.
- Click the “Online Registry GO” icon:
For Online Registry access, contact CIR:
• By phone: (347) 396-2400, or 311
• Visit: • http://www.nyc.gov/html/doh/html/hcp/
cir-security-admin-info.shtml (for Health Care Providers) • http://www.nyc.gov/html/doh/html/hcp/
cir-online-registry-for-schools.shtml (for Schools, Child Care Programs)
3
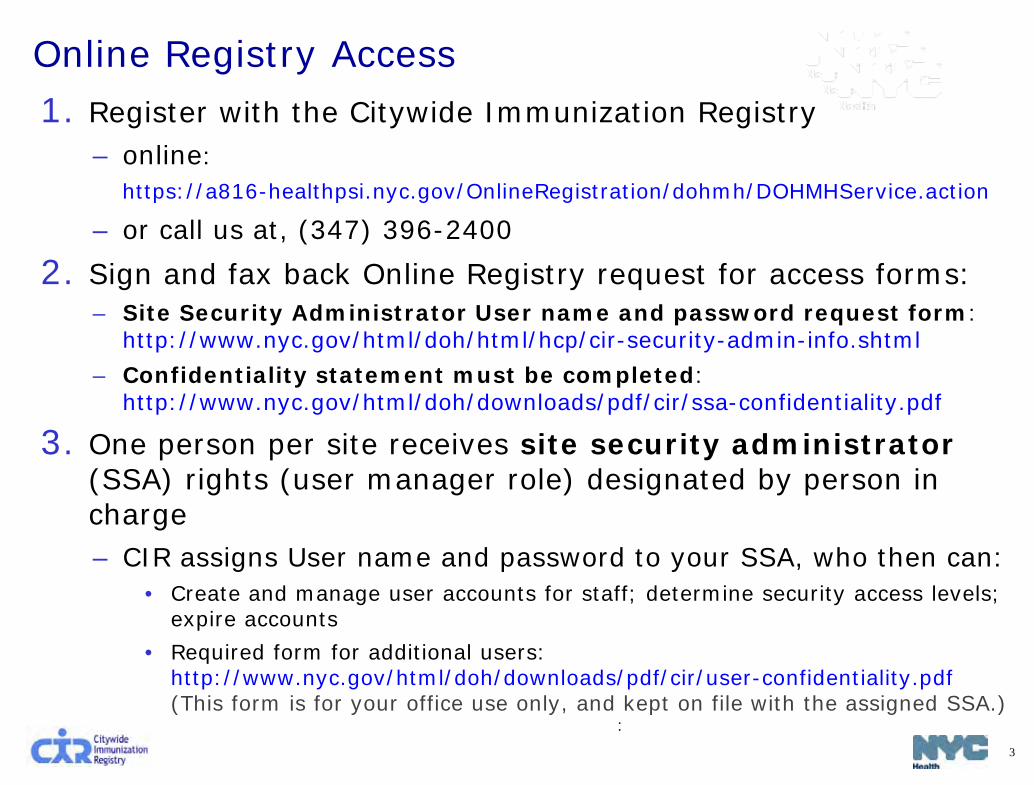
1. Register with the Citywide Immunization Registry – online: https://a816-healthpsi.nyc.gov/OnlineRegistration/dohmh/DOHMHService.action
– or call us at, (347) 396-2400
2. Sign and fax back Online Registry request for access forms: – Site Security Administrator User name and password request form:
http://www.nyc.gov/html/doh/html/hcp/cir-security-admin-info.shtml – Confidentiality statement must be completed:
http://www.nyc.gov/html/doh/downloads/pdf/cir/ssa-confidentiality.pdf
3. One person per site receives site security administrator (SSA) rights (user manager role) designated by person in charge – CIR assigns User name and password to your SSA, who then can:
• Create and manage user accounts for staff; determine security access levels; expire accounts
• Required form for additional users: http://www.nyc.gov/html/doh/downloads/pdf/cir/user-confidentiality.pdf (This form is for your office use only, and kept on file with the assigned SSA.)
Online Registry Access
:
4
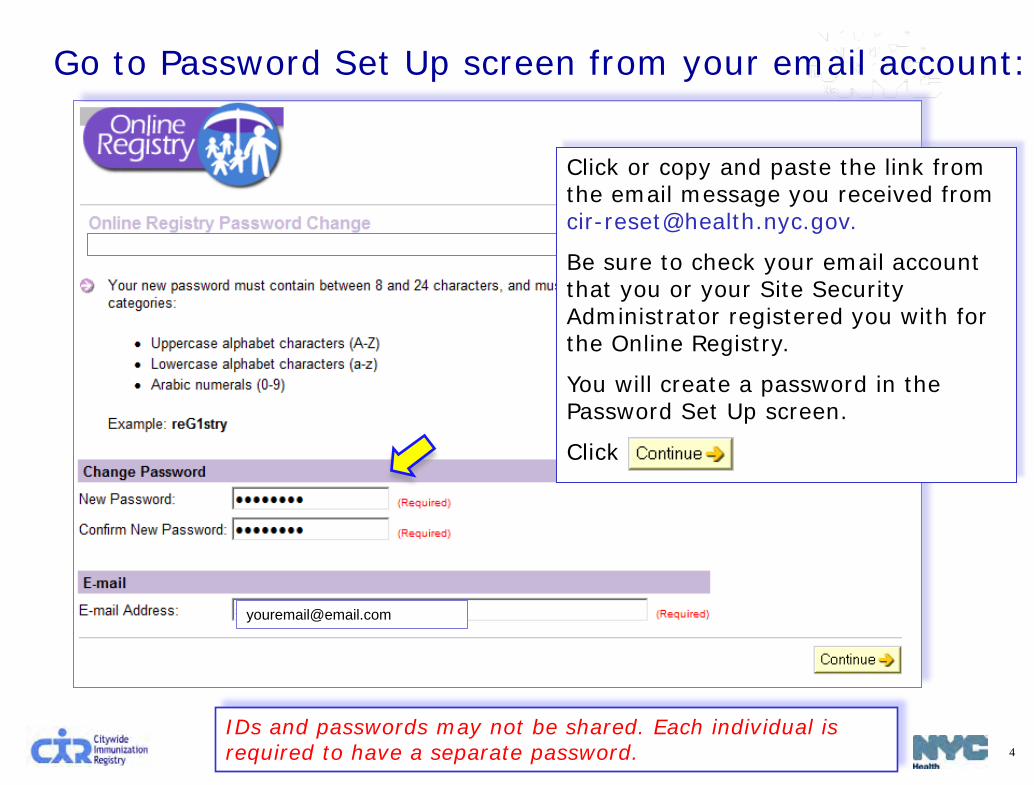
Go to Password Set Up screen from your email account:
Click or copy and paste the link from the email message you received from [email protected].
Be sure to check your email account that you or your Site Security Administrator registered you with for the Online Registry.
You will create a password in the Password Set Up screen.
Click
IDs and passwords may not be shared. Each individual is required to have a separate password.

5
After creating your password for the first time, you will see this log in screen this one time. To enter, scroll down to click
Password Set Up Log In screen:

6
Bookmark the CIR Homepage for future access to the log in icon:
nyc.gov/health/cir Check for updates on this page.
Click the “Online Registry GO” icon to access the log in page:
See next slide…

7
After account set up is completed this is the Log in screen you will see going forward:
1. Enter User ID & Password; 2. Click
Contact CIR at (347)396-2400 or 311 or [email protected] for Online Registry account issues.
Check notice boxes for updates.
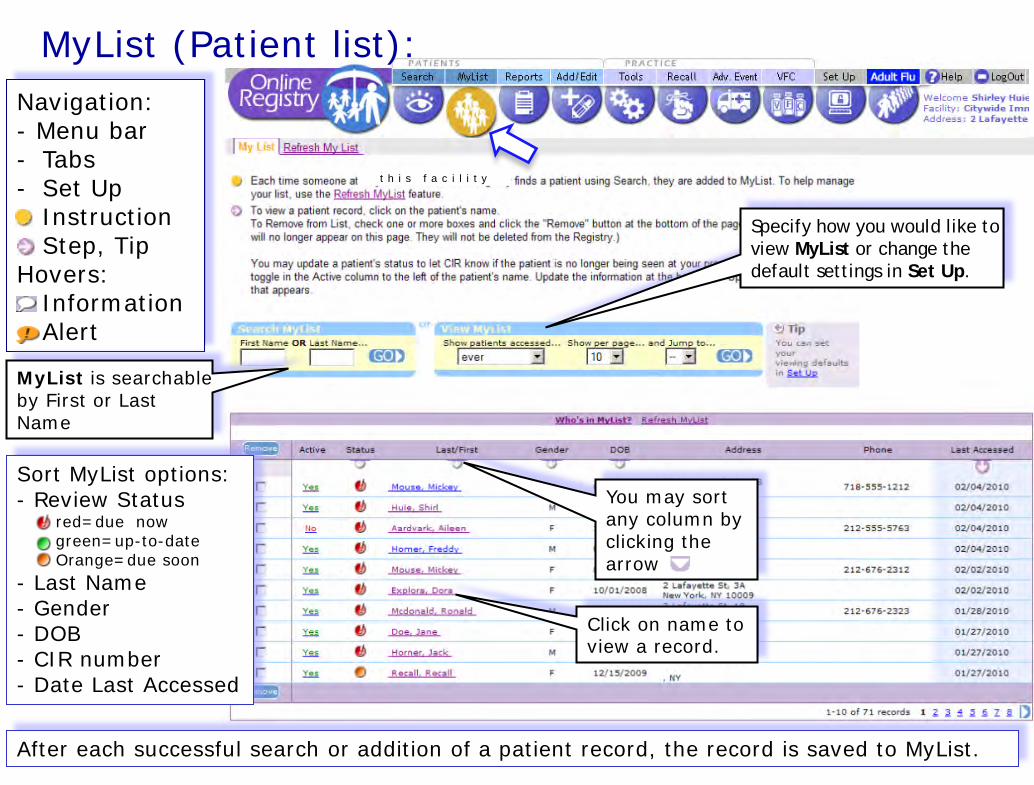
MyList (Patient list): Navigation: - Menu bar - Tabs - Set Up • Instruction • Step, Tip Hovers: • Information • Alert
Sort MyList options: - Review Status
red=due now green=up-to-date Orange=due soon
- Last Name - Gender - DOB - CIR number - Date Last Accessed
After each successful search or addition of a patient record, the record is saved to MyList.
t h i s f a c i l i t y
Specify how you would like to view MyList or change the default settings in Set Up.
MyList is searchable by First or Last Name
You may sort any column by clicking the arrow
Click on name to view a record.
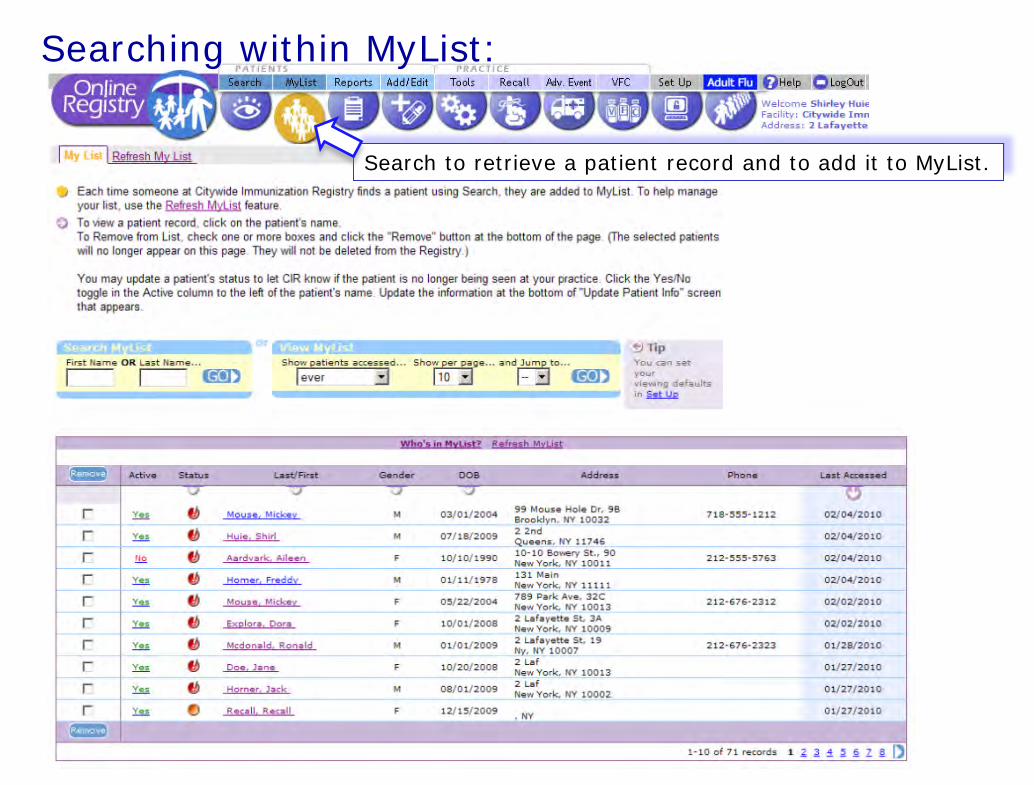
Searching within MyList:
Search to retrieve a patient record and to add it to MyList.
10
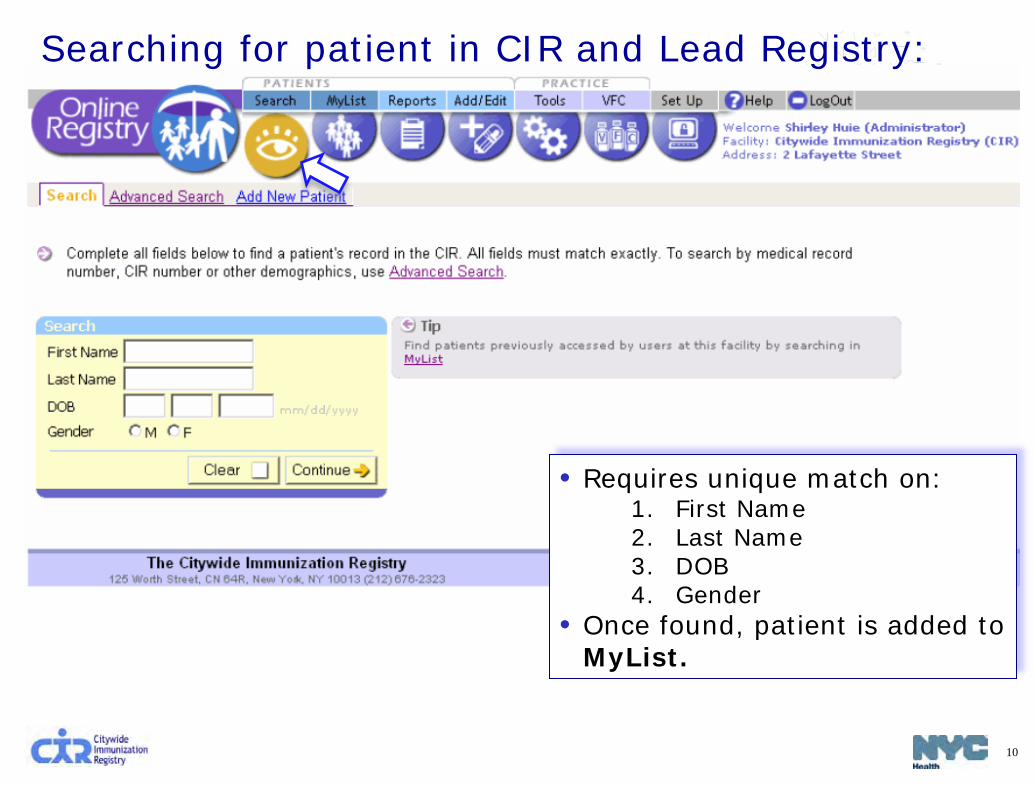
• Requires unique match on: 1. First Name 2. Last Name 3. DOB 4. Gender
• Once found, patient is added to MyList.
Searching for patient in CIR and Lead Registry:
11
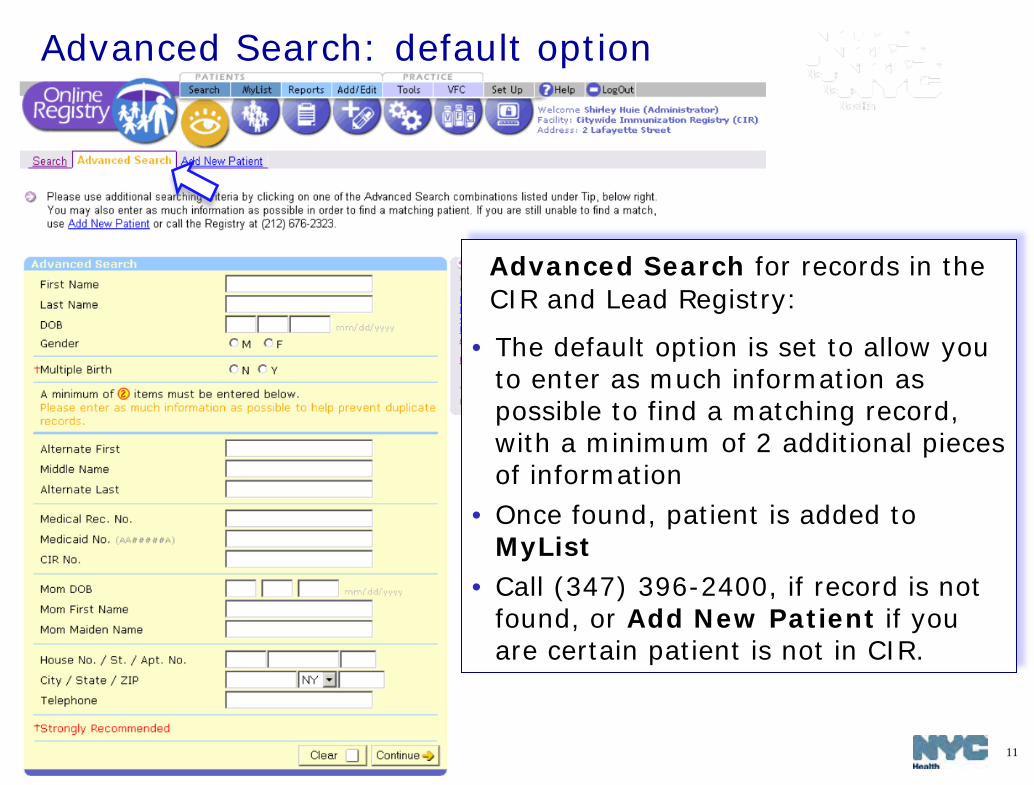
Advanced Search for records in the CIR and Lead Registry:
• The default option is set to allow you to enter as much information as possible to find a matching record, with a minimum of 2 additional pieces of information
• Once found, patient is added to MyList
• Call (347) 396-2400, if record is not found, or Add New Patient if you are certain patient is not in CIR.
Advanced Search: default option

12
Click an advanced search combination option
Advanced Search: search combination options
• Choose a search combination inside the Tip box by clicking on the link:
• Medical record No. • Medicaid No. • CIR No. • Mom’s info • Address/phone
Enter information in the highlighted dark yellow fields.
• Go to Set Up to customize search settings.
• Call (347) 396-2400, if record is not found, or use Add New Patient if you are certain patient is not in CIR

Required elements: • First Name • Last Name • DOB • Gender
Strongly Recommended: • Mom DOB • Mom First Name • Mom Maiden Name • Full Address, or • Telephone.
Add New Patient*:
You may add a new patient if you believe the patient is not in the CIR. A patient born outside of NYC or has a date of birth > 1996 may not be in the CIR. Enter as much information as possible to help prevent duplicate records.
*not available to read-only accounts
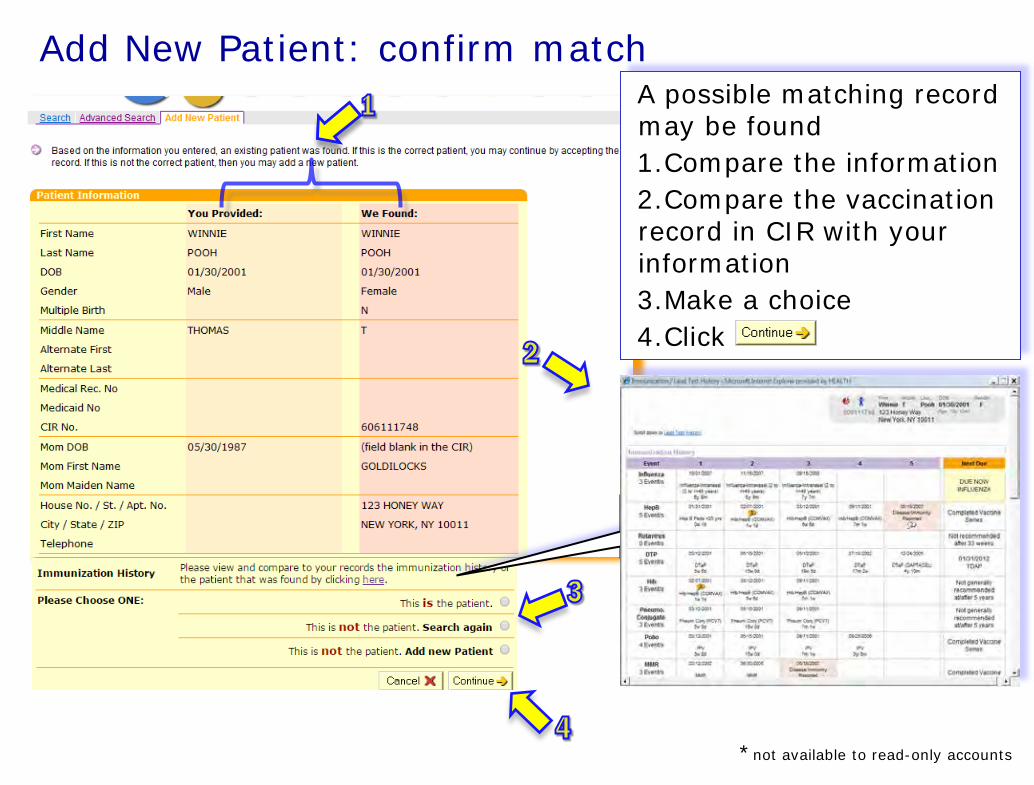
A possible matching record may be found 1.Compare the information 2.Compare the vaccination record in CIR with your information 3.Make a choice 4.Click
Add New Patient: confirm match
*not available to read-only accounts
Click “here” to view the record in CIR

Footnotes
Immunization Recommendations
Sample footnotes: 2:This immunization event occurred prior to the recommended
age or recommended interval for this dose. 3:This immunization event was an extra dose since it occurred
after this series was completed. 4:The age of this patient exceeds the max age of the series
based on the current immunization schedule.
View Record: Immunization & Lead Test Records: Verify patient name, DOB,
address
To access a patient record click on a name in MyList, or use the Search or Advanced Search to find a record.

16
Lead Test Record:
Lead Recommendations based on latest test results are found below the immunization record.
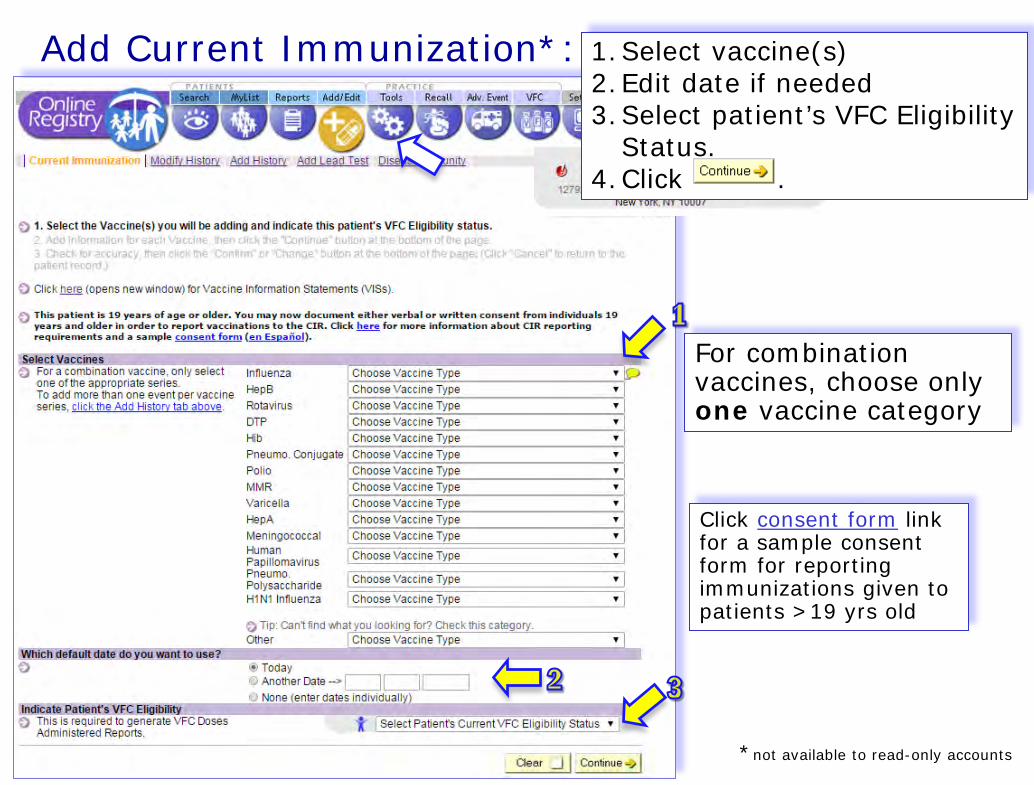
Add Current Immunization*:
For combination vaccines, choose only one vaccine category
Click consent form link for a sample consent form for reporting immunizations given to patients >19 yrs old
1.Select vaccine(s) 2.Edit date if needed 3.Select patient’s VFC Eligibility
Status. 4.Click .
*not available to read-only accounts
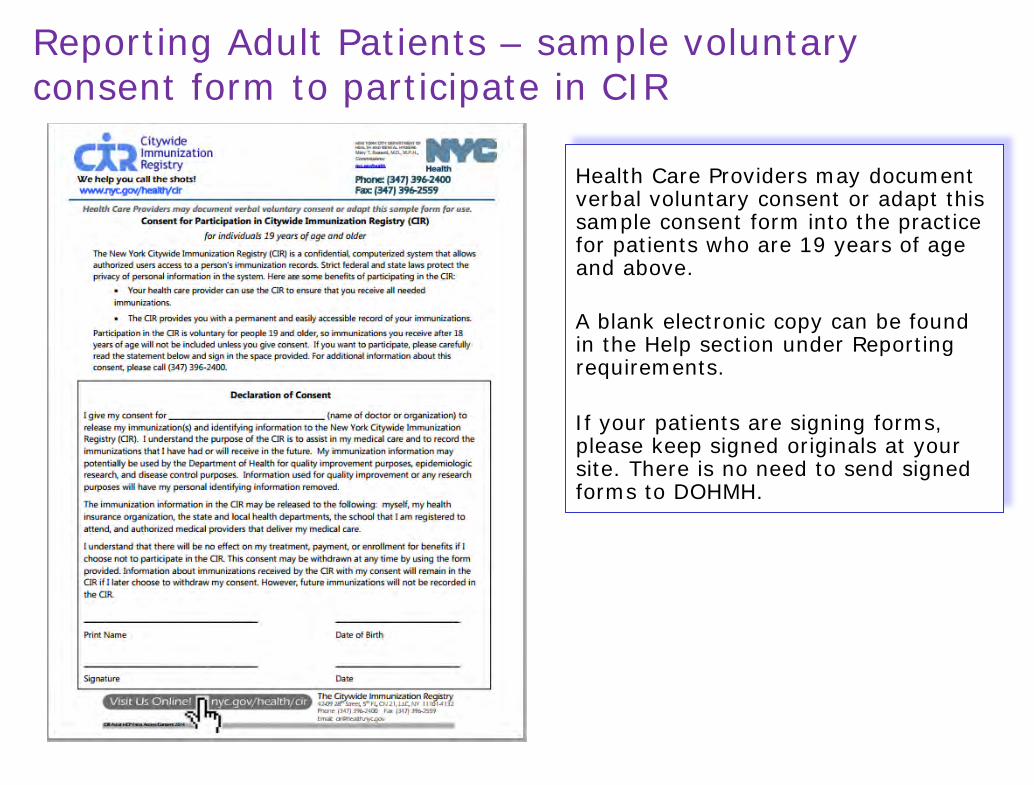
Reporting Adult Patients – sample voluntary consent form to participate in CIR
Health Care Providers may document verbal voluntary consent or adapt this sample consent form into the practice for patients who are 19 years of age and above. A blank electronic copy can be found in the Help section under Reporting requirements.
If your patients are signing forms, please keep signed originals at your site. There is no need to send signed forms to DOHMH.
19
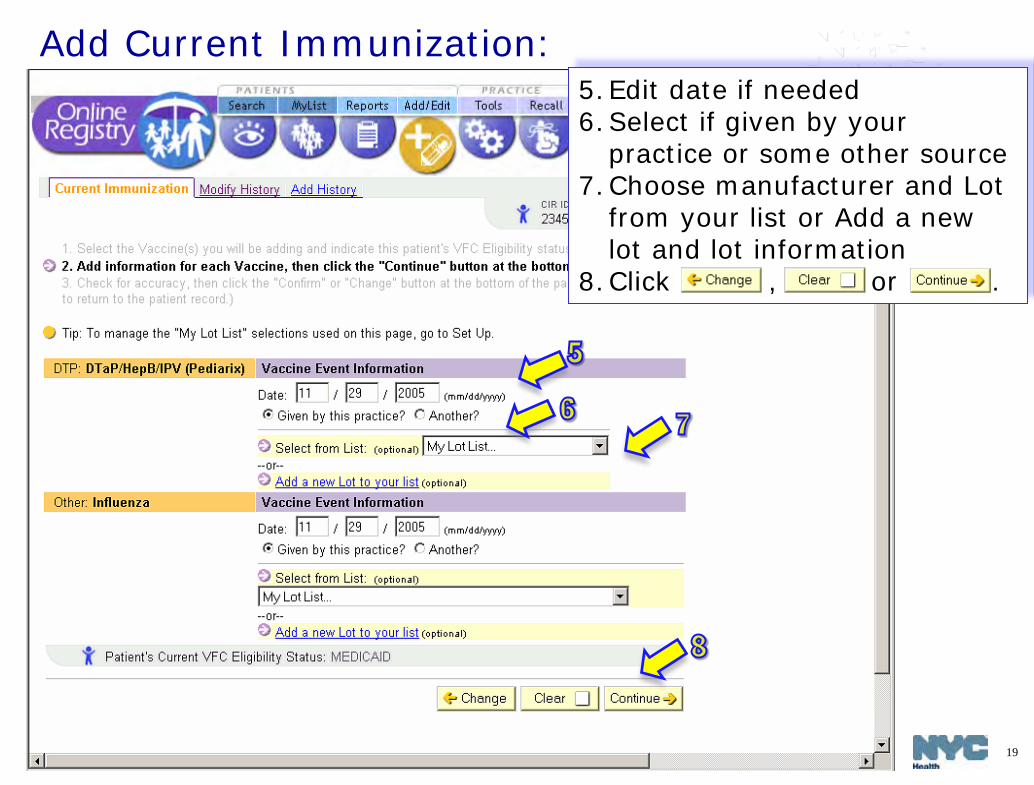
5.Edit date if needed 6.Select if given by your
practice or some other source 7.Choose manufacturer and Lot
from your list or Add a new lot and lot information
8.Click Clear , or .
Add Current Immunization:
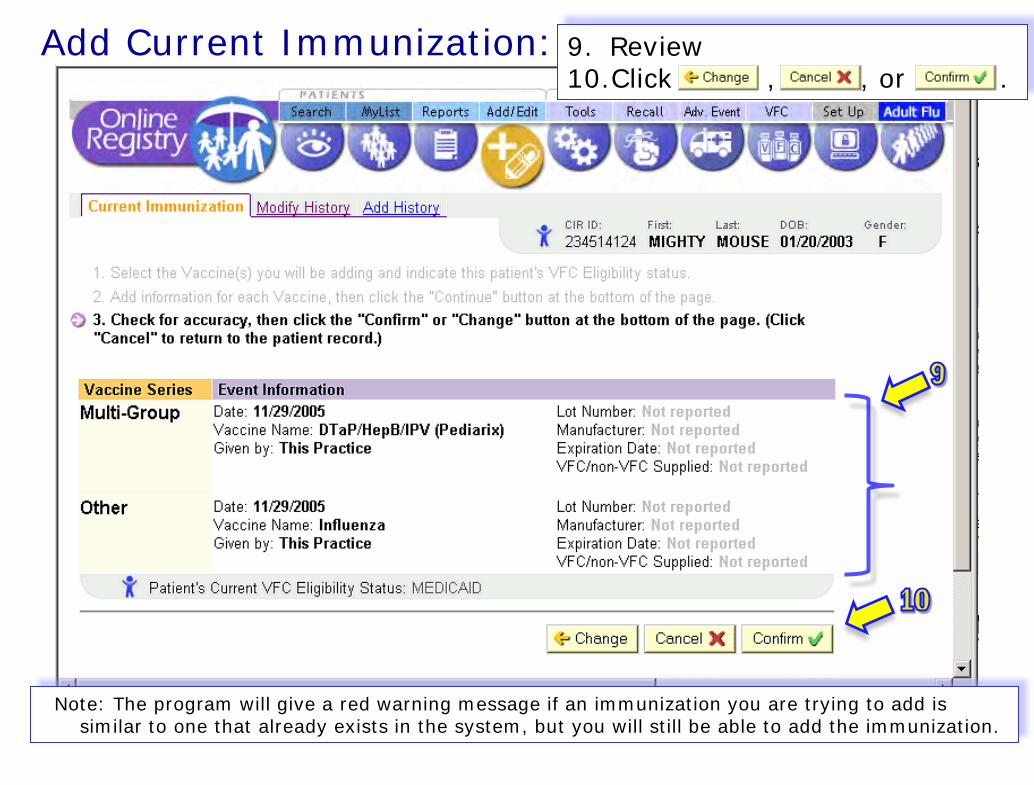
9. Review 10.Click , , or .
Note: The program will give a red warning message if an immunization you are trying to add is similar to one that already exists in the system, but you will still be able to add the immunization.
Add Current Immunization:
21
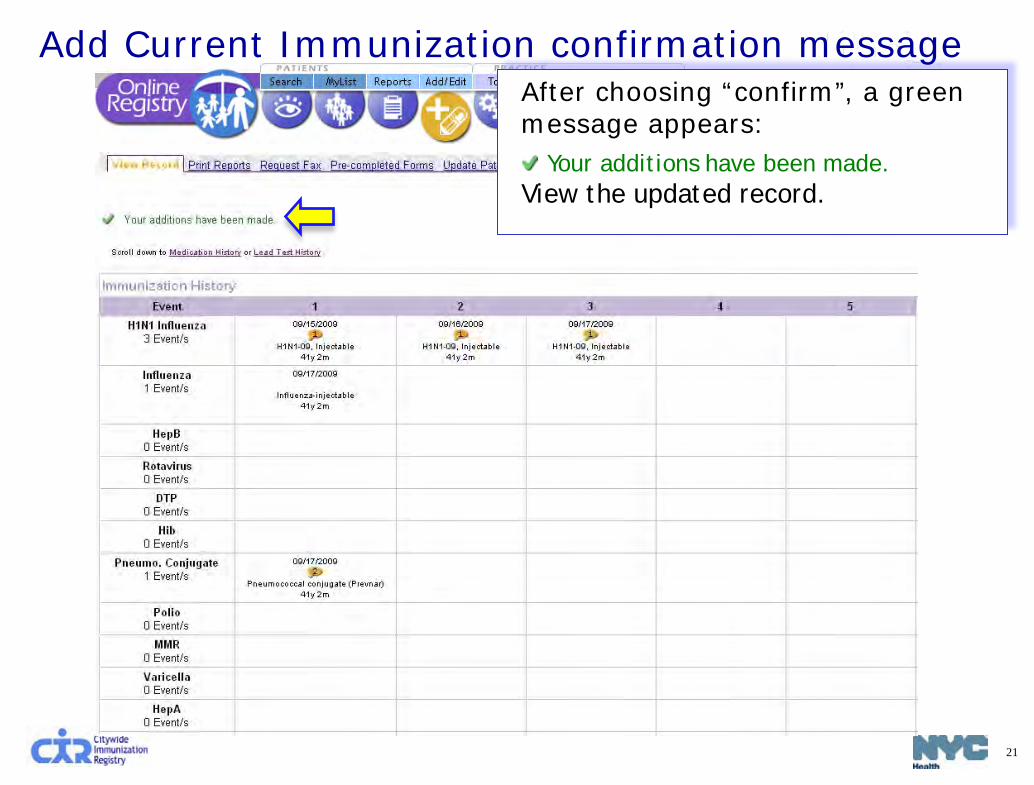
After choosing “confirm”, a green message appears:
Your additions have been made. View the updated record.
Add Current Immunization confirmation message
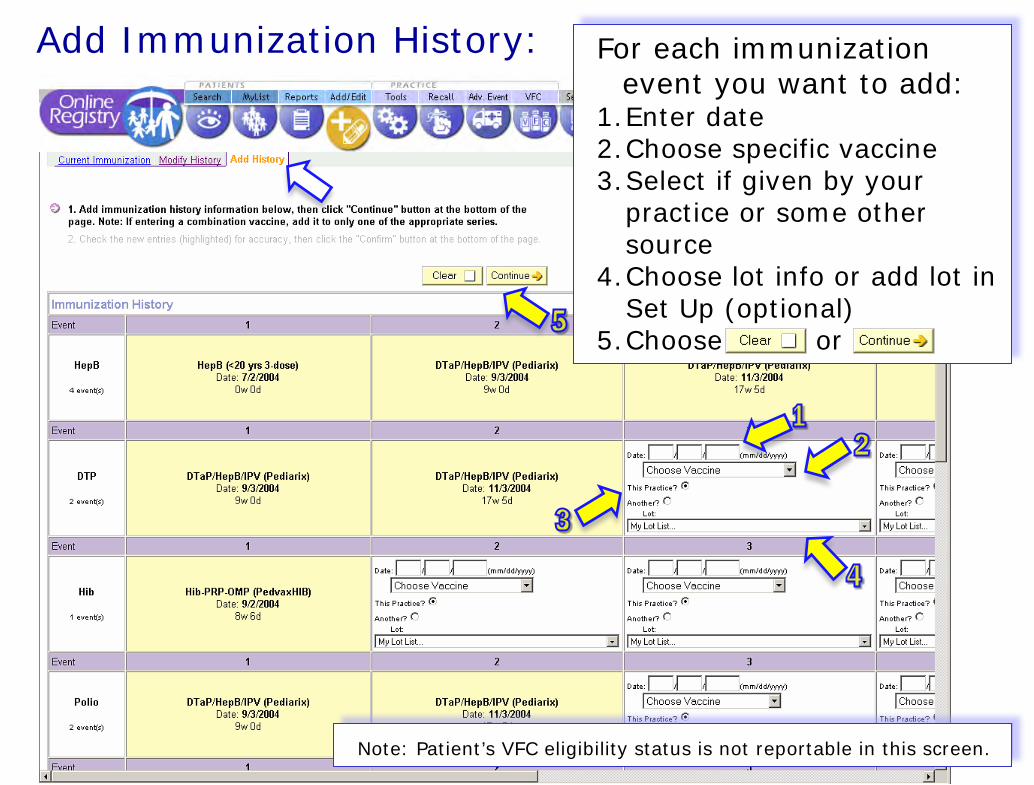
Add Immunization History: For each immunization event you want to add:
1.Enter date 2.Choose specific vaccine 3.Select if given by your
practice or some other source
4.Choose lot info or add lot in Set Up (optional)
5.Choose or
Note: Patient’s VFC eligibility status is not reportable in this screen.

6.Review your entries 7.Choose , ……..,or 8.After choosing “confirm”, a
green message appears:
Your additions have been made.
Add Immunization History:
Note: The program will give a red warning message if an immunization you are trying to add is similar to one that already exists in the system, but you will still be able to add the immunization.
24
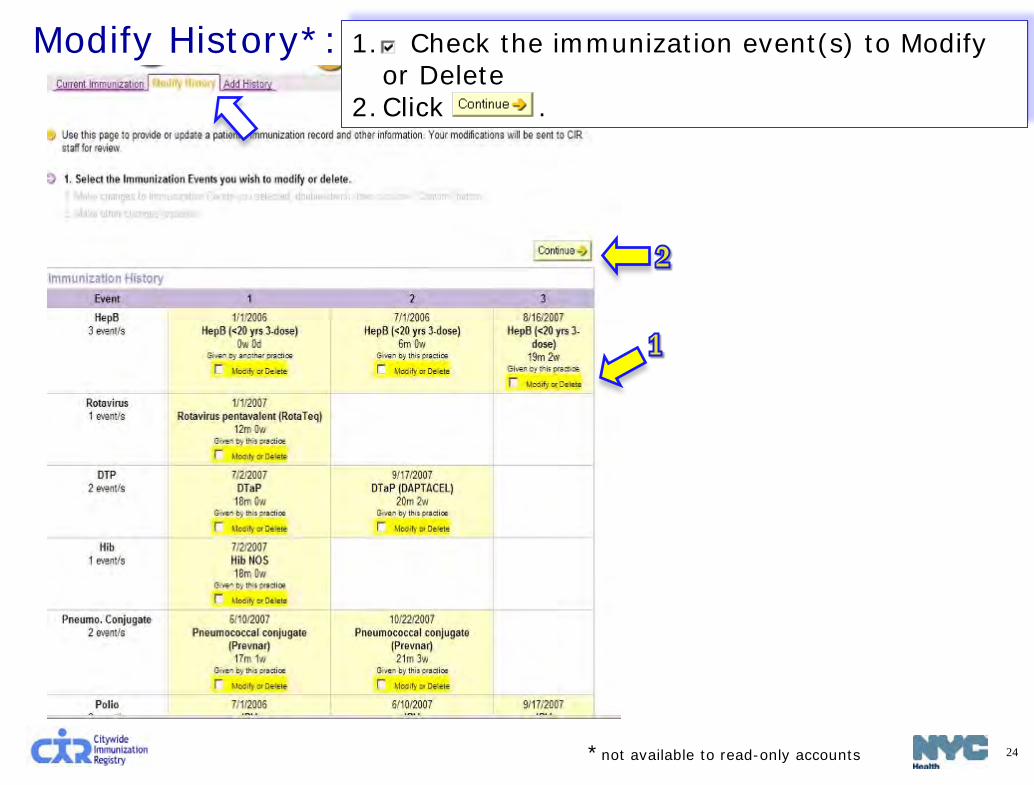
1. Check the immunization event(s) to Modify or Delete
2.Click .
Modify History*:
*not available to read-only accounts
25
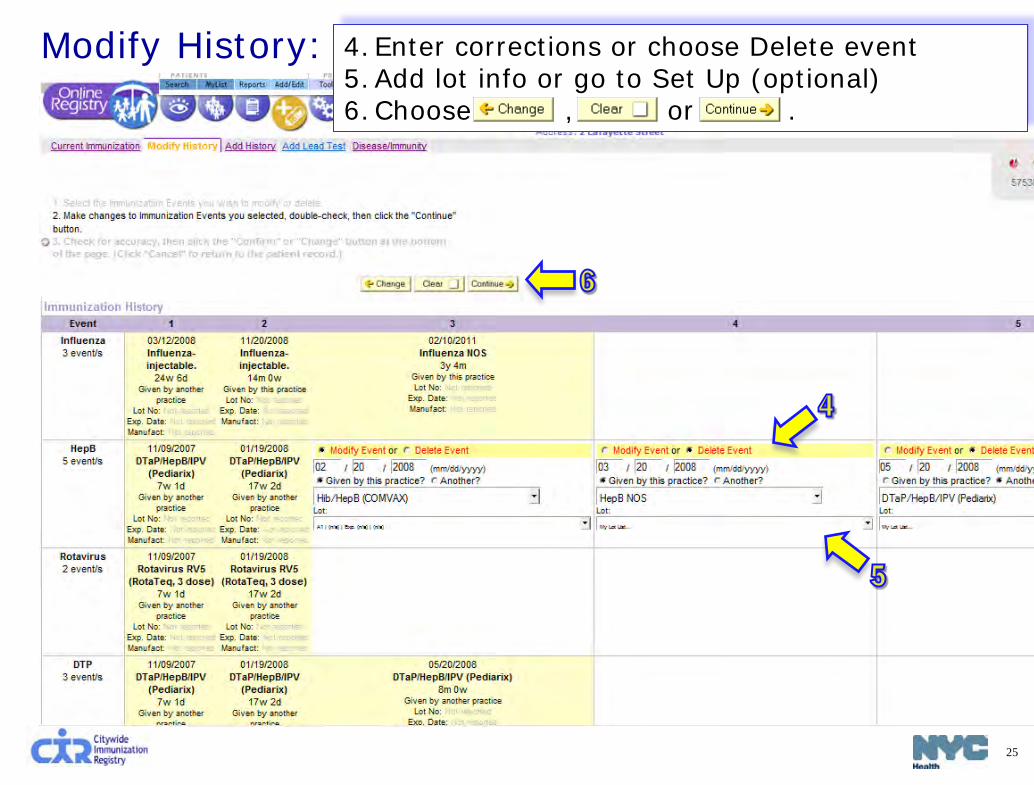
Modify History: 4.Enter corrections or choose Delete event 5.Add lot info or go to Set Up (optional) 6.Choose , or .
26
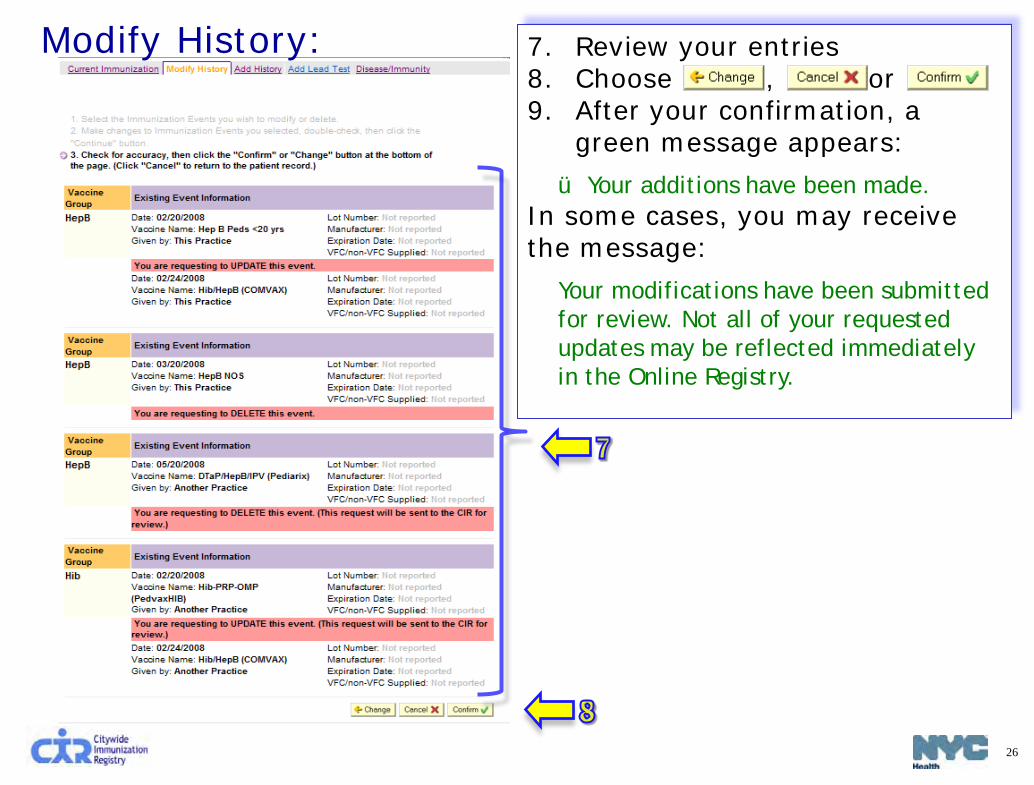
Modify History: 7. Review your entries 8. Choose , or 9. After your confirmation, a
green message appears:
ü Your additions have been made. In some cases, you may receive the message:
Your modifications have been submitted for review. Not all of your requested updates may be reflected immediately in the Online Registry.
27
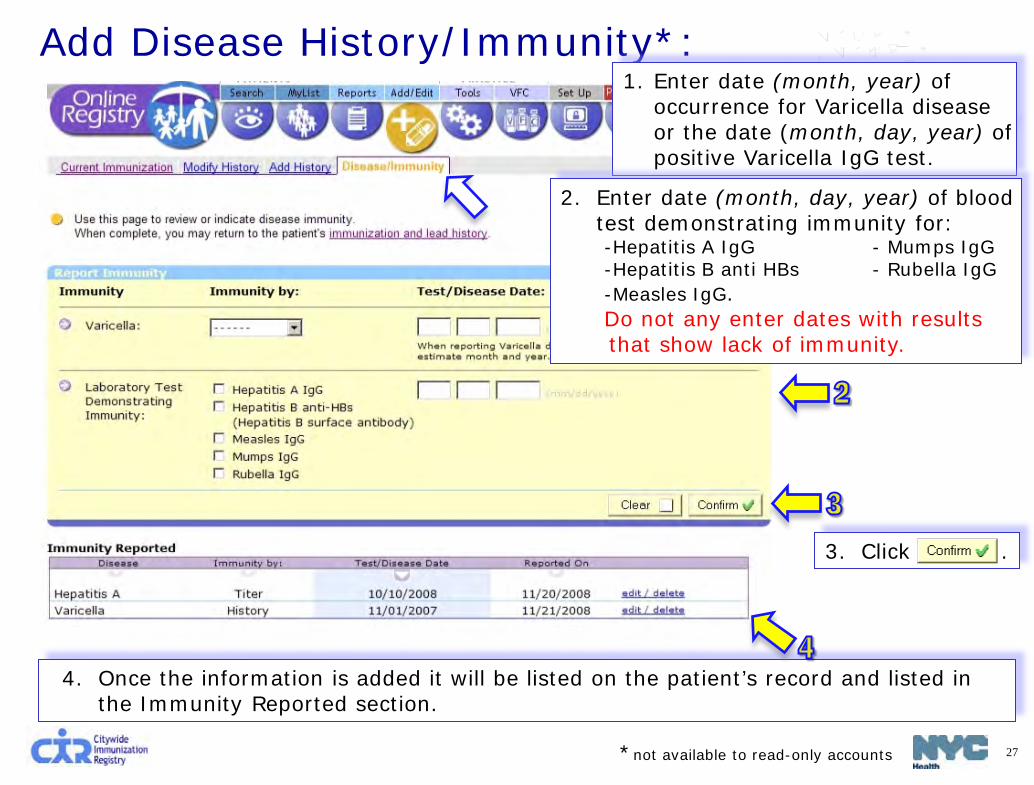
3. Click .
Add Disease History/Immunity*: 1. Enter date (month, year) of
occurrence for Varicella disease or the date (month, day, year) of positive Varicella IgG test.
4. Once the information is added it will be listed on the patient’s record and listed in the Immunity Reported section.
*not available to read-only accounts
2. Enter date (month, day, year) of blood test demonstrating immunity for: -Hepatitis A IgG - Mumps IgG -Hepatitis B anti HBs - Rubella IgG -Measles IgG. Do not any enter dates with results that show lack of immunity.
28
Add Lead Test (Step 1: for lead results analyzed by a commercial lab)
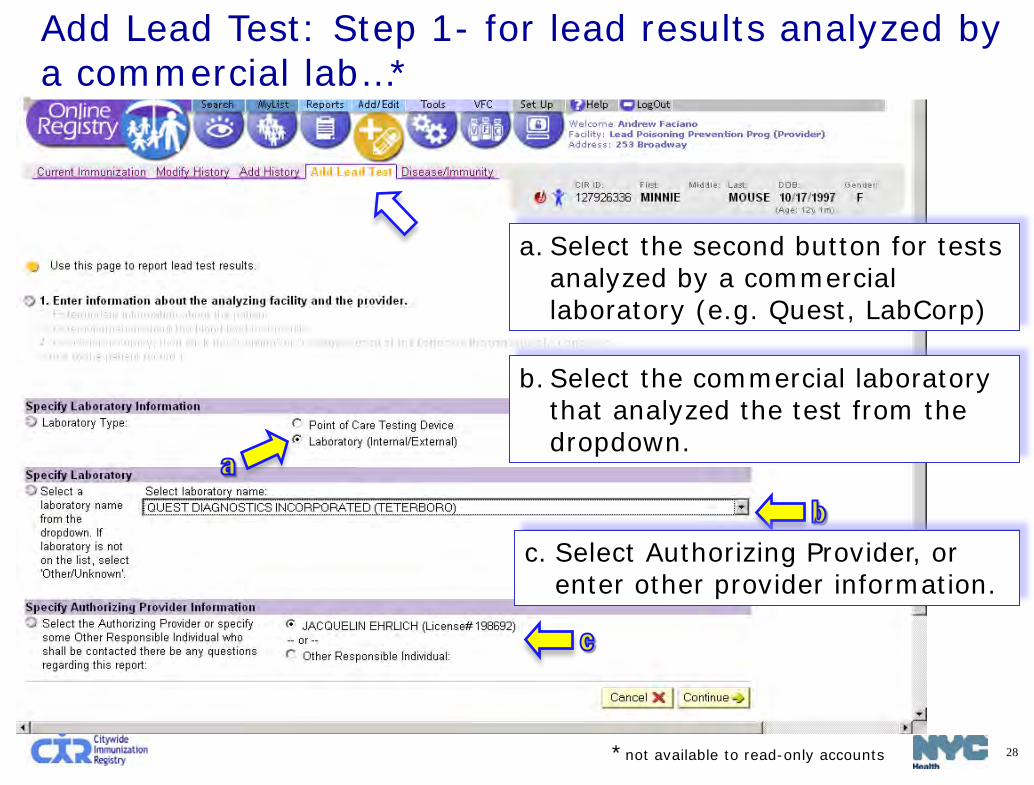
Add Lead Test: Step 1- for lead results analyzed by a commercial lab…*
a. Select the second button for tests analyzed by a commercial laboratory (e.g. Quest, LabCorp)
b.Select the commercial laboratory that analyzed the test from the dropdown.
*not available to read-only accounts
c. Select Authorizing Provider, or enter other provider information.
29
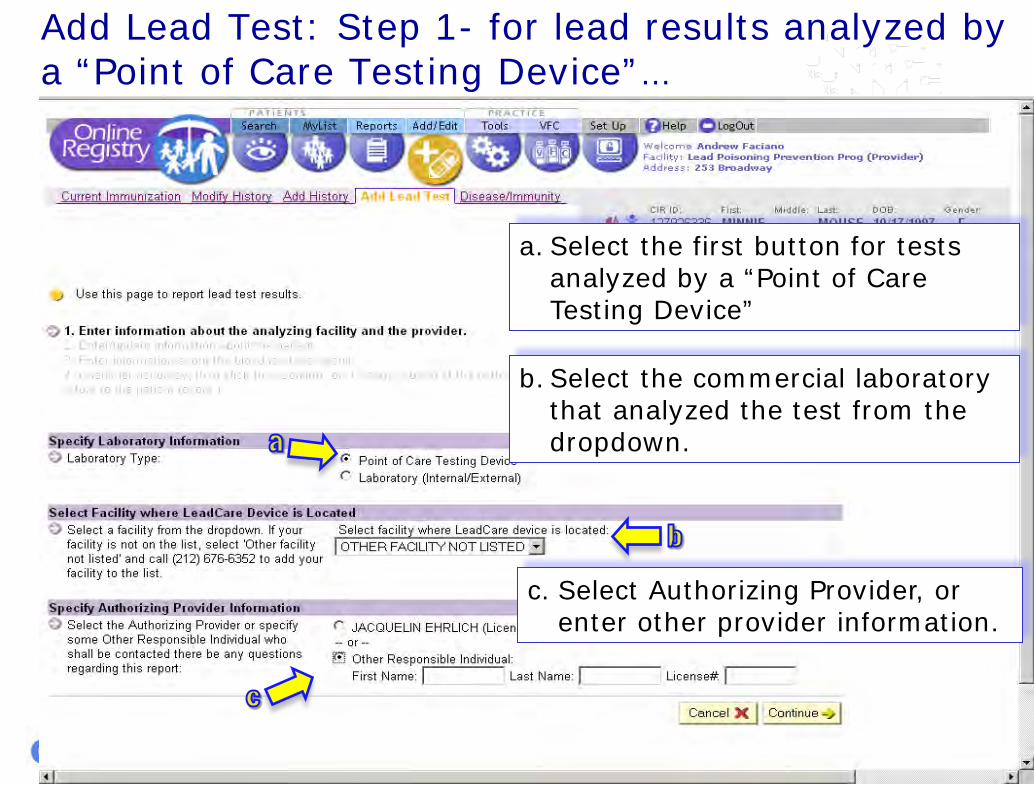
Add Lead Test: Step 1- for lead results analyzed by a “Point of Care Testing Device”…
c. Select Authorizing Provider, or enter other provider information.
a. Select the first button for tests analyzed by a “Point of Care Testing Device”
b.Select the commercial laboratory that analyzed the test from the dropdown.
30
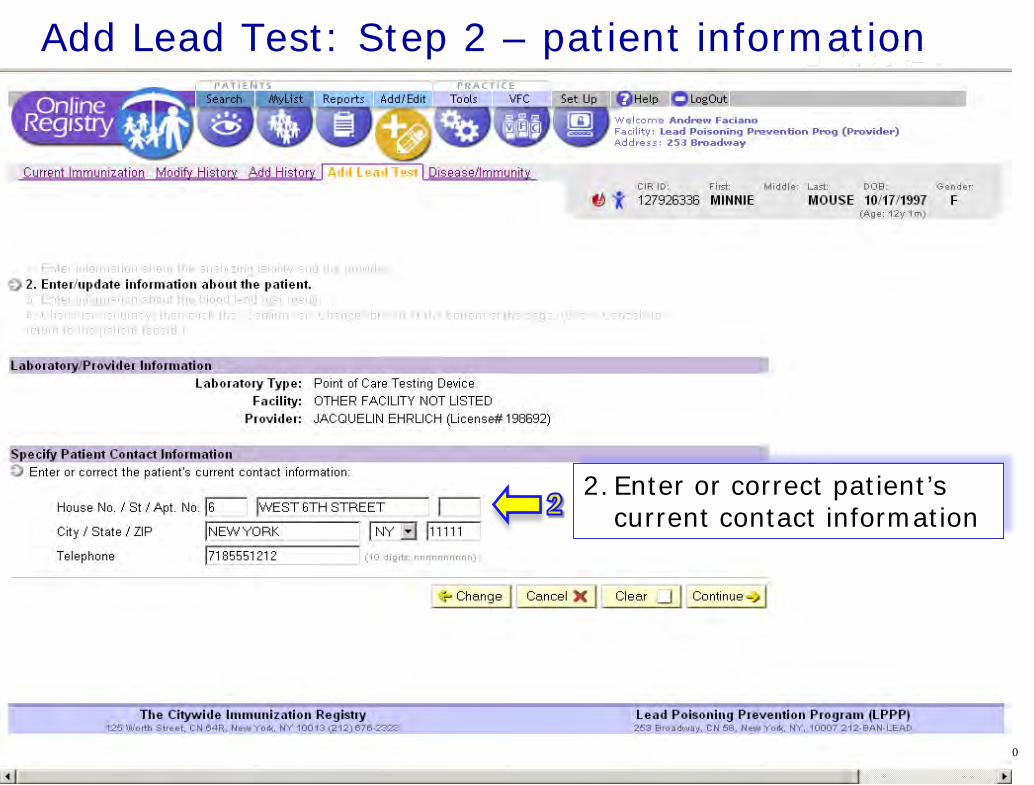
2.Enter or correct patient’s current contact information
Add Lead Test: Step 2 – patient information
31
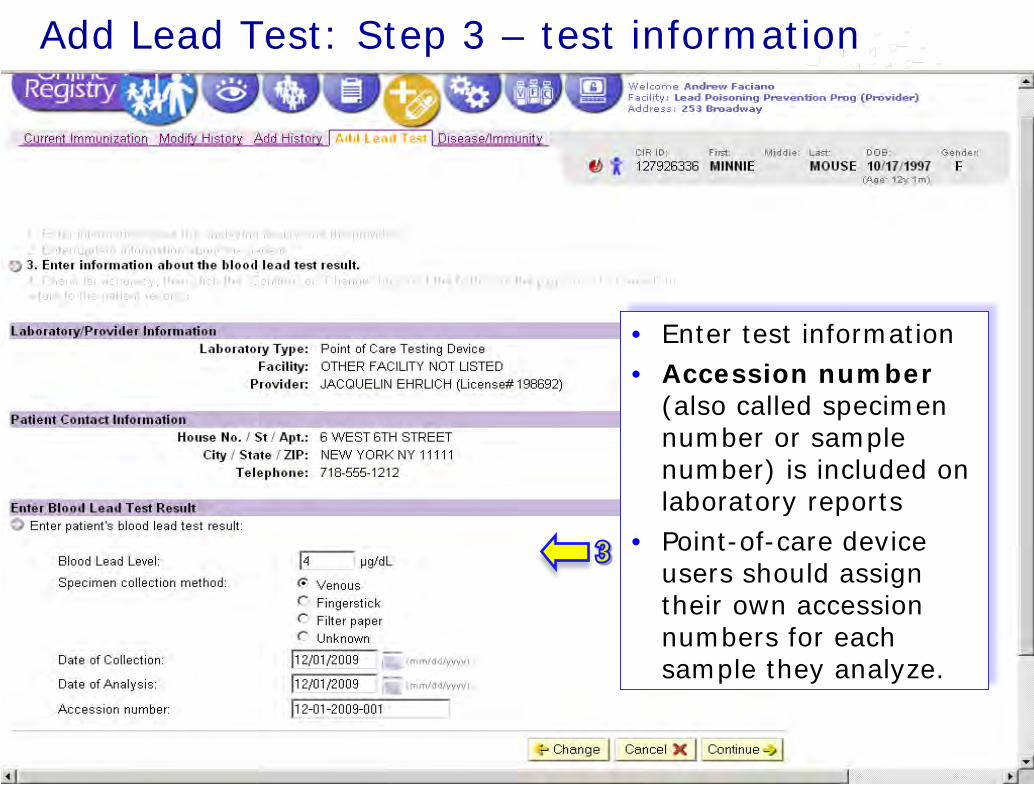
• Enter test information • Accession number
(also called specimen number or sample number) is included on laboratory reports
• Point-of-care device users should assign their own accession numbers for each sample they analyze.
Add Lead Test: Step 3 – test information
32
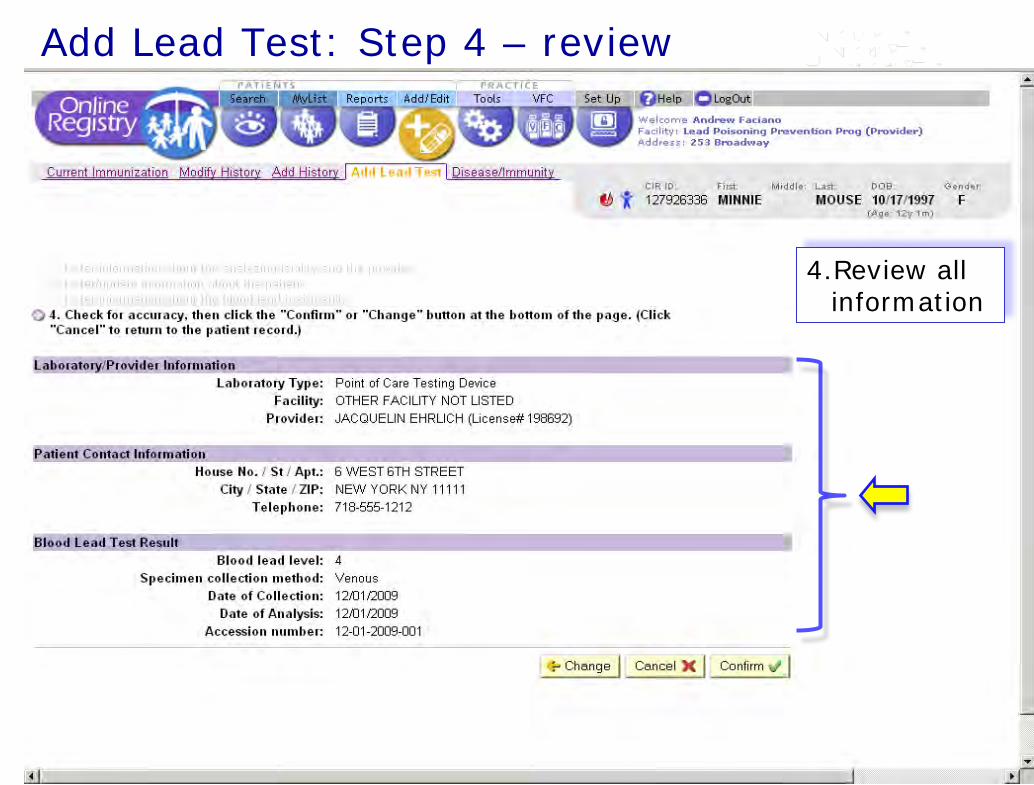
4.Review all information
Add Lead Test: Step 4 – review

33
If you have more tests to report, click one of the links.
Add Lead Test: Step 5 – confirmation message, report additional tests
34
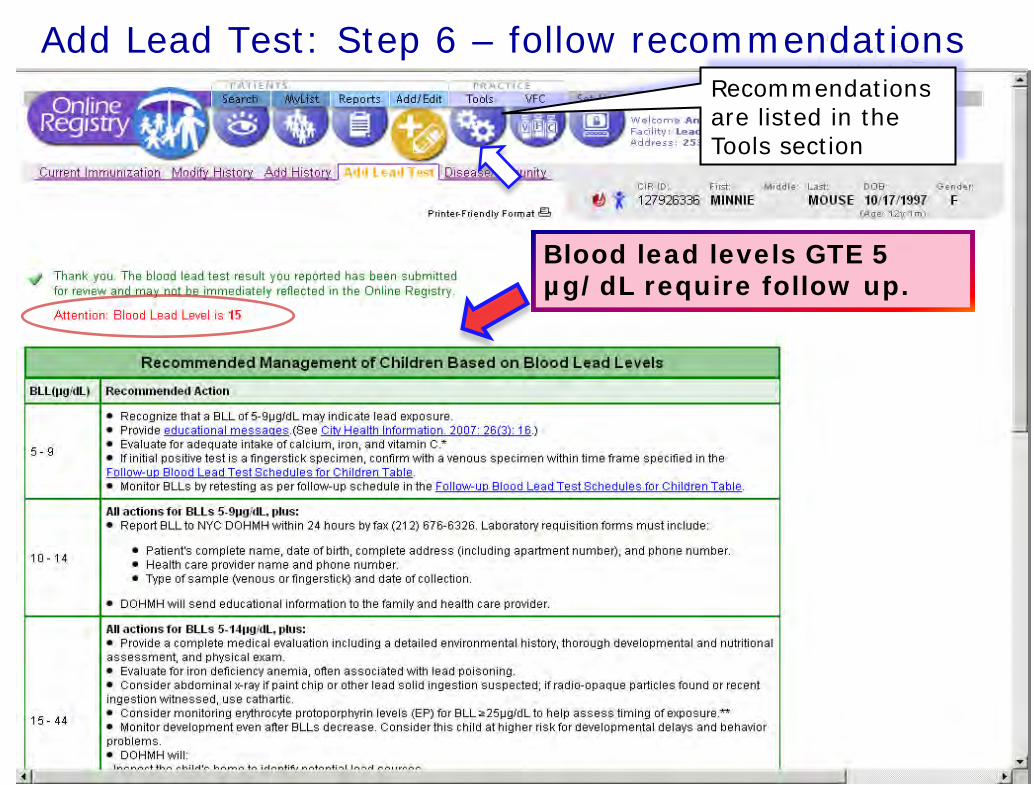
Blood lead levels GTE 5 µg/dL require follow up.
Add Lead Test: Step 6 – follow recommendations
Recommendations are listed in the Tools section
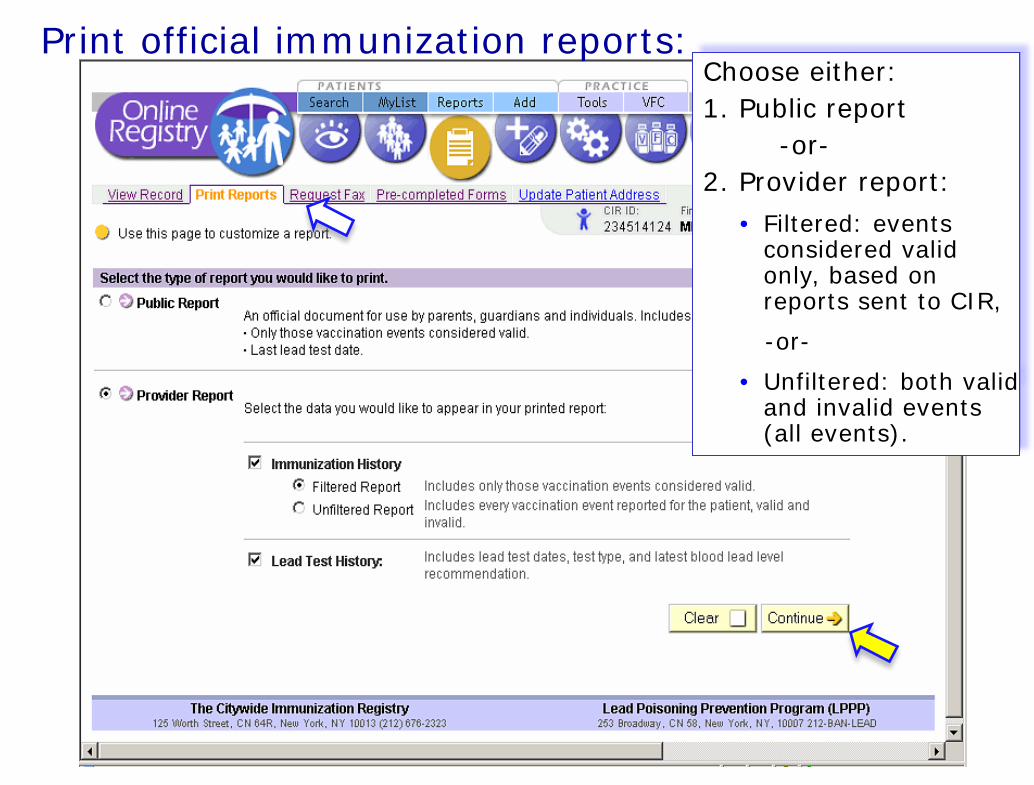
Print official immunization reports: Choose either: 1. Public report -or-
2. Provider report: • Filtered: events
considered valid only, based on reports sent to CIR,
-or- • Unfiltered: both valid
and invalid events (all events).
36
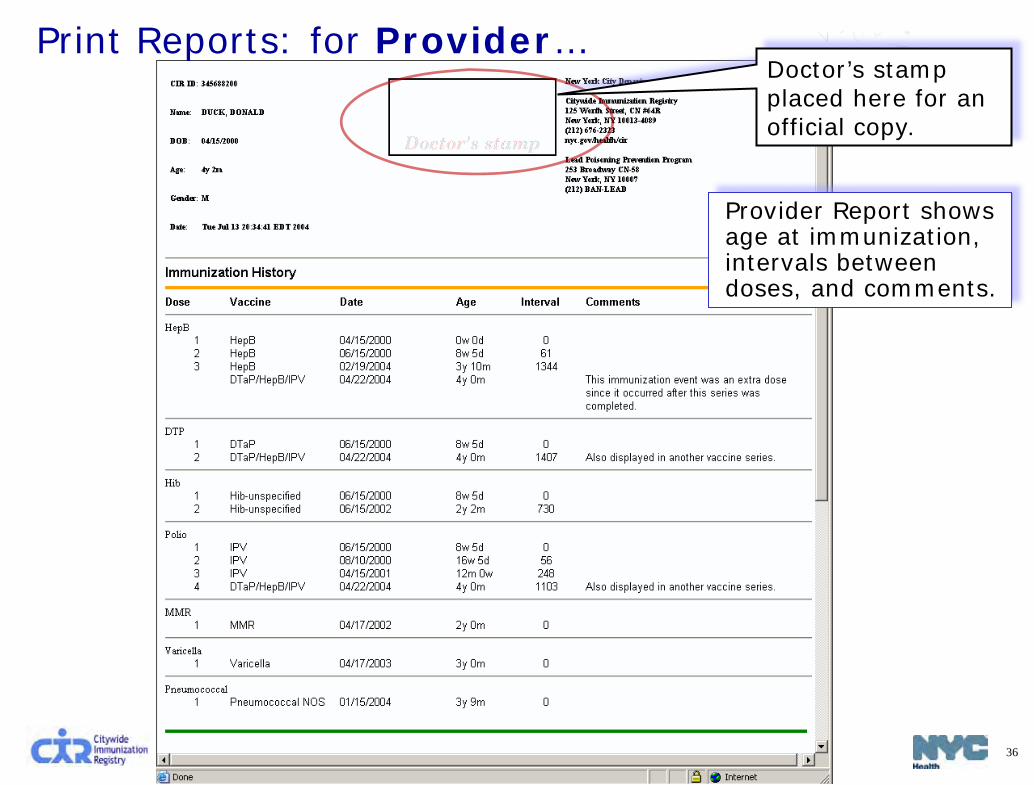
Provider Report shows age at immunization, intervals between doses, and comments.
Print Reports: for Provider…
Doctor’s stamp placed here for an official copy.

37
Public Report shows valid immunizations only, based on reports sent to CIR.
Print Reports: for Public…
Doctor’s stamp placed here for an official copy.
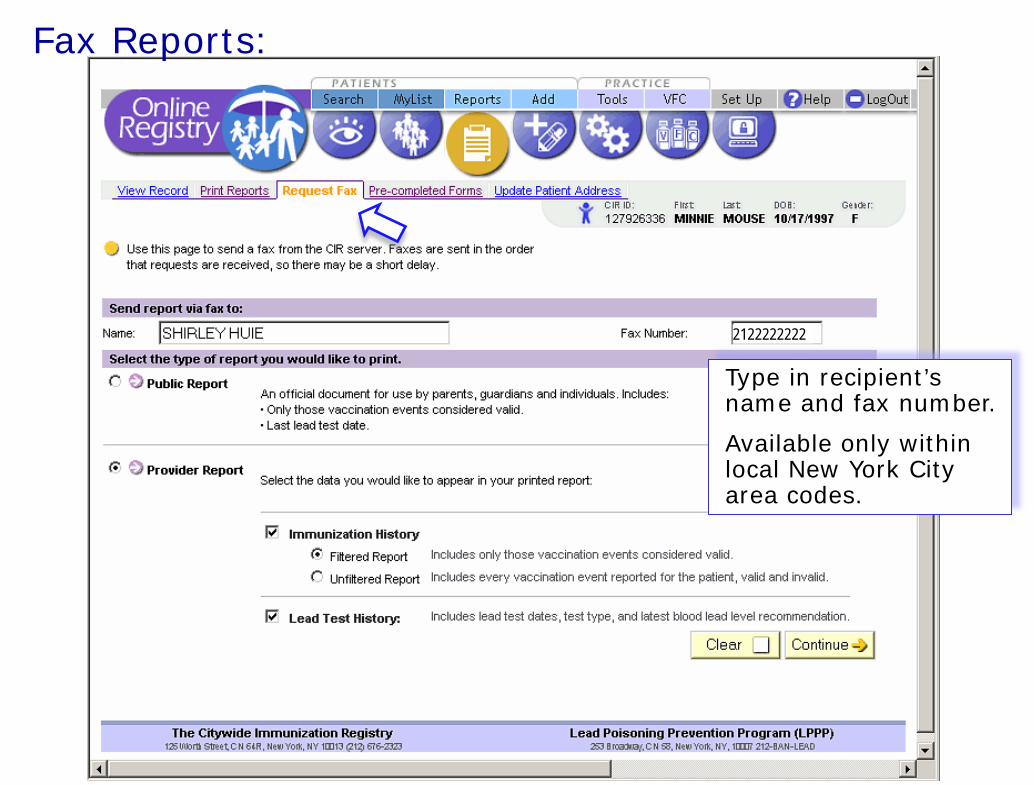
Fax Reports:
Type in recipient’s name and fax number. Available only within local New York City area codes.
2122222222
39
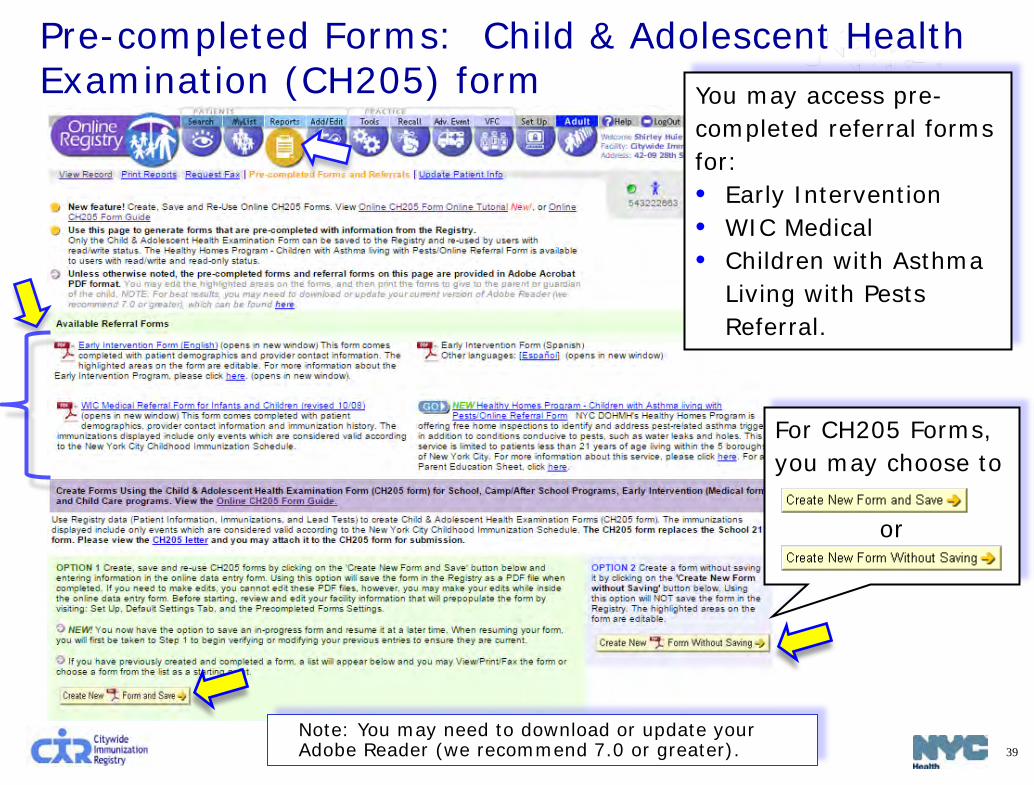
Note: You may need to download or update your Adobe Reader (we recommend 7.0 or greater).
Pre-completed Forms: Child & Adolescent Health Examination (CH205) form You may access pre-
completed referral forms for: • Early Intervention • WIC Medical • Children with Asthma
Living with Pests Referral.
For CH205 Forms, you may choose to
or

40
Steps (b) through (e) pertain only to forms needed by child care centers. b. Specify if child is
attending a “Center-Based” or “School-Aged/Home-Based/Other” facility
c. Next, search for the center. You may enter a partial name or street name. Click on the Search button.
Ascertain from the child’s parent/guardian the organization type(s) requesting the form, and if it is a child care center, note the name and/or address.
1. Begin new form: a.Select the organization types requesting
the form. You may choose more than one.
Child care definitions are listed under
Select & search for organization(s) requesting form:
41
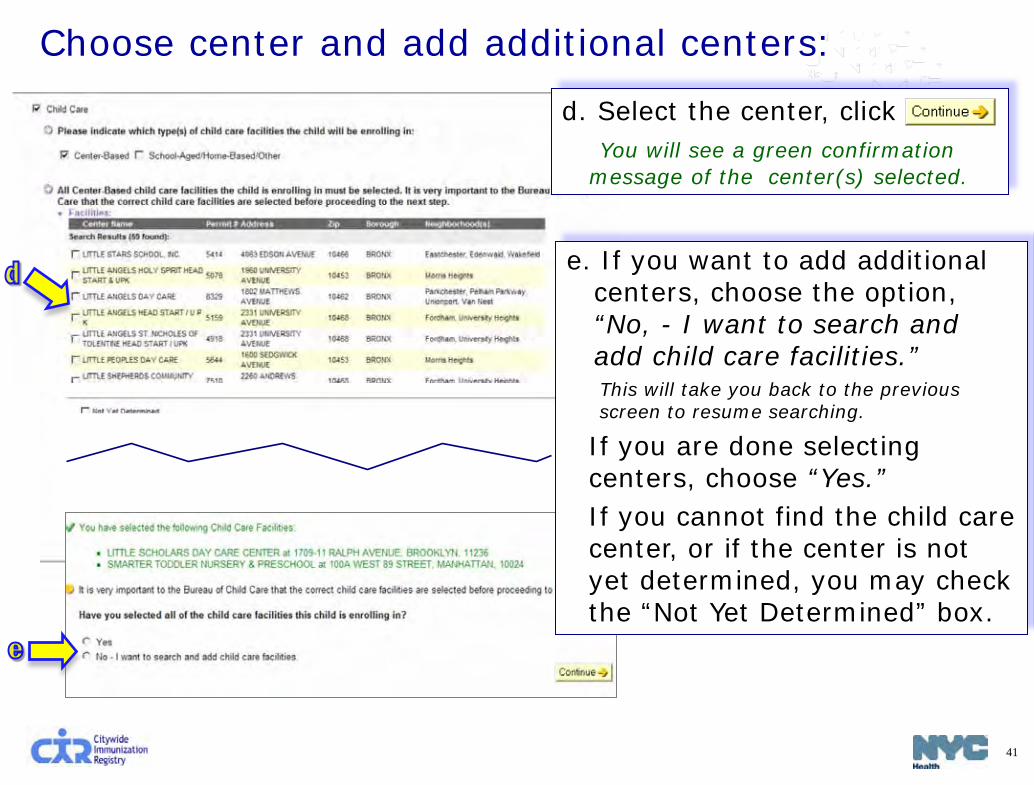
d. Select the center, click You will see a green confirmation
message of the center(s) selected.
e. If you want to add additional centers, choose the option, “No, - I want to search and add child care facilities.” This will take you back to the previous screen to resume searching.
If you are done selecting centers, choose “Yes.” If you cannot find the child care center, or if the center is not yet determined, you may check the “Not Yet Determined” box.
Choose center and add additional centers:
42
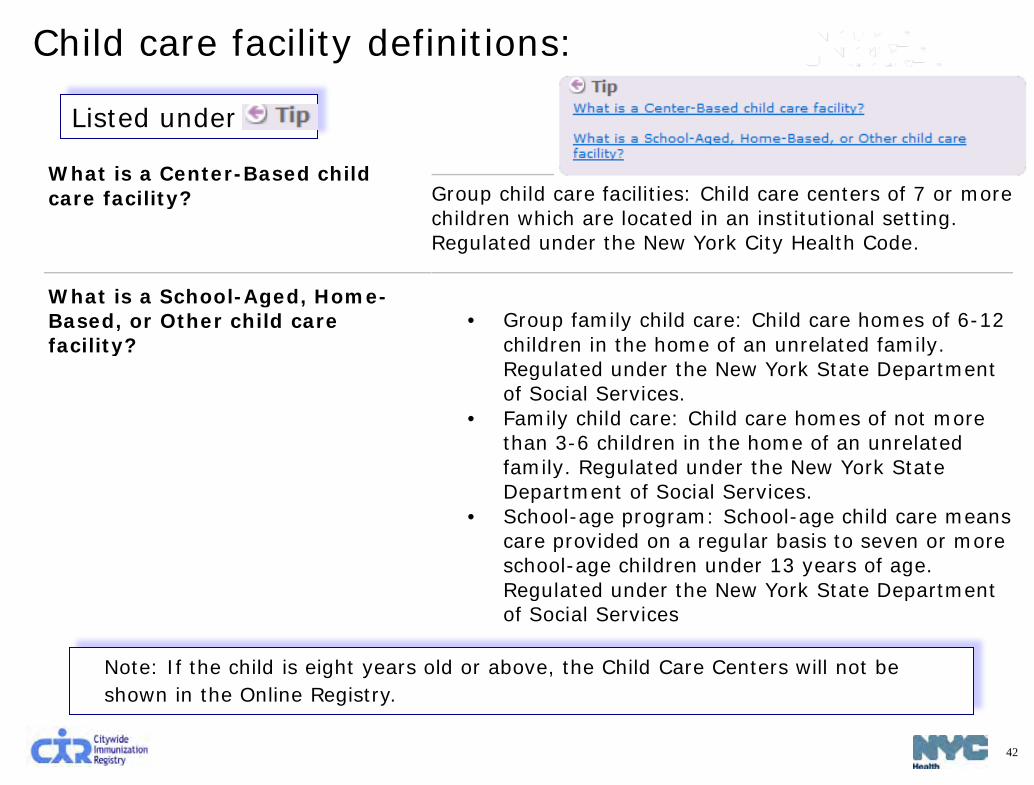
What is a Center-Based child care facility?
Group child care facilities: Child care centers of 7 or more children which are located in an institutional setting. Regulated under the New York City Health Code.
What is a School-Aged, Home-Based, or Other child care facility?
· Group family child care: Child care homes of 6-12 children in the home of an unrelated family. Regulated under the New York State Department of Social Services.
· Family child care: Child care homes of not more than 3-6 children in the home of an unrelated family. Regulated under the New York State Department of Social Services.
· School-age program: School-age child care means care provided on a regular basis to seven or more school-age children under 13 years of age. Regulated under the New York State Department of Social Services
Note: If the child is eight years old or above, the Child Care Centers will not be shown in the Online Registry.
Listed under
Child care facility definitions:

43
The next steps provide opportunities to update: • Patient Information • Immunization History • Lead Test History Results You may click though these steps if the record is up to date.
Patient Information
Verify patient information:

44
Immunization History – Click link to Add/Edit
Verify and update the immunization history:
45
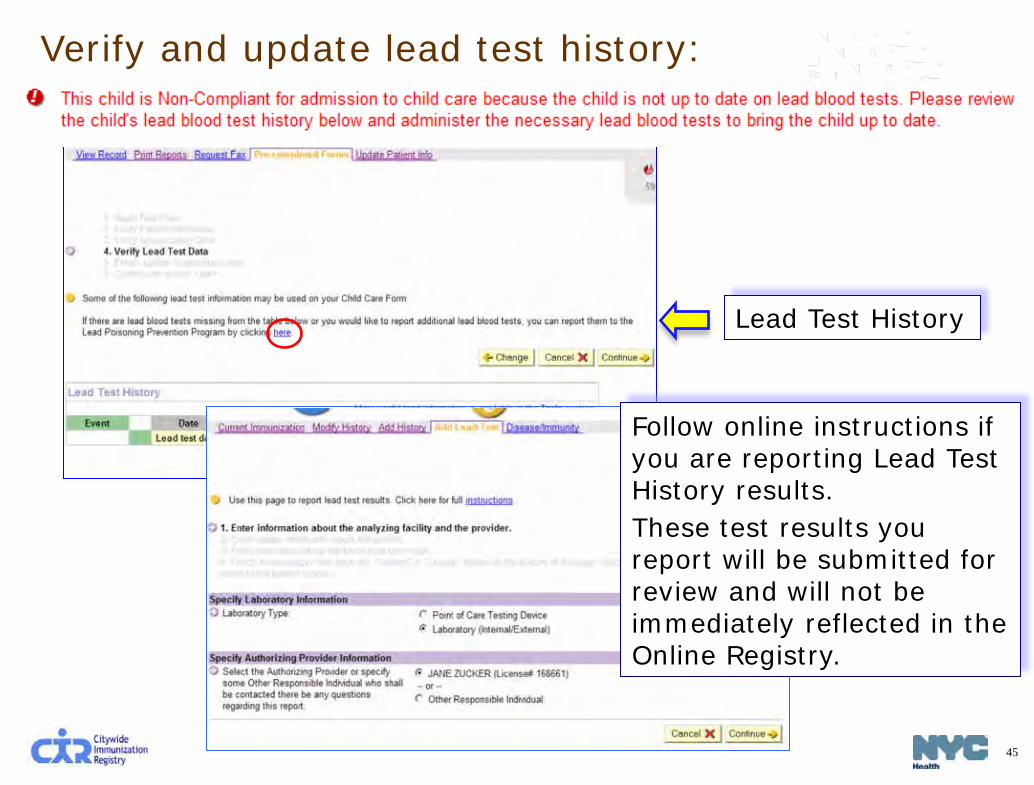
Lead Test History
Follow online instructions if you are reporting Lead Test History results. These test results you report will be submitted for review and will not be immediately reflected in the Online Registry.
Verify and update lead test history:
46
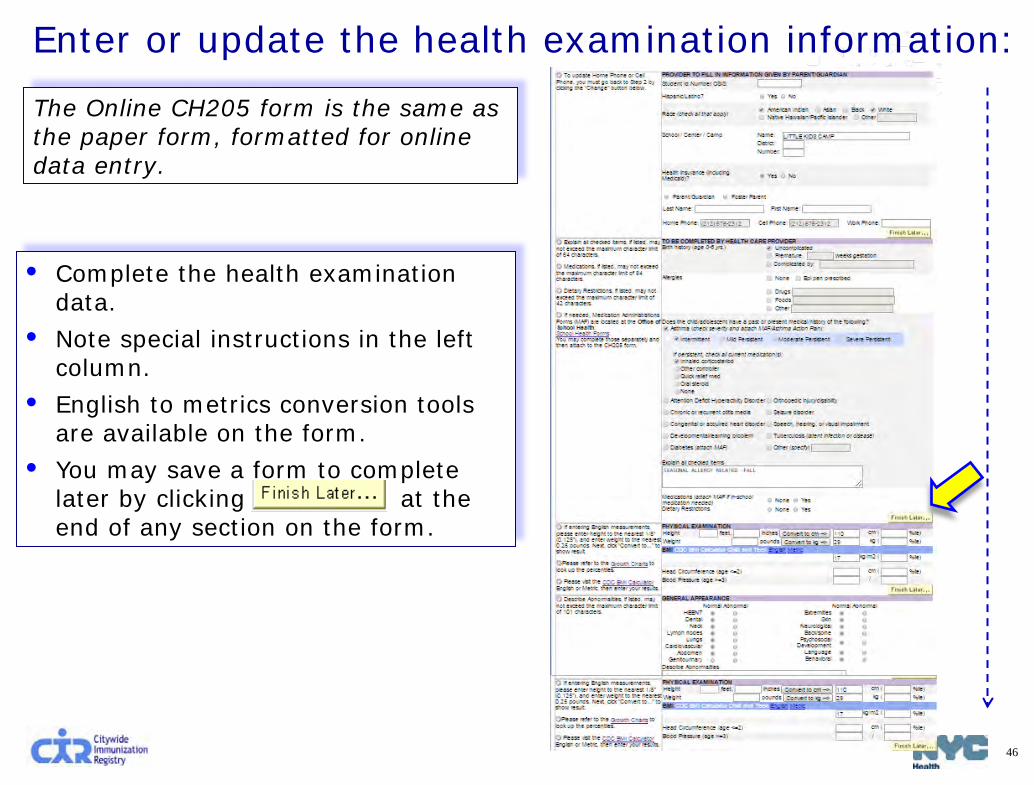
The Online CH205 form is the same as the paper form, formatted for online data entry.
Enter or update the health examination information:
• Complete the health examination data.
• Note special instructions in the left column.
• English to metrics conversion tools are available on the form.
• You may save a form to complete later by clicking Finish Later at the end of any section on the form.
47
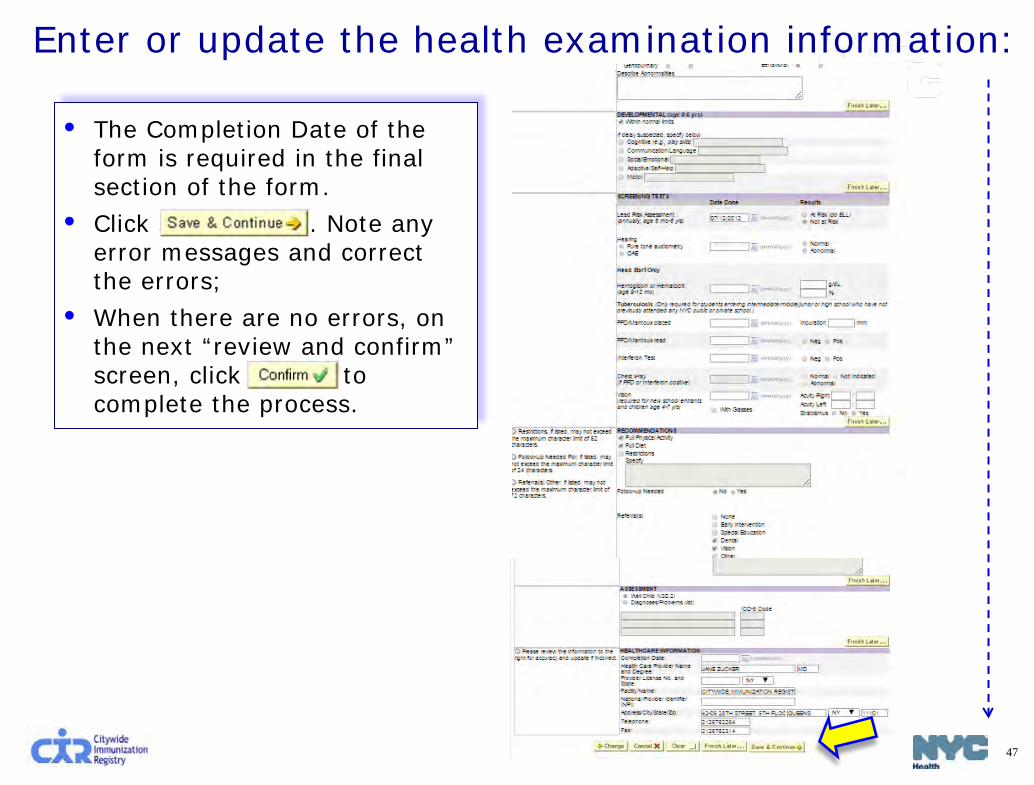
Enter or update the health examination information:
• The Completion Date of the form is required in the final section of the form.
• Click Save & Continue, . Note any error messages and correct the errors;
• When there are no errors, on the next “review and confirm” screen, click Confirm to complete the process.
48
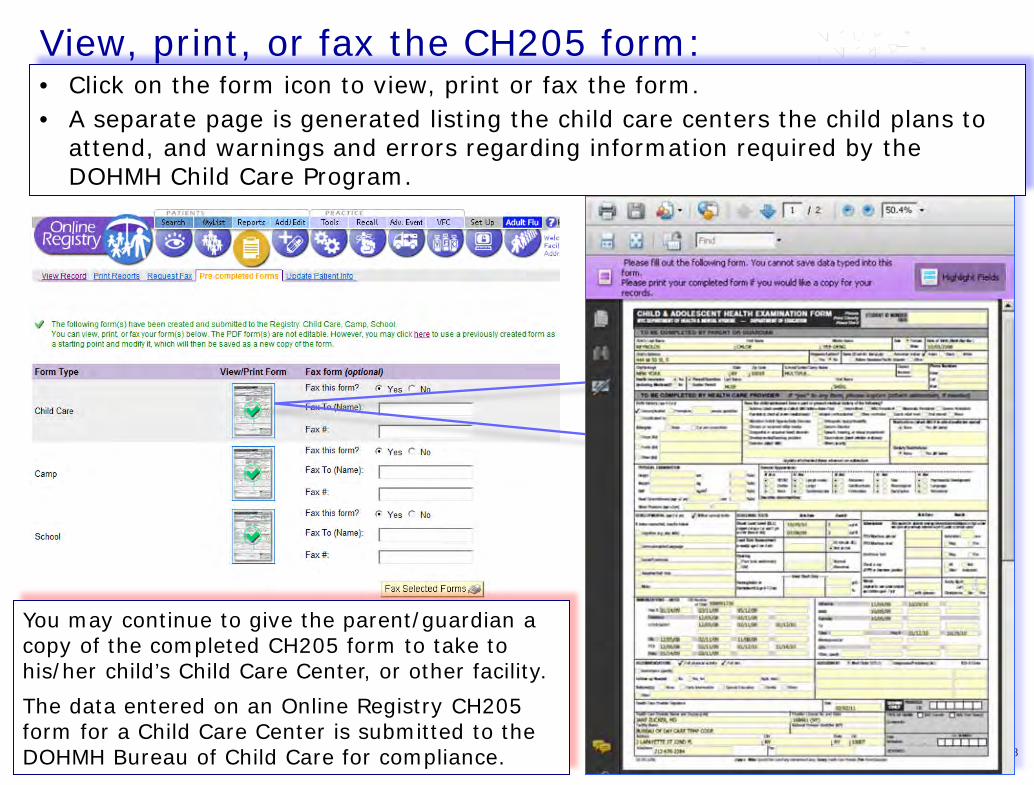
• Click on the form icon to view, print or fax the form. • A separate page is generated listing the child care centers the child plans to
attend, and warnings and errors regarding information required by the DOHMH Child Care Program.
You may continue to give the parent/guardian a copy of the completed CH205 form to take to his/her child’s Child Care Center, or other facility. The data entered on an Online Registry CH205 form for a Child Care Center is submitted to the DOHMH Bureau of Child Care for compliance.
View, print, or fax the CH205 form:
49
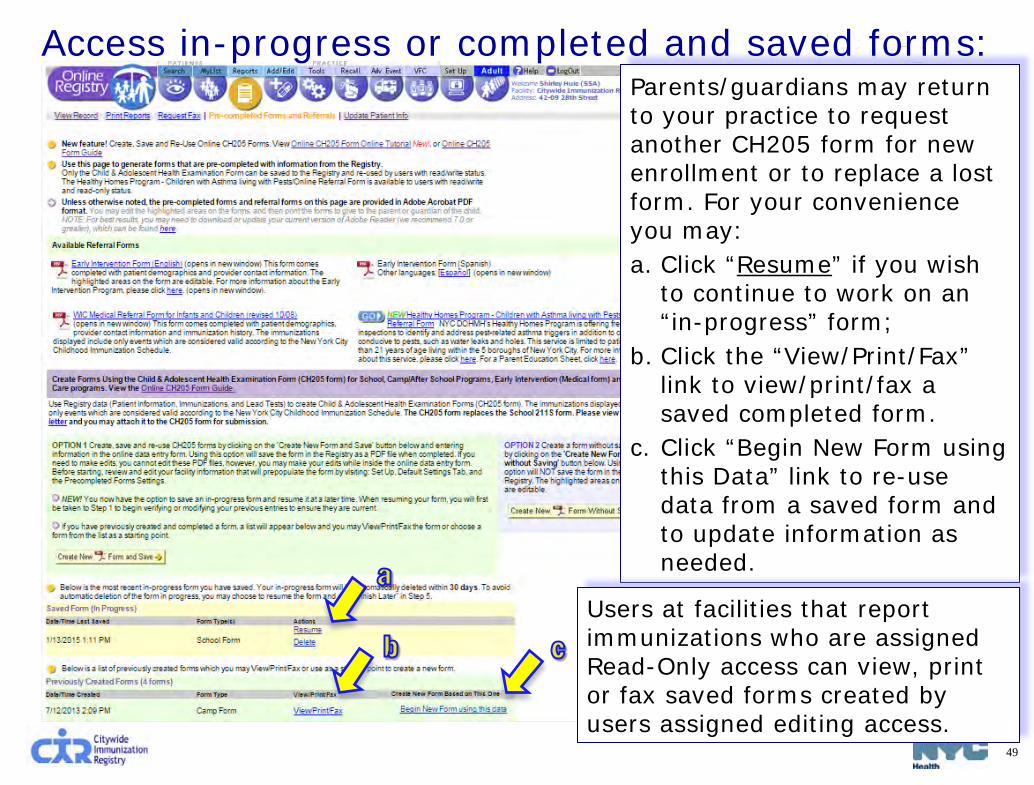
Parents/guardians may return to your practice to request another CH205 form for new enrollment or to replace a lost form. For your convenience you may: a. Click “Resume” if you wish
to continue to work on an “in-progress” form;
b. Click the “View/Print/Fax” link to view/print/fax a saved completed form.
c. Click “Begin New Form using this Data” link to re-use data from a saved form and to update information as needed.
Access in-progress or completed and saved forms:
Users at facilities that report immunizations who are assigned Read-Only access can view, print or fax saved forms created by users assigned editing access.
50
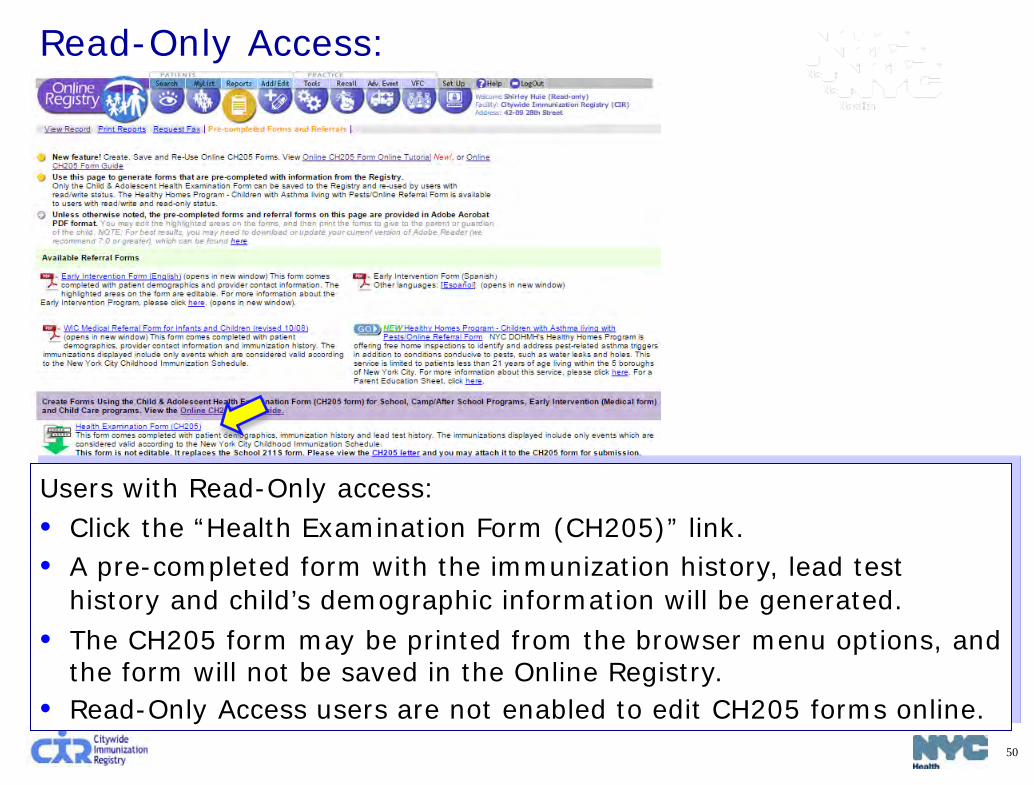
Read-Only Access:
Users with Read-Only access: • Click the “Health Examination Form (CH205)” link. • A pre-completed form with the immunization history, lead test
history and child’s demographic information will be generated. • The CH205 form may be printed from the browser menu options, and
the form will not be saved in the Online Registry. • Read-Only Access users are not enabled to edit CH205 forms online.
51
• Fill out the form as you normally would fill out the paper form. • If you chose “Child Care center” as the organization type and
searched for and found the center, you will see the name filled in on the form.
• If you chose an organization other than a Child Care center, you may type the name directly on the form.
• You may fill in the parent/guardian information. If you enter this information, it will be saved on the form and you would not need to type this in again on future forms.
• You do not need to fill in the OSIIS number. • Some items if checked will expand, requesting additional input. • The text boxes are limited in the number of characters that may
be entered so that the text you type will fit inside the boxes on the paper form. You may add an addendum to attach to the form when you print it out to give to the parent/guardian.
• To edit the provider information, visit Set Up, and then go to Default Settings (for users with editing access).
Additional tips on completing the Online CH205 data entry form:
52
• If you “Resume” working on an unfinished form or re-use a saved form, you will be taken through the first few steps of the program to update patient information stored in the CIR (demographics, immunizations, and lead test history) before accessing your previously saved health exam data. Click through quickly if you have no changes.
• If you are re-using the form for a child care center, the system will remember all the previous centers that your practice associated with the patient and quickly present you with these choices for convenience.
• If you have since updated the default settings in Set Up for the provider information, the updated information will populate the forms.
• Only your authorized online registry users at your facility may access your facility’s completed forms.
Additional tips on in-progress forms and re-using saved CH205 forms:
53
1. Refresh MyList (located in the MyList screen). This feature retrieves patients you immunized in the past who are in the CIR, but may not already be on MyList.
2. View and edit a patient’s last valid address and phone numbers reported by a practice, and update patient’s status – active or inactive (a.k.a. Moved or Gone Elsewhere –MOGE).
3. Report options: a) Coverage (located in Tools screen):
• Up-to-Date (UTD) percentages for 7-11 month olds, 19-35 month olds, 24-35 month olds, or 11–18 year olds;
• Influenza UTD percentages for 6-59 month olds, 5-10 year olds, or 11–18 year olds.
b) Recall (located in Recall screen): Custom Recall –used to see who has vaccine Due Now: (1) enter age ranges of your choice; (2) choose to recall patients who are missing any age-appropriate immunization,
any specified vaccine series, and /or # of specified valid doses Standard Recall – used to see who in MyList is Due Now.
c) Reminder (located in Recall screen): same as Recall, but used to see who is due immunizations within 28 days, or Due Soon.
Both coverage and recall reports can be used to produce a recall list, or to produce letters and address labels. Reports can be saved.
Overview of Recall/Reminder features:
54
• The coverage or recall/reminder reports are only as good as the information (immunizations and addresses) your practice reported to the CIR. Use the Online Registry features to help you update your records in CIR.
55
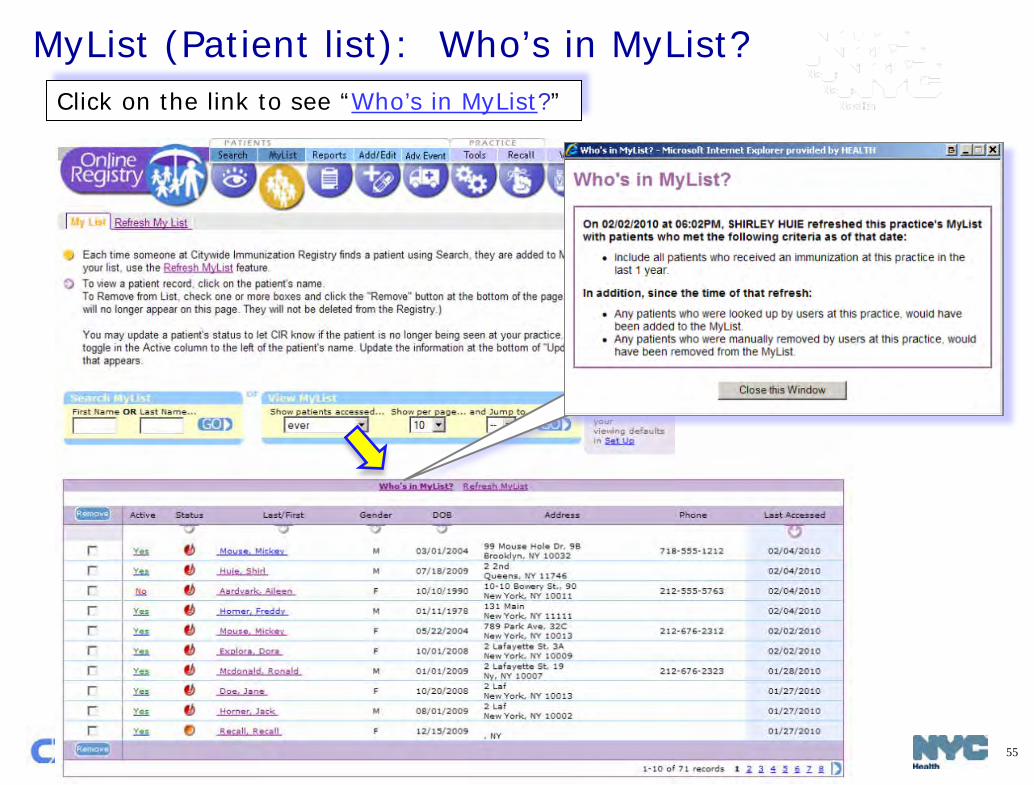
MyList (Patient list): Who’s in MyList?
Who’s in MyList?
Click on the link to see “Who’s in MyList?”
56
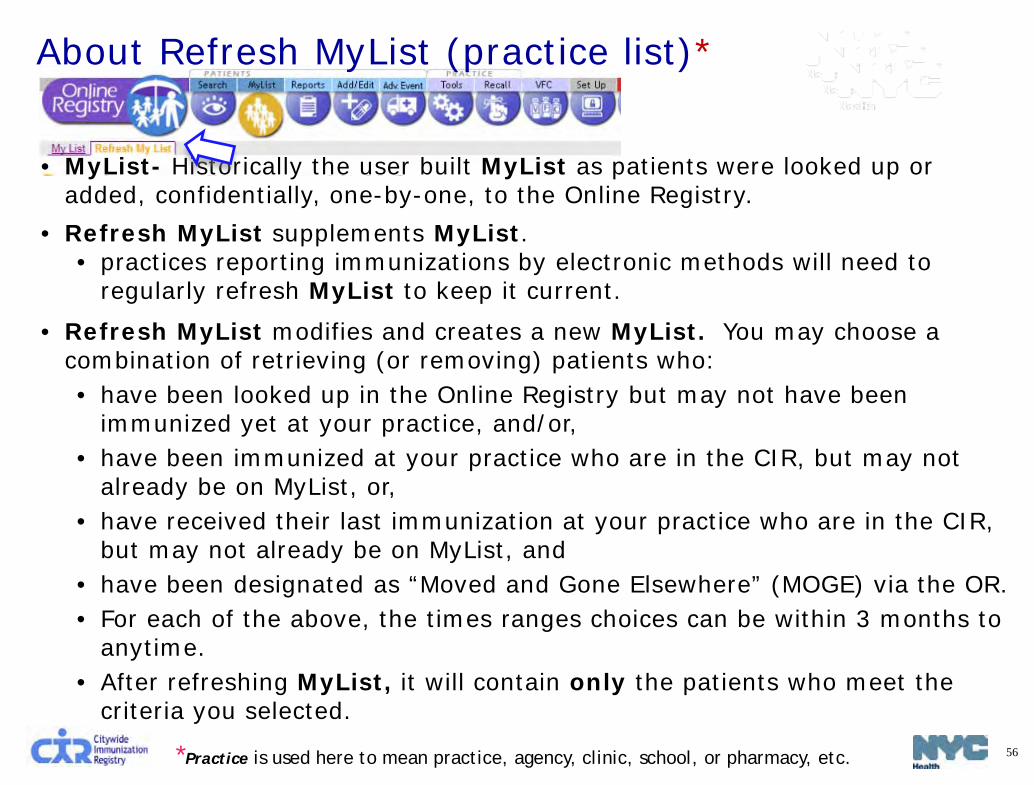
About Refresh MyList (practice list)*
*Practice is used here to mean practice, agency, clinic, school, or pharmacy, etc.
• MyList- Historically the user built MyList as patients were looked up or added, confidentially, one-by-one, to the Online Registry.
• Refresh MyList supplements MyList. • practices reporting immunizations by electronic methods will need to
regularly refresh MyList to keep it current.
• Refresh MyList modifies and creates a new MyList. You may choose a combination of retrieving (or removing) patients who: • have been looked up in the Online Registry but may not have been
immunized yet at your practice, and/or, • have been immunized at your practice who are in the CIR, but may not
already be on MyList, or, • have received their last immunization at your practice who are in the CIR,
but may not already be on MyList, and • have been designated as “Moved and Gone Elsewhere” (MOGE) via the OR. • For each of the above, the times ranges choices can be within 3 months to
anytime. • After refreshing MyList, it will contain only the patients who meet the
criteria you selected.

57
• Please remember that MyList is shared by all of the Online Registry users at your practice. Any changes you make will affect all of your users!
• You may want to consider designating one person at your practice to update MyList and run reports.
• Please contact the CIR at (347) 396-2400 if you have duplicate/fragmented CIR records that need to be merged.
• Please review your records and let us know if you do not see records you reported in the CIR.
• Agencies and organizations that use the Online Registry to look up patient records only and do not report immunizations may not need to use this feature.
Refresh MyList (practice list): tips
58
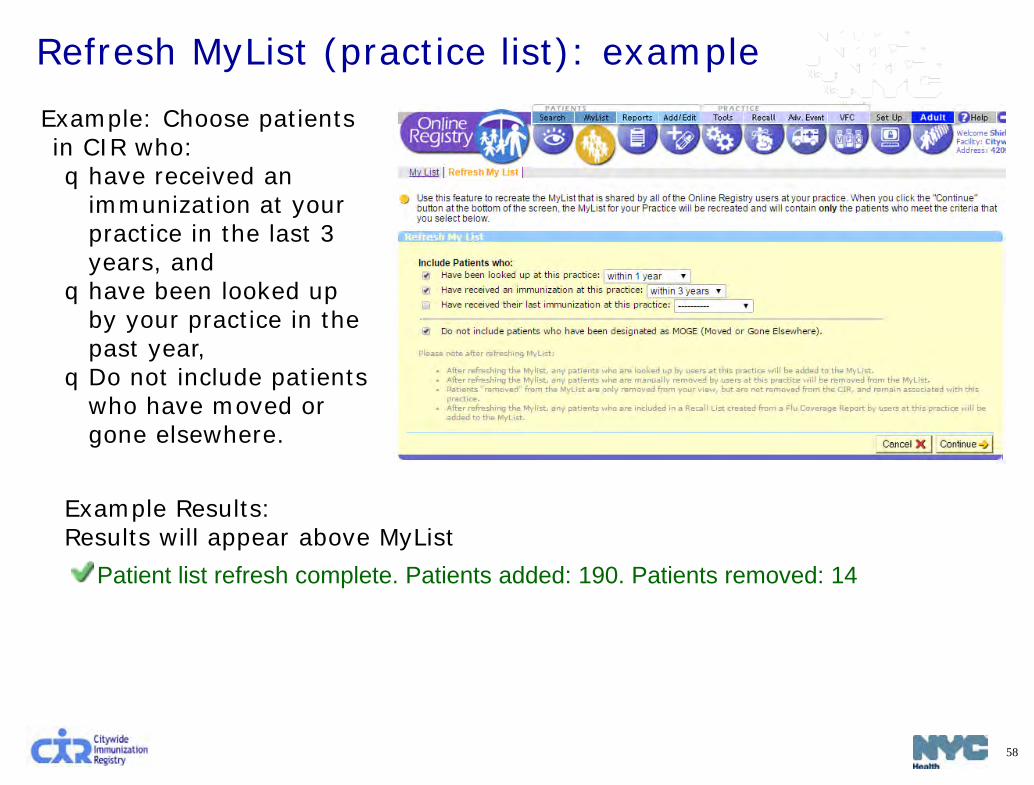
Refresh MyList (practice list): example Example: Choose patients in CIR who: qhave received an
immunization at your practice in the last 3 years, and qhave been looked up
by your practice in the past year, qDo not include patients
who have moved or gone elsewhere.
Example Results: Results will appear above MyList
Patient list refresh complete. Patients added: 190. Patients removed: 14

59
MyList (patient list): Active Status & Remove features
Before running a coverage, recall or reminder report, you may update a patient's status to let CIR know if the patient is no longer being seen (a.k.a., Moved or Gone Elsewhere [MOGE] status) at your practice:
1) Click Yes/No in the Active column. 2) Update Patient Info screen will appear (see next slide). Make your choice. 3) You must do two things to remove a patient from MyList and from your practice.
a) Update the Active Status to “No.” b) Remove the patient from MyList by checking the box in the Remove column.
Click Remove. . Record is removed from MyList, but remains in CIR.
60
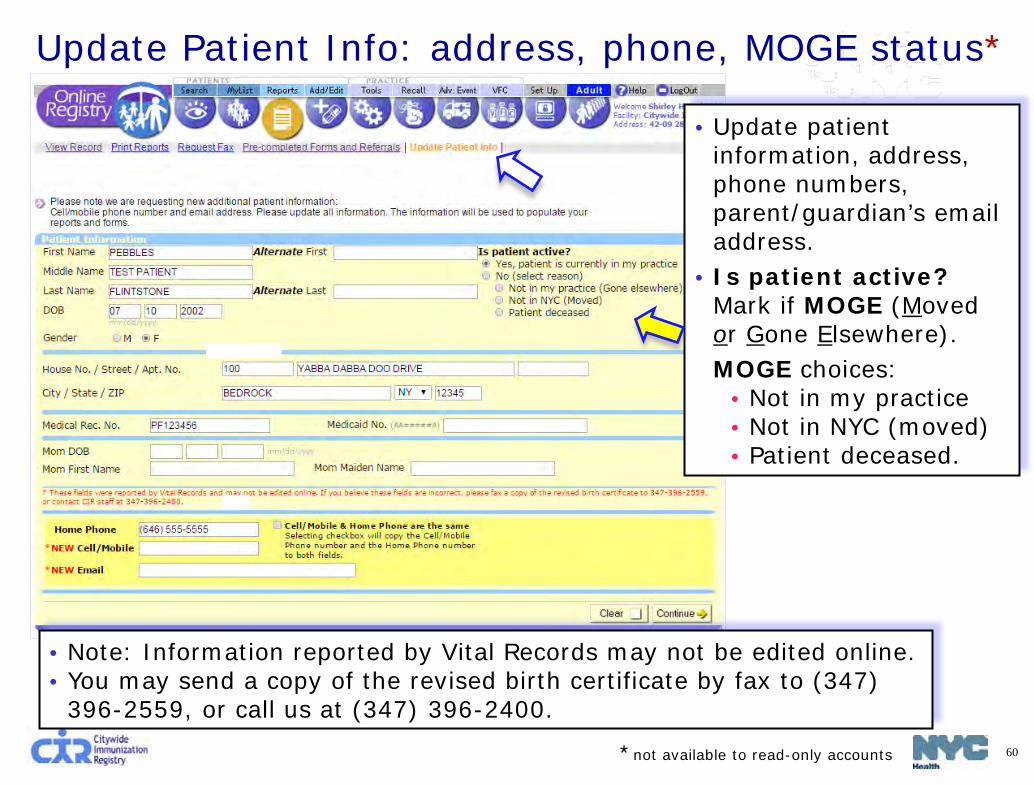
Update Patient Info: address, phone, MOGE status*
• Update patient information, address, phone numbers, parent/guardian’s email address.
• Is patient active? Mark if MOGE (Moved or Gone Elsewhere).
MOGE choices: • Not in my practice • Not in NYC (moved) • Patient deceased.
*not available to read-only accounts
• Note: Information reported by Vital Records may not be edited online. • You may send a copy of the revised birth certificate by fax to (347)
396-2559, or call us at (347) 396-2400.

61
Criteria of Moved or Gone Elsewhere (MOGE) The following describes the criteria which should be used to consider a child a MOGE:
• There is documentation in the chart that the child moved to another city/state and/or transferred to another health care provider. or
• The child has not returned to the practice in over one year and there are 3 documented contact attempts (by letter or by phone) with no response. If there are phone call attempts with no direct contact, there should be at least one letter sent. or
• There is a “returned to sender” follow-up letter in chart, and it was sent after the last visit. Keep in mind that a letter may be returned because the facility failed to update the patient’s information. Therefore, a child with a returned letter may be considered a MOGE if the returned letter was sent and received 6 months after the last visit. If the last visit to the practice was just recently made (< 6 months) and the provider received a “returned to sender” follow-up letter and there is no other type of follow-up attempt, the child should be kept in the practice’s MyList. or
• If the provider has obtained records from the CIR, and the CIR record indicates additional vaccination dates after the child’s last visit to the practice, this may mean that the child transferred care to another provider in New York City. If the additional dates in the CIR record are at least 6 months after the last visit, then the child can be considered a MOGE. If the CIR record indicates additional vaccination dates < 6 months after the last visit and the provider never attempted to contact the child, then the child should be kept in the practice’s MyList.
62
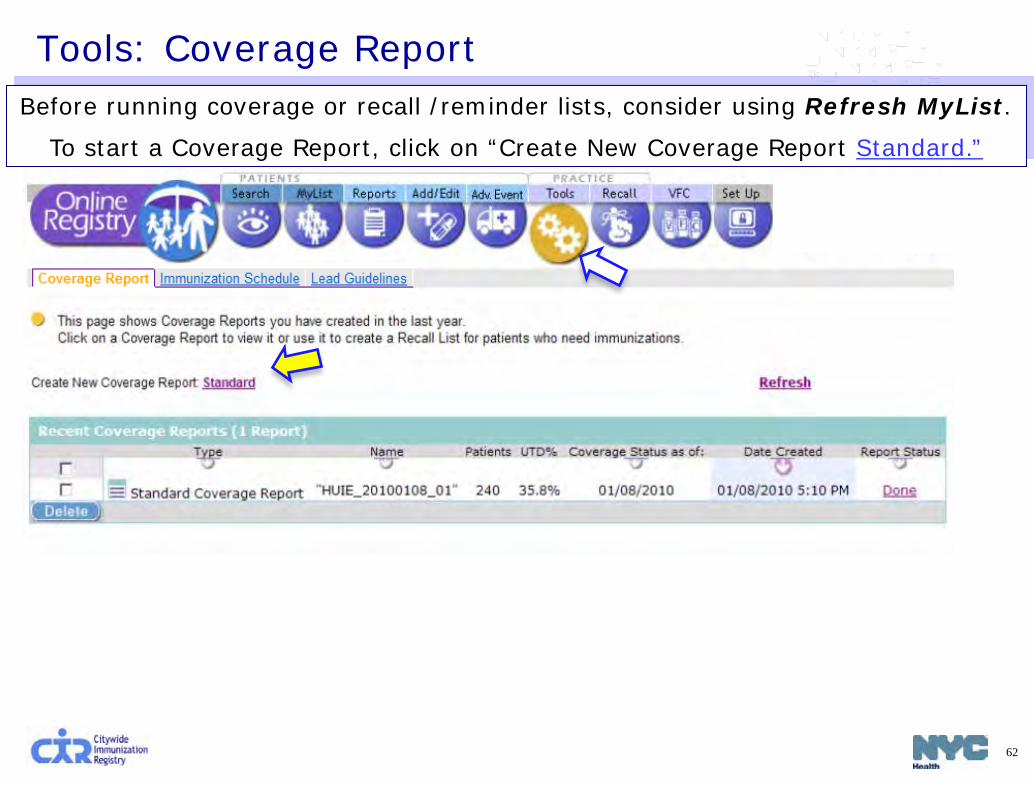
Tools: Coverage Report Before running coverage or recall /reminder lists, consider using Refresh MyList.
To start a Coverage Report, click on “Create New Coverage Report Standard.”
63
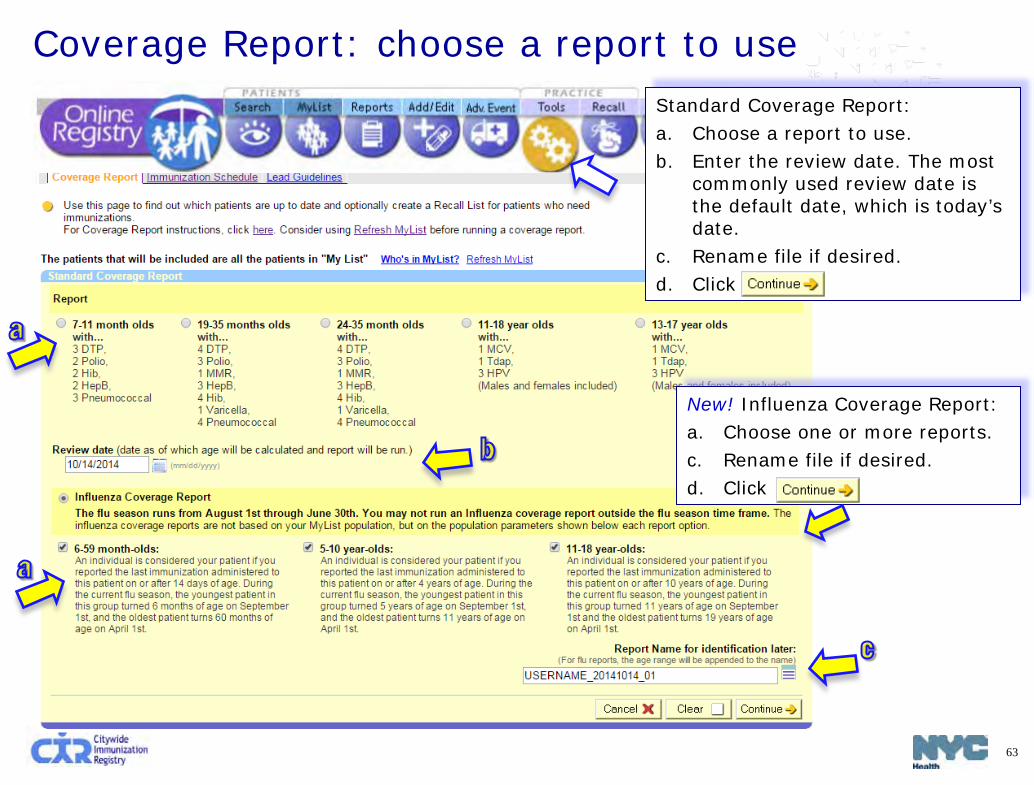
Coverage Report: choose a report to use Standard Coverage Report: a. Choose a report to use. b. Enter the review date. The most
commonly used review date is the default date, which is today’s date.
c. Rename file if desired. d. Click
New! Influenza Coverage Report: a. Choose one or more reports. c. Rename file if desired. d. Click
64
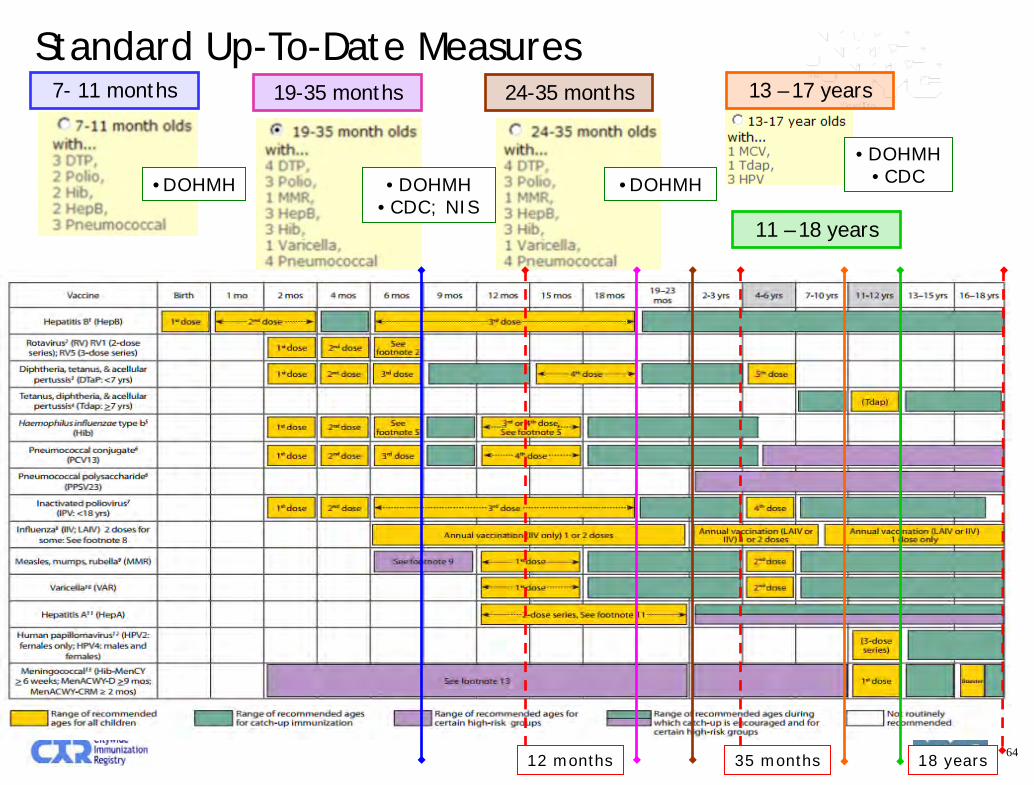
7- 11 months 19-35 months 24-35 months
Standard Up-To-Date Measures
•DOHMH •DOHMH •CDC; NIS
•DOHMH
12 months 35 months
11 – 18 years
13 – 17 years
18 years
•DOHMH •CDC
65
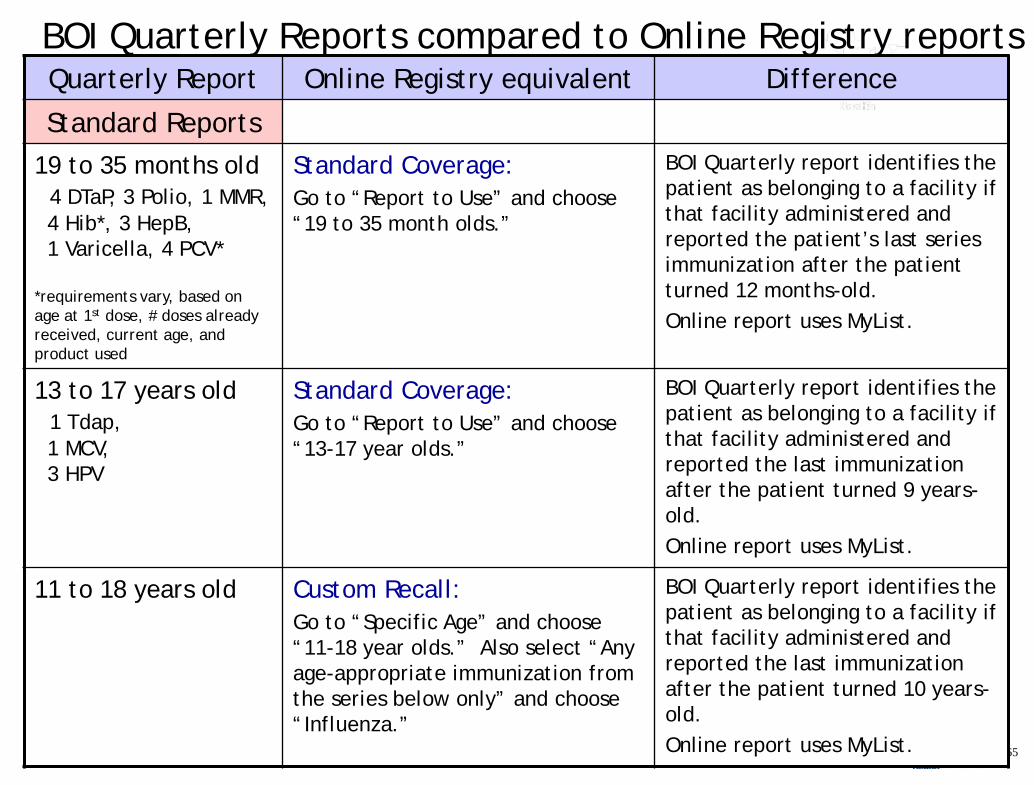
BOI Quarterly Reports compared to Online Registry reports Quarterly Report Online Registry equivalent Difference
Standard Reports 19 to 35 months old 4 DTaP, 3 Polio, 1 MMR, 4 Hib*, 3 HepB, 1 Varicella, 4 PCV* *requirements vary, based on age at 1st dose, # doses already received, current age, and product used
Standard Coverage: Go to “Report to Use” and choose “19 to 35 month olds.”
BOI Quarterly report identifies the patient as belonging to a facility if that facility administered and reported the patient’s last series immunization after the patient turned 12 months-old. Online report uses MyList.
13 to 17 years old 1 Tdap, 1 MCV, 3 HPV
Standard Coverage: Go to “Report to Use” and choose “13-17 year olds.”
BOI Quarterly report identifies the patient as belonging to a facility if that facility administered and reported the last immunization after the patient turned 9 years-old. Online report uses MyList.
11 to 18 years old Custom Recall: Go to “Specific Age” and choose “11-18 year olds.” Also select “Any age-appropriate immunization from the series below only” and choose “Influenza.”
BOI Quarterly report identifies the patient as belonging to a facility if that facility administered and reported the last immunization after the patient turned 10 years-old. Online report uses MyList.

66
BOI Quarterly Reports compared to Online Registry reports Quarterly Report Online Registry equivalent Difference
January, May Seasonal Flu Report
6 to 59 months old Custom Recall: Select “Age range” and indicate “From > 6 mo To < 60 mo.” Also select “Any age-appropriate immunization from the series below only” and choose “Influenza.”
BOI Quarterly report identifies the patient as belonging to a facility if that facility administered and reported the last immunization after the patient turned 14 days old. Online report uses MyList.
5 to 10 years old
Custom Recall: Select “Age range” and indicate “From > 5 years To < 10 years.” Also select “Any age-appropriate immunization from the series below only” and choose “Influenza.”
BOI Quarterly report identifies the patient as belonging to a facility if that facility administered and reported the last immunization at 4 years of age. Online report uses MyList.
11 to 18 years old Custom Recall: Go to “Specific Age” and choose “11-18 year olds.” Also select “Any age-appropriate immunization from the series below only” and choose “Influenza.”
BOI Quarterly report identifies the patient as belonging to a facility if that facility administered and reported the last immunization after the patient turned 10 years-old. Online report uses MyList.

67
e. A confirmation message appears. f. The processed Recall file will be found in the Recent Coverage Reports list. g. The Report Status (right column) will change from “Processing…” to “Done.”
Please be patient. Some reports take more time. You may return to this page later. If you see the record processing counter is not changing, click “Refresh.”
h. To view results, click on “Done” in the Report Status column.
Coverage Report: view completed reports
68
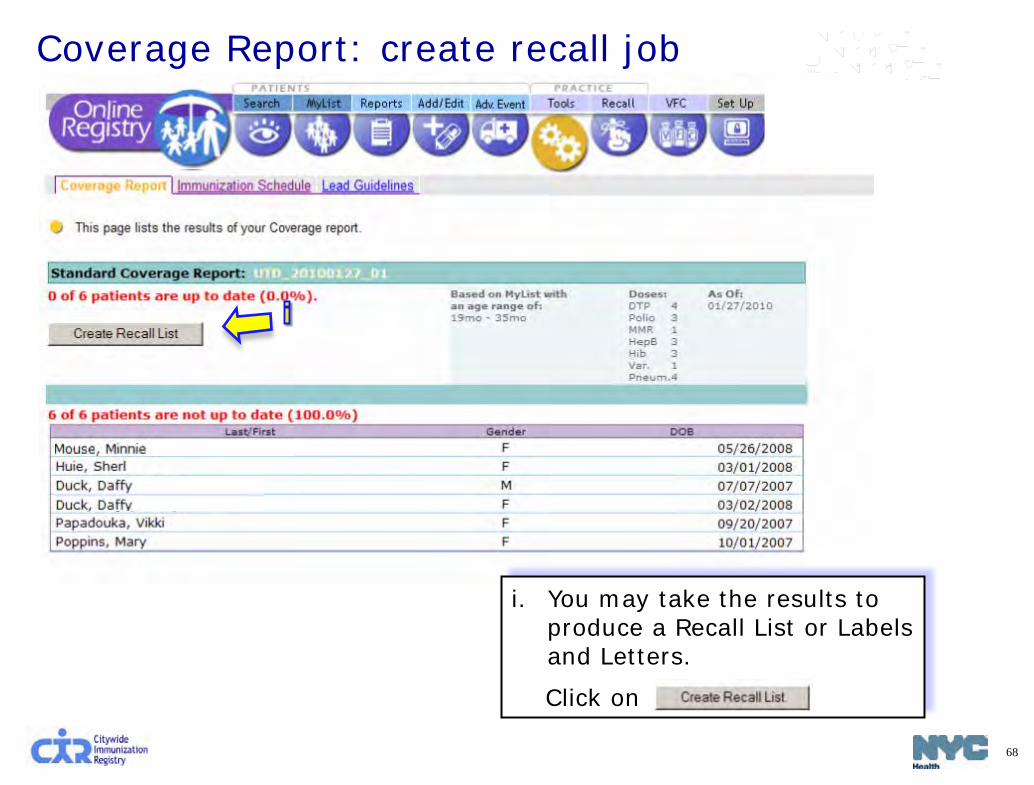
Coverage Report: create recall job
i. You may take the results to produce a Recall List or Labels and Letters.
Click on
69
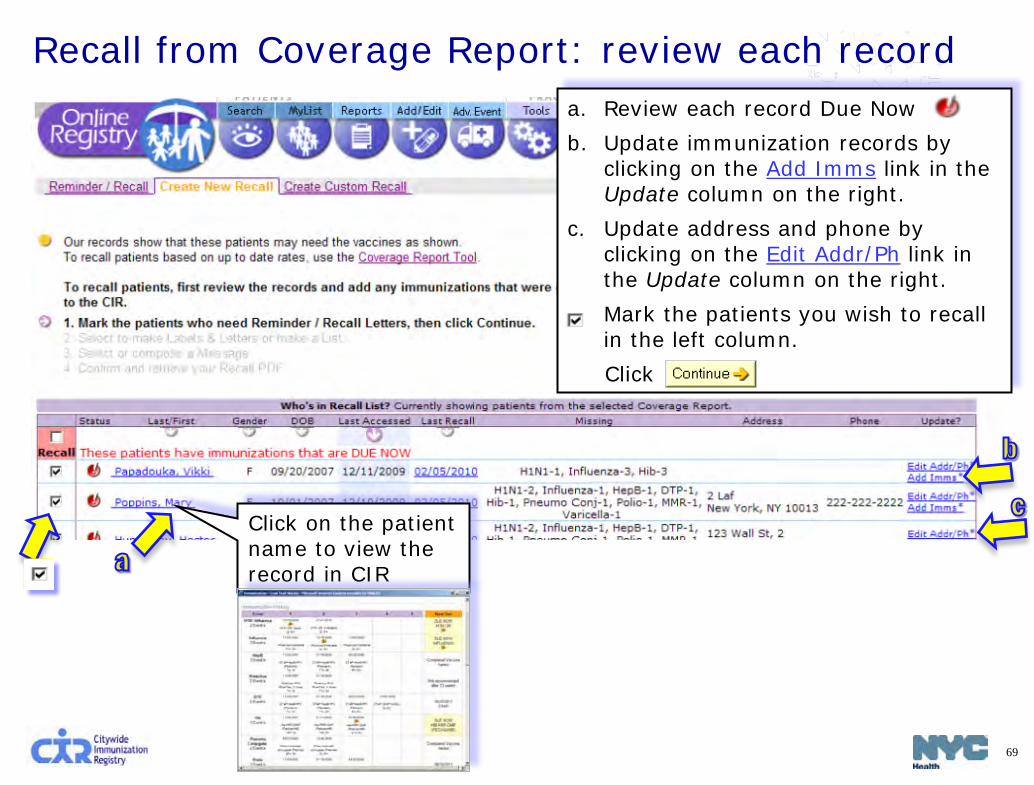
Recall from Coverage Report: review each record a. Review each record Due Now . b. Update immunization records by
clicking on the Add Imms link in the Update column on the right.
c. Update address and phone by clicking on the Edit Addr/Ph link in the Update column on the right.
d. Mark the patients you wish to recall in the left column.
Click
Click on the patient name to view the record in CIR
70
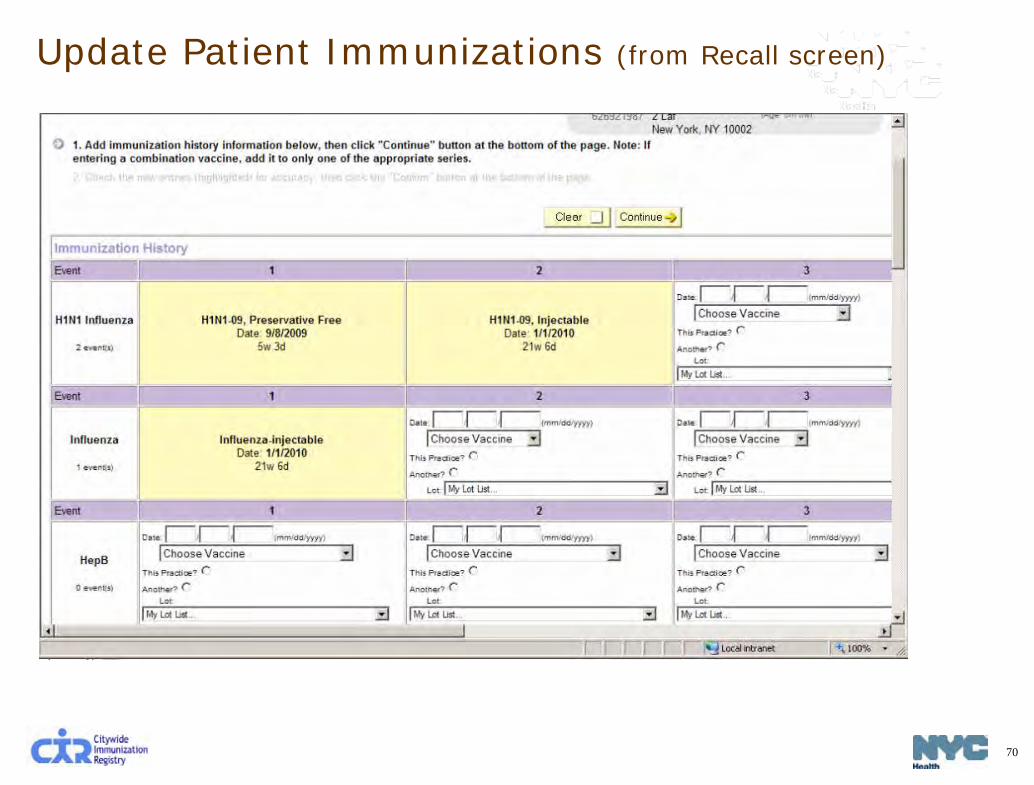
Update Patient Immunizations (from Recall screen)

71
Update Patient Info: address, phones, MOGE status • Update patient
information, address, phone numbers, parent/guardian’s email address.
• Is patient active? Mark if MOGE (Moved or Gone Elsewhere).
MOGE choices: • Not in my practice • Not in NYC (moved) • Patient deceased.
• Note: Information reported by Vital Records may not be edited online. • You may send a copy of the revised birth certificate by fax to (347)
396-2559, or call us at (347) 396-2400.

72
d. After marking the patients to recall and clicking “continue,”
select to create:
• a List (downloadable in Excel), or
• Labels & Letters. • Click
Recall from Coverage Report: List or Labels & Letters
73
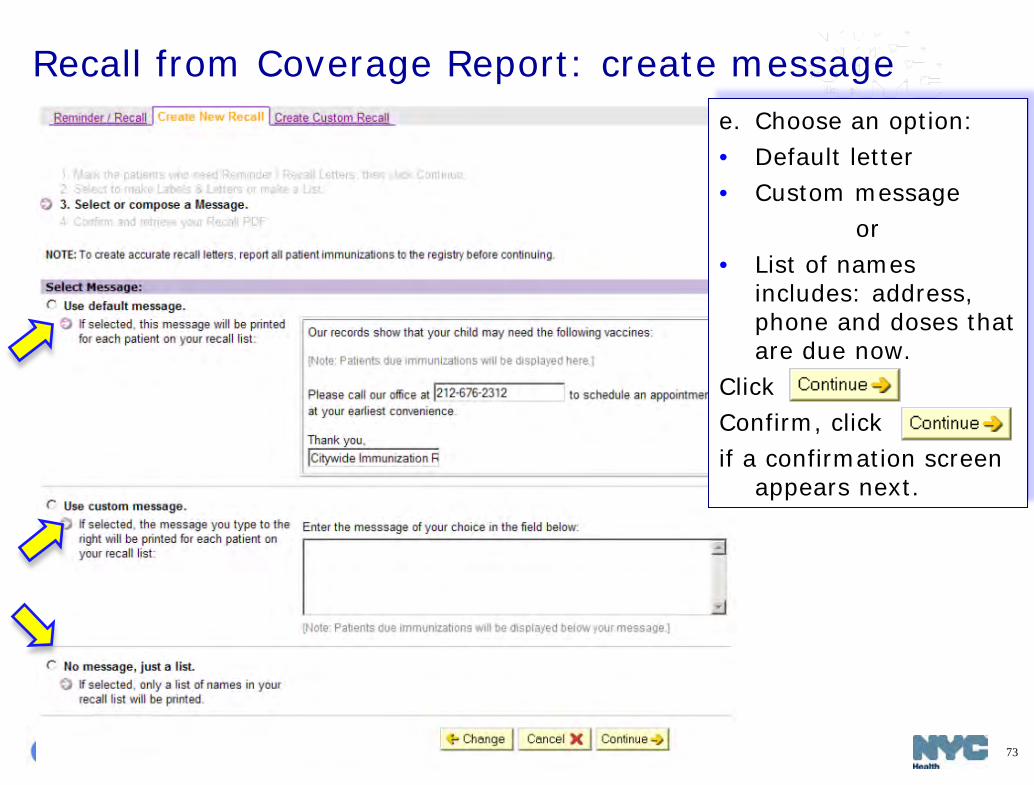
Recall from Coverage Report: create message e. Choose an option: • Default letter • Custom message
or • List of names
includes: address, phone and doses that are due now.
Click Confirm, click if a confirmation screen
appears next.
74
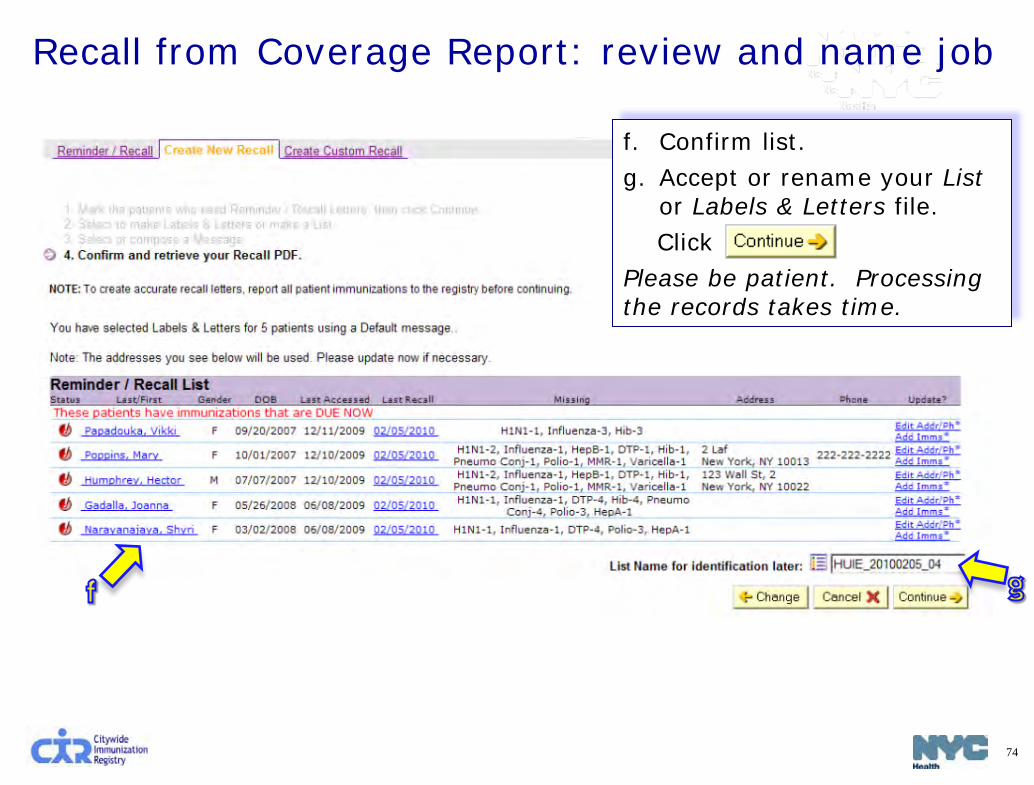
Recall from Coverage Report: review and name job
f. Confirm list. g. Accept or rename your List
or Labels & Letters file. Click Please be patient. Processing the records takes time.

75
Recall from Coverage Report: access finished jobs h. A confirmation message appears i. The processed Recall file will be found in the Reminder/Recall tab.
The Report Status will change from “Processing…” to the type of job you chose. Please be patient. Processing the records takes time.
j. To view results, click on each of the links in the Status column.
76
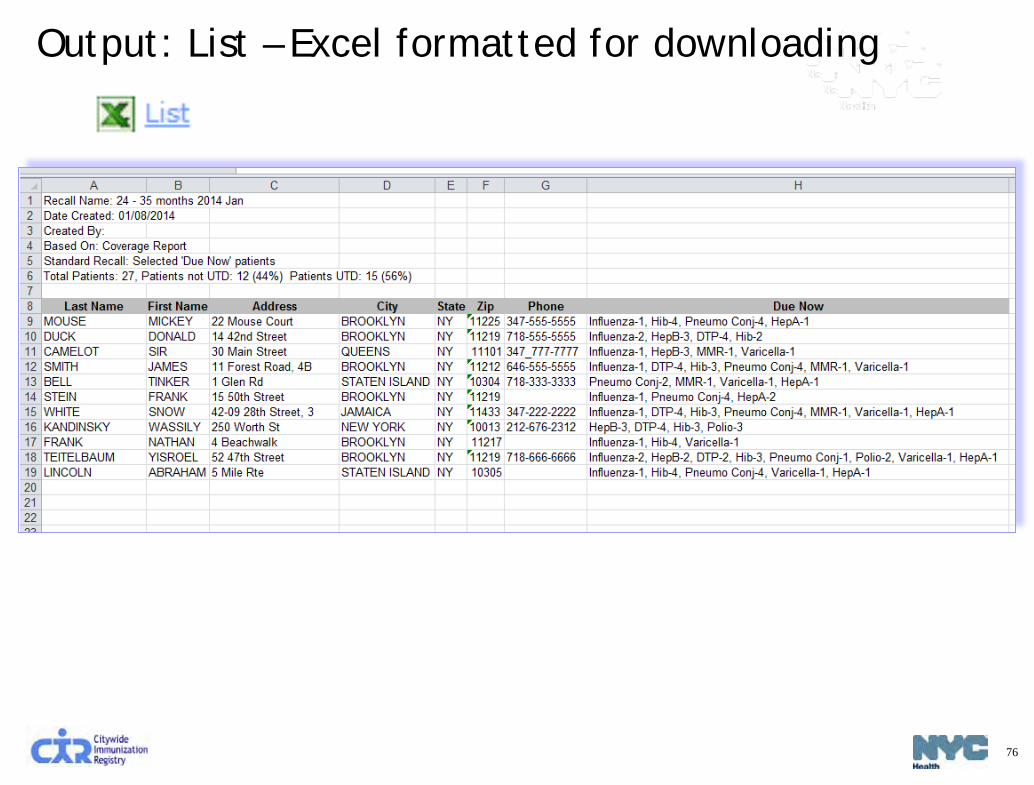
Output: List – Excel formatted for downloading

77
Output: Letters & Labels
Address labels
Letter: default or customized
You may use paper preprinted with your office letterhead to print the letters.
To print labels, use standard address labels, 1” x 2-5/8”
78
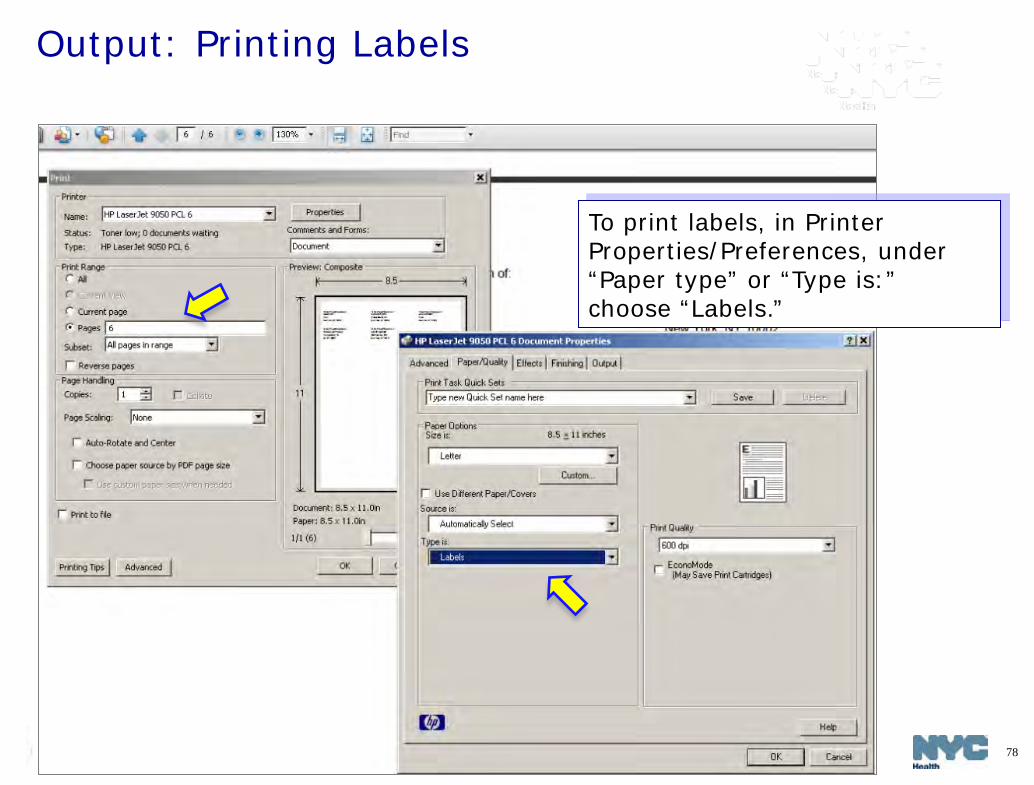
Output: Printing Labels
To print labels, in Printer Properties/Preferences, under “Paper type” or “Type is:” choose “Labels.”

79
Recall: “Due Now” a. To start a new Recall list, click the Standard or
Custom Reminder/Recall option.
Please view the user guide:
“Coverage, Reminder / Recall Guide ”
for detailed instructions.

80
Recall: Custom Recall Users can either recall patients in MyList who are Due Now or use the Custom Recall.
A. In Custom Recall, choose one of the three age range choices in the left column.
B. Specify gender, optional. C. Next, choose one of the
three choices in the right column to include patients to recall who are: 1. missing age-appropriate
immunizations, or 2. missing any age-appropriate
immunizations from a specified vaccine series, or
3. missing a specified # of valid doses from specified series.
A
B
C

81
Custom Recall - Example 1
A
B
C
Example 1: To recall patients who are missing a Hib, you may choose, for example, a.24-35 month age range, and b.“any age appropriate immunization from the series only,” and choose “Hib.”
Results will include patients missing the correct number of age-appropriate doses of Hib.
Also, results will list other vaccines missing for this group of patients.
82
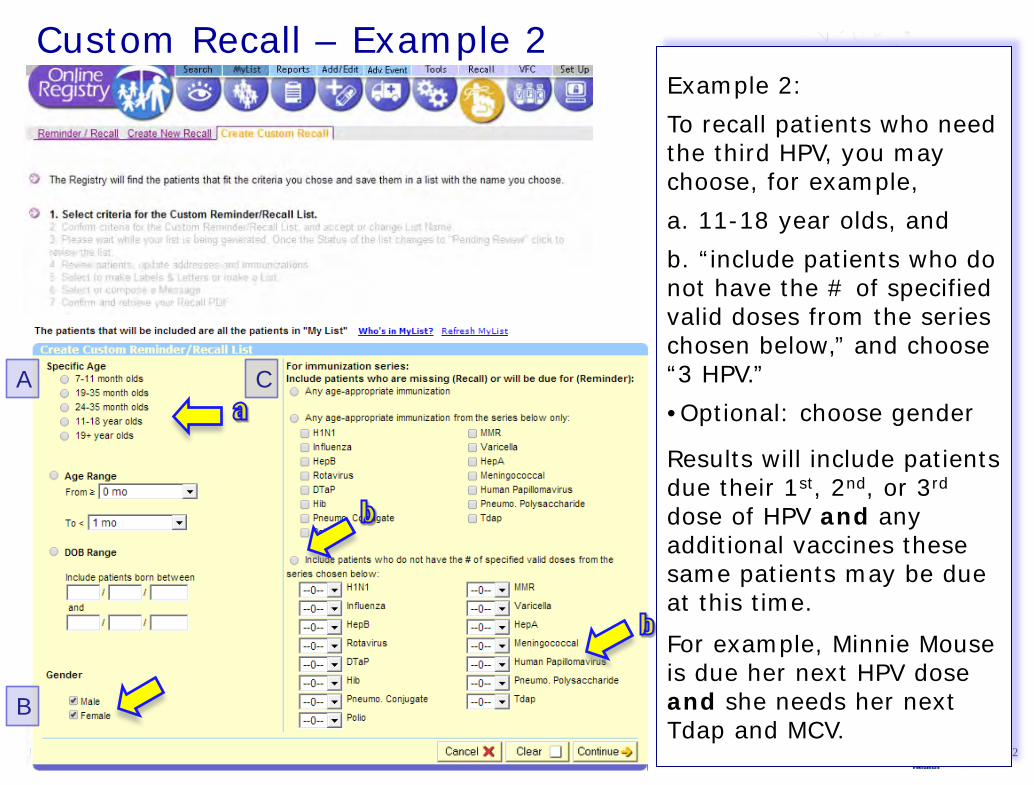
Custom Recall – Example 2 Example 2: To recall patients who need the third HPV, you may choose, for example, a. 11-18 year olds, and b. “include patients who do not have the # of specified valid doses from the series chosen below,” and choose “3 HPV.” •Optional: choose gender
Results will include patients due their 1st, 2nd, or 3rd dose of HPV and any additional vaccines these same patients may be due at this time.
For example, Minnie Mouse is due her next HPV dose and she needs her next Tdap and MCV.
A
B
C
83
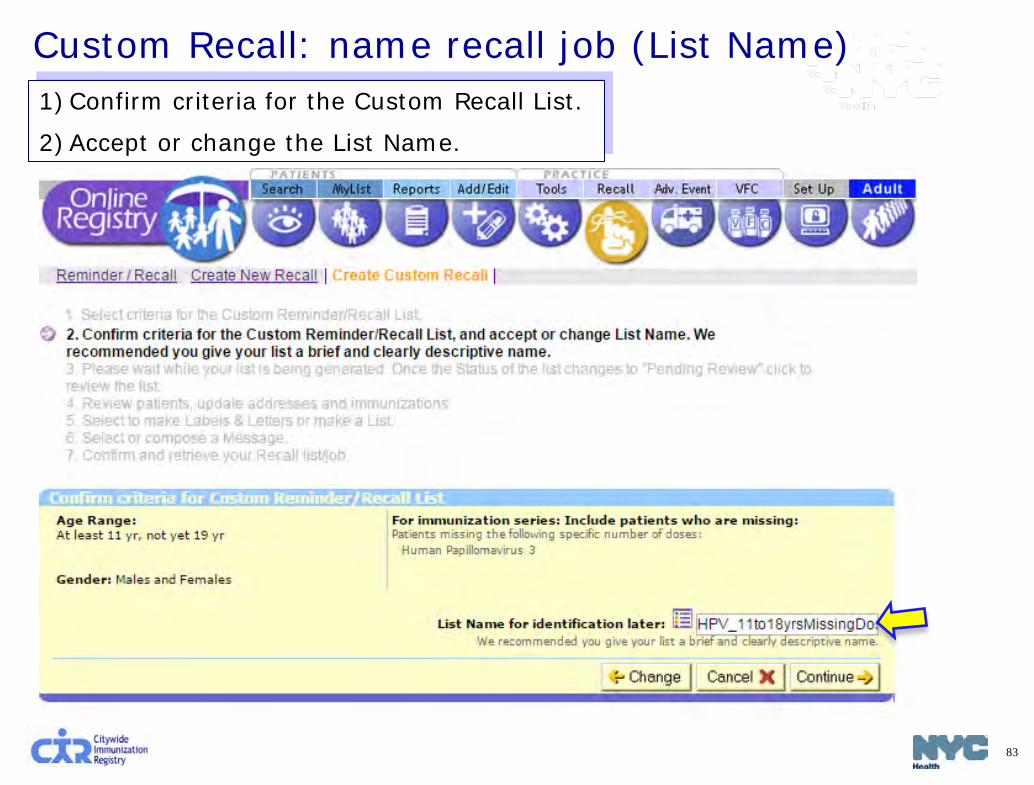
1)Confirm criteria for the Custom Recall List.
2)Accept or change the List Name.
Custom Recall: name recall job (List Name)

84
Custom Recall: view patients retrieved for this job
Click on the list of patients that are “Pending Review.”
85
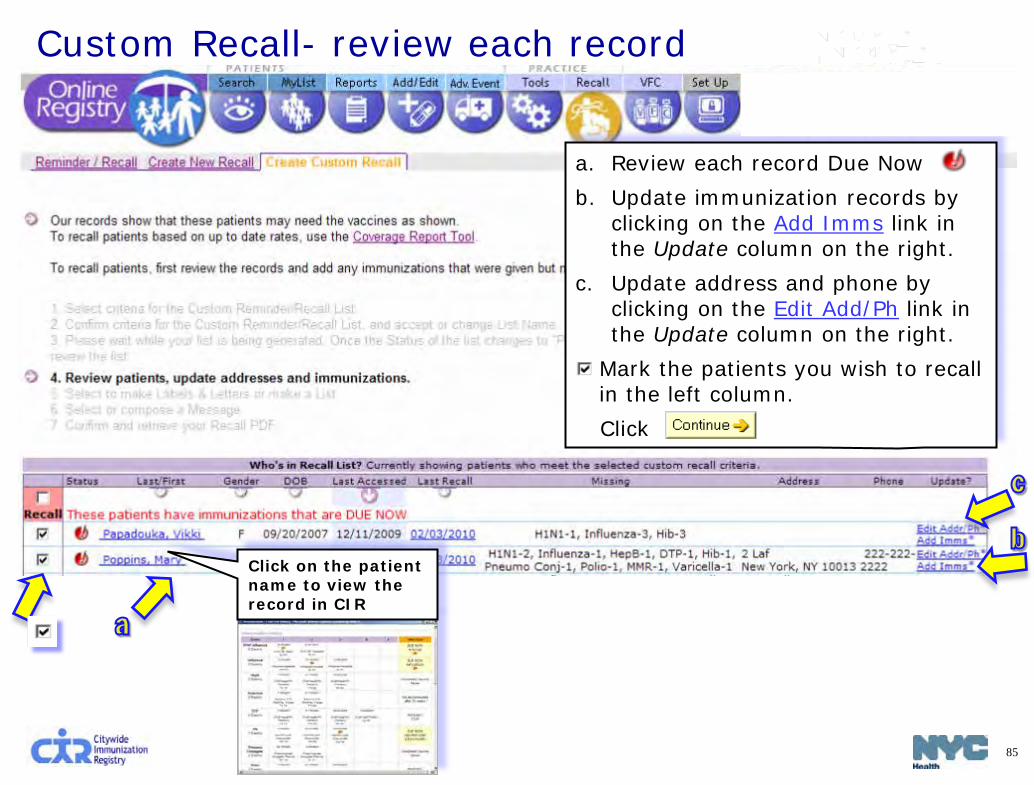
Custom Recall- review each record
a. Review each record Due Now . b. Update immunization records by
clicking on the Add Imms link in the Update column on the right.
c. Update address and phone by clicking on the Edit Add/Ph link in the Update column on the right.
d.Mark the patients you wish to recall in the left column. Click
Click on the patient name to view the record in CIR
86
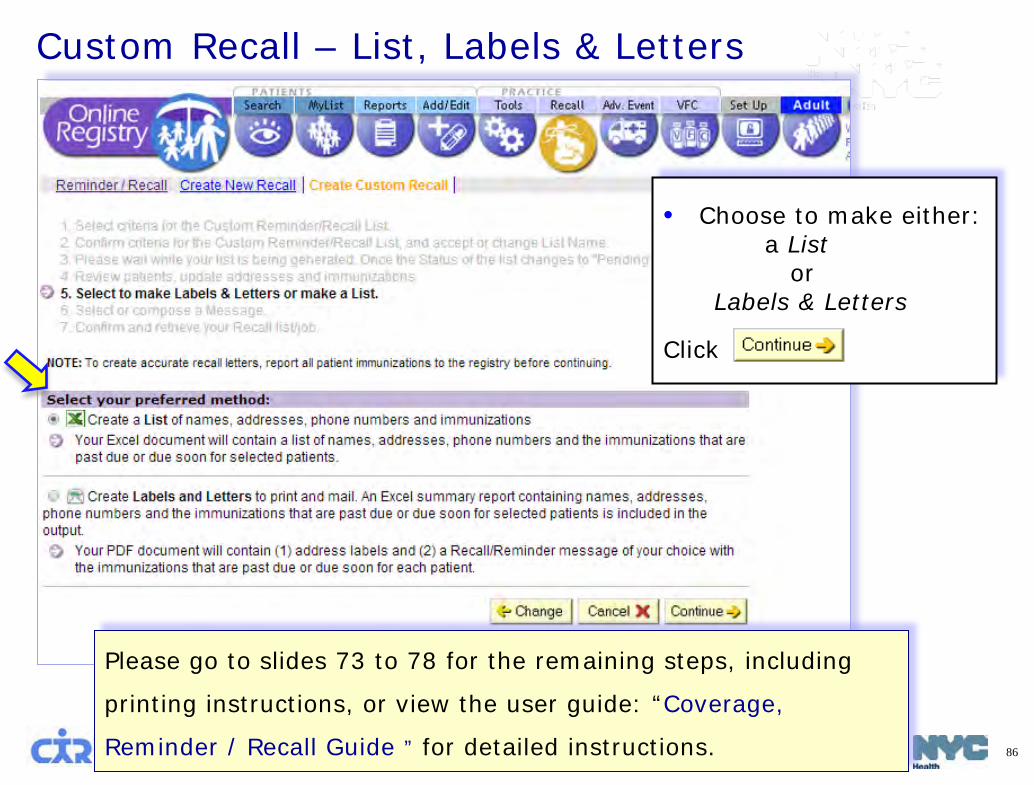
Custom Recall – List, Labels & Letters
Please go to slides 73 to 78 for the remaining steps, including
printing instructions, or view the user guide: “Coverage,
Reminder / Recall Guide ” for detailed instructions.
• Choose to make either: a List or Labels & Letters
Click
87
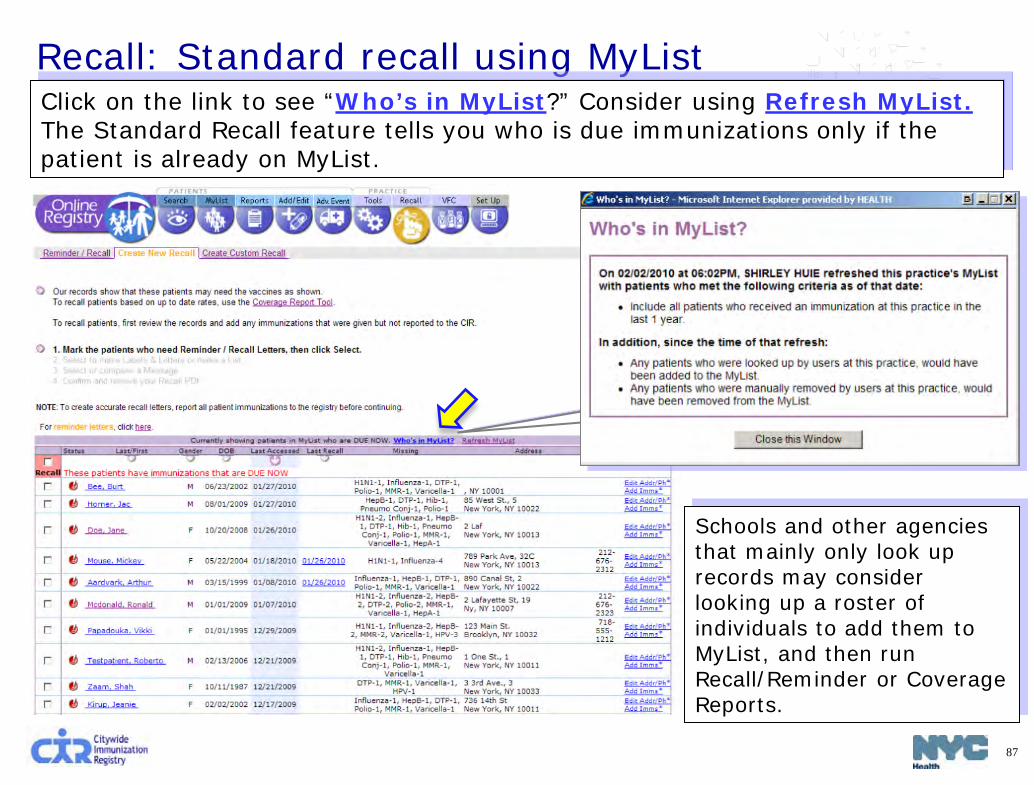
Recall: Standard recall using MyList
Who’s in MyList?
Click on the link to see “Who’s in MyList?” Consider using Refresh MyList. The Standard Recall feature tells you who is due immunizations only if the patient is already on MyList.
Schools and other agencies that mainly only look up records may consider looking up a roster of individuals to add them to MyList, and then run Recall/Reminder or Coverage Reports.
88
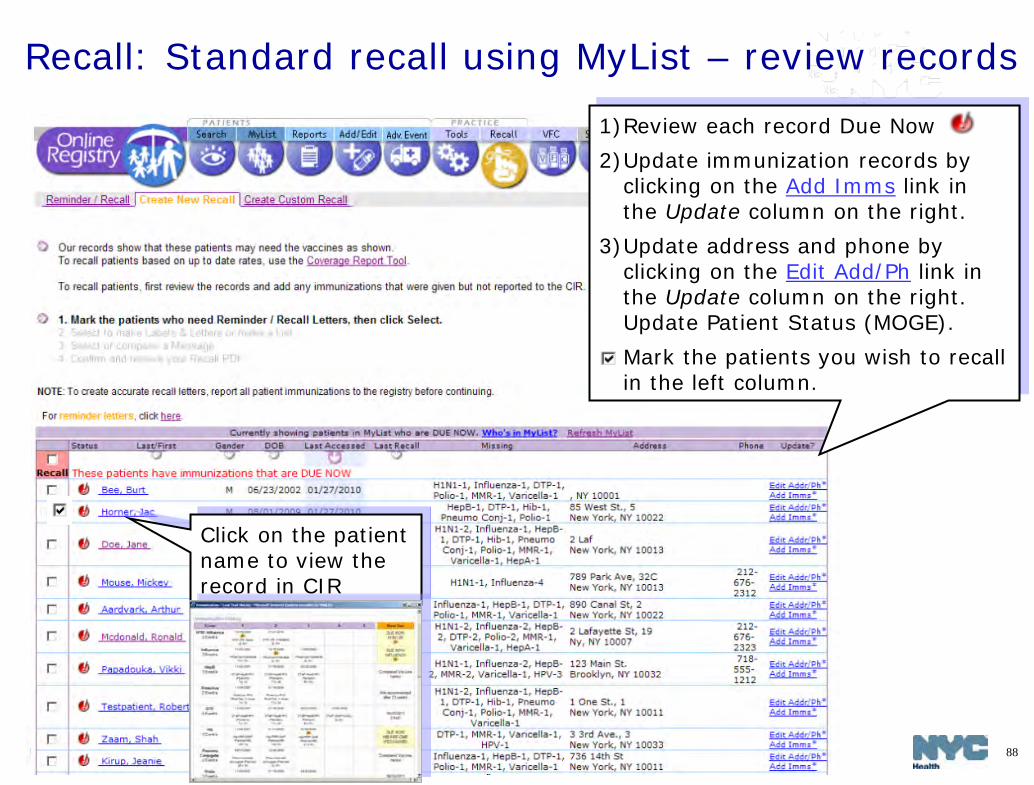
Recall: Standard recall using MyList – review records
1)Review each record Due Now . 2)Update immunization records by
clicking on the Add Imms link in the Update column on the right.
3)Update address and phone by clicking on the Edit Add/Ph link in the Update column on the right. Update Patient Status (MOGE).
4)Mark the patients you wish to recall in the left column.
Click on the patient name to view the record in CIR
89
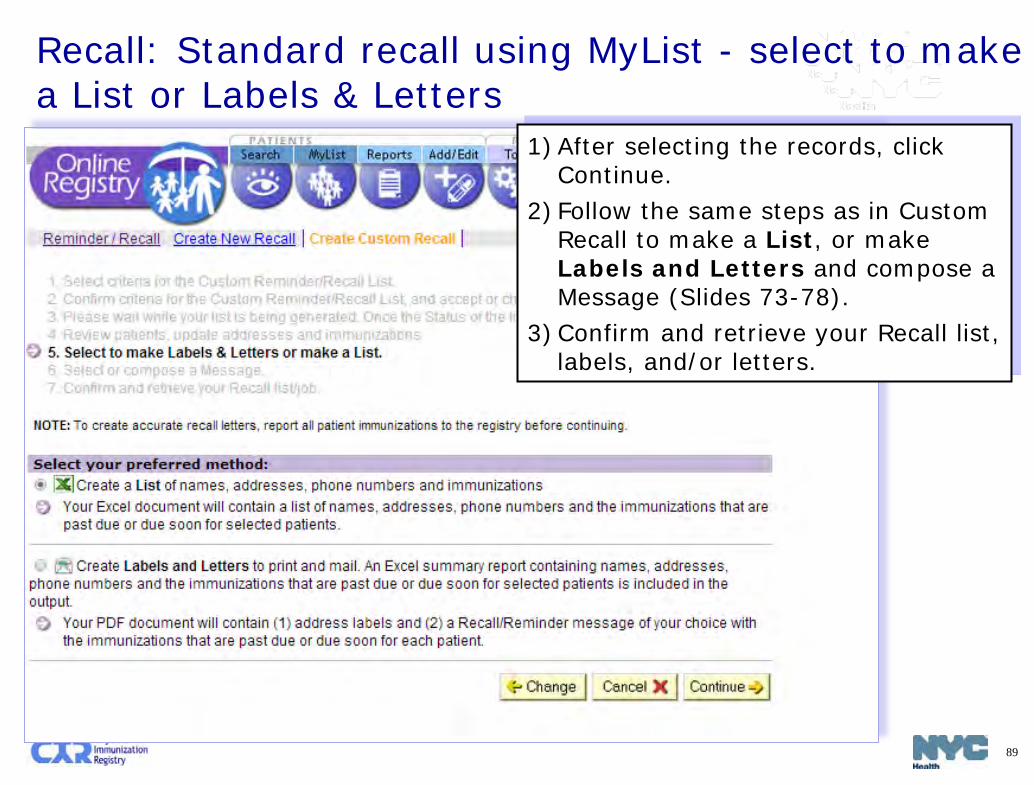
Recall: Standard recall using MyList - select to make a List or Labels & Letters
1)After selecting the records, click Continue.
2) Follow the same steps as in Custom Recall to make a List, or make Labels and Letters and compose a Message (Slides 73-78).
3)Confirm and retrieve your Recall list, labels, and/or letters.
90
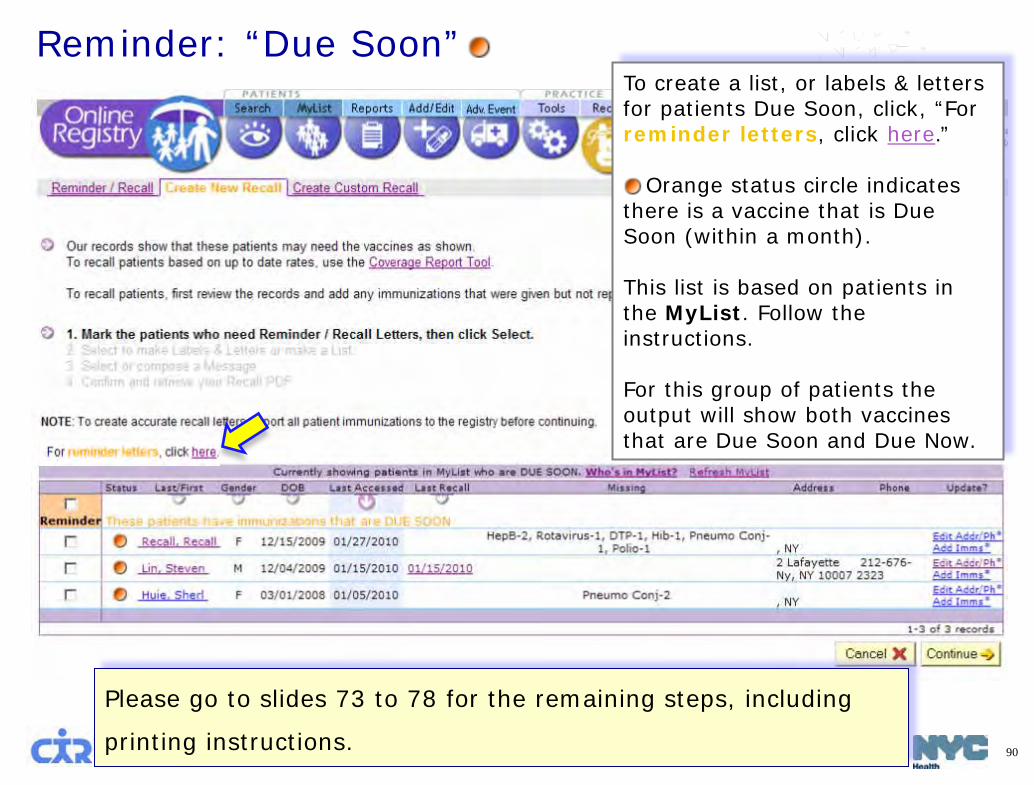
Reminder: “Due Soon” To create a list, or labels & letters for patients Due Soon, click, “For reminder letters, click here.” Orange status circle indicates there is a vaccine that is Due Soon (within a month). This list is based on patients in the MyList. Follow the instructions. For this group of patients the output will show both vaccines that are Due Soon and Due Now.
Please go to slides 73 to 78 for the remaining steps, including
printing instructions.

Reporting Adverse Events* • Report adverse events that occur after vaccine administration. • Report is sent to directly VAERS.
How do I report an adverse event using the Online Registry?
There are three options: a. Look up an existing patient
in the CIR b. Add a new patient into the
registry c. Add an adverse event report
without choosing patient or adding a new patient. But, note for this option, a patient record will not be created nor saved in the CIR, and will not be saved to MyList.
Click on “instructions” for more
details.
*not available to read-only accounts

92
Reporting Adverse Events: Patient already exists in CIR
1. Look up or select the patient in the CIR using either patient “Search” or “MyList”
2. Click the “Adv.Event” tab 3. Select the vaccination which you
wish to associate with the adverse event
4. Click “continue.” 5. The Adverse Event Reporting form
will be prefilled with information on the patient, the reporter, the vaccinator, and vaccination history
6. Complete the Adverse Event Reporting form by completing:
a. Date of adverse event b. Type of adverse event c. Description of adverse event d. Outcome 7. Click “continue” 8. Confirm to submit the report 9. Print a copy for your records.
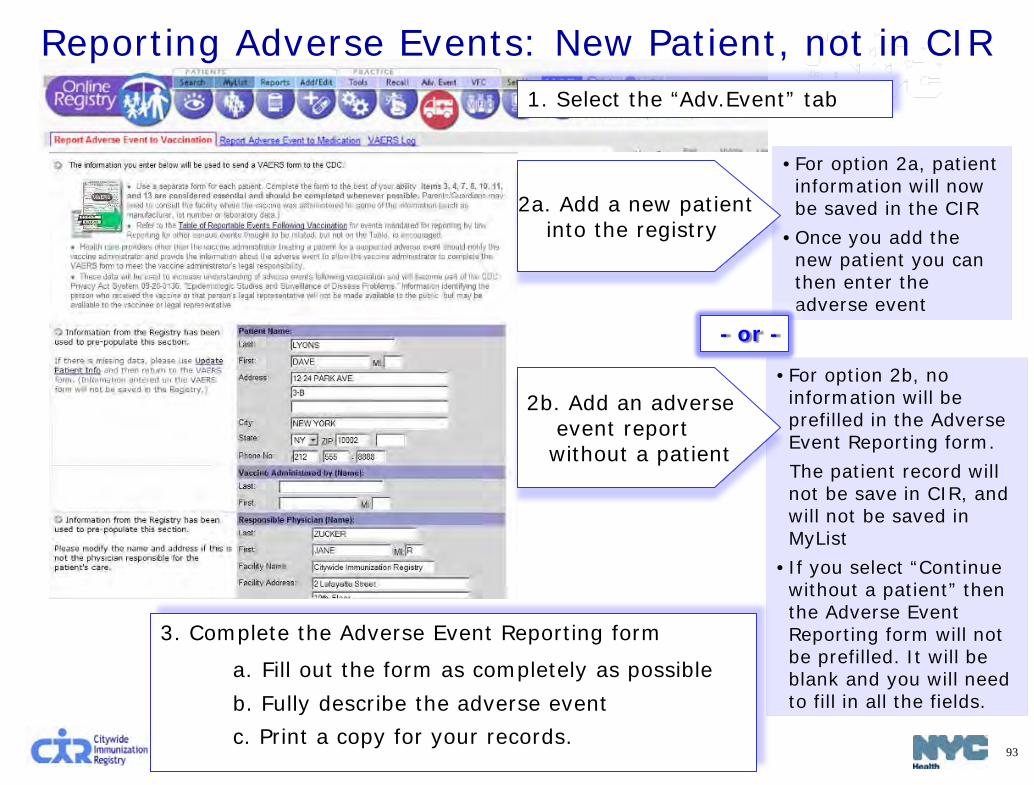
93
•For option 2a, patient information will now be saved in the CIR
•Once you add the new patient you can then enter the adverse event
•For option 2b, no information will be prefilled in the Adverse Event Reporting form.
The patient record will not be save in CIR, and will not be saved in MyList
•If you select “Continue without a patient” then the Adverse Event Reporting form will not be prefilled. It will be blank and you will need to fill in all the fields.
Reporting Adverse Events: New Patient, not in CIR
3. Complete the Adverse Event Reporting form
a. Fill out the form as completely as possible b. Fully describe the adverse event c. Print a copy for your records.
1. Select the “Adv.Event” tab
- or -
2a. Add a new patient into the registry
2b. Add an adverse event report without a patient
94
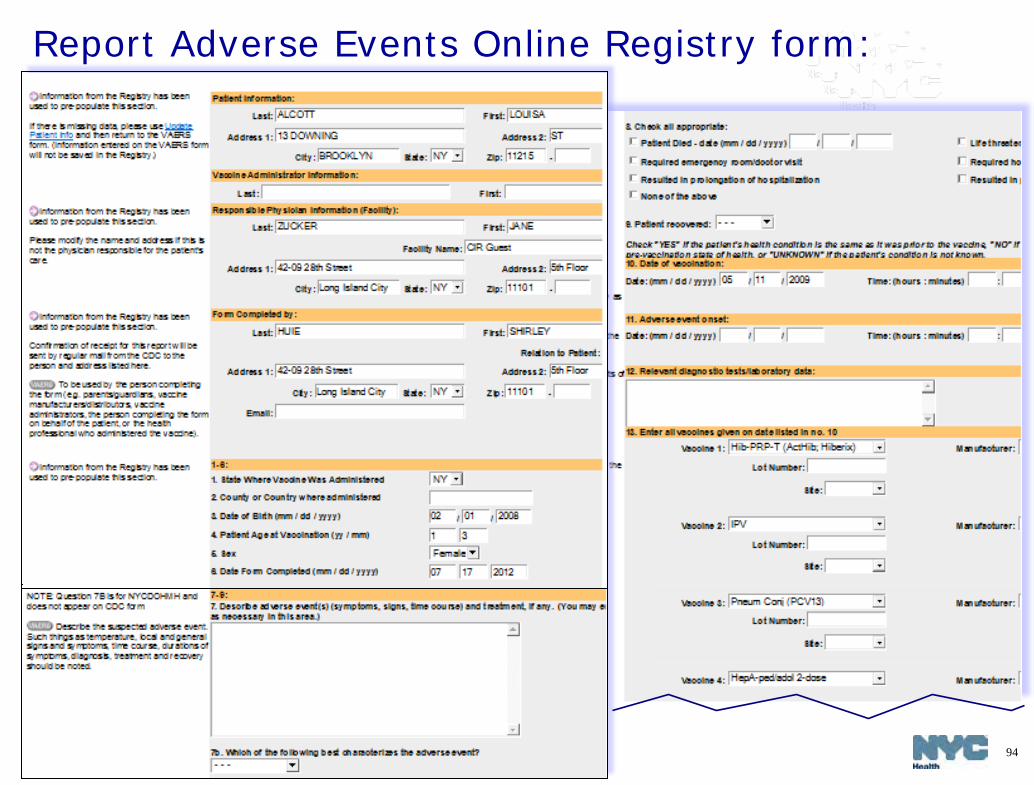
Report Adverse Events Online Registry form:
95
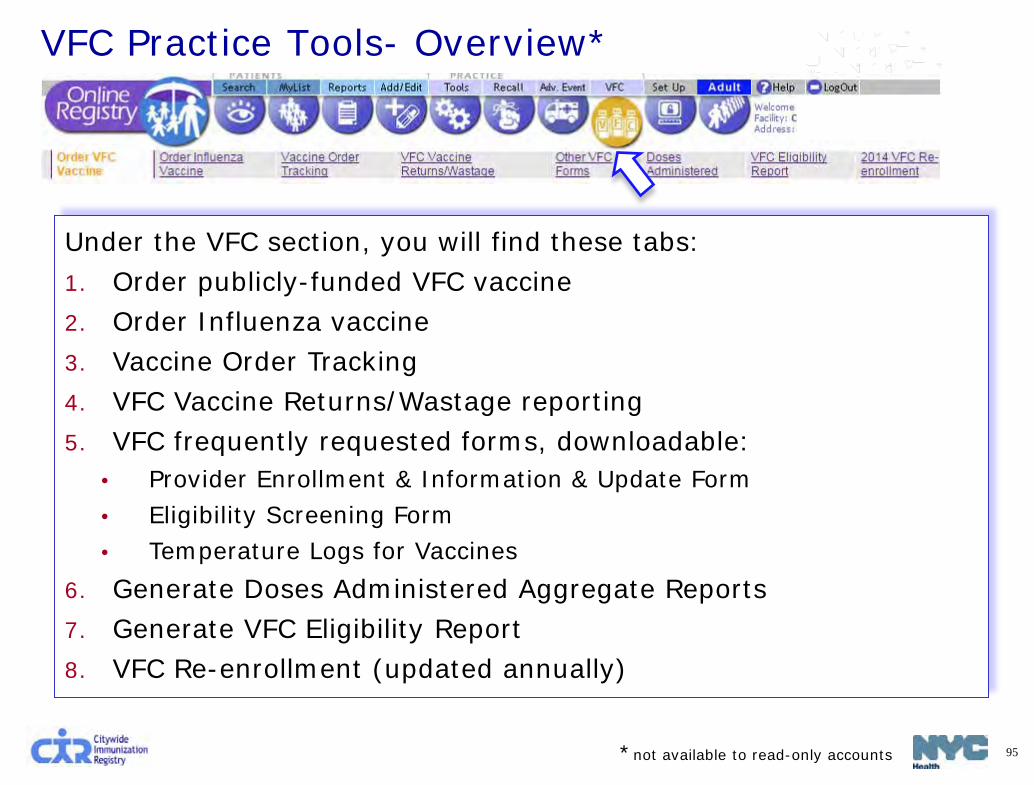
VFC Practice Tools- Overview*
Under the VFC section, you will find these tabs: 1. Order publicly-funded VFC vaccine 2. Order Influenza vaccine 3. Vaccine Order Tracking 4. VFC Vaccine Returns/Wastage reporting 5. VFC frequently requested forms, downloadable:
• Provider Enrollment & Information & Update Form • Eligibility Screening Form • Temperature Logs for Vaccines
6. Generate Doses Administered Aggregate Reports 7. Generate VFC Eligibility Report 8. VFC Re-enrollment (updated annually)
*not available to read-only accounts

96
VFC Practice Tools – Order VFC Vaccines
• For more detailed instruction, please see the Online Registry Vaccine Management: Ordering and Reporting guide: http://www.nyc.gov/html/doh/downloads/pdf/imm/how-to-report-guide.pdf
Ordering publicly-funded VFC vaccine is a simple 6-step process: 1. Review vaccine order history 2. Confirm, enter or update the
following information:
- Shipping and storage details - Refrigerator and freezer
temperatures - Storage used for VFC vaccines 3. Enter current VFC vaccine
inventory 3a. Enter replenished vaccine
inventory 4. Enter VFC order quantities
5. Confirm order 6. Receive confirmation number.
Orders may be tracked by clicking on the “Vaccine Order Tracking” tab.

97
VFC Practice Tools – Place, monitor, modify influenza vaccines orders Ordering, or pre-booking influenza
vaccine is a separate process from ordering all other VFC vaccines.
1. Review and update shipping details
2. Read the Influenza Vaccine Recommendation for Children
3. Place your order, click Submit 4. Receive confirmation number 5. A copy of the order will be
emailed to the address on record
6. Orders may be later modified in the “revised order screen.”
7. Remaining orders may be canceled by clicking on the ‘Cancel All Remaining Orders’ button.
Orders may be tracked by clicking on the “Vaccine Order Tracking” tab.
• For more detailed instruction, please see the Online Vaccine Ordering Tools Guide: http://www.nyc.gov/html/doh/downloads/pdf/cir/vfc-olot-guide.pdf, Slide 17

98
VFC Practice Tools – Track influenza vaccines orders
All vaccine orders can be tracked by going to the ‘Vaccine Order Tracking’ tab.
Use the “Filter by” feature to locate your orders by date or by vaccine type.
• For more detailed instruction, please see the Online Vaccine Ordering Tools Guide: http://www.nyc.gov/html/doh/downloads/pdf/cir/vfc-olot-guide.pdf

99
Reporting VFC vaccine returns and wastage online is a simple 3-step process: 1.Enter VFC vaccine returns/wastage information. • Complete all the fields in the
“VFC Vaccines Return/Wastage form”.
2.Review/confirm VFC vaccine return/wastage information.
3.Receive VFC Vaccine Return/Wastage receipt.
VFC Practice Tools – VFC Vaccine Returns/Wastage
• For more detailed instruction, please see the Online Registry Vaccine Management: Reporting Vaccine Wastage and Returns Guide:
http://www.nyc.gov/html/doh/downloads/pdf/cir/vfc-returns-waste-guide.pdf

100
VFC Practice Tools – Generate Doses Administered Summary Report
Enter a date range. Click

101
VFC Practice Tools – Generate Doses Administered Summary Report: Results
102
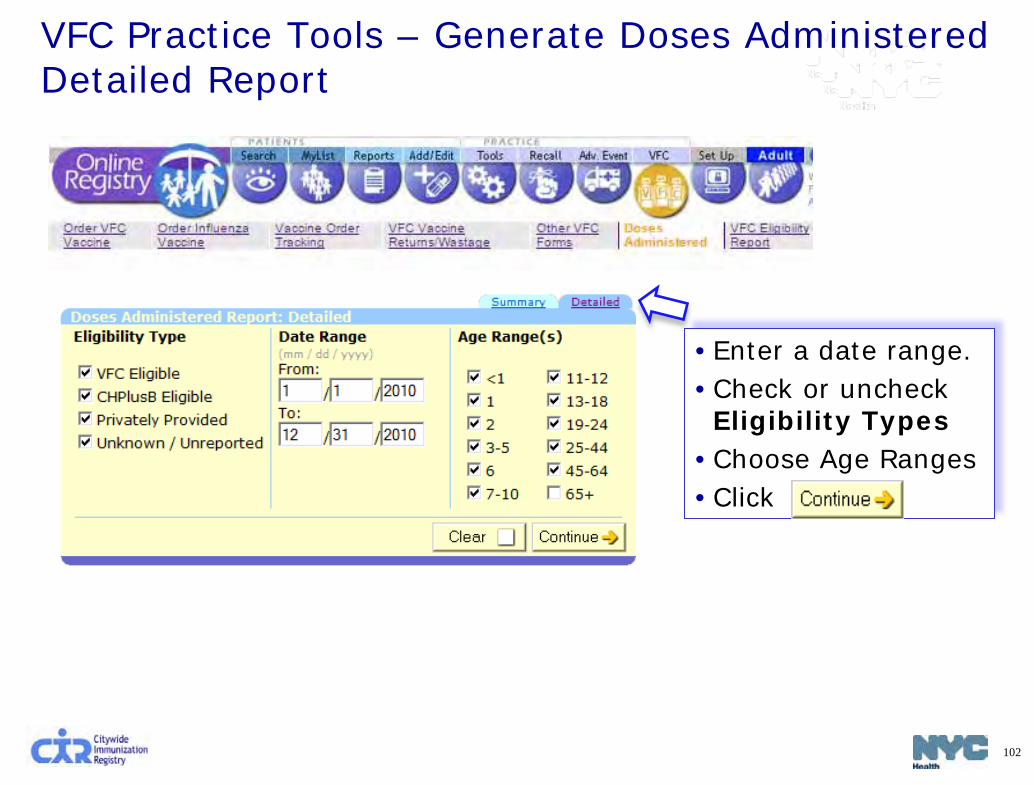
VFC Practice Tools – Generate Doses Administered Detailed Report
•Enter a date range. •Check or uncheck Eligibility Types
•Choose Age Ranges •Click
103
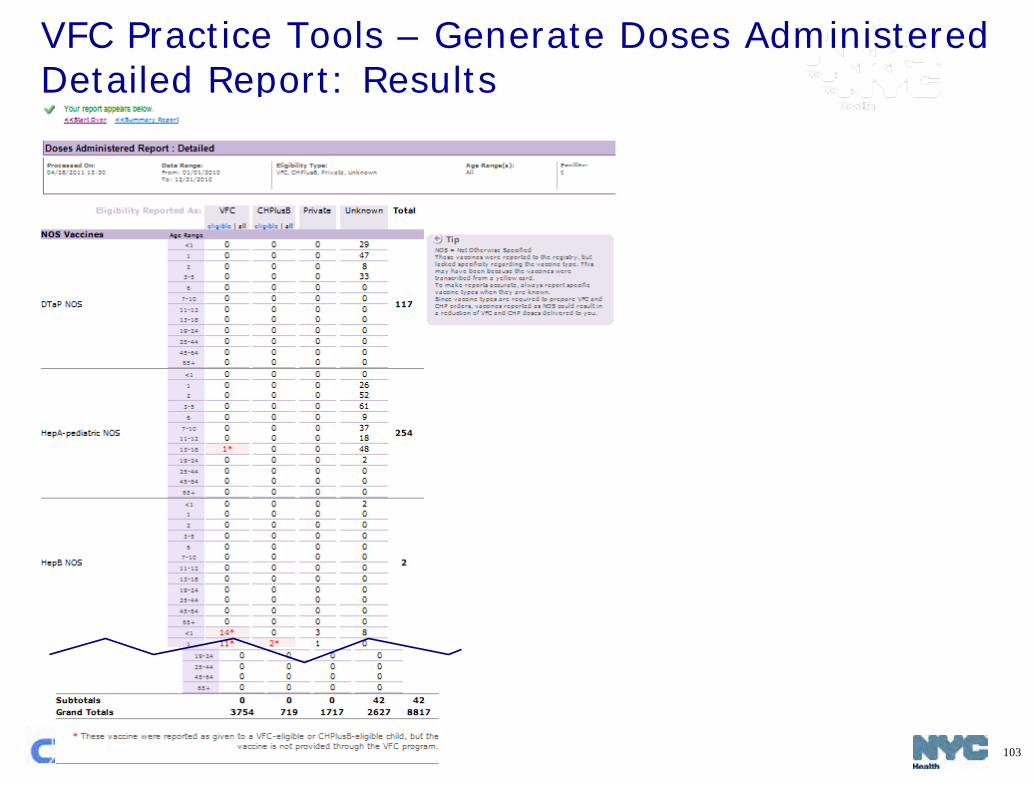
VFC Practice Tools – Generate Doses Administered Detailed Report: Results

104
VFC Practice Tools – Annual VFC Re-enrollment For instructions on how to enroll or re-enroll, please visit: http://www.nyc.gov/html/doh/html/hcp/vfc-hcp-requirements.shtml
105
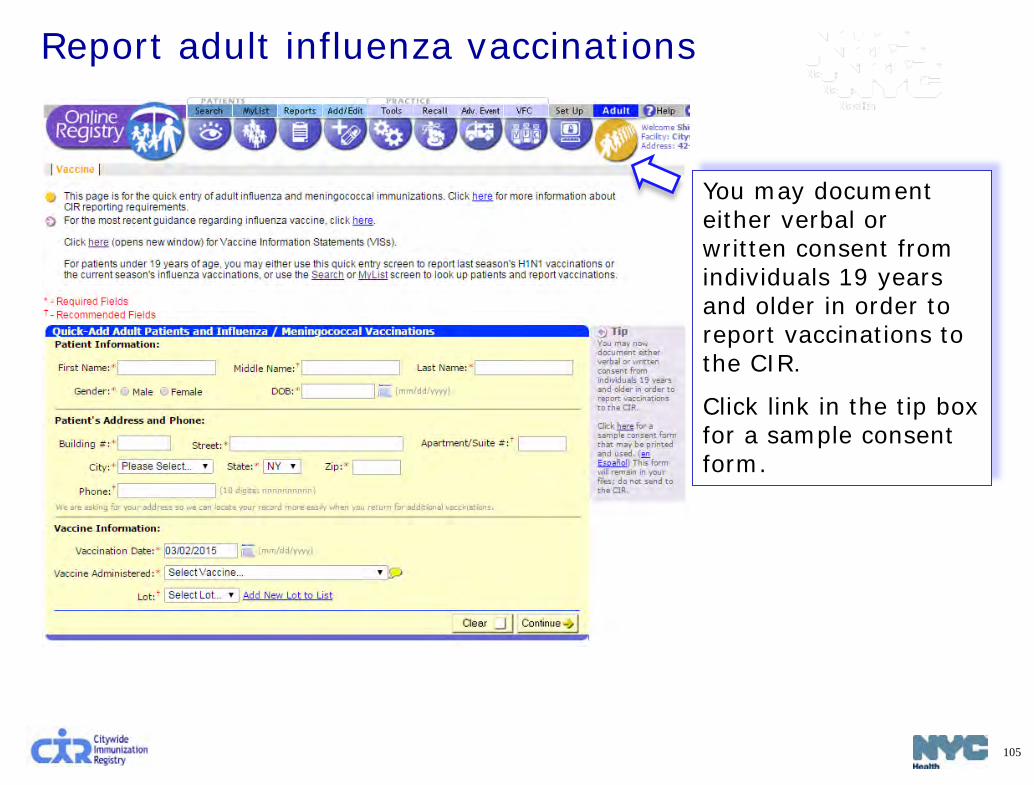
Report adult influenza vaccinations
You may document either verbal or written consent from individuals 19 years and older in order to report vaccinations to the CIR.
Click link in the tip box for a sample consent form.
106
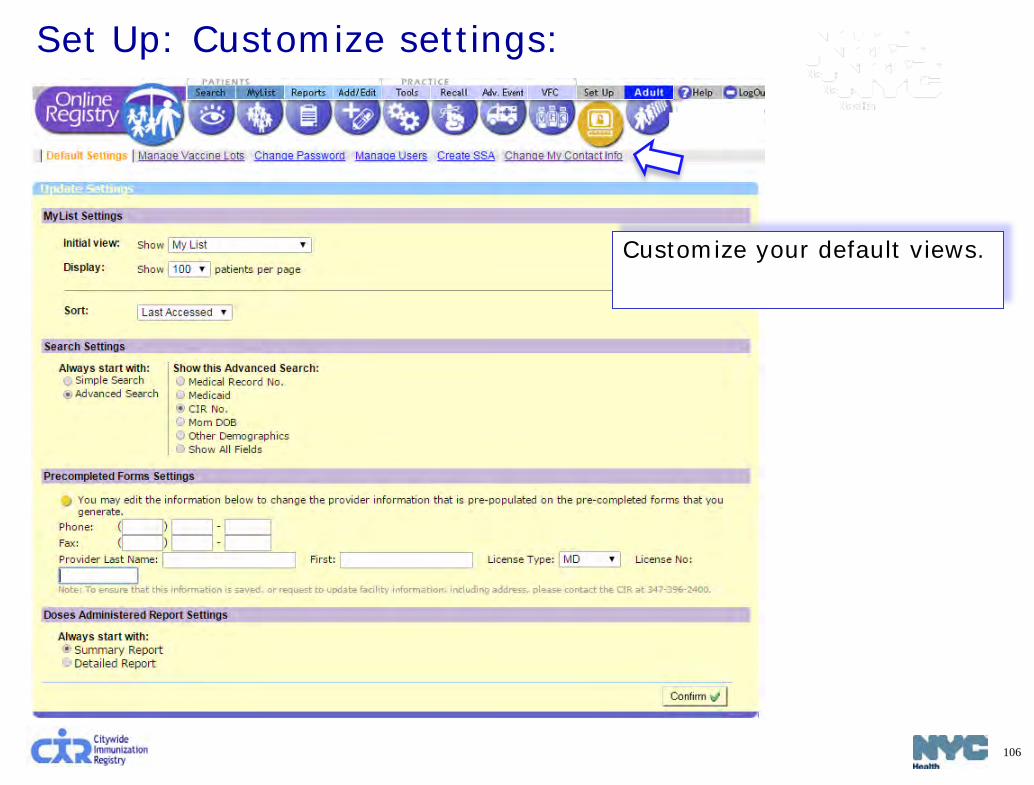
Set Up: Customize settings:
Customize your default views.

107
Set Up: manage privately purchased vaccine lots
Previously entered vaccine lots are listed.
Click continu to add a new lot.
108
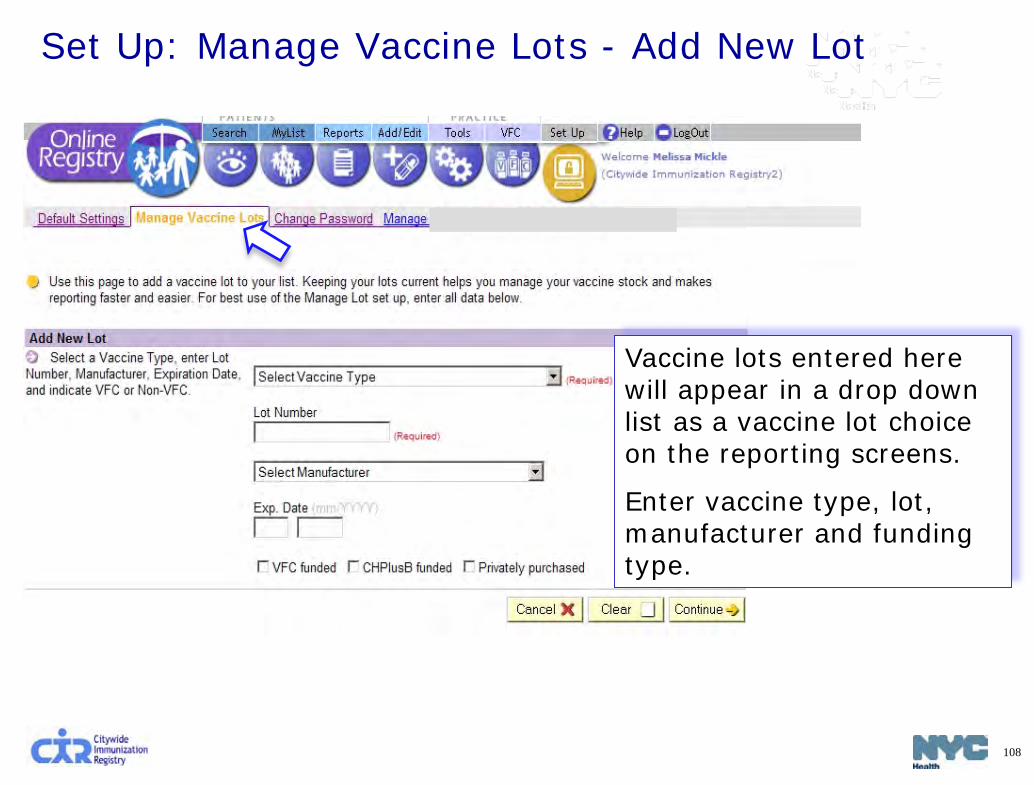
Vaccine lots entered here will appear in a drop down list as a vaccine lot choice on the reporting screens.
Enter vaccine type, lot, manufacturer and funding type.
Set Up: Manage Vaccine Lots - Add New Lot
109
1. The Security Administrator logs on to the Online Registry using his/her User ID & password. 2. Go to the Set Up icon. 3. Click on the tab Manage Users. 4. Click the yellow “Continue” button under Add a New User. 5. Fill out the information. You must enter a valid e-mail address for the new user. 6. For Security Group, Select “Normal” if you want your user to Add/Edit immunizations.
Select, “Read Only,” if your user will only be viewing patient immunization records and printing reports.
7. Authorizing provider information should already be filled in. Please contact us at 347-396-2400 to change the Authorizing Provider.
8. Click “Continue” and the following note in green will appear at the top of the page: User ID xxx was created. Please have the user check his/her email to set the password for his/her new Online Registry account. Please be aware: (a) that there may be a delay of up to an hour for receipt of the email; and, (b) that the email will expire after 4 days, whereupon the account will need to be set up again.
9. The e-mail you need to look for will be sent from: [email protected]. 10. Please instruct users that passwords must contain characters from each of the three
categories listed below, and must be at least 8 characters long: a. Uppercase alphabet characters (A-Z) b. Lowercase alphabet characters (a-z) c. Arabic numerals (0-9)
Add new Online Registry users: (instructions in text)

110
2. Go to the Set Up icon. 3. Click on the tab Manage Users. 4. Click the “Continue” button under “Add a New User.”
1. The Security Administrator logs on to the Online Registry using his/her User ID & password.
Add new Online Registry users: (screenshots)
111
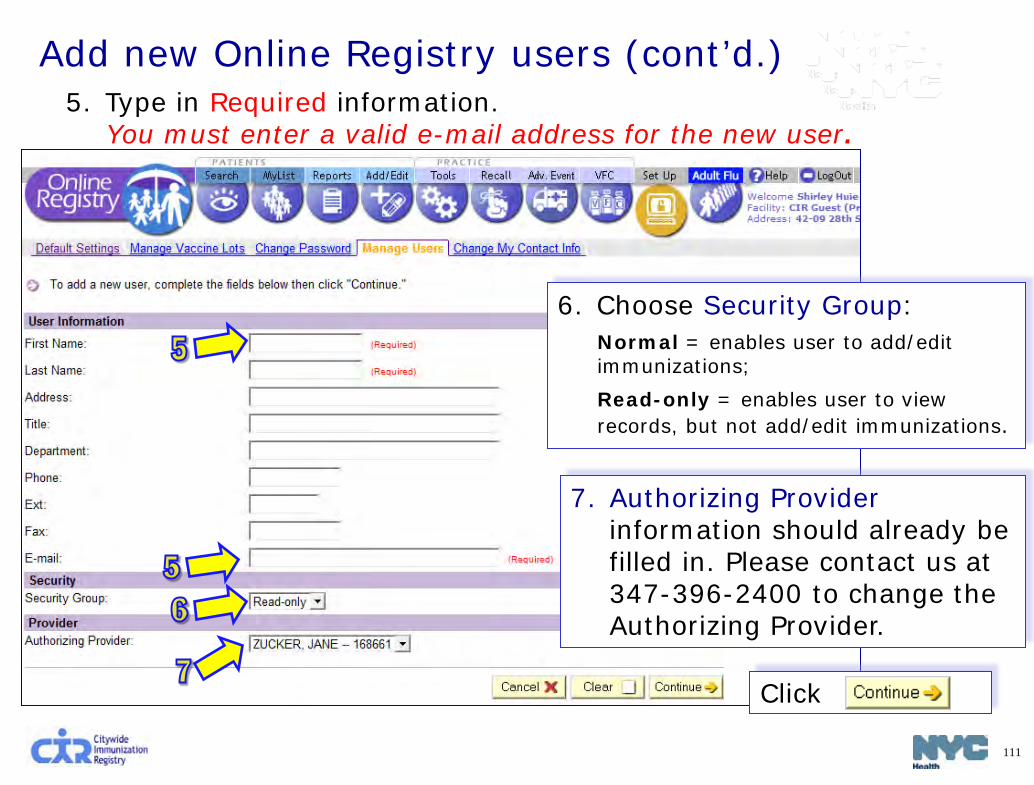
Add new Online Registry users (cont’d.)
6. Choose Security Group: Normal = enables user to add/edit immunizations; Read-only = enables user to view records, but not add/edit immunizations.
5. Type in Required information. You must enter a valid e-mail address for the new user.
7. Authorizing Provider information should already be filled in. Please contact us at 347-396-2400 to change the Authorizing Provider.
Click
112
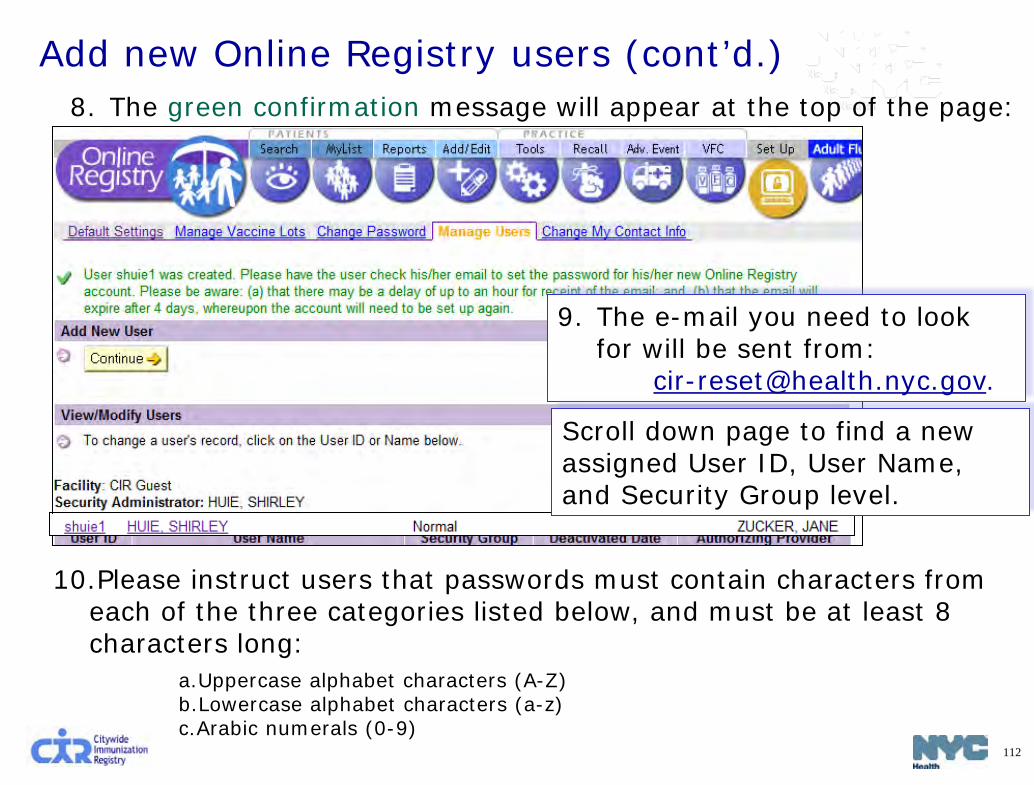
Add new Online Registry users (cont’d.) 8. The green confirmation message will appear at the top of the page:
10.Please instruct users that passwords must contain characters from each of the three categories listed below, and must be at least 8 characters long:
a.Uppercase alphabet characters (A-Z) b.Lowercase alphabet characters (a-z) c.Arabic numerals (0-9)
9. The e-mail you need to look for will be sent from: [email protected].
Scroll down page to find a new assigned User ID, User Name, and Security Group level.
113
Reset an existing user’s password 1. The Security Administrator logs on to the Online Registry
using his/her User ID & password. 2. Go to the Set Up icon. 3. Click on the tab Manage Users. 4. Scroll down. Click on a User ID or Name whose password
needs to be reset. 5. Click on “Reset Password” located under the Password
section. 6. Click “Continue” and the following note in green will appear
at the top of the page: Password reset initiated for User Id xxxxx. Please have the user check his/her email to reset the password for his/her Online Registry account. Please be aware: (a) that there may be a delay of up to an hour for receipt of the email; and, (b) that the email will expire after 4 days, whereupon the account will need to be reset again.

114
1. The Security Administrator logs on to the Online Registry using his/her User ID & password. 2. Go to the Set Up icon. 3. Click on the tab Manage Users. 4. Scroll down. Click on a User ID or Name to be modified. 5. To modify a user’s record: Edit the information. You must enter a valid e-mail
address if it has not been entered already. 6. For Security Group, Select “Normal” if you want your user to Add/Edit immunizations.
Select, “Read Only,” if your user will only be viewing patient immunization records and printing reports.
7. Authorizing provider information should already be filled in and may not be edited online at this time. Please contact us at 347-396-2400 to change the Authorizing Provider.
8. Click “Continue” and the following note in green will appear at the top of the page: The user record has been updated.
9. To deactivate users, click on the user’s name and click on “No” for Active User.
Modify Online Registry user: (instructions in text)
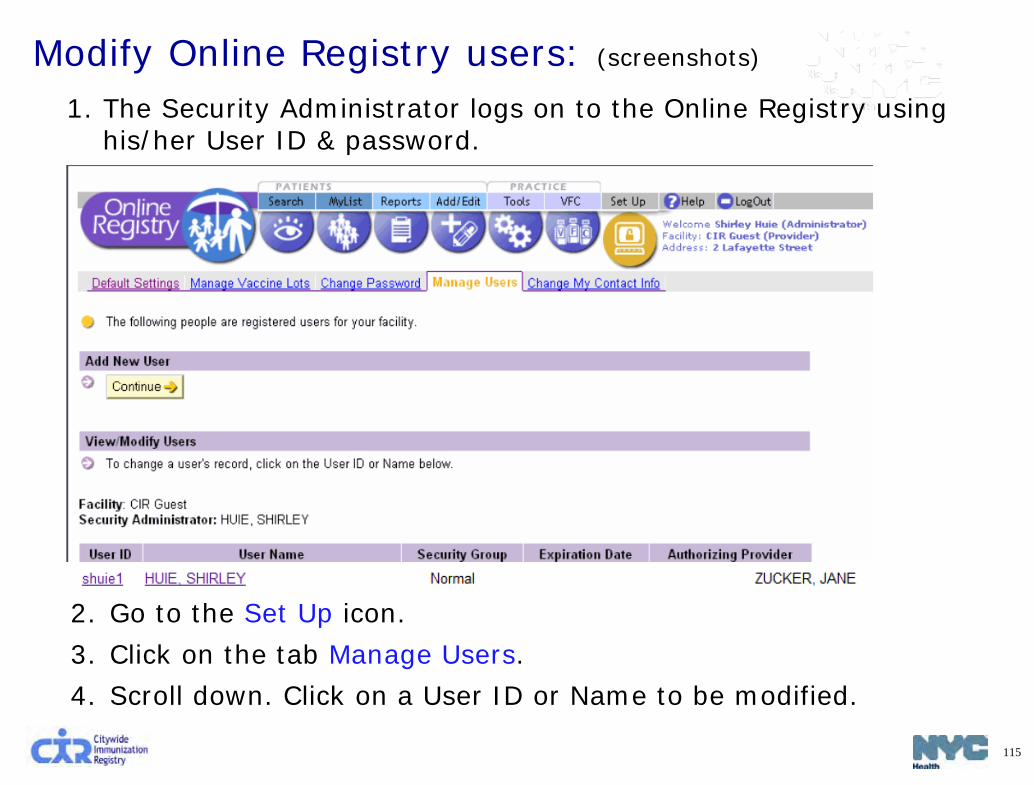
115
2. Go to the Set Up icon. 3. Click on the tab Manage Users. 4. Scroll down. Click on a User ID or Name to be modified.
1. The Security Administrator logs on to the Online Registry using his/her User ID & password.
Modify Online Registry users: (screenshots)
116
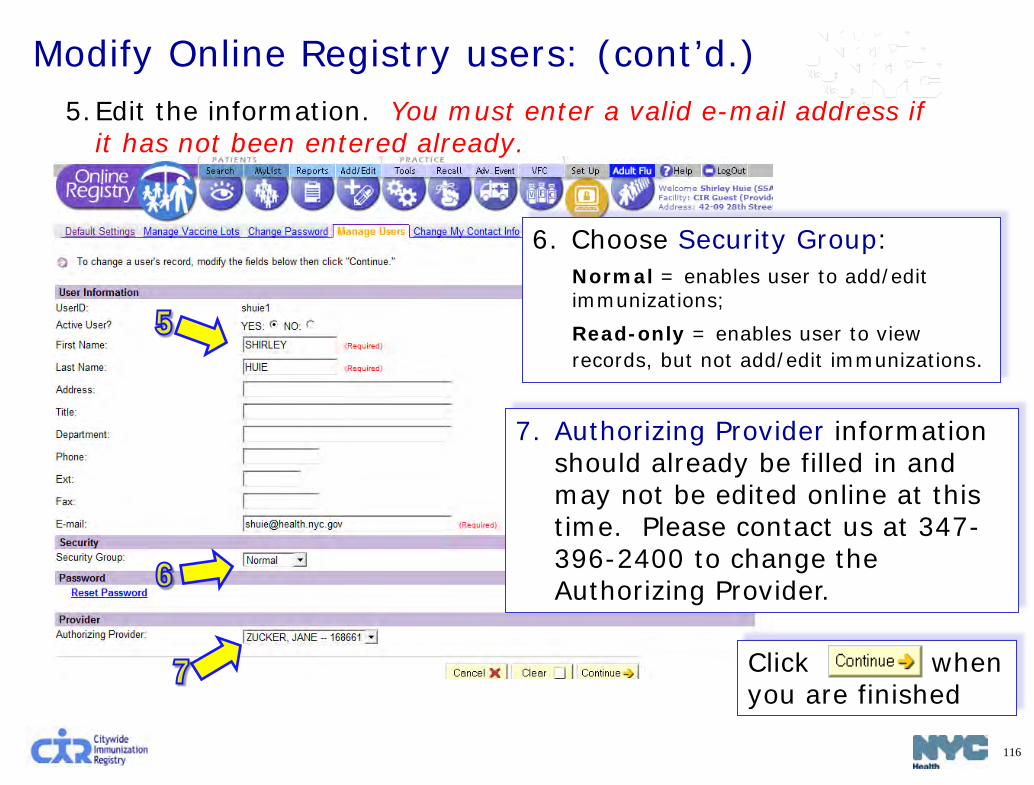
Click when you are finished
5.Edit the information. You must enter a valid e-mail address if it has not been entered already.
Modify Online Registry users: (cont’d.)
6. Choose Security Group: Normal = enables user to add/edit immunizations; Read-only = enables user to view records, but not add/edit immunizations.
7. Authorizing Provider information should already be filled in and may not be edited online at this time. Please contact us at 347-396-2400 to change the Authorizing Provider.
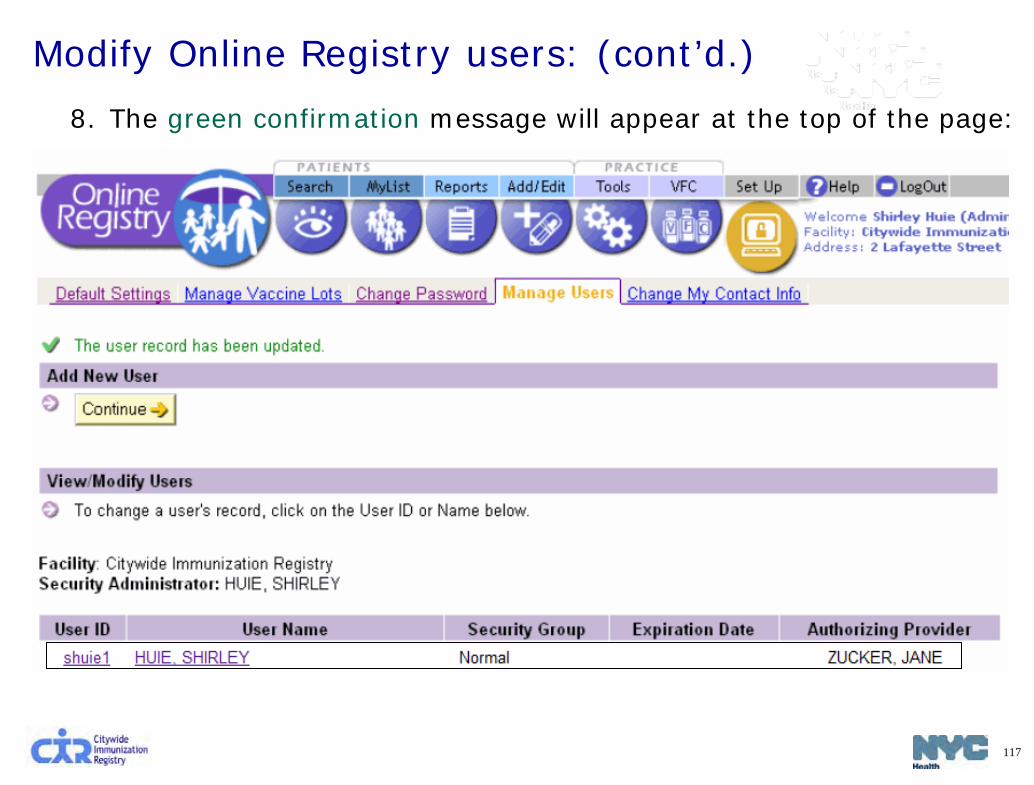
117
8. The green confirmation message will appear at the top of the page:
Modify Online Registry users: (cont’d.)

118
Help:
• Help by Feature • Help by FAQs • Contact Information
• User Guides
119
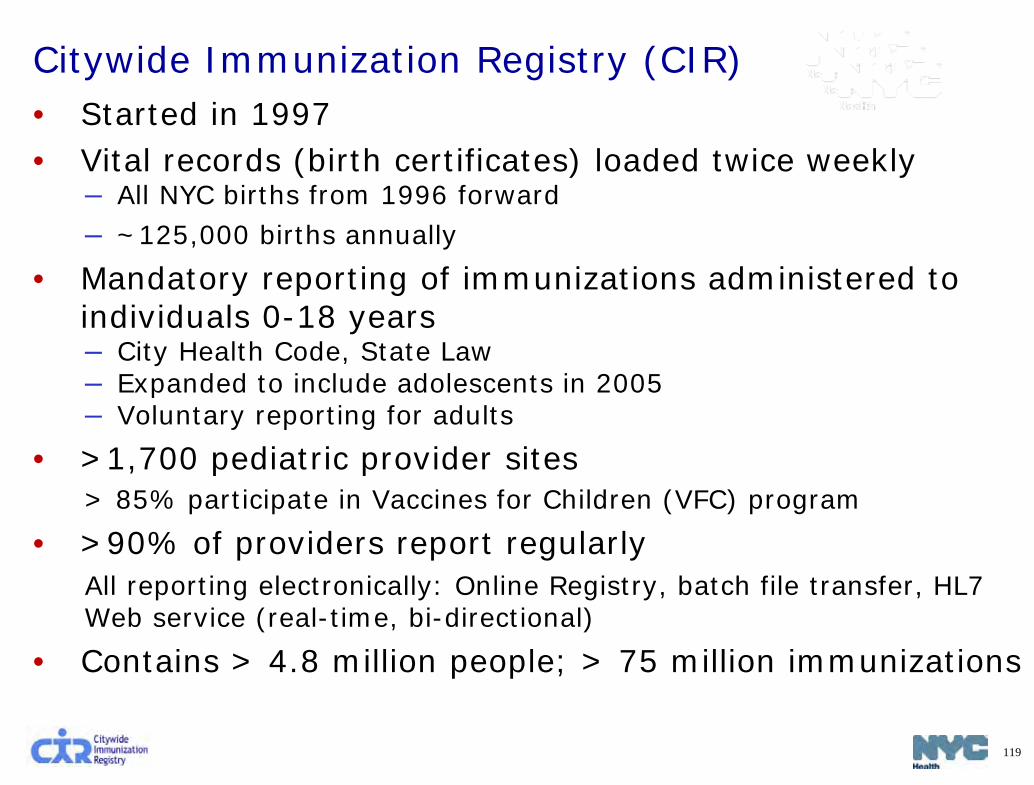
• Started in 1997 • Vital records (birth certificates) loaded twice weekly
– All NYC births from 1996 forward – ~125,000 births annually
• Mandatory reporting of immunizations administered to individuals 0-18 years – City Health Code, State Law – Expanded to include adolescents in 2005 – Voluntary reporting for adults
• >1,700 pediatric provider sites > 85% participate in Vaccines for Children (VFC) program
• >90% of providers report regularly All reporting electronically: Online Registry, batch file transfer, HL7 Web service (real-time, bi-directional)
• Contains > 4.8 million people; > 75 million immunizations
Citywide Immunization Registry (CIR)

120
Limited to health care providers, parents, legal guardians or custodians, authorized agencies (i.e., MCOs, WIC, schools, child care) • Online Registry - 24/7 self-service:
• look-up immunization records and view lead test histories • print or fax a record • print pre-completed forms: § CH205: schools/daycare/afterschool/day camp, § Early Intervention Program Referral form, § WIC
• Use MyList and/or Reminder/Recall to keep track • Fax, mail in, or telephone (M-F , 9 am-5 pm) requests to
CIR • HL7 Web Service - real-time data query • Batch file data exchange
CIR Access

121
Short, signed application required to obtain a record: • Telephone to request
application: 347-396-2400 • Download forms from
www.nyc.gov/health/cir • Go to the Parents &
Guardians page
CIR access for parents, legal guardians and individuals

122
Citywide Immunization Registry NYC Department of Health and Mental
Hygiene
General CIR contact information: Tel: (347) 396-2400 Fax: (347) 396-2559
nyc.gov/health/cir [email protected]
Contact Information


![Citywide Intelligence Hub e-Learning · A^ cWT CchfXST 8]cT[[XVT]RT HdQ Using the Citywide Intelligence Hub Data Profiler Using the Citywide Intelligence Hub Data Correlator Citywide](https://static.documents.pub/doc/80x56/5fb9423785d7246345058e12/citywide-intelligence-hub-e-learning-a-cwt-cchfxst-8ctxvtrt-hdq-using-the-citywide.jpg)


