76
NeXpose User’s Guide Enterprise Edition Document version 1.7
| Date post: | 03-Mar-2015 |
| Category: |
Documents |
| Upload: | cvaughan79 |
| View: | 2,306 times |
| Download: | 26 times |
NeXpose User’s Guide
Enterprise EditionDocument version 1.7

Copyright © 2011 Rapid7 LLC. Boston, Massachusetts, USA. All rights reserved. Rapid7 and NeXpose are trademarks of
Rapid7, LLC. Other names appearing in this content may be trademarks of their respective owners.
NeXpose User’s Guide 2

Revision historyThe current document version is 1.7
Revision Date Version Description
June 15, 2010 1.0 Created document.
August 30, 2010 1.1 Added information about new PCI-mandated report templates to be used by ASVs as of September 1, 2010; clarified how CVSS scores relate to severity rankings in NeXpose.
October 25, 2010 1.2 Added more detailed instructions about specifying a directory for stored reports.
December 13, 2010 1.3 Added instructions for SSH public key authentication.
December 20, 2010 1.4 Added instructions for using Asset Filter search and creating dynamic asset groups. Also added instructions for using new asset search features when creating static asset groups and reports.
January 31, 2011 1.5 Added information about new PCI report sections and the PCI Host Details report template.
March 14, 2011 1.6 Added information about including organization information in site configuration and managing assets according to host type.
July 11, 2011 1.7 Added information about expanded vulnerability exception workflows.
NeXpose User’s Guide 3
Enterprise Edition
NeXpose User’s Guide 4
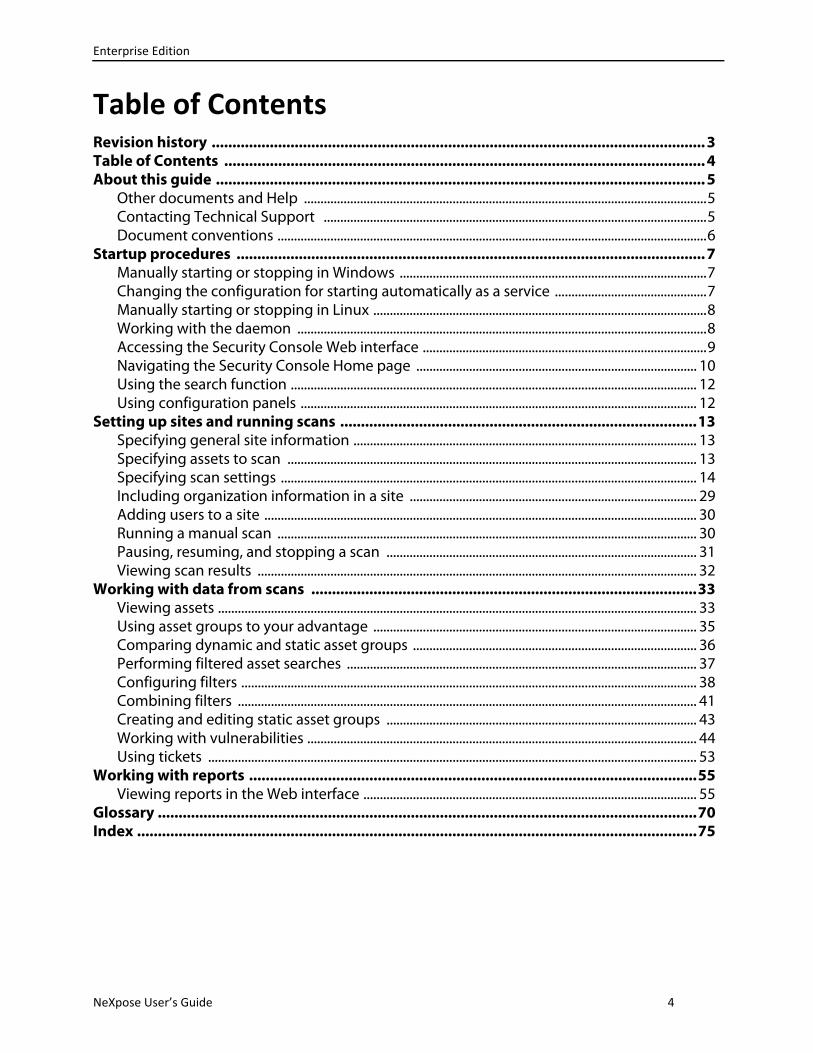
Table of ContentsRevision history ....................................................................................................................... 3Table of Contents .................................................................................................................... 4About this guide ...................................................................................................................... 5
Other documents and Help ..........................................................................................................................5Contacting Technical Support ....................................................................................................................5Document conventions ..................................................................................................................................6
Startup procedures ................................................................................................................. 7Manually starting or stopping in Windows .............................................................................................7Changing the configuration for starting automatically as a service ..............................................7Manually starting or stopping in Linux .....................................................................................................8Working with the daemon ............................................................................................................................8Accessing the Security Console Web interface ......................................................................................9Navigating the Security Console Home page ..................................................................................... 10Using the search function ........................................................................................................................... 12Using configuration panels ........................................................................................................................ 12
Setting up sites and running scans ......................................................................................13Specifying general site information ........................................................................................................ 13Specifying assets to scan ............................................................................................................................ 13Specifying scan settings .............................................................................................................................. 14Including organization information in a site ....................................................................................... 29Adding users to a site ................................................................................................................................... 30Running a manual scan ............................................................................................................................... 30Pausing, resuming, and stopping a scan .............................................................................................. 31Viewing scan results ..................................................................................................................................... 32
Working with data from scans .............................................................................................33Viewing assets ................................................................................................................................................. 33Using asset groups to your advantage .................................................................................................. 35Comparing dynamic and static asset groups ...................................................................................... 36Performing filtered asset searches .......................................................................................................... 37Configuring filters .......................................................................................................................................... 38Combining filters ........................................................................................................................................... 41Creating and editing static asset groups .............................................................................................. 43Working with vulnerabilities ...................................................................................................................... 44Using tickets .................................................................................................................................................... 53
Working with reports ............................................................................................................55Viewing reports in the Web interface ..................................................................................................... 55
Glossary ..................................................................................................................................70Index .......................................................................................................................................75

Enterprise Edition
About this guideThis guide helps you to gather and distribute information about your network assets and vulnerabilities using NeXpose. It covers the following activities:
• logging onto the NeXpose Security Console and familiarizing yourself with the Web interface
• setting up sites and scans
• running scans manually
• viewing asset and vulnerability data
• creating remediation tickets
• creating reports
Other documents and Help
Click the Help link on any page of the NeXpose Security Console Web interface to find information quickly.
You will also find the following documents useful. You can download them from the Support page in NeXpose Help.
NeXpose Administrator’s Guidehelps you to ensure that NeXpose works effectively and consistently in support of your organization's security objectives. It provides instruction for doing key administrative tasks:
• configuring NeXpose host systems for maximum performance
• planning a NeXpose deployment, including determining how to distribute scan engines
• managing NeXpose users and roles
• tuning scan performance
• maintaining and troubleshooting NeXpose
NeXpose Reporting Guide helps you to get the most useful information from NeXpose reports so that you can prioritize remediation tasks and monitor your organization's security posture. It provides guidance for understanding key report-ing concepts:
• using preset and custom report templates
• using report formats
• reading and interpreting report data
NeXpose API guides help you integrate features with your internal systems.
Contacting Technical Support
To contact Technical Support, send an e-mail to [email protected].
For additional contact information and resources, click the Support link on the NeXpose Security Console Web inter-face.
NeXpose User’s Guide 5
Enterprise Edition
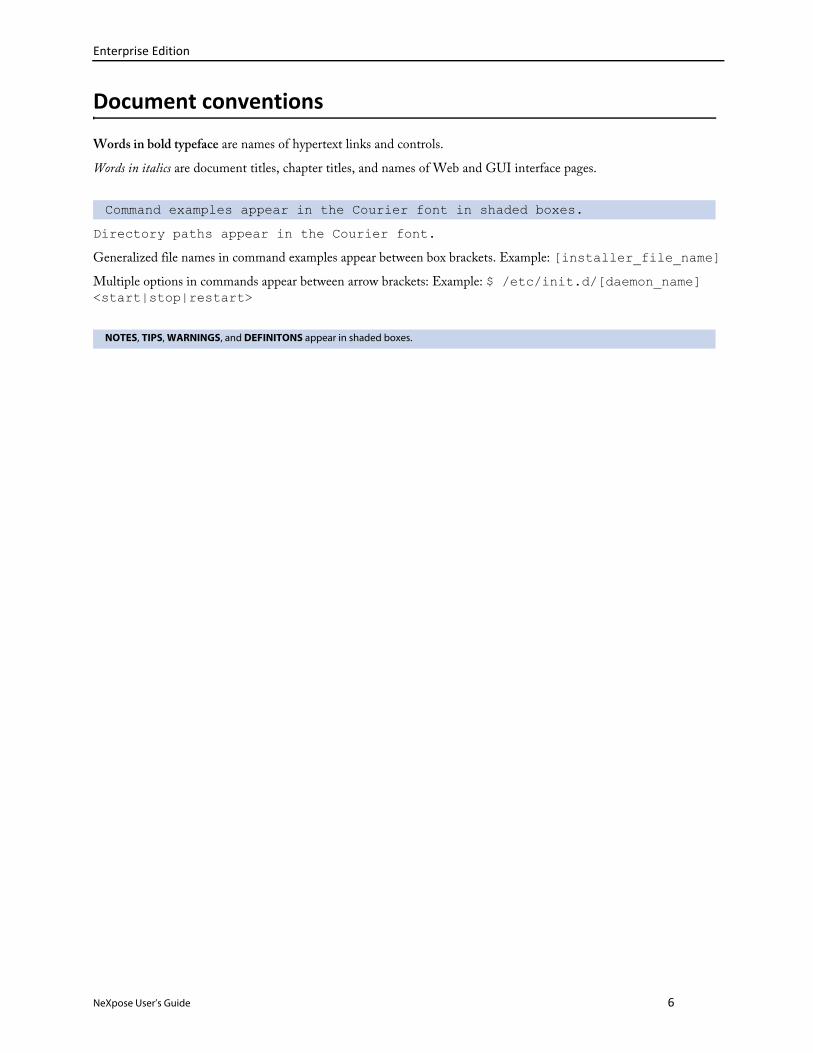
Document conventions
Words in bold typeface are names of hypertext links and controls.
Words in italics are document titles, chapter titles, and names of Web and GUI interface pages.
Directory paths appear in the Courier font.
Generalized file names in command examples appear between box brackets. Example: [installer_file_name]
Multiple options in commands appear between arrow brackets: Example: $ /etc/init.d/[daemon_name] <start|stop|restart>
Command examples appear in the Courier font in shaded boxes.
NOTES, TIPS, WARNINGS, and DEFINITONS appear in shaded boxes.
NeXpose User’s Guide 6
Enterprise Edition
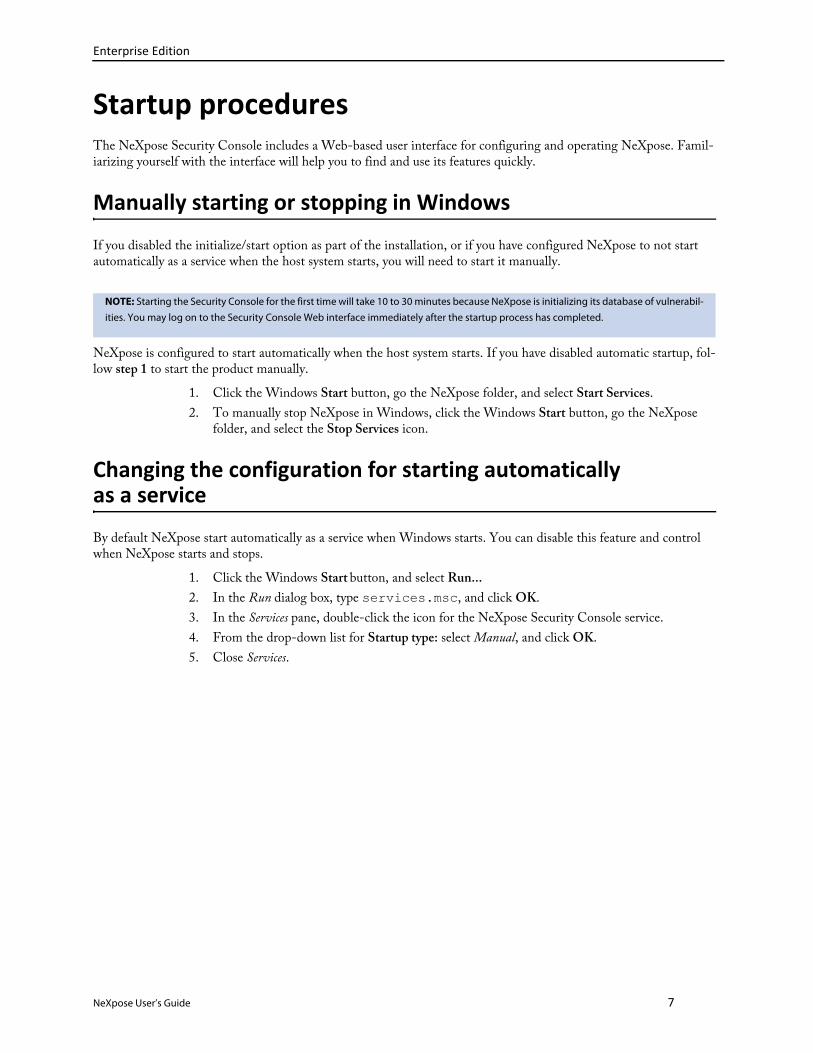
Startup proceduresThe NeXpose Security Console includes a Web-based user interface for configuring and operating NeXpose. Famil-iarizing yourself with the interface will help you to find and use its features quickly.
Manually starting or stopping in Windows
If you disabled the initialize/start option as part of the installation, or if you have configured NeXpose to not start automatically as a service when the host system starts, you will need to start it manually.
NeXpose is configured to start automatically when the host system starts. If you have disabled automatic startup, fol-low step 1 to start the product manually.
1. Click the Windows Start button, go the NeXpose folder, and select Start Services.
2. To manually stop NeXpose in Windows, click the Windows Start button, go the NeXpose folder, and select the Stop Services icon.
Changing the configuration for starting automatically as a service
By default NeXpose start automatically as a service when Windows starts. You can disable this feature and control when NeXpose starts and stops.
1. Click the Windows Start button, and select Run...
2. In the Run dialog box, type services.msc, and click OK.
3. In the Services pane, double-click the icon for the NeXpose Security Console service.
4. From the drop-down list for Startup type: select Manual, and click OK.
5. Close Services.
NOTE: Starting the Security Console for the first time will take 10 to 30 minutes because NeXpose is initializing its database of vulnerabil-
ities. You may log on to the Security Console Web interface immediately after the startup process has completed.
NeXpose User’s Guide 7
Enterprise Edition
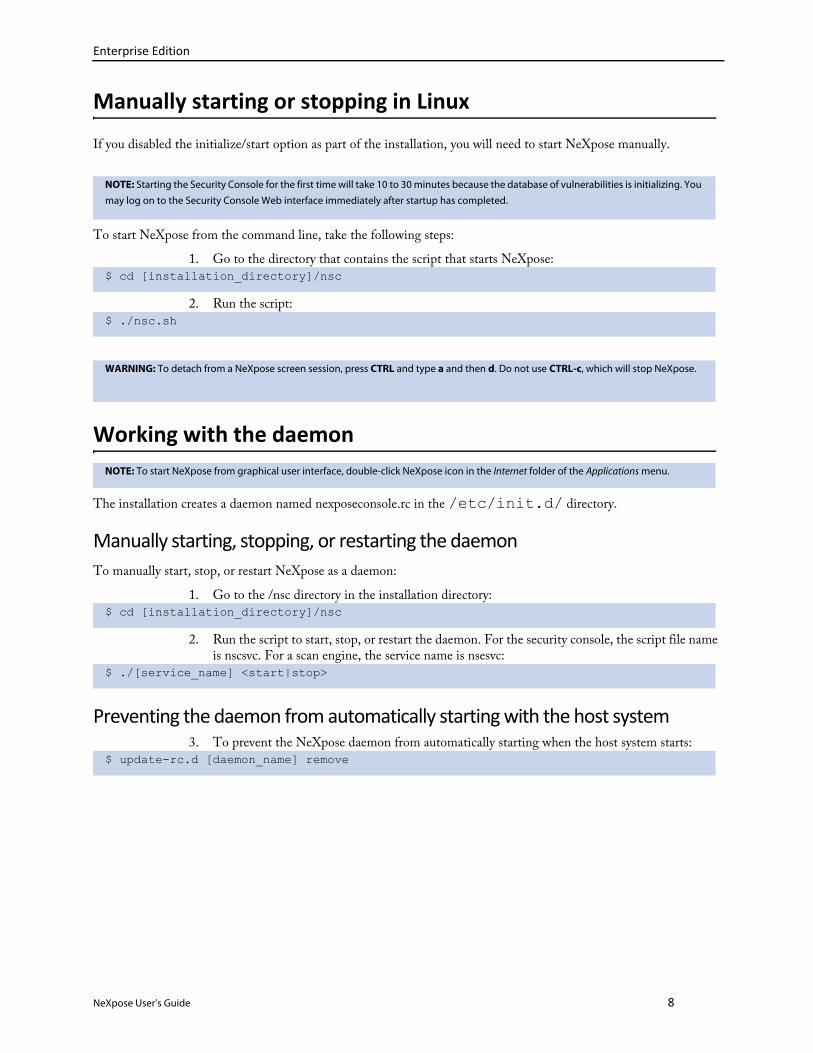
Manually starting or stopping in Linux
If you disabled the initialize/start option as part of the installation, you will need to start NeXpose manually.
To start NeXpose from the command line, take the following steps:
1. Go to the directory that contains the script that starts NeXpose:
2. Run the script:
Working with the daemon
The installation creates a daemon named nexposeconsole.rc in the /etc/init.d/ directory.
Manually starting, stopping, or restarting the daemonTo manually start, stop, or restart NeXpose as a daemon:
1. Go to the /nsc directory in the installation directory:
2. Run the script to start, stop, or restart the daemon. For the security console, the script file name is nscsvc. For a scan engine, the service name is nsesvc:
Preventing the daemon from automatically starting with the host system3. To prevent the NeXpose daemon from automatically starting when the host system starts:
NOTE: Starting the Security Console for the first time will take 10 to 30 minutes because the database of vulnerabilities is initializing. You
may log on to the Security Console Web interface immediately after startup has completed.
$ cd [installation_directory]/nsc
$ ./nsc.sh
WARNING: To detach from a NeXpose screen session, press CTRL and type a and then d. Do not use CTRL-c, which will stop NeXpose.
NOTE: To start NeXpose from graphical user interface, double-click NeXpose icon in the Internet folder of the Applications menu.
$ cd [installation_directory]/nsc
$ ./[service_name] <start|stop>
$ update-rc.d [daemon_name] remove
NeXpose User’s Guide 8

Enterprise Edition
Accessing the Security Console Web interface
Start a Web browser. NeXpose’s AJAX user interface supports Microsoft Internet Explorer 7.x and later and Firefox 3.5 and later browser versions. Other browsers may operate successfully with the interface.
If you are running the browser on the same computer as the console, go to the IP address 127.0.0.1, and specify port 3780.
Make sure to indicate HTTPS protocol when entering the URL:
https://127.0.0.1:3780
If you are running the browser on a separate computer, substitute 127.0.0.1 with the correct host name IP address.
Logon procedures1. When your browser displays the Logon box, type the default logon name and the password that
you specified during installation.
1. Click the Logon button.
2. User names and passwords are case-sensitive and nonrecoverable.
If you are a first-time user and have not yet activated your license, the console displays an activa-tion dialog box.
3. If Rapid7 sent you a product key, enter the product key in the text box.
4. (Optional) If you do not have a product key, click the link to request one. Doing so will open a page on the Rapid7 Web site, where you can register to receive a key. After you receive the key, log on to NeXpose again, enter the product key.
5. Click Activate to complete this step.
If the console displays a warning about authentication services being unavailable, and your net-work uses an external authentication source such as LDAP or Kerberos, your global administra-tor must check the configuration for that source. See Using external sources for user authentication in the NeXpose Administrator’s Guide The problem may also indicate that the authentication server is down.
The first time you log on to the console, you will see the News page, which lists all updates and improvements in the installed system, including new vulnerability checks. If you do not want to see this page every time you log on after an update, clear the check box for automatically dis-playing this page after every login. You can always view the News page by clicking the News link that appears in a row near the top right corner of every page of the console interface.
6. Click Home to view the Security Console Home page.
NOTE: If there is a use conflict for port 3780, you may specify another available port in the XML file nsc\conf\httpd.xml. You also can
switch the port after you log on. See Managing Security Console settings in the NeXpose Administrator's Guide.
NOTE: Browsers do not include non-English, UTF-8 character sets, such as those for Chinese languages, in their default installations. To
use your browser with one of these languages, you must install the appropriate language pack. In the Windows version of Internet
Explorer 7.0, you can add a language by selecting Internet Options from the Tools menu, and then clicking the Languages button in
the Internet Options dialog box. In the Windows version of Firefox 2.0, select Options from the Tools menu and then clicked the
Advanced icon in the Options dialog box. In the Languages pane, click Choose... to select a language to add.
NOTE: If the logon box indicates that the Security Console is in maintenance mode, then either an error has stopped the system from
starting, or a scheduled task has initiated maintenance mode. See Running NeXpose in maintenance mode in the NeXpose Administrator's
Guide for more information.
NeXpose User’s Guide 9
Enterprise Edition
Navigating the Security Console Home page
When you log on to the NeXpose Home page for the first time, you see place holders for information, but no informa-tion contained in them. After installation, the only information in the database is the account of the default global administrator and the product license.
The Home page shows sites, asset groups, tickets, and statistics about your network, based on scan data. If you are a global administrator, you can view and edit site and asset group information, and run scans for your entire network on this page.
• A row of tabs appears at the top of the Home page, as well as every page of the Security Console.
Use these tabs to navigate to the main pages for each area.
• The Assets page links to pages for viewing assets organized by different groupings, such as the
sites they belong to or the operating systems running on them.
• The Tickets page lists remediation tickets and their status.
• The Reports page lists all generated reports and provides controls for editing and creating report
templates.
• The Vulnerabilities page lists all discovered vulnerabilities.
• The Administration page is the starting point for all management activities, such as creating and
editing user accounts, asset groups, and scan and report templates. Only global administrators
see this tab.
On the Site Listing pane, you can click controls to view and edit site information, run scans, and start to create a new site, depending on your role and permissions.
Information for any currently running scan appears in the pane labeled Current Scan Listings for All Sites.
On the Ticket Listing pane, you can click controls to view information about tickets and assets for which those tickets are assigned.
On the Asset Group Listing pane, you can click controls to view and edit information about asset groups, and start to create a new asset group.
NeXpose User’s Guide 10

Enterprise Edition
On the Home page and throughout the interface, you can use various controls for navigation and administration.
Control Description
Minimize any pane so that only its title bar appears.
Expand a minimized pane.
Close a pane.
Configure link Click to display a list of closed panes and open any of the listed panes. See (Insert X Ref)
Reverse the sort order of listed items in a given column. You can also click column headings to produce the same result.
Export asset data to a comma‐separated value (CSV) file.
Start a manual scan.
Pause a scan.
Resume a scan.
Stop a scan.
Edit properties for a site, report, or a user account.
Preview a report template.
Delete a site, report, or user account.
Exclude a vulnerability from a report.
Help link View Help.
News link View the News page which lists all updates.
Log Out link Log out of the Security Console interface. The Logon box appears. For security reasons, the Secu‐rity Console automatically logs out a user who has been inactive for 10 minutes.
User: <user name> link
This link is the logged‐on user name. Click it to open the User Configuration panel where you can edit account information such as the password and view site and asset group access. Only Global Administrators can change roles and permissions.
Search box Search the database for assets, asset groups, and vulnerabilities.
NeXpose User’s Guide 11
Enterprise Edition
Using the search function
With the powerful full-text search feature, you can search the NeXpose database using a variety of criteria, including full or partial IP addresses. For example, you can search for "192.168", and NeXpose returns all IP address that start with 192.168.x.x.
Enter your search criteria in the Search box on any a page of the security console interface, and click the magnifying glass icon.
NeXpose displays the Search page, which lists results in various categories. Within each category pane, NeXpose dis-plays the results in a table that includes all possible features for that category. For example, the table in the Vulnerabil-ity Results pane includes all the columns that appear on the Vulnerabilities page. At the bottom of each category pane, you can view the total number of results and change settings for how results are displayed.
In the Search Criteria pane, you can refine and repeat the search. You can change the search phrase and select check boxes to allow partial word matches and to specify that all words in the phrase appear in each result. After refining the criteria, click the Search Again button.
Using configuration panels
NeXpose provides panels for configuration and administration tasks:
• creating and editing user accounts
• creating and editing asset groups
• creating and editing scan templates
• creating and editing report templates
• configuring NeXpose Security Console settings
• troubleshooting and maintaining NeXpose
All panels have the same navigation scheme. You can either use the navigation buttons in the upper-right corner of each panel page to progress through each page of the panel, or you can click a page link listed on the left column of each panel page to go directly to that page.
To save configuration changes, click the Save button that appears on every page. To discard changes, click the Cancel button.
NOTE: Parameters labeled in red denote required parameters on all panel pages.
NeXpose User’s Guide 12

Enterprise Edition
Setting up sites and running scansYou must set up at least one site containing at least one asset in order to run scans in NeXpose. Doing so involves the following steps:
• Setting up sites and running scans on page 13
• Specifying assets to scan on page 13
• Specifying scan settings on page 14
• Setting up alerts on page 23
• Establishing scan credentials on page 24
Specifying general site information
To begin setting up a site:
1. Click the New Site button on the Home page.
OR
2. Click the Assets tab.
3. When the console displays the Assets page, click the View link next to sites.
4. When the console displays the Sites page, click New Site.
5. On the Site Configuration – General page, type a name for your site.
You may wish to associate the name with the type of scan that you will perform on the site, such as Full Audit, or Denial of Service.
6. Type a brief description for the site and select a level of importance from the drop down list.
The importance level corresponds to a risk factor that NeXpose uses to calculate a risk index for each site. The Very Low setting reduces a risk index to 1/3 of its initial value. The Low setting reduces the risk index to 2/3 of its initial value. High and Very High settings increase the risk index to 2x and 3x times its initial value, respectively. A Normal setting does not change the risk index.
Specifying assets to scan
Go to the Devices page to list assets for your new site. You can manually enter addresses and host names in the text box labeled Devices to scan. You also can import a comma- or new-line-delimited ASCII-text file that lists IP address and host names of assets you want to scan.
To import an asset list, click the Browse button in the Included Devices area, and select the appropriate .txt file from the local computer or shared network drive for which read access is permitted. Each address in the file should appear on its own line. Addresses may incorporate any valid NeXpose convention, including CIDR notation, host name, fully qualified domain name, and range of devices. See the box labeled More Information.
If you are a global administrator, you may edit or delete addresses already listed in the site detail page.
To prevent assets within an IP address range from being scanned, manually enter addresses and host names in the text box labeled Devices to Exclude from scanning; or import a comma- or new-line-delimited ASCII-text file that lists addresses and host names that you don’t want to scan.
NeXpose User’s Guide 13

Enterprise Edition
To exclude devices:
1. Click Browse button in the Excluded Devices area
2. Select the appropriate .txt file from the local computer or shared network drive for which read access is permitted.
Each address in the file should appear on its own line. Addresses may incorporate any valid NeXpose convention, including CIDR notation, host name, fully qualified domain name, and range of devices.
You also can exclude specific assets from scans in all sites throughout your deployment on the global Device Exclusion page. See Managing global settings in the NeXpose Administrator’s Guide.
Specifying scan settings
Go to the Scan Setup page to select a scan template and/or scan engine other than the default settings. You also can enable scans to run on a specified schedule.
A scan template is a predefined set of scan attributes that you can select quickly rather than manually define properties, such as target assets, services, and vulnerabilities.
A global administrator can customize scan templates for your organization’s specific needs. When you modify a tem-plate, all sites that use that scan template will use the modified settings. See Modifying and creating scan templates in the NeXpose Administrator’s Guide for more information.
Select an existing scan template from the drop down list. The boxes that follow list descriptions and attributes for each default template. You also can create a custom scan template. See Modifying and creating scan templates in the NeXpose Administrator’s Guide for more information.
NOTE: If you specify a host name for exclusion, NeXpose will attempt to resolve it to an IP address prior to a scan. If it is initially unable to
do so, it will perform one or more phases of a scan on the specified asset, such as pinging or port discovery. In the process, NeXpose may
be able to determine that the asset has been excluded from the scope of the scan, and it will discontinue scanning it. However, if NeX-
pose is unable to make that determination, it will continue scanning the asset.
NeXpose User’s Guide 14

Enterprise Edition
Denial of service
Discovery scan
Description: This basic audit of all network assets uses both safe and unsafe (denial-of-service) checks. This scan does not include in-
depth patch/hotfix checking, policy compliance checking, or application-layer auditing.
Why use this template: You can run a denial of service scan in a preproduction environment to test the resistance of assets to denial-of
service conditions.
Device/vulnerability scan: Y/Y
Maximum # scan threads: 10
ICMP (Ping hosts): Y
TCP ports used for device discovery: 80
UDP ports used for device discovery: None
Device discovery performance: 5 ms send delay, 4 retries, 1000 ms block time-out
TCP port scan method: Stealth scan (SYN)
TCP optimizer ports: None
TCP ports to scan: Well known numbers + 1-1040
TCP port scan performance: 0 ms send delay, 10 blocks, 10 ms block delay, 5 retries
UDP ports to scan: Well-known numbers
Simultaneous port scans: 5
Specific vulnerability checks enabled (which disables all other checks): None
Specific vulnerability checks disabled: Local, patch, policy check types
Description: This scan locates live assets on the network and identifies their host names and operating systems. NeXpose does not per-
form enumeration, policy, or vulnerability scanning with this template.
Why use this template: You can run a discovery scan to compile a complete list of all network assets. Afterward, you can target subsets
of these assets for intensive vulnerability scans, such as with the Exhaustive scan template.
Device/vulnerability scan: Y/N
Maximum # scan threads: 10
ICMP (Ping hosts): Y
TCP ports used for device discovery: 21, 22, 23, 25, 80, 88, 110, 111, 135, 139, 143, 220, 264, 389, 443, 445, 449, 524, 585, 636, 993, 995,
1433, 1521, 1723, 3389, 8080, 9100
UDP ports used for device discovery: 53,67,111,135,137,161,500,1701
Device discovery performance: 5 ms send delay, 2 retries, 3000 ms block time-out
TCP port scan method: Stealth scan (SYN)
TCP optimizer ports: None
TCP ports to scan: 21, 22, 23, 25, 80, 110, 139, 143,220, 264, 443, 445, 449, 524, 585, 993, 995, 1433, 1521, 1723, 8080, 9100
TCP port scan performance: 0 ms send delay, 25 blocks, 500 ms block delay, 3 retries
UDP ports to scan: 161, 500
Simultaneous port scans: 10
Specific vulnerability checks enabled (which disables all other checks): None
Specific vulnerability checks disabled: None
NeXpose User’s Guide 15

Enterprise Edition
Discovery scan (aggressive)
Exhaustive
Description: This fast, cursory scan locates live assets on high-speed networks and identifies their host names and operating systems.
NeXpose sends packets at a very high rate, which may trigger IPS/IDS sensors, SYN flood protection, and exhaust states on state-
ful firewalls. NeXpose does not perform enumeration, policy, or vulnerability scanning with this template.
Why use this template: This template is identical in scope to the discovery scan, except that it uses more threads and is, therefore,
much faster. The trade-off is that scans run with this template may not be as thorough as with the Discovery scan template.
Device/vulnerability scan: Y/N
Maximum # scan threads: 25
ICMP (Ping hosts): Y
TCP ports used for device discovery: 21, 22, 23, 25, 80, 88, 110, 111, 135, 139, 143, 220, 264, 389, 443, 445, 449, 524, 585, 636, 993, 995,
1433, 1521, 1723, 3389, 8080, 9100
UDP ports used for device discovery: 53, 67, 111, 135, 137, 161, 500, 1701
Device discovery performance: 0 ms send delay, 2 retries, 3000 ms block time-out
TCP port scan method: Stealth scan (SYN)
TCP optimizer ports: None
TCP ports to scan: 21, 22, 23, 25, 80, 110, 139, 143, 220, 264, 443, 445, 449, 524, 585, 993, 995, 1433, 1521, 1723, 8080, 9100
TCP port scan performance: 0 ms send delay, 25 blocks, 500 ms block delay, 3 retries
UDP ports to scan: 161, 500
Simultaneous port scans: 25
Specific vulnerability checks enabled (which disables all other checks): None
Specific vulnerability checks disabled: None
Description: This thorough network scan of all systems and services uses only safe checks, including patch/hotfix inspections, policy
compliance assessments, and application-layer auditing. This scan could take several hours, or even days, to complete, depend-
ing on the number of target assets.
Why use this template: Scans run with this template are thorough, but slow. Use this template to run intensive scans targeting a low
number of assets.
Device/vulnerability scan: Y/Y
Maximum # scan threads: 10
ICMP (Ping hosts): Y
TCP ports used for device discovery: 80
UDP ports used for device discovery: None
Device discovery performance: 5 ms send delay, 4 retries, 1000 ms block time-out
TCP port scan method: NeXpose determines optimal method
TCP optimizer ports: 21, 23, 25, 80, 110, 111, 135, 139, 443, 445, 449, 8080
TCP ports to scan: All possible (1-65535)
TCP port scan performance: 0 ms send delay, 10 blocks, 10 ms block delay, 5 retries
UDP ports to scan: Well-known numbers
Simultaneous port scans: 5
Specific vulnerability checks enabled (which disables all other checks): None
Specific vulnerability checks disabled: None
NeXpose User’s Guide 16

Enterprise Edition
Full audit
HIPAA compliance
Description: This full network audit of all systems uses only safe checks, including network-based vulnerabilities, patch/hotfix checking,
and application-layer auditing. NeXpose scans only default ports and disables policy checking, which makes scans faster than
with the Exhaustive scan. Also, NeXpose does not check for potential vulnerabilities with this template.
Why use this template: This is the default NeXpose scan template. Use it to run a fast, thorough vulnerability scan right “out of the
box.”
Device/vulnerability scan: Y/Y
Maximum # scan threads: 10
ICMP (Ping hosts): Y
TCP ports used for device discovery: 80
UDP ports used for device discovery: None
Device discovery performance: 5 ms send delay, 4 retries, 1000 ms block time-out
TCP port scan method: Stealth scan (SYN)
TCP optimizer ports: None
TCP ports to scan: Well known numbers + 1-1040
TCP port scan performance: 0 ms send delay, 10 blocks, 10 ms block delay, 5 retries
UDP ports to scan: Well-known numbers
Simultaneous port scans: 5
Specific vulnerability checks enabled (which disables all other checks): None
Specific vulnerability checks disabled: Policy check type
Description: NeXpose uses safe checks in this audit of compliance with HIPAA section 164.312 (“Technical Safeguards”). The scan will
flag any conditions resulting in inadequate access control, inadequate auditing, loss of integrity, inadequate authentication, or
inadequate transmission security (encryption).
Why use this template: Use this template to scan assets in a HIPAA-regulated environment, as part of a HIPAA compliance program.
Device/vulnerability scan: Y/Y
Maximum # scan threads: 10
ICMP (Ping hosts): Y
TCP ports used for device discovery: 80
UDP ports used for device discovery: None
Device discovery performance: 5 ms send delay, 4 retries, 1000 ms block time-out
TCP port scan method: Stealth scan (SYN)
TCP optimizer ports: None
TCP ports to scan: Well known numbers +
1-1040
TCP port scan performance: 0 ms send delay, 10 blocks, 10 ms block delay, 5 retries
UDP ports to scan: Well-known numbers
Simultaneous port scans: 5
Specific vulnerability checks enabled (which disables all other checks): None
Specific vulnerability checks disabled: None
NeXpose User’s Guide 17
Enterprise Edition
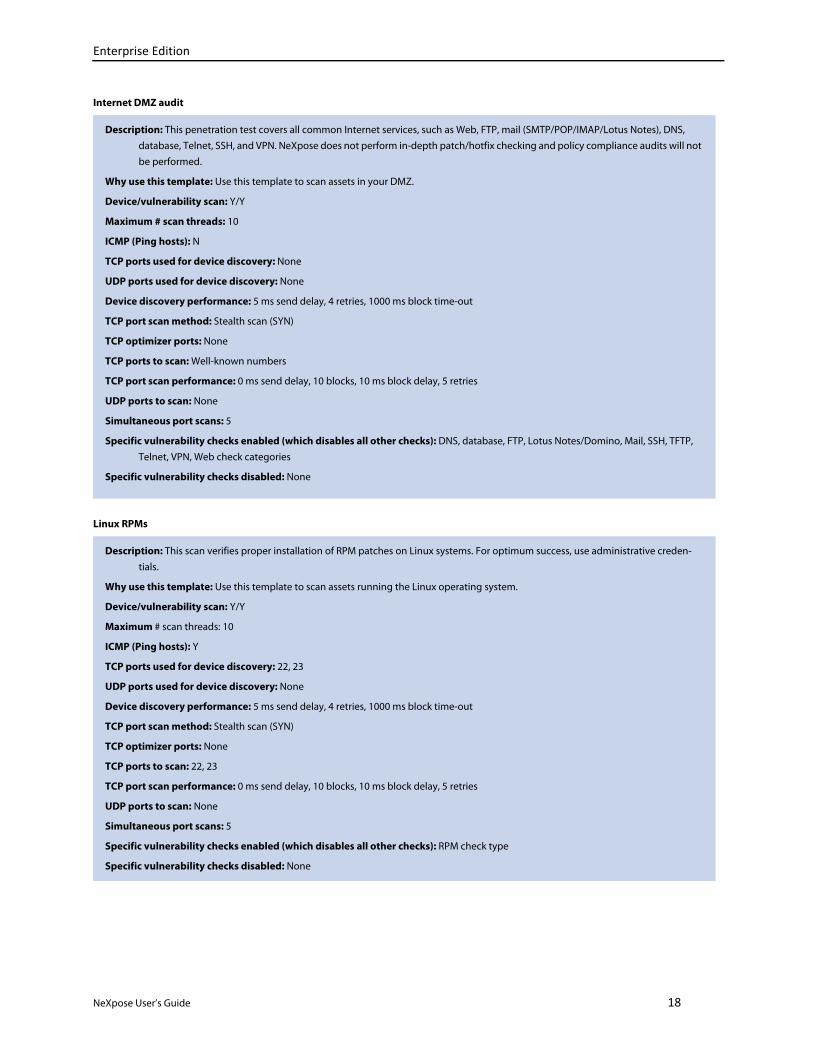
Internet DMZ audit
Linux RPMs
Description: This penetration test covers all common Internet services, such as Web, FTP, mail (SMTP/POP/IMAP/Lotus Notes), DNS,
database, Telnet, SSH, and VPN. NeXpose does not perform in-depth patch/hotfix checking and policy compliance audits will not
be performed.
Why use this template: Use this template to scan assets in your DMZ.
Device/vulnerability scan: Y/Y
Maximum # scan threads: 10
ICMP (Ping hosts): N
TCP ports used for device discovery: None
UDP ports used for device discovery: None
Device discovery performance: 5 ms send delay, 4 retries, 1000 ms block time-out
TCP port scan method: Stealth scan (SYN)
TCP optimizer ports: None
TCP ports to scan: Well-known numbers
TCP port scan performance: 0 ms send delay, 10 blocks, 10 ms block delay, 5 retries
UDP ports to scan: None
Simultaneous port scans: 5
Specific vulnerability checks enabled (which disables all other checks): DNS, database, FTP, Lotus Notes/Domino, Mail, SSH, TFTP,
Telnet, VPN, Web check categories
Specific vulnerability checks disabled: None
Description: This scan verifies proper installation of RPM patches on Linux systems. For optimum success, use administrative creden-
tials.
Why use this template: Use this template to scan assets running the Linux operating system.
Device/vulnerability scan: Y/Y
Maximum # scan threads: 10
ICMP (Ping hosts): Y
TCP ports used for device discovery: 22, 23
UDP ports used for device discovery: None
Device discovery performance: 5 ms send delay, 4 retries, 1000 ms block time-out
TCP port scan method: Stealth scan (SYN)
TCP optimizer ports: None
TCP ports to scan: 22, 23
TCP port scan performance: 0 ms send delay, 10 blocks, 10 ms block delay, 5 retries
UDP ports to scan: None
Simultaneous port scans: 5
Specific vulnerability checks enabled (which disables all other checks): RPM check type
Specific vulnerability checks disabled: None
NeXpose User’s Guide 18

Enterprise Edition
Microsoft hotfix
Payment Card Industry (PCI) audit
Description: This scan verifies proper installation of hotfixes and service packs on Microsoft Windows systems. For optimum success,
use administrative credentials.
Why use this template: Use this template to verify that assets running Windows have hotfix patches installed on them.
Device/vulnerability scan: Y/Y
Maximum # scan threads: 10
ICMP (Ping hosts): Y
TCP ports used for device discovery: 135, 139, 445, 1433, 2400
UDP ports used for device discovery: None
Device discovery performance: 5 ms send delay, 4 retries, 1000 ms block time-out
TCP port scan method: Stealth scan (SYN)
TCP optimizer ports: None
TCP ports to scan: 135, 139, 445, 1433, 2433
TCP port scan performance: 0 ms send delay, 10 blocks, 10 ms block delay, 5 retries
UDP ports to scan: None
Simultaneous port scans: 5
Specific vulnerability checks enabled (which disables all other checks): Microsoft hotfix check type
Specific vulnerability checks disabled: None
Description: This audit of Payment Card Industry (PCI) compliance uses only safe checks, including network-based vulnerabilities,
patch/hotfix verification, and application-layer testing. NeXpose scans all TCP ports and well-known UDP ports. NeXpose does
not perform policy checks.
Why use this template: Use this template to scan assets as part of a PCI compliance program.
Device/vulnerability scan: Y/Y
Maximum # scan threads: 10
ICMP (Ping hosts): Y
TCP ports used for device discovery: 22, 23, 25, 80, 443
UDP ports used for device discovery: None
Device discovery performance: 5 ms send delay, 4 retries, 1000 ms block time-out
TCP port scan method: Stealth scan (SYN)
TCP optimizer ports: None
TCP ports to scan: All possible (1-65535)
TCP port scan performance: 1 ms send delay, 5 blocks, 15 ms block delay, 5 retries
UDP ports to scan: Well-known numbers
Simultaneous port scans: 5
Specific vulnerability checks enabled (which disables all other checks): None
Specific vulnerability checks disabled: Policy check types
NeXpose User’s Guide 19
Enterprise Edition
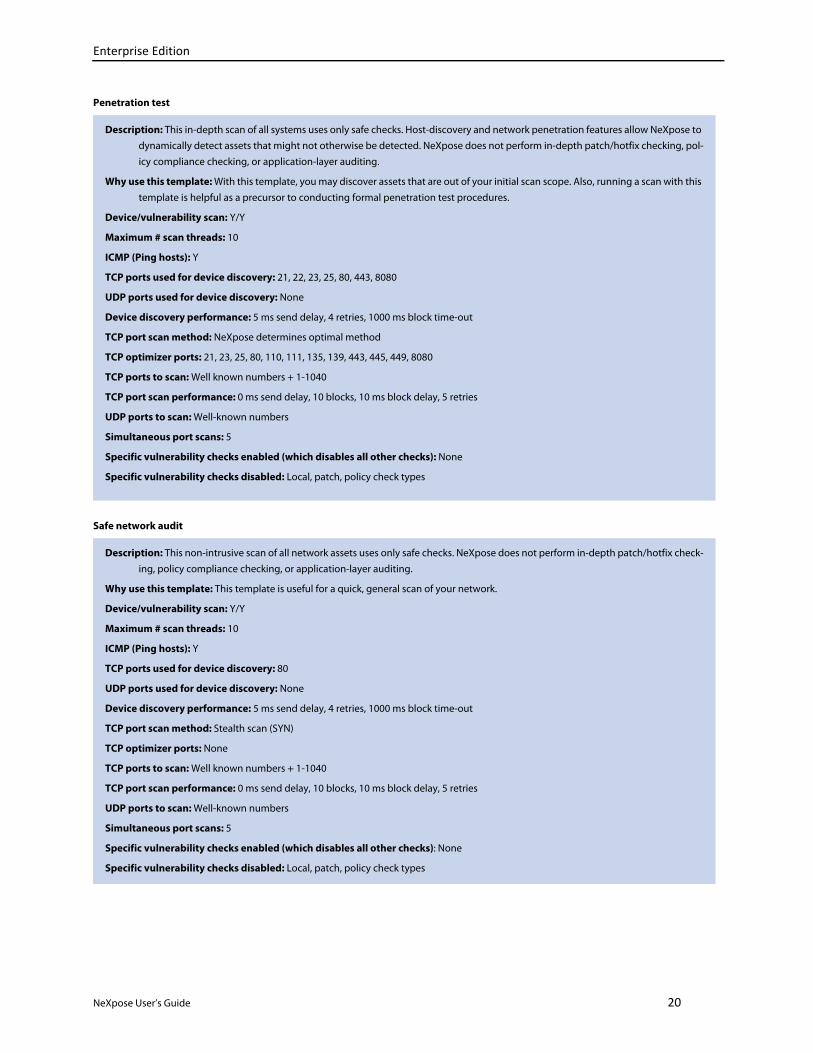
Penetration test
Safe network audit
Description: This in-depth scan of all systems uses only safe checks. Host-discovery and network penetration features allow NeXpose to
dynamically detect assets that might not otherwise be detected. NeXpose does not perform in-depth patch/hotfix checking, pol-
icy compliance checking, or application-layer auditing.
Why use this template: With this template, you may discover assets that are out of your initial scan scope. Also, running a scan with this
template is helpful as a precursor to conducting formal penetration test procedures.
Device/vulnerability scan: Y/Y
Maximum # scan threads: 10
ICMP (Ping hosts): Y
TCP ports used for device discovery: 21, 22, 23, 25, 80, 443, 8080
UDP ports used for device discovery: None
Device discovery performance: 5 ms send delay, 4 retries, 1000 ms block time-out
TCP port scan method: NeXpose determines optimal method
TCP optimizer ports: 21, 23, 25, 80, 110, 111, 135, 139, 443, 445, 449, 8080
TCP ports to scan: Well known numbers + 1-1040
TCP port scan performance: 0 ms send delay, 10 blocks, 10 ms block delay, 5 retries
UDP ports to scan: Well-known numbers
Simultaneous port scans: 5
Specific vulnerability checks enabled (which disables all other checks): None
Specific vulnerability checks disabled: Local, patch, policy check types
Description: This non-intrusive scan of all network assets uses only safe checks. NeXpose does not perform in-depth patch/hotfix check-
ing, policy compliance checking, or application-layer auditing.
Why use this template: This template is useful for a quick, general scan of your network.
Device/vulnerability scan: Y/Y
Maximum # scan threads: 10
ICMP (Ping hosts): Y
TCP ports used for device discovery: 80
UDP ports used for device discovery: None
Device discovery performance: 5 ms send delay, 4 retries, 1000 ms block time-out
TCP port scan method: Stealth scan (SYN)
TCP optimizer ports: None
TCP ports to scan: Well known numbers + 1-1040
TCP port scan performance: 0 ms send delay, 10 blocks, 10 ms block delay, 5 retries
UDP ports to scan: Well-known numbers
Simultaneous port scans: 5
Specific vulnerability checks enabled (which disables all other checks): None
Specific vulnerability checks disabled: Local, patch, policy check types
NeXpose User’s Guide 20
Enterprise Edition
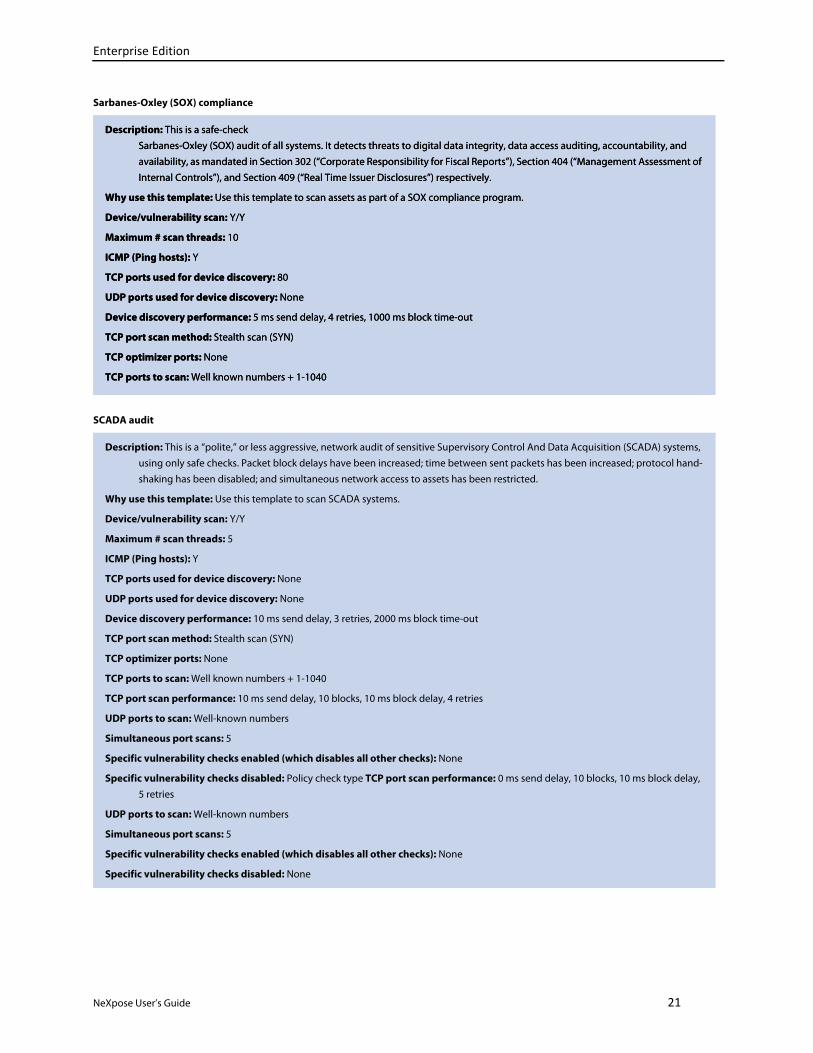
Sarbanes-Oxley (SOX) compliance
SCADA audit
Description: This is a safe-check
Sarbanes-Oxley (SOX) audit of all systems. It detects threats to digital data integrity, data access auditing, accountability, and
availability, as mandated in Section 302 (“Corporate Responsibility for Fiscal Reports”), Section 404 (“Management Assessment of
Internal Controls”), and Section 409 (“Real Time Issuer Disclosures”) respectively.
Why use this template: Use this template to scan assets as part of a SOX compliance program.
Device/vulnerability scan: Y/Y
Maximum # scan threads: 10
ICMP (Ping hosts): Y
TCP ports used for device discovery: 80
UDP ports used for device discovery: None
Device discovery performance: 5 ms send delay, 4 retries, 1000 ms block time-out
TCP port scan method: Stealth scan (SYN)
TCP optimizer ports: None
TCP ports to scan: Well known numbers + 1-1040
Description: This is a “polite,” or less aggressive, network audit of sensitive Supervisory Control And Data Acquisition (SCADA) systems,
using only safe checks. Packet block delays have been increased; time between sent packets has been increased; protocol hand-
shaking has been disabled; and simultaneous network access to assets has been restricted.
Why use this template: Use this template to scan SCADA systems.
Device/vulnerability scan: Y/Y
Maximum # scan threads: 5
ICMP (Ping hosts): Y
TCP ports used for device discovery: None
UDP ports used for device discovery: None
Device discovery performance: 10 ms send delay, 3 retries, 2000 ms block time-out
TCP port scan method: Stealth scan (SYN)
TCP optimizer ports: None
TCP ports to scan: Well known numbers + 1-1040
TCP port scan performance: 10 ms send delay, 10 blocks, 10 ms block delay, 4 retries
UDP ports to scan: Well-known numbers
Simultaneous port scans: 5
Specific vulnerability checks enabled (which disables all other checks): None
Specific vulnerability checks disabled: Policy check type TCP port scan performance: 0 ms send delay, 10 blocks, 10 ms block delay,
5 retries
UDP ports to scan: Well-known numbers
Simultaneous port scans: 5
Specific vulnerability checks enabled (which disables all other checks): None
Specific vulnerability checks disabled: None
NeXpose User’s Guide 21
Enterprise Edition
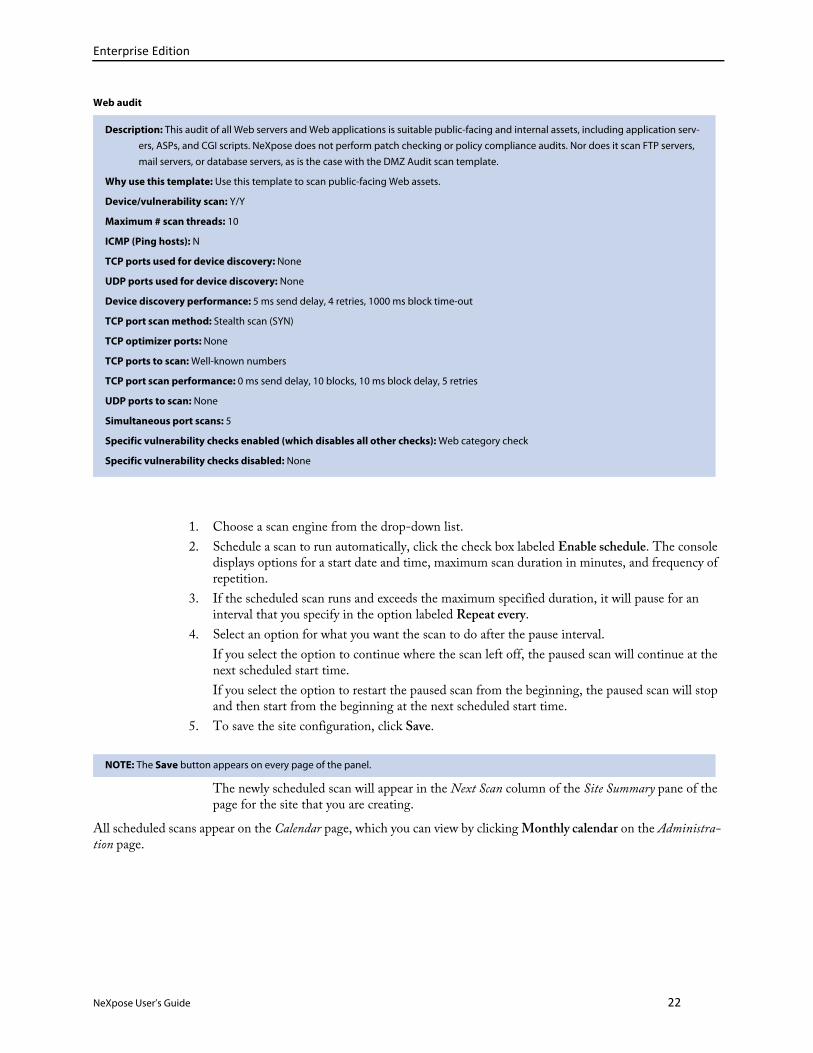
Web audit
1. Choose a scan engine from the drop-down list.
2. Schedule a scan to run automatically, click the check box labeled Enable schedule. The console displays options for a start date and time, maximum scan duration in minutes, and frequency of repetition.
3. If the scheduled scan runs and exceeds the maximum specified duration, it will pause for an interval that you specify in the option labeled Repeat every.
4. Select an option for what you want the scan to do after the pause interval.
If you select the option to continue where the scan left off, the paused scan will continue at the next scheduled start time.
If you select the option to restart the paused scan from the beginning, the paused scan will stop and then start from the beginning at the next scheduled start time.
5. To save the site configuration, click Save.
The newly scheduled scan will appear in the Next Scan column of the Site Summary pane of the page for the site that you are creating.
All scheduled scans appear on the Calendar page, which you can view by clicking Monthly calendar on the Administra-tion page.
Description: This audit of all Web servers and Web applications is suitable public-facing and internal assets, including application serv-
ers, ASPs, and CGI scripts. NeXpose does not perform patch checking or policy compliance audits. Nor does it scan FTP servers,
mail servers, or database servers, as is the case with the DMZ Audit scan template.
Why use this template: Use this template to scan public-facing Web assets.
Device/vulnerability scan: Y/Y
Maximum # scan threads: 10
ICMP (Ping hosts): N
TCP ports used for device discovery: None
UDP ports used for device discovery: None
Device discovery performance: 5 ms send delay, 4 retries, 1000 ms block time-out
TCP port scan method: Stealth scan (SYN)
TCP optimizer ports: None
TCP ports to scan: Well-known numbers
TCP port scan performance: 0 ms send delay, 10 blocks, 10 ms block delay, 5 retries
UDP ports to scan: None
Simultaneous port scans: 5
Specific vulnerability checks enabled (which disables all other checks): Web category check
Specific vulnerability checks disabled: None
NOTE: The Save button appears on every page of the panel.
NeXpose User’s Guide 22

Enterprise Edition
Setting up alerts
You can set up alerts for certain scan events:
• a scan starting
• a scan stopping
• a scan failing to conclude successfully
• a scan discovering a vulnerability that matches specified criteria
To set up alerts:
1. Go to the Alerting page and click New Alert.
2. The console displays a New Alert dialog box. Click the Enable alert check box to ensure that NeXpose generates this type of alert. You can click the box again at any time to disable the alert if you prefer not to receive that alert temporarily without having to delete it.
3. Type a name for the alert.
4. Type a value in the Send at most field if you wish to limit the number of this type of alert that you receive during the scan.
5. Select the check boxes for types of events that you wish to generate alerts for. For example, if you select Paused and Resumed, NeXpose generates an alert every time it pauses or resumes a scan.
6. Select a severity level for vulnerabilities that you wish to generate alerts for. For information about severity levels, see Viewing active vulnerabilities in the NeXpose User's Guide.
7. Select the Confirmed, Unconfirmed, and/or Potential check boxes to receive only those alerts. You can filter alerts for vulnerabilities based on the level of certainty that those vulnerabilities exist.
When NeXpose scans an asset, it performs a sequence of discoveries, verifying the existence of an asset, port, service, and variety of service (for example, an Apache Web server or an IIS Web server). Then, NeXpose attempts to test the asset for vulnerabilities known to be associated with that asset, based on the information gathered in the discovery phase.
If NeXpose is able to verify a vulnerability, it reports a “confirmed” vulnerability. If NeXpose is unable to verify a vulnerability known to be associated with that asset, it reports an “uncon-firmed” or “potential” vulnerability. The difference between these latter two classifications is the level of probability. Unconfirmed vulnerabilities are more likely to exist than potential ones, based on the asset's profile.
8. Select a notification method from the drop-down box. NeXpose can send alerts via SMTP e-mail, SNMP message, or Syslog message. Your selection will control which additional fields appear below this box.
If you select the e-mail method, enter the addresses of your intended recipients. If your network restricts outbound SMTP traffic, specify a mail relay server for sending the alert e-mails.
If you select the option to send SNMP alerts, type the name of the SNMP community and the address of the SNMP server to which NeXpose will send alerts.
If you select the option to send a Syslog message, type the address of the Syslog server to which NeXpose will send messages.
9. Click the Limit alert text check box to send the alert without a description of the alert or its solution. Limited-text alerts only include the name and severity. This is a security option for alerts sent over the Internet or as text messages to mobile devices.
10. Click Save. The new alert appears on the Alerting page.
NeXpose User’s Guide 23

Enterprise Edition
Establishing scan credentials
Establishing logon credentials for your scan engine enables it to perform deep checks, inspecting assets for a wider range of vulnerabilities, such as policy violations, adware, or spyware. Additionally, credentialed scans can check for software applications and packages or hotfixes.
To establish scan credentials:
1. Go to the Credentials page of the Site Configuration panel, and click New Login. The console displays a New Login box.
2. Select the desired type of credentials from the drop-down list labeled Service. This selection determines the other fields that appear in the form. However, all forms include fields for enter-ing some kind of user name and/or password. Additionally, all forms contain two fields, Restrict to Device and Restrict to Port.
Typing in the name or IP address of an asset in the Restrict to Device field enables you to test your credentials on that asset to ensure that the credentials will be accepted in the site. After filling that field, click the Test login button to make sure that the credentials work.
Upon completing the test, make sure to remove the asset name or address from the Restrict to Device field, or NeXpose will use the credentials to scan that specified asset only!
Specifying a port in the Restrict to Port field allows you to limit your range of scanned ports in certain situations. For example, if you wish to run a scan of Web servers, you would use the HTTP credentials. To avoid scanning all Web services within a site, you can specify only those assets with a specific port.
3. Click Save. The new credentials appear on the Credentials page.
4. After you finish configuring your site, click Save.
NOTE: NeXpose protects all credentials with RSA encryption and triple DES encryption before storing them in its database.
NOTE: If you save your credentials with the Restrict to Device field filled, NeXpose will use the credentials to scan the specified asset only.
And you cannot edit credentials after saving them; you can only delete them. Therefore, delete the information that you typed in the
Restrict to Device field after testing the credentials unless you are intending to only use the credentials on the specified asset.
NOTE: The Save button appears on every page of the panel.
NeXpose User’s Guide 24
Enterprise Edition
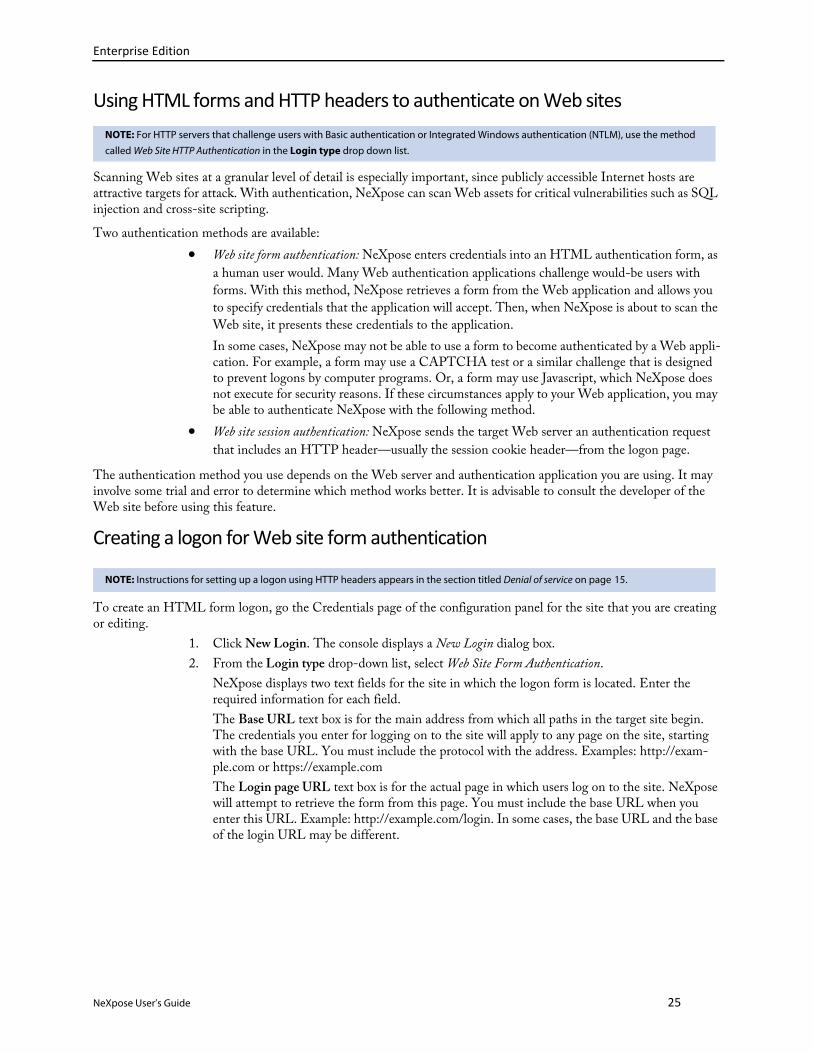
Using HTML forms and HTTP headers to authenticate on Web sites
Scanning Web sites at a granular level of detail is especially important, since publicly accessible Internet hosts are attractive targets for attack. With authentication, NeXpose can scan Web assets for critical vulnerabilities such as SQL injection and cross-site scripting.
Two authentication methods are available:
• Web site form authentication: NeXpose enters credentials into an HTML authentication form, as
a human user would. Many Web authentication applications challenge would-be users with
forms. With this method, NeXpose retrieves a form from the Web application and allows you
to specify credentials that the application will accept. Then, when NeXpose is about to scan the
Web site, it presents these credentials to the application.
In some cases, NeXpose may not be able to use a form to become authenticated by a Web appli-cation. For example, a form may use a CAPTCHA test or a similar challenge that is designed to prevent logons by computer programs. Or, a form may use Javascript, which NeXpose does not execute for security reasons. If these circumstances apply to your Web application, you may be able to authenticate NeXpose with the following method.
• Web site session authentication: NeXpose sends the target Web server an authentication request
that includes an HTTP header—usually the session cookie header—from the logon page.
The authentication method you use depends on the Web server and authentication application you are using. It may involve some trial and error to determine which method works better. It is advisable to consult the developer of the Web site before using this feature.
Creating a logon for Web site form authentication
To create an HTML form logon, go the Credentials page of the configuration panel for the site that you are creating or editing.
1. Click New Login. The console displays a New Login dialog box.
2. From the Login type drop-down list, select Web Site Form Authentication.
NeXpose displays two text fields for the site in which the logon form is located. Enter the required information for each field.
The Base URL text box is for the main address from which all paths in the target site begin. The credentials you enter for logging on to the site will apply to any page on the site, starting with the base URL. You must include the protocol with the address. Examples: http://exam-ple.com or https://example.com
The Login page URL text box is for the actual page in which users log on to the site. NeXpose will attempt to retrieve the form from this page. You must include the base URL when you enter this URL. Example: http://example.com/login. In some cases, the base URL and the base of the login URL may be different.
NOTE: For HTTP servers that challenge users with Basic authentication or Integrated Windows authentication (NTLM), use the method
called Web Site HTTP Authentication in the Login type drop down list.
NOTE: Instructions for setting up a logon using HTTP headers appears in the section titled Denial of service on page 15.
NeXpose User’s Guide 25

Enterprise Edition
3. Click Next.
NeXpose contacts the Web server to retrieve any available forms. If NeXpose fails to make con-tact or retrieve any forms, it displays a failure notification that lists the reason for the failure.
If NeXpose successfully retrieves one or more forms, it displays the Form Selection and Custom-ization box.
4. From the drop-down list, select the form with which NeXpose will log on to the application.
Based on your selection, NeXpose displays a table of fields for that particular form. Click the Edit icon for any field value that you wish to edit.
NeXpose displays a dialog box for editing the field value. If the value was provided by the Web server, you must select the option button to specify a new value. Only change the value to match what the server will accept from NeXpose when NeXpose logs on to the site. If you are not cer-tain of what value to use, contact your Web administrator.
5. After changing the value, click Save. NeXpose now displays the Form Selection and Customiza-tion page with the field value changed. Repeat the editing step for any other values that you want to change.
6. When the table displays the form field data as desired, click Next.
NeXpose displays the Regular Expression and Login Test page.
7. If you wish to use a regular expression (regex) that is different from the default value, change the value in the Regular expression text box. The default value works in most logon cases. If you are unsure of what regular expression to use, consult the Web administrator. For more information, see Appendix A: Using regular expressions in the NeXpose Administrator’s Guide.
8. When the regular expression appears in the text box appears as desired, click the Test login but-ton to make sure that NeXpose can successfully log on to the Web application. If NeXpose dis-plays a success notification, save the HTML form information and proceed with any other site configuration tasks.
9. If NeXpose displays a failure notification, return to the Form Selection and Customization page to change any field data. If NeXpose continues to fail to log on to the Web application, consult your Web administrator.
NOTE: If the test logon fails repeatedly, it may be that NeXpose simply does not support the form or Web authentication application.
NeXpose User’s Guide 26
Enterprise Edition
Creating a logon for Web site session authentication with HTTP headers
To create an HTTP header logon, go the Credentials page of the configuration panel for the site that you are creating or editing.
1. Click New Login. The console displays a New Login dialog box.
2. From the Login type drop-down list, select Web Site Session Authentication.
NeXpose displays a text field for the base URL, which is the main address from which all paths in the target site begin. You must include the protocol with the address.
Examples: http://example.com or https://example.com
3. Click Next.
4. NeXpose displays a box for specifying an HTTP header. Click Add.
NeXpose displays a dialog box for entering an HTTP header. Every header is consists of two elements, which are referred to jointly as a name/value pair.
“Name” corresponds to a specific data type, such as the Web host name, Web server type, ses-sion identifier, or supported languages.
“Value” corresponds to the actual value string that NeXpose sends to the server for that data type. For example, the value for a session ID (SID) might be a uniform resource identifier (URI).
If you are not sure what header to use, consult your Web administrator.
5. After entering a name/value pair, click Save.
NeXpose displays the name/value pair in the dialog box for specifying a header.
6. Click Next.
NeXpose displays the Regular Expression and Login Test page.
If you wish to use a regular expression (regex) that is different from the default value, change the value in the Regular expression text box. The default value works in most logon cases. If you are unsure of what regular expression to use, consult the Web administrator. For more information, see Appendix A: Using regular expressions in the NeXpose Administrator’s Guide.
7. When the regular expression appears in the text box appears as desired, click the Test login but-ton to make sure that NeXpose can successfully log on to the Web application. If NeXpose dis-plays a success notification, save the HTML form information and proceed with any other site configuration tasks.
If NeXpose displays a failure notification, return to the Form Selection and Customization page to change any field data. If NeXpose continues to fail to log on to the Web application, consult your Web administrator.
NOTE: When using HTTP headers to authenticate NeXpose, make sure that the session ID header is valid between the time you save this
ID for the site and when you start the scan. For more information about the session ID header, consult your Web administrator.
NeXpose User’s Guide 27

Enterprise Edition
Using SSH public key authenticationYou can use NeXpose to perform credentialed scans on assets that authenticate users with SSH public key authentica-tion.
This method, also known as asymmetric key encryption, involves the creation of two related keys, or large, random numbers:
• a public key that any entity can use to encrypt authentication information
• a private key that only trusted entities can use to decrypt the information encrypted by its paired
public key
When generating a key pair, keep the following guidelines in mind:
• NeXpose supports SSH protocol version 2 RSA and DSA keys.
• Keys must be OpenSSH-compatible and PEM-encoded.
• RSA keys can range between 768 and 16384 bits.
• DSA keys must be 1024 bits.
1. Generate a key pair that is appropriate for NeXpose. The following example involves a 2048-bit RSA key.
2. Run the ssh-keygen command to create the key pair, specifying a secure directory for storing the new file. This example incorporates the /tmp directory, but you should use any directory that you trust to protect the file.
3. This command generates the private key files, id_rsa, and the public key file, id_rsa.pub.
4. Make the public key available for NeXpose on the target asset.
5. Make sure that the computer with which you are generating the key has a .ssh directory. If not, run the mkdir command to create it:
6. Copy the contents of he public key that you created by running the command /tmp/id_rsa.pub.
7. On the target asset, append the contents of the /tmp/id_rsa.pub file to the .ssh/authorized_keys file in the home directory of a user with the appropriate access-level per-missions that NeXpose requires for complete scan coverage.
8. Provide NeXpose with the private key.
9. In the Security Console Web interface, either edit a site or create a site for which you want to provide NeXpose with SSH public key authentication.
NOTE: This topic provides general steps for configuring an asset to accept public key authentication. For specific steps, consult the
documentation for the particular system that you are using.
ssh-keygen -t rsa -b 2048 -f /tmp/id_rsa
NOTE: The ssh-keygen process will provide the option to enter a passphrase. It is recommended that you use a passphrase to protect the
key if you plan to use the key elsewhere in addition to NeXpose.
mkdir /home/[username]/.ssh
cat /[directory]/id_rsa.pub >> /home/[username]/.ssh/authorized_keys
NOTE: Some checks require root access.
NOTE: .ssh/authorized_keys is the default file for most OpenSSH- and Drop down-based SSH daemons. Consult the documentation for
your Linux distribution to verify the appropriate file.
NeXpose User’s Guide 28

Enterprise Edition
10. Go to the credentials page of the Site Configuration panel. NeXpose displays the New Login dia-log box. Select Secure Shell (SSH) Public Key as the from Login type drop down list.
11. Enter the appropriate user name, for NeXpose. It should match the user specified in step 2.
12. If you created a passphrase when generating the keys, enter it in the appropriate text box.
13. The private key that you created by running the command in step 2.b. is the /tmp/id_rsa file on the target asset. Copy the contents of that file into the PEM-format private key text box.
14. To test the authentication, note the IP address of a target asset that accepts the key pair that you created. Enter that address in the Restrict to Device field. Then click the Test login button. NeXpose displays a message indicating whether the test was successful. Upon completing a suc-cessful test, remove the IP address from the Restrict to Device field, unless you want to use this authentication on that address alone.
15. Click Save to complete the public key authentication setup.
16. If you have no other site configuration tasks to complete, click Save.
Including organization information in a site
The Organization page in the Site Configuration panel includes optional fields for entering information about your organization, such as its name, Web site URL, primary contact, and business address. NeXpose incorporates this information in PCI reports.
To include organization information in a site, go to the Organization page in the Site Configuration panel. Enter any desired information. Filling all fields is not required.
To save the site configuration, click the Save button on any page of the panel.
NOTE: This authentication method is different from the method listed in the drop down as Secure Shell (SSH). This latter method incorpo-
rates passwords instead of keys.
NOTE: If you save your credentials with the Restrict to Device field filled, NeXpose will use the credentials to scan the specified asset only.
And you cannot edit credentials after saving them; you can only delete them. Therefore, delete the information that you typed in the
Restrict to Device field after testing the credentials unless you are intending to only use the credentials on the specified asset.
NeXpose User’s Guide 29

Enterprise Edition
Adding users to a site
You must give users access to a site in order for them to be able view assets or perform asset-related operations, such as scanning or reporting, with assets in that site.
1. Go to the Access page in the Site Configuration panel.
2. Add users to the site access list.
a. Click Add Users.
b. In the Add Users dialog box, select the check box for every user account that you want to
add to the access list.
OR
c. Select the check box in the top row to add all users.
3. Click Save.
4. To save the site configuration, click Save on any page of the panel.
Running a manual scan
To start a scan manually, right away, click the New Manual Scan icon for a given site in the Site Listing pane of the Home page.
Or, you can click the New Manual Scan button on the Sites page or on the page for a specific site.
The console displays the Start New Scan dialog box, which lists all the assets that you specified in the site configuration for NeXpose to scan, or to exclude from the scan.
In the Manual Scan Targets area, select either the option to scan all assets within the scope of a site, or to specify cer-tain target assets. Specifying the latter is useful if you want to scan a particular asset as soon as possible, for example, to check for critical vulnerabilities or verify a patch installation.
If you select the option to scan specific assets, enter their IP addresses or host names in the text box. Refer to the lists of included and excluded assets for the desired IP addresses and host names. You can copy and paste the addresses.
Click the Start Now button to begin the scan immediately*.
You can view the status of any currently running scan in several areas:
• the Home page
• the Sites page
• the page for the site that is being scanned
• the page for the actual scan
You also can pause, resume, and stop scans using these pages. See Pausing, resuming, and stopping a scan on page 31.
NOTE: If you enter information in the Organization page and you are also using the Site configuration API, make sure to incorporate the
Organization element, even though it's optional. Populated organization fields in the site configuration may cause the API to return the
Organization element in a response to site configuration request, and if the Option element is not parsed, the API client may generate
parsing errors. See the topics about SiteSaveRequest and Site DTD in the NeXpose API v1.1 Guide.
NOTE: You can start as many manual scans as you require. However, if you have manually started a scan of all assets in a site, or if a full
site scan has been automatically started by the scheduler, NeXpose will not permit you to run another full site scan.
NOTE: Remember to use bread crumb links to go back and forth between the Home, Sites, and specific site and scan pages.
NeXpose User’s Guide 30
Enterprise Edition
Each time NeXpose discovers an asset, it appears in the Asset Listing pane of the scan page, if you are using a local scan engine. NeXpose displays scan results from a local scan engine while the scan is in progress, but it does not store those results in the asset database until it successfully completes the scan. NeXpose displays scan results from distributed engines when the scan is completed.
You can view any vulnerabilities discovered by the local scan engine on the scan page, whether the scan is in progress or complete. You can view any vulnerabilities discovered by remote scan engines when the scan is complete. In either case, simply click the link for any listed asset's address. The console displays the Device Properties page. Click the link for any listed vulnerability to read details about that vulnerability.
*If you have the process auto-stop feature enabled, and if your NeXpose server is running low on memory, NeXpose will not start a scan. It will display a message indicating that system resources are insufficient. For more information, see Viewing general Security Console information and enabling auto-stop in the NeXpose Administrator’s Guide.
Pausing, resuming, and stopping a scan
If you are a user with appropriate site permissions, you can pause, resume or stop manual scans and scans that have been started automatically by the NeXpose scheduler.
You can pause, resume, or stop scans in several areas:
• the Home page
• the Sites page
• the page for the site that is being scanned
• the page for the actual scan
To pause a scan, click the Pause icon for the scan on the Home, Sites, or specific site page; or click the Pause Scan but-ton on the specific scan page.
A message displays asking you to confirm that you want to pause the scan. Click OK.
To resume a paused scan, click the Resume icon for the scan on the Home, Sites, or specific site page; or click the Resume Scan button on the specific scan page. NeXpose displays a message, asking you to confirm that you want to resume the scan. Click OK.
To stop a scan, click the Stop icon for the scan on the Home, Sites, or specific site page; or click the Stop Scan button on the specific scan page. NeXpose displays a message, asking you to confirm that you want to stop the scan. Click OK.
The stop operation may take 30 seconds or more to complete pending any in-progress scan activity.
NOTE: Remember to use bread crumb links to go back and forth between the Home, site, and scan pages.
NeXpose User’s Guide 31
Enterprise Edition
Viewing scan results
The console lists scan results by ascending or descending order for any category, depending on your sorting preference. In the Asset Listing pane, click the desired category column heading, such as Address or Vulnerabilities, to sort results by that category.
Click the link for an asset name or address to view scan-related, and other, information about that asset. Remember that NeXpose scans sites, not asset groups, but asset groups can include assets that also are included in sites.
To view the results of a scan, click the link for a site's name on the Home page. Click the site name link to view devices in the site, along with pertinent information about the scan results. On this page, you also can view information about any asset within the site by clicking the link for its name or address.
Viewing the scan logTo view the activity log of a scan that is in progress or complete, click the View scan log button. The console displays the scan log.
Click your browser’s Back button to return to the Scan Progress page.
Viewing history for all scansYou can quickly browse the scan history for your entire NeXpose deployment by clicking the Scan History link on the Administration page.
The interface displays the Scan History page, which lists all scans, plus the total number of scanned assets, discovered vulnerabilities, and other information pertaining to each scan. You can click the date link in the Completed column to view details about any scan.
NeXpose User’s Guide 32

Enterprise Edition
Working with data from scansThe NeXpose Security Console interface provides several tools for viewing and managing vulnerability and asset data gathered during scans. This chapter contains information about performing the following activities:
• drilling down to view asset data by different categories
• creating asset groups to control who sees what asset data
• viewing vulnerabilities and risk-related metrics
• creating vulnerability exceptions, which prevent vulnerabilities from appearing in reports
• creating vulnerability remediation tickets
Viewing assets
While it is easy to view information about scanned assets, it is a best practice to create asset groups to control which NeXpose users can see which asset information in your organization. See Managing and creating asset groups in the NeXpose Administrator’s Guide.
You can view network assets by various categories:
• sites to which they are assigned
• asset groups to which they are assigned
• operating systems that they are running
• services that they are running
• software that they are running
To view assets, click the Assets tab on the console interface. The console displays the Assets page. Click the View link for the category by which you would like to see the assets organized.
Viewing assets by sitesTo view assets by sites to which they have been assigned, click the View link next to Sites. The console displays the Sites page.
Charts and graphs at the top of the Sites page provide a statistical overview of sites, including risks and vulnerabilities. From this page you can create a new site. See Setting up sites and running scans on page 13.
If a scan is in progress for any site, a column labeled Scan Status appears in the table. To view information about that scan, click the Scan in progress link. If no scans are in progress, a column labeled Last Scan appears in the table. Click the date link in the Last Scan column for any site to view information about the most recently completed scan for that site.
Click the link for any site in the Site Listing pane to view its assets. The console displays a page for that site, including recent scan information, statistical charts and graphs, and a list of assets. On this page, you can view important secu-rity-related information about each asset to help you prioritize remediation projects: the number of available exploits, the number of vulnerabilities, and the risk score.
From this page, you can manage site assets and create site-level reports. See Working with reports on page 55. You also can start a new scan. See Setting up sites and running scans on page 13.
NOTE: You will see an exploit count of 0 for assets that were scanned prior to the January 29, 2010, NeXpose release, which includes the
Exploit Exposure feature. This does not necessarily mean that these assets do not have any available exploits. It means that they were
scanned before the feature was available in NeXpose. For more information, see Appendix B Using Exploit Exposure in the NeXpose Admin-
istrator’s Guide.
NeXpose User’s Guide 33

Enterprise Edition
To view information about an asset listed in the Device Listing pane, click on the link for that asset.
The console displays a page for that asset. On this page, you can view any reported vulnerabilities and any vulnerabili-ties excluded from reports. You can also view information about software, services, policy listings, databases, files, and directories on that asset as discovered by NeXpose. Finally, you can view any users or groups associated with the asset.
Finally, you can view any asset fingerprints. Fingerprinting is a set of methods by which NeXpose identifies as many details about the asset as possible. By inspecting properties such as the specific bit settings in reserved areas of a buffer, the timing of a response, or a unique acknowledgement interchange, NeXpose can identify indicators about the asset’s hardware and operating system.
From this page, you can run a scan or create a report for the device. See Working with reports on page 55. In the Vul-nerability Listing pane, you can open a ticket for tracking the remediation of the vulnerabilities. See Using tickets on page 53.
For each discovered vulnerability with an associated exploit NeXpose displays an exploit link. Click this link to open a box that displays descriptions about all available exploits, their required skill levels, and their online sources. The Exploit Database is an archive of exploits and vulnerable software. If a Metasploit exploit is available, NeXpose dis-
plays the TM icon and a link to a Metasploit module that provides detailed exploit information and resources.
There are three levels of exploit skill: Novice, Intermediate, and Expert. These map to Metasploit's seven-level exploit ranking. For more information, see the Metasploit Framework page (http://www.metasploit.com/redmine/projects/framework/wiki/Exploit_Ranking).
• Beginner maps to Great through Excellent.
• Intermediate maps to Normal through Good.
• Expert maps to Manual through Low through Average.
An administrative change to your network, such as new credentials, may change the level of access that an asset per-mits during its next scan. If NeXpose previously discovered certain vulnerabilities because an asset permitted greater access, that vulnerability data will no longer be available due to diminished access. This may result in a lower number of reported vulnerabilities, even if no remediation has occurred. Using baseline comparison reports to list differences between scans may yield incorrect results or provide more information than necessary because of these changes. Make sure that your assets permit the highest level of access required for the scans you are running to prevent these problems.
Viewing assets by groupsTo view assets by groups to which they have been assigned, click the View link next to Groups on the Assets page. The console displays the Groups page.
Charts and graphs at the top of the Groups page provide a statistical overview of asset groups, including risks and vul-nerabilities. From this page you can create a new asset group. See Creating asset groups in the NeXpose Administrator’s Guide.
Click the link for any site in the Site Listing pane to view the assets it includes. The console displays a page for that site, including recent scan information, statistical charts and graphs, and a list of assets. From this page, you can man-age and add site assets, create site-level reports, start a new scan, and view scan history. You also can view a list of assets in the Device Listing pane. Click on the link for any asset to view information about that specific asset
NeXpose User’s Guide 34
Enterprise Edition
Click the link for any group in the Asset Group Listing pane to view its assets. The console displays a page for that asset group, including statistical charts and graphs and a list of assets. In the Device Listing pane, you can view the scan, risk, and vulnerability information about any asset. You can click a link for the site to which the asset belongs to view infor-mation about the site. You also can click the link for any asset address to view information about it.
Viewing assets by operating systemTo view assets by the operating systems running on them, click the View link next to Operating Systems on the Assets page. The console displays the Operating Systems page, which lists all the operating systems running in your network and the number of instances of each operating system. Click the link for an operating system to view the assets that are running it.
The console displays a page that lists all the assets running that operating system. You can view scan, risk, and vulner-ability information about any asset. You can click a link for the site to which the asset belongs to view information about the site. You also can click the link for any asset address to view information about it.
Viewing assets by servicesTo view assets by the services they are using, click the View link next to Services on the Assets page. The console dis-plays the Services page, which lists all the services running in your network and the number of the number of instances of each service. Click the link for a service to view the assets that are running it.
The console displays a page for that service. A description of the service appears in the top pane of the page. In the Discovered Instances pane, you can view a list of addresses, names, and ports for assets running the service, as well as products that are using them. You also can click the link for any asset address or name to view information about it.
Viewing assets by softwareTo view assets by the software running on them, click the View link next to Software on the Assets page. The console displays the Software page, which lists any software that NeXpose found running in your network, the number of instances of program, and the type of program. Click the link for a program to view the assets that are running it.
NeXpose only lists software for which it has credentials to scan. An exception to this would be when NeXpose discov-ers a vulnerability that permits root/admin access.
The console displays a page that lists all the assets running that program. You can view scan, risk, and vulnerability information about any asset. You can click a link for the site to which the asset belongs to view information about the site. You also can click the link for any asset address or name to view information about it.
Using asset groups to your advantage
Asset groups provide different ways for members of your organization to grant access to, view, and report on, asset information. You can use the same grouping principles that you use for sites, create subsets of sites, or create groups that include assets from any number of different sites.
Asset groups also have a useful security function in that they limit what member users can see, and dictate what non-member users cannot see. The asset groups that you create will influence the types of roles and permissions you assign to users, and vice-versa.
One use case illustrates how asset groups can “spin off” organically from sites. A bank purchases NeXpose with a fixed-number IP address license. The network topology includes one head office and 15 branches, all with similar “cookie-cutter” IP address schemes. The IP addresses in the first branch are all 10.1.1.x.; the addresses in the second branch are 10.1.2.x; and so on. For each branch, whatever integer equals .x is a certain type of asset. For example .5 is always a server.
NeXpose User’s Guide 35
Enterprise Edition
The security team scans each site and then “chunks” the information in various ways by creating reports for specific asset groups. It creates one set of asset groups based on locations so that branch managers can view vulnerability trends and high-level data. The team creates another set of asset groups based on that last integer in the IP address. The users in charge of remediating server vulnerabilities will only see “.5” assets. If the “x” integer is subject to more granular divisions, the security team can create more finally specialized asset groups. For example .51 may correspond to file servers, and .52 may correspond to database servers.
Another approach to creating asset groups is categorizing them according to membership. For example, you can have an “Executive” asset group for senior company officers who see high-level business-sensitive reports about all the assets within your enterprise. You can have more technical asset groups for different members of your security team, who are responsible for remediating vulnerabilities on specific types of assets, such as databases, workstations, or Web servers.
Comparing dynamic and static asset groups
One way to think of an asset group is as a snapshot of your environment. This snapshot provides important informa-tion about your assets and the security issues affecting them:
• their network location
• the operating systems running on them
• the number of vulnerabilities discovered on them
• whether exploits exist for any of the vulnerabilities
• their risk scores
With NeXpose, you can create two different kinds of “snapshots”. The dynamic asset group is a snapshot that poten-tially changes with every scan; and the static asset group is an unchanging snapshot. Each type of asset group can be useful depending on your needs.
Using dynamic asset groupsA dynamic asset group contains scanned assets that meet a specific set of search criteria. You define these criteria with asset search filters, such as IP address range or hosted operating systems. The list of assets in a dynamic group is sub-ject to change with every scan. In this regard, a dynamic asset group differs from a static asset group. See Creating and editing static asset groups on page 43. Assets that no longer meet the group's Asset Filter criteria after a scan will be removed from the list. Newly discovered assets that meet the criteria will be added to the list.
Note that the list does not change immediately, but after NeXpose completes a scan and integrates the new asset infor-mation in the database.
An ever-evolving snapshot of your environment, a dynamic asset group allows you to track changes to your live asset inventory and security posture at a quick glance, and to create reports based on the most current data. For example, you can create a dynamic asset group of assets with a vulnerability that was included in a Patch Tuesday bulletin. Then, after applying the patch for the vulnerability, you can run a scan and view the dynamic asset group to determine if any assets still have this vulnerability. If the patch application was successful, the group theoretically should not include any assets.
You can create dynamic asset groups using the filtered asset search. See Performing filtered asset searches on page 37.
NeXpose User’s Guide 36

Enterprise Edition
You grant user access to dynamic asset groups through the User Configuration panel. See Managing and creating user accounts in the NeXpose Administrator’s Guide.
Using static asset groupsA static asset group contains assets that meet a set of criteria that you define according to your organization’s needs. Unlike with a dynamic asset group, the list of assets in a static group does not change unless you alter it manually.
Static asset groups provide useful time-frozen views of your environment that you can use for reference or comparison. For example, you may find it useful to create a static asset group of Windows servers and create a report to capture all of their vulnerabilities. Then, after applying patches and running a scan for patch verification, you can create a baseline report to compare vulnerabilities on those same assets before and after the scan.
You can create static asset groups using either of two options:
• the Group Configuration panel; see Creating and editing static asset groups on page 43
• the filtered asset search; see Performing filtered asset searches on page 37
Performing filtered asset searches
When dealing with networks of large numbers of assets, you may find it necessary or helpful to concentrate on a spe-cific subset. The filtered asset search feature allows you to search for assets based on criteria that can include IP address, site, operating system, software, services, vulnerabilities, and asset name. You can then save the results as a dynamic asset group for tracking and reporting purposes. See Viewing, using, and saving search results on page 42.
Using search filters, you can find assets of immediate interest to you. This helps you to focus your remediation efforts and to manage the sheer quantity of assets running on a large network.
To start a filtered asset search:
1. Click the Asset Filter icon, which appears next to the Search box in the Web interface. The Fil-tered asset search page appears.
OR
2. Click the Administration tab to go to the Administration page, and then click the dynamic link next to Asset Groups.
OR
3. If you are on the Asset Groups page already, click New Dynamic Asset Group.
NOTE: Once a user has access to a dynamic asset group, he or she will have access to newly discovered assets that meet group criteria
regardless of whether or not those assets belong to a site to which the user does not have access. For example, suppose you have cre-
ated a dynamic asset group of Windows XP workstations. You grant two users, Joe and Beth, access to this dynamic asset group. You
scan a site to which Beth has access and Joe does not. The scan discovers 50 new Windows XP workstations. Joe and Beth will both be
able to see the 50 new Windows XP workstations in the dynamic asset group list and include them in reports, even though Joe does not
have access to the site that contains these same assets. When managing user access to dynamic asset groups, you need to assess how
these groups will affect site permissions. To ensure that a dynamic asset group does not include any assets from a given site, use the site
filter. See Filter by site name on page 39.
NOTE: Performing a filtered asset search is the first step in creating a dynamic asset group.
NeXpose User’s Guide 37

Enterprise Edition
Configuring filters
A search filter allows you to choose the attributes of the assets that you are interested in. You can add multiple filters for more precise searches. For example, you could create filters for a given IP address range, a particular operating sys-tem, and a particular site, and then combine these filters to return a list of all the assets that simultaneously meet all the specified criteria. Using fewer filters typically increases the number of search results.
You can combine filters so that the search result set contains only the assets that meet all of the criteria in all of the fil-ters (leading to a smaller result set). Or you can combine filters so that the search result set contains any asset that meets all of the criteria in any given filter (leading to a larger result set). See Combining filters on page 41.
Eight asset search filters are available:
• IP address range
• Site name
• Operating system name
• Software name
• Service name
• Vulnerability name
• Asset name
• Host type
To select the first filter in the Filtered asset search panel, use the first drop down list. When you select a filter, the con-figuration options, operators, for that filter dynamically become available. Select the appropriate operator.
To add filters, use the + button. To remove filters, use the - button.
To remove all the filters, click the Reset button.
Filtering by IP address rangeThe IP address range filter lets you specify a range of IP addresses, so that the search returns a list of assets that are either in the IP range, or not in the IP range. It works with the following operators:
• is returns all assets with an IP address that falls within the IP address range.
• is not returns all assets whose IP addresses do not fall into the IP address range.
When you select the IP address range filter, you will see two blank fields separated by the word to. You use the left field to enter the start of the IP address range, and use the right to enter the end of the range.
The format for the IP addresses is a “dotted quad.” Example:
192.168.2.1 to 192.168.2.254
NeXpose User’s Guide 38

Enterprise Edition
Filter by site nameThe site name filter lets you search for assets based on the name of the site to which the assets belong.
This is an important filter to use if you want to control users’ access to newly discovered assets in sites to which users do not have access. See the note in Using dynamic asset groups on page 36.
The filter applies a search string to site names, so that the search returns a list of assets that either belong to, or do not belong to, the specified sites. It works with the following operators:
• is returns all assets that belong to the selected sites. You select one or more sites from the adja-
cent list.
• is not returns all assets that do not belong to the selected sites. You select one or more sites from
the adjacent list.
Filter by operating system nameThe operating system name filter lets you search for assets based on their hosted operating systems. Depending on the search, you choose from a list of operating systems, or enter a search string. The filter returns a list of assets that meet the specified criteria. It works with the following operators:
• contains returns all assets running on the operating system whose name contains the characters
specified in the search string. You type the search string in the adjacent field. You can use an
asterisk (*) as a wildcard character.
• does not contain returns all assets running on the operating system whose name does not contain
the characters specified in the search string. You type the search string in the adjacent field. You
can use an asterisk (*) as a wildcard character.
Filter by software nameThe software name filter lets you search for assets based on software installed on them. The filter applies a search string to software names, so that the search returns a list of assets that either runs or does not run the specified software. It works with the following operators:
• contains returns all assets with software installed so that the search returns the software's name
contains the search string. You can use an asterisk (*) as a wildcard character.
• does not contain returns all assets that do not have software installed so that the search returns
the software's name contains the search string. You can use an asterisk (*) as a wildcard
character.
After you select an operator, you type the search string for the software name in the blank field.
Filter by service nameThe service name filter lets you search for assets based on the services running on them. The filter applies a search string to service names, so that the search returns a list of assets that either have or do not have the specified service. It works with the following operators:
• contains returns all assets running a service whose name contains the search string. You can use
an asterisk (*) as a wildcard character.
• does not contain returns all assets that do not run a service whose name contains the search string.
You can use an asterisk (*) as a wildcard character.
After you select an operator, you type a search string for the service name in the blank field.
NeXpose User’s Guide 39

Enterprise Edition
Filter by vulnerability nameThe vulnerability name filter lets you search for assets based on the vulnerabilities that have been flagged on them dur-ing scans. This is a useful filter to use for verifying patch applications, or finding out at a quick glance how many, and which, assets have a particular high-risk vulnerability.
The filter applies a search string to vulnerability names, so that the search returns a list of assets that either have or do not have the specified service. It works with the following operators:
• contains returns all assets with a vulnerability whose name contains the search string. You can
use an asterisk (*) as a wildcard character.
• does not contain returns all assets that do not have a vulnerability whose name contains the search
string. You can use an asterisk (*) as a wildcard character.
After you select an operator, you type a search string for the vulnerability name in the blank field.
Filter by asset nameThe asset name filter lets you search for assets based on the asset name. The filter applies a search string to the asset names, so that the search returns assets that meet the specified criteria. It works with the following operators:
• is returns all assets whose names match the search string exactly.
• is not returns all assets whose names do not match the search string.
• starts with returns all assets whose names begin with the same characters as the search string.
• ends with returns all assets whose names end with the same characters as the search string
• contains returns all assets whose names contain the search string anywhere in the name.
• does not contain returns all assets whose names do not contain the search string.
After you select an operator, you type a search string for the asset name in the blank field.
Filter by host typeThe Host type filter lets you search for assets based on the type of host system, where assets can be any one or more of the following types:
• Bare metal is physical hardware.
• Hypervisor is a host of one or more virtual machines.
• Virtual machine is an all-software guest of another computer.
• Unknown is a host of an indeterminate type.
You can use this filter to track, and report on, security issues that are specific to host types. For example, a hypervisor may be considered especially sensitive because if it is compromised then any guest of that hypervisor is also at risk.
The filter applies a search string to host types, so that the search returns a list of assets that either match, or do not match, the selected host types. It works with the following operators:
• is returns all assets that match the host type that you select from the adjacent drop down list.
• is not returns all assets that do not match the host type that you select from the adjacent drop
down list.
You can combine multiple host types in your criteria to search for assets that meet multiple criteria. For example, you can create a filter for “is Hypervisor” and another for “is virtual machine” to find all-software hypervisors.
NeXpose User’s Guide 40

Enterprise Edition
Combining filters
If you create multiple filters, you can have NeXpose return a list of assets that match all the criteria specified in the fil-ters, or a list of assets that match any of the criteria specified in the filters. You can make this selection in a drop down list at the bottom of the Search Criteria panel.
The difference between All and Any is that the All setting will only return assets that match the search criteria in all of the filters, whereas the Any setting will return assets that match any given filter. For this reason, a search with All selected typically returns fewer results than Any.
For example, suppose you are scanning a site with 10 assets. Five of the assets run Linux, and their names are linux01, linux02, linux03, linux04, and linux05. The other five run Windows, and their names are win01, win02, win03, win04, and win05.
Suppose you create two filters. The first filter is an operating system filter, and it returns a list of assets that run Win-dows. The second filter is an asset filter, and it returns a list of assets that have “linux” in their names.
If you perform a filtered asset search with the two filters using the All setting, the search will return a list of assets that run Windows and have “linux” in their asset names. Since no such assets exist, there will be no search results. How-ever, if you use the same filters with the Any setting, the search will return a list of assets that run Windows or have “linux” in their names. Five of the assets run Windows, and the other five assets have “linux” in their names. There-fore, the result set will contain all of the assets.
NeXpose User’s Guide 41

Enterprise Edition
Viewing, using, and saving search resultsTo save, use, or view search results:
1. After you have configured your filters, click Search.
NeXpose displays a table of assets that meet the filter criteria.
2. To export the results to a comma-separated values (CSV) file that you can view and manipulate in a spreadsheet program, Click the Export to CSV link at the bottom of the table.
3. If you have permissions to create asset groups, you can save the results as an asset group.
a. Click Create Asset Group. NeXpose displays controls for creating an asset group.
b. Select either the Dynamic or Static option, depending on what kind of asset group you
want to create. See Comparing dynamic and static asset groups on page 36.
c. Enter a unique asset group name and description.
You must give users access to an asset group in order for them to be able view assets or per-
form asset-related operations, such as reporting, with assets in that group.
d. Click Add Users. In the Add Users dialog box, select the check box for every user account
that you want to add to the access list.
OR
e. (Optional) Select the check box in the top row to add all users.
f. Click OK.
g. In the bottom-right corner of the Asset Group configuration area, click Save. The new
group will include the assets listed in the search results table.
All asset groups appear in the Asset Group Listing table on the Assets :: Asset Groups page.
Changing criteria for inclusion in a dynamic asset groupYou can change criteria for membership in a dynamic asset group at any time.
1. Go to the Assets :: Asset Groups page by one of the following routes:
2. Click the Administration tab to go to the Administration page, and then click the manage link next to Groups.
OR
3. Click the Assets tab to go to the Assets page, and then click the view link next to Groups.
4. Find a dynamic asset group that you want to modify, and click the Edit icon.
OR
NOTE: Only Global Administrators or users with the Manage Group Assets permission can create asset groups, so only these users can
save Asset Filter search results.
NOTE: You must be a Global Administrator or have Manage Asset Group Access permission to add users to an asset group.
NOTE: If this is a dynamic asset group, the asset list is subject to change with every scan. See Using dynamic asset groups on page 36.
NeXpose User’s Guide 42

Enterprise Edition
5. Click the link for the name of the desired asset group. NeXpose displays the page for that group. You can either click the Edit Asset Group link or click the View Asset Filter link to review a summary of filter criteria and then click the Edit Asset Group button.
Any of these approaches causes NeXpose to display the Filtered asset search panel with the filters set for the most recent asset search.
6. Change the filters according to your preferences, and run a search. See Performing filtered asset searches on page 37.
7. Click Save.
Creating and editing static asset groups
Go to the Assets :: Asset Groups page by one of the following routes:
1. Click the Administration tab to go to the Administration page, and then click the manage link next to Groups.
OR
2. Click the Assets tab to go to the Assets page, and then click the view link next to Groups.
3. To create a new static asset group, click the New Static Asset Group button.
4. To edit a static asset group, click the Edit icon for any group listed with a static asset group icon.
NeXpose displays the Asset Group Configuration panel. The process for editing an existing group is the same as the process for creating a group. See Configuring general attributes for a static asset group on page 43.
Configuring general attributes for a static asset group1. On the Asset Groups page, click the New Static Asset Group button. Or click the Create button
next to Asset Groups on the Administration page. The console displays the General page of the Asset Group Configuration panel.
2. Type a group name and description in the appropriate fields.
3. To save the new asset group information, click the Save button.
Adding assets to a static asset groupIf your NeXposedatabase contains a large number of scanned assets, you can save time by searching for assets that meet specific criteria for inclusion in your asset group.
1. Go to the Assets page of the Asset Group Configuration panel.
2. The console displays a page with search filters. Use any of these filters to find assets that certain criteria, then click Display matching assets to run the search. For example, you can select all of the assets within an IP address range that run on a particular operating system.
OR
3. You can simply click Display all assets, which is convenient if your NeXposedatabase contains a small number of assets.
NOTE: Only global administrators can create asset groups.
NOTE: You can only create an asset group after running an initial scan of assets that you wish to include in that group.
NOTE: There may be a delay if the search returns a very large number of assets.
NeXpose User’s Guide 43

Enterprise Edition
4. Select the assets you wish to add to the asset group. To include all assets, select the check box in the header row.
5. Click the Save button. The assets appear on the Assets page.
6. To save the new asset group information, click the Save button, which appears on every page of the panel.
Working with vulnerabilities
Every vulnerability that NeXpose discovers in the scanning process appears in the NeXpose vulnerability database. This extensive, full-text, searchable database also stores information on patches, downloadable fixes, and reference content about security weaknesses. NeXpose keeps the database current through a subscription service that maintains and updates vulnerability definitions and links. NeXpose contacts this service for new information every six hours.
The database has been certified to be compatible with the MITRE Corporation's Common Vulnerabilities and Expo-sures (CVE) index, which standardizes the names of vulnerabilities across diverse security products and vendors. The index rates vulnerabilities according to MITRE's Common Vulnerabilities Scoring System (CVSS) Version 2.
A NeXpose algorithm computes the CVSS score based on ease of exploit, remote execution capability, credentialed access requirement, and other criteria. The score, which ranges from 1.0 to 10.0, is used in Payment Card Industry (PCI) compliance testing. For more information about CVSS scoring, go to the FIRST Web site (http://www.first.org/cvss/cvss-guide.html).
Viewing active vulnerabilitiesViewing vulnerabilities and their risk scores helps you to prioritize remediation projects. You also can find out which vulnerabilities have exploits available, enabling you to verify those vulnerabilities. See Appendix B: Using Exploit Expo-sure in the NeXpose Administrator’s Guide.
Click the Vulnerabilities tab that appears on every page of the console interface.
The console displays the Vulnerabilities page. You can change the sorting criteria by clicking any of the column head-ings in the Vulnerability Listing page.
The Vulnerability column lists the name of each vulnerability.
To the left of Vulnerability column heading is a Microsoft Excel icon. You can export the vulnerability list to a Micro-soft Excel file by clicking this icon. You must be running Internet Explorer and have Active X controls enabled and Microsoft Excel installed.
For each discovered vulnerability with an associated exploit NeXpose displays an exploit link. Click this link to open a box that displays descriptions about all available exploits, their required skill levels, and their online sources. The Exploit Database is an archive of exploits and vulnerable software. If a Metasploit exploit is available, NeXpose dis-
plays the TM icon and a link to a Metasploit module that provides detailed exploit information and resources.
TIP: You can repeat the asset search to include multiple sets of search results in an asset group. You will need to save a set of results
before proceeding to the next results. If you do not save a set of selected search results, the next search will clear that set.
NOTE: When you use this asset selection feature to create a new asset group, you will not see any assets displayed. When you use this
asset selection feature to edit an existing report, you will see the list of assets that you selected when you created, or most recently
edited, the report.
NOTE: The Vulnerabilities page list all the vulnerabilities for assets that the currently logged-on user is authorized to see, depending on
that user's permissions. Since global administrators have access to all assets in your organization, they will see all the vulnerabilities in
the database.
NeXpose User’s Guide 44
Enterprise Edition
There are three levels of exploit skill: Novice, Intermediate, and Expert. These map to Metasploit's seven-level exploit ranking. For more information, see the Metasploit Framework page (http://www.metasploit.com/redmine/projects/framework/wiki/Exploit_Ranking).
• Beginner maps to Great through Excellent.
• Intermediate maps to Normal through Good.
• Expert maps to Manual through Low through Average.
The CVSS Score column lists the score for each vulnerability.
The Published On column lists the date when information about each vulnerability became available.
The Risk column lists the risk score that NeXpose calculates, indicating the potential danger that each vulnerability poses to an attacker exploits it. NeXpose provides two risk scoring models, which you can configure. See Selecting a model for calculating risk scores in the NeXpose Administrator's Guide. The risk model you select controls the scores that appear in the Risk column. To learn more about risk scores and how they are calculated, see the PCI, CVSS, and risk scoring FAQs, which you can access in the NeXpose Support page.
NeXpose assigns each vulnerability a severity level, which is listed in the Severity column. The three severity levels—Critical, Severe, and Moderate—reflect how much risk a given vulnerability poses to your network security. NeXpose uses various factors to rate severity, including CVSS scores, vulnerability age and prevalence, and whether exploits are available. See the PCI, CVSS, and risk scoring FAQs, which you can access in the NeXpose Support page.
0 to 3 = Moderate
3 to 7 = Severe
7 to 10 = Critical
The Instances column lists the number the total number of instances of that vulnerability in your site. If you click the link for the vulnerability name, you can view which specific assets are affected by the vulnerability. See Viewing vulner-ability details on page 45.
The SANS column displays a SANS Top 20 logo for any vulnerability that appears on the list for that service.
You can click the icon in the Exclude column for any listed vulnerability to exclude that vulnerability from a report.
Viewing vulnerability detailsClick the link for any vulnerability listed on the Vulnerabilities page to view information about it. The console displays a page for that vulnerability. At the top of the page is a description of the vulnerability, its severity level and CVSS rat-ing.
Below these items is a table listing each affected asset, port, and the site on which a scan reported the vulnerability. You can click on the link for the device name or address to view all of its vulnerabilities. On the device page, you can create a ticket for remediation. See Using tickets on page 53. You also can click the site link to view information about the site.
The Port column in the Affected Assets table lists the port that NeXpose used to contact the affected service or software during the scan. The Status column lists a “Vulnerable” status for an asset if NeXpose confirmed the vulnerability. It lists a “Vulnerable Version” status if NeXpose only detected that the asset is running a version of a particular program that is known to have the vulnerability.
DEFINITION: The SysAdmin, Audit, Network, Security (SANS) Institute maintains an Internet security knowledge base from which it pub-
lishes and updates a “Top 20” list of critical security risks. SANS defines these risks as “requiring immediate remediation.”
NOTE: The severity ranking in the Severity column is not related to the severity score in PCI reports.
NeXpose User’s Guide 45
Enterprise Edition
The Proof column lists the method that NeXpose used to detect the vulnerability on each asset. NeXpose uses exploi-tation methods typically associated with hackers, inspecting registry keys, banners, software version numbers, and other indicators of susceptibility.
The Exploits pane lists descriptions of available exploits and their online sources. The Exploit Database is an archive of
exploits and vulnerable software. If a Metasploit exploit is available, NeXpose displays the TM icon and a link to a Metasploit module that provides detailed exploit information and resources.
The References pane, which appears below the Affected Assets pane, lists links to Web sites that provide comprehensive information about the vulnerability. At the very bottom of the page is the Solution pane, which lists remediation steps and links for downloading patches and fixes.
If you wish to query the database for a specific vulnerability, and you know its name, type all or part of the name in the Search box that appears on every page of the console interface, and click the magnifying glass icon. The console dis-plays a page of search results organized by different categories, including vulnerabilities.
Working with vulnerability exceptionsAll discovered vulnerabilities appear in Vulnerabilities Listing table of the security console web interface. Your organi-zation can exclude certain vulnerabilities from appearing in reports or affecting risk scores.
Understanding cases for excluding vulnerabilities
There are several possible reasons for excluding vulnerabilities from reports.
Compensating controls: Network managers may mitigate the security risks of certain vulnerabilities, which, technically, could prevent their organization from being PCI compliant. It may be acceptable to exclude these vulnerabilities from the report under certain circumstances. For example, NeXpose may discover a vulnerable service on an asset behind a firewall because it has credentialed access through the firewall. While this vulnerability could result in the asset or site failing the audit, the merchant could argue that the firewall reduces any real risk under normal circumstances. Addi-tionally, the network may have host- or network-based intrusion prevention systems in place, further reducing risk.
Acceptable use: Organizations may have legitimate uses for certain practices that NeXpose would interpret as vulnerabil-ities. For example, anonymous FTP access may be a deliberate practice and not a vulnerability.
Acceptable risk: In certain situations, it may be preferable not to remediate a vulnerability if the vulnerability poses a low security risk and if remediation would be too expensive or require too much effort. For example, applying a specific patch for a vulnerability may prevent an application from functioning. Re-engineering the application to work on the patched system may require too much time, money, or other resources to be justified, especially if the vulnerability poses minimal risk.
NeXpose User’s Guide 46

Enterprise Edition
False positives: According to PCI criteria, a merchant should be able to report a false positive, which can then be veri-fied and accepted by a Qualified Security Assessor (QSA) or Approved Scanning Vendor (ASV) in a PCI audit. Below are scenarios in which it would be appropriate to exclude a false positive from an audit report. In all cases, a QSA or ASV would need to approve the exception.
• Backporting may cause false positives. For example, an Apache update installed on an older Red
Hat server may produce vulnerabilities that should be excluded as false positives.
• If an exploit reports false positives on one or more assets, it would be appropriate to exclude
these results.
Understanding vulnerability exception permissions
Your ability to work with vulnerability exceptions depends on your permissions. If you do now know what your per-missions are, consult your NeXpose administrator.
Three permissions are associated with the vulnerability exception workflow:
• Submit Vulnerability Exceptions: A user with this permission can submit requests to exclude
vulnerabilities from reports.
• Review Vulnerability Exceptions: A user with this permission can approve or reject requests to
exclude vulnerabilities from reports.
• Delete Vulnerability Exceptions: A user with this permission can delete vulnerability exceptions
and exception requests. This permission is significant in that it is the only way to overturn a vul-
nerability request approval. In that sense, a user with this permission can wield a check and bal-
ance against users who have permission to review requests.
NOTE: In order to comply with federal regulations, such as the Sarbanes-Oxley Act (SOX), it is often critically important to document the
details of a vulnerability exception, such as the personnel involved in requesting and approving the exception, relevant dates, and infor-
mation about the exception.
NeXpose User’s Guide 47

Enterprise Edition
Understanding vulnerability exception status and work flow
Every vulnerability has an exception status, including vulnerabilities that have never been considered for exception. The range of actions you can take with respect to exceptions depends on the exception status, as well as your permissions, as indicated in the following table
If the vulnerability has the following exception status...
...and you have the following permission...
...you can take the following action:
never been submitted for anexception
Submit Exception Request submit an exception request
previously approved and later deleted or expired
Submit Exception Request submit an exception request
under review (submitted, but not approved or rejected)
Review Vulnerability Exceptions approve or reject the request
under review (and submitted by you) recall the exception
under review (submitted, but not approved or rejected)
Delete Vulnerability Exceptions delete the request
approved Review Vulnerability Exceptions view and change the details of the approval, but not overturn the approval
rejected Submit Exception Request submit another exception request
approved or rejected Delete Vulnerability Exceptions delete the exception, thus overturing the approval
NeXpose User’s Guide 48
Enterprise Edition
Understanding different options for exception scope
A vulnerability may be discovered once on a certain asset, or several times on a certain asset. Or the vulnerability may be discovered on hundreds of assets. Before you submit a request for a vulnerability exception, make sure to review how many instances of the vulnerability have been discovered and how many assets are affected. It’s also important to understand the circumstances surrounding each affected asset. You can control the scope of the exception by using one of three options when submitting a request:
• You can create global exception that affects all discovered instances of a vulnerability on all
affected assets. For example, you may have many instances of a vulnerability related to an open
SSH port. However, if in all instances a compensating control is in place, such as a firewall, you
may want to exclude that vulnerability globally.
• You can create an exception for a single asset. For example one of the assets affected by a partic-
ular vulnerability may be located in a DMZ. Or perhaps it only runs for very limited periods of
time for a specific purpose, making it less sensitive.
• You can create an exception for a single instance of a vulnerability. For example, a vulnerability
may be discovered on each of several ports on a server. However, one of those ports is behind a
firewall. You may want to exclude the vulnerability instance that affects that protected port.
Submitting or re‐submitting a request for a global vulnerability exception
A global vulnerability exception means that NeXpose will not report the vulnerability against any asset in your net-work. Only a Global Administrator can submit requests for global exceptions.
1. Locate the vulnerability for which you want to request an exception.
a. Click the Vulnerabilities tab of the security console Web interface.
b. On the Vulnerabilities page, locate the vulnerability in the Vulnerability Listing table.
2. Create and submit the exception request.
a. Look at the Exceptions column for the located vulnerability. This column displays one of
several possible actions. If an exception request has not previously been submitted for that
vulnerability, or if it was submitted and then rejected, the column displays an Exclude link.
Click the link
.
b. A Vulnerability Exception dialog box appears. If an exception request was previously sub-
mitted and then rejected, you can view the reasons for the rejection and the user name of
the reviewer in a note at the top of the box. Select a reason for the exception from the drop-
down list. For information about exception reasons, see Understanding cases for excluding
vulnerabilities on page 46.
c. Enter additional comments. These are especially helpful for the reviewer of your exception
request to understand your reasons or the background context for the request.
d. Click Submit & Approve to have the exception take effect.
OR
e. Click Submit to place the exception under review and have another individual in your
organization review it.
NOTE: If a vulnerability has an action link other than Exclude, see Understanding vulnerability exception status and work flow on page 48.
NOTE: If you select Other as a reason from the drop-down list, additional comments are required.
NOTE: Only a Global Administrator can submit and approve a vulnerability exception.
NeXpose User’s Guide 49

Enterprise Edition
3. Verify the exception (if you submitted and approved it). After you approve an exception, the vulnerability no longer appears in the list on the Vulnerabilities page.
a. Click the Administration tab.
b. On the Administration page, click the Manage link for Vulnerability Exceptions.
c. Locate the exception in the Vulnerability Exception Listing table.
Submitting or re‐submitting an exception request for all instances of a vulnerability on a specific asset
1. Locate the vulnerability for which you want to request an exception.
a. Click the Vulnerabilities tab of the security console Web interface.
b. On the Vulnerabilities page, locate the vulnerability in the Vulnerability Listing table, and
click the link for it.
c. In the Affects table of the vulnerability details page, click the link for the asset that includes
the instances of the vulnerability that you want to have excluded.
d. On the details page of the affected asset, locate the vulnerability in the Vulnerability Listing
table.
2. Create and submit the exception request.
a. Look at the Exceptions column for the located vulnerability. This column displays one of
several possible actions. If an exception request has never been submitted for that vulnera-
bility, or if it was submitted and then denied, the column displays an Exclude link. Click
the link.
b. A Vulnerability Exception dialog box appears. If an exception request was previously sub-
mitted and then rejected, you can view the reasons for the rejection and the user name of
the reviewer in a note at the top of the box. Select a reason for the exception from the drop-
down list. For information about exception reasons, see Understanding cases for excluding
vulnerabilities on page 46.
c. Enter additional comments. These are especially helpful for the reviewer of your exception
request to understand your reasons or the background context for the request.
d. Click Submit. The link in the Exceptions column changes to Under Review.
Submitting or re‐submitting an exception request for a single instance of a vulnerability
When you create an exception for a single instance of a vulnerability, NeXpose will not report the vulnerability against the asset if the device, port, and additional data match.
1. Locate the instance of the vulnerability for which you want to request an exception.
a. Click the Vulnerabilities tab of the security console Web interface.
b. On the Vulnerabilities page, locate the vulnerability in the Vulnerability Listing table, and
click the link for it.
c. On the details page for the vulnerability, locate the affected asset in the in the Affects table.
NOTE: If a vulnerability has an action link other than Exclude, see Understanding vulnerability exception status and work flow on page 48.
NOTE: If you select Other as a reason from the drop-down list, additional comments are required.
NeXpose User’s Guide 50
Enterprise Edition
2. Create and submit the exception request.
a. Look at the Exceptions column for the located asset. This column displays one of several
possible actions. If an exception request has never been submitted for that vulnerability, or
if it was submitted and then denied, the column displays an Exclude link. Click the link.
b. A Vulnerability Exception dialog box appears. If an exception request was previously sub-mitted and then rejected, you can view the reasons for the rejection and the user name of the reviewer in a note at the top of the box. Select a reason for requesting the exception from the drop-down list. For information about exception reasons, see Understanding cases for excluding vulnerabilities on page 46.
c. Enter additional comments. These are especially helpful for the reviewer of your exception request to understand your reasons or the background context for the request.
d. Click Submit. The link in the Exceptions column changes to Under Review.
Recalling an exception request that you submitted
You can recall, or cancel, a vulnerability exception request that you submitted if its status remains under review.
1. Locate the exception request, and verify that it is still under review. The location depends on the scope of the exception. For example, if the exception is for all instances of the vulnerability on a single asset, locate that asset in the Affects table on the details page for the vulnerability. If the link in the Exceptions column is Under review, you can recall it.
2. Recall the request
a. Click the Under Review link.
b. In the Vulnerability Exception dialog box, click Recall. The link in the Exceptions column changes to Under Review.
Reviewing an exception request
Upon reviewing a vulnerability exception request, you can either approve or reject it.
1. Locate the exception request.
a. Click the Administration tab of the security console Web interface.
b. On the Administration page, click the Manage link next to Vulnerability Exceptions.
c. Locate the request in the Vulnerability Exception Listing table.
2. Review the request.
a. Click the Under review link in the Review Status column.
b. In the Review Status dialog box, read the comments by the user who submitted the request and decide whether to approve or reject the request.
c. Enter comments in the Reviewer’s Comments text box. Doing so may be helpful for the submitter.
d. If you want to select an expiration date for the review decision, click the calendar icon and select a date. For example, you may want the exception to be in effect only until a PCI audit is complete.
3. Click Approve or Reject, depending on your decision. The result of the review appears in the Review Status column.
NOTE: If a vulnerability has an action link other than Exclude, see Understanding vulnerability exception status and work flow on page 48.
NOTE: If you select Other as a reason from the drop-down list, additional comments are required.
NOTE: You also can click the top row check box to select all requests and then approve or reject them in one step.
NeXpose User’s Guide 51
Enterprise Edition
Deleting a vulnerability exception or exception request
Deleting an exception is the only way to override an approved request.
1. Locate the exception or exception request.
a. Click the Administration tab of the security console Web interface.
b. On the Administration page, click the Manage link next to Vulnerability Exceptions.
c. Locate the request in the Vulnerability Exception Listing table.
2. Delete the exception or exception request.
a. Select the check box for the located entry.
b. Click the Delete icon. The entry no longer appears in the Vulnerability Exception Listing
table. The affected vulnerability appears in the appropriate vulnerability listing with an
Exclude icon, which means that a user appropriate permission can submit an exception
request for it.
Viewing vulnerability exceptions in the Report Card report
When you generate a report based on the NeXpose default Report Card template, each vulnerability exception appears on the vulnerability list with the reason for its exception.
How vulnerability exceptions appear in XML and CSV formats
Vulnerability exceptions can be important for the prioritization of remediation projects and for compliance audits. Report templates include a section dedicated to exceptions. See Vulnerability Exceptions on page 69. In XML and CSV reports, exception information is also available.
XML: The vulnerability test status attribute will be set to one of the following values for vulnerabilities suppressed due to an exception:
exception-vulnerable-exploited - Exception suppressed exploited vulnerability
exception-vulnerable-version - Exception suppressed version-checked vulnerabil-ity
exception-vulnerable-potential - Exception suppressed potential vulnerability
The exception details are not currently available in the XML Export format.
CSV: The vulnerability result-code column will be set to one of the following values for vulnerabilities suppressed due to an exception. Each code corresponds to results of a vulnerability check:
NeXpose User’s Guide 52
Enterprise Edition
Each code corresponds to results of a vulnerability check:
• ds (skipped, disabled): A check was not performed because it was disabled in the scan template.
• ee (excluded, exploited): A check for an exploitable vulnerability was excluded.
• ep (excluded, potential): A check for a potential vulnerability was excluded.
• er (error during check): An error occurred during the vulnerability check.
• ev (excluded, version check): A check was excluded. It is for a vulnerability that can be identified
because the version of the scanned service or application is associated with known vulnerabili-ties.
• nt (no tests): There were no checks to perform.
• nv (not vulnerable): The check was negative.
• ov (overridden, version check): A check for a vulnerability that would ordinarily be positive
because the version of the target service or application is associated with known vulnerabilities was negative due to information from other checks.
• sd (skipped because of DoS settings): sd (skipped because of DOS settings)—If unsafe checks
were not enabled in the scan template, NeXpose skipped the check because of the risk of caus-ing denial of service (DOS). See Configuring vulnerability check settings in the NeXpose Adminis-trator’s Guide.
• sv (skipped because of inapplicable version): NeXpose did not perform a check because the ver-
sion of the scanned item is not included in the list of checks.
• uk (unknown): An internal issue prevented NeXpose from reporting a scan result.
• ve (vulnerable, exploited): The check was positive. An exploit verified the vulnerability.
• vp (vulnerable, potential): The check for a potential vulnerability was positive.
• vv (vulnerable, version check): The check was positive. The version of the scanned service or
software is associated with known vulnerabilities.
The exception details are not currently available in the CSV export.
API: The NeXpose API does not currently support vulnerability exception management.
Using tickets
You can use the NeXpose ticketing system to manage the remediation work flow and delegate remediation tasks. Each ticket is associated with an asset and contains information about one or more vulnerabilities discovered during the scanning process.
Viewing ticketsClick the Tickets tab to view all active tickets. The console displays the Tickets page.
Click a link for a ticket name to view or update the ticket. See the following section for details about editing tickets. From the Tickets page, you also can click the link for an asset's address to view information about that asset, and open a new ticket.
Creating and updating ticketsThe process of creating a new ticket for an asset starts on the console page that lists details about that asset. You can get to that page by selecting a view option on the Assets page and following the sequence of console pages that ends with asset. See Viewing assets on page 33.
NeXpose User’s Guide 53

Enterprise Edition
Opening a ticket
When you want to create a ticket for a vulnerability, click the Open a ticket button, which appears at the bottom of the Vulnerability Listings pane on the detail page for each asset. See Viewing assets by sites on page 33. The console displays the General page of the Ticket Configuration panel.
On the Ticket Configuration–General page, type name for the new ticket. These names are not unique. They appear in ticket notifications, reports, and the list of tickets on the Tickets page.
The status of the ticket appears in the Ticket State field. You cannot modify this field in the panel. The state changes as the ticket issue is addressed.
Assign a priority to the ticket, ranging from Critical to Low, depending on factors such as the vulnerability level. The priority of a ticket is often associated with external ticketing systems.
Assign the ticket to a user who will be responsible for overseeing the remediation work flow. To do so, select a user name from the drop down list labeled Assigned To. Only accounts that have access to the affected asset appear in the list.
You can close the ticket to stop any further remediation action on the related issue. To do so, click the Close Ticket button on this page. The console displays a box with a drop down list of reasons for closing the ticket. Options include Problem fixed, Problem not reproducible, and Problem not considered an issue (policy reasons). Add any other relevant infor-mation in the dialog box and click the Save button.
Adding vulnerabilities
Go to the Ticket Configuration—Vulnerabilities page.
Click the Select Vulnerabilities... button. The console displays a box that lists all reported vulnerabilities for the asset. You can click the link for any vulnerability to view details about it, including remediation guidance.
Select the check boxes for all the vulnerabilities you wish to include in the ticket, and click the Save button. The selected vulnerabilities appear on the Vulnerabilities page.
Updating ticket history
You can update coworkers on the status of a remediation project, or note impediments, questions, or other issues, by annotating the ticket history. As NeXpose users and administrators add comments related to the work flow, you can track the remediation progress.
1. Go to the Ticket Configuration—History page.
2. Click the Add Comments... button.
The console displays a box, where you can type a comment.
3. Click Save.
The console displays all comments on the History page.
NOTE: If you need to assign the ticket to a user who does not appear on the drop down list, you must first add that user to the associated
asset group.
NeXpose User’s Guide 54

Enterprise Edition
Working with reportsReports allow you to distribute critical security data to stakeholders in your organization who do not have access to the NeXpose Security Console interface. Different export formats also make it possible to integrate NeXpose with exter-nal systems and databases.
Viewing reports in the Web interface
To view existing reports, click the Reports tab that appears on every page of the console interface. The console displays the Reports page. You can see all the reports of which you have ownership. See Selecting assets to be included in the report. A global administrator can see all reports.
The Reports page lists reports by name and most recent report generation date. Report names are unique in NeXpose. You can tailor reports to include all historical scan data or just data from the most recent scan. Also, you can customize NeXpose to generate reports automatically on a schedule or after each scan; or you can manually generate a report by clicking the Generate icon for that report*.
Every time NeXpose writes a new instance of a report, it changes the date in the Most Recent Report column. You can click the link for that date to view the most recent instance of the report. To view all past instances of a report, click its History icon.
You also can configure a report by clicking the Edit icon, or copy a template by clicking the Copy icon. Doing the lat-ter enables you to create modified version of an existing template that incorporates some but not all of the original template's attributes. Whether you click the Edit or Copy icon, the console displays the General page of the Report Configuration panel.
*If you have the process auto-stop feature enabled, and if your NeXpose server is running low on memory, NeXpose will not start generating a report. It will display a message indicating that system resources are insufficient. For more information, see Viewing general Security Console information and enabling auto-stop in theNeXpose Administrator’s Guide.
Creating a new reportReport configuration entails selecting a report template, assets to report on, and distribution options. You may sched-ule automatic reports for generation and distribution after scans or on a fixed calendar timetable; or you may run reports manually.
After you go through all the following configuration steps and click Save, NeXpose will immediately start generating a report, unless you have the process auto-stop feature enabled low system memory. See Viewing reports in the Web inter-face on page 55.
Specifying general report attributes
To create a new report, click the New Report button on the Reports page. The console displays the General page of the Report Configuration panel.
Type a name for the new report. It will be unique in NeXpose.
Select a format for the report.
NOTE: The NeXpose authorization scheme is based on asset names and sites as defined by NeXpose administrators, not IP addresses.
This makes it possible for multiple administrators with RFC1918 addressing to maintain assets with identical IP addresses, if the assets
are listed in multiple sites.
NeXpose User’s Guide 55

Enterprise Edition
Several formats make report data easy for security team members to distribute, open, and read immediately:
• PDF can be opened and viewed in Adobe Reader.
• HTML can be opened and viewed in a Web browser.
• RTF can be opened and viewed in Microsoft Word.
• Text can be opened and viewed in any text editing program.
Other formats are ideal for integration with third-party systems:
• CSV (comma separated value) can be opened in Microsoft Excel, and the data can easily be
manipulated with macros.
• Database Export can be output to Oracle, SQL/Server, and external databases. See Exporting
scan data to external databases on page 60.
• XML Export, also known as “raw XML,” contains all possible data from a scan with minimal
structure. Its contents must be parsed so that other systems can use its information.
• NeXposeTM Simple XML is also a “raw XML” format. It is ideal for integration of scan data
with the Metasploit vulnerability exploit framework. It contains a subset of the data available in
the XML Export format:
• hosts scanned
• vulnerabilities found on those hosts
• services scanned
• vulnerabilities found in those services
• SCAP Compatible XML is also a “raw XML” format that includes Common Platform Enu-
meration (CPE) names for fingerprinted platforms. This format supports compliance with
Security Content Automation Protocol (SCAP) criteria for an Unauthenticated Scanner
product.
• XML arranges data in clearly organized, human-readable XML and is ideal for exporting
to other document formats.
• Qualys* XML Export is intended for integration with the Qualys reporting framework.
*Qualys is a trademark of Qualys, Inc.
NOTE: If you are using the PCI Attestation of Compliance or PCI Executive Summary template or a custom template made with sections
from either of these templates, you can only use the RTF format. These two templates require ASVs to fill in certain sections manually.
NOTE: If you wish to generate PDF reports with Asian-language characters, make sure that UTF-8 fonts are properly installed on your
host computer. PDF reports with UTF-8 fonts tend to be slightly larger in file size.
NOTE: A vulnerability check status code, added with the 4.8 release of NeXpose, indicates that the results of a remote vulnerability check
have been overridden by a local operating system patch check. The characters for code are “ov.”
NeXpose User’s Guide 56

Enterprise Edition
If you wish to use a standard NeXpose template, select one from the drop down list. Click the Browse Templates but-ton to view information about each template. You also can click the Preview icon for any template to view a sample.
• Audit Report provides detailed information about network systems, services, vulnerabilities and
resources.
• Baseline Comparison evaluates scan results against a set of results that you define as a baseline
from a previous scan.
• Executive Overview provides a high-level summary of scan results.
• Highest Risk Vulnerabilities lists the top 10 discovered vulnerabilities and classifies them by risk
level.
• PCI Attestation of Compliance is one of three PCI-mandated report templates to be used by
ASVs for PCI scans as of September 1, 2010. It contains all the information fields that ASVs
must populate in order to demonstrate that a scanned merchant has met PCI criteria. It also
displays the Pass or Fail score for the scan. It is only available in RTF format because ASVs
have to manually fill in certain sections.
• PCI Audit Report (legacy) is one of two reports no longer used by ASVs in PCI scans as of Sep-
tember 1, 2010. It provides detailed scan results, ranking each discovered vulnerability accord-
ing to its Common Vulnerability Scoring System (CVSS) ranking.
• PCI Executive Report (legacy) is one of two reports no longer used by ASVs in PCI scans as of
September 1, 2010. It provides high-level scan information.
• PCI Executive Summary is one of three PCI-mandated report templates to be used by ASVs for
PCI scans as of September 1, 2010. It indicates whether each scanned asset received a Pass or
Fail score. It provides a list of discovered vulnerabilities, remediation solutions, potential excep-
tions, and a space for ASVs to enter special notes. It is only available in RTF format because
ASVs have to manually fill in certain sections.
• PCI Host Details provides granular, sorted scan information about each asset, or host, covered in
a PCI scan.
• SANS Top 20 highlights vulnerabilities that appear on a list compiled by the SANS Institute,
which provides information and security training (www.sans.org).
• Policy Evaluation assesses the compliance of scanned assets with a security policy. This report
requires a credentialed scan with a template for which a policy file has been defined.
• Report Card lists every test that NeXpose has run against an asset and characterizes test results
by “pass” and “fail” grades.
• Remediation Plan limits the report to steps for removing the vulnerability.
• Vulnerability Details is one of three PCI-mandated report templates to be used by ASVs for PCI
scans as of September 1, 2010. It summarizes and provides granular information about each vul-
nerability. It is only available in RTF format because ASVs have to manually fill in certain sec-
tions.
You can use any of these default templates by clicking the link for the template name. The console displays the Report Configuration—General page again. The selected template appears in the drop down list.
Select a time zone for reports from the drop down list. This setting defaults to the local NSC time zone, but allows for the time localization of generated reports.
NOTE: If you are a global administrator, you can copy a template by clicking the Copy icon. Doing so launches the Report Template Con-
figuration panel, which enables you to create a modified version of the template.
NeXpose User’s Guide 57

Enterprise Edition
Selecting assets to be included in the report
1. Select a report owner.
2. Go to the Content page of the Report Configuration panel.
3. If you are a global administrator, you will see a list of users to whom you can assign ownership of the report. Select a report owner. After a report is generated, only a global administrator and the designated report owner can see that report on the Reports page. You also can have a copy of the report stored in the report owner's directory. See Storing reports in report owner directories on page 59.
If you are not a global administrator, you will not see a list of users. You will automatically become the report owner.
4. Select assets to be included in the report.
You can select entire sites or asset groups by clicking the appropriate button, which causes NeXpose to display a list of sites or asset groups. In each case, select the items you wish to include in the report, or select the check box in the header row to include all items.
5. Then click Save. The selected sites or asset groups appear on the Content page.
6. If you want to be more granular about which assets to include in the report, you can select indi-vidual assets by clicking the Select assets... button.
If you click the Select assets... button, the console displays a page with search filters. If your database contains a large number of assets, it is helpful to use these filters to find assets that meet certain criteria. For example, you can select all of the assets within an IP address range that run on a particular operating system. After setting up the search click Display matching assets to run the search.
OR
Simply click Display all assets, which is convenient if your database contains a small number of assets.
7. Select the assets you wish to add to the asset group. To select all assets, select the check box in the header row.
8. Click the Save button.
The assets appear on the Content page.
9. If you wish to use only the most recent scan data in your report, click the check box for that option on the Content page. Otherwise, NeXpose will include all historical scan data in the report.
TIP: These choices are not mutually exclusive. You can combine selections of sites, asset groups, and individual assets.
NOTE: There may be a delay if the search returns a very large number of assets.
TIP: You can repeat the asset search to include multiple sets of search results in a report. You will need to save a set of results before pro-
ceeding to the next results. If you do not save a set of selected search results, the next search will clear that set.
NeXpose User’s Guide 58

Enterprise Edition
Selecting a scan as a baseline
Designating an earlier scan as a baseline for comparison against future scans allows you to track changes in your net-work. Possible changes between scans include newly discovered assets, services and vulnerabilities; assets and services that are no longer available; and vulnerabilities that were mitigated or remediated.
You must select the Baseline Comparison report template in order to be able to define a baseline. See Specifying report attributes.
Go to the Report Configuration—Baseline page. Click the radio button for the first scan ever performed for the site, the most recent scan (previous), or a specific scan date depending on your preference for a baseline. If you prefer a specific date, click the calendar icon to select a date.
Storing reports in report owner directories
When NeXpose generates a report, it stores it in the reports directory on the console host:
[installation_directory]/nsc/htroot/reports/
You can configure NeXpose to also store a copy of the report in a user directory for the report owner. It is a subdirec-tory of the reports folder, and it is given the report owner's user name.
Go to the Report Configuration—Output page. In the text box, specify the directory path to be created off the /reports/[user_name] directory.
You can use string literals, variables, or a combination of these to create a directory path.
Available variables include:
• $(date): the date that the report is created; format is yyyy-MM-dd
• $(time): the time that the report is created; format is HH-mm-ss
• $(user): the report owner's user name
• $(report_name): the name of the report, which was created on the General page of the
Report Configuration panel
After you create the path and run the report, NeXpose creates the report owner's user directory and the subdirectory path that you specified on the Output page. Within this subdirectory will be another directory with a hexidecimal iden-tifier containing the report copy.
For example, if you specify the path windows_scans/$(date), you can access the newly created report at:
reports/[report_owner]/windows_scans/$(date)/[hex_number]/[report_file_name]
Consider designing a path naming convention that will be useful for classifying and organizing reports. This will become especially useful if you store copies of many reports.
Another option for sharing reports is to distribute them via e-mail. Click the Distribution link in the left navigation column to go the Distribution page. See Configuring NeXpose to distribute reports on page 60.
NeXpose User’s Guide 59
Enterprise Edition
Exporting scan data to external databases
If you selected Database Export as your report format, the Report Configuration—Output page contains fields specifi-cally for transferring scan data to a database.
Before you type information in these fields, you must set up a JDBC-compliant database. In Oracle, MySQL, or Microsoft SQL Server create a new database with administrative rights.
1. In the Report Configuration—Output page, select the database type from the drop down list. Type the IP address and port of the database server.
2. Enter the IP address of the database server.
3. If you want to set a server port other than the default, enter it in the appropriate text box.
4. Enter a name for the database.
5. Enter the administrative user ID and password for logging on to that database.
After NeXpose completes a scan, check the database to make sure that the scan data has popu-lated the tables.
Scheduling reports
You can produce a report manually, on demand, or you can configure NeXpose to generate reports automatically on a schedule. Doing the latter is a good idea if you have an asset group containing assets that are assigned to many differ-ent sites, each with a different scan template. Since these assets will be scanned frequently, it makes sense to generate reports automatically.
Go to the Report Configuration—Schedule page. If you wish to produce a report manually, on the spot, click the radio button labeled This time only. If you want NeXpose to generate a report every time it successfully completes a scan of any one asset, click the radio button labeled After each scan.
If you wish to schedule reports for regular time intervals, click the radio button labeled On the following schedule. Click the calendar icon to select a start date. Type a start time in the hour and minute fields to the right of the calendar icon.
To set a time interval for repeating the report, type a value in the field labeled Repeat every and select a time unit. If you wish to run a report only once, type “0” in the field labeled Repeat every.
Configuring NeXpose to distribute reports
You can configure NeXpose to distribute reports via e-mail as a URL link or an attachment. Using a link is recom-mended when recipients have network access, and you are concerned with securing the report data and minimizing the size of the e-mail.
Attachments work better when one or more recipient does not have access to your network or global administrator privileges in NeXpose, and you are not concerned about report security.
1. Go to the Report Configuration—Distribution page. Click the check box labeled Send E-mail.
2. Click a radio button for attaching the report as a URL, an uncompressed file (File), or a zipped file.
NOTE: Recipients of the report as an HTML link must be either global administrators or users who have access to the assets included in
the report. When recipients click the URL link, their browsers will display a logon challenge.
NOTE: Selecting the uncompressed file option is not recommended for reports that consist of multiple files, such as HTML pages with
graphs. If such a report is attached without being zipped, NeXpose will send only the HTML page and not the graph files.
NeXpose User’s Guide 60

Enterprise Edition
If you wish to e-mail reports to NeXpose users with access to the assets included into the report, click the appropriate check box. This is a convenient way to distribute reports automatically to users who are responsible for remediation of vulnerabilities.
3. Type all other recipient e-mail addresses.
4. Type the e-mail address of the sender.
You may require an SMTP relay server for one of several reasons. For example, a firewall may prevent NeXpose from accessing your network's mail server. If you are using an SMTP relay server, type its address in the appropriate field.
If you leave SMTP relay server field blank, NeXpose searches for a suitable mail server for send-ing reports. Also NeXpose regards the mail sender address as the “originator” of e-mailed reports.
5. If you have completed all other configuration steps in the panel, click the Next tab on the Report Configuration—Distribution page to view a summary page. There, you can review the attributes for your new report and then change or save those attributes, or cancel the new report.
Creating a custom report templateThe steps for creating a custom template, as detailed in this section, are the same as those for modifying a standard template.
1. On the Report Configuration—General page, click the New Template button.
2. Or, on the Administration page, click the Create link for Report Templates.
The console displays the Report Template Configuration panel.
3. On the Report Template Configuration—General page, type a name and description for your cus-tom report. The report name is unique in NeXpose.
4. From the drop down list, select a level of technical detail for information to be included in the report.
Go to the Report Sections page and click the Select Sections button. The console displays a box listing sections that you can include in the report. Some of these correspond to types of infor-mation, such as Baseline Comparison, Executive Summary, and Risk Assessment. Other options correspond to features of the report itself, such as Cover Page and Table of Contents.
5. Click the check boxes for sections that you wish to include in the report.
6. Click the Save button. The console displays the Report Template Configuration—Report Sections page listing the selected sections. You can change the order of how the sections appear in the report by clicking the Move Up and Move Down arrows for sections you wish to move.
Three of the available sections have properties that you can edit. If you have selected any of these sections, it appears on the list with an Edit icon.
• Baseline Comparison: You can select the scan date that you wish to use as a baseline.
• Executive Summary: You can type a preamble to begin the report.
• Cover page: You can choose the elements that appear on the cover page, such as title and
scan date.
NOTE: The PCI Attestation of Compliance and PCI Executive Summary templates are only available in RTF format, because they require
ASVs to fill in certain sections manually. ASVs can combine the sections for PCI templates into one custom template for use in PCI scans.
Also, the PCI Attestation of Compliance template is a section unto itself, and is not divided into smaller sections.
NOTE: You must select at least one report section.
NeXpose User’s Guide 61

Enterprise Edition
7. Go to the Report Template Configuration—Settings page. If you want the report to include asset names, as well as IP addresses, click the check box.
8. Click the Save button.
Your new custom report template appears in the Browse Template box, which you can view by clicking the Browse Templates button on the General page of the Report Configuration panel. See Selecting assets to be included in the report.
Customizing a report template with your own logoBy default, a report cover page includes a generic title, the name of the report, the date of the scan that provided the data for the report, and the date that the report was generated. It also may include the Rapid7logo or no logo at all, depending on the report template. See Cover Page on page 65. You can easily customize a cover page to include your own title and logo.
If you want to display your own logo on the cover page, copy the logo file to the designated directory of your NeXpose installation:
In Windows, the directory is [installation_directory]\shared\reportImages.
In Linux, the directory is [installation_directory]/shared/reportimages.
When you are creating or editing a custom report template in the Report Template Configuration panel, go to the Report Sections page.
1. If the cover page section is not listed, click Select sections...
2. In the Select Sections dialog box, select the Cover page check box and click Save.
3. On the Report Sections page, click the Edit icon for Cover page.
NeXpose displays a dialog box for selecting cover page elements. Select the check box for each element that you want to include on the cover page.
If you want to display your own logo on the cover page, enter the name of the logo file, pre-ceded by the word “image:”, in the text box labeled Logo image name. Example: image:file_name.jpg. Do not insert a space between the word “image:” and the file name.
4. If you want to customize the report title, enter a title in the appropriate text box.
5. Click Save.
Selecting report template sectionsCustomizing a report template involves selecting the sections to be included in the template.
The following matrix lists all report sections available in NeXpose, including those that appear in preset report tem-plates and those that you can include in your own customized template. You may find that a given preset template contains all the sections that you require in a particular report, making it unnecessary to create a custom template.
Descriptions of all report sections follow the matrix.
NOTE: NeXpose supports GIF and JPEG logo formats.
NOTE: The PCI Attestation of Compliance and PCI Executive Summary are only available in RTF format because they require ASVs to fill in
certain sections manually. The PCI Attestation of Compliance column is blank, because it is a section unto itself.
NeXpose User’s Guide 62
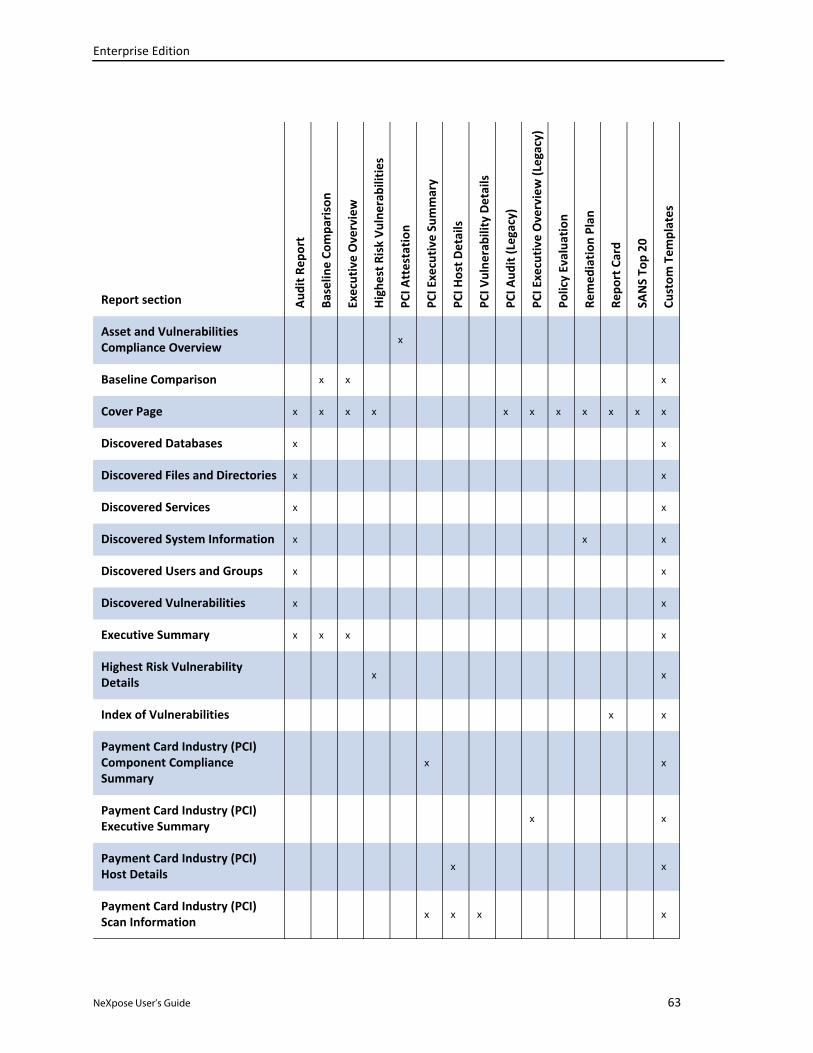
Enterprise Edition
Report section Audit R
eport
Baselin
e Co
mpa
rison
Executive Overview
Highe
st Risk Vu
lnerab
ilitie
s
PCI A
ttestatio
n
PCI Executiv
e Summary
PCI H
ost D
etails
PCI V
ulne
rability Details
PCI A
udit (Legacy)
PCI Executiv
e Overview (Legacy)
Policy Evalua
tion
Remed
iatio
n Plan
Repo
rt Card
SANS To
p 20
Custom
Tem
plates
Asset and Vulnerabilities Compliance Overview
x
Baseline Comparison x x x
Cover Page x x x x x x x x x x x
Discovered Databases x x
Discovered Files and Directories x x
Discovered Services x x
Discovered System Information x x x
Discovered Users and Groups x x
Discovered Vulnerabilities x x
Executive Summary x x x x
Highest Risk Vulnerability Details
x x
Index of Vulnerabilities x x
Payment Card Industry (PCI) Component Compliance Summary
x x
Payment Card Industry (PCI) Executive Summary
x x
Payment Card Industry (PCI) Host Details
x x
Payment Card Industry (PCI) Scan Information
x x x x
NeXpose User’s Guide 63

Enterprise Edition
Payment Card Industry (PCI) Scanned Hosts/Networks
x x
Payment Card Industry (PCI) Special Notes
x x
Payment Card Industry (PCI) Vulnerability Details
x x x
Payment Card Industry (PCI) Vulnerability Synopsis
x x
Payment Card Industry (PCI) Vulnerabilities Noted (sub‐sectioned into High, Medium, and Small)
x x
Policy Evaluation x x x
Remediation Plan x x
Risk Assessment x x
SANS Top 20 Device Listing x x
SANS Top 20 Device Synopsis x x
SANS Top 20 Executive Summary
x x
SANS Top 20 Vulnerability Details
x x
SANS Top 20 Vulnerability Synopsis
x x
Spidered Web Site Structure x x
Table of Contents x x x x x x
Vulnerability Exceptions x x
Report section Audit R
eport
Baselin
e Co
mpa
rison
Executive Overview
Highe
st Risk Vu
lnerab
ilitie
s
PCI A
ttestatio
n
PCI Executiv
e Su
mmary
PCI H
ost D
etails
PCI V
ulne
rability Details
PCI A
udit (Legacy)
PCI Executiv
e Overview (Legacy)
Policy Evalua
tion
Remed
iatio
n Plan
Repo
rt Card
SANS To
p 20
Custom
Tem
plates
NeXpose User’s Guide 64

Enterprise Edition
Baseline Comparison
This section appears when you select the Baseline Report template. It provides a comparison of data between the most recent scan and the baseline, enumerating the following changes:
• discovered assets that did not appear in the baseline scan
• assets that were discovered in the baseline scan but not in the most recent scan
• discovered services that did not appear the baseline scan
• services that were discovered in the baseline scan but not in the most recent scan
• discovered vulnerabilities that did not appear in the baseline scan
• vulnerabilities that were discovered in the baseline scan but not in the most recent scan
Additionally, this section provides suggestions as to why changes in data may have occurred between the two scans. For example, newly discovered vulnerabilities may be attributable to the installation of vulnerable software that occurred after the baseline scan.
Cover Page
The Cover Page includes the name of the site, the date of the scan, and the date that the report was generated. Other display options include a customized title and company logo.
Discovered Databases
This section lists all databases discovered through a scan of database servers on the network.
For information to appear in this section, the scan on which the report is based must meet the following conditions:
• database server scanning must be enabled in the scan template
• NeXpose must have correct database server logon credentials
Vulnerability Report Card by Node
x x x
Vulnerability Report Card Across Networks
x
Vulnerability Test Errors x
Report section Audit R
eport
Baselin
e Co
mpa
rison
Executive Overview
Highe
st Risk Vu
lnerab
ilitie
s
PCI A
ttestatio
n
PCI Executiv
e Su
mmary
PCI H
ost D
etails
PCI V
ulne
rability Details
PCI A
udit (Legacy)
PCI Executiv
e Overview (Legacy)
Policy Evalua
tion
Remed
iatio
n Plan
Repo
rt Card
SANS To
p 20
Custom
Tem
plates
NOTE: In generated reports, this section appears with the heading Trend Analysis.
NeXpose User’s Guide 65
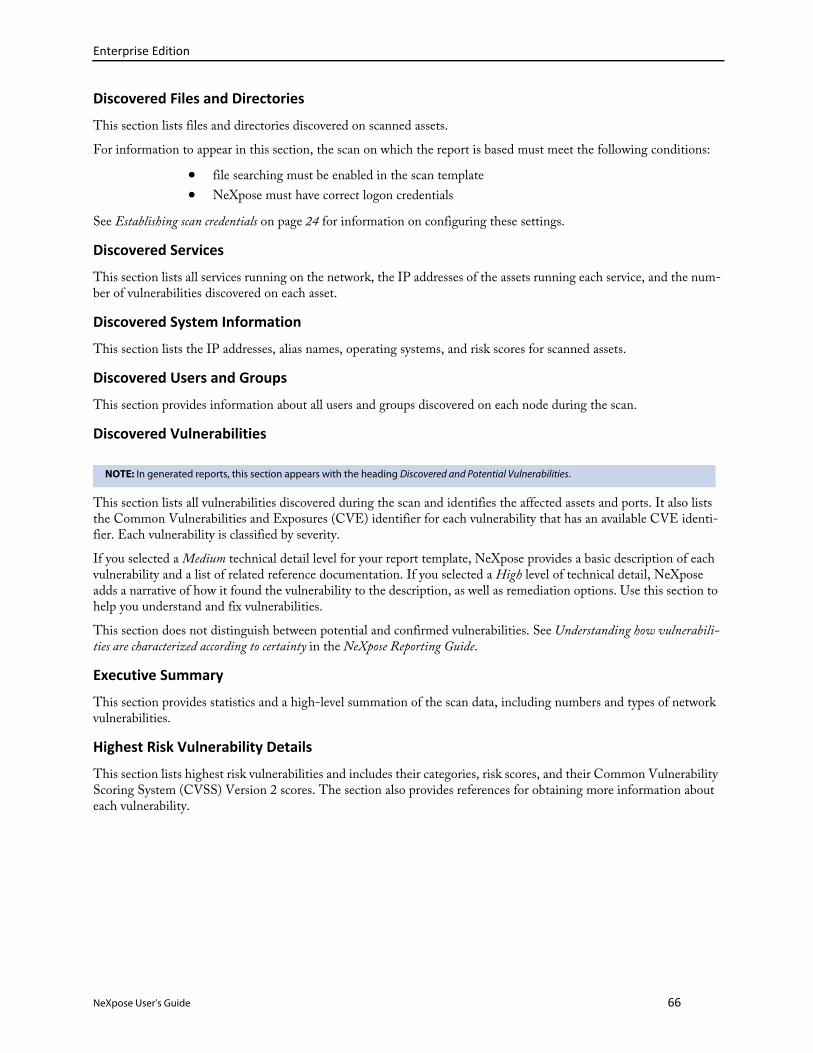
Enterprise Edition
Discovered Files and Directories
This section lists files and directories discovered on scanned assets.
For information to appear in this section, the scan on which the report is based must meet the following conditions:
• file searching must be enabled in the scan template
• NeXpose must have correct logon credentials
See Establishing scan credentials on page 24 for information on configuring these settings.
Discovered Services
This section lists all services running on the network, the IP addresses of the assets running each service, and the num-ber of vulnerabilities discovered on each asset.
Discovered System Information
This section lists the IP addresses, alias names, operating systems, and risk scores for scanned assets.
Discovered Users and Groups
This section provides information about all users and groups discovered on each node during the scan.
Discovered Vulnerabilities
This section lists all vulnerabilities discovered during the scan and identifies the affected assets and ports. It also lists the Common Vulnerabilities and Exposures (CVE) identifier for each vulnerability that has an available CVE identi-fier. Each vulnerability is classified by severity.
If you selected a Medium technical detail level for your report template, NeXpose provides a basic description of each vulnerability and a list of related reference documentation. If you selected a High level of technical detail, NeXpose adds a narrative of how it found the vulnerability to the description, as well as remediation options. Use this section to help you understand and fix vulnerabilities.
This section does not distinguish between potential and confirmed vulnerabilities. See Understanding how vulnerabili-ties are characterized according to certainty in the NeXpose Reporting Guide.
Executive Summary
This section provides statistics and a high-level summation of the scan data, including numbers and types of network vulnerabilities.
Highest Risk Vulnerability Details
This section lists highest risk vulnerabilities and includes their categories, risk scores, and their Common Vulnerability Scoring System (CVSS) Version 2 scores. The section also provides references for obtaining more information about each vulnerability.
NOTE: In generated reports, this section appears with the heading Discovered and Potential Vulnerabilities.
NeXpose User’s Guide 66
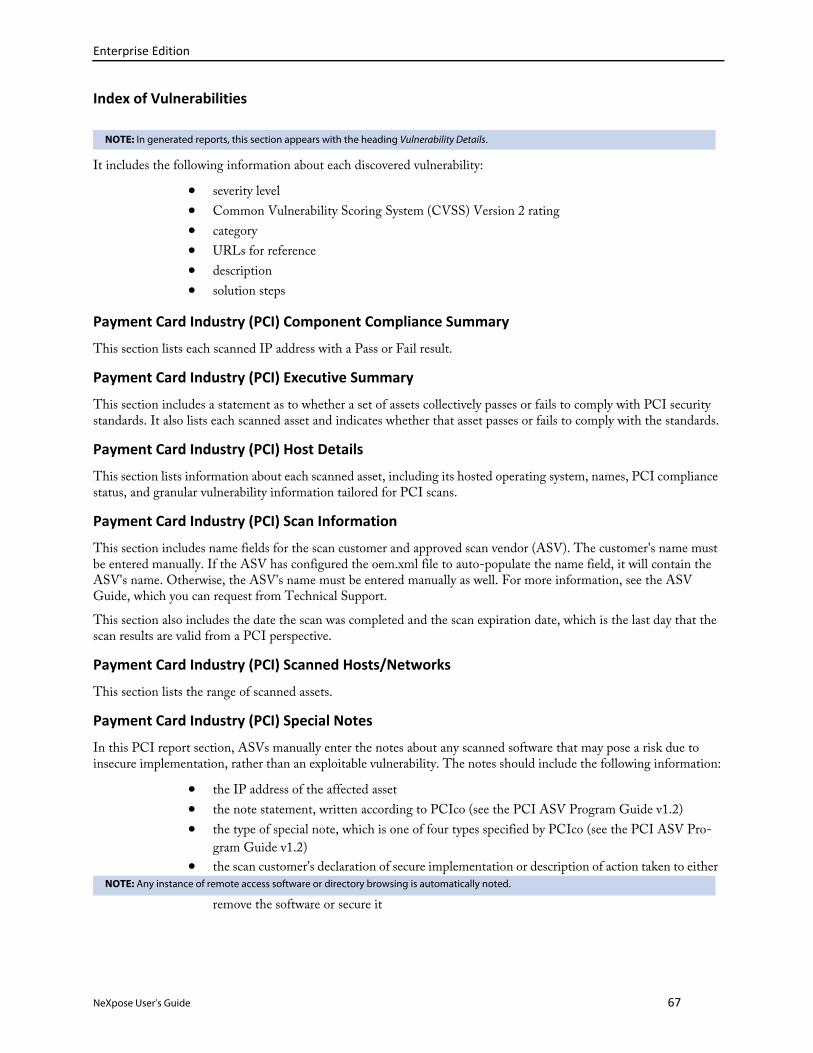
Enterprise Edition
Index of Vulnerabilities
It includes the following information about each discovered vulnerability:
• severity level
• Common Vulnerability Scoring System (CVSS) Version 2 rating
• category
• URLs for reference
• description
• solution steps
Payment Card Industry (PCI) Component Compliance Summary
This section lists each scanned IP address with a Pass or Fail result.
Payment Card Industry (PCI) Executive Summary
This section includes a statement as to whether a set of assets collectively passes or fails to comply with PCI security standards. It also lists each scanned asset and indicates whether that asset passes or fails to comply with the standards.
Payment Card Industry (PCI) Host Details
This section lists information about each scanned asset, including its hosted operating system, names, PCI compliance status, and granular vulnerability information tailored for PCI scans.
Payment Card Industry (PCI) Scan Information
This section includes name fields for the scan customer and approved scan vendor (ASV). The customer's name must be entered manually. If the ASV has configured the oem.xml file to auto-populate the name field, it will contain the ASV's name. Otherwise, the ASV's name must be entered manually as well. For more information, see the ASV Guide, which you can request from Technical Support.
This section also includes the date the scan was completed and the scan expiration date, which is the last day that the scan results are valid from a PCI perspective.
Payment Card Industry (PCI) Scanned Hosts/Networks
This section lists the range of scanned assets.
Payment Card Industry (PCI) Special Notes
In this PCI report section, ASVs manually enter the notes about any scanned software that may pose a risk due to insecure implementation, rather than an exploitable vulnerability. The notes should include the following information:
• the IP address of the affected asset
• the note statement, written according to PCIco (see the PCI ASV Program Guide v1.2)
• the type of special note, which is one of four types specified by PCIco (see the PCI ASV Pro-
gram Guide v1.2)
• the scan customer’s declaration of secure implementation or description of action taken to either
remove the software or secure it
NOTE: In generated reports, this section appears with the heading Vulnerability Details.
NOTE: Any instance of remote access software or directory browsing is automatically noted.
NeXpose User’s Guide 67
Enterprise Edition
Payment Card Industry (PCI) Vulnerabilities Noted
This section includes a table listing each discovered vulnerability with a set of attributes including PCI severity, CVSS score, and whether the vulnerability passes or fails the scan. If an ASV runs a PCI Executive Summary report and has marked a vulnerability for exception, the exception is indicated here. The column labeled Exceptions, False Positives, or Compensating Controls field in the PCI Executive Summary report is auto-populated with the user name of an individ-ual who excluded a given vulnerability.
Payment Card Industry (PCI) Vulnerability Details
This section contains in-depth information about each vulnerability included in a PCI Audit report. It quantifies the vulnerability according to its severity level and its Common Vulnerability Scoring System (CVSS) Version 2 rating.
This latter number is used to determine whether the vulnerable assets in question comply with PCI security standards, according to the CVSS v2 metrics. Possible scores range from 1.0 to 10.0. A score of 4.0 or higher indicates failure to comply, with some exceptions. For more information about CVSS scoring, see How NeXpose implements CVSS in the NeXpose Administrator’s Guide; or go to the FIRST Web site (http://www.first.org/cvss/cvss-guide.html).
Payment Card Industry (PCI) Vulnerability Synopsis
This section lists vulnerabilities by categories, such as types of client applications and server-side software.
Policy Evaluation
This sections lists the results of any policy evaluations, such as whether Microsoft security templates are in effect on scanned systems. Section contents include system settings, registry settings, registry ACLs, file ACLs, group member-ship, and account privileges.
Remediation Plan
This section consolidates information about all vulnerabilities and provides a plan for remediation. The NeXpose database of vulnerabilities feeds the Remediation Plan section with information about patches and fixes, including Web links for downloading them. For each remediation, the database provides a time estimate. Use this section to research fixes, patches, work-arounds, and other remediation measures.
Risk Assessment
This section ranks each node (asset) by its risk index score, which indicates the risk that asset poses to network secu-rity. An asset's confirmed and unconfirmed vulnerabilities affect its risk score.
SANS Top 20 Device Listing
This section includes detailed network information about each scanned asset and lists its vulnerabilities that appear on the current SANS Top 20 vulnerabilities list.
SANS TOP 20 Device Synopsis
This section includes a matrix of network assets and the number of discovered vulnerabilities discovered in each SANS category from the current SANS Top 20 list.
SANS TOP 20 Executive Summary
This section includes high-level network information, summarizing the incidence of SANS Top 20 discovered vulner-abilities on scanned assets that appear on the current SANS Top 20 list.
NOTE: In generated reports, this section appears with the heading Device Details.
NeXpose User’s Guide 68

Enterprise Edition
SANS TOP 20 Vulnerability Details
This section includes exhaustive information about each discovered SANS Top 20 vulnerability that appears on the current SANS Top 20 list. The section also includes, the affected assets, and remediation steps.
SANS Top 20 Vulnerability Synopsis
This section includes a list of all discovered SANS Top 20 vulnerabilities that appear on the current SANS Top 20 list, sorted by various criteria, such as types of client applications, server-side software, and other categories.
Scanned Hosts and Networks
This section lists the assets that were scanned. If the IP addresses are consecutive, NeXpose displays the list as a range.
Table of Contents
This section lists the contents of the report.
Trend Analysis
This section appears when you select the Baseline report template. It compares the vulnerabilities discovered in a scan against those discovered in a baseline scan. Use this section to gauge progress in reducing vulnerabilities improving network’s security.
Vulnerabilities by IP Address and PCI Severity Level
This section, which appears in PCI Audit reports, lists each vulnerability, indicating whether it has passed or failed in terms of meeting PCI compliance criteria. The section also includes remediation information.
Vulnerability Exceptions
This section lists each vulnerability that has been excluded from report and the reason for each exclusion. You may not wish to see certain vulnerabilities listed with others, such as those to be targeted for remediation; but business policies may dictate that you list excluded vulnerabilities if only to indicate that they were excluded. A typical example is the PCI Audit report. Vulnerabilities of a certain severity level may result in an audit failure. They may be excluded for certain reasons, but the exclusions must be noted.
Do not confuse an excluded vulnerability with a disabled vulnerability check. An excluded vulnerability has been dis-covered by NeXpose, which means the check was enabled.
To learn how vulnerability exceptions are expressed in other reporting formats, see How vulnerability exceptions appear in XML and CSV formats on page 52.
Vulnerability Report Card by Node
This section lists the results of vulnerability tests for each node (asset) in the network. Use this section to assess the vulnerability of each asset.
Vulnerability Report Card Across Network
This section lists all tested vulnerabilities, and indicates how each node (asset) in the network responded when NeX-pose attempted to confirm a vulnerability on it. Use this section as an overview of the network's susceptibility to each vulnerability.
Vulnerability Test Errors
This section displays vulnerabilities that were not confirmed due to unexpected failures. Use this section to anticipate or prevent system errors and to validate that scan parameters are set properly.
NeXpose User’s Guide 69

Enterprise Edition
GlossaryFor more detailed information on any term in this glossary, search for the term in NeXpose Help.
API (application program interface)An API is a NeXpose function that a developer can integrate with another software application by using program calls. The term API also refers to one of two sets of NeXpose XML APIs, each with its own included operations: API v1.1 and Extended API v1.2. To learn about each API, See the NeXpose API documentation, which you can download from the Support page of Help.
ApplianceAn Appliance is a set of NeXpose components shipped as a dedicated hardware/software unit. Appliance configura-tions include a Security Console/Scan Engine combination and an Scan Engine-only version.
AssetAn asset is a single device on a network that NeXpose discovers during a scan. In the Web interface and API, an asset may also be referred to as a device. See Managed asset on page 71 and Unmanaged asset on page 73. An asset’s data has been integrated into the scan database, so it can be listed in sites and asset groups. In this regard, it differs from a node. See Node on page 71.
Asset groupAn asset group is a logical collection of managed assets to which specific members have access for creating or viewing reports or tracking remediation tickets. An asset group may contain assets that belong to multiple sites or other asset groups. An asset group is either static or dynamic. An asset group is not a site. See Site on page 73. See Dynamic asset group on page 71 and Static asset group on page 73.
Asset OwnerAsset Owner is one of the preset NeXpose roles. A user with this role can view data about discovered assets, run man-ual scans, and create and run reports in accessible sites and asset groups.
AuthenticationAuthentication is the process of a security application verifying the logon credentials of a client or user that is attempt-ing to gain access. By default NeXpose authenticates users with an internal process, but you can configure NeXpose to authenticate users with an external LDAP or Kerberos source.
Command consoleThe command console is a page in the NeXposeSecurity Console Web interface for entering commands to run certain operations. When you use this tool, you can see real-time diagnostics and a behind-the-scenes view of Security Con-sole activity. To access the command console page, click the Run console commands link next to the Troubleshooting item on the Administration page.
Continuous scanA continuous scan starts over from the beginning if it completes its coverage of site assets within its scheduled win-dow. This is a site configuration setting.
NeXpose User’s Guide 70
Enterprise Edition
Dynamic asset groupA dynamic asset group contains scanned assets that meet a specific set of search criteria. You define these criteria with asset search filters, such as IP address range or operating systems. The list of assets in a dynamic group is subject to change with every scan or when vulnerability exceptions are created. In this regard, a dynamic asset group differs from a static asset group. See Static asset group on page 73.
Dynamic Scan PoolThe Dynamic Scan Pool feature allows you to use Scan Engine pools to enhance the consistency of your scan coverage. A Scan Engine pool is a group of shared Scan Engines that can be bound to a site so that the load is distributed evenly across the shared Scan Engines. You can configure scan pools using the Extended API v1.2.
DiscoveryDiscovery is the first phase of a scan, in which NeXpose finds devices on a network.
ExploitAn exploit is an attempt to penetrate a network or gain access to a computer through a security flaw, or vulnerability. Malicious exploits can result in system disruptions or theft of data. Penetration testers use benign exploits only to ver-ify that vulnerabilities exist. The Metasploit product is a tool for performing benign exploits. See Metasploit on page 71.
Global AdministratorGlobal Administrator is one of the preset NeXpose roles.
Managed assetA managed asset is a network device that has been discovered during a scan and added to a site’s target list, either automatically or manually. Only managed assets can be checked for vulnerabilities and tracked over time. Once an asset becomes a managed asset, it counts against the maximum number of assets that can be scanned, according to your NeXpose license.
Manual scanA manual scan is one that you start at any time, even if it is scheduled to run automatically at other times. Synonyms include ad-hoc scan and unscheduled scan.
MetasploitMetasploit is a product that performs benign exploits to verify vulnerabilities. See Exploit on page 71.
NodeA node is a device on a network that NeXposediscovers during a scan. After NeXposeintegrates its data into the scan database, the device is regarded as an asset that can be listed in sites and asset groups. See Asset on page 70.
PermissionA permission is the ability to perform one or more specific operations in NeXpose. Some permissions only apply to sites or asset groups to which an assigned user has access. Others are not subject to this kind of access.
NeXpose User’s Guide 71
Enterprise Edition
Risk scoreA risk score is a rating that NeXpose calculates for every asset and vulnerability. The score indicates the potential dan-ger posed to network and business security in the event of a malicious exploit. You can configure NeXpose to rate risk according to one of two available scoring models:
• The Temporal model emphasizes the length of time that the vulnerability has been known to
exist, as well as the nature of the risk. Older vulnerabilities are easier to exploit because attackers
have known about them for a longer period of time.
• The Weighted model is based primarily on asset data and vulnerability types, and it takes into
account the level of importance, or weight, that you assign to a site when you configure it.
RoleA role is a set of permissions. Five preset roles NeXpose are available in NeXpose. You also can create custom roles by manually selecting permissions. See Asset Owner on page 70, Global Administrator on page 71, and Site Owner on page 73.
ScanA scan is a process by which NeXpose discovers network assets and checks them for vulnerabilities. See Discovery on page 71 and See Vulnerability check on page 74.
Scan credentialsScan credentials are the user name and password that NeXpose submits to target assets for authentication in order to gain access and perform deep checks. NeXpose supports many different authentication mechanisms for a wide variety of platforms.
Scan EngineThe Scan Engine is one of two major NeXpose components. It performs asset discovery and vulnerability detection operations. Scan engines can be distributed within or outside a firewall for varied coverage. Each installation of the Security Console also includes a local engine, which can be used for scans within the console’s network perimeter.
Scan templateA scan template is a set of parameters for defining how NeXpose scans assets. Various preset scan templates are avail-able in NeXpose for different scanning scenarios. You also can create custom scan templates. Parameters of scan tem-plates include the following:
• methods for discovering assets and services
• types of vulnerability checks, including safe and unsafe
• Web application scanning properties
• verification of compliance with policies and standards for various platforms
Scheduled scanA scheduled scan starts automatically at predetermined points in time. The scheduling of a scan is an optional setting in site configuration. It is also possible to start any scan manually at any time.
NeXpose User’s Guide 72

Enterprise Edition
Security ConsoleThe Security Console is one of two major NeXpose components. It controls Scan Engines and retrieves scan data from them. It also controls all NeXpose operations and provides a Web-based user interface.
Security ManagerSecurity Manager is one of the preset NeXpose roles. A user with this role can configure and run scans, create reports, and view asset data in accessible sites and asset groups.
SiteA site is a collection of assets that are targeted for a scan. Each site is associated with a list of target assets, a scan tem-plate, one or more Scan Engines, and other scan-related settings. A site is not an asset group.
Site OwnerSite Owner is one of the preset NeXpose roles. A user with this role can configure and run scans, create reports, and view asset data in accessible sites.
Static asset groupA static asset group contains assets that meet a set of criteria that you define according to your organization's needs. Unlike with a dynamic asset group, the list of assets in a static group does not change unless you alter it manually. See Dynamic asset group on page 71.
Unmanaged assetAn unmanaged asset is a device that has been discovered during a scan but not correlated against a managed asset or added to a site’s target list. NeXpose is designed to provide sufficient information about unmanaged assets so that you can decide whether to manage them. An unmanaged assets does not count against the maximum number of assets that can be scanned according to your NeXpose license.
UpdateAn update is a released set of changes to NeXpose. By default, NeXpose automatically downloads and applies two types of updates:
• Content updates include new checks for vulnerabilities, patch verification, and security policy
compliance. Content updates always occur automatically when they are available.
• Product updates include performance improvements, bug fixes, and new product features.
Unlike content updates, it is possible to disable automatic product updates and update the prod-
uct manually.
UserUser is one of the preset NeXpose roles. An individual with this role can view asset data and run reports in accessible sites and asset groups.
VulnerabilityA vulnerability is a security flaw in a network or computer.
NeXpose User’s Guide 73

Enterprise Edition
Vulnerability checkA vulnerability check is a series of operations that NeXpose performs to determine whether a security flaw exists on a target asset.
Vulnerability exceptionA vulnerability exception is the removal of a vulnerability from a report and from any asset listing table. Excluded vul-nerabilities also are not considered in the computation of risk scores.
NeXpose User’s Guide 74

Enterprise Edition
IndexAAdding assets to a static asset group 43Adding vulnerabilities 54adware 24Alerting page 23alerts
Alerting page 23Enable alert 23Limit alert text 23New Alert 23New Alert dialog box 23Paused scan 23Resumed scan 23Send at most field 23severity level for vulnerabilities 23SMTP e-mail 23SNMP message 23Syslog 23
alerts, Alerting page 23alerts, vulnerabilities 23asset
Restrict to Device 24Restrict to Port 24
BBaseline Comparison 65CChanging criteria for inclusion in a dynamic asset group42Combining filters 41Comparing dynamic and static asset groups 36Configuring filters 38Configuring general attributes for a static asset group 43Configuring report distribution 60Cover Page 65Creating a custom report template 61Creating a logon for Web site form authentication 25Creating a new report 55Creating and editing static asset groups 33, 43Creating and updating tickets 53Creating global vulnerability exceptions 47, 51credentials 24Credentials page 24Customizing a report template with your own logo 62DDiscovered Databases 65Discovered Files and Directories 66Discovered Services 66Discovered System Information 66Discovered Users and Groups 66Discovered Vulnerabilities 66Document conventions 6
EExecutive Summary 66Exporting scan data to external databases 60FFilter by asset name 40Filter by host type 40Filter by operating system name 39Filter by service name 39Filter by site name 39Filter by software name 39Filter by vulnerability name 40Filtering by IP address range 38HHighest Risk Vulnerability Details 66How vulnerability exceptions appear in XML and CSV for-mats 52IIncluding organization information in a site 29Index of Vulnerabilities 67LLogging on 9logon credentials 24NNavigating the Security Console Home page 10OOpening a ticket 54Other documents and Help 5PPausing, resuming, and stopping a scan 31Payment Card Industry (PCI) Component ComplianceSummary 67Payment Card Industry (PCI) Executive Summary 67Payment Card Industry (PCI) Host Details 67Payment Card Industry (PCI) Scan Information 67Payment Card Industry (PCI) Scanned Hosts/Networks 67Payment Card Industry (PCI) Special Notes 67Payment Card Industry (PCI) Vulnerabilities Noted 68Payment Card Industry (PCI) Vulnerability Details 68Payment Card Industry (PCI) Vulnerability Synopsis 68Pen test 20Policy Evaluation 68policy violations 24RRemediation Plan 68Risk Assessment 68risk index 13Running a manual scan 30SSANS Top 20 Device Listing 68SANS TOP 20 Device Synopsis 68SANS TOP 20 Executive Summary 68SANS TOP 20 Vulnerability Details 69SANS Top 20 Vulnerability Synopsis 69
NeXpose User’s Guide 75

Enterprise Edition
scan typeDenial of service 15Discovery scan 15Discovery scan (aggressive) 16Exhaustive 16, 22Full audit 17Internet DMZ audit 18Linux RPMs 18Microsoft hotfix 19, 22Payment Card Industry (PCI) audit 19Penetration test 20Safe network audit 20, 22Sarbanes-Oxley (SOX) compliance 21SCADA audit 21Web audit 22
scan types, HIPAA compliance 17Scanned Hosts and Networks 69scans, HTTP credentials 24Scheduling reports 60Selecting a scan as a baseline 59Selecting assets to be included in the report 58Selecting report template sections 62Site Configuration panel 24SOX 21Specifying assets to scan 13Specifying general report attributes 55Specifying general site information 13spyware 24Storing reports in report owner directories 59TTable of Contents 69Trend Analysis 69UUnderstand cases for excluding vulnerabilities 46Updating ticket history 54Using asset groups to your advantage 35Using dynamic asset groups 36Using static asset groups 37Using the search function 12VViewing active vulnerabilities 44Viewing assets 33Viewing assets by groups 34Viewing assets by operating system 35Viewing assets by services 35Viewing assets by sites 33Viewing assets by software 35Viewing history for all scans 32Viewing reports in the Web interface 55Viewing the scan log 32Viewing tickets 53Viewing vulnerability details 45Viewing vulnerability exceptions in the Report Card re-port 52
Vulnerabilities by IP Address and PCI Severity Level 69vulnerabilities, associated assets 23Vulnerability Exceptions 69Vulnerability Report Card Across Network 69Vulnerability Report Card by Node 69Vulnerability Test Errors 69vulnerability, confirmed 23vulnerability, potential 23vulnerability, unconfirmed 23WWorking with vulnerabilities 44
NeXpose User’s Guide 76


