GETTING STARTED GUIDE NI-DAQ mx for USB Devices This guide describes how to install and configure NI USB data acquisition (DAQ) devices and how to verify that the devices are working properly. Current versions of NI documents are available at ni.com/manuals. For NI-DAQmx related documentation, go to ni.com/info and enter rddq8x. The NI-DAQmx readme, available on the NI-DAQmx installation disc, contains software version support information. You must be an Administrator to install NI software and devices on your computer. Linux and Mac OS drivers are available by entering rddqld at ni.com/info. Step 1. Install the NI Application Software Install the NI application software such as NI LabVIEW. Back up any applications before upgrading software or modifying the application. Step 2. Install NI-DAQmx Install NI-DAQmx driver software before installing NI USB devices so Windows can detect them. Insert the disc included with your device into your computer. If the NI-DAQmx installer does not open automatically, select Start»Run. Enter x:\autorun.exe, where x is the drive letter. Complete the instructions. Troubleshooting information is available at ni.com/support/daqmx. ™
Transcript
GETTING STARTED GUIDE
NI-DAQ mx for USB DevicesThis guide describes how to install and configure NI USB data acquisition (DAQ) devices and how to verify that the devices are working properly. Current versions of NI documents are available at ni.com/manuals. For NI-DAQmx related documentation, go to ni.com/info and enter rddq8x. The NI-DAQmx readme, available on the NI-DAQmx installation disc, contains software version support information.
You must be an Administrator to install NI software and devices on your computer.
Linux and Mac OS drivers are available by entering rddqld at ni.com/info.
Step 1. Install the NI Application SoftwareInstall the NI application software such as NI LabVIEW. Back up any applications before upgrading software or modifying the application.
Step 2. Install NI-DAQmxInstall NI-DAQmx driver software before installing NI USB devices so Windows can detect them. Insert the disc included with your device into your computer. If the NI-DAQmx installer does not open automatically, select Start»Run. Enter x:\autorun.exe, where x is the drive letter. Complete the instructions. Troubleshooting information is available at ni.com/support/daqmx.
™
NI-DAQmx for USB Devices Getting Started Guide 2 ni.com
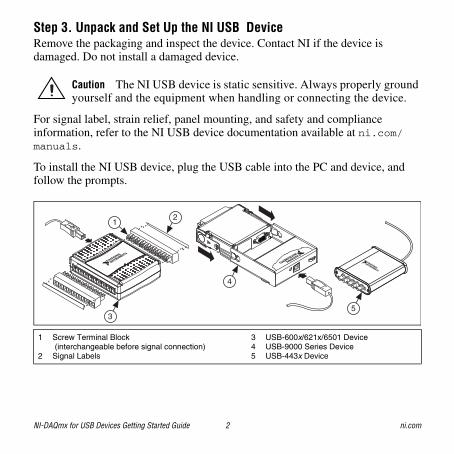
Step 3. Unpack and Set Up the NI USB DeviceRemove the packaging and inspect the device. Contact NI if the device is damaged. Do not install a damaged device.
Caution The NI USB device is static sensitive. Always properly ground yourself and the equipment when handling or connecting the device.
For signal label, strain relief, panel mounting, and safety and compliance information, refer to the NI USB device documentation available at ni.com/manuals.
To install the NI USB device, plug the USB cable into the PC and device, and follow the prompts.
1 Screw Terminal Block (interchangeable before signal connection)
2 Signal Labels
3 USB-600x/621x/6501 Device4 USB-9000 Series Device5 USB-443x Device
Firmware Update—After installing the NI USB device or upgrading NI-DAQmx, complete any Windows Hardware Wizard prompts to update the firmware on your device.
USB-9000 Series Users—When first connecting the device to your computer, the Found New Hardware Wizard cycles through approximately three installations before the device is ready for use.
Windows Device RecognitionWindows versions earlier than Vista recognize newly installed devices when the computer restarts. Vista installs device software automatically.
NI Device MonitorAfter Windows detects newly installed devices, NI Device Monitor runs automatically at startup.
NI Device Monitor is on when the icon, shown at left, is visible in your Windows taskbar. To turn the NI Device Monitor on, unplug your device, restart NI Device Monitor by selecting Start»All Programs»National Instruments»NI-DAQ»NI Device Monitor, and replug in your device.
The NI Device Monitor prompts you to select from the following options. These options may vary, depending on the devices and software installed on your system.
• Begin a Measurement with This Device Using NI LabVIEW SignalExpress—Opens an NI-DAQmx step that uses the channels from your device in LabVIEW SignalExpress.
• Begin an Application with This Device—Launches LabVIEW. Choose this option if you have already configured your device in MAX.
• Run Test Panels—Launches MAX test panels for your device.
NI-DAQmx for USB Devices Getting Started Guide 4 ni.com
• Configure and Test This Device—Opens MAX.
• Take No Action—Recognizes your device but does not launch an application.
The following features are available by right-clicking the NI Device Monitor icon:
• Run at Startup—Runs NI Device Monitor at system startup (default).
• Clear All Device Associations—Select to clear all actions set by the Always Take This Action checkbox in the device auto-launch dialog box.
• Close—Turns off NI Device Monitor.
Step 4. Confirm NI USB Device RecognitionTo confirm NI USB device recognition, complete the following steps:
1. Launch MAX.
2. Expand Devices and Interfaces to confirm MAX detects your NI USB device. If your NI USB device is not listed, press <F5> to refresh MAX. If the device is still not recognized, go to ni.com/support/daqmx.
3. Right-click the NI USB device name and select Self-Test. When the self-test completes, a successful verification message appears. If an error occurs, refer to ni.com/support/install.
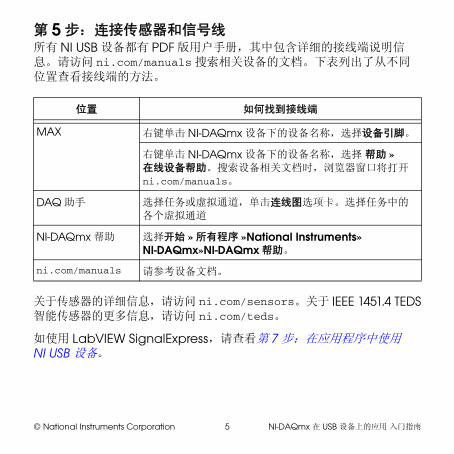
Step 5. Attach Sensors and Signal LinesAll NI USB devices have a PDF user manual that contains pinouts. Go to ni.com/manuals and search for your device. The following table lists pinout locations.
For information about sensors, go to ni.com/sensors. For information about IEEE 1451.4 TEDS smart sensors, go to ni.com/teds.
If using LabVIEW SignalExpress, go to Step 7. Using Your NI USB Device in an Application.
Location How to Access Pinout
MAX Right-click the device name under NI-DAQmx Devices, and select Device Pinouts.
Right-click the device name under NI-DAQmx Devices, and select Help»Online Device Documentation. A browser window opens to ni.com/manuals with the results of a search for relevant device documents.
DAQ Assistant Select the task or virtual channel, and click the Connection Diagram tab. Select each virtual channel in the task.
NI-DAQmx Help Select Start»All Programs»National Instruments»NI-DAQmx»NI-DAQmx Help.
ni.com/manuals Refer to the device documentation.
NI-DAQmx for USB Devices Getting Started Guide 6 ni.com
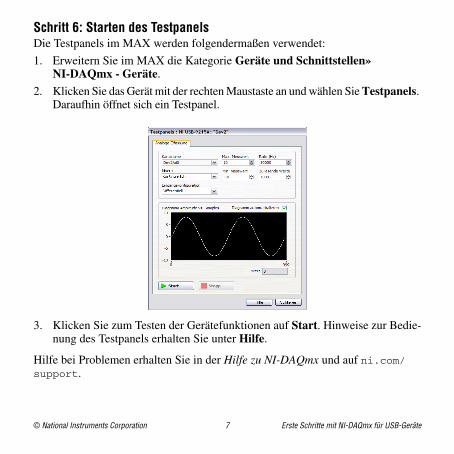
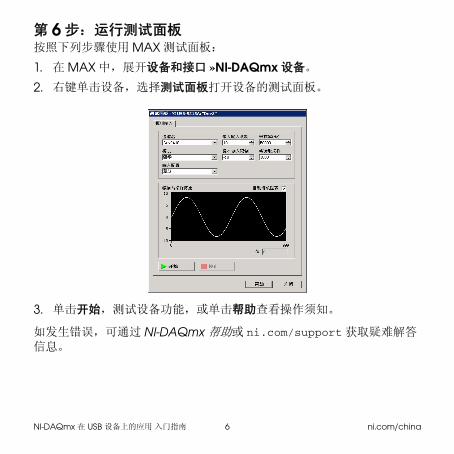
Step 6. Run Test PanelsUse the MAX test panel as follows:
1. In MAX, expand Devices and Interfaces»NI-DAQmx Devices.2. Right-click the device, and select Test Panels to open a test panel.
3. Click Start to test device functions, or Help for operating instructions.
To troubleshoot errors, refer to the NI-DAQmx Help, or go to ni.com/support.
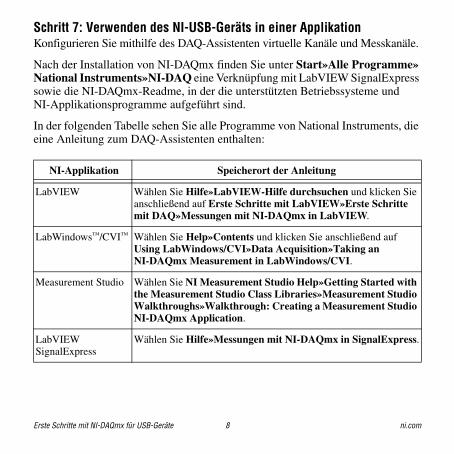
Step 7. Using Your NI USB Device in an ApplicationUse the DAQ Assistant to configure virtual and measurement channels.
After installing NI-DAQmx refer to the Start»All Programs»National Instruments»NI-DAQ for LabVIEW SignalExpress and for the NI-DAQmx readme for operating system and NI application version support.
The following table lists DAQ Assistant tutorial locations in NI applications:
Programming ExamplesNI-DAQmx includes example programs to help you get started developing an application. Modify example code and save it in an application, or use examples to develop a new application, or add example code to an existing application.
To locate NI software examples, go to ni.com/info and enter the info code daqmxexp. For additional examples, refer to zone.ni.com.
To run examples without the NI USB device installed, use an NI-DAQmx simulated device. For more information, select Help»Help Topics»NI-DAQmx»MAX Help for NI-DAQmx and search for simulated devices.
NI Application Tutorial Location
LabVIEW Go to Help»Search the LabVIEW Help. Next, go to Getting Started with LabVIEW»Getting Started with DAQ»Taking an NI-DAQmx Measurement in LabVIEW.
LabWindows™/CVI™ Go to Help»Contents. Next, go to Using LabWindows/CVI»Data Acquisition»Taking an NI-DAQmx Measurement in LabWindows/CVI.
Measurement Studio Go to NI Measurement Studio Help»Getting Started with the Measurement Studio Class Libraries»Measurement Studio Walkthroughs»Walkthrough: Creating a Measurement Studio NI-DAQmx Application.
LabVIEW SignalExpress
Go to Help»Taking an NI-DAQmx Measurement in SignalExpress.
CVI, National Instruments, NI, ni.com, and LabVIEW are trademarks of National Instruments Corporation. Refer to the Terms of Use section on ni.com/legal for more information about National Instruments trademarks. The mark LabWindows is used under a license from Microsoft Corporation. Windows is a registered trademark of Microsoft Corporation in the United States and other countries. Other product and company names mentioned herein are trademarks or trade names of their respective companies. For patents covering National Instruments products/technology, refer to the appropriate location: Help»Patents in your software, the patents.txt file on your media, or the National Instruments Patent Notice at ni.com/patents
Troubleshooting• Go to ni.com/support/install or ni.com/kb.
• If you need to return your National Instruments USB device for repair or device calibration, go to ni.com/info and enter rdsenn to start the Return Merchandise Authorization (RMA) process.
Worldwide Technical SupportFor support information, refer to the Technical Support Information document available at ni.com/manuals. Also visit ni.com/support or ni.com/zone. For support available at the National Instruments worldwide offices, visit ni.com. National Instruments corporate headquarters is located at 11500 North Mopac Expressway, Austin, Texas, 78759-3504.
INITIATION À
NI-DAQ mx pour les périphériques USBCe guide décrit comment installer et configurer des périphériques d’acquisition de données (DAQ) USB NI et comment vérifier que les périphériques fonctionnent correctement. Vous trouverez les versions actuelles des documents NI sur ni.com/manuals. Pour la documentation concernant NI-DAQmx, allez sur ni.com/frinfo et entrez l’info-code rddq8x. Le fichier Readme NI-DAQmx, disponible sur le disque d’installation NI-DAQmx, contient des informations sur le support de la version logicielle.
Vous devez avoir des droits d’administrateur pour installer les logiciels et les périphériques NI sur votre ordinateur.
Les drivers Linux et Mac OS sont disponibles en entrant l’info-code rddqld sur la page ni.com/frinfo.
Étape 1. Installez le logiciel d’application NIInstallez le logiciel d’application NI (NI LabVIEW, par exemple). Faites une copie de sauvegarde de toutes vos applications avant de mettre le logiciel à jour ou de modifier l’application.
™
Initiation à NI-DAQmx pour les périphériques USB 2 ni.com
Étape 2. Installez NI-DAQmxInstallez le driver NI-DAQmx avant d’installer de nouveaux périphériques USB NI pour que Windows puisse les détecter. Insérez le disque fourni avec votre périphérique dans l’ordinateur. Si l’installeur NI-DAQmx ne s’ouvre pas automatiquement, sélectionnez Démarrer»Exécuter. Entrez x:\autorun.exe, x étant la lettre du lecteur. Suivez les instructions qui s’affichent. Vous trouverez des informations de dépannage à ni.com/support/daqmx.
Étape 3. Déballez et configurez le périphérique USB NISortez le périphérique de son emballage et inspectez-le. Contactez NI si le périphérique est endommagé. N’installez pas un périphérique endommagé.
Attention Le périphérique USB NI est sensible à l’électricité statique. Mettez toujours l’équipement à la masse lorsque vous manipulez votre périphérique ou que vous le connectez et assurez-vous d’être vous-même relié à la masse.
Pour obtenir des informations sur les étiquettes de signaux, le support du câble et le montage sur un panneau d’un périphérique USB NI, ainsi que des informations sur sa conformité, reportez-vous à la documentation du périphérique disponible à ni.com/manuals.
Pour installer le périphérique USB NI, connectez le câble USB au PC et au périphérique et suivez les invites.
Mise à jour du firmware — Après avoir installé le périphérique USB NI ou mis à jour NI-DAQmx, répondez aux invites de l’Assistant de matériel Windows pour mettre à jour le firmware sur votre périphérique.
Pour les utilisateurs de périphériques de la série USB-9000 — La première fois que vous connectez le périphérique à votre ordinateur, l’Assistant Nouveau matériel détecté effectue trois cycles d’installation environ avant que le périphérique soit prêt à l’utilisation.
1 Bloc de connexion à vis (interchangeable avec la connexion de signaux)
2 Étiquettes de signaux
3 Périphérique USB-600x/621x/65014 Périphérique de la série USB-90005 Périphérique USB-443x
3
4
21
5
Initiation à NI-DAQmx pour les périphériques USB 4 ni.com
Reconnaissance de périphériques sous WindowsLes versions Windows antérieures à Vista reconnaissent les périphériques qui viennent d’être installés au redémarrage de l’ordinateur. Vista installe automatiquement les drivers de périphériques.
Moniteur de périphériques NILorsque Windows détecte que de nouveaux périphériques viennent d’être installés, le Moniteur de périphériques NI s’exécute automatiquement au démarrage.
Le Moniteur de périphériques NI a été démarré si l’icône représentée à gauche est visible dans la zone de notification de la barre des tâches de Windows. Pour lancer le Moniteur de périphériques NI, déconnectez le périphérique, redémarrez le Moniteur de périphériques NI en sélectionnant Démarrer»Tous les programmes»National Instruments»NI-DAQ»Moniteur de périphériques NI et reconnectez le périphérique.
Le Moniteur de périphériques NI vous demande de sélectionner parmi les options suivantes. Ces options varient en fonction des périphériques et des logiciels qui sont installés sur votre système.
• Commencer une mesure en utilisant ce périphérique avec NI LabVIEW SignalExpress — Ouvre une étape NI-DAQmx qui utilise les voies de votre périphérique dans LabVIEW SignalExpress.
• Commencer une application en utilisant ce périphérique — Lance LabVIEW. Choisissez cette option si vous avez déjà configuré votre périphérique dans MAX.
• Afficher les panneaux de test — Lance les panneaux de test MAX pour votre périphérique.
• Configurer et tester ce périphérique — Ouvre MAX.
• Ne rien faire — Reconnaît votre périphérique, mais ne lance pas d’application.
Pour accéder aux fonctionnalités suivantes, cliquez avec le bouton droit sur l’icône du Moniteur de périphériques NI :
• Exécuter au démarrage — Lance le Moniteur de périphériques NI au démarrage du système (paramétrage par défaut).
• Réinitialiser les actions associées aux périphériques — Sélectionnez cette option pour annuler toutes les actions définies par la case Toujours effectuer cette action dans la boîte de dialogue de lancement automatique de périphériques.
• Fermer — Arrête le Moniteur de périphériques NI.
Initiation à NI-DAQmx pour les périphériques USB 6 ni.com
Étape 4. Confirmez la reconnaissance du périphérique USB NIPour confirmer la reconnaissance du périphérique USB NI, effectuez les étapes suivantes :
1. Lancer MAX.
2. Développez Périphériques et interfaces pour vous assurer que MAX détecte votre périphérique USB NI. Si votre périphérique USB NI ne figure pas dans la liste, appuyez sur <F5> pour rafraîchir l’affichage dans MAX. Si le périphérique n’est toujours pas reconnu, reportez-vous à la page ni.com/support/daqmx.
3. Faites un clic droit sur le périphérique USB NI et sélectionnez Auto-test. À la fin de l’auto-test, un message de confirmation de réussite apparaît. Si une erreur s’est produite, reportez-vous à ni.com/support/install.
Étape 5. Connectez les capteurs et les lignes de signauxTous les périphériques USB NI ont un guide de l’utilisateur au format PDF qui contient les informations de brochage. Reportez-vous à ni.com/manuals et recherchez votre périphérique. Le tableau suivant indique comment accéder au schéma de brochage des périphériques.
Pour obtenir des informations sur les capteurs, reportez-vous à ni.com/sensors. Pour en savoir plus sur les capteurs intelligents TEDS IEEE 1451.4, reportez-vous à ni.com/teds.
Si vous utilisez LabVIEW SignalExpress, allez à l’Étape 7. Utilisez votre périphérique USB NI dans une application.
Emplacement Méthode d’accès au schéma de brochage
MAX Cliquez avec le bouton droit sur le nom du périphérique sous Périphériques NI-DAQmx et sélectionnez Brochage du périphérique.
Cliquez avec le bouton droit sur le nom du périphérique sous Périphériques NI-DAQmx et sélectionnez Aide»Documentation en ligne sur les périphériques. La page ni.com/manuals s’ouvre et vous donne les résultats de la recherche sur les documents se rapportant à votre périphérique.
Assistant DAQ Sélectionnez la tâche ou la voie virtuelle et cliquez sur l’onglet Diagramme des connexions. Sélectionnez chaque voie virtuelle de la tâche.
Aide NI-DAQmx Sélectionnez Démarrer»Tous les programmes»National Instruments»NI-DAQmx»Aide NI-DAQmx.
ni.com/manuals Reportez-vous à la documentation du périphérique.
Initiation à NI-DAQmx pour les périphériques USB 8 ni.com
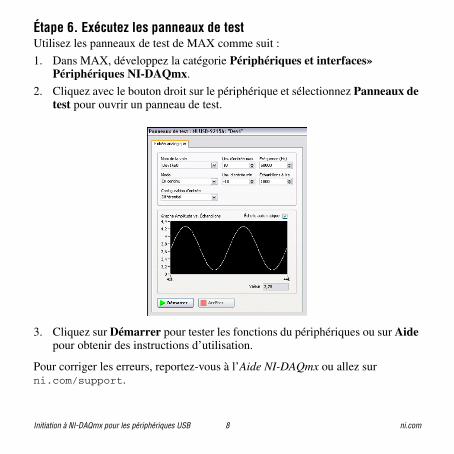
Étape 6. Exécutez les panneaux de testUtilisez les panneaux de test de MAX comme suit :
1. Dans MAX, développez la catégorie Périphériques et interfaces»Périphériques NI-DAQmx.
2. Cliquez avec le bouton droit sur le périphérique et sélectionnez Panneaux de test pour ouvrir un panneau de test.
3. Cliquez sur Démarrer pour tester les fonctions du périphériques ou sur Aide pour obtenir des instructions d’utilisation.
Pour corriger les erreurs, reportez-vous à l’Aide NI-DAQmx ou allez sur ni.com/support.
Étape 7. Utilisez votre périphérique USB NI dans une applicationUtilisez l’Assistant DAQ pour configurer des voies de mesure virtuelles.
Après avoir installé NI-DAQmx, reportez-vous à Démarrer»Tous les programmes»National Instruments»NI-DAQ pour LabVIEW SignalExpress et pour le fichier Readme NI-DAQmx qui vous fournira des informations sur le support des versions de systèmes d’exploitation et des applications NI.
Le tableau suivant répertorie les emplacements du tutoriel de l’Assistant DAQ dans diverses applications NI :
Application NI Emplacement du tutoriel
LabVIEW Sélectionnez Aide»Rechercher dans l’Aide LabVIEW. Ensuite, sélectionnez Initiation à LabVIEW»Initiation à DAQ»Prendre une mesure NI-DAQmx dans LabVIEW.
LabWindows™/CVI™ Sélectionnez Aide»Sommaire. Ensuite, sélectionnez Using LabWindows/CVI»Data Acquisition»Taking an NI-DAQmx Measurement in LabWindows/CVI.
Measurement Studio Sélectionnez NI Measurement Studio Help»Getting Started with the Measurement Studio Class Libraries»Measurement Studio Walkthroughs»Walkthrough: Creating a Measurement Studio NI-DAQmx Application.
LabVIEW SignalExpress
Sélectionnez Aide»Prendre une mesure NI-DAQmx dans LabVIEW SignalExpress.
Initiation à NI-DAQmx pour les périphériques USB 10 ni.com
Exemples de programmationNI-DAQmx comprend des exemples de programmes pour vous aider à développer une application. Modifiez le code d’exemple et enregistrez-le dans une application, utilisez les exemples pour développer une nouvelle application ou ajoutez le code d’ un exemple à une application existante.
Pour trouver les exemples logiciels NI, allez à ni.com/frinfo et entrez l’info-code daqmxexp. Pour consulter d’autres exemples, allez sur ni.com/zone.
Pour exécuter des exemples sans matériel USB NI installé, utilisez un périphérique simulé NI-DAQmx. Pour obtenir des informations complémentaires, sélectionnez Aide»Rubriques de l’aide»NI-DAQmx»Aide MAX pour NI-DAQmx et recherchez “périphériques simulés”.
Dépannage• Allez à ni.com/support/install ou ni.com/kb.• Si vous devez renvoyer votre périphérique USB National Instruments pour le
faire réparer ou étalonner, allez sur ni.com/frinfo et entrez l’info-code rdfcon pour obtenir les informations de contact de votre filiale afin de savoir comment obtenir une autorisation de renvoi de marchandise.
Support technique dans le monde entierPour obtenir des informations sur le support technique, reportez-vous au document Technical Support Information disponible à partir de la page ni.com/manuals. Vous pouvez aussi visiter le site ni.com/support ou ni.com/zone. Pour obtenir des informations sur le support technique disponible dans les différentes filiales de National Instruments, reportez-vous à ni.com. Le siège social de National Instruments est situé à l’adresse suivante : 11500 North Mopac Expressway, Austin, Texas, 78759-3504, USA.
CVI, National Instruments, NI, ni.com et LabVIEW sont des marques de National Instruments Corporation. Pour plus d’informations concernant les marques de National Instruments, veuillez vous référer à la partie Terms of Use sur le site ni.com/legal. The mark LabWindows is used under a license from Microsoft Corporation. Windows is a registered trademark of Microsoft Corporation in the United States and other countries. Les autres noms de produits et de sociétés mentionnés aux présentes sont les marques ou les noms de leurs propriétaires respectifs. Pour la liste des brevets protégeant les produits/technologies National Instruments, veuillez vous référer, selon le cas : à la rubrique Aide»Brevets de votre logiciel, au fichier patents.txt sur votre média, ou à National Instruments Patent Notice sur ni.com/patents.
NI-DAQ mx für USB-GeräteIn dieser Anleitung werden die Installation und Konfiguration von Datenerfas-sungsgeräten (DAQ-Geräten) mit USB-Anschluss beschrieben und Sie erfahren, wie die Funktionstüchtigkeit der Geräte geprüft wird. Aktuelle Versionen von NI-Dokumenten finden Sie auf ni.com/manuals. Dokumentation zu NI-DAQmx erhalten Sie auf ni.com/info nach Eingabe des Infocodes rddq8x. Die NI-DAQmx-Readme, die sich auf dem NI-DAQmx-Installationsdatenträger-befindet, enthält Informationen zu unterstützter Software.
Zur Installation von Software und Geräten von National Instruments benötigen Sie Administratorrechte.
Treiber für Linux und Mac OS finden Sie auf ni.com/info nach Eingabe des Infocodes rddqld.
Schritt 1: Installieren der Applikationssoftware von National InstrumentsInstallieren Sie Ihre Applikationssoftware von National Instruments, z. B. NI LabVIEW. Legen Sie eine Sicherungskopie von Anwendungen an, bevor Sie ein Software-Upgrade durchführen oder Anwendungen bearbeiten.
™
Erste Schritte mit NI-DAQmx für USB-Geräte 2 ni.com
Schritt 2: Installieren von NI-DAQmxInstallieren Sie den NI-DAQmx-Treiber vor dem Anschließen neuer USB-Geräte, da diese sonst nicht automatisch erkannt werden. Legen Sie die mit Ihrem Gerät gelieferte CD oder DVD in den Computer ein. Wenn der Installationsassistent nicht automatisch gestartet wird, wählen Sie Start»Ausführen. Geben Sie x:\autorun.exe ein (x steht für den Laufwerksbuchstaben). Folgen Sie den Anweisungen. Bei Problemen besuchen Sie bitte die Website ni.com/support/daqmx.
Schritt 3: Auspacken und Installation des NI-USB-GerätsPacken Sie das Gerät aus und untersuchen Sie es. Sollte das Gerät schadhaft erscheinen, setzen Sie sich bitte mit uns in Verbindung. Schließen Sie auf keinen Fall ein defektes Gerät an!
Vorsicht! Das Gerät muss vor elektrostatischen Entladungen geschützt werden. Erden Sie sich und die verwendeten Werkzeuge, bevor Sie das Gerät berühren oder mit dem Gerät arbeiten.
Die Signalnamen des Geräts sowie Angaben zur Zugentlastung, Frontplatten-montage, Sicherheit und zu den Sicherheitsstandards, die das USB-Gerät erfüllt, finden Sie in der Dokumentation zum Gerät auf ni.com/manuals.
Schließen Sie das NI-USB-Gerät über das USB-Kabel an den PC an und folgen Sie den Anweisungen auf dem Bildschirm.
Firmware-Update—Folgen Sie nach dem Anschließen des NI-USB-Geräts oder Aktualisieren von NI-DAQmx den Eingabeaufforderungen des Assistenten “Neue Hardware hinzufügen”.
Für Benutzer von Geräten der Serie USB-9000—Wenn Sie das Gerät erstmals an den Computer anschließen, durchläuft der Assistent “Neue Hardware hinzu-fügen” etwa drei Installationen, bevor das Gerät betriebsbereit ist.
Erkennung von Geräten unter WindowsBei Windows-Versionen vor Vista werden neu angeschlossene Geräte nach einem Neustart des Computers erkannt. Unter Vista werden Gerätetreiber automatisch installiert.
1 Schraubklemmanschluss (vor dem Anschließen des Signals austauschbar)
2 Beschriftungsstreifen
3 USB-600x/621x/6501-Gerät4 Gerät der Serie USB-90005 Gerät der Serie USB-443x
3
4
21
5
Erste Schritte mit NI-DAQmx für USB-Geräte 4 ni.com
NI-GerätemonitorWenn ein neues NI-USB-Gerät in Windows erkannt wird, startet automatisch der NI-Gerätemonitor.
Der NI-Gerätemonitor wird ausgeführt, wenn das links abgebildete Symbol in der Windows-Taskleiste angezeigt wird. Zum Aufrufen des NI-Geräte-monitors trennen Sie Ihr Gerät vom Computer, starten Sie das Programm über Start»Alle Programme»National Instruments»NI-DAQ»NI-Gerätemonitor und schließen Sie das Gerät danach wieder an.
Im NI-Gerätemonitor werden Sie zur Auswahl einer der nachfolgenden Optionen aufgefordert. Die Optionen können je nach installierter Hard- und Software unter-schiedlich sein.• Eine Messung mit diesem Gerät durchführen – NI LabVIEW
SignalExpress ausführen—Startet in LabVIEW SignalExpress einen NI-DAQmx-Schritt, der mit den Kanälen Ihres Geräts arbeitet.
• Eine Anwendung mit diesem Gerät erstellen—Startet LabVIEW. Wählen Sie diese Option, wenn das Gerät bereits im MAX konfiguriert wurde.
• Testpanels starten—Startet das MAX-Testpanel zu Ihrem Gerät.• Dieses Gerät konfigurieren und testen—Öffnet MAX.• Keine Aktion ausführen—Startet kein Programm. Das Gerät wird aber trotz-
dem erkannt.
Wenn Sie das NI-Gerätemonitor-Symbol mit der rechten Maustaste anklicken, werden folgende Optionen angezeigt:• Beim Start ausführen—Der NI-Gerätemonitor wird nach dem Systemstart
aufgerufen (Voreinstellung).• Alle Gerätezuweisungen löschen—Hebt die unter Immer diese Aktion
ausführen ausgewählte Option auf. • Schließen—Beendet den NI-Gerätemonitor.
Schritt 4: Überprüfen der automatischen Erkennung des NI-USB-GerätsUm zu prüfen, ob das Gerät erkannt wurde, gehen Sie wie folgt vor:
1. Starten Sie den MAX.
2. Prüfen Sie, ob Ihr Gerät unter Geräte und Schnittstellen angezeigt wird. Sollte eine Komponente nicht automatisch aufgelistet werden, muss MAX unter Umständen mit der <F5>-Taste aktualisiert werden. Wenn das Gerät dann immer noch nicht angezeigt wird, besuchen Sie die Website ni.com/support/daqmx.
3. Klicken Sie mit der rechten Maustaste auf den Namen des Geräts und wählen Sie Selbsttest. Nach dem Abschluss des Selbsttests wird eine entsprechende Meldung angezeigt. Hilfe bei Problemen finden Sie auf der Website ni.com/support/install.
Erste Schritte mit NI-DAQmx für USB-Geräte 6 ni.com
Schritt 5: Anschließen von Sensoren und SignalleitungenZu allen NI-USB-Geräten gibt es PDF-Anleitungen mit Pinbelegungen. Die Anlei-tung zu Ihrem Gerät finden Sie auf ni.com/manuals nach Eingabe des Gerätenamens. In der folgenden Tabelle sehen Sie, wo Pinbelegungen zu finden sind.
Weitere Informationen zu Sensoren finden Sie auf der Website ni.com/sensors. TEDS-Sensoren (intelligente Sensoren, die dem Standard IEEE 1451.4 ent-sprechen) sind auf ni.com/teds beschrieben.
Wenn Sie mit LabVIEW SignalExpress arbeiten, fahren Sie mit Schritt 7: Verwen-den des NI-USB-Geräts in einer Applikation fort.
Software oderDokument Zugriff auf Pinbelegungen
MAX Klicken Sie mit der rechten Maustaste auf den Gerätenamen unter “NI-DAQmx - Geräte” und wählen Sie Pinbelegung des Geräts.
Klicken Sie mit der rechten Maustaste auf den Gerätenamen unter “NI-DAQmx - Geräte” und wählen Sie Hilfe»Online-Gerätedoku-mentation. Auf ni.com/manuals können Sie nach Informationen zu einem Gerät suchen.
DAQ-Assistent Wählen Sie den Task oder virtuellen Kanal aus und klicken Sie auf die Registerkarte Anschlussplan. Wählen Sie jeden virtuellen Kanal im Task aus.
Hilfe zu NI-DAQmx Klicken Sie zum Starten der Hilfedatei auf Start»Alle Programme»National Instruments»NI-DAQmx»Hilfe zu NI-DAQmx.
ni.com/manuals Lesen Sie die Dokumentation des Geräts.
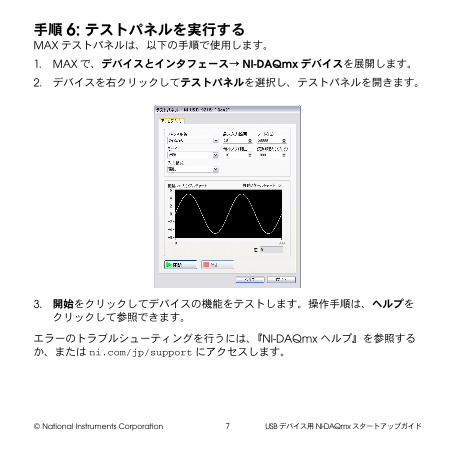
Schritt 6: Starten des TestpanelsDie Testpanels im MAX werden folgendermaßen verwendet:
1. Erweitern Sie im MAX die Kategorie Geräte und Schnittstellen»NI-DAQmx - Geräte.
2. Klicken Sie das Gerät mit der rechten Maustaste an und wählen Sie Testpanels. Daraufhin öffnet sich ein Testpanel.
3. Klicken Sie zum Testen der Gerätefunktionen auf Start. Hinweise zur Bedie-nung des Testpanels erhalten Sie unter Hilfe.
Hilfe bei Problemen erhalten Sie in der Hilfe zu NI-DAQmx und auf ni.com/support.
Erste Schritte mit NI-DAQmx für USB-Geräte 8 ni.com
Schritt 7: Verwenden des NI-USB-Geräts in einer ApplikationKonfigurieren Sie mithilfe des DAQ-Assistenten virtuelle Kanäle und Messkanäle.
Nach der Installation von NI-DAQmx finden Sie unter Start»Alle Programme»National Instruments»NI-DAQ eine Verknüpfung mit LabVIEW SignalExpress sowie die NI-DAQmx-Readme, in der die unterstützten Betriebssysteme und NI-Applikationsprogramme aufgeführt sind.
In der folgenden Tabelle sehen Sie alle Programme von National Instruments, die eine Anleitung zum DAQ-Assistenten enthalten:
NI-Applikation Speicherort der Anleitung
LabVIEW Wählen Sie Hilfe»LabVIEW-Hilfe durchsuchen und klicken Sie anschließend auf Erste Schritte mit LabVIEW»Erste Schritte mit DAQ»Messungen mit NI-DAQmx in LabVIEW.
LabWindows™/CVI™ Wählen Sie Help»Contents und klicken Sie anschließend auf Using LabWindows/CVI»Data Acquisition»Taking an NI-DAQmx Measurement in LabWindows/CVI.
Measurement Studio Wählen Sie NI Measurement Studio Help»Getting Started with the Measurement Studio Class Libraries»Measurement Studio Walkthroughs»Walkthrough: Creating a Measurement Studio NI-DAQmx Application.
LabVIEW SignalExpress
Wählen Sie Hilfe»Messungen mit NI-DAQmx in SignalExpress.
ProgrammierbeispieleDie Beispielprogramme von NI-DAQmx sollen Ihnen den Einstieg in die Ent-wicklung von Applikationen erleichtern. Sie können Beispiele beliebig ändern und in eigene Applikationen einfügen. Ebenso können Sie von Beispielen aus-gehend neue Applikationen entwickeln.
Beispiele zu Software von National Instruments finden Sie auf ni.com/info nach Eingabe des Infocodes daqmxexp. Zusätzliche Beispiele sind unter zone.ni.com zu finden.
Mit der NI-DAQmx-Simulationsfunktion lassen sich Beispiele auch ohne ein an-geschlossenes Gerät ausführen. Wie ein Gerät simuliert wird, ist im MAX unter Hilfe»Hilfethemen»NI-DAQmx»MAX-Hilfe für NI-DAQmx beschrieben.
Fehlersuche• Besuchen Sie ni.com/support/install oder ni.com/kb.
• Wenn Sie das NI-USB-Gerät zur Reparatur oder Kalibrierung an National Instruments zurücksenden möchten, erfahren Sie auf ni.com/info nach Ein-gabe von rdsenn, was bei der Warenrücksendung an National Instruments zu beachten ist.
Weltweite technische UnterstützungHinweise zur technischen Unterstützung finden Sie im Dokument Technical Support Information auf ni.com/manuals sowie auf ni.com/support oder ni.com/zone. Welche Art der technischen Unterstützung die einzelnen Nieder-lassungen von National Instruments bieten, erfahren Sie auf ni.com. Die Adresse der Hauptniederlassung von National Instruments lautet: 11500 North Mopac Expressway, Austin, Texas, 78759-3504, USA.
CVI, National Instruments, NI, ni.com und LabVIEW sind Marken der Firma National Instruments Corporation. Nähere Informationen zu den Marken von National Instruments finden Sie im Abschnitt Terms of Use unter ni.com/legal. The mark LabWindows is used under a license from Microsoft Corporation. Windows is a registered trademark of Microsoft Corporation in the United States and other countries. Sonstige hierin erwähnte Produkt- und Firmenbezeichnungen sind Marken oder Handelsnamen der jeweiligen Unternehmen. Nähere Informationen über den Patentschutz von Produkten oder Technologien von National Instruments finden Sie unter Hilfe»Patente in Ihrer Software, in der Datei patents.txt auf Ihrem Datenträger oder in den Patentinformationen von National Instruments auf ni.com/patents.
スタートアップガイド
USB デバイス用 NI-DAQ mxこのガイドでは、NI USB データ集録(DAQ)デバイスをインストールして構成す
る方法、およびデバイスが正常に動作しているかどうかを確認する方法を説明します。最新の NI ドキュメントは、ni.com/manualsにアクセスして入手できま
す。NI-DAQmx 関連ドキュメントについては、ni.com/jp/infoで info codeに jpze2vと入力してください。NI-DAQmx インストールディスクにある
『NI-DAQmx Readme』には、ソフトウェアバージョンのサポート情報が含まれ
ます。
NI のソフトウェアおよびデバイスをコンピュータにインストールするには、管理
者権限を持っている必要があります。
Linux および Mac OS ドライバは、ni.com/jp/infoで jp5pumと入力すると
入手できます。
手順 1: NI アプリケーションソフトウェアをインストールするNI LabVIEW などの NI アプリケーションソフトウェアをインストールします。
ソフトウェアをアップグレードする前、またはアプリケーションを修正する前
に、バックアップを作成してください。
™
USBデバイス用 NI-DAQmxスタートアップガイド 2 ni.com/jp
手順 2: NI-DAQmx をインストールするWindows によって新しいハードウェアデバイスが検出されるよう、NI-DAQmxドライバソフトウェアのインストール後に NI USB デバイスをコンピュータに取り付けてください。デバイスに付属するディスクをコンピュータに挿入します。
手順 7: アプリケーションで NI USB デバイスを使用するDAQ アシスタントを使用して、仮想および測定チャンネルを構成します。
NI-DAQmx をインストールした後、スタート→すべてのプログラム→ National Instruments → NI-DAQ にアクセスし、LabVIEW SignalExpress、およびオペ
レーティングシステムと NI アプリケーションバージョンのサポートが記載されている『NI-DAQmx Readme』を参照してください。
以下の表には、NI アプリケーションにおける DAQ アシスタントチュートリアル
の場所が記載されています。
NI アプリケーション チュートリアルの場所
LabVIEW ヘルプ→ LabVIEW ヘルプを検索を開きます。次に、LabVIEW ス
タートアップガイド→ DAQ 入門→ LabVIEW での NI-DAQmx 計
測を開きます。
LabWindowsTM/CVITMヘルプ→目次を開きます。次に、Using LabWindows/CVI →Data Acquisition → Taking an NI-DAQmx Measurement in LabWindows/CVI を開きます。
Measurement Studio NI Measurement Studio Help → Getting Started with the Measurement Studio Class Libraries → Measurement Studio Walkthroughs → Walkthrough: Creating a Measurement Studio NI-DAQmx Application を開きます。
CVI, National Instruments、NI、ni.com、および LabVIEW は National Instruments Corporation(米国ナショナルインスツルメンツ社)の商標です。National Instruments の商標の詳細については、ni.com/legalの「Terms of Use」セクションを参照してください。The mark LabWindows is used under a license from Microsoft Corporation. Windows is a registered trademark of Microsoft Corporation in the United States and other countries. 本文書中に記載されたその他の製品名および企業名は、それぞれの企業の商標または商号です。National Instrumentsの製品 / 技術を保護する特許については、ソフトウェアで参照できる特許情報 ( ヘルプ→特許情報 )、メディアに含まれている patents.txtファイル、または「National Instruments Patent Notice」(ni.com/patents)のうち、該当するリソースから参照してください。
世界各国の技術サポートサポートに関する情報は、ni.com/manualsで『Technical Support Information』のドキュメントを参照してください。また、ni.com/jp/support
ださい。ナショナルインスツルメンツの米国本社は、11500 North Mopac Expressway, Austin, Texas, 78759-3504 にあります。
시작하기 가이드
USB 디바이스용 NI-DAQ mx 이 가이드는 NI USB 데이터 수집 (DAQ) 디바이스를 설치 및 설정하는 방법과 디바이스가 올바르게 작동하는지 확인하는 방법을 설명합니다 . NI 문서의 최신 버전은 ni.com/manuals에서 찾을 수 있습니다 . NI-DAQmx와 관련된 문서는 ni.com/info에서 rddq8x를 입력하십시오 . NI-DAQmx 설치 디스크에 들어있는 NI-DAQmx readme에는 소프트웨어 버전 지원 정보가 들어있습니다 .
사용하는 컴퓨터에 NI 소프트웨어와 디바이스를 설치하려면 반드시 관리자로 접속해야 합니다 .
Linux 및 Mac OS 드라이버는 ni.com/info에서 rddqld를 입력하십시오 .
단계 1. NI 어플리케이션 소프트웨어 설치하기NI LabVIEW와 같은 NI 어플리케이션 소프트웨어를 설치하십시오 . 소프트웨어를 업그레이드하거나 어플리케이션을 수정하기 전에 모든 어플리케이션을 백업하십시오 .
™
USB 디바이스용 NI-DAQmx 시작하기 가이드 2 ni.com/korea
단계 2. NI-DAQmx 설치하기NI USB 디바이스를 설치하기 전에 NI-DAQmx 드라이버 소프트웨어를 설치하여 Windows가 디바이스를 감지할 수 있도록 합니다 . 디바이스와 함께 들어있는 디스크를 컴퓨터에 넣습니다 . NI-DAQmx 설치 프로그램이 자동으로 열리지 않는 경우 , 시작≫실행을 선택합니다 . 입력 창에 x:\autorun.exe을 입력합니다 . 여기서 x는 드라이브를 나타냅니다 . 설명에 따라 설치를 완료합니다 . 문제 해결 정보는 ni.com/support/daqmx를 참조하십시오 .
단계 3. NI USB 디바이스 포장 풀기 및 설정하기포장을 풀고 디바이스를 확인합니다 . 디바이스가 손상된 경우 , NI에 연락하십시오 . 결함이 있는 디바이스는 설치하지 마십시오 .
주의 NI USB 디바이스는 정전기에 민감합니다 . 반드시 사용자와 장치가 모두 접지된 상태에서 디바이스를 다루거나 연결하십시오 .
신호 라벨 , 연결 도움 , 패널 장착 , 안전 및 규정 정보는 ni.com/manuals에 있는 NI USB 디바이스 문서를 참조하십시오 .
NI USB 디바이스를 설치하려면 USB 케이블을 PC와 디바이스에 꽂은 다음 나타나는 안내를 따릅니다 .
펌웨어 업데이트—NI USB 디바이스를 설치하거나 NI-DAQmx를 업그레이드한 후에는 Windows 하드웨어 마법사의 안내에 따라 디바이스에 펌웨어를 업데이트하십시오 .
USB-9000 시리즈 사용자—디바이스를 처음으로 컴퓨터에 연결할 때 , 새 하드웨어 찾기 마법사가 약 세 번의 설치 사이클을 돈 후 디바이스가 사용 가능하게 됩니다 .
Windows 디바이스 인식
Vista 이전 버전은 컴퓨터를 다시 시작할 때 새로 설치된 디바이스를 인식합니다 . Vista는 자동으로 디바이스 소프트웨어를 설치합니다 .
1 나사 고정 터미널 블록(신호 연결 전에 교환 가능 )
2 신호 라벨
3 USB-600x/621x/6501 디바이스4 USB-9000 시리즈 디바이스5 USB-443x 디바이스
3
4
21
5
USB 디바이스용 NI-DAQmx 시작하기 가이드 4 ni.com/korea
NI 디바이스 모니터
Windows가 새로 설치된 디바이스를 감지한 후 , 시작할 때 NI 디바이스 모니터가 자동으로 실행됩니다 .
Windows 작업 표시줄에 왼쪽과 같은 아이콘이 나타나면 NI 디바이스 모니터가 작동하는 상태입니다 . NI 디바이스 모니터를 켜려면 디바이스의 플러그를 뽑고 시작≫모든 프로그램≫ National Instruments ≫ NI-DAQ ≫ NI 디바이스 모니터를 선택하여 NI 디바이스 모니터를 다시 시작한 후 디바이스의 플러그를 다시 꽂습니다 .
NI 디바이스 모니터는 다음 중 하나를 선택하라는 대화 상자를 띄웁니다 . 이 옵션은 시스템에 설치된 디바이스와 소프트웨어에 따라 달라질 수 있습니다 .
• 이 디바이스로 측정 시작 : NI LabVIEW SignalExpress 실행—LabVIEW SignalExpress에서 사용자 디바이스의 채널을 사용하는 NI-DAQ 단계를 엽니다 .
• 이 디바이스로 어플리케이션 시작—LabVIEW를 시작합니다 . 디바이스를 이미 MAX에서 설정한 경우 이 옵션을 선택하십시오 .
NI 디바이스 모니터 아이콘에서 마우스 오른쪽 버튼을 클릭하면 다음 기능을 사용할 수 있습니다 :
• 시작시 실행—시스템이 시작될 때 NI 디바이스 모니터를 실행합니다(기본 ).
• 디바이스 관련 모두 삭제—선택하면 디바이스 자동 시작 대화 상자의 항상 이 동작을 취함 확인란으로 설정된 모든 동작을 삭제합니다 .
• 닫기—NI 디바이스 모니터를 끕니다 .
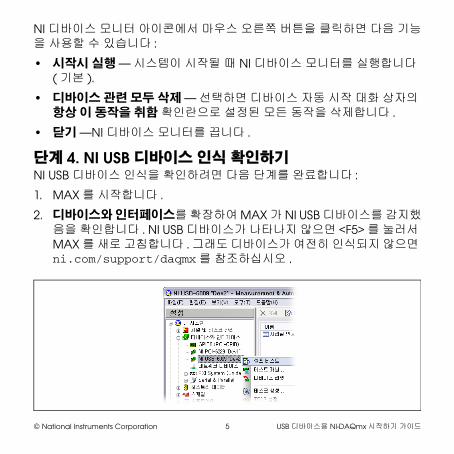
단계 4. NI USB 디바이스 인식 확인하기NI USB 디바이스 인식을 확인하려면 다음 단계를 완료합니다 :
1. MAX를 시작합니다 .
2. 디바이스와 인터페이스를 확장하여 MAX가 NI USB 디바이스를 감지했음을 확인합니다 . NI USB 디바이스가 나타나지 않으면 <F5>를 눌러서 MAX를 새로 고침합니다 . 그래도 디바이스가 여전히 인식되지 않으면 ni.com/support/daqmx를 참조하십시오 .
USB 디바이스용 NI-DAQmx 시작하기 가이드 6 ni.com/korea
3. NI USB 디바이스 이름에서 마우스 오른쪽 버튼을 클릭하고 셀프 테스트를 선택합니다 . 셀프 테스트가 완료되면 성공적으로 확인되었다는 메시지가 나타납니다 . 에러가 발생하면 ni.com/support/install을 참조하십시오 .
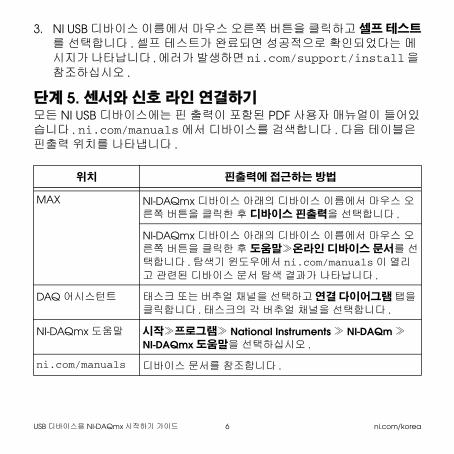
단계 5. 센서와 신호 라인 연결하기모든 NI USB 디바이스에는 핀 출력이 포함된 PDF 사용자 매뉴얼이 들어있습니다 . ni.com/manuals에서 디바이스를 검색합니다 . 다음 테이블은 핀출력 위치를 나타냅니다 .
위치 핀출력에 접근하는 방법
MAX NI-DAQmx 디바이스 아래의 디바이스 이름에서 마우스 오른쪽 버튼을 클릭한 후 디바이스 핀출력을 선택합니다 .
NI-DAQmx 디바이스 아래의 디바이스 이름에서 마우스 오른쪽 버튼을 클릭한 후 도움말≫온라인 디바이스 문서를 선택합니다 . 탐색기 윈도우에서 ni.com/manuals이 열리고 관련된 디바이스 문서 탐색 결과가 나타납니다 .
DAQ 어시스턴트 태스크 또는 버추얼 채널을 선택하고 연결 다이어그램 탭을 클릭합니다 . 태스크의 각 버추얼 채널을 선택합니다 .
NI-DAQmx 도움말 시작≫프로그램≫ National Instruments ≫ NI-DAQm ≫
단계 7. 어플리케이션에서 NI USB 디바이스 사용하기DAQ 어시스턴트를 사용하여 버추얼 및 측정 채널을 설정합니다 .
NI-DAQmx를 설치한 후에는 시작≫모든 프로그램≫ National Instruments ≫ NI-DAQ에서 볼 수 있는 LabVIEW SignalExpress와 NI-DAQmx readme에서 OS와 NI 어플리케이션 버전 지원을 참조합니다 .
다음 테이블은 NI 어플리케이션의 DAQ 어시스턴트 길라잡이 위치를 나열합니다 :
NI 어플리케이션 길라잡이 위치
LabVIEW 도움말≫ LabVIEW 도움말 검색을 선택합니다 . 그 후 LabVIEW 시작하기≫ DAQ 시작하기≫ LabVIEW 에서 NI-DAQmx 측정 사용하기를 선택합니다 .
LabWindowsTM/CVITM도움말≫목차를 선택합니다 . 그 후 Using LabWindows/CVI ≫ Data Acquisition ≫ Taking an NI-DAQmx Measurement in LabWindows/CVI를 선택합니다 .
Measurement Studio NI Measurement Studio Help ≫ Getting Started with the Measurement Studio Class Libraries ≫Measurement Studio Walkthroughs ≫ Walkthrough: Creating a Measurement Studio NI-DAQmx Application를 선택합니다 .
LabVIEW SignalExpress Help ≫ Taking an NI-DAQmx Measurement in SignalExpress를 선택합니다 .
USB 디바이스용 NI-DAQmx 시작하기 가이드 10 ni.com/korea
프로그래밍 예제
NI-DAQmx에는 어플리케이션 개발을 도와주는 예제 프로그램이 포함되어 있습니다 . 예제 코드를 수정하여 어플리케이션에 저장하거나 , 예제를 활용하여 새로운 어플리케이션을 개발하거나 , 예제 코드를 기존 어플리케이션에 추가할 수 있습니다 .
NI 소프트웨어 예제를 찾으려면 ni.com/info에서 정보 코드 daqmxexp를 입력하십시오 . 추가적인 예제는 zone.ni.com을 참조하십시오 .
NI USB 디바이스를 설치하지 않고 예제를 실행하는 경우 , NI-DAQmx 시뮬레이션 디바이스를 사용합니다 . 더 자세한 정보는 도움말≫도움말 토픽≫
NI-DAQmx ≫ NI-DAQmx 를 위한 MAX 도움말을 선택하여 시뮬레이션 디바이스를 검색합니다 .
문제 해결
• ni.com/support/install 또는 ni.com/kb를 참조하십시오 .
• 복구나 디바이스 교정을 위해 내쇼날인스트루먼트 USB 디바이스를 반환해야 하는 경우 , 내쇼날인스트루먼트 기술 지원부에 연락하십시오 . 전화 번호는 (02) 3451-3400, E-메일은 [email protected]입니다 .
CVI, National Instruments, NI, ni.com과 LabVIEW는 National Instruments Corporation의 상표들입니다 . National Instruments의 상표들에 관한 더 많은 정보를 원하신다면 ni.com/legal 에서 Terms of Use 란을 참조하십시오 .이 The mark LabWindows is used under a license from Microsoft Corporation. Windows is a registered trademark of Microsoft Corporation in the United States and other countries. 문서에서 언급된 다른 제품과 회사의 이름들은 각각 해당 회사들의 상표이거나 상호들입니다 . National Instruments 제품 /기술에 대한 특허권에 관하여는 귀하의 소프트웨어에 있는 도움말≫특허 , 귀하의 미디어에 있는 patents.txt 파일 또는 ni.com/patents의 National Instruments Patent Notice를 참고하십시오 .
전세계에 걸친 기술 지원지원 정보는 ni.com/manuals의 기술 지원 정보 문서를 참조하십시오 . 또는 ni.com/support나 ni.com/zone을 방문하십시오 . 내쇼날인트스투먼트 전세계 현지 사무소 지원 정보는 ni.com을 방문하십시오 . National Instruments 본사의 주소는 11500 North Mopac Expressway, Austin, Texas, 78759-3504입니다 .
入门指南
NI-DAQ mx 在 USB 设备上的应用该指南介绍了如何安装和配置 NI USB 数据采集设备,以及如何确认设备工作正常。请访问 ni.com/manuals查看与当前版本相关的其他文档。请访问 ni.com/info并输入信息代码 rddq8x,查看 NI-DAQmx 相关的文档。 NI-DAQmx 安装光盘上有 NI-DAQmx 的自述文件,文件中包含当前版本的支持信息。
必须以管理员身份登录,才可在计算机上安装 NI 软件和设备。
如要获取 Linux 和 Mac OS 驱动程序,请访问 ni.com/info并输入rddqld下载。
第 1 步:安装 NI 应用软件安装 NI 应用软件,例如, LabVIEW。升级软件或修改应用程序前应备份应用程序。
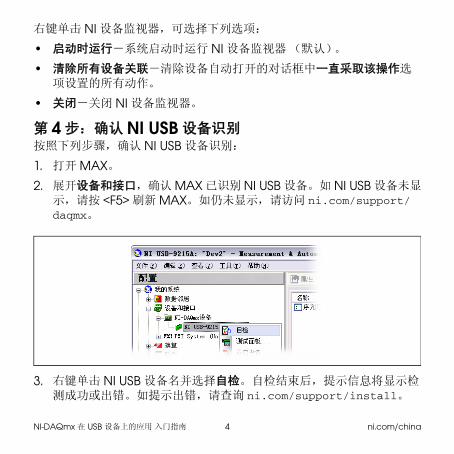
第 2 步:安装 NI-DAQmx在安装 NI USB 设备前安装 NI-DAQmx 驱动程序软件,可使 Windows 检测出设备。将设备随附的光盘插入计算机。如 NI-DAQmx 安装程序未自动运行,可选择开始 » 运行。输入 x:\autorun.exe, x是驱动器的名称。完成安装。关于故障排查信息,请访问 ni.com/support/daqmx。
™
NI-DAQmx 在 USB 设备上的应用 入门指南 2 ni.com/china
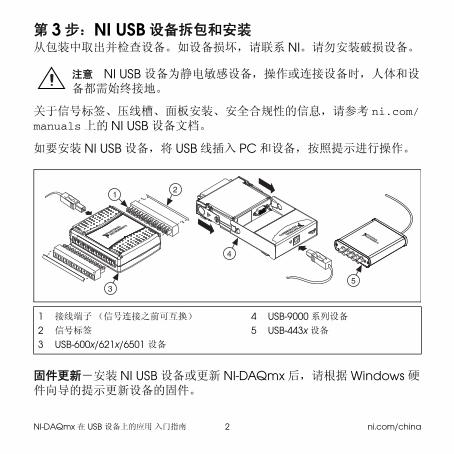
第 3 步:NI USB 设备拆包和安装从包装中取出并检查设备。如设备损坏,请联系 NI。请勿安装破损设备。
注意 NI USB 设备为静电敏感设备,操作或连接设备时,人体和设备都需始终接地。
关于信号标签、压线槽、面板安装、安全合规性的信息,请参考 ni.com/manuals上的 NI USB 设备文档。
如要安装 NI USB 设备,将 USB 线插入 PC 和设备,按照提示进行操作。
固件更新-安装 NI USB 设备或更新 NI-DAQmx 后,请根据 Windows 硬件向导的提示更新设备的固件。
门指南 »DAQ 入门指南 »Taking an NI-DAQmx Measurement in LabVIEW。
LabWindows™/CVI™ 选择 Help»Contents。然后选择 Using LabWindows/CVI»Data Acquisition»Taking an NI-DAQmx Measurement in LabWindows/CVI。
Measurement Studio
选择 NI Measurement Studio Help»Getting Started with the Measurement Studio Class Libraries»Measurement Studio Walkthroughs»Walkthrough: Creating a Measurement Studio NI-DAQmx Application。
LabVIEW SignalExpress
选择 Help»Taking an NI-DAQmx Measurement in SignalExpress。
访问 ni.com/info,输入信息代码 daqmxexp,可查看 NI 程序范例。更多范例,请访问 ni.com/zone。
使用 NI-DAQmx 仿真设备,无需安装 NI USB 设备即可运行这些范例。在 MAX 中选择帮助 » 帮助主题 »NI-DAQmx»NI-DAQmx 的 MAX 帮助,搜索使用 MAX 创建 NI-DAQmx 仿真设备的详细信息。
疑难解答
• 请访问 ni.com/support/install或 ni.com/kb。
• 如需将 NI USB 设备送至 National Instruments 公司返修或校准,请访问 ni.com/info并输入信息代码 rdsenn,查询关于商品返修授权
(RMA) 过程的信息。
全球技术支持关于技术支持信息,请查看 ni.com/manuals上的技术支持信息文档。或访问 ni.com/support, ni.com/zone。关于 NI 全球办事处提供的技术支持,请访问 ni.com。 National Instruments 总部:11500 North Mopac Expressway, Austin, Texas, 78759-3504.
CVI、National Instruments、NI、ni.com 和 LabVIEW 为 National Instruments Corporation 的商标。有关 National Instruments 商标的详细信息见 ni.com/legal上的 Terms of Use 部分。 The mark LabWindows is used under a license from Microsoft Corporation. Windows is a registered trademark of Microsoft Corporation in the United States and other countries. 此处提及的其它产品和公司名称为其各自公司的商标或商业名称。 关于National Instruments产品和技术的专利权,见软件中的帮助 »专利信息、光盘上的 patents.txt文档,或登录 ni.com/patents查看 National Instruments Patent Notice。