Table of Contents 2Welcome to NiceLabel Automation 5Typographical Conventions 7Setting Up Application 8
Architecture 8
System Requirements 8
Installation 9
Activation 10
Trial Mode 11
Understanding Filters 12
Understanding Filters 12
Configuring Structured Text Filter 13
Configuring Unstructured Data Filter 17
Configuring XML filter 25
Setting Label and Printer Names from Input Data 32
Configuring Triggers 33
Understanding Triggers 33
Defining Triggers 35
Using Variables 61
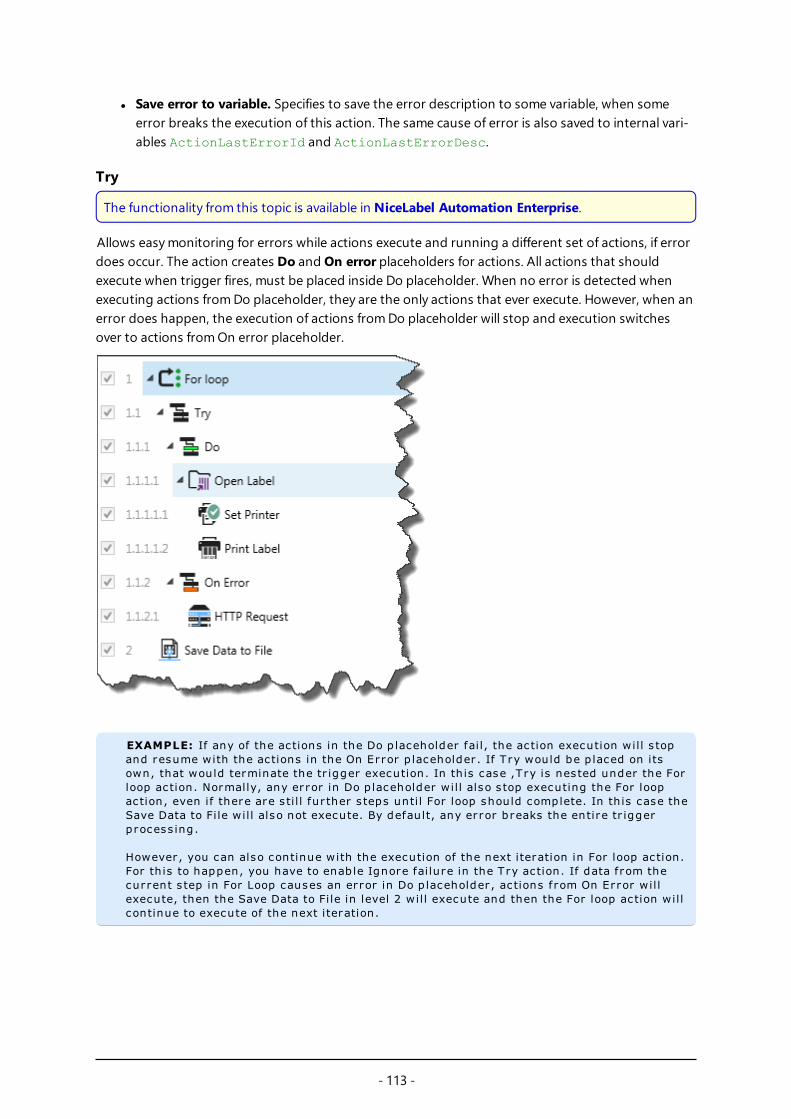
Using Actions 64
Testing Triggers 121
Protecting Trigger Configuration from Editing 123
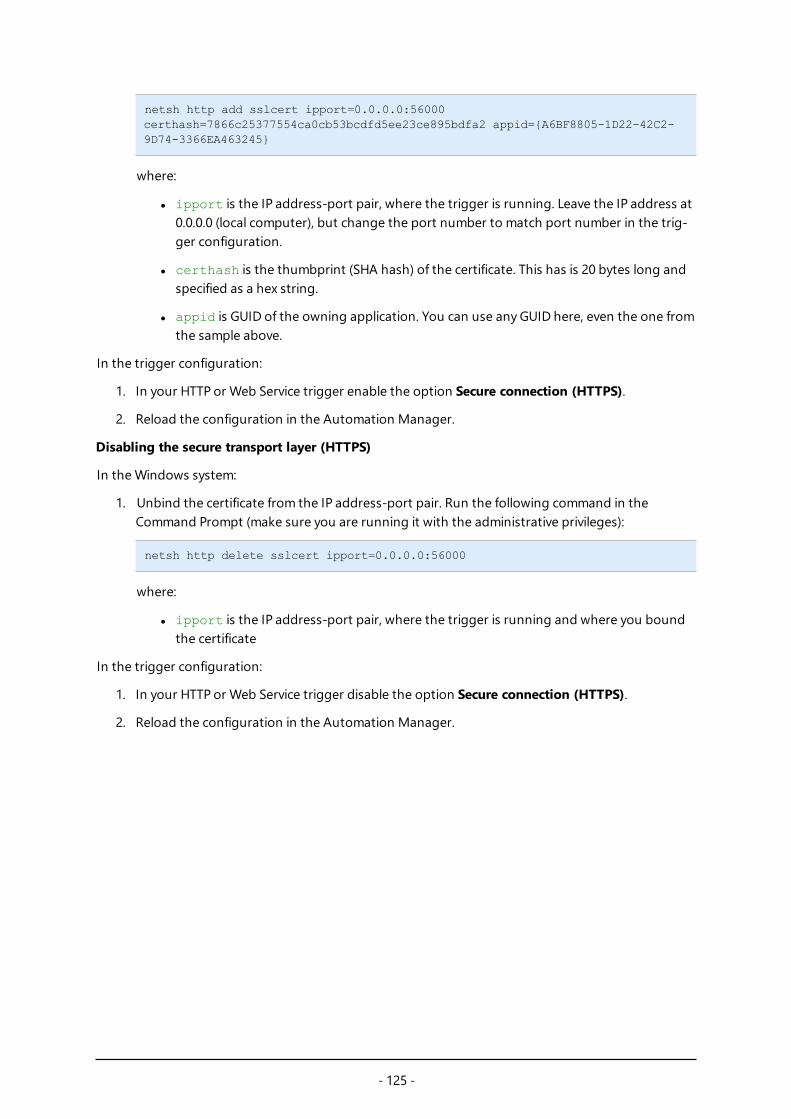
Using Secure Transport Layer (HTTPS) 123
Running and Managing Triggers 126
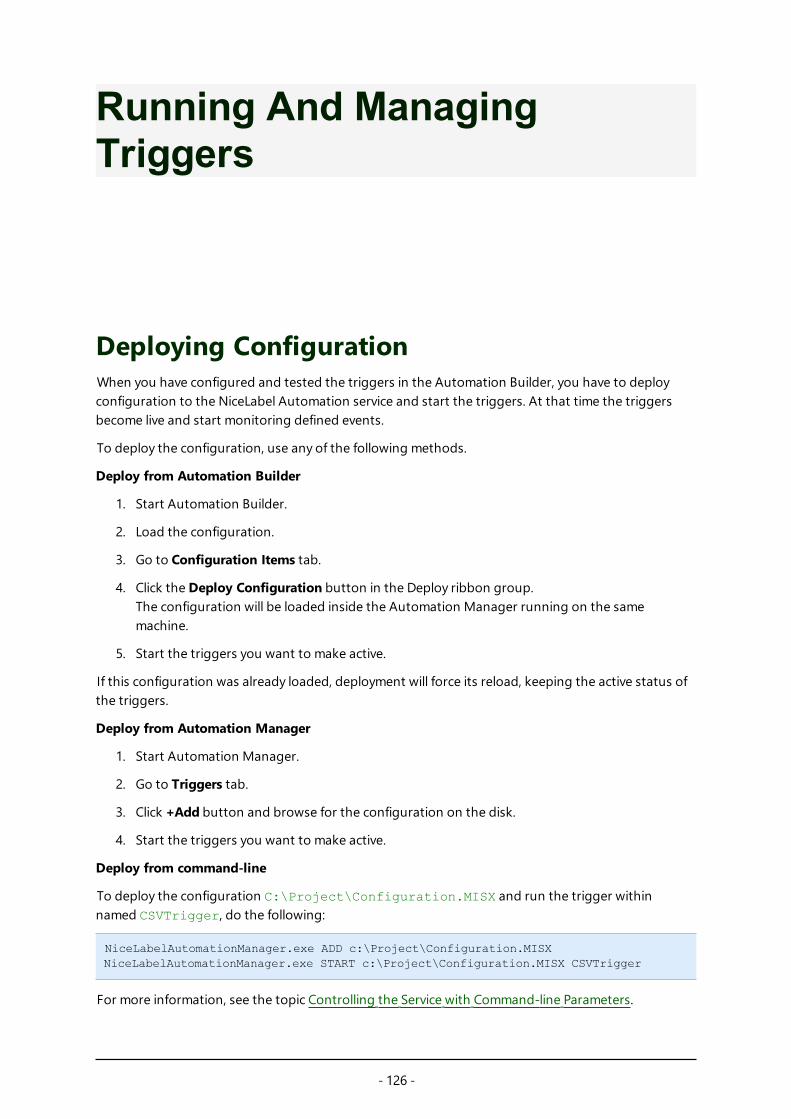
Deploying Configuration 126
Event Logging Options 127
- 3 -
Managing Triggers 127
Using Event Log 129
Performance and Feedback Options 130
Parallel Processing 130
Caching Files 131
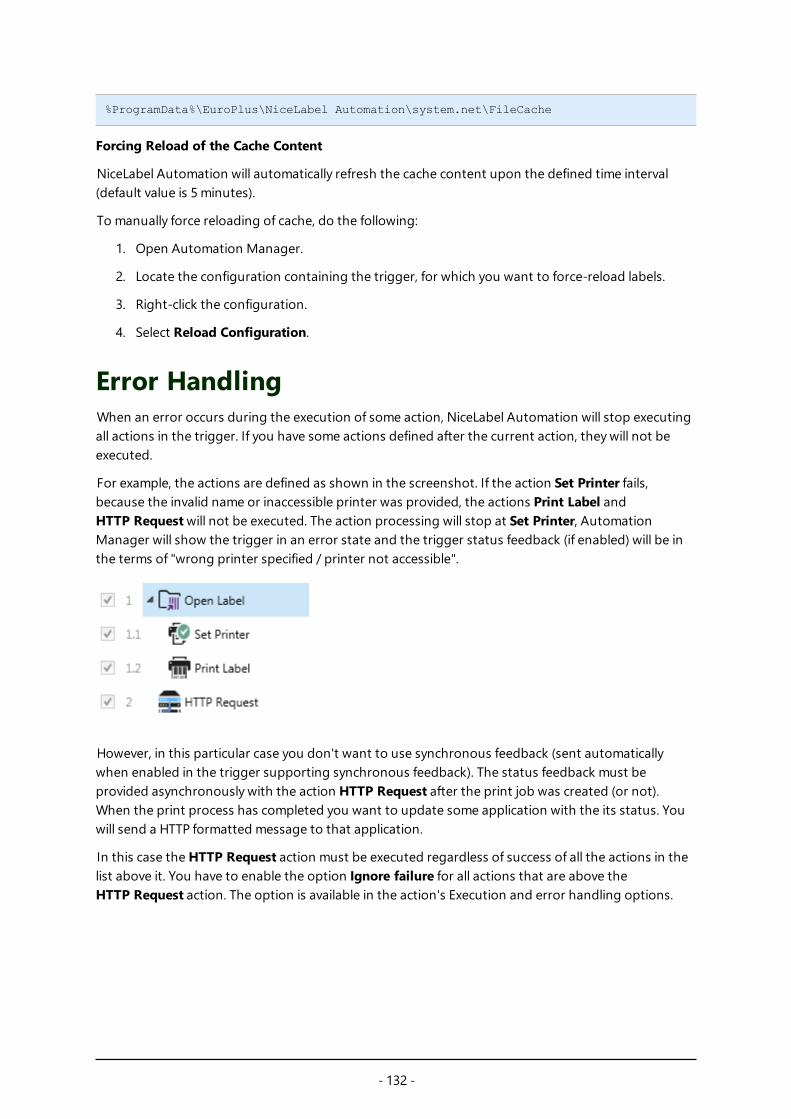
Error Handling 132
Synchronous Print Mode 133
Print Job Status Feedback 134
Using Store/Recall Printing Mode 136
High-availability (Failover) Cluster 136
Load-balancing Cluster 137
Understanding Data Structures 138
Understanding Data Structures 138
Binary Files 138
Command Files 139
Compound CSV 139
Legacy Data 140
Text Database 140
XML Data 141
Reference and Troubleshooting 143
Command File Types 143
Custom Commands 150
Access to Network Shared Resources 155
Accessing Databases 156
Automatic Font Replacement 156
Changing Multi-threaded Printing Defaults 158
Compatibility with NiceWatch Products 158
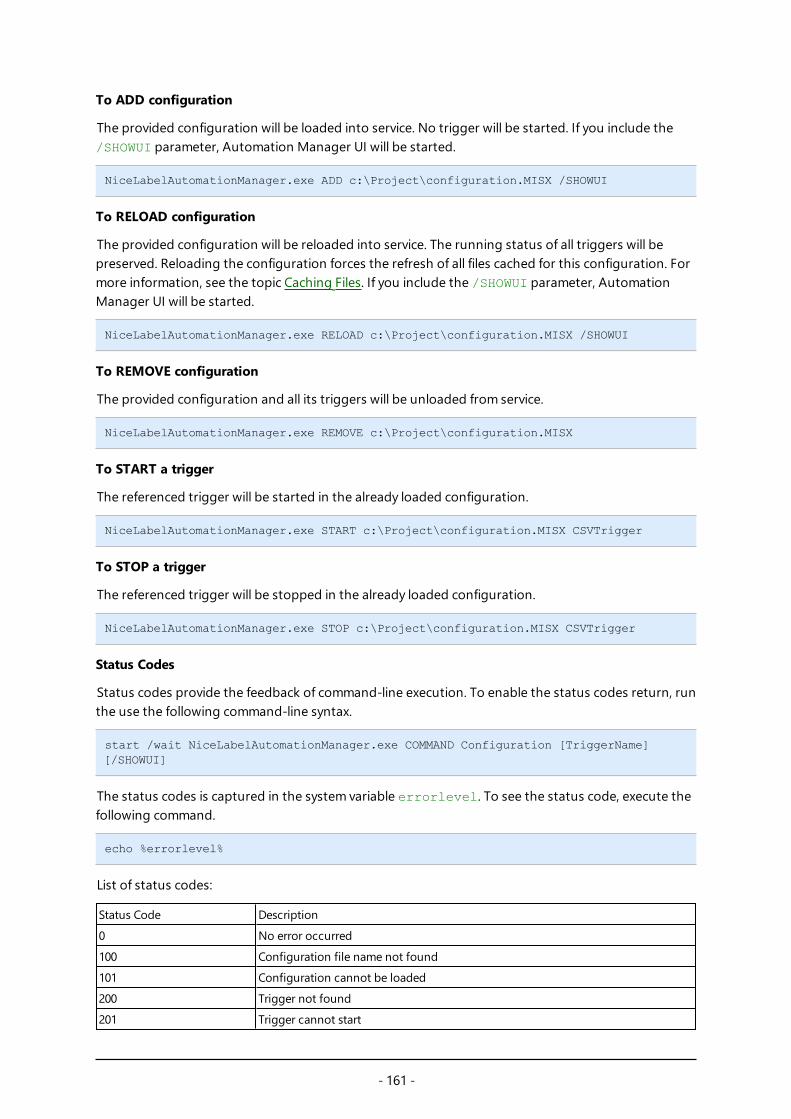
Controlling the Service with Command-line Parameters 160
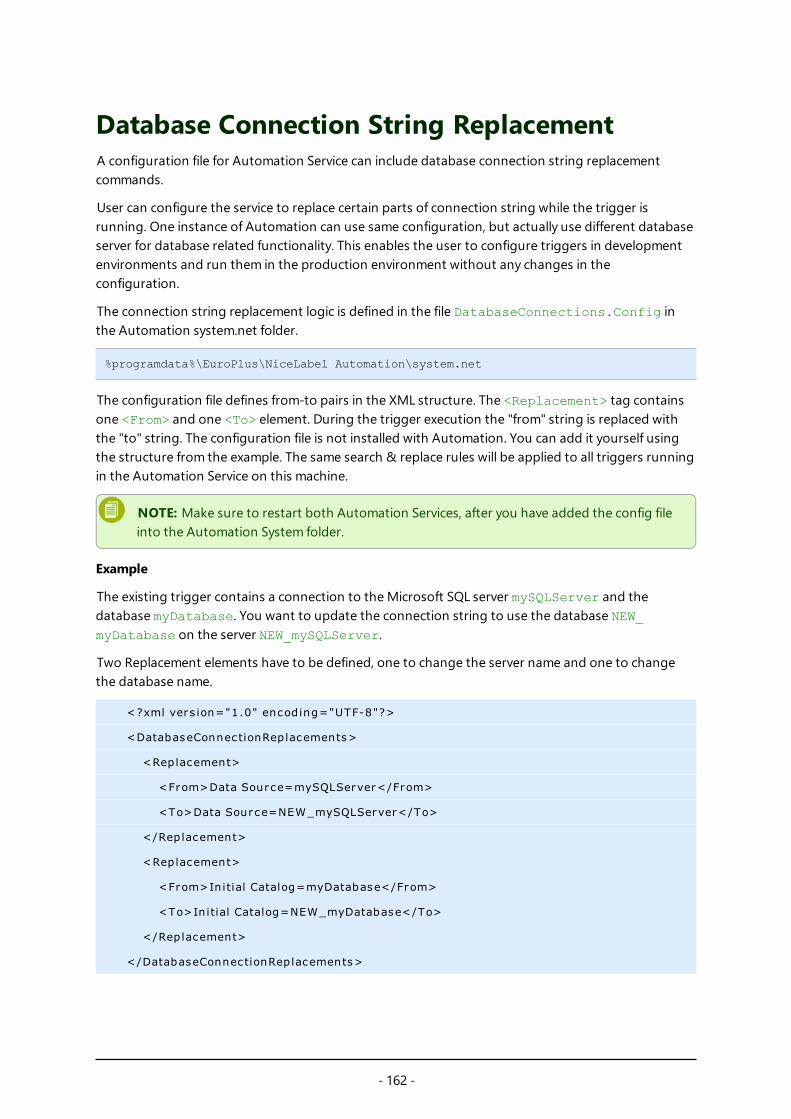
Database Connection String Replacement 162
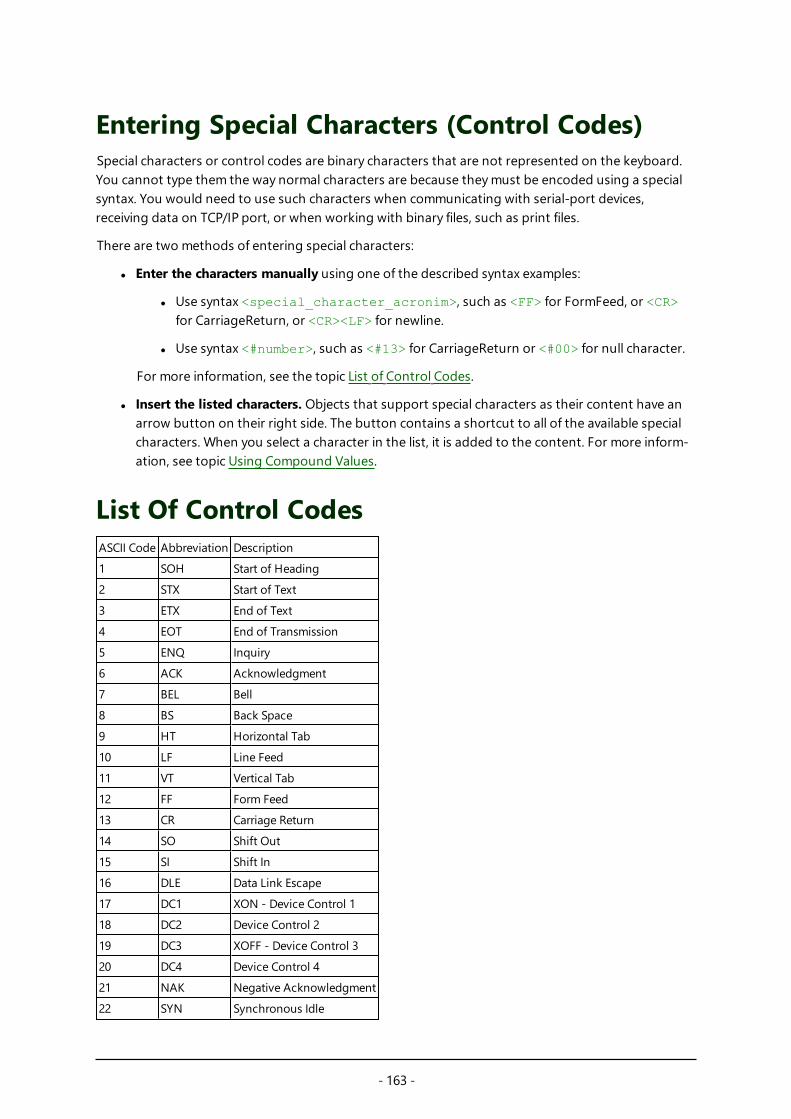
Entering Special Characters (Control Codes) 163
List of Control Codes 163
Offline Mode 164
Printer Licensing Mode 164
- 4 -
Running in Service Mode 165
Search order for the Requested Files 166
Securing Access to your Triggers 167
Tips and Tricks for Using Variables in Actions 168
Tracing Mode 168
Understanding Printer Settings and DEVMODE 169
Using the Same User Account to Configure and to Run Triggers 171
Examples 172
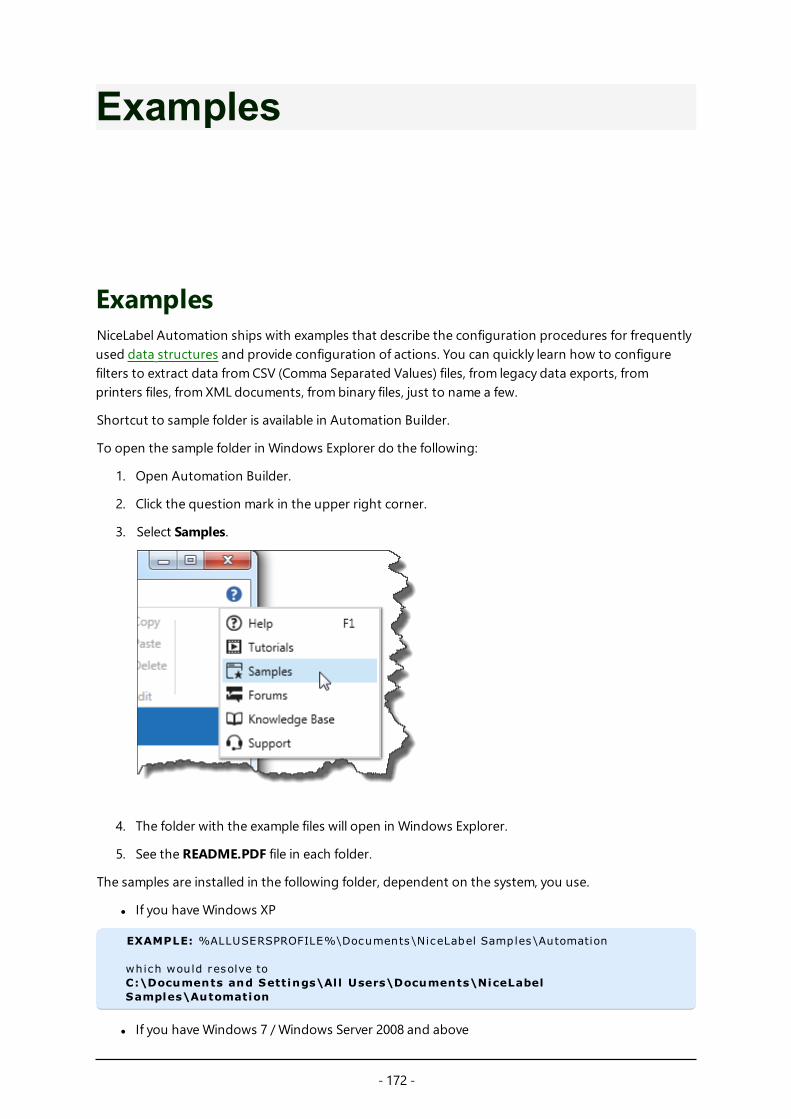
Examples 172
Technical Support 174
Online Support 174
- 5 -
Welcome To NiceLabel Automation
NiceLabel Automation is an application that automates repetitive tasks. In most cases you would use it to integrate label printing processes into existing informational systems, such as existing business applications, production and packaging lines, distribution systems, supply chains. All applications across all divisions and locations in your company can now print authorized labels templates.
NiceLabel Automation represents the optimal business label printing system by synchronizing business events with label production. Automated printing without human interaction is by far the most effective way to remove user errors and maximize performance.
Automating label printing with a trigger-based application revolves around 3 core processes.
Trigger
Triggers are a simple but powerful function that help you automate work. At its core a trigger is a cause and effect statement: ff a monitored event happens, do something.
We are talking about IF .. THEN processing. Triggers are good for things you find yourself repeating.
Automated label printing is triggered by a business operation. NiceLabel Automation is set to supervise a folder, file, or a communication port. When a business operation takes place, a file change or incoming data is detected and it triggers the label printing process.
Learn more about various Triggers:
l File trigger
l Serial port trigger
l Database trigger
l TCP/IP trigger
l HTTP trigger
l Web Service trigger
Data Extraction and Placement
Once the printing is triggered, the NiceLabel Automation extracts label data and inserts it into variable fields on the label design.
Data extraction Filters support:
l Structured text files
l Unstructured text files
- 6 -
l Various XML files
l Binary data: printer replacement, export from legacy software, data from hardware devices, etc.
Action Execution
When the data has been matched with variable fields on the label, NiceLabel Automation performs actions. Basic operations usually include the Open Label and Print Label actions to print extracted data on the label. You can also send the data to custom destinations, such as files on the disk, to Web servers, hardware devices and much more. All together you can select from over 30 different actions.
See more information about basic and advanced printing Actions.
- 7 -
Typographical Conventions
Text that appears in bold refers to menu names and buttons.
Text that appears in italic refers to options, confirming actions like Read only and locations like Folder.
Text enclosed in <Less-Than and Greater-Than signs> refers to keys from the desktop PC keyboard such as <Enter>.
Variables are enclosed in [brackets].
NOTE: This is the design of a note.
EXAMPLE: This is the des ign of an example.
This is the design of a best practice.
WARNING: This is the design of a warning.
This is the design of a tip.
- 8 -
Setting Up Application
ArchitectureNiceLabel Automation is a service-based application. The execution of all rules and actions is performed as the background process under the credentials of the user account defined for the Service.
The NiceLabel Automation consists out of three components.
l Automation Builder. This the configuration application that the developer would use to cre-ate triggers, filters and actions to execute when data is received into the trigger. This applic-ation always runs as the 32-bit application.
l Automation Manager. This is the management application that is used to monitor the exe-cution of triggers in the real time and start/stop the triggers. This application always runs as the 32-bit application.
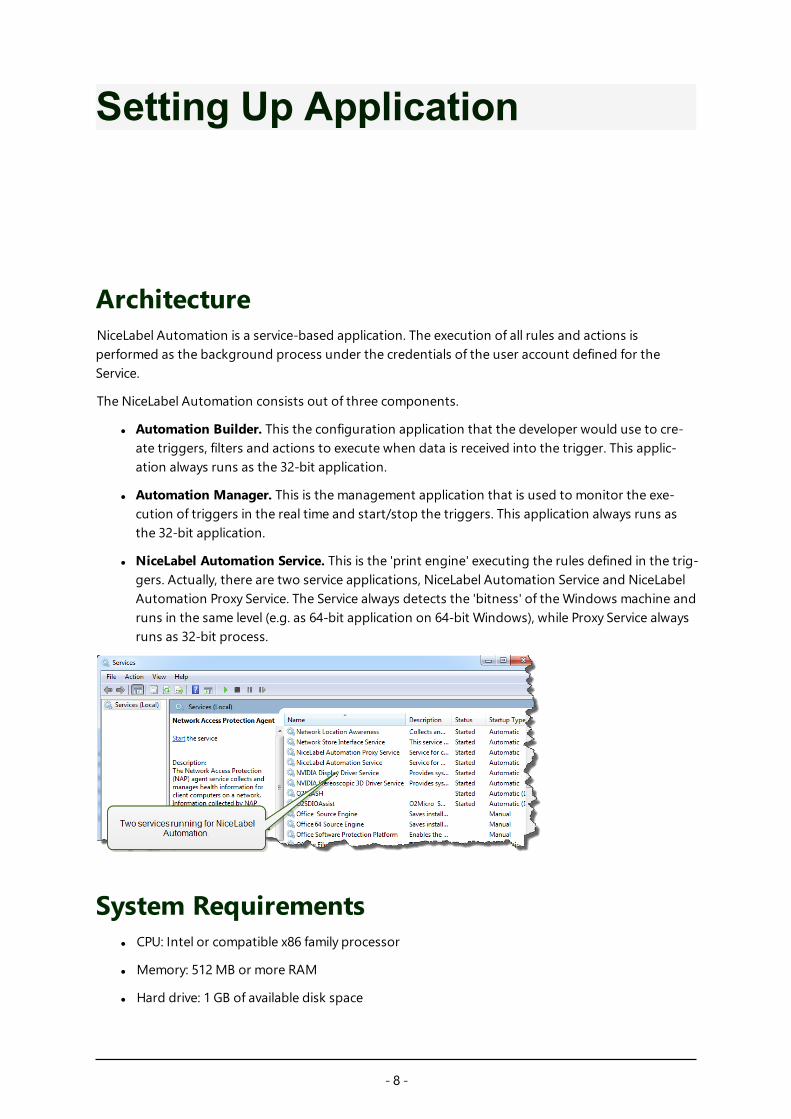
l NiceLabel Automation Service. This is the 'print engine' executing the rules defined in the trig-gers. Actually, there are two service applications, NiceLabel Automation Service and NiceLabel Automation Proxy Service. The Service always detects the 'bitness' of the Windows machine and runs in the same level (e.g. as 64-bit application on 64-bit Windows), while Proxy Service always runs as 32-bit process.
System Requirements l CPU: Intel or compatible x86 family processor
l Memory: 512 MB or more RAM
l Hard drive: 1 GB of available disk space
- 9 -
l Operating system: One of the 32-bit or 64-bit Windows operating systems – Windows XP Service Pack 3, Windows Server 2003, Windows Server 2003 R2, Windows Vista, Windows Server 2008, Windows Server 2008 R2, Windows 7, Windows 8, Windows 8.1, Windows Server 2012, Windows Server 2012 R2, Windows 10
l Microsoft .NET Framework Version 4.0
l Display: 1024×768 or higher resolution monitor
l Label Designer:
l Recommended: NiceLabel Designer Pro or NiceLabel PowerForms Desktop, both V6.0 or higher
l Minimum: NiceLabel Pro V5.4
l Recommended printer drivers: NiceLabel Printer Drivers V5.1 or higher
l Full access to the applications 'System' folder, where events are logged to a database
%ProgramData%\EuroPlus\NiceLabel Automation
l Full access to the service user account's %temp% folder.
InstallationNOTE: Below is the summarized version of the installation procedure. For more information, see the NiceLabel Automation Installation Guide.
Before you begin with the installation, make sure your infrastructure is compatible with the System Requirements.
To install NiceLabel Automation, do the following:
1. Insert NiceLabel Automation DVD.The main menu application will start automatically.
If the main menu application does not start, double click the START.EXE file on the DVD.
2. Click the Install NiceLabel products.The installation of NiceLabel Automation will start.
3. Follow the Setup Wizard prompts.
During the installation the Setup will prompt for the user name under which the NiceLabel Automation service will run under. Make sure to select some real user name, because service will inherit that user name's privileges. For more information, see the topic Running in Service Mode.
Upgrade
To upgrade NiceLabel Automation install the new version on top of the installed version overwriting it. During the upgrade the old version will be removed and replaced with the new, keeping the existing settings. During the upgrade the log database will be emptied.
- 10 -
ActivationYou must activate NiceLabel Automation software to enable processing of the configured triggers. The activation procedure requires the Internet connection, preferably on the machine where your are installing the software. The same activation procedure is used to activate the trial license key.
NOTE: You can activate the software either from Automation Builder or Automation Manager and achieve the same effect.
Activation in Automation Builder
1. Run Automation Builder.
2. Select File>Tools>Manage License.The Activation Wizard will start.
3. Select the activation method.
l Single user software key. In this case you want to activate NiceLabel Automation as stand-alone server. Click Next and follow on-screen instructions.
l Control Center license server. In this case you want to activate NiceLabel Automation from the Control Center. Click Next and select the Control Center server, which already has the NiceLabel Automation license activated. Refer to the Control Center installation guide for the steps to activate products inside the Control Center.
Activation in Automation Manager
1. Run Automation Manager.
2. Go to About tab.
3. Click Enter License Key.
4. Select the activation method.
l Single user software key. In this case you want to activate NiceLabel Automation as stand-alone server. Click Next and follow on-screen instructions.
l Control Center license server. In this case you want to activate NiceLabel Automation from the Control Center. Click Next and select the Control Center server, which already has the NiceLabel Automation license activated. Refer the to the Control Center install-ation guide for the steps to activate products inside the Control Center.
Activation without Internet Access
The automatically activate NiceLabel Automation you must have the connection to the Internet during the activation procedure. You install NiceLabel Automation on the server without the Internet connection, but you will still need to have the Internet connection on some other machine, where the activation procedure will be completed.
Do the following:
1. Follow the activation procedure.
2. Type in the License Key, the Registration Number will be generated.
- 11 -
3. Click the button Save registration data.
4. Copy the file to USB key and go to the computer with Internet Access.
5. Open the URL from the saved file.The Web activation page will open.
6. Make sure values for all fields are properly entered, then click Activate button.
7. Remember the Activation Code and enter it back on the server with NiceLabel Automation.
8. Click Finish button.
Trial ModeTrial mode allows you to test NiceLabel Automation product for up to 30 days. Trial mode has the same functionality as running the licensed version, so it allows evaluation of the product prior the purchase. The Automation Manager will continuously display the trial notification message and the number of trial days remaining. When trial mode expires, the NiceLabel Automation service will no longer process triggers. The countdown of 30 days begins from the day of the installation.
NOTE: You can extend the trial mode by contacting your NiceLabel reseller and requesting another trial license key. You have to activate the trial license key. For more information, see the topic Activation.
- 12 -
Understanding Filters
Understanding FiltersNiceLabel Automation uses filters to define structure of the data received by triggers. Every time a trigger receives a data, that data is parsed through one or many filters, which extract the values you need. Every filter is configured with rules that describe how to identify fields in the data.
NOTE: As a result, the filter provides a list of fields and their values (name:value pairs).
Filter Types
For more information, see the topics Configuring Structured Text Filter, Configuring Unstructured Data Filter and Configuring XML filter.
Data Structure
The filter complexity depends on the data structure. The data that is already in the structured form, such as CSV or XML, can be easily extracted. In this case the field names are already defined with the data. Extracting of name:value pairs is quick. In case of data without a clear structure, it takes more time to define the extraction rules. Such data might be in a form of export of documents and reports from legacy system, intercepted communication between devices, captured print stream, and similar.
The filter defines a list of fields that will be extracted from the incoming data once you run the filter.
NiceLabel Automation supports various types of input data that can be all parsed by one of the supported filter types. You must choose the correct filter to match the type of the incoming data. For example, you would use Structured Text filter for incoming CSV data and you would use XML filter for incoming XML data. For any unstructured data you would use Unstructured Data filter. For more information, see the topic Understanding Data Structures.
Extracting Data
Filter is just a set of rules and doesn't do any extraction by itself. To run the filter you must run the Use Data Filter action. The action will execute filter rules against the data and extract the values.
Every trigger can execute as many of Use Data Filter actions as you need. If you receive compound input data that cannot be parsed by a single filer alone, you can define several filters and execute their rules in Use Data Filter actions running one after another. At the end you can use the extracted values from all actions on the same label.
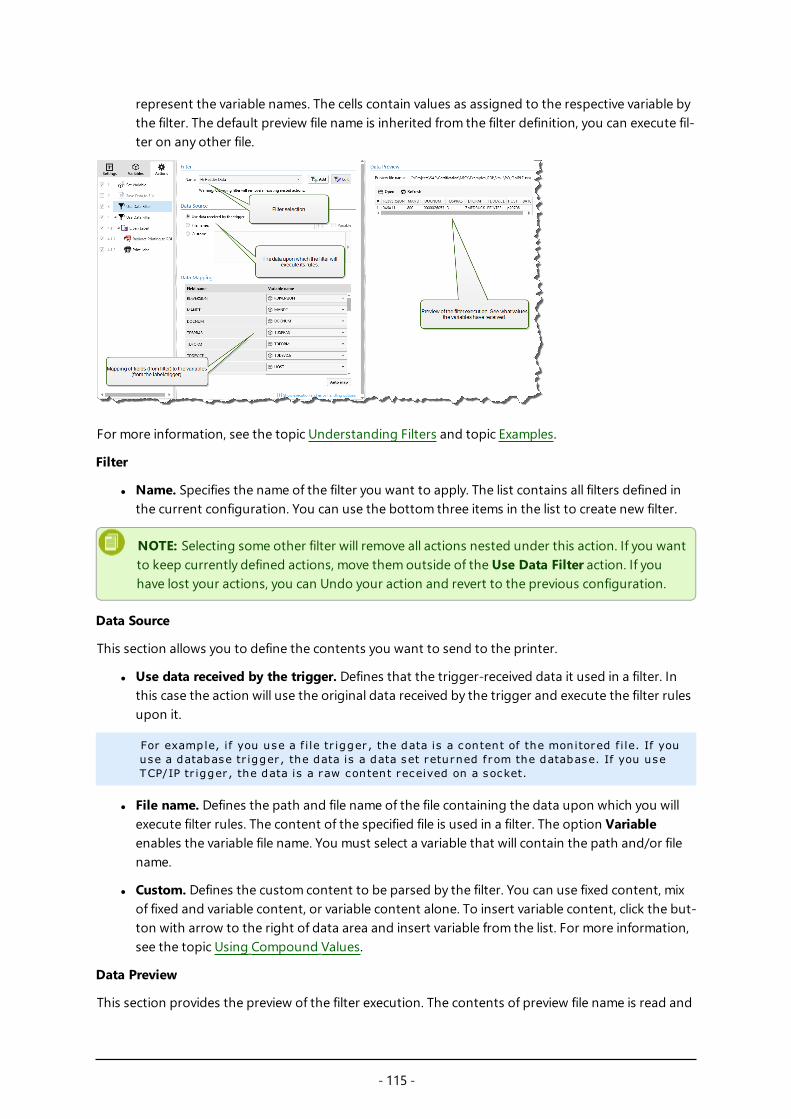
Mapping Fields to Variables
To use the extracted values, you have to save them into variables. The Use Data Filter action doesn't only extract values, but also saves them to variables. To configure this process, you have to map the variable to the respective field. Value of the field will then be saved to a mapped variable.
- 13 -
It's a good practice to define fields and variables with the same names. In this case the auto-mapping feature will link variables to the fields of the same names, eliminating the manual process.
Auto-mapping is available for all supported filter types. With auto-mapping enabled, the Use Data Filter action will extract values and automatically map them to the variables of the same names as field names. For more information, see the topic Enabling Dynamic Structure for Structured Text filter, Defining Assignment Areas for Unstructured Data filter and Defining XML Assignment Area for XML filter.
Defining Actions to Run for Extracted Data
Usually you want to run some actions against the extracted data, such as Open Label, Print Label, or some of the outbound connectivity actions. It is critically important that you nest your actions under the Use Data Filter action. This will ensure that nested actions run for each data extraction.
EXAMPLE: If you have CSV f i le with 5 l ines , the nested actions wil l also run 5 times, once for each data extraction. If the actions are not nested, they wil l only execute one time and contain data from the las t data extraction. For example above, 5th CSV l ine would pr int, but not also the f ir s t four l ines . If you use Sub Areas make sure to nest your action under the correct p laceholder .
Configuring Structured Text FilterStructured Text Filter
To learn more about filters in general, see topic Understanding Filters.
Use this filter whenever you receive a structured text file. These are text files where fields are identified by one of the methods.
l Fields are delimited by a characters. Usual delimiters are comma or semicolon. CSV (comma separated values) is a typical example of a file.
l Fields contain fixed number of characters. In other words, fields are defined by the fixed-width columns.
For examples of the structured text data, see topic Text Database.
Defining Structure
To define the structure of the text file, you have the following options.
l Importing structure using the Text File Wizard. In this case click the Import Data Structure button in the ribbon and follow on-screen instructions. After you finish the wizard, the type of text database and all fields will be defined. If the first line of data contains field names, the Wiz-ard can import them. This is the recommended method, if trigger will always receive data of the same structure.
- 14 -
l Manually defining the fields. In this case you have to manually define the type of the data (delimited fields or fixed-width fields and then define the field names. For more information, see the topic Defining Fields.
l Dynamically read the fields. In this case the trigger might receive data of different structure, such as new field names, and you don't want to update the filter for each structural change. Dynamic support will automatically read all fields in the data, no matter if there exist new fields, or some of the old fields are missing and will map them automatically with the variables using the same names. For more information, see the topic Enabling Dynamic Structure.
The Data Preview section simplifies the configuration. The result of defined filter rule highlights in the preview area with every configuration change. You can see what data would be extracted with each rule.
Defining Fields
The definition of fields is very easy for structured text files. You have two options.
l Delimited defines the fields. In this case you have delimited, such as comma or semicolon between the fields. You just have to define the field names in the same order as they will appear in the data received by a trigger.
l Fixed-width fields. In this case you have to define the field names in the same order as they will appear in the data received by a trigger and define the number of characters the field will occupy. That many characters will be read from the data for this field.
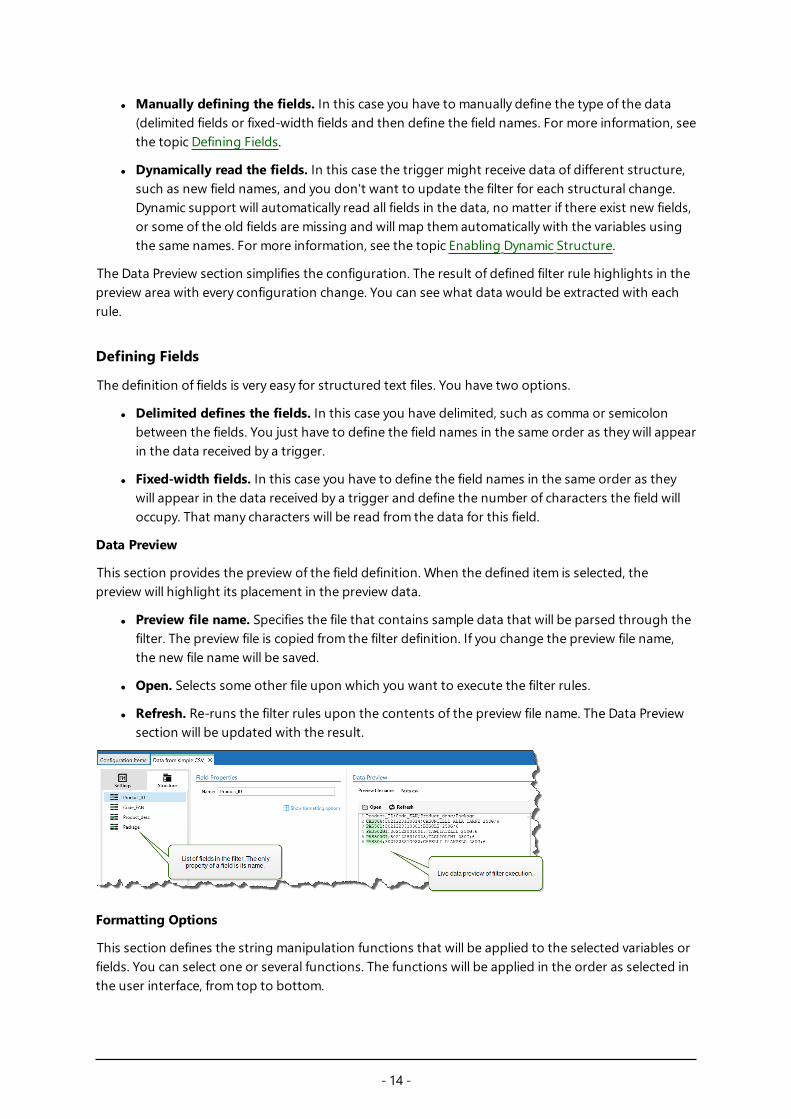
Data Preview
This section provides the preview of the field definition. When the defined item is selected, the preview will highlight its placement in the preview data.
l Preview file name. Specifies the file that contains sample data that will be parsed through the filter. The preview file is copied from the filter definition. If you change the preview file name, the new file name will be saved.
l Open. Selects some other file upon which you want to execute the filter rules.
l Refresh. Re-runs the filter rules upon the contents of the preview file name. The Data Preview section will be updated with the result.
Formatting Options
This section defines the string manipulation functions that will be applied to the selected variables or fields. You can select one or several functions. The functions will be applied in the order as selected in the user interface, from top to bottom.
- 15 -
l Delete spaces at the beginning. Deletes all space characters (decimal ASCII code 32) from the beginning of the string.
l Delete spaces at the end. Deletes all space characters (decimal ASCII value 32) from the end of a string.
l Delete opening closing characters. Deletes the first occurrence of the selected opening and closing characters that are found in the string.
EXAMPLE: If you use "{" for opening character and "}" for the c los ing character , the input s tr ing {{selection}} wil l be conver ted to {selection}.
l Search and replace. Executes standard search and replace function upon the provided values for find what and replace with. You can also use regular expressions.
NOTE: There are several implementations of the regular expressions in use. NiceLabel Automation uses the .NET Framework syntax for the regular expressions. For more information, see Knowledge Base article KB250.
l Replace non printable characters with space. Replaces all control characters in the string with space character (decimal ASCII code 32). The non printable characters are characters with decimal ASCII values between 0-31 and 127-159.
l Delete non printable characters. Deletes all control characters in the string. The non printable characters are characters with decimal ASCII values between 0-31 and 127-159.
l Decode special characters. The special characters (or control codes) are characters not available on the keyboard, such as Carriage Return or Line Feed. NiceLabel Automation uses a notation to encode such characters in human-readable form, such as <CR> for Carriage Return and <LF> for Line Feed. For more information see topic Entering Special Characters (Control Codes).
This option converts special characters from NiceLabel syntax into actual binary characters.
EXAMPLE: When you receive the data "<CR><LF>", NiceLabel Automation wil l use it as p lain s tr ing of 8 characters . You wil l have to enable this option to interpret and use the received data as two b inary characters CR (Carr iage Return - ASCII code 13) and LF (Line Feed - ASCII code 10).
l Search and delete everything before. Finds the provided string and deletes all characters from the beginning of the data until the string. The found string itself can also be deleted.
l Search and delete everything after. Finds the provided string and deletes all characters from the string until the end of the data. The found string itself can also be deleted.
Enabling Dynamic Structure
Structured Text filter has ability to automatically identify the fields and their values in the data, eliminating the need of manual variable to field mapping.
This functionality is useful if the trigger receives the data of the changeable structure. The main data structure is the same, e.g. fields delimited by a comma, or the same XML structure, but the order in which the fields are represented is changed and/or the number of fields has changed; there might be new fields, or some old fields are no longer available. The filter will automatically identify structure. At the same time the field names and values (name:value pairs) will be read from the data, eliminating the need to manually map fields to variables.
The Use Data Filter action won't display any mapping possibilities, because mapping will be done dynamically. You even don't have to define label variables into trigger configuration. The action will assign field values to the label variables of the same name without requiring the variables imported from the label. However, this rule applies to Print Label action alone. If you want to use the field values in any other action, you will have to define variables in the trigger, while still keeping the automatic variable to field mapping.
NOTE: No error will be raised if the field available in the input data doesn't have a matching label variable. The missing variables are silently ignored.
Configuring the dynamic structure
To configure the dynamic structure, enable the option Dynamic structure in the Structured Text filter properties.
l The first line of data must contain field names.
l The line that you select for Start import at line must be the line with the field names (usually the first line in data).
l The data structure must be delimited.
l You can format the data, if necessary.
Formatting Options
This section defines the string manipulation functions that will be applied to the selected variables or fields. You can select one or several functions. The functions will be applied in the order as selected in the user interface, from top to bottom.
l Delete spaces at the beginning. Deletes all space characters (decimal ASCII code 32) from the beginning of the string.
l Delete spaces at the end. Deletes all space characters (decimal ASCII value 32) from the end of a string.
l Delete opening closing characters. Deletes the first occurrence of the selected opening and closing characters that are found in the string.
EXAMPLE: If you use "{" for opening character and "}" for the c los ing character , the input s tr ing {{selection}} wil l be conver ted to {selection}.
l Search and replace. Executes standard search and replace function upon the provided values for find what and replace with. You can also use regular expressions.
NOTE: There are several implementations of the regular expressions in use. NiceLabel Automation uses the .NET Framework syntax for the regular expressions. For more information, see Knowledge Base article KB250.
l Replace non printable characters with space. Replaces all control characters in the string with space character (decimal ASCII code 32). The non printable char-acters are characters with decimal ASCII values between 0-31 and 127-159.
l Delete non printable characters. Deletes all control characters in the string. The non printable characters are characters with decimal ASCII values between 0-31 and 127-159.
l Decode special characters. The special characters (or control codes) are characters not available on the keyboard, such as Carriage Return or Line Feed. NiceLabel Automation uses a notation to encode such characters in human-readable form, such as <CR> for Carriage Return and <LF> for Line Feed. For more information see topic Entering Special Characters (Control Codes).
This option converts special characters from NiceLabel syntax into actual binary characters.
EXAMPLE: When you receive the data "<CR><LF>", NiceLabel Automation wil l use it as p lain s tr ing of 8 characters . You wil l have to enable this option to interpret and use the received data as two b inary characters CR (Carr iage Return - ASCII code 13) and LF (Line Feed - ASCII code 10).
l Search and delete everything before. Finds the provided string and deletes all characters from the beginning of the data until the string. The found string itself can also be deleted.
l Search and delete everything after. Finds the provided string and deletes all characters from the string until the end of the data. The found string itself can also be deleted.
Configuring Unstructured Data FilterUnstructured Data Filter
To learn more about filters in general, see topic Understanding Filters.
Use this filter whenever trigger receives non-structured data, such as documents and reports exported from legacy system, intercepted communication between devices, captured print stream, and similar. The filter allows you to extract individual fields, fields in the repeatable sub areas, and even name-value pairs.
For examples of the structured text data, see topics Legacy Data and Compound CSV and Binary Files.
- 18 -
Defining Structure
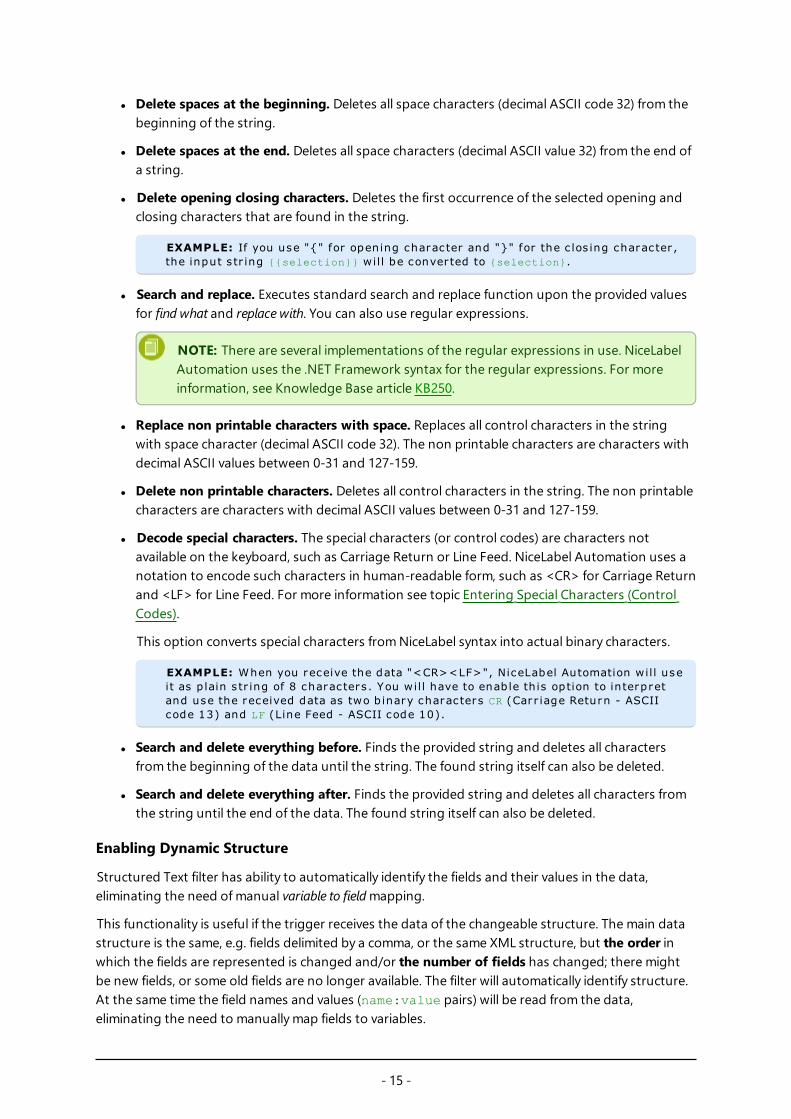
The items you can use to configure the filter:
l Field. Specifies the location of field data between field-start and field-end location. There are various options to define the field location, from hard-coding the position to enable relative placements. You must map the defined fields to respective variables in the Use Data Filter action. For more information, see the topic Defining Fields.
l Sub area. Specifies the location of repeatable data. Each sub area defines at least one data block, which in turn contains data for labels. There can be sub areas defined within sub areas, allowing for definition of complex structures. You can define fields within each data block. You must map the defined fields to respective variables in the Use Data Filter action. For each sub area a new level of placeholder will be defined inside Use Data Filter, so you can map variables to fields of that level. For more information, see the topic Defining Sub Areas.
l Assignment area. Specifies the location of repeatable data containing the name-value pairs. The field names and their values are read simultaneously. The mapping to variables is done automatically. Use this feature to accommodate filter to changeable input data, eliminating the maintenance time. The assignment area can be defined in the root level of the document, or inside the sub area. For more information, see the topic Defining Assignment Areas.
The Data Preview section simplifies the configuration. The result of defined filter rule highlights in the preview area with every configuration change. You can see what data would be extracted with each rule.
The fields can be defined in the root level as document fields. The fields can be defined inside data block. The name-value pairs can be defined inside assignment area.
- 19 -
General
This section defines the general properties of the unstructured data filter.
l Name. Specifies the filter name. Use the descriptive name that will identify what the filter does. You can change it anytime.
l Description. Provides a possibility to describe the functionality of this filter. You can use it to write short explanation what the filter does.
l Encoding. Specifies the encoding of the data this filter will work with.
l Ignore empty lines in data blocks. Specifies not to raise error if filter would extract empty field values from the data blocks.
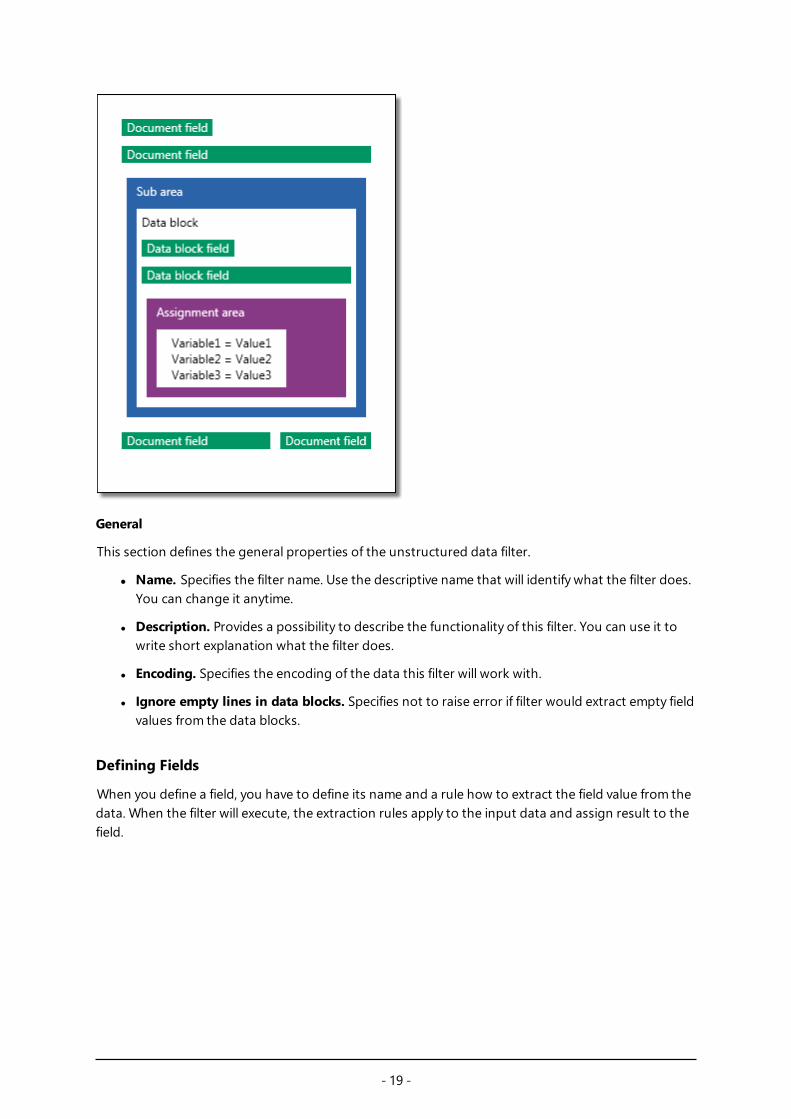
Defining Fields
When you define a field, you have to define its name and a rule how to extract the field value from the data. When the filter will execute, the extraction rules apply to the input data and assign result to the field.
- 20 -
Field Properties
l Name. Specifies the unique name of the field.
l Field has binary data. Specifies that the field will contain binary data. Don't enable it unless you really expect to receive binary data.
Field Start
l Position in document. The start/end point is determined by the hard-coded position in the data. The coordinate origin is upper left corner. The character in the defined position is included in the extracted data.
l End of document. The start/end point is at the end of the document. You can also define an offset from the end for specified number of lines and/or characters.
l Find string from start of document. The start/end point is defined by position of the searched-for-string. When the required string is found, the next character determines the start/end point. The searched string is not included in the extracted data. The default search is case sensitive.
l Start search from absolute position. You can fine-tune searching by changing the start position from data-start (position 1,1) to an offset. Use this feature to skip searching at the beginning of data.
l Occurrence. Specifies which occurrence of the search string should be matched. Use this option if you don't wait to set start/stop position after the first found string.
l Offset from string. Specifies the positive or negative offset after the searched string.
EXAMPLE: You would def ine the offset to inc lude the searched-for-s tr ing in the extracted data.
Field End
l Position in document. The start/end point is determined by the hard-coded position in the data. The coordinate origin is upper left corner. The character in the defined position is included in the extracted data.
l End of document. The start/end point is at the end of the document. You can also define an offset from the end for specified number of lines and/or characters.
- 21 -
l Find string from start of document. The start/end point is defined by position of the searched-for-string. When the required string is found, the next character determines the start/end point. The searched string is not included in the extracted data. The default search is case sensitive.
l Start search from absolute position. You can fine-tune searching by changing the start position from data-start (position 1,1) to an offset. Use this feature to skip searching at the beginning of data.
l Occurrence. Specifies which occurrence of the search string should be matched. Use this option if you don't wait to set start/stop position after the first found string.
l Offset from string. Specifies the positive or negative offset after the searched string.
EXAMPLE: You would def ine the offset to inc lude the searched-for-s tr ing in the extracted data.
l Find string after field start. The start/stop end point is defined by position of the searched-for-string as in the option Find string from start of document, but the search starts after the start position of the field/area, not at the beginning of the data.
l Length. Specifies the length of the data in lines in characters. The specified number of lines and/or characters will be extracted from the start position.
l End of line. Specifies to extract the data from the start position until the end of the same line. You can define a negative offset from end of the line.
Formatting Options
This section defines the string manipulation functions that will be applied to the selected variables or fields. You can select one or several functions. The functions will be applied in the order as selected in the user interface, from top to bottom.
l Delete spaces at the beginning. Deletes all space characters (decimal ASCII code 32) from the beginning of the string.
l Delete spaces at the end. Deletes all space characters (decimal ASCII value 32) from the end of a string.
l Delete opening closing characters. Deletes the first occurrence of the selected opening and closing characters that are found in the string.
EXAMPLE: If you use "{" for opening character and "}" for the c los ing character , the input s tr ing {{selection}} wil l be conver ted to {selection}.
l Search and replace. Executes standard search and replace function upon the provided values for find what and replace with. You can also use regular expressions.
NOTE: There are several implementations of the regular expressions in use. NiceLabel Automation uses the .NET Framework syntax for the regular expressions. For more information, see Knowledge Base article KB250.
l Replace non printable characters with space. Replaces all control characters in the string with space character (decimal ASCII code 32). The non printable characters are characters with decimal ASCII values between 0-31 and 127-159.
l Delete non printable characters. Deletes all control characters in the string. The non printable characters are characters with decimal ASCII values between 0-31 and 127-159.
l Decode special characters. The special characters (or control codes) are characters not available on the keyboard, such as Carriage Return or Line Feed. NiceLabel Automation uses a notation to encode such characters in human-readable form, such as <CR> for Carriage Return and <LF> for Line Feed. For more information see topic Entering Special Characters (Control Codes).
This option converts special characters from NiceLabel syntax into actual binary characters.
EXAMPLE: When you receive the data "<CR><LF>", NiceLabel Automation wil l use it as p lain s tr ing of 8 characters . You wil l have to enable this option to interpret and use the received data as two b inary characters CR (Carr iage Return - ASCII code 13) and LF (Line Feed - ASCII code 10).
l Search and delete everything before. Finds the provided string and deletes all characters from the beginning of the data until the string. The found string itself can also be deleted.
l Search and delete everything after. Finds the provided string and deletes all characters from the string until the end of the data. The found string itself can also be deleted.
Defining Sub Areas
Sub area is the section of data within which there are several blocks of data identified by the same extraction rule. Each data block provides data for a single label. All data blocks must be identified by the same configuration rule. Each data block can contain another sub area. You can define unlimited number of nested sub areas within parent sub areas.
When the filter contains definition of a sub area, the Use Data Filter action will display sub areas with nested placeholders. All action nested below such placeholder will execute only for data blocks on this level. You can print different labels with data from different sub areas.
Configuring Sub Area
The sub area is defined with similar rules as individual fields. Each sub area is defined by the following parameters.
- 23 -
l Sub Area Name. Specifies the name of the sub area.
l Data Blocks. Specifies how to identify the data blocks within the sub area. Each sub area con-tains at least one data block. Each data block provides data for a single label.
l Each block contains fixed number of lines. Specifies that each data block in a sub area contains the provided fixed number of lines. Use this option if you know that each data block contains exactly the same number of lines.
l Blocks start with a string. Specifies that data blocks begin with the provided string. All content between two provided strings belongs to a separate data block. The content between last string and the end of the data identifies the last data block.
l Block end with a string. Specifies that data blocks end with the provided string. All con-tents between two provided strings belongs to a separate data block. The content between the beginning of data and the first string identifies the first data block.
l Blocks are separated by a string. Specifies that data blocks are separated with the provided string. All contents between two provided strings belongs to separate data block.
l Beginning of First Data Block. Specifies the start position of the first data block and thus the start position of the sub area. Usually, start position is the beginning of the received data. The configuration parameters are the same as for defining fields. For more information, see the topic Defining Fields.
l End of Last Data Block. Specifies the end position of the last data block and thus the end pos-ition of the sub area. Usually, end position is at the end of the received data. The configuration parameters are the same as for defining fields. For more information, see the topic Defining Fields.
Configuring Fields Inside Sub Area
The fields inside the sub area are configured using the same parameters as for the fields defined in the root level. For more information, see the topic Defining Fields.
NOTE: The field lines numbers refer to the position within data block, not position within the input data.
Data Preview
This section provides the preview of the field definition. When the defined item is selected, the preview will highlight its placement in the preview data.
l Preview file name. Specifies the file that contains sample data that will be parsed through the filter. The preview file is copied from the filter definition. If you change the preview file name, the new file name will be saved.
l Open. Selects some other file upon which you want to execute the filter rules.
l Refresh. Re-runs the filter rules upon the contents of the preview file name. The Data Preview section will be updated with the result.
- 24 -
Defining Assignment Areas
Unstructured Data filter has ability to automatically identify the fields and their values in the data, eliminating the need of manual variable to field mapping.
This functionality is useful if the trigger receives the data of the changeable structure. The main data structure is the same, e.g. fields delimited by a comma, or the same XML structure, but the order in which the fields are represented is changed and/or the number of fields has changed; there might be new fields, or some old fields are no longer available. The filter will automatically identify structure. At the same time the field names and values (name:value pairs) will be read from the data, eliminating the need to manually map fields to variables.
The Use Data Filter action won't display any mapping possibilities, because mapping will be done dynamically. You even don't have to define label variables into trigger configuration. The action will assign field values to the label variables of the same name without requiring the variables imported from the label. However, this rule applies to Print Label action alone. If you want to use the field values in any other action, you will have to define variables in the trigger, while still keeping the automatic variable to field mapping.
NOTE: No error will be raised if the field available in the input data doesn't have a matching label variable. The missing variables are silently ignored.
Configuring Assignment Area
The assignment area is configured using the same procedure as sub area. For more information, see the topic Defining Sub Areas. The assignment area can be defined on the root data level, appearing just once. Or it can be configured inside a sub are, so it will execute for each data block in the sub area.
Configuring Fields in Assignment Area
When you create the assignment area, the filter will automatically define two placeholders, which will define the name:value pair.
l Variable name. Specifies the field, which contents will be the variable name (name component in a pair). Configure the field using the same procedure as for document fields. For more inform-ation, see the topic Defining Fields.
- 25 -
l Variable value. Specifies the field, which contents will be the variable value (value component in a pair). Configure the field using the same procedure as for document fields. For more inform-ation, see the topic Defining Fields.
Example
The area between ̂ XA and ̂ XZ is assignment area. Every line in assignment area provides the name:value pair. Name is defined as value between 6th character in the line and equal character. Value is defined as value between equal character and end of the line with negative offset of three characters
^XA^FD01DonationHR=G095605 3412625^FS^FD02DonationBC=DG0956053412625^FS^FD03HospitalNoHR=HN060241^FS^FD04HospitalNoBC=060241^FS^FD05Surname=Hawley^FS^FD07Forename=Annie^FS^FD09Product=Blood^FS^FD10PatientBlGp=O Rh +ve^FS^FD11DoB=27 June 1947^FS^FD12DateReqd=25 Dec 2012^FS^XZ
For more information, see the topic Examples.
Configuring XML FilterXML Filter
The functionality from this topic is available in NiceLabel Automation Pro and NiceLabel Automation Enterprise.
To learn more about filters in general, see topic Understanding Filters.
Use this filter whenever trigger receives the XML-encoded data. The filter allows you to extract individual fields, fields in the repeatable sub areas, and even name-value pairs. The XML structure defines elements and sub elements, attributes and their values, and text values (element values).
While you can define the structure of the XML file yourself, it's best practice to import the structure from the existing sample XML file. Click Import Data Structure button in the ribbon. When you import XML structure, the Data Preview section will display the XML contents and then highlight the elements and attributes that you define as output fields.
For examples of the XML data, see topic XML Data.
Defining Structure
To use the XML items you must configure their usage as:
l Variable value. Specifies that you want to use the selected item as field and you will map its value to respective variables in the Use Data Filter action. For more information, see the topic Defining XML Fields.
l Optional element. Specifies that this element is not mandatory. This corresponds to the attribute minOccurs=0 in the XML schema (XSD file). The variable mapped to such field
- 26 -
will have an empty value, when the element does not appear in the XML.
l Data block. Specifies that the selected element occurs many times and will provide data for single label. Data block can be defined as repeatable area, as assignment area, or both.
l Repeatable area. Specifies that you want to extract values from all repeatable data block, not just the first one. You can define fields within each data block. You must map the defined fields to respective variables in the Use Data Filter action. For more inform-ation, see the topic Defining Repeatable Elements.
l Assignment area. Specifies that data block contains name-value pairs. The field names and their values are read simultaneously. The mapping to variables is done auto-matically. Use this feature to accommodate filter to changeable input data, eliminating the maintenance time. For more information, see the topic Defining XML Assignment Area.
The Data Preview section simplifies the configuration. The result of a defined filter rule will be highlighted in the preview area.
To change the previewed XML data, click Open and browse for a new sample XML file.
Defining XML Fields
The functionality from this topic is available in NiceLabel Automation Pro and NiceLabel Automation Enterprise.
When you define the XML field, you make the value of selected item available as field. The filter definition will provide such field for mapping to variable in Use Data Filter action. You can extract the value of the element or value of the attribute.
To define the item value as field, do the following:
1. Select the element or attribute in the structure list.
2. For Usage select Variable value.
3. The item in the structure list will be displayed with bold letters, indicating it is in use.
4. The element or attribute name will be used as the output field name.
5. The Data Preview section will highlight value of the selected item.
- 27 -
Formatting Options
This section defines the string manipulation functions that will be applied to the selected variables or fields. You can select one or several functions. The functions will be applied in the order as selected in the user interface, from top to bottom.
l Delete spaces at the beginning. Deletes all space characters (decimal ASCII code 32) from the beginning of the string.
l Delete spaces at the end. Deletes all space characters (decimal ASCII value 32) from the end of a string.
l Delete opening closing characters. Deletes the first occurrence of the selected opening and closing characters that are found in the string.
EXAMPLE: If you use "{" for opening character and "}" for the c los ing character , the input s tr ing {{selection}} wil l be conver ted to {selection}.
l Search and replace. Executes standard search and replace function upon the provided values for find what and replace with. You can also use regular expressions.
NOTE: There are several implementations of the regular expressions in use. NiceLabel Automation uses the .NET Framework syntax for the regular expressions. For more information, see Knowledge Base article KB250.
l Replace non printable characters with space. Replaces all control characters in the string with space character (decimal ASCII code 32). The non printable characters are characters with decimal ASCII values between 0-31 and 127-159.
l Delete non printable characters. Deletes all control characters in the string. The non printable characters are characters with decimal ASCII values between 0-31 and 127-159.
l Decode special characters. The special characters (or control codes) are characters not available on the keyboard, such as Carriage Return or Line Feed. NiceLabel Automation uses a notation to encode such characters in human-readable form, such as <CR> for Carriage Return and <LF> for Line Feed. For more information see topic Entering Special Characters (Control Codes).
This option converts special characters from NiceLabel syntax into actual binary characters.
EXAMPLE: When you receive the data "<CR><LF>", NiceLabel Automation wil l use it as p lain s tr ing of 8 characters . You wil l have to enable this option to interpret and use the received data as two b inary characters CR (Carr iage Return - ASCII code 13) and LF (Line Feed - ASCII code 10).
l Search and delete everything before. Finds the provided string and deletes all characters from the beginning of the data until the string. The found string itself can also be deleted.
l Search and delete everything after. Finds the provided string and deletes all characters from the string until the end of the data. The found string itself can also be deleted.
Data Preview
This section provides the preview of the field definition. When the defined item is selected, the preview will highlight its placement in the preview data.
l Preview file name. Specifies the file that contains sample data that will be parsed through the filter. The preview file is copied from the filter definition. If you change the preview file name, the new file name will be saved.
l Open. Selects some other file upon which you want to execute the filter rules.
l Refresh. Re-runs the filter rules upon the contents of the preview file name. The Data Preview section will be updated with the result.
Defining Repeatable Elements
The functionality from this topic is available in NiceLabel Automation Pro and NiceLabel Automation Enterprise.
When you have a XML element that occurs many times in the XML data, that element is repeatable. Usually, the repeatable element contains the data for a single label. To indicate that you want to use data from all repeatable elements, not just the first one, you have to define the element as Data block and enable the option Repeatable element. When the filter contains definition of elements defined as data block / repeatable element, the Use Data Filter action will display repeatable elements with nested placeholders. All action nested below such placeholder will execute only for data blocks on this level.
Example
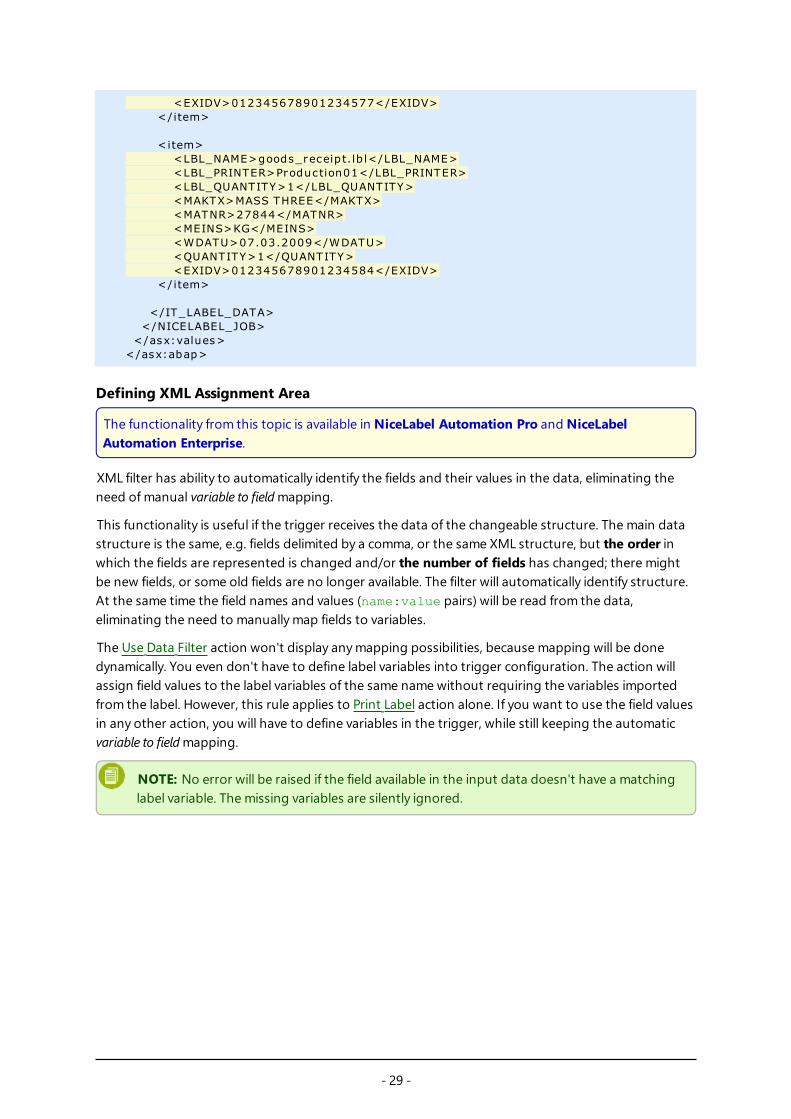
The <item> element is defined as Data block and Repeatable element. This instructs the filter to extract all occurrences of the <item> element, not just the first one. In this case the <item> would be defined as the sub-level in Use Data Filter action. You must nest the actions Open Label and Print Label under this sub-level placeholder, so they will be looped as many times as there are occurrences of the <item> element. In this case three times.
<?xml vers ion="1.0" encoding="utf-8"?><asx:abap xmlns:asx="http://www.sap.com/abapxml" vers ion="1.0"> <asx:values> <NICELABEL_JOB> <TIMESTAMP>20130221100527.788134</TIMESTAMP> <USER>PGRI</USER> <IT_LABEL_DATA>
The functionality from this topic is available in NiceLabel Automation Pro and NiceLabel Automation Enterprise.
XML filter has ability to automatically identify the fields and their values in the data, eliminating the need of manual variable to field mapping.
This functionality is useful if the trigger receives the data of the changeable structure. The main data structure is the same, e.g. fields delimited by a comma, or the same XML structure, but the order in which the fields are represented is changed and/or the number of fields has changed; there might be new fields, or some old fields are no longer available. The filter will automatically identify structure. At the same time the field names and values (name:value pairs) will be read from the data, eliminating the need to manually map fields to variables.
The Use Data Filter action won't display any mapping possibilities, because mapping will be done dynamically. You even don't have to define label variables into trigger configuration. The action will assign field values to the label variables of the same name without requiring the variables imported from the label. However, this rule applies to Print Label action alone. If you want to use the field values in any other action, you will have to define variables in the trigger, while still keeping the automatic variable to field mapping.
NOTE: No error will be raised if the field available in the input data doesn't have a matching label variable. The missing variables are silently ignored.
- 30 -
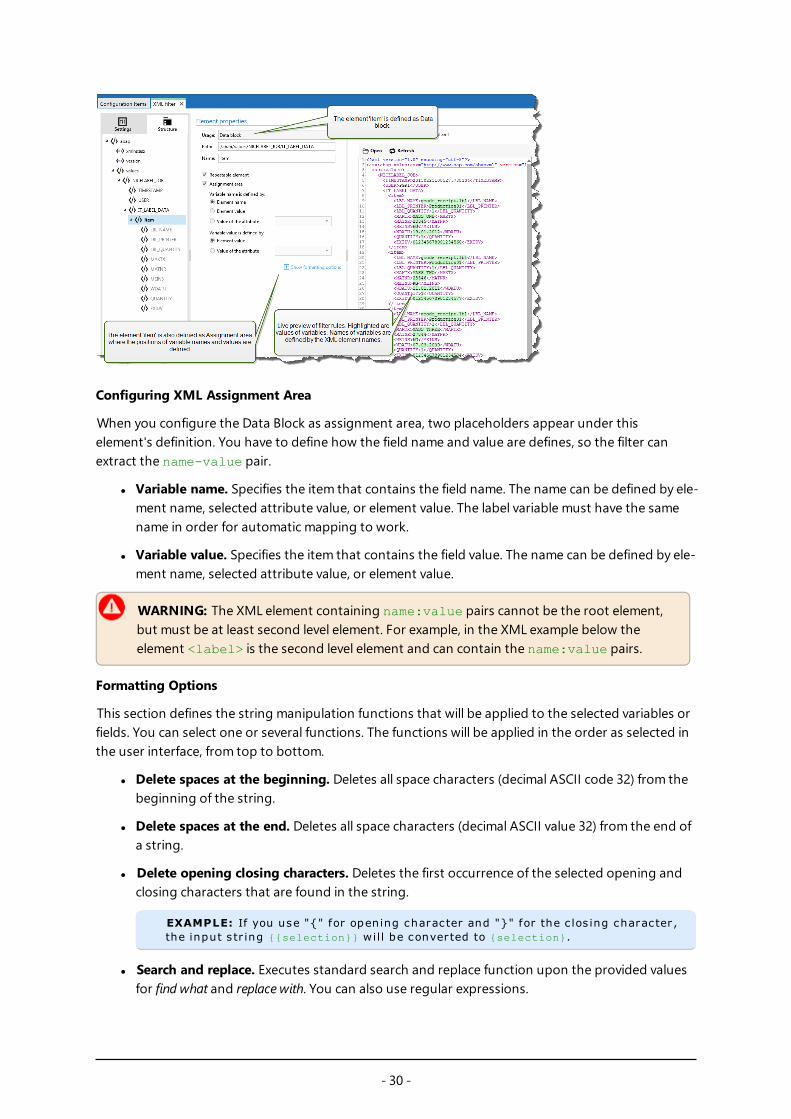
Configuring XML Assignment Area
When you configure the Data Block as assignment area, two placeholders appear under this element's definition. You have to define how the field name and value are defines, so the filter can extract the name-value pair.
l Variable name. Specifies the item that contains the field name. The name can be defined by ele-ment name, selected attribute value, or element value. The label variable must have the same name in order for automatic mapping to work.
l Variable value. Specifies the item that contains the field value. The name can be defined by ele-ment name, selected attribute value, or element value.
WARNING: The XML element containing name:value pairs cannot be the root element, but must be at least second level element. For example, in the XML example below the element <label> is the second level element and can contain the name:value pairs.
Formatting Options
This section defines the string manipulation functions that will be applied to the selected variables or fields. You can select one or several functions. The functions will be applied in the order as selected in the user interface, from top to bottom.
l Delete spaces at the beginning. Deletes all space characters (decimal ASCII code 32) from the beginning of the string.
l Delete spaces at the end. Deletes all space characters (decimal ASCII value 32) from the end of a string.
l Delete opening closing characters. Deletes the first occurrence of the selected opening and closing characters that are found in the string.
EXAMPLE: If you use "{" for opening character and "}" for the c los ing character , the input s tr ing {{selection}} wil l be conver ted to {selection}.
l Search and replace. Executes standard search and replace function upon the provided values for find what and replace with. You can also use regular expressions.
- 31 -
NOTE: There are several implementations of the regular expressions in use. NiceLabel Automation uses the .NET Framework syntax for the regular expressions. For more information, see Knowledge Base article KB250.
l Replace non printable characters with space. Replaces all control characters in the string with space character (decimal ASCII code 32). The non printable characters are characters with decimal ASCII values between 0-31 and 127-159.
l Delete non printable characters. Deletes all control characters in the string. The non printable characters are characters with decimal ASCII values between 0-31 and 127-159.
l Decode special characters. The special characters (or control codes) are characters not available on the keyboard, such as Carriage Return or Line Feed. NiceLabel Automation uses a notation to encode such characters in human-readable form, such as <CR> for Carriage Return and <LF> for Line Feed. For more information see topic Entering Special Characters (Control Codes).
This option converts special characters from NiceLabel syntax into actual binary characters.
EXAMPLE: When you receive the data "<CR><LF>", NiceLabel Automation wil l use it as p lain s tr ing of 8 characters . You wil l have to enable this option to interpret and use the received data as two b inary characters CR (Carr iage Return - ASCII code 13) and LF (Line Feed - ASCII code 10).
l Search and delete everything before. Finds the provided string and deletes all characters from the beginning of the data until the string. The found string itself can also be deleted.
l Search and delete everything after. Finds the provided string and deletes all characters from the string until the end of the data. The found string itself can also be deleted.
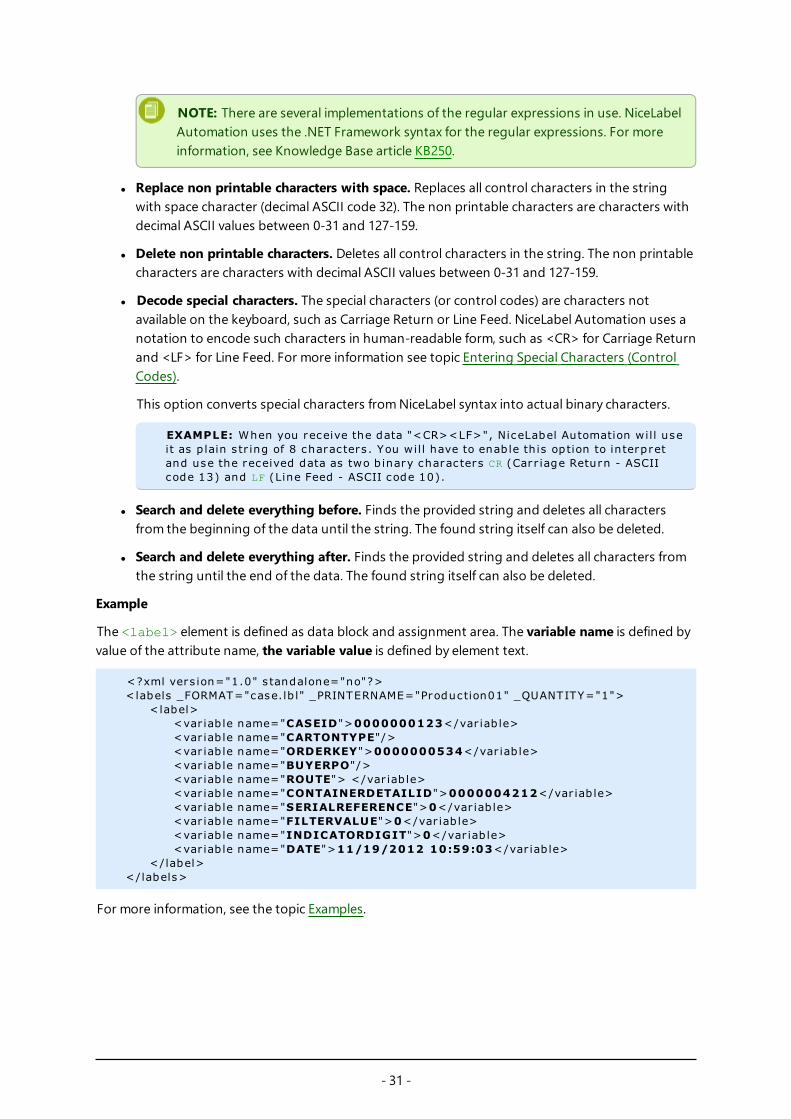
Example
The <label> element is defined as data block and assignment area. The variable name is defined by value of the attribute name, the variable value is defined by element text.
<?xml vers ion="1.0" s tandalone="no"?><labels _FORMAT="case.lb l" _PRINTERNAME="Production01" _QUANTITY="1"> <label> <var iab le name="CASEID">0000000123</var iab le> <var iab le name="CARTONTYPE"/> <var iab le name="ORDERKEY">0000000534</var iab le> <var iab le name="BUYERPO"/> <var iab le name="ROUTE"> </var iab le> <var iab le name="CONTAINERDETAILID">0000004212</var iab le> <var iab le name="SERIALREFERENCE">0</var iab le> <var iab le name="FILTERVALUE">0</var iab le> <var iab le name="INDICATORDIGIT">0</var iab le> <var iab le name="DATE">11/19/2012 10:59:03</var iab le> </label></labels>
Setting Label And Printer Names From Input DataTypically, filters are used to extract values from the received data and send them to the label variables for printing. In such case the label name or printer name are hard-coded into the actions. For example, Open Label action will hard-code the label name, and Set Printer action will hard-code the printer name. However, the input data can also provide the meta-data, the values used inside NiceLabel Automation processing, but not printed on the label, such as label name, printer name, label quantity, or anything else.
To use the values of meta-fields in the print process, do the following.
1. Filter reconfiguration. You must define new fields for the input data to extract the meta-data fields as well.
2. Variable definition. You must manually define the variables that will store the meta-data, they don't exist on the label and cannot be imported. Use intuitive names, such as LabelName, PrinterName, and Quantity. You are free to use any variable name.
3. Mapping reconfiguration. You must manually configure the Use Data Filter action to map meta-fields to new variables.
4. Action reconfiguration. You must reconfigure Open Label action to open label specified by variable LabelName, and Set Printer action to use printer specified by variable PrinterName.
Example
The CSV file contains label data, but also provides meta-data, such as label name, printer name and quantity of labels. The Structured Text filter will extract all fields, send label-related values to the label variables and use meta-data to configure action Open Label, Set Printer and Print Label.
label_name;label_count;printer_name;art_code;art_name;ean13;weightlabel1.lbl;1;CAB A3 203DPI;00265012;SAC.PESTO 250G;383860026501;1,1 kglabel2.lbl;1;Zebra R-402;00126502;TAGLIOLINI 250G;383860026002;3,0 kg
For more information, see the topic Examples.
- 33 -
Configuring Triggers
Understanding TriggersThe functionality from this topic is not all available in every NiceLabel Automation product.
NiceLabel Automation is an event-based application and will trigger action execution upon change in the monitored event. You can use any of the available triggers to monitor changes in events, such as file drop into a certain folder, data acquire on specific TCP/IP socket, HTTP message and other. The trigger's main job is to recognize the change in the event, get data provided by the event and then execute actions. Majority of the triggers are designed to passively listen for the monitored event to occur, but there are two exceptions. The Database trigger is active trigger and will periodically check for changes in the monitored database. The Serial port trigger can wait for incoming connection, or can actively poll for data in specified time intervals.
Processing Triggers
In most cases the trigger receives data that must print on labels. Once the trigger receives the data,the actions are executed in defined order from top to bottom. The received data can contain values for the label objects. However, before you can use these values, you must extract them from the received data and save them in variables. The filters define the extraction rules. When executed, filters will save the extracted data to the mapped variables. Once you have the data safely stored in the variables, you can run actions that will use the variables, such as Print Label.
When the event occurs, the input data it provided is saved to the temporary file on the disk in the service user's %temp% folder. The internal variable DataFileName references the temporary file location. The file is deleted when the trigger completes its execution.
Trigger Properties
To configure trigger, you have to define how you will accept the data and the actions you want to run. Optionally you can also use variables. There are three sections in trigger configuration.
l Settings. Defines the main parameters of the selected trigger. You can define the event that trigger will monitor for changes, or define the inbound communication channel. The settings include selection of the script programming engine and security options. The available options depend on the trigger type. For more information, see section Trigger Types below.
l Variables. This section defines the variables you need inside the trigger. Usually, you will import variables from the label templates, so you can map them with the fields extracted from the inbound data. You can also define variables to be used internally in various actions and won't be sent to the label. For more information, see the topic Using Variables.
- 34 -
l Actions. This section defines the actions to execute whenever the trigger detects change in the monitored event. Actions execute in order from top to bottom. For more information, see the topic Using Actions.
Trigger Types
l Defining Triggers. Monitors the change in the file or set of files in the folder. Contents of the file can be parsed in filters and used in actions.
l Serial Port Trigger. Monitors the inbound communication on the serial RS232 port. Contents of the input stream can be parsed in filters and used in actions. The data can be also polled from the external device in defined time intervals.
l Database Trigger. Monitors the record changes in the SQL database tables. Contents of the returned data set can be parsed and used in actions. The database is monitored in defined time intervals. The trigger can also update the database after the actions execute using INSERT, UPDATE and INSERT SQL statements.
l TCP/IP Server Trigger. Monitors the inbound raw data stream arriving on the defined socket. Contents of the input stream can be parsed in filters and used in actions. Can be bidirectional, providing feedback.
l HTTP Server Trigger. Monitors the inbound HTTP-formatted data stream arriving on the defined socket. Contents of the input stream can be parsed in filters and used in actions. User authentication can be enabled. Is bidirectional, providing feedback.
l Web Service Trigger. Monitors the inbound data stream arriving on the defined Web Service method. Contents of the input stream can be parsed in filters and used in actions. Is bid-irectional, providing feedback.
Error Handling in Triggers
l Configuration errors. The trigger will be in the error state, whenever it's not configured properly or entirely. For example, the you have configured the file trigger, but failed to specify the file name to check for changes. Or, you defined the action to print labels, but you failed to specify the label name. You can save triggers that contain configuration errors, but you cannot run them in Automation Manager until you resolve the problem. The error in the lower level in the configuration will propagate itself all the way to the higher level, so it is easy to find the error location.
EXAMPLE: If you have one action in er ror s tate, al l upper-level ac tions wil l ind icate the er ror s ituation, the er ror icon wil l be d isp layed in the Actions tab and in the tr igger name.
l Overlapping configurations. While it is perfectly acceptable for the configuration to include triggers monitoring the same event, such as the same file name, or listening on the same TCP/IP port, such triggers cannot run simultaneously. When you start the trigger in Auto-mation Manager, it will start only if no other trigger from the same or other configuration mon-itors the same event.
Print Job Status Feedback
See the topic Print Job Status Feedback.
- 35 -
Defining TriggersFile Trigger
To learn more about triggers in general, see topic Understanding Triggers.
The file trigger event occurs when a monitored file or set of files in monitored folder change. Appearance of new file will also fire a trigger. Dependent on the trigger configuration the Windows system alerts the trigger about the changed files, or the trigger itself keeps a list of the file's last-write time-stamp and will fire when the file has a newer time-stamp.
Typical usage: The existing business system executes a transaction, which in effect generates trigger file in the shared folder. The contents of the data might be structured in CSV, XML and other formats, or it can be structured in a legacy format. In either way, NiceLabel Automation will read the data, parse values using filters and print them on labels. For more information how to parse and extract data, see the topic Understanding Filters.
General
This section allows you to configure the most important file trigger settings.
l Name. Specifies the unique name of the trigger. The names helps you distinguish between dif-ferent triggers when you configure them in Automation Builder and later run them in Auto-mation Manager.
l Description. Provides a possibility to describe the functionality of this trigger. You can use it to write short explanation what the trigger does.
l Detect the specified file. Specifies the path and file name of the file that you will monitor for changes.
l Detect a set of files in the specified folder. Specifies the path to the folder, which you will monitor for file changes, and the file names. You can use standard Windows wild cards "*" and "?". Some file types are predefined in the drop-down box, you can also enter your own types.
NOTE: When monitoring the network folder, make sure to use the UNC notation of \\server\share\file. For more information, see the topic Access to Network Shared Resources.
l Automatically detect changes. The application will respond to the file changes as soon as the file has been created or changed. In this case, Windows operating system informs NiceLabel Automation Service about the change. You can use it when the monitored folder is located on the local drive and also in some network environments.
l Check for changes in folder in intervals (milliseconds). The application will scan the folder for file changes in the defined time intervals. In this case, NiceLabel Automation itself monitors folder for file changes. This polling method tends to be slower than automatic detection. Use it as a fallback, when the automatic detection cannot be used in your environment.
Execution
Options in the File Access section specify how the application will access the trigger file.
- 36 -
l Open file exclusively. Specifies to open the trigger file in exclusive mode. No other application can access the file at the same time. This is default selection.
l Open file with read only permissions. Specifies to open the trigger file in read-only mode.
l Open file with read and write permissions. Specifies to open the trigger file in read-write mode.
l File open retry period. Specifies the time period in which NiceLabel Automation will try to open the trigger file. If the file access is still not possible after this time period, NiceLabel Auto-mation will report an error.
Options in the Monitoring Options section specify the file detection possibilities.
l Check file size. Enables detection of changes not only in the time-stamp, but also in the file length. The changes to the file time-stamp might not be detected, so it will help to see that the file size has changed and trigger the actions
l Ignore empty trigger files. If the trigger file has no contents, it will be ignored. The actions will not execute.
l Delete the trigger file. After the change in the trigger file has been detected, and trigger fires the file will be deleted. Enabling this option will keep the folder clean of already processed files.
NOTE: NiceLabel Automation always creates a backup of the received trigger data; in this case the contents of trigger file and saves it to unique file name. This is important, when you need the contents of the trigger file in some of the actions, such as Run Command File. The location of the backup trigger data is referenced to by the internal variable DataFileName.
l Empty file contents. When actions execute, the trigger file is emptied. This is useful when the third party applications appends data into the trigger file. You want to keep the file so the append can be done, but you don't want to print old data.
l Track changes while trigger is inactive. Specifies if you want to fire trigger upon the files that changed while the trigger was not started. When your NiceLabel Automation is not deployed in the high-availability environment with backup servers the incoming trigger files might be lost, when the server is down. When the NiceLabel Automation is back online, the existent trig-ger files can be processed.
Other
Options in the Feedback from the Print Engine section specify the communication with the print engine.
The functionality from this topic is available in NiceLabel Automation Pro and NiceLabel Automation Enterprise.
l Supervised printing. Enables the synchronous printing mode. Use it whenever you want to send the print job status back to the third party application. For more information, see topic Synchronous Print Mode.
Options in the Data Processing section specify whether you want to trim the data so it fits into variable or ignore missing label variables. By default, NiceLabel Automation will report errors and
- 37 -
break the printing process, if you try to save too long value into the label variable, or try to set value to non-existing label variable.
l Ignore excessive variable contents. Data values exceeding the length of the variable as defined in the label designer will be truncated to fit into variable. This option is in effect when setting variable values in filters, from command files and when setting values of trigger variables to label variables of the same name.
EXAMPLE: The label var iab le accepts 10 characters at maximum. With this option enabled, any value longer than 10 characters wil l be truncated to f ir s t 10 characters , al l characters past character number 10 wil l be ignored.
l Ignore missing label variables. When you execute printing with command files (such as JOB file), the printing process will ignore all variables that are specified in the command file (using command SET), but are not defined in the label. There will be no error, when trying to set value to non-existent label variable. Similar processing occurs when you define assignment area in the filter to extract all name:value pairs, but you have less variables defined in the label.
Options in the Scripting section specify the scripting possibilities.
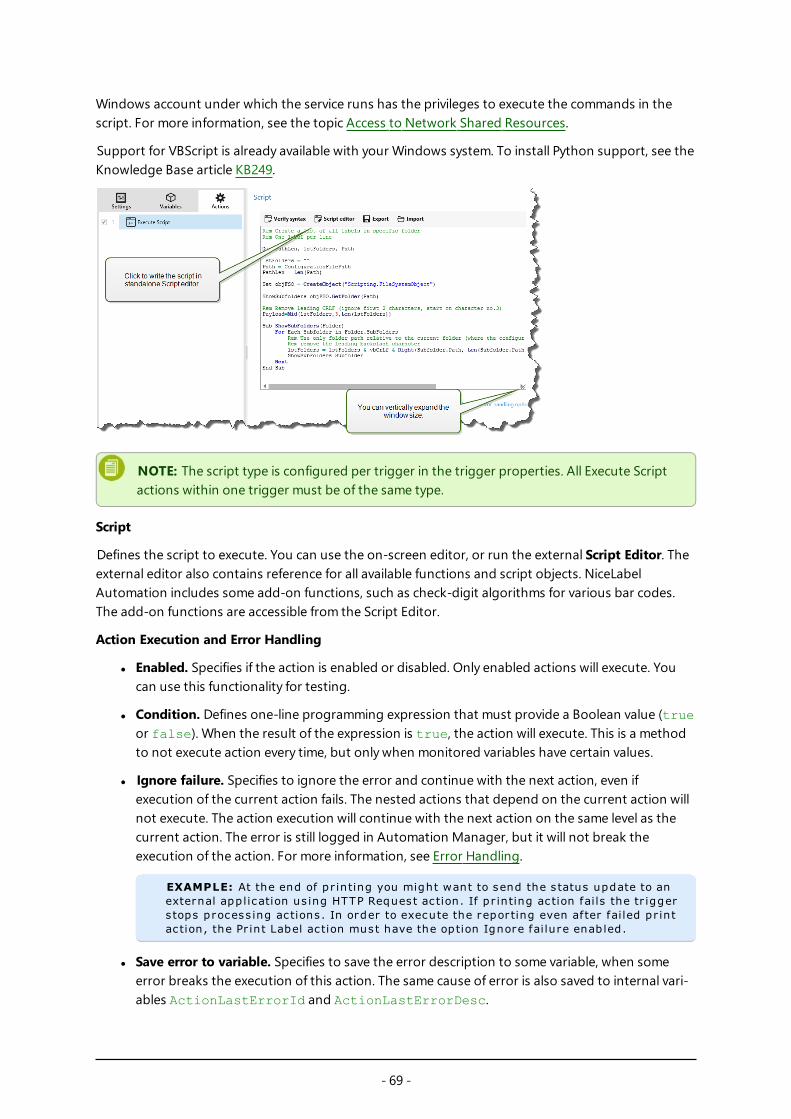
l Scripting language. Specifies the scripting language enabled for the trigger. All Execute script actions that you use within a single trigger use the same scripting language.
Options in the Save Received Data section specify the commands available for the data received by the trigger.
l Save data received by the trigger to file. Enable this option to save the data received by the trigger. The option Variable enables the variable file name. You must select a variable that will contain the path and file name.
l On error save data received by the trigger to file. Enable this option to save the data by into the trigger only if there the error occurs during the action execution. You might want to enable this option to have the data that caused the problem ready the troubleshooting at a later time.
WARNING: Make sure to enable the Supervised printing support, or NiceLabel Automation will not be able to detect the error during the execution. For more information, see topic Synchronous Print Mode.
NOTE: NiceLabel Automation already saves the received data into a temporary file name, which is deleted right after the trigger execution completes. The internal variable DataFileName points to that file name. For more information, see Internal Variables.
Security
l Lock and encrypt trigger. Enables the trigger protection. When enabled, the trigger is locked and cannot be edited, and actions become encrypted. Only the user with a password can unlock the trigger and modify it.
Serial Port Trigger
To learn more about triggers in general, see topic Understanding Triggers.
The serial port trigger event occurs when data is received on the monitored RS232 serial port.
- 38 -
Typical usage: (1) Printer replacement. You will retire the existing serial port-connected label printer. In its place NiceLabel Automation will accept the data , extract the values for label objects from the received print stream, and create a print job for the new printer model. (2) Weight scales. The weight scale provides the data about the weighted object. NiceLabel Automation extracts the required data from the received data stream, and prints a label. For more information how to parse and extract data, see the topic Understanding Filters.
General
This section allows you to configure the most important file trigger settings.
l Name. Specifies the unique name of the trigger. The names helps you distinguish between dif-ferent triggers when you configure them in Automation Builder and later run them in Auto-mation Manager.
l Description. Provides a possibility to describe the functionality of this trigger. You can use it to write short explanation what the trigger does.
l Port. Specifies the serial port (COM) number where incoming data will be accepted on. Use the port that is not in use by some other application, or device, such as printer driver. If the selec-ted port is in use, you won't be able to start the trigger in Automation Manager.
The options in the Port Settings section specify the communication parameters that must match the parameters assigned on the serial port device.
l Disable port initialization. Specifies that the port initialization will not be executed when you start the trigger in Automation Manager. This option is sometimes required for virtual COM ports.
Execution
l Use initialization data. Specifies that you want to send the initialization string to the serial device each time the trigger is started. Some serial devices require to be awaken or put into standby mode before they can provide the data. For more information about the initialization string and if you need it at all, see your device's user guide. You can include binary characters. For more information, see the topic Entering Special Characters (Control Codes).
l Use data polling. Specifies that the trigger will actively ask the device for data. In the specified time intervals the trigger will send the commands provided in the Contents field. can include binary characters. For more information, see the topic Entering Special Characters (Control Codes).
Other
Options in the Feedback from the Print Engine section specify the communication with the print engine.
The functionality from this topic is available in NiceLabel Automation Pro and NiceLabel Automation Enterprise.
l Supervised printing. Enables the synchronous printing mode. Use it whenever you want to send the print job status back to the third party application. For more information, see topic Synchronous Print Mode.
- 39 -
Options in the Data Processing section specify whether you want to trim the data so it fits into variable or ignore missing label variables. By default, NiceLabel Automation will report errors and break the printing process, if you try to save too long value into the label variable, or try to set value to non-existing label variable.
l Ignore excessive variable contents. Data values exceeding the length of the variable as defined in the label designer will be truncated to fit into variable. This option is in effect when setting variable values in filters, from command files and when setting values of trigger variables to label variables of the same name.
EXAMPLE: The label var iab le accepts 10 characters at maximum. With this option enabled, any value longer than 10 characters wil l be truncated to f ir s t 10 characters , al l characters past character number 10 wil l be ignored.
l Ignore missing label variables. When you execute printing with command files (such as JOB file), the printing process will ignore all variables that are specified in the command file (using command SET), but are not defined in the label. There will be no error, when trying to set value to non-existent label variable. Similar processing occurs when you define assignment area in the filter to extract all name:value pairs, but you have less variables defined in the label.
Options in the Scripting section specify the scripting possibilities.
l Scripting language. Specifies the scripting language enabled for the trigger. All Execute script actions that you use within a single trigger use the same scripting language.
Options in the Save Received Data section specify the commands available for the data received by the trigger.
l Save data received by the trigger to file. Enable this option to save the data received by the trigger. The option Variable enables the variable file name. You must select a variable that will contain the path and file name.
l On error save data received by the trigger to file. Enable this option to save the data by into the trigger only if there the error occurs during the action execution. You might want to enable this option to have the data that caused the problem ready the troubleshooting at a later time.
WARNING: Make sure to enable the Supervised printing support, or NiceLabel Automation will not be able to detect the error during the execution. For more information, see topic Synchronous Print Mode.
NOTE: NiceLabel Automation already saves the received data into a temporary file name, which is deleted right after the trigger execution completes. The internal variable DataFileName points to that file name. For more information, see Internal Variables.
Security
l Lock and encrypt trigger. Enables the trigger protection. When enabled, the trigger is locked and cannot be edited, and actions become encrypted. Only the user with a password can unlock the trigger and modify it.
Database Trigger
To learn more about triggers in general, see topic Understanding Triggers.
- 40 -
The database trigger event occurs when a change in the monitored database table is detected. There might be new records, or existing records have been updated. Database trigger doesn't wait for the for any event change, such as data delivery. Instead, it pulls the data from the database in the defined time intervals.
Typical usage: The existing business system executes a transaction, which in effect updates data in some database table. NiceLabel Automation will detect the updated and new records, and print their contents on the labels.
General
This section allows you to configure the most important file trigger settings.
l Name. Specifies the unique name of the trigger. The names helps you distinguish between dif-ferent triggers when you configure them in Automation Builder and later run them in Auto-mation Manager.
l Description. Provides a possibility to describe the functionality of this trigger. You can use it to write short explanation what the trigger does.
l Database connection. Specifies the connection string to the database. Click on the Define button opens a Database dialog box, where you can configure a connection to the database, including database type, table name, and user credentials. You have to connect to the database that enables access with SQL commands. For this reason you cannot use database trigger to automatically detect data changes in CSV text files (comma separated files) and Microsoft Excel spreadsheets.
NOTE: The configuration details depend on the type of selected database. The options in the dialog box depend on the database driver that you use. For configuration details, see user guide for your database driver. For more information about database connectivity, see the topic Accessing Databases.
l Check database in the time intervals. Specifies the time interval in which the database will be polled for the records.
l Detection Options and Advanced. These options allow you to fine-tune the record detection mechanism. When the records are acquired from the database, the Action tab will automatically display the object For Each Record, where you can map the table fields to label variables.
Get records based on unique incremental field value
In this case the trigger will monitor specified auto-incremental numeric field in the table. NiceLabel Automation will remember the field's value for the last processed record. At the next polling interval only the records with values greater than the remembered value will be acquired. To configure this option, you have to select the table name where the records reside (table name), the auto-incremental field (key field) and the starting value for the field (key field default value). Internally, the variable KeyField is used to reference the last remembered value of key field.
- 41 -
NOTE: The last value of the key field is remembered internally, but is not updated back into configuration, so the value for key field default value does not change in this dialog box. You can safely reload configuration and/or stop/start this trigger in the Automation Manager and still keep the last remembered value. However, if you remove the configuration from Automation Manager and add it back, the value of last remembered key field will be re-set to what you have defined in key field default value.
Get records and delete them
In this case all records are acquired from the table and then deleted from the table. To configure this option, you have to select the table name where the records reside (table name) and specify the primary key in the table (key fields). While you can have a table without a primary key, it is strongly recommended that you define a primary key. If the primary key exists the records will be deleted one by one , when the particular record is processed in the actions.
WARNING: If the primary key does not exists, all records obtained in the current trigger will be deleted at once. That's fine if there is no error processing the records. But if there is an error processing some record, the Automation will stop processing any more records. Because all records captured in this polling interval have already been deleted without being processed, you can lose data. Therefore having a primary key in a table is a good idea.
SQL Code Examples
NOTE: These SQL statements are read-only and are provided for reference only. To provide the custom SQL statements, select the Get and manage records with custom SQL detection method.
Example of Update SQL statement, when table contains the primary index.
DELETE FROM [Table]WHERE [ID] = :ID
The field ID in the table is defined as a primary index. The construct :ID in the WHERE clause contains the value of field ID in each iteration. For first record the value of ID is 1, for second record 2, etc. Specifying the colon in front of the field name in SQL statement specifies the usage of the variable.
Example of Update SQL statement, when table does not have primary index defined.
DELETE FROM [Table]
- 42 -
When no primary index is defined in the table, all records will be deleted from the table, when the first record has been processed.
Get records and update them
In this case all records are acquired from the table and then updated. You can write a custom value into field in the table as indication 'this records has been already printed'. To configure this option, you have to select the table name, where the records reside (table name), select the field that you want to update (update field), and enter the value that will be stored in the field (update value). Internally, the variable UpdateValue is used in the SQL statement to reference the current value of field (update value).
While you can have a table without a primary key, it is strongly recommended that you define a primary key. If the primary key exists the records will be updated one by one , when the particular record is processed in the actions.
WARNING: If the primary key does not exists, all records obtained in the trigger will be updated at once. That's fine if there is no error processing the records. But if there is an error processing some record, the Automation will stop processing any more records. Because all records captured in this polling interval have already been updated without being processed in actions, you can lose data. Therefore having a primary key in a table is a good idea.
SQL Code Examples
NOTE: These SQL statements are read-only and are provided for reference only. To provide the custom SQL statements, select the Get and manage records with custom SQL detection method.
The field ID in the table is defined as a primary index. The construct :ID in the WHERE clause contains the value of field ID in each iteration. For first record the value of ID is 1, for second record 2, etc. Specifying the colon in front of the field name in SQL statement specifies the usage of the variable. The field UpdateValue is defined in the trigger configuration in the edit field Update value.
Example of Update SQL statement, when table does not have primary index defined.
UPDATE [Table]SET [AlreadyPrinted] = :UpdateValue
- 43 -
When no primary index is defined in the table, all records from the table will be updated, when the first record has been processed.
Get and manage records with custom SQL
In this case the SQL statements for record extraction and field updates are entirely up to you. To configure this option, you have to provide a custom SQL statement to acquire records (search SQL statement) and custom SQL statement to update the records after processing (update SQL statement). Click the Test button to test-execute your SQL statements and see the result on-screen.
You can use values of table fields or values of trigger variables as parameters in the WHERE clause in the SQL statement. You would precede the field or variable name with the colon character (:). This instructs NiceLabel Automation to use the current value of that field or variable.
To get the records that haven't been printed already, do the following. The field AlreadyPrinted must not contain the value Y, and have blank or NULL value.
SELECT * FROM TableWHERE AlreadyPrinted <> 'Y' or AlreadyPrinted is NULL
From the sample table above two records will be extracted, with ID values 2 and 3. The first record has already been printed and will be ignored.
Example of Update SQL statement.
To mark the already printed records with the value Y in the AlreadyPrinted field, do the following.
You have to put colon (:) in front of the variable name in your SQL statement to identify it as variable. You can use any field from the table for the parameters in the WHERE clause. In the example, we are updating the AlreadyPrinted field only for the currently processed record (value of field ID must be the same as the value from the current record). In the similar way you would reference other fields in the record as :ProductID or :CodeEAN, or even reference variables defined inside this database trigger.
To delete the current record from the table, do the following.
DELETE FROM [Table]WHERE [ID] = :ID
- 44 -
Show SQL statement. Expand this section to see the generated SQL statement and write your own statement, if you have selected the option Get and manage records with custom SQL.
Previewing SQL Execution
To test the execution of the SQL sentences and see what the effect would be, click the Test button in the toolbar of the SQL edit area. The Data Preview section will open in the right-hand pane. Click the Execute button to start the SQL code. When you use values of table field in the SQL statement (with colon (:) in front of the field name), you will have to provide the test values for them.
NOTE: If you have Data Preview open and have just added some variables in the script, click Test button twice (to close and open Data Preview section) to update the list of variables in the preview.
l Simulate execution. Specifies that all changes made to the database are ignored. The data-base transaction is reverted so no updates are written to the database.
Execution
The options in Execution specify when the database updating will take place. The update type depends on the Detection Options for the trigger.
l Before processing actions. Specifies that records will be updated before the actions defined for this trigger have started to execute.
l After processing actions. Specifies that records will be updated after the actions defined for this trigger have been executed. Usually you want to update the records after they have been successfully processed.
NOTE: If necessary, you can also update the records while the actions are still executing. For more information, see the topic Execute SQL Statement.
Other
Options in the Feedback from the Print Engine section specify the communication with the print engine.
The functionality from this topic is available in NiceLabel Automation Pro and NiceLabel Automation Enterprise.
l Supervised printing. Enables the synchronous printing mode. Use it whenever you want to send the print job status back to the third party application. For more information, see topic Synchronous Print Mode.
Options in the Data Processing section specify whether you want to trim the data so it fits into variable or ignore missing label variables. By default, NiceLabel Automation will report errors and break the printing process, if you try to save too long value into the label variable, or try to set value to non-existing label variable.
l Ignore excessive variable contents. Data values exceeding the length of the variable as defined in the label designer will be truncated to fit into variable. This option is in effect when setting variable values in filters, from command files and when setting values of trigger variables to label variables of the same name.
- 45 -
EXAMPLE: The label var iab le accepts 10 characters at maximum. With this option enabled, any value longer than 10 characters wil l be truncated to f ir s t 10 characters , al l characters past character number 10 wil l be ignored.
l Ignore missing label variables. When you execute printing with command files (such as JOB file), the printing process will ignore all variables that are specified in the command file (using command SET), but are not defined in the label. There will be no error, when trying to set value to non-existent label variable. Similar processing occurs when you define assignment area in the filter to extract all name:value pairs, but you have less variables defined in the label.
Options in the Scripting section specify the scripting possibilities.
l Scripting language. Specifies the scripting language enabled for the trigger. All Execute script actions that you use within a single trigger use the same scripting language.
Options in the Save Received Data section specify the commands available for the data received by the trigger.
l Save data received by the trigger to file. Enable this option to save the data received by the trigger. The option Variable enables the variable file name. You must select a variable that will contain the path and file name.
l On error save data received by the trigger to file. Enable this option to save the data by into the trigger only if there the error occurs during the action execution. You might want to enable this option to have the data that caused the problem ready the troubleshooting at a later time.
WARNING: Make sure to enable the Supervised printing support, or NiceLabel Automation will not be able to detect the error during the execution. For more information, see topic Synchronous Print Mode.
NOTE: NiceLabel Automation already saves the received data into a temporary file name, which is deleted right after the trigger execution completes. The internal variable DataFileName points to that file name. For more information, see Internal Variables.
Security
l Lock and encrypt trigger. Enables the trigger protection. When enabled, the trigger is locked and cannot be edited, and actions become encrypted. Only the user with a password can unlock the trigger and modify it.
TCP/IP Server Trigger
To learn more about triggers in general, see topic Understanding Triggers.
The TCP/IP trigger event occurs when data is received on the monitored socket (IP address and port number).
Typical usage: The existing business system executes a transaction, which in effect sends the data to NiceLabel Automation server on a specific socket. The contents of the data might be structured in CSV, XML and other formats, or it can be structured in a legacy format. In either way,
- 46 -
NiceLabel Automation will read the data, parse values using filters and print them on labels. For more information how to parse and extract data, see the topic Understanding Filters.
General
NOTE: This trigger supports Internet Protocol version 6 (IPv6).
This section allows you to configure the most important file trigger settings.
l Name. Specifies the unique name of the trigger. The names helps you distinguish between dif-ferent triggers when you configure them in Automation Builder and later run them in Auto-mation Manager.
l Description. Provides a possibility to describe the functionality of this trigger. You can use it to write short explanation what the trigger does.
l Port. Specifies the port number where incoming data will be accepted on. Use the port number that is not in use by some other application. If the selected port is in use, you won't be able to start the trigger in Automation Manager. For more information about security concerns, see the topic Securing Access to your Triggers.
NOTE: If your server has multi-homing enabled (more IP addresses on one or more network cards), NiceLabel Automation will respond on the defined port on all IP addresses.
l Maximum number of concurrent connections. Specifies the maximum number of accepted connections. That many concurrent clients can send data to the trigger simultaneously.
The options in the Execution Event section specify when the trigger should fire and start executing actions.
l On client disconnect. Specifies that trigger will fire after the client sends data and closes the connection. This is a default setting.
NOTE: If you want to send the print job status back to the third party application as a feedback, don't use this option. If the connection is left open, you can send feedback using the action Send data to TCP/IP port with the parameter Reply to sender.
l On number of characters received. Specifies that trigger will fire when the required number of characters has been received. In this case the third party application can keep a connection open and continuously sends data. Each chunk of data must be of the same size.
l On sequence of characters received. Specifies that the trigger will fire every time when the required sequence of characters has been received. You would use this option if you know that the 'end of data' is always identified by a unique set of characters. You can insert special (bin-ary) characters using the button next to the edit field.
l Include in trigger data. The sequence of characters that is used to determine the trig-ger event will not be stripped from the data, but will be included with the data. The trig-ger will receive complete received data stream.
- 47 -
l When nothing is received after the specified time interval. Specifies that the trigger will fire after a required time interval passes since the last character has been received.
Execution
l Allow connections from the following hosts. Specifies the list of IP addresses or host names of the computers that are allowed to connect to the trigger. Put each entry in a new line.
l Deny connections from the following hosts. Specifies the list of IP addresses or host names of the computers that are not allowed to connect to the trigger. Put each entry in a new line.
l Welcome message. Specifies the text message that is returned to the client each time it connects to the TCP/IP trigger.
l Answer message. Specifies the text message that is returned to the client each time the actions execute. Use this option when the client doesn't disconnect upon data send and expects the answer when action execution has ended. The answer message is hard-coded and thus always the same.
l Message encoding. Specifies the data encoding scheme, so the special characters can be correctly processed. NiceLabel Automation can automatically detect the data encoding, based on BOM header (text files), or encoding attribute (XML files).
Other
Options in the Feedback from the Print Engine section specify the communication with the print engine.
The functionality from this topic is available in NiceLabel Automation Pro and NiceLabel Automation Enterprise.
l Supervised printing. Enables the synchronous printing mode. Use it whenever you want to send the print job status back to the third party application. For more information, see topic Synchronous Print Mode.
Options in the Data Processing section specify whether you want to trim the data so it fits into variable or ignore missing label variables. By default, NiceLabel Automation will report errors and break the printing process, if you try to save too long value into the label variable, or try to set value to non-existing label variable.
l Ignore excessive variable contents. Data values exceeding the length of the variable as defined in the label designer will be truncated to fit into variable. This option is in effect when setting variable values in filters, from command files and when setting values of trigger variables to label variables of the same name.
EXAMPLE: The label var iab le accepts 10 characters at maximum. With this option enabled, any value longer than 10 characters wil l be truncated to f ir s t 10 characters , al l characters past character number 10 wil l be ignored.
l Ignore missing label variables. When you execute printing with command files (such as JOB file), the printing process will ignore all variables that are specified in the command file (using command SET), but are not defined in the label. There will be no error, when trying to set value to non-existent label variable. Similar processing occurs when you define assignment area in the filter to extract all name:value pairs, but you have less variables defined in the label.
Options in the Scripting section specify the scripting possibilities.
- 48 -
l Scripting language. Specifies the scripting language enabled for the trigger. All Execute script actions that you use within a single trigger use the same scripting language.
Options in the Save Received Data section specify the commands available for the data received by the trigger.
l Save data received by the trigger to file. Enable this option to save the data received by the trigger. The option Variable enables the variable file name. You must select a variable that will contain the path and file name.
l On error save data received by the trigger to file. Enable this option to save the data by into the trigger only if there the error occurs during the action execution. You might want to enable this option to have the data that caused the problem ready the troubleshooting at a later time.
WARNING: Make sure to enable the Supervised printing support, or NiceLabel Automation will not be able to detect the error during the execution. For more information, see topic Synchronous Print Mode.
NOTE: NiceLabel Automation already saves the received data into a temporary file name, which is deleted right after the trigger execution completes. The internal variable DataFileName points to that file name. For more information, see Internal Variables.
Security
l Lock and encrypt trigger. Enables the trigger protection. When enabled, the trigger is locked and cannot be edited, and actions become encrypted. Only the user with a password can unlock the trigger and modify it.
HTTP Server Trigger
The functionality from this topic is available in NiceLabel Automation Pro and NiceLabel Automation Enterprise.
To learn more about triggers in general, see topic Understanding Triggers.
The HTTP trigger event occurs when data is received on the monitored socket (IP address and port number). Contrary to TCP/IP trigger the received data is not in a raw data stream, but must include the standard HTTP header. The third party application must use the POST or GET request methods and provide data in the message body or in the query string. It does not matter which Internet media type (MIME Type, or Content-Type) you use in the message body. NiceLabel Automation will receive the message and you can define a filter to extract required data from the message content.
Typical usage: The existing business system executes a transaction, which in effect sends the data to NiceLabel Automation server formatted as HTTP POST message on a specific socket. The contents of the data might be structured in CSV, XML and other formats, or it can be structured in a legacy format. In either way, NiceLabel Automation will read the data, parse values using the filters and print extracted data on the labels. For more information how to parse and extract data, see Understanding Filters.
Providing data
- 49 -
You can provide the data for HTTP trigger with any of the following methods. You can also combine the methods if needed and use both in the same HTTP request.
Data in the query string
A query string is the part of a uniform resource locator (URL) that contains data to be passed to the HTTP trigger.
A typical URL containing a query string is as follows:
http://server/path/?query_string
The question mark is used as a separator and is not part of the query string.
The query string is usually composed of a series of name:value pairs, where within each pair the field name and value are separated by an equals sign (=). The series of pairs are separated by the ampersand (&). So the typical query string would provide values for fields (variables) like this:
field1=value1&field2=value2&field3=value3
The HTTP trigger has built-in support to extract values of all fields and store them to the variables of the same name, so you don't have to define any filter to extract values from the query string.
l You don't have to define variables inside a trigger in order to populate them with values from the query string. NiceLabel Automation will extract all variables in the query string and send their values to the currently active label. If the variables of the same name exist in the label, their values will be populated. If the variables do not exist in the label, the values will be ignored and no errors will be reported.
l You would define the variables in the trigger, if you need their values inside some action in this trigger. To get all values provided in the query string, just define the variables that have the same names as fields in the query string. For the above example, you would define trigger vari-ables with names field1, field2 and field3.
You would usually use GET HTTP request method to provide the query string.
Data in the body of the HTTP request
You must use the POST request method to provide the message in the body of the HTTP request.
You are free to send whatever data and data structure that you want in the body, provided that you can handle the data with the NiceLabel Automation filters. The contents can be formatted as XML, CSV, it can be plain text, it can even be binary data (Base64-encoded). Bare in mind that you will have to parse the data with filters.
If you can influence the structure of the incoming message, use standardized structures, such as XML or CSV, to simplify the filter configuration.
You would use POST HTTP request method to provide the data in the message body.
General
This section allows you to configure the most important file trigger settings.
l Name. Specifies the unique name of the trigger. The names helps you distinguish between dif-ferent triggers when you configure them in Automation Builder and later run them in Auto-mation Manager.
- 50 -
l Description. Provides a possibility to describe the functionality of this trigger. You can use it to write short explanation what the trigger does.
Communication
NOTE: This trigger supports Internet Protocol version 6 (IPv6).
This section allows you to configure the mandatory port number and optional feedback options. You can use the standard HTTP Response Codes to indicate success of the action execution. For more advanced purposes you can also send the custom content back to the data-providing application, may it be a simple string feedback, or binary data, such as label preview or print stream.
The typical URL to connect to the HTTP trigger is as follows:
http://server:port/path/?query_string
l Server. This is the FQDN or IP address of the machine, where NiceLabel Automation is installed.
l Port. Specifies the port number where incoming data will be accepted on. Use the port number that is not in use by some other application. If the selected port is in use, you won't be able to start the trigger in Automation Manager. For more information about security concerns, see Securing Access to your Triggers.
NOTE: If your server has multi-homing enabled (more IP addresses on one or more network cards), NiceLabel Automation will respond on the defined port on all IP addresses.
l Path. Specifies the optional path in the URL. This functionality enables NiceLabel Automation to expose multiple HTTP triggers on the same port. The client will use the triggers through a single port in a REST like syntax, causing different triggers to be fired by a different URL. If you are not sure what to use, leave the default path (\).
l Secure connection (HTTPS). Enables the secure transport layer for your HTTP message and prevents eavesdropping. For more information how to set it up, see Using Secure Transport Layer (HTTPS).
This option is available in NiceLabel Automation Enterprise.
l Query string. Specifies the name-value pairs in the URL. An optional parameter, the data is usu-ally provided in the body of the HTTP request.
l Wait for trigger execution to finish. The HTTP protocol requires the receiver (in this case NiceLabel Automation) to send a numeric response back to the sender indicating the status of the received message. By default, NiceLabel Automation will response with code 200, indicating that data was successfully received, but this tells nothing about the success of the trigger actions.
This option specifies that trigger doesn't send the response immediately after data is received, but waits until all actions have been executed and then sends the response code indicating the success of the action execution. When this option is enabled, you can send back the custom response type and data (e.g. the response to a HTTP request is label preview in PDF format).
The available built-in HTTP response codes are:
- 51 -
HTTP Response Code Description200 All actions executed successfully.401 Unauthorized, wrong user name and password were specified.500 There were errors during action execution.
NOTE: If you want to send feedback about the print process, make sure to enable synchronous print mode. For more information, see Synchronous Print Mode.
l Maximum number of concurrent requests. Specifies the maximum number of concurrent inbound connections. That many concurrent clients can send data to the trigger sim-ultaneously. The number also depends on the hardware performance of your server.
l Response type. Specifies the type of your response message. Frequently-used Internet media types (also known as MIME types, or Content-types) are predefined in the drop down box. If your media type is not available in the list, simply enter it yourself. The response data will be sent outbound as a feedback, formatted in defined media type. The option Variable enables the variable media type. When enabled, you must select the variable that will contain the media type.
NOTE: If you don't specify the Content-Type, NiceLabel Automation will use application/octet-stream as a default one.
l Response data. Defines the content for the response message. You can use fixed content, mix of fixed and variable content, or variable content alone. To insert variable content, click the button with arrow to the right of data area and insert variable from the list that contains the data you want to send back as HTTP response message. For more information, see Using Compound Values.
Some examples of what you can send back as the HTTP response: custom error messages, label preview, generated PDF files, print stream file (spool file), XML file with details from the print engine plus the label preview (encoded as Base64 string), the possibilities are endless.
NOTE: If you will output binary-only content (such as label preview or print stream), make sure to select the proper media type, e.g. image/jpeg or application/octet-stream.
User Authentication
l Enable basic authentication. Specifies that incoming messages include the user name and password. The trigger will only accept HTTP messages, which credentials match the credentials entered here. For more information about security concerns, see Securing Access to your Trig-gers.
Other
Options in the Feedback from the Print Engine section specify the communication with the print engine.
The functionality from this topic is available in NiceLabel Automation Pro and NiceLabel Automation Enterprise.
- 52 -
l Supervised printing. Enables the synchronous printing mode. Use it whenever you want to send the print job status back to the third party application. For more information, see topic Synchronous Print Mode.
Options in the Data Processing section specify whether you want to trim the data so it fits into variable or ignore missing label variables. By default, NiceLabel Automation will report errors and break the printing process, if you try to save too long value into the label variable, or try to set value to non-existing label variable.
l Ignore excessive variable contents. Data values exceeding the length of the variable as defined in the label designer will be truncated to fit into variable. This option is in effect when setting variable values in filters, from command files and when setting values of trigger variables to label variables of the same name.
EXAMPLE: The label var iab le accepts 10 characters at maximum. With this option enabled, any value longer than 10 characters wil l be truncated to f ir s t 10 characters , al l characters past character number 10 wil l be ignored.
l Ignore missing label variables. When you execute printing with command files (such as JOB file), the printing process will ignore all variables that are specified in the command file (using command SET), but are not defined in the label. There will be no error, when trying to set value to non-existent label variable. Similar processing occurs when you define assignment area in the filter to extract all name:value pairs, but you have less variables defined in the label.
Options in the Scripting section specify the scripting possibilities.
l Scripting language. Specifies the scripting language enabled for the trigger. All Execute script actions that you use within a single trigger use the same scripting language.
Options in the Save Received Data section specify the commands available for the data received by the trigger.
l Save data received by the trigger to file. Enable this option to save the data received by the trigger. The option Variable enables the variable file name. You must select a variable that will contain the path and file name.
l On error save data received by the trigger to file. Enable this option to save the data by into the trigger only if there the error occurs during the action execution. You might want to enable this option to have the data that caused the problem ready the troubleshooting at a later time.
WARNING: Make sure to enable the Supervised printing support, or NiceLabel Automation will not be able to detect the error during the execution. For more information, see topic Synchronous Print Mode.
NOTE: NiceLabel Automation already saves the received data into a temporary file name, which is deleted right after the trigger execution completes. The internal variable DataFileName points to that file name. For more information, see Internal Variables.
Security
l Lock and encrypt trigger. Enables the trigger protection. When enabled, the trigger is locked and cannot be edited, and actions become encrypted. Only the user with a password can unlock the trigger and modify it.
- 53 -
Web Service Trigger
The functionality from this topic is available in NiceLabel Automation Enterprise.
To learn more about triggers in general, see topic Understanding Triggers.
The Web Service trigger event occurs when data is received on the monitored socket (IP address and port number). The data must follow the SOAP notation (XML data encoded into HTTP message). The Web Service interface is described in the WSDL document available with each defined Web Service trigger.
The Web Service can provide a feedback about print job status, but you have to enable the synchronous processing mode. For more information, see the topic Print Job Status Feedback.
Typically, Web Service would be used by programmers to integrate label printing in their own applications. The existing business system executes a transaction, which in effect sends the data to NiceLabel Automation server on a specific socket formatted as SOAP message. The data can be provided in CSV, XML and other structured formats, or it can be provided in some legacy format. In either way, NiceLabel Automation will read the data, parse values using filters and print them on labels. For more information how to parse and extract data, see the topic Understanding Filters.
General
This section allows you to configure the most important file trigger settings.
l Name. Specifies the unique name of the trigger. The names helps you distinguish between dif-ferent triggers when you configure them in Automation Builder and later run them in Auto-mation Manager.
l Description. Provides a possibility to describe the functionality of this trigger. You can use it to write short explanation what the trigger does.
Communication
NOTE: This trigger supports Internet Protocol version 6 (IPv6).
This section allows you to configure the mandatory port number and optional feedback options.
l Port. Specifies the port number where incoming data will be accepted on. Use the port number that is not in use by some other application. If the selected port is in use, you won't be able to start the trigger in Automation Manager. For more information about security concerns, see the topic Securing Access to your Triggers.
NOTE: If your server has multi-homing enabled (more IP addresses on one or more network cards), NiceLabel Automation will respond on the defined port on all IP addresses.
l Secure connection (HTTPS). Enables the secure transport layer for your HTTP message and prevents eavesdropping. For more information how to set it up, see topic Using Secure Trans-port Layer (HTTPS).
- 54 -
l Maximum number of concurrent calls. Specifies the maximum number of accepted con-nections. That many concurrent clients can send data to the trigger simultaneously.
l Response data. Defines the custom response that can be used with ExecuteTrig-gerWithResponse and ExecuteTriggerAndSetVariablesWithResponse methods. The response data will contain the content as provided in the text area. You can combine fixed val-ues, variable values and special characters. To insert variables and special characters, click the arrow button to the right of the text area. The response can contain binary data, such as image of label preview and print file (*.PRN).
Status Feedback
By design, Web Service trigger provides the feedback about the status of the created print job. The trigger will accept the provided data and use it when executing defined actions . The action execution can be supervised. The trigger will report the success status for every execution event. To enable status reporting from the print process, you must enable the Synchronous Print Mode.
There are the following methods (functions) exposed in the Web Service trigger:
l ExecuteTrigger. This method accepts data into processing and provides the optional status feedback. One of the input parameters enables or disables the feedback. If you enable status reporting, the feedback will contain error ID and detailed description of the error. If error ID equals 0, there was no problem creating print file. If error ID is greater than 0, some error occurred during the print process. The Web Service response in this method is not con-figurable and will always contain error ID and error description.
l ExecuteTriggerWithResponse. This method accepts data into processing and provides the cus-tom status feedback. The Web Service response is configurable. You can send back any data you want in any structure you might have. You can use binary data in the response.
l ExecuteTriggerAndSetVariables. Similar to ExecuteTrigger above, but it exposes additional inbound parameter that accepts the formatted list of name-value pairs. The trigger will auto-matically parse the list, extract values and save the to the variables of the same name, so you don't have to create any data-extraction filter yourself.
l ExecuteTriggerAndSetVariablesWithResponse. Similar to ExecuteTriggerWithResponse above, but it exposes additional inbound parameter that accepts the formatted list of name-value pairs. The trigger will automatically parse the list, extract values and save the to the vari-ables of the same name, so you don't have to create any data-extraction filter yourself.
For more information about structure of the messages that you can send to one or the other method, see chapter WSDL below.
WSDL
Specifies the style of the SOAP messages. It can be either Remote Procedure Call (RPC) or a document style. Choose the style that is supported in your application providing data to NiceLabel Automation.
The WSDL (Web Service Description Language) document defines the input and output parameters of the Web Service.
If you define Web Service trigger on port 12345, deploy it in Automation Manager and then start it, its WSDL will be available at:
http://localhost:12345
- 55 -
The WSDL exposes several methods that all provide data into the trigger. You will have to choose the one that is most appropriate for what you have to achieve.
l The methods that have WithResponse in their names allow you to send customized responses, such as custom error messages, label previews, PDF files, print files (*.PRN) and similar. The methods without WithResponse in their name will still provide the feedback, but you cannot cus-tomize the response. The feedback will contain default error messages.
l The methods that have SetVariables in their names allow you to provide list of variables in two predefined formats and their values will be extracted and mapped to the appropriate variables automatically. This saves you time because you don't have to set up any filter to do the extrac-tion and mapping. For the methods without SetVariables in their names you have to define the filter yourself.
The Web Service interface defines the following methods:
There are two input variables (you provide their values):
l text. This is the input string, which can be parsed by the filter defined in the configuration. Usu-ally the string is structured as CSV or XML to be easily parsed with a filter, but you can use any other text format.
l wait. This is Boolean field that specifies if you will wait for the print job status response and if Web Service should provide feedback. For True use 1, for False use 0. Dependent on the method type that you select, there is either a predefined response, or you can send the cus-tomized response.
There are the following optional output variables (you receive their values, if you request them by setting wait to 1):
l ExecuteTriggerResult. The integer response will contain value 0 if there was no problems pro-cessing the data, and it will contain an integer greater than 0, when error(s) did occur. The application executing the Web Service call to NiceLabel Automation can use the response as error indicator.
l errorText. This string value will contain the print job status response, if an error was raised during the trigger processing.
NOTE: If there was an error during the trigger processing, this element is included in the XML response message and its value contains the error description. However, if there was no error, this element will not be included in the XML response.
Method ExecuteTriggerWithResponse
- 56 -
You would use this method when the trigger should send the custom response after it completes the execution.
Some examples of what you can send back as the custom response: custom error messages, label preview, generated PDF files, print stream file (spool file), XML file with details from the print engine plus the label preview (encoded as Base64 string), the possibilities are endless.
There are two input variables (you provide their values):
l text. This is the input string, which can be parsed by the filter defined in the configuration. Usu-ally the string is structured as CSV or XML to be easily parsed with a filter, but you can use any other text format.
l wait. This is Boolean field that specifies if you will wait for the print job status response and if Web Service should provide feedback. For True use 1, for False use 0. Dependent on the method type that you select, there is either a predefined response, or you can send the cus-tomized response.
There are the following optional output variables (you receive their values, if you request them by setting wait to 1):
l ExecuteTriggerWithResponseResult. The integer response will contain value 0 if there was no problems processing the data, and it will contain an integer greater than 0, when error(s) did occur. The application executing the Web Service call to NiceLabel Automation can use the response as error indicator.
l responseData. The custom response that you can define in the Web Service trigger con-figuration.
l errorText. This string value will contain the print job status response, if an error was raised during the trigger processing.
l NOTE: If there was an error during the trigger processing, this element is included in the XML response message and its value contains the error description. However, if there was no error, this element will not be included in the XML response.
There are three input variables (you provide their values):
l text. This is the input string, which can be parsed by the filter defined in the configuration. Usu-ally the string is structured as CSV or XML to be easily parsed with a filter, but you can use any other text format.
l wait. This is Boolean field that specifies if you will wait for the print job status response and if Web Service should provide feedback. For True use 1, for False use 0. Dependent on the method type that you select, there is either a predefined response, or you can send the cus-tomized response.
l variableData. This is the string that contains the name:value pairs. The trigger will read all pairs and assign provided values to the trigger variables of the same name. If the variable doesn't exist in the trigger, that name:value pair is discarded. When you provide the list of variables and their values in this method, you don't have to define any data extraction with the filters. The trigger will do all the parsing for you.
The contents for the variableData can be provided in either of the two available structures.
XML structure
The variables are provided within <Variables /> root element in the XML file. Variable name is provided with the attribute name, the variable value is provided by the element value.
NOTE: You will have to embed your XML data inside the CDATA section. CDATA, meaning character data, is a section of element content that is marked for the parser to interpret as only character data, not markup. All contents is used as character data, for example <element>ABC</element> will be interpreted as <element>ABC</element>. A CDATA section starts with the sequence <![CDATA[ and ends with the sequence ]]>. Simply put your XML data inside these sequences.
Delimited structure
The variables are provided in a text stream. Every name:value pair is provided in a newline. Variable name is to the left of the equals character (=), variable value is to the right.
There are the following optional output variables (you receive their values, if you request them by setting wait to 1):
- 58 -
l ExecuteTriggerAndSetVariablesResult. The integer response will contain value 0 if there was no problems processing the data, and it will contain an integer greater than 0, when error(s) did occur. The application executing the Web Service call to NiceLabel Automation can use the response as error indicator.
l errorText. This string value will contain the print job status response, if an error was raised during the trigger processing.
l NOTE: If there was an error during the trigger processing, this element is included in the XML response message and its value contains the error description. However, if there was no error, this element will not be included in the XML response.
Method ExecuteTriggerAndSetVariablesWithResponse
You would use this method when the trigger should send the custom response after it completes the execution.
Some examples of what you can send back as the custom response: custom error messages, label preview, generated PDF files, print stream file (spool file), XML file with details from the print engine plus the label preview (encoded as Base64 string), the possibilities are endless.
There are three input variables (you provide their values):
l text. This is the input string, which can be parsed by the filter defined in the configuration. Usu-ally the string is structured as CSV or XML to be easily parsed with a filter, but you can use any other text format.
l wait. This is Boolean field that specifies if you will wait for the print job status response and if Web Service should provide feedback. For True use 1, for False use 0. Dependent on the method type that you select, there is either a predefined response, or you can send the cus-tomized response.
l variableData. This is the string that contains the name:value pairs. The trigger will read all pairs and assign provided values to the trigger variables of the same name. If the variable doesn't exist in the trigger, that name:value pair is discarded. When you provide the list of variables and their values in this method, you don't have to define any data extraction with the filters. The trigger will do all the parsing for you.
The contents for the variableData can be provided in either of the two available structures.
- 59 -
XML structure
The variables are provided within <Variables /> root element in the XML file. Variable name is provided with the attribute name, the variable value is provided by the element value.
NOTE: You will have to embed your XML data inside the CDATA section. CDATA, meaning character data, is a section of element content that is marked for the parser to interpret as only character data, not markup. All contents is used as character data, for example <element>ABC</element> will be interpreted as <element>ABC</element>. A CDATA section starts with the sequence <![CDATA[ and ends with the sequence ]]>. Simply put your XML data inside these sequences.
Delimited structure
The variables are provided in a text stream. Every name:value pair is provided in a newline. Variable name is to the left of the equals character (=), variable value is to the right.
There are the following optional output variables (you receive their values, if you request them by setting wait to 1):
l ExecuteTriggerAndSetVariablesWithResponseResult. The integer response will contain value 0 if there was no problems processing the data, and it will contain an integer greater than 0, when error(s) did occur. The application executing the Web Service call to NiceLabel Auto-mation can use the response as error indicator.
l responseData. The custom response that you can define in the Web Service trigger con-figuration.
l errorText. This string value will contain the print job status response, if an error was raised during the trigger processing.
l NOTE: If there was an error during the trigger processing, this element is included in the XML response message and its value contains the error description. However, if there was no error, this element will not be included in the XML response.
Other
Options in the Feedback from the Print Engine section specify the communication with the print engine.
The functionality from this topic is available in NiceLabel Automation Pro and NiceLabel Automation Enterprise.
- 60 -
l Supervised printing. Enables the synchronous printing mode. Use it whenever you want to send the print job status back to the third party application. For more information, see topic Synchronous Print Mode.
Options in the Data Processing section specify whether you want to trim the data so it fits into variable or ignore missing label variables. By default, NiceLabel Automation will report errors and break the printing process, if you try to save too long value into the label variable, or try to set value to non-existing label variable.
l Ignore excessive variable contents. Data values exceeding the length of the variable as defined in the label designer will be truncated to fit into variable. This option is in effect when setting variable values in filters, from command files and when setting values of trigger variables to label variables of the same name.
EXAMPLE: The label var iab le accepts 10 characters at maximum. With this option enabled, any value longer than 10 characters wil l be truncated to f ir s t 10 characters , al l characters past character number 10 wil l be ignored.
l Ignore missing label variables. When you execute printing with command files (such as JOB file), the printing process will ignore all variables that are specified in the command file (using command SET), but are not defined in the label. There will be no error, when trying to set value to non-existent label variable. Similar processing occurs when you define assignment area in the filter to extract all name:value pairs, but you have less variables defined in the label.
Options in the Scripting section specify the scripting possibilities.
l Scripting language. Specifies the scripting language enabled for the trigger. All Execute script actions that you use within a single trigger use the same scripting language.
Options in the Save Received Data section specify the commands available for the data received by the trigger.
l Save data received by the trigger to file. Enable this option to save the data received by the trigger. The option Variable enables the variable file name. You must select a variable that will contain the path and file name.
l On error save data received by the trigger to file. Enable this option to save the data by into the trigger only if there the error occurs during the action execution. You might want to enable this option to have the data that caused the problem ready the troubleshooting at a later time.
WARNING: Make sure to enable the Supervised printing support, or NiceLabel Automation will not be able to detect the error during the execution. For more information, see topic Synchronous Print Mode.
NOTE: NiceLabel Automation already saves the received data into a temporary file name, which is deleted right after the trigger execution completes. The internal variable DataFileName points to that file name. For more information, see Internal Variables.
Security
l Lock and encrypt trigger. Enables the trigger protection. When enabled, the trigger is locked and cannot be edited, and actions become encrypted. Only the user with a password can unlock the trigger and modify it.
- 61 -
Using VariablesVariables
Variables are used as containers for data values. You need variables to transfer values to the label in Print Label action, or to use values in other data-manipulation actions. Typically, the filter will extract values from the data streams received by trigger and send values into variables. For more information, see the topic Understanding Filters.
Usually, you want to send the values of variables to the label template and print label. The mechanism to send values of variables to labels uses the automated name mapping - value of the variable defined in the trigger will be sent to the variable defined in the label of the same name. You can define variables in one of three ways:
l Import variables from label file. For the above explained automatic mapping it makes a good practice to import your variables from the label each time. This action ensures that variable names match and saves time. The imported variable doesn't inherit just the variable name, but also supported variable properties, such as length and default value.
l Manually define variables. When manually defining variables, you have to be extra careful to use the same names as variables in the label. You would manually define the variables that don't exist in the label, but you need them inside the trigger.
NOTE: An example would be variables, such as LabelName, PrinterName, Quantity and similar variables that you need to remember the label name, printer name, quantity or other meta-values assigned by the filter.
l Enabling internal variables. Values for internal variables are assigned by NiceLabel Auto-mation and are available as read-only values. For more information, see the topic Internal Vari-ables.
If you enable the assignment area (in Unstructured Text and XML filters) and dynamic structure (in Structured Text filter), NiceLabel Automation will extract name:value pairs from the trigger data and automatically send values to the variables of the same name that are defined in the label. No manual variable mapping is necessary.
Properties
l Name. Specifies the unique variable name. Names are not case sensitive. Although you can use spaces in variable names, it's a better practice not to. Even more so if you use variables in scripts or in conditions on actions, because you will have to enclose them in square brackets.
l Allowed characters. Specifies the list of characters the value can occupy. You can select between All (all characters are accepted), Numeric (only digits are accepted), and Binary (all char-acters and control codes are accepted).
l Limit variable length. Specifies the maximum number of characters the variable can occupy.
l Fixed length. Specifies that the value must occupy exactly as many characters as defined by its length.
- 62 -
NOTE: You must limit variable length for certain objects on the label, such as bar code EAN-13, which accepts 13 digits.
l Value required. Specifies that the variable must contain a value
l Default value. Specifies a default value. If the variable is not assigned with any value, then default value will be always used.
Using Compound Values
Some objects in trigger configuration accept compound values. The contents can be a mixture of fixed values, variables and special characters (control codes). The objects accepting compound values are identified by a small arrow button to the right side of the object. You can click the arrow button to insert either variable or special character.
l Using fixed values. You can enter the fixed value for the variable.
This is fixed value.
l Using fixed values and data from variables. You can also define the compound value, combined out of values of variables and fixed values. The variable names must be enclosed in square brackets []. You can enter variables manually, or insert them by clicking the arrow button to the right. At processing time, the values of variables will be merged together with fixed data and used as the content. For more information, see the topic Tips and Tricks for Using Variables in Actions.In this case the content will be merged from three variables and some fixed data.
[variable1] // This is fixed value [variable2][variable3]
l Using special characters. You can also add special characters to the mix. You can enter the special characters manually, or insert them. For more information, see the topic Entering Special Characters (Control Codes).In this case the value of variable1 will be merged with some fixed data and form-feed binary character.
[variable1] Form feed will follow this fixed text <FF>
Internal Variables
Internal variables are predefined by NiceLabel Automation. Their values are assigned automatically and are available in ready-only mode. The icon with lock symbol in front of the variable name distinguish internal variables from user-defined variables. You can use internal variables in your actions in the same way as you would use user-defined variables. The trigger internal variables are internal to each trigger.
Internal variable Available in trigger
Description
ActionLastErrorDesc All Provides the description of the error that occurred last. You can use this value in a feedback to host system, identifying the cause of the fault.
ActionLastErrorID All Provides the ID of the error that occurred last. This is integer value. When value is 0, there was no error. You can use this value in conditions, eval-uating if there was some error or not.
- 63 -
BytesOfReceivedData TCP/IP Provides the number of bytes received by the trigger.ComputerName All Provides the name of the computer where the configuration runs.ConfigurationFileName All Provides the path and file name of the current configuration (.MISX file).ConfigurationFilePath All Provides the path of the current configuration file. Also see description
for ConfigurationFileName.DataFileName All Provides the path and file name of the working copy of received data.
Each time the trigger accepts the data, it makes a backup copy of it to the unique file name identified by this variable.
Database Database Provides the database type as configured in the trigger.Date All Provides the current date in the format as specified by system locale, such
as 26.2.2013.DateDay All Provides the current number of the day in a month, such as 26.DateMonth All Provides the current number of the month in the year, such as 2.DateYear All Provides the current number of the year, such as 2013.DefaultPrinterName All Provides the name of printer driver, which is defined as default.DriverType Database Provides the name of the driver used to connect to the selected database.Hostname TCP/IP Provides the host name of device/computer connecting to the trigger.HttpMethodName HTTP Provides the method name the user has provided in the HTTP request.HttpPath HTTP Provides the path defined in the HTTP trigger.HttpQuery HTTP Provides the contents of the query string as received by the HTTP trigger.NumberOfRowsReturned Database Provides the number of rows that the trigger gets from a database.LocalIP TCP/IP Provides the local IP address on which the trigger responded to. This is
useful if you have multi-homing machine with several network interface cards (NIC) and want to determine to which IP address the client con-nected to. This is useful for printer replacement scenarios.
PathDataFileName All Provides the path in the DataFileName variable, without the file name. Also see description for DataFileName.
PathTriggerFileName File Provides the path in the TriggerFileName variable, without the file name. Also see description for TriggerFileName.
Port TCP/IP, HTTP,
Web Ser-vice
Provides the port number as defined in the trigger.
RemoteHttpIp HTTP Provides the host name of device/computer connecting to the trigger.RemoteIP Web Ser-
viceProvides the host name of device/computer connecting to the trigger.
ShortConfigurationFileName
All Provides the file name of the configuration file, without a path, Also see description for ConfigurationFileName.
ShortDataFileName All Provides the file name to the DataFileName variable, without the path. Also see description for DataFileName.
ShortTriggerFileName File Provides the file name to the TriggerFileName variable, without the path. Also see description for TriggerFileName.
SystemUserName All Provides the Windows name of the logged-in user.TableName Database Provides the name of the table as used in the trigger.Time All Provides the current time in the format as specified by system locale, such
as 15:18,TimeHour All Provides the current hour value, such as 15.TimeMinute All Provides the current minute value, such as 18.
- 64 -
TimeSecond All Provides the current second value, such as 25.TriggerFileName File Provides the file name that triggered actions. This is useful when you mon-
itor set of files in the folder, so you can identify which file exactly triggered actions.
TriggerName All Provides the name of the trigger as defined by the user.Username Provides the NiceLabel Automation user name of the currently logged in
user. The variable has contents only if the user login is enabled.
Global Variables
Global variables are a type of variable that can be used on different labels. Global variables are defined outside of the label file and remember the last-used value. Global variables are typically defined as global counters. Global variable will provide a unique value for every label requesting a new value. File locking takes place ensuring uniqueness of each value.
Global variables are defined in the label designer, the NiceLabel Automation will only use it. If you have your NiceLabel Automation installed on different computer than NiceLabel designer, you will have to copy the definition file for global variables to NiceLabel Automation machine, where print production takes place.
To copy the global variables to the NiceLabel Automation machine, do the following:
1. On computer with NiceLabel designer go to the following folder:
On Windows Vista, Windows 7, Windows Server 2008, Windows Server 2012 and above
%PROGRAMDATA%\EuroPlus\Variables
On Windows XP, Windows Server 2003
%ALLUSERSPROFILE%\EuroPlus\Variables
2. Copy the files GLOBAL.TDB and GLOBALS.TDB.SCH.
3. Paste files to the NiceLabel Automation computer in the same folder.
Using ActionsActions
The Actions section specifies the list of actions that will execute every time the trigger fires.
Defining actions.
To define the action, click the action icon in the Insert Action ribbon group. The main ribbon contains commonly used actions. To see all available actions, click All Actions button. To see available commands over the selected action, right-click it and select command from the list.
- 65 -
Nested actions.
Some actions cannot be used on their own. Their specific functionality requires them to be nested below some other action. Use buttons in Action Order ribbon group to change action placement. Each action is identified with the ID number that shows its position in the list, including nesting. This ID number will be displayed in the error message so you can find the problematic action easier.
- 66 -
NOTE: The Print Label action is a good example of such action. You have to position it under the Open Label action, so it references the exact label to print.
Action execution.
The actions in the list will execute just once per trigger. The action execution if from top to bottom, so order of actions is important. There are two exceptions. The actions For Loop and Use Data Filter will execute nested actions many times. For loop as many times as defined in its properties, Use Data Filter as many times as there are records in a data set returned from the associated filter.
NiceLabel Automationruns as service under a specified Windows user account and inherits security permissions from the account. For more details, see the topic Running in Service Mode.
Conditional actions.
Every action can be conditional. Conditional action only runs when the provided condition allows it to be run. Condition is one line script (VBScript or Python). To define condition, click the Show execution and error handling options in action properties to expand the possibilities.
In this case the action will execute only if the previous action has completed successfully, so the internal variable ActionLastErrorID has value 0. To use such condition with internal variables, you must first enable the internal variable.
Identifying actions that are in the configuration error.
When the action is not completely configured, it will be marked with red exclamation icon. Such action cannot execute. You can include such action in the list, but you will have to complete the configuration, before you can start the trigger. If one of the nested actions is in error, all parent expansion arrows (to the left of the action name) will also be colored red as an indicator of sub-action error.
In this case, the action Open Label is in configuration error. There is no parameter specified for the label name. the red exclamation sign is shown next to the erroneous parameter in the action itself, in the action list, in the Actions tab, in the trigger tab and in the Configuration Items tab, just for you to easily identify the problem.
- 67 -
Disabling actions.
By default, every newly created action is enabled and will execute when the trigger fires. You can disable the actions that you don't need, but still want to keep the configuration. A shortcut to action enabling & disabling is a check box in front of the action name in the list of defined actions.
In this case the action Set Printer is still defined in the actions list, but has been disabled. Currently it is not needed and will be ignored during the processing, but you can easily enable it back.
Copying actions.
You can copy the action and paste it back in the same or some other trigger. You can use standard Windows keyboard shortcuts, or right-click on the action.
Right-click on the action will display available shortcut commands available for the currently selected object.
Navigating the action list.
You can use your mouse to select the defined action and then click the respective arrow button in
- 68 -
Action Order group in the ribbon. You can also use keyboard. The cursor keys will move selection in the action list, Ctrl + cursors keys will move the action position up and down, and also left and right for nesting.
Delete File
The functionality from this topic is available in NiceLabel Automation Pro and NiceLabel Automation Enterprise.
Deletes file on the disk. NiceLabel Automation runs as service under defined Windows user account. Make sure that account has permissions to delete file in the specified folder.
File
l File name. Specifies the path and file name. They can be hard-coded, and the same file will used every time. If you use just file name without the path, the folder where configuration file (.MISX) is saved will be used. You can use relative reference to the file name, where folder with .MISX file is used as the root folder. The option Variable enables the variable file name. You can select a single variable that will contain the path and/or file name or you can combine several variables that will create the file name. For more information see topic Using Compound Values.
NOTE: Use UNC syntax for network resources. For more information, see topic Access to Network Shared Resources.
Action Execution and Error Handling
l Enabled. Specifies if the action is enabled or disabled. Only enabled actions will execute. You can use this functionality for testing.
l Condition. Defines one-line programming expression that must provide a Boolean value (true or false). When the result of the expression is true, the action will execute. This is a method to not execute action every time, but only when monitored variables have certain values.
l Ignore failure. Specifies to ignore the error and continue with the next action, even if execution of the current action fails. The nested actions that depend on the current action will not execute. The action execution will continue with the next action on the same level as the current action. The error is still logged in Automation Manager, but it will not break the execution of the action. For more information, see Error Handling.
EXAMPLE: At the end of pr inting you might want to send the s tatus update to an external application us ing HTTP Request ac tion. If pr inting action fai ls the tr igger s tops process ing actions . In order to execute the repor ting even after fai led pr int ac tion, the Pr int Label ac tion must have the option Ignore fai lure enabled.
l Save error to variable. Specifies to save the error description to some variable, when some error breaks the execution of this action. The same cause of error is also saved to internal vari-ables ActionLastErrorId and ActionLastErrorDesc.
Execute Script
Enhances the software functionality by using the custom VBScript or Python scripts. You can use this function if the built-in actions don't satisfy your data-manipulation requirements. NiceLabel Automation runs as service application and as such doesn't have the access to the desktop, so you cannot use functions, such as MsgBox() to interact with desktop in VBScript. Also make sure that
- 69 -
Windows account under which the service runs has the privileges to execute the commands in the script. For more information, see the topic Access to Network Shared Resources.
Support for VBScript is already available with your Windows system. To install Python support, see the Knowledge Base article KB249.
NOTE: The script type is configured per trigger in the trigger properties. All Execute Script actions within one trigger must be of the same type.
Script
Defines the script to execute. You can use the on-screen editor, or run the external Script Editor. The external editor also contains reference for all available functions and script objects. NiceLabel Automation includes some add-on functions, such as check-digit algorithms for various bar codes. The add-on functions are accessible from the Script Editor.
Action Execution and Error Handling
l Enabled. Specifies if the action is enabled or disabled. Only enabled actions will execute. You can use this functionality for testing.
l Condition. Defines one-line programming expression that must provide a Boolean value (true or false). When the result of the expression is true, the action will execute. This is a method to not execute action every time, but only when monitored variables have certain values.
l Ignore failure. Specifies to ignore the error and continue with the next action, even if execution of the current action fails. The nested actions that depend on the current action will not execute. The action execution will continue with the next action on the same level as the current action. The error is still logged in Automation Manager, but it will not break the execution of the action. For more information, see Error Handling.
EXAMPLE: At the end of pr inting you might want to send the s tatus update to an external application us ing HTTP Request ac tion. If pr inting action fai ls the tr igger s tops process ing actions . In order to execute the repor ting even after fai led pr int ac tion, the Pr int Label ac tion must have the option Ignore fai lure enabled.
l Save error to variable. Specifies to save the error description to some variable, when some error breaks the execution of this action. The same cause of error is also saved to internal vari-ables ActionLastErrorId and ActionLastErrorDesc.
The functionality from this topic is available in NiceLabel Automation Pro and NiceLabel Automation Enterprise.
Sends SQL commands to an SQL server and collect the results. Use the commands SELECT, INSERT, UPDATE, and DELETE.
You would use this action for two purposes.
l Obtain additional data from the database. The trigger will receive data for label printing, but not all required values. For example, the trigger receives the value for Product ID and Description, but no Price. We have to look up the value for Price in the SQL database.
See example of SQL code
SELECT Price FROM ProductsWHERE ID = :[Product ID]
The ID is field in the database, Product ID is a variable defined in the trigger.
l Update or delete records in the database. When the label is printed, you want to update the record in the database signaling the system that the particular records has been already pro-cessed.
See example of SQL code
You would set the table field AlreadyPrinted to True for the currently processed record.
UPDATE ProductsSET AlreadyPrinted = TrueWHERE ID = :[Product ID]
Or you would delete the current record from a database, because it's not needed anymore.
DELETE FROM ProductsWHERE ID = :[Product ID]
The ID is field in the database, Product ID is a variable defined in the trigger.
NOTE: To use value of a variable inside SQL statement, you have to put colon (:) in front of its name. This signals to NiceLabel Automation that the variable names follows.
Database Connection
Defines the connection parameters to the database. Before you can send SQL sentence to the database, you have to set up the connection to it. Click Define button and follow on-screen instructions. You can connect to a data source that can be controlled with SQL commands, so you cannot use text files (CSV) and Excel files.
SQL Statement
Defines the SQL statement --or query-- to execute. You can use statements from Data Manipulation Language (DML) to execute queries upon existing database tables. You can use the standard SQL
- 71 -
statements, such as SELECT, INSERT, DELETE and UPDATE, including joins, function and keywords. You cannot use statements from Data Definition Language (DDL) to create databases and tables (CREATE DATABASE, CREATE TABLE), or to delete them (DROP TABLE).
Click the Test button in the toolbar to open the Data Preview section, where you can test execution of SQL statements. Click the Insert variable button to insert trigger variables into the SQL statement. The editor control allows you to Export/Import the SQL statements to/from file.
Execution mode
Specifies the explicit mode of execution. With some complex SQL queries it becomes increasingly difficult to automatically determine what is the supposed action. If the built-in logic has troubles identifying your intent, manually select the main action.
l Automatic. The application will try to automatically determine the action.
l Returns set of records (SELECT). You expect to receive data set with records.
l Does not return set of records (INSERT, DELETE, UPDATE). You are executing query that will not return the records. You want to either insert new records, delete or update existing records. The result will be status response about how many rows very affected by your query.
Save Result to Variable
Defines the variable that will store the result of the SQL statement.
l Result of SELECT statement. When you execute the SELECT statement, the result will be data set of records. You will receive the CSV-formatted text contents. The first line will contain field names returned in a result. The next lines will contain records.
To extract the values from the returned data set and use them in other actions, define the Configuring Structured Text Filter and execute action Use Data Filter upon the contents of this variable.
l Result of INSERT, DELETE and UPDATE statements. When you use INSERT, DELETE and UPDATE statements, the result will be number indicating the number of records affected in the table.
Retry on Failure
This section allows you to configure the action to continually retry connection to the database server in case the first attempt was not successful. If the action will fail to connect in all defined number of attempts, the error is raised.
l Retry attempts. Specifies the number of times the action will try to connect to the database server.
l Retry interval. Specifies the time period for which this action will wait until it will try to re-con-nect to the database.
Data Preview
This section allows you to test the execution of your SQL statement upon a live data. To protect the data from accidental updates, make sure the option Simulate execution is enabled. The statements INSERT, DELETE and UPDATE will execute, so you will have feedback about how many records will be affected, then the transactions will be reversed.
- 72 -
If you use trigger variables in the SQL statement, you will be able to enter their values for the test execution.
Action Execution and Error Handling
l Enabled. Specifies if the action is enabled or disabled. Only enabled actions will execute. You can use this functionality for testing.
l Condition. Defines one-line programming expression that must provide a Boolean value (true or false). When the result of the expression is true, the action will execute. This is a method to not execute action every time, but only when monitored variables have certain values.
l Ignore failure. Specifies to ignore the error and continue with the next action, even if execution of the current action fails. The nested actions that depend on the current action will not execute. The action execution will continue with the next action on the same level as the current action. The error is still logged in Automation Manager, but it will not break the execution of the action. For more information, see Error Handling.
EXAMPLE: At the end of pr inting you might want to send the s tatus update to an external application us ing HTTP Request ac tion. If pr inting action fai ls the tr igger s tops process ing actions . In order to execute the repor ting even after fai led pr int ac tion, the Pr int Label ac tion must have the option Ignore fai lure enabled.
l Save error to variable. Specifies to save the error description to some variable, when some error breaks the execution of this action. The same cause of error is also saved to internal vari-ables ActionLastErrorId and ActionLastErrorDesc.
For Loop
The functionality from this topic is available in NiceLabel Automation Enterprise.
Executes the actions defined below this action multiple times. You would use this action to when you want to execute a group of nested actions many times. All nested actions will be executed in a loop as many times as defined by the difference between start value and end value.
- 73 -
Loop Settings
l Start value. Specifies the reference for the start point. You can use negative value. The option Variable enables the variable start value. You must select a variable that will contain numeric value for start.
l End value. Specifies the reference for the end point. You can use negative value. The option Variable enables the variable end value. You must select a variable that will contain numeric value for end.
l Save loop variable to a variable. Saves the current loop step value into a selected variable. The loop step value can contain any value between start and end value. You would save the value to variable to use it in some other action to know with the current iteration.
Action Execution and Error Handling
l Enabled. Specifies if the action is enabled or disabled. Only enabled actions will execute. You can use this functionality for testing.
l Condition. Defines one-line programming expression that must provide a Boolean value (true or false). When the result of the expression is true, the action will execute. This is a method to not execute action every time, but only when monitored variables have certain values.
l Ignore failure. Specifies to ignore the error and continue with the next action, even if execution of the current action fails. The nested actions that depend on the current action will not execute. The action execution will continue with the next action on the same level as the current action. The error is still logged in Automation Manager, but it will not break the execution of the action. For more information, see Error Handling.
EXAMPLE: At the end of pr inting you might want to send the s tatus update to an external application us ing HTTP Request ac tion. If pr inting action fai ls the tr igger s tops process ing actions . In order to execute the repor ting even after fai led pr int ac tion, the Pr int Label ac tion must have the option Ignore fai lure enabled.
l Save error to variable. Specifies to save the error description to some variable, when some error breaks the execution of this action. The same cause of error is also saved to internal vari-ables ActionLastErrorId and ActionLastErrorDesc.
Get Label Information
The functionality from this topic is available in NiceLabel Automation Enterprise.
This action returns the structural information about the associated label file. The action provides the information about the label dimensions, printer driver and lists all label variables and their main properties. It returns the original information as are saved in the label file and also the information after the print process has been simulated.
The simulation ensures that all labels variables get the value as they would have during the normal print. Also, the label height information provides the correct dimensions in case that you defined the label as variable-height label (in this case the label size depends on the amount of data to print).
The action will return the dimensions for a label size, not for a page size.
The action will save the information about the label structure into the selected variable. You can then send the data back to the system using the action HTTP Request (or similar outbound data connectivity action), or send it back in the trigger response, if you bidirectional trigger.
- 74 -
NOTE: This action must be nested below the Open Label action.
Variable
l Name. Specifies the variable name. You must select a variable into which the XML-formatted label information is saved.
l If you want to use the information from the XML inside this trigger, you can define the Configuring XML filter and execute it with Use Data Filter action.
l If you want to return the XML data as response in your HTTP or Web Service trigger, use this variable directly in the Response data field the trigger configuration.
l If you want to save the XML data to file, use the Save Data to File action.
Action Execution and Error Handling
l Enabled. Specifies if the action is enabled or disabled. Only enabled actions will execute. You can use this functionality for testing.
l Condition. Defines one-line programming expression that must provide a Boolean value (true or false). When the result of the expression is true, the action will execute. This is a method to not execute action every time, but only when monitored variables have certain values.
l Ignore failure. Specifies to ignore the error and continue with the next action, even if execution of the current action fails. The nested actions that depend on the current action will not execute. The action execution will continue with the next action on the same level as the current action. The error is still logged in Automation Manager, but it will not break the execution of the action. For more information, see Error Handling.
EXAMPLE: At the end of pr inting you might want to send the s tatus update to an external application us ing HTTP Request ac tion. If pr inting action fai ls the tr igger s tops process ing actions . In order to execute the repor ting even after fai led pr int ac tion, the Pr int Label ac tion must have the option Ignore fai lure enabled.
l Save error to variable. Specifies to save the error description to some variable, when some error breaks the execution of this action. The same cause of error is also saved to internal vari-ables ActionLastErrorId and ActionLastErrorDesc.
Sample Label Information XML
The sample presents the structural view on the elements and their attributes as they are returned.
This section contains the description of the XML file structure as returned by this action.
NOTE: All measurement values are expressed in the 1/1000 mm units. For example width of 25000 is 25 mm.
l <Label>. This is a root element.
l <Original>. Specifies the label dimensions and the printer name as are saved in the label file.
l Width. This element contains the original label width.
l Height. This element contains the original label height.
l PrinterName. This element contains the printer name for which the label has been cre-ated for.
l Current. Specifies the label dimensions and the printer name after the simulated print has been completed.
l Width. This element contains the actual label width.
l Height. This element contains the actual label height. If the label is defined as variable-height label, it can grow together with label objects. For example, Text Box and RTF objects can grow in vertical direction and cause the label to expand as well.
l PrinterName. This element contains the printer name that will be used for printing. For example, the printer will be different from the original printer name, if the original printer driver is not installed on this computer, or you have changed the printer with the Set Printer action.
l <Variables> and <Variable>. The element Variables contains the list of all prompt label vari-ables , each defined in a separate Variable element. The prompt variables are the ones listed in the print dialog box when you print label from the designer. If there are no prompt variables
- 76 -
defined in the label , the element Variables is empty.
l Name. Contains the variable name.
l Description. Contains the variable description.
l DefaultValue. Contains the default value as defined for the variable when the label has been designed.
l Format. Contains the type of content (characters) the variable accepts.
l CurrentValue. Contains the actual value as will be used for printing.
l IncrementType. Contains the information, if the variable is defined as counter, and if it is, what kind of counter it is.
l IncrementStep. Contains the information about the counter step. The counter value will increment/decrement for this value on the next label.
l IncrementCount. Contains the information about when the counter should incre-ment/decrement its value. Usually, the counter changes value on every label, but that can be changed.
l Length. Contains the maximum number of characters the variable can contain.
XML Schema Definition (XSD) for Label Specification XML
The functionality from this topic is available in NiceLabel Automation Enterprise.
Sends data to the destination Web server using the selected HTTP method. You can use http and HTTPS URI schemes.
HTTP functions as a request-response protocol in the client-server computing model. With this action NiceLabel Automation takes a role of the client, communicating with the remote server. This action will submit the selected HTTP request message to the server. The server will return a response message, which can contain completion status information about the request and may also contain requested content in its message body.
Connection Settings
NOTE: This action supports Internet Protocol version 6 (IPv6).
l Destination. Defines the address, port and destination (path) on the Web server. If the Web server runs on default port 80, you can skip the port number. You can hard-code the con-nection parameters and use fixed host name or IP address. You can also use variable con-nection parameters. For more information, see the topic Using Compound Values.
EXAMPLE: If the var iab le hostname provides the Web server name and the var iab le port provides the por t number , you can enter the fol lowing for the destination:[hostname]:[port]
- 78 -
l Request method. Lists the available methods for the request. You can choose between POST, GET, PUT and DELETE.
l Timeout. Defines the timeout in which connection to the server will try to be established.
l Wait for status reply. Specifies that you want to receive the status feedback, whether the data was sent successfully. The HTTP status code returned from the Web server will be saved into selected variable. Status code in range 2XX are success code, common "OK" response is code 200. Codes 5XX are server errors.
l Save status reply in a variable. Defines the variable that will store the status code returned from the server.
Authentication
This section allows you to enter the credentials you need to connect to the Web server. You must enter user name and password, which can be fixed or can be provided with value of the variable.
HTTP Basic authentication (BA) uses static standard HTTP headers. The BA mechanism provides no confidentiality protection for the transmitted credentials. They are merely encoded with Base64 in transit, but not encrypted or hashed in any way. Basic Authentication should be used over HTTPS.
Content
This section allows you to define the contents you want to send to the Web server. You can use fixed content, mix of fixed and variable content, or variable content alone. To insert a variable content, click the button with arrow to the right of data area and insert variable from the list. For more information, see the topic Using Compound Values.
l Data. Specifies the contents that will be sent outbound.
l Encoding. Specifies the encoding of the data.
l Type. Specifies the Content-Type property for the HTTP message. If you don't select any type, the default application/x-www-form-urlencoded will be used. If you don't see appro-priate type listed, just type it in yourself.
Additional HTTP Headers
Some HTTP servers (especially for REST services) require custom HTTP headers to be included in the message. This section allows you to provide the HTTP headers that you need.
The HTTP headers must be entered using the following syntax:
header field name: header field value
For example, to use the header field names Accept, User-Agent and Content-Type, you could use the following:
Accept: application/json; charset=utf-8User-Agent: Mozilla/5.0 (Windows NT 6.3; WOW64) AppleWebKit/537.36 (KHTML, like Gecko) Chrome/31.0.1650.63 Safari/537.36Content-Type: application/json; charset=UTF-8
You can hard code the header field names, or you can obtain their values from the trigger variables. To access the variables click the small arrow button to the right of the text area. For more information, see the topic Using Compound Values.
- 79 -
You can use as many custom header fields as you want, just make sure you place each header field in a new line.
NOTE: The entered HTTP headers will override the already defined headers elsewhere in the action properties, such as Content-Type.
Action Execution and Error Handling
l Enabled. Specifies if the action is enabled or disabled. Only enabled actions will execute. You can use this functionality for testing.
l Condition. Defines one-line programming expression that must provide a Boolean value (true or false). When the result of the expression is true, the action will execute. This is a method to not execute action every time, but only when monitored variables have certain values.
l Ignore failure. Specifies to ignore the error and continue with the next action, even if execution of the current action fails. The nested actions that depend on the current action will not execute. The action execution will continue with the next action on the same level as the current action. The error is still logged in Automation Manager, but it will not break the execution of the action. For more information, see Error Handling.
EXAMPLE: At the end of pr inting you might want to send the s tatus update to an external application us ing HTTP Request ac tion. If pr inting action fai ls the tr igger s tops process ing actions . In order to execute the repor ting even after fai led pr int ac tion, the Pr int Label ac tion must have the option Ignore fai lure enabled.
l Save error to variable. Specifies to save the error description to some variable, when some error breaks the execution of this action. The same cause of error is also saved to internal vari-ables ActionLastErrorId and ActionLastErrorDesc.
Load Variable Data
The functionality from this topic is available in NiceLabel Automation Pro and NiceLabel Automation Enterprise.
Loads values of one or multiple variables from the associated file as were saved to file by the action Save Variable Data. This action allows you to exchange data between triggers. You can load a particular variable or all variables that exist in the file.
File
l File name. Specifies the file name where the variable values will be loaded from. It can be hard-coded, and values will be loaded from the same file every time. The option Variable enables the variable file name. You must select a variable that will contain the path and/or file name when trigger is executed. Usually, the value to the variable is assigned by a filter.Use UNC syntax for network resources. For more information, see the topic Access to Network Shared Resources.
File Structure
This section defines the structure of the variable file. The structure has to match the structure as was used to save the variables to file.
l Delimiter. Specifies the delimiter in the data file. You can select a predefined delimiter, or enter a custom one.
- 80 -
l Text qualifier. Specifies the text qualifier. You can select a predefined delimiter, or enter a cus-tom one.
l Encoding. Specifies the encoding mode used in the data file. UTF-8 makes a good default selec-tion.
Variables
This section defines the variables that will be read from the data file. Values of the existing variables will be overwritten with values from the file.
l All variables. Specifies that all variables defined in the data file will be read.
l Selected variables. Specifies that only the selected variables will be read from the data file.
Action Execution and Error Handling
l Enabled. Specifies if the action is enabled or disabled. Only enabled actions will execute. You can use this functionality for testing.
l Condition. Defines one-line programming expression that must provide a Boolean value (true or false). When the result of the expression is true, the action will execute. This is a method to not execute action every time, but only when monitored variables have certain values.
l Ignore failure. Specifies to ignore the error and continue with the next action, even if execution of the current action fails. The nested actions that depend on the current action will not execute. The action execution will continue with the next action on the same level as the current action. The error is still logged in Automation Manager, but it will not break the execution of the action. For more information, see Error Handling.
EXAMPLE: At the end of pr inting you might want to send the s tatus update to an external application us ing HTTP Request ac tion. If pr inting action fai ls the tr igger s tops process ing actions . In order to execute the repor ting even after fai led pr int ac tion, the Pr int Label ac tion must have the option Ignore fai lure enabled.
l Save error to variable. Specifies to save the error description to some variable, when some error breaks the execution of this action. The same cause of error is also saved to internal vari-ables ActionLastErrorId and ActionLastErrorDesc.
Message
Writes a custom entry into the log file.
Usually, the log file contains application-generated strings and error descriptions. Use this action to write custom string. This is useful for configuration troubleshooting and debugging so you can track values of selected variables.
EXAMPLE: To conf igure logging of custom message in the log pane in Automation Builder (when you are tes ting conf iguration) or in the log pane in Automation Manager (when the tr igger has been deployed and s tar ted), see the fol lowing screenshots .
- 81 -
Content
l Caption. Specifies title of the custom message. The option Variable enables the variable title. You must select a variable that will contain the title when trigger is executed.
l Message. Specifies contents of the custom message. The option Variable enables the variable title. You must select a variable that will contain the title when trigger is executed. Usually, you will prepare variable contents in some other action, then use it here.
Action Execution and Error Handling
l Enabled. Specifies if the action is enabled or disabled. Only enabled actions will execute. You can use this functionality for testing.
l Condition. Defines one-line programming expression that must provide a Boolean value (true or false). When the result of the expression is true, the action will execute. This is a method to not execute action every time, but only when monitored variables have certain values.
l Ignore failure. Specifies to ignore the error and continue with the next action, even if execution of the current action fails. The nested actions that depend on the current action will not execute. The action execution will continue with the next action on the same level as the current action. The error is still logged in Automation Manager, but it will not break the execution of the action. For more information, see Error Handling.
EXAMPLE: At the end of pr inting you might want to send the s tatus update to an external application us ing HTTP Request ac tion. If pr inting action fai ls the tr igger s tops process ing actions . In order to execute the repor ting even after fai led pr int ac tion, the Pr int Label ac tion must have the option Ignore fai lure enabled.
l Save error to variable. Specifies to save the error description to some variable, when some error breaks the execution of this action. The same cause of error is also saved to internal vari-ables ActionLastErrorId and ActionLastErrorDesc.
Open Document / Program
Interfaces with external program and executes it in the command-line. The external program can execute some additional processing and provide result back to the NiceLabel Automation. This action
- 82 -
allows NiceLabel Automation to bind with any 3rd party software that can execute some additional data processing, or acquire data. External software can provide data response by saving it to file, from where you can read it into variables.
You can feed the value of variable(s) to the program by listing them in the command-line in square brackets.
l File name. Specifies the path and file name. They can be hard-coded, and the same file will used every time. If you use just file name without the path, the folder where configuration file (.MISX) is saved will be used. You can use relative reference to the file name, where folder with .MISX file is used as the root folder. The option Variable enables the variable file name. You can select a single variable that will contain the path and/or file name or you can combine several variables that will create the file name. For more information see topic Using Compound Values.
NOTE: Use UNC syntax for network resources. For more information, see topic Access to Network Shared Resources.
Execution Options
l Hide window. Specifies that the application's window will not be shown to the user. Because NiceLabel Automation runs as a service application within its own session, it cannot interact with the user's desktop, even if it runs with the privileges of the currently logged in user. From security reasons Microsoft has prevented this interaction in Windows Vista and newer oper-ating systems.
l Wait for completion. Specifies that action execution will wait for this action to complete before continuing with the next action in the list. Enable this option if the next action depends on the result from the external application.
Action Execution and Error Handling
l Enabled. Specifies if the action is enabled or disabled. Only enabled actions will execute. You can use this functionality for testing.
l Condition. Defines one-line programming expression that must provide a Boolean value (true or false). When the result of the expression is true, the action will execute. This is a method to not execute action every time, but only when monitored variables have certain values.
l Ignore failure. Specifies to ignore the error and continue with the next action, even if execution of the current action fails. The nested actions that depend on the current action will not execute. The action execution will continue with the next action on the same level as the current action. The error is still logged in Automation Manager, but it will not break the
- 83 -
execution of the action. For more information, see Error Handling.
EXAMPLE: At the end of pr inting you might want to send the s tatus update to an external application us ing HTTP Request ac tion. If pr inting action fai ls the tr igger s tops process ing actions . In order to execute the repor ting even after fai led pr int ac tion, the Pr int Label ac tion must have the option Ignore fai lure enabled.
l Save error to variable. Specifies to save the error description to some variable, when some error breaks the execution of this action. The same cause of error is also saved to internal vari-ables ActionLastErrorId and ActionLastErrorDesc.
Open Label
Specifies the name of label file for printing. When the action is executed the specified label template will open in the memory cache. The label remains in the cache as long as triggers use it. There is no limit on the number of labels that can be opened concurrently. If the label is already loaded and is requested again, NiceLabel Automation will first determine if a newer version is available and approved for printing, then open it.
In this example the NiceLabel Automation will load the label label.lbl from the folder C:\ProjectA\Labels.
C:\ProjectA\Labels\label.lbl
If the specified label cannot be found, NiceLabel Automation will try to find it in the alternative locations. For more information, see topic Search order for the Requested Files.
File
l Label. Specifies the label name. It can be hard-coded, and the same label will print every time. The option Variable enables the variable file name. You must select a variable that will contain the path and/or file name when trigger is executed. Usually, the value to the variable is assigned by a filter.Use UNC syntax for network resources. For more information, see the topic Access to Network Shared Resources.
Using Relative Paths
You can also use relative path to reference your label file. The root folder is always the folder where the configuration file (MISX) is stored.
With the following syntax, the label will load relatively from the location of the configuration file. The label will be searched for in the folder ProjectA, which is two levels above the current folder, and then into folder Labels.
- 84 -
..\..\ProjectA\Labels\label.lbl
Action Execution and Error Handling
l Enabled. Specifies if the action is enabled or disabled. Only enabled actions will execute. You can use this functionality for testing.
l Condition. Defines one-line programming expression that must provide a Boolean value (true or false). When the result of the expression is true, the action will execute. This is a method to not execute action every time, but only when monitored variables have certain values.
l Ignore failure. Specifies to ignore the error and continue with the next action, even if execution of the current action fails. The nested actions that depend on the current action will not execute. The action execution will continue with the next action on the same level as the current action. The error is still logged in Automation Manager, but it will not break the execution of the action. For more information, see Error Handling.
EXAMPLE: At the end of pr inting you might want to send the s tatus update to an external application us ing HTTP Request ac tion. If pr inting action fai ls the tr igger s tops process ing actions . In order to execute the repor ting even after fai led pr int ac tion, the Pr int Label ac tion must have the option Ignore fai lure enabled.
l Save error to variable. Specifies to save the error description to some variable, when some error breaks the execution of this action. The same cause of error is also saved to internal vari-ables ActionLastErrorId and ActionLastErrorDesc.
Preview Label
The functionality from this topic is available in NiceLabel Automation Enterprise.
Executes the print process and delivers the label preview as an image. By default the preview is saved to disk as JPEG image, but you can choose other image type. You can also control the size of the created preview image. The action will generate preview for one label.
Once you have the label preview created in a file, you can send the file to third party application using one of the outbound actions, such as Send Data to HTTP, Send Data to Serial Port, Send Data to TCP/IP Port, or use it as response message from bidirectional triggers, such as HTTP Server Trigger and Web Service Trigger. The third party application can take the image and show is as label preview to the user.
Preview
l File name. Specifies the path and file name. They can be hard-coded, and the same file will used every time. If you use just file name without the path, the folder where configuration file (.MISX) is saved will be used. You can use relative reference to the file name, where folder with .MISX file is used as the root folder. The option Variable enables the variable file name. You must select a variable that will contain the path and/or file name when trigger is executed. Usu-ally, the value to the variable is assigned by a filter.
l Image type. Specifies the image type in which the label preview will be saved.
l Preview label back side (2-sided labels). Enables preview of the back label. This is useful, when you use double sided labels and want to preview label's back side.
Preview Size
l Width and height. Specifies the image size in pixels as will be saved to disk. The label preview
- 85 -
will fit proportionally into defined dimensions and will never be stretched. The image will use white background for all excess background not covered by the label preview.
l Use printer and label settings to set preview size. Enables the preview image to use exact dimensions (in pixels) as defined by the label template (.LBL file) and the printer properties . Label template will provide label dimensions (in selected unit of measure) and printer driver will provide the printer resolution (DPI). If you want to create label preview with different res-olution, change the printer before executing Preview Label action. Use the Set Printer action to change the associated printer.
EXAMPLE: For example, if your label template def ines d imens ion as 4" × 3" and label pr inter has resolution of 200 DPI, the resulting preview image wil l have d imens ions of 800 × 600 p ixels . Width equals 4 inches times 200 DPI, which results in 800 p ixels . Height equals 3 inches times 200 DPI, which results in 600 p ixels .
Action Execution and Error Handling
l Enabled. Specifies if the action is enabled or disabled. Only enabled actions will execute. You can use this functionality for testing.
l Condition. Defines one-line programming expression that must provide a Boolean value (true or false). When the result of the expression is true, the action will execute. This is a method to not execute action every time, but only when monitored variables have certain values.
l Ignore failure. Specifies to ignore the error and continue with the next action, even if execution of the current action fails. The nested actions that depend on the current action will not execute. The action execution will continue with the next action on the same level as the current action. The error is still logged in Automation Manager, but it will not break the execution of the action. For more information, see Error Handling.
EXAMPLE: At the end of pr inting you might want to send the s tatus update to an external application us ing HTTP Request ac tion. If pr inting action fai ls the tr igger s tops process ing actions . In order to execute the repor ting even after fai led pr int ac tion, the Pr int Label ac tion must have the option Ignore fai lure enabled.
l Save error to variable. Specifies to save the error description to some variable, when some error breaks the execution of this action. The same cause of error is also saved to internal vari-ables ActionLastErrorId and ActionLastErrorDesc.
Print Label
Executes the label printing. The action cannot be used on its own. You must always nest this action under the Open Label action to reference the label to print. This allows you to have many labels opened at the same time, and you can specify which label must print. When issuing this command the label will print using the printer driver defined in the label template. If that printer driver is not found on the system, the label will print using system default printer driver. You can override the printer driver using the command Set Printer.
To achieve high performance label printing, NiceLabel Automation enables two settings by default:
l Parallel processing. Multiple print processes are all carried out simultaneously. The number of background printing threads depend on the hardware, specifically on the processor type. Each processor core can accommodate one printing thread, and this default can be changed. For more information, see Parallel Processing.
- 86 -
l Asynchronous mode. As soon as the trigger pre-processing completes and the instructions for the print engine are available, the printing thread takes it over in the background. The con-trol is returned to the trigger so it can accept the next incoming data stream as soon as pos-sible. When the synchronous mode is enabled, the control is not returned to the trigger until the print process is finished. This can take a while, but the trigger has a benefit of providing the feedback back to data-providing application. For more information, see the topic Synchronous Print Mode.
NOTE: Using Save error to variable option in Action Execution and Error Handling will not yield any result in asynchronous mode, as the trigger will not receive feedback from the print process. To capture feedback from the print process you have to enable synchronous mode.
Quantity
This section specifies the number of labels you want to print.
l Labels. Specifies the number of labels to print.
l Variable. Specifies the variable that will define the label quantity. Value of the variable is usually assigned by the action Use Data Filter and must be integer.
l All (unlimited quantity). Dependent on the design of the label template, labels will print in different quantities.
Details
Typically, you would use this option in two scenarios.
1. Command the printer to continuously print the same label until it is switched off, or when it receives a command to clear its memory buffer.
WARNING: In this scenario, you must use NiceLabel printer driver to print your labels.
When you print the fixed label, just one print job is sent to the printer, with the quantity set to "unlimited". Label printers have a parameter to the print command to indicate "unlimited" printing.
When the label is not fixed but includes objects that change during the printing, such as counters, then the printed quantity will be set to the maximum quantity supported by the printer. NiceLabel printer driver knows the printer quantity limit and will print that many labels.
EXAMPLE: The maximum quantity the pr inter suppor ts is 32,000. This is the amount of labels that wil l pr int, when you selec t "unlimited" quantity.
2. The trigger doesn't provide and data, but only acts as a signal that "event has happened". The logic to acquire necessary data is on the label. Usually, a connection to a database is configured on the label and at every trigger the label must connect to the database, and acquire all records from the database. In this case, the option "unlimited" is understood as "print all records from the database".
- 87 -
l Variable quantity (defined from label variable). Specifies that some label variable contains the label quantity information. The trigger doesn't receive the number of labels to print so it passes the decision to the label template. The label might contain a connection to a database, which will provide the label quantity, or there is some other source of quantity information. One label variable must be defined as "variable quantity". For more information, see label designer's user guide.
Advanced
This section specifies non-frequently used label quantity related settings.
l Number of skipped labels. Specifies the number of labels that will be skipped on the first page of labels. The sheet of labels might be printed once already, but not entirely. You can re-use the same sheet by offsetting the starting position. This option is applicable, when you print labels to sheets of labels, not rolls of labels, so it's effective for office printers not label printers. The value can be hard-coded, or some variable can provide the number.
l Identical label copies. Specifies the number of label copies to make for each unique label. This option produces the same result as the main Number of Labels option, when you have fixed labels. With variable labels, such as labels using counters, you can get the real label copies.
l Label sets. Specifies how many times the entire label printing process should repeat. For example, the trigger will receive content with 3 lines of CSV-formatted data, so 3 labels are expected to print (1, 2, 3). If you set this option to 3, the printout will be in the following order 1, 2, 3, 1, 2, 3, 1, 2, 3.
Action Execution and Error Handling
l Enabled. Specifies if the action is enabled or disabled. Only enabled actions will execute. You can use this functionality for testing.
l Condition. Defines one-line programming expression that must provide a Boolean value (true or false). When the result of the expression is true, the action will execute. This is a method to not execute action every time, but only when monitored variables have certain values.
l Ignore failure. Specifies to ignore the error and continue with the next action, even if execution of the current action fails. The nested actions that depend on the current action will not execute. The action execution will continue with the next action on the same level as the current action. The error is still logged in Automation Manager, but it will not break the execution of the action. For more information, see Error Handling.
EXAMPLE: At the end of pr inting you might want to send the s tatus update to an external application us ing HTTP Request ac tion. If pr inting action fai ls the tr igger s tops process ing actions . In order to execute the repor ting even after fai led pr int ac tion, the Pr int Label ac tion must have the option Ignore fai lure enabled.
l Save error to variable. Specifies to save the error description to some variable, when some error breaks the execution of this action. The same cause of error is also saved to internal vari-ables ActionLastErrorId and ActionLastErrorDesc.
Printer Status
The functionality from this topic is available in NiceLabel Automation Pro and NiceLabel Automation Enterprise.
- 88 -
Communicates with the printer to acquire printer's real-time state and Windows Spooler for additional information about the printer and its jobs. As a result the information about errors, spooler status, number of jobs in the spooler is collected, so you can identify possible errors.
Examples of possible usage. (1) You will verify the printer status before printing. If the printer is in error state, you will print the label to the backup printer. (2) You will count the number of jobs waiting in a spooler of main printer. If there are too many, you will print label to alternative printer. (3) You will verify the printer status before printing. If the printer is in error state, you will not print labels, but report the error back to the main system using any of the outbound actions, such as Send Data to TCP/IP Port, HTTP Request, Execute SQL Statement, Web Service, or as the trigger response.
Prerequisites
You must comply with the following prerequisites, to be able to retrieve live printer status:
l You must use NiceLabel Printer Driver to receive detailed status information. If you use other printer driver, you will only be able to see the information retrieved from the Windows Spooler and not live printer status.
l The printer must be capable of reporting the live status. For the printer models supporting bid-irectional communication see NiceLabel Download web page.
l The printer must be connected on the interface that supports bidirectional communication.
l The bidirectional support must be enabled in the Control Panel>Hardware and Sound>Devices and Printers>driver>Printer Properties>Ports tab>Enable bidirectional sup-port.
l If using network-connected label printer, make sure the you are using Advanced TCP/IP Port, not Standard TCP/IP Port. For more information, see Knowledge Base article KB189.
Printer
l Printer name. Specifies the printer name. You can select the printer from the list of locally installed printer drivers, or you can enter any printer name. The option Variable enables the variable printer name. When enabled, you must select a variable that will contain the printer name when trigger is executed. Usually, the value to the variable is assigned by a filter.
Data Mapping
WARNING: The majority of the following parameters are only supported when using NiceLabel Printer Driver. If you use some other printer driver, you can use only the spooler-related parameters.
This section defines the parameters that are returned as result of the Printer Status action.
l Printer status. Specifies the printer live status as string. If the printer is in multiple states, all states are merged together in one string, delimited by comma ",". If there is no problem with the printer, this field has no value. Printer status might be "Offline", "Out of labels", "Ribbon near end". There is no standardized reporting, so each printer brand can use different status messages.
l Printer error. Specifies the boolean (true/false) value of the printer error status.
l Printer offline. Specifies the boolean (true/false) value of the printer offline status.
l Driver paused. Specifies the boolean (true/false) value of the driver pause status
l NiceLabel Printer Driver driver. Specifies the boolean (true/false) value of the NiceLabel Printer Driver status. Provides information if the selected driver is NiceLabel Printer Driver.
l Spooler status. Specifies the spooler status as string, as is reported by the Windows system. The spooler can be simultaneously in several statuses. In this case the statuses are merged with comma ",".
l Spooler status ID. Specifies the spooler status as number, as is reported by the Windows system. The spooler can be simultaneously in several statuses. In this case the returned status IDs contains all IDs as flags. For example, value 5 represents status IDs 4 and 1, which translates to "Printer is in error, Printer is paused". Refer to the table below.
The action will return decimal value, the values in the table below are in hex, so you will have to do the conversion, before parsing the response.
The table of spooler status IDs and matching descriptionsSpooler status ID (in hex) Spooler status description0 No status.1 Printer is paused.2 Printer is printing.4 Printer is in error.8 Printer is not available.10 Printer is out of paper.20 Manual feed required.40 Printer has a problem with paper.80 Printer is offline.100 Active Input/Output state.200 Printer is busy.400 Paper jam.800 Output bin is full.2000 Printer is waiting.4000 Printer is processing.10000 Printer is warming up.20000 Toner/Ink level is low.40000 No toner left in the printer.80000 Current page can not be printed.100000 User intervention is required.200000 Printer is out of memory.400000 Door is open.800000 Unknown error.1000000 Printer is in power save mode.
l Number of jobs in the spooler. Specifies the number of jobs that are in the spooler for the selected printer.
Action Execution and Error Handling
l Enabled. Specifies if the action is enabled or disabled. Only enabled actions will execute. You
- 90 -
can use this functionality for testing.
l Condition. Defines one-line programming expression that must provide a Boolean value (true or false). When the result of the expression is true, the action will execute. This is a method to not execute action every time, but only when monitored variables have certain values.
l Ignore failure. Specifies to ignore the error and continue with the next action, even if execution of the current action fails. The nested actions that depend on the current action will not execute. The action execution will continue with the next action on the same level as the current action. The error is still logged in Automation Manager, but it will not break the execution of the action. For more information, see Error Handling.
EXAMPLE: At the end of pr inting you might want to send the s tatus update to an external application us ing HTTP Request ac tion. If pr inting action fai ls the tr igger s tops process ing actions . In order to execute the repor ting even after fai led pr int ac tion, the Pr int Label ac tion must have the option Ignore fai lure enabled.
l Save error to variable. Specifies to save the error description to some variable, when some error breaks the execution of this action. The same cause of error is also saved to internal vari-ables ActionLastErrorId and ActionLastErrorDesc.
Read Data From File
The functionality from this topic is available in NiceLabel Automation Pro and NiceLabel Automation Enterprise.
Reads content of the provided file name and saves it into the variable. You can read content of file of any type, including binary data.
Usually NiceLabel Automation will receive data for label printing with the trigger. E.g. when you use file trigger, the contents of the trigger file is automatically read and can be parsed by filters. However, you might want bypass filters to obtain some external data. Once you execute this action and have the data stored in a variable, you can use any of the available actions to use the data.
This action is useful:
l When you must combine data received by the trigger with data stored in some file.
WARNING: If you will load data from binary files (such as bitmap image or print file), make sure the variable to store the read content is defined as binary variable.
l When you want to exchange data between triggers. One triggers prepares data and saves it to file (using the Save Data to File action), the other trigger reads the data.
File
l File name. Specifies the path and file name. They can be hard-coded, and the same file will used every time. If you use just file name without the path, the folder where configuration file (.MISX) is saved will be used. You can use relative reference to the file name, where folder with .MISX file is used as the root folder. The option Variable enables the variable file name. You can select a single variable that will contain the path and/or file name or you can combine several variables that will create the file name. For more information see topic Using Compound Values.
- 91 -
NOTE: Use UNC syntax for network resources. For more information, see topic Access to Network Shared Resources.
Content
l Variable. Specifies the variable that will store all content of the selected file name. You must have at least one variable defined.
l Encoding. Specifies the encoding of the read data. If unsure about the encoding, leave it at Auto. You cannot select encoding when reading data into binary variable. In this case the vari-able will contain the data as-is.
Retry on Failure
NiceLabel Automation might cannot access the file, because it locked by some other application. If some application still writes data to file and has it locked in exclusive mode, no other application can open it at the same time, not even for reading. Other causes for retries can be the following: file doesn't exist (yet), folder does not exist (yet), the service user doesn't have privileges to access the file, or something else went wrong.
These options determine how many times should NiceLabel Automation retry opening a file. If the file cannot be open even after all retries, the action will fail.
l Retry attempts. Specifies number of times that we should retry accessing the file. When the value is 0, no retries will be made.
l Retry interval. Specifies time interval between retries (defined in milliseconds).
Action Execution and Error Handling
l Enabled. Specifies if the action is enabled or disabled. Only enabled actions will execute. You can use this functionality for testing.
l Condition. Defines one-line programming expression that must provide a Boolean value (true or false). When the result of the expression is true, the action will execute. This is a method to not execute action every time, but only when monitored variables have certain values.
l Ignore failure. Specifies to ignore the error and continue with the next action, even if execution of the current action fails. The nested actions that depend on the current action will not execute. The action execution will continue with the next action on the same level as the current action. The error is still logged in Automation Manager, but it will not break the execution of the action. For more information, see Error Handling.
EXAMPLE: At the end of pr inting you might want to send the s tatus update to an external application us ing HTTP Request ac tion. If pr inting action fai ls the tr igger s tops process ing actions . In order to execute the repor ting even after fai led pr int ac tion, the Pr int Label ac tion must have the option Ignore fai lure enabled.
l Save error to variable. Specifies to save the error description to some variable, when some error breaks the execution of this action. The same cause of error is also saved to internal vari-ables ActionLastErrorId and ActionLastErrorDesc.
Read Data From Serial Port
Collects data received on the serial port (RS-232) and saves it to selected variable. You can use this action to communicate with the external serial port devices.
- 92 -
Port
l Port name. Specifies the port name, where your external device connects to. This can be a hard-ware COM port or virtual COM port.
Port Settings
This section displays options for the serial port connection. Make sure the settings here match the settings on your external device.
l Bits per second. Specifies the speed that the external device will use to communicate to the PC. The usual alias used with the setting is "baud rate".
l Data bits. Specifies the number of data bits in each character. 8 data bits are almost universally used in newer devices.
l Parity. Specifies the method of detecting errors in transmission. The most common parity set-ting, however, is "none", with error detection handled by a communication protocol (flow con-trol).
l Stop bits. Stop bits sent at the end of every character allow the receiving signal hardware to detect the end of a character and to resynchronize with the character stream. Electronic devices usually use one stop bit.
l Flow control. A serial port may use signals in the interface to pause and resume the transmission of data.
EXAMPLE: For example, a s low device might need to handshake with the ser ial por t to ind icate that data should be paused while the device processes received data.
Options
l Read delay. Specifies the optional delay when reading the data from the serial port. After the delay, the entire contents of the serial port buffer will be read.
l Send initialization data. Specifies the string that is sent to selected serial port before data is read. This provides the functionality to initialize the device to be able to provide the data. You can also use it to send a specific question to the device, and receive the specific answer. Click the arrow button to insert special characters, such as control codes. For more information, see the topic Entering Special Characters (Control Codes).
Data Extraction
l Enable data extraction. Provides a functionality to extract part of the received data. You can define the start and end position. All characters within these positions will be extracted. To use stronger extraction techniques, you can parse the received data through filters. For more information, see the topic Understanding Filters.
Result
l Save data to variable. Specifies the variable that will store the received data. Once you have captured data and saved it to variable, you can manipulate it using filters, and/or as input to other actions.
Action Execution and Error Handling
l Enabled. Specifies if the action is enabled or disabled. Only enabled actions will execute. You can use this functionality for testing.
- 93 -
l Condition. Defines one-line programming expression that must provide a Boolean value (true or false). When the result of the expression is true, the action will execute. This is a method to not execute action every time, but only when monitored variables have certain values.
l Ignore failure. Specifies to ignore the error and continue with the next action, even if execution of the current action fails. The nested actions that depend on the current action will not execute. The action execution will continue with the next action on the same level as the current action. The error is still logged in Automation Manager, but it will not break the execution of the action. For more information, see Error Handling.
EXAMPLE: At the end of pr inting you might want to send the s tatus update to an external application us ing HTTP Request ac tion. If pr inting action fai ls the tr igger s tops process ing actions . In order to execute the repor ting even after fai led pr int ac tion, the Pr int Label ac tion must have the option Ignore fai lure enabled.
l Save error to variable. Specifies to save the error description to some variable, when some error breaks the execution of this action. The same cause of error is also saved to internal vari-ables ActionLastErrorId and ActionLastErrorDesc.
Redirect Printing To File
Diverts the print job to file. Instead of sending the created print file to the printer port as defined in the printer driver, the printout is redirected to file. You can append data to the existing file, or overwrite it. With this action you can capture printer commands to file.
The action will instruct NiceLabel Automation to redirect printing, it will not print labels. Make sure it is followed by the Print Label action.
NOTE: NiceLabel Automation runs as service under defined Windows user account. Make sure this user account has privileges accessing the specified folder with read/write permissions. For more information, see the topic Access to Network Shared Resources.
This action is also useful to print several different labels (.LBL files) to the network printer keeping the correct order of labels. When multiple .LBL files are printed from the same trigger, NiceLabel Automation will send each label to the printer in a separate print job, even if the target printer is the same for both labels. When network printer is used, job of some other user can be inserted between two jobs the trigger must send together. Using this action you can append print data into the same file and then send its contents to the printer using the action Send Data to Printer.
File
l File name. Specifies the file name. It can be hard-coded, and printing will be redirected to the same file every time. The option Variable enables the variable file name. You must select a vari-able that will contain the path and/or file name when trigger is executed. Usually, the value to the variable is assigned by a filter.Use UNC syntax for network resources. For more information, see the topic Access to Network Shared Resources.
l Overwrite the file. If the specified file already exists on the disk, it will be overwritten.
l Append data to the file. The job file will be appended to the existing data in the provided file.
Persistence
- 94 -
This option allows you to control the persistence of the redirect action. You can control the number of Print Label actions that are affected by the redirect.
l Apply to all subsequent print actions. Specifies that the print redirect applies to all Print Label actions that are defined after this redirect action.
l Apply to next print action. Specifies that the print redirect applies to the next Print Label action only (just one).
Action Execution and Error Handling
l Enabled. Specifies if the action is enabled or disabled. Only enabled actions will execute. You can use this functionality for testing.
l Condition. Defines one-line programming expression that must provide a Boolean value (true or false). When the result of the expression is true, the action will execute. This is a method to not execute action every time, but only when monitored variables have certain values.
l Ignore failure. Specifies to ignore the error and continue with the next action, even if execution of the current action fails. The nested actions that depend on the current action will not execute. The action execution will continue with the next action on the same level as the current action. The error is still logged in Automation Manager, but it will not break the execution of the action. For more information, see Error Handling.
EXAMPLE: At the end of pr inting you might want to send the s tatus update to an external application us ing HTTP Request ac tion. If pr inting action fai ls the tr igger s tops process ing actions . In order to execute the repor ting even after fai led pr int ac tion, the Pr int Label ac tion must have the option Ignore fai lure enabled.
l Save error to variable. Specifies to save the error description to some variable, when some error breaks the execution of this action. The same cause of error is also saved to internal vari-ables ActionLastErrorId and ActionLastErrorDesc.
Redirect Printing To PDF
The functionality from this topic is available in NiceLabel Automation Enterprise.
Diverts the print job to PDF document. Instead of printing the label to printer, the printout is redirected to PDF. You can append data to the existing file, or overwrite it. The PDF document will retain the exact label dimensions as defined during label design. The rendering quality of graphics in the PDF matches the resolution of the target printer and desired printout size.
The action will instruct NiceLabel Automation to redirect printing, it will not print labels. Make sure it is followed by the Print Label action.
NOTE: NiceLabel Automation runs as service under defined Windows user account. Make sure this user account has privileges accessing the specified folder with read/write permissions. For more information, see the topic Access to Network Shared Resources.
File
l File name. Specifies the file name. It can be hard-coded, and printing will be redirected to the same file every time. The option Variable enables the variable file name. You must select a vari-able that will contain the path and/or file name when trigger is executed. Usually, the value to the variable is assigned by a filter.Use UNC syntax for network resources. For more information, see the topic Access to Network
- 95 -
Shared Resources.
l Overwrite the file. If the specified file already exists on the disk, it will be overwritten.
l Append data to the file. The job file will be appended to the existing data in the provided file.
Persistence
This option allows you to control the persistence of the redirect action. You can control the number of Print Label actions that are affected by the redirect.
l Apply to all subsequent print actions. Specifies that the print redirect applies to all Print Label actions that are defined after this redirect action.
l Apply to next print action. Specifies that the print redirect applies to the next Print Label action only (just one).
Action Execution and Error Handling
l Enabled. Specifies if the action is enabled or disabled. Only enabled actions will execute. You can use this functionality for testing.
l Condition. Defines one-line programming expression that must provide a Boolean value (true or false). When the result of the expression is true, the action will execute. This is a method to not execute action every time, but only when monitored variables have certain values.
l Ignore failure. Specifies to ignore the error and continue with the next action, even if execution of the current action fails. The nested actions that depend on the current action will not execute. The action execution will continue with the next action on the same level as the current action. The error is still logged in Automation Manager, but it will not break the execution of the action. For more information, see Error Handling.
EXAMPLE: At the end of pr inting you might want to send the s tatus update to an external application us ing HTTP Request ac tion. If pr inting action fai ls the tr igger s tops process ing actions . In order to execute the repor ting even after fai led pr int ac tion, the Pr int Label ac tion must have the option Ignore fai lure enabled.
l Save error to variable. Specifies to save the error description to some variable, when some error breaks the execution of this action. The same cause of error is also saved to internal vari-ables ActionLastErrorId and ActionLastErrorDesc.
Run Command File
Executes the commands in the selected command file. All types of files provide commands that NiceLabel Automation will execute in order from top to bottom. Command files usually provide data for a single label, but you can define files of any level of complexity. For more information, see the topic Reference and Troubleshooting.
NOTE: This action is available in all NiceLabel Automation products on the feature level of the selected product. The higher the product level, more commands can be used in the command files.
File
l File type. Specifies the type of the command file to be executed.
l File name. Specifies the command file name. It can be hard-coded, and the same command file will execute every time. The option Variable enables the variable file name. You must select a
- 96 -
variable that will contain the path and/or file name when trigger is executed. Usually, the value to the variable is assigned by a filter.Use UNC syntax for network resources. For more information, see the topic Access to Network Shared Resources.
How to receive a command file in a trigger and execute it
When the trigger receives the command file and you want to execute it, do the following:
1. In Variables tab, click the Internal Variable button in the ribbon.
2. In the drop down enable the internal variable DataFileName. This internal variable provides the path and file name to the file that contains data received by the trigger. In this case, the contents is command file. For more information, see topic Internal Variables.
3. In Actions tab, add the action to execute the command file, such as Run Command File, Run Oracle XML Command File, or Run SAP AII XML Command File.For the action Run Command File, select the type of the command file in File type.
4. Enable the option Variable.
5. Select the variable DataFileName from the list of available variables.
Action Execution and Error Handling
l Enabled. Specifies if the action is enabled or disabled. Only enabled actions will execute. You can use this functionality for testing.
l Condition. Defines one-line programming expression that must provide a Boolean value (true or false). When the result of the expression is true, the action will execute. This is a method to not execute action every time, but only when monitored variables have certain values.
l Ignore failure. Specifies to ignore the error and continue with the next action, even if execution of the current action fails. The nested actions that depend on the current action will not execute. The action execution will continue with the next action on the same level as the current action. The error is still logged in Automation Manager, but it will not break the execution of the action. For more information, see Error Handling.
EXAMPLE: At the end of pr inting you might want to send the s tatus update to an external application us ing HTTP Request ac tion. If pr inting action fai ls the tr igger s tops process ing actions . In order to execute the repor ting even after fai led pr int ac tion, the Pr int Label ac tion must have the option Ignore fai lure enabled.
l Save error to variable. Specifies to save the error description to some variable, when some error breaks the execution of this action. The same cause of error is also saved to internal vari-ables ActionLastErrorId and ActionLastErrorDesc.
Run Oracle XML Command File
The functionality from this topic is available in NiceLabel Automation Pro and NiceLabel Automation Enterprise.
Executes printing with data from an Oracle XML-formatted file.
NiceLabel Automation internally supports XML files with the "Oracle XML" structure, which are defined by Oracle Warehouse Management software. Use this action as a shortcut to execute Oracle XML files directly without any need to parse them with XML filter and map values to variables. To be
- 97 -
able to use this action, the XML file must conform to Oracle XML specifications. For more information, see the topic Oracle XML Specifications.
Use UNC syntax for network resources. For more information, see the topic Access to Network Shared Resources.
How to receive a command file in a trigger and execute it
When the trigger receives the command file and you want to execute it, do the following:
1. In Variables tab, click the Internal Variable button in the ribbon.
2. In the drop down enable the internal variable DataFileName. This internal variable provides the path and file name to the file that contains data received by the trigger. In this case, the contents is command file. For more information, see topic Internal Variables.
3. In Actions tab, add the action to execute the command file, such as Run Command File, Run Oracle XML Command File, or Run SAP AII XML Command File.For the action Run Command File, select the type of the command file in File type.
4. Enable the option Variable.
5. Select the variable DataFileName from the list of available variables.
Action Execution and Error Handling
l Enabled. Specifies if the action is enabled or disabled. Only enabled actions will execute. You can use this functionality for testing.
l Condition. Defines one-line programming expression that must provide a Boolean value (true or false). When the result of the expression is true, the action will execute. This is a method to not execute action every time, but only when monitored variables have certain values.
l Ignore failure. Specifies to ignore the error and continue with the next action, even if execution of the current action fails. The nested actions that depend on the current action will not execute. The action execution will continue with the next action on the same level as the current action. The error is still logged in Automation Manager, but it will not break the execution of the action. For more information, see Error Handling.
EXAMPLE: At the end of pr inting you might want to send the s tatus update to an external application us ing HTTP Request ac tion. If pr inting action fai ls the tr igger s tops process ing actions . In order to execute the repor ting even after fai led pr int ac tion, the Pr int Label ac tion must have the option Ignore fai lure enabled.
l Save error to variable. Specifies to save the error description to some variable, when some error breaks the execution of this action. The same cause of error is also saved to internal vari-ables ActionLastErrorId and ActionLastErrorDesc.
Run SAP AII XML Command File
The functionality from this topic is available in NiceLabel Automation Pro and NiceLabel Automation Enterprise.
Executes printing with data from an SAP AII XML-formatted file.
NiceLabel Automation internally supports XML files with the "SAP AII XML" structure, which are defined by SAP software. Use this action as a shortcut to execute SAP AII XML files directly without any need to parse them with XML filter and map values to variables. To be able to use this action, the XML
- 98 -
file must conform to SAP AII XML specifications. For more information, see the topic SAP AII XML Specifications.
Use UNC syntax for network resources. For more information, see the topic Access to Network Shared Resources.
How to receive a command file in a trigger and execute it
When the trigger receives the command file and you want to execute it, do the following:
1. In Variables tab, click the Internal Variable button in the ribbon.
2. In the drop down enable the internal variable DataFileName. This internal variable provides the path and file name to the file that contains data received by the trigger. In this case, the contents is command file. For more information, see topic Internal Variables.
3. In Actions tab, add the action to execute the command file, such as Run Command File, Run Oracle XML Command File, or Run SAP AII XML Command File.For the action Run Command File, select the type of the command file in File type.
4. Enable the option Variable.
5. Select the variable DataFileName from the list of available variables.
Action Execution and Error Handling
l Enabled. Specifies if the action is enabled or disabled. Only enabled actions will execute. You can use this functionality for testing.
l Condition. Defines one-line programming expression that must provide a Boolean value (true or false). When the result of the expression is true, the action will execute. This is a method to not execute action every time, but only when monitored variables have certain values.
l Ignore failure. Specifies to ignore the error and continue with the next action, even if execution of the current action fails. The nested actions that depend on the current action will not execute. The action execution will continue with the next action on the same level as the current action. The error is still logged in Automation Manager, but it will not break the execution of the action. For more information, see Error Handling.
EXAMPLE: At the end of pr inting you might want to send the s tatus update to an external application us ing HTTP Request ac tion. If pr inting action fai ls the tr igger s tops process ing actions . In order to execute the repor ting even after fai led pr int ac tion, the Pr int Label ac tion must have the option Ignore fai lure enabled.
l Save error to variable. Specifies to save the error description to some variable, when some error breaks the execution of this action. The same cause of error is also saved to internal vari-ables ActionLastErrorId and ActionLastErrorDesc.
Save Data To File
The functionality from this topic is available in NiceLabel Automation Pro and NiceLabel Automation Enterprise.
Saves variable value or other data streams (such as binary data) into the file. The NiceLabel Automation service must have write access to the defined folder.
File
- 99 -
l File name. Specifies the path and file name. They can be hard-coded, and the same file will used every time. If you use just file name without the path, the folder where configuration file (.MISX) is saved will be used. You can use relative reference to the file name, where folder with .MISX file is used as the root folder. The option Variable enables the variable file name. You can select a single variable that will contain the path and/or file name or you can combine several variables that will create the file name. For more information see topic Using Compound Values.
NOTE: Use UNC syntax for network resources. For more information, see topic Access to Network Shared Resources.
If File Exists
l Overwrite the file. Specifies that the specified will be overwritten, if it already exists on the disk.
l Append data to the file. Specifies that data will be written at the end of the file, if the file of defined name already exists.
Content
l Use data received by the trigger. The file will contain the original data as received by the trig-ger. Effectively, this will make a copy of the incoming data.
l Custom. The data will contain the content as provided in the text area. You can combine fixed values, variable values and special characters in the content. To insert variables and special char-acters, click the arrow button to the right of the text area. For more information, see the topic Using Compound Values.
l Encoding. Specifies the encoding of the output file. Select Auto when you append data to file and want to use encoding from the existing file.
Action Execution and Error Handling
l Enabled. Specifies if the action is enabled or disabled. Only enabled actions will execute. You can use this functionality for testing.
l Condition. Defines one-line programming expression that must provide a Boolean value (true or false). When the result of the expression is true, the action will execute. This is a method to not execute action every time, but only when monitored variables have certain values.
l Ignore failure. Specifies to ignore the error and continue with the next action, even if execution of the current action fails. The nested actions that depend on the current action will not execute. The action execution will continue with the next action on the same level as the current action. The error is still logged in Automation Manager, but it will not break the execution of the action. For more information, see Error Handling.
EXAMPLE: At the end of pr inting you might want to send the s tatus update to an external application us ing HTTP Request ac tion. If pr inting action fai ls the tr igger s tops process ing actions . In order to execute the repor ting even after fai led pr int ac tion, the Pr int Label ac tion must have the option Ignore fai lure enabled.
l Save error to variable. Specifies to save the error description to some variable, when some error breaks the execution of this action. The same cause of error is also saved to internal vari-ables ActionLastErrorId and ActionLastErrorDesc.
- 100 -
Save Variable Data
The functionality from this topic is available in NiceLabel Automation Pro and NiceLabel Automation Enterprise.
Saves values of one or multiple variables to the associated file. This action allows you to exchange data between triggers. To read data back into trigger, use the action Load Variable Data. The values are saved in the CSV format with first line containing variable names. When variables have multi-line values the newline characters (CR/LF) will be encoded as \n\r.
File
l File name. Specifies the file name where the variable values will be saved into. It can be hard-coded, and values will be saved into the same file every time. The option Variable enables the variable file name. You must select a variable that will contain the path and/or file name when trigger is executed. Usually, the value to the variable is assigned by a filter.Use UNC syntax for network resources. For more information, see the topic Access to Network Shared Resources.
If File Exists
l Overwrite the file. Specifies that the existing data file will be overwritten with new data. The old contents is lost.
l Append data to the file. Specifies that the values of variables are appended to the existing data file. This option allows you to generate the "text database" file, such as CSV file.
File Structure
This section defines the structure of the variable file. The structure has to match the structure as was used to save the variables to file.
l Delimiter. Specifies the delimiter in the data file. You can select a predefined delimiter, or enter a custom one.
l Text qualifier. Specifies the text qualifier. You can select a predefined delimiter, or enter a cus-tom one.
l Encoding. Specifies the encoding mode used in the data file. UTF-8 makes a good default selec-tion.
Variables
This section defines the variables that will be read from the data file. Values of the existing variables will be overwritten with values from the file.
l All variables. Specifies that all variables defined in the data file will be read.
l Selected variables. Specifies that only the selected variables will be read from the data file.
Action Execution and Error Handling
l Enabled. Specifies if the action is enabled or disabled. Only enabled actions will execute. You can use this functionality for testing.
l Condition. Defines one-line programming expression that must provide a Boolean value (true or false). When the result of the expression is true, the action will execute. This is a method to not execute action every time, but only when monitored variables have certain values.
- 101 -
l Ignore failure. Specifies to ignore the error and continue with the next action, even if execution of the current action fails. The nested actions that depend on the current action will not execute. The action execution will continue with the next action on the same level as the current action. The error is still logged in Automation Manager, but it will not break the execution of the action. For more information, see Error Handling.
EXAMPLE: At the end of pr inting you might want to send the s tatus update to an external application us ing HTTP Request ac tion. If pr inting action fai ls the tr igger s tops process ing actions . In order to execute the repor ting even after fai led pr int ac tion, the Pr int Label ac tion must have the option Ignore fai lure enabled.
l Save error to variable. Specifies to save the error description to some variable, when some error breaks the execution of this action. The same cause of error is also saved to internal vari-ables ActionLastErrorId and ActionLastErrorDesc.
Send Custom Commands
The functionality from this topic is available in NiceLabel Automation Pro and NiceLabel Automation Enterprise.
Executes the entered custom commands. You must always nest this action under the Open Label action to reference the label to which to apply the commands. For more information, see the topic Custom Commands.
NOTE: Majority of custom commands are available with individual actions, so in most cases you don't need custom commands.
Action Execution and Error Handling
l Enabled. Specifies if the action is enabled or disabled. Only enabled actions will execute. You can use this functionality for testing.
l Condition. Defines one-line programming expression that must provide a Boolean value (true or false). When the result of the expression is true, the action will execute. This is a method to not execute action every time, but only when monitored variables have certain values.
l Ignore failure. Specifies to ignore the error and continue with the next action, even if execution of the current action fails. The nested actions that depend on the current action will not execute. The action execution will continue with the next action on the same level as the current action. The error is still logged in Automation Manager, but it will not break the execution of the action. For more information, see Error Handling.
EXAMPLE: At the end of pr inting you might want to send the s tatus update to an external application us ing HTTP Request ac tion. If pr inting action fai ls the tr igger s tops process ing actions . In order to execute the repor ting even after fai led pr int ac tion, the Pr int Label ac tion must have the option Ignore fai lure enabled.
l Save error to variable. Specifies to save the error description to some variable, when some error breaks the execution of this action. The same cause of error is also saved to internal vari-ables ActionLastErrorId and ActionLastErrorDesc.
Send Data To Printer
Sends data to the selected printer. Useful for sending pre-generated printer streams to any available printer. NiceLabel Automation uses the installed printer driver in pass-through mode just to be able
- 102 -
to send data to the target port, such as LPT, COM, TCP/IP or USB port, on which the printer is connected.
Possible scenario. The data received by the trigger must be printed out on the same network printer but on different label templates (.LBL files). The printer can accept data from various workstations and will usually print the jobs in the received order. NiceLabel Automation will send each label template in separate print job, making it possible for some other workstation to insert its job between jobs created in our NiceLabel Automation. Instead of sending each job separately to the printer, you can merge all label jobs together (by using the action Redirect Printing to File) and then send one big print job to the printer.
Printer
l Printer name. Specifies the printer name. You can select the printer from the list of locally installed printer drivers, or you can enter any printer name. The option Variable enables the variable printer name. When enabled, you must select a variable that will contain the printer name when trigger is executed. Usually, the value to the variable is assigned by a filter.
Data Source
This section allows you to define the contents you want to send to the printer.
l Use data received by the trigger. Defines that the trigger-received data it used. In this case you received the printer stream as input to the filter and want to redirect it to printer without any modification. The same result can be achieved by enabling the internal variable DataFileName and using the contents of file it refers to. For more information, see the topic Internal Variables.
l File name. Defines the path and file name of the file containing printer stream. Contents of the specified file is used. The option Variable enables the variable file name. You must select a vari-able that will contain the path and/or file name.
l Variable. Defines the variable that contains printer stream. The contents of selected variable is used.
l Custom. Defines the custom contents. You can use fixed content, mix of fixed and variable con-tent, or variable content alone. To insert a variable content, click the button with arrow to the right of data area and insert variable from the list. For more information, see the topic Using Compound Values.
Action Execution and Error Handling
l Enabled. Specifies if the action is enabled or disabled. Only enabled actions will execute. You can use this functionality for testing.
l Condition. Defines one-line programming expression that must provide a Boolean value (true or false). When the result of the expression is true, the action will execute. This is a method to not execute action every time, but only when monitored variables have certain values.
l Ignore failure. Specifies to ignore the error and continue with the next action, even if execution of the current action fails. The nested actions that depend on the current action will not execute. The action execution will continue with the next action on the same level as the current action. The error is still logged in Automation Manager, but it will not break the execution of the action. For more information, see Error Handling.
- 103 -
EXAMPLE: At the end of pr inting you might want to send the s tatus update to an external application us ing HTTP Request ac tion. If pr inting action fai ls the tr igger s tops process ing actions . In order to execute the repor ting even after fai led pr int ac tion, the Pr int Label ac tion must have the option Ignore fai lure enabled.
l Save error to variable. Specifies to save the error description to some variable, when some error breaks the execution of this action. The same cause of error is also saved to internal vari-ables ActionLastErrorId and ActionLastErrorDesc.
Send Data To Serial Port
Sends data to a serial port. You would use this action for communication with external serial-port devices. Make sure the port settings match on both ends, in the action and in the serial-port device. Serial port can be used by one application in the machine. To successfully use the port from this action, no other application must use the port, not even any printer driver.
Port
l Port name. Specifies the port name, where your external device connects to. This can be a hard-ware COM port or virtual COM port.
Port Settings
This section displays options for the serial port connection. Make sure the settings here match the settings on your external device.
l Bits per second. Specifies the speed that the external device will use to communicate to the PC. The usual alias used with the setting is "baud rate".
l Data bits. Specifies the number of data bits in each character. 8 data bits are almost universally used in newer devices.
l Parity. Specifies the method of detecting errors in transmission. The most common parity set-ting, however, is "none", with error detection handled by a communication protocol (flow con-trol).
l Stop bits. Stop bits sent at the end of every character allow the receiving signal hardware to detect the end of a character and to resynchronize with the character stream. Electronic devices usually use one stop bit.
l Flow control. A serial port may use signals in the interface to pause and resume the transmission of data.
EXAMPLE: For example, a s low device might need to handshake with the ser ial por t to ind icate that data should be paused while the device processes received data.
Content
This section allows you to define the contents you want to send to serial port. You can use fixed content, mix of fixed and variable content, or variable content alone. To insert a variable content, click the button with arrow to the right of data area and insert variable from the list. For more information, see the topic Using Compound Values.
l Data. Specifies the contents that will be sent outbound.
Action Execution and Error Handling
l Enabled. Specifies if the action is enabled or disabled. Only enabled actions will execute. You
- 104 -
can use this functionality for testing.
l Condition. Defines one-line programming expression that must provide a Boolean value (true or false). When the result of the expression is true, the action will execute. This is a method to not execute action every time, but only when monitored variables have certain values.
l Ignore failure. Specifies to ignore the error and continue with the next action, even if execution of the current action fails. The nested actions that depend on the current action will not execute. The action execution will continue with the next action on the same level as the current action. The error is still logged in Automation Manager, but it will not break the execution of the action. For more information, see Error Handling.
EXAMPLE: At the end of pr inting you might want to send the s tatus update to an external application us ing HTTP Request ac tion. If pr inting action fai ls the tr igger s tops process ing actions . In order to execute the repor ting even after fai led pr int ac tion, the Pr int Label ac tion must have the option Ignore fai lure enabled.
l Save error to variable. Specifies to save the error description to some variable, when some error breaks the execution of this action. The same cause of error is also saved to internal vari-ables ActionLastErrorId and ActionLastErrorDesc.
Send Data To TCP/IP Port
The functionality from this topic is available in NiceLabel Automation Pro and NiceLabel Automation Enterprise.
Sends the data to any external device, accepting TCP/IP connection on a predefined port number. The action establishes connection to the device, sends the data and terminates the connection. The connection and communication is governed by the handshake that occurs between a client and server when initiating or terminating a TCP connection.
Connection Settings
NOTE: This action supports Internet Protocol version 6 (IPv6).
l Destination. Defines the destination address and port of the TCP/IP server. You can hard-code the connection parameters and use fixed host name or IP address. You can also use variable connection parameters. For more information, see the topic Using Compound Values.
EXAMPLE: If the var iab le hostname provides the TCP/IP server name and the var iab le port provides the por t number , you can enter the fol lowing for the destination:[hostname]:[port]
l Disconnect delay. Prolongs the connection to the target socket by the defined time intervals after the data has already been delivered. Some devices need more time to process the data. By default, the delay is disabled.
l Reply to sender. Enables the reply directly to the socket from which the trigger data originated. This option can be used to provide feedback about the printing process.
Prerequisites for Reply to sender setting
The following prerequisites must be met:
- 105 -
l The remote party does not disconnect the communication channel, once they have delivered the message.
l The action Send Data to TCP/IP Port is used within the TCP/IP Server trigger.
l The Execution Event in the TCP/IP Server trigger is not configured as On client dis-connect.
Content
This section allows you to define the contents you want to send to the TCP/IP server. You can use fixed content, mix of fixed and variable content, or variable content alone. To insert a variable content, click the button with arrow to the right of data area and insert variable from the list. For more information, see the topic Using Compound Values.
l Data. Specifies the contents that will be sent outbound.
l Encoding. Specifies the encoding of the send data.
Action Execution and Error Handling
l Enabled. Specifies if the action is enabled or disabled. Only enabled actions will execute. You can use this functionality for testing.
l Condition. Defines one-line programming expression that must provide a Boolean value (true or false). When the result of the expression is true, the action will execute. This is a method to not execute action every time, but only when monitored variables have certain values.
l Ignore failure. Specifies to ignore the error and continue with the next action, even if execution of the current action fails. The nested actions that depend on the current action will not execute. The action execution will continue with the next action on the same level as the current action. The error is still logged in Automation Manager, but it will not break the execution of the action. For more information, see Error Handling.
EXAMPLE: At the end of pr inting you might want to send the s tatus update to an external application us ing HTTP Request ac tion. If pr inting action fai ls the tr igger s tops process ing actions . In order to execute the repor ting even after fai led pr int ac tion, the Pr int Label ac tion must have the option Ignore fai lure enabled.
l Save error to variable. Specifies to save the error description to some variable, when some error breaks the execution of this action. The same cause of error is also saved to internal vari-ables ActionLastErrorId and ActionLastErrorDesc.
Set Print Job Name
Specifies the name of the print job file as it appears in the Windows Spooler. A default print job name is the name of the used label file, and this action will override it. You must always nest the action under the Open Label action, so it applies to specific label file.
Print Job
l Name. Specifies the job name. It can be hard-coded, and the same name will be used for every Label Print action. The option Variable enables the variable file name. You must select a variable that will contain the path and/or file name when trigger is executed. Usually, the value to the variable is assigned by a filter.
Action Execution and Error Handling
l Enabled. Specifies if the action is enabled or disabled. Only enabled actions will execute. You
- 106 -
can use this functionality for testing.
l Condition. Defines one-line programming expression that must provide a Boolean value (true or false). When the result of the expression is true, the action will execute. This is a method to not execute action every time, but only when monitored variables have certain values.
l Ignore failure. Specifies to ignore the error and continue with the next action, even if execution of the current action fails. The nested actions that depend on the current action will not execute. The action execution will continue with the next action on the same level as the current action. The error is still logged in Automation Manager, but it will not break the execution of the action. For more information, see Error Handling.
EXAMPLE: At the end of pr inting you might want to send the s tatus update to an external application us ing HTTP Request ac tion. If pr inting action fai ls the tr igger s tops process ing actions . In order to execute the repor ting even after fai led pr int ac tion, the Pr int Label ac tion must have the option Ignore fai lure enabled.
l Save error to variable. Specifies to save the error description to some variable, when some error breaks the execution of this action. The same cause of error is also saved to internal vari-ables ActionLastErrorId and ActionLastErrorDesc.
Set Print Parameter
The functionality from this topic is available in NiceLabel Automation Pro and NiceLabel Automation Enterprise.
Allows fine-tuning the printer-driver related parameters, such as speed and darkness for label printers, or paper tray for the laser printers. The printer settings are applied for the current printout only and are not remembered or the next trigger event.
If you use Set Printer action to change the printer name, make sure to use Set Print Parameter action after it. Before you can apply the DEVMODE structure to the printer driver, you must first load the default driver settings, which Set Printer action will do. The DEVMODE is only compatible with the DEVMODE of the same printer driver.
Print Parameters
This section defines the available parameters you can fine-tune before printing.
l Paper bin. Defines the name of the paper bin containing the label media. Usually used with laser and ink jet printers with multiple paper bins. The provided name of the paper bin must
- 107 -
match the name of the bin in the printer driver. For more information, see printer driver prop-erties.
l Print speed. Defines the value for the print speed and overrides setting from the label. The provided value must be in range of accepted values. For example, one printer model accepts a range of values from 0 to 30, the other printer model accepts values from -15 to 15. For more information, see printer driver properties.
l Darkness. Defines the darkness of the printed objects on the paper and overrides setting from the label. The provided value must be in range of accepted values. For more information, see printer driver properties.
l Print offset X. Applies the horizontal offset. The label printout will be repositioned by the spe-cified number of dots in the horizontal direction. You can define negative offset.
l Print offset Y. Applies the vertical offset. The label printout will be repositioned by the spe-cified number of dots in the vertical direction. You can define negative offset.
The option Variable next to each parameter enables the variable contents. You must select a variable that will contain the value of the selected parameter when trigger is executed.
Advanced Print Parameters
NOTE: Make sure the action Set Printer is defined in front of this action.
This section customizes the printer settings sent with the print job. All printer settings, such as printing speed, darkness, media type, offsets and similar, can be defined as follows.
1. Defined in the label itself
2. Recalled from the printer driver
3. Recalled from the printer at print time.
The supported methods depend on the printer driver and printer capabilities. The printing mode (recall settings from label or driver or printer) is configurable in the label design. However, you might need to apply these printer settings at a time of printing, and they can be different for each printout.
EXAMPLE: For example, you want to pr int a s ing le label template (.LBL f i le) to var iety of pr inters , but each pr inter requires a s l ightly d if ferent parameters . The pr inters from dif ferent manufacturers don't use the same values to set pr inting speed or temperature. Additionally, some pr inters require ver tical or hor izontal of fset to pr int the label to the correct p lace. Dur ing the testing phase you can determine the best settings for every pr inter you intend to use and apply them to a s ing le label template just before pr inting. This ac tion wil l apply these corresponding settings to each def ined pr inter .
This action expects to receive the printer settings in a DEVMODE structure. This is a Windows standard data structure with information about initialization and environment of a printer. For more information, see topic Understanding Printer Settings and DEVMODE.
The Printer settings option will apply the custom printer settings. You can use following inputs:
1. Fixed-data Base64-encoded DEVMODE. In this case you must provide the printer's DEVMODE encoded in Base64-encoded string directly into the edit field. When executed, the action will convert the Base64-encoded data back into the binary form.
- 108 -
2. Variable-data Base64-encoded DEVMODE. In this case the selected variable must contain the Base64-encoded DEVMODE. Enable Variable and select the appropriate variable from the list. When executed, the action will convert the Base64-encoded data back into the binary form.
3. Variable-data binary DEVMODE. In this case the selected variable must contain the DEVMODE in its native binary form. Enable Variable and select the appropriate variable from the list. When executed, the action will use the DEVMODE as-is, without any conversion.
NOTE: If the variable will provide binary DEVMODE, make sure that the selected variable is defined as binary variable in the trigger configuration.
Extracting the DEVMODE structure
DEVMODE structure is encoded into the system registry. You could extract it from the registry.
To help you test and use the Set Printer Parameter action, the application has been provided that will retrieve the DEVMODE of the selected printer and save it to file or Base64-encode it for you. You can find the application GetPrinterSettings.exe on the NiceLabel Automation DVD and online at NiceLabel Web site.
Using the application interactively
Run the application, select the printer for which you need a DEVMODE structure and click the Get Printer Settings button. The DEVMODE will be provided as Base64-encoded string. You can paste it into the Set Print Parameter action.
Using the application with the command-line parameters
In this case you can control the application with the command-line parameters.
l printer_name: name of the printer driver as available in the Windows system.
l file_name: name of the file that will contain the extracted DEVMODE
l base64: optional parameter. If provided, the DEVMODE will be encoded into Base64 string, oth-erwise the DEVMODE will be provided as the binary data
For example:
Save DEVMODE for printer "Avery AP 5.4 300DPI" as binary data in file "devmode1".
EXAMPLE: GetPr interSettings .exe "Avery AP 5.4 300DPI" c:\temp\devmode1
Save DEVMODE for printer "Avery AP 5.4 300DPI" as Base64-encoded data in file "devmode2".
EXAMPLE: GetPr interSettings .exe "Avery AP 5.4 300DPI" c:\temp\devmode2 base64
Action Execution and Error Handling
l Enabled. Specifies if the action is enabled or disabled. Only enabled actions will execute. You can use this functionality for testing.
- 109 -
l Condition. Defines one-line programming expression that must provide a Boolean value (true or false). When the result of the expression is true, the action will execute. This is a method to not execute action every time, but only when monitored variables have certain values.
l Ignore failure. Specifies to ignore the error and continue with the next action, even if execution of the current action fails. The nested actions that depend on the current action will not execute. The action execution will continue with the next action on the same level as the current action. The error is still logged in Automation Manager, but it will not break the execution of the action. For more information, see Error Handling.
EXAMPLE: At the end of pr inting you might want to send the s tatus update to an external application us ing HTTP Request ac tion. If pr inting action fai ls the tr igger s tops process ing actions . In order to execute the repor ting even after fai led pr int ac tion, the Pr int Label ac tion must have the option Ignore fai lure enabled.
l Save error to variable. Specifies to save the error description to some variable, when some error breaks the execution of this action. The same cause of error is also saved to internal vari-ables ActionLastErrorId and ActionLastErrorDesc.
Set Printer
Specifies the name of the printer where the label will print. Use this action to override the printer defined in the label template. This action is also useful when you must print the same label template to different printers. You must always nest this action under the Open Label action to reference the label, where to change the printer. This action reads the default settings --such as speed and darkness-- from the selected printer driver and applies them to the label. If you don't use the Set Printer action, the label will print to the printer as defined in the label template.
WARNING: Be careful, when changing the printer from one printer brand to another, e.g. from Zebra to SATO, or even from one printer model to another model of the same brand. The printer settings might not be compatible and label printout might not be identical. Also, label design optimizations for original printer, such as internal counters, and internal fonts, might not be available on the selected printer.
Printer
l Printer name. Specifies the printer name. You can select the printer from the list of locally installed printer drivers, or you can enter any printer name. The option Variable enables the variable printer name. When enabled, you must select a variable that will contain the printer name when trigger is executed. Usually, the value to the variable is assigned by a filter.
Action Execution and Error Handling
l Enabled. Specifies if the action is enabled or disabled. Only enabled actions will execute. You can use this functionality for testing.
l Condition. Defines one-line programming expression that must provide a Boolean value (true or false). When the result of the expression is true, the action will execute. This is a method to not execute action every time, but only when monitored variables have certain values.
l Ignore failure. Specifies to ignore the error and continue with the next action, even if execution of the current action fails. The nested actions that depend on the current action will not execute. The action execution will continue with the next action on the same level as the current action. The error is still logged in Automation Manager, but it will not break the
- 110 -
execution of the action. For more information, see Error Handling.
EXAMPLE: At the end of pr inting you might want to send the s tatus update to an external application us ing HTTP Request ac tion. If pr inting action fai ls the tr igger s tops process ing actions . In order to execute the repor ting even after fai led pr int ac tion, the Pr int Label ac tion must have the option Ignore fai lure enabled.
l Save error to variable. Specifies to save the error description to some variable, when some error breaks the execution of this action. The same cause of error is also saved to internal vari-ables ActionLastErrorId and ActionLastErrorDesc.
Set Variable
Assigns a new value to the selected variable. Usually the variables will get their values by the Use Data Filter action, which will extract fields from received data and map them to variables. You might also need to set the variable values yourself, usually for troubleshooting purposes. The variable values are not remembered from one trigger to another, but they are kept while the same trigger is being processed.
Variable
This section allows you to define the contents you want to send assign to the selected variable.
l Name. Specifies the name of the variable that will get a new value.
l Value. Specifies the new value of the variable. You can use fixed content, mix of fixed and vari-able content, or variable content alone. To insert a variable content, click the button with arrow to the right of data area and insert variable from the list. For more information, see the topic Using Compound Values.
Action Execution and Error Handling
l Enabled. Specifies if the action is enabled or disabled. Only enabled actions will execute. You can use this functionality for testing.
l Condition. Defines one-line programming expression that must provide a Boolean value (true or false). When the result of the expression is true, the action will execute. This is a method to not execute action every time, but only when monitored variables have certain values.
l Ignore failure. Specifies to ignore the error and continue with the next action, even if execution of the current action fails. The nested actions that depend on the current action will not execute. The action execution will continue with the next action on the same level as the current action. The error is still logged in Automation Manager, but it will not break the execution of the action. For more information, see Error Handling.
EXAMPLE: At the end of pr inting you might want to send the s tatus update to an external application us ing HTTP Request ac tion. If pr inting action fai ls the tr igger s tops process ing actions . In order to execute the repor ting even after fai led pr int ac tion, the Pr int Label ac tion must have the option Ignore fai lure enabled.
l Save error to variable. Specifies to save the error description to some variable, when some error breaks the execution of this action. The same cause of error is also saved to internal vari-ables ActionLastErrorId and ActionLastErrorDesc.
- 111 -
Store Label To Printer
String Manipulation
Formats the values of selected variables. You can perform actions such as: delete leading and trailing spaces, search and replace characters, and delete opening and closing quotes. Usually you need this functionality when trigger receives unstructured or legacy data, and you have to parse it with the Unstructured Data filter. This action allows you to fine-tune the data value.
NOTE: If this action doesn't provide enough string manipulation power for a particular case, you can use the action Execute Script and use Visual Basic Script or Python to manipulate your data.
Variables
This section defines the variables to which the string manipulation will apply.
l All variables. Specifies that selected manipulation(s) will apply to all defined variables.
l Selected variables. Specifies that selected manipulation(s) will apply to all selected variables.
Formatting Options
This section defines the string manipulation functions that will be applied to the selected variables or fields. You can select one or several functions. The functions will be applied in the order as selected in the user interface, from top to bottom.
l Delete spaces at the beginning. Deletes all space characters (decimal ASCII code 32) from the beginning of the string.
l Delete spaces at the end. Deletes all space characters (decimal ASCII value 32) from the end of a string.
l Delete opening closing characters. Deletes the first occurrence of the selected opening and closing characters that are found in the string.
- 112 -
EXAMPLE: If you use "{" for opening character and "}" for the c los ing character , the input s tr ing {{selection}} wil l be conver ted to {selection}.
l Search and replace. Executes standard search and replace function upon the provided values for find what and replace with. You can also use regular expressions.
NOTE: There are several implementations of the regular expressions in use. NiceLabel Automation uses the .NET Framework syntax for the regular expressions. For more information, see Knowledge Base article KB250.
l Replace non printable characters with space. Replaces all control characters in the string with space character (decimal ASCII code 32). The non printable characters are characters with decimal ASCII values between 0-31 and 127-159.
l Delete non printable characters. Deletes all control characters in the string. The non printable characters are characters with decimal ASCII values between 0-31 and 127-159.
l Decode special characters. The special characters (or control codes) are characters not available on the keyboard, such as Carriage Return or Line Feed. NiceLabel Automation uses a notation to encode such characters in human-readable form, such as <CR> for Carriage Return and <LF> for Line Feed. For more information see topic Entering Special Characters (Control Codes).
This option converts special characters from NiceLabel syntax into actual binary characters.
EXAMPLE: When you receive the data "<CR><LF>", NiceLabel Automation wil l use it as p lain s tr ing of 8 characters . You wil l have to enable this option to interpret and use the received data as two b inary characters CR (Carr iage Return - ASCII code 13) and LF (Line Feed - ASCII code 10).
l Search and delete everything before. Finds the provided string and deletes all characters from the beginning of the data until the string. The found string itself can also be deleted.
l Search and delete everything after. Finds the provided string and deletes all characters from the string until the end of the data. The found string itself can also be deleted.
Action Execution and Error Handling
l Enabled. Specifies if the action is enabled or disabled. Only enabled actions will execute. You can use this functionality for testing.
l Condition. Defines one-line programming expression that must provide a Boolean value (true or false). When the result of the expression is true, the action will execute. This is a method to not execute action every time, but only when monitored variables have certain values.
l Ignore failure. Specifies to ignore the error and continue with the next action, even if execution of the current action fails. The nested actions that depend on the current action will not execute. The action execution will continue with the next action on the same level as the current action. The error is still logged in Automation Manager, but it will not break the execution of the action. For more information, see Error Handling.
EXAMPLE: At the end of pr inting you might want to send the s tatus update to an external application us ing HTTP Request ac tion. If pr inting action fai ls the tr igger s tops process ing actions . In order to execute the repor ting even after fai led pr int ac tion, the Pr int Label ac tion must have the option Ignore fai lure enabled.
l Save error to variable. Specifies to save the error description to some variable, when some error breaks the execution of this action. The same cause of error is also saved to internal vari-ables ActionLastErrorId and ActionLastErrorDesc.
Try
The functionality from this topic is available in NiceLabel Automation Enterprise.
Allows easy monitoring for errors while actions execute and running a different set of actions, if error does occur. The action creates Do and On error placeholders for actions. All actions that should execute when trigger fires, must be placed inside Do placeholder. When no error is detected when executing actions from Do placeholder, they are the only actions that ever execute. However, when an error does happen, the execution of actions from Do placeholder will stop and execution switches over to actions from On error placeholder.
EXAMPLE: If any of the actions in the Do p laceholder fai l, the action execution wil l s top and resume with the actions in the On Error p laceholder . If Try would be p laced on its own, that would terminate the tr igger execution. In this case ,Try is nested under the For loop action. Normally, any er ror in Do p laceholder wil l also s top executing the For loop action, even if there are s ti l l fur ther s teps unti l For loop should complete. In this case the Save Data to Fi le wil l also not execute. By default, any er ror breaks the entire tr igger process ing.
However , you can also continue with the execution of the next iteration in For loop action. For this to happen, you have to enable Ignore fai lure in the Try action. If data from the current s tep in For Loop causes an er ror in Do p laceholder , ac tions from On Error wil l execute, then the Save Data to Fi le in level 2 wil l execute and then the For loop action wil l continue to execute of the next iteration.
- 114 -
This action provides easy error detection and execution of "feedback" or "reporting" actions. For example, if an error happens during trigger processing, you can send out the warning. For more information, see the topic Print Job Status Feedback.
Action Execution and Error Handling
l Enabled. Specifies if the action is enabled or disabled. Only enabled actions will execute. You can use this functionality for testing.
l Condition. Defines one-line programming expression that must provide a Boolean value (true or false). When the result of the expression is true, the action will execute. This is a method to not execute action every time, but only when monitored variables have certain values.
l Ignore failure. Specifies to ignore the error and continue with the next action, even if execution of the current action fails. The nested actions that depend on the current action will not execute. The action execution will continue with the next action on the same level as the current action. The error is still logged in Automation Manager, but it will not break the execution of the action. For more information, see Error Handling.
EXAMPLE: At the end of pr inting you might want to send the s tatus update to an external application us ing HTTP Request ac tion. If pr inting action fai ls the tr igger s tops process ing actions . In order to execute the repor ting even after fai led pr int ac tion, the Pr int Label ac tion must have the option Ignore fai lure enabled.
l Save error to variable. Specifies to save the error description to some variable, when some error breaks the execution of this action. The same cause of error is also saved to internal vari-ables ActionLastErrorId and ActionLastErrorDesc.
Use Data Filter
Executes the filter rules on the input data source. As a result the action will extract fields from the input data and map their values to the linked variables. So, the action executes the selected filter and assigns the variables with respective values.
l Elements on lower level. The action can create sub-level elements, identified with "for each line" or "for each data block in ...". When you see those, the filter will extract the data not on the document level (with hard-coded field placement), but relatively from the sub areas that contain repeatable sections. In this case make sure that you position your actions below such elements. You have to nest the action under such elements.
l Mapping variables to fields. The mapping between trigger variables and filter fields is defined either manually, or is automated, dependent on how the filter is configured. If you have manu-ally defined fields in the filter, you also have to manually map fields to the corresponding vari-able.
It's a good practice to define fields using the same names as are names of the label variables. In this case the button Auto map will map matching names automatically.
l Testing the execution of filter. When the mapping of variables to fields is done, you can test the execution of the filter. The result will be shown on-screen in table. Number of lines in the table represent the number times actions will execute in the selected level. The column names
- 115 -
represent the variable names. The cells contain values as assigned to the respective variable by the filter. The default preview file name is inherited from the filter definition, you can execute fil-ter on any other file.
For more information, see the topic Understanding Filters and topic Examples.
Filter
l Name. Specifies the name of the filter you want to apply. The list contains all filters defined in the current configuration. You can use the bottom three items in the list to create new filter.
NOTE: Selecting some other filter will remove all actions nested under this action. If you want to keep currently defined actions, move them outside of the Use Data Filter action. If you have lost your actions, you can Undo your action and revert to the previous configuration.
Data Source
This section allows you to define the contents you want to send to the printer.
l Use data received by the trigger. Defines that the trigger-received data it used in a filter. In this case the action will use the original data received by the trigger and execute the filter rules upon it.
For example, if you use a f i le tr igger , the data is a content of the monitored f i le. If you use a database tr igger , the data is a data set returned from the database. If you use TCP/IP tr igger , the data is a raw content received on a socket.
l File name. Defines the path and file name of the file containing the data upon which you will execute filter rules. The content of the specified file is used in a filter. The option Variable enables the variable file name. You must select a variable that will contain the path and/or file name.
l Custom. Defines the custom content to be parsed by the filter. You can use fixed content, mix of fixed and variable content, or variable content alone. To insert variable content, click the but-ton with arrow to the right of data area and insert variable from the list. For more information, see the topic Using Compound Values.
Data Preview
This section provides the preview of the filter execution. The contents of preview file name is read and
- 116 -
the selected filter applied to it. The rules in the filter will extract fields. The table will display result of the extraction. Each line in the table represents data for one label. Each column represents the variable. To see any result, first you have to configure mapping of fields to respective variables. Dependent on the filter definition, you could map the variables to fields manually, or it is done automatically.
l Preview file name. Specifies the file that contains sample data that will be parsed through the filter. The preview file is copied from the filter definition. If you change the preview file name, the new file name will be saved.
l Open. Selects some other file upon which you want to execute the filter rules.
l Refresh. Re-runs the filter rules upon the contents of the preview file name. The Data Preview section will be updated with the result.
Action Execution and Error Handling
l Enabled. Specifies if the action is enabled or disabled. Only enabled actions will execute. You can use this functionality for testing.
l Condition. Defines one-line programming expression that must provide a Boolean value (true or false). When the result of the expression is true, the action will execute. This is a method to not execute action every time, but only when monitored variables have certain values.
l Ignore failure. Specifies to ignore the error and continue with the next action, even if execution of the current action fails. The nested actions that depend on the current action will not execute. The action execution will continue with the next action on the same level as the current action. The error is still logged in Automation Manager, but it will not break the execution of the action. For more information, see Error Handling.
EXAMPLE: At the end of pr inting you might want to send the s tatus update to an external application us ing HTTP Request ac tion. If pr inting action fai ls the tr igger s tops process ing actions . In order to execute the repor ting even after fai led pr int ac tion, the Pr int Label ac tion must have the option Ignore fai lure enabled.
l Save error to variable. Specifies to save the error description to some variable, when some error breaks the execution of this action. The same cause of error is also saved to internal vari-ables ActionLastErrorId and ActionLastErrorDesc.
Verify License
Reads the activated license and executes the actions nested below this action only if a certain license type is used.
This action provides protection of your trigger configuration from running on the unauthorized machines. The license key that activates the software can also encode a Solution ID. This is a unique number that identifies the solution provider that sold the NiceLabel Automation license. If the configured Solution ID matches the Solution ID encoded in the license, the target machine is allowed to run nested actions, effectively limiting execution to licenses sold by the solution provider.
The triggers can be further encrypted and locked so only authorized users can open the configuration. For more information, see the topic Protecting Trigger Configuration from Editing.
License Information
l Solution ID. Defines the ID number of the licenses that are allowed to run the nested actions.
- 117 -
l If the entered value is not the Solution ID that is encoded in the license, the nested actions will not execute.
l If the entered value is 0, the actions will execute if any valid license is found.
Action Execution and Error Handling
l Enabled. Specifies if the action is enabled or disabled. Only enabled actions will execute. You can use this functionality for testing.
l Condition. Defines one-line programming expression that must provide a Boolean value (true or false). When the result of the expression is true, the action will execute. This is a method to not execute action every time, but only when monitored variables have certain values.
l Ignore failure. Specifies to ignore the error and continue with the next action, even if execution of the current action fails. The nested actions that depend on the current action will not execute. The action execution will continue with the next action on the same level as the current action. The error is still logged in Automation Manager, but it will not break the execution of the action. For more information, see Error Handling.
EXAMPLE: At the end of pr inting you might want to send the s tatus update to an external application us ing HTTP Request ac tion. If pr inting action fai ls the tr igger s tops process ing actions . In order to execute the repor ting even after fai led pr int ac tion, the Pr int Label ac tion must have the option Ignore fai lure enabled.
l Save error to variable. Specifies to save the error description to some variable, when some error breaks the execution of this action. The same cause of error is also saved to internal vari-ables ActionLastErrorId and ActionLastErrorDesc.
Web Service
The functionality from this topic is available in NiceLabel Automation Enterprise.
A Web Service is a method of communication between two electronic devices or software. Web Service describes a standard way of data exchange. It uses XML to tag the data, SOAP is used to transfer the data, and WSDL is used to describe the services available. This action connects to a remote Web service and executes the methods on it. The methods can be described as actions that are published on the Web Service. The action will send inbound values to the selected method in the remote Web service, collect the result and save it in the selected variables.
After you import the WSDL and add a reference to the Web Service, its methods will be listed in the Method combo box.
NOTE: You can transfer simple types over the Web Service, such as string, integer, boolean, but not the complex types. The WSDL must contain one binding only.
You must print product labels. Your trigger would receive only segment of the needed data. E.g. the trigger receives the value for Product ID and Description, but not the Price. The price information is available in a separate database, which is accessible over Web service call. The Web service defines the function by it WSDL definition, such as the input to the function is Product ID and output is Price. The Web Service action will send Product ID to the Web service, which
- 118 -
will make an internal look up to its database and provide the matching Price as the result. The action will save the result in the variable, which can be used on the label.
Web Service Definition
NOTE: This action supports Internet Protocol version 6 (IPv6).
l WSDL. Specifies the location of Web Service Description Language (WSDL) definition. This is XML-based interface description language that describes the functionality offered by the Web service. The WSDL is usually provided by the Web service itself. Typically you would enter the link to WSDL and click the Import button to read the definition. If you have troubles getting WSDL from the online resource, save the WSDL to file and enter the path with file name to load methods from it.
NiceLabel Automation will automatically detect if the remote Web Service uses document or RPC syntax and communicate appropriately.
Supported WSDL and data types
The action supports the simple Web Service communication:
l You can transfer simple data types, such as string, integer, boolean. Complex and com-pound types are not supported.
l The WSDL must contain one binding only. The methods from the other binding is ignored.
l Input and output parameters must be defined in a single location, multiple locations are not supported. This is defined by a SOAP extension soap:address, specifically in loc-ation="uri" element.
l Address. Provides the address where the Web Service is published. Initially, this information is retrieved from the WSDL, but you can update it before the action is executed. This is helpful for development / test / production environments, where you use the same list of actions, but with different names of servers where Web Services run.
You can use fixed content, mix of fixed and variable content, or variable content alone. To a insert variable content, click the button with arrow to the right of data area and insert variable from the list. For more information, see the topic Using Compound Values.
l Method. Lists the methods (functions) available in selected Web service. The list is automatically populated from the WSDL definition.
l Parameters. Defines the input and output variables to the selected method (function). The inbound parameters expect input from the trigger. For testing and troubleshooting reasons you can enter fixed value and preview result on-screen. But typically you would select a variable for inbound parameter. Value of that variable will be used as input parameter. The outbound parameter provides the result from the function. You must select the variable that will store the result.
l Timeout. Defines the timeout in which connection to the server will try to be established.
User Authentication
l Enable basic authentication. Defines the user credentials that are necessary to establish the
- 119 -
outbound call to the remote Web Service. For more information about security concerns, see the topic Securing Access to your Triggers.
Action Execution and Error Handling
l Enabled. Specifies if the action is enabled or disabled. Only enabled actions will execute. You can use this functionality for testing.
l Condition. Defines one-line programming expression that must provide a Boolean value (true or false). When the result of the expression is true, the action will execute. This is a method to not execute action every time, but only when monitored variables have certain values.
l Ignore failure. Specifies to ignore the error and continue with the next action, even if execution of the current action fails. The nested actions that depend on the current action will not execute. The action execution will continue with the next action on the same level as the current action. The error is still logged in Automation Manager, but it will not break the execution of the action. For more information, see Error Handling.
EXAMPLE: At the end of pr inting you might want to send the s tatus update to an external application us ing HTTP Request ac tion. If pr inting action fai ls the tr igger s tops process ing actions . In order to execute the repor ting even after fai led pr int ac tion, the Pr int Label ac tion must have the option Ignore fai lure enabled.
l Save error to variable. Specifies to save the error description to some variable, when some error breaks the execution of this action. The same cause of error is also saved to internal vari-ables ActionLastErrorId and ActionLastErrorDesc.
Data Preview
l Execute. Executes Web service call. It sends values of inbound parameters to the Web service and provides the result in the outbound parameter. Use this functionality to test the Web ser-vice execution. You can enter values for inbound parameters and see the result on-screen. When satisfied with execution, you would replace entered fixed value for inbound parameter with a variable from the list.
XML Transform
The functionality from this topic is available in NiceLabel Automation Enterprise.
Transforms the XML document into another document using the provided transformation rules. The rules must be provided by the .XSLT definition in a file, or by other variable source. The action allows you to convert the complex XML documents into XML documents of more manageable structure. XSLT stands for XSL Transformations. XSL stands for EXtensible Stylesheet Language, and is a style sheet language for XML documents.
The action will store the converted XML document in the selected variable. The original file is left intact on the disk. If you want to save the converted XML document, use the action Save Data to File.
Typically, you would use the action to simplify XML documents provided by the host application. Defining XML filter for the complex XML document might take a while, or in some cases the XML is just too complex to be handled. As alternative, you would defined the rules to convert XML into structure that can be easily handled by the XML filter, or even skipping the need for a filter
- 120 -
altogether. You can convert XML document into natively-supported XML, such as Oracle XML and then simply executing it with the Run Oracle XML Command File action.
Data Source
This section defines the XML data that you want to transform.
l Use data received by the trigger. Defines that the trigger-received data it used. The same res-ult can be achieved by enabling the internal variable DataFileName and using the contents of file it refers to. For more information, see the topic Internal Variables.
l File name. Defines the path and file name of the file containing the XML file to transform. Con-tents of the specified file is used. The option Variable enables the variable file name. You must select a variable that will contain the path and/or file name. The action will open the specified file and apply transformation on file contents, which must be XML formatted.
l Variable. Defines the variable that contains printer stream. The contents of selected variable is used and it must contain XML structure.
Transformation Rules Data Source (XSLT)
This section defines the transformation rules (.XSLT document) that will be applied to the XML document.
l File name. Defines the path and file name of the file containing the transformation rules (.XSLT).
l Custom. Defines the custom contents. You can use fixed content, mix of fixed and variable con-tent, or variable content alone. To insert a variable content, click the button with arrow to the right of data area and insert variable from the list. For more information, see the topic Using Compound Values.
Save Result to Variable
l Variable. Specifies the variable that will contain the result of the transformation process. E.g. if you will use the rules that will convert complex XML into simpler XML, the contents of the selec-ted variable is the simple XML.
Action Execution and Error Handling
l Enabled. Specifies if the action is enabled or disabled. Only enabled actions will execute. You can use this functionality for testing.
l Condition. Defines one-line programming expression that must provide a Boolean value (true or false). When the result of the expression is true, the action will execute. This is a method to not execute action every time, but only when monitored variables have certain values.
l Ignore failure. Specifies to ignore the error and continue with the next action, even if execution of the current action fails. The nested actions that depend on the current action will not execute. The action execution will continue with the next action on the same level as the current action. The error is still logged in Automation Manager, but it will not break the execution of the action. For more information, see Error Handling.
EXAMPLE: At the end of pr inting you might want to send the s tatus update to an external application us ing HTTP Request ac tion. If pr inting action fai ls the tr igger
- 121 -
stops process ing actions . In order to execute the repor ting even after fai led pr int ac tion, the Pr int Label ac tion must have the option Ignore fai lure enabled.
l Save error to variable. Specifies to save the error description to some variable, when some error breaks the execution of this action. The same cause of error is also saved to internal vari-ables ActionLastErrorId and ActionLastErrorDesc.
Example
The example for this action is installed with the product. For more information, see the topic Examples.
Testing TriggersTesting Triggers
When you have the configuration of the trigger done, that's only half of the job done. Before deploying the trigger you must thoroughly test is for its intended operation upon incoming data and verify the execution of actions.
You can test your configuration while you are still working on it in Automation Builder. Some actions have built-in test capabilities so you can focus on the execution of individual action. You can also test every triggers with Run Preview command. However, the final test should always be done in the real environment, providing real data and using real triggers, where you monitor trigger execution in Automation Manager.
Testing execution of the individual actions
Some of the actions have preview functionality allowing you to change the input parameters and see the result of the action on-screen.
l Use Data Filter. The action will show live preview of the parsed data. The rules from the selec-ted filter are applied to the selected input data file and result shown in the table. If you use sub- or assignment areas, you can see the preview for every level of filter definition.
l Execute SQL Statement. The action will show preview of the execution of defined SQL state-ment. You can see the data set resulting from the SELECT statement and number of rows affected by the UPDATE, INSERT and DELETE statements. The preview execution is transaction-safe and you can roll-back all changes. You can change the input query parameters and see how they influence the result.
l Web Service. The action will show preview of the execution of selected method (function) from Web Service. You can change the input parameters and see how they influence the result.
l Execute script. The action will check for syntax errors in the provided script, and also execute it. You can change the input parameters and see how they influence the script execution.
Testing the execution of trigger and displaying label preview on-screen
To test the trigger from the ground up, use the built-in Run Preview functionality. You can run preview for every trigger, no matter its type. The trigger won't fire upon changes of the monitored event, only trigger started in the Automation Manager can do it. Instead, the trigger will execute actions based on the data saved in a file. You have to make sure you have file that contains sample data that trigger will accept in real-time deployment.
- 122 -
The trigger will execute all defined actions, including data filtering, and display label preview(s) on-screen. The preview will simulate the printing process to every detail. The labels would print with the same composition and contents as they are previewed. This includes the number of labels and their contents. You will learn about how many print jobs are produced, how many labels are in each job and preview of each label. You can navigate from one label to the next in the selected print job.
The Log pane displays the same information as would be displayed in the Automation Manager. Expand the log entries to see full detail.
NOTE: When you run the preview, all action defined for the selected trigger will run, not just the Print Label action. Be careful, when you use actions that will modify the data, such as Execute SQL Statement, or Web Service, because their execution is irreversible.
To preview the labels, do the following:
1. Open the trigger configuration.
2. Make sure the trigger configuration is saved.
3. Click the button Run Preview in Preview group in the ribbon.
4. Browse for the data file providing the typical contents that trigger will accept.
5. See the result in a Preview tab.
Testing deployment on pre-production server
It makes a good practice to deploy the configuration to Automation Manager on a pre-production server, before the deployment on the production server. Testing in pre-production environment might identify additional configuration problems not detected when testing the trigger in the Automation Builder alone. The performance can also be stress-tested by adding the load to the trigger and see how it performs. The testing will provide the important information about the available throughput and identify weak points. Based on the conclusions you can then implement various system optimization techniques, such as optimizing label design to produce smaller print streams, and optimizing the overall flow of data from the existing application into NiceLabel Automation.
Important differences between real testing and previewing in Automation Builder
While previewing the trigger on-screen in Automation Builder provides a quick method of trigger testing, you must not rely on it alone. There can be execution differences between previewing and running the trigger for real when you use 64-bit Windows.
Even if you have your configuration working in Automation Builder, make sure to run in for real using the Service as well.
l When you run command Run Preview, the configuration will execute in Automation Builder, which always runs as 32-bit application. Previewing your trigger in Automation Builder will only test execution on 32-bit platform.
l When you run triggers for real, the configuration will execute in Service, which will run as 32-bit application on 32-bit Windows, and will run as 64-bit application on 64-bit Windows. For more information see the topic Running in Service Mode.
l The problems might arise when trigger processing is affected by platform differences (32-bit vs 64-bit):
- 123 -
l Database access. 64-bit applications require 64-bit database drivers, and 32-bit applic-ations require 32-bit drivers. To run configuration from Automation Builder and in the Service, you need 32-bit and 64-bit database drivers to access your database. For more information, see topic Accessing Databases.
l UNC syntax for network files. The service account cannot access network shared files with mapped drive letter. You have to use UNC syntax for network files. For example, use \\server\share\files\label.lbl and not G:\files\label.lbl, where G: is mapped to\\server\share. For more information see the topic Access to Network Shared Resources.
l If your NiceLabel Automation Service runs under a different user account that you are using for Automation Builder, the accounts might not have the same security privileges. If you can open the label in Automation Builder, the user account for the Service might not be able to access it. To run Automation Builder under the same user account as the Service, see Using the Same User Account to Configure and to Run Triggers.
Protecting Trigger Configuration From EditingThe trigger configuration can be protected using two methods.
l Locking trigger. Using this method you lock the trigger configuration file and protect it with a password. Without the password nobody can edit the trigger. Enable the option Lock and encrypt trigger in trigger Settings -> Security.
l Setting access permissions. Using this method you rely on the user permissions as are defined in the NiceLabel Automation Options. You can enable user groups and assign different roles to each group. If the group is assigned with the edit privileges, all members of the group can edit triggers. This method requires that you enable user login. You can use Windows users from local groups or active directory, or you can define NiceLabel Automationusers. See User rights and access in Configuration.
Using Secure Transport Layer (HTTPS)The functionality from this topic is available in NiceLabel Automation Enterprise.
You can protect the inbound traffic to the HTTP Server Trigger and Web Service Trigger by enabling the HTTPS support. HTTPS secures the transmission of the messages exchanged over the network. The communication security uses X.509 certificates to encrypt the data flowing between the parties. Your information remains confidential from prying eyes because just the client and the NiceLabel Automation can decrypt the traffic. Even if some unauthorized user does eavesdrop on the communication he would fail to understand the meaning of the messages, because the traffic appears as a stream of random bytes.
It makes a good security practice to encrypt the communication in cases, such as:
l You work with the sensitive and confidential data that must not be exposed to 3rd party users.
l The message must pass through networks that are outside of your control. For example, this happens when you send data to Automation over the internet, and not from the local network.
Enabling the secure transport layer (HTTPS)
- 124 -
To enable secure transport for your trigger, do the following.
In the Windows system:
1. Obtain the X.509 certificate from the issuer of the digital certificates (certificate authority - CA). You need a certificate type for the 'server authentication'.
NOTE: If you will self-generate the certificate, make sure to import the CA certificate in the Trusted Authority store, so the CA signature can be verified on the server certificate.
2. Install the X.509 certificate in the system, where NiceLabel Automation is installed. Make sure the certificate is visible to the user account under which you run NiceLabel Automation service. It is a good practice to install the certificate in the local computer store, not the current user store. This will allow NiceLabel Automation to use the certificate even if it is not running under your current logged-in user account.
1. Open a Command Prompt window.
2. Type mmc and press the ENTER key (make sure you are running it with the admin-istrative privileges).
3. On the File menu, click Add/Remove Snap In.
4. In the Add Standalone Snap-in dialog box, select Certificates.
5. Click Add.
6. In the Certificates snap-in dialog box, select Computer account and click Next.
7. In the Select Computer dialog box, click Finish.
8. On the Add/Remove Snap-in dialog box, click OK.
9. In the Console Root window, expand Certificates>Personal.
10. Right-click Certificates folder and select All Tasks>Import.
11. Follow the wizard to import the certificate.
3. Retrieve the thumbprint of a certificate you have just imported.
1. While still in the MMC double-click the certificate.
2. In the Certificate dialog box, click the Details tab.
3. Scroll through the list of fields and click Thumbprint.
4. Copy the hexadecimal characters from the box. Remove the spaces between the hexa-decimal numbers. For example, the thumbprint "a9 09 50 2d d8 2a e4 14 33 e6 f8 38 86 b0 0d 42 77 a3 2a 7b" should be specified as "a909502d-d82ae41433e6f83886b00d4277a32a7b" in code. This is certhash required in the next step.
4. Bind the certificate to the IP address and port where the trigger is running. This action will enable the certificate on the selected port number.
Open the Command Prompt (make sure you are running it with the administrative privileges) and run the following command:
l ipport is the IP address-port pair, where the trigger is running. Leave the IP address at 0.0.0.0 (local computer), but change the port number to match port number in the trig-ger configuration.
l certhash is the thumbprint (SHA hash) of the certificate. This has is 20 bytes long and specified as a hex string.
l appid is GUID of the owning application. You can use any GUID here, even the one from the sample above.
In the trigger configuration:
1. In your HTTP or Web Service trigger enable the option Secure connection (HTTPS).
2. Reload the configuration in the Automation Manager.
Disabling the secure transport layer (HTTPS)
In the Windows system:
1. Unbind the certificate from the IP address-port pair. Run the following command in the Command Prompt (make sure you are running it with the administrative privileges):
netsh http delete sslcert ipport=0.0.0.0:56000
where:
l ipport is the IP address-port pair, where the trigger is running and where you bound the certificate
In the trigger configuration:
1. In your HTTP or Web Service trigger disable the option Secure connection (HTTPS).
2. Reload the configuration in the Automation Manager.
- 126 -
Running And Managing Triggers
Deploying ConfigurationWhen you have configured and tested the triggers in the Automation Builder, you have to deploy configuration to the NiceLabel Automation service and start the triggers. At that time the triggers become live and start monitoring defined events.
To deploy the configuration, use any of the following methods.
Deploy from Automation Builder
1. Start Automation Builder.
2. Load the configuration.
3. Go to Configuration Items tab.
4. Click the Deploy Configuration button in the Deploy ribbon group.The configuration will be loaded inside the Automation Manager running on the same machine.
5. Start the triggers you want to make active.
If this configuration was already loaded, deployment will force its reload, keeping the active status of the triggers.
Deploy from Automation Manager
1. Start Automation Manager.
2. Go to Triggers tab.
3. Click +Add button and browse for the configuration on the disk.
4. Start the triggers you want to make active.
Deploy from command-line
To deploy the configuration C:\Project\Configuration.MISX and run the trigger within named CSVTrigger, do the following:
For more information, see the topic Controlling the Service with Command-line Parameters.
- 127 -
Event Logging OptionsWARNING: Some functionality in this topic requires purchase of product from NiceLabel Control Center products.
NiceLabel Automation will log events to various destinations, dependent on its deployment scenario. The first two logging features are available with every NiceLabel Automation product.
l Logging to log database. Logging to internal log database is always enabled and logs all events and all details. When viewing the logged information you can use filter to display events matching the rules. For more information, see the topic Using Event Log.The data is stored in the SQLite database. This is temporary log repository, the events are removed from the database on a weekly basis. The housekeeping interval is configurable in Options. The records of old events will be deleted from the database, but database won't be compacted (vacuumed), so it might still occupy the disk space. To compact it, use some 3rd party SQLite management software.
l Logging to Windows Application Event Log. Important events are saved to the Windows Application Event Log in case the NiceLabel Automation could not start , so you have a sec-ondary resource for logged events.
l Logging to Control Center. Logging to Control Center is available when you couple NiceLabel Automation with one of the Control Center products. Control Center is Web-based management console recording all events from one or more NiceLabel Automation servers. The data is stored in the Microsoft SQL Server database. You can search in the collected data and the application also supports automated alerts in case of certain event, printer management, document storage, revision control system (versioning), workflows and label reprint.
NOTE: For more information see Control Center user guide.
Managing TriggersThe application Automation Manager is the management part of the NiceLabel Automation software. If you use Automation Builder for configuring the triggers, you will use Automation Manager to deploy and run them in production environment. The application allows you to load triggers from different configurations, see their live status, start/stop them and see execution details in the log file.
You can change the view on the loaded configurations and their triggers. The last view is remembered and is applied when you run Automation Manager the next time. When you enable view by status, triggers from all open configurations that are in that status will be displayed together. When you enable view by configurations, triggers from the selected configuration will be displayed together, no matter what their status is. The trigger status is color-coded in the trigger icon for easier identification.
The displayed trigger details will change in real time as the trigger events are detected. You can see the information, such as trigger name, type of trigger, how many events have already been processed, how many errors were detected and the time that passed since the last event. If you hover your mouse above the number of already processed triggers, you will see the number of trigger events waiting to be processed.
- 128 -
NOTE: The loaded configuration is cached in memory. If you make a change to the configuration in Automation Builder, the Automation Manager will not automatically apply it. To apply the change, you have to reload the configuration.
Loading configuration
To load the configuration, click the +Add button and browse for the configuration file (.MISX). The triggers from the configuration will load in suspended state. You have to start triggers to make them active. For more information, see the topic Deploying Configuration.
The list of loaded configurations and status for each trigger is remembered. If the server is restarted from whatever reason, NiceLabel Automation Service will restore the trigger state from before the restart.
Configuration reload and removal
When you update the configuration in Automation Builder and save it, the changes will not be automatically applied in the Automation Manager. To reload the configuration, right-click the configuration name, then select Reload Configuration. All triggers will be reloaded. If you have file caching enabled, the reload will force synchronization off all files used by the triggers.
Starting / stopping triggers
When you load triggers from a configuration, their default state is stopped. To start the trigger, click the Start button in the trigger area. To stop the trigger, click the Stop button. You can select more triggers from the same configuration and start / stop all of them simultaneously.
You can also control starting/stopping from a command-line. For more information, see the topic Controlling the Service with Command-line Parameters.
Handling trigger conflicts
Triggers can be in errors because of the following situations. You cannot start such trigger until you resolve the problem.
l Trigger not configured correctly or completely. In this case, the trigger is not configured, mandatory properties are not defined, or actions defined for this printer are not configured. You cannot start such trigger.
l Trigger configuration overlaps with another trigger. Two triggers cannot monitor the same event.
EXAMPLE: Two f i le tr iggers cannot monitor the same f i le, two HTTP tr iggers cannot accept data on the same por t. If tr igger conf iguration over laps with another tr igger , the second tr igger wil l not run, because the event is already captured by the f ir s t tr igger . For more information, see Log pane for that tr igger .
Resetting the error status
When the trigger execution causes an error, the trigger icon will change to red color, trigger has error status and the event details are logged to logging database. Even if all next events complete successfully, the trigger will remain in error state until you confirm that you understand the error and want to clear the status. To acknowledge the error, click the icon next to the error counter in the trigger details.
Using notification pane
The notification pane is the area above the list of triggers in the Triggers tab where important
- 129 -
messages will display. The notification area will display application status messages, such as "Trial mode" or "Trial mode expired", or warning messages, such as "Tracing has been enabled".
Viewing Logged data
Every trigger activity is logged in the database, including trigger start/stop events, successful execution of action and errors encountered during processing. Click the Log button to see logged events just for the selected trigger. For more information, see the topic Using Event Log.
Using Event LogAll activities in NiceLabel Automation software are logged to a database for history and troubleshooting.When you click the Log button in the Triggers tab, then events for that particular trigger will display. The log pane will display information for all events that comply with the defined filter.
Logging data is useful for troubleshooting. If the trigger or action cannot be executed, the application records an error description in the log file that helps you identify and resolve the problem.
NOTE: The default data retention time is 7 days and is configurable in Configuration. To minimize log database size on busy systems you might want to reduce the retention period. See options NiceLabel Automation Configuration.
Filtering events
The configurable filters:
l Configuration and triggers. Specifies which events to display, events from the selected trigger, or events from all triggers from the selected configuration.
l Logged period. Specifies the time frame in which the events occurred. Default is Last 5 minutes.
l Event level. Specifies the type (importance) of the events you want to display. Error is type of event that will break the execution. Warning is type of event where errors happen, but are con-figured to be ignored. Information is type of event that logs all non-erroneous information. The log level is configurable in NiceLabel Automation Configuration.
l Filter by text. You can display all events that contain the provided string. Use this option for troubleshooting busy triggers. The filter will be applied to the trigger description field.
Clearing the log database
You can clear the log from Automation Builder. To clear the log database, click Clear Log button.
WARNING: Use with caution, there is no turning back. This will remove ALL logged events from the database, and is applied to all triggers not just to the current trigger.
- 130 -
Performance And Feedback Options
Parallel ProcessingThe functionality from this topic is available in NiceLabel Automation Pro and NiceLabel Automation Enterprise.
NiceLabel Automation product line has been developed to support parallel processing both for the inbound and outbound processing. This ensures the maximum efficiency on any system, where the software has been installed to. NiceLabel Automation can execute many tasks simultaneously , while still preserving the order in which the triggers came in. The throughput of label jobs is greatly dependent on the hardware where the software runs.
Inbound Parallel Processing
You can run many triggers on the same machine and they all will respond to changes in the monitored events simultaneously. Each trigger remembers the data from its unprocessed events in the queue list. This list will buffer incoming data in case that none of the print processes is available at that moment. As soon as one print process becomes available, the first job is taken from queue using FIFO (First In, First Out) principle. This ensures the correct order of processing the inbound data. However, it does not ensure the FIFO principle for printing. See the next paragraph.
NOTE: It's not just that you can run many triggers in parallel. Each trigger can also allow concurrent connections. TCP/IP, HTTP, and Web Service triggers all accept concurrent connections from many clients. Also, file trigger can be configured to monitor a set of files in a folder, configurable by file mask.
Outbound Parallel Processing
Usually the result of the trigger is label print process. You want use data received by the trigger and print it on the labels. NiceLabel Automation service runs print processes (aka "print engines") in parallel in the background. Modern processors have two or more independent central processing units called "cores". Multiple cores can run multiple instructions at the same time, increasing overall speed of processing, in case NiceLabel Automation they will increase of print job processing, and ultimately the label printing performance.
By default, each NiceLabel Automation product will run print process in a separate thread on every core that is available in the machine. The more powerful CPU you have, the more throughput is available. This maximizes the usage of the available CPU power. The software installs with reasonable defaults where every available core accommodates one thread for print processing, and under normal
- 131 -
circumstances you never have to make any change. If you need to make a change, see the topic Changing Multi-threaded Printing Defaults.
When you have many print processes available, the data from the first event can be printed by one print process, while the data from the second event could be printed by a different print process simultaneously, if a second print process is available at that time. If the second event did not provide much data, the print process might provide the data for the printer faster than the first print process, breaking the order. In such case, data from the second event could print before data from the first event. To ensure FIFO principle also for the printing, see the topic Synchronous Print Mode.
Caching FilesThe functionality from this topic is available in NiceLabel Automation Enterprise.
To improve the time-to-first label and performance in general NiceLabel Automation supports file caching. When you load the labels, images and database data from network shares, you might experience delays printing your labels. NiceLabel Automation must fetch all required files before the printing process can begin.
There are two levels of caching that complement each other.
l Memory cache. The memory cache consists of keeping the already used files in memory. The labels that have been used at least once are loaded in the memory cache. When the trigger requests print of the same label, the label is immediately available for printing process. The memory cache is enabled by default. The contents of the memory cache will be cleared for a par-ticular configuration, when you remove or reload that configuration. The label file is checked for changes for each Open Label action. If there is newer label available, it will be loaded auto-matically, replacing the old version in the cache.
l Persistent cache. The persistent cache stores data to disk and is intended for intermediate term storage of files. Caching is managed per file object. When a file is being requested from the network share, the service first verifies if the file is already present in cache and uses it. If file is not in the cache, it will be fetched from the network share and cached for future use. The cache service continuously updates the cache contents with new versions of files. You can con-figure the time intervals for version checking in NiceLabel Automation Configuration.
NOTE: When you reload the configuration, the cache service will verify if newer version of the file exists in the network share and update the local cache.
Enabling Persistent Cache
To enable and configure the persistent cache, open the NiceLabel Automation Configuration, select NiceLabel Automation Settings and enabled Cache remote files.
l Refresh cache files. Defines the time interval in minutes in which the files in the cache will be synchronized with the files in the original folder. This is the time interval that you allow the sys-tem to use the old version of the file.
l Remove cache files when older than. Defines the time interval in days that will be used to remove all files in cache that haven't been accessed that long.
NiceLabel Automation will use the following local folder to cache remote files:
NiceLabel Automation will automatically refresh the cache content upon the defined time interval (default value is 5 minutes).
To manually force reloading of cache, do the following:
1. Open Automation Manager.
2. Locate the configuration containing the trigger, for which you want to force-reload labels.
3. Right-click the configuration.
4. Select Reload Configuration.
Error HandlingWhen an error occurs during the execution of some action, NiceLabel Automation will stop executing all actions in the trigger. If you have some actions defined after the current action, they will not be executed.
For example, the actions are defined as shown in the screenshot. If the action Set Printer fails, because the invalid name or inaccessible printer was provided, the actions Print Label and HTTP Request will not be executed. The action processing will stop at Set Printer, Automation Manager will show the trigger in an error state and the trigger status feedback (if enabled) will be in the terms of "wrong printer specified / printer not accessible".
However, in this particular case you don't want to use synchronous feedback (sent automatically when enabled in the trigger supporting synchronous feedback). The status feedback must be provided asynchronously with the action HTTP Request after the print job was created (or not). When the print process has completed you want to update some application with the its status. You will send a HTTP formatted message to that application.
In this case the HTTP Request action must be executed regardless of success of all the actions in the list above it. You have to enable the option Ignore failure for all actions that are above the HTTP Request action. The option is available in the action's Execution and error handling options.
- 133 -
If a particular action fails, NiceLabel Automation will start executing the next action in the previous level of hierarchy.
EXAMPLE: If the action Set Printer in level 1.1 fai ls , the execution wil l not continue with action Print Label in level 1.2 because it wil l l ikely fai l as well, but wil l continue with the action HTTP Request in level 2, because it is the next action in the higher-level h ierarchy.
The same logic can be implemented for looping actions, such as Use Data Filter, Loop and For Each Record, where you iterate through all members in the list. If processing of one member fails from whatever reason, by default NiceLabel Automation will stop processing all other members and report an error. If you enable Ignore failure option, the processing of the failed member will stop, but NiceLabel Automation will continue with the next member. At the end the error is reported anyway.
For more information also see topics Print Job Status Feedback and Synchronous Print Mode.
Synchronous Print ModeThe functionality from this topic is available in NiceLabel Automation Pro and NiceLabel Automation Enterprise.
Asynchronous Print Mode
The default NiceLabel Automation operation mode is the asynchronous mode. It's a form of printing, when a trigger sends the data for printing and then closes a connection to the print subsystem. The trigger does not wait for the result of the print process and will not receive any feedback. Immediately after data is sent, the trigger is ready to accept a new incoming data stream. Asynchronous mode boosts the trigger performance and increases the number of triggers that can be processed in a time frame. Each print process has a buffer in front of it, where the trigger feeds the print requests into. The buffer will accommodate for the trigger spikes and make sure no data is lost.
If the error occurs during processing, it will still be logged in Automation Manager (and NiceLabel Control Center, if you use it), but the trigger itself is not aware of it. When using asynchronous print mode, you cannot define conditional actions that would execute, if the trigger execution is in error.
- 134 -
Synchronous Print Mode
On the contrary, the synchronous mode doesn't break a connection to the print process. In this mode the trigger sends the data for printing and keeps the connection to the print subsystem established as long as it is busy execution actions. When the print process completes (successfully or with some error), the trigger will receive feedback about the status. You can use this information inside the actions that are defined in the same trigger and make decision to execute some other actions in case error occurred. You can also send the print job status back to the data-issuing application. For more information, see the topic Print Job Status Feedback.
EXAMPLE: You can repor t the pr inting s tatus to the ERP application that provided the data.
You will use synchronous mode when you want to receive status feedback inside the trigger, or when you want to ensure FIFO printing mode (the data received in the trigger events is printed in the same order in which it was received).
NOTE: When the trigger runs in the synchronous print mode, it will communicate with one print process only. Enabling synchronous print mode ensures the FIFO method of manipulating events in the outbound direction (printing). The multi-core processing by default cannot ensure the printing order.
Enabling the Synchronous Print Mode
The synchronous mode is definable per-trigger. To enable synchronous mode in a trigger, do the following:
1. Open the properties of the trigger.
2. Go to Settings tab.
3. Select the Other option.
4. In section Feedback from the Print Engine, enable the option Supervised printing.
Print Job Status FeedbackThe functionality from this topic is not all available in every NiceLabel Automation product.
The application providing data for label printing into NiceLabel Automation might expect to receive information about print job status. The feedback can be as simple as "All OK" in case of successful print job generation, or detailed error description in case of any problem. From performance reasons NiceLabel Automation disables feedback possibility by default. This will ensure high-throughput printing as trigger doesn't care about the execution of the print process. The errors will be logged to log database, but the trigger will not handle them.
You can also use this method to send feedback about other data the trigger can collect, such as status of the network printers, number of jobs in the printer spooler, list of labels in a folder, list of variables in the specified label file, and many more.
- 135 -
NOTE: To enable the feedback support from the print engine, you have to enable synchronous print mode. For more information, see the topic Synchronous Print Mode.
You can provide the status feedback in one of two methods.
The trigger provides feedback about print job status (Synchronous feedback)
Some triggers have built-in feedback possibility by design. When synchronous print mode is enabled, the trigger is internally aware of the job status. The client can send the data into trigger, keep the connection open and wait for the feedback. To use this feedback method, you must use the trigger supporting it.
When the error happens in any of the actions, the internal variable LastActionErrorDesc will contain the detailed error message. You can send its value as-is or customize it.
For more information, see details of the respective trigger.
l Web Service Trigger. This trigger supports feedback by design. The WSDL (Web Service Description Language) document describes details about the Web Service interface and how to enable feedback. You can use the default reply that will send back the error description in case the print action failed. Or, you can customize the response and send back content of any variable. The variable itself can contain any data, including label preview or label print job (binary data).
l HTTP Server Trigger. This trigger supports feedback by design. NiceLabel Automation will use the standard HTTP response codes to indicate the print job status. You can customize the HTTP response and send back content of any variable. The variable itself can contain any data, includ-ing label preview or label print job (binary data).
l TCP/IP Server Trigger. This trigger supports feedback, but not automatically. In this case you must configure the data-providing client not to break the connection once the data is sent. When print process completes, the next action in the list can be Send Data to TCP/IP Port with the setting Reply to sender. You can feedback over the established still-open connection.
The action provides the feedback about print job status (Asynchronous feedback)
For triggers that don't natively support feedback or if you want to send feedback messages during the trigger processing, you can define an action that will send feedback to some destination. In this case, the data-providing application can close the connection as soon as the trigger data is delivered.
EXAMPLE: You used TCP/IP tr igger to capture data. The c l ient dropped connection immediately after it sent the data was sent, so we cannot rep ly over the same connection. In such cases , you can use some other channel to send feedback. You can conf igure any of the outbound-connectivity actions , such as Execute SQL Statement, Open Document / Program, HTTP Request, Send Data to TCP/IP Por t and other . You would p lace such action under the Pr int Label ac tion.
If you want to send feedback only for specific status, such as "error occurred", you can use the following methods.
l Using condition on action. The print job status is exposed in two internal variables (LastAc-tionErrorID and LastActionErrorDesc). First one will contain the error ID or will contain value 0 in case of no errors. The second one contains the detailed error message. You can use values of these variables in conditions on actions that you want to execute in case of errors. For example, you would use the action HTTP Request after printing and send feedback just in case
- 136 -
some error occurred. You would do the following:
1. Open trigger properties.
2. In ribbon group Variable, click the Internal Variables button and enable variable LastActionErrorID.
3. Go to Actions tab.
4. Add the action Send Data to HTTP.
5. Inside action's properties expand the Show execution and error handling options.
6. For Condition, enter the following. The action with this condition will execute only when error occurred and LastErrorActionID contains the error ID (any value greater than 0). By default, the conditions runs using VB Script syntax.
LastErrorActionID > 0
7. You will also have to enable the option Ignore failure on each action you expect to fail. This will instruct Automation not to stop executing actions entirely, but continue with the next action in the same hierarchical level.
NOTE: For more information see topic Error Handling.
l Using action Try. Action Try eliminates need for coding conditions. The action provides you with two placeholders. Placeholder Do will contain the actions that you want to run. If any error occurs when running them, the execution will break and actions in the On error place-holder will be executed. You would use outbound-connectivity actions in this placeholder, to provide a print job status feedback. For more information, see the topic Try.
Using Store/Recall Printing Mode
High-availability (Failover) ClusterThe functionality from this topic is available in NiceLabel Automation Enterprise.
NiceLabel Automation supports Microsoft high-availability (fail-over) cluster. A fail-over cluster is a group of independent computers that work together to increase the availability of label printing through NiceLabel Automation. The clustered servers (called nodes) are connected by physical cables and by software. If one or more of the cluster nodes fail, other nodes begin to provide service (a process known as fail-over). In addition, the clustered roles are proactively monitored to verify that they are working properly. If they are not working, they are restarted or moved to another node. The clients providing data will connect to the IP address belonging to the cluster, not node IP addresses.
To enable NiceLabel Automation for high-availability, you must do the following:
l Set up Microsoft Failover Clustering feature in your Windows Servers.
l Install NiceLabel Automation on each node.
l Enable the failover cluster support in NiceLabel Automation properties on each node.Do the following:
- 137 -
1. Open NiceLabel Automation Configuration.
2. Select Cluster Support section.
3. Enable Failover Cluster Support.
4. Browse for the folder, located outside of both nodes, but still accessible with full access privileges to NiceLabel Automation software. The important system files that both nodes need will be copies to this folder.
l Configure the cluster to start NiceLabel Automation on the second node in case the master node is down.
Load-balancing ClusterThe functionality from this topic is available in NiceLabel Automation Enterprise.
NiceLabel Automation supports Microsoft load-balancing cluster. A load-balancing cluster is a group of independent computers that work together to increase the high-availability and scalability of label printing through NiceLabel Automation. The clustered servers (called nodes) are connected by physical cables and by software. The incoming requests for label printing are distributed among all nodes in a cluster. The clients providing data will connect to the IP address belonging to the cluster, not node IP addresses.
NOTE: You can use the TCP/IP-based triggers with the load-balancing cluster, this includes TCP/IP Server Trigger, HTTP Server Trigger and Web Service Trigger.
To enable NiceLabel Automation for load-balancing, you must do the following:
l Set up Microsoft Load-balancing Clustering feature in your Windows Servers.
l Install NiceLabel Automation on each node.
l Load the same configuration files in Automation Manager on each node.
- 138 -
Understanding Data Structures
Understanding Data StructuresThis chapter demonstrates the basic data structure that are frequently used in automation scenarios. We have to read the structures, extract the values of interest and print them on the label. Each of the mentioned samples is used in the sample configurations that install with the software. For more information, see the topic Examples.
l Text Database
l Compound CSV
l Binary Files
l Legacy Data
l Command Files
l XML Data
Binary FilesBinary files are files that don't contain plain text only, but include binary characters, such as control codes (characters below ASCII code 32). The Configuring Unstructured Data Filter has support for binary characters. You can use binary characters to define fields positions, and you can also use binary characters for field values.
Typical example would be data export from legacy system, where data for each label is delimited with a Form Feed character <FF>.
Example
In this case trigger captures the print stream. The yellow-highlighted data section must be extracted from the stream and sent to a different printer. The filter is configured to search for <FF> as field-end position.
<ESC>%-12345X@PJL USTATUSOFF@PJL INFO STATUS@PJL USTATUS DEVICE=ON<ESC>%-12345X<ESC>%-12345X
Command FilesCommand files are plain text files containing commands that will be executed one at a time from top to bottom. NiceLabel Automation supports native command files, as well as Oracle and SAP XML command files. For more information see the topics Reference and Troubleshooting, Oracle XML Specifications and SAP AII XML Specifications.
Example
The label label2.lbl will print to CAB A3 203DPI printer.
Compound CSVCompound CSV is a text file containing the CSV structure as well as multi-line header in other structure. The contents cannot be parsed with one filter alone. You have to configure two filters, one Configuring Structured Text Filter for fields in CSV section and one Configuring Unstructured Data Filter for fields in the header section. In actions you would define two Use Data Filter actions and execute both filters on the received data.
Example
The data from line 3 until the end of document has CSV structure and is parsed by Structured Text filter. The data in first two lines doesn't have any particular structure and is parsed by Unstructured Data filter.
Legacy DataLegacy data is unstructured or semi-structured export from legacy applications. This is not CSV or XML structure of data, so you must use Configuring Unstructured Data Filter and define the positions of fields of interest. The filter will extract field values so you can print them on labels.
Example
There is no rule about the structure. Each field must be configured manually.
HAWLEY ANNIE ER12345678 ABC XYZ 9876543210 PRE OP 07/11/12 F 27/06/47 St. Ken Hospital 3
Antibody Screen: Negative Store Sample : SAMPLE VALID FOR 24 HOURS, NO TRANSFUSION HISTORY SUPPLIED
07/11/12 B,31.0001245.E O Rh(D) Pos PHO RLUH BT
For more information, see the topic Examples.
Text DatabaseText database in an alias for text file with structured fields, such as CSV (comma separated file), or file with fixed-width fields. In either case, you can click the Import Data Structure button and follow the wizard to import the fields. If you have data file with delimited structure and number of fields vary from one copy to another, you can enable the Dynamic structure feature and let NiceLabel Automation handle the data extraction and mapping to variables automatically. For more information, see the topic Enabling Dynamic Structure.
Example
l File with delimited fields. The first line in the file can contain field names that filter can import.
Product_ID;Code_EAN;Product_desc;PackageCAS006;8021228110014;CASONCELLI ALLA CARNE 250G;6PAS501;8021228310001;BIGOLI 250G;6PAS502GI;8021228310018;TAGLIATELLE 250G;6PAS503GI;8021228310025;TAGLIOLINI 250G;6PAS504;8021228310032;CAPELLI D'ANGELO 250G;6
XML DataThe functionality from this topic is available in NiceLabel Automation Pro and NiceLabel Automation Enterprise.
XML stands for eXtensible Markup Language. XML tags are not predefined, you are free to define your own tags that will describe your data. XML is designed to be self-descriptive.
XML structure is defined by elements, attributes (and their values), and text (element text).
Examples
Oracle XML
Processing of Oracle XML is built-into the software. You don't have to configure any filters to extract data, just run the built-in action Run Oracle XML Command File. For more information on the XML structure, see the topic Oracle XML Specifications.
<?xml vers ion="1.0" s tandalone="no"?><labels _FORMAT="case.lbl" _PRINTERNAME="Production01" _QUANTITY="1"> <label> <var iab le name="CASEID">0000000123</var iab le> <var iab le name="CARTONTYPE"/> <var iab le name="ORDERKEY">0000000534</var iab le> <var iab le name="BUYERPO"/> <var iab le name="ROUTE"></var iab le> <var iab le name="CONTAINERDETAILID">0000004212</var iab le> <var iab le name="SERIALREFERENCE">0</var iab le> <var iab le name="FILTERVALUE">0</var iab le> <var iab le name="INDICATORDIGIT">0</var iab le> <var iab le name="DATE">11/19/2012 10:59:03</var iab le> </label></labels>
General XML
If the XML structure in not natively supported in the software, you will have to define the XML filter and define rules to extract data. For more information, see the topic Understanding Filters.
<?xml vers ion="1.0" encoding="utf-8"?><asx:abap xmlns:asx="http://www.sap.com/abapxml" vers ion="1.0"> <asx:values> <NICELABEL_JOB> <TIMESTAMP>20130221100527.788134</TIMESTAMP> <USER>PGRI</USER> <IT_LABEL_DATA> <LBL_NAME>goods_receipt.lbl</LBL_NAME> <LBL_PRINTER>Production01</LBL_PRINTER> <LBL_QUANTITY>1</LBL_QUANTITY> <MAKTX>MASS ONE</MAKTX> <MATNR>28345</MATNR>
Processing of NiceLabelXML is built-into the software. You don't have to configure any filters to extract the data, just run the built-in action Run Command File. For more information on the XML structure, see the topic XML Command File.
<nice_commands> <label name="label1.lbl"> <sess ion_pr int_job pr inter="CAB A3 203DPI" skip=0 job_name="job name 1" pr int_to_f i le="f i lename 1"> <sess ion quantity="10"> <var iab le name="var iab le name 1" >variable value 1</var iab le> </sess ion> </sess ion_pr int_job>
<pr int_job pr inter="Zebra R-402” quantity="10" skip=0 identical_copies=1 number_of_sets=1 job_name="job name 2" pr int_to_f i le="f i lename 2"> <var iab le name="var iab le1" >1</var iab le> <var iab le name="var iab le2" >2</var iab le> <var iab le name="var iab le3" >3</var iab le> </pr int_job> </label></nice_commands>
For more hands-on information on how to work with XML data, see the topic Examples.
- 143 -
Reference And Troubleshooting
Command File TypesCommand Files Specifications
Command files contain instructions for the print process and are expressed with the NiceLabel commands. Commands are executed one at a time from the beginning until the end of the file. The files support Unicode formatting, so you can include the multi-lingual contents. Command files come in three different flavors.
CSV Command File
The commands available in the CSV command files are a subset from NiceLabel commands. You can use the following commands: LABEL, SET, PORT, PRINTER and PRINT.
The CSV stands for Comma Separated Values. This is the text file where values are delimited by the comma (,) character. The text file can contain Unicode value (important for multi-language data). Each line in the CSV command file contains the commands for one label print action.
The first row in the CSV command file must contain the commands and variable names. The order of commands and names is not important, but all records in the same data stream must follow the same structure. Variable name-value pairs are extracted automatically and sent to the referenced label. If the variable with the name from CSV does not exist on the label, no error message is displayed.
Sample CSV Command File
The sample presents the structural view on the fields that you can use in the CSV command file.
The commands in the first line of data must be expressed with at (@) character. The fields without @ at the beginning are names of variables, and they will be extracted with their values as name-value pairs.
l @Label. Specifies the label name to use. It's a good practice include label path and filename. Make sure the service user can access file. For more information, see the topic Access to Net-work Shared Resources. A required field.
- 144 -
l @Printer. Specifies the printer to use. It overrides the printer defined in the label. Make sure the service user can access the printer. For more information, see the topic Access to Network Shared Resources. Optional field.
l @Quantity. Specifies the number of labels to print. Possible values: numeric value, VARIABLE or UNLIMITED. For more information, see the topic Print Label. A required field.
l @Skip. Specifies the number of labels to skip at the beginning of the first printed page. This fea-ture is useful if you want to re-use the partially printed sheet of labels. Optional field.
l @IdenticalCopies. Specifies the number of label copies that should be printed for each unique label. This feature is useful when printing labels with data from database or when you use coun-ters, and you need label copies. Optional field.
l @NumberOfSets. specifies the number of times the printing process should repeat. Each label set defines the occurrence of the printing process. Optional field.
l @Port. Specified the port name for the printer. You can override the default port as specified in the printer driver. You can also use it to redirect printing to file. Optional field.
l Other field names. All other fields define names of variables from the label. The field contents will be saved to the variable of the same name as its value.
JOB Command File
JOB command file is text file containing NiceLabel commands. The commands execute in order from the top to bottom. The commands usually start with LABEL (to open label), then SET (to set variable value) and finally PRINT (to print label). For more information about the available commands, see the topic Custom Commands.
Sample JOB Command File
This JOB file will open label2.lbl, set variables and print one label. Because no PRINTER command is used to redirect printing, the label will print using the printer name as defined in the label.
The commands available in the XML Command files are subset of NiceLabel commands. You can use the following commands: LOGIN, LABEL, SET, PORT, PRINTER, SESSIONEND, SESSIONSTART and SESSIONPRINT. The syntax differs a little bit when used in XML file.
The root element in the XML Command file is <Nice_Commands>. The next element that must follow is <Label>, and it specifies the label to use. To start label printing there are two methods: print labels normally using the element <Print_Job>, or print labels in session using the element <Session_Print_Job>. You can also change the printer to which the labels will print, and you can set the variable value.
- 145 -
Sample XML Command File
The sample presents the structural view on the elements and their attributes as you can use them in the XML command file.
This section contains the description of the XML Command file structure. There are several elements that contain attributes. Some attributes are required, other are optional. Some attributes can occupy pre-defined values only, for other you can specify the custom values.
l <Nice_Commands>. This is a root element.
l <Label>. Specifies the label file to open. If the label is already opened, it won't be opened again. The label file must be accessible from this computer. For more information, see the topic Access to Network Shared Resources. This element can occur several times within the com-mand file.
l Name. This attribute contains the label name. You can include the path to the label name. Required.
l <Print_Job>. The element that contains data for one label job. This element can occur several times within the command file.
l Printer. Use this attribute to override the printer defined in the label. The printer must be accessible from this computer. For more information, see the topic Access to Net-work Shared Resources. Optional.
l Quantity. Use this attribute to specify the number of labels to print. Possible values: numeric value, VARIABLE or UNLIMITED. For more information on parameters, see the topic Print Label. Required.
l Skip. Use this attribute to specify how many labels to skip at the beginning. This feature is useful if you print sheet of labels to laser printer, but the sheet is partial already prin-ted. For more information, see the topic Print Label. Optional.
l Job_name. Use this attribute to specify the name of your job file. The specified name is visible in the print spooler. For more information, see the topic Set Print Job Name. Optional.
- 146 -
l Print_to_file. Use this attribute to specify the file name where you want to save the printer commands. For more information, see the topic Redirect Printing to File. Optional.
l Identical_copies. use this attribute to specify the number of copies you need for each label. For more information, see the topic Print Label. Optional.
l <Session_Print_Job>. The element that contains commands and data for one or more ses-sions. The element can contain one or more <Session> elements. It considers session print rules. You can use this element several times within the command file. For available attributes look up the attributes for the element <Print_Job>. All of them are valid, you just cannot use the quantity attribute. See the description of the element <Session> to find out how to spe-cify label quantity in session printing.
l <Session>. The element that contains data for one session. When printing in session, all labels are encoded into a single print job and are sent to the printer as one job.
l Quantity. Use this attribute to specify the number of labels to print. Possible values: numeric value, string VARIABLE, or string UNLIMITED. For more information on para-meters, see the topic Print Label. Required.
l <Variable>. The element that sets the value of variables on the label. This element can occur several times within the command file.
l Name. The attribute contains the variable name. Required.
Oracle defined the XML format so that the XML contents can be understood, parsed and then printed as a label. A XML Document Type Definition (DTD) defines the XML tags that will be used in the XML file. Oracle will generate XML files according to this DTD and the 3rd party software will translate the XML according to this DTD.
To execute such command file, use the Run Oracle XML Command File action.
XML DTD
The following is the XML DTD that is used in forming the XML for both the synchronous and asynchronous XML formats, it defines the elements that will be used in the XML file, a list of their attributes and the next level elements.
When executing this sample Oracle XML file the label serial.lbl will print with the following variable values.
Variable name Variable valueitem O Ringrevision V1lot 123serial_number 12345lot_status 123serial_number_status Activeorganization A1
The label will print in 1 copy, with the spooler jobname Serial. The printer name is not specified in the XML file, so the label will print to the printer as defined in the label template.
SAP AII XML Specifications
NiceLabel Automation can present itself as RFID device controller, capable of encoding RFID tags and printing labels. For more information about SAP AII XML specifications, see the document SAP Auto-ID Infrastructure Device Controller Interface from SAP web page.
To execute such command file, use the Run SAP AII XML Command File action.
Sample SAP AII XML
This is the SAP AII XML providing data for one label (there is just one <label> element).
When executing this sample SAP AI XML file the label c:\SAP Demo\SAP label.lbl will print with the following variable values.
Variable name Variable valueEPC 00037000657330EPC_TYPE SGTIN-96EPC urn:autoid:tag:sgtin:3.5.0037000.065774.8PRODUCT ProductPRODUCT_DESCRIPTION Product description
The label will print in 1 copy, with the spooler job name Writer_Device2004092916574. The printer name is not specified in the XML file, so the label will print to the printer as defined in the label template.
Custom CommandsUsing Custom Commands
NiceLabel commands are used in command files to control label printing. NiceLabel Automation executes the command within command files from top to bottom. For more information, see the topic Reference and Troubleshooting.
You can use the specific custom command, when it is available in your NiceLabel Automation product as an action.
NOTE: For example, you can use SETPRINTPARAM, if you can see the action Set Print Parameter (product level Pro and Enterprise).
NiceLabel Commands Specification
COMMENT
;
When developing command file it is good practice to document your commands. This will help you decode what the script really performs, when you will look at the code after some time. Use semicolon (;) on the beginning of the line. Everything following the semicolon will be treated as comment and will not be processed.
CLEARVARIABLEVALUES
CLEARVARIABLEVALUES
- 151 -
This command resets variable values to their default values.
CREATEFILE
CREATEFILE <file name> [, <contents>]
This command will create a text file. You can use it to signal to some third party application that print process has begun or has ended, dependent on the location where you put the command. Use UNC syntax for network resources. For more information, see the topic Access to Network Shared Resources.
DELETEFILE
DELETEFILE <file name>
Deletes the specified file. Use UNC syntax for network resources. For more information, see the topic Access to Network Shared Resources.
IGNOREERROR
IGNOREERROR
Specifies that the error occurring in the JOB file will not terminate the print process, if the following errors occur:
l Incorrect variable name is used
l Incorrect value is sent to the variable
l Label does not exist / is not accessible
l Printer does not exist / is not accessible
LABEL
LABEL <label name> [,<printer_name>]
The command opens the label to print. If the label is already loaded, it will not be re-opened. You can include the path name. Enclose the label name in double quotes, if the name or path contains spaces. Use UNC syntax for network resources. For more information, see the topic Access to Network Shared Resources.
The optional printer_name specifies the printer, for which the label will be opened. Use this setting if you want to override the printer name that is saved in the label template. If the driver for the provided printer name is not installed or not available, the command will raise an error.
MESSAGEBOX
MESSAGEBOX <message> [,<caption>]
Logs the custom message into the trigger log. If the message contains space characters or commas, you have to enclose the text in double quotes (").
PORT
PORT <file name> [, APPEND]
- 152 -
This command overrides port as defined in the printer driver and redirect printing to a file. If file path or file name contain spaces, enclose the value in double quotes ("). Use UNC syntax for network resources. For more information, see the topic Access to Network Shared Resources.
The parameter APPEND is optional. By default the file will be overwritten. Use this parameter to append data into the existing file.
Once you use a command PORT in the JOB file it will be valid until the next PORT command, or until the end of file (whichever comes first). If you use PRINTER command after the PORT command has been executed, the PORT setting will overwrite the port defined for the selected printer. If you want to use the actual port that is defined for the selected printer, you have to use another PORT command with empty value, such as PORT = "".
PRINT
PRINT <quantity> [,<skip> [,<identical label copies> [,number of label sets]]]
This command starts the print process.
l Quantity. Specifies the number of labels to print.
l <number>. Specified number of labels will print.
l VARIABLE. Specifies that some label variable is defined as variable quantity and will con-tain the number labels to print. The label will determine how many labels to print.
l UNLIMITED. If you use a database to acquire values for objects, unlimited printing will print as many labels as there are record in the database. If you do not use a database, the maximum number of labels that thermal printer internally supports will be printed.
l Skip. Specifies the number of labels you want to skip on the first page. The parameter is used for printing labels on sheets of paper. When the part of the page has already been used, you can reuse the same sheet by shifting the start location of the first label.
l Identical label copies. Specifies how many copies of the same label must print.
l Number of label sets. Specifies the number of times the whole printing process should repeat itself.
NOTE: Make sure the quantity values are provided as the numeric value, not string value. Do not enclose the value in the double quotes.
PRINTER
PRINTER <printer name>
This command overrides the printer as defined in the label file. If the printer name contains space characters, you have to enclose it in double quotes (").
Use the printer name as displayed in the status line in the label design application. Printer names are usually the same as the printer names in Printers and Faxes from Control Panel, but not always. When you are using network printers, you might see the name displayed in syntax \\server\share.
PRINTJOBNAME
PRINTJOBNAME
- 153 -
This command specifies the print job name you will see in Windows Spooler. If name contains space characters or commas, you have to enclose the value in double quotes (").
SESSIONEND
SESSIONEND
This command closes print stream. Also see SESSIONSTART.
SESSIONPRINT
SESSIONPRINT <quantity> [,<skip>]
This command prints the currently referenced label and adds it into the currently open session-print stream. You can use multiple SESSIONPRINT commands one after another and join the referenced labels in single print stream. The stream will not close until you close it with the command SESSIONEND. The meaning of quantity and skip parameters is the same as with NiceCommand PRINT. Also see SESSIONSTART.
l Quantity. Specifies the number of labels to print.
l Skip. Specifies the number of labels you want to skip on the first page. The parameter is used for printing labels on sheets of paper. When the part of the page has already been used, you can reuse the same sheet by shifting the start location of the first label.
SESSIONSTART
SESSIONSTART
This command initiates the session-print type of printing.
The three session-print-related commands (SESSIONSTART, SESSIONPRINT, SESSIONEND) are used together. When you use command PRINT, every label data will be sent to the printer in a separate print job. If you want to join label data for multiple labels into print stream, you should use the session print commands. You must start with the command SESSIONSTART, followed with any number of SESSIONPRINT commands and in the end the command SESSIONEND.
Use these commands to optimize label printing process. Printing labels coming from one print job is much faster than printing labels from a bunch of print jobs.
There some rules you have to follow so the session print will not break.
l You cannot change the label within a session.
l You cannot change the printer within a session
l You must set values for all variables from the label within a session, even if some of the variables will have empty values
SET
SET <name>=<value> [,<step> [,<number or repetitions>]]
This command assigns the variable name with value. The variable must be defined on the label, or error will be raised. If the variable isn't on the label, an error will occur. Step and number of repetitions are parameters for counter variables. These parameters specify the counter increment and the number labels before the counter changes value.
- 154 -
If value contains spaces or comma characters, you must enclose the text in double quotes ("). Also see TEXTQUALIFIER.
If you want to assign multi-line value, use \r\n to encode newline character. \r is replaced with CR (Carriage Return) and \n is replaced with LF (Line Feed).
Be careful when setting values to variables that provide data for pictures on the label, as backslash characters might be replaced with some other characters.
EXAMPLE: If you ass ign a value "c:\My Pic tures\raw.jpg" to the var iab le, the "\r " wil l be rep laced with CR character .
SETPRINTPARAM
SETPRINTPARAM <paramname> = <value>
This command allows you to set fine-tune printer settings just before printing. The supported parameter for printer settings (paramname) are:
l PAPERBIN. Specifies the tray that contains label media. If the printer is equipped with more than just one paper / label tray, you can control which is used for printing. The name of the tray should be acquired from the printer driver.
l PRINTSPEED. Specifies the printing speed. The acceptable values vary from one printer to the other. See printer's manuals for exact range of values.
l PRINTDARKNESS. Specifies the printing darkness / contrast. The acceptable values vary from one printer to the other. See printer's manuals for exact range of values.
l PRINTOFFSETX. Specifies the left offset for all printing objects. The value for parameter must be numeric, positive or negative, in dots.
l PRINTOFFSETY. Specifies the top offset for all printing objects. The value for parameter must be numeric, positive or negative, in dots.
l PRINTERSETTINGS. Specifies the custom printer settings to be applied to the print job. The parameter requires the entire DEVMODE for the target printer, provided in a Base64-encoded string. The DEVMODE contains all parameters from the printer driver at once (speed, darkness, offsets and other). For more information, see topic Understanding Printer Settings and DEVMODE.
NOTE: The Base64-encoded string must be provided inside double quotes (").
TEXTQUALIFIER
TEXTQUALIFIER <character>
Text-qualifier is the character that embeds data value that is assigned to a variable. Whenever data value includes space characters, it must be included with text-qualifiers. The default text qualifier is a double quote character ("). Because double quote character is used as shortcut for inch unit of measure, sometimes it is difficult to pass the data with inch marks in the JOB files. You can use two double quotes to encode one double quote, or use TEXTQUALIFIER.
Example
- 155 -
TEXTQUALIFIER %SET Variable = %EPAK 12"X10 7/32"%
Access To Network Shared ResourcesThis topic defines best practice steps when using network shared resources.
l User privileges for service mode. The execution component of NiceLabel Automation runs in service mode under specified user account inheriting access privileges of that account. For NiceLabel Automation to be able to open label files and user printer drivers, the associated user account must have granted the same privileges. For more information, see the topic Run-ning in Service Mode.
l UNC notation for network shares. When accessing the file on a network drive, make sure to use the UNC syntax (Universal Naming Convention) and not the mapped drive letters. UNC is a naming convention to specify and map network drives. NiceLabel Automation will try to replace the drive-letter syntax with the UNC syntax automatically.
EXAMPLE: If the f i le is access ib le as G:\Labels\label.lbl, refer to it in UNC notation as \\server\share\Labels\label.lbl (where G: dr ive is mapped to \\server\share).
l Notation for accessing files in Control Center. When you open the file in the Document Stor-age inside Control Center, you can use the HTTP notation as http://server-name:8080/label.lbl, or WebDAV notation as \\servername@8080\DavWWWRoot\label.lbl.
Additional notes:
l The user account used to run NiceLabel Automation service will be used to get files from the Document Storage. This user must be configured in Control Center Configuration to have access to files in the Document Storage.
l The WebDAV access can only be used with Windows user authentication in Control Center.
NOTE: Document Storage is available with products NiceLabel Control Center Pro and NiceLabel Control Center Enterprise.
l Printer drivers availability. To print labels to network shared printer, you will have to make the printer driver available on the server where NiceLabel Automation is installed on. Make sure the user account that NiceLabel Automation Service runs under has access to the printer driver. If the network printer was just installed on the machine, NiceLabel Automation might not see it until your restart the Service. To allow automatic notification of new network printer drivers, you have to enable the appropriate inbound rule in the Windows firewall. For more information, see Knowledge Base article KB 265.
Accessing DatabasesWhenever NiceLabel Automation must get the data from some database, you must make sure that the necessary database driver is installed in the Windows system. The database drivers are provided by the company developing the database software. The driver that you install must match the bitness of your Windows system.
32-bit Windows
If you have 32-bit Windows, you can only install 32-bit database drivers. The same database driver will be used to configure the trigger in Automation Builder and to execute trigger execution in NiceLabel Automation Service. All NiceLabel Automation components will run as 32-bit applications.
64-bit Windows
If you have 64-bit Windows, you can install 64-bit or 32-bit database drivers. The applications that are running in 64-bit will use 64-bit database drivers. The applications that are running in 32-bit will use 32-bit database drivers.
l NiceLabel Automation Service. By default, the Service runs as 64-bit process, and as such needs 64-bit version of the database driver.
l NiceLabel Automation Builder. It always runs as 32-bit application. As such it must use 32-bit database drivers. So, when you execute the trigger preview in Automation Builder, the trigger will use 32-bit database drivers. When you deploy the same trigger into Automation Manager and run it in the production environment, the event log might display an error message about missing database content provider. This will happen, if you don't have 64-bit database driver installed on the same system. The Service runs as 64-bit process and requires 64-bit database driver.
To make it easier, when the 64-bit database drivers are not available, the Service will offload the database connection task to the Proxy Service process. Because Proxy Service runs as a 32-bit process, it will use the same database drivers as you have used in the Automation Builder, and connection will succeed.
Automatic Font ReplacementYou might design your label templates to print text objects formatted as built-in printer fonts. However, when printing such label to a different kind or printer, the selected fonts might not be available on the new printer. The new printer probably supports an entirely different set of internal fonts. The fonts might look alike, but are available under a different name.
The similar problem might occur when the Truetype font that is used in the label is not installed on the target machine, where NiceLabel Automation will print labels.
NiceLabel Automation can be configured to automatically replace the fonts used on the label with compatible fonts. You can configure the font mapping based the font names. When the original font is not found, NiceLabel Automation will try to use the first available replacement font as defined in the mapping table. If no suitable replacement font is found, Arial Truetype font will be used.
NOTE: If you configure the font replacement feature, the mapping rules will execute when the printer on the label is changed.
- 157 -
Configuring the Font Mapping
To configure the custom font mapping, do the following:
1. Open File Explorer and navigate to the following folder:
2. Open the file fontmapping.def in your favorite text XML editor.
3. Inside the element FontMappings, create a new element with a custom name.
4. Inside the new element, create at least two elements with name Mapping.
l Value of the first element Mapping must contain name of the original font.
l Value of the second element Mapping must contain name of the replacement font.
NOTE: There can be additional Mapping elements with new font names. If the first replacement font is not available, NiceLabel Automation will try the next. If no replacement fonts are available, Arial Truetype will be used instead.
Sample Mapping Configuration
In this example, two mappings are defined.
l The first mapping will convert any Avery font into matching Novexx font. For example font Avery YT100 will be replaced with Novexx YT100, font Avery 1 will be replaced with Novexx 1. If the Novexx font is not available, Arial Truetype will be used.
l The second mapping will convert Avery YT100 into Novexx YT104. If that font is not available, then font Zebra 0 will be used. If that font is also not available Arial Truetype will be used.
l The second mapping will override the first one.
<?xml vers ion="1.0" encoding="utf-8"?>
<FontMappings>
<AveryNovexx>
<Mapping>Avery</Mapping>
<Mapping>Novexx</Mapping>
</AveryNovexx>
<TextReplacement>
<Mapping>Avery YT100</Mapping>
<Mapping>Novexx YT104</Mapping>
<Mapping>Zebra 0</Mapping>
</TextReplacement>
</FontMappings>
- 158 -
Changing Multi-threaded Printing DefaultsThe functionality from this topic is available in NiceLabel Automation Pro and NiceLabel Automation Enterprise.
Every NiceLabel Automation product can take advantage of multiple cores inside the processor. Each core will be used to run a print process. Half of the number of cores are used for processing concurrent normal threads and the other half for processing concurrent session-print threads.
NOTE: Under normal circumstances you never have to change the default settings. Make sure you know what you are doing by changing these defaults.
To modify the number of the concurrent print threads, do the following:
1. Open file product.config in text editor.The file is here:
3. Save the file. NiceLabel Automation will automatically update the service with new number of print threads.
Session Print
Session-print enables when you print the same label to the same printer and are printing many labels. All labels will be sent to the printer in one print job. On the other hand is non-session printing, when each label is sent to the printer as a separate print job. From performance point of view the session print makes a better choice. NiceLabel Automation automatically determines the printing mode from the trigger configuration .
Compatibility With NiceWatch ProductsNiceLabel Automation can load the trigger configurations that were defined in one of the NiceWatch products. In majority of cases you can run NiceWatch configuration in NiceLabel Automation without any modification.
NiceLabel Automation products are using new .NET-based print engine optimized for performance and low memory footprint. The new print engine does not support each label design option that is available in the label designer. Each new release of NiceLabel Automation is closing the gap, but you might still experience some unavailable features.
- 159 -
Resolving Incompatibility Issues
NiceLabel Automation will also warn you if you try to print existing label templates that contain design functionality, not available in the new print engine.
If there are incompatibilities with the NiceWatch configuration file or label templates, you will be notified about:
l Compatibility with trigger configuration. While opening the NiceWatch configuration (.MIS file), NiceLabel Automation checks it against the supported features. Not all features from NiceWatch products are available in NiceLabel Automation. Some are not available at all and some are configured differently. If the MIS file contains some not supported features, you will see a list such features and they will be removed from the configuration.
In this case you have to open the .MIS file in Automation Builder and resolve the incompatibility issues. You will have to use NiceLabel Automation functionality to re-create the removed configuration.
l Compatibility with the label templates. If your existing label templates contain functionality not supported in the print engine provided by NiceLabel Automation, you will see error messages in the Log pane. This information is visible in the Automation Builder (when designing triggers) or in Automation Manager (when running the triggers).
In this case you have to open the label file in the label designer and remove the unsupported features from the label.
NOTE: For more information about incompatibility issues with NiceWatch and label designers, see Knowledge Base article KB251.
Opening NiceWatch Configuration for Editing
You can open the existing NiceWatch configuration (.MIS file) in Automation Builder and edit it in Automation Builder. You can save the configuration only in the .MISX format.
To edit the NiceWatch configuration, do the following:
1. Start Automation Builder.
2. Select File>Open NiceWatch File.
3. In Open dialog box, browse for the NiceWatch configuration file (.MIS file).
4. Click OK.
5. If the configuration contains unsupported functionality, a list of unsupported features will be displayed. They will be removed from the configuration.
Opening NiceWatch Configuration for Execution
You can open NiceWatch configuration (.MIS file) in Automation Manager without conversion to the NiceLabel Automation file format (.MISX file). If the triggers from NiceWatch are compatible with NiceLabel Automation, you can start using them right away.
To open and deploy NiceWatch configuration, do the following:
3. In Open dialog box, change the file type into NiceWatch Configuration.
4. Browse for the NiceWatch configuration file (.MIS file).
5. Click OK.
6. In the Automation Manager, the trigger from the selected configuration will display.To start the trigger, select it and click the Start button.
NOTE: If there is some compatibility problem with the NiceWatch configuration, you will have to open it in Automation Builder and reconfigure it.
Controlling The Service With Command-line ParametersThis chapter provides the information how to start or stop the Automation Services and how to control which configurations are loaded and which triggers are active, all from the command prompt.
NOTE: Make sure you are running Command Prompt in the elevated mode (with administrative permissions). Right-click cmd.exe and then select Run as Administrator.
Starting and Stopping the Services
To start both services from the command line use the following commands:
net start NiceLabelAutomationProxyServicenet start NiceLabelAutomationService
If you want to open configuration file when the Service is started, use:
net start NiceLabelAutomationService [Configuration]
For example:
net start NiceLabelAutomationService "c:\Project\configuration.MISX"
To stop services use the following commands:
net stop NiceLabelAutomationProxyServicenet stop NiceLabelAutomationService
Managing the Configurations and Triggers
NiceLabel Automation service can be controlled with the Automation Manager command-line parameters. The general syntax to use command-line parameters is as follows.
NOTE: Note: include the full path to the configuration name, don't use the file name alone.
- 161 -
To ADD configuration
The provided configuration will be loaded into service. No trigger will be started. If you include the /SHOWUI parameter, Automation Manager UI will be started.
The provided configuration will be reloaded into service. The running status of all triggers will be preserved. Reloading the configuration forces the refresh of all files cached for this configuration. For more information, see the topic Caching Files. If you include the /SHOWUI parameter, Automation Manager UI will be started.
The status codes is captured in the system variable errorlevel. To see the status code, execute the following command.
echo %errorlevel%
List of status codes:
Status Code Description0 No error occurred100 Configuration file name not found101 Configuration cannot be loaded200 Trigger not found201 Trigger cannot start
- 162 -
Database Connection String ReplacementA configuration file for Automation Service can include database connection string replacement commands.
User can configure the service to replace certain parts of connection string while the trigger is running. One instance of Automation can use same configuration, but actually use different database server for database related functionality. This enables the user to configure triggers in development environments and run them in the production environment without any changes in the configuration.
The connection string replacement logic is defined in the file DatabaseConnections.Config in the Automation system.net folder.
The configuration file defines from-to pairs in the XML structure. The <Replacement> tag contains one <From> and one <To> element. During the trigger execution the "from" string is replaced with the "to" string. The configuration file is not installed with Automation. You can add it yourself using the structure from the example. The same search & replace rules will be applied to all triggers running in the Automation Service on this machine.
NOTE: Make sure to restart both Automation Services, after you have added the config file into the Automation System folder.
Example
The existing trigger contains a connection to the Microsoft SQL server mySQLServer and the database myDatabase. You want to update the connection string to use the database NEW_myDatabase on the server NEW_mySQLServer.
Two Replacement elements have to be defined, one to change the server name and one to change the database name.
<?xml vers ion="1.0" encoding="UTF-8"?>
<DatabaseConnectionReplacements>
<Replacement>
<From>Data Source=mySQLServer</From>
<To>Data Source=NEW_mySQLServer</To>
</Replacement>
<Replacement>
<From>Initial Catalog=myDatabase</From>
<To>Initial Catalog=NEW_myDatabase</To>
</Replacement>
</DatabaseConnectionReplacements>
- 163 -
Entering Special Characters (Control Codes)Special characters or control codes are binary characters that are not represented on the keyboard. You cannot type them the way normal characters are because they must be encoded using a special syntax. You would need to use such characters when communicating with serial-port devices, receiving data on TCP/IP port, or when working with binary files, such as print files.
There are two methods of entering special characters:
l Enter the characters manually using one of the described syntax examples:
l Use syntax <special_character_acronim>, such as <FF> for FormFeed, or <CR> for CarriageReturn, or <CR><LF> for newline.
l Use syntax <#number>, such as <#13> for CarriageReturn or <#00> for null character.
For more information, see the topic List of Control Codes.
l Insert the listed characters. Objects that support special characters as their content have an arrow button on their right side. The button contains a shortcut to all of the available special characters. When you select a character in the list, it is added to the content. For more inform-ation, see topic Using Compound Values.
List Of Control CodesASCII Code Abbreviation Description1 SOH Start of Heading2 STX Start of Text3 ETX End of Text4 EOT End of Transmission5 ENQ Inquiry6 ACK Acknowledgment7 BEL Bell8 BS Back Space9 HT Horizontal Tab10 LF Line Feed11 VT Vertical Tab12 FF Form Feed13 CR Carriage Return14 SO Shift Out15 SI Shift In16 DLE Data Link Escape17 DC1 XON - Device Control 118 DC2 Device Control 219 DC3 XOFF - Device Control 320 DC4 Device Control 421 NAK Negative Acknowledgment22 SYN Synchronous Idle
- 164 -
23 ETB End Transmission Block24 CAN Cancel25 EM End of Medium26 SUB Substitute27 ESC Escape28 FS File Separator29 GS Group Separator30 RS Record Separator31 US Unit Separator188 FNC1 Function Code 1189 FNC2 Function Code 2190 FNC3 Function Code 3191 FNC4 Function Code 4
Offline ModeThe functionality from this topic is available in NiceLabel Automation Pro and NiceLabel Automation Enterprise.
Offline mode is an emergency mode that automatically enables when the licensing server cannot be contacted. Automation Manager will display the message in the information pane and log the event in the Windows Application Event log. NiceLabel Automation running in offline mode will continue to process triggers for up to 24 hours. You will have to restore a connection to the licensing server within 24 hours to ensure uninterrupted operation. Information about printing activities will be cached locally and synchronized with the server, once the connection is re-established.
NOTE: The offline mode is only available, when you activate NiceLabel Automation license in the NiceLabel Control Center.
Printer Licensing ModeDependent on the license, your NiceLabel Automation product might be limited to the number of printers you can use simultaneously. In this case NiceLabel Automation keeps a track of the number and names of different printers you have used for printing. When you exceed the number of printers defined by your license, you cannot print to any new printer. Error will be logged into log database.
You can reset the printer list by restarting the NiceLabel Automation service. To restart the service, open Windows Services console, find NiceLabel Automation Service and click the Restart Service button.
WARNING: Make sure you restart the service when NiceLabel Automation is idle. Restarting the service in busy environments can cause failures in the label production. When service is stopped, all internal queue lists and buffers are cleared and intermediate data erased. Restart the service with caution!
- 165 -
Running In Service ModeNiceLabel Automation runs as Windows service and is designed not to require any user intervention when processing data and executing actions. The service is configured to start when the operating system is booted and will run in the background as long as Windows is running. NiceLabel Automation will remember the list of all loaded configurations and active triggers. The last-known state is automatically restored when the server restarts.
The service runs with the privileges of the user account selected during the installation. The service will inherit all access permissions of that user account, including access to network shared resources, such as network drives and printer drivers. Use the account of some existing user with sufficient privileges, or even better, create a dedicate account just for NiceLabel Automation.
You can manage the service by launching the Services from the Windows Control Panel. In modern Windows operating system you can also manage the service in the Services tab in Windows Task Manager. You would use Services to execute tasks such as:
l Start and stop the service
l Change the account under which the service logs on
Good Practices Configuring the User Account for Service
l While possible it is considered a bad practice to run the service under the Local System Account. This is a predefined local Windows account with extensive privileges on the local com-puter, but is usually without privileges to access network resources. NiceLabel Automation requires full access to the account's %temp% folder, which might not be available for Local System Account.
l If creating a new user account for NiceLabel Automation service, make sure that you log in Win-dows with this new user at least once. This will make sure that the user account is fully created. E.g. when you log in, the temporary folder %temp% will be created.
l Disable the requirement to occasionally change password for this user account.
l Make sure the account has permissions to Log on as service.
l Run the Service in x64 (64-bit) mode.
Accessing Resources
NiceLabel Automation inherits all privileges from the Windows user account under which the service runs. The service executes all actions under that account name. Label can be opened, if the account has permissions to access the file. Label can be printed, if the account has access to the printer driver.
When using revision control system and approval steps inside Document Storage in Control Center, you have to make service's user account member of the 'Print-Only' profile, such as Operator. Then configure access permissions for specific folder to read-only mode or profile Operator. This will make sure that NiceLabel Automation will only use the approved labels, not drafts.
For more information, see the topic Access to Network Shared Resources.
Service Mode: 32-bit vs 64-bit
NiceLabel Automation can run on 32-bit (x86) and 64-bit (x64) systems natively. The execution mode is auto-determined by the Windows operating system. NiceLabel Automation will run in 64-bit mode on
- 166 -
64-bit Windows and it will run in 32-bit mode on 32-bit Windows.
l Printing. There are benefits running as 64-bit process, such as direct communication with the 64-bit printer Spooler service on 64-bit Windows. This eliminates the infamous problems with the SPLWOW64.EXE, which is a 'middleware' for 32-bit applications to use 64-bit printer spooler service.
l Database access. Running as 64-bit process NiceLabel Automation Service requires 64-bit ver-sion of the database drivers to be able to access the data. For more information, see the topic Accessing Databases.
NOTE: If you don't have 64-bit database drivers for your database, you cannot use NiceLabel Automation in 64-bit mode. You have to install it to 32-bit system, or force it into 32-bit mode.
Forcing x86 Operation Mode on Windows x64
There might be reasons to run NiceLabel Automation as 32-bit application on 64-bit Windows.
To force NiceLabel Automation into x86 mode on Windows x64, do the following:
l Change the file name to NiceLabelAutomationService.x86.exe, keeping the existing path.
l Restart NiceLabel Automation service.
WARNING: It is not recommended to change the NiceLabel Automation service mode. If you will do it anyway, make sure you execute extensive trigger testing prior to deployment in the production environment.
Search Order For The Requested FilesWhen NiceLabel Automation tries to load a specified label file or image file, it will not cancel the processing and report the error, if the file is not found. It will try to locate the requested file in the alternate locations.
NiceLabel Automation will try to locate the file in this order:
1. Check, if the file exists in the location as specified by the action.
2. Check, if the file exists in the same folder as the configuration file (.MISX).
3. Check, if the label file exists in .\Labels folder (for graphic files check .\Graphics folder).
4. Check, if the label file exists in ..\Labels folder (for graphic files check ..\Graphics folder).
5. Check if the file exists in the global Labels folder (Graphics folder for graphics files) in the Con-figuration utility.
If the file is not found in any of these locations, then the action fails and the error is raised.
- 167 -
Securing Access To Your TriggersIn some deployments you want to set up secured access to the triggers. NiceLabel Automation allows you to enable security measures in order to allows access to triggers from trustworthy network devices. The security configuration depends on the trigger type. Some of the trigger types by design allow configuration of security access. For all triggers that are based on the TCP/IP protocol, you can further define all details inside the Windows Firewall.
Configuring Firewall
When you use TCP/IP based triggers, such as TCP/IP Server Trigger, HTTP Server Trigger or Web Service Trigger you must make sure to allow external applications connecting to the triggers. Each trigger runs within NiceLabel Automation service, access to which is governed by Windows Firewall. A firewall is like locking the front door to your house - it helps keep intruders from getting in.
NOTE: By default, the Windows Firewall is configured to allow all inbound connections to the NiceLabel Automation service. This makes it easier for you to configure and test triggers, but can be susceptible to unauthorized access.
If the NiceLabel Automation deployment your company is a subject of strict security regulations, you must update the firewall rules according to them.
For example:
l You can fine-tune firewall to accept incoming traffic from well-known sources only.
l You can allow inbound data only on pre-defined ports.
l You can allow connection only from certain users.
l You can define on which interfaces your will accept incoming connection.
To make changes in the Windows Firewall , open the Windows Firewall with Advanced Security management console from Control Panel -> System And Security -> Windows Firewall -> Advanced Settings.
NOTE: When you have NiceLabel Automation linked to NiceLabel Control Center products, make sure that you enable inbound connection on port 56415/TCP. If you close this port, you won't be able to manage NiceLabel Automation from Control Center.
Allowing Access Based on the File Access Permissions
File trigger will execute upon the time-stamp-change event in the monitored file or files. You must put the trigger files into a folder, which the NiceLabel Automation service can access. The user account running the Service must be able to access the files. Simultaneously, access permissions to the location also determine, which user and/or application can save the trigger file. You should set up access permissions in a way that only authorized users can save files.
Allowing Access Based on the IP Address & Hostname
You can protect access to TCP/IP Server trigger with two lists of IP addresses and host names.
l The first list 'Allow connections from the following hosts' contains IP addresses or host names of devices that can send data to the trigger. When some device has an IP address listed
- 168 -
here, it is allowed to send data to the trigger.
l The second list 'Deny connections from the following hosts' contains IP addresses or host names of devices that are not allowed to send data. When some device has an IP address listed here, it is not allowed to send data to the trigger.
Allowing Access Based on User names & Passwords
You can protect access to HTTP Server trigger by enabling the user authentication. When enabled, each HTTP request sent to the HTTP Server trigger must include the 'user name & password' combination that matches the defined combination.
Tips And Tricks For Using Variables In ActionsWhen you use variables in the actions within NiceLabel Automation, follow the next recommendations.
l Enclose variables in square brackets. When you have variables with spaces in their names and refer to variables in actions, such as Execute SQL Statement or Execute Script enclose the vari-ables in square brackets, like [Product Name]. You would also use square brackets, if vari-able names are the same as reserved names, e.g. in the SQL Statement.
l Place colon in front of the variable name. To refer to the variable in the Execute SQL Statement statement or in a Database Trigger you have to place a colon (:) in front of variable name, such as :[Product ID]. The SQL parser will understood it as 'variable value'.
SELECT * FROM MyTable WHERE ID = :[ProductID]
l Convert values to integer for computation. When you want to execute some numeric cal-culation with the variables, make sure that you convert the variable value into integer. Defining the variable as numerical only limits the characters accepted for value, but doesn't change the variable type. NiceLabel Automation treats all variables of string type. In VBScript you would use the function CInt().
l Set default / start up values for scripts. When you use variables in Execute Script action, make sure they have some default value, or the script checking might fail. You can define default val-ues in variable properties, or inside the script (and remove them after you have tested the script).
Tracing ModeBy default, NiceLabel Automation logs events into the log database. This includes higher-level information, such as logging of action execution, logging of filter execution and logging of trigger status updates. For more information, see the topic Event Logging Options.
However, the default logging doesn't log the deep under-the-hood executions. When the troubleshooting is needed on the lower-level of the code execution, the tracing mode must be enabled. In this mode NiceLabel Automation logs the details about all internal executions that take place during trigger processing. Tracing mode should only be enabled during troubleshooting to collect logs and then disabled to enable normal operation.
- 169 -
WARNING: Tracing mode will slow down processing and should only be used when instructed so by the NiceLabel technical support team.
Enabling the tracing mode
To enable the tracing mode, do the following:
1. Navigate to the NiceLabel Automation System.Net folder.
5. When you save the file, NiceLabel Automation Service will automatically apply the setting.
6. The tracing files (*.LOG) will appear in the same folder.
7. To confirm that tracing mode is enabled, start the Automation Manager. It will display the text Tracing has been enabled in the notification pane above the trigger list.
Understanding Printer Settings And DEVMODENOTE: The DEVMODE data structure is part of the GDI Print API structure in Windows. This is a highly technical information, used only with very specific requirements.
Whenever you print the label in NiceLabel software (or any document in Windows applications for that matter), the printing application will read the printer settings as defined in the printer driver and apply them to the print job. The same label can be printed to different printers by just selecting some other printer driver. Each time the printer settings of a new printer apply to the label.
Printing some text document on one or other laser printer usually produces the same or comparable result. Printing labels to one or another label printer could produce different result. The same label file might require some extra settings in the printer driver, such as adjustment of offsets, speed and temperature of printing, to produce comparable results. NiceLabel also applies the printer settings with every printout. By default, the printer settings are saved inside the label file for the selected printer.
DEVMODE is a Windows structure that holds the printer settings (initialization and environment information about a printer). It is made up of two parts: public and private. The public part contains data that is common to all printers. The private part contains data that is specific to a particular printer. The private part can be of variable length and contains all of the manufacturer specific settings.
l Public part. This part encodes the general settings that are exposed in the printer driver model, such as printer name, driver version, paper size, orientation, color, duplex and similar. The public part is the same for any printer driver and does not support the specifics of label printers (thermal printers, industrial ink jet printers, laser engraving machines).
l Private part. This part encodes the settings not available in the public part. NiceLabel printer drivers use this part to store the printer model-specific data, such as printing speed, tem-perature setting, offsets, print mode, media type, sensors, cutters, graphics encoding, RFID sup-port and similar. The data structure within the private part is up to the driver developers and looks just as a stream of binary data.
Changing the DEVMODE
The DEVMODE data structure is stored in the Windows registry. There are two copies of the structure: default printer settings and user-specific printer settings. You change the DEVMODE (printer settings) by changing the parameters in the printer driver. The first two options are Windows-related, the third option is available with NiceLabel software.
l The default printer settings. They are defined in Printer properties>Advanced tab>Printing Defaults.
l The user specific settings. They are stored separately for each user in the user's HKEY_CURRENT_USER registry key. By default, the user specific settings are inherited from the printer’s default settings. The user specific settings are defined in Printer prop-erties>Preferences. All the modifications here will affect the current user only.
l The label specific settings. The designer using NiceLabel NiceLabel software can choose to embed the DEVMODE into the label itself. This makes the printer settings portable. When the label is copied to another computer, the printer settings travel with it. To embed printer set-tings into the label enable the option Use custom printer settings saved in the label in File>Label Setup>Printer tab in the Designer Pro. You can change the in-label printers settings by selecting File>Printer Settings.
Applying custom DEVMODE to the printout
In NiceLabel Automation you can open a label file and apply the custom DEVMODE to it. When printing the label, the label design is taken from the .LBL file and the DEVMODE applies the specific printer-related formatting. This allows you to have just one label master. The printout will be the same no matter which print you use for printing, because the optimal printer settings for that printer are applied.
To apply the custom DEVMODE to the label, you can use two options:
1. Using the Set Print Parameter action, more specifically the parameter Printer settings.
2. The JOB command file, more specifically the command SETPRINTPARAM with parameter PRINTERSETTINGS. For more information, see Custom Commands.
- 171 -
Using The Same User Account To Configure And To Run TriggersThe NiceLabel Automation Service always runs under the credentials of the user account configured for the service. However, Automation Builder always runs under the credentials of the currently logged-on user. The credentials of service account and currently logged-on account might be different. While you are able to preview the trigger in the Automation Builder with no problem, the Service might report an error message, caused by credentials mismatch. While currently logged-on user has permissions to access folders and printers, the user account that the Service uses might not.
You can test the execution of the triggers in Automation Builder using the same credentials as the Service has. To do so, run Automation Builder under the same user account as is defined for the Service.
To run Automation Builder under a different user account, do the following:
1. Press and hold Shift key, then right click the Automation Builder icon.
2. Select Run as different user.
3. Enter the credentials for the same user, that is used in NiceLabel Automation Service.
4. Click OK.
If you frequently want to run the Automation Builder with credentials of the other user account, see the Windows-provided command-line utility RUNAS. Use the switches /user to specify the user account and /savecred so you will only type the password once, then it will be remembered for the next time.
- 172 -
Examples
ExamplesNiceLabel Automation ships with examples that describe the configuration procedures for frequently used data structures and provide configuration of actions. You can quickly learn how to configure filters to extract data from CSV (Comma Separated Values) files, from legacy data exports, from printers files, from XML documents, from binary files, just to name a few.
Shortcut to sample folder is available in Automation Builder.
To open the sample folder in Windows Explorer do the following:
1. Open Automation Builder.
2. Click the question mark in the upper right corner.
3. Select Samples.
4. The folder with the example files will open in Windows Explorer.
5. See the README.PDF file in each folder.
The samples are installed in the following folder, dependent on the system, you use.
which would resolve toc:\Users\Public\Documents\NiceLabel Samples\Automation
- 174 -
Technical Support
Online SupportYou can find the latest builds, updates, workarounds for problems and Frequently Asked Questions (FAQ) on the product web site at www.nicelabel.com.
For more information please refer to:
l Knowledge base: http://kb.nicelabel.com
l NiceLabel Support: http://www.nicelabel.com/support
l NiceLabel Tutorials: www.nicelabel.com/Learning-center/Tutorials
l NiceLabel Forums: forums.nicelabel.com
NOTE: If you have a Service Maintenance Agreement (SMA), please contact the premium support as specified in the agreement.