315
| Date post: | 19-Aug-2015 |
| Category: |
Education |
| Upload: | matoom-marita |
| View: | 1,628 times |
| Download: | 5 times |
ptg

ptg
Rob Sylvan
Snapshots to
Nikon D5100:
Great Shots
From

ptg
Nikon D5100: From Snapshots to Great ShotsRob Sylvan
Peachpit Press1249 Eighth StreetBerkeley, CA 94710510/524-2178510/524-2221 (fax)
Find us on the Web at www.peachpit.comTo report errors, please send a note to [email protected] Press is a division of Pearson Education
Copyright © 2012 by Peachpit Press
Senior Acquisitions Editor: Nikki McDonaldAssociate Editor: Valerie WitteProduction Editor: Lisa BraziealCopyeditor: Scout FestaProofreader: Patricia PaneComposition: WolfsonDesignIndexer: Valerie Haynes PerryCover Image: Rob SylvanCover Design: Aren StraigerBack Cover Author Photo: Rob Sylvan
Notice of RightsAll rights reserved. No part of this book may be reproduced or transmitted in any form by any means,electronic, mechanical, photocopying, recording, or otherwise, without the prior written permission ofthe publisher. For information on getting permission for reprints and excerpts, contact [email protected].
Notice of LiabilityThe information in this book is distributed on an “As Is” basis, without warranty. While every precautionhas been taken in the preparation of the book, neither the author nor Peachpit shall have any liability to any person or entity with respect to any loss or damage caused or alleged to be caused directly orindirectly by the instructions contained in this book or by the computer software and hardware productsdescribed in it.
TrademarksAll Nikon products are trademarks or registered trademarks of Nikon and/or Nikon Corporation.
Many of the designations used by manufacturers and sellers to distinguish their products are claimed as trademarks. Where those designations appear in this book, and Peachpit was aware of a trademarkclaim, the designations appear as requested by the owner of the trademark. All other product namesand services identified throughout this book are used in editorial fashion only and for the benefit of suchcompanies with no intention of infringement of the trademark. No such use, or the use of any tradename, is intended to convey endorsement or other affiliation with this book.
Camera provided to author by B&H Photo (www.bhphotovideo.com)
ISBN-13 978- 0-321-79384-3ISBN-10 0-321-79384-6
9 8 7 6 5 4 3 2 1Printed and bound in the United States of America

ptg
DeDicationFor all of the teachers I have had in the past, and all of the ones I have yet to meet.
Thank you.
ptg
acknowleDgmentsMy deepest thanks go to Jeff Revell, the author of a number of books in the From Snapshots to Great
Shots series, and specifically of the book on the D5000, which I had the honor and pleasure of updating
for the D5100. Jeff is a tremendous photographer and gifted teacher. Thank you for providing such a
sound foundation upon which to build.
Any book that has reached the final stage of being published is actually the work of many hands
(eyes, brains, and hearts too) behind the scenes. I owe everyone at Peachpit a great deal of gratitude,
but specifically Nikki McDonald, Ted Waitt, Valerie Witte, Lisa Brazieal, Scout Festa, Patricia Pane,
Owen Wolfson, Valerie Haynes Perry, Aren Straiger, Sara Jane Todd, Scott Cowlin, and Nancy Aldrich-
Ruenzel, who were instrumental in getting this book finished, making it look so darn fantastic, and
putting it out into the world. Thank you all.
A special thanks to David Brommer and B&H Photo Video for help in securing the D5100 I used to write
this book.
I am grateful for all that I have learned from my friends at the National Association of Photoshop Profes-
sionals, from the fantastic instructors at Photoshop World, and of course from my fellow photographers
at iStockphoto. You all have taught and inspired me over the years.
I also want to thank my wife, Paloma, for being the love of my life and my number one supporter during
this project; my son, Quinn, for assisting me on many shoots and being the model in many more; and my
family, friends, and neighbors—Ea, Avery, Otis, Hayley, Mark, Adrienne, Emma, Julia, Paige, Kris, Gabby,
Sabrina, Chris, Anna, Dan, Holden, Beth, and Brent—for being a part of the book in large and small ways.
Also, a big shout-out to Crackskull’s Coffee & Books and the New Hampshire Media Makers. Thanks, guys!
ptg
ContentsintroDuction x
chapter 1: the D5100 top ten list 1Ten Tips to Make Your Shooting More Productive
Right Out of the Box
Poring Over the Camera 2
Poring Over the Camera 4
1. Charge Your Battery 5
2. Adjust Your Auto Off Timer Setting 6
3. Set Your JPEG Image Quality 7
4. Turn Off the Auto ISO Setting 9
5. Set Your Focus Point and Mode 11
6. Set the Correct White Balance 13
7. Set Your Color Space 15
8. Know How to Override Autofocus 17
9. Review Your Shots 18
10. Hold Your Camera for Proper Shooting 22
chapter 2: First things First 27A Few Things to Know and Do Before You Begin
Taking Pictures
Poring Over the Picture 28
Choosing the Right Memory Card 30
Formatting Your Memory Card 31
Updating the D5100’s Firmware 32
Cleaning the Sensor 33
Using the Right Format: Raw vs. JPEG 34
Lenses and Focal Lengths 37
What Is Exposure? 42
Motion and Depth of Field 45
Video and the D5100 48
c o n t e n t s v

ptg
chapter 3: the auto moDes 55Get Shooting with the Automatic Camera Modes
Poring Over the Picture 56
Auto Mode 58
Auto (Flash Off) Mode 59
Portrait Mode 60
Landscape Mode 61
Child Mode 63
Sports Mode 64
Close-up Mode 65
Scene Modes 66
Effects Modes 71
Why You May Never Want to Use the Auto Scene Modes Again 74
chapter 4: the proFessional moDes 79Taking Your Photography to the Next Level
Poring Over the Picture 80
P: Program Mode 82
S: Shutter Priority Mode 85
A: Aperture Priority Mode 89
M: Manual Mode 93
How I Shoot: A Closer Look at the Camera Settings I Use 96
chapter 5: moving target 103The Tricks to Shooting Subjects in Motion
Poring Over the Picture 104
Stop Right There! 106
Using Shutter Priority (S) Mode to Stop Motion 109
Using Aperture Priority (A) Mode to Isolate Your Subject 111
The Auto ISO Sensitivity Control Trick 113
Keep them in Focus with Continuous-Servo Focus and AF Focus Point Selection 115
Stop and Go with 3D-Tracking AF 116
Manual Focus for Anticipated Action 117
Keeping Up with the Continuous Shooting Mode 119
A Sense of Motion 121
Tips for Shooting Action 123
vi n i k o n D 5 1 0 0 : F r o m s n a p s h o t s t o g r e at s h o t s
ptg
chapter 6: say cheese! 129Settings and Features to Make Great Portraits
Poring Over the Picture 130
Automatic Portrait Mode 132
Using Aperture Priority Mode 132
Metering Modes for Portraits 135
Using the AE-L (Auto Exposure Lock) Feature 137
Focusing: The Eyes Have It 138
Classic Black and White Portraits 140
The Portrait Picture Control for Better Skin Tones 144
Detect Faces with Live View 144
Use Fill Flash for Reducing Shadows 146
Portraits on the Move 148
Tips for Shooting Better Portraits 149
chapter 7: lanDscape photography 161 Tips, Tools, and Techniques to Get the Most out of Your
Landscape Photography
Poring Over the Picture 162
Sharp and In Focus: Using Tripods 164
Selecting the Proper ISO 166
Using Noise Reduction 168
Selecting a White Balance 169
Using the Landscape Picture Control 171
Taming Overexposure with Exposure Compensation 172
Shooting Beautiful Black and White Landscapes 175
The Golden Light 176
Where to Focus 178
Easier Focusing 180
Making Water Fluid 182
Directing the Viewer: A Word about Composition 184
Advanced Techniques to Explore 190
c o n t e n t s vii
ptg
chapter 8: mooD lighting 205Shooting When the Lights Get Low
Poring Over the Picture 206
Raising the ISO: The Simple Solution 208
Using Very High ISOs 210
Stabilizing the Situation 212
Focusing in Low Light 214
Shooting Long Exposures 217
Using the Built-in Flash 218
Compensating for the Flash Exposure 221
Reducing Red-Eye 223
Rear Curtain Sync 226
Flash and Glass 228
A Few Words about External Flash 228
chapter 9: creative compositions 233Improving Your Pictures with Sound Compositional Elements
Poring Over the Picture 234
Depth of Field 236
Angles 238
Point of View 239
Patterns 239
Color 241
Contrast 242
Leading Lines 245
Splitting the Frame 246
Frames within Frames 246
viii n i k o n D 5 1 0 0 : F r o m s n a p s h o t s t o g r e at s h o t s

ptg
chapter 10: aDvanceD techniques 251Impress Your Family and Friends
Poring Over the Picture 252
Spot Meter for More Exposure Control 254
Manual Mode 257
Avoiding Lens Flare 259
Bracketing Exposures 260
Macro Photography 261
Active D-Lighting 263
The My Menu Setting 266
Conclusion 267
inDex 270
Bonus chapter 11: pimp my riDe 11-1
Bonus chapter 12: D5100 viDeo: BeyonD the Basics 12-1
c o n t e n t s ix
ptg
IntroductionThe D5100 is an amazing bit of technology and a very capable tool for creating photographsthat you will be proud to show others. The intention of this book is not to be a rehash of the owner’s manual that came with the camera, but rather to be a resource for learning how to improve your photography while specifically using your D5100. I am very excited andhonored to help you in that process, and to that end I have put together a short Q&A to helpyou get a better understanding of just what you can expect from this book.
q: is every camera Feature going to Be covereD?
A: Nope, just the ones I felt you need to know about in order to start taking great photos.Believe it or not, you already own a great resource that covers every feature of your camera:the owner’s manual. Writing a book that just repeats this information would have been awaste of my time and your money. What I did want to write about was how to harness cer-tain camera features to the benefit of your photography. As you read through the book, youwill also see callouts that point you to specific pages in your owner’s manual that are relatedto the topic being discussed. For example, in Chapter 6, I discuss the use of the AE-L button,but there is more information available on this feature in the manual. I cover the functionthat applies to our specific needs, but I also give you the page numbers in the manual toexplore this function even further.
q: so iF i alreaDy own the manual, why Do i neeD this Book?
A: The manual does a pretty good job of telling you how to use a feature or turn it on in themenus, but it doesn’t necessarily tell you why and when you should use it. If you really wantto improve your photography, you need to know the whys and whens to put all of thosegreat camera features to use at the right time. To that extent, the manual just isn’t going tocut it. It is, however, a great resource on the camera’s features, and it is for that reason that Itreat it like a companion to this book. You already own it, so why not get something of valuefrom it?
q: what can i expect to learn From this Book?
A: Hopefully, you will learn how to take great photographs. My goal, and the reason thebook is laid out the way it is, is to guide you through the basics of photography as they relateto different situations and scenarios. By using the features of your D5100 and this book, youwill learn about aperture, shutter speed, ISO, lens selection, depth of field, and many otherphotographic concepts. You will also find plenty of full-page photos that include captions,shooting data, and callouts so you can see how all of the photography fundamentals cometogether to make great images. All the while, you will be learning how your camera worksand how to apply its functions and features to your photography.
x n i k o n D 5 1 0 0 : F r o m s n a p s h o t s t o g r e at s h o t s
ptg
xi
q: what are the assignments all aBout?
A: At the end of most of the chapters, you will find shooting assignments, where I give you some suggestions as to how you can apply the lessons of the chapter to help reinforceeverything you just learned. Let’s face it—using the camera is much more fun than readingabout it, so the assignments are a way of taking a little break after each chapter and havingsome fun.
q: shoulD i reaD the Book straight through or cani skip arounD From chapter to chapter?
A: Here’s the easy answer: yes and no. No, because the first four chapters give you thebasic information that you need to know about your camera. These are the buildingblocks for using the camera. After that, yes, you can move around the book as you see fit because those chapters are written to stand on their own as guides to specific types ofphotography or shooting situations. So you can bounce from portraits to landscapes andthen maybe to a little action photography. It’s all about your needs and how you want toaddress them. Or, you can read it straight through. The choice is up to you.
q: i Don’t see any chapters DevoteD to viDeo. Do you cover that?
A: I know that one of the reasons you probably bought the D5100 was its ability to captureHD video. I have covered some basic video setup information in Chapter 2, but I reallywanted the focus of this book to be the photographic capabilities and possibilities. Don’tworry, though; read the next Q&A and I think you’ll be happy.
q: is there anything else i shoulD know BeFore getting starteD?
A: In order to keep the book short and focused, I had to be pretty selective about what I put in each chapter. The problem is that there is a little more information that mightcome in handy after you’ve gone through all the chapters. So as an added value for you,there are two bonus chapters: Chapter 11, called “Pimp My Ride,” and Chapter 12, “D5100Video: Beyond the Basics.” Chapter 11 is full of information on photo accessories that willassist you in making better photographs. You will find recommendations for things likefilters, tripods, and much more. Chapter 12 will lead you through some video tips and tech-niques to make your D5100 videos even better. To access the bonus chapters, just log in toor join Peachpit.com (it’s free) and enter the book’s ISBN on this page: www.peachpit.com/store/register.aspx. After you register the book, a link to the bonus chapters will be listedon your Account page under Registered Products.
q: is that it?
A: One last thought before you dive into the first chapter. My goal in writing this book hasbeen to give you a resource that you can turn to for creating great photographs with yourNikon D5100. Take some time to learn the basics and then put them to use. Photography,like most things, takes time to master and requires practice. I have been a photographerfor many years and I’m still learning. Always remember, it’s not the camera but the personusing it who makes beautiful photographs. Have fun, make mistakes, and then learn fromthem. In no time, I’m sure you will transition from a person who takes snapshots to a pho-tographer who makes great shots.

ptg
1
ISO 2001/30 sec.f/860mm lens
ptg
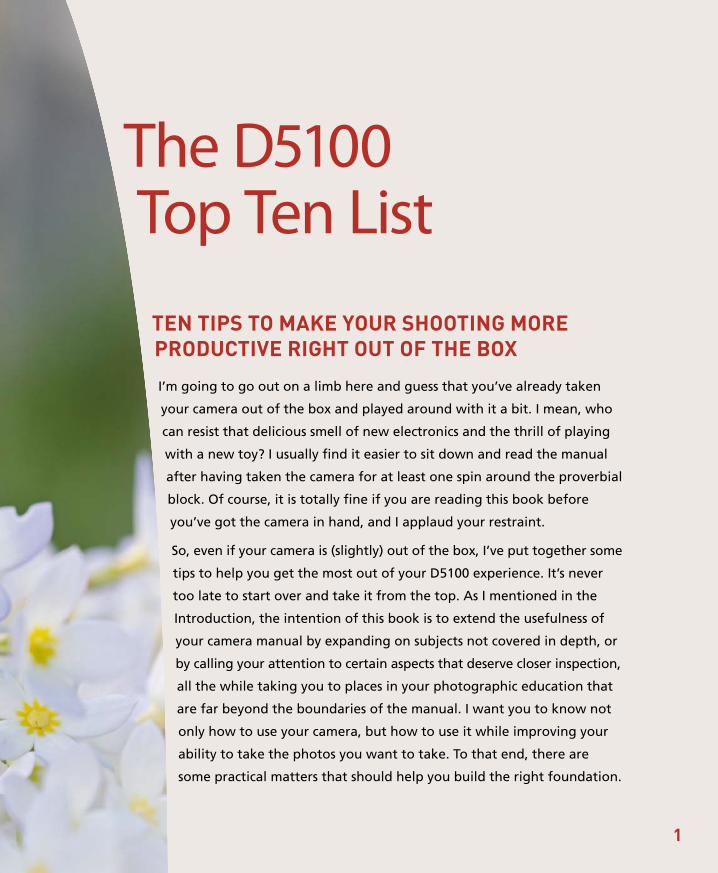
The D5100 Top Ten List
Ten Tips To make your shooTing moreproducTive righT ouT of The box
I’m going to go out on a limb here and guess that you’ve already taken
your camera out of the box and played around with it a bit. I mean, who
can resist that delicious smell of new electronics and the thrill of playing
with a new toy? I usually find it easier to sit down and read the manual
after having taken the camera for at least one spin around the proverbial
block. Of course, it is totally fine if you are reading this book before
you’ve got the camera in hand, and I applaud your restraint.
So, even if your camera is (slightly) out of the box, I’ve put together some
tips to help you get the most out of your D5100 experience. It’s never
too late to start over and take it from the top. As I mentioned in the
Introduction, the intention of this book is to extend the usefulness of
your camera manual by expanding on subjects not covered in depth, or
by calling your attention to certain aspects that deserve closer inspection,
all the while taking you to places in your photographic education that
are far beyond the boundaries of the manual. I want you to know not
only how to use your camera, but how to use it while improving your
ability to take the photos you want to take. To that end, there are
some practical matters that should help you build the right foundation.
1
ptg
2 n i k o n d 5 1 0 0 : f r o m s n a p s h o T s T o g r e aT s h o T s
poring over The camera
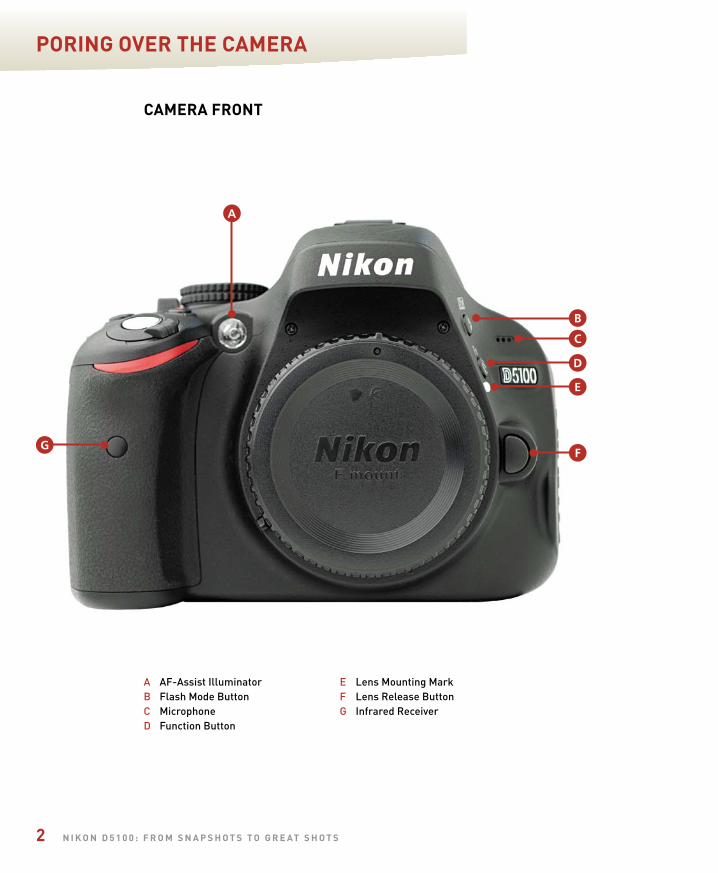
camera fronT
A AF-Assist IlluminatorB Flash Mode ButtonC MicrophoneD Function Button
E Lens Mounting MarkF Lens Release ButtonG Infrared Receiver
B
D
FG
A
C
E

ptg
c h a p T e r 1 : T h e d 5 1 0 0 T o p T e n L i s T 3
camera back
E
L
B
F
G
I
H
N
M
A MenuB Information EditC Mode DialD AutoExposure/AutoFocus Lock ButtonE Command Dial
F Playback ButtonG Multi-SelectorH OK ButtonI Memory Card DoorJ Delete Button
K Playback Zoom InL Thumbnail/Playback Zoom OutM LCD/Information ScreenN Infrared Receiver
DA
K J
C
ptg
4 n i k o n d 5 1 0 0 : f r o m s n a p s h o T s T o g r e aT s h o T s
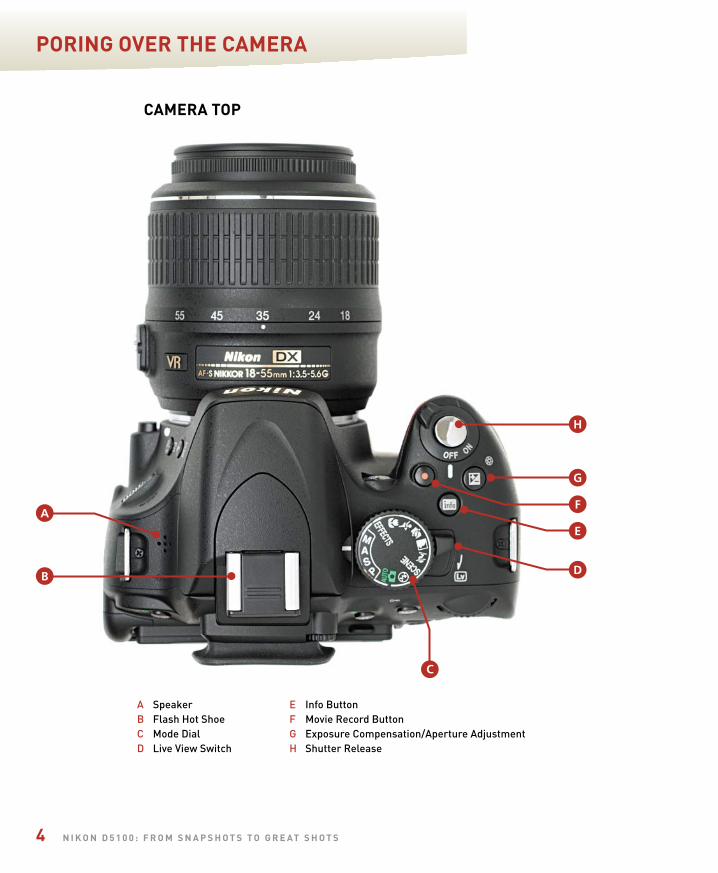
poring over The camera
camera Top
A SpeakerB Flash Hot ShoeC Mode DialD Live View Switch
E Info ButtonF Movie Record ButtonG Exposure Compensation/Aperture AdjustmentH Shutter Release
F
E
G
H
A
B
C
D
ptg
c h a p T e r 1 : T h e d 5 1 0 0 T o p T e n L i s T 5
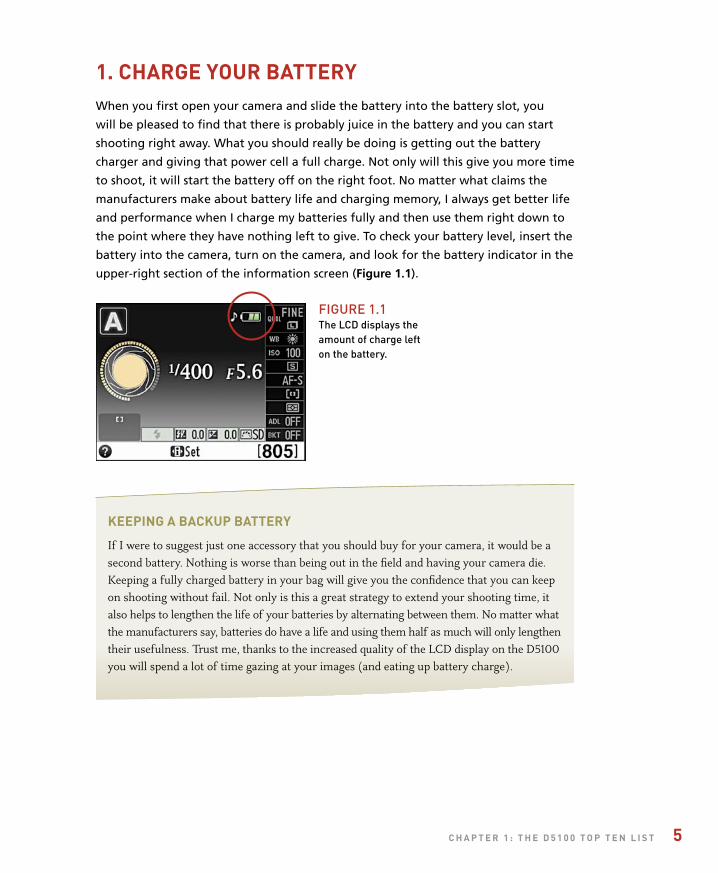
1. charge your baTTeryWhen you first open your camera and slide the battery into the battery slot, you
will be pleased to find that there is probably juice in the battery and you can start
shooting right away. What you should really be doing is getting out the battery
charger and giving that power cell a full charge. Not only will this give you more time
to shoot, it will start the battery off on the right foot. No matter what claims the
manufacturers make about battery life and charging memory, I always get better life
and performance when I charge my batteries fully and then use them right down to
the point where they have nothing left to give. To check your battery level, insert the
battery into the camera, turn on the camera, and look for the battery indicator in the
upper-right section of the information screen (Figure 1.1).
keeping a backup baTTery
If I were to suggest just one accessory that you should buy for your camera, it would be a second battery. Nothing is worse than being out in the field and having your camera die. Keeping a fully charged battery in your bag will give you the confidence that you can keep on shooting without fail. Not only is this a great strategy to extend your shooting time, it also helps to lengthen the life of your batteries by alternating between them. No matter what the manufacturers say, batteries do have a life and using them half as much will only lengthen their usefulness. Trust me, thanks to the increased quality of the LCD display on the D5100 you will spend a lot of time gazing at your images (and eating up battery charge).
FIGuRE 1.1The LCD displays theamount of charge lefton the battery.
ptg
6 n i k o n d 5 1 0 0 : f r o m s n a p s h o T s T o g r e aT s h o T s
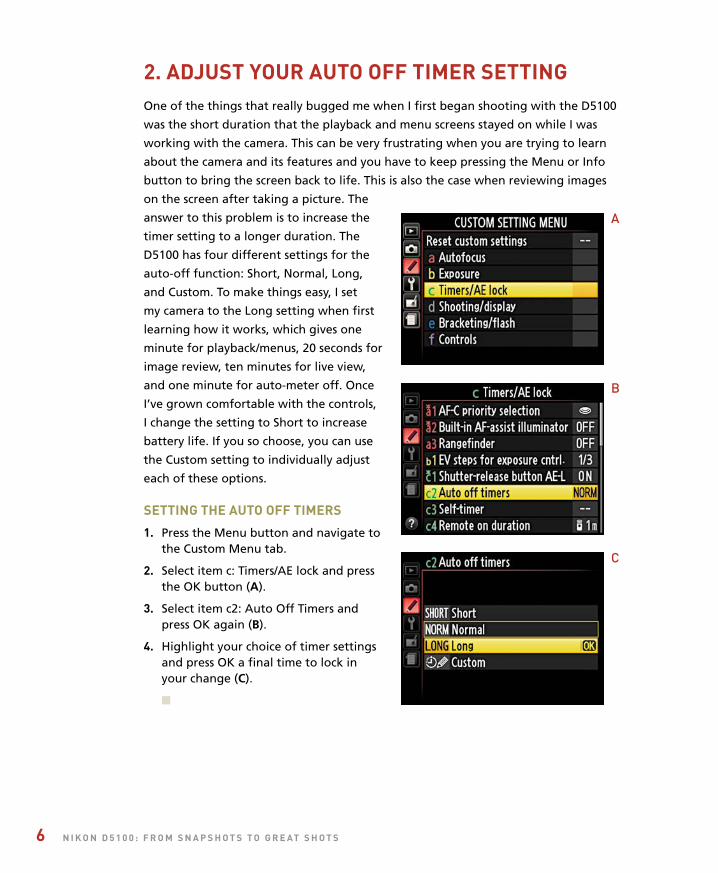
2. adjusT your auTo off Timer seTTingOne of the things that really bugged me when I first began shooting with the D5100
was the short duration that the playback and menu screens stayed on while I was
working with the camera. This can be very frustrating when you are trying to learn
about the camera and its features and you have to keep pressing the Menu or Info
button to bring the screen back to life. This is also the case when reviewing images
on the screen after taking a picture. The
answer to this problem is to increase the
timer setting to a longer duration. The
D5100 has four different settings for the
auto-off function: Short, Normal, Long,
and Custom. To make things easy, I set
my camera to the Long setting when first
learning how it works, which gives one
minute for playback/menus, 20 seconds for
image review, ten minutes for live view,
and one minute for auto-meter off. Once
I’ve grown comfortable with the controls,
I change the setting to Short to increase
battery life. If you so choose, you can use
the Custom setting to individually adjust
each of these options.
seTTing The auTo off Timers
1. Press the Menu button and navigate tothe Custom Menu tab.
2. Select item c: Timers/AE lock and pressthe OK button (A).
3. Select item c2: Auto Off Timers andpress OK again (B).
4. Highlight your choice of timer settingsand press OK a final time to lock inyour change (C).
n
A
B
C
ptg
c h a p T e r 1 : T h e d 5 1 0 0 T o p T e n L i s T 7
3. seT your jpeg image quaLiTyYour new D5100 has a number of image-quality settings to choose from, and you
can adjust them according to your needs. Most people shoot with the JPEG option
because it allows them to capture a large number of photos on their memory cards.
The problem is that unless you understand what JPEG is, you might be degrading the
quality of your images without realizing it.
The JPEG format has been around since about 1994. JPEG stands for Joint Photographic
Experts Group, and the format was developed by this group as a method of shrinking
digital images down to a smaller size for the purpose of reducing large file sizes while
retaining the original image information. (Technically, JPEG isn’t even a file format—
it’s a mathematical equation for reducing image file sizes—but to keep things simple,
we’ll just refer to it as a file format.) The problem with JPEG is that, in order to reduce
file size, it has to throw away some of the information. This is referred to as “lossy
compression.” This is important to understand because, while you can fit more images
on your memory card by choosing a lower-quality JPEG setting, you will also be reduc-
ing the quality of your image. This effect becomes more apparent as you enlarge
your pictures.
The JPEG file format also has one other characteristic: to apply the compression to
the image before final storage on your memory card, the camera has to apply all of
the image processing first. Image processing involves such factors as sharpening, color
adjustment, contrast adjustment, noise reduction, and so on. Many photographers
now prefer to use the RAW file format to get greater control over the image process-
ing. We will take a closer look at this in Chapter 2, but for now let’s just make sure
that we are using the best-quality JPEG possible.
The D5100 has nine different settings for the JPEG format. There are three settings
each for the Large, Medium, and Small image size settings. The three settings (Basic,
Normal, and Fine) represent more or less image compression, based on your choice.
The Large, Medium, and Small settings determine the actual physical size of your
image in pixels. Let’s work with the highest-quality setting possible. After all, our
goal is to make big, beautiful photographs, so why start the process with a lower-
quality image?
ptg
8 n i k o n d 5 1 0 0 : f r o m s n a p s h o T s T o g r e aT s h o T s
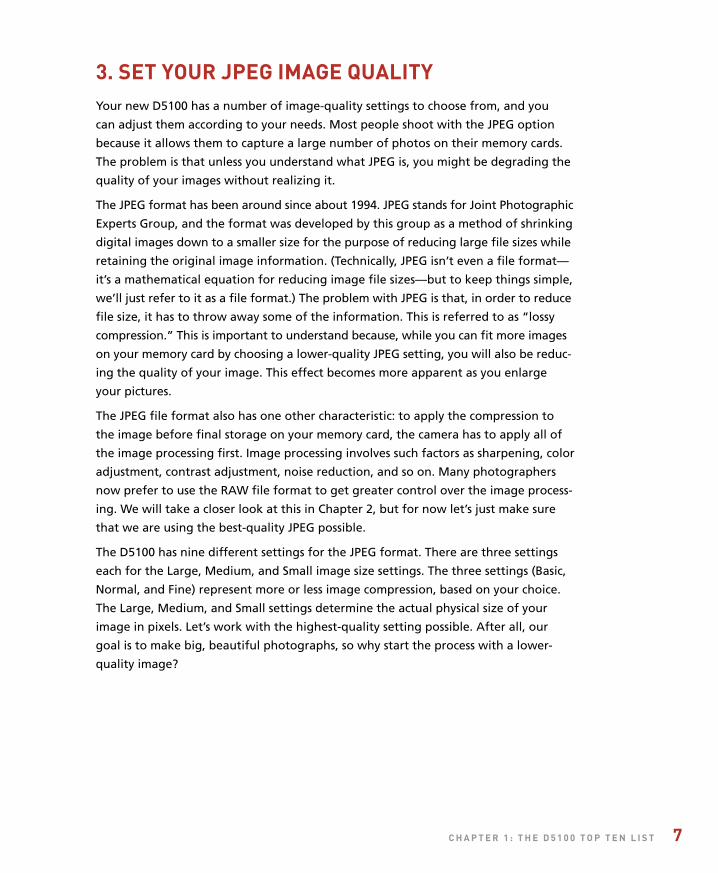
seTTing The image quaLiTy
1. Press the i button on the back of the camera to activate the cursor in theinformation screen.
2. Use the Multi-selector to select the image-quality setting, then press the OKbutton (A).
3. When the option screen appears, use the Multi-selector to choose the Finesetting, and press the OK button (B).
4. Now move the cursor down one step to choose the image size and press OK toget to the options (C).
5. Select the L option to use the largest image size available and press OK oncemore (D).
6. Press the i button again to return to shooting mode.
n
A B
C D

ptg
c h a p T e r 1 : T h e d 5 1 0 0 T o p T e n L i s T 9
As you will see when scrolling through the
quality settings, the higher the quality, the
fewer pictures you will be able to fit on your
card. If you have an 8 GB memory card, the
quality setting we have selected will allow you
to shoot about 844 photographs before you
fill up your card. Always try to choose quality
over quantity. Your pictures will be the better
for it.
4. Turn off The auTo iso seTTingThe ISO setting on your camera allows you to choose the level of sensitivity of the
camera sensor to light. The ability to change this sensitivity is one of the biggest
advantages to using a digital camera. In the days of film cameras, you had to choose
the ISO by film type. This meant that if you wanted to shoot in lower light, you had
to replace the film in the camera with one that had a higher ISO. So not only did you
have to carry different types of film, but you also had to remove one roll from the
camera to replace it with another, even if you hadn’t used up the current roll. Now all
you have to do is go to your information screen and select the appropriate ISO.
Having this flexibility is a powerful option, but just as with the Quality setting, the ISO
setting has a direct bearing on the quality of the final image. The higher the ISO, the
more digital noise the image will contain. Since our goal is to produce high-quality
photographs, it is important that we get control over all of the camera controls and
bend them to our will. When you turn your camera on for the first time, the ISO will
be set to Auto. This means that the camera is determining how much light is available
and will choose what it believes is the correct ISO setting. Since you want to use the
lowest ISO possible, you will need to turn this setting off and manually select the
appropriate ISO.
Which ISO you choose depends on your level of available or ambient light. For sunny
days or very bright scenes, use a low ISO such as 100. As the level of light is reduced,
raise the ISO level. Cloudy days or indoor scenes might require you to use ISO 400.
Low-light scenes, such as when you are shooting at night, will mean you need to
bump up that ISO to 1600. The thing to remember is to shoot with the lowest setting
possible for maximum quality.
Manual CalloutFor a complete chart that shows the image-quality settings with the number of possible shots for each setting, turn to page 218 in the Reference Manual on the companion CD that comes with the camera.
ptg
10 n i k o n d 5 1 0 0 : f r o m s n a p s h o T s T o g r e aT s h o T s
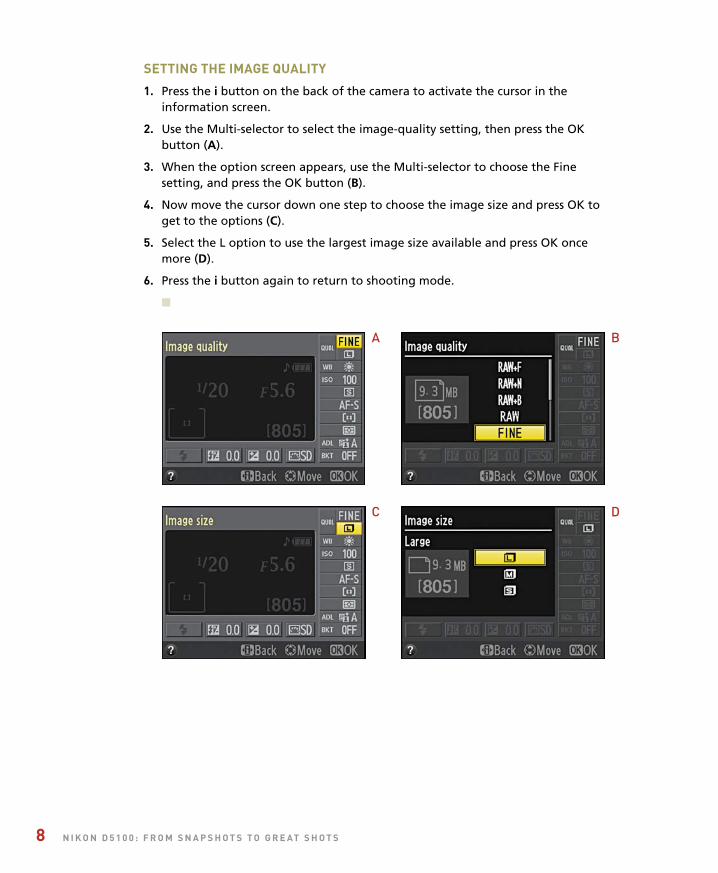
seTTing The iso
1. Press the i button on the back of thecamera to activate the cursor in theinformation screen.
2. Use the Multi-selector to highlight theISO Sensitivity option and press the OKbutton (A).
3. In the option screen, select theappropriate ISO for the level of lightyou are shooting in, and press the OKbutton to lock in the change (B).
n
You should know that the Auto ISO option
is only enabled as a default when using
one of the automatic scene/effects modes.
When using one of the professional
modes (M, A, S, and P; we’ll discuss these
in Chapter 4), the Auto ISO feature will
be automatically turned off. If you wish to use Auto ISO in one of these modes, you
must activate it and set the auto parameters in the shooting menu. If you plan on
shooting with the Auto mode, you cannot turn off the Auto ISO option at all.
noise
Noise is the enemy of digital photography, but it has nothing to do with the loudness of your camera operation. It refers to the electronic artifacts that appear as speckles in your image. They generally appear in darker shadow areas and are a result of the camera trying to amplify the signal to produce visible information. The more the image needs to be amplified—raising the sensitivity through higher ISOs—the greater the amount of noise there will be.
A
B
ptg
c h a p T e r 1 : T h e d 5 1 0 0 T o p T e n L i s T 11
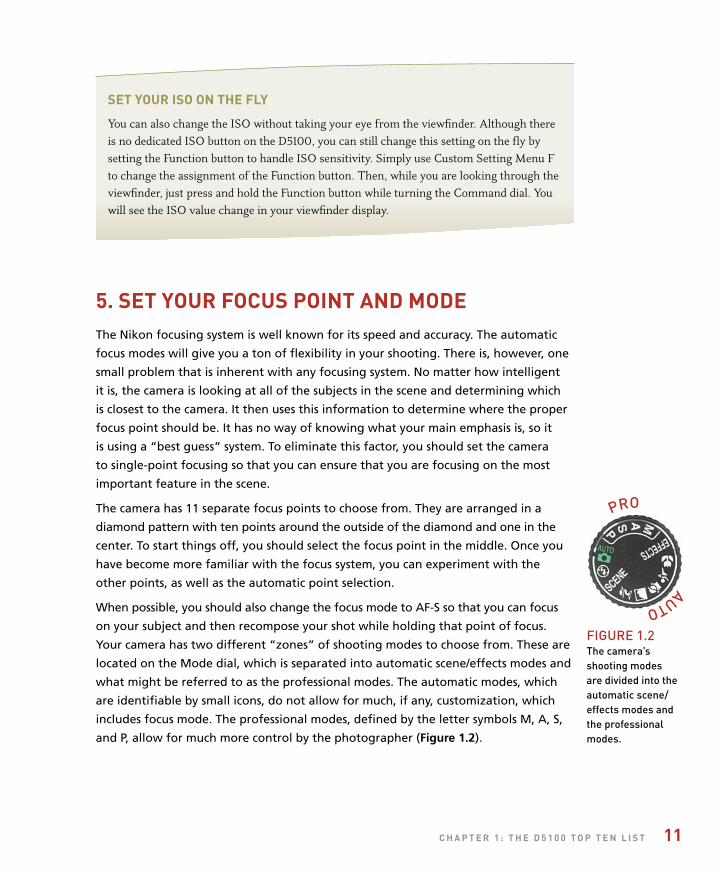
FIGuRE 1.2The camera’sshooting modesare divided into theautomatic scene/effects modes andthe professionalmodes.
PRO
AuTO
seT your iso on The fLy
You can also change the ISO without taking your eye from the viewfinder. Although there is no dedicated ISO button on the D5100, you can still change this setting on the fly by setting the Function button to handle ISO sensitivity. Simply use Custom Setting Menu F to change the assignment of the Function button. Then, while you are looking through the viewfinder, just press and hold the Function button while turning the Command dial. You will see the ISO value change in your viewfinder display.
5. seT your focus poinT and modeThe Nikon focusing system is well known for its speed and accuracy. The automatic
focus modes will give you a ton of flexibility in your shooting. There is, however, one
small problem that is inherent with any focusing system. No matter how intelligent
it is, the camera is looking at all of the subjects in the scene and determining which
is closest to the camera. It then uses this information to determine where the proper
focus point should be. It has no way of knowing what your main emphasis is, so it
is using a “best guess” system. To eliminate this factor, you should set the camera
to single-point focusing so that you can ensure that you are focusing on the most
important feature in the scene.
The camera has 11 separate focus points to choose from. They are arranged in a
diamond pattern with ten points around the outside of the diamond and one in the
center. To start things off, you should select the focus point in the middle. Once you
have become more familiar with the focus system, you can experiment with the
other points, as well as the automatic point selection.
When possible, you should also change the focus mode to AF-S so that you can focus
on your subject and then recompose your shot while holding that point of focus.
Your camera has two different “zones” of shooting modes to choose from. These are
located on the Mode dial, which is separated into automatic scene/effects modes and
what might be referred to as the professional modes. The automatic modes, which
are identifiable by small icons, do not allow for much, if any, customization, which
includes focus mode. The professional modes, defined by the letter symbols M, A, S,
and P, allow for much more control by the photographer (Figure 1.2).
ptg
12 n i k o n d 5 1 0 0 : f r o m s n a p s h o T s T o g r e aT s h o T s
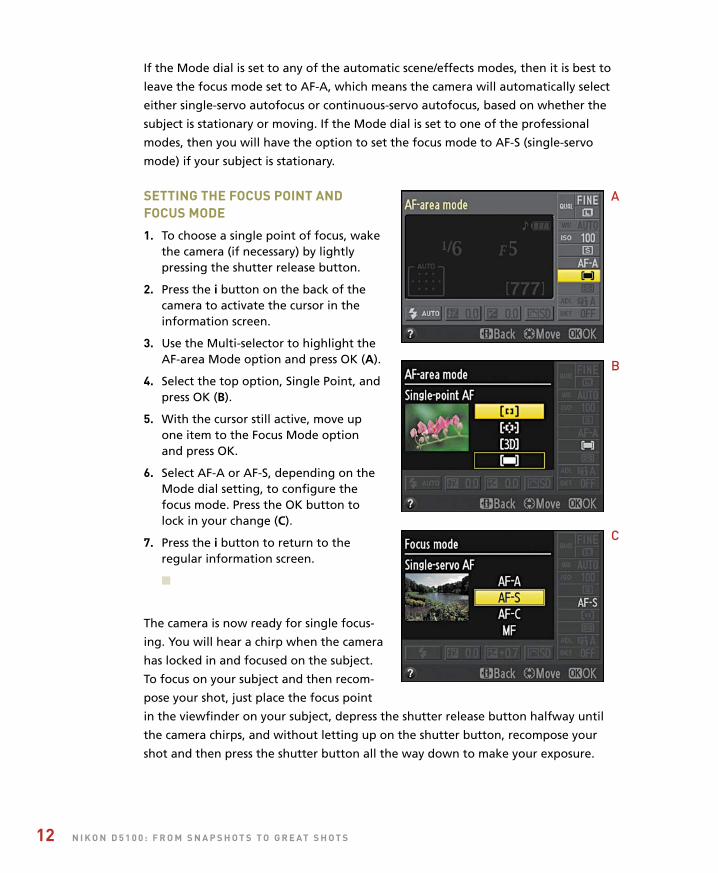
If the Mode dial is set to any of the automatic scene/effects modes, then it is best to
leave the focus mode set to AF-A, which means the camera will automatically select
either single-servo autofocus or continuous-servo autofocus, based on whether the
subject is stationary or moving. If the Mode dial is set to one of the professional
modes, then you will have the option to set the focus mode to AF-S (single-servo
mode) if your subject is stationary.
seTTing The focus poinT andfocus mode
1. To choose a single point of focus, wakethe camera (if necessary) by lightlypressing the shutter release button.
2. Press the i button on the back of thecamera to activate the cursor in theinformation screen.
3. Use the Multi-selector to highlight theAF-area Mode option and press OK (A).
4. Select the top option, Single Point, andpress OK (B).
5. With the cursor still active, move upone item to the Focus Mode optionand press OK.
6. Select AF-A or AF-S, depending on theMode dial setting, to configure thefocus mode. Press the OK button tolock in your change (C).
7. Press the i button to return to theregular information screen.
n
The camera is now ready for single focus-
ing. You will hear a chirp when the camera
has locked in and focused on the subject.
To focus on your subject and then recom-
pose your shot, just place the focus point
in the viewfinder on your subject, depress the shutter release button halfway until
the camera chirps, and without letting up on the shutter button, recompose your
shot and then press the shutter button all the way down to make your exposure.
A
B
C

ptg
c h a p T e r 1 : T h e d 5 1 0 0 T o p T e n L i s T 13
6. seT The correcT whiTe baLanceColor balance correction is the process of rendering accurate colors in your final
image. Most people don’t even notice that light has different color characteristics
because the human eye automatically adjusts to different color temperatures, so
quickly, in fact, that everything looks correct in a matter of milliseconds.
When color film ruled the world, photographers would select which film to use
according to what their light source was going to be. The most common film was bal-
anced for daylight, but you could also buy film that was color balanced for tungsten
light sources. Most other lighting situations had to be handled by using color filters
over the lens. This process was necessary for the photographer’s final image to show
the correct color balance of a scene.
Your camera has the ability to perform this same process automatically, but you can
also choose to override it and set it manually. Guess which method we are going to
use? You are catching on fast! Once again, your photography should be all about
maintaining control over everything that influences your final image.
Luckily, you don’t need to have a deep understanding of color temperatures to con-
trol your camera’s white balance. The choices are given to you in terms that are easy
to relate to and that will make things pretty simple. Your white balance choices are:
• Auto: The default setting for your camera. It is also the setting used by all of the
automatic scene/effects modes (see Chapter 3).
• Incandescent: Used for any occasion where you are using regular household-type
bulbs for your light source. Incandescent (also called tungsten) is a very warm light
source and will result in a yellow/orange cast if you don’t correct for it.
• Fluorescent: Used to get rid of the green-blue cast that can result from using
regular fluorescent lights as your dominant light source. Some fluorescent lights
are actually balanced for daylight, which would allow you to use the Direct
Sunlight white balance setting.
• Direct Sunlight: Most often used for general daylight/sunlit shooting.
• Flash: Used whenever you’re using the built-in flash or a flash on the hot shoe.
You should select this white balance to adjust for the slightly cooler light that
comes from using a flash. (The hot shoe is the small bracket located on the top
of your camera, which rests just above the eyepiece. This bracket is used for
attaching a more powerful flash to the camera [see Chapter 8 and Chapter 11,
which is one of the bonus chapters].)
ptg
14 n i k o n d 5 1 0 0 : f r o m s n a p s h o T s T o g r e aT s h o T s
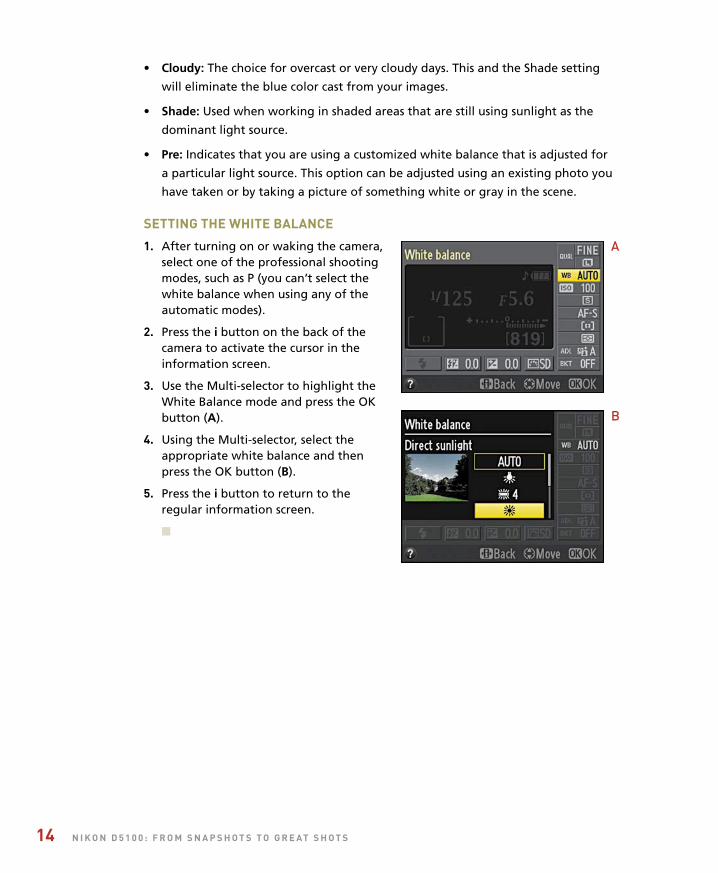
• Cloudy: The choice for overcast or very cloudy days. This and the Shade setting
will eliminate the blue color cast from your images.
• Shade: Used when working in shaded areas that are still using sunlight as the
dominant light source.
• Pre: Indicates that you are using a customized white balance that is adjusted for
a particular light source. This option can be adjusted using an existing photo you
have taken or by taking a picture of something white or gray in the scene.
seTTing The whiTe baLance
1. After turning on or waking the camera,select one of the professional shootingmodes, such as P (you can’t select thewhite balance when using any of theautomatic modes).
2. Press the i button on the back of thecamera to activate the cursor in theinformation screen.
3. Use the Multi-selector to highlight theWhite Balance mode and press the OKbutton (A).
4. Using the Multi-selector, select theappropriate white balance and thenpress the OK button (B).
5. Press the i button to return to theregular information screen.
n
A
B

ptg
c h a p T e r 1 : T h e d 5 1 0 0 T o p T e n L i s T 15
whiTe baLance and The TemperaTure of coLor
When you select different white balances in your camera, you will notice that underneath several of the choices is a number, e.g., 5200K, 7000K, or 3200K. These numbers refer to the Kelvin temperature of the colors in the visible spectrum. The visible spectrum is the range of light that the human eye can see (think of a rainbow or the color bands that come out of a spectrum). The visible spectrum of light has been placed into a scale called the Kelvin temperature scale, which identifies the thermodynamic temperature of a given color of light. Put simply, reds and yellows are “warm” and greens and blues are “cool.” Even more confusing can be the actual temperature ratings. Warm temperatures are typically lower on the Kelvin scale, ranging from 3000 degrees to 5000 degrees, while cool temperatures run from 5500 degrees to around 10,000 degrees. Take a look at this list for an example of Kelvin temperature properties.
KELVIN TEMPERATuRE PROPERTIES
Flames 1700K–1900K Daylight 5000K
Incandescent bulb 2800K–3300K Camera flash 5500K
White fluorescent 4000K Overcast sky 6000K
Moonlight 4000K Open shade 7000K
The most important thing to remember here is how the color temperature of light will affect the look of your images. If something is “warm,” it will look reddish-yellow, and if something is “cool,” it will have a bluish cast.
7. seT your coLor spaceThe color space deals with how your images will ultimately be used. It is basically a
set of instructions that tells your camera how to define the colors in your image and
then output them to the device of your choice, be it your monitor or a printer. Your
camera has a choice of two color spaces: sRGB and Adobe RGB.

ptg
16 n i k o n d 5 1 0 0 : f r o m s n a p s h o T s T o g r e aT s h o T s
The first choice, sRGB, was developed by Hewlett-Packard and Microsoft as a way
of defining colors for the Internet. This space was created to deal with the way that
computer monitors actually display images using red, green, and blue (RGB) colors.
Because there are no black pixels in your monitor, the color space uses a combination
of these three colors to display all of the colors in your image.
In 1998, Adobe Systems developed a new color space, Adobe RGB, which was
intended to encompass a wider range of colors than was obtainable using traditional
cyan, magenta, yellow, and black colors (called CMYK) but doing so using the primary
red, green, and blue colors. It uses a more widely defined palette of colors (or gamut)
than the sRGB space and, therefore, can contain some colors farther toward the more
saturated end of the spectrum than sRGB.
a LiTTLe coLor Theory
The visible spectrum of light is based on a principle called additive color and is based on three primary colors: red, green, and blue. When you add these colors together in equal parts, you get white light. By combining different amounts of them, you can achieve all the different colors of the visible spectrum. This is a completely different process than printing, where cyan, magenta, and yellow colors are combined to create various colors. This method is called subtractive color and has to do with the reflective properties of pigments or inks as they are combined.
The color space choice is applied only to the JPEG images produced by the camera.
When shooting RAW, the color space is determined later when you are using soft-
ware to process the photos. I typically use the Adobe RGB space when shooting JPEG
because it has a wider gamut than sRGB, and it is always better to go from a wider
color space to a narrower one when editing. That said, if you are shooting JPEG and
sending photos straight to a printer or posting online without much (or any) editing,
then sRGB is a good choice.
ptg
c h a p T e r 1 : T h e d 5 1 0 0 T o p T e n L i s T 17
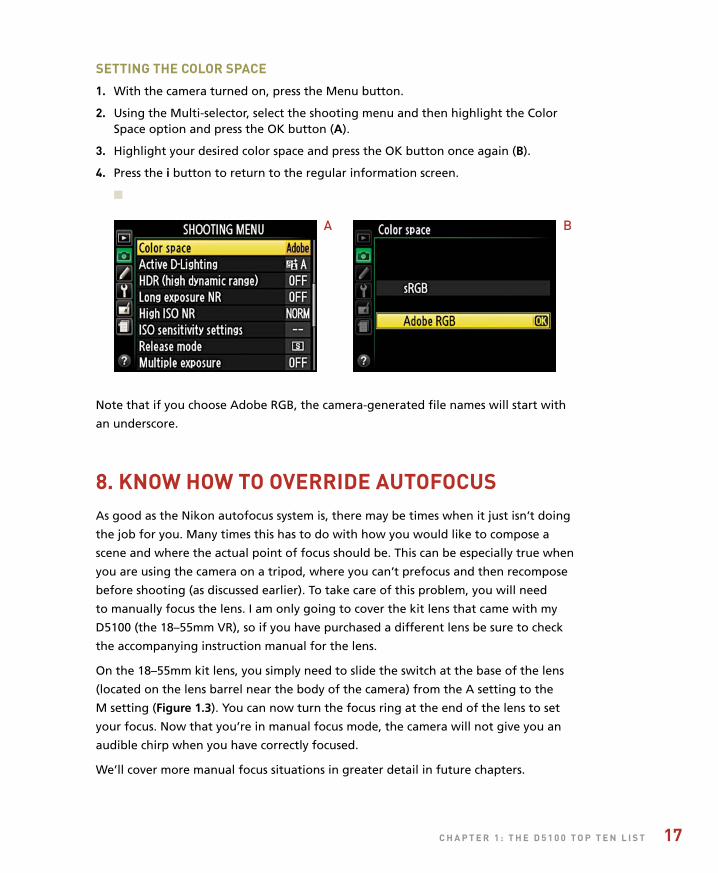
seTTing The coLor space
1. With the camera turned on, press the Menu button.
2. Using the Multi-selector, select the shooting menu and then highlight the ColorSpace option and press the OK button (A).
3. Highlight your desired color space and press the OK button once again (B).
4. Press the i button to return to the regular information screen.
n
Note that if you choose Adobe RGB, the camera-generated file names will start with
an underscore.
8. know how To override auTofocusAs good as the Nikon autofocus system is, there may be times when it just isn’t doing
the job for you. Many times this has to do with how you would like to compose a
scene and where the actual point of focus should be. This can be especially true when
you are using the camera on a tripod, where you can’t prefocus and then recompose
before shooting (as discussed earlier). To take care of this problem, you will need
to manually focus the lens. I am only going to cover the kit lens that came with my
D5100 (the 18–55mm VR), so if you have purchased a different lens be sure to check
the accompanying instruction manual for the lens.
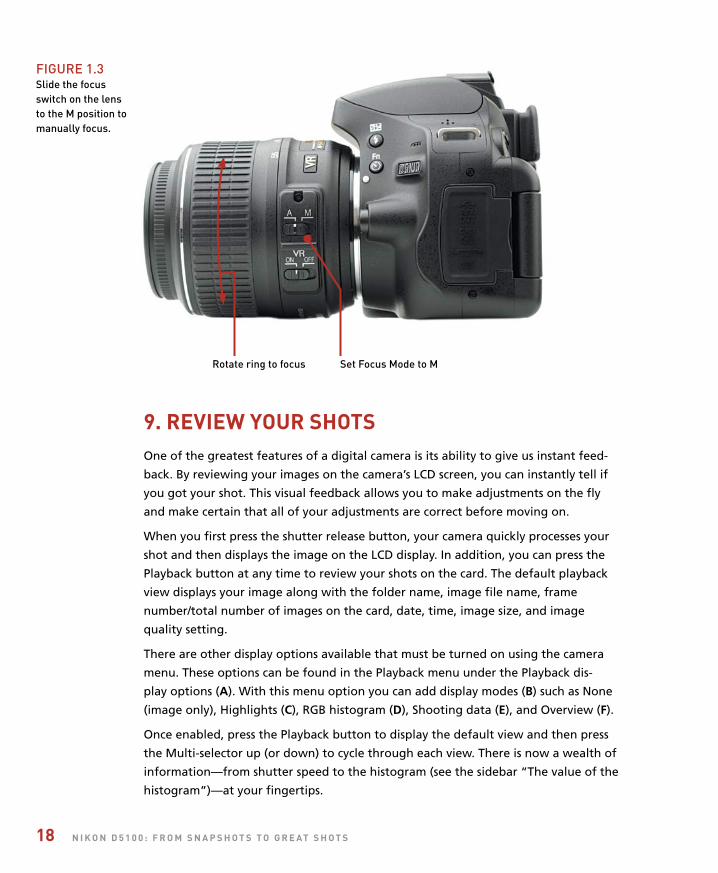
On the 18–55mm kit lens, you simply need to slide the switch at the base of the lens
(located on the lens barrel near the body of the camera) from the A setting to the
M setting (Figure 1.3). You can now turn the focus ring at the end of the lens to set
your focus. Now that you’re in manual focus mode, the camera will not give you an
audible chirp when you have correctly focused.
We’ll cover more manual focus situations in greater detail in future chapters.
A B
ptg
18 n i k o n d 5 1 0 0 : f r o m s n a p s h o T s T o g r e aT s h o T s
9. review your shoTsOne of the greatest features of a digital camera is its ability to give us instant feed-
back. By reviewing your images on the camera’s LCD screen, you can instantly tell if
you got your shot. This visual feedback allows you to make adjustments on the fly
and make certain that all of your adjustments are correct before moving on.
When you first press the shutter release button, your camera quickly processes your
shot and then displays the image on the LCD display. In addition, you can press the
Playback button at any time to review your shots on the card. The default playback
view displays your image along with the folder name, image file name, frame
number/total number of images on the card, date, time, image size, and image
quality setting.
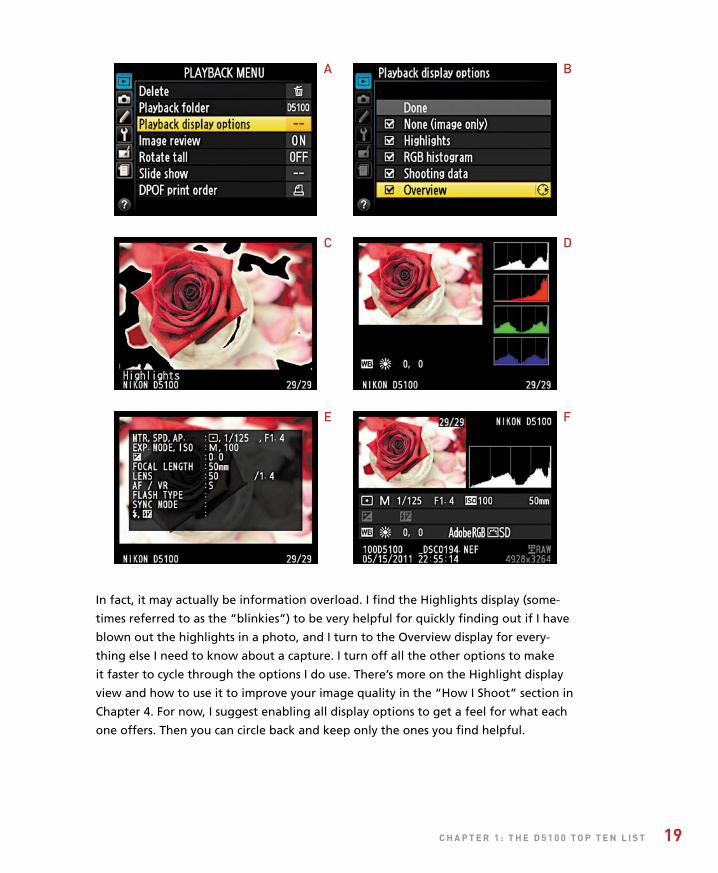
There are other display options available that must be turned on using the camera
menu. These options can be found in the Playback menu under the Playback dis-
play options (A). With this menu option you can add display modes (B) such as None
(image only), Highlights (C), RGB histogram (D), Shooting data (E), and Overview (F).
Once enabled, press the Playback button to display the default view and then press
the Multi-selector up (or down) to cycle through each view. There is now a wealth of
information—from shutter speed to the histogram (see the sidebar “The value of the
histogram”)—at your fingertips.
FIGuRE 1.3Slide the focusswitch on the lensto the M position tomanually focus.
Set Focus Mode to MRotate ring to focus
ptg
c h a p T e r 1 : T h e d 5 1 0 0 T o p T e n L i s T 19
In fact, it may actually be information overload. I find the Highlights display (some-
times referred to as the “blinkies”) to be very helpful for quickly finding out if I have
blown out the highlights in a photo, and I turn to the Overview display for every-
thing else I need to know about a capture. I turn off all the other options to make
it faster to cycle through the options I do use. There’s more on the Highlight display
view and how to use it to improve your image quality in the “How I Shoot” section in
Chapter 4. For now, I suggest enabling all display options to get a feel for what each
one offers. Then you can circle back and keep only the ones you find helpful.
A B
C
E
D
F
ptg
20 n i k o n d 5 1 0 0 : f r o m s n a p s h o T s T o g r e aT s h o T s
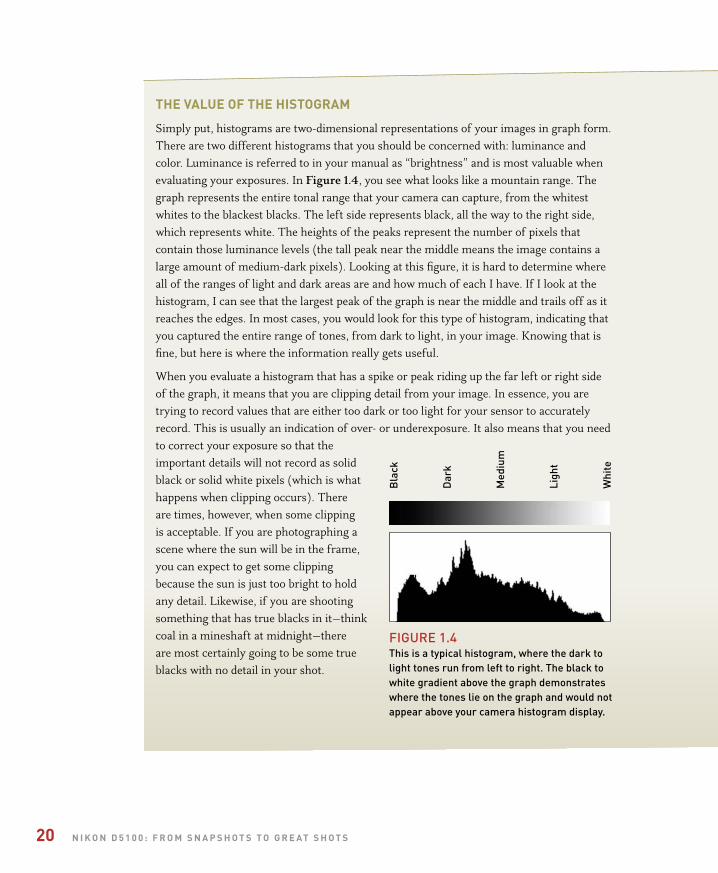
The vaLue of The hisTogram
Simply put, histograms are two-dimensional representations of your images in graph form. There are two different histograms that you should be concerned with: luminance and color. Luminance is referred to in your manual as “brightness” and is most valuable when evaluating your exposures. In Figure 1.4, you see what looks like a mountain range. The graph represents the entire tonal range that your camera can capture, from the whitest whites to the blackest blacks. The left side represents black, all the way to the right side, which represents white. The heights of the peaks represent the number of pixels that contain those luminance levels (the tall peak near the middle means the image contains a large amount of medium-dark pixels). Looking at this figure, it is hard to determine where all of the ranges of light and dark areas are and how much of each I have. If I look at the histogram, I can see that the largest peak of the graph is near the middle and trails off as it reaches the edges. In most cases, you would look for this type of histogram, indicating that you captured the entire range of tones, from dark to light, in your image. Knowing that is fine, but here is where the information really gets useful.
When you evaluate a histogram that has a spike or peak riding up the far left or right side of the graph, it means that you are clipping detail from your image. In essence, you are trying to record values that are either too dark or too light for your sensor to accurately record. This is usually an indication of over- or underexposure. It also means that you need to correct your exposure so that the important details will not record as solid black or solid white pixels (which is what happens when clipping occurs). There are times, however, when some clipping is acceptable. If you are photographing a scene where the sun will be in the frame, you can expect to get some clipping because the sun is just too bright to hold any detail. Likewise, if you are shooting something that has true blacks in it—think coal in a mineshaft at midnight—there are most certainly going to be some true blacks with no detail in your shot.
Bla
ck
Dar
k
Med
ium
Ligh
t
Whi
te
FIGuRE 1.4This is a typical histogram, where the dark tolight tones run from left to right. The black towhite gradient above the graph demonstrateswhere the tones lie on the graph and would notappear above your camera histogram display.
ptg
c h a p T e r 1 : T h e d 5 1 0 0 T o p T e n L i s T 21
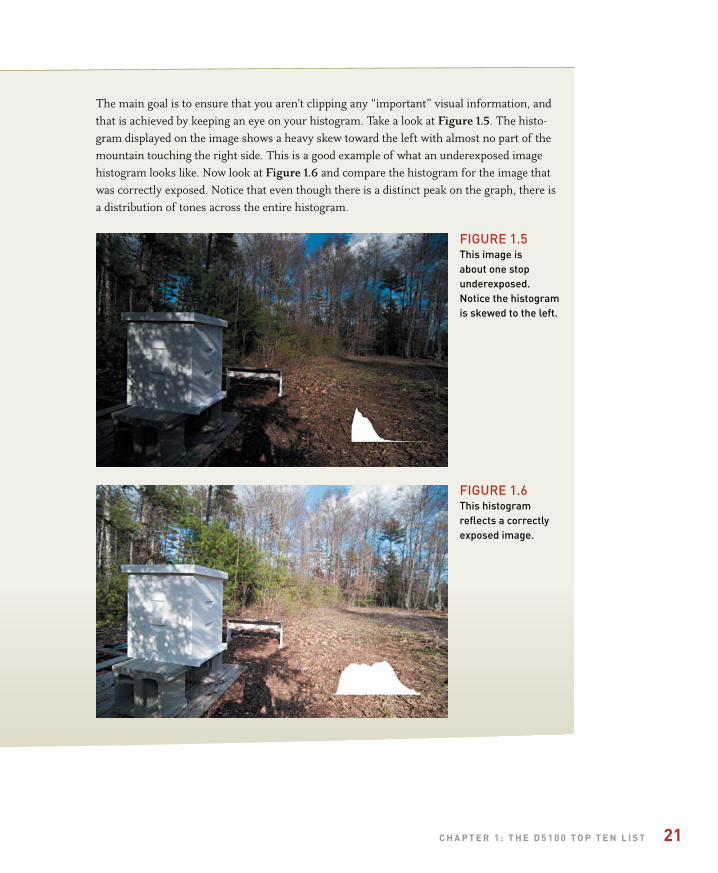
The main goal is to ensure that you aren’t clipping any “important” visual information, and that is achieved by keeping an eye on your histogram. Take a look at Figure 1.5. The histo-gram displayed on the image shows a heavy skew toward the left with almost no part of the mountain touching the right side. This is a good example of what an underexposed image histogram looks like. Now look at Figure 1.6 and compare the histogram for the image that was correctly exposed. Notice that even though there is a distinct peak on the graph, there is a distribution of tones across the entire histogram.
FIGuRE 1.5This image is about one stopunderexposed.Notice the histogramis skewed to the left.
FIGuRE 1.6This histogramreflects a correctlyexposed image.
ptg
22 n i k o n d 5 1 0 0 : f r o m s n a p s h o T s T o g r e aT s h o T s
deLeTing images
Deleting or erasing images is a fairly simple process that is covered on page 27 of the printed user manual. To quickly get you on your way, simply press the Playback button and use the Multi-selector to find the picture that you want to delete. Then press the Delete button (it has a trash can icon on it) located on the back of the camera to the left of the eyepiece. When you see the confirmation screen, simply press the Delete button once again to complete the process.
Caution: Once you have deleted an image, it is gone for good. Make sure you don’t want it before you drop it in the trash.
10. hoLd your camera for proper shooTingYou might think that this is really dumb, but I hope that you take a few seconds to
read this over and make sure that you are giving yourself the best chance for great
images. I can’t begin to tell you how many times I see photographers holding their
cameras in a fashion that is either unstable or just plain uncomfortable-looking.
Much of this probably comes from holding point-and-shoot cameras. There is a huge
difference between point-and-shoots and dSLR cameras, and learning the correct
way to hold one now will result in great images later. The purpose of practicing cor-
rect shooting form is to provide the most stable platform possible for your camera
(besides using a tripod, of course).
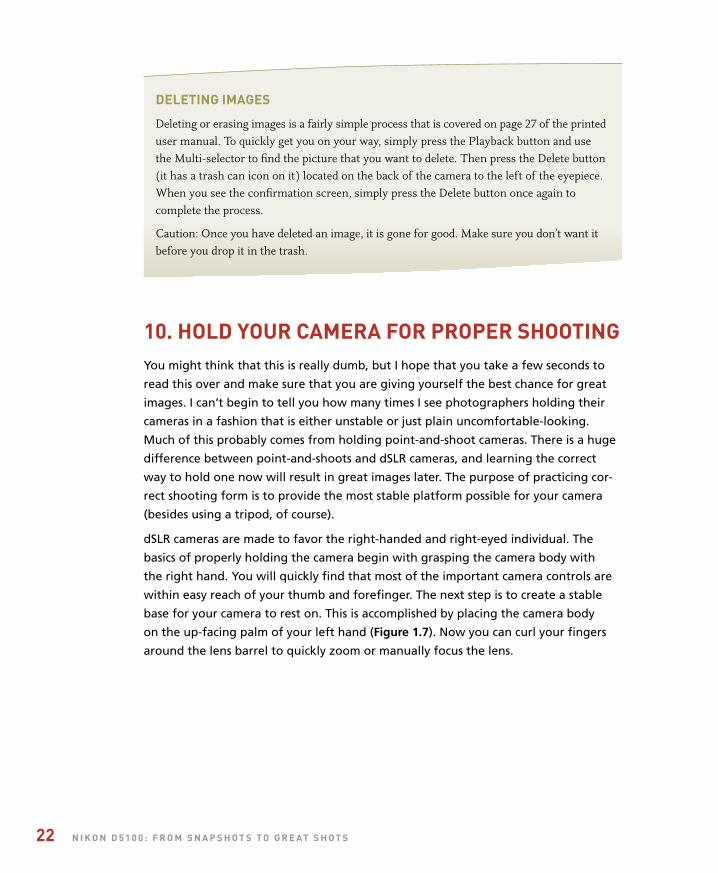
dSLR cameras are made to favor the right-handed and right-eyed individual. The
basics of properly holding the camera begin with grasping the camera body with
the right hand. You will quickly find that most of the important camera controls are
within easy reach of your thumb and forefinger. The next step is to create a stable
base for your camera to rest on. This is accomplished by placing the camera body
on the up-facing palm of your left hand (Figure 1.7). Now you can curl your fingers
around the lens barrel to quickly zoom or manually focus the lens.
ptg
c h a p T e r 1 : T h e d 5 1 0 0 T o p T e n L i s T 23
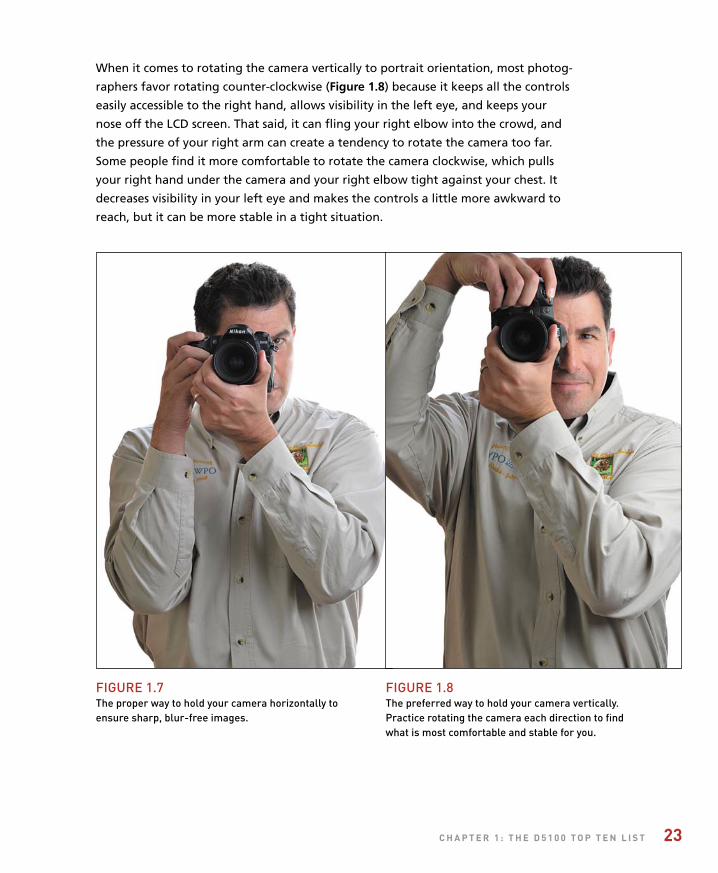
When it comes to rotating the camera vertically to portrait orientation, most photog-
raphers favor rotating counter-clockwise (Figure 1.8) because it keeps all the controls
easily accessible to the right hand, allows visibility in the left eye, and keeps your
nose off the LCD screen. That said, it can fling your right elbow into the crowd, and
the pressure of your right arm can create a tendency to rotate the camera too far.
Some people find it more comfortable to rotate the camera clockwise, which pulls
your right hand under the camera and your right elbow tight against your chest. It
decreases visibility in your left eye and makes the controls a little more awkward to
reach, but it can be more stable in a tight situation.
FIGuRE 1.7The proper way to hold your camera horizontally toensure sharp, blur-free images.
FIGuRE 1.8The preferred way to hold your camera vertically. Practice rotating the camera each direction to find what is most comfortable and stable for you.
ptg
24 n i k o n d 5 1 0 0 : f r o m s n a p s h o T s T o g r e aT s h o T s
Now that you know where to put your hands, let’s talk about what to do with the
rest of your body parts. By using the underhand grip, your elbows will be drawn
closer to your body. You should concentrate on pulling them in close to your body
to stabilize your shooting position. You should also try to maintain proper upright
posture. Leaning forward at the waist will begin to fatigue your back, neck, and
arms. You can really ruin a day of shooting with a sore back, so make sure you stand
erect with your elbows in. Finally, place your left foot in front of your right foot,
and face your subject in a slightly wide stance. By combining all of these aspects into
your photography, you will give yourself the best chance of eliminating self-imposed
camera shake in your images, resulting in much sharper photographs.
Chapter 1 AssignmentsLet’s begin our shooting assignments by setting up and using all of the elements of the Top Ten list. Even though I have yet to cover the professional shooting modes, you should set your camera to the P (Program) mode. This will allow you to interact with the various settings and menus that have been covered thus far.
Basic camera setup
Charge your battery to 100% to get it started on a life of dependable service. Next, using your newfound knowledge, set up your camera to address the following: Image Quality, Auto ISO, and Color Space.
Selecting the proper white balance
Take your camera outside into a daylight environment and then photograph the same scene using different white balance settings. Pay close attention to how each setting affects the overall color cast of your images. Next, move indoors and repeat the exercise while shooting in a tungsten lighting environment. Finally, find a fluorescent light source and repeat one more time.
ptg
25
Focusing with single point and AF-S
Change your camera setting so that you are focusing using the single-point focus mode. Try using all of the different focus points to see how they work in focusing your scene. Then set your focus mode to AF-S and practice focusing on a subject and then recomposing before actually taking the picture. Try doing this with subjects at varying distances.
Evaluating your pictures with the LCD display
Set up your image display properties and then review some of your previous assignment images using the different display modes. Review your shooting information for each image and take a look at the histograms to see how the content of your photo affects the shape of the histograms.
Discovering the manual focus mode
Change your focus mode from autofocus to manual focus and practice a little manual focus photography. Get familiar with where the focus ring is and how to use it to achieve sharp images.
Get a grip: proper camera holding
This final assignment is something that you should practice every time you shoot: proper grip and stance for shooting with your camera. Use the described technique and then shoot a series of images. Try comparing it with improper techniques to compare the stability of the grip and stance.
Share your results with the book’s Flickr group!
Join the group here: flickr.com/groups/nikond5100fromsnapshotstogreatshots/
ptg
2
ISO 2001/100 sec.f/8200mm lens
ptg
First Things First
A Few Things To Know And do BeFore You Begin TAKing PicTures
Now that we’ve covered the top ten tasks to get you up and shooting,
we should probably take care of some other important details. You must
become familiar with certain features of your camera before you can take
full advantage of it. Additionally, we will take some steps to prepare the
camera and memory card for use. So to get things moving, let’s start off
with something that you will definitely need before you can take a single
picture: a memory card.
27
ptg
28 n i K o n d 5 1 0 0 : F r o m s n A P s h o T s T o g r e AT s h o T s
Poring over The PicTure
ISO 8001/500 sec.f/5.6400mm lens
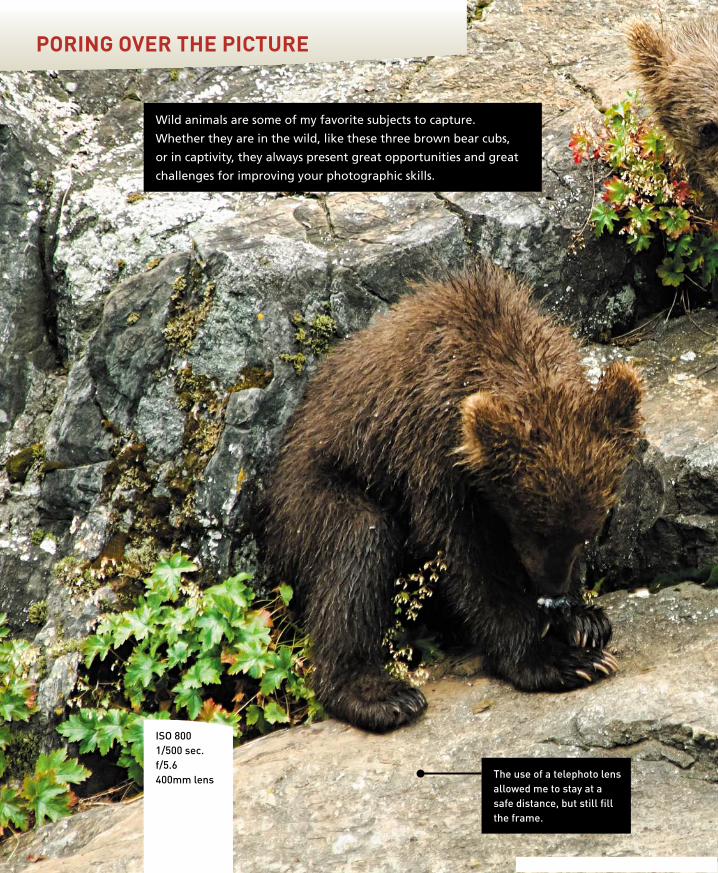
Wild animals are some of my favorite subjects to capture.
Whether they are in the wild, like these three brown bear cubs,
or in captivity, they always present great opportunities and great
challenges for improving your photographic skills.
The use of a telephoto lensallowed me to stay at asafe distance, but still fillthe frame.
ptg
c h A P T e r 2 : F i r s T T h i n g s F i r s T 29
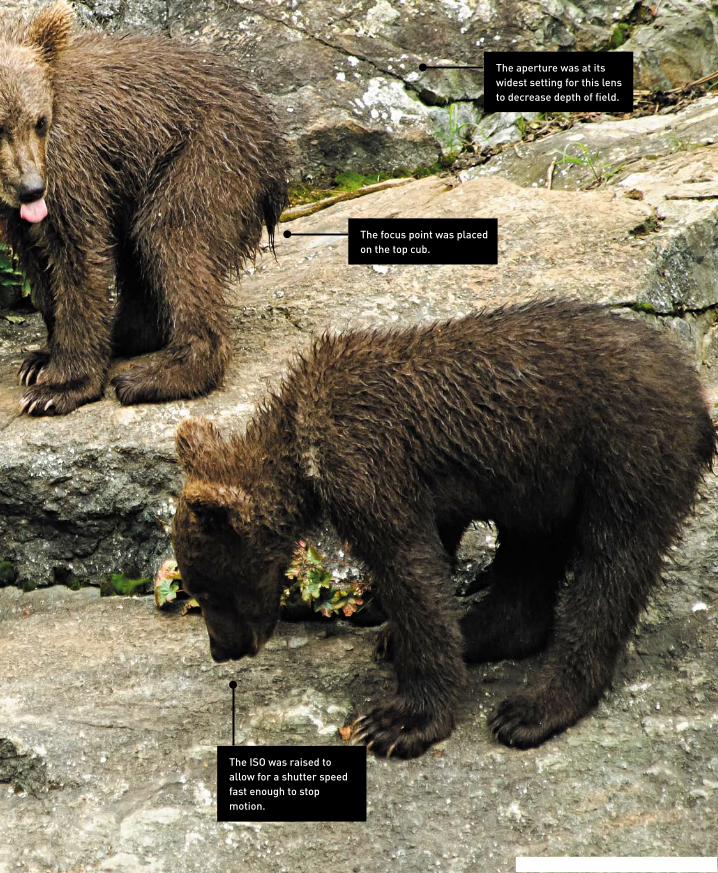
The aperture was at itswidest setting for this lensto decrease depth of field.
The focus point was placedon the top cub.
The ISO was raised toallow for a shutter speedfast enough to stop motion.
ptg
30 n i K o n d 5 1 0 0 : F r o m s n A P s h o T s T o g r e AT s h o T s
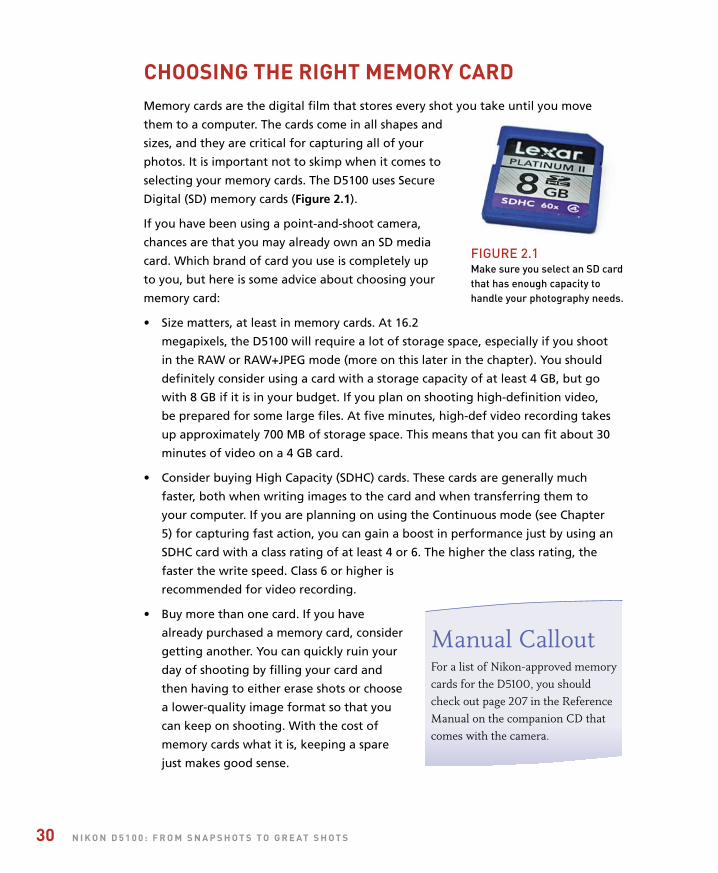
choosing The righT memorY cArdMemory cards are the digital film that stores every shot you take until you move
them to a computer. The cards come in all shapes and
sizes, and they are critical for capturing all of your
photos. It is important not to skimp when it comes to
selecting your memory cards. The D5100 uses Secure
Digital (SD) memory cards (Figure 2.1).
If you have been using a point-and-shoot camera,
chances are that you may already own an SD media
card. Which brand of card you use is completely up
to you, but here is some advice about choosing your
memory card:
• Size matters, at least in memory cards. At 16.2
megapixels, the D5100 will require a lot of storage space, especially if you shoot
in the RAW or RAW+JPEG mode (more on this later in the chapter). You should
definitely consider using a card with a storage capacity of at least 4 GB, but go
with 8 GB if it is in your budget. If you plan on shooting high-definition video,
be prepared for some large files. At five minutes, high-def video recording takes
up approximately 700 MB of storage space. This means that you can fit about 30
minutes of video on a 4 GB card.
• Consider buying High Capacity (SDHC) cards. These cards are generally much
faster, both when writing images to the card and when transferring them to
your computer. If you are planning on using the Continuous mode (see Chapter
5) for capturing fast action, you can gain a boost in performance just by using an
SDHC card with a class rating of at least 4 or 6. The higher the class rating, the
faster the write speed. Class 6 or higher is
recommended for video recording.
• Buy more than one card. If you have
already purchased a memory card, consider
getting another. You can quickly ruin your
day of shooting by filling your card and
then having to either erase shots or choose
a lower-quality image format so that you
can keep on shooting. With the cost of
memory cards what it is, keeping a spare
just makes good sense.
FIgure 2.1Make sure you select an SD card that has enough capacity to handle your photography needs.
Manual CalloutFor a list of Nikon-approved memory cards for the D5100, you should check out page 207 in the Reference Manual on the companion CD that comes with the camera.
ptg
c h A P T e r 2 : F i r s T T h i n g s F i r s T 31
FormATTing Your memorY cArdNow that you have your card, let’s talk about formatting for a minute. When you pur-
chase any new SD card, you can pop it into your camera and start shooting right away
—and probably everything will work as it should. However, what you should do first
is format the card in the camera. This process allows the camera to set up the card to
record images from your camera. Just as a computer hard drive must be formatted, for-
matting your card ensures that it is properly initialized. The card may work in the camera
without first being formatted, but chances of failure down the road are much higher.
As a general practice, I always format new cards or cards that have been used in dif-
ferent cameras. I also reformat cards after I have downloaded my images and want
to start a new shooting session. Note that you should always format your card in the
camera, not your computer. Using the computer could render the card useless. You
should also pay attention to the card manufacturer’s recommendations with respect
to moisture, humidity, and proper handling procedures. It sounds a little cliché, but
when it comes to protecting your images, every little bit helps.
Most people make the mistake of thinking that the process of formatting the memory
card is equivalent to erasing it. Not so. The truth is that when you format the card all
you are doing is changing the file management information on the card. Think of it
as removing the table of contents from a book and replacing it with a blank page.
All of the contents are still there, but you wouldn’t know it
by looking at the empty table of contents. The camera will
see the card as completely empty so you won’t be losing any
space, even if you have previously filled the card with images.
Your camera will simply write the new image data over the
previous data.
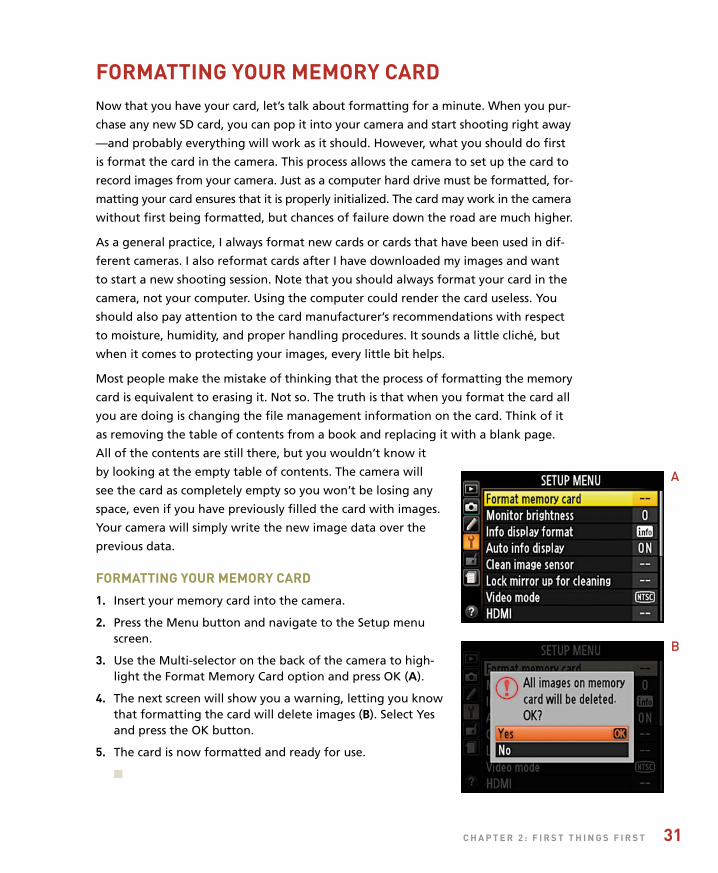
FormATTing Your memorY cArd
1. Insert your memory card into the camera.
2. Press the Menu button and navigate to the Setup menuscreen.
3. Use the Multi-selector on the back of the camera to high-light the Format Memory Card option and press OK (A).
4. The next screen will show you a warning, letting you knowthat formatting the card will delete images (B). Select Yesand press the OK button.
5. The card is now formatted and ready for use.
n
A
B

ptg
32 n i K o n d 5 1 0 0 : F r o m s n A P s h o T s T o g r e AT s h o T s
uPdATing The d5100’s FirmwAreI know that you want to get shooting, but having the proper firmware can impact
the way the camera operates. It can fix problems as well as improve operation, so you
should probably check it sooner rather than later. Updating your camera’s firmware is
something that the manual completely omits, yet it can change the entire behavior
of your camera operating systems and functions. The firmware of your camera is the
set of computer operating instructions that control how your camera functions. Updating
this firmware is a great way to not only fix little bugs but also gain access to new func-
tionality. You will need to check out the information on the Nikon firmware update
page (www.nikonusa.com/Service-And-Support/Download-Center.page) to see if a
firmware update is available and how it will impact your camera, but it is always a
good idea to be working with the most up-to-date firmware version available.
checKing The cAmerA’s currenT FirmwAre version numBer
1. Press the Menu button and then navigate to the Setup menu.
2. Use the Multi-selector on the back of the camera to highlight the FirmwareVersion option and press OK (A).
3. Take note of the current version numbers (there are three of them) and thencheck the Nikon Web site to see if you are using the current versions (B).
n
uPdATing The FirmwAre From Your sd cArd
1. Download the firmware update file from the Nikon Web site. (You can findthe file by going to the Download Center section of the Nikon camera site andlocating the firmware update for your camera and computer operating system.)
2. Once you have downloaded the firmware to your computer and extracted it,you will need to transfer it to your SD card. The card must be formatted in yourcamera prior to loading the firmware to it.
A B
ptg
c h A P T e r 2 : F i r s T T h i n g s F i r s T 33
3. With a freshly charged camera battery, insert the card into the camera and turnit on.
4. Follow the instructions listed above for locating your firmware version, and youwill now be able to update your firmware using the files located on the SD card.
n
When this book was being written, there were no firmware updates available for the
D5100. After you check your camera firmware version and the Nikon site for updates,
continue to check back periodically to see if there are updates available.
cleAning The sensorCleaning camera sensors used to be a nerve-racking process that required leaving the
sensor exposed to scratching and even more dust. Now cleaning the sensor is pretty
much an automatic function. Every time you turn the camera on and off, you can
instruct the sensor in the camera to vibrate to remove any dust particles that might
have landed on it.
There are five choices for cleaning in the camera Setup menu: Clean at Startup, Clean
at Shutdown, Clean at Startup and Shutdown, Cleaning Off, and Clean Now. I’m
kind of obsessive when it comes to cleaning my sensor, so I like to have it set to clean
when I turn the camera on and off.
The one cleaning function that you will need to use via this menu is the Clean now
feature. This should be done every time that you remove the lens from the camera
body. That is because removing or changing a lens will leave the camera body open
and susceptible to dust sneaking into the body. If you never change lenses, you
shouldn’t have too many dust problems. But the more often you change lenses, the
more chances you are giving dust to enter the body. It’s for this reason that I have
added the Clean Now function to the custom My Menu list (see Chapter 10).
Every now and then, there will be a dust spot that is impervious to the shaking of the
Auto Cleaning feature. This will require you to clean the sensor manually by raising
the mirror and opening the camera shutter. When you activate this feature, it will
move everything out of the way, giving you access to the sensor so that you can use a
blower or other cleaning device to remove the stubborn dust speck. The camera will
need to be turned off after cleaning to allow the mirror to reset.
If you choose to manually clean your sensor, use a device that has been made to clean
sensors (not a cotton swab from your medicine cabinet). There are dozens of com-
mercially available devices such as brushes, swabs, and blowers that will clean the
ptg
34 n i K o n d 5 1 0 0 : F r o m s n A P s h o T s T o g r e AT s h o T s
sensor without damaging it. To keep the sensor clean, always store the camera with a
body cap or lens attached.
The camera sensor is an electrically charged device. This means that when the camera
is turned on, there is a current running through the sensor. This electric current can
create static electricity, which will attract small dust particles to the sensor area. For
this reason, it is always a good idea to turn off the camera prior to removing a lens.
You should also consider having the lens mount facing down when changing lenses
so that there is less opportunity for dust to fall into the inner workings of the camera.
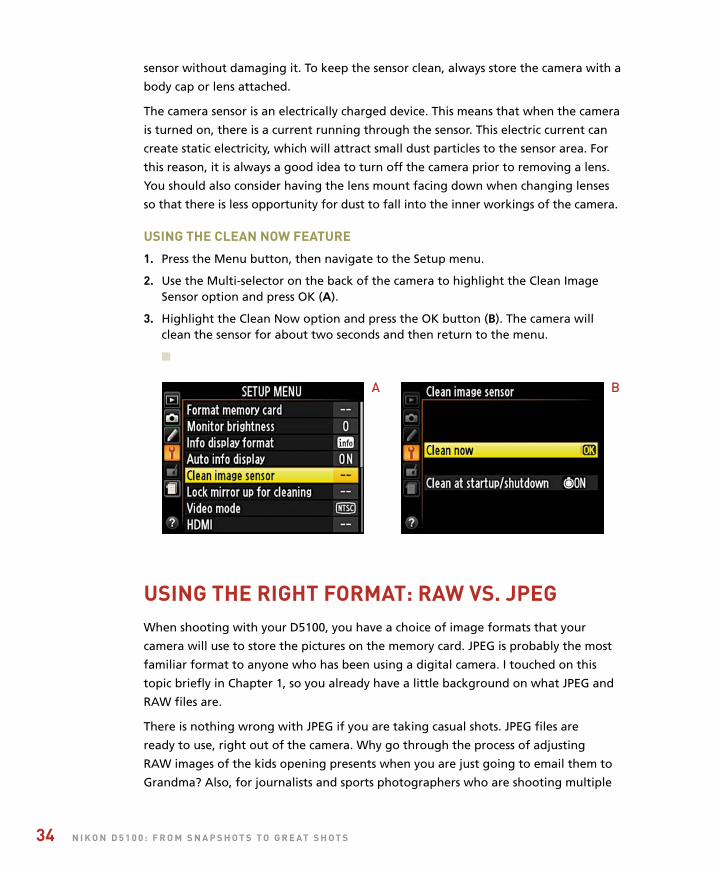
using The cleAn now FeATure
1. Press the Menu button, then navigate to the Setup menu.
2. Use the Multi-selector on the back of the camera to highlight the Clean ImageSensor option and press OK (A).
3. Highlight the Clean Now option and press the OK button (B). The camera willclean the sensor for about two seconds and then return to the menu.
n
using The righT FormAT: rAw vs. JPegWhen shooting with your D5100, you have a choice of image formats that your
camera will use to store the pictures on the memory card. JPEG is probably the most
familiar format to anyone who has been using a digital camera. I touched on this
topic briefly in Chapter 1, so you already have a little background on what JPEG and
RAW files are.
There is nothing wrong with JPEG if you are taking casual shots. JPEG files are
ready to use, right out of the camera. Why go through the process of adjusting
RAW images of the kids opening presents when you are just going to email them to
Grandma? Also, for journalists and sports photographers who are shooting multiple
A B

ptg
c h A P T e r 2 : F i r s T T h i n g s F i r s T 35
frames per second and who need to transmit their images across the wire, again,
JPEG is just fine. So what is wrong with JPEG? Absolutely nothing—unless you care
about having complete creative control over all of your image data (as opposed to
what a compression algorithm thinks is important).
As I mentioned in Chapter 1, JPEG is not actually an image format. It is a compression
standard, and compression is where things go bad. When you have your camera set
to JPEG—whether it is Fine, Normal, or Basic—you are telling the camera to process
the image based on the in-camera settings and then throw away enough image data
to make it shrink into a smaller space. In doing so, you give up subtle image details
that you will never get back in post-processing. That is an awfully simplified state-
ment, but still fairly accurate.
so whAT does rAw hAve To oFFer?First and foremost, RAW images are not compressed. (There are some cameras, like
the D5100, that have a compressed RAW format, but it is lossless compression, which
means there is no loss of actual image data.) Note that RAW image files will require
you to perform post-processing on your photographs. This is not only necessary, it is
the reason that most photographers use it.
RAW images have a greater dynamic range than JPEG-processed images. This means
that you can recover image detail in the highlights and shadows that just isn’t avail-
able in JPEG-processed images.
There is more color information in a RAW image because it is a 12- or 14-bit image
(depending on the camera), which means it contains more color information than a
JPEG, which is always an 8-bit image. More color information means more to work
with and smoother changes between tones—kind of like the difference between
performing surgery with a scalpel as opposed to a butcher’s knife. They’ll both get
the job done, but one will do less damage.
imAge resoluTion
When discussing digital cameras, image resolution is often used to describe pixel resolution or the number of pixels used to make an image. This can be displayed as a dimension, such as 4928x3264. This is the physical number of pixels in the width and height of the image sensor. Resolution can also be referred to in megapixels (MP), such as 16.2 MP. This number represents the total number of pixels on the sensor and is commonly used to describe the amount of image data that a digital camera can capture.

ptg
36 n i K o n d 5 1 0 0 : F r o m s n A P s h o T s T o g r e AT s h o T s
Regarding sharpening, a RAW image offers more control because you are the one
who is applying the sharpening according to the effect you want to achieve. Once
again, JPEG processing applies a standard amount of sharpening that you cannot
change after the fact. Once it is done, it’s done.
Finally, and most importantly, a RAW file is your negative. No matter what you do
to it, you won’t change it unless you save your file in a different format. This means
that you can come back to that RAW file later and try different processing settings
to achieve differing results and never harm the original image. By comparison, if you
make a change to your JPEG and accidentally save the file, guess what? You have a
new original file, and you will never get back to that first image. That alone should
make you sit up and take notice.
Advice For new rAw shooTersDon’t give up on shooting RAW just because it means more work. Hey, if it takes
up more space on your card, buy bigger cards or more small ones. Will it take more
time to download? Yes, but good things come to those who wait. Don’t worry about
needing to purchase expensive software to work with your RAW files; you already
own a program that will allow you to work with your RAW files. Nikon’s ViewNX soft-
ware comes bundled in the box with your camera and gives you the ability to work
directly on the RAW files and then output the enhanced results. That said, you will
have more control with dedicated RAW processing software such as Nikon’s Capture
NX2, Apple’s Aperture, or Adobe’s Photoshop and Lightroom.
My recommendation is to shoot in JPEG mode while you are using this book. This will
allow you to quickly review your images and study the effects of the lessons. Once
you have become comfortable with all of the camera features, you should switch to
shooting in RAW mode so that you can start gaining more creative control over your
image processing. After all, you took the photograph—shouldn’t you be the one to
decide how it looks in the end?
shooTing duAl FormATsYour camera has the added benefit of being able to write two files for each picture
you take, one in RAW and one in JPEG. If you have a RAW+JPEG setting selected,
your camera will save your images in both formats on your card.
I think shooting RAW+JPEG is actually a good way to transition to shooting RAW.
You get the ease and safety of the familiar JPEG, and the ability to compare the JPEG
against your RAW processing experiences. Obviously this will take up more of the
space on your memory card and hard drive, but think of it as a stepping-stone on the

ptg
c h A P T e r 2 : F i r s T T h i n g s F i r s T 37
path to shooting only RAW in the future. It took me a little while to make the transi-
tion, and looking back there are some shots I took in JPEG mode that I now wish I had
a RAW version of that I could try to improve. Live and learn.
shooTing in rAw+JPeg
1. Press the i button to activate the cursor in the information screen.
2. Use the Multi-selector to highlight the Image Quality setting, located at the topright of the screen, and press OK (A).
3. Press up on the Multi-selector to highlight the RAW+JPEG option of your choice.The three options include RAW+B (Basic), RAW+N (Normal), and RAW+F (Fine) (B).
4. Press the OK button to lock in your changes.
n
You will notice when you are in the selection screen that you will be able to see how
much storage space each option will require on your SD card. The RAW+F option,
which is the one I use, will take up approximately 32 MB of space for each photo-
graph you take.
lenses And FocAl lengThsIf you ask most professional photographers what they believe to be their most critical
piece of photographic equipment, they would undoubtedly tell you that it is their
lens. The technology and engineering that goes into your camera is a marvel, but
it isn’t worth a darn if it can’t get the light from the outside onto the sensor. The
D5100, as a digital single lens reflex (dSLR) camera, uses the lens for a multitude of
tasks, from focusing on a subject, to metering a scene, to delivering and focusing the
light onto the camera sensor. The lens is also responsible for the amount of the scene
that will be captured (the frame). With all of this riding on the lens, let’s take a more
in-depth look at the camera’s eye on the world.
A B

ptg
38 n i K o n d 5 1 0 0 : F r o m s n A P s h o T s T o g r e AT s h o T s
Lenses are composed of optical glass that is both concave and convex in shape. The
alignment of the glass elements is designed to focus the light coming in from the
front of the lens onto the camera sensor. The amount of light that enters the cam-
era is also controlled by the lens, the size of the glass elements, and the aperture
mechanism within the lens housing. The quality of the glass used in the lens will
have a direct effect on how well the lens can resolve details and on the contrast of
the image (the ability to deliver great highlights and shadows). Most lenses now
routinely include things like an autofocus motor and, in some cases, a vibration
reduction mechanism.
One other aspect of the camera lens is often the first consideration of the photogra-
pher: lens length. Lenses are typically divided into three or four groups depending on
the field of view they deliver.
Wide-angle lenses cover a field of view from around 110 degrees to about 60 degrees
(Figure 2.2). There is also a tendency to get some distortion in your image when
using extremely wide-angle lenses. This will be apparent toward the outer edges of
the frame. As for which lenses would be considered wide angle, anything 35mm or
smaller could be considered wide.
ISO 1001/500 sec.f/5.618mm lens
FIgure 2.2The 18mm lenssetting provides a wide view of thescene but littledetail of distantobjects.

ptg
c h A P T e r 2 : F i r s T T h i n g s F i r s T 39
Wide-angle lenses can display a large depth of field, which allows you to keep the
foreground and background in sharp focus. This makes them very useful for landscape
photography. They also work well in tight spaces, such as indoors, where there isn’t
much elbow room available (Figure 2.3). They can also be handy for large group shots
but, because of the amount of distortion, not so great for close-up portrait work.
ISO 2001/25 sec.f/418mm lens
FIgure 2.3When shooting in tightspaces, such as indoors,a nice wide-angle lenshelps capture more ofthe scene.

ptg
40 n i K o n d 5 1 0 0 : F r o m s n A P s h o T s T o g r e AT s h o T s
A normal lens has a field of view that is about 45 degrees and delivers approximately
the same view as the human eye. The perspective is very natural and there is little
distortion in objects. The normal lens for full-frame and 35mm cameras is the 50mm
lens (Figure 2.4), but for the D5100 it is more in the neighborhood of a 35mm lens
because of its sensor’s 1.5x crop factor.
ISO 1001/200 sec.f/5.650mm lens
Normal focal length lenses are useful for photographing people and architecture
and for most other general photographic needs. They create very little distortion and
offer a moderate range of depth of field.
Most longer focal length lenses are referred to as telephoto lenses. They can range in
length from 135mm up to 800mm or longer, and have a field of view that is about 35
degrees or smaller. These lenses have the ability to greatly magnify the scene, allow-
ing you to capture details of distant objects, but the angle of view is greatly reduced
(Figure 2.5). You will also find that you can achieve a much narrower depth of field.
They also suffer from something called distance compression, which means they make
objects at different distances appear to be much closer together than they really are.
Telephoto lenses are most useful for sports photography or any application where
you need to get closer to your subject (Figure 2.6). They can have a compressing
effect—making objects look closer together than they actually are—and a very nar-
row depth of field when shot at their widest apertures.
FIgure 2.4Long consideredthe “normal” lens for 35mmphotography, the50mm focal lengthcan be consideredsomewhat of atelephoto lens onthe D5100 becauseit has the sameangle of view andmagnification as an 80mm lens on a35mm camera body.
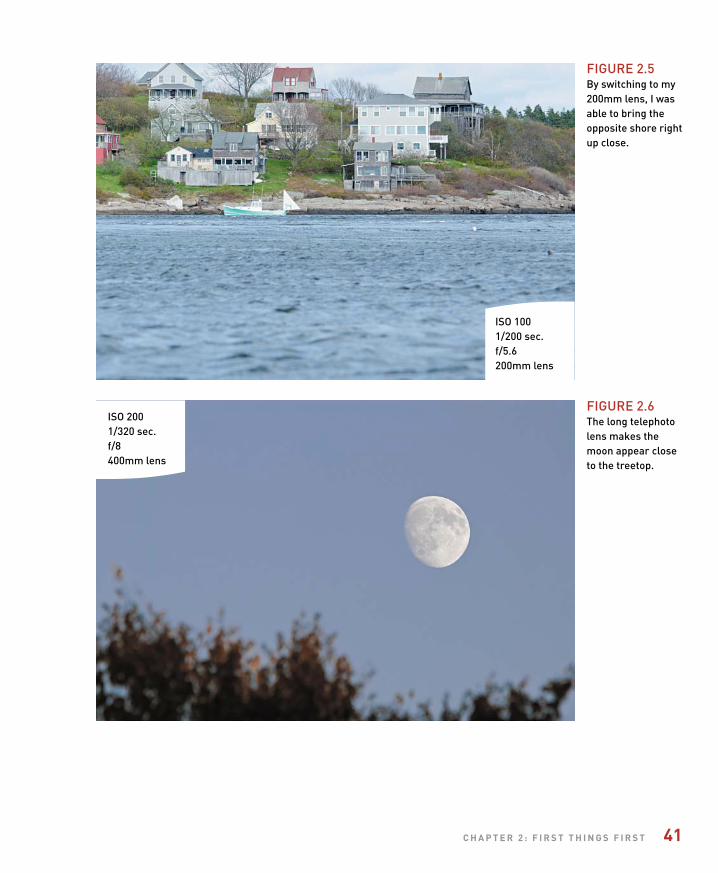
ptg
c h A P T e r 2 : F i r s T T h i n g s F i r s T 41
ISO 2001/320 sec.f/8400mm lens
FIgure 2.6The long telephotolens makes themoon appear closeto the treetop.
ISO 1001/200 sec.f/5.6200mm lens
FIgure 2.5By switching to my200mm lens, I wasable to bring theopposite shore rightup close.
ptg
42 n i K o n d 5 1 0 0 : F r o m s n A P s h o T s T o g r e AT s h o T s
A zoom lens is a great compromise to carrying a bunch of single focal length lenses
(also referred to as “prime” lenses). They can cover a wide range of focal lengths
because of the configuration of their optics. However, because it takes more optical
elements to capture a scene at different focal lengths, the light must pass through
more glass on its way to the image sensor. The more glass, the lower the quality of
the image sharpness. The other sacrifice that is made is in aperture. Zoom lenses typi-
cally have smaller maximum apertures than prime lenses, which means they cannot
achieve a narrow depth of field or work in lower light levels without the assistance
of image stabilization, a tripod, or higher ISO settings. (We’ll discuss all this in more
detail in later chapters.)
The D5100 can be purchased with the body only, but many folks will purchase it with
a kit lens. The most common kit lens is the 18–55mm VR f/3.5–5.6. With my D5100,
I have been working the 18–55mm as well as the 70–200mm VR AF-S lens.
Throughout the book, I will occasionally make reference to lenses that are wider or
more telephoto than these, because I have a multitude of lenses that I use for my
photography. This doesn’t mean that you have to run out and purchase more lenses.
It just means that if you do this long enough, you are sure to accumulate additional
lenses that will expand your ability to be even more creative with your photography.
whAT is exPosure?In order for you to get the most out of this book, I need to briefly discuss the prin-
ciples of exposure. Without this basic knowledge, it will be difficult for you to move
forward in improving your photography. Granted, I could write an entire book on
exposure and the photographic process—and many people have—but for our pur-
poses I will just cover some of the basics. This will give you the essential tools to make
educated decisions in determining how best to photograph a subject.
Exposure is the process whereby the light reflecting off a subject reflects through
an opening in the camera lens for a defined period of time onto the camera sensor.
The combination of the lens opening, shutter speed, and sensor sensitivity is used to
achieve a proper exposure value (EV) for the scene. The EV is the sum of these com-
ponents necessary to properly expose a scene. A relationship exists between these
factors that is sometimes referred to as the “exposure triangle.”
ptg
c h A P T e r 2 : F i r s T T h i n g s F i r s T 43
At each point of the triangle lies one of the factors of exposure:
• ISO: Determines the sensitivity of the camera sensor. ISO stands for the
International Organization for Standardization, but the acronym is used as a term
to describe the sensitivity of the camera sensor to light. The higher the sensitivity,
the less light is required for a good exposure. These values are a carryover from
the days of traditional color and black and white films.
• Aperture: Also referred to as the f-stop, this determines how much light passes
through the lens at once.
• Shutter Speed: Controls the length of time that light is allowed to hit the sensor.
Here’s how it works. The camera sensor has a level of sensitivity that is determined
by the ISO setting. To get a proper exposure—not too much, not too little—the lens
needs to adjust the aperture diaphragm (the size of the lens opening) to control the
volume of light entering the camera. Then the shutter is opened for a relatively short
period of time to allow the light to hit the sensor long enough for it to record on
the sensor.
ISO numbers for the D5100 start at 100 and then double in sensitivity as you double
the number. So 200 is twice as sensitive as 100. The camera can be set to use 1/2- or
1/3-stop increments, but for ISO just remember that the base numbers double: 100,
200, 400, 800, and so on. There are also a wide variety of shutter speeds that you can
use. The speeds on the D5100 range from as long as 30 seconds to as short as 1/4000
of a second. When using the camera, you will not see the 1 over the number in the
viewfinder, so you will need to remember that anything shorter than a second will
be a fraction. Typically, you will be working with a shutter speed from around 1/30 of
a second to about 1/2000 of a second, but these numbers will change depending on
your circumstances and the effect that you are trying to achieve. The lens apertures
will vary slightly depending on which lens you are using. This is because different
lenses have different maximum apertures. The typical apertures that are at your dis-
posal are f/4, f/5.6, f/8, f/11, f/16, and f/22.
When it comes to exposure, a change to any one of these factors requires changing
one or more of the other two. This is referred to as reciprocal change. If you let more
light in the lens by choosing a larger aperture, you will need to shorten the amount
of time the shutter is open. If the shutter is allowed to stay open for a longer period
of time, the aperture needs to be smaller to restrict the amount of light coming in.
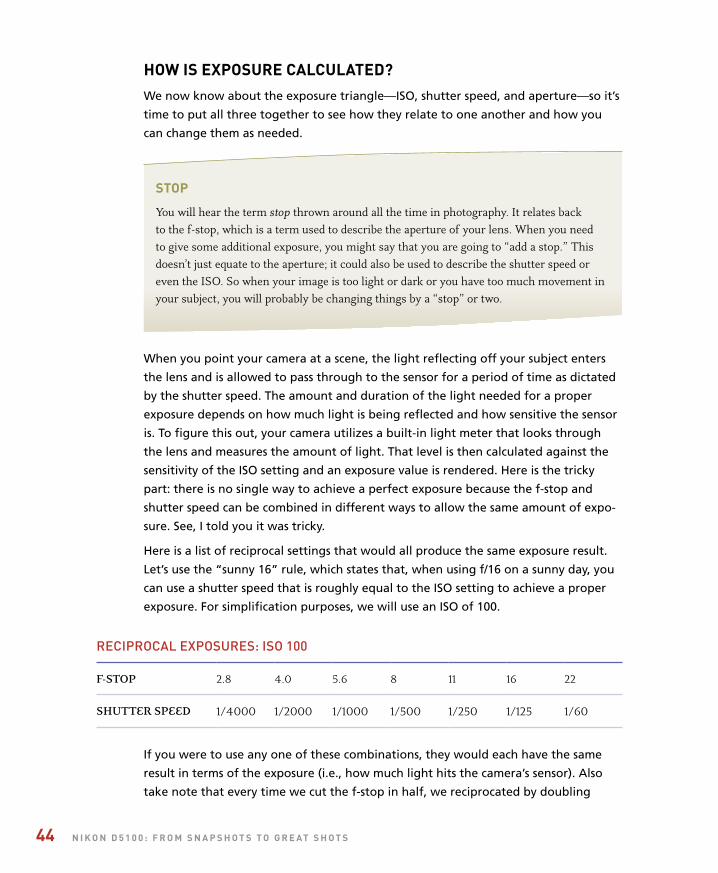
ptg
44 n i K o n d 5 1 0 0 : F r o m s n A P s h o T s T o g r e AT s h o T s
how is exPosure cAlculATed?We now know about the exposure triangle—ISO, shutter speed, and aperture—so it’s
time to put all three together to see how they relate to one another and how you
can change them as needed.
sToP
You will hear the term stop thrown around all the time in photography. It relates back to the f-stop, which is a term used to describe the aperture of your lens. When you need to give some additional exposure, you might say that you are going to “add a stop.” This doesn’t just equate to the aperture; it could also be used to describe the shutter speed or even the ISO. So when your image is too light or dark or you have too much movement in your subject, you will probably be changing things by a “stop” or two.
When you point your camera at a scene, the light reflecting off your subject enters
the lens and is allowed to pass through to the sensor for a period of time as dictated
by the shutter speed. The amount and duration of the light needed for a proper
exposure depends on how much light is being reflected and how sensitive the sensor
is. To figure this out, your camera utilizes a built-in light meter that looks through
the lens and measures the amount of light. That level is then calculated against the
sensitivity of the ISO setting and an exposure value is rendered. Here is the tricky
part: there is no single way to achieve a perfect exposure because the f-stop and
shutter speed can be combined in different ways to allow the same amount of expo-
sure. See, I told you it was tricky.
Here is a list of reciprocal settings that would all produce the same exposure result.
Let’s use the “sunny 16” rule, which states that, when using f/16 on a sunny day, you
can use a shutter speed that is roughly equal to the ISO setting to achieve a proper
exposure. For simplification purposes, we will use an ISO of 100.
recIprOcAL expOSureS: ISO 100
F-STOP 2.8 4.0 5.6 8 11 16 22
SHUTTER SPEED 1/4000 1/2000 1/1000 1/500 1/250 1/125 1/60
If you were to use any one of these combinations, they would each have the same
result in terms of the exposure (i.e., how much light hits the camera’s sensor). Also
take note that every time we cut the f-stop in half, we reciprocated by doubling
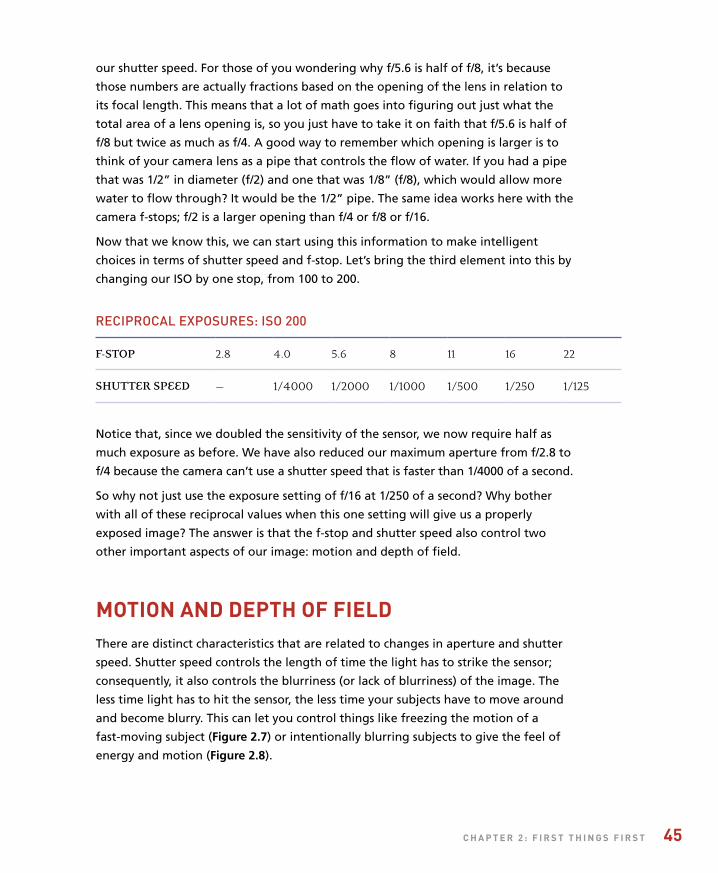
ptg
c h A P T e r 2 : F i r s T T h i n g s F i r s T 45
our shutter speed. For those of you wondering why f/5.6 is half of f/8, it’s because
those numbers are actually fractions based on the opening of the lens in relation to
its focal length. This means that a lot of math goes into figuring out just what the
total area of a lens opening is, so you just have to take it on faith that f/5.6 is half of
f/8 but twice as much as f/4. A good way to remember which opening is larger is to
think of your camera lens as a pipe that controls the flow of water. If you had a pipe
that was 1/2” in diameter (f/2) and one that was 1/8” (f/8), which would allow more
water to flow through? It would be the 1/2” pipe. The same idea works here with the
camera f-stops; f/2 is a larger opening than f/4 or f/8 or f/16.
Now that we know this, we can start using this information to make intelligent
choices in terms of shutter speed and f-stop. Let’s bring the third element into this by
changing our ISO by one stop, from 100 to 200.
recIprOcAL expOSureS: ISO 200
F-STOP 2.8 4.0 5.6 8 11 16 22
SHUTTER SPEED — 1/4000 1/2000 1/1000 1/500 1/250 1/125
Notice that, since we doubled the sensitivity of the sensor, we now require half as
much exposure as before. We have also reduced our maximum aperture from f/2.8 to
f/4 because the camera can’t use a shutter speed that is faster than 1/4000 of a second.
So why not just use the exposure setting of f/16 at 1/250 of a second? Why bother
with all of these reciprocal values when this one setting will give us a properly
exposed image? The answer is that the f-stop and shutter speed also control two
other important aspects of our image: motion and depth of field.
moTion And dePTh oF FieldThere are distinct characteristics that are related to changes in aperture and shutter
speed. Shutter speed controls the length of time the light has to strike the sensor;
consequently, it also controls the blurriness (or lack of blurriness) of the image. The
less time light has to hit the sensor, the less time your subjects have to move around
and become blurry. This can let you control things like freezing the motion of a
fast-moving subject (Figure 2.7) or intentionally blurring subjects to give the feel of
energy and motion (Figure 2.8).

ptg
46 n i K o n d 5 1 0 0 : F r o m s n A P s h o T s T o g r e AT s h o T s
ISO 4001/1250 sec.f/5.3210mm lens
ISO 1001/30 sec.f/450mm lens
FIgure 2.7A fast shutter speedwas used to freezethe action.
FIgure 2.8The slower shutterspeed relays asense of motion as the globe spinsaround its axis.

ptg
c h A P T e r 2 : F i r s T T h i n g s F i r s T 47
The aperture controls the amount of light that comes through the lens, but it also
determines what areas of the image will be in focus. This is referred to as depth
of field, and it is an extremely valuable creative tool. The smaller the opening (the
larger the number, such as f/22), the greater the sharpness of objects from near to far
(Figure 2.9). A large opening (or small number, like f/2.8) means more blurring of objects
that are not at the same distance as the subject you are focusing on (Figure 2.10).
ISO 4001/80 sec.f/2220mm lens
FIgure 2.9By using a small aperture, thearea of sharp focus extends froma point that is near the camera all the way out to distant objects,which we can see by the level ofdetail in the foreground rocks, thehelicopter, and even the distantmountains.
ISO 2001/1000 sec.f/2.8200mm lens
FIgure 2.10Isolating a subject is accomplishedby using a large aperture, whichproduces a narrow area of sharp focus, while blurring theforeground and everything in thebackground as well.

ptg
48 n i K o n d 5 1 0 0 : F r o m s n A P s h o T s T o g r e AT s h o T s
As we further explore the features of the camera, we will learn not only how to
utilize the elements of exposure to capture properly exposed photographs, but also
how we can make adjustments to emphasize our subject. It is the manipulation of
these elements—motion and focus—that will take your images to the next level.
video And The d5100Probably one of the reasons you purchased the D5100 instead of other competing
camera models is its ability to capture video. Not just regular video, but full high-
definition video. As I discussed in the book’s introduction, I am going to keep the
focus of this book on the photography aspects of the camera, but that doesn’t mean
I am going to simply ignore the video functions completely. In fact, I am dedicating
a bonus chapter to some fun video tips, but I thought that I would at least cover the
video basics here in Chapter 2 since we’ve already looked at a lot of other camera
functions. First, let’s cover some of the basic facts about the movie-making features.
Video recording is a feature of the Live View capabilities of the camera, so you’ll have
to put the camera into the active Live View mode to begin to capture video. This is
accomplished by rotating the Live View switch (Figure 2.11) on the top of the camera,
which activates the Live View on the rear display. If you want to control the aperture,
you should set the aperture value to either Manual mode or Aperture Priority mode
before switching to Live View. Otherwise, switch to one of the other modes and let
the camera adjust it automatically.
Once Live View is active, press the i button and choose a focus mode. It is possible to
use the full-time-servo (AF-F)
mode while recording video,
and you should try it out
because it does a fine job in
some situations, but I strongly
urge you to refine your man-
ual focus (MF) skills. Using
manual focus not only gives
you creative control of what
is in focus, it also eliminates
the sound of the lens trying
to maintain autofocus.
Once your subject is in focus,
you can push the Movie
Live View Switch
FIgure 2.11rotate the Live View switch to start.
Movie record Button
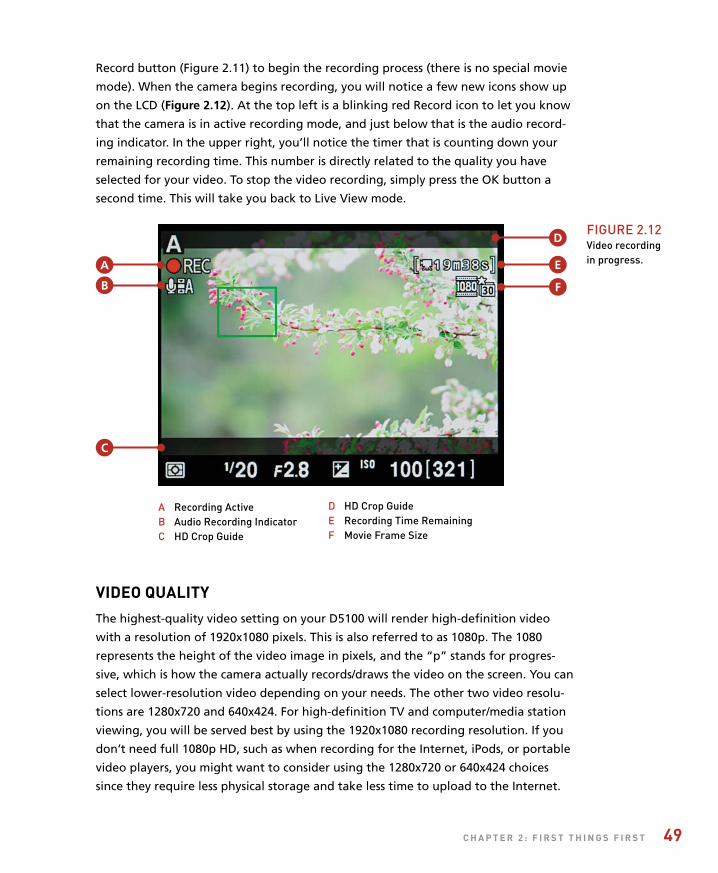
ptg
c h A P T e r 2 : F i r s T T h i n g s F i r s T 49
Record button (Figure 2.11) to begin the recording process (there is no special movie
mode). When the camera begins recording, you will notice a few new icons show up
on the LCD (Figure 2.12). At the top left is a blinking red Record icon to let you know
that the camera is in active recording mode, and just below that is the audio record-
ing indicator. In the upper right, you’ll notice the timer that is counting down your
remaining recording time. This number is directly related to the quality you have
selected for your video. To stop the video recording, simply press the OK button a
second time. This will take you back to Live View mode.
FIgure 2.12Video recording in progress.
B
C
D
A recording ActiveB Audio recording Indicatorc HD crop guide
D HD crop guidee recording Time remainingF Movie Frame Size
A
F
E
video quAliTYThe highest-quality video setting on your D5100 will render high-definition video
with a resolution of 1920x1080 pixels. This is also referred to as 1080p. The 1080
represents the height of the video image in pixels, and the “p” stands for progres-
sive, which is how the camera actually records/draws the video on the screen. You can
select lower-resolution video depending on your needs. The other two video resolu-
tions are 1280x720 and 640x424. For high-definition TV and computer/media station
viewing, you will be served best by using the 1920x1080 recording resolution. If you
don’t need full 1080p HD, such as when recording for the Internet, iPods, or portable
video players, you might want to consider using the 1280x720 or 640x424 choices
since they require less physical storage and take less time to upload to the Internet.

ptg
50 n i K o n d 5 1 0 0 : F r o m s n A P s h o T s T o g r e AT s h o T s
Progressive scAn
When it comes to video, there are usually two terms associated with the quality of the video and how it is captured and displayed on a monitor or screen: progressive and interlaced. The two terms describe how the video is drawn by line for each frame. Video frames are not displayed all at once like a photograph. In progressive video, the lines are drawn in sequence from top to bottom. Interlaced video draws all of the odd-numbered lines and then all of the even-numbered lines. This odd-even drawing can present itself as screen flicker, which is why the progressive video standard is preferred, especially when viewing higher-definition images.
seTTing The movie quAliTY
1. Start by pressing the Menu button.
2. Navigate to the Shooting menu usingthe Multi-selector, highlight the MovieSettings option, and press OK (A).
3. Highlight the Movie Quality settingand press OK (B).
4. Select the video quality of your choiceand press the OK button (C).
5. Press the Menu button twice to exit themenu mode and return to shooting, or rotate the Live View switch to jump right into the Live View/videorecording mode.
n
A
B
cManual CalloutRefer to page 53 of the printed user manual for a complete rundown of the video quality and frame rate settings.
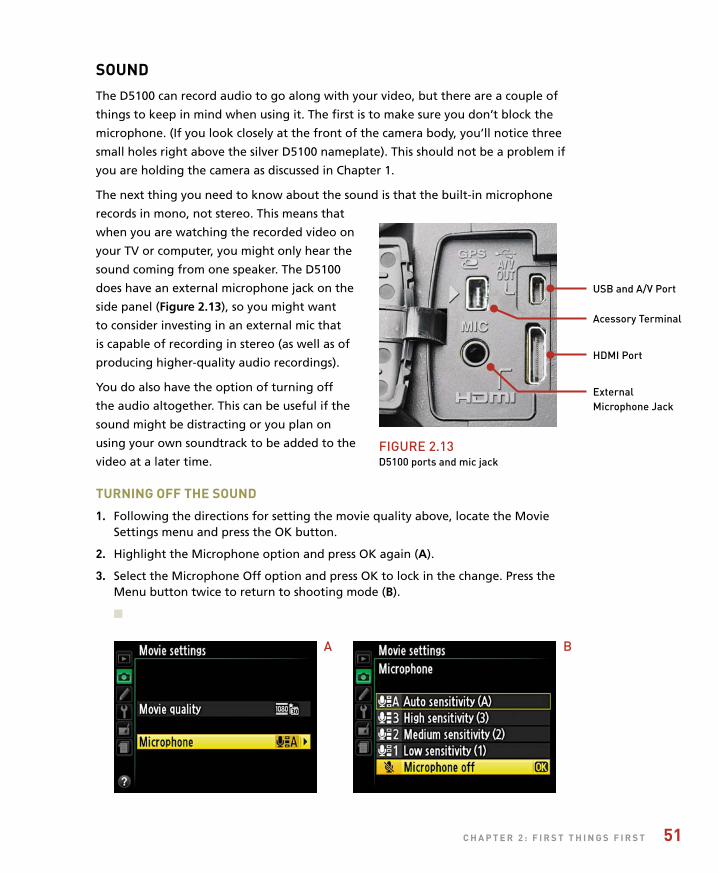
ptg
c h A P T e r 2 : F i r s T T h i n g s F i r s T 51
soundThe D5100 can record audio to go along with your video, but there are a couple of
things to keep in mind when using it. The first is to make sure you don’t block the
microphone. (If you look closely at the front of the camera body, you’ll notice three
small holes right above the silver D5100 nameplate). This should not be a problem if
you are holding the camera as discussed in Chapter 1.
The next thing you need to know about the sound is that the built-in microphone
records in mono, not stereo. This means that
when you are watching the recorded video on
your TV or computer, you might only hear the
sound coming from one speaker. The D5100
does have an external microphone jack on the
side panel (Figure 2.13), so you might want
to consider investing in an external mic that
is capable of recording in stereo (as well as of
producing higher-quality audio recordings).
You do also have the option of turning off
the audio altogether. This can be useful if the
sound might be distracting or you plan on
using your own soundtrack to be added to the
video at a later time.
Turning oFF The sound
1. Following the directions for setting the movie quality above, locate the MovieSettings menu and press the OK button.
2. Highlight the Microphone option and press OK again (A).
3. Select the Microphone Off option and press OK to lock in the change. Press theMenu button twice to return to shooting mode (B).
n
uSB and A/V port
HDMI port
Acessory Terminal
external Microphone Jack
FIgure 2.13D5100 ports and mic jack
A B
ptg
52 n i K o n d 5 1 0 0 : F r o m s n A P s h o T s T o g r e AT s h o T s
wATching Your videosThere are a couple of different ways you can review your video once you have fin-
ished recording. The first, and probably the easiest, is to press the Playback button to
bring up the recorded image on the rear LCD screen and then use the OK button to
start playing the video. The Multi-selector acts as the video controller and allows you
to rewind and fast-forward as well as stop the video altogether.
If you would like to get a larger look at things, you will need to either watch the
video on your TV or move the video files to your computer. To watch on your TV, you
can use the video cable that came with your camera and plug it into the small port
on the side of the camera body (Figure 2.13). This lets you watch low-resolution video
on your TV. To get the full effect from your HD videos, you will need to purchase an
HDMI cable (your TV needs to support at least 720 HD and have an HDMI port to use
this option). Once you have the cable hooked up to your TV, simply use the same
camera controls that you used for watching the video on the rear LCD screen.
If you want to watch or use the videos on your computer, you will need to download
the video using the Nikon software or by using an SD card reader attached to the
computer. The video files will have the extension .mov at the end of the file name.
These files should play on either a Mac or a PC using software that came with your
operating system (QuickTime for Mac and Windows Media Player for the PC).
For even more information about using video with your D5100, be sure to download
the Chapter 12 bonus chapter from Peachpit.com (as discussed in the introduction).

ptg
53
Chapter 2 AssignmentsFormatting your card
Even if you have already begun using your camera, make sure you are familiar with format-ting the Secure Digital card. If you haven’t done so already, follow the directions given earlier in the chapter and format as prescribed (make sure you save any images that you may have already taken). Then perform the format function every time you have downloaded or saved your images or use a new card.
Checking your firmware version
Using the most up-to-date version of the camera firmware will ensure that your camera is functioning properly. Use the menu to find your current firmware version and then update as necessary using the steps listed in this chapter.
Cleaning your sensor
You probably noticed the sensor-cleaning message the first time you turned your camera on. Make sure you are familiar with the Clean Now command so you can perform this function every time you change a lens.
Exploring your image formats
I want you to become familiar with all of the camera features before using the RAW format, but take a little time to explore the format menu so you can see what options are available to you.
Exploring your lens
If you are using a zoom lens, spend a little time shooting with all of the different focal lengths, from the widest to the longest. See just how much of an angle you can cover with your widest lens setting. How much magnification will you be able to get from the telephoto setting? Try shooting the same subject with a variety of focal lengths to note the differences in how the subject looks, and also the relationship between the subject and the other elements in the photo.
Recording video clips
Take a little time to discover how the video function works on your camera. Set the video quality to high definition and record a short sequence, and then try it with some of the lower resolution settings. Open the video clips on your computer or hook up the camera to your TV, then review the different video clips to see how the quality setting affects the video.
Share your results with the book’s Flickr group!
Join the group here: flickr.com/groups/nikond5100fromsnapshotstogreatshots/

ptg
3
ISO 1001/30 sec.f/880mm lens

ptg
The Auto Modes
Get shootinG with the automatic camera modes
The Nikon D5100 is an amazing camera that has some incredible features.
In fact, with all of the technology built into it, it can be pretty intimidating
for the person new to dSLR photography. For that reason, the folks at Nikon
have made it a little easier for you to get some great-looking photographs
without having to do a lot of thinking. Enter the scene modes. The camera
modes on the automatic side of the Mode dial are simple, icon-labeled
modes that are set up to use specific features of the camera for various
shooting situations. In addition, a new feature of the D5100 is a collection
of in-camera special effects. Let’s take a look at the different modes and
how and when to use them.
55
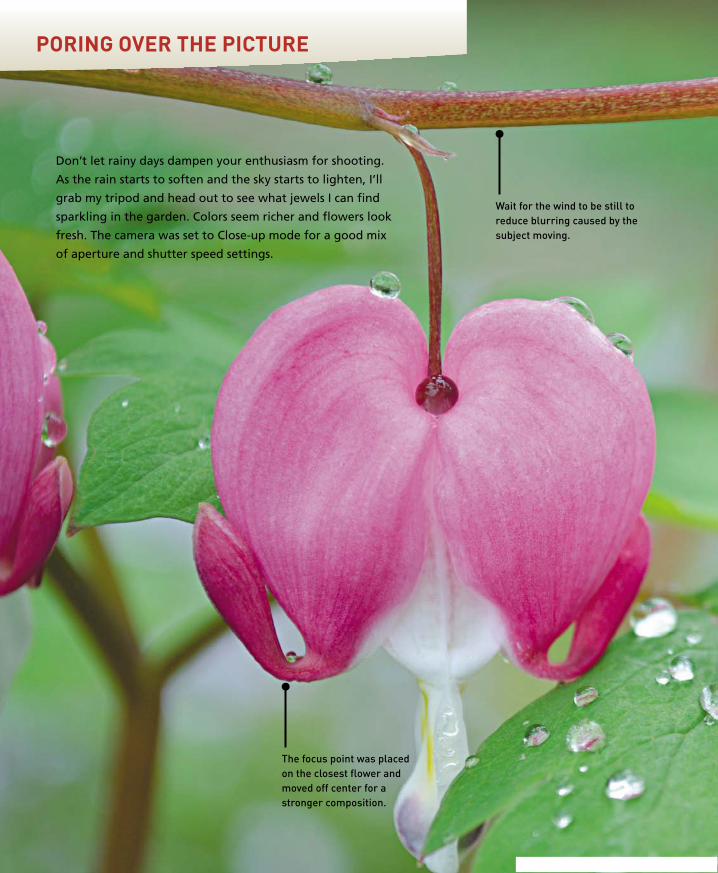
ptg
PorinG over the Picture
Don’t let rainy days dampen your enthusiasm for shooting.
As the rain starts to soften and the sky starts to lighten, I’ll
grab my tripod and head out to see what jewels I can find
sparkling in the garden. Colors seem richer and flowers look
fresh. The camera was set to Close-up mode for a good mix
of aperture and shutter speed settings.
Wait for the wind to be still toreduce blurring caused by thesubject moving.
The focus point was placedon the closest flower andmoved off center for astronger composition.
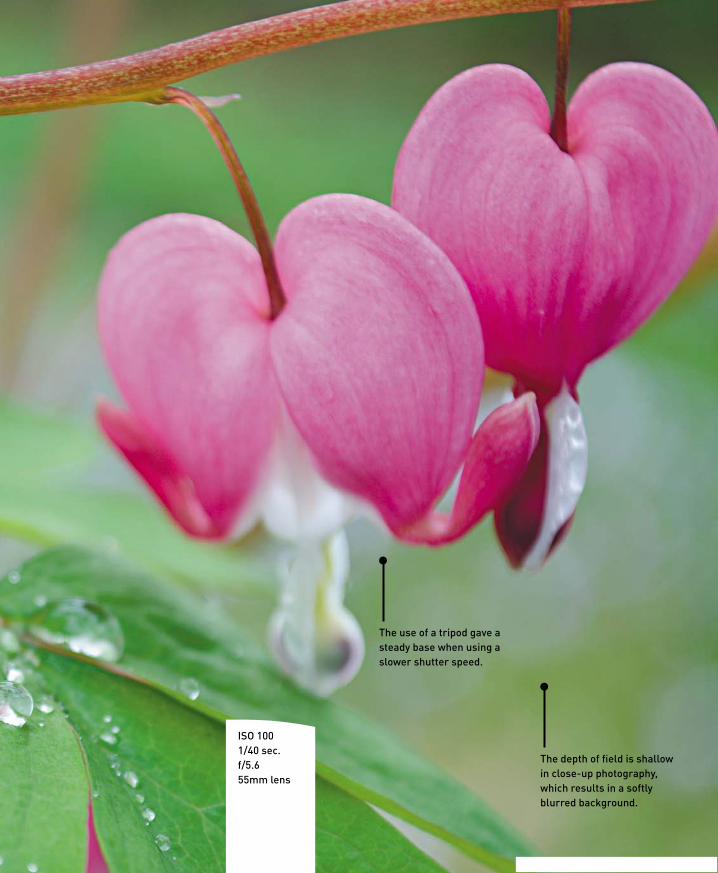
ptg
ISO 1001/40 sec.f/5.655mm lens
The depth of field is shallowin close-up photography,which results in a softlyblurred background.
The use of a tripod gave asteady base when using aslower shutter speed.

ptg
58 n i k o n d 5 1 0 0 : F r o m s n a P s h o t s t o G r e at s h o t s
auto modeAuto mode is all about thought-
free photography (Figure 3.1).
There is little to nothing for
you to do in this mode except point and
shoot. Your biggest concern when using
Auto mode is focusing. The camera will utilize
the automatic focusing modes to achieve the
best-possible focus for your picture. Naturally,
the camera is going to assume that the object
that is closest to the camera is the one that
you want in sharpest focus. Simply press the
shutter button down halfway while looking
through the viewfinder and you should see one of the focus points light up over the
subject. Of course, you know that putting your subject in the middle of the picture
is not the best way to compose your shot. So wait for the chirp to confirm that the
focus has been set and then, while still holding down the button, recompose your
shot. Now just press down the shutter button the rest of the way to take the photo.
It’s just that easy (Figure 3.2). The camera will take care of all your exposure decisions,
including when to use the flash.
FIgure 3.1The Auto mode info screen.
ISO 1401/125 sec.f/1145mm lens
FIgure 3.2The Auto modeworks great whenyou don’t want tothink too much andjust want to snapsome shots.
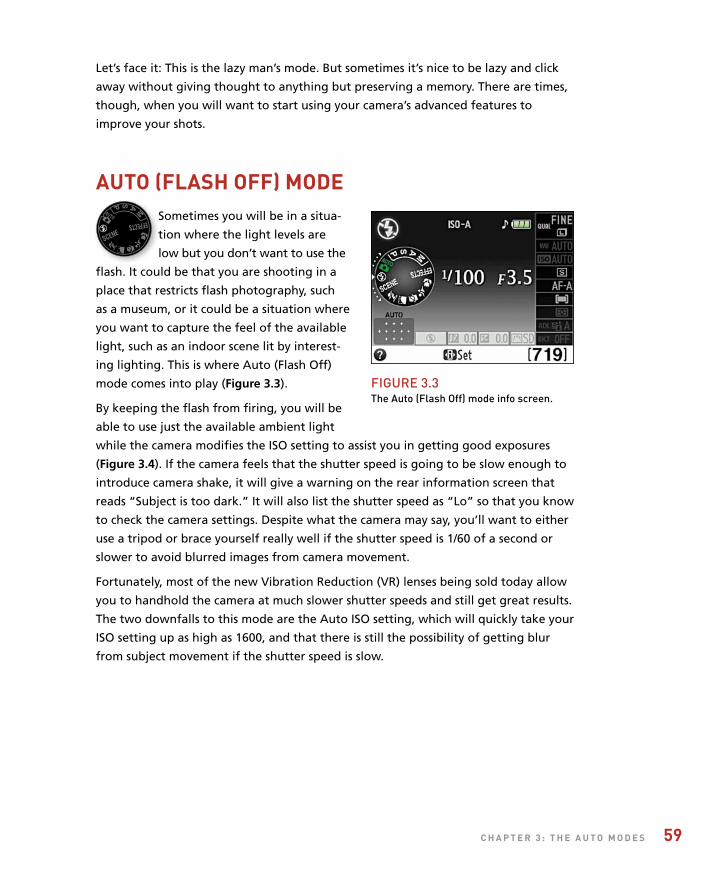
ptg
c h a P t e r 3 : t h e a u t o m o d e s 59
Let’s face it: This is the lazy man’s mode. But sometimes it’s nice to be lazy and click
away without giving thought to anything but preserving a memory. There are times,
though, when you will want to start using your camera’s advanced features to
improve your shots.
auto (Flash oFF) modeSometimes you will be in a situa-
tion where the light levels are
low but you don’t want to use the
flash. It could be that you are shooting in a
place that restricts flash photography, such
as a museum, or it could be a situation where
you want to capture the feel of the available
light, such as an indoor scene lit by interest-
ing lighting. This is where Auto (Flash Off)
mode comes into play (Figure 3.3).
By keeping the flash from firing, you will be
able to use just the available ambient light
while the camera modifies the ISO setting to assist you in getting good exposures
(Figure 3.4). If the camera feels that the shutter speed is going to be slow enough to
introduce camera shake, it will give a warning on the rear information screen that
reads “Subject is too dark.” It will also list the shutter speed as “Lo” so that you know
to check the camera settings. Despite what the camera may say, you’ll want to either
use a tripod or brace yourself really well if the shutter speed is 1/60 of a second or
slower to avoid blurred images from camera movement.
Fortunately, most of the new Vibration Reduction (VR) lenses being sold today allow
you to handhold the camera at much slower shutter speeds and still get great results.
The two downfalls to this mode are the Auto ISO setting, which will quickly take your
ISO setting up as high as 1600, and that there is still the possibility of getting blur
from subject movement if the shutter speed is slow.
FIgure 3.3The Auto (Flash Off) mode info screen.

ptg
60 n i k o n d 5 1 0 0 : F r o m s n a P s h o t s t o G r e at s h o t s
ISO 16001/100 sec.f/3.560mm lens
Portrait modeOne problem with Auto mode is
that it has no idea what type of
subject you are photographing
and, therefore, uses the same settings for
each situation. Shooting portraits is a perfect
example. When you take a photograph of
someone, you usually want the emphasis of
the picture to be on the person, not necessar-
ily the stuff going on in the background.
This is what Portrait mode is all about
(Figure 3.5). When you set your camera to
this mode, you are telling the camera to
select a larger aperture so that the depth of field is much narrower and will give
more blur to objects in the background. This blurry background places the attention
on your subject (Figure 3.6). The other feature of this mode is the automatic selec-
tion of the D5100’s built-in Portrait picture control (we’ll go into more detail about
picture controls in later chapters). This feature is optimized for skin tones and will
also be a little softer to improve the look of skin.
FIgure 3.4Auto (Flash Off)mode made surethe pop-up flashstayed disabledin the low-lightenvironment.
FIgure 3.5The Portrait mode info screen.

ptg
c h a P t e r 3 : t h e a u t o m o d e s 61
ISO 2001/60 sec.f/2.850mm lens
FIgure 3.6Portrait mode isuseful for gettingthe right settingsunder the currentlighting conditionsfor people photos.(Photo by PalomaSylvan)
usinG the best lens For Great Portraits
When using Portrait mode, use a lens that is 50mm or longer. The longer lens will give you a natural view of the subject, as well as aid in keeping the depth of field narrow.
landscaPe modeAs you might have guessed,
Landscape mode has been opti-
mized for shooting landscape
images (Figure 3.7). Particular emphasis is
placed on the picture control, with the
camera trying to boost the greens and blues
in the image (Figure 3.8). This makes sense,
since the typical landscape would be outdoors
where grass, trees, and skies should look more
colorful. This picture control also boosts the
sharpness that is applied during processing.
FIgure 3.7The Landscape mode info screen.
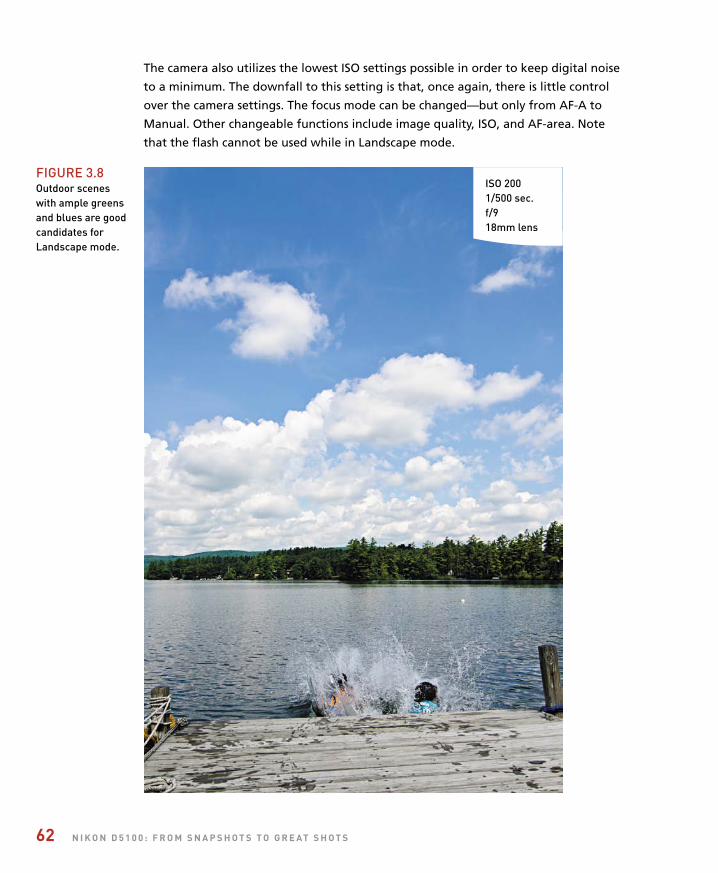
ptg
62 n i k o n d 5 1 0 0 : F r o m s n a P s h o t s t o G r e at s h o t s
The camera also utilizes the lowest ISO settings possible in order to keep digital noise
to a minimum. The downfall to this setting is that, once again, there is little control
over the camera settings. The focus mode can be changed—but only from AF-A to
Manual. Other changeable functions include image quality, ISO, and AF-area. Note
that the flash cannot be used while in Landscape mode.
ISO 2001/500 sec.f/918mm lens
FIgure 3.8Outdoor sceneswith ample greensand blues are goodcandidates forLandscape mode.
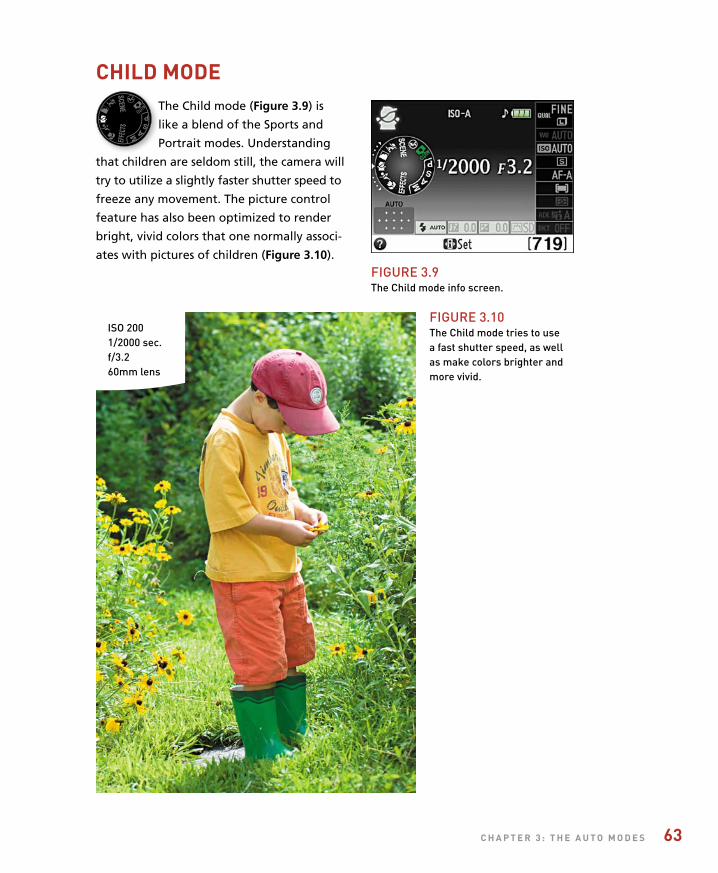
ptg
c h a P t e r 3 : t h e a u t o m o d e s 63
child modeThe Child mode (Figure 3.9) is
like a blend of the Sports and
Portrait modes. Understanding
that children are seldom still, the camera will
try to utilize a slightly faster shutter speed to
freeze any movement. The picture control
feature has also been optimized to render
bright, vivid colors that one normally associ-
ates with pictures of children (Figure 3.10).
FIgure 3.9The Child mode info screen.
ISO 2001/2000 sec.f/3.260mm lens
FIgure 3.10The Child mode tries to usea fast shutter speed, as wellas make colors brighter andmore vivid.
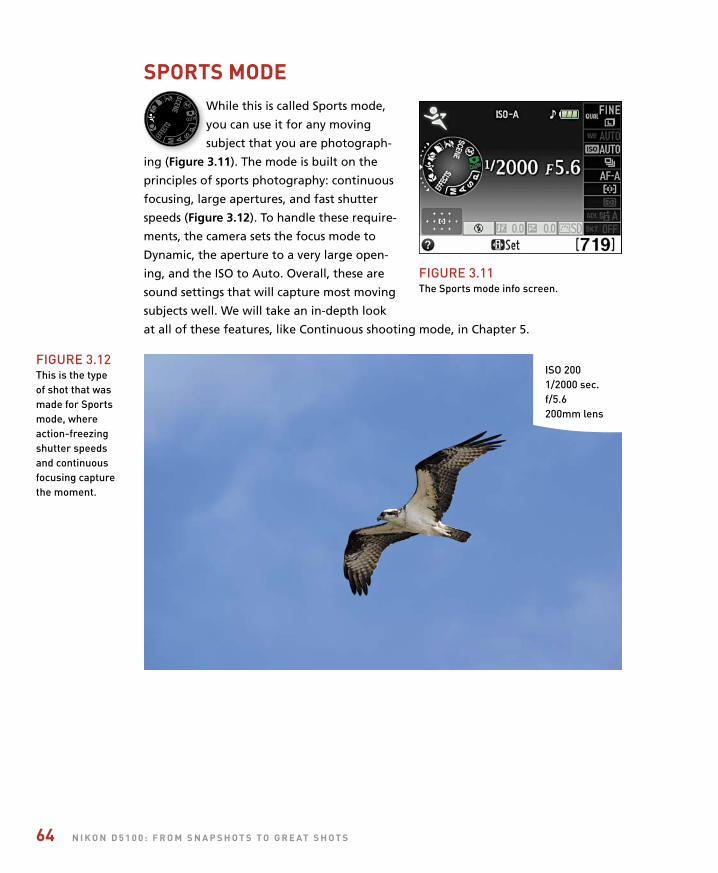
ptg
64 n i k o n d 5 1 0 0 : F r o m s n a P s h o t s t o G r e at s h o t s
sPorts modeWhile this is called Sports mode,
you can use it for any moving
subject that you are photograph-
ing (Figure 3.11). The mode is built on the
principles of sports photography: continuous
focusing, large apertures, and fast shutter
speeds (Figure 3.12). To handle these require-
ments, the camera sets the focus mode to
Dynamic, the aperture to a very large open-
ing, and the ISO to Auto. Overall, these are
sound settings that will capture most moving
subjects well. We will take an in-depth look
at all of these features, like Continuous shooting mode, in Chapter 5.
ISO 2001/2000 sec.f/5.6200mm lens
FIgure 3.12This is the typeof shot that wasmade for Sportsmode, whereaction-freezingshutter speedsand continuousfocusing capturethe moment.
FIgure 3.11The Sports mode info screen.

ptg
c h a P t e r 3 : t h e a u t o m o d e s 65
You can, however, run the risk of too much digital noise in your picture if the camera
decides that you need a very high ISO (such as 1600) because the available light is
low. This is why you have the ability to change some options within the Sports mode,
such as ISO and the Release mode (single or continuous). Also, when using Sports
mode, you can change the focus mode from AF-A to Manual. This is especially handy
if you know when and where the action will take place and want to prefocus the
camera on a spot and wait for the right moment to take the photo.
close-uP modeAlthough most zoom lenses don’t
support true “macro” settings,
that doesn’t mean you can’t shoot
some great close-up photos. The key here is
to use your camera-to-subject distance to fill
the frame and still achieve sharp focus. This
means that you move yourself as close as
possible to your subject while still being able
to get a good, sharp focus. Oftentimes, your
lens will be marked with the minimum
focusing distance. On my 18–55mm zoom, it
is about 6 inches with the lens set to 55mm.
To help get the best focus in the picture, Close-up mode (Figure 3.13) will use the
smallest aperture it can while keeping the shutter speed fast enough to get a sharp
shot (Figure 3.14). It does this by raising the ISO or turning on the built-in flash—or
a combination of the two. Fortunately, these are two of the settings that you can
change in this mode. The flash will be set to Auto by default, but you can also change
it to Auto-Redeye or Off, depending on your needs. The ISO can be changed from
the Auto setting to one of your own choosing. This probably only needs to be done
in low-light settings when the Auto-ISO starts to move up to maintain exposure values.
Other settings that can be changed are the image quality, release mode, focus mode
(AF-A or Manual), and AF-area.
FIgure 3.13The Close-up mode info screen.
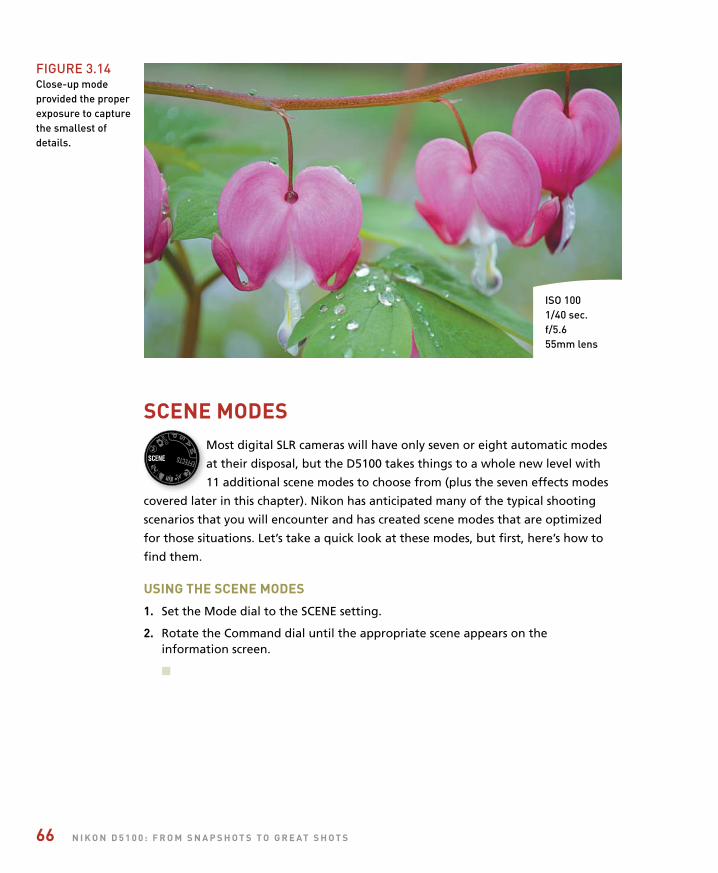
ptg
66 n i k o n d 5 1 0 0 : F r o m s n a P s h o t s t o G r e at s h o t s
scene modesMost digital SLR cameras will have only seven or eight automatic modes
at their disposal, but the D5100 takes things to a whole new level with
11 additional scene modes to choose from (plus the seven effects modes
covered later in this chapter). Nikon has anticipated many of the typical shooting
scenarios that you will encounter and has created scene modes that are optimized
for those situations. Let’s take a quick look at these modes, but first, here’s how to
find them.
usinG the scene modes
1. Set the Mode dial to the SCENE setting.
2. Rotate the Command dial until the appropriate scene appears on theinformation screen.
n
ISO 1001/40 sec.f/5.655mm lens
FIgure 3.14Close-up modeprovided the properexposure to capturethe smallest ofdetails.

ptg
c h a P t e r 3 : t h e a u t o m o d e s 67
FoodFood photography is very popular as of late,
and Nikon has provided you with a scene
mode that is perfect for this type of pho-
tography (Figure 3.15). When you select this
mode, the camera will use large apertures
for fairly narrow depth of field, slightly over-
exposed settings to keep things bright, and
a picture control that makes colors slightly
more vivid.
niGht PortraitYou’re out on the town at night and you
want to take a nice picture of someone,
but you want to show some of the interest-
ing scenery in the background as well. The
solution is to use Night Portrait mode (Figure
3.16). When you set the dial to this mode, you
are telling the camera that you want to use a
slower-than-normal shutter speed so that the
background is getting more time (and, thus,
more light) to achieve a proper exposure.
The typical shutter speed for using flash is
about 1/60 of a second or faster (but not
faster than 1/200 of a second). By leaving the shutter open for a longer duration, the
camera allows more of the background to be exposed so that you get a much more
balanced scene. This is also a great mode for taking portraits during sunset. The cam-
era uses an automatic ISO setting by default, so you will want to keep an eye on it to
make sure that setting isn’t so high that the noise levels ruin your photo.
FIgure 3.15The Food scene mode.
FIgure 3.16The Night Portrait scene mode.

ptg
68 n i k o n d 5 1 0 0 : F r o m s n a P s h o t s t o G r e at s h o t s
niGht landscaPeA tripod or stable shooting surface is defi-
nitely recommended for the Night Landscape
mode (Figure 3.17). By using low ISOs, longer
shutter speeds, and noise reduction, you can
capture great cityscapes with more-accurate
colors. The flash and focus-assist functions are
turned off for this mode, so focusing might
be a little difficult. If so, try moving your
focus point to a different location or switch
to manual focus.
Party/indoorThis mode is very much like the Night Portrait
mode except it is optimized for indoor use
(Figure 3.18). The flash is automatically set
to Auto+Red-eye Reduction and will use the
red-eye reduction lamp to help eliminate
the red-eye problem that often occurs when
using the flash indoors.
beach/snowShooting in a bright environment like the
beach or a ski resort can have a bad effect
on your images. The problem is that beaches
and snow often reflect a lot of light and can
fool the camera’s light meter into under-
exposing. This means that the snow would
come out looking darker than it should. To
solve this problem, you can use the Beach/
Snow scene mode (Figure 3.19), which will
overexpose slightly, giving you much more
accurate tones.
FIgure 3.17The Night Landscape scene mode.
FIgure 3.18The Party/Indoor scene mode.
FIgure 3.19The Beach/Snow scene mode.

ptg
c h a P t e r 3 : t h e a u t o m o d e s 69
sunsetThis mode is set to optimize the colors that
are present in a sunset (Figure 3.20). It will
utilize slightly longer exposures, so a tripod
or steady shooting surface is advised. You also
won’t be able to use the flash in this mode
since it would interfere with the settings
necessary for capturing the sunset.
dusk/dawnThere are some great photo opportunities
that take place both before the sun rises and
after it sets. The only problem is that the
typical camera settings don’t truly capture the
vibrancy of the colors. The Dusk/Dawn camera
setting is optimized for low-light photog-
raphy and helps boost colors and eliminate
noise from longer exposures (Figure 3.21).
Pet PortraitThis mode is similar to the Portrait mode
in that it uses larger apertures and faster
shutter speeds (Figure 3.22). The difference
is that the Portrait mode is optimized for
human skin, with adjustments to the hues
and color values. Pets don’t normally have
any skin showing, so the sharpness and hues
are adjusted accordingly.
FIgure 3.20The Sunset scene mode.
FIgure 3.21The Dusk/Dawn scene mode.
FIgure 3.22The Pet Portrait scene mode.
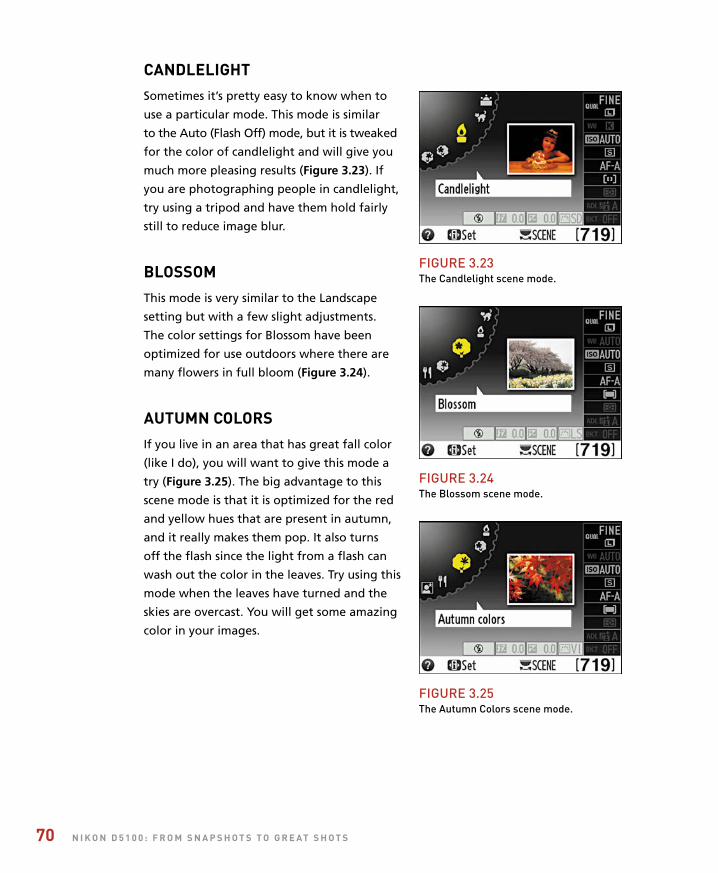
ptg
70 n i k o n d 5 1 0 0 : F r o m s n a P s h o t s t o G r e at s h o t s
candleliGhtSometimes it’s pretty easy to know when to
use a particular mode. This mode is similar
to the Auto (Flash Off) mode, but it is tweaked
for the color of candlelight and will give you
much more pleasing results (Figure 3.23). If
you are photographing people in candlelight,
try using a tripod and have them hold fairly
still to reduce image blur.
blossomThis mode is very similar to the Landscape
setting but with a few slight adjustments.
The color settings for Blossom have been
optimized for use outdoors where there are
many flowers in full bloom (Figure 3.24).
autumn colorsIf you live in an area that has great fall color
(like I do), you will want to give this mode a
try (Figure 3.25). The big advantage to this
scene mode is that it is optimized for the red
and yellow hues that are present in autumn,
and it really makes them pop. It also turns
off the flash since the light from a flash can
wash out the color in the leaves. Try using this
mode when the leaves have turned and the
skies are overcast. You will get some amazing
color in your images.
FIgure 3.23The Candlelight scene mode.
FIgure 3.24The Blossom scene mode.
FIgure 3.25The Autumn Colors scene mode.

ptg
c h a P t e r 3 : t h e a u t o m o d e s 71
eFFects modesBeyond the scene-specific settings, there is a collection of in-camera special
effects that are actually kind of fun to use. Remember, a digital camera is
not only a light-capturing device but also a small computer in its own way.
After an image is captured and saved to memory, these special effects modes give
you the power to process your photos before they ever leave the camera. In fact, all
of these effects can even be applied to video. Because the Night Vision, Color Sketch,
Miniature Effect, and Selective Color effects require additional in-camera processing,
it is not possible to shoot in RAW mode with them. In addition, due to the extra work
the camera has to do to process these effects, be prepared to wait between exposures
and expect the charge on the battery to be consumed faster.
I was a bit skeptical about these effects when I first heard about them. After all, one
of the most important selling features of the D5100 is its stunning image quality, so
it felt a bit risky to take the chance of capturing a good photo in, say, Color Sketch
mode but not have any way to get the unprocessed original photo. But after giving
each one a thorough test drive, I found some of them quite enjoyable to use. And
once I started getting used to the effects, I started looking for specific instances that
might be better suited to a given effect, and I found it much more satisfying.
usinG the eFFects modes
1. Set the Mode dial to the EFFECTS setting.
2. Rotate the Command dial until the desired effect appears on the information screen.
n
silhouetteThe Silhouette mode (Figure 3.26) does things
like adjust the exposure for the brightest area
of the scene as well as turn off the Active
D-Lighting feature (see Chapter 10 for more
on Active D-Lighting). This is necessary, since
Active D-Lighting tries to boost exposure in
shadow areas, which is the opposite of the
effect you want when trying to get a nice
silhouette. Look for situations with strong
backlighting behind your subject. FIgure 3.26The Silhouette effects mode.
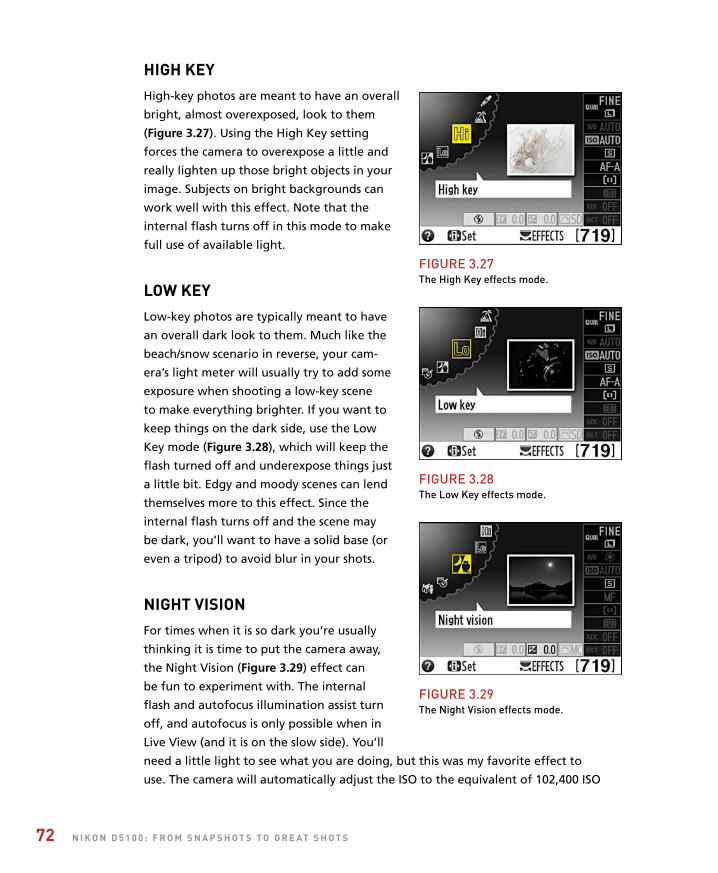
ptg
72 n i k o n d 5 1 0 0 : F r o m s n a P s h o t s t o G r e at s h o t s
hiGh keyHigh-key photos are meant to have an overall
bright, almost overexposed, look to them
(Figure 3.27). Using the High Key setting
forces the camera to overexpose a little and
really lighten up those bright objects in your
image. Subjects on bright backgrounds can
work well with this effect. Note that the
internal flash turns off in this mode to make
full use of available light.
low keyLow-key photos are typically meant to have
an overall dark look to them. Much like the
beach/snow scenario in reverse, your cam-
era’s light meter will usually try to add some
exposure when shooting a low-key scene
to make everything brighter. If you want to
keep things on the dark side, use the Low
Key mode (Figure 3.28), which will keep the
flash turned off and underexpose things just
a little bit. Edgy and moody scenes can lend
themselves more to this effect. Since the
internal flash turns off and the scene may
be dark, you’ll want to have a solid base (or
even a tripod) to avoid blur in your shots.
niGht visionFor times when it is so dark you’re usually
thinking it is time to put the camera away,
the Night Vision (Figure 3.29) effect can
be fun to experiment with. The internal
flash and autofocus illumination assist turn
off, and autofocus is only possible when in
Live View (and it is on the slow side). You’ll
need a little light to see what you are doing, but this was my favorite effect to
use. The camera will automatically adjust the ISO to the equivalent of 102,400 ISO
FIgure 3.27The High Key effects mode.
FIgure 3.28The Low Key effects mode.
FIgure 3.29The Night Vision effects mode.
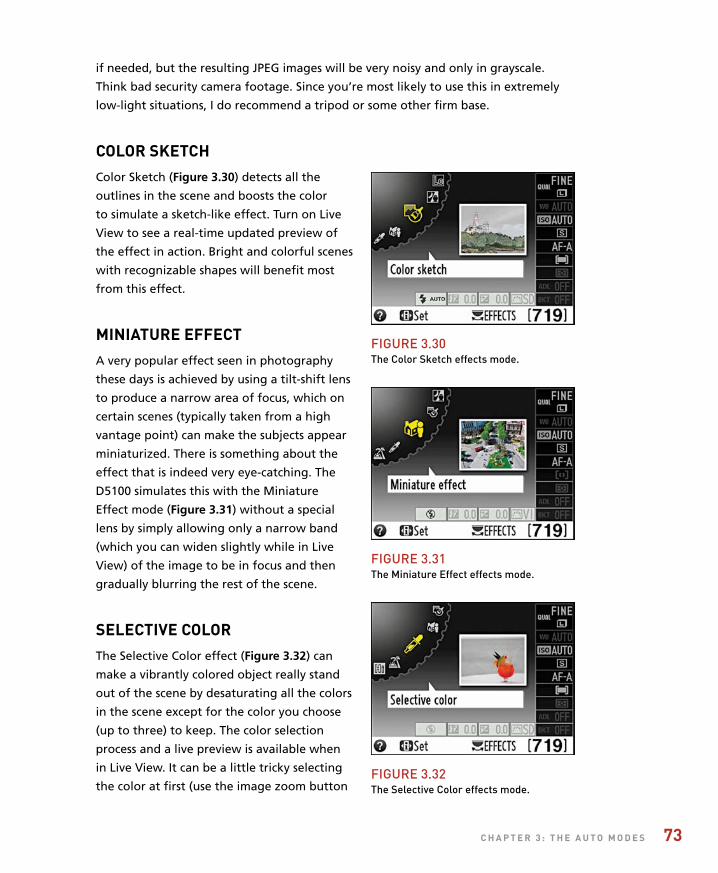
ptg
c h a P t e r 3 : t h e a u t o m o d e s 73
if needed, but the resulting JPEG images will be very noisy and only in grayscale.
Think bad security camera footage. Since you’re most likely to use this in extremely
low-light situations, I do recommend a tripod or some other firm base.
color sketchColor Sketch (Figure 3.30) detects all the
outlines in the scene and boosts the color
to simulate a sketch-like effect. Turn on Live
View to see a real-time updated preview of
the effect in action. Bright and colorful scenes
with recognizable shapes will benefit most
from this effect.
miniature eFFectA very popular effect seen in photography
these days is achieved by using a tilt-shift lens
to produce a narrow area of focus, which on
certain scenes (typically taken from a high
vantage point) can make the subjects appear
miniaturized. There is something about the
effect that is indeed very eye-catching. The
D5100 simulates this with the Miniature
Effect mode (Figure 3.31) without a special
lens by simply allowing only a narrow band
(which you can widen slightly while in Live
View) of the image to be in focus and then
gradually blurring the rest of the scene.
selective colorThe Selective Color effect (Figure 3.32) can
make a vibrantly colored object really stand
out of the scene by desaturating all the colors
in the scene except for the color you choose
(up to three) to keep. The color selection
process and a live preview is available when
in Live View. It can be a little tricky selecting
the color at first (use the image zoom button
FIgure 3.30The Color Sketch effects mode.
FIgure 3.31The Miniature effect effects mode.
FIgure 3.32The Selective Color effects mode.

ptg
74 n i k o n d 5 1 0 0 : F r o m s n a P s h o t s t o G r e at s h o t s
to zoom in on your color for easier selection),
but it won’t take long to get the hang of it.
I’m more of a fan of doing this type of effect
via software on my computer (to ensure I have
a full-color original), but in a pinch (or for use
in a video) it works pretty well.
why you may never want to use the auto scene modes aGainWith so many easy-to-use camera modes, why would anyone ever want to use any-
thing else? Well, the first thing that comes to my mind is control. It is the number
one reason for using a digital SLR camera. The ability to control every aspect of your
photography will open up creative avenues that just aren’t available in the automatic
scene modes. Let’s face it: There is a reason that the Mode dial is split into two different
categories. Let’s look at what we are giving up when we work in the scene modes.
• White balance. There is no choice available for white balance. You are simply
stuck with the Auto setting. This isn’t always a bad thing, but your camera doesn’t
always get it right. And in the scene modes, there is just no way to change it.
• Picture control. All of the automatic modes have specifically tuned picture con-
trols. Some of them use the control presets, such as Landscape or Vivid, but there
is no way to change the characteristics of the controls while in the auto modes.
• Metering. All of the auto scene modes use the Matrix metering mode to establish
the proper exposure. This is generally not a bad thing, but if there are scenarios
that would benefit from a center or spot metering solution (which we’ll cover in
later chapters), you’re just out of luck.
• Autofocus. While each of the modes may use a specific focus area mode, such as
Single or Dynamic, the actual focus mode for all of the scene modes is limited to
either AF-A or Manual when shooting using the viewfinder. The problem is that
you can’t just use AF-S (single) or AF-C (continuous) as the default setting (unless
you switch to Live View; see the sidebar “Live View”).
Manual calloutYou can learn more about the specific controls for each of these effects on page 58 of the printed user manual.
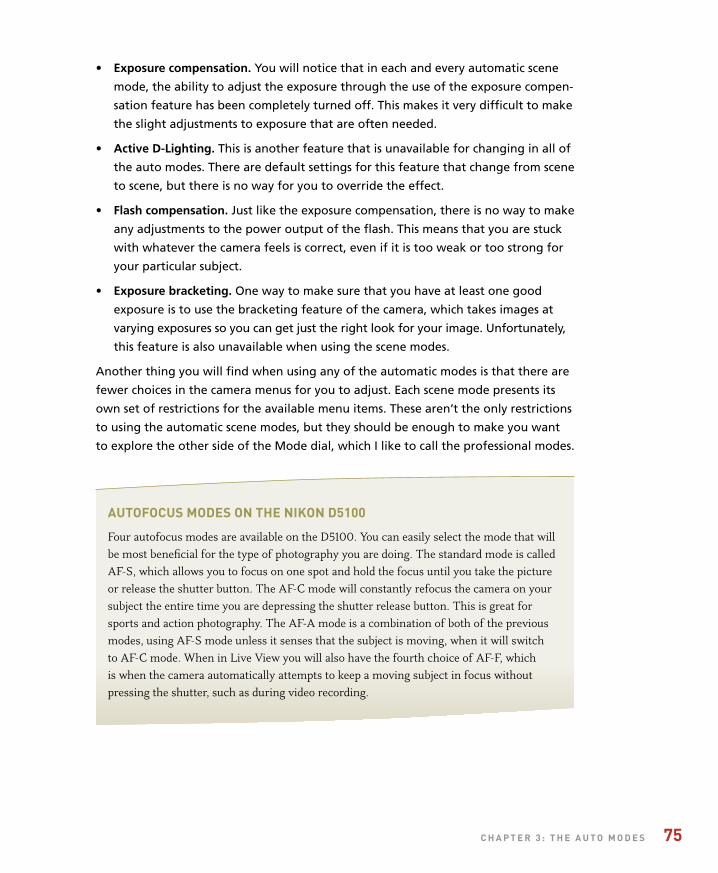
ptg
c h a P t e r 3 : t h e a u t o m o d e s 75
• Exposure compensation. You will notice that in each and every automatic scene
mode, the ability to adjust the exposure through the use of the exposure compen-
sation feature has been completely turned off. This makes it very difficult to make
the slight adjustments to exposure that are often needed.
• Active D-Lighting. This is another feature that is unavailable for changing in all of
the auto modes. There are default settings for this feature that change from scene
to scene, but there is no way for you to override the effect.
• Flash compensation. Just like the exposure compensation, there is no way to make
any adjustments to the power output of the flash. This means that you are stuck
with whatever the camera feels is correct, even if it is too weak or too strong for
your particular subject.
• Exposure bracketing. One way to make sure that you have at least one good
exposure is to use the bracketing feature of the camera, which takes images at
varying exposures so you can get just the right look for your image. Unfortunately,
this feature is also unavailable when using the scene modes.
Another thing you will find when using any of the automatic modes is that there are
fewer choices in the camera menus for you to adjust. Each scene mode presents its
own set of restrictions for the available menu items. These aren’t the only restrictions
to using the automatic scene modes, but they should be enough to make you want
to explore the other side of the Mode dial, which I like to call the professional modes.
autoFocus modes on the nikon d5100
Four autofocus modes are available on the D5100. You can easily select the mode that will be most beneficial for the type of photography you are doing. The standard mode is called AF-S, which allows you to focus on one spot and hold the focus until you take the picture or release the shutter button. The AF-C mode will constantly refocus the camera on your subject the entire time you are depressing the shutter release button. This is great for sports and action photography. The AF-A mode is a combination of both of the previous modes, using AF-S mode unless it senses that the subject is moving, when it will switch to AF-C mode. When in Live View you will also have the fourth choice of AF-F, which is when the camera automatically attempts to keep a moving subject in focus without pressing the shutter, such as during video recording.
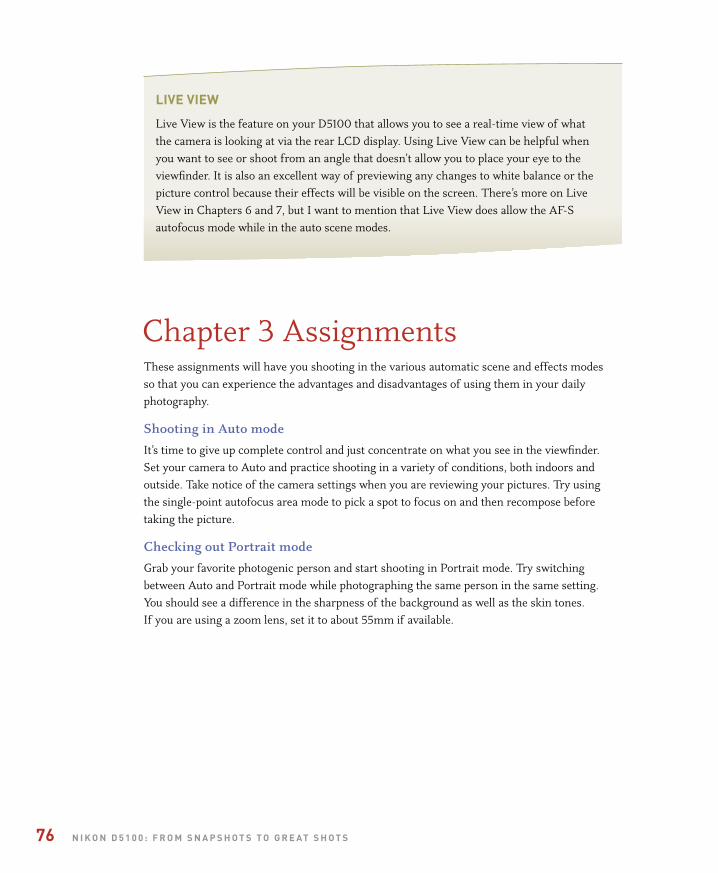
ptg
76 n i k o n d 5 1 0 0 : F r o m s n a P s h o t s t o G r e at s h o t s
live view
Live View is the feature on your D5100 that allows you to see a real-time view of what the camera is looking at via the rear LCD display. Using Live View can be helpful when you want to see or shoot from an angle that doesn’t allow you to place your eye to the viewfinder. It is also an excellent way of previewing any changes to white balance or the picture control because their effects will be visible on the screen. There’s more on Live View in Chapters 6 and 7, but I want to mention that Live View does allow the AF-S autofocus mode while in the auto scene modes.
Chapter 3 AssignmentsThese assignments will have you shooting in the various automatic scene and effects modes so that you can experience the advantages and disadvantages of using them in your daily photography.
Shooting in Auto mode
It’s time to give up complete control and just concentrate on what you see in the viewfinder. Set your camera to Auto and practice shooting in a variety of conditions, both indoors and outside. Take notice of the camera settings when you are reviewing your pictures. Try using the single-point autofocus area mode to pick a spot to focus on and then recompose before taking the picture.
Checking out Portrait mode
Grab your favorite photogenic person and start shooting in Portrait mode. Try switching between Auto and Portrait mode while photographing the same person in the same setting. You should see a difference in the sharpness of the background as well as the skin tones. If you are using a zoom lens, set it to about 55mm if available.
ptg
77
Capturing the scenery with Landscape and Close-up modes
Take your camera outside for some landscape and macro work. First, find a nice scene and then, with your widest available lens, take some pictures using Landscape mode and then switch back to Auto so that you can compare the settings used for each image as well as the changes to colors and sharpness. Now, while you are still outside, find something in the foreground—a leaf or a flower—and switch the camera to Close-up mode. See how close you can get and take note of the f-stop that the mode uses. Then switch to Auto and shoot the same subject.
Stopping the action with Sports mode
This assignment will require that you find a subject that is in motion. That could be the traffic in front of your home or your child at play. The only real requirement is that the subject be moving. This will be your opportunity to test out Sports mode. There isn’t a lot to worry about here. Just point and shoot. Try shooting a few frames one at a time and then go ahead and hold down the shutter button and shoot a burst of about five or six frames. It will help if your subject is in good available light to start with so that the camera won’t be forced to use high ISOs.
Having fun with the effects modes
Carve out some time to give each of the effects a good test run and have fun with it. It is all too easy to get hung up on getting the perfect shot, but with the effects modes you have permission to play. See how the world looks with just a single color; try envisioning things in miniature; check out your pets in Color Sketch mode. Just focus on being creative and exploring the results. You never know when one of these effects might come in handy down the road.
Share your results with the book’s Flickr group!
Join the group here: flickr.com/groups/nikond5100fromsnapshotstogreatshots/

ptg
4
ISO 2001/320 sec.f/11400mm lens

ptg
The Professional Modes
Taking your phoTography To The nexT level
If you talk to professional photographers, you will find that the majority
of them are using a few selective modes that offer the greatest amount
of control over their photography. To anyone who has been involved
with photography for any period of time, these modes are known as
the backbones of photography. They allow you to influence two of
the most important factors in taking great photographs: aperture and
shutter speed. To access these modes, you simply turn the Mode dial to
one of the letter-designated modes and begin shooting. But wouldn’t
it be nice to know exactly what those modes control and how to make
them do our bidding? Well, if you really want to take that next step in
controlling your photography, it is essential that you understand not
only how to control these modes, but why you are controlling them.
So let’s move that Mode dial to the first of our professional modes:
Program mode.
79
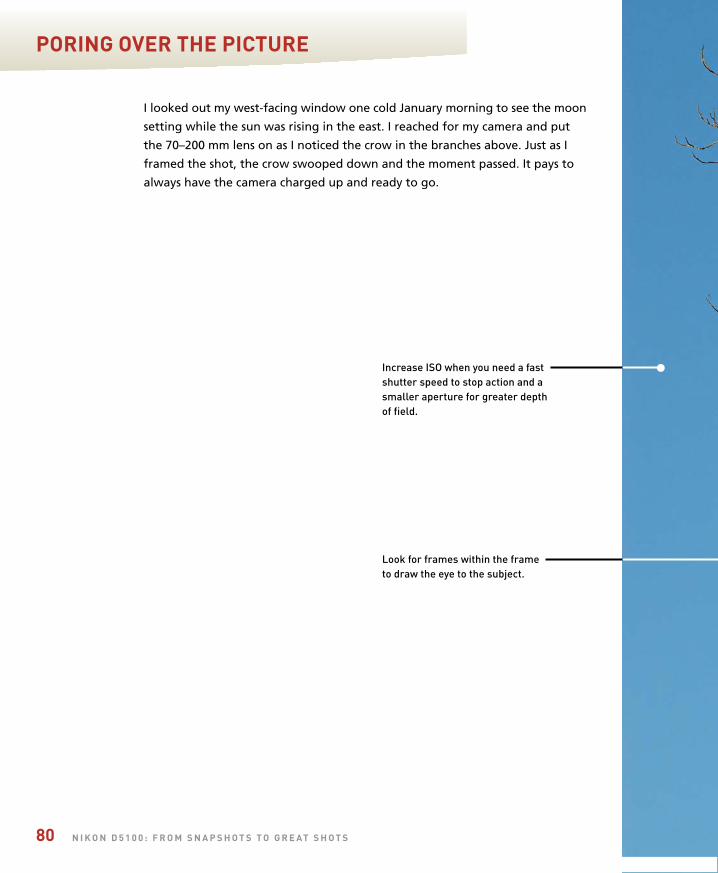
ptg
80 n i k o n D 5 1 0 0 : F r o m S n a p S h o T S T o g r e aT S h o T S
poring over The picTure
I looked out my west-facing window one cold January morning to see the moon
setting while the sun was rising in the east. I reached for my camera and put
the 70–200 mm lens on as I noticed the crow in the branches above. Just as I
framed the shot, the crow swooped down and the moment passed. It pays to
always have the camera charged up and ready to go.
Increase ISO when you need a fastshutter speed to stop action and asmaller aperture for greater depthof field.
Look for frames within the frame to draw the eye to the subject.

ptg
c h a p T e r 4 : T h e p r o F e S S i o n a l m o D e S 81
ISO 4001/640 sec.f/8135 mm lens
The focus point wasplaced on the treeto keep detail in thebranches.
I used the spot meter on the tree bark to ensure I retainedthe highlight detail.
ptg
82 n i k o n D 5 1 0 0 : F r o m S n a p S h o T S T o g r e aT S h o T S
p: program moDeThere is a reason that Program
mode is only one click away from
the automatic modes: With respect
to apertures and shutter speeds, the camera is
doing most of the thinking for you. So, if that
is the case, why even bother with Program
mode? First, let me say that it is very rare that I
will use Program mode, because it just doesn’t
give as much control over the image-making
process as the other professional modes. There
are occasions, however, when it comes in handy, like when I am shooting in widely
changing lighting conditions and don’t have the time to think through all of my
options, or when I’m not very concerned with having ultimate control of the scene.
Think of a picnic outdoors in a partial shade/sun environment. I want great-looking
pictures, but I’m not looking for anything to hang in a museum. If that’s the scenario,
why choose Program over one of the scene modes? Because it gives me choices and
control that none of the scene modes can deliver.
When To uSe program (p) moDe inSTeaD oF The auTomaTic Scene moDeS• When shooting in a casual environment where quick adjustments are needed
• When you want more control over the ISO
• If you want to make corrections to the white balance
• When you want to change shutter speeds or the aperture to achieve a
specific result
Let’s go back to our picnic scenario. As I said, the light is moving from deep shadow
to bright sunlight, which means that the camera is trying to balance our three photo
factors (ISO, aperture, and shutter speed) to make a good exposure. From Chapter 1,
we know that Auto ISO is just not a consideration, so we have already turned that
feature off (you did turn it off, didn’t you?). Well, in Program mode, you can choose
which ISO you would like the camera to base its exposure on. The lower the ISO num-
ber, the better the quality of our photographs, but the less light sensitive the camera
becomes. It’s a balancing act with the main goal always being to keep the ISO as low
as possible—too low an ISO, and we will get camera shake in our images from a long
Manual CalloutTo see a comparison of all of the different modes, check out the table on page 216 of the reference manual on the CD that came with the camera.

ptg
c h a p T e r 4 : T h e p r o F e S S i o n a l m o D e S 83
shutter speed; and too high an ISO means we will have an unacceptable amount of
digital noise. For our purposes, let’s go ahead and select ISO 400 so that we provide
enough sensitivity for those shadows while allowing the camera to use shutter speeds
that are fast enough to stop motion.
STarTing poinTS For iSo SelecTion
There is a lot of discussion concerning ISO in this and other chapters, but it might be helpful if you know where your starting points should be for your ISO settings. The first thing you should always try to do is use the lowest possible ISO setting. That being said, here are good starting points for your ISO settings:
• 100: Bright, sunny day
• 200: Hazy or outdoor shade on a sunny day
• 400: Indoor lighting at night or cloudy conditions outside
• 800: Late-night, low-light conditions or sporting arenas at night
These are just suggestions, and your ISO selection will depend on a number of factors that will be discussed later in the book. You might have to push your ISO even higher as needed, but at least now you know where to start.
With the ISO selected, we can now make use of the other controls built into Program
mode. By rotating the Command dial, we now have the ability to shift the program
settings. Remember, your camera is using the internal meter to pick what it believes
are suitable exposure values, but sometimes it doesn’t know what it’s looking at and
how you want those values applied (Figures 4.1 and 4.2). With the program shift, you
can influence what the shot will look like. Do you need faster shutter speeds in order
to stop the action? Just turn the Command dial to the right. Do you want a smaller
aperture so that you get a narrow depth of field? Then turn the dial to the left until
you get the desired aperture. The camera shifts the shutter speed and aperture
accordingly in order to get a proper exposure, and you will get the benefit of your
choice as a result. Just keep in mind that the camera is always trying to maintain the
right exposure at every setting, and so the available light and the maximum and
minimum aperture values of the attached lens will limit the range of shutter speeds
at a given ISO value.
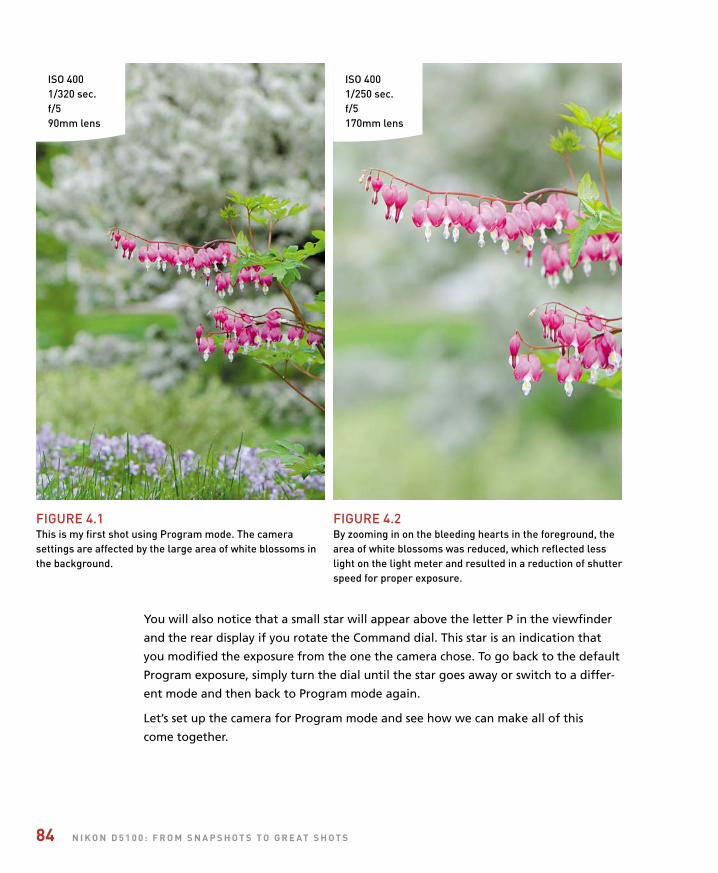
ptg
84 n i k o n D 5 1 0 0 : F r o m S n a p S h o T S T o g r e aT S h o T S
FIgure 4.1This is my first shot using Program mode. The camerasettings are affected by the large area of white blossoms inthe background.
FIgure 4.2By zooming in on the bleeding hearts in the foreground, thearea of white blossoms was reduced, which reflected lesslight on the light meter and resulted in a reduction of shutterspeed for proper exposure.
ISO 4001/320 sec.f/590mm lens
ISO 4001/250 sec.f/5170mm lens
You will also notice that a small star will appear above the letter P in the viewfinder
and the rear display if you rotate the Command dial. This star is an indication that
you modified the exposure from the one the camera chose. To go back to the default
Program exposure, simply turn the dial until the star goes away or switch to a differ-
ent mode and then back to Program mode again.
Let’s set up the camera for Program mode and see how we can make all of this
come together.
ptg
c h a p T e r 4 : T h e p r o F e S S i o n a l m o D e S 85
SeTTing up anD ShooTing in program moDe
1. Turn your camera on and then turn the Command dial to align the P with theindicator line.
2. Select your ISO by pressing the i button on the back of the camera.
3. Press up or down on the Multi-selector to highlight the ISO option, then select OK.
4. Press down on the Multi-selector to select a higher ISO setting and then press OK to lock in the change.
5. Point the camera at your subject and then activate the camera meter by depress-ing the shutter button halfway.
6. View the exposure information in the bottom of the viewfinder or by looking atthe display panel on the back of the camera.
7. While the meter is activated, use your thumb to roll the Command dial left andright to see the changed exposure values.
8. Select the exposure that is right for you and start clicking. (Don’t worry if youaren’t sure what the right exposure is. We will start working on making the rightchoices for those great shots beginning with the next chapter.)
n
S: ShuTTer prioriTy moDeS mode is what we photographers commonly refer to as Shutter Priority
mode. Just as the name implies, it is the mode that prioritizes or places
major emphasis on the shutter speed above all other camera settings.
Just as with Program mode, Shutter Priority mode gives us more freedom to control
certain aspects of our photography. In this case, we are talking about shutter speed.
The selected shutter speed determines just how long you expose your camera’s sensor
to light. The longer it remains open, the more time your sensor has to gather light.
The shutter speed also, to a large degree, determines how sharp your photographs
are. This is different from the image being sharply in focus. Two of the major influ-
ences on the sharpness of an image are camera shake and the subject’s movement.
Because a slower shutter speed means that light from your subject is hitting the sen-
sor for a longer period of time, any movement by you or your subject will show up in
your photos as blur.

ptg
86 n i k o n D 5 1 0 0 : F r o m S n a p S h o T S T o g r e aT S h o T S
When To uSe ShuTTer prioriTy (S) moDe• When working with fast-moving subjects where you want to freeze the action
(Figure 4.3); much more on this is in Chapter 5
• When you want to emphasize movement in your subject with motion blur
(Figure 4.4)
• When you want to use a long exposure to gather light over a long period of time
(Figure 4.5); more on this is in Chapter 8
• When you want to create that silky-looking water in a waterfall (Figure 4.6)
As you can see, the subject of your photo usually determines whether or not you will
use Shutter Priority mode. It is important that you be able to visualize the result of
using a particular shutter speed. The great thing about shooting with digital cameras
is that you get instant feedback by viewing your shot on the LCD screen. But what if
your subject won’t give you a do-over? Such is often the case when shooting sport-
ing events. It’s not like you can go ask the quarterback to throw that touchdown pass
again because your last shot was blurry from a slow shutter speed. This is why it’s
important to know what those speeds represent in terms of their capabilities to stop
the action and deliver a blur-free shot.
ISO 1001/1000 sec.f/412mm lens
FIgure 4.3even the fastest of subjects can befrozen with theright shutter speed.
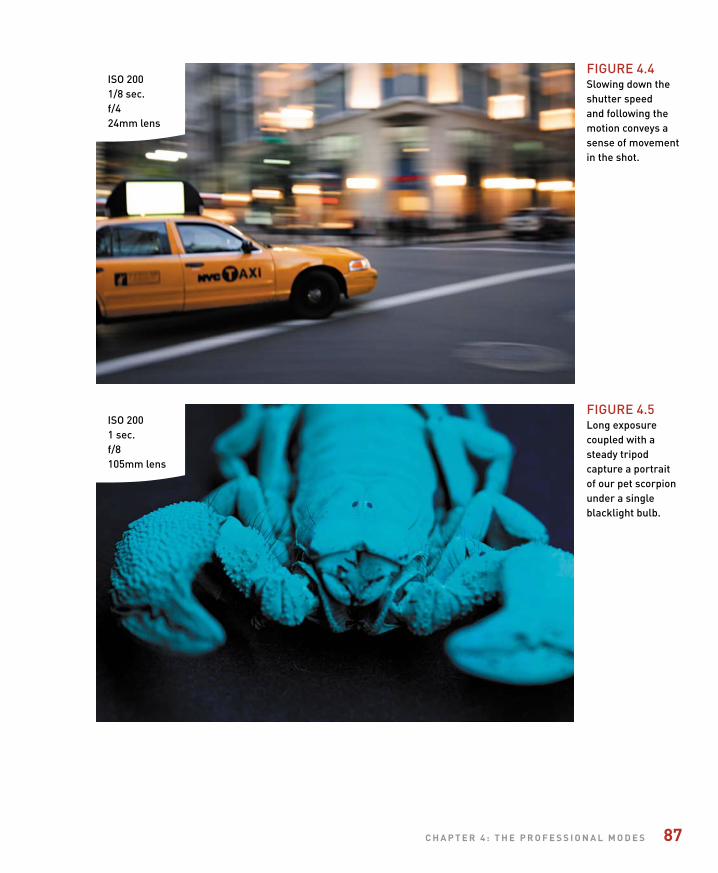
ptg
c h a p T e r 4 : T h e p r o F e S S i o n a l m o D e S 87
ISO 2001/8 sec.f/424mm lens
FIgure 4.4Slowing down theshutter speed and following themotion conveys asense of movementin the shot.
ISO 2001 sec.f/8105mm lens
FIgure 4.5Long exposurecoupled with asteady tripodcapture a portraitof our pet scorpionunder a singleblacklight bulb.
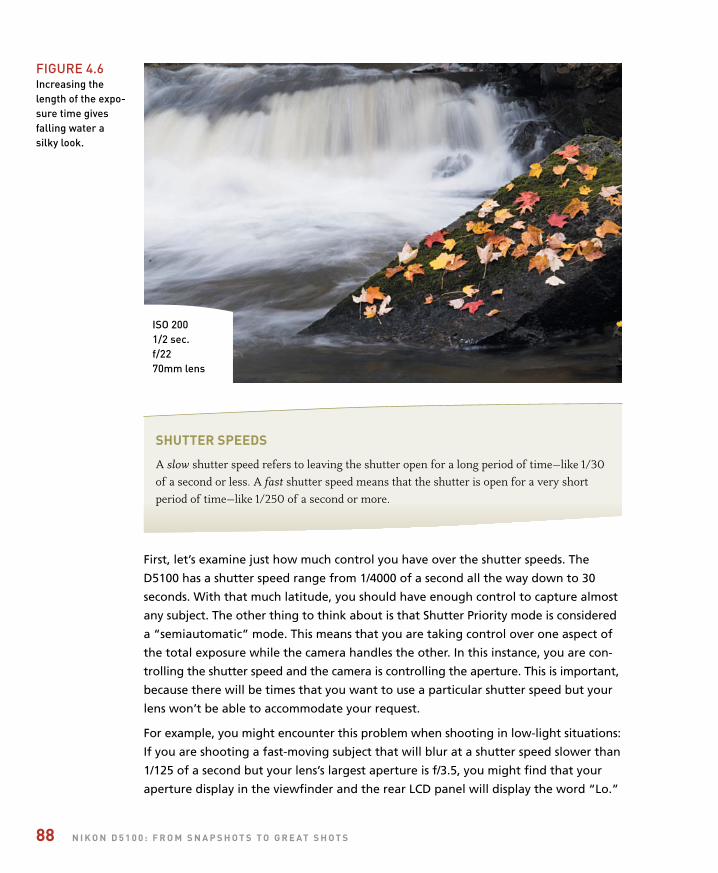
ptg
88 n i k o n D 5 1 0 0 : F r o m S n a p S h o T S T o g r e aT S h o T S
ShuTTer SpeeDS
A slow shutter speed refers to leaving the shutter open for a long period of time—like 1/30 of a second or less. A fast shutter speed means that the shutter is open for a very short period of time—like 1/250 of a second or more.
First, let’s examine just how much control you have over the shutter speeds. The
D5100 has a shutter speed range from 1/4000 of a second all the way down to 30
seconds. With that much latitude, you should have enough control to capture almost
any subject. The other thing to think about is that Shutter Priority mode is considered
a “semiautomatic” mode. This means that you are taking control over one aspect of
the total exposure while the camera handles the other. In this instance, you are con-
trolling the shutter speed and the camera is controlling the aperture. This is important,
because there will be times that you want to use a particular shutter speed but your
lens won’t be able to accommodate your request.
For example, you might encounter this problem when shooting in low-light situations:
If you are shooting a fast-moving subject that will blur at a shutter speed slower than
1/125 of a second but your lens’s largest aperture is f/3.5, you might find that your
aperture display in the viewfinder and the rear LCD panel will display the word “Lo.”
ISO 2001/2 sec.f/2270mm lens
FIgure 4.6Increasing thelength of the expo-sure time givesfalling water a silky look.

ptg
c h a p T e r 4 : T h e p r o F e S S i o n a l m o D e S 89
This is your warning that there won’t be enough light available for the shot—due to
the limitations of the lens—so your picture will be underexposed.
Another case where you might run into this situation is when you are shooting moving
water. To get that look of silky, flowing water, it’s usually necessary to use a shutter
speed of at least 1/15 of a second. If your waterfall is in full sunlight, you may get a
message that reads “Hi” because the lens you are using only stops down to f/22 at
its smallest opening. In this instance, your camera is warning you that you will be
overexposing your image. There are workarounds for these problems, which we will
discuss later (see Chapter 7), but it is important to know that there can be limitations
when using Shutter Priority mode.
SeTTing up anD ShooTing in ShuTTer prioriTy moDe
1. Turn your camera on and then turn the Mode dial to align the S with the indicator line.
2. Select your ISO by pressing the i button on the back of the camera.
3. Press up or down on the Multi-selector to highlight the ISO option and thenpress OK.
4. Press down on the Multi-selector to select a higher ISO setting, then press OK to lock in the change.
5. Point the camera at your subject and then activate the camera meter bydepressing the shutter button halfway.
6. View the exposure information in the bottom area of the viewfinder or by looking at the rear LCD panel.
7. While the meter is activated, use your thumb to roll the Command dial left and right to see the changed exposure values. Roll the dial to the right forfaster shutter speeds and to the left for slower speeds.
n
a: aperTure prioriTy moDeYou wouldn’t know it from its name, but Aperture Priority mode is one
of the most useful and popular of all the professional modes. The mode
is one of my personal favorites, and I believe that it will quickly become
one of yours, as well. Aperture Priority mode is also deemed a semiautomatic mode
because it allows you to once again control one factor of exposure while the camera
adjusts for the other.
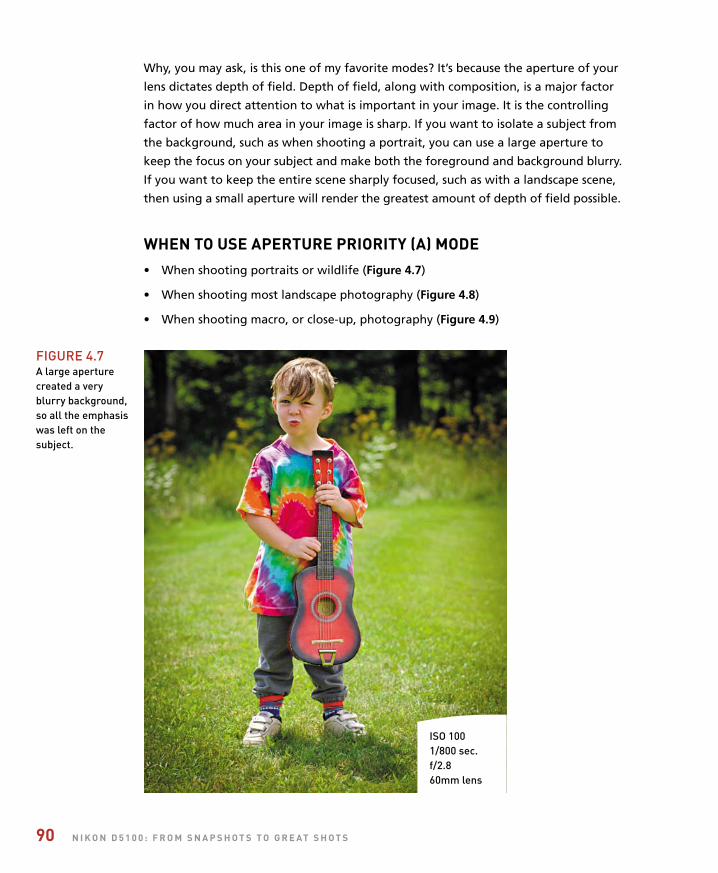
ptg
90 n i k o n D 5 1 0 0 : F r o m S n a p S h o T S T o g r e aT S h o T S
Why, you may ask, is this one of my favorite modes? It’s because the aperture of your
lens dictates depth of field. Depth of field, along with composition, is a major factor
in how you direct attention to what is important in your image. It is the controlling
factor of how much area in your image is sharp. If you want to isolate a subject from
the background, such as when shooting a portrait, you can use a large aperture to
keep the focus on your subject and make both the foreground and background blurry.
If you want to keep the entire scene sharply focused, such as with a landscape scene,
then using a small aperture will render the greatest amount of depth of field possible.
When To uSe aperTure prioriTy (a) moDe• When shooting portraits or wildlife (Figure 4.7)
• When shooting most landscape photography (Figure 4.8)
• When shooting macro, or close-up, photography (Figure 4.9)
FIgure 4.7A large aperturecreated a veryblurry background,so all the emphasiswas left on thesubject.
ISO 1001/800 sec.f/2.860mm lens
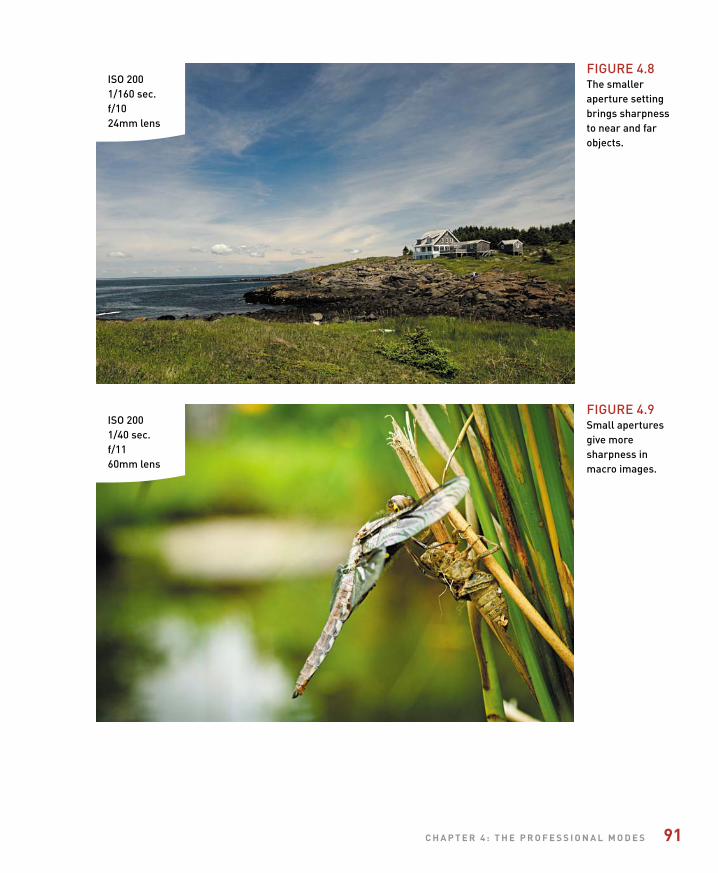
ptg
c h a p T e r 4 : T h e p r o F e S S i o n a l m o D e S 91
ISO 2001/160 sec.f/1024mm lens
FIgure 4.8The smalleraperture settingbrings sharpnessto near and farobjects.
ISO 2001/40 sec.f/1160mm lens
FIgure 4.9Small aperturesgive moresharpness in macro images.
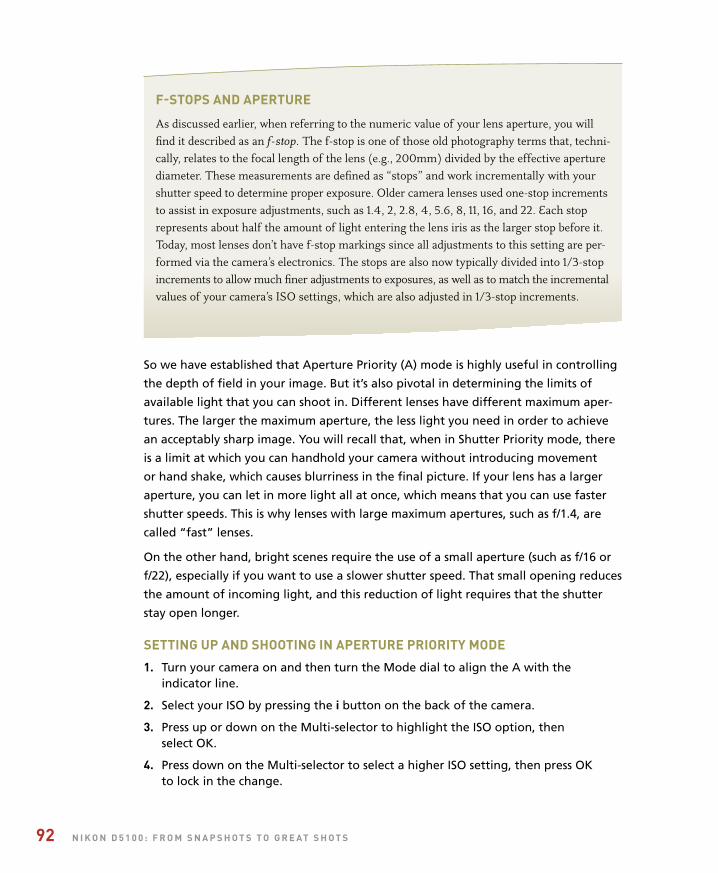
ptg
92 n i k o n D 5 1 0 0 : F r o m S n a p S h o T S T o g r e aT S h o T S
F-STopS anD aperTure
As discussed earlier, when referring to the numeric value of your lens aperture, you will find it described as an f-stop. The f-stop is one of those old photography terms that, techni- cally, relates to the focal length of the lens (e.g., 200mm) divided by the effective aperture diameter. These measurements are defined as “stops” and work incrementally with your shutter speed to determine proper exposure. Older camera lenses used one-stop increments to assist in exposure adjustments, such as 1.4, 2, 2.8, 4, 5.6, 8, 11, 16, and 22. Each stop represents about half the amount of light entering the lens iris as the larger stop before it. Today, most lenses don’t have f-stop markings since all adjustments to this setting are per- formed via the camera’s electronics. The stops are also now typically divided into 1/3-stop increments to allow much finer adjustments to exposures, as well as to match the incremental values of your camera’s ISO settings, which are also adjusted in 1/3-stop increments.
So we have established that Aperture Priority (A) mode is highly useful in controlling
the depth of field in your image. But it’s also pivotal in determining the limits of
available light that you can shoot in. Different lenses have different maximum aper-
tures. The larger the maximum aperture, the less light you need in order to achieve
an acceptably sharp image. You will recall that, when in Shutter Priority mode, there
is a limit at which you can handhold your camera without introducing movement
or hand shake, which causes blurriness in the final picture. If your lens has a larger
aperture, you can let in more light all at once, which means that you can use faster
shutter speeds. This is why lenses with large maximum apertures, such as f/1.4, are
called “fast” lenses.
On the other hand, bright scenes require the use of a small aperture (such as f/16 or
f/22), especially if you want to use a slower shutter speed. That small opening reduces
the amount of incoming light, and this reduction of light requires that the shutter
stay open longer.
SeTTing up anD ShooTing in aperTure prioriTy moDe
1. Turn your camera on and then turn the Mode dial to align the A with the indicator line.
2. Select your ISO by pressing the i button on the back of the camera.
3. Press up or down on the Multi-selector to highlight the ISO option, then select OK.
4. Press down on the Multi-selector to select a higher ISO setting, then press OK to lock in the change.
ptg
c h a p T e r 4 : T h e p r o F e S S i o n a l m o D e S 93
5. Point the camera at your subject and then activate the camera meter bydepressing the shutter button halfway.
6. View the exposure information in the bottom area of the viewfinder or by looking at the rear display panel.
7. While the meter is activated, use your thumb to roll the Command dial left and right to see the changed exposure values. Roll the dial to the right for asmaller aperture (higher f-stop number) and to the left for a larger aperture(smaller f-stop number).
n
Zoom lenSeS anD maximum aperTureS
Some zoom lenses (like the 18–55mm kit lens) have a variable maximum aperture. This means that the largest opening will change depending on the zoom setting. In the example of the 18–55mm zoom, the lens has a maximum aperture of f/3.5 at 18mm and only f/5.6 when the lens is zoomed out to 55mm.
m: manual moDeOnce upon a time, long before digital cameras and program modes, there
was manual mode. In those days it wasn’t called “manual mode” because
there were no other modes. It was just photography. Let’s face it—if you
want to learn the effects of aperture and shutter speed on your photography, there is
no better way to learn than by setting these adjustments yourself. However, today,
with the advancement of camera technology, many new photographers never give
this mode a second thought. That’s truly a shame, as not only is it an excellent way to
learn your photography basics, but it’s also an essential tool to have in your photo-
graphic bag of tricks.
When you have your camera set to Manual (M) mode, the camera meter will give
you a reading of the scene you are photographing. It’s your job, though, to set both
the f-stop (aperture) and the shutter speed to achieve a correct exposure. If you need
a faster shutter speed, you will have to make the reciprocal change to your f-stop.
Using any other mode, such as Shutter Priority or Aperture Priority, would mean that
you just have to worry about one of these changes, but Manual mode means you
have to do it all yourself. This can be a little challenging at first, but after a while
you will have a complete understanding of how each change affects your exposure,
which will, in turn, improve the way that you use the other modes.
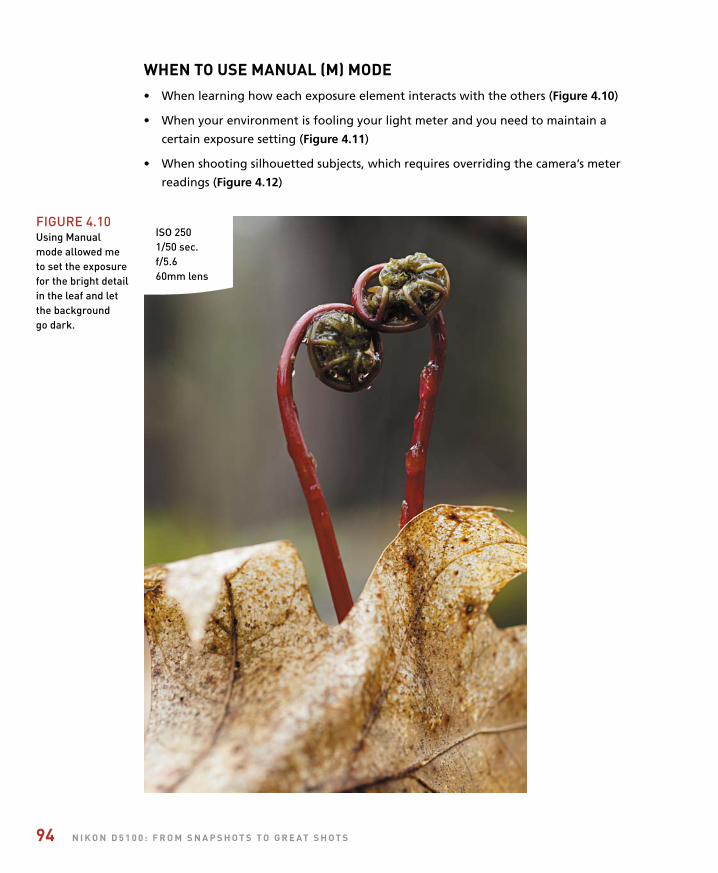
ptg
94 n i k o n D 5 1 0 0 : F r o m S n a p S h o T S T o g r e aT S h o T S
When To uSe manual (m) moDe• When learning how each exposure element interacts with the others (Figure 4.10)
• When your environment is fooling your light meter and you need to maintain a
certain exposure setting (Figure 4.11)
• When shooting silhouetted subjects, which requires overriding the camera’s meter
readings (Figure 4.12)
FIgure 4.10using Manual mode allowed me to set the exposurefor the bright detailin the leaf and letthe background go dark.
ISO 2501/50 sec.f/5.660mm lens

ptg
c h a p T e r 4 : T h e p r o F e S S i o n a l m o D e S 95
ISO 2001/320 sec.f/11400mm lens
FIgure 4.11Beaches andsnow are alwaysa challenge forlight meters.using Manualmode allowedme to prevent thescene from beingunderexposed.
ISO 1001/350 sec.f/830mm lens
FIgure 4.12Although the meter was doing a pretty good job of exposing for thesky, I used Manualmode to push the foreground elementsinto complete black silhouetteand get richer colorin the sunset.

ptg
96 n i k o n D 5 1 0 0 : F r o m S n a p S h o T S T o g r e aT S h o T S
SeTTing up anD ShooTing in manual moDe
1. Turn your camera on and then turn the Mode dial to align the M with the indicator line.
2. Select your ISO by pressing the i button on the back of the camera.
3. Press up or down on the Multi-selector to highlight the ISO option, then select OK.
4. Press down on the Multi-selector to select a higher ISO setting, then press OK to lock in the change.
5. Point the camera at your subject and then activate the camera meter by depressingthe shutter button halfway.
6. View the exposure information in the bottom area of the viewfinder or by looking at the display panel on the rear of the camera.
7. While the meter is activated, use your thumb to roll the Command dial left andright to change your shutter speed value until the exposure mark is lined up withthe zero mark. The exposure information is displayed by a scale with marks thatrun from +2 to -2 stops. A proper exposure will line up with the arrow mark in themiddle. As the indicator moves to the left, it is a sign that you will be overexposing(there is too much light on the sensor to provide adequate exposure). Move theindicator to the right and you will be providing less exposure than the camerameter calls for. This is underexposure.
8. To set your exposure using the aperture, depress the shutter release button until the meter is activated. Then, while holding down the Exposure Compensation/Aperture button (located behind and to the right of the shutter release button),rotate the Command dial to change the aperture. Rotate right for a smaller aper-ture (large f-stop number) and left for a larger aperture (small f-stop number).
n
hoW i ShooT: a cloSer look aT The camera SeTTingS i uSeThe great thing about working with a dSLR camera is that I can always feel confident
that some things will remain unchanged from camera to camera. For me, these are the
Aperture Priority (A) and Shutter Priority (S) shooting modes. Regardless of the sub-
ject I am shooting—from landscape to portrait to macro—I am almost always going
to be concerned with my depth of field. Whether it’s isolating my subject with a large
aperture or trying to maximize the overall sharpness of a sweeping landscape, I always
keep an eye on my aperture setting. If I do have a need to control the action, I use
Shutter Priority, my fallback mode. It’s not really a fallback; it’s more like the right
tool for the right job. If I am trying to create a silky waterfall effect (Figure 4.13), I can
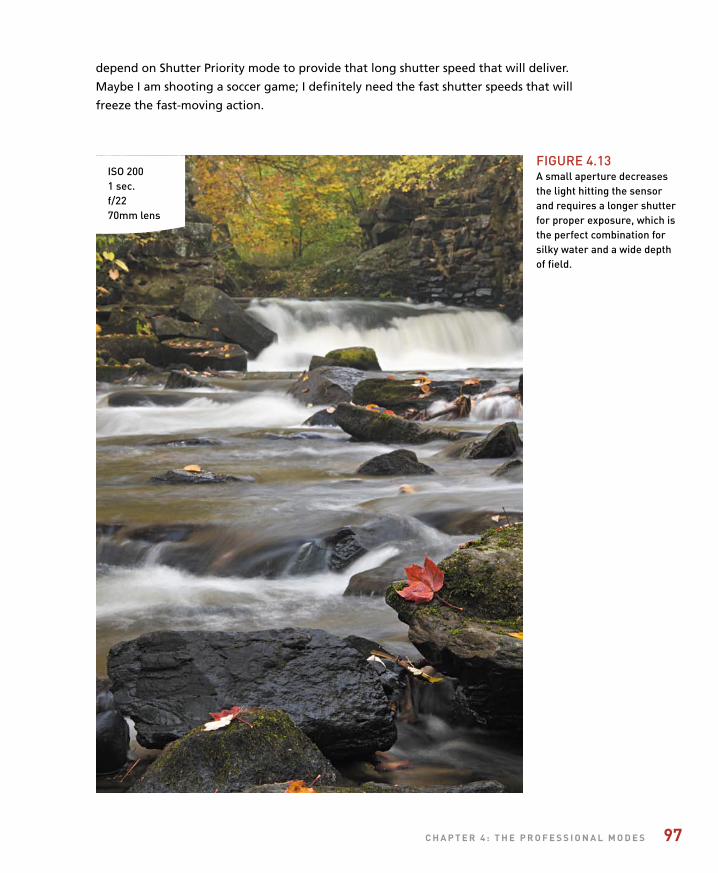
ptg
c h a p T e r 4 : T h e p r o F e S S i o n a l m o D e S 97
depend on Shutter Priority mode to provide that long shutter speed that will deliver.
Maybe I am shooting a soccer game; I definitely need the fast shutter speeds that will
freeze the fast-moving action.
ISO 2001 sec.f/2270mm lens
FIgure 4.13A small aperture decreasesthe light hitting the sensorand requires a longer shutterfor proper exposure, which isthe perfect combination forsilky water and a wide depthof field.

ptg
98 n i k o n D 5 1 0 0 : F r o m S n a p S h o T S T o g r e aT S h o T S
While the other camera modes have their place, I think you will find that, like me
and most other working pros, you will use the Aperture Priority and Shutter Priority
modes for 90 percent of your shooting.
The other concern that I have when I am setting up my camera is just how low I can
keep my ISO. This is always a priority for me because a low ISO will deliver the clean-
est image. I raise the ISO only as a last resort because each increase in sensitivity is an
opportunity for more digital noise to enter my image. To that end, I always have the
High ISO Noise Reduction feature turned on (see Chapter 7).
To make quick changes while I shoot, I often use the Exposure Compensation feature
(covered in Chapter 7) so that I can make small over- and underexposure changes.
This is different than changing the aperture or shutter; it is more like fooling the
camera meter into thinking the scene is brighter or darker than it actually is. To get
to this function quickly, I simply press the Exposure Compensation/Aperture button,
then dial in the desired amount of compensation. Truth be told, I usually have this set
to –1/3 so that there is just a tiny bit of underexposure in my image. This usually leads
to better color saturation. (Note: The Exposure Compensation feature does not work
in the Manual shooting mode.)
One of the reasons I change my exposure is to make corrections when I see the
“blinkies” in my rear LCD. Blinkies are the warning signal that part of my image has
been overexposed to the point that I no longer have any detail in the highlights.
When the Highlight Alert feature is turned on, the display will flash wherever the
potential exists for overexposure. The black and white flashing will only appear in
areas of your picture that are in danger of overexposure.
SeTTing up The highlighT alerT FeaTure
1. Press the Menu button, then use the Multi-selector to access the Playback menu (A).
2. Once in the Playback menu, move the Multi-selector to Playback Display Optionsand press OK (B).
A B
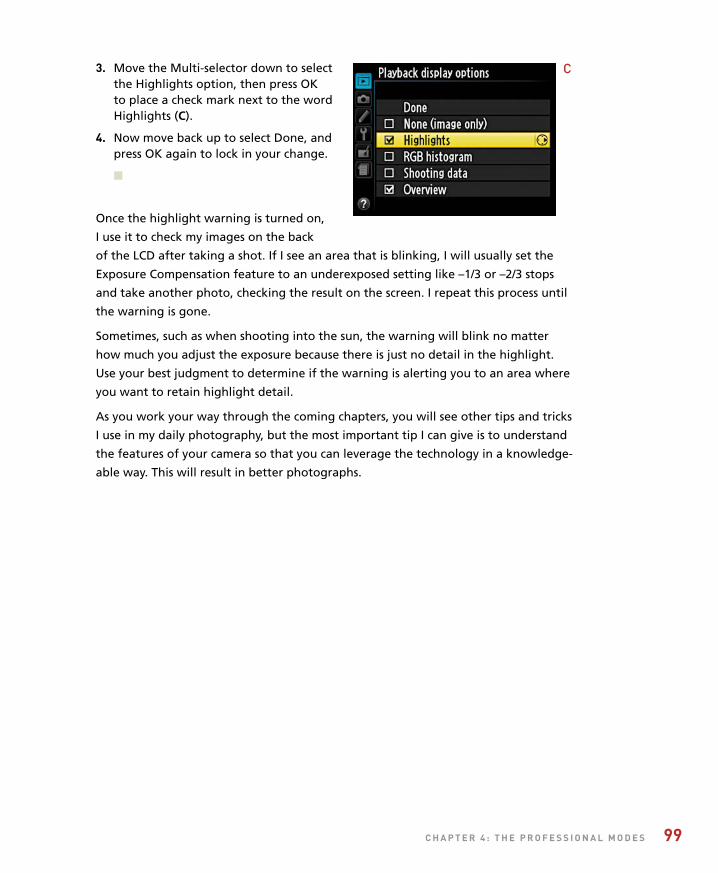
ptg
c h a p T e r 4 : T h e p r o F e S S i o n a l m o D e S 99
3. Move the Multi-selector down to selectthe Highlights option, then press OK to place a check mark next to the wordHighlights (C).
4. Now move back up to select Done, andpress OK again to lock in your change.
n
Once the highlight warning is turned on,
I use it to check my images on the back
of the LCD after taking a shot. If I see an area that is blinking, I will usually set the
Exposure Compensation feature to an underexposed setting like –1/3 or –2/3 stops
and take another photo, checking the result on the screen. I repeat this process until
the warning is gone.
Sometimes, such as when shooting into the sun, the warning will blink no matter
how much you adjust the exposure because there is just no detail in the highlight.
Use your best judgment to determine if the warning is alerting you to an area where
you want to retain highlight detail.
As you work your way through the coming chapters, you will see other tips and tricks
I use in my daily photography, but the most important tip I can give is to understand
the features of your camera so that you can leverage the technology in a knowledge-
able way. This will result in better photographs.
C
ptg
100 n i k o n D 5 1 0 0 : F r o m S n a p S h o T S T o g r e aT S h o T S
Chapter 4 AssignmentsThis will be more of a mental challenge than anything else, but you should put a lot of work into these lesson assignments because the information covered in this chapter will define how you work with your camera from this point on. Granted, there may be times that you just want to grab some quick pictures and will resort to the automatic scene modes, but to get serious with your photography, you will want to learn the professional modes inside and out.
Starting off with Program mode
Set your camera on Program mode and start shooting. Become familiar with the adjustments you can make to your exposure by turning the Command dial. Shoot in bright sun, deep shade, indoors, anywhere that you have different types and intensities of light. While you are shooting, make sure that you keep an eye on your ISO and raise or lower it according to your environment.
Learning to control time with the Shutter Priority mode
Find some moving subjects and then set your camera to S mode. Have someone ride their bike back and forth or even just photograph cars as they go by. Start with a slow shutter speed of around 1/30 of a second and then start shooting with faster and faster shutter speeds. Keep shooting until you can freeze the action. Now find something that isn’t moving, like a flower, and start with your shutter speed at something fast like 1/500 of a second and then work your way down. Don’t brace the camera on a steady surface. Just try and shoot as slowly as possible, down to about 1/4 of a second. The point is to see how well you can handhold your camera before you start introducing hand shake into the image, making it appear soft and somewhat unfocused.
Controlling depth of field with the Aperture Priority mode
The name of the game with Aperture Priority mode is depth of field. Set up three items an equal distance from you. I would use chess pieces or something similar. Now focus on the middle item and set your camera to the largest aperture that your lens allows (remember, large aperture means a small number, like f/3.5). Now, while still focusing on the middle subject, start shooting with ever-smaller apertures until you are at the smallest f-stop for your lens. If you have a zoom lens, try doing this exercise with the lens at the widest and then the most telephoto settings. Now move up to subjects that are farther away, like telephone poles, and shoot them in the same way. The idea is to get a feel for how each aperture setting affects your depth of field.
ptg
101
Giving and taking with Manual mode
Manual mode is not going to require a lot of work, but you should pay close attention to your results. Go outside on a sunny day and, using the camera in Manual mode, set your ISO to 100, your shutter speed to 1/125 of a second, and your aperture to f/16. Now press your shutter release button to get a meter reading. You should be pretty close to that zero mark. If not, make small adjustments to one of your settings until it hits that mark. Now, this is where the fun begins. Start moving your shutter speed slower, to 1/60, and then set your aperture to f/22. Now go the other way. Set your aperture on f/8 and your shutter speed to 1/500. Now review your images. If all went well, all the exposures should look the same. This is because you balanced the light with reciprocal changes to the aperture and shutter speed. Now go back to our original setting of 1/125 at f/16 and try just moving the shutter speed without changing the aperture. Just make 1/3-stop changes (1/125 to 1/100 to 1/80 to 1/60), and then review your images to see what a 1/3 stop of overexposure looks like. Then do the same thing going in the opposite way. It’s hard to know if you want to over- or underexpose a scene until you have actually done it and seen the results.
With each of the assignments, make sure that you keep track of your modes and exposures so that you can compare them with the image. If you are using software to review your images, you should also be able to check the camera settings that are embedded within the image’s metadata.
Share your results with the book’s Flickr group!
Join the group here: flickr.com/groups/nikond5100fromsnapshotstogreatshots/
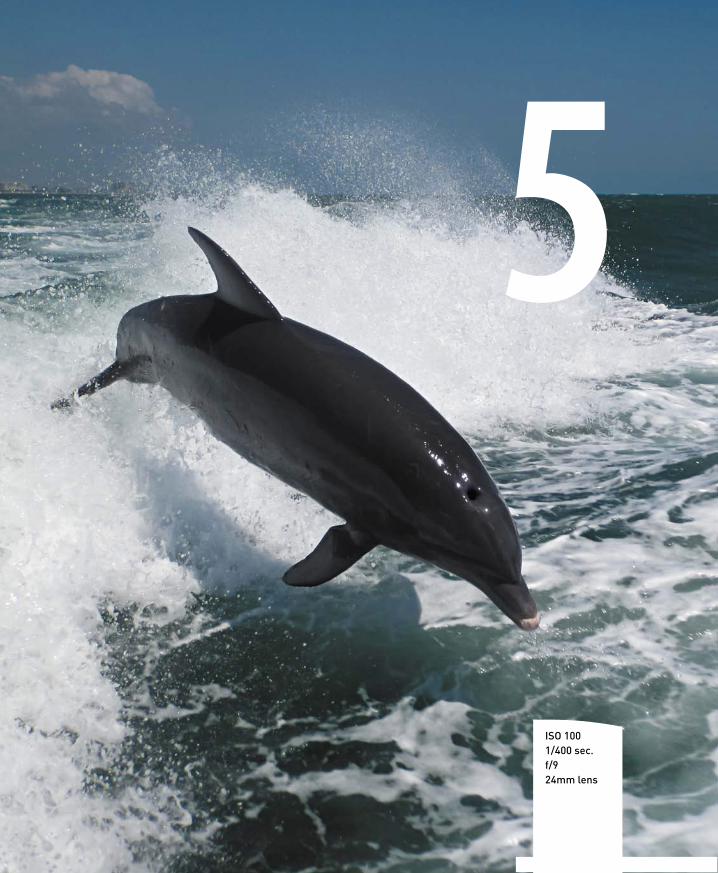
ptg
5
ISO 1001/400 sec.f/924mm lens
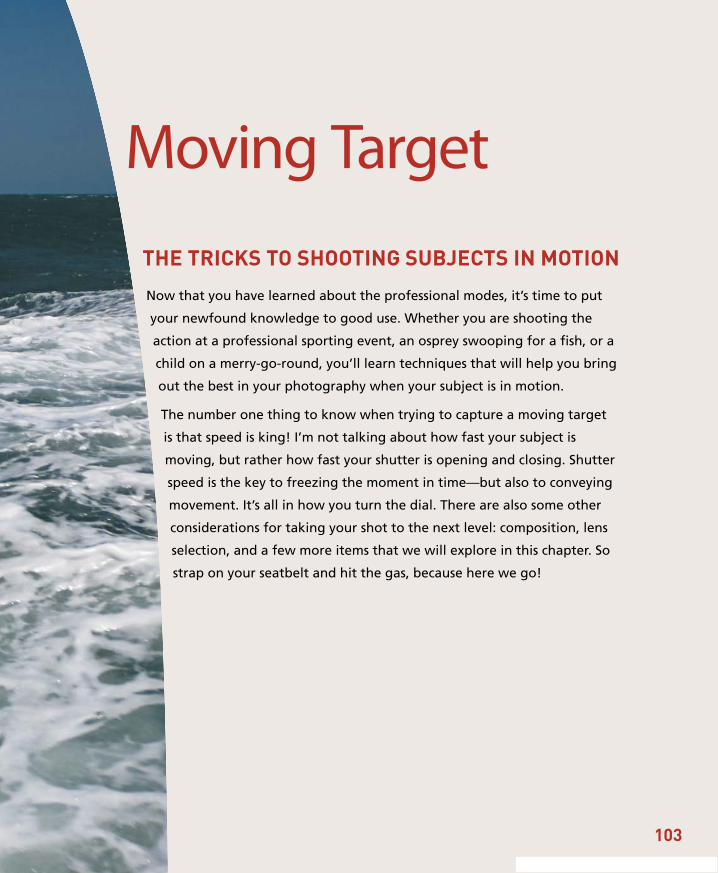
ptg
Moving Target
The Tricks To shooTing subjecTs in moTion
Now that you have learned about the professional modes, it’s time to put
your newfound knowledge to good use. Whether you are shooting the
action at a professional sporting event, an osprey swooping for a fish, or a
child on a merry-go-round, you’ll learn techniques that will help you bring
out the best in your photography when your subject is in motion.
The number one thing to know when trying to capture a moving target
is that speed is king! I’m not talking about how fast your subject is
moving, but rather how fast your shutter is opening and closing. Shutter
speed is the key to freezing the moment in time—but also to conveying
movement. It’s all in how you turn the dial. There are also some other
considerations for taking your shot to the next level: composition, lens
selection, and a few more items that we will explore in this chapter. So
strap on your seatbelt and hit the gas, because here we go!
103
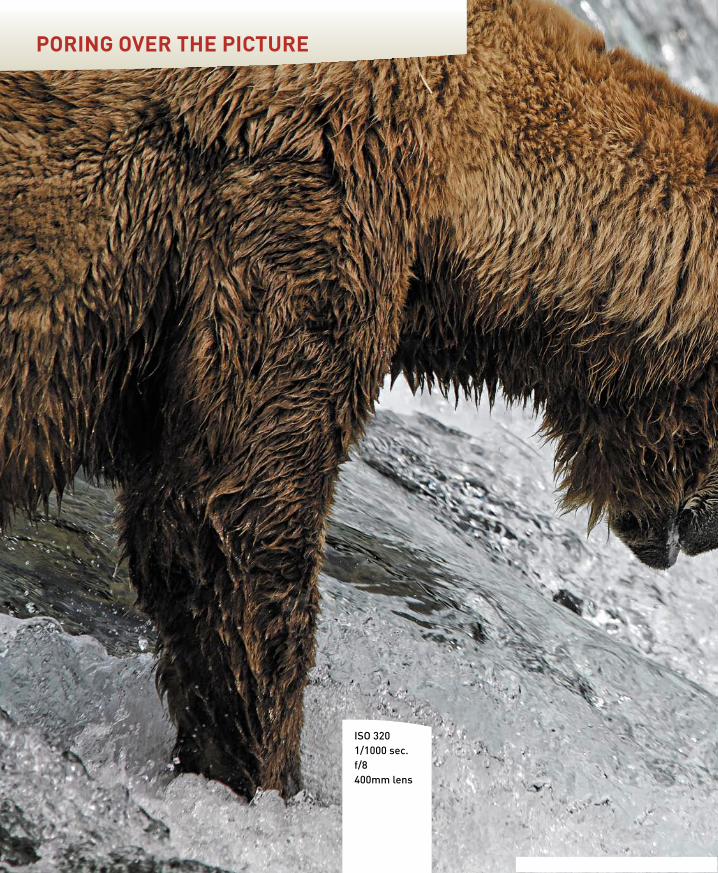
ptg
Poring over The PicTure
ISO 3201/1000 sec.f/8400mm lens
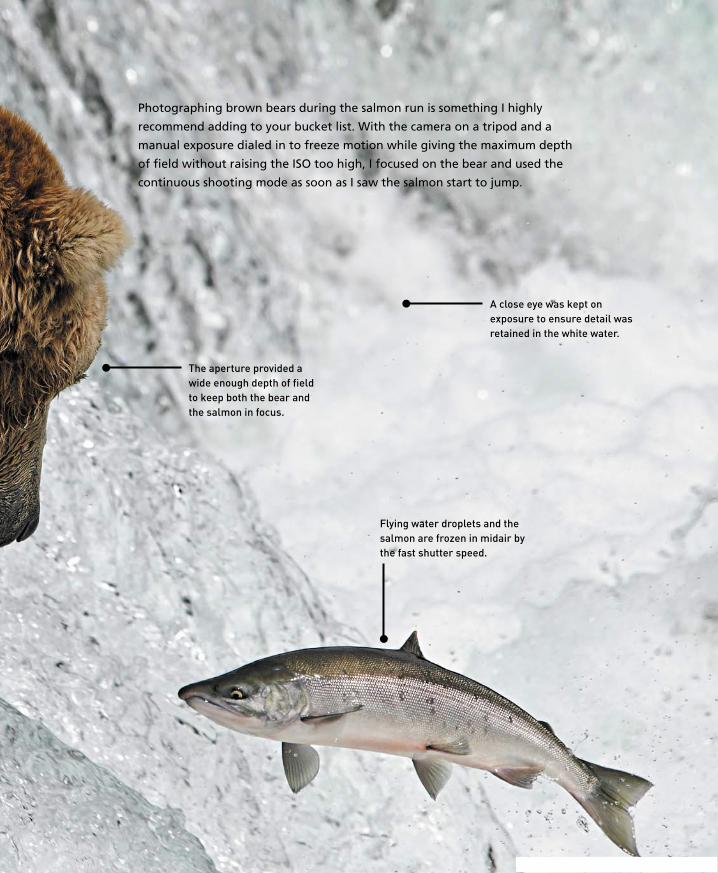
ptg
Photographing brown bears during the salmon run is something I highly
recommend adding to your bucket list. With the camera on a tripod and a
manual exposure dialed in to freeze motion while giving the maximum depth
of field without raising the ISO too high, I focused on the bear and used the
continuous shooting mode as soon as I saw the salmon start to jump.
Flying water droplets and thesalmon are frozen in midair bythe fast shutter speed.
A close eye was kept onexposure to ensure detail wasretained in the white water.
The aperture provided awide enough depth of fieldto keep both the bear andthe salmon in focus.
ptg
106 n i k o n D 5 1 0 0 : F r o m s n a P s h o T s T o g r e aT s h o T s
sToP righT There!Shutter speed is the main tool in the photographer’s arsenal for capturing great action
shots. The ability to freeze a moment in time often makes the difference between
a good shot and a great one. To take advantage of this concept, you should have a
good grasp of the relationship between shutter speed and movement. When you press
the shutter release button, your camera goes into action by opening the shutter cur-
tain and then closing it after a predetermined length of time. The longer you leave
your shutter open, the more your subject will move across the frame, so common
sense dictates that the first thing to consider is just how fast your subject is moving.
Typically, you will be working in fractions of a second. How many fractions depends
on several factors. Subject movement, while simple in concept, is actually based on
three factors. The first is the direction of travel. Is the subject moving across your field
of view (left to right) or traveling toward or away from you? The second consideration
is the actual speed at which the subject is moving. There is a big difference between
a moving sports car and a child on a bicycle. Finally, the distance from you to the sub-
ject has a direct bearing on how fast the action seems to be taking place. Let’s take a
brief look at each of these factors to see how they might affect your shooting.
DirecTion oF TravelTypically, the first thing that people think about when taking an action shot is how
fast the subject is moving, but in reality the first consideration should be the direc-
tion of travel. Where you are positioned in relation to the subject’s direction of travel
is critically important in selecting the proper shutter speed. When you open your
shutter, the lens gathers light from your subject and records it on the camera sensor.
If the subject is moving across your viewfinder, you need a faster shutter speed to
keep that lateral movement from being recorded as a streak across your image. Subjects
that are moving perpendicular to your shooting location do not move across your
viewfinder and appear to be more stationary. This allows you to use a slightly slower
shutter speed (Figure 5.1). A subject that is moving in a diagonal direction—both across
the frame and toward or away from you—requires a shutter speed in between the two.
subjecT sPeeDOnce the angle of motion has been determined, you can then assess the speed at
which the subject is traveling. The faster your subject moves, the faster your shutter
speed needs to be in order to “freeze” that subject (Figure 5.2). A person walking
across your frame might only require a shutter speed of 1/60 of a second, while a
cyclist traveling in the same direction would call for 1/500 of a second. That same
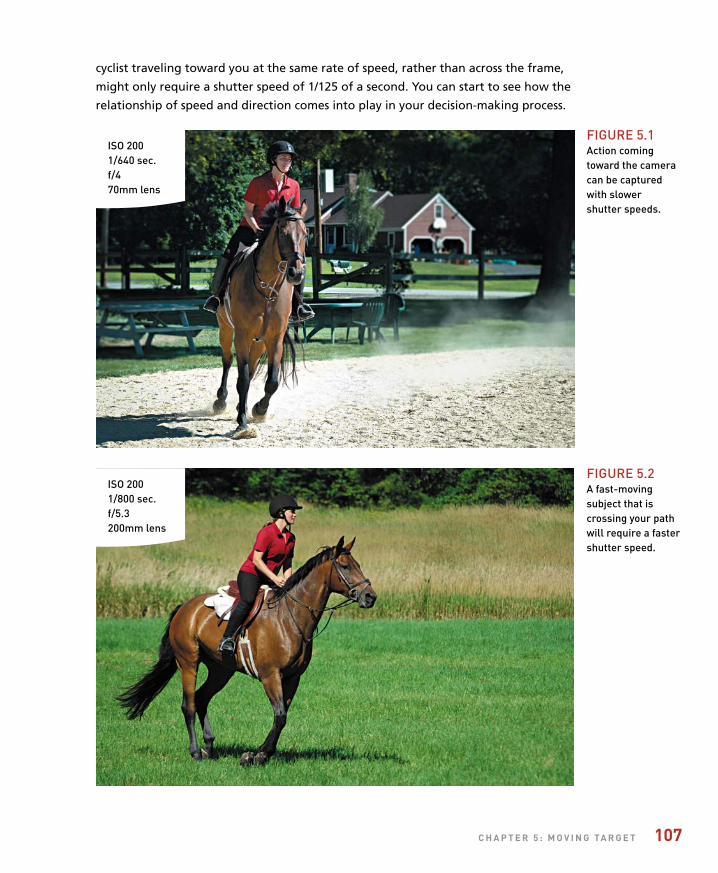
ptg
c h a P T e r 5 : m o v i n g Ta r g e T 107
cyclist traveling toward you at the same rate of speed, rather than across the frame,
might only require a shutter speed of 1/125 of a second. You can start to see how the
relationship of speed and direction comes into play in your decision-making process.
ISO 2001/640 sec.f/470mm lens
FIgure 5.1Action comingtoward the cameracan be capturedwith slower shutter speeds.
ISO 2001/800 sec.f/5.3200mm lens
FIgure 5.2A fast-movingsubject that iscrossing your pathwill require a fastershutter speed.

ptg
108 n i k o n D 5 1 0 0 : F r o m s n a P s h o T s T o g r e aT s h o T s
subjecT-To-camera DisTanceSo now we know both the direction and the speed of your subject. The final factor
to address is the distance between you and the action. Picture yourself looking at a
highway full of cars from up in a tall building a quarter of a mile from the road. As
you stare down at the traffic moving along at 55 miles per hour, the cars and trucks
seem to be slowly moving along the roadway. Now picture yourself standing in the
median of that same road as the same traffic flies by at the same rate of speed.
Although the traffic is moving at the same speed, the shorter distance between you
and the traffic makes the cars look like they are moving much faster. This is because
your field of view is much narrower; therefore, the subjects are not going to present
themselves within the frame for the same length of time. The concept of distance
applies to the length of your lens as well (Figure 5.3). If you are using a wide-angle
lens, you can probably get away with a slower shutter speed than if you were using
a telephoto, which puts you in the heart of the action. It all has to do with your field
of view. That telephoto gets you “closer” to the action—and the closer you are, the
faster your subject will be moving across your viewfinder.
FIgure 5.3Because of thedistance of thesubject from thecamera, a slowershutter speed couldbe used to capturethis action.
ISO 2001/400 sec.f/875mm lens
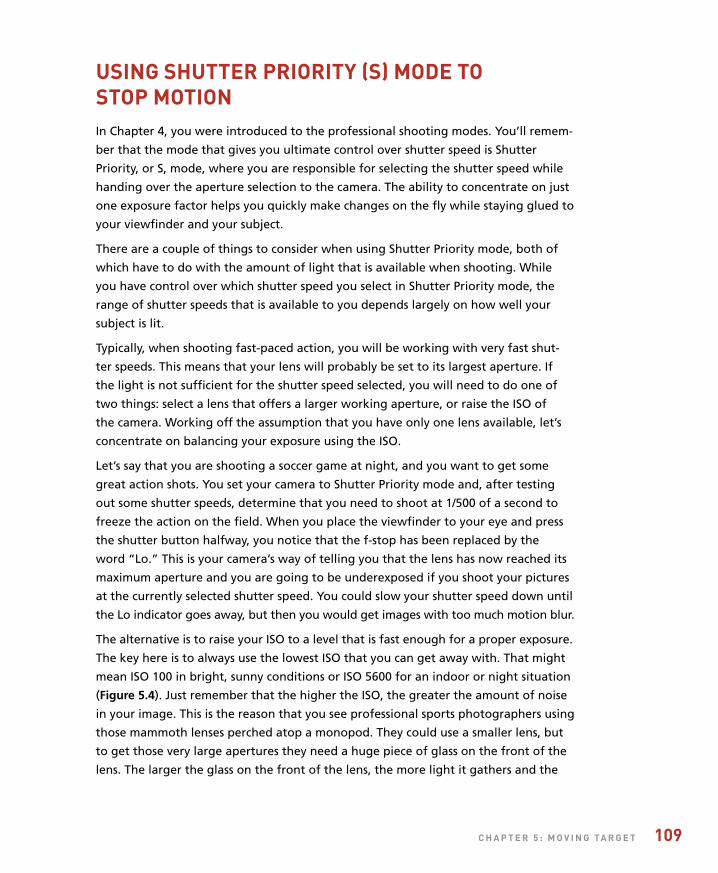
ptg
c h a P T e r 5 : m o v i n g Ta r g e T 109
using shuTTer PrioriTy (s) moDe To sToP moTionIn Chapter 4, you were introduced to the professional shooting modes. You’ll remem-
ber that the mode that gives you ultimate control over shutter speed is Shutter
Priority, or S, mode, where you are responsible for selecting the shutter speed while
handing over the aperture selection to the camera. The ability to concentrate on just
one exposure factor helps you quickly make changes on the fly while staying glued to
your viewfinder and your subject.
There are a couple of things to consider when using Shutter Priority mode, both of
which have to do with the amount of light that is available when shooting. While
you have control over which shutter speed you select in Shutter Priority mode, the
range of shutter speeds that is available to you depends largely on how well your
subject is lit.
Typically, when shooting fast-paced action, you will be working with very fast shut-
ter speeds. This means that your lens will probably be set to its largest aperture. If
the light is not sufficient for the shutter speed selected, you will need to do one of
two things: select a lens that offers a larger working aperture, or raise the ISO of
the camera. Working off the assumption that you have only one lens available, let’s
concentrate on balancing your exposure using the ISO.
Let’s say that you are shooting a soccer game at night, and you want to get some
great action shots. You set your camera to Shutter Priority mode and, after testing
out some shutter speeds, determine that you need to shoot at 1/500 of a second to
freeze the action on the field. When you place the viewfinder to your eye and press
the shutter button halfway, you notice that the f-stop has been replaced by the
word “Lo.” This is your camera’s way of telling you that the lens has now reached its
maximum aperture and you are going to be underexposed if you shoot your pictures
at the currently selected shutter speed. You could slow your shutter speed down until
the Lo indicator goes away, but then you would get images with too much motion blur.
The alternative is to raise your ISO to a level that is fast enough for a proper exposure.
The key here is to always use the lowest ISO that you can get away with. That might
mean ISO 100 in bright, sunny conditions or ISO 5600 for an indoor or night situation
(Figure 5.4). Just remember that the higher the ISO, the greater the amount of noise
in your image. This is the reason that you see professional sports photographers using
those mammoth lenses perched atop a monopod. They could use a smaller lens, but
to get those very large apertures they need a huge piece of glass on the front of the
lens. The larger the glass on the front of the lens, the more light it gathers and the
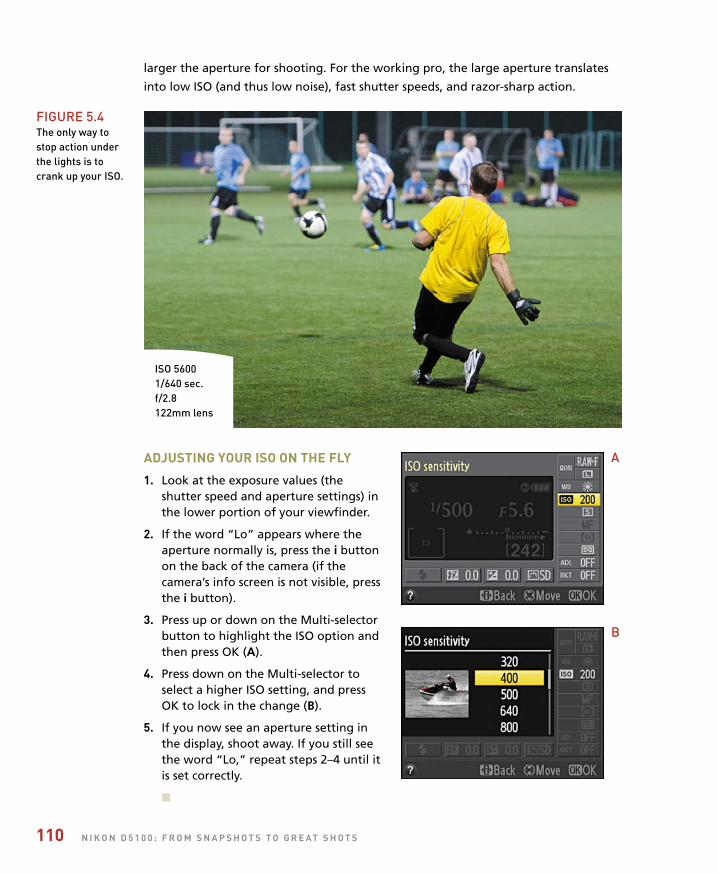
ptg
110 n i k o n D 5 1 0 0 : F r o m s n a P s h o T s T o g r e aT s h o T s
larger the aperture for shooting. For the working pro, the large aperture translates
into low ISO (and thus low noise), fast shutter speeds, and razor-sharp action.
aDjusTing your iso on The Fly
1. Look at the exposure values (theshutter speed and aperture settings) inthe lower portion of your viewfinder.
2. If the word “Lo” appears where theaperture normally is, press the i buttonon the back of the camera (if thecamera’s info screen is not visible, pressthe i button).
3. Press up or down on the Multi-selectorbutton to highlight the ISO option andthen press OK (A).
4. Press down on the Multi-selector toselect a higher ISO setting, and pressOK to lock in the change (B).
5. If you now see an aperture setting inthe display, shoot away. If you still seethe word “Lo,” repeat steps 2–4 until itis set correctly.
n
ISO 56001/640 sec.f/2.8122mm lens
FIgure 5.4The only way to stop action underthe lights is tocrank up your ISO.
A
B
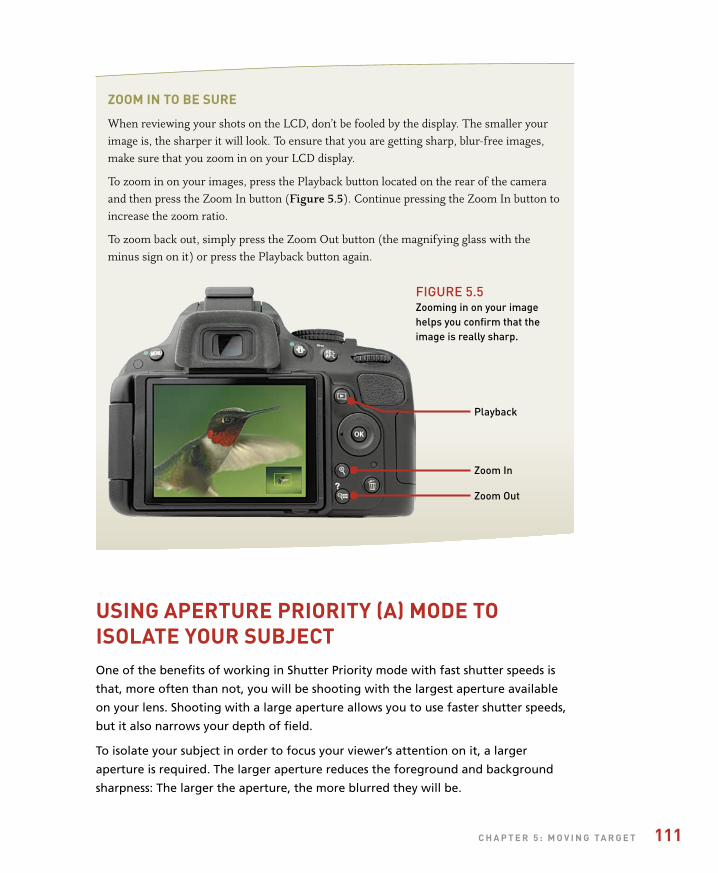
ptg
c h a P T e r 5 : m o v i n g Ta r g e T 111
Zoom in To be sure
When reviewing your shots on the LCD, don’t be fooled by the display. The smaller your image is, the sharper it will look. To ensure that you are getting sharp, blur-free images, make sure that you zoom in on your LCD display.
To zoom in on your images, press the Playback button located on the rear of the camera and then press the Zoom In button (Figure 5.5). Continue pressing the Zoom In button to increase the zoom ratio.
To zoom back out, simply press the Zoom Out button (the magnifying glass with the minus sign on it) or press the Playback button again.
using aPerTure PrioriTy (a) moDe ToisolaTe your subjecTOne of the benefits of working in Shutter Priority mode with fast shutter speeds is
that, more often than not, you will be shooting with the largest aperture available
on your lens. Shooting with a large aperture allows you to use faster shutter speeds,
but it also narrows your depth of field.
To isolate your subject in order to focus your viewer’s attention on it, a larger
aperture is required. The larger aperture reduces the foreground and background
sharpness: The larger the aperture, the more blurred they will be.
FIgure 5.5Zooming in on your imagehelps you confirm that theimage is really sharp.
Playback
Zoom In
Zoom Out
ptg
112 n i k o n D 5 1 0 0 : F r o m s n a P s h o T s T o g r e aT s h o T s
The reason that I bring this up here is that when you are shooting most sporting
events, the idea is to isolate your main subject by having it in focus while the rest of
the image has some amount of blur. This sharp focus draws your viewer right to the
subject. Studies have shown that the eye is drawn to sharp areas before moving on
to the blurry areas. Also, depending on what your subject matter is, there can be a
tendency to get distracted by a busy background if everything in the photo is equally
sharp. Without a narrow depth of field, it might be difficult for the viewer to estab-
lish exactly what the main subject is in your picture.
Let’s look at how to use depth of field to bring focus to your subject. In the previous
section, I told you that you should use Shutter Priority mode for getting those really
fast shutter speeds to stop action. Generally speaking, Shutter Priority mode will be
the mode you most often use for shooting sports and other action, but there will be
times when you want to ensure that you are getting the narrowest depth of field
possible in your image. The way to do this is by using Aperture Priority mode.
So how do you know when you should use Aperture Priority mode as opposed to
Shutter Priority mode? It’s not a simple answer, but your LCD screen can help you
make this determination. The best scenario for using Aperture Priority mode is a
brightly lit scene where maximum apertures will still give you plenty of shutter speed
to stop the action.
Let’s say that you are shooting a game in the midday sun. If you have determined
that you need something between 1/500 and 1/1250 of a second for stopping the
action, you could just set your camera to a high shutter speed in Shutter Priority
mode and start shooting. But you also want to be using an aperture of, say, f/4.5 to
get that narrow depth of field. Here’s the problem: If you set your camera to Shutter
Priority mode and select 1/1000 of a second as a nice compromise, you might get that
desired f/stop—but you might not. As the meter is trained on your moving subject,
the light levels could rise or fall, which might actually change that desired f-stop to
something higher, like f/5.6 or even f/8. Now the depth of field is extended, and you
will no longer get that nice isolation and separation that you wanted.
To rectify this, switch the camera to Aperture Priority mode and select f/4.5 as your
aperture. Now, as you begin shooting, the camera holds that aperture and makes
exposure adjustments with the shutter speed. As I said before, this works well when
you have lots of light—enough light so that you can have a high-enough shutter
speed without introducing motion blur.
ptg
c h a P T e r 5 : m o v i n g Ta r g e T 113
The auTo iso sensiTiviTy conTrol TrickThere is a very cool trick that can get you the best of both worlds and that won’t
sacrifice your shutter speed or aperture. By setting up the Auto ISO sensitivity control
feature, you can set the camera to automatically select an ISO that keeps you at your
preferred shutter speed, while using the largest aperture and lowest ISO possible.
It will also put an upper limit on the ISO to keep you from getting too much noise in
your images.
Here’s the way it works. If I am shooting an activity that requires a shutter speed of
1/250 of a second, I set that as the minimum in the auto control settings. Then I decide
that I can deal with the noise that is produced with an ISO up to 1600, so I set that
as my maximum sensitivity. Since I would always like to use the lowest ISO, I set the
ISO Sensitivity setting to 100. Once everything is set, the camera will now adjust my
ISO without any interaction from me, letting me shoot at my desired shutter speed at
the lowest possible ISO and largest aperture setting possible. I used this feature when
shooting the evening soccer game in Figure 5.5, and it allowed me to keep the shutter
at 1/640 of a second on into the night.
seTTing uP The auTo iso sensiTiviTy conTrol FeaTure
1. Press the Menu button and then use the Multi-selector to get to the Shooting menu.
2. Press the Multi-selector to the right to enter the menu and then locate the ISO Sensitivity Settings feature (A).
3. Press the Multi-selector to the right to enter the set-up screen.
4. Press the Multi-selector to the right, select the lowest ISO that you wish to use(ISO Sensitivity), and press the OK button (B).
A B
ptg
114 n i k o n D 5 1 0 0 : F r o m s n a P s h o T s T o g r e aT s h o T s
5. Press the Multi-selector down tohighlight Auto ISO Sensitivity Control,and then move the selector to the right and select On to activate thefeature (C).
6. Use the Multi-selector to choose theMaximum Sensitivity option (D). Thisallows you to set the upper limit ofyour ISO.
7. Finally, select the minimum shutter speed that you want to use while shooting (E). This will be completely dependent on the speed necessary to stopthe action you are shooting.
n
With everything set up, you can begin
shooting without fear of constantly having
to change the ISO. This technique is also
quite helpful when working in varying light
conditions. As you are shooting, you will
notice the ISO AUTO warning in the lower
portion of the viewfinder along with the
adjusted ISO setting.
D e
C
Manual calloutFor more information about the Auto ISO sensitivity control, turn to page 155 in the reference manual on the companion CD that came with the camera.
ptg
c h a P T e r 5 : m o v i n g Ta r g e T 115
keeP Them in Focus wiTh conTinuous-servo Focus anD aF Focus PoinT selecTionWith the exposure issue handled for the moment, let’s move on to an area that is
equally important: focusing. If you have browsed your manual, you know that there
are several focus modes to choose from in the D5100. To get the greatest benefit
from each of them, it is important to understand how they work and the situations
where each mode will give you the best opportunity to grab a great shot. Because we
are discussing subject movement, our first choice is going to be Continuous-servo AF
mode (AF-C). AF-C mode uses all of the focus points in the camera to find a moving
subject and then lock in the focus when the shutter button is completely depressed.
selecTing anD shooTing in conTinuous-servo aF Focus moDe
1. Press the i button on the back of the camera (if the camera’s info screen is notvisible, press the i button twice).
2. Press up or down on the Multi-selector to highlight the focus mode and thenpress the OK button.
3. Use the Multi-selector to select AF-C and press OK (A).
4. Locate your subject in the viewfinder,then press and hold the shutterbutton halfway to activate the focusmechanism.
5. The camera will maintain the subject’sfocus as long as it remains within oneof the focus points in the viewfinder oruntil you release the shutter button ortake a picture.
n
You should take note that holding down the shutter button for long periods of time
will cause your battery to drain much faster because the camera will be constantly
focusing on the subject.
When using the AF-C mode, you can use the AF point mode set to Dynamic area,
which uses a focus point of your choosing as the primary focus, but uses information
from the surrounding points if your subject happens to move away from the point.
A

ptg
116 n i k o n D 5 1 0 0 : F r o m s n a P s h o T s T o g r e aT s h o T s
seTTing The aF-area moDe To Dynamic
1. To set the AF-area mode, press the i button on the back of the camera.
2. Press up or down on the Multi-selector to highlight the AF-area mode and thenpress the OK button (A).
3. Use the Multi-selector to choose the Dynamic AF mode and press OK (B).
n
To select a focus point you want to use, simply move the Multi-selector up, down,
left, or right until the desired point is highlighted in your viewfinder. Pressing the
OK button in the center of the Multi-
selector will reset your focus point to the
center position.
Note that the AF mode is used to select
the method with which the camera will
focus the lens. This is different from the
AF point, which is a cluster of small points
that are visible in the viewfinder and are
used to determine where you want the
lens to focus (Figure 5.6). If you don’t see
Dynamic as an option, go back and choose
the AF-C focus mode.
sToP anD go wiTh 3D-Tracking aFIf you are going to be changing between a moving target and one that is still, you
should consider using the 3D-tracking AF mode. This mode mixes both the AF-S and
Dynamic modes for shooting a subject that goes from stationary to moving without
having to adjust your focus mode.
A B
FIgure 5.6The Automatic Focus (AF) points are the 11small boxes arranged in your viewfinder.
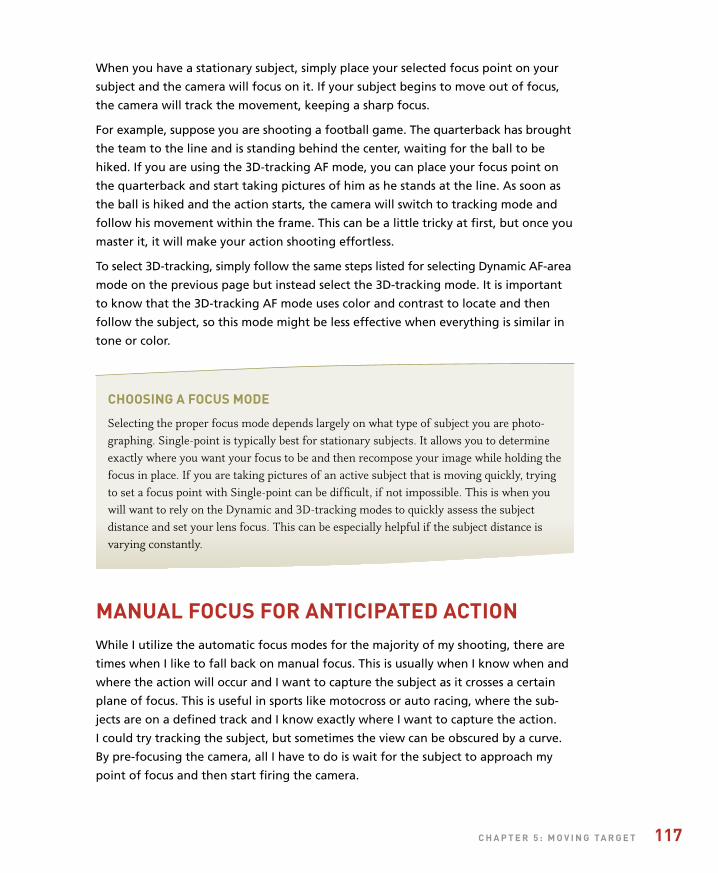
ptg
c h a P T e r 5 : m o v i n g Ta r g e T 117
When you have a stationary subject, simply place your selected focus point on your
subject and the camera will focus on it. If your subject begins to move out of focus,
the camera will track the movement, keeping a sharp focus.
For example, suppose you are shooting a football game. The quarterback has brought
the team to the line and is standing behind the center, waiting for the ball to be
hiked. If you are using the 3D-tracking AF mode, you can place your focus point on
the quarterback and start taking pictures of him as he stands at the line. As soon as
the ball is hiked and the action starts, the camera will switch to tracking mode and
follow his movement within the frame. This can be a little tricky at first, but once you
master it, it will make your action shooting effortless.
To select 3D-tracking, simply follow the same steps listed for selecting Dynamic AF-area
mode on the previous page but instead select the 3D-tracking mode. It is important
to know that the 3D-tracking AF mode uses color and contrast to locate and then
follow the subject, so this mode might be less effective when everything is similar in
tone or color.
manual Focus For anTiciPaTeD acTionWhile I utilize the automatic focus modes for the majority of my shooting, there are
times when I like to fall back on manual focus. This is usually when I know when and
where the action will occur and I want to capture the subject as it crosses a certain
plane of focus. This is useful in sports like motocross or auto racing, where the sub-
jects are on a defined track and I know exactly where I want to capture the action.
I could try tracking the subject, but sometimes the view can be obscured by a curve.
By pre-focusing the camera, all I have to do is wait for the subject to approach my
point of focus and then start firing the camera.
choosing a Focus moDe
Selecting the proper focus mode depends largely on what type of subject you are photo-graphing. Single-point is typically best for stationary subjects. It allows you to determine exactly where you want your focus to be and then recompose your image while holding the focus in place. If you are taking pictures of an active subject that is moving quickly, trying to set a focus point with Single-point can be difficult, if not impossible. This is when you will want to rely on the Dynamic and 3D-tracking modes to quickly assess the subject distance and set your lens focus. This can be especially helpful if the subject distance is varying constantly.

ptg
118 n i k o n D 5 1 0 0 : F r o m s n a P s h o T s T o g r e aT s h o T s
Take a look at Figure 5.7. We have a hummingbird feeder set up outside one of our win-
dows so that we can watch them come and go. They tend to follow a regular pattern
as they approach the feeder, so I set up my camera on a tripod and trained it on a point
where they tended to hover between feedings. I set focus to manual and fired in con-
tinuous mode each time one appeared. Not every shot was in focus on the right part
of the bird, but it was easier than trying to follow a hummingbird around on its flight.
ISO 2001/400 sec.f/5200mm lens
Here’s another example (Figure 5.8), where I used manual focusing to determine
where I wanted the subject to be critically focused. I stationed myself at a point
where the rollercoaster came around a bend, so that it appeared to be coming right
at me, and locked focused on the track. I would fire away in continuous shooting
mode each time they came to that point in the track.
FIgure 5.7Pre-focus thecamera to a pointwhere you know thesubject will be andstart shooting rightbefore they getthere.
Drive moDes
The drive mode determines how fast your camera will take pictures. Single shot is for taking one photograph at a time. With every full press of the shutter release button, the camera will take a single image. The continuous mode allows for a more rapid capture rate. Think of it like a machine gun. When you are using the continuous mode, the camera will continue to take pictures as long as the shutter release button is held down.
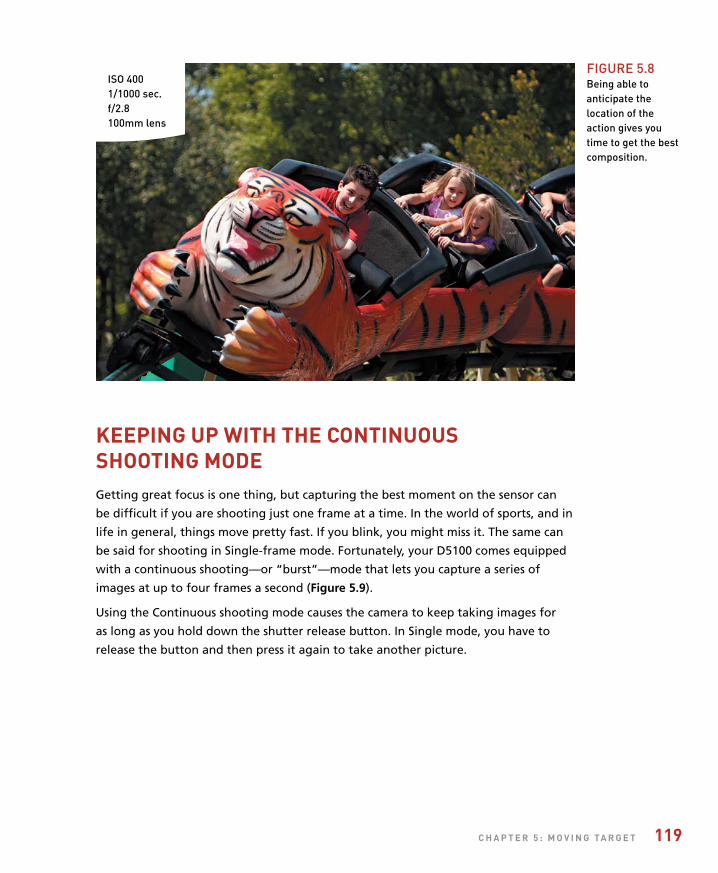
ptg
c h a P T e r 5 : m o v i n g Ta r g e T 119
ISO 4001/1000 sec.f/2.8100mm lens
FIgure 5.8Being able toanticipate thelocation of theaction gives youtime to get the bestcomposition.
keePing uP wiTh The conTinuous shooTing moDeGetting great focus is one thing, but capturing the best moment on the sensor can
be difficult if you are shooting just one frame at a time. In the world of sports, and in
life in general, things move pretty fast. If you blink, you might miss it. The same can
be said for shooting in Single-frame mode. Fortunately, your D5100 comes equipped
with a continuous shooting—or “burst”—mode that lets you capture a series of
images at up to four frames a second (Figure 5.9).
Using the Continuous shooting mode causes the camera to keep taking images for
as long as you hold down the shutter release button. In Single mode, you have to
release the button and then press it again to take another picture.
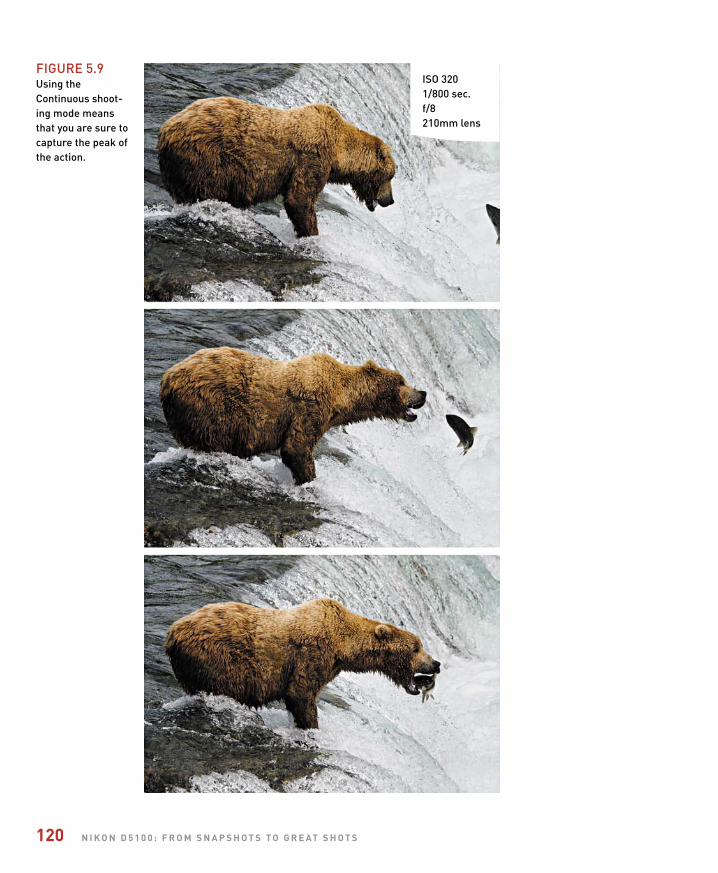
ptg
120 n i k o n D 5 1 0 0 : F r o m s n a P s h o T s T o g r e aT s h o T s
FIgure 5.9using theContinuous shoot-ing mode meansthat you are sure tocapture the peak ofthe action.
ISO 3201/800 sec.f/8210mm lens
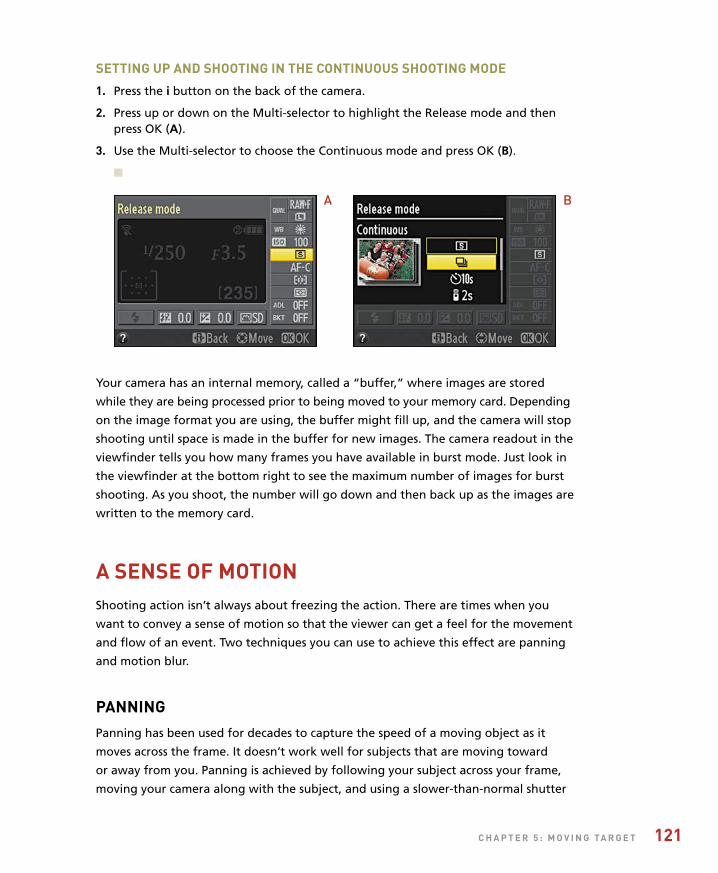
ptg
c h a P T e r 5 : m o v i n g Ta r g e T 121
seTTing uP anD shooTing in The conTinuous shooTing moDe
1. Press the i button on the back of the camera.
2. Press up or down on the Multi-selector to highlight the Release mode and thenpress OK (A).
3. Use the Multi-selector to choose the Continuous mode and press OK (B).
n
Your camera has an internal memory, called a “buffer,” where images are stored
while they are being processed prior to being moved to your memory card. Depending
on the image format you are using, the buffer might fill up, and the camera will stop
shooting until space is made in the buffer for new images. The camera readout in the
viewfinder tells you how many frames you have available in burst mode. Just look in
the viewfinder at the bottom right to see the maximum number of images for burst
shooting. As you shoot, the number will go down and then back up as the images are
written to the memory card.
a sense oF moTionShooting action isn’t always about freezing the action. There are times when you
want to convey a sense of motion so that the viewer can get a feel for the movement
and flow of an event. Two techniques you can use to achieve this effect are panning
and motion blur.
PanningPanning has been used for decades to capture the speed of a moving object as it
moves across the frame. It doesn’t work well for subjects that are moving toward
or away from you. Panning is achieved by following your subject across your frame,
moving your camera along with the subject, and using a slower-than-normal shutter
A B
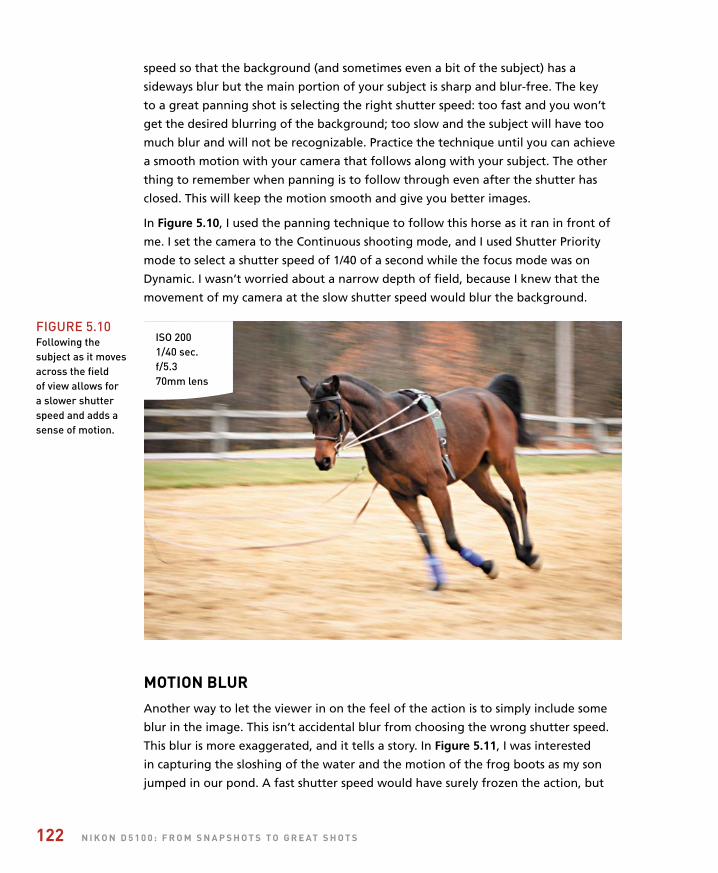
ptg
122 n i k o n D 5 1 0 0 : F r o m s n a P s h o T s T o g r e aT s h o T s
speed so that the background (and sometimes even a bit of the subject) has a
sideways blur but the main portion of your subject is sharp and blur-free. The key
to a great panning shot is selecting the right shutter speed: too fast and you won’t
get the desired blurring of the background; too slow and the subject will have too
much blur and will not be recognizable. Practice the technique until you can achieve
a smooth motion with your camera that follows along with your subject. The other
thing to remember when panning is to follow through even after the shutter has
closed. This will keep the motion smooth and give you better images.
In Figure 5.10, I used the panning technique to follow this horse as it ran in front of
me. I set the camera to the Continuous shooting mode, and I used Shutter Priority
mode to select a shutter speed of 1/40 of a second while the focus mode was on
Dynamic. I wasn’t worried about a narrow depth of field, because I knew that the
movement of my camera at the slow shutter speed would blur the background.
moTion blurAnother way to let the viewer in on the feel of the action is to simply include some
blur in the image. This isn’t accidental blur from choosing the wrong shutter speed.
This blur is more exaggerated, and it tells a story. In Figure 5.11, I was interested
in capturing the sloshing of the water and the motion of the frog boots as my son
jumped in our pond. A fast shutter speed would have surely frozen the action, but
ISO 2001/40 sec.f/5.370mm lens
FIgure 5.10Following thesubject as it movesacross the field of view allows for a slower shutterspeed and adds asense of motion.

ptg
c h a P T e r 5 : m o v i n g Ta r g e T 123
I wanted the viewer to feel as though the water was still rippling around the pond
and that the boot could break the surface at any moment.
ISO 2001/80 sec.f/5.660mm lens
FIgure 5.11The movement of the boots andwater, coupled withthe slow shutterspeed, conveys the sense of fluidmotion.
Just as in panning, there is no preordained shutter speed to use for this effect. It is
simply a matter of trial and error until you have a look that conveys the action. I try
to get some area of the subject that is frozen. The key to this technique is the correct
shutter speed combined with keeping the camera still during the exposure. You are
trying to capture the motion of the subject, not of the photographer or the camera,
so use a good shooting stance or even a tripod.
TiPs For shooTing acTion
give Them somewhere To goWhether you are shooting something as simple as your child’s soccer match or as com-
plex as the aerial acrobatics of a motorcycle jumper, where you place the subject in the
frame is equally as important as how well you expose the image. A poorly composed
shot can completely ruin a great moment by not holding the viewer’s attention.
The one mistake I see many times in action photography is that the photographer
doesn’t use the frame properly. If you are dealing with a subject that is moving

ptg
124 n i k o n D 5 1 0 0 : F r o m s n a P s h o T s T o g r e aT s h o T s
horizontally across your field of view, give the subject somewhere to go by placing
them to the side of the frame, with their motion leading toward the middle of the
frame (Figure 5.12). This offsetting of the subject will introduce a sense of direction
and anticipation for the viewer. Unless you are going to completely fill the image with
the action, try to avoid placing your subject in the middle of the frame. My dog was
happy to catch as many snowballs as were required (and then some) to get the shot.
ISO 2001/640 sec.f/1155mm lens
geT in FronT oF The acTionHere’s another one. When shooting action, show the action coming toward you
(Figure 5.13). Don’t shoot the action going away from you. People want to see faces.
Faces convey the action, the drive, the sense of urgency, and the emotion of the
moment. So if you are shooting action involving people, always position yourself so
that the action is either coming at you or is at least perpendicular to your position.
PuT your camera in a DiFFerenT PlaceChanging your vantage point is a great way of finding new angles. Shooting from a
low position with a wide-angle lens might let you incorporate some foreground to
give depth to the image. Shooting from farther away with a telephoto lens will com-
press the elements in a scene and allow you to crop in tighter on the action. Don’t be
afraid to experiment and try new things.
FIgure 5.12Try to leave space infront of your subjectto lead the action ina direction.
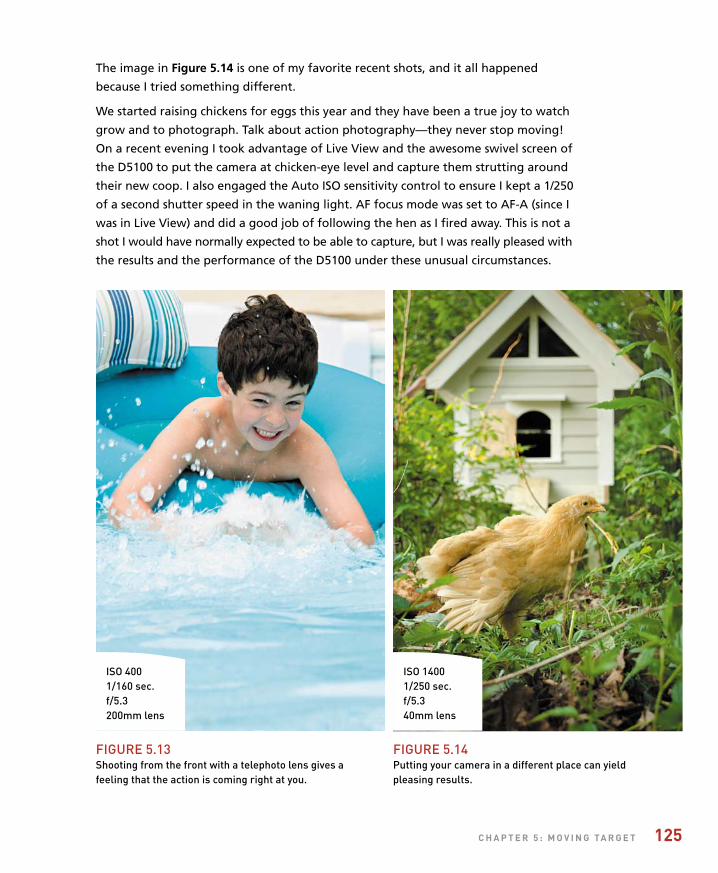
ptg
c h a P T e r 5 : m o v i n g Ta r g e T 125
ISO 4001/160 sec.f/5.3200mm lens
ISO 14001/250 sec.f/5.340mm lens
FIgure 5.13Shooting from the front with a telephoto lens gives afeeling that the action is coming right at you.
FIgure 5.14Putting your camera in a different place can yieldpleasing results.
The image in Figure 5.14 is one of my favorite recent shots, and it all happened
because I tried something different.
We started raising chickens for eggs this year and they have been a true joy to watch
grow and to photograph. Talk about action photography—they never stop moving!
On a recent evening I took advantage of Live View and the awesome swivel screen of
the D5100 to put the camera at chicken-eye level and capture them strutting around
their new coop. I also engaged the Auto ISO sensitivity control to ensure I kept a 1/250
of a second shutter speed in the waning light. AF focus mode was set to AF-A (since I
was in Live View) and did a good job of following the hen as I fired away. This is not a
shot I would have normally expected to be able to capture, but I was really pleased with
the results and the performance of the D5100 under these unusual circumstances.

ptg
126 n i k o n D 5 1 0 0 : F r o m s n a P s h o T s T o g r e aT s h o T s
Chapter 5 AssignmentsThe mechanics of motion
For this first assignment, you need to find some action. Explore the relationship between the speed of an object and its direction of travel. Use the same shutter speed to record your subject moving toward you and across your view. Try using the same shutter speed for both to compare the difference made by the direction of travel.
Wide vs. telephoto
Just as with the first assignment, photograph a subject moving in different directions, but this time, use a wide-angle lens and then a telephoto. Check out how the telephoto setting on the zoom lens will require faster shutter speeds than the lens at its wide-angle setting.
Getting a feel for focusing modes
We discussed two different ways to auto focus for action: Dynamic and 3D-tracking. Starting with Dynamic mode, find a moving subject and get familiar with the way the mode works.
Now repeat the process using the 3D-tracking AF mode. The point of the exercise is to become familiar enough with the two modes to decide which one to use for the situation you are photographing.
Anticipating the spot using manual focus
For this assignment, you will need to find a subject that you know will cross a specific line that you can pre-focus on. A street with moderate traffic works well for this. Focus on a spot on the street that the cars will travel across (don’t forget to set your lens for manual focus). To do this right, you need to set the drive mode on the camera to the Continuous mode. Now, when a car approaches the spot, start shooting. Try shooting in three- or four-frame bursts.

ptg
127
Following the action
Panning is a great way to show motion. To begin, find a subject that will move across your path at a steady speed and practice following it in your viewfinder from side to side. Now, with the camera in Shutter Priority mode, set your shutter speed to 1/30 of a second and the focus mode to Dynamic. Now pan along with the subject and shoot as it moves across your view. Experiment with different shutter speeds and focal lengths. Panning is one of those skills that takes some time to get a feel for, so try it with different types of subjects moving at different speeds.
Feeling the movement
Instead of panning with the motion, use a stationary camera position and adjust the shutter speed until you get a blurred effect that gives the sense of motion while still being able to identify the subject. There is a big difference between a slightly blurred photo that looks like you just picked the wrong shutter speed and one that looks intentional for the purpose of showing motion. Just like panning, it will take some experimentation to find just the right shutter speed to achieve the desired effect.
Share your results with the book’s Flickr group!
Join the group here: flickr.com/groups/nikond5100fromsnapshotstogreatshots/
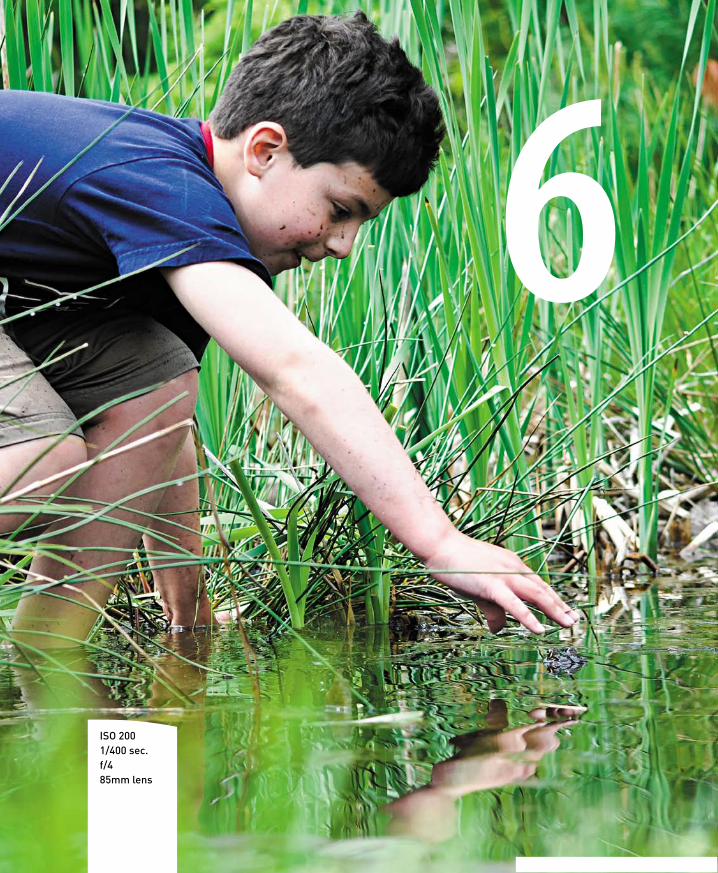
ptg
6
ISO 2001/400 sec.f/485mm lens

ptg
Say Cheese!
SettingS and featureS to make great portraitS
Taking pictures of people is one of the great joys of photography. You
will experience a great sense of accomplishment when you capture the
spirit and personality of someone in a photograph. At the same time, you
have a great responsibility because the person in front of the camera is
depending on you to make them look good. You can’t always change
how someone looks, but you can control the way you photograph that
individual. In this chapter, we will explore some camera features and
techniques that can help you create great portraits.
129

ptg
130 n i k o n d 5 1 0 0 : f r o m S n a p S h o t S t o g r e at S h o t S
poring over the picture
I had the pleasure of shooting a senior portrait for my good friend’s oldest
daughter. It certainly helps when your subject is so photogenic, but I tried to
put her in the best light possible by putting the sun and a backlit tree behind
her, and a little bit of reflective material in front of her to bounce some of that
great light back into her face. I added a tiny bit of fill light from an off-camera
flash to wash out any shadows around the eyes.
Using a long zoom lens and a fairlywide-open aperture does a nice jobof throwing the background into abeautiful wash of color.
Holding the camera in the portraitorientation allowed me to zoom inand fill the frame with the subject.
Sharp focus on the eyes is criticalin photographs of people. Thebright sky behind us added a nicecatchlight to her eyes.
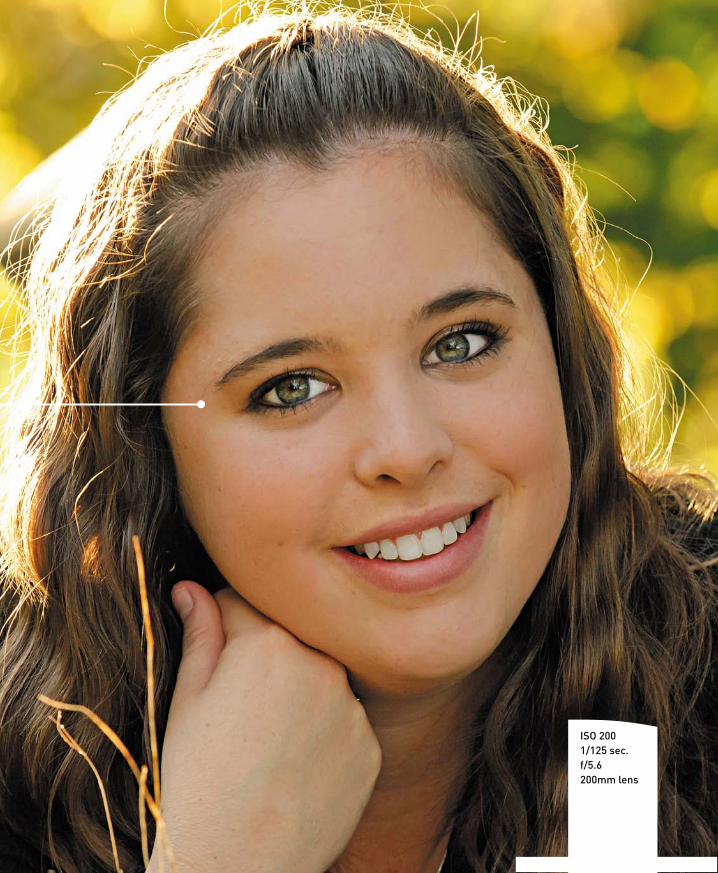
ptg
c h a p t e r 6 : S a y c h e e S e ! 131
ISO 2001/125 sec.f/5.6200mm lens
ptg
132 n i k o n d 5 1 0 0 : f r o m S n a p S h o t S t o g r e at S h o t S
automatic portrait modeIn Chapter 3, we reviewed all of the automatic scene modes. One of them, Portrait
mode, is dedicated to shooting portraits. While this is not my preferred camera set-
ting, it is a great jumping-off point for those who are just starting out. The key to
using this mode is to understand what is going on with the camera so that when you
venture further into portrait photography, you can expand on the settings and get
the most from your camera and, more importantly, your subject.
Whether you are photographing an individual or a group, the emphasis should always
be on the subject. Portrait mode utilizes a larger aperture setting to keep the depth
of field very narrow, which means that the background will appear slightly blurred or
out of focus. To take full advantage of this effect, use a medium- to telephoto-length
lens. Also, keep a pretty close distance to your subject. If you shoot from too far
away, the narrow depth of field will not be as effective.
uSing aperture priority modeIf you took a poll of portrait photographers to see which shooting mode was most
often used for portraits, the answer would certainly be Aperture Priority (A) mode.
Selecting the right aperture is important for placing the most critically sharp area of
the photo on your subject, while simultaneously blurring all of the distracting back-
ground clutter (Figure 6.1). Not only will a large aperture give the narrowest depth
of field, it will also allow you to shoot in lower light levels at lower ISO settings.
This isn’t to say that you have to use the largest aperture on your lens. A good place
to begin is f/5.6. This will give you enough depth of field to keep the entire face in
focus, while providing enough blur to eliminate distractions in the background. This
isn’t a hard-and-fast setting; it’s just a good, all-around number to start with. Your
aperture might change depending on the focal length of the lens you are using and
on the amount of blur that you want for your foreground and background elements.

ptg
c h a p t e r 6 : S a y c h e e S e ! 133
ISO 1001/640 sec.f/2.8200mm lens
FIgUre 6.1Using a wide aperture, especiallywith a longer lens,blurs distractingbackground details.
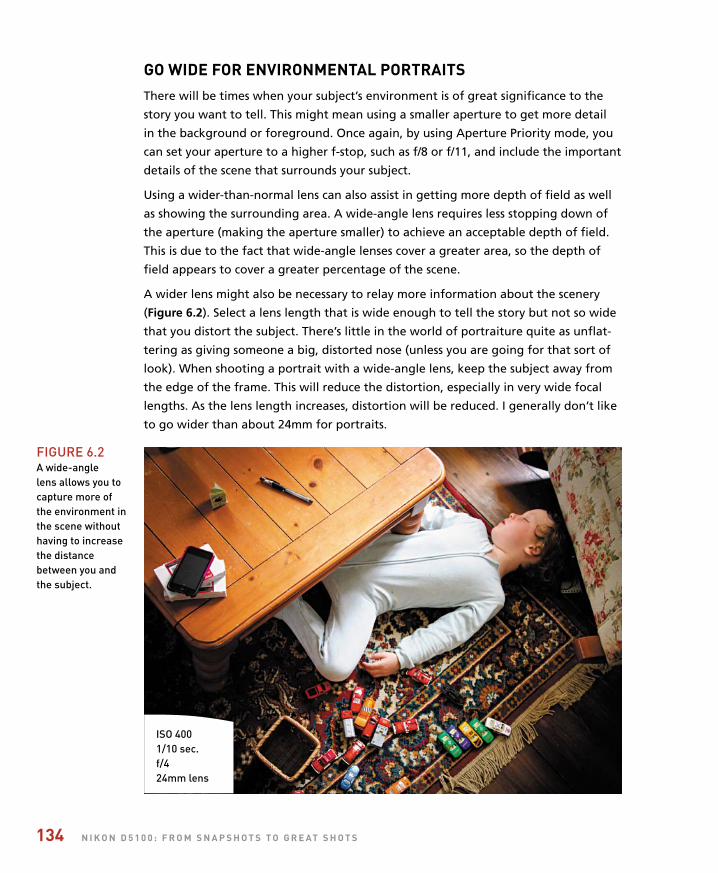
ptg
134 n i k o n d 5 1 0 0 : f r o m S n a p S h o t S t o g r e at S h o t S
go wide for environmental portraitSThere will be times when your subject’s environment is of great significance to the
story you want to tell. This might mean using a smaller aperture to get more detail
in the background or foreground. Once again, by using Aperture Priority mode, you
can set your aperture to a higher f-stop, such as f/8 or f/11, and include the important
details of the scene that surrounds your subject.
Using a wider-than-normal lens can also assist in getting more depth of field as well
as showing the surrounding area. A wide-angle lens requires less stopping down of
the aperture (making the aperture smaller) to achieve an acceptable depth of field.
This is due to the fact that wide-angle lenses cover a greater area, so the depth of
field appears to cover a greater percentage of the scene.
A wider lens might also be necessary to relay more information about the scenery
(Figure 6.2). Select a lens length that is wide enough to tell the story but not so wide
that you distort the subject. There’s little in the world of portraiture quite as unflat-
tering as giving someone a big, distorted nose (unless you are going for that sort of
look). When shooting a portrait with a wide-angle lens, keep the subject away from
the edge of the frame. This will reduce the distortion, especially in very wide focal
lengths. As the lens length increases, distortion will be reduced. I generally don’t like
to go wider than about 24mm for portraits.
ISO 4001/10 sec.f/424mm lens
FIgUre 6.2A wide-angle lens allows you tocapture more of the environment inthe scene withouthaving to increasethe distancebetween you andthe subject.

ptg
c h a p t e r 6 : S a y c h e e S e ! 135
metering BaSicS
There are multiple metering modes in your camera, but the way they work is very similar. A light meter measures the amount of light being reflected off your subject and then renders a suggested exposure value based on the brightness of the subject and the ISO setting of the sensor. To establish this value, the meter averages all of the brightness values to come up with a middle tone, sometimes referred to as 18 percent gray. The exposure value is then rendered based on this middle gray value. This means that a white wall would be underexposed and a black wall would be overexposed in an effort to make each one appear gray. To assist with special lighting situations, the D5100 has three metering modes: Matrix (Figure 6.3), which uses the entire frame; Spot (Figure 6.4), which takes specific readings from small areas (often used with a gray card); and Center-weighted (Figure 6.5), which looks at the entire frame but places most of the exposure emphasis on the center of the frame.
metering modeS for portraitSFor most portrait situations, the Matrix metering mode is ideal. (For more on how
metering works, see the “Metering Basics” sidebar.) This mode measures light values
from all portions of the viewfinder and then establishes a proper exposure for the
scene. The only problem that you might encounter when using this metering mode is
when you have very light or dark backgrounds in your portrait shots.
In these instances, the meter might be fooled into using the wrong exposure infor-
mation because it will be trying to lighten or darken the entire scene based on the
prominence of dark or light areas (Figure 6.6). You can deal with this in one of two
ways. You can use the Exposure Compensation feature, which we cover in Chapter 7,
to dial in adjustments for over- and underexposure. Or you can change the metering
mode to Center-weighted metering. The Center-weighted metering mode only uses
FIgUre 6.3 The Matrix meteringmode uses the entireframe.
FIgUre 6.4 The Spot meteringmode uses a very smallarea of the frame.
FIgUre 6.5 The Center-weighted meteringmode looks at the entire framebut emphasizes the center of it.
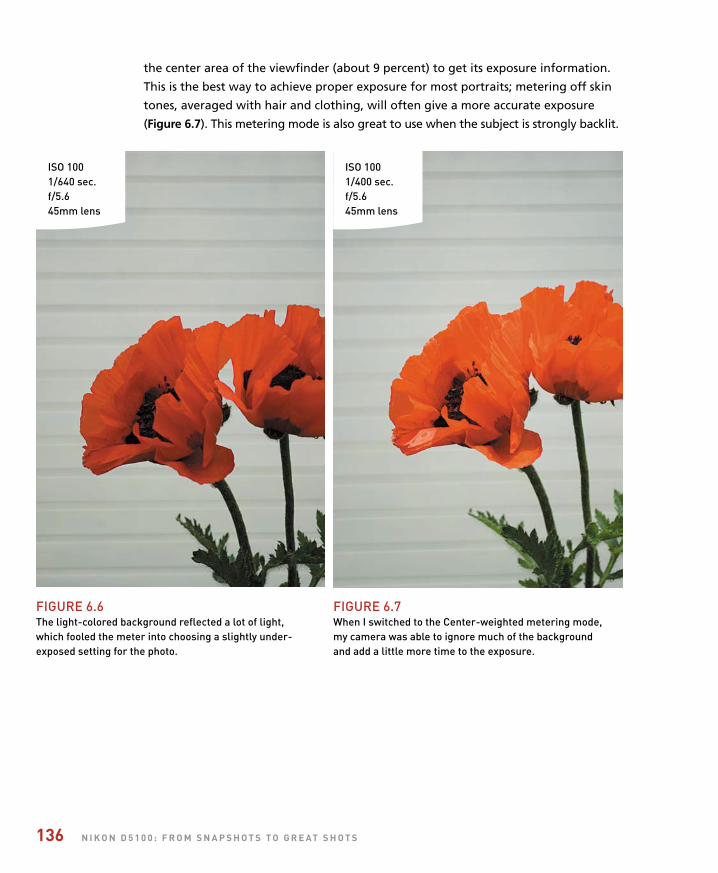
ptg
136 n i k o n d 5 1 0 0 : f r o m S n a p S h o t S t o g r e at S h o t S
the center area of the viewfinder (about 9 percent) to get its exposure information.
This is the best way to achieve proper exposure for most portraits; metering off skin
tones, averaged with hair and clothing, will often give a more accurate exposure
(Figure 6.7). This metering mode is also great to use when the subject is strongly backlit.
FIgUre 6.6 The light-colored background reflected a lot of light, which fooled the meter into choosing a slightly under-exposed setting for the photo.
FIgUre 6.7 When I switched to the Center-weighted metering mode, my camera was able to ignore much of the background and add a little more time to the exposure.
ISO 1001/640 sec.f/5.645mm lens
ISO 1001/400 sec.f/5.645mm lens

ptg
c h a p t e r 6 : S a y c h e e S e ! 137
Setting your metering mode to center-weighted metering
1. Press the i button to activate the cursor in the information screen.
2. Use the Multi-selector to move the cursor to the Metering icon and press the OKbutton (A).
3. Select the Center-weighted icon and press the OK button to lock in the change (B).
n
uSing the ae-l (auto expoSure lock)featureThere will often be times when your subject is not in the center of the frame but you
still want to use the Center-weighted metering mode. So how can you get an accu-
rate reading if the subject isn’t in the center? Try using the AE-L (Auto Exposure Lock)
feature to hold the exposure setting while you recompose.
AE Lock lets you use the exposure setting from any portion of the scene that you
think is appropriate and then lock that setting in regardless of how the scene looks
when you recompose. An example of this would be when you’re shooting a photo-
graph of someone and a large amount of blue sky appears in the picture. Normally,
the meter might be fooled by all that bright sky and try to reduce the exposure.
Using AE Lock, you can establish the correct metering by zooming in on the subject
(or even pointing the camera toward the ground), taking the meter reading and
locking it in with the AE-L feature, and then recomposing and taking your photo
with the locked-in exposure.
A B
ptg
138 n i k o n d 5 1 0 0 : f r o m S n a p S h o t S t o g r e at S h o t S
Shooting with the ae lock feature
1. Find the AE Lock button on the back of thecamera and place your thumb on it.
2. While looking through the viewfinder,place the focus point on your subject, pressthe shutter release button halfway to get ameter reading, and focus the camera.
3. Press and hold the AE Lock button to lockin the meter reading. You should see theAE-L indicator in the viewfinder.
4. While pressing in the AE-L button,recompose your shot and take the photo.
5. To take more than one photo withouthaving to take another meter reading, justhold down the AE Lock button until youare done using the meter setting.
n
focuSing: the eyeS have itIt has been said that the eyes are the windows to the soul, and nothing could be
truer when you are taking a photograph of someone (Figure 6.8). You could have
the perfect composition and exposure, but if the eyes aren’t sharp the entire image
suffers. While there are many different focusing modes to choose from on your
D5100, for portrait work you can’t beat AF-S (Single-servo AF) mode using a single
focusing point. AF-S focusing will establish a single focus for the lens and then hold it
until you take the photograph; the other focusing modes continue focusing until the
photograph is taken. The single-point selection lets you place the focusing point right
on your subject’s eye and set that spot as the critical focus spot. Using AF-S mode lets
you get that focus and recompose all in one motion.
Manual CalloutThere is a way to lock in your AE-L reading so that you can continue shooting without having to hold in the AE-L button. This involves chang-ing the button function in the custom menu, but I prefer to leave this feature turned off because I would, more often than not, forget that it is on and end up using the wrong metering for a new subject. If you want to learn more about this feature, check out pages 69 and 166 of the reference manual on the companion CD that came with the camera.
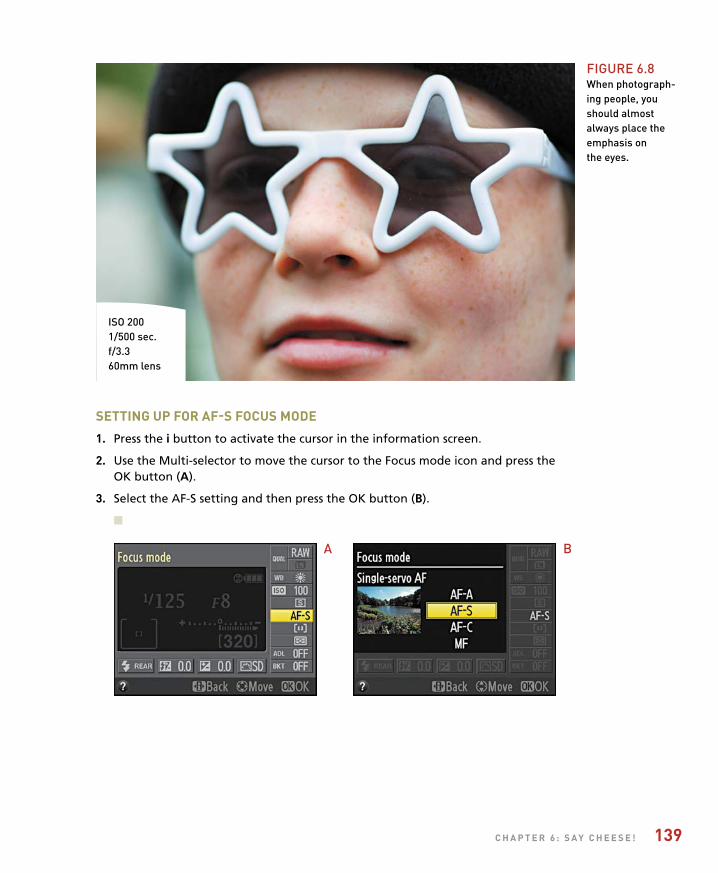
ptg
c h a p t e r 6 : S a y c h e e S e ! 139
Setting up for af-S focuS mode
1. Press the i button to activate the cursor in the information screen.
2. Use the Multi-selector to move the cursor to the Focus mode icon and press theOK button (A).
3. Select the AF-S setting and then press the OK button (B).
n
A B
ISO 2001/500 sec.f/3.360mm lens
FIgUre 6.8When photograph-ing people, youshould almostalways place theemphasis on the eyes.

ptg
140 n i k o n d 5 1 0 0 : f r o m S n a p S h o t S t o g r e at S h o t S
Setting your focuS to a Single point
1. Press the i button to activate the cursor in the information screen.
2. Use the Multi-selector to move the cursor to the AF-area mode icon and pressthe OK button (A).
3. Select the Single-point AF icon and press the OK button (B).
4. When you are back in shooting mode, use the Multi-selector to move the focuspoint to one of the 11 available positions. This is visible while looking throughthe viewfinder but also on the information screen.
n
Now, to shoot using this focus point, place that point on your subject’s eye and press
the shutter button halfway until focus locks (you will hear the chirp if the audible
beep is turned on). While still holding the shutter button down halfway, recompose
if necessary and take your shot.
I typically use the center point for focus selection. I find it easier to place that point
directly on the location where my critical focus should be established and then
recompose the shot. Even though the single point can be selected from any of the
focus points, it typically takes longer to figure out where that point should be in
relation to my subject. By using the center point, I can quickly establish focus and
get on with my shooting.
claSSic Black and white portraitSThere is something timeless about a black and white portrait. It eliminates the
distraction of color and puts all the emphasis on the subject. To get great black and
whites without having to resort to any image-processing software, set your picture
control to Monochrome (Figure 6.9). You should know that the picture controls are
automatically applied when shooting with the JPEG file format. If you are shooting
A B
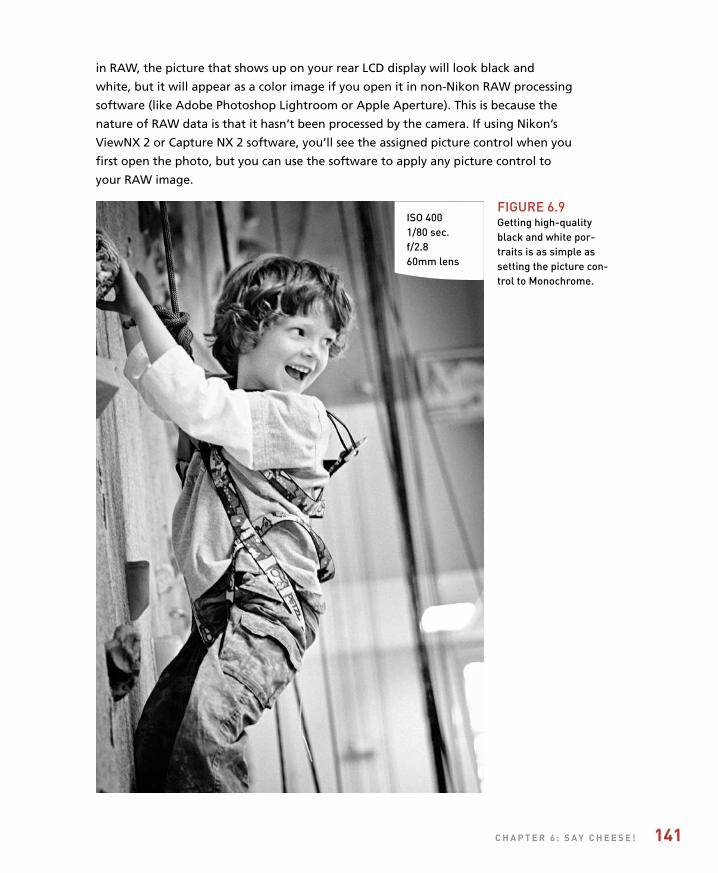
ptg
c h a p t e r 6 : S a y c h e e S e ! 141
in RAW, the picture that shows up on your rear LCD display will look black and
white, but it will appear as a color image if you open it in non-Nikon RAW processing
software (like Adobe Photoshop Lightroom or Apple Aperture). This is because the
nature of RAW data is that it hasn’t been processed by the camera. If using Nikon’s
ViewNX 2 or Capture NX 2 software, you’ll see the assigned picture control when you
first open the photo, but you can use the software to apply any picture control to
your RAW image.
ISO 4001/80 sec.f/2.860mm lens
FIgUre 6.9getting high-qualityblack and white por-traits is as simple assetting the picture con-trol to Monochrome.
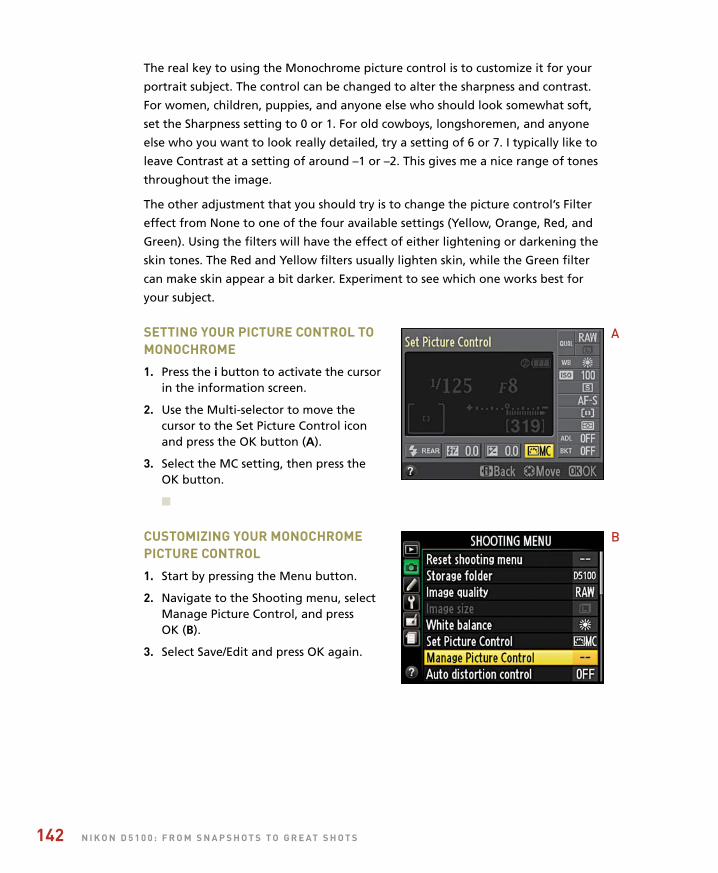
ptg
142 n i k o n d 5 1 0 0 : f r o m S n a p S h o t S t o g r e at S h o t S
The real key to using the Monochrome picture control is to customize it for your
portrait subject. The control can be changed to alter the sharpness and contrast.
For women, children, puppies, and anyone else who should look somewhat soft,
set the Sharpness setting to 0 or 1. For old cowboys, longshoremen, and anyone
else who you want to look really detailed, try a setting of 6 or 7. I typically like to
leave Contrast at a setting of around –1 or –2. This gives me a nice range of tones
throughout the image.
The other adjustment that you should try is to change the picture control’s Filter
effect from None to one of the four available settings (Yellow, Orange, Red, and
Green). Using the filters will have the effect of either lightening or darkening the
skin tones. The Red and Yellow filters usually lighten skin, while the Green filter
can make skin appear a bit darker. Experiment to see which one works best for
your subject.
Setting your picture control tomonochrome
1. Press the i button to activate the cursorin the information screen.
2. Use the Multi-selector to move thecursor to the Set Picture Control iconand press the OK button (A).
3. Select the MC setting, then press theOK button.
n
cuStomizing your monochromepicture control
1. Start by pressing the Menu button.
2. Navigate to the Shooting menu, selectManage Picture Control, and press OK (B).
3. Select Save/Edit and press OK again.
A
B

ptg
c h a p t e r 6 : S a y c h e e S e ! 143
4. Scroll down to Monochrome and then press the Multi-selector to the right toenter the customization screen (C). Don’t hit the OK button here or it will goright to the Save As screen.
5. Now that you are in the customize screen, make the desired changes to each ofthe different items (move the Multi-selector up or down to select the item youwant to change and left to right to change the settings) (D).
6. When you have everything set the way you want, press the OK button to saveyour new custom settings. Select the first available slot (C1) and press right onthe Multi-selector (E). You can now use the default name or type in one of yourown. To delete the current name, use the Command dial to select the letterlocation and hit the Delete (trashcan) button. Then use the Multi-selector tospell the new name (F). When done, press the OK button.
C
e
D
F
7. To use the new setting, follow the previous set of directions for selecting apicture control except this time, choose C1 instead of MC.
n
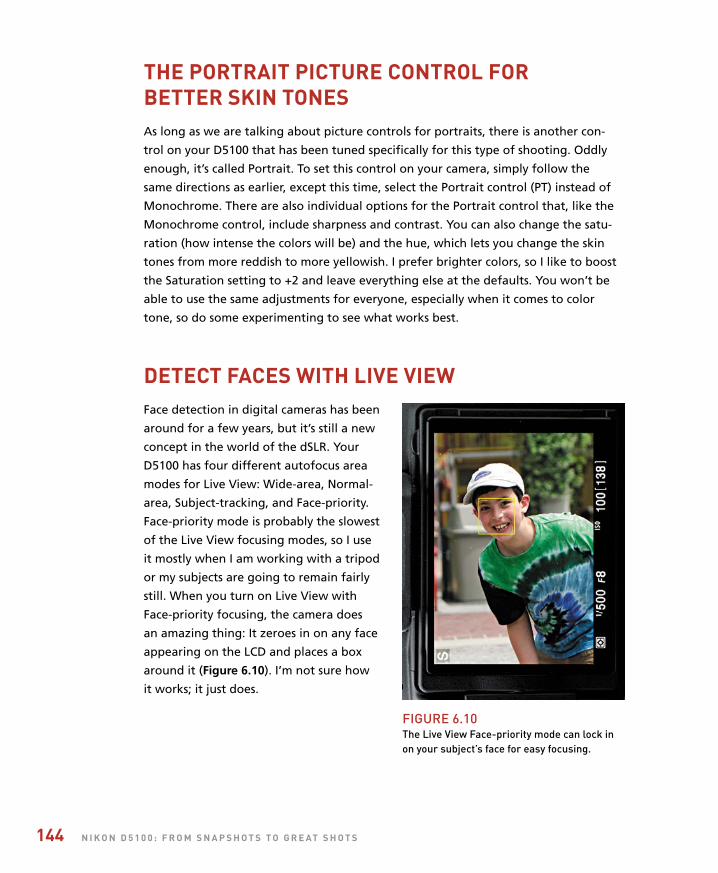
ptg
144 n i k o n d 5 1 0 0 : f r o m S n a p S h o t S t o g r e at S h o t S
the portrait picture control for Better Skin toneSAs long as we are talking about picture controls for portraits, there is another con-
trol on your D5100 that has been tuned specifically for this type of shooting. Oddly
enough, it’s called Portrait. To set this control on your camera, simply follow the
same directions as earlier, except this time, select the Portrait control (PT) instead of
Monochrome. There are also individual options for the Portrait control that, like the
Monochrome control, include sharpness and contrast. You can also change the satu-
ration (how intense the colors will be) and the hue, which lets you change the skin
tones from more reddish to more yellowish. I prefer brighter colors, so I like to boost
the Saturation setting to +2 and leave everything else at the defaults. You won’t be
able to use the same adjustments for everyone, especially when it comes to color
tone, so do some experimenting to see what works best.
detect faceS with live viewFace detection in digital cameras has been
around for a few years, but it’s still a new
concept in the world of the dSLR. Your
D5100 has four different autofocus area
modes for Live View: Wide-area, Normal-
area, Subject-tracking, and Face-priority.
Face-priority mode is probably the slowest
of the Live View focusing modes, so I use
it mostly when I am working with a tripod
or my subjects are going to remain fairly
still. When you turn on Live View with
Face-priority focusing, the camera does
an amazing thing: It zeroes in on any face
appearing on the LCD and places a box
around it (Figure 6.10). I’m not sure how
it works; it just does.
FIgUre 6.10The Live View Face-priority mode can lock inon your subject’s face for easy focusing.
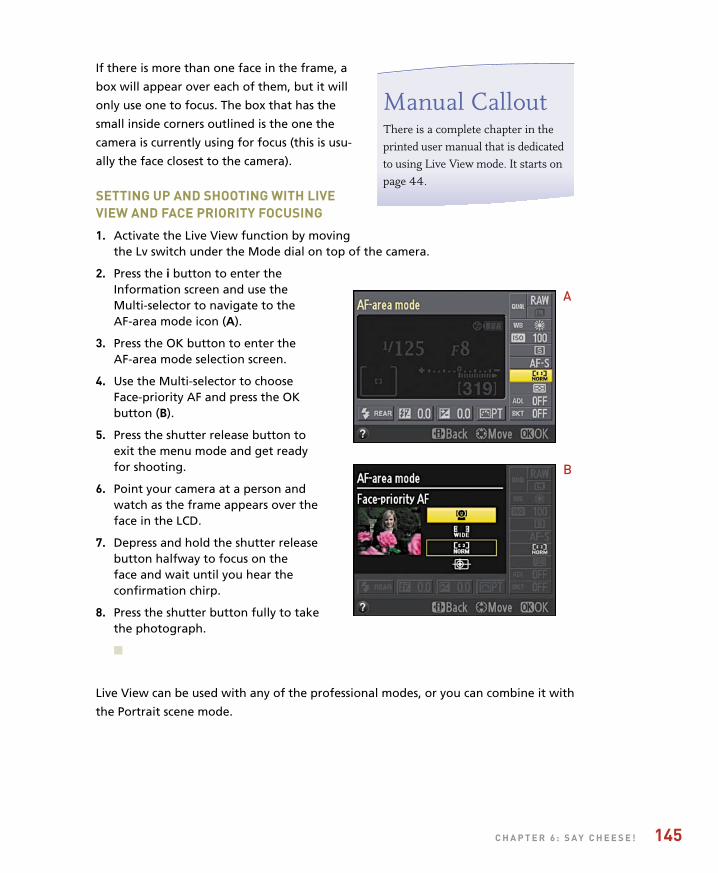
ptg
c h a p t e r 6 : S a y c h e e S e ! 145
If there is more than one face in the frame, a
box will appear over each of them, but it will
only use one to focus. The box that has the
small inside corners outlined is the one the
camera is currently using for focus (this is usu-
ally the face closest to the camera).
Setting up and Shooting with liveview and face priority focuSing
1. Activate the Live View function by moving the Lv switch under the Mode dial on top of the camera.
2. Press the i button to enter theInformation screen and use the Multi-selector to navigate to theAF-area mode icon (A).
3. Press the OK button to enter theAF-area mode selection screen.
4. Use the Multi-selector to choose Face-priority AF and press the OKbutton (B).
5. Press the shutter release button to exit the menu mode and get ready for shooting.
6. Point your camera at a person andwatch as the frame appears over theface in the LCD.
7. Depress and hold the shutter releasebutton halfway to focus on the face and wait until you hear theconfirmation chirp.
8. Press the shutter button fully to takethe photograph.
n
Live View can be used with any of the professional modes, or you can combine it with
the Portrait scene mode.
Manual CalloutThere is a complete chapter in the printed user manual that is dedicated to using Live View mode. It starts on page 44.
A
B

ptg
146 n i k o n d 5 1 0 0 : f r o m S n a p S h o t S t o g r e at S h o t S
uSing live view’S grid overlayThere is another benefit to using Live View:
the Grid overlay. This is a feature that actu-
ally places a grid over your image, dividing
it into sectors, which can be of great benefit
in properly composing your image for por-
traits (Figure 6.11). Check out Chapter 7
for full instructions on setting up and using
this feature.
uSe fill flaSh for reducing ShadowSA common problem when taking pictures of people outside, especially during the
midday hours, is that the overhead sun can create dark shadows under the eyes and
chin. You could have your subject turn his or her face to the sun, but that is usually
considered cruel and unusual punishment. So how can you have your subject’s back
to the sun and still get a decent exposure of the face? Try turning on your flash to
fill in the shadows. This also works well when you are photographing someone with
a ball cap on. The bill of the hat tends to create heavy shadows over the eyes, and
the fill flash will lighten up those areas while providing a really nice catchlight in
the eyes.
Another scenario where this is useful is when photographing people at sunset. At a
recent dinner out with friends, I just had to capture them with the sun setting in the
background as the lights of the city started to come on (Figure 6.12). I popped up the
flash, set it to Rear Curtain Sync (more on that in Chapter 8), and reduced the flash
power a little. The longer exposure captured the colors of the sky, and the fill flash
provided enough light to brighten the faces and add a little catchlight.
catchlight
A catchlight is that little sparkle that adds life to the eyes. When you are photographing a person with a light source in front of them, you will usually get a reflection of that light in the eye, be it your flash, the sun, or something else brightly reflecting in the eye. The light is reflected off the surface of the eyes as bright highlights and serves to bring attention to the eyes.
FIgUre 6.11Using Live View’s grid option can help youcompose your shots.
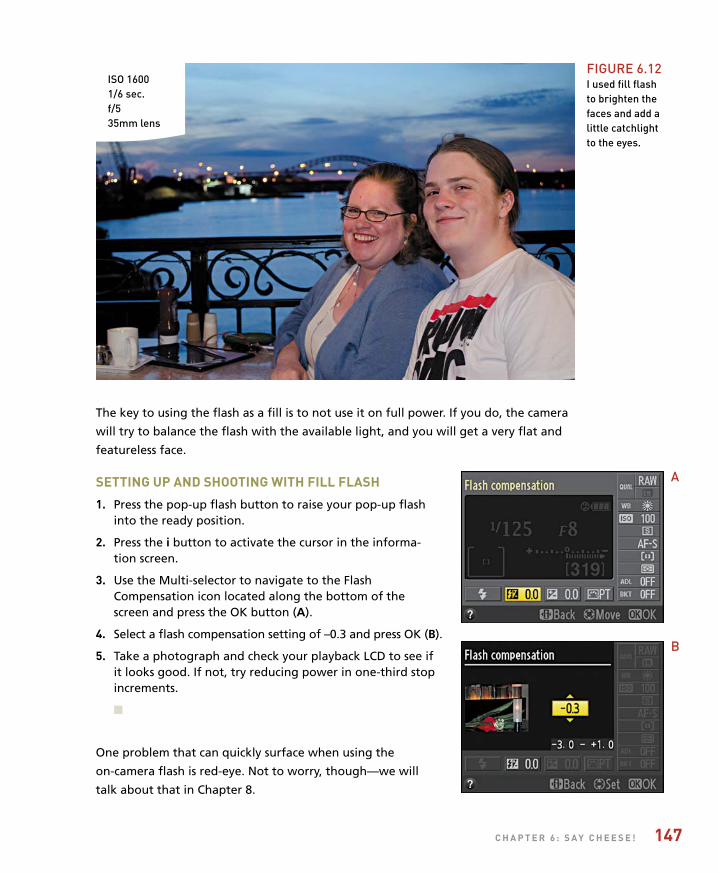
ptg
c h a p t e r 6 : S a y c h e e S e ! 147
ISO 16001/6 sec.f/535mm lens
FIgUre 6.12I used fill flash to brighten thefaces and add alittle catchlight to the eyes.
The key to using the flash as a fill is to not use it on full power. If you do, the camera
will try to balance the flash with the available light, and you will get a very flat and
featureless face.
Setting up and Shooting with fill flaSh
1. Press the pop-up flash button to raise your pop-up flashinto the ready position.
2. Press the i button to activate the cursor in the informa-tion screen.
3. Use the Multi-selector to navigate to the FlashCompensation icon located along the bottom of thescreen and press the OK button (A).
4. Select a flash compensation setting of –0.3 and press OK (B).
5. Take a photograph and check your playback LCD to see ifit looks good. If not, try reducing power in one-third stopincrements.
n
One problem that can quickly surface when using the
on-camera flash is red-eye. Not to worry, though—we will
talk about that in Chapter 8.
A
B
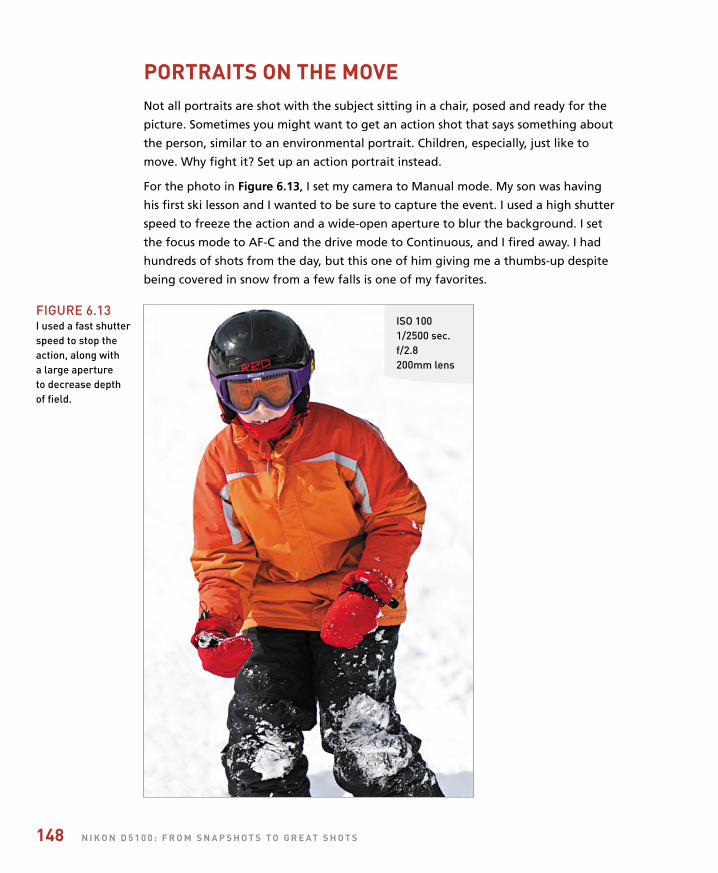
ptg
148 n i k o n d 5 1 0 0 : f r o m S n a p S h o t S t o g r e at S h o t S
portraitS on the moveNot all portraits are shot with the subject sitting in a chair, posed and ready for the
picture. Sometimes you might want to get an action shot that says something about
the person, similar to an environmental portrait. Children, especially, just like to
move. Why fight it? Set up an action portrait instead.
For the photo in Figure 6.13, I set my camera to Manual mode. My son was having
his first ski lesson and I wanted to be sure to capture the event. I used a high shutter
speed to freeze the action and a wide-open aperture to blur the background. I set
the focus mode to AF-C and the drive mode to Continuous, and I fired away. I had
hundreds of shots from the day, but this one of him giving me a thumbs-up despite
being covered in snow from a few falls is one of my favorites.
ISO 1001/2500 sec.f/2.8200mm lens
FIgUre 6.13I used a fast shutterspeed to stop theaction, along with a large aperture to decrease depthof field.
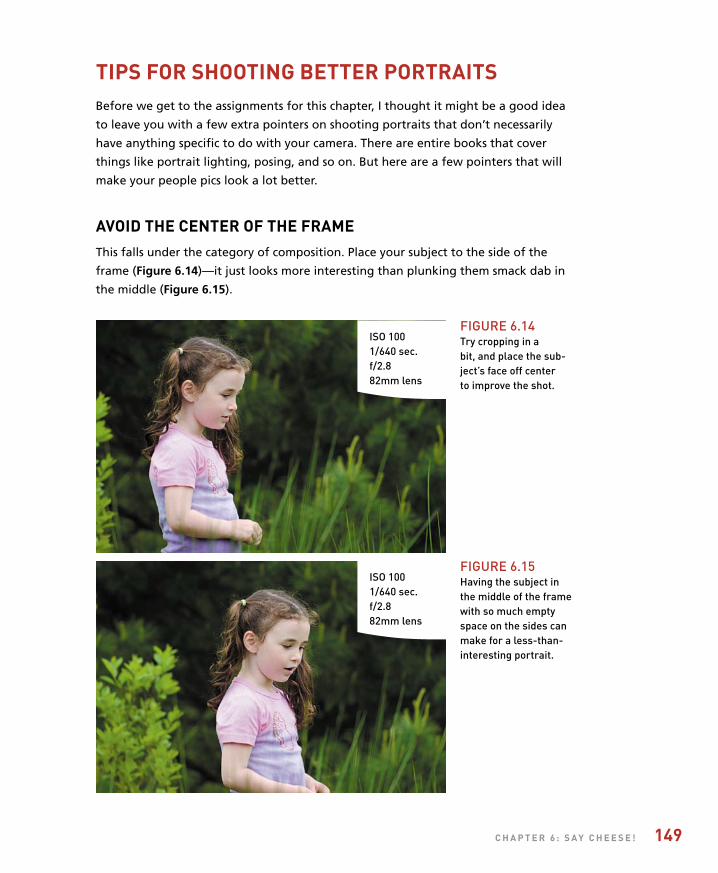
ptg
c h a p t e r 6 : S a y c h e e S e ! 149
tipS for Shooting Better portraitSBefore we get to the assignments for this chapter, I thought it might be a good idea
to leave you with a few extra pointers on shooting portraits that don’t necessarily
have anything specific to do with your camera. There are entire books that cover
things like portrait lighting, posing, and so on. But here are a few pointers that will
make your people pics look a lot better.
avoid the center of the frameThis falls under the category of composition. Place your subject to the side of the
frame (Figure 6.14)—it just looks more interesting than plunking them smack dab in
the middle (Figure 6.15).
ISO 1001/640 sec.f/2.882mm lens
ISO 1001/640 sec.f/2.882mm lens
FIgUre 6.14Try cropping in a bit, and place the sub-ject’s face off center to improve the shot.
FIgUre 6.15Having the subject inthe middle of the framewith so much emptyspace on the sides canmake for a less-than-interesting portrait.
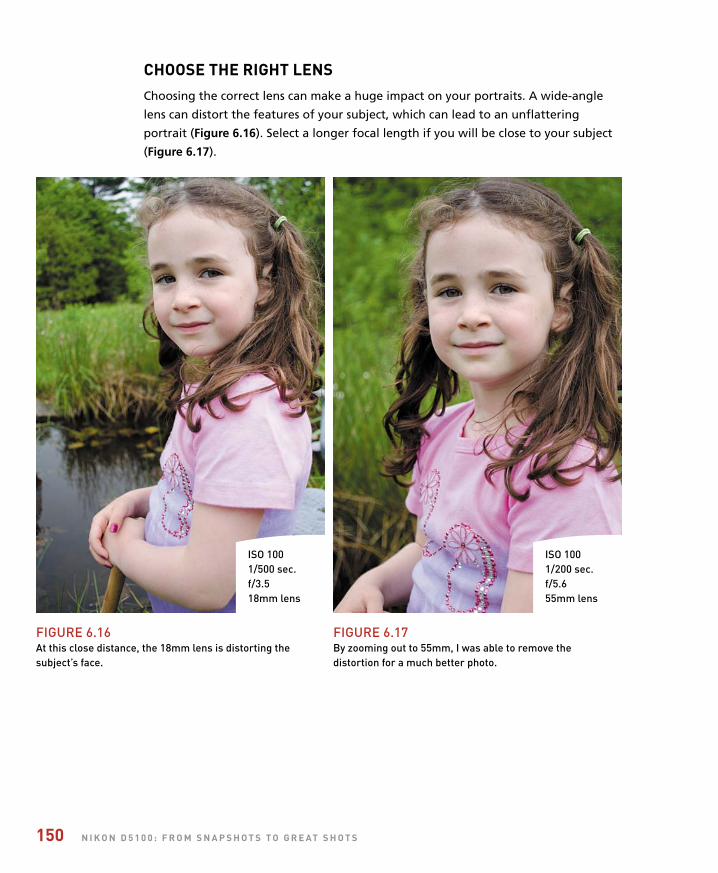
ptg
150 n i k o n d 5 1 0 0 : f r o m S n a p S h o t S t o g r e at S h o t S
chooSe the right lenSChoosing the correct lens can make a huge impact on your portraits. A wide-angle
lens can distort the features of your subject, which can lead to an unflattering
portrait (Figure 6.16). Select a longer focal length if you will be close to your subject
(Figure 6.17).
FIgUre 6.16 At this close distance, the 18mm lens is distorting the subject’s face.
FIgUre 6.17 By zooming out to 55mm, I was able to remove the distortion for a much better photo.
ISO 1001/500 sec.f/3.518mm lens
ISO 1001/200 sec.f/5.655mm lens
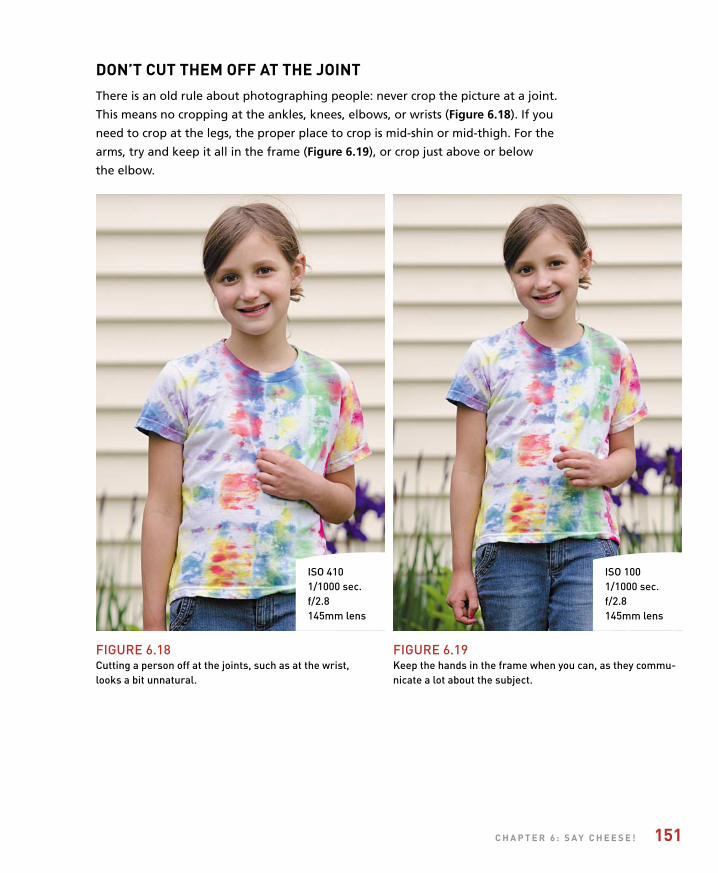
ptg
c h a p t e r 6 : S a y c h e e S e ! 151
don’t cut them off at the jointThere is an old rule about photographing people: never crop the picture at a joint.
This means no cropping at the ankles, knees, elbows, or wrists (Figure 6.18). If you
need to crop at the legs, the proper place to crop is mid-shin or mid-thigh. For the
arms, try and keep it all in the frame (Figure 6.19), or crop just above or below
the elbow.
FIgUre 6.18Cutting a person off at the joints, such as at the wrist, looks a bit unnatural.
FIgUre 6.19Keep the hands in the frame when you can, as they commu-nicate a lot about the subject.
ISO 4101/1000 sec.f/2.8145mm lens
ISO 1001/1000 sec.f/2.8145mm lens
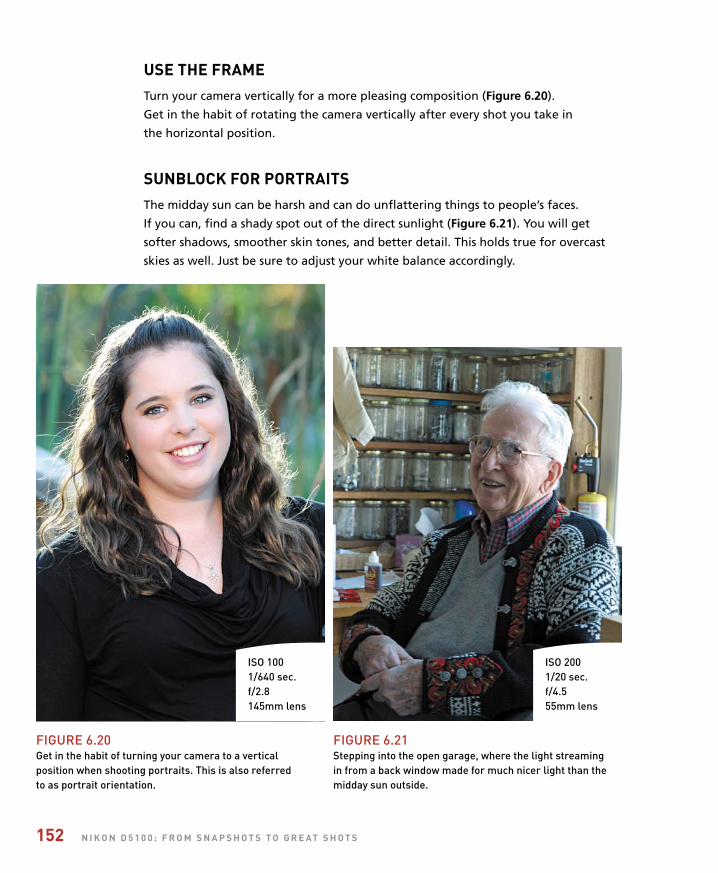
ptg
152 n i k o n d 5 1 0 0 : f r o m S n a p S h o t S t o g r e at S h o t S
uSe the frameTurn your camera vertically for a more pleasing composition (Figure 6.20).
Get in the habit of rotating the camera vertically after every shot you take in
the horizontal position.
SunBlock for portraitSThe midday sun can be harsh and can do unflattering things to people’s faces.
If you can, find a shady spot out of the direct sunlight (Figure 6.21). You will get
softer shadows, smoother skin tones, and better detail. This holds true for overcast
skies as well. Just be sure to adjust your white balance accordingly.
FIgUre 6.20get in the habit of turning your camera to a vertical position when shooting portraits. This is also referred to as portrait orientation.
FIgUre 6.21Stepping into the open garage, where the light streamingin from a back window made for much nicer light than themidday sun outside.
ISO 1001/640 sec.f/2.8145mm lens
ISO 2001/20 sec.f/4.555mm lens

ptg
c h a p t e r 6 : S a y c h e e S e ! 153
frame the SceneUsing elements in the scene to create a frame around your subject is a great way to
draw the viewer in. You don’t have to use a window frame to do this. Just look for
elements in the foreground that could be used to force the viewer’s eye toward your
subject (Figure 6.22).
ISO 1001/640 sec.f/2.880mm lens
FIgUre 6.22I stepped over the fenceto frame the shot throughthe rails. Learn to use theelements of the scene toframe your subject anddraw in the viewer’s eyes.
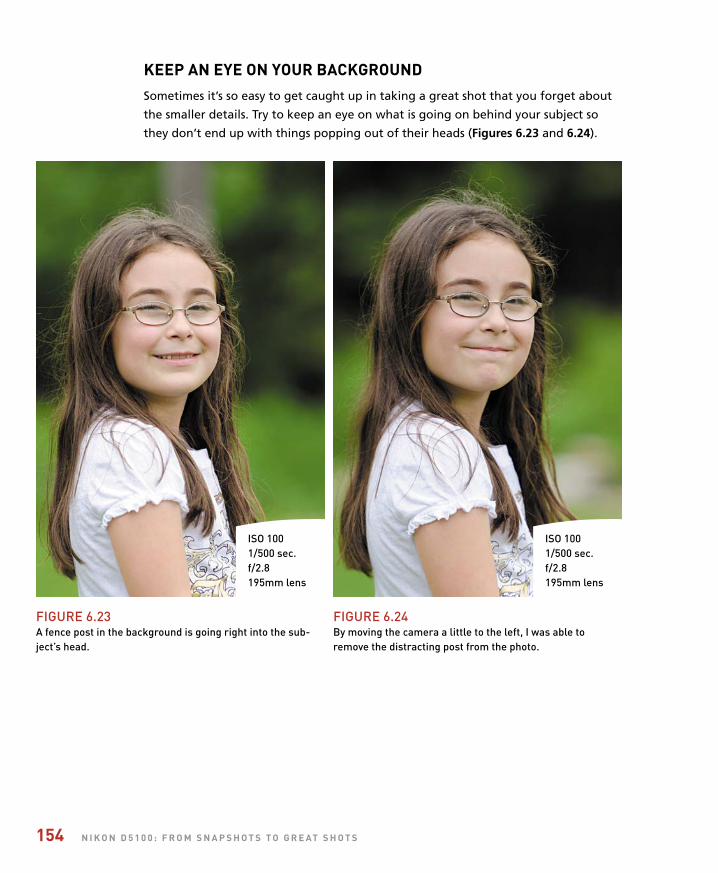
ptg
154 n i k o n d 5 1 0 0 : f r o m S n a p S h o t S t o g r e at S h o t S
keep an eye on your BackgroundSometimes it’s so easy to get caught up in taking a great shot that you forget about
the smaller details. Try to keep an eye on what is going on behind your subject so
they don’t end up with things popping out of their heads (Figures 6.23 and 6.24).
FIgUre 6.23A fence post in the background is going right into the sub-ject’s head.
FIgUre 6.24By moving the camera a little to the left, I was able toremove the distracting post from the photo.
ISO 1001/500 sec.f/2.8195mm lens
ISO 1001/500 sec.f/2.8195mm lens

ptg
c h a p t e r 6 : S a y c h e e S e ! 155
give them a healthy glowNearly everyone looks better with a warm, healthy glow. Some of the best light
of the day happens just a little before sundown, so shoot at that time if you can
(Figure 6.25).
more than juSt a pretty faceMost people think of a portrait as a photo of someone’s face. Don’t ignore other
aspects of your subject that reflect their personality—hands, especially, can go a long
way to describing someone (Figure 6.26) and capturing the moment.
ISO 2001/250 sec.f/2.860mm lens
FIgUre 6.25You just can’t beat theglow of the late afternoonsun for adding warmth to your portraits.
FIgUre 6.26There’s more to a personthan just their face. Handscan tell a lot about what ishappening in the scene.
ISO 2001/90 sec.f/4.518mm lens

ptg
156 n i k o n d 5 1 0 0 : f r o m S n a p S h o t S t o g r e at S h o t S
get down on their levelIf you want better pictures of children, don’t shoot from an adult’s eye level. Getting
the camera down to the child’s level will make your images look more personal
(Figure 6.27).
FIgUre 6.27Sometimes takingphotographs ofchildren meanslying on the floor,but the end resultis a much betterimage.
ISO 2001/320 sec.f/5.6300mm lens
eliminate Space Between your SuBjectSOne of the problems you can encounter when taking portraits of more than one
person is that of personal space. What feels like a close distance to the subjects can
look impersonal to the viewer. Have your subjects move close together, eliminating
any open space between them (Figure 6.28).

ptg
c h a p t e r 6 : S a y c h e e S e ! 157
FIgUre 6.28getting kids tosquish together willusually result insilly faces too.
ISO 2001/40 sec.f/490mm lens
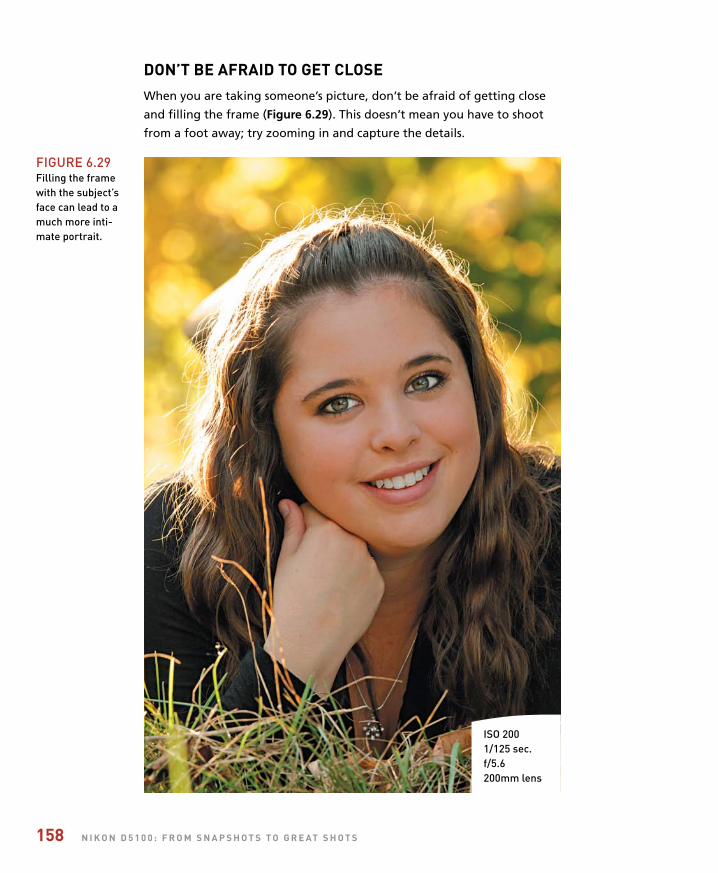
ptg
158 n i k o n d 5 1 0 0 : f r o m S n a p S h o t S t o g r e at S h o t S
don’t Be afraid to get cloSeWhen you are taking someone’s picture, don’t be afraid of getting close
and filling the frame (Figure 6.29). This doesn’t mean you have to shoot
from a foot away; try zooming in and capture the details.
FIgUre 6.29Filling the framewith the subject’sface can lead to amuch more inti-mate portrait.
ISO 2001/125 sec.f/5.6200mm lens
ptg
159
Chapter 6 AssignmentsDepth of field in portraits
Let’s start with something simple. Grab your favorite person and start experimenting with using different aperture settings. Shoot wide open (the widest your lens goes, such as f/3.5 or f/5.6) and then really stopped down (like f/22). Look at the difference in the depth of field and how it plays an important role in placing the attention on your subject. (Make sure you don’t have your subject standing against the background. Give some distance so that there is a good blurring effect of the background at the wide f-stop setting.)
Discovering the qualities of natural light
Pick a nice sunny day and try shooting some portraits in the midday sun. If your subject is willing, have them turn so the sun is in their face. If they are still speaking to you after blind-ing them, have them turn their back to the sun. Try this with and without the fill flash so you can see the difference. Finally, move them into a completely shaded spot and take a few more.
Picking the right metering method
Find a very dark or light background and place your subject in front of it. Now take a couple of shots, giving a lot of space around your subject for the background to show. Now switch metering modes and use the AE Lock feature to get a more accurate reading of your subject. Notice the differences in exposure between the metering methods.
Picture controls for portraits
Have some fun playing with the different picture controls. Try the Portrait control as com-pared to the Standard. Then try out Monochrome and play with the different color filter options to see how they affect skin tones.
Share your results with the book’s Flickr group!
Join the group here: flickr.com/groups/nikond5100fromsnapshotstogreatshots/
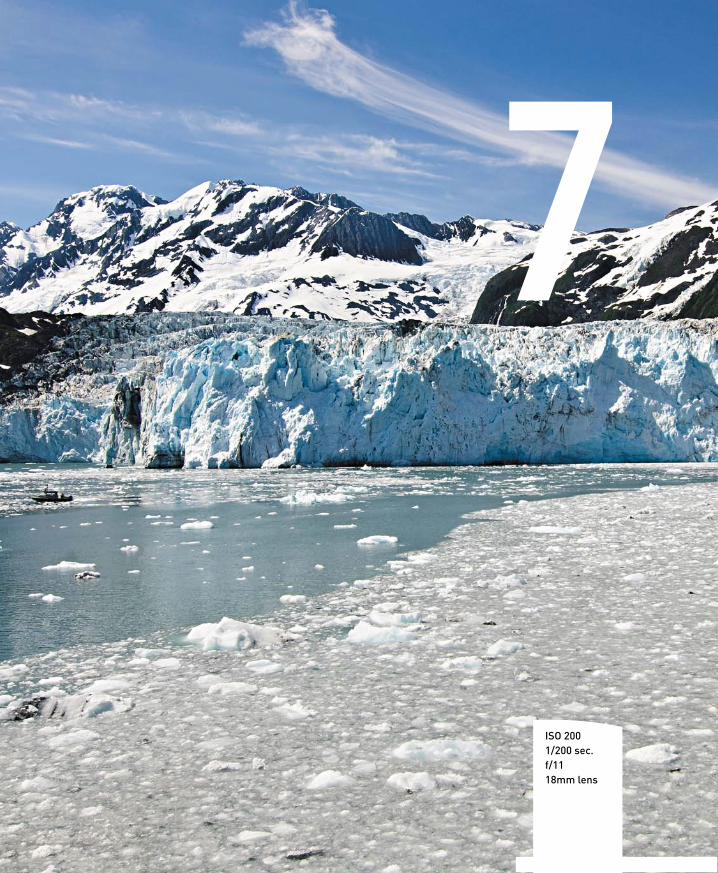
ptg
7
ISO 2001/200 sec.f/1118mm lens

ptg
Landscape Photography
Tips, Tools, and Techniques To geTThe mosT ouT of your landscape phoTography
There has always been something about shooting landscapes that has
brought a sense of joy to my photography. It might have something to do
with being outdoors and working at the mercy of Mother Nature. Maybe
it’s the way it challenges me to visualize the landscape and try to capture
it with my camera. It truly is a celebration of light, composition, and the
world we live in.
In this chapter, we will explore some of the features of the D5100 that
not only improve the look of your landscape photography, but also
make it easier to take great shots. We will also explore some typical
scenarios and discuss methods to bring out the best in your landscape
photography.
161
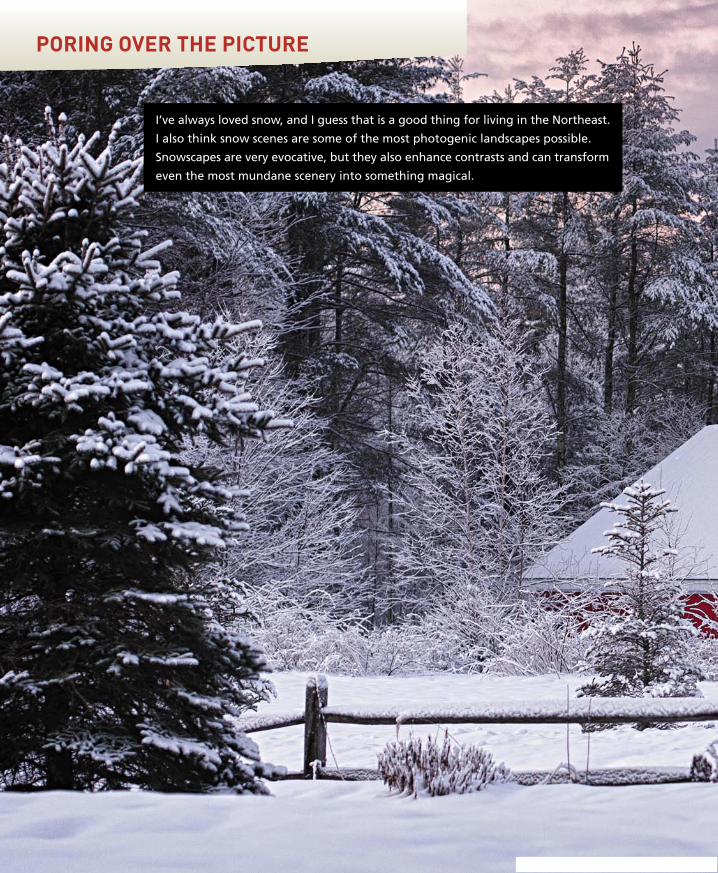
ptg
poring over The picTure
I’ve always loved snow, and I guess that is a good thing for living in the Northeast.
I also think snow scenes are some of the most photogenic landscapes possible.
Snowscapes are very evocative, but they also enhance contrasts and can transform
even the most mundane scenery into something magical.

ptg
ISO 2001/40 sec.f/2.870mm lens
Keeping the barn off center created astronger composition.
Using a wide-open aperture andfocusing on the barn throws the foreground into soft focus,adding depth to the image.
A tripod was essential foreliminating camera-shake blurat the slow shutter speed.
Waiting until there was just a littlecolor to the sky added an elementof warmth to this cold scene.
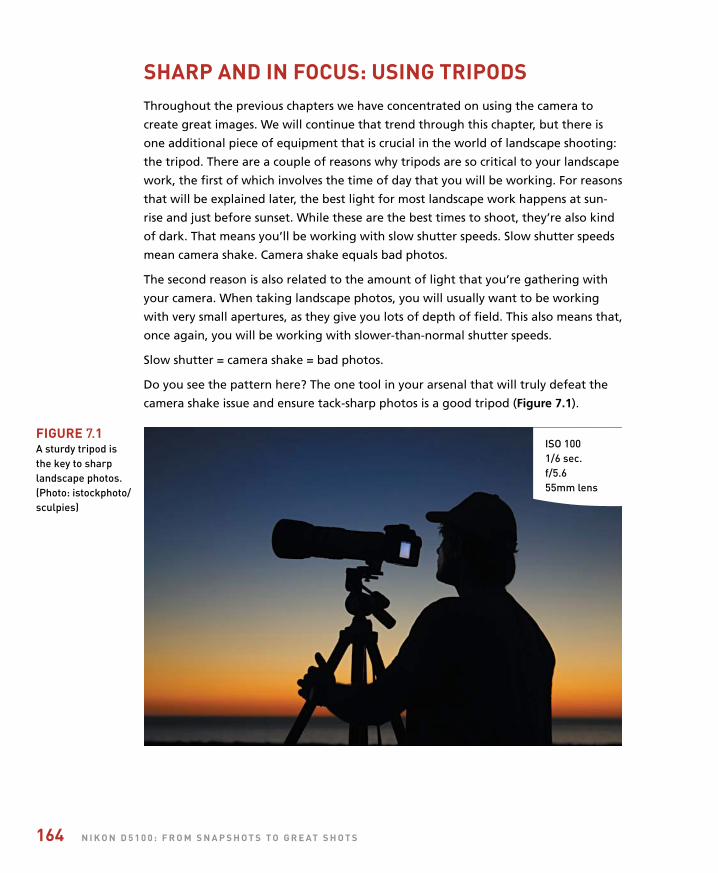
ptg
164 n i k o n d 5 1 0 0 : f r o m s n a p s h o T s T o g r e aT s h o T s
sharp and in focus: using TripodsThroughout the previous chapters we have concentrated on using the camera to
create great images. We will continue that trend through this chapter, but there is
one additional piece of equipment that is crucial in the world of landscape shooting:
the tripod. There are a couple of reasons why tripods are so critical to your landscape
work, the first of which involves the time of day that you will be working. For reasons
that will be explained later, the best light for most landscape work happens at sun-
rise and just before sunset. While these are the best times to shoot, they’re also kind
of dark. That means you’ll be working with slow shutter speeds. Slow shutter speeds
mean camera shake. Camera shake equals bad photos.
The second reason is also related to the amount of light that you’re gathering with
your camera. When taking landscape photos, you will usually want to be working
with very small apertures, as they give you lots of depth of field. This also means that,
once again, you will be working with slower-than-normal shutter speeds.
Slow shutter = camera shake = bad photos.
Do you see the pattern here? The one tool in your arsenal that will truly defeat the
camera shake issue and ensure tack-sharp photos is a good tripod (Figure 7.1).
ISO 1001/6 sec.f/5.655mm lens
figure 7.1A sturdy tripod isthe key to sharplandscape photos.(Photo: istockphoto/sculpies)

ptg
c h a p T e r 7 : l a n d s c a p e p h o T o g r a p h y 165
So what should you look for in a tripod? Well, first make sure it is sturdy enough to
support your camera and any lens that you might want to use. Next, check the height
of the tripod. Bending over all day to look through the viewfinder of a camera on a
short tripod can wreak havoc on your back. Finally, think about getting a tripod that
utilizes a quick-release head. This usually employs a plate that screws into the bottom
of the camera and then quickly snaps into place on the tripod. This will be especially
handy if you are going to move between shooting by hand and using the tripod.
There’s more information about tripods in bonus Chapter 11.
Tripod sTabiliTy
Most tripods have a center column that allows the user to extend the height of the camera above the point where the tripod legs join together. This might seem like a great idea, but the reality is that the further you raise that column, the less stable your tripod becomes. Think of a tall building that sways near the top. To get the most solid base for your camera, always try to use it with the center column at its lowest point so that your camera is right at the apex of the tripod legs.
vr lenses and Tripods don’T mix
If you are using Vibration Reduction (VR) lenses on your camera, you need to remember to turn this feature off when you use a tripod (Figure 7.2). This is because the Vibration Reduction can, while trying to minimize camera movement, actually create movement when the camera is already stable. To turn off the VR feature, just slide the VR selector switch on the side of the lens to the Off position.
FIgUre 7.2Turn off the Vibration reductionfeature when using a tripod.

ptg
166 n i k o n d 5 1 0 0 : f r o m s n a p s h o T s T o g r e aT s h o T s
selecTing The proper isoWhen shooting most landscape scenes, the ISO should only be increased as a last
resort. While it is easy to select a higher ISO to get a smaller aperture, the noise that
it can introduce into your images can be quite harmful. The noise is not only visible
as large grainy artifacts, but it can also be multi-colored, which further degrades the
image quality.
Take a look at Figures 7.3 and 7.4, which show a photograph taken with an ISO of
1600. The purpose was to shorten the shutter speed and still use a small aperture
setting of f/11. The problem is that the noise level is so high that, in addition to being
distracting, it is obscuring fine details in the plants and trees.
FIgUre 7.3A high ISO setting created a lot of digital noise in theshadows.
FIgUre 7.4When the image is enlarged, the noise is even more apparent.It is most noticeable as the grainy texture in the shadows.
ISO 16001/40 sec.f/1124mm lens
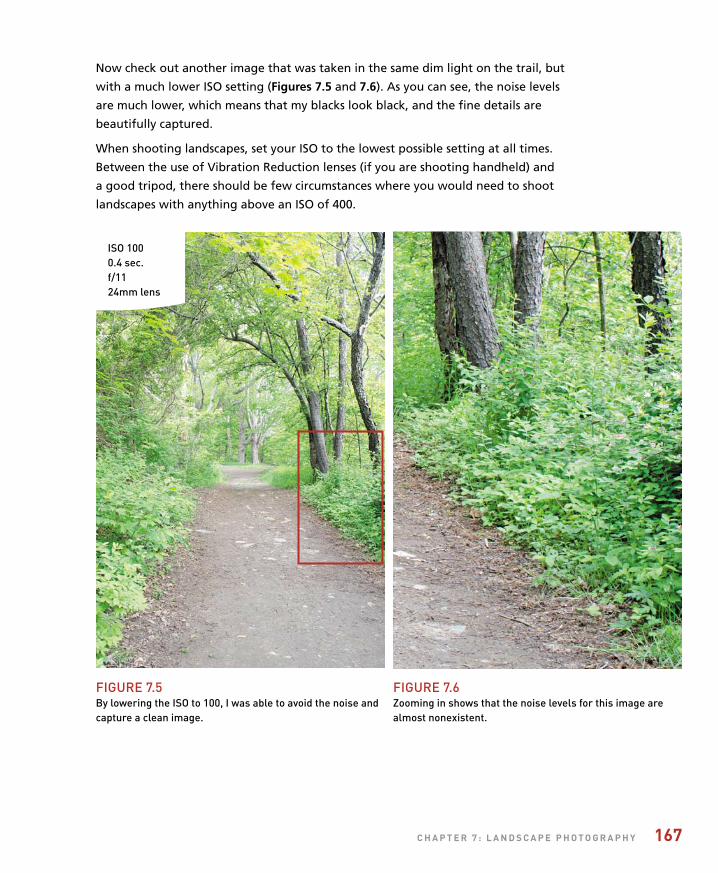
ptg
c h a p T e r 7 : l a n d s c a p e p h o T o g r a p h y 167
Now check out another image that was taken in the same dim light on the trail, but
with a much lower ISO setting (Figures 7.5 and 7.6). As you can see, the noise levels
are much lower, which means that my blacks look black, and the fine details are
beautifully captured.
When shooting landscapes, set your ISO to the lowest possible setting at all times.
Between the use of Vibration Reduction lenses (if you are shooting handheld) and
a good tripod, there should be few circumstances where you would need to shoot
landscapes with anything above an ISO of 400.
FIgUre 7.5By lowering the ISO to 100, I was able to avoid the noise andcapture a clean image.
FIgUre 7.6Zooming in shows that the noise levels for this image arealmost nonexistent.
ISO 1000.4 sec.f/1124mm lens

ptg
168 n i k o n d 5 1 0 0 : f r o m s n a p s h o T s T o g r e aT s h o T s
using noise reducTionBoth of the trail images were taken with a tripod, but the image set to an ISO of 100
required a much longer shutter speed (4/10 of a second at ISO 100) compared to the
high ISO image (1/40 of a second at ISO 1600). The temptation to use higher ISOs
should always be avoided, as the end result will be more image noise and less detail.
There can be an issue when using a low ISO setting: the sometimes-lengthy shutter
speeds can also introduce noise. This noise is a result of the heating of the camera
sensor as it is being exposed to light. This effect is not visible in short exposures, but
as you start shooting with shutter speeds that exceed one second, the level of image
noise can increase. Your camera has a couple of features that you can turn on to com-
bat noise from long exposures and high ISOs.
seTTing up noise reducTion
1. Press the Menu button, then use theMulti-selector to get to the Shootingmenu.
2. Using the Multi-selector, select LongExposure NR and then press OK (A).Change this option to On and press theOK button.
3. Now use the Multi-selector to get to the High ISO NR setting in the Shooting menu (it’s located just under Long Exposure NR) and press OK (B).
4. ISO noise reduction comes in four flavors: High, Normal, Low, and Off. Set thisto Normal for everyday shooting or to High for those instances where you haveto significantly raise your ISO (C).
n
A
B C

ptg
c h a p T e r 7 : l a n d s c a p e p h o T o g r a p h y 169
selecTing a whiTe balanceThis probably seems like a no-brainer. If it’s sunny, select Daylight. If it’s overcast,
choose the Shade or Cloudy setting. Those choices wouldn’t be wrong for those
circumstances, but why limit yourself? Sometimes you can actually change the mood
of the photo by selecting a white balance that doesn’t quite fit the light for the scene
that you are shooting.
Figure 7.7 is an example of a correct white balance. It was late afternoon and the sun
was starting to move low in the sky, giving everything that warm afternoon glow.
The white balance for this image was set to Daylight.
But what if I want to make the scene look like it was shot in the early morning hours?
Simple, I just change the white balance to Fluorescent, which is a much cooler setting
(Figure 7.8).
ISO 2001/1250 sec.f/5.6210mm lens
FIgUre 7.7Using the “proper” whitebalance yields predict-able results.
ISO 2001/1250 sec.f/5.6210mm lens
FIgUre 7.8Changing the white balance to Fluorescentgives the impression that the picture wastaken at a different timeof day than it really was.

ptg
170 n i k o n d 5 1 0 0 : f r o m s n a p s h o T s T o g r e aT s h o T s
You can select the most appropriate white balance for your shooting conditions in
a couple of ways. The first is to just take a shot, review it on the LCD, and keep the
one you like. Of course, you would need to take one for each white balance setting,
which means that you will have to take about seven different shots to see which is
most pleasing.
The second method, and my personal favorite, doesn’t require taking a single shot.
Instead, it uses Live View to get perfectly selected white balances. Live View gives
instant feedback as you scroll through all of the white balance settings and displays
them for you right on the LCD. Even better, you can choose a custom setting that will
let you dial in exactly the right look for your image.
To use Live View to preview the white balance, first you have to customize the
Function button.
cusTomizing The funcTion buTTonfor whiTe balance
1. Press the Menu button and use theMulti-selector to access the CustomSetting menu (A).
2. Now highlight menu item f: Controlsand press OK.
3. Select item f1: Assign Fn Button andpress OK (B).
4. Now select WB: White Balance andpress OK (C). This will give you quickaccess to the white balance options bypressing the Function button.
n
using live view To previewdifferenT whiTe balanceseTTings
1. Rotate the Live View switch locatedunder the Mode dial on top of thecamera.
2. With Live View activated, press theFunction button on the front of thecamera (it’s located between the lensrelease and flash buttons).
A
B
C
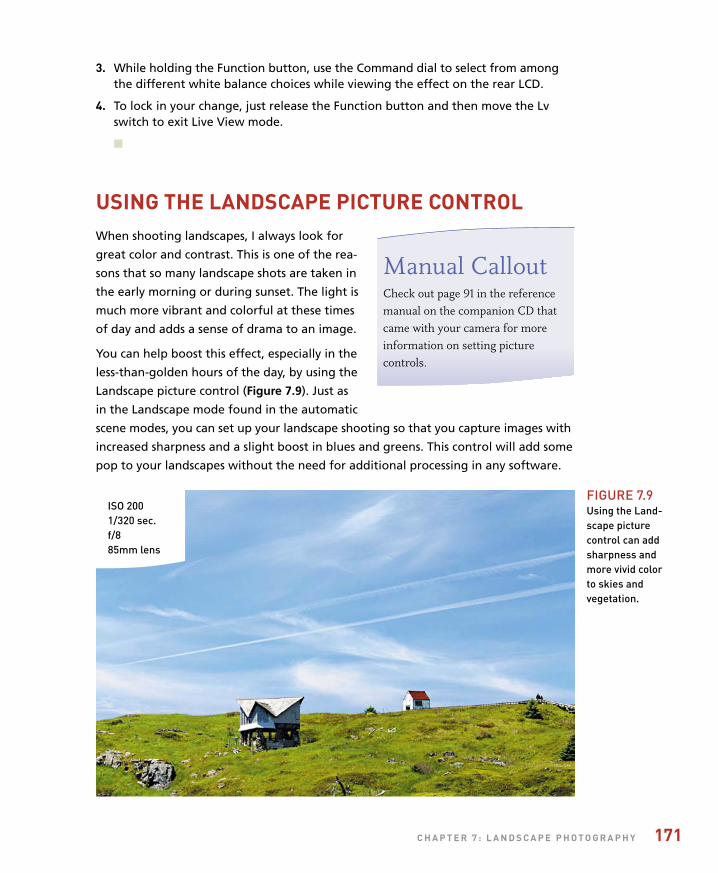
ptg
c h a p T e r 7 : l a n d s c a p e p h o T o g r a p h y 171
3. While holding the Function button, use the Command dial to select from amongthe different white balance choices while viewing the effect on the rear LCD.
4. To lock in your change, just release the Function button and then move the Lvswitch to exit Live View mode.
n
using The landscape picTure conTrolWhen shooting landscapes, I always look for
great color and contrast. This is one of the rea-
sons that so many landscape shots are taken in
the early morning or during sunset. The light is
much more vibrant and colorful at these times
of day and adds a sense of drama to an image.
You can help boost this effect, especially in the
less-than-golden hours of the day, by using the
Landscape picture control (Figure 7.9). Just as
in the Landscape mode found in the automatic
scene modes, you can set up your landscape shooting so that you capture images with
increased sharpness and a slight boost in blues and greens. This control will add some
pop to your landscapes without the need for additional processing in any software.
ISO 2001/320 sec.f/885mm lens
FIgUre 7.9Using the Land-scape picturecontrol can addsharpness andmore vivid colorto skies andvegetation.
Manual CalloutCheck out page 91 in the reference manual on the companion CD that came with your camera for more information on setting picture controls.
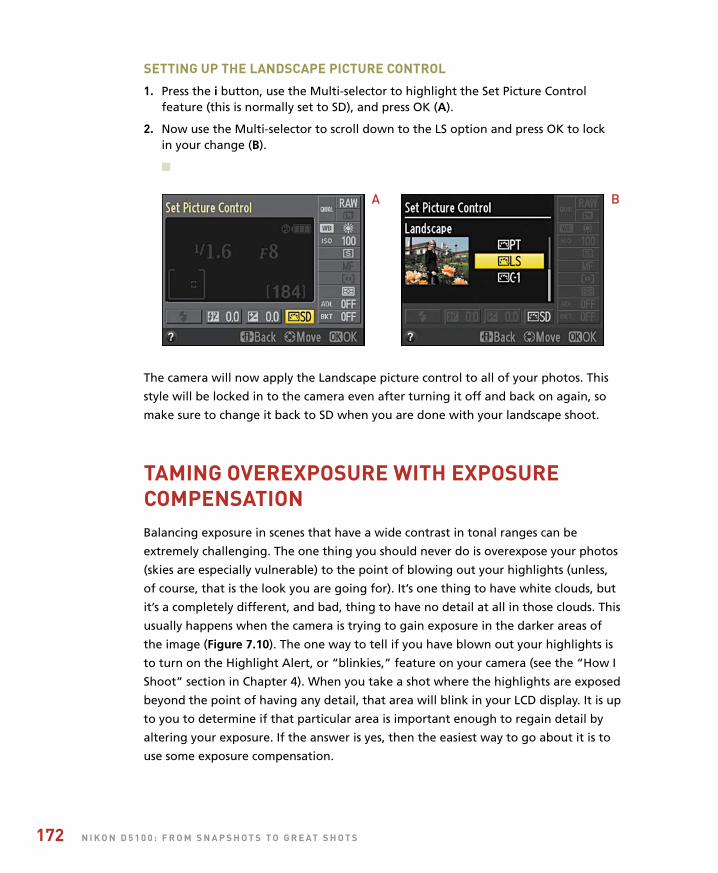
ptg
172 n i k o n d 5 1 0 0 : f r o m s n a p s h o T s T o g r e aT s h o T s
seTTing up The landscape picTure conTrol
1. Press the i button, use the Multi-selector to highlight the Set Picture Controlfeature (this is normally set to SD), and press OK (A).
2. Now use the Multi-selector to scroll down to the LS option and press OK to lockin your change (B).
n
The camera will now apply the Landscape picture control to all of your photos. This
style will be locked in to the camera even after turning it off and back on again, so
make sure to change it back to SD when you are done with your landscape shoot.
Taming overexposure wiTh exposurecompensaTionBalancing exposure in scenes that have a wide contrast in tonal ranges can be
extremely challenging. The one thing you should never do is overexpose your photos
(skies are especially vulnerable) to the point of blowing out your highlights (unless,
of course, that is the look you are going for). It’s one thing to have white clouds, but
it’s a completely different, and bad, thing to have no detail at all in those clouds. This
usually happens when the camera is trying to gain exposure in the darker areas of
the image (Figure 7.10). The one way to tell if you have blown out your highlights is
to turn on the Highlight Alert, or “blinkies,” feature on your camera (see the “How I
Shoot” section in Chapter 4). When you take a shot where the highlights are exposed
beyond the point of having any detail, that area will blink in your LCD display. It is up
to you to determine if that particular area is important enough to regain detail by
altering your exposure. If the answer is yes, then the easiest way to go about it is to
use some exposure compensation.
A B
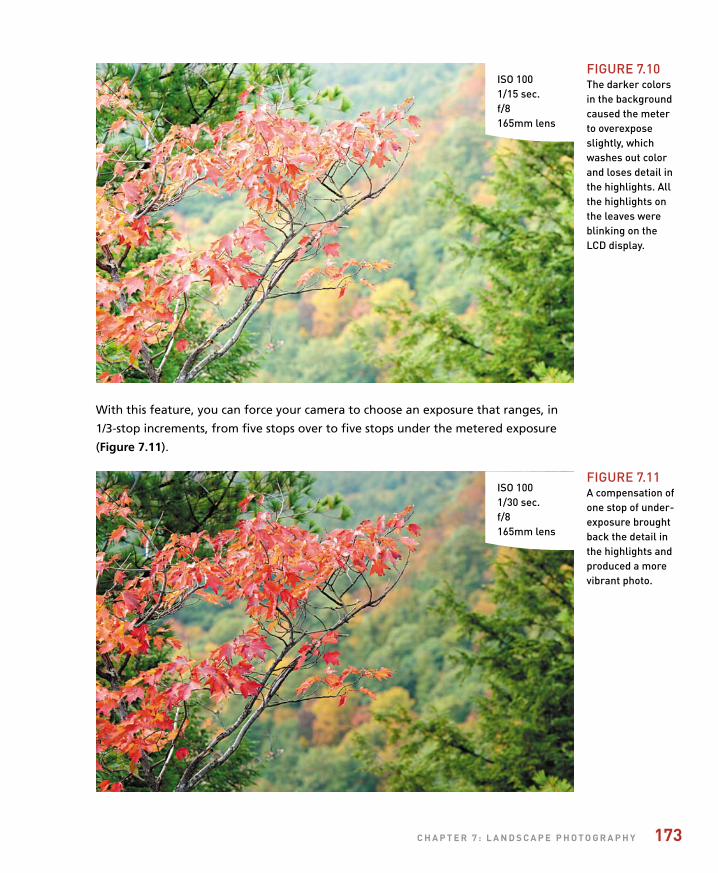
ptg
c h a p T e r 7 : l a n d s c a p e p h o T o g r a p h y 173
ISO 1001/15 sec.f/8165mm lens
With this feature, you can force your camera to choose an exposure that ranges, in
1/3-stop increments, from five stops over to five stops under the metered exposure
(Figure 7.11).
ISO 1001/30 sec.f/8165mm lens
FIgUre 7.10The darker colorsin the backgroundcaused the meterto overexposeslightly, whichwashes out colorand loses detail inthe highlights. Allthe highlights onthe leaves wereblinking on the LCD display.
FIgUre 7.11A compensation ofone stop of under-exposure broughtback the detail inthe highlights andproduced a morevibrant photo.
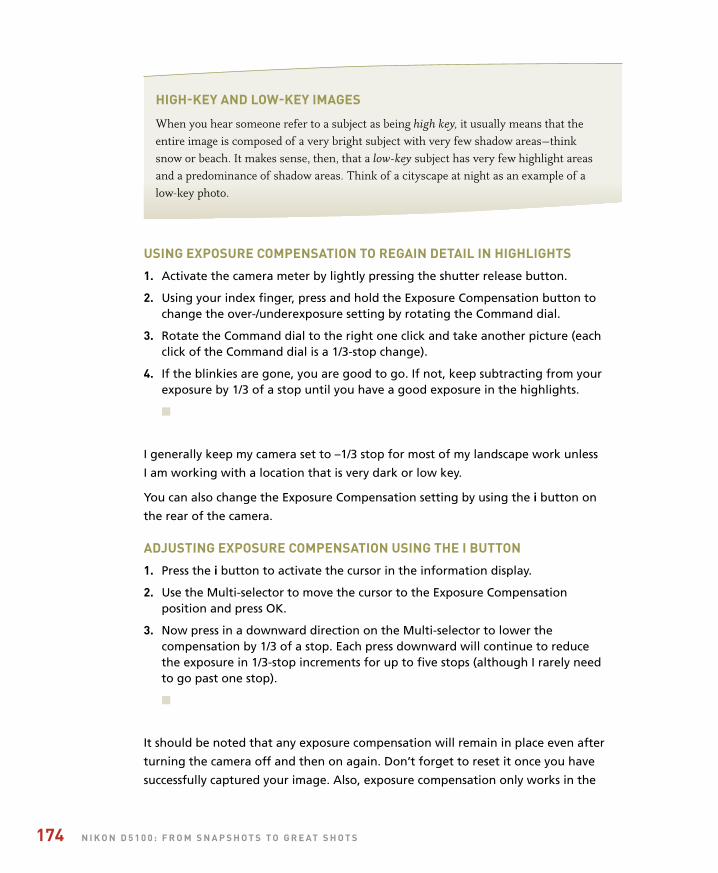
ptg
174 n i k o n d 5 1 0 0 : f r o m s n a p s h o T s T o g r e aT s h o T s
high-key and low-key images
When you hear someone refer to a subject as being high key, it usually means that the entire image is composed of a very bright subject with very few shadow areas—think snow or beach. It makes sense, then, that a low-key subject has very few highlight areas and a predominance of shadow areas. Think of a cityscape at night as an example of a low-key photo.
using exposure compensaTion To regain deTail in highlighTs
1. Activate the camera meter by lightly pressing the shutter release button.
2. Using your index finger, press and hold the Exposure Compensation button tochange the over-/underexposure setting by rotating the Command dial.
3. Rotate the Command dial to the right one click and take another picture (eachclick of the Command dial is a 1/3-stop change).
4. If the blinkies are gone, you are good to go. If not, keep subtracting from yourexposure by 1/3 of a stop until you have a good exposure in the highlights.
n
I generally keep my camera set to –1/3 stop for most of my landscape work unless
I am working with a location that is very dark or low key.
You can also change the Exposure Compensation setting by using the i button on
the rear of the camera.
adjusTing exposure compensaTion using The i buTTon
1. Press the i button to activate the cursor in the information display.
2. Use the Multi-selector to move the cursor to the Exposure Compensationposition and press OK.
3. Now press in a downward direction on the Multi-selector to lower thecompensation by 1/3 of a stop. Each press downward will continue to reducethe exposure in 1/3-stop increments for up to five stops (although I rarely needto go past one stop).
n
It should be noted that any exposure compensation will remain in place even after
turning the camera off and then on again. Don’t forget to reset it once you have
successfully captured your image. Also, exposure compensation only works in the
ptg
c h a p T e r 7 : l a n d s c a p e p h o T o g r a p h y 175
Program, Shutter Priority, and Aperture Priority modes. Changing between these
three modes will hold the compensation you set while switching from one to the
other. When you change the mode dial to one of the automatic scene modes or to
Manual, the compensation will set itself to zero.
shooTing beauTiful black and whiTelandscapesThere is almost nothing as timeless as a beautiful black and white landscape photo.
For many, it is the purest form of photography. The genre conjures up thoughts of
Ansel Adams out in Yosemite Valley, capturing stunning monoliths with his 8x10 view
camera. Well, just because you are shooting with a digital camera doesn’t mean you
can’t create your own stunning photos using the power of the Monochrome picture
control. (See the “Classic Black and White Portraits” section of Chapter 6 for instruc-
tions on setting up this feature.) Not only can you shoot in black and white, you can
also customize the camera to apply built-in filters to lighten or darken different ele-
ments within your scene, as well as add contrast and definition.
The four filter colors are red, yellow, green, and orange. The most typically used
filters in black and white photography are red and yellow. This is because the color of
these filters will darken opposite colors and lighten similar colors. So if you want to
darken a blue sky, you would use a yellow filter because blue is the opposite of yel-
low. To darken green foliage, you would use a red filter. Check out the series of shots
in Figure 7.12 with different filters applied.
You can see that there is no real difference in contrast between the color and the
black and white image with no filter. The red filter has the effect of darkening the
skies slightly and giving a darker look to the grass and trees, while lightening the
rusted metal in the foreground. Using the yellow filter makes the rusted metal darker
as well as the grass and sky. For this particular shot, I much prefer the look of the yel-
low filter.
Other options in the Monochrome picture control enable you to adjust the sharpness
and contrast, and even add some color toning to the final image. This information
is also in the “Classic Black and White Portraits” section of Chapter 6. I like to have
Sharpness set to 5 and Contrast set to +1 for my landscape images. This gives an
overall look to the black and white image that is reminiscent of the classic black and
white films. Experiment with the various settings to find the combination that is most
pleasing to you.
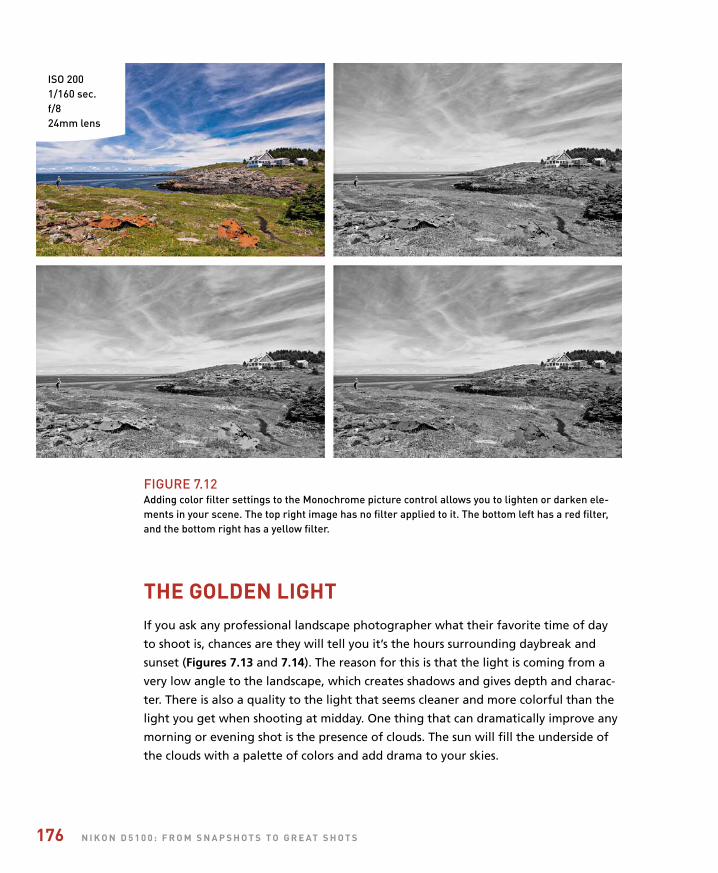
ptg
176 n i k o n d 5 1 0 0 : f r o m s n a p s h o T s T o g r e aT s h o T s
The golden lighTIf you ask any professional landscape photographer what their favorite time of day
to shoot is, chances are they will tell you it’s the hours surrounding daybreak and
sunset (Figures 7.13 and 7.14). The reason for this is that the light is coming from a
very low angle to the landscape, which creates shadows and gives depth and charac-
ter. There is also a quality to the light that seems cleaner and more colorful than the
light you get when shooting at midday. One thing that can dramatically improve any
morning or evening shot is the presence of clouds. The sun will fill the underside of
the clouds with a palette of colors and add drama to your skies.
ISO 2001/160 sec.f/824mm lens
FIgUre 7.12Adding color filter settings to the Monochrome picture control allows you to lighten or darken ele-ments in your scene. The top right image has no filter applied to it. The bottom left has a red filter,and the bottom right has a yellow filter.
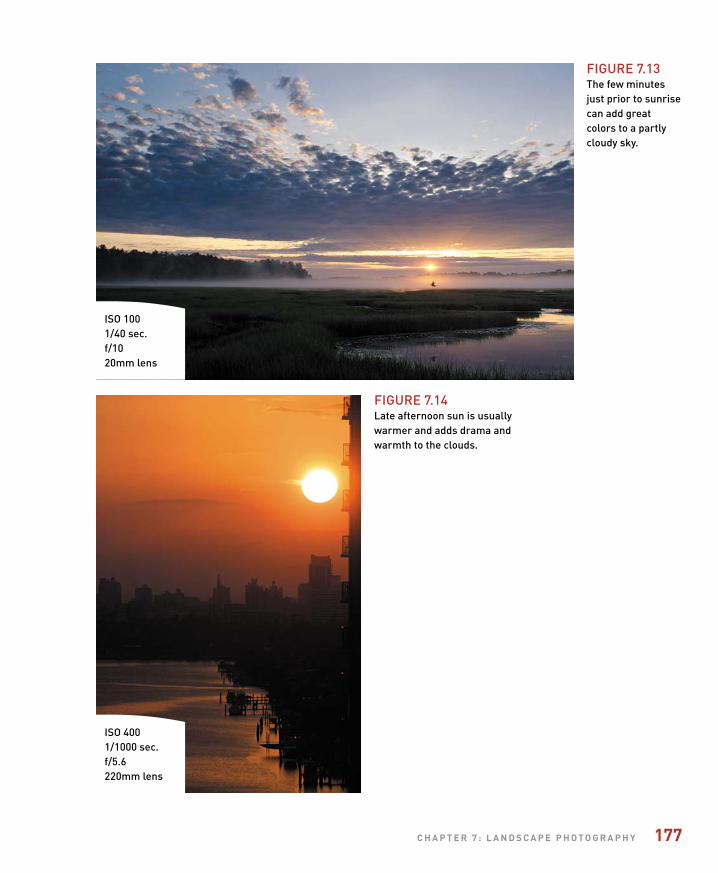
ptg
c h a p T e r 7 : l a n d s c a p e p h o T o g r a p h y 177
ISO 1001/40 sec.f/1020mm lens
ISO 4001/1000 sec.f/5.6220mm lens
FIgUre 7.13The few minutesjust prior to sunrisecan add greatcolors to a partlycloudy sky.
FIgUre 7.14Late afternoon sun is usuallywarmer and adds drama andwarmth to the clouds.
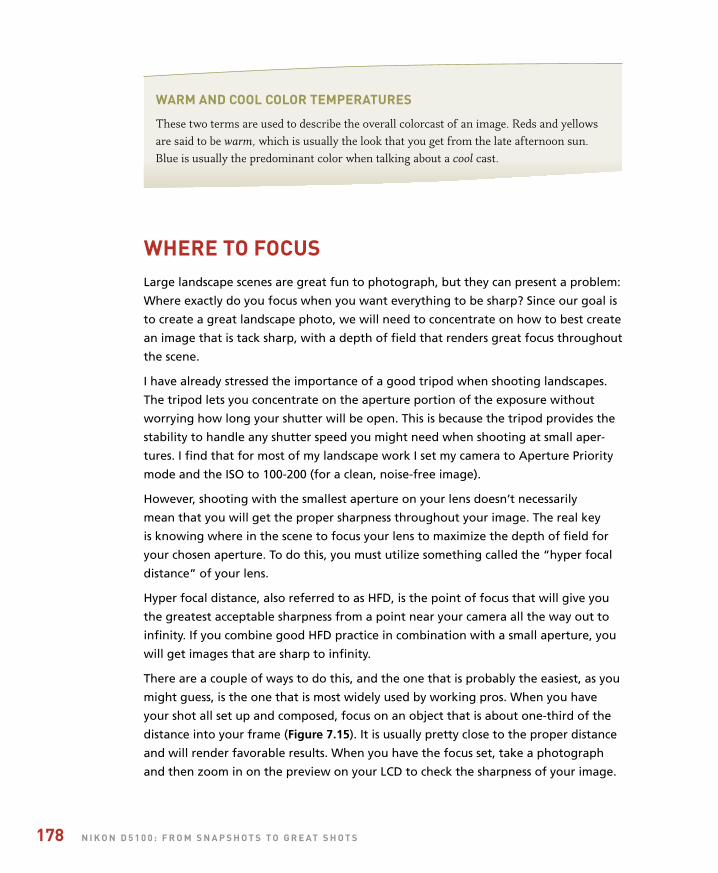
ptg
178 n i k o n d 5 1 0 0 : f r o m s n a p s h o T s T o g r e aT s h o T s
warm and cool color TemperaTures
These two terms are used to describe the overall colorcast of an image. Reds and yellows are said to be warm, which is usually the look that you get from the late afternoon sun. Blue is usually the predominant color when talking about a cool cast.
where To focusLarge landscape scenes are great fun to photograph, but they can present a problem:
Where exactly do you focus when you want everything to be sharp? Since our goal is
to create a great landscape photo, we will need to concentrate on how to best create
an image that is tack sharp, with a depth of field that renders great focus throughout
the scene.
I have already stressed the importance of a good tripod when shooting landscapes.
The tripod lets you concentrate on the aperture portion of the exposure without
worrying how long your shutter will be open. This is because the tripod provides the
stability to handle any shutter speed you might need when shooting at small aper-
tures. I find that for most of my landscape work I set my camera to Aperture Priority
mode and the ISO to 100-200 (for a clean, noise-free image).
However, shooting with the smallest aperture on your lens doesn’t necessarily
mean that you will get the proper sharpness throughout your image. The real key
is knowing where in the scene to focus your lens to maximize the depth of field for
your chosen aperture. To do this, you must utilize something called the “hyper focal
distance” of your lens.
Hyper focal distance, also referred to as HFD, is the point of focus that will give you
the greatest acceptable sharpness from a point near your camera all the way out to
infinity. If you combine good HFD practice in combination with a small aperture, you
will get images that are sharp to infinity.
There are a couple of ways to do this, and the one that is probably the easiest, as you
might guess, is the one that is most widely used by working pros. When you have
your shot all set up and composed, focus on an object that is about one-third of the
distance into your frame (Figure 7.15). It is usually pretty close to the proper distance
and will render favorable results. When you have the focus set, take a photograph
and then zoom in on the preview on your LCD to check the sharpness of your image.
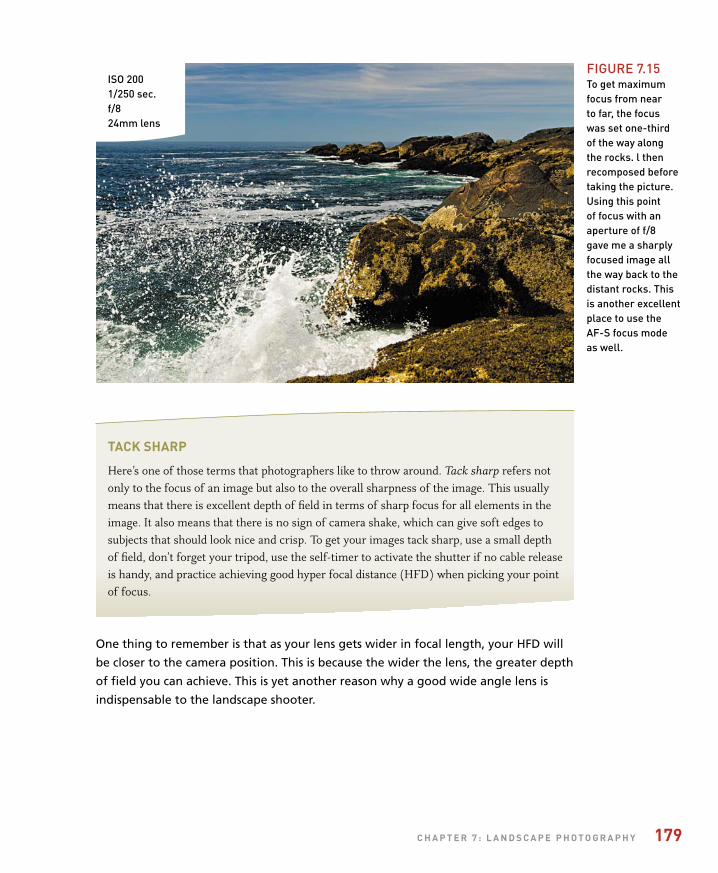
ptg
c h a p T e r 7 : l a n d s c a p e p h o T o g r a p h y 179
ISO 2001/250 sec.f/824mm lens
FIgUre 7.15To get maximumfocus from near to far, the focuswas set one-thirdof the way alongthe rocks. l thenrecomposed beforetaking the picture.Using this point of focus with anaperture of f/8gave me a sharplyfocused image allthe way back to thedistant rocks. Thisis another excellentplace to use theAF-S focus modeas well.
Tack sharp
Here’s one of those terms that photographers like to throw around. Tack sharp refers not only to the focus of an image but also to the overall sharpness of the image. This usually means that there is excellent depth of field in terms of sharp focus for all elements in the image. It also means that there is no sign of camera shake, which can give soft edges to subjects that should look nice and crisp. To get your images tack sharp, use a small depth of field, don’t forget your tripod, use the self-timer to activate the shutter if no cable release is handy, and practice achieving good hyper focal distance (HFD) when picking your point of focus.
One thing to remember is that as your lens gets wider in focal length, your HFD will
be closer to the camera position. This is because the wider the lens, the greater depth
of field you can achieve. This is yet another reason why a good wide angle lens is
indispensable to the landscape shooter.
ptg
180 n i k o n d 5 1 0 0 : f r o m s n a p s h o T s T o g r e aT s h o T s
easier focusingThere’s no denying that the automatic focus features on the D5100 are great, but
sometimes it just pays to turn them off and go manual. This is especially true if you
are shooting on a tripod: Once you have your shot composed in the viewfinder and
you are ready to focus, chances are that the area you want to focus on is not going
to be in the area of one of the focus points. Often this is the case when you have
a foreground element that is fairly low in the frame. You could use a single focus
point set low in your viewfinder and then pan the camera down until it rests on your
subject. But then you would have to press the shutter button halfway to focus the
camera and then try to recompose and lock down the tripod. It’s no easy task.
But you can have the best of both worlds by having the camera focus for you, then
switching to manual focus to comfortably recompose your shot (Figure 7.16).
geTTing focused while using a Tripod
1. Set up your shot and find the area that you want to focus on.
2. Pan your tripod head so that your active focus point is on that spot.
3. Press the shutter button halfway to focus the camera.
4. Switch the camera to manual focus by sliding the switch on the lens barrel fromA to M.
5. Recompose the composition on the tripod and then take the shot.
n
The camera will fire without trying to refocus the lens. This works especially well for
wide-angle lenses, which can be difficult to focus in manual mode.
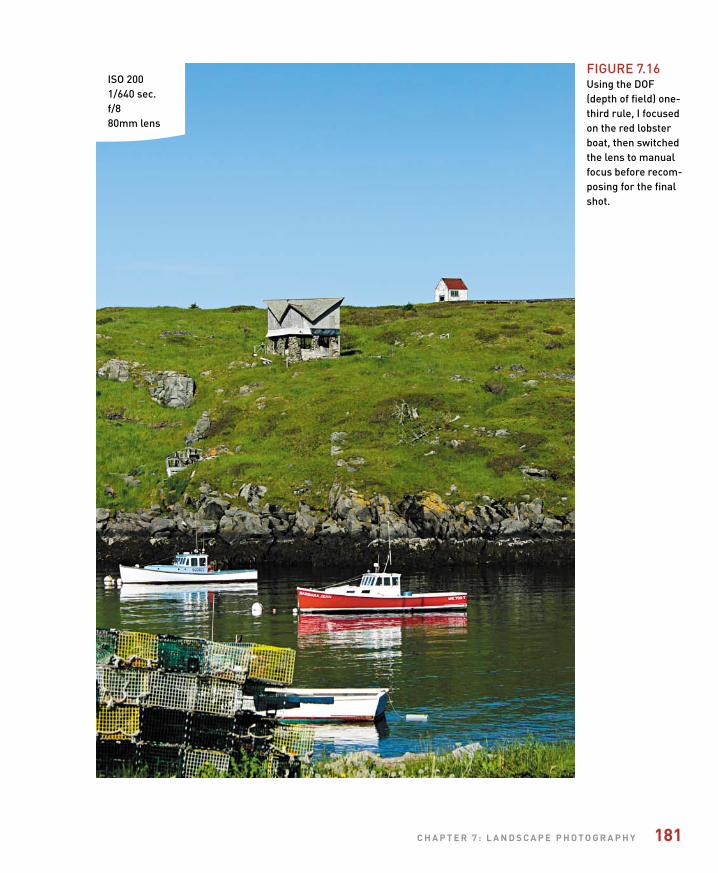
ptg
c h a p T e r 7 : l a n d s c a p e p h o T o g r a p h y 181
FIgUre 7.16Using the DOF(depth of field) one-third rule, I focusedon the red lobsterboat, then switchedthe lens to manualfocus before recom-posing for the finalshot.
ISO 2001/640 sec.f/880mm lens
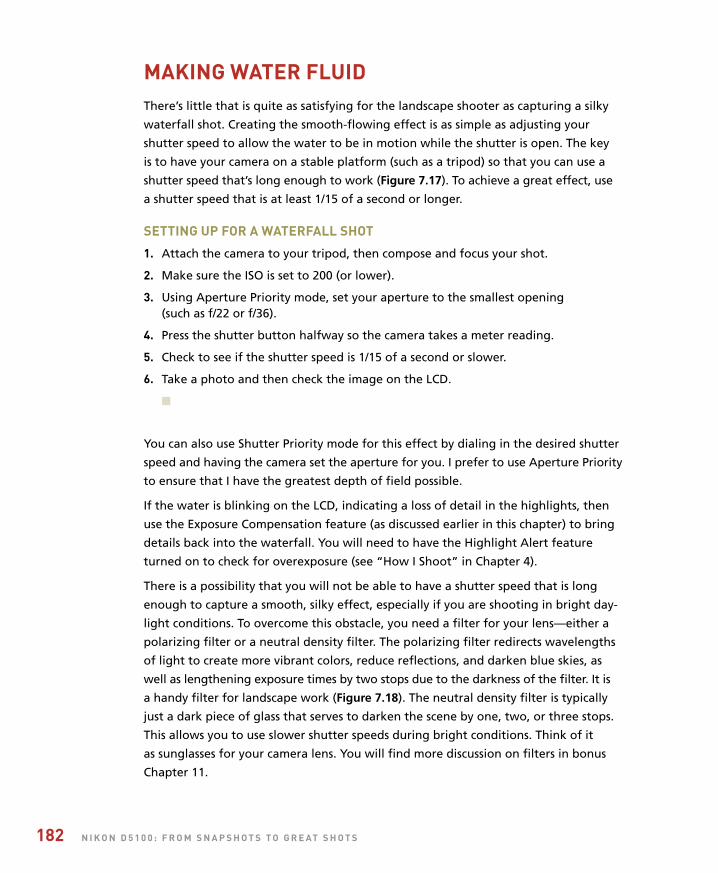
ptg
182 n i k o n d 5 1 0 0 : f r o m s n a p s h o T s T o g r e aT s h o T s
making waTer fluidThere’s little that is quite as satisfying for the landscape shooter as capturing a silky
waterfall shot. Creating the smooth-flowing effect is as simple as adjusting your
shutter speed to allow the water to be in motion while the shutter is open. The key
is to have your camera on a stable platform (such as a tripod) so that you can use a
shutter speed that’s long enough to work (Figure 7.17). To achieve a great effect, use
a shutter speed that is at least 1/15 of a second or longer.
seTTing up for a waTerfall shoT
1. Attach the camera to your tripod, then compose and focus your shot.
2. Make sure the ISO is set to 200 (or lower).
3. Using Aperture Priority mode, set your aperture to the smallest opening (such as f/22 or f/36).
4. Press the shutter button halfway so the camera takes a meter reading.
5. Check to see if the shutter speed is 1/15 of a second or slower.
6. Take a photo and then check the image on the LCD.
n
You can also use Shutter Priority mode for this effect by dialing in the desired shutter
speed and having the camera set the aperture for you. I prefer to use Aperture Priority
to ensure that I have the greatest depth of field possible.
If the water is blinking on the LCD, indicating a loss of detail in the highlights, then
use the Exposure Compensation feature (as discussed earlier in this chapter) to bring
details back into the waterfall. You will need to have the Highlight Alert feature
turned on to check for overexposure (see “How I Shoot” in Chapter 4).
There is a possibility that you will not be able to have a shutter speed that is long
enough to capture a smooth, silky effect, especially if you are shooting in bright day-
light conditions. To overcome this obstacle, you need a filter for your lens—either a
polarizing filter or a neutral density filter. The polarizing filter redirects wavelengths
of light to create more vibrant colors, reduce reflections, and darken blue skies, as
well as lengthening exposure times by two stops due to the darkness of the filter. It is
a handy filter for landscape work (Figure 7.18). The neutral density filter is typically
just a dark piece of glass that serves to darken the scene by one, two, or three stops.
This allows you to use slower shutter speeds during bright conditions. Think of it
as sunglasses for your camera lens. You will find more discussion on filters in bonus
Chapter 11.

ptg
c h a p T e r 7 : l a n d s c a p e p h o T o g r a p h y 183
ISO 1003 sec.f/2260mm lens
FIgUre 7.17I used a tripod and a long expo-sure time to givethe waterfall itssilky look.

ptg
184 n i k o n d 5 1 0 0 : f r o m s n a p s h o T s T o g r e aT s h o T s
ISO 1002 sec.f/2217mm lens
direcTing The viewer: a word abouT composiTionAs a photographer, it’s your job to lead the viewer through your image. You accom-
plish this by utilizing the principles of composition, which is the arrangement of
elements in the scene that draw the viewer’s eyes through your image and holds
their attention. As the director of this viewing, you need to understand how people
see, and then use that information to focus their attention on the most important
elements in your image.
There is a general order at which we look at elements in a photograph. The first is
brightness. The eye wants to travel to the brightest object within a scene. So if you
have a bright sky, it’s probably the first place the eye will travel to. The second order
of attention is sharpness. Sharp, detailed elements will get more attention than soft,
blurry areas. Finally, the eye will move to vivid colors while leaving the dull, flat col-
ors for last. It is important to know these essentials in order to grab—and keep—the
viewer’s attention and then direct them through the frame.
FIgUre 7.18I used a neutraldensity filter to add two stops ofexposure, thusallowing for a lon-ger exposure timeunder the risingsun and transform-ing the waves into a silky mist. I gotthe added benefit ofdarkening the sky.

ptg
c h a p T e r 7 : l a n d s c a p e p h o T o g r a p h y 185
In Figure 7.19, the eye is drawn to the bright wooden cross at the bottom of the
frame. From there, it is pulled toward the contrast of the dark crow perched on top.
Moving upward to the bright moon, then down to the sharpness and color of the
flowers and grass that is anchoring the lower portion of the image. The elements
within the image all help to keep the eye moving but never leave the frame.
FIgUre 7.19The composition of the elements pulls the viewer’seyes around the image, leading from one element to the next in a circular pattern.
ISO 2001/250 sec.f/8160mm lens
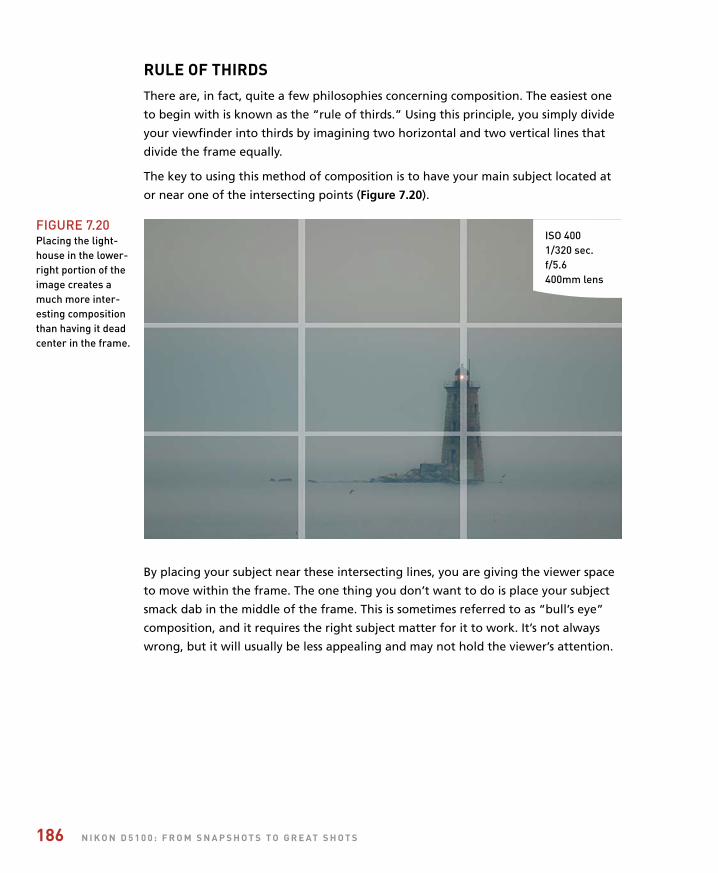
ptg
186 n i k o n d 5 1 0 0 : f r o m s n a p s h o T s T o g r e aT s h o T s
rule of ThirdsThere are, in fact, quite a few philosophies concerning composition. The easiest one
to begin with is known as the “rule of thirds.” Using this principle, you simply divide
your viewfinder into thirds by imagining two horizontal and two vertical lines that
divide the frame equally.
The key to using this method of composition is to have your main subject located at
or near one of the intersecting points (Figure 7.20).
ISO 4001/320 sec.f/5.6400mm lens
By placing your subject near these intersecting lines, you are giving the viewer space
to move within the frame. The one thing you don’t want to do is place your subject
smack dab in the middle of the frame. This is sometimes referred to as “bull’s eye”
composition, and it requires the right subject matter for it to work. It’s not always
wrong, but it will usually be less appealing and may not hold the viewer’s attention.
FIgUre 7.20Placing the light-house in the lower-right portion of theimage creates amuch more inter-esting compositionthan having it deadcenter in the frame.
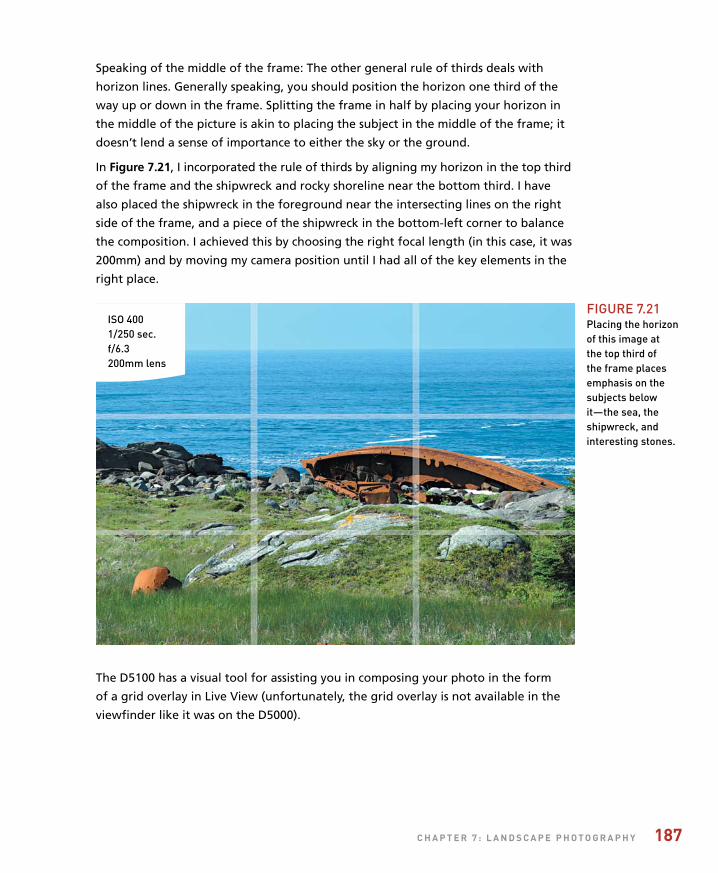
ptg
c h a p T e r 7 : l a n d s c a p e p h o T o g r a p h y 187
Speaking of the middle of the frame: The other general rule of thirds deals with
horizon lines. Generally speaking, you should position the horizon one third of the
way up or down in the frame. Splitting the frame in half by placing your horizon in
the middle of the picture is akin to placing the subject in the middle of the frame; it
doesn’t lend a sense of importance to either the sky or the ground.
In Figure 7.21, I incorporated the rule of thirds by aligning my horizon in the top third
of the frame and the shipwreck and rocky shoreline near the bottom third. I have
also placed the shipwreck in the foreground near the intersecting lines on the right
side of the frame, and a piece of the shipwreck in the bottom-left corner to balance
the composition. I achieved this by choosing the right focal length (in this case, it was
200mm) and by moving my camera position until I had all of the key elements in the
right place.
ISO 4001/250 sec.f/6.3200mm lens
FIgUre 7.21Placing the horizonof this image at the top third of the frame placesemphasis on thesubjects belowit—the sea, theshipwreck, andinteresting stones.
The D5100 has a visual tool for assisting you in composing your photo in the form
of a grid overlay in Live View (unfortunately, the grid overlay is not available in the
viewfinder like it was on the D5000).
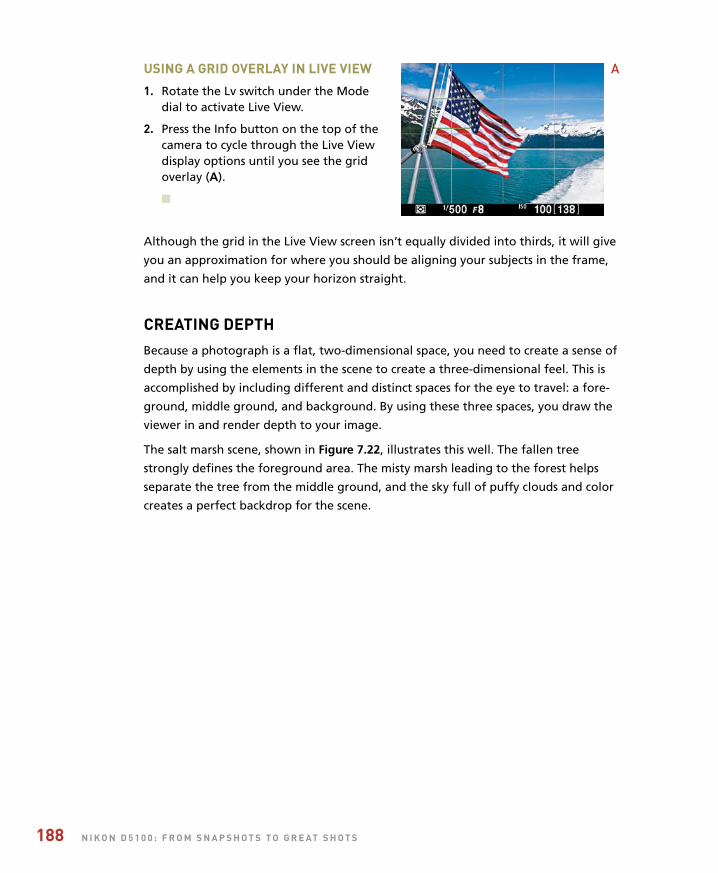
ptg
188 n i k o n d 5 1 0 0 : f r o m s n a p s h o T s T o g r e aT s h o T s
using a grid overlay in live view
1. Rotate the Lv switch under the Modedial to activate Live View.
2. Press the Info button on the top of thecamera to cycle through the Live Viewdisplay options until you see the gridoverlay (A).
n
Although the grid in the Live View screen isn’t equally divided into thirds, it will give
you an approximation for where you should be aligning your subjects in the frame,
and it can help you keep your horizon straight.
creaTing depThBecause a photograph is a flat, two-dimensional space, you need to create a sense of
depth by using the elements in the scene to create a three-dimensional feel. This is
accomplished by including different and distinct spaces for the eye to travel: a fore-
ground, middle ground, and background. By using these three spaces, you draw the
viewer in and render depth to your image.
The salt marsh scene, shown in Figure 7.22, illustrates this well. The fallen tree
strongly defines the foreground area. The misty marsh leading to the forest helps
separate the tree from the middle ground, and the sky full of puffy clouds and color
creates a perfect backdrop for the scene.
A

ptg
c h a p T e r 7 : l a n d s c a p e p h o T o g r a p h y 189
FIgUre 7.22The fallen tree,misty marsh hills,and sky all add tothe feeling of depthin the image.
ISO 1001/25 sec.f/2218mm lens
ptg
190 n i k o n d 5 1 0 0 : f r o m s n a p s h o T s T o g r e aT s h o T s
advanced Techniques To exploreThis section comes with a warning attached. All of the techniques and topics up to
this point have been centered on your camera. The following two sections, covering
panoramas and high dynamic range (HDR) images, require you to use image-process-
ing software to complete the photograph. They are, however, important enough that
you should know how to correctly shoot for success, should you choose to explore
these two popular techniques. But wait, what about the in-camera HDR function that
is new to the D5100? Don’t worry, we’ll cover that too, but as you’ll soon see, it has
its limitations, so I want to show you an alternative HDR method that will give you
more data in your captures and more control over the finished product.
shooTing panoramasIf you have ever visited the Grand Canyon, you know just how large and wide open
it truly is—so much so that it would be difficult to capture its splendor in just one
frame. The same can be said for a mountain range, or a cityscape, or any extremely
wide vista. There are two methods that you can use to capture the feeling of this
type of scene.
The “fake” panorama
The first method is to shoot with your lens set to its widest focal length, and then
crop out the top and bottom portion of the frame in your imaging software.
Panoramic images are generally two or three times wider than a normal image.
creaTing a fake panorama
1. To create the look of the panorama, find your widest lens focal length. The18mm setting on the 18–55mm AF-S kit lens is a great starting point.
2. Using the guidelines discussed earlier in the chapter, compose and focus yourscene, and select the smallest aperture possible.
3. Shoot your image. That’s all there is to it, from a photography standpoint.
4. Now, open the image in your favorite image-processing software and cropthe extraneous foreground and sky from the image, leaving you with a widepanorama of the scene. A typical panoramic aspect ratio is 3:1, where thelongest side is three times longer than the short side.
n

ptg
c h a p T e r 7 : l a n d s c a p e p h o T o g r a p h y 191
Figure 7.23 shows an example using a photo taken in Glacier Bay, Alaska.
As you can see, the image was shot with a very wide perspective, using a 22mm lens.
While it is not a bad photo, it has the potential to have more of an impact with the
right crop. Now look at the same image, cropped for panoramic view (Figure 7.24).
As you can see, it makes a huge difference in the image and gives much higher visual
impact by zeroing in on the glacier, drawing your eyes across the length of the hori-
zon, and allowing you to better see the small boat in the foreground.
FIgUre 7.23This is a nice image, but it couldlook good as apanorama too.
FIgUre 7.24Cropping gives thefeeling of a sweep-ing vista and makesthe shot visuallyappealing.
ISO 2001/200 sec.f/1122mm lens

ptg
192 n i k o n d 5 1 0 0 : f r o m s n a p s h o T s T o g r e aT s h o T s
FIgUre 7.25Here you see the makings of apanorama, with ten shots overlap-ping by about 30percent from frameto frame.
FIgUre 7.26I used Adobe Photoshop tocombine all of theexposures into one large pan-oramic image.
ISO 2001/200 sec.f/1180mm lens
The mulTiple-image panorama
The reason the previous method is sometimes referred to as a “fake” panorama is
because it is made with a standard-size frame and then cropped down to a narrow
perspective. To shoot a true panorama, you need to use either a special panorama
camera that shoots a very wide frame, or the following method, which requires the
combining of multiple frames.
The multiple-image pano has gained in popularity in the past few years; this is prin-
cipally due to advances in image-processing software. Many software options are

ptg
c h a p T e r 7 : l a n d s c a p e p h o T o g r a p h y 193
available now that will take multiple images, align them, and then “stitch” them
into a single panoramic image. The real key to shooting a multiple-image pano is to
overlap your shots by about 30 percent from one frame to the next (Figures 7.25 and
7.26). It is possible to handhold the camera while capturing your images, but the best
method for capturing great panoramic images is to use a tripod.
Now that you have your series of overlapping images, you can import them into
your image-processing software to stitch them together and create a single pan-
oramic image.
ptg
194 n i k o n d 5 1 0 0 : f r o m s n a p s h o T s T o g r e aT s h o T s
shooTing properly for a mulTiple-image panorama
1. Mount your camera on your tripod and make sure it is level.
2. Choose a focal length for your lens that is somewhere between 35mm and80mm (depending on the distance between you and your subject).
3. In Aperture Priority mode, use a very small aperture for the greatest depth offield. Take a meter reading of a bright part of the scene, and make note of it.
4. Now change your camera to Manual mode (M), and dial in the aperture andshutter speed that you obtained in the previous step.
5. Set your lens to manual focus, and then focus your lens for the area of interestusing the HFD method of finding a point one-third of the way into the scene. (Ifyou use the autofocus, you risk getting different points of focus from image toimage, which will make the image stitching more difficult for the software.)
6. While carefully panning your camera, shoot your images to cover the entirearea of the scene from one end to the other, leaving a 30 percent overlap fromone frame to the next.
7. The final step involves using your favorite imaging software to combine allof the photographs into a single panoramic image and then cropping off anyexcess areas to achieve the desired aspect ratio.
n
sorTing your shoTs for The mulTi-image panorama
If you shoot more than one series of shots for your panoramas, it can sometimes be difficult to know when one series of images ends and the other begins. Here is a quick tip for separating your images.
Set up your camera using the steps listed here. Now, before you take your first good exposure in the series, hold up one finger in front of the camera and take a shot. Now move your hand away and begin taking your overlapping images. When you have taken your last shot, hold two fingers in front of the camera and take another shot.
Now, when you go to review your images, use the series of shots that falls between the frames with one and two fingers in them. Then just repeat the process for your next panorama series.
ptg
c h a p T e r 7 : l a n d s c a p e p h o T o g r a p h y 195
shooTing high dynamic range (hdr) imagesOne of the more recent trends in digital photography is the use of high dynamic
range (HDR) to capture the full range of tonal values in your final image. Typically,
when you photograph a scene that has a wide range of tones from shadows to
highlights, you have to make a decision regarding which tonal values you are going
to emphasize and then adjust your exposure accordingly. This is because your camera
has a limited dynamic range, at least as compared to the human eye. HDR photography
allows you to capture multiple exposures for the highlights, shadows, and midtones
and then combine them into a single image using software. A number of software
applications allow you to combine the images and then perform a process called
“tonemapping,” whereby the complete range of exposures is represented in a single
image. I will not be covering how to use the various software applications, but I will
explore the process of shooting a scene to help you render properly captured images
for the HDR process. Note that using a tripod is absolutely necessary for this technique,
since you need to have perfect alignment of each image when they are combined.
Before we look at how to shoot for HDR photos to be processed in specialized soft-
ware, let’s take a look at the HDR function built into the D5100. The in-camera HDR
function on the D5100 takes two exposures —one slightly underexposed and one
slightly overexposed—and then blends the two photos together automatically in the
camera to create a new photo that contains a wider dynamic range (meaning more
detail in the highlights and shadows) than a single exposure does. This is not far off
from the Active D-Lighting function that automatically reduces the exposure and
then uses software in the camera to increase the brightness in the shadows while pre-
serving more detail in the highlights. Both functions have their place, and you should
know how to use them.
That said, the downside of the in-camera HDR function is that it only combines the
data from two captures (many photographers shooting HDR images combine three to
seven exposures worth of data) and it only works in JPEG mode. You also have limited
control over the blending process, and you have to make your decision before you
shoot. Of course you can massage the final JPEG image a little to tease out more detail,
but if you are going to do that you lose one of the benefits of the in-camera process.
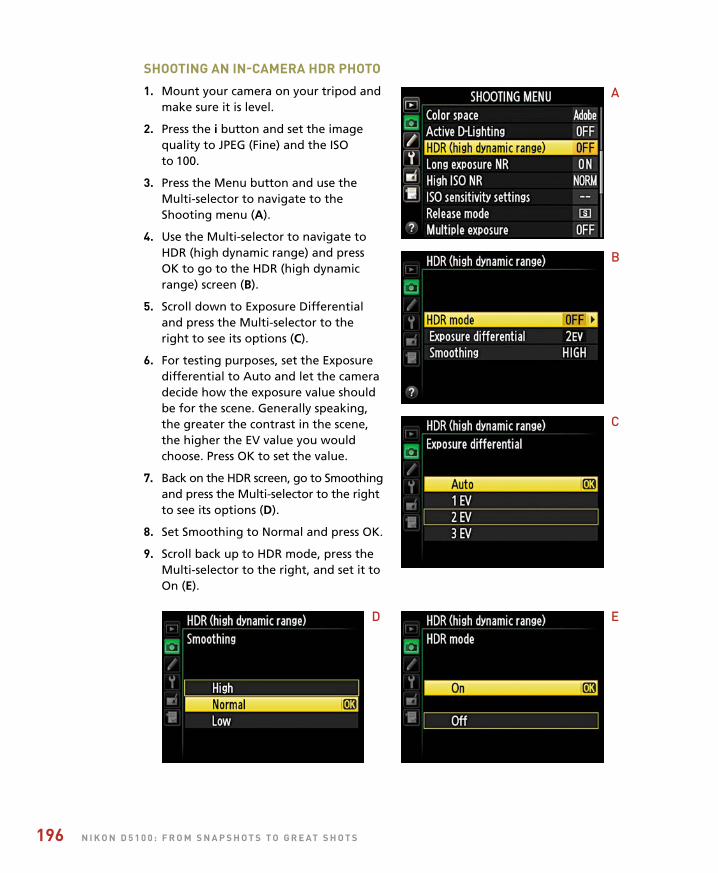
ptg
196 n i k o n d 5 1 0 0 : f r o m s n a p s h o T s T o g r e aT s h o T s
shooTing an in-camera hdr phoTo
1. Mount your camera on your tripod andmake sure it is level.
2. Press the i button and set the imagequality to JPEG (Fine) and the ISO to 100.
3. Press the Menu button and use theMulti-selector to navigate to theShooting menu (A).
4. Use the Multi-selector to navigate toHDR (high dynamic range) and pressOK to go to the HDR (high dynamicrange) screen (B).
5. Scroll down to Exposure Differentialand press the Multi-selector to theright to see its options (C).
6. For testing purposes, set the Exposuredifferential to Auto and let the cameradecide how the exposure value shouldbe for the scene. Generally speaking,the greater the contrast in the scene,the higher the EV value you wouldchoose. Press OK to set the value.
7. Back on the HDR screen, go to Smoothingand press the Multi-selector to the rightto see its options (D).
8. Set Smoothing to Normal and press OK.
9. Scroll back up to HDR mode, press theMulti-selector to the right, and set it toOn (E).
e
A
C
B
D
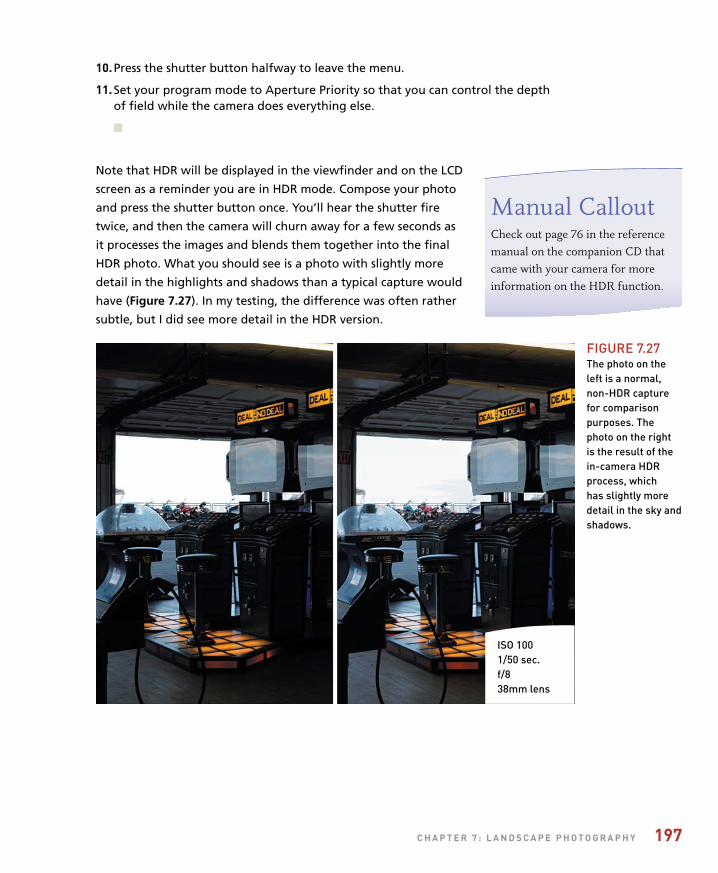
ptg
c h a p T e r 7 : l a n d s c a p e p h o T o g r a p h y 197
10. Press the shutter button halfway to leave the menu.
11. Set your program mode to Aperture Priority so that you can control the depthof field while the camera does everything else.
n
Note that HDR will be displayed in the viewfinder and on the LCD
screen as a reminder you are in HDR mode. Compose your photo
and press the shutter button once. You’ll hear the shutter fire
twice, and then the camera will churn away for a few seconds as
it processes the images and blends them together into the final
HDR photo. What you should see is a photo with slightly more
detail in the highlights and shadows than a typical capture would
have (Figure 7.27). In my testing, the difference was often rather
subtle, but I did see more detail in the HDR version.
Manual CalloutCheck out page 76 in the reference manual on the companion CD that came with your camera for more information on the HDR function.
FIgUre 7.27The photo on theleft is a normal,non-HDr capturefor comparisonpurposes. Thephoto on the right is the result of thein-camera HDrprocess, which has slightly moredetail in the sky andshadows.
ISO 1001/50 sec.f/838mm lens

ptg
198 n i k o n d 5 1 0 0 : f r o m s n a p s h o T s T o g r e aT s h o T s
ISO 1001/200 sec.f/838mm lens
ISO 1001/50 sec.f/838mm lens
ISO 1001/13 sec.f/819mm lens
By all means, give this feature a good test drive to get a feel for the conditions under
which it will deliver the best results. If you are shooting in JPEG already, it is a real
nice trick to have in your back pocket (again, much like Active D-Lighting). That said,
if you are interested in delving a little further into HDR photography, you can take
advantage of the D5100’s autoexposure bracketing function to take three different
exposures (in RAW mode, even) and combine them in dedicated HDR software. I think
you’ll be impressed by how much more detail you are able to capture (Figures 7.28–7.31).
FIgUre 7.28(left) Underexpos-ing two stops willrender more detailin the highlightareas of the clouds.
FIgUre 7.29(right) This is thenormal exposureas dictated by thecamera meter.
FIgUre 7.30(left) Overexpos-ing by two stopsensures that thedarker areas areexposed for detailin the shadows.
FIgUre 7.31(right) This is thefinal HDr imagethat was renderedfrom the threeother exposuresyou see here.
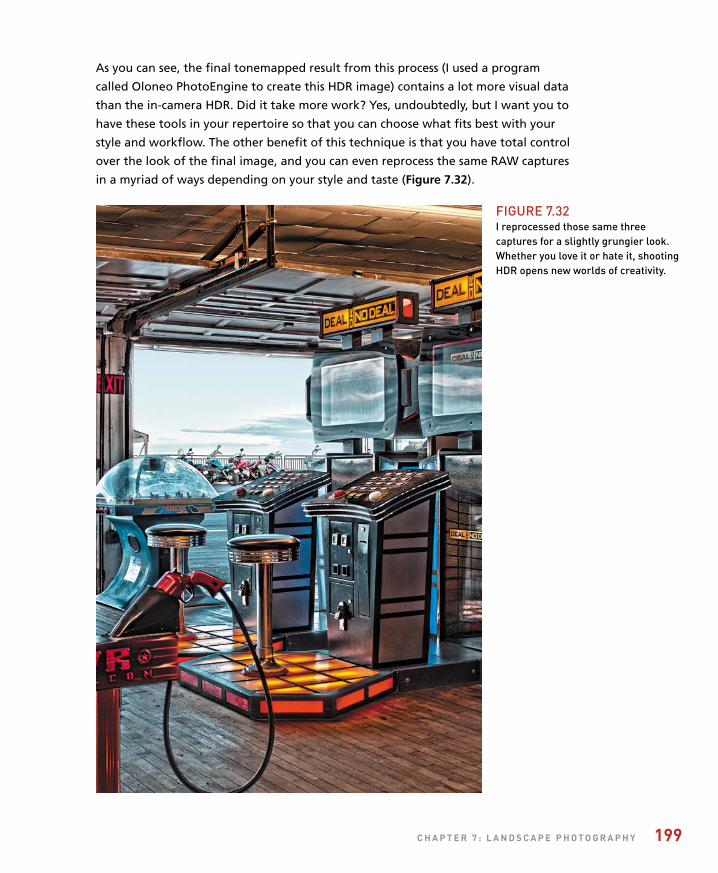
ptg
c h a p T e r 7 : l a n d s c a p e p h o T o g r a p h y 199
As you can see, the final tonemapped result from this process (I used a program
called Oloneo PhotoEngine to create this HDR image) contains a lot more visual data
than the in-camera HDR. Did it take more work? Yes, undoubtedly, but I want you to
have these tools in your repertoire so that you can choose what fits best with your
style and workflow. The other benefit of this technique is that you have total control
over the look of the final image, and you can even reprocess the same RAW captures
in a myriad of ways depending on your style and taste (Figure 7.32).
FIgUre 7.32I reprocessed those same threecaptures for a slightly grungier look.Whether you love it or hate it, shootingHDr opens new worlds of creativity.
ptg
200 n i k o n d 5 1 0 0 : f r o m s n a p s h o T s T o g r e aT s h o T s
seTTing up for shooTing an hdr image
1. Set your ISO to 100 to ensure clean, noise-free images.
2. Set your program mode to Aperture Priority. During the shooting process, youwill be taking three shots of the same scene, creating an overexposed image, anunderexposed image, and a normal exposure. Since the camera is going to beadjusting the exposure, you want it to make changes to the shutter speed, notthe aperture, so that your depth of field is consistent.
3. Set your camera file format to RAW. This is extremely important because theRAW format contains a much larger range of exposure values than a JPEG file,and the HDR software needs this information.
4. Change your shooting mode to Continuous. This will allow you to capture yourexposures quickly. Even though you will be using a tripod, there is always achance that something within your scene will be moving (like clouds or leaves).Shooting in the Continuous mode minimizes any subject movement betweenframes.
5. Adjust the autoexposure bracket (BKT) mode to shoot three exposures in two-stop increments. To do this, you will first need to set the BKT function for AEbracketing by pressing the Menu button.
6. Navigate to the Custom Setting menu and then enter item e: Bracketing/Flash.
7. Locate item e2: Auto Bracketing Set, and press OK. In the next menu screen,select AE Bracketing and then press the OK button.
8. Press the i button twice to enter the function setup screen on the rear LCD,use the Multi-selector to highlight BKT, and press OK. Using the Multi-selector,change the option from OFF to AE2.0 and press OK.
9. Focus the camera using the manual focus method discussed earlier in thechapter, compose your shot, secure the tripod, and hold down the shutterbutton until the camera has fired three consecutive times. The result will be onenormal exposure, as well as one underexposed and one overexposed image.
n
ptg
c h a p T e r 7 : l a n d s c a p e p h o T o g r a p h y 201
A software program, such as Adobe Photoshop CS5, Oloneo PhotoEngine, Nik HDR
Efex Pro, or HDRsoft Photomatix Pro, can now process your exposure-bracketed
images into a single HDR file. You can find more information on HDR photography
and creating HDR images in the Tutorials section at www.photowalkpro.com.
Remember to turn the BKT function back to OFF when you are done or the camera
will continue to shoot bracketed images.
brackeTing your exposures
In HDR, bracketing is the process of capturing a series of exposures at different stop intervals. You can bracket your exposures even if you aren’t going to be using HDR. Sometimes this is helpful when you have a tricky lighting situation and you want to ensure that you have just the right exposure to capture the look you’re after. In HDR, you bracket to the plus and minus side of a “normal” exposure, but you can also bracket all of your exposures to the over or under side of normal. It all depends on what you are after. If you aren’t sure whether you are getting enough shadow detail, you can bracket a little toward the overexposed side. The same is true for highlights. You can bracket in increments as small as a third of a stop. This means that you can capture several images with very subtle exposure variances and then decide later which one is best. If you want to bracket just to one side of a normal exposure, set your exposure compensation to +1 or –1, whichever way you need, and then use the bracketing feature to automatically bracket your exposures.
ptg
202 n i k o n d 5 1 0 0 : f r o m s n a p s h o T s T o g r e aT s h o T s
Chapter 7 AssignmentsWe’ve covered a lot of ground in this chapter, so it’s definitely time to put this knowledge to work in order to get familiar with these new camera settings and techniques.
Comparing depth of field: Wide-angle vs. telephoto
Speaking of depth of field, you should also practice using the hyper focal distance of your lens to maximize the depth of field. You can do this by picking a focal length to work with on your lens.
If you have a zoom lens, try using the longest length. Compose your image and find an object to focus on. Set your aperture to f/22 and take a photo.
Now do the same thing with the zoom lens at its widest focal length. Use the same aperture and focus point.
Review the images and compare the depth of field when using wide angle as opposed to a telephoto lens. Try this again with a large aperture as well.
Applying hyper focal distance to your landscapes
Pick a scene that once again has objects that are near the camera position and something that is clearly defined in the background. Try using a wide to medium wide focal length for this (18–35mm). Use a small aperture and focus on the object in the foreground; then recompose and take a shot.
Without moving the camera position, use the object in the background as your point of focus and take another shot.
Finally, find a point that is one-third of the way into the frame from near to far and use that as the focus point.
Compare all of the images to see which method delivered the greatest range of depth of field from near to infinity.

ptg
203
Using Live View and the rule of thirds
Now let’s get some practice using the rule of thirds for improving composition. To do this, you need to employ Live View with the grid overlay turned on for a little visual assistance.
Using the Live View grid, practice shooting while placing your main subject in one of the intersecting line locations. Take some comparison shots with the subject at one of the inter-secting locations, and then shoot the same subject in the middle of the frame.
Placing your horizons
Finally, find a location with a defined horizon and, using the Live View grid, shoot the hori-zon along the top third of the frame, in the middle of the frame, and along the bottom third of the frame.
Test drive the in-camera HDR function
Now that you know the feature exists, look for high-contrast scenes (where there are areas of bright highlight with detail and dark shadow with detail) and put that HDR function through its paces. You may not like all the images, but learning to recognize the situations where it comes in handy is worth the practice.
Share your results with the book’s Flickr group!
Join the group here: flickr.com/groups/nikond5100fromsnapshotstogreatshots/

ptg
8
ISO 2001/250 sec.f/860mm lens
ptg
Mood Lighting
Shooting when the lightS get low
There is no reason to put your camera away when the sun goes down.
Your D5100 has some great features that let you work with available light
as well as the built-in flash. In this chapter, we will explore ways to push
your camera’s technology to the limit in order to capture great photos in
difficult lighting situations. We will also explore the use of flash and how
best to utilize your built-in flash features to improve your photography.
But let’s first look at working with low-level available light.
205
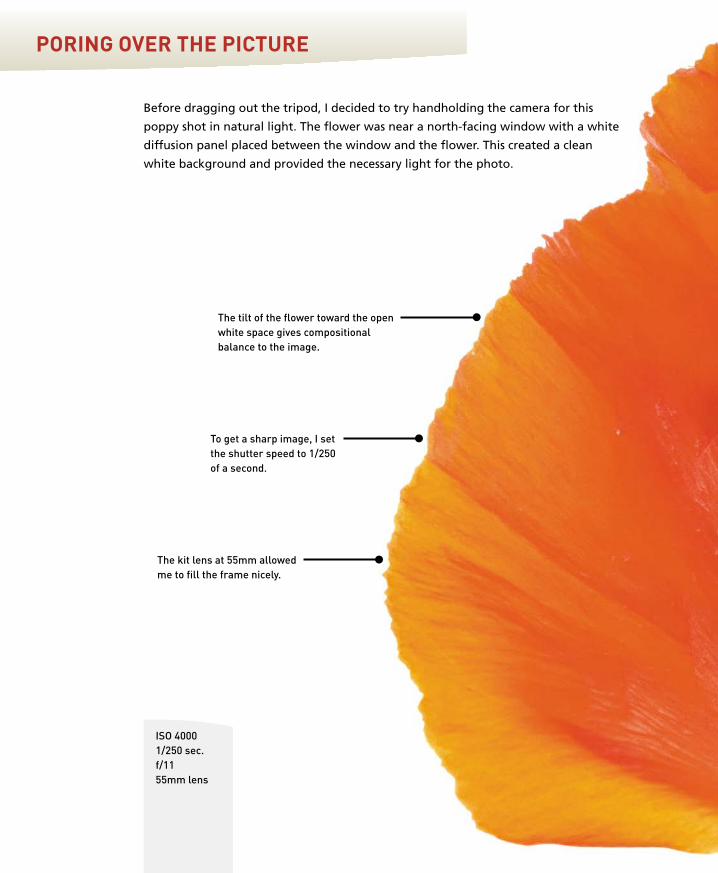
ptg
Poring over the Picture
ISO 40001/250 sec.f/1155mm lens
Before dragging out the tripod, I decided to try handholding the camera for this
poppy shot in natural light. The flower was near a north-facing window with a white
diffusion panel placed between the window and the flower. This created a clean
white background and provided the necessary light for the photo.
The tilt of the flower toward the openwhite space gives compositionalbalance to the image.
The kit lens at 55mm allowedme to fill the frame nicely.
To get a sharp image, I setthe shutter speed to 1/250of a second.
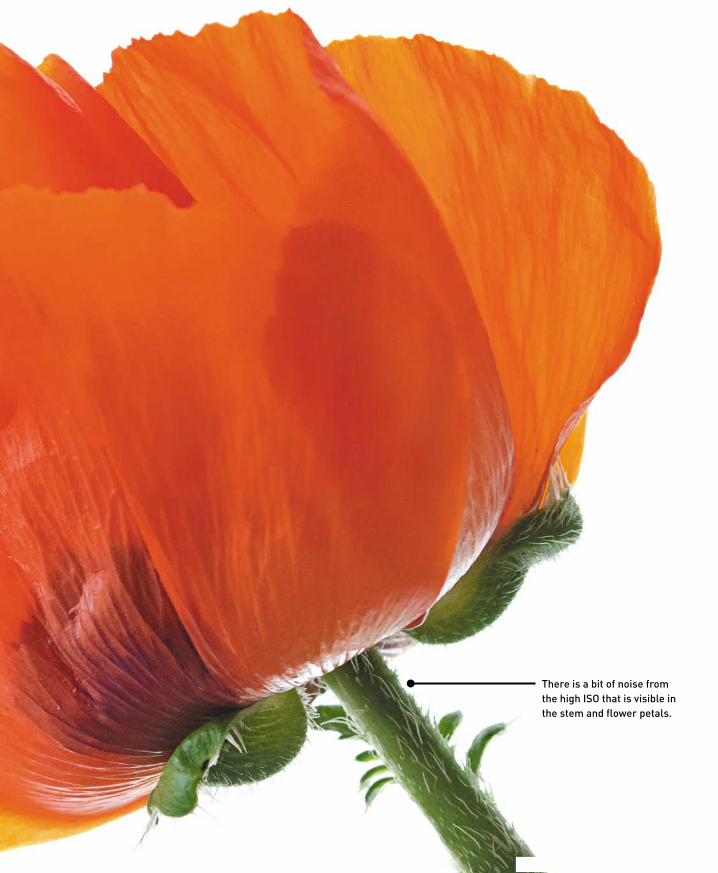
ptg
There is a bit of noise fromthe high ISO that is visible inthe stem and flower petals.

ptg
208 n i k o n D 5 1 0 0 : F r o m S n a P S h o t S t o g r e at S h o t S
raiSing the iSo: the SimPle SolutionLet’s begin with the obvious way to keep shooting when the lights get low: raising
the ISO (Figure 8.1). By now you know how to change the ISO by using the i button
and the Multi-selector. In typical shooting situations, you should keep the ISO in the
100–800 range. This will keep your pictures nice and clean by keeping the digital
noise to a minimum. But as the available light gets low, you might find yourself
working in the higher ranges of the ISO scale, which could lead to more noise in
your image.
You could use the flash, but that has a limited range (15–20 feet) that might not
work for you. Also, you could be in a situation where flash is prohibited, or at least
frowned upon, like at a wedding or in a museum. Sometimes the flash just kills the
mood of the scene you are viewing, and that feeling is an important part of the sub-
ject you are trying to capture.
And what about a tripod in combination with a long shutter speed? That is also an
option, and we’ll cover it a little further into the chapter. The problem with using a
tripod and a slow shutter speed in low-light photography, though, is that it performs
best when subjects aren’t moving. Besides, try to set up a tripod in a museum and see
how quickly you grab the attention of the security guards.
FIgure 8.1Some moments justneed to be capturedin the availablelight, no matterhow little light isavailable.
ISO 16001/30 sec.f/1.450mm lens

ptg
c h a P t e r 8 : m o o D l i g h t i n g 209
So if the only choice to get the shot is to raise the ISO to 800 or higher, make sure
that you turn on the High ISO Noise Reduction feature (Figure 8.2). This custom menu
function is set to Normal by default, but as you start using higher ISO values you
should consider changing it to the High setting. (Chapter 7 explains how to set the
noise reduction features.) If you move on to shooting in RAW mode you will have
other tools in the RAW processing software for dealing with noise.
To see the effect of High ISO Noise Reduction, you need to zoom in and take a closer
look (Figures 8.3 and 8.4).
Raising the noise reduction to the High setting slightly increases the processing time
for your images, so if you are shooting in the Continuous drive mode you might see a
little reduction in the speed of your frames per second.
FIgure 8.2Although this lookslike a well-lit shot,it was a handheldshot made possiblethrough the use ofa very high ISO andthe High ISO Noisereduction feature.
FIgure 8.3Here is a close-up of the same flower, so youcan get an idea of how things look with HighISO Noise reduction turned off.
FIgure 8.4Here is the same flower photographed with HighISO Noise reduction turned to High. While itdoesn’t get rid of all the noise, it certainly reducesthe effect and improves the look of your image.
ISO 40001/250 sec.f/1155mm lens
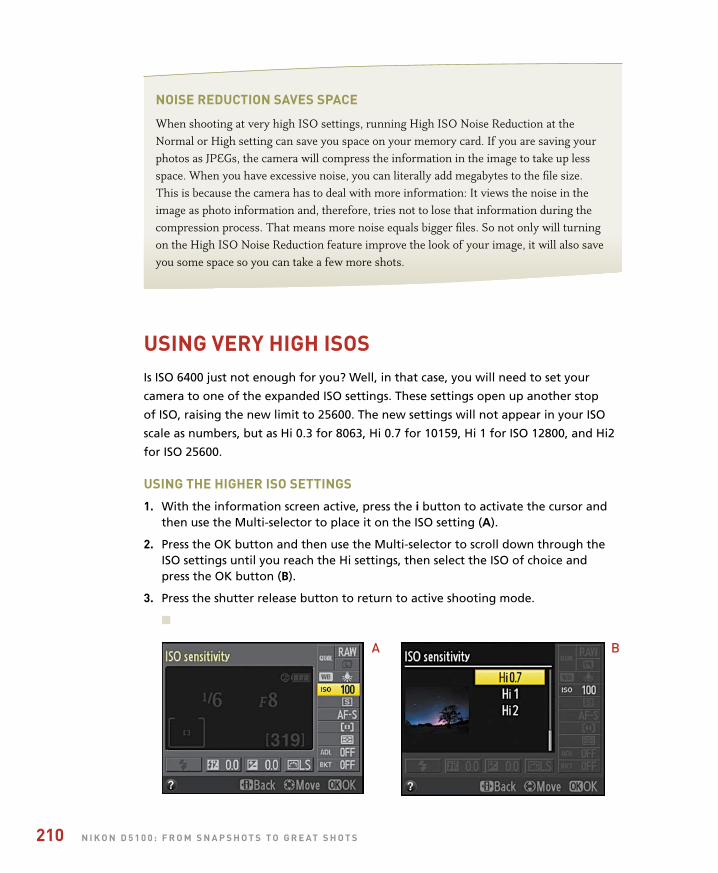
ptg
210 n i k o n D 5 1 0 0 : F r o m S n a P S h o t S t o g r e at S h o t S
noiSe reDuction SaveS SPace
When shooting at very high ISO settings, running High ISO Noise Reduction at the Normal or High setting can save you space on your memory card. If you are saving your photos as JPEGs, the camera will compress the information in the image to take up less space. When you have excessive noise, you can literally add megabytes to the file size. This is because the camera has to deal with more information: It views the noise in the image as photo information and, therefore, tries not to lose that information during the compression process. That means more noise equals bigger files. So not only will turning on the High ISO Noise Reduction feature improve the look of your image, it will also save you some space so you can take a few more shots.
uSing very high iSoSIs ISO 6400 just not enough for you? Well, in that case, you will need to set your
camera to one of the expanded ISO settings. These settings open up another stop
of ISO, raising the new limit to 25600. The new settings will not appear in your ISO
scale as numbers, but as Hi 0.3 for 8063, Hi 0.7 for 10159, Hi 1 for ISO 12800, and Hi2
for ISO 25600.
uSing the higher iSo SettingS
1. With the information screen active, press the i button to activate the cursor andthen use the Multi-selector to place it on the ISO setting (A).
2. Press the OK button and then use the Multi-selector to scroll down through theISO settings until you reach the Hi settings, then select the ISO of choice andpress the OK button (B).
3. Press the shutter release button to return to active shooting mode.
n
A B

ptg
c h a P t e r 8 : m o o D l i g h t i n g 211
A word of warning about the expanded ISO settings: although it is great to have
these high ISO settings available during low-light shooting, they should always be
your last resort. Even with High ISO Noise Reduction turned on, the amount of visible
noise will be extremely high. If you are going to be shooting frequently in low-light
situations, I would urge you to consider investing in a faster lens (with a wide aperture),
which, when coupled with ISOs between 3200 and 6400, can allow you to increase
your shutter speed fast enough to stop the action under poor lighting conditions
(Figure 8.5).
FIgure 8.5The only way to geta fast-enough shut-ter speed duringthis night game wasto raise the ISO to5600.
Don’t forget about the D5100’s Night Vision effect (refer to Chapter 3) when
there’s almost no light at all and you can live with the grainy black and white image
(Figure 8.6) it produces. Notice the level of noise in the capture makes it almost look
like it was snowing at the time.
ISO 56001/500 sec.f/2.8200mm lens
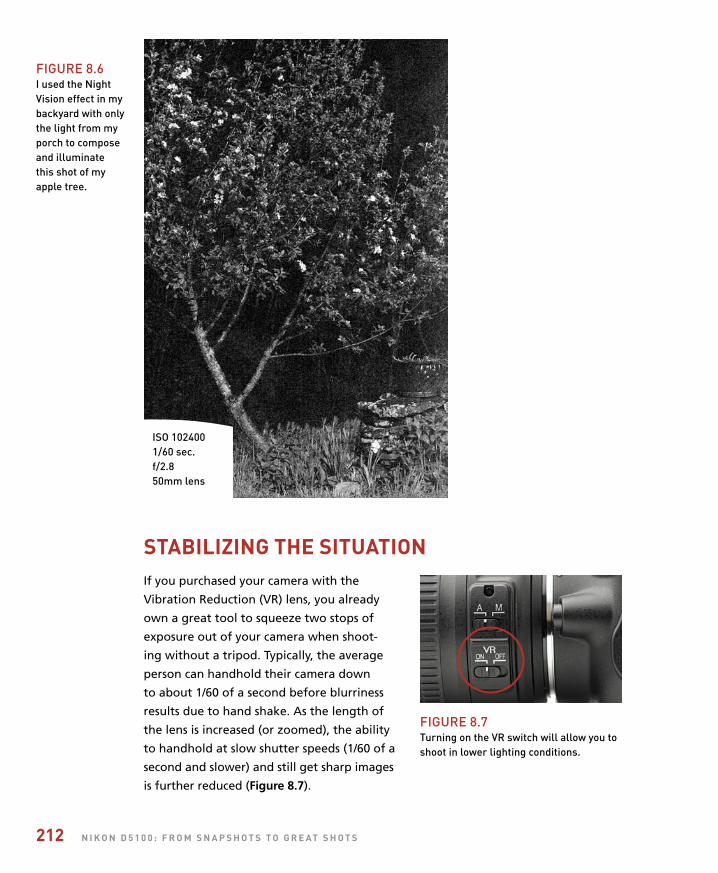
ptg
212 n i k o n D 5 1 0 0 : F r o m S n a P S h o t S t o g r e at S h o t S
FIgure 8.6I used the NightVision effect in mybackyard with onlythe light from myporch to composeand illuminate this shot of myapple tree.
ISO 1024001/60 sec.f/2.850mm lens
Stabilizing the SituationIf you purchased your camera with the
Vibration Reduction (VR) lens, you already
own a great tool to squeeze two stops of
exposure out of your camera when shoot-
ing without a tripod. Typically, the average
person can handhold their camera down
to about 1/60 of a second before blurriness
results due to hand shake. As the length of
the lens is increased (or zoomed), the ability
to handhold at slow shutter speeds (1/60 of a
second and slower) and still get sharp images
is further reduced (Figure 8.7).
FIgure 8.7Turning on the Vr switch will allow you toshoot in lower lighting conditions.
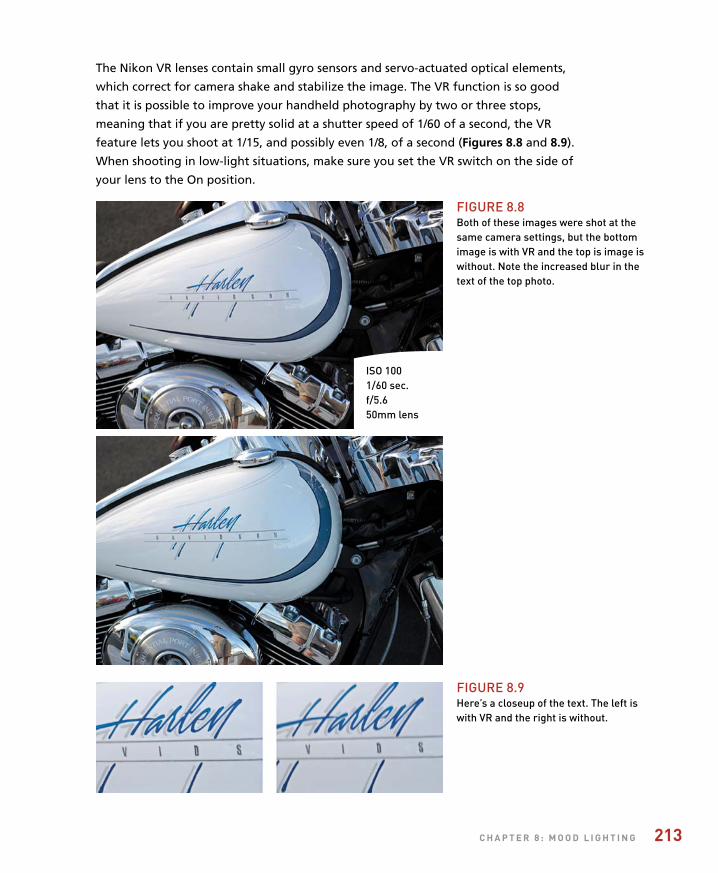
ptg
c h a P t e r 8 : m o o D l i g h t i n g 213
The Nikon VR lenses contain small gyro sensors and servo-actuated optical elements,
which correct for camera shake and stabilize the image. The VR function is so good
that it is possible to improve your handheld photography by two or three stops,
meaning that if you are pretty solid at a shutter speed of 1/60 of a second, the VR
feature lets you shoot at 1/15, and possibly even 1/8, of a second (Figures 8.8 and 8.9).
When shooting in low-light situations, make sure you set the VR switch on the side of
your lens to the On position.
FIgure 8.8Both of these images were shot at thesame camera settings, but the bottomimage is with Vr and the top is image iswithout. Note the increased blur in thetext of the top photo.
FIgure 8.9Here’s a closeup of the text. The left iswith Vr and the right is without.
ISO 1001/60 sec.f/5.650mm lens
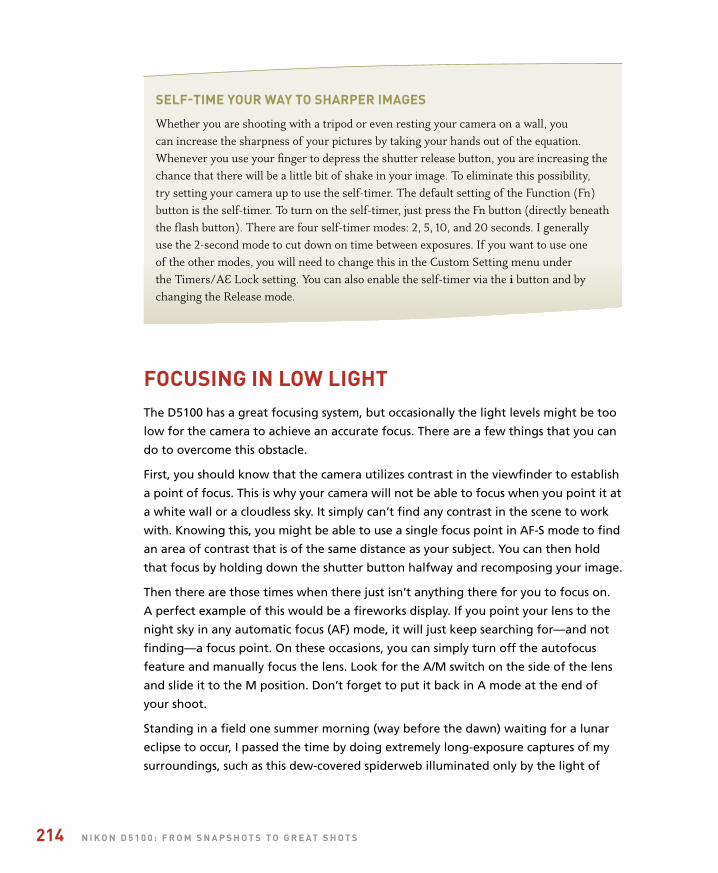
ptg
214 n i k o n D 5 1 0 0 : F r o m S n a P S h o t S t o g r e at S h o t S
SelF-time your way to SharPer imageS
Whether you are shooting with a tripod or even resting your camera on a wall, you can increase the sharpness of your pictures by taking your hands out of the equation. Whenever you use your finger to depress the shutter release button, you are increasing the chance that there will be a little bit of shake in your image. To eliminate this possibility, try setting your camera up to use the self-timer. The default setting of the Function (Fn) button is the self-timer. To turn on the self-timer, just press the Fn button (directly beneath the flash button). There are four self-timer modes: 2, 5, 10, and 20 seconds. I generally use the 2-second mode to cut down on time between exposures. If you want to use one of the other modes, you will need to change this in the Custom Setting menu under the Timers/AE Lock setting. You can also enable the self-timer via the i button and by changing the Release mode.
FocuSing in low lightThe D5100 has a great focusing system, but occasionally the light levels might be too
low for the camera to achieve an accurate focus. There are a few things that you can
do to overcome this obstacle.
First, you should know that the camera utilizes contrast in the viewfinder to establish
a point of focus. This is why your camera will not be able to focus when you point it at
a white wall or a cloudless sky. It simply can’t find any contrast in the scene to work
with. Knowing this, you might be able to use a single focus point in AF-S mode to find
an area of contrast that is of the same distance as your subject. You can then hold
that focus by holding down the shutter button halfway and recomposing your image.
Then there are those times when there just isn’t anything there for you to focus on.
A perfect example of this would be a fireworks display. If you point your lens to the
night sky in any automatic focus (AF) mode, it will just keep searching for—and not
finding—a focus point. On these occasions, you can simply turn off the autofocus
feature and manually focus the lens. Look for the A/M switch on the side of the lens
and slide it to the M position. Don’t forget to put it back in A mode at the end of
your shoot.
Standing in a field one summer morning (way before the dawn) waiting for a lunar
eclipse to occur, I passed the time by doing extremely long-exposure captures of my
surroundings, such as this dew-covered spiderweb illuminated only by the light of
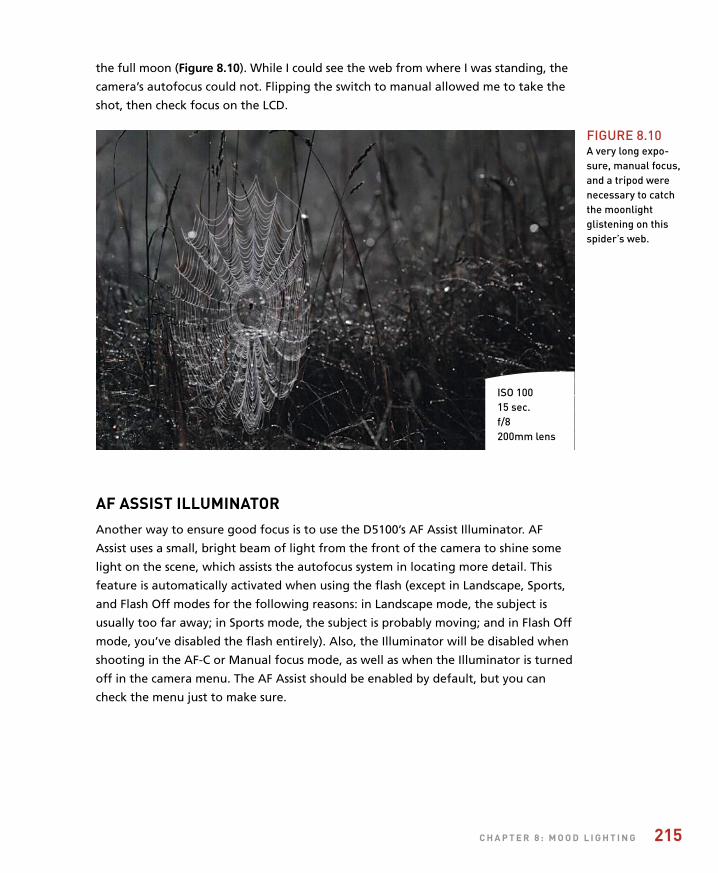
ptg
c h a P t e r 8 : m o o D l i g h t i n g 215
the full moon (Figure 8.10). While I could see the web from where I was standing, the
camera’s autofocus could not. Flipping the switch to manual allowed me to take the
shot, then check focus on the LCD.
aF aSSiSt illuminatorAnother way to ensure good focus is to use the D5100’s AF Assist Illuminator. AF
Assist uses a small, bright beam of light from the front of the camera to shine some
light on the scene, which assists the autofocus system in locating more detail. This
feature is automatically activated when using the flash (except in Landscape, Sports,
and Flash Off modes for the following reasons: in Landscape mode, the subject is
usually too far away; in Sports mode, the subject is probably moving; and in Flash Off
mode, you’ve disabled the flash entirely). Also, the Illuminator will be disabled when
shooting in the AF-C or Manual focus mode, as well as when the Illuminator is turned
off in the camera menu. The AF Assist should be enabled by default, but you can
check the menu just to make sure.
FIgure 8.10A very long expo-sure, manual focus,and a tripod werenecessary to catchthe moonlightglistening on thisspider’s web.
ISO 10015 sec.f/8200mm lens
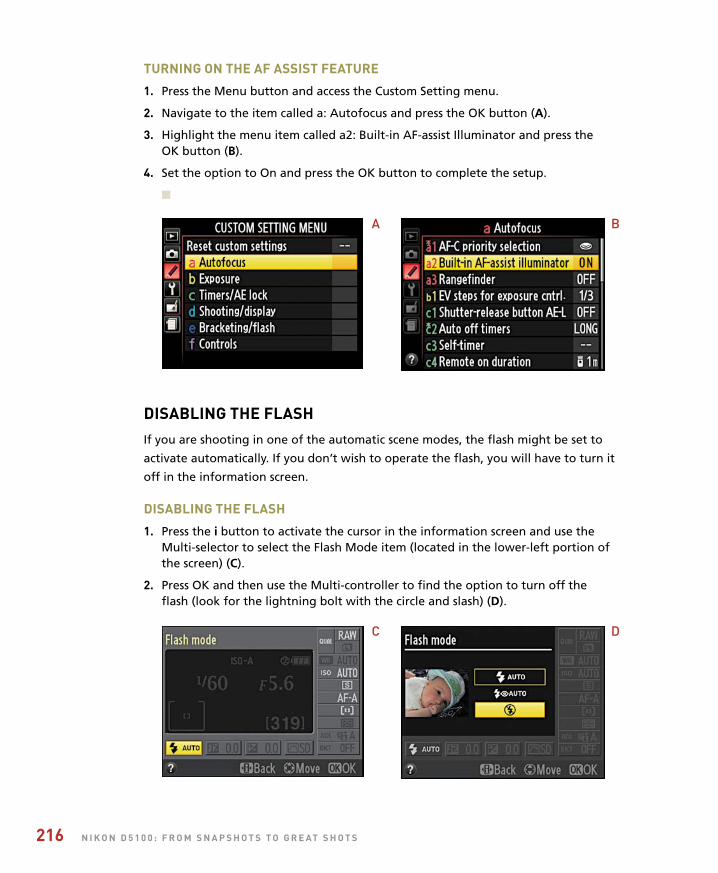
ptg
216 n i k o n D 5 1 0 0 : F r o m S n a P S h o t S t o g r e at S h o t S
turning on the aF aSSiSt Feature
1. Press the Menu button and access the Custom Setting menu.
2. Navigate to the item called a: Autofocus and press the OK button (A).
3. Highlight the menu item called a2: Built-in AF-assist Illuminator and press theOK button (B).
4. Set the option to On and press the OK button to complete the setup.
n
DiSabling the FlaShIf you are shooting in one of the automatic scene modes, the flash might be set to
activate automatically. If you don’t wish to operate the flash, you will have to turn it
off in the information screen.
DiSabling the FlaSh
1. Press the i button to activate the cursor in the information screen and use theMulti-selector to select the Flash Mode item (located in the lower-left portion ofthe screen) (C).
2. Press OK and then use the Multi-controller to find the option to turn off theflash (look for the lightning bolt with the circle and slash) (D).
A
C
B
D

ptg
c h a P t e r 8 : m o o D l i g h t i n g 217
3. Press OK and then make sure the pop-up flash is in the down position beforeshooting.
n
To disable the flash in the professional modes, simply keep the flash head in the low-
ered position. It will not be active unless you raise it.
Shooting long exPoSureSWe have covered some of the techniques for shooting in low light, so let’s go through
the process of capturing a night or low-light scene for maximum image quality. The
first thing to consider is that in order to shoot in low light with a low ISO, you will
need to use shutter speeds that are longer than you could possibly handhold (longer
than 1/15 of a second). This will require the use of a tripod or stable surface for you
to place your camera on. For maximum quality, the ISO should be low—somewhere
below 400. The long exposure noise reduction should be turned on to minimize the
effects of exposing for longer durations (to set this up, see Chapter 7).
I go to Las Vegas at least once a year for Photoshop World, and on my last visit I finally
got a room on the strip side of the hotel and couldn’t pass up a chance to do a long
exposure of the city all lit up (Figure 8.11). I didn’t have my tripod, but pulling a table
right up to the window and using the camera’s self-timer worked almost as well.
Turning out all the lights in the room eliminated reflections on the glass.
FIgure 8.11Las Vegas at night isworth visiting at leastonce in your life.
ISO 10030 sec.f/812mm lens
ptg
218 n i k o n D 5 1 0 0 : F r o m S n a P S h o t S t o g r e at S h o t S
Once you have the noise reduction turned on, set your camera to Aperture Priority
(A) mode. That way, you can concentrate on the aperture that you believe is most
appropriate and let the camera determine the best shutter speed. If it is too dark
for the autofocus to function properly, try focusing manually. Finally, consider using
a cable release (see the bonus Chapter 11) to activate the shutter. If you don’t have
one, check out the sidebar, “Self-time your way to sharper images.” Once you shoot
the image, you may notice some lag time before it is displayed on the rear LCD. This
is due to the noise reduction process, which can take anywhere from a fraction of a
second up to 30 seconds, depending on the length of the exposure.
FlaSh Sync
The basic idea behind the term flash synchronization (flash sync for short) is that when you take a photograph using the flash, the camera needs to ensure that the shutter is fully open at the time that the flash goes off. This is not an issue if you are using a long shutter speed such as 1/15 of a second but does become more critical for fast shutter speeds. To ensure that the flash and shutter are synchronized so that the flash is going off while the shutter is open, the D5100 implements a top sync speed of 1/200 of a second. This means that when you are using the flash, you will not be able to have your shutter speed be any faster than 1/200. If you did use a faster shutter speed, the shutter would actually start closing before the flash fired, which would cause a black area to appear in the frame where the light from the flash was blocked by the shutter.
uSing the built-in FlaShThere are going to be times when you have to turn to your camera’s built-in flash
to get the shot. The pop-up flash on the D5100 is not extremely powerful, but with
the camera’s advanced metering system it does a pretty good job of lighting up the
night…or just filling in the shadows.
If you are working with one of the automatic scene modes, the flash should automat-
ically activate when needed. If, however, you are working in one of the professional
modes you will have to turn the flash on for yourself. To do this, just press the pop-up
flash button located on the front of the camera (Figure 8.12). Once the flash is up, it
is ready to go (Figure 8.13). It’s that simple.
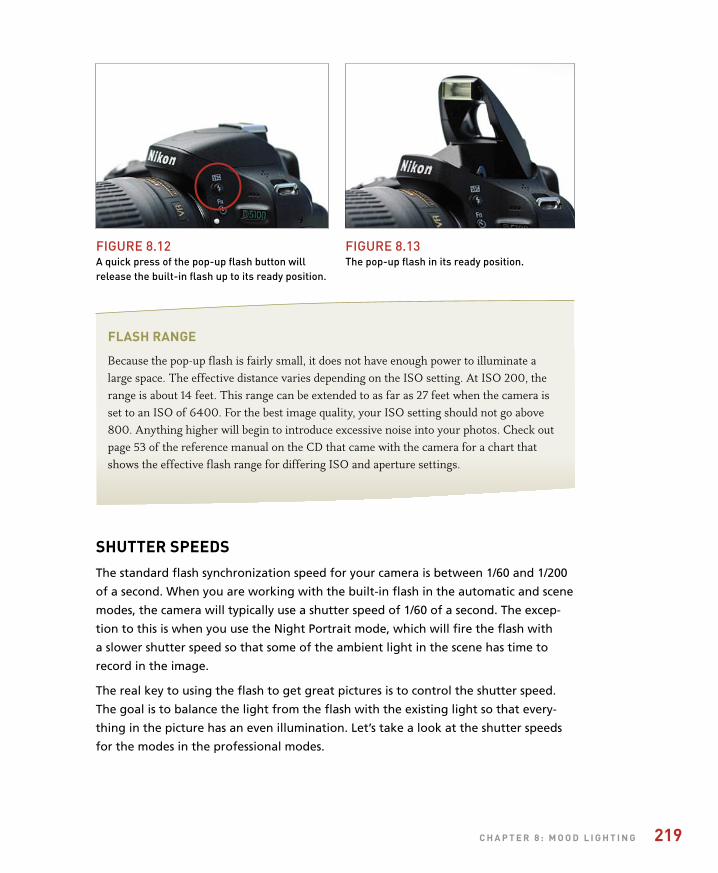
ptg
c h a P t e r 8 : m o o D l i g h t i n g 219
FlaSh range
Because the pop-up flash is fairly small, it does not have enough power to illuminate a large space. The effective distance varies depending on the ISO setting. At ISO 200, the range is about 14 feet. This range can be extended to as far as 27 feet when the camera is set to an ISO of 6400. For the best image quality, your ISO setting should not go above 800. Anything higher will begin to introduce excessive noise into your photos. Check out page 53 of the reference manual on the CD that came with the camera for a chart that shows the effective flash range for differing ISO and aperture settings.
Shutter SPeeDSThe standard flash synchronization speed for your camera is between 1/60 and 1/200
of a second. When you are working with the built-in flash in the automatic and scene
modes, the camera will typically use a shutter speed of 1/60 of a second. The excep-
tion to this is when you use the Night Portrait mode, which will fire the flash with
a slower shutter speed so that some of the ambient light in the scene has time to
record in the image.
The real key to using the flash to get great pictures is to control the shutter speed.
The goal is to balance the light from the flash with the existing light so that every-
thing in the picture has an even illumination. Let’s take a look at the shutter speeds
for the modes in the professional modes.
FIgure 8.12A quick press of the pop-up flash button willrelease the built-in flash up to its ready position.
FIgure 8.13The pop-up flash in its ready position.
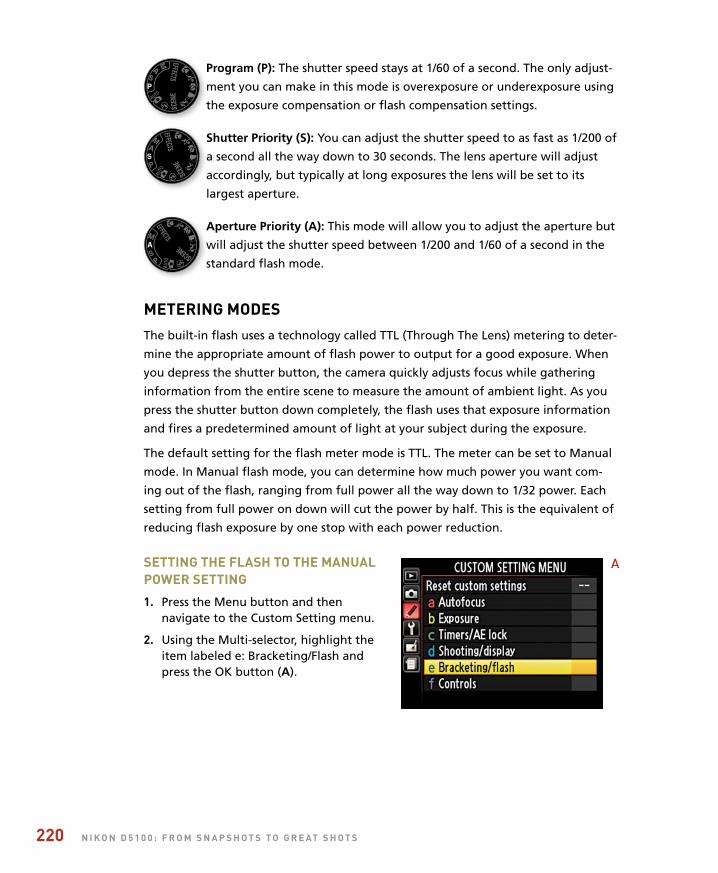
ptg
220 n i k o n D 5 1 0 0 : F r o m S n a P S h o t S t o g r e at S h o t S
Program (P): The shutter speed stays at 1/60 of a second. The only adjust-
ment you can make in this mode is overexposure or underexposure using
the exposure compensation or flash compensation settings.
Shutter Priority (S): You can adjust the shutter speed to as fast as 1/200 of
a second all the way down to 30 seconds. The lens aperture will adjust
accordingly, but typically at long exposures the lens will be set to its
largest aperture.
Aperture Priority (A): This mode will allow you to adjust the aperture but
will adjust the shutter speed between 1/200 and 1/60 of a second in the
standard flash mode.
metering moDeSThe built-in flash uses a technology called TTL (Through The Lens) metering to deter-
mine the appropriate amount of flash power to output for a good exposure. When
you depress the shutter button, the camera quickly adjusts focus while gathering
information from the entire scene to measure the amount of ambient light. As you
press the shutter button down completely, the flash uses that exposure information
and fires a predetermined amount of light at your subject during the exposure.
The default setting for the flash meter mode is TTL. The meter can be set to Manual
mode. In Manual flash mode, you can determine how much power you want com-
ing out of the flash, ranging from full power all the way down to 1/32 power. Each
setting from full power on down will cut the power by half. This is the equivalent of
reducing flash exposure by one stop with each power reduction.
Setting the FlaSh to the manualPower Setting
1. Press the Menu button and thennavigate to the Custom Setting menu.
2. Using the Multi-selector, highlight theitem labeled e: Bracketing/Flash andpress the OK button (A).
A
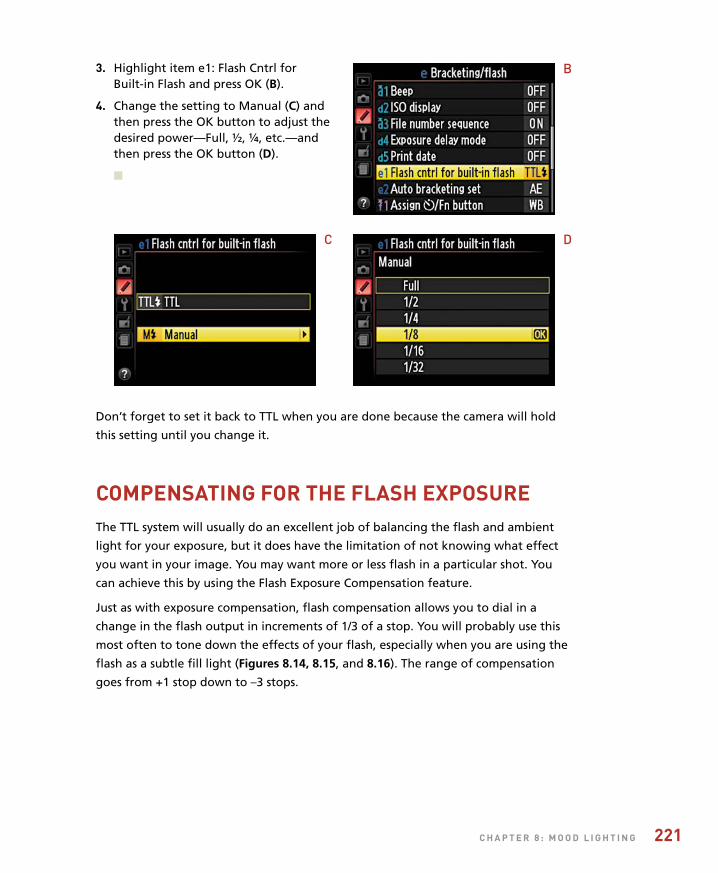
ptg
c h a P t e r 8 : m o o D l i g h t i n g 221
3. Highlight item e1: Flash Cntrl forBuilt-in Flash and press OK (B).
4. Change the setting to Manual (C) andthen press the OK button to adjust thedesired power—Full, ½, ¼, etc.—andthen press the OK button (D).
n
Don’t forget to set it back to TTL when you are done because the camera will hold
this setting until you change it.
comPenSating For the FlaSh exPoSureThe TTL system will usually do an excellent job of balancing the flash and ambient
light for your exposure, but it does have the limitation of not knowing what effect
you want in your image. You may want more or less flash in a particular shot. You
can achieve this by using the Flash Exposure Compensation feature.
Just as with exposure compensation, flash compensation allows you to dial in a
change in the flash output in increments of 1/3 of a stop. You will probably use this
most often to tone down the effects of your flash, especially when you are using the
flash as a subtle fill light (Figures 8.14, 8.15, and 8.16). The range of compensation
goes from +1 stop down to –3 stops.
B
C D
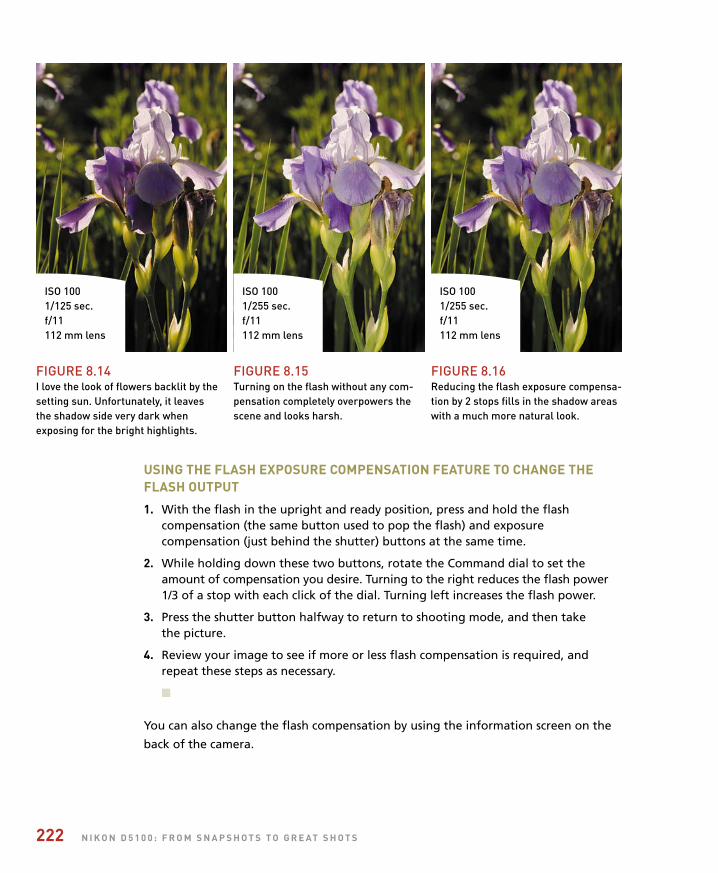
ptg
222 n i k o n D 5 1 0 0 : F r o m S n a P S h o t S t o g r e at S h o t S
ISO 1001/125 sec.f/11112 mm lens
ISO 1001/255 sec.f/11112 mm lens
ISO 1001/255 sec.f/11112 mm lens
FIgure 8.14I love the look of flowers backlit by thesetting sun. unfortunately, it leavesthe shadow side very dark whenexposing for the bright highlights.
FIgure 8.15Turning on the flash without any com-pensation completely overpowers thescene and looks harsh.
FIgure 8.16reducing the flash exposure compensa-tion by 2 stops fills in the shadow areaswith a much more natural look.
uSing the FlaSh exPoSure comPenSation Feature to change theFlaSh outPut
1. With the flash in the upright and ready position, press and hold the flashcompensation (the same button used to pop the flash) and exposurecompensation (just behind the shutter) buttons at the same time.
2. While holding down these two buttons, rotate the Command dial to set theamount of compensation you desire. Turning to the right reduces the flash power1/3 of a stop with each click of the dial. Turning left increases the flash power.
3. Press the shutter button halfway to return to shooting mode, and then take the picture.
4. Review your image to see if more or less flash compensation is required, andrepeat these steps as necessary.
n
You can also change the flash compensation by using the information screen on the
back of the camera.
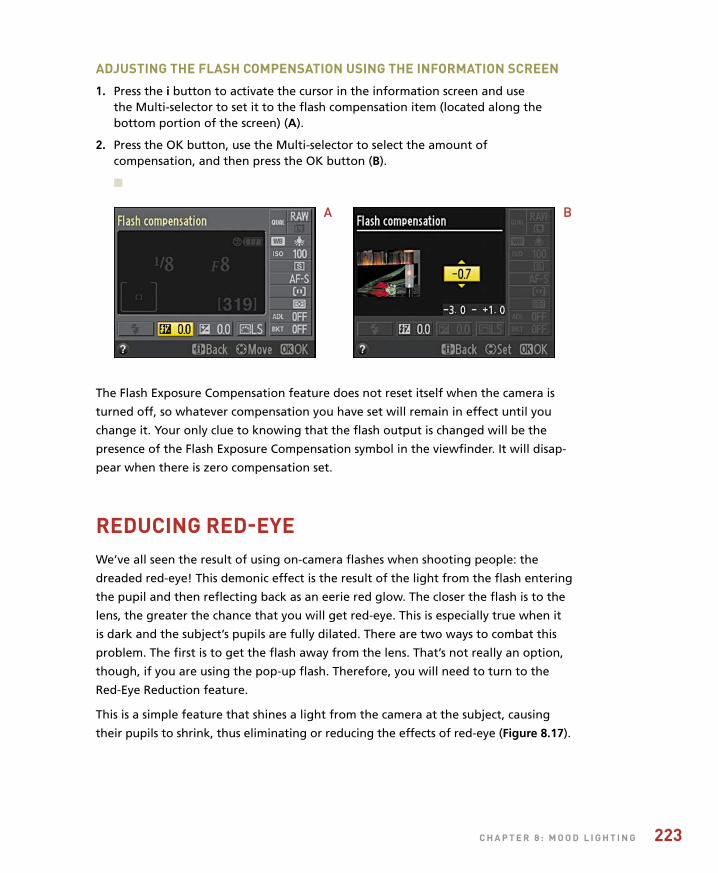
ptg
c h a P t e r 8 : m o o D l i g h t i n g 223
aDjuSting the FlaSh comPenSation uSing the inFormation Screen
1. Press the i button to activate the cursor in the information screen and usethe Multi-selector to set it to the flash compensation item (located along thebottom portion of the screen) (A).
2. Press the OK button, use the Multi-selector to select the amount ofcompensation, and then press the OK button (B).
n
The Flash Exposure Compensation feature does not reset itself when the camera is
turned off, so whatever compensation you have set will remain in effect until you
change it. Your only clue to knowing that the flash output is changed will be the
presence of the Flash Exposure Compensation symbol in the viewfinder. It will disap-
pear when there is zero compensation set.
reDucing reD-eyeWe’ve all seen the result of using on-camera flashes when shooting people: the
dreaded red-eye! This demonic effect is the result of the light from the flash entering
the pupil and then reflecting back as an eerie red glow. The closer the flash is to the
lens, the greater the chance that you will get red-eye. This is especially true when it
is dark and the subject’s pupils are fully dilated. There are two ways to combat this
problem. The first is to get the flash away from the lens. That’s not really an option,
though, if you are using the pop-up flash. Therefore, you will need to turn to the
Red-Eye Reduction feature.
This is a simple feature that shines a light from the camera at the subject, causing
their pupils to shrink, thus eliminating or reducing the effects of red-eye (Figure 8.17).
A B
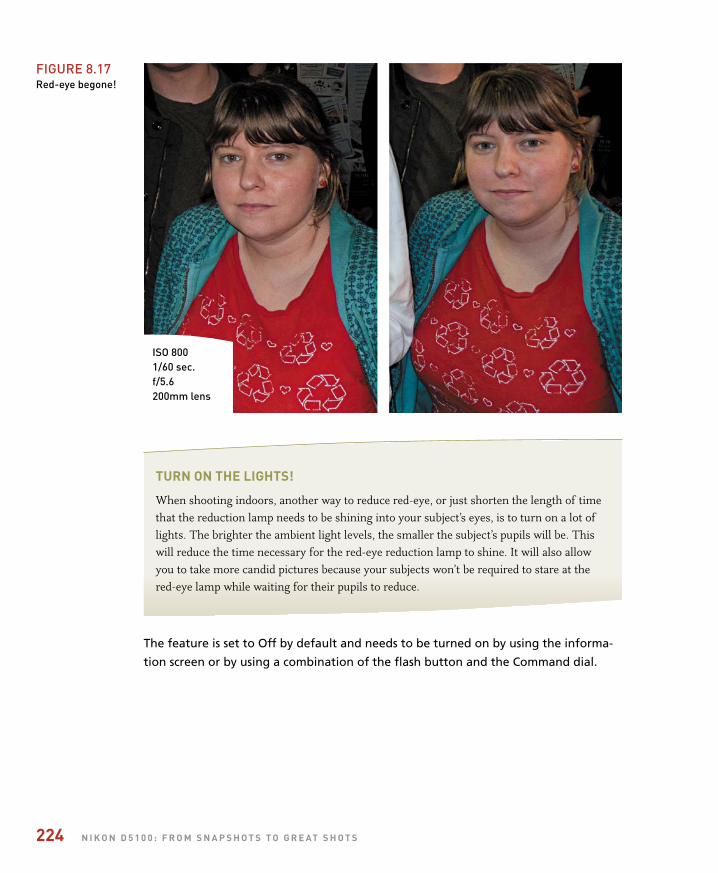
ptg
224 n i k o n D 5 1 0 0 : F r o m S n a P S h o t S t o g r e at S h o t S
turn on the lightS!
When shooting indoors, another way to reduce red-eye, or just shorten the length of time that the reduction lamp needs to be shining into your subject’s eyes, is to turn on a lot of lights. The brighter the ambient light levels, the smaller the subject’s pupils will be. This will reduce the time necessary for the red-eye reduction lamp to shine. It will also allow you to take more candid pictures because your subjects won’t be required to stare at the red-eye lamp while waiting for their pupils to reduce.
The feature is set to Off by default and needs to be turned on by using the informa-
tion screen or by using a combination of the flash button and the Command dial.
FIgure 8.17red-eye begone!
ISO 8001/60 sec.f/5.6200mm lens
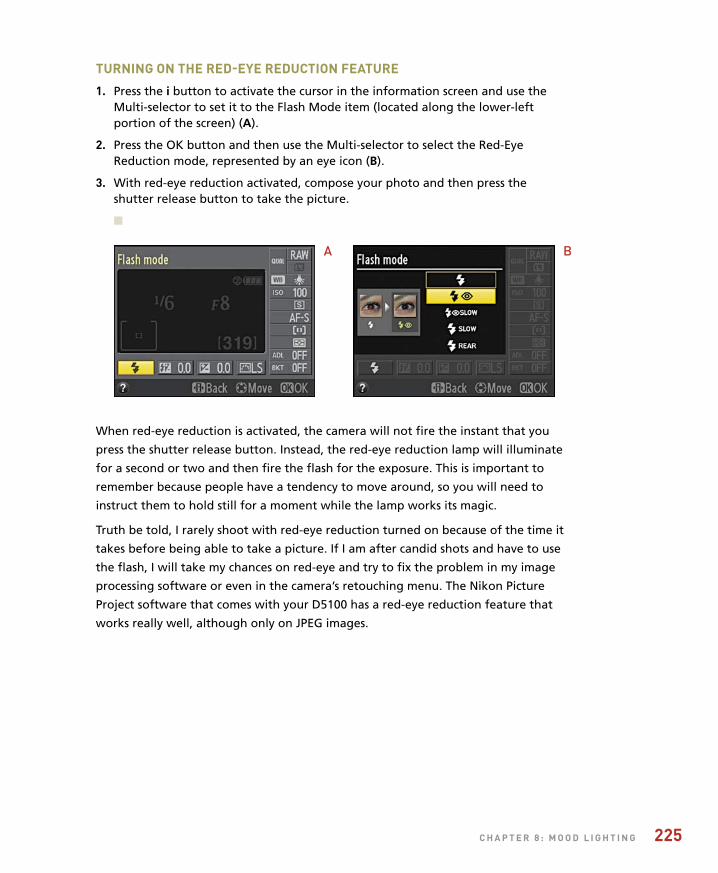
ptg
c h a P t e r 8 : m o o D l i g h t i n g 225
turning on the reD-eye reDuction Feature
1. Press the i button to activate the cursor in the information screen and use theMulti-selector to set it to the Flash Mode item (located along the lower-leftportion of the screen) (A).
2. Press the OK button and then use the Multi-selector to select the Red-EyeReduction mode, represented by an eye icon (B).
3. With red-eye reduction activated, compose your photo and then press theshutter release button to take the picture.
n
When red-eye reduction is activated, the camera will not fire the instant that you
press the shutter release button. Instead, the red-eye reduction lamp will illuminate
for a second or two and then fire the flash for the exposure. This is important to
remember because people have a tendency to move around, so you will need to
instruct them to hold still for a moment while the lamp works its magic.
Truth be told, I rarely shoot with red-eye reduction turned on because of the time it
takes before being able to take a picture. If I am after candid shots and have to use
the flash, I will take my chances on red-eye and try to fix the problem in my image
processing software or even in the camera’s retouching menu. The Nikon Picture
Project software that comes with your D5100 has a red-eye reduction feature that
works really well, although only on JPEG images.
A B
ptg
226 n i k o n D 5 1 0 0 : F r o m S n a P S h o t S t o g r e at S h o t S
rear curtain SyncThere are two flash synchronization modes in the D5100. There’s front curtain and
rear curtain. You may be asking, “What in the world does synchronization do, and
what’s with these ‘curtains’?” Good question.
When your camera fires, there are two curtains that open and close to make up the
shutter. The first, or front, curtain moves out of the way, exposing the camera sensor
to the light. At the end of the exposure, the second, or rear, curtain moves in front
of the sensor, ending that picture cycle. In flash photography, timing is extremely
important because the flash fires in milliseconds and the shutter is usually opening in
tenths or hundredths of a second. To make sure these two functions happen in order,
the camera usually fires the flash just as the first curtain moves out of the way (see
the “Flash Sync” sidebar, earlier in this chapter).
In Rear Curtain Sync mode, the flash will not fire until just before the second shutter
curtain ends the exposure. So, why have this mode at all? Well, there might be times
when you want to have a longer exposure to balance out the light from the back-
ground to go with the subject needing the flash. Imagine taking a photograph of a
friend standing in Times Square at night with all the traffic moving about and the
bright lights of the streets overhead. If the flash fires at the beginning of the expo-
sure and then the objects around the subject move, those objects will often blur or
even obscure the subject a bit. If the camera is set to Rear Curtain Sync, though, all
of the movement is recorded using the existing light first, and then the subject is
“frozen” by the flash at the end by the exposure.
There is no right or wrong to it. It’s just a decision on what type of effect it is that
you would like to create. Many times, Rear Curtain Sync is used for artistic purposes
or to record movement in the scene without it overlapping the flash-exposed subject
(Figure 8.18). To make sure that the main subject is always getting the final pop of
the flash, I leave my camera set to Rear Camera Sync most of the time.
Figure 8.19 shows an example of what happens with a slow shutter speed, fast
action, and rear curtain sync. It was a handheld shot, so there is camera shake with
the 3-second exposure, but thanks to the Rear Curtain Sync setting, the result conveys
the sense of movement, the low ambient light of the playground at dusk, and a clear
shot of the child leaving the slide.
Note that if you do intend to use a long exposure with first curtain synchronization,
you need to have your subject remain fairly still so that any movement that occurs
after the flash goes off will be minimized in the image.
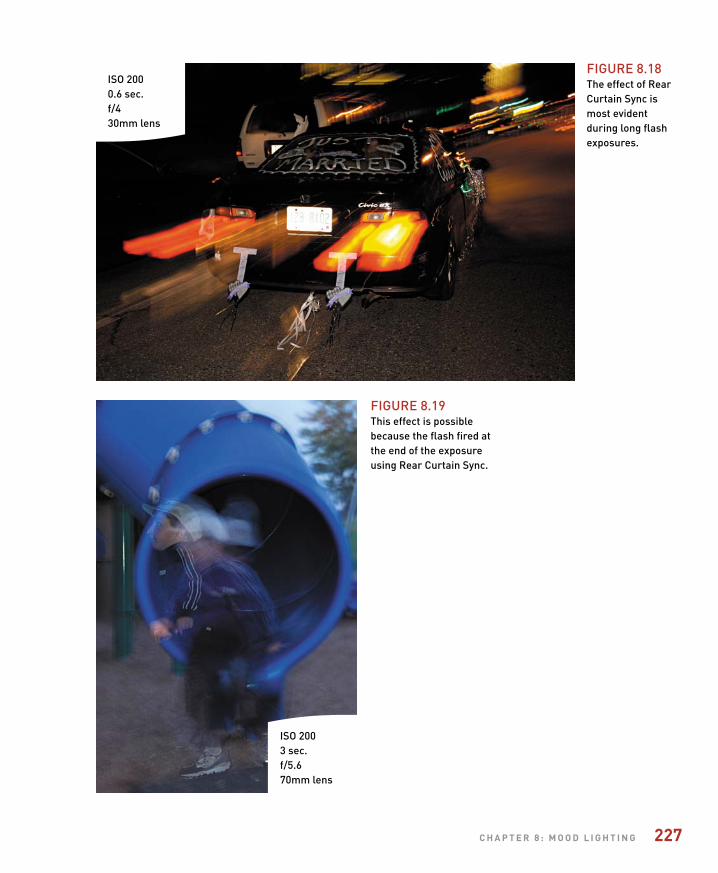
ptg
c h a P t e r 8 : m o o D l i g h t i n g 227
ISO 2000.6 sec.f/430mm lens
FIgure 8.18The effect of rearCurtain Sync ismost evidentduring long flashexposures.
FIgure 8.19This effect is possiblebecause the flash fired atthe end of the exposureusing rear Curtain Sync.
ISO 2003 sec.f/5.670mm lens
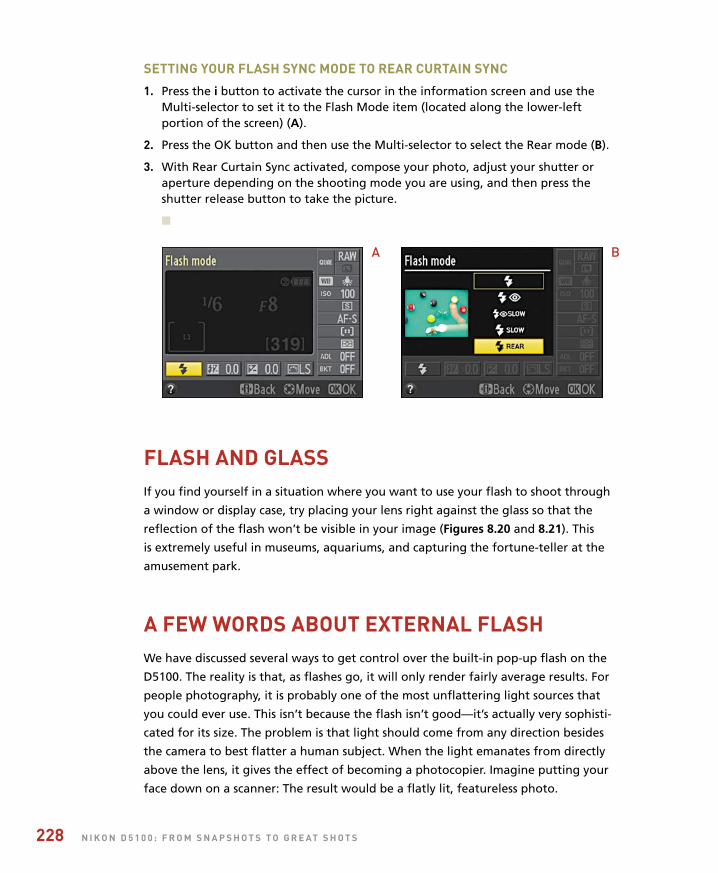
ptg
228 n i k o n D 5 1 0 0 : F r o m S n a P S h o t S t o g r e at S h o t S
Setting your FlaSh Sync moDe to rear curtain Sync
1. Press the i button to activate the cursor in the information screen and use theMulti-selector to set it to the Flash Mode item (located along the lower-leftportion of the screen) (A).
2. Press the OK button and then use the Multi-selector to select the Rear mode (B).
3. With Rear Curtain Sync activated, compose your photo, adjust your shutter oraperture depending on the shooting mode you are using, and then press theshutter release button to take the picture.
n
FlaSh anD glaSSIf you find yourself in a situation where you want to use your flash to shoot through
a window or display case, try placing your lens right against the glass so that the
reflection of the flash won’t be visible in your image (Figures 8.20 and 8.21). This
is extremely useful in museums, aquariums, and capturing the fortune-teller at the
amusement park.
a Few worDS about external FlaShWe have discussed several ways to get control over the built-in pop-up flash on the
D5100. The reality is that, as flashes go, it will only render fairly average results. For
people photography, it is probably one of the most unflattering light sources that
you could ever use. This isn’t because the flash isn’t good—it’s actually very sophisti-
cated for its size. The problem is that light should come from any direction besides
the camera to best flatter a human subject. When the light emanates from directly
above the lens, it gives the effect of becoming a photocopier. Imagine putting your
face down on a scanner: The result would be a flatly lit, featureless photo.
A B
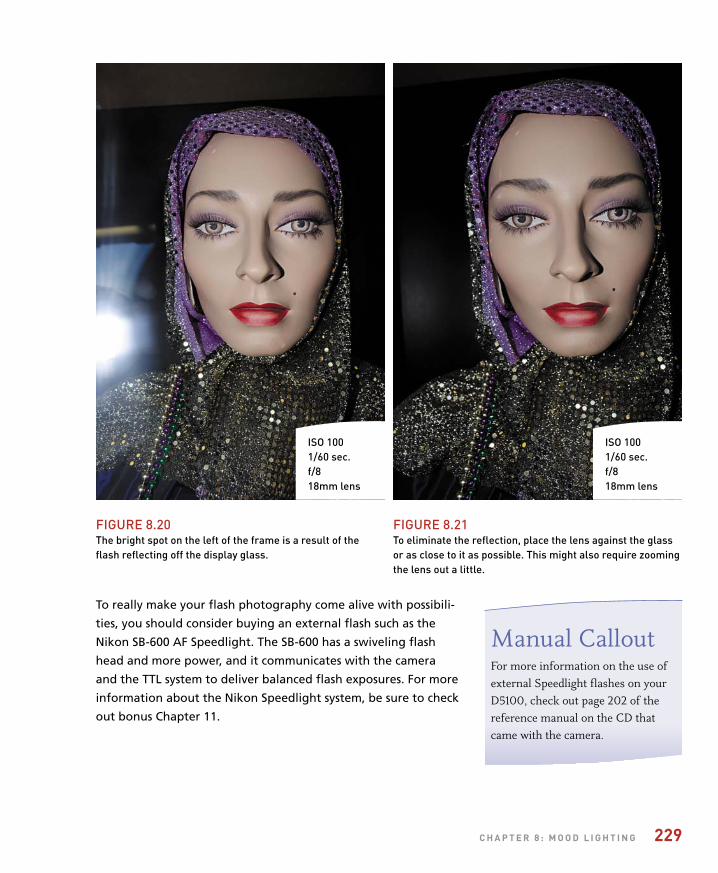
ptg
c h a P t e r 8 : m o o D l i g h t i n g 229
ISO 1001/60 sec.f/818mm lens
ISO 1001/60 sec.f/818mm lens
FIgure 8.20The bright spot on the left of the frame is a result of theflash reflecting off the display glass.
FIgure 8.21To eliminate the reflection, place the lens against the glassor as close to it as possible. This might also require zoomingthe lens out a little.
To really make your flash photography come alive with possibili-
ties, you should consider buying an external flash such as the
Nikon SB-600 AF Speedlight. The SB-600 has a swiveling flash
head and more power, and it communicates with the camera
and the TTL system to deliver balanced flash exposures. For more
information about the Nikon Speedlight system, be sure to check
out bonus Chapter 11.
Manual CalloutFor more information on the use of external Speedlight flashes on your D5100, check out page 202 of the reference manual on the CD that came with the camera.

ptg
230 n i k o n D 5 1 0 0 : F r o m S n a P S h o t S t o g r e at S h o t S
Chapter 8 AssignmentsNow that we have looked at the possibilities of shooting after dark, it’s time to put it all to the test. These assignments cover the full range of shooting possibilities, both with flash and with-out. Let’s get started.
How steady are your hands?
It’s important to know just what your limits are in terms of handholding your camera and still getting sharp pictures. This will change depending on the focal length of the lens you are working with. Wider-angle lenses are more forgiving than telephoto lenses, so check this out for your longest and shortest lenses. Using the 18–55mm zoom as an example, set your lens to 55mm and then, with the camera set to ISO 200 and the mode set to Shutter Priority, turn off the VR and start taking pictures with lower and lower shutter speeds. Review each image on the LCD at a zoomed-in magnification to take note of when you start seeing visible camera shake in your images. It will probably be around 1/60 of a second for a 55mm lens.
Now do the same for the wide-angle setting on the lens. My limit is about 1/30 of a second. These shutter speeds are with the Vibration Reduction feature turned off. If you have a VR lens, try it with and without the VR feature enabled to see just how slow you can set your shut-ter while getting sharp results.
Pushing your ISO to the extreme
Find a place to shoot where the ambient light level is low. This could be at night or indoors in a darkened room. Using the mode of your choice, start increasing the ISO from 100 until you get to Hi 2. Make sure you evaluate the level of noise in your image, especially in the shadow areas. Only you can decide how much noise is acceptable in your pictures. I can tell you from personal experience that I never like to stray above that ISO 800 mark unless I absolutely need to get the shot regardless of the noise.
Getting rid of the noise
Turn on High ISO Noise Reduction and repeat the previous assignment. Find your acceptable limits with the noise reduction turned on. Also pay attention to how much detail is lost in your shadows with this function enabled.
Long exposures in the dark
If you don’t have a tripod, find a stable place to set your camera outside and try some long expo-sures. Set your camera to Aperture Priority mode and then use the self-timer to activate the camera (this will keep you from shaking the camera while pressing the shutter button).
Shoot in an area that has some level of ambient light, be it a streetlight, traffic lights, or even a full moon. The idea is to get some late-night low-light exposures.

ptg
231
Reducing the noise in your long exposures
Now repeat the last assignment but with Long Exposure Noise Reduction set to On. Now look at the difference in the images that were taken before and after the noise reduction was enabled. For best results, perform this assignment and the previous assignment in the same shooting session and using the same subject.
Testing the limits of the pop-up flash
Wait for the lights to get low and then press that pop-up flash button to start using the built-in flash. Try using the different shooting modes to see how they affect your exposures. Use the Flash Exposure Compensation feature to take a series of pictures while adjusting from –3 stops all the way to +1 stops so that you become familiar with how much latitude you will get from this feature.
Getting the red out
Find a friend with some patience and a tolerance for bright lights. Have them sit in a darkened room or outside at night and then take their picture with the flash. Now turn on Red-Eye Reduction to see if you get better results. Don’t forget to have them sit still while the red-eye lamp does its thing.
Getting creative with Rear Curtain Sync
Now it’s time for a little creative fun. Set your camera up for Rear Curtain Sync and start shooting. Moving targets are best. Experiment with Shutter and Aperture Priority modes to lower the shutter speeds and exaggerate the effect. Try using a low ISO so the camera is forced to use longer shutter speeds. Be creative and have some fun!
Share your results with the book’s Flickr group!
Join the group here: flickr.com/groups/nikond5100fromsnapshotstogreatshots/

ptg
9
ISO 2001/180 sec.f/4.886mm lens
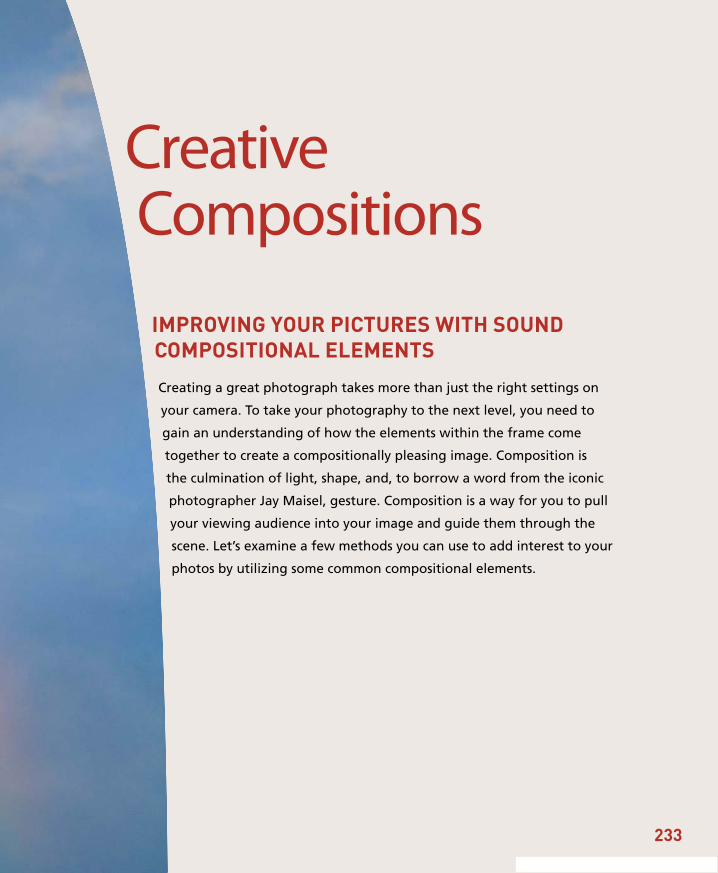
ptg
Creative Compositions
ImprovIng Your pIctures wIth soundcomposItIonal elements
Creating a great photograph takes more than just the right settings on
your camera. To take your photography to the next level, you need to
gain an understanding of how the elements within the frame come
together to create a compositionally pleasing image. Composition is
the culmination of light, shape, and, to borrow a word from the iconic
photographer Jay Maisel, gesture. Composition is a way for you to pull
your viewing audience into your image and guide them through the
scene. Let’s examine a few methods you can use to add interest to your
photos by utilizing some common compositional elements.
233
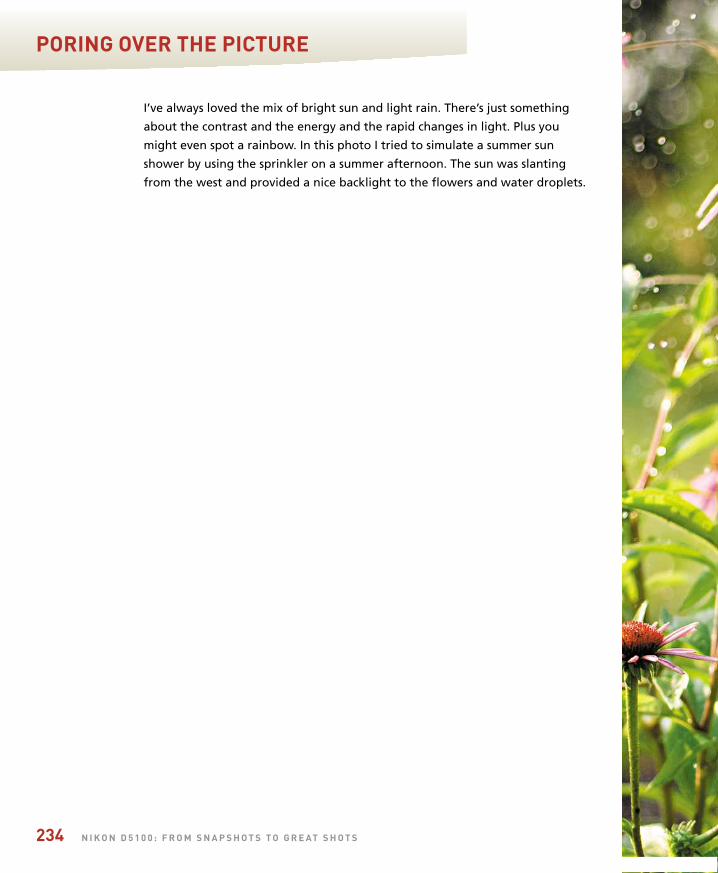
ptg
234 n I k o n d 5 1 0 0 : F r o m s n a p s h o t s t o g r e at s h o t s
porIng over the pIcture
I’ve always loved the mix of bright sun and light rain. There’s just something
about the contrast and the energy and the rapid changes in light. Plus you
might even spot a rainbow. In this photo I tried to simulate a summer sun
shower by using the sprinkler on a summer afternoon. The sun was slanting
from the west and provided a nice backlight to the flowers and water droplets.

ptg
c h a p t e r 9 : c r e at I v e c o m p o s I t I o n s 235
ISO 4001/2000 sec.f/2.860mm lens
Water droplets arefrozen in mid-flight bythe fast shutter speed.
I love the way the out of focuswater droplets add energy to theempty space above the flowers.
The bright pinks in theflowers leap off the darkgreens of the background.
A wide-open aperture threwthe background out of focus.

ptg
236 n I k o n d 5 1 0 0 : F r o m s n a p s h o t s t o g r e at s h o t s
depth oF FIeldLong focal lengths and large apertures will allow you to isolate your subject from the
chaos that surrounds it. I utilize the Aperture Priority mode for the majority of my
shooting. I also like to use a longer focal length lens to shrink the depth of field to a
very narrow area (Figure 9.1).
The blurred background and foreground force the viewer’s eye toward the sharper,
in-focus areas, which gives greater emphasis to the subject.
Occasionally a greater depth of field is required to maintain a sharp focus across a
greater distance. This might be due to the sheer depth of your subject, where you
have objects that are near the camera but sharpness is desired at a greater distance
as well (Figure 9.2).
ISO 2001/1000 sec.f/2.8200mm lens
ISO 2001/125 sec.f/8200mm lens
FIgure 9.1The combination of a telephoto lens and a large aperture can create a shallow depth of field to isolate the subject.
FIgure 9.2Decreasing the size of the aperture extends the depth offield farther.
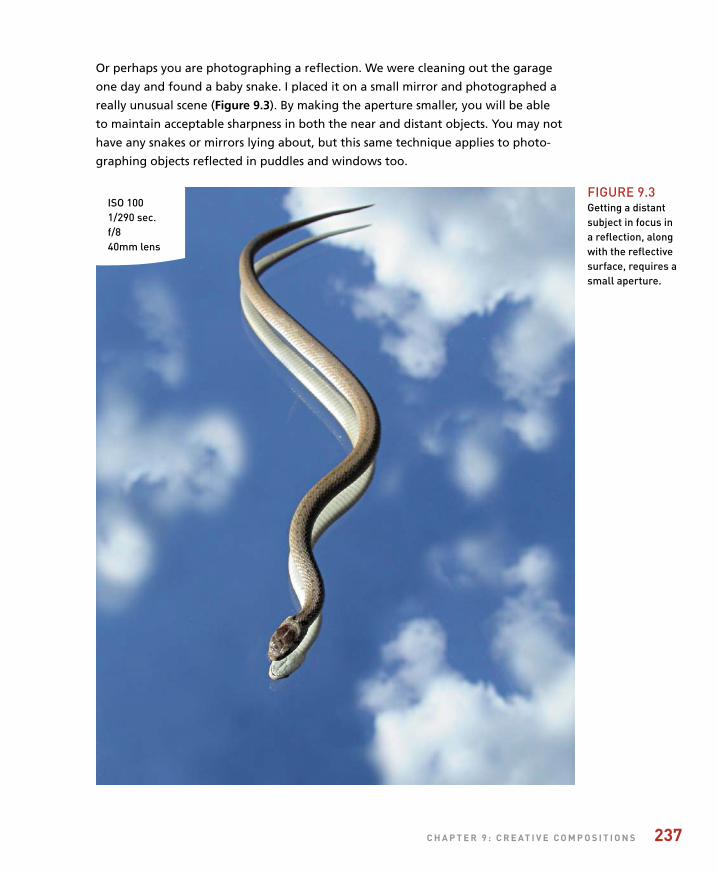
ptg
c h a p t e r 9 : c r e at I v e c o m p o s I t I o n s 237
Or perhaps you are photographing a reflection. We were cleaning out the garage
one day and found a baby snake. I placed it on a small mirror and photographed a
really unusual scene (Figure 9.3). By making the aperture smaller, you will be able
to maintain acceptable sharpness in both the near and distant objects. You may not
have any snakes or mirrors lying about, but this same technique applies to photo-
graphing objects reflected in puddles and windows too.
ISO 1001/290 sec.f/840mm lens
FIgure 9.3getting a distantsubject in focus ina reflection, alongwith the reflectivesurface, requires asmall aperture.
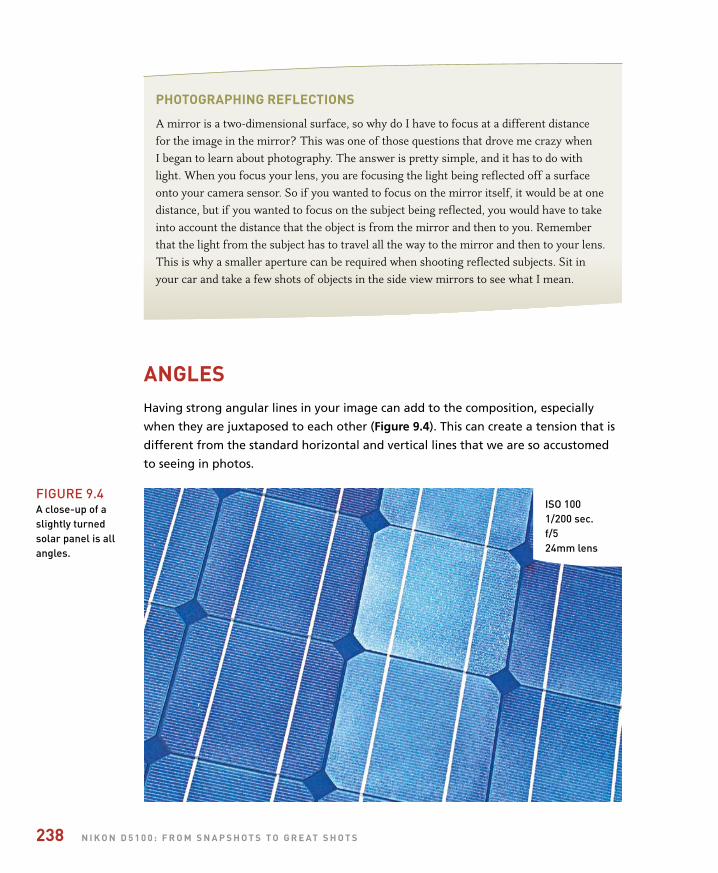
ptg
238 n I k o n d 5 1 0 0 : F r o m s n a p s h o t s t o g r e at s h o t s
photographIng reFlectIons
A mirror is a two-dimensional surface, so why do I have to focus at a different distance for the image in the mirror? This was one of those questions that drove me crazy when I began to learn about photography. The answer is pretty simple, and it has to do with light. When you focus your lens, you are focusing the light being reflected off a surface onto your camera sensor. So if you wanted to focus on the mirror itself, it would be at one distance, but if you wanted to focus on the subject being reflected, you would have to take into account the distance that the object is from the mirror and then to you. Remember that the light from the subject has to travel all the way to the mirror and then to your lens. This is why a smaller aperture can be required when shooting reflected subjects. Sit in your car and take a few shots of objects in the side view mirrors to see what I mean.
anglesHaving strong angular lines in your image can add to the composition, especially
when they are juxtaposed to each other (Figure 9.4). This can create a tension that is
different from the standard horizontal and vertical lines that we are so accustomed
to seeing in photos.
ISO 1001/200 sec.f/524mm lens
FIgure 9.4A close-up of aslightly turnedsolar panel is allangles.
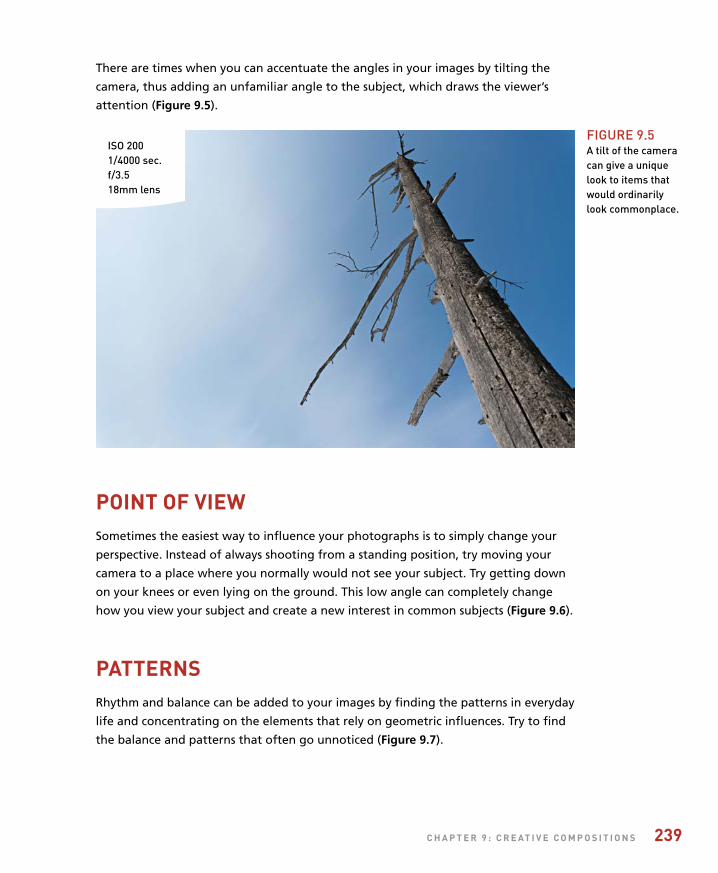
ptg
c h a p t e r 9 : c r e at I v e c o m p o s I t I o n s 239
There are times when you can accentuate the angles in your images by tilting the
camera, thus adding an unfamiliar angle to the subject, which draws the viewer’s
attention (Figure 9.5).
ISO 2001/4000 sec.f/3.518mm lens
FIgure 9.5A tilt of the cameracan give a uniquelook to items thatwould ordinarilylook commonplace.
poInt oF vIewSometimes the easiest way to influence your photographs is to simply change your
perspective. Instead of always shooting from a standing position, try moving your
camera to a place where you normally would not see your subject. Try getting down
on your knees or even lying on the ground. This low angle can completely change
how you view your subject and create a new interest in common subjects (Figure 9.6).
patternsRhythm and balance can be added to your images by finding the patterns in everyday
life and concentrating on the elements that rely on geometric influences. Try to find
the balance and patterns that often go unnoticed (Figure 9.7).
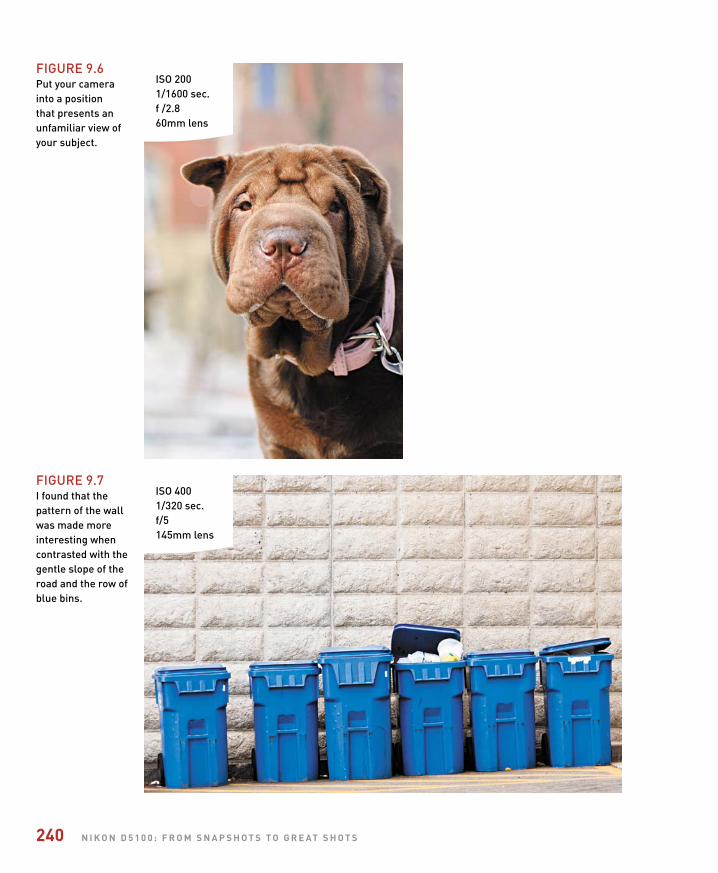
ptg
240 n I k o n d 5 1 0 0 : F r o m s n a p s h o t s t o g r e at s h o t s
ISO 2001/1600 sec.f /2.860mm lens
ISO 4001/320 sec.f/5145mm lens
FIgure 9.6Put your camerainto a positionthat presents anunfamiliar view ofyour subject.
FIgure 9.7I found that thepattern of the wallwas made moreinteresting whencontrasted with thegentle slope of theroad and the row ofblue bins.
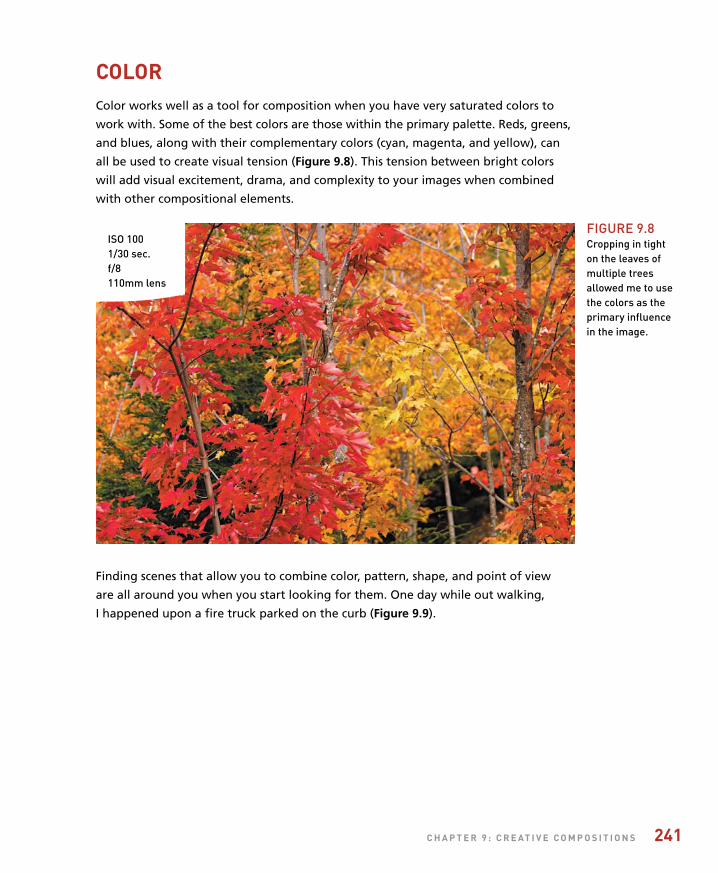
ptg
c h a p t e r 9 : c r e at I v e c o m p o s I t I o n s 241
colorColor works well as a tool for composition when you have very saturated colors to
work with. Some of the best colors are those within the primary palette. Reds, greens,
and blues, along with their complementary colors (cyan, magenta, and yellow), can
all be used to create visual tension (Figure 9.8). This tension between bright colors
will add visual excitement, drama, and complexity to your images when combined
with other compositional elements.
ISO 1001/30 sec.f/8110mm lens
FIgure 9.8Cropping in tighton the leaves ofmultiple treesallowed me to usethe colors as theprimary influencein the image.
Finding scenes that allow you to combine color, pattern, shape, and point of view
are all around you when you start looking for them. One day while out walking,
I happened upon a fire truck parked on the curb (Figure 9.9).

ptg
242 n I k o n d 5 1 0 0 : F r o m s n a p s h o t s t o g r e at s h o t s
contrastWe just saw that you can use color as a strong compositional tool. One of the most
effective uses of color is to combine two contrasting colors that make the eye move
back and forth across the image (Figure 9.10). There is no exact combination that will
work best, but consider using dark and light colors, like red and yellow or blue and
yellow, to provide the strongest contrasts.
You can also introduce contrast through different geometric shapes that battle (in
a good way) for the attention of the viewer. You can combine circles and triangles,
ovals and rectangles, curvy and straight, hard and soft, dark and light, and so
many more (Figure 9.11). You aren’t limited to just one contrasting element either.
Combining more than one element of contrast will add even more interest. Look for
these contrasting combinations whenever you are out shooting, and then use them
to shake up your compositions.
FIgure 9.9Looking at the backof the truck, I was struck by thepatterns and colorsas well as thetextures and lines.
ISO 2001/640 sec.f/6.3170mm lens
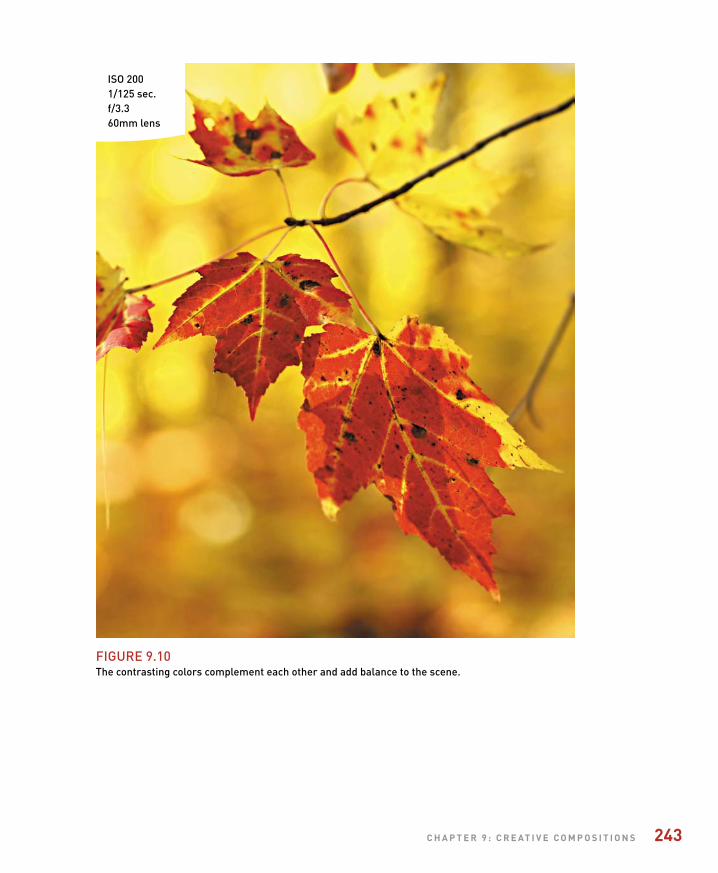
ptg
c h a p t e r 9 : c r e at I v e c o m p o s I t I o n s 243
ISO 2001/125 sec.f/3.360mm lens
FIgure 9.10The contrasting colors complement each other and add balance to the scene.

ptg
244 n I k o n d 5 1 0 0 : F r o m s n a p s h o t s t o g r e at s h o t s
ISO 1001/640 sec.f/5.340mm lens
FIgure 9.11The horizontal linesof the brick buildingcontrast with theupward-juttinglines of the steeple,but both buildingsshare a roundwindow, creatinganother area ofvisual interest forthe eye to discover.
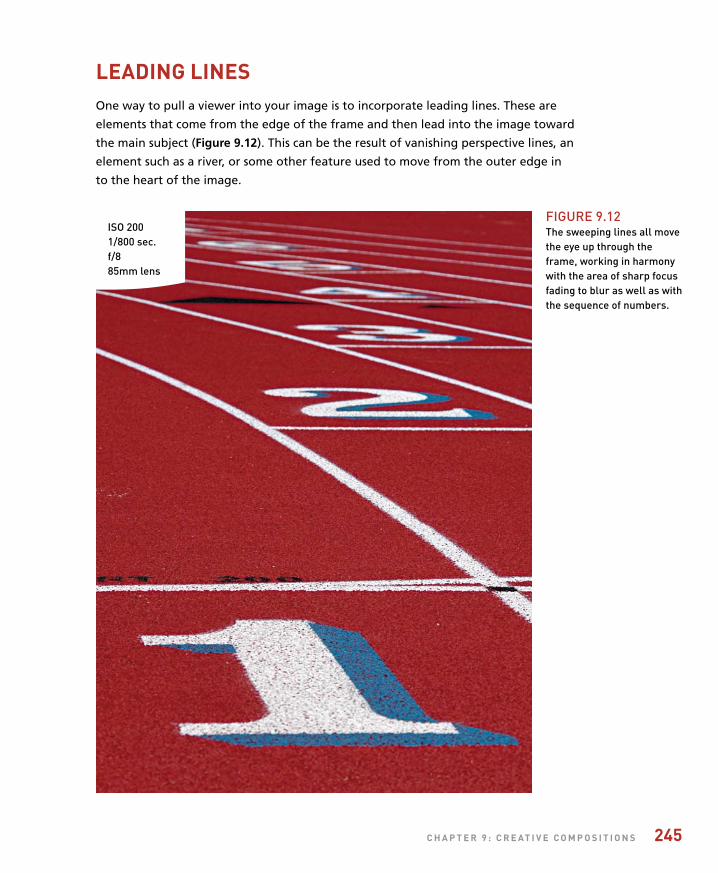
ptg
c h a p t e r 9 : c r e at I v e c o m p o s I t I o n s 245
leadIng lInesOne way to pull a viewer into your image is to incorporate leading lines. These are
elements that come from the edge of the frame and then lead into the image toward
the main subject (Figure 9.12). This can be the result of vanishing perspective lines, an
element such as a river, or some other feature used to move from the outer edge in
to the heart of the image.
FIgure 9.12The sweeping lines all movethe eye up through theframe, working in harmonywith the area of sharp focusfading to blur as well as withthe sequence of numbers.
ISO 2001/800 sec.f/885mm lens

ptg
246 n I k o n d 5 1 0 0 : F r o m s n a p s h o t s t o g r e at s h o t s
splIttIng the FrameSplitting the frame right down the middle is not necessarily your best option. While
it may seem more balanced, it can actually be pretty boring. Generally speaking, you
should utilize the rule of thirds when deciding how to divide your frame (Figure 9.13).
ISO 1001/750 sec.f/5.627mm lens
With horizons, a low horizon will give a sense of stability to the image. Typically, this
is done when the sky is more appealing than the landscape below. When the empha-
sis is to be placed on the landscape, the horizon line should be moved upward in the
frame, leaving the bottom two-thirds to the subject below (Figure 9.14).
Frames wIthIn FramesThe outer edge of your photograph acts as a frame to hold all of the visual elements
of the photograph. One way to add emphasis to your subject is through the use of
internal frames (Figure 9.15). Depending on how the frame is used, it can create the
illusion of a third dimension to your image, giving it a feeling of depth.
FIgure 9.13Not only did I placethe tree line at thebottom third of theframe, I also movedthe lone tree to theside instead of themiddle. This addsmore interest to thesubject and allowsthe eyes to moveacross the image in a more pleasingway.

ptg
c h a p t e r 9 : c r e at I v e c o m p o s I t I o n s 247
ISO 2001/500 sec.f/830 mm lens
FIgure 9.14The dull gray sky is nothing to lookat, so the smallboy on the beach is likely the firstthing to catch youreye. But then theleading lines of thefootprints carryyou up the beach tothe horizon, whichsweeps you to theleft to notice theother two figureswalking along theshore.
ISO 2001/160 sec.f/5.6105mm lens
FIgure 9.15This metalsculpture along theNew Hampshirecoast provides a perfect frame to watch the seabeyond. It makes a fine perch for acrow too.
ptg
248 n I k o n d 5 1 0 0 : F r o m s n a p s h o t s t o g r e at s h o t s
Chapter 9 AssignmentsApply the shooting techniques and tools that you have learned in the previous chapters to these assignments, and you’ll improve your ability to incorporate good composition into your photos. Make sure you experiment with all the different elements of composition and see how you can combine them to add interest to your images.
Learning to see lines and patterns
Take your camera for a walk around your neighborhood and look for patterns and angles. Don’t worry as much about getting great shots as about developing an eye for details.
The ABCs of composition
Here’s a great exercise: Shoot the alphabet. This will be a little more difficult, but with prac-tice you will start to see beyond the obvious. Don’t just find letters in street signs and the like. Instead, find objects that aren’t really letters but that have the shape of the letters.
Finding the square peg and the round hole
Circles, squares, and triangles. Spend a few sessions concentrating on shooting simple geometric shapes.
Using the aperture to focus attention
Depth of field plays an important role in defining your images and establishing depth and dimension. Practice shooting wide open, using your largest aperture for the narrowest depth of field. Then find a scene that would benefit from extended depth of field, using very small apertures to give sharpness throughout the scene.
Leading them into a frame
Look for scenes where you can use elements as leading lines, and then look for framing elements that you can use to isolate your subject and add both depth and dimension to your images.
Share your results with the book’s Flickr group!
Join the group here: flickr.com/groups/nikond5100fromsnapshotstogreatshots/

ptg
This page intentionally left blank
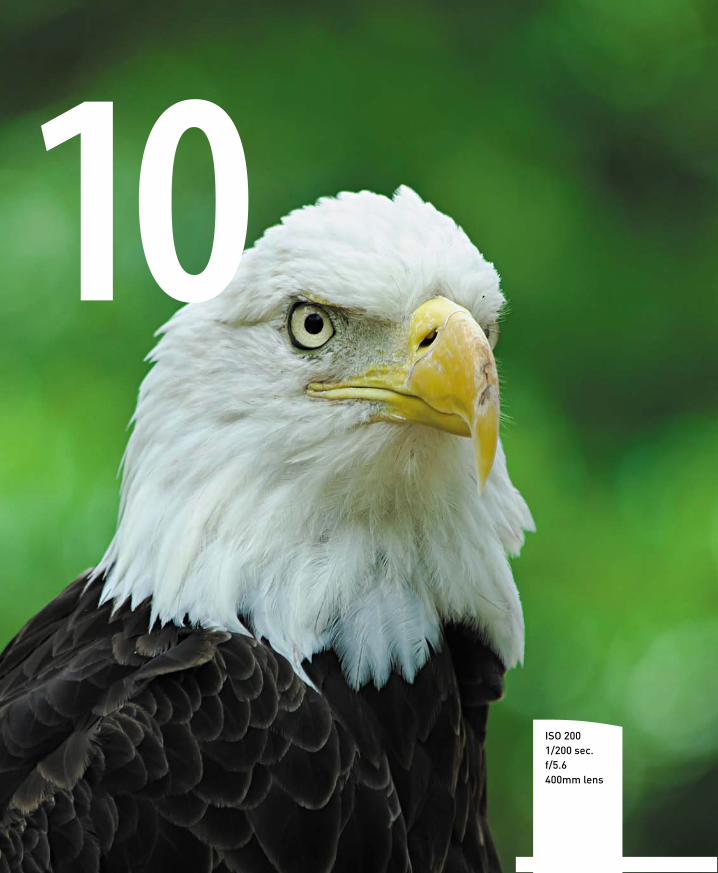
ptg
10
ISO 2001/200 sec.f/5.6400mm lens
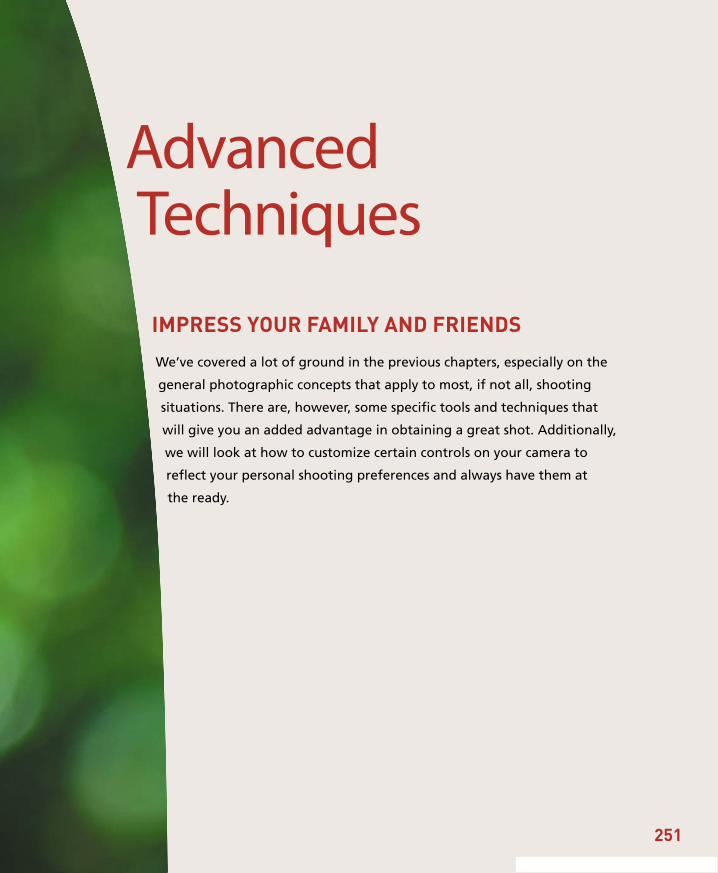
ptg
Advanced Techniques
Impress your famIly and frIends
We’ve covered a lot of ground in the previous chapters, especially on the
general photographic concepts that apply to most, if not all, shooting
situations. There are, however, some specific tools and techniques that
will give you an added advantage in obtaining a great shot. Additionally,
we will look at how to customize certain controls on your camera to
reflect your personal shooting preferences and always have them at
the ready.
251
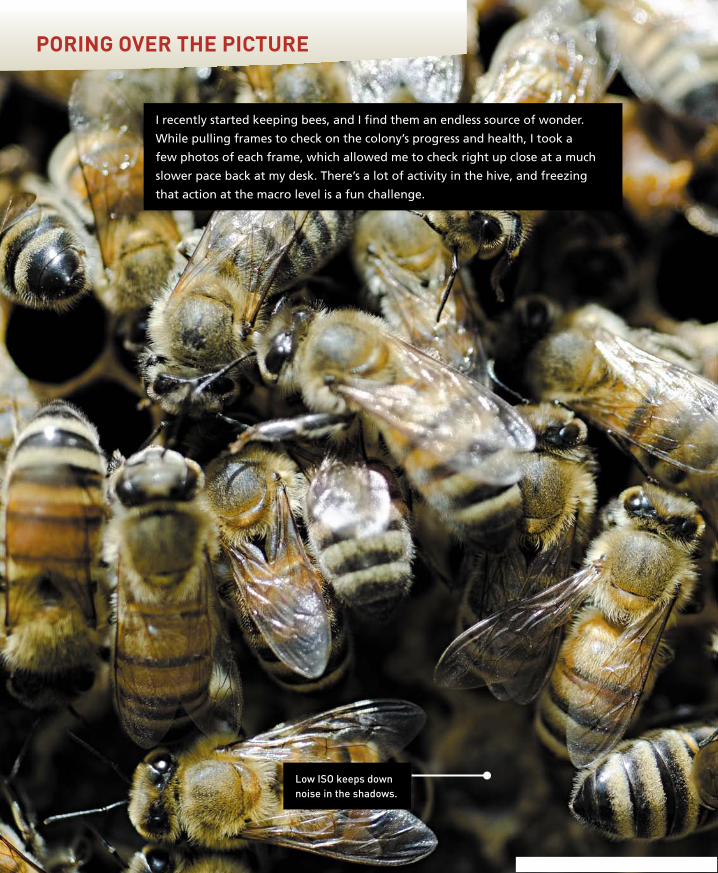
ptg
porIng over the pIcture
Low ISO keeps downnoise in the shadows.
I recently started keeping bees, and I find them an endless source of wonder.
While pulling frames to check on the colony’s progress and health, I took a
few photos of each frame, which allowed me to check right up close at a much
slower pace back at my desk. There’s a lot of activity in the hive, and freezing
that action at the macro level is a fun challenge.
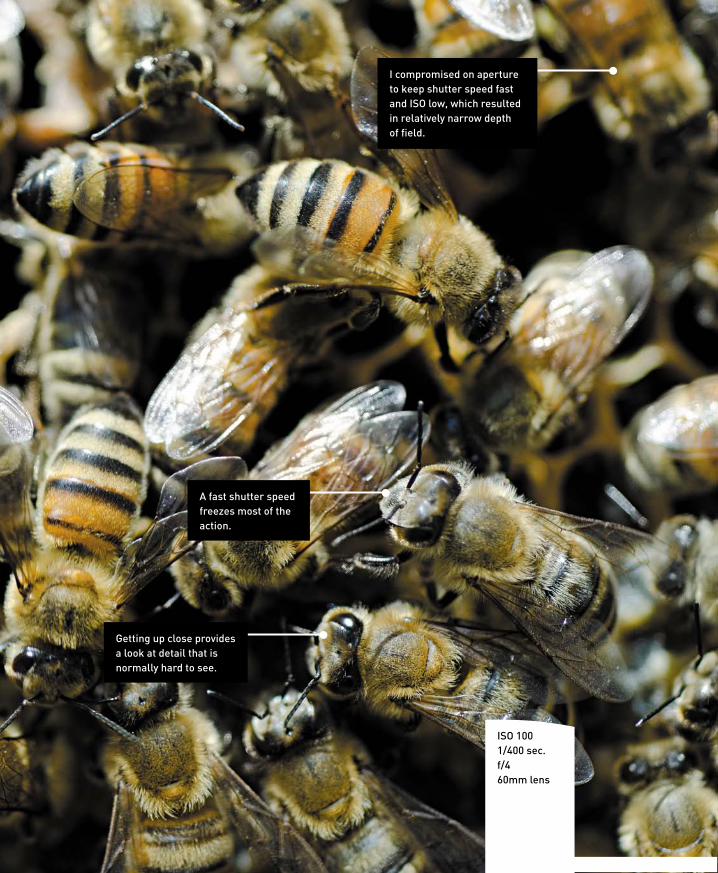
ptg
ISO 1001/400 sec.f/460mm lens
A fast shutter speedfreezes most of theaction.
I compromised on apertureto keep shutter speed fastand ISO low, which resultedin relatively narrow depthof field.
Getting up close providesa look at detail that isnormally hard to see.
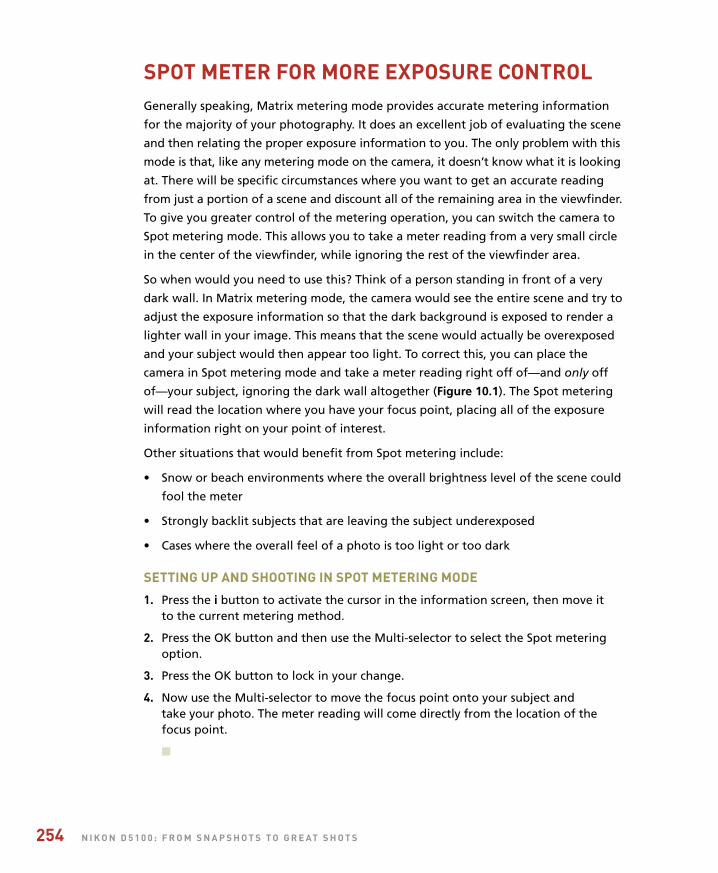
ptg
254 n I k o n d 5 1 0 0 : f r o m s n a p s h o t s t o g r e at s h o t s
spot meter for more exposure controlGenerally speaking, Matrix metering mode provides accurate metering information
for the majority of your photography. It does an excellent job of evaluating the scene
and then relating the proper exposure information to you. The only problem with this
mode is that, like any metering mode on the camera, it doesn’t know what it is looking
at. There will be specific circumstances where you want to get an accurate reading
from just a portion of a scene and discount all of the remaining area in the viewfinder.
To give you greater control of the metering operation, you can switch the camera to
Spot metering mode. This allows you to take a meter reading from a very small circle
in the center of the viewfinder, while ignoring the rest of the viewfinder area.
So when would you need to use this? Think of a person standing in front of a very
dark wall. In Matrix metering mode, the camera would see the entire scene and try to
adjust the exposure information so that the dark background is exposed to render a
lighter wall in your image. This means that the scene would actually be overexposed
and your subject would then appear too light. To correct this, you can place the
camera in Spot metering mode and take a meter reading right off of—and only off
of—your subject, ignoring the dark wall altogether (Figure 10.1). The Spot metering
will read the location where you have your focus point, placing all of the exposure
information right on your point of interest.
Other situations that would benefit from Spot metering include:
• Snow or beach environments where the overall brightness level of the scene could
fool the meter
• Strongly backlit subjects that are leaving the subject underexposed
• Cases where the overall feel of a photo is too light or too dark
settIng up and shootIng In spot meterIng mode
1. Press the i button to activate the cursor in the information screen, then move itto the current metering method.
2. Press the OK button and then use the Multi-selector to select the Spot meteringoption.
3. Press the OK button to lock in your change.
4. Now use the Multi-selector to move the focus point onto your subject and take your photo. The meter reading will come directly from the location of thefocus point.
n

ptg
c h a p t e r 1 0 : a d v a n c e d t e c h n I q u e s 255
ISO 1001/800 sec.f/3.260mm lens
FIGure 10.1The darkbackground wasmaking the meteroverexpose thelight-colored iris.using the Spotmeter on thesubject can helpyou zero in on great exposures.
Note that if you are using the Auto-area focus mode, the camera will use the center
focus point as the Spot metering location.
When using Spot metering mode, remember that the meter believes it is looking at a
middle gray value, so you might need to incorporate some exposure compensation of
your own to the reading that you are getting from your subject. This will come from
experience as you use the meter.
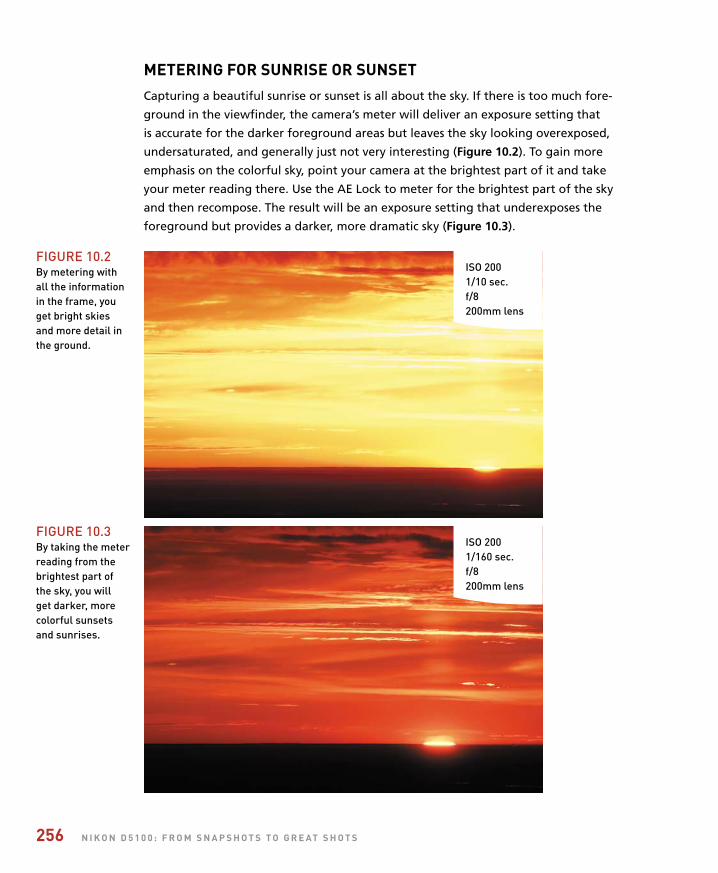
ptg
256 n I k o n d 5 1 0 0 : f r o m s n a p s h o t s t o g r e at s h o t s
meterIng for sunrIse or sunsetCapturing a beautiful sunrise or sunset is all about the sky. If there is too much fore-
ground in the viewfinder, the camera’s meter will deliver an exposure setting that
is accurate for the darker foreground areas but leaves the sky looking overexposed,
undersaturated, and generally just not very interesting (Figure 10.2). To gain more
emphasis on the colorful sky, point your camera at the brightest part of it and take
your meter reading there. Use the AE Lock to meter for the brightest part of the sky
and then recompose. The result will be an exposure setting that underexposes the
foreground but provides a darker, more dramatic sky (Figure 10.3).
ISO 2001/10 sec.f/8200mm lens
ISO 2001/160 sec.f/8200mm lens
FIGure 10.2By metering withall the informationin the frame, youget bright skies and more detail inthe ground.
FIGure 10.3By taking the meterreading from thebrightest part ofthe sky, you will get darker, morecolorful sunsetsand sunrises.

ptg
c h a p t e r 1 0 : a d v a n c e d t e c h n I q u e s 257
manual modeProbably one of the most advanced, and yet most basic, skills to master is shooting in
Manual mode. With the power and utility of most of the automatic modes, Manual
mode almost never sees the light of day. I have to admit that I don’t select it for use
very often, but there are times when no other mode will do. A situation that works
well with Manual is studio work with external flashes. I know that when I work with
studio lights, my exposure will not change, so I use Manual to eliminate any auto-
matic changes that might happen from shooting in Program, Shutter Priority, or
Aperture Priority mode.
Since you probably aren’t too concerned with studio strobes at this point, I will con-
centrate on one of the ways in which you will want to use Manual mode for your
photography: long nighttime exposures.
BulB photographyIf you want to work with long shutter speeds that don’t quite fit into one of the
selectable shutter speeds, you can select Bulb. This setting is only available in Manual
mode, and its sole purpose is to open the shutter at your command and then close it
again when you decide. I can think of two common scenarios where this would come
in handy: shooting fireworks and shooting lightning.
If you are photographing fireworks, you could certainly use one of the longer shutter
speeds available in Shutter Priority mode, since they are available for exposure times
of up to 30 seconds. That is fine, but sometimes you don’t need 30 seconds’ worth of
exposure and sometimes you need more.
If you open the shutter and then see a great burst of fireworks, you might decide
that that is all you want for that particular frame, so you click the button to end
the exposure. Set the camera to 30 seconds and you might get too many bursts, but
shorten it to 10 seconds and you might not get the one you want. The same can be
said for photographing a lightning storm. Lightning can be very tricky to capture,
and using the Bulb setting to open and then close the shutter at will allows for more
creativity as well as more opportunity to get the shot.
A safer subject you can practice with from the comfort of your own home is captur-
ing light trails from someone moving a glow stick in a dark room or your backyard
at night. Another option for owners of an iPad, iPod Touch, or iPhone is a great app
called Holographium (http://holographium.com), which allows you to create holo-
graphic text (Figure 10.4) captured during long exposures. Check out the gallery of
photos on the Holographium Web site to see some of the possibilities.

ptg
258 n I k o n d 5 1 0 0 : f r o m s n a p s h o t s t o g r e at s h o t s
ISO 1008.2 sec.f/855mm lens
To select the Bulb setting, simply place your camera in Manual mode and then
rotate the Command dial to the left until the shutter speed displays Bulb on the
rear LCD screen.
When you’re using the Bulb setting, the shutter will only stay open for the duration
that you are holding down the shutter button. You should also be using a sturdy
tripod or shooting surface to eliminate any self-induced vibration while using the
Bulb setting.
BulB
If you are new to the world of photography, you might be wondering where in the world the bulb shutter function got its name. After all, wouldn’t it make more sense to call it the Manual Shutter setting? It probably would, but this is one of those terms that harkens back to the origins of photography. Way back when, the shutter was actually opened through the use of a bulb-shaped device that forced air through a tube, which, in turn, pushed a plunger down, activating the camera shutter. When the bulb was released, it pulled the plunger back, letting the shutter close and ending the exposure.
FIGure 10.4I created aholographic longexposure of myname. The ML-L3wireless remoteis very handy forthese situations.
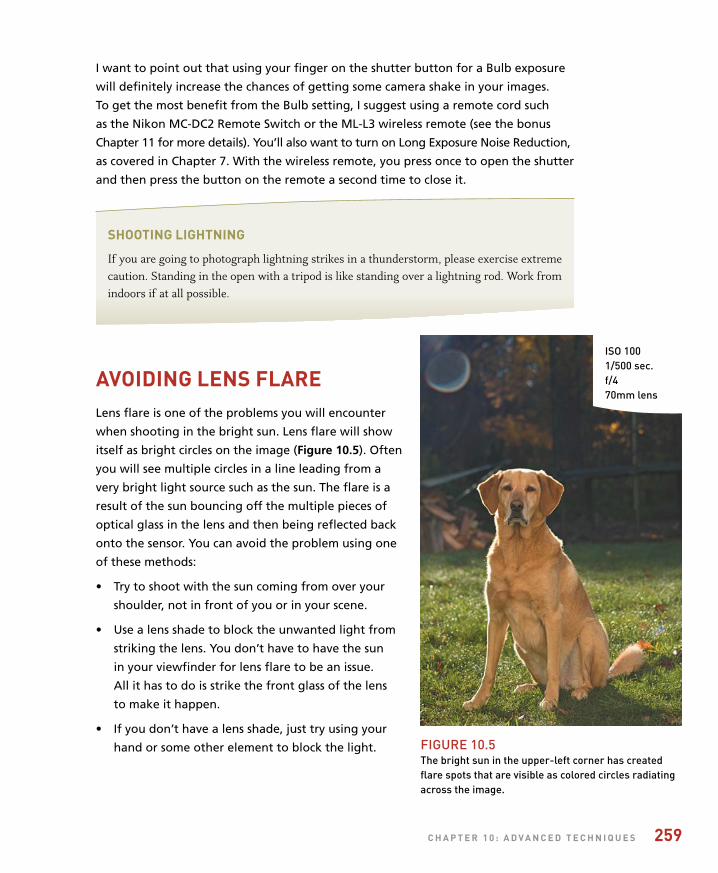
ptg
c h a p t e r 1 0 : a d v a n c e d t e c h n I q u e s 259
I want to point out that using your finger on the shutter button for a Bulb exposure
will definitely increase the chances of getting some camera shake in your images.
To get the most benefit from the Bulb setting, I suggest using a remote cord such
as the Nikon MC-DC2 Remote Switch or the ML-L3 wireless remote (see the bonus
Chapter 11 for more details). You’ll also want to turn on Long Exposure Noise Reduction,
as covered in Chapter 7. With the wireless remote, you press once to open the shutter
and then press the button on the remote a second time to close it.
shootIng lIghtnIng
If you are going to photograph lightning strikes in a thunderstorm, please exercise extreme caution. Standing in the open with a tripod is like standing over a lightning rod. Work from indoors if at all possible.
avoIdIng lens flareLens flare is one of the problems you will encounter
when shooting in the bright sun. Lens flare will show
itself as bright circles on the image (Figure 10.5). Often
you will see multiple circles in a line leading from a
very bright light source such as the sun. The flare is a
result of the sun bouncing off the multiple pieces of
optical glass in the lens and then being reflected back
onto the sensor. You can avoid the problem using one
of these methods:
• Try to shoot with the sun coming from over your
shoulder, not in front of you or in your scene.
• Use a lens shade to block the unwanted light from
striking the lens. You don’t have to have the sun
in your viewfinder for lens flare to be an issue.
All it has to do is strike the front glass of the lens
to make it happen.
• If you don’t have a lens shade, just try using your
hand or some other element to block the light.
ISO 1001/500 sec.f/470mm lens
FIGure 10.5The bright sun in the upper-left corner has createdflare spots that are visible as colored circles radiatingacross the image.
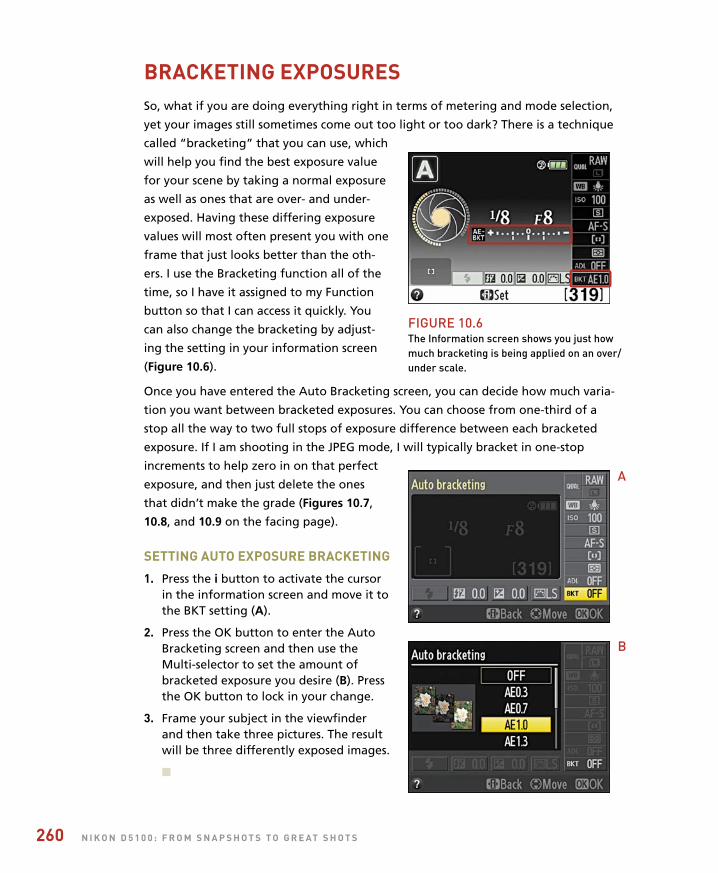
ptg
260 n I k o n d 5 1 0 0 : f r o m s n a p s h o t s t o g r e at s h o t s
BracketIng exposuresSo, what if you are doing everything right in terms of metering and mode selection,
yet your images still sometimes come out too light or too dark? There is a technique
called “bracketing” that you can use, which
will help you find the best exposure value
for your scene by taking a normal exposure
as well as ones that are over- and under-
exposed. Having these differing exposure
values will most often present you with one
frame that just looks better than the oth-
ers. I use the Bracketing function all of the
time, so I have it assigned to my Function
button so that I can access it quickly. You
can also change the bracketing by adjust-
ing the setting in your information screen
(Figure 10.6).
Once you have entered the Auto Bracketing screen, you can decide how much varia-
tion you want between bracketed exposures. You can choose from one-third of a
stop all the way to two full stops of exposure difference between each bracketed
exposure. If I am shooting in the JPEG mode, I will typically bracket in one-stop
increments to help zero in on that perfect
exposure, and then just delete the ones
that didn’t make the grade (Figures 10.7,
10.8, and 10.9 on the facing page).
settIng auto exposure BracketIng
1. Press the i button to activate the cursorin the information screen and move it tothe BKT setting (A).
2. Press the OK button to enter the AutoBracketing screen and then use theMulti-selector to set the amount ofbracketed exposure you desire (B). Pressthe OK button to lock in your change.
3. Frame your subject in the viewfinderand then take three pictures. The resultwill be three differently exposed images.
n
FIGure 10.6The Information screen shows you just howmuch bracketing is being applied on an over/under scale.
A
B
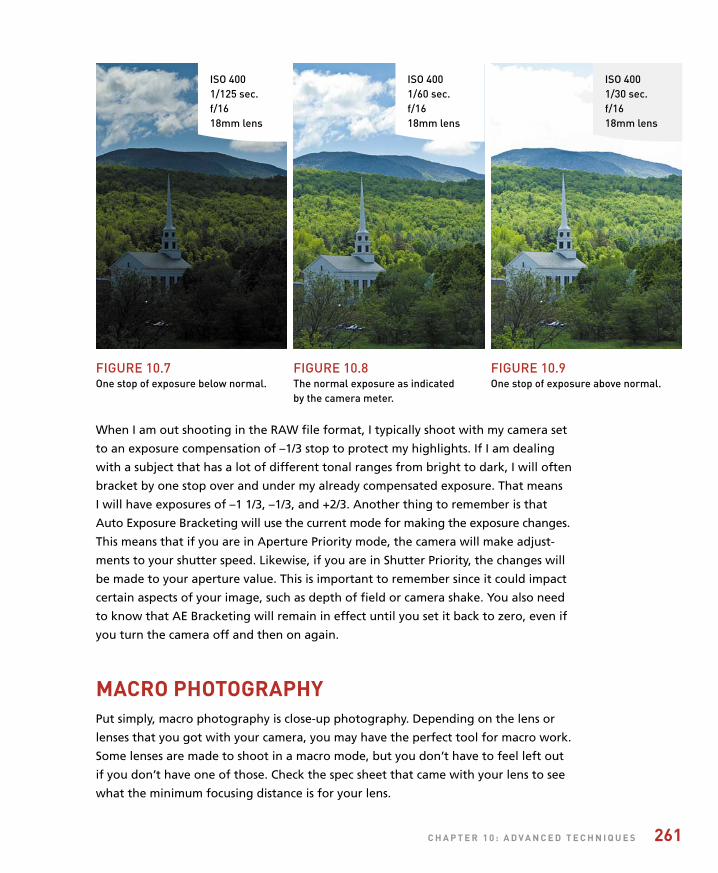
ptg
c h a p t e r 1 0 : a d v a n c e d t e c h n I q u e s 261
When I am out shooting in the RAW file format, I typically shoot with my camera set
to an exposure compensation of –1/3 stop to protect my highlights. If I am dealing
with a subject that has a lot of different tonal ranges from bright to dark, I will often
bracket by one stop over and under my already compensated exposure. That means
I will have exposures of –1 1/3, –1/3, and +2/3. Another thing to remember is that
Auto Exposure Bracketing will use the current mode for making the exposure changes.
This means that if you are in Aperture Priority mode, the camera will make adjust-
ments to your shutter speed. Likewise, if you are in Shutter Priority, the changes will
be made to your aperture value. This is important to remember since it could impact
certain aspects of your image, such as depth of field or camera shake. You also need
to know that AE Bracketing will remain in effect until you set it back to zero, even if
you turn the camera off and then on again.
macro photographyPut simply, macro photography is close-up photography. Depending on the lens or
lenses that you got with your camera, you may have the perfect tool for macro work.
Some lenses are made to shoot in a macro mode, but you don’t have to feel left out
if you don’t have one of those. Check the spec sheet that came with your lens to see
what the minimum focusing distance is for your lens.
FIGure 10.7One stop of exposure below normal.
FIGure 10.8The normal exposure as indicatedby the camera meter.
FIGure 10.9One stop of exposure above normal.
ISO 4001/125 sec.f/1618mm lens
ISO 4001/60 sec.f/1618mm lens
ISO 4001/30 sec.f/1618mm lens
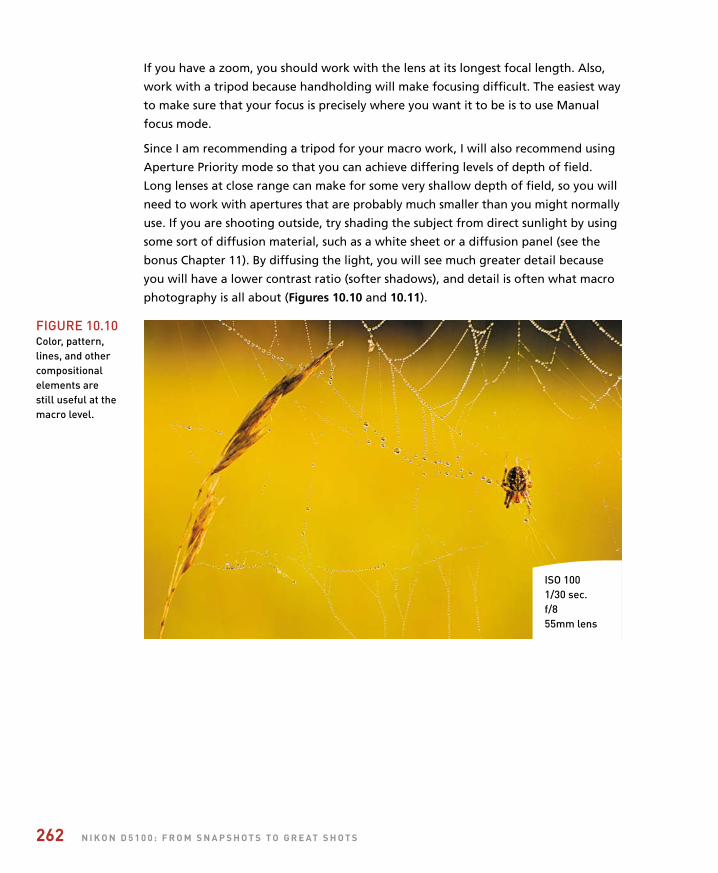
ptg
262 n I k o n d 5 1 0 0 : f r o m s n a p s h o t s t o g r e at s h o t s
If you have a zoom, you should work with the lens at its longest focal length. Also,
work with a tripod because handholding will make focusing difficult. The easiest way
to make sure that your focus is precisely where you want it to be is to use Manual
focus mode.
Since I am recommending a tripod for your macro work, I will also recommend using
Aperture Priority mode so that you can achieve differing levels of depth of field.
Long lenses at close range can make for some very shallow depth of field, so you will
need to work with apertures that are probably much smaller than you might normally
use. If you are shooting outside, try shading the subject from direct sunlight by using
some sort of diffusion material, such as a white sheet or a diffusion panel (see the
bonus Chapter 11). By diffusing the light, you will see much greater detail because
you will have a lower contrast ratio (softer shadows), and detail is often what macro
photography is all about (Figures 10.10 and 10.11).
ISO 1001/30 sec.f/855mm lens
FIGure 10.10Color, pattern,lines, and othercompositionalelements are still useful at themacro level.
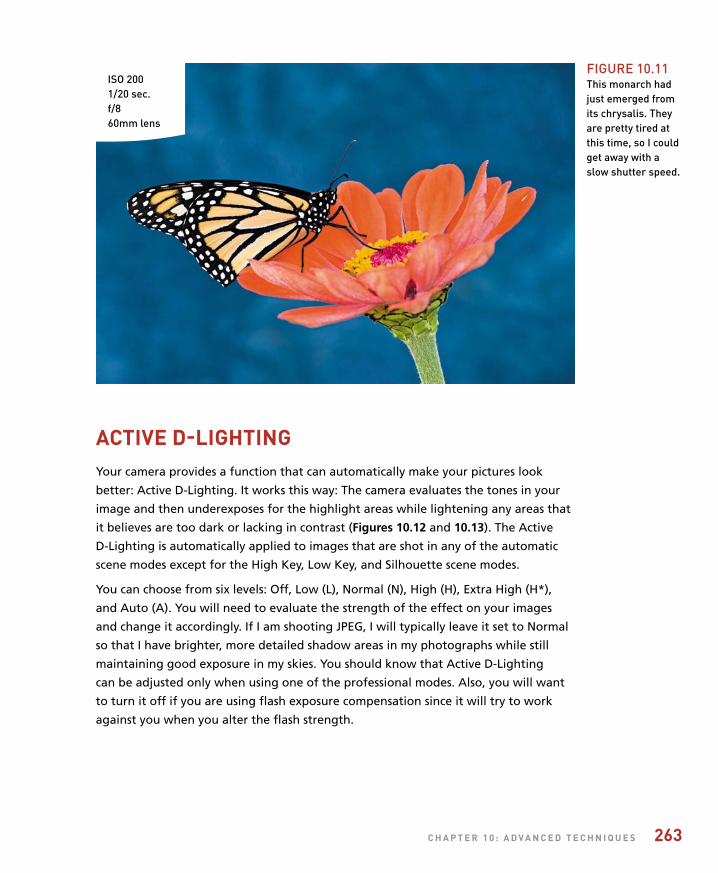
ptg
c h a p t e r 1 0 : a d v a n c e d t e c h n I q u e s 263
ISO 2001/20 sec.f/860mm lens
FIGure 10.11This monarch hadjust emerged fromits chrysalis. Theyare pretty tired atthis time, so I couldget away with aslow shutter speed.
actIve d-lIghtIngYour camera provides a function that can automatically make your pictures look
better: Active D-Lighting. It works this way: The camera evaluates the tones in your
image and then underexposes for the highlight areas while lightening any areas that
it believes are too dark or lacking in contrast (Figures 10.12 and 10.13). The Active
D-Lighting is automatically applied to images that are shot in any of the automatic
scene modes except for the High Key, Low Key, and Silhouette scene modes.
You can choose from six levels: Off, Low (L), Normal (N), High (H), Extra High (H*),
and Auto (A). You will need to evaluate the strength of the effect on your images
and change it accordingly. If I am shooting JPEG, I will typically leave it set to Normal
so that I have brighter, more detailed shadow areas in my photographs while still
maintaining good exposure in my skies. You should know that Active D-Lighting
can be adjusted only when using one of the professional modes. Also, you will want
to turn it off if you are using flash exposure compensation since it will try to work
against you when you alter the flash strength.

ptg
264 n I k o n d 5 1 0 0 : f r o m s n a p s h o t s t o g r e at s h o t s
Because Active D-Lighting reduces exposure and then uses Nikon’s own secret
sauce to process the final result in-camera when shooting JPEG, I don’t use Active
D-Lighting when shooting in RAW mode if I am not going to process the RAW images
in Nikon’s software (such as ViewNX 2 or Capture NX 2). This is because third-party
RAW processing software (such as Adobe Photoshop Lightroom or Apple Aperture)
sees only the slightly underexposed image and is unaware of the Active D-Lighting
setting. Just keep that in the back of your mind when you decide to make the move
up to shooting in RAW mode.
FIGure 10.12Without Active D-Lighting, the shadows in the image aredark and contrasty, while the bright sky is almost completelywashed out.
FIGure 10.13Active D-Lighting on the extra High setting preserved a lotmore detail in the sky even while managing to bring outmore detail in the shadows.
ISO 1000.6 sec.f/2215mm lens
ISO 1001.6 sec.f/2215mm lens
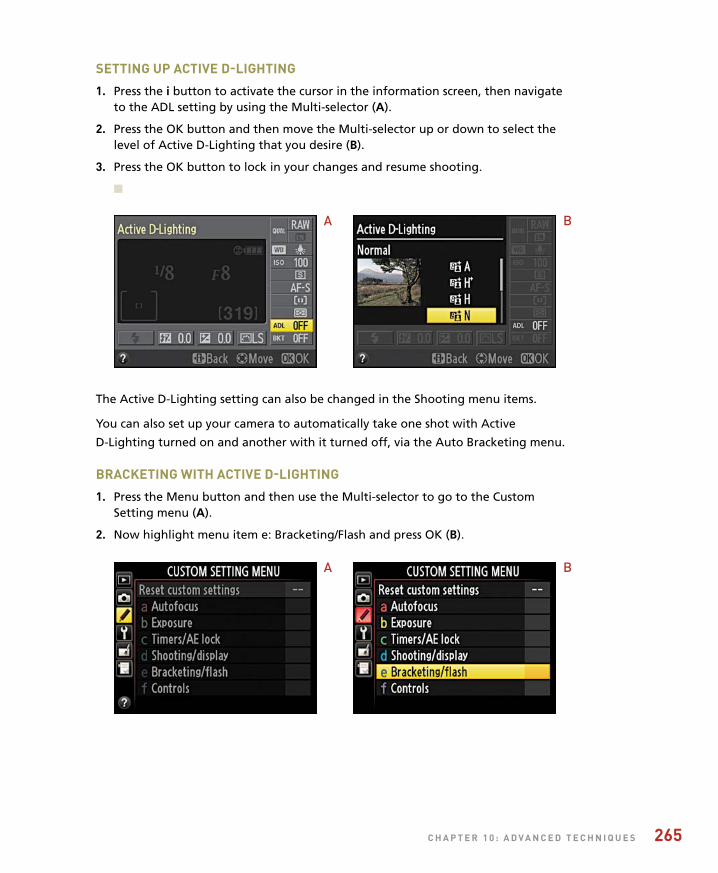
ptg
c h a p t e r 1 0 : a d v a n c e d t e c h n I q u e s 265
settIng up actIve d-lIghtIng
1. Press the i button to activate the cursor in the information screen, then navigateto the ADL setting by using the Multi-selector (A).
2. Press the OK button and then move the Multi-selector up or down to select thelevel of Active D-Lighting that you desire (B).
3. Press the OK button to lock in your changes and resume shooting.
n
The Active D-Lighting setting can also be changed in the Shooting menu items.
You can also set up your camera to automatically take one shot with Active
D-Lighting turned on and another with it turned off, via the Auto Bracketing menu.
BracketIng wIth actIve d-lIghtIng
1. Press the Menu button and then use the Multi-selector to go to the CustomSetting menu (A).
2. Now highlight menu item e: Bracketing/Flash and press OK (B).
A
A
B
B
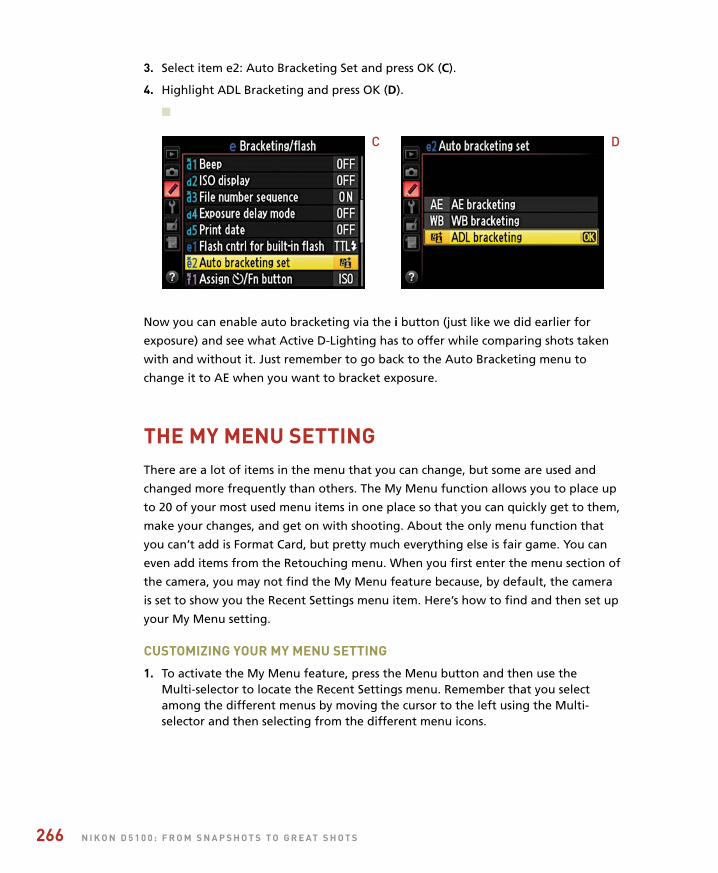
ptg
266 n I k o n d 5 1 0 0 : f r o m s n a p s h o t s t o g r e at s h o t s
3. Select item e2: Auto Bracketing Set and press OK (C).
4. Highlight ADL Bracketing and press OK (D).
n
Now you can enable auto bracketing via the i button (just like we did earlier for
exposure) and see what Active D-Lighting has to offer while comparing shots taken
with and without it. Just remember to go back to the Auto Bracketing menu to
change it to AE when you want to bracket exposure.
the my menu settIngThere are a lot of items in the menu that you can change, but some are used and
changed more frequently than others. The My Menu function allows you to place up
to 20 of your most used menu items in one place so that you can quickly get to them,
make your changes, and get on with shooting. About the only menu function that
you can’t add is Format Card, but pretty much everything else is fair game. You can
even add items from the Retouching menu. When you first enter the menu section of
the camera, you may not find the My Menu feature because, by default, the camera
is set to show you the Recent Settings menu item. Here’s how to find and then set up
your My Menu setting.
customIzIng your my menu settIng
1. To activate the My Menu feature, press the Menu button and then use theMulti-selector to locate the Recent Settings menu. Remember that you selectamong the different menus by moving the cursor to the left using the Multi-selector and then selecting from the different menu icons.
C D
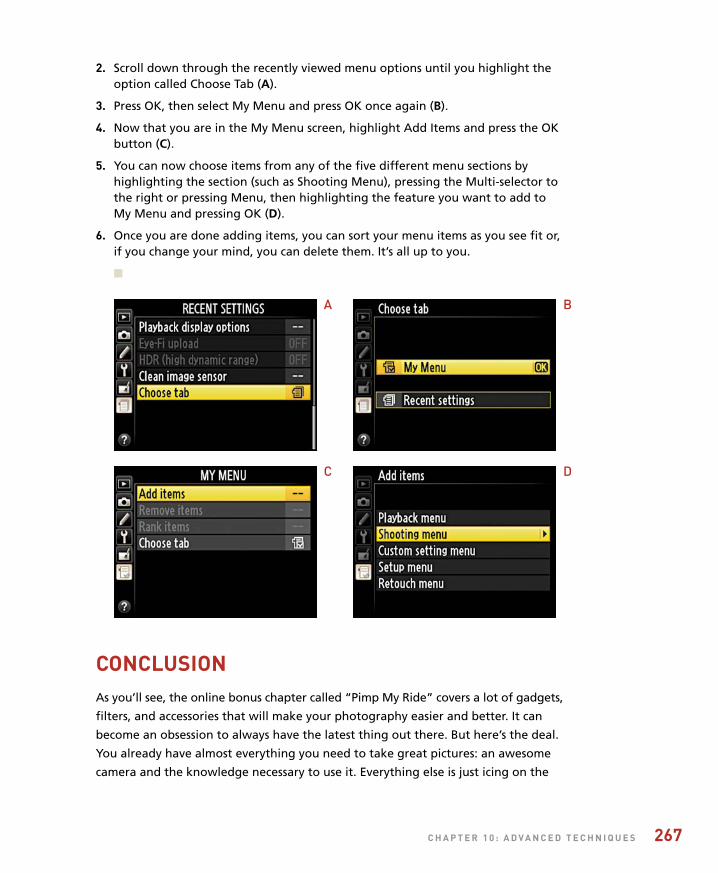
ptg
c h a p t e r 1 0 : a d v a n c e d t e c h n I q u e s 267
2. Scroll down through the recently viewed menu options until you highlight theoption called Choose Tab (A).
3. Press OK, then select My Menu and press OK once again (B).
4. Now that you are in the My Menu screen, highlight Add Items and press the OKbutton (C).
5. You can now choose items from any of the five different menu sections byhighlighting the section (such as Shooting Menu), pressing the Multi-selector tothe right or pressing Menu, then highlighting the feature you want to add toMy Menu and pressing OK (D).
6. Once you are done adding items, you can sort your menu items as you see fit or,if you change your mind, you can delete them. It’s all up to you.
n
conclusIonAs you’ll see, the online bonus chapter called “Pimp My Ride” covers a lot of gadgets,
filters, and accessories that will make your photography easier and better. It can
become an obsession to always have the latest thing out there. But here’s the deal.
You already have almost everything you need to take great pictures: an awesome
camera and the knowledge necessary to use it. Everything else is just icing on the
A
C
B
D
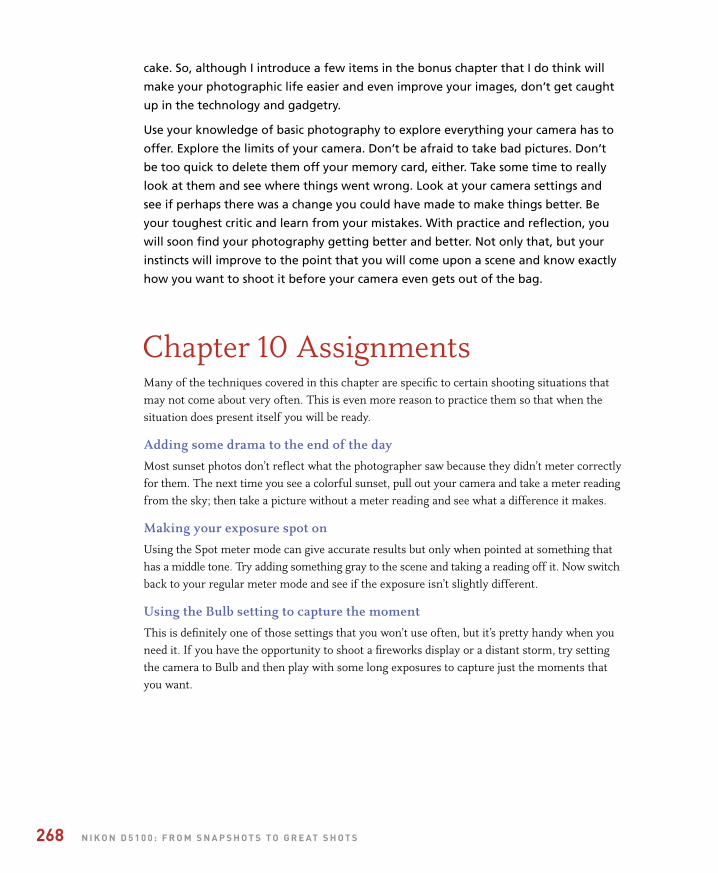
ptg
268 n I k o n d 5 1 0 0 : f r o m s n a p s h o t s t o g r e at s h o t s
cake. So, although I introduce a few items in the bonus chapter that I do think will
make your photographic life easier and even improve your images, don’t get caught
up in the technology and gadgetry.
Use your knowledge of basic photography to explore everything your camera has to
offer. Explore the limits of your camera. Don’t be afraid to take bad pictures. Don’t
be too quick to delete them off your memory card, either. Take some time to really
look at them and see where things went wrong. Look at your camera settings and
see if perhaps there was a change you could have made to make things better. Be
your toughest critic and learn from your mistakes. With practice and reflection, you
will soon find your photography getting better and better. Not only that, but your
instincts will improve to the point that you will come upon a scene and know exactly
how you want to shoot it before your camera even gets out of the bag.
Chapter 10 AssignmentsMany of the techniques covered in this chapter are specific to certain shooting situations that may not come about very often. This is even more reason to practice them so that when the situation does present itself you will be ready.
Adding some drama to the end of the day
Most sunset photos don’t reflect what the photographer saw because they didn’t meter correctly for them. The next time you see a colorful sunset, pull out your camera and take a meter reading from the sky; then take a picture without a meter reading and see what a difference it makes.
Making your exposure spot on
Using the Spot meter mode can give accurate results but only when pointed at something that has a middle tone. Try adding something gray to the scene and taking a reading off it. Now switch back to your regular meter mode and see if the exposure isn’t slightly different.
Using the Bulb setting to capture the moment
This is definitely one of those settings that you won’t use often, but it’s pretty handy when you need it. If you have the opportunity to shoot a fireworks display or a distant storm, try setting the camera to Bulb and then play with some long exposures to capture just the moments that you want.

ptg
269
Bracketing your way to better exposures
Why settle for just one variation of an image when you can bracket to get the best exposure choice? Set your camera up for a 1/3-bracket series and then expand it to a one-stop series. Review the results to see if the normal setting was the best, or perhaps one of the bracketed exposures is even better.
Moving in for a close-up
Macro photography is best practiced on stationary subjects, which is why I like flowers. If you have a zoom lens, check the minimum focusing distance and then try to get right to that spot to squeeze the most from your subject. Try using a diffuse light source as well to minimize shadows.
Share your results with the book’s Flickr group!
Join the group here: flickr.com/groups/nikond5100fromsnapshotstogreatshots/
ptg
270 N i k o N D 5 1 0 0 : F r o m S N a p S h o t S t o G r e at S h o t S
iNDeX
Numbers3D-tracking AF mode, using,
116–117100 ISO setting, using, 83200 ISO setting, using, 83400 ISO setting, using, 83800 ISO setting, using, 831080p resolution, explained, 49
aA (Aperture Priority) mode, 96
environmental portraits, 134isolating subjects, 111–112vs. S (Shutter Priority) mode,
111–112using, 89–93, 100, 132–134
accessory terminal, identifying, 51action. See also movement
anticipating, 117–119camera placement, 124–125following, 127freezing, 46, 80–81, 109–110getting in front of, 124panning, 127placement of subjects, 123–124tips for shooting, 123–125
action shotsdirection of travel, 106shutter speeds, 109subject speed, 106–107subject-to-camera distance, 108
Active D-Lighting featureAuto (A) level, 263bracketing with, 265–266Extra High (H*) level, 263High (H) level, 263Low (L) level, 263Normal (N) level, 263Off level, 263setting up, 265unavailability in scene
modes, 75using, 263–264
additive color, explained, 16Adobe RGB color space, 15–17AE-L (Auto Exposure Lock)
feature, using, 137–138, 256AF Assist Illuminator, using,
215–216AF (autofocus) modes, 75, 116–117.
See also focus modes; M (Manual) focus
AF-A mode, 12, 75AF-area mode, setting to Dynamic,
116AF-Assist Illuminator,
identifying, 2AF-C mode, 75
selecting, 115shooting in, 115
AF-F mode, 75AF-S (Single-servo AF) mode, 11,
25, 75, 138–139angles, considering in
composition, 238–239aperture
and f-stops, 92function of, 47reaching maximum of, 109role in exposure triangle, 43
aperture mode, accessing, 79Aperture Priority (A) mode, 96
environmental portraits, 134isolating subjects, 111–112vs. Shutter Priority (S) mode,
112using, 89–93, 100, 132–134
audiorecording, 51turning off, 51
Auto (Flash Off) modeISO setting, 59using, 59–60
Auto Exposure Bracketing, using, 260–261
Auto Exposure Lock (AE-L) feature, using, 137–138, 256
Auto ISO sensitivity control, 113–114. See also ISO settings
Auto ISO settingenabling, 10noise associated with, 10turning off, 9–11
Auto modeproblem with, 60shooting in, 76using, 58–59
Auto Off timer setting, adjusting, 6
AutoExposure/AutoFocus Lock button, identifying, 3
autofocusoverriding, 17–18unavailability in scene
modes, 74
autofocus (AF) modes, 75, 116–117. See also focus modes; M (Manual) focus
automatic focus features, turning off, 180
automatic modes, limitations of, 74–75
Autumn Colors scene mode, 70A/V port, identifying, 51
Bbattery
charging, 5keeping backups, 5
Beach/Snow scene mode, 68BKT mode
accessing, 260using with HDR (high dynamic
range), 200black and white
filter colors, 175landscape scenes, 175–176
black and white portraitsFilter effects, 142Monochrome picture control,
140–143taking, 140–142
“blinkies” feature, turning on, 172Blossom scene mode, 70bracketing
with Active D-Lighting feature, 265–266
exposures, 260–261HDR images, 201
buffer, function of, 121built-in flash. See also fill flash;
flashAperture Priority (A) speed,
220ISO settings, 219metering modes, 220–221Program (P) shutter speed, 220range of, 219setting to manual power setting,
220–221Shutter Priority (S) speed, 220shutter speeds, 219–220TTL (Through The Lens)
feature, 220using, 218–219
Bulb settingselecting, 258using, 259, 268
burst mode, using, 119–121

ptg
i N D e X 271
Ccamera back
AutoExposure/AutoFocus Lock button, 3
Command dial, 3Delete button, 3information edit, 3infrared receiver, 3LCD/information screen, 3memory card door, 3menu, 3Mode dial, 3Multi-Selector, 3OK button, 3Playback button, 3playback zoom in, 3Thumbnail/Playback Zoom
Out, 3camera front
AF-Assist Illuminator, 2Flash Mode button, 2Function button, 2infrared receiver, 2lens mounting mark, 2Lens Release button, 2microphone, 2
camera settings, changing, 25camera shake, avoiding, 214camera top
Exposure Compensation/Aperture Adjustment, 4
flash hot shoe, 4Info button, 4Live View switch, 4mode dial, 4Movie Record button, 4shutter release, 4speaker, 4
camerasdSLR, 22–24handholding, 212, 230holding, 22–25point-and-shoot, 22–24setting up, 24
Candlelight scene mode, 70cards. See memory cardscatchlight
examples, 147explained, 146
Center-weighted metering mode, 135–137
Child mode, using, 63children, photographing, 156–157Clean Now feature, using, 34cleaning sensors, 33–34
Close-up modeaperture, 65built-in flash, 65ISO settings, 65using, 65–66, 77
close-up photography, 261–263, 269
Cloudy setting, using with white balance, 14
colorconsidering in composition,
241–242warm versus cool, 15
color balance correction, process of, 13
Color Sketch effect mode, 71, 73color spaces
Adobe RGB, 15–17sRGB, 15–16
color temperature, 15, 178color theory
additive color, 16subtractive color, 16
Command dial, identifying, 3composition
ABCs of, 248angles, 238–239brightness, 184color, 241–242colors, 184contrast, 242–244creating depth, 188–189defined, 184, 233depth of field, 236–237directing viewers, 184–185frames within frames, 246–247grid overlays, 188horizon lines, 187leading lines, 245lines, 246–247patterns, 239–240point of view, 239reflections, 238rule of thirds, 186–187sharpness, 184splitting frames, 246
Continuous shooting mode, using, 119–121
Continuous-servo AF mode (AF-C)
selecting, 115shooting in, 115
contrast, considering in composition, 242–244
cool vs. warm color temperatures, 178
cursor, activating in information screen, 8
Ddawn, shooting at, 69Delete button, identifying, 3deleting images, 22depth, creating, 188–189depth of field (DOF)
comparing, 202in composition, 236–237controlling, 100dictating, 90explained, 47focusing subjects, 112increasing, 80–81one-third rule, 181in portraits, 159
Direct Sunlight, using with white balance, 13
display modesHighlights, 18–19None, 18–19Overview, 18–19RGB histogram, 18–19Shooting data, 18–19
drive modescontinuous, 118single shot, 118
dSLR cameras, holding, 22Dusk/Dawn scene mode, 69
eeffects modes
Color Sketch, 71, 73High Key, 72Low Key, 72Miniature Effect, 71, 73Night Vision, 71–73Selective Color, 71, 73–74Silhouette, 71using, 71, 77
environmental portraits, shooting, 134. See also portraits
EV (exposure value), achieving, 42exposure. See also long exposures;
reciprocal exposuresbracketing, 75, 260–261calculating, 44–45controlling with spot meter,
254–256light needed for, 44process of, 42
Exposure Compensation feature, 75, 172–175
Exposure Compensation/Aperture Adjustment, 4
ptg
272 N i k o N D 5 1 0 0 : F r o m S N a p S h o t S t o G r e at S h o t S
iimage formats
JPEG vs. RAW, 34–35learning, 53shooting in, 36–37
image quality settingsaccessing chart of, 9adjusting, 7–9
image resolution, explained, 35images
adding balance to, 239–240deleting, 22
Incandescent setting, using with white balance, 13
indoors, shooting, 68Info button, identifying, 4information display, activating,
8, 174information edit, identifying, 3infrared receiver, identifying, 2–3interlaced video, 50ISO, role in exposure triangle, 43ISO 100 reciprocal exposures, 44ISO 200 reciprocal exposures, 45ISO settings. See also Auto ISO
sensitivity controladjusting on the fly, 110choosing, 9–11expanding, 211keeping, 98for landscape scenes, 166–168raising for mood lighting,
208–211starting points, 83
JJPEG format. See also RAW+JPEG
formatversus RAW, 34–35shooting in, 36
JPEG image quality, setting, 7–9JPEG settings
Basic, 7Fine, 7Large, 7Medium, 7Normal, 7Small, 7
kKelvin temperatures
camera flash, 15daylight, 15flames, 15incandescent bulbs, 15moonlight, 15shade (open), 15
focus pointsavailability of, 11establishing, 214setting, 11–12shooting from, 140
focusing in low light, 215–216Food scene mode, 67frames
within frames, 246–247splitting, 246–247
front curtain mode, explained, 226f-stops
and aperture, 92calculating, 44–45examples, 44explained, 44ISO 100, 44ISO 200, 45
Function button, identifying, 2
Ggolden light, shooting in, 176–177grid overlay, using in Live View,
188
hHDMI port, identifying, 51HDR (high dynamic range)
imagesBKT mode, 200bracketing, 200–201built-in function, 195–200exposure, 198overexposing, 198rendering, 198setting up for, 200tonemapping, 195, 199underexposing, 198
HDR function, using, 203HFD (hyper focal distance),
178–179, 202High ISO Noise Reduction, 230
High setting, 210Normal setting, 210using, 209–210
High Key effect mode, 72, 174Highlight Alert feature
setting up, 98–99using, 172
highlights, regaining detail in, 174Highlights display mode, 18–19histograms, evaluating, 20–21Holographium app, features of,
257–258horizon lines, considering, 187,
203, 246
exposure triangleaperture, 43ISO, 43reciprocal change, 43shutter speed, 43
exposure value (EV), achieving, 42
Ff/5.6 aperture, using, 132face priority focusing, 145faces, detecting, 144–146fill flash, using, 146–147. See also
built-in flash; flashfilter colors, using in black and
white photos, 175filters
neutral density, 182, 184polarizing, 182
firmwarechecking version number,
32, 53updating, 32–33, 53
flash. See also built-in flash; fill flash
disabling, 216–217external, 228–229and glass, 228–229preventing from firing, 59
flash compensationchanging, 222–223icon, 147range of, 221–222unavailability in scene modes,
75using, 222
flash hot shoe, identifying, 4Flash Mode, 2, 216Flash setting, using with white
balance, 13flash sync
explained, 218front curtain mode, 226Rear Curtain Sync mode, 226speed, 219
Fluorescent setting, using with white balance, 13
focal length lensesnormal, 40telephoto, 40–41zoom, 42
focus modes. See also AF (autofocus) modes; M (Manual) mode
AF-S (Single-servo AF), 11, 138–139
choosing, 117experimenting with, 126setting, 11–12
ptg
i N D e X 273
MC setting, accessing, 142megapixels (MP), referring to
resolution in, 35memory cards
accessing list of, 30choosing, 30door, 3formatting, 31, 53SDHC type, 30size of, 30updating firmware from, 32–33
menu, identifying, 3meter
activating, 85, 89, 93, 96, 174function of, 135
meteringfor sunrise, 256for sunset, 256unavailability in scene modes,
74metering modes
Center-weighted, 135–137choosing, 159Exposure Compensation
feature, 135Matrix, 135for portraits, 135–137Spot, 135
MF (manual focus)using, 25, 117–118, 126using for video recording, 48
mic jack, identifying, 51microphone, identifying, 2microphone jack, identifying, 51Miniature Effect mode, 71, 73Mode dial
categories of, 74identifying, 3–4zones on, 11–12
Monochrome picture controlcolor filter settings, 175–176Sharpness setting, 175using, 140–143
mood lightingfocusing in low light, 214–217High ISO Noise Reduction, 209Night Vision effect mode,
211–212raising ISO settings, 208–211raising noise reduction, 209shooting in low-light
conditions, 212VR (Vibration Reduction) lens,
212–213moonlight, shooting in, 215motion
mechanics of, 126stopping, 109–111
light meteractivating, 85, 89, 93, 96, 174function of, 135
lightingfocusing in low light, 214–217High ISO Noise Reduction, 209Night Vision effect mode,
211–212raising ISO settings, 208–211raising noise reduction, 209shooting in low-light
conditions, 212VR (Vibration Reduction) lens,
212–213lightning strikes, photographing,
259lines, considering in composition,
238, 244, 246–247Live View
activating, 145autofocus area modes, 144combining with modes, 145detecting faces with, 144–146Face-priority autofocus area
mode, 144features of, 76Grid overlay, 146, 188Normal-area autofocus mode,
144resource, 145shooting with, 145Subject-tracking autofocus area
mode, 144switch, 4, 48using for white balance, 170–171using with rule of thirds, 203using with video recording, 48Wide-area autofocus mode, 144
“Lo,” appearance of, 109long exposures. See also exposure
reducing noise in, 231shooting, 217–218, 230
lossless compression, explained, 35Low Key effect mode, 72, 174low-light conditions, shooting in,
212, 214–217
mM (Manual) mode. See also AF
(autofocus) modes; focus modes
bulb photography, 257–259using, 93–96, 101.
macro photography, 261–263, 269manual focus (MF)
using, 25, 117–118, 126using for video recording, 48
Matrix metering mode, 135
sky (overcast), 15white fluorescent, 15
kit lenses, 42
LLandscape mode
changing functions, 62focus mode, 62ISO settings, 62picture control, 61using, 61–62, 77
Landscape picture control, applying, 172
landscape scenesblack and white, 175–176composition, 184–189darkening foliage, 175darkening skies, 175Exposure Compensation
feature, 172–175focusing, 178–181golden light, 176–177HDR (high dynamic range)
images, 195–201HFD (hyper focal distance), 178ISO settings, 166–168making water fluid, 182–184noise reduction, 168panoramas, 190–194tack sharp, 179tripods, 178using tripods for, 164–165white balance, 169–171
LCD displayidentifying, 3reviewing shots on, 25, 111zooming in on, 111
leading lines, considering in composition, 245, 247
lens flare, avoiding, 259lens mounting mark, identifying, 2Lens Release button, identifying, 2lenses
components of, 38function of, 37glass elements of, 38kit, 42normal, 40selecting for portraits, 150telephoto, 40–41using, 53VR (Vibration Reduction),
212–213wide vs. telephoto, 126wide-angle, 38–39, 134, 180zoom, 42, 93
light. See visible spectrum of light

ptg
274 N i k o N D 5 1 0 0 : F r o m S N a p S h o t S t o G r e at S h o t S
reciprocal change, explained, 43reciprocal exposures. See also
exposureISO 100, 44ISO 200, 45
red-eye, reducing, 223–225, 231reflections, photographing,
237–238resolution. See image resolutionRGB color spaces, 15–16RGB histogram display mode, 18–19rule of thirds, applying, 186–187,
203
SS (Shutter Priority) mode, 96–97
vs. A (Aperture Priority) mode, 111–112
benefit of, 111stopping motion, 109–111using, 85–89, 100using with waterfalls, 182
SB-600 Speedlight, 229scene modes
Autumn Colors, 70Beach/Snow, 68Blossom, 70Candlelight, 70Dusk/Dawn, 69Food, 67limitations of, 74–75Night Landscape, 68Night Portrait, 67Party/Indoor, 68Pet Portrait, 69Sunset, 69using, 66
SD (Secure Digital) memory cardsconsidering, 30updating firmware from, 32–33
SDHC memory cards, considering, 30
Selective Color effect mode, 71, 73–74
self-timer, using, 214. See also timer settings
sensor, cleaning, 33–34, 53Set Picture Control icon,
displaying, 142Shade setting, using with white
balance, 14shadows, reducing, 146–147sharpness, achieving, 91Shooting data display mode, 18–19
picture controlsunavailability in scene modes,
74using with portraits, 159
pictures, increasing sharpness of, 214. See also shots
Playback button, identifying, 3Playback menu, display options, 18playback zoom, identifying, 3point of view, considering in
composition, 239polarizing filter, using, 182Portrait (PT) control, using, 144Portrait mode, using, 60–61, 76,
132portrait tips
backgrounds, 154–155children, 156close-ups, 158composition, 149, 152cropping, 151faces in composition, 155framing scenes, 153lens selection, 150midday sun, 152pre-sundown shots, 155space between subjects, 156taking vertical shots, 152using frames, 152
portraits. See also environmental portraits
black and white, 140–143metering modes for, 135–137on the move, 148
ports, identifying, 51Program (P) mode
appearance of star in, 84ISO settings, 82–83using, 82–85, 100
progressive scan video, 50PT (Portrait) control, using, 144
rRAW format
advice, 36dynamic range, 35features of, 35–36versus JPEG, 34–35lossless compression, 35as negative, 36sharpening, 36
RAW+JPEG format, shooting in, 36–37. See also JPEG format
Rear Curtain Sync modeexplained, 226–227using, 228, 231
motion effectsmotion blur, 122–123panning, 121–122
movement. See also actionconveying, 87feeling, 127and shutter speed, 106
movie quality, setting, 50Movie Record button
identifying, 4, 48pressing, 48–49
MP (megapixels), referring to resolution in, 35
Multi-Selector, identifying, 3My Menu setting
activating, 266customizing, 266–267using, 266
Nneutral density filter, using, 182,
184Night Landscape scene mode, 68Night Portrait scene mode, 67Night Vision effect mode, 71–73,
211–212Nikon SB-600 Speedlight, 229noise, occurrence of, 10noise reduction
in landscape scenes, 168raising for mood lighting, 209saving space with, 210
None display mode, 18–19normal lenses, 40
oOK button, identifying, 3one-third rule, using, 181overexposure, applying Exposure
Compensation, 172–175
pP (Program) mode
appearance of star in, 84ISO settings, 82–83using, 82–85, 100
panning, 121–122, 127panoramas
creating, 190–191multiple-image, 192–194
Party/Indoor scene mode, 68patterns, considering in
composition, 239–240people, photographing outside,
146. See also subjectsPet Portrait scene mode, 69
ptg
i N D e X 275
Wwarm vs. cool color temperatures,
178water
making fluid, 182–184shooting, 88, 97
waterfall shot, setting up, 182white balance
Auto setting, 13Cloudy setting, 14and color temperature, 15customizing Function button
for, 170Direct Sunlight setting, 13Flash setting, 13Fluorescent setting, 13Incandescent setting, 13Pre setting, 14selecting, 24selecting for landscape scenes,
169–171setting, 13–17Shade setting, 14unavailability in scene modes,
74using Live View for, 170–171
wide-angle lenses, 38–39focusing in manual mode, 180vs. telephoto, 126using, 134
Zzoom lenses, 42, 93
Subjects. See also peoplefocusing, 112freezing, 106high-key, 174isolating, 47, 80–81, 111–112low-key, 174
subtractive color, explained, 16sunrise, metering for, 256sunset, metering for, 256Sunset scene mode, 69
ttack sharp, explained, 179telephoto lenses, 40–41, 126Thumbnail/Playback Zoom Out,
identifying, 3timer settings, choosing, 6. See
also self-timertripods
focusing during use of, 180stability, 165using in landscape scenes,
164–165, 178and VR (Vibration Reduction)
lenses, 165TTL (Through The Lens)
technology, 220
UUSB port, identifying, 51
Vvideo
capturing, 48–49frame rate settings, 50interlaced, 50progressive scan, 50quality, 49–50resolutions, 49using MF (manual focus), 48watching, 52
video clips, recording, 53video recording
starting, 48–49stopping, 49
views, selecting for shots, 18–19visible spectrum of light
basis of, 16explained, 15
VR (Vibration Reduction) lenses, 165, 212–213
shooting modesautomatic scene/effects, 11professional, 11returning to, 8zones, 11
shots, reviewing, 18–19. See also pictures
Shutter Priority (S) mode, 96–97vs. Aperture Priority (A) mode,
112benefit of, 111stopping motion, 109–111using, 85–89, 100using with waterfalls, 182
shutter release, identifying, 4shutter speed
controlling, 88examples, 43function of, 45importance of, 106ISO 100, 44ISO 200, 45lengthening, 257and movement, 106range of, 88role in exposure triangle, 43slow vs. fast, 88
shutter speed mode, accessing, 79Silhouette effect mode, 71Single-servo AF (AF-S) mode, 11,
25, 75, 138–139skin tones, improving, 144snow, shooting, 68, 95sound
recording, 51turning off, 51
speaker, identifying, 4Speedlight flashes, external, 229Sports mode
ISO settings, 65using, 64–65, 77
spot meter, using, 254–256Spot Metering mode, 135
setting up, 254shooting in, 254–255
sRGB color space, 15–16stops
and aperture, 92calculating, 44–45examples, 44explained, 44ISO 100, 44ISO 200, 45

ptg
Unlimited online access to all Peachpit, AdobePress, Apple Training and New Riders videos and books, as well as content from other leading publishers including: O’Reilly Media,Focal Press, Sams, Que, Total Training, JohnWiley & Sons, Course Technology PTR, Class on Demand, VTC and more.
No time commitment or contract required! Sign up for one month or a year. All for $19.99 a month
Sign up todaypeachpit.com/creativeedge
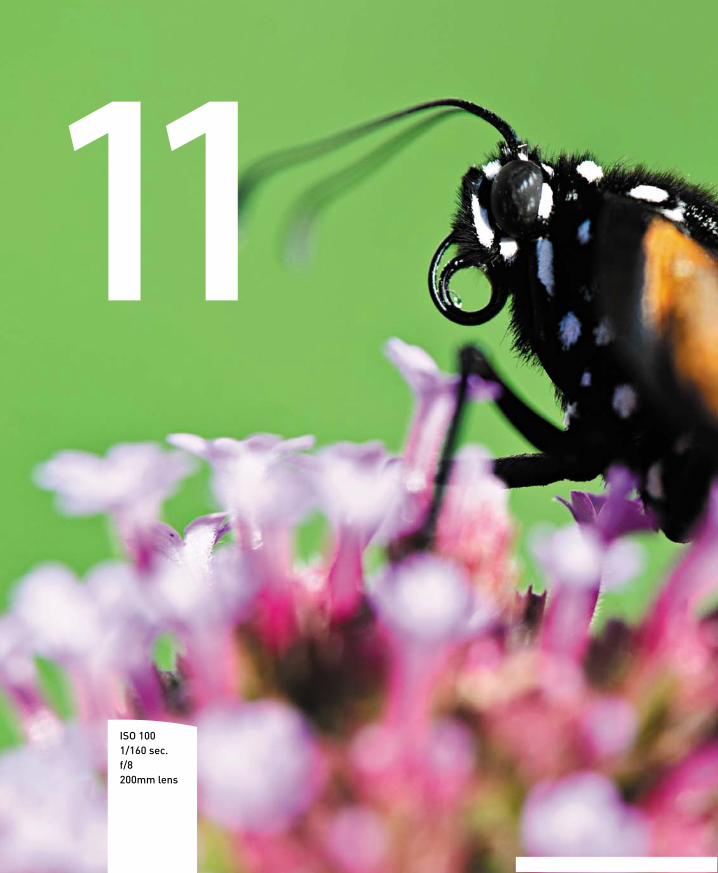
ptg
11
ISO 1001/160 sec.f/8200mm lens
ptg
Pimp My Ride
Upgrades and accessories to expand yoUrcamera’s creative potential
If you bought your camera with a lens, then you basically have everything
you need to begin shooting with your D5100. I took great care to ensure
that almost all of the techniques in this book can be utilized with your
basic camera setup. That being said, there are some accessories that
are essential for certain types of photography. Other accessories aren’t
necessarily essential, but they will improve the look of your images.
Let’s take a look at some items that I believe are must-have accessories
for your photography.
11-1

ptg
11-2 n i k o n d 5 1 0 0 : F r o m s n a p s h o t s t o g r e at s h o t s
FiltersYou should have several filters in your camera bag. Each one serves a unique purpose.
Some say that digital-imaging programs such as Adobe Photoshop can duplicate the
effects that filters offer. This may be true for some effects, but some filters affect
exposure time (like a neutral density filter for that silky waterfall look) and are nearly
impossible to realistically re-create in Photoshop.
polarizingThis one ranks right up there at the top of the list
of must-own photography accessories. You won’t
find a self-respecting landscape photographer who
doesn’t have at least one polarizer in his or her cam-
era bag (Figure 11.1).
Light travels in straight lines, but the problem is
that all those lines are moving in different direc-
tions. When they enter the camera lens, they are
scattering about, creating colorcasts and other
effects. The polarizer controls how light waves are
allowed to enter the camera, letting only certain
ones pass through. So what does that mean for you?
Polarizing filters will make blue skies appear darker,
vegetation color will be more accurate, colors will
look more saturated, haze will be reduced, and
images can look sharper (Figures 11.2 and 11.3). Not
bad for a little piece of glass.
Most polarizers are circular and allow you to rotate the polarizing element to
control the amount of polarization that you want. As the filter is rotated, differ-
ent light waves will be allowed to pass through, such as a reflection on a body of
water (Figure 11.4). Turn the filter a little and the light waves from the reflection are
blocked, making the reflection disappear (Figure 11.5). Another benefit of the filter is
that it is fairly dark, so when used in bright lighting conditions, it can act as a neutral
density filter (you’ll learn more in the next section), allowing you to use larger aper-
tures or slower shutter speeds. The average polarizing filter requires an increase in
exposure of about one-and-a-half stops. This won’t be an issue for you because you
will be using the camera meter, which is already looking through the filter to calcu-
late exposure settings. You should consider it, though, if your intention is to shoot
with a fast shutter speed or use a small aperture for increased depth of field.
FIgure 11.1A Tiffen circular polarizing filter.

ptg
c h a p t e r 1 1 : p i m p m y r i d e 11-3
FIgure 11.2(left) Without usingthe polarizingfilter, the scenelooks a little low oncontrast and has ablue colorcast fromthe sky.
FIgure 11.3(right) After addinga polarizer, thecolors are muchmore accurate, theblue sky is darker,and the colorcast isnow gone.
FIgure 11.4(left) Before addinga polarizer, the skyand kayaks arestrongly reflected in the water.
FIgure 11.5(right) After addinga polarizer, you can see through the surface of the water.
ISO 2001/200 sec.f/970mm lens
ISO 2001/125 sec.f/970mm lens
ISO 2001/320 sec.f/9200mm lens
ISO 2001/250 sec.f/9200mm lens

ptg
11-4 n i k o n d 5 1 0 0 : F r o m s n a p s h o t s t o g r e at s h o t s
neUtral density (nd)Sometimes there is just too much light falling on your scene to use the camera set-
tings that you want. Most often this is the case when you want to use a slow shutter
speed but your lens is already stopped down to its smallest aperture, leaving you
with a shutter speed that’s faster than you want.
A classic example of this is shooting a waterfall in bright sunlight. To get a silky look to
the water, the shutter speed needs to be about 1/15 of a second or slower. The prob-
lem is that a proper exposure for bright sunlight is f/16 at 1/100 of a second with the
camera set to ISO 100 (this comes from the Sunny 16 rule). If my lens has a minimum
aperture of f/22, the slowest shutter speed I will be able to use is 1/50 of a second.
The way around this problem is to use a neutral
density (ND) filter to make the outside world appear
to be a little darker. Think of it as sunglasses for your
camera. ND filters come in different strengths, which
are labeled as .3, .6, and .9. They represent a one-
stop difference in exposure for each .3 increment. If
you need to turn daylight into dark, the .9 ND filter
will give you an extra three stops of exposure (Figure
11.6). This means that, in my earlier example, I could
get an exposure of f/16 at about 1/10 of a second. This
would be an ideal exposure for capturing a shot of
silky-smooth water (Figure 11.7).
To see more B+W filters, check out
www.schneideroptics.com.
gradUated ndAnother favorite of the landscape photographer, the graduated ND filter has the
benefits of the standard ND filter but graduates to a clear portion (Figure 11.8). This
allows you to darken just the upper or lower part of your scene while leaving the
other part unaffected. This filter is most commonly used to darken skies that are too
bright without affecting the ground area. If a regular ND is used, the entire area will
get darker and there will be no visible change in the brightness ratio between the sky
and the ground.
You can purchase the graduated ND as a screw-on filter, but most photographers
prefer to use the larger 4x6 version, which allows them to control exactly where the
filter transitions from dark to transparent. There are many options in graduated ND
filters, such as the density factor (number of stops) and how gradual the transition is
from dark to clear.
FIgure 11.6A B+W 77mm .9 ND filter.
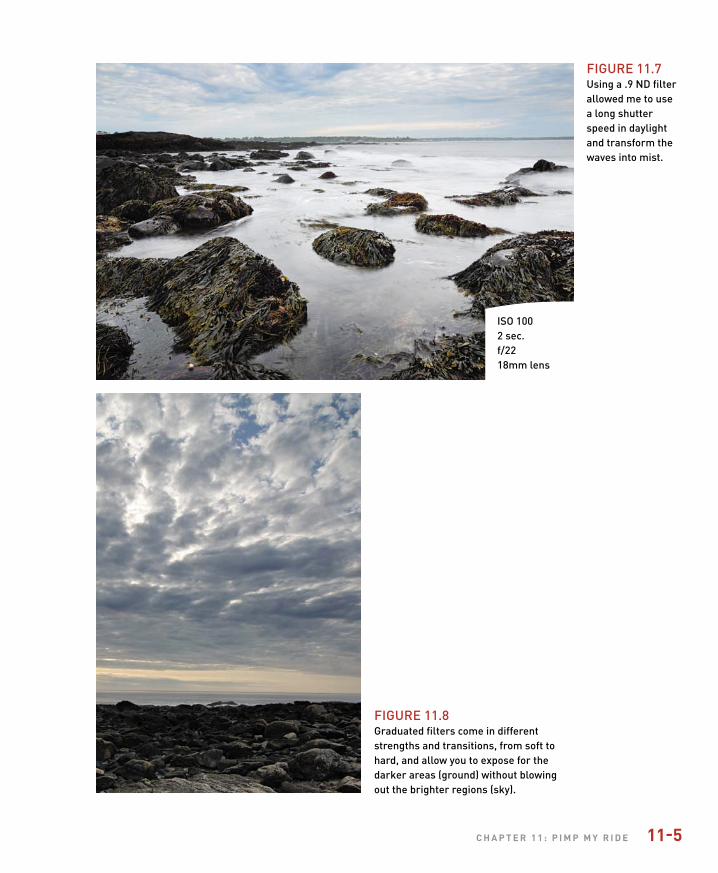
ptg
c h a p t e r 1 1 : p i m p m y r i d e 11-5
ISO 1002 sec.f/2218mm lens
FIgure 11.8graduated filters come in differentstrengths and transitions, from soft tohard, and allow you to expose for thedarker areas (ground) without blowingout the brighter regions (sky).
FIgure 11.7using a .9 ND filterallowed me to usea long shutterspeed in daylightand transform thewaves into mist.

ptg
11-6 n i k o n d 5 1 0 0 : F r o m s n a p s h o t s t o g r e at s h o t s
tripodsIf you buy only one accessory for your photography, do yourself a favor and make it
a tripod. In general, any tripod is going to be better than no tripod at all. A tripod
makes your photos sharper and lets you shoot in any lighting condition. There are
more choices in tripods than there are in dSLRs, so how do you go about choosing
the right one for you? The main considerations are weight, height, and head.
The weight of your tripod will probably determine whether or not you will actually
carry it along with you farther than the parking lot. Many different types of materi-
als are used in tripods today. The lightest is carbon fiber, which is probably the most
expensive as well. More than likely, you should consider an aluminum tripod that is
sturdy and has a weight rating that is suitable for your camera as well as your lenses.
Make sure that the tripod extends to a height that is tall enough to allow you to
shoot from a comfortable standing position. Nothing ruins a good shoot like a sore
back. Taller tripods need to be sturdier to maintain a rigid base for your camera. You
will also want to consider how low the tripod can go. If you want to do macro work
of low-level subjects such as flowers, you will need to lower the tripod fairly close to
the ground. Many new tripods have leg supports that allow you to spread the legs
very wide and get the camera low to the ground.
The other determining factor when purchasing a tripod is the type of head that it
employs to secure the camera to the legs. There are two basic types of tripod heads:
ball and pan. Ball heads use a simple ball joint that allows you to freely position the
camera in any upright position and then clamp it down securely. This type of head is
flexible and quick to use, but it can sometimes be difficult to switch between portrait
and landscape orientations. They tend to be slightly more expensive as well.
Pan heads employ a swivel and usually two hinged joints that allow the camera to
pan left and right, move up and down, and adjust the position along the horizon-
tal axis. Handles are typically employed to allow movement of the camera and lock
down the position. The pan head is by and large the most popular tripod head style
on the market. If you plan on shooting a lot of video with your D5100, you might
want to consider the pan head style since it will deliver more functionality for your
videography, specifically in panning from side to side.
If you really want to make your tripod shooting move faster, consider buying a tripod
that utilizes a quick-release head. There are many styles of quick-release brackets;
most use a small plate that screws into the bottom of the camera and then quickly
locks into and releases from the tripod head.
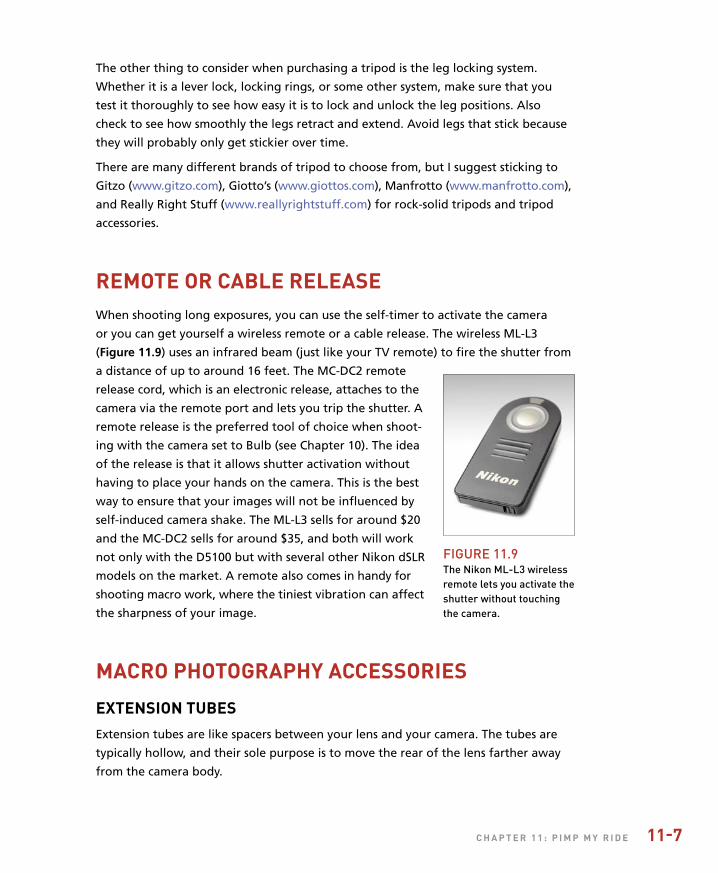
ptg
c h a p t e r 1 1 : p i m p m y r i d e 11-7
The other thing to consider when purchasing a tripod is the leg locking system.
Whether it is a lever lock, locking rings, or some other system, make sure that you
test it thoroughly to see how easy it is to lock and unlock the leg positions. Also
check to see how smoothly the legs retract and extend. Avoid legs that stick because
they will probably only get stickier over time.
There are many different brands of tripod to choose from, but I suggest sticking to
Gitzo (www.gitzo.com), Giotto’s (www.giottos.com), Manfrotto (www.manfrotto.com),
and Really Right Stuff (www.reallyrightstuff.com) for rock-solid tripods and tripod
accessories.
remote or cable releaseWhen shooting long exposures, you can use the self-timer to activate the camera
or you can get yourself a wireless remote or a cable release. The wireless ML-L3
(Figure 11.9) uses an infrared beam (just like your TV remote) to fire the shutter from
a distance of up to around 16 feet. The MC-DC2 remote
release cord, which is an electronic release, attaches to the
camera via the remote port and lets you trip the shutter. A
remote release is the preferred tool of choice when shoot-
ing with the camera set to Bulb (see Chapter 10). The idea
of the release is that it allows shutter activation without
having to place your hands on the camera. This is the best
way to ensure that your images will not be influenced by
self-induced camera shake. The ML-L3 sells for around $20
and the MC-DC2 sells for around $35, and both will work
not only with the D5100 but with several other Nikon dSLR
models on the market. A remote also comes in handy for
shooting macro work, where the tiniest vibration can affect
the sharpness of your image.
macro photography accessories
extension tUbesExtension tubes are like spacers between your lens and your camera. The tubes are
typically hollow, and their sole purpose is to move the rear of the lens farther away
from the camera body.
FIgure 11.9The Nikon ML-L3 wirelessremote lets you activate theshutter without touchingthe camera.
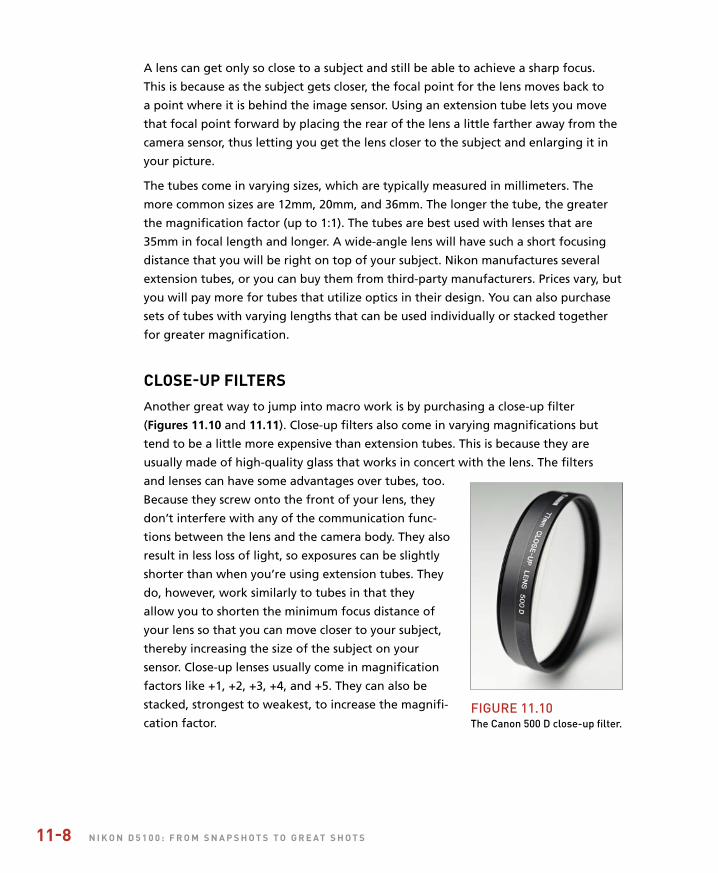
ptg
11-8 n i k o n d 5 1 0 0 : F r o m s n a p s h o t s t o g r e at s h o t s
A lens can get only so close to a subject and still be able to achieve a sharp focus.
This is because as the subject gets closer, the focal point for the lens moves back to
a point where it is behind the image sensor. Using an extension tube lets you move
that focal point forward by placing the rear of the lens a little farther away from the
camera sensor, thus letting you get the lens closer to the subject and enlarging it in
your picture.
The tubes come in varying sizes, which are typically measured in millimeters. The
more common sizes are 12mm, 20mm, and 36mm. The longer the tube, the greater
the magnification factor (up to 1:1). The tubes are best used with lenses that are
35mm in focal length and longer. A wide-angle lens will have such a short focusing
distance that you will be right on top of your subject. Nikon manufactures several
extension tubes, or you can buy them from third-party manufacturers. Prices vary, but
you will pay more for tubes that utilize optics in their design. You can also purchase
sets of tubes with varying lengths that can be used individually or stacked together
for greater magnification.
close-Up FiltersAnother great way to jump into macro work is by purchasing a close-up filter
(Figures 11.10 and 11.11). Close-up filters also come in varying magnifications but
tend to be a little more expensive than extension tubes. This is because they are
usually made of high-quality glass that works in concert with the lens. The filters
and lenses can have some advantages over tubes, too.
Because they screw onto the front of your lens, they
don’t interfere with any of the communication func-
tions between the lens and the camera body. They also
result in less loss of light, so exposures can be slightly
shorter than when you’re using extension tubes. They
do, however, work similarly to tubes in that they
allow you to shorten the minimum focus distance of
your lens so that you can move closer to your subject,
thereby increasing the size of the subject on your
sensor. Close-up lenses usually come in magnification
factors like +1, +2, +3, +4, and +5. They can also be
stacked, strongest to weakest, to increase the magnifi-
cation factor.FIgure 11.10The Canon 500 D close-up filter.

ptg
c h a p t e r 1 1 : p i m p m y r i d e 11-9
The other difference is that they are usually screw-threaded onto your lens, which
means that you have to purchase a specific thread diameter. So if your favorite lens
has a 68mm filter thread, that is the size you would use for the close-up filter. The
big downside is that if you want to use different lenses that have different thread
sizes, you will have to buy multiple filters. One solution is to work with a zoom lens
so that you can have a range of focal lengths to use with just one filter. Also, just as
with most glass filters, the larger the diameter, the higher the price. Another solu-
tion to this problem is to use a step-up ring, which allows you to thread a large filter
to a smaller lens (check out www.stepupring.com for more information on step-up
and step-down rings). I purchase all my filters at 77mm and then use step-up rings to
attach them to smaller-diameter lenses.
FIgure 11.11The Canon 500 Dclose-up filter onthe Nikon 60mm 2.8 lens was usedto help capture thisdime.
ISO 1001/10 sec.f/1160mm lens
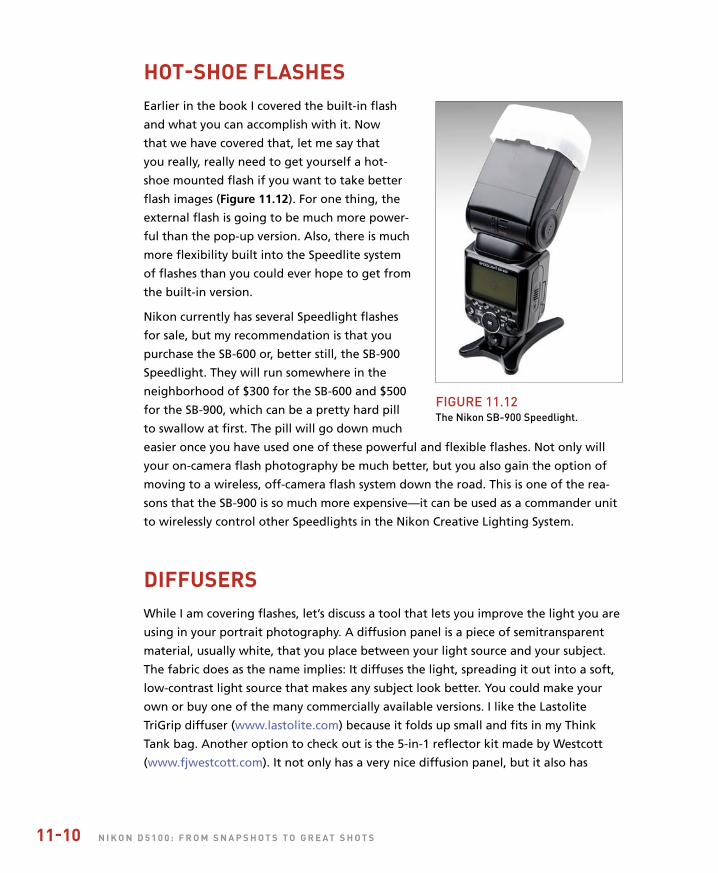
ptg
11-10 n i k o n d 5 1 0 0 : F r o m s n a p s h o t s t o g r e at s h o t s
hot-shoe FlashesEarlier in the book I covered the built-in flash
and what you can accomplish with it. Now
that we have covered that, let me say that
you really, really need to get yourself a hot-
shoe mounted flash if you want to take better
flash images (Figure 11.12). For one thing, the
external flash is going to be much more power-
ful than the pop-up version. Also, there is much
more flexibility built into the Speedlite system
of flashes than you could ever hope to get from
the built-in version.
Nikon currently has several Speedlight flashes
for sale, but my recommendation is that you
purchase the SB-600 or, better still, the SB-900
Speedlight. They will run somewhere in the
neighborhood of $300 for the SB-600 and $500
for the SB-900, which can be a pretty hard pill
to swallow at first. The pill will go down much
easier once you have used one of these powerful and flexible flashes. Not only will
your on-camera flash photography be much better, but you also gain the option of
moving to a wireless, off-camera flash system down the road. This is one of the rea-
sons that the SB-900 is so much more expensive—it can be used as a commander unit
to wirelessly control other Speedlights in the Nikon Creative Lighting System.
diFFUsersWhile I am covering flashes, let’s discuss a tool that lets you improve the light you are
using in your portrait photography. A diffusion panel is a piece of semitransparent
material, usually white, that you place between your light source and your subject.
The fabric does as the name implies: It diffuses the light, spreading it out into a soft,
low-contrast light source that makes any subject look better. You could make your
own or buy one of the many commercially available versions. I like the Lastolite
TriGrip diffuser (www.lastolite.com) because it folds up small and fits in my Think
Tank bag. Another option to check out is the 5-in-1 reflector kit made by Westcott
(www.fjwestcott.com). It not only has a very nice diffusion panel, but it also has
FIgure 11.12The Nikon SB-900 Speedlight.
ptg
c h a p t e r 1 1 : p i m p m y r i d e 11-11
reflective covers that slip over the diffusion panel so that you can bounce some fill
light into your scene. Best of all, the entire system is collapsible, so it fits into a pretty
small package for traveling.
camera bagsThis topic is tricky because there is no one-size-fits all answer. How much gear you
want to carry, how big you are, and your own style will all influence your bag pur-
chasing decision.
For me, I like to travel with my photo gear. Typically, my travel involves flying.
This means that all of my camera equipment will be traveling in the cabin with me,
not in the luggage compartment. I can’t emphasize this enough: Do not pack your
camera in your checked luggage! Thousands of cameras, lenses, and accessories are
lost and stolen from checked luggage every year. The best way to ensure that doesn’t
happen to you is to bring your equipment on board and place it in the overhead
storage. I like to bring my laptop as well, so I have found a couple of backpack
camera storage systems that allow me to fit a camera body, several lenses, some
accessories, my laptop, and even some snacks into one backpack-style bag that still
fits under the seat in front of me or in the overhead bin. I also prefer a backpack
because I like the freedom of slinging the bag over my shoulder, leaving my hands
free for other luggage. I am currently using a Think Tank Photo Airport Acceleration
bag (www.thinktankphoto.com) for all of my travel needs.
The other bag that you should look into is a more traditional, shoulder-style bag.
These bags are made to handle all sorts of camera bodies, lenses, and accessories,
and they’re usually completely configurable with moveable padded partitions so that
you can completely customize the bag for your own needs. My current bag of choice
is a Boda lens bag (www.goboda.com). This small-looking bag easily holds a single
camera body, two or three lenses, my iPad, extra batteries, multiple memory cards,
and plenty more.
These two bags are the ones that I am using currently, but finding the perfect camera
bag is truly the Holy Grail for photographers. The fact is that you can go through a
lot of them searching for one that perfectly fits your every need and never find it.
I have several bags presently taking up residence in my closet.
Another company that makes great bags is Lowepro. You can check out the full line
of Lowepro camera gear at www.lowepro.com.
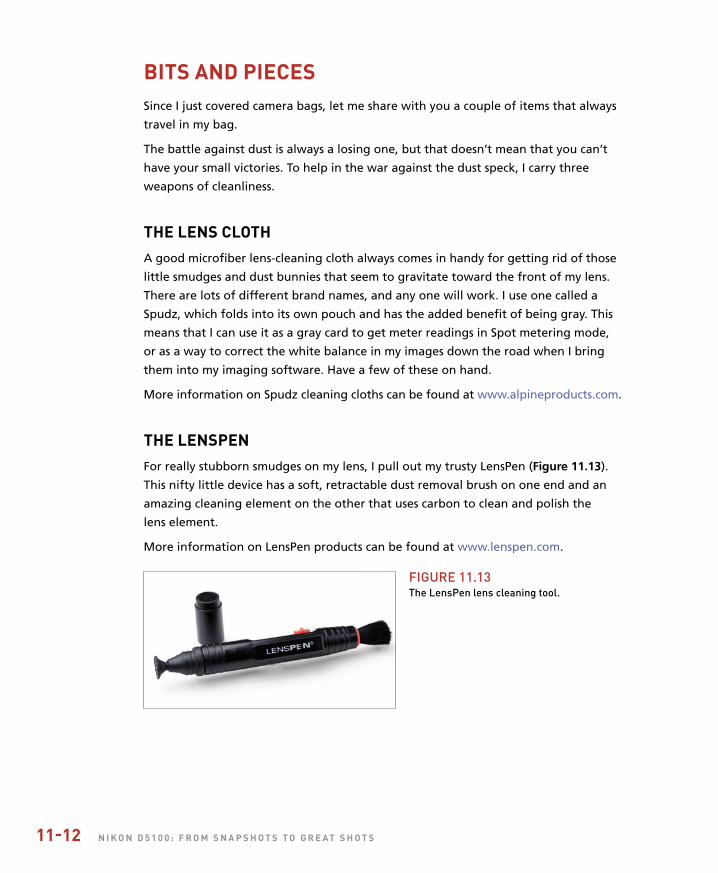
ptg
11-12 n i k o n d 5 1 0 0 : F r o m s n a p s h o t s t o g r e at s h o t s
bits and piecesSince I just covered camera bags, let me share with you a couple of items that always
travel in my bag.
The battle against dust is always a losing one, but that doesn’t mean that you can’t
have your small victories. To help in the war against the dust speck, I carry three
weapons of cleanliness.
the lens clothA good microfiber lens-cleaning cloth always comes in handy for getting rid of those
little smudges and dust bunnies that seem to gravitate toward the front of my lens.
There are lots of different brand names, and any one will work. I use one called a
Spudz, which folds into its own pouch and has the added benefit of being gray. This
means that I can use it as a gray card to get meter readings in Spot metering mode,
or as a way to correct the white balance in my images down the road when I bring
them into my imaging software. Have a few of these on hand.
More information on Spudz cleaning cloths can be found at www.alpineproducts.com.
the lenspenFor really stubborn smudges on my lens, I pull out my trusty LensPen (Figure 11.13).
This nifty little device has a soft, retractable dust removal brush on one end and an
amazing cleaning element on the other that uses carbon to clean and polish the
lens element.
More information on LensPen products can be found at www.lenspen.com.
FIgure 11.13The LensPen lens cleaning tool.

ptg
c h a p t e r 1 1 : p i m p m y r i d e 11-13
air blowersSome folks prefer to use canned compressed air to blow away dust, but the cans can
sometimes release fluid when they are tilted. For this reason, I always use my Rocket-
Air blower from Giotto’s (www.giottos.com) (Figure 11.14). This funny-looking device
is great for getting rid of tough dust, and it uses a clean air path so that the dust that
you are blowing away doesn’t get sucked back into the ball and redeposited on your
equipment the next time you use it.
FIgure 11.14The giotto’s rocket-Air dust blower.
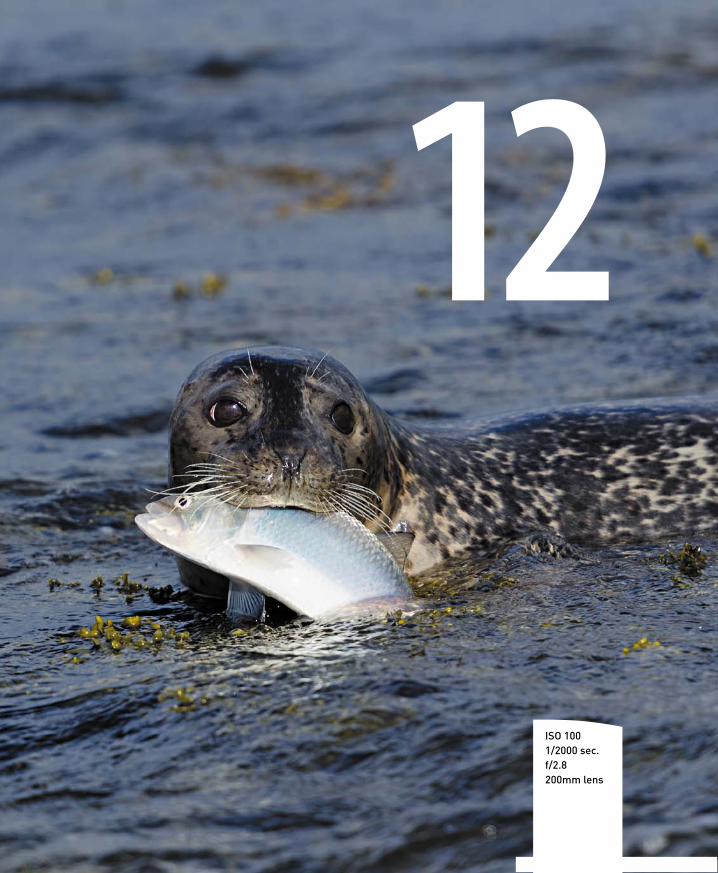
ptg
12
ISO 1001/2000 sec.f/2.8200mm lens
ptg
D5100 Video: Beyond the Basics
GettinG professional-lookinG videofrom your d5100
Back in Chapter 2, I took you through some of the basics for setting up
and using the video recording functions of the D5100. In this bonus
chapter, we will take a look at some of the creative things you can do
with your video. First, though, let’s take a look at why the video capture
feature is such a big deal in a dSLR.
12-1

ptg
12-2 n i k o n d 5 1 0 0 : f r o m s n a p s h o t s t o G r e at s h o t s
it’s all about the lensesVideo cameras have been around for a long time, so why is it such a big deal that you
can now use your dSLR camera to record video? The answer is simple: It’s all about
the lenses. If you have any experience using a video camcorder, you know that it
always seems like everything is in focus. While this isn’t always a bad thing, it can also
be pretty boring. Using dSLR video allows you to use faster lenses (larger apertures),
which can give you shallower depth of field in your videos. This shallow depth of
field can add a sense of dimension and depth that is normally lacking in most of your
standard video cameras. The truth is that many videographers are turning their
attention from video cameras costing many thousands of dollars to the much more
affordable dSLR video camera to produce similar high-definition results.
Using the D5100 will not only allow you
to capture video with a more shallow
depth of field, you also have the flexibil-
ity of using different lenses for different
effects. While you may only own one lens
right now, you have the ability to buy
specialty lenses to enhance your video as
well as your still capture. Any lens that
you can use for still photography on your
D5100 can also be used for video, includ-
ing ultra-wide lenses such as the AF DX
Fisheye-Nikkor 10.5mm f/2.8 ED lens, the
AF-S VR Zoom NIKKOR 70-300mm f/4.5-
5.6G IF-ED, the AF Micro NIKKOR 60mm
f/2.8D for getting extreme close-up videos,
or even a Lensbaby (www.lensbaby.com)
for creating movies with only small selec-
tive areas of the image in focus (Figure
12.1). The Lensbaby has to be used in
Manual mode and is all manual focus, but
the results are really different than those
of a normal lens (and kinda fun). Here’s a
video clip to illustrate what I mean:
D5100 and a Lensbaby Composer video clip: http://vimeo.com/24702712
FIgure 12.1using specialty lenses such as this Lensbabywill add a different perspective to your video.
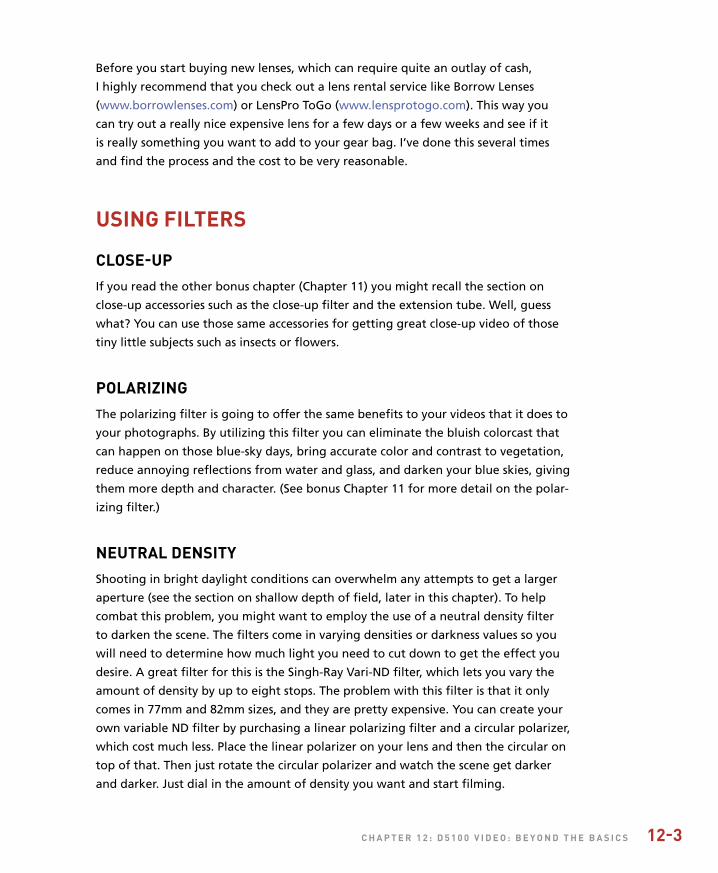
ptg
C h a p t e r 1 2 : d 5 1 0 0 v i d e o : b e y o n d t h e b a s i C s 12-3
Before you start buying new lenses, which can require quite an outlay of cash,
I highly recommend that you check out a lens rental service like Borrow Lenses
(www.borrowlenses.com) or LensPro ToGo (www.lensprotogo.com). This way you
can try out a really nice expensive lens for a few days or a few weeks and see if it
is really something you want to add to your gear bag. I’ve done this several times
and find the process and the cost to be very reasonable.
usinG filters
Close-upIf you read the other bonus chapter (Chapter 11) you might recall the section on
close-up accessories such as the close-up filter and the extension tube. Well, guess
what? You can use those same accessories for getting great close-up video of those
tiny little subjects such as insects or flowers.
polarizinGThe polarizing filter is going to offer the same benefits to your videos that it does to
your photographs. By utilizing this filter you can eliminate the bluish colorcast that
can happen on those blue-sky days, bring accurate color and contrast to vegetation,
reduce annoying reflections from water and glass, and darken your blue skies, giving
them more depth and character. (See bonus Chapter 11 for more detail on the polar-
izing filter.)
neutral densityShooting in bright daylight conditions can overwhelm any attempts to get a larger
aperture (see the section on shallow depth of field, later in this chapter). To help
combat this problem, you might want to employ the use of a neutral density filter
to darken the scene. The filters come in varying densities or darkness values so you
will need to determine how much light you need to cut down to get the effect you
desire. A great filter for this is the Singh-Ray Vari-ND filter, which lets you vary the
amount of density by up to eight stops. The problem with this filter is that it only
comes in 77mm and 82mm sizes, and they are pretty expensive. You can create your
own variable ND filter by purchasing a linear polarizing filter and a circular polarizer,
which cost much less. Place the linear polarizer on your lens and then the circular on
top of that. Then just rotate the circular polarizer and watch the scene get darker
and darker. Just dial in the amount of density you want and start filming.

ptg
12-4 n i k o n d 5 1 0 0 : f r o m s n a p s h o t s t o G r e at s h o t s
tripodsAnother topic that was covered in the other bonus chapter was the use of tripods to
stabilize the camera for the purpose of achieving sharper images. The use of a tripod
for video is not quite the same as for still image applications. When you are shooting
video, you want to present a nice, smooth video scene that is fairly free of camera
shake. One particular case for this is the pan shot. When you are following a subject
from side to side, you will want the viewer’s attention to be focused on the subject,
not the shaky look of the video. To help in this cause, your preferred weapon of
choice should be a tripod with a fluid head. A fluid head looks a little different than
a standard tripod head, in that it usually has one long handle for controlled panning.
To really make things smooth, the head uses a system of small fluid cartridges within
the panning mechanisms so that your panning movements are nice and smooth. For
$75–$85, you can get a nice fluid pan head that will mount on your existing tripod
legs (if your existing tripod has a removable head).
You can find some good fluid pan heads at www.bogentripodparts.com.
GettinG shallow depth of fieldAs I said earlier, getting the look of a production cinema camera means working with
shallow depth of field. The problem that you might encounter when trying to get a
large aperture in your video will be that the camera wants to use an autoexposure
mode to establish the correct camera settings for recording video. To get the benefit
of a large aperture, you are going to need to start in Manual or Aperture Priority
mode and set your aperture before switching to Live View. To illustrate what I am
talking about, I uploaded two video clips for comparison. One clip was shot with the
aperture set to f/3.2 (Figure 12.2), and in the other all I did was change the aperture
to f/22 (Figure 12.3):
• Video clip at f/3.2: http://vimeo.com/24819482
• Video clip at f/22: http://vimeo.com/24819658
Can you see the difference in the depth of field in the two clips? Deciding what is in
focus is a very powerful cinematic technique, and controlling the depth of field is a
great way to home right in on the most important part of the scene.

ptg
C h a p t e r 1 2 : d 5 1 0 0 v i d e o : b e y o n d t h e b a s i C s 12-5
FIgure 12.2Frame of video shot at f/3.2 showing narrowdepth of field.
FIgure 12.3Frame of video shotat f/22 showingwider depth of field.
ptg
12-6 n i k o n d 5 1 0 0 : f r o m s n a p s h o t s t o G r e at s h o t s
GivinG a different look to your videos
usinG piCture ControlsSomething that a lot of people don’t realize is that you can use the picture controls
to give your video a completely different look. Sure, you can use the Standard control
for everyday video, but why not add some punch by using the Vivid setting? Nothing
says “HD” like bright, vivid colors. Or maybe you want to shoot a landscape scene.
Go ahead and set the picture control to the Landscape setting to improve the look
of skies and vegetation. If you really want to get creative, try using the Monochrome
setting and shoot in black and white. The great thing about using the picture controls
is that you will see the effect right on your LCD screen as you record, so you will know
exactly what your video is going to look like. Want to take things up a notch? Try cus-
tomizing the picture controls and do things like shoot sepia-colored video. Check out
the “Classic Black and White Portraits” section of Chapter 6 to see how to customize
the look of your Monochrome picture control.
usinG effeCts modes As discussed in Chapter 3, the effects modes can also be used when capturing video.
You’ll be hard-pressed to find an easier way to make your videos look different
than shooting with the Miniature Effect mode, which not only makes things appear
smaller, but also speeds up the timeline when recording video. The Color Sketch
effect not only affects the color of the video, but also gives it a sort of stop-motion
animation effect as well. Try shooting some video using each effect to see the differ-
ent results:
• Miniature Effect video clip: http://vimeo.com/24798674
• Color Sketch video clip: http://vimeo.com/24798174
white balanCeAnother great way to change the look and feel of your video is to select a white
balance that doesn’t match your scene. You can completely change the mood of
the video by selecting a white balance setting that is different from the actual light
source that you are working in. Don’t be afraid to be creative and try out different
looks for your video.

ptg
C h a p t e r 1 2 : d 5 1 0 0 v i d e o : b e y o n d t h e b a s i C s 12-7
tips for better video
shoot short ClipsMost professional video shot today is actually made up of very short video sequences
that are edited together. If you don’t believe me, watch any TV show and see how
long you see an actual continuous sequence. I am guessing that you won’t see any
clip that is longer than about 10 seconds. You can thank music videos for shortening
our attention span, but the reality is that your video will look much more profes-
sional if you shoot in shorter clips and then edit them together, which brings me to
the next tip.
staGe your shotsIf you are trying to produce a good-looking video, take some time before you begin
shooting to determine what you want to shoot and where you want to shoot it from.
You can mark the floor with tape to give your “actors” a mark to hit. You can also
use staging to figure out where your lens needs to be set for correct focus on these
different scenes.
manual foCusThis will be difficult at first, especially if you have never had to manually focus in
the past, but with a little practice you can become fairly adept at the process. One
benefit of using manual focus is that, depending on the lens you are using, you will
avoid the noise of the autofocus motor, which can be picked up by the mic if you
are recording audio. More importantly, it puts you in the driver’s seat for controlling
what is in focus, which leads the viewer’s eye to what you want to show. While in
Live View, you can enable AF-F (not all of the effects modes support AF-F), which will
try to continually keep the subject in focus even when recording video, but it may
be too slow for your needs or it may try to focus on something other than what you
have in mind. Brushing up your manual focus skills is only going to serve you well
down the road. Set the camera lens to manual focus and then use the focus ring on
the front of the lens.
ptg
12-8 n i k o n d 5 1 0 0 : f r o m s n a p s h o t s t o G r e at s h o t s
put your Camera in a different plaCeIt’s very possible that the one feature that really compelled you to buy the D5100 was
the articulating LCD screen. Being able to see the screen from just about any angle
will give you a lot of flexibility in where you put your camera while recording. You
can place the camera on the ground or hold it way over your head and still see all of
the action taking place. Use this to your advantage to capture video from angles that
are different from the standard shooting position that most people use when shoot-
ing video.
avoid the quiCk panWhile recording video, your camera uses something called a rolling shutter, which,
as the name implies, rolls from the top to the bottom of the frame. If you are pan-
ning quickly from one side to another, you will see your video start to jiggle like it is
being shot through Jell-O. This is something that can’t be overcome except by using a
slower panning motion.
use a fast memory CardYour video will be recording at 24, 25, or 30 frames per second (depending on your
settings). As it is recording, it is placing the video into a buffer, or temporary hold-
ing spot, while the camera writes the frames to your memory card. If you are using a
slower card, it might not be able to keep up with the flow of video, with the result
being dropped frames. The camera will actually not record some frames because
the buffer will fill up before the images have time to be written. This will be seen as
small skips in the video when you watch it later. You can prevent this from happen-
ing by using an SD card that has a speed rating of class 4 or 6. These cards have faster
writing speeds and will keep the video moving smoothly from the camera to the card.
Get yourself a mini-hdmi CableWhen you are ready to play back your video, you can run the video directly from your
camera to your TV. If you want to get the best-quality picture on your TV, you will
want to use a TV capable of displaying high-definition video, which also means that
you will want to use an HDMI cable to connect the camera to the TV. HDMI (High
Definition Multimedia Interface) cables will carry your uncompressed video to your
HDTV in all its glory. The only problem is that your camera didn’t have an HDMI cable
included in the box when you bought it. This means that you will have to purchase
one to take advantage of the HD playback. If you are thinking that you already own
ptg
C h a p t e r 1 2 : d 5 1 0 0 v i d e o : b e y o n d t h e b a s i C s 12-9
an HDMI cable for connecting your other media components to your TV, you might
want to take another look. Your camera uses a mini-HDMI connection, so most stan-
dard cables designed for video components won’t work. If you do decide to purchase
one, make sure you get a mini-HDMI-to-HDMI cable. You can find them at most elec-
tronics stores that sell HD cameras and TVs.
Get an external miCrophoneIf you want or need to record sound with your videos, I highly recommend you look
into getting an external mic that you can plug into the mic jack on the side of the
D5100. Nikon released the ME-1 mic when the D5100 came out, and it is a nice step
up from the built-in mic if for no other reason than that it records in stereo. You can
watch and listen to a thorough review of the ME-1 along with some comparisons to
other external mic choices here: http://bit.ly/d5100Mic.
turn off the soundIf a mic upgrade is not in your near future, then you might consider going silent. In
Chapter 2, I told you how to turn off the audio option while recording your video.
The truth is that the mono microphone does not produce audio that is up to the
quality of the video. To make your videos stand out, try turning it off and then
adding a music soundtrack. You will be amazed at how the right music can really
enhance a video. Of course, you will need to do this on your computer, which will
require special video-editing software, which leads us to our next section.
watChinG and editinG your video
watChinG videoThere are a couple of different ways for you to watch your videos. Actually, there are
three: in your camera, on your TV, and on your computer. To watch your video clips
on your camera, simply press the Playback button and press the OK button to activate
the Play command. Pretty simple.
To watch on your TV, you can use the mini-HDMI cable discussed above and connect to
your HDMI-compatible TV. You’ll need to tune your TV to the channel used for HDMI
input and then play the video just as you would if you were watching it in-camera.
If you don’t have an HDMI cable or compatible TV, you can use the standard A/V cable
that came with your camera. Plug it into the AV port on the side of your camera, and

ptg
12-10 n i k o n d 5 1 0 0 : f r o m s n a p s h o t s t o G r e at s h o t s
then plug the yellow and white RCA plugs into the color-coded RCA A/V input jacks
on your TV. There will only be one audio cable (white) to plug in, since the D5100
records mono, not stereo, sound.
If you would like to watch your video on your computer, you will first need to either
download the files or access them using an SD card reader. For Apple owners, you
can use Apple’s QuickTime Player to watch the video. If it is too large for your screen,
try pressing Command-0 (zero) to make the video half-size or Command-3 to fit the
video to your screen. For Microsoft Windows users, you can open the videos using
the Windows Media Player. This should be the default player for video files on your
computer, so you should be able to just double-click the file to open it in the Media
Player. Resize the video by pressing Alt-1 for a 50% view. You can also download and
install the free QuickTime Player on Windows (www.apple.com/quicktime).
editinG video on your CameraThe D5100 has a very simple editing feature built into the camera’s software that can
be used for trimming the beginning or ending of a clip, but it is a bit slow to use and
drains your battery faster. To really edit your clips, I suggest copying the clips to your
computer and using dedicated video editing software, which will give you greater
control and a much more user-friendly workspace.
editinG video on your ComputerIf you are a Mac owner, you can edit your videos using iMovie ‘11. Windows 7 and
Vista users can start with Windows Live Movie Maker, since it should come with your
computer and is fine for basic editing. Whichever operating system you use, I also
recommend checking out Adobe Premiere Elements 9 (or higher). You can find more
information and download a trial version at www.adobe.com/products/premiereel.
takinG it to the next levelThese tips are intended to get you started with shooting video, but if you really want
to take your video production to the next level, I highly recommend From Still to
Motion: A photographer’s guide to creating video with your DSLR (New Riders). You
won’t find a better resource dedicated to the topic of shooting video with your dSLR.

ptg
You love our books and you love to share them with your colleagues and friends...why not earn some $$ doing it!
If you have a website, blog or even a Facebook page,you can start earning money by putting a Peachpit link on your page.
If a visitor clicks on that link and purchases something on peachpit.com, you earn commissions* on all sales!
Every sale you bring to our site will earn you a commission. All you have to do is post an ad and we’ll take care of the rest.
ApplY And get stArted!It’s quick and easy to apply. To learn more go to: http://www.peachpit.com/affiliates/*Valid for all books, eBooks and video sales at www.Peachpit.com
Join the PeachPit AffiliAte teAm!


