Nios II Debug Client This tutorial presents an introduction to the Nios II Debug Client, which is used to compile, assemble, down- load and debug programs for Altera’s Nios II processor. This tutorial presents step-by-step instructions that illus- trate the features of the Nios II Debug Client. The process of dowloading and debugging a Nios II application requires the presence of an actual FPGA device to implement the Nios II processor. For the purposes of this tutorial, it is assumed that the user has access to the Altera DE2 Development and Education board connected to a computer that has Quartus II (version 5.1 or higher) and Nios II software installed. The screen captures in the tutorial were obtained using the version 1.0 of the Nios II Debug Client; if other versions of the software are used, some of the images may be slightly different. Contents: Installing the Nios II Debug Client Starting the Nios II Debug Client Compiling and Downloading Nios II Applications Running an Application Using the Disassembler Examining Memory Contents Examining and Changing Register Values Single Step Advanced Single Step Setting a Breakpoint JTAG UART Console 1
Transcript
Nios II Debug Client
This tutorial presents an introduction to the Nios II Debug Client, which is used to compile, assemble, down-load and debug programs for Altera’s Nios II processor. This tutorial presents step-by-step instructions that illus-trate the features of the Nios II Debug Client.
The process of dowloading and debugging a Nios II application requires the presence of an actual FPGA deviceto implement the Nios II processor. For the purposes of this tutorial, it is assumed that the user has access to theAltera DE2 Development and Education board connected to a computer that has Quartus II (version 5.1 or higher)and Nios II software installed.
The screen captures in the tutorial were obtained using the version 1.0 of the Nios II Debug Client; if otherversions of the software are used, some of the images may be slightly different.
Contents:Installing the Nios II Debug ClientStarting the Nios II Debug ClientCompiling and Downloading Nios II ApplicationsRunning an ApplicationUsing the DisassemblerExamining Memory ContentsExamining and Changing Register ValuesSingle StepAdvanced Single StepSetting a BreakpointJTAG UART Console
1
Introduction
The Nios II Debug Client is a software application that runs on a host PC connected to a Nios II System. It allowsthe user to compile or assemble Nios II applications, download the application to the Nios II system and thendebug the running application. The Debug Client provides functionality that allows the user to:
• Examine register and memory contents.
• Disassemble the machine code present in any memory region.
• Single step through each assembly language instruction in the Nios II application.
• Set breakpoints that trigger when certain instructions are reached or when certain data addresses are ac-cessed.
• Examine a graphical view of an Instruction Trace that records the set of recently executed instructions beforea breakpoint is hit.
• View serial output sent through the Nios II JTAG UART.
1 Installing the Nios II Debug Client
Figure 1: Install File on DE2 CD.
To install the Nios II Debug Client, proceed as follows:
1. UseMicrosoft Windows Explorer to open the folder “University Program/Installs” from the DE2 CD-ROM. As shown in Figure 1, the folder will contain a single executable file namedn2client_inst.
2. Double-Click on thisn2client_instexecutable file. This will bring up the first screen of the installer asillustrated in Figure 2. Click on theInstall button and proceed to the next step. During the install, you willbe asked if you would like a shortcut to the Nios II Debug Client to be placed on yourWindows Desktop.Answering yes will install an icon similar to the one shown in Figure 3 on your desktop.
3. Assuming that the install was successful, the screen shown in Figure 4 will be displayed. Click on theFinishbutton to complete the installation. Should an error occur, a dialog box will suggest the appropriate action.Errors include:
• Quartus II Software is not already installed or the Quartus II version is too old.
• Nios II SDK Software is not already installed or the version is too old.
2
Figure 2: Nios II Debug Client Install Wizard.
Figure 3: Nios II Debug Client Desktop Icon.
Figure 4: Nios II Debug Client Install Finished.
3
2 Starting the Nios II Debug Client
Before starting the Nios II Debug Client, ensure that a Nios II System has been downloaded onto the DE2 De-velopment and Education board. This tutorial assumes that the example Nios II system provided on the DE2CD-ROM has been downloaded.
If you have chosen to install a Windows Desktop Shortcut, you may start the Nios II Debug Client by doubleclicking on the associated icon. If you have not installed the shortcut or wish to start the Debug Client in analternative manner, proceed as follows:
1. Start theNios II SDK Shellfrom the Windows Start Menu by following the links fromAltera > Nios IIDevelopment Kit > Nios II SDK Shell. This step is illustrated in Figure 5.
Figure 5: Starting the Nios II SDK Shell.
2. The Nios II Debug Client can now be started from the Nios II SDK shell as shown in Figure 6. Enter thecommandn2clientin the SDK shell and press Enter.
Figure 6: Starting the Nios II Debug Client.
4
After startup, the Nios II Debug ClientSettings Windowwill appear as shown in Figure 7. Nios II systemshave a user configurable architecture. The designer may choose from a variety of peripherals and memory optionsin Altera’s SOPC Builder. The Nios II Debug Client needs information describing the Nios II system that is beingtargetted. Systems created by Altera’s SOPC builder are described by a.ptf file located in the project’s maindirectory. This file contains information about all the peripherals connected to the Nios II processor as well asthe memory map. The Nios II Debug Client can use this information to debug applications for any Nios II basedsystem.
Figure 7: Nios II Debug Client Settings Window.
TheSettings Windowallows the user to choose the location of the.ptf file that describes their particular NiosII System. It also tells the Nios II Debug Client where it should download the target software application. This willtypically be a symbolic name, created in SOPC builder, that describes a memory device. By default, the first timethat the Debug Client is started, a.ptf file describing the example Nios II System shipped with DE2 CD-ROM willbe selected and thesdrammemory will be chosen to hold the target application. To change the defaults, proceedas follows:
1. Select the directory that contains your.ptf file by using theLook In: drop down list.
2. Double Click on the appropriate.ptf file in theSOPC Builder PTF File area.
3. Select the approriate memory device from theProgram Memory drop down list.
4. Click on theConfirm button. These settings will remain for all subsequent runs of the Nios II Debug Client.Only theConfirm button will need to be pressed if no changes are required.
5
After a few seconds, the Nios II Debug Client window will appear. The startup screen is shown in Figure 8.
Figure 8: Nios II Debug Client.
6
3 Compiling and Downloading Nios II Applications
To compile and download a Nios II application, proceed with the following steps:
1. As shown in Figure 8, the first step (highlighted with the circled1) involves selecting the cable that willbe used to communicate with the DE2 Development and Education board. This cable should have a namesimilar toUSB-Blaster [USB-0].
Figure 9: Open File Dialog Box.
2. Next, click on theCompile & Load button. A dialog box, shown in Figure 9, will appear. Select thedirectory that contains your application source file using theLook In: drop down list. Note that somesample applications are included on the DE2 CD.
3. For the purposes of this tutorial, we assume the existance of an assembly language source file namedtest.s.The Nios II Debug Client is capable of compiling and downloading:
• S-Record Files: These file have a.srecextension and contain raw machine code instructions and data.
• Assembly Language Source Files: These files have a.s extension and contain human readable NiosII instructions. The Nios II Debug client will call the Nios II assembler to convert these files intoan equivalent S-Record format. The S-Record file will then be downloaded into the Nios II memoryspace.
• C-Language Source Files: These files have a.c extension and contain C-Language code. The Nios IIDebug Client will call thegcccompiler to compile the source code into assembly language and finallyto the machine code in S-Record format. Again, the S-Record file will then be downloaded.
To select an Assembly Language source file, the user must ensure thatAssembly Language Source Files(.s) is selected from theFiles of Typedrop down list.
4. Select the application to be downloaded. For this tutorial, the filetest.sis selected.
5. Finally click on theOpenbutton. After a few seconds, the Nios II Debug client will download the machinecode into memory. The first few instructions are then disassembled and displayed as shown in Figure 10.
7
Figure 10: Source File loaded and Disassembled.
8
Users who wish to gain insight into details of the assembly or compilation process may use theDebugpaneof the Nios II Debug Client, as illustrated in Figure 11. The first section of theDebug pane contains all of thecommands used to convert a source file into machine code in the S-Record format. The user may choose to usethese commands at the command prompt of theNios II SDK Shellor use them as part of aMakefilein a morecomplex project.
Figure 11: Debug Information.
TheDebugpane will also be populated with other types of advanced information as the debugging session pro-gresses. The Nios II Debug Client is a graphical interface that communicates with thenios2-gdb-serverprovidedwith Altera’s Nios II SDK. The nios2-gdb-serverprovides a set of low-level routines that allow for debuggingan application running on a Nios II system. A description of the commands and protocol for communicatingto the server is described inhttp://sourceware.org/gdb/current/onlinedocs/gdb_33.html#SEC684. TheDebugpane displays each of these low level commands and responses received for every actionperformed in the Debug Client.
9
4 Running an Application
To run the target application on the DE2 board, execute the following steps:
1. Return to theDisassemblepane and Click theRun button as shown in Figure 10.
Figure 12: Program Running.
2. While the application is running, the Nios II Debug Client will only have a single button that is enabled.This is theHalt button and is shown in Figure 12. This button can be used to stop the execution of the targetapplication and allow for debugging.
10
Figure 13: Program Stopped.
3. Click on theHalt button as shown in Figure 13. The Nios II Debug Client will then pop up a dialog boxindicating that the application has been halted. Press theOK button and proceed to the next step.
11
Figure 14: Instruction Trace.
4. Once the application has been halted, the user can view an instruction trace that shows the recently executedinstructions just before the point at which the halt occured. This is accomplished by clicking on theTracetab as shown in Figure 14.
5. Notice also that the values of the various Nios II registers have been updated in theRegisterstable. Thesevalues contain the register contents at the halt point.
12
5 Using the Disassembler
To disassemble the contents from a particular set of memory locations, proceed as follows:
Figure 15: Using the Disassembler.
1. Click on theDisassembletab as shown in Figure 16.
2. Enter the starting address of the memory block to be displayed as a HEX value (there is no need to use aprefix such as “0x”) in theStart Address text field. The user may also choose to enter a symbolic namewhich was present in the original source file. The Nios II Debug Client will map this name to an addressand use this value as the starting address. If the symbolic name is not found, an error will be issued.
3. Enter the number of instructions to be disassembled in theNum Instructions text field. This is a decimalvalue. Note that the maximum value is limited to 64 instructions.
4. Click on theDisassemblebutton and the disassembled source code will appear in the text area. Note thatthe disassembler will display both your original source code and the disassembled instructions if possible.This is typically possible for files that were assembled or compiled. It is not possible for manually createdS-Records that contain only machine code.
5. If desired, a printed copy of the contents of the text area can be produced by clicking on thePrint button.
13
6 Examining Memory Contents
To examine the contents of the Nios II memory space, execute the following steps:
Figure 16: Examining Memory.
1. Click on theMemory tab as shown in Figure 16.
2. Enter the starting address of the memory block to be displayed as a HEX value (there is no need to use aprefix such as “0x”) in theStart Address text field.
3. Enter the ending address of the memory block to be displayed as a HEX value (again, there is no need touse a prefix such as “0x”) in theEnd Addresstext field.
4. Select the format of the memory display from theMem Format list. In Figure 16, the value32-bit Wordsis selected.
5. Finally, click on theDisplay Memory button. The Nios II Debug client will respond by fetching therequested data and displaying it in the Memory text area.
14
7 Examining and Changing Register Values
The process of changing a register value is as follows:
Figure 17: Changing a Register Value.
1. Changing the value in registerR7 is illustrated in Figure 17. Double click on the text field associated withR7 and enter a new HEX value. Press theEnter key to complete the change.
15
Figure 18: Register Value Changed.
2. Figure 18 shows the result of changing the contents of registerR7 to the HEX valueabcdef123.
Although, only a change ofR7 has been described, all registers (including the program counter) can bechanged in the same manner.
16
8 Single Step
The Nios II Debug Client makes it possible to single step through a downloaded program. Each step consists ofexecuting a single assembly language instruction and returing control to the Nios II Debug Client. If the user haschosen to compile a C-program, the single steps will still correspond to assembly language generated from theC-code. The functionality of stepping through entire statements in the high level source is not supported by theNios II Debug Client; however, theNios II Integrated Development Environmentsupports these advanced features.
Notice in Figure 18 that the Nios II Debug Client indicates that theNext Instruction to be executed is onewhich will load the registerR7 with the value1. This will be different in your case depending on the applicationdownloaded and where it was stopped; however, the general technique of the single step will remain the same.
Figure 19: Single Step.
Click on theSingle Stepbutton as shown in Figure 19. After execution of this single instruction, the Nios IIDebug Client will update the register values of any affected registers. In this example, we expectR7= 1 and thisis indeed the case.
17
9 Advanced Single Step
Often, a user may wish to single step through an application until some set of conditions is satisfied. In thisexample, we illustrate how to single step through the application until the conditionR2=DE2000 is met. The
Figure 20: Advanced Tab.
process is illustrated in Figure 20:
1. Click on theAdvancedtab.
2. Enter the condition to be searched for in theExpressionwindow. Notice that HEX values require the prefix“H” .
3. Click on theSingle step untilbutton to single step through the program until the condition specified in theexpression expression is met.
18
4. Once the condition has been met, the Nios II Debug Client will stop executing single instructions and returncontrol to the user as shown in Figure 21. Notice that the value ofR2 is as expected in theRegisterstable.
Figure 21: Single Step Until Condition Met.
More complex expression formulations may be used as C-language style logical expressions are supported.For example, to check for the condition where registersR1, R2 andR3 all contain the same value the expressionwould be:R1==R2 && R2==R3.
19
10 Setting a breakpoint
Breakpoints are special conditions that are checked by dedicated hardware in the Nios II processor as the applica-tion is running in real time. The difference between a breakpoint and theAdvanced Single Stepis that breakpointsonly support very limited conditions to be checked for such as:
• An instruction at a particular address has been reached.
• A particular address has been read from.
• A particular address has been written to.
• A particular address has been accessed.
Although the conditions are limited, they are checked in real time as the application is executed.
Figure 22: Setting a breakpoint.
This tutorial will demonstrate setting a breakpoint based on a certain instruction being reached. This is illus-trated in Figure 22. The process of setting the breakpoint is as follows:
1. First click on theDisassembletab to determine the instruction at which the breakpoint should be set. In thisexample, we choose the instruction atouter_delay_loop:and determine from the disassembly view that itis located at address80002c.
20
2. Click on the first text field in theBreak & Watch section. Enter the address80002c.
3. Click on the drop down list next to the address just entered. Selectbreak. This corresponds to a breakpointwhen a particular instruction has been reached. Other choices includerwatch (address read from),wwatch(address written to) andawatch (address accessed either by a read or write).
4. The next step involes running the program by clicking on theRun button.
5. When the target instruction has been reached, the Nios II Debug Client will indicate this condition as shownin Figure 23. ClickOK to continue debugging.
Figure 23: Breakpoint hit.
21
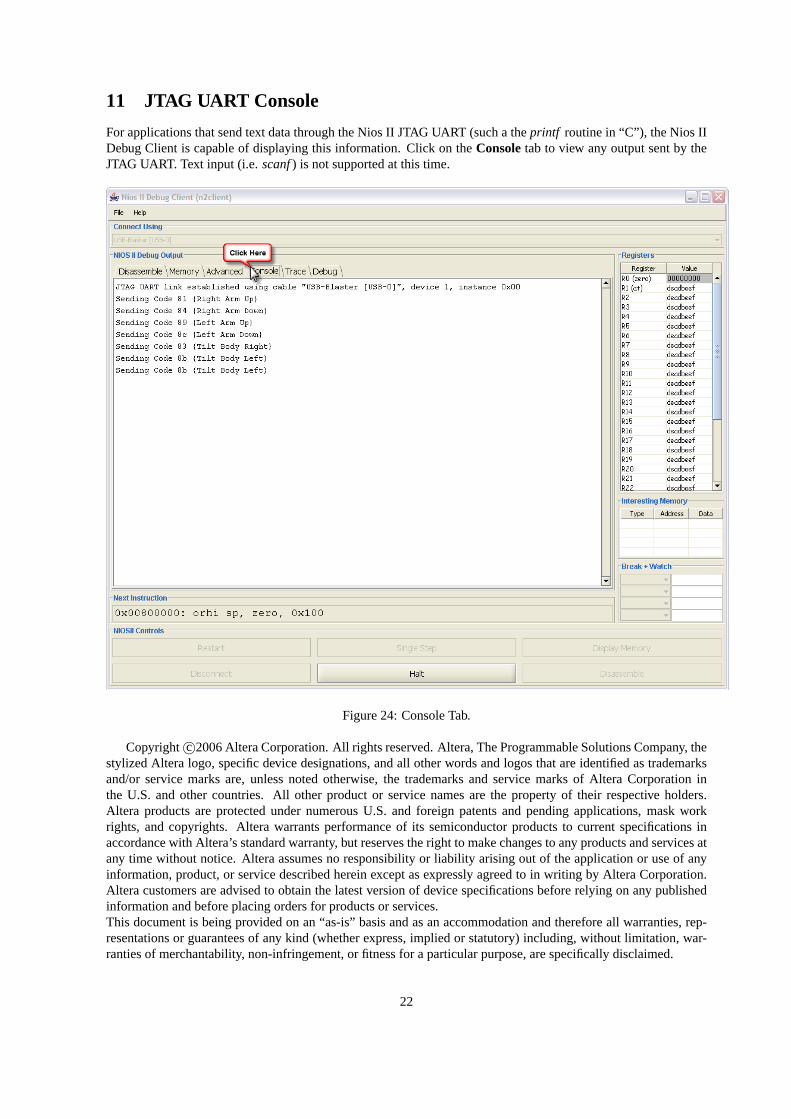
11 JTAG UART Console
For applications that send text data through the Nios II JTAG UART (such a theprintf routine in “C”), the Nios IIDebug Client is capable of displaying this information. Click on theConsoletab to view any output sent by theJTAG UART. Text input (i.e.scanf) is not supported at this time.