40

Processors
Livestock with electronic devices
NLIS | Database User Guide
NLIS Database User Guide | Processors September 2012
This User Guide explains how to submit transactions and run reports for livestock identified with electronic devices. Cattle movements are always recorded on an individual basis, while sheep transactions must be recorded on a mob basis, regardless of whether or not they are electronically tagged. However, if sheep do have electronic tags, if you wish you can also record their movements on an individual basis.
For more information about mob-based movements, see the NLIS Database User Guide – Mob-based movements for PIC-based accounts – Livestock with visual tags.
When using the database, you can usually enter either a device’s NLISID or RFID (Radio Frequency Identification Device) number. The first eight characters of an NLISID are the Property Identification Code (PIC) of the property that purchased the device. The NLISID is printed on the outside of the device and is linked to the RFID number, which is associated with the electronic chip inside the device.
Suggestions for improvements to this User Guide may be sent to [email protected]
ContentsManage your account
Log in to the database .....................................................................................1
Change password ...........................................................................................2
Change contact details ....................................................................................3
Change livestock types ....................................................................................4
Submit transactions
Transactions ....................................................................................................5
Device status ...................................................................................................7
ERP enquiry ..................................................................................................10
ERP exception list download .........................................................................11
Killed animals with PIC of consignment ..........................................................12
Livestock moved off my property ...................................................................13
Livestock moved onto my property ................................................................15
Transfer correction .........................................................................................16
Run reports
Reports .........................................................................................................20
Boxed cattle query report ..............................................................................22
Carcase feedback query report ......................................................................23
ERP PIC status report ....................................................................................24
EU PIC status report ......................................................................................25
EU status of devices report ............................................................................26
Livestock movement reports ..........................................................................27
Period on consigning PIC report ....................................................................28
Search the PIC register report ........................................................................29
Time of movement onto PIC report ................................................................30
TTF beast enquiry report ................................................................................31
TTF current holdings report ............................................................................32
View large report results ................................................................................33
View my transaction history ...........................................................................34
Format files
File format examples ......................................................................................35
Key
Tech Tips provide more information about topics featured in this guide. They can be found online on the NLIS website by clicking Help Tools.
Reports Run a report to get information from the database.
Transactions Submit a transaction to send information to the database.
September 2012 NLIS Database User Guide | Processors | 1
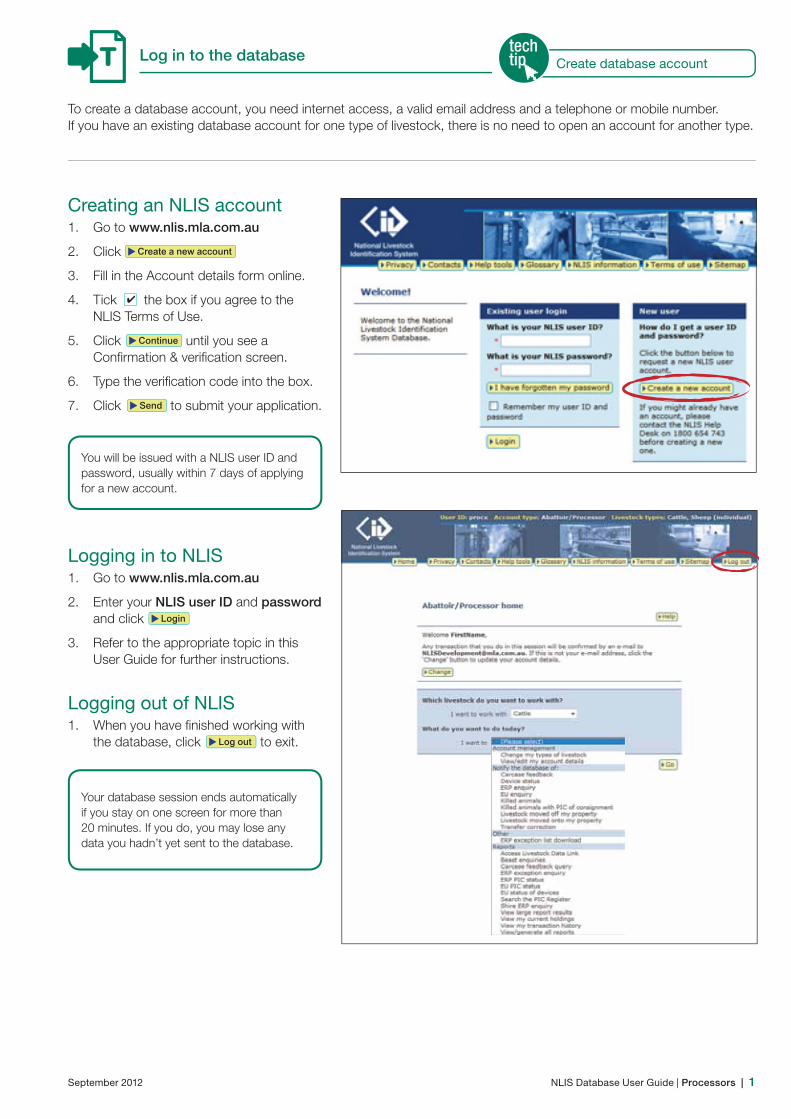
To create a database account, you need internet access, a valid email address and a telephone or mobile number. If you have an existing database account for one type of livestock, there is no need to open an account for another type.
Creating an NLIS account1. Go to www.nlis.mla.com.au
2. Click
Send me the list via e-mail
3. Fill in the Account details form online.
4. Tick
Send me the list via e-mail
the box if you agree to the NLIS Terms of Use.
5. Click
Send me the list via e-mail
until you see a Confirmation & verification screen.
6. Type the verification code into the box.
7. Click
Send me the list via e-mail
to submit your application.
Logging in to NLIS1. Go to www.nlis.mla.com.au
2. Enter your NLIS user ID and password and click
Send me the list via e-mail
3. Refer to the appropriate topic in this User Guide for further instructions.
Logging out of NLIS1. When you have finished working with
the database, click
Send me the list via e-mail
to exit.
Log in to the database
You will be issued with a NLIS user ID and password, usually within 7 days of applying for a new account.
Your database session ends automatically if you stay on one screen for more than 20 minutes. If you do, you may lose any data you hadn’t yet sent to the database.
Create database account
2 | NLIS Database User Guide | Processors September 2012
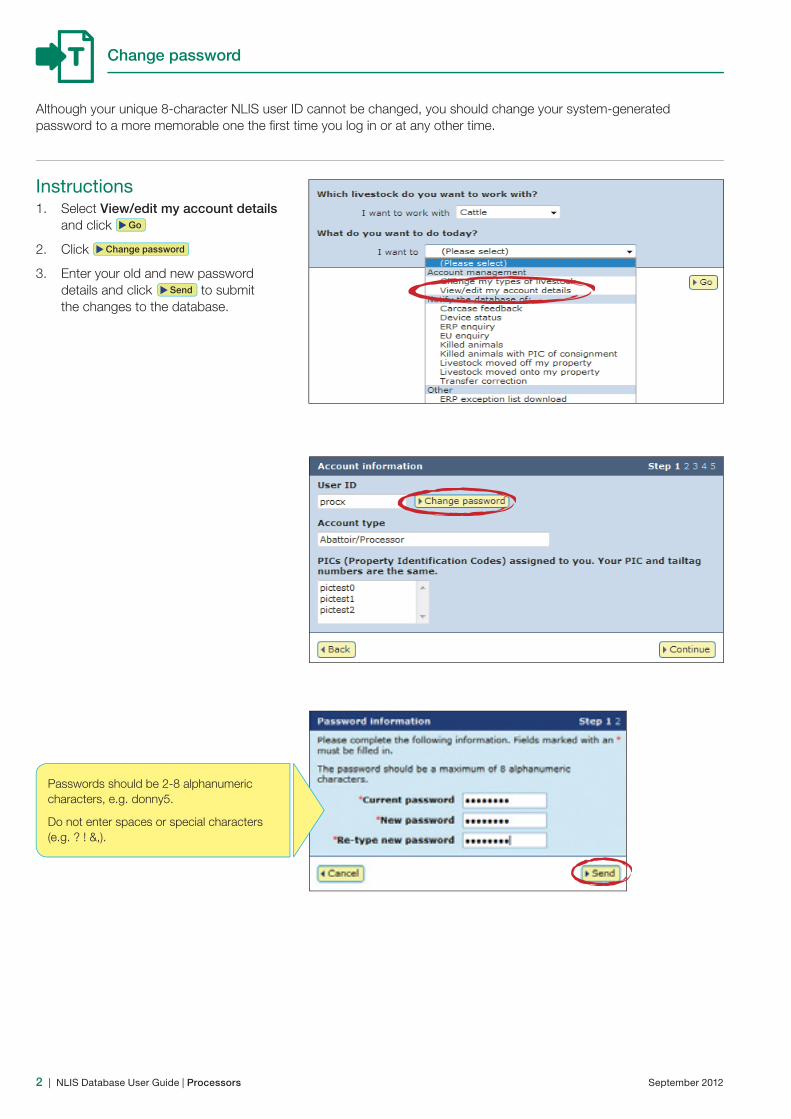
Although your unique 8-character NLIS user ID cannot be changed, you should change your system-generated password to a more memorable one the first time you log in or at any other time.
Instructions1. Select View/edit my account details
and click
Send me the list via e-mail
2. Click
Send me the list via e-mail
3. Enter your old and new password details and click
Send me the list via e-mail
to submit the changes to the database.
Change password
Passwords should be 2-8 alphanumeric characters, e.g. donny5.
Do not enter spaces or special characters (e.g. ? ! &,).

September 2012 NLIS Database User Guide | Processors | 3
Please ensure that your account details are current so that we can contact you if necessary.
Instructions1. Select View/edit my account details
and click
Send me the list via e-mail
2. Click
Send me the list via e-mail
3. Edit details. You can only edit fields with a red asterisk*.
4. Click
Send me the list via e-mail
until you see a Confirmation screen.
5. Click
Send me the list via e-mail
to submit the changes to the database.
Change contact details
If you change your postal address or no longer need a database account, email [email protected] so the NLIS Database Helpdesk can update your address or close your account.
If you change your email address, please enter your new one.
A phone or mobile number must be provided.

4 | NLIS Database User Guide | Processors September 2012
Change livestock types
When you create an account, you must select all of the livestock types that you work with. If you work with multiple livestock types (for example, if you slaughter both cattle and sheep) and have both of these linked to your account, you must always select a livestock type to work with on the homepage.
If there is only one livestock type associated with your account, you don’t need to select it when you log in to the database.
To add or remove a livestock type, follow the instructions below.
Instructions1. Select Change my types of livestock
and click
Send me the list via e-mail
2. Tick (or untick) the appropriate box to select (or de-select) a livestock type and click
Send me the list via e-mail
3. If you have just added a new livestock type, you can now select it on the homepage.
Your account information and associated livestock types are displayed at the top of the screen.
If you slaughter multiple livestock types (e.g. cattle and sheep), select both to link both types to your account.
Livestock types
September 2012 NLIS Database User Guide | Processors | 5
TransactionsYou must record information on the database to comply with state regulations relating to biosecurity and traceability.
The instructions in this guide explain how to submit transactions directly to the NLIS database.
If your company has specialised software installed that is integrated with the NLIS database, you may rarely need to submit transactions via the web interface.
6 | NLIS Database User Guide | Processors September 2012
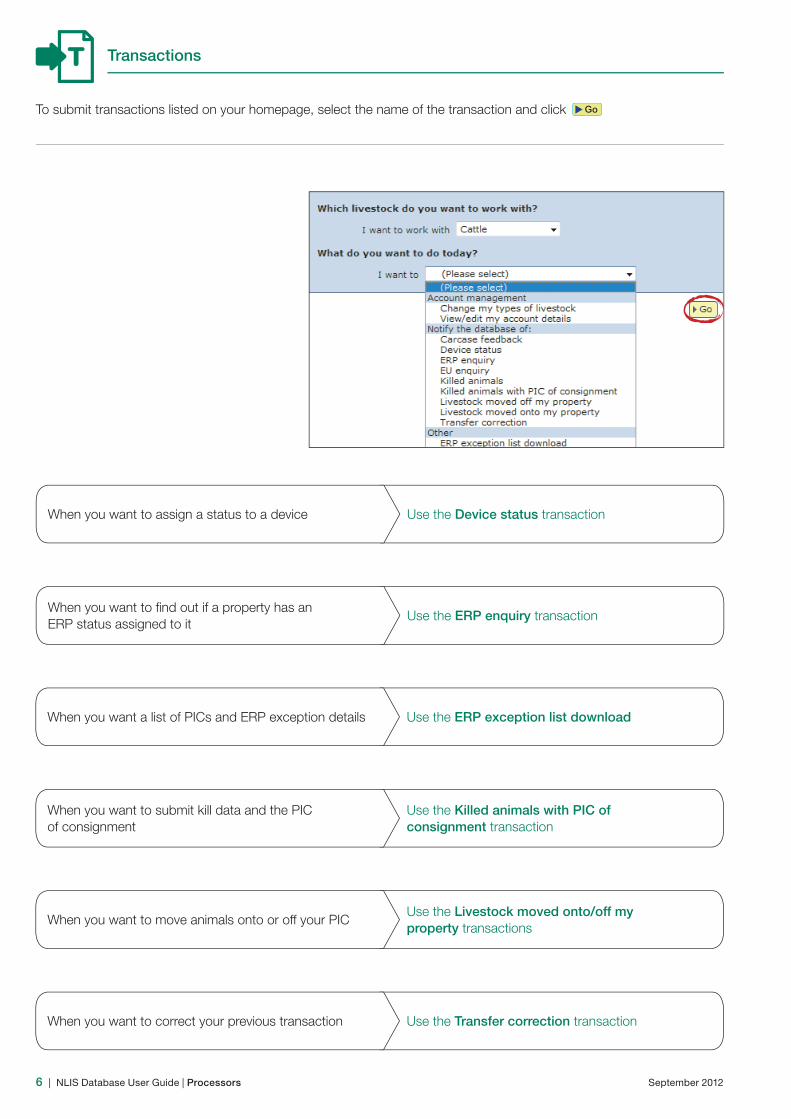
Transactions
To submit transactions listed on your homepage, select the name of the transaction and click
Send me the list via e-mail
Use the Device status transactionWhen you want to assign a status to a device
Use the ERP enquiry transactionWhen you want to find out if a property has an ERP status assigned to it
Use the ERP exception list downloadWhen you want a list of PICs and ERP exception details
Use the Killed animals with PIC of consignment transaction
When you want to submit kill data and the PIC of consignment
Use the Livestock moved onto/off my property transactions
When you want to move animals onto or off your PIC
Use the Transfer correction transactionWhen you want to correct your previous transaction
September 2012 NLIS Database User Guide | Processors | 7
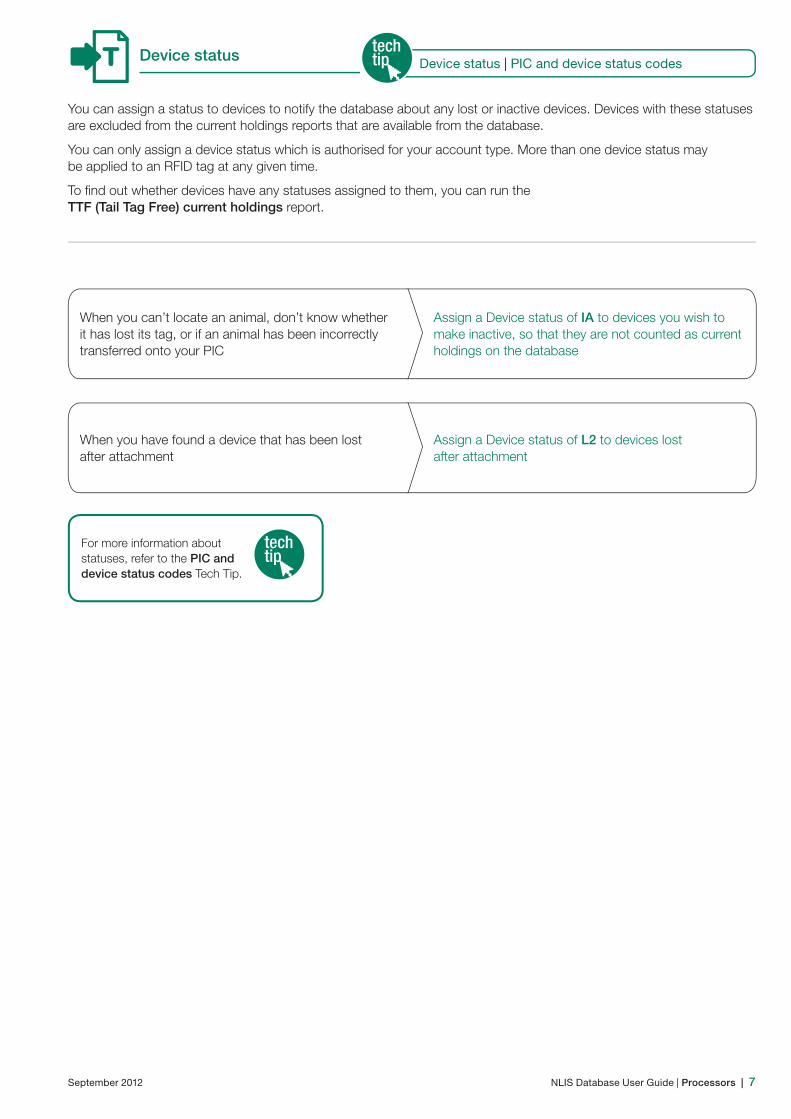
You can assign a status to devices to notify the database about any lost or inactive devices. Devices with these statuses are excluded from the current holdings reports that are available from the database.
You can only assign a device status which is authorised for your account type. More than one device status may be applied to an RFID tag at any given time.
To find out whether devices have any statuses assigned to them, you can run the TTF (Tail Tag Free) current holdings report.
Device status Device status | PIC and device status codes
For more information about statuses, refer to the PIC and device status codes Tech Tip.
Assign a Device status of IA to devices you wish to make inactive, so that they are not counted as current holdings on the database
When you can’t locate an animal, don’t know whether it has lost its tag, or if an animal has been incorrectly transferred onto your PIC
Assign a Device status of L2 to devices lost after attachment
When you have found a device that has been lost after attachment
8 | NLIS Database User Guide | Processors September 2012
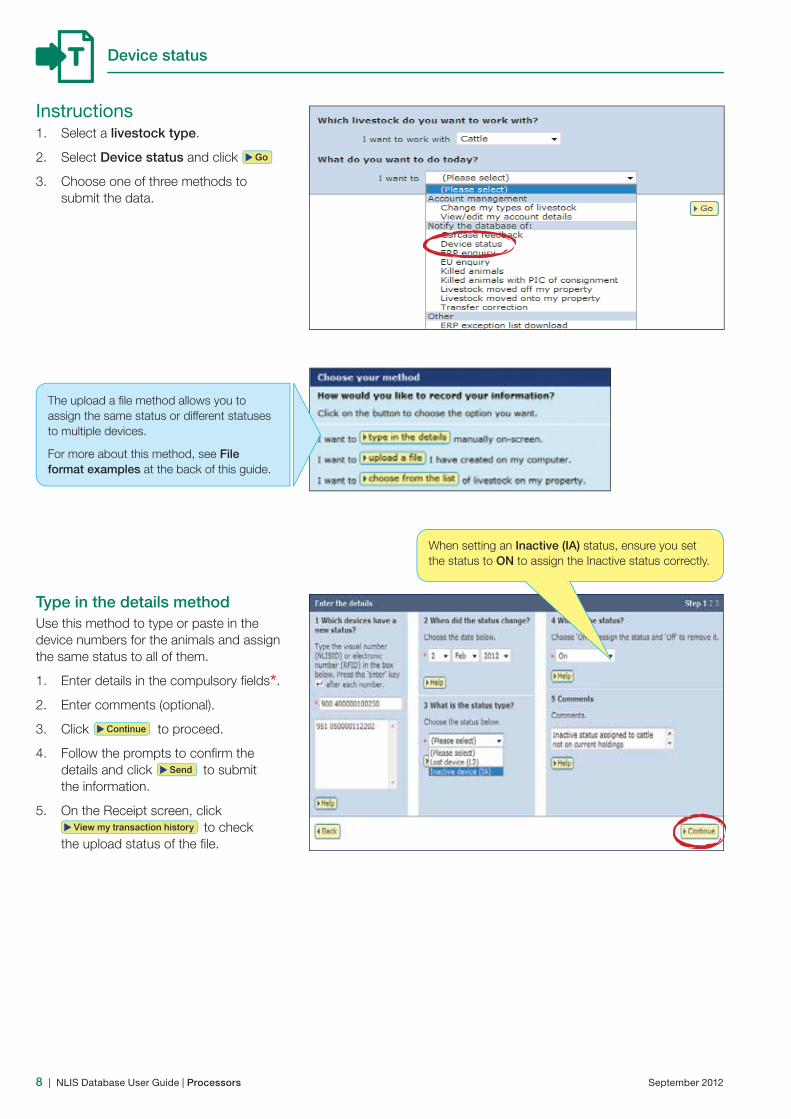
Instructions1. Select a livestock type.
2. Select Device status and click
Send me the list via e-mail
3. Choose one of three methods to submit the data.
Device status
Type in the details methodUse this method to type or paste in the device numbers for the animals and assign the same status to all of them.
1. Enter details in the compulsory fields*.
2. Enter comments (optional).
3. Click
Send me the list via e-mail
to proceed.
4. Follow the prompts to confirm the details and click
Send me the list via e-mail
to submit the information.
5. On the Receipt screen, click
Send me the list via e-mail
to check the upload status of the file.
The upload a file method allows you to assign the same status or different statuses to multiple devices.
For more about this method, see File format examples at the back of this guide.
When setting an Inactive (IA) status, ensure you set the status to ON to assign the Inactive status correctly.

September 2012 NLIS Database User Guide | Processors | 9
Choose from the list methodUse this method to choose the animals from a list and assign the same status to all of them.
1. Choose a list to view.
2. Select the appropriate PIC and click
Send me the list via e-mail
to proceed.
3. Tick the boxes for all the animals that you wish to assign the same status.
4. Click
Send me the list via e-mail
to proceed.
Device status
To enter the device status details:
5. Enter details in the compulsory fields*.
6. Enter comments (optional).
7. Click
Send me the list via e-mail
to proceed.
8. Click
Send me the list via e-mail
to submit the information.
9. On the Receipt screen, click
Send me the list via e-mail
to check the upload status of the file.
To view your list on one page select All items per page.
If you choose livestock moved onto or livestock bred on, also specify a date range. If you wish to see active devices, tick the Show only active devices box.
10 | NLIS Database User Guide | Processors September 2012
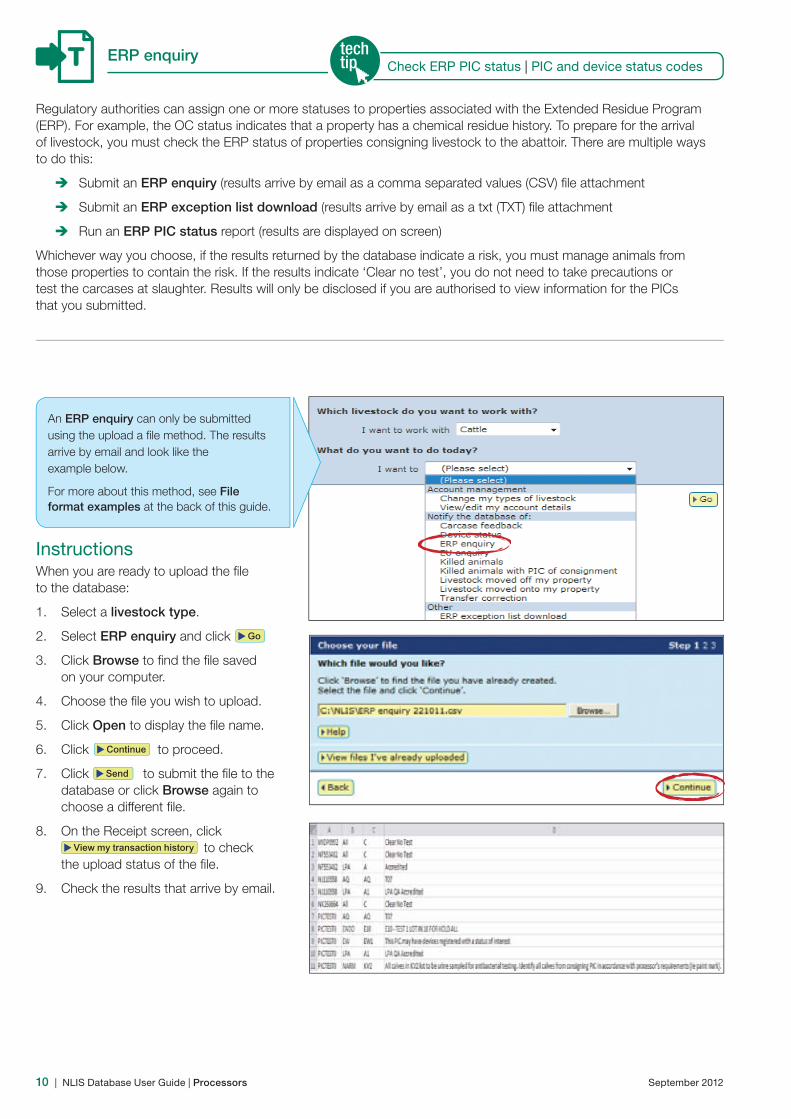
Regulatory authorities can assign one or more statuses to properties associated with the Extended Residue Program (ERP). For example, the OC status indicates that a property has a chemical residue history. To prepare for the arrival of livestock, you must check the ERP status of properties consigning livestock to the abattoir. There are multiple ways to do this:
Submit an ERP enquiry (results arrive by email as a comma separated values (CSV) file attachment
Submit an ERP exception list download (results arrive by email as a txt (TXT) file attachment
Run an ERP PIC status report (results are displayed on screen)
Whichever way you choose, if the results returned by the database indicate a risk, you must manage animals from those properties to contain the risk. If the results indicate ‘Clear no test’, you do not need to take precautions or test the carcases at slaughter. Results will only be disclosed if you are authorised to view information for the PICs that you submitted.
InstructionsWhen you are ready to upload the file to the database:
1. Select a livestock type.
2. Select ERP enquiry and click
Send me the list via e-mail
3. Click Browse to find the file saved on your computer.
4. Choose the file you wish to upload.
5. Click Open to display the file name.
6. Click
Send me the list via e-mail
to proceed.
7. Click
Send me the list via e-mail
to submit the file to the database or click Browse again to choose a different file.
8. On the Receipt screen, click
Send me the list via e-mail
to check the upload status of the file.
9. Check the results that arrive by email.
ERP enquiryCheck ERP PIC status | PIC and device status codes
An ERP enquiry can only be submitted using the upload a file method. The results arrive by email and look like the example below.
For more about this method, see File format examples at the back of this guide.

September 2012 NLIS Database User Guide | Processors | 11
Instructions1. Select a livestock type.
2. Select ERP exception list download and click
Send me the list via e-mail
3. Select ALL or a specific state.
4. Click
Send me the list via e-mail
5. Check the results that arrive by email.
6. Perform any necessary tasks to prepare for any animals that may require residue testing.
An ERP exception download lists all PICs that have statuses assigned to them. You can choose to download PICs for one state or for all states. A PIC may have multiple statuses. In that case, the PIC will be be listed multiple times for the relevant state.
A PIC with an ENDO (E10) status indicates that every 10th lot of livestock consigned by that property should be checked for endosulfan residues. PICs with an OC (N1F) have a high risk of contamination from organochlorines, so livestock from those properties must be tested at slaughter.
ERP exception list download PIC and device status codes
12 | NLIS Database User Guide | Processors September 2012
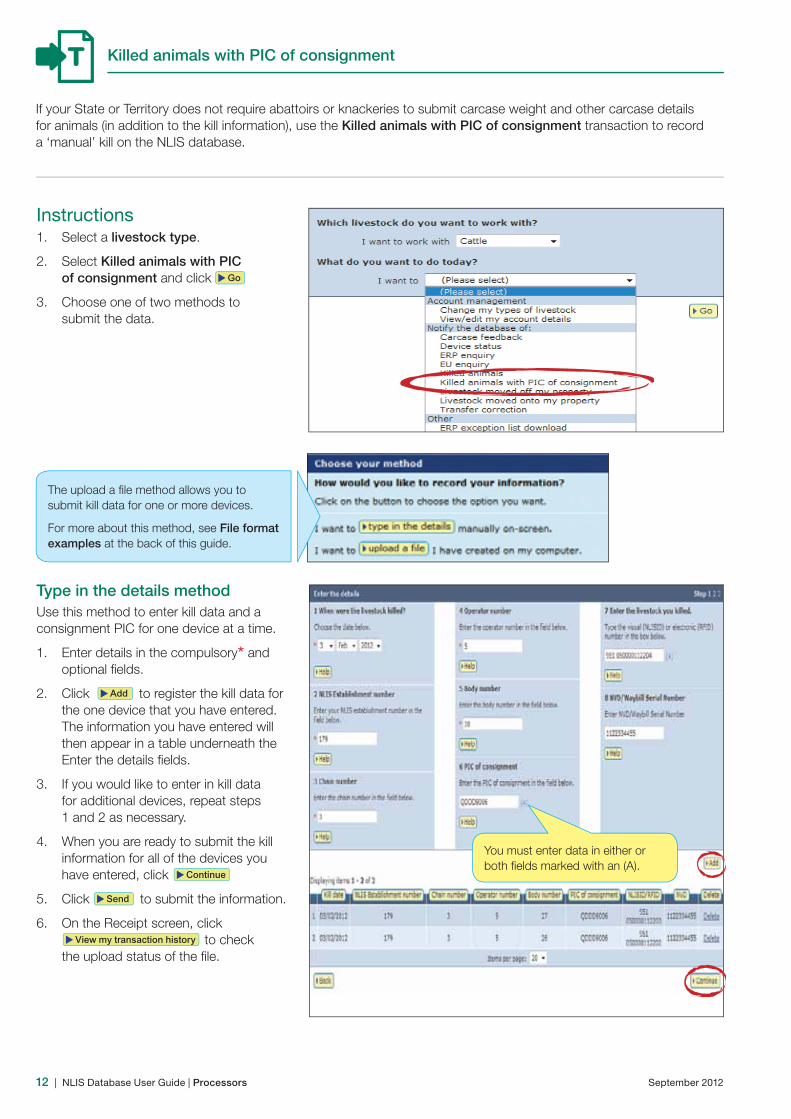
If your State or Territory does not require abattoirs or knackeries to submit carcase weight and other carcase details for animals (in addition to the kill information), use the Killed animals with PIC of consignment transaction to record a ‘manual’ kill on the NLIS database.
Instructions1. Select a livestock type.
2. Select Killed animals with PIC of consignment and click
Send me the list via e-mail
3. Choose one of two methods to submit the data.
Killed animals with PIC of consignment
Type in the details methodUse this method to enter kill data and a consignment PIC for one device at a time.
1. Enter details in the compulsory* and optional fields.
2. Click
Send me the list via e-mail
to register the kill data for the one device that you have entered. The information you have entered will then appear in a table underneath the Enter the details fields.
3. If you would like to enter in kill data for additional devices, repeat steps 1 and 2 as necessary.
4. When you are ready to submit the kill information for all of the devices you have entered, click
Send me the list via e-mail
5. Click
Send me the list via e-mail
to submit the information.
6. On the Receipt screen, click
Send me the list via e-mail
to check the upload status of the file.
The upload a file method allows you to submit kill data for one or more devices.
For more about this method, see File format examples at the back of this guide.
You must enter data in either or both fields marked with an (A).
September 2012 NLIS Database User Guide | Processors | 13
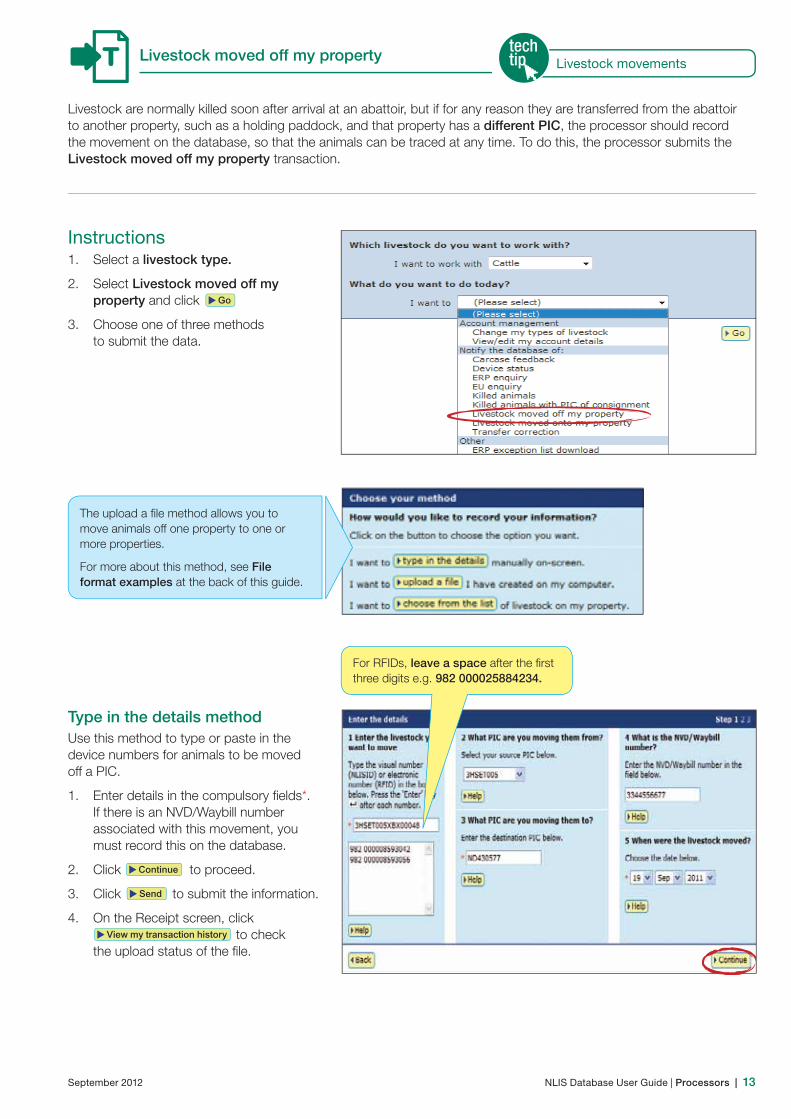
Livestock moved off my property
Livestock are normally killed soon after arrival at an abattoir, but if for any reason they are transferred from the abattoir to another property, such as a holding paddock, and that property has a different PIC, the processor should record the movement on the database, so that the animals can be traced at any time. To do this, the processor submits the Livestock moved off my property transaction.
Instructions1. Select a livestock type.
2. Select Livestock moved off my property and click
Send me the list via e-mail
3. Choose one of three methods to submit the data.
Type in the details methodUse this method to type or paste in the device numbers for animals to be moved off a PIC.
1. Enter details in the compulsory fields*. If there is an NVD/Waybill number associated with this movement, you must record this on the database.
2. Click
Send me the list via e-mail
to proceed.
3. Click
Send me the list via e-mail
to submit the information.
4. On the Receipt screen, click
Send me the list via e-mail
to check the upload status of the file.
The upload a file method allows you to move animals off one property to one or more properties.
For more about this method, see File format examples at the back of this guide.
For RFIDs, leave a space after the first three digits e.g. 982 000025884234.
Livestock movements
14 | NLIS Database User Guide | Processors September 2012
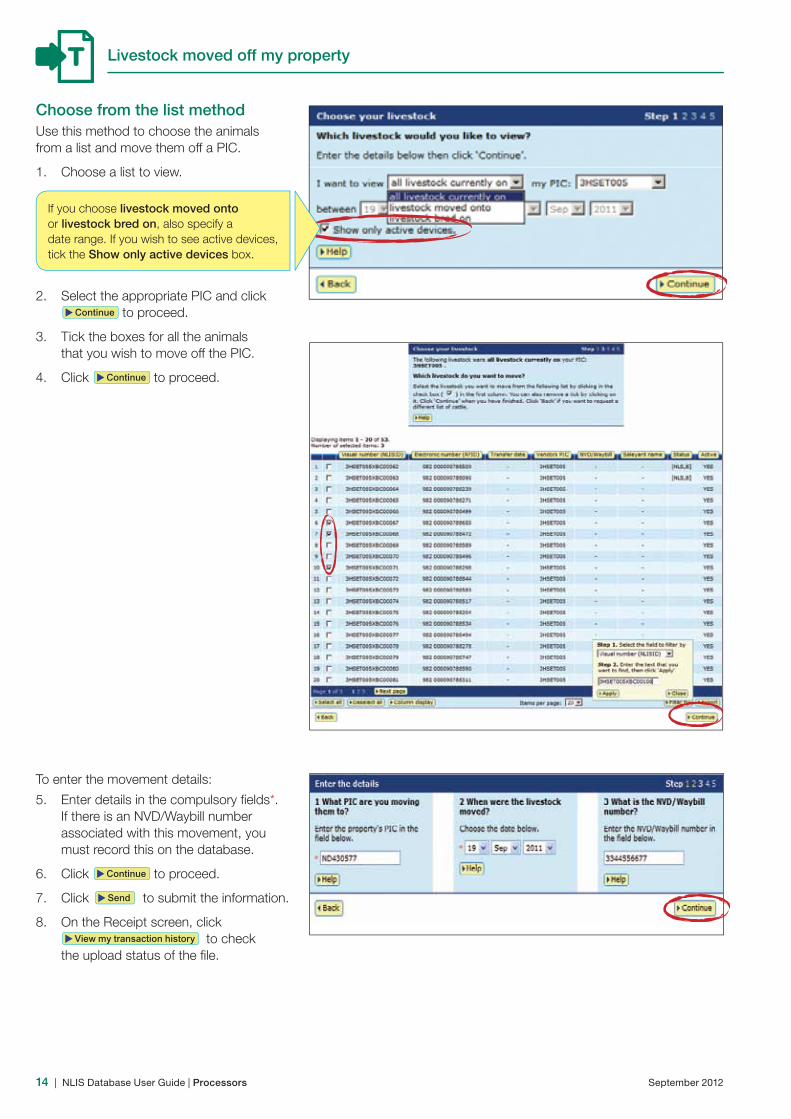
Choose from the list methodUse this method to choose the animals from a list and move them off a PIC.
1. Choose a list to view.
2. Select the appropriate PIC and click
Send me the list via e-mail
to proceed.
3. Tick the boxes for all the animals that you wish to move off the PIC.
4. Click
Send me the list via e-mail
to proceed.
Livestock moved off my property
To enter the movement details:
5. Enter details in the compulsory fields*. If there is an NVD/Waybill number associated with this movement, you must record this on the database.
6. Click
Send me the list via e-mail
to proceed.
7. Click
Send me the list via e-mail
to submit the information.
8. On the Receipt screen, click
Send me the list via e-mail
to check the upload status of the file.
To view your list on one page select All items per page.
If you choose livestock moved onto or livestock bred on, also specify a date range. If you wish to see active devices, tick the Show only active devices box.
September 2012 NLIS Database User Guide | Processors | 15
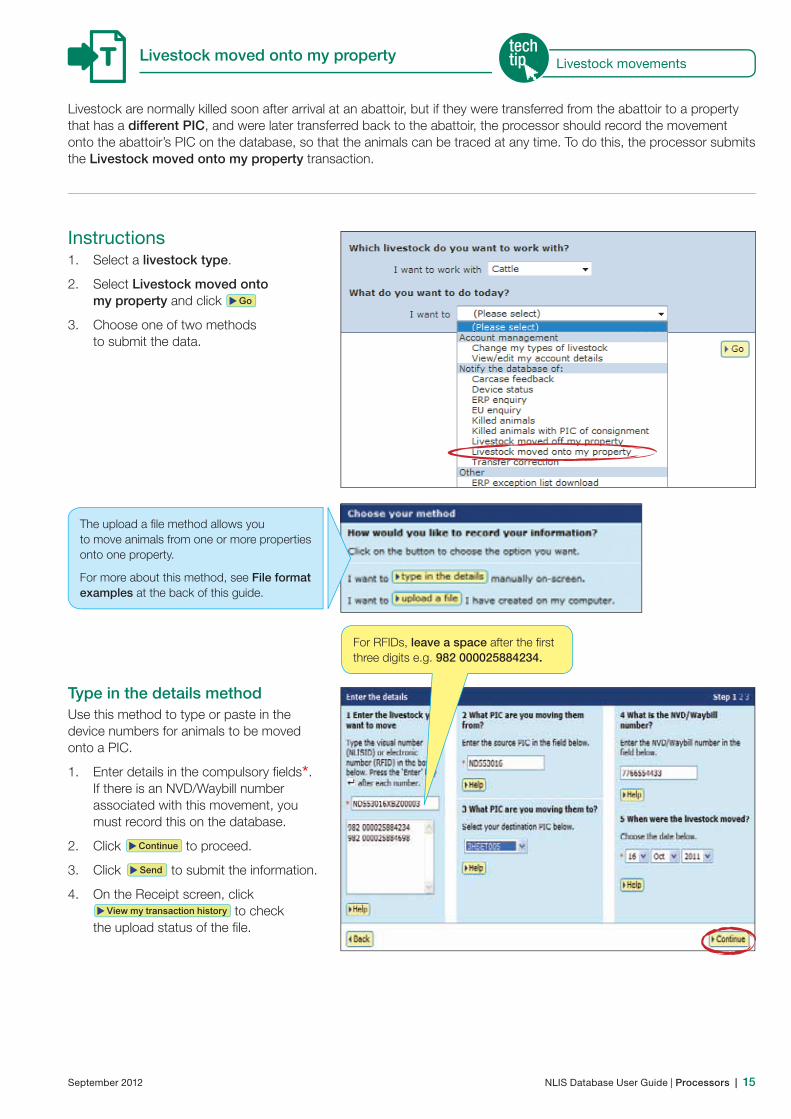
Livestock moved onto my property
Livestock are normally killed soon after arrival at an abattoir, but if they were transferred from the abattoir to a property that has a different PIC, and were later transferred back to the abattoir, the processor should record the movement onto the abattoir’s PIC on the database, so that the animals can be traced at any time. To do this, the processor submits the Livestock moved onto my property transaction.
Instructions1. Select a livestock type.
2. Select Livestock moved onto my property and click
Send me the list via e-mail
3. Choose one of two methods to submit the data.
The upload a file method allows you to move animals from one or more properties onto one property.
For more about this method, see File format examples at the back of this guide.
Type in the details methodUse this method to type or paste in the device numbers for animals to be moved onto a PIC.
1. Enter details in the compulsory fields*. If there is an NVD/Waybill number associated with this movement, you must record this on the database.
2. Click
Send me the list via e-mail
to proceed.
3. Click
Send me the list via e-mail
to submit the information.
4. On the Receipt screen, click
Send me the list via e-mail
to check the upload status of the file.
For RFIDs, leave a space after the first three digits e.g. 982 000025884234.
Livestock movements
16 | NLIS Database User Guide | Processors September 2012
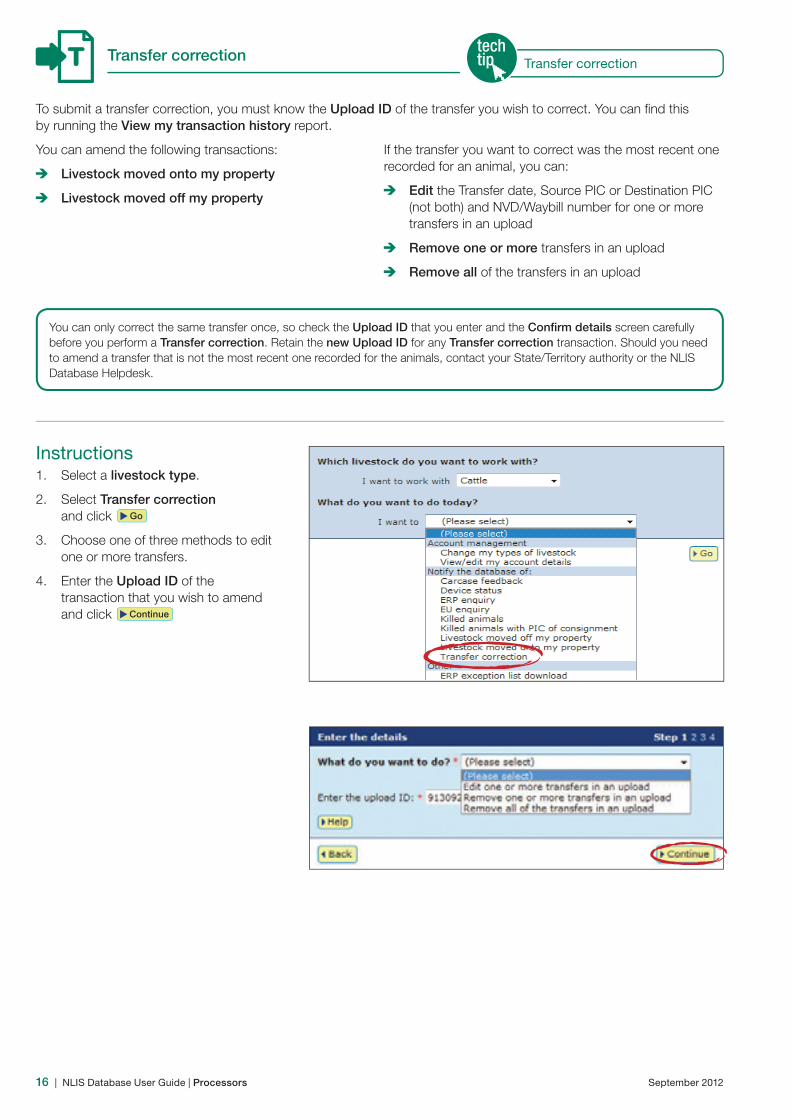
To submit a transfer correction, you must know the Upload ID of the transfer you wish to correct. You can find this by running the View my transaction history report.
You can amend the following transactions:
Livestock moved onto my property
Livestock moved off my property
If the transfer you want to correct was the most recent one recorded for an animal, you can:
Edit the Transfer date, Source PIC or Destination PIC (not both) and NVD/Waybill number for one or more transfers in an upload
Remove one or more transfers in an upload
Remove all of the transfers in an upload
Transfer correction
You can only correct the same transfer once, so check the Upload ID that you enter and the Confirm details screen carefully before you perform a Transfer correction. Retain the new Upload ID for any Transfer correction transaction. Should you need to amend a transfer that is not the most recent one recorded for the animals, contact your State/Territory authority or the NLIS Database Helpdesk.
Transfer correction
Instructions1. Select a livestock type.
2. Select Transfer correction and click
Send me the list via e-mail
3. Choose one of three methods to edit one or more transfers.
4. Enter the Upload ID of the transaction that you wish to amend and click
Send me the list via e-mail
September 2012 NLIS Database User Guide | Processors | 17
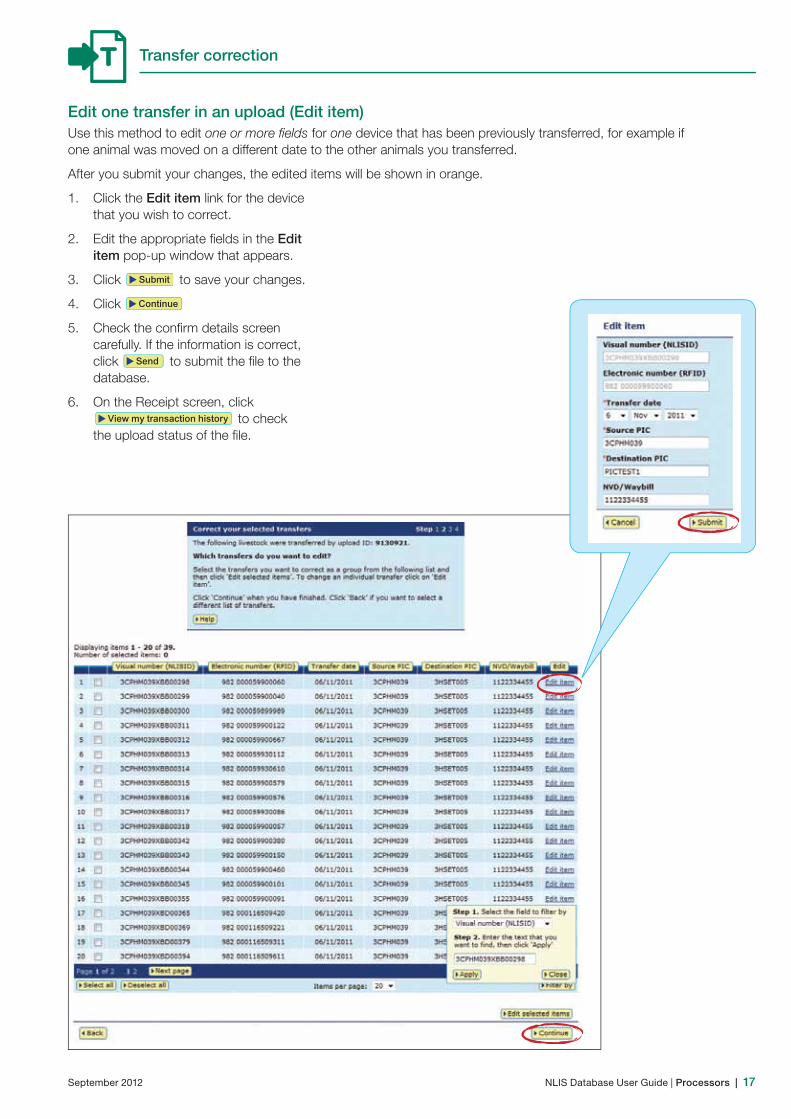
Edit one transfer in an upload (Edit item)Use this method to edit one or more fields for one device that has been previously transferred, for example if one animal was moved on a different date to the other animals you transferred.
After you submit your changes, the edited items will be shown in orange.
1. Click the Edit item link for the device that you wish to correct.
2. Edit the appropriate fields in the Edit item pop-up window that appears.
3. Click
Send me the list via e-mail
to save your changes.
4. Click
Send me the list via e-mail
5. Check the confirm details screen carefully. If the information is correct, click
Send me the list via e-mail
to submit the file to the database.
6. On the Receipt screen, click
Send me the list via e-mail
to check the upload status of the file.
Transfer correction

18 | NLIS Database User Guide | Processors September 2012
Edit multiple transfers in an upload (Edit selected items)Use this method to edit the same fields for multiple devices that have been previously transferred, for example if you entered an incorrect PIC.
After you submit your changes, the edited items will be shown in orange.
1. Tick the boxes for the devices you wish to edit or click
Send me the list via e-mail
if you wish to edit all the devices in one upload.
2. Click
Send me the list via e-mail
3. Edit the appropriate fields in the Edit selected items pop-up window that appears.
4. Click
Send me the list via e-mail
to save your changes.
5. Click
Send me the list via e-mail
6. Check the confirm details screen carefully. If the information is correct, click
Send me the list via e-mail
to submit the file to the database.
7. On the Receipt screen, click
Send me the list via e-mail
to check the upload status of the file.
Transfer correction
September 2012 NLIS Database User Guide | Processors | 19
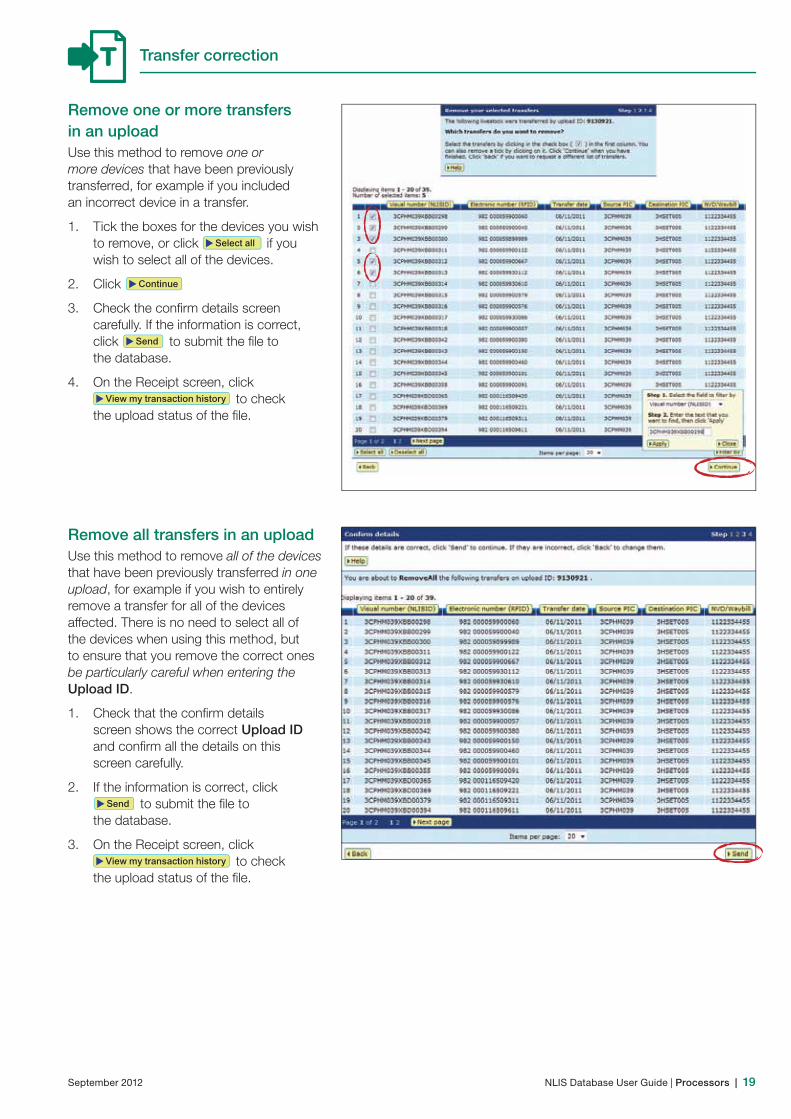
Remove one or more transfers in an uploadUse this method to remove one or more devices that have been previously transferred, for example if you included an incorrect device in a transfer.
1. Tick the boxes for the devices you wish to remove, or click
Send me the list via e-mail
if you wish to select all of the devices.
2. Click
Send me the list via e-mail
3. Check the confirm details screen carefully. If the information is correct, click
Send me the list via e-mail
to submit the file to the database.
4. On the Receipt screen, click
Send me the list via e-mail
to check the upload status of the file.
Transfer correction
Remove all transfers in an uploadUse this method to remove all of the devices that have been previously transferred in one upload, for example if you wish to entirely remove a transfer for all of the devices affected. There is no need to select all of the devices when using this method, but to ensure that you remove the correct ones be particularly careful when entering the Upload ID.
1. Check that the confirm details screen shows the correct Upload ID and confirm all the details on this screen carefully.
2. If the information is correct, click
Send me the list via e-mail
to submit the file to the database.
3. On the Receipt screen, click
Send me the list via e-mail
to check the upload status of the file.

20 | NLIS Database User Guide | Processors September 2012
ReportsProcessors record information on the database to comply with state regulations relating to biosecurity and traceability.
To retrieve information from the database, you can run various reports. For example, the TTF current holdings report allows you to find RFID and NLISID numbers to submit transactions.
You can also filter your report results and export data to another file. This information can help you to manage your holdings more effectively.
September 2012 NLIS Database User Guide | Processors | 21
Reports
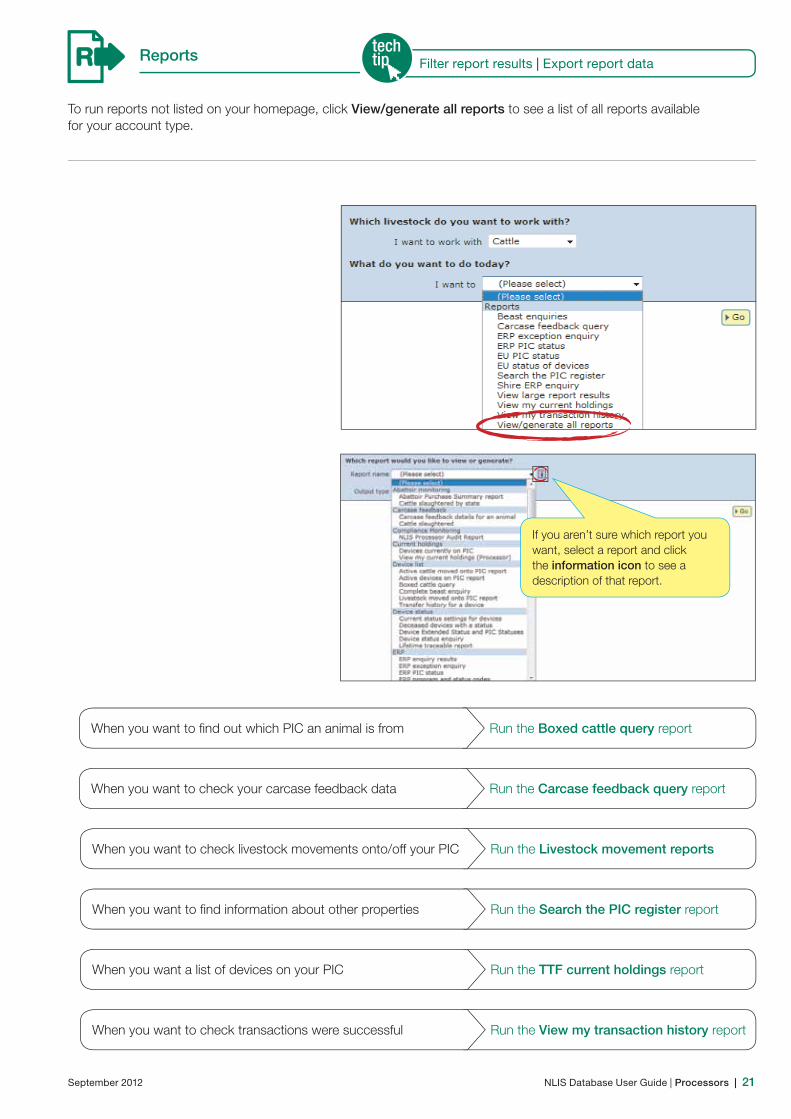
To run reports not listed on your homepage, click View/generate all reports to see a list of all reports available for your account type.
Filter report results | Export report data
Run the Livestock movement reportsWhen you want to check livestock movements onto/off your PIC
Run the Search the PIC register reportWhen you want to find information about other properties
Run the TTF current holdings reportWhen you want a list of devices on your PIC
Run the View my transaction history reportWhen you want to check transactions were successful
Run the Carcase feedback query reportWhen you want to check your carcase feedback data
Run the Boxed cattle query reportWhen you want to find out which PIC an animal is from
If you aren’t sure which report you want, select a report and click the information icon to see a description of that report.

22 | NLIS Database User Guide | Processors September 2012
Boxed cattle query report
Instructions1. Select a livestock type.
2. Select View/generate all reports and click
Send me the list via e-mail
3. Select Boxed cattle query.
4. Enter up to five PICs.
5. Enter in the RFID and/or NLISID numbers and click
Send me the list via e-mail
This report helps you to identify which PICs may have consigned animals that have been boxed together.
You may enter up to five PICs and multiple RFID and/or NLISID numbers. If any of the device numbers are registered to one of the PICs that you entered, the details will be displayed in the report results. If the device numbers are not registered to any of the PICs you have entered, a message informing you that the device is not registered to any of the PICs submitted will be displayed. The ‘Current PIC’ column shows the ‘PIC of consignment’.
Boxed cattle query
To view your list on one page select All items per page.
Although the default Output type is On-screen, you can also choose Email or XML if you would prefer to receive report results via email or as XML code.
When the results are displayed, if you want to search for specific items, click Filter by, follow steps 1-2 on the filter screen and then click Apply.
September 2012 NLIS Database User Guide | Processors | 23
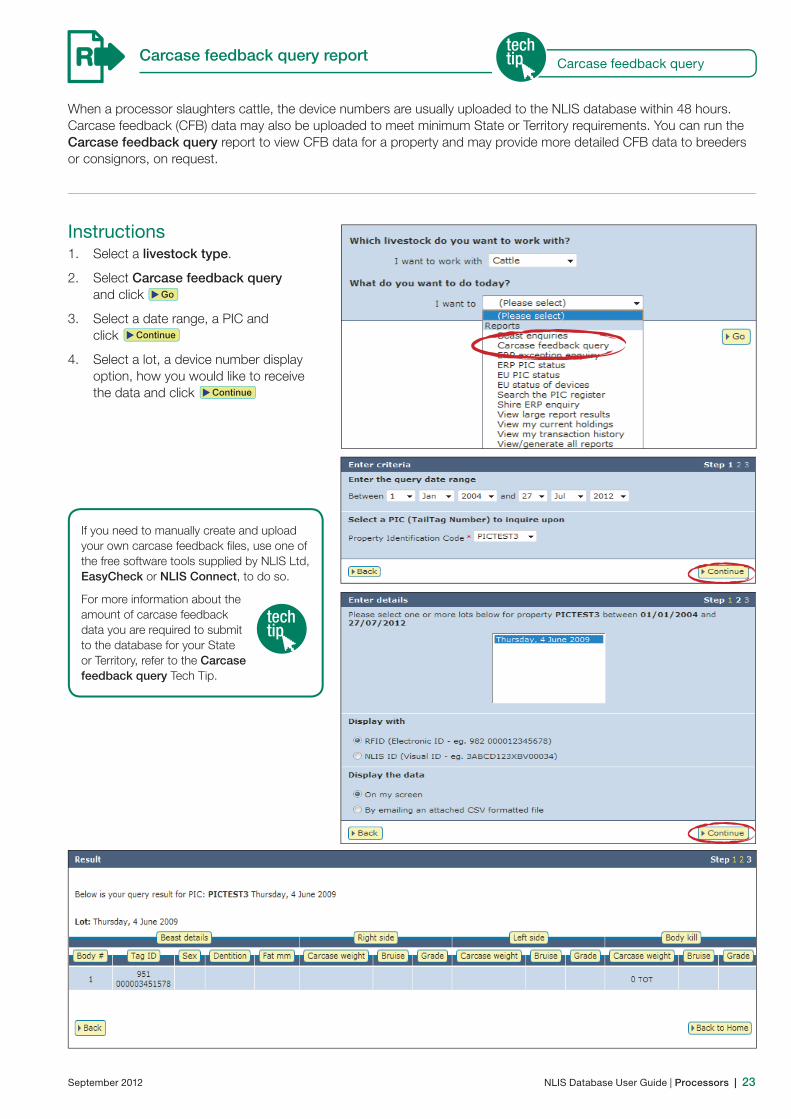
When a processor slaughters cattle, the device numbers are usually uploaded to the NLIS database within 48 hours. Carcase feedback (CFB) data may also be uploaded to meet minimum State or Territory requirements. You can run the Carcase feedback query report to view CFB data for a property and may provide more detailed CFB data to breeders or consignors, on request.
Instructions1. Select a livestock type.
2. Select Carcase feedback query and click
Send me the list via e-mail
3. Select a date range, a PIC and click
Send me the list via e-mail
4. Select a lot, a device number display option, how you would like to receive
the data and click
Send me the list via e-mail
If you need to manually create and upload your own carcase feedback files, use one of the free software tools supplied by NLIS Ltd, EasyCheck or NLIS Connect, to do so.
For more information about the amount of carcase feedback data you are required to submit to the database for your State or Territory, refer to the Carcase feedback query Tech Tip.
Carcase feedback query report Carcase feedback query

24 | NLIS Database User Guide | Processors September 2012
To run the ERP PIC status report, you must enter one or more PICs. The report results list those PICs on screen and display any PIC statuses associated with them. This will assist you to prepare for the arrival of any livestock whose results indicate a risk.
For example, if one of the PICs in the report results has a NARM KV2 status assigned to it, bobby calves consigned to your abattoir from that property must be urine sampled for anti-bacterial testing.
Instructions1. Select a livestock type.
2. Select ERP PIC status and click
Send me the list via e-mail
3. Enter in one or more PICs and click
Send me the list via e-mail
ERP PIC status report
For more information about statuses, refer to the PIC and device status codes Tech Tip.
PIC and device status codes
September 2012 NLIS Database User Guide | Processors | 25
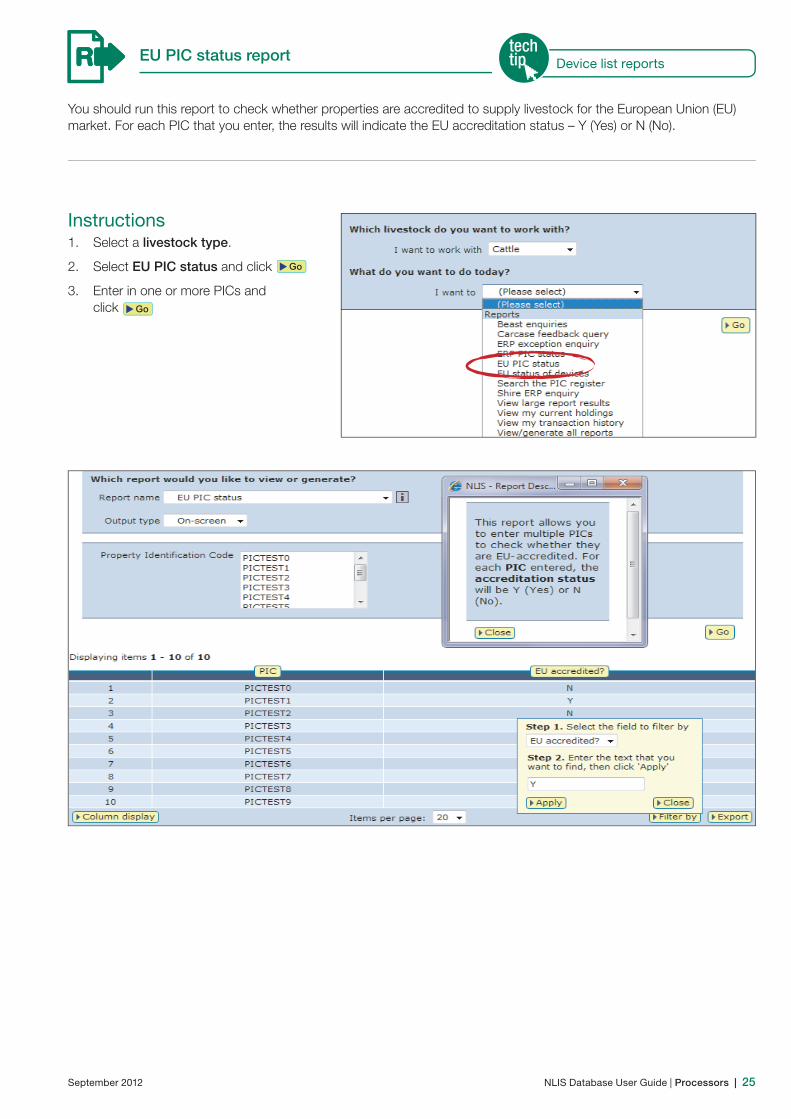
EU PIC status report
You should run this report to check whether properties are accredited to supply livestock for the European Union (EU) market. For each PIC that you enter, the results will indicate the EU accreditation status – Y (Yes) or N (No).
Instructions1. Select a livestock type.
2. Select EU PIC status and click
Send me the list via e-mail
3. Enter in one or more PICs and click
Send me the list via e-mail
Device list reports

26 | NLIS Database User Guide | Processors September 2012
EU status of devices report
Instructions1. Select a livestock type.
2. Select EU status of devices and click
Send me the list via e-mail
3. Enter a PIC and click
Send me the list via e-mail
You should run this report to check whether animals from a specific property are eligible for the European Union (EU) market. For the PIC that you enter, the results will list all the cattle registered to that PIC on the database and indicate the EU status of each animal – Y (Yes), N (No) or D (Deceased).

September 2012 NLIS Database User Guide | Processors | 27
Livestock movement reports Livestock movement reports
You should use these reports to check movements onto/off your PIC during a specific period. The information in these reports is derived from the details recorded on the database when the Livestock moved onto/off my property transactions are submitted.
Instructions1. Select a livestock type.
2. Select View/generate all reports and click
Send me the list via e-mail
3. Select Livestock moved onto/off PIC report.
4. Select a PIC, a date range and click
Send me the list via e-mail
28 | NLIS Database User Guide | Processors September 2012
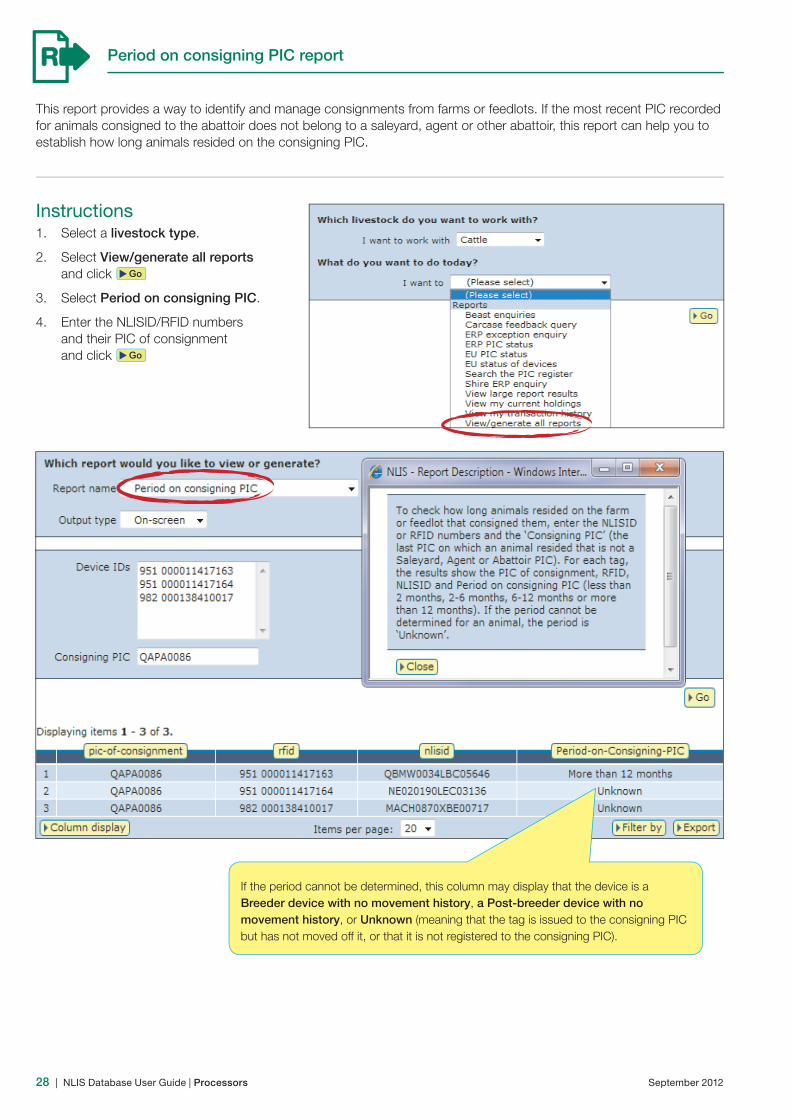
This report provides a way to identify and manage consignments from farms or feedlots. If the most recent PIC recorded for animals consigned to the abattoir does not belong to a saleyard, agent or other abattoir, this report can help you to establish how long animals resided on the consigning PIC.
Instructions1. Select a livestock type.
2. Select View/generate all reports and click
Send me the list via e-mail
3. Select Period on consigning PIC.
4. Enter the NLISID/RFID numbers and their PIC of consignment and click
Send me the list via e-mail
Period on consigning PIC report
If the period cannot be determined, this column may display that the device is a Breeder device with no movement history, a Post-breeder device with no movement history, or Unknown (meaning that the tag is issued to the consigning PIC but has not moved off it, or that it is not registered to the consigning PIC).
September 2012 NLIS Database User Guide | Processors | 29
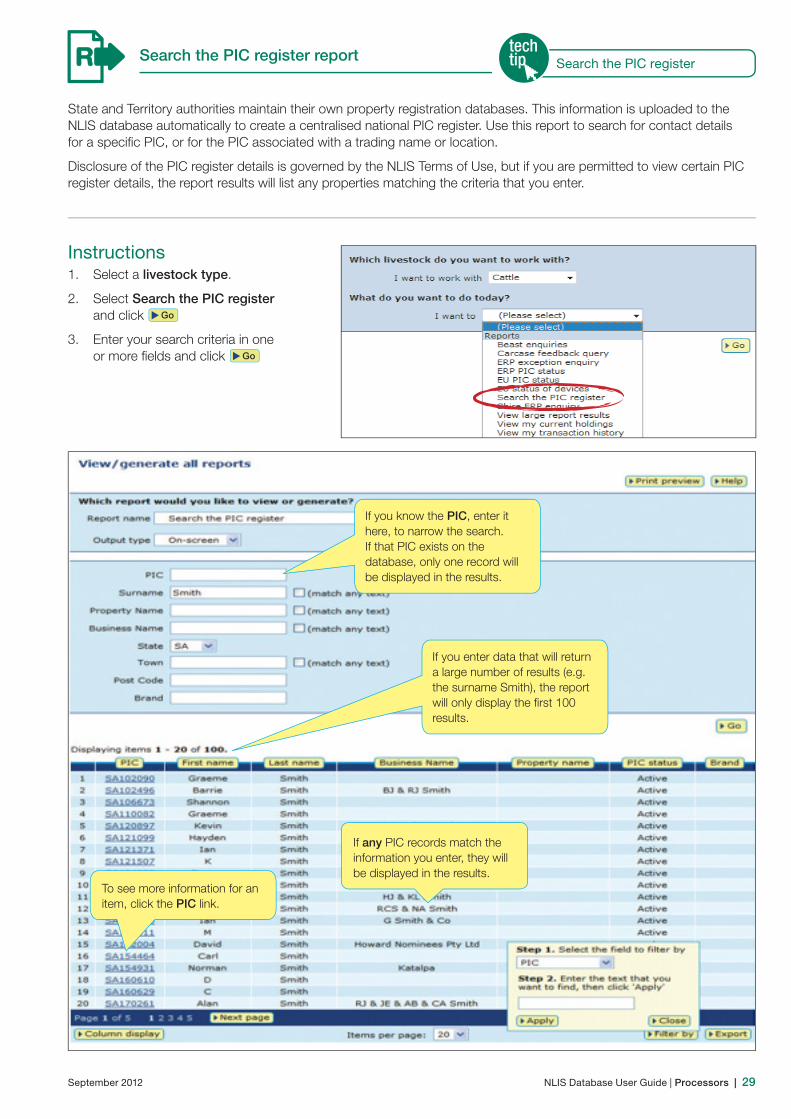
Search the PIC register report
State and Territory authorities maintain their own property registration databases. This information is uploaded to the NLIS database automatically to create a centralised national PIC register. Use this report to search for contact details for a specific PIC, or for the PIC associated with a trading name or location.
Disclosure of the PIC register details is governed by the NLIS Terms of Use, but if you are permitted to view certain PIC register details, the report results will list any properties matching the criteria that you enter.
Instructions1. Select a livestock type.
2. Select Search the PIC register and click
Send me the list via e-mail
3. Enter your search criteria in one or more fields and click
Send me the list via e-mail
Search the PIC register
If you know the PIC, enter it here, to narrow the search. If that PIC exists on the database, only one record will be displayed in the results.
If any PIC records match the information you enter, they will be displayed in the results.
To see more information for an item, click the PIC link.
If you enter data that will return a large number of results (e.g. the surname Smith), the report will only display the first 100 results.

30 | NLIS Database User Guide | Processors September 2012
Time of movement onto PIC report
This report allows you to find out when one or more animals moved off the PIC(s) they were residing on (Departure date and Departure time) and/or out of the saleyards they were consigned from (SY departure date & SY departure time) before moving onto your PIC.
Although it is not essential to record a time when recording a movement, time of movement data can be provided by various types of database users when it is submitted within device-based transactions.
Instructions1. Select a livestock type.
2. Select View/generate all reports and click
Send me the list via e-mail
3. Select Time of movement onto PIC.
4. Select a PIC, a date range and click
Send me the list via e-mail
Time of event
September 2012 NLIS Database User Guide | Processors | 31
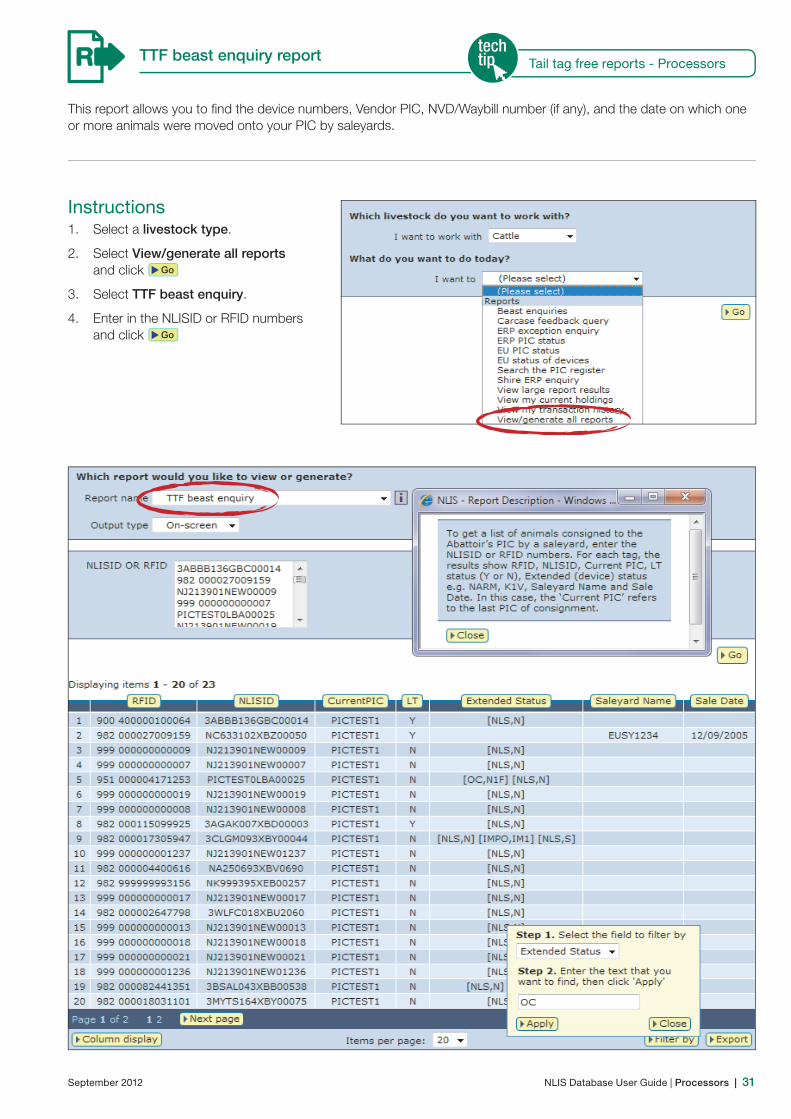
TTF beast enquiry report
This report allows you to find the device numbers, Vendor PIC, NVD/Waybill number (if any), and the date on which one or more animals were moved onto your PIC by saleyards.
Instructions1. Select a livestock type.
2. Select View/generate all reports and click
Send me the list via e-mail
3. Select TTF beast enquiry.
4. Enter in the NLISID or RFID numbers and click
Send me the list via e-mail
Tail tag free reports - Processors
32 | NLIS Database User Guide | Processors September 2012
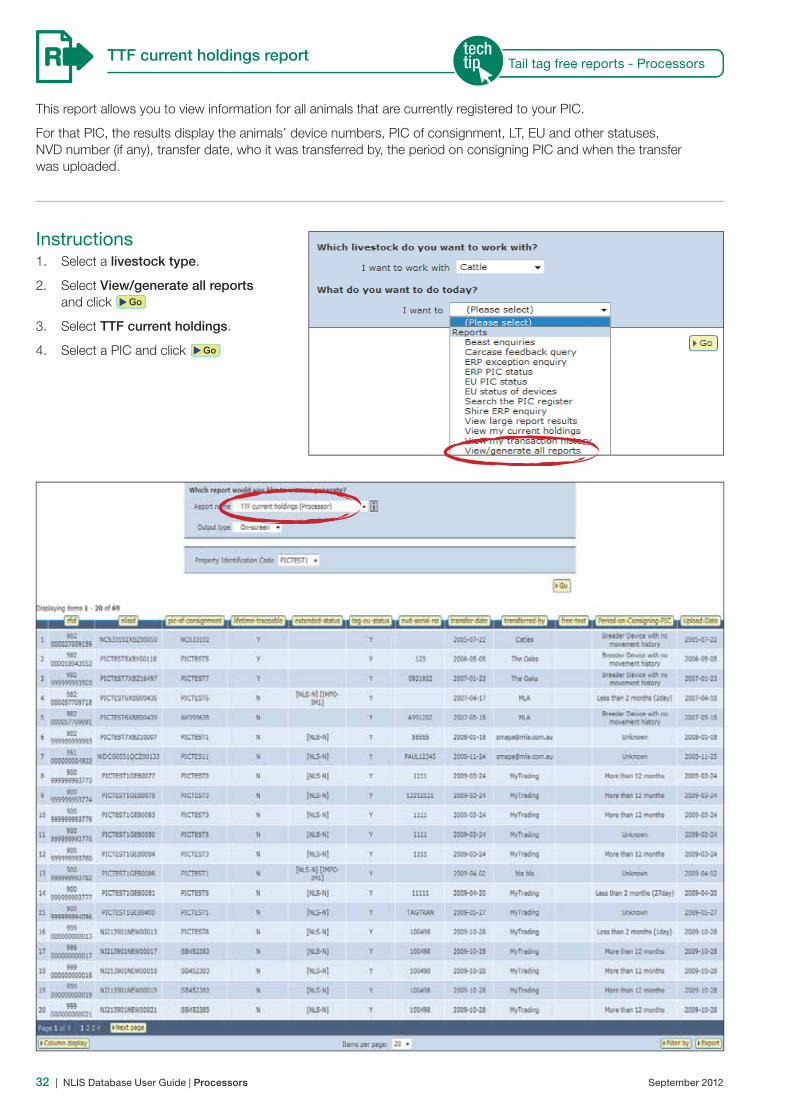
TTF current holdings report
This report allows you to view information for all animals that are currently registered to your PIC.
For that PIC, the results display the animals’ device numbers, PIC of consignment, LT, EU and other statuses, NVD number (if any), transfer date, who it was transferred by, the period on consigning PIC and when the transfer was uploaded.
Instructions1. Select a livestock type.
2. Select View/generate all reports and click
Send me the list via e-mail
3. Select TTF current holdings.
4. Select a PIC and click
Send me the list via e-mail
Dead animals - LS died on PICTail tag free reports - Processors

September 2012 NLIS Database User Guide | Processors | 33
As some reports contain a lot of data, they may take a while to process.
If your report is too large to view on screen, a message will be displayed.
You can access any large report results via the homepage, but you will also be notified by email when the report is ready to view. To view the report this way, click on the link in the body of the email you receive to open the report.
Access via homepage method1. Log in to the database.
2. Select a livestock type.
3. Select View large report results and click
Send me the list via e-mail
4. Click the link under Report name for the report you require.
5. On the File download dialog click either:
Open to view the file
Save to store the file on your computer so that you can view it later
Cancel if you prefer not to download the file.
View large report results
When the report is ready to view, click the link to open the report.
34 | NLIS Database User Guide | Processors September 2012
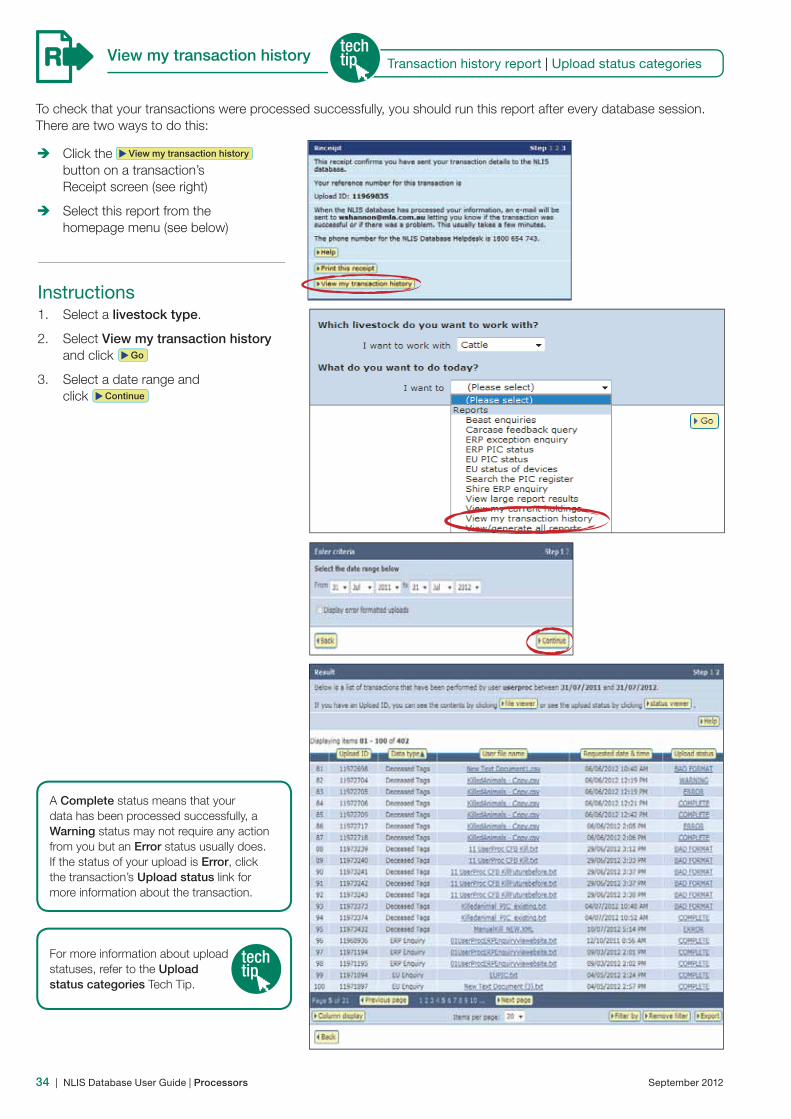
To check that your transactions were processed successfully, you should run this report after every database session. There are two ways to do this:
Click the
Send me the list via e-mail
button on a transaction’s Receipt screen (see right)
Select this report from the homepage menu (see below)
Instructions1. Select a livestock type.
2. Select View my transaction history and click
Send me the list via e-mail
3. Select a date range and click
Send me the list via e-mail
View my transaction history
A Complete status means that your data has been processed successfully, a Warning status may not require any action from you but an Error status usually does. If the status of your upload is Error, click the transaction’s Upload status link for more information about the transaction.
Transaction history report | Upload status categories
For more information about upload statuses, refer to the Upload status categories Tech Tip.
September 2012 NLIS Database User Guide | Processors | 35
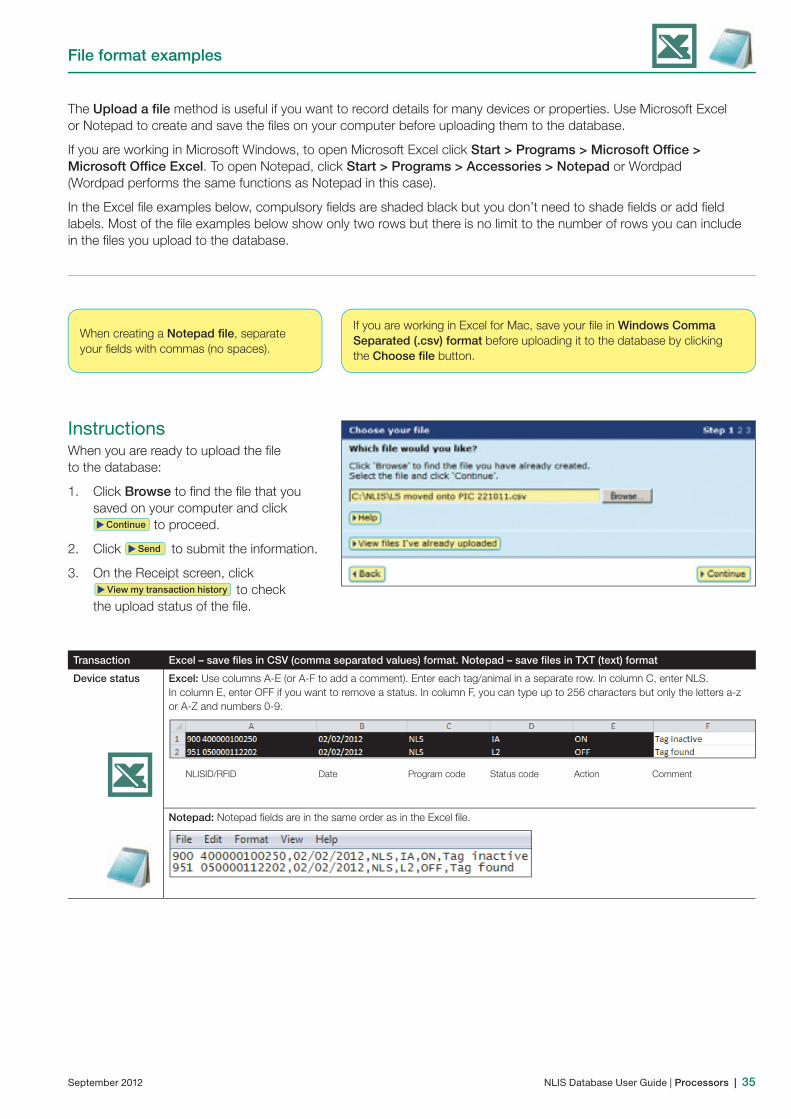
The Upload a file method is useful if you want to record details for many devices or properties. Use Microsoft Excel or Notepad to create and save the files on your computer before uploading them to the database.
If you are working in Microsoft Windows, to open Microsoft Excel click Start > Programs > Microsoft Office > Microsoft Office Excel. To open Notepad, click Start > Programs > Accessories > Notepad or Wordpad (Wordpad performs the same functions as Notepad in this case).
In the Excel file examples below, compulsory fields are shaded black but you don’t need to shade fields or add field labels. Most of the file examples below show only two rows but there is no limit to the number of rows you can include in the files you upload to the database.
InstructionsWhen you are ready to upload the file to the database:
1. Click Browse to find the file that you saved on your computer and click
Send me the list via e-mail
to proceed.
2. Click
Send me the list via e-mail
to submit the information.
3. On the Receipt screen, click
Send me the list via e-mail
to check the upload status of the file.
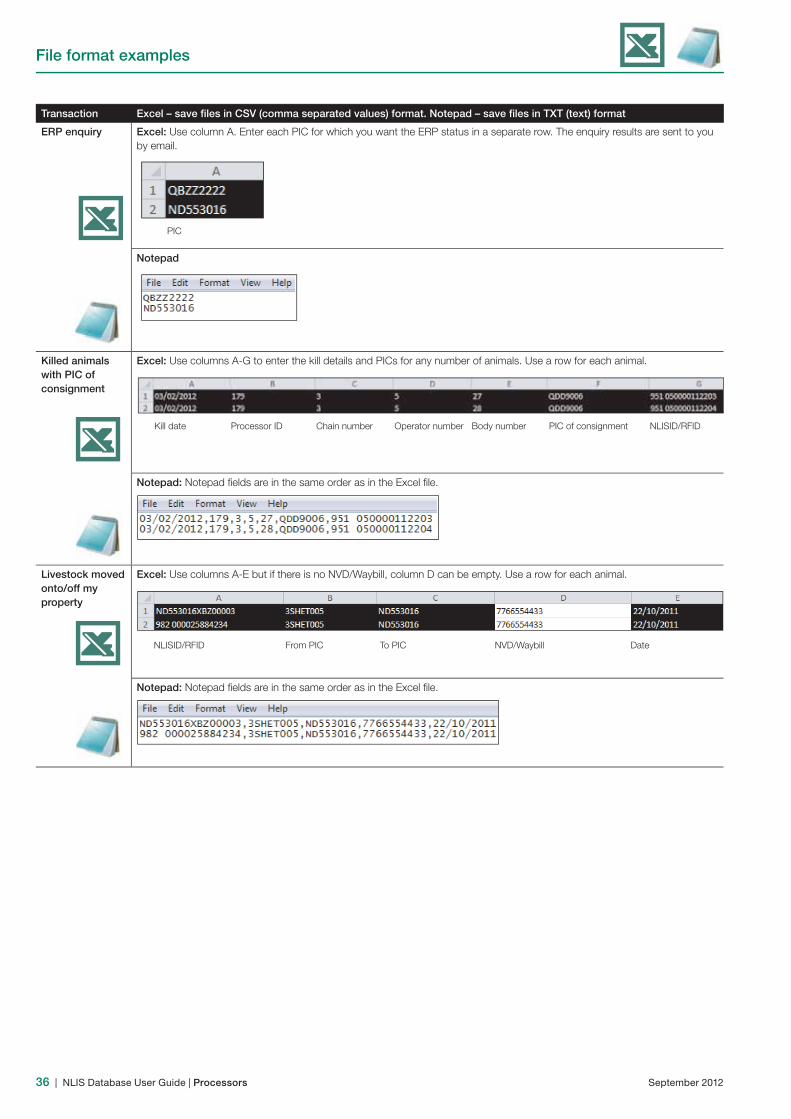
File format examples
Transaction Excel – save files in CSV (comma separated values) format. Notepad – save files in TXT (text) format
Device status Excel: Use columns A-E (or A-F to add a comment). Enter each tag/animal in a separate row. In column C, enter NLS. In column E, enter OFF if you want to remove a status. In column F, you can type up to 256 characters but only the letters a-z or A-Z and numbers 0-9.
Notepad: Notepad fields are in the same order as in the Excel file.
NLISID/RFID Date Program code Status code Action Comment
When creating a Notepad file, separate your fields with commas (no spaces).
If you are working in Excel for Mac, save your file in Windows Comma Separated (.csv) format before uploading it to the database by clicking the Choose file button.
36 | NLIS Database User Guide | Processors September 2012
File format examples
Transaction Excel – save files in CSV (comma separated values) format. Notepad – save files in TXT (text) format
ERP enquiry Excel: Use column A. Enter each PIC for which you want the ERP status in a separate row. The enquiry results are sent to you by email.
Notepad
Killed animals with PIC of consignment
Excel: Use columns A-G to enter the kill details and PICs for any number of animals. Use a row for each animal.
Notepad: Notepad fields are in the same order as in the Excel file.
Livestock moved onto/off my property
Excel: Use columns A-E but if there is no NVD/Waybill, column D can be empty. Use a row for each animal.
Notepad: Notepad fields are in the same order as in the Excel file.
PIC
Kill date Processor ID Chain number Operator number Body number PIC of consignment NLISID/RFID
NLISID/RFID From PIC To PIC NVD/Waybill Date
September 2012 NLIS Database User Guide | Processors
State/Territory NLIS authorities
Australian Capital Territory
Department of Territory and Municipal Services
T: (02) 6207 2357 E: [email protected]
New South Wales
Department of Primary Industries
Local Land Services (LLS)
NSW DPI NLIS Helpline: 1300 720 405
LLS Helpline: 1300 795 299
W: www.dpi.nsw.gov.au/nlis W: www.lls.nsw.gov.au E: [email protected]
Northern Territory
Department of Primary Industry and Fisheries
T: (08) 8999 2030 (Darwin)
(08) 8973 9754 (Katherine)
(08) 8962 4458 (Tennant Creek)
(08) 8951 8125 (Alice Springs)
W: www.nt.gov.au/d/nlis E: [email protected]
Queensland
Department of Agriculture, Fisheries and Forestry (DAFF)
Biosecurity Queensland
Business Information Centre: 13 25 23
W: www.daff.qld.gov.au E: [email protected]
South Australia
Primary Industries & Regions of South Australia (PIRSA)
Biosecurity SA
T: 1800 654 688 W: www.pir.sa.gov.au E: [email protected]
Tasmania
Department of Primary Industries, Parks, Water & Environment
Biosecurity Tasmania
T: 1300 368 550 W: www.dpipwe.tas.gov.au E: [email protected]
Victoria
Department of Environment and Primary Industries Biosecurity Victoria, Animal Biosecurity and Welfare
T: 1800 678 779 W: www.depi.vic.gov.au E: [email protected]
Western Australia
Department of Agriculture and Food Livestock Biosecurity
T: (08) 9780 6100 W: www.agric.wa.gov.au E: [email protected]
Designed by O’Kelly & Associates Branding + Design
Printed in Australia by Stonecrop Print Management Services
All information contained in this guide is current as of September 2012, though subject to change.
The devices shown in this guide do not indicate a preference on the part of NLIS Ltd for these specific devices. For more information about NLIS-accredited device manufacturers, please visit www.nlis.com.au

This guide was produced by NLIS Ltd PO Box 1961, North Sydney NSW 2059 Published September 2012 © ABN 34 134 745 038
NLIS Database Helpdesk1800 654 743 [email protected] operates a Database Helpdesk service from Monday-Friday, 9am-5pm (Sydney time). If you require assistance with the database, please note your NLIS user ID and Upload ID (if relevant) before contacting the Helpdesk.
LPA Program1800 683 111 [email protected] Livestock Production Assurance (LPA) Program is Australia’s on-farm food safety certification body. LPA’s food safety standards are associated with basic on-farm food safety guidelines, which underpin the food safety declarations on LPA National Vendor Declarations (NVDs). LPA accreditation is linked to Property Identification Codes (PICs). To use LPA NVDs, producers must ensure their PICs are accredited in the LPA program.
European Union Cattle Accreditation Scheme (EUCAS)
1800 305 544 [email protected] European Union Cattle Accreditation Scheme (EUCAS) is a national animal production scheme that guarantees full traceability of all animals through the NLIS database. It allows Australia to meet the European Union (EU) market requirements for beef by segregating cattle that have never been treated with hormonal growth promotants (HGPs) at any time.
NLIS operates in partnership with the Australian meat and livestock industries and state and federal governments
Collaborating partners of the database include:


![Database of StateDatabase of State Incentives forIncentives for ...€¦ · e:] Renewable Energy Energy Efficiency Select Incentive Type: Search by Incentive Type Select the database](https://static.documents.pub/doc/80x56/5f831940c58eab702e4e8486/database-of-statedatabase-of-state-incentives-forincentives-for-e-renewable.jpg)


