984
Avaya Aura ® Contact Center Installation Release 6.3 NN44400-311 Issue 04.02 May 2013
| Date post: | 01-Dec-2015 |
| Category: |
Documents |
| Upload: | carlos-tejada |
| View: | 24 times |
| Download: | 1 times |
Avaya Aura® Contact Center Installation
Release 6.3NN44400-311
Issue 04.02May 2013

© 2013 Avaya Inc.
All Rights Reserved.
Notice
While reasonable efforts have been made to ensure that theinformation in this document is complete and accurate at the time ofprinting, Avaya assumes no liability for any errors. Avaya reserves theright to make changes and corrections to the information in thisdocument without the obligation to notify any person or organization ofsuch changes.
Documentation disclaimer
“Documentation” means information published by Avaya in varyingmediums which may include product information, operating instructionsand performance specifications that Avaya generally makes availableto users of its products. Documentation does not include marketingmaterials. Avaya shall not be responsible for any modifications,additions, or deletions to the original published version ofdocumentation unless such modifications, additions, or deletions wereperformed by Avaya. End User agrees to indemnify and hold harmlessAvaya, Avaya's agents, servants and employees against all claims,lawsuits, demands and judgments arising out of, or in connection with,subsequent modifications, additions or deletions to this documentation,to the extent made by End User.
Link disclaimer
Avaya is not responsible for the contents or reliability of any linkedwebsites referenced within this site or documentation provided byAvaya. Avaya is not responsible for the accuracy of any information,statement or content provided on these sites and does not necessarilyendorse the products, services, or information described or offeredwithin them. Avaya does not guarantee that these links will work all thetime and has no control over the availability of the linked pages.
Warranty
Avaya provides a limited warranty on its hardware and Software(“Product(s)”). Refer to your sales agreement to establish the terms ofthe limited warranty. In addition, Avaya’s standard warranty language,as well as information regarding support for this Product while underwarranty is available to Avaya customers and other parties through theAvaya Support website: http://support.avaya.com. Please note that ifyou acquired the Product(s) from an authorized Avaya reseller outsideof the United States and Canada, the warranty is provided to you bysaid Avaya reseller and not by Avaya. “Software” means computerprograms in object code, provided by Avaya or an Avaya ChannelPartner, whether as stand-alone products or pre-installed on hardwareproducts, and any upgrades, updates, bug fixes, or modified versions.
Licenses
THE SOFTWARE LICENSE TERMS AVAILABLE ON THE AVAYAWEBSITE, HTTP://SUPPORT.AVAYA.COM/LICENSEINFO AREAPPLICABLE TO ANYONE WHO DOWNLOADS, USES AND/ORINSTALLS AVAYA SOFTWARE, PURCHASED FROM AVAYA INC.,ANY AVAYA AFFILIATE, OR AN AUTHORIZED AVAYA RESELLER(AS APPLICABLE) UNDER A COMMERCIAL AGREEMENT WITHAVAYA OR AN AUTHORIZED AVAYA RESELLER. UNLESSOTHERWISE AGREED TO BY AVAYA IN WRITING, AVAYA DOESNOT EXTEND THIS LICENSE IF THE SOFTWARE WAS OBTAINEDFROM ANYONE OTHER THAN AVAYA, AN AVAYA AFFILIATE ORAN AVAYA AUTHORIZED RESELLER; AVAYA RESERVES THERIGHT TO TAKE LEGAL ACTION AGAINST YOU AND ANYONEELSE USING OR SELLING THE SOFTWARE WITHOUT A LICENSE.BY INSTALLING, DOWNLOADING OR USING THE SOFTWARE, ORAUTHORIZING OTHERS TO DO SO, YOU, ON BEHALF OFYOURSELF AND THE ENTITY FOR WHOM YOU ARE INSTALLING,DOWNLOADING OR USING THE SOFTWARE (HEREINAFTERREFERRED TO INTERCHANGEABLY AS “YOU” AND “END USER”),AGREE TO THESE TERMS AND CONDITIONS AND CREATE ABINDING CONTRACT BETWEEN YOU AND AVAYA INC. OR THEAPPLICABLE AVAYA AFFILIATE (“AVAYA”).
Avaya grants you a license within the scope of the license typesdescribed below, with the exception of Heritage Nortel Software, forwhich the scope of the license is detailed below. Where the orderdocumentation does not expressly identify a license type, theapplicable license will be a Designated System License. The applicablenumber of licenses and units of capacity for which the license is grantedwill be one (1), unless a different number of licenses or units of capacityis specified in the documentation or other materials available to you.“Designated Processor” means a single stand-alone computing device.“Server” means a Designated Processor that hosts a softwareapplication to be accessed by multiple users.
License type(s)
Concurrent User License (CU). End User may install and use theSoftware on multiple Designated Processors or one or more Servers,so long as only the licensed number of Units are accessing and usingthe Software at any given time. A “Unit” means the unit on which Avaya,at its sole discretion, bases the pricing of its licenses and can be,without limitation, an agent, port or user, an e-mail or voice mail accountin the name of a person or corporate function (e.g., webmaster orhelpdesk), or a directory entry in the administrative database utilizedby the Software that permits one user to interface with the Software.Units may be linked to a specific, identified Server.
Heritage Nortel Software
“Heritage Nortel Software” means the software that was acquired byAvaya as part of its purchase of the Nortel Enterprise SolutionsBusiness in December 2009. The Heritage Nortel Software currentlyavailable for license from Avaya is the software contained within the listof Heritage Nortel Products located at http://support.avaya.com/LicenseInfo under the link “Heritage Nortel Products”. For HeritageNortel Software, Avaya grants Customer a license to use HeritageNortel Software provided hereunder solely to the extent of theauthorized activation or authorized usage level, solely for the purposespecified in the Documentation, and solely as embedded in, forexecution on, or (in the event the applicable Documentation permitsinstallation on non-Avaya equipment) for communication with Avayaequipment. Charges for Heritage Nortel Software may be based onextent of activation or use authorized as specified in an order or invoice.
Copyright
Except where expressly stated otherwise, no use should be made ofmaterials on this site, the Documentation, Software, or hardwareprovided by Avaya. All content on this site, the documentation and theProduct provided by Avaya including the selection, arrangement anddesign of the content is owned either by Avaya or its licensors and isprotected by copyright and other intellectual property laws including thesui generis rights relating to the protection of databases. You may notmodify, copy, reproduce, republish, upload, post, transmit or distributein any way any content, in whole or in part, including any code andsoftware unless expressly authorized by Avaya. Unauthorizedreproduction, transmission, dissemination, storage, and or use withoutthe express written consent of Avaya can be a criminal, as well as acivil offense under the applicable law.
Third Party Components
“Third Party Components” mean certain software programs or portionsthereof included in the Software that may contain software (includingopen source software) distributed under third party agreements (“ThirdParty Components”), which contain terms regarding the rights to usecertain portions of the Software (“Third Party Terms”). Informationregarding distributed Linux OS source code (for those Products thathave distributed Linux OS source code) and identifying the copyrightholders of the Third Party Components and the Third Party Terms thatapply is available in the Documentation or on Avaya’s website at: http://support.avaya.com/Copyright. You agree to the Third Party Terms forany such Third Party Components.
Preventing Toll Fraud
“Toll Fraud” is the unauthorized use of your telecommunicationssystem by an unauthorized party (for example, a person who is not a
2 Avaya Aura® Contact Center Installation May 2013Comments? [email protected]
corporate employee, agent, subcontractor, or is not working on yourcompany's behalf). Be aware that there can be a risk of Toll Fraudassociated with your system and that, if Toll Fraud occurs, it can resultin substantial additional charges for your telecommunications services.
Avaya Toll Fraud intervention
If you suspect that you are being victimized by Toll Fraud and you needtechnical assistance or support, call Technical Service Center TollFraud Intervention Hotline at +1-800-643-2353 for the United Statesand Canada. For additional support telephone numbers, see the AvayaSupport website: http://support.avaya.com. Suspected securityvulnerabilities with Avaya products should be reported to Avaya bysending mail to: [email protected].
Trademarks
Avaya, the Avaya logo, Avaya one-X® Portal, Avaya Aura®
Communication Manager, Avaya Aura® Experience Portal, AvayaAura® Orchestration Designer, Avaya Aura® Session Manager, AvayaAura® System Manager, and Application Enablement Services areeither registered trademarks or trademarks of Avaya Inc. in the UnitedStates of America and/or other jurisdictions.
All non-Avaya trademarks are the property of their respective owners,and “Linux” is a registered trademark of Linus Torvalds.
Downloading Documentation
For the most current versions of Documentation, see the AvayaSupport website: http://support.avaya.com.
Contact Avaya Support
See the Avaya Support website: http://support.avaya.com for productnotices and articles, or to report a problem with your Avaya product.For a list of support telephone numbers and contact addresses, go tothe Avaya Support website: http://support.avaya.com, scroll to thebottom of the page, and select Contact Avaya Support.
Avaya Aura® Contact Center Installation May 2013 3

4 Avaya Aura® Contact Center Installation May 2013Comments? [email protected]

Contents
Chapter 1: New in this release........................................................................................... 21Features.................................................................................................................................................... 21
Avaya Aura® Contact Center server types....................................................................................... 21Chapter 2: Introduction...................................................................................................... 23
Platform Vendor Independence checking utility........................................................................................ 26Third Party Software Upgrade Utility......................................................................................................... 27Prerequisites............................................................................................................................................. 28Related resources..................................................................................................................................... 28
Avaya Mentor videos........................................................................................................................ 28Support...................................................................................................................................................... 29
Part I: Avaya Aura® Unified Communications.................................................................. 31Chapter 3: Avaya Aura® Contact Center software installation for Avaya Aura®Unified Communications platform............................................................................. 33
Prerequisites for Contact Center installation workflow..................................................................... 34Contact Center server types and software installation for Avaya Aura® Unified Communicationsplatform............................................................................................................................................ 34
Chapter 4: Voice and Multimedia Contact Server for Avaya Aura® platforminstallation.................................................................................................................... 37
Voice and Multimedia Contact Server installation prerequisites...................................................... 38Downloading the latest documentation............................................................................................ 38Installing Windows Server 2008 Release 2...................................................................................... 39Configuring Windows Server 2008................................................................................................... 42Installing the latest supported operating system service packs....................................................... 43Connecting to the contact center subnet.......................................................................................... 44Adding a server to a domain............................................................................................................ 44Disabling the Remote Access services............................................................................................ 45Configuring SNMP on your server.................................................................................................... 46Downloading the most recent patches to the server........................................................................ 47Disabling unused Network Adapters................................................................................................ 47Enabling Microsoft Remote Desktop connection.............................................................................. 48Configuring Data Execution Prevention........................................................................................... 48Importing Contact Center Firewall Security policy............................................................................ 49Installing operating system components for Contact Center............................................................ 50Configuring MIME types to support Microsoft updates..................................................................... 52Disabling Admin Approval Mode for Windows Server 2008 administrators (optional)..................... 53Updating server for a network location installation........................................................................... 54Installing the Voice and Multimedia Contact Server software for Avaya Aura® UnifiedCommunications platform................................................................................................................. 55Upgrading Java Runtime Environment, Java Development Kit, and Apache Tomcat componentsusing Third Party Software Upgrade Utility...................................................................................... 69Configuring WebLM licensing........................................................................................................... 69Securing the Windows server........................................................................................................... 71Adding the domain AD-LDS replication account to the primary server administrators and replicatorgroup................................................................................................................................................ 71Installing the external Web communication server software............................................................ 73
Avaya Aura® Contact Center Installation May 2013 5
Installing the Instant Messaging chat server on the external Web server........................................ 74Chapter 5: Standby Voice and Multimedia Contact Server for Avaya Aura®platform installation..................................................................................................... 75
Standby Voice and Multimedia Contact Server installation prerequisites........................................ 76Downloading the latest documentation............................................................................................ 76Installing Windows Server 2008 Release 2...................................................................................... 77Configuring Windows Server 2008................................................................................................... 79Installing the latest supported operating system service packs....................................................... 81Connecting to the contact center subnet.......................................................................................... 82Adding a server to a domain............................................................................................................ 82Disabling the Remote Access services............................................................................................ 83Configuring SNMP on your server.................................................................................................... 84Downloading the most recent patches to the server........................................................................ 85Disabling unused Network Adapters................................................................................................ 85Enabling Microsoft Remote Desktop connection.............................................................................. 86Configuring Data Execution Prevention........................................................................................... 86Importing Contact Center Firewall Security policy............................................................................ 87Adding the domain AD-LDS replication account to the standby administrators and replicator group 88Installing operating system components for Contact Center............................................................ 89Configuring MIME types to support Microsoft updates..................................................................... 92Updating server for a network location installation........................................................................... 92Installing the standby Voice and Multimedia Contact Server for Avaya Aura® UnifiedCommunications platform................................................................................................................. 94Upgrading Java Runtime Environment, Java Development Kit, and Apache Tomcat componentsusing Third Party Software Upgrade Utility...................................................................................... 120Configuring WebLM licensing........................................................................................................... 121Securing the Windows server........................................................................................................... 122
Chapter 6: Voice Contact Server for Avaya Aura® platform installation................ 125Voice Contact Server installation prerequisites................................................................................ 126Downloading the latest documentation............................................................................................ 126Installing Windows Server 2008 Release 2...................................................................................... 126Configuring Windows Server 2008................................................................................................... 129Installing the latest supported operating system service packs....................................................... 130Connecting to the contact center subnet.......................................................................................... 131Adding a server to a domain............................................................................................................ 132Disabling the Remote Access services............................................................................................ 133Configuring SNMP on your server.................................................................................................... 133Downloading the most recent patches to the server........................................................................ 134Disabling unused Network Adapters................................................................................................ 135Enabling Microsoft Remote Desktop connection.............................................................................. 135Configuring Data Execution Prevention........................................................................................... 136Importing Contact Center Firewall Security policy............................................................................ 137Installing operating system components for Contact Center............................................................ 138Configuring MIME types to support Microsoft updates..................................................................... 140Updating server for a network location installation........................................................................... 141Installing the Voice Contact Server software for Avaya Aura® Unified Communications platform... 142Upgrading Java Runtime Environment, Java Development Kit, and Apache Tomcat componentsusing Third Party Software Upgrade Utility...................................................................................... 153
6 Avaya Aura® Contact Center Installation May 2013

Configuring WebLM licensing........................................................................................................... 154Securing the Windows server........................................................................................................... 155Adding the domain AD-LDS replication account to the primary server administrators and replicatorgroup................................................................................................................................................ 156
Chapter 7: Standby Voice Contact Server for Avaya Aura® platform installation. 159Standby Voice Contact Server installation prerequisites.................................................................. 160Downloading the latest documentation............................................................................................ 160Installing Windows Server 2008 Release 2...................................................................................... 160Configuring Windows Server 2008................................................................................................... 163Installing the latest supported operating system service packs....................................................... 164Connecting to the contact center subnet.......................................................................................... 165Adding a server to a domain............................................................................................................ 166Disabling the Remote Access services............................................................................................ 167Configuring SNMP on your server.................................................................................................... 167Downloading the most recent patches to the server........................................................................ 168Disabling unused Network Adapters................................................................................................ 169Enabling Microsoft Remote Desktop connection.............................................................................. 169Configuring Data Execution Prevention........................................................................................... 170Importing Contact Center Firewall Security policy............................................................................ 171Adding the domain AD-LDS replication account to the standby administrators and replicator group 172Installing operating system components for Contact Center............................................................ 173Configuring MIME types to support Microsoft updates..................................................................... 175Updating server for a network location installation........................................................................... 176Installing the standby Voice Contact Server software for Avaya Aura® Unified Communicationsplatform............................................................................................................................................ 177Upgrading Java Runtime Environment, Java Development Kit, and Apache Tomcat componentsusing Third Party Software Upgrade Utility...................................................................................... 200Configuring WebLM licensing........................................................................................................... 201Securing the Windows server........................................................................................................... 202
Chapter 8: Multimedia Contact Server software installation................................... 205Multimedia Contact Server installation prerequisites....................................................................... 206Downloading the latest documentation............................................................................................ 206Installing Windows Server 2008 Release 2...................................................................................... 207Configuring Windows Server 2008................................................................................................... 209Installing the latest supported operating system service packs....................................................... 211Connecting to the contact center subnet.......................................................................................... 212Adding a server to a domain............................................................................................................ 212Disabling the Remote Access services............................................................................................ 213Configuring SNMP on your server.................................................................................................... 214Downloading the most recent patches to the server........................................................................ 215Disabling unused Network Adapters................................................................................................ 215Enabling Microsoft Remote Desktop connection.............................................................................. 216Configuring Data Execution Prevention........................................................................................... 216Importing Contact Center Firewall Security policy............................................................................ 217Configuring Internet Information Services........................................................................................ 218Updating server for a network location installation........................................................................... 220Installing the Multimedia Contact Server software........................................................................... 221
Avaya Aura® Contact Center Installation May 2013 7

Upgrading Java Runtime Environment, Java Development Kit, and Apache Tomcat componentsusing Third Party Software Upgrade Utility...................................................................................... 229Securing the Windows server........................................................................................................... 230Installing the external Web communication server software............................................................ 230Installing the Instant Messaging chat server on the external Web server........................................ 232
Part II: Avaya Communication Server 1000...................................................................... 233Chapter 9: Avaya Aura® Contact Center software installation for CS1000............ 235
Prerequisites for Contact Center installation workflow..................................................................... 235Contact Center server types and software installation for CS1000.................................................. 236
Chapter 10: Voice and Multimedia Contact Server for CS1000 installation........... 239Voice and Multimedia Contact Server installation prerequisites...................................................... 240Downloading the latest documentation............................................................................................ 240Installing Windows Server 2008 Release 2...................................................................................... 241Configuring Windows Server 2008................................................................................................... 243Installing the latest supported operating system service packs....................................................... 245Connecting to the contact center subnet.......................................................................................... 246Adding a server to a domain............................................................................................................ 246Disabling the Remote Access services............................................................................................ 247Configuring SNMP on your server.................................................................................................... 248Downloading the most recent patches to the server........................................................................ 249Disabling unused Network Adapters................................................................................................ 249Enabling Microsoft Remote Desktop connection.............................................................................. 250Configuring Data Execution Prevention........................................................................................... 250Importing Contact Center Firewall Security policy............................................................................ 251Disabling NetBIOS........................................................................................................................... 252Connecting the Embedded LAN subnet........................................................................................... 253Configuring the binding order........................................................................................................... 253Installing operating system components for Contact Center............................................................ 254Configuring MIME types to support Microsoft updates..................................................................... 256Updating server for a network location installation........................................................................... 257Installing the Voice and Multimedia Contact Server software for CS1000....................................... 259Upgrading Java Runtime Environment, Java Development Kit, and Apache Tomcat componentsusing Third Party Software Upgrade Utility...................................................................................... 271Securing the Windows server........................................................................................................... 272Installing the external Web communication server software............................................................ 272
Chapter 11: Primary Voice and Multimedia Contact Server for CS1000 softwareinstallation in a domain............................................................................................... 275
Voice and Multimedia Contact Server installation prerequisites...................................................... 276Downloading the latest documentation............................................................................................ 276Installing Windows Server 2008 Release 2...................................................................................... 277Configuring Windows Server 2008................................................................................................... 280Installing the latest supported operating system service packs....................................................... 281Connecting to the contact center subnet.......................................................................................... 282Adding a server to a domain............................................................................................................ 282Disabling the Remote Access services............................................................................................ 283Configuring SNMP on your server.................................................................................................... 284Downloading the most recent patches to the server........................................................................ 285Disabling unused Network Adapters................................................................................................ 285
8 Avaya Aura® Contact Center Installation May 2013

Enabling Microsoft Remote Desktop connection.............................................................................. 286Configuring Data Execution Prevention........................................................................................... 286Importing Contact Center Firewall Security policy............................................................................ 287Disabling NetBIOS........................................................................................................................... 288Connecting the Embedded LAN subnet........................................................................................... 289Configuring the binding order........................................................................................................... 289Installing operating system components for Contact Center............................................................ 290Configuring MIME types to support Microsoft updates..................................................................... 292Updating server for a network location installation........................................................................... 293Installing the Voice and Multimedia Contact Server software for CS1000....................................... 294Upgrading Java Runtime Environment, Java Development Kit, and Apache Tomcat componentsusing Third Party Software Upgrade Utility...................................................................................... 306Securing the Windows server........................................................................................................... 307Adding the domain AD-LDS replication account to the primary administrators and replicator group 307
Chapter 12: Standby Voice and Multimedia Contact Server for CS1000 softwareinstallation in a domain............................................................................................... 309
Standby Voice and Multimedia Contact Server installation prerequisites........................................ 310Downloading the latest documentation............................................................................................ 310Installing Windows Server 2008 Release 2...................................................................................... 311Configuring Windows Server 2008................................................................................................... 313Installing the latest supported operating system service packs....................................................... 315Connecting to the contact center subnet.......................................................................................... 316Adding a server to a domain............................................................................................................ 316Disabling the Remote Access services............................................................................................ 317Configuring SNMP on your server.................................................................................................... 318Disabling unused Network Adapters................................................................................................ 319Enabling Microsoft Remote Desktop connection.............................................................................. 319Configuring Data Execution Prevention........................................................................................... 320Importing Contact Center Firewall Security policy............................................................................ 320Disabling NetBIOS........................................................................................................................... 321Connecting the Embedded LAN subnet........................................................................................... 322Configuring the binding order........................................................................................................... 323Installing operating system components for Contact Center............................................................ 323Configuring MIME types to support Microsoft updates..................................................................... 326Adding the domain AD-LDS replication account to the standby administrators and replicator group 326Updating server for a network location installation........................................................................... 328Installing the standby Voice and Multimedia Contact Server software for CS1000 in a domain...... 329Upgrading Java Runtime Environment, Java Development Kit, and Apache Tomcat componentsusing Third Party Software Upgrade Utility...................................................................................... 353Securing the Windows server........................................................................................................... 354
Chapter 13: Primary Voice and Multimedia Contact Server for CS1000 softwareinstallation in a workgroup......................................................................................... 355
Voice and Multimedia Contact Server installation prerequisites...................................................... 356Downloading the latest documentation............................................................................................ 356Installing Windows Server 2008 Release 2...................................................................................... 357Configuring Windows Server 2008................................................................................................... 360Installing the latest supported operating system service packs....................................................... 361Connecting to the contact center subnet.......................................................................................... 362
Avaya Aura® Contact Center Installation May 2013 9

Disabling the Remote Access services............................................................................................ 362Configuring SNMP on your server.................................................................................................... 363Downloading the most recent patches to the server........................................................................ 364Disabling unused Network Adapters................................................................................................ 364Enabling Microsoft Remote Desktop connection.............................................................................. 365Configuring Data Execution Prevention........................................................................................... 365Importing Contact Center Firewall Security policy............................................................................ 366Disabling NetBIOS........................................................................................................................... 367Connecting the Embedded LAN subnet........................................................................................... 368Configuring the binding order........................................................................................................... 368Installing operating system components for Contact Center............................................................ 369Configuring MIME types to support Microsoft updates..................................................................... 371Updating server for a network location installation........................................................................... 372Installing the Voice and Multimedia Contact Server software for CS1000....................................... 373Upgrading Java Runtime Environment, Java Development Kit, and Apache Tomcat componentsusing Third Party Software Upgrade Utility...................................................................................... 385Securing the Windows server........................................................................................................... 386Saving managed, active and standby server names and IP addresses........................................... 386Creating a local (workgroup) user account for AD-LDS Replication................................................ 387Adding the local (workgroup) AD-LDS replication account to the primary administrators andreplicator group................................................................................................................................ 388Configuring the AD-LDS replication account as a service account.................................................. 389Changing the service account of the primary CCMA AD-LDS instance........................................... 390Verifying the AD-LDS Replication account is applied to the AD-LDS instance................................ 391
Chapter 14: Standby Voice and Multimedia Contact Server for CS1000 softwareinstallation in a workgroup......................................................................................... 393
Standby Voice and Multimedia Contact Server installation prerequisites........................................ 394Downloading the latest documentation............................................................................................ 394Installing Windows Server 2008 Release 2...................................................................................... 395Configuring Windows Server 2008................................................................................................... 397Installing the latest supported operating system service packs....................................................... 399Connecting to the contact center subnet.......................................................................................... 400Disabling the Remote Access services............................................................................................ 400Configuring SNMP on your server.................................................................................................... 401Disabling unused Network Adapters................................................................................................ 401Enabling Microsoft Remote Desktop connection.............................................................................. 402Configuring Data Execution Prevention........................................................................................... 402Importing Contact Center Firewall Security policy............................................................................ 403Disabling NetBIOS........................................................................................................................... 404Connecting the Embedded LAN subnet........................................................................................... 405Configuring the binding order........................................................................................................... 405Installing operating system components for Contact Center............................................................ 406Configuring MIME types to support Microsoft updates..................................................................... 408Saving managed, active and standby server names and IP addresses........................................... 409Creating a local workstation AD-LDS replication account on the standby server............................ 410Adding the local (workgroup) AD-LDS replication account to the standby administrators andreplicator group................................................................................................................................ 411Configuring the AD-LDS replication account as a service account.................................................. 412
10 Avaya Aura® Contact Center Installation May 2013

Updating server for a network location installation........................................................................... 412Installing the standby Voice And Multimedia Contact Server software for CS1000 in a workgroup 414Upgrading Java Runtime Environment, Java Development Kit, and Apache Tomcat componentsusing Third Party Software Upgrade Utility...................................................................................... 440Securing the Windows server........................................................................................................... 441
Chapter 15: Voice Contact Server for CS1000 installation...................................... 443Downloading the latest documentation............................................................................................ 444Installing Windows Server 2008 Release 2...................................................................................... 444Configuring Windows Server 2008................................................................................................... 447Connecting to the contact center subnet.......................................................................................... 448Adding a server to a domain............................................................................................................ 449Configuring SNMP on your server.................................................................................................... 450Downloading the most recent patches to the server........................................................................ 450Disabling unused Network Adapters................................................................................................ 451Enabling Microsoft Remote Desktop connection.............................................................................. 452Configuring Data Execution Prevention........................................................................................... 452Importing Contact Center Firewall Security policy............................................................................ 453Disabling NetBIOS........................................................................................................................... 454Connecting the Embedded LAN subnet........................................................................................... 455Configuring the binding order........................................................................................................... 455Installing operating system components for Contact Center............................................................ 456Configuring MIME types to support Microsoft updates..................................................................... 458Updating server for a network location installation........................................................................... 459Installing the Voice Contact Server software for CS1000................................................................ 460Upgrading Java Runtime Environment, Java Development Kit, and Apache Tomcat componentsusing Third Party Software Upgrade Utility...................................................................................... 470Securing the Windows server........................................................................................................... 470
Chapter 16: Primary Voice Contact Server for CS1000 installation in a domain... 473Voice Contact Server installation prerequisites................................................................................ 474Downloading the latest documentation............................................................................................ 474Installing Windows Server 2008 Release 2...................................................................................... 475Configuring Windows Server 2008................................................................................................... 477Connecting to the contact center subnet.......................................................................................... 479Adding a server to a domain............................................................................................................ 479Configuring SNMP on your server.................................................................................................... 480Downloading the most recent patches to the server........................................................................ 481Disabling unused Network Adapters................................................................................................ 482Enabling Microsoft Remote Desktop connection.............................................................................. 482Configuring Data Execution Prevention........................................................................................... 483Importing Contact Center Firewall Security policy............................................................................ 483Disabling NetBIOS........................................................................................................................... 484Connecting the Embedded LAN subnet........................................................................................... 485Configuring the binding order........................................................................................................... 486Installing operating system components for Contact Center............................................................ 486Configuring MIME types to support Microsoft updates..................................................................... 489Updating server for a network location installation........................................................................... 489Installing the Voice Contact Server software for CS1000................................................................ 491
Avaya Aura® Contact Center Installation May 2013 11

Upgrading Java Runtime Environment, Java Development Kit, and Apache Tomcat componentsusing Third Party Software Upgrade Utility...................................................................................... 501Securing the Windows server........................................................................................................... 501Adding the domain AD-LDS replication account to the primary administrators and replicator group 502
Chapter 17: Standby Voice Contact Standby Server for CS1000 installation in adomain.......................................................................................................................... 505
Standby Voice Contact Server installation prerequisites.................................................................. 505Downloading the latest documentation............................................................................................ 506Installing Windows Server 2008 Release 2...................................................................................... 506Configuring Windows Server 2008................................................................................................... 509Installing the latest supported operating system service packs....................................................... 510Connecting to the contact center subnet.......................................................................................... 511Adding a server to a domain............................................................................................................ 512Disabling the Remote Access services............................................................................................ 513Configuring SNMP on your server.................................................................................................... 513Downloading the most recent patches to the server........................................................................ 514Disabling unused Network Adapters................................................................................................ 515Enabling Microsoft Remote Desktop connection.............................................................................. 515Configuring Data Execution Prevention........................................................................................... 516Importing Contact Center Firewall Security policy............................................................................ 517Disabling NetBIOS........................................................................................................................... 518Connecting the Embedded LAN subnet........................................................................................... 518Configuring the binding order........................................................................................................... 519Installing operating system components for Contact Center............................................................ 520Configuring MIME types to support Microsoft updates..................................................................... 522Adding the domain AD-LDS replication account to the standby administrators and replicator group 523Updating server for a network location installation........................................................................... 524Installing the standby Voice Contact Server software for CS1000 in a domain............................... 525Upgrading Java Runtime Environment, Java Development Kit, and Apache Tomcat componentsusing Third Party Software Upgrade Utility...................................................................................... 547Securing the Windows server........................................................................................................... 548
Chapter 18: Primary Voice Contact Server for CS1000 installation in a workgroup 549Voice Contact Server installation prerequisites................................................................................ 550Downloading the latest documentation............................................................................................ 550Installing Windows Server 2008 Release 2...................................................................................... 551Configuring Windows Server 2008................................................................................................... 553Connecting to the contact center subnet.......................................................................................... 555Configuring SNMP on your server.................................................................................................... 555Downloading the most recent patches to the server........................................................................ 556Disabling unused Network Adapters................................................................................................ 557Enabling Microsoft Remote Desktop connection.............................................................................. 557Configuring Data Execution Prevention........................................................................................... 558Importing Contact Center Firewall Security policy............................................................................ 558Disabling NetBIOS........................................................................................................................... 559Connecting the Embedded LAN subnet........................................................................................... 560Configuring the binding order........................................................................................................... 561Installing operating system components for Contact Center............................................................ 561Configuring MIME types to support Microsoft updates..................................................................... 564
12 Avaya Aura® Contact Center Installation May 2013

Updating server for a network location installation........................................................................... 564Installing the Voice Contact Server software for CS1000................................................................ 566Upgrading Java Runtime Environment, Java Development Kit, and Apache Tomcat componentsusing Third Party Software Upgrade Utility...................................................................................... 576Securing the Windows server........................................................................................................... 576Saving managed, active and standby server names and IP addresses........................................... 577Creating a local (workgroup) user account for AD-LDS Replication................................................ 578Adding the local (workgroup) AD-LDS replication account to the primary administrators andreplicator group................................................................................................................................ 579Configuring the AD-LDS replication account as a service account.................................................. 580Changing the service account of the primary CCMA AD-LDS instance........................................... 581Verifying the AD-LDS Replication account is applied to the AD-LDS instance................................ 582
Chapter 19: Standby Voice Contact Standby Server for CS1000 installation in aworkgroup.................................................................................................................... 583
Standby Voice Contact Server installation prerequisites.................................................................. 583Downloading the latest documentation............................................................................................ 584Installing Windows Server 2008 Release 2...................................................................................... 584Configuring Windows Server 2008................................................................................................... 587Installing the latest supported operating system service packs....................................................... 588Connecting to the contact center subnet.......................................................................................... 589Disabling the Remote Access services............................................................................................ 589Configuring SNMP on your server.................................................................................................... 590Downloading the most recent patches to the server........................................................................ 591Disabling unused Network Adapters................................................................................................ 592Enabling Microsoft Remote Desktop connection.............................................................................. 592Configuring Data Execution Prevention........................................................................................... 593Importing Contact Center Firewall Security policy............................................................................ 593Disabling NetBIOS........................................................................................................................... 594Connecting the Embedded LAN subnet........................................................................................... 595Configuring the binding order........................................................................................................... 596Installing operating system components for Contact Center............................................................ 596Configuring MIME types to support Microsoft updates..................................................................... 599Saving managed, active and standby server names and IP addresses........................................... 599Creating a local workstation AD-LDS replication account on the standby server............................ 600Adding the local (workgroup) AD-LDS replication account to the standby administrators andreplicator group................................................................................................................................ 601Configuring the AD-LDS replication account as a service account.................................................. 602Updating server for a network location installation........................................................................... 603Installing the standby Voice Contact Server software for CS1000 in a workgroup.......................... 604Upgrading Java Runtime Environment, Java Development Kit, and Apache Tomcat componentsusing Third Party Software Upgrade Utility...................................................................................... 628Securing the Windows server........................................................................................................... 629
Chapter 20: Multimedia Contact Server software installation................................. 631Multimedia Contact Server installation prerequisites....................................................................... 632Downloading the latest documentation............................................................................................ 632Installing Windows Server 2008 Release 2...................................................................................... 633Configuring Windows Server 2008................................................................................................... 635Installing the latest supported operating system service packs....................................................... 637
Avaya Aura® Contact Center Installation May 2013 13
Connecting to the contact center subnet.......................................................................................... 638Adding a server to a domain............................................................................................................ 638Disabling the Remote Access services............................................................................................ 639Configuring SNMP on your server.................................................................................................... 640Downloading the most recent patches to the server........................................................................ 641Disabling unused Network Adapters................................................................................................ 641Enabling Microsoft Remote Desktop connection.............................................................................. 642Configuring Data Execution Prevention........................................................................................... 642Importing Contact Center Firewall Security policy............................................................................ 643Configuring Internet Information Services........................................................................................ 644Updating server for a network location installation........................................................................... 646Installing the Multimedia Contact Server software........................................................................... 647Upgrading Java Runtime Environment, Java Development Kit, and Apache Tomcat componentsusing Third Party Software Upgrade Utility...................................................................................... 655Securing the Windows server........................................................................................................... 656Installing the external Web communication server software............................................................ 656
Chapter 21: Knowledge Worker Server software installation.................................. 659Knowledge Worker Server software installation prerequisites......................................................... 659Downloading the latest documentation............................................................................................ 659Installing Windows Server 2008 Release 2...................................................................................... 660Configuring Windows Server 2008................................................................................................... 663Installing the latest supported operating system service packs....................................................... 664Connecting to the contact center subnet.......................................................................................... 665Adding a server to a domain............................................................................................................ 665Disabling the Remote Access services............................................................................................ 666Configuring SNMP on your server.................................................................................................... 667Downloading the most recent patches to the server........................................................................ 668Disabling unused Network Adapters................................................................................................ 668Enabling Microsoft Remote Desktop connection.............................................................................. 669Configuring Data Execution Prevention........................................................................................... 669Importing Contact Center Firewall Security policy............................................................................ 670Installing the Knowledge Worker Server software............................................................................ 671Upgrading Java Runtime Environment, Java Development Kit, and Apache Tomcat componentsusing Third Party Software Upgrade Utility...................................................................................... 677Securing the Windows server........................................................................................................... 677
Part III: Multimedia Complement For Elite........................................................................ 679Chapter 22: Avaya Aura® Contact Center Multimedia Complement softwareinstallation for Avaya Aura® Call Center Elite........................................................... 681
Prerequisites for Contact Center installation workflow..................................................................... 681Contact Center server types and software installation for Avaya Aura® Call Center Elite............... 682
Chapter 23: Multimedia Complement for Elite software installation...................... 685Multimedia Complement for Elite software installation prerequisites............................................... 685Downloading the latest documentation............................................................................................ 686Installing Windows Server 2008 Release 2...................................................................................... 686Configuring Windows Server 2008................................................................................................... 689Installing operating system components for Contact Center............................................................ 690Installing the latest supported operating system service packs....................................................... 693Connecting to the contact center subnet.......................................................................................... 694
14 Avaya Aura® Contact Center Installation May 2013

Adding a server to a domain............................................................................................................ 694Disabling the Remote Access services............................................................................................ 695Configuring SNMP on your server.................................................................................................... 696Downloading the most recent patches to the server........................................................................ 697Disabling unused Network Adapters................................................................................................ 697Enabling Microsoft Remote Desktop connection.............................................................................. 698Configuring Data Execution Prevention........................................................................................... 698Importing Contact Center Firewall Security policy............................................................................ 699Installing operating system components for Contact Center............................................................ 700Configuring MIME types to support Microsoft updates..................................................................... 702Updating server for a network location installation........................................................................... 703Installing the Multimedia Complement for Elite software.................................................................. 704Upgrading Java Runtime Environment, Java Development Kit, and Apache Tomcat componentsusing Third Party Software Upgrade Utility...................................................................................... 715Configuring WebLM licensing........................................................................................................... 716Securing the Windows server........................................................................................................... 717Installing the external Web communication server software............................................................ 718Adding the domain AD-LDS replication account to the primary server administrators and replicatorgroup................................................................................................................................................ 719
Chapter 24: Standby Multimedia Complement for Elite software installation....... 721Standby Multimedia Complement for Elite software installation prerequisites................................. 721Downloading the latest documentation............................................................................................ 722Installing Windows Server 2008 Release 2...................................................................................... 722Configuring Windows Server 2008................................................................................................... 725Installing the latest supported operating system service packs....................................................... 726Connecting to the contact center subnet.......................................................................................... 727Adding a server to a domain............................................................................................................ 728Disabling the Remote Access services............................................................................................ 729Configuring SNMP on your server.................................................................................................... 729Downloading the most recent patches to the server........................................................................ 730Disabling unused Network Adapters................................................................................................ 731Enabling Microsoft Remote Desktop connection.............................................................................. 731Configuring Data Execution Prevention........................................................................................... 732Importing Contact Center Firewall Security policy............................................................................ 733Installing operating system components for Contact Center............................................................ 734Configuring MIME types to support Microsoft updates..................................................................... 736Adding the domain AD-LDS replication account to the standby administrators and replicator group 737Updating server for a network location installation........................................................................... 738Installing the standby Multimedia Complement for Elite software.................................................... 739Upgrading Java Runtime Environment, Java Development Kit, and Apache Tomcat componentsusing Third Party Software Upgrade Utility...................................................................................... 762Configuring WebLM licensing........................................................................................................... 763Securing the Windows server........................................................................................................... 764
Part IV: No Switch Configured - Multimedia only............................................................. 767Chapter 25: Avaya Aura® Contact Center multimedia only..................................... 769
Prerequisites for Contact Center installation workflow..................................................................... 769Contact Center server types and software installation for multimedia only solutions....................... 769
Chapter 26: No Switch Configured Multimedia Only software installation............ 771
Avaya Aura® Contact Center Installation May 2013 15

Multimedia only software installation prerequisites.......................................................................... 772Downloading the latest documentation............................................................................................ 772Installing Windows Server 2008 Release 2...................................................................................... 773Configuring Windows Server 2008................................................................................................... 775Installing the latest supported operating system service packs....................................................... 777Connecting to the contact center subnet.......................................................................................... 778Adding a server to a domain............................................................................................................ 778Disabling the Remote Access services............................................................................................ 779Configuring SNMP on your server.................................................................................................... 780Downloading the most recent patches to the server........................................................................ 781Disabling unused Network Adapters................................................................................................ 781Enabling Microsoft Remote Desktop connection.............................................................................. 782Configuring Data Execution Prevention........................................................................................... 782Importing Contact Center Firewall Security policy............................................................................ 783Installing operating system components for Contact Center............................................................ 784Configuring MIME types to support Microsoft updates..................................................................... 786Updating server for a network location installation........................................................................... 787Installing the Multimedia only software............................................................................................. 788Upgrading Java Runtime Environment, Java Development Kit, and Apache Tomcat componentsusing Third Party Software Upgrade Utility...................................................................................... 799Configuring WebLM licensing........................................................................................................... 800Securing the Windows server........................................................................................................... 801Installing the external Web communication server software............................................................ 802Adding the domain AD-LDS replication account to the primary server administrators and replicatorgroup................................................................................................................................................ 803
Chapter 27: Standby No Switch Configured multimedia only software installation 805Multimedia only software installation prerequisites.......................................................................... 805Standby multimedia only software installation prerequisites............................................................ 806Downloading the latest documentation............................................................................................ 806Installing Windows Server 2008 Release 2...................................................................................... 807Configuring Windows Server 2008................................................................................................... 809Installing the latest supported operating system service packs....................................................... 811Connecting to the contact center subnet.......................................................................................... 812Adding a server to a domain............................................................................................................ 812Disabling the Remote Access services............................................................................................ 813Configuring SNMP on your server.................................................................................................... 814Downloading the most recent patches to the server........................................................................ 815Disabling unused Network Adapters................................................................................................ 815Enabling Microsoft Remote Desktop connection.............................................................................. 816Configuring Data Execution Prevention........................................................................................... 816Importing Contact Center Firewall Security policy............................................................................ 817Installing operating system components for Contact Center............................................................ 818Configuring MIME types to support Microsoft updates..................................................................... 820Adding the domain AD-LDS replication account to the standby administrators and replicator group 821Updating server for a network location installation........................................................................... 822Installing the standby Multimedia only software............................................................................... 823Upgrading Java Runtime Environment, Java Development Kit, and Apache Tomcat componentsusing Third Party Software Upgrade Utility...................................................................................... 849
16 Avaya Aura® Contact Center Installation May 2013

Configuring WebLM licensing........................................................................................................... 850Securing the Windows server........................................................................................................... 851
Part V: Avaya Media Server On Linux............................................................................... 853Chapter 28: Avaya Media Server installation on Linux............................................ 855
Avaya Media Server installation on Linux perequisites.................................................................... 855Installing the Linux server................................................................................................................. 856Installing the required packages on the Linux server....................................................................... 859Adding a Linux user group and user................................................................................................ 862Preparing the Linux operating system for Avaya Media Server....................................................... 863Configuring Network Time Protocol (NTP)....................................................................................... 864Installing Avaya Media Server software on Linux............................................................................. 865Securing your Avaya Media Server (optional).................................................................................. 867
Part VI: Network Control Center Server............................................................................ 869Chapter 29: Network Control Center Server software installation.......................... 871
Network Control Center Server software installation prerequisites.................................................. 872Job aid: Installation time................................................................................................................... 872Downloading the latest documentation............................................................................................ 872Installing Windows Server 2008 Release 2...................................................................................... 873Configuring Windows Server 2008................................................................................................... 875Installing the latest supported operating system service packs....................................................... 877Connecting to the contact center subnet.......................................................................................... 878Adding a server to a domain............................................................................................................ 878Disabling the Remote Access services............................................................................................ 879Configuring SNMP on your server.................................................................................................... 880Downloading the most recent patches to the server........................................................................ 881Disabling unused Network Adapters................................................................................................ 881Enabling Microsoft Remote Desktop connection.............................................................................. 882Configuring Data Execution Prevention........................................................................................... 882Importing Contact Center Firewall Security policy............................................................................ 883Installing the Network Control Center Server software.................................................................... 884Upgrading Java Runtime Environment, Java Development Kit, and Apache Tomcat componentsusing Third Party Software Upgrade Utility...................................................................................... 893Configuring WebLM licensing........................................................................................................... 894Securing the Windows server........................................................................................................... 895
Part VII: Security Framework Server................................................................................. 897Chapter 30: Security Framework Server software installation................................ 899
Security Framework Server software installation prerequisites........................................................ 899Job aid: Installation time................................................................................................................... 899Downloading the latest documentation............................................................................................ 900Installing Windows Server 2008 Release 2...................................................................................... 900Configuring Windows Server 2008................................................................................................... 903Installing the latest supported operating system service packs....................................................... 904Connecting to the contact center subnet.......................................................................................... 905Adding a server to a domain............................................................................................................ 906Disabling the Remote Access services............................................................................................ 907Configuring SNMP on your server.................................................................................................... 907Downloading the most recent patches to the server........................................................................ 908
Avaya Aura® Contact Center Installation May 2013 17
Disabling unused Network Adapters................................................................................................ 909Enabling Microsoft Remote Desktop connection.............................................................................. 909Configuring Data Execution Prevention........................................................................................... 910Importing Contact Center Firewall Security policy............................................................................ 911Installing the Security Framework Server software.......................................................................... 912Upgrading Java Runtime Environment, Java Development Kit, and Apache Tomcat componentsusing Third Party Software Upgrade Utility...................................................................................... 916Securing the Windows server........................................................................................................... 916
Part VIII: Client Software Installation................................................................................ 919Chapter 31: Agent Desktop client software installation........................................... 921
Agent Desktop client software installation prerequisites.................................................................. 921Assigning a group policy for embedded softphone settings............................................................. 922Installing the Agent Desktop client software..................................................................................... 924Installing the required services for Agent Desktop QoS support...................................................... 924Registering Agent Desktop third-party headsets.............................................................................. 925
Chapter 32: Agent Desktop Displays software installation..................................... 927Prerequisites to Agent Desktop Displays software installation......................................................... 927Installing Agent Desktop Display client software.............................................................................. 927Installing Windows update KB917607.............................................................................................. 929
Chapter 33: Orchestration Designer client software installation............................ 931Job aid: Installation time................................................................................................................... 931Installing the Orchestration Designer client software....................................................................... 931
Chapter 34: Avaya Communication Server 1000 Data Extraction Tool installation 933Avaya Communication Server 1000 Data Extraction Tool software installation prerequisites......... 933Job aid: Installation time................................................................................................................... 933Installing the Avaya Communication Server 1000 Data Extraction Tool software........................... 934
Chapter 35: Client software installation in a Citrix deployment.............................. 935Client software installation prerequisites.......................................................................................... 935Publishing Agent Desktop client software on a Citrix server............................................................ 935Publishing Contact Center Manager Administration on a Citrix server as content........................... 940Publishing Contact Center Manager Administration on a Citrix server as an installed application.. 942Publishing Agent Desktop Displays client software on a Citrix server............................................. 945
Part IX: Software Uninstall................................................................................................. 949Chapter 36: Server software uninstallation............................................................... 951
Prerequisites for server software uninstallation................................................................................ 951Removing the server software patches............................................................................................ 951Removing the server software.......................................................................................................... 952Removing the Avaya Media Server software................................................................................... 953Removing the Multimedia Contact Server software......................................................................... 953
Chapter 37: Client Software uninstallation................................................................ 955Removing the Agent Desktop client software................................................................................... 955Removing the Agent Desktop Displays software............................................................................. 955Removing the Orchestration Designer client software..................................................................... 956Uninstalling the required services for Agent Desktop QoS support................................................. 957
Chapter 38: Avaya Media Server uninstallation on Linux........................................ 959Uninstalling Avaya Media Server on Linux....................................................................................... 959
Appendix A: Free open source software licensing.......................................................... 961
18 Avaya Aura® Contact Center Installation May 2013

TAO........................................................................................................................................................... 961Apache...................................................................................................................................................... 962
How to apply the Apache License to your work............................................................................... 965Eclipse....................................................................................................................................................... 966SUN........................................................................................................................................................... 969OpenSSL................................................................................................................................................... 976
Index..................................................................................................................................... 979
Avaya Aura® Contact Center Installation May 2013 19

20 Avaya Aura® Contact Center Installation May 2013

Chapter 1: New in this release
The following sections detail what is new in Avaya Aura® Contact Center Installation (NN44400-311) forRelease 6.3.
Navigation• Features on page 21
FeaturesSee the following sections for information about feature changes:
• Avaya Aura® Contact Center server types on page 21
Avaya Aura® Contact Center server typesThe Avaya Aura® Contact Center Release 6.3 DVD Installer supports a range of new servertypes. Each new server type installs a combination of Avaya Aura® Contact Center applicationssuitable for a specific contact center function. Some Contact Center servers support only voicecontacts, some Contact Center servers support only multimedia contacts, and some newContact Center servers support both voice and multimedia. Avaya Aura® Contact CenterRelease 6.3 offers a range of servers for both Avaya Aura® Unified Communications platformand Avaya Communication Server 1000 based solutions. Avaya Aura® Contact CenterRelease 6.3 also provides multimedia only solutions, and a Multimedia Complement to AvayaAura® Call Center Elite.
Avaya Aura® Contact Center Release 6.3 no longer supports the installation of individualContact Center components or applications.
The Avaya Aura® Contact Center Release 6.3 DVD contains a Windows and a Linux versionof Avaya Media Server. You can use the Avaya Aura® Contact Center Release 6.3 DVDInstaller to install the Windows version of Avaya Media Server co-resident with other ContactCenter applications on a Windows server. You can also access the Linux version of AvayaMedia Server directly from the DVD folder structure and install it standalone on a Linuxserver.
Avaya Aura® Contact Center Installation May 2013 21

For more information about the supported range of server types, see Introduction onpage 23.
New in this release
22 Avaya Aura® Contact Center Installation May 2013Comments? [email protected]

Chapter 2: Introduction
This document describes how to install and un-install all server software for Avaya Aura® Contact CenterRelease 6.3. You can install Contact Center in various configurations to suit your contact centersolution.
You can install the following Contact Center server types:
Voice and Multimedia Contact Server — Install this server to provide context sensitive and skill-basedrouting for customer voice and multimedia contacts. This server provides routed contact support for emailmessages, web communications, voice mail messages, scanned documents, fax messages, and SMStext messages. Each SIP-enabled Voice and Multimedia Contact Server requires one or more AvayaMedia Server in the contact center solution. Avaya Media Server supports SIP-based voice contactrouting, and it provides conferencing, announcements, dialogs, and Agent Greeting capabilities in SIP-enabled contact centers. A Voice and Multimedia Contact Server has the following components:
• Contact Center Manager Server• Contact Center License Manager• Contact Center Manager Server Utility• Contact Center Manager Administration• Communication Control Toolkit• Contact Center Multimedia• Optional Avaya Media Server Windows version (only in SIP-enabled solutions)
In a small to medium solution using a Voice and Multimedia Contact Server, agents download and installAvaya Aura® Agent Desktop software from the Voice and Multimedia Contact Server.
Voice Contact Server Only — Install this server to provide context sensitive and skill-based routing forcustomer voice contacts in a large contact center solution. Each SIP-enabled Voice Contact Serverrequires one or more Avaya Media Server in the contact center solution. Avaya Media Server supportsSIP-based voice contact routing, and it provides conferencing, announcements, dialogs, and AgentGreeting capabilities in SIP-enabled contact centers. A Voice Contact Server has the followingcomponents:
• Contact Center Manager Server• Contact Center License Manager• Contact Center Manager Server Utility• Contact Center Manager Administration• Communication Control Toolkit
In a solution where agents use Avaya Aura® Agent Desktop to log on and handle customer calls, eachVoice Contact Server requires one Multimedia Contact Server. In a SIP-enabled voice contact center
Avaya Aura® Contact Center Installation May 2013 23

solution, agents must use Avaya Aura® Agent Desktop to log on and handle customer calls. Thereforeeach SIP-enabled voice solution using a Voice Contact Server also requires one Multimedia ContactServer. In an Avaya Communication Server 1000 AML-based voice-only solution, where agents useAvaya Aura® Agent Desktop to log on and handle customer calls, each Voice Contact Server requires oneMultimedia Contact Server. In an Avaya Communication Server 1000 AML-based voice-only solution,where agents use their desk phones to log on and handle customer calls, and where the agents do notuse Avaya Aura® Agent Desktop, a Multimedia Contact Server is not required.
Multimedia Contact Server Only — Install this server to increase the number of contact center agentsin your enterprise solution. When installed, this server provides the multimedia contact processingcapabilities, and the Voice Contact Server processes only voice contacts. In a solution using a MultimediaContact Server, agents download and install Avaya Aura® Agent Desktop software from the MultimediaContact Server. Administrators configure Agent Desktop features and functions using the CCMMAdministration utility installed on the Multimedia Contact Server.
A Multimedia Contact Server has the following components:
• Contact Center Multimedia
AACC Multimedia Complement for Elite — Install this server to add multimedia contact routing supportto a new or existing Avaya Aura® Call Center Elite voice-based solution. This server supports contactrouting for web communications, fax messages, SMS text messaging, and email messages, withadditional support for peer-to-peer Instant Messaging (IM). In an Elite Complement solution, agentsdownload and install Avaya Aura® Agent Desktop software from the Multimedia Complement for Eliteserver. Administrators configure Agent Desktop features and functions using the CCMM Administrationutility installed on the Multimedia Complement for Elite server. A Multimedia Complement for Elite serverhas the following components:
• Contact Center Manager Server
• Contact Center License Manager
• Contact Center Manager Server Utility
• Contact Center Manager Administration
• Communication Control Toolkit
• Contact Center Multimedia
No Switch Configured Multimedia Only — Install this server to provide multimedia contact routing. Thisserver supports contact routing for web communications, fax messages, SMS text messaging, and emailmessages, with additional support for peer-to-peer Instant Messaging (IM). Choose this server type whenthere is no existing voice-based call center, or when multimedia integration with a voice contact center isnot required. In a multimedia only solution, agents download and install Avaya Aura® Agent Desktopsoftware from the No Switch Configured Multimedia Only server. Administrators configure Agent Desktopfeatures and functions using the CCMM Administration utility installed on the No Switch ConfiguredMultimedia Only server. A No Switch Configured Multimedia Only server has the following components:
Introduction
24 Avaya Aura® Contact Center Installation May 2013Comments? [email protected]

• Contact Center Manager Server
• Contact Center License Manager
• Contact Center Manager Server Utility
• Contact Center Manager Administration
• Communication Control Toolkit
• Contact Center Multimedia
• Avaya Media Server Windows version
Network Control Center Server Only — Install this server to add networking, network skill-based routing,and consolidated reporting support for a number of Voice and Multimedia Contact Servers operating asa single distributed contact center. Use this server to configure contact routing between the Voice andMultimedia Contact Server nodes of a distributed contact center solution. A Network Control Center Serverhas the following components:
• Contact Center Manager Server — Network Control Center
• Contact Center Manager Administration
• Contact Center License Manager
Knowledge Worker Server Only — Install a Knowledge Worker server to provide Computer-TelephonyIntegration (CTI) functionality and call data handling capabilities. A Knowledge Worker Server has thefollowing components:
• Communication Control Toolkit Knowledge Worker version
• Contact Center License Manager
Security Framework Server — Install this server to provide identity management, authorization, andsingle sign-on (SSO) authentication for contact center solution users. Security Framework providessession management and integrates with your directory services infrastructure (for example, ActiveDirectory) to reduce administrative costs and eliminate the redundant user information associated withapplication solutions. A Security Framework Server has the following components:
• Security Framework
Avaya Media Server on Linux — Install this server to provide additional media processing capabilities,and to support Avaya Media Server High Availability. Avaya Media Server supports SIP-enabled voicecontact routing, and it provides conferencing, announcements, dialogs, and Agent Greeting capabilitiesin SIP-based contact centers. Avaya Media Server High Availability is not supported on the Windowsoperating system. Each SIP-enabled Contact Center requires one or more Avaya Media Server. For smallto medium contact centers without High Availability, choose a server type with co-resident Avaya MediaServer for Windows. For large contact centers, or contact centers requiring High Availability, install oneor more standalone Avaya Media Server Linux-based servers.
Avaya Aura® Contact Center Installation May 2013 25

You can install Contact Center software in the following environments:
• Avaya Aura® Unified Communications platform Release 6.1 and 6.2.
• AML-based Avaya Communication Server 1000. Application Module Link (AML) is an internalprotocol used by Avaya Aura® Contact Center to communicate directly with Avaya CommunicationServer 1000 (CS1000).
• As a multimedia complement to an Avaya Aura® Call Center Elite voice-based call center.
• No Switch Configured. Select this option when installing Avaya Aura® Contact Center to support onlymultimedia contacts.
How to use this bookTo install Avaya Aura® Contact Center software, first select your voice platform type, then install acombination of Contact Center server types for that voice platform. For more information, select your voiceplatform from this list:
• Avaya Aura® Contact Center software installation for Avaya Aura® Unified Communicationsplatform on page 33
• Avaya Aura® Contact Center software installation for CS1000 on page 235• Avaya Aura® Contact Center Multimedia Complement software installation for Avaya Aura® Call
Center Elite on page 681• Avaya Aura® Contact Center multimedia only on page 769
When you have installed and configured these core Avaya Aura® Contact Center servers, you can expandyour solution to include the following optional server types:
• Network Control Center Server software installation on page 871• Security Framework Server software installation on page 899
When the Avaya Aura® Contact Center servers are installed and commissioned, install the clientapplications on agent, supervisor, or administrator computers. For more information about Avaya Aura®
Contact Center client software, see:• Agent Desktop client software installation on page 921• Agent Desktop Displays software installation on page 927• Orchestration Designer client software installation on page 931• Avaya Communication Server 1000 Data Extraction Tool installation on page 933
Platform Vendor Independence checking utilityYou can purchase your choice of server hardware as long as it complies with the PlatformVendor Independence (PVI) specification for Avaya Aura® Contact Center software. You havethe flexibility to purchase a hardware specification that conforms with your corporate standard.
Introduction
26 Avaya Aura® Contact Center Installation May 2013Comments? [email protected]

For more information about the Avaya Aura® Contact Center PVI server specifications, seeAvaya Aura® Contact Center Planning and Engineering (NN44400-210).
To check whether a proposed server meets the basic requirements for Platform VendorIndependence, the Contact Center Installer runs a Platform Vendor Independence utility beforethe software is installed. The Platform Vendor Independence utility generates warnings andsuggestions when the proposed server does not satisfy the minimum or suggestedrequirement.
If major problems are detected, the Platform Vendor Independence utility reports a Failmessage. The installation cannot proceed until you fix the problems.
Use the Platform Vendor Independence utility in conjunction with the guidelines stated in thisdocument.
The Platform Vendor Independence utility is included in the Contact Center product installationDVD. The utility runs automatically before the software is installed to verify the system.
Third Party Software Upgrade UtilityThird Party Software Upgrade Utility automates the process of upgrading your Java RuntimeEnvironment (JRE) and Tomcat software deployed on a Contact Center 6.3 Service Pack 10or later system.
Third Party Software Upgrade Utility is available in the Contact Center 6.3 Service Pack 10 orlater that you download from the Avaya Support website, http://support.avaya.com. You mustrun this utility after you have applied Contact Center 6.3 Service Pack 10 or later as an install-time patch. For more information, see Upgrading Java Runtime Environment, JavaDevelopment Kit, and Apache Tomcat components using Third Party Software UpgradeUtility on page 69.
Third Party Software Upgrade Utility upgrades the following third-party software:Software Platform Upgrade From Old
VersionTo New Version
Java RuntimeEnvironment
x86 1.6.0 Update 17 1.6.0 Update 37
Java RuntimeEnvironment
x64 1.6.0 Update 21 1.6.0 Update 37
Java DevelopmentKit
x86 1.6.0 Update 17 1.6.0 Update 37
Apache Tomcat x86 6.0.20 6.0.35
Note:Avaya Media Server includes JRE and Tomcat versions that are upgraded as part of ServicePack 10. When you follow the standard Avaya Media Server Service Pack upgrade
Third Party Software Upgrade Utility
Avaya Aura® Contact Center Installation May 2013 27

procedures, the system automatically upgrades the JRE and Tomcat versions also. ThirdParty Software Upgrade Utility does not perform this task.
Prerequisites• Read Avaya Aura® Contact Center Fundamentals (NN44400-110).
• Read Avaya Aura® Contact Center Planning and Engineering (NN44400-210).
• Complete the Avaya Aura® Contact Center Installation Checklist (NN44400-310).
• Understand the features you purchased with Contact Center.
• Know on which server you want to install each Contact Center component.
• Determine your required network components and configuration based on theinformation in the Avaya Aura® Contact Center Planning and Engineering(NN44400-210).
• Ensure that you have the Contact Center Release 6.3 DVD.
• Ensure that your servers, clients, and network meet the minimum system requirementsbased on the Avaya Aura® Contact Center Planning and Engineering(NN44400-210).
• Ensure that your PABX is configured. For more information about configuring thePABX, see Avaya Aura® Contact Center Configuration – Avaya Aura® UnifiedCommunications Platform Integration (NN44400-521) or Avaya Aura® Contact CenterConfiguration – Avaya CS1000 Integration (NN44400-512).
• Ensure that all software is installed on the servers using a common administrationaccount.
Related resources
Avaya Mentor videosAvaya Mentor is an Avaya-run channel on YouTube that includes technical content on how toinstall, configure, and troubleshoot Avaya products.
Go to http://www.youtube.com/AvayaMentor and perform one of the following actions:
Introduction
28 Avaya Aura® Contact Center Installation May 2013Comments? [email protected]

• Enter a key word or key words in the Search Channel to search for a specific productor topic.
• Scroll down Playlists, and click the name of a topic to see the available list of videosposted on the site.
SupportVisit the Avaya Support website at http://support.avaya.com for the most up-to-datedocumentation, product notices, and knowledge articles. You can also search for releasenotes, downloads, and resolutions to issues. Use the online service request system to createa service request. Chat with live agents to get answers to questions, or request an agent toconnect you to a support team if an issue requires additional expertise.
Support
Avaya Aura® Contact Center Installation May 2013 29

Part I: Avaya Aura® Unified Communications
Avaya Aura® Contact Center Installation May 2013 31

Avaya Aura® Unified Communications
32 Avaya Aura® Contact Center Installation May 2013Comments? [email protected]

Chapter 3: Avaya Aura® Contact Centersoftware installation for AvayaAura® Unified Communicationsplatform
Avaya Aura® Contact Center Release 6.3 supports a range of server types for Avaya Aura® UnifiedCommunications SIP-enabled solutions. Each server type installs a combination of Avaya Aura® ContactCenter applications suitable for a specific contact center function. Some Contact Center servers supportonly voice contacts, some Contact Center servers support only multimedia contacts, and some ContactCenter servers support both voice and multimedia.
A Contact Center solution may involve one or more servers. The installation configuration you choosedepends on the hardware resources and performance demands of your contact center. To implement theAvaya Aura® Contact Center High Availability feature, your solution requires additional standby serversto provide resiliency and redundancy.
Voice and Multimedia Contact Server — Install this server to provide context sensitive and skill-basedrouting for customer voice and multimedia contacts. This server provides routed contact support for emailmessages, web communications, voice mail messages, instant messages (IMs) scanned documents, faxmessages, and SMS text messages. Each SIP-enabled Voice and Multimedia Contact Server requiresone or more Avaya Media Server in the contact center solution. Avaya Media Server supports SIP-basedvoice contact routing, and it provides conferencing, announcements, dialogs, and Agent Greetingcapabilities in SIP-enabled contact centers. Voice and Multimedia Contact Server is available with andwithout Avaya Media Server.
SIP-enabled Avaya Aura® Contact Center supports two types of Voice and Multimedia Contact Server:
• Voice and Multimedia Contact Server with Avaya Media Server
• Voice and Multimedia Contact Server without Avaya Media Server
Avaya Aura® Contact Center does not support Voice and Multimedia Contact Server with Avaya MediaServer on VMware. A server with Voice and Multimedia Contact Server with Avaya Media Server softwareinstalled does not support Contact Center High Availability.
Voice Contact Server Only — Install this server to provide context sensitive and skill-based routing forcustomer voice contacts. Each SIP-enabled Voice Contact Server requires one or more Avaya MediaServer in the contact center solution. Avaya Media Server supports SIP-based voice contact routing, andit provides conferencing, announcements, dialogs, and Agent Greeting capabilities in SIP-enabled contact
Avaya Aura® Contact Center Installation May 2013 33
centers. Each SIP-enabled Voice Contact Server requires one Multimedia Contact Server in the contactcenter solution.
Multimedia Contact Server Only — Install this server to increase the number of contact center agentsin your enterprise solution. When installed, this server provides the multimedia contact processingcapabilities, and the Voice Contact Server processes only voice contacts.
Prerequisites for Contact Center installation workflow• Complete the Avaya Aura® Contact Center Installation Checklist (NN44400-310).
• Ensure all your server hardware meets the requirements described in Avaya Aura®
Contact Center Planning and Engineering (NN44400-210).
• Know the installation configuration you plan to use in your contact center. For moreinformation see Avaya Aura® Contact Center Planning and Engineering(NN44400-210).
• Ensure that your PABX is configured. For more information about configuring thePABX, see Avaya Aura® Contact Center Configuration – Avaya Aura® UnifiedCommunications Platform Integration (NN44400-521).
Contact Center server types and software installation forAvaya Aura® Unified Communications platform
About this taskThis work flow shows the sequence of tasks you perform to install one or more Contact Centerservers in a SIP-enabled Avaya Aura® Unified Communications platform based contact centersolution.
The number of Avaya Media Server servers required depends on the number of agents in yoursolution. For more information, see Avaya Aura® Contact Center Planning and Engineering(NN44400-210).
Avaya Aura® Contact Center does not support the Voice and Multimedia Contact Server withAvaya Media Server software on a VMware guest.
34 Avaya Aura® Contact Center Installation May 2013Comments? [email protected]

Figure 1: Contact Center software installation tasks for Avaya Aura® Unified Communications
Contact Center server types and software installation for Avaya Aura® Unified Communications platform
Avaya Aura® Contact Center Installation May 2013 35

platform based solutions
For more information about installing Avaya Aura® Contact Center servers for a SIP-enabledAvaya Aura® Unified Communications based contact center solution, see the following:
• Voice and Multimedia Contact Server for Avaya Aura® platform installation on page 37
• Standby Voice and Multimedia Contact Server for Avaya Aura® platform installation onpage 75
• Voice Contact Server for Avaya Aura® platform installation on page 125• Standby Voice Contact Server for Avaya Aura® platform installation on page 159• Multimedia Contact Server software installation on page 205• Avaya Media Server installation on Linux on page 855
The following additional and optional server types are also supported in Avaya Aura® UnifiedCommunications SIP-enabled contact center solutions:
• Network Control Center Server software installation on page 871• Security Framework Server software installation on page 899
36 Avaya Aura® Contact Center Installation May 2013Comments? [email protected]

Chapter 4: Voice and Multimedia ContactServer for Avaya Aura® platforminstallation
This chapter describes how to install a Voice and Multimedia Contact Server for a solution with an AvayaAura® Unified Communications platform. A Voice and Multimedia Contact Server includes the followingserver software:
• Contact Center Manager Server (CCMS)
• Contact Center Manager Server Utility
• Contact Center License Manager
• Contact Center Manager Administration (CCMA)
• Communication Control Toolkit (CCT)
• Contact Center Multimedia (CCMM)
• Optional Avaya Media Server Windows version
This chapter describes two types of Voice and Multimedia Contact Server:
• Voice and Multimedia Contact Server with Avaya Media Server. Contact Center does not supportthis server on VMware. This server type does not support Contact Center High Availability.
• Voice and Multimedia Contact Server without Avaya Media Server. Contact Center supports thisserver on VMware. This server type supports Contact Center High Availability.
Install this server to provide context‐sensitive and skill-based routing for customer voice and multimediacontacts. This server provides routed contact support for voice calls, email messages, instant messages(IMs), Web communications, voice mail messages, scanned documents, fax messages, and SMS textmessages. This server provides extensive tools for agent management, real-time and historical reporting,and graphical tools to create contact flows and treatment rules. Use this server for license management,networking, Open Interfaces Web Service and third-party application interfaces integration.
You can change the name of a Contact Center server, but because this is time consuming, Avayarecommends that you configure the server final production name before installing Contact Centersoftware.
If you plan to follow the Microsoft server hardening guidelines, complete those procedures before installingAvaya Aura® Contact Center.
Avaya Aura® Contact Center Installation May 2013 37

Important:You can create an administration account on the server and then install Avaya Aura® Contact Centerusing the account. This Avaya Aura® Contact Center administration account must have fulladministrative privileges. You must upgrade and patch Avaya Aura® Contact Center using thisadministration account. You can rename this account after installing Avaya Aura® Contact Center, butyou must not delete the account. If you delete the account used to install Avaya Aura® Contact Center,Avaya Aura® Contact Center stops working.
You must complete the procedures in this chapter in sequential order.
High Availability noteAvaya Media Server High Availability is not supported on the Windows operating system. Avaya MediaServer High Availability is supported only on Linux servers. If you plan to implement Avaya Aura® ContactCenter High Availability, install a Voice and Multimedia Contact Server without Avaya Media Server. Theninstall the Voice and Multimedia Contact Server without Avaya Media Server software on a standby server.Next install two or more Avaya Media Servers to build a resilient contact center solution.
Voice and Multimedia Contact Server installationprerequisites
• Copy the most recent patches for the Contact Center software.
• Ensure that your new Contact Center license file is available.
Important:For the system to correctly handle backup and restore SNMP events, you must installWindows SNMP Service before you install Contact Center server software.
Downloading the latest documentationBefore you begin
• Download the most recent version of Acrobat Reader.• Access the Avaya Web site at www.avaya.com/support.
About this taskDownload the most recent documentation to ensure you have the most recent updates.Updates in the documentation accurately reflect the most recent changes in the software.
38 Avaya Aura® Contact Center Installation May 2013Comments? [email protected]

Procedure
1. Log on to the Avaya Web site.
2. Compare the versions of the documentation on the site with the versions youhave.
3. If the version number on www.avaya.com/support is higher than your version,download the latest version of the document.
4. Review the Avaya Web site for release notes and readme files.
Installing Windows Server 2008 Release 2Before you begin
• Ensure that you have a newly formatted server that meets the specifications in AvayaAura® Contact Center Planning and Engineering (NN44400-210) on which to installMicrosoft Windows Server 2008 64-bit, Release 2, Service Pack 1.
Do not upgrade your operating system from a previous release. Contact Center is notsupported on an upgraded operating system.
• Configure all servers for RAID as described in Avaya Aura® Contact Center Planning andEngineering (NN44400-210).
• Ensure that you have a DVD for Windows Server 2008 Release 2.• Install the network interface card in the server.• Know the IP addresses for the contact center subnet.
About this taskInstall the Windows operating system, which is required for the Contact Center server software.During the installation, configure the Windows settings as required. You must perform thisprocedure on each server before you install Contact Center server software on the server.
Procedure
1. Insert the Windows Server 2008 64-bit Release 2 Standard Edition or WindowsServer 2008 64-bit Release 2 Enterprise Edition DVD into the DVD drive.
2. Install Windows Server 2008 Release 2 according to the instructions supplied bythe DVD.
3. On the first install page, select your language for installation.
4. Click Next.
5. On the Installation window, select a Language to install from the list.
Installing Windows Server 2008 Release 2
Avaya Aura® Contact Center Installation May 2013 39

6. Select a Time and currency format from the list.
7. Select Keyboard or input method from the list.
8. Click Next.
9. Click Install Now.
10. Select an operating system from the list.
11. Click Next.
12. On the first Install Windows screen, read the terms of the license agreement andselect I accept the license terms.
13. Click Next.
14. Select Custom.
15. Select the disk partition on which you want to install Windows Server 2008.
Important:You can use the partition management options to configure the partitions on yourserver.
16. Click Next.The installation proceeds and automatically restarts the server several times.
17. After completing the installation, log on to the server as Administrator. Enter andconfirm the Administrator password.
18. In the Initial Configuration Tasks window, select Activate Windows and followthe instructions or the Microsoft documentation to activate your server.
19. Select Set time zone and complete the information as required for your system.This server time zone daylight saving setting must match the time zone daylightsaving setting on the Avaya Media Server(s) in this SIP-enabled contact centersolution.
20. Select Configure Networking and complete the information for your NetworkInterface Card (NIC) with the server IP address.
21. Select Provide computer name and domain and complete the information for yourserver name and workgroup or domain settings.
22. Change the DVD drive letter to E: to ensure the correct drive letters are free for theContact Center application and database hard disk drives and partitions.
23. Configure the hard disk drives and partitions for this server using the WindowsServer 2008 Server Manager - Disk Management utility. For more information abouthard disk drives and partitions, see Avaya Aura® Contact Center Planning andEngineering (NN44400-210).
24. Install other required drivers for your hardware configuration.
40 Avaya Aura® Contact Center Installation May 2013Comments? [email protected]

Procedure job aid
Name Description
Computer name Do not use spaces or underscores or exceed15 characters. The name must start with analphabetic character.The computer name must match (includingcase sensitivity) the DNS name.
Disk drives Format the partitions as required for theserver. For more information, see AvayaAura® Contact Center Planning andEngineering (NN44400-210).
Domain/workgroup name Configure as required for your site.You must check to ensure the DNS Domainname (including case) matches the servername if the server is added to a domain orworkgroup after configuration.
Licensing modes Select Per server licensing mode.Accept the default five concurrentconnections.
Modem dialing Configure as required for your site. Do notinstall a modem on a Communication ControlToolkit server.
Network components Configure IP Address, WINS, DNS for one ortwo network cards as per configuration.Contact Center does not support IPv6.
Network connections If the server has more than one NIC/adapter,ensure contact center subnet appears first inthe network adapter binding order.
Partitions Configure C: drive to be a primary drive.Configure the other drives on your server tomeet the requirements according to AvayaAura® Contact Center Planning andEngineering (NN44400-210) for the server.
Regional settings window Configure as required for your site.
SNMP Configure for all servers.
Installing Windows Server 2008 Release 2
Avaya Aura® Contact Center Installation May 2013 41

Configuring Windows Server 2008Before you begin
• Install Microsoft Windows Server 2008 64-bit Release 2 on your server.
About this taskBefore you can install Avaya Aura® Contact Center software on your server, you must configureWindows Server 2008 to meet the requirements of the software.
You can prepare the server using this and other procedures, or you can download and use anAvaya Aura® Contact Center operating system configuration tool that installs the requiredWindows roles and features.
The Avaya Aura® Contact Center Windows Roles and Features installer configures thefollowing Windows Server 2008 resources:
• Windows Server Backup Features• SNMP Services• Active Directory Light Weight Directory Services• Application Server• Web Server (IIS)
For more information, and to download the Avaya Aura® Contact Center Windows Roles andFeatures installer, see http://support.avaya.com.
The Avaya Aura® Contact Center Windows Roles and Features installer replaces the followingprocedures:
• Configuring Windows Server 2008 (this procedure)• Configuring SNMP on your server• Installing operating system components for Contact Center
If you use the Avaya Aura® Contact Center Windows Roles and Features installer, skip thesethree procedures.
Procedure
1. Log on to the Windows Server 2008 server using an administrator account.
2. Select the Don’t display this screen on startup check box.
3. Update the emergency repair disk to record the latest configuration data for theserver.
4. Choose Start > Administrative Tools > Server Manager.
5. In the left pane, click Features.
42 Avaya Aura® Contact Center Installation May 2013Comments? [email protected]

6. Click Add Features.
7. Select Windows Server Backup Features.
8. Click Next.
9. Click Install.
10. Click Close.
11. Choose Start > All Programs > Accessories > System Tools > Windows ServerBackup.
12. Follow the on-screen instructions to select what you want to back up.
Installing the latest supported operating system servicepacks
Before you begin
• Access the Avaya hotfixes list on the Web site www.avaya.com/support.• Install and configure Microsoft Windows Server 2008 64-bit Release 2 on your server.• Review the recommendations on operating system service updates in Avaya Aura®
Contact Center Planning and Engineering (NN44400-210).• Install the Microsoft .NET Framework 3.5 and Microsoft .NET Framework 3.5 SP1.
About this taskAvaya recommends that you install the most recent supported operating system service packs.You must download the supported operating system service pack from the Avaya hotfixes listto ensure your Contact Center server software functions correctly with the supported operatingsystem patches.
Procedure
1. Log on to the server and disable the Windows Update feature. There are a numberof methods for disabling the Windows Update feature, refer to the Windows Server2008 documentation for a method suitable to your solution. Disabling the WindowsUpdate feature prevents Windows Server 2008 from automatically applyingoperating system patches and potentially rebooting the server.
2. Review the Contact Center Service Packs Compatibility and Security HotfixesApplicability List to determine the most recent Avaya Aura® Contact Centersupported patches or service packs.
3. Download the appropriate Microsoft Windows Server 2008 patches for the AvayaAura® Contact Center software installed on this server.
Installing the latest supported operating system service packs
Avaya Aura® Contact Center Installation May 2013 43

4. Install the most recent Windows Server 2008 service pack that is validated withAvaya Aura® Contact Center by following the Microsoft Installation instructions.
Connecting to the contact center subnetAbout this taskConnect the Contact Center server to the contact center subnet. The contact center subnet isthe network on which the server software applications work together to route contacts andgenerate reports.
Procedure
1. Locate the slot assigned to the contact center subnet network interface card for theserver. Make a note of the slot.
2. Connect the cable from the contact center subnet to the contact center subnetnetwork interface card in the server in accordance with customer site networkingguidelines.
3. Use the ping command to test the contact center subnet.
Adding a server to a domainBefore you begin
• Ensure that you have domain administrator privileges, or ask the Domain Administratorto assign you a domain user account for remote access.
• On the server, configure a preferred Domain Name System (DNS) server on the NetworkInterface Card (NIC).
About this taskAdd the server to an existing domain. Avaya recommends that you add the server to the domainbefore installing Contact Center software.
Ask your System Administrator to add a Domain Name System (DNS) static entry for thisserver. Each Contact Center server in a domain requires a DNS static entry.
Important:Avaya Aura® Contact Center High Availability solutions do not support Windows Server 2008Dynamic DNS.
In High Availability solutions, ask your System Administrator to add one DNS static entry forthe each managed name and associated managed IP address. A typical High Availability
44 Avaya Aura® Contact Center Installation May 2013Comments? [email protected]
campus solution with a pair of servers requires 3 DNS static entries; one DNS static entry forthe active server, one DNS static entry for the standby server, and one DNS static entry forthe managed name and associated IP address.
Procedure
1. Log on to the server.
2. Click Start > Administrative Tools > Server Manager.
3. Beside Computer Information, click Change System Properties.
4. In the System Properties dialog box, click the Computer Name tab.
5. Click Change.
6. In the Computer Name/Domain Changes dialog box, click the Domain option.
7. Type the domain name (you must provide the fully qualified domain name, whichincludes the prefix and suffix).
8. Click OK.
9. Type the domain administrator User name and Password.
10. Click OK.
11. Restart the server when you are prompted to do so.
Disabling the Remote Access servicesAbout this taskAvaya Aura® Contact Center does not support Remote Access Services (RAS). Disable theRemote Access services before installing Avaya Aura® Contact Center. Microsoft RemoteDesktop continues to run after you disable Remote Access services. After you disable theservices, restart the server.
Procedure
1. Choose Start > Administrative Tools > Services.
2. In the Services window, right-click the Remote Access Connection Managericon.
3. Click Properties.
4. In the General tab, from the Startup type list, select Disabled.
5. Click OK.
6. In the Services window, right-click the Remote Access Auto ConnectionManager icon.
Disabling the Remote Access services
Avaya Aura® Contact Center Installation May 2013 45

7. Click Properties.
8. In the General tab, from the Startup type list, select Disabled.
9. Click OK.
10. In the Services window, click File, Exit.
11. Restart the server.
Configuring SNMP on your serverBefore you begin
• Install and configure Microsoft Windows Server 2008 64-bit Release 2 on your server.
About this taskConfigure Simple Network Management Protocol (SNMP) on your server to ensure you haveall of the required components of the Internet protocol for monitoring devices in your network.SNMP helps you manage data that describes the system configuration and errors that mayoccur between them.
Procedure
1. Log on to the server using the administrator account.
2. Choose Start > Control Panel > Programs.
3. In the Programs and Features section, click Turn Windows features on or off.
4. In the Server Manager window, select Server Manager and click Add Features.
5. Select SNMP Services.
6. Click Next.
7. Click Install.
8. If prompted, insert the Windows Server 2008 DVD.
9. Click Close.
46 Avaya Aura® Contact Center Installation May 2013Comments? [email protected]

Downloading the most recent patches to the serverBefore you begin
• Install and configure Windows Server 2008 64-bit Release 2 on your server according tothe settings in this chapter.
• Download and install the most recent and valid updates for Microsoft Windows Server2008 64-bit Release 2.
• Know the location at which you plan to install each Contact Center server softwarepackage.
• Ensure that you use one administrator account on your server to un-install and installsoftware updates.
About this taskTo ensure that you have the most current software, download the most recent Contact Centerpatches from www.avaya.com/support to the server you plan to install.
Procedure
1. Log on to the server using the administrator account.
2. Create a folder Avaya_Support\ProductUpdates on the drive on which youwant to save the software updates.
3. Download the most recent service pack file. Save and unzip the file on the ContactCenter server in the Avaya_Support\ProductUpdates folder.
4. If new patches are available for the latest service pack, download and save thepatches on the Contact Center server in the Avaya_Support\ProductUpdates folder.
5. Read the Contact Center Release Notes for the most recent instructions.
Disabling unused Network AdaptersAbout this taskDisable all unused Network Adapters or Network Interface Cards (NICs) to improve networkcommunications and prevent the erroneous configuration of unused NICs during ContactCenter server commissioning.
Downloading the most recent patches to the server
Avaya Aura® Contact Center Installation May 2013 47

Procedure
1. Log on to the server.
2. Click Start > Control Panel > Network and Internet > Network and SharingCenter > Change Adapter Settings.
3. Right-click on the unused Network Adapter, and select Disable.
4. Repeat this procedure for all unused Network Adapters.
Enabling Microsoft Remote Desktop connectionBefore you begin
• Install Microsoft Windows Server 2008 64-bit Release 2 on your server.• Log on to the server with administrator privileges.
About this taskEnable Microsoft Remote Desktop connection as your remote access tool. Microsoft RemoteDesktop provides remote access for support on the server.
Procedure
1. Choose Start > Control Panel > System and Security.
2. In the System section, select Allow remote access.
3. Click the Remote tab.
4. Select Allow connections from computers running any version of RemoteDesktop (less secure).
5. Click OK.
Configuring Data Execution PreventionAbout this taskConfigure the Data Execution Prevention (DEP) hardware and software to perform additionalchecks on memory that protect the Avaya Aura® Contact Center server against malicious codeexploitation.
48 Avaya Aura® Contact Center Installation May 2013Comments? [email protected]

Procedure
1. Log on to Windows as administrator.
2. Choose Start > Control Panel > System and Security.
3. Click System.
4. In the System window, click Advanced system settings.
5. In the System Properties dialog box, click the Advanced tab.
6. Under Performance, click Settings.
7. In the Performance Options dialog box, click the Data Execution Preventiontab.
8. On the Data Execution Prevention tab, select Turn on DEP for essentialWindows programs and services only.
9. Click OK.
10. On the System Properties dialog box, click OK.
11. Click OK to restart the computer.
Importing Contact Center Firewall Security policyBefore you begin
• Install Microsoft Windows Server 2008 64-bit Release 2 on your server.• Log on to the server with administrator privileges.• Download the most recent Avaya Aura® Contact Center Firewall Security policy from
www.avaya.com/support.
About this taskImport the Avaya Aura® Contact Center Firewall Security policy to ensure all contact centerservers in the solution can communicate.
Avaya recommends that you export and backup your existing firewall security policy beforeimporting the Avaya Aura® Contact Center Firewall Security policy. You can use this backuppolicy to rollback the Avaya Aura® Contact Center Firewall Security policy, if you ever needto.
Procedure
1. Choose Start > Administrative Tools > Windows Firewall with AdvancedSecurity.
2. Choose Actions > Export Policy.
Importing Contact Center Firewall Security policy
Avaya Aura® Contact Center Installation May 2013 49

3. In the File name box, type the name for the backup policy.
4. Click Save.Windows exports the existing policy. You can use this backup policy to rollback theAvaya Aura® Contact Center Firewall Security policy, if you ever need to.
5. On the Policy successfully exported message box, click OK.
6. Choose Actions > Import Policy.
7. On the policy overwrite message box, click Yes.
8. Navigate to the folder containing the Avaya Aura® Contact Center Firewall Securitypolicy.
9. Click Open.Windows imports the Avaya Aura® Contact Center Firewall Security policy.
10. On the Policy successfully imported message box, click OK.
Installing operating system components for ContactCenter
Before you begin
• Install Windows Server 2008 64-bit Release 2.
About this taskBefore installing Contact Center software, you must install specific operating system softwarecomponents such as Internet Information Services to integrate the components in ContactCenter.
Procedure
1. Choose Start > Administrative Tools > Server Manager.
2. In the left-hand column of the Server Manager, right-click Roles, and select AddRoles.
3. Review the requirements for the new role, and click Next.
4. Under Server Roles, select Active Directory Lightweight Directory Services.
5. If an Add Roles Wizard message box that lists features required by Active DirectoryLightweight Directory Services appears, click Add Required Features.
6. Under Server Roles, select Application Server.
7. If an Add Roles Wizard message box that lists features required by ApplicationServer appears, click Add Required Features.
50 Avaya Aura® Contact Center Installation May 2013Comments? [email protected]

8. Under Application Server, select Role Services.
9. Select Web Server (IIS) Support.
10. If an Add Roles Wizard message box appears, listing features required by WebServer (IIS) Support appears, click Add Required Features.
11. Click Next.
12. On the Introduction to Web Server (IIS) page, click Next.
13. On the Select Role Services page, under Common HTTP Features, select thefollowing services:
• Static Content
• Default Document
• Directory Browsing
• HTTP Errors
• HTTP Redirection
Important:All other services check boxes must be cleared.
14. On the Select Role Services page, under Application Development, select thefollowing services:
• ASP.NET
• .NET Extensibility
• ASP
• ISAPI Extensions
• ISAPI Filters
• Server Side Includes
Important:All other services check boxes must be cleared.
15. On the Select Role Services page, under Health and Diagnosis, select thefollowing services:
• HTTP Logging
• Logging Tools
• Request Monitor
• Tracing
Installing operating system components for Contact Center
Avaya Aura® Contact Center Installation May 2013 51

Important:All other services check boxes must be cleared.
16. On the Select Role Services page, under Security, select all services.
17. On the Select Role Services page, under Performance, select all services.
18. On the Select Role Services page, under Management Tools, select the followingservices:
• IIS Management Console
• IIS Management Scripts and Tools
• Management Service
• All items under IIS 6 Management Compatibility
Important:All other services check boxes must be cleared.
19. Click Next.
20. Review the installation information.
21. Click Install.
22. On the Installation Results page, click Close.
23. Restart the server if required.
Configuring MIME types to support Microsoft updatesAbout this taskConfigure the Multipurpose Internet Mail Extension (MIME) types to support Microsoft updatesand patches.
Procedure
1. Log on to the server.
2. Click Start > Administrative Tools > Computer Management.
3. In the Computer Management dialog box, expand Services and Applications >Internet Information Services > IIS Manager > Sites.
4. Select Default Web Site.
5. Under IIS, select MIME Types.
52 Avaya Aura® Contact Center Installation May 2013Comments? [email protected]

6. Double-click MIME Types.
7. On the Actions list on the right, click Add.
8. In the File name extension box, type .msp.
9. In the MIME Type box, type application/microsoftpatch.
10. Click OK.
11. On the Actions list on the right, click Add.
12. In the File name extension box, type .msu.
13. In the MIME Type box, type application/microsoftupdate.
14. Click OK.
15. Close the Computer Management window.
Disabling Admin Approval Mode for Windows Server 2008administrators (optional)
About this taskWindows Server 2008 implements a security feature known as User Account Control (UAC).By default, this feature causes applications run by local non built-in administrators to behaveas if the applications had been run by standard users. This can lead to issues when installingAvaya Media Server or when configuring Avaya Media Server security framework. Performthis procedure to ensure that local administrators get full privileges for running applications.
Procedure
1. Click Start > Administrative Tools > Local Security Policy.
2. Under Security Settings, expand Local Policies.
3. Select Security Options.
4. In the policy pane on the right, double-click on User Account Control: Run alladministrators in Admin Approval Mode.
5. Click the Local Security Setting tab, and select Disabled.
6. Click OK.If prompted, restart the server.
Disabling Admin Approval Mode for Windows Server 2008 administrators (optional)
Avaya Aura® Contact Center Installation May 2013 53

Updating server for a network location installationAbout this taskConfigure the server .NET security settings to prepare the server for a remote networkinstallation. Avaya Aura® Contact Center supports network installation. You can insert theAvaya Aura® Contact Center DVD into a computer on your network. You then add this computeras a trusted site and network location on the new server. You can access this DVD from thenetwork location, and with some .NET security updates, use the remote DVD to install AvayaAura® Contact Center software on the new server.
Note:Skip this procedure if you plan to use the Avaya Aura® Contact Center DVD from the DVDdrive of the server.
Procedure
1. Insert the Avaya Aura® Contact Center DVD into a computer on the contact centernetwork.
2. Log on to the new server you are preparing for Contact Center.
3. Choose Start > Control Panel > Network and Internet > Internet Options.
4. In the Security tab, click Trusted sites.
5. In the Trusted sites section, click Sites.
6. In the Add this Web site to the zone box, type the <IP address> of the remotecomputer with the Avaya Aura® Contact Center DVD.
7. Click Add.
8. Click OK.
9. Close the Internet Options box.
10. From the new server, navigate to the network location with the DVD.
11. Access the remote DVD and in the root folder of the DVD, double-clickNetworkSetup.bat..NetFramework 3.5 installs and the .NetSecurity settings are modified.
12. If the Avaya Aura® Contact Center installation does not automatically start, in theroot folder of the DVD double-click Setup.exe.
13. After Avaya Aura® Contact Center installs, navigate to your network location anddouble-click NetworkSetupReset.bat.
54 Avaya Aura® Contact Center Installation May 2013Comments? [email protected]

Installing the Voice and Multimedia Contact Server softwarefor Avaya Aura® Unified Communications platform
Before you begin
• Ensure the Avaya Aura® Unified Communications platform is configured. For moreinformation see Avaya Aura® Contact Center Configuration – Avaya Aura® UnifiedCommunications Platform Integration (NN44400-521).
• Download the most recent Contact Center and Common Components patches to theserver.
About this taskInstall the Contact Center Voice and Multimedia Contact Server software and enable yourcontact center to route contacts to the agents that can answer the call with the correct skills.
Note:Installing Voice and Multimedia Contact Server software installs Apache Tomcat Server.The default port number for Apache Tomcat is 8081. If you need to change the port numberto avoid conflicts with third-party software, see your Apache Tomcat documentation.
Note:Read the Contact Center Release Notes for the most recent instructions.
Procedure
1. Insert the Contact Center DVD into the DVD drive of your server.
2. If the installation does not automatically start, double-click Setup.exe.
3. Click Install to install the Microsoft .NET Framework 3.5 SP1 and Visual C++runtime libraries on the server.If you are prompted to accept the Microsoft .NET Framework 3.5.1 licenseagreement, click Accept. If you are prompted to restart the server, click Yes andrepeat step 2.
4. On the Welcome window, click Next.
Installing the Voice and Multimedia Contact Server software for Avaya Aura® Unified Communications platform
Avaya Aura® Contact Center Installation May 2013 55

5. On the License Agreement window, read the terms of the agreement.
56 Avaya Aura® Contact Center Installation May 2013Comments? [email protected]
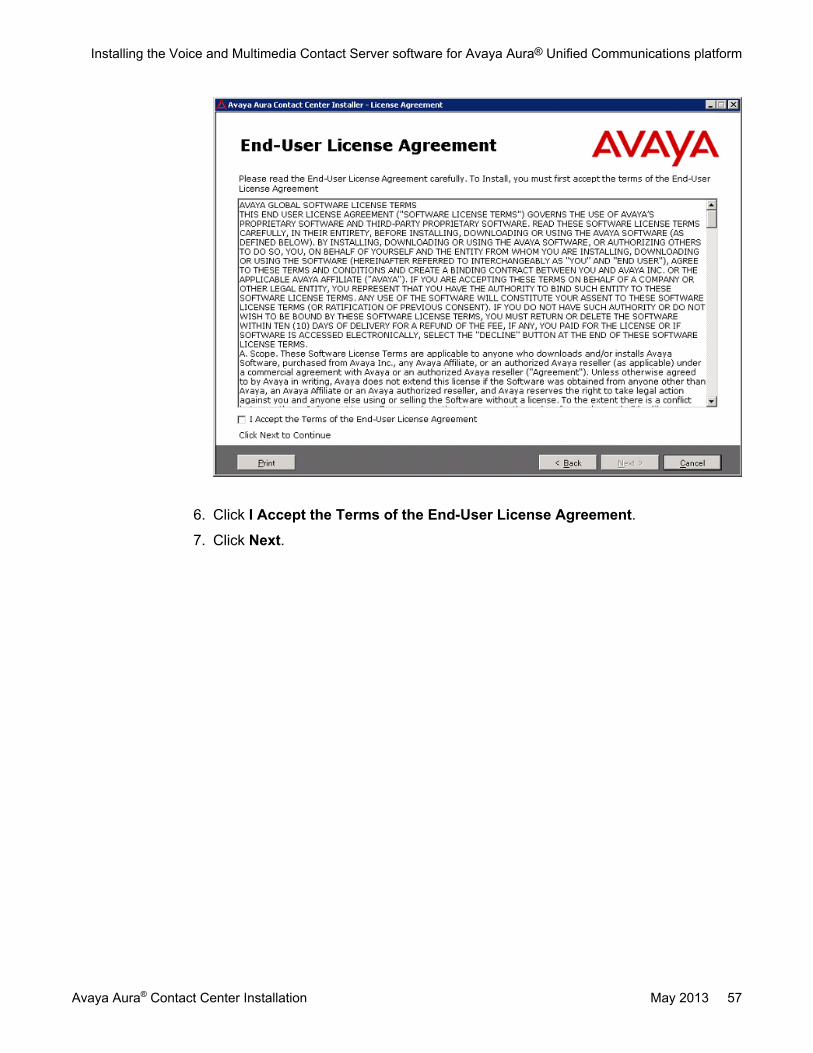
6. Click I Accept the Terms of the End-User License Agreement.
7. Click Next.
Installing the Voice and Multimedia Contact Server software for Avaya Aura® Unified Communications platform
Avaya Aura® Contact Center Installation May 2013 57

8. On the Installation Selection window, under Avaya Aura 6.x - SIP, select Voiceand Multimedia Contact Server with Avaya Media Server or Voice andMultimedia Contact Server without Avaya Media Server.
9. Click Next.
58 Avaya Aura® Contact Center Installation May 2013Comments? [email protected]

10. On the Installation Destination window, on the Application Destination Drivetab, select where to install the Contact Center application software by choosing adisk drive letter.
11. Click the Database Destination Drive tab.
12. Under Select the destination drive for the Contact Center database files, selectthe drive for the Contact Center Manager Server database.
13. Under Select the destination drive for the Contact Center database files, selectthe drive for the Communication Control Toolkit database.
14. Under Select the destination drive for the Contact Center database files, selectthe drive for the Contact Center Multimedia database.
Installing the Voice and Multimedia Contact Server software for Avaya Aura® Unified Communications platform
Avaya Aura® Contact Center Installation May 2013 59

15. Click the Product Updates Location tab.
60 Avaya Aura® Contact Center Installation May 2013Comments? [email protected]

16. Under Select the Product Updates Location, click Browse to locate the foldercontaining the Contact Center product updates.
17. Click Next.The System Readiness Check runs on the server.
18. If the System Readiness Check utility returns a Fail, the software installation cannotproceed until you correct the problem. Review any failures returned by the SystemReadiness Check and consult Avaya Aura® Contact Center Planning andEngineering (NN44400-210) to determine the actions to resolve the issue.You can ignore warnings if the potential impact to the operation of the contact centeris understood and not applicable.
19. Click Next.
20. On the Installation Data window, type the installation details for each tab.
21. Select the CCMS tab, and configure the server details.
Installing the Voice and Multimedia Contact Server software for Avaya Aura® Unified Communications platform
Avaya Aura® Contact Center Installation May 2013 61

22. In the Customer Name box, type the customer name.
23. In the Company Name box, type the name of the company.
24. In the Site Name box, type the site name for the Contact Center server. The sitename must not contain spaces or non-alphabetical characters except hyphen (-)and underscore (_). The first character must be a letter. The site name must beunique and can consist of 6 to 15 characters.
25. In the RSM IP Address box, type the Real-time Statistics Multicast IP Address ofthe server to associate with sending real-time data. The IP address must be from224.0.1.0 to 239.255.255.255. The default is 234.5.6.10.
26. In the Contact Center Server Subnet IP Address box, type the IP Address of theserver.
27. Select the Licensing tab, and configure the licensing details.
62 Avaya Aura® Contact Center Installation May 2013Comments? [email protected]
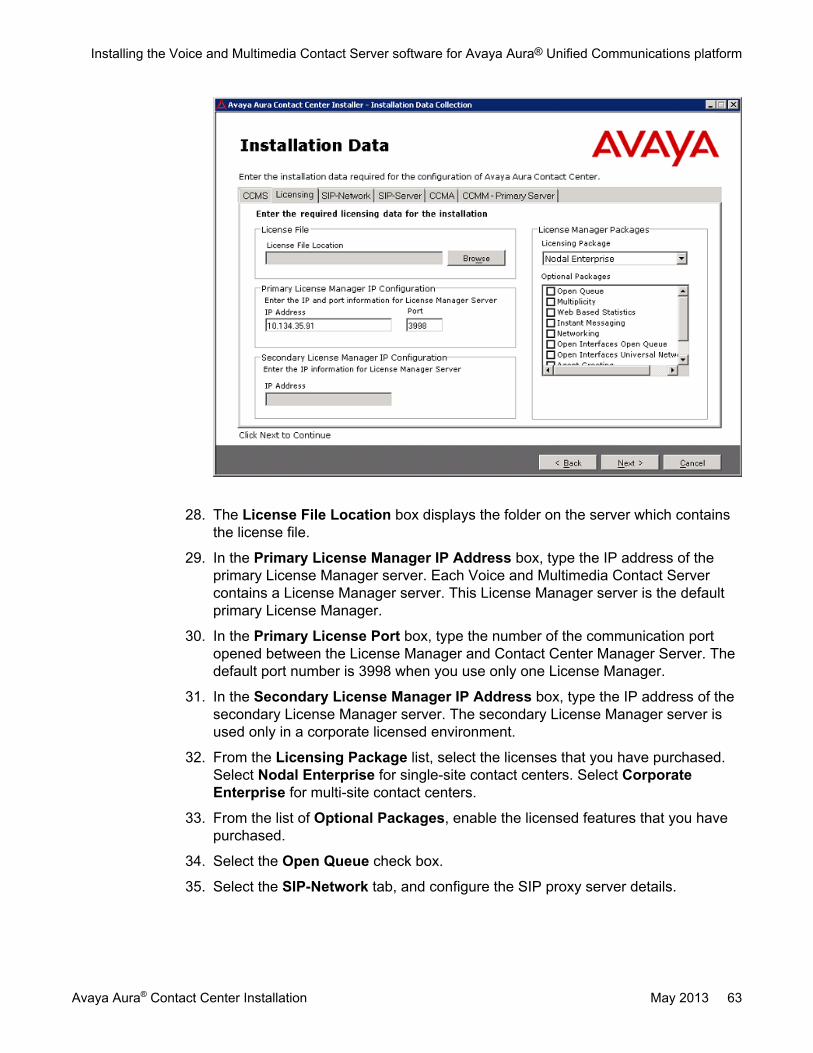
28. The License File Location box displays the folder on the server which containsthe license file.
29. In the Primary License Manager IP Address box, type the IP address of theprimary License Manager server. Each Voice and Multimedia Contact Servercontains a License Manager server. This License Manager server is the defaultprimary License Manager.
30. In the Primary License Port box, type the number of the communication portopened between the License Manager and Contact Center Manager Server. Thedefault port number is 3998 when you use only one License Manager.
31. In the Secondary License Manager IP Address box, type the IP address of thesecondary License Manager server. The secondary License Manager server isused only in a corporate licensed environment.
32. From the Licensing Package list, select the licenses that you have purchased.Select Nodal Enterprise for single-site contact centers. Select CorporateEnterprise for multi-site contact centers.
33. From the list of Optional Packages, enable the licensed features that you havepurchased.
34. Select the Open Queue check box.
35. Select the SIP-Network tab, and configure the SIP proxy server details.
Installing the Voice and Multimedia Contact Server software for Avaya Aura® Unified Communications platform
Avaya Aura® Contact Center Installation May 2013 63

36. In the SIP Voice Proxy Server section, in the IP Address box, type the IP addressfor the primary Avaya Aura® Session Manager.
37. In the SIP Voice Proxy Server section, in the Port box, type the server listeningport number. The default port is 5060.
38. In the SIP Voice Proxy Server section, from the Network Transport list, select theSIP Network Transport communication protocol. The default is TCP.
39. In the SIP CTI Proxy Server section, in the IP Address box, type the IP addressfor the Avaya Aura® Application Enablement Services server.
40. In the SIP CTI Proxy Server section, in the Port box, type the SIP CTI Proxy Serverport number. The default SIP CTI Proxy Server port is 4723.
41. In the SIP CTI Proxy Server section, from the Network Transport list, select theSIP Network Transport CTI communication protocol. The default Avaya Aura®
Application Enablement Services communication protocol is TLS.
42. In the Backup SIP Voice Proxy Server section, in the IP Address box, type theIP address for the backup Avaya Aura® Session Manager. You must have a HighAvailability Standby Server license to support a Backup SIP Voice Proxy Server.
43. In the Backup SIP Voice Proxy Server section, in the Port box, type the serverlistening port number. The default port is 5060.
44. In the Backup SIP Voice Proxy Server section, from the Network Transport list,select the SIP Network Transport communication protocol. The default is TCP.
64 Avaya Aura® Contact Center Installation May 2013Comments? [email protected]

45. In the SIP IM Proxy Server section, from the IM Provider list, select the name ofthe instant messaging provider. Select either Aura Presence Services or MicrosoftOCS.
46. In the SIP IM Proxy Server section, if using an Avaya Aura® Presence Servicesserver, in the XMPP Domain box, type the domain name of the ExtensibleMessaging and Presence Protocol (XMPP) server. The XMPP Domain name mustbe different to the Local SIP Subscriber Domain Name.
47. In the SIP IM Proxy Server section, in the IP Address box, type the IP address ofthe SIP IM Proxy Server.
48. In the SIP IM Proxy Server section, in the Port box, type the port number for theIM Proxy Server. The default SIP IM Proxy Server for Avaya Aura® PresenceServices is port 5222.
49. In the SIP IM Proxy Server section, from the Network Transport list, select theSIP IM Proxy Server transport protocol.
50. Select the SIP-Server tab, and configure the SIP server details.
51. In the Local SIP Subscriber section, in the Domain Name box, type the SIPdomain name for the SIP-enabled contact center. Typically the Avaya Aura® ContactCenter SIP Domain Name matches your Active Directory domain name. If the AvayaAura® Contact Center SIP Domain Name does not match the Active Directorydomain name then it must match the Session Manager contact center SIP domain
Installing the Voice and Multimedia Contact Server software for Avaya Aura® Unified Communications platform
Avaya Aura® Contact Center Installation May 2013 65

name. The Local SIP Subscriber Domain Name must be different to the XMPPDomain name.
52. The Web Service Ports group box appears only if you select Avaya Aura®
Presence Services as the IM Provider. In the Server Port box, type the Server Portnumber. The Server Port default is 9100. In the Client Port box, type the Client Portnumber. The Client Port default is 9120.
53. From the MS Locale list, select the locale (including language and dialects) of thesolution environment.
54. In the Local Listening Ports section, type the port numbers. The TCP/UDP Portdefault is 5060. The TLS Port default is 5061.
55. Select the CCMA tab, and configure the CCMA details.
56. In the Configuration section clear Enable CCMA Replication. Clear the checkbox on the primary server.
57. In the LDAP Port Number box, type the port number for the Lightweight DirectoryAccess Protocol (LDAP) for which common contact information is stored on aserver. The default value of the port is 389. Check with the system administrator toensure that the port number is not already in use.
58. In the SSL Port Number box, type the port number for the Secure Sockets Layer(SSL) that controls security when applications are communicating across the
66 Avaya Aura® Contact Center Installation May 2013Comments? [email protected]

network. The default port is 636. Check with the system administrator to ensure thatthe port number is not already in use.
59. In the System Account Configuration section, in the Password box, type thepassword for the CCMA System Account user account. Confirm the password inthe second box. The password is not checked against the server security policy forminimum password requirements. Avaya recommends that you enter a passwordthat conforms to your corporate password policy.
60. Select the CCMM tab, and configure the Contact Center Multimedia details.
61. From the IM Provider list, select either None, Microsoft OCS or Aura PresenceServices. IM and presence features are supported for Avaya Aura® PresenceServices server and Microsoft Office Communications Server. Instant Messagingis supported only in SIP-enabled contact center solutions.
62. In the License Server box, type the name of the server on which the Contact CenterLicense Manager software is installed.
63. In the Web Reporting (Optional) section, in the Server Name box, type the IPaddress of the optional Web Reporting server.
64. In the Web Reporting (Optional) section, in the Port box, type the port number ofthe optional Web Reporting server. The default is 9090.
65. In the Inbound Mail Server (POP3) box, type the name of the server on which emailmessages are received in your network.
Installing the Voice and Multimedia Contact Server software for Avaya Aura® Unified Communications platform
Avaya Aura® Contact Center Installation May 2013 67

66. In the Outbound Mail Server (SMTP) box, type the name of the server from onwhich email messages are sent. Your inbound and outbound mail servers can havethe same name.
67. Select Enter Predictive Outbound Configuration to enable predictive outboundcontacts.
68. In the Predictive Server box, type the name of the Predictive Outbound solutionsapplication server on which the administration software resides, or the CPSE2
server.
69. In the Predictive Reporting Server box, type the name of the Predictive Outboundsolutions server that contains the statistics for reporting predictive outbound data,or Portfolio server.
70. In the Web Stats Server box, type the name of the optional Web Statistics serverthat agents and supervisors use to view real-time statistics for call handling, skillsetdata, and the state information on the Agent Desktop. Web Based Statistics is anoptional licensed feature and requires a Web Based Statistics feature license.
71. In the Web Stats Port box, type the port number of the Web Statistics server. Thedefault port number is 9086.
72. In the Web Communications Server (Optional) box, type the name of the serveron which the Web Customer Interface is installed if Web communications is licensedin your contact center.
73. Click Next.
74. On the Summary window, review and verify the information.
75. Click Install.
76. After the installation is complete, click Finish.
77. If prompted, restart the server.
78. If you are using WebLM, you must restart the Contact Center Tomcat Instanceservice after installing the Contact Center software.
68 Avaya Aura® Contact Center Installation May 2013Comments? [email protected]
Upgrading Java Runtime Environment, Java DevelopmentKit, and Apache Tomcat components using Third PartySoftware Upgrade Utility
Before you begin
• Apply Contact Center 6.3 Service Pack 10 or later on your system as an install-timepatch.
• Restart the Contact Center server to complete this procedure.
About this taskUse Third Party Software Upgrade Utility to automatically upgrade your Java RuntimeEnvironment and Tomcat software components. For more information, see Third PartySoftware Upgrade Utility on page 27.
Procedure
1. Log on to the server using the administrator account.
2. Navigate to the Avaya_Support\ProductUpdates folder.
3. Open the folder where you had saved the latest Service Pack.
4. Browse to ThirdParty\AACCThirdPartySoftwareUpgradeUtility.exe.
5. Double-click AACCThirdPartySoftwareUpgradeUtility.exe.
6. Click Upgrade.The system displays the “User Action Required” dialog box.
7. Click OK.
8. Click Yes to restart Contact Center and complete the upgrade.
Configuring WebLM licensingBefore you begin
• Install the Contact Center License Manager server software.• Restart the Contact Center License Manager server.
Upgrading Java Runtime Environment, Java Development Kit, and Apache Tomcat components using Third PartySoftware Upgrade Utility
Avaya Aura® Contact Center Installation May 2013 69

About this taskConfigure Contact Center License Manager to use WebLM. Then restart the Contact CenterTomcat Instance on the Contact Center License Manager server to commission WebLM forthe first time.
Important:If you are using a Keycode Retrieval System (KRS) PLIC license file, skip this procedure.This procedure applies only when you are using an Avaya Product Licensing and DeliverySystem (PLDS) WebLM license file or an Avaya WebLM server.
Note:When you install Contact Center License Manager, an instance of Apache Tomcat Serveris also installed on the same server. The default port number for Apache Tomcat is 8081. Ifyou need to change the port number to avoid conflicts with third-party software, see yourApache Tomcat documentation.
Procedure
1. Log on to the server where the Contact Center License Manager software isinstalled.
2. Click Start > All Programs > Avaya > Contact Center > License Manager >Configuration.
3. If you are using a local WebLM license file, complete the following steps to specifythe license file:
a. View the type of license file currently used, and then click OK.b. On the Configuration page, click Browse.c. Navigate the file system and locate the WebLM license file.d. Click Open.
4. If you are using a remote WebLM server, complete the following steps to specifythe license server:
a. View the type of license file currently used, and then click OK.b. On the Configuration page, in the WebLM Host Name field, type the host name
or IP address of the WebLM server.c. In the WebLM Port Number field, type 52233.
5. Click Apply.Ignore the LMConfig dialog box for now.
6. On the Start menu, choose All Programs > Administrative Tools > Services.
7. Right-click the Contact Center Tomcat Instance service, and click Stop.
8. Right-click the Contact Center Tomcat Instance service, and click Start.
9. Close the services window.
70 Avaya Aura® Contact Center Installation May 2013Comments? [email protected]

10. On the LMConfig dialog box, click Yes to restart the Contact Center LicenseManager services.
11. Click OK to close the window.
12. Click Exit.
Securing the Windows serverAbout this taskApply optional security measures to your operating system to further secure your server.
Important:Scanning software can degrade the performance and decrease the reliability of the system.Install virus scanning software only if the system connects to an exposed network or to theInternet.
Important:To maintain server performance, you must schedule virus scans during maintenanceperiods or low usage hours only.
Procedure
1. Harden the operating system using defined site procedures.
2. Install antivirus software. If you install antivirus software, Avaya recommends thatyou exclude some contact center files and folders from real-time and scheduledscans. For more information, and for a list of files and folders to exclude, see AvayaAura® Contact Center Planning and Engineering (NN44400-210).
Adding the domain AD-LDS replication account to theprimary server administrators and replicator group
About this taskAdd the AD-LDS replication account to the local Administrators and replicator group on theprimary Contact Center server.
Securing the Windows server
Avaya Aura® Contact Center Installation May 2013 71

Important:If you are using High Availability, and if this server is to be the primary active server, performthis procedure. If you are not implementing High Availability, skip this procedure.
If you are using a domain, you must request this AD-LDS replication account from your Networkor System Administrator. The primary and standby replicating Contact Center servers mustboth be added to the same domain.
For this procedure, the name of the AD-LDS replication account is CCMAReplication. You canchoose another name for the account.
Procedure
1. Log on to the primary Contact Center server.
2. Click Start > Administrative Tools > Computer Management.
3. In the Computer Management window, expand Local Users and Groups.
4. Click the Groups folder.
5. Double-click on the Administrators group.
6. Click Add > Locations.
7. On the Windows Security dialog box, type the domain logon details.
8. On the Locations dialog, select the domain to be used by CCMA replication.
9. Expand the domain folder to display domain users.
10. Click Users.
11. Click OK.
12. Click Advanced > Find Now, to display domain users.
13. From the list of users select the CCMA replication domain user account, for exampleselect the myDomain\CCMAReplication user account.
14. Click OK.
15. Click OK > Apply > OK.
16. Click the Groups folder.
17. Double-click on the Replicator group.
18. Click Add > Locations.
19. On the Windows Security dialog box, type the domain logon details.
20. On the Locations dialog, select the domain to be used by CCMA replication.
21. Expand the domain folder to display domain users.
22. Click Users.
23. Click OK.
72 Avaya Aura® Contact Center Installation May 2013Comments? [email protected]

24. Click Advanced > Find Now, to display domain users.
25. From the list of users select the CCMA replication domain user account, for exampleselect the myDomain\CCMAReplication user account.
26. Click OK.
27. Click OK > Apply > OK.
Installing the external Web communication serversoftware
Before you begin
• Install Contact Center Multimedia software.
About this taskIf you use Web communications in your contact center, you can use the Sample CustomerInterface (CI) Web site implementation to help you develop pages for your corporate Web site.The Web services architecture is a platform-independent interface that customers can accessfrom both Microsoft .NET and Java applications. Customer Web sites or third-party applicationsuse the open interface for integration with the Contact Center Multimedia system.
The Customer Interface Web services provide a range of methods to perform the followingfunctions:
• Register new customers in the Contact Center Multimedia database• Log on or log off existing customers• Update customer logon credentials• Create customer contacts• Update customer details• Read customer information• Review a customer contact history• Request immediate or scheduled callback requests• Read a contact• Create and maintain a Web communications chat session
To integrate Web Communications with the Contact Center Multimedia system, download theAvaya Aura® Contact Center Web Communications SDK package and ReferenceImplementation from www.avaya.com/devconnect. The Web Communications ReferenceImplementation contains information about customizing the Web communication applicationto your solution.
Installing the external Web communication server software
Avaya Aura® Contact Center Installation May 2013 73

Important:Do not install the Web Communications Reference Implementation on an Avaya Aura®
Contact Center server. Install the Web Communications Reference Implementation on yourown server in the contact center solution.
Procedure
1. Locate and download the Web Communications Reference Implementationsoftware from www.avaya.com/devconnect.
2. Copy the Web Communications Reference Implementation software to the externalWeb server.
3. Follow the Reference Implementation instructions to install and commission theWeb Communications server.
Installing the Instant Messaging chat server on the externalWeb server
Before you begin
• Install Contact Center Multimedia server software in a SIP-enabled Contact Center.• Install the Instant Messaging license on the Contact Center License Manager.
About this taskThe Instant Messaging chat server allows customers to have Instant Messaging chat sessionswith the contact center. The Instant Messaging chat server uses Presence Services to gatherpresence information for the Agent, Supervisor and Expert.
Procedure
1. Download the Avaya Aura® Contact Center Sample Instant Message XMPP clientapplication from www.avaya.com/support to the external Web server.
2. Extract the contents of the sample application and read theAACCPresenceServices_IMChatServerInstall document for further instructions.
74 Avaya Aura® Contact Center Installation May 2013Comments? [email protected]

Chapter 5: Standby Voice and MultimediaContact Server for Avaya Aura®platform installation
This chapter describes how to install a standby Voice and Multimedia Contact Server for an Avaya Aura®
Unified Communications platform. A standby Voice and Multimedia Contact Server includes the followingserver software:
• Contact Center Manager Server (CCMS)
• Contact Center Manager Server Utility
• Contact Center License Manager
• Contact Center Manager Administration (CCMA)
• Communication Control Toolkit (CCT)
• Contact Center Multimedia (CCMM)
You can install a standby Voice and Multimedia Contact Server and commission it to be the standby Voiceand Multimedia Contact Server in a campus High Availability solution. The standby server takes overcontact processing and becomes the active server if the existing active server fails. This standby serverprovides High Availability redundancy and resiliency. The standby and active servers must be at the samepatch level and have the same hard disk drive partitions.
You can install another standby Voice and Multimedia Contact Server and commission it to be the RemoteGeographic Node (RGN) Voice and Multimedia Contact Server in a solution with Disaster Recovery. TheRemote Geographic Node server shadows the active server. Remote Geographic Node servers do notautomatically take over if the active server fails. The standby server, Remote Geographic Node server,and active server must be at the same patch level and have the same hard disk drive partitions.
Install this server to provide context‐sensitive and skill-based routing for customer voice and multimediacontacts. This server provides routed contact support for voice calls, email messages, instant messages(IMs), Web communications, voice mail messages, scanned documents, fax messages, and SMS textmessages. This server provides extensive tools for agent management, real-time and historical reporting,and graphical tools to create contact flows and treatment rules. Use this server for license management,High Availability configuration, networking, Open Interfaces Web Service and third-party applicationinterfaces integration.
You must complete all the procedures in this section in sequential order.
Avaya Aura® Contact Center Installation May 2013 75

Standby Voice and Multimedia Contact Server installationprerequisites
• Copy the most recent patches for the Contact Center software.
• Ensure that your new Contact Center license file with a High Availability standby serverlicense is available.
Important:For the system to correctly handle backup and restore SNMP events, you must installWindows SNMP Service before you install Contact Center server software.
Downloading the latest documentationBefore you begin
• Download the most recent version of Acrobat Reader.• Access the Avaya Web site at www.avaya.com/support.
About this taskDownload the most recent documentation to ensure you have the most recent updates.Updates in the documentation accurately reflect the most recent changes in the software.
Procedure
1. Log on to the Avaya Web site.
2. Compare the versions of the documentation on the site with the versions youhave.
3. If the version number on www.avaya.com/support is higher than your version,download the latest version of the document.
4. Review the Avaya Web site for release notes and readme files.
76 Avaya Aura® Contact Center Installation May 2013Comments? [email protected]

Installing Windows Server 2008 Release 2Before you begin
• Ensure that you have a newly formatted server that meets the specifications in AvayaAura® Contact Center Planning and Engineering (NN44400-210) on which to installMicrosoft Windows Server 2008 64-bit, Release 2, Service Pack 1.
Do not upgrade your operating system from a previous release. Contact Center is notsupported on an upgraded operating system.
• Configure all servers for RAID as described in Avaya Aura® Contact Center Planning andEngineering (NN44400-210).
• Ensure that you have a DVD for Windows Server 2008 Release 2.• Install the network interface card in the server.• Know the IP addresses for the contact center subnet.
About this taskInstall the Windows operating system, which is required for the Contact Center server software.During the installation, configure the Windows settings as required. You must perform thisprocedure on each server before you install Contact Center server software on the server.
Procedure
1. Insert the Windows Server 2008 64-bit Release 2 Standard Edition or WindowsServer 2008 64-bit Release 2 Enterprise Edition DVD into the DVD drive.
2. Install Windows Server 2008 Release 2 according to the instructions supplied bythe DVD.
3. On the first install page, select your language for installation.
4. Click Next.
5. On the Installation window, select a Language to install from the list.
6. Select a Time and currency format from the list.
7. Select Keyboard or input method from the list.
8. Click Next.
9. Click Install Now.
10. Select an operating system from the list.
11. Click Next.
12. On the first Install Windows screen, read the terms of the license agreement andselect I accept the license terms.
Installing Windows Server 2008 Release 2
Avaya Aura® Contact Center Installation May 2013 77

13. Click Next.
14. Select Custom.
15. Select the disk partition on which you want to install Windows Server 2008.
Important:You can use the partition management options to configure the partitions on yourserver.
16. Click Next.The installation proceeds and automatically restarts the server several times.
17. After completing the installation, log on to the server as Administrator. Enter andconfirm the Administrator password.
18. In the Initial Configuration Tasks window, select Activate Windows and followthe instructions or the Microsoft documentation to activate your server.
19. Select Set time zone and complete the information as required for your system.This server time zone daylight saving setting must match the time zone daylightsaving setting on the Avaya Media Server(s) in this SIP-enabled contact centersolution.
20. Select Configure Networking and complete the information for your NetworkInterface Card (NIC) with the server IP address.
21. Select Provide computer name and domain and complete the information for yourserver name and workgroup or domain settings.
22. Change the DVD drive letter to E: to ensure the correct drive letters are free for theContact Center application and database hard disk drives and partitions.
23. Configure the hard disk drives and partitions for this server using the WindowsServer 2008 Server Manager - Disk Management utility. For more information abouthard disk drives and partitions, see Avaya Aura® Contact Center Planning andEngineering (NN44400-210).
24. Install other required drivers for your hardware configuration.
Procedure job aid
Name Description
Computer name Do not use spaces or underscores or exceed15 characters. The name must start with analphabetic character.The computer name must match (includingcase sensitivity) the DNS name.
78 Avaya Aura® Contact Center Installation May 2013Comments? [email protected]

Name Description
Disk drives Format the partitions as required for theserver. For more information, see AvayaAura® Contact Center Planning andEngineering (NN44400-210).
Domain/workgroup name Configure as required for your site.You must check to ensure the DNS Domainname (including case) matches the servername if the server is added to a domain orworkgroup after configuration.
Licensing modes Select Per server licensing mode.Accept the default five concurrentconnections.
Modem dialing Configure as required for your site. Do notinstall a modem on a Communication ControlToolkit server.
Network components Configure IP Address, WINS, DNS for one ortwo network cards as per configuration.Contact Center does not support IPv6.
Network connections If the server has more than one NIC/adapter,ensure contact center subnet appears first inthe network adapter binding order.
Partitions Configure C: drive to be a primary drive.Configure the other drives on your server tomeet the requirements according to AvayaAura® Contact Center Planning andEngineering (NN44400-210) for the server.
Regional settings window Configure as required for your site.
SNMP Configure for all servers.
Configuring Windows Server 2008Before you begin
• Install Microsoft Windows Server 2008 64-bit Release 2 on your server.
About this taskBefore you can install Avaya Aura® Contact Center software on your server, you must configureWindows Server 2008 to meet the requirements of the software.
Configuring Windows Server 2008
Avaya Aura® Contact Center Installation May 2013 79

You can prepare the server using this and other procedures, or you can download and use anAvaya Aura® Contact Center operating system configuration tool that installs the requiredWindows roles and features.
The Avaya Aura® Contact Center Windows Roles and Features installer configures thefollowing Windows Server 2008 resources:
• Windows Server Backup Features• SNMP Services• Active Directory Light Weight Directory Services• Application Server• Web Server (IIS)
For more information, and to download the Avaya Aura® Contact Center Windows Roles andFeatures installer, see http://support.avaya.com.
The Avaya Aura® Contact Center Windows Roles and Features installer replaces the followingprocedures:
• Configuring Windows Server 2008 (this procedure)• Configuring SNMP on your server• Installing operating system components for Contact Center
If you use the Avaya Aura® Contact Center Windows Roles and Features installer, skip thesethree procedures.
Procedure
1. Log on to the Windows Server 2008 server using an administrator account.
2. Select the Don’t display this screen on startup check box.
3. Update the emergency repair disk to record the latest configuration data for theserver.
4. Choose Start > Administrative Tools > Server Manager.
5. In the left pane, click Features.
6. Click Add Features.
7. Select Windows Server Backup Features.
8. Click Next.
9. Click Install.
10. Click Close.
11. Choose Start > All Programs > Accessories > System Tools > Windows ServerBackup.
12. Follow the on-screen instructions to select what you want to back up.
80 Avaya Aura® Contact Center Installation May 2013Comments? [email protected]

Installing the latest supported operating system servicepacks
Before you begin
• Access the Avaya hotfixes list on the Web site www.avaya.com/support.• Install and configure Microsoft Windows Server 2008 64-bit Release 2 on your server.• Review the recommendations on operating system service updates in Avaya Aura®
Contact Center Planning and Engineering (NN44400-210).• Install the Microsoft .NET Framework 3.5 and Microsoft .NET Framework 3.5 SP1.
About this taskAvaya recommends that you install the most recent supported operating system service packs.You must download the supported operating system service pack from the Avaya hotfixes listto ensure your Contact Center server software functions correctly with the supported operatingsystem patches.
Procedure
1. Log on to the server and disable the Windows Update feature. There are a numberof methods for disabling the Windows Update feature, refer to the Windows Server2008 documentation for a method suitable to your solution. Disabling the WindowsUpdate feature prevents Windows Server 2008 from automatically applyingoperating system patches and potentially rebooting the server.
2. Review the Contact Center Service Packs Compatibility and Security HotfixesApplicability List to determine the most recent Avaya Aura® Contact Centersupported patches or service packs.
3. Download the appropriate Microsoft Windows Server 2008 patches for the AvayaAura® Contact Center software installed on this server.
4. Install the most recent Windows Server 2008 service pack that is validated withAvaya Aura® Contact Center by following the Microsoft Installation instructions.
Installing the latest supported operating system service packs
Avaya Aura® Contact Center Installation May 2013 81

Connecting to the contact center subnetAbout this taskConnect the Contact Center server to the contact center subnet. The contact center subnet isthe network on which the server software applications work together to route contacts andgenerate reports.
Procedure
1. Locate the slot assigned to the contact center subnet network interface card for theserver. Make a note of the slot.
2. Connect the cable from the contact center subnet to the contact center subnetnetwork interface card in the server in accordance with customer site networkingguidelines.
3. Use the ping command to test the contact center subnet.
Adding a server to a domainBefore you begin
• Ensure that you have domain administrator privileges, or ask the Domain Administratorto assign you a domain user account for remote access.
• On the server, configure a preferred Domain Name System (DNS) server on the NetworkInterface Card (NIC).
About this taskAdd the server to an existing domain. Avaya recommends that you add the server to the domainbefore installing Contact Center software.
Ask your System Administrator to add a Domain Name System (DNS) static entry for thisserver. Each Contact Center server in a domain requires a DNS static entry.
Important:Avaya Aura® Contact Center High Availability solutions do not support Windows Server 2008Dynamic DNS.
In High Availability solutions, ask your System Administrator to add one DNS static entry forthe each managed name and associated managed IP address. A typical High Availabilitycampus solution with a pair of servers requires 3 DNS static entries; one DNS static entry for
82 Avaya Aura® Contact Center Installation May 2013Comments? [email protected]

the active server, one DNS static entry for the standby server, and one DNS static entry forthe managed name and associated IP address.
Procedure
1. Log on to the server.
2. Click Start > Administrative Tools > Server Manager.
3. Beside Computer Information, click Change System Properties.
4. In the System Properties dialog box, click the Computer Name tab.
5. Click Change.
6. In the Computer Name/Domain Changes dialog box, click the Domain option.
7. Type the domain name (you must provide the fully qualified domain name, whichincludes the prefix and suffix).
8. Click OK.
9. Type the domain administrator User name and Password.
10. Click OK.
11. Restart the server when you are prompted to do so.
Disabling the Remote Access servicesAbout this taskAvaya Aura® Contact Center does not support Remote Access Services (RAS). Disable theRemote Access services before installing Avaya Aura® Contact Center. Microsoft RemoteDesktop continues to run after you disable Remote Access services. After you disable theservices, restart the server.
Procedure
1. Choose Start > Administrative Tools > Services.
2. In the Services window, right-click the Remote Access Connection Managericon.
3. Click Properties.
4. In the General tab, from the Startup type list, select Disabled.
5. Click OK.
6. In the Services window, right-click the Remote Access Auto ConnectionManager icon.
Disabling the Remote Access services
Avaya Aura® Contact Center Installation May 2013 83

7. Click Properties.
8. In the General tab, from the Startup type list, select Disabled.
9. Click OK.
10. In the Services window, click File, Exit.
11. Restart the server.
Configuring SNMP on your serverBefore you begin
• Install and configure Microsoft Windows Server 2008 64-bit Release 2 on your server.
About this taskConfigure Simple Network Management Protocol (SNMP) on your server to ensure you haveall of the required components of the Internet protocol for monitoring devices in your network.SNMP helps you manage data that describes the system configuration and errors that mayoccur between them.
Procedure
1. Log on to the server using the administrator account.
2. Choose Start > Control Panel > Programs.
3. In the Programs and Features section, click Turn Windows features on or off.
4. In the Server Manager window, select Server Manager and click Add Features.
5. Select SNMP Services.
6. Click Next.
7. Click Install.
8. If prompted, insert the Windows Server 2008 DVD.
9. Click Close.
84 Avaya Aura® Contact Center Installation May 2013Comments? [email protected]

Downloading the most recent patches to the serverBefore you begin
• Install and configure Windows Server 2008 64-bit Release 2 on your server according tothe settings in this chapter.
• Download and install the most recent and valid updates for Microsoft Windows Server2008 64-bit Release 2.
• Know the location at which you plan to install each Contact Center server softwarepackage.
• Ensure that you use one administrator account on your server to un-install and installsoftware updates.
About this taskTo ensure that you have the most current software, download the most recent Contact Centerpatches from www.avaya.com/support to the server you plan to install.
Procedure
1. Log on to the server using the administrator account.
2. Create a folder Avaya_Support\ProductUpdates on the drive on which youwant to save the software updates.
3. Download the most recent service pack file. Save and unzip the file on the ContactCenter server in the Avaya_Support\ProductUpdates folder.
4. If new patches are available for the latest service pack, download and save thepatches on the Contact Center server in the Avaya_Support\ProductUpdates folder.
5. Read the Contact Center Release Notes for the most recent instructions.
Disabling unused Network AdaptersAbout this taskDisable all unused Network Adapters or Network Interface Cards (NICs) to improve networkcommunications and prevent the erroneous configuration of unused NICs during ContactCenter server commissioning.
Downloading the most recent patches to the server
Avaya Aura® Contact Center Installation May 2013 85

Procedure
1. Log on to the server.
2. Click Start > Control Panel > Network and Internet > Network and SharingCenter > Change Adapter Settings.
3. Right-click on the unused Network Adapter, and select Disable.
4. Repeat this procedure for all unused Network Adapters.
Enabling Microsoft Remote Desktop connectionBefore you begin
• Install Microsoft Windows Server 2008 64-bit Release 2 on your server.• Log on to the server with administrator privileges.
About this taskEnable Microsoft Remote Desktop connection as your remote access tool. Microsoft RemoteDesktop provides remote access for support on the server.
Procedure
1. Choose Start > Control Panel > System and Security.
2. In the System section, select Allow remote access.
3. Click the Remote tab.
4. Select Allow connections from computers running any version of RemoteDesktop (less secure).
5. Click OK.
Configuring Data Execution PreventionAbout this taskConfigure the Data Execution Prevention (DEP) hardware and software to perform additionalchecks on memory that protect the Avaya Aura® Contact Center server against malicious codeexploitation.
86 Avaya Aura® Contact Center Installation May 2013Comments? [email protected]

Procedure
1. Log on to Windows as administrator.
2. Choose Start > Control Panel > System and Security.
3. Click System.
4. In the System window, click Advanced system settings.
5. In the System Properties dialog box, click the Advanced tab.
6. Under Performance, click Settings.
7. In the Performance Options dialog box, click the Data Execution Preventiontab.
8. On the Data Execution Prevention tab, select Turn on DEP for essentialWindows programs and services only.
9. Click OK.
10. On the System Properties dialog box, click OK.
11. Click OK to restart the computer.
Importing Contact Center Firewall Security policyBefore you begin
• Install Microsoft Windows Server 2008 64-bit Release 2 on your server.• Log on to the server with administrator privileges.• Download the most recent Avaya Aura® Contact Center Firewall Security policy from
www.avaya.com/support.
About this taskImport the Avaya Aura® Contact Center Firewall Security policy to ensure all contact centerservers in the solution can communicate.
Avaya recommends that you export and backup your existing firewall security policy beforeimporting the Avaya Aura® Contact Center Firewall Security policy. You can use this backuppolicy to rollback the Avaya Aura® Contact Center Firewall Security policy, if you ever needto.
Procedure
1. Choose Start > Administrative Tools > Windows Firewall with AdvancedSecurity.
2. Choose Actions > Export Policy.
Importing Contact Center Firewall Security policy
Avaya Aura® Contact Center Installation May 2013 87

3. In the File name box, type the name for the backup policy.
4. Click Save.Windows exports the existing policy. You can use this backup policy to rollback theAvaya Aura® Contact Center Firewall Security policy, if you ever need to.
5. On the Policy successfully exported message box, click OK.
6. Choose Actions > Import Policy.
7. On the policy overwrite message box, click Yes.
8. Navigate to the folder containing the Avaya Aura® Contact Center Firewall Securitypolicy.
9. Click Open.Windows imports the Avaya Aura® Contact Center Firewall Security policy.
10. On the Policy successfully imported message box, click OK.
Adding the domain AD-LDS replication account to thestandby administrators and replicator group
About this taskAdd the AD-LDS replication account to the local Administrators and replicator group on thestandby server. Perform this procedure before installing Contact Center software on thestandby server.
If you are using a domain, you must request this AD-LDS replication account from your Networkor System Administrator. The primary and standby replicating Contact Center servers mustboth be added to the same domain.
For this procedure, the name of the AD-LDS replication account is CCMAReplication. You canchoose another name for the account.
Procedure
1. Log on to the standby Contact Center server.
2. Click Start > Administrative Tools > Computer Management.
3. In the Computer Management window, expand Local Users and Groups.
4. Click the Groups folder.
5. Double-click on the Administrators group.
6. Click Add > Locations.
7. On the Windows Security dialog box, type the domain logon details.
88 Avaya Aura® Contact Center Installation May 2013Comments? [email protected]

8. On the Locations dialog, select the domain to be used for CCMA replication.
9. Expand the domain folder to display domain users.
10. Click Users.
11. Click OK.
12. Click Advanced > Find Now, to display domain users.
13. From the list of users select the CCMA replication domain user account, for exampleselect the myDomain\CCMAReplication user account.
14. Click OK.
15. Click OK > Apply > OK.
16. Click the Groups folder.
17. Double-click on the Replicator group.
18. Click Add > Locations.
19. On the Windows Security dialog box, type the domain logon details.
20. On the Locations dialog, select the domain to be used for CCMA replication.
21. Expand the domain folder to display domain users.
22. Click Users.
23. Click OK.
24. Click Advanced > Find Now, to display domain users.
25. From the list of users select the CCMA replication domain user account, for exampleselect the myDomain\CCMAReplication user account.
26. Click OK.
27. Click OK > Apply > OK.
Installing operating system components for ContactCenter
Before you begin
• Install Windows Server 2008 64-bit Release 2.
About this taskBefore installing Contact Center software, you must install specific operating system softwarecomponents such as Internet Information Services to integrate the components in ContactCenter.
Installing operating system components for Contact Center
Avaya Aura® Contact Center Installation May 2013 89
Procedure
1. Choose Start > Administrative Tools > Server Manager.
2. In the left-hand column of the Server Manager, right-click Roles, and select AddRoles.
3. Review the requirements for the new role, and click Next.
4. Under Server Roles, select Active Directory Lightweight Directory Services.
5. If an Add Roles Wizard message box that lists features required by Active DirectoryLightweight Directory Services appears, click Add Required Features.
6. Under Server Roles, select Application Server.
7. If an Add Roles Wizard message box that lists features required by ApplicationServer appears, click Add Required Features.
8. Under Application Server, select Role Services.
9. Select Web Server (IIS) Support.
10. If an Add Roles Wizard message box appears, listing features required by WebServer (IIS) Support appears, click Add Required Features.
11. Click Next.
12. On the Introduction to Web Server (IIS) page, click Next.
13. On the Select Role Services page, under Common HTTP Features, select thefollowing services:
• Static Content
• Default Document
• Directory Browsing
• HTTP Errors
• HTTP Redirection
Important:All other services check boxes must be cleared.
14. On the Select Role Services page, under Application Development, select thefollowing services:
• ASP.NET
• .NET Extensibility
• ASP
• ISAPI Extensions
• ISAPI Filters
90 Avaya Aura® Contact Center Installation May 2013Comments? [email protected]

• Server Side Includes
Important:All other services check boxes must be cleared.
15. On the Select Role Services page, under Health and Diagnosis, select thefollowing services:
• HTTP Logging
• Logging Tools
• Request Monitor
• Tracing
Important:All other services check boxes must be cleared.
16. On the Select Role Services page, under Security, select all services.
17. On the Select Role Services page, under Performance, select all services.
18. On the Select Role Services page, under Management Tools, select the followingservices:
• IIS Management Console
• IIS Management Scripts and Tools
• Management Service
• All items under IIS 6 Management Compatibility
Important:All other services check boxes must be cleared.
19. Click Next.
20. Review the installation information.
21. Click Install.
22. On the Installation Results page, click Close.
23. Restart the server if required.
Installing operating system components for Contact Center
Avaya Aura® Contact Center Installation May 2013 91

Configuring MIME types to support Microsoft updatesAbout this taskConfigure the Multipurpose Internet Mail Extension (MIME) types to support Microsoft updatesand patches.
Procedure
1. Log on to the server.
2. Click Start > Administrative Tools > Computer Management.
3. In the Computer Management dialog box, expand Services and Applications >Internet Information Services > IIS Manager > Sites.
4. Select Default Web Site.
5. Under IIS, select MIME Types.
6. Double-click MIME Types.
7. On the Actions list on the right, click Add.
8. In the File name extension box, type .msp.
9. In the MIME Type box, type application/microsoftpatch.
10. Click OK.
11. On the Actions list on the right, click Add.
12. In the File name extension box, type .msu.
13. In the MIME Type box, type application/microsoftupdate.
14. Click OK.
15. Close the Computer Management window.
Updating server for a network location installationAbout this taskConfigure the server .NET security settings to prepare the server for a remote networkinstallation. Avaya Aura® Contact Center supports network installation. You can insert theAvaya Aura® Contact Center DVD into a computer on your network. You then add this computeras a trusted site and network location on the new server. You can access this DVD from the
92 Avaya Aura® Contact Center Installation May 2013Comments? [email protected]

network location, and with some .NET security updates, use the remote DVD to install AvayaAura® Contact Center software on the new server.
Note:Skip this procedure if you plan to use the Avaya Aura® Contact Center DVD from the DVDdrive of the server.
Procedure
1. Insert the Avaya Aura® Contact Center DVD into a computer on the contact centernetwork.
2. Log on to the new server you are preparing for Contact Center.
3. Choose Start > Control Panel > Network and Internet > Internet Options.
4. In the Security tab, click Trusted sites.
5. In the Trusted sites section, click Sites.
6. In the Add this Web site to the zone box, type the <IP address> of the remotecomputer with the Avaya Aura® Contact Center DVD.
7. Click Add.
8. Click OK.
9. Close the Internet Options box.
10. From the new server, navigate to the network location with the DVD.
11. Access the remote DVD and in the root folder of the DVD, double-clickNetworkSetup.bat..NetFramework 3.5 installs and the .NetSecurity settings are modified.
12. If the Avaya Aura® Contact Center installation does not automatically start, in theroot folder of the DVD double-click Setup.exe.
13. After Avaya Aura® Contact Center installs, navigate to your network location anddouble-click NetworkSetupReset.bat.
Updating server for a network location installation
Avaya Aura® Contact Center Installation May 2013 93

Installing the standby Voice and Multimedia Contact Serverfor Avaya Aura® Unified Communications platform
Before you begin
• Ensure the Avaya Aura® Unified Communications platform is configured. For moreinformation see Avaya Aura® Contact Center Configuration – Avaya Aura® UnifiedCommunications Platform Integration (NN44400-521).
• Download the most recent Contact Center and Common Components patches to theserver.
• The primary active Voice and Multimedia Contact Server for the Avaya Aura® UnifiedCommunications platform must already be installed and configured.
• The primary active Voice and Multimedia Contact Server for the Avaya Aura® UnifiedCommunications platform must already be configured to support AD-LDS replication.
About this taskInstall the standby Contact Center Voice and Multimedia Contact Server software and enableyour contact center to route contacts to the agents that can answer the call with the correctskills.
Note:Installing Voice and Multimedia Contact Server software installs Apache Tomcat Server.The default port number for Apache Tomcat is 8081. If you need to change the port numberto avoid conflicts with third-party software, see your Apache Tomcat documentation.
Note:Read the Contact Center Release Notes for the most recent instructions.
Procedure
1. Insert the Contact Center DVD into the DVD drive of your server.
2. If the installation does not automatically start, double-click Setup.exe.
3. Click Install to install the Microsoft .NET Framework 3.5 SP1 and Visual C++runtime libraries on the server.If you are prompted to accept the Microsoft .NET Framework 3.5.1 licenseagreement, click Accept. If you are prompted to restart the server, click Yes andrepeat step 2.
4. On the Welcome window, click Next.
5. On the License Agreement window, read the terms of the agreement.
6. Click I Accept the Terms of the End-User License Agreement.
94 Avaya Aura® Contact Center Installation May 2013Comments? [email protected]
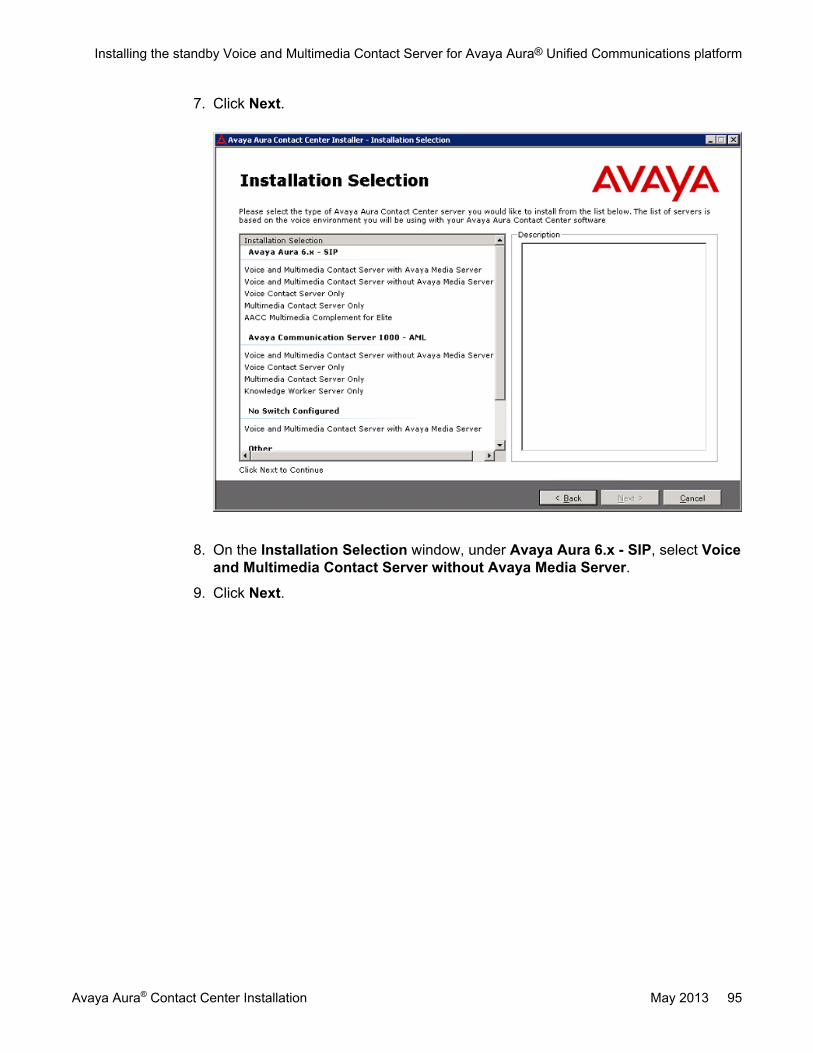
7. Click Next.
8. On the Installation Selection window, under Avaya Aura 6.x - SIP, select Voiceand Multimedia Contact Server without Avaya Media Server.
9. Click Next.
Installing the standby Voice and Multimedia Contact Server for Avaya Aura® Unified Communications platform
Avaya Aura® Contact Center Installation May 2013 95

10. On the Installation Destination window, on the Application Destination Drivetab, select where to install the Contact Center application software by choosing adisk drive letter.
11. Click the Database Destination Drive tab.
12. Under Select the destination drive for the Contact Center database files, selectthe drive for the Contact Center Manager Server database.
13. Under Select the destination drive for the Contact Center database files, selectthe drive for the Communication Control Toolkit database.
14. Under Select the destination drive for the Contact Center database files, selectthe drive for the Contact Center Multimedia database.
96 Avaya Aura® Contact Center Installation May 2013Comments? [email protected]

15. Click the Product Updates Location tab.
Installing the standby Voice and Multimedia Contact Server for Avaya Aura® Unified Communications platform
Avaya Aura® Contact Center Installation May 2013 97

16. Under Select the Product Updates Location, click Browse to locate the foldercontaining the Contact Center product updates.
17. Click Next.The System Readiness Check runs on the server.
18. If the System Readiness Check utility returns a Fail, the software installation cannotproceed until you correct the problem. Review any failures returned by the SystemReadiness Check and consult Avaya Aura® Contact Center Planning andEngineering (NN44400-210) to determine the actions to resolve the issue.You can ignore warnings if the potential impact to the operation of the contact centeris understood and not applicable.
19. Click Next.
20. On the Installation Data window, type the installation details for each tab.
21. Select the CCMS tab, and configure the server details.
98 Avaya Aura® Contact Center Installation May 2013Comments? [email protected]

22. In the Customer Name box, type the customer name.
23. In the Company Name box, type the name of the company.
24. In the Site Name box, type the site name for the Contact Center server. The sitename must not contain spaces or non-alphabetical characters except hyphen (-)and underscore (_). The first character must be a letter. The site name must beunique and can consist of 6 to 15 characters. The Site Name of the standby servermust be the same as the Site Name of the primary server.
25. In the RSM IP Address box, type the Real-time Statistics Multicast IP Address ofthe server to associate with sending real-time data. The IP address must be from224.0.1.0 to 239.255.255.255. The default is 234.5.6.10.
26. In the Contact Center Server Subnet IP Address box, type the IP Address of theserver.
27. Select the Licensing tab, and configure the licensing details.
Installing the standby Voice and Multimedia Contact Server for Avaya Aura® Unified Communications platform
Avaya Aura® Contact Center Installation May 2013 99

28. The License File Location box displays the folder on the server which containsthe license file.
29. In the Primary License Manager IP Address box, type the IP address of thestandby License Manager. Each Voice and Multimedia Contact Server contains aLicense Manager. Type the IP address of the standby Voice and Multimedia ContactServer.
30. In the Primary License Port box, type the number of the communication portopened between the License Manager and Contact Center Manager Server. Thedefault port number is 3998 when you use only one License Manager.
31. In the Secondary License Manager IP Address box, type the IP address of thesecondary License Manager server. The secondary License Manager server isused only in a corporate licensed environment.
32. From the Licensing Package list, select the licenses that you have purchased.Select Nodal Enterprise for single-site contact centers. Select CorporateEnterprise for multi-site contact centers.
33. From the list of Optional Packages, enable the licensed features that you havepurchased.
34. Select the Open Queue check box.
35. Select the SIP-Network tab, and configure the SIP proxy server details.
100 Avaya Aura® Contact Center Installation May 2013Comments? [email protected]

36. In the SIP Voice Proxy Server section, in the IP Address box, type the IP addressfor the primary Avaya Aura® Session Manager.
37. In the SIP Voice Proxy Server section, in the Port box, type the server listeningport number. The default port is 5060.
38. In the SIP Voice Proxy Server section, from the Network Transport list, select theSIP Network Transport communication protocol. The default is TCP.
39. In the SIP CTI Proxy Server section, in the IP Address box, type the IP addressfor the Avaya Aura® Application Enablement Services server.
40. In the SIP CTI Proxy Server section, in the Port box, type the SIP CTI Proxy Serverport number. The default SIP CTI Proxy Server port is 4723.
41. In the SIP CTI Proxy Server section, from the Network Transport list, select theSIP Network Transport CTI communication protocol. The default Avaya Aura®
Application Enablement Services communication protocol is TLS.
42. In the Backup SIP Voice Proxy Server section, in the IP Address box, type theIP address for the backup Avaya Aura® Session Manager. You must have a HighAvailability Standby Server license to support a Backup SIP Voice Proxy Server.
43. In the Backup SIP Voice Proxy Server section, in the Port box, type the serverlistening port number. The default port is 5060.
44. In the Backup SIP Voice Proxy Server section, from the Network Transport list,select the SIP Network Transport communication protocol. The default is TCP.
Installing the standby Voice and Multimedia Contact Server for Avaya Aura® Unified Communications platform
Avaya Aura® Contact Center Installation May 2013 101

45. In the SIP IM Proxy Server section, from the IM Provider list, select the name ofthe instant messaging provider. Select either Aura Presence Services or MicrosoftOCS.
46. In the SIP IM Proxy Server section, if using an Avaya Aura® Presence Servicesserver, in the XMPP Domain box, type the domain name of the ExtensibleMessaging and Presence Protocol (XMPP) server. The XMPP Domain name mustbe different to the Local SIP Subscriber Domain Name.
47. In the SIP IM Proxy Server section, in the IP Address box, type the IP address ofthe SIP IM Proxy Server.
48. In the SIP IM Proxy Server section, in the Port box, type the port number for theIM Proxy Server. The default SIP IM Proxy Server for Avaya Aura® PresenceServices is port 5222.
49. In the SIP IM Proxy Server section, from the Network Transport list, select theSIP IM Proxy Server transport protocol.
50. Select the SIP-Server tab, and configure the SIP server details.
51. In the Local SIP Subscriber section, in the Domain Name box, type the SIPdomain name for the SIP-enabled contact center. Typically the Avaya Aura® ContactCenter SIP Domain Name matches your Active Directory domain name. If the AvayaAura® Contact Center SIP Domain Name does not match the Active Directorydomain name then it must match the Session Manager contact center SIP domain
102 Avaya Aura® Contact Center Installation May 2013Comments? [email protected]

name. The Local SIP Subscriber Domain Name must be different to the XMPPDomain name.
52. The Web Service Ports group box appears only if you select Avaya Aura®
Presence Services as the IM Provider. In the Server Port box, type the Server Portnumber. The Server Port default is 9100. In the Client Port box, type the Client Portnumber. The Client Port default is 9120.
53. From the MS Locale list, select the locale (including language and dialects) of thesystem environment.
54. In the Local Listening Ports section, type the port numbers. The TCP/UDP Portdefault is 5060. The TLS Port default is 5061.
55. Select the CCMA tab, and configure the CCMA details.
56. In the Configuration section, select Enable CCMA Replication. CCMA replicationis reproducing an active copy of the AD-LDS for backup or emergency failure. Incase of server failure, a current AD-LDS is available to maintain the contactcenter.
57. On the Contact Center Installer message box, click Yes to confirm that this is astandby server.
58. In the LDAP Port Number box, type the port number for the Lightweight DirectoryAccess Protocol (LDAP) for which common contact information is stored on a
Installing the standby Voice and Multimedia Contact Server for Avaya Aura® Unified Communications platform
Avaya Aura® Contact Center Installation May 2013 103

server. The default value of the port is 389. Check with the system administrator toensure that the port number is not already in use.
59. In the SSL Port Number box, type the port number for the Secure Sockets Layer(SSL) that controls security when applications are communicating across thenetwork. The default port is 636. Check with the system administrator to ensure thatthe port number is not already in use.
60. In the System Account Configuration section, in the Password box, type thepassword for the CCMA System Account user account. Confirm the password inthe second box. The password is not checked against the server security policy forminimum password requirements. Avaya recommends that you enter a passwordthat conforms to your corporate password policy.
61. Select the CCMM tab, and configure the Contact Center Multimedia details.
62. From the IM Provider list, select either None, Microsoft OCS or Aura PresenceServices. IM and presence features are supported for Avaya Aura® PresenceServices server and Microsoft Office Communications Server. Instant Messagingis supported only in SIP-enabled contact center solutions.
63. In the License Server box, type the name of the server on which the Contact CenterLicense Manager software is installed.
64. In the Web Reporting (Optional) section, in the Server Name box, type the IPaddress of the optional Web Reporting server.
104 Avaya Aura® Contact Center Installation May 2013Comments? [email protected]

65. In the Web Reporting (Optional) section, in the Port box, type the port number ofthe optional Web Reporting server. The default is 9090.
66. In the Inbound Mail Server (POP3) box, type the name of the server on which emailmessages are received in your network.
67. In the Outbound Mail Server (SMTP) box, type the name of the server from onwhich email messages are sent. Your inbound and outbound mail servers can havethe same name.
68. Select Enter Predictive Outbound Configuration to enable predictive outboundcontacts.
69. In the Predictive Server box, type the name of the Predictive Outbound solutionsapplication server on which the administration software resides, or the CPSE2
server.
70. In the Predictive Reporting Server box, type the name of the Predictive Outboundsolutions server that contains the statistics for reporting predictive outbound data,or Portfolio server.
71. In the Web Stats Server box, type the name of the optional Web Statistics serverthat agents and supervisors use to view real-time statistics for call handling, skillsetdata, and the state information on the Agent Desktop. Web Based Statistics is anoptional licensed feature and requires a Web Based Statistics feature license.
72. In the Web Stats Port box, type the port number of the Web Statistics server. Thedefault port number is 9086.
73. In the Web Communications Server (Optional) box, type the name of the serveron which the Web Customer Interface is installed if Web communications is licensedin your contact center.
74. Click Next.
75. On the Summary window, review and verify the information.
76. Select Install. The install continues until the AD-LDS setup wizard appears.
Installing the standby Voice and Multimedia Contact Server for Avaya Aura® Unified Communications platform
Avaya Aura® Contact Center Installation May 2013 105
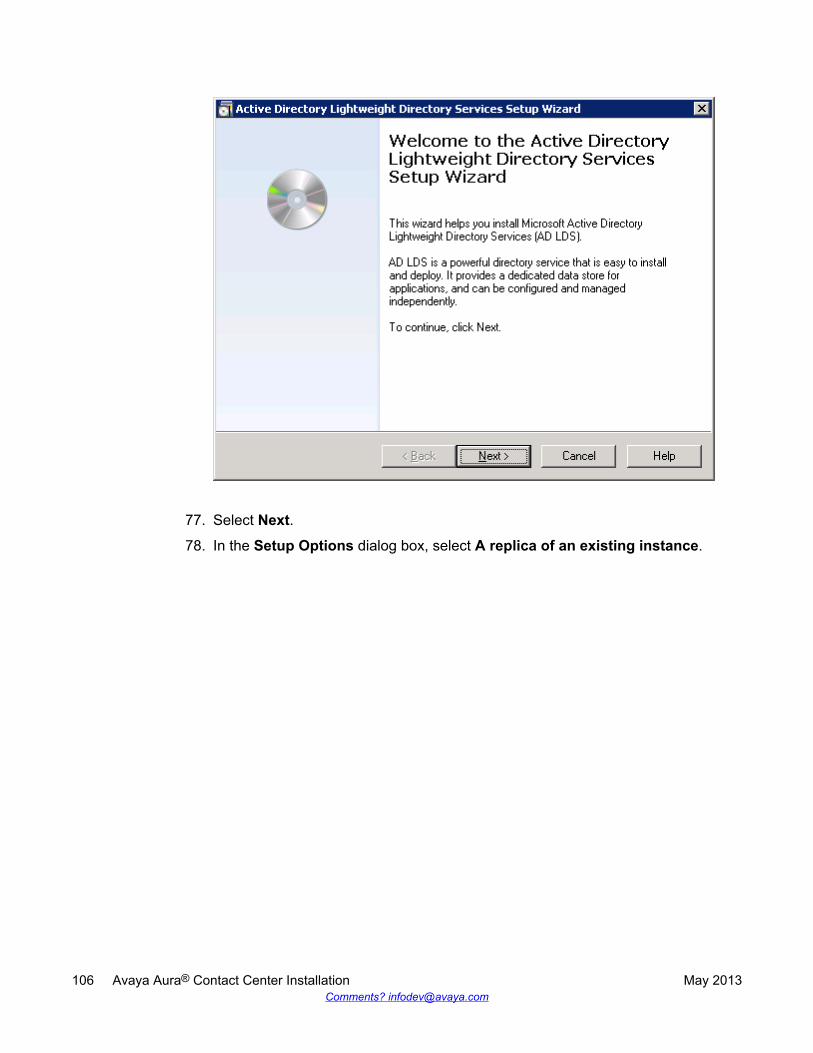
77. Select Next.
78. In the Setup Options dialog box, select A replica of an existing instance.
106 Avaya Aura® Contact Center Installation May 2013Comments? [email protected]

79. Select Next.
80. On the Instance Name dialog box, in the Instance name box, type the AD-LDSinstance name. The default instance name is SymposiumWC, so typeSymposiumWC.
Installing the standby Voice and Multimedia Contact Server for Avaya Aura® Unified Communications platform
Avaya Aura® Contact Center Installation May 2013 107

81. In the Description box, type SymposiumWC.
82. Click Next.
83. On the Ports dialog box, if no other applications use the ports, accept the defaultvalues in the LDAP port number and SSL port number boxes and select Next.
108 Avaya Aura® Contact Center Installation May 2013Comments? [email protected]

84. On the Joining a Configuration Set dialog box, in the Server box, type the FQDNname of the primary Contact Center server to replicate.Example of entering the primary Contact Center server name.
Installing the standby Voice and Multimedia Contact Server for Avaya Aura® Unified Communications platform
Avaya Aura® Contact Center Installation May 2013 109

85. On the Joining a Configuration Set window, in the LDAP Port box, type the portnumber on the AD-LDS instance on the primary Contact Center. The default is portnumber 389.
86. Click Next.
87. On the Administrative Credentials for the Configuration Set window, select Thisaccount.
88. In the User name box, type the primary Contact Center server name followed byits Administrator name in the format <primary Contact Center name>\Administrator.For example enter WIN-RBMQ1SU0OL1\Administrator. If you have created anotheradministrator account for Contact Center, then enter the details (name andpassword) for that primary Contact Center server administrator account here. Youradministrator account must have full administrative privileges.Example of entering the administrative credentials.
110 Avaya Aura® Contact Center Installation May 2013Comments? [email protected]

89. In the Password box, type the password for this user account.
90. Click Next.
91. In the Copying Application Directory Partitions dialog box, in the Partition DNlist, select the partition DC=Nortelnetworks,DC=COM.
Installing the standby Voice and Multimedia Contact Server for Avaya Aura® Unified Communications platform
Avaya Aura® Contact Center Installation May 2013 111

92. Select Next.
93. In the File Location dialog box, accept the default values, click Next.
112 Avaya Aura® Contact Center Installation May 2013Comments? [email protected]

94. In the Service Account Selection dialog box, select Network service account.Example of using a domain and selecting Network service account.
Installing the standby Voice and Multimedia Contact Server for Avaya Aura® Unified Communications platform
Avaya Aura® Contact Center Installation May 2013 113
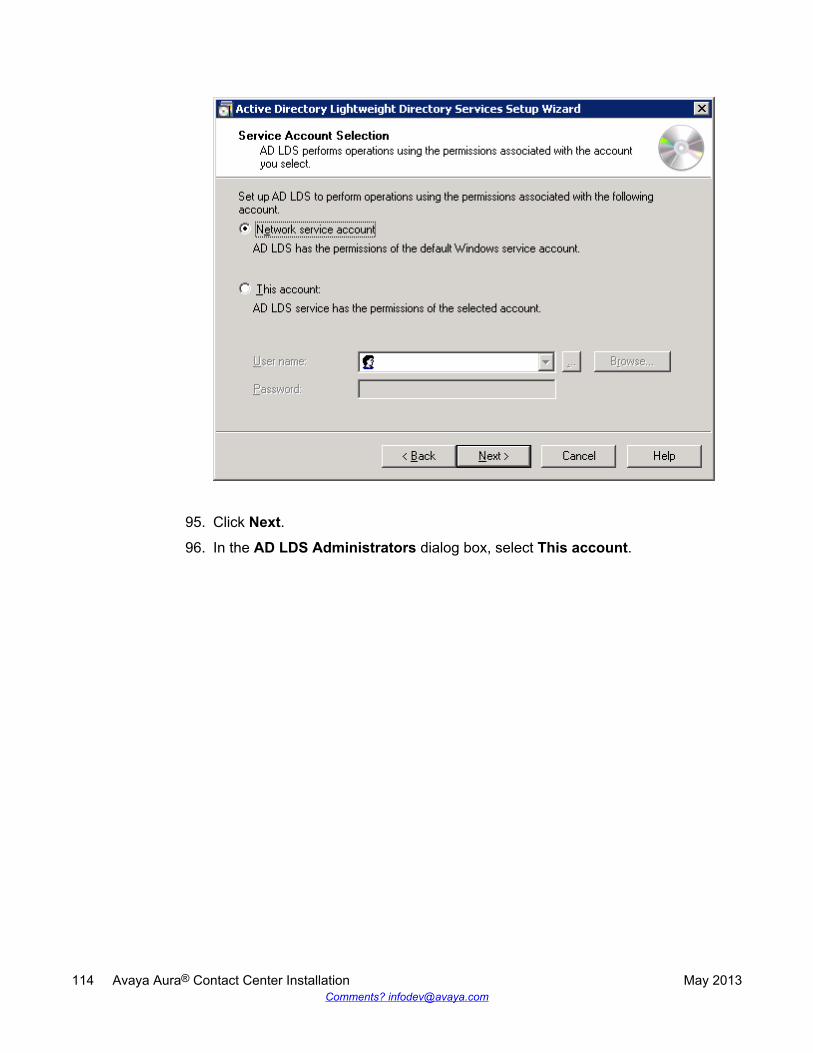
95. Click Next.
96. In the AD LDS Administrators dialog box, select This account.
114 Avaya Aura® Contact Center Installation May 2013Comments? [email protected]

97. Select Browse to locate the CCMA AD-LDS replication account.The Select User or Group dialog box appears. Note that the location is the localdomain.
98. In the Select User or Group dialog box, click Advanced.
Installing the standby Voice and Multimedia Contact Server for Avaya Aura® Unified Communications platform
Avaya Aura® Contact Center Installation May 2013 115

99. In the Windows Security dialog box, type a logon name and password of anaccount with permissions to access your domain.
100. Click OK.The advanced Select User or Group dialog box appears.
116 Avaya Aura® Contact Center Installation May 2013Comments? [email protected]
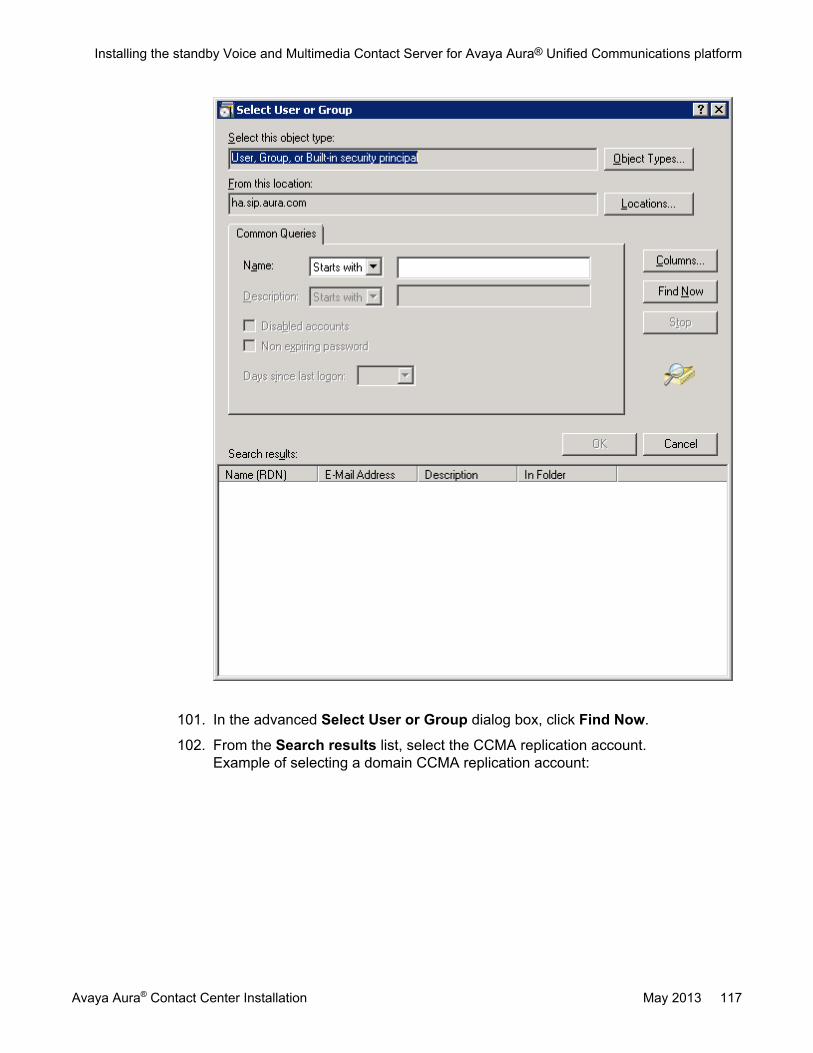
101. In the advanced Select User or Group dialog box, click Find Now.
102. From the Search results list, select the CCMA replication account.Example of selecting a domain CCMA replication account:
Installing the standby Voice and Multimedia Contact Server for Avaya Aura® Unified Communications platform
Avaya Aura® Contact Center Installation May 2013 117
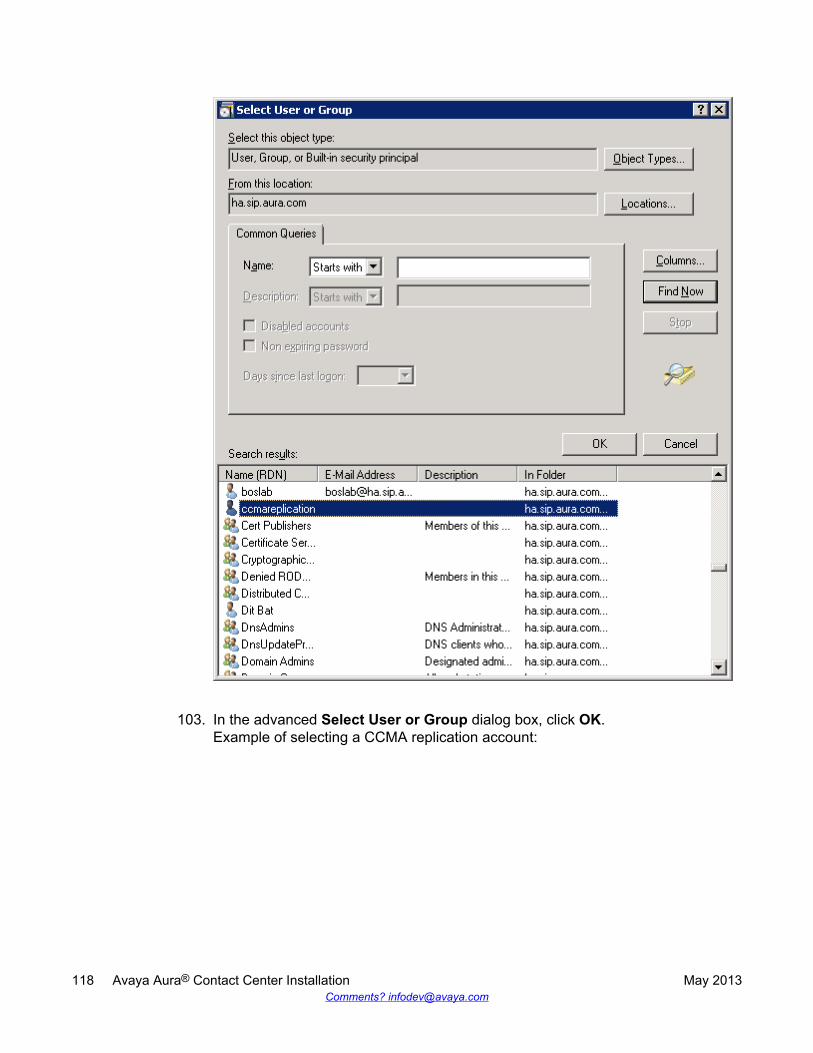
103. In the advanced Select User or Group dialog box, click OK.Example of selecting a CCMA replication account:
118 Avaya Aura® Contact Center Installation May 2013Comments? [email protected]
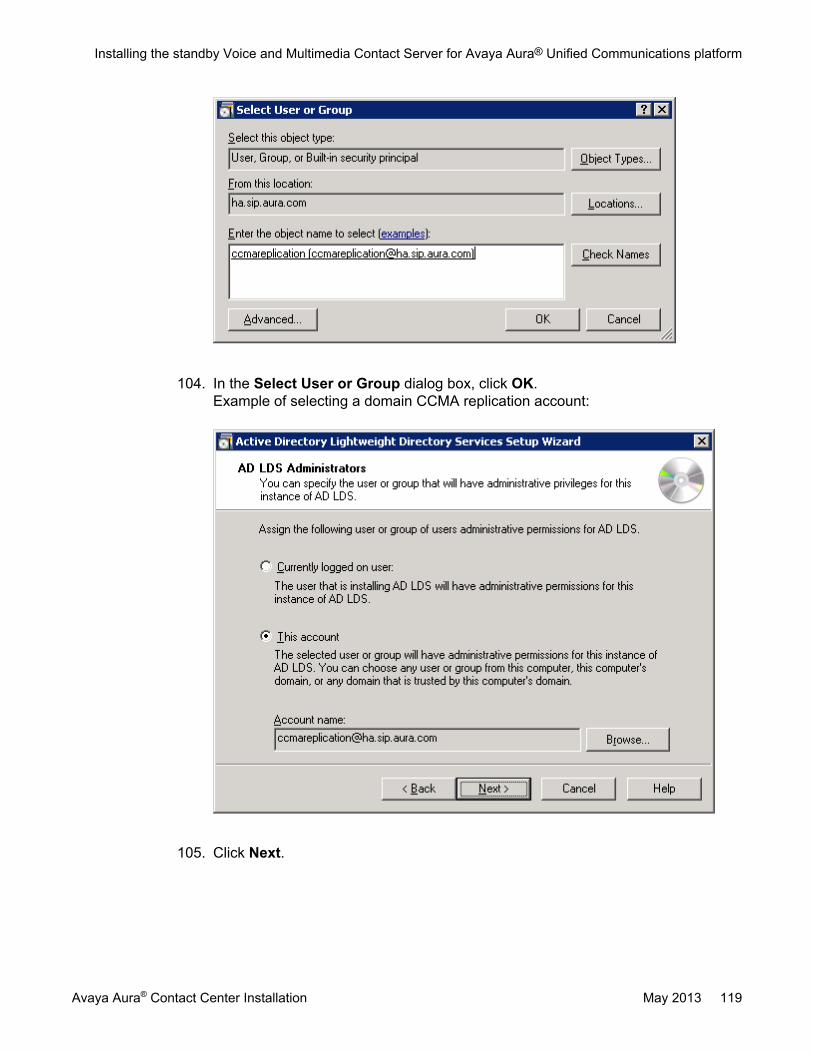
104. In the Select User or Group dialog box, click OK.Example of selecting a domain CCMA replication account:
105. Click Next.
Installing the standby Voice and Multimedia Contact Server for Avaya Aura® Unified Communications platform
Avaya Aura® Contact Center Installation May 2013 119

106. Confirm the installation components, and click Next.
107. After the installation is complete, click Finish.
108. If prompted, restart the server.
109. If you are using WebLM, you must restart the Contact Center Tomcat Instanceservice after installing the Contact Center software.
Upgrading Java Runtime Environment, Java DevelopmentKit, and Apache Tomcat components using Third PartySoftware Upgrade Utility
Before you begin
• Apply Contact Center 6.3 Service Pack 10 or later on your system as an install-timepatch.
• Restart the Contact Center server to complete this procedure.
120 Avaya Aura® Contact Center Installation May 2013Comments? [email protected]

About this taskUse Third Party Software Upgrade Utility to automatically upgrade your Java RuntimeEnvironment and Tomcat software components. For more information, see Third PartySoftware Upgrade Utility on page 27.
Procedure
1. Log on to the server using the administrator account.
2. Navigate to the Avaya_Support\ProductUpdates folder.
3. Open the folder where you had saved the latest Service Pack.
4. Browse to ThirdParty\AACCThirdPartySoftwareUpgradeUtility.exe.
5. Double-click AACCThirdPartySoftwareUpgradeUtility.exe.
6. Click Upgrade.The system displays the “User Action Required” dialog box.
7. Click OK.
8. Click Yes to restart Contact Center and complete the upgrade.
Configuring WebLM licensingBefore you begin
• Install the Contact Center License Manager server software.• Restart the Contact Center License Manager server.
About this taskConfigure Contact Center License Manager to use WebLM. Then restart the Contact CenterTomcat Instance on the Contact Center License Manager server to commission WebLM forthe first time.
Important:If you are using a Keycode Retrieval System (KRS) PLIC license file, skip this procedure.This procedure applies only when you are using an Avaya Product Licensing and DeliverySystem (PLDS) WebLM license file or an Avaya WebLM server.
Note:When you install Contact Center License Manager, an instance of Apache Tomcat Serveris also installed on the same server. The default port number for Apache Tomcat is 8081. Ifyou need to change the port number to avoid conflicts with third-party software, see yourApache Tomcat documentation.
Configuring WebLM licensing
Avaya Aura® Contact Center Installation May 2013 121
Procedure
1. Log on to the server where the Contact Center License Manager software isinstalled.
2. Click Start > All Programs > Avaya > Contact Center > License Manager >Configuration.
3. If you are using a local WebLM license file, complete the following steps to specifythe license file:
a. View the type of license file currently used, and then click OK.b. On the Configuration page, click Browse.c. Navigate the file system and locate the WebLM license file.d. Click Open.
4. If you are using a remote WebLM server, complete the following steps to specifythe license server:
a. View the type of license file currently used, and then click OK.b. On the Configuration page, in the WebLM Host Name field, type the host name
or IP address of the WebLM server.c. In the WebLM Port Number field, type 52233.
5. Click Apply.Ignore the LMConfig dialog box for now.
6. On the Start menu, choose All Programs > Administrative Tools > Services.
7. Right-click the Contact Center Tomcat Instance service, and click Stop.
8. Right-click the Contact Center Tomcat Instance service, and click Start.
9. Close the services window.
10. On the LMConfig dialog box, click Yes to restart the Contact Center LicenseManager services.
11. Click OK to close the window.
12. Click Exit.
Securing the Windows serverAbout this taskApply optional security measures to your operating system to further secure your server.
122 Avaya Aura® Contact Center Installation May 2013Comments? [email protected]

Important:Scanning software can degrade the performance and decrease the reliability of the system.Install virus scanning software only if the system connects to an exposed network or to theInternet.
Important:To maintain server performance, you must schedule virus scans during maintenanceperiods or low usage hours only.
Procedure
1. Harden the operating system using defined site procedures.
2. Install antivirus software. If you install antivirus software, Avaya recommends thatyou exclude some contact center files and folders from real-time and scheduledscans. For more information, and for a list of files and folders to exclude, see AvayaAura® Contact Center Planning and Engineering (NN44400-210).
Securing the Windows server
Avaya Aura® Contact Center Installation May 2013 123

124 Avaya Aura® Contact Center Installation May 2013Comments? [email protected]

Chapter 6: Voice Contact Server for AvayaAura® platform installation
This chapter describes how to install a Voice Contact Server for a solution with an Avaya Aura® UnifiedCommunications platform. A Voice Contact Server includes the following server software:
• Contact Center Manager Server (CCMS)
• Contact Center Manager Server Utility
• Contact Center License Manager
• Contact Center Manager Administration (CCMA)
• Communication Control Toolkit (CCT)
Install this server to provide context‐sensitive and skill-based routing for customer voice contacts. Thisserver provides routed contact support for voice calls. This server provides extensive tools for agentmanagement, real-time and historical reporting, and graphical tools to create contact flows and treatmentrules. Use this server for license management, High Availability configuration, networking, OpenInterfaces Web Service and third-party application interfaces integration.
You can change the name of a Contact Center server, but because this is time consuming, Avayarecommends that you configure the server final production name before installing Contact Centersoftware.
If you plan to follow the Microsoft server hardening guidelines, complete those procedures before installingAvaya Aura® Contact Center.
Important:You can create an administration account on the server and then install Avaya Aura® Contact Centerusing the account. This Avaya Aura® Contact Center administration account must have fulladministrative privileges. You must upgrade and patch Avaya Aura® Contact Center using thisadministration account. You can rename this account after installing Avaya Aura® Contact Center, butyou must not delete the account. If you delete the account used to install Avaya Aura® Contact Center,Avaya Aura® Contact Center stops working.
You must complete all the procedures in this section in sequential order.
Avaya Aura® Contact Center Installation May 2013 125

Voice Contact Server installation prerequisites• Copy the most recent patches for the Contact Center software.
• Ensure that your new Contact Center license file is available.
Downloading the latest documentationBefore you begin
• Download the most recent version of Acrobat Reader.• Access the Avaya Web site at www.avaya.com/support.
About this taskDownload the most recent documentation to ensure you have the most recent updates.Updates in the documentation accurately reflect the most recent changes in the software.
Procedure
1. Log on to the Avaya Web site.
2. Compare the versions of the documentation on the site with the versions youhave.
3. If the version number on www.avaya.com/support is higher than your version,download the latest version of the document.
4. Review the Avaya Web site for release notes and readme files.
Installing Windows Server 2008 Release 2Before you begin
• Ensure that you have a newly formatted server that meets the specifications in AvayaAura® Contact Center Planning and Engineering (NN44400-210) on which to installMicrosoft Windows Server 2008 64-bit, Release 2, Service Pack 1.
126 Avaya Aura® Contact Center Installation May 2013Comments? [email protected]

Do not upgrade your operating system from a previous release. Contact Center is notsupported on an upgraded operating system.
• Configure all servers for RAID as described in Avaya Aura® Contact Center Planning andEngineering (NN44400-210).
• Ensure that you have a DVD for Windows Server 2008 Release 2.• Install the network interface card in the server.• Know the IP addresses for the contact center subnet.
About this taskInstall the Windows operating system, which is required for the Contact Center server software.During the installation, configure the Windows settings as required. You must perform thisprocedure on each server before you install Contact Center server software on the server.
Procedure
1. Insert the Windows Server 2008 64-bit Release 2 Standard Edition or WindowsServer 2008 64-bit Release 2 Enterprise Edition DVD into the DVD drive.
2. Install Windows Server 2008 Release 2 according to the instructions supplied bythe DVD.
3. On the first install page, select your language for installation.
4. Click Next.
5. On the Installation window, select a Language to install from the list.
6. Select a Time and currency format from the list.
7. Select Keyboard or input method from the list.
8. Click Next.
9. Click Install Now.
10. Select an operating system from the list.
11. Click Next.
12. On the first Install Windows screen, read the terms of the license agreement andselect I accept the license terms.
13. Click Next.
14. Select Custom.
15. Select the disk partition on which you want to install Windows Server 2008.
Important:You can use the partition management options to configure the partitions on yourserver.
16. Click Next.The installation proceeds and automatically restarts the server several times.
Installing Windows Server 2008 Release 2
Avaya Aura® Contact Center Installation May 2013 127

17. After completing the installation, log on to the server as Administrator. Enter andconfirm the Administrator password.
18. In the Initial Configuration Tasks window, select Activate Windows and followthe instructions or the Microsoft documentation to activate your server.
19. Select Set time zone and complete the information as required for your system.This server time zone daylight saving setting must match the time zone daylightsaving setting on the Avaya Media Server(s) in this SIP-enabled contact centersolution.
20. Select Configure Networking and complete the information for your NetworkInterface Card (NIC) with the server IP address.
21. Select Provide computer name and domain and complete the information for yourserver name and workgroup or domain settings.
22. Change the DVD drive letter to E: to ensure the correct drive letters are free for theContact Center application and database hard disk drives and partitions.
23. Configure the hard disk drives and partitions for this server using the WindowsServer 2008 Server Manager - Disk Management utility. For more information abouthard disk drives and partitions, see Avaya Aura® Contact Center Planning andEngineering (NN44400-210).
24. Install other required drivers for your hardware configuration.
Procedure job aid
Name Description
Computer name Do not use spaces or underscores or exceed15 characters. The name must start with analphabetic character.The computer name must match (includingcase sensitivity) the DNS name.
Disk drives Format the partitions as required for theserver. For more information, see AvayaAura® Contact Center Planning andEngineering (NN44400-210).
Domain/workgroup name Configure as required for your site.You must check to ensure the DNS Domainname (including case) matches the servername if the server is added to a domain orworkgroup after configuration.
Licensing modes Select Per server licensing mode.
128 Avaya Aura® Contact Center Installation May 2013Comments? [email protected]
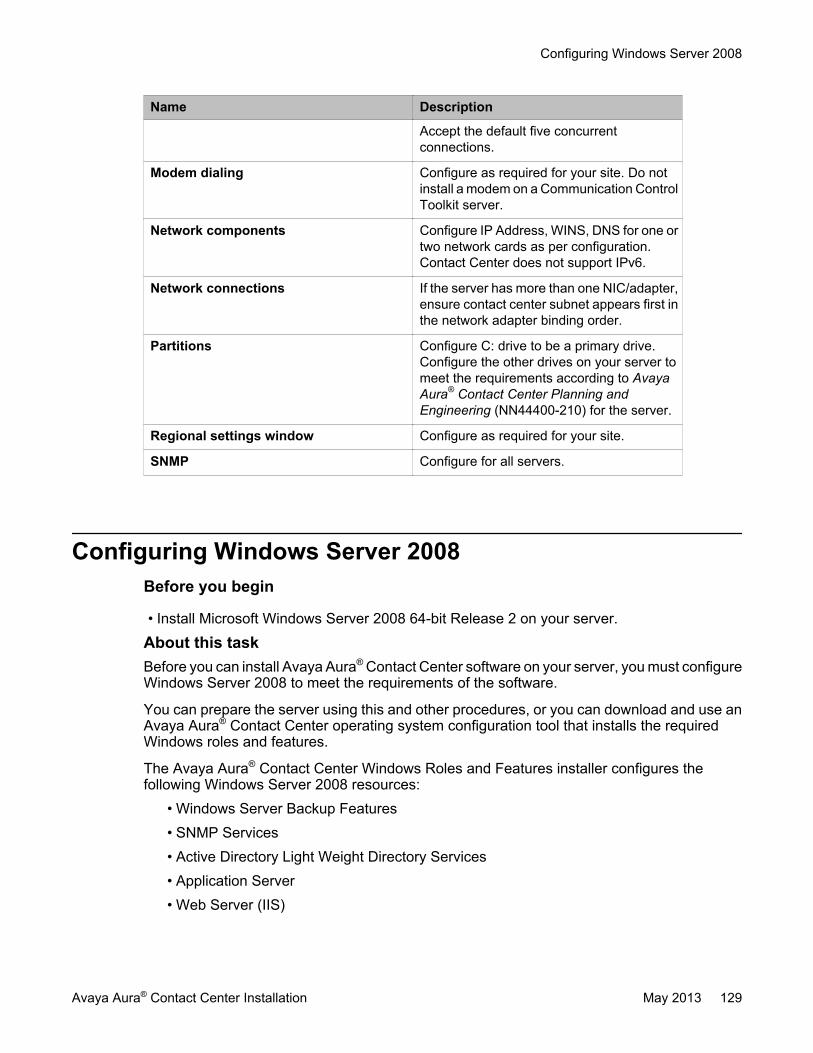
Name Description
Accept the default five concurrentconnections.
Modem dialing Configure as required for your site. Do notinstall a modem on a Communication ControlToolkit server.
Network components Configure IP Address, WINS, DNS for one ortwo network cards as per configuration.Contact Center does not support IPv6.
Network connections If the server has more than one NIC/adapter,ensure contact center subnet appears first inthe network adapter binding order.
Partitions Configure C: drive to be a primary drive.Configure the other drives on your server tomeet the requirements according to AvayaAura® Contact Center Planning andEngineering (NN44400-210) for the server.
Regional settings window Configure as required for your site.
SNMP Configure for all servers.
Configuring Windows Server 2008Before you begin
• Install Microsoft Windows Server 2008 64-bit Release 2 on your server.
About this taskBefore you can install Avaya Aura® Contact Center software on your server, you must configureWindows Server 2008 to meet the requirements of the software.
You can prepare the server using this and other procedures, or you can download and use anAvaya Aura® Contact Center operating system configuration tool that installs the requiredWindows roles and features.
The Avaya Aura® Contact Center Windows Roles and Features installer configures thefollowing Windows Server 2008 resources:
• Windows Server Backup Features• SNMP Services• Active Directory Light Weight Directory Services• Application Server• Web Server (IIS)
Configuring Windows Server 2008
Avaya Aura® Contact Center Installation May 2013 129

For more information, and to download the Avaya Aura® Contact Center Windows Roles andFeatures installer, see http://support.avaya.com.
The Avaya Aura® Contact Center Windows Roles and Features installer replaces the followingprocedures:
• Configuring Windows Server 2008 (this procedure)• Configuring SNMP on your server• Installing operating system components for Contact Center
If you use the Avaya Aura® Contact Center Windows Roles and Features installer, skip thesethree procedures.
Procedure
1. Log on to the Windows Server 2008 server using an administrator account.
2. Select the Don’t display this screen on startup check box.
3. Update the emergency repair disk to record the latest configuration data for theserver.
4. Choose Start > Administrative Tools > Server Manager.
5. In the left pane, click Features.
6. Click Add Features.
7. Select Windows Server Backup Features.
8. Click Next.
9. Click Install.
10. Click Close.
11. Choose Start > All Programs > Accessories > System Tools > Windows ServerBackup.
12. Follow the on-screen instructions to select what you want to back up.
Installing the latest supported operating system servicepacks
Before you begin
• Access the Avaya hotfixes list on the Web site www.avaya.com/support.• Install and configure Microsoft Windows Server 2008 64-bit Release 2 on your server.
130 Avaya Aura® Contact Center Installation May 2013Comments? [email protected]

• Review the recommendations on operating system service updates in Avaya Aura®
Contact Center Planning and Engineering (NN44400-210).• Install the Microsoft .NET Framework 3.5 and Microsoft .NET Framework 3.5 SP1.
About this taskAvaya recommends that you install the most recent supported operating system service packs.You must download the supported operating system service pack from the Avaya hotfixes listto ensure your Contact Center server software functions correctly with the supported operatingsystem patches.
Procedure
1. Log on to the server and disable the Windows Update feature. There are a numberof methods for disabling the Windows Update feature, refer to the Windows Server2008 documentation for a method suitable to your solution. Disabling the WindowsUpdate feature prevents Windows Server 2008 from automatically applyingoperating system patches and potentially rebooting the server.
2. Review the Contact Center Service Packs Compatibility and Security HotfixesApplicability List to determine the most recent Avaya Aura® Contact Centersupported patches or service packs.
3. Download the appropriate Microsoft Windows Server 2008 patches for the AvayaAura® Contact Center software installed on this server.
4. Install the most recent Windows Server 2008 service pack that is validated withAvaya Aura® Contact Center by following the Microsoft Installation instructions.
Connecting to the contact center subnetAbout this taskConnect the Contact Center server to the contact center subnet. The contact center subnet isthe network on which the server software applications work together to route contacts andgenerate reports.
Procedure
1. Locate the slot assigned to the contact center subnet network interface card for theserver. Make a note of the slot.
2. Connect the cable from the contact center subnet to the contact center subnetnetwork interface card in the server in accordance with customer site networkingguidelines.
3. Use the ping command to test the contact center subnet.
Connecting to the contact center subnet
Avaya Aura® Contact Center Installation May 2013 131

Adding a server to a domainBefore you begin
• Ensure that you have domain administrator privileges, or ask the Domain Administratorto assign you a domain user account for remote access.
• On the server, configure a preferred Domain Name System (DNS) server on the NetworkInterface Card (NIC).
About this taskAdd the server to an existing domain. Avaya recommends that you add the server to the domainbefore installing Contact Center software.
Ask your System Administrator to add a Domain Name System (DNS) static entry for thisserver. Each Contact Center server in a domain requires a DNS static entry.
Important:Avaya Aura® Contact Center High Availability solutions do not support Windows Server 2008Dynamic DNS.
In High Availability solutions, ask your System Administrator to add one DNS static entry forthe each managed name and associated managed IP address. A typical High Availabilitycampus solution with a pair of servers requires 3 DNS static entries; one DNS static entry forthe active server, one DNS static entry for the standby server, and one DNS static entry forthe managed name and associated IP address.
Procedure
1. Log on to the server.
2. Click Start > Administrative Tools > Server Manager.
3. Beside Computer Information, click Change System Properties.
4. In the System Properties dialog box, click the Computer Name tab.
5. Click Change.
6. In the Computer Name/Domain Changes dialog box, click the Domain option.
7. Type the domain name (you must provide the fully qualified domain name, whichincludes the prefix and suffix).
8. Click OK.
9. Type the domain administrator User name and Password.
10. Click OK.
132 Avaya Aura® Contact Center Installation May 2013Comments? [email protected]
11. Restart the server when you are prompted to do so.
Disabling the Remote Access servicesAbout this taskAvaya Aura® Contact Center does not support Remote Access Services (RAS). Disable theRemote Access services before installing Avaya Aura® Contact Center. Microsoft RemoteDesktop continues to run after you disable Remote Access services. After you disable theservices, restart the server.
Procedure
1. Choose Start > Administrative Tools > Services.
2. In the Services window, right-click the Remote Access Connection Managericon.
3. Click Properties.
4. In the General tab, from the Startup type list, select Disabled.
5. Click OK.
6. In the Services window, right-click the Remote Access Auto ConnectionManager icon.
7. Click Properties.
8. In the General tab, from the Startup type list, select Disabled.
9. Click OK.
10. In the Services window, click File, Exit.
11. Restart the server.
Configuring SNMP on your serverBefore you begin
• Install and configure Microsoft Windows Server 2008 64-bit Release 2 on your server.
About this taskConfigure Simple Network Management Protocol (SNMP) on your server to ensure you haveall of the required components of the Internet protocol for monitoring devices in your network.
Disabling the Remote Access services
Avaya Aura® Contact Center Installation May 2013 133

SNMP helps you manage data that describes the system configuration and errors that mayoccur between them.
Procedure
1. Log on to the server using the administrator account.
2. Choose Start > Control Panel > Programs.
3. In the Programs and Features section, click Turn Windows features on or off.
4. In the Server Manager window, select Server Manager and click Add Features.
5. Select SNMP Services.
6. Click Next.
7. Click Install.
8. If prompted, insert the Windows Server 2008 DVD.
9. Click Close.
Downloading the most recent patches to the serverBefore you begin
• Install and configure Windows Server 2008 64-bit Release 2 on your server according tothe settings in this chapter.
• Download and install the most recent and valid updates for Microsoft Windows Server2008 64-bit Release 2.
• Know the location at which you plan to install each Contact Center server softwarepackage.
• Ensure that you use one administrator account on your server to un-install and installsoftware updates.
About this taskTo ensure that you have the most current software, download the most recent Contact Centerpatches from www.avaya.com/support to the server you plan to install.
Procedure
1. Log on to the server using the administrator account.
2. Create a folder Avaya_Support\ProductUpdates on the drive on which youwant to save the software updates.
3. Download the most recent service pack file. Save and unzip the file on the ContactCenter server in the Avaya_Support\ProductUpdates folder.
134 Avaya Aura® Contact Center Installation May 2013Comments? [email protected]

4. If new patches are available for the latest service pack, download and save thepatches on the Contact Center server in the Avaya_Support\ProductUpdates folder.
5. Read the Contact Center Release Notes for the most recent instructions.
Disabling unused Network AdaptersAbout this taskDisable all unused Network Adapters or Network Interface Cards (NICs) to improve networkcommunications and prevent the erroneous configuration of unused NICs during ContactCenter server commissioning.
Procedure
1. Log on to the server.
2. Click Start > Control Panel > Network and Internet > Network and SharingCenter > Change Adapter Settings.
3. Right-click on the unused Network Adapter, and select Disable.
4. Repeat this procedure for all unused Network Adapters.
Enabling Microsoft Remote Desktop connectionBefore you begin
• Install Microsoft Windows Server 2008 64-bit Release 2 on your server.• Log on to the server with administrator privileges.
About this taskEnable Microsoft Remote Desktop connection as your remote access tool. Microsoft RemoteDesktop provides remote access for support on the server.
Procedure
1. Choose Start > Control Panel > System and Security.
2. In the System section, select Allow remote access.
3. Click the Remote tab.
Disabling unused Network Adapters
Avaya Aura® Contact Center Installation May 2013 135

4. Select Allow connections from computers running any version of RemoteDesktop (less secure).
5. Click OK.
Configuring Data Execution PreventionAbout this taskConfigure the Data Execution Prevention (DEP) hardware and software to perform additionalchecks on memory that protect the Avaya Aura® Contact Center server against malicious codeexploitation.
Procedure
1. Log on to Windows as administrator.
2. Choose Start > Control Panel > System and Security.
3. Click System.
4. In the System window, click Advanced system settings.
5. In the System Properties dialog box, click the Advanced tab.
6. Under Performance, click Settings.
7. In the Performance Options dialog box, click the Data Execution Preventiontab.
8. On the Data Execution Prevention tab, select Turn on DEP for essentialWindows programs and services only.
9. Click OK.
10. On the System Properties dialog box, click OK.
11. Click OK to restart the computer.
136 Avaya Aura® Contact Center Installation May 2013Comments? [email protected]

Importing Contact Center Firewall Security policyBefore you begin
• Install Microsoft Windows Server 2008 64-bit Release 2 on your server.• Log on to the server with administrator privileges.• Download the most recent Avaya Aura® Contact Center Firewall Security policy from
www.avaya.com/support.
About this taskImport the Avaya Aura® Contact Center Firewall Security policy to ensure all contact centerservers in the solution can communicate.
Avaya recommends that you export and backup your existing firewall security policy beforeimporting the Avaya Aura® Contact Center Firewall Security policy. You can use this backuppolicy to rollback the Avaya Aura® Contact Center Firewall Security policy, if you ever needto.
Procedure
1. Choose Start > Administrative Tools > Windows Firewall with AdvancedSecurity.
2. Choose Actions > Export Policy.
3. In the File name box, type the name for the backup policy.
4. Click Save.Windows exports the existing policy. You can use this backup policy to rollback theAvaya Aura® Contact Center Firewall Security policy, if you ever need to.
5. On the Policy successfully exported message box, click OK.
6. Choose Actions > Import Policy.
7. On the policy overwrite message box, click Yes.
8. Navigate to the folder containing the Avaya Aura® Contact Center Firewall Securitypolicy.
9. Click Open.Windows imports the Avaya Aura® Contact Center Firewall Security policy.
10. On the Policy successfully imported message box, click OK.
Importing Contact Center Firewall Security policy
Avaya Aura® Contact Center Installation May 2013 137
Installing operating system components for ContactCenter
Before you begin
• Install Windows Server 2008 64-bit Release 2.
About this taskBefore installing Contact Center software, you must install specific operating system softwarecomponents such as Internet Information Services to integrate the components in ContactCenter.
Procedure
1. Choose Start > Administrative Tools > Server Manager.
2. In the left-hand column of the Server Manager, right-click Roles, and select AddRoles.
3. Review the requirements for the new role, and click Next.
4. Under Server Roles, select Active Directory Lightweight Directory Services.
5. If an Add Roles Wizard message box that lists features required by Active DirectoryLightweight Directory Services appears, click Add Required Features.
6. Under Server Roles, select Application Server.
7. If an Add Roles Wizard message box that lists features required by ApplicationServer appears, click Add Required Features.
8. Under Application Server, select Role Services.
9. Select Web Server (IIS) Support.
10. If an Add Roles Wizard message box appears, listing features required by WebServer (IIS) Support appears, click Add Required Features.
11. Click Next.
12. On the Introduction to Web Server (IIS) page, click Next.
13. On the Select Role Services page, under Common HTTP Features, select thefollowing services:
• Static Content
• Default Document
• Directory Browsing
• HTTP Errors
138 Avaya Aura® Contact Center Installation May 2013Comments? [email protected]

• HTTP Redirection
Important:All other services check boxes must be cleared.
14. On the Select Role Services page, under Application Development, select thefollowing services:
• ASP.NET
• .NET Extensibility
• ASP
• ISAPI Extensions
• ISAPI Filters
• Server Side Includes
Important:All other services check boxes must be cleared.
15. On the Select Role Services page, under Health and Diagnosis, select thefollowing services:
• HTTP Logging
• Logging Tools
• Request Monitor
• Tracing
Important:All other services check boxes must be cleared.
16. On the Select Role Services page, under Security, select all services.
17. On the Select Role Services page, under Performance, select all services.
18. On the Select Role Services page, under Management Tools, select the followingservices:
• IIS Management Console
• IIS Management Scripts and Tools
• Management Service
• All items under IIS 6 Management Compatibility
Important:All other services check boxes must be cleared.
Installing operating system components for Contact Center
Avaya Aura® Contact Center Installation May 2013 139

19. Click Next.
20. Review the installation information.
21. Click Install.
22. On the Installation Results page, click Close.
23. Restart the server if required.
Configuring MIME types to support Microsoft updatesAbout this taskConfigure the Multipurpose Internet Mail Extension (MIME) types to support Microsoft updatesand patches.
Procedure
1. Log on to the server.
2. Click Start > Administrative Tools > Computer Management.
3. In the Computer Management dialog box, expand Services and Applications >Internet Information Services > IIS Manager > Sites.
4. Select Default Web Site.
5. Under IIS, select MIME Types.
6. Double-click MIME Types.
7. On the Actions list on the right, click Add.
8. In the File name extension box, type .msp.
9. In the MIME Type box, type application/microsoftpatch.
10. Click OK.
11. On the Actions list on the right, click Add.
12. In the File name extension box, type .msu.
13. In the MIME Type box, type application/microsoftupdate.
14. Click OK.
15. Close the Computer Management window.
140 Avaya Aura® Contact Center Installation May 2013Comments? [email protected]

Updating server for a network location installationAbout this taskConfigure the server .NET security settings to prepare the server for a remote networkinstallation. Avaya Aura® Contact Center supports network installation. You can insert theAvaya Aura® Contact Center DVD into a computer on your network. You then add this computeras a trusted site and network location on the new server. You can access this DVD from thenetwork location, and with some .NET security updates, use the remote DVD to install AvayaAura® Contact Center software on the new server.
Note:Skip this procedure if you plan to use the Avaya Aura® Contact Center DVD from the DVDdrive of the server.
Procedure
1. Insert the Avaya Aura® Contact Center DVD into a computer on the contact centernetwork.
2. Log on to the new server you are preparing for Contact Center.
3. Choose Start > Control Panel > Network and Internet > Internet Options.
4. In the Security tab, click Trusted sites.
5. In the Trusted sites section, click Sites.
6. In the Add this Web site to the zone box, type the <IP address> of the remotecomputer with the Avaya Aura® Contact Center DVD.
7. Click Add.
8. Click OK.
9. Close the Internet Options box.
10. From the new server, navigate to the network location with the DVD.
11. Access the remote DVD and in the root folder of the DVD, double-clickNetworkSetup.bat..NetFramework 3.5 installs and the .NetSecurity settings are modified.
12. If the Avaya Aura® Contact Center installation does not automatically start, in theroot folder of the DVD double-click Setup.exe.
13. After Avaya Aura® Contact Center installs, navigate to your network location anddouble-click NetworkSetupReset.bat.
Updating server for a network location installation
Avaya Aura® Contact Center Installation May 2013 141

Installing the Voice Contact Server software for Avaya Aura®
Unified Communications platformBefore you begin
• Ensure the Avaya Aura® Unified Communications platform is configured. For moreinformation see Avaya Aura® Contact Center Configuration – Avaya Aura® UnifiedCommunications Platform Integration (NN44400-521).
• Download the most recent Contact Center and Common Components patches to theserver.
About this taskInstall the Contact Center Voice Contact Server software and enable your contact center toroute contacts to the agents that can answer the call with the correct skills.
Note:Installing Voice Contact Server software installs Apache Tomcat Server. The default portnumber for Apache Tomcat is 8081. If you need to change the port number to avoid conflictswith third-party software, see your Apache Tomcat documentation.
Note:Read the Contact Center Release Notes for the most recent instructions.
Procedure
1. Insert the Contact Center DVD into the DVD drive of your server.
2. If the installation does not automatically start, double-click Setup.exe.
3. Click Install to install the Microsoft .NET Framework 3.5 SP1 and Visual C++runtime libraries on the server.If you are prompted to accept the Microsoft .NET Framework 3.5.1 licenseagreement, click Accept. If you are prompted to restart the server, click Yes andrepeat step 2.
4. On the Welcome window, click Next.
142 Avaya Aura® Contact Center Installation May 2013Comments? [email protected]

5. On the License Agreement window, read the terms of the agreement.
Installing the Voice Contact Server software for Avaya Aura® Unified Communications platform
Avaya Aura® Contact Center Installation May 2013 143

6. Click I Accept the Terms of the End-User License Agreement.
7. Click Next.
144 Avaya Aura® Contact Center Installation May 2013Comments? [email protected]
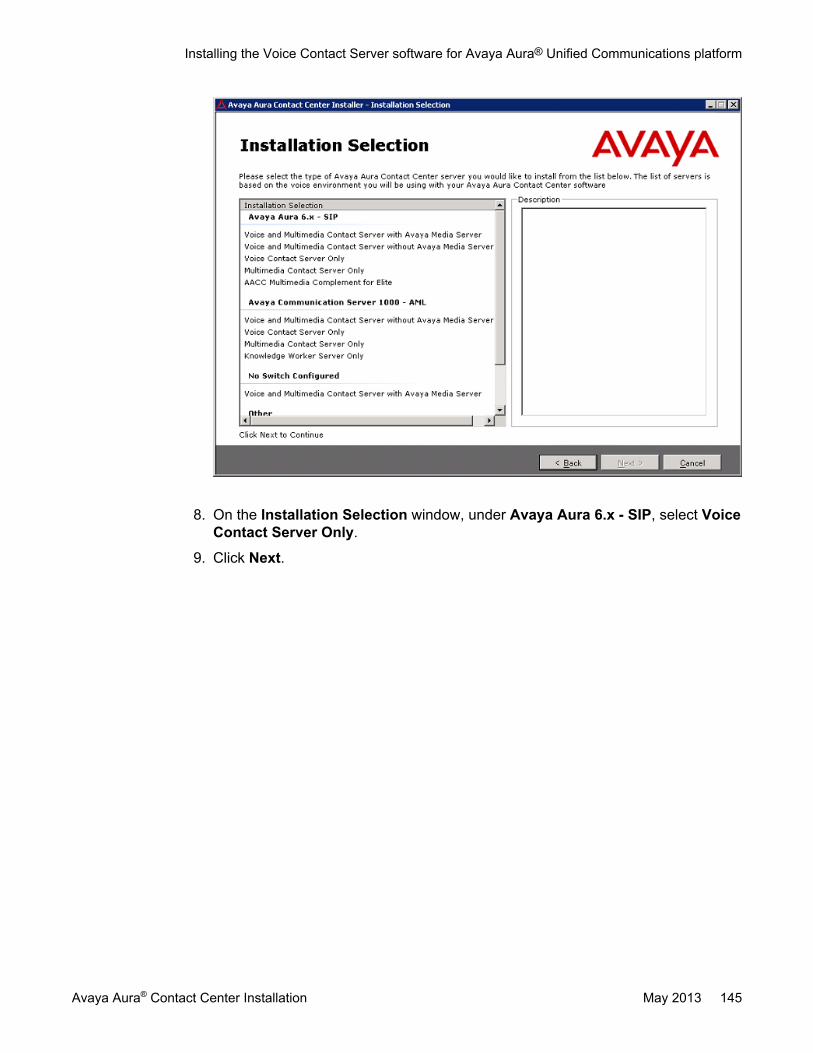
8. On the Installation Selection window, under Avaya Aura 6.x - SIP, select VoiceContact Server Only.
9. Click Next.
Installing the Voice Contact Server software for Avaya Aura® Unified Communications platform
Avaya Aura® Contact Center Installation May 2013 145

10. On the Installation Destination window, on the Application Destination Drivetab, select where to install the Contact Center application software by choosing adisk drive letter.
11. Click the Database Destination Drive tab.
12. Under Select the destination drive for the Contact Center database files, selectthe drive for the Contact Center Manager Server database.
13. Under Select the destination drive for the Contact Center database files, selectthe drive for the Communication Control Toolkit database.
14. Click the Product Updates Location tab.
146 Avaya Aura® Contact Center Installation May 2013Comments? [email protected]

15. Under Select the Product Updates Location, click Browse to locate the foldercontaining the Contact Center product updates.
16. Click Next.The System Readiness Check runs on the server.
17. If the System Readiness Check utility returns a Fail, the software installation cannotproceed until you correct the problem. Review any failures returned by the SystemReadiness Check and consult Avaya Aura® Contact Center Planning andEngineering (NN44400-210) to determine the actions to resolve the issue.You can ignore warnings if the potential impact to the operation of the contact centeris understood and not applicable.
18. Click Next.
19. On the Installation Data window, type the installation details for each tab.
20. Select the CCMS tab, and configure the server details.
Installing the Voice Contact Server software for Avaya Aura® Unified Communications platform
Avaya Aura® Contact Center Installation May 2013 147
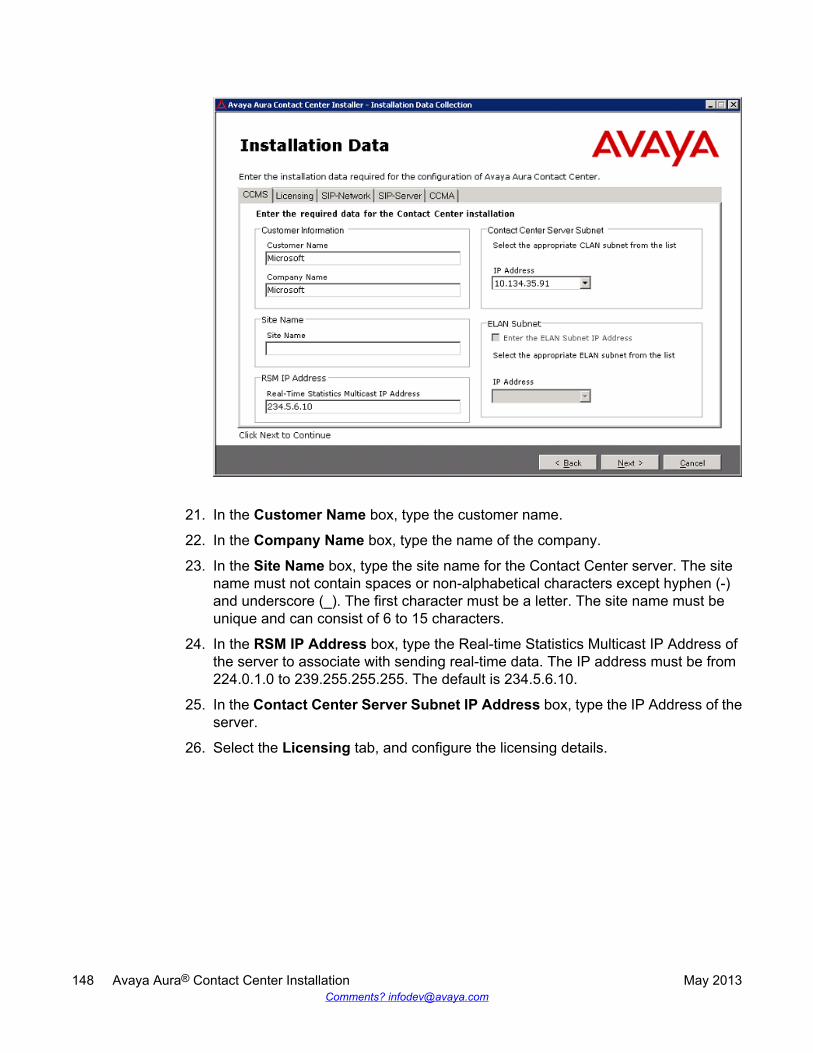
21. In the Customer Name box, type the customer name.
22. In the Company Name box, type the name of the company.
23. In the Site Name box, type the site name for the Contact Center server. The sitename must not contain spaces or non-alphabetical characters except hyphen (-)and underscore (_). The first character must be a letter. The site name must beunique and can consist of 6 to 15 characters.
24. In the RSM IP Address box, type the Real-time Statistics Multicast IP Address ofthe server to associate with sending real-time data. The IP address must be from224.0.1.0 to 239.255.255.255. The default is 234.5.6.10.
25. In the Contact Center Server Subnet IP Address box, type the IP Address of theserver.
26. Select the Licensing tab, and configure the licensing details.
148 Avaya Aura® Contact Center Installation May 2013Comments? [email protected]

27. The License File Location box displays the folder on the server which containsthe license file.
28. In the Primary License Manager IP Address box, type the IP address of theprimary License Manager server. Each Voice Contact Server contains a LicenseManager server. This License Manager server is the default primary LicenseManager.
29. In the Primary License Port box, type the number of the communication portopened between the License Manager and Contact Center Manager Server. Thedefault port number is 3998 when you use only one License Manager.
30. In the Secondary License Manager IP Address box, type the IP address of thesecondary License Manager server. The secondary License Manager server isused only in a corporate licensed environment.
31. From the Licensing Package list, select the licenses that you have purchased.Select Nodal Enterprise for single-site contact centers. Select CorporateEnterprise for multi-site contact centers.
32. From the list of Optional Packages, enable the licensed features that you havepurchased.
33. Select the Open Queue check box.
34. Select the SIP-Network tab, and configure the SIP proxy server details.
Installing the Voice Contact Server software for Avaya Aura® Unified Communications platform
Avaya Aura® Contact Center Installation May 2013 149

35. In the SIP Voice Proxy Server section, in the IP Address box, type the IP addressfor the primary Avaya Aura® Session Manager.
36. In the SIP Voice Proxy Server section, in the Port box, type the server listeningport number. The default port is 5060.
37. In the SIP Voice Proxy Server section, from the Network Transport list, select theSIP Network Transport communication protocol. The default is TCP.
38. In the SIP CTI Proxy Server section, in the IP Address box, type the IP addressfor the Avaya Aura® Application Enablement Services server.
39. In the SIP CTI Proxy Server section, in the Port box, type the SIP CTI Proxy Serverport number. The default SIP CTI Proxy Server port is 4723.
40. In the SIP CTI Proxy Server section, from the Network Transport list, select theSIP Network Transport CTI communication protocol. The default Avaya Aura®
Application Enablement Services communication protocol is TLS.
41. In the Backup SIP Voice Proxy Server section, in the IP Address box, type theIP address for the backup Avaya Aura® Session Manager. You must have a HighAvailability Standby Server license to support a Backup SIP Voice Proxy Server.
42. In the Backup SIP Voice Proxy Server section, in the Port box, type the serverlistening port number. The default port is 5060.
43. In the Backup SIP Voice Proxy Server section, from the Network Transport list,select the SIP Network Transport communication protocol. The default is TCP.
150 Avaya Aura® Contact Center Installation May 2013Comments? [email protected]

44. In the SIP IM Proxy Server section, from the IM Provider list, select the name ofthe instant messaging provider. Select either Aura Presence Services or MicrosoftOCS.
45. In the SIP IM Proxy Server section, if using an Avaya Aura® Presence Servicesserver, in the XMPP Domain box, type the domain name of the ExtensibleMessaging and Presence Protocol (XMPP) server. The XMPP Domain name mustbe different to the Local SIP Subscriber Domain Name.
46. In the SIP IM Proxy Server section, in the IP Address box, type the IP address ofthe SIP IM Proxy Server.
47. In the SIP IM Proxy Server section, in the Port box, type the port number for theIM Proxy Server. The default SIP IM Proxy Server for Avaya Aura® PresenceServices is port 5222.
48. In the SIP IM Proxy Server section, from the Network Transport list, select theSIP IM Proxy Server transport protocol.
49. Select the SIP-Server tab, and configure the SIP server details.
50. In the Local SIP Subscriber section, in the Domain Name box, type the SIPdomain name for the SIP-enabled contact center. Typically the Avaya Aura® ContactCenter SIP Domain Name matches your Active Directory domain name. If the AvayaAura® Contact Center SIP Domain Name does not match the Active Directorydomain name then it must match the Session Manager contact center SIP domain
Installing the Voice Contact Server software for Avaya Aura® Unified Communications platform
Avaya Aura® Contact Center Installation May 2013 151

name. The Local SIP Subscriber Domain Name must be different to the XMPPDomain name.
51. From the MS Locale list, select the locale (including language and dialects) of thesystem environment.
52. In the Local Listening Ports section, type the port numbers. The TCP/UDP Portdefault is 5060. The TLS Port default is 5061.
53. Select the CCMA tab, and configure the CCMA details.
54. In the Configuration section clear Enable CCMA Replication. Clear the checkbox on the primary server.
55. In the LDAP Port Number box, type the port number for the Lightweight DirectoryAccess Protocol (LDAP) for which common contact information is stored on aserver. The default value of the port is 389. Check with the system administrator toensure that the port number is not already in use.
56. In the SSL Port Number box, type the port number for the Secure Sockets Layer(SSL) that controls security when applications are communicating across thenetwork. The default port is 636. Check with the system administrator to ensure thatthe port number is not already in use.
57. In the System Account Configuration section, in the Password box, type thepassword for the CCMA System Account user account. Confirm the password inthe second box. The password is not checked against the server security policy for
152 Avaya Aura® Contact Center Installation May 2013Comments? [email protected]

minimum password requirements. Avaya recommends that you enter a passwordthat conforms to your corporate password policy.
58. Click Next.
59. On the Summary window, review and verify the information.
60. Click Install.
61. After the installation is complete, click Finish.
62. If prompted, restart the server.
63. If you are using WebLM, you must restart the Contact Center Tomcat Instanceservice after installing the Contact Center software.
Upgrading Java Runtime Environment, Java DevelopmentKit, and Apache Tomcat components using Third PartySoftware Upgrade Utility
Before you begin
• Apply Contact Center 6.3 Service Pack 10 or later on your system as an install-timepatch.
• Restart the Contact Center server to complete this procedure.
About this taskUse Third Party Software Upgrade Utility to automatically upgrade your Java RuntimeEnvironment and Tomcat software components. For more information, see Third PartySoftware Upgrade Utility on page 27.
Procedure
1. Log on to the server using the administrator account.
2. Navigate to the Avaya_Support\ProductUpdates folder.
3. Open the folder where you had saved the latest Service Pack.
4. Browse to ThirdParty\AACCThirdPartySoftwareUpgradeUtility.exe.
5. Double-click AACCThirdPartySoftwareUpgradeUtility.exe.
6. Click Upgrade.The system displays the “User Action Required” dialog box.
7. Click OK.
Upgrading Java Runtime Environment, Java Development Kit, and Apache Tomcat components using Third PartySoftware Upgrade Utility
Avaya Aura® Contact Center Installation May 2013 153

8. Click Yes to restart Contact Center and complete the upgrade.
Configuring WebLM licensingBefore you begin
• Install the Contact Center License Manager server software.• Restart the Contact Center License Manager server.
About this taskConfigure Contact Center License Manager to use WebLM. Then restart the Contact CenterTomcat Instance on the Contact Center License Manager server to commission WebLM forthe first time.
Important:If you are using a Keycode Retrieval System (KRS) PLIC license file, skip this procedure.This procedure applies only when you are using an Avaya Product Licensing and DeliverySystem (PLDS) WebLM license file or an Avaya WebLM server.
Note:When you install Contact Center License Manager, an instance of Apache Tomcat Serveris also installed on the same server. The default port number for Apache Tomcat is 8081. Ifyou need to change the port number to avoid conflicts with third-party software, see yourApache Tomcat documentation.
Procedure
1. Log on to the server where the Contact Center License Manager software isinstalled.
2. Click Start > All Programs > Avaya > Contact Center > License Manager >Configuration.
3. If you are using a local WebLM license file, complete the following steps to specifythe license file:
a. View the type of license file currently used, and then click OK.b. On the Configuration page, click Browse.c. Navigate the file system and locate the WebLM license file.d. Click Open.
4. If you are using a remote WebLM server, complete the following steps to specifythe license server:
a. View the type of license file currently used, and then click OK.
154 Avaya Aura® Contact Center Installation May 2013Comments? [email protected]

b. On the Configuration page, in the WebLM Host Name field, type the host nameor IP address of the WebLM server.
c. In the WebLM Port Number field, type 52233.
5. Click Apply.Ignore the LMConfig dialog box for now.
6. On the Start menu, choose All Programs > Administrative Tools > Services.
7. Right-click the Contact Center Tomcat Instance service, and click Stop.
8. Right-click the Contact Center Tomcat Instance service, and click Start.
9. Close the services window.
10. On the LMConfig dialog box, click Yes to restart the Contact Center LicenseManager services.
11. Click OK to close the window.
12. Click Exit.
Securing the Windows serverAbout this taskApply optional security measures to your operating system to further secure your server.
Important:Scanning software can degrade the performance and decrease the reliability of the system.Install virus scanning software only if the system connects to an exposed network or to theInternet.
Important:To maintain server performance, you must schedule virus scans during maintenanceperiods or low usage hours only.
Procedure
1. Harden the operating system using defined site procedures.
2. Install antivirus software. If you install antivirus software, Avaya recommends thatyou exclude some contact center files and folders from real-time and scheduledscans. For more information, and for a list of files and folders to exclude, see AvayaAura® Contact Center Planning and Engineering (NN44400-210).
Securing the Windows server
Avaya Aura® Contact Center Installation May 2013 155

Adding the domain AD-LDS replication account to theprimary server administrators and replicator group
About this taskAdd the AD-LDS replication account to the local Administrators and replicator group on theprimary Contact Center server.
Important:If you are using High Availability, and if this server is to be the primary active server, performthis procedure. If you are not implementing High Availability, skip this procedure.
If you are using a domain, you must request this AD-LDS replication account from your Networkor System Administrator. The primary and standby replicating Contact Center servers mustboth be added to the same domain.
For this procedure, the name of the AD-LDS replication account is CCMAReplication. You canchoose another name for the account.
Procedure
1. Log on to the primary Contact Center server.
2. Click Start > Administrative Tools > Computer Management.
3. In the Computer Management window, expand Local Users and Groups.
4. Click the Groups folder.
5. Double-click on the Administrators group.
6. Click Add > Locations.
7. On the Windows Security dialog box, type the domain logon details.
8. On the Locations dialog, select the domain to be used by CCMA replication.
9. Expand the domain folder to display domain users.
10. Click Users.
11. Click OK.
12. Click Advanced > Find Now, to display domain users.
13. From the list of users select the CCMA replication domain user account, for exampleselect the myDomain\CCMAReplication user account.
14. Click OK.
15. Click OK > Apply > OK.
16. Click the Groups folder.
156 Avaya Aura® Contact Center Installation May 2013Comments? [email protected]

17. Double-click on the Replicator group.
18. Click Add > Locations.
19. On the Windows Security dialog box, type the domain logon details.
20. On the Locations dialog, select the domain to be used by CCMA replication.
21. Expand the domain folder to display domain users.
22. Click Users.
23. Click OK.
24. Click Advanced > Find Now, to display domain users.
25. From the list of users select the CCMA replication domain user account, for exampleselect the myDomain\CCMAReplication user account.
26. Click OK.
27. Click OK > Apply > OK.
Adding the domain AD-LDS replication account to the primary server administrators and replicator group
Avaya Aura® Contact Center Installation May 2013 157

158 Avaya Aura® Contact Center Installation May 2013Comments? [email protected]

Chapter 7: Standby Voice Contact Serverfor Avaya Aura® platforminstallation
This chapter describes how to install a standby Voice Contact Server for an Avaya Aura® UnifiedCommunications platform. A standby Voice Contact Server includes the following server software:
• Contact Center Manager Server (CCMS)
• Contact Center Manager Server Utility
• Contact Center License Manager
• Contact Center Manager Administration (CCMA)
• Communication Control Toolkit (CCT)
You can install a standby Voice Contact Server and commission it to be the standby Voice Contact Serverin a campus High Availability solution. The standby server takes over contact processing and becomesthe active server if the existing active server fails. The standby server provides High Availabilityredundancy and resiliency. The standby and active servers must be at the same patch level and have thesame hard disk drive partitions.
You can install another standby Voice Contact Server and commission it to be the Remote GeographicNode Voice Contact Server in a solution with Disaster Recovery. The Remote Geographic Node (RGN)server shadows the active server. Remote Geographic Node servers do not automatically take over if theactive server fails. The standby server, Remote Geographic Node server, and active server must be atthe same patch level and have the same hard disk drive partitions.
Install this server to provide context‐sensitive and skill-based routing for customer voice contacts. Thisserver provides routed contact support for voice calls. This server provides extensive tools for agentmanagement, real-time and historical reporting, and graphical tools to create contact flows and treatmentrules. Use this server for license management, High Availability configuration, networking, OpenInterfaces Web Service and third-party application interfaces integration.
You must complete all the procedures in this section in sequential order.
Avaya Aura® Contact Center Installation May 2013 159

Standby Voice Contact Server installation prerequisites• Copy the most recent patches for the Contact Center software.
• Ensure that your new Contact Center license file with a High Availability standby serverlicense is available.
Downloading the latest documentationBefore you begin
• Download the most recent version of Acrobat Reader.• Access the Avaya Web site at www.avaya.com/support.
About this taskDownload the most recent documentation to ensure you have the most recent updates.Updates in the documentation accurately reflect the most recent changes in the software.
Procedure
1. Log on to the Avaya Web site.
2. Compare the versions of the documentation on the site with the versions youhave.
3. If the version number on www.avaya.com/support is higher than your version,download the latest version of the document.
4. Review the Avaya Web site for release notes and readme files.
Installing Windows Server 2008 Release 2Before you begin
• Ensure that you have a newly formatted server that meets the specifications in AvayaAura® Contact Center Planning and Engineering (NN44400-210) on which to installMicrosoft Windows Server 2008 64-bit, Release 2, Service Pack 1.
160 Avaya Aura® Contact Center Installation May 2013Comments? [email protected]

Do not upgrade your operating system from a previous release. Contact Center is notsupported on an upgraded operating system.
• Configure all servers for RAID as described in Avaya Aura® Contact Center Planning andEngineering (NN44400-210).
• Ensure that you have a DVD for Windows Server 2008 Release 2.• Install the network interface card in the server.• Know the IP addresses for the contact center subnet.
About this taskInstall the Windows operating system, which is required for the Contact Center server software.During the installation, configure the Windows settings as required. You must perform thisprocedure on each server before you install Contact Center server software on the server.
Procedure
1. Insert the Windows Server 2008 64-bit Release 2 Standard Edition or WindowsServer 2008 64-bit Release 2 Enterprise Edition DVD into the DVD drive.
2. Install Windows Server 2008 Release 2 according to the instructions supplied bythe DVD.
3. On the first install page, select your language for installation.
4. Click Next.
5. On the Installation window, select a Language to install from the list.
6. Select a Time and currency format from the list.
7. Select Keyboard or input method from the list.
8. Click Next.
9. Click Install Now.
10. Select an operating system from the list.
11. Click Next.
12. On the first Install Windows screen, read the terms of the license agreement andselect I accept the license terms.
13. Click Next.
14. Select Custom.
15. Select the disk partition on which you want to install Windows Server 2008.
Important:You can use the partition management options to configure the partitions on yourserver.
16. Click Next.The installation proceeds and automatically restarts the server several times.
Installing Windows Server 2008 Release 2
Avaya Aura® Contact Center Installation May 2013 161

17. After completing the installation, log on to the server as Administrator. Enter andconfirm the Administrator password.
18. In the Initial Configuration Tasks window, select Activate Windows and followthe instructions or the Microsoft documentation to activate your server.
19. Select Set time zone and complete the information as required for your system.This server time zone daylight saving setting must match the time zone daylightsaving setting on the Avaya Media Server(s) in this SIP-enabled contact centersolution.
20. Select Configure Networking and complete the information for your NetworkInterface Card (NIC) with the server IP address.
21. Select Provide computer name and domain and complete the information for yourserver name and workgroup or domain settings.
22. Change the DVD drive letter to E: to ensure the correct drive letters are free for theContact Center application and database hard disk drives and partitions.
23. Configure the hard disk drives and partitions for this server using the WindowsServer 2008 Server Manager - Disk Management utility. For more information abouthard disk drives and partitions, see Avaya Aura® Contact Center Planning andEngineering (NN44400-210).
24. Install other required drivers for your hardware configuration.
Procedure job aid
Name Description
Computer name Do not use spaces or underscores or exceed15 characters. The name must start with analphabetic character.The computer name must match (includingcase sensitivity) the DNS name.
Disk drives Format the partitions as required for theserver. For more information, see AvayaAura® Contact Center Planning andEngineering (NN44400-210).
Domain/workgroup name Configure as required for your site.You must check to ensure the DNS Domainname (including case) matches the servername if the server is added to a domain orworkgroup after configuration.
Licensing modes Select Per server licensing mode.
162 Avaya Aura® Contact Center Installation May 2013Comments? [email protected]

Name Description
Accept the default five concurrentconnections.
Modem dialing Configure as required for your site. Do notinstall a modem on a Communication ControlToolkit server.
Network components Configure IP Address, WINS, DNS for one ortwo network cards as per configuration.Contact Center does not support IPv6.
Network connections If the server has more than one NIC/adapter,ensure contact center subnet appears first inthe network adapter binding order.
Partitions Configure C: drive to be a primary drive.Configure the other drives on your server tomeet the requirements according to AvayaAura® Contact Center Planning andEngineering (NN44400-210) for the server.
Regional settings window Configure as required for your site.
SNMP Configure for all servers.
Configuring Windows Server 2008Before you begin
• Install Microsoft Windows Server 2008 64-bit Release 2 on your server.
About this taskBefore you can install Avaya Aura® Contact Center software on your server, you must configureWindows Server 2008 to meet the requirements of the software.
You can prepare the server using this and other procedures, or you can download and use anAvaya Aura® Contact Center operating system configuration tool that installs the requiredWindows roles and features.
The Avaya Aura® Contact Center Windows Roles and Features installer configures thefollowing Windows Server 2008 resources:
• Windows Server Backup Features• SNMP Services• Active Directory Light Weight Directory Services• Application Server• Web Server (IIS)
Configuring Windows Server 2008
Avaya Aura® Contact Center Installation May 2013 163

For more information, and to download the Avaya Aura® Contact Center Windows Roles andFeatures installer, see http://support.avaya.com.
The Avaya Aura® Contact Center Windows Roles and Features installer replaces the followingprocedures:
• Configuring Windows Server 2008 (this procedure)• Configuring SNMP on your server• Installing operating system components for Contact Center
If you use the Avaya Aura® Contact Center Windows Roles and Features installer, skip thesethree procedures.
Procedure
1. Log on to the Windows Server 2008 server using an administrator account.
2. Select the Don’t display this screen on startup check box.
3. Update the emergency repair disk to record the latest configuration data for theserver.
4. Choose Start > Administrative Tools > Server Manager.
5. In the left pane, click Features.
6. Click Add Features.
7. Select Windows Server Backup Features.
8. Click Next.
9. Click Install.
10. Click Close.
11. Choose Start > All Programs > Accessories > System Tools > Windows ServerBackup.
12. Follow the on-screen instructions to select what you want to back up.
Installing the latest supported operating system servicepacks
Before you begin
• Access the Avaya hotfixes list on the Web site www.avaya.com/support.• Install and configure Microsoft Windows Server 2008 64-bit Release 2 on your server.
164 Avaya Aura® Contact Center Installation May 2013Comments? [email protected]

• Review the recommendations on operating system service updates in Avaya Aura®
Contact Center Planning and Engineering (NN44400-210).• Install the Microsoft .NET Framework 3.5 and Microsoft .NET Framework 3.5 SP1.
About this taskAvaya recommends that you install the most recent supported operating system service packs.You must download the supported operating system service pack from the Avaya hotfixes listto ensure your Contact Center server software functions correctly with the supported operatingsystem patches.
Procedure
1. Log on to the server and disable the Windows Update feature. There are a numberof methods for disabling the Windows Update feature, refer to the Windows Server2008 documentation for a method suitable to your solution. Disabling the WindowsUpdate feature prevents Windows Server 2008 from automatically applyingoperating system patches and potentially rebooting the server.
2. Review the Contact Center Service Packs Compatibility and Security HotfixesApplicability List to determine the most recent Avaya Aura® Contact Centersupported patches or service packs.
3. Download the appropriate Microsoft Windows Server 2008 patches for the AvayaAura® Contact Center software installed on this server.
4. Install the most recent Windows Server 2008 service pack that is validated withAvaya Aura® Contact Center by following the Microsoft Installation instructions.
Connecting to the contact center subnetAbout this taskConnect the Contact Center server to the contact center subnet. The contact center subnet isthe network on which the server software applications work together to route contacts andgenerate reports.
Procedure
1. Locate the slot assigned to the contact center subnet network interface card for theserver. Make a note of the slot.
2. Connect the cable from the contact center subnet to the contact center subnetnetwork interface card in the server in accordance with customer site networkingguidelines.
3. Use the ping command to test the contact center subnet.
Connecting to the contact center subnet
Avaya Aura® Contact Center Installation May 2013 165

Adding a server to a domainBefore you begin
• Ensure that you have domain administrator privileges, or ask the Domain Administratorto assign you a domain user account for remote access.
• On the server, configure a preferred Domain Name System (DNS) server on the NetworkInterface Card (NIC).
About this taskAdd the server to an existing domain. Avaya recommends that you add the server to the domainbefore installing Contact Center software.
Ask your System Administrator to add a Domain Name System (DNS) static entry for thisserver. Each Contact Center server in a domain requires a DNS static entry.
Important:Avaya Aura® Contact Center High Availability solutions do not support Windows Server 2008Dynamic DNS.
In High Availability solutions, ask your System Administrator to add one DNS static entry forthe each managed name and associated managed IP address. A typical High Availabilitycampus solution with a pair of servers requires 3 DNS static entries; one DNS static entry forthe active server, one DNS static entry for the standby server, and one DNS static entry forthe managed name and associated IP address.
Procedure
1. Log on to the server.
2. Click Start > Administrative Tools > Server Manager.
3. Beside Computer Information, click Change System Properties.
4. In the System Properties dialog box, click the Computer Name tab.
5. Click Change.
6. In the Computer Name/Domain Changes dialog box, click the Domain option.
7. Type the domain name (you must provide the fully qualified domain name, whichincludes the prefix and suffix).
8. Click OK.
9. Type the domain administrator User name and Password.
10. Click OK.
166 Avaya Aura® Contact Center Installation May 2013Comments? [email protected]

11. Restart the server when you are prompted to do so.
Disabling the Remote Access servicesAbout this taskAvaya Aura® Contact Center does not support Remote Access Services (RAS). Disable theRemote Access services before installing Avaya Aura® Contact Center. Microsoft RemoteDesktop continues to run after you disable Remote Access services. After you disable theservices, restart the server.
Procedure
1. Choose Start > Administrative Tools > Services.
2. In the Services window, right-click the Remote Access Connection Managericon.
3. Click Properties.
4. In the General tab, from the Startup type list, select Disabled.
5. Click OK.
6. In the Services window, right-click the Remote Access Auto ConnectionManager icon.
7. Click Properties.
8. In the General tab, from the Startup type list, select Disabled.
9. Click OK.
10. In the Services window, click File, Exit.
11. Restart the server.
Configuring SNMP on your serverBefore you begin
• Install and configure Microsoft Windows Server 2008 64-bit Release 2 on your server.
About this taskConfigure Simple Network Management Protocol (SNMP) on your server to ensure you haveall of the required components of the Internet protocol for monitoring devices in your network.
Disabling the Remote Access services
Avaya Aura® Contact Center Installation May 2013 167

SNMP helps you manage data that describes the system configuration and errors that mayoccur between them.
Procedure
1. Log on to the server using the administrator account.
2. Choose Start > Control Panel > Programs.
3. In the Programs and Features section, click Turn Windows features on or off.
4. In the Server Manager window, select Server Manager and click Add Features.
5. Select SNMP Services.
6. Click Next.
7. Click Install.
8. If prompted, insert the Windows Server 2008 DVD.
9. Click Close.
Downloading the most recent patches to the serverBefore you begin
• Install and configure Windows Server 2008 64-bit Release 2 on your server according tothe settings in this chapter.
• Download and install the most recent and valid updates for Microsoft Windows Server2008 64-bit Release 2.
• Know the location at which you plan to install each Contact Center server softwarepackage.
• Ensure that you use one administrator account on your server to un-install and installsoftware updates.
About this taskTo ensure that you have the most current software, download the most recent Contact Centerpatches from www.avaya.com/support to the server you plan to install.
Procedure
1. Log on to the server using the administrator account.
2. Create a folder Avaya_Support\ProductUpdates on the drive on which youwant to save the software updates.
3. Download the most recent service pack file. Save and unzip the file on the ContactCenter server in the Avaya_Support\ProductUpdates folder.
168 Avaya Aura® Contact Center Installation May 2013Comments? [email protected]
4. If new patches are available for the latest service pack, download and save thepatches on the Contact Center server in the Avaya_Support\ProductUpdates folder.
5. Read the Contact Center Release Notes for the most recent instructions.
Disabling unused Network AdaptersAbout this taskDisable all unused Network Adapters or Network Interface Cards (NICs) to improve networkcommunications and prevent the erroneous configuration of unused NICs during ContactCenter server commissioning.
Procedure
1. Log on to the server.
2. Click Start > Control Panel > Network and Internet > Network and SharingCenter > Change Adapter Settings.
3. Right-click on the unused Network Adapter, and select Disable.
4. Repeat this procedure for all unused Network Adapters.
Enabling Microsoft Remote Desktop connectionBefore you begin
• Install Microsoft Windows Server 2008 64-bit Release 2 on your server.• Log on to the server with administrator privileges.
About this taskEnable Microsoft Remote Desktop connection as your remote access tool. Microsoft RemoteDesktop provides remote access for support on the server.
Procedure
1. Choose Start > Control Panel > System and Security.
2. In the System section, select Allow remote access.
3. Click the Remote tab.
Disabling unused Network Adapters
Avaya Aura® Contact Center Installation May 2013 169

4. Select Allow connections from computers running any version of RemoteDesktop (less secure).
5. Click OK.
Configuring Data Execution PreventionAbout this taskConfigure the Data Execution Prevention (DEP) hardware and software to perform additionalchecks on memory that protect the Avaya Aura® Contact Center server against malicious codeexploitation.
Procedure
1. Log on to Windows as administrator.
2. Choose Start > Control Panel > System and Security.
3. Click System.
4. In the System window, click Advanced system settings.
5. In the System Properties dialog box, click the Advanced tab.
6. Under Performance, click Settings.
7. In the Performance Options dialog box, click the Data Execution Preventiontab.
8. On the Data Execution Prevention tab, select Turn on DEP for essentialWindows programs and services only.
9. Click OK.
10. On the System Properties dialog box, click OK.
11. Click OK to restart the computer.
170 Avaya Aura® Contact Center Installation May 2013Comments? [email protected]

Importing Contact Center Firewall Security policyBefore you begin
• Install Microsoft Windows Server 2008 64-bit Release 2 on your server.• Log on to the server with administrator privileges.• Download the most recent Avaya Aura® Contact Center Firewall Security policy from
www.avaya.com/support.
About this taskImport the Avaya Aura® Contact Center Firewall Security policy to ensure all contact centerservers in the solution can communicate.
Avaya recommends that you export and backup your existing firewall security policy beforeimporting the Avaya Aura® Contact Center Firewall Security policy. You can use this backuppolicy to rollback the Avaya Aura® Contact Center Firewall Security policy, if you ever needto.
Procedure
1. Choose Start > Administrative Tools > Windows Firewall with AdvancedSecurity.
2. Choose Actions > Export Policy.
3. In the File name box, type the name for the backup policy.
4. Click Save.Windows exports the existing policy. You can use this backup policy to rollback theAvaya Aura® Contact Center Firewall Security policy, if you ever need to.
5. On the Policy successfully exported message box, click OK.
6. Choose Actions > Import Policy.
7. On the policy overwrite message box, click Yes.
8. Navigate to the folder containing the Avaya Aura® Contact Center Firewall Securitypolicy.
9. Click Open.Windows imports the Avaya Aura® Contact Center Firewall Security policy.
10. On the Policy successfully imported message box, click OK.
Importing Contact Center Firewall Security policy
Avaya Aura® Contact Center Installation May 2013 171

Adding the domain AD-LDS replication account to thestandby administrators and replicator group
About this taskAdd the AD-LDS replication account to the local Administrators and replicator group on thestandby server. Perform this procedure before installing Contact Center software on thestandby server.
If you are using a domain, you must request this AD-LDS replication account from your Networkor System Administrator. The primary and standby replicating Contact Center servers mustboth be added to the same domain.
For this procedure, the name of the AD-LDS replication account is CCMAReplication. You canchoose another name for the account.
Procedure
1. Log on to the standby Contact Center server.
2. Click Start > Administrative Tools > Computer Management.
3. In the Computer Management window, expand Local Users and Groups.
4. Click the Groups folder.
5. Double-click on the Administrators group.
6. Click Add > Locations.
7. On the Windows Security dialog box, type the domain logon details.
8. On the Locations dialog, select the domain to be used for CCMA replication.
9. Expand the domain folder to display domain users.
10. Click Users.
11. Click OK.
12. Click Advanced > Find Now, to display domain users.
13. From the list of users select the CCMA replication domain user account, for exampleselect the myDomain\CCMAReplication user account.
14. Click OK.
15. Click OK > Apply > OK.
16. Click the Groups folder.
17. Double-click on the Replicator group.
18. Click Add > Locations.
172 Avaya Aura® Contact Center Installation May 2013Comments? [email protected]
19. On the Windows Security dialog box, type the domain logon details.
20. On the Locations dialog, select the domain to be used for CCMA replication.
21. Expand the domain folder to display domain users.
22. Click Users.
23. Click OK.
24. Click Advanced > Find Now, to display domain users.
25. From the list of users select the CCMA replication domain user account, for exampleselect the myDomain\CCMAReplication user account.
26. Click OK.
27. Click OK > Apply > OK.
Installing operating system components for ContactCenter
Before you begin
• Install Windows Server 2008 64-bit Release 2.
About this taskBefore installing Contact Center software, you must install specific operating system softwarecomponents such as Internet Information Services to integrate the components in ContactCenter.
Procedure
1. Choose Start > Administrative Tools > Server Manager.
2. In the left-hand column of the Server Manager, right-click Roles, and select AddRoles.
3. Review the requirements for the new role, and click Next.
4. Under Server Roles, select Active Directory Lightweight Directory Services.
5. If an Add Roles Wizard message box that lists features required by Active DirectoryLightweight Directory Services appears, click Add Required Features.
6. Under Server Roles, select Application Server.
7. If an Add Roles Wizard message box that lists features required by ApplicationServer appears, click Add Required Features.
8. Under Application Server, select Role Services.
Installing operating system components for Contact Center
Avaya Aura® Contact Center Installation May 2013 173

9. Select Web Server (IIS) Support.
10. If an Add Roles Wizard message box appears, listing features required by WebServer (IIS) Support appears, click Add Required Features.
11. Click Next.
12. On the Introduction to Web Server (IIS) page, click Next.
13. On the Select Role Services page, under Common HTTP Features, select thefollowing services:
• Static Content
• Default Document
• Directory Browsing
• HTTP Errors
• HTTP Redirection
Important:All other services check boxes must be cleared.
14. On the Select Role Services page, under Application Development, select thefollowing services:
• ASP.NET
• .NET Extensibility
• ASP
• ISAPI Extensions
• ISAPI Filters
• Server Side Includes
Important:All other services check boxes must be cleared.
15. On the Select Role Services page, under Health and Diagnosis, select thefollowing services:
• HTTP Logging
• Logging Tools
• Request Monitor
• Tracing
Important:All other services check boxes must be cleared.
174 Avaya Aura® Contact Center Installation May 2013Comments? [email protected]

16. On the Select Role Services page, under Security, select all services.
17. On the Select Role Services page, under Performance, select all services.
18. On the Select Role Services page, under Management Tools, select the followingservices:
• IIS Management Console
• IIS Management Scripts and Tools
• Management Service
• All items under IIS 6 Management Compatibility
Important:All other services check boxes must be cleared.
19. Click Next.
20. Review the installation information.
21. Click Install.
22. On the Installation Results page, click Close.
23. Restart the server if required.
Configuring MIME types to support Microsoft updatesAbout this taskConfigure the Multipurpose Internet Mail Extension (MIME) types to support Microsoft updatesand patches.
Procedure
1. Log on to the server.
2. Click Start > Administrative Tools > Computer Management.
3. In the Computer Management dialog box, expand Services and Applications >Internet Information Services > IIS Manager > Sites.
4. Select Default Web Site.
5. Under IIS, select MIME Types.
6. Double-click MIME Types.
7. On the Actions list on the right, click Add.
8. In the File name extension box, type .msp.
Configuring MIME types to support Microsoft updates
Avaya Aura® Contact Center Installation May 2013 175
9. In the MIME Type box, type application/microsoftpatch.
10. Click OK.
11. On the Actions list on the right, click Add.
12. In the File name extension box, type .msu.
13. In the MIME Type box, type application/microsoftupdate.
14. Click OK.
15. Close the Computer Management window.
Updating server for a network location installationAbout this taskConfigure the server .NET security settings to prepare the server for a remote networkinstallation. Avaya Aura® Contact Center supports network installation. You can insert theAvaya Aura® Contact Center DVD into a computer on your network. You then add this computeras a trusted site and network location on the new server. You can access this DVD from thenetwork location, and with some .NET security updates, use the remote DVD to install AvayaAura® Contact Center software on the new server.
Note:Skip this procedure if you plan to use the Avaya Aura® Contact Center DVD from the DVDdrive of the server.
Procedure
1. Insert the Avaya Aura® Contact Center DVD into a computer on the contact centernetwork.
2. Log on to the new server you are preparing for Contact Center.
3. Choose Start > Control Panel > Network and Internet > Internet Options.
4. In the Security tab, click Trusted sites.
5. In the Trusted sites section, click Sites.
6. In the Add this Web site to the zone box, type the <IP address> of the remotecomputer with the Avaya Aura® Contact Center DVD.
7. Click Add.
8. Click OK.
9. Close the Internet Options box.
10. From the new server, navigate to the network location with the DVD.
176 Avaya Aura® Contact Center Installation May 2013Comments? [email protected]

11. Access the remote DVD and in the root folder of the DVD, double-clickNetworkSetup.bat..NetFramework 3.5 installs and the .NetSecurity settings are modified.
12. If the Avaya Aura® Contact Center installation does not automatically start, in theroot folder of the DVD double-click Setup.exe.
13. After Avaya Aura® Contact Center installs, navigate to your network location anddouble-click NetworkSetupReset.bat.
Installing the standby Voice Contact Server software forAvaya Aura® Unified Communications platform
Before you begin
• Ensure the Avaya Aura® Unified Communications platform is configured. For moreinformation see Avaya Aura® Contact Center Configuration – Avaya Aura® UnifiedCommunications Platform Integration (NN44400-521).
• Download the most recent Contact Center and Common Components patches to theserver.
• The primary active Voice Contact Server for the Avaya Aura® Unified Communicationsplatform must already be installed and configured.
• The primary active Voice Contact Server for the Avaya Aura® Unified Communicationsplatform must already be configured to support AD-LDS replication.
About this taskInstall the standby Contact Center Voice Contact Server software and enable your contactcenter to route contacts to the agents that can answer the call with the correct skills.
Note:Installing Voice Contact Server software installs Apache Tomcat Server. The default portnumber for Apache Tomcat is 8081. If you need to change the port number to avoid conflictswith third-party software, see your Apache Tomcat documentation.
Note:Read the Contact Center Release Notes for the most recent instructions.
Procedure
1. Insert the Contact Center DVD into the DVD drive of your server.
2. If the installation does not automatically start, double-click Setup.exe.
Installing the standby Voice Contact Server software for Avaya Aura® Unified Communications platform
Avaya Aura® Contact Center Installation May 2013 177

3. Click Install to install the Microsoft .NET Framework 3.5 SP1 and Visual C++runtime libraries on the server.If you are prompted to accept the Microsoft .NET Framework 3.5.1 licenseagreement, click Accept. If you are prompted to restart the server, click Yes andrepeat step 2.
4. On the Welcome window, click Next.
5. On the License Agreement window, read the terms of the agreement.
6. Click I Accept the Terms of the End-User License Agreement.
7. Click Next.
8. On the Installation Selection window, under Avaya Aura 6.x - SIP, select VoiceContact Server Only.
9. Click Next.
178 Avaya Aura® Contact Center Installation May 2013Comments? [email protected]

10. On the Installation Destination window, on the Application Destination Drivetab, select where to install the Contact Center application software by choosing adisk drive letter.
11. Click the Database Destination Drive tab.
12. Under Select the destination drive for the Contact Center database files, selectthe drive for the Contact Center Manager Server database.
13. Under Select the destination drive for the Contact Center database files, selectthe drive for the Communication Control Toolkit database.
14. Click the Product Updates Location tab.
Installing the standby Voice Contact Server software for Avaya Aura® Unified Communications platform
Avaya Aura® Contact Center Installation May 2013 179

15. Under Select the Product Updates Location, click Browse to locate the foldercontaining the Contact Center product updates.
16. Click Next.The System Readiness Check runs on the server.
17. If the System Readiness Check utility returns a Fail, the software installation cannotproceed until you correct the problem. Review any failures returned by the SystemReadiness Check and consult Avaya Aura® Contact Center Planning andEngineering (NN44400-210) to determine the actions to resolve the issue.You can ignore warnings if the potential impact to the operation of the contact centeris understood and not applicable.
18. Click Next.
19. On the Installation Data window, type the installation details for each tab.
20. Select the CCMS tab, and configure the server details.
180 Avaya Aura® Contact Center Installation May 2013Comments? [email protected]

21. In the Customer Name box, type the customer name.
22. In the Company Name box, type the name of the company.
23. In the Site Name box, type the site name for the Contact Center server. The sitename must not contain spaces or non-alphabetical characters except hyphen (-)and underscore (_). The first character must be a letter. The site name must beunique and can consist of 6 to 15 characters. The Site Name of the standby servermust be the same as the Site Name of the primary server.
24. In the RSM IP Address box, type the Real-time Statistics Multicast IP Address ofthe server to associate with sending real-time data. The IP address must be from224.0.1.0 to 239.255.255.255. The default is 234.5.6.10.
25. In the Contact Center Server Subnet IP Address box, type the IP Address of theserver.
26. Select the Licensing tab, and configure the licensing details.
Installing the standby Voice Contact Server software for Avaya Aura® Unified Communications platform
Avaya Aura® Contact Center Installation May 2013 181
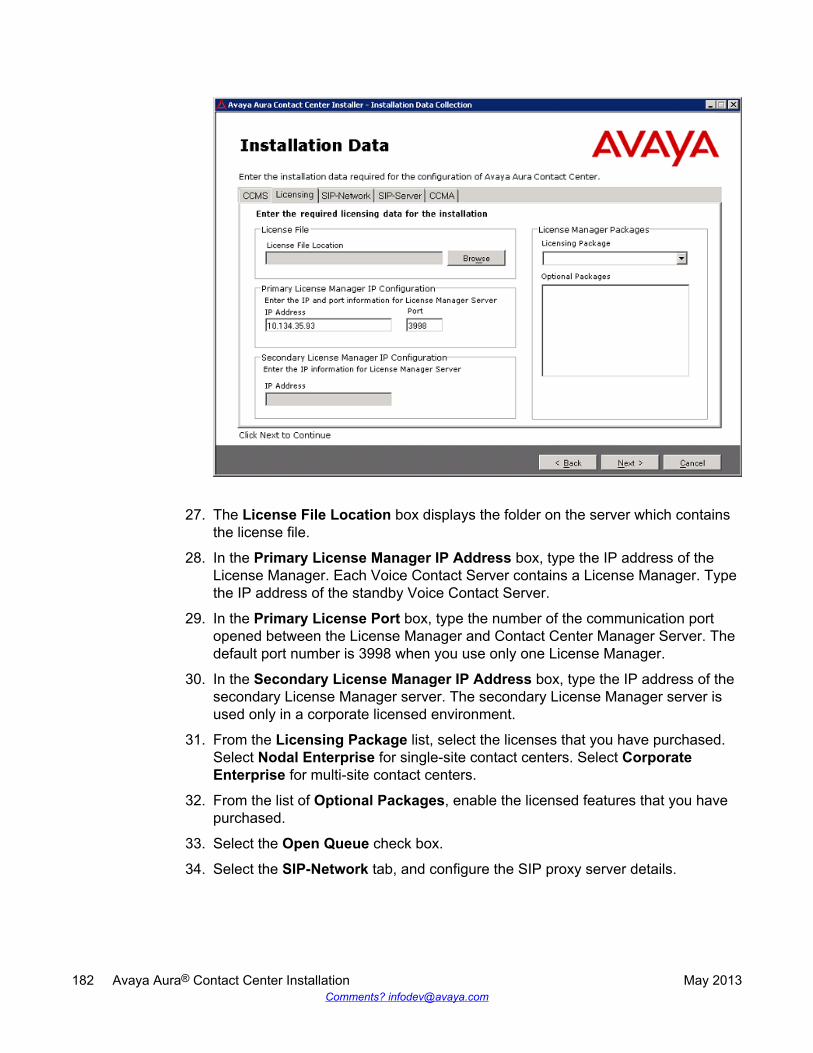
27. The License File Location box displays the folder on the server which containsthe license file.
28. In the Primary License Manager IP Address box, type the IP address of theLicense Manager. Each Voice Contact Server contains a License Manager. Typethe IP address of the standby Voice Contact Server.
29. In the Primary License Port box, type the number of the communication portopened between the License Manager and Contact Center Manager Server. Thedefault port number is 3998 when you use only one License Manager.
30. In the Secondary License Manager IP Address box, type the IP address of thesecondary License Manager server. The secondary License Manager server isused only in a corporate licensed environment.
31. From the Licensing Package list, select the licenses that you have purchased.Select Nodal Enterprise for single-site contact centers. Select CorporateEnterprise for multi-site contact centers.
32. From the list of Optional Packages, enable the licensed features that you havepurchased.
33. Select the Open Queue check box.
34. Select the SIP-Network tab, and configure the SIP proxy server details.
182 Avaya Aura® Contact Center Installation May 2013Comments? [email protected]

35. In the SIP Voice Proxy Server section, in the IP Address box, type the IP addressfor the primary Avaya Aura® Session Manager.
36. In the SIP Voice Proxy Server section, in the Port box, type the server listeningport number. The default port is 5060.
37. In the SIP Voice Proxy Server section, from the Network Transport list, select theSIP Network Transport communication protocol. The default is TCP.
38. In the SIP CTI Proxy Server section, in the IP Address box, type the IP addressfor the Avaya Aura® Application Enablement Services server.
39. In the SIP CTI Proxy Server section, in the Port box, type the SIP CTI Proxy Serverport number. The default SIP CTI Proxy Server port is 4723.
40. In the SIP CTI Proxy Server section, from the Network Transport list, select theSIP Network Transport CTI communication protocol. The default Avaya Aura®
Application Enablement Services communication protocol is TLS.
41. In the Backup SIP Voice Proxy Server section, in the IP Address box, type theIP address for the backup Avaya Aura® Session Manager. You must have a HighAvailability Standby Server license to support a Backup SIP Voice Proxy Server.
42. In the Backup SIP Voice Proxy Server section, in the Port box, type the serverlistening port number. The default port is 5060.
43. In the Backup SIP Voice Proxy Server section, from the Network Transport list,select the SIP Network Transport communication protocol. The default is TCP.
Installing the standby Voice Contact Server software for Avaya Aura® Unified Communications platform
Avaya Aura® Contact Center Installation May 2013 183

44. In the SIP IM Proxy Server section, from the IM Provider list, select the name ofthe instant messaging provider. Select either Aura Presence Services or MicrosoftOCS.
45. In the SIP IM Proxy Server section, if using an Avaya Aura® Presence Servicesserver, in the XMPP Domain box, type the domain name of the ExtensibleMessaging and Presence Protocol (XMPP) server. The XMPP Domain name mustbe different to the Local SIP Subscriber Domain Name.
46. In the SIP IM Proxy Server section, in the IP Address box, type the IP address ofthe SIP IM Proxy Server.
47. In the SIP IM Proxy Server section, in the Port box, type the port number for theIM Proxy Server. The default SIP IM Proxy Server for Avaya Aura® PresenceServices is port 5222.
48. In the SIP IM Proxy Server section, from the Network Transport list, select theSIP IM Proxy Server transport protocol.
49. Select the SIP-Server tab, and configure the SIP server details.
50. In the Local SIP Subscriber section, in the Domain Name box, type the SIPdomain name for the SIP-enabled contact center. Typically the Avaya Aura® ContactCenter SIP Domain Name matches your Active Directory domain name. If the AvayaAura® Contact Center SIP Domain Name does not match the Active Directorydomain name then it must match the Session Manager contact center SIP domain
184 Avaya Aura® Contact Center Installation May 2013Comments? [email protected]

name. The Local SIP Subscriber Domain Name must be different to the XMPPDomain name.
51. From the MS Locale list, select the locale (including language and dialects) of thesystem environment.
52. In the Local Listening Ports section, type the port numbers. The TCP/UDP Portdefault is 5060. The TLS Port default is 5061.
53. Select the CCMA tab, and configure the CCMA details.
54. In the Configuration section, select Enable CCMA Replication. CCMA replicationis reproducing an active copy of the AD-LDS for backup or emergency failure. Incase of server failure, a current AD-LDS is available to maintain the contactcenter.
55. On the Contact Center Installer message box, click Yes.
56. In the LDAP Port Number box, type the port number for the Lightweight DirectoryAccess Protocol (LDAP) for which common contact information is stored on aserver. The default value of the port is 389. Check with the system administrator toensure that the port number is not already in use.
57. In the SSL Port Number box, type the port number for the Secure Sockets Layer(SSL) that controls security when applications are communicating across thenetwork. The default port is 636. Check with the system administrator to ensure thatthe port number is not already in use.
Installing the standby Voice Contact Server software for Avaya Aura® Unified Communications platform
Avaya Aura® Contact Center Installation May 2013 185

58. In the System Account Configuration section, in the Password box, type thepassword for the CCMA System Account user account. Confirm the password inthe second box. The password is not checked against the server security policy forminimum password requirements. Avaya recommends that you enter a passwordthat conforms to your corporate password policy.
59. Click Next.
60. On the Summary window, review and verify the information.
61. Select Install. The install continues until the AD-LDS setup wizard appears.
62. Select Next.
63. In the Setup Options dialog box, select A replica of an existing instance.
186 Avaya Aura® Contact Center Installation May 2013Comments? [email protected]

64. Select Next.
65. On the Instance Name dialog box, in the Instance name box, type the AD-LDSinstance name. The default instance name is SymposiumWC, so typeSymposiumWC.
Installing the standby Voice Contact Server software for Avaya Aura® Unified Communications platform
Avaya Aura® Contact Center Installation May 2013 187

66. In the Description box, type SymposiumWC.
67. Click Next.
68. On the Ports dialog box, if no other applications use the ports, accept the defaultvalues in the LDAP port number and SSL port number boxes and select Next.
188 Avaya Aura® Contact Center Installation May 2013Comments? [email protected]

69. On the Joining a Configuration Set dialog box, in the Server box, type the FQDNname of the primary Contact Center server to replicate.Example of entering the primary Contact Center server name.
Installing the standby Voice Contact Server software for Avaya Aura® Unified Communications platform
Avaya Aura® Contact Center Installation May 2013 189

70. On the Joining a Configuration Set window, in the LDAP Port box, type the portnumber on the AD-LDS instance on the primary Contact Center server. The defaultis port number 389.
71. Click Next.
72. On the Administrative Credentials for the Configuration Set window, select Thisaccount.
73. In the User name box, type the primary Contact Center server name followed byits Administrator name in the format <primary Contact Center server name>\Administrator. For example enter WIN-RBMQ1SU0OL1\Administrator. If you havecreated another administrator account for Contact Center, then enter the details(name and password) for that primary Contact Center server administrator accounthere. Your administrator account must have full administrative privileges.Example of entering the administrative credentials.
190 Avaya Aura® Contact Center Installation May 2013Comments? [email protected]
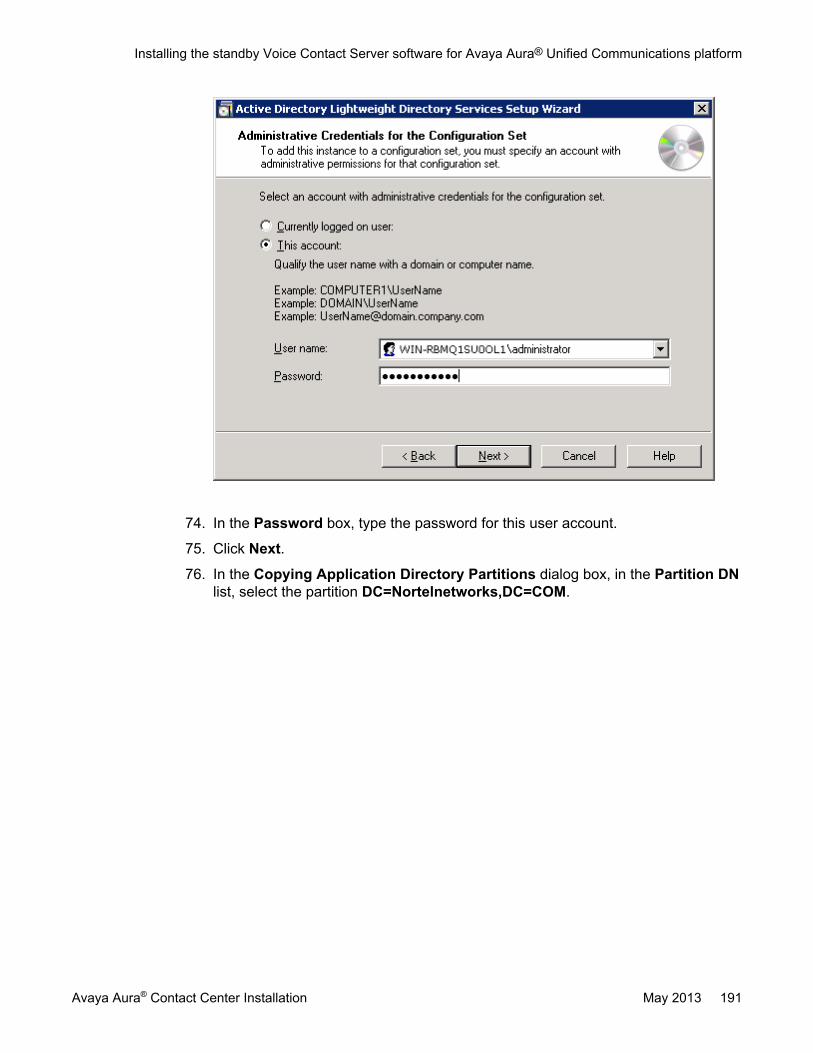
74. In the Password box, type the password for this user account.
75. Click Next.
76. In the Copying Application Directory Partitions dialog box, in the Partition DNlist, select the partition DC=Nortelnetworks,DC=COM.
Installing the standby Voice Contact Server software for Avaya Aura® Unified Communications platform
Avaya Aura® Contact Center Installation May 2013 191

77. Select Next.
78. In the File Location dialog box, accept the default values, click Next.
192 Avaya Aura® Contact Center Installation May 2013Comments? [email protected]

79. In the Service Account Selection dialog box, select Network service account.Example of using a domain and selecting Network service account.
Installing the standby Voice Contact Server software for Avaya Aura® Unified Communications platform
Avaya Aura® Contact Center Installation May 2013 193

80. Click Next.
81. In the AD LDS Administrators dialog box, select This account.
194 Avaya Aura® Contact Center Installation May 2013Comments? [email protected]

82. Select Browse to locate the CCMA AD-LDS replication account.The Select User or Group dialog box appears. Note that the location is the localdomain.
83. In the Select User or Group dialog box, click Advanced.
Installing the standby Voice Contact Server software for Avaya Aura® Unified Communications platform
Avaya Aura® Contact Center Installation May 2013 195

84. In the Windows Security dialog box, type a logon name and password of anaccount with permissions to access your domain.
85. Click OK.The advanced Select User or Group dialog box appears.
196 Avaya Aura® Contact Center Installation May 2013Comments? [email protected]

86. In the advanced Select User or Group dialog box, click Find Now.
87. From the Search results list, select the CCMA replication account.Example of selecting a domain CCMA replication account:
Installing the standby Voice Contact Server software for Avaya Aura® Unified Communications platform
Avaya Aura® Contact Center Installation May 2013 197

88. In the advanced Select User or Group dialog box, click OK.Example of selecting a CCMA replication account:
198 Avaya Aura® Contact Center Installation May 2013Comments? [email protected]

89. In the Select User or Group dialog box, click OK.Example of selecting a domain CCMA replication account:
90. Click Next.
Installing the standby Voice Contact Server software for Avaya Aura® Unified Communications platform
Avaya Aura® Contact Center Installation May 2013 199

91. Confirm the installation components, and click Next.
92. After the installation is complete, click Finish.
93. If prompted, restart the server.
94. If you are using WebLM, you must restart the Contact Center Tomcat Instanceservice after installing the Contact Center software.
Upgrading Java Runtime Environment, Java DevelopmentKit, and Apache Tomcat components using Third PartySoftware Upgrade Utility
Before you begin
• Apply Contact Center 6.3 Service Pack 10 or later on your system as an install-timepatch.
• Restart the Contact Center server to complete this procedure.
200 Avaya Aura® Contact Center Installation May 2013Comments? [email protected]

About this taskUse Third Party Software Upgrade Utility to automatically upgrade your Java RuntimeEnvironment and Tomcat software components. For more information, see Third PartySoftware Upgrade Utility on page 27.
Procedure
1. Log on to the server using the administrator account.
2. Navigate to the Avaya_Support\ProductUpdates folder.
3. Open the folder where you had saved the latest Service Pack.
4. Browse to ThirdParty\AACCThirdPartySoftwareUpgradeUtility.exe.
5. Double-click AACCThirdPartySoftwareUpgradeUtility.exe.
6. Click Upgrade.The system displays the “User Action Required” dialog box.
7. Click OK.
8. Click Yes to restart Contact Center and complete the upgrade.
Configuring WebLM licensingBefore you begin
• Install the Contact Center License Manager server software.• Restart the Contact Center License Manager server.
About this taskConfigure Contact Center License Manager to use WebLM. Then restart the Contact CenterTomcat Instance on the Contact Center License Manager server to commission WebLM forthe first time.
Important:If you are using a Keycode Retrieval System (KRS) PLIC license file, skip this procedure.This procedure applies only when you are using an Avaya Product Licensing and DeliverySystem (PLDS) WebLM license file or an Avaya WebLM server.
Note:When you install Contact Center License Manager, an instance of Apache Tomcat Serveris also installed on the same server. The default port number for Apache Tomcat is 8081. Ifyou need to change the port number to avoid conflicts with third-party software, see yourApache Tomcat documentation.
Configuring WebLM licensing
Avaya Aura® Contact Center Installation May 2013 201

Procedure
1. Log on to the server where the Contact Center License Manager software isinstalled.
2. Click Start > All Programs > Avaya > Contact Center > License Manager >Configuration.
3. If you are using a local WebLM license file, complete the following steps to specifythe license file:
a. View the type of license file currently used, and then click OK.b. On the Configuration page, click Browse.c. Navigate the file system and locate the WebLM license file.d. Click Open.
4. If you are using a remote WebLM server, complete the following steps to specifythe license server:
a. View the type of license file currently used, and then click OK.b. On the Configuration page, in the WebLM Host Name field, type the host name
or IP address of the WebLM server.c. In the WebLM Port Number field, type 52233.
5. Click Apply.Ignore the LMConfig dialog box for now.
6. On the Start menu, choose All Programs > Administrative Tools > Services.
7. Right-click the Contact Center Tomcat Instance service, and click Stop.
8. Right-click the Contact Center Tomcat Instance service, and click Start.
9. Close the services window.
10. On the LMConfig dialog box, click Yes to restart the Contact Center LicenseManager services.
11. Click OK to close the window.
12. Click Exit.
Securing the Windows serverAbout this taskApply optional security measures to your operating system to further secure your server.
202 Avaya Aura® Contact Center Installation May 2013Comments? [email protected]

Important:Scanning software can degrade the performance and decrease the reliability of the system.Install virus scanning software only if the system connects to an exposed network or to theInternet.
Important:To maintain server performance, you must schedule virus scans during maintenanceperiods or low usage hours only.
Procedure
1. Harden the operating system using defined site procedures.
2. Install antivirus software. If you install antivirus software, Avaya recommends thatyou exclude some contact center files and folders from real-time and scheduledscans. For more information, and for a list of files and folders to exclude, see AvayaAura® Contact Center Planning and Engineering (NN44400-210).
Securing the Windows server
Avaya Aura® Contact Center Installation May 2013 203

204 Avaya Aura® Contact Center Installation May 2013Comments? [email protected]

Chapter 8: Multimedia Contact Serversoftware installation
This chapter describes how to install the Multimedia Contact Server software that enables your contactcenter to handle multimedia contacts. Contact Center Multimedia (CCMM) software enables routing ofemail (including voice mail, SMS, faxes, and scanned documents), outbound, instant messaging (IM) andWeb communication contacts to appropriate agents based on subject, contact type, or the time that thecontact arrives.
This section describes how to install Multimedia Contact Server software in Avaya Aura® UnifiedCommunications based solutions.
In some small contact center environments, you can install a Voice and Multimedia Contact Server toprocess both voice and multimedia contacts. But in large contact center environments, you must installthe Multimedia Contact Server software on a standalone server. Separate servers are also required foremail (MS Exchange for example), Web communication, and some outbound call processing.
You must complete all the procedures in this section in sequential order.
Standby Multimedia Contact Server - High Availability noteAvaya Aura® Contact Center Multimedia Contact Server supports High Availability. To install a standbyMultimedia Contact Server, first use the procedures in this chapter to install a primary active MultimediaContact Server, then repeat the procedures in this chapter to install a standby Multimedia Contact Serverand a Remote Geographic Node Multimedia Contact Server.
You can install a standby Multimedia Contact Server and commission it to be the standby MultimediaContact Server in a campus High Availability solution. The standby server takes over multimedia contactprocessing and becomes the active server if the existing active Multimedia Contact Server fails. Thestandby server provides High Availability redundancy and resiliency. The standby and active servers mustbe at the same patch level and have the same hard disk drive partitions.
You can install another standby Multimedia Contact Server and commission it to be the RemoteGeographic Node Multimedia Contact Server in a solution with Disaster Recovery. The RemoteGeographic Node server shadows the active server. The Remote Geographic Node (RGN) server doesnot automatically take over if the active server fails. The standby server, Remote Geographic Node server,and active server must be at the same patch level and have the same hard disk drive partitions.
The roles and responsibilities of the active, Remote Geographic Node, and standby Multimedia ContactServers are defined later during commissioning.
Avaya Aura® Contact Center Installation May 2013 205
Multimedia Contact Server installation prerequisites• Install a Voice Contact Server to provide the core functionality for this Multimedia
Contact Server.
• If you use email in your contact center, install and configure an inbound email serverand an outbound email server in your network.
• If you use Web communications in your contact center, install and configure a Webserver in your network.
• If you use predictive outbound in your contact center, ensure that the predictiveoutbound hardware and software is configured for your network.
• Ensure that your new Contact Center license file is available.
Downloading the latest documentationBefore you begin
• Download the most recent version of Acrobat Reader.• Access the Avaya Web site at www.avaya.com/support.
About this taskDownload the most recent documentation to ensure you have the most recent updates.Updates in the documentation accurately reflect the most recent changes in the software.
Procedure
1. Log on to the Avaya Web site.
2. Compare the versions of the documentation on the site with the versions youhave.
3. If the version number on www.avaya.com/support is higher than your version,download the latest version of the document.
4. Review the Avaya Web site for release notes and readme files.
206 Avaya Aura® Contact Center Installation May 2013Comments? [email protected]

Installing Windows Server 2008 Release 2Before you begin
• Ensure that you have a newly formatted server that meets the specifications in AvayaAura® Contact Center Planning and Engineering (NN44400-210) on which to installMicrosoft Windows Server 2008 64-bit, Release 2, Service Pack 1.
Do not upgrade your operating system from a previous release. Contact Center is notsupported on an upgraded operating system.
• Configure all servers for RAID as described in Avaya Aura® Contact Center Planning andEngineering (NN44400-210).
• Ensure that you have a DVD for Windows Server 2008 Release 2.• Install the network interface card in the server.• Know the IP addresses for the contact center subnet.
About this taskInstall the Windows operating system, which is required for the Contact Center server software.During the installation, configure the Windows settings as required. You must perform thisprocedure on each server before you install Contact Center server software on the server.
Procedure
1. Insert the Windows Server 2008 64-bit Release 2 Standard Edition or WindowsServer 2008 64-bit Release 2 Enterprise Edition DVD into the DVD drive.
2. Install Windows Server 2008 Release 2 according to the instructions supplied bythe DVD.
3. On the first install page, select your language for installation.
4. Click Next.
5. On the Installation window, select a Language to install from the list.
6. Select a Time and currency format from the list.
7. Select Keyboard or input method from the list.
8. Click Next.
9. Click Install Now.
10. Select an operating system from the list.
11. Click Next.
12. On the first Install Windows screen, read the terms of the license agreement andselect I accept the license terms.
Installing Windows Server 2008 Release 2
Avaya Aura® Contact Center Installation May 2013 207

13. Click Next.
14. Select Custom.
15. Select the disk partition on which you want to install Windows Server 2008.
Important:You can use the partition management options to configure the partitions on yourserver.
16. Click Next.The installation proceeds and automatically restarts the server several times.
17. After completing the installation, log on to the server as Administrator. Enter andconfirm the Administrator password.
18. In the Initial Configuration Tasks window, select Activate Windows and followthe instructions or the Microsoft documentation to activate your server.
19. Select Set time zone and complete the information as required for your system.This server time zone daylight saving setting must match the time zone daylightsaving setting on the Avaya Media Server(s) in this SIP-enabled contact centersolution.
20. Select Configure Networking and complete the information for your NetworkInterface Card (NIC) with the server IP address.
21. Select Provide computer name and domain and complete the information for yourserver name and workgroup or domain settings.
22. Change the DVD drive letter to E: to ensure the correct drive letters are free for theContact Center application and database hard disk drives and partitions.
23. Configure the hard disk drives and partitions for this server using the WindowsServer 2008 Server Manager - Disk Management utility. For more information abouthard disk drives and partitions, see Avaya Aura® Contact Center Planning andEngineering (NN44400-210).
24. Install other required drivers for your hardware configuration.
Procedure job aid
Name Description
Computer name Do not use spaces or underscores or exceed15 characters. The name must start with analphabetic character.The computer name must match (includingcase sensitivity) the DNS name.
208 Avaya Aura® Contact Center Installation May 2013Comments? [email protected]

Name Description
Disk drives Format the partitions as required for theserver. For more information, see AvayaAura® Contact Center Planning andEngineering (NN44400-210).
Domain/workgroup name Configure as required for your site.You must check to ensure the DNS Domainname (including case) matches the servername if the server is added to a domain orworkgroup after configuration.
Licensing modes Select Per server licensing mode.Accept the default five concurrentconnections.
Modem dialing Configure as required for your site. Do notinstall a modem on a Communication ControlToolkit server.
Network components Configure IP Address, WINS, DNS for one ortwo network cards as per configuration.Contact Center does not support IPv6.
Network connections If the server has more than one NIC/adapter,ensure contact center subnet appears first inthe network adapter binding order.
Partitions Configure C: drive to be a primary drive.Configure the other drives on your server tomeet the requirements according to AvayaAura® Contact Center Planning andEngineering (NN44400-210) for the server.
Regional settings window Configure as required for your site.
SNMP Configure for all servers.
Configuring Windows Server 2008Before you begin
• Install Microsoft Windows Server 2008 64-bit Release 2 on your server.
About this taskBefore you can install Avaya Aura® Contact Center software on your server, you must configureWindows Server 2008 to meet the requirements of the software.
Configuring Windows Server 2008
Avaya Aura® Contact Center Installation May 2013 209

You can prepare the server using this and other procedures, or you can download and use anAvaya Aura® Contact Center operating system configuration tool that installs the requiredWindows roles and features.
The Avaya Aura® Contact Center Windows Roles and Features installer configures thefollowing Windows Server 2008 resources:
• Windows Server Backup Features• SNMP Services• Active Directory Light Weight Directory Services• Application Server• Web Server (IIS)
For more information, and to download the Avaya Aura® Contact Center Windows Roles andFeatures installer, see http://support.avaya.com.
The Avaya Aura® Contact Center Windows Roles and Features installer replaces the followingprocedures:
• Configuring Windows Server 2008 (this procedure)• Configuring SNMP on your server• Installing operating system components for Contact Center
If you use the Avaya Aura® Contact Center Windows Roles and Features installer, skip thesethree procedures.
Procedure
1. Log on to the Windows Server 2008 server using an administrator account.
2. Select the Don’t display this screen on startup check box.
3. Update the emergency repair disk to record the latest configuration data for theserver.
4. Choose Start > Administrative Tools > Server Manager.
5. In the left pane, click Features.
6. Click Add Features.
7. Select Windows Server Backup Features.
8. Click Next.
9. Click Install.
10. Click Close.
11. Choose Start > All Programs > Accessories > System Tools > Windows ServerBackup.
12. Follow the on-screen instructions to select what you want to back up.
210 Avaya Aura® Contact Center Installation May 2013Comments? [email protected]

Installing the latest supported operating system servicepacks
Before you begin
• Access the Avaya hotfixes list on the Web site www.avaya.com/support.• Install and configure Microsoft Windows Server 2008 64-bit Release 2 on your server.• Review the recommendations on operating system service updates in Avaya Aura®
Contact Center Planning and Engineering (NN44400-210).• Install the Microsoft .NET Framework 3.5 and Microsoft .NET Framework 3.5 SP1.
About this taskAvaya recommends that you install the most recent supported operating system service packs.You must download the supported operating system service pack from the Avaya hotfixes listto ensure your Contact Center server software functions correctly with the supported operatingsystem patches.
Procedure
1. Log on to the server and disable the Windows Update feature. There are a numberof methods for disabling the Windows Update feature, refer to the Windows Server2008 documentation for a method suitable to your solution. Disabling the WindowsUpdate feature prevents Windows Server 2008 from automatically applyingoperating system patches and potentially rebooting the server.
2. Review the Contact Center Service Packs Compatibility and Security HotfixesApplicability List to determine the most recent Avaya Aura® Contact Centersupported patches or service packs.
3. Download the appropriate Microsoft Windows Server 2008 patches for the AvayaAura® Contact Center software installed on this server.
4. Install the most recent Windows Server 2008 service pack that is validated withAvaya Aura® Contact Center by following the Microsoft Installation instructions.
Installing the latest supported operating system service packs
Avaya Aura® Contact Center Installation May 2013 211

Connecting to the contact center subnetAbout this taskConnect the Contact Center server to the contact center subnet. The contact center subnet isthe network on which the server software applications work together to route contacts andgenerate reports.
Procedure
1. Locate the slot assigned to the contact center subnet network interface card for theserver. Make a note of the slot.
2. Connect the cable from the contact center subnet to the contact center subnetnetwork interface card in the server in accordance with customer site networkingguidelines.
3. Use the ping command to test the contact center subnet.
Adding a server to a domainBefore you begin
• Ensure that you have domain administrator privileges, or ask the Domain Administratorto assign you a domain user account for remote access.
• On the server, configure a preferred Domain Name System (DNS) server on the NetworkInterface Card (NIC).
About this taskAdd the server to an existing domain. Avaya recommends that you add the server to the domainbefore installing Contact Center software.
Ask your System Administrator to add a Domain Name System (DNS) static entry for thisserver. Each Contact Center server in a domain requires a DNS static entry.
Important:Avaya Aura® Contact Center High Availability solutions do not support Windows Server 2008Dynamic DNS.
In High Availability solutions, ask your System Administrator to add one DNS static entry forthe each managed name and associated managed IP address. A typical High Availabilitycampus solution with a pair of servers requires 3 DNS static entries; one DNS static entry for
212 Avaya Aura® Contact Center Installation May 2013Comments? [email protected]

the active server, one DNS static entry for the standby server, and one DNS static entry forthe managed name and associated IP address.
Procedure
1. Log on to the server.
2. Click Start > Administrative Tools > Server Manager.
3. Beside Computer Information, click Change System Properties.
4. In the System Properties dialog box, click the Computer Name tab.
5. Click Change.
6. In the Computer Name/Domain Changes dialog box, click the Domain option.
7. Type the domain name (you must provide the fully qualified domain name, whichincludes the prefix and suffix).
8. Click OK.
9. Type the domain administrator User name and Password.
10. Click OK.
11. Restart the server when you are prompted to do so.
Disabling the Remote Access servicesAbout this taskAvaya Aura® Contact Center does not support Remote Access Services (RAS). Disable theRemote Access services before installing Avaya Aura® Contact Center. Microsoft RemoteDesktop continues to run after you disable Remote Access services. After you disable theservices, restart the server.
Procedure
1. Choose Start > Administrative Tools > Services.
2. In the Services window, right-click the Remote Access Connection Managericon.
3. Click Properties.
4. In the General tab, from the Startup type list, select Disabled.
5. Click OK.
6. In the Services window, right-click the Remote Access Auto ConnectionManager icon.
Disabling the Remote Access services
Avaya Aura® Contact Center Installation May 2013 213

7. Click Properties.
8. In the General tab, from the Startup type list, select Disabled.
9. Click OK.
10. In the Services window, click File, Exit.
11. Restart the server.
Configuring SNMP on your serverBefore you begin
• Install and configure Microsoft Windows Server 2008 64-bit Release 2 on your server.
About this taskConfigure Simple Network Management Protocol (SNMP) on your server to ensure you haveall of the required components of the Internet protocol for monitoring devices in your network.SNMP helps you manage data that describes the system configuration and errors that mayoccur between them.
Procedure
1. Log on to the server using the administrator account.
2. Choose Start > Control Panel > Programs.
3. In the Programs and Features section, click Turn Windows features on or off.
4. In the Server Manager window, select Server Manager and click Add Features.
5. Select SNMP Services.
6. Click Next.
7. Click Install.
8. If prompted, insert the Windows Server 2008 DVD.
9. Click Close.
214 Avaya Aura® Contact Center Installation May 2013Comments? [email protected]

Downloading the most recent patches to the serverBefore you begin
• Install and configure Windows Server 2008 64-bit Release 2 on your server according tothe settings in this chapter.
• Download and install the most recent and valid updates for Microsoft Windows Server2008 64-bit Release 2.
• Know the location at which you plan to install each Contact Center server softwarepackage.
• Ensure that you use one administrator account on your server to un-install and installsoftware updates.
About this taskTo ensure that you have the most current software, download the most recent Contact Centerpatches from www.avaya.com/support to the server you plan to install.
Procedure
1. Log on to the server using the administrator account.
2. Create a folder Avaya_Support\ProductUpdates on the drive on which youwant to save the software updates.
3. Download the most recent service pack file. Save and unzip the file on the ContactCenter server in the Avaya_Support\ProductUpdates folder.
4. If new patches are available for the latest service pack, download and save thepatches on the Contact Center server in the Avaya_Support\ProductUpdates folder.
5. Read the Contact Center Release Notes for the most recent instructions.
Disabling unused Network AdaptersAbout this taskDisable all unused Network Adapters or Network Interface Cards (NICs) to improve networkcommunications and prevent the erroneous configuration of unused NICs during ContactCenter server commissioning.
Downloading the most recent patches to the server
Avaya Aura® Contact Center Installation May 2013 215

Procedure
1. Log on to the server.
2. Click Start > Control Panel > Network and Internet > Network and SharingCenter > Change Adapter Settings.
3. Right-click on the unused Network Adapter, and select Disable.
4. Repeat this procedure for all unused Network Adapters.
Enabling Microsoft Remote Desktop connectionBefore you begin
• Install Microsoft Windows Server 2008 64-bit Release 2 on your server.• Log on to the server with administrator privileges.
About this taskEnable Microsoft Remote Desktop connection as your remote access tool. Microsoft RemoteDesktop provides remote access for support on the server.
Procedure
1. Choose Start > Control Panel > System and Security.
2. In the System section, select Allow remote access.
3. Click the Remote tab.
4. Select Allow connections from computers running any version of RemoteDesktop (less secure).
5. Click OK.
Configuring Data Execution PreventionAbout this taskConfigure the Data Execution Prevention (DEP) hardware and software to perform additionalchecks on memory that protect the Avaya Aura® Contact Center server against malicious codeexploitation.
216 Avaya Aura® Contact Center Installation May 2013Comments? [email protected]

Procedure
1. Log on to Windows as administrator.
2. Choose Start > Control Panel > System and Security.
3. Click System.
4. In the System window, click Advanced system settings.
5. In the System Properties dialog box, click the Advanced tab.
6. Under Performance, click Settings.
7. In the Performance Options dialog box, click the Data Execution Preventiontab.
8. On the Data Execution Prevention tab, select Turn on DEP for essentialWindows programs and services only.
9. Click OK.
10. On the System Properties dialog box, click OK.
11. Click OK to restart the computer.
Importing Contact Center Firewall Security policyBefore you begin
• Install Microsoft Windows Server 2008 64-bit Release 2 on your server.• Log on to the server with administrator privileges.• Download the most recent Avaya Aura® Contact Center Firewall Security policy from
www.avaya.com/support.
About this taskImport the Avaya Aura® Contact Center Firewall Security policy to ensure all contact centerservers in the solution can communicate.
Avaya recommends that you export and backup your existing firewall security policy beforeimporting the Avaya Aura® Contact Center Firewall Security policy. You can use this backuppolicy to rollback the Avaya Aura® Contact Center Firewall Security policy, if you ever needto.
Procedure
1. Choose Start > Administrative Tools > Windows Firewall with AdvancedSecurity.
2. Choose Actions > Export Policy.
Importing Contact Center Firewall Security policy
Avaya Aura® Contact Center Installation May 2013 217

3. In the File name box, type the name for the backup policy.
4. Click Save.Windows exports the existing policy. You can use this backup policy to rollback theAvaya Aura® Contact Center Firewall Security policy, if you ever need to.
5. On the Policy successfully exported message box, click OK.
6. Choose Actions > Import Policy.
7. On the policy overwrite message box, click Yes.
8. Navigate to the folder containing the Avaya Aura® Contact Center Firewall Securitypolicy.
9. Click Open.Windows imports the Avaya Aura® Contact Center Firewall Security policy.
10. On the Policy successfully imported message box, click OK.
Configuring Internet Information ServicesBefore you begin
• Install Windows Server 2008 64-bit Release 2.
About this taskConfigure Internet Information Services (IIS) to enable the Web-based administrationapplication for the Multimedia software. IIS is an optional component of the Windows Server2008 Release 2 installation.
Procedure
1. Choose Start > Administrative Tools > Server Manager.
2. In the left-hand column of the Server Manager, right-click Roles, select AddRoles.
3. Review the requirements for the new role, and click Next.
4. Under Server Roles, select Web Server (IIS).
5. If an Add Roles Wizard message box appears, listing features required by WebServer (IIS) Support appears, click Add Required Features.
6. Click Next.
7. On the Web Server (IIS) introduction page, click Next.
8. On the Select Role Services page, under Common HTTP Features, select thefollowing services:
218 Avaya Aura® Contact Center Installation May 2013Comments? [email protected]

• Static Content
• Default Document
• Directory Browsing
• HTTP Errors
• HTTP Redirection
Important:All other services check boxes must be cleared.
9. On the Select Role Services page, under Application Development, select thefollowing services:
• ASP.NET
• .NET Extensibility
• ASP
• ISAPI Extensions
• ISAPI Filters
• Server Side Includes
Important:All other services check boxes must be cleared.
10. On the Select Role Services page, under Health and Diagnosis, select thefollowing services:
• HTTP Logging
• Logging Tools
• Request Monitor
• Tracing
Important:All other services check boxes must be cleared.
11. On the Select Role Services page, under Security, select all services.
12. On the Select Role Services page, under Performance, select all services.
13. On the Select Role Services page, under Management Tools, select the followingservices:
• IIS Management Console
• IIS Management Scripts and Tools
• Management Service
Configuring Internet Information Services
Avaya Aura® Contact Center Installation May 2013 219

• All items under IIS 6 Management Compatibility
Important:All other services check boxes must be cleared.
14. Click Next.
15. Review the installation information.
16. Click Install.
17. On the Installation Results page, click Close.
18. Restart the server if required.
Updating server for a network location installationAbout this taskConfigure the server .NET security settings to prepare the server for a remote networkinstallation. Avaya Aura® Contact Center supports network installation. You can insert theAvaya Aura® Contact Center DVD into a computer on your network. You then add this computeras a trusted site and network location on the new server. You can access this DVD from thenetwork location, and with some .NET security updates, use the remote DVD to install AvayaAura® Contact Center software on the new server.
Note:Skip this procedure if you plan to use the Avaya Aura® Contact Center DVD from the DVDdrive of the server.
Procedure
1. Insert the Avaya Aura® Contact Center DVD into a computer on the contact centernetwork.
2. Log on to the new server you are preparing for Contact Center.
3. Choose Start > Control Panel > Network and Internet > Internet Options.
4. In the Security tab, click Trusted sites.
5. In the Trusted sites section, click Sites.
6. In the Add this Web site to the zone box, type the <IP address> of the remotecomputer with the Avaya Aura® Contact Center DVD.
7. Click Add.
8. Click OK.
220 Avaya Aura® Contact Center Installation May 2013Comments? [email protected]

9. Close the Internet Options box.
10. From the new server, navigate to the network location with the DVD.
11. Access the remote DVD and in the root folder of the DVD, double-clickNetworkSetup.bat..NetFramework 3.5 installs and the .NetSecurity settings are modified.
12. If the Avaya Aura® Contact Center installation does not automatically start, in theroot folder of the DVD double-click Setup.exe.
13. After Avaya Aura® Contact Center installs, navigate to your network location anddouble-click NetworkSetupReset.bat.
Installing the Multimedia Contact Server softwareBefore you begin
• Download the most recent Contact Center Multimedia and common component patchesto the server.
• Empty all temporary folders on the server. To determine the specific temporary foldersfor a server, access the DOS prompt and type set. Note the values listed for TEMP andTMP, and delete all files in those locations.
About this taskInstall the Multimedia Contact Server software to provide inbound and outbound voice, email(including voice mail, SMS, faxes and scanned documents), and Web communications contacttypes in your contact center. Multimedia Contact Server also supports instant messaging inSIP-enabled contact centers.
Procedure
1. Insert the Avaya Aura® Contact Center DVD into the DVD drive of your server.
2. If the installation does not automatically start, double-click Setup.exe.
3. Click Install to install the Microsoft .NET Framework 3.5 SP1 and Visual C++runtime libraries on the server.If you are prompted to accept the Microsoft .NET Framework 3.5.1 licenseagreement, click Accept. If you are prompted to restart the server, click Yes andrepeat step 2.
4. On the Welcome window, click Next.
5. On the License Agreement window, read the terms of the agreement.
Installing the Multimedia Contact Server software
Avaya Aura® Contact Center Installation May 2013 221

6. Click I Accept the Terms of the End-User License Agreement.
7. Click Next.
222 Avaya Aura® Contact Center Installation May 2013Comments? [email protected]

8. On the Installation Selection window, in the appropriate section for your platformtype, select Multimedia Contact Server Only.
9. Click Next.
Installing the Multimedia Contact Server software
Avaya Aura® Contact Center Installation May 2013 223

10. On the Installation Destination window, on the Application Destination Drivetab, select the drive for the contact center software applications.
11. Click the Database Destination Drive tab.
224 Avaya Aura® Contact Center Installation May 2013Comments? [email protected]

12. Under Install Multimedia Server Database to, select the drive for the multimediaserver database.
13. Click the Product Updates Location tab.
Installing the Multimedia Contact Server software
Avaya Aura® Contact Center Installation May 2013 225

14. Under Select the parent directory where patches are stored, select the drive onwhich you stored the patches. Click Browse to locate the folder.
15. Click Next.The System Readiness Check utility runs on the server.
16. If the System Readiness Check utility returns a Fail, the software installation cannotproceed until you correct the problem. Review any failures returned by the SystemReadiness Check and consult Avaya Aura® Contact Center Planning andEngineering (NN44400-210) to determine the actions to resolve the issue.You can ignore warnings if the potential impact to the operation of the contact centeris understood and not applicable.
17. Click Next.
18. On the Installation Data window, type the installation details for the CCMM -Primary Server tab.
226 Avaya Aura® Contact Center Installation May 2013Comments? [email protected]

19. From the IM Provider list, select either None, Microsoft OCS or Aura PresenceServices. IM and presence features are supported for Avaya Aura® PresenceServices server and Microsoft Office Communications Server. Instant Messagingcontacts are supported only in SIP-enabled contact center solutions. AvayaCommunication Server 1000 (CS1000) based solutions do not support InstantMessaging contact routing.
20. In the Manager Server (CCMS) box, type the name of the server on which theContact Center Manager Server software is installed.
21. In the License Server box, type the name of the server on which the Contact CenterLicense Manager software is installed.
22. In the Telephony Server (CCT) box, type the name of the server on which theCommunication Control Toolkit software is installed.
23. In the Administration Server (CCMA) box, type the name of the server on whichthe Contact Center Manager Administration software is installed.
24. In the Inbound Mail Server (POP3) box, type the name of the server on which emailmessages are received in your network.
25. In the Outbound Mail Server (SMTP) box, type the name of the server from onwhich email messages are sent. Your inbound and outbound mail servers can havethe same name.
Installing the Multimedia Contact Server software
Avaya Aura® Contact Center Installation May 2013 227

26. Select Enter Predictive Outbound Configuration to enable predictive outboundcontacts.
27. In the Predictive Server box, type the name of the Predictive Outbound solutionsapplication server on which the administration software resides, or the CPSE2
server.
28. In the Predictive Reporting Server box, type the name of the Predictive Outboundsolutions server that contains the statistics for reporting predictive outbound data,or Portfolio server.
29. In the Web Stats Server box, type the name of the optional Web Statistics serverthat agents and supervisors use to view real-time statistics for call handling, skillsetdata, and the state information on the Agent Desktop. Web Based Statistics is anoptional licensed feature and requires a Web Based Statistics feature license.
30. In the Web Stats Port box, type the port number of the Web Statistics server. Thedefault port number is 9086.
31. In the Web Communications Server (Optional) box, type the name of the serveron which the Web Customer Interface is installed if Web communications is licensedin your contact center.
32. Click Next.
33. On the Summary window, review and verify the information.
228 Avaya Aura® Contact Center Installation May 2013Comments? [email protected]

34. Click Install.
35. After the installation is complete, click Finish.
36. If prompted, restart the server.
Upgrading Java Runtime Environment, Java DevelopmentKit, and Apache Tomcat components using Third PartySoftware Upgrade Utility
Before you begin
• Apply Contact Center 6.3 Service Pack 10 or later on your system as an install-timepatch.
• Restart the Contact Center server to complete this procedure.
About this taskUse Third Party Software Upgrade Utility to automatically upgrade your Java RuntimeEnvironment and Tomcat software components. For more information, see Third PartySoftware Upgrade Utility on page 27.
Procedure
1. Log on to the server using the administrator account.
2. Navigate to the Avaya_Support\ProductUpdates folder.
3. Open the folder where you had saved the latest Service Pack.
4. Browse to ThirdParty\AACCThirdPartySoftwareUpgradeUtility.exe.
5. Double-click AACCThirdPartySoftwareUpgradeUtility.exe.
6. Click Upgrade.The system displays the “User Action Required” dialog box.
7. Click OK.
8. Click Yes to restart Contact Center and complete the upgrade.
Upgrading Java Runtime Environment, Java Development Kit, and Apache Tomcat components using Third PartySoftware Upgrade Utility
Avaya Aura® Contact Center Installation May 2013 229

Securing the Windows serverAbout this taskApply optional security measures to your operating system to further secure your server.
Important:Scanning software can degrade the performance and decrease the reliability of the system.Install virus scanning software only if the system connects to an exposed network or to theInternet.
Important:To maintain server performance, you must schedule virus scans during maintenanceperiods or low usage hours only.
Procedure
1. Harden the operating system using defined site procedures.
2. Install antivirus software. If you install antivirus software, Avaya recommends thatyou exclude some contact center files and folders from real-time and scheduledscans. For more information, and for a list of files and folders to exclude, see AvayaAura® Contact Center Planning and Engineering (NN44400-210).
Installing the external Web communication serversoftware
Before you begin
• Install Contact Center Multimedia software.
About this taskIf you use Web communications in your contact center, you can use the Sample CustomerInterface (CI) Web site implementation to help you develop pages for your corporate Web site.The Web services architecture is a platform-independent interface that customers can accessfrom both Microsoft .NET and Java applications. Customer Web sites or third-party applicationsuse the open interface for integration with the Contact Center Multimedia system.
230 Avaya Aura® Contact Center Installation May 2013Comments? [email protected]

The Customer Interface Web services provide a range of methods to perform the followingfunctions:
• Register new customers in the Contact Center Multimedia database• Log on or log off existing customers• Update customer logon credentials• Create customer contacts• Update customer details• Read customer information• Review a customer contact history• Request immediate or scheduled callback requests• Read a contact• Create and maintain a Web communications chat session
To integrate Web Communications with the Contact Center Multimedia system, download theAvaya Aura® Contact Center Web Communications SDK package and ReferenceImplementation from www.avaya.com/devconnect. The Web Communications ReferenceImplementation contains information about customizing the Web communication applicationto your solution.
Important:Do not install the Web Communications Reference Implementation on an Avaya Aura®
Contact Center server. Install the Web Communications Reference Implementation on yourown server in the contact center solution.
Procedure
1. Locate and download the Web Communications Reference Implementationsoftware from www.avaya.com/devconnect.
2. Copy the Web Communications Reference Implementation software to the externalWeb server.
3. Follow the Reference Implementation instructions to install and commission theWeb Communications server.
Installing the external Web communication server software
Avaya Aura® Contact Center Installation May 2013 231

Installing the Instant Messaging chat server on the externalWeb server
Before you begin
• Install Contact Center Multimedia server software in a SIP-enabled Contact Center.• Install the Instant Messaging license on the Contact Center License Manager.
About this taskThe Instant Messaging chat server allows customers to have Instant Messaging chat sessionswith the contact center. The Instant Messaging chat server uses Presence Services to gatherpresence information for the Agent, Supervisor and Expert.
Procedure
1. Download the Avaya Aura® Contact Center Sample Instant Message XMPP clientapplication from www.avaya.com/support to the external Web server.
2. Extract the contents of the sample application and read theAACCPresenceServices_IMChatServerInstall document for further instructions.
232 Avaya Aura® Contact Center Installation May 2013Comments? [email protected]

Part II: Avaya Communication Server 1000
Avaya Aura® Contact Center Installation May 2013 233

Avaya Communication Server 1000
234 Avaya Aura® Contact Center Installation May 2013Comments? [email protected]

Chapter 9: Avaya Aura® Contact Centersoftware installation for CS1000
Avaya Aura® Contact Center Release 6.3 supports a range of server types for Avaya CommunicationServer 1000 AML-based solutions. Each server type installs a combination of Avaya Aura® Contact Centerapplications suitable for a specific contact center function. Some Contact Center servers support onlyvoice contacts, some Contact Center servers support only multimedia contacts, and some Contact Centerservers support both voice and multimedia.
The Contact Center solution may include one or more servers. The installation configuration you choosedepends on the hardware resources and performance demands of your contact center. To implement theAvaya Aura® Contact Center High Availability feature, your solution requires additional standby serversto provide resiliency and redundancy.
Voice and Multimedia Contact Server — Install this server to provide context sensitive and skill-basedrouting for customer voice and multimedia contacts. This server provides routed contact support for emailmessages, web communications, voice mail messages, scanned documents, fax messages, and SMStext messages.
Voice Contact Server Only — Install this server to provide context sensitive and skill-based routing forcustomer voice contacts.
Multimedia Contact Server Only — Install this server to increase the number of contact center agentsin your enterprise solution. When installed, this server provides the multimedia contact processingcapabilities, and the Voice Contact Server processes only voice contacts.
Knowledge Worker Server Only — Install a Knowledge Worker server to provide Computer-TelephonyIntegration (CTI) functionality and call data handling capabilities. The contact center has no Contact CenterManager Server and, therefore, no skill-based routing capability. Knowledge Worker Server does notsupport High Availability.
Prerequisites for Contact Center installation workflow• Complete the Avaya Aura® Contact Center Installation Checklist (NN44400-310).
• Ensure all your server hardware meets the requirements described in Avaya Aura®
Contact Center Planning and Engineering (NN44400-210).
Avaya Aura® Contact Center Installation May 2013 235
• Know the installation configuration you plan to use in your contact center. For moreinformation see Avaya Aura® Contact Center Planning and Engineering(NN44400-210).
• Ensure that your PABX is configured. For more information about configuring thePABX, see Avaya Aura® Contact Center Configuration – Avaya CS1000 Integration(NN44400-512).
Contact Center server types and software installation forCS1000
About this taskThis work flow shows the sequence of tasks you perform to install one or more Contact Centerservers in an AML-based Avaya Communication Server 1000 contact center solution.
236 Avaya Aura® Contact Center Installation May 2013Comments? [email protected]

Figure 2: Contact Center software installation tasks for Avaya Communication Server 1000 based
Contact Center server types and software installation for CS1000
Avaya Aura® Contact Center Installation May 2013 237

solutions
For more information about installing Avaya Aura® Contact Center servers for an AvayaCommunication Server 1000 AML-based contact center solution, see the following:
• Voice and Multimedia Contact Server for CS1000 installation on page 239• Primary Voice and Multimedia Contact Server for CS1000 software installation in a
domain on page 275• Standby Voice and Multimedia Contact Server for CS1000 software installation in a
domain on page 309• Primary Voice and Multimedia Contact Server for CS1000 software installation in a
workgroup on page 355• Standby Voice and Multimedia Contact Server for CS1000 software installation in a
workgroup on page 393
• Voice Contact Server for CS1000 installation on page 443• Primary Voice Contact Server for CS1000 installation in a domain on page 473• Standby Voice Contact Standby Server for CS1000 installation in a domain on page
505• Primary Voice Contact Server for CS1000 installation in a workgroup on page 549• Standby Voice Contact Standby Server for CS1000 installation in a workgroup on
page 583
• Multimedia Contact Server software installation on page 631• Knowledge Worker Server software installation on page 659
The following additional and optional server types are also supported in Avaya CommunicationServer 1000 AML-based contact center solutions:
• Network Control Center Server software installation on page 871• Security Framework Server software installation on page 899
238 Avaya Aura® Contact Center Installation May 2013Comments? [email protected]

Chapter 10: Voice and Multimedia ContactServer for CS1000 installation
This chapter describes how to install a Voice and Multimedia Contact Server in a solution with an AvayaCommunication Server 1000 (CS1000) platform. A Voice and Multimedia Contact Server includes thefollowing server software:
• Contact Center Manager Server (CCMS)
• Contact Center Manager Server Utility
• Contact Center License Manager
• Contact Center Manager Administration (CCMA)
• Communication Control Toolkit (CCT)
• Contact Center Multimedia (CCMM)
Install this server to provide context‐sensitive and skill-based routing for customer voice and multimediacontacts. This server provides routed contact support for voice calls, email messages, Webcommunications, voice mail messages, scanned documents, fax messages, and SMS text messages.This server provides extensive tools for agent management, real-time and historical reporting, andgraphical tools to create contact flows and treatment rules. Use this server for license management, HighAvailability configuration, networking, Open Interfaces Web Service and third-party application interfacesintegration.
If the server is to be used in a domain, Avaya recommends that you add the server to the domain beforeinstalling Contact Center software.
You can change the name of a Contact Center server, but because this is time consuming, Avayarecommends that you configure the server final production name before installing Contact Centersoftware.
If you plan to follow the Microsoft server hardening guidelines, complete those procedures before installingAvaya Aura® Contact Center.
Important:You can create an administration account on the server and then install Avaya Aura® Contact Centerusing the account. This Avaya Aura® Contact Center administration account must have fulladministrative privileges. You must upgrade and patch Avaya Aura® Contact Center using thisadministration account. You can rename this account after installing Avaya Aura® Contact Center, butyou must not delete the account. If you delete the account used to install Avaya Aura® Contact Center,Avaya Aura® Contact Center stops working.
Avaya Aura® Contact Center Installation May 2013 239

Voice and Multimedia Contact Server supports two Network Interface Cards (NICs) and two subnets (onecontact center subnet and one ELAN subnet). The Voice and Multimedia Contact Server ELAN NIC andELAN subnet are optional.
You must complete all the procedures in this section in sequential order.
Voice and Multimedia Contact Server installationprerequisites
• Copy the most recent patches for the Contact Center software.
• Ensure that your new Contact Center license file is available.
Important:For the system to correctly handle backup and restore SNMP events, you must installWindows SNMP Service before you install Contact Center server software.
Downloading the latest documentationBefore you begin
• Download the most recent version of Acrobat Reader.• Access the Avaya Web site at www.avaya.com/support.
About this taskDownload the most recent documentation to ensure you have the most recent updates.Updates in the documentation accurately reflect the most recent changes in the software.
Procedure
1. Log on to the Avaya Web site.
2. Compare the versions of the documentation on the site with the versions youhave.
3. If the version number on www.avaya.com/support is higher than your version,download the latest version of the document.
4. Review the Avaya Web site for release notes and readme files.
240 Avaya Aura® Contact Center Installation May 2013Comments? [email protected]
Installing Windows Server 2008 Release 2Before you begin
• Ensure that you have a newly formatted server that meets the specifications in AvayaAura® Contact Center Planning and Engineering (NN44400-210) on which to installMicrosoft Windows Server 2008 64-bit, Release 2, Service Pack 1.
Do not upgrade your operating system from a previous release. Contact Center is notsupported on an upgraded operating system.
• Configure all servers for RAID as described in Avaya Aura® Contact Center Planning andEngineering (NN44400-210).
• Ensure that you have a DVD for Windows Server 2008 Release 2.• Install the network interface card in the server.• Know the IP addresses for the contact center subnet.
About this taskInstall the Windows operating system, which is required for the Contact Center server software.During the installation, configure the Windows settings as required. You must perform thisprocedure on each server before you install Contact Center server software on the server.
Procedure
1. Insert the Windows Server 2008 64-bit Release 2 Standard Edition or WindowsServer 2008 64-bit Release 2 Enterprise Edition DVD into the DVD drive.
2. Install Windows Server 2008 Release 2 according to the instructions supplied bythe DVD.
3. On the first install page, select your language for installation.
4. Click Next.
5. On the Installation window, select a Language to install from the list.
6. Select a Time and currency format from the list.
7. Select Keyboard or input method from the list.
8. Click Next.
9. Click Install Now.
10. Select an operating system from the list.
11. Click Next.
12. On the first Install Windows screen, read the terms of the license agreement andselect I accept the license terms.
Installing Windows Server 2008 Release 2
Avaya Aura® Contact Center Installation May 2013 241

13. Click Next.
14. Select Custom.
15. Select the disk partition on which you want to install Windows Server 2008.
Important:You can use the partition management options to configure the partitions on yourserver.
16. Click Next.The installation proceeds and automatically restarts the server several times.
17. After completing the installation, log on to the server as Administrator. Enter andconfirm the Administrator password.
18. In the Initial Configuration Tasks window, select Activate Windows and followthe instructions or the Microsoft documentation to activate your server.
19. Select Set time zone and complete the information as required for your system.If you are installing Voice Contact Server Only software or Knowledge WorkerServer software on this server, ensure that you clear Automatically adjust clockfor daylight saving changes. Otherwise select Automatically adjust clock fordaylight saving changes.
20. Select Configure Networking and complete the information for your NetworkInterface Card (NIC) with the server IP address.
21. Select Provide computer name and domain and complete the information for yourserver name and workgroup or domain settings.
22. Change the DVD drive letter to E: to ensure the correct drive letters are free for theContact Center application and database hard disk drives and partitions.
23. Configure the hard disk drives and partitions for this server using the WindowsServer 2008 Server Manager - Disk Management utility. For more information abouthard disk drives and partitions, see Avaya Aura® Contact Center Planning andEngineering (NN44400-210).
24. Install other required drivers for your hardware configuration.
Procedure job aid
Name Description
Computer name Do not use spaces or underscores or exceed15 characters. The name must start with analphabetic character.
242 Avaya Aura® Contact Center Installation May 2013Comments? [email protected]
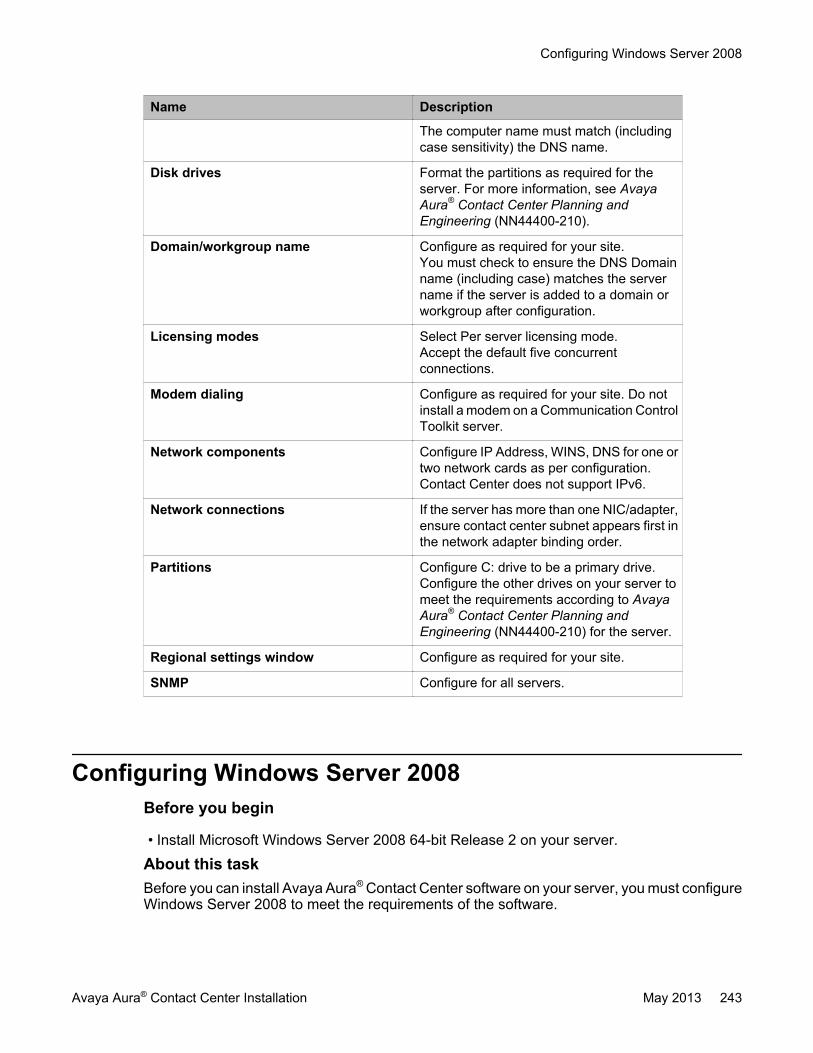
Name Description
The computer name must match (includingcase sensitivity) the DNS name.
Disk drives Format the partitions as required for theserver. For more information, see AvayaAura® Contact Center Planning andEngineering (NN44400-210).
Domain/workgroup name Configure as required for your site.You must check to ensure the DNS Domainname (including case) matches the servername if the server is added to a domain orworkgroup after configuration.
Licensing modes Select Per server licensing mode.Accept the default five concurrentconnections.
Modem dialing Configure as required for your site. Do notinstall a modem on a Communication ControlToolkit server.
Network components Configure IP Address, WINS, DNS for one ortwo network cards as per configuration.Contact Center does not support IPv6.
Network connections If the server has more than one NIC/adapter,ensure contact center subnet appears first inthe network adapter binding order.
Partitions Configure C: drive to be a primary drive.Configure the other drives on your server tomeet the requirements according to AvayaAura® Contact Center Planning andEngineering (NN44400-210) for the server.
Regional settings window Configure as required for your site.
SNMP Configure for all servers.
Configuring Windows Server 2008Before you begin
• Install Microsoft Windows Server 2008 64-bit Release 2 on your server.
About this taskBefore you can install Avaya Aura® Contact Center software on your server, you must configureWindows Server 2008 to meet the requirements of the software.
Configuring Windows Server 2008
Avaya Aura® Contact Center Installation May 2013 243

You can prepare the server using this and other procedures, or you can download and use anAvaya Aura® Contact Center operating system configuration tool that installs the requiredWindows roles and features.
The Avaya Aura® Contact Center Windows Roles and Features installer configures thefollowing Windows Server 2008 resources:
• Windows Server Backup Features• SNMP Services• Active Directory Light Weight Directory Services• Application Server• Web Server (IIS)
For more information, and to download the Avaya Aura® Contact Center Windows Roles andFeatures installer, see http://support.avaya.com.
The Avaya Aura® Contact Center Windows Roles and Features installer replaces the followingprocedures:
• Configuring Windows Server 2008 (this procedure)• Configuring SNMP on your server• Installing operating system components for Contact Center
If you use the Avaya Aura® Contact Center Windows Roles and Features installer, skip thesethree procedures.
Procedure
1. Log on to the Windows Server 2008 server using an administrator account.
2. Select the Don’t display this screen on startup check box.
3. Update the emergency repair disk to record the latest configuration data for theserver.
4. Choose Start > Administrative Tools > Server Manager.
5. In the left pane, click Features.
6. Click Add Features.
7. Select Windows Server Backup Features.
8. Click Next.
9. Click Install.
10. Click Close.
11. Choose Start > All Programs > Accessories > System Tools > Windows ServerBackup.
12. Follow the on-screen instructions to select what you want to back up.
244 Avaya Aura® Contact Center Installation May 2013Comments? [email protected]
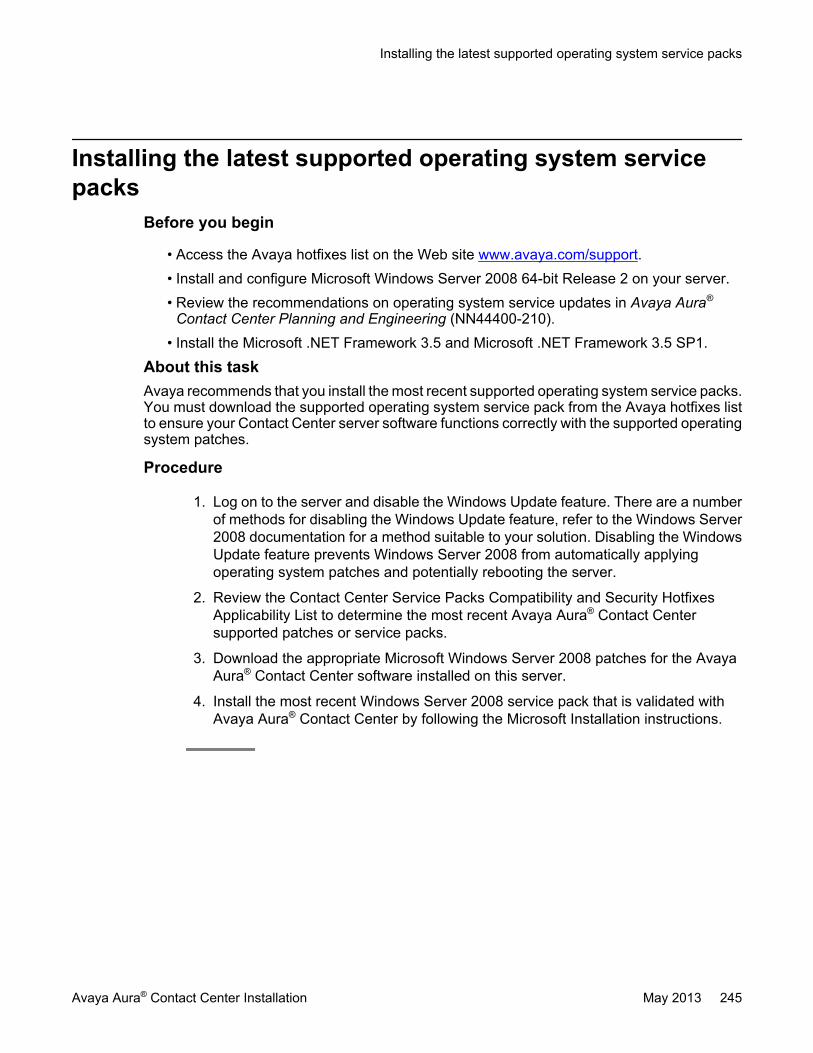
Installing the latest supported operating system servicepacks
Before you begin
• Access the Avaya hotfixes list on the Web site www.avaya.com/support.• Install and configure Microsoft Windows Server 2008 64-bit Release 2 on your server.• Review the recommendations on operating system service updates in Avaya Aura®
Contact Center Planning and Engineering (NN44400-210).• Install the Microsoft .NET Framework 3.5 and Microsoft .NET Framework 3.5 SP1.
About this taskAvaya recommends that you install the most recent supported operating system service packs.You must download the supported operating system service pack from the Avaya hotfixes listto ensure your Contact Center server software functions correctly with the supported operatingsystem patches.
Procedure
1. Log on to the server and disable the Windows Update feature. There are a numberof methods for disabling the Windows Update feature, refer to the Windows Server2008 documentation for a method suitable to your solution. Disabling the WindowsUpdate feature prevents Windows Server 2008 from automatically applyingoperating system patches and potentially rebooting the server.
2. Review the Contact Center Service Packs Compatibility and Security HotfixesApplicability List to determine the most recent Avaya Aura® Contact Centersupported patches or service packs.
3. Download the appropriate Microsoft Windows Server 2008 patches for the AvayaAura® Contact Center software installed on this server.
4. Install the most recent Windows Server 2008 service pack that is validated withAvaya Aura® Contact Center by following the Microsoft Installation instructions.
Installing the latest supported operating system service packs
Avaya Aura® Contact Center Installation May 2013 245

Connecting to the contact center subnetAbout this taskConnect the Contact Center server to the contact center subnet. The contact center subnet isthe network on which the server software applications work together to route contacts andgenerate reports.
Procedure
1. Locate the slot assigned to the contact center subnet network interface card for theserver. Make a note of the slot.
2. Connect the cable from the contact center subnet to the contact center subnetnetwork interface card in the server in accordance with customer site networkingguidelines.
3. Use the ping command to test the contact center subnet.
Adding a server to a domainBefore you begin
• Ensure that you have domain administrator privileges, or ask the Domain Administratorto assign you a domain user account for remote access.
• On the server, configure a preferred Domain Name System (DNS) server on the NetworkInterface Card (NIC).
About this taskAdd the server to an existing domain. Avaya recommends that you add the server to the domainbefore installing Contact Center software.
Ask your System Administrator to add a Domain Name System (DNS) static entry for thisserver. Each Contact Center server in a domain requires a DNS static entry.
Important:Avaya Aura® Contact Center High Availability solutions do not support Windows Server 2008Dynamic DNS.
In High Availability solutions, ask your System Administrator to add one DNS static entry forthe each managed name and associated managed IP address. A typical High Availabilitycampus solution with a pair of servers requires 3 DNS static entries; one DNS static entry for
246 Avaya Aura® Contact Center Installation May 2013Comments? [email protected]

the active server, one DNS static entry for the standby server, and one DNS static entry forthe managed name and associated IP address.
Procedure
1. Log on to the server.
2. Click Start > Administrative Tools > Server Manager.
3. Beside Computer Information, click Change System Properties.
4. In the System Properties dialog box, click the Computer Name tab.
5. Click Change.
6. In the Computer Name/Domain Changes dialog box, click the Domain option.
7. Type the domain name (you must provide the fully qualified domain name, whichincludes the prefix and suffix).
8. Click OK.
9. Type the domain administrator User name and Password.
10. Click OK.
11. Restart the server when you are prompted to do so.
Disabling the Remote Access servicesAbout this taskAvaya Aura® Contact Center does not support Remote Access Services (RAS). Disable theRemote Access services before installing Avaya Aura® Contact Center. Microsoft RemoteDesktop continues to run after you disable Remote Access services. After you disable theservices, restart the server.
Procedure
1. Choose Start > Administrative Tools > Services.
2. In the Services window, right-click the Remote Access Connection Managericon.
3. Click Properties.
4. In the General tab, from the Startup type list, select Disabled.
5. Click OK.
6. In the Services window, right-click the Remote Access Auto ConnectionManager icon.
Disabling the Remote Access services
Avaya Aura® Contact Center Installation May 2013 247

7. Click Properties.
8. In the General tab, from the Startup type list, select Disabled.
9. Click OK.
10. In the Services window, click File, Exit.
11. Restart the server.
Configuring SNMP on your serverBefore you begin
• Install and configure Microsoft Windows Server 2008 64-bit Release 2 on your server.
About this taskConfigure Simple Network Management Protocol (SNMP) on your server to ensure you haveall of the required components of the Internet protocol for monitoring devices in your network.SNMP helps you manage data that describes the system configuration and errors that mayoccur between them.
Procedure
1. Log on to the server using the administrator account.
2. Choose Start > Control Panel > Programs.
3. In the Programs and Features section, click Turn Windows features on or off.
4. In the Server Manager window, select Server Manager and click Add Features.
5. Select SNMP Services.
6. Click Next.
7. Click Install.
8. If prompted, insert the Windows Server 2008 DVD.
9. Click Close.
248 Avaya Aura® Contact Center Installation May 2013Comments? [email protected]

Downloading the most recent patches to the serverBefore you begin
• Install and configure Windows Server 2008 64-bit Release 2 on your server according tothe settings in this chapter.
• Download and install the most recent and valid updates for Microsoft Windows Server2008 64-bit Release 2.
• Know the location at which you plan to install each Contact Center server softwarepackage.
• Ensure that you use one administrator account on your server to un-install and installsoftware updates.
About this taskTo ensure that you have the most current software, download the most recent Contact Centerpatches from www.avaya.com/support to the server you plan to install.
Procedure
1. Log on to the server using the administrator account.
2. Create a folder Avaya_Support\ProductUpdates on the drive on which youwant to save the software updates.
3. Download the most recent service pack file. Save and unzip the file on the ContactCenter server in the Avaya_Support\ProductUpdates folder.
4. If new patches are available for the latest service pack, download and save thepatches on the Contact Center server in the Avaya_Support\ProductUpdates folder.
5. Read the Contact Center Release Notes for the most recent instructions.
Disabling unused Network AdaptersAbout this taskDisable all unused Network Adapters or Network Interface Cards (NICs) to improve networkcommunications and prevent the erroneous configuration of unused NICs during ContactCenter server commissioning.
Downloading the most recent patches to the server
Avaya Aura® Contact Center Installation May 2013 249

Procedure
1. Log on to the server.
2. Click Start > Control Panel > Network and Internet > Network and SharingCenter > Change Adapter Settings.
3. Right-click on the unused Network Adapter, and select Disable.
4. Repeat this procedure for all unused Network Adapters.
Enabling Microsoft Remote Desktop connectionBefore you begin
• Install Microsoft Windows Server 2008 64-bit Release 2 on your server.• Log on to the server with administrator privileges.
About this taskEnable Microsoft Remote Desktop connection as your remote access tool. Microsoft RemoteDesktop provides remote access for support on the server.
Procedure
1. Choose Start > Control Panel > System and Security.
2. In the System section, select Allow remote access.
3. Click the Remote tab.
4. Select Allow connections from computers running any version of RemoteDesktop (less secure).
5. Click OK.
Configuring Data Execution PreventionAbout this taskConfigure the Data Execution Prevention (DEP) hardware and software to perform additionalchecks on memory that protect the Avaya Aura® Contact Center server against malicious codeexploitation.
250 Avaya Aura® Contact Center Installation May 2013Comments? [email protected]

Procedure
1. Log on to Windows as administrator.
2. Choose Start > Control Panel > System and Security.
3. Click System.
4. In the System window, click Advanced system settings.
5. In the System Properties dialog box, click the Advanced tab.
6. Under Performance, click Settings.
7. In the Performance Options dialog box, click the Data Execution Preventiontab.
8. On the Data Execution Prevention tab, select Turn on DEP for essentialWindows programs and services only.
9. Click OK.
10. On the System Properties dialog box, click OK.
11. Click OK to restart the computer.
Importing Contact Center Firewall Security policyBefore you begin
• Install Microsoft Windows Server 2008 64-bit Release 2 on your server.• Log on to the server with administrator privileges.• Download the most recent Avaya Aura® Contact Center Firewall Security policy from
www.avaya.com/support.
About this taskImport the Avaya Aura® Contact Center Firewall Security policy to ensure all contact centerservers in the solution can communicate.
Avaya recommends that you export and backup your existing firewall security policy beforeimporting the Avaya Aura® Contact Center Firewall Security policy. You can use this backuppolicy to rollback the Avaya Aura® Contact Center Firewall Security policy, if you ever needto.
Procedure
1. Choose Start > Administrative Tools > Windows Firewall with AdvancedSecurity.
2. Choose Actions > Export Policy.
Importing Contact Center Firewall Security policy
Avaya Aura® Contact Center Installation May 2013 251
3. In the File name box, type the name for the backup policy.
4. Click Save.Windows exports the existing policy. You can use this backup policy to rollback theAvaya Aura® Contact Center Firewall Security policy, if you ever need to.
5. On the Policy successfully exported message box, click OK.
6. Choose Actions > Import Policy.
7. On the policy overwrite message box, click Yes.
8. Navigate to the folder containing the Avaya Aura® Contact Center Firewall Securitypolicy.
9. Click Open.Windows imports the Avaya Aura® Contact Center Firewall Security policy.
10. On the Policy successfully imported message box, click OK.
Disabling NetBIOSAbout this taskIf the Contact Center server uses two Network Interface Cards (NICs), disable NetBIOS on theEmbedded LAN (ELAN) network interface card (NIC) to avoid NetBIOS conflicts.
Contact Center supports two Network Interface Cards (NICs) and two subnets (one contactcenter subnet and one ELAN subnet). The Contact Center ELAN NIC and ELAN subnet areoptional.
Procedure
1. Choose Start > Control Panel > Network and Internet.
2. Click Network and Sharing Center.
3. Click Change adapter settings.
4. Right-click the ELAN Network Interface Card (NIC).
5. Click Properties.
6. Select Internet Protocol Version 4 (TCP/IPv4).
7. Click Properties.
8. Click Advanced.
9. Click the WINS tab.
10. Select the Disable NetBIOS over TCP/IP check box.
252 Avaya Aura® Contact Center Installation May 2013Comments? [email protected]

11. Click OK.
Connecting the Embedded LAN subnetBefore you begin
• Install two network cards on the Contact Center server.• Disable the NetBIOS on the ELAN network interface card.• Connect the contact center subnet network interface card.
About this taskIf your server uses two NICs, connect the Embedded LAN (ELAN) NIC to the ELAN subnet.Contact Center supports two network interface cards (NICs) and two subnets (one contactcenter subnet and one ELAN subnet). The Contact Center ELAN NIC and ELAN subnet areoptional.
Procedure
1. Locate the slot assigned to the ELAN network interface card for the server.
2. Write the MAC address of the card on a small label. Attach the label to the back ofthe card or the chassis slot position.
3. Connect the ELAN subnet from the Avaya equipment to the Ethernet hub.
4. Connect the network cable from the ELAN network interface card in the server tothe hub.
5. Plug in the power cord for the hub.
6. If you have an ELAN subnet network connection, use the ping command to test it.
Configuring the binding orderBefore you begin
• Install two network interface cards on the Contact Center server.• Disable the NetBIOS on the ELAN network interface card.• Connect the Contact Center server network interface card to the contact center subnet.• Connect the Contact Center server ELAN network interface card to the ELAN subnet.
Connecting the Embedded LAN subnet
Avaya Aura® Contact Center Installation May 2013 253

About this taskConfigure the binding order of the network cards. The contact center subnet network interfacecard must be bound first and then the ELAN network interface card.
Procedure
1. Choose Start > Control Panel > Network and Internet > Network and SharingCenter.
2. Click Change adapter settings.
3. In the Network Connections window, press the ALT key.A hidden menu appears.
4. Choose Advanced > Advanced Settings.
5. In the Connections box, ensure that the contact center subnet connection is listedfirst. If it is not listed first, adjust the order.
Installing operating system components for ContactCenter
Before you begin
• Install Windows Server 2008 64-bit Release 2.
About this taskBefore installing Contact Center software, you must install specific operating system softwarecomponents such as Internet Information Services to integrate the components in ContactCenter.
Procedure
1. Choose Start > Administrative Tools > Server Manager.
2. In the left-hand column of the Server Manager, right-click Roles, and select AddRoles.
3. Review the requirements for the new role, and click Next.
4. Under Server Roles, select Active Directory Lightweight Directory Services.
5. If an Add Roles Wizard message box that lists features required by Active DirectoryLightweight Directory Services appears, click Add Required Features.
6. Under Server Roles, select Application Server.
7. If an Add Roles Wizard message box that lists features required by ApplicationServer appears, click Add Required Features.
254 Avaya Aura® Contact Center Installation May 2013Comments? [email protected]

8. Under Application Server, select Role Services.
9. Select Web Server (IIS) Support.
10. If an Add Roles Wizard message box appears, listing features required by WebServer (IIS) Support appears, click Add Required Features.
11. Click Next.
12. On the Introduction to Web Server (IIS) page, click Next.
13. On the Select Role Services page, under Common HTTP Features, select thefollowing services:
• Static Content
• Default Document
• Directory Browsing
• HTTP Errors
• HTTP Redirection
Important:All other services check boxes must be cleared.
14. On the Select Role Services page, under Application Development, select thefollowing services:
• ASP.NET
• .NET Extensibility
• ASP
• ISAPI Extensions
• ISAPI Filters
• Server Side Includes
Important:All other services check boxes must be cleared.
15. On the Select Role Services page, under Health and Diagnosis, select thefollowing services:
• HTTP Logging
• Logging Tools
• Request Monitor
• Tracing
Installing operating system components for Contact Center
Avaya Aura® Contact Center Installation May 2013 255

Important:All other services check boxes must be cleared.
16. On the Select Role Services page, under Security, select all services.
17. On the Select Role Services page, under Performance, select all services.
18. On the Select Role Services page, under Management Tools, select the followingservices:
• IIS Management Console
• IIS Management Scripts and Tools
• Management Service
• All items under IIS 6 Management Compatibility
Important:All other services check boxes must be cleared.
19. Click Next.
20. Review the installation information.
21. Click Install.
22. On the Installation Results page, click Close.
23. Restart the server if required.
Configuring MIME types to support Microsoft updatesAbout this taskConfigure the Multipurpose Internet Mail Extension (MIME) types to support Microsoft updatesand patches.
Procedure
1. Log on to the server.
2. Click Start > Administrative Tools > Computer Management.
3. In the Computer Management dialog box, expand Services and Applications >Internet Information Services > IIS Manager > Sites.
4. Select Default Web Site.
5. Under IIS, select MIME Types.
256 Avaya Aura® Contact Center Installation May 2013Comments? [email protected]

6. Double-click MIME Types.
7. On the Actions list on the right, click Add.
8. In the File name extension box, type .msp.
9. In the MIME Type box, type application/microsoftpatch.
10. Click OK.
11. On the Actions list on the right, click Add.
12. In the File name extension box, type .msu.
13. In the MIME Type box, type application/microsoftupdate.
14. Click OK.
15. Close the Computer Management window.
Updating server for a network location installationAbout this taskConfigure the server .NET security settings to prepare the server for a remote networkinstallation. Avaya Aura® Contact Center supports network installation. You can insert theAvaya Aura® Contact Center DVD into a computer on your network. You then add this computeras a trusted site and network location on the new server. You can access this DVD from thenetwork location, and with some .NET security updates, use the remote DVD to install AvayaAura® Contact Center software on the new server.
Note:Skip this procedure if you plan to use the Avaya Aura® Contact Center DVD from the DVDdrive of the server.
Procedure
1. Insert the Avaya Aura® Contact Center DVD into a computer on the contact centernetwork.
2. Log on to the new server you are preparing for Contact Center.
3. Choose Start > Control Panel > Network and Internet > Internet Options.
4. In the Security tab, click Trusted sites.
5. In the Trusted sites section, click Sites.
6. In the Add this Web site to the zone box, type the <IP address> of the remotecomputer with the Avaya Aura® Contact Center DVD.
7. Click Add.
Updating server for a network location installation
Avaya Aura® Contact Center Installation May 2013 257

8. Click OK.
9. Close the Internet Options box.
10. From the new server, navigate to the network location with the DVD.
11. Access the remote DVD and in the root folder of the DVD, double-clickNetworkSetup.bat..NetFramework 3.5 installs and the .NetSecurity settings are modified.
12. If the Avaya Aura® Contact Center installation does not automatically start, in theroot folder of the DVD double-click Setup.exe.
13. After Avaya Aura® Contact Center installs, navigate to your network location anddouble-click NetworkSetupReset.bat.
Configuring MIME types to support Microsoft updatesAbout this taskConfigure the Multipurpose Internet Mail Extension (MIME) types to support Microsoft updatesand patches.
Procedure
1. Log on to the server.
2. Click Start > Administrative Tools > Computer Management.
3. In the Computer Management dialog box, expand Services and Applications >Internet Information Services > IIS Manager > Sites.
4. Select Default Web Site.
5. Under IIS, select MIME Types.
6. Double-click MIME Types.
7. On the Actions list on the right, click Add.
8. In the File name extension box, type .msp.
9. In the MIME Type box, type application/microsoftpatch.
10. Click OK.
11. On the Actions list on the right, click Add.
12. In the File name extension box, type .msu.
13. In the MIME Type box, type application/microsoftupdate.
14. Click OK.
258 Avaya Aura® Contact Center Installation May 2013Comments? [email protected]

15. Close the Computer Management window.
Installing the Voice and Multimedia Contact Server softwarefor CS1000
Before you begin
• Ensure the Avaya Communication Server 1000 is configured. For more information seeAvaya Aura® Contact Center Configuration – Avaya CS1000 Integration(NN44400-512).
• Download the most recent Contact Center and Common Components patches to theserver.
About this taskInstall the Contact Center Voice and Multimedia Contact Server software and enable yourcontact center to route contacts to the agents that can answer the call with the correct skills.
Note:Installing Voice and Multimedia Contact Server software installs Apache Tomcat Server.The default port number for Apache Tomcat is 8081. If you need to change the port numberto avoid conflicts with third-party software, see your Apache Tomcat documentation.
Note:Read the Contact Center Release Notes for the most recent instructions.
Procedure
1. Insert the Contact Center DVD into the DVD drive of your server.
2. If the installation does not automatically start, double-click Setup.exe.
3. Click Install to install the Microsoft .NET Framework 3.5 SP1 and Visual C++runtime libraries on the server.If you are prompted to accept the Microsoft .NET Framework 3.5.1 licenseagreement, click Accept. If you are prompted to restart the server, click Yes andrepeat step 2.
4. On the Welcome window, click Next.
Installing the Voice and Multimedia Contact Server software for CS1000
Avaya Aura® Contact Center Installation May 2013 259

5. On the License Agreement window, read the terms of the agreement.
260 Avaya Aura® Contact Center Installation May 2013Comments? [email protected]
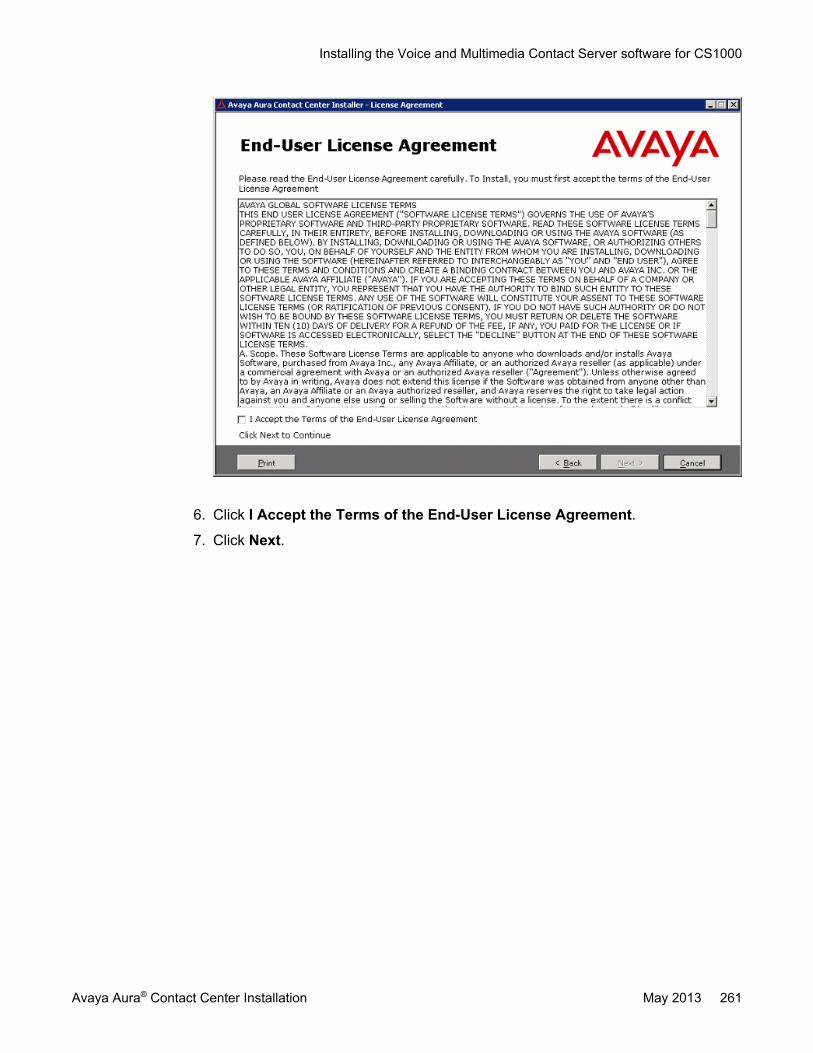
6. Click I Accept the Terms of the End-User License Agreement.
7. Click Next.
Installing the Voice and Multimedia Contact Server software for CS1000
Avaya Aura® Contact Center Installation May 2013 261

8. On the Installation Selection window, under Avaya Communication Server 1000- AML, select Voice and Multimedia Contact Server without Avaya MediaServer.
9. Click Next.
262 Avaya Aura® Contact Center Installation May 2013Comments? [email protected]

10. On the Installation Destination window, on the Application Destination Drivetab, select where to install the Contact Center application software by choosing adisk drive letter.
11. Click the Database Destination Drive tab.
12. Under Select the destination drive for the Contact Center database files, selectthe drive for the Contact Center Manager Server database.
13. Under Select the destination drive for the Contact Center database files, selectthe drive for the Communication Control Toolkit database.
14. Under Select the destination drive for the Contact Center database files, selectthe drive for the Contact Center Multimedia database.
Installing the Voice and Multimedia Contact Server software for CS1000
Avaya Aura® Contact Center Installation May 2013 263
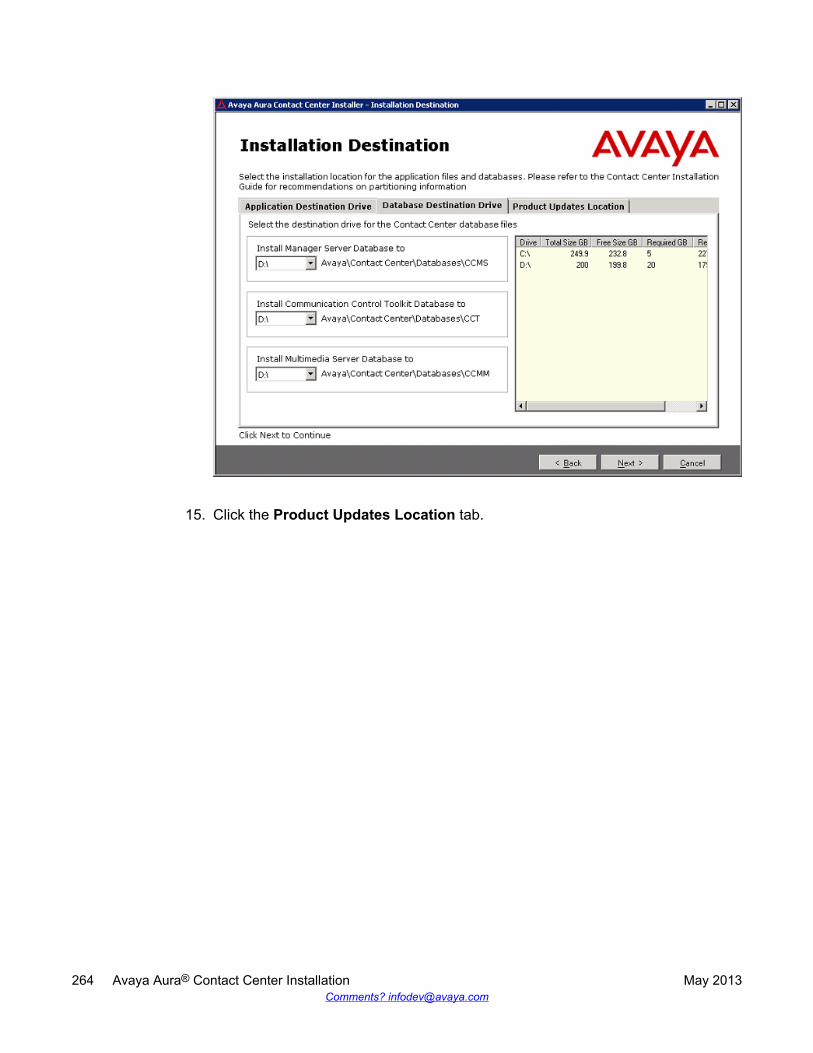
15. Click the Product Updates Location tab.
264 Avaya Aura® Contact Center Installation May 2013Comments? [email protected]

16. Under Select the Product Updates Location, click Browse to locate the foldercontaining the Contact Center product updates.
17. Click Next.The System Readiness Check runs on the server.
18. If the System Readiness Check utility returns a Fail, the software installation cannotproceed until you correct the problem. Review any failures returned by the SystemReadiness Check and consult Avaya Aura® Contact Center Planning andEngineering (NN44400-210) to determine the actions to resolve the issue.You can ignore warnings if the potential impact to the operation of the contact centeris understood and not applicable.
19. Click Next.
20. On the Installation Data window, type the installation details for each tab.
21. Select the CCMS tab, and configure the server details.
Installing the Voice and Multimedia Contact Server software for CS1000
Avaya Aura® Contact Center Installation May 2013 265
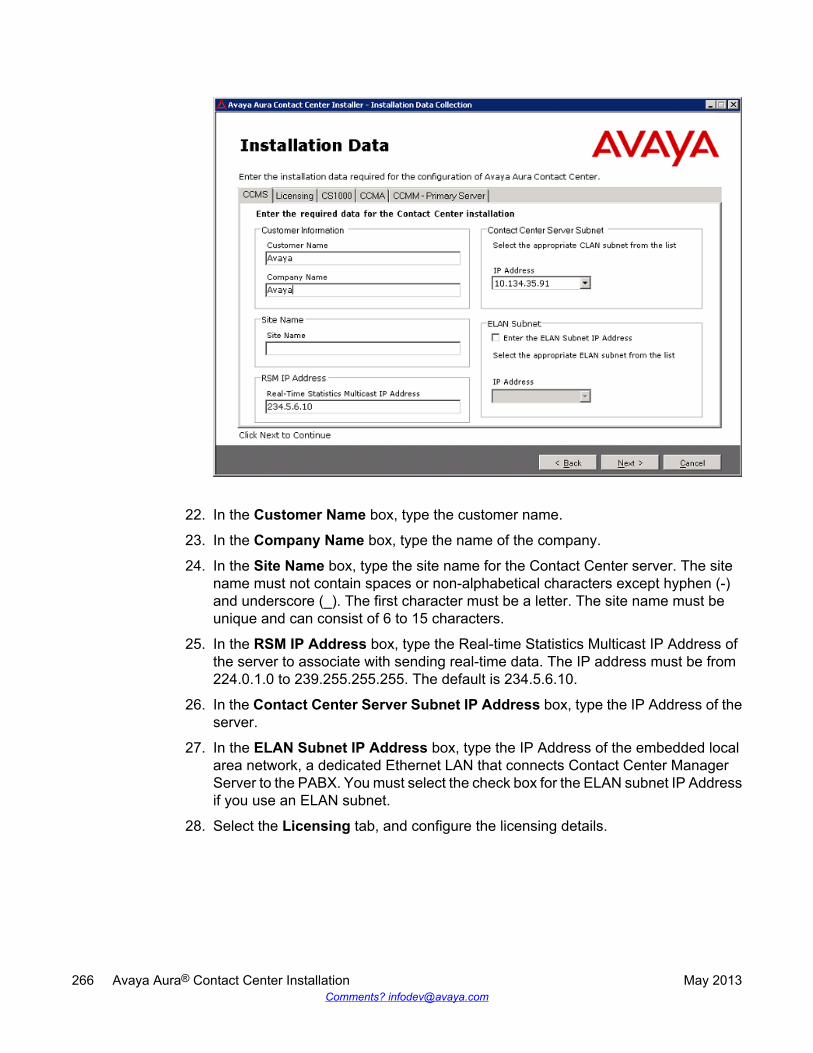
22. In the Customer Name box, type the customer name.
23. In the Company Name box, type the name of the company.
24. In the Site Name box, type the site name for the Contact Center server. The sitename must not contain spaces or non-alphabetical characters except hyphen (-)and underscore (_). The first character must be a letter. The site name must beunique and can consist of 6 to 15 characters.
25. In the RSM IP Address box, type the Real-time Statistics Multicast IP Address ofthe server to associate with sending real-time data. The IP address must be from224.0.1.0 to 239.255.255.255. The default is 234.5.6.10.
26. In the Contact Center Server Subnet IP Address box, type the IP Address of theserver.
27. In the ELAN Subnet IP Address box, type the IP Address of the embedded localarea network, a dedicated Ethernet LAN that connects Contact Center ManagerServer to the PABX. You must select the check box for the ELAN subnet IP Addressif you use an ELAN subnet.
28. Select the Licensing tab, and configure the licensing details.
266 Avaya Aura® Contact Center Installation May 2013Comments? [email protected]

29. The License File Location box displays the folder on the server which containsthe license file.
30. In the Primary License Manager IP Address box, type the IP address of theprimary License Manager server. Each Voice and Multimedia Contact Servercontains a License Manager server. This License Manager server is the defaultprimary License Manager.
31. In the Primary License Port box, type the number of the communication portopened between the License Manager and Contact Center Manager Server. Thedefault port number is 3998 when you use only one License Manager.
32. In the Secondary License Manager IP Address box, type the IP address of thesecondary License Manager server. The secondary License Manager server isused only in a corporate licensed environment.
33. From the Licensing Package list, select the licenses that you have purchased.Select Nodal Enterprise for single-site contact centers. Select CorporateEnterprise for multi-site contact centers.
34. From the list of Optional Packages, enable the licensed features that you havepurchased.
35. Select the Open Queue check box.
36. In the Switch Serial Number box, type the serial number for the AvayaCommunication Server 1000.
Installing the Voice and Multimedia Contact Server software for CS1000
Avaya Aura® Contact Center Installation May 2013 267

37. Select the CS1000 tab, and configure the Avaya Communication Server 1000details.
38. In the Switch Name box, type the name of the AML Avaya Communication Server1000 telephone switch. Valid characters for Avaya Communication Server 1000names are A–Z, a–z, 0–9, underscore (_), and period (.). Names must begin withan alphabetical character and cannot contain spaces. The last character must notbe an underscore or a period. Names must not exceed 80 characters in length.
39. In the Switch IP Address box, type the IP address of the Avaya CommunicationServer 1000.
40. In the Alternative Switch IP Address box, type the IP address of an alternateAvaya Communication Server 1000, if you have one.
41. In the Switch Customer Number box, type the customer number for the AvayaCommunication Server 1000.
42. In the Voice Connection Type section, select the method used to connect to thePABX. Select None, Avaya Aura Experience Portal, or Avaya CallPilot®. If you usea standalone Avaya CallPilot®, type the Avaya CallPilot® server ELAN IP Addressand then configure the Port to 10008. If you are using Avaya CallPilot® HighAvailability, type the Avaya CallPilot® Managed ELAN IP Address and thenconfigure the Port to 10008.
43. Select the CCMA tab, and configure the CCMA details.
268 Avaya Aura® Contact Center Installation May 2013Comments? [email protected]

44. In the Configuration section clear Enable CCMA Replication. Clear the checkbox on the primary server.
45. In the LDAP Port Number box, type the port number for the Lightweight DirectoryAccess Protocol (LDAP) for which common contact information is stored on aserver. The default value of the port is 389. Check with the system administrator toensure that the port number is not already in use.
46. In the SSL Port Number box, type the port number for the Secure Sockets Layer(SSL) that controls security when applications are communicating across thenetwork. The default port is 636. Check with the system administrator to ensure thatthe port number is not already in use.
47. In the System Account Configuration section, in the Password box, type thepassword for the CCMA System Account user account. Confirm the password inthe second box. The password is not checked against the server security policy forminimum password requirements. Avaya recommends that you enter a passwordthat conforms to your corporate password policy.
48. Select the CCMM tab, and configure the Contact Center Multimedia details.
Installing the Voice and Multimedia Contact Server software for CS1000
Avaya Aura® Contact Center Installation May 2013 269

49. In the License Server box, type the name of the server on which the Contact CenterLicense Manager software is installed.
50. In the Inbound Mail Server (POP3) box, type the name of the server on which emailmessages are received in your network.
51. In the Outbound Mail Server (SMTP) box, type the name of the server from onwhich email messages are sent. Your inbound and outbound mail servers can havethe same name.
52. Select Enter Predictive Outbound Configuration to enable predictive outboundcontacts.
53. In the Predictive Server box, type the name of the Predictive Outbound solutionsapplication server on which the administration software resides, or the CPSE2
server.
54. In the Predictive Reporting Server box, type the name of the Predictive Outboundsolutions server that contains the statistics for reporting predictive outbound data,or Portfolio server.
55. In the Web Stats Server box, type the name of the optional Web Statistics serverthat agents and supervisors use to view real-time statistics for call handling, skillsetdata, and the state information on the Agent Desktop. Web Based Statistics is anoptional licensed feature and requires a Web Based Statistics feature license.
270 Avaya Aura® Contact Center Installation May 2013Comments? [email protected]
56. In the Web Stats Port box, type the port number of the Web Statistics server. Thedefault port number is 9086.
57. In the Web Communications Server (Optional) box, type the name of the serveron which the Web Customer Interface is installed if Web communications is licensedin your contact center.
58. Click Next.
59. On the Summary window, review and verify the information.
60. Click Install.
61. After the installation is complete, click Finish.
62. If prompted, restart the server.
Upgrading Java Runtime Environment, Java DevelopmentKit, and Apache Tomcat components using Third PartySoftware Upgrade Utility
Before you begin
• Apply Contact Center 6.3 Service Pack 10 or later on your system as an install-timepatch.
• Restart the Contact Center server to complete this procedure.
About this taskUse Third Party Software Upgrade Utility to automatically upgrade your Java RuntimeEnvironment and Tomcat software components. For more information, see Third PartySoftware Upgrade Utility on page 27.
Procedure
1. Log on to the server using the administrator account.
2. Navigate to the Avaya_Support\ProductUpdates folder.
3. Open the folder where you had saved the latest Service Pack.
4. Browse to ThirdParty\AACCThirdPartySoftwareUpgradeUtility.exe.
5. Double-click AACCThirdPartySoftwareUpgradeUtility.exe.
6. Click Upgrade.The system displays the “User Action Required” dialog box.
7. Click OK.
Upgrading Java Runtime Environment, Java Development Kit, and Apache Tomcat components using Third PartySoftware Upgrade Utility
Avaya Aura® Contact Center Installation May 2013 271

8. Click Yes to restart Contact Center and complete the upgrade.
Securing the Windows serverAbout this taskApply optional security measures to your operating system to further secure your server.
Important:Scanning software can degrade the performance and decrease the reliability of the system.Install virus scanning software only if the system connects to an exposed network or to theInternet.
Important:To maintain server performance, you must schedule virus scans during maintenanceperiods or low usage hours only.
Procedure
1. Harden the operating system using defined site procedures.
2. Install antivirus software. If you install antivirus software, Avaya recommends thatyou exclude some contact center files and folders from real-time and scheduledscans. For more information, and for a list of files and folders to exclude, see AvayaAura® Contact Center Planning and Engineering (NN44400-210).
Installing the external Web communication serversoftware
Before you begin
• Install Contact Center Multimedia software.
About this taskIf you use Web communications in your contact center, you can use the Sample CustomerInterface (CI) Web site implementation to help you develop pages for your corporate Web site.The Web services architecture is a platform-independent interface that customers can accessfrom both Microsoft .NET and Java applications. Customer Web sites or third-party applicationsuse the open interface for integration with the Contact Center Multimedia system.
272 Avaya Aura® Contact Center Installation May 2013Comments? [email protected]

The Customer Interface Web services provide a range of methods to perform the followingfunctions:
• Register new customers in the Contact Center Multimedia database• Log on or log off existing customers• Update customer logon credentials• Create customer contacts• Update customer details• Read customer information• Review a customer contact history• Request immediate or scheduled callback requests• Read a contact• Create and maintain a Web communications chat session
To integrate Web Communications with the Contact Center Multimedia system, download theAvaya Aura® Contact Center Web Communications SDK package and ReferenceImplementation from www.avaya.com/devconnect. The Web Communications ReferenceImplementation contains information about customizing the Web communication applicationto your solution.
Important:Do not install the Web Communications Reference Implementation on an Avaya Aura®
Contact Center server. Install the Web Communications Reference Implementation on yourown server in the contact center solution.
Procedure
1. Locate and download the Web Communications Reference Implementationsoftware from www.avaya.com/devconnect.
2. Copy the Web Communications Reference Implementation software to the externalWeb server.
3. Follow the Reference Implementation instructions to install and commission theWeb Communications server.
Installing the external Web communication server software
Avaya Aura® Contact Center Installation May 2013 273

274 Avaya Aura® Contact Center Installation May 2013Comments? [email protected]

Chapter 11: Primary Voice and MultimediaContact Server for CS1000software installation in adomain
This chapter describes how to install a primary Voice and Multimedia Contact Server in a solution thatsupports High Availability and has an Avaya Communication Server 1000 (CS1000) platform. A Voiceand Multimedia Contact Server includes the following server software:
• Contact Center Manager Server (CCMS)
• Contact Center Manager Server Utility
• Contact Center License Manager
• Contact Center Manager Administration (CCMA)
• Communication Control Toolkit (CCT)
• Contact Center Multimedia (CCMM)
Install this server to provide context‐sensitive and skill-based routing for customer voice and multimediacontacts. This server provides routed contact support for voice calls, email messages, Webcommunications, voice mail messages, scanned documents, fax messages, and SMS text messages.This server provides extensive tools for agent management, real-time and historical reporting, andgraphical tools to create contact flows and treatment rules. Use this server for license management, HighAvailability configuration, networking, Open Interfaces Web Service and third-party application interfacesintegration.
You can change the name of a Contact Center server, but because this is time consuming, Avayarecommends that you configure the server final production name before installing Contact Centersoftware.
If you plan to follow the Microsoft server hardening guidelines, complete those procedures before installingAvaya Aura® Contact Center.
Important:You can create an administration account on the server and then install Avaya Aura® Contact Centerusing the account. This Avaya Aura® Contact Center administration account must have fulladministrative privileges. You must upgrade and patch Avaya Aura® Contact Center using thisadministration account. You can rename this account after installing Avaya Aura® Contact Center, but
Avaya Aura® Contact Center Installation May 2013 275

you must not delete the account. If you delete the account used to install Avaya Aura® Contact Center,Avaya Aura® Contact Center stops working.
Voice and Multimedia Contact Server supports two Network Interface Cards (NICs) and two subnets (onecontact center subnet and one ELAN subnet). The Voice and Multimedia Contact Server ELAN NIC andELAN subnet are optional.
You must complete all the procedures in this section in sequential order.
Voice and Multimedia Contact Server installationprerequisites
• Copy the most recent patches for the Contact Center software.
• Ensure that your new Contact Center license file is available.
Important:For the system to correctly handle backup and restore SNMP events, you must installWindows SNMP Service before you install Contact Center server software.
Downloading the latest documentationBefore you begin
• Download the most recent version of Acrobat Reader.• Access the Avaya Web site at www.avaya.com/support.
About this taskDownload the most recent documentation to ensure you have the most recent updates.Updates in the documentation accurately reflect the most recent changes in the software.
Procedure
1. Log on to the Avaya Web site.
2. Compare the versions of the documentation on the site with the versions youhave.
3. If the version number on www.avaya.com/support is higher than your version,download the latest version of the document.
276 Avaya Aura® Contact Center Installation May 2013Comments? [email protected]

4. Review the Avaya Web site for release notes and readme files.
Installing Windows Server 2008 Release 2Before you begin
• Ensure that you have a newly formatted server that meets the specifications in AvayaAura® Contact Center Planning and Engineering (NN44400-210) on which to installMicrosoft Windows Server 2008 64-bit, Release 2, Service Pack 1.
Do not upgrade your operating system from a previous release. Contact Center is notsupported on an upgraded operating system.
• Configure all servers for RAID as described in Avaya Aura® Contact Center Planning andEngineering (NN44400-210).
• Ensure that you have a DVD for Windows Server 2008 Release 2.• Install the network interface card in the server.• Know the IP addresses for the contact center subnet.
About this taskInstall the Windows operating system, which is required for the Contact Center server software.During the installation, configure the Windows settings as required. You must perform thisprocedure on each server before you install Contact Center server software on the server.
Procedure
1. Insert the Windows Server 2008 64-bit Release 2 Standard Edition or WindowsServer 2008 64-bit Release 2 Enterprise Edition DVD into the DVD drive.
2. Install Windows Server 2008 Release 2 according to the instructions supplied bythe DVD.
3. On the first install page, select your language for installation.
4. Click Next.
5. On the Installation window, select a Language to install from the list.
6. Select a Time and currency format from the list.
7. Select Keyboard or input method from the list.
8. Click Next.
9. Click Install Now.
10. Select an operating system from the list.
11. Click Next.
Installing Windows Server 2008 Release 2
Avaya Aura® Contact Center Installation May 2013 277

12. On the first Install Windows screen, read the terms of the license agreement andselect I accept the license terms.
13. Click Next.
14. Select Custom.
15. Select the disk partition on which you want to install Windows Server 2008.
Important:You can use the partition management options to configure the partitions on yourserver.
16. Click Next.The installation proceeds and automatically restarts the server several times.
17. After completing the installation, log on to the server as Administrator. Enter andconfirm the Administrator password.
18. In the Initial Configuration Tasks window, select Activate Windows and followthe instructions or the Microsoft documentation to activate your server.
19. Select Set time zone and complete the information as required for your system.If you are installing Voice Contact Server Only software or Knowledge WorkerServer software on this server, ensure that you clear Automatically adjust clockfor daylight saving changes. Otherwise select Automatically adjust clock fordaylight saving changes.
20. Select Configure Networking and complete the information for your NetworkInterface Card (NIC) with the server IP address.
21. Select Provide computer name and domain and complete the information for yourserver name and workgroup or domain settings.
22. Change the DVD drive letter to E: to ensure the correct drive letters are free for theContact Center application and database hard disk drives and partitions.
23. Configure the hard disk drives and partitions for this server using the WindowsServer 2008 Server Manager - Disk Management utility. For more information abouthard disk drives and partitions, see Avaya Aura® Contact Center Planning andEngineering (NN44400-210).
24. Install other required drivers for your hardware configuration.
278 Avaya Aura® Contact Center Installation May 2013Comments? [email protected]

Procedure job aid
Name Description
Computer name Do not use spaces or underscores or exceed15 characters. The name must start with analphabetic character.The computer name must match (includingcase sensitivity) the DNS name.
Disk drives Format the partitions as required for theserver. For more information, see AvayaAura® Contact Center Planning andEngineering (NN44400-210).
Domain/workgroup name Configure as required for your site.You must check to ensure the DNS Domainname (including case) matches the servername if the server is added to a domain orworkgroup after configuration.
Licensing modes Select Per server licensing mode.Accept the default five concurrentconnections.
Modem dialing Configure as required for your site. Do notinstall a modem on a Communication ControlToolkit server.
Network components Configure IP Address, WINS, DNS for one ortwo network cards as per configuration.Contact Center does not support IPv6.
Network connections If the server has more than one NIC/adapter,ensure contact center subnet appears first inthe network adapter binding order.
Partitions Configure C: drive to be a primary drive.Configure the other drives on your server tomeet the requirements according to AvayaAura® Contact Center Planning andEngineering (NN44400-210) for the server.
Regional settings window Configure as required for your site.
SNMP Configure for all servers.
Installing Windows Server 2008 Release 2
Avaya Aura® Contact Center Installation May 2013 279

Configuring Windows Server 2008Before you begin
• Install Microsoft Windows Server 2008 64-bit Release 2 on your server.
About this taskBefore you can install Avaya Aura® Contact Center software on your server, you must configureWindows Server 2008 to meet the requirements of the software.
You can prepare the server using this and other procedures, or you can download and use anAvaya Aura® Contact Center operating system configuration tool that installs the requiredWindows roles and features.
The Avaya Aura® Contact Center Windows Roles and Features installer configures thefollowing Windows Server 2008 resources:
• Windows Server Backup Features• SNMP Services• Active Directory Light Weight Directory Services• Application Server• Web Server (IIS)
For more information, and to download the Avaya Aura® Contact Center Windows Roles andFeatures installer, see http://support.avaya.com.
The Avaya Aura® Contact Center Windows Roles and Features installer replaces the followingprocedures:
• Configuring Windows Server 2008 (this procedure)• Configuring SNMP on your server• Installing operating system components for Contact Center
If you use the Avaya Aura® Contact Center Windows Roles and Features installer, skip thesethree procedures.
Procedure
1. Log on to the Windows Server 2008 server using an administrator account.
2. Select the Don’t display this screen on startup check box.
3. Update the emergency repair disk to record the latest configuration data for theserver.
4. Choose Start > Administrative Tools > Server Manager.
5. In the left pane, click Features.
280 Avaya Aura® Contact Center Installation May 2013Comments? [email protected]

6. Click Add Features.
7. Select Windows Server Backup Features.
8. Click Next.
9. Click Install.
10. Click Close.
11. Choose Start > All Programs > Accessories > System Tools > Windows ServerBackup.
12. Follow the on-screen instructions to select what you want to back up.
Installing the latest supported operating system servicepacks
Before you begin
• Access the Avaya hotfixes list on the Web site www.avaya.com/support.• Install and configure Microsoft Windows Server 2008 64-bit Release 2 on your server.• Review the recommendations on operating system service updates in Avaya Aura®
Contact Center Planning and Engineering (NN44400-210).• Install the Microsoft .NET Framework 3.5 and Microsoft .NET Framework 3.5 SP1.
About this taskAvaya recommends that you install the most recent supported operating system service packs.You must download the supported operating system service pack from the Avaya hotfixes listto ensure your Contact Center server software functions correctly with the supported operatingsystem patches.
Procedure
1. Log on to the server and disable the Windows Update feature. There are a numberof methods for disabling the Windows Update feature, refer to the Windows Server2008 documentation for a method suitable to your solution. Disabling the WindowsUpdate feature prevents Windows Server 2008 from automatically applyingoperating system patches and potentially rebooting the server.
2. Review the Contact Center Service Packs Compatibility and Security HotfixesApplicability List to determine the most recent Avaya Aura® Contact Centersupported patches or service packs.
3. Download the appropriate Microsoft Windows Server 2008 patches for the AvayaAura® Contact Center software installed on this server.
Installing the latest supported operating system service packs
Avaya Aura® Contact Center Installation May 2013 281
4. Install the most recent Windows Server 2008 service pack that is validated withAvaya Aura® Contact Center by following the Microsoft Installation instructions.
Connecting to the contact center subnetAbout this taskConnect the Contact Center server to the contact center subnet. The contact center subnet isthe network on which the server software applications work together to route contacts andgenerate reports.
Procedure
1. Locate the slot assigned to the contact center subnet network interface card for theserver. Make a note of the slot.
2. Connect the cable from the contact center subnet to the contact center subnetnetwork interface card in the server in accordance with customer site networkingguidelines.
3. Use the ping command to test the contact center subnet.
Adding a server to a domainBefore you begin
• Ensure that you have domain administrator privileges, or ask the Domain Administratorto assign you a domain user account for remote access.
• On the server, configure a preferred Domain Name System (DNS) server on the NetworkInterface Card (NIC).
About this taskAdd the server to an existing domain. Avaya recommends that you add the server to the domainbefore installing Contact Center software.
Ask your System Administrator to add a Domain Name System (DNS) static entry for thisserver. Each Contact Center server in a domain requires a DNS static entry.
Important:Avaya Aura® Contact Center High Availability solutions do not support Windows Server 2008Dynamic DNS.
In High Availability solutions, ask your System Administrator to add one DNS static entry forthe each managed name and associated managed IP address. A typical High Availability
282 Avaya Aura® Contact Center Installation May 2013Comments? [email protected]

campus solution with a pair of servers requires 3 DNS static entries; one DNS static entry forthe active server, one DNS static entry for the standby server, and one DNS static entry forthe managed name and associated IP address.
Procedure
1. Log on to the server.
2. Click Start > Administrative Tools > Server Manager.
3. Beside Computer Information, click Change System Properties.
4. In the System Properties dialog box, click the Computer Name tab.
5. Click Change.
6. In the Computer Name/Domain Changes dialog box, click the Domain option.
7. Type the domain name (you must provide the fully qualified domain name, whichincludes the prefix and suffix).
8. Click OK.
9. Type the domain administrator User name and Password.
10. Click OK.
11. Restart the server when you are prompted to do so.
Disabling the Remote Access servicesAbout this taskAvaya Aura® Contact Center does not support Remote Access Services (RAS). Disable theRemote Access services before installing Avaya Aura® Contact Center. Microsoft RemoteDesktop continues to run after you disable Remote Access services. After you disable theservices, restart the server.
Procedure
1. Choose Start > Administrative Tools > Services.
2. In the Services window, right-click the Remote Access Connection Managericon.
3. Click Properties.
4. In the General tab, from the Startup type list, select Disabled.
5. Click OK.
6. In the Services window, right-click the Remote Access Auto ConnectionManager icon.
Disabling the Remote Access services
Avaya Aura® Contact Center Installation May 2013 283

7. Click Properties.
8. In the General tab, from the Startup type list, select Disabled.
9. Click OK.
10. In the Services window, click File, Exit.
11. Restart the server.
Configuring SNMP on your serverBefore you begin
• Install and configure Microsoft Windows Server 2008 64-bit Release 2 on your server.
About this taskConfigure Simple Network Management Protocol (SNMP) on your server to ensure you haveall of the required components of the Internet protocol for monitoring devices in your network.SNMP helps you manage data that describes the system configuration and errors that mayoccur between them.
Procedure
1. Log on to the server using the administrator account.
2. Choose Start > Control Panel > Programs.
3. In the Programs and Features section, click Turn Windows features on or off.
4. In the Server Manager window, select Server Manager and click Add Features.
5. Select SNMP Services.
6. Click Next.
7. Click Install.
8. If prompted, insert the Windows Server 2008 DVD.
9. Click Close.
284 Avaya Aura® Contact Center Installation May 2013Comments? [email protected]

Downloading the most recent patches to the serverBefore you begin
• Install and configure Windows Server 2008 64-bit Release 2 on your server according tothe settings in this chapter.
• Download and install the most recent and valid updates for Microsoft Windows Server2008 64-bit Release 2.
• Know the location at which you plan to install each Contact Center server softwarepackage.
• Ensure that you use one administrator account on your server to un-install and installsoftware updates.
About this taskTo ensure that you have the most current software, download the most recent Contact Centerpatches from www.avaya.com/support to the server you plan to install.
Procedure
1. Log on to the server using the administrator account.
2. Create a folder Avaya_Support\ProductUpdates on the drive on which youwant to save the software updates.
3. Download the most recent service pack file. Save and unzip the file on the ContactCenter server in the Avaya_Support\ProductUpdates folder.
4. If new patches are available for the latest service pack, download and save thepatches on the Contact Center server in the Avaya_Support\ProductUpdates folder.
5. Read the Contact Center Release Notes for the most recent instructions.
Disabling unused Network AdaptersAbout this taskDisable all unused Network Adapters or Network Interface Cards (NICs) to improve networkcommunications and prevent the erroneous configuration of unused NICs during ContactCenter server commissioning.
Downloading the most recent patches to the server
Avaya Aura® Contact Center Installation May 2013 285

Procedure
1. Log on to the server.
2. Click Start > Control Panel > Network and Internet > Network and SharingCenter > Change Adapter Settings.
3. Right-click on the unused Network Adapter, and select Disable.
4. Repeat this procedure for all unused Network Adapters.
Enabling Microsoft Remote Desktop connectionBefore you begin
• Install Microsoft Windows Server 2008 64-bit Release 2 on your server.• Log on to the server with administrator privileges.
About this taskEnable Microsoft Remote Desktop connection as your remote access tool. Microsoft RemoteDesktop provides remote access for support on the server.
Procedure
1. Choose Start > Control Panel > System and Security.
2. In the System section, select Allow remote access.
3. Click the Remote tab.
4. Select Allow connections from computers running any version of RemoteDesktop (less secure).
5. Click OK.
Configuring Data Execution PreventionAbout this taskConfigure the Data Execution Prevention (DEP) hardware and software to perform additionalchecks on memory that protect the Avaya Aura® Contact Center server against malicious codeexploitation.
286 Avaya Aura® Contact Center Installation May 2013Comments? [email protected]

Procedure
1. Log on to Windows as administrator.
2. Choose Start > Control Panel > System and Security.
3. Click System.
4. In the System window, click Advanced system settings.
5. In the System Properties dialog box, click the Advanced tab.
6. Under Performance, click Settings.
7. In the Performance Options dialog box, click the Data Execution Preventiontab.
8. On the Data Execution Prevention tab, select Turn on DEP for essentialWindows programs and services only.
9. Click OK.
10. On the System Properties dialog box, click OK.
11. Click OK to restart the computer.
Importing Contact Center Firewall Security policyBefore you begin
• Install Microsoft Windows Server 2008 64-bit Release 2 on your server.• Log on to the server with administrator privileges.• Download the most recent Avaya Aura® Contact Center Firewall Security policy from
www.avaya.com/support.
About this taskImport the Avaya Aura® Contact Center Firewall Security policy to ensure all contact centerservers in the solution can communicate.
Avaya recommends that you export and backup your existing firewall security policy beforeimporting the Avaya Aura® Contact Center Firewall Security policy. You can use this backuppolicy to rollback the Avaya Aura® Contact Center Firewall Security policy, if you ever needto.
Procedure
1. Choose Start > Administrative Tools > Windows Firewall with AdvancedSecurity.
2. Choose Actions > Export Policy.
Importing Contact Center Firewall Security policy
Avaya Aura® Contact Center Installation May 2013 287

3. In the File name box, type the name for the backup policy.
4. Click Save.Windows exports the existing policy. You can use this backup policy to rollback theAvaya Aura® Contact Center Firewall Security policy, if you ever need to.
5. On the Policy successfully exported message box, click OK.
6. Choose Actions > Import Policy.
7. On the policy overwrite message box, click Yes.
8. Navigate to the folder containing the Avaya Aura® Contact Center Firewall Securitypolicy.
9. Click Open.Windows imports the Avaya Aura® Contact Center Firewall Security policy.
10. On the Policy successfully imported message box, click OK.
Disabling NetBIOSAbout this taskIf the Contact Center server uses two Network Interface Cards (NICs), disable NetBIOS on theEmbedded LAN (ELAN) network interface card (NIC) to avoid NetBIOS conflicts.
Contact Center supports two Network Interface Cards (NICs) and two subnets (one contactcenter subnet and one ELAN subnet). The Contact Center ELAN NIC and ELAN subnet areoptional.
Procedure
1. Choose Start > Control Panel > Network and Internet.
2. Click Network and Sharing Center.
3. Click Change adapter settings.
4. Right-click the ELAN Network Interface Card (NIC).
5. Click Properties.
6. Select Internet Protocol Version 4 (TCP/IPv4).
7. Click Properties.
8. Click Advanced.
9. Click the WINS tab.
10. Select the Disable NetBIOS over TCP/IP check box.
288 Avaya Aura® Contact Center Installation May 2013Comments? [email protected]

11. Click OK.
Connecting the Embedded LAN subnetBefore you begin
• Install two network cards on the Contact Center server.• Disable the NetBIOS on the ELAN network interface card.• Connect the contact center subnet network interface card.
About this taskIf your server uses two NICs, connect the Embedded LAN (ELAN) NIC to the ELAN subnet.Contact Center supports two network interface cards (NICs) and two subnets (one contactcenter subnet and one ELAN subnet). The Contact Center ELAN NIC and ELAN subnet areoptional.
Procedure
1. Locate the slot assigned to the ELAN network interface card for the server.
2. Write the MAC address of the card on a small label. Attach the label to the back ofthe card or the chassis slot position.
3. Connect the ELAN subnet from the Avaya equipment to the Ethernet hub.
4. Connect the network cable from the ELAN network interface card in the server tothe hub.
5. Plug in the power cord for the hub.
6. If you have an ELAN subnet network connection, use the ping command to test it.
Configuring the binding orderBefore you begin
• Install two network interface cards on the Contact Center server.• Disable the NetBIOS on the ELAN network interface card.• Connect the Contact Center server network interface card to the contact center subnet.• Connect the Contact Center server ELAN network interface card to the ELAN subnet.
Connecting the Embedded LAN subnet
Avaya Aura® Contact Center Installation May 2013 289

About this taskConfigure the binding order of the network cards. The contact center subnet network interfacecard must be bound first and then the ELAN network interface card.
Procedure
1. Choose Start > Control Panel > Network and Internet > Network and SharingCenter.
2. Click Change adapter settings.
3. In the Network Connections window, press the ALT key.A hidden menu appears.
4. Choose Advanced > Advanced Settings.
5. In the Connections box, ensure that the contact center subnet connection is listedfirst. If it is not listed first, adjust the order.
Installing operating system components for ContactCenter
Before you begin
• Install Windows Server 2008 64-bit Release 2.
About this taskBefore installing Contact Center software, you must install specific operating system softwarecomponents such as Internet Information Services to integrate the components in ContactCenter.
Procedure
1. Choose Start > Administrative Tools > Server Manager.
2. In the left-hand column of the Server Manager, right-click Roles, and select AddRoles.
3. Review the requirements for the new role, and click Next.
4. Under Server Roles, select Active Directory Lightweight Directory Services.
5. If an Add Roles Wizard message box that lists features required by Active DirectoryLightweight Directory Services appears, click Add Required Features.
6. Under Server Roles, select Application Server.
7. If an Add Roles Wizard message box that lists features required by ApplicationServer appears, click Add Required Features.
290 Avaya Aura® Contact Center Installation May 2013Comments? [email protected]

8. Under Application Server, select Role Services.
9. Select Web Server (IIS) Support.
10. If an Add Roles Wizard message box appears, listing features required by WebServer (IIS) Support appears, click Add Required Features.
11. Click Next.
12. On the Introduction to Web Server (IIS) page, click Next.
13. On the Select Role Services page, under Common HTTP Features, select thefollowing services:
• Static Content
• Default Document
• Directory Browsing
• HTTP Errors
• HTTP Redirection
Important:All other services check boxes must be cleared.
14. On the Select Role Services page, under Application Development, select thefollowing services:
• ASP.NET
• .NET Extensibility
• ASP
• ISAPI Extensions
• ISAPI Filters
• Server Side Includes
Important:All other services check boxes must be cleared.
15. On the Select Role Services page, under Health and Diagnosis, select thefollowing services:
• HTTP Logging
• Logging Tools
• Request Monitor
• Tracing
Installing operating system components for Contact Center
Avaya Aura® Contact Center Installation May 2013 291

Important:All other services check boxes must be cleared.
16. On the Select Role Services page, under Security, select all services.
17. On the Select Role Services page, under Performance, select all services.
18. On the Select Role Services page, under Management Tools, select the followingservices:
• IIS Management Console
• IIS Management Scripts and Tools
• Management Service
• All items under IIS 6 Management Compatibility
Important:All other services check boxes must be cleared.
19. Click Next.
20. Review the installation information.
21. Click Install.
22. On the Installation Results page, click Close.
23. Restart the server if required.
Configuring MIME types to support Microsoft updatesAbout this taskConfigure the Multipurpose Internet Mail Extension (MIME) types to support Microsoft updatesand patches.
Procedure
1. Log on to the server.
2. Click Start > Administrative Tools > Computer Management.
3. In the Computer Management dialog box, expand Services and Applications >Internet Information Services > IIS Manager > Sites.
4. Select Default Web Site.
5. Under IIS, select MIME Types.
292 Avaya Aura® Contact Center Installation May 2013Comments? [email protected]

6. Double-click MIME Types.
7. On the Actions list on the right, click Add.
8. In the File name extension box, type .msp.
9. In the MIME Type box, type application/microsoftpatch.
10. Click OK.
11. On the Actions list on the right, click Add.
12. In the File name extension box, type .msu.
13. In the MIME Type box, type application/microsoftupdate.
14. Click OK.
15. Close the Computer Management window.
Updating server for a network location installationAbout this taskConfigure the server .NET security settings to prepare the server for a remote networkinstallation. Avaya Aura® Contact Center supports network installation. You can insert theAvaya Aura® Contact Center DVD into a computer on your network. You then add this computeras a trusted site and network location on the new server. You can access this DVD from thenetwork location, and with some .NET security updates, use the remote DVD to install AvayaAura® Contact Center software on the new server.
Note:Skip this procedure if you plan to use the Avaya Aura® Contact Center DVD from the DVDdrive of the server.
Procedure
1. Insert the Avaya Aura® Contact Center DVD into a computer on the contact centernetwork.
2. Log on to the new server you are preparing for Contact Center.
3. Choose Start > Control Panel > Network and Internet > Internet Options.
4. In the Security tab, click Trusted sites.
5. In the Trusted sites section, click Sites.
6. In the Add this Web site to the zone box, type the <IP address> of the remotecomputer with the Avaya Aura® Contact Center DVD.
7. Click Add.
Updating server for a network location installation
Avaya Aura® Contact Center Installation May 2013 293
8. Click OK.
9. Close the Internet Options box.
10. From the new server, navigate to the network location with the DVD.
11. Access the remote DVD and in the root folder of the DVD, double-clickNetworkSetup.bat..NetFramework 3.5 installs and the .NetSecurity settings are modified.
12. If the Avaya Aura® Contact Center installation does not automatically start, in theroot folder of the DVD double-click Setup.exe.
13. After Avaya Aura® Contact Center installs, navigate to your network location anddouble-click NetworkSetupReset.bat.
Installing the Voice and Multimedia Contact Server softwarefor CS1000
Before you begin
• Ensure the Avaya Communication Server 1000 is configured. For more information seeAvaya Aura® Contact Center Configuration – Avaya CS1000 Integration(NN44400-512).
• Download the most recent Contact Center and Common Components patches to theserver.
About this taskInstall the Contact Center Voice and Multimedia Contact Server software and enable yourcontact center to route contacts to the agents that can answer the call with the correct skills.
Note:Installing Voice and Multimedia Contact Server software installs Apache Tomcat Server.The default port number for Apache Tomcat is 8081. If you need to change the port numberto avoid conflicts with third-party software, see your Apache Tomcat documentation.
Note:Read the Contact Center Release Notes for the most recent instructions.
Procedure
1. Insert the Contact Center DVD into the DVD drive of your server.
2. If the installation does not automatically start, double-click Setup.exe.
294 Avaya Aura® Contact Center Installation May 2013Comments? [email protected]
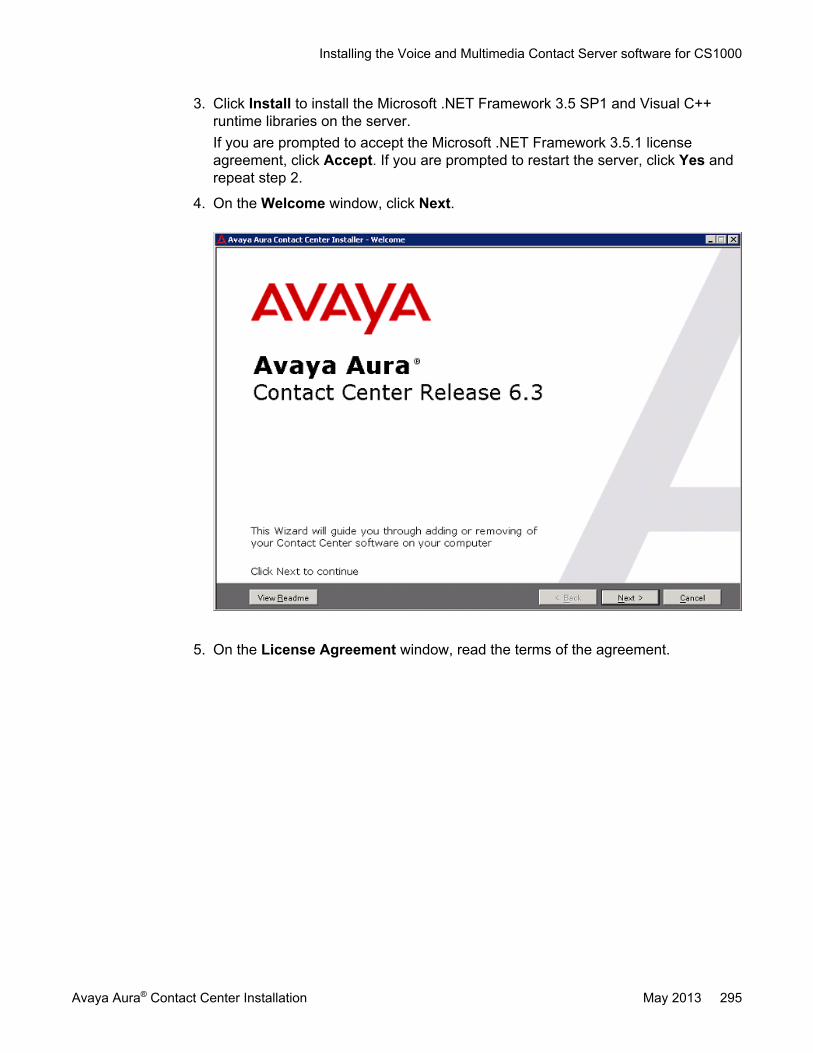
3. Click Install to install the Microsoft .NET Framework 3.5 SP1 and Visual C++runtime libraries on the server.If you are prompted to accept the Microsoft .NET Framework 3.5.1 licenseagreement, click Accept. If you are prompted to restart the server, click Yes andrepeat step 2.
4. On the Welcome window, click Next.
5. On the License Agreement window, read the terms of the agreement.
Installing the Voice and Multimedia Contact Server software for CS1000
Avaya Aura® Contact Center Installation May 2013 295

6. Click I Accept the Terms of the End-User License Agreement.
7. Click Next.
296 Avaya Aura® Contact Center Installation May 2013Comments? [email protected]

8. On the Installation Selection window, under Avaya Communication Server 1000- AML, select Voice and Multimedia Contact Server without Avaya MediaServer.
9. Click Next.
Installing the Voice and Multimedia Contact Server software for CS1000
Avaya Aura® Contact Center Installation May 2013 297

10. On the Installation Destination window, on the Application Destination Drivetab, select where to install the Contact Center application software by choosing adisk drive letter.
11. Click the Database Destination Drive tab.
12. Under Select the destination drive for the Contact Center database files, selectthe drive for the Contact Center Manager Server database.
13. Under Select the destination drive for the Contact Center database files, selectthe drive for the Communication Control Toolkit database.
14. Under Select the destination drive for the Contact Center database files, selectthe drive for the Contact Center Multimedia database.
298 Avaya Aura® Contact Center Installation May 2013Comments? [email protected]

15. Click the Product Updates Location tab.
Installing the Voice and Multimedia Contact Server software for CS1000
Avaya Aura® Contact Center Installation May 2013 299
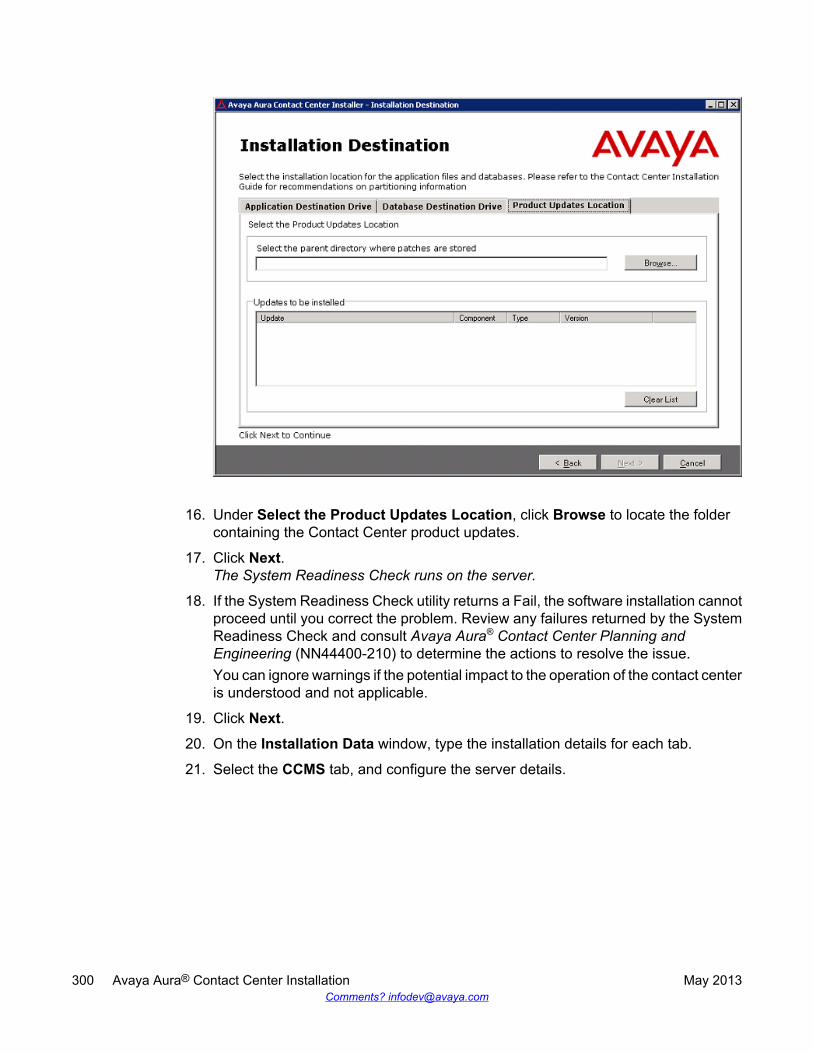
16. Under Select the Product Updates Location, click Browse to locate the foldercontaining the Contact Center product updates.
17. Click Next.The System Readiness Check runs on the server.
18. If the System Readiness Check utility returns a Fail, the software installation cannotproceed until you correct the problem. Review any failures returned by the SystemReadiness Check and consult Avaya Aura® Contact Center Planning andEngineering (NN44400-210) to determine the actions to resolve the issue.You can ignore warnings if the potential impact to the operation of the contact centeris understood and not applicable.
19. Click Next.
20. On the Installation Data window, type the installation details for each tab.
21. Select the CCMS tab, and configure the server details.
300 Avaya Aura® Contact Center Installation May 2013Comments? [email protected]
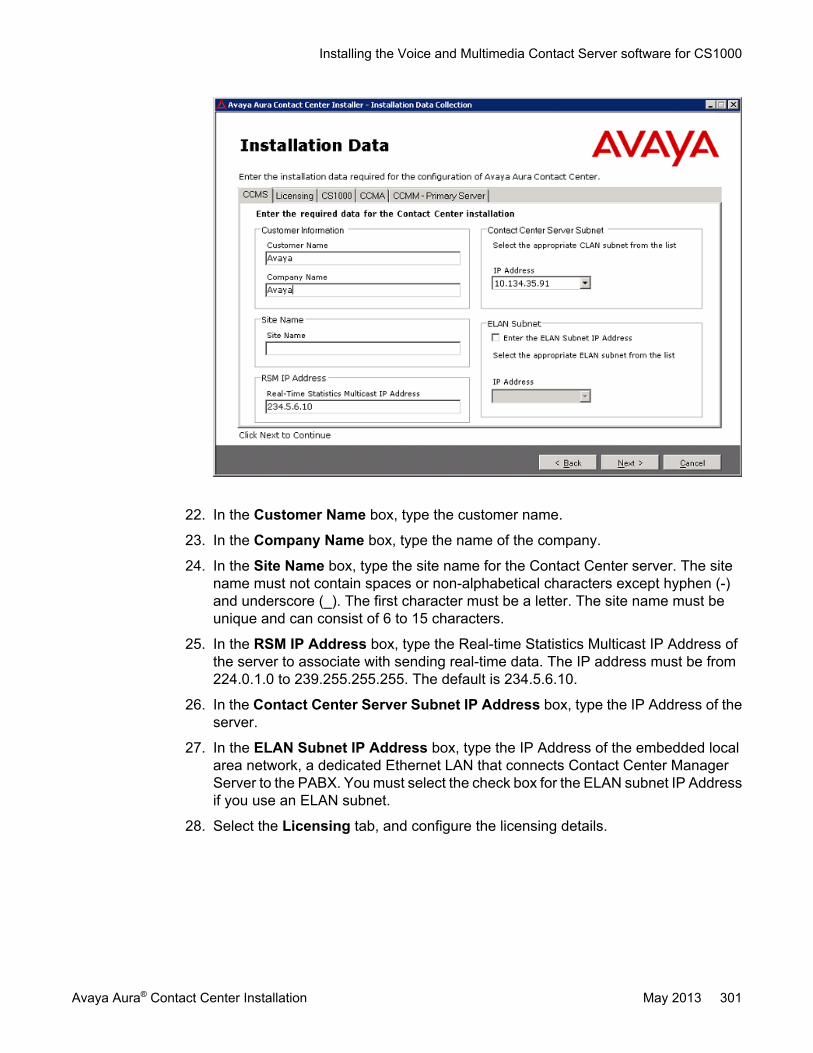
22. In the Customer Name box, type the customer name.
23. In the Company Name box, type the name of the company.
24. In the Site Name box, type the site name for the Contact Center server. The sitename must not contain spaces or non-alphabetical characters except hyphen (-)and underscore (_). The first character must be a letter. The site name must beunique and can consist of 6 to 15 characters.
25. In the RSM IP Address box, type the Real-time Statistics Multicast IP Address ofthe server to associate with sending real-time data. The IP address must be from224.0.1.0 to 239.255.255.255. The default is 234.5.6.10.
26. In the Contact Center Server Subnet IP Address box, type the IP Address of theserver.
27. In the ELAN Subnet IP Address box, type the IP Address of the embedded localarea network, a dedicated Ethernet LAN that connects Contact Center ManagerServer to the PABX. You must select the check box for the ELAN subnet IP Addressif you use an ELAN subnet.
28. Select the Licensing tab, and configure the licensing details.
Installing the Voice and Multimedia Contact Server software for CS1000
Avaya Aura® Contact Center Installation May 2013 301

29. The License File Location box displays the folder on the server which containsthe license file.
30. In the Primary License Manager IP Address box, type the IP address of theprimary License Manager server. Each Voice and Multimedia Contact Servercontains a License Manager server. This License Manager server is the defaultprimary License Manager.
31. In the Primary License Port box, type the number of the communication portopened between the License Manager and Contact Center Manager Server. Thedefault port number is 3998 when you use only one License Manager.
32. In the Secondary License Manager IP Address box, type the IP address of thesecondary License Manager server. The secondary License Manager server isused only in a corporate licensed environment.
33. From the Licensing Package list, select the licenses that you have purchased.Select Nodal Enterprise for single-site contact centers. Select CorporateEnterprise for multi-site contact centers.
34. From the list of Optional Packages, enable the licensed features that you havepurchased.
35. Select the Open Queue check box.
36. In the Switch Serial Number box, type the serial number for the AvayaCommunication Server 1000.
302 Avaya Aura® Contact Center Installation May 2013Comments? [email protected]
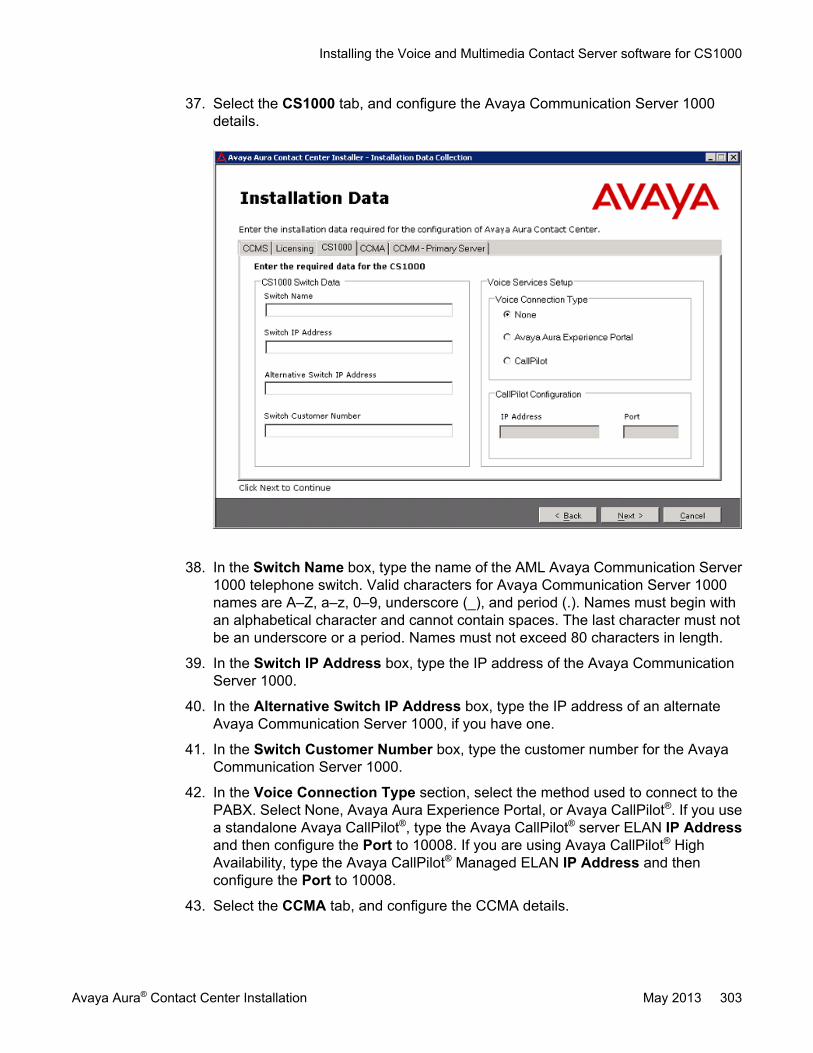
37. Select the CS1000 tab, and configure the Avaya Communication Server 1000details.
38. In the Switch Name box, type the name of the AML Avaya Communication Server1000 telephone switch. Valid characters for Avaya Communication Server 1000names are A–Z, a–z, 0–9, underscore (_), and period (.). Names must begin withan alphabetical character and cannot contain spaces. The last character must notbe an underscore or a period. Names must not exceed 80 characters in length.
39. In the Switch IP Address box, type the IP address of the Avaya CommunicationServer 1000.
40. In the Alternative Switch IP Address box, type the IP address of an alternateAvaya Communication Server 1000, if you have one.
41. In the Switch Customer Number box, type the customer number for the AvayaCommunication Server 1000.
42. In the Voice Connection Type section, select the method used to connect to thePABX. Select None, Avaya Aura Experience Portal, or Avaya CallPilot®. If you usea standalone Avaya CallPilot®, type the Avaya CallPilot® server ELAN IP Addressand then configure the Port to 10008. If you are using Avaya CallPilot® HighAvailability, type the Avaya CallPilot® Managed ELAN IP Address and thenconfigure the Port to 10008.
43. Select the CCMA tab, and configure the CCMA details.
Installing the Voice and Multimedia Contact Server software for CS1000
Avaya Aura® Contact Center Installation May 2013 303

44. In the Configuration section clear Enable CCMA Replication. Clear the checkbox on the primary server.
45. In the LDAP Port Number box, type the port number for the Lightweight DirectoryAccess Protocol (LDAP) for which common contact information is stored on aserver. The default value of the port is 389. Check with the system administrator toensure that the port number is not already in use.
46. In the SSL Port Number box, type the port number for the Secure Sockets Layer(SSL) that controls security when applications are communicating across thenetwork. The default port is 636. Check with the system administrator to ensure thatthe port number is not already in use.
47. In the System Account Configuration section, in the Password box, type thepassword for the CCMA System Account user account. Confirm the password inthe second box. The password is not checked against the server security policy forminimum password requirements. Avaya recommends that you enter a passwordthat conforms to your corporate password policy.
48. Select the CCMM tab, and configure the Contact Center Multimedia details.
304 Avaya Aura® Contact Center Installation May 2013Comments? [email protected]

49. In the License Server box, type the name of the server on which the Contact CenterLicense Manager software is installed.
50. In the Inbound Mail Server (POP3) box, type the name of the server on which emailmessages are received in your network.
51. In the Outbound Mail Server (SMTP) box, type the name of the server from onwhich email messages are sent. Your inbound and outbound mail servers can havethe same name.
52. Select Enter Predictive Outbound Configuration to enable predictive outboundcontacts.
53. In the Predictive Server box, type the name of the Predictive Outbound solutionsapplication server on which the administration software resides, or the CPSE2
server.
54. In the Predictive Reporting Server box, type the name of the Predictive Outboundsolutions server that contains the statistics for reporting predictive outbound data,or Portfolio server.
55. In the Web Stats Server box, type the name of the optional Web Statistics serverthat agents and supervisors use to view real-time statistics for call handling, skillsetdata, and the state information on the Agent Desktop. Web Based Statistics is anoptional licensed feature and requires a Web Based Statistics feature license.
Installing the Voice and Multimedia Contact Server software for CS1000
Avaya Aura® Contact Center Installation May 2013 305

56. In the Web Stats Port box, type the port number of the Web Statistics server. Thedefault port number is 9086.
57. In the Web Communications Server (Optional) box, type the name of the serveron which the Web Customer Interface is installed if Web communications is licensedin your contact center.
58. Click Next.
59. On the Summary window, review and verify the information.
60. Click Install.
61. After the installation is complete, click Finish.
62. If prompted, restart the server.
Upgrading Java Runtime Environment, Java DevelopmentKit, and Apache Tomcat components using Third PartySoftware Upgrade Utility
Before you begin
• Apply Contact Center 6.3 Service Pack 10 or later on your system as an install-timepatch.
• Restart the Contact Center server to complete this procedure.
About this taskUse Third Party Software Upgrade Utility to automatically upgrade your Java RuntimeEnvironment and Tomcat software components. For more information, see Third PartySoftware Upgrade Utility on page 27.
Procedure
1. Log on to the server using the administrator account.
2. Navigate to the Avaya_Support\ProductUpdates folder.
3. Open the folder where you had saved the latest Service Pack.
4. Browse to ThirdParty\AACCThirdPartySoftwareUpgradeUtility.exe.
5. Double-click AACCThirdPartySoftwareUpgradeUtility.exe.
6. Click Upgrade.The system displays the “User Action Required” dialog box.
7. Click OK.
306 Avaya Aura® Contact Center Installation May 2013Comments? [email protected]

8. Click Yes to restart Contact Center and complete the upgrade.
Securing the Windows serverAbout this taskApply optional security measures to your operating system to further secure your server.
Important:Scanning software can degrade the performance and decrease the reliability of the system.Install virus scanning software only if the system connects to an exposed network or to theInternet.
Important:To maintain server performance, you must schedule virus scans during maintenanceperiods or low usage hours only.
Procedure
1. Harden the operating system using defined site procedures.
2. Install antivirus software. If you install antivirus software, Avaya recommends thatyou exclude some contact center files and folders from real-time and scheduledscans. For more information, and for a list of files and folders to exclude, see AvayaAura® Contact Center Planning and Engineering (NN44400-210).
Adding the domain AD-LDS replication account to theprimary administrators and replicator group
About this taskAdd the AD-LDS replication account to the local Administrators and replicator group on theprimary Contact Center server.
If you are using a domain, you must request this AD-LDS replication account from your Networkor System Administrator. The primary and standby replicating Contact Center servers mustboth be added to the same domain.
For this procedure, the name of the AD-LDS replication account is CCMAReplication. You canchoose another name for the account.
Securing the Windows server
Avaya Aura® Contact Center Installation May 2013 307

Procedure
1. Log on to the primary Contact Center server.
2. Click Start > Administrative Tools > Computer Management.
3. In the Computer Management window, expand Local Users and Groups.
4. Click the Groups folder.
5. Double-click on the Administrators group.
6. Click Add > Locations.
7. On the Windows Security dialog box, type the domain logon details.
8. On the Locations dialog, select the domain to be used by CCMA replication.
9. Expand the domain folder to display domain users.
10. Click Users.
11. Click OK.
12. Click Advanced > Find Now, to display domain users.
13. From the list of users select the CCMA replication domain user account, for exampleselect the myDomain\CCMAReplication user account.
14. Click OK.
15. Click OK > Apply > OK.
16. Click the Groups folder.
17. Double-click on the Replicator group.
18. Click Add > Locations.
19. On the Windows Security dialog box, type the domain logon details.
20. On the Locations dialog, select the domain to be used by CCMA replication.
21. Expand the domain folder to display domain users.
22. Click Users.
23. Click OK.
24. Click Advanced > Find Now, to display domain users.
25. From the list of users select the CCMA replication domain user account, for exampleselect the myDomain\CCMAReplication user account.
26. Click OK.
27. Click OK > Apply > OK.
308 Avaya Aura® Contact Center Installation May 2013Comments? [email protected]

Chapter 12: Standby Voice and MultimediaContact Server for CS1000software installation in adomain
This chapter describes how to install a standby Voice and Multimedia Contact Server for AvayaCommunication Server 1000 (CS1000). This chapter describes how to install a Voice and MultimediaContact Server in a solution using a Windows domain. A standby Voice and Multimedia Contact Serverincludes the following server software:
• Contact Center Manager Server (CCMS)
• Contact Center Manager Server Utility
• Contact Center License Manager
• Contact Center Manager Administration (CCMA)
• Communication Control Toolkit (CCT)
• Contact Center Multimedia (CCMM)
Contact Center Manager Server supports two Network Interface Cards (NICs) and two subnets (onecontact center subnet and one ELAN subnet). The Contact Center Manager Server ELAN NIC and ELANsubnet are optional.
You can install a standby Voice and Multimedia Contact Server and commission it to be the standby Voiceand Multimedia Contact Server in a campus High Availability solution. The standby server takes overcontact processing and becomes the active server if the existing active server fails. The standby serverprovides High Availability redundancy and resiliency. The standby and active servers must be at the samepatch level and have the same hard disk drive partitions.
You can install another standby Voice and Multimedia Contact Server and commission it to be the RemoteGeographic Node Voice and Multimedia Contact Server in a solution with Disaster Recovery. The RemoteGeographic Node (RGN) server shadows the active server. Remote Geographic Node servers do notautomatically take over if the active server fails. The standby server, Remote Geographic Node server,and active server must be at the same patch level and have the same hard disk drive partitions.
You must complete the procedures in this section in sequential order.
Avaya Aura® Contact Center Installation May 2013 309
Standby Voice and Multimedia Contact Server installationprerequisites
• Copy the most recent patches for the Contact Center software.
• Ensure that your new Contact Center license file with a High Availability standby serverlicense is available.
Important:For the system to correctly handle backup and restore SNMP events, you must installWindows SNMP Service before you install Contact Center server software.
Downloading the latest documentationBefore you begin
• Download the most recent version of Acrobat Reader.• Access the Avaya Web site at www.avaya.com/support.
About this taskDownload the most recent documentation to ensure you have the most recent updates.Updates in the documentation accurately reflect the most recent changes in the software.
Procedure
1. Log on to the Avaya Web site.
2. Compare the versions of the documentation on the site with the versions youhave.
3. If the version number on www.avaya.com/support is higher than your version,download the latest version of the document.
4. Review the Avaya Web site for release notes and readme files.
310 Avaya Aura® Contact Center Installation May 2013Comments? [email protected]

Installing Windows Server 2008 Release 2Before you begin
• Ensure that you have a newly formatted server that meets the specifications in AvayaAura® Contact Center Planning and Engineering (NN44400-210) on which to installMicrosoft Windows Server 2008 64-bit, Release 2, Service Pack 1.
Do not upgrade your operating system from a previous release. Contact Center is notsupported on an upgraded operating system.
• Configure all servers for RAID as described in Avaya Aura® Contact Center Planning andEngineering (NN44400-210).
• Ensure that you have a DVD for Windows Server 2008 Release 2.• Install the network interface card in the server.• Know the IP addresses for the contact center subnet.
About this taskInstall the Windows operating system, which is required for the Contact Center server software.During the installation, configure the Windows settings as required. You must perform thisprocedure on each server before you install Contact Center server software on the server.
Procedure
1. Insert the Windows Server 2008 64-bit Release 2 Standard Edition or WindowsServer 2008 64-bit Release 2 Enterprise Edition DVD into the DVD drive.
2. Install Windows Server 2008 Release 2 according to the instructions supplied bythe DVD.
3. On the first install page, select your language for installation.
4. Click Next.
5. On the Installation window, select a Language to install from the list.
6. Select a Time and currency format from the list.
7. Select Keyboard or input method from the list.
8. Click Next.
9. Click Install Now.
10. Select an operating system from the list.
11. Click Next.
12. On the first Install Windows screen, read the terms of the license agreement andselect I accept the license terms.
Installing Windows Server 2008 Release 2
Avaya Aura® Contact Center Installation May 2013 311

13. Click Next.
14. Select Custom.
15. Select the disk partition on which you want to install Windows Server 2008.
Important:You can use the partition management options to configure the partitions on yourserver.
16. Click Next.The installation proceeds and automatically restarts the server several times.
17. After completing the installation, log on to the server as Administrator. Enter andconfirm the Administrator password.
18. In the Initial Configuration Tasks window, select Activate Windows and followthe instructions or the Microsoft documentation to activate your server.
19. Select Set time zone and complete the information as required for your system.If you are installing Voice Contact Server Only software or Knowledge WorkerServer software on this server, ensure that you clear Automatically adjust clockfor daylight saving changes. Otherwise select Automatically adjust clock fordaylight saving changes.
20. Select Configure Networking and complete the information for your NetworkInterface Card (NIC) with the server IP address.
21. Select Provide computer name and domain and complete the information for yourserver name and workgroup or domain settings.
22. Change the DVD drive letter to E: to ensure the correct drive letters are free for theContact Center application and database hard disk drives and partitions.
23. Configure the hard disk drives and partitions for this server using the WindowsServer 2008 Server Manager - Disk Management utility. For more information abouthard disk drives and partitions, see Avaya Aura® Contact Center Planning andEngineering (NN44400-210).
24. Install other required drivers for your hardware configuration.
Procedure job aid
Name Description
Computer name Do not use spaces or underscores or exceed15 characters. The name must start with analphabetic character.
312 Avaya Aura® Contact Center Installation May 2013Comments? [email protected]

Name Description
The computer name must match (includingcase sensitivity) the DNS name.
Disk drives Format the partitions as required for theserver. For more information, see AvayaAura® Contact Center Planning andEngineering (NN44400-210).
Domain/workgroup name Configure as required for your site.You must check to ensure the DNS Domainname (including case) matches the servername if the server is added to a domain orworkgroup after configuration.
Licensing modes Select Per server licensing mode.Accept the default five concurrentconnections.
Modem dialing Configure as required for your site. Do notinstall a modem on a Communication ControlToolkit server.
Network components Configure IP Address, WINS, DNS for one ortwo network cards as per configuration.Contact Center does not support IPv6.
Network connections If the server has more than one NIC/adapter,ensure contact center subnet appears first inthe network adapter binding order.
Partitions Configure C: drive to be a primary drive.Configure the other drives on your server tomeet the requirements according to AvayaAura® Contact Center Planning andEngineering (NN44400-210) for the server.
Regional settings window Configure as required for your site.
SNMP Configure for all servers.
Configuring Windows Server 2008Before you begin
• Install Microsoft Windows Server 2008 64-bit Release 2 on your server.
About this taskBefore you can install Avaya Aura® Contact Center software on your server, you must configureWindows Server 2008 to meet the requirements of the software.
Configuring Windows Server 2008
Avaya Aura® Contact Center Installation May 2013 313

You can prepare the server using this and other procedures, or you can download and use anAvaya Aura® Contact Center operating system configuration tool that installs the requiredWindows roles and features.
The Avaya Aura® Contact Center Windows Roles and Features installer configures thefollowing Windows Server 2008 resources:
• Windows Server Backup Features• SNMP Services• Active Directory Light Weight Directory Services• Application Server• Web Server (IIS)
For more information, and to download the Avaya Aura® Contact Center Windows Roles andFeatures installer, see http://support.avaya.com.
The Avaya Aura® Contact Center Windows Roles and Features installer replaces the followingprocedures:
• Configuring Windows Server 2008 (this procedure)• Configuring SNMP on your server• Installing operating system components for Contact Center
If you use the Avaya Aura® Contact Center Windows Roles and Features installer, skip thesethree procedures.
Procedure
1. Log on to the Windows Server 2008 server using an administrator account.
2. Select the Don’t display this screen on startup check box.
3. Update the emergency repair disk to record the latest configuration data for theserver.
4. Choose Start > Administrative Tools > Server Manager.
5. In the left pane, click Features.
6. Click Add Features.
7. Select Windows Server Backup Features.
8. Click Next.
9. Click Install.
10. Click Close.
11. Choose Start > All Programs > Accessories > System Tools > Windows ServerBackup.
12. Follow the on-screen instructions to select what you want to back up.
314 Avaya Aura® Contact Center Installation May 2013Comments? [email protected]

Installing the latest supported operating system servicepacks
Before you begin
• Access the Avaya hotfixes list on the Web site www.avaya.com/support.• Install and configure Microsoft Windows Server 2008 64-bit Release 2 on your server.• Review the recommendations on operating system service updates in Avaya Aura®
Contact Center Planning and Engineering (NN44400-210).• Install the Microsoft .NET Framework 3.5 and Microsoft .NET Framework 3.5 SP1.
About this taskAvaya recommends that you install the most recent supported operating system service packs.You must download the supported operating system service pack from the Avaya hotfixes listto ensure your Contact Center server software functions correctly with the supported operatingsystem patches.
Procedure
1. Log on to the server and disable the Windows Update feature. There are a numberof methods for disabling the Windows Update feature, refer to the Windows Server2008 documentation for a method suitable to your solution. Disabling the WindowsUpdate feature prevents Windows Server 2008 from automatically applyingoperating system patches and potentially rebooting the server.
2. Review the Contact Center Service Packs Compatibility and Security HotfixesApplicability List to determine the most recent Avaya Aura® Contact Centersupported patches or service packs.
3. Download the appropriate Microsoft Windows Server 2008 patches for the AvayaAura® Contact Center software installed on this server.
4. Install the most recent Windows Server 2008 service pack that is validated withAvaya Aura® Contact Center by following the Microsoft Installation instructions.
Installing the latest supported operating system service packs
Avaya Aura® Contact Center Installation May 2013 315

Connecting to the contact center subnetAbout this taskConnect the Contact Center server to the contact center subnet. The contact center subnet isthe network on which the server software applications work together to route contacts andgenerate reports.
Procedure
1. Locate the slot assigned to the contact center subnet network interface card for theserver. Make a note of the slot.
2. Connect the cable from the contact center subnet to the contact center subnetnetwork interface card in the server in accordance with customer site networkingguidelines.
3. Use the ping command to test the contact center subnet.
Adding a server to a domainBefore you begin
• Ensure that you have domain administrator privileges, or ask the Domain Administratorto assign you a domain user account for remote access.
• On the server, configure a preferred Domain Name System (DNS) server on the NetworkInterface Card (NIC).
About this taskAdd the server to an existing domain. Avaya recommends that you add the server to the domainbefore installing Contact Center software.
Ask your System Administrator to add a Domain Name System (DNS) static entry for thisserver. Each Contact Center server in a domain requires a DNS static entry.
Important:Avaya Aura® Contact Center High Availability solutions do not support Windows Server 2008Dynamic DNS.
In High Availability solutions, ask your System Administrator to add one DNS static entry forthe each managed name and associated managed IP address. A typical High Availabilitycampus solution with a pair of servers requires 3 DNS static entries; one DNS static entry for
316 Avaya Aura® Contact Center Installation May 2013Comments? [email protected]

the active server, one DNS static entry for the standby server, and one DNS static entry forthe managed name and associated IP address.
Procedure
1. Log on to the server.
2. Click Start > Administrative Tools > Server Manager.
3. Beside Computer Information, click Change System Properties.
4. In the System Properties dialog box, click the Computer Name tab.
5. Click Change.
6. In the Computer Name/Domain Changes dialog box, click the Domain option.
7. Type the domain name (you must provide the fully qualified domain name, whichincludes the prefix and suffix).
8. Click OK.
9. Type the domain administrator User name and Password.
10. Click OK.
11. Restart the server when you are prompted to do so.
Disabling the Remote Access servicesAbout this taskAvaya Aura® Contact Center does not support Remote Access Services (RAS). Disable theRemote Access services before installing Avaya Aura® Contact Center. Microsoft RemoteDesktop continues to run after you disable Remote Access services. After you disable theservices, restart the server.
Procedure
1. Choose Start > Administrative Tools > Services.
2. In the Services window, right-click the Remote Access Connection Managericon.
3. Click Properties.
4. In the General tab, from the Startup type list, select Disabled.
5. Click OK.
6. In the Services window, right-click the Remote Access Auto ConnectionManager icon.
Disabling the Remote Access services
Avaya Aura® Contact Center Installation May 2013 317

7. Click Properties.
8. In the General tab, from the Startup type list, select Disabled.
9. Click OK.
10. In the Services window, click File, Exit.
11. Restart the server.
Configuring SNMP on your serverBefore you begin
• Install and configure Microsoft Windows Server 2008 64-bit Release 2 on your server.
About this taskConfigure Simple Network Management Protocol (SNMP) on your server to ensure you haveall of the required components of the Internet protocol for monitoring devices in your network.SNMP helps you manage data that describes the system configuration and errors that mayoccur between them.
Procedure
1. Log on to the server using the administrator account.
2. Choose Start > Control Panel > Programs.
3. In the Programs and Features section, click Turn Windows features on or off.
4. In the Server Manager window, select Server Manager and click Add Features.
5. Select SNMP Services.
6. Click Next.
7. Click Install.
8. If prompted, insert the Windows Server 2008 DVD.
9. Click Close.
318 Avaya Aura® Contact Center Installation May 2013Comments? [email protected]

Disabling unused Network AdaptersAbout this taskDisable all unused Network Adapters or Network Interface Cards (NICs) to improve networkcommunications and prevent the erroneous configuration of unused NICs during ContactCenter server commissioning.
Procedure
1. Log on to the server.
2. Click Start > Control Panel > Network and Internet > Network and SharingCenter > Change Adapter Settings.
3. Right-click on the unused Network Adapter, and select Disable.
4. Repeat this procedure for all unused Network Adapters.
Enabling Microsoft Remote Desktop connectionBefore you begin
• Install Microsoft Windows Server 2008 64-bit Release 2 on your server.• Log on to the server with administrator privileges.
About this taskEnable Microsoft Remote Desktop connection as your remote access tool. Microsoft RemoteDesktop provides remote access for support on the server.
Procedure
1. Choose Start > Control Panel > System and Security.
2. In the System section, select Allow remote access.
3. Click the Remote tab.
4. Select Allow connections from computers running any version of RemoteDesktop (less secure).
5. Click OK.
Disabling unused Network Adapters
Avaya Aura® Contact Center Installation May 2013 319

Configuring Data Execution PreventionAbout this taskConfigure the Data Execution Prevention (DEP) hardware and software to perform additionalchecks on memory that protect the Avaya Aura® Contact Center server against malicious codeexploitation.
Procedure
1. Log on to Windows as administrator.
2. Choose Start > Control Panel > System and Security.
3. Click System.
4. In the System window, click Advanced system settings.
5. In the System Properties dialog box, click the Advanced tab.
6. Under Performance, click Settings.
7. In the Performance Options dialog box, click the Data Execution Preventiontab.
8. On the Data Execution Prevention tab, select Turn on DEP for essentialWindows programs and services only.
9. Click OK.
10. On the System Properties dialog box, click OK.
11. Click OK to restart the computer.
Importing Contact Center Firewall Security policyBefore you begin
• Install Microsoft Windows Server 2008 64-bit Release 2 on your server.• Log on to the server with administrator privileges.• Download the most recent Avaya Aura® Contact Center Firewall Security policy from
www.avaya.com/support.
About this taskImport the Avaya Aura® Contact Center Firewall Security policy to ensure all contact centerservers in the solution can communicate.
320 Avaya Aura® Contact Center Installation May 2013Comments? [email protected]
Avaya recommends that you export and backup your existing firewall security policy beforeimporting the Avaya Aura® Contact Center Firewall Security policy. You can use this backuppolicy to rollback the Avaya Aura® Contact Center Firewall Security policy, if you ever needto.
Procedure
1. Choose Start > Administrative Tools > Windows Firewall with AdvancedSecurity.
2. Choose Actions > Export Policy.
3. In the File name box, type the name for the backup policy.
4. Click Save.Windows exports the existing policy. You can use this backup policy to rollback theAvaya Aura® Contact Center Firewall Security policy, if you ever need to.
5. On the Policy successfully exported message box, click OK.
6. Choose Actions > Import Policy.
7. On the policy overwrite message box, click Yes.
8. Navigate to the folder containing the Avaya Aura® Contact Center Firewall Securitypolicy.
9. Click Open.Windows imports the Avaya Aura® Contact Center Firewall Security policy.
10. On the Policy successfully imported message box, click OK.
Disabling NetBIOSAbout this taskIf the Contact Center server uses two Network Interface Cards (NICs), disable NetBIOS on theEmbedded LAN (ELAN) network interface card (NIC) to avoid NetBIOS conflicts.
Contact Center supports two Network Interface Cards (NICs) and two subnets (one contactcenter subnet and one ELAN subnet). The Contact Center ELAN NIC and ELAN subnet areoptional.
Procedure
1. Choose Start > Control Panel > Network and Internet.
2. Click Network and Sharing Center.
3. Click Change adapter settings.
4. Right-click the ELAN Network Interface Card (NIC).
Disabling NetBIOS
Avaya Aura® Contact Center Installation May 2013 321

5. Click Properties.
6. Select Internet Protocol Version 4 (TCP/IPv4).
7. Click Properties.
8. Click Advanced.
9. Click the WINS tab.
10. Select the Disable NetBIOS over TCP/IP check box.
11. Click OK.
Connecting the Embedded LAN subnetBefore you begin
• Install two network cards on the Contact Center server.• Disable the NetBIOS on the ELAN network interface card.• Connect the contact center subnet network interface card.
About this taskIf your server uses two NICs, connect the Embedded LAN (ELAN) NIC to the ELAN subnet.Contact Center supports two network interface cards (NICs) and two subnets (one contactcenter subnet and one ELAN subnet). The Contact Center ELAN NIC and ELAN subnet areoptional.
Procedure
1. Locate the slot assigned to the ELAN network interface card for the server.
2. Write the MAC address of the card on a small label. Attach the label to the back ofthe card or the chassis slot position.
3. Connect the ELAN subnet from the Avaya equipment to the Ethernet hub.
4. Connect the network cable from the ELAN network interface card in the server tothe hub.
5. Plug in the power cord for the hub.
6. If you have an ELAN subnet network connection, use the ping command to test it.
322 Avaya Aura® Contact Center Installation May 2013Comments? [email protected]

Configuring the binding orderBefore you begin
• Install two network interface cards on the Contact Center server.• Disable the NetBIOS on the ELAN network interface card.• Connect the Contact Center server network interface card to the contact center subnet.• Connect the Contact Center server ELAN network interface card to the ELAN subnet.
About this taskConfigure the binding order of the network cards. The contact center subnet network interfacecard must be bound first and then the ELAN network interface card.
Procedure
1. Choose Start > Control Panel > Network and Internet > Network and SharingCenter.
2. Click Change adapter settings.
3. In the Network Connections window, press the ALT key.A hidden menu appears.
4. Choose Advanced > Advanced Settings.
5. In the Connections box, ensure that the contact center subnet connection is listedfirst. If it is not listed first, adjust the order.
Installing operating system components for ContactCenter
Before you begin
• Install Windows Server 2008 64-bit Release 2.
About this taskBefore installing Contact Center software, you must install specific operating system softwarecomponents such as Internet Information Services to integrate the components in ContactCenter.
Configuring the binding order
Avaya Aura® Contact Center Installation May 2013 323

Procedure
1. Choose Start > Administrative Tools > Server Manager.
2. In the left-hand column of the Server Manager, right-click Roles, and select AddRoles.
3. Review the requirements for the new role, and click Next.
4. Under Server Roles, select Active Directory Lightweight Directory Services.
5. If an Add Roles Wizard message box that lists features required by Active DirectoryLightweight Directory Services appears, click Add Required Features.
6. Under Server Roles, select Application Server.
7. If an Add Roles Wizard message box that lists features required by ApplicationServer appears, click Add Required Features.
8. Under Application Server, select Role Services.
9. Select Web Server (IIS) Support.
10. If an Add Roles Wizard message box appears, listing features required by WebServer (IIS) Support appears, click Add Required Features.
11. Click Next.
12. On the Introduction to Web Server (IIS) page, click Next.
13. On the Select Role Services page, under Common HTTP Features, select thefollowing services:
• Static Content
• Default Document
• Directory Browsing
• HTTP Errors
• HTTP Redirection
Important:All other services check boxes must be cleared.
14. On the Select Role Services page, under Application Development, select thefollowing services:
• ASP.NET
• .NET Extensibility
• ASP
• ISAPI Extensions
• ISAPI Filters
324 Avaya Aura® Contact Center Installation May 2013Comments? [email protected]

• Server Side Includes
Important:All other services check boxes must be cleared.
15. On the Select Role Services page, under Health and Diagnosis, select thefollowing services:
• HTTP Logging
• Logging Tools
• Request Monitor
• Tracing
Important:All other services check boxes must be cleared.
16. On the Select Role Services page, under Security, select all services.
17. On the Select Role Services page, under Performance, select all services.
18. On the Select Role Services page, under Management Tools, select the followingservices:
• IIS Management Console
• IIS Management Scripts and Tools
• Management Service
• All items under IIS 6 Management Compatibility
Important:All other services check boxes must be cleared.
19. Click Next.
20. Review the installation information.
21. Click Install.
22. On the Installation Results page, click Close.
23. Restart the server if required.
Installing operating system components for Contact Center
Avaya Aura® Contact Center Installation May 2013 325

Configuring MIME types to support Microsoft updatesAbout this taskConfigure the Multipurpose Internet Mail Extension (MIME) types to support Microsoft updatesand patches.
Procedure
1. Log on to the server.
2. Click Start > Administrative Tools > Computer Management.
3. In the Computer Management dialog box, expand Services and Applications >Internet Information Services > IIS Manager > Sites.
4. Select Default Web Site.
5. Under IIS, select MIME Types.
6. Double-click MIME Types.
7. On the Actions list on the right, click Add.
8. In the File name extension box, type .msp.
9. In the MIME Type box, type application/microsoftpatch.
10. Click OK.
11. On the Actions list on the right, click Add.
12. In the File name extension box, type .msu.
13. In the MIME Type box, type application/microsoftupdate.
14. Click OK.
15. Close the Computer Management window.
Adding the domain AD-LDS replication account to thestandby administrators and replicator group
About this taskAdd the AD-LDS replication account to the local Administrators and replicator group on thestandby server. Perform this procedure before installing Contact Center software on thestandby server.
326 Avaya Aura® Contact Center Installation May 2013Comments? [email protected]

If you are using a domain, you must request this AD-LDS replication account from your Networkor System Administrator. The primary and standby replicating Contact Center servers mustboth be added to the same domain.
For this procedure, the name of the AD-LDS replication account is CCMAReplication. You canchoose another name for the account.
Procedure
1. Log on to the standby Contact Center server.
2. Click Start > Administrative Tools > Computer Management.
3. In the Computer Management window, expand Local Users and Groups.
4. Click the Groups folder.
5. Double-click on the Administrators group.
6. Click Add > Locations.
7. On the Windows Security dialog box, type the domain logon details.
8. On the Locations dialog, select the domain to be used for CCMA replication.
9. Expand the domain folder to display domain users.
10. Click Users.
11. Click OK.
12. Click Advanced > Find Now, to display domain users.
13. From the list of users select the CCMA replication domain user account, for exampleselect the myDomain\CCMAReplication user account.
14. Click OK.
15. Click OK > Apply > OK.
16. Click the Groups folder.
17. Double-click on the Replicator group.
18. Click Add > Locations.
19. On the Windows Security dialog box, type the domain logon details.
20. On the Locations dialog, select the domain to be used for CCMA replication.
21. Expand the domain folder to display domain users.
22. Click Users.
23. Click OK.
24. Click Advanced > Find Now, to display domain users.
25. From the list of users select the CCMA replication domain user account, for exampleselect the myDomain\CCMAReplication user account.
26. Click OK.
Adding the domain AD-LDS replication account to the standby administrators and replicator group
Avaya Aura® Contact Center Installation May 2013 327

27. Click OK > Apply > OK.
Updating server for a network location installationAbout this taskConfigure the server .NET security settings to prepare the server for a remote networkinstallation. Avaya Aura® Contact Center supports network installation. You can insert theAvaya Aura® Contact Center DVD into a computer on your network. You then add this computeras a trusted site and network location on the new server. You can access this DVD from thenetwork location, and with some .NET security updates, use the remote DVD to install AvayaAura® Contact Center software on the new server.
Note:Skip this procedure if you plan to use the Avaya Aura® Contact Center DVD from the DVDdrive of the server.
Procedure
1. Insert the Avaya Aura® Contact Center DVD into a computer on the contact centernetwork.
2. Log on to the new server you are preparing for Contact Center.
3. Choose Start > Control Panel > Network and Internet > Internet Options.
4. In the Security tab, click Trusted sites.
5. In the Trusted sites section, click Sites.
6. In the Add this Web site to the zone box, type the <IP address> of the remotecomputer with the Avaya Aura® Contact Center DVD.
7. Click Add.
8. Click OK.
9. Close the Internet Options box.
10. From the new server, navigate to the network location with the DVD.
11. Access the remote DVD and in the root folder of the DVD, double-clickNetworkSetup.bat..NetFramework 3.5 installs and the .NetSecurity settings are modified.
12. If the Avaya Aura® Contact Center installation does not automatically start, in theroot folder of the DVD double-click Setup.exe.
328 Avaya Aura® Contact Center Installation May 2013Comments? [email protected]

13. After Avaya Aura® Contact Center installs, navigate to your network location anddouble-click NetworkSetupReset.bat.
Installing the standby Voice and Multimedia Contact Serversoftware for CS1000 in a domain
Before you begin
• Ensure the Avaya Communication Server 1000 is configured. For more information seeAvaya Aura® Contact Center Configuration – Avaya CS1000 Integration(NN44400-512).
• Download the most recent Contact Center and Common Components patches to theserver.
• The primary active Voice and Multimedia Contact Server for Avaya CommunicationServer 1000 must already be installed and configured.
• The primary active Voice and Multimedia Contact Server for Avaya CommunicationServer 1000 must already be configured to support AD-LDS replication.
About this taskInstall the Contact Center standby Voice and Multimedia Contact Server software to providea resilient solution. To configure CCMA replication you must enable replication during theinstall. Enabling replication requires a few extra steps at install time to configure the standbyserver. A replication server can only be configured at install time.
Note:Installing Voice and Multimedia Contact Server software installs Apache Tomcat Server.The default port number for Apache Tomcat is 8081. If you need to change the port numberto avoid conflicts with third-party software, see your Apache Tomcat documentation.
Note:Read the Contact Center Release Notes for the most recent instructions.
Procedure
1. Insert the Contact Center DVD into the DVD drive of your server.
2. If the installation does not automatically start, double-click Setup.exe.
3. Click Install to install the Microsoft .NET Framework 3.5 SP1 and Visual C++runtime libraries on the server.
Installing the standby Voice and Multimedia Contact Server software for CS1000 in a domain
Avaya Aura® Contact Center Installation May 2013 329

If you are prompted to accept the Microsoft .NET Framework 3.5.1 licenseagreement, click Accept. If you are prompted to restart the server, click Yes andrepeat step 2.
4. On the Welcome window, click Next.
5. On the License Agreement window, read the terms of the agreement.
6. Click I Accept the Terms of the End-User License Agreement.
7. Click Next.
8. On the Installation Selection window, under Avaya Communication Server 1000- AML, select Voice and Multimedia Contact Server without Avaya MediaServer.
9. Click Next.
330 Avaya Aura® Contact Center Installation May 2013Comments? [email protected]

10. On the Installation Destination window, on the Application Destination Drivetab, select where to install the Contact Center application software by choosing adisk drive letter.
11. Click the Database Destination Drive tab.
12. Under Select the destination drive for the Contact Center database files, selectthe drive for the Contact Center Manager Server database.
13. Under Select the destination drive for the Contact Center database files, selectthe drive for the Communication Control Toolkit database.
14. Under Select the destination drive for the Contact Center database files, selectthe drive for the Contact Center Multimedia database.
Installing the standby Voice and Multimedia Contact Server software for CS1000 in a domain
Avaya Aura® Contact Center Installation May 2013 331

15. Click the Product Updates Location tab.
332 Avaya Aura® Contact Center Installation May 2013Comments? [email protected]

16. Under Select the Product Updates Location, click Browse to locate the foldercontaining the Contact Center product updates.
17. Click Next.The System Readiness Check runs on the server.
18. If the System Readiness Check utility returns a Fail, the software installation cannotproceed until you correct the problem. Review any failures returned by the SystemReadiness Check and consult Avaya Aura® Contact Center Planning andEngineering (NN44400-210) to determine the actions to resolve the issue.You can ignore warnings if the potential impact to the operation of the contact centeris understood and not applicable.
19. Click Next.
20. On the Installation Data window, type the installation details for each tab.
21. Select the CCMS tab, and configure the server details.
Installing the standby Voice and Multimedia Contact Server software for CS1000 in a domain
Avaya Aura® Contact Center Installation May 2013 333

22. In the Customer Name box, type the customer name.
23. In the Company Name box, type the name of the company.
24. In the Site Name box, type the site name for the Contact Center. The site namemust not contain spaces or non-alphabetical characters except hyphen (-) andunderscore (_). The first character must be a letter. The site name must be uniqueand can consist of 6 to 15 characters. The Site Name of the standby server mustbe the same as the Site Name of the primary server.
25. In the RSM IP Address box, type the Real-time Statistics Multicast IP Address ofthe server to associate with sending real-time data. The IP address must be from224.0.1.0 to 239.255.255.255. The default is 234.5.6.10.
26. In the Contact Center Server Subnet IP Address box, type the IP Address of theserver.
27. In the ELAN Subnet IP Address box, type the IP Address of the embedded localarea network, a dedicated Ethernet LAN that connects Contact Center ManagerServer to the PABX. You must select the check box for the ELAN subnet IP Addressif you use an ELAN subnet.
28. Select the Licensing tab, and configure the licensing details.
334 Avaya Aura® Contact Center Installation May 2013Comments? [email protected]
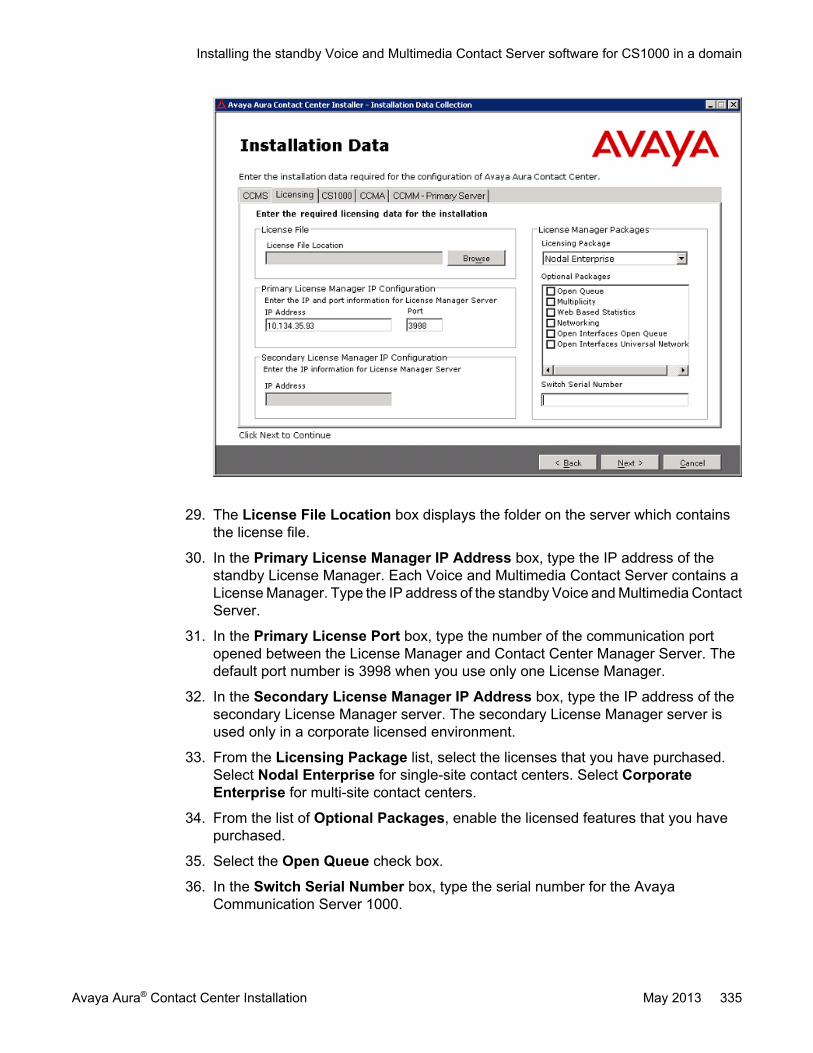
29. The License File Location box displays the folder on the server which containsthe license file.
30. In the Primary License Manager IP Address box, type the IP address of thestandby License Manager. Each Voice and Multimedia Contact Server contains aLicense Manager. Type the IP address of the standby Voice and Multimedia ContactServer.
31. In the Primary License Port box, type the number of the communication portopened between the License Manager and Contact Center Manager Server. Thedefault port number is 3998 when you use only one License Manager.
32. In the Secondary License Manager IP Address box, type the IP address of thesecondary License Manager server. The secondary License Manager server isused only in a corporate licensed environment.
33. From the Licensing Package list, select the licenses that you have purchased.Select Nodal Enterprise for single-site contact centers. Select CorporateEnterprise for multi-site contact centers.
34. From the list of Optional Packages, enable the licensed features that you havepurchased.
35. Select the Open Queue check box.
36. In the Switch Serial Number box, type the serial number for the AvayaCommunication Server 1000.
Installing the standby Voice and Multimedia Contact Server software for CS1000 in a domain
Avaya Aura® Contact Center Installation May 2013 335

37. Select the CS1000 tab, and configure the Avaya Communication Server 1000details.
38. In the Switch Name box, type the name of the AML Avaya Communication Server1000 telephone switch. Valid characters for Avaya Communication Server 1000names are A–Z, a–z, 0–9, underscore (_), and period (.). Names must begin withan alphabetical character and cannot contain spaces. The last character must notbe an underscore or a period. Names must not exceed 80 characters in length.
39. In the Switch IP Address box, type the IP address of the Avaya CommunicationServer 1000.
40. In the Alternative Switch IP Address box, type the IP address of an alternateAvaya Communication Server 1000, if you have one.
41. In the Switch Customer Number box, type the customer number for the AvayaCommunication Server 1000.
42. In the Voice Connection Type section, select the method used to connect to thePABX. Select None, Avaya Aura Experience Portal, or Avaya CallPilot®. If you usea standalone Avaya CallPilot®, type the Avaya CallPilot® server ELAN IP Addressand then configure the Port to 10008. If you are using Avaya CallPilot® HighAvailability, type the Avaya CallPilot® Managed ELAN IP Address and thenconfigure the Port to 10008.
43. Select the CCMA tab, and configure the CCMA details.
336 Avaya Aura® Contact Center Installation May 2013Comments? [email protected]

44. In the Configuration section, select Enable CCMA Replication. CCMA replicationis reproducing an active copy of the AD-LDS for backup or emergency failure. Incase of server failure, a current AD-LDS is available to maintain the contactcenter.
45. On the Contact Center Installer message box, click Yes to confirm that this is astandby server.
46. In the LDAP Port Number box, type the port number for the Lightweight DirectoryAccess Protocol (LDAP) for which common contact information is stored on aserver. The default value of the port is 389. Check with the system administrator toensure that the port number is not already in use.
47. In the SSL Port Number box, type the port number for the Secure Sockets Layer(SSL) that controls security when applications are communicating across thenetwork. The default port is 636. Check with the system administrator to ensure thatthe port number is not already in use.
48. In the System Account Configuration section, in the Password box, type thepassword for the CCMA System Account user account. Confirm the password inthe second box. The password is not checked against the server security policy forminimum password requirements. Avaya recommends that you enter a passwordthat conforms to your corporate password policy.
49. Select the CCMM tab, and configure the Contact Center Multimedia details.
Installing the standby Voice and Multimedia Contact Server software for CS1000 in a domain
Avaya Aura® Contact Center Installation May 2013 337

50. In the License Server box, type the name of the server on which the Contact CenterLicense Manager software is installed.
51. In the Inbound Mail Server (POP3) box, type the name of the server on which emailmessages are received in your network.
52. In the Outbound Mail Server (SMTP) box, type the name of the server from onwhich email messages are sent. Your inbound and outbound mail servers can havethe same name.
53. Select Enter Predictive Outbound Configuration to enable predictive outboundcontacts.
54. In the Predictive Server box, type the name of the Predictive Outbound solutionsapplication server on which the administration software resides, or the CPSE2
server.
55. In the Predictive Reporting Server box, type the name of the Predictive Outboundsolutions server that contains the statistics for reporting predictive outbound data,or Portfolio server.
56. In the Web Stats Server box, type the name of the optional Web Statistics serverthat agents and supervisors use to view real-time statistics for call handling, skillsetdata, and the state information on the Agent Desktop. Web Based Statistics is anoptional licensed feature and requires a Web Based Statistics feature license.
338 Avaya Aura® Contact Center Installation May 2013Comments? [email protected]
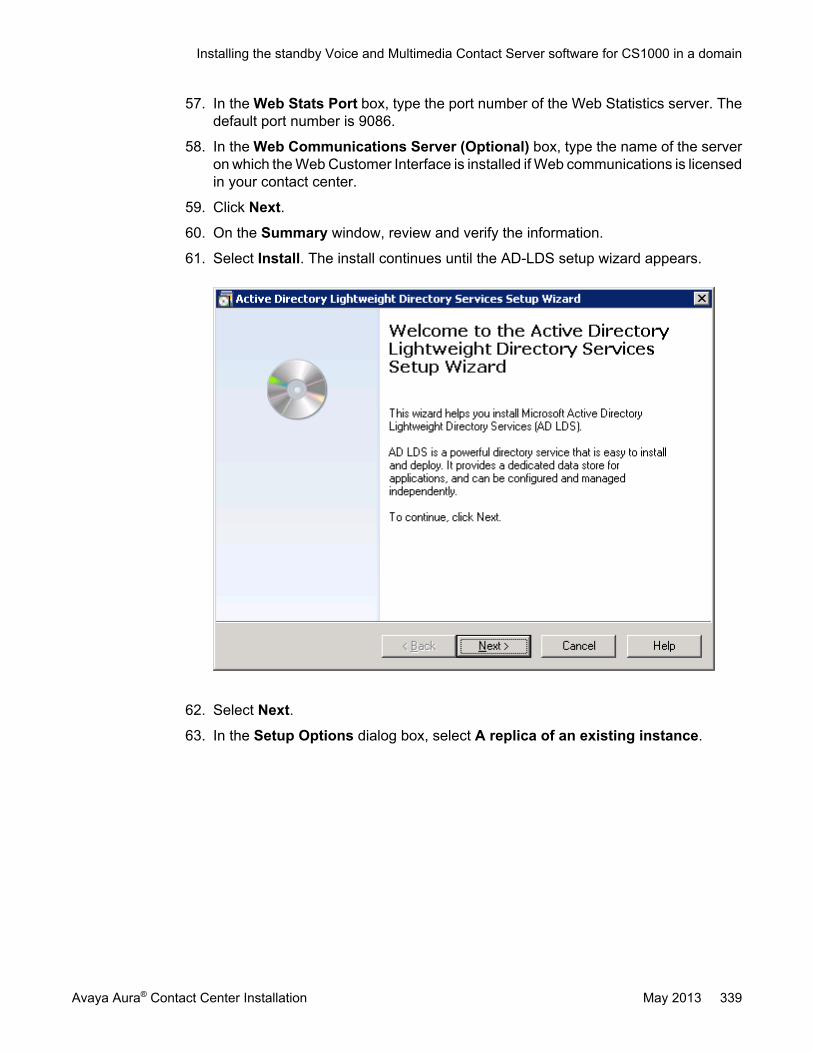
57. In the Web Stats Port box, type the port number of the Web Statistics server. Thedefault port number is 9086.
58. In the Web Communications Server (Optional) box, type the name of the serveron which the Web Customer Interface is installed if Web communications is licensedin your contact center.
59. Click Next.
60. On the Summary window, review and verify the information.
61. Select Install. The install continues until the AD-LDS setup wizard appears.
62. Select Next.
63. In the Setup Options dialog box, select A replica of an existing instance.
Installing the standby Voice and Multimedia Contact Server software for CS1000 in a domain
Avaya Aura® Contact Center Installation May 2013 339

64. Select Next.
65. On the Instance Name dialog box, in the Instance name box, type the AD-LDSinstance name. The default instance name is SymposiumWC, so typeSymposiumWC.
340 Avaya Aura® Contact Center Installation May 2013Comments? [email protected]

66. In the Description box, type SymposiumWC.
67. Click Next.
68. On the Ports dialog box, if no other applications use the ports, accept the defaultvalues in the LDAP port number and SSL port number boxes and select Next.
Installing the standby Voice and Multimedia Contact Server software for CS1000 in a domain
Avaya Aura® Contact Center Installation May 2013 341

69. On the Joining a Configuration Set dialog box, in the Server box, type the FQDNname of the primary Voice and Multimedia Contact Server to replicate.Example of entering the primary Voice and Multimedia Contact Server name.
342 Avaya Aura® Contact Center Installation May 2013Comments? [email protected]

70. On the Joining a Configuration Set window, in the LDAP Port box, type the portnumber on the AD-LDS instance on the primary Voice and Multimedia ContactServer. The default is port number 389.
71. Click Next.
72. On the Administrative Credentials for the Configuration Set window, select Thisaccount.
73. In the User name box, type the primary Voice and Multimedia Contact Server servername followed by its Administrator name in the format <primary Voice andMultimedia Contact Server name>\Administrator. For example enter WIN-RBMQ1SU0OL1\Administrator. If you have created another administrator accountfor Contact Center, then enter the details (name and password) for that primaryVoice and Multimedia Contact Server server administrator account here. Youradministrator account must have full administrative privileges.Example of entering the administrative credentials.
Installing the standby Voice and Multimedia Contact Server software for CS1000 in a domain
Avaya Aura® Contact Center Installation May 2013 343
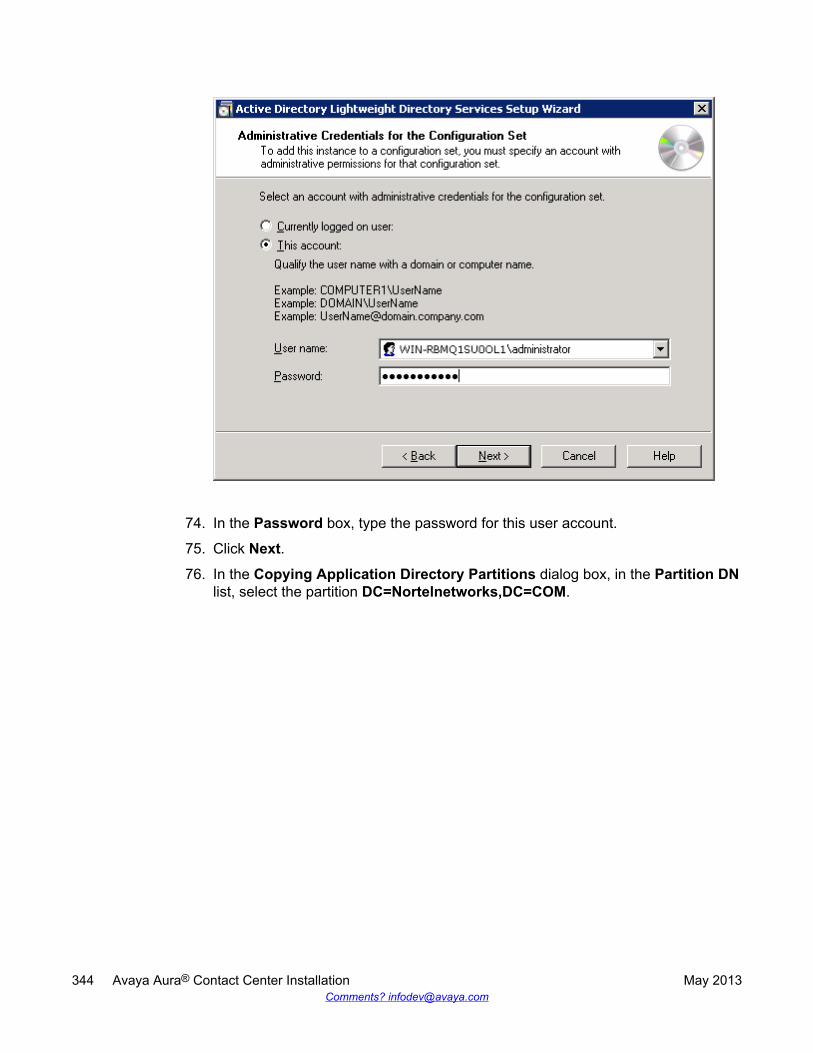
74. In the Password box, type the password for this user account.
75. Click Next.
76. In the Copying Application Directory Partitions dialog box, in the Partition DNlist, select the partition DC=Nortelnetworks,DC=COM.
344 Avaya Aura® Contact Center Installation May 2013Comments? [email protected]

77. Select Next.
78. In the File Location dialog box, accept the default values, click Next.
Installing the standby Voice and Multimedia Contact Server software for CS1000 in a domain
Avaya Aura® Contact Center Installation May 2013 345

79. In the Service Account Selection dialog box, select Network service account.Example of using a domain and selecting Network service account.
346 Avaya Aura® Contact Center Installation May 2013Comments? [email protected]

80. Click Next.
81. In the AD LDS Administrators dialog box, select This account.
Installing the standby Voice and Multimedia Contact Server software for CS1000 in a domain
Avaya Aura® Contact Center Installation May 2013 347

82. Select Browse to locate the CCMA AD-LDS replication account.The Select User or Group dialog box appears. Note that the location is the localdomain.
83. In the Select User or Group dialog box, click Advanced.
348 Avaya Aura® Contact Center Installation May 2013Comments? [email protected]

84. In the Windows Security dialog box, type a logon name and password of an accountwith permissions to access your domain.
85. Click OK.The advanced Select User or Group dialog box appears.
Installing the standby Voice and Multimedia Contact Server software for CS1000 in a domain
Avaya Aura® Contact Center Installation May 2013 349

86. In the advanced Select User or Group dialog box, click Find Now.
87. From the Search results list, select the CCMA replication account.Example of selecting a domain CCMA replication account:
350 Avaya Aura® Contact Center Installation May 2013Comments? [email protected]

88. In the advanced Select User or Group dialog box, click OK.Example of selecting a CCMA replication account:
Installing the standby Voice and Multimedia Contact Server software for CS1000 in a domain
Avaya Aura® Contact Center Installation May 2013 351
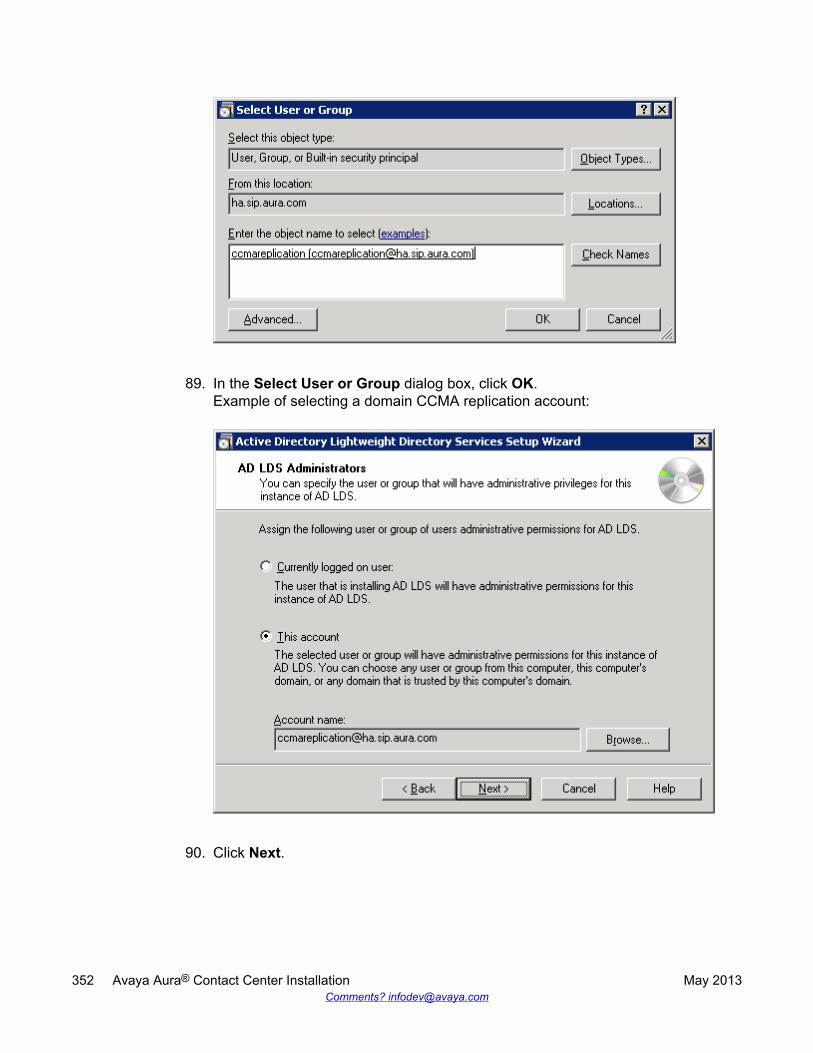
89. In the Select User or Group dialog box, click OK.Example of selecting a domain CCMA replication account:
90. Click Next.
352 Avaya Aura® Contact Center Installation May 2013Comments? [email protected]

91. Confirm the installation components, and click Next.
92. After the installation is complete, click Finish.
93. If prompted, restart the server.
Upgrading Java Runtime Environment, Java DevelopmentKit, and Apache Tomcat components using Third PartySoftware Upgrade Utility
Before you begin
• Apply Contact Center 6.3 Service Pack 10 or later on your system as an install-timepatch.
• Restart the Contact Center server to complete this procedure.
Upgrading Java Runtime Environment, Java Development Kit, and Apache Tomcat components using Third PartySoftware Upgrade Utility
Avaya Aura® Contact Center Installation May 2013 353

About this taskUse Third Party Software Upgrade Utility to automatically upgrade your Java RuntimeEnvironment and Tomcat software components. For more information, see Third PartySoftware Upgrade Utility on page 27.
Procedure
1. Log on to the server using the administrator account.
2. Navigate to the Avaya_Support\ProductUpdates folder.
3. Open the folder where you had saved the latest Service Pack.
4. Browse to ThirdParty\AACCThirdPartySoftwareUpgradeUtility.exe.
5. Double-click AACCThirdPartySoftwareUpgradeUtility.exe.
6. Click Upgrade.The system displays the “User Action Required” dialog box.
7. Click OK.
8. Click Yes to restart Contact Center and complete the upgrade.
Securing the Windows serverAbout this taskApply optional security measures to your operating system to further secure your server.
Important:Scanning software can degrade the performance and decrease the reliability of the system.Install virus scanning software only if the system connects to an exposed network or to theInternet.
Important:To maintain server performance, you must schedule virus scans during maintenanceperiods or low usage hours only.
Procedure
1. Harden the operating system using defined site procedures.
2. Install antivirus software. If you install antivirus software, Avaya recommends thatyou exclude some contact center files and folders from real-time and scheduledscans. For more information, and for a list of files and folders to exclude, see AvayaAura® Contact Center Planning and Engineering (NN44400-210).
354 Avaya Aura® Contact Center Installation May 2013Comments? [email protected]
Chapter 13: Primary Voice and MultimediaContact Server for CS1000software installation in aworkgroup
This chapter describes how to install a primary Voice and Multimedia Contact Server in a solution thatsupports High Availability and has an Avaya Communication Server 1000 (CS1000) platform. A Voiceand Multimedia Contact Server includes the following server software:
• Contact Center Manager Server (CCMS)
• Contact Center Manager Server Utility
• Contact Center License Manager
• Contact Center Manager Administration (CCMA)
• Communication Control Toolkit (CCT)
• Contact Center Multimedia (CCMM)
Install this server to provide context‐sensitive and skill-based routing for customer voice and multimediacontacts. This server provides routed contact support for voice calls, email messages, Webcommunications, voice mail messages, scanned documents, fax messages, and SMS text messages.This server provides extensive tools for agent management, real-time and historical reporting, andgraphical tools to create contact flows and treatment rules. Use this server for license management, HighAvailability configuration, networking, Open Interfaces Web Service and third-party application interfacesintegration.
You can change the name of a Contact Center server, but because this is time consuming, Avayarecommends that you configure the server final production name before installing Contact Centersoftware.
If you plan to follow the Microsoft server hardening guidelines, complete those procedures before installingAvaya Aura® Contact Center.
Important:You can create an administration account on the server and then install Avaya Aura® Contact Centerusing the account. This Avaya Aura® Contact Center administration account must have fulladministrative privileges. You must upgrade and patch Avaya Aura® Contact Center using thisadministration account. You can rename this account after installing Avaya Aura® Contact Center, but
Avaya Aura® Contact Center Installation May 2013 355

you must not delete the account. If you delete the account used to install Avaya Aura® Contact Center,Avaya Aura® Contact Center stops working.
Voice and Multimedia Contact Server supports two Network Interface Cards (NICs) and two subnets (onecontact center subnet and one ELAN subnet). The Voice and Multimedia Contact Server ELAN NIC andELAN subnet are optional.
You must complete all the procedures in this section in sequential order.
Voice and Multimedia Contact Server installationprerequisites
• Copy the most recent patches for the Contact Center software.
• Ensure that your new Contact Center license file is available.
Important:For the system to correctly handle backup and restore SNMP events, you must installWindows SNMP Service before you install Contact Center server software.
Downloading the latest documentationBefore you begin
• Download the most recent version of Acrobat Reader.• Access the Avaya Web site at www.avaya.com/support.
About this taskDownload the most recent documentation to ensure you have the most recent updates.Updates in the documentation accurately reflect the most recent changes in the software.
Procedure
1. Log on to the Avaya Web site.
2. Compare the versions of the documentation on the site with the versions youhave.
3. If the version number on www.avaya.com/support is higher than your version,download the latest version of the document.
356 Avaya Aura® Contact Center Installation May 2013Comments? [email protected]

4. Review the Avaya Web site for release notes and readme files.
Installing Windows Server 2008 Release 2Before you begin
• Ensure that you have a newly formatted server that meets the specifications in AvayaAura® Contact Center Planning and Engineering (NN44400-210) on which to installMicrosoft Windows Server 2008 64-bit, Release 2, Service Pack 1.
Do not upgrade your operating system from a previous release. Contact Center is notsupported on an upgraded operating system.
• Configure all servers for RAID as described in Avaya Aura® Contact Center Planning andEngineering (NN44400-210).
• Ensure that you have a DVD for Windows Server 2008 Release 2.• Install the network interface card in the server.• Know the IP addresses for the contact center subnet.
About this taskInstall the Windows operating system, which is required for the Contact Center server software.During the installation, configure the Windows settings as required. You must perform thisprocedure on each server before you install Contact Center server software on the server.
Procedure
1. Insert the Windows Server 2008 64-bit Release 2 Standard Edition or WindowsServer 2008 64-bit Release 2 Enterprise Edition DVD into the DVD drive.
2. Install Windows Server 2008 Release 2 according to the instructions supplied bythe DVD.
3. On the first install page, select your language for installation.
4. Click Next.
5. On the Installation window, select a Language to install from the list.
6. Select a Time and currency format from the list.
7. Select Keyboard or input method from the list.
8. Click Next.
9. Click Install Now.
10. Select an operating system from the list.
11. Click Next.
Installing Windows Server 2008 Release 2
Avaya Aura® Contact Center Installation May 2013 357

12. On the first Install Windows screen, read the terms of the license agreement andselect I accept the license terms.
13. Click Next.
14. Select Custom.
15. Select the disk partition on which you want to install Windows Server 2008.
Important:You can use the partition management options to configure the partitions on yourserver.
16. Click Next.The installation proceeds and automatically restarts the server several times.
17. After completing the installation, log on to the server as Administrator. Enter andconfirm the Administrator password.
18. In the Initial Configuration Tasks window, select Activate Windows and followthe instructions or the Microsoft documentation to activate your server.
19. Select Set time zone and complete the information as required for your system.If you are installing Voice Contact Server Only software or Knowledge WorkerServer software on this server, ensure that you clear Automatically adjust clockfor daylight saving changes. Otherwise select Automatically adjust clock fordaylight saving changes.
20. Select Configure Networking and complete the information for your NetworkInterface Card (NIC) with the server IP address.
21. Select Provide computer name and domain and complete the information for yourserver name and workgroup or domain settings.
22. Change the DVD drive letter to E: to ensure the correct drive letters are free for theContact Center application and database hard disk drives and partitions.
23. Configure the hard disk drives and partitions for this server using the WindowsServer 2008 Server Manager - Disk Management utility. For more information abouthard disk drives and partitions, see Avaya Aura® Contact Center Planning andEngineering (NN44400-210).
24. Install other required drivers for your hardware configuration.
358 Avaya Aura® Contact Center Installation May 2013Comments? [email protected]

Procedure job aid
Name Description
Computer name Do not use spaces or underscores or exceed15 characters. The name must start with analphabetic character.The computer name must match (includingcase sensitivity) the DNS name.
Disk drives Format the partitions as required for theserver. For more information, see AvayaAura® Contact Center Planning andEngineering (NN44400-210).
Domain/workgroup name Configure as required for your site.You must check to ensure the DNS Domainname (including case) matches the servername if the server is added to a domain orworkgroup after configuration.
Licensing modes Select Per server licensing mode.Accept the default five concurrentconnections.
Modem dialing Configure as required for your site. Do notinstall a modem on a Communication ControlToolkit server.
Network components Configure IP Address, WINS, DNS for one ortwo network cards as per configuration.Contact Center does not support IPv6.
Network connections If the server has more than one NIC/adapter,ensure contact center subnet appears first inthe network adapter binding order.
Partitions Configure C: drive to be a primary drive.Configure the other drives on your server tomeet the requirements according to AvayaAura® Contact Center Planning andEngineering (NN44400-210) for the server.
Regional settings window Configure as required for your site.
SNMP Configure for all servers.
Installing Windows Server 2008 Release 2
Avaya Aura® Contact Center Installation May 2013 359

Configuring Windows Server 2008Before you begin
• Install Microsoft Windows Server 2008 64-bit Release 2 on your server.
About this taskBefore you can install Avaya Aura® Contact Center software on your server, you must configureWindows Server 2008 to meet the requirements of the software.
You can prepare the server using this and other procedures, or you can download and use anAvaya Aura® Contact Center operating system configuration tool that installs the requiredWindows roles and features.
The Avaya Aura® Contact Center Windows Roles and Features installer configures thefollowing Windows Server 2008 resources:
• Windows Server Backup Features• SNMP Services• Active Directory Light Weight Directory Services• Application Server• Web Server (IIS)
For more information, and to download the Avaya Aura® Contact Center Windows Roles andFeatures installer, see http://support.avaya.com.
The Avaya Aura® Contact Center Windows Roles and Features installer replaces the followingprocedures:
• Configuring Windows Server 2008 (this procedure)• Configuring SNMP on your server• Installing operating system components for Contact Center
If you use the Avaya Aura® Contact Center Windows Roles and Features installer, skip thesethree procedures.
Procedure
1. Log on to the Windows Server 2008 server using an administrator account.
2. Select the Don’t display this screen on startup check box.
3. Update the emergency repair disk to record the latest configuration data for theserver.
4. Choose Start > Administrative Tools > Server Manager.
5. In the left pane, click Features.
360 Avaya Aura® Contact Center Installation May 2013Comments? [email protected]

6. Click Add Features.
7. Select Windows Server Backup Features.
8. Click Next.
9. Click Install.
10. Click Close.
11. Choose Start > All Programs > Accessories > System Tools > Windows ServerBackup.
12. Follow the on-screen instructions to select what you want to back up.
Installing the latest supported operating system servicepacks
Before you begin
• Access the Avaya hotfixes list on the Web site www.avaya.com/support.• Install and configure Microsoft Windows Server 2008 64-bit Release 2 on your server.• Review the recommendations on operating system service updates in Avaya Aura®
Contact Center Planning and Engineering (NN44400-210).• Install the Microsoft .NET Framework 3.5 and Microsoft .NET Framework 3.5 SP1.
About this taskAvaya recommends that you install the most recent supported operating system service packs.You must download the supported operating system service pack from the Avaya hotfixes listto ensure your Contact Center server software functions correctly with the supported operatingsystem patches.
Procedure
1. Log on to the server and disable the Windows Update feature. There are a numberof methods for disabling the Windows Update feature, refer to the Windows Server2008 documentation for a method suitable to your solution. Disabling the WindowsUpdate feature prevents Windows Server 2008 from automatically applyingoperating system patches and potentially rebooting the server.
2. Review the Contact Center Service Packs Compatibility and Security HotfixesApplicability List to determine the most recent Avaya Aura® Contact Centersupported patches or service packs.
3. Download the appropriate Microsoft Windows Server 2008 patches for the AvayaAura® Contact Center software installed on this server.
Installing the latest supported operating system service packs
Avaya Aura® Contact Center Installation May 2013 361

4. Install the most recent Windows Server 2008 service pack that is validated withAvaya Aura® Contact Center by following the Microsoft Installation instructions.
Connecting to the contact center subnetAbout this taskConnect the Contact Center server to the contact center subnet. The contact center subnet isthe network on which the server software applications work together to route contacts andgenerate reports.
Procedure
1. Locate the slot assigned to the contact center subnet network interface card for theserver. Make a note of the slot.
2. Connect the cable from the contact center subnet to the contact center subnetnetwork interface card in the server in accordance with customer site networkingguidelines.
3. Use the ping command to test the contact center subnet.
Disabling the Remote Access servicesAbout this taskAvaya Aura® Contact Center does not support Remote Access Services (RAS). Disable theRemote Access services before installing Avaya Aura® Contact Center. Microsoft RemoteDesktop continues to run after you disable Remote Access services. After you disable theservices, restart the server.
Procedure
1. Choose Start > Administrative Tools > Services.
2. In the Services window, right-click the Remote Access Connection Managericon.
3. Click Properties.
4. In the General tab, from the Startup type list, select Disabled.
5. Click OK.
362 Avaya Aura® Contact Center Installation May 2013Comments? [email protected]
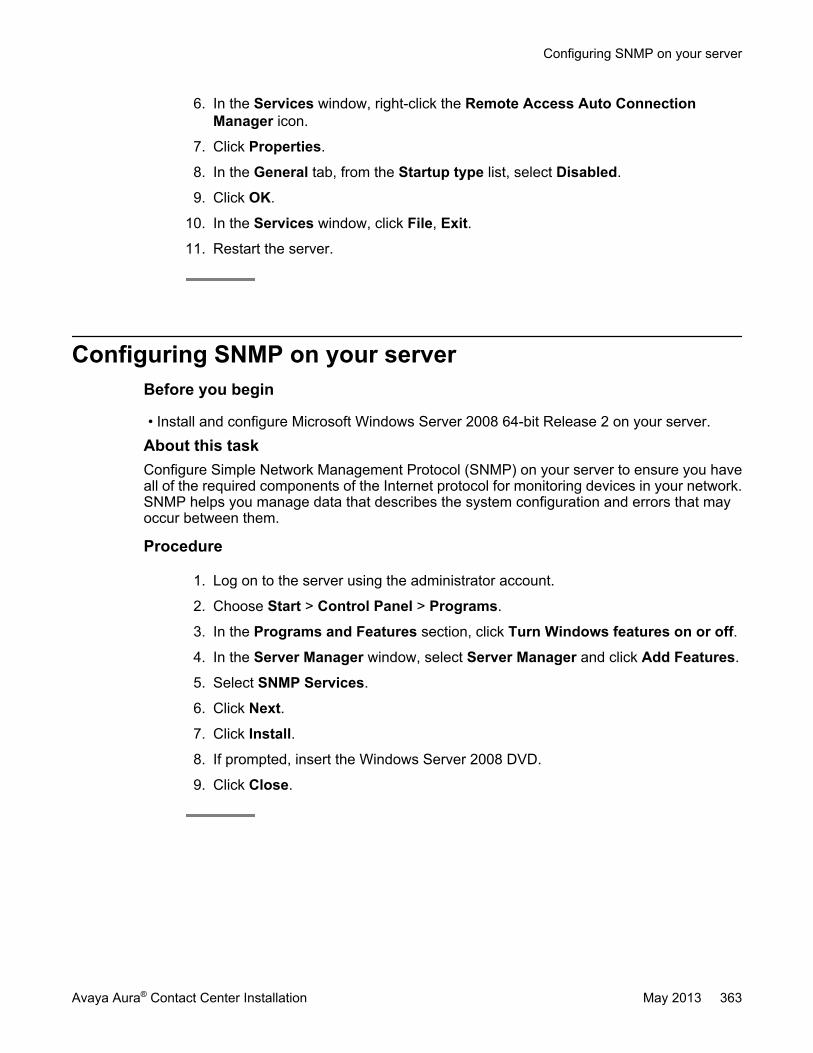
6. In the Services window, right-click the Remote Access Auto ConnectionManager icon.
7. Click Properties.
8. In the General tab, from the Startup type list, select Disabled.
9. Click OK.
10. In the Services window, click File, Exit.
11. Restart the server.
Configuring SNMP on your serverBefore you begin
• Install and configure Microsoft Windows Server 2008 64-bit Release 2 on your server.
About this taskConfigure Simple Network Management Protocol (SNMP) on your server to ensure you haveall of the required components of the Internet protocol for monitoring devices in your network.SNMP helps you manage data that describes the system configuration and errors that mayoccur between them.
Procedure
1. Log on to the server using the administrator account.
2. Choose Start > Control Panel > Programs.
3. In the Programs and Features section, click Turn Windows features on or off.
4. In the Server Manager window, select Server Manager and click Add Features.
5. Select SNMP Services.
6. Click Next.
7. Click Install.
8. If prompted, insert the Windows Server 2008 DVD.
9. Click Close.
Configuring SNMP on your server
Avaya Aura® Contact Center Installation May 2013 363

Downloading the most recent patches to the serverBefore you begin
• Install and configure Windows Server 2008 64-bit Release 2 on your server according tothe settings in this chapter.
• Download and install the most recent and valid updates for Microsoft Windows Server2008 64-bit Release 2.
• Know the location at which you plan to install each Contact Center server softwarepackage.
• Ensure that you use one administrator account on your server to un-install and installsoftware updates.
About this taskTo ensure that you have the most current software, download the most recent Contact Centerpatches from www.avaya.com/support to the server you plan to install.
Procedure
1. Log on to the server using the administrator account.
2. Create a folder Avaya_Support\ProductUpdates on the drive on which youwant to save the software updates.
3. Download the most recent service pack file. Save and unzip the file on the ContactCenter server in the Avaya_Support\ProductUpdates folder.
4. If new patches are available for the latest service pack, download and save thepatches on the Contact Center server in the Avaya_Support\ProductUpdates folder.
5. Read the Contact Center Release Notes for the most recent instructions.
Disabling unused Network AdaptersAbout this taskDisable all unused Network Adapters or Network Interface Cards (NICs) to improve networkcommunications and prevent the erroneous configuration of unused NICs during ContactCenter server commissioning.
364 Avaya Aura® Contact Center Installation May 2013Comments? [email protected]
Procedure
1. Log on to the server.
2. Click Start > Control Panel > Network and Internet > Network and SharingCenter > Change Adapter Settings.
3. Right-click on the unused Network Adapter, and select Disable.
4. Repeat this procedure for all unused Network Adapters.
Enabling Microsoft Remote Desktop connectionBefore you begin
• Install Microsoft Windows Server 2008 64-bit Release 2 on your server.• Log on to the server with administrator privileges.
About this taskEnable Microsoft Remote Desktop connection as your remote access tool. Microsoft RemoteDesktop provides remote access for support on the server.
Procedure
1. Choose Start > Control Panel > System and Security.
2. In the System section, select Allow remote access.
3. Click the Remote tab.
4. Select Allow connections from computers running any version of RemoteDesktop (less secure).
5. Click OK.
Configuring Data Execution PreventionAbout this taskConfigure the Data Execution Prevention (DEP) hardware and software to perform additionalchecks on memory that protect the Avaya Aura® Contact Center server against malicious codeexploitation.
Enabling Microsoft Remote Desktop connection
Avaya Aura® Contact Center Installation May 2013 365
Procedure
1. Log on to Windows as administrator.
2. Choose Start > Control Panel > System and Security.
3. Click System.
4. In the System window, click Advanced system settings.
5. In the System Properties dialog box, click the Advanced tab.
6. Under Performance, click Settings.
7. In the Performance Options dialog box, click the Data Execution Preventiontab.
8. On the Data Execution Prevention tab, select Turn on DEP for essentialWindows programs and services only.
9. Click OK.
10. On the System Properties dialog box, click OK.
11. Click OK to restart the computer.
Importing Contact Center Firewall Security policyBefore you begin
• Install Microsoft Windows Server 2008 64-bit Release 2 on your server.• Log on to the server with administrator privileges.• Download the most recent Avaya Aura® Contact Center Firewall Security policy from
www.avaya.com/support.
About this taskImport the Avaya Aura® Contact Center Firewall Security policy to ensure all contact centerservers in the solution can communicate.
Avaya recommends that you export and backup your existing firewall security policy beforeimporting the Avaya Aura® Contact Center Firewall Security policy. You can use this backuppolicy to rollback the Avaya Aura® Contact Center Firewall Security policy, if you ever needto.
Procedure
1. Choose Start > Administrative Tools > Windows Firewall with AdvancedSecurity.
2. Choose Actions > Export Policy.
366 Avaya Aura® Contact Center Installation May 2013Comments? [email protected]

3. In the File name box, type the name for the backup policy.
4. Click Save.Windows exports the existing policy. You can use this backup policy to rollback theAvaya Aura® Contact Center Firewall Security policy, if you ever need to.
5. On the Policy successfully exported message box, click OK.
6. Choose Actions > Import Policy.
7. On the policy overwrite message box, click Yes.
8. Navigate to the folder containing the Avaya Aura® Contact Center Firewall Securitypolicy.
9. Click Open.Windows imports the Avaya Aura® Contact Center Firewall Security policy.
10. On the Policy successfully imported message box, click OK.
Disabling NetBIOSAbout this taskIf the Contact Center server uses two Network Interface Cards (NICs), disable NetBIOS on theEmbedded LAN (ELAN) network interface card (NIC) to avoid NetBIOS conflicts.
Contact Center supports two Network Interface Cards (NICs) and two subnets (one contactcenter subnet and one ELAN subnet). The Contact Center ELAN NIC and ELAN subnet areoptional.
Procedure
1. Choose Start > Control Panel > Network and Internet.
2. Click Network and Sharing Center.
3. Click Change adapter settings.
4. Right-click the ELAN Network Interface Card (NIC).
5. Click Properties.
6. Select Internet Protocol Version 4 (TCP/IPv4).
7. Click Properties.
8. Click Advanced.
9. Click the WINS tab.
10. Select the Disable NetBIOS over TCP/IP check box.
Disabling NetBIOS
Avaya Aura® Contact Center Installation May 2013 367
11. Click OK.
Connecting the Embedded LAN subnetBefore you begin
• Install two network cards on the Contact Center server.• Disable the NetBIOS on the ELAN network interface card.• Connect the contact center subnet network interface card.
About this taskIf your server uses two NICs, connect the Embedded LAN (ELAN) NIC to the ELAN subnet.Contact Center supports two network interface cards (NICs) and two subnets (one contactcenter subnet and one ELAN subnet). The Contact Center ELAN NIC and ELAN subnet areoptional.
Procedure
1. Locate the slot assigned to the ELAN network interface card for the server.
2. Write the MAC address of the card on a small label. Attach the label to the back ofthe card or the chassis slot position.
3. Connect the ELAN subnet from the Avaya equipment to the Ethernet hub.
4. Connect the network cable from the ELAN network interface card in the server tothe hub.
5. Plug in the power cord for the hub.
6. If you have an ELAN subnet network connection, use the ping command to test it.
Configuring the binding orderBefore you begin
• Install two network interface cards on the Contact Center server.• Disable the NetBIOS on the ELAN network interface card.• Connect the Contact Center server network interface card to the contact center subnet.• Connect the Contact Center server ELAN network interface card to the ELAN subnet.
368 Avaya Aura® Contact Center Installation May 2013Comments? [email protected]
About this taskConfigure the binding order of the network cards. The contact center subnet network interfacecard must be bound first and then the ELAN network interface card.
Procedure
1. Choose Start > Control Panel > Network and Internet > Network and SharingCenter.
2. Click Change adapter settings.
3. In the Network Connections window, press the ALT key.A hidden menu appears.
4. Choose Advanced > Advanced Settings.
5. In the Connections box, ensure that the contact center subnet connection is listedfirst. If it is not listed first, adjust the order.
Installing operating system components for ContactCenter
Before you begin
• Install Windows Server 2008 64-bit Release 2.
About this taskBefore installing Contact Center software, you must install specific operating system softwarecomponents such as Internet Information Services to integrate the components in ContactCenter.
Procedure
1. Choose Start > Administrative Tools > Server Manager.
2. In the left-hand column of the Server Manager, right-click Roles, and select AddRoles.
3. Review the requirements for the new role, and click Next.
4. Under Server Roles, select Active Directory Lightweight Directory Services.
5. If an Add Roles Wizard message box that lists features required by Active DirectoryLightweight Directory Services appears, click Add Required Features.
6. Under Server Roles, select Application Server.
7. If an Add Roles Wizard message box that lists features required by ApplicationServer appears, click Add Required Features.
Installing operating system components for Contact Center
Avaya Aura® Contact Center Installation May 2013 369
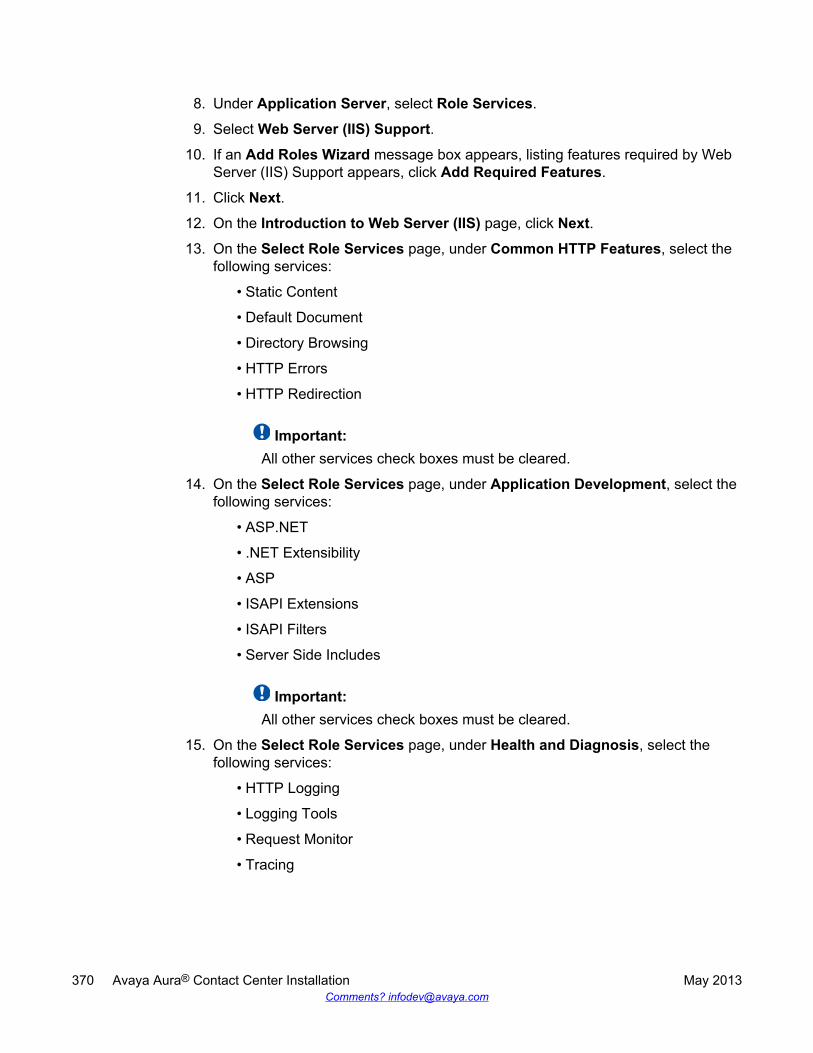
8. Under Application Server, select Role Services.
9. Select Web Server (IIS) Support.
10. If an Add Roles Wizard message box appears, listing features required by WebServer (IIS) Support appears, click Add Required Features.
11. Click Next.
12. On the Introduction to Web Server (IIS) page, click Next.
13. On the Select Role Services page, under Common HTTP Features, select thefollowing services:
• Static Content
• Default Document
• Directory Browsing
• HTTP Errors
• HTTP Redirection
Important:All other services check boxes must be cleared.
14. On the Select Role Services page, under Application Development, select thefollowing services:
• ASP.NET
• .NET Extensibility
• ASP
• ISAPI Extensions
• ISAPI Filters
• Server Side Includes
Important:All other services check boxes must be cleared.
15. On the Select Role Services page, under Health and Diagnosis, select thefollowing services:
• HTTP Logging
• Logging Tools
• Request Monitor
• Tracing
370 Avaya Aura® Contact Center Installation May 2013Comments? [email protected]

Important:All other services check boxes must be cleared.
16. On the Select Role Services page, under Security, select all services.
17. On the Select Role Services page, under Performance, select all services.
18. On the Select Role Services page, under Management Tools, select the followingservices:
• IIS Management Console
• IIS Management Scripts and Tools
• Management Service
• All items under IIS 6 Management Compatibility
Important:All other services check boxes must be cleared.
19. Click Next.
20. Review the installation information.
21. Click Install.
22. On the Installation Results page, click Close.
23. Restart the server if required.
Configuring MIME types to support Microsoft updatesAbout this taskConfigure the Multipurpose Internet Mail Extension (MIME) types to support Microsoft updatesand patches.
Procedure
1. Log on to the server.
2. Click Start > Administrative Tools > Computer Management.
3. In the Computer Management dialog box, expand Services and Applications >Internet Information Services > IIS Manager > Sites.
4. Select Default Web Site.
5. Under IIS, select MIME Types.
Configuring MIME types to support Microsoft updates
Avaya Aura® Contact Center Installation May 2013 371

6. Double-click MIME Types.
7. On the Actions list on the right, click Add.
8. In the File name extension box, type .msp.
9. In the MIME Type box, type application/microsoftpatch.
10. Click OK.
11. On the Actions list on the right, click Add.
12. In the File name extension box, type .msu.
13. In the MIME Type box, type application/microsoftupdate.
14. Click OK.
15. Close the Computer Management window.
Updating server for a network location installationAbout this taskConfigure the server .NET security settings to prepare the server for a remote networkinstallation. Avaya Aura® Contact Center supports network installation. You can insert theAvaya Aura® Contact Center DVD into a computer on your network. You then add this computeras a trusted site and network location on the new server. You can access this DVD from thenetwork location, and with some .NET security updates, use the remote DVD to install AvayaAura® Contact Center software on the new server.
Note:Skip this procedure if you plan to use the Avaya Aura® Contact Center DVD from the DVDdrive of the server.
Procedure
1. Insert the Avaya Aura® Contact Center DVD into a computer on the contact centernetwork.
2. Log on to the new server you are preparing for Contact Center.
3. Choose Start > Control Panel > Network and Internet > Internet Options.
4. In the Security tab, click Trusted sites.
5. In the Trusted sites section, click Sites.
6. In the Add this Web site to the zone box, type the <IP address> of the remotecomputer with the Avaya Aura® Contact Center DVD.
7. Click Add.
372 Avaya Aura® Contact Center Installation May 2013Comments? [email protected]

8. Click OK.
9. Close the Internet Options box.
10. From the new server, navigate to the network location with the DVD.
11. Access the remote DVD and in the root folder of the DVD, double-clickNetworkSetup.bat..NetFramework 3.5 installs and the .NetSecurity settings are modified.
12. If the Avaya Aura® Contact Center installation does not automatically start, in theroot folder of the DVD double-click Setup.exe.
13. After Avaya Aura® Contact Center installs, navigate to your network location anddouble-click NetworkSetupReset.bat.
Installing the Voice and Multimedia Contact Server softwarefor CS1000
Before you begin
• Ensure the Avaya Communication Server 1000 is configured. For more information seeAvaya Aura® Contact Center Configuration – Avaya CS1000 Integration(NN44400-512).
• Download the most recent Contact Center and Common Components patches to theserver.
About this taskInstall the Contact Center Voice and Multimedia Contact Server software and enable yourcontact center to route contacts to the agents that can answer the call with the correct skills.
Note:Installing Voice and Multimedia Contact Server software installs Apache Tomcat Server.The default port number for Apache Tomcat is 8081. If you need to change the port numberto avoid conflicts with third-party software, see your Apache Tomcat documentation.
Note:Read the Contact Center Release Notes for the most recent instructions.
Procedure
1. Insert the Contact Center DVD into the DVD drive of your server.
2. If the installation does not automatically start, double-click Setup.exe.
Installing the Voice and Multimedia Contact Server software for CS1000
Avaya Aura® Contact Center Installation May 2013 373

3. Click Install to install the Microsoft .NET Framework 3.5 SP1 and Visual C++runtime libraries on the server.If you are prompted to accept the Microsoft .NET Framework 3.5.1 licenseagreement, click Accept. If you are prompted to restart the server, click Yes andrepeat step 2.
4. On the Welcome window, click Next.
5. On the License Agreement window, read the terms of the agreement.
374 Avaya Aura® Contact Center Installation May 2013Comments? [email protected]

6. Click I Accept the Terms of the End-User License Agreement.
7. Click Next.
Installing the Voice and Multimedia Contact Server software for CS1000
Avaya Aura® Contact Center Installation May 2013 375

8. On the Installation Selection window, under Avaya Communication Server 1000- AML, select Voice and Multimedia Contact Server without Avaya MediaServer.
9. Click Next.
376 Avaya Aura® Contact Center Installation May 2013Comments? [email protected]

10. On the Installation Destination window, on the Application Destination Drivetab, select where to install the Contact Center application software by choosing adisk drive letter.
11. Click the Database Destination Drive tab.
12. Under Select the destination drive for the Contact Center database files, selectthe drive for the Contact Center Manager Server database.
13. Under Select the destination drive for the Contact Center database files, selectthe drive for the Communication Control Toolkit database.
14. Under Select the destination drive for the Contact Center database files, selectthe drive for the Contact Center Multimedia database.
Installing the Voice and Multimedia Contact Server software for CS1000
Avaya Aura® Contact Center Installation May 2013 377

15. Click the Product Updates Location tab.
378 Avaya Aura® Contact Center Installation May 2013Comments? [email protected]

16. Under Select the Product Updates Location, click Browse to locate the foldercontaining the Contact Center product updates.
17. Click Next.The System Readiness Check runs on the server.
18. If the System Readiness Check utility returns a Fail, the software installation cannotproceed until you correct the problem. Review any failures returned by the SystemReadiness Check and consult Avaya Aura® Contact Center Planning andEngineering (NN44400-210) to determine the actions to resolve the issue.You can ignore warnings if the potential impact to the operation of the contact centeris understood and not applicable.
19. Click Next.
20. On the Installation Data window, type the installation details for each tab.
21. Select the CCMS tab, and configure the server details.
Installing the Voice and Multimedia Contact Server software for CS1000
Avaya Aura® Contact Center Installation May 2013 379

22. In the Customer Name box, type the customer name.
23. In the Company Name box, type the name of the company.
24. In the Site Name box, type the site name for the Contact Center server. The sitename must not contain spaces or non-alphabetical characters except hyphen (-)and underscore (_). The first character must be a letter. The site name must beunique and can consist of 6 to 15 characters.
25. In the RSM IP Address box, type the Real-time Statistics Multicast IP Address ofthe server to associate with sending real-time data. The IP address must be from224.0.1.0 to 239.255.255.255. The default is 234.5.6.10.
26. In the Contact Center Server Subnet IP Address box, type the IP Address of theserver.
27. In the ELAN Subnet IP Address box, type the IP Address of the embedded localarea network, a dedicated Ethernet LAN that connects Contact Center ManagerServer to the PABX. You must select the check box for the ELAN subnet IP Addressif you use an ELAN subnet.
28. Select the Licensing tab, and configure the licensing details.
380 Avaya Aura® Contact Center Installation May 2013Comments? [email protected]

29. The License File Location box displays the folder on the server which containsthe license file.
30. In the Primary License Manager IP Address box, type the IP address of theprimary License Manager server. Each Voice and Multimedia Contact Servercontains a License Manager server. This License Manager server is the defaultprimary License Manager.
31. In the Primary License Port box, type the number of the communication portopened between the License Manager and Contact Center Manager Server. Thedefault port number is 3998 when you use only one License Manager.
32. In the Secondary License Manager IP Address box, type the IP address of thesecondary License Manager server. The secondary License Manager server isused only in a corporate licensed environment.
33. From the Licensing Package list, select the licenses that you have purchased.Select Nodal Enterprise for single-site contact centers. Select CorporateEnterprise for multi-site contact centers.
34. From the list of Optional Packages, enable the licensed features that you havepurchased.
35. Select the Open Queue check box.
36. In the Switch Serial Number box, type the serial number for the AvayaCommunication Server 1000.
Installing the Voice and Multimedia Contact Server software for CS1000
Avaya Aura® Contact Center Installation May 2013 381

37. Select the CS1000 tab, and configure the Avaya Communication Server 1000details.
38. In the Switch Name box, type the name of the AML Avaya Communication Server1000 telephone switch. Valid characters for Avaya Communication Server 1000names are A–Z, a–z, 0–9, underscore (_), and period (.). Names must begin withan alphabetical character and cannot contain spaces. The last character must notbe an underscore or a period. Names must not exceed 80 characters in length.
39. In the Switch IP Address box, type the IP address of the Avaya CommunicationServer 1000.
40. In the Alternative Switch IP Address box, type the IP address of an alternateAvaya Communication Server 1000, if you have one.
41. In the Switch Customer Number box, type the customer number for the AvayaCommunication Server 1000.
42. In the Voice Connection Type section, select the method used to connect to thePABX. Select None, Avaya Aura Experience Portal, or Avaya CallPilot®. If you usea standalone Avaya CallPilot®, type the Avaya CallPilot® server ELAN IP Addressand then configure the Port to 10008. If you are using Avaya CallPilot® HighAvailability, type the Avaya CallPilot® Managed ELAN IP Address and thenconfigure the Port to 10008.
43. Select the CCMA tab, and configure the CCMA details.
382 Avaya Aura® Contact Center Installation May 2013Comments? [email protected]
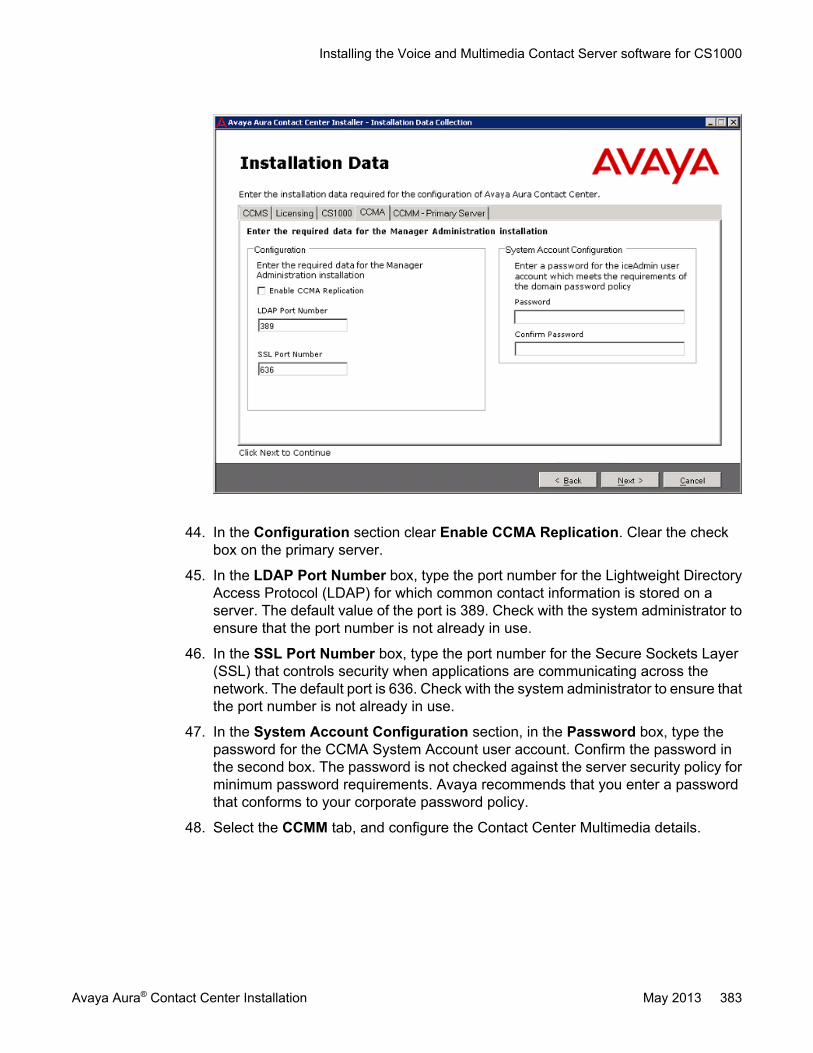
44. In the Configuration section clear Enable CCMA Replication. Clear the checkbox on the primary server.
45. In the LDAP Port Number box, type the port number for the Lightweight DirectoryAccess Protocol (LDAP) for which common contact information is stored on aserver. The default value of the port is 389. Check with the system administrator toensure that the port number is not already in use.
46. In the SSL Port Number box, type the port number for the Secure Sockets Layer(SSL) that controls security when applications are communicating across thenetwork. The default port is 636. Check with the system administrator to ensure thatthe port number is not already in use.
47. In the System Account Configuration section, in the Password box, type thepassword for the CCMA System Account user account. Confirm the password inthe second box. The password is not checked against the server security policy forminimum password requirements. Avaya recommends that you enter a passwordthat conforms to your corporate password policy.
48. Select the CCMM tab, and configure the Contact Center Multimedia details.
Installing the Voice and Multimedia Contact Server software for CS1000
Avaya Aura® Contact Center Installation May 2013 383

49. In the License Server box, type the name of the server on which the Contact CenterLicense Manager software is installed.
50. In the Inbound Mail Server (POP3) box, type the name of the server on which emailmessages are received in your network.
51. In the Outbound Mail Server (SMTP) box, type the name of the server from onwhich email messages are sent. Your inbound and outbound mail servers can havethe same name.
52. Select Enter Predictive Outbound Configuration to enable predictive outboundcontacts.
53. In the Predictive Server box, type the name of the Predictive Outbound solutionsapplication server on which the administration software resides, or the CPSE2
server.
54. In the Predictive Reporting Server box, type the name of the Predictive Outboundsolutions server that contains the statistics for reporting predictive outbound data,or Portfolio server.
55. In the Web Stats Server box, type the name of the optional Web Statistics serverthat agents and supervisors use to view real-time statistics for call handling, skillsetdata, and the state information on the Agent Desktop. Web Based Statistics is anoptional licensed feature and requires a Web Based Statistics feature license.
384 Avaya Aura® Contact Center Installation May 2013Comments? [email protected]

56. In the Web Stats Port box, type the port number of the Web Statistics server. Thedefault port number is 9086.
57. In the Web Communications Server (Optional) box, type the name of the serveron which the Web Customer Interface is installed if Web communications is licensedin your contact center.
58. Click Next.
59. On the Summary window, review and verify the information.
60. Click Install.
61. After the installation is complete, click Finish.
62. If prompted, restart the server.
Upgrading Java Runtime Environment, Java DevelopmentKit, and Apache Tomcat components using Third PartySoftware Upgrade Utility
Before you begin
• Apply Contact Center 6.3 Service Pack 10 or later on your system as an install-timepatch.
• Restart the Contact Center server to complete this procedure.
About this taskUse Third Party Software Upgrade Utility to automatically upgrade your Java RuntimeEnvironment and Tomcat software components. For more information, see Third PartySoftware Upgrade Utility on page 27.
Procedure
1. Log on to the server using the administrator account.
2. Navigate to the Avaya_Support\ProductUpdates folder.
3. Open the folder where you had saved the latest Service Pack.
4. Browse to ThirdParty\AACCThirdPartySoftwareUpgradeUtility.exe.
5. Double-click AACCThirdPartySoftwareUpgradeUtility.exe.
6. Click Upgrade.The system displays the “User Action Required” dialog box.
7. Click OK.
Upgrading Java Runtime Environment, Java Development Kit, and Apache Tomcat components using Third PartySoftware Upgrade Utility
Avaya Aura® Contact Center Installation May 2013 385

8. Click Yes to restart Contact Center and complete the upgrade.
Securing the Windows serverAbout this taskApply optional security measures to your operating system to further secure your server.
Important:Scanning software can degrade the performance and decrease the reliability of the system.Install virus scanning software only if the system connects to an exposed network or to theInternet.
Important:To maintain server performance, you must schedule virus scans during maintenanceperiods or low usage hours only.
Procedure
1. Harden the operating system using defined site procedures.
2. Install antivirus software. If you install antivirus software, Avaya recommends thatyou exclude some contact center files and folders from real-time and scheduledscans. For more information, and for a list of files and folders to exclude, see AvayaAura® Contact Center Planning and Engineering (NN44400-210).
Saving managed, active and standby server names and IPaddresses
About this taskComplete the following procedure on the primary active server to resolve the managed CLANserver name to the managed IP address using the Windows hosts file.
For information about saving the managed CLAN server name to the DNS server, contact yourSystem Administrator.
Perform this procedure on the primary active Contact Center Server.
Procedure
1. Log on to the primary Contact Center server.
386 Avaya Aura® Contact Center Installation May 2013Comments? [email protected]

2. Open Windows Explorer.
3. Go to the folder C:\Windows\system32\drivers\etc.
4. Double-click the hosts file, select Notepad and click OK.
5. Add the following to the hosts file: CLAN Managed IP address and the server nameto the hosts file.
• CLAN Managed IP address and the server name
• Active and Standby Server name and IP addresses
Important:The Managed Server name can be a full name or netbios server name.
Creating a local (workgroup) user account for AD-LDSReplication
Before you begin
• You plan to use AD-LDS replication in your contact center to create a live backup for yourContact Center server.
About this taskCreate a user account on the primary Contact Center server. This user account is used for AD-LDS Replication. This procedure is necessary when you install both Contact Center serversin a workgroup.
For this procedure, the name of the local user account is “myPrimaryContactCenterServer\CCMAReplication”. You can choose another name for the account.
Procedure
1. Log on to the primary Contact Center server.
2. Click Start > Administrative Tools > Computer Management.
3. In the Computer Management window, expand Local Users and Groups.
4. Right-click Users, and click New User.
5. In the New User dialog box, in the User name box, type CCMAReplication.
6. In the Password box, type a password.
7. In the Confirm password box, retype the password.
8. Clear the User must change password at next logon check box.
Creating a local (workgroup) user account for AD-LDS Replication
Avaya Aura® Contact Center Installation May 2013 387

9. Click Create.
10. Click Close to close the New User dialog box.
Adding the local (workgroup) AD-LDS replication accountto the primary administrators and replicator group
About this taskAdd the AD-LDS replication account to the local Administrators and replicator group on theprimary Contact Center server.
If you are using a workgroup, you must create this AD-LDS replication account.
For this procedure, the name of the AD-LDS replication account is CCMAReplication. You canchoose another name for the account.
Procedure
1. Log on to the primary Contact Center server.
2. Click Start > Administrative Tools > Computer Management.
3. In the Computer Management window, expand Local Users and Groups.
4. Click the Users folder.
5. In the right-pane, double-click CCMAReplication.
6. In the CCMAReplication Properties dialog box, click the Member Of tab.
7. Click Add.
8. In the Select Groups dialog box, in the Enter the object names to select box,type Administrators.
9. Click OK.
10. In the CCMAReplication Properties dialog box, on the Member Of tab, clickAdd.
11. In the Select Groups dialog box, in the Enter the object names to select box,type Replicator.
12. Click OK.
13. In the CCMAReplication Properties dialog box, click Apply to save yourchanges.
14. Click OK to close the CCMAReplication Properties dialog box.
388 Avaya Aura® Contact Center Installation May 2013Comments? [email protected]

Configuring the AD-LDS replication account as a serviceaccount
Before you begin
• If you are using a workgroup, add the local user account to the local Administrators andreplicator group on the primary Contact Center server.
About this taskConfigure the AD-LDS replication account as a service account on the primary Contact Centerserver. This account is the AD-LDS Replication service account.
For this procedure, the name of the AD-LDS Replication account is CCMAReplication. Youcan choose another name for the account.
Procedure
1. Log on to the primary Contact Center server.
2. Click Start > Administrative Tools > Local Security Policy.
3. In the Local Security Policy window, in the left pane, expand the Local Policiesfolder.
4. Click the User Rights Assignment folder.
5. In the right pane, double-click Log on as a service.
6. In the Log on as a service Properties dialog box, click Add User or Group.
7. In the Select Users, Computers, or Groups dialog box, type the account name:If you are using a workgroup, type myPrimaryContactCenterServer\CCMAReplication.
8. Click OK.
9. If a Security Templates message box is displayed, select the message box andclick OK.
10. Click Apply to save your changes.
11. Click OK to close the Log on as a service Properties dialog box.
Configuring the AD-LDS replication account as a service account
Avaya Aura® Contact Center Installation May 2013 389

Changing the service account of the primary CCMA AD-LDSinstance
Before you begin
• Configure the local account as a service account on the primary Contact Center server.
About this taskChange the service account of the AD-LDS instance on the Contact Center server. By default,AD-LDS runs under a Windows system account. To enable AD-LDS replication the AD-LDSservice account must be changed to a domain or workgroup account accessible by thereplicating standby Contact Center server.
Change the CCMA AD-LDS service account from the default Windows service account to theAD-LDS Replication account that you have added.
For this procedure, the name of the AD-LDS Replication account is myDomain\CCMAReplication. You can choose another name for the account.
Procedure
1. Log on to the primary Contact Center server.
2. Click Start > All Programs > Run. Type cmd and press Enter.
3. At the command prompt, type net stop <instance name>. For example, type netstop SymposiumWC.
4. At the command prompt, type dsdbutil.
5. At the dsdbutil prompt, type activate instance <instancename>. For example,type activate instance SymposiumWC.
6. At the dsdbutil prompt, type change service account <account name><password>; <account name> and <password> represent the name and passwordof the account to use as the AD-LDS service account.For example type;change service account myPrimaryContactCenterServer\CCMAReplication<CCMAReplication password>.
7. At the dsdbutil prompt, type quit to exit dsdbutil.
8. At the command prompt, type net start <instance name> to restart the AD-LDSinstance. For example, type net start SymposiumWC.
390 Avaya Aura® Contact Center Installation May 2013Comments? [email protected]

Verifying the AD-LDS Replication account is applied to theAD-LDS instance
Before you begin
• Change the service account of an AD-LDS instance on the primary Contact Center ManagerAdministration server.
About this taskVerify the account applied to the AD-LDS instance to ensure the change to the service accountis successful on the primary Contact Center server.
For this procedure, the name of the AD-LDS Replication account is CCMAReplication. Youcan choose another name for the account.
Procedure
1. Log on to the primary Contact Center server.
2. Click Start > Administrative Tools > Services.
3. In the right pane, right-click SymposiumWC and click Properties.
4. In the SymposiumWC Properties dialog box, click the Logon tab.
5. Confirm that the entry in the This account box equals the local user account(CCMAReplication).
Verifying the AD-LDS Replication account is applied to the AD-LDS instance
Avaya Aura® Contact Center Installation May 2013 391

392 Avaya Aura® Contact Center Installation May 2013Comments? [email protected]

Chapter 14: Standby Voice and MultimediaContact Server for CS1000software installation in aworkgroup
This chapter describes how to install a standby Voice and Multimedia Contact Server for AvayaCommunication Server 1000 (CS1000). This chapter describes how to install a Voice and MultimediaContact Server in a solution using a workgroup. A standby Voice and Multimedia Contact Server includesthe following server software:
• Contact Center Manager Server (CCMS)
• Contact Center Manager Server Utility
• Contact Center License Manager
• Contact Center Manager Administration (CCMA)
• Communication Control Toolkit (CCT)
• Contact Center Multimedia (CCMM)
Contact Center Manager Server supports two Network Interface Cards (NICs) and two subnets (onecontact center subnet and one ELAN subnet). The Contact Center Manager Server ELAN NIC and ELANsubnet are optional.
You can install a standby Voice and Multimedia Contact Server and commission it to be the standby Voiceand Multimedia Contact Server in a campus High Availability solution. The standby server takes overcontact processing and becomes the active server if the existing active server fails. The standby serverprovides High Availability redundancy and resiliency. The standby and active servers must be at the samepatch level and have the same hard disk drive partitions.
You can install another standby Voice and Multimedia Contact Server and commission it to be the RemoteGeographic Node Voice and Multimedia Contact Server in a solution with Disaster Recovery. The RemoteGeographic Node (RGN) server shadows the active server. Remote Geographic Node servers do notautomatically take over if the active server fails. The standby server, Remote Geographic Node server,and active server must be at the same patch level and have the same hard disk drive partitions.
You must complete the procedures in this section in sequential order.
Avaya Aura® Contact Center Installation May 2013 393

Standby Voice and Multimedia Contact Server installationprerequisites
• Copy the most recent patches for the Contact Center software.
• Ensure that your new Contact Center license file with a High Availability standby serverlicense is available.
Important:For the system to correctly handle backup and restore SNMP events, you must installWindows SNMP Service before you install Contact Center server software.
Downloading the latest documentationBefore you begin
• Download the most recent version of Acrobat Reader.• Access the Avaya Web site at www.avaya.com/support.
About this taskDownload the most recent documentation to ensure you have the most recent updates.Updates in the documentation accurately reflect the most recent changes in the software.
Procedure
1. Log on to the Avaya Web site.
2. Compare the versions of the documentation on the site with the versions youhave.
3. If the version number on www.avaya.com/support is higher than your version,download the latest version of the document.
4. Review the Avaya Web site for release notes and readme files.
394 Avaya Aura® Contact Center Installation May 2013Comments? [email protected]

Installing Windows Server 2008 Release 2Before you begin
• Ensure that you have a newly formatted server that meets the specifications in AvayaAura® Contact Center Planning and Engineering (NN44400-210) on which to installMicrosoft Windows Server 2008 64-bit, Release 2, Service Pack 1.
Do not upgrade your operating system from a previous release. Contact Center is notsupported on an upgraded operating system.
• Configure all servers for RAID as described in Avaya Aura® Contact Center Planning andEngineering (NN44400-210).
• Ensure that you have a DVD for Windows Server 2008 Release 2.• Install the network interface card in the server.• Know the IP addresses for the contact center subnet.
About this taskInstall the Windows operating system, which is required for the Contact Center server software.During the installation, configure the Windows settings as required. You must perform thisprocedure on each server before you install Contact Center server software on the server.
Procedure
1. Insert the Windows Server 2008 64-bit Release 2 Standard Edition or WindowsServer 2008 64-bit Release 2 Enterprise Edition DVD into the DVD drive.
2. Install Windows Server 2008 Release 2 according to the instructions supplied bythe DVD.
3. On the first install page, select your language for installation.
4. Click Next.
5. On the Installation window, select a Language to install from the list.
6. Select a Time and currency format from the list.
7. Select Keyboard or input method from the list.
8. Click Next.
9. Click Install Now.
10. Select an operating system from the list.
11. Click Next.
12. On the first Install Windows screen, read the terms of the license agreement andselect I accept the license terms.
Installing Windows Server 2008 Release 2
Avaya Aura® Contact Center Installation May 2013 395

13. Click Next.
14. Select Custom.
15. Select the disk partition on which you want to install Windows Server 2008.
Important:You can use the partition management options to configure the partitions on yourserver.
16. Click Next.The installation proceeds and automatically restarts the server several times.
17. After completing the installation, log on to the server as Administrator. Enter andconfirm the Administrator password.
18. In the Initial Configuration Tasks window, select Activate Windows and followthe instructions or the Microsoft documentation to activate your server.
19. Select Set time zone and complete the information as required for your system.If you are installing Voice Contact Server Only software or Knowledge WorkerServer software on this server, ensure that you clear Automatically adjust clockfor daylight saving changes. Otherwise select Automatically adjust clock fordaylight saving changes.
20. Select Configure Networking and complete the information for your NetworkInterface Card (NIC) with the server IP address.
21. Select Provide computer name and domain and complete the information for yourserver name and workgroup or domain settings.
22. Change the DVD drive letter to E: to ensure the correct drive letters are free for theContact Center application and database hard disk drives and partitions.
23. Configure the hard disk drives and partitions for this server using the WindowsServer 2008 Server Manager - Disk Management utility. For more information abouthard disk drives and partitions, see Avaya Aura® Contact Center Planning andEngineering (NN44400-210).
24. Install other required drivers for your hardware configuration.
Procedure job aid
Name Description
Computer name Do not use spaces or underscores or exceed15 characters. The name must start with analphabetic character.
396 Avaya Aura® Contact Center Installation May 2013Comments? [email protected]

Name Description
The computer name must match (includingcase sensitivity) the DNS name.
Disk drives Format the partitions as required for theserver. For more information, see AvayaAura® Contact Center Planning andEngineering (NN44400-210).
Domain/workgroup name Configure as required for your site.You must check to ensure the DNS Domainname (including case) matches the servername if the server is added to a domain orworkgroup after configuration.
Licensing modes Select Per server licensing mode.Accept the default five concurrentconnections.
Modem dialing Configure as required for your site. Do notinstall a modem on a Communication ControlToolkit server.
Network components Configure IP Address, WINS, DNS for one ortwo network cards as per configuration.Contact Center does not support IPv6.
Network connections If the server has more than one NIC/adapter,ensure contact center subnet appears first inthe network adapter binding order.
Partitions Configure C: drive to be a primary drive.Configure the other drives on your server tomeet the requirements according to AvayaAura® Contact Center Planning andEngineering (NN44400-210) for the server.
Regional settings window Configure as required for your site.
SNMP Configure for all servers.
Configuring Windows Server 2008Before you begin
• Install Microsoft Windows Server 2008 64-bit Release 2 on your server.
About this taskBefore you can install Avaya Aura® Contact Center software on your server, you must configureWindows Server 2008 to meet the requirements of the software.
Configuring Windows Server 2008
Avaya Aura® Contact Center Installation May 2013 397

You can prepare the server using this and other procedures, or you can download and use anAvaya Aura® Contact Center operating system configuration tool that installs the requiredWindows roles and features.
The Avaya Aura® Contact Center Windows Roles and Features installer configures thefollowing Windows Server 2008 resources:
• Windows Server Backup Features• SNMP Services• Active Directory Light Weight Directory Services• Application Server• Web Server (IIS)
For more information, and to download the Avaya Aura® Contact Center Windows Roles andFeatures installer, see http://support.avaya.com.
The Avaya Aura® Contact Center Windows Roles and Features installer replaces the followingprocedures:
• Configuring Windows Server 2008 (this procedure)• Configuring SNMP on your server• Installing operating system components for Contact Center
If you use the Avaya Aura® Contact Center Windows Roles and Features installer, skip thesethree procedures.
Procedure
1. Log on to the Windows Server 2008 server using an administrator account.
2. Select the Don’t display this screen on startup check box.
3. Update the emergency repair disk to record the latest configuration data for theserver.
4. Choose Start > Administrative Tools > Server Manager.
5. In the left pane, click Features.
6. Click Add Features.
7. Select Windows Server Backup Features.
8. Click Next.
9. Click Install.
10. Click Close.
11. Choose Start > All Programs > Accessories > System Tools > Windows ServerBackup.
12. Follow the on-screen instructions to select what you want to back up.
398 Avaya Aura® Contact Center Installation May 2013Comments? [email protected]

Installing the latest supported operating system servicepacks
Before you begin
• Access the Avaya hotfixes list on the Web site www.avaya.com/support.• Install and configure Microsoft Windows Server 2008 64-bit Release 2 on your server.• Review the recommendations on operating system service updates in Avaya Aura®
Contact Center Planning and Engineering (NN44400-210).• Install the Microsoft .NET Framework 3.5 and Microsoft .NET Framework 3.5 SP1.
About this taskAvaya recommends that you install the most recent supported operating system service packs.You must download the supported operating system service pack from the Avaya hotfixes listto ensure your Contact Center server software functions correctly with the supported operatingsystem patches.
Procedure
1. Log on to the server and disable the Windows Update feature. There are a numberof methods for disabling the Windows Update feature, refer to the Windows Server2008 documentation for a method suitable to your solution. Disabling the WindowsUpdate feature prevents Windows Server 2008 from automatically applyingoperating system patches and potentially rebooting the server.
2. Review the Contact Center Service Packs Compatibility and Security HotfixesApplicability List to determine the most recent Avaya Aura® Contact Centersupported patches or service packs.
3. Download the appropriate Microsoft Windows Server 2008 patches for the AvayaAura® Contact Center software installed on this server.
4. Install the most recent Windows Server 2008 service pack that is validated withAvaya Aura® Contact Center by following the Microsoft Installation instructions.
Installing the latest supported operating system service packs
Avaya Aura® Contact Center Installation May 2013 399

Connecting to the contact center subnetAbout this taskConnect the Contact Center server to the contact center subnet. The contact center subnet isthe network on which the server software applications work together to route contacts andgenerate reports.
Procedure
1. Locate the slot assigned to the contact center subnet network interface card for theserver. Make a note of the slot.
2. Connect the cable from the contact center subnet to the contact center subnetnetwork interface card in the server in accordance with customer site networkingguidelines.
3. Use the ping command to test the contact center subnet.
Disabling the Remote Access servicesAbout this taskAvaya Aura® Contact Center does not support Remote Access Services (RAS). Disable theRemote Access services before installing Avaya Aura® Contact Center. Microsoft RemoteDesktop continues to run after you disable Remote Access services. After you disable theservices, restart the server.
Procedure
1. Choose Start > Administrative Tools > Services.
2. In the Services window, right-click the Remote Access Connection Managericon.
3. Click Properties.
4. In the General tab, from the Startup type list, select Disabled.
5. Click OK.
6. In the Services window, right-click the Remote Access Auto ConnectionManager icon.
7. Click Properties.
8. In the General tab, from the Startup type list, select Disabled.
400 Avaya Aura® Contact Center Installation May 2013Comments? [email protected]

9. Click OK.
10. In the Services window, click File, Exit.
11. Restart the server.
Configuring SNMP on your serverBefore you begin
• Install and configure Microsoft Windows Server 2008 64-bit Release 2 on your server.
About this taskConfigure Simple Network Management Protocol (SNMP) on your server to ensure you haveall of the required components of the Internet protocol for monitoring devices in your network.SNMP helps you manage data that describes the system configuration and errors that mayoccur between them.
Procedure
1. Log on to the server using the administrator account.
2. Choose Start > Control Panel > Programs.
3. In the Programs and Features section, click Turn Windows features on or off.
4. In the Server Manager window, select Server Manager and click Add Features.
5. Select SNMP Services.
6. Click Next.
7. Click Install.
8. If prompted, insert the Windows Server 2008 DVD.
9. Click Close.
Disabling unused Network AdaptersAbout this taskDisable all unused Network Adapters or Network Interface Cards (NICs) to improve networkcommunications and prevent the erroneous configuration of unused NICs during ContactCenter server commissioning.
Configuring SNMP on your server
Avaya Aura® Contact Center Installation May 2013 401

Procedure
1. Log on to the server.
2. Click Start > Control Panel > Network and Internet > Network and SharingCenter > Change Adapter Settings.
3. Right-click on the unused Network Adapter, and select Disable.
4. Repeat this procedure for all unused Network Adapters.
Enabling Microsoft Remote Desktop connectionBefore you begin
• Install Microsoft Windows Server 2008 64-bit Release 2 on your server.• Log on to the server with administrator privileges.
About this taskEnable Microsoft Remote Desktop connection as your remote access tool. Microsoft RemoteDesktop provides remote access for support on the server.
Procedure
1. Choose Start > Control Panel > System and Security.
2. In the System section, select Allow remote access.
3. Click the Remote tab.
4. Select Allow connections from computers running any version of RemoteDesktop (less secure).
5. Click OK.
Configuring Data Execution PreventionAbout this taskConfigure the Data Execution Prevention (DEP) hardware and software to perform additionalchecks on memory that protect the Avaya Aura® Contact Center server against malicious codeexploitation.
402 Avaya Aura® Contact Center Installation May 2013Comments? [email protected]

Procedure
1. Log on to Windows as administrator.
2. Choose Start > Control Panel > System and Security.
3. Click System.
4. In the System window, click Advanced system settings.
5. In the System Properties dialog box, click the Advanced tab.
6. Under Performance, click Settings.
7. In the Performance Options dialog box, click the Data Execution Preventiontab.
8. On the Data Execution Prevention tab, select Turn on DEP for essentialWindows programs and services only.
9. Click OK.
10. On the System Properties dialog box, click OK.
11. Click OK to restart the computer.
Importing Contact Center Firewall Security policyBefore you begin
• Install Microsoft Windows Server 2008 64-bit Release 2 on your server.• Log on to the server with administrator privileges.• Download the most recent Avaya Aura® Contact Center Firewall Security policy from
www.avaya.com/support.
About this taskImport the Avaya Aura® Contact Center Firewall Security policy to ensure all contact centerservers in the solution can communicate.
Avaya recommends that you export and backup your existing firewall security policy beforeimporting the Avaya Aura® Contact Center Firewall Security policy. You can use this backuppolicy to rollback the Avaya Aura® Contact Center Firewall Security policy, if you ever needto.
Procedure
1. Choose Start > Administrative Tools > Windows Firewall with AdvancedSecurity.
2. Choose Actions > Export Policy.
Importing Contact Center Firewall Security policy
Avaya Aura® Contact Center Installation May 2013 403

3. In the File name box, type the name for the backup policy.
4. Click Save.Windows exports the existing policy. You can use this backup policy to rollback theAvaya Aura® Contact Center Firewall Security policy, if you ever need to.
5. On the Policy successfully exported message box, click OK.
6. Choose Actions > Import Policy.
7. On the policy overwrite message box, click Yes.
8. Navigate to the folder containing the Avaya Aura® Contact Center Firewall Securitypolicy.
9. Click Open.Windows imports the Avaya Aura® Contact Center Firewall Security policy.
10. On the Policy successfully imported message box, click OK.
Disabling NetBIOSAbout this taskIf the Contact Center server uses two Network Interface Cards (NICs), disable NetBIOS on theEmbedded LAN (ELAN) network interface card (NIC) to avoid NetBIOS conflicts.
Contact Center supports two Network Interface Cards (NICs) and two subnets (one contactcenter subnet and one ELAN subnet). The Contact Center ELAN NIC and ELAN subnet areoptional.
Procedure
1. Choose Start > Control Panel > Network and Internet.
2. Click Network and Sharing Center.
3. Click Change adapter settings.
4. Right-click the ELAN Network Interface Card (NIC).
5. Click Properties.
6. Select Internet Protocol Version 4 (TCP/IPv4).
7. Click Properties.
8. Click Advanced.
9. Click the WINS tab.
10. Select the Disable NetBIOS over TCP/IP check box.
404 Avaya Aura® Contact Center Installation May 2013Comments? [email protected]

11. Click OK.
Connecting the Embedded LAN subnetBefore you begin
• Install two network cards on the Contact Center server.• Disable the NetBIOS on the ELAN network interface card.• Connect the contact center subnet network interface card.
About this taskIf your server uses two NICs, connect the Embedded LAN (ELAN) NIC to the ELAN subnet.Contact Center supports two network interface cards (NICs) and two subnets (one contactcenter subnet and one ELAN subnet). The Contact Center ELAN NIC and ELAN subnet areoptional.
Procedure
1. Locate the slot assigned to the ELAN network interface card for the server.
2. Write the MAC address of the card on a small label. Attach the label to the back ofthe card or the chassis slot position.
3. Connect the ELAN subnet from the Avaya equipment to the Ethernet hub.
4. Connect the network cable from the ELAN network interface card in the server tothe hub.
5. Plug in the power cord for the hub.
6. If you have an ELAN subnet network connection, use the ping command to test it.
Configuring the binding orderBefore you begin
• Install two network interface cards on the Contact Center server.• Disable the NetBIOS on the ELAN network interface card.• Connect the Contact Center server network interface card to the contact center subnet.• Connect the Contact Center server ELAN network interface card to the ELAN subnet.
Connecting the Embedded LAN subnet
Avaya Aura® Contact Center Installation May 2013 405

About this taskConfigure the binding order of the network cards. The contact center subnet network interfacecard must be bound first and then the ELAN network interface card.
Procedure
1. Choose Start > Control Panel > Network and Internet > Network and SharingCenter.
2. Click Change adapter settings.
3. In the Network Connections window, press the ALT key.A hidden menu appears.
4. Choose Advanced > Advanced Settings.
5. In the Connections box, ensure that the contact center subnet connection is listedfirst. If it is not listed first, adjust the order.
Installing operating system components for ContactCenter
Before you begin
• Install Windows Server 2008 64-bit Release 2.
About this taskBefore installing Contact Center software, you must install specific operating system softwarecomponents such as Internet Information Services to integrate the components in ContactCenter.
Procedure
1. Choose Start > Administrative Tools > Server Manager.
2. In the left-hand column of the Server Manager, right-click Roles, and select AddRoles.
3. Review the requirements for the new role, and click Next.
4. Under Server Roles, select Active Directory Lightweight Directory Services.
5. If an Add Roles Wizard message box that lists features required by Active DirectoryLightweight Directory Services appears, click Add Required Features.
6. Under Server Roles, select Application Server.
7. If an Add Roles Wizard message box that lists features required by ApplicationServer appears, click Add Required Features.
406 Avaya Aura® Contact Center Installation May 2013Comments? [email protected]

8. Under Application Server, select Role Services.
9. Select Web Server (IIS) Support.
10. If an Add Roles Wizard message box appears, listing features required by WebServer (IIS) Support appears, click Add Required Features.
11. Click Next.
12. On the Introduction to Web Server (IIS) page, click Next.
13. On the Select Role Services page, under Common HTTP Features, select thefollowing services:
• Static Content
• Default Document
• Directory Browsing
• HTTP Errors
• HTTP Redirection
Important:All other services check boxes must be cleared.
14. On the Select Role Services page, under Application Development, select thefollowing services:
• ASP.NET
• .NET Extensibility
• ASP
• ISAPI Extensions
• ISAPI Filters
• Server Side Includes
Important:All other services check boxes must be cleared.
15. On the Select Role Services page, under Health and Diagnosis, select thefollowing services:
• HTTP Logging
• Logging Tools
• Request Monitor
• Tracing
Installing operating system components for Contact Center
Avaya Aura® Contact Center Installation May 2013 407

Important:All other services check boxes must be cleared.
16. On the Select Role Services page, under Security, select all services.
17. On the Select Role Services page, under Performance, select all services.
18. On the Select Role Services page, under Management Tools, select the followingservices:
• IIS Management Console
• IIS Management Scripts and Tools
• Management Service
• All items under IIS 6 Management Compatibility
Important:All other services check boxes must be cleared.
19. Click Next.
20. Review the installation information.
21. Click Install.
22. On the Installation Results page, click Close.
23. Restart the server if required.
Configuring MIME types to support Microsoft updatesAbout this taskConfigure the Multipurpose Internet Mail Extension (MIME) types to support Microsoft updatesand patches.
Procedure
1. Log on to the server.
2. Click Start > Administrative Tools > Computer Management.
3. In the Computer Management dialog box, expand Services and Applications >Internet Information Services > IIS Manager > Sites.
4. Select Default Web Site.
5. Under IIS, select MIME Types.
408 Avaya Aura® Contact Center Installation May 2013Comments? [email protected]
6. Double-click MIME Types.
7. On the Actions list on the right, click Add.
8. In the File name extension box, type .msp.
9. In the MIME Type box, type application/microsoftpatch.
10. Click OK.
11. On the Actions list on the right, click Add.
12. In the File name extension box, type .msu.
13. In the MIME Type box, type application/microsoftupdate.
14. Click OK.
15. Close the Computer Management window.
Saving managed, active and standby server names and IPaddresses
About this taskComplete the following procedure on the standby Contact Center server to resolve themanaged CLAN server name to the managed IP address using the Windows hosts file.
For information about saving the managed CLAN server name to the DNS server, contact yourSystem Administrator.
Perform this procedure on the standby Contact Center Server.
Procedure
1. Open Windows Explorer.
2. Go to the folder C:\Windows\system32\drivers\etc.
3. Double-click the hosts file, select Notepad and click OK.
4. Add the following to the hosts file: CLAN Managed IP address and the server nameto the hosts file.
• CLAN Managed IP address and the server name
• Active and Standby Server name and IP addresses
Important:The Managed Server name can be a full name or netbios server name.
Saving managed, active and standby server names and IP addresses
Avaya Aura® Contact Center Installation May 2013 409

Creating a local workstation AD-LDS replication account onthe standby server
Before you begin
• Know the user account details (user name and password) on the primary server. The detailsfor the account on the standby server must match the details for the account on the primaryserver.
About this taskCreate a user account on the standby server. This user account is used for AD-LDSReplication. This procedure is necessary when you install both Contact Center servers in aworkgroup. Perform this procedure before installing Contact Center on the standby server.
For this procedure, the name of the local user account is “myStandbyContactCenterServer\CCMAReplication”. You can choose another name for the account.
Important:The standby AD-LDS replication account name and password must match the primary AD-LDS replication account name and password. For example; If the primary AD-LDS accountis myPrimaryContactCenterServer\CCMAReplication, then the standby account must bemyStandbyContactCenterServer\CCMAReplication.
Procedure
1. Log on to the standby server.
2. Click Start > Administrative Tools > Computer Management.
3. In the Computer Management window, expand Local Users and Groups.
4. Right-click Users, and click New User.
5. In the New User dialog box, in the User name box, type CCMAReplication.
6. In the Password box, type a password.
7. In the Confirm password box, retype the password.
8. Clear the User must change password at next logon check box.
9. Click Create.
10. Click Close to close the New User dialog box.
410 Avaya Aura® Contact Center Installation May 2013Comments? [email protected]

Adding the local (workgroup) AD-LDS replication accountto the standby administrators and replicator group
About this taskAdd the AD-LDS replication account to the local Administrators and replicator group on thestandby server. Perform this procedure before installing Contact Center on the standbyserver.
If you are using a workgroup, you must create this AD-LDS replication account.
For this procedure, the name of the AD-LDS replication account is CCMAReplication. You canchoose another name for the account.
Procedure
1. Log on to the standby server.
2. Click Start > Administrative Tools > Computer Management.
3. In the Computer Management window, expand Local Users and Groups.
4. Click the Users folder.
5. In the right-pane, double-click CCMAReplication.
6. In the CCMAReplication Properties dialog box, click the Member Of tab.
7. Click Add.
8. In the Select Groups dialog box, in the Enter the object names to select box,type Administrators.
9. Click OK.
10. In the CCMAReplication Properties dialog box, on the Member Of tab, clickAdd.
11. In the Select Groups dialog box, in the Enter the object names to select box,type Replicator.
12. Click OK.
13. In the CCMAReplication Properties dialog box, click Apply to save yourchanges.
14. Click OK to close the CCMAReplication Properties dialog box.
Adding the local (workgroup) AD-LDS replication account to the standby administrators and replicator group
Avaya Aura® Contact Center Installation May 2013 411

Configuring the AD-LDS replication account as a serviceaccount
Before you begin
• If you are using a workgroup, add the local user account to the local Administrators andreplicator group on the standby Contact Center server.
About this taskConfigure the AD-LDS replication account as a service account on the standby Contact Centerserver. This account is the AD-LDS replication service account. Perform this procedure beforeinstalling Contact Center software on the standby server.
For this procedure, the name of the AD-LDS replication account is CCMAReplication. You canchoose another name for the account.
Procedure
1. Log on to the standby server.
2. Click Start > Administrative Tools > Local Security Policy.
3. In the Local Security Settings window, in the left pane, expand the LocalPolicies folder.
4. Click the User Rights Assignment folder.
5. In the right pane, double-click Log on as a service.
6. In the Log on as a service Properties dialog box, click Add User or Group.
7. In the Select Users, Computers, or Groups dialog box, type the account name;CCMAReplication.
8. Click OK.The account appears in the Log on as a service list.
9. Click Apply to save your changes.
10. Click OK to close the Log on as a service Properties dialog box.
Updating server for a network location installationAbout this taskConfigure the server .NET security settings to prepare the server for a remote networkinstallation. Avaya Aura® Contact Center supports network installation. You can insert the
412 Avaya Aura® Contact Center Installation May 2013Comments? [email protected]

Avaya Aura® Contact Center DVD into a computer on your network. You then add this computeras a trusted site and network location on the new server. You can access this DVD from thenetwork location, and with some .NET security updates, use the remote DVD to install AvayaAura® Contact Center software on the new server.
Note:Skip this procedure if you plan to use the Avaya Aura® Contact Center DVD from the DVDdrive of the server.
Procedure
1. Insert the Avaya Aura® Contact Center DVD into a computer on the contact centernetwork.
2. Log on to the new server you are preparing for Contact Center.
3. Choose Start > Control Panel > Network and Internet > Internet Options.
4. In the Security tab, click Trusted sites.
5. In the Trusted sites section, click Sites.
6. In the Add this Web site to the zone box, type the <IP address> of the remotecomputer with the Avaya Aura® Contact Center DVD.
7. Click Add.
8. Click OK.
9. Close the Internet Options box.
10. From the new server, navigate to the network location with the DVD.
11. Access the remote DVD and in the root folder of the DVD, double-clickNetworkSetup.bat..NetFramework 3.5 installs and the .NetSecurity settings are modified.
12. If the Avaya Aura® Contact Center installation does not automatically start, in theroot folder of the DVD double-click Setup.exe.
13. After Avaya Aura® Contact Center installs, navigate to your network location anddouble-click NetworkSetupReset.bat.
Updating server for a network location installation
Avaya Aura® Contact Center Installation May 2013 413

Installing the standby Voice And Multimedia Contact Serversoftware for CS1000 in a workgroup
Before you begin
• Ensure the Avaya Communication Server 1000 is configured. For more information seeAvaya Aura® Contact Center Configuration – Avaya CS1000 Integration(NN44400-512).
• Download the most recent Contact Center and Common Components patches to theserver.
• The primary active Voice and Multimedia Contact Server for Avaya CommunicationServer 1000 must already be installed and configured.
• The primary active Voice and Multimedia Contact Server for Avaya CommunicationServer 1000 must already be configured to support AD-LDS replication.
About this taskInstall the Contact Center standby Voice and Multimedia Contact Server software to providea resilient solution. To configure CCMA replication you must enable replication during theinstall. Enabling replication requires a few extra steps at install time to configure the standbyserver. A replication server can only be configured at install time.
Note:Installing Voice and Multimedia Contact Server software installs Apache Tomcat Server.The default port number for Apache Tomcat is 8081. If you need to change the port numberto avoid conflicts with third-party software, see your Apache Tomcat documentation.
Note:Read the Contact Center Release Notes for the most recent instructions.
Procedure
1. Insert the Contact Center DVD into the DVD drive of your server.
2. If the installation does not automatically start, double-click Setup.exe.
3. Click Install to install the Microsoft .NET Framework 3.5 SP1 and Visual C++runtime libraries on the server.If you are prompted to accept the Microsoft .NET Framework 3.5.1 licenseagreement, click Accept. If you are prompted to restart the server, click Yes andrepeat step 2.
4. On the Welcome window, click Next.
5. On the License Agreement window, read the terms of the agreement.
414 Avaya Aura® Contact Center Installation May 2013Comments? [email protected]

6. Click I Accept the Terms of the End-User License Agreement.
7. Click Next.
8. On the Installation Selection window, under Avaya Communication Server 1000- AML, select Voice and Multimedia Contact Server without Avaya MediaServer.
9. Click Next.
Installing the standby Voice And Multimedia Contact Server software for CS1000 in a workgroup
Avaya Aura® Contact Center Installation May 2013 415

10. On the Installation Destination window, on the Application Destination Drivetab, select where to install the Contact Center application software by choosing adisk drive letter.
11. Click the Database Destination Drive tab.
12. Under Select the destination drive for the Contact Center database files, selectthe drive for the Contact Center Manager Server database.
13. Under Select the destination drive for the Contact Center database files, selectthe drive for the Communication Control Toolkit database.
14. Under Select the destination drive for the Contact Center database files, selectthe drive for the Contact Center Multimedia database.
416 Avaya Aura® Contact Center Installation May 2013Comments? [email protected]

15. Click the Product Updates Location tab.
Installing the standby Voice And Multimedia Contact Server software for CS1000 in a workgroup
Avaya Aura® Contact Center Installation May 2013 417

16. Under Select the Product Updates Location, click Browse to locate the foldercontaining the Contact Center product updates.
17. Click Next.The System Readiness Check runs on the server.
18. If the System Readiness Check utility returns a Fail, the software installation cannotproceed until you correct the problem. Review any failures returned by the SystemReadiness Check and consult Avaya Aura® Contact Center Planning andEngineering (NN44400-210) to determine the actions to resolve the issue.You can ignore warnings if the potential impact to the operation of the contact centeris understood and not applicable.
19. Click Next.
20. On the Installation Data window, type the installation details for each tab.
21. Select the CCMS tab, and configure the server details.
418 Avaya Aura® Contact Center Installation May 2013Comments? [email protected]

22. In the Customer Name box, type the customer name.
23. In the Company Name box, type the name of the company.
24. In the Site Name box, type the site name for the Contact Center. The site namemust not contain spaces or non-alphabetical characters except hyphen (-) andunderscore (_). The first character must be a letter. The site name must be uniqueand can consist of 6 to 15 characters. The Site Name of the standby server mustbe the same as the Site Name of the primary server.
25. In the RSM IP Address box, type the Real-time Statistics Multicast IP Address ofthe server to associate with sending real-time data. The IP address must be from224.0.1.0 to 239.255.255.255. The default is 234.5.6.10.
26. In the Contact Center Server Subnet IP Address box, type the IP Address of theserver.
27. In the ELAN Subnet IP Address box, type the IP Address of the embedded localarea network, a dedicated Ethernet LAN that connects Contact Center ManagerServer to the PABX. You must select the check box for the ELAN subnet IP Addressif you use an ELAN subnet.
28. Select the Licensing tab, and configure the licensing details.
Installing the standby Voice And Multimedia Contact Server software for CS1000 in a workgroup
Avaya Aura® Contact Center Installation May 2013 419

29. The License File Location box displays the folder on the server which containsthe license file.
30. In the Primary License Manager IP Address box, type the IP address of thestandby License Manager. Each Voice and Multimedia Contact Server contains aLicense Manager. Type the IP address of the standby Voice and Multimedia ContactServer.
31. In the Primary License Port box, type the number of the communication portopened between the License Manager and Contact Center Manager Server. Thedefault port number is 3998 when you use only one License Manager.
32. In the Secondary License Manager IP Address box, type the IP address of thesecondary License Manager server. The secondary License Manager server isused only in a corporate licensed environment.
33. From the Licensing Package list, select the licenses that you have purchased.Select Nodal Enterprise for single-site contact centers. Select CorporateEnterprise for multi-site contact centers.
34. From the list of Optional Packages, enable the licensed features that you havepurchased.
35. Select the Open Queue check box.
36. In the Switch Serial Number box, type the serial number for the AvayaCommunication Server 1000.
420 Avaya Aura® Contact Center Installation May 2013Comments? [email protected]

37. Select the CS1000 tab, and configure the Avaya Communication Server 1000details.
38. In the Switch Name box, type the name of the AML Avaya Communication Server1000 telephone switch. Valid characters for Avaya Communication Server 1000names are A–Z, a–z, 0–9, underscore (_), and period (.). Names must begin withan alphabetical character and cannot contain spaces. The last character must notbe an underscore or a period. Names must not exceed 80 characters in length.
39. In the Switch IP Address box, type the IP address of the Avaya CommunicationServer 1000.
40. In the Alternative Switch IP Address box, type the IP address of an alternateAvaya Communication Server 1000, if you have one.
41. In the Switch Customer Number box, type the customer number for the AvayaCommunication Server 1000.
42. In the Voice Connection Type section, select the method used to connect to thePABX. Select None, Avaya Aura Experience Portal, or Avaya CallPilot®. If you usea standalone Avaya CallPilot®, type the Avaya CallPilot® server ELAN IP Addressand then configure the Port to 10008. If you are using Avaya CallPilot® HighAvailability, type the Avaya CallPilot® Managed ELAN IP Address and thenconfigure the Port to 10008.
43. Select the CCMA tab, and configure the CCMA details.
Installing the standby Voice And Multimedia Contact Server software for CS1000 in a workgroup
Avaya Aura® Contact Center Installation May 2013 421

44. In the Configuration section, select Enable CCMA Replication. CCMA replicationis reproducing an active copy of the AD-LDS for backup or emergency failure. Incase of server failure, a current AD-LDS is available to maintain the contactcenter.
45. On the Contact Center Installer message box, click Yes to confirm that this is astandby server.
46. In the LDAP Port Number box, type the port number for the Lightweight DirectoryAccess Protocol (LDAP) for which common contact information is stored on aserver. The default value of the port is 389. Check with the system administrator toensure that the port number is not already in use.
47. In the SSL Port Number box, type the port number for the Secure Sockets Layer(SSL) that controls security when applications are communicating across thenetwork. The default port is 636. Check with the system administrator to ensure thatthe port number is not already in use.
48. In the System Account Configuration section, in the Password box, type thepassword for the CCMA System Account user account. Confirm the password inthe second box. The password is not checked against the server security policy forminimum password requirements. Avaya recommends that you enter a passwordthat conforms to your corporate password policy.
49. Select the CCMM tab, and configure the Contact Center Multimedia details.
422 Avaya Aura® Contact Center Installation May 2013Comments? [email protected]

50. In the License Server box, type the name of the server on which the Contact CenterLicense Manager software is installed.
51. In the Inbound Mail Server (POP3) box, type the name of the server on which emailmessages are received in your network.
52. In the Outbound Mail Server (SMTP) box, type the name of the server from onwhich email messages are sent. Your inbound and outbound mail servers can havethe same name.
53. Select Enter Predictive Outbound Configuration to enable predictive outboundcontacts.
54. In the Predictive Server box, type the name of the Predictive Outbound solutionsapplication server on which the administration software resides, or the CPSE2
server.
55. In the Predictive Reporting Server box, type the name of the Predictive Outboundsolutions server that contains the statistics for reporting predictive outbound data,or Portfolio server.
56. In the Web Stats Server box, type the name of the optional Web Statistics serverthat agents and supervisors use to view real-time statistics for call handling, skillsetdata, and the state information on the Agent Desktop. Web Based Statistics is anoptional licensed feature and requires a Web Based Statistics feature license.
Installing the standby Voice And Multimedia Contact Server software for CS1000 in a workgroup
Avaya Aura® Contact Center Installation May 2013 423

57. In the Web Stats Port box, type the port number of the Web Statistics server. Thedefault port number is 9086.
58. In the Web Communications Server (Optional) box, type the name of the serveron which the Web Customer Interface is installed if Web communications is licensedin your contact center.
59. Click Next.
60. On the Summary window, review and verify the information.
61. Select Install. The install continues until the AD-LDS setup wizard appears.
62. Select Next.
63. In the Setup Options dialog box, select A replica of an existing instance.
424 Avaya Aura® Contact Center Installation May 2013Comments? [email protected]

64. Select Next.
65. On the Instance Name dialog box, in the Instance name box, type the AD-LDSinstance name. The default instance name is SymposiumWC, so typeSymposiumWC.
Installing the standby Voice And Multimedia Contact Server software for CS1000 in a workgroup
Avaya Aura® Contact Center Installation May 2013 425

66. In the Description box, type SymposiumWC.
67. Click Next.
68. On the Ports dialog box, if no other applications use the ports, accept the defaultvalues in the LDAP port number and SSL port number boxes and select Next.
426 Avaya Aura® Contact Center Installation May 2013Comments? [email protected]

69. On the Joining a Configuration Set dialog box, in the Server box, type the nameof the primary Voice and Multimedia Contact Server to replicate.
Installing the standby Voice And Multimedia Contact Server software for CS1000 in a workgroup
Avaya Aura® Contact Center Installation May 2013 427

70. On the Joining a Configuration Set window, in the LDAP Port box, type the portnumber on the AD-LDS instance on the primary Voice and Multimedia ContactServer. The default is port number 389.
71. Click Next.
72. On the Administrative Credentials for the Configuration Set window, select Thisaccount.
73. In the User name box, type the primary Voice and Multimedia Contact Server servername followed by its Administrator name in the format <primary Voice andMultimedia Contact Server name>\Administrator. For example enter WIN-RBMQ1SU0OL1\Administrator. If you have created another administrator accountfor Contact Center, then enter the details (name and password) for that primaryVoice and Multimedia Contact Server administrator account here. Youradministrator account must have full administrative privileges.
428 Avaya Aura® Contact Center Installation May 2013Comments? [email protected]

74. In the Password box, type the password for this user account.
75. Click Next.
76. In the Copying Application Directory Partitions dialog box, in the Partition DNlist, select the partition DC=Nortelnetworks,DC=COM.
Installing the standby Voice And Multimedia Contact Server software for CS1000 in a workgroup
Avaya Aura® Contact Center Installation May 2013 429

77. Click Next.
78. In the File Location dialog box, accept the default values.
430 Avaya Aura® Contact Center Installation May 2013Comments? [email protected]

79. Click Next.
80. In the Service Account Selection dialog box, select This account.
Installing the standby Voice And Multimedia Contact Server software for CS1000 in a workgroup
Avaya Aura® Contact Center Installation May 2013 431
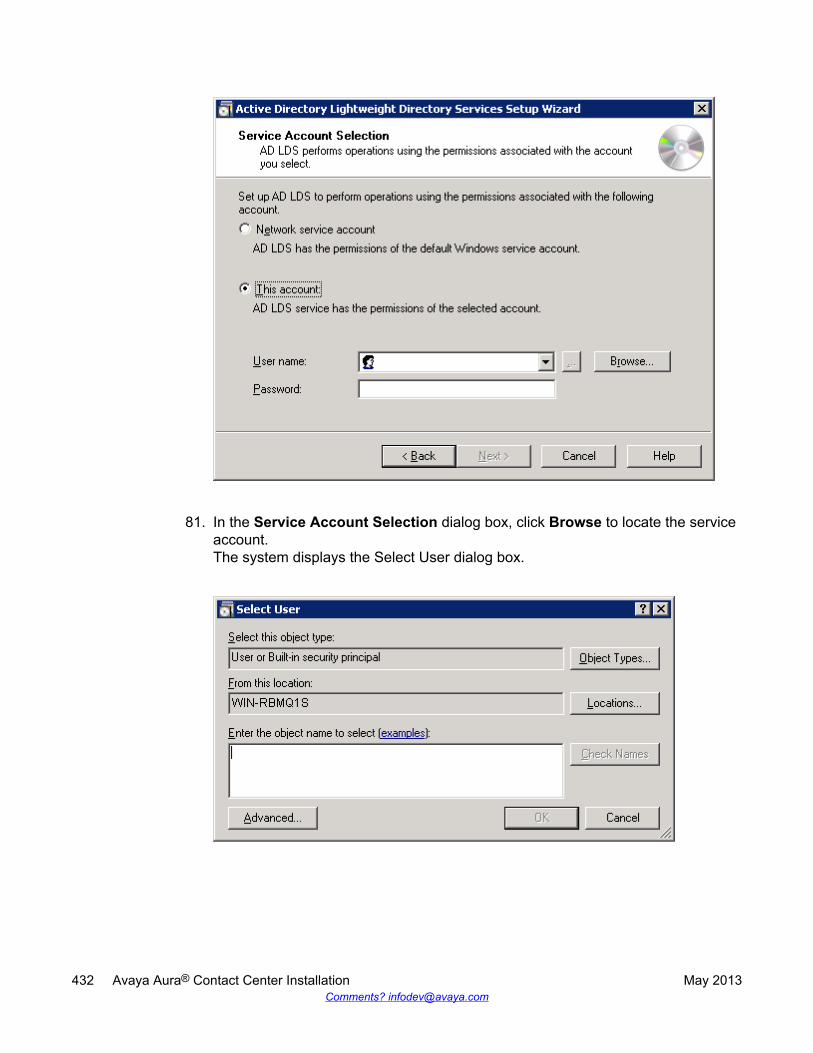
81. In the Service Account Selection dialog box, click Browse to locate the serviceaccount.The system displays the Select User dialog box.
432 Avaya Aura® Contact Center Installation May 2013Comments? [email protected]

Note:Ensure that the local server name appears in the From this location box (thecomputer on which you install AD-LDS). If the standby Contact Center ManagerAdministration server name does not appear, click Locations and browse to thecorrect server name.
82. In the Select User dialog, click Advanced.The system displays the advanced Select User dialog box.
83. In the advanced Select User dialog box, click Find Now.
Installing the standby Voice And Multimedia Contact Server software for CS1000 in a workgroup
Avaya Aura® Contact Center Installation May 2013 433

The system displays the list of available users in the Search results list.
84. In the advanced Select User dialog box, from the Search results list, select theworkgroup CCMA replication service account.
85. In the advanced Select User dialog box, click OK.The Select User dialog box appears. Example of selecting a workgroup CCMAreplication service account:
434 Avaya Aura® Contact Center Installation May 2013Comments? [email protected]
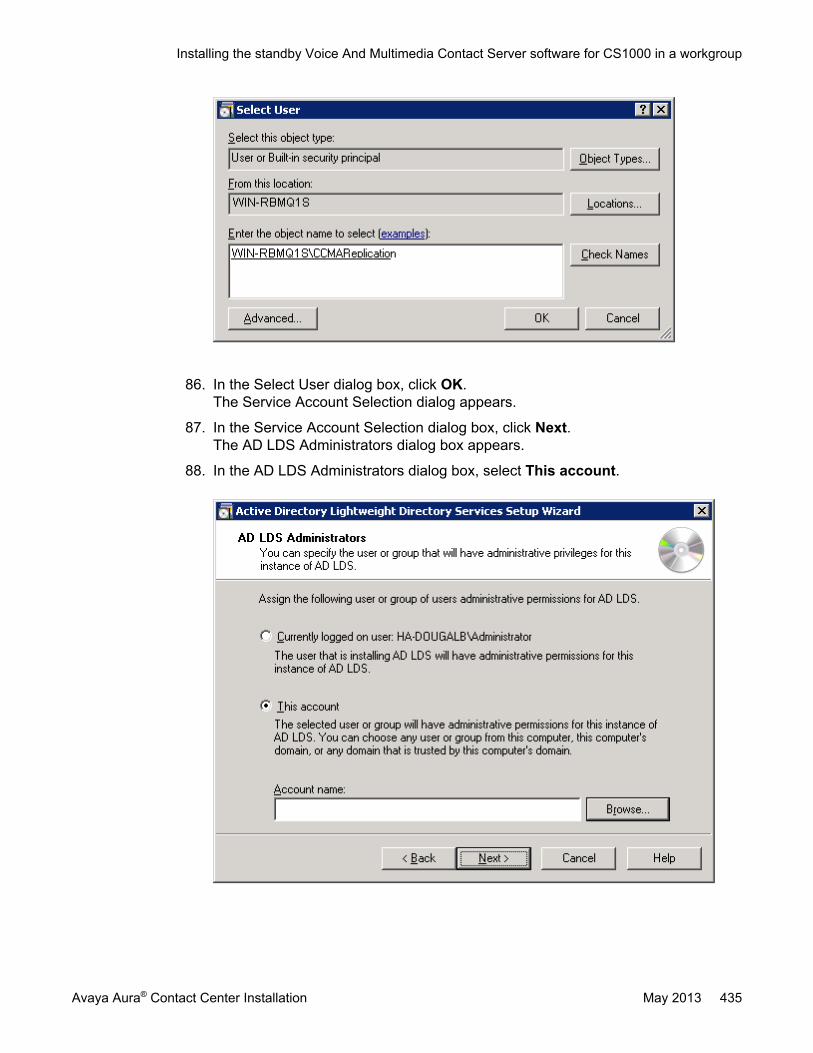
86. In the Select User dialog box, click OK.The Service Account Selection dialog appears.
87. In the Service Account Selection dialog box, click Next.The AD LDS Administrators dialog box appears.
88. In the AD LDS Administrators dialog box, select This account.
Installing the standby Voice And Multimedia Contact Server software for CS1000 in a workgroup
Avaya Aura® Contact Center Installation May 2013 435

89. Click Browse to locate the CCMA AD-LDS replication account.The Select User dialog box appears. Note that the location is this Voice andMultimedia Contact Server. Example of using a workgroup and selecting a CCMAAD-LDS replication account:
Note:Ensure that the local server name appears in the From this location box (thecomputer on which you install AD-LDS). If the standby Contact Center ManagerAdministration server name does not appear, click Locations and browse to theserver name.
90. In the Select User dialog box, click Advanced.The advanced Select User dialog box appears. Note that the location is this Voiceand Multimedia Contact Server. Example of using a workgroup and selecting aCCMA AD-LDS replication account:
436 Avaya Aura® Contact Center Installation May 2013Comments? [email protected]

91. In the advanced Select User dialog box, click Find now to display the list of useraccounts.Example of using a workgroup and selecting a CCMA AD-LDS replication account:
Installing the standby Voice And Multimedia Contact Server software for CS1000 in a workgroup
Avaya Aura® Contact Center Installation May 2013 437

92. From the Search results list, select the workgroup CCMA AD-LDS replicationaccount.
93. In the advanced Select User dialog box, click OK.The Select User dialog appears. Example of selecting a workgroup CCMA AD-LDSreplication account:
438 Avaya Aura® Contact Center Installation May 2013Comments? [email protected]

94. In the Select User dialog box, click OK.
95. Click Next.The Ready to Install dialog appears.
Installing the standby Voice And Multimedia Contact Server software for CS1000 in a workgroup
Avaya Aura® Contact Center Installation May 2013 439

96. Confirm the installation components, and click Next.
97. After the installation is complete, click Finish.
98. If prompted, restart the server.
Upgrading Java Runtime Environment, Java DevelopmentKit, and Apache Tomcat components using Third PartySoftware Upgrade Utility
Before you begin
• Apply Contact Center 6.3 Service Pack 10 or later on your system as an install-timepatch.
• Restart the Contact Center server to complete this procedure.
440 Avaya Aura® Contact Center Installation May 2013Comments? [email protected]
About this taskUse Third Party Software Upgrade Utility to automatically upgrade your Java RuntimeEnvironment and Tomcat software components. For more information, see Third PartySoftware Upgrade Utility on page 27.
Procedure
1. Log on to the server using the administrator account.
2. Navigate to the Avaya_Support\ProductUpdates folder.
3. Open the folder where you had saved the latest Service Pack.
4. Browse to ThirdParty\AACCThirdPartySoftwareUpgradeUtility.exe.
5. Double-click AACCThirdPartySoftwareUpgradeUtility.exe.
6. Click Upgrade.The system displays the “User Action Required” dialog box.
7. Click OK.
8. Click Yes to restart Contact Center and complete the upgrade.
Securing the Windows serverAbout this taskApply optional security measures to your operating system to further secure your server.
Important:Scanning software can degrade the performance and decrease the reliability of the system.Install virus scanning software only if the system connects to an exposed network or to theInternet.
Important:To maintain server performance, you must schedule virus scans during maintenanceperiods or low usage hours only.
Procedure
1. Harden the operating system using defined site procedures.
2. Install antivirus software. If you install antivirus software, Avaya recommends thatyou exclude some contact center files and folders from real-time and scheduledscans. For more information, and for a list of files and folders to exclude, see AvayaAura® Contact Center Planning and Engineering (NN44400-210).
Securing the Windows server
Avaya Aura® Contact Center Installation May 2013 441

442 Avaya Aura® Contact Center Installation May 2013Comments? [email protected]

Chapter 15: Voice Contact Server forCS1000 installation
This chapter describes how to install a Voice Contact Server in a solution with an Avaya CommunicationServer 1000 (CS1000) platform. A Voice Contact Server includes the following server software:
• Contact Center Manager Server (CCMS)
• Contact Center Manager Server Utility
• Contact Center License Manager
• Contact Center Manager Administration (CCMA)
• Communication Control Toolkit (CCT)
Install this server to provide context‐sensitive and skill-based routing for customer voice contacts. Thisserver provides routed contact support for voice calls. This server provides extensive tools for agentmanagement, real-time and historical reporting, and graphical tools to create contact flows and treatmentrules. Use this server for license management, High Availability configuration, networking, OpenInterfaces Web Service and third-party application interfaces integration.
If the server is to be used in a domain, Avaya recommends that you add the server to the domain beforeinstalling Contact Center software.
You can change the name of a Contact Center server, but because this is time consuming, Avayarecommends that you configure the server final production name before installing Contact Centersoftware.
If you plan to follow the Microsoft server hardening guidelines, complete those procedures before installingAvaya Aura® Contact Center.
Important:You can create an administration account on the server and then install Avaya Aura® Contact Centerusing the account. This Avaya Aura® Contact Center administration account must have fulladministrative privileges. You must upgrade and patch Avaya Aura® Contact Center using thisadministration account. You can rename this account after installing Avaya Aura® Contact Center, butyou must not delete the account. If you delete the account used to install Avaya Aura® Contact Center,Avaya Aura® Contact Center stops working.
Contact Center Manager Server supports two Network Interface Cards (NICs) and two subnets (onecontact center subnet and one ELAN subnet). The Contact Center Manager Server ELAN NIC and ELANsubnet are optional.
You must complete all the procedures in this section in sequential order.
Avaya Aura® Contact Center Installation May 2013 443
All active and standby applications must be on the same patch level.
Downloading the latest documentationBefore you begin
• Download the most recent version of Acrobat Reader.• Access the Avaya Web site at www.avaya.com/support.
About this taskDownload the most recent documentation to ensure you have the most recent updates.Updates in the documentation accurately reflect the most recent changes in the software.
Procedure
1. Log on to the Avaya Web site.
2. Compare the versions of the documentation on the site with the versions youhave.
3. If the version number on www.avaya.com/support is higher than your version,download the latest version of the document.
4. Review the Avaya Web site for release notes and readme files.
Installing Windows Server 2008 Release 2Before you begin
• Ensure that you have a newly formatted server that meets the specifications in AvayaAura® Contact Center Planning and Engineering (NN44400-210) on which to installMicrosoft Windows Server 2008 64-bit, Release 2, Service Pack 1.
Do not upgrade your operating system from a previous release. Contact Center is notsupported on an upgraded operating system.
• Configure all servers for RAID as described in Avaya Aura® Contact Center Planning andEngineering (NN44400-210).
• Ensure that you have a DVD for Windows Server 2008 Release 2.• Install the network interface card in the server.• Know the IP addresses for the contact center subnet.
444 Avaya Aura® Contact Center Installation May 2013Comments? [email protected]

About this taskInstall the Windows operating system, which is required for the Contact Center server software.During the installation, configure the Windows settings as required. You must perform thisprocedure on each server before you install Contact Center server software on the server.
Procedure
1. Insert the Windows Server 2008 64-bit Release 2 Standard Edition or WindowsServer 2008 64-bit Release 2 Enterprise Edition DVD into the DVD drive.
2. Install Windows Server 2008 Release 2 according to the instructions supplied bythe DVD.
3. On the first install page, select your language for installation.
4. Click Next.
5. On the Installation window, select a Language to install from the list.
6. Select a Time and currency format from the list.
7. Select Keyboard or input method from the list.
8. Click Next.
9. Click Install Now.
10. Select an operating system from the list.
11. Click Next.
12. On the first Install Windows screen, read the terms of the license agreement andselect I accept the license terms.
13. Click Next.
14. Select Custom.
15. Select the disk partition on which you want to install Windows Server 2008.
Important:You can use the partition management options to configure the partitions on yourserver.
16. Click Next.The installation proceeds and automatically restarts the server several times.
17. After completing the installation, log on to the server as Administrator. Enter andconfirm the Administrator password.
18. In the Initial Configuration Tasks window, select Activate Windows and followthe instructions or the Microsoft documentation to activate your server.
19. Select Set time zone and complete the information as required for your system.If you are installing Voice Contact Server Only software or Knowledge WorkerServer software on this server, ensure that you clear Automatically adjust clock
Installing Windows Server 2008 Release 2
Avaya Aura® Contact Center Installation May 2013 445

for daylight saving changes. Otherwise select Automatically adjust clock fordaylight saving changes.
20. Select Configure Networking and complete the information for your NetworkInterface Card (NIC) with the server IP address.
21. Select Provide computer name and domain and complete the information for yourserver name and workgroup or domain settings.
22. Change the DVD drive letter to E: to ensure the correct drive letters are free for theContact Center application and database hard disk drives and partitions.
23. Configure the hard disk drives and partitions for this server using the WindowsServer 2008 Server Manager - Disk Management utility. For more information abouthard disk drives and partitions, see Avaya Aura® Contact Center Planning andEngineering (NN44400-210).
24. Install other required drivers for your hardware configuration.
Procedure job aid
Name Description
Computer name Do not use spaces or underscores or exceed15 characters. The name must start with analphabetic character.The computer name must match (includingcase sensitivity) the DNS name.
Disk drives Format the partitions as required for theserver. For more information, see AvayaAura® Contact Center Planning andEngineering (NN44400-210).
Domain/workgroup name Configure as required for your site.You must check to ensure the DNS Domainname (including case) matches the servername if the server is added to a domain orworkgroup after configuration.
Licensing modes Select Per server licensing mode.Accept the default five concurrentconnections.
Modem dialing Configure as required for your site. Do notinstall a modem on a Communication ControlToolkit server.
446 Avaya Aura® Contact Center Installation May 2013Comments? [email protected]

Name Description
Network components Configure IP Address, WINS, DNS for one ortwo network cards as per configuration.Contact Center does not support IPv6.
Network connections If the server has more than one NIC/adapter,ensure contact center subnet appears first inthe network adapter binding order.
Partitions Configure C: drive to be a primary drive.Configure the other drives on your server tomeet the requirements according to AvayaAura® Contact Center Planning andEngineering (NN44400-210) for the server.
Regional settings window Configure as required for your site.
SNMP Configure for all servers.
Configuring Windows Server 2008Before you begin
• Install Microsoft Windows Server 2008 64-bit Release 2 on your server.
About this taskBefore you can install Avaya Aura® Contact Center software on your server, you must configureWindows Server 2008 to meet the requirements of the software.
You can prepare the server using this and other procedures, or you can download and use anAvaya Aura® Contact Center operating system configuration tool that installs the requiredWindows roles and features.
The Avaya Aura® Contact Center Windows Roles and Features installer configures thefollowing Windows Server 2008 resources:
• Windows Server Backup Features• SNMP Services• Active Directory Light Weight Directory Services• Application Server• Web Server (IIS)
For more information, and to download the Avaya Aura® Contact Center Windows Roles andFeatures installer, see http://support.avaya.com.
The Avaya Aura® Contact Center Windows Roles and Features installer replaces the followingprocedures:
Configuring Windows Server 2008
Avaya Aura® Contact Center Installation May 2013 447

• Configuring Windows Server 2008 (this procedure)• Configuring SNMP on your server• Installing operating system components for Contact Center
If you use the Avaya Aura® Contact Center Windows Roles and Features installer, skip thesethree procedures.
Procedure
1. Log on to the Windows Server 2008 server using an administrator account.
2. Select the Don’t display this screen on startup check box.
3. Update the emergency repair disk to record the latest configuration data for theserver.
4. Choose Start > Administrative Tools > Server Manager.
5. In the left pane, click Features.
6. Click Add Features.
7. Select Windows Server Backup Features.
8. Click Next.
9. Click Install.
10. Click Close.
11. Choose Start > All Programs > Accessories > System Tools > Windows ServerBackup.
12. Follow the on-screen instructions to select what you want to back up.
Connecting to the contact center subnetAbout this taskConnect the Contact Center server to the contact center subnet. The contact center subnet isthe network on which the server software applications work together to route contacts andgenerate reports.
Procedure
1. Locate the slot assigned to the contact center subnet network interface card for theserver. Make a note of the slot.
2. Connect the cable from the contact center subnet to the contact center subnetnetwork interface card in the server in accordance with customer site networkingguidelines.
448 Avaya Aura® Contact Center Installation May 2013Comments? [email protected]

3. Use the ping command to test the contact center subnet.
Adding a server to a domainBefore you begin
• Ensure that you have domain administrator privileges, or ask the Domain Administratorto assign you a domain user account for remote access.
• On the server, configure a preferred Domain Name System (DNS) server on the NetworkInterface Card (NIC).
About this taskAdd the server to an existing domain. Avaya recommends that you add the server to the domainbefore installing Contact Center software.
Ask your System Administrator to add a Domain Name System (DNS) static entry for thisserver. Each Contact Center server in a domain requires a DNS static entry.
Important:Avaya Aura® Contact Center High Availability solutions do not support Windows Server 2008Dynamic DNS.
In High Availability solutions, ask your System Administrator to add one DNS static entry forthe each managed name and associated managed IP address. A typical High Availabilitycampus solution with a pair of servers requires 3 DNS static entries; one DNS static entry forthe active server, one DNS static entry for the standby server, and one DNS static entry forthe managed name and associated IP address.
Procedure
1. Log on to the server.
2. Click Start > Administrative Tools > Server Manager.
3. Beside Computer Information, click Change System Properties.
4. In the System Properties dialog box, click the Computer Name tab.
5. Click Change.
6. In the Computer Name/Domain Changes dialog box, click the Domain option.
7. Type the domain name (you must provide the fully qualified domain name, whichincludes the prefix and suffix).
8. Click OK.
9. Type the domain administrator User name and Password.
Adding a server to a domain
Avaya Aura® Contact Center Installation May 2013 449

10. Click OK.
11. Restart the server when you are prompted to do so.
Configuring SNMP on your serverBefore you begin
• Install and configure Microsoft Windows Server 2008 64-bit Release 2 on your server.
About this taskConfigure Simple Network Management Protocol (SNMP) on your server to ensure you haveall of the required components of the Internet protocol for monitoring devices in your network.SNMP helps you manage data that describes the system configuration and errors that mayoccur between them.
Procedure
1. Log on to the server using the administrator account.
2. Choose Start > Control Panel > Programs.
3. In the Programs and Features section, click Turn Windows features on or off.
4. In the Server Manager window, select Server Manager and click Add Features.
5. Select SNMP Services.
6. Click Next.
7. Click Install.
8. If prompted, insert the Windows Server 2008 DVD.
9. Click Close.
Downloading the most recent patches to the serverBefore you begin
• Install and configure Windows Server 2008 64-bit Release 2 on your server according tothe settings in this chapter.
• Download and install the most recent and valid updates for Microsoft Windows Server2008 64-bit Release 2.
450 Avaya Aura® Contact Center Installation May 2013Comments? [email protected]

• Know the location at which you plan to install each Contact Center server softwarepackage.
• Ensure that you use one administrator account on your server to un-install and installsoftware updates.
About this taskTo ensure that you have the most current software, download the most recent Contact Centerpatches from www.avaya.com/support to the server you plan to install.
Procedure
1. Log on to the server using the administrator account.
2. Create a folder Avaya_Support\ProductUpdates on the drive on which youwant to save the software updates.
3. Download the most recent service pack file. Save and unzip the file on the ContactCenter server in the Avaya_Support\ProductUpdates folder.
4. If new patches are available for the latest service pack, download and save thepatches on the Contact Center server in the Avaya_Support\ProductUpdates folder.
5. Read the Contact Center Release Notes for the most recent instructions.
Disabling unused Network AdaptersAbout this taskDisable all unused Network Adapters or Network Interface Cards (NICs) to improve networkcommunications and prevent the erroneous configuration of unused NICs during ContactCenter server commissioning.
Procedure
1. Log on to the server.
2. Click Start > Control Panel > Network and Internet > Network and SharingCenter > Change Adapter Settings.
3. Right-click on the unused Network Adapter, and select Disable.
4. Repeat this procedure for all unused Network Adapters.
Disabling unused Network Adapters
Avaya Aura® Contact Center Installation May 2013 451
Enabling Microsoft Remote Desktop connectionBefore you begin
• Install Microsoft Windows Server 2008 64-bit Release 2 on your server.• Log on to the server with administrator privileges.
About this taskEnable Microsoft Remote Desktop connection as your remote access tool. Microsoft RemoteDesktop provides remote access for support on the server.
Procedure
1. Choose Start > Control Panel > System and Security.
2. In the System section, select Allow remote access.
3. Click the Remote tab.
4. Select Allow connections from computers running any version of RemoteDesktop (less secure).
5. Click OK.
Configuring Data Execution PreventionAbout this taskConfigure the Data Execution Prevention (DEP) hardware and software to perform additionalchecks on memory that protect the Avaya Aura® Contact Center server against malicious codeexploitation.
Procedure
1. Log on to Windows as administrator.
2. Choose Start > Control Panel > System and Security.
3. Click System.
4. In the System window, click Advanced system settings.
5. In the System Properties dialog box, click the Advanced tab.
6. Under Performance, click Settings.
452 Avaya Aura® Contact Center Installation May 2013Comments? [email protected]

7. In the Performance Options dialog box, click the Data Execution Preventiontab.
8. On the Data Execution Prevention tab, select Turn on DEP for essentialWindows programs and services only.
9. Click OK.
10. On the System Properties dialog box, click OK.
11. Click OK to restart the computer.
Importing Contact Center Firewall Security policyBefore you begin
• Install Microsoft Windows Server 2008 64-bit Release 2 on your server.• Log on to the server with administrator privileges.• Download the most recent Avaya Aura® Contact Center Firewall Security policy from
www.avaya.com/support.
About this taskImport the Avaya Aura® Contact Center Firewall Security policy to ensure all contact centerservers in the solution can communicate.
Avaya recommends that you export and backup your existing firewall security policy beforeimporting the Avaya Aura® Contact Center Firewall Security policy. You can use this backuppolicy to rollback the Avaya Aura® Contact Center Firewall Security policy, if you ever needto.
Procedure
1. Choose Start > Administrative Tools > Windows Firewall with AdvancedSecurity.
2. Choose Actions > Export Policy.
3. In the File name box, type the name for the backup policy.
4. Click Save.Windows exports the existing policy. You can use this backup policy to rollback theAvaya Aura® Contact Center Firewall Security policy, if you ever need to.
5. On the Policy successfully exported message box, click OK.
6. Choose Actions > Import Policy.
7. On the policy overwrite message box, click Yes.
Importing Contact Center Firewall Security policy
Avaya Aura® Contact Center Installation May 2013 453
8. Navigate to the folder containing the Avaya Aura® Contact Center Firewall Securitypolicy.
9. Click Open.Windows imports the Avaya Aura® Contact Center Firewall Security policy.
10. On the Policy successfully imported message box, click OK.
Disabling NetBIOSAbout this taskIf the Contact Center server uses two Network Interface Cards (NICs), disable NetBIOS on theEmbedded LAN (ELAN) network interface card (NIC) to avoid NetBIOS conflicts.
Contact Center supports two Network Interface Cards (NICs) and two subnets (one contactcenter subnet and one ELAN subnet). The Contact Center ELAN NIC and ELAN subnet areoptional.
Procedure
1. Choose Start > Control Panel > Network and Internet.
2. Click Network and Sharing Center.
3. Click Change adapter settings.
4. Right-click the ELAN Network Interface Card (NIC).
5. Click Properties.
6. Select Internet Protocol Version 4 (TCP/IPv4).
7. Click Properties.
8. Click Advanced.
9. Click the WINS tab.
10. Select the Disable NetBIOS over TCP/IP check box.
11. Click OK.
454 Avaya Aura® Contact Center Installation May 2013Comments? [email protected]

Connecting the Embedded LAN subnetBefore you begin
• Install two network cards on the Contact Center server.• Disable the NetBIOS on the ELAN network interface card.• Connect the contact center subnet network interface card.
About this taskIf your server uses two NICs, connect the Embedded LAN (ELAN) NIC to the ELAN subnet.Contact Center supports two network interface cards (NICs) and two subnets (one contactcenter subnet and one ELAN subnet). The Contact Center ELAN NIC and ELAN subnet areoptional.
Procedure
1. Locate the slot assigned to the ELAN network interface card for the server.
2. Write the MAC address of the card on a small label. Attach the label to the back ofthe card or the chassis slot position.
3. Connect the ELAN subnet from the Avaya equipment to the Ethernet hub.
4. Connect the network cable from the ELAN network interface card in the server tothe hub.
5. Plug in the power cord for the hub.
6. If you have an ELAN subnet network connection, use the ping command to test it.
Configuring the binding orderBefore you begin
• Install two network interface cards on the Contact Center server.• Disable the NetBIOS on the ELAN network interface card.• Connect the Contact Center server network interface card to the contact center subnet.• Connect the Contact Center server ELAN network interface card to the ELAN subnet.
About this taskConfigure the binding order of the network cards. The contact center subnet network interfacecard must be bound first and then the ELAN network interface card.
Connecting the Embedded LAN subnet
Avaya Aura® Contact Center Installation May 2013 455

Procedure
1. Choose Start > Control Panel > Network and Internet > Network and SharingCenter.
2. Click Change adapter settings.
3. In the Network Connections window, press the ALT key.A hidden menu appears.
4. Choose Advanced > Advanced Settings.
5. In the Connections box, ensure that the contact center subnet connection is listedfirst. If it is not listed first, adjust the order.
Installing operating system components for ContactCenter
Before you begin
• Install Windows Server 2008 64-bit Release 2.
About this taskBefore installing Contact Center software, you must install specific operating system softwarecomponents such as Internet Information Services to integrate the components in ContactCenter.
Procedure
1. Choose Start > Administrative Tools > Server Manager.
2. In the left-hand column of the Server Manager, right-click Roles, and select AddRoles.
3. Review the requirements for the new role, and click Next.
4. Under Server Roles, select Active Directory Lightweight Directory Services.
5. If an Add Roles Wizard message box that lists features required by Active DirectoryLightweight Directory Services appears, click Add Required Features.
6. Under Server Roles, select Application Server.
7. If an Add Roles Wizard message box that lists features required by ApplicationServer appears, click Add Required Features.
8. Under Application Server, select Role Services.
9. Select Web Server (IIS) Support.
456 Avaya Aura® Contact Center Installation May 2013Comments? [email protected]

10. If an Add Roles Wizard message box appears, listing features required by WebServer (IIS) Support appears, click Add Required Features.
11. Click Next.
12. On the Introduction to Web Server (IIS) page, click Next.
13. On the Select Role Services page, under Common HTTP Features, select thefollowing services:
• Static Content
• Default Document
• Directory Browsing
• HTTP Errors
• HTTP Redirection
Important:All other services check boxes must be cleared.
14. On the Select Role Services page, under Application Development, select thefollowing services:
• ASP.NET
• .NET Extensibility
• ASP
• ISAPI Extensions
• ISAPI Filters
• Server Side Includes
Important:All other services check boxes must be cleared.
15. On the Select Role Services page, under Health and Diagnosis, select thefollowing services:
• HTTP Logging
• Logging Tools
• Request Monitor
• Tracing
Important:All other services check boxes must be cleared.
16. On the Select Role Services page, under Security, select all services.
Installing operating system components for Contact Center
Avaya Aura® Contact Center Installation May 2013 457

17. On the Select Role Services page, under Performance, select all services.
18. On the Select Role Services page, under Management Tools, select the followingservices:
• IIS Management Console
• IIS Management Scripts and Tools
• Management Service
• All items under IIS 6 Management Compatibility
Important:All other services check boxes must be cleared.
19. Click Next.
20. Review the installation information.
21. Click Install.
22. On the Installation Results page, click Close.
23. Restart the server if required.
Configuring MIME types to support Microsoft updatesAbout this taskConfigure the Multipurpose Internet Mail Extension (MIME) types to support Microsoft updatesand patches.
Procedure
1. Log on to the server.
2. Click Start > Administrative Tools > Computer Management.
3. In the Computer Management dialog box, expand Services and Applications >Internet Information Services > IIS Manager > Sites.
4. Select Default Web Site.
5. Under IIS, select MIME Types.
6. Double-click MIME Types.
7. On the Actions list on the right, click Add.
8. In the File name extension box, type .msp.
9. In the MIME Type box, type application/microsoftpatch.
458 Avaya Aura® Contact Center Installation May 2013Comments? [email protected]

10. Click OK.
11. On the Actions list on the right, click Add.
12. In the File name extension box, type .msu.
13. In the MIME Type box, type application/microsoftupdate.
14. Click OK.
15. Close the Computer Management window.
Updating server for a network location installationAbout this taskConfigure the server .NET security settings to prepare the server for a remote networkinstallation. Avaya Aura® Contact Center supports network installation. You can insert theAvaya Aura® Contact Center DVD into a computer on your network. You then add this computeras a trusted site and network location on the new server. You can access this DVD from thenetwork location, and with some .NET security updates, use the remote DVD to install AvayaAura® Contact Center software on the new server.
Note:Skip this procedure if you plan to use the Avaya Aura® Contact Center DVD from the DVDdrive of the server.
Procedure
1. Insert the Avaya Aura® Contact Center DVD into a computer on the contact centernetwork.
2. Log on to the new server you are preparing for Contact Center.
3. Choose Start > Control Panel > Network and Internet > Internet Options.
4. In the Security tab, click Trusted sites.
5. In the Trusted sites section, click Sites.
6. In the Add this Web site to the zone box, type the <IP address> of the remotecomputer with the Avaya Aura® Contact Center DVD.
7. Click Add.
8. Click OK.
9. Close the Internet Options box.
10. From the new server, navigate to the network location with the DVD.
Updating server for a network location installation
Avaya Aura® Contact Center Installation May 2013 459

11. Access the remote DVD and in the root folder of the DVD, double-clickNetworkSetup.bat..NetFramework 3.5 installs and the .NetSecurity settings are modified.
12. If the Avaya Aura® Contact Center installation does not automatically start, in theroot folder of the DVD double-click Setup.exe.
13. After Avaya Aura® Contact Center installs, navigate to your network location anddouble-click NetworkSetupReset.bat.
Installing the Voice Contact Server software for CS1000Before you begin
• Ensure the Avaya Communication Server 1000 is configured. For more information seeAvaya Aura® Contact Center Configuration – Avaya CS1000 Integration(NN44400-512).
• Download the most recent Contact Center and Common Components patches to theserver.
About this taskInstall the Contact Center Voice Contact Server software and enable your contact center toroute contacts to the agents that can answer the call with the correct skills.
Note:Installing Voice Contact Server software installs Apache Tomcat Server. The default portnumber for Apache Tomcat is 8081. If you need to change the port number to avoid conflictswith third-party software, see your Apache Tomcat documentation.
Note:Read the Contact Center Release Notes for the most recent instructions.
Procedure
1. Insert the Contact Center DVD into the DVD drive of your server.
2. If the installation does not automatically start, double-click Setup.exe.
3. Click Install to install the Microsoft .NET Framework 3.5 SP1 and Visual C++runtime libraries on the server.If you are prompted to accept the Microsoft .NET Framework 3.5.1 licenseagreement, click Accept. If you are prompted to restart the server, click Yes andrepeat step 2.
4. On the Welcome window, click Next.
460 Avaya Aura® Contact Center Installation May 2013Comments? [email protected]

5. On the License Agreement window, read the terms of the agreement.
Installing the Voice Contact Server software for CS1000
Avaya Aura® Contact Center Installation May 2013 461

6. Click I Accept the Terms of the End-User License Agreement.
7. Click Next.
462 Avaya Aura® Contact Center Installation May 2013Comments? [email protected]
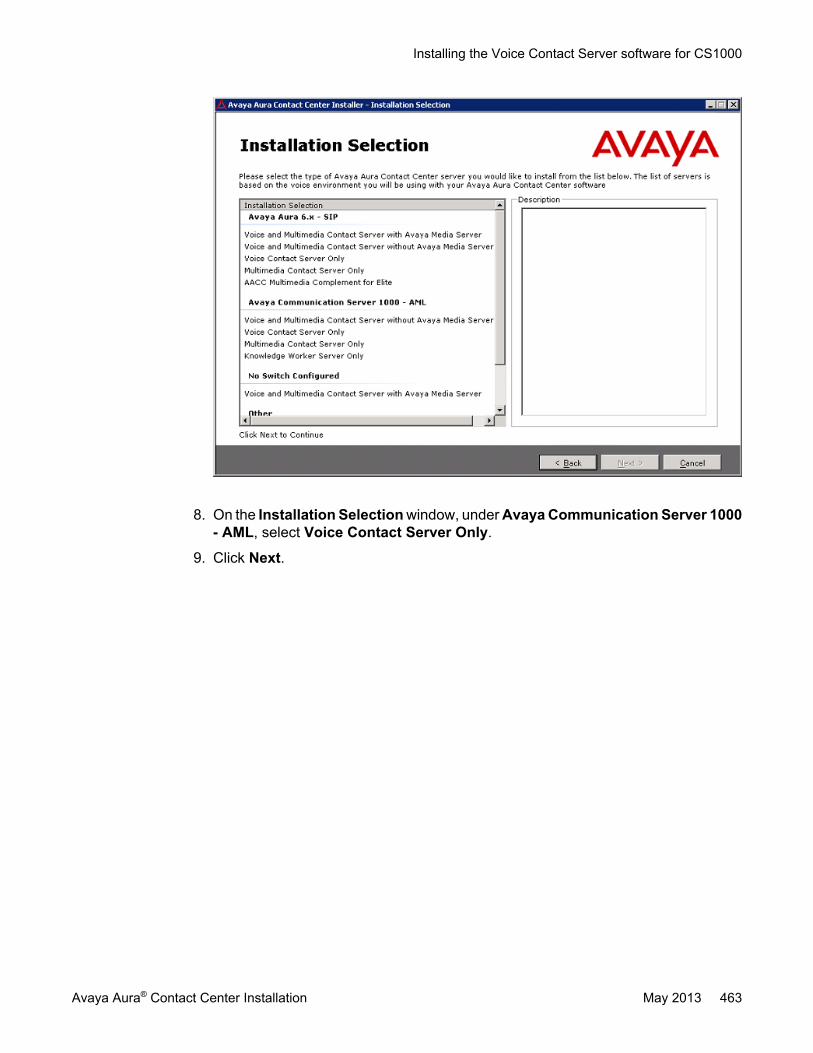
8. On the Installation Selection window, under Avaya Communication Server 1000- AML, select Voice Contact Server Only.
9. Click Next.
Installing the Voice Contact Server software for CS1000
Avaya Aura® Contact Center Installation May 2013 463
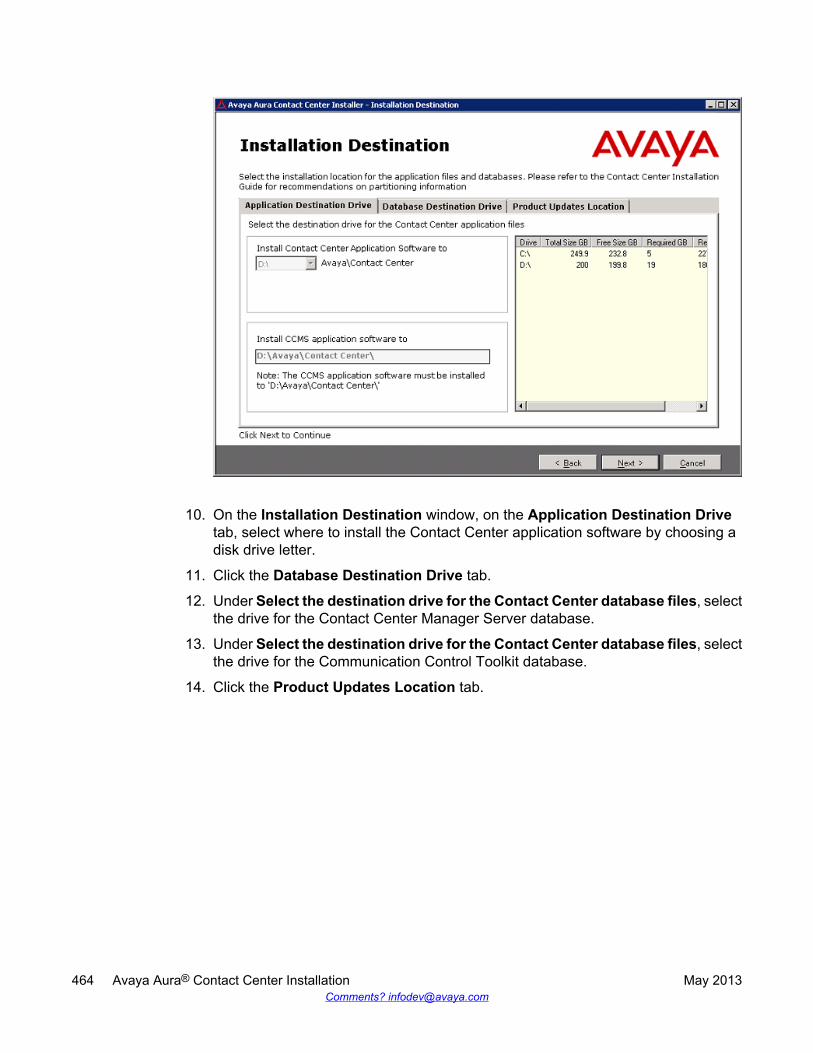
10. On the Installation Destination window, on the Application Destination Drivetab, select where to install the Contact Center application software by choosing adisk drive letter.
11. Click the Database Destination Drive tab.
12. Under Select the destination drive for the Contact Center database files, selectthe drive for the Contact Center Manager Server database.
13. Under Select the destination drive for the Contact Center database files, selectthe drive for the Communication Control Toolkit database.
14. Click the Product Updates Location tab.
464 Avaya Aura® Contact Center Installation May 2013Comments? [email protected]

15. Under Select the Product Updates Location, click Browse to locate the foldercontaining the Contact Center product updates.
16. Click Next.The System Readiness Check runs on the server.
17. If the System Readiness Check utility returns a Fail, the software installation cannotproceed until you correct the problem. Review any failures returned by the SystemReadiness Check and consult Avaya Aura® Contact Center Planning andEngineering (NN44400-210) to determine the actions to resolve the issue.You can ignore warnings if the potential impact to the operation of the contact centeris understood and not applicable.
18. Click Next.
19. On the Installation Data window, type the installation details for each tab.
20. Select the CCMS tab, and configure the server details.
Installing the Voice Contact Server software for CS1000
Avaya Aura® Contact Center Installation May 2013 465

21. In the Customer Name box, type the customer name.
22. In the Company Name box, type the name of the company.
23. In the Site Name box, type the site name for the Contact Center server. The sitename must not contain spaces or non-alphabetical characters except hyphen (-)and underscore (_). The first character must be a letter. The site name must beunique and can consist of 6 to 15 characters.
24. In the RSM IP Address box, type the Real-time Statistics Multicast IP Address ofthe server to associate with sending real-time data. The IP address must be from224.0.1.0 to 239.255.255.255. The default is 234.5.6.10.
25. In the Contact Center Server Subnet IP Address box, type the IP Address of theserver.
26. In the ELAN Subnet IP Address box, type the IP Address of the embedded localarea network, a dedicated Ethernet LAN that connects Contact Center ManagerServer to the PABX. You must select the check box for the ELAN subnet IP Addressif you use an ELAN subnet.
27. Select the Licensing tab, and configure the licensing details.
466 Avaya Aura® Contact Center Installation May 2013Comments? [email protected]
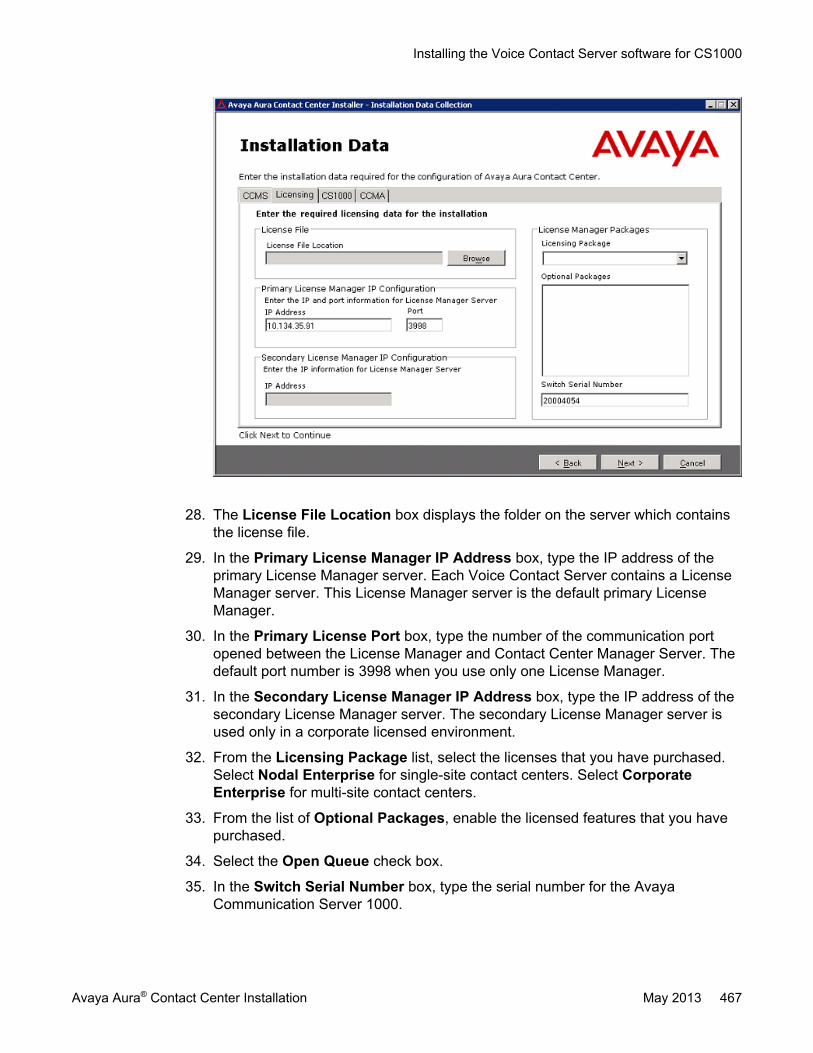
28. The License File Location box displays the folder on the server which containsthe license file.
29. In the Primary License Manager IP Address box, type the IP address of theprimary License Manager server. Each Voice Contact Server contains a LicenseManager server. This License Manager server is the default primary LicenseManager.
30. In the Primary License Port box, type the number of the communication portopened between the License Manager and Contact Center Manager Server. Thedefault port number is 3998 when you use only one License Manager.
31. In the Secondary License Manager IP Address box, type the IP address of thesecondary License Manager server. The secondary License Manager server isused only in a corporate licensed environment.
32. From the Licensing Package list, select the licenses that you have purchased.Select Nodal Enterprise for single-site contact centers. Select CorporateEnterprise for multi-site contact centers.
33. From the list of Optional Packages, enable the licensed features that you havepurchased.
34. Select the Open Queue check box.
35. In the Switch Serial Number box, type the serial number for the AvayaCommunication Server 1000.
Installing the Voice Contact Server software for CS1000
Avaya Aura® Contact Center Installation May 2013 467
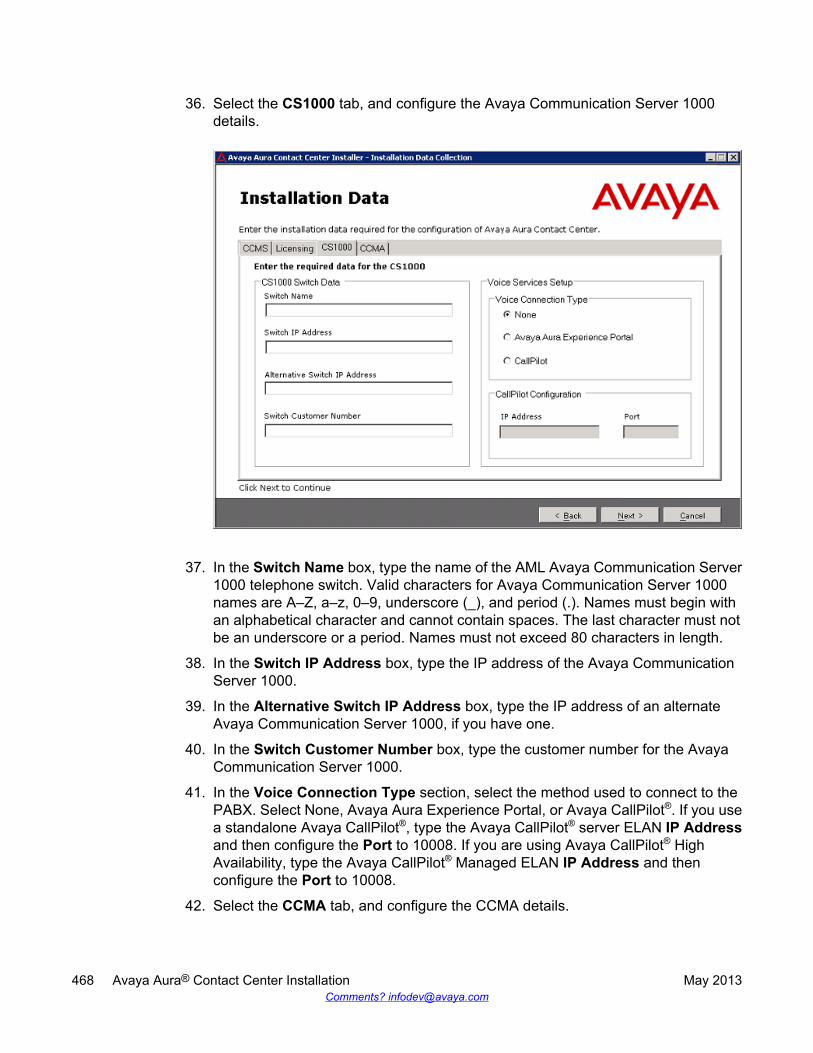
36. Select the CS1000 tab, and configure the Avaya Communication Server 1000details.
37. In the Switch Name box, type the name of the AML Avaya Communication Server1000 telephone switch. Valid characters for Avaya Communication Server 1000names are A–Z, a–z, 0–9, underscore (_), and period (.). Names must begin withan alphabetical character and cannot contain spaces. The last character must notbe an underscore or a period. Names must not exceed 80 characters in length.
38. In the Switch IP Address box, type the IP address of the Avaya CommunicationServer 1000.
39. In the Alternative Switch IP Address box, type the IP address of an alternateAvaya Communication Server 1000, if you have one.
40. In the Switch Customer Number box, type the customer number for the AvayaCommunication Server 1000.
41. In the Voice Connection Type section, select the method used to connect to thePABX. Select None, Avaya Aura Experience Portal, or Avaya CallPilot®. If you usea standalone Avaya CallPilot®, type the Avaya CallPilot® server ELAN IP Addressand then configure the Port to 10008. If you are using Avaya CallPilot® HighAvailability, type the Avaya CallPilot® Managed ELAN IP Address and thenconfigure the Port to 10008.
42. Select the CCMA tab, and configure the CCMA details.
468 Avaya Aura® Contact Center Installation May 2013Comments? [email protected]

43. In the Configuration section clear Enable CCMA Replication. Clear the checkbox on the primary server.
44. In the LDAP Port Number box, type the port number for the Lightweight DirectoryAccess Protocol (LDAP) for which common contact information is stored on aserver. The default value of the port is 389. Check with the system administrator toensure that the port number is not already in use.
45. In the SSL Port Number box, type the port number for the Secure Sockets Layer(SSL) that controls security when applications are communicating across thenetwork. The default port is 636. Check with the system administrator to ensure thatthe port number is not already in use.
46. In the System Account Configuration section, in the Password box, type thepassword for the CCMA System Account user account. Confirm the password inthe second box. The password is not checked against the server security policy forminimum password requirements. Avaya recommends that you enter a passwordthat conforms to your corporate password policy.
47. Click Next.
48. On the Summary window, review and verify the information.
49. Click Install.
50. After the installation is complete, click Finish.
Installing the Voice Contact Server software for CS1000
Avaya Aura® Contact Center Installation May 2013 469

51. If prompted, restart the server.
Upgrading Java Runtime Environment, Java DevelopmentKit, and Apache Tomcat components using Third PartySoftware Upgrade Utility
Before you begin
• Apply Contact Center 6.3 Service Pack 10 or later on your system as an install-timepatch.
• Restart the Contact Center server to complete this procedure.
About this taskUse Third Party Software Upgrade Utility to automatically upgrade your Java RuntimeEnvironment and Tomcat software components. For more information, see Third PartySoftware Upgrade Utility on page 27.
Procedure
1. Log on to the server using the administrator account.
2. Navigate to the Avaya_Support\ProductUpdates folder.
3. Open the folder where you had saved the latest Service Pack.
4. Browse to ThirdParty\AACCThirdPartySoftwareUpgradeUtility.exe.
5. Double-click AACCThirdPartySoftwareUpgradeUtility.exe.
6. Click Upgrade.The system displays the “User Action Required” dialog box.
7. Click OK.
8. Click Yes to restart Contact Center and complete the upgrade.
Securing the Windows serverAbout this taskApply optional security measures to your operating system to further secure your server.
470 Avaya Aura® Contact Center Installation May 2013Comments? [email protected]

Important:Scanning software can degrade the performance and decrease the reliability of the system.Install virus scanning software only if the system connects to an exposed network or to theInternet.
Important:To maintain server performance, you must schedule virus scans during maintenanceperiods or low usage hours only.
Procedure
1. Harden the operating system using defined site procedures.
2. Install antivirus software. If you install antivirus software, Avaya recommends thatyou exclude some contact center files and folders from real-time and scheduledscans. For more information, and for a list of files and folders to exclude, see AvayaAura® Contact Center Planning and Engineering (NN44400-210).
Securing the Windows server
Avaya Aura® Contact Center Installation May 2013 471

472 Avaya Aura® Contact Center Installation May 2013Comments? [email protected]
Chapter 16: Primary Voice Contact Serverfor CS1000 installation in adomain
This chapter describes how to install a Voice Contact Server in a solution with an Avaya CommunicationServer 1000 (CS1000) platform. This chapter describes how to install a Voice Contact Server in a domain.A Voice Contact Server includes the following server software:
• Contact Center Manager Server (CCMS)
• Contact Center Manager Server Utility
• Contact Center License Manager
• Contact Center Manager Administration (CCMA)
• Communication Control Toolkit (CCT)
Install this server to provide context‐sensitive and skill-based routing for customer voice contacts. Thisserver provides routed contact support for voice calls. This server provides extensive tools for agentmanagement, real-time and historical reporting, and graphical tools to create contact flows and treatmentrules. Use this server for license management, High Availability configuration, networking, OpenInterfaces Web Service and third-party application interfaces integration.
You can change the name of a Contact Center server, but because this is time consuming, Avayarecommends that you configure the server final production name before installing Contact Centersoftware.
If you plan to follow the Microsoft server hardening guidelines, complete those procedures before installingAvaya Aura® Contact Center.
Important:You can create an administration account on the server and then install Avaya Aura® Contact Centerusing the account. This Avaya Aura® Contact Center administration account must have fulladministrative privileges. You must upgrade and patch Avaya Aura® Contact Center using thisadministration account. You can rename this account after installing Avaya Aura® Contact Center, butyou must not delete the account. If you delete the account used to install Avaya Aura® Contact Center,Avaya Aura® Contact Center stops working.
Contact Center Manager Server supports two Network Interface Cards (NICs) and two subnets (onecontact center subnet and one ELAN subnet). The Contact Center Manager Server ELAN NIC and ELANsubnet are optional.
Avaya Aura® Contact Center Installation May 2013 473
All active and standby applications must be on the same patch level.
Voice Contact Server installation prerequisites• Copy the most recent patches for the Contact Center software.
• Ensure that your new Contact Center license file with a High Availability standby serverlicense is available.
Important:For the system to correctly handle backup and restore SNMP events, you must installWindows SNMP Service before you install Contact Center server software.
Downloading the latest documentationBefore you begin
• Download the most recent version of Acrobat Reader.• Access the Avaya Web site at www.avaya.com/support.
About this taskDownload the most recent documentation to ensure you have the most recent updates.Updates in the documentation accurately reflect the most recent changes in the software.
Procedure
1. Log on to the Avaya Web site.
2. Compare the versions of the documentation on the site with the versions youhave.
3. If the version number on www.avaya.com/support is higher than your version,download the latest version of the document.
4. Review the Avaya Web site for release notes and readme files.
474 Avaya Aura® Contact Center Installation May 2013Comments? [email protected]

Installing Windows Server 2008 Release 2Before you begin
• Ensure that you have a newly formatted server that meets the specifications in AvayaAura® Contact Center Planning and Engineering (NN44400-210) on which to installMicrosoft Windows Server 2008 64-bit, Release 2, Service Pack 1.
Do not upgrade your operating system from a previous release. Contact Center is notsupported on an upgraded operating system.
• Configure all servers for RAID as described in Avaya Aura® Contact Center Planning andEngineering (NN44400-210).
• Ensure that you have a DVD for Windows Server 2008 Release 2.• Install the network interface card in the server.• Know the IP addresses for the contact center subnet.
About this taskInstall the Windows operating system, which is required for the Contact Center server software.During the installation, configure the Windows settings as required. You must perform thisprocedure on each server before you install Contact Center server software on the server.
Procedure
1. Insert the Windows Server 2008 64-bit Release 2 Standard Edition or WindowsServer 2008 64-bit Release 2 Enterprise Edition DVD into the DVD drive.
2. Install Windows Server 2008 Release 2 according to the instructions supplied bythe DVD.
3. On the first install page, select your language for installation.
4. Click Next.
5. On the Installation window, select a Language to install from the list.
6. Select a Time and currency format from the list.
7. Select Keyboard or input method from the list.
8. Click Next.
9. Click Install Now.
10. Select an operating system from the list.
11. Click Next.
12. On the first Install Windows screen, read the terms of the license agreement andselect I accept the license terms.
Installing Windows Server 2008 Release 2
Avaya Aura® Contact Center Installation May 2013 475

13. Click Next.
14. Select Custom.
15. Select the disk partition on which you want to install Windows Server 2008.
Important:You can use the partition management options to configure the partitions on yourserver.
16. Click Next.The installation proceeds and automatically restarts the server several times.
17. After completing the installation, log on to the server as Administrator. Enter andconfirm the Administrator password.
18. In the Initial Configuration Tasks window, select Activate Windows and followthe instructions or the Microsoft documentation to activate your server.
19. Select Set time zone and complete the information as required for your system.If you are installing Voice Contact Server Only software or Knowledge WorkerServer software on this server, ensure that you clear Automatically adjust clockfor daylight saving changes. Otherwise select Automatically adjust clock fordaylight saving changes.
20. Select Configure Networking and complete the information for your NetworkInterface Card (NIC) with the server IP address.
21. Select Provide computer name and domain and complete the information for yourserver name and workgroup or domain settings.
22. Change the DVD drive letter to E: to ensure the correct drive letters are free for theContact Center application and database hard disk drives and partitions.
23. Configure the hard disk drives and partitions for this server using the WindowsServer 2008 Server Manager - Disk Management utility. For more information abouthard disk drives and partitions, see Avaya Aura® Contact Center Planning andEngineering (NN44400-210).
24. Install other required drivers for your hardware configuration.
Procedure job aid
Name Description
Computer name Do not use spaces or underscores or exceed15 characters. The name must start with analphabetic character.
476 Avaya Aura® Contact Center Installation May 2013Comments? [email protected]

Name Description
The computer name must match (includingcase sensitivity) the DNS name.
Disk drives Format the partitions as required for theserver. For more information, see AvayaAura® Contact Center Planning andEngineering (NN44400-210).
Domain/workgroup name Configure as required for your site.You must check to ensure the DNS Domainname (including case) matches the servername if the server is added to a domain orworkgroup after configuration.
Licensing modes Select Per server licensing mode.Accept the default five concurrentconnections.
Modem dialing Configure as required for your site. Do notinstall a modem on a Communication ControlToolkit server.
Network components Configure IP Address, WINS, DNS for one ortwo network cards as per configuration.Contact Center does not support IPv6.
Network connections If the server has more than one NIC/adapter,ensure contact center subnet appears first inthe network adapter binding order.
Partitions Configure C: drive to be a primary drive.Configure the other drives on your server tomeet the requirements according to AvayaAura® Contact Center Planning andEngineering (NN44400-210) for the server.
Regional settings window Configure as required for your site.
SNMP Configure for all servers.
Configuring Windows Server 2008Before you begin
• Install Microsoft Windows Server 2008 64-bit Release 2 on your server.
About this taskBefore you can install Avaya Aura® Contact Center software on your server, you must configureWindows Server 2008 to meet the requirements of the software.
Configuring Windows Server 2008
Avaya Aura® Contact Center Installation May 2013 477

You can prepare the server using this and other procedures, or you can download and use anAvaya Aura® Contact Center operating system configuration tool that installs the requiredWindows roles and features.
The Avaya Aura® Contact Center Windows Roles and Features installer configures thefollowing Windows Server 2008 resources:
• Windows Server Backup Features• SNMP Services• Active Directory Light Weight Directory Services• Application Server• Web Server (IIS)
For more information, and to download the Avaya Aura® Contact Center Windows Roles andFeatures installer, see http://support.avaya.com.
The Avaya Aura® Contact Center Windows Roles and Features installer replaces the followingprocedures:
• Configuring Windows Server 2008 (this procedure)• Configuring SNMP on your server• Installing operating system components for Contact Center
If you use the Avaya Aura® Contact Center Windows Roles and Features installer, skip thesethree procedures.
Procedure
1. Log on to the Windows Server 2008 server using an administrator account.
2. Select the Don’t display this screen on startup check box.
3. Update the emergency repair disk to record the latest configuration data for theserver.
4. Choose Start > Administrative Tools > Server Manager.
5. In the left pane, click Features.
6. Click Add Features.
7. Select Windows Server Backup Features.
8. Click Next.
9. Click Install.
10. Click Close.
11. Choose Start > All Programs > Accessories > System Tools > Windows ServerBackup.
12. Follow the on-screen instructions to select what you want to back up.
478 Avaya Aura® Contact Center Installation May 2013Comments? [email protected]

Connecting to the contact center subnetAbout this taskConnect the Contact Center server to the contact center subnet. The contact center subnet isthe network on which the server software applications work together to route contacts andgenerate reports.
Procedure
1. Locate the slot assigned to the contact center subnet network interface card for theserver. Make a note of the slot.
2. Connect the cable from the contact center subnet to the contact center subnetnetwork interface card in the server in accordance with customer site networkingguidelines.
3. Use the ping command to test the contact center subnet.
Adding a server to a domainBefore you begin
• Ensure that you have domain administrator privileges, or ask the Domain Administratorto assign you a domain user account for remote access.
• On the server, configure a preferred Domain Name System (DNS) server on the NetworkInterface Card (NIC).
About this taskAdd the server to an existing domain. Avaya recommends that you add the server to the domainbefore installing Contact Center software.
Ask your System Administrator to add a Domain Name System (DNS) static entry for thisserver. Each Contact Center server in a domain requires a DNS static entry.
Important:Avaya Aura® Contact Center High Availability solutions do not support Windows Server 2008Dynamic DNS.
In High Availability solutions, ask your System Administrator to add one DNS static entry forthe each managed name and associated managed IP address. A typical High Availabilitycampus solution with a pair of servers requires 3 DNS static entries; one DNS static entry for
Connecting to the contact center subnet
Avaya Aura® Contact Center Installation May 2013 479

the active server, one DNS static entry for the standby server, and one DNS static entry forthe managed name and associated IP address.
Procedure
1. Log on to the server.
2. Click Start > Administrative Tools > Server Manager.
3. Beside Computer Information, click Change System Properties.
4. In the System Properties dialog box, click the Computer Name tab.
5. Click Change.
6. In the Computer Name/Domain Changes dialog box, click the Domain option.
7. Type the domain name (you must provide the fully qualified domain name, whichincludes the prefix and suffix).
8. Click OK.
9. Type the domain administrator User name and Password.
10. Click OK.
11. Restart the server when you are prompted to do so.
Configuring SNMP on your serverBefore you begin
• Install and configure Microsoft Windows Server 2008 64-bit Release 2 on your server.
About this taskConfigure Simple Network Management Protocol (SNMP) on your server to ensure you haveall of the required components of the Internet protocol for monitoring devices in your network.SNMP helps you manage data that describes the system configuration and errors that mayoccur between them.
Procedure
1. Log on to the server using the administrator account.
2. Choose Start > Control Panel > Programs.
3. In the Programs and Features section, click Turn Windows features on or off.
4. In the Server Manager window, select Server Manager and click Add Features.
5. Select SNMP Services.
6. Click Next.
480 Avaya Aura® Contact Center Installation May 2013Comments? [email protected]
7. Click Install.
8. If prompted, insert the Windows Server 2008 DVD.
9. Click Close.
Downloading the most recent patches to the serverBefore you begin
• Install and configure Windows Server 2008 64-bit Release 2 on your server according tothe settings in this chapter.
• Download and install the most recent and valid updates for Microsoft Windows Server2008 64-bit Release 2.
• Know the location at which you plan to install each Contact Center server softwarepackage.
• Ensure that you use one administrator account on your server to un-install and installsoftware updates.
About this taskTo ensure that you have the most current software, download the most recent Contact Centerpatches from www.avaya.com/support to the server you plan to install.
Procedure
1. Log on to the server using the administrator account.
2. Create a folder Avaya_Support\ProductUpdates on the drive on which youwant to save the software updates.
3. Download the most recent service pack file. Save and unzip the file on the ContactCenter server in the Avaya_Support\ProductUpdates folder.
4. If new patches are available for the latest service pack, download and save thepatches on the Contact Center server in the Avaya_Support\ProductUpdates folder.
5. Read the Contact Center Release Notes for the most recent instructions.
Downloading the most recent patches to the server
Avaya Aura® Contact Center Installation May 2013 481

Disabling unused Network AdaptersAbout this taskDisable all unused Network Adapters or Network Interface Cards (NICs) to improve networkcommunications and prevent the erroneous configuration of unused NICs during ContactCenter server commissioning.
Procedure
1. Log on to the server.
2. Click Start > Control Panel > Network and Internet > Network and SharingCenter > Change Adapter Settings.
3. Right-click on the unused Network Adapter, and select Disable.
4. Repeat this procedure for all unused Network Adapters.
Enabling Microsoft Remote Desktop connectionBefore you begin
• Install Microsoft Windows Server 2008 64-bit Release 2 on your server.• Log on to the server with administrator privileges.
About this taskEnable Microsoft Remote Desktop connection as your remote access tool. Microsoft RemoteDesktop provides remote access for support on the server.
Procedure
1. Choose Start > Control Panel > System and Security.
2. In the System section, select Allow remote access.
3. Click the Remote tab.
4. Select Allow connections from computers running any version of RemoteDesktop (less secure).
5. Click OK.
482 Avaya Aura® Contact Center Installation May 2013Comments? [email protected]

Configuring Data Execution PreventionAbout this taskConfigure the Data Execution Prevention (DEP) hardware and software to perform additionalchecks on memory that protect the Avaya Aura® Contact Center server against malicious codeexploitation.
Procedure
1. Log on to Windows as administrator.
2. Choose Start > Control Panel > System and Security.
3. Click System.
4. In the System window, click Advanced system settings.
5. In the System Properties dialog box, click the Advanced tab.
6. Under Performance, click Settings.
7. In the Performance Options dialog box, click the Data Execution Preventiontab.
8. On the Data Execution Prevention tab, select Turn on DEP for essentialWindows programs and services only.
9. Click OK.
10. On the System Properties dialog box, click OK.
11. Click OK to restart the computer.
Importing Contact Center Firewall Security policyBefore you begin
• Install Microsoft Windows Server 2008 64-bit Release 2 on your server.• Log on to the server with administrator privileges.• Download the most recent Avaya Aura® Contact Center Firewall Security policy from
www.avaya.com/support.
About this taskImport the Avaya Aura® Contact Center Firewall Security policy to ensure all contact centerservers in the solution can communicate.
Configuring Data Execution Prevention
Avaya Aura® Contact Center Installation May 2013 483
Avaya recommends that you export and backup your existing firewall security policy beforeimporting the Avaya Aura® Contact Center Firewall Security policy. You can use this backuppolicy to rollback the Avaya Aura® Contact Center Firewall Security policy, if you ever needto.
Procedure
1. Choose Start > Administrative Tools > Windows Firewall with AdvancedSecurity.
2. Choose Actions > Export Policy.
3. In the File name box, type the name for the backup policy.
4. Click Save.Windows exports the existing policy. You can use this backup policy to rollback theAvaya Aura® Contact Center Firewall Security policy, if you ever need to.
5. On the Policy successfully exported message box, click OK.
6. Choose Actions > Import Policy.
7. On the policy overwrite message box, click Yes.
8. Navigate to the folder containing the Avaya Aura® Contact Center Firewall Securitypolicy.
9. Click Open.Windows imports the Avaya Aura® Contact Center Firewall Security policy.
10. On the Policy successfully imported message box, click OK.
Disabling NetBIOSAbout this taskIf the Contact Center server uses two Network Interface Cards (NICs), disable NetBIOS on theEmbedded LAN (ELAN) network interface card (NIC) to avoid NetBIOS conflicts.
Contact Center supports two Network Interface Cards (NICs) and two subnets (one contactcenter subnet and one ELAN subnet). The Contact Center ELAN NIC and ELAN subnet areoptional.
Procedure
1. Choose Start > Control Panel > Network and Internet.
2. Click Network and Sharing Center.
3. Click Change adapter settings.
4. Right-click the ELAN Network Interface Card (NIC).
484 Avaya Aura® Contact Center Installation May 2013Comments? [email protected]
5. Click Properties.
6. Select Internet Protocol Version 4 (TCP/IPv4).
7. Click Properties.
8. Click Advanced.
9. Click the WINS tab.
10. Select the Disable NetBIOS over TCP/IP check box.
11. Click OK.
Connecting the Embedded LAN subnetBefore you begin
• Install two network cards on the Contact Center server.• Disable the NetBIOS on the ELAN network interface card.• Connect the contact center subnet network interface card.
About this taskIf your server uses two NICs, connect the Embedded LAN (ELAN) NIC to the ELAN subnet.Contact Center supports two network interface cards (NICs) and two subnets (one contactcenter subnet and one ELAN subnet). The Contact Center ELAN NIC and ELAN subnet areoptional.
Procedure
1. Locate the slot assigned to the ELAN network interface card for the server.
2. Write the MAC address of the card on a small label. Attach the label to the back ofthe card or the chassis slot position.
3. Connect the ELAN subnet from the Avaya equipment to the Ethernet hub.
4. Connect the network cable from the ELAN network interface card in the server tothe hub.
5. Plug in the power cord for the hub.
6. If you have an ELAN subnet network connection, use the ping command to test it.
Connecting the Embedded LAN subnet
Avaya Aura® Contact Center Installation May 2013 485

Configuring the binding orderBefore you begin
• Install two network interface cards on the Contact Center server.• Disable the NetBIOS on the ELAN network interface card.• Connect the Contact Center server network interface card to the contact center subnet.• Connect the Contact Center server ELAN network interface card to the ELAN subnet.
About this taskConfigure the binding order of the network cards. The contact center subnet network interfacecard must be bound first and then the ELAN network interface card.
Procedure
1. Choose Start > Control Panel > Network and Internet > Network and SharingCenter.
2. Click Change adapter settings.
3. In the Network Connections window, press the ALT key.A hidden menu appears.
4. Choose Advanced > Advanced Settings.
5. In the Connections box, ensure that the contact center subnet connection is listedfirst. If it is not listed first, adjust the order.
Installing operating system components for ContactCenter
Before you begin
• Install Windows Server 2008 64-bit Release 2.
About this taskBefore installing Contact Center software, you must install specific operating system softwarecomponents such as Internet Information Services to integrate the components in ContactCenter.
486 Avaya Aura® Contact Center Installation May 2013Comments? [email protected]

Procedure
1. Choose Start > Administrative Tools > Server Manager.
2. In the left-hand column of the Server Manager, right-click Roles, and select AddRoles.
3. Review the requirements for the new role, and click Next.
4. Under Server Roles, select Active Directory Lightweight Directory Services.
5. If an Add Roles Wizard message box that lists features required by Active DirectoryLightweight Directory Services appears, click Add Required Features.
6. Under Server Roles, select Application Server.
7. If an Add Roles Wizard message box that lists features required by ApplicationServer appears, click Add Required Features.
8. Under Application Server, select Role Services.
9. Select Web Server (IIS) Support.
10. If an Add Roles Wizard message box appears, listing features required by WebServer (IIS) Support appears, click Add Required Features.
11. Click Next.
12. On the Introduction to Web Server (IIS) page, click Next.
13. On the Select Role Services page, under Common HTTP Features, select thefollowing services:
• Static Content
• Default Document
• Directory Browsing
• HTTP Errors
• HTTP Redirection
Important:All other services check boxes must be cleared.
14. On the Select Role Services page, under Application Development, select thefollowing services:
• ASP.NET
• .NET Extensibility
• ASP
• ISAPI Extensions
• ISAPI Filters
Installing operating system components for Contact Center
Avaya Aura® Contact Center Installation May 2013 487

• Server Side Includes
Important:All other services check boxes must be cleared.
15. On the Select Role Services page, under Health and Diagnosis, select thefollowing services:
• HTTP Logging
• Logging Tools
• Request Monitor
• Tracing
Important:All other services check boxes must be cleared.
16. On the Select Role Services page, under Security, select all services.
17. On the Select Role Services page, under Performance, select all services.
18. On the Select Role Services page, under Management Tools, select the followingservices:
• IIS Management Console
• IIS Management Scripts and Tools
• Management Service
• All items under IIS 6 Management Compatibility
Important:All other services check boxes must be cleared.
19. Click Next.
20. Review the installation information.
21. Click Install.
22. On the Installation Results page, click Close.
23. Restart the server if required.
488 Avaya Aura® Contact Center Installation May 2013Comments? [email protected]

Configuring MIME types to support Microsoft updatesAbout this taskConfigure the Multipurpose Internet Mail Extension (MIME) types to support Microsoft updatesand patches.
Procedure
1. Log on to the server.
2. Click Start > Administrative Tools > Computer Management.
3. In the Computer Management dialog box, expand Services and Applications >Internet Information Services > IIS Manager > Sites.
4. Select Default Web Site.
5. Under IIS, select MIME Types.
6. Double-click MIME Types.
7. On the Actions list on the right, click Add.
8. In the File name extension box, type .msp.
9. In the MIME Type box, type application/microsoftpatch.
10. Click OK.
11. On the Actions list on the right, click Add.
12. In the File name extension box, type .msu.
13. In the MIME Type box, type application/microsoftupdate.
14. Click OK.
15. Close the Computer Management window.
Updating server for a network location installationAbout this taskConfigure the server .NET security settings to prepare the server for a remote networkinstallation. Avaya Aura® Contact Center supports network installation. You can insert theAvaya Aura® Contact Center DVD into a computer on your network. You then add this computeras a trusted site and network location on the new server. You can access this DVD from the
Configuring MIME types to support Microsoft updates
Avaya Aura® Contact Center Installation May 2013 489

network location, and with some .NET security updates, use the remote DVD to install AvayaAura® Contact Center software on the new server.
Note:Skip this procedure if you plan to use the Avaya Aura® Contact Center DVD from the DVDdrive of the server.
Procedure
1. Insert the Avaya Aura® Contact Center DVD into a computer on the contact centernetwork.
2. Log on to the new server you are preparing for Contact Center.
3. Choose Start > Control Panel > Network and Internet > Internet Options.
4. In the Security tab, click Trusted sites.
5. In the Trusted sites section, click Sites.
6. In the Add this Web site to the zone box, type the <IP address> of the remotecomputer with the Avaya Aura® Contact Center DVD.
7. Click Add.
8. Click OK.
9. Close the Internet Options box.
10. From the new server, navigate to the network location with the DVD.
11. Access the remote DVD and in the root folder of the DVD, double-clickNetworkSetup.bat..NetFramework 3.5 installs and the .NetSecurity settings are modified.
12. If the Avaya Aura® Contact Center installation does not automatically start, in theroot folder of the DVD double-click Setup.exe.
13. After Avaya Aura® Contact Center installs, navigate to your network location anddouble-click NetworkSetupReset.bat.
490 Avaya Aura® Contact Center Installation May 2013Comments? [email protected]

Installing the Voice Contact Server software for CS1000Before you begin
• Ensure the Avaya Communication Server 1000 is configured. For more information seeAvaya Aura® Contact Center Configuration – Avaya CS1000 Integration(NN44400-512).
• Download the most recent Contact Center and Common Components patches to theserver.
About this taskInstall the Contact Center Voice Contact Server software and enable your contact center toroute contacts to the agents that can answer the call with the correct skills.
Note:Installing Voice Contact Server software installs Apache Tomcat Server. The default portnumber for Apache Tomcat is 8081. If you need to change the port number to avoid conflictswith third-party software, see your Apache Tomcat documentation.
Note:Read the Contact Center Release Notes for the most recent instructions.
Procedure
1. Insert the Contact Center DVD into the DVD drive of your server.
2. If the installation does not automatically start, double-click Setup.exe.
3. Click Install to install the Microsoft .NET Framework 3.5 SP1 and Visual C++runtime libraries on the server.If you are prompted to accept the Microsoft .NET Framework 3.5.1 licenseagreement, click Accept. If you are prompted to restart the server, click Yes andrepeat step 2.
4. On the Welcome window, click Next.
Installing the Voice Contact Server software for CS1000
Avaya Aura® Contact Center Installation May 2013 491

5. On the License Agreement window, read the terms of the agreement.
492 Avaya Aura® Contact Center Installation May 2013Comments? [email protected]

6. Click I Accept the Terms of the End-User License Agreement.
7. Click Next.
Installing the Voice Contact Server software for CS1000
Avaya Aura® Contact Center Installation May 2013 493
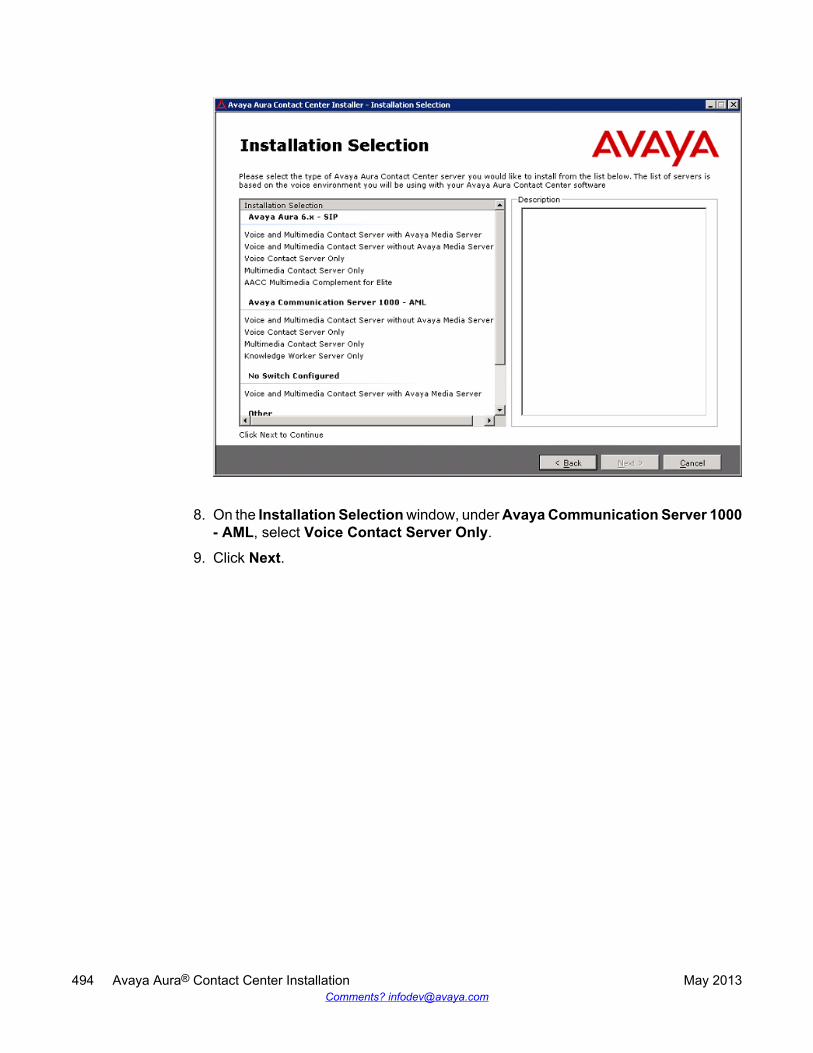
8. On the Installation Selection window, under Avaya Communication Server 1000- AML, select Voice Contact Server Only.
9. Click Next.
494 Avaya Aura® Contact Center Installation May 2013Comments? [email protected]
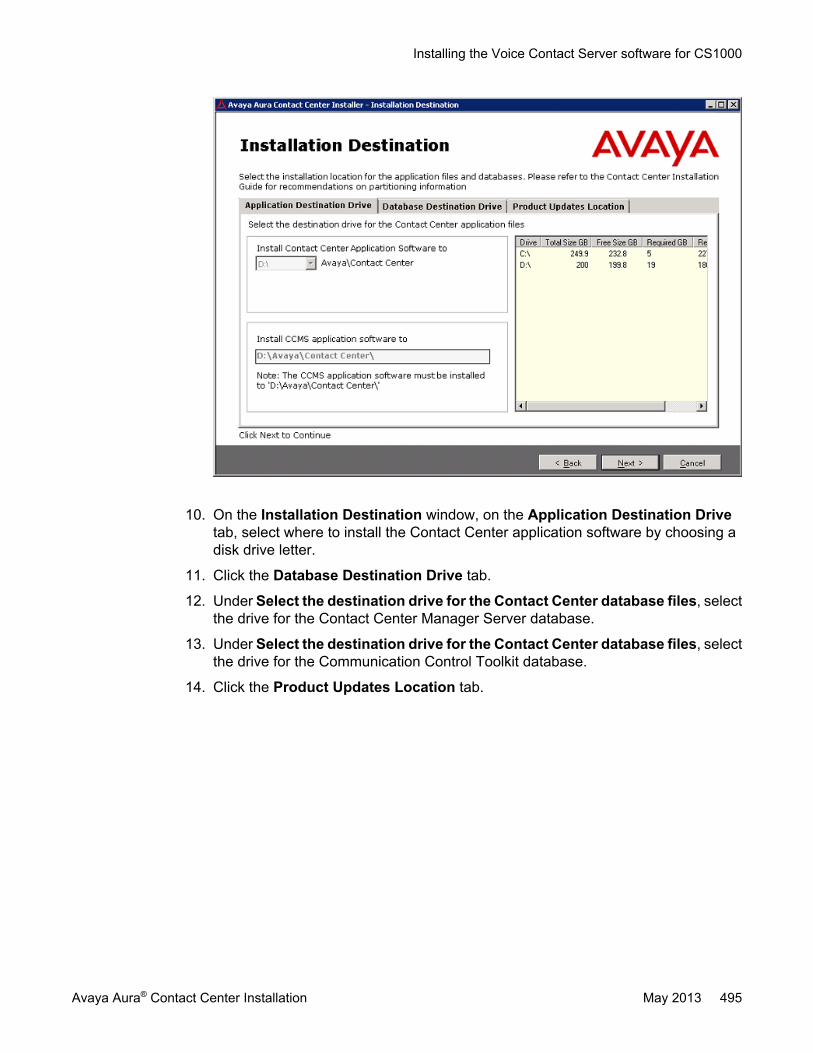
10. On the Installation Destination window, on the Application Destination Drivetab, select where to install the Contact Center application software by choosing adisk drive letter.
11. Click the Database Destination Drive tab.
12. Under Select the destination drive for the Contact Center database files, selectthe drive for the Contact Center Manager Server database.
13. Under Select the destination drive for the Contact Center database files, selectthe drive for the Communication Control Toolkit database.
14. Click the Product Updates Location tab.
Installing the Voice Contact Server software for CS1000
Avaya Aura® Contact Center Installation May 2013 495

15. Under Select the Product Updates Location, click Browse to locate the foldercontaining the Contact Center product updates.
16. Click Next.The System Readiness Check runs on the server.
17. If the System Readiness Check utility returns a Fail, the software installation cannotproceed until you correct the problem. Review any failures returned by the SystemReadiness Check and consult Avaya Aura® Contact Center Planning andEngineering (NN44400-210) to determine the actions to resolve the issue.You can ignore warnings if the potential impact to the operation of the contact centeris understood and not applicable.
18. Click Next.
19. On the Installation Data window, type the installation details for each tab.
20. Select the CCMS tab, and configure the server details.
496 Avaya Aura® Contact Center Installation May 2013Comments? [email protected]

21. In the Customer Name box, type the customer name.
22. In the Company Name box, type the name of the company.
23. In the Site Name box, type the site name for the Contact Center server. The sitename must not contain spaces or non-alphabetical characters except hyphen (-)and underscore (_). The first character must be a letter. The site name must beunique and can consist of 6 to 15 characters.
24. In the RSM IP Address box, type the Real-time Statistics Multicast IP Address ofthe server to associate with sending real-time data. The IP address must be from224.0.1.0 to 239.255.255.255. The default is 234.5.6.10.
25. In the Contact Center Server Subnet IP Address box, type the IP Address of theserver.
26. In the ELAN Subnet IP Address box, type the IP Address of the embedded localarea network, a dedicated Ethernet LAN that connects Contact Center ManagerServer to the PABX. You must select the check box for the ELAN subnet IP Addressif you use an ELAN subnet.
27. Select the Licensing tab, and configure the licensing details.
Installing the Voice Contact Server software for CS1000
Avaya Aura® Contact Center Installation May 2013 497

28. The License File Location box displays the folder on the server which containsthe license file.
29. In the Primary License Manager IP Address box, type the IP address of theprimary License Manager server. Each Voice Contact Server contains a LicenseManager server. This License Manager server is the default primary LicenseManager.
30. In the Primary License Port box, type the number of the communication portopened between the License Manager and Contact Center Manager Server. Thedefault port number is 3998 when you use only one License Manager.
31. In the Secondary License Manager IP Address box, type the IP address of thesecondary License Manager server. The secondary License Manager server isused only in a corporate licensed environment.
32. From the Licensing Package list, select the licenses that you have purchased.Select Nodal Enterprise for single-site contact centers. Select CorporateEnterprise for multi-site contact centers.
33. From the list of Optional Packages, enable the licensed features that you havepurchased.
34. Select the Open Queue check box.
35. In the Switch Serial Number box, type the serial number for the AvayaCommunication Server 1000.
498 Avaya Aura® Contact Center Installation May 2013Comments? [email protected]

36. Select the CS1000 tab, and configure the Avaya Communication Server 1000details.
37. In the Switch Name box, type the name of the AML Avaya Communication Server1000 telephone switch. Valid characters for Avaya Communication Server 1000names are A–Z, a–z, 0–9, underscore (_), and period (.). Names must begin withan alphabetical character and cannot contain spaces. The last character must notbe an underscore or a period. Names must not exceed 80 characters in length.
38. In the Switch IP Address box, type the IP address of the Avaya CommunicationServer 1000.
39. In the Alternative Switch IP Address box, type the IP address of an alternateAvaya Communication Server 1000, if you have one.
40. In the Switch Customer Number box, type the customer number for the AvayaCommunication Server 1000.
41. In the Voice Connection Type section, select the method used to connect to thePABX. Select None, Avaya Aura Experience Portal, or Avaya CallPilot®. If you usea standalone Avaya CallPilot®, type the Avaya CallPilot® server ELAN IP Addressand then configure the Port to 10008. If you are using Avaya CallPilot® HighAvailability, type the Avaya CallPilot® Managed ELAN IP Address and thenconfigure the Port to 10008.
42. Select the CCMA tab, and configure the CCMA details.
Installing the Voice Contact Server software for CS1000
Avaya Aura® Contact Center Installation May 2013 499

43. In the Configuration section clear Enable CCMA Replication. Clear the checkbox on the primary server.
44. In the LDAP Port Number box, type the port number for the Lightweight DirectoryAccess Protocol (LDAP) for which common contact information is stored on aserver. The default value of the port is 389. Check with the system administrator toensure that the port number is not already in use.
45. In the SSL Port Number box, type the port number for the Secure Sockets Layer(SSL) that controls security when applications are communicating across thenetwork. The default port is 636. Check with the system administrator to ensure thatthe port number is not already in use.
46. In the System Account Configuration section, in the Password box, type thepassword for the CCMA System Account user account. Confirm the password inthe second box. The password is not checked against the server security policy forminimum password requirements. Avaya recommends that you enter a passwordthat conforms to your corporate password policy.
47. Click Next.
48. On the Summary window, review and verify the information.
49. Click Install.
50. After the installation is complete, click Finish.
500 Avaya Aura® Contact Center Installation May 2013Comments? [email protected]

51. If prompted, restart the server.
Upgrading Java Runtime Environment, Java DevelopmentKit, and Apache Tomcat components using Third PartySoftware Upgrade Utility
Before you begin
• Apply Contact Center 6.3 Service Pack 10 or later on your system as an install-timepatch.
• Restart the Contact Center server to complete this procedure.
About this taskUse Third Party Software Upgrade Utility to automatically upgrade your Java RuntimeEnvironment and Tomcat software components. For more information, see Third PartySoftware Upgrade Utility on page 27.
Procedure
1. Log on to the server using the administrator account.
2. Navigate to the Avaya_Support\ProductUpdates folder.
3. Open the folder where you had saved the latest Service Pack.
4. Browse to ThirdParty\AACCThirdPartySoftwareUpgradeUtility.exe.
5. Double-click AACCThirdPartySoftwareUpgradeUtility.exe.
6. Click Upgrade.The system displays the “User Action Required” dialog box.
7. Click OK.
8. Click Yes to restart Contact Center and complete the upgrade.
Securing the Windows serverAbout this taskApply optional security measures to your operating system to further secure your server.
Upgrading Java Runtime Environment, Java Development Kit, and Apache Tomcat components using Third PartySoftware Upgrade Utility
Avaya Aura® Contact Center Installation May 2013 501

Important:Scanning software can degrade the performance and decrease the reliability of the system.Install virus scanning software only if the system connects to an exposed network or to theInternet.
Important:To maintain server performance, you must schedule virus scans during maintenanceperiods or low usage hours only.
Procedure
1. Harden the operating system using defined site procedures.
2. Install antivirus software. If you install antivirus software, Avaya recommends thatyou exclude some contact center files and folders from real-time and scheduledscans. For more information, and for a list of files and folders to exclude, see AvayaAura® Contact Center Planning and Engineering (NN44400-210).
Adding the domain AD-LDS replication account to theprimary administrators and replicator group
About this taskAdd the AD-LDS replication account to the local Administrators and replicator group on theprimary Contact Center server.
If you are using a domain, you must request this AD-LDS replication account from your Networkor System Administrator. The primary and standby replicating Contact Center servers mustboth be added to the same domain.
For this procedure, the name of the AD-LDS replication account is CCMAReplication. You canchoose another name for the account.
Procedure
1. Log on to the primary Contact Center server.
2. Click Start > Administrative Tools > Computer Management.
3. In the Computer Management window, expand Local Users and Groups.
4. Click the Groups folder.
5. Double-click on the Administrators group.
6. Click Add > Locations.
502 Avaya Aura® Contact Center Installation May 2013Comments? [email protected]

7. On the Windows Security dialog box, type the domain logon details.
8. On the Locations dialog, select the domain to be used by CCMA replication.
9. Expand the domain folder to display domain users.
10. Click Users.
11. Click OK.
12. Click Advanced > Find Now, to display domain users.
13. From the list of users select the CCMA replication domain user account, for exampleselect the myDomain\CCMAReplication user account.
14. Click OK.
15. Click OK > Apply > OK.
16. Click the Groups folder.
17. Double-click on the Replicator group.
18. Click Add > Locations.
19. On the Windows Security dialog box, type the domain logon details.
20. On the Locations dialog, select the domain to be used by CCMA replication.
21. Expand the domain folder to display domain users.
22. Click Users.
23. Click OK.
24. Click Advanced > Find Now, to display domain users.
25. From the list of users select the CCMA replication domain user account, for exampleselect the myDomain\CCMAReplication user account.
26. Click OK.
27. Click OK > Apply > OK.
Adding the domain AD-LDS replication account to the primary administrators and replicator group
Avaya Aura® Contact Center Installation May 2013 503

504 Avaya Aura® Contact Center Installation May 2013Comments? [email protected]

Chapter 17: Standby Voice ContactStandby Server for CS1000installation in a domain
This chapter describes how to install a standby Voice Contact Server for Avaya Communication Server1000 (CS1000). A standby Voice Contact Server includes the following server software:
• Contact Center Manager Server (CCMS)
• Contact Center Manager Server Utility
• Contact Center License Manager
• Contact Center Manager Administration (CCMA)
• Communication Control Toolkit (CCT)
Voice Contact Server supports two Network Interface Cards (NICs) and two subnets (one contact centersubnet and one ELAN subnet). The Voice Contact Server ELAN NIC and ELAN subnet are optional.
You can install a standby Voice Contact Server and commission it to be the standby Voice Contact Serverin a campus High Availability solution. The standby server takes over contact processing and becomesthe active server if the existing active server fails. The standby server provides High Availabilityredundancy and resiliency. The standby and active servers must be at the same patch level and have thesame hard disk drive partitions.
You can install another standby Voice Contact Server and commission it to be the Remote GeographicNode Voice Contact Server in a solution with Disaster Recovery. The Remote Geographic Node (RGN)server shadows the active server. Remote Geographic Node servers do not automatically take over if theactive server fails. The standby server, Remote Geographic Node server, and active server must be atthe same patch level and have the same hard disk drive partitions.
You must complete the procedures in this section in sequential order.
Standby Voice Contact Server installation prerequisites• Copy the most recent patches for the Contact Center software.
• Ensure that your new Contact Center license file with a High Availability standby serverlicense is available.
Avaya Aura® Contact Center Installation May 2013 505

Downloading the latest documentationBefore you begin
• Download the most recent version of Acrobat Reader.• Access the Avaya Web site at www.avaya.com/support.
About this taskDownload the most recent documentation to ensure you have the most recent updates.Updates in the documentation accurately reflect the most recent changes in the software.
Procedure
1. Log on to the Avaya Web site.
2. Compare the versions of the documentation on the site with the versions youhave.
3. If the version number on www.avaya.com/support is higher than your version,download the latest version of the document.
4. Review the Avaya Web site for release notes and readme files.
Installing Windows Server 2008 Release 2Before you begin
• Ensure that you have a newly formatted server that meets the specifications in AvayaAura® Contact Center Planning and Engineering (NN44400-210) on which to installMicrosoft Windows Server 2008 64-bit, Release 2, Service Pack 1.
Do not upgrade your operating system from a previous release. Contact Center is notsupported on an upgraded operating system.
• Configure all servers for RAID as described in Avaya Aura® Contact Center Planning andEngineering (NN44400-210).
• Ensure that you have a DVD for Windows Server 2008 Release 2.• Install the network interface card in the server.• Know the IP addresses for the contact center subnet.
506 Avaya Aura® Contact Center Installation May 2013Comments? [email protected]

About this taskInstall the Windows operating system, which is required for the Contact Center server software.During the installation, configure the Windows settings as required. You must perform thisprocedure on each server before you install Contact Center server software on the server.
Procedure
1. Insert the Windows Server 2008 64-bit Release 2 Standard Edition or WindowsServer 2008 64-bit Release 2 Enterprise Edition DVD into the DVD drive.
2. Install Windows Server 2008 Release 2 according to the instructions supplied bythe DVD.
3. On the first install page, select your language for installation.
4. Click Next.
5. On the Installation window, select a Language to install from the list.
6. Select a Time and currency format from the list.
7. Select Keyboard or input method from the list.
8. Click Next.
9. Click Install Now.
10. Select an operating system from the list.
11. Click Next.
12. On the first Install Windows screen, read the terms of the license agreement andselect I accept the license terms.
13. Click Next.
14. Select Custom.
15. Select the disk partition on which you want to install Windows Server 2008.
Important:You can use the partition management options to configure the partitions on yourserver.
16. Click Next.The installation proceeds and automatically restarts the server several times.
17. After completing the installation, log on to the server as Administrator. Enter andconfirm the Administrator password.
18. In the Initial Configuration Tasks window, select Activate Windows and followthe instructions or the Microsoft documentation to activate your server.
19. Select Set time zone and complete the information as required for your system.If you are installing Voice Contact Server Only software or Knowledge WorkerServer software on this server, ensure that you clear Automatically adjust clock
Installing Windows Server 2008 Release 2
Avaya Aura® Contact Center Installation May 2013 507

for daylight saving changes. Otherwise select Automatically adjust clock fordaylight saving changes.
20. Select Configure Networking and complete the information for your NetworkInterface Card (NIC) with the server IP address.
21. Select Provide computer name and domain and complete the information for yourserver name and workgroup or domain settings.
22. Change the DVD drive letter to E: to ensure the correct drive letters are free for theContact Center application and database hard disk drives and partitions.
23. Configure the hard disk drives and partitions for this server using the WindowsServer 2008 Server Manager - Disk Management utility. For more information abouthard disk drives and partitions, see Avaya Aura® Contact Center Planning andEngineering (NN44400-210).
24. Install other required drivers for your hardware configuration.
Procedure job aid
Name Description
Computer name Do not use spaces or underscores or exceed15 characters. The name must start with analphabetic character.The computer name must match (includingcase sensitivity) the DNS name.
Disk drives Format the partitions as required for theserver. For more information, see AvayaAura® Contact Center Planning andEngineering (NN44400-210).
Domain/workgroup name Configure as required for your site.You must check to ensure the DNS Domainname (including case) matches the servername if the server is added to a domain orworkgroup after configuration.
Licensing modes Select Per server licensing mode.Accept the default five concurrentconnections.
Modem dialing Configure as required for your site. Do notinstall a modem on a Communication ControlToolkit server.
508 Avaya Aura® Contact Center Installation May 2013Comments? [email protected]

Name Description
Network components Configure IP Address, WINS, DNS for one ortwo network cards as per configuration.Contact Center does not support IPv6.
Network connections If the server has more than one NIC/adapter,ensure contact center subnet appears first inthe network adapter binding order.
Partitions Configure C: drive to be a primary drive.Configure the other drives on your server tomeet the requirements according to AvayaAura® Contact Center Planning andEngineering (NN44400-210) for the server.
Regional settings window Configure as required for your site.
SNMP Configure for all servers.
Configuring Windows Server 2008Before you begin
• Install Microsoft Windows Server 2008 64-bit Release 2 on your server.
About this taskBefore you can install Avaya Aura® Contact Center software on your server, you must configureWindows Server 2008 to meet the requirements of the software.
You can prepare the server using this and other procedures, or you can download and use anAvaya Aura® Contact Center operating system configuration tool that installs the requiredWindows roles and features.
The Avaya Aura® Contact Center Windows Roles and Features installer configures thefollowing Windows Server 2008 resources:
• Windows Server Backup Features• SNMP Services• Active Directory Light Weight Directory Services• Application Server• Web Server (IIS)
For more information, and to download the Avaya Aura® Contact Center Windows Roles andFeatures installer, see http://support.avaya.com.
The Avaya Aura® Contact Center Windows Roles and Features installer replaces the followingprocedures:
Configuring Windows Server 2008
Avaya Aura® Contact Center Installation May 2013 509

• Configuring Windows Server 2008 (this procedure)• Configuring SNMP on your server• Installing operating system components for Contact Center
If you use the Avaya Aura® Contact Center Windows Roles and Features installer, skip thesethree procedures.
Procedure
1. Log on to the Windows Server 2008 server using an administrator account.
2. Select the Don’t display this screen on startup check box.
3. Update the emergency repair disk to record the latest configuration data for theserver.
4. Choose Start > Administrative Tools > Server Manager.5. In the left pane, click Features.
6. Click Add Features.
7. Select Windows Server Backup Features.
8. Click Next.9. Click Install.
10. Click Close.
11. Choose Start > All Programs > Accessories > System Tools > Windows ServerBackup.
12. Follow the on-screen instructions to select what you want to back up.
Installing the latest supported operating system servicepacks
Before you begin
• Access the Avaya hotfixes list on the Web site www.avaya.com/support.• Install and configure Microsoft Windows Server 2008 64-bit Release 2 on your server.• Review the recommendations on operating system service updates in Avaya Aura®
Contact Center Planning and Engineering (NN44400-210).• Install the Microsoft .NET Framework 3.5 and Microsoft .NET Framework 3.5 SP1.
About this taskAvaya recommends that you install the most recent supported operating system service packs.You must download the supported operating system service pack from the Avaya hotfixes list
510 Avaya Aura® Contact Center Installation May 2013Comments? [email protected]
to ensure your Contact Center server software functions correctly with the supported operatingsystem patches.
Procedure
1. Log on to the server and disable the Windows Update feature. There are a numberof methods for disabling the Windows Update feature, refer to the Windows Server2008 documentation for a method suitable to your solution. Disabling the WindowsUpdate feature prevents Windows Server 2008 from automatically applyingoperating system patches and potentially rebooting the server.
2. Review the Contact Center Service Packs Compatibility and Security HotfixesApplicability List to determine the most recent Avaya Aura® Contact Centersupported patches or service packs.
3. Download the appropriate Microsoft Windows Server 2008 patches for the AvayaAura® Contact Center software installed on this server.
4. Install the most recent Windows Server 2008 service pack that is validated withAvaya Aura® Contact Center by following the Microsoft Installation instructions.
Connecting to the contact center subnetAbout this taskConnect the Contact Center server to the contact center subnet. The contact center subnet isthe network on which the server software applications work together to route contacts andgenerate reports.
Procedure
1. Locate the slot assigned to the contact center subnet network interface card for theserver. Make a note of the slot.
2. Connect the cable from the contact center subnet to the contact center subnetnetwork interface card in the server in accordance with customer site networkingguidelines.
3. Use the ping command to test the contact center subnet.
Connecting to the contact center subnet
Avaya Aura® Contact Center Installation May 2013 511

Adding a server to a domainBefore you begin
• Ensure that you have domain administrator privileges, or ask the Domain Administratorto assign you a domain user account for remote access.
• On the server, configure a preferred Domain Name System (DNS) server on the NetworkInterface Card (NIC).
About this taskAdd the server to an existing domain. Avaya recommends that you add the server to the domainbefore installing Contact Center software.
Ask your System Administrator to add a Domain Name System (DNS) static entry for thisserver. Each Contact Center server in a domain requires a DNS static entry.
Important:Avaya Aura® Contact Center High Availability solutions do not support Windows Server 2008Dynamic DNS.
In High Availability solutions, ask your System Administrator to add one DNS static entry forthe each managed name and associated managed IP address. A typical High Availabilitycampus solution with a pair of servers requires 3 DNS static entries; one DNS static entry forthe active server, one DNS static entry for the standby server, and one DNS static entry forthe managed name and associated IP address.
Procedure
1. Log on to the server.
2. Click Start > Administrative Tools > Server Manager.
3. Beside Computer Information, click Change System Properties.
4. In the System Properties dialog box, click the Computer Name tab.
5. Click Change.
6. In the Computer Name/Domain Changes dialog box, click the Domain option.
7. Type the domain name (you must provide the fully qualified domain name, whichincludes the prefix and suffix).
8. Click OK.
9. Type the domain administrator User name and Password.
10. Click OK.
512 Avaya Aura® Contact Center Installation May 2013Comments? [email protected]

11. Restart the server when you are prompted to do so.
Disabling the Remote Access servicesAbout this taskAvaya Aura® Contact Center does not support Remote Access Services (RAS). Disable theRemote Access services before installing Avaya Aura® Contact Center. Microsoft RemoteDesktop continues to run after you disable Remote Access services. After you disable theservices, restart the server.
Procedure
1. Choose Start > Administrative Tools > Services.
2. In the Services window, right-click the Remote Access Connection Managericon.
3. Click Properties.
4. In the General tab, from the Startup type list, select Disabled.
5. Click OK.
6. In the Services window, right-click the Remote Access Auto ConnectionManager icon.
7. Click Properties.
8. In the General tab, from the Startup type list, select Disabled.
9. Click OK.
10. In the Services window, click File, Exit.
11. Restart the server.
Configuring SNMP on your serverBefore you begin
• Install and configure Microsoft Windows Server 2008 64-bit Release 2 on your server.
About this taskConfigure Simple Network Management Protocol (SNMP) on your server to ensure you haveall of the required components of the Internet protocol for monitoring devices in your network.
Disabling the Remote Access services
Avaya Aura® Contact Center Installation May 2013 513

SNMP helps you manage data that describes the system configuration and errors that mayoccur between them.
Procedure
1. Log on to the server using the administrator account.
2. Choose Start > Control Panel > Programs.
3. In the Programs and Features section, click Turn Windows features on or off.
4. In the Server Manager window, select Server Manager and click Add Features.
5. Select SNMP Services.
6. Click Next.
7. Click Install.
8. If prompted, insert the Windows Server 2008 DVD.
9. Click Close.
Downloading the most recent patches to the serverBefore you begin
• Install and configure Windows Server 2008 64-bit Release 2 on your server according tothe settings in this chapter.
• Download and install the most recent and valid updates for Microsoft Windows Server2008 64-bit Release 2.
• Know the location at which you plan to install each Contact Center server softwarepackage.
• Ensure that you use one administrator account on your server to un-install and installsoftware updates.
About this taskTo ensure that you have the most current software, download the most recent Contact Centerpatches from www.avaya.com/support to the server you plan to install.
Procedure
1. Log on to the server using the administrator account.
2. Create a folder Avaya_Support\ProductUpdates on the drive on which youwant to save the software updates.
3. Download the most recent service pack file. Save and unzip the file on the ContactCenter server in the Avaya_Support\ProductUpdates folder.
514 Avaya Aura® Contact Center Installation May 2013Comments? [email protected]

4. If new patches are available for the latest service pack, download and save thepatches on the Contact Center server in the Avaya_Support\ProductUpdates folder.
5. Read the Contact Center Release Notes for the most recent instructions.
Disabling unused Network AdaptersAbout this taskDisable all unused Network Adapters or Network Interface Cards (NICs) to improve networkcommunications and prevent the erroneous configuration of unused NICs during ContactCenter server commissioning.
Procedure
1. Log on to the server.
2. Click Start > Control Panel > Network and Internet > Network and SharingCenter > Change Adapter Settings.
3. Right-click on the unused Network Adapter, and select Disable.
4. Repeat this procedure for all unused Network Adapters.
Enabling Microsoft Remote Desktop connectionBefore you begin
• Install Microsoft Windows Server 2008 64-bit Release 2 on your server.• Log on to the server with administrator privileges.
About this taskEnable Microsoft Remote Desktop connection as your remote access tool. Microsoft RemoteDesktop provides remote access for support on the server.
Procedure
1. Choose Start > Control Panel > System and Security.
2. In the System section, select Allow remote access.
3. Click the Remote tab.
Disabling unused Network Adapters
Avaya Aura® Contact Center Installation May 2013 515

4. Select Allow connections from computers running any version of RemoteDesktop (less secure).
5. Click OK.
Configuring Data Execution PreventionAbout this taskConfigure the Data Execution Prevention (DEP) hardware and software to perform additionalchecks on memory that protect the Avaya Aura® Contact Center server against malicious codeexploitation.
Procedure
1. Log on to Windows as administrator.
2. Choose Start > Control Panel > System and Security.
3. Click System.
4. In the System window, click Advanced system settings.
5. In the System Properties dialog box, click the Advanced tab.
6. Under Performance, click Settings.
7. In the Performance Options dialog box, click the Data Execution Preventiontab.
8. On the Data Execution Prevention tab, select Turn on DEP for essentialWindows programs and services only.
9. Click OK.
10. On the System Properties dialog box, click OK.
11. Click OK to restart the computer.
516 Avaya Aura® Contact Center Installation May 2013Comments? [email protected]

Importing Contact Center Firewall Security policyBefore you begin
• Install Microsoft Windows Server 2008 64-bit Release 2 on your server.• Log on to the server with administrator privileges.• Download the most recent Avaya Aura® Contact Center Firewall Security policy from
www.avaya.com/support.
About this taskImport the Avaya Aura® Contact Center Firewall Security policy to ensure all contact centerservers in the solution can communicate.
Avaya recommends that you export and backup your existing firewall security policy beforeimporting the Avaya Aura® Contact Center Firewall Security policy. You can use this backuppolicy to rollback the Avaya Aura® Contact Center Firewall Security policy, if you ever needto.
Procedure
1. Choose Start > Administrative Tools > Windows Firewall with AdvancedSecurity.
2. Choose Actions > Export Policy.
3. In the File name box, type the name for the backup policy.
4. Click Save.Windows exports the existing policy. You can use this backup policy to rollback theAvaya Aura® Contact Center Firewall Security policy, if you ever need to.
5. On the Policy successfully exported message box, click OK.
6. Choose Actions > Import Policy.
7. On the policy overwrite message box, click Yes.
8. Navigate to the folder containing the Avaya Aura® Contact Center Firewall Securitypolicy.
9. Click Open.Windows imports the Avaya Aura® Contact Center Firewall Security policy.
10. On the Policy successfully imported message box, click OK.
Importing Contact Center Firewall Security policy
Avaya Aura® Contact Center Installation May 2013 517

Disabling NetBIOSAbout this taskIf the Contact Center server uses two Network Interface Cards (NICs), disable NetBIOS on theEmbedded LAN (ELAN) network interface card (NIC) to avoid NetBIOS conflicts.
Contact Center supports two Network Interface Cards (NICs) and two subnets (one contactcenter subnet and one ELAN subnet). The Contact Center ELAN NIC and ELAN subnet areoptional.
Procedure
1. Choose Start > Control Panel > Network and Internet.
2. Click Network and Sharing Center.
3. Click Change adapter settings.
4. Right-click the ELAN Network Interface Card (NIC).
5. Click Properties.
6. Select Internet Protocol Version 4 (TCP/IPv4).
7. Click Properties.
8. Click Advanced.
9. Click the WINS tab.
10. Select the Disable NetBIOS over TCP/IP check box.
11. Click OK.
Connecting the Embedded LAN subnetBefore you begin
• Install two network cards on the Contact Center server.• Disable the NetBIOS on the ELAN network interface card.• Connect the contact center subnet network interface card.
About this taskIf your server uses two NICs, connect the Embedded LAN (ELAN) NIC to the ELAN subnet.Contact Center supports two network interface cards (NICs) and two subnets (one contact
518 Avaya Aura® Contact Center Installation May 2013Comments? [email protected]

center subnet and one ELAN subnet). The Contact Center ELAN NIC and ELAN subnet areoptional.
Procedure
1. Locate the slot assigned to the ELAN network interface card for the server.
2. Write the MAC address of the card on a small label. Attach the label to the back ofthe card or the chassis slot position.
3. Connect the ELAN subnet from the Avaya equipment to the Ethernet hub.
4. Connect the network cable from the ELAN network interface card in the server tothe hub.
5. Plug in the power cord for the hub.
6. If you have an ELAN subnet network connection, use the ping command to test it.
Configuring the binding orderBefore you begin
• Install two network interface cards on the Contact Center server.• Disable the NetBIOS on the ELAN network interface card.• Connect the Contact Center server network interface card to the contact center subnet.• Connect the Contact Center server ELAN network interface card to the ELAN subnet.
About this taskConfigure the binding order of the network cards. The contact center subnet network interfacecard must be bound first and then the ELAN network interface card.
Procedure
1. Choose Start > Control Panel > Network and Internet > Network and SharingCenter.
2. Click Change adapter settings.
3. In the Network Connections window, press the ALT key.A hidden menu appears.
4. Choose Advanced > Advanced Settings.
5. In the Connections box, ensure that the contact center subnet connection is listedfirst. If it is not listed first, adjust the order.
Configuring the binding order
Avaya Aura® Contact Center Installation May 2013 519

Installing operating system components for ContactCenter
Before you begin
• Install Windows Server 2008 64-bit Release 2.
About this taskBefore installing Contact Center software, you must install specific operating system softwarecomponents such as Internet Information Services to integrate the components in ContactCenter.
Procedure
1. Choose Start > Administrative Tools > Server Manager.
2. In the left-hand column of the Server Manager, right-click Roles, and select AddRoles.
3. Review the requirements for the new role, and click Next.
4. Under Server Roles, select Active Directory Lightweight Directory Services.
5. If an Add Roles Wizard message box that lists features required by Active DirectoryLightweight Directory Services appears, click Add Required Features.
6. Under Server Roles, select Application Server.
7. If an Add Roles Wizard message box that lists features required by ApplicationServer appears, click Add Required Features.
8. Under Application Server, select Role Services.
9. Select Web Server (IIS) Support.
10. If an Add Roles Wizard message box appears, listing features required by WebServer (IIS) Support appears, click Add Required Features.
11. Click Next.
12. On the Introduction to Web Server (IIS) page, click Next.
13. On the Select Role Services page, under Common HTTP Features, select thefollowing services:
• Static Content
• Default Document
• Directory Browsing
• HTTP Errors
520 Avaya Aura® Contact Center Installation May 2013Comments? [email protected]

• HTTP Redirection
Important:All other services check boxes must be cleared.
14. On the Select Role Services page, under Application Development, select thefollowing services:
• ASP.NET
• .NET Extensibility
• ASP
• ISAPI Extensions
• ISAPI Filters
• Server Side Includes
Important:All other services check boxes must be cleared.
15. On the Select Role Services page, under Health and Diagnosis, select thefollowing services:
• HTTP Logging
• Logging Tools
• Request Monitor
• Tracing
Important:All other services check boxes must be cleared.
16. On the Select Role Services page, under Security, select all services.
17. On the Select Role Services page, under Performance, select all services.
18. On the Select Role Services page, under Management Tools, select the followingservices:
• IIS Management Console
• IIS Management Scripts and Tools
• Management Service
• All items under IIS 6 Management Compatibility
Important:All other services check boxes must be cleared.
Installing operating system components for Contact Center
Avaya Aura® Contact Center Installation May 2013 521

19. Click Next.
20. Review the installation information.
21. Click Install.
22. On the Installation Results page, click Close.
23. Restart the server if required.
Configuring MIME types to support Microsoft updatesAbout this taskConfigure the Multipurpose Internet Mail Extension (MIME) types to support Microsoft updatesand patches.
Procedure
1. Log on to the server.
2. Click Start > Administrative Tools > Computer Management.
3. In the Computer Management dialog box, expand Services and Applications >Internet Information Services > IIS Manager > Sites.
4. Select Default Web Site.
5. Under IIS, select MIME Types.
6. Double-click MIME Types.
7. On the Actions list on the right, click Add.
8. In the File name extension box, type .msp.
9. In the MIME Type box, type application/microsoftpatch.
10. Click OK.
11. On the Actions list on the right, click Add.
12. In the File name extension box, type .msu.
13. In the MIME Type box, type application/microsoftupdate.
14. Click OK.
15. Close the Computer Management window.
522 Avaya Aura® Contact Center Installation May 2013Comments? [email protected]

Adding the domain AD-LDS replication account to thestandby administrators and replicator group
About this taskAdd the AD-LDS replication account to the local Administrators and replicator group on thestandby server. Perform this procedure before installing Contact Center software on thestandby server.
If you are using a domain, you must request this AD-LDS replication account from your Networkor System Administrator. The primary and standby replicating Contact Center servers mustboth be added to the same domain.
For this procedure, the name of the AD-LDS replication account is CCMAReplication. You canchoose another name for the account.
Procedure
1. Log on to the standby Contact Center server.
2. Click Start > Administrative Tools > Computer Management.
3. In the Computer Management window, expand Local Users and Groups.
4. Click the Groups folder.
5. Double-click on the Administrators group.
6. Click Add > Locations.
7. On the Windows Security dialog box, type the domain logon details.
8. On the Locations dialog, select the domain to be used for CCMA replication.
9. Expand the domain folder to display domain users.
10. Click Users.
11. Click OK.
12. Click Advanced > Find Now, to display domain users.
13. From the list of users select the CCMA replication domain user account, for exampleselect the myDomain\CCMAReplication user account.
14. Click OK.
15. Click OK > Apply > OK.
16. Click the Groups folder.
17. Double-click on the Replicator group.
18. Click Add > Locations.
Adding the domain AD-LDS replication account to the standby administrators and replicator group
Avaya Aura® Contact Center Installation May 2013 523
19. On the Windows Security dialog box, type the domain logon details.
20. On the Locations dialog, select the domain to be used for CCMA replication.
21. Expand the domain folder to display domain users.
22. Click Users.
23. Click OK.
24. Click Advanced > Find Now, to display domain users.
25. From the list of users select the CCMA replication domain user account, for exampleselect the myDomain\CCMAReplication user account.
26. Click OK.
27. Click OK > Apply > OK.
Updating server for a network location installationAbout this taskConfigure the server .NET security settings to prepare the server for a remote networkinstallation. Avaya Aura® Contact Center supports network installation. You can insert theAvaya Aura® Contact Center DVD into a computer on your network. You then add this computeras a trusted site and network location on the new server. You can access this DVD from thenetwork location, and with some .NET security updates, use the remote DVD to install AvayaAura® Contact Center software on the new server.
Note:Skip this procedure if you plan to use the Avaya Aura® Contact Center DVD from the DVDdrive of the server.
Procedure
1. Insert the Avaya Aura® Contact Center DVD into a computer on the contact centernetwork.
2. Log on to the new server you are preparing for Contact Center.
3. Choose Start > Control Panel > Network and Internet > Internet Options.
4. In the Security tab, click Trusted sites.
5. In the Trusted sites section, click Sites.
6. In the Add this Web site to the zone box, type the <IP address> of the remotecomputer with the Avaya Aura® Contact Center DVD.
7. Click Add.
524 Avaya Aura® Contact Center Installation May 2013Comments? [email protected]

8. Click OK.
9. Close the Internet Options box.
10. From the new server, navigate to the network location with the DVD.
11. Access the remote DVD and in the root folder of the DVD, double-clickNetworkSetup.bat..NetFramework 3.5 installs and the .NetSecurity settings are modified.
12. If the Avaya Aura® Contact Center installation does not automatically start, in theroot folder of the DVD double-click Setup.exe.
13. After Avaya Aura® Contact Center installs, navigate to your network location anddouble-click NetworkSetupReset.bat.
Installing the standby Voice Contact Server software forCS1000 in a domain
Before you begin
• Ensure the Avaya Communication Server 1000 is configured. For more information seeAvaya Aura® Contact Center Configuration – Avaya CS1000 Integration(NN44400-512).
• Download the most recent Contact Center and Common Components patches to theserver.
• The primary active Voice Contact Server for Avaya Communication Server 1000 mustalready be installed and configured.
• The primary active Voice Contact Server for Avaya Communication Server 1000 mustalready be configured to support AD-LDS replication.
About this taskInstall the Contact Center standby Voice Contact Server software to provide a resilient solution.To configure CCMA replication you must enable replication during the install. Enablingreplication requires a few extra steps at install time to configure the standby server. Areplication server can only be configured at install time.
Note:Installing Voice Contact Server software installs Apache Tomcat Server. The default portnumber for Apache Tomcat is 8081. If you need to change the port number to avoid conflictswith third-party software, see your Apache Tomcat documentation.
Note:Read the Contact Center Release Notes for the most recent instructions.
Installing the standby Voice Contact Server software for CS1000 in a domain
Avaya Aura® Contact Center Installation May 2013 525

Procedure
1. Insert the Contact Center DVD into the DVD drive of your server.
2. If the installation does not automatically start, double-click Setup.exe.
3. Click Install to install the Microsoft .NET Framework 3.5 SP1 and Visual C++runtime libraries on the server.If you are prompted to accept the Microsoft .NET Framework 3.5.1 licenseagreement, click Accept. If you are prompted to restart the server, click Yes andrepeat step 2.
4. On the Welcome window, click Next.
5. On the License Agreement window, read the terms of the agreement.
6. Click I Accept the Terms of the End-User License Agreement.
7. Click Next.
8. On the Installation Selection window, under Avaya Communication Server 1000- AML, select Voice Contact Server Only.
9. Click Next.
526 Avaya Aura® Contact Center Installation May 2013Comments? [email protected]

10. On the Installation Destination window, on the Application Destination Drivetab, select where to install the Contact Center application software by choosing adisk drive letter.
11. Click the Database Destination Drive tab.
12. Under Select the destination drive for the Contact Center database files, selectthe drive for the Contact Center Manager Server database.
13. Under Select the destination drive for the Contact Center database files, selectthe drive for the Communication Control Toolkit database.
14. Click the Product Updates Location tab.
Installing the standby Voice Contact Server software for CS1000 in a domain
Avaya Aura® Contact Center Installation May 2013 527

15. Under Select the Product Updates Location, click Browse to locate the foldercontaining the Contact Center product updates.
16. Click Next.The System Readiness Check runs on the server.
17. If the System Readiness Check utility returns a Fail, the software installation cannotproceed until you correct the problem. Review any failures returned by the SystemReadiness Check and consult Avaya Aura® Contact Center Planning andEngineering (NN44400-210) to determine the actions to resolve the issue.You can ignore warnings if the potential impact to the operation of the contact centeris understood and not applicable.
18. Click Next.
19. On the Installation Data window, type the installation details for each tab.
20. Select the CCMS tab, and configure the server details.
528 Avaya Aura® Contact Center Installation May 2013Comments? [email protected]
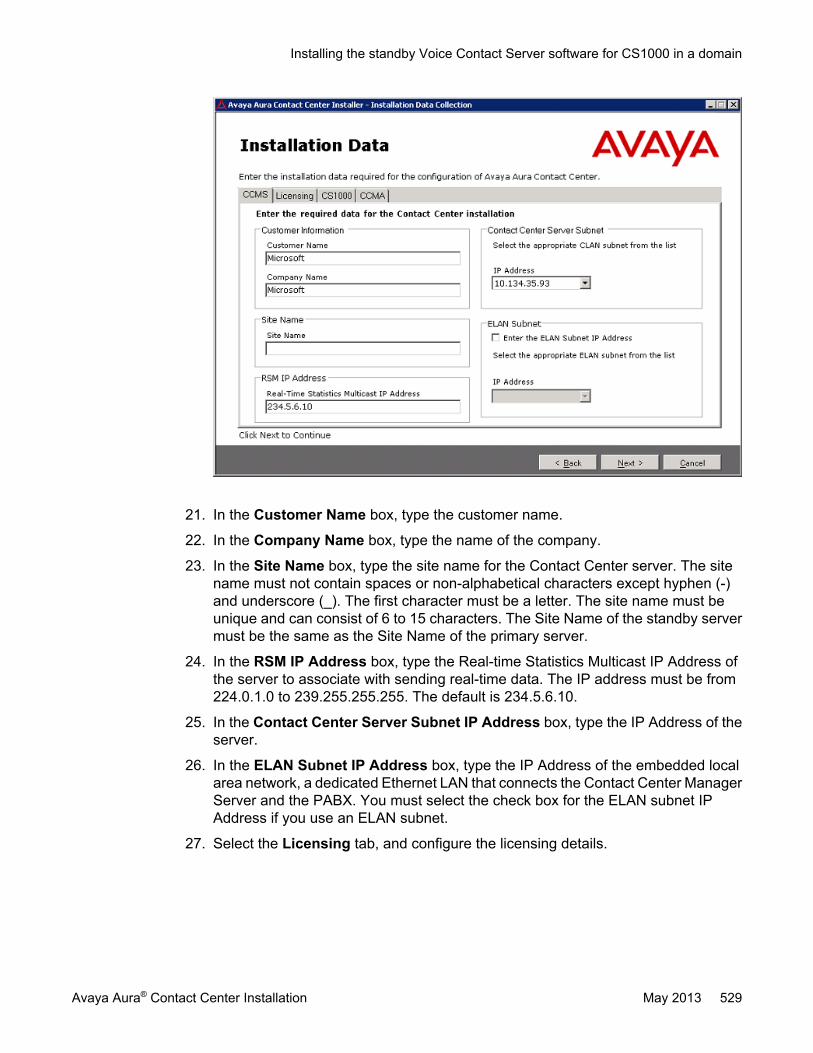
21. In the Customer Name box, type the customer name.
22. In the Company Name box, type the name of the company.
23. In the Site Name box, type the site name for the Contact Center server. The sitename must not contain spaces or non-alphabetical characters except hyphen (-)and underscore (_). The first character must be a letter. The site name must beunique and can consist of 6 to 15 characters. The Site Name of the standby servermust be the same as the Site Name of the primary server.
24. In the RSM IP Address box, type the Real-time Statistics Multicast IP Address ofthe server to associate with sending real-time data. The IP address must be from224.0.1.0 to 239.255.255.255. The default is 234.5.6.10.
25. In the Contact Center Server Subnet IP Address box, type the IP Address of theserver.
26. In the ELAN Subnet IP Address box, type the IP Address of the embedded localarea network, a dedicated Ethernet LAN that connects the Contact Center ManagerServer and the PABX. You must select the check box for the ELAN subnet IPAddress if you use an ELAN subnet.
27. Select the Licensing tab, and configure the licensing details.
Installing the standby Voice Contact Server software for CS1000 in a domain
Avaya Aura® Contact Center Installation May 2013 529
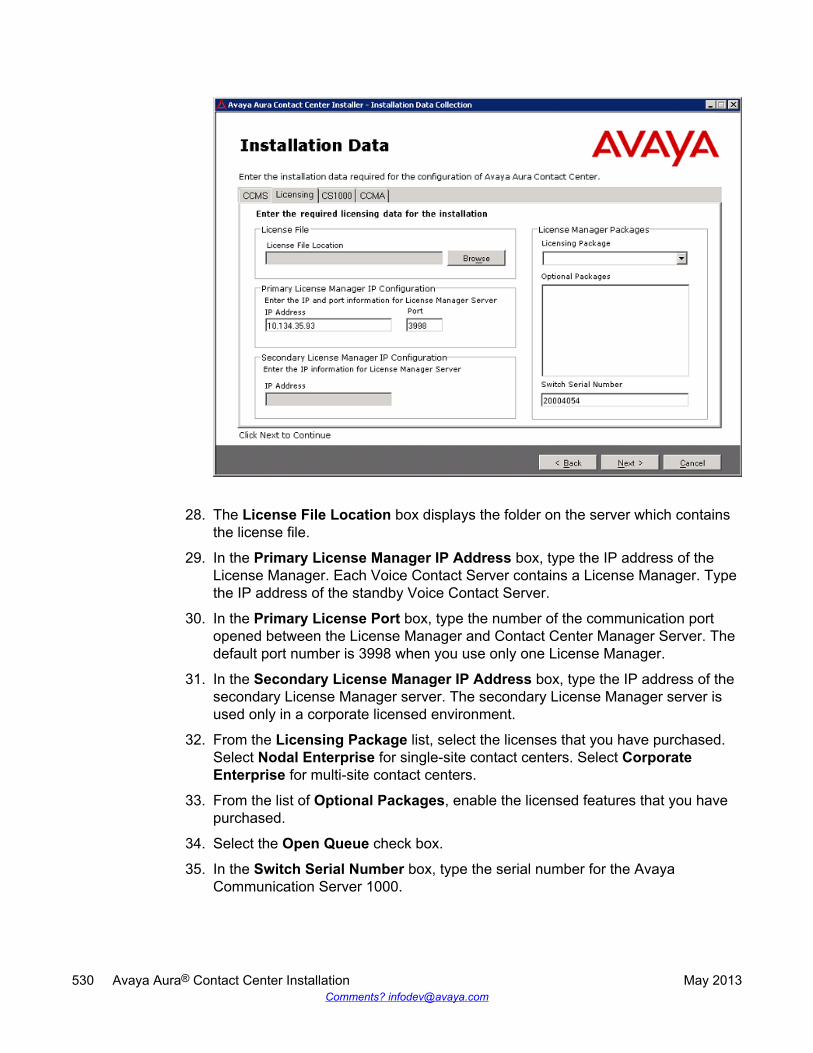
28. The License File Location box displays the folder on the server which containsthe license file.
29. In the Primary License Manager IP Address box, type the IP address of theLicense Manager. Each Voice Contact Server contains a License Manager. Typethe IP address of the standby Voice Contact Server.
30. In the Primary License Port box, type the number of the communication portopened between the License Manager and Contact Center Manager Server. Thedefault port number is 3998 when you use only one License Manager.
31. In the Secondary License Manager IP Address box, type the IP address of thesecondary License Manager server. The secondary License Manager server isused only in a corporate licensed environment.
32. From the Licensing Package list, select the licenses that you have purchased.Select Nodal Enterprise for single-site contact centers. Select CorporateEnterprise for multi-site contact centers.
33. From the list of Optional Packages, enable the licensed features that you havepurchased.
34. Select the Open Queue check box.
35. In the Switch Serial Number box, type the serial number for the AvayaCommunication Server 1000.
530 Avaya Aura® Contact Center Installation May 2013Comments? [email protected]

36. Select the CS1000 tab, and configure the Avaya Communication Server 1000details.
37. In the Switch Name box, type the name of the AML Avaya Communication Server1000 telephone switch. Valid characters for Avaya Communication Server 1000names are A–Z, a–z, 0–9, underscore (_), and period (.). Names must begin withan alphabetical character and cannot contain spaces. The last character must notbe an underscore or a period. Names must not exceed 80 characters in length.
38. In the Switch IP Address box, type the IP address of the Avaya CommunicationServer 1000.
39. In the Alternative Switch IP Address box, type the IP address of an alternateAvaya Communication Server 1000, if you have one.
40. In the Switch Customer Number box, type the customer number for the AvayaCommunication Server 1000.
41. In the Voice Connection Type section, select the method used to connect to thePABX. Select None, Avaya Aura Experience Portal, or Avaya CallPilot®. If you usea standalone Avaya CallPilot®, type the Avaya CallPilot® server ELAN IP Addressand then configure the Port to 10008. If you are using Avaya CallPilot® HighAvailability, type the Avaya CallPilot® Managed ELAN IP Address and thenconfigure the Port to 10008.
42. Select the CCMA tab, and configure the CCMA details.
Installing the standby Voice Contact Server software for CS1000 in a domain
Avaya Aura® Contact Center Installation May 2013 531

43. In the Configuration section, select Enable CCMA Replication. CCMA replicationis reproducing an active copy of the AD-LDS for backup or emergency failure. Incase of server failure, a current AD-LDS is available to maintain the contactcenter.
44. On the Contact Center Installer message box, click Yes to confirm that this is astandby server.
45. In the LDAP Port Number box, type the port number for the Lightweight DirectoryAccess Protocol (LDAP) for which common contact information is stored on aserver. The default value of the port is 389. Check with the system administrator toensure that the port number is not already in use.
46. In the SSL Port Number box, type the port number for the Secure Sockets Layer(SSL) that controls security when applications are communicating across thenetwork. The default port is 636. Check with the system administrator to ensure thatthe port number is not already in use.
47. In the System Account Configuration section, in the Password box, type thepassword for the CCMA System Account user account. Confirm the password inthe second box. The password is not checked against the server security policy forminimum password requirements. Avaya recommends that you enter a passwordthat conforms to your corporate password policy.
48. Click Next.
532 Avaya Aura® Contact Center Installation May 2013Comments? [email protected]

49. On the Summary window, review and verify the information.
50. Select Install. The install continues until the AD-LDS setup wizard appears.
51. Select Next.
52. In the Setup Options dialog box, select A replica of an existing instance.
Installing the standby Voice Contact Server software for CS1000 in a domain
Avaya Aura® Contact Center Installation May 2013 533
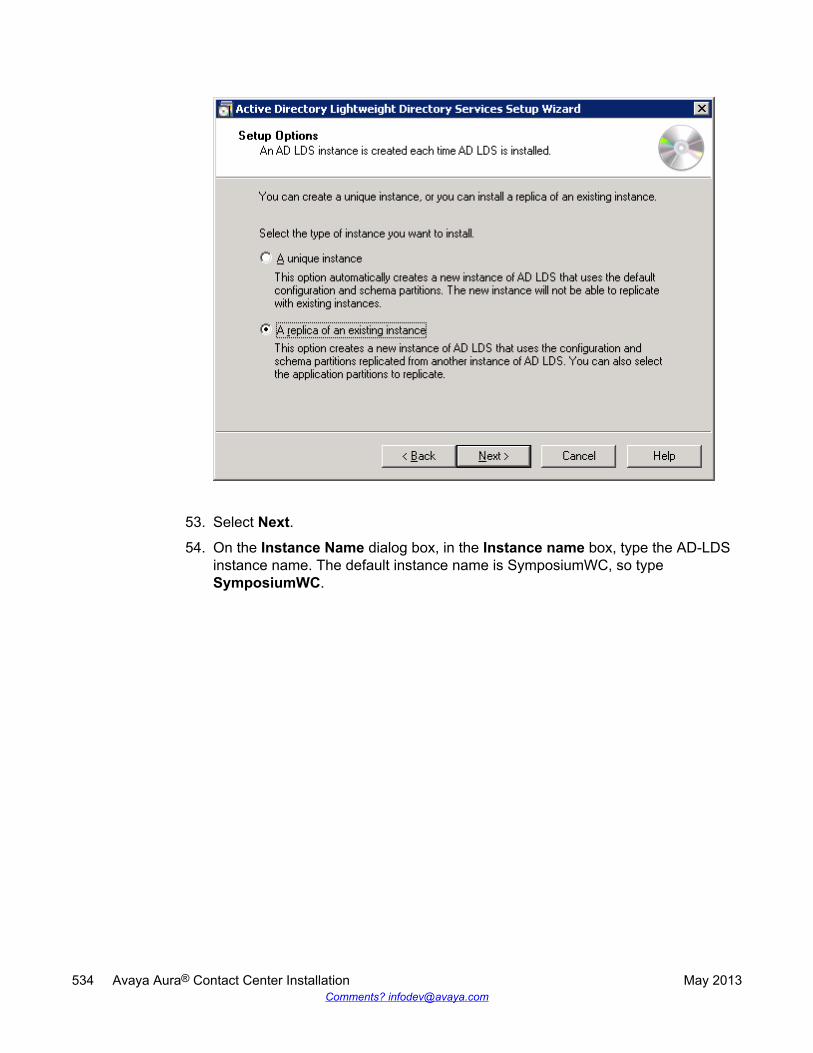
53. Select Next.
54. On the Instance Name dialog box, in the Instance name box, type the AD-LDSinstance name. The default instance name is SymposiumWC, so typeSymposiumWC.
534 Avaya Aura® Contact Center Installation May 2013Comments? [email protected]
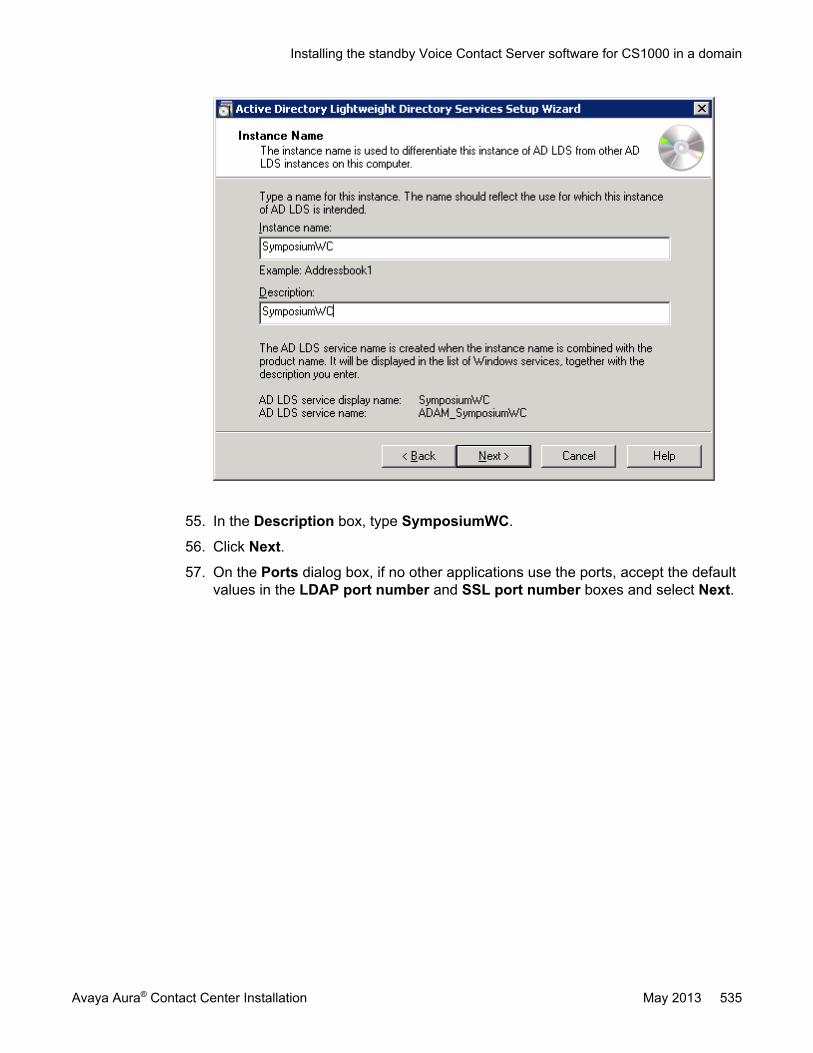
55. In the Description box, type SymposiumWC.
56. Click Next.
57. On the Ports dialog box, if no other applications use the ports, accept the defaultvalues in the LDAP port number and SSL port number boxes and select Next.
Installing the standby Voice Contact Server software for CS1000 in a domain
Avaya Aura® Contact Center Installation May 2013 535
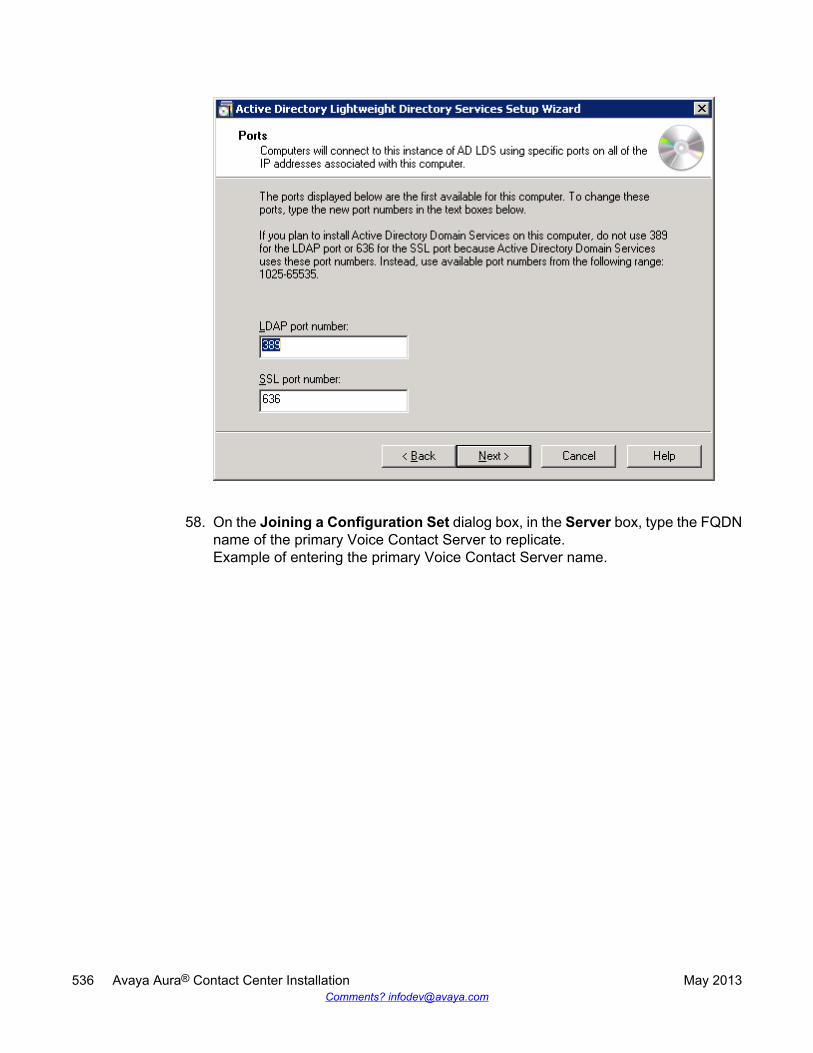
58. On the Joining a Configuration Set dialog box, in the Server box, type the FQDNname of the primary Voice Contact Server to replicate.Example of entering the primary Voice Contact Server name.
536 Avaya Aura® Contact Center Installation May 2013Comments? [email protected]

59. On the Joining a Configuration Set window, in the LDAP Port box, type the portnumber on the AD-LDS instance on the primary Voice Contact Server. The defaultis port number 389.
60. Click Next.
61. On the Administrative Credentials for the Configuration Set window, select Thisaccount.
62. In the User name box, type the primary Voice Contact Server name followed by itsAdministrator name in the format <primary Voice Contact Server name>\Administrator. For example enter WIN-RBMQ1SU0OL1\Administrator. If you havecreated another administrator account for Contact Center, then enter the details(name and password) for that primary Voice Contact Server administrator accounthere. Your administrator account must have full administrative privileges.Example of entering the administrative credentials.
Installing the standby Voice Contact Server software for CS1000 in a domain
Avaya Aura® Contact Center Installation May 2013 537

63. In the Password box, type the password for this user account.
64. Click Next.
65. In the Copying Application Directory Partitions dialog box, in the Partition DNlist, select the partition DC=Nortelnetworks,DC=COM.
538 Avaya Aura® Contact Center Installation May 2013Comments? [email protected]

66. Select Next.
67. In the File Location dialog box, accept the default values, click Next.
Installing the standby Voice Contact Server software for CS1000 in a domain
Avaya Aura® Contact Center Installation May 2013 539
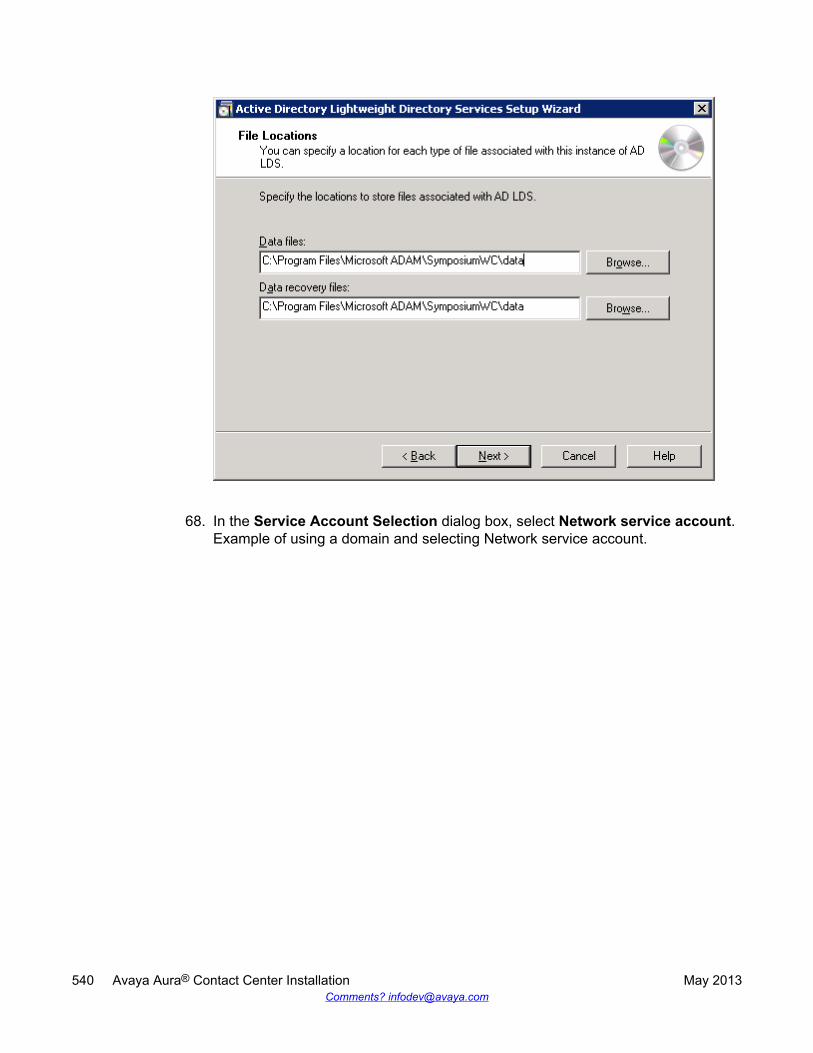
68. In the Service Account Selection dialog box, select Network service account.Example of using a domain and selecting Network service account.
540 Avaya Aura® Contact Center Installation May 2013Comments? [email protected]

69. Click Next.
70. In the AD LDS Administrators dialog box, select This account.
Installing the standby Voice Contact Server software for CS1000 in a domain
Avaya Aura® Contact Center Installation May 2013 541

71. Select Browse to locate the CCMA AD-LDS replication account.The Select User or Group dialog box appears. Note that the location is the localdomain.
72. In the Select User or Group dialog box, click Advanced.
542 Avaya Aura® Contact Center Installation May 2013Comments? [email protected]

73. In the Windows Security dialog box, type a logon name and password of an accountwith permissions to access your domain.
74. Click OK.The advanced Select User or Group dialog box appears.
Installing the standby Voice Contact Server software for CS1000 in a domain
Avaya Aura® Contact Center Installation May 2013 543

75. In the advanced Select User or Group dialog box, click Find Now.
76. From the Search results list, select the CCMA replication account.Example of selecting a domain CCMA replication account:
544 Avaya Aura® Contact Center Installation May 2013Comments? [email protected]
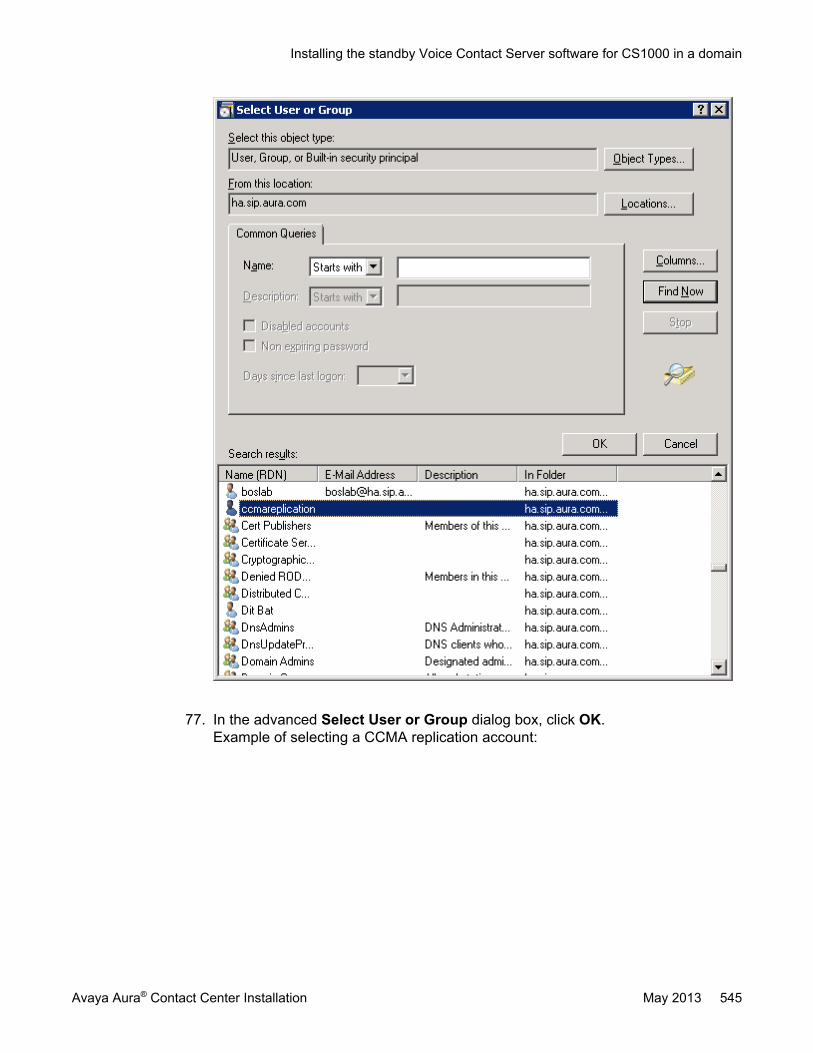
77. In the advanced Select User or Group dialog box, click OK.Example of selecting a CCMA replication account:
Installing the standby Voice Contact Server software for CS1000 in a domain
Avaya Aura® Contact Center Installation May 2013 545

78. In the Select User or Group dialog box, click OK.Example of selecting a domain CCMA replication account:
79. Click Next.
546 Avaya Aura® Contact Center Installation May 2013Comments? [email protected]

80. Confirm the installation components, and click Next.
81. After the installation is complete, click Finish.
82. If prompted, restart the server.
Upgrading Java Runtime Environment, Java DevelopmentKit, and Apache Tomcat components using Third PartySoftware Upgrade Utility
Before you begin
• Apply Contact Center 6.3 Service Pack 10 or later on your system as an install-timepatch.
• Restart the Contact Center server to complete this procedure.
Upgrading Java Runtime Environment, Java Development Kit, and Apache Tomcat components using Third PartySoftware Upgrade Utility
Avaya Aura® Contact Center Installation May 2013 547
About this taskUse Third Party Software Upgrade Utility to automatically upgrade your Java RuntimeEnvironment and Tomcat software components. For more information, see Third PartySoftware Upgrade Utility on page 27.
Procedure
1. Log on to the server using the administrator account.
2. Navigate to the Avaya_Support\ProductUpdates folder.
3. Open the folder where you had saved the latest Service Pack.
4. Browse to ThirdParty\AACCThirdPartySoftwareUpgradeUtility.exe.
5. Double-click AACCThirdPartySoftwareUpgradeUtility.exe.
6. Click Upgrade.The system displays the “User Action Required” dialog box.
7. Click OK.
8. Click Yes to restart Contact Center and complete the upgrade.
Securing the Windows serverAbout this taskApply optional security measures to your operating system to further secure your server.
Important:Scanning software can degrade the performance and decrease the reliability of the system.Install virus scanning software only if the system connects to an exposed network or to theInternet.
Important:To maintain server performance, you must schedule virus scans during maintenanceperiods or low usage hours only.
Procedure
1. Harden the operating system using defined site procedures.
2. Install antivirus software. If you install antivirus software, Avaya recommends thatyou exclude some contact center files and folders from real-time and scheduledscans. For more information, and for a list of files and folders to exclude, see AvayaAura® Contact Center Planning and Engineering (NN44400-210).
548 Avaya Aura® Contact Center Installation May 2013Comments? [email protected]

Chapter 18: Primary Voice Contact Serverfor CS1000 installation in aworkgroup
This chapter describes how to install a Voice Contact Server in a solution with an Avaya CommunicationServer 1000 (CS1000) platform. This chapter describes how to install a Voice Contact Server in aworkgroup. A Voice Contact Server includes the following server software:
• Contact Center Manager Server (CCMS)
• Contact Center Manager Server Utility
• Contact Center License Manager
• Contact Center Manager Administration (CCMA)
• Communication Control Toolkit (CCT)
Install this server to provide context‐sensitive and skill-based routing for customer voice contacts. Thisserver provides routed contact support for voice calls. This server provides extensive tools for agentmanagement, real-time and historical reporting, and graphical tools to create contact flows and treatmentrules. Use this server for license management, High Availability configuration, networking, OpenInterfaces Web Service and third-party application interfaces integration.
You can change the name of a Contact Center server, but because this is time consuming, Avayarecommends that you configure the server final production name before installing Contact Centersoftware.
If you plan to follow the Microsoft server hardening guidelines, complete those procedures before installingAvaya Aura® Contact Center.
Important:You can create an administration account on the server and then install Avaya Aura® Contact Centerusing the account. This Avaya Aura® Contact Center administration account must have fulladministrative privileges. You must upgrade and patch Avaya Aura® Contact Center using thisadministration account. You can rename this account after installing Avaya Aura® Contact Center, butyou must not delete the account. If you delete the account used to install Avaya Aura® Contact Center,Avaya Aura® Contact Center stops working.
Contact Center Manager Server supports two Network Interface Cards (NICs) and two subnets (onecontact center subnet and one ELAN subnet). The Contact Center Manager Server ELAN NIC and ELANsubnet are optional.
Avaya Aura® Contact Center Installation May 2013 549

You must complete all the procedures in this section in sequential order.
Voice Contact Server installation prerequisites• Copy the most recent patches for the Contact Center software.
• Ensure that your new Contact Center license file with a High Availability standby serverlicense is available.
Important:For the system to correctly handle backup and restore SNMP events, you must installWindows SNMP Service before you install Contact Center server software.
Downloading the latest documentationBefore you begin
• Download the most recent version of Acrobat Reader.• Access the Avaya Web site at www.avaya.com/support.
About this taskDownload the most recent documentation to ensure you have the most recent updates.Updates in the documentation accurately reflect the most recent changes in the software.
Procedure
1. Log on to the Avaya Web site.
2. Compare the versions of the documentation on the site with the versions youhave.
3. If the version number on www.avaya.com/support is higher than your version,download the latest version of the document.
4. Review the Avaya Web site for release notes and readme files.
550 Avaya Aura® Contact Center Installation May 2013Comments? [email protected]

Installing Windows Server 2008 Release 2Before you begin
• Ensure that you have a newly formatted server that meets the specifications in AvayaAura® Contact Center Planning and Engineering (NN44400-210) on which to installMicrosoft Windows Server 2008 64-bit, Release 2, Service Pack 1.
Do not upgrade your operating system from a previous release. Contact Center is notsupported on an upgraded operating system.
• Configure all servers for RAID as described in Avaya Aura® Contact Center Planning andEngineering (NN44400-210).
• Ensure that you have a DVD for Windows Server 2008 Release 2.• Install the network interface card in the server.• Know the IP addresses for the contact center subnet.
About this taskInstall the Windows operating system, which is required for the Contact Center server software.During the installation, configure the Windows settings as required. You must perform thisprocedure on each server before you install Contact Center server software on the server.
Procedure
1. Insert the Windows Server 2008 64-bit Release 2 Standard Edition or WindowsServer 2008 64-bit Release 2 Enterprise Edition DVD into the DVD drive.
2. Install Windows Server 2008 Release 2 according to the instructions supplied bythe DVD.
3. On the first install page, select your language for installation.
4. Click Next.
5. On the Installation window, select a Language to install from the list.
6. Select a Time and currency format from the list.
7. Select Keyboard or input method from the list.
8. Click Next.
9. Click Install Now.
10. Select an operating system from the list.
11. Click Next.
12. On the first Install Windows screen, read the terms of the license agreement andselect I accept the license terms.
Installing Windows Server 2008 Release 2
Avaya Aura® Contact Center Installation May 2013 551
13. Click Next.
14. Select Custom.
15. Select the disk partition on which you want to install Windows Server 2008.
Important:You can use the partition management options to configure the partitions on yourserver.
16. Click Next.The installation proceeds and automatically restarts the server several times.
17. After completing the installation, log on to the server as Administrator. Enter andconfirm the Administrator password.
18. In the Initial Configuration Tasks window, select Activate Windows and followthe instructions or the Microsoft documentation to activate your server.
19. Select Set time zone and complete the information as required for your system.If you are installing Voice Contact Server Only software or Knowledge WorkerServer software on this server, ensure that you clear Automatically adjust clockfor daylight saving changes. Otherwise select Automatically adjust clock fordaylight saving changes.
20. Select Configure Networking and complete the information for your NetworkInterface Card (NIC) with the server IP address.
21. Select Provide computer name and domain and complete the information for yourserver name and workgroup or domain settings.
22. Change the DVD drive letter to E: to ensure the correct drive letters are free for theContact Center application and database hard disk drives and partitions.
23. Configure the hard disk drives and partitions for this server using the WindowsServer 2008 Server Manager - Disk Management utility. For more information abouthard disk drives and partitions, see Avaya Aura® Contact Center Planning andEngineering (NN44400-210).
24. Install other required drivers for your hardware configuration.
Procedure job aid
Name Description
Computer name Do not use spaces or underscores or exceed15 characters. The name must start with analphabetic character.
552 Avaya Aura® Contact Center Installation May 2013Comments? [email protected]

Name Description
The computer name must match (includingcase sensitivity) the DNS name.
Disk drives Format the partitions as required for theserver. For more information, see AvayaAura® Contact Center Planning andEngineering (NN44400-210).
Domain/workgroup name Configure as required for your site.You must check to ensure the DNS Domainname (including case) matches the servername if the server is added to a domain orworkgroup after configuration.
Licensing modes Select Per server licensing mode.Accept the default five concurrentconnections.
Modem dialing Configure as required for your site. Do notinstall a modem on a Communication ControlToolkit server.
Network components Configure IP Address, WINS, DNS for one ortwo network cards as per configuration.Contact Center does not support IPv6.
Network connections If the server has more than one NIC/adapter,ensure contact center subnet appears first inthe network adapter binding order.
Partitions Configure C: drive to be a primary drive.Configure the other drives on your server tomeet the requirements according to AvayaAura® Contact Center Planning andEngineering (NN44400-210) for the server.
Regional settings window Configure as required for your site.
SNMP Configure for all servers.
Configuring Windows Server 2008Before you begin
• Install Microsoft Windows Server 2008 64-bit Release 2 on your server.
About this taskBefore you can install Avaya Aura® Contact Center software on your server, you must configureWindows Server 2008 to meet the requirements of the software.
Configuring Windows Server 2008
Avaya Aura® Contact Center Installation May 2013 553

You can prepare the server using this and other procedures, or you can download and use anAvaya Aura® Contact Center operating system configuration tool that installs the requiredWindows roles and features.
The Avaya Aura® Contact Center Windows Roles and Features installer configures thefollowing Windows Server 2008 resources:
• Windows Server Backup Features• SNMP Services• Active Directory Light Weight Directory Services• Application Server• Web Server (IIS)
For more information, and to download the Avaya Aura® Contact Center Windows Roles andFeatures installer, see http://support.avaya.com.
The Avaya Aura® Contact Center Windows Roles and Features installer replaces the followingprocedures:
• Configuring Windows Server 2008 (this procedure)• Configuring SNMP on your server• Installing operating system components for Contact Center
If you use the Avaya Aura® Contact Center Windows Roles and Features installer, skip thesethree procedures.
Procedure
1. Log on to the Windows Server 2008 server using an administrator account.
2. Select the Don’t display this screen on startup check box.
3. Update the emergency repair disk to record the latest configuration data for theserver.
4. Choose Start > Administrative Tools > Server Manager.
5. In the left pane, click Features.
6. Click Add Features.
7. Select Windows Server Backup Features.
8. Click Next.
9. Click Install.
10. Click Close.
11. Choose Start > All Programs > Accessories > System Tools > Windows ServerBackup.
12. Follow the on-screen instructions to select what you want to back up.
554 Avaya Aura® Contact Center Installation May 2013Comments? [email protected]
Connecting to the contact center subnetAbout this taskConnect the Contact Center server to the contact center subnet. The contact center subnet isthe network on which the server software applications work together to route contacts andgenerate reports.
Procedure
1. Locate the slot assigned to the contact center subnet network interface card for theserver. Make a note of the slot.
2. Connect the cable from the contact center subnet to the contact center subnetnetwork interface card in the server in accordance with customer site networkingguidelines.
3. Use the ping command to test the contact center subnet.
Configuring SNMP on your serverBefore you begin
• Install and configure Microsoft Windows Server 2008 64-bit Release 2 on your server.
About this taskConfigure Simple Network Management Protocol (SNMP) on your server to ensure you haveall of the required components of the Internet protocol for monitoring devices in your network.SNMP helps you manage data that describes the system configuration and errors that mayoccur between them.
Procedure
1. Log on to the server using the administrator account.
2. Choose Start > Control Panel > Programs.
3. In the Programs and Features section, click Turn Windows features on or off.
4. In the Server Manager window, select Server Manager and click Add Features.
5. Select SNMP Services.
6. Click Next.
7. Click Install.
Connecting to the contact center subnet
Avaya Aura® Contact Center Installation May 2013 555

8. If prompted, insert the Windows Server 2008 DVD.
9. Click Close.
Downloading the most recent patches to the serverBefore you begin
• Install and configure Windows Server 2008 64-bit Release 2 on your server according tothe settings in this chapter.
• Download and install the most recent and valid updates for Microsoft Windows Server2008 64-bit Release 2.
• Know the location at which you plan to install each Contact Center server softwarepackage.
• Ensure that you use one administrator account on your server to un-install and installsoftware updates.
About this taskTo ensure that you have the most current software, download the most recent Contact Centerpatches from www.avaya.com/support to the server you plan to install.
Procedure
1. Log on to the server using the administrator account.
2. Create a folder Avaya_Support\ProductUpdates on the drive on which youwant to save the software updates.
3. Download the most recent service pack file. Save and unzip the file on the ContactCenter server in the Avaya_Support\ProductUpdates folder.
4. If new patches are available for the latest service pack, download and save thepatches on the Contact Center server in the Avaya_Support\ProductUpdates folder.
5. Read the Contact Center Release Notes for the most recent instructions.
556 Avaya Aura® Contact Center Installation May 2013Comments? [email protected]

Disabling unused Network AdaptersAbout this taskDisable all unused Network Adapters or Network Interface Cards (NICs) to improve networkcommunications and prevent the erroneous configuration of unused NICs during ContactCenter server commissioning.
Procedure
1. Log on to the server.
2. Click Start > Control Panel > Network and Internet > Network and SharingCenter > Change Adapter Settings.
3. Right-click on the unused Network Adapter, and select Disable.
4. Repeat this procedure for all unused Network Adapters.
Enabling Microsoft Remote Desktop connectionBefore you begin
• Install Microsoft Windows Server 2008 64-bit Release 2 on your server.• Log on to the server with administrator privileges.
About this taskEnable Microsoft Remote Desktop connection as your remote access tool. Microsoft RemoteDesktop provides remote access for support on the server.
Procedure
1. Choose Start > Control Panel > System and Security.
2. In the System section, select Allow remote access.
3. Click the Remote tab.
4. Select Allow connections from computers running any version of RemoteDesktop (less secure).
5. Click OK.
Disabling unused Network Adapters
Avaya Aura® Contact Center Installation May 2013 557
Configuring Data Execution PreventionAbout this taskConfigure the Data Execution Prevention (DEP) hardware and software to perform additionalchecks on memory that protect the Avaya Aura® Contact Center server against malicious codeexploitation.
Procedure
1. Log on to Windows as administrator.
2. Choose Start > Control Panel > System and Security.
3. Click System.
4. In the System window, click Advanced system settings.
5. In the System Properties dialog box, click the Advanced tab.
6. Under Performance, click Settings.
7. In the Performance Options dialog box, click the Data Execution Preventiontab.
8. On the Data Execution Prevention tab, select Turn on DEP for essentialWindows programs and services only.
9. Click OK.
10. On the System Properties dialog box, click OK.
11. Click OK to restart the computer.
Importing Contact Center Firewall Security policyBefore you begin
• Install Microsoft Windows Server 2008 64-bit Release 2 on your server.• Log on to the server with administrator privileges.• Download the most recent Avaya Aura® Contact Center Firewall Security policy from
www.avaya.com/support.
About this taskImport the Avaya Aura® Contact Center Firewall Security policy to ensure all contact centerservers in the solution can communicate.
558 Avaya Aura® Contact Center Installation May 2013Comments? [email protected]

Avaya recommends that you export and backup your existing firewall security policy beforeimporting the Avaya Aura® Contact Center Firewall Security policy. You can use this backuppolicy to rollback the Avaya Aura® Contact Center Firewall Security policy, if you ever needto.
Procedure
1. Choose Start > Administrative Tools > Windows Firewall with AdvancedSecurity.
2. Choose Actions > Export Policy.
3. In the File name box, type the name for the backup policy.
4. Click Save.Windows exports the existing policy. You can use this backup policy to rollback theAvaya Aura® Contact Center Firewall Security policy, if you ever need to.
5. On the Policy successfully exported message box, click OK.
6. Choose Actions > Import Policy.
7. On the policy overwrite message box, click Yes.
8. Navigate to the folder containing the Avaya Aura® Contact Center Firewall Securitypolicy.
9. Click Open.Windows imports the Avaya Aura® Contact Center Firewall Security policy.
10. On the Policy successfully imported message box, click OK.
Disabling NetBIOSAbout this taskIf the Contact Center server uses two Network Interface Cards (NICs), disable NetBIOS on theEmbedded LAN (ELAN) network interface card (NIC) to avoid NetBIOS conflicts.
Contact Center supports two Network Interface Cards (NICs) and two subnets (one contactcenter subnet and one ELAN subnet). The Contact Center ELAN NIC and ELAN subnet areoptional.
Procedure
1. Choose Start > Control Panel > Network and Internet.
2. Click Network and Sharing Center.
3. Click Change adapter settings.
4. Right-click the ELAN Network Interface Card (NIC).
Disabling NetBIOS
Avaya Aura® Contact Center Installation May 2013 559

5. Click Properties.
6. Select Internet Protocol Version 4 (TCP/IPv4).
7. Click Properties.
8. Click Advanced.
9. Click the WINS tab.
10. Select the Disable NetBIOS over TCP/IP check box.
11. Click OK.
Connecting the Embedded LAN subnetBefore you begin
• Install two network cards on the Contact Center server.• Disable the NetBIOS on the ELAN network interface card.• Connect the contact center subnet network interface card.
About this taskIf your server uses two NICs, connect the Embedded LAN (ELAN) NIC to the ELAN subnet.Contact Center supports two network interface cards (NICs) and two subnets (one contactcenter subnet and one ELAN subnet). The Contact Center ELAN NIC and ELAN subnet areoptional.
Procedure
1. Locate the slot assigned to the ELAN network interface card for the server.
2. Write the MAC address of the card on a small label. Attach the label to the back ofthe card or the chassis slot position.
3. Connect the ELAN subnet from the Avaya equipment to the Ethernet hub.
4. Connect the network cable from the ELAN network interface card in the server tothe hub.
5. Plug in the power cord for the hub.
6. If you have an ELAN subnet network connection, use the ping command to test it.
560 Avaya Aura® Contact Center Installation May 2013Comments? [email protected]

Configuring the binding orderBefore you begin
• Install two network interface cards on the Contact Center server.• Disable the NetBIOS on the ELAN network interface card.• Connect the Contact Center server network interface card to the contact center subnet.• Connect the Contact Center server ELAN network interface card to the ELAN subnet.
About this taskConfigure the binding order of the network cards. The contact center subnet network interfacecard must be bound first and then the ELAN network interface card.
Procedure
1. Choose Start > Control Panel > Network and Internet > Network and SharingCenter.
2. Click Change adapter settings.
3. In the Network Connections window, press the ALT key.A hidden menu appears.
4. Choose Advanced > Advanced Settings.
5. In the Connections box, ensure that the contact center subnet connection is listedfirst. If it is not listed first, adjust the order.
Installing operating system components for ContactCenter
Before you begin
• Install Windows Server 2008 64-bit Release 2.
About this taskBefore installing Contact Center software, you must install specific operating system softwarecomponents such as Internet Information Services to integrate the components in ContactCenter.
Configuring the binding order
Avaya Aura® Contact Center Installation May 2013 561

Procedure
1. Choose Start > Administrative Tools > Server Manager.
2. In the left-hand column of the Server Manager, right-click Roles, and select AddRoles.
3. Review the requirements for the new role, and click Next.
4. Under Server Roles, select Active Directory Lightweight Directory Services.
5. If an Add Roles Wizard message box that lists features required by Active DirectoryLightweight Directory Services appears, click Add Required Features.
6. Under Server Roles, select Application Server.
7. If an Add Roles Wizard message box that lists features required by ApplicationServer appears, click Add Required Features.
8. Under Application Server, select Role Services.
9. Select Web Server (IIS) Support.
10. If an Add Roles Wizard message box appears, listing features required by WebServer (IIS) Support appears, click Add Required Features.
11. Click Next.
12. On the Introduction to Web Server (IIS) page, click Next.
13. On the Select Role Services page, under Common HTTP Features, select thefollowing services:
• Static Content
• Default Document
• Directory Browsing
• HTTP Errors
• HTTP Redirection
Important:All other services check boxes must be cleared.
14. On the Select Role Services page, under Application Development, select thefollowing services:
• ASP.NET
• .NET Extensibility
• ASP
• ISAPI Extensions
• ISAPI Filters
562 Avaya Aura® Contact Center Installation May 2013Comments? [email protected]

• Server Side Includes
Important:All other services check boxes must be cleared.
15. On the Select Role Services page, under Health and Diagnosis, select thefollowing services:
• HTTP Logging
• Logging Tools
• Request Monitor
• Tracing
Important:All other services check boxes must be cleared.
16. On the Select Role Services page, under Security, select all services.
17. On the Select Role Services page, under Performance, select all services.
18. On the Select Role Services page, under Management Tools, select the followingservices:
• IIS Management Console
• IIS Management Scripts and Tools
• Management Service
• All items under IIS 6 Management Compatibility
Important:All other services check boxes must be cleared.
19. Click Next.
20. Review the installation information.
21. Click Install.
22. On the Installation Results page, click Close.
23. Restart the server if required.
Installing operating system components for Contact Center
Avaya Aura® Contact Center Installation May 2013 563

Configuring MIME types to support Microsoft updatesAbout this taskConfigure the Multipurpose Internet Mail Extension (MIME) types to support Microsoft updatesand patches.
Procedure
1. Log on to the server.
2. Click Start > Administrative Tools > Computer Management.
3. In the Computer Management dialog box, expand Services and Applications >Internet Information Services > IIS Manager > Sites.
4. Select Default Web Site.
5. Under IIS, select MIME Types.
6. Double-click MIME Types.
7. On the Actions list on the right, click Add.
8. In the File name extension box, type .msp.
9. In the MIME Type box, type application/microsoftpatch.
10. Click OK.
11. On the Actions list on the right, click Add.
12. In the File name extension box, type .msu.
13. In the MIME Type box, type application/microsoftupdate.
14. Click OK.
15. Close the Computer Management window.
Updating server for a network location installationAbout this taskConfigure the server .NET security settings to prepare the server for a remote networkinstallation. Avaya Aura® Contact Center supports network installation. You can insert theAvaya Aura® Contact Center DVD into a computer on your network. You then add this computeras a trusted site and network location on the new server. You can access this DVD from the
564 Avaya Aura® Contact Center Installation May 2013Comments? [email protected]
network location, and with some .NET security updates, use the remote DVD to install AvayaAura® Contact Center software on the new server.
Note:Skip this procedure if you plan to use the Avaya Aura® Contact Center DVD from the DVDdrive of the server.
Procedure
1. Insert the Avaya Aura® Contact Center DVD into a computer on the contact centernetwork.
2. Log on to the new server you are preparing for Contact Center.
3. Choose Start > Control Panel > Network and Internet > Internet Options.
4. In the Security tab, click Trusted sites.
5. In the Trusted sites section, click Sites.
6. In the Add this Web site to the zone box, type the <IP address> of the remotecomputer with the Avaya Aura® Contact Center DVD.
7. Click Add.
8. Click OK.
9. Close the Internet Options box.
10. From the new server, navigate to the network location with the DVD.
11. Access the remote DVD and in the root folder of the DVD, double-clickNetworkSetup.bat..NetFramework 3.5 installs and the .NetSecurity settings are modified.
12. If the Avaya Aura® Contact Center installation does not automatically start, in theroot folder of the DVD double-click Setup.exe.
13. After Avaya Aura® Contact Center installs, navigate to your network location anddouble-click NetworkSetupReset.bat.
Updating server for a network location installation
Avaya Aura® Contact Center Installation May 2013 565

Installing the Voice Contact Server software for CS1000Before you begin
• Ensure the Avaya Communication Server 1000 is configured. For more information seeAvaya Aura® Contact Center Configuration – Avaya CS1000 Integration(NN44400-512).
• Download the most recent Contact Center and Common Components patches to theserver.
About this taskInstall the Contact Center Voice Contact Server software and enable your contact center toroute contacts to the agents that can answer the call with the correct skills.
Note:Installing Voice Contact Server software installs Apache Tomcat Server. The default portnumber for Apache Tomcat is 8081. If you need to change the port number to avoid conflictswith third-party software, see your Apache Tomcat documentation.
Note:Read the Contact Center Release Notes for the most recent instructions.
Procedure
1. Insert the Contact Center DVD into the DVD drive of your server.
2. If the installation does not automatically start, double-click Setup.exe.
3. Click Install to install the Microsoft .NET Framework 3.5 SP1 and Visual C++runtime libraries on the server.If you are prompted to accept the Microsoft .NET Framework 3.5.1 licenseagreement, click Accept. If you are prompted to restart the server, click Yes andrepeat step 2.
4. On the Welcome window, click Next.
566 Avaya Aura® Contact Center Installation May 2013Comments? [email protected]

5. On the License Agreement window, read the terms of the agreement.
Installing the Voice Contact Server software for CS1000
Avaya Aura® Contact Center Installation May 2013 567
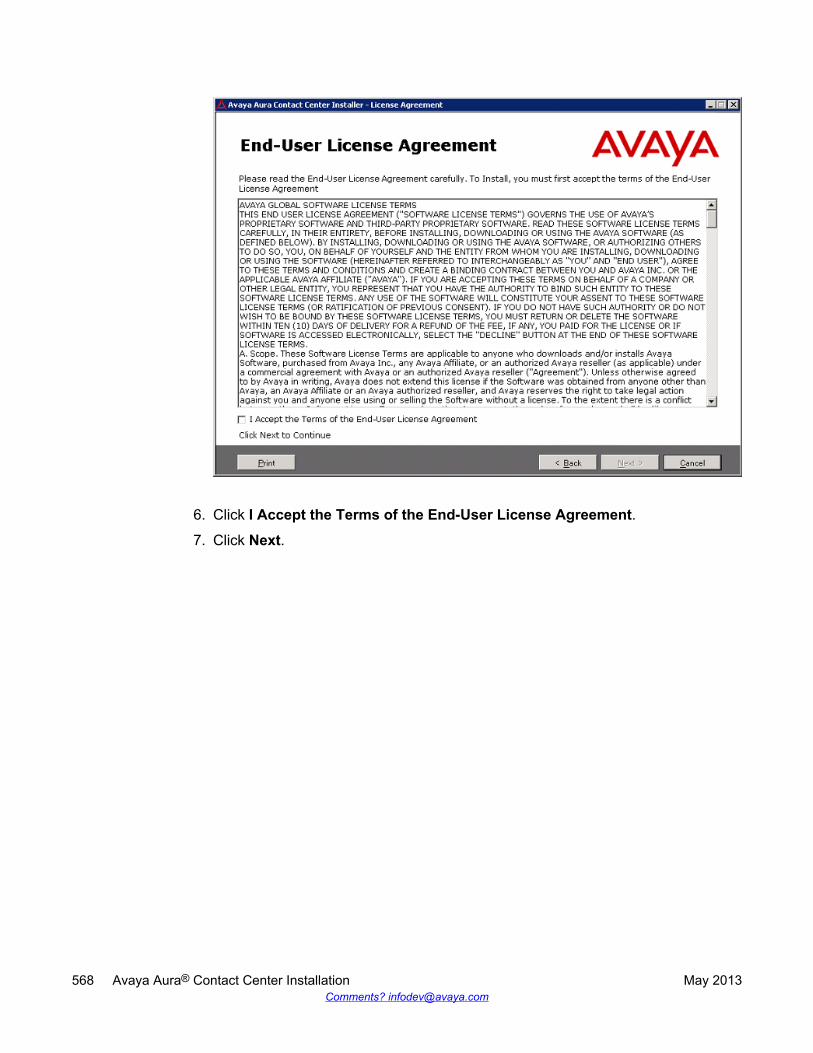
6. Click I Accept the Terms of the End-User License Agreement.
7. Click Next.
568 Avaya Aura® Contact Center Installation May 2013Comments? [email protected]

8. On the Installation Selection window, under Avaya Communication Server 1000- AML, select Voice Contact Server Only.
9. Click Next.
Installing the Voice Contact Server software for CS1000
Avaya Aura® Contact Center Installation May 2013 569

10. On the Installation Destination window, on the Application Destination Drivetab, select where to install the Contact Center application software by choosing adisk drive letter.
11. Click the Database Destination Drive tab.
12. Under Select the destination drive for the Contact Center database files, selectthe drive for the Contact Center Manager Server database.
13. Under Select the destination drive for the Contact Center database files, selectthe drive for the Communication Control Toolkit database.
14. Click the Product Updates Location tab.
570 Avaya Aura® Contact Center Installation May 2013Comments? [email protected]
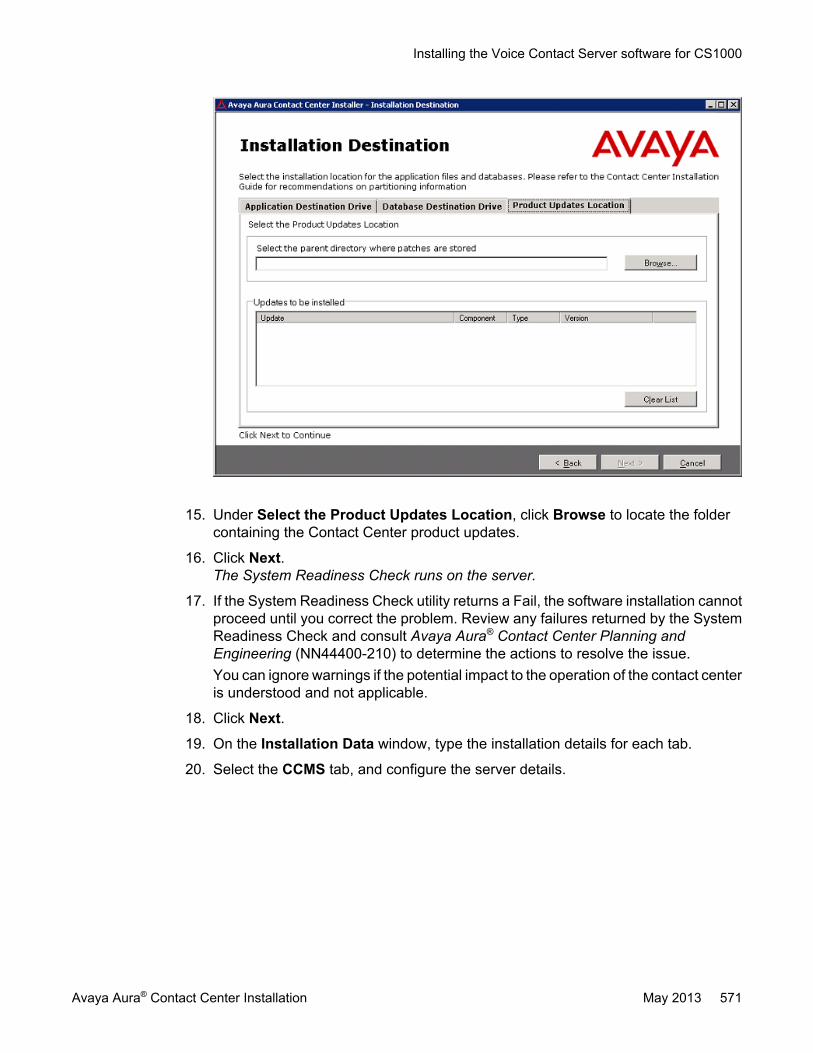
15. Under Select the Product Updates Location, click Browse to locate the foldercontaining the Contact Center product updates.
16. Click Next.The System Readiness Check runs on the server.
17. If the System Readiness Check utility returns a Fail, the software installation cannotproceed until you correct the problem. Review any failures returned by the SystemReadiness Check and consult Avaya Aura® Contact Center Planning andEngineering (NN44400-210) to determine the actions to resolve the issue.You can ignore warnings if the potential impact to the operation of the contact centeris understood and not applicable.
18. Click Next.
19. On the Installation Data window, type the installation details for each tab.
20. Select the CCMS tab, and configure the server details.
Installing the Voice Contact Server software for CS1000
Avaya Aura® Contact Center Installation May 2013 571

21. In the Customer Name box, type the customer name.
22. In the Company Name box, type the name of the company.
23. In the Site Name box, type the site name for the Contact Center server. The sitename must not contain spaces or non-alphabetical characters except hyphen (-)and underscore (_). The first character must be a letter. The site name must beunique and can consist of 6 to 15 characters.
24. In the RSM IP Address box, type the Real-time Statistics Multicast IP Address ofthe server to associate with sending real-time data. The IP address must be from224.0.1.0 to 239.255.255.255. The default is 234.5.6.10.
25. In the Contact Center Server Subnet IP Address box, type the IP Address of theserver.
26. In the ELAN Subnet IP Address box, type the IP Address of the embedded localarea network, a dedicated Ethernet LAN that connects Contact Center ManagerServer to the PABX. You must select the check box for the ELAN subnet IP Addressif you use an ELAN subnet.
27. Select the Licensing tab, and configure the licensing details.
572 Avaya Aura® Contact Center Installation May 2013Comments? [email protected]

28. The License File Location box displays the folder on the server which containsthe license file.
29. In the Primary License Manager IP Address box, type the IP address of theprimary License Manager server. Each Voice Contact Server contains a LicenseManager server. This License Manager server is the default primary LicenseManager.
30. In the Primary License Port box, type the number of the communication portopened between the License Manager and Contact Center Manager Server. Thedefault port number is 3998 when you use only one License Manager.
31. In the Secondary License Manager IP Address box, type the IP address of thesecondary License Manager server. The secondary License Manager server isused only in a corporate licensed environment.
32. From the Licensing Package list, select the licenses that you have purchased.Select Nodal Enterprise for single-site contact centers. Select CorporateEnterprise for multi-site contact centers.
33. From the list of Optional Packages, enable the licensed features that you havepurchased.
34. Select the Open Queue check box.
35. In the Switch Serial Number box, type the serial number for the AvayaCommunication Server 1000.
Installing the Voice Contact Server software for CS1000
Avaya Aura® Contact Center Installation May 2013 573

36. Select the CS1000 tab, and configure the Avaya Communication Server 1000details.
37. In the Switch Name box, type the name of the AML Avaya Communication Server1000 telephone switch. Valid characters for Avaya Communication Server 1000names are A–Z, a–z, 0–9, underscore (_), and period (.). Names must begin withan alphabetical character and cannot contain spaces. The last character must notbe an underscore or a period. Names must not exceed 80 characters in length.
38. In the Switch IP Address box, type the IP address of the Avaya CommunicationServer 1000.
39. In the Alternative Switch IP Address box, type the IP address of an alternateAvaya Communication Server 1000, if you have one.
40. In the Switch Customer Number box, type the customer number for the AvayaCommunication Server 1000.
41. In the Voice Connection Type section, select the method used to connect to thePABX. Select None, Avaya Aura Experience Portal, or Avaya CallPilot®. If you usea standalone Avaya CallPilot®, type the Avaya CallPilot® server ELAN IP Addressand then configure the Port to 10008. If you are using Avaya CallPilot® HighAvailability, type the Avaya CallPilot® Managed ELAN IP Address and thenconfigure the Port to 10008.
42. Select the CCMA tab, and configure the CCMA details.
574 Avaya Aura® Contact Center Installation May 2013Comments? [email protected]

43. In the Configuration section clear Enable CCMA Replication. Clear the checkbox on the primary server.
44. In the LDAP Port Number box, type the port number for the Lightweight DirectoryAccess Protocol (LDAP) for which common contact information is stored on aserver. The default value of the port is 389. Check with the system administrator toensure that the port number is not already in use.
45. In the SSL Port Number box, type the port number for the Secure Sockets Layer(SSL) that controls security when applications are communicating across thenetwork. The default port is 636. Check with the system administrator to ensure thatthe port number is not already in use.
46. In the System Account Configuration section, in the Password box, type thepassword for the CCMA System Account user account. Confirm the password inthe second box. The password is not checked against the server security policy forminimum password requirements. Avaya recommends that you enter a passwordthat conforms to your corporate password policy.
47. Click Next.
48. On the Summary window, review and verify the information.
49. Click Install.
50. After the installation is complete, click Finish.
Installing the Voice Contact Server software for CS1000
Avaya Aura® Contact Center Installation May 2013 575

51. If prompted, restart the server.
Upgrading Java Runtime Environment, Java DevelopmentKit, and Apache Tomcat components using Third PartySoftware Upgrade Utility
Before you begin
• Apply Contact Center 6.3 Service Pack 10 or later on your system as an install-timepatch.
• Restart the Contact Center server to complete this procedure.
About this taskUse Third Party Software Upgrade Utility to automatically upgrade your Java RuntimeEnvironment and Tomcat software components. For more information, see Third PartySoftware Upgrade Utility on page 27.
Procedure
1. Log on to the server using the administrator account.
2. Navigate to the Avaya_Support\ProductUpdates folder.
3. Open the folder where you had saved the latest Service Pack.
4. Browse to ThirdParty\AACCThirdPartySoftwareUpgradeUtility.exe.
5. Double-click AACCThirdPartySoftwareUpgradeUtility.exe.
6. Click Upgrade.The system displays the “User Action Required” dialog box.
7. Click OK.
8. Click Yes to restart Contact Center and complete the upgrade.
Securing the Windows serverAbout this taskApply optional security measures to your operating system to further secure your server.
576 Avaya Aura® Contact Center Installation May 2013Comments? [email protected]

Important:Scanning software can degrade the performance and decrease the reliability of the system.Install virus scanning software only if the system connects to an exposed network or to theInternet.
Important:To maintain server performance, you must schedule virus scans during maintenanceperiods or low usage hours only.
Procedure
1. Harden the operating system using defined site procedures.
2. Install antivirus software. If you install antivirus software, Avaya recommends thatyou exclude some contact center files and folders from real-time and scheduledscans. For more information, and for a list of files and folders to exclude, see AvayaAura® Contact Center Planning and Engineering (NN44400-210).
Saving managed, active and standby server names and IPaddresses
About this taskComplete the following procedure on the primary active server to resolve the managed CLANserver name to the managed IP address using the Windows hosts file.
For information about saving the managed CLAN server name to the DNS server, contact yourSystem Administrator.
Perform this procedure on the primary active Contact Center Server.
Procedure
1. Log on to the primary Contact Center server.
2. Open Windows Explorer.
3. Go to the folder C:\Windows\system32\drivers\etc.
4. Double-click the hosts file, select Notepad and click OK.
5. Add the following to the hosts file: CLAN Managed IP address and the server nameto the hosts file.
• CLAN Managed IP address and the server name
• Active and Standby Server name and IP addresses
Saving managed, active and standby server names and IP addresses
Avaya Aura® Contact Center Installation May 2013 577

Important:The Managed Server name can be a full name or netbios server name.
Creating a local (workgroup) user account for AD-LDSReplication
Before you begin
• You plan to use AD-LDS replication in your contact center to create a live backup for yourContact Center server.
About this taskCreate a user account on the primary Contact Center server. This user account is used for AD-LDS Replication. This procedure is necessary when you install both Contact Center serversin a workgroup.
For this procedure, the name of the local user account is “myPrimaryContactCenterServer\CCMAReplication”. You can choose another name for the account.
Procedure
1. Log on to the primary Contact Center server.
2. Click Start > Administrative Tools > Computer Management.
3. In the Computer Management window, expand Local Users and Groups.
4. Right-click Users, and click New User.
5. In the New User dialog box, in the User name box, type CCMAReplication.
6. In the Password box, type a password.
7. In the Confirm password box, retype the password.
8. Clear the User must change password at next logon check box.
9. Click Create.
10. Click Close to close the New User dialog box.
578 Avaya Aura® Contact Center Installation May 2013Comments? [email protected]
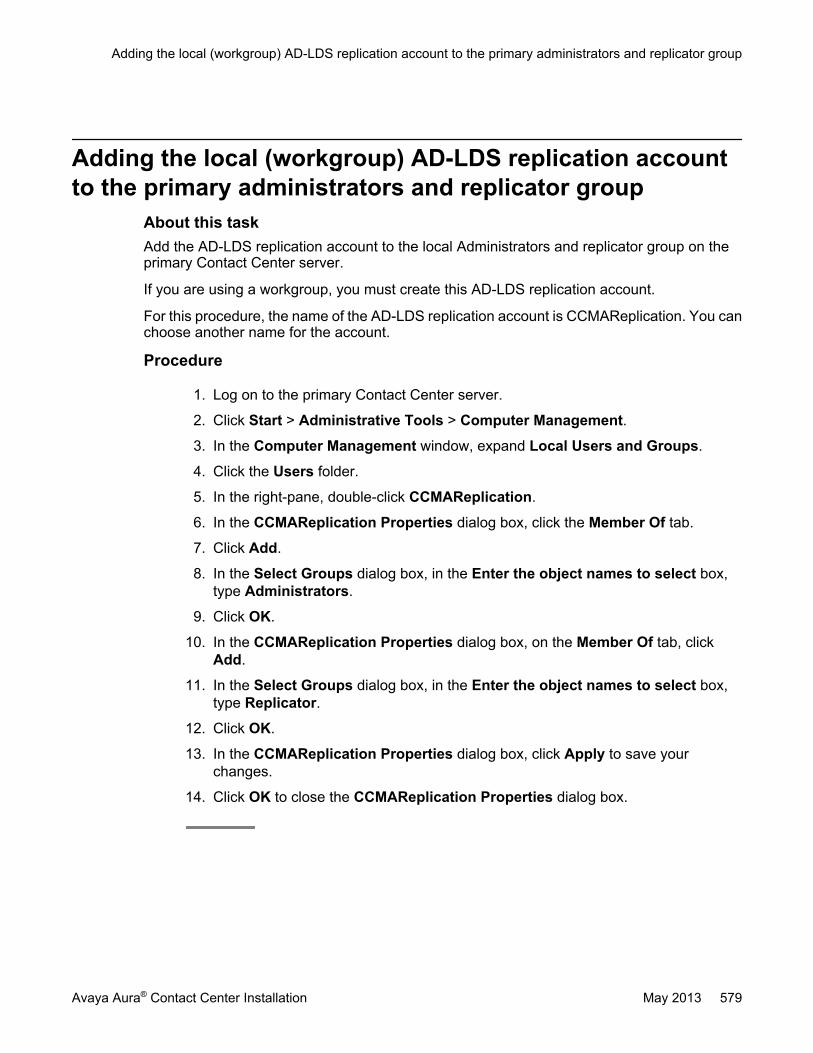
Adding the local (workgroup) AD-LDS replication accountto the primary administrators and replicator group
About this taskAdd the AD-LDS replication account to the local Administrators and replicator group on theprimary Contact Center server.
If you are using a workgroup, you must create this AD-LDS replication account.
For this procedure, the name of the AD-LDS replication account is CCMAReplication. You canchoose another name for the account.
Procedure
1. Log on to the primary Contact Center server.
2. Click Start > Administrative Tools > Computer Management.
3. In the Computer Management window, expand Local Users and Groups.
4. Click the Users folder.
5. In the right-pane, double-click CCMAReplication.
6. In the CCMAReplication Properties dialog box, click the Member Of tab.
7. Click Add.
8. In the Select Groups dialog box, in the Enter the object names to select box,type Administrators.
9. Click OK.
10. In the CCMAReplication Properties dialog box, on the Member Of tab, clickAdd.
11. In the Select Groups dialog box, in the Enter the object names to select box,type Replicator.
12. Click OK.
13. In the CCMAReplication Properties dialog box, click Apply to save yourchanges.
14. Click OK to close the CCMAReplication Properties dialog box.
Adding the local (workgroup) AD-LDS replication account to the primary administrators and replicator group
Avaya Aura® Contact Center Installation May 2013 579

Configuring the AD-LDS replication account as a serviceaccount
Before you begin
• If you are using a workgroup, add the local user account to the local Administrators andreplicator group on the primary Contact Center server.
About this taskConfigure the AD-LDS replication account as a service account on the primary Contact Centerserver. This account is the AD-LDS Replication service account.
For this procedure, the name of the AD-LDS Replication account is CCMAReplication. Youcan choose another name for the account.
Procedure
1. Log on to the primary Contact Center server.
2. Click Start > Administrative Tools > Local Security Policy.
3. In the Local Security Policy window, in the left pane, expand the Local Policiesfolder.
4. Click the User Rights Assignment folder.
5. In the right pane, double-click Log on as a service.
6. In the Log on as a service Properties dialog box, click Add User or Group.
7. In the Select Users, Computers, or Groups dialog box, type the account name:If you are using a workgroup, type myPrimaryContactCenterServer\CCMAReplication.
8. Click OK.
9. If a Security Templates message box is displayed, select the message box andclick OK.
10. Click Apply to save your changes.
11. Click OK to close the Log on as a service Properties dialog box.
580 Avaya Aura® Contact Center Installation May 2013Comments? [email protected]
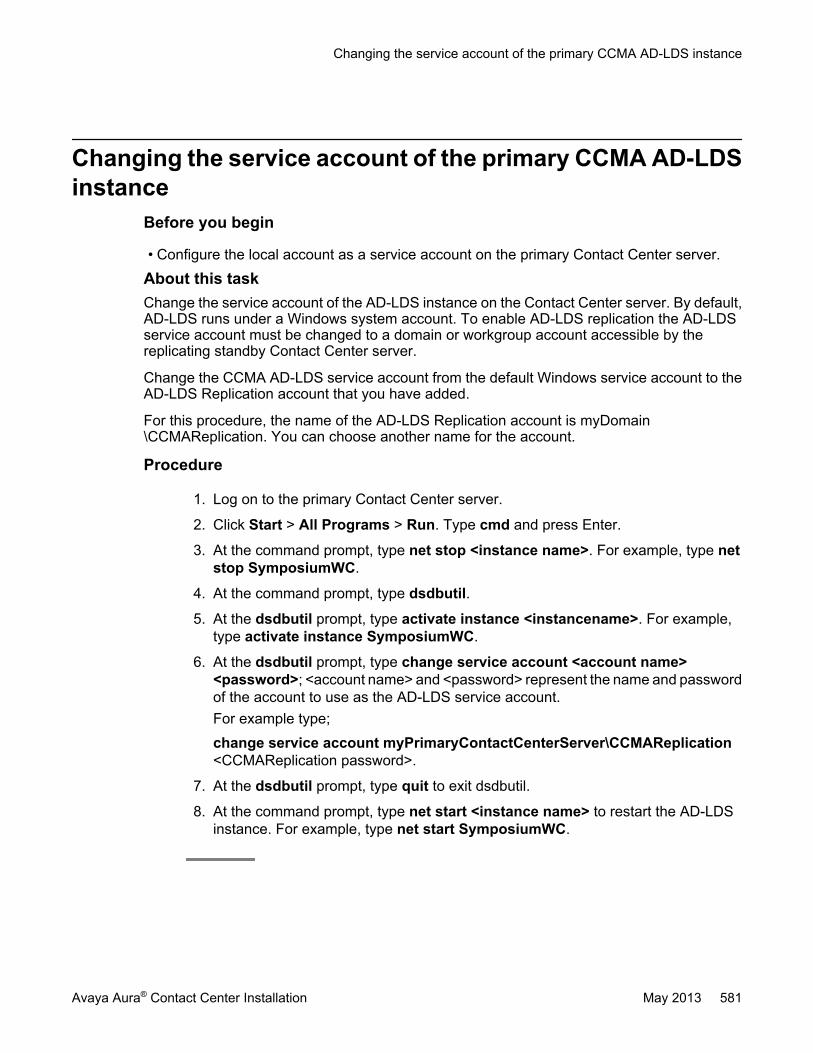
Changing the service account of the primary CCMA AD-LDSinstance
Before you begin
• Configure the local account as a service account on the primary Contact Center server.
About this taskChange the service account of the AD-LDS instance on the Contact Center server. By default,AD-LDS runs under a Windows system account. To enable AD-LDS replication the AD-LDSservice account must be changed to a domain or workgroup account accessible by thereplicating standby Contact Center server.
Change the CCMA AD-LDS service account from the default Windows service account to theAD-LDS Replication account that you have added.
For this procedure, the name of the AD-LDS Replication account is myDomain\CCMAReplication. You can choose another name for the account.
Procedure
1. Log on to the primary Contact Center server.
2. Click Start > All Programs > Run. Type cmd and press Enter.
3. At the command prompt, type net stop <instance name>. For example, type netstop SymposiumWC.
4. At the command prompt, type dsdbutil.
5. At the dsdbutil prompt, type activate instance <instancename>. For example,type activate instance SymposiumWC.
6. At the dsdbutil prompt, type change service account <account name><password>; <account name> and <password> represent the name and passwordof the account to use as the AD-LDS service account.For example type;change service account myPrimaryContactCenterServer\CCMAReplication<CCMAReplication password>.
7. At the dsdbutil prompt, type quit to exit dsdbutil.
8. At the command prompt, type net start <instance name> to restart the AD-LDSinstance. For example, type net start SymposiumWC.
Changing the service account of the primary CCMA AD-LDS instance
Avaya Aura® Contact Center Installation May 2013 581

Verifying the AD-LDS Replication account is applied to theAD-LDS instance
Before you begin
• Change the service account of an AD-LDS instance on the primary Contact Center ManagerAdministration server.
About this taskVerify the account applied to the AD-LDS instance to ensure the change to the service accountis successful on the primary Contact Center server.
For this procedure, the name of the AD-LDS Replication account is CCMAReplication. Youcan choose another name for the account.
Procedure
1. Log on to the primary Contact Center server.
2. Click Start > Administrative Tools > Services.
3. In the right pane, right-click SymposiumWC and click Properties.
4. In the SymposiumWC Properties dialog box, click the Logon tab.
5. Confirm that the entry in the This account box equals the local user account(CCMAReplication).
582 Avaya Aura® Contact Center Installation May 2013Comments? [email protected]

Chapter 19: Standby Voice ContactStandby Server for CS1000installation in a workgroup
This chapter describes how to install a standby Voice Contact Server for Avaya Communication Server1000 (CS1000). A standby Voice Contact Server includes the following server software:
• Contact Center Manager Server (CCMS)
• Contact Center Manager Server Utility
• Contact Center License Manager
• Contact Center Manager Administration (CCMA)
• Communication Control Toolkit (CCT)
Voice Contact Server supports two Network Interface Cards (NICs) and two subnets (one contact centersubnet and one ELAN subnet). The Voice Contact Server ELAN NIC and ELAN subnet are optional.
You can install a standby Voice Contact Server and commission it to be the standby Voice Contact Serverin a campus High Availability solution. The standby server takes over contact processing and becomesthe active server if the existing active server fails. The standby server provides High Availabilityredundancy and resiliency. The standby and active servers must be at the same patch level and have thesame hard disk drive partitions.
You can install another standby Voice Contact Server and commission it to be the Remote GeographicNode Voice Contact Server in a solution with Disaster Recovery. The Remote Geographic Node (RGN)server shadows the active server. Remote Geographic Node servers do not automatically take over if theactive server fails. The standby server, Remote Geographic Node server, and active server must be atthe same patch level and have the same hard disk drive partitions.
You must complete the procedures in this section in sequential order.
Standby Voice Contact Server installation prerequisites• Copy the most recent patches for the Contact Center software.
• Ensure that your new Contact Center license file with a High Availability standby serverlicense is available.
Avaya Aura® Contact Center Installation May 2013 583
Downloading the latest documentationBefore you begin
• Download the most recent version of Acrobat Reader.• Access the Avaya Web site at www.avaya.com/support.
About this taskDownload the most recent documentation to ensure you have the most recent updates.Updates in the documentation accurately reflect the most recent changes in the software.
Procedure
1. Log on to the Avaya Web site.
2. Compare the versions of the documentation on the site with the versions youhave.
3. If the version number on www.avaya.com/support is higher than your version,download the latest version of the document.
4. Review the Avaya Web site for release notes and readme files.
Installing Windows Server 2008 Release 2Before you begin
• Ensure that you have a newly formatted server that meets the specifications in AvayaAura® Contact Center Planning and Engineering (NN44400-210) on which to installMicrosoft Windows Server 2008 64-bit, Release 2, Service Pack 1.
Do not upgrade your operating system from a previous release. Contact Center is notsupported on an upgraded operating system.
• Configure all servers for RAID as described in Avaya Aura® Contact Center Planning andEngineering (NN44400-210).
• Ensure that you have a DVD for Windows Server 2008 Release 2.• Install the network interface card in the server.• Know the IP addresses for the contact center subnet.
584 Avaya Aura® Contact Center Installation May 2013Comments? [email protected]

About this taskInstall the Windows operating system, which is required for the Contact Center server software.During the installation, configure the Windows settings as required. You must perform thisprocedure on each server before you install Contact Center server software on the server.
Procedure
1. Insert the Windows Server 2008 64-bit Release 2 Standard Edition or WindowsServer 2008 64-bit Release 2 Enterprise Edition DVD into the DVD drive.
2. Install Windows Server 2008 Release 2 according to the instructions supplied bythe DVD.
3. On the first install page, select your language for installation.
4. Click Next.
5. On the Installation window, select a Language to install from the list.
6. Select a Time and currency format from the list.
7. Select Keyboard or input method from the list.
8. Click Next.
9. Click Install Now.
10. Select an operating system from the list.
11. Click Next.
12. On the first Install Windows screen, read the terms of the license agreement andselect I accept the license terms.
13. Click Next.
14. Select Custom.
15. Select the disk partition on which you want to install Windows Server 2008.
Important:You can use the partition management options to configure the partitions on yourserver.
16. Click Next.The installation proceeds and automatically restarts the server several times.
17. After completing the installation, log on to the server as Administrator. Enter andconfirm the Administrator password.
18. In the Initial Configuration Tasks window, select Activate Windows and followthe instructions or the Microsoft documentation to activate your server.
19. Select Set time zone and complete the information as required for your system.If you are installing Voice Contact Server Only software or Knowledge WorkerServer software on this server, ensure that you clear Automatically adjust clock
Installing Windows Server 2008 Release 2
Avaya Aura® Contact Center Installation May 2013 585
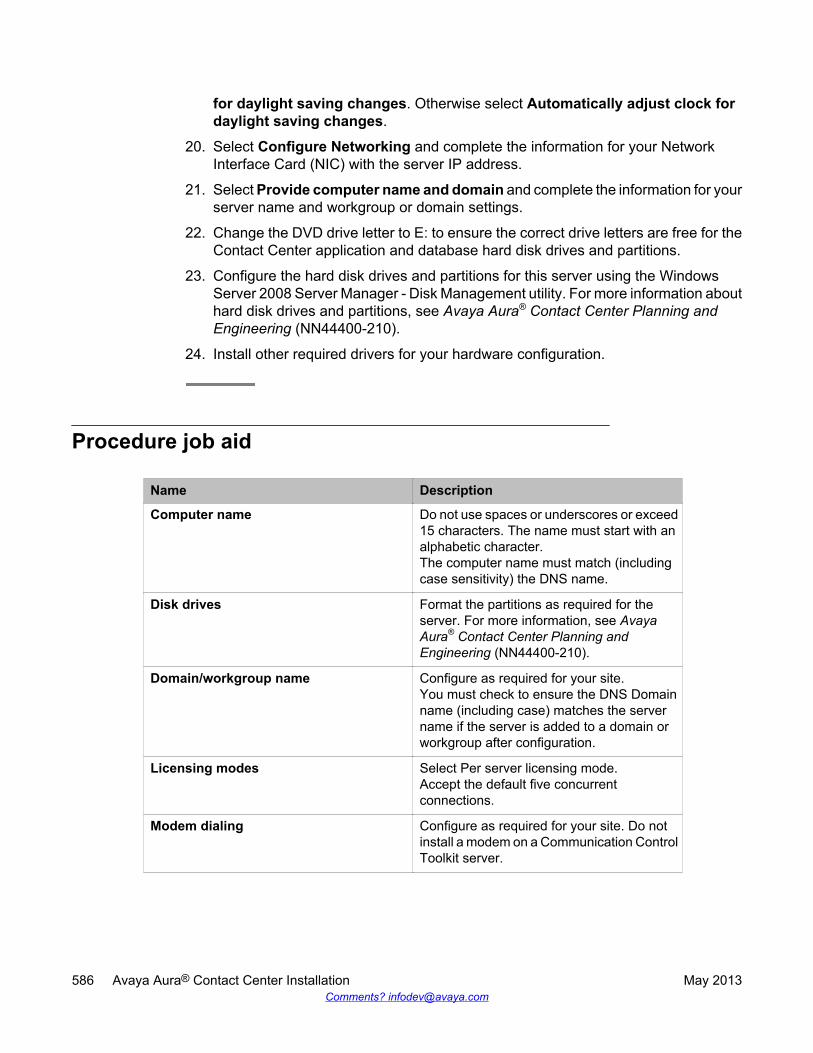
for daylight saving changes. Otherwise select Automatically adjust clock fordaylight saving changes.
20. Select Configure Networking and complete the information for your NetworkInterface Card (NIC) with the server IP address.
21. Select Provide computer name and domain and complete the information for yourserver name and workgroup or domain settings.
22. Change the DVD drive letter to E: to ensure the correct drive letters are free for theContact Center application and database hard disk drives and partitions.
23. Configure the hard disk drives and partitions for this server using the WindowsServer 2008 Server Manager - Disk Management utility. For more information abouthard disk drives and partitions, see Avaya Aura® Contact Center Planning andEngineering (NN44400-210).
24. Install other required drivers for your hardware configuration.
Procedure job aid
Name Description
Computer name Do not use spaces or underscores or exceed15 characters. The name must start with analphabetic character.The computer name must match (includingcase sensitivity) the DNS name.
Disk drives Format the partitions as required for theserver. For more information, see AvayaAura® Contact Center Planning andEngineering (NN44400-210).
Domain/workgroup name Configure as required for your site.You must check to ensure the DNS Domainname (including case) matches the servername if the server is added to a domain orworkgroup after configuration.
Licensing modes Select Per server licensing mode.Accept the default five concurrentconnections.
Modem dialing Configure as required for your site. Do notinstall a modem on a Communication ControlToolkit server.
586 Avaya Aura® Contact Center Installation May 2013Comments? [email protected]

Name Description
Network components Configure IP Address, WINS, DNS for one ortwo network cards as per configuration.Contact Center does not support IPv6.
Network connections If the server has more than one NIC/adapter,ensure contact center subnet appears first inthe network adapter binding order.
Partitions Configure C: drive to be a primary drive.Configure the other drives on your server tomeet the requirements according to AvayaAura® Contact Center Planning andEngineering (NN44400-210) for the server.
Regional settings window Configure as required for your site.
SNMP Configure for all servers.
Configuring Windows Server 2008Before you begin
• Install Microsoft Windows Server 2008 64-bit Release 2 on your server.
About this taskBefore you can install Avaya Aura® Contact Center software on your server, you must configureWindows Server 2008 to meet the requirements of the software.
You can prepare the server using this and other procedures, or you can download and use anAvaya Aura® Contact Center operating system configuration tool that installs the requiredWindows roles and features.
The Avaya Aura® Contact Center Windows Roles and Features installer configures thefollowing Windows Server 2008 resources:
• Windows Server Backup Features• SNMP Services• Active Directory Light Weight Directory Services• Application Server• Web Server (IIS)
For more information, and to download the Avaya Aura® Contact Center Windows Roles andFeatures installer, see http://support.avaya.com.
The Avaya Aura® Contact Center Windows Roles and Features installer replaces the followingprocedures:
Configuring Windows Server 2008
Avaya Aura® Contact Center Installation May 2013 587

• Configuring Windows Server 2008 (this procedure)• Configuring SNMP on your server• Installing operating system components for Contact Center
If you use the Avaya Aura® Contact Center Windows Roles and Features installer, skip thesethree procedures.
Procedure
1. Log on to the Windows Server 2008 server using an administrator account.
2. Select the Don’t display this screen on startup check box.
3. Update the emergency repair disk to record the latest configuration data for theserver.
4. Choose Start > Administrative Tools > Server Manager.5. In the left pane, click Features.
6. Click Add Features.
7. Select Windows Server Backup Features.
8. Click Next.9. Click Install.
10. Click Close.
11. Choose Start > All Programs > Accessories > System Tools > Windows ServerBackup.
12. Follow the on-screen instructions to select what you want to back up.
Installing the latest supported operating system servicepacks
Before you begin
• Access the Avaya hotfixes list on the Web site www.avaya.com/support.• Install and configure Microsoft Windows Server 2008 64-bit Release 2 on your server.• Review the recommendations on operating system service updates in Avaya Aura®
Contact Center Planning and Engineering (NN44400-210).• Install the Microsoft .NET Framework 3.5 and Microsoft .NET Framework 3.5 SP1.
About this taskAvaya recommends that you install the most recent supported operating system service packs.You must download the supported operating system service pack from the Avaya hotfixes list
588 Avaya Aura® Contact Center Installation May 2013Comments? [email protected]

to ensure your Contact Center server software functions correctly with the supported operatingsystem patches.
Procedure
1. Log on to the server and disable the Windows Update feature. There are a numberof methods for disabling the Windows Update feature, refer to the Windows Server2008 documentation for a method suitable to your solution. Disabling the WindowsUpdate feature prevents Windows Server 2008 from automatically applyingoperating system patches and potentially rebooting the server.
2. Review the Contact Center Service Packs Compatibility and Security HotfixesApplicability List to determine the most recent Avaya Aura® Contact Centersupported patches or service packs.
3. Download the appropriate Microsoft Windows Server 2008 patches for the AvayaAura® Contact Center software installed on this server.
4. Install the most recent Windows Server 2008 service pack that is validated withAvaya Aura® Contact Center by following the Microsoft Installation instructions.
Connecting to the contact center subnetAbout this taskConnect the Contact Center server to the contact center subnet. The contact center subnet isthe network on which the server software applications work together to route contacts andgenerate reports.
Procedure
1. Locate the slot assigned to the contact center subnet network interface card for theserver. Make a note of the slot.
2. Connect the cable from the contact center subnet to the contact center subnetnetwork interface card in the server in accordance with customer site networkingguidelines.
3. Use the ping command to test the contact center subnet.
Disabling the Remote Access servicesAbout this taskAvaya Aura® Contact Center does not support Remote Access Services (RAS). Disable theRemote Access services before installing Avaya Aura® Contact Center. Microsoft Remote
Connecting to the contact center subnet
Avaya Aura® Contact Center Installation May 2013 589

Desktop continues to run after you disable Remote Access services. After you disable theservices, restart the server.
Procedure
1. Choose Start > Administrative Tools > Services.
2. In the Services window, right-click the Remote Access Connection Managericon.
3. Click Properties.
4. In the General tab, from the Startup type list, select Disabled.
5. Click OK.
6. In the Services window, right-click the Remote Access Auto ConnectionManager icon.
7. Click Properties.
8. In the General tab, from the Startup type list, select Disabled.
9. Click OK.
10. In the Services window, click File, Exit.
11. Restart the server.
Configuring SNMP on your serverBefore you begin
• Install and configure Microsoft Windows Server 2008 64-bit Release 2 on your server.
About this taskConfigure Simple Network Management Protocol (SNMP) on your server to ensure you haveall of the required components of the Internet protocol for monitoring devices in your network.SNMP helps you manage data that describes the system configuration and errors that mayoccur between them.
Procedure
1. Log on to the server using the administrator account.
2. Choose Start > Control Panel > Programs.
3. In the Programs and Features section, click Turn Windows features on or off.
4. In the Server Manager window, select Server Manager and click Add Features.
5. Select SNMP Services.
590 Avaya Aura® Contact Center Installation May 2013Comments? [email protected]

6. Click Next.
7. Click Install.
8. If prompted, insert the Windows Server 2008 DVD.
9. Click Close.
Downloading the most recent patches to the serverBefore you begin
• Install and configure Windows Server 2008 64-bit Release 2 on your server according tothe settings in this chapter.
• Download and install the most recent and valid updates for Microsoft Windows Server2008 64-bit Release 2.
• Know the location at which you plan to install each Contact Center server softwarepackage.
• Ensure that you use one administrator account on your server to un-install and installsoftware updates.
About this taskTo ensure that you have the most current software, download the most recent Contact Centerpatches from www.avaya.com/support to the server you plan to install.
Procedure
1. Log on to the server using the administrator account.
2. Create a folder Avaya_Support\ProductUpdates on the drive on which youwant to save the software updates.
3. Download the most recent service pack file. Save and unzip the file on the ContactCenter server in the Avaya_Support\ProductUpdates folder.
4. If new patches are available for the latest service pack, download and save thepatches on the Contact Center server in the Avaya_Support\ProductUpdates folder.
5. Read the Contact Center Release Notes for the most recent instructions.
Downloading the most recent patches to the server
Avaya Aura® Contact Center Installation May 2013 591

Disabling unused Network AdaptersAbout this taskDisable all unused Network Adapters or Network Interface Cards (NICs) to improve networkcommunications and prevent the erroneous configuration of unused NICs during ContactCenter server commissioning.
Procedure
1. Log on to the server.
2. Click Start > Control Panel > Network and Internet > Network and SharingCenter > Change Adapter Settings.
3. Right-click on the unused Network Adapter, and select Disable.
4. Repeat this procedure for all unused Network Adapters.
Enabling Microsoft Remote Desktop connectionBefore you begin
• Install Microsoft Windows Server 2008 64-bit Release 2 on your server.• Log on to the server with administrator privileges.
About this taskEnable Microsoft Remote Desktop connection as your remote access tool. Microsoft RemoteDesktop provides remote access for support on the server.
Procedure
1. Choose Start > Control Panel > System and Security.
2. In the System section, select Allow remote access.
3. Click the Remote tab.
4. Select Allow connections from computers running any version of RemoteDesktop (less secure).
5. Click OK.
592 Avaya Aura® Contact Center Installation May 2013Comments? [email protected]

Configuring Data Execution PreventionAbout this taskConfigure the Data Execution Prevention (DEP) hardware and software to perform additionalchecks on memory that protect the Avaya Aura® Contact Center server against malicious codeexploitation.
Procedure
1. Log on to Windows as administrator.
2. Choose Start > Control Panel > System and Security.
3. Click System.
4. In the System window, click Advanced system settings.
5. In the System Properties dialog box, click the Advanced tab.
6. Under Performance, click Settings.
7. In the Performance Options dialog box, click the Data Execution Preventiontab.
8. On the Data Execution Prevention tab, select Turn on DEP for essentialWindows programs and services only.
9. Click OK.
10. On the System Properties dialog box, click OK.
11. Click OK to restart the computer.
Importing Contact Center Firewall Security policyBefore you begin
• Install Microsoft Windows Server 2008 64-bit Release 2 on your server.• Log on to the server with administrator privileges.• Download the most recent Avaya Aura® Contact Center Firewall Security policy from
www.avaya.com/support.
About this taskImport the Avaya Aura® Contact Center Firewall Security policy to ensure all contact centerservers in the solution can communicate.
Configuring Data Execution Prevention
Avaya Aura® Contact Center Installation May 2013 593

Avaya recommends that you export and backup your existing firewall security policy beforeimporting the Avaya Aura® Contact Center Firewall Security policy. You can use this backuppolicy to rollback the Avaya Aura® Contact Center Firewall Security policy, if you ever needto.
Procedure
1. Choose Start > Administrative Tools > Windows Firewall with AdvancedSecurity.
2. Choose Actions > Export Policy.
3. In the File name box, type the name for the backup policy.
4. Click Save.Windows exports the existing policy. You can use this backup policy to rollback theAvaya Aura® Contact Center Firewall Security policy, if you ever need to.
5. On the Policy successfully exported message box, click OK.
6. Choose Actions > Import Policy.
7. On the policy overwrite message box, click Yes.
8. Navigate to the folder containing the Avaya Aura® Contact Center Firewall Securitypolicy.
9. Click Open.Windows imports the Avaya Aura® Contact Center Firewall Security policy.
10. On the Policy successfully imported message box, click OK.
Disabling NetBIOSAbout this taskIf the Contact Center server uses two Network Interface Cards (NICs), disable NetBIOS on theEmbedded LAN (ELAN) network interface card (NIC) to avoid NetBIOS conflicts.
Contact Center supports two Network Interface Cards (NICs) and two subnets (one contactcenter subnet and one ELAN subnet). The Contact Center ELAN NIC and ELAN subnet areoptional.
Procedure
1. Choose Start > Control Panel > Network and Internet.
2. Click Network and Sharing Center.
3. Click Change adapter settings.
4. Right-click the ELAN Network Interface Card (NIC).
594 Avaya Aura® Contact Center Installation May 2013Comments? [email protected]

5. Click Properties.
6. Select Internet Protocol Version 4 (TCP/IPv4).
7. Click Properties.
8. Click Advanced.
9. Click the WINS tab.
10. Select the Disable NetBIOS over TCP/IP check box.
11. Click OK.
Connecting the Embedded LAN subnetBefore you begin
• Install two network cards on the Contact Center server.• Disable the NetBIOS on the ELAN network interface card.• Connect the contact center subnet network interface card.
About this taskIf your server uses two NICs, connect the Embedded LAN (ELAN) NIC to the ELAN subnet.Contact Center supports two network interface cards (NICs) and two subnets (one contactcenter subnet and one ELAN subnet). The Contact Center ELAN NIC and ELAN subnet areoptional.
Procedure
1. Locate the slot assigned to the ELAN network interface card for the server.
2. Write the MAC address of the card on a small label. Attach the label to the back ofthe card or the chassis slot position.
3. Connect the ELAN subnet from the Avaya equipment to the Ethernet hub.
4. Connect the network cable from the ELAN network interface card in the server tothe hub.
5. Plug in the power cord for the hub.
6. If you have an ELAN subnet network connection, use the ping command to test it.
Connecting the Embedded LAN subnet
Avaya Aura® Contact Center Installation May 2013 595

Configuring the binding orderBefore you begin
• Install two network interface cards on the Contact Center server.• Disable the NetBIOS on the ELAN network interface card.• Connect the Contact Center server network interface card to the contact center subnet.• Connect the Contact Center server ELAN network interface card to the ELAN subnet.
About this taskConfigure the binding order of the network cards. The contact center subnet network interfacecard must be bound first and then the ELAN network interface card.
Procedure
1. Choose Start > Control Panel > Network and Internet > Network and SharingCenter.
2. Click Change adapter settings.
3. In the Network Connections window, press the ALT key.A hidden menu appears.
4. Choose Advanced > Advanced Settings.
5. In the Connections box, ensure that the contact center subnet connection is listedfirst. If it is not listed first, adjust the order.
Installing operating system components for ContactCenter
Before you begin
• Install Windows Server 2008 64-bit Release 2.
About this taskBefore installing Contact Center software, you must install specific operating system softwarecomponents such as Internet Information Services to integrate the components in ContactCenter.
596 Avaya Aura® Contact Center Installation May 2013Comments? [email protected]

Procedure
1. Choose Start > Administrative Tools > Server Manager.
2. In the left-hand column of the Server Manager, right-click Roles, and select AddRoles.
3. Review the requirements for the new role, and click Next.
4. Under Server Roles, select Active Directory Lightweight Directory Services.
5. If an Add Roles Wizard message box that lists features required by Active DirectoryLightweight Directory Services appears, click Add Required Features.
6. Under Server Roles, select Application Server.
7. If an Add Roles Wizard message box that lists features required by ApplicationServer appears, click Add Required Features.
8. Under Application Server, select Role Services.
9. Select Web Server (IIS) Support.
10. If an Add Roles Wizard message box appears, listing features required by WebServer (IIS) Support appears, click Add Required Features.
11. Click Next.
12. On the Introduction to Web Server (IIS) page, click Next.
13. On the Select Role Services page, under Common HTTP Features, select thefollowing services:
• Static Content
• Default Document
• Directory Browsing
• HTTP Errors
• HTTP Redirection
Important:All other services check boxes must be cleared.
14. On the Select Role Services page, under Application Development, select thefollowing services:
• ASP.NET
• .NET Extensibility
• ASP
• ISAPI Extensions
• ISAPI Filters
Installing operating system components for Contact Center
Avaya Aura® Contact Center Installation May 2013 597

• Server Side Includes
Important:All other services check boxes must be cleared.
15. On the Select Role Services page, under Health and Diagnosis, select thefollowing services:
• HTTP Logging
• Logging Tools
• Request Monitor
• Tracing
Important:All other services check boxes must be cleared.
16. On the Select Role Services page, under Security, select all services.
17. On the Select Role Services page, under Performance, select all services.
18. On the Select Role Services page, under Management Tools, select the followingservices:
• IIS Management Console
• IIS Management Scripts and Tools
• Management Service
• All items under IIS 6 Management Compatibility
Important:All other services check boxes must be cleared.
19. Click Next.
20. Review the installation information.
21. Click Install.
22. On the Installation Results page, click Close.
23. Restart the server if required.
598 Avaya Aura® Contact Center Installation May 2013Comments? [email protected]

Configuring MIME types to support Microsoft updatesAbout this taskConfigure the Multipurpose Internet Mail Extension (MIME) types to support Microsoft updatesand patches.
Procedure
1. Log on to the server.
2. Click Start > Administrative Tools > Computer Management.
3. In the Computer Management dialog box, expand Services and Applications >Internet Information Services > IIS Manager > Sites.
4. Select Default Web Site.
5. Under IIS, select MIME Types.
6. Double-click MIME Types.
7. On the Actions list on the right, click Add.
8. In the File name extension box, type .msp.
9. In the MIME Type box, type application/microsoftpatch.
10. Click OK.
11. On the Actions list on the right, click Add.
12. In the File name extension box, type .msu.
13. In the MIME Type box, type application/microsoftupdate.
14. Click OK.
15. Close the Computer Management window.
Saving managed, active and standby server names and IPaddresses
About this taskComplete the following procedure on the standby Contact Center server to resolve themanaged CLAN server name to the managed IP address using the Windows hosts file.
Configuring MIME types to support Microsoft updates
Avaya Aura® Contact Center Installation May 2013 599

For information about saving the managed CLAN server name to the DNS server, contact yourSystem Administrator.
Perform this procedure on the standby Contact Center Server.
Procedure
1. Open Windows Explorer.
2. Go to the folder C:\Windows\system32\drivers\etc.
3. Double-click the hosts file, select Notepad and click OK.
4. Add the following to the hosts file: CLAN Managed IP address and the server nameto the hosts file.
• CLAN Managed IP address and the server name
• Active and Standby Server name and IP addresses
Important:The Managed Server name can be a full name or netbios server name.
Creating a local workstation AD-LDS replication account onthe standby server
Before you begin
• Know the user account details (user name and password) on the primary server. The detailsfor the account on the standby server must match the details for the account on the primaryserver.
About this taskCreate a user account on the standby server. This user account is used for AD-LDSReplication. This procedure is necessary when you install both Contact Center servers in aworkgroup. Perform this procedure before installing Contact Center on the standby server.
For this procedure, the name of the local user account is “myStandbyContactCenterServer\CCMAReplication”. You can choose another name for the account.
Important:The standby AD-LDS replication account name and password must match the primary AD-LDS replication account name and password. For example; If the primary AD-LDS accountis myPrimaryContactCenterServer\CCMAReplication, then the standby account must bemyStandbyContactCenterServer\CCMAReplication.
600 Avaya Aura® Contact Center Installation May 2013Comments? [email protected]

Procedure
1. Log on to the standby server.
2. Click Start > Administrative Tools > Computer Management.
3. In the Computer Management window, expand Local Users and Groups.
4. Right-click Users, and click New User.
5. In the New User dialog box, in the User name box, type CCMAReplication.
6. In the Password box, type a password.
7. In the Confirm password box, retype the password.
8. Clear the User must change password at next logon check box.
9. Click Create.
10. Click Close to close the New User dialog box.
Adding the local (workgroup) AD-LDS replication accountto the standby administrators and replicator group
About this taskAdd the AD-LDS replication account to the local Administrators and replicator group on thestandby server. Perform this procedure before installing Contact Center on the standbyserver.
If you are using a workgroup, you must create this AD-LDS replication account.
For this procedure, the name of the AD-LDS replication account is CCMAReplication. You canchoose another name for the account.
Procedure
1. Log on to the standby server.
2. Click Start > Administrative Tools > Computer Management.
3. In the Computer Management window, expand Local Users and Groups.
4. Click the Users folder.
5. In the right-pane, double-click CCMAReplication.
6. In the CCMAReplication Properties dialog box, click the Member Of tab.
7. Click Add.
Adding the local (workgroup) AD-LDS replication account to the standby administrators and replicator group
Avaya Aura® Contact Center Installation May 2013 601

8. In the Select Groups dialog box, in the Enter the object names to select box,type Administrators.
9. Click OK.
10. In the CCMAReplication Properties dialog box, on the Member Of tab, clickAdd.
11. In the Select Groups dialog box, in the Enter the object names to select box,type Replicator.
12. Click OK.
13. In the CCMAReplication Properties dialog box, click Apply to save yourchanges.
14. Click OK to close the CCMAReplication Properties dialog box.
Configuring the AD-LDS replication account as a serviceaccount
Before you begin
• If you are using a workgroup, add the local user account to the local Administrators andreplicator group on the standby Contact Center server.
About this taskConfigure the AD-LDS replication account as a service account on the standby Contact Centerserver. This account is the AD-LDS replication service account. Perform this procedure beforeinstalling Contact Center software on the standby server.
For this procedure, the name of the AD-LDS replication account is CCMAReplication. You canchoose another name for the account.
Procedure
1. Log on to the standby server.
2. Click Start > Administrative Tools > Local Security Policy.
3. In the Local Security Settings window, in the left pane, expand the LocalPolicies folder.
4. Click the User Rights Assignment folder.
5. In the right pane, double-click Log on as a service.
6. In the Log on as a service Properties dialog box, click Add User or Group.
602 Avaya Aura® Contact Center Installation May 2013Comments? [email protected]

7. In the Select Users, Computers, or Groups dialog box, type the account name;CCMAReplication.
8. Click OK.The account appears in the Log on as a service list.
9. Click Apply to save your changes.
10. Click OK to close the Log on as a service Properties dialog box.
Updating server for a network location installationAbout this taskConfigure the server .NET security settings to prepare the server for a remote networkinstallation. Avaya Aura® Contact Center supports network installation. You can insert theAvaya Aura® Contact Center DVD into a computer on your network. You then add this computeras a trusted site and network location on the new server. You can access this DVD from thenetwork location, and with some .NET security updates, use the remote DVD to install AvayaAura® Contact Center software on the new server.
Note:Skip this procedure if you plan to use the Avaya Aura® Contact Center DVD from the DVDdrive of the server.
Procedure
1. Insert the Avaya Aura® Contact Center DVD into a computer on the contact centernetwork.
2. Log on to the new server you are preparing for Contact Center.
3. Choose Start > Control Panel > Network and Internet > Internet Options.
4. In the Security tab, click Trusted sites.
5. In the Trusted sites section, click Sites.
6. In the Add this Web site to the zone box, type the <IP address> of the remotecomputer with the Avaya Aura® Contact Center DVD.
7. Click Add.
8. Click OK.
9. Close the Internet Options box.
10. From the new server, navigate to the network location with the DVD.
11. Access the remote DVD and in the root folder of the DVD, double-clickNetworkSetup.bat.
Updating server for a network location installation
Avaya Aura® Contact Center Installation May 2013 603

.NetFramework 3.5 installs and the .NetSecurity settings are modified.
12. If the Avaya Aura® Contact Center installation does not automatically start, in theroot folder of the DVD double-click Setup.exe.
13. After Avaya Aura® Contact Center installs, navigate to your network location anddouble-click NetworkSetupReset.bat.
Installing the standby Voice Contact Server software forCS1000 in a workgroup
Before you begin
• Ensure the Avaya Communication Server 1000 is configured. For more information seeAvaya Aura® Contact Center Configuration – Avaya CS1000 Integration(NN44400-512).
• Download the most recent Contact Center and Common Components patches to theserver.
• The primary active Voice Contact Server for Avaya Communication Server 1000 mustalready be installed and configured.
• The primary active Voice Contact Server for Avaya Communication Server 1000 mustalready be configured to support AD-LDS replication.
About this taskInstall the Contact Center standby Voice Contact Server software to provide a resilient solution.To configure CCMA replication you must enable replication during the install. Enablingreplication requires a few extra steps at install time to configure the standby server. Areplication server can only be configured at install time.
Note:Installing Voice Contact Server software installs Apache Tomcat Server. The default portnumber for Apache Tomcat is 8081. If you need to change the port number to avoid conflictswith third-party software, see your Apache Tomcat documentation.
Note:Read the Contact Center Release Notes for the most recent instructions.
To configure a CCMA replication server install Voice Contact Server software on the standbyserver and enable replication. Enabling replication requires a few extra steps at install time toconfigure the standby server. A replication server can only be configured at install time.
604 Avaya Aura® Contact Center Installation May 2013Comments? [email protected]

Procedure
1. Insert the Contact Center DVD into the DVD drive of your server.
2. If the installation does not automatically start, double-click Setup.exe.
3. Click Install to install the Microsoft .NET Framework 3.5 SP1 and Visual C++runtime libraries on the server.If you are prompted to accept the Microsoft .NET Framework 3.5.1 licenseagreement, click Accept. If you are prompted to restart the server, click Yes andrepeat step 2.
4. On the Welcome window, click Next.
5. On the License Agreement window, read the terms of the agreement.
6. Click I Accept the Terms of the End-User License Agreement.
7. Click Next.
8. On the Installation Selection window, under Avaya Communication Server 1000- AML, select Voice Contact Server Only.
9. Click Next.
Installing the standby Voice Contact Server software for CS1000 in a workgroup
Avaya Aura® Contact Center Installation May 2013 605

10. On the Installation Destination window, on the Application Destination Drivetab, select where to install the Contact Center application software by choosing adisk drive letter.
11. Click the Database Destination Drive tab.
12. Under Select the destination drive for the Contact Center database files, selectthe drive for the Contact Center Manager Server database.
13. Under Select the destination drive for the Contact Center database files, selectthe drive for the Communication Control Toolkit database.
14. Click the Product Updates Location tab.
606 Avaya Aura® Contact Center Installation May 2013Comments? [email protected]

15. Under Select the Product Updates Location, click Browse to locate the foldercontaining the Contact Center product updates.
16. Click Next.The System Readiness Check runs on the server.
17. If the System Readiness Check utility returns a Fail, the software installation cannotproceed until you correct the problem. Review any failures returned by the SystemReadiness Check and consult Avaya Aura® Contact Center Planning andEngineering (NN44400-210) to determine the actions to resolve the issue.You can ignore warnings if the potential impact to the operation of the contact centeris understood and not applicable.
18. Click Next.
19. On the Installation Data window, type the installation details for each tab.
20. Select the CCMS tab, and configure the server details.
Installing the standby Voice Contact Server software for CS1000 in a workgroup
Avaya Aura® Contact Center Installation May 2013 607

21. In the Customer Name box, type the customer name.
22. In the Company Name box, type the name of the company.
23. In the Site Name box, type the site name for the Contact Center server. The sitename must not contain spaces or non-alphabetical characters except hyphen (-)and underscore (_). The first character must be a letter. The site name must beunique and can consist of 6 to 15 characters. The Site Name of the standby servermust be the same as the Site Name of the primary server.
24. In the RSM IP Address box, type the Real-time Statistics Multicast IP Address ofthe server to associate with sending real-time data. The IP address must be from224.0.1.0 to 239.255.255.255. The default is 234.5.6.10.
25. In the Contact Center Server Subnet IP Address box, type the IP Address of theserver.
26. In the ELAN Subnet IP Address box, type the IP Address of the embedded localarea network, a dedicated Ethernet LAN that connects the Contact Center ManagerServer and the PABX. You must select the check box for the ELAN subnet IPAddress if you use an ELAN subnet.
27. Select the Licensing tab, and configure the licensing details.
608 Avaya Aura® Contact Center Installation May 2013Comments? [email protected]

28. The License File Location box displays the folder on the server which containsthe license file.
29. In the Primary License Manager IP Address box, type the IP address of thestandby License Manager. Each Voice Contact Server contains a License Manager.Type the IP address of the standby Voice Contact Server.
30. In the Primary License Port box, type the number of the communication portopened between the License Manager and Contact Center Manager Server. Thedefault port number is 3998 when you use only one License Manager.
31. In the Secondary License Manager IP Address box, type the IP address of thesecondary License Manager server. The secondary License Manager server isused only in a corporate licensed environment.
32. From the Licensing Package list, select the licenses that you have purchased.Select Nodal Enterprise for single-site contact centers. Select CorporateEnterprise for multi-site contact centers.
33. From the list of Optional Packages, enable the licensed features that you havepurchased.
34. Select the Open Queue check box.
35. In the Switch Serial Number box, type the serial number for the AvayaCommunication Server 1000.
Installing the standby Voice Contact Server software for CS1000 in a workgroup
Avaya Aura® Contact Center Installation May 2013 609

36. Select the CS1000 tab, and configure the Avaya Communication Server 1000details.
37. In the Switch Name box, type the name of the AML Avaya Communication Server1000 telephone switch. Valid characters for Avaya Communication Server 1000names are A–Z, a–z, 0–9, underscore (_), and period (.). Names must begin withan alphabetical character and cannot contain spaces. The last character must notbe an underscore or a period. Names must not exceed 80 characters in length.
38. In the Switch IP Address box, type the IP address of the Avaya CommunicationServer 1000.
39. In the Alternative Switch IP Address box, type the IP address of an alternateAvaya Communication Server 1000, if you have one.
40. In the Switch Customer Number box, type the customer number for the AvayaCommunication Server 1000.
41. In the Voice Connection Type section, select the method used to connect to thePABX. Select None, Avaya Aura Experience Portal, or Avaya CallPilot®. If you usea standalone Avaya CallPilot®, type the Avaya CallPilot® server ELAN IP Addressand then configure the Port to 10008. If you are using Avaya CallPilot® HighAvailability, type the Avaya CallPilot® Managed ELAN IP Address and thenconfigure the Port to 10008.
42. Select the CCMA tab, and configure the CCMA details.
610 Avaya Aura® Contact Center Installation May 2013Comments? [email protected]

43. In the Configuration section, select Enable CCMA Replication. CCMA replicationis reproducing an active copy of the AD-LDS for backup or emergency failure. Incase of server failure, a current AD-LDS is available to maintain the contactcenter.
44. On the Contact Center Installer message box, click Yes to confirm that this is astandby server.
45. In the LDAP Port Number box, type the port number for the Lightweight DirectoryAccess Protocol (LDAP) for which common contact information is stored on aserver. The default value of the port is 389. Check with the system administrator toensure that the port number is not already in use.
46. In the SSL Port Number box, type the port number for the Secure Sockets Layer(SSL) that controls security when applications are communicating across thenetwork. The default port is 636. Check with the system administrator to ensure thatthe port number is not already in use.
47. In the System Account Configuration section, in the Password box, type thepassword for the CCMA System Account user account. Confirm the password inthe second box. The password is not checked against the server security policy forminimum password requirements. Avaya recommends that you enter a passwordthat conforms to your corporate password policy.
48. Click Next.
Installing the standby Voice Contact Server software for CS1000 in a workgroup
Avaya Aura® Contact Center Installation May 2013 611
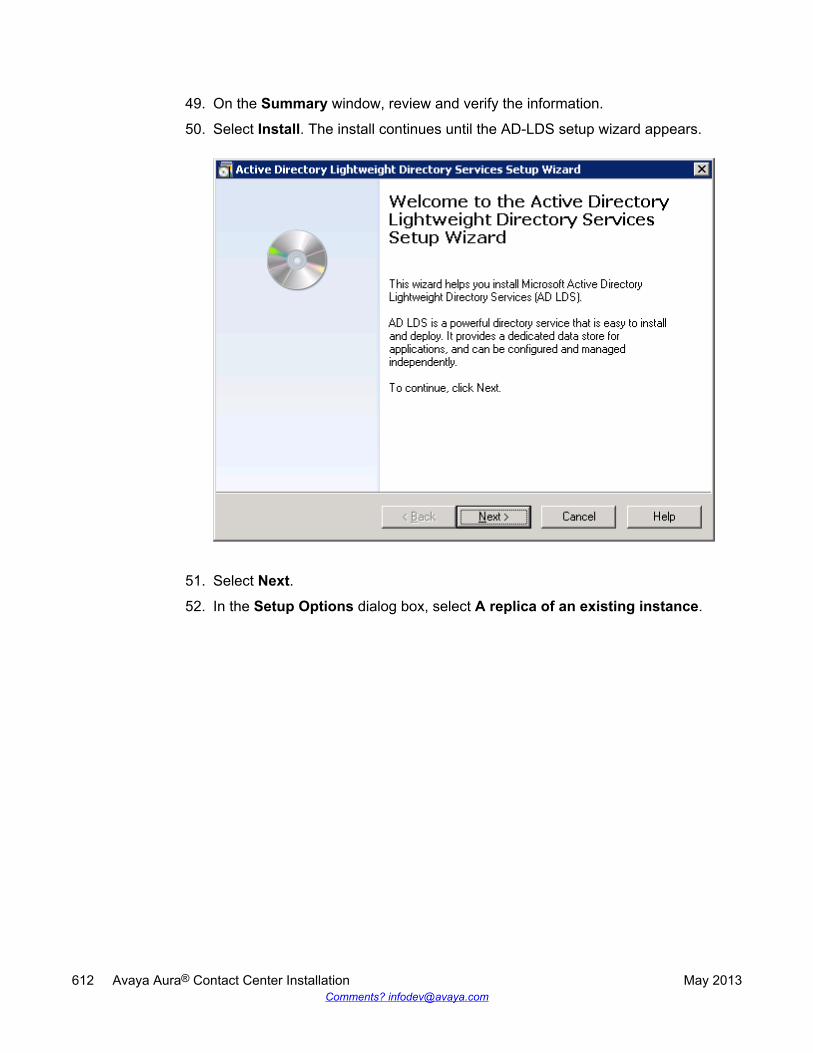
49. On the Summary window, review and verify the information.
50. Select Install. The install continues until the AD-LDS setup wizard appears.
51. Select Next.
52. In the Setup Options dialog box, select A replica of an existing instance.
612 Avaya Aura® Contact Center Installation May 2013Comments? [email protected]

53. Select Next.
54. On the Instance Name dialog box, in the Instance name box, type the AD-LDSinstance name. The default instance name is SymposiumWC, so typeSymposiumWC.
Installing the standby Voice Contact Server software for CS1000 in a workgroup
Avaya Aura® Contact Center Installation May 2013 613

55. In the Description box, type SymposiumWC.
56. Click Next.
57. On the Ports dialog box, if no other applications use the ports, accept the defaultvalues in the LDAP port number and SSL port number boxes and select Next.
614 Avaya Aura® Contact Center Installation May 2013Comments? [email protected]
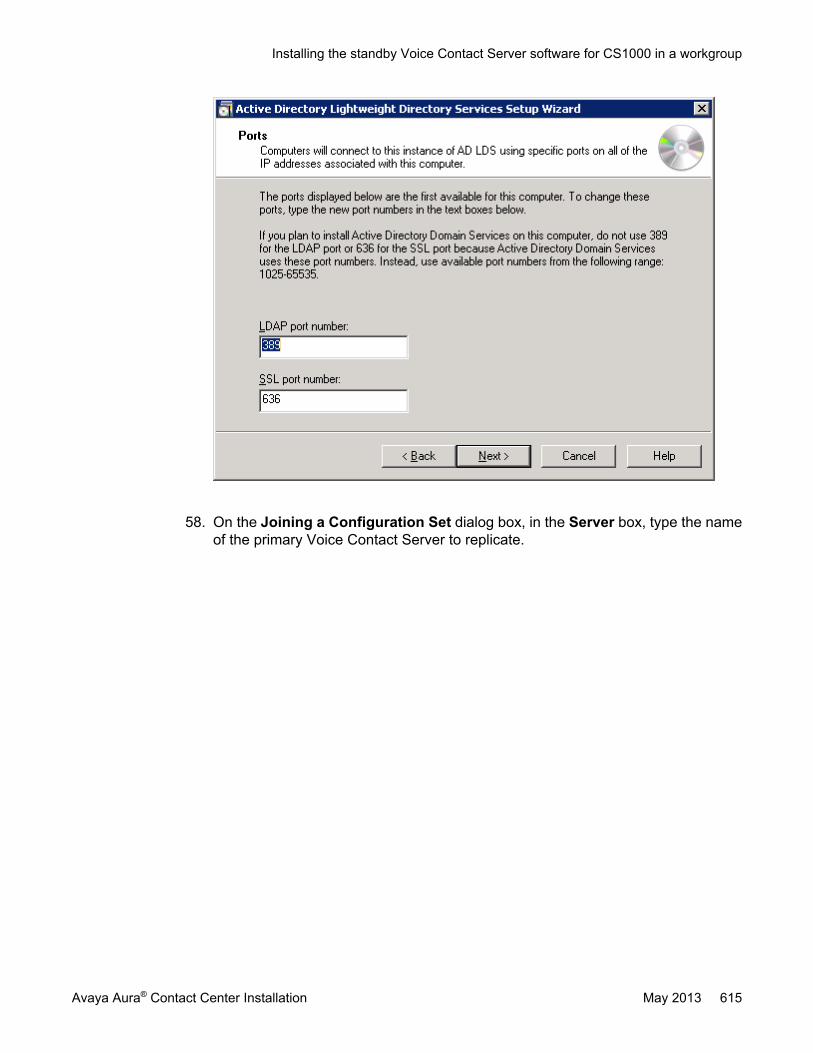
58. On the Joining a Configuration Set dialog box, in the Server box, type the nameof the primary Voice Contact Server to replicate.
Installing the standby Voice Contact Server software for CS1000 in a workgroup
Avaya Aura® Contact Center Installation May 2013 615

59. On the Joining a Configuration Set window, in the LDAP Port box, type the portnumber on the AD-LDS instance on the primary Voice Contact Server. The defaultis port number 389.
60. Click Next.
61. On the Administrative Credentials for the Configuration Set window, select Thisaccount.
62. In the User name box, type the primary Voice Contact Server name followed by itsAdministrator name in the format <primary Voice Contact Server name>\Administrator. For example enter WIN-RBMQ1SU0OL1\Administrator. If you havecreated another administrator account for Contact Center, then enter the details(name and password) for that primary Voice Contact Server administrator accounthere. Your administrator account must have full administrative privileges.
616 Avaya Aura® Contact Center Installation May 2013Comments? [email protected]

63. In the Password box, type the password for this user account.
64. Click Next.
65. In the Copying Application Directory Partitions dialog box, in the Partition DNlist, select the partition DC=Nortelnetworks,DC=COM.
Installing the standby Voice Contact Server software for CS1000 in a workgroup
Avaya Aura® Contact Center Installation May 2013 617
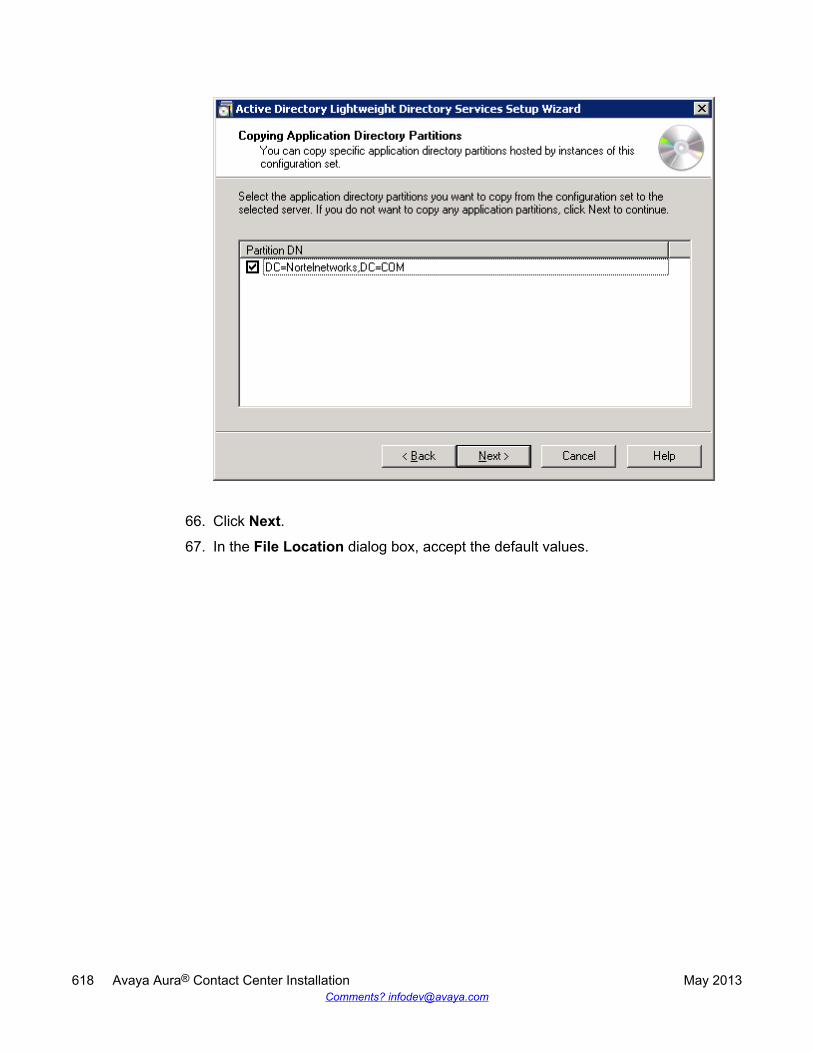
66. Click Next.
67. In the File Location dialog box, accept the default values.
618 Avaya Aura® Contact Center Installation May 2013Comments? [email protected]
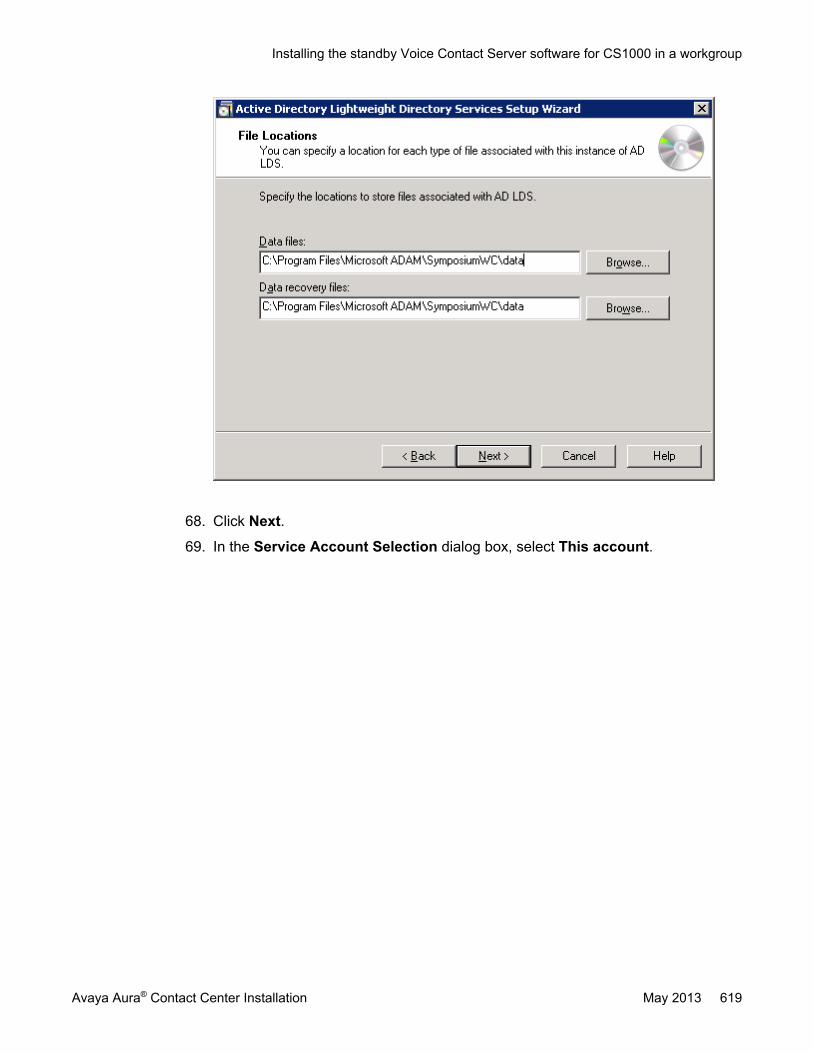
68. Click Next.
69. In the Service Account Selection dialog box, select This account.
Installing the standby Voice Contact Server software for CS1000 in a workgroup
Avaya Aura® Contact Center Installation May 2013 619

70. In the Service Account Selection dialog box, click Browse to locate the serviceaccount.The Select User dialog appears.
620 Avaya Aura® Contact Center Installation May 2013Comments? [email protected]

Note:Ensure that the local server name appears in the From this location box (thecomputer on which you install AD-LDS). If the standby Contact Center ManagerAdministration server name does not appear, click Locations and browse to thecorrect server name.
71. In the Select User dialog, click Advanced.The advanced Select User dialog appears.
72. In the advanced Select User dialog box, click Find Now.
Installing the standby Voice Contact Server software for CS1000 in a workgroup
Avaya Aura® Contact Center Installation May 2013 621

The list of available users appears in the Search results list.
73. In the advanced Select User dialog box, from the Search results list, select theworkgroup CCMA replication service account.
74. In the advanced Select User dialog box, click OK.The Select User dialog box appears. Example of selecting a workgroup CCMAreplication service account:
622 Avaya Aura® Contact Center Installation May 2013Comments? [email protected]

75. In the Select User dialog box, click OK.The Service Account Selection dialog appears.
76. In the Service Account Selection dialog box, click Next.The AD LDS Administrators dialog box appears.
77. In the AD LDS Administrators dialog box, select This account.
Installing the standby Voice Contact Server software for CS1000 in a workgroup
Avaya Aura® Contact Center Installation May 2013 623

78. Click Browse to locate the CCMA AD-LDS replication account.The Select User dialog box appears. Note that the location is this Voice ContactServer. Example of using a workgroup and selecting a CCMA AD-LDS replicationaccount:
Note:Ensure that the local server name appears in the From this location box (thecomputer on which you install AD-LDS). If the standby Contact Center ManagerAdministration server name does not appear, click Locations and browse to theserver name.
79. In the Select User dialog box, click Advanced.The advanced Select User dialog box appears. Note that the location is this VoiceContact Server . Example of using a workgroup and selecting a CCMA AD-LDSreplication account:
624 Avaya Aura® Contact Center Installation May 2013Comments? [email protected]

80. In the advanced Select User dialog box, click Find now to display the list of useraccounts.Example of using a workgroup and selecting a CCMA AD-LDS replication account:
Installing the standby Voice Contact Server software for CS1000 in a workgroup
Avaya Aura® Contact Center Installation May 2013 625
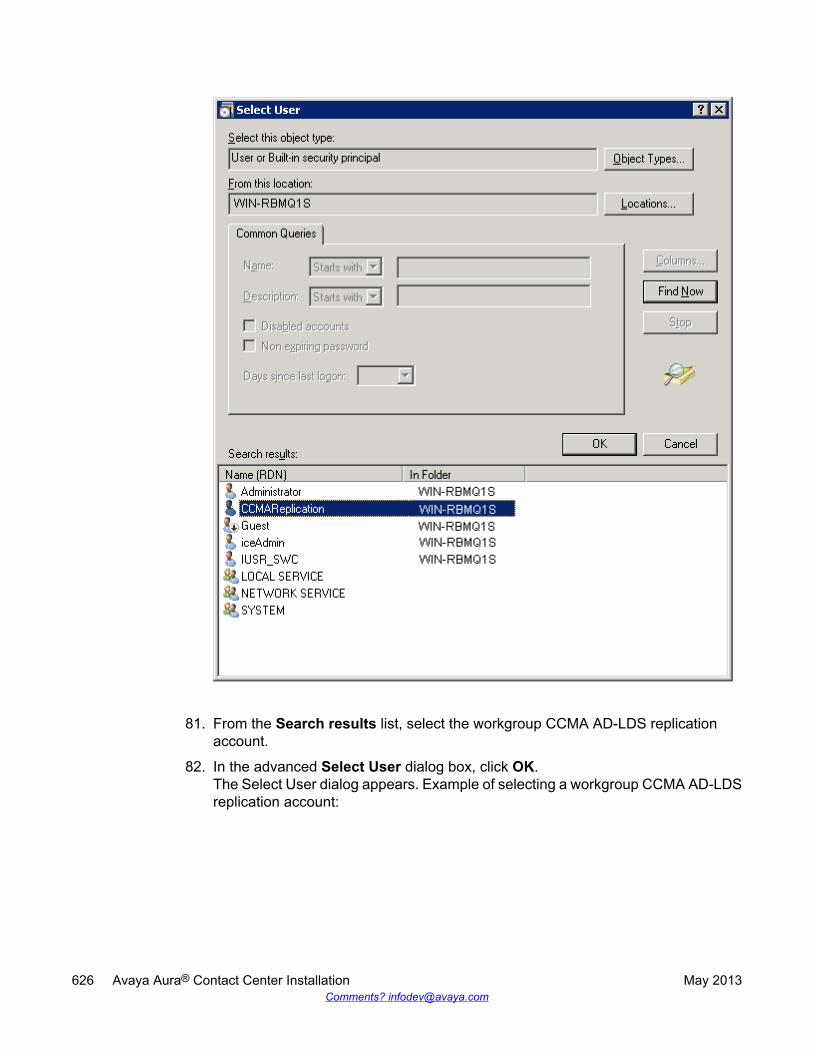
81. From the Search results list, select the workgroup CCMA AD-LDS replicationaccount.
82. In the advanced Select User dialog box, click OK.The Select User dialog appears. Example of selecting a workgroup CCMA AD-LDSreplication account:
626 Avaya Aura® Contact Center Installation May 2013Comments? [email protected]
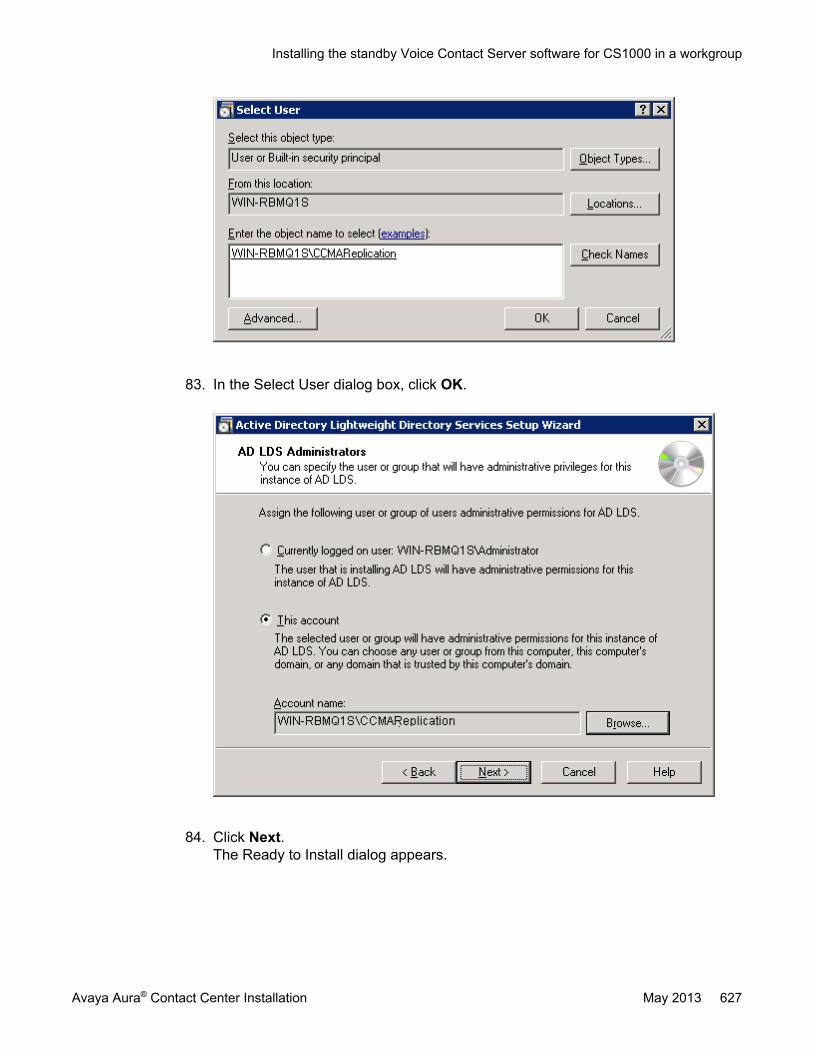
83. In the Select User dialog box, click OK.
84. Click Next.The Ready to Install dialog appears.
Installing the standby Voice Contact Server software for CS1000 in a workgroup
Avaya Aura® Contact Center Installation May 2013 627

85. Confirm the installation components, and click Next.
86. After the installation is complete, click Finish.
87. If prompted, restart the server.
Upgrading Java Runtime Environment, Java DevelopmentKit, and Apache Tomcat components using Third PartySoftware Upgrade Utility
Before you begin
• Apply Contact Center 6.3 Service Pack 10 or later on your system as an install-timepatch.
• Restart the Contact Center server to complete this procedure.
628 Avaya Aura® Contact Center Installation May 2013Comments? [email protected]

About this taskUse Third Party Software Upgrade Utility to automatically upgrade your Java RuntimeEnvironment and Tomcat software components. For more information, see Third PartySoftware Upgrade Utility on page 27.
Procedure
1. Log on to the server using the administrator account.
2. Navigate to the Avaya_Support\ProductUpdates folder.
3. Open the folder where you had saved the latest Service Pack.
4. Browse to ThirdParty\AACCThirdPartySoftwareUpgradeUtility.exe.
5. Double-click AACCThirdPartySoftwareUpgradeUtility.exe.
6. Click Upgrade.The system displays the “User Action Required” dialog box.
7. Click OK.
8. Click Yes to restart Contact Center and complete the upgrade.
Securing the Windows serverAbout this taskApply optional security measures to your operating system to further secure your server.
Important:Scanning software can degrade the performance and decrease the reliability of the system.Install virus scanning software only if the system connects to an exposed network or to theInternet.
Important:To maintain server performance, you must schedule virus scans during maintenanceperiods or low usage hours only.
Procedure
1. Harden the operating system using defined site procedures.
2. Install antivirus software. If you install antivirus software, Avaya recommends thatyou exclude some contact center files and folders from real-time and scheduledscans. For more information, and for a list of files and folders to exclude, see AvayaAura® Contact Center Planning and Engineering (NN44400-210).
Securing the Windows server
Avaya Aura® Contact Center Installation May 2013 629

630 Avaya Aura® Contact Center Installation May 2013Comments? [email protected]

Chapter 20: Multimedia Contact Serversoftware installation
This chapter describes how to install the Multimedia Contact Server software that enables your contactcenter to handle multimedia contacts. Contact Center Multimedia (CCMM) software enables routing ofemail (including voice mail, SMS, faxes, and scanned documents), outbound, and Web communicationcontacts to appropriate agents based on subject, contact type, or the time that the contact arrives.
This section describes how to install Multimedia Contact Server software in Avaya Communication Server1000 based solutions.
In some small contact center environments, you can install a Voice and Multimedia Contact Server toprocess both voice and multimedia contacts. But in large contact center environments, you must installthe Multimedia Contact Server software on a standalone server. Separate servers are also required foremail (MS Exchange for example), Web communication, and some outbound call processing.
You must complete all the procedures in this section in sequential order.
Standby Multimedia Contact Server - High Availability noteAvaya Aura® Contact Center Multimedia Contact Server supports High Availability. To install a standbyMultimedia Contact Server, first use the procedures in this chapter to install a primary active MultimediaContact Server, then repeat the procedures in this chapter to install a standby Multimedia ContactServer.
You can install a Multimedia Contact Server and commission it to be the standby Multimedia ContactServer in a campus High Availability solution. The standby server takes over multimedia contactprocessing and becomes the active server if the existing active Multimedia Contact Server fails. Thestandby server provides High Availability redundancy and resiliency. The standby and active servers mustbe at the same patch level and have the same hard disk drive partitions.
You can install another standby Multimedia Contact Server and commission it to be the RemoteGeographic Node Multimedia Contact Server in a solution with Disaster Recovery. The RemoteGeographic Node (RGN) server shadows the active server. The Remote Geographic Node server doesnot automatically take over if the active server fails. The standby server, Remote Geographic Node server,and active server must be at the same patch level and have the same hard disk drive partitions.
The roles and responsibilities of the active, Remote Geographic Node, and standby Multimedia ContactServers are defined later during commissioning.
Avaya Aura® Contact Center Installation May 2013 631

Multimedia Contact Server installation prerequisites• Install a Voice Contact Server to provide the core functionality for this Multimedia
Contact Server.
• If you use email in your contact center, install and configure an inbound email serverand an outbound email server in your network.
• If you use Web communications in your contact center, install and configure a Webserver in your network.
• If you use predictive outbound in your contact center, ensure that the predictiveoutbound hardware and software is configured for your network.
• Ensure that your new Contact Center license file is available.
Downloading the latest documentationBefore you begin
• Download the most recent version of Acrobat Reader.• Access the Avaya Web site at www.avaya.com/support.
About this taskDownload the most recent documentation to ensure you have the most recent updates.Updates in the documentation accurately reflect the most recent changes in the software.
Procedure
1. Log on to the Avaya Web site.
2. Compare the versions of the documentation on the site with the versions youhave.
3. If the version number on www.avaya.com/support is higher than your version,download the latest version of the document.
4. Review the Avaya Web site for release notes and readme files.
632 Avaya Aura® Contact Center Installation May 2013Comments? [email protected]

Installing Windows Server 2008 Release 2Before you begin
• Ensure that you have a newly formatted server that meets the specifications in AvayaAura® Contact Center Planning and Engineering (NN44400-210) on which to installMicrosoft Windows Server 2008 64-bit, Release 2, Service Pack 1.
Do not upgrade your operating system from a previous release. Contact Center is notsupported on an upgraded operating system.
• Configure all servers for RAID as described in Avaya Aura® Contact Center Planning andEngineering (NN44400-210).
• Ensure that you have a DVD for Windows Server 2008 Release 2.• Install the network interface card in the server.• Know the IP addresses for the contact center subnet.
About this taskInstall the Windows operating system, which is required for the Contact Center server software.During the installation, configure the Windows settings as required. You must perform thisprocedure on each server before you install Contact Center server software on the server.
Procedure
1. Insert the Windows Server 2008 64-bit Release 2 Standard Edition or WindowsServer 2008 64-bit Release 2 Enterprise Edition DVD into the DVD drive.
2. Install Windows Server 2008 Release 2 according to the instructions supplied bythe DVD.
3. On the first install page, select your language for installation.
4. Click Next.
5. On the Installation window, select a Language to install from the list.
6. Select a Time and currency format from the list.
7. Select Keyboard or input method from the list.
8. Click Next.
9. Click Install Now.
10. Select an operating system from the list.
11. Click Next.
12. On the first Install Windows screen, read the terms of the license agreement andselect I accept the license terms.
Installing Windows Server 2008 Release 2
Avaya Aura® Contact Center Installation May 2013 633

13. Click Next.
14. Select Custom.
15. Select the disk partition on which you want to install Windows Server 2008.
Important:You can use the partition management options to configure the partitions on yourserver.
16. Click Next.The installation proceeds and automatically restarts the server several times.
17. After completing the installation, log on to the server as Administrator. Enter andconfirm the Administrator password.
18. In the Initial Configuration Tasks window, select Activate Windows and followthe instructions or the Microsoft documentation to activate your server.
19. Select Set time zone and complete the information as required for your system.If you are installing Voice Contact Server Only software or Knowledge WorkerServer software on this server, ensure that you clear Automatically adjust clockfor daylight saving changes. Otherwise select Automatically adjust clock fordaylight saving changes.
20. Select Configure Networking and complete the information for your NetworkInterface Card (NIC) with the server IP address.
21. Select Provide computer name and domain and complete the information for yourserver name and workgroup or domain settings.
22. Change the DVD drive letter to E: to ensure the correct drive letters are free for theContact Center application and database hard disk drives and partitions.
23. Configure the hard disk drives and partitions for this server using the WindowsServer 2008 Server Manager - Disk Management utility. For more information abouthard disk drives and partitions, see Avaya Aura® Contact Center Planning andEngineering (NN44400-210).
24. Install other required drivers for your hardware configuration.
Procedure job aid
Name Description
Computer name Do not use spaces or underscores or exceed15 characters. The name must start with analphabetic character.
634 Avaya Aura® Contact Center Installation May 2013Comments? [email protected]

Name Description
The computer name must match (includingcase sensitivity) the DNS name.
Disk drives Format the partitions as required for theserver. For more information, see AvayaAura® Contact Center Planning andEngineering (NN44400-210).
Domain/workgroup name Configure as required for your site.You must check to ensure the DNS Domainname (including case) matches the servername if the server is added to a domain orworkgroup after configuration.
Licensing modes Select Per server licensing mode.Accept the default five concurrentconnections.
Modem dialing Configure as required for your site. Do notinstall a modem on a Communication ControlToolkit server.
Network components Configure IP Address, WINS, DNS for one ortwo network cards as per configuration.Contact Center does not support IPv6.
Network connections If the server has more than one NIC/adapter,ensure contact center subnet appears first inthe network adapter binding order.
Partitions Configure C: drive to be a primary drive.Configure the other drives on your server tomeet the requirements according to AvayaAura® Contact Center Planning andEngineering (NN44400-210) for the server.
Regional settings window Configure as required for your site.
SNMP Configure for all servers.
Configuring Windows Server 2008Before you begin
• Install Microsoft Windows Server 2008 64-bit Release 2 on your server.
About this taskBefore you can install Avaya Aura® Contact Center software on your server, you must configureWindows Server 2008 to meet the requirements of the software.
Configuring Windows Server 2008
Avaya Aura® Contact Center Installation May 2013 635

You can prepare the server using this and other procedures, or you can download and use anAvaya Aura® Contact Center operating system configuration tool that installs the requiredWindows roles and features.
The Avaya Aura® Contact Center Windows Roles and Features installer configures thefollowing Windows Server 2008 resources:
• Windows Server Backup Features• SNMP Services• Active Directory Light Weight Directory Services• Application Server• Web Server (IIS)
For more information, and to download the Avaya Aura® Contact Center Windows Roles andFeatures installer, see http://support.avaya.com.
The Avaya Aura® Contact Center Windows Roles and Features installer replaces the followingprocedures:
• Configuring Windows Server 2008 (this procedure)• Configuring SNMP on your server• Installing operating system components for Contact Center
If you use the Avaya Aura® Contact Center Windows Roles and Features installer, skip thesethree procedures.
Procedure
1. Log on to the Windows Server 2008 server using an administrator account.
2. Select the Don’t display this screen on startup check box.
3. Update the emergency repair disk to record the latest configuration data for theserver.
4. Choose Start > Administrative Tools > Server Manager.
5. In the left pane, click Features.
6. Click Add Features.
7. Select Windows Server Backup Features.
8. Click Next.
9. Click Install.
10. Click Close.
11. Choose Start > All Programs > Accessories > System Tools > Windows ServerBackup.
12. Follow the on-screen instructions to select what you want to back up.
636 Avaya Aura® Contact Center Installation May 2013Comments? [email protected]

Installing the latest supported operating system servicepacks
Before you begin
• Access the Avaya hotfixes list on the Web site www.avaya.com/support.• Install and configure Microsoft Windows Server 2008 64-bit Release 2 on your server.• Review the recommendations on operating system service updates in Avaya Aura®
Contact Center Planning and Engineering (NN44400-210).• Install the Microsoft .NET Framework 3.5 and Microsoft .NET Framework 3.5 SP1.
About this taskAvaya recommends that you install the most recent supported operating system service packs.You must download the supported operating system service pack from the Avaya hotfixes listto ensure your Contact Center server software functions correctly with the supported operatingsystem patches.
Procedure
1. Log on to the server and disable the Windows Update feature. There are a numberof methods for disabling the Windows Update feature, refer to the Windows Server2008 documentation for a method suitable to your solution. Disabling the WindowsUpdate feature prevents Windows Server 2008 from automatically applyingoperating system patches and potentially rebooting the server.
2. Review the Contact Center Service Packs Compatibility and Security HotfixesApplicability List to determine the most recent Avaya Aura® Contact Centersupported patches or service packs.
3. Download the appropriate Microsoft Windows Server 2008 patches for the AvayaAura® Contact Center software installed on this server.
4. Install the most recent Windows Server 2008 service pack that is validated withAvaya Aura® Contact Center by following the Microsoft Installation instructions.
Installing the latest supported operating system service packs
Avaya Aura® Contact Center Installation May 2013 637

Connecting to the contact center subnetAbout this taskConnect the Contact Center server to the contact center subnet. The contact center subnet isthe network on which the server software applications work together to route contacts andgenerate reports.
Procedure
1. Locate the slot assigned to the contact center subnet network interface card for theserver. Make a note of the slot.
2. Connect the cable from the contact center subnet to the contact center subnetnetwork interface card in the server in accordance with customer site networkingguidelines.
3. Use the ping command to test the contact center subnet.
Adding a server to a domainBefore you begin
• Ensure that you have domain administrator privileges, or ask the Domain Administratorto assign you a domain user account for remote access.
• On the server, configure a preferred Domain Name System (DNS) server on the NetworkInterface Card (NIC).
About this taskAdd the server to an existing domain. Avaya recommends that you add the server to the domainbefore installing Contact Center software.
Ask your System Administrator to add a Domain Name System (DNS) static entry for thisserver. Each Contact Center server in a domain requires a DNS static entry.
Important:Avaya Aura® Contact Center High Availability solutions do not support Windows Server 2008Dynamic DNS.
In High Availability solutions, ask your System Administrator to add one DNS static entry forthe each managed name and associated managed IP address. A typical High Availabilitycampus solution with a pair of servers requires 3 DNS static entries; one DNS static entry for
638 Avaya Aura® Contact Center Installation May 2013Comments? [email protected]

the active server, one DNS static entry for the standby server, and one DNS static entry forthe managed name and associated IP address.
Procedure
1. Log on to the server.
2. Click Start > Administrative Tools > Server Manager.
3. Beside Computer Information, click Change System Properties.
4. In the System Properties dialog box, click the Computer Name tab.
5. Click Change.
6. In the Computer Name/Domain Changes dialog box, click the Domain option.
7. Type the domain name (you must provide the fully qualified domain name, whichincludes the prefix and suffix).
8. Click OK.
9. Type the domain administrator User name and Password.
10. Click OK.
11. Restart the server when you are prompted to do so.
Disabling the Remote Access servicesAbout this taskAvaya Aura® Contact Center does not support Remote Access Services (RAS). Disable theRemote Access services before installing Avaya Aura® Contact Center. Microsoft RemoteDesktop continues to run after you disable Remote Access services. After you disable theservices, restart the server.
Procedure
1. Choose Start > Administrative Tools > Services.
2. In the Services window, right-click the Remote Access Connection Managericon.
3. Click Properties.
4. In the General tab, from the Startup type list, select Disabled.
5. Click OK.
6. In the Services window, right-click the Remote Access Auto ConnectionManager icon.
Disabling the Remote Access services
Avaya Aura® Contact Center Installation May 2013 639

7. Click Properties.
8. In the General tab, from the Startup type list, select Disabled.
9. Click OK.
10. In the Services window, click File, Exit.
11. Restart the server.
Configuring SNMP on your serverBefore you begin
• Install and configure Microsoft Windows Server 2008 64-bit Release 2 on your server.
About this taskConfigure Simple Network Management Protocol (SNMP) on your server to ensure you haveall of the required components of the Internet protocol for monitoring devices in your network.SNMP helps you manage data that describes the system configuration and errors that mayoccur between them.
Procedure
1. Log on to the server using the administrator account.
2. Choose Start > Control Panel > Programs.
3. In the Programs and Features section, click Turn Windows features on or off.
4. In the Server Manager window, select Server Manager and click Add Features.
5. Select SNMP Services.
6. Click Next.
7. Click Install.
8. If prompted, insert the Windows Server 2008 DVD.
9. Click Close.
640 Avaya Aura® Contact Center Installation May 2013Comments? [email protected]

Downloading the most recent patches to the serverBefore you begin
• Install and configure Windows Server 2008 64-bit Release 2 on your server according tothe settings in this chapter.
• Download and install the most recent and valid updates for Microsoft Windows Server2008 64-bit Release 2.
• Know the location at which you plan to install each Contact Center server softwarepackage.
• Ensure that you use one administrator account on your server to un-install and installsoftware updates.
About this taskTo ensure that you have the most current software, download the most recent Contact Centerpatches from www.avaya.com/support to the server you plan to install.
Procedure
1. Log on to the server using the administrator account.
2. Create a folder Avaya_Support\ProductUpdates on the drive on which youwant to save the software updates.
3. Download the most recent service pack file. Save and unzip the file on the ContactCenter server in the Avaya_Support\ProductUpdates folder.
4. If new patches are available for the latest service pack, download and save thepatches on the Contact Center server in the Avaya_Support\ProductUpdates folder.
5. Read the Contact Center Release Notes for the most recent instructions.
Disabling unused Network AdaptersAbout this taskDisable all unused Network Adapters or Network Interface Cards (NICs) to improve networkcommunications and prevent the erroneous configuration of unused NICs during ContactCenter server commissioning.
Downloading the most recent patches to the server
Avaya Aura® Contact Center Installation May 2013 641

Procedure
1. Log on to the server.
2. Click Start > Control Panel > Network and Internet > Network and SharingCenter > Change Adapter Settings.
3. Right-click on the unused Network Adapter, and select Disable.
4. Repeat this procedure for all unused Network Adapters.
Enabling Microsoft Remote Desktop connectionBefore you begin
• Install Microsoft Windows Server 2008 64-bit Release 2 on your server.• Log on to the server with administrator privileges.
About this taskEnable Microsoft Remote Desktop connection as your remote access tool. Microsoft RemoteDesktop provides remote access for support on the server.
Procedure
1. Choose Start > Control Panel > System and Security.
2. In the System section, select Allow remote access.
3. Click the Remote tab.
4. Select Allow connections from computers running any version of RemoteDesktop (less secure).
5. Click OK.
Configuring Data Execution PreventionAbout this taskConfigure the Data Execution Prevention (DEP) hardware and software to perform additionalchecks on memory that protect the Avaya Aura® Contact Center server against malicious codeexploitation.
642 Avaya Aura® Contact Center Installation May 2013Comments? [email protected]

Procedure
1. Log on to Windows as administrator.
2. Choose Start > Control Panel > System and Security.
3. Click System.
4. In the System window, click Advanced system settings.
5. In the System Properties dialog box, click the Advanced tab.
6. Under Performance, click Settings.
7. In the Performance Options dialog box, click the Data Execution Preventiontab.
8. On the Data Execution Prevention tab, select Turn on DEP for essentialWindows programs and services only.
9. Click OK.
10. On the System Properties dialog box, click OK.
11. Click OK to restart the computer.
Importing Contact Center Firewall Security policyBefore you begin
• Install Microsoft Windows Server 2008 64-bit Release 2 on your server.• Log on to the server with administrator privileges.• Download the most recent Avaya Aura® Contact Center Firewall Security policy from
www.avaya.com/support.
About this taskImport the Avaya Aura® Contact Center Firewall Security policy to ensure all contact centerservers in the solution can communicate.
Avaya recommends that you export and backup your existing firewall security policy beforeimporting the Avaya Aura® Contact Center Firewall Security policy. You can use this backuppolicy to rollback the Avaya Aura® Contact Center Firewall Security policy, if you ever needto.
Procedure
1. Choose Start > Administrative Tools > Windows Firewall with AdvancedSecurity.
2. Choose Actions > Export Policy.
Importing Contact Center Firewall Security policy
Avaya Aura® Contact Center Installation May 2013 643
3. In the File name box, type the name for the backup policy.
4. Click Save.Windows exports the existing policy. You can use this backup policy to rollback theAvaya Aura® Contact Center Firewall Security policy, if you ever need to.
5. On the Policy successfully exported message box, click OK.
6. Choose Actions > Import Policy.
7. On the policy overwrite message box, click Yes.
8. Navigate to the folder containing the Avaya Aura® Contact Center Firewall Securitypolicy.
9. Click Open.Windows imports the Avaya Aura® Contact Center Firewall Security policy.
10. On the Policy successfully imported message box, click OK.
Configuring Internet Information ServicesBefore you begin
• Install Windows Server 2008 64-bit Release 2.
About this taskConfigure Internet Information Services (IIS) to enable the Web-based administrationapplication for the Multimedia software. IIS is an optional component of the Windows Server2008 Release 2 installation.
Procedure
1. Choose Start > Administrative Tools > Server Manager.
2. In the left-hand column of the Server Manager, right-click Roles, select AddRoles.
3. Review the requirements for the new role, and click Next.
4. Under Server Roles, select Web Server (IIS).
5. If an Add Roles Wizard message box appears, listing features required by WebServer (IIS) Support appears, click Add Required Features.
6. Click Next.
7. On the Web Server (IIS) introduction page, click Next.
8. On the Select Role Services page, under Common HTTP Features, select thefollowing services:
644 Avaya Aura® Contact Center Installation May 2013Comments? [email protected]

• Static Content
• Default Document
• Directory Browsing
• HTTP Errors
• HTTP Redirection
Important:All other services check boxes must be cleared.
9. On the Select Role Services page, under Application Development, select thefollowing services:
• ASP.NET
• .NET Extensibility
• ASP
• ISAPI Extensions
• ISAPI Filters
• Server Side Includes
Important:All other services check boxes must be cleared.
10. On the Select Role Services page, under Health and Diagnosis, select thefollowing services:
• HTTP Logging
• Logging Tools
• Request Monitor
• Tracing
Important:All other services check boxes must be cleared.
11. On the Select Role Services page, under Security, select all services.
12. On the Select Role Services page, under Performance, select all services.
13. On the Select Role Services page, under Management Tools, select the followingservices:
• IIS Management Console
• IIS Management Scripts and Tools
• Management Service
Configuring Internet Information Services
Avaya Aura® Contact Center Installation May 2013 645

• All items under IIS 6 Management Compatibility
Important:All other services check boxes must be cleared.
14. Click Next.
15. Review the installation information.
16. Click Install.
17. On the Installation Results page, click Close.
18. Restart the server if required.
Updating server for a network location installationAbout this taskConfigure the server .NET security settings to prepare the server for a remote networkinstallation. Avaya Aura® Contact Center supports network installation. You can insert theAvaya Aura® Contact Center DVD into a computer on your network. You then add this computeras a trusted site and network location on the new server. You can access this DVD from thenetwork location, and with some .NET security updates, use the remote DVD to install AvayaAura® Contact Center software on the new server.
Note:Skip this procedure if you plan to use the Avaya Aura® Contact Center DVD from the DVDdrive of the server.
Procedure
1. Insert the Avaya Aura® Contact Center DVD into a computer on the contact centernetwork.
2. Log on to the new server you are preparing for Contact Center.
3. Choose Start > Control Panel > Network and Internet > Internet Options.
4. In the Security tab, click Trusted sites.
5. In the Trusted sites section, click Sites.
6. In the Add this Web site to the zone box, type the <IP address> of the remotecomputer with the Avaya Aura® Contact Center DVD.
7. Click Add.
8. Click OK.
646 Avaya Aura® Contact Center Installation May 2013Comments? [email protected]

9. Close the Internet Options box.
10. From the new server, navigate to the network location with the DVD.
11. Access the remote DVD and in the root folder of the DVD, double-clickNetworkSetup.bat..NetFramework 3.5 installs and the .NetSecurity settings are modified.
12. If the Avaya Aura® Contact Center installation does not automatically start, in theroot folder of the DVD double-click Setup.exe.
13. After Avaya Aura® Contact Center installs, navigate to your network location anddouble-click NetworkSetupReset.bat.
Installing the Multimedia Contact Server softwareBefore you begin
• Download the most recent Contact Center Multimedia and common component patchesto the server.
• Empty all temporary folders on the server. To determine the specific temporary foldersfor a server, access the DOS prompt and type set. Note the values listed for TEMP andTMP, and delete all files in those locations.
About this taskInstall the Multimedia Contact Server software to provide inbound and outbound voice, email(including voice mail, SMS, faxes and scanned documents), and Web communications contacttypes in your contact center. Multimedia Contact Server also supports instant messaging inSIP-enabled contact centers.
Procedure
1. Insert the Avaya Aura® Contact Center DVD into the DVD drive of your server.
2. If the installation does not automatically start, double-click Setup.exe.
3. Click Install to install the Microsoft .NET Framework 3.5 SP1 and Visual C++runtime libraries on the server.If you are prompted to accept the Microsoft .NET Framework 3.5.1 licenseagreement, click Accept. If you are prompted to restart the server, click Yes andrepeat step 2.
4. On the Welcome window, click Next.
5. On the License Agreement window, read the terms of the agreement.
Installing the Multimedia Contact Server software
Avaya Aura® Contact Center Installation May 2013 647

6. Click I Accept the Terms of the End-User License Agreement.
7. Click Next.
648 Avaya Aura® Contact Center Installation May 2013Comments? [email protected]

8. On the Installation Selection window, in the appropriate section for your platformtype, select Multimedia Contact Server Only.
9. Click Next.
Installing the Multimedia Contact Server software
Avaya Aura® Contact Center Installation May 2013 649

10. On the Installation Destination window, on the Application Destination Drivetab, select the drive for the contact center software applications.
11. Click the Database Destination Drive tab.
650 Avaya Aura® Contact Center Installation May 2013Comments? [email protected]

12. Under Install Multimedia Server Database to, select the drive for the multimediaserver database.
13. Click the Product Updates Location tab.
Installing the Multimedia Contact Server software
Avaya Aura® Contact Center Installation May 2013 651

14. Under Select the parent directory where patches are stored, select the drive onwhich you stored the patches. Click Browse to locate the folder.
15. Click Next.The System Readiness Check utility runs on the server.
16. If the System Readiness Check utility returns a Fail, the software installation cannotproceed until you correct the problem. Review any failures returned by the SystemReadiness Check and consult Avaya Aura® Contact Center Planning andEngineering (NN44400-210) to determine the actions to resolve the issue.You can ignore warnings if the potential impact to the operation of the contact centeris understood and not applicable.
17. Click Next.
18. On the Installation Data window, type the installation details for the CCMM -Primary Server tab.
652 Avaya Aura® Contact Center Installation May 2013Comments? [email protected]

19. From the IM Provider list, select either None, Microsoft OCS or Aura PresenceServices. IM and presence features are supported for Avaya Aura® PresenceServices server and Microsoft Office Communications Server. Instant Messagingcontacts are supported only in SIP-enabled contact center solutions. AvayaCommunication Server 1000 (CS1000) based solutions do not support InstantMessaging contact routing.
20. In the Manager Server (CCMS) box, type the name of the server on which theContact Center Manager Server software is installed.
21. In the License Server box, type the name of the server on which the Contact CenterLicense Manager software is installed.
22. In the Telephony Server (CCT) box, type the name of the server on which theCommunication Control Toolkit software is installed.
23. In the Administration Server (CCMA) box, type the name of the server on whichthe Contact Center Manager Administration software is installed.
24. In the Inbound Mail Server (POP3) box, type the name of the server on which emailmessages are received in your network.
25. In the Outbound Mail Server (SMTP) box, type the name of the server from onwhich email messages are sent. Your inbound and outbound mail servers can havethe same name.
Installing the Multimedia Contact Server software
Avaya Aura® Contact Center Installation May 2013 653
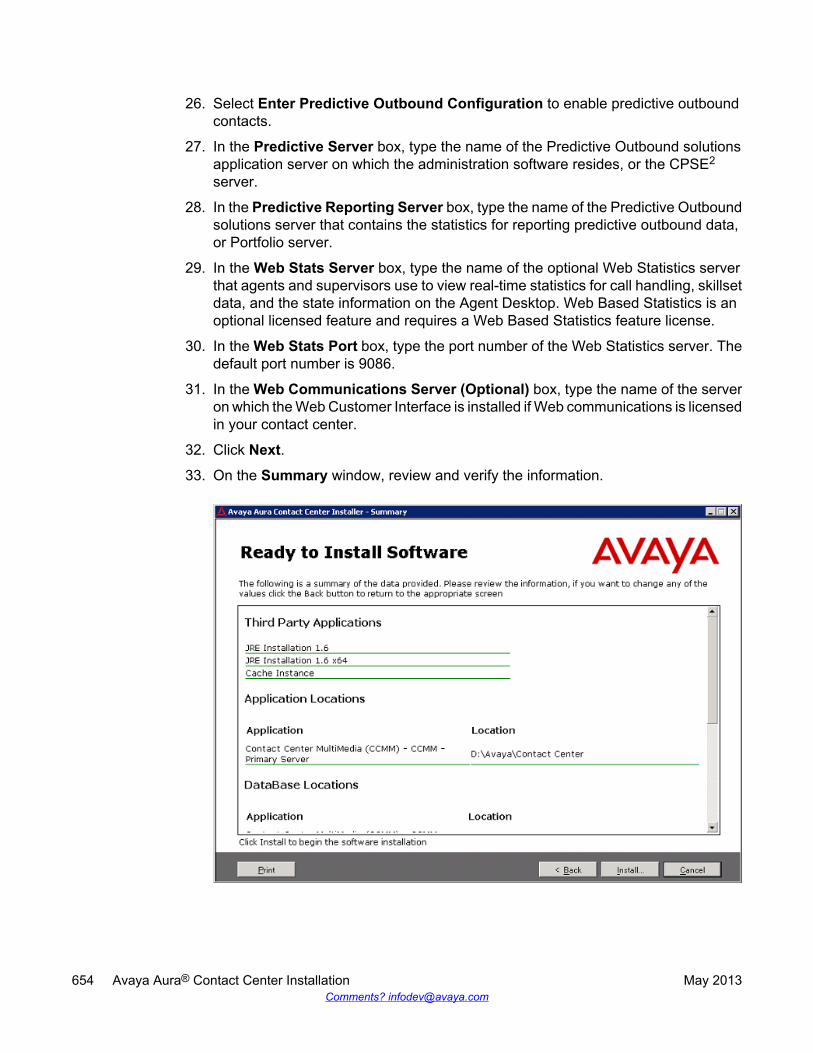
26. Select Enter Predictive Outbound Configuration to enable predictive outboundcontacts.
27. In the Predictive Server box, type the name of the Predictive Outbound solutionsapplication server on which the administration software resides, or the CPSE2
server.
28. In the Predictive Reporting Server box, type the name of the Predictive Outboundsolutions server that contains the statistics for reporting predictive outbound data,or Portfolio server.
29. In the Web Stats Server box, type the name of the optional Web Statistics serverthat agents and supervisors use to view real-time statistics for call handling, skillsetdata, and the state information on the Agent Desktop. Web Based Statistics is anoptional licensed feature and requires a Web Based Statistics feature license.
30. In the Web Stats Port box, type the port number of the Web Statistics server. Thedefault port number is 9086.
31. In the Web Communications Server (Optional) box, type the name of the serveron which the Web Customer Interface is installed if Web communications is licensedin your contact center.
32. Click Next.
33. On the Summary window, review and verify the information.
654 Avaya Aura® Contact Center Installation May 2013Comments? [email protected]

34. Click Install.
35. After the installation is complete, click Finish.
36. If prompted, restart the server.
Upgrading Java Runtime Environment, Java DevelopmentKit, and Apache Tomcat components using Third PartySoftware Upgrade Utility
Before you begin
• Apply Contact Center 6.3 Service Pack 10 or later on your system as an install-timepatch.
• Restart the Contact Center server to complete this procedure.
About this taskUse Third Party Software Upgrade Utility to automatically upgrade your Java RuntimeEnvironment and Tomcat software components. For more information, see Third PartySoftware Upgrade Utility on page 27.
Procedure
1. Log on to the server using the administrator account.
2. Navigate to the Avaya_Support\ProductUpdates folder.
3. Open the folder where you had saved the latest Service Pack.
4. Browse to ThirdParty\AACCThirdPartySoftwareUpgradeUtility.exe.
5. Double-click AACCThirdPartySoftwareUpgradeUtility.exe.
6. Click Upgrade.The system displays the “User Action Required” dialog box.
7. Click OK.
8. Click Yes to restart Contact Center and complete the upgrade.
Upgrading Java Runtime Environment, Java Development Kit, and Apache Tomcat components using Third PartySoftware Upgrade Utility
Avaya Aura® Contact Center Installation May 2013 655

Securing the Windows serverAbout this taskApply optional security measures to your operating system to further secure your server.
Important:Scanning software can degrade the performance and decrease the reliability of the system.Install virus scanning software only if the system connects to an exposed network or to theInternet.
Important:To maintain server performance, you must schedule virus scans during maintenanceperiods or low usage hours only.
Procedure
1. Harden the operating system using defined site procedures.
2. Install antivirus software. If you install antivirus software, Avaya recommends thatyou exclude some contact center files and folders from real-time and scheduledscans. For more information, and for a list of files and folders to exclude, see AvayaAura® Contact Center Planning and Engineering (NN44400-210).
Installing the external Web communication serversoftware
Before you begin
• Install Contact Center Multimedia software.
About this taskIf you use Web communications in your contact center, you can use the Sample CustomerInterface (CI) Web site implementation to help you develop pages for your corporate Web site.The Web services architecture is a platform-independent interface that customers can accessfrom both Microsoft .NET and Java applications. Customer Web sites or third-party applicationsuse the open interface for integration with the Contact Center Multimedia system.
656 Avaya Aura® Contact Center Installation May 2013Comments? [email protected]

The Customer Interface Web services provide a range of methods to perform the followingfunctions:
• Register new customers in the Contact Center Multimedia database• Log on or log off existing customers• Update customer logon credentials• Create customer contacts• Update customer details• Read customer information• Review a customer contact history• Request immediate or scheduled callback requests• Read a contact• Create and maintain a Web communications chat session
To integrate Web Communications with the Contact Center Multimedia system, download theAvaya Aura® Contact Center Web Communications SDK package and ReferenceImplementation from www.avaya.com/devconnect. The Web Communications ReferenceImplementation contains information about customizing the Web communication applicationto your solution.
Important:Do not install the Web Communications Reference Implementation on an Avaya Aura®
Contact Center server. Install the Web Communications Reference Implementation on yourown server in the contact center solution.
Procedure
1. Locate and download the Web Communications Reference Implementationsoftware from www.avaya.com/devconnect.
2. Copy the Web Communications Reference Implementation software to the externalWeb server.
3. Follow the Reference Implementation instructions to install and commission theWeb Communications server.
Installing the external Web communication server software
Avaya Aura® Contact Center Installation May 2013 657

658 Avaya Aura® Contact Center Installation May 2013Comments? [email protected]

Chapter 21: Knowledge Worker Serversoftware installation
This chapter describes how to install the Knowledge Worker Server software on a server that is connecteddirectly to the Avaya Communication Server 1000 switch. The contact center has no Contact CenterManager Server and, therefore, no skill-based routing capability. A Knowledge Worker Server includesthe following server software:
• Communication Control Toolkit (CCT) — Knowledge Worker version
• Contact Center License Manager
Install a Knowledge Worker server to provide Computer-Telephony Integration (CTI) functionality and calldata handling capabilities.
Knowledge Worker Server does not support High Availability.
You must complete the procedures in this section in sequential order.
Knowledge Worker Server software installationprerequisites
• Ensure that your new license file is available.
Downloading the latest documentationBefore you begin
• Download the most recent version of Acrobat Reader.• Access the Avaya Web site at www.avaya.com/support.
About this taskDownload the most recent documentation to ensure you have the most recent updates.Updates in the documentation accurately reflect the most recent changes in the software.
Avaya Aura® Contact Center Installation May 2013 659

Procedure
1. Log on to the Avaya Web site.
2. Compare the versions of the documentation on the site with the versions youhave.
3. If the version number on www.avaya.com/support is higher than your version,download the latest version of the document.
4. Review the Avaya Web site for release notes and readme files.
Installing Windows Server 2008 Release 2Before you begin
• Ensure that you have a newly formatted server that meets the specifications in AvayaAura® Contact Center Planning and Engineering (NN44400-210) on which to installMicrosoft Windows Server 2008 64-bit, Release 2, Service Pack 1.
Do not upgrade your operating system from a previous release. Contact Center is notsupported on an upgraded operating system.
• Configure all servers for RAID as described in Avaya Aura® Contact Center Planning andEngineering (NN44400-210).
• Ensure that you have a DVD for Windows Server 2008 Release 2.• Install the network interface card in the server.• Know the IP addresses for the contact center subnet.
About this taskInstall the Windows operating system, which is required for the Contact Center server software.During the installation, configure the Windows settings as required. You must perform thisprocedure on each server before you install Contact Center server software on the server.
Procedure
1. Insert the Windows Server 2008 64-bit Release 2 Standard Edition or WindowsServer 2008 64-bit Release 2 Enterprise Edition DVD into the DVD drive.
2. Install Windows Server 2008 Release 2 according to the instructions supplied bythe DVD.
3. On the first install page, select your language for installation.
4. Click Next.
5. On the Installation window, select a Language to install from the list.
660 Avaya Aura® Contact Center Installation May 2013Comments? [email protected]
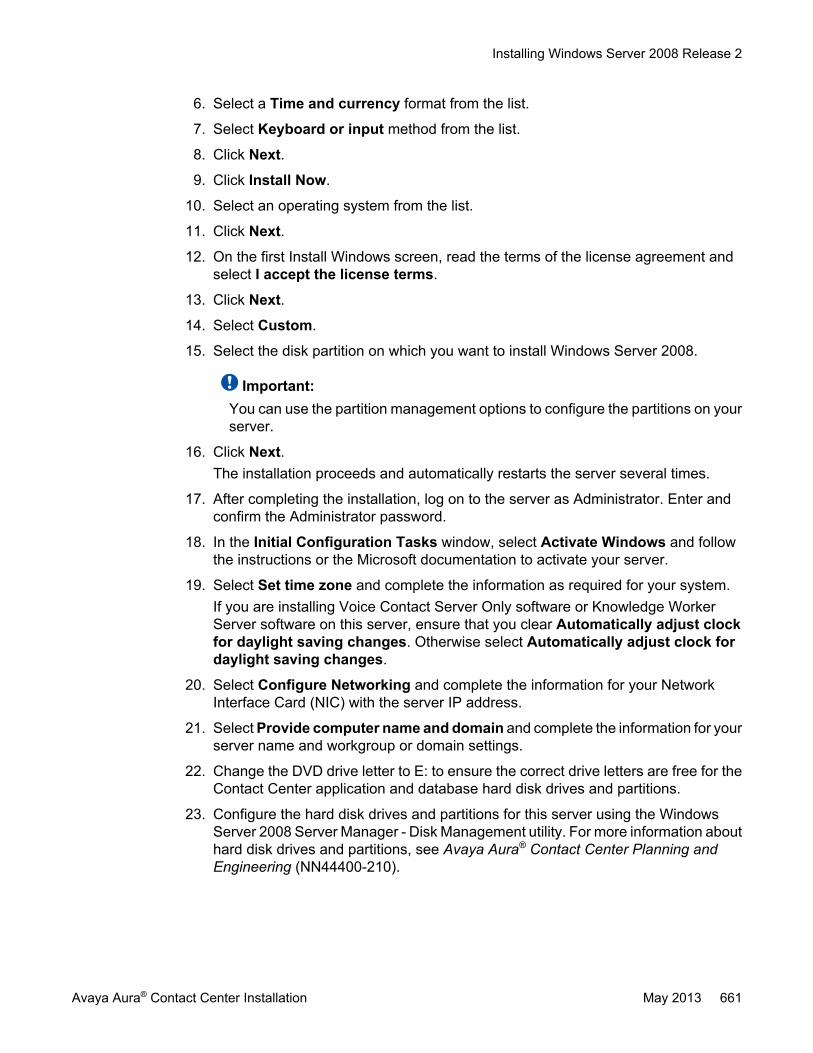
6. Select a Time and currency format from the list.
7. Select Keyboard or input method from the list.
8. Click Next.
9. Click Install Now.
10. Select an operating system from the list.
11. Click Next.
12. On the first Install Windows screen, read the terms of the license agreement andselect I accept the license terms.
13. Click Next.
14. Select Custom.
15. Select the disk partition on which you want to install Windows Server 2008.
Important:You can use the partition management options to configure the partitions on yourserver.
16. Click Next.The installation proceeds and automatically restarts the server several times.
17. After completing the installation, log on to the server as Administrator. Enter andconfirm the Administrator password.
18. In the Initial Configuration Tasks window, select Activate Windows and followthe instructions or the Microsoft documentation to activate your server.
19. Select Set time zone and complete the information as required for your system.If you are installing Voice Contact Server Only software or Knowledge WorkerServer software on this server, ensure that you clear Automatically adjust clockfor daylight saving changes. Otherwise select Automatically adjust clock fordaylight saving changes.
20. Select Configure Networking and complete the information for your NetworkInterface Card (NIC) with the server IP address.
21. Select Provide computer name and domain and complete the information for yourserver name and workgroup or domain settings.
22. Change the DVD drive letter to E: to ensure the correct drive letters are free for theContact Center application and database hard disk drives and partitions.
23. Configure the hard disk drives and partitions for this server using the WindowsServer 2008 Server Manager - Disk Management utility. For more information abouthard disk drives and partitions, see Avaya Aura® Contact Center Planning andEngineering (NN44400-210).
Installing Windows Server 2008 Release 2
Avaya Aura® Contact Center Installation May 2013 661

24. Install other required drivers for your hardware configuration.
Procedure job aid
Name Description
Computer name Do not use spaces or underscores or exceed15 characters. The name must start with analphabetic character.The computer name must match (includingcase sensitivity) the DNS name.
Disk drives Format the partitions as required for theserver. For more information, see AvayaAura® Contact Center Planning andEngineering (NN44400-210).
Domain/workgroup name Configure as required for your site.You must check to ensure the DNS Domainname (including case) matches the servername if the server is added to a domain orworkgroup after configuration.
Licensing modes Select Per server licensing mode.Accept the default five concurrentconnections.
Modem dialing Configure as required for your site. Do notinstall a modem on a Communication ControlToolkit server.
Network components Configure IP Address, WINS, DNS for one ortwo network cards as per configuration.Contact Center does not support IPv6.
Network connections If the server has more than one NIC/adapter,ensure contact center subnet appears first inthe network adapter binding order.
Partitions Configure C: drive to be a primary drive.Configure the other drives on your server tomeet the requirements according to AvayaAura® Contact Center Planning andEngineering (NN44400-210) for the server.
Regional settings window Configure as required for your site.
SNMP Configure for all servers.
662 Avaya Aura® Contact Center Installation May 2013Comments? [email protected]

Configuring Windows Server 2008Before you begin
• Install Microsoft Windows Server 2008 64-bit Release 2 on your server.
About this taskBefore you can install Avaya Aura® Contact Center software on your server, you must configureWindows Server 2008 to meet the requirements of the software.
You can prepare the server using this and other procedures, or you can download and use anAvaya Aura® Contact Center operating system configuration tool that installs the requiredWindows roles and features.
The Avaya Aura® Contact Center Windows Roles and Features installer configures thefollowing Windows Server 2008 resources:
• Windows Server Backup Features• SNMP Services• Active Directory Light Weight Directory Services• Application Server• Web Server (IIS)
For more information, and to download the Avaya Aura® Contact Center Windows Roles andFeatures installer, see http://support.avaya.com.
The Avaya Aura® Contact Center Windows Roles and Features installer replaces the followingprocedures:
• Configuring Windows Server 2008 (this procedure)• Configuring SNMP on your server• Installing operating system components for Contact Center
If you use the Avaya Aura® Contact Center Windows Roles and Features installer, skip thesethree procedures.
Procedure
1. Log on to the Windows Server 2008 server using an administrator account.
2. Select the Don’t display this screen on startup check box.
3. Update the emergency repair disk to record the latest configuration data for theserver.
4. Choose Start > Administrative Tools > Server Manager.
5. In the left pane, click Features.
Configuring Windows Server 2008
Avaya Aura® Contact Center Installation May 2013 663

6. Click Add Features.
7. Select Windows Server Backup Features.
8. Click Next.
9. Click Install.
10. Click Close.
11. Choose Start > All Programs > Accessories > System Tools > Windows ServerBackup.
12. Follow the on-screen instructions to select what you want to back up.
Installing the latest supported operating system servicepacks
Before you begin
• Access the Avaya hotfixes list on the Web site www.avaya.com/support.• Install and configure Microsoft Windows Server 2008 64-bit Release 2 on your server.• Review the recommendations on operating system service updates in Avaya Aura®
Contact Center Planning and Engineering (NN44400-210).• Install the Microsoft .NET Framework 3.5 and Microsoft .NET Framework 3.5 SP1.
About this taskAvaya recommends that you install the most recent supported operating system service packs.You must download the supported operating system service pack from the Avaya hotfixes listto ensure your Contact Center server software functions correctly with the supported operatingsystem patches.
Procedure
1. Log on to the server and disable the Windows Update feature. There are a numberof methods for disabling the Windows Update feature, refer to the Windows Server2008 documentation for a method suitable to your solution. Disabling the WindowsUpdate feature prevents Windows Server 2008 from automatically applyingoperating system patches and potentially rebooting the server.
2. Review the Contact Center Service Packs Compatibility and Security HotfixesApplicability List to determine the most recent Avaya Aura® Contact Centersupported patches or service packs.
3. Download the appropriate Microsoft Windows Server 2008 patches for the AvayaAura® Contact Center software installed on this server.
664 Avaya Aura® Contact Center Installation May 2013Comments? [email protected]

4. Install the most recent Windows Server 2008 service pack that is validated withAvaya Aura® Contact Center by following the Microsoft Installation instructions.
Connecting to the contact center subnetAbout this taskConnect the Contact Center server to the contact center subnet. The contact center subnet isthe network on which the server software applications work together to route contacts andgenerate reports.
Procedure
1. Locate the slot assigned to the contact center subnet network interface card for theserver. Make a note of the slot.
2. Connect the cable from the contact center subnet to the contact center subnetnetwork interface card in the server in accordance with customer site networkingguidelines.
3. Use the ping command to test the contact center subnet.
Adding a server to a domainBefore you begin
• Ensure that you have domain administrator privileges, or ask the Domain Administratorto assign you a domain user account for remote access.
• On the server, configure a preferred Domain Name System (DNS) server on the NetworkInterface Card (NIC).
About this taskAdd the server to an existing domain. Avaya recommends that you add the server to the domainbefore installing Contact Center software.
Ask your System Administrator to add a Domain Name System (DNS) static entry for thisserver. Each Contact Center server in a domain requires a DNS static entry.
Important:Avaya Aura® Contact Center High Availability solutions do not support Windows Server 2008Dynamic DNS.
In High Availability solutions, ask your System Administrator to add one DNS static entry forthe each managed name and associated managed IP address. A typical High Availability
Connecting to the contact center subnet
Avaya Aura® Contact Center Installation May 2013 665

campus solution with a pair of servers requires 3 DNS static entries; one DNS static entry forthe active server, one DNS static entry for the standby server, and one DNS static entry forthe managed name and associated IP address.
Procedure
1. Log on to the server.
2. Click Start > Administrative Tools > Server Manager.
3. Beside Computer Information, click Change System Properties.
4. In the System Properties dialog box, click the Computer Name tab.
5. Click Change.
6. In the Computer Name/Domain Changes dialog box, click the Domain option.
7. Type the domain name (you must provide the fully qualified domain name, whichincludes the prefix and suffix).
8. Click OK.
9. Type the domain administrator User name and Password.
10. Click OK.
11. Restart the server when you are prompted to do so.
Disabling the Remote Access servicesAbout this taskAvaya Aura® Contact Center does not support Remote Access Services (RAS). Disable theRemote Access services before installing Avaya Aura® Contact Center. Microsoft RemoteDesktop continues to run after you disable Remote Access services. After you disable theservices, restart the server.
Procedure
1. Choose Start > Administrative Tools > Services.
2. In the Services window, right-click the Remote Access Connection Managericon.
3. Click Properties.
4. In the General tab, from the Startup type list, select Disabled.
5. Click OK.
6. In the Services window, right-click the Remote Access Auto ConnectionManager icon.
666 Avaya Aura® Contact Center Installation May 2013Comments? [email protected]

7. Click Properties.
8. In the General tab, from the Startup type list, select Disabled.
9. Click OK.
10. In the Services window, click File, Exit.
11. Restart the server.
Configuring SNMP on your serverBefore you begin
• Install and configure Microsoft Windows Server 2008 64-bit Release 2 on your server.
About this taskConfigure Simple Network Management Protocol (SNMP) on your server to ensure you haveall of the required components of the Internet protocol for monitoring devices in your network.SNMP helps you manage data that describes the system configuration and errors that mayoccur between them.
Procedure
1. Log on to the server using the administrator account.
2. Choose Start > Control Panel > Programs.
3. In the Programs and Features section, click Turn Windows features on or off.
4. In the Server Manager window, select Server Manager and click Add Features.
5. Select SNMP Services.
6. Click Next.
7. Click Install.
8. If prompted, insert the Windows Server 2008 DVD.
9. Click Close.
Configuring SNMP on your server
Avaya Aura® Contact Center Installation May 2013 667

Downloading the most recent patches to the serverBefore you begin
• Install and configure Windows Server 2008 64-bit Release 2 on your server according tothe settings in this chapter.
• Download and install the most recent and valid updates for Microsoft Windows Server2008 64-bit Release 2.
• Know the location at which you plan to install each Contact Center server softwarepackage.
• Ensure that you use one administrator account on your server to un-install and installsoftware updates.
About this taskTo ensure that you have the most current software, download the most recent Contact Centerpatches from www.avaya.com/support to the server you plan to install.
Procedure
1. Log on to the server using the administrator account.
2. Create a folder Avaya_Support\ProductUpdates on the drive on which youwant to save the software updates.
3. Download the most recent service pack file. Save and unzip the file on the ContactCenter server in the Avaya_Support\ProductUpdates folder.
4. If new patches are available for the latest service pack, download and save thepatches on the Contact Center server in the Avaya_Support\ProductUpdates folder.
5. Read the Contact Center Release Notes for the most recent instructions.
Disabling unused Network AdaptersAbout this taskDisable all unused Network Adapters or Network Interface Cards (NICs) to improve networkcommunications and prevent the erroneous configuration of unused NICs during ContactCenter server commissioning.
668 Avaya Aura® Contact Center Installation May 2013Comments? [email protected]

Procedure
1. Log on to the server.
2. Click Start > Control Panel > Network and Internet > Network and SharingCenter > Change Adapter Settings.
3. Right-click on the unused Network Adapter, and select Disable.
4. Repeat this procedure for all unused Network Adapters.
Enabling Microsoft Remote Desktop connectionBefore you begin
• Install Microsoft Windows Server 2008 64-bit Release 2 on your server.• Log on to the server with administrator privileges.
About this taskEnable Microsoft Remote Desktop connection as your remote access tool. Microsoft RemoteDesktop provides remote access for support on the server.
Procedure
1. Choose Start > Control Panel > System and Security.
2. In the System section, select Allow remote access.
3. Click the Remote tab.
4. Select Allow connections from computers running any version of RemoteDesktop (less secure).
5. Click OK.
Configuring Data Execution PreventionAbout this taskConfigure the Data Execution Prevention (DEP) hardware and software to perform additionalchecks on memory that protect the Avaya Aura® Contact Center server against malicious codeexploitation.
Enabling Microsoft Remote Desktop connection
Avaya Aura® Contact Center Installation May 2013 669

Procedure
1. Log on to Windows as administrator.
2. Choose Start > Control Panel > System and Security.
3. Click System.
4. In the System window, click Advanced system settings.
5. In the System Properties dialog box, click the Advanced tab.
6. Under Performance, click Settings.
7. In the Performance Options dialog box, click the Data Execution Preventiontab.
8. On the Data Execution Prevention tab, select Turn on DEP for essentialWindows programs and services only.
9. Click OK.
10. On the System Properties dialog box, click OK.
11. Click OK to restart the computer.
Importing Contact Center Firewall Security policyBefore you begin
• Install Microsoft Windows Server 2008 64-bit Release 2 on your server.• Log on to the server with administrator privileges.• Download the most recent Avaya Aura® Contact Center Firewall Security policy from
www.avaya.com/support.
About this taskImport the Avaya Aura® Contact Center Firewall Security policy to ensure all contact centerservers in the solution can communicate.
Avaya recommends that you export and backup your existing firewall security policy beforeimporting the Avaya Aura® Contact Center Firewall Security policy. You can use this backuppolicy to rollback the Avaya Aura® Contact Center Firewall Security policy, if you ever needto.
Procedure
1. Choose Start > Administrative Tools > Windows Firewall with AdvancedSecurity.
2. Choose Actions > Export Policy.
670 Avaya Aura® Contact Center Installation May 2013Comments? [email protected]

3. In the File name box, type the name for the backup policy.
4. Click Save.Windows exports the existing policy. You can use this backup policy to rollback theAvaya Aura® Contact Center Firewall Security policy, if you ever need to.
5. On the Policy successfully exported message box, click OK.
6. Choose Actions > Import Policy.
7. On the policy overwrite message box, click Yes.
8. Navigate to the folder containing the Avaya Aura® Contact Center Firewall Securitypolicy.
9. Click Open.Windows imports the Avaya Aura® Contact Center Firewall Security policy.
10. On the Policy successfully imported message box, click OK.
Installing the Knowledge Worker Server software Before you begin
• Ensure the Avaya Communication Server 1000 is configured. For more information seeAvaya Aura® Contact Center Configuration – Avaya CS1000 Integration(NN44400-512).
• Download the most recent Contact Center and Common Components patches to theserver.
About this taskInstall the Knowledge Worker Server software to enable the Computer-Telephony Integration(CTI) between the PABX and the applications.
Note:Installation of this component installs Apache Tomcat Server. The default port number forApache Tomcat is 8081. If you need to change the port number to avoid conflicts with third-party software, see your Apache Tomcat documentation.
Procedure
1. Insert the Contact Center DVD into the DVD drive of your server.
2. If the installation does not automatically start, double-click Setup.exe.
3. Click Install to install the Microsoft .NET Framework 3.5 SP1 and Visual C++runtime libraries on the server.
Installing the Knowledge Worker Server software
Avaya Aura® Contact Center Installation May 2013 671

If you are prompted to accept the Microsoft .NET Framework 3.5.1 licenseagreement, click Accept. If you are prompted to restart the server, click Yes andrepeat step 2.
4. On the Welcome window, click Next.
5. On the License Agreement window, read the terms of the agreement.
672 Avaya Aura® Contact Center Installation May 2013Comments? [email protected]

6. Click I Accept the Terms of the End-User License Agreement.
7. Click Next.
Installing the Knowledge Worker Server software
Avaya Aura® Contact Center Installation May 2013 673

8. On the Installation Selection window, under Avaya Communication Server 1000- AML, select Knowledge Worker Server Only.
9. Click Next.
10. On the Installation Destination window, on the Application Destination Drivetab, select where to install the Contact Center application software by choosing adisk drive letter.
11. Click the Database Destination Drive tab.
12. Under Select the destination drive for the Contact Center database files, selectthe drive for the Communication Control Toolkit database.
13. Click the Product Updates Location tab.
674 Avaya Aura® Contact Center Installation May 2013Comments? [email protected]

14. Under Select the Product Updates Location, click Browse to locate the foldercontaining the Contact Center product updates.
15. Click Next.The System Readiness Check runs on the server.
16. If the System Readiness Check utility returns a Fail, the software installation cannotproceed until you correct the problem. Review any failures returned by the SystemReadiness Check and consult Avaya Aura® Contact Center Planning andEngineering (NN44400-210) to determine the actions to resolve the issue.You can ignore warnings if the potential impact to the operation of the contact centeris understood and not applicable.
17. Click Next.
18. On the Installation Data window, type the installation details for each tab.
19. Select the License Manager tab, and configure the licensing details.
Installing the Knowledge Worker Server software
Avaya Aura® Contact Center Installation May 2013 675

20. The License File Location box displays the folder on the server which containsthe license file.
21. In the Primary License Manager IP Address box, type the IP address of theprimary License Manager server. Each Knowledge Worker Server contains LicenseManager server software. This License Manager server is the default primaryLicense Manager.
22. In the Primary License Port box, type the number of the communication portopened between the License Manager and Communication Control Toolkit. Thedefault port number is 3998 when you use only one License Manager.
23. In the Secondary License Manager IP Address box, type the IP address of thesecondary License Manager server. The secondary License Manager server isused only in a corporate licensed environment.
24. Click Next.
25. On the Summary window, review and verify the information.
26. Click Install.
27. After the installation is complete, click Finish.
28. If prompted, restart the server.
676 Avaya Aura® Contact Center Installation May 2013Comments? [email protected]
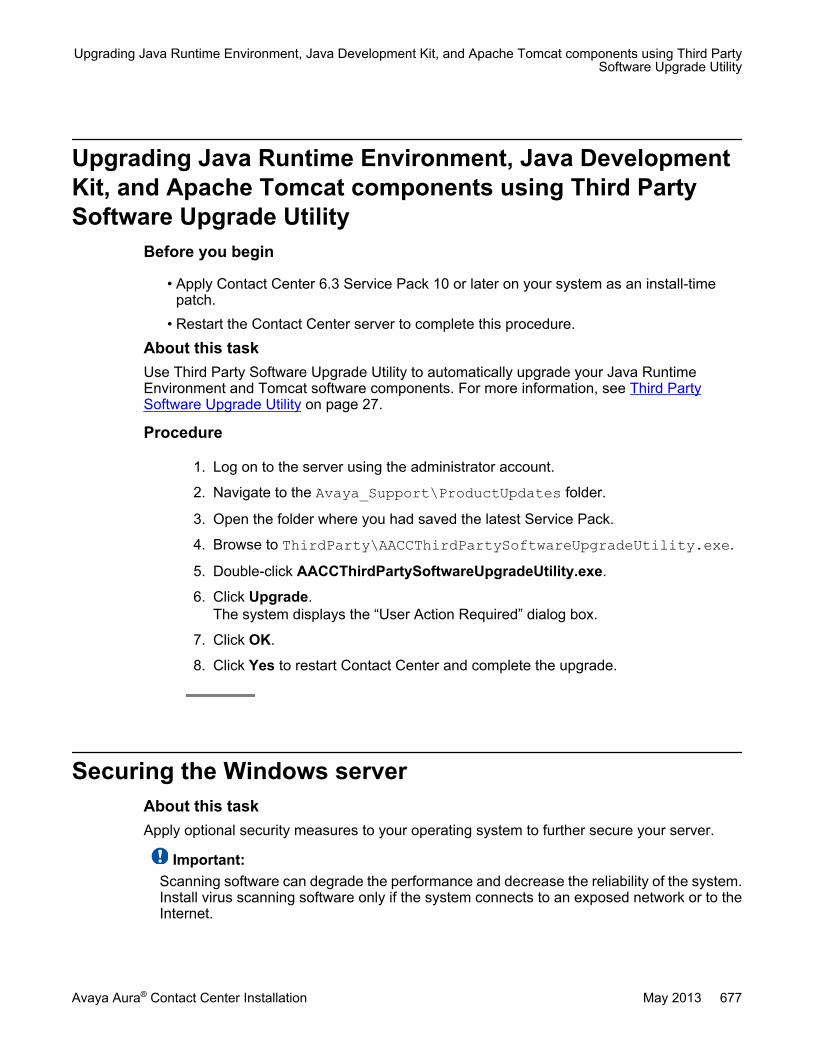
Upgrading Java Runtime Environment, Java DevelopmentKit, and Apache Tomcat components using Third PartySoftware Upgrade Utility
Before you begin
• Apply Contact Center 6.3 Service Pack 10 or later on your system as an install-timepatch.
• Restart the Contact Center server to complete this procedure.
About this taskUse Third Party Software Upgrade Utility to automatically upgrade your Java RuntimeEnvironment and Tomcat software components. For more information, see Third PartySoftware Upgrade Utility on page 27.
Procedure
1. Log on to the server using the administrator account.
2. Navigate to the Avaya_Support\ProductUpdates folder.
3. Open the folder where you had saved the latest Service Pack.
4. Browse to ThirdParty\AACCThirdPartySoftwareUpgradeUtility.exe.
5. Double-click AACCThirdPartySoftwareUpgradeUtility.exe.
6. Click Upgrade.The system displays the “User Action Required” dialog box.
7. Click OK.
8. Click Yes to restart Contact Center and complete the upgrade.
Securing the Windows serverAbout this taskApply optional security measures to your operating system to further secure your server.
Important:Scanning software can degrade the performance and decrease the reliability of the system.Install virus scanning software only if the system connects to an exposed network or to theInternet.
Upgrading Java Runtime Environment, Java Development Kit, and Apache Tomcat components using Third PartySoftware Upgrade Utility
Avaya Aura® Contact Center Installation May 2013 677

Important:To maintain server performance, you must schedule virus scans during maintenanceperiods or low usage hours only.
Procedure
1. Harden the operating system using defined site procedures.
2. Install antivirus software. If you install antivirus software, Avaya recommends thatyou exclude some contact center files and folders from real-time and scheduledscans. For more information, and for a list of files and folders to exclude, see AvayaAura® Contact Center Planning and Engineering (NN44400-210).
678 Avaya Aura® Contact Center Installation May 2013Comments? [email protected]

Part III: Multimedia Complement For Elite
Avaya Aura® Contact Center Installation May 2013 679

Multimedia Complement For Elite
680 Avaya Aura® Contact Center Installation May 2013Comments? [email protected]

Chapter 22: Avaya Aura® Contact CenterMultimedia Complementsoftware installation for AvayaAura® Call Center Elite
Avaya Aura® Contact Center Release 6.3 supports a Multimedia Complement for Avaya Aura® Call CenterElite. This server type adds multimedia contact support to an Avaya Aura® Call Center Elite voice-basedsolution. To implement the Avaya Aura® Contact Center High Availability feature, your solution requiresadditional standby servers to provide resiliency and redundancy.
AACC Multimedia Complement for Elite — Install this server to add multimedia contact routing supportto a new or existing Avaya Aura® Call Center Elite voice-based solution. This server supports contactrouting for web communications, fax messages, SMS text messaging, and email messages, withadditional support for peer-to-peer Instant Messaging (IM).
Prerequisites for Contact Center installation workflow• Complete the Avaya Aura® Contact Center Installation Checklist (NN44400-310).
• Ensure all your server hardware meets the requirements described in Avaya Aura®
Contact Center Planning and Engineering (NN44400-210).
• Know the installation configuration you plan to use in your contact center. For moreinformation see Avaya Aura® Contact Center Planning and Engineering(NN44400-210).
Avaya Aura® Contact Center Installation May 2013 681
Contact Center server types and software installation forAvaya Aura® Call Center Elite
About this taskThis work flow shows the sequence of tasks you perform to install one or more Contact Centerservers to provide a multimedia complement to an Avaya Aura® Call Center Elite voice-basedsolution.
682 Avaya Aura® Contact Center Installation May 2013Comments? [email protected]

Figure 3: Contact Center software installation tasks forAvaya Aura® Call Center Elite basedsolutions
For more information about installing Avaya Aura® Contact Center servers for an Avaya Aura®
Call Center Elite solution, see the following:• Multimedia Complement for Elite software installation on page 685• Standby Multimedia Complement for Elite software installation on page 721
Contact Center server types and software installation for Avaya Aura® Call Center Elite
Avaya Aura® Contact Center Installation May 2013 683

684 Avaya Aura® Contact Center Installation May 2013Comments? [email protected]

Chapter 23: Multimedia Complement forElite software installation
This chapter provides the steps to perform a typical installation of Avaya Aura® Contact Center serversoftware on a Multimedia Complement for Elite Server. A Multimedia Complement for Elite Server includesthe following server software:
• Contact Center Manager Server (CCMS)
• Contact Center Manager Server Utility
• Contact Center License Manager
• Contact Center Manager Administration (CCMA)
• Communication Control Toolkit (CCT)
• Contact Center Multimedia (CCMM)
Install this server to add multimedia contact routing support to a new or existing Avaya Aura® Call CenterElite voice-based solution. This server supports contact routing for web communications, fax messages,SMS text messaging, and email messages, with additional support for peer-to-peer Instant Messaging(IM).
You must complete all the procedures in this section in sequential order.
Multimedia Complement for Elite software installationprerequisites
• Copy the most recent patches for the Contact Center software.
• Ensure that your new Contact Center license file is available.
Important:For the system to correctly handle backup and restore SNMP events, you must installWindows SNMP Service before you install Contact Center server software.
Avaya Aura® Contact Center Installation May 2013 685

Downloading the latest documentationBefore you begin
• Download the most recent version of Acrobat Reader.• Access the Avaya Web site at www.avaya.com/support.
About this taskDownload the most recent documentation to ensure you have the most recent updates.Updates in the documentation accurately reflect the most recent changes in the software.
Procedure
1. Log on to the Avaya Web site.
2. Compare the versions of the documentation on the site with the versions youhave.
3. If the version number on www.avaya.com/support is higher than your version,download the latest version of the document.
4. Review the Avaya Web site for release notes and readme files.
Installing Windows Server 2008 Release 2Before you begin
• Ensure that you have a newly formatted server that meets the specifications in AvayaAura® Contact Center Planning and Engineering (NN44400-210) on which to installMicrosoft Windows Server 2008 64-bit, Release 2, Service Pack 1.
Do not upgrade your operating system from a previous release. Contact Center is notsupported on an upgraded operating system.
• Configure all servers for RAID as described in Avaya Aura® Contact Center Planning andEngineering (NN44400-210).
• Ensure that you have a DVD for Windows Server 2008 Release 2.• Install the network interface card in the server.• Know the IP addresses for the contact center subnet.
686 Avaya Aura® Contact Center Installation May 2013Comments? [email protected]

About this taskInstall the Windows operating system, which is required for the Contact Center server software.During the installation, configure the Windows settings as required. You must perform thisprocedure on each server before you install Contact Center server software on the server.
Procedure
1. Insert the Windows Server 2008 64-bit Release 2 Standard Edition or WindowsServer 2008 64-bit Release 2 Enterprise Edition DVD into the DVD drive.
2. Install Windows Server 2008 Release 2 according to the instructions supplied bythe DVD.
3. On the first install page, select your language for installation.
4. Click Next.
5. On the Installation window, select a Language to install from the list.
6. Select a Time and currency format from the list.
7. Select Keyboard or input method from the list.
8. Click Next.
9. Click Install Now.
10. Select an operating system from the list.
11. Click Next.
12. On the first Install Windows screen, read the terms of the license agreement andselect I accept the license terms.
13. Click Next.
14. Select Custom.
15. Select the disk partition on which you want to install Windows Server 2008.
Important:You can use the partition management options to configure the partitions on yourserver.
16. Click Next.The installation proceeds and automatically restarts the server several times.
17. After completing the installation, log on to the server as Administrator. Enter andconfirm the Administrator password.
18. In the Initial Configuration Tasks window, select Activate Windows and followthe instructions or the Microsoft documentation to activate your server.
19. Select Set time zone and complete the information as required for your system.
Installing Windows Server 2008 Release 2
Avaya Aura® Contact Center Installation May 2013 687

This server time zone daylight saving setting must match the time zone daylightsaving setting on the Avaya Media Server(s) in this SIP-enabled contact centersolution.
20. Select Configure Networking and complete the information for your NetworkInterface Card (NIC) with the server IP address.
21. Select Provide computer name and domain and complete the information for yourserver name and workgroup or domain settings.
22. Change the DVD drive letter to E: to ensure the correct drive letters are free for theContact Center application and database hard disk drives and partitions.
23. Configure the hard disk drives and partitions for this server using the WindowsServer 2008 Server Manager - Disk Management utility. For more information abouthard disk drives and partitions, see Avaya Aura® Contact Center Planning andEngineering (NN44400-210).
24. Install other required drivers for your hardware configuration.
Procedure job aid
Name Description
Computer name Do not use spaces or underscores or exceed15 characters. The name must start with analphabetic character.The computer name must match (includingcase sensitivity) the DNS name.
Disk drives Format the partitions as required for theserver. For more information, see AvayaAura® Contact Center Planning andEngineering (NN44400-210).
Domain/workgroup name Configure as required for your site.You must check to ensure the DNS Domainname (including case) matches the servername if the server is added to a domain orworkgroup after configuration.
Licensing modes Select Per server licensing mode.Accept the default five concurrentconnections.
Modem dialing Configure as required for your site. Do notinstall a modem on a Communication ControlToolkit server.
688 Avaya Aura® Contact Center Installation May 2013Comments? [email protected]
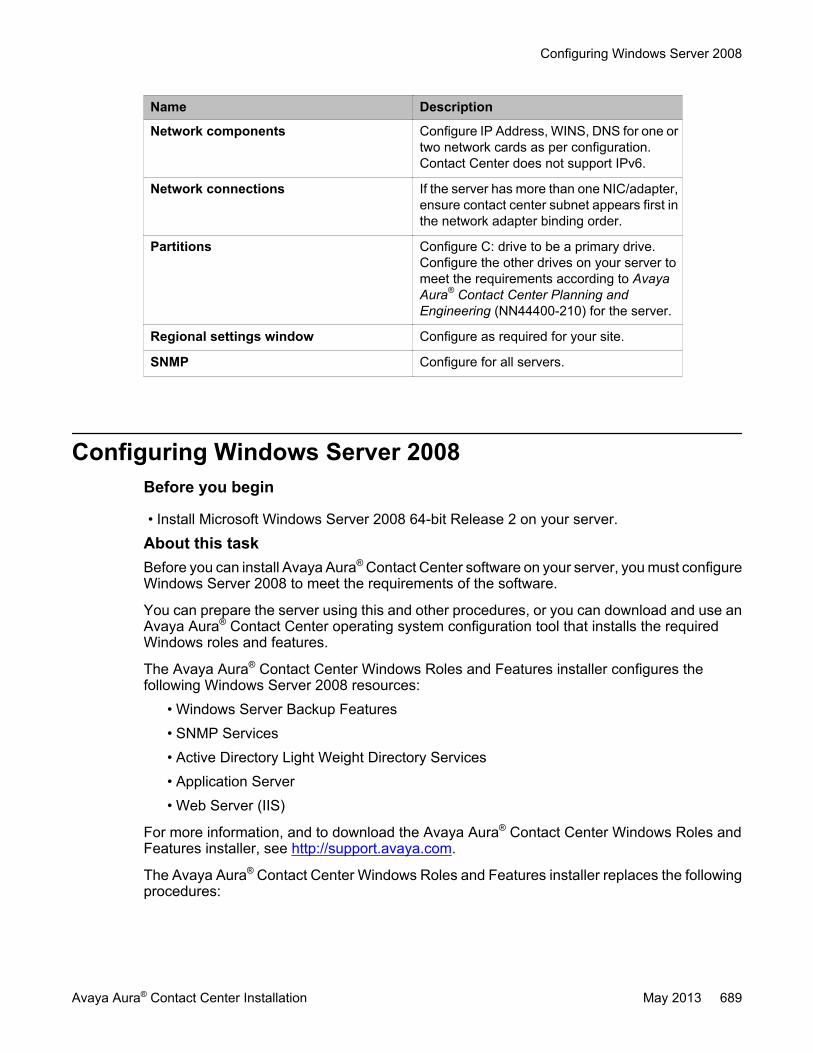
Name Description
Network components Configure IP Address, WINS, DNS for one ortwo network cards as per configuration.Contact Center does not support IPv6.
Network connections If the server has more than one NIC/adapter,ensure contact center subnet appears first inthe network adapter binding order.
Partitions Configure C: drive to be a primary drive.Configure the other drives on your server tomeet the requirements according to AvayaAura® Contact Center Planning andEngineering (NN44400-210) for the server.
Regional settings window Configure as required for your site.
SNMP Configure for all servers.
Configuring Windows Server 2008Before you begin
• Install Microsoft Windows Server 2008 64-bit Release 2 on your server.
About this taskBefore you can install Avaya Aura® Contact Center software on your server, you must configureWindows Server 2008 to meet the requirements of the software.
You can prepare the server using this and other procedures, or you can download and use anAvaya Aura® Contact Center operating system configuration tool that installs the requiredWindows roles and features.
The Avaya Aura® Contact Center Windows Roles and Features installer configures thefollowing Windows Server 2008 resources:
• Windows Server Backup Features• SNMP Services• Active Directory Light Weight Directory Services• Application Server• Web Server (IIS)
For more information, and to download the Avaya Aura® Contact Center Windows Roles andFeatures installer, see http://support.avaya.com.
The Avaya Aura® Contact Center Windows Roles and Features installer replaces the followingprocedures:
Configuring Windows Server 2008
Avaya Aura® Contact Center Installation May 2013 689

• Configuring Windows Server 2008 (this procedure)• Configuring SNMP on your server• Installing operating system components for Contact Center
If you use the Avaya Aura® Contact Center Windows Roles and Features installer, skip thesethree procedures.
Procedure
1. Log on to the Windows Server 2008 server using an administrator account.
2. Select the Don’t display this screen on startup check box.
3. Update the emergency repair disk to record the latest configuration data for theserver.
4. Choose Start > Administrative Tools > Server Manager.
5. In the left pane, click Features.
6. Click Add Features.
7. Select Windows Server Backup Features.
8. Click Next.
9. Click Install.
10. Click Close.
11. Choose Start > All Programs > Accessories > System Tools > Windows ServerBackup.
12. Follow the on-screen instructions to select what you want to back up.
Installing operating system components for ContactCenter
Before you begin
• Install Windows Server 2008 64-bit Release 2.
About this taskBefore installing Contact Center software, you must install specific operating system softwarecomponents such as Internet Information Services to integrate the components in ContactCenter.
690 Avaya Aura® Contact Center Installation May 2013Comments? [email protected]

Procedure
1. Choose Start > Administrative Tools > Server Manager.
2. In the left-hand column of the Server Manager, right-click Roles, and select AddRoles.
3. Review the requirements for the new role, and click Next.
4. Under Server Roles, select Active Directory Lightweight Directory Services.
5. If an Add Roles Wizard message box that lists features required by Active DirectoryLightweight Directory Services appears, click Add Required Features.
6. Under Server Roles, select Application Server.
7. If an Add Roles Wizard message box that lists features required by ApplicationServer appears, click Add Required Features.
8. Under Application Server, select Role Services.
9. Select Web Server (IIS) Support.
10. If an Add Roles Wizard message box appears, listing features required by WebServer (IIS) Support appears, click Add Required Features.
11. Click Next.
12. On the Introduction to Web Server (IIS) page, click Next.
13. On the Select Role Services page, under Common HTTP Features, select thefollowing services:
• Static Content
• Default Document
• Directory Browsing
• HTTP Errors
• HTTP Redirection
Important:All other services check boxes must be cleared.
14. On the Select Role Services page, under Application Development, select thefollowing services:
• ASP.NET
• .NET Extensibility
• ASP
• ISAPI Extensions
• ISAPI Filters
Installing operating system components for Contact Center
Avaya Aura® Contact Center Installation May 2013 691

• Server Side Includes
Important:All other services check boxes must be cleared.
15. On the Select Role Services page, under Health and Diagnosis, select thefollowing services:
• HTTP Logging
• Logging Tools
• Request Monitor
• Tracing
Important:All other services check boxes must be cleared.
16. On the Select Role Services page, under Security, select all services.
17. On the Select Role Services page, under Performance, select all services.
18. On the Select Role Services page, under Management Tools, select the followingservices:
• IIS Management Console
• IIS Management Scripts and Tools
• Management Service
• All items under IIS 6 Management Compatibility
Important:All other services check boxes must be cleared.
19. Click Next.
20. Review the installation information.
21. Click Install.
22. On the Installation Results page, click Close.
23. Restart the server if required.
692 Avaya Aura® Contact Center Installation May 2013Comments? [email protected]

Installing the latest supported operating system servicepacks
Before you begin
• Access the Avaya hotfixes list on the Web site www.avaya.com/support.• Install and configure Microsoft Windows Server 2008 64-bit Release 2 on your server.• Review the recommendations on operating system service updates in Avaya Aura®
Contact Center Planning and Engineering (NN44400-210).• Install the Microsoft .NET Framework 3.5 and Microsoft .NET Framework 3.5 SP1.
About this taskAvaya recommends that you install the most recent supported operating system service packs.You must download the supported operating system service pack from the Avaya hotfixes listto ensure your Contact Center server software functions correctly with the supported operatingsystem patches.
Procedure
1. Log on to the server and disable the Windows Update feature. There are a numberof methods for disabling the Windows Update feature, refer to the Windows Server2008 documentation for a method suitable to your solution. Disabling the WindowsUpdate feature prevents Windows Server 2008 from automatically applyingoperating system patches and potentially rebooting the server.
2. Review the Contact Center Service Packs Compatibility and Security HotfixesApplicability List to determine the most recent Avaya Aura® Contact Centersupported patches or service packs.
3. Download the appropriate Microsoft Windows Server 2008 patches for the AvayaAura® Contact Center software installed on this server.
4. Install the most recent Windows Server 2008 service pack that is validated withAvaya Aura® Contact Center by following the Microsoft Installation instructions.
Installing the latest supported operating system service packs
Avaya Aura® Contact Center Installation May 2013 693

Connecting to the contact center subnetAbout this taskConnect the Contact Center server to the contact center subnet. The contact center subnet isthe network on which the server software applications work together to route contacts andgenerate reports.
Procedure
1. Locate the slot assigned to the contact center subnet network interface card for theserver. Make a note of the slot.
2. Connect the cable from the contact center subnet to the contact center subnetnetwork interface card in the server in accordance with customer site networkingguidelines.
3. Use the ping command to test the contact center subnet.
Adding a server to a domainBefore you begin
• Ensure that you have domain administrator privileges, or ask the Domain Administratorto assign you a domain user account for remote access.
• On the server, configure a preferred Domain Name System (DNS) server on the NetworkInterface Card (NIC).
About this taskAdd the server to an existing domain. Avaya recommends that you add the server to the domainbefore installing Contact Center software.
Ask your System Administrator to add a Domain Name System (DNS) static entry for thisserver. Each Contact Center server in a domain requires a DNS static entry.
Important:Avaya Aura® Contact Center High Availability solutions do not support Windows Server 2008Dynamic DNS.
In High Availability solutions, ask your System Administrator to add one DNS static entry forthe each managed name and associated managed IP address. A typical High Availabilitycampus solution with a pair of servers requires 3 DNS static entries; one DNS static entry for
694 Avaya Aura® Contact Center Installation May 2013Comments? [email protected]

the active server, one DNS static entry for the standby server, and one DNS static entry forthe managed name and associated IP address.
Procedure
1. Log on to the server.
2. Click Start > Administrative Tools > Server Manager.
3. Beside Computer Information, click Change System Properties.
4. In the System Properties dialog box, click the Computer Name tab.
5. Click Change.
6. In the Computer Name/Domain Changes dialog box, click the Domain option.
7. Type the domain name (you must provide the fully qualified domain name, whichincludes the prefix and suffix).
8. Click OK.
9. Type the domain administrator User name and Password.
10. Click OK.
11. Restart the server when you are prompted to do so.
Disabling the Remote Access servicesAbout this taskAvaya Aura® Contact Center does not support Remote Access Services (RAS). Disable theRemote Access services before installing Avaya Aura® Contact Center. Microsoft RemoteDesktop continues to run after you disable Remote Access services. After you disable theservices, restart the server.
Procedure
1. Choose Start > Administrative Tools > Services.
2. In the Services window, right-click the Remote Access Connection Managericon.
3. Click Properties.
4. In the General tab, from the Startup type list, select Disabled.
5. Click OK.
6. In the Services window, right-click the Remote Access Auto ConnectionManager icon.
Disabling the Remote Access services
Avaya Aura® Contact Center Installation May 2013 695

7. Click Properties.
8. In the General tab, from the Startup type list, select Disabled.
9. Click OK.
10. In the Services window, click File, Exit.
11. Restart the server.
Configuring SNMP on your serverBefore you begin
• Install and configure Microsoft Windows Server 2008 64-bit Release 2 on your server.
About this taskConfigure Simple Network Management Protocol (SNMP) on your server to ensure you haveall of the required components of the Internet protocol for monitoring devices in your network.SNMP helps you manage data that describes the system configuration and errors that mayoccur between them.
Procedure
1. Log on to the server using the administrator account.
2. Choose Start > Control Panel > Programs.
3. In the Programs and Features section, click Turn Windows features on or off.
4. In the Server Manager window, select Server Manager and click Add Features.
5. Select SNMP Services.
6. Click Next.
7. Click Install.
8. If prompted, insert the Windows Server 2008 DVD.
9. Click Close.
696 Avaya Aura® Contact Center Installation May 2013Comments? [email protected]

Downloading the most recent patches to the serverBefore you begin
• Install and configure Windows Server 2008 64-bit Release 2 on your server according tothe settings in this chapter.
• Download and install the most recent and valid updates for Microsoft Windows Server2008 64-bit Release 2.
• Know the location at which you plan to install each Contact Center server softwarepackage.
• Ensure that you use one administrator account on your server to un-install and installsoftware updates.
About this taskTo ensure that you have the most current software, download the most recent Contact Centerpatches from www.avaya.com/support to the server you plan to install.
Procedure
1. Log on to the server using the administrator account.
2. Create a folder Avaya_Support\ProductUpdates on the drive on which youwant to save the software updates.
3. Download the most recent service pack file. Save and unzip the file on the ContactCenter server in the Avaya_Support\ProductUpdates folder.
4. If new patches are available for the latest service pack, download and save thepatches on the Contact Center server in the Avaya_Support\ProductUpdates folder.
5. Read the Contact Center Release Notes for the most recent instructions.
Disabling unused Network AdaptersAbout this taskDisable all unused Network Adapters or Network Interface Cards (NICs) to improve networkcommunications and prevent the erroneous configuration of unused NICs during ContactCenter server commissioning.
Downloading the most recent patches to the server
Avaya Aura® Contact Center Installation May 2013 697

Procedure
1. Log on to the server.
2. Click Start > Control Panel > Network and Internet > Network and SharingCenter > Change Adapter Settings.
3. Right-click on the unused Network Adapter, and select Disable.
4. Repeat this procedure for all unused Network Adapters.
Enabling Microsoft Remote Desktop connectionBefore you begin
• Install Microsoft Windows Server 2008 64-bit Release 2 on your server.• Log on to the server with administrator privileges.
About this taskEnable Microsoft Remote Desktop connection as your remote access tool. Microsoft RemoteDesktop provides remote access for support on the server.
Procedure
1. Choose Start > Control Panel > System and Security.
2. In the System section, select Allow remote access.
3. Click the Remote tab.
4. Select Allow connections from computers running any version of RemoteDesktop (less secure).
5. Click OK.
Configuring Data Execution PreventionAbout this taskConfigure the Data Execution Prevention (DEP) hardware and software to perform additionalchecks on memory that protect the Avaya Aura® Contact Center server against malicious codeexploitation.
698 Avaya Aura® Contact Center Installation May 2013Comments? [email protected]

Procedure
1. Log on to Windows as administrator.
2. Choose Start > Control Panel > System and Security.
3. Click System.
4. In the System window, click Advanced system settings.
5. In the System Properties dialog box, click the Advanced tab.
6. Under Performance, click Settings.
7. In the Performance Options dialog box, click the Data Execution Preventiontab.
8. On the Data Execution Prevention tab, select Turn on DEP for essentialWindows programs and services only.
9. Click OK.
10. On the System Properties dialog box, click OK.
11. Click OK to restart the computer.
Importing Contact Center Firewall Security policyBefore you begin
• Install Microsoft Windows Server 2008 64-bit Release 2 on your server.• Log on to the server with administrator privileges.• Download the most recent Avaya Aura® Contact Center Firewall Security policy from
www.avaya.com/support.
About this taskImport the Avaya Aura® Contact Center Firewall Security policy to ensure all contact centerservers in the solution can communicate.
Avaya recommends that you export and backup your existing firewall security policy beforeimporting the Avaya Aura® Contact Center Firewall Security policy. You can use this backuppolicy to rollback the Avaya Aura® Contact Center Firewall Security policy, if you ever needto.
Procedure
1. Choose Start > Administrative Tools > Windows Firewall with AdvancedSecurity.
2. Choose Actions > Export Policy.
Importing Contact Center Firewall Security policy
Avaya Aura® Contact Center Installation May 2013 699

3. In the File name box, type the name for the backup policy.
4. Click Save.Windows exports the existing policy. You can use this backup policy to rollback theAvaya Aura® Contact Center Firewall Security policy, if you ever need to.
5. On the Policy successfully exported message box, click OK.
6. Choose Actions > Import Policy.
7. On the policy overwrite message box, click Yes.
8. Navigate to the folder containing the Avaya Aura® Contact Center Firewall Securitypolicy.
9. Click Open.Windows imports the Avaya Aura® Contact Center Firewall Security policy.
10. On the Policy successfully imported message box, click OK.
Installing operating system components for ContactCenter
Before you begin
• Install Windows Server 2008 64-bit Release 2.
About this taskBefore installing Contact Center software, you must install specific operating system softwarecomponents such as Internet Information Services to integrate the components in ContactCenter.
Procedure
1. Choose Start > Administrative Tools > Server Manager.
2. In the left-hand column of the Server Manager, right-click Roles, and select AddRoles.
3. Review the requirements for the new role, and click Next.
4. Under Server Roles, select Active Directory Lightweight Directory Services.
5. If an Add Roles Wizard message box that lists features required by Active DirectoryLightweight Directory Services appears, click Add Required Features.
6. Under Server Roles, select Application Server.
7. If an Add Roles Wizard message box that lists features required by ApplicationServer appears, click Add Required Features.
700 Avaya Aura® Contact Center Installation May 2013Comments? [email protected]

8. Under Application Server, select Role Services.
9. Select Web Server (IIS) Support.
10. If an Add Roles Wizard message box appears, listing features required by WebServer (IIS) Support appears, click Add Required Features.
11. Click Next.
12. On the Introduction to Web Server (IIS) page, click Next.
13. On the Select Role Services page, under Common HTTP Features, select thefollowing services:
• Static Content
• Default Document
• Directory Browsing
• HTTP Errors
• HTTP Redirection
Important:All other services check boxes must be cleared.
14. On the Select Role Services page, under Application Development, select thefollowing services:
• ASP.NET
• .NET Extensibility
• ASP
• ISAPI Extensions
• ISAPI Filters
• Server Side Includes
Important:All other services check boxes must be cleared.
15. On the Select Role Services page, under Health and Diagnosis, select thefollowing services:
• HTTP Logging
• Logging Tools
• Request Monitor
• Tracing
Installing operating system components for Contact Center
Avaya Aura® Contact Center Installation May 2013 701

Important:All other services check boxes must be cleared.
16. On the Select Role Services page, under Security, select all services.
17. On the Select Role Services page, under Performance, select all services.
18. On the Select Role Services page, under Management Tools, select the followingservices:
• IIS Management Console
• IIS Management Scripts and Tools
• Management Service
• All items under IIS 6 Management Compatibility
Important:All other services check boxes must be cleared.
19. Click Next.
20. Review the installation information.
21. Click Install.
22. On the Installation Results page, click Close.
23. Restart the server if required.
Configuring MIME types to support Microsoft updatesAbout this taskConfigure the Multipurpose Internet Mail Extension (MIME) types to support Microsoft updatesand patches.
Procedure
1. Log on to the server.
2. Click Start > Administrative Tools > Computer Management.
3. In the Computer Management dialog box, expand Services and Applications >Internet Information Services > IIS Manager > Sites.
4. Select Default Web Site.
5. Under IIS, select MIME Types.
702 Avaya Aura® Contact Center Installation May 2013Comments? [email protected]

6. Double-click MIME Types.
7. On the Actions list on the right, click Add.
8. In the File name extension box, type .msp.
9. In the MIME Type box, type application/microsoftpatch.
10. Click OK.
11. On the Actions list on the right, click Add.
12. In the File name extension box, type .msu.
13. In the MIME Type box, type application/microsoftupdate.
14. Click OK.
15. Close the Computer Management window.
Updating server for a network location installationAbout this taskConfigure the server .NET security settings to prepare the server for a remote networkinstallation. Avaya Aura® Contact Center supports network installation. You can insert theAvaya Aura® Contact Center DVD into a computer on your network. You then add this computeras a trusted site and network location on the new server. You can access this DVD from thenetwork location, and with some .NET security updates, use the remote DVD to install AvayaAura® Contact Center software on the new server.
Note:Skip this procedure if you plan to use the Avaya Aura® Contact Center DVD from the DVDdrive of the server.
Procedure
1. Insert the Avaya Aura® Contact Center DVD into a computer on the contact centernetwork.
2. Log on to the new server you are preparing for Contact Center.
3. Choose Start > Control Panel > Network and Internet > Internet Options.
4. In the Security tab, click Trusted sites.
5. In the Trusted sites section, click Sites.
6. In the Add this Web site to the zone box, type the <IP address> of the remotecomputer with the Avaya Aura® Contact Center DVD.
7. Click Add.
Updating server for a network location installation
Avaya Aura® Contact Center Installation May 2013 703

8. Click OK.
9. Close the Internet Options box.
10. From the new server, navigate to the network location with the DVD.
11. Access the remote DVD and in the root folder of the DVD, double-clickNetworkSetup.bat..NetFramework 3.5 installs and the .NetSecurity settings are modified.
12. If the Avaya Aura® Contact Center installation does not automatically start, in theroot folder of the DVD double-click Setup.exe.
13. After Avaya Aura® Contact Center installs, navigate to your network location anddouble-click NetworkSetupReset.bat.
Installing the Multimedia Complement for Elite softwareBefore you begin
• Download the most recent Contact Center and Common Components patches to theserver.
About this taskInstall the Multimedia Complement For Elite software and enable your contact center to routecontacts to the agents that can answer the call with the correct skills.
Note:Installing Multimedia Complement For Elite software installs Apache Tomcat Server. Thedefault port number for Apache Tomcat is 8081. If you need to change the port number toavoid conflicts with third-party software, see your Apache Tomcat documentation.
Note:Read the Contact Center Release Notes for the most recent instructions.
Procedure
1. Insert the Contact Center DVD into the DVD drive of your server.
2. If the installation does not automatically start, double-click Setup.exe.
3. Click Install to install the Microsoft .NET Framework 3.5 SP1 and Visual C++runtime libraries on the server.If you are prompted to accept the Microsoft .NET Framework 3.5.1 licenseagreement, click Accept. If you are prompted to restart the server, click Yes andrepeat step 2.
704 Avaya Aura® Contact Center Installation May 2013Comments? [email protected]

4. On the Welcome window, click Next.
5. On the License Agreement window, read the terms of the agreement.
Installing the Multimedia Complement for Elite software
Avaya Aura® Contact Center Installation May 2013 705

6. Click I Accept the Terms of the End-User License Agreement.
7. Click Next.
706 Avaya Aura® Contact Center Installation May 2013Comments? [email protected]

8. On the Installation Selection window, under Avaya Aura 6.x - SIP, select AACCMultimedia Complement for Elite.
9. Click Next.
Installing the Multimedia Complement for Elite software
Avaya Aura® Contact Center Installation May 2013 707

10. On the Installation Destination window, on the Application Destination Drivetab, select where to install the Contact Center application software by choosing adisk drive letter.
11. Click the Database Destination Drive tab
12. Under Select the destination drive for the Contact Center database files, selectthe drive for the Contact Center Manager Server database.
13. Under Select the destination drive for the Contact Center database files, selectthe drive for the Communication Control Toolkit database.
14. Under Select the destination drive for the Contact Center database files, selectthe drive for the Contact Center Multimedia database.
708 Avaya Aura® Contact Center Installation May 2013Comments? [email protected]

15. Click the Product Updates Location tab.
Installing the Multimedia Complement for Elite software
Avaya Aura® Contact Center Installation May 2013 709

16. Under Select the Product Updates Location, click Browse to locate the foldercontaining the Contact Center product updates.
17. Click Next.The System Readiness Check runs on the server.
18. If the System Readiness Check utility returns a Fail, the software installation cannotproceed until you correct the problem. Review any failures returned by the SystemReadiness Check and consult Avaya Aura® Contact Center Planning andEngineering (NN44400-210) to determine the actions to resolve the issue.You can ignore warnings if the potential impact to the operation of the contact centeris understood and not applicable.
19. Click Next.
20. On the Installation Data window, type the installation details for each tab.
21. Select the CCMS tab, and configure the server details.
710 Avaya Aura® Contact Center Installation May 2013Comments? [email protected]
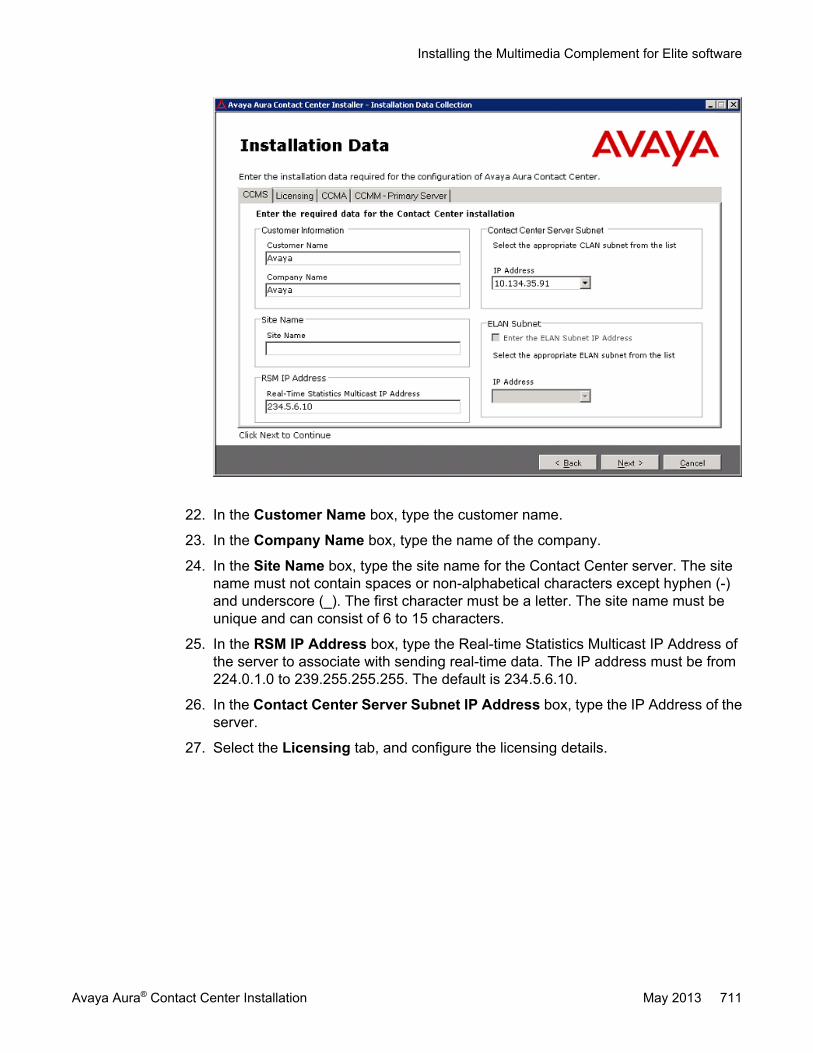
22. In the Customer Name box, type the customer name.
23. In the Company Name box, type the name of the company.
24. In the Site Name box, type the site name for the Contact Center server. The sitename must not contain spaces or non-alphabetical characters except hyphen (-)and underscore (_). The first character must be a letter. The site name must beunique and can consist of 6 to 15 characters.
25. In the RSM IP Address box, type the Real-time Statistics Multicast IP Address ofthe server to associate with sending real-time data. The IP address must be from224.0.1.0 to 239.255.255.255. The default is 234.5.6.10.
26. In the Contact Center Server Subnet IP Address box, type the IP Address of theserver.
27. Select the Licensing tab, and configure the licensing details.
Installing the Multimedia Complement for Elite software
Avaya Aura® Contact Center Installation May 2013 711

28. The License File Location box displays the folder on the server which containsthe license file.
29. In the Primary License Manager IP Address box, type the IP address of theprimary License Manager server. Each Multimedia Complement For Elite Servercontains a License Manager server. This License Manager server is the defaultprimary License Manager.
30. In the Primary License Port box, type the number of the communication portopened between the License Manager and Contact Center Manager Server. Thedefault port number is 3998 when you use only one License Manager.
31. In the Secondary License Manager IP Address box, type the IP address of thesecondary License Manager server. The secondary License Manager server isused only in a corporate licensed environment.
32. From the Licensing Package list, select the licenses that you have purchased.Select Nodal Enterprise for single-site contact centers. Select CorporateEnterprise for multi-site contact centers.
33. From the list of Optional Packages, enable the licensed features that you havepurchased.
34. Select the Open Queue check box.
35. Select the CCMA tab, and configure the CCMA details.
712 Avaya Aura® Contact Center Installation May 2013Comments? [email protected]

36. In the Configuration section clear Enable CCMA Replication. Clear the checkbox on the primary server.
37. In the LDAP Port Number box, type the port number for the Lightweight DirectoryAccess Protocol (LDAP) for which common contact information is stored on aserver. The default value of the port is 389. Check with the system administrator toensure that the port number is not already in use.
38. In the SSL Port Number box, type the port number for the Secure Sockets Layer(SSL) that controls security when applications are communicating across thenetwork. The default port is 636. Check with the system administrator to ensure thatthe port number is not already in use.
39. In the System Account Configuration section, in the Password box, type thepassword for the CCMA System Account user account. Confirm the password inthe second box. The password is not checked against the server security policy forminimum password requirements. Avaya recommends that you enter a passwordthat conforms to your corporate password policy.
40. Select the CCMM tab, and configure the Contact Center Multimedia details.
Installing the Multimedia Complement for Elite software
Avaya Aura® Contact Center Installation May 2013 713

41. From the IM Provider list, select either None, Microsoft OCS or Aura PresenceServices. Peer-to-Peer IM and presence features are supported for Avaya Aura®
Presence Services server and Microsoft Office Communications Server.
42. In the License Server box, type the name of the server on which the Contact CenterLicense Manager software is installed.
43. In the Inbound Mail Server (POP3) box, type the name of the server on which emailmessages are received in your network.
44. In the Outbound Mail Server (SMTP) box, type the name of the server from onwhich email messages are sent. Your inbound and outbound mail servers can havethe same name.
45. In the Web Stats Server box, type the name of the optional Web Statistics serverthat agents and supervisors use to view real-time statistics for call handling, skillsetdata, and the state information on the Agent Desktop. Web Based Statistics is anoptional licensed feature and requires a Web Based Statistics feature license.
46. In the Web Stats Port box, type the port number of the Web Statistics server. Thedefault port number is 9086.
47. In the Web Communications Server (Optional) box, type the name of the serveron which the Web Customer Interface is installed if Web communications is licensedin your contact center.
48. Click Next.
714 Avaya Aura® Contact Center Installation May 2013Comments? [email protected]

49. On the Summary window, review and verify the information.
50. Click Install.
51. After the installation is complete, click Finish.
52. If prompted, restart the server.
53. If you are using WebLM, you must restart the Contact Center Tomcat Instanceservice after installing the Contact Center software.
Upgrading Java Runtime Environment, Java DevelopmentKit, and Apache Tomcat components using Third PartySoftware Upgrade Utility
Before you begin
• Apply Contact Center 6.3 Service Pack 10 or later on your system as an install-timepatch.
• Restart the Contact Center server to complete this procedure.
About this taskUse Third Party Software Upgrade Utility to automatically upgrade your Java RuntimeEnvironment and Tomcat software components. For more information, see Third PartySoftware Upgrade Utility on page 27.
Procedure
1. Log on to the server using the administrator account.
2. Navigate to the Avaya_Support\ProductUpdates folder.
3. Open the folder where you had saved the latest Service Pack.
4. Browse to ThirdParty\AACCThirdPartySoftwareUpgradeUtility.exe.
5. Double-click AACCThirdPartySoftwareUpgradeUtility.exe.
6. Click Upgrade.The system displays the “User Action Required” dialog box.
7. Click OK.
8. Click Yes to restart Contact Center and complete the upgrade.
Upgrading Java Runtime Environment, Java Development Kit, and Apache Tomcat components using Third PartySoftware Upgrade Utility
Avaya Aura® Contact Center Installation May 2013 715
Configuring WebLM licensingBefore you begin
• Install the Contact Center License Manager server software.• Restart the Contact Center License Manager server.
About this taskConfigure Contact Center License Manager to use WebLM. Then restart the Contact CenterTomcat Instance on the Contact Center License Manager server to commission WebLM forthe first time.
Important:If you are using a Keycode Retrieval System (KRS) PLIC license file, skip this procedure.This procedure applies only when you are using an Avaya Product Licensing and DeliverySystem (PLDS) WebLM license file or an Avaya WebLM server.
Note:When you install Contact Center License Manager, an instance of Apache Tomcat Serveris also installed on the same server. The default port number for Apache Tomcat is 8081. Ifyou need to change the port number to avoid conflicts with third-party software, see yourApache Tomcat documentation.
Procedure
1. Log on to the server where the Contact Center License Manager software isinstalled.
2. Click Start > All Programs > Avaya > Contact Center > License Manager >Configuration.
3. If you are using a local WebLM license file, complete the following steps to specifythe license file:
a. View the type of license file currently used, and then click OK.b. On the Configuration page, click Browse.c. Navigate the file system and locate the WebLM license file.d. Click Open.
4. If you are using a remote WebLM server, complete the following steps to specifythe license server:
a. View the type of license file currently used, and then click OK.b. On the Configuration page, in the WebLM Host Name field, type the host name
or IP address of the WebLM server.c. In the WebLM Port Number field, type 52233.
716 Avaya Aura® Contact Center Installation May 2013Comments? [email protected]

5. Click Apply.Ignore the LMConfig dialog box for now.
6. On the Start menu, choose All Programs > Administrative Tools > Services.
7. Right-click the Contact Center Tomcat Instance service, and click Stop.
8. Right-click the Contact Center Tomcat Instance service, and click Start.
9. Close the services window.
10. On the LMConfig dialog box, click Yes to restart the Contact Center LicenseManager services.
11. Click OK to close the window.
12. Click Exit.
Securing the Windows serverAbout this taskApply optional security measures to your operating system to further secure your server.
Important:Scanning software can degrade the performance and decrease the reliability of the system.Install virus scanning software only if the system connects to an exposed network or to theInternet.
Important:To maintain server performance, you must schedule virus scans during maintenanceperiods or low usage hours only.
Procedure
1. Harden the operating system using defined site procedures.
2. Install antivirus software. If you install antivirus software, Avaya recommends thatyou exclude some contact center files and folders from real-time and scheduledscans. For more information, and for a list of files and folders to exclude, see AvayaAura® Contact Center Planning and Engineering (NN44400-210).
Securing the Windows server
Avaya Aura® Contact Center Installation May 2013 717

Installing the external Web communication serversoftware
Before you begin
• Install Contact Center Multimedia software.
About this taskIf you use Web communications in your contact center, you can use the Sample CustomerInterface (CI) Web site implementation to help you develop pages for your corporate Web site.The Web services architecture is a platform-independent interface that customers can accessfrom both Microsoft .NET and Java applications. Customer Web sites or third-party applicationsuse the open interface for integration with the Contact Center Multimedia system.
The Customer Interface Web services provide a range of methods to perform the followingfunctions:
• Register new customers in the Contact Center Multimedia database• Log on or log off existing customers• Update customer logon credentials• Create customer contacts• Update customer details• Read customer information• Review a customer contact history• Request immediate or scheduled callback requests• Read a contact• Create and maintain a Web communications chat session
To integrate Web Communications with the Contact Center Multimedia system, download theAvaya Aura® Contact Center Web Communications SDK package and ReferenceImplementation from www.avaya.com/devconnect. The Web Communications ReferenceImplementation contains information about customizing the Web communication applicationto your solution.
Important:Do not install the Web Communications Reference Implementation on an Avaya Aura®
Contact Center server. Install the Web Communications Reference Implementation on yourown server in the contact center solution.
718 Avaya Aura® Contact Center Installation May 2013Comments? [email protected]
Procedure
1. Locate and download the Web Communications Reference Implementationsoftware from www.avaya.com/devconnect.
2. Copy the Web Communications Reference Implementation software to the externalWeb server.
3. Follow the Reference Implementation instructions to install and commission theWeb Communications server.
Adding the domain AD-LDS replication account to theprimary server administrators and replicator group
About this taskAdd the AD-LDS replication account to the local Administrators and replicator group on theprimary Contact Center server.
Important:If you are using High Availability, and if this server is to be the primary active server, performthis procedure. If you are not implementing High Availability, skip this procedure.
If you are using a domain, you must request this AD-LDS replication account from your Networkor System Administrator. The primary and standby replicating Contact Center servers mustboth be added to the same domain.
For this procedure, the name of the AD-LDS replication account is CCMAReplication. You canchoose another name for the account.
Procedure
1. Log on to the primary Contact Center server.
2. Click Start > Administrative Tools > Computer Management.
3. In the Computer Management window, expand Local Users and Groups.
4. Click the Groups folder.
5. Double-click on the Administrators group.
6. Click Add > Locations.
7. On the Windows Security dialog box, type the domain logon details.
8. On the Locations dialog, select the domain to be used by CCMA replication.
9. Expand the domain folder to display domain users.
Adding the domain AD-LDS replication account to the primary server administrators and replicator group
Avaya Aura® Contact Center Installation May 2013 719

10. Click Users.
11. Click OK.
12. Click Advanced > Find Now, to display domain users.
13. From the list of users select the CCMA replication domain user account, for exampleselect the myDomain\CCMAReplication user account.
14. Click OK.
15. Click OK > Apply > OK.
16. Click the Groups folder.
17. Double-click on the Replicator group.
18. Click Add > Locations.
19. On the Windows Security dialog box, type the domain logon details.
20. On the Locations dialog, select the domain to be used by CCMA replication.
21. Expand the domain folder to display domain users.
22. Click Users.
23. Click OK.
24. Click Advanced > Find Now, to display domain users.
25. From the list of users select the CCMA replication domain user account, for exampleselect the myDomain\CCMAReplication user account.
26. Click OK.
27. Click OK > Apply > OK.
720 Avaya Aura® Contact Center Installation May 2013Comments? [email protected]

Chapter 24: Standby MultimediaComplement for Elite softwareinstallation
This chapter describes how to install a standby Multimedia Complement for Elite Server. A MultimediaComplement for Elite Server includes the following server software:
• Contact Center Manager Server (CCMS)
• Contact Center Manager Server Utility
• Contact Center License Manager
• Contact Center Manager Administration (CCMA)
• Communication Control Toolkit (CCT)
• Contact Center Multimedia (CCMM)
This chapter describes how to configure the standby Multimedia Complement for Elite Server with thewindows accounts used by CCMA replication in your High Availability Avaya Aura® Contact Centersolution.
You must complete all the procedures in this section in sequential order.
Standby Multimedia Complement for Elite softwareinstallation prerequisites
• Copy the most recent patches for the Contact Center software.
• Ensure that your new Contact Center license file with a High Availability standby serverlicense is available.
Important:For the system to correctly handle backup and restore SNMP events, you must installWindows SNMP Service before you install Contact Center server software.
Avaya Aura® Contact Center Installation May 2013 721

Downloading the latest documentationBefore you begin
• Download the most recent version of Acrobat Reader.• Access the Avaya Web site at www.avaya.com/support.
About this taskDownload the most recent documentation to ensure you have the most recent updates.Updates in the documentation accurately reflect the most recent changes in the software.
Procedure
1. Log on to the Avaya Web site.
2. Compare the versions of the documentation on the site with the versions youhave.
3. If the version number on www.avaya.com/support is higher than your version,download the latest version of the document.
4. Review the Avaya Web site for release notes and readme files.
Installing Windows Server 2008 Release 2Before you begin
• Ensure that you have a newly formatted server that meets the specifications in AvayaAura® Contact Center Planning and Engineering (NN44400-210) on which to installMicrosoft Windows Server 2008 64-bit, Release 2, Service Pack 1.
Do not upgrade your operating system from a previous release. Contact Center is notsupported on an upgraded operating system.
• Configure all servers for RAID as described in Avaya Aura® Contact Center Planning andEngineering (NN44400-210).
• Ensure that you have a DVD for Windows Server 2008 Release 2.• Install the network interface card in the server.• Know the IP addresses for the contact center subnet.
722 Avaya Aura® Contact Center Installation May 2013Comments? [email protected]
About this taskInstall the Windows operating system, which is required for the Contact Center server software.During the installation, configure the Windows settings as required. You must perform thisprocedure on each server before you install Contact Center server software on the server.
Procedure
1. Insert the Windows Server 2008 64-bit Release 2 Standard Edition or WindowsServer 2008 64-bit Release 2 Enterprise Edition DVD into the DVD drive.
2. Install Windows Server 2008 Release 2 according to the instructions supplied bythe DVD.
3. On the first install page, select your language for installation.
4. Click Next.
5. On the Installation window, select a Language to install from the list.
6. Select a Time and currency format from the list.
7. Select Keyboard or input method from the list.
8. Click Next.
9. Click Install Now.
10. Select an operating system from the list.
11. Click Next.
12. On the first Install Windows screen, read the terms of the license agreement andselect I accept the license terms.
13. Click Next.
14. Select Custom.
15. Select the disk partition on which you want to install Windows Server 2008.
Important:You can use the partition management options to configure the partitions on yourserver.
16. Click Next.The installation proceeds and automatically restarts the server several times.
17. After completing the installation, log on to the server as Administrator. Enter andconfirm the Administrator password.
18. In the Initial Configuration Tasks window, select Activate Windows and followthe instructions or the Microsoft documentation to activate your server.
19. Select Set time zone and complete the information as required for your system.
Installing Windows Server 2008 Release 2
Avaya Aura® Contact Center Installation May 2013 723

This server time zone daylight saving setting must match the time zone daylightsaving setting on the Avaya Media Server(s) in this SIP-enabled contact centersolution.
20. Select Configure Networking and complete the information for your NetworkInterface Card (NIC) with the server IP address.
21. Select Provide computer name and domain and complete the information for yourserver name and workgroup or domain settings.
22. Change the DVD drive letter to E: to ensure the correct drive letters are free for theContact Center application and database hard disk drives and partitions.
23. Configure the hard disk drives and partitions for this server using the WindowsServer 2008 Server Manager - Disk Management utility. For more information abouthard disk drives and partitions, see Avaya Aura® Contact Center Planning andEngineering (NN44400-210).
24. Install other required drivers for your hardware configuration.
Procedure job aid
Name Description
Computer name Do not use spaces or underscores or exceed15 characters. The name must start with analphabetic character.The computer name must match (includingcase sensitivity) the DNS name.
Disk drives Format the partitions as required for theserver. For more information, see AvayaAura® Contact Center Planning andEngineering (NN44400-210).
Domain/workgroup name Configure as required for your site.You must check to ensure the DNS Domainname (including case) matches the servername if the server is added to a domain orworkgroup after configuration.
Licensing modes Select Per server licensing mode.Accept the default five concurrentconnections.
Modem dialing Configure as required for your site. Do notinstall a modem on a Communication ControlToolkit server.
724 Avaya Aura® Contact Center Installation May 2013Comments? [email protected]

Name Description
Network components Configure IP Address, WINS, DNS for one ortwo network cards as per configuration.Contact Center does not support IPv6.
Network connections If the server has more than one NIC/adapter,ensure contact center subnet appears first inthe network adapter binding order.
Partitions Configure C: drive to be a primary drive.Configure the other drives on your server tomeet the requirements according to AvayaAura® Contact Center Planning andEngineering (NN44400-210) for the server.
Regional settings window Configure as required for your site.
SNMP Configure for all servers.
Configuring Windows Server 2008Before you begin
• Install Microsoft Windows Server 2008 64-bit Release 2 on your server.
About this taskBefore you can install Avaya Aura® Contact Center software on your server, you must configureWindows Server 2008 to meet the requirements of the software.
You can prepare the server using this and other procedures, or you can download and use anAvaya Aura® Contact Center operating system configuration tool that installs the requiredWindows roles and features.
The Avaya Aura® Contact Center Windows Roles and Features installer configures thefollowing Windows Server 2008 resources:
• Windows Server Backup Features• SNMP Services• Active Directory Light Weight Directory Services• Application Server• Web Server (IIS)
For more information, and to download the Avaya Aura® Contact Center Windows Roles andFeatures installer, see http://support.avaya.com.
The Avaya Aura® Contact Center Windows Roles and Features installer replaces the followingprocedures:
Configuring Windows Server 2008
Avaya Aura® Contact Center Installation May 2013 725
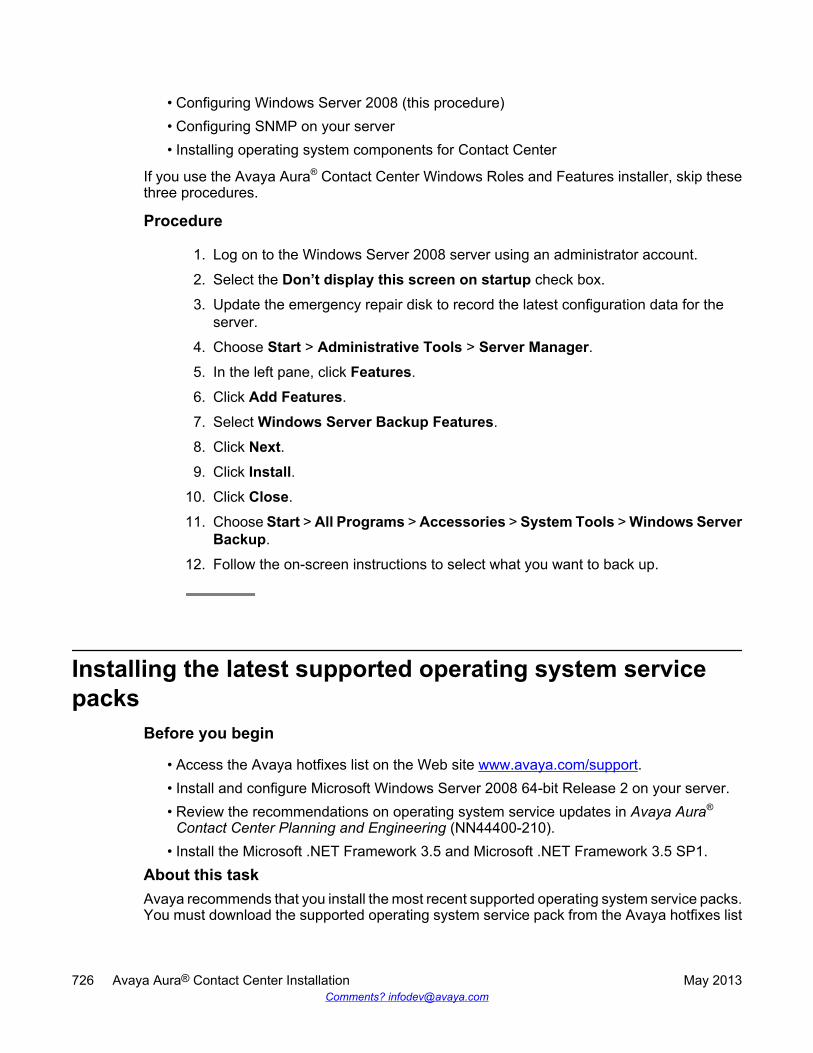
• Configuring Windows Server 2008 (this procedure)• Configuring SNMP on your server• Installing operating system components for Contact Center
If you use the Avaya Aura® Contact Center Windows Roles and Features installer, skip thesethree procedures.
Procedure
1. Log on to the Windows Server 2008 server using an administrator account.
2. Select the Don’t display this screen on startup check box.
3. Update the emergency repair disk to record the latest configuration data for theserver.
4. Choose Start > Administrative Tools > Server Manager.5. In the left pane, click Features.
6. Click Add Features.
7. Select Windows Server Backup Features.
8. Click Next.9. Click Install.
10. Click Close.
11. Choose Start > All Programs > Accessories > System Tools > Windows ServerBackup.
12. Follow the on-screen instructions to select what you want to back up.
Installing the latest supported operating system servicepacks
Before you begin
• Access the Avaya hotfixes list on the Web site www.avaya.com/support.• Install and configure Microsoft Windows Server 2008 64-bit Release 2 on your server.• Review the recommendations on operating system service updates in Avaya Aura®
Contact Center Planning and Engineering (NN44400-210).• Install the Microsoft .NET Framework 3.5 and Microsoft .NET Framework 3.5 SP1.
About this taskAvaya recommends that you install the most recent supported operating system service packs.You must download the supported operating system service pack from the Avaya hotfixes list
726 Avaya Aura® Contact Center Installation May 2013Comments? [email protected]

to ensure your Contact Center server software functions correctly with the supported operatingsystem patches.
Procedure
1. Log on to the server and disable the Windows Update feature. There are a numberof methods for disabling the Windows Update feature, refer to the Windows Server2008 documentation for a method suitable to your solution. Disabling the WindowsUpdate feature prevents Windows Server 2008 from automatically applyingoperating system patches and potentially rebooting the server.
2. Review the Contact Center Service Packs Compatibility and Security HotfixesApplicability List to determine the most recent Avaya Aura® Contact Centersupported patches or service packs.
3. Download the appropriate Microsoft Windows Server 2008 patches for the AvayaAura® Contact Center software installed on this server.
4. Install the most recent Windows Server 2008 service pack that is validated withAvaya Aura® Contact Center by following the Microsoft Installation instructions.
Connecting to the contact center subnetAbout this taskConnect the Contact Center server to the contact center subnet. The contact center subnet isthe network on which the server software applications work together to route contacts andgenerate reports.
Procedure
1. Locate the slot assigned to the contact center subnet network interface card for theserver. Make a note of the slot.
2. Connect the cable from the contact center subnet to the contact center subnetnetwork interface card in the server in accordance with customer site networkingguidelines.
3. Use the ping command to test the contact center subnet.
Connecting to the contact center subnet
Avaya Aura® Contact Center Installation May 2013 727

Adding a server to a domainBefore you begin
• Ensure that you have domain administrator privileges, or ask the Domain Administratorto assign you a domain user account for remote access.
• On the server, configure a preferred Domain Name System (DNS) server on the NetworkInterface Card (NIC).
About this taskAdd the server to an existing domain. Avaya recommends that you add the server to the domainbefore installing Contact Center software.
Ask your System Administrator to add a Domain Name System (DNS) static entry for thisserver. Each Contact Center server in a domain requires a DNS static entry.
Important:Avaya Aura® Contact Center High Availability solutions do not support Windows Server 2008Dynamic DNS.
In High Availability solutions, ask your System Administrator to add one DNS static entry forthe each managed name and associated managed IP address. A typical High Availabilitycampus solution with a pair of servers requires 3 DNS static entries; one DNS static entry forthe active server, one DNS static entry for the standby server, and one DNS static entry forthe managed name and associated IP address.
Procedure
1. Log on to the server.
2. Click Start > Administrative Tools > Server Manager.
3. Beside Computer Information, click Change System Properties.
4. In the System Properties dialog box, click the Computer Name tab.
5. Click Change.
6. In the Computer Name/Domain Changes dialog box, click the Domain option.
7. Type the domain name (you must provide the fully qualified domain name, whichincludes the prefix and suffix).
8. Click OK.
9. Type the domain administrator User name and Password.
10. Click OK.
728 Avaya Aura® Contact Center Installation May 2013Comments? [email protected]

11. Restart the server when you are prompted to do so.
Disabling the Remote Access servicesAbout this taskAvaya Aura® Contact Center does not support Remote Access Services (RAS). Disable theRemote Access services before installing Avaya Aura® Contact Center. Microsoft RemoteDesktop continues to run after you disable Remote Access services. After you disable theservices, restart the server.
Procedure
1. Choose Start > Administrative Tools > Services.
2. In the Services window, right-click the Remote Access Connection Managericon.
3. Click Properties.
4. In the General tab, from the Startup type list, select Disabled.
5. Click OK.
6. In the Services window, right-click the Remote Access Auto ConnectionManager icon.
7. Click Properties.
8. In the General tab, from the Startup type list, select Disabled.
9. Click OK.
10. In the Services window, click File, Exit.
11. Restart the server.
Configuring SNMP on your serverBefore you begin
• Install and configure Microsoft Windows Server 2008 64-bit Release 2 on your server.
About this taskConfigure Simple Network Management Protocol (SNMP) on your server to ensure you haveall of the required components of the Internet protocol for monitoring devices in your network.
Disabling the Remote Access services
Avaya Aura® Contact Center Installation May 2013 729

SNMP helps you manage data that describes the system configuration and errors that mayoccur between them.
Procedure
1. Log on to the server using the administrator account.
2. Choose Start > Control Panel > Programs.
3. In the Programs and Features section, click Turn Windows features on or off.
4. In the Server Manager window, select Server Manager and click Add Features.
5. Select SNMP Services.
6. Click Next.
7. Click Install.
8. If prompted, insert the Windows Server 2008 DVD.
9. Click Close.
Downloading the most recent patches to the serverBefore you begin
• Install and configure Windows Server 2008 64-bit Release 2 on your server according tothe settings in this chapter.
• Download and install the most recent and valid updates for Microsoft Windows Server2008 64-bit Release 2.
• Know the location at which you plan to install each Contact Center server softwarepackage.
• Ensure that you use one administrator account on your server to un-install and installsoftware updates.
About this taskTo ensure that you have the most current software, download the most recent Contact Centerpatches from www.avaya.com/support to the server you plan to install.
Procedure
1. Log on to the server using the administrator account.
2. Create a folder Avaya_Support\ProductUpdates on the drive on which youwant to save the software updates.
3. Download the most recent service pack file. Save and unzip the file on the ContactCenter server in the Avaya_Support\ProductUpdates folder.
730 Avaya Aura® Contact Center Installation May 2013Comments? [email protected]

4. If new patches are available for the latest service pack, download and save thepatches on the Contact Center server in the Avaya_Support\ProductUpdates folder.
5. Read the Contact Center Release Notes for the most recent instructions.
Disabling unused Network AdaptersAbout this taskDisable all unused Network Adapters or Network Interface Cards (NICs) to improve networkcommunications and prevent the erroneous configuration of unused NICs during ContactCenter server commissioning.
Procedure
1. Log on to the server.
2. Click Start > Control Panel > Network and Internet > Network and SharingCenter > Change Adapter Settings.
3. Right-click on the unused Network Adapter, and select Disable.
4. Repeat this procedure for all unused Network Adapters.
Enabling Microsoft Remote Desktop connectionBefore you begin
• Install Microsoft Windows Server 2008 64-bit Release 2 on your server.• Log on to the server with administrator privileges.
About this taskEnable Microsoft Remote Desktop connection as your remote access tool. Microsoft RemoteDesktop provides remote access for support on the server.
Procedure
1. Choose Start > Control Panel > System and Security.
2. In the System section, select Allow remote access.
3. Click the Remote tab.
Disabling unused Network Adapters
Avaya Aura® Contact Center Installation May 2013 731
4. Select Allow connections from computers running any version of RemoteDesktop (less secure).
5. Click OK.
Configuring Data Execution PreventionAbout this taskConfigure the Data Execution Prevention (DEP) hardware and software to perform additionalchecks on memory that protect the Avaya Aura® Contact Center server against malicious codeexploitation.
Procedure
1. Log on to Windows as administrator.
2. Choose Start > Control Panel > System and Security.
3. Click System.
4. In the System window, click Advanced system settings.
5. In the System Properties dialog box, click the Advanced tab.
6. Under Performance, click Settings.
7. In the Performance Options dialog box, click the Data Execution Preventiontab.
8. On the Data Execution Prevention tab, select Turn on DEP for essentialWindows programs and services only.
9. Click OK.
10. On the System Properties dialog box, click OK.
11. Click OK to restart the computer.
732 Avaya Aura® Contact Center Installation May 2013Comments? [email protected]
Importing Contact Center Firewall Security policyBefore you begin
• Install Microsoft Windows Server 2008 64-bit Release 2 on your server.• Log on to the server with administrator privileges.• Download the most recent Avaya Aura® Contact Center Firewall Security policy from
www.avaya.com/support.
About this taskImport the Avaya Aura® Contact Center Firewall Security policy to ensure all contact centerservers in the solution can communicate.
Avaya recommends that you export and backup your existing firewall security policy beforeimporting the Avaya Aura® Contact Center Firewall Security policy. You can use this backuppolicy to rollback the Avaya Aura® Contact Center Firewall Security policy, if you ever needto.
Procedure
1. Choose Start > Administrative Tools > Windows Firewall with AdvancedSecurity.
2. Choose Actions > Export Policy.
3. In the File name box, type the name for the backup policy.
4. Click Save.Windows exports the existing policy. You can use this backup policy to rollback theAvaya Aura® Contact Center Firewall Security policy, if you ever need to.
5. On the Policy successfully exported message box, click OK.
6. Choose Actions > Import Policy.
7. On the policy overwrite message box, click Yes.
8. Navigate to the folder containing the Avaya Aura® Contact Center Firewall Securitypolicy.
9. Click Open.Windows imports the Avaya Aura® Contact Center Firewall Security policy.
10. On the Policy successfully imported message box, click OK.
Importing Contact Center Firewall Security policy
Avaya Aura® Contact Center Installation May 2013 733

Installing operating system components for ContactCenter
Before you begin
• Install Windows Server 2008 64-bit Release 2.
About this taskBefore installing Contact Center software, you must install specific operating system softwarecomponents such as Internet Information Services to integrate the components in ContactCenter.
Procedure
1. Choose Start > Administrative Tools > Server Manager.
2. In the left-hand column of the Server Manager, right-click Roles, and select AddRoles.
3. Review the requirements for the new role, and click Next.
4. Under Server Roles, select Active Directory Lightweight Directory Services.
5. If an Add Roles Wizard message box that lists features required by Active DirectoryLightweight Directory Services appears, click Add Required Features.
6. Under Server Roles, select Application Server.
7. If an Add Roles Wizard message box that lists features required by ApplicationServer appears, click Add Required Features.
8. Under Application Server, select Role Services.
9. Select Web Server (IIS) Support.
10. If an Add Roles Wizard message box appears, listing features required by WebServer (IIS) Support appears, click Add Required Features.
11. Click Next.
12. On the Introduction to Web Server (IIS) page, click Next.
13. On the Select Role Services page, under Common HTTP Features, select thefollowing services:
• Static Content
• Default Document
• Directory Browsing
• HTTP Errors
734 Avaya Aura® Contact Center Installation May 2013Comments? [email protected]

• HTTP Redirection
Important:All other services check boxes must be cleared.
14. On the Select Role Services page, under Application Development, select thefollowing services:
• ASP.NET
• .NET Extensibility
• ASP
• ISAPI Extensions
• ISAPI Filters
• Server Side Includes
Important:All other services check boxes must be cleared.
15. On the Select Role Services page, under Health and Diagnosis, select thefollowing services:
• HTTP Logging
• Logging Tools
• Request Monitor
• Tracing
Important:All other services check boxes must be cleared.
16. On the Select Role Services page, under Security, select all services.
17. On the Select Role Services page, under Performance, select all services.
18. On the Select Role Services page, under Management Tools, select the followingservices:
• IIS Management Console
• IIS Management Scripts and Tools
• Management Service
• All items under IIS 6 Management Compatibility
Important:All other services check boxes must be cleared.
Installing operating system components for Contact Center
Avaya Aura® Contact Center Installation May 2013 735

19. Click Next.
20. Review the installation information.
21. Click Install.
22. On the Installation Results page, click Close.
23. Restart the server if required.
Configuring MIME types to support Microsoft updatesAbout this taskConfigure the Multipurpose Internet Mail Extension (MIME) types to support Microsoft updatesand patches.
Procedure
1. Log on to the server.
2. Click Start > Administrative Tools > Computer Management.
3. In the Computer Management dialog box, expand Services and Applications >Internet Information Services > IIS Manager > Sites.
4. Select Default Web Site.
5. Under IIS, select MIME Types.
6. Double-click MIME Types.
7. On the Actions list on the right, click Add.
8. In the File name extension box, type .msp.
9. In the MIME Type box, type application/microsoftpatch.
10. Click OK.
11. On the Actions list on the right, click Add.
12. In the File name extension box, type .msu.
13. In the MIME Type box, type application/microsoftupdate.
14. Click OK.
15. Close the Computer Management window.
736 Avaya Aura® Contact Center Installation May 2013Comments? [email protected]

Adding the domain AD-LDS replication account to thestandby administrators and replicator group
About this taskAdd the AD-LDS replication account to the local Administrators and replicator group on thestandby server. Perform this procedure before installing Contact Center software on thestandby server.
If you are using a domain, you must request this AD-LDS replication account from your Networkor System Administrator. The primary and standby replicating Contact Center servers mustboth be added to the same domain.
For this procedure, the name of the AD-LDS replication account is CCMAReplication. You canchoose another name for the account.
Procedure
1. Log on to the standby Contact Center server.
2. Click Start > Administrative Tools > Computer Management.
3. In the Computer Management window, expand Local Users and Groups.
4. Click the Groups folder.
5. Double-click on the Administrators group.
6. Click Add > Locations.
7. On the Windows Security dialog box, type the domain logon details.
8. On the Locations dialog, select the domain to be used for CCMA replication.
9. Expand the domain folder to display domain users.
10. Click Users.
11. Click OK.
12. Click Advanced > Find Now, to display domain users.
13. From the list of users select the CCMA replication domain user account, for exampleselect the myDomain\CCMAReplication user account.
14. Click OK.
15. Click OK > Apply > OK.
16. Click the Groups folder.
17. Double-click on the Replicator group.
18. Click Add > Locations.
Adding the domain AD-LDS replication account to the standby administrators and replicator group
Avaya Aura® Contact Center Installation May 2013 737

19. On the Windows Security dialog box, type the domain logon details.
20. On the Locations dialog, select the domain to be used for CCMA replication.
21. Expand the domain folder to display domain users.
22. Click Users.
23. Click OK.
24. Click Advanced > Find Now, to display domain users.
25. From the list of users select the CCMA replication domain user account, for exampleselect the myDomain\CCMAReplication user account.
26. Click OK.
27. Click OK > Apply > OK.
Updating server for a network location installationAbout this taskConfigure the server .NET security settings to prepare the server for a remote networkinstallation. Avaya Aura® Contact Center supports network installation. You can insert theAvaya Aura® Contact Center DVD into a computer on your network. You then add this computeras a trusted site and network location on the new server. You can access this DVD from thenetwork location, and with some .NET security updates, use the remote DVD to install AvayaAura® Contact Center software on the new server.
Note:Skip this procedure if you plan to use the Avaya Aura® Contact Center DVD from the DVDdrive of the server.
Procedure
1. Insert the Avaya Aura® Contact Center DVD into a computer on the contact centernetwork.
2. Log on to the new server you are preparing for Contact Center.
3. Choose Start > Control Panel > Network and Internet > Internet Options.
4. In the Security tab, click Trusted sites.
5. In the Trusted sites section, click Sites.
6. In the Add this Web site to the zone box, type the <IP address> of the remotecomputer with the Avaya Aura® Contact Center DVD.
7. Click Add.
738 Avaya Aura® Contact Center Installation May 2013Comments? [email protected]

8. Click OK.
9. Close the Internet Options box.
10. From the new server, navigate to the network location with the DVD.
11. Access the remote DVD and in the root folder of the DVD, double-clickNetworkSetup.bat..NetFramework 3.5 installs and the .NetSecurity settings are modified.
12. If the Avaya Aura® Contact Center installation does not automatically start, in theroot folder of the DVD double-click Setup.exe.
13. After Avaya Aura® Contact Center installs, navigate to your network location anddouble-click NetworkSetupReset.bat.
Installing the standby Multimedia Complement for Elitesoftware
Before you begin
• Download the most recent Contact Center and Common Components patches to theserver.
• The primary active Multimedia Complement For Elite server must already be installed andconfigured.
• The primary active Multimedia Complement For Elite server must already be configuredto support AD-LDS replication.
About this taskInstall the standby Multimedia Complement For Elite software and enable your contact centerto route contacts to the agents that can answer the call with the correct skills.
Note:Installing Multimedia Complement For Elite software installs Apache Tomcat Server. Thedefault port number for Apache Tomcat is 8081. If you need to change the port number toavoid conflicts with third-party software, see your Apache Tomcat documentation.
Note:Read the Contact Center Release Notes for the most recent instructions.
Procedure
1. Insert the Contact Center DVD into the DVD drive of your server.
2. If the installation does not automatically start, double-click Setup.exe.
Installing the standby Multimedia Complement for Elite software
Avaya Aura® Contact Center Installation May 2013 739

3. Click Install to install the Microsoft .NET Framework 3.5 SP1 and Visual C++runtime libraries on the server.If you are prompted to accept the Microsoft .NET Framework 3.5.1 licenseagreement, click Accept. If you are prompted to restart the server, click Yes andrepeat step 2.
4. On the Welcome window, click Next.
5. On the License Agreement window, read the terms of the agreement.
6. Click I Accept the Terms of the End-User License Agreement.
7. Click Next.
8. On the Installation Selection window, under Avaya Aura 6.x - SIP, select AACCMultimedia Complement for Elite.
9. Click Next.
740 Avaya Aura® Contact Center Installation May 2013Comments? [email protected]
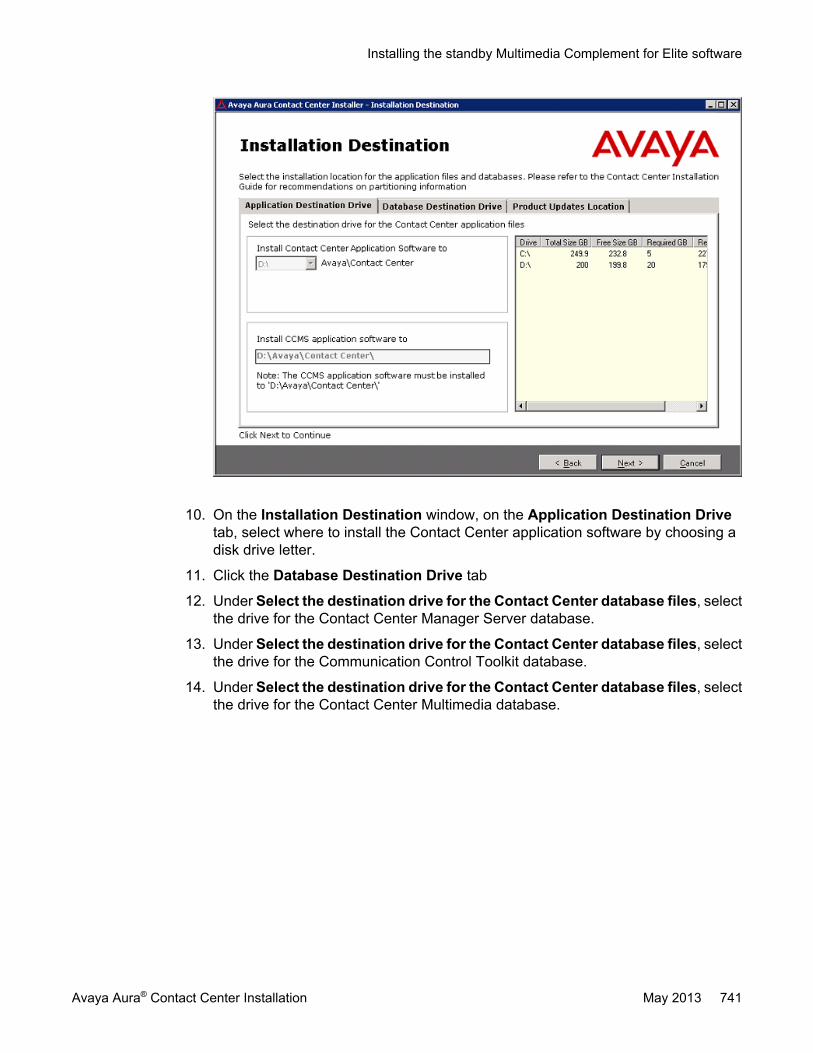
10. On the Installation Destination window, on the Application Destination Drivetab, select where to install the Contact Center application software by choosing adisk drive letter.
11. Click the Database Destination Drive tab
12. Under Select the destination drive for the Contact Center database files, selectthe drive for the Contact Center Manager Server database.
13. Under Select the destination drive for the Contact Center database files, selectthe drive for the Communication Control Toolkit database.
14. Under Select the destination drive for the Contact Center database files, selectthe drive for the Contact Center Multimedia database.
Installing the standby Multimedia Complement for Elite software
Avaya Aura® Contact Center Installation May 2013 741

15. Click the Product Updates Location tab.
742 Avaya Aura® Contact Center Installation May 2013Comments? [email protected]

16. Under Select the Product Updates Location, click Browse to locate the foldercontaining the Contact Center product updates.
17. Click Next.The System Readiness Check runs on the server.
18. If the System Readiness Check utility returns a Fail, the software installation cannotproceed until you correct the problem. Review any failures returned by the SystemReadiness Check and consult Avaya Aura® Contact Center Planning andEngineering (NN44400-210) to determine the actions to resolve the issue.You can ignore warnings if the potential impact to the operation of the contact centeris understood and not applicable.
19. Click Next.
20. On the Installation Data window, type the installation details for each tab.
21. Select the CCMS tab, and configure the server details.
Installing the standby Multimedia Complement for Elite software
Avaya Aura® Contact Center Installation May 2013 743

22. In the Customer Name box, type the customer name.
23. In the Company Name box, type the name of the company.
24. In the Site Name box, type the site name for the Contact Center server. The sitename must not contain spaces or non-alphabetical characters except hyphen (-)and underscore (_). The first character must be a letter. The site name must beunique and can consist of 6 to 15 characters. The Site Name of the standby servermust be the same as the Site Name of the primary server.
25. In the RSM IP Address box, type the Real-time Statistics Multicast IP Address ofthe server to associate with sending real-time data. The IP address must be from224.0.1.0 to 239.255.255.255. The default is 234.5.6.10.
26. In the Contact Center Server Subnet IP Address box, type the IP Address of theserver.
27. Select the Licensing tab, and configure the licensing details.
744 Avaya Aura® Contact Center Installation May 2013Comments? [email protected]

28. The License File Location box displays the folder on the server which containsthe license file.
29. In the Primary License Manager IP Address box, type the IP address of thestandby License Manager. Each Multimedia Complement for Elite Server containsa License Manager server. Type the IP address of the standby MultimediaComplement for Elite Server.
30. In the Primary License Port box, type the number of the communication portopened between the License Manager and Contact Center Manager Server. Thedefault port number is 3998 when you use only one License Manager.
31. In the Secondary License Manager IP Address box, type the IP address of thesecondary License Manager server. The secondary License Manager server isused only in a corporate licensed environment.
32. From the Licensing Package list, select the licenses that you have purchased.Select Nodal Enterprise for single-site contact centers. Select CorporateEnterprise for multi-site contact centers.
33. From the list of Optional Packages, enable the licensed features that you havepurchased.
34. Select the Open Queue check box.
35. Select the CCMA tab, and configure the CCMA details.
Installing the standby Multimedia Complement for Elite software
Avaya Aura® Contact Center Installation May 2013 745

36. In the Configuration section, select Enable CCMA Replication. CCMA replicationis reproducing an active copy of the AD-LDS for backup or emergency failure. Incase of server failure, a current AD-LDS is available to maintain the contactcenter.
37. On the Contact Center Installer message box, click Yes to confirm that this is astandby server.
38. In the LDAP Port Number box, type the port number for the Lightweight DirectoryAccess Protocol (LDAP) for which common contact information is stored on aserver. The default value of the port is 389. Check with the system administrator toensure that the port number is not already in use.
39. In the SSL Port Number box, type the port number for the Secure Sockets Layer(SSL) that controls security when applications are communicating across thenetwork. The default port is 636. Check with the system administrator to ensure thatthe port number is not already in use.
40. In the System Account Configuration section, in the Password box, type thepassword for the CCMA System Account user account. Confirm the password inthe second box. The password is not checked against the server security policy forminimum password requirements. Avaya recommends that you enter a passwordthat conforms to your corporate password policy.
41. Select the CCMM tab, and configure the Contact Center Multimedia details.
746 Avaya Aura® Contact Center Installation May 2013Comments? [email protected]

42. From the IM Provider list, select either None, Microsoft OCS or Aura PresenceServices. Peer-to-Peer IM and presence features are supported for Avaya Aura®
Presence Services server and Microsoft Office Communications Server.
43. In the License Server box, type the name of the server on which the Contact CenterLicense Manager software is installed.
44. In the Inbound Mail Server (POP3) box, type the name of the server on which emailmessages are received in your network.
45. In the Outbound Mail Server (SMTP) box, type the name of the server from onwhich email messages are sent. Your inbound and outbound mail servers can havethe same name.
46. In the Web Stats Server box, type the name of the optional Web Statistics serverthat agents and supervisors use to view real-time statistics for call handling, skillsetdata, and the state information on the Agent Desktop. Web Based Statistics is anoptional licensed feature and requires a Web Based Statistics feature license.
47. In the Web Stats Port box, type the port number of the Web Statistics server. Thedefault port number is 9086.
48. In the Web Communications Server (Optional) box, type the name of the serveron which the Web Customer Interface is installed if Web communications is licensedin your contact center.
49. Click Next.
Installing the standby Multimedia Complement for Elite software
Avaya Aura® Contact Center Installation May 2013 747

50. On the Summary window, review and verify the information.
51. Select Install. The install continues until the AD-LDS setup wizard appears.
52. Select Next.
53. In the Setup Options dialog box, select A replica of an existing instance.
748 Avaya Aura® Contact Center Installation May 2013Comments? [email protected]

54. Select Next.
55. On the Instance Name dialog box, in the Instance name box, type the AD-LDSinstance name. The default instance name is SymposiumWC, so typeSymposiumWC.
Installing the standby Multimedia Complement for Elite software
Avaya Aura® Contact Center Installation May 2013 749

56. In the Description box, type SymposiumWC.
57. Click Next.
58. On the Ports dialog box, if no other applications use the ports, accept the defaultvalues in the LDAP port number and SSL port number boxes and select Next.
750 Avaya Aura® Contact Center Installation May 2013Comments? [email protected]

59. On the Joining a Configuration Set dialog box, in the Server box, type the FQDNname of the primary Multimedia Complement For Elite server to replicate.Example of entering the primary Multimedia Complement For Elite server name.
Installing the standby Multimedia Complement for Elite software
Avaya Aura® Contact Center Installation May 2013 751

60. On the Joining a Configuration Set window, in the LDAP Port box, type the portnumber on the AD-LDS instance on the primary Multimedia Complement For Eliteserver. The default is port number 389.
61. Click Next.
62. On the Administrative Credentials for the Configuration Set window, select Thisaccount.
63. In the User name box, type the primary Multimedia Complement For Elite servername followed by its Administrator name in the format <primary MultimediaComplement For Elite server name>\Administrator. For example enter WIN-RBMQ1SU0OL1\Administrator. If you have created another administrator accountfor Contact Center, then enter the details (name and password) for that primaryMultimedia Complement For Elite server administrator account here. Youradministrator account must have full administrative privileges.Example of entering the administrative credentials.
752 Avaya Aura® Contact Center Installation May 2013Comments? [email protected]

64. In the Password box, type the password for this user account.
65. Click Next.
66. In the Copying Application Directory Partitions dialog box, in the Partition DNlist, select the partition DC=Nortelnetworks,DC=COM.
Installing the standby Multimedia Complement for Elite software
Avaya Aura® Contact Center Installation May 2013 753

67. Select Next.
68. In the File Location dialog box, accept the default values, click Next.
754 Avaya Aura® Contact Center Installation May 2013Comments? [email protected]

69. In the Service Account Selection dialog box, select Network service account.Example of using a domain and selecting Network service account.
Installing the standby Multimedia Complement for Elite software
Avaya Aura® Contact Center Installation May 2013 755

70. Click Next.
71. In the AD LDS Administrators dialog box, select This account.
756 Avaya Aura® Contact Center Installation May 2013Comments? [email protected]
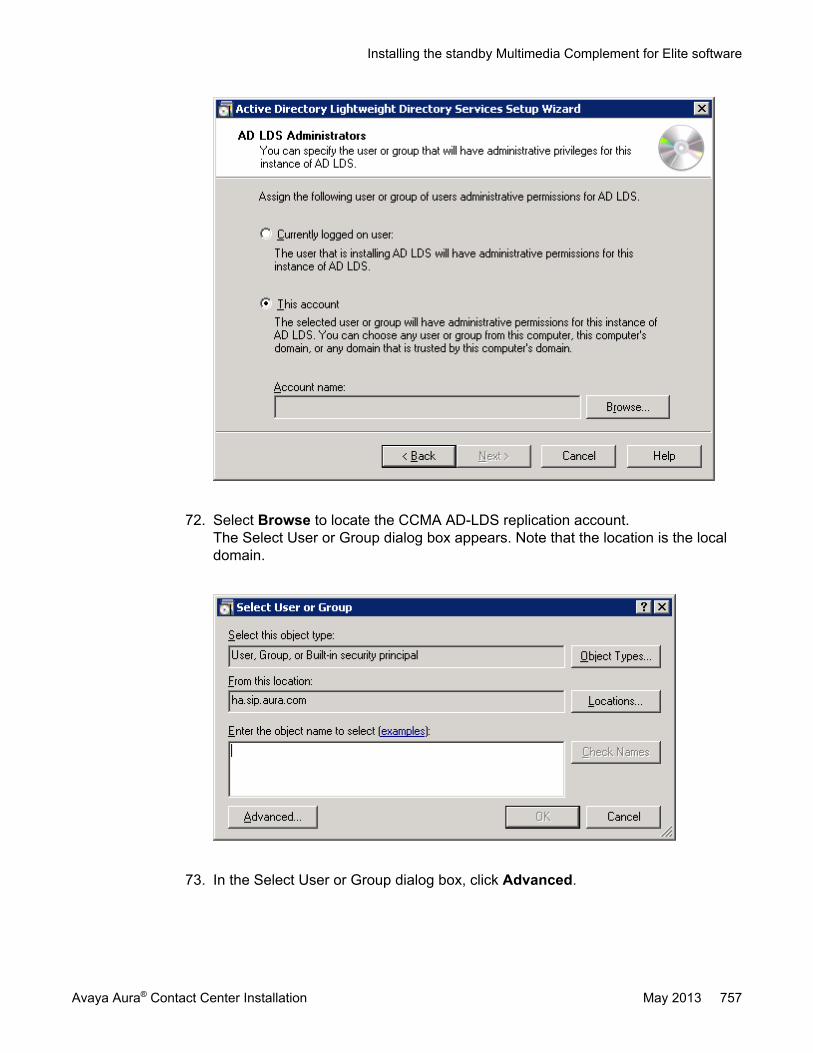
72. Select Browse to locate the CCMA AD-LDS replication account.The Select User or Group dialog box appears. Note that the location is the localdomain.
73. In the Select User or Group dialog box, click Advanced.
Installing the standby Multimedia Complement for Elite software
Avaya Aura® Contact Center Installation May 2013 757

74. In the Windows Security dialog box, type a logon name and password of an accountwith permissions to access your domain.
75. Click OK.The advanced Select User or Group dialog box appears.
758 Avaya Aura® Contact Center Installation May 2013Comments? [email protected]

76. In the advanced Select User or Group dialog box, click Find Now.
77. From the Search results list, select the CCMA replication account.Example of selecting a domain CCMA replication account:
Installing the standby Multimedia Complement for Elite software
Avaya Aura® Contact Center Installation May 2013 759

78. In the advanced Select User or Group dialog box, click OK.Example of selecting a CCMA replication account:
760 Avaya Aura® Contact Center Installation May 2013Comments? [email protected]
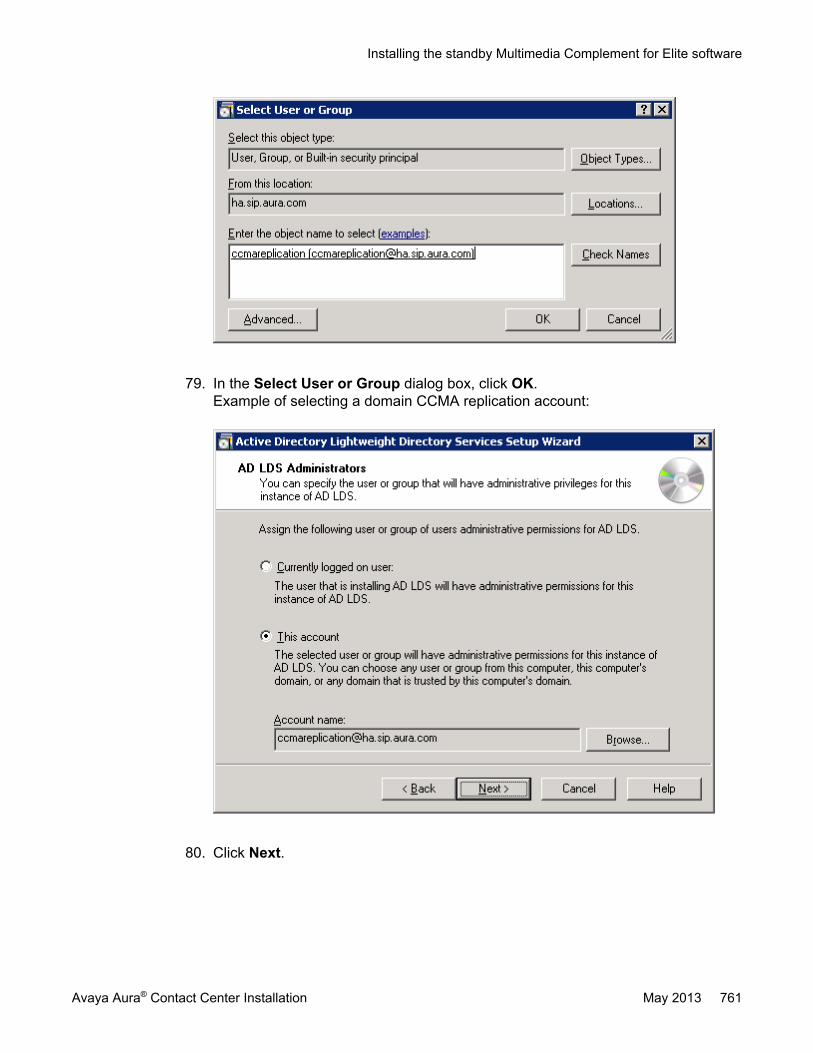
79. In the Select User or Group dialog box, click OK.Example of selecting a domain CCMA replication account:
80. Click Next.
Installing the standby Multimedia Complement for Elite software
Avaya Aura® Contact Center Installation May 2013 761

81. Confirm the installation components, and click Next.
82. After the installation is complete, click Finish.
83. If prompted, restart the server.
84. If you are using WebLM, you must restart the Contact Center Tomcat Instanceservice after installing the Contact Center software.
Upgrading Java Runtime Environment, Java DevelopmentKit, and Apache Tomcat components using Third PartySoftware Upgrade Utility
Before you begin
• Apply Contact Center 6.3 Service Pack 10 or later on your system as an install-timepatch.
• Restart the Contact Center server to complete this procedure.
762 Avaya Aura® Contact Center Installation May 2013Comments? [email protected]

About this taskUse Third Party Software Upgrade Utility to automatically upgrade your Java RuntimeEnvironment and Tomcat software components. For more information, see Third PartySoftware Upgrade Utility on page 27.
Procedure
1. Log on to the server using the administrator account.
2. Navigate to the Avaya_Support\ProductUpdates folder.
3. Open the folder where you had saved the latest Service Pack.
4. Browse to ThirdParty\AACCThirdPartySoftwareUpgradeUtility.exe.
5. Double-click AACCThirdPartySoftwareUpgradeUtility.exe.
6. Click Upgrade.The system displays the “User Action Required” dialog box.
7. Click OK.
8. Click Yes to restart Contact Center and complete the upgrade.
Configuring WebLM licensingBefore you begin
• Install the Contact Center License Manager server software.• Restart the Contact Center License Manager server.
About this taskConfigure Contact Center License Manager to use WebLM. Then restart the Contact CenterTomcat Instance on the Contact Center License Manager server to commission WebLM forthe first time.
Important:If you are using a Keycode Retrieval System (KRS) PLIC license file, skip this procedure.This procedure applies only when you are using an Avaya Product Licensing and DeliverySystem (PLDS) WebLM license file or an Avaya WebLM server.
Note:When you install Contact Center License Manager, an instance of Apache Tomcat Serveris also installed on the same server. The default port number for Apache Tomcat is 8081. Ifyou need to change the port number to avoid conflicts with third-party software, see yourApache Tomcat documentation.
Configuring WebLM licensing
Avaya Aura® Contact Center Installation May 2013 763

Procedure
1. Log on to the server where the Contact Center License Manager software isinstalled.
2. Click Start > All Programs > Avaya > Contact Center > License Manager >Configuration.
3. If you are using a local WebLM license file, complete the following steps to specifythe license file:
a. View the type of license file currently used, and then click OK.b. On the Configuration page, click Browse.c. Navigate the file system and locate the WebLM license file.d. Click Open.
4. If you are using a remote WebLM server, complete the following steps to specifythe license server:
a. View the type of license file currently used, and then click OK.b. On the Configuration page, in the WebLM Host Name field, type the host name
or IP address of the WebLM server.c. In the WebLM Port Number field, type 52233.
5. Click Apply.Ignore the LMConfig dialog box for now.
6. On the Start menu, choose All Programs > Administrative Tools > Services.
7. Right-click the Contact Center Tomcat Instance service, and click Stop.
8. Right-click the Contact Center Tomcat Instance service, and click Start.
9. Close the services window.
10. On the LMConfig dialog box, click Yes to restart the Contact Center LicenseManager services.
11. Click OK to close the window.
12. Click Exit.
Securing the Windows serverAbout this taskApply optional security measures to your operating system to further secure your server.
764 Avaya Aura® Contact Center Installation May 2013Comments? [email protected]

Important:Scanning software can degrade the performance and decrease the reliability of the system.Install virus scanning software only if the system connects to an exposed network or to theInternet.
Important:To maintain server performance, you must schedule virus scans during maintenanceperiods or low usage hours only.
Procedure
1. Harden the operating system using defined site procedures.
2. Install antivirus software. If you install antivirus software, Avaya recommends thatyou exclude some contact center files and folders from real-time and scheduledscans. For more information, and for a list of files and folders to exclude, see AvayaAura® Contact Center Planning and Engineering (NN44400-210).
Securing the Windows server
Avaya Aura® Contact Center Installation May 2013 765

766 Avaya Aura® Contact Center Installation May 2013Comments? [email protected]

Part IV: No Switch Configured - Multimediaonly
Avaya Aura® Contact Center Installation May 2013 767

No Switch Configured - Multimedia only
768 Avaya Aura® Contact Center Installation May 2013Comments? [email protected]
Chapter 25: Avaya Aura® Contact Centermultimedia only
Avaya Aura® Contact Center Release 6.3 supports a multimedia only contact center solution. Toimplement the Avaya Aura® Contact Center High Availability feature, your solution requires additionalstandby servers to provide resiliency and redundancy.
No Configured Switch Multimedia Only — Install this server to provide multimedia contact routing. Thisserver supports contact routing for web communications, fax messages, SMS text messaging, and emailmessages, with additional support for peer-to-peer Instant Messaging (IM).
Prerequisites for Contact Center installation workflow• Complete the Avaya Aura® Contact Center Installation Checklist (NN44400-310).
• Ensure all your server hardware meets the requirements described in Avaya Aura®
Contact Center Planning and Engineering (NN44400-210).
• Know the installation configuration you plan to use in your contact center. For moreinformation see Avaya Aura® Contact Center Planning and Engineering(NN44400-210).
Contact Center server types and software installation formultimedia only solutions
About this taskThis work flow shows the sequence of tasks you perform to install one or more Contact Centerservers to provide a multimedia solution.
Avaya Aura® Contact Center Installation May 2013 769
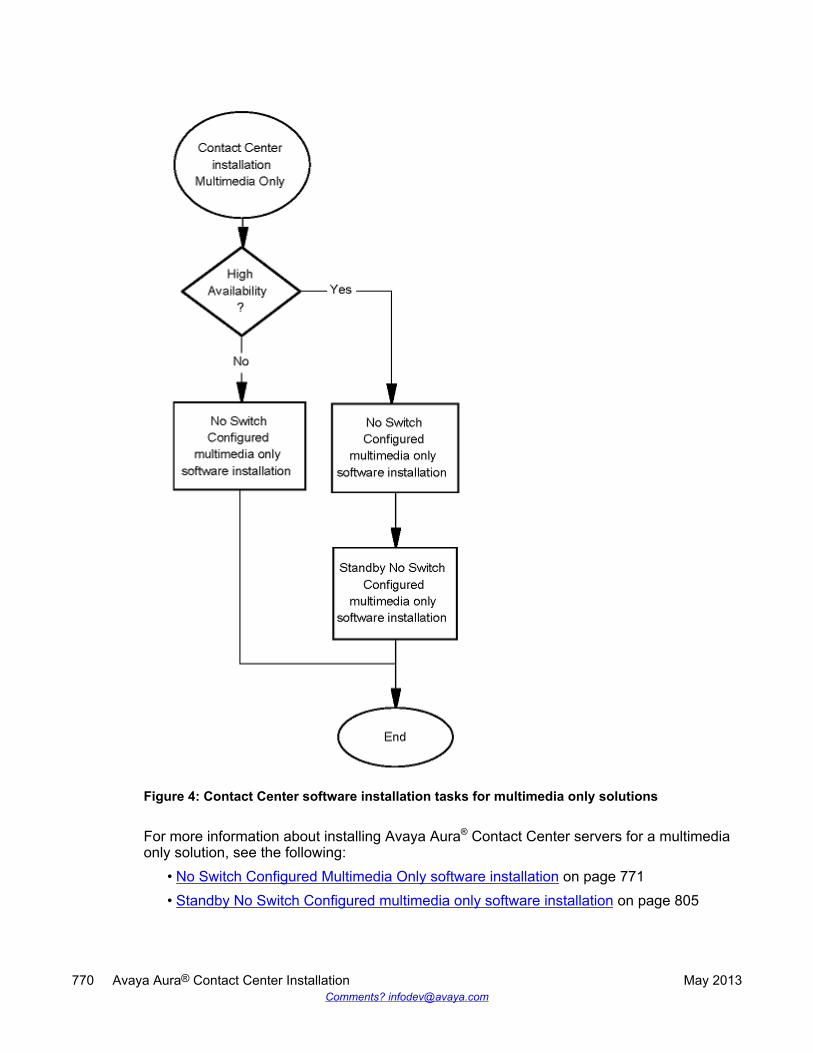
Figure 4: Contact Center software installation tasks for multimedia only solutions
For more information about installing Avaya Aura® Contact Center servers for a multimediaonly solution, see the following:
• No Switch Configured Multimedia Only software installation on page 771• Standby No Switch Configured multimedia only software installation on page 805
770 Avaya Aura® Contact Center Installation May 2013Comments? [email protected]

Chapter 26: No Switch ConfiguredMultimedia Only softwareinstallation
This chapter describes how to install a Multimedia Only contact center. A multimedia-only server includesthe following server software:
• Contact Center Manager Server (CCMS)
• Contact Center Manager Server Utility
• Contact Center License Manager
• Contact Center Manager Administration (CCMA)
• Communication Control Toolkit (CCT)
• Contact Center Multimedia (CCMM)
• Avaya Media Server Windows version
Install this server to add multimedia contact routing support. This server supports contact routing for webcommunications, fax messages, SMS text messaging, and email messages, with additional support forpeer-to-peer Instant Messaging (IM).
Install this server type when there is no existing voice-based call center, or when integration with a voicecontact center is not required.
You must complete all the procedures in this section in sequential order.
High Availability noteAvaya Media Server High Availability is not supported on the Windows operating system. Avaya MediaServer High Availability is supported only on the Linux operating system. If you plan to implement HighAvailability for the No Switch Configured Multimedia Only solution, you must uninstall Avaya Media Serverfrom both the primary and the backup Multimedia Only servers. For more information about removingAvaya Media Server, see Removing the Avaya Media Server software on page 953.
VMware noteThis server type includes the Windows version of Avaya Media Server. This server type does not supportVMware.
Avaya Aura® Contact Center Installation May 2013 771

Multimedia only software installation prerequisites• Copy the most recent patches for the Contact Center software.
• Ensure that your new Contact Center license file with a High Availability standby serverlicense is available.
Important:For the system to correctly handle backup and restore SNMP events, you must installWindows SNMP Service before you install Contact Center server software.
Downloading the latest documentationBefore you begin
• Download the most recent version of Acrobat Reader.• Access the Avaya Web site at www.avaya.com/support.
About this taskDownload the most recent documentation to ensure you have the most recent updates.Updates in the documentation accurately reflect the most recent changes in the software.
Procedure
1. Log on to the Avaya Web site.
2. Compare the versions of the documentation on the site with the versions youhave.
3. If the version number on www.avaya.com/support is higher than your version,download the latest version of the document.
4. Review the Avaya Web site for release notes and readme files.
772 Avaya Aura® Contact Center Installation May 2013Comments? [email protected]

Installing Windows Server 2008 Release 2Before you begin
• Ensure that you have a newly formatted server that meets the specifications in AvayaAura® Contact Center Planning and Engineering (NN44400-210) on which to installMicrosoft Windows Server 2008 64-bit, Release 2, Service Pack 1.
Do not upgrade your operating system from a previous release. Contact Center is notsupported on an upgraded operating system.
• Configure all servers for RAID as described in Avaya Aura® Contact Center Planning andEngineering (NN44400-210).
• Ensure that you have a DVD for Windows Server 2008 Release 2.• Install the network interface card in the server.• Know the IP addresses for the contact center subnet.
About this taskInstall the Windows operating system, which is required for the Contact Center server software.During the installation, configure the Windows settings as required. You must perform thisprocedure on each server before you install Contact Center server software on the server.
Procedure
1. Insert the Windows Server 2008 64-bit Release 2 Standard Edition or WindowsServer 2008 64-bit Release 2 Enterprise Edition DVD into the DVD drive.
2. Install Windows Server 2008 Release 2 according to the instructions supplied bythe DVD.
3. On the first install page, select your language for installation.
4. Click Next.
5. On the Installation window, select a Language to install from the list.
6. Select a Time and currency format from the list.
7. Select Keyboard or input method from the list.
8. Click Next.
9. Click Install Now.
10. Select an operating system from the list.
11. Click Next.
12. On the first Install Windows screen, read the terms of the license agreement andselect I accept the license terms.
Installing Windows Server 2008 Release 2
Avaya Aura® Contact Center Installation May 2013 773

13. Click Next.
14. Select Custom.
15. Select the disk partition on which you want to install Windows Server 2008.
Important:You can use the partition management options to configure the partitions on yourserver.
16. Click Next.The installation proceeds and automatically restarts the server several times.
17. After completing the installation, log on to the server as Administrator. Enter andconfirm the Administrator password.
18. In the Initial Configuration Tasks window, select Activate Windows and followthe instructions or the Microsoft documentation to activate your server.
19. Select Set time zone and complete the information as required for your system.This server time zone daylight saving setting must match the time zone daylightsaving setting on the Avaya Media Server(s) in this SIP-enabled contact centersolution.
20. Select Configure Networking and complete the information for your NetworkInterface Card (NIC) with the server IP address.
21. Select Provide computer name and domain and complete the information for yourserver name and workgroup or domain settings.
22. Change the DVD drive letter to E: to ensure the correct drive letters are free for theContact Center application and database hard disk drives and partitions.
23. Configure the hard disk drives and partitions for this server using the WindowsServer 2008 Server Manager - Disk Management utility. For more information abouthard disk drives and partitions, see Avaya Aura® Contact Center Planning andEngineering (NN44400-210).
24. Install other required drivers for your hardware configuration.
Procedure job aid
Name Description
Computer name Do not use spaces or underscores or exceed15 characters. The name must start with analphabetic character.The computer name must match (includingcase sensitivity) the DNS name.
774 Avaya Aura® Contact Center Installation May 2013Comments? [email protected]

Name Description
Disk drives Format the partitions as required for theserver. For more information, see AvayaAura® Contact Center Planning andEngineering (NN44400-210).
Domain/workgroup name Configure as required for your site.You must check to ensure the DNS Domainname (including case) matches the servername if the server is added to a domain orworkgroup after configuration.
Licensing modes Select Per server licensing mode.Accept the default five concurrentconnections.
Modem dialing Configure as required for your site. Do notinstall a modem on a Communication ControlToolkit server.
Network components Configure IP Address, WINS, DNS for one ortwo network cards as per configuration.Contact Center does not support IPv6.
Network connections If the server has more than one NIC/adapter,ensure contact center subnet appears first inthe network adapter binding order.
Partitions Configure C: drive to be a primary drive.Configure the other drives on your server tomeet the requirements according to AvayaAura® Contact Center Planning andEngineering (NN44400-210) for the server.
Regional settings window Configure as required for your site.
SNMP Configure for all servers.
Configuring Windows Server 2008Before you begin
• Install Microsoft Windows Server 2008 64-bit Release 2 on your server.
About this taskBefore you can install Avaya Aura® Contact Center software on your server, you must configureWindows Server 2008 to meet the requirements of the software.
Configuring Windows Server 2008
Avaya Aura® Contact Center Installation May 2013 775

You can prepare the server using this and other procedures, or you can download and use anAvaya Aura® Contact Center operating system configuration tool that installs the requiredWindows roles and features.
The Avaya Aura® Contact Center Windows Roles and Features installer configures thefollowing Windows Server 2008 resources:
• Windows Server Backup Features• SNMP Services• Active Directory Light Weight Directory Services• Application Server• Web Server (IIS)
For more information, and to download the Avaya Aura® Contact Center Windows Roles andFeatures installer, see http://support.avaya.com.
The Avaya Aura® Contact Center Windows Roles and Features installer replaces the followingprocedures:
• Configuring Windows Server 2008 (this procedure)• Configuring SNMP on your server• Installing operating system components for Contact Center
If you use the Avaya Aura® Contact Center Windows Roles and Features installer, skip thesethree procedures.
Procedure
1. Log on to the Windows Server 2008 server using an administrator account.
2. Select the Don’t display this screen on startup check box.
3. Update the emergency repair disk to record the latest configuration data for theserver.
4. Choose Start > Administrative Tools > Server Manager.
5. In the left pane, click Features.
6. Click Add Features.
7. Select Windows Server Backup Features.
8. Click Next.
9. Click Install.
10. Click Close.
11. Choose Start > All Programs > Accessories > System Tools > Windows ServerBackup.
12. Follow the on-screen instructions to select what you want to back up.
776 Avaya Aura® Contact Center Installation May 2013Comments? [email protected]

Installing the latest supported operating system servicepacks
Before you begin
• Access the Avaya hotfixes list on the Web site www.avaya.com/support.• Install and configure Microsoft Windows Server 2008 64-bit Release 2 on your server.• Review the recommendations on operating system service updates in Avaya Aura®
Contact Center Planning and Engineering (NN44400-210).• Install the Microsoft .NET Framework 3.5 and Microsoft .NET Framework 3.5 SP1.
About this taskAvaya recommends that you install the most recent supported operating system service packs.You must download the supported operating system service pack from the Avaya hotfixes listto ensure your Contact Center server software functions correctly with the supported operatingsystem patches.
Procedure
1. Log on to the server and disable the Windows Update feature. There are a numberof methods for disabling the Windows Update feature, refer to the Windows Server2008 documentation for a method suitable to your solution. Disabling the WindowsUpdate feature prevents Windows Server 2008 from automatically applyingoperating system patches and potentially rebooting the server.
2. Review the Contact Center Service Packs Compatibility and Security HotfixesApplicability List to determine the most recent Avaya Aura® Contact Centersupported patches or service packs.
3. Download the appropriate Microsoft Windows Server 2008 patches for the AvayaAura® Contact Center software installed on this server.
4. Install the most recent Windows Server 2008 service pack that is validated withAvaya Aura® Contact Center by following the Microsoft Installation instructions.
Installing the latest supported operating system service packs
Avaya Aura® Contact Center Installation May 2013 777

Connecting to the contact center subnetAbout this taskConnect the Contact Center server to the contact center subnet. The contact center subnet isthe network on which the server software applications work together to route contacts andgenerate reports.
Procedure
1. Locate the slot assigned to the contact center subnet network interface card for theserver. Make a note of the slot.
2. Connect the cable from the contact center subnet to the contact center subnetnetwork interface card in the server in accordance with customer site networkingguidelines.
3. Use the ping command to test the contact center subnet.
Adding a server to a domainBefore you begin
• Ensure that you have domain administrator privileges, or ask the Domain Administratorto assign you a domain user account for remote access.
• On the server, configure a preferred Domain Name System (DNS) server on the NetworkInterface Card (NIC).
About this taskAdd the server to an existing domain. Avaya recommends that you add the server to the domainbefore installing Contact Center software.
Ask your System Administrator to add a Domain Name System (DNS) static entry for thisserver. Each Contact Center server in a domain requires a DNS static entry.
Important:Avaya Aura® Contact Center High Availability solutions do not support Windows Server 2008Dynamic DNS.
In High Availability solutions, ask your System Administrator to add one DNS static entry forthe each managed name and associated managed IP address. A typical High Availabilitycampus solution with a pair of servers requires 3 DNS static entries; one DNS static entry for
778 Avaya Aura® Contact Center Installation May 2013Comments? [email protected]

the active server, one DNS static entry for the standby server, and one DNS static entry forthe managed name and associated IP address.
Procedure
1. Log on to the server.
2. Click Start > Administrative Tools > Server Manager.
3. Beside Computer Information, click Change System Properties.
4. In the System Properties dialog box, click the Computer Name tab.
5. Click Change.
6. In the Computer Name/Domain Changes dialog box, click the Domain option.
7. Type the domain name (you must provide the fully qualified domain name, whichincludes the prefix and suffix).
8. Click OK.
9. Type the domain administrator User name and Password.
10. Click OK.
11. Restart the server when you are prompted to do so.
Disabling the Remote Access servicesAbout this taskAvaya Aura® Contact Center does not support Remote Access Services (RAS). Disable theRemote Access services before installing Avaya Aura® Contact Center. Microsoft RemoteDesktop continues to run after you disable Remote Access services. After you disable theservices, restart the server.
Procedure
1. Choose Start > Administrative Tools > Services.
2. In the Services window, right-click the Remote Access Connection Managericon.
3. Click Properties.
4. In the General tab, from the Startup type list, select Disabled.
5. Click OK.
6. In the Services window, right-click the Remote Access Auto ConnectionManager icon.
Disabling the Remote Access services
Avaya Aura® Contact Center Installation May 2013 779

7. Click Properties.
8. In the General tab, from the Startup type list, select Disabled.
9. Click OK.
10. In the Services window, click File, Exit.
11. Restart the server.
Configuring SNMP on your serverBefore you begin
• Install and configure Microsoft Windows Server 2008 64-bit Release 2 on your server.
About this taskConfigure Simple Network Management Protocol (SNMP) on your server to ensure you haveall of the required components of the Internet protocol for monitoring devices in your network.SNMP helps you manage data that describes the system configuration and errors that mayoccur between them.
Procedure
1. Log on to the server using the administrator account.
2. Choose Start > Control Panel > Programs.
3. In the Programs and Features section, click Turn Windows features on or off.
4. In the Server Manager window, select Server Manager and click Add Features.
5. Select SNMP Services.
6. Click Next.
7. Click Install.
8. If prompted, insert the Windows Server 2008 DVD.
9. Click Close.
780 Avaya Aura® Contact Center Installation May 2013Comments? [email protected]

Downloading the most recent patches to the serverBefore you begin
• Install and configure Windows Server 2008 64-bit Release 2 on your server according tothe settings in this chapter.
• Download and install the most recent and valid updates for Microsoft Windows Server2008 64-bit Release 2.
• Know the location at which you plan to install each Contact Center server softwarepackage.
• Ensure that you use one administrator account on your server to un-install and installsoftware updates.
About this taskTo ensure that you have the most current software, download the most recent Contact Centerpatches from www.avaya.com/support to the server you plan to install.
Procedure
1. Log on to the server using the administrator account.
2. Create a folder Avaya_Support\ProductUpdates on the drive on which youwant to save the software updates.
3. Download the most recent service pack file. Save and unzip the file on the ContactCenter server in the Avaya_Support\ProductUpdates folder.
4. If new patches are available for the latest service pack, download and save thepatches on the Contact Center server in the Avaya_Support\ProductUpdates folder.
5. Read the Contact Center Release Notes for the most recent instructions.
Disabling unused Network AdaptersAbout this taskDisable all unused Network Adapters or Network Interface Cards (NICs) to improve networkcommunications and prevent the erroneous configuration of unused NICs during ContactCenter server commissioning.
Downloading the most recent patches to the server
Avaya Aura® Contact Center Installation May 2013 781

Procedure
1. Log on to the server.
2. Click Start > Control Panel > Network and Internet > Network and SharingCenter > Change Adapter Settings.
3. Right-click on the unused Network Adapter, and select Disable.
4. Repeat this procedure for all unused Network Adapters.
Enabling Microsoft Remote Desktop connectionBefore you begin
• Install Microsoft Windows Server 2008 64-bit Release 2 on your server.• Log on to the server with administrator privileges.
About this taskEnable Microsoft Remote Desktop connection as your remote access tool. Microsoft RemoteDesktop provides remote access for support on the server.
Procedure
1. Choose Start > Control Panel > System and Security.
2. In the System section, select Allow remote access.
3. Click the Remote tab.
4. Select Allow connections from computers running any version of RemoteDesktop (less secure).
5. Click OK.
Configuring Data Execution PreventionAbout this taskConfigure the Data Execution Prevention (DEP) hardware and software to perform additionalchecks on memory that protect the Avaya Aura® Contact Center server against malicious codeexploitation.
782 Avaya Aura® Contact Center Installation May 2013Comments? [email protected]

Procedure
1. Log on to Windows as administrator.
2. Choose Start > Control Panel > System and Security.
3. Click System.
4. In the System window, click Advanced system settings.
5. In the System Properties dialog box, click the Advanced tab.
6. Under Performance, click Settings.
7. In the Performance Options dialog box, click the Data Execution Preventiontab.
8. On the Data Execution Prevention tab, select Turn on DEP for essentialWindows programs and services only.
9. Click OK.
10. On the System Properties dialog box, click OK.
11. Click OK to restart the computer.
Importing Contact Center Firewall Security policyBefore you begin
• Install Microsoft Windows Server 2008 64-bit Release 2 on your server.• Log on to the server with administrator privileges.• Download the most recent Avaya Aura® Contact Center Firewall Security policy from
www.avaya.com/support.
About this taskImport the Avaya Aura® Contact Center Firewall Security policy to ensure all contact centerservers in the solution can communicate.
Avaya recommends that you export and backup your existing firewall security policy beforeimporting the Avaya Aura® Contact Center Firewall Security policy. You can use this backuppolicy to rollback the Avaya Aura® Contact Center Firewall Security policy, if you ever needto.
Procedure
1. Choose Start > Administrative Tools > Windows Firewall with AdvancedSecurity.
2. Choose Actions > Export Policy.
Importing Contact Center Firewall Security policy
Avaya Aura® Contact Center Installation May 2013 783

3. In the File name box, type the name for the backup policy.
4. Click Save.Windows exports the existing policy. You can use this backup policy to rollback theAvaya Aura® Contact Center Firewall Security policy, if you ever need to.
5. On the Policy successfully exported message box, click OK.
6. Choose Actions > Import Policy.
7. On the policy overwrite message box, click Yes.
8. Navigate to the folder containing the Avaya Aura® Contact Center Firewall Securitypolicy.
9. Click Open.Windows imports the Avaya Aura® Contact Center Firewall Security policy.
10. On the Policy successfully imported message box, click OK.
Installing operating system components for ContactCenter
Before you begin
• Install Windows Server 2008 64-bit Release 2.
About this taskBefore installing Contact Center software, you must install specific operating system softwarecomponents such as Internet Information Services to integrate the components in ContactCenter.
Procedure
1. Choose Start > Administrative Tools > Server Manager.
2. In the left-hand column of the Server Manager, right-click Roles, and select AddRoles.
3. Review the requirements for the new role, and click Next.
4. Under Server Roles, select Active Directory Lightweight Directory Services.
5. If an Add Roles Wizard message box that lists features required by Active DirectoryLightweight Directory Services appears, click Add Required Features.
6. Under Server Roles, select Application Server.
7. If an Add Roles Wizard message box that lists features required by ApplicationServer appears, click Add Required Features.
784 Avaya Aura® Contact Center Installation May 2013Comments? [email protected]
8. Under Application Server, select Role Services.
9. Select Web Server (IIS) Support.
10. If an Add Roles Wizard message box appears, listing features required by WebServer (IIS) Support appears, click Add Required Features.
11. Click Next.
12. On the Introduction to Web Server (IIS) page, click Next.
13. On the Select Role Services page, under Common HTTP Features, select thefollowing services:
• Static Content
• Default Document
• Directory Browsing
• HTTP Errors
• HTTP Redirection
Important:All other services check boxes must be cleared.
14. On the Select Role Services page, under Application Development, select thefollowing services:
• ASP.NET
• .NET Extensibility
• ASP
• ISAPI Extensions
• ISAPI Filters
• Server Side Includes
Important:All other services check boxes must be cleared.
15. On the Select Role Services page, under Health and Diagnosis, select thefollowing services:
• HTTP Logging
• Logging Tools
• Request Monitor
• Tracing
Installing operating system components for Contact Center
Avaya Aura® Contact Center Installation May 2013 785

Important:All other services check boxes must be cleared.
16. On the Select Role Services page, under Security, select all services.
17. On the Select Role Services page, under Performance, select all services.
18. On the Select Role Services page, under Management Tools, select the followingservices:
• IIS Management Console
• IIS Management Scripts and Tools
• Management Service
• All items under IIS 6 Management Compatibility
Important:All other services check boxes must be cleared.
19. Click Next.
20. Review the installation information.
21. Click Install.
22. On the Installation Results page, click Close.
23. Restart the server if required.
Configuring MIME types to support Microsoft updatesAbout this taskConfigure the Multipurpose Internet Mail Extension (MIME) types to support Microsoft updatesand patches.
Procedure
1. Log on to the server.
2. Click Start > Administrative Tools > Computer Management.
3. In the Computer Management dialog box, expand Services and Applications >Internet Information Services > IIS Manager > Sites.
4. Select Default Web Site.
5. Under IIS, select MIME Types.
786 Avaya Aura® Contact Center Installation May 2013Comments? [email protected]

6. Double-click MIME Types.
7. On the Actions list on the right, click Add.
8. In the File name extension box, type .msp.
9. In the MIME Type box, type application/microsoftpatch.
10. Click OK.
11. On the Actions list on the right, click Add.
12. In the File name extension box, type .msu.
13. In the MIME Type box, type application/microsoftupdate.
14. Click OK.
15. Close the Computer Management window.
Updating server for a network location installationAbout this taskConfigure the server .NET security settings to prepare the server for a remote networkinstallation. Avaya Aura® Contact Center supports network installation. You can insert theAvaya Aura® Contact Center DVD into a computer on your network. You then add this computeras a trusted site and network location on the new server. You can access this DVD from thenetwork location, and with some .NET security updates, use the remote DVD to install AvayaAura® Contact Center software on the new server.
Note:Skip this procedure if you plan to use the Avaya Aura® Contact Center DVD from the DVDdrive of the server.
Procedure
1. Insert the Avaya Aura® Contact Center DVD into a computer on the contact centernetwork.
2. Log on to the new server you are preparing for Contact Center.
3. Choose Start > Control Panel > Network and Internet > Internet Options.
4. In the Security tab, click Trusted sites.
5. In the Trusted sites section, click Sites.
6. In the Add this Web site to the zone box, type the <IP address> of the remotecomputer with the Avaya Aura® Contact Center DVD.
7. Click Add.
Updating server for a network location installation
Avaya Aura® Contact Center Installation May 2013 787
8. Click OK.
9. Close the Internet Options box.
10. From the new server, navigate to the network location with the DVD.
11. Access the remote DVD and in the root folder of the DVD, double-clickNetworkSetup.bat..NetFramework 3.5 installs and the .NetSecurity settings are modified.
12. If the Avaya Aura® Contact Center installation does not automatically start, in theroot folder of the DVD double-click Setup.exe.
13. After Avaya Aura® Contact Center installs, navigate to your network location anddouble-click NetworkSetupReset.bat.
Installing the Multimedia only softwareBefore you begin
• Download the most recent Contact Center and Common Components patches to theserver.
About this taskInstall the No Switch Configured multimedia software and enable your contact center to routecontacts to the agents that can handle the contact with the correct skills.
Note:Installing Contact Center software installs Apache Tomcat Server. The default port numberfor Apache Tomcat is 8081. If you need to change the port number to avoid conflicts withthird-party software, see your Apache Tomcat documentation.
Note:Read the Contact Center Release Notes for the most recent instructions.
Procedure
1. Insert the Contact Center DVD into the DVD drive of your server.
2. If the installation does not automatically start, double-click Setup.exe.
3. Click Install to install the Microsoft .NET Framework 3.5 SP1 and Visual C++runtime libraries on the server.If you are prompted to accept the Microsoft .NET Framework 3.5.1 licenseagreement, click Accept. If you are prompted to restart the server, click Yes andrepeat step 2.
788 Avaya Aura® Contact Center Installation May 2013Comments? [email protected]

4. On the Welcome window, click Next.
5. On the License Agreement window, read the terms of the agreement.
Installing the Multimedia only software
Avaya Aura® Contact Center Installation May 2013 789

6. Click I Accept the Terms of the End-User License Agreement.
7. Click Next.
790 Avaya Aura® Contact Center Installation May 2013Comments? [email protected]

8. On the Installation Selection window, under No Switch Configured, select Voiceand Multimedia Contact Sever with Avaya Media Server.
9. Click Next.
Installing the Multimedia only software
Avaya Aura® Contact Center Installation May 2013 791

10. On the Installation Destination window, on the Application Destination Drivetab, select where to install the Contact Center application software by choosing adisk drive letter.
11. Click the Database Destination Drive tab
12. Under Select the destination drive for the Contact Center database files, selectthe drive for the Contact Center Manager Server database.
13. Under Select the destination drive for the Contact Center database files, selectthe drive for the Communication Control Toolkit database.
14. Under Select the destination drive for the Contact Center database files, selectthe drive for the Contact Center Multimedia database.
792 Avaya Aura® Contact Center Installation May 2013Comments? [email protected]

15. Click the Product Updates Location tab.
Installing the Multimedia only software
Avaya Aura® Contact Center Installation May 2013 793

16. Under Select the Product Updates Location, click Browse to locate the foldercontaining the Contact Center product updates.
17. Click Next.The System Readiness Check runs on the server.
18. If the System Readiness Check utility returns a Fail, the software installation cannotproceed until you correct the problem. Review any failures returned by the SystemReadiness Check and consult Avaya Aura® Contact Center Planning andEngineering (NN44400-210) to determine the actions to resolve the issue.You can ignore warnings if the potential impact to the operation of the contact centeris understood and not applicable.
19. Click Next.
20. On the Installation Data window, type the installation details for each tab.
21. Select the CCMS tab, and configure the server details.
794 Avaya Aura® Contact Center Installation May 2013Comments? [email protected]

22. In the Customer Name box, type the customer name.
23. In the Company Name box, type the name of the company.
24. In the Site Name box, type the site name for the Contact Center Manager Server.The site name must not contain spaces or non-alphabetical characters excepthyphen (-) and underscore (_). The first character must be a letter. The site namemust be unique and can consist of 6 to 15 characters.
25. In the RSM IP Address box, type the Real-time Statistics Multicast IP Address ofthe server to associate with sending real-time data. The IP address must be from224.0.1.0 to 239.255.255.255. The default is 234.5.6.10.
26. In the Contact Center Server Subnet IP Address box, type the IP Address of theserver.
27. Select the Licensing tab, and configure the licensing details.
Installing the Multimedia only software
Avaya Aura® Contact Center Installation May 2013 795

28. The License File Location box displays the folder on the server which containsthe license file.
29. In the Primary License Manager IP Address box, type the IP address of theprimary License Manager server. This server contains a License Manager server.This installed License Manager server is the default primary License Manager.
30. In the Primary License Port box, type the number of the communication portopened between the License Manager and Contact Center Manager Server. Thedefault port number is 3998 when you use only one License Manager.
31. In the Secondary License Manager IP Address box, type the IP address of thesecondary License Manager server. The secondary License Manager server isused only in a corporate licensed environment.
32. From the Licensing Package list, select the licenses that you have purchased.Select Nodal Enterprise for single-site contact centers. Select CorporateEnterprise for multi-site contact centers.
33. From the list of Optional Packages, enable the licensed features that you havepurchased.
34. Select the Open Queue check box.
35. Select the CCMA tab, and configure the CCMA details.
796 Avaya Aura® Contact Center Installation May 2013Comments? [email protected]

36. In the Configuration section clear Enable CCMA Replication. Clear the checkbox on the primary server.
37. In the LDAP Port Number box, type the port number for the Lightweight DirectoryAccess Protocol (LDAP) for which common contact information is stored on aserver. The default value of the port is 389. Check with the system administrator toensure that the port number is not already in use.
38. In the SSL Port Number box, type the port number for the Secure Sockets Layer(SSL) that controls security when applications are communicating across thenetwork. The default port is 636. Check with the system administrator to ensure thatthe port number is not already in use.
39. In the System Account Configuration section, in the Password box, type thepassword for the CCMA System Account user account. Confirm the password inthe second box. The password is not checked against the server security policy forminimum password requirements. Avaya recommends that you enter a passwordthat conforms to your corporate password policy.
40. Select the CCMM tab, and configure the Contact Center Multimedia details.
Installing the Multimedia only software
Avaya Aura® Contact Center Installation May 2013 797
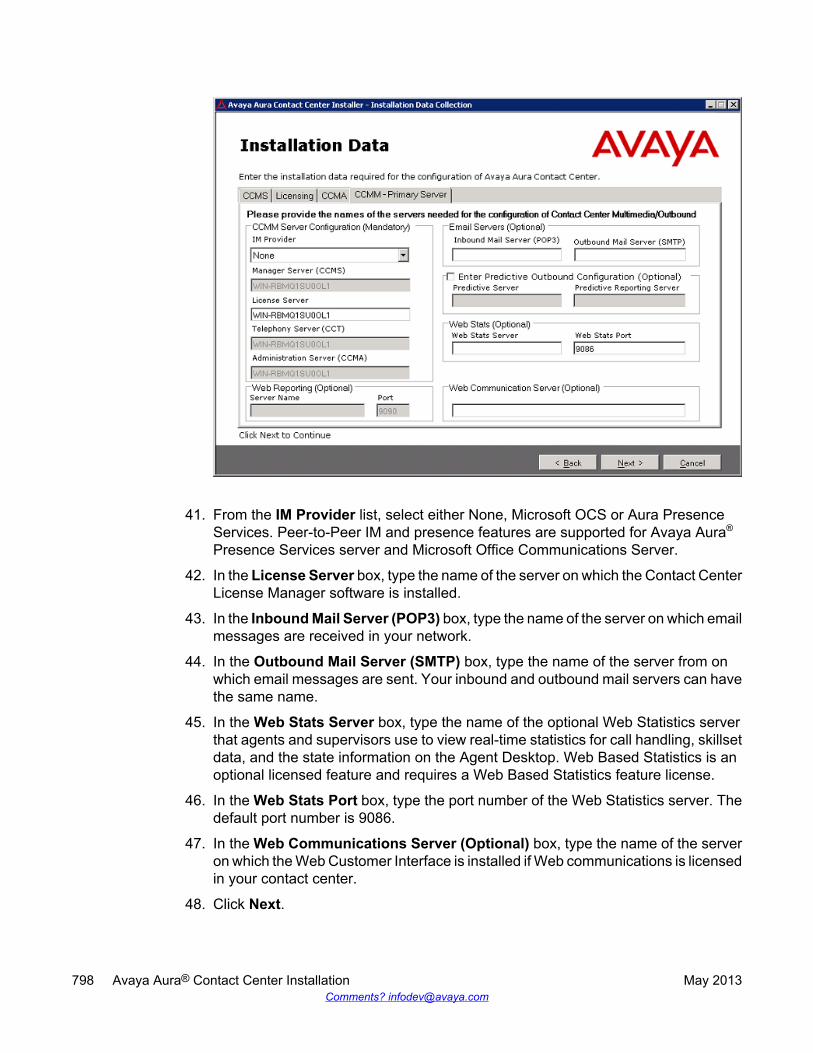
41. From the IM Provider list, select either None, Microsoft OCS or Aura PresenceServices. Peer-to-Peer IM and presence features are supported for Avaya Aura®
Presence Services server and Microsoft Office Communications Server.
42. In the License Server box, type the name of the server on which the Contact CenterLicense Manager software is installed.
43. In the Inbound Mail Server (POP3) box, type the name of the server on which emailmessages are received in your network.
44. In the Outbound Mail Server (SMTP) box, type the name of the server from onwhich email messages are sent. Your inbound and outbound mail servers can havethe same name.
45. In the Web Stats Server box, type the name of the optional Web Statistics serverthat agents and supervisors use to view real-time statistics for call handling, skillsetdata, and the state information on the Agent Desktop. Web Based Statistics is anoptional licensed feature and requires a Web Based Statistics feature license.
46. In the Web Stats Port box, type the port number of the Web Statistics server. Thedefault port number is 9086.
47. In the Web Communications Server (Optional) box, type the name of the serveron which the Web Customer Interface is installed if Web communications is licensedin your contact center.
48. Click Next.
798 Avaya Aura® Contact Center Installation May 2013Comments? [email protected]
49. On the Summary window, review and verify the information.
50. Click Install.
51. After the installation is complete, click Finish.
52. If prompted, restart the server.
53. If you are using WebLM, you must restart the Contact Center Tomcat Instanceservice after installing the Contact Center software.
Upgrading Java Runtime Environment, Java DevelopmentKit, and Apache Tomcat components using Third PartySoftware Upgrade Utility
Before you begin
• Apply Contact Center 6.3 Service Pack 10 or later on your system as an install-timepatch.
• Restart the Contact Center server to complete this procedure.
About this taskUse Third Party Software Upgrade Utility to automatically upgrade your Java RuntimeEnvironment and Tomcat software components. For more information, see Third PartySoftware Upgrade Utility on page 27.
Procedure
1. Log on to the server using the administrator account.
2. Navigate to the Avaya_Support\ProductUpdates folder.
3. Open the folder where you had saved the latest Service Pack.
4. Browse to ThirdParty\AACCThirdPartySoftwareUpgradeUtility.exe.
5. Double-click AACCThirdPartySoftwareUpgradeUtility.exe.
6. Click Upgrade.The system displays the “User Action Required” dialog box.
7. Click OK.
8. Click Yes to restart Contact Center and complete the upgrade.
Upgrading Java Runtime Environment, Java Development Kit, and Apache Tomcat components using Third PartySoftware Upgrade Utility
Avaya Aura® Contact Center Installation May 2013 799

Configuring WebLM licensingBefore you begin
• Install the Contact Center License Manager server software.• Restart the Contact Center License Manager server.
About this taskConfigure Contact Center License Manager to use WebLM. Then restart the Contact CenterTomcat Instance on the Contact Center License Manager server to commission WebLM forthe first time.
Important:If you are using a Keycode Retrieval System (KRS) PLIC license file, skip this procedure.This procedure applies only when you are using an Avaya Product Licensing and DeliverySystem (PLDS) WebLM license file or an Avaya WebLM server.
Note:When you install Contact Center License Manager, an instance of Apache Tomcat Serveris also installed on the same server. The default port number for Apache Tomcat is 8081. Ifyou need to change the port number to avoid conflicts with third-party software, see yourApache Tomcat documentation.
Procedure
1. Log on to the server where the Contact Center License Manager software isinstalled.
2. Click Start > All Programs > Avaya > Contact Center > License Manager >Configuration.
3. If you are using a local WebLM license file, complete the following steps to specifythe license file:
a. View the type of license file currently used, and then click OK.b. On the Configuration page, click Browse.c. Navigate the file system and locate the WebLM license file.d. Click Open.
4. If you are using a remote WebLM server, complete the following steps to specifythe license server:
a. View the type of license file currently used, and then click OK.b. On the Configuration page, in the WebLM Host Name field, type the host name
or IP address of the WebLM server.c. In the WebLM Port Number field, type 52233.
800 Avaya Aura® Contact Center Installation May 2013Comments? [email protected]

5. Click Apply.Ignore the LMConfig dialog box for now.
6. On the Start menu, choose All Programs > Administrative Tools > Services.
7. Right-click the Contact Center Tomcat Instance service, and click Stop.
8. Right-click the Contact Center Tomcat Instance service, and click Start.
9. Close the services window.
10. On the LMConfig dialog box, click Yes to restart the Contact Center LicenseManager services.
11. Click OK to close the window.
12. Click Exit.
Securing the Windows serverAbout this taskApply optional security measures to your operating system to further secure your server.
Important:Scanning software can degrade the performance and decrease the reliability of the system.Install virus scanning software only if the system connects to an exposed network or to theInternet.
Important:To maintain server performance, you must schedule virus scans during maintenanceperiods or low usage hours only.
Procedure
1. Harden the operating system using defined site procedures.
2. Install antivirus software. If you install antivirus software, Avaya recommends thatyou exclude some contact center files and folders from real-time and scheduledscans. For more information, and for a list of files and folders to exclude, see AvayaAura® Contact Center Planning and Engineering (NN44400-210).
Securing the Windows server
Avaya Aura® Contact Center Installation May 2013 801

Installing the external Web communication serversoftware
Before you begin
• Install Contact Center Multimedia software.
About this taskIf you use Web communications in your contact center, you can use the Sample CustomerInterface (CI) Web site implementation to help you develop pages for your corporate Web site.The Web services architecture is a platform-independent interface that customers can accessfrom both Microsoft .NET and Java applications. Customer Web sites or third-party applicationsuse the open interface for integration with the Contact Center Multimedia system.
The Customer Interface Web services provide a range of methods to perform the followingfunctions:
• Register new customers in the Contact Center Multimedia database• Log on or log off existing customers• Update customer logon credentials• Create customer contacts• Update customer details• Read customer information• Review a customer contact history• Request immediate or scheduled callback requests• Read a contact• Create and maintain a Web communications chat session
To integrate Web Communications with the Contact Center Multimedia system, download theAvaya Aura® Contact Center Web Communications SDK package and ReferenceImplementation from www.avaya.com/devconnect. The Web Communications ReferenceImplementation contains information about customizing the Web communication applicationto your solution.
Important:Do not install the Web Communications Reference Implementation on an Avaya Aura®
Contact Center server. Install the Web Communications Reference Implementation on yourown server in the contact center solution.
802 Avaya Aura® Contact Center Installation May 2013Comments? [email protected]

Procedure
1. Locate and download the Web Communications Reference Implementationsoftware from www.avaya.com/devconnect.
2. Copy the Web Communications Reference Implementation software to the externalWeb server.
3. Follow the Reference Implementation instructions to install and commission theWeb Communications server.
Adding the domain AD-LDS replication account to theprimary server administrators and replicator group
About this taskAdd the AD-LDS replication account to the local Administrators and replicator group on theprimary Contact Center server.
Important:If you are using High Availability, and if this server is to be the primary active server, performthis procedure. If you are not implementing High Availability, skip this procedure.
If you are using a domain, you must request this AD-LDS replication account from your Networkor System Administrator. The primary and standby replicating Contact Center servers mustboth be added to the same domain.
For this procedure, the name of the AD-LDS replication account is CCMAReplication. You canchoose another name for the account.
Procedure
1. Log on to the primary Contact Center server.
2. Click Start > Administrative Tools > Computer Management.
3. In the Computer Management window, expand Local Users and Groups.
4. Click the Groups folder.
5. Double-click on the Administrators group.
6. Click Add > Locations.
7. On the Windows Security dialog box, type the domain logon details.
8. On the Locations dialog, select the domain to be used by CCMA replication.
9. Expand the domain folder to display domain users.
Adding the domain AD-LDS replication account to the primary server administrators and replicator group
Avaya Aura® Contact Center Installation May 2013 803
10. Click Users.
11. Click OK.
12. Click Advanced > Find Now, to display domain users.
13. From the list of users select the CCMA replication domain user account, for exampleselect the myDomain\CCMAReplication user account.
14. Click OK.
15. Click OK > Apply > OK.
16. Click the Groups folder.
17. Double-click on the Replicator group.
18. Click Add > Locations.
19. On the Windows Security dialog box, type the domain logon details.
20. On the Locations dialog, select the domain to be used by CCMA replication.
21. Expand the domain folder to display domain users.
22. Click Users.
23. Click OK.
24. Click Advanced > Find Now, to display domain users.
25. From the list of users select the CCMA replication domain user account, for exampleselect the myDomain\CCMAReplication user account.
26. Click OK.
27. Click OK > Apply > OK.
804 Avaya Aura® Contact Center Installation May 2013Comments? [email protected]

Chapter 27: Standby No Switch Configuredmultimedia only softwareinstallation
This chapter describes how to install a standby multimedia only contact center. A multimedia-only serverincludes the following server software:
• Contact Center Manager Server (CCMS)
• Contact Center Manager Server Utility
• Contact Center License Manager
• Contact Center Manager Administration (CCMA)
• Communication Control Toolkit (CCT)
• Contact Center Multimedia (CCMM)
Install this server to provide multimedia contact routing functionality. This server supports contact routingfor web communications, fax messages, SMS text messaging, and email messages, with additionalsupport for peer-to-peer Instant Messaging (IM).
You must complete all the procedures in this section in sequential order.
Multimedia only software installation prerequisites• Copy the most recent patches for the Contact Center software.
• Ensure that your new Contact Center license file with a High Availability standby serverlicense is available.
Important:For the system to correctly handle backup and restore SNMP events, you must installWindows SNMP Service before you install Contact Center server software.
Avaya Aura® Contact Center Installation May 2013 805

Standby multimedia only software installationprerequisites
• Copy the most recent patches for the Contact Center software.
• Ensure that your new Contact Center license file is available.
Important:For the system to correctly handle backup and restore SNMP events, you must installWindows SNMP Service before you install Contact Center server software.
Downloading the latest documentationBefore you begin
• Download the most recent version of Acrobat Reader.• Access the Avaya Web site at www.avaya.com/support.
About this taskDownload the most recent documentation to ensure you have the most recent updates.Updates in the documentation accurately reflect the most recent changes in the software.
Procedure
1. Log on to the Avaya Web site.
2. Compare the versions of the documentation on the site with the versions youhave.
3. If the version number on www.avaya.com/support is higher than your version,download the latest version of the document.
4. Review the Avaya Web site for release notes and readme files.
806 Avaya Aura® Contact Center Installation May 2013Comments? [email protected]

Installing Windows Server 2008 Release 2Before you begin
• Ensure that you have a newly formatted server that meets the specifications in AvayaAura® Contact Center Planning and Engineering (NN44400-210) on which to installMicrosoft Windows Server 2008 64-bit, Release 2, Service Pack 1.
Do not upgrade your operating system from a previous release. Contact Center is notsupported on an upgraded operating system.
• Configure all servers for RAID as described in Avaya Aura® Contact Center Planning andEngineering (NN44400-210).
• Ensure that you have a DVD for Windows Server 2008 Release 2.• Install the network interface card in the server.• Know the IP addresses for the contact center subnet.
About this taskInstall the Windows operating system, which is required for the Contact Center server software.During the installation, configure the Windows settings as required. You must perform thisprocedure on each server before you install Contact Center server software on the server.
Procedure
1. Insert the Windows Server 2008 64-bit Release 2 Standard Edition or WindowsServer 2008 64-bit Release 2 Enterprise Edition DVD into the DVD drive.
2. Install Windows Server 2008 Release 2 according to the instructions supplied bythe DVD.
3. On the first install page, select your language for installation.
4. Click Next.
5. On the Installation window, select a Language to install from the list.
6. Select a Time and currency format from the list.
7. Select Keyboard or input method from the list.
8. Click Next.
9. Click Install Now.
10. Select an operating system from the list.
11. Click Next.
12. On the first Install Windows screen, read the terms of the license agreement andselect I accept the license terms.
Installing Windows Server 2008 Release 2
Avaya Aura® Contact Center Installation May 2013 807

13. Click Next.
14. Select Custom.
15. Select the disk partition on which you want to install Windows Server 2008.
Important:You can use the partition management options to configure the partitions on yourserver.
16. Click Next.The installation proceeds and automatically restarts the server several times.
17. After completing the installation, log on to the server as Administrator. Enter andconfirm the Administrator password.
18. In the Initial Configuration Tasks window, select Activate Windows and followthe instructions or the Microsoft documentation to activate your server.
19. Select Set time zone and complete the information as required for your system.This server time zone daylight saving setting must match the time zone daylightsaving setting on the Avaya Media Server(s) in this SIP-enabled contact centersolution.
20. Select Configure Networking and complete the information for your NetworkInterface Card (NIC) with the server IP address.
21. Select Provide computer name and domain and complete the information for yourserver name and workgroup or domain settings.
22. Change the DVD drive letter to E: to ensure the correct drive letters are free for theContact Center application and database hard disk drives and partitions.
23. Configure the hard disk drives and partitions for this server using the WindowsServer 2008 Server Manager - Disk Management utility. For more information abouthard disk drives and partitions, see Avaya Aura® Contact Center Planning andEngineering (NN44400-210).
24. Install other required drivers for your hardware configuration.
Procedure job aid
Name Description
Computer name Do not use spaces or underscores or exceed15 characters. The name must start with analphabetic character.The computer name must match (includingcase sensitivity) the DNS name.
808 Avaya Aura® Contact Center Installation May 2013Comments? [email protected]

Name Description
Disk drives Format the partitions as required for theserver. For more information, see AvayaAura® Contact Center Planning andEngineering (NN44400-210).
Domain/workgroup name Configure as required for your site.You must check to ensure the DNS Domainname (including case) matches the servername if the server is added to a domain orworkgroup after configuration.
Licensing modes Select Per server licensing mode.Accept the default five concurrentconnections.
Modem dialing Configure as required for your site. Do notinstall a modem on a Communication ControlToolkit server.
Network components Configure IP Address, WINS, DNS for one ortwo network cards as per configuration.Contact Center does not support IPv6.
Network connections If the server has more than one NIC/adapter,ensure contact center subnet appears first inthe network adapter binding order.
Partitions Configure C: drive to be a primary drive.Configure the other drives on your server tomeet the requirements according to AvayaAura® Contact Center Planning andEngineering (NN44400-210) for the server.
Regional settings window Configure as required for your site.
SNMP Configure for all servers.
Configuring Windows Server 2008Before you begin
• Install Microsoft Windows Server 2008 64-bit Release 2 on your server.
About this taskBefore you can install Avaya Aura® Contact Center software on your server, you must configureWindows Server 2008 to meet the requirements of the software.
Configuring Windows Server 2008
Avaya Aura® Contact Center Installation May 2013 809

You can prepare the server using this and other procedures, or you can download and use anAvaya Aura® Contact Center operating system configuration tool that installs the requiredWindows roles and features.
The Avaya Aura® Contact Center Windows Roles and Features installer configures thefollowing Windows Server 2008 resources:
• Windows Server Backup Features• SNMP Services• Active Directory Light Weight Directory Services• Application Server• Web Server (IIS)
For more information, and to download the Avaya Aura® Contact Center Windows Roles andFeatures installer, see http://support.avaya.com.
The Avaya Aura® Contact Center Windows Roles and Features installer replaces the followingprocedures:
• Configuring Windows Server 2008 (this procedure)• Configuring SNMP on your server• Installing operating system components for Contact Center
If you use the Avaya Aura® Contact Center Windows Roles and Features installer, skip thesethree procedures.
Procedure
1. Log on to the Windows Server 2008 server using an administrator account.
2. Select the Don’t display this screen on startup check box.
3. Update the emergency repair disk to record the latest configuration data for theserver.
4. Choose Start > Administrative Tools > Server Manager.
5. In the left pane, click Features.
6. Click Add Features.
7. Select Windows Server Backup Features.
8. Click Next.
9. Click Install.
10. Click Close.
11. Choose Start > All Programs > Accessories > System Tools > Windows ServerBackup.
12. Follow the on-screen instructions to select what you want to back up.
810 Avaya Aura® Contact Center Installation May 2013Comments? [email protected]

Installing the latest supported operating system servicepacks
Before you begin
• Access the Avaya hotfixes list on the Web site www.avaya.com/support.• Install and configure Microsoft Windows Server 2008 64-bit Release 2 on your server.• Review the recommendations on operating system service updates in Avaya Aura®
Contact Center Planning and Engineering (NN44400-210).• Install the Microsoft .NET Framework 3.5 and Microsoft .NET Framework 3.5 SP1.
About this taskAvaya recommends that you install the most recent supported operating system service packs.You must download the supported operating system service pack from the Avaya hotfixes listto ensure your Contact Center server software functions correctly with the supported operatingsystem patches.
Procedure
1. Log on to the server and disable the Windows Update feature. There are a numberof methods for disabling the Windows Update feature, refer to the Windows Server2008 documentation for a method suitable to your solution. Disabling the WindowsUpdate feature prevents Windows Server 2008 from automatically applyingoperating system patches and potentially rebooting the server.
2. Review the Contact Center Service Packs Compatibility and Security HotfixesApplicability List to determine the most recent Avaya Aura® Contact Centersupported patches or service packs.
3. Download the appropriate Microsoft Windows Server 2008 patches for the AvayaAura® Contact Center software installed on this server.
4. Install the most recent Windows Server 2008 service pack that is validated withAvaya Aura® Contact Center by following the Microsoft Installation instructions.
Installing the latest supported operating system service packs
Avaya Aura® Contact Center Installation May 2013 811

Connecting to the contact center subnetAbout this taskConnect the Contact Center server to the contact center subnet. The contact center subnet isthe network on which the server software applications work together to route contacts andgenerate reports.
Procedure
1. Locate the slot assigned to the contact center subnet network interface card for theserver. Make a note of the slot.
2. Connect the cable from the contact center subnet to the contact center subnetnetwork interface card in the server in accordance with customer site networkingguidelines.
3. Use the ping command to test the contact center subnet.
Adding a server to a domainBefore you begin
• Ensure that you have domain administrator privileges, or ask the Domain Administratorto assign you a domain user account for remote access.
• On the server, configure a preferred Domain Name System (DNS) server on the NetworkInterface Card (NIC).
About this taskAdd the server to an existing domain. Avaya recommends that you add the server to the domainbefore installing Contact Center software.
Ask your System Administrator to add a Domain Name System (DNS) static entry for thisserver. Each Contact Center server in a domain requires a DNS static entry.
Important:Avaya Aura® Contact Center High Availability solutions do not support Windows Server 2008Dynamic DNS.
In High Availability solutions, ask your System Administrator to add one DNS static entry forthe each managed name and associated managed IP address. A typical High Availabilitycampus solution with a pair of servers requires 3 DNS static entries; one DNS static entry for
812 Avaya Aura® Contact Center Installation May 2013Comments? [email protected]

the active server, one DNS static entry for the standby server, and one DNS static entry forthe managed name and associated IP address.
Procedure
1. Log on to the server.
2. Click Start > Administrative Tools > Server Manager.
3. Beside Computer Information, click Change System Properties.
4. In the System Properties dialog box, click the Computer Name tab.
5. Click Change.
6. In the Computer Name/Domain Changes dialog box, click the Domain option.
7. Type the domain name (you must provide the fully qualified domain name, whichincludes the prefix and suffix).
8. Click OK.
9. Type the domain administrator User name and Password.
10. Click OK.
11. Restart the server when you are prompted to do so.
Disabling the Remote Access servicesAbout this taskAvaya Aura® Contact Center does not support Remote Access Services (RAS). Disable theRemote Access services before installing Avaya Aura® Contact Center. Microsoft RemoteDesktop continues to run after you disable Remote Access services. After you disable theservices, restart the server.
Procedure
1. Choose Start > Administrative Tools > Services.
2. In the Services window, right-click the Remote Access Connection Managericon.
3. Click Properties.
4. In the General tab, from the Startup type list, select Disabled.
5. Click OK.
6. In the Services window, right-click the Remote Access Auto ConnectionManager icon.
Disabling the Remote Access services
Avaya Aura® Contact Center Installation May 2013 813

7. Click Properties.
8. In the General tab, from the Startup type list, select Disabled.
9. Click OK.
10. In the Services window, click File, Exit.
11. Restart the server.
Configuring SNMP on your serverBefore you begin
• Install and configure Microsoft Windows Server 2008 64-bit Release 2 on your server.
About this taskConfigure Simple Network Management Protocol (SNMP) on your server to ensure you haveall of the required components of the Internet protocol for monitoring devices in your network.SNMP helps you manage data that describes the system configuration and errors that mayoccur between them.
Procedure
1. Log on to the server using the administrator account.
2. Choose Start > Control Panel > Programs.
3. In the Programs and Features section, click Turn Windows features on or off.
4. In the Server Manager window, select Server Manager and click Add Features.
5. Select SNMP Services.
6. Click Next.
7. Click Install.
8. If prompted, insert the Windows Server 2008 DVD.
9. Click Close.
814 Avaya Aura® Contact Center Installation May 2013Comments? [email protected]

Downloading the most recent patches to the serverBefore you begin
• Install and configure Windows Server 2008 64-bit Release 2 on your server according tothe settings in this chapter.
• Download and install the most recent and valid updates for Microsoft Windows Server2008 64-bit Release 2.
• Know the location at which you plan to install each Contact Center server softwarepackage.
• Ensure that you use one administrator account on your server to un-install and installsoftware updates.
About this taskTo ensure that you have the most current software, download the most recent Contact Centerpatches from www.avaya.com/support to the server you plan to install.
Procedure
1. Log on to the server using the administrator account.
2. Create a folder Avaya_Support\ProductUpdates on the drive on which youwant to save the software updates.
3. Download the most recent service pack file. Save and unzip the file on the ContactCenter server in the Avaya_Support\ProductUpdates folder.
4. If new patches are available for the latest service pack, download and save thepatches on the Contact Center server in the Avaya_Support\ProductUpdates folder.
5. Read the Contact Center Release Notes for the most recent instructions.
Disabling unused Network AdaptersAbout this taskDisable all unused Network Adapters or Network Interface Cards (NICs) to improve networkcommunications and prevent the erroneous configuration of unused NICs during ContactCenter server commissioning.
Downloading the most recent patches to the server
Avaya Aura® Contact Center Installation May 2013 815

Procedure
1. Log on to the server.
2. Click Start > Control Panel > Network and Internet > Network and SharingCenter > Change Adapter Settings.
3. Right-click on the unused Network Adapter, and select Disable.
4. Repeat this procedure for all unused Network Adapters.
Enabling Microsoft Remote Desktop connectionBefore you begin
• Install Microsoft Windows Server 2008 64-bit Release 2 on your server.• Log on to the server with administrator privileges.
About this taskEnable Microsoft Remote Desktop connection as your remote access tool. Microsoft RemoteDesktop provides remote access for support on the server.
Procedure
1. Choose Start > Control Panel > System and Security.
2. In the System section, select Allow remote access.
3. Click the Remote tab.
4. Select Allow connections from computers running any version of RemoteDesktop (less secure).
5. Click OK.
Configuring Data Execution PreventionAbout this taskConfigure the Data Execution Prevention (DEP) hardware and software to perform additionalchecks on memory that protect the Avaya Aura® Contact Center server against malicious codeexploitation.
816 Avaya Aura® Contact Center Installation May 2013Comments? [email protected]

Procedure
1. Log on to Windows as administrator.
2. Choose Start > Control Panel > System and Security.
3. Click System.
4. In the System window, click Advanced system settings.
5. In the System Properties dialog box, click the Advanced tab.
6. Under Performance, click Settings.
7. In the Performance Options dialog box, click the Data Execution Preventiontab.
8. On the Data Execution Prevention tab, select Turn on DEP for essentialWindows programs and services only.
9. Click OK.
10. On the System Properties dialog box, click OK.
11. Click OK to restart the computer.
Importing Contact Center Firewall Security policyBefore you begin
• Install Microsoft Windows Server 2008 64-bit Release 2 on your server.• Log on to the server with administrator privileges.• Download the most recent Avaya Aura® Contact Center Firewall Security policy from
www.avaya.com/support.
About this taskImport the Avaya Aura® Contact Center Firewall Security policy to ensure all contact centerservers in the solution can communicate.
Avaya recommends that you export and backup your existing firewall security policy beforeimporting the Avaya Aura® Contact Center Firewall Security policy. You can use this backuppolicy to rollback the Avaya Aura® Contact Center Firewall Security policy, if you ever needto.
Procedure
1. Choose Start > Administrative Tools > Windows Firewall with AdvancedSecurity.
2. Choose Actions > Export Policy.
Importing Contact Center Firewall Security policy
Avaya Aura® Contact Center Installation May 2013 817

3. In the File name box, type the name for the backup policy.
4. Click Save.Windows exports the existing policy. You can use this backup policy to rollback theAvaya Aura® Contact Center Firewall Security policy, if you ever need to.
5. On the Policy successfully exported message box, click OK.
6. Choose Actions > Import Policy.
7. On the policy overwrite message box, click Yes.
8. Navigate to the folder containing the Avaya Aura® Contact Center Firewall Securitypolicy.
9. Click Open.Windows imports the Avaya Aura® Contact Center Firewall Security policy.
10. On the Policy successfully imported message box, click OK.
Installing operating system components for ContactCenter
Before you begin
• Install Windows Server 2008 64-bit Release 2.
About this taskBefore installing Contact Center software, you must install specific operating system softwarecomponents such as Internet Information Services to integrate the components in ContactCenter.
Procedure
1. Choose Start > Administrative Tools > Server Manager.
2. In the left-hand column of the Server Manager, right-click Roles, and select AddRoles.
3. Review the requirements for the new role, and click Next.
4. Under Server Roles, select Active Directory Lightweight Directory Services.
5. If an Add Roles Wizard message box that lists features required by Active DirectoryLightweight Directory Services appears, click Add Required Features.
6. Under Server Roles, select Application Server.
7. If an Add Roles Wizard message box that lists features required by ApplicationServer appears, click Add Required Features.
818 Avaya Aura® Contact Center Installation May 2013Comments? [email protected]

8. Under Application Server, select Role Services.
9. Select Web Server (IIS) Support.
10. If an Add Roles Wizard message box appears, listing features required by WebServer (IIS) Support appears, click Add Required Features.
11. Click Next.
12. On the Introduction to Web Server (IIS) page, click Next.
13. On the Select Role Services page, under Common HTTP Features, select thefollowing services:
• Static Content
• Default Document
• Directory Browsing
• HTTP Errors
• HTTP Redirection
Important:All other services check boxes must be cleared.
14. On the Select Role Services page, under Application Development, select thefollowing services:
• ASP.NET
• .NET Extensibility
• ASP
• ISAPI Extensions
• ISAPI Filters
• Server Side Includes
Important:All other services check boxes must be cleared.
15. On the Select Role Services page, under Health and Diagnosis, select thefollowing services:
• HTTP Logging
• Logging Tools
• Request Monitor
• Tracing
Installing operating system components for Contact Center
Avaya Aura® Contact Center Installation May 2013 819

Important:All other services check boxes must be cleared.
16. On the Select Role Services page, under Security, select all services.
17. On the Select Role Services page, under Performance, select all services.
18. On the Select Role Services page, under Management Tools, select the followingservices:
• IIS Management Console
• IIS Management Scripts and Tools
• Management Service
• All items under IIS 6 Management Compatibility
Important:All other services check boxes must be cleared.
19. Click Next.
20. Review the installation information.
21. Click Install.
22. On the Installation Results page, click Close.
23. Restart the server if required.
Configuring MIME types to support Microsoft updatesAbout this taskConfigure the Multipurpose Internet Mail Extension (MIME) types to support Microsoft updatesand patches.
Procedure
1. Log on to the server.
2. Click Start > Administrative Tools > Computer Management.
3. In the Computer Management dialog box, expand Services and Applications >Internet Information Services > IIS Manager > Sites.
4. Select Default Web Site.
5. Under IIS, select MIME Types.
820 Avaya Aura® Contact Center Installation May 2013Comments? [email protected]

6. Double-click MIME Types.
7. On the Actions list on the right, click Add.
8. In the File name extension box, type .msp.
9. In the MIME Type box, type application/microsoftpatch.
10. Click OK.
11. On the Actions list on the right, click Add.
12. In the File name extension box, type .msu.
13. In the MIME Type box, type application/microsoftupdate.
14. Click OK.
15. Close the Computer Management window.
Adding the domain AD-LDS replication account to thestandby administrators and replicator group
About this taskAdd the AD-LDS replication account to the local Administrators and replicator group on thestandby server. Perform this procedure before installing Contact Center software on thestandby server.
If you are using a domain, you must request this AD-LDS replication account from your Networkor System Administrator. The primary and standby replicating Contact Center servers mustboth be added to the same domain.
For this procedure, the name of the AD-LDS replication account is CCMAReplication. You canchoose another name for the account.
Procedure
1. Log on to the standby Contact Center server.
2. Click Start > Administrative Tools > Computer Management.
3. In the Computer Management window, expand Local Users and Groups.
4. Click the Groups folder.
5. Double-click on the Administrators group.
6. Click Add > Locations.
7. On the Windows Security dialog box, type the domain logon details.
8. On the Locations dialog, select the domain to be used for CCMA replication.
Adding the domain AD-LDS replication account to the standby administrators and replicator group
Avaya Aura® Contact Center Installation May 2013 821

9. Expand the domain folder to display domain users.
10. Click Users.
11. Click OK.
12. Click Advanced > Find Now, to display domain users.
13. From the list of users select the CCMA replication domain user account, for exampleselect the myDomain\CCMAReplication user account.
14. Click OK.
15. Click OK > Apply > OK.
16. Click the Groups folder.
17. Double-click on the Replicator group.
18. Click Add > Locations.
19. On the Windows Security dialog box, type the domain logon details.
20. On the Locations dialog, select the domain to be used for CCMA replication.
21. Expand the domain folder to display domain users.
22. Click Users.
23. Click OK.
24. Click Advanced > Find Now, to display domain users.
25. From the list of users select the CCMA replication domain user account, for exampleselect the myDomain\CCMAReplication user account.
26. Click OK.
27. Click OK > Apply > OK.
Updating server for a network location installationAbout this taskConfigure the server .NET security settings to prepare the server for a remote networkinstallation. Avaya Aura® Contact Center supports network installation. You can insert theAvaya Aura® Contact Center DVD into a computer on your network. You then add this computeras a trusted site and network location on the new server. You can access this DVD from thenetwork location, and with some .NET security updates, use the remote DVD to install AvayaAura® Contact Center software on the new server.
822 Avaya Aura® Contact Center Installation May 2013Comments? [email protected]
Note:Skip this procedure if you plan to use the Avaya Aura® Contact Center DVD from the DVDdrive of the server.
Procedure
1. Insert the Avaya Aura® Contact Center DVD into a computer on the contact centernetwork.
2. Log on to the new server you are preparing for Contact Center.
3. Choose Start > Control Panel > Network and Internet > Internet Options.
4. In the Security tab, click Trusted sites.
5. In the Trusted sites section, click Sites.
6. In the Add this Web site to the zone box, type the <IP address> of the remotecomputer with the Avaya Aura® Contact Center DVD.
7. Click Add.
8. Click OK.
9. Close the Internet Options box.
10. From the new server, navigate to the network location with the DVD.
11. Access the remote DVD and in the root folder of the DVD, double-clickNetworkSetup.bat..NetFramework 3.5 installs and the .NetSecurity settings are modified.
12. If the Avaya Aura® Contact Center installation does not automatically start, in theroot folder of the DVD double-click Setup.exe.
13. After Avaya Aura® Contact Center installs, navigate to your network location anddouble-click NetworkSetupReset.bat.
Installing the standby Multimedia only softwareBefore you begin
• Download the most recent Contact Center and Common Components patches to theserver.
• The primary active Multimedia only server must already be installed and configured.• The primary active Multimedia only server must already be configured to support AD-LDS
replication.
Installing the standby Multimedia only software
Avaya Aura® Contact Center Installation May 2013 823

About this taskInstall the standby No Switch Configured multimedia software and enable your contact centerto route contacts to the agents that can handle the contact with the correct skills.
Note:Installing Contact Center software installs Apache Tomcat Server. The default port numberfor Apache Tomcat is 8081. If you need to change the port number to avoid conflicts withthird-party software, see your Apache Tomcat documentation.
Note:Read the Contact Center Release Notes for the most recent instructions.
Procedure
1. Insert the Contact Center DVD into the DVD drive of your server.
2. If the installation does not automatically start, double-click Setup.exe.
3. Click Install to install the Microsoft .NET Framework 3.5 SP1 and Visual C++runtime libraries on the server.If you are prompted to accept the Microsoft .NET Framework 3.5.1 licenseagreement, click Accept. If you are prompted to restart the server, click Yes andrepeat step 2.
4. On the Welcome window, click Next.
824 Avaya Aura® Contact Center Installation May 2013Comments? [email protected]
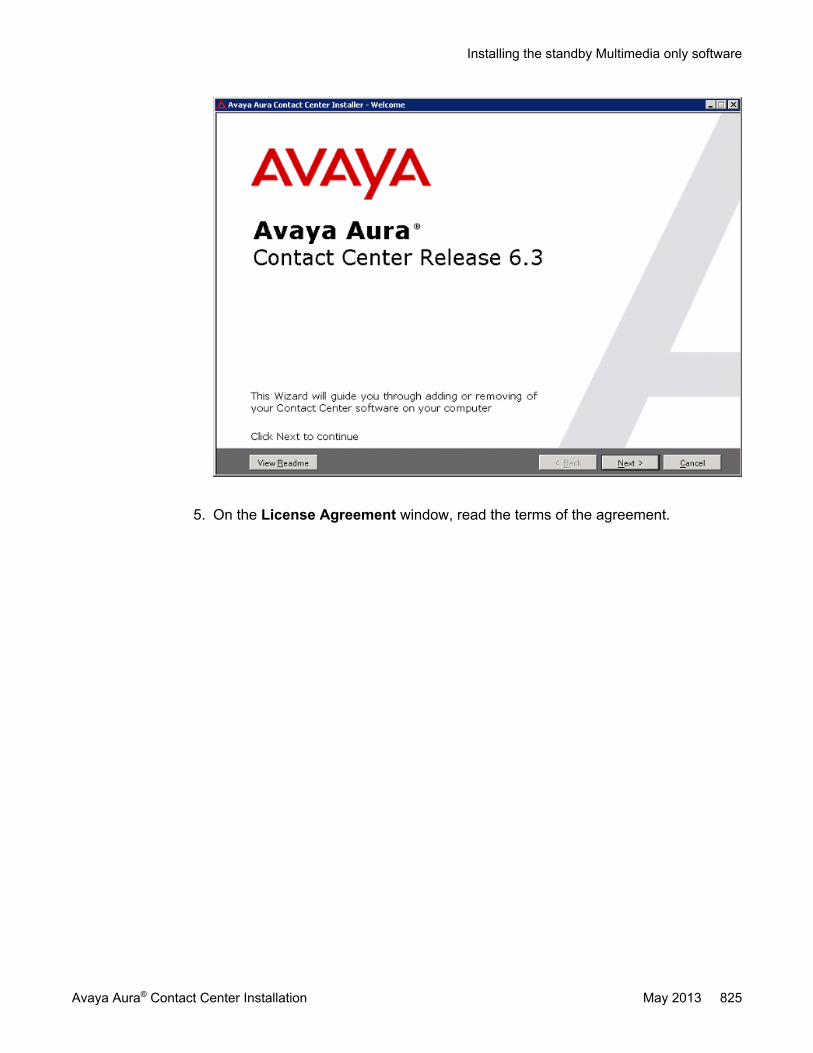
5. On the License Agreement window, read the terms of the agreement.
Installing the standby Multimedia only software
Avaya Aura® Contact Center Installation May 2013 825

6. Click I Accept the Terms of the End-User License Agreement.
7. Click Next.
826 Avaya Aura® Contact Center Installation May 2013Comments? [email protected]

8. On the Installation Selection window, under No Switch Configured, select Voiceand Multimedia Contact Sever with Avaya Media Server.
9. Click Next.
Installing the standby Multimedia only software
Avaya Aura® Contact Center Installation May 2013 827

10. On the Installation Destination window, on the Application Destination Drivetab, select where to install the Contact Center application software by choosing adisk drive letter.
11. Click the Database Destination Drive tab
12. Under Select the destination drive for the Contact Center database files, selectthe drive for the Contact Center Manager Server database.
13. Under Select the destination drive for the Contact Center database files, selectthe drive for the Communication Control Toolkit database.
14. Under Select the destination drive for the Contact Center database files, selectthe drive for the Contact Center Multimedia database.
828 Avaya Aura® Contact Center Installation May 2013Comments? [email protected]

15. Click the Product Updates Location tab.
Installing the standby Multimedia only software
Avaya Aura® Contact Center Installation May 2013 829

16. Under Select the Product Updates Location, click Browse to locate the foldercontaining the Contact Center product updates.
17. Click Next.The System Readiness Check runs on the server.
18. If the System Readiness Check utility returns a Fail, the software installation cannotproceed until you correct the problem. Review any failures returned by the SystemReadiness Check and consult Avaya Aura® Contact Center Planning andEngineering (NN44400-210) to determine the actions to resolve the issue.You can ignore warnings if the potential impact to the operation of the contact centeris understood and not applicable.
19. Click Next.
20. On the Installation Data window, type the installation details for each tab.
21. Select the CCMS tab, and configure the server details.
830 Avaya Aura® Contact Center Installation May 2013Comments? [email protected]

22. In the Customer Name box, type the customer name.
23. In the Company Name box, type the name of the company.
24. In the Site Name box, type the site name for the Contact Center server. The sitename must not contain spaces or non-alphabetical characters except hyphen (-)and underscore (_). The first character must be a letter. The site name must beunique and can consist of 6 to 15 characters. The Site Name of the standby servermust be the same as the Site Name of the primary server.
25. In the RSM IP Address box, type the Real-time Statistics Multicast IP Address ofthe server to associate with sending real-time data. The IP address must be from224.0.1.0 to 239.255.255.255. The default is 234.5.6.10.
26. In the Contact Center Server Subnet IP Address box, type the IP Address of theserver.
27. Select the Licensing tab, and configure the licensing details.
Installing the standby Multimedia only software
Avaya Aura® Contact Center Installation May 2013 831
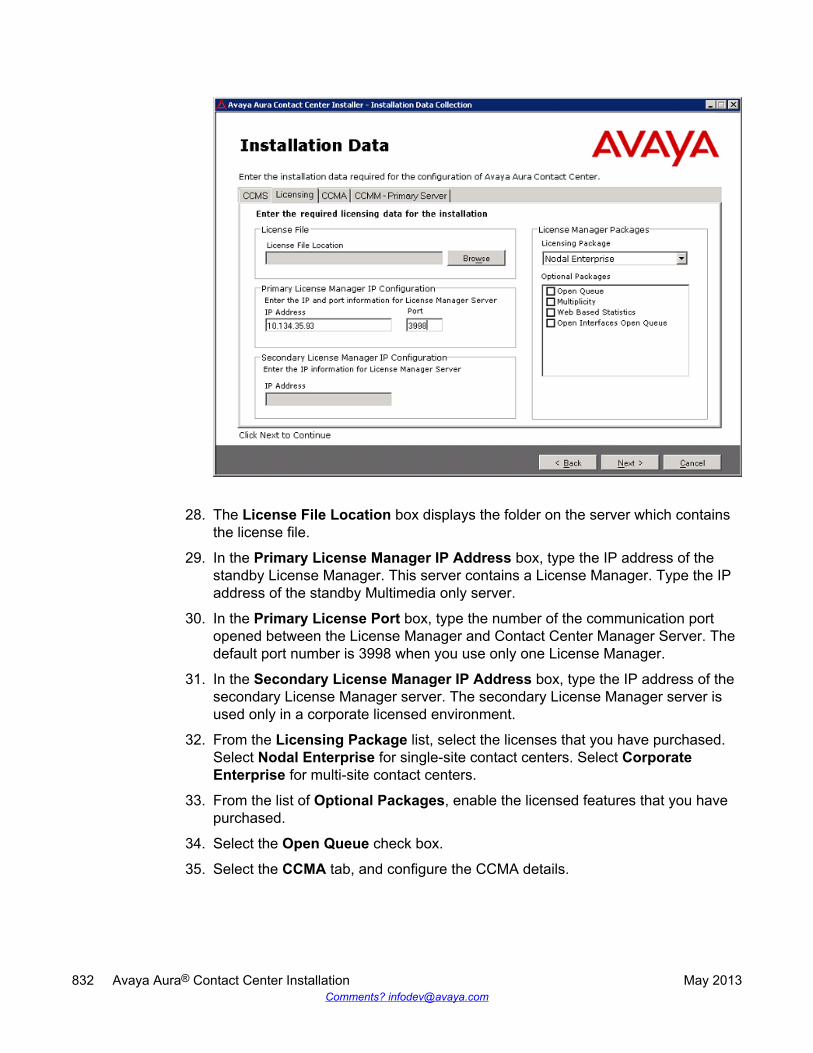
28. The License File Location box displays the folder on the server which containsthe license file.
29. In the Primary License Manager IP Address box, type the IP address of thestandby License Manager. This server contains a License Manager. Type the IPaddress of the standby Multimedia only server.
30. In the Primary License Port box, type the number of the communication portopened between the License Manager and Contact Center Manager Server. Thedefault port number is 3998 when you use only one License Manager.
31. In the Secondary License Manager IP Address box, type the IP address of thesecondary License Manager server. The secondary License Manager server isused only in a corporate licensed environment.
32. From the Licensing Package list, select the licenses that you have purchased.Select Nodal Enterprise for single-site contact centers. Select CorporateEnterprise for multi-site contact centers.
33. From the list of Optional Packages, enable the licensed features that you havepurchased.
34. Select the Open Queue check box.
35. Select the CCMA tab, and configure the CCMA details.
832 Avaya Aura® Contact Center Installation May 2013Comments? [email protected]

36. In the Configuration section, select Enable CCMA Replication. CCMA replicationis reproducing an active copy of the AD-LDS for backup or emergency failure. Incase of server failure, a current AD-LDS is available to maintain the contactcenter.
37. On the Contact Center Installer message box, click Yes to confirm that this is astandby server.
38. In the LDAP Port Number box, type the port number for the Lightweight DirectoryAccess Protocol (LDAP) for which common contact information is stored on aserver. The default value of the port is 389. Check with the system administrator toensure that the port number is not already in use.
39. In the SSL Port Number box, type the port number for the Secure Sockets Layer(SSL) that controls security when applications are communicating across thenetwork. The default port is 636. Check with the system administrator to ensure thatthe port number is not already in use.
40. In the System Account Configuration section, in the Password box, type thepassword for the CCMA System Account user account. Confirm the password inthe second box. The password is not checked against the server security policy forminimum password requirements. Avaya recommends that you enter a passwordthat conforms to your corporate password policy.
41. Select the CCMM tab, and configure the Contact Center Multimedia details.
Installing the standby Multimedia only software
Avaya Aura® Contact Center Installation May 2013 833

42. From the IM Provider list, select either None, Microsoft OCS or Aura PresenceServices. Peer-to-Peer IM and presence features are supported for Avaya Aura®
Presence Services server and Microsoft Office Communications Server.
43. In the License Server box, type the name of the server on which the Contact CenterLicense Manager software is installed.
44. In the Inbound Mail Server (POP3) box, type the name of the server on which emailmessages are received in your network.
45. In the Outbound Mail Server (SMTP) box, type the name of the server from onwhich email messages are sent. Your inbound and outbound mail servers can havethe same name.
46. In the Web Stats Server box, type the name of the optional Web Statistics serverthat agents and supervisors use to view real-time statistics for call handling, skillsetdata, and the state information on the Agent Desktop. Web Based Statistics is anoptional licensed feature and requires a Web Based Statistics feature license.
47. In the Web Stats Port box, type the port number of the Web Statistics server. Thedefault port number is 9086.
48. In the Web Communications Server (Optional) box, type the name of the serveron which the Web Customer Interface is installed if Web communications is licensedin your contact center.
49. Click Next.
834 Avaya Aura® Contact Center Installation May 2013Comments? [email protected]
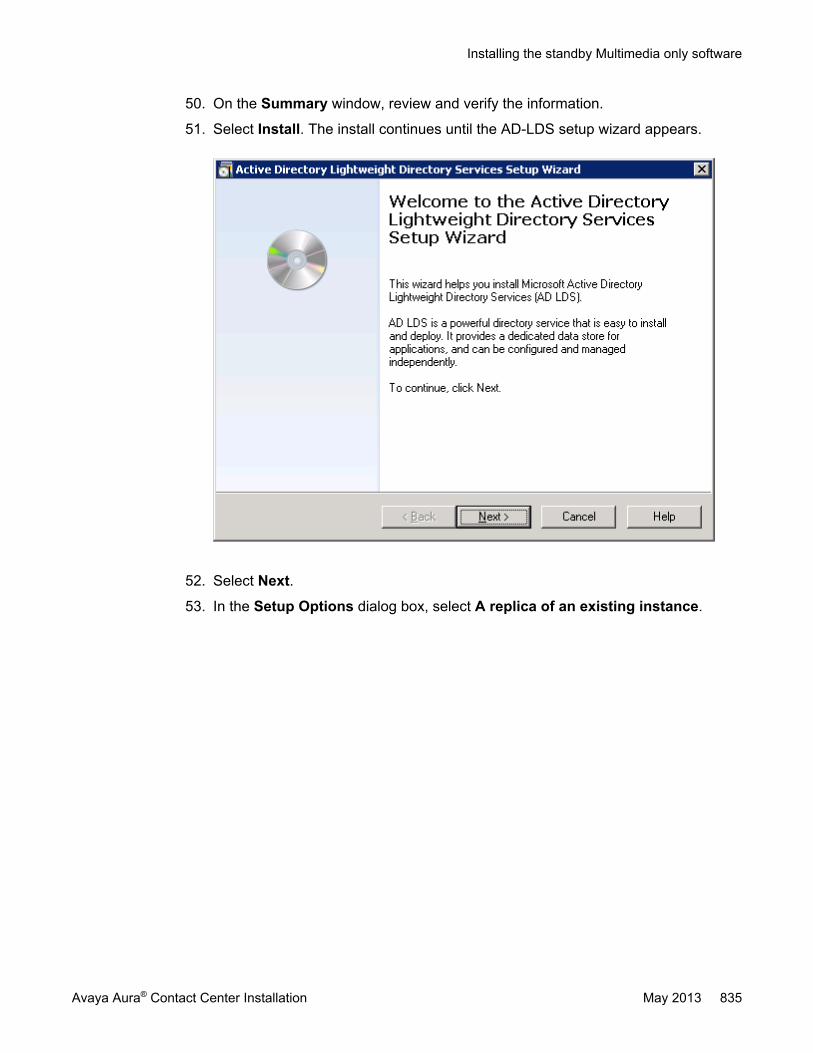
50. On the Summary window, review and verify the information.
51. Select Install. The install continues until the AD-LDS setup wizard appears.
52. Select Next.
53. In the Setup Options dialog box, select A replica of an existing instance.
Installing the standby Multimedia only software
Avaya Aura® Contact Center Installation May 2013 835

54. Select Next.
55. On the Instance Name dialog box, in the Instance name box, type the AD-LDSinstance name. The default instance name is SymposiumWC, so typeSymposiumWC.
836 Avaya Aura® Contact Center Installation May 2013Comments? [email protected]

56. In the Description box, type SymposiumWC.
57. Click Next.
58. On the Ports dialog box, if no other applications use the ports, accept the defaultvalues in the LDAP port number and SSL port number boxes and select Next.
Installing the standby Multimedia only software
Avaya Aura® Contact Center Installation May 2013 837

59. On the Joining a Configuration Set dialog box, in the Server box, type the FQDNname of the primary Multimedia only server to replicate.Example of entering the primary Multimedia only server name.
838 Avaya Aura® Contact Center Installation May 2013Comments? [email protected]

60. On the Joining a Configuration Set window, in the LDAP Port box, type the portnumber on the AD-LDS instance on the primary Multimedia only. The default is portnumber 389.
61. Click Next.
62. On the Administrative Credentials for the Configuration Set window, select Thisaccount.
63. In the User name box, type the primary Multimedia only server name followed byits Administrator name in the format <primary Multimedia only server name>\Administrator. For example enter WIN-RBMQ1SU0OL1\Administrator. If you havecreated another administrator account for Contact Center, then enter the details(name and password) for that primary Multimedia only server administrator accounthere. Your administrator account must have full administrative privileges.Example of entering the administrative credentials.
Installing the standby Multimedia only software
Avaya Aura® Contact Center Installation May 2013 839

64. In the Password box, type the password for this user account.
65. Click Next.
66. In the Copying Application Directory Partitions dialog box, in the Partition DNlist, select the partition DC=Nortelnetworks,DC=COM.
840 Avaya Aura® Contact Center Installation May 2013Comments? [email protected]

67. Select Next.
68. In the File Location dialog box, accept the default values, click Next.
Installing the standby Multimedia only software
Avaya Aura® Contact Center Installation May 2013 841

69. In the Service Account Selection dialog box, select Network service account.Example of using a domain and selecting Network service account.
842 Avaya Aura® Contact Center Installation May 2013Comments? [email protected]

70. Click Next.
71. In the AD LDS Administrators dialog box, select This account.
Installing the standby Multimedia only software
Avaya Aura® Contact Center Installation May 2013 843

72. Select Browse to locate the CCMA AD-LDS replication account.The Select User or Group dialog box appears. Note that the location is the localdomain.
73. In the Select User or Group dialog box, click Advanced.
844 Avaya Aura® Contact Center Installation May 2013Comments? [email protected]

74. In the Windows Security dialog box, type a logon name and password of an accountwith permissions to access your domain.
75. Click OK.The advanced Select User or Group dialog box appears.
Installing the standby Multimedia only software
Avaya Aura® Contact Center Installation May 2013 845

76. In the advanced Select User or Group dialog box, click Find Now.
77. From the Search results list, select the CCMA replication account.Example of selecting a domain CCMA replication account:
846 Avaya Aura® Contact Center Installation May 2013Comments? [email protected]

78. In the advanced Select User or Group dialog box, click OK.Example of selecting a CCMA replication account:
Installing the standby Multimedia only software
Avaya Aura® Contact Center Installation May 2013 847

79. In the Select User or Group dialog box, click OK.Example of selecting a domain CCMA replication account:
80. Click Next.
848 Avaya Aura® Contact Center Installation May 2013Comments? [email protected]

81. Confirm the installation components, and click Next.
82. After the installation is complete, click Finish.
83. If prompted, restart the server.
84. If you are using WebLM, you must restart the Contact Center Tomcat Instanceservice after installing the Contact Center software.
Upgrading Java Runtime Environment, Java DevelopmentKit, and Apache Tomcat components using Third PartySoftware Upgrade Utility
Before you begin
• Apply Contact Center 6.3 Service Pack 10 or later on your system as an install-timepatch.
• Restart the Contact Center server to complete this procedure.
Upgrading Java Runtime Environment, Java Development Kit, and Apache Tomcat components using Third PartySoftware Upgrade Utility
Avaya Aura® Contact Center Installation May 2013 849
About this taskUse Third Party Software Upgrade Utility to automatically upgrade your Java RuntimeEnvironment and Tomcat software components. For more information, see Third PartySoftware Upgrade Utility on page 27.
Procedure
1. Log on to the server using the administrator account.
2. Navigate to the Avaya_Support\ProductUpdates folder.
3. Open the folder where you had saved the latest Service Pack.
4. Browse to ThirdParty\AACCThirdPartySoftwareUpgradeUtility.exe.
5. Double-click AACCThirdPartySoftwareUpgradeUtility.exe.
6. Click Upgrade.The system displays the “User Action Required” dialog box.
7. Click OK.
8. Click Yes to restart Contact Center and complete the upgrade.
Configuring WebLM licensingBefore you begin
• Install the Contact Center License Manager server software.• Restart the Contact Center License Manager server.
About this taskConfigure Contact Center License Manager to use WebLM. Then restart the Contact CenterTomcat Instance on the Contact Center License Manager server to commission WebLM forthe first time.
Important:If you are using a Keycode Retrieval System (KRS) PLIC license file, skip this procedure.This procedure applies only when you are using an Avaya Product Licensing and DeliverySystem (PLDS) WebLM license file or an Avaya WebLM server.
Note:When you install Contact Center License Manager, an instance of Apache Tomcat Serveris also installed on the same server. The default port number for Apache Tomcat is 8081. Ifyou need to change the port number to avoid conflicts with third-party software, see yourApache Tomcat documentation.
850 Avaya Aura® Contact Center Installation May 2013Comments? [email protected]
Procedure
1. Log on to the server where the Contact Center License Manager software isinstalled.
2. Click Start > All Programs > Avaya > Contact Center > License Manager >Configuration.
3. If you are using a local WebLM license file, complete the following steps to specifythe license file:
a. View the type of license file currently used, and then click OK.b. On the Configuration page, click Browse.c. Navigate the file system and locate the WebLM license file.d. Click Open.
4. If you are using a remote WebLM server, complete the following steps to specifythe license server:
a. View the type of license file currently used, and then click OK.b. On the Configuration page, in the WebLM Host Name field, type the host name
or IP address of the WebLM server.c. In the WebLM Port Number field, type 52233.
5. Click Apply.Ignore the LMConfig dialog box for now.
6. On the Start menu, choose All Programs > Administrative Tools > Services.
7. Right-click the Contact Center Tomcat Instance service, and click Stop.
8. Right-click the Contact Center Tomcat Instance service, and click Start.
9. Close the services window.
10. On the LMConfig dialog box, click Yes to restart the Contact Center LicenseManager services.
11. Click OK to close the window.
12. Click Exit.
Securing the Windows serverAbout this taskApply optional security measures to your operating system to further secure your server.
Securing the Windows server
Avaya Aura® Contact Center Installation May 2013 851

Important:Scanning software can degrade the performance and decrease the reliability of the system.Install virus scanning software only if the system connects to an exposed network or to theInternet.
Important:To maintain server performance, you must schedule virus scans during maintenanceperiods or low usage hours only.
Procedure
1. Harden the operating system using defined site procedures.
2. Install antivirus software. If you install antivirus software, Avaya recommends thatyou exclude some contact center files and folders from real-time and scheduledscans. For more information, and for a list of files and folders to exclude, see AvayaAura® Contact Center Planning and Engineering (NN44400-210).
852 Avaya Aura® Contact Center Installation May 2013Comments? [email protected]

Part V: Avaya Media Server On Linux
Avaya Aura® Contact Center Installation May 2013 853

Avaya Media Server On Linux
854 Avaya Aura® Contact Center Installation May 2013Comments? [email protected]

Chapter 28: Avaya Media Server installationon Linux
This chapter describes how to install Avaya Media Server software on a Linux server in your SIP-enabledAvaya Aura® Contact Center.
Avaya Media Server is a software based media processing platform. The Avaya Aura® Contact CenterDVD contains an enhanced version of Avaya Media Server which contains an additional component—Contact Center Services for Avaya Media Server. The Contact Center Services packaged applicationprovides the conference, announcement, and dialog services required by SIP-enabled Contact Center.
You must complete all the procedures in this section in sequential order.
High Availability noteThe Avaya Aura® Contact Center High Availability feature supports Avaya Media Server only on the Linuxoperating system. To install a standby Avaya Media Server, first use the procedures in this chapter toinstall a primary active Avaya Media Server, then repeat the procedures in this chapter to install a standbyAvaya Media Server. The roles and responsibilities of the primary (active) and backup (standby) AvayaMedia Servers are defined later during commissioning.
Avaya Media Server installation on Linux perequisites • Install Contact Center Manager Server, Contact Center License Manager, Server
Utility, and Contact Center Manager Administration software in your network.
• If you are using KRS licensing for your contact center solution, ensure that your AvayaAura® Contact Center PLIC license file is available.
• The Avaya Aura® Contact Center version of Avaya Media Server is supported only ina SIP-enabled contact center.
Avaya Aura® Contact Center Installation May 2013 855

Installing the Linux serverBefore you begin
• Ensure your new server hardware meets all the requirements described in Avaya Aura®
Contact Center Planning and Engineering (NN44400-210).
About this taskInstall the Linux server operating system so that you can install the Avaya Media Serversoftware.
For new installations of Avaya Media Server, Avaya Aura® Contact Center supports only RedHat Enterprise Linux R6.3 (32–bit version).
Always select the installation defaults except where this procedure specifies otherwise.
Procedure
1. Place the Linux installation disk in the DVD drive of the server.
2. Restart the server by powering it off, then powering it on again.
3. On the Welcome to Red Hat Enterprise Linux 6.3! screen, select Install orupgrade an existing system.
4. On the Disc Found screen, select OK if you want to test your installation media(DVD), or select Skip to continue.Testing the media can take a long time, but it helps prevent installation problemsthat can occur due to bad media.
5. On the Red Hat Enterprise Linux 6 splash screen, select Next.
6. On the What language would you like to use for the installation screen, selectEnglish (English).Avaya Media Server supports only the English operating system.
7. On the Select an appropriate keyboard for the system screen, select thekeyboard type for your server, and click Next.
8. On the What type of devices will your installation involve screen, select BasicStorage Devices, and click Next.
9. If the installer displays the Storage Device Warning screen, click Yes, discardany data, and click Next.
10. If the installer displays the At least one existing installation has been detectedon your system screen, select Fresh Installation, and click Next.
11. On the Please name this computer screen, in the Hostname box, enter the FullyQualified Domain Name (FQDN) for this server.
12. Click Configure Network.
856 Avaya Aura® Contact Center Installation May 2013Comments? [email protected]

13. On the Network Connections screen, select Connect automatically.
14. On the Network Connections screen, select the Wired tab.
15. Select the Ethernet interface that you are going to connect to your physical network,and click Edit.
16. On the Editing screen for the interface you selected, select the IPv4 Settings Addtab.
17. From the Method list, select Manual.
18. Click Add.
19. Enter the IP address, network mask, and gateway for this server.
20. In the DNS servers box, type the IP address of the DNS server for your network.
21. In the Search domains box, type the domain for this server.
Installing the Linux server
Avaya Aura® Contact Center Installation May 2013 857

22. Click Apply.
23. On the Network Connections screen, click Close.
24. Click Next.
25. On the Please select the nearest city in your time zone screen, select the nearestcity to your server's location.
26. Select System clock uses UTC, and click Next.
27. Enter and confirm the root password for this server, and click Next.
28. On the Which type of installation would you like screen, select Use All Space,and click Next.
29. On the Writing storage configuration to disk screen, select Write changes todisk.
30. On the default installation of Red Hat Enterprise Linux screen, select BasicServer.
31. Click Next.
858 Avaya Aura® Contact Center Installation May 2013Comments? [email protected]

32. Complete the installation and reboot the server.
Next stepsLog on to the server and verify that the Ethernet connection is operating correctly. You canuse the ifconfig, ping, and ifup commands to check and start the connection. You canuse the system-config-network-tui command to verify your network configurationdetails. If the connection does not work, refer to your Red Hat documentation fortroubleshooting guidance.
The following is an example of using the system-config-network-tui command:
Installing the required packages on the Linux serverBefore you beginLog on to the Linux server.
About this taskAvaya Media Server (Avaya MS) requires specific 32–bit Linux packages to operate correctly.Check whether these packages are installed and install any that are missing. this procedureexplains how to use the YUM package manager to check, install, and remove packages.
You must remove the mysql-libs package from the Avaya MS server.
Installing the required packages on the Linux server
Avaya Aura® Contact Center Installation May 2013 859
Procedure
1. Put the Red Hat Enterprise Linux DVD in the server DVD drive.
2. Change to the root user by running the following command:su —
3. Mount the RHEL DVD by running the following commands:mkdir /mnt/cdrommount /dev/cdrom /mnt/cdrom
4. Set up the YUM repository by copying the yum .repo file from the RHEL DVD, usingthe following command:cp /mnt/cdrom/media.repo /etc/yum.repos.d/
5. Set up the YUM repository .repo file permissions. For example:chmod +rw /etc/yum.repos.d/media.repo
6. Use the vi editor to open the YUM repository .repo file. For example, enter:vi /etc/yum.repos.d/media.repo
7. Use the vi editor to add the following lines to the end of the YUM repository .repofile. This configures YUM to point to the mounted DVD image:baseurl=file:///mnt/cdromenabled=1
8. For each Linux package required for Avaya MS, use the yum info command tocheck whether it is installed on the server. For example, the following commandchecks whether the libX11.i686 package is installed:yum info libX11For the list of required packages, see Linux packages required for Avaya MS onpage 861.
9. If you find a required 32–bit Linux package is not present on the server, run the yuminstall command to install it. For example, the following command installs thelibX11.i686 package:yum install libX11.i686
10. If the libXdmcp Linux package is not present on the server, run the yuminstall command to install it. For example, the following command installs thelibXdmcp.i686 package:yum install libXdmcp.i686
11. Use the yum remove command to remove the mysql-libs package from the server:
860 Avaya Aura® Contact Center Installation May 2013Comments? [email protected]

yum remove mysql-libs
ExampleThe following example shows the complete set of commands to mount the RHEL DVD, set upthe YUM repository, check and install the libX11 and libXdmcp packages, and remove themysql-libs package.su -Password: *******mkdir /mnt/cdrom mount /dev/cdrom /mnt/cdrom cp /mnt/cdrom/media.repo /etc/yum.repos.d/ chmod +rw /etc/yum.repos.d/media.repo vi /etc/yum.repos.d/media.repo /* --- Add the following lines to the end of the file, save and quit baseurl=file:///mnt/cdrom enabled=1 --- */yum info libX11 yum install libX11.i686 yum info libXdmcp yum install libXdmcp.i686 yum remove mysql-libs
When you run the yum info command, the Arch: heading of the output contains i686 if theinstalled package is the 32-bit version. The Repo: heading shows Installed if the packageis already installed.
Linux packages required for Avaya MSAvaya Media Server requires 32–bit versions of the RHEL 6.x packages listed in the followingtable:
Linux packages required for Avaya MS
cyrus-sasl-lib
e2fsprogs-libs
glibc
iproute
keyutils-libs
krb5-libs
libICE
libSM
libX11
libXau
libXdmcp
Installing the required packages on the Linux server
Avaya Aura® Contact Center Installation May 2013 861

Linux packages required for Avaya MS
libXext
libXt
libgcc
libidn
libselinux
libsepol
libstdc++
net-snmp-utils
openldap
zlib
Adding a Linux user group and userAbout this taskCreate a Linux user and account group that you can use to log on to Avaya Media ServerElement Manager.
For example, create a user group named mediaservergroup, and then create a user msuseras a member of that group. Use this account to access Avaya Media Server ElementManager.
Procedure
1. On the Linux server, open a Linux terminal.
2. Use the su command to change to the root user account. For example:su -
3. Use the Linux groupadd command to create a new group. For example:groupadd mediaservergroup
4. Use the Linux useradd command to create a new user in the group you created.For example:useradd msuser -G mediaservergroup
5. Use the Linux passwd command to configure the password for the user. Forexample:passwd msuser
862 Avaya Aura® Contact Center Installation May 2013Comments? [email protected]

Preparing the Linux operating system for Avaya MediaServer
Before you begin
• Complete the Avaya Aura® Contact Center Installation Checklist (NN44400-310).
About this taskPrepare the Linux server so you can install the Avaya Media Server software. SecurityEnhanced Linux (SELinux) enforces the access rules, which apply to the processes and fileson a Linux server. To support Avaya Aura® Contact Center and Avaya Media Server, you mustdisable SELinux.
When a network address is added to a Linux server, the corresponding entries in theLinux /etc/hosts configuration file are not compatible with the Avaya Media Server PVI checker.You must edit the Linux hosts file to enable Avaya Media Server network communication.Remove hostname and Fully Qualified Domain Name (FQDN) references from the 127.0.0.1localhost line in the hosts file.
Procedure
1. Log on to the Linux server.
2. Use the su command to change to the root user account. For example:su -
3. Enter sestatus to check the SELinux status. If the status is disabled, skip to step9.
4. Using a text editor such as vi, open the /etc/selinux/config file.
5. Change the SELINUX line to read SELINUX=disabled
Preparing the Linux operating system for Avaya Media Server
Avaya Aura® Contact Center Installation May 2013 863
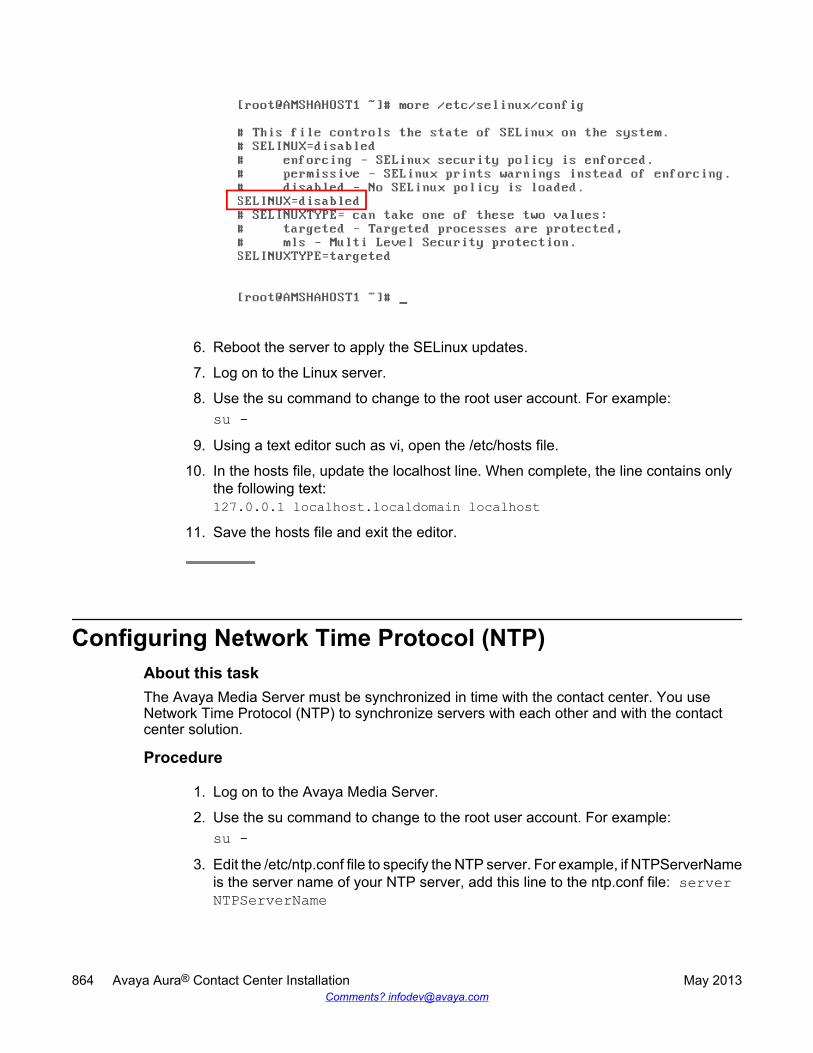
6. Reboot the server to apply the SELinux updates.
7. Log on to the Linux server.
8. Use the su command to change to the root user account. For example:su -
9. Using a text editor such as vi, open the /etc/hosts file.
10. In the hosts file, update the localhost line. When complete, the line contains onlythe following text:127.0.0.1 localhost.localdomain localhost
11. Save the hosts file and exit the editor.
Configuring Network Time Protocol (NTP)About this taskThe Avaya Media Server must be synchronized in time with the contact center. You useNetwork Time Protocol (NTP) to synchronize servers with each other and with the contactcenter solution.
Procedure
1. Log on to the Avaya Media Server.
2. Use the su command to change to the root user account. For example:su -
3. Edit the /etc/ntp.conf file to specify the NTP server. For example, if NTPServerNameis the server name of your NTP server, add this line to the ntp.conf file: serverNTPServerName
864 Avaya Aura® Contact Center Installation May 2013Comments? [email protected]

4. Start the Network Time Protocol ntpd client service, using the following command:service ntpd start
5. Configure the Network Time Protocol ntpd client service to automatically start aftera Linux server reboot, using the following command:chkconfig ntpd on
6. Verify that the Network Time Protocol client is working using the following command:ntpq -p
Installing Avaya Media Server software on LinuxBefore you begin
• Download and review the Avaya Aura® Contact Center Release Notes. The ReleaseNotes contain the known issues, patches, and workarounds specific to a release andpatch line-up of Avaya Aura® Contact Center.
• Obtain the Avaya Aura® Contact Center Release 6.3 DVD. The Avaya Aura® ContactCenter DVD may not contain the most recent version of the Avaya Media Server software.Read the Avaya Aura® Contact Center Release Notes to ensure that you are using themost recent version of Avaya Media Server software.
• Log on to the Linux server.
About this taskInstall the Avaya Media Server software to provide media processing for contacts in a SIP-enabled contact center environment.
Note:Read the Contact Center Release Notes for the most recent instructions.
Procedure
1. Read the Avaya Aura® Contact Center and Avaya Media Server release notes todetermine the most recent version of the Avaya Media Server software to install.
2. On your Linux server, use the su command to change to the root user account. Forexample:su -
3. Stop the Linux firewall using the following command:service iptables stop
4. Use the mkdir command to create a temporary folder on the Avaya Media Server.For example:mkdir /tmp/AvayaMS
Installing Avaya Media Server software on Linux
Avaya Aura® Contact Center Installation May 2013 865

5. On the Avaya Aura® Contact Center Release 6.3 DVD, find the folder /InstallSoftware/AMS/linux. Mount the Avaya Aura® Contact Center Release 6.3 DVD, forexample type the following:mount /dev/cdrom /mnt/cdrom/
6. Copy the Avaya Media Server installation files to the temporary directory youcreated. For example:cp “/mnt/cdrom/Install Software/AMS/linux/MediaServer_7.5.0.837_2012.09.12.bin” /tmp/AvayaMS
7. Copy the Contact Center Services For Avaya Media Server installation files to thetemporary directory you created. For example, copyContactCenterServicesForAMS_6.3.0.104 to /tmp/AvayaMS.
8. Navigate to the temporary directory you created. For example:cd /tmp/AvayaMS
9. Grant executable permissions to the Avaya MS installation file. For example:chmod +x MediaServer_7.5.0.837_2012.09.12.bin
10. Start the Avaya Media Server installer by running the installation file. For example:./MediaServer_7.5.0.837_2012.09.12.bin
11. The installer displays the Install Overview. Press Enter to continue to page throughthe license agreement.
12. To accept the license agreement and continue with the install, enter Y.
13. When prompted Install Element Manager?, enter Y to install the ElementManager.
14. When prompted for the Linux group name; press Enter to accept the default orspecify the user group you created earlier. For example, select mediaservergroupso members of this group can log on an use Avaya Media Server ElementManager.
• Press Enter to accept the default.
• Specify an existing user group. Select an existing user group so members ofthat group can log on and use Avaya Media Server Element Manager. Forexample, select the mediaservergroup user group.
15. When prompted Where would you like to install?, press Enter to acceptthe default of /opt/avaya.
16. When the install completes copying files, press Enter to exit the install.
17. Assign executable permissions to the Contact Center Services For Avaya MediaServer installation file. For example,chmod +x ContactCenterServicesForAMS_6.3.0.104
18. Start the Contact Center Services for Avaya Media Server installer by running theinstallation file. For example,./ContactCenterServicesForAMS_6.3.0.104
866 Avaya Aura® Contact Center Installation May 2013Comments? [email protected]

The installer displays the progress of the Contact Center Services For Avaya MediaServer installation.
19. When the Contact Center Services for Avaya Media Server installation completes,copy the Avaya MS firewall configuration to the system using the followingcommand:cp /opt/avaya/iptables.AMS75 /etc/sysconfig/iptables
If prompted, overwrite the existing iptables file.
20. Run the shell script to set up the Avaya MS environment using the followingcommand:. /etc/profile.d/masenv.sh
21. Restart the Linux firewall using the following command:service iptables start
22. Reboot the Linux server.
Securing your Avaya Media Server (optional)About this taskApply optional security measures to your operating system to further secure your server.
Important:Scanning software can degrade the performance and decrease the reliability of the system.Install virus scanning software only if the system connects to an exposed network or to theInternet.
Important:To maintain server performance, you must schedule virus scans during maintenanceperiods or low usage hours only.
Procedure
1. Harden the operating system using defined site procedures.
2. Install antivirus software. If you install antivirus software, ensure that you excludethe following directories from the scans. The following are the default installlocations. If you installed Avaya Media Server in a different location, navigate to thenecessary directories and exclude them from antivirus scans.
• /opt/avaya/ma/MAS/platdata
Securing your Avaya Media Server (optional)
Avaya Aura® Contact Center Installation May 2013 867

• /opt/avaya/ma/MAS/common/log
868 Avaya Aura® Contact Center Installation May 2013Comments? [email protected]

Part VI: Network Control Center Server
Avaya Aura® Contact Center Installation May 2013 869

Network Control Center Server
870 Avaya Aura® Contact Center Installation May 2013Comments? [email protected]
Chapter 29: Network Control Center Serversoftware installation
This chapter describes how to install the Network Control Center Server software on a network. TheNetwork Control Center (NCC) server is required when servers in multiple Contact Center Manager Serversites are networked and operate as a single distributed contact center.
A Network Control Center Server includes the following server software:
• Contact Center Manager Server — Network Control Center (NCC)
• Contact Center License Manager (LM)
• Contact Center Manager Administration (CCMA)
Install this server to add networking, network skill-based routing, and consolidated reporting support fora number of Voice and Multimedia Contact Servers operating as a single distributed contact center. Usethis server to configure contact routing between the Voice and Multimedia Contact Server nodes of adistributed contact center solution.
Avaya Aura® Contact Center supports networked calls between AML-based and SIP-enabled nodes. TheNetwork Control Center (NCC) software must be the most recent release, relative to the other nodes onthe network. For example, in a network with Avaya Aura® Contact Center Release 6.3 and Release 6.2nodes, the NCC must be Release 6.3. All nodes in the network must be Avaya Aura® Contact CenterRelease 6.2 or later.
All nodes in an Avaya Aura® Contact Center networking deployment, including the Network Control Centerserver, must be installed on operating systems from the same language family. Contact Center ManagerAdministration does not support displaying names from two different languages families. For example, asingle Contact Center Manager Administration does not support one node with French and another nodewith Russian.
You must complete all the procedures in this section in sequential order.
Avaya Aura® Contact Center Installation May 2013 871
Network Control Center Server software installationprerequisites
• Ensure that your new Contact Center license file is available.
Job aid: Installation timeThe estimated time to install the Network Control Center server software is 30 minutes. Thistime can vary depending on the server, network infrastructure, and your confidence level withthe software. This installation time is based on installing a server that meets the minimumspecification for this function.
Downloading the latest documentationBefore you begin
• Download the most recent version of Acrobat Reader.• Access the Avaya Web site at www.avaya.com/support.
About this taskDownload the most recent documentation to ensure you have the most recent updates.Updates in the documentation accurately reflect the most recent changes in the software.
Procedure
1. Log on to the Avaya Web site.
2. Compare the versions of the documentation on the site with the versions youhave.
3. If the version number on www.avaya.com/support is higher than your version,download the latest version of the document.
4. Review the Avaya Web site for release notes and readme files.
872 Avaya Aura® Contact Center Installation May 2013Comments? [email protected]

Installing Windows Server 2008 Release 2Before you begin
• Ensure that you have a newly formatted server that meets the specifications in AvayaAura® Contact Center Planning and Engineering (NN44400-210) on which to installMicrosoft Windows Server 2008 64-bit, Release 2, Service Pack 1.
Do not upgrade your operating system from a previous release. Contact Center is notsupported on an upgraded operating system.
• Configure all servers for RAID as described in Avaya Aura® Contact Center Planning andEngineering (NN44400-210).
• Ensure that you have a DVD for Windows Server 2008 Release 2.• Install the network interface card in the server.• Know the IP addresses for the contact center subnet.
About this taskInstall the Windows operating system, which is required for the Contact Center server software.During the installation, configure the Windows settings as required. You must perform thisprocedure on each server before you install Contact Center server software on the server.
Procedure
1. Insert the Windows Server 2008 64-bit Release 2 Standard Edition or WindowsServer 2008 64-bit Release 2 Enterprise Edition DVD into the DVD drive.
2. Install Windows Server 2008 Release 2 according to the instructions supplied bythe DVD.
3. On the first install page, select your language for installation.
4. Click Next.
5. On the Installation window, select a Language to install from the list.
6. Select a Time and currency format from the list.
7. Select Keyboard or input method from the list.
8. Click Next.
9. Click Install Now.
10. Select an operating system from the list.
11. Click Next.
12. On the first Install Windows screen, read the terms of the license agreement andselect I accept the license terms.
Installing Windows Server 2008 Release 2
Avaya Aura® Contact Center Installation May 2013 873

13. Click Next.
14. Select Custom.
15. Select the disk partition on which you want to install Windows Server 2008.
Important:You can use the partition management options to configure the partitions on yourserver.
16. Click Next.The installation proceeds and automatically restarts the server several times.
17. After completing the installation, log on to the server as Administrator. Enter andconfirm the Administrator password.
18. In the Initial Configuration Tasks window, select Activate Windows and followthe instructions or the Microsoft documentation to activate your server.
19. Select Set time zone and complete the information as required for your system.If you are installing Voice Contact Server Only software or Knowledge WorkerServer software on this server, ensure that you clear Automatically adjust clockfor daylight saving changes. Otherwise select Automatically adjust clock fordaylight saving changes.
20. Select Configure Networking and complete the information for your NetworkInterface Card (NIC) with the server IP address.
21. Select Provide computer name and domain and complete the information for yourserver name and workgroup or domain settings.
22. Change the DVD drive letter to E: to ensure the correct drive letters are free for theContact Center application and database hard disk drives and partitions.
23. Configure the hard disk drives and partitions for this server using the WindowsServer 2008 Server Manager - Disk Management utility. For more information abouthard disk drives and partitions, see Avaya Aura® Contact Center Planning andEngineering (NN44400-210).
24. Install other required drivers for your hardware configuration.
Procedure job aid
Name Description
Computer name Do not use spaces or underscores or exceed15 characters. The name must start with analphabetic character.
874 Avaya Aura® Contact Center Installation May 2013Comments? [email protected]

Name Description
The computer name must match (includingcase sensitivity) the DNS name.
Disk drives Format the partitions as required for theserver. For more information, see AvayaAura® Contact Center Planning andEngineering (NN44400-210).
Domain/workgroup name Configure as required for your site.You must check to ensure the DNS Domainname (including case) matches the servername if the server is added to a domain orworkgroup after configuration.
Licensing modes Select Per server licensing mode.Accept the default five concurrentconnections.
Modem dialing Configure as required for your site. Do notinstall a modem on a Communication ControlToolkit server.
Network components Configure IP Address, WINS, DNS for one ortwo network cards as per configuration.Contact Center does not support IPv6.
Network connections If the server has more than one NIC/adapter,ensure contact center subnet appears first inthe network adapter binding order.
Partitions Configure C: drive to be a primary drive.Configure the other drives on your server tomeet the requirements according to AvayaAura® Contact Center Planning andEngineering (NN44400-210) for the server.
Regional settings window Configure as required for your site.
SNMP Configure for all servers.
Configuring Windows Server 2008Before you begin
• Install Microsoft Windows Server 2008 64-bit Release 2 on your server.
About this taskBefore you can install Avaya Aura® Contact Center software on your server, you must configureWindows Server 2008 to meet the requirements of the software.
Configuring Windows Server 2008
Avaya Aura® Contact Center Installation May 2013 875

You can prepare the server using this and other procedures, or you can download and use anAvaya Aura® Contact Center operating system configuration tool that installs the requiredWindows roles and features.
The Avaya Aura® Contact Center Windows Roles and Features installer configures thefollowing Windows Server 2008 resources:
• Windows Server Backup Features• SNMP Services• Active Directory Light Weight Directory Services• Application Server• Web Server (IIS)
For more information, and to download the Avaya Aura® Contact Center Windows Roles andFeatures installer, see http://support.avaya.com.
The Avaya Aura® Contact Center Windows Roles and Features installer replaces the followingprocedures:
• Configuring Windows Server 2008 (this procedure)• Configuring SNMP on your server• Installing operating system components for Contact Center
If you use the Avaya Aura® Contact Center Windows Roles and Features installer, skip thesethree procedures.
Procedure
1. Log on to the Windows Server 2008 server using an administrator account.
2. Select the Don’t display this screen on startup check box.
3. Update the emergency repair disk to record the latest configuration data for theserver.
4. Choose Start > Administrative Tools > Server Manager.
5. In the left pane, click Features.
6. Click Add Features.
7. Select Windows Server Backup Features.
8. Click Next.
9. Click Install.
10. Click Close.
11. Choose Start > All Programs > Accessories > System Tools > Windows ServerBackup.
12. Follow the on-screen instructions to select what you want to back up.
876 Avaya Aura® Contact Center Installation May 2013Comments? [email protected]

Installing the latest supported operating system servicepacks
Before you begin
• Access the Avaya hotfixes list on the Web site www.avaya.com/support.• Install and configure Microsoft Windows Server 2008 64-bit Release 2 on your server.• Review the recommendations on operating system service updates in Avaya Aura®
Contact Center Planning and Engineering (NN44400-210).• Install the Microsoft .NET Framework 3.5 and Microsoft .NET Framework 3.5 SP1.
About this taskAvaya recommends that you install the most recent supported operating system service packs.You must download the supported operating system service pack from the Avaya hotfixes listto ensure your Contact Center server software functions correctly with the supported operatingsystem patches.
Procedure
1. Log on to the server and disable the Windows Update feature. There are a numberof methods for disabling the Windows Update feature, refer to the Windows Server2008 documentation for a method suitable to your solution. Disabling the WindowsUpdate feature prevents Windows Server 2008 from automatically applyingoperating system patches and potentially rebooting the server.
2. Review the Contact Center Service Packs Compatibility and Security HotfixesApplicability List to determine the most recent Avaya Aura® Contact Centersupported patches or service packs.
3. Download the appropriate Microsoft Windows Server 2008 patches for the AvayaAura® Contact Center software installed on this server.
4. Install the most recent Windows Server 2008 service pack that is validated withAvaya Aura® Contact Center by following the Microsoft Installation instructions.
Installing the latest supported operating system service packs
Avaya Aura® Contact Center Installation May 2013 877

Connecting to the contact center subnetAbout this taskConnect the Contact Center server to the contact center subnet. The contact center subnet isthe network on which the server software applications work together to route contacts andgenerate reports.
Procedure
1. Locate the slot assigned to the contact center subnet network interface card for theserver. Make a note of the slot.
2. Connect the cable from the contact center subnet to the contact center subnetnetwork interface card in the server in accordance with customer site networkingguidelines.
3. Use the ping command to test the contact center subnet.
Adding a server to a domainBefore you begin
• Ensure that you have domain administrator privileges, or ask the Domain Administratorto assign you a domain user account for remote access.
• On the server, configure a preferred Domain Name System (DNS) server on the NetworkInterface Card (NIC).
About this taskAdd the server to an existing domain. Avaya recommends that you add the server to the domainbefore installing Contact Center software.
Ask your System Administrator to add a Domain Name System (DNS) static entry for thisserver. Each Contact Center server in a domain requires a DNS static entry.
Important:Avaya Aura® Contact Center High Availability solutions do not support Windows Server 2008Dynamic DNS.
In High Availability solutions, ask your System Administrator to add one DNS static entry forthe each managed name and associated managed IP address. A typical High Availabilitycampus solution with a pair of servers requires 3 DNS static entries; one DNS static entry for
878 Avaya Aura® Contact Center Installation May 2013Comments? [email protected]
the active server, one DNS static entry for the standby server, and one DNS static entry forthe managed name and associated IP address.
Procedure
1. Log on to the server.
2. Click Start > Administrative Tools > Server Manager.
3. Beside Computer Information, click Change System Properties.
4. In the System Properties dialog box, click the Computer Name tab.
5. Click Change.
6. In the Computer Name/Domain Changes dialog box, click the Domain option.
7. Type the domain name (you must provide the fully qualified domain name, whichincludes the prefix and suffix).
8. Click OK.
9. Type the domain administrator User name and Password.
10. Click OK.
11. Restart the server when you are prompted to do so.
Disabling the Remote Access servicesAbout this taskAvaya Aura® Contact Center does not support Remote Access Services (RAS). Disable theRemote Access services before installing Avaya Aura® Contact Center. Microsoft RemoteDesktop continues to run after you disable Remote Access services. After you disable theservices, restart the server.
Procedure
1. Choose Start > Administrative Tools > Services.
2. In the Services window, right-click the Remote Access Connection Managericon.
3. Click Properties.
4. In the General tab, from the Startup type list, select Disabled.
5. Click OK.
6. In the Services window, right-click the Remote Access Auto ConnectionManager icon.
Disabling the Remote Access services
Avaya Aura® Contact Center Installation May 2013 879

7. Click Properties.
8. In the General tab, from the Startup type list, select Disabled.
9. Click OK.
10. In the Services window, click File, Exit.
11. Restart the server.
Configuring SNMP on your serverBefore you begin
• Install and configure Microsoft Windows Server 2008 64-bit Release 2 on your server.
About this taskConfigure Simple Network Management Protocol (SNMP) on your server to ensure you haveall of the required components of the Internet protocol for monitoring devices in your network.SNMP helps you manage data that describes the system configuration and errors that mayoccur between them.
Procedure
1. Log on to the server using the administrator account.
2. Choose Start > Control Panel > Programs.
3. In the Programs and Features section, click Turn Windows features on or off.
4. In the Server Manager window, select Server Manager and click Add Features.
5. Select SNMP Services.
6. Click Next.
7. Click Install.
8. If prompted, insert the Windows Server 2008 DVD.
9. Click Close.
880 Avaya Aura® Contact Center Installation May 2013Comments? [email protected]
Downloading the most recent patches to the serverBefore you begin
• Install and configure Windows Server 2008 64-bit Release 2 on your server according tothe settings in this chapter.
• Download and install the most recent and valid updates for Microsoft Windows Server2008 64-bit Release 2.
• Know the location at which you plan to install each Contact Center server softwarepackage.
• Ensure that you use one administrator account on your server to un-install and installsoftware updates.
About this taskTo ensure that you have the most current software, download the most recent Contact Centerpatches from www.avaya.com/support to the server you plan to install.
Procedure
1. Log on to the server using the administrator account.
2. Create a folder Avaya_Support\ProductUpdates on the drive on which youwant to save the software updates.
3. Download the most recent service pack file. Save and unzip the file on the ContactCenter server in the Avaya_Support\ProductUpdates folder.
4. If new patches are available for the latest service pack, download and save thepatches on the Contact Center server in the Avaya_Support\ProductUpdates folder.
5. Read the Contact Center Release Notes for the most recent instructions.
Disabling unused Network AdaptersAbout this taskDisable all unused Network Adapters or Network Interface Cards (NICs) to improve networkcommunications and prevent the erroneous configuration of unused NICs during ContactCenter server commissioning.
Downloading the most recent patches to the server
Avaya Aura® Contact Center Installation May 2013 881

Procedure
1. Log on to the server.
2. Click Start > Control Panel > Network and Internet > Network and SharingCenter > Change Adapter Settings.
3. Right-click on the unused Network Adapter, and select Disable.
4. Repeat this procedure for all unused Network Adapters.
Enabling Microsoft Remote Desktop connectionBefore you begin
• Install Microsoft Windows Server 2008 64-bit Release 2 on your server.• Log on to the server with administrator privileges.
About this taskEnable Microsoft Remote Desktop connection as your remote access tool. Microsoft RemoteDesktop provides remote access for support on the server.
Procedure
1. Choose Start > Control Panel > System and Security.
2. In the System section, select Allow remote access.
3. Click the Remote tab.
4. Select Allow connections from computers running any version of RemoteDesktop (less secure).
5. Click OK.
Configuring Data Execution PreventionAbout this taskConfigure the Data Execution Prevention (DEP) hardware and software to perform additionalchecks on memory that protect the Avaya Aura® Contact Center server against malicious codeexploitation.
882 Avaya Aura® Contact Center Installation May 2013Comments? [email protected]
Procedure
1. Log on to Windows as administrator.
2. Choose Start > Control Panel > System and Security.
3. Click System.
4. In the System window, click Advanced system settings.
5. In the System Properties dialog box, click the Advanced tab.
6. Under Performance, click Settings.
7. In the Performance Options dialog box, click the Data Execution Preventiontab.
8. On the Data Execution Prevention tab, select Turn on DEP for essentialWindows programs and services only.
9. Click OK.
10. On the System Properties dialog box, click OK.
11. Click OK to restart the computer.
Importing Contact Center Firewall Security policyBefore you begin
• Install Microsoft Windows Server 2008 64-bit Release 2 on your server.• Log on to the server with administrator privileges.• Download the most recent Avaya Aura® Contact Center Firewall Security policy from
www.avaya.com/support.
About this taskImport the Avaya Aura® Contact Center Firewall Security policy to ensure all contact centerservers in the solution can communicate.
Avaya recommends that you export and backup your existing firewall security policy beforeimporting the Avaya Aura® Contact Center Firewall Security policy. You can use this backuppolicy to rollback the Avaya Aura® Contact Center Firewall Security policy, if you ever needto.
Procedure
1. Choose Start > Administrative Tools > Windows Firewall with AdvancedSecurity.
2. Choose Actions > Export Policy.
Importing Contact Center Firewall Security policy
Avaya Aura® Contact Center Installation May 2013 883

3. In the File name box, type the name for the backup policy.
4. Click Save.Windows exports the existing policy. You can use this backup policy to rollback theAvaya Aura® Contact Center Firewall Security policy, if you ever need to.
5. On the Policy successfully exported message box, click OK.
6. Choose Actions > Import Policy.
7. On the policy overwrite message box, click Yes.
8. Navigate to the folder containing the Avaya Aura® Contact Center Firewall Securitypolicy.
9. Click Open.Windows imports the Avaya Aura® Contact Center Firewall Security policy.
10. On the Policy successfully imported message box, click OK.
Installing the Network Control Center Server softwareBefore you begin
• If you install Network Control Center server software with an AML Avaya CommunicationServer 1000, ensure the PABX is configured. See Avaya Aura® Contact CenterConfiguration – Avaya CS1000 Integration (NN44400-512).
• If you install Network Control Center server software with an Avaya Aura® UnifiedCommunications platform, ensure the platform is configured. See Avaya Aura® ContactCenter Configuration – Avaya Aura® Unified Communications Platform Integration(NN44400-521).
• Download the most recent Network Control Center patches to the server.
About this taskInstall the Network Control Center server software to enable your contact center to routecontacts to available agents with the correct skills.
Procedure
1. Insert the Contact Center DVD into the DVD drive of your server.
2. If the installation does not automatically start, double-click Setup.exe.
3. Click Install to install the Microsoft .NET Framework 3.5 SP1 and Visual C++runtime libraries on the server.If you are prompted to accept the Microsoft .NET Framework 3.5.1 licenseagreement, click Accept. If you are prompted to restart the server, click Yes andrepeat step 2.
884 Avaya Aura® Contact Center Installation May 2013Comments? [email protected]

4. On the Welcome window, click Next.
5. On the License Agreement window, read the terms of the agreement.
Installing the Network Control Center Server software
Avaya Aura® Contact Center Installation May 2013 885

6. Click I Accept the Terms of the End-User License Agreement.
7. Click Next.
886 Avaya Aura® Contact Center Installation May 2013Comments? [email protected]

8. On the Installation Selection window, under Other, select Network ControlCenter Server Only.
9. Click Next.
Installing the Network Control Center Server software
Avaya Aura® Contact Center Installation May 2013 887

10. On the Installation Destination window, on the Application Destination Drivetab, select where to install the Contact Center application software by choosing adisk drive letter.
11. Click the Database Destination Drive tab.
12. Under Select the destination drive for the Contact Center database files, selectthe drive for the Contact Center Manager Server database.
13. Click the Product Updates Location tab.
888 Avaya Aura® Contact Center Installation May 2013Comments? [email protected]

14. Under Select the Product Updates Location, click Browse to locate the foldercontaining the Contact Center product updates.
15. Click Next.The System Readiness Check runs on the server.
16. If the System Readiness Check utility returns a Fail, the software installation cannotproceed until you correct the problem. Review any failures returned by the SystemReadiness Check and consult Avaya Aura® Contact Center Planning andEngineering (NN44400-210) to determine the actions to resolve the issue.You can ignore warnings if the potential impact to the operation of the contact centeris understood and not applicable.
17. Click Next.
18. On the Installation Data window, type the installation details for each tab.
19. Select the CCMS tab, and configure the server details.
Installing the Network Control Center Server software
Avaya Aura® Contact Center Installation May 2013 889

20. In the Customer Name box, type the customer name.
21. In the Company Name box, type the name of the company.
22. In the Site Name box, type the site name for the Contact Center server. The sitename must not contain spaces or non-alphabetical characters except hyphen (-)and underscore (_). The first character must be a letter. The site name must beunique and can consist of 6 to 15 characters.
23. In the RSM IP Address box, type the Real-time Statistics Multicast IP Address ofthe server to associate with sending real-time data. The IP address must be from224.0.1.0 to 239.255.255.255. The default is 234.5.6.10.
24. In the Contact Center Server Subnet IP Address box, type the IP Address of theNCC server.
25. Select the Licensing tab, and configure the licensing details.
890 Avaya Aura® Contact Center Installation May 2013Comments? [email protected]

26. The License File Location box displays the folder on the server which containsthe license file.
27. In the Primary License Manager IP Address box, type the IP address of theprimary License Manager server. This server contains a License Manager server.This License Manager server is the default primary License Manager.
28. In the Primary License Port box, type the number of the communication portopened between the License Manager and Network Contact Center. The defaultport number is 3998 when you use only one License Manager.
29. In the Secondary License Manager IP Address box, type the IP address of thesecondary License Manager server. The secondary License Manager server isused only in a corporate licensed environment.
30. From the Licensing Package list, select the licenses that you have purchased.Select Nodal NCC or Corporate NCC.
31. From the list of Optional Packages, enable the licensed features that you havepurchased.
32. Select the CCMA tab, and configure the CCMA details.
Installing the Network Control Center Server software
Avaya Aura® Contact Center Installation May 2013 891

33. In the Configuration section clear Enable CCMA Replication. CCMA replicationis reproducing an active copy of the AD-LDS for backup or emergency failure. Incase of server failure, a current AD-LDS is available to maintain the contact center.Clear the check box on the primary server.
34. In the LDAP Port Number box, type the port number for the Lightweight DirectoryAccess Protocol (LDAP) for which common contact information is stored on aserver. The default value of the port is 389. Check with the system administrator toensure that the port number is not already in use.
35. In the SSL Port Number box, type the port number for the Secure Sockets Layer(SSL) that controls security when applications are communicating across thenetwork. The default port is 636. Check with the system administrator to ensure thatthe port number is not already in use.
36. In the System Account Configuration section, in the Password box, type thepassword for the CCMA System Account user account. Confirm the password inthe second box. The password is not checked against the server security policy forminimum password requirements. Avaya recommends that you enter a passwordthat conforms to your corporate password policy.
37. Click Next.
38. On the Summary window, review and verify the information.
39. Click Install.
892 Avaya Aura® Contact Center Installation May 2013Comments? [email protected]

40. After the installation is complete, click Finish.
41. If prompted, restart the server.
42. If you are using WebLM, you must restart the Contact Center Tomcat Instanceservice after installing the Contact Center software.
Upgrading Java Runtime Environment, Java DevelopmentKit, and Apache Tomcat components using Third PartySoftware Upgrade Utility
Before you begin
• Apply Contact Center 6.3 Service Pack 10 or later on your system as an install-timepatch.
• Restart the Contact Center server to complete this procedure.
About this taskUse Third Party Software Upgrade Utility to automatically upgrade your Java RuntimeEnvironment and Tomcat software components. For more information, see Third PartySoftware Upgrade Utility on page 27.
Procedure
1. Log on to the server using the administrator account.
2. Navigate to the Avaya_Support\ProductUpdates folder.
3. Open the folder where you had saved the latest Service Pack.
4. Browse to ThirdParty\AACCThirdPartySoftwareUpgradeUtility.exe.
5. Double-click AACCThirdPartySoftwareUpgradeUtility.exe.
6. Click Upgrade.The system displays the “User Action Required” dialog box.
7. Click OK.
8. Click Yes to restart Contact Center and complete the upgrade.
Upgrading Java Runtime Environment, Java Development Kit, and Apache Tomcat components using Third PartySoftware Upgrade Utility
Avaya Aura® Contact Center Installation May 2013 893

Configuring WebLM licensingBefore you begin
• Install the Contact Center License Manager server software.• Restart the Contact Center License Manager server.
About this taskConfigure Contact Center License Manager to use WebLM. Then restart the Contact CenterTomcat Instance on the Contact Center License Manager server to commission WebLM forthe first time.
Important:If you are using a Keycode Retrieval System (KRS) PLIC license file, skip this procedure.This procedure applies only when you are using an Avaya Product Licensing and DeliverySystem (PLDS) WebLM license file or an Avaya WebLM server.
Note:When you install Contact Center License Manager, an instance of Apache Tomcat Serveris also installed on the same server. The default port number for Apache Tomcat is 8081. Ifyou need to change the port number to avoid conflicts with third-party software, see yourApache Tomcat documentation.
Procedure
1. Log on to the server where the Contact Center License Manager software isinstalled.
2. Click Start > All Programs > Avaya > Contact Center > License Manager >Configuration.
3. If you are using a local WebLM license file, complete the following steps to specifythe license file:
a. View the type of license file currently used, and then click OK.b. On the Configuration page, click Browse.c. Navigate the file system and locate the WebLM license file.d. Click Open.
4. If you are using a remote WebLM server, complete the following steps to specifythe license server:
a. View the type of license file currently used, and then click OK.b. On the Configuration page, in the WebLM Host Name field, type the host name
or IP address of the WebLM server.c. In the WebLM Port Number field, type 52233.
894 Avaya Aura® Contact Center Installation May 2013Comments? [email protected]

5. Click Apply.Ignore the LMConfig dialog box for now.
6. On the Start menu, choose All Programs > Administrative Tools > Services.
7. Right-click the Contact Center Tomcat Instance service, and click Stop.
8. Right-click the Contact Center Tomcat Instance service, and click Start.
9. Close the services window.
10. On the LMConfig dialog box, click Yes to restart the Contact Center LicenseManager services.
11. Click OK to close the window.
12. Click Exit.
Securing the Windows serverAbout this taskApply optional security measures to your operating system to further secure your server.
Important:Scanning software can degrade the performance and decrease the reliability of the system.Install virus scanning software only if the system connects to an exposed network or to theInternet.
Important:To maintain server performance, you must schedule virus scans during maintenanceperiods or low usage hours only.
Procedure
1. Harden the operating system using defined site procedures.
2. Install antivirus software. If you install antivirus software, Avaya recommends thatyou exclude some contact center files and folders from real-time and scheduledscans. For more information, and for a list of files and folders to exclude, see AvayaAura® Contact Center Planning and Engineering (NN44400-210).
Securing the Windows server
Avaya Aura® Contact Center Installation May 2013 895

896 Avaya Aura® Contact Center Installation May 2013Comments? [email protected]

Part VII: Security Framework Server
Avaya Aura® Contact Center Installation May 2013 897

Security Framework Server
898 Avaya Aura® Contact Center Installation May 2013Comments? [email protected]
Chapter 30: Security Framework Serversoftware installation
This chapter describes how to install the Security Framework Server software that controls the securityaccess to the Contact Center Manager Administration Web application and other applications within AvayaAura® Contact Center.
Install this server to provide identity management, authorization, and single sign-on authentication forcontact center solution users. Security Framework provides session management and integrates with yourdirectory services infrastructure (for example, Active Directory) to reduce administrative costs andeliminate the redundant user information associated with application solutions.
You must complete all the procedures in this section in sequential order.
Standby Security Framework Server - High Availability noteAvaya Aura® Contact Center Security Framework Server supports High Availability. To install a standbySecurity Framework Server, first use the procedures in this chapter to install a primary active SecurityFramework Server, then repeat the procedures in this chapter to install a standby Security FrameworkServer. The roles and responsibilities of the active and standby Security Framework Servers are definedlater during commissioning.
Security Framework Server software installationprerequisites
• Read Avaya Aura® Contact Center Planning and Engineering (NN44400-210).
Job aid: Installation timeThe estimated time to install the Security Framework software is 30 minutes. This time canvary depending on the server, network infrastructure, and your confidence level with thesoftware. This installation time is based on installing a server that meets the minimumspecification for this function.
Avaya Aura® Contact Center Installation May 2013 899

Downloading the latest documentationBefore you begin
• Download the most recent version of Acrobat Reader.• Access the Avaya Web site at www.avaya.com/support.
About this taskDownload the most recent documentation to ensure you have the most recent updates.Updates in the documentation accurately reflect the most recent changes in the software.
Procedure
1. Log on to the Avaya Web site.
2. Compare the versions of the documentation on the site with the versions youhave.
3. If the version number on www.avaya.com/support is higher than your version,download the latest version of the document.
4. Review the Avaya Web site for release notes and readme files.
Installing Windows Server 2008 Release 2Before you begin
• Ensure that you have a newly formatted server that meets the specifications in AvayaAura® Contact Center Planning and Engineering (NN44400-210) on which to installMicrosoft Windows Server 2008 64-bit, Release 2, Service Pack 1.
Do not upgrade your operating system from a previous release. Contact Center is notsupported on an upgraded operating system.
• Configure all servers for RAID as described in Avaya Aura® Contact Center Planning andEngineering (NN44400-210).
• Ensure that you have a DVD for Windows Server 2008 Release 2.• Install the network interface card in the server.• Know the IP addresses for the contact center subnet.
900 Avaya Aura® Contact Center Installation May 2013Comments? [email protected]

About this taskInstall the Windows operating system, which is required for the Contact Center server software.During the installation, configure the Windows settings as required. You must perform thisprocedure on each server before you install Contact Center server software on the server.
Procedure
1. Insert the Windows Server 2008 64-bit Release 2 Standard Edition or WindowsServer 2008 64-bit Release 2 Enterprise Edition DVD into the DVD drive.
2. Install Windows Server 2008 Release 2 according to the instructions supplied bythe DVD.
3. On the first install page, select your language for installation.
4. Click Next.
5. On the Installation window, select a Language to install from the list.
6. Select a Time and currency format from the list.
7. Select Keyboard or input method from the list.
8. Click Next.
9. Click Install Now.
10. Select an operating system from the list.
11. Click Next.
12. On the first Install Windows screen, read the terms of the license agreement andselect I accept the license terms.
13. Click Next.
14. Select Custom.
15. Select the disk partition on which you want to install Windows Server 2008.
Important:You can use the partition management options to configure the partitions on yourserver.
16. Click Next.The installation proceeds and automatically restarts the server several times.
17. After completing the installation, log on to the server as Administrator. Enter andconfirm the Administrator password.
18. In the Initial Configuration Tasks window, select Activate Windows and followthe instructions or the Microsoft documentation to activate your server.
19. Select Set time zone and complete the information as required for your system.If you are installing Voice Contact Server Only software or Knowledge WorkerServer software on this server, ensure that you clear Automatically adjust clock
Installing Windows Server 2008 Release 2
Avaya Aura® Contact Center Installation May 2013 901

for daylight saving changes. Otherwise select Automatically adjust clock fordaylight saving changes.
20. Select Configure Networking and complete the information for your NetworkInterface Card (NIC) with the server IP address.
21. Select Provide computer name and domain and complete the information for yourserver name and workgroup or domain settings.
22. Change the DVD drive letter to E: to ensure the correct drive letters are free for theContact Center application and database hard disk drives and partitions.
23. Configure the hard disk drives and partitions for this server using the WindowsServer 2008 Server Manager - Disk Management utility. For more information abouthard disk drives and partitions, see Avaya Aura® Contact Center Planning andEngineering (NN44400-210).
24. Install other required drivers for your hardware configuration.
Procedure job aid
Name Description
Computer name Do not use spaces or underscores or exceed15 characters. The name must start with analphabetic character.The computer name must match (includingcase sensitivity) the DNS name.
Disk drives Format the partitions as required for theserver. For more information, see AvayaAura® Contact Center Planning andEngineering (NN44400-210).
Domain/workgroup name Configure as required for your site.You must check to ensure the DNS Domainname (including case) matches the servername if the server is added to a domain orworkgroup after configuration.
Licensing modes Select Per server licensing mode.Accept the default five concurrentconnections.
Modem dialing Configure as required for your site. Do notinstall a modem on a Communication ControlToolkit server.
902 Avaya Aura® Contact Center Installation May 2013Comments? [email protected]

Name Description
Network components Configure IP Address, WINS, DNS for one ortwo network cards as per configuration.Contact Center does not support IPv6.
Network connections If the server has more than one NIC/adapter,ensure contact center subnet appears first inthe network adapter binding order.
Partitions Configure C: drive to be a primary drive.Configure the other drives on your server tomeet the requirements according to AvayaAura® Contact Center Planning andEngineering (NN44400-210) for the server.
Regional settings window Configure as required for your site.
SNMP Configure for all servers.
Configuring Windows Server 2008Before you begin
• Install Microsoft Windows Server 2008 64-bit Release 2 on your server.
About this taskBefore you can install Avaya Aura® Contact Center software on your server, you must configureWindows Server 2008 to meet the requirements of the software.
You can prepare the server using this and other procedures, or you can download and use anAvaya Aura® Contact Center operating system configuration tool that installs the requiredWindows roles and features.
The Avaya Aura® Contact Center Windows Roles and Features installer configures thefollowing Windows Server 2008 resources:
• Windows Server Backup Features• SNMP Services• Active Directory Light Weight Directory Services• Application Server• Web Server (IIS)
For more information, and to download the Avaya Aura® Contact Center Windows Roles andFeatures installer, see http://support.avaya.com.
The Avaya Aura® Contact Center Windows Roles and Features installer replaces the followingprocedures:
Configuring Windows Server 2008
Avaya Aura® Contact Center Installation May 2013 903

• Configuring Windows Server 2008 (this procedure)• Configuring SNMP on your server• Installing operating system components for Contact Center
If you use the Avaya Aura® Contact Center Windows Roles and Features installer, skip thesethree procedures.
Procedure
1. Log on to the Windows Server 2008 server using an administrator account.
2. Select the Don’t display this screen on startup check box.
3. Update the emergency repair disk to record the latest configuration data for theserver.
4. Choose Start > Administrative Tools > Server Manager.5. In the left pane, click Features.
6. Click Add Features.
7. Select Windows Server Backup Features.
8. Click Next.9. Click Install.
10. Click Close.
11. Choose Start > All Programs > Accessories > System Tools > Windows ServerBackup.
12. Follow the on-screen instructions to select what you want to back up.
Installing the latest supported operating system servicepacks
Before you begin
• Access the Avaya hotfixes list on the Web site www.avaya.com/support.• Install and configure Microsoft Windows Server 2008 64-bit Release 2 on your server.• Review the recommendations on operating system service updates in Avaya Aura®
Contact Center Planning and Engineering (NN44400-210).• Install the Microsoft .NET Framework 3.5 and Microsoft .NET Framework 3.5 SP1.
About this taskAvaya recommends that you install the most recent supported operating system service packs.You must download the supported operating system service pack from the Avaya hotfixes list
904 Avaya Aura® Contact Center Installation May 2013Comments? [email protected]

to ensure your Contact Center server software functions correctly with the supported operatingsystem patches.
Procedure
1. Log on to the server and disable the Windows Update feature. There are a numberof methods for disabling the Windows Update feature, refer to the Windows Server2008 documentation for a method suitable to your solution. Disabling the WindowsUpdate feature prevents Windows Server 2008 from automatically applyingoperating system patches and potentially rebooting the server.
2. Review the Contact Center Service Packs Compatibility and Security HotfixesApplicability List to determine the most recent Avaya Aura® Contact Centersupported patches or service packs.
3. Download the appropriate Microsoft Windows Server 2008 patches for the AvayaAura® Contact Center software installed on this server.
4. Install the most recent Windows Server 2008 service pack that is validated withAvaya Aura® Contact Center by following the Microsoft Installation instructions.
Connecting to the contact center subnetAbout this taskConnect the Contact Center server to the contact center subnet. The contact center subnet isthe network on which the server software applications work together to route contacts andgenerate reports.
Procedure
1. Locate the slot assigned to the contact center subnet network interface card for theserver. Make a note of the slot.
2. Connect the cable from the contact center subnet to the contact center subnetnetwork interface card in the server in accordance with customer site networkingguidelines.
3. Use the ping command to test the contact center subnet.
Connecting to the contact center subnet
Avaya Aura® Contact Center Installation May 2013 905

Adding a server to a domainBefore you begin
• Ensure that you have domain administrator privileges, or ask the Domain Administratorto assign you a domain user account for remote access.
• On the server, configure a preferred Domain Name System (DNS) server on the NetworkInterface Card (NIC).
About this taskAdd the server to an existing domain. Avaya recommends that you add the server to the domainbefore installing Contact Center software.
Ask your System Administrator to add a Domain Name System (DNS) static entry for thisserver. Each Contact Center server in a domain requires a DNS static entry.
Important:Avaya Aura® Contact Center High Availability solutions do not support Windows Server 2008Dynamic DNS.
In High Availability solutions, ask your System Administrator to add one DNS static entry forthe each managed name and associated managed IP address. A typical High Availabilitycampus solution with a pair of servers requires 3 DNS static entries; one DNS static entry forthe active server, one DNS static entry for the standby server, and one DNS static entry forthe managed name and associated IP address.
Procedure
1. Log on to the server.
2. Click Start > Administrative Tools > Server Manager.
3. Beside Computer Information, click Change System Properties.
4. In the System Properties dialog box, click the Computer Name tab.
5. Click Change.
6. In the Computer Name/Domain Changes dialog box, click the Domain option.
7. Type the domain name (you must provide the fully qualified domain name, whichincludes the prefix and suffix).
8. Click OK.
9. Type the domain administrator User name and Password.
10. Click OK.
906 Avaya Aura® Contact Center Installation May 2013Comments? [email protected]

11. Restart the server when you are prompted to do so.
Disabling the Remote Access servicesAbout this taskAvaya Aura® Contact Center does not support Remote Access Services (RAS). Disable theRemote Access services before installing Avaya Aura® Contact Center. Microsoft RemoteDesktop continues to run after you disable Remote Access services. After you disable theservices, restart the server.
Procedure
1. Choose Start > Administrative Tools > Services.
2. In the Services window, right-click the Remote Access Connection Managericon.
3. Click Properties.
4. In the General tab, from the Startup type list, select Disabled.
5. Click OK.
6. In the Services window, right-click the Remote Access Auto ConnectionManager icon.
7. Click Properties.
8. In the General tab, from the Startup type list, select Disabled.
9. Click OK.
10. In the Services window, click File, Exit.
11. Restart the server.
Configuring SNMP on your serverBefore you begin
• Install and configure Microsoft Windows Server 2008 64-bit Release 2 on your server.
About this taskConfigure Simple Network Management Protocol (SNMP) on your server to ensure you haveall of the required components of the Internet protocol for monitoring devices in your network.
Disabling the Remote Access services
Avaya Aura® Contact Center Installation May 2013 907

SNMP helps you manage data that describes the system configuration and errors that mayoccur between them.
Procedure
1. Log on to the server using the administrator account.
2. Choose Start > Control Panel > Programs.
3. In the Programs and Features section, click Turn Windows features on or off.
4. In the Server Manager window, select Server Manager and click Add Features.
5. Select SNMP Services.
6. Click Next.
7. Click Install.
8. If prompted, insert the Windows Server 2008 DVD.
9. Click Close.
Downloading the most recent patches to the serverBefore you begin
• Install and configure Windows Server 2008 64-bit Release 2 on your server according tothe settings in this chapter.
• Download and install the most recent and valid updates for Microsoft Windows Server2008 64-bit Release 2.
• Know the location at which you plan to install each Contact Center server softwarepackage.
• Ensure that you use one administrator account on your server to un-install and installsoftware updates.
About this taskTo ensure that you have the most current software, download the most recent Contact Centerpatches from www.avaya.com/support to the server you plan to install.
Procedure
1. Log on to the server using the administrator account.
2. Create a folder Avaya_Support\ProductUpdates on the drive on which youwant to save the software updates.
3. Download the most recent service pack file. Save and unzip the file on the ContactCenter server in the Avaya_Support\ProductUpdates folder.
908 Avaya Aura® Contact Center Installation May 2013Comments? [email protected]

4. If new patches are available for the latest service pack, download and save thepatches on the Contact Center server in the Avaya_Support\ProductUpdates folder.
5. Read the Contact Center Release Notes for the most recent instructions.
Disabling unused Network AdaptersAbout this taskDisable all unused Network Adapters or Network Interface Cards (NICs) to improve networkcommunications and prevent the erroneous configuration of unused NICs during ContactCenter server commissioning.
Procedure
1. Log on to the server.
2. Click Start > Control Panel > Network and Internet > Network and SharingCenter > Change Adapter Settings.
3. Right-click on the unused Network Adapter, and select Disable.
4. Repeat this procedure for all unused Network Adapters.
Enabling Microsoft Remote Desktop connectionBefore you begin
• Install Microsoft Windows Server 2008 64-bit Release 2 on your server.• Log on to the server with administrator privileges.
About this taskEnable Microsoft Remote Desktop connection as your remote access tool. Microsoft RemoteDesktop provides remote access for support on the server.
Procedure
1. Choose Start > Control Panel > System and Security.
2. In the System section, select Allow remote access.
3. Click the Remote tab.
Disabling unused Network Adapters
Avaya Aura® Contact Center Installation May 2013 909

4. Select Allow connections from computers running any version of RemoteDesktop (less secure).
5. Click OK.
Configuring Data Execution PreventionAbout this taskConfigure the Data Execution Prevention (DEP) hardware and software to perform additionalchecks on memory that protect the Avaya Aura® Contact Center server against malicious codeexploitation.
Procedure
1. Log on to Windows as administrator.
2. Choose Start > Control Panel > System and Security.
3. Click System.
4. In the System window, click Advanced system settings.
5. In the System Properties dialog box, click the Advanced tab.
6. Under Performance, click Settings.
7. In the Performance Options dialog box, click the Data Execution Preventiontab.
8. On the Data Execution Prevention tab, select Turn on DEP for essentialWindows programs and services only.
9. Click OK.
10. On the System Properties dialog box, click OK.
11. Click OK to restart the computer.
910 Avaya Aura® Contact Center Installation May 2013Comments? [email protected]

Importing Contact Center Firewall Security policyBefore you begin
• Install Microsoft Windows Server 2008 64-bit Release 2 on your server.• Log on to the server with administrator privileges.• Download the most recent Avaya Aura® Contact Center Firewall Security policy from
www.avaya.com/support.
About this taskImport the Avaya Aura® Contact Center Firewall Security policy to ensure all contact centerservers in the solution can communicate.
Avaya recommends that you export and backup your existing firewall security policy beforeimporting the Avaya Aura® Contact Center Firewall Security policy. You can use this backuppolicy to rollback the Avaya Aura® Contact Center Firewall Security policy, if you ever needto.
Procedure
1. Choose Start > Administrative Tools > Windows Firewall with AdvancedSecurity.
2. Choose Actions > Export Policy.
3. In the File name box, type the name for the backup policy.
4. Click Save.Windows exports the existing policy. You can use this backup policy to rollback theAvaya Aura® Contact Center Firewall Security policy, if you ever need to.
5. On the Policy successfully exported message box, click OK.
6. Choose Actions > Import Policy.
7. On the policy overwrite message box, click Yes.
8. Navigate to the folder containing the Avaya Aura® Contact Center Firewall Securitypolicy.
9. Click Open.Windows imports the Avaya Aura® Contact Center Firewall Security policy.
10. On the Policy successfully imported message box, click OK.
Importing Contact Center Firewall Security policy
Avaya Aura® Contact Center Installation May 2013 911

Installing the Security Framework Server softwareBefore you begin
• Download the most recent Security Framework and common component patches to theserver.
• Ensure the server Primary DNS suffix is configured.
About this taskInstall the Security Framework Server software on one server.
Procedure
1. Insert the Contact Center DVD into the DVD drive of your server.
2. If the installation does not automatically start, double-click Setup.exe.
3. Click Install to install the Microsoft .NET Framework 3.5 SP1 and Visual C++runtime libraries on the server.If you are prompted to accept the Microsoft .NET Framework 3.5.1 licenseagreement, click Accept. If you are prompted to restart the server, click Yes andrepeat step 2.
4. On the Welcome window, click Next.
5. On the License Agreement window, read the terms of the agreement.
912 Avaya Aura® Contact Center Installation May 2013Comments? [email protected]

6. Click I Accept the Terms of the End-User License Agreement.
7. Click Next.
Installing the Security Framework Server software
Avaya Aura® Contact Center Installation May 2013 913

8. On the Installation Selection window, under Other, select Security FrameworkServer.
9. Click Next.
10. On the Installation Destination window, on the Application Destination Drivetab, select where to install the Contact Center application software by choosing adisk drive letter.
11. Click the Product Updates Location tab.
12. Under Select the Product Updates Location, click Browse to locate the foldercontaining the Contact Center product updates.
13. Click Next.
14. On the Installation Data window, type the installation details for each tab.
15. Select the Security Framework tab, and configure the details.
914 Avaya Aura® Contact Center Installation May 2013Comments? [email protected]

16. In the HTTP Port Number box, type the port number for the Hypertext TransferProtocol (HTTP) for request/responses between the clients and servers. The defaultport is 8091. Check with the system administrator to ensure that the port number isnot already in use.
17. In the HTTPS Port Number box, type the port number for the Secure HypertextTransfer Protocol (HTTPS) for request/responses between the clients and servers.The default port is 8443. Check with the system administrator to ensure that theport number is not already in use.
18. In the LDAP Port Number box, type the port number for the Lightweight DirectoryAccess Protocol (LDAP) for which commonly used contact information is stored ona server. The default value of the port is 389. Check with the system administratorto ensure that the port number is not already in use.
19. In the SSL Port Number box, type the port number for the Secure Sockets Layer(SSL) that controls security when applications are communicating across thenetwork. The default port is 636. Check with the system administrator to ensure thatthe port number is not already in use.
20. Click Next.
21. On the Summary window, review and verify the information.
22. Click Install.
23. After the installation is complete, click Finish.
Installing the Security Framework Server software
Avaya Aura® Contact Center Installation May 2013 915
24. If prompted, restart the server.
Upgrading Java Runtime Environment, Java DevelopmentKit, and Apache Tomcat components using Third PartySoftware Upgrade Utility
Before you begin
• Apply Contact Center 6.3 Service Pack 10 or later on your system as an install-timepatch.
• Restart the Contact Center server to complete this procedure.
About this taskUse Third Party Software Upgrade Utility to automatically upgrade your Java RuntimeEnvironment and Tomcat software components. For more information, see Third PartySoftware Upgrade Utility on page 27.
Procedure
1. Log on to the server using the administrator account.
2. Navigate to the Avaya_Support\ProductUpdates folder.
3. Open the folder where you had saved the latest Service Pack.
4. Browse to ThirdParty\AACCThirdPartySoftwareUpgradeUtility.exe.
5. Double-click AACCThirdPartySoftwareUpgradeUtility.exe.
6. Click Upgrade.The system displays the “User Action Required” dialog box.
7. Click OK.
8. Click Yes to restart Contact Center and complete the upgrade.
Securing the Windows serverAbout this taskApply optional security measures to your operating system to further secure your server.
916 Avaya Aura® Contact Center Installation May 2013Comments? [email protected]
Important:Scanning software can degrade the performance and decrease the reliability of the system.Install virus scanning software only if the system connects to an exposed network or to theInternet.
Important:To maintain server performance, you must schedule virus scans during maintenanceperiods or low usage hours only.
Procedure
1. Harden the operating system using defined site procedures.
2. Install antivirus software. If you install antivirus software, Avaya recommends thatyou exclude some contact center files and folders from real-time and scheduledscans. For more information, and for a list of files and folders to exclude, see AvayaAura® Contact Center Planning and Engineering (NN44400-210).
Securing the Windows server
Avaya Aura® Contact Center Installation May 2013 917

918 Avaya Aura® Contact Center Installation May 2013Comments? [email protected]
Part VIII: Client Software Installation
Avaya Aura® Contact Center Installation May 2013 919

Client Software Installation
920 Avaya Aura® Contact Center Installation May 2013Comments? [email protected]

Chapter 31: Agent Desktop client softwareinstallation
This chapter describes how to install the Agent Desktop client software on each client computer in yourcontact center. The Agent Desktop enables agents to handle contacts of all media types enabled in yourcontact center from the start to the end of a contact. The Agent Desktop is part of the Avaya Aura® ContactCenter solution.
You install the Agent Desktop client application on the client computers. Download the client softwarefrom the server by accessing a Web location on the server.
You must complete the procedures in this section in sequential order.
Agent Desktop client software installation prerequisites• Install Voice and Multimedia Contact Server software or Multimedia Contact Server
software.
• Install one of the supported operating systems for Agent Desktop on the clientcomputer. The supported operating systems are as follows:
- Windows XP with Service Pack 2 (SP2) or later
- Windows 7
- Windows Vista
• Install Internet Explorer Release 7.0, 8.0, or 9.0.
• If the contact center PABX is not an Avaya Communication Server 1000, on the contactcenter domain create a Windows OU that contains all the agents’ desktopcomputers.
Avaya Aura® Contact Center Installation May 2013 921

Assigning a group policy for embedded softphonesettings
Before you begin
• This procedure does not apply to solutions using an Avaya Communication Server 1000.If you are using an Avaya Communication Server 1000, skip this procedure.
• You understand Windows group policy management.
Important:This procedure describes the steps to follow on Windows 2008 Server. If you are usingan earlier version of Windows for your domain controller, refer to the appropriateWindows documentation.
• You have created on the contact center domain a Windows OU that contains all thedesktop computers for the agents using Agent Desktop.
• You have copied the AAADSignalPort.ADM file from the <Install Drive>:\Avaya\ContactCenter\Multimedia Server\Common Utilities folder on the server where CCMM is installed,to a folder on the domain controller.
About this taskAssign the Group Policy administrative template with specific settings for Agent Desktop toyour Windows domain controller. You need to copy the administrative template file from theCCMM server to the Windows domain controller. You also need to add all the desktopcomputers for the agents using Agent Desktop to an organization unit (OU) on the contactcenter domain. This procedure requires a reboot of all the desktop computers for the agentsusing Agent Desktop.
Important:If agents do not have full registry read/write privileges you must apply this group policy.
Procedure
1. On the Windows domain controller, choose Start > Administrative Tools > GroupPolicy Management.
2. Right-click the OU to which you want to link the Group Policy administrativetemplate. This is the OU that contains the agents’ desktop computers.
3. Select Create a GPO in this domain, and Link it here.Windows displays the New GPO dialog.
4. In the Name box, type a name for the new GPO.
5. Click OK.
922 Avaya Aura® Contact Center Installation May 2013Comments? [email protected]
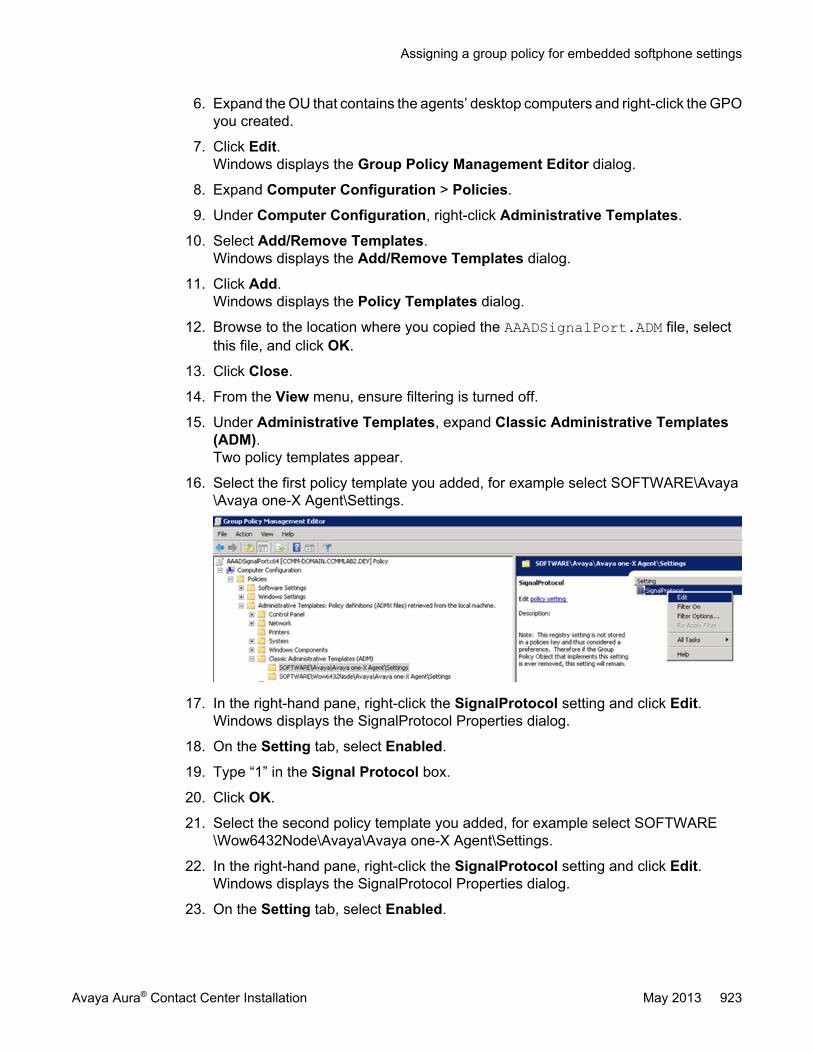
6. Expand the OU that contains the agents’ desktop computers and right-click the GPOyou created.
7. Click Edit.Windows displays the Group Policy Management Editor dialog.
8. Expand Computer Configuration > Policies.
9. Under Computer Configuration, right-click Administrative Templates.
10. Select Add/Remove Templates.Windows displays the Add/Remove Templates dialog.
11. Click Add.Windows displays the Policy Templates dialog.
12. Browse to the location where you copied the AAADSignalPort.ADM file, selectthis file, and click OK.
13. Click Close.
14. From the View menu, ensure filtering is turned off.
15. Under Administrative Templates, expand Classic Administrative Templates(ADM).Two policy templates appear.
16. Select the first policy template you added, for example select SOFTWARE\Avaya\Avaya one-X Agent\Settings.
17. In the right-hand pane, right-click the SignalProtocol setting and click Edit.Windows displays the SignalProtocol Properties dialog.
18. On the Setting tab, select Enabled.
19. Type “1” in the Signal Protocol box.
20. Click OK.
21. Select the second policy template you added, for example select SOFTWARE\Wow6432Node\Avaya\Avaya one-X Agent\Settings.
22. In the right-hand pane, right-click the SignalProtocol setting and click Edit.Windows displays the SignalProtocol Properties dialog.
23. On the Setting tab, select Enabled.
Assigning a group policy for embedded softphone settings
Avaya Aura® Contact Center Installation May 2013 923
24. Type “1” in the Signal Protocol box.
25. Click OK.
26. Exit the Group Policy Management Editor.
27. Ensure all agents restart their desktop computers before accessing the AgentDesktop application for the first time.
Installing the Agent Desktop client softwareAbout this taskInstall the Agent Desktop client software on each client computer for which an agent logs onto handle contacts using the softphone and multimedia toolbar.
Procedure
1. On the client computer, start Internet Explorer.
2. In the Address box, type http://<servername>/agentdesktop. Where servernameis the name of the server on which the Contact Center Multimedia server softwareis installed.
3. On the Agent Desktop page, click Install Prerequisites.The client downloads the .NET Framework and C++ software from the server andinstalls the application on the client.
4. Click Launch AAAD.
5. On the Application Install - Security Warning message box, click Install.
Installing the required services for Agent Desktop QoSsupport
Before you begin
• Download the AAADQoS.zip file from http://support.avaya.com. Unzip the file and save thecontents to a location on the client computer.
About this taskQuality of Service (QoS) allows for the prioritization of voice traffic over data traffic by taggingvoice packets with priority tags. This allows switches to differentiate between both and to favourvoice packets. This tagging is supported with the installation of an additional Windows service
924 Avaya Aura® Contact Center Installation May 2013Comments? [email protected]

(iClarityQOSService) on each client computer. The AAADQoS.zip file containsiClarityQOSService.
Agent Desktop supports QoS only when using the embedded softphone mode on the AvayaAura® Unified Communications platform. This procedure must be performed on each AgentDesktop client computer.
Note:Support for Agent Desktop QoS requires additional Avaya Aura® Communication Managerconfiguration. For more information, see Avaya Aura® Contact Center Configuration – AvayaAura® Unified Communications Platform Integration.
Procedure
1. Log on to the Agent Desktop client computer.
2. Open a command prompt by clicking Start > All Programs > Run. Type cmd andpress Enter.
3. Navigate to the location of the downloaded QoS files.
4. Type the following command and press Enter:QosServInst —I [systemfolder]
where, for example, systemfolder is C:\windows\system325. Type the following command and press Enter:
net start iClarityQOSService6. Close the command prompt window.
Registering Agent Desktop third-party headsetsBefore you begin
• Download the AAADHeadsetSupport.msi file from http://support.avaya.com. Save the file toa location on the client computer.
About this taskWhere Agent Desktop is deployed with an Avaya Aura® Communication Manager, you canuse Agent Desktop in embedded soft phone mode. While using Agent Desktop in embeddedsoft phone mode, you can perform telephony operations (for example, call answer or hold)using buttons on certain third-party headsets. If you want to use third-party headsets to performtelephony operations, you must install the required third-party software on the client computerand you must register the headset interface dll.
Avaya Aura® Contact Center includes an .msi file that performs this automatic registration. Thisprocedure describes how to install the required dll for Agent Desktop headset support.
Registering Agent Desktop third-party headsets
Avaya Aura® Contact Center Installation May 2013 925

Procedure
1. Navigate to the location of the downloaded AAADHeadsetSupport.msi file.
2. Double-click AAADHeadsetSupport.
3. Click Next.
4. Click Install.
5. After the installation completes, click Finish.
926 Avaya Aura® Contact Center Installation May 2013Comments? [email protected]

Chapter 32: Agent Desktop Displayssoftware installation
This chapter describes how to prepare and install the Agent Desktop Displays software on each client inyour Avaya Aura® Contact Center. The Agent Desktop Displays application provides real-time skillsetmonitoring on agent desktops for supervisors or contact center agents.
Prerequisites to Agent Desktop Displays softwareinstallation
• Install a Voice and Multimedia Contact Server or a Multimedia Contact Server with aVoice Contact Server.
• Ensure that you have administrative privileges on the client.
• Ensure that one of the supported operating systems for Agent Desktop Displays isinstalled on the client. The supported operating systems are as follows:
- Windows XP with Service Pack 2 (SP2) or later
- Windows Vista
- Windows 7
Installing Agent Desktop Display client softwareBefore you begin
• Configure a shared network directory on the Contact Center Manager Administrationserver.
• If you install Agent Desktop Displays on a Contact Center Manager Administration serverthat uses proxy settings for Internet Explorer, for Agent Desktop Displays to function,ensure that the proxy settings exception list includes the full computer name and IPaddress of the Contact Center Manager Administration server.
• The IP multicast addresses that you select for Real-time Statistics Multicast (RSM)sending and receiving must be within the 224.0.1.0 to 239.255.255.255 range. Ask yournetwork administrator for acceptable IP multicast addresses for your network.
Avaya Aura® Contact Center Installation May 2013 927

About this taskInstall Agent Desktop Display software to provide skillset monitoring to Contact CenterManager Server agents.
You can install both the standard English version and the multilanguage support version of theAgent Desktop Display client software.
Procedure
1. Log on to the client PC with administrator privileges.
2. Browse to the shared network directory on the Contact Center ManagerAdministration server at <install directory>: \Avaya\Contact Center\ManagerAdministration\Apps\ADD\ADD Client.ORInsert the Contact Center DVD into the DVD drive of the client PC and browse toInstall Software, CCMA, Agent Desktop Displays Client.
3. Double-click setup.exe.
4. In the Agent Desktop Displays - InstallShield Wizard dialog box, from the list,select the language in which to install Agent Desktop Display.
5. Click OK.
6. In the Welcome to the InstallShield Wizard for Agent Desktop Displays dialogbox, click Next.
7. In the Customer Information dialog box, in the User name box, type a username.
8. In the Organization name box, type your company name.
9. Select Anyone who uses this computer (all users).
10. Click Next.
11. In the Setup Type dialog box, select Complete to install all Agent Desktop Displaycomponents in the default directory.
12. Click Next.
13. In the Ready to Install the Program dialog box, click Install.
14. If a Files in Use dialog box appears, click Retry.
15. In the Server Configuration dialog box, in Contact Center ManagerAdministration: Active box, type the IP address or host name of the active ContactCenter Manager Administration server.
16. In the Active Port box, type the port number for the active Contact Center ManagerAdministration server.
17. In the Contact Center Manager Server: Active box, type the IP address or hostname of the active Contact Center Manager Server.
928 Avaya Aura® Contact Center Installation May 2013Comments? [email protected]

18. If you install a standby Contact Center Manager Administration server, in theContact Center Manager Administration: Standby box, type the IP address orhost name of the standby Contact Center Manager Administration server.
19. In the Standby Port box, type the port number for the standby Contact CenterManager Administration server.
20. If you install a standby Contact Center Manager Server, in the Contact CenterManager Server: Standby box, type the IP address or host name of the standbyContact Center Manager Server.
21. Select the Active Contact Center Manager Administration server check box.
22. Select the Active Contact Center Manager Server server check box.
23. Click Save.
24. In the InstallShield Wizard Completed dialog box, click Finish.
Installing Windows update KB917607Before you begin
• Install Windows Vista.• Open www.microsoft.com.
About this taskIf you install Windows Vista on the client, users cannot view online help for Agent DesktopDisplays. To view online help, you must download and install Windows update KB917607 oneach client. This update includes the WinHlp32.exe file, which is required to view WinHelp helpfiles, such as Agent Desktop Display online Help.
Procedure
1. On the Microsoft Web site, search for the file KB917607.
2. In the list of search results, browse to and click the download link.
3. Follow the download and install instructions.
Installing Windows update KB917607
Avaya Aura® Contact Center Installation May 2013 929

930 Avaya Aura® Contact Center Installation May 2013Comments? [email protected]

Chapter 33: Orchestration Designer clientsoftware installation
This chapter describes how to install the Orchestration Designer software on a client computer so thatyou can create flows for routing voice and multimedia contacts in an offline mode to minimize disruptionwithin your Avaya Aura® Contact Center.
The Orchestration Designer software is also installed on the Voice and Multimedia Contact Server, or onthe Voice Contact Server, and you can use an offline mode to create scripts.
Job aid: Installation timeThe estimated time to install the Orchestration Designer client software is 30 minutes. Thistime can vary depending on the server, network infrastructure, and your confidence level withthe software. This installation time is based on installing a server that meets the minimumspecification for this function.
Installing the Orchestration Designer client softwareBefore you begin
• Ensure that you have enough free disk space on the C drive. See Avaya Aura® ContactCenter Planning and Engineering (NN44400-210).
About this taskInstall the Orchestration Designer software on a client to allow your administrator to createscripts for routing calls offline. You can then import the new scripts into your contact centerwhen the new scripts are tested and validated.
Procedure
1. From the client computer, log on to Contact Center Manager Administration.
2. On the Launchpad, click Scripting.
3. Select Orchestration Designer > Launch Orchestration Designer.Install any additional software, if a window opens with an installation request.A VBScript window opens.
Avaya Aura® Contact Center Installation May 2013 931

4. Click OK.
5. Click Run.Follow the on-screen instructions to complete the Orchestration Designer clientsoftware install.
932 Avaya Aura® Contact Center Installation May 2013Comments? [email protected]

Chapter 34: Avaya Communication Server1000 Data Extraction Toolinstallation
This chapter describes how to install the Avaya Aura® Contact Center Avaya Communication Server 1000Data Extraction Tool software. The CS 1000 Data Extraction Tool is a software application that extractsinformation about resources such as Terminal Numbers (TNs), voice ports, Controlled Directory Numbers(CDNs), Interactive Voice Response Automatic Call Distribution DNs (IVR ACD-DNs), and routes froman Avaya Communication Server 1000 PABX. The tool saves this information in Excel spreadsheets.
You can install the Avaya Communication Server 1000 Data Extraction Tool on a client PC or on theContact Center Manager Administration server.
Avaya Communication Server 1000 Data Extraction Toolsoftware installation prerequisites
• Ensure that your client computer meet all requirements. For more information, seeAvaya Aura® Contact Center Planning and Engineering (NN44400-210).
• Install Microsoft Excel 97 or later on the client computer.
Job aid: Installation timeThe estimated time to install the Avaya Communication Server 1000 Data Extraction Toolsoftware is 15 minutes. This time can vary depending on the server, network infrastructure,and your confidence level with the software. This installation time is based on installing a serverthat meets the minimum specification for this function.
Avaya Aura® Contact Center Installation May 2013 933

Installing the Avaya Communication Server 1000 DataExtraction Tool software
About this taskInstall the Avaya Communication Server 1000 Data Extraction Tool to allow an administratorto extract information about resources such as Terminal Numbers (TNs), voice ports,Controlled Directory Numbers (CDNs), Interactive Voice Response Automatic Call DistributionDNs (IVR ACD-DNs), and routes from the Avaya Communication Server 1000.
Procedure
1. Insert the Contact Center DVD into the DVD drive and browse to InstallSoftware, CCMA, CS1000 Data Extraction Tool.
2. Double-click CS1000 Data Extraction Tool.msi.
3. On the Welcome dialog box, click Next.
4. On the Destination Folder dialog box, click Next to accept the default folder forthe Avaya Communication Server 1000 Data Extraction Tool.ORClick Change to choose a new location.
5. On the Ready to Install the Program dialog box, click Install.
6. On the InstallShield Wizard Completed dialog box, click Finish.
934 Avaya Aura® Contact Center Installation May 2013Comments? [email protected]

Chapter 35: Client software installation in aCitrix deployment
This chapter describes how to configure and publish Avaya Aura® Contact Center software applicationsin a Citrix deployment.
Client software installation prerequisites• Install the required Contact Center server software.• Ensure that you have administrative privileges on the client.• Install one of the supported operating systems on the client computer. The supported
operating systems are as follows:- Windows XP with Service Pack 2 (SP2) or later- Windows 7- Windows Vista
• Install Internet Explorer Release 7.0, 8.0, or 9.0.• If the contact center PABX is not an Avaya Communication Server 1000, on the contact
center domain create a Windows OU that contains all the agents’ desktopcomputers.
Publishing Agent Desktop client software on a Citrixserver
Before you begin
• Install Avaya Aura® Agent Desktop on the Voice and Multimedia Contact Server or theMultimedia Contact Server.
• Copy the Agent Desktop client folder from the server where Agent Desktop is installed toa location on the Citrix server. The folder is located on the server at: D:\Avaya\ContactCenter\Multimedia Server\Agent Desktop\client
About this taskYou can launch Agent Desktop client software on a client computer using a Citrix server. Youmust configure your Citrix server to publish AAAD as a published application before you can
Avaya Aura® Contact Center Installation May 2013 935

launch Agent Desktop software on client computers. Publish Agent Desktop client software ona Citrix Server by following the procedure below.
Note:The following example uses Citrix XenApp 6.5.
Procedure
1. On your Citrix server, open Citrix AppCenter.
2. In the left pane, right-click Applications and click Publish Application.
3. On the Name window, in the Display name box, type a name for the new publishedapplication. For example, type aaad.
4. In the Application description box, type a description for the new publishedapplication.
5. Click Next.
6. On the Type window, under Application type, select Accessed from a server.
7. Click Next.
8. On the Location window, click Browse.
9. Navigate to the location on the Citrix server where the Agent Desktop client folderis stored.
936 Avaya Aura® Contact Center Installation May 2013Comments? [email protected]

10. Select the CCAD.exe file and click OK.
11. Click Next.
12. On the Servers window, click Add.
13. On the Select Servers dialog box, select the Citrix server used to execute the AAADapplication and click Add.
14. Click OK.
15. Click Next.
16. On the Users window, click Add.
17. On the Select Users or Groups dialog box, select the users allowed to executethe published application. For example, select your Contact Center agents and clickAdd.
Publishing Agent Desktop client software on a Citrix server
Avaya Aura® Contact Center Installation May 2013 937

18. Click OK.
19. Click Next.
20. On the Shortcut presentation window you can select from a number of shortcutoptions for display on the browser.
Note:The AAAD icon appears by default as an icon. You can also choose to create aclient application folder on each client computer that contains all publishedapplications, or add shortcuts to the client’s Start menu or desktop.
938 Avaya Aura® Contact Center Installation May 2013Comments? [email protected]
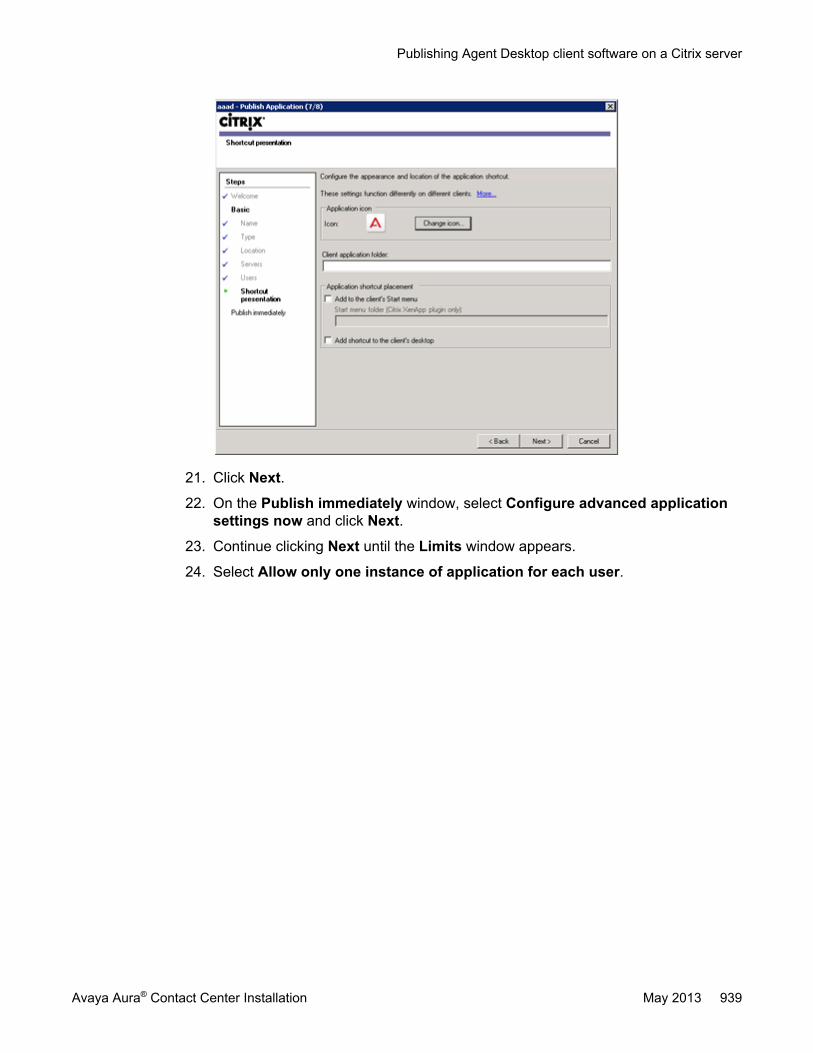
21. Click Next.
22. On the Publish immediately window, select Configure advanced applicationsettings now and click Next.
23. Continue clicking Next until the Limits window appears.
24. Select Allow only one instance of application for each user.
Publishing Agent Desktop client software on a Citrix server
Avaya Aura® Contact Center Installation May 2013 939

25. Click Next.
26. Click Finish.
27. On the client computer, agents can now launch Agent Desktop using one of theconfigured shortcuts.
Publishing Contact Center Manager Administration on aCitrix server as content
Before you begin
• Install a Voice and Multimedia Contact Server or Voice Contact Server.
About this taskYou can access the Contact Center Manager Administration application on a client computerusing a Citrix server. You must configure your Citrix server to publish CCMA as publishedcontent.
Procedure
1. On your Citrix server, open Citrix AppCenter.
940 Avaya Aura® Contact Center Installation May 2013Comments? [email protected]
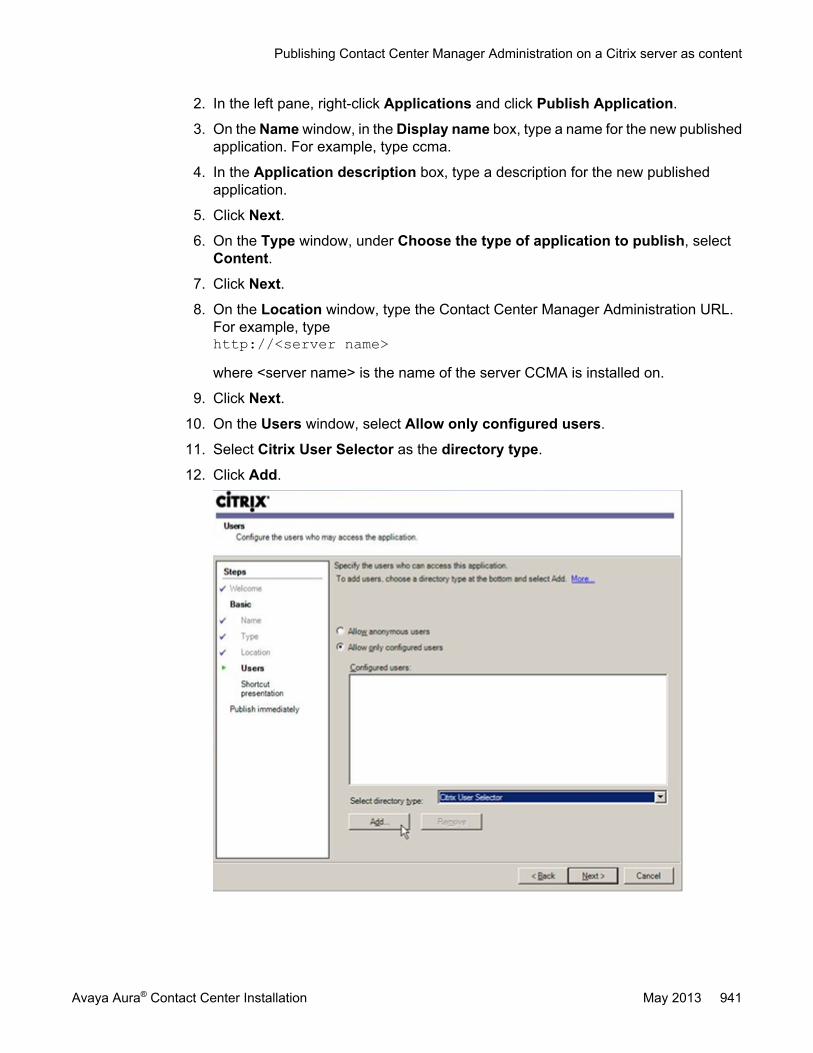
2. In the left pane, right-click Applications and click Publish Application.
3. On the Name window, in the Display name box, type a name for the new publishedapplication. For example, type ccma.
4. In the Application description box, type a description for the new publishedapplication.
5. Click Next.
6. On the Type window, under Choose the type of application to publish, selectContent.
7. Click Next.
8. On the Location window, type the Contact Center Manager Administration URL.For example, typehttp://<server name>where <server name> is the name of the server CCMA is installed on.
9. Click Next.
10. On the Users window, select Allow only configured users.
11. Select Citrix User Selector as the directory type.
12. Click Add.
Publishing Contact Center Manager Administration on a Citrix server as content
Avaya Aura® Contact Center Installation May 2013 941

13. On the Select Users or Groups dialog box, select the users allowed to executethe published application. For example, select your Contact Center administratorsand click Add.
14. Click OK.
15. Click Next.
16. Click Next.
17. Click Finish.
18. On the client computer, authorized users can now access CCMA using the Citrixclient.
Publishing Contact Center Manager Administration on aCitrix server as an installed application
Before you begin
• Install a Voice and Multimedia Contact Server or Voice Contact Server.
About this taskYou can access the Contact Center Manager Administration application on a client computerusing a Citrix server. You must configure your Citrix server to publish CCMA as an installedapplication.
Procedure
1. On your Citrix server, open Citrix AppCenter.
2. In the left pane, right-click Applications and click Publish Application.
3. On the Name window, in the Display name box, type a name for the new publishedapplication. For example, type ccma.
4. In the Application description box, type a description for the new publishedapplication.
5. Click Next.
6. On the Type window, under Choose the type of application to publish, selectApplication.
7. Under Application Type, select Accessed from a server.
942 Avaya Aura® Contact Center Installation May 2013Comments? [email protected]

8. Click Next.
9. On the Location window, click Browse.
10. Navigate to the location on the Citrix server of the Internet Explorer executable. Forexample, navigate to C:\Program Files (x86)\Internet Explorer\iexplore.exe.
11. Ensure the location appears within quotation marks, and type the Contact CenterManager Administration URL after the location. For example, type“C:\Program Files (x86)\Internet Explorer\iexplore.exe”http://<server name>where <server name> is the name of the server CCMA is installed on.
12. Click Next.
13. On the Servers window, click Add.
14. On the Select Servers dialog box, select the Citrix server used to execute theCCMA application and click Add.
15. Click OK.
16. Click Next.
17. Click Next.
18. On the Users window, select Allow only configured users.
19. Select Citrix User Selector as the directory type.
Publishing Contact Center Manager Administration on a Citrix server as an installed application
Avaya Aura® Contact Center Installation May 2013 943
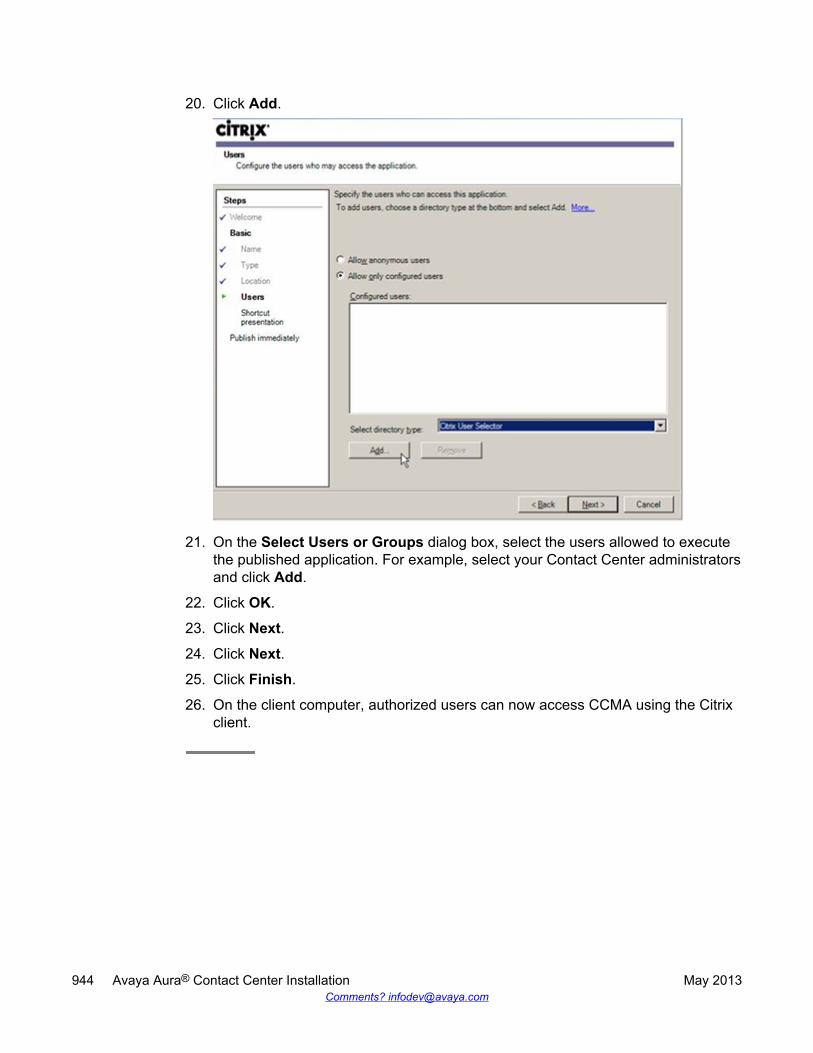
20. Click Add.
21. On the Select Users or Groups dialog box, select the users allowed to executethe published application. For example, select your Contact Center administratorsand click Add.
22. Click OK.
23. Click Next.
24. Click Next.
25. Click Finish.
26. On the client computer, authorized users can now access CCMA using the Citrixclient.
944 Avaya Aura® Contact Center Installation May 2013Comments? [email protected]

Publishing Agent Desktop Displays client software on aCitrix server
Before you begin
• Install Agent Desktop Displays (ADD) client software on the Citrix server. The Agent DesktopDisplays client folder is located on the server where CCMA is installed at D:\Avaya\Contact Centre\Manager Administration\Apps\ADD. For more information, seeInstalling Display client software on page 927.
About this taskYou can launch Agent Desktop Displays client software on a client computer using a Citrixserver. You must configure your Citrix server to publish ADD as a published application beforeyou can launch Agent Desktop Displays software on client computers. Publish Agent DesktopDisplays client software on a Citrix Server by following the procedure below.
Note:The following example uses Citrix XenApp 6.5.
Procedure
1. On your Citrix server, open Citrix AppCenter.
2. In the left pane, right-click Applications and click Publish Application.
3. On the Name window, in the Display name box, type a name for the new publishedapplication. For example, type ADD.
4. In the Application description box, type a description for the new publishedapplication.
5. Click Next.
6. On the Type window, under Application type, select Accessed from a server.
Publishing Agent Desktop Displays client software on a Citrix server
Avaya Aura® Contact Center Installation May 2013 945

7. Click Next.
8. On the Location window, click Browse.
9. Navigate to the location on the Citrix server where Agent Desktop Displays isinstalled, for example C:\Program Files (x86)\Avaya\ADD\.
10. Select the ADDTabular.exe file and click OK.
11. Click Next.
12. On the Servers window, click Add.
13. On the Select Servers dialog box, select the Citrix server used to execute the ADDapplication and click Add.
14. Click OK.
15. Click Next.
16. On the Users window, click Add.
17. On the Select Users or Groups dialog box, select the users allowed to executethe published application. For example, select your Contact Center administratorsand click Add.
18. Click OK.
19. Click Next.
20. Click Next.
946 Avaya Aura® Contact Center Installation May 2013Comments? [email protected]

21. On the Publish immediately window, select Configure advanced applicationsettings now and click Next.
22. Continue clicking Next until the Limits window appears.
23. Select Allow only one instance of application for each user.
24. Click Next.
25. Click Finish.
26. On the client computer, authorized users can now launch Agent Desktop Displaysusing the Citrix client.
Publishing Agent Desktop Displays client software on a Citrix server
Avaya Aura® Contact Center Installation May 2013 947

948 Avaya Aura® Contact Center Installation May 2013Comments? [email protected]

Part IX: Software Uninstall
Avaya Aura® Contact Center Installation May 2013 949
Chapter 36: Server software uninstallation
Remove any Avaya Aura® Contact Center Release 6.3 server software from your server to prepare tomove the software component to another network server.
Caution:Before you uninstall an Avaya Aura® Contact Center application, backup that application's database.Avaya recommends that you backup application databases to a remote secure network location.
Prerequisites for server software uninstallation• Ensure that you have the uninstaller on the server or that you have the Contact Center
Release 6.3 server installation DVD in the DVD drive.
Removing the server software patchesBefore you begin
• Ensure that you know the most recent patch.
About this taskRemove the most recent patches to ensure that you have your base software remaining toremove.
Procedure
1. On the server, click Start > All Programs > Avaya > Common Utilities > ContactCenter Patch Manager.
2. On the Avaya Aura Update Manager dialog box, select the All Updates tab.
3. Click Select all.
4. Click Remove Selected Updates.
5. Click Remove.
6. Click Close.
Avaya Aura® Contact Center Installation May 2013 951

7. Restart the server.
Removing the server softwareBefore you begin
• Remove all patches for the server software you want to remove.• To maintain the database, ensure that you back up the database to another network
location.
About this taskRemove all or parts of the server software to remove the software applications andcorresponding databases from the server.
You can remove the server software with the un-installer on the server or with the setup.exefile on your Contact Center Release 6.3 DVD.
The installation for CCMA includes AD-LDS software. The CCMA un-installation does not fullyremove AD-LDS. Removing AD-LDS can cause the operating system to malfunction. To un-install AD-LDS software, see Avaya Aura® Contact Center Troubleshooting (NN44400-712).However, un-installing CCMA removes the AD-LDS CCMA Instance (CCMA data store).
Procedure
1. Click Start > All Programs > Avaya > Contact Center > Uninstall ContactCenter.
2. On the Welcome window, click Next.
3. On the Remove Selection window, select Remove ALL Server Software.
4. Click Remove.
5. Confirm the software applications to remove.
6. Click Remove.
7. After the installation is complete, click Finish.
8. If you are prompted, restart the server.
952 Avaya Aura® Contact Center Installation May 2013Comments? [email protected]
Removing the Avaya Media Server softwareBefore you begin
• To maintain the database, ensure that you back up the database to another networklocation.
About this taskTo increase the number of active agents in your contact center solution, or to support HighAvailability, remove the co-resident Avaya Media Server software from this server. If youremove the co-resident Avaya Media Server software, and if your contact center solutionsupports voice contacts, you must install one or more standalone Avaya Media Server Linux-based servers in this solution.
Procedure
1. Click Start > All Programs > Avaya > Contact Center > Uninstall ContactCenter.
2. On the Welcome window, click Next.
3. On the Remove Selection window, select Remove Avaya Media ServerSoftware.
4. Click Remove.
5. Confirm the software applications to remove.
6. Click Remove.
7. After the installation is complete, click Finish.
8. If you are prompted, restart the server.
Removing the Multimedia Contact Server softwareBefore you begin
• To maintain the database, ensure that you back up the database to another networklocation.
About this taskTo increase the number of active agents in your contact center solution, backup the Multimediadatabase and then remove the co-resident Multimedia Contact Server software from this
Removing the Avaya Media Server software
Avaya Aura® Contact Center Installation May 2013 953

server. If you remove the co-resident Multimedia Contact Server software, you must install astandalone Multimedia Contact Server Only server in this solution.
Procedure
1. Click Start > All Programs > Avaya > Contact Center > Uninstall ContactCenter.
2. On the Welcome window, click Next.
3. On the Remove Selection window, select Remove Multimedia Contact ServerSoftware.
4. Click Remove.
5. Confirm the software applications to remove.
6. Click Remove.
7. After the installation is complete, click Finish.
8. If you are prompted, restart the server.
954 Avaya Aura® Contact Center Installation May 2013Comments? [email protected]
Chapter 37: Client Software uninstallation
Remove any Avaya Aura® Contact Center Release 6.3 client software from your client computer. In HighAvailability solutions, you must uninstall the Agent Desktop client software downloaded directly from theoriginal server. You must then install the Agent Desktop client software from the Managed IP or ManagedName of the Voice and Multimedia Contact Server or the Multimedia Contact Server HA pair.
Removing the Agent Desktop client softwareAbout this taskRemove Agent Desktop client software from a client computer. The software uninstall iscompleted using the Windows Control Panel.
Note:This example procedure is performed on a Windows 7 client.
Procedure
1. Log on to the Agent Desktop client computer.
2. Click the Start icon and select Control Panel.
3. Under Programs, click Uninstall a program.
4. From the Name list, select Avaya Aura Agent Desktop 6.0 and click Uninstall/Change.
5. On the Avaya Aura Agent Desktop 6.0 Maintenance box, ensure Remove theapplication from this computer is selected and click OK.
Removing the Agent Desktop Displays softwareAbout this taskRemove Agent Desktop Displays software from a client computer. The software uninstall iscompleted using the Windows Control Panel.
Note:This example procedure is performed on a Windows 7 client.
Avaya Aura® Contact Center Installation May 2013 955
Procedure
1. Log on to the client computer.
2. Click the Start icon and select Control Panel.
3. Under Programs, click Uninstall a program.
4. From the Name list, select Agent Desktop Displays and click Uninstall.
5. Click Yes.
Removing the Orchestration Designer client softwareAbout this taskRemove Orchestration Designer software from a client computer. The software uninstall iscompleted using the Windows Control Panel.
Important:Local data is preserved in Orchestration Designer after the Orchestration Designer softwareis removed. If you reinstall Orchestration Designer software on the client computer, yourprevious local data is available.
Note:This example procedure is performed on a Windows 7 client.
Procedure
1. Log on to the client computer.
2. Click the Start icon and select Control Panel.
3. Under Programs, click Uninstall a program.
4. From the Name list, select Orchestration Designer - Contact Center Client andclick Uninstall.
5. Click Yes.
956 Avaya Aura® Contact Center Installation May 2013Comments? [email protected]
Uninstalling the required services for Agent Desktop QoSsupport
About this taskUninstall the Windows service (iClarityQOSService) required for Agent Desktop QoS on theclient computer. This procedure is similar to the installation procedure.
Procedure
1. Log on to the Agent Desktop client computer.
2. Open a command prompt by clicking Start > All Programs > Run. Type cmd andpress Enter.
3. Navigate to the location of the downloaded QoS files.
4. Type the following command and press Enter:QosServInst —u
5. Close the command prompt window.
Uninstalling the required services for Agent Desktop QoS support
Avaya Aura® Contact Center Installation May 2013 957

958 Avaya Aura® Contact Center Installation May 2013Comments? [email protected]

Chapter 38: Avaya Media Serveruninstallation on Linux
This chapter describes how to uninstall Avaya Media Server software on Linux.
Uninstalling Avaya Media Server on LinuxAbout this taskPerform the following procedure to uninstall Avaya Media Server on Linux.
Procedure
1. Log in as the root user.
2. Run the ContactCenterServicesForAMS uninstaller by using the followingcommands:cd /opt/avaya./UninstallContactCenterServicesForAMS
3. Run the Avaya Media Server uninstaller by using the following commands:cd /opt/avaya/UninstallMediaServer./UninstallMediaServer
4. Follow the on-screen directions to continue with the uninstall and select whether ornot any data or configuration settings are to be saved.
Avaya Aura® Contact Center Installation May 2013 959

960 Avaya Aura® Contact Center Installation May 2013Comments? [email protected]
Appendix A: Free open source softwarelicensing
Avaya Aura® Contact Center contains a number of open source software packages, which are embeddedand delivered as part of the installation. This appendix lists the suppliers of these packages and theassociated public licenses for their distribution and use.
TAOCopyright and Licensing Information for ACE, TAO, CIAO, and CoSMIC
ACE, TAO, CIAO, and CoSMIC (henceforth referred to as “DOC software” are copyrighted byDouglas C. Schmidt and his research group at Washington University, University of California,Irvine, and Vanderbilt University, Copyright (c) 1983–2008, all rights reserved. Since DOCsoftware is open source, freely available software, you are free to use, modify, copy, anddistribute—perpetually and irrevocably—the DOC software source code and object codeproduced from the source, as well as copy and distribute modified versions of this software.You must, however, include this copyright statement along with any code built using DOCsoftware that you release. No copyright statement needs to be provided if you just ship binaryexecutables of your software products.
You can use DOC software in commercial and/or binary software releases and are under noobligation to redistribute any of your source code that is built using DOC software. Note,however, that you may not do anything to the DOC software code, such as copyrighting ityourself or claiming authorship of the DOC software code, that will prevent DOC software frombeing distributed freely using an open-source development model. You needn’t inform anyonethat you’re using DOC software in your software, though we encourage you to let us know([email protected]) so we can promote your project in the DOC software successstories.
The ACE, TAO, CIAO, and CoSMIC Web sites are maintained by the DOC Group at theInstitute for Software Integrated Systems (ISIS) and the Center for Distributed ObjectComputing of Washington University, St. Louis for the development of open-source softwareas part of the open-source software community. Submissions are provided by the submitter“as is” with no warranties whatsoever, including any warranty of merchantability,noninfringement of third party intellectual property, or fitness for any particular purpose. In noevent shall the submitter be liable for any direct, indirect, special, exemplary, punitive, orconsequential damages, including without limitation, lost profits, even if advised of thepossibility of such damages. Likewise, DOC software is provided as is with no warranties ofany kind, including the warranties of design, merchantability, and fitness for a particularpurpose, noninfringement, or arising from a course of dealing, usage or trade practice.Washington University, UC Irvine, Vanderbilt University, their employees, and students shall
Avaya Aura® Contact Center Installation May 2013 961

have no liability with respect to the infringement of copyrights, trade secrets or any patents byDOC software or any part thereof. Moreover, in no event will Washington University, UC Irvine,or Vanderbilt University, their employees, or students be liable for any lost revenue or profitsor other special, indirect and consequential damages.
DOC software is provided with no support and without any obligation on the part of WashingtonUniversity, UC Irvine, Vanderbilt University, their employees, or students to assist in its use,correction, modification, or enhancement. A number of companies around the world providecommercial support for DOC software, however. DOC software is Y2K-compliant, as long asthe underlying OS platform is Y2K-compliant. Likewise, DOC software is compliant with thenew US daylight savings rule passed by Congress as “The Energy Policy Act of 2005”, whichestablished new daylight savings times (DST) rules for the United States that expand DST asof March 2007. Since DOC software obtains time/date and calendaring information fromoperating systems, users will not be affected by the new DST rules as long as they upgradetheir operating systems accordingly.
The names ACE, TAO, CIAO, CoSMIC, Washington University, UC Irvine, and VanderbiltUniversity, may not be used to endorse or promote products or services derived from thissource without express written permission from Washington University, UC Irvine, orVanderbilt University. This license grants no permission to call products or services derivedfrom this source ACE, TAO, CIAO, or CoSMIC, nor does it grant permission for the nameWashington University, UC Irvine, or Vanderbilt University to appear in their names. If you haveany suggestions, additions, comments, or questions, please let me know([email protected]).
Douglas C. Schmidt
ApacheApache License, Version 2.0
Apache License
Version 2.0, January 2004
http://www.apache.org/licenses/
TERMS AND CONDITIONS FOR USE, REPRODUCTION, AND DISTRIBUTION
1. Definitions.
“License” shall mean the terms and conditions for use, reproduction, and distribution as definedby Sections 1 through 9 of this document.
“Licensor” shall mean the copyright owner or entity authorized by the copyright owner that isgranting the License.
“Legal Entity” shall mean the union of the acting entity and all other entities that control, arecontrolled by, or are under common control with that entity. For the purposes of this definition,“control” means (i) the power, direct or indirect, to cause the direction or management of such
Free open source software licensing
962 Avaya Aura® Contact Center Installation May 2013Comments? [email protected]

entity, whether by contract or otherwise, or (ii) ownership of fifty percent (50%) or more of theoutstanding shares, or (iii) beneficial ownership of such entity.
“You” (or “Your”) shall mean an individual or Legal Entity exercising permissions granted bythis License.
“Source” form shall mean the preferred form for making modifications, including but not limitedto software source code, documentation source, and configuration files.
“Object” form shall mean any form resulting from mechanical transformation or translation ofa Source form, including but not limited to compiled object code, generated documentation,and conversions to other media types.
“Work” shall mean the work of authorship, whether in Source or Object form, made availableunder the License, as indicated by a copyright notice that is included in or attached to the work(an example is provided in the Appendix below).
“Derivative Works” shall mean any work, whether in Source or Object form, that is based on(or derived from) the Work and for which the editorial revisions, annotations, elaborations, orother modifications represent, as a whole, an original work of authorship. For the purposes ofthis License, Derivative Works shall not include works that remain separable from, or merelylink (or bind by name) to the interfaces of, the Work and Derivative Works thereof.
“Contribution” shall mean any work of authorship, including the original version of the Workand any modifications or additions to that Work or Derivative Works thereof, that is intentionallysubmitted to Licensor for inclusion in the Work by the copyright owner or by an individual orLegal Entity authorized to submit on behalf of the copyright owner. For the purposes of thisdefinition, “submitted” means any form of electronic, verbal, or written communication sent tothe Licensor or its representatives, including but not limited to communication on electronicmailing lists, source code control systems, and issue-tracking systems that are managed by,or on behalf of, the Licensor for the purpose of discussing and improving the Work, butexcluding communication that is conspicuously marked or otherwise designated in writing bythe copyright owner as “Not a Contribution.”
“Contributor” shall mean Licensor and any individual or Legal Entity on behalf of whom aContribution has been received by Licensor and subsequently incorporated within the Work.
2. Grant of Copyright License.
Subject to the terms and conditions of this License, each Contributor hereby grants to You aperpetual, worldwide, non-exclusive, no-charge, royalty-free, irrevocable copyright license toreproduce, prepare Derivative Works of, publicly display, publicly perform, sublicense, anddistribute the Work and such Derivative Works in Source or Object form.
3. Grant of Patent License.
Subject to the terms and conditions of this License, each Contributor hereby grants to You aperpetual, worldwide, non-exclusive, no-charge, royalty-free, irrevocable (except as stated inthis section) patent license to make, have made, use, offer to sell import, and otherwise transferthe Work, where such license applies only to those patent claims licensable by such Contributorthat are necessarily infringed by their Contribution(s) alone or by combination of theirContribution(s) with the Work to which such Contribution(s) was submitted. If You institutepatent litigation against any entity (including a cross-claim or counterclaim in a lawsuit) allegingthat the Work or a Contribution incorporated within the Work constitutes direct or contributory
Apache
Avaya Aura® Contact Center Installation May 2013 963

patent infringement, then any patent licenses granted to You under this License for that Workshall terminate as of the date such litigation is filed.
4. Redistribution.
You may reproduce and distribute copies of the Work or Derivative Works thereof in anymedium, with or without modifications, and in Source or Object form, provided that You meetthe following conditions:
You must give any other recipients of the Work or Derivative Works a copy of this License, and
You must cause any modified files to carry prominent notices stating that you changed the filesand
You must retain, in the Source form of any Derivative Works that You distribute, all copyright,patent, trademark, and attribution notices from the Source form of the Work, excluding thosenotices that do not pertain to any part of the Derivative Works, and
If the Work includes a “NOTICE” text file as part of its distribution, then any Derivative Worksthat You distribute must include a readable copy of the attribution notices contained within suchNOTICE file, excluding those notices that do not pertain to any part of the Derivative Works,in at least one of the following places: within a NOTICE text file distributed as part of theDerivative Works, within the Source form or documentation, if provided along with theDerivative Works, or within a display generated by the Derivative Works, if and wherever suchthird-party notices normally appear. The contents of the NOTICE file are for informationalpurposes only and do not modify the License. You may add Your own attribution notices withinthe Derivative Works that You distribute, alongside or as an addendum to the NOTICE textfrom the Work, provided that such additional attribution notices cannot be construed asmodifying the License.
You may add Your own copyright statement to Your modifications and may provide additionalor different license terms and conditions for use, reproduction, or distribution of Yourmodifications, or for any such Derivative Works as a whole, provided Your use, reproduction,and distribution of the Work otherwise complies with the conditions stated in this License.
5. Submission of Contributions.
Unless You explicitly state otherwise, any Contribution intentionally submitted for inclusion inthe Work by You to the Licensor shall be under the terms and conditions of this License, withoutany additional terms or conditions. Notwithstanding the above, nothing herein shall supersedeor modify the terms of any separate license agreement you may have executed with Licensorregarding such Contributions.
6. Trademarks.
This License does not grant permission to use the trade names, trademarks, service marks,or product names of the Licensor, except as required for reasonable and customary use indescribing the origin of the Work and reproducing the content of the NOTICE file.
7. Disclaimer of Warranty.
Unless required by applicable law or agreed to in writing, Licensor provides the Work (andeach Contributor provides its Contributions) on an “AS IS” BASIS, WITHOUT WARRANTIESOR CONDITIONS OF ANY KIND, either express or implied, including, without limitation, anywarranties or conditions of TITLE, NON-INFRINGEMENT, MERCHANTABILITY, or FITNESS
Free open source software licensing
964 Avaya Aura® Contact Center Installation May 2013Comments? [email protected]

FOR A PARTICULAR PURPOSE. You are solely responsible for determining theappropriateness of using or redistributing the Work and assume any risks associated with Yourexercise of permissions under this License.
8. Limitation of Liability.
In no event and under no legal theory, whether in tort (including negligence), contract, orotherwise, unless required by applicable law (such as deliberate and grossly negligent acts)or agreed to in writing, shall any Contributor be liable to You for damages, including any direct,indirect, special, incidental, or consequential damages of any character arising as a result ofthis License or out of the use or inability to use the Work (including but not limited to damagesfor loss of goodwill, work stoppage, computer failure or malfunction, or any and all othercommercial damages or losses), even if such Contributor has been advised of the possibilityof such damages.
9. Accepting Warranty or Additional Liability.
While redistributing the Work or Derivative Works thereof, You may choose to offer and chargea fee for, acceptance of support, warranty, indemnity, or other liability obligations and/or rightsconsistent with this License. However, in accepting such obligations, You may act only on Yourown behalf and on Your sole responsibility, not on behalf of any other Contributor, and only ifYou agree to indemnify, defend, and hold each Contributor harmless for any liability incurredby, or claims asserted against, such Contributor by reason of your accepting any such warrantyor additional liability.
END OF TERMS AND CONDITIONS
How to apply the Apache License to your workTo apply the Apache License to your work, attach the following boilerplate notice, with the fieldsenclosed by brackets “[]” replaced with your own identifying information. (Don’t include thebrackets!) The text should be enclosed in the appropriate comment syntax for the file format.We also recommend that a file or class name and description of purpose be included on thesame “printed page” as the copyright notice for easier identification within third-partyarchives.
Copyright [yyyy] [name of copyright owner]
Licensed under the Apache License, Version 2.0 (the “License”); you may not use this fileexcept in compliance with the License.
You may obtain a copy of the License at www.apache.org.
Unless required by applicable law or agreed to in writing, software distributed under the Licenseis distributed on an “AS IS” BASIS, WITHOUT WARRANTIES OR CONDITIONS OF ANYKIND, either express or implied.
See the License for the specific language governing permissions and limitations under theLicense.
Apache
Avaya Aura® Contact Center Installation May 2013 965
EclipseEclipse Public License -v 1.0
THE ACCOMPANYING PROGRAM IS PROVIDED UNDER THE TERMS OF THIS ECLIPSEPUBLIC LICENSE (“AGREEMENT”) ANY USE, REPRODUCTION OR DISTRIBUTION OFTHE PROGRAM CONSTITUTES RECIPIENT’S ACCEPTANCE OF THIS AGREEMENT.
1. DEFINITIONS
“Contribution” means:
a) in the case of the initial Contributor, the initial code and documentation distributed underthis Agreement, and
b) in the case of each subsequent Contributor:
i) changes to the Program, and
ii) additions to the Program;
where such changes and/or additions to the Program originate from and are distributed by thatparticular Contributor. A Contribution ‘originates’ from a Contributor if it was added to theProgram by such Contributor itself or anyone acting on such Contributor’s behalf. Contributionsdo not include additions to the Program which: (i) are separate modules of the softwaredistributed in conjunction with the Program under their own license agreement, and (ii) are notderivative works of the program.
“Contributor” means any person or entity that distributes the Program.
“Licensed Patents” mean patent claims licensable by a Contributor which are necessarilyinfringed by the use or sale of its Contribution alone or when combined with the Program.
“Program” means the Contributions distributed in accordance with this Agreement.
“Recipient” means anyone who receives the Program under this Agreement, including allContributors.
2. GRANT OF RIGHTS
a) Subject to the terms of this Agreement, each Contributor hereby grants Recipient a non-exclusive, worldwide, royalty-free copyright license to reproduce, prepare derivative works of,publicly display, publicly perform, distribute and sublicense the Contribution of suchContributor, if any, and such derivative works, in source code and object code form.
b) Subject to the terms of this Agreement, each Contributor hereby grants Recipient a non-exclusive, worldwide, royalty-free patent license under Licensed Patents to make, use, sell,offer to sell, import and otherwise transfer the Contribution of such Contributor, if any, in sourcecode and object code form. This patent license shall apply to the combination of theContribution and the Program if, at the time the Contribution is added by the Contributor, suchaddition of the Contribution causes such combination to be covered by the Licensed Patents.
Free open source software licensing
966 Avaya Aura® Contact Center Installation May 2013Comments? [email protected]

The patent license shall not apply to any other combinations which include the Contribution.No hardware per se is licensed hereunder.
c) Recipient understands that although each Contributor grants the licenses to its Contributionsset forth herein, no assurances are provided by any Contributor that the Program does notinfringe the patent or other intellectual property rights of any other entity. Each Contributordisclaims any liability to Recipient for claims brought by any other entity based on infringementof intellectual property rights or otherwise. As a condition to exercising the rights and licensesgranted hereunder, each Recipient hereby assumes sole responsibility to secure any otherintellectual property rights needed, if any. For example, if a third party patent license is requiredto allow Recipient to distribute the Program, it is Recipient’s responsibility to acquire thatlicense before distributing the Program.
d) Each Contributor represents that to its knowledge it has sufficient copyright rights in itsContribution, if any, to grant the copyright license set forth in this Agreement.
3. REQUIREMENTS
A Contributor may choose to distribute the Program in object code form under its own licenseagreement, provided that:
a) it complies with the terms and conditions of this Agreement; and
its license agreement:
i) effectively disclaims on behalf of all Contributors all warranties and conditions, express andimplied, including warranties or conditions of title and non-infringement, and implies warrantiesor conditions of merchantability and fitness for a particular purpose;
ii) effectively excludes on behalf of all Contributors all liability for damages, such as lost profits;
iii) States that any provisions which differ from this Agreement are offered by that Contributoralone and not by any other party; and
iv) states that source code for the Program is available from such Contributor, and informslicensees how to obtain it in a reasonable manner on or through a medium customarily usedfor software exchange.
When the Program is made available in source code form:
a) it must be made available under this Agreement; and
b) a copy of this Agreement must be included with each copy of the Program. Contributorsmay not remove or alter any copyright notices contained within the Program.
Each Contributor must identify itself as the originator of its Contribution, if any, in a mannerthat reasonably allows subsequent Recipients to identify the originator of the Contribution.
4. COMMERCIAL DISTRIBUTION
Commercial distributors of software may accept certain responsibilities with respect to endusers, business partners and the like. While this license is intended to facilitate the commercialuse of the Program, the Contributor who includes the Program in a commercial product offeringshould do so in a manner which does not create potential liability for other Contributors.Therefore, if a Contributor includes the Program in a commercial product offering, suchContributor (“Commercial Contributor”) hereby agrees to defend and indemnify every other
Eclipse
Avaya Aura® Contact Center Installation May 2013 967

Contributor (“Indemnified Contributor”) against any losses, damages and costs (collectively“Losses”) arising from claims, lawsuits and other legal actions brought by a third party againstthe Indemnified Contributor to the extent caused by the acts or omissions of such CommercialContributor in connection with its distribution of the Program in a commercial product offering.The obligations in this section do not apply to any claims or Losses relating to any actual oralleged intellectual property infringement. In order to qualify, an Indemnified Contributor must:a) promptly notify the Commercial Contributor in writing of such claim, and b) allow theCommercial Contributor to control, and cooperate with the Commercial Contributor in, thedefense and any related settlement negotiations. The Indemnified Contributor may participatein any such claim at its own expense.
For example, a Contributor might include the Program in a commercial product offering,Product X. That Contributor is then a Commercial Contributor. If that Commercial Contributorthen makes performance claims, or offers warranties related to Product X, those performanceclaims and warranties are such Commercial Contributor’s responsibility alone. Under thissection, the Commercial Contributor would have to defend claims against the otherContributors related to those performance claims and warranties, and if a court requires anyother Contributor to pay any damages as a result, the Commercial Contributor must pay thosedamages.
5. NO WARRANTY EXCEPT AS EXPRESSLY SET FORTH IN THIS AGREEMENT, THEPROGRAM IS PROVIDED ON AN “AS IS” BASIS, WITHOUT WARRANTIES ORCONDITIONS OF ANY KIND, EITHER EXPRESS OR IMPLIED INCLUDING, WITHOUTLIMITATION, ANY WARRANTIES OR CONDITIONS OF TITLE, NON-INFRINGEMENT,MERCHANTABILITY OR FITNESS FOR A PARTICULAR PURPOSE. Each Recipient is solelyresponsible for determining the appropriateness of using and distributing the Program andassumes all risks associated with its exercise of rights under this Agreement , including butnot limited to the risks and costs of program errors, compliance with applicable laws, damageto or loss of data, programs or equipment, and unavailability or interruption of operations.
6. DISCLAIMER OF LIABILITY
EXCEPT AS EXPRESSLY SET FORTH IN THIS AGREEMENT, NEITHER RECIPIENT NORANY CONTRIBUTORS SHALL HAVE ANY LIABILITY FOR ANY DIRECT, INDIRECT,INCIDENTAL, SPECIAL, EXEMPLARY, OR CONSEQUENTIAL DAMAGES (INCLUDINGWITHOUT LIMITATION LOST PROFITS), HOWEVER CAUSED AND ON ANY THEORY OFLIABILITY, WHETHER IN CONTRACT, STRICT LIABILITY, OR TORT (INCLUDINGNEGLIGENCE OR OTHERWISE) ARISING IN ANY WAY OUT OF THE USE ORDISTRIBUTION OF THE PROGRAM OR THE EXERCISE OF ANY RIGHTS GRANTEDHEREUNDER, EVEN IF ADVISED OF THE POSSIBILITY OF SUCH DAMAGES.
7. GENERAL
If any provision of this Agreement is invalid or unenforceable under applicable law, it shall notaffect the validity or enforceability of the remainder of the terms of this Agreement, and withoutfurther action by the parties hereto, such provision shall be reformed to the minimum extentnecessary to make such provision valid and enforceable.
If Recipient institutes patent litigation against any entity (including a cross-claim orcounterclaim in a lawsuit) alleging that the Program itself (excluding combinations of theProgram with other software or hardware) infringes such Recipient’s patent(s), then suchRecipient’s rights granted under Section 2(b) shall terminate as of the date such litigation isfiled.
Free open source software licensing
968 Avaya Aura® Contact Center Installation May 2013Comments? [email protected]

All Recipient’s rights under this Agreement shall terminate if it fails to comply with any of thematerial terms or conditions of this Agreement and does not cure such failure in a reasonableperiod of time after becoming aware of such noncompliance. If all Recipient’s rights under thisAgreement terminate, Recipient agrees to cease use and distribution of the Program as soonas reasonably practicable. However, Recipient’s obligations under this Agreement and anylicenses granted by Recipient relating to the Program shall continue and survive.
Everyone is permitted to copy and distribute copies of this Agreement, but in order to avoidinconsistency the Agreement is copyrighted and may only be modified in the following manner.The Agreement Steward reserves the right to publish new versions (including revisions) of thisAgreement from time to time. No one other than the Agreement Steward has the right to modifythis Agreement. The Eclipse Foundation is the initial Agreement Steward. The EclipseFoundation may assign the responsibility to serve as the Agreement Steward to a suitableseparate entity. Each new version of the Agreement will be given a distinguishing versionnumber. The Program (including Contributions) may always be distributed subject to theversion of the Agreement under which it was received. In addition, after a new version of theAgreement is published, Contributor may elect to distribute the Program (including itsContributions) under the new version. Except as expressly stated in Sections 2(a) and 2(b)above, Recipient receives no rights or licenses to the intellectual property of any Contributorunder this Agreement, whether expressly, by implication, estoppel or otherwise. All rights inthe Program not expressly granted under this Agreement are reserved.
This Agreement is governed by the laws of the State of New York and the intellectual propertylaws of the United States of America. No party to this Agreement will bring a legal action underthis Agreement more than one year after the cause of action arose. Each party waives its rightsto a jury trial in any resulting litigation.
SUNSUN PUBLIC LICENSE Version 1.0
1. Definitions
1.0.1. “Commercial Use” means distribution or otherwise making the Covered Code availableto a third party.
1.1. “Contributor” means each entity that creates or contributes to the creation ofModifications.
1.2. “Contributor Version” means the combination of the Original Code, prior Modificationsused by a Contributor, and the Modifications made by that particular Contributor.
1.3. “Covered Code” means the Original Code or Modifications or the combination of theOriginal Code and Modifications, in each case including portions thereof and correspondingdocumentation released with the source code.
1.4. “Electronic Distribution Mechanism” means a mechanism generally accepted in thesoftware development community for the electronic transfer of data.
1.5. “Executable” means Covered Code in any form other than Source Code.
SUN
Avaya Aura® Contact Center Installation May 2013 969

1.6. “Initial Developer” means the individual or entity identified as the Initial Developer in theSource Code notice required by Exhibit A.
1.7. “Larger Work” means a work which combines Covered Code or portions thereof with codenot governed by the terms of this License.
1.8. “License” means this document.
1.8.1. “Licensable” means having the right to grant, to the maximum extent possible, whetherat the time of the initial grant or subsequently acquired, any and all of the rights conveyedherein.
1.9. “Modifications” means any addition to or deletion from the substance or structure of eitherthe Original Code or any previous Modifications. When Covered Code is released as a seriesof files, a Modification is:
A. Any addition to or deletion from the contents of a file containing Original Code or previousModifications.
B. Any new file that contains any part of the Original Code or previous Modifications.
1.10. “Original Code” means Source Code of computer software code which is described inthe Source Code notice required by Exhibit A as Original Code, and which, at the time of itsrelease under this License is not already Covered Code governed by this License.
1.10.1. “Patent Claims means any patent claim(s), now owned or hereafter acquired, includingwithout limitation, method, process, and apparatus claims, in any patent Licensable bygrantor.
1.11. “Source Code” means the preferred form of the Covered Code for making modificationsto it, including all modules it contains, plus any associated documentation, interface definitionfiles, scripts used to control compilation and installation of an Executable, or source codedifferential comparisons against either the Original Code or another well known, availableCovered Code of the Contributor’s choice. The Source Code can be in a compressed orarchival form, provided the appropriate decompression or de-archiving software is widelyavailable for no charge.
1.12. “You” (or “Your”) means an individual or a legal entity exercising rights under, andcomplying with all of the terms of, this License or a future version of this License issued underSection 6.1. For legal entities, “You” includes any entity which controls, is controlled by, or isunder common control with You. For purposes of this definition, “control” means (a) the power,direct or indirect, to cause the direction or management of such entity, whether by contract orotherwise, or (b) ownership of more than fifty percent (50%) of the outstanding shares orbeneficial ownership of such entity.
2. Source Code License
2.1. The Initial Developer Grant.
The Initial Developer hereby grants you a world-wide, royalty-free, non-exclusive license,subject to third party intellectual property claims:
(a) under intellectual property rights (other than patent or trademark) Licensable by InitialDeveloper to use, reproduce, modify, display, perform, sublicense and distribute the OriginalCode (or portions thereof) with or without Modifications, and/or as part of a Larger Work, and
Free open source software licensing
970 Avaya Aura® Contact Center Installation May 2013Comments? [email protected]

(b) under Patent Claims infringed by the making, using or selling of Original Code, to make,have made, use, practice, sell, and offer for sale, and/or otherwise dispose of the Original Code(or portions thereof).
(c) the licenses granted in this Section 2.1(a) and (b) are effective on the date Initial Developerfirst distributes Original Code under the terms of this License.
(d) Notwithstanding Section 2.1(b) above, no patent license is granted: 1) for code that Youdelete from the Original Code; 2) separate from the Original Code; or 3) for infringementscaused by:
i) the modifications of the Original Code or ii) the combination of the Original Code with othersoftware or devices.
2.2. Contributor Grant.
Subject to third party intellectual property claims, each Contributor hereby grants You a world-wide, royalty-free, non-exclusive license
(a) under intellectual property rights (other than patent or trademark) Licensable by Contributor,to use, reproduce, modify, display, perform, sublicense and distribute the Modifications createdby such Contributor (or portions thereof) either on an unmodified basis, with otherModifications, as Covered Code and/or as part of a Larger Work; and
(b) under Patent Claims infringed by the making, using, or selling of Modifications made bythat Contributor either alone and/or in combination with its Contributor Version (or portions ofsuch combination), to make, use, sell, offer for sale, have made, and/or otherwise dispose of:1) Modifications made by that Contributor (or portions thereof); and 2) the combination ofModifications made by that Contributor with its Contributor Version (or portions of suchcombination).
(c) the licenses granted in Sections 2.2(a) and 2.2(b) are effective on the date Contributor firstmakes Commercial Use of the Covered Code.
(d) notwithstanding Section 2.2(b) above, no patent license is granted: 1) for any code thatContributor has deleted from the Contributor Version; 2) separate from the Contributor Version;3) for infringements caused by 1) third party modifications of Contributor Version or ii) thecombination of Modifications made by that Contributor with other software (except as part ofthe Contributor Version) or other devices; or 4) under Patent Claims infringed by Covered Codein the absence of Modifications made by that Contributor.
3. Distribution Obligations.
3.1. Application of License.
The Modifications which You create or to which You contribute are governed by the terms ofthis License, including without limitation Section 2.2. The Source Code version of CoveredCode may be distributed only under the terms of this License or a future version of this Licensereleased under Section 6.1, and You must include a copy of this License with every copy ofthe Source Code You distribute. You may not offer or impose any terms on any Source Codeversion that alters or restricts the applicable version of this License or the recipients’ rightshereunder. However, You may include an additional document offering the additional rightsdescribed in Section 3.5.
3.2. Availability of Source Code.
SUN
Avaya Aura® Contact Center Installation May 2013 971

Any Modification which You create or to which You contribute must be made available inSource Code form under the terms of this License either on the same media as an Executableversion or via an accepted Electronic Distribution Mechanism to anyone to whom you madean Executable version available; and if made available via Electronic Distribution Mechanism,must remain available for at least twelve (12) months after the date it initially became available,or at least six (6) months after a subsequent version of that particular Modification has beenmade available to such recipients. You are responsible for ensuring that the Source Codeversion remains available even if the Electronic Distribution Mechanism is maintained by athird party.
3.3. Description of Modifications.
You must cause all Covered Code to which You contribute to contain a file documenting thechanges You made to create that Covered Code and the date of any change. You must includea prominent statement that the Modification is derived, directly or indirectly, from Original Codeprovided by the Initial Developer and including the name of the Initial Developer in (a) theSource Code, and (b) in any notice in an Executable version or related documentation in whichYou describe the origin or ownership of the Covered Code.
3.4. Intellectual Property Matters
(a) Third Party Claims.
If Contributor has knowledge that a license under a third party’s intellectual property rights isrequired to exercise the rights granted by such Contributor under Sections 2.1 or 2.2,Contributor must include a text file with the Source Code distribution titled “LEGAL” whichdescribes the claim and the party making the claim in sufficient detail that a recipient will knowwhom to contact. If Contributor obtains such knowledge after the Modification is made availableas described in Section 3.2, Contributor shall promptly modify the LEGAL file in all copiesContributor makes available thereafter and shall take other steps (such as notifying appropriatemailing lists or newsgroups) reasonably calculated to inform those who received the CoveredCode that new knowledge has been obtained.
(b) Contributor APIs
If Contributor’s Modifications include an application programming interface (“API”) andContributor has knowledge of patent licenses which are reasonably necessary to implementthat API, Contributor must also include this information in the LEGAL file.
(c) Representations.
Contributor represents that, except as disclosed pursuant to Section 3.4(a) above, Contributorbelieves that Contributor’s Modifications are Contributor’s original creation(s) and/orContributor has sufficient rights to grant the rights conveyed by this License.
3.5. Required Notices.
You must duplicate the notice in Exhibit A in each file of the Source Code. If it is not possibleto put such notice in a particular Source Code file due to its structure, then You must includesuch notice in a location (such as a relevant directory) where a user would be likely to look forsuch a notice. If You created one or more Modification(s) You may add your name as aContributor to the notice described in Exhibit A. You must also duplicate this License in anydocumentation for the Source Code where You describe recipients’ rights or ownership rightsrelating to Covered Code. You may choose to offer, and to charge a fee for, warranty, support,indemnity or liability obligations to one or more recipients of Covered Code. However, You may
Free open source software licensing
972 Avaya Aura® Contact Center Installation May 2013Comments? [email protected]

do so only on Your own behalf, and not on behalf of the Initial Developer or any Contributor.You must make it absolutely clear than any such warranty, support, indemnity or liabilityobligation is offered by You alone, and You hereby agree to indemnify the Initial Developerand every Contributor for any liability incurred by the Initial Developer or such Contributor asa result of warranty, support, indemnity or liability terms You offer.
3.6. Distribution of Executable Versions.
You may distribute Covered Code in Executable form only if the requirements of Section 3.1–3.5 have been met for that Covered Code, and if You include a notice stating that the SourceCode version of the Covered Code is available under the terms of this License, including adescription of how and where You have fulfilled the obligations of Section 3.2. The notice mustbe conspicuously included in any notice in an Executable version, related documentation orcollateral in which You describe recipients’ rights relating to the Covered Code. You maydistribute the Executable version of Covered Code or ownership rights under a license of Yourchoice, which may contain terms different from this License, provided that You are incompliance with the terms of this License and that the license for the Executable version doesnot attempt to limit or alter the recipient’s rights in the Source Code version from the rights setforth in this License. If You distribute the Executable version under a different license You mustmake it absolutely clear that any terms which differ from this License are offered by You alone,not by the Initial Developer or any Contributor. You hereby agree to indemnify the InitialDeveloper and every Contributor for any liability incurred by the Initial Developer or suchContributor as a result of any such terms You offer.
3.7. Larger Works.
You may create a Larger Work by combining Covered Code with other code not governed bythe terms of this License and distribute the Larger Work as a single product. In such a case,You must make sure the requirements of this License are fulfilled for the Covered Code.
4. Inability to Comply Due to Statute or Regulation.
If it is impossible for You to comply with any of the terms of this License with respect to someor all of the Covered Code due to statute, judicial order, or regulation then You must: (a) complywith the terms of this License to the maximum extent possible; and (b) describe the limitationsand the code they affect. Such description must be included in the LEGAL file described inSection 3.4 and must be included with all distributions of the Source Code. Except to the extentprohibited by statute or regulation, such description must be sufficiently detailed for a recipientof ordinary skill to be able to understand it.
5. Application of this License.
This License applies to code to which the Initial Developer has attached the notice in ExhibitA and to related Covered Code.
6. Versions of the License.
6.1. New Versions.
Sun Microsystems, Inc. (“Sun”) may publish revised and/or new versions of the License fromtime to time. Each version will be given a distinguishing version number.
6.2. Effect of New Versions.
SUN
Avaya Aura® Contact Center Installation May 2013 973

Once Covered Code has been published under a particular version of the License, You mayalways continue to use it under the terms of that version. You may also choose to use suchCovered Code under the terms of any subsequent version of the License published by Sun.No one other than Sun has the right to modify the terms applicable to Covered Code createdunder this License.
6.3. Derivative Works.
If You create or use a modified version of this License (which you may only do in order to applyit to code which is not already Covered Code governed by this License), You must (a) renameYour license so that the phrases “Sun”, “Sun Public License,” or “SPL” or any confusinglysimilar phrase do not appear in your license (except to note that your license differs from thisLicense) and (b) otherwise make it clear that Your version of the license contains terms whichdiffer from the Sun Public License. (Filling in the name of the Initial Developer, Original Codeor Contributor in the notice described in Exhibit A shall not of themselves be deemed to bemodifications of this License.)
7. DISCLAIMER OF WARRANTY.
COVERED CODE IS PROVIDED UNDER THIS LICENSE ON AN “AS IS” BASIS, WITHOUTWARRANTY OF ANY KIND, EITHER EXPRESSED OR IMPLIED, INCLUDING, WITHOUTLIMITATION, WARRANTIES THAT THE COVERED CODE IS FREE OF DEFECTS,MERCHANTABLE, FIT FOR A PARTICULAR PURPOSE OR NON-INFRINGING. THEENTIRE RISK AS TO THE QUALITY AND PERFORMANCE OF THE COVERED CODE ISWITH YOU. SHOULD ANY COVERED CODE PROVE DEFECTIVE IN ANY RESPECT, YOU(NOT THE INITIAL DEVELOPER OR ANY OTHER CONTRIBUTOR) ASSUME THE COSTOF ANY NECESSARY SERVICING, REPAIR OR CORRECTION. THIS DISCLAIMER OFWARRANTY CONSTITUTES AN ESSENTIAL PART OF THIS LICENSE. NO USE OF ANYCOVERED CODE IS AUTHORIZED HEREUNDER EXCEPT UNDER THIS DISCLAIMER.
8. TERMINATION.
8.1. This License and the rights granted hereunder will terminate automatically if You fail tocomply with terms herein and fail to cure such breach within 30 days of becoming aware ofthe breach. All sublicenses to the Covered Code which are properly granted shall survive anytermination of this License. Provisions which, by their nature, must remain in effect beyond thetermination of this License shall survive.
8.2. If You initiate litigation by asserting a patent infringement claim (excluding declaratoryjudgment actions) against Initial Developer or a Contributor (the Initial Developer or Contributoragainst whom You file such action is referred to as Participant) alleging that:
(a) such Participant’s Contributor Version directly or indirectly infringes any patent, then anyand all rights granted by such Participant to You under Sections 2.1 and/or 2.2 of this Licenseshall, upon 60 days notice from Participant terminate prospectively, unless if within 60 daysafter receipt of notice You either: (i) agree in writing to pay Participant a mutually agreeablereasonable royalty for Your past and future use of Modifications made by such Participant, or(ii) withdraw Your litigation claim with respect to the Contributor Version against suchParticipant. If within 60 days of notice, a reasonable royalty and payment arrangement are notmutually agreed upon in writing by the parties or the litigation claim is not withdrawn, the rightsgranted by Participant to You under Sections 2.1 and/or 2.2 automatically terminate at theexpiration of the 60 day notice period specified above.
Free open source software licensing
974 Avaya Aura® Contact Center Installation May 2013Comments? [email protected]

(b) any software, hardware, or device, other than such Participant’s Contributor Version,directly or indirectly infringes any patent, then any rights granted to You by such Participantunder Sections 2.1(b) and 2.2(b) are revoked effective as of the date You first made, used,sold, distributed, or had made, Modifications made by that Participant.
8.3. If You assert a patent infringement claim against Participant alleging that such Participant’sContributor Version directly or indirectly infringes any patent where such claim is resolved(such as by license or settlement) prior to the initiation of patent infringement litigation, thenthe reasonable value of the licenses granted by such Participant under Sections 2.1 or 2.2shall be taken into account in determining the amount or value of any payment or license.
8.4. In the event of termination under Sections 8.1 or 8.2 above, all end user licenseagreements (excluding distributors and resellers) which have been validly granted by You orany distributor hereunder prior to termination shall survive termination.
9. LIMITATION OF LIABILITY.
UNDER NO CIRCUMSTANCES AND UNDER NO LEGAL THEORY, WHETHER TORT(INCLUDING NEGLIGENCE), CONTRACT, OR OTHERWISE, SHALL YOU, THE INITIALDEVELOPER, ANY OTHER CONTRIBUTOR, OR ANY DISTRIBUTOR OF COVEREDCODE, OR ANY SUPPLIER OF ANY OF SUCH PARTIES, BE LIABLE TO ANY PERSONFOR ANY INDIRECT, SPECIAL, INCIDENTAL, OR CONSEQUENTIAL DAMAGES OF ANYCHARACTER INCLUDING, WITHOUT LIMITATION, DAMAGES FOR LOSS OF GOODWILL,WORK STOPPAGE, COMPUTER FAILURE OR MALFUNCTION, OR ANY AND ALL OTHERCOMMERCIAL DAMAGES OR LOSSES, EVEN IF SUCH PARTY SHALL HAVE BEENINFORMED OF THE POSSIBILITY OF SUCH DAMAGES. THIS LIMITATION OF LIABILITYSHALL NOT APPLY TO LIABILITY FOR DEATH OR PERSONAL INJURY RESULTINGFROM SUCH PARTY’S NEGLIGENCE TO THE EXTENT APPLICABLE LAW PROHIBITSSUCH LIMITATION. SOME JURISDICTIONS DO NOT ALLOW THE EXCLUSION ORLIMITATION OF INCIDENTAL OR CONSEQUENTIAL DAMAGES, SO THIS EXCLUSIONAND LIMITATION MAY NOT APPLY TO YOU.
10. U.S. GOVERNMENT END USERS.
The Covered Code is a commercial item, as that term is defined in 48 C.F.R. 2.101 (Oct. 1995),consisting of commercial computer software and commercial computer softwaredocumentation, as such terms are used in 48 C.F.R. 12.212 (Sept. 1995). Consistent with 48C.F.R. 12.212 and 48 C.F.R. 227.7202-1 through 227.7202-4 (June 1995), all U.S.Government End Users acquire Covered Code with only those rights set forth herein.
11. MISCELLANEOUS.
This License represents the complete agreement concerning subject matter hereof. If anyprovision of this License is held to be unenforceable, such provision shall be reformed only tothe extent necessary to make it enforceable. This License shall be governed by California lawprovisions (except to the extent applicable law, if any, provides otherwise), excluding itsconflict-of-law provisions. With respect to disputes in which at least one party is a citizen of, oran entity chartered or registered to do business in the United States of America, any litigationrelating to this License shall be subject to the jurisdiction of the Federal Courts of the NorthernDistrict of California, with venue lying in Santa Clara County, California, with the losing partyresponsible for costs, including without limitation, court costs and reasonable attorneys’ feesand expenses. The application of the United Nations Convention on Contracts for theInternational Sale of Goods is expressly excluded. Any law or regulation which provides that
SUN
Avaya Aura® Contact Center Installation May 2013 975

the language of a contract shall be construed against the drafter shall not apply to thisLicense.
12. RESPONSIBILITY FOR CLAIMS.
As between Initial Developer and the Contributors, each party is responsible for claims anddamages arising, directly or indirectly, out of its utilization of rights under this License and Youagree to work with Initial Developer and Contributors to distribute such responsibility on anequitable basis. Nothing herein is intended or shall be deemed to constitute any admission ofliability.
13. MULTIPLE-LICENSED CODE.
Initial Developer may designate portions of the Covered Code as “Multiple-Licensed”.“Multiple-Licensed” means that the Initial Developer permits you to utilize portions of theCovered Code under Your choice of the alternative licenses, if any, specified by the InitialDeveloper in the file described in Exhibit A.
Exhibit A -Sun Public License Notice.
The contents of this file are subject to the Sun Public License Version 1.0 (the License); youmay not use this file except in compliance with the License. A copy of the License is availableat www.sun.com.
The Original Code is _________________. The Initial Developer of the Original Code is___________. Portions created by ______ are Copyright (C)_________. All RightsReserved.
Contributor(s):____________________________________.
Alternatively, the contents of this file may be used under the terms of the _____ license (the ?[___] License?), in which case the provisions of [______] License are applicable instead ofthose above. If you wish to allow use of your version of this file only under the terms of the[____] License and not to allow others to use your version of this file under the SPL, indicateyour decision by deleting the provisions above and replace them with the notice and otherprovisions required by the [___] License. If you do not delete the provisions above, a recipientmay use your version of this file under either the SPL or the [___] License. [NOTE: The text ofthis Exhibit A may differ slightly from the text of the notices in the Source Code files of theOriginal Code. You should use the text of this Exhibit A rather than the text found in the OriginalCode Source Code for Your Modifications.]
OpenSSLLicense
This is a copy of the current LICENSE file inside the CVS repository.
LICENSE ISSUES
The OpenSSL toolkit stays under a dual license, i.e. both the conditions of the OpenSSLLicense and the original SSLeay license apply to the toolkit. See below for the actual license
Free open source software licensing
976 Avaya Aura® Contact Center Installation May 2013Comments? [email protected]
texts. Actually both licenses are BSD-style Open Source licenses. In case of any license issuesrelated to OpenSSL please contact [email protected].
OpenSSL License
Copyright (c) 1998–2008 The OpenSSL Project. All rights reserved.
Redistribution and use in source and binary forms, with or without modification, are permittedprovided that the following conditions are met:
1. Redistributions of source code must retain the above copyright notice, this2. Redistributions in binary form must reproduce the above copyright notice, this list
of conditions and the following disclaimer in the documentation and/or othermaterials provided with the distribution.
3. All advertising materials mentioning features or use of this software must displaythe following acknowledgment:
“This product includes software developed by the OpenSSL Project for use in theOpenSSL Toolkit. (http://www.openssl.org/)”
4. The names “OpenSSL Toolkit” and “OpenSSL Project” must not be used to endorseor promote products derived from this software without prior written permission. Forwritten permission, please contact [email protected].
5. Products derived from this software may not be called “OpenSSL” nor may“OpenSSL” appear in their names without prior written permission of the OpenSSLProject.
6. Redistributions of any form whatsoever must retain the following acknowledgment:
“This product includes software developed by the OpenSSL Project for use in theOpenSSL Toolkit (http://www.openssl.org/)”
THIS SOFTWARE IS PROVIDED BY THE OpenSSL PROJECT “AS IS” AND ANYEXPRESSED OR IMPLIED WARRANTIES, INCLUDING, BUT NOT LIMITED TO, THEIMPLIED WARRANTIES OF MERCHANTABILITY AND FITNESS FOR A PARTICULARPURPOSE ARE DISCLAIMED. IN NO EVENT SHALL THE OpenSSL PROJECT OR ITSCONTRIBUTORS BE LIABLE FOR ANY DIRECT, INDIRECT, INCIDENTAL, SPECIAL,EXEMPLARY, OR CONSEQUENTIAL DAMAGES (INCLUDING, BUT NOT LIMITED TO,PROCUREMENT OF SUBSTITUTE GOODS OR SERVICES; LOSS OF USE, DATA, ORPROFITS; OR BUSINESS INTERRUPTION) HOWEVER CAUSED AND ON ANY THEORYOF LIABILITY, WHETHER IN CONTRACT, STRICT LIABILITY, OR TORT (INCLUDINGNEGLIGENCE OR OTHERWISE) ARISING IN ANY WAY OUT OF THE USE OF THISSOFTWARE, EVEN IF ADVISED OF THE POSSIBILITY OF SUCH DAMAGE.
This product includes cryptographic software written by Eric Young ([email protected]). Thisproduct includes software written by Tim Hudson ([email protected]).
Original SSLeay License
Copyright (C) 1995-1998 Eric Young ([email protected])
All rights reserved.
This package is an SSL implementation written by Eric Young ([email protected]). Theimplementation was written so as to conform with Netscapes SSL.
OpenSSL
Avaya Aura® Contact Center Installation May 2013 977

This library is free for commercial and non-commercial use as long as the following conditionsare adhered to. The following conditions apply to all code found in this distribution, be it theRC4, RSA, lhash, DES, etc., code; not just the SSL code. The SSL documentation includedwith this distribution is covered by the same copyright terms except that the holder is TimHudson ([email protected]).
Copyright remains Eric Young's, and as such any Copyright notices in the code are not to beremoved. If this package is used in a product, Eric Young should be given attribution as theauthor of the parts of the library used. This can be in the form of a textual message at programstartup or in documentation (online or textual) provided with the package.
Redistribution and use in source and binary forms, with or without modification, are permittedprovided that the following conditions are met:
1. Redistributions of source code must retain the copyright notice, this list of conditionsand the following disclaimer.
2. Redistributions in binary form must reproduce the above copyright notice, this listof conditions and the following disclaimer in the documentation and/or othermaterials provided with the distribution.
3. All advertising materials mentioning features or use of this software must displaythe following acknowledgement:
“This product includes cryptographic software written by Eric Young([email protected])”
The word ‘cryptographic’ can be left out if the routines from the library being usedare not cryptographic related.
4. If you include any Windows specific code (or a derivative thereof) from the appsdirectory (application code) you must include an acknowledgement:
“This product includes software written by Tim Hudson ([email protected])”THIS SOFTWARE IS PROVIDED BY ERIC YOUNG “AS IS” AND ANY EXPRESS ORIMPLIED WARRANTIES, INCLUDING, BUT NOT LIMITED TO, THE IMPLIED WARRANTIESOF MERCHANTABILITY AND FITNESS FOR A PARTICULAR PURPOSE AREDISCLAIMED. IN NO EVENT SHALL THE AUTHOR OR CONTRIBUTORS BE LIABLE FORANY DIRECT, INDIRECT, INCIDENTAL, SPECIAL, EXEMPLARY, OR CONSEQUENTIALDAMAGES (INCLUDING, BUT NOT LIMITED TO, PROCUREMENT OF SUBSTITUTEGOODS OR SERVICES; LOSS OF USE, DATA, OR PROFITS; OR BUSINESSINTERRUPTION) HOWEVER CAUSED AND ON ANY THEORY OF LIABILITY, WHETHERIN CONTRACT, STRICT LIABILITY, OR TORT (INCLUDING NEGLIGENCE OROTHERWISE) ARISING IN ANY WAY OUT OF THE USE OF THIS SOFTWARE, EVEN IFADVISED OF THE POSSIBILITY OF SUCH DAMAGE.
The licence and distribution terms for any publicly available version or derivative of this codecannot be changed. i.e. this code cannot simply be copied and put under another distributionlicence [including the GNU Public Licence.]
Free open source software licensing
978 Avaya Aura® Contact Center Installation May 2013Comments? [email protected]

Index
A
active server ......................................................386, 577resolve managed CLAN server name .........386, 577
AD-LDS replication ............................................387, 578create local (workgroup) user account ........387, 578
AD-LDS replication account ............... 389, 412, 580, 602service account ...........................................389, 580service account on the standby server ....... 412, 602
add ....44, 82, 132, 166, 212, 246, 282, 316, 449, 479, 512,638, 665, 694, 728, 778, 812, 862, 878, 906
Linux user group and user ................................. 862server to domain ....44, 82, 132, 166, 212, 246, 282,
316, 449, 479, 512, 638, 665, 694, 728, 778,812, 878, 906
add domain AD-LDS replication ....71, 88, 156, 172, 307,326, 502, 523, 719, 737, 803, 821
local Administrators and replicator group ....71, 88,156, 172, 307, 326, 502, 523, 719, 737, 803,821
add local (workgroup) AD-LDS replication ....388, 411,579, 601
local Administrators and replicator group ...388, 411,579, 601
Agent Desktop ........................................... 924, 925, 935Citrix published application ................................ 935QoS support .......................................................924third-party headsets ........................................... 925
Agent Desktop client .................................................955uninstall ..............................................................955
Agent Desktop client software .................................. 921installation .......................................................... 921
Agent Desktop client software installation . 921, 922, 924assign a group policy for embedded softphone
settings ..................................................922installation procedure .........................................924prerequisites .......................................................921
Agent Desktop Displays .................................... 945, 955Citrix published application ................................ 945uninstall ..............................................................955
Agent Desktop Displays software .............................927installation .......................................................... 927
Agent Desktop Displays software installation ... 927, 929install Windows update KB917607 .....................929installation procedure .........................................927prerequisites .......................................................927
antivirus ... 71, 122, 155, 202, 230, 272, 307, 354, 386, 441,470, 501, 548, 576, 629, 656, 677, 717, 764, 801,851, 895, 916
Apache license ......................................................... 965assign ....................................................................... 922
group policy for embedded softphone settings .. 922Avaya Aura® Contact Center ............... 33, 235, 681, 769
software installation ....................... 33, 235, 681, 769Avaya Media server ..................................................959
uninstallation on Linux ........................................959Avaya Media Server On Linux ..................................853Avaya Media Server software ...................................855
installation .......................................................... 855Avaya Media Server software installation ... 53, 855, 856,
862–865, 867prerequisites .......................................................855add Linux user group and user .......................... 862configure NTP .................................................... 864disable Admin Approval Mode ............................. 53install Linux server ............................................. 856installation procedure (Linux) .............................865prepare the Linux operating system ...................863secure your server ............................................. 867
Avaya Media server uninstallation (Linux) ................959procedures ......................................................... 959
Avaya Mentor videos ..................................................29
C
CCMA ....50, 89, 138, 173, 254, 290, 323, 369, 406, 456,486, 520, 561, 596, 690, 700, 734, 784, 818, 940,942
Citrix published application ................................ 942Citrix published content ......................................940installing operating system components ....50, 89,
138, 173, 254, 290, 323, 369, 406, 456, 486,520, 561, 596, 690, 700, 734, 784, 818
CCMA replication .............................................. 275, 355High Availability Contact Center ................. 275, 355pre-installation configuration .......................275, 355
CCMM software installation ....73, 74, 230, 232, 272, 656,718, 802
install external Web server software ....73, 230, 272,656, 718, 802
install Instant Messaging chat server ........... 74, 232CCT (knowledge worker) ..........................................659
Avaya Aura® Contact Center Installation May 2013 979

installation .......................................................... 659CCT (knowledge worker) installation ................ 659, 671
installation procedure .........................................671prerequisites .......................................................659
change service account AD-LDS ...................... 390, 581primary Contact Center ...............................390, 581
Citrix deployment ......................................................935Client Software Installation ....................................... 919Client Software uninstallation ................................... 955configuration ...42, 46, 48, 52, 69, 79, 84, 86, 92, 121, 129,
133, 136, 140, 154, 163, 167, 170, 175, 201, 209,214, 216, 218, 243, 248, 250, 253, 256, 258, 280,284, 286, 289, 292, 313, 318, 320, 323, 326, 360,363, 365, 368, 371, 389, 397, 401, 402, 405, 408,447, 450, 452, 455, 458, 477, 480, 483, 486, 489,509, 513, 516, 519, 522, 553, 555, 558, 561, 564,580, 587, 590, 593, 596, 599, 635, 640, 642, 644,663, 667, 669, 689, 696, 698, 702, 716, 725, 729,732, 736, 763, 775, 780, 782, 786, 800, 809, 814,816, 820, 850, 864, 875, 880, 882, 894, 903, 907,910
AD-LDS replication account as a service account........................................................389, 580
binding order .. 253, 289, 323, 368, 405, 455, 486, 519,561, 596
DEP ....48, 86, 136, 170, 216, 250, 286, 320, 365, 402,452, 483, 516, 558, 593, 642, 669, 698, 732,782, 816, 882, 910
IIS ............................................................... 218, 644MIME types ....52, 92, 140, 175, 256, 258, 292, 326,
371, 408, 458, 489, 522, 564, 599, 702, 736,786, 820
Network Time Protocol .......................................864SNMP .. 46, 84, 133, 167, 214, 248, 284, 318, 363, 401,
450, 480, 513, 555, 590, 640, 667, 696, 729,780, 814, 880, 907
WebLM licensing ....69, 121, 154, 201, 716, 763, 800,850, 894
Windows Server 2008 ....42, 79, 129, 163, 209, 243,280, 313, 360, 397, 447, 477, 509, 553, 587,635, 663, 689, 725, 775, 809, 875, 903
connection ..44, 82, 131, 165, 212, 246, 253, 282, 289, 316,322, 362, 368, 400, 405, 448, 455, 479, 485, 511,518, 555, 560, 589, 595, 638, 665, 694, 727, 778,812, 878, 905
contact center subnet ....44, 82, 131, 165, 212, 246,282, 316, 362, 400, 448, 479, 511, 555, 589,638, 665, 694, 727, 778, 812, 878, 905
embedded LAN subnet ..253, 289, 322, 368, 405, 455,485, 518, 560, 595
Contact Center ..................................... 33, 235, 681, 769
software installation ....................... 33, 235, 681, 769Contact Center software ...................... 33, 235, 681, 769
installation ......................................33, 235, 681, 769Contact Center software installation ....33, 34, 235, 236,
681, 682, 769prerequisites .................................. 34, 235, 681, 769tasks .............................................. 34, 236, 682, 769
create ................................................................ 410, 600user account on standby server ..................410, 600
CS 1000 Data Extraction Tool .................................. 933installation .......................................................... 933
CS 1000 Data Extraction Tool installation .........933, 934installation procedure .........................................934prerequisites .......................................................933time .................................................................... 933
CS1000 .....................................................................233
D
disable ....47, 85, 135, 169, 215, 249, 252, 285, 288, 319,321, 364, 367, 401, 404, 451, 454, 482, 484, 515,518, 557, 559, 592, 594, 641, 668, 697, 731, 781,815, 881, 909
NetBios 252, 288, 321, 367, 404, 454, 484, 518, 559, 594unused Network Adapters ....47, 85, 135, 169, 215,
249, 285, 319, 364, 401, 451, 482, 515, 557,592, 641, 668, 697, 731, 781, 815, 881, 909
disable Admin Approval Mode ....................................53Windows Server 2008 administrators .................. 53
download ...47, 85, 134, 168, 215, 249, 285, 364, 450, 481,514, 556, 591, 641, 668, 697, 730, 781, 815, 881,908
recent server patches ....47, 85, 134, 168, 215, 249,285, 364, 450, 481, 514, 556, 591, 641, 668,697, 730, 781, 815, 881, 908
E
enable ....48, 86, 135, 169, 216, 250, 286, 319, 365, 402,452, 482, 515, 557, 592, 642, 669, 698, 731, 782,816, 882, 909
Microsoft Remote Desktop connection ...48, 86, 135,169, 216, 250, 286, 319, 365, 402, 452, 482,515, 557, 592, 642, 669, 698, 731, 782, 816,882, 909
I
import ..49, 87, 137, 171, 217, 251, 287, 320, 366, 403, 453,483, 517, 558, 593, 643, 670, 699, 733, 783, 817,883, 911
980 Avaya Aura® Contact Center Installation May 2013

firewall security policy ....49, 87, 137, 171, 217, 251,287, 320, 366, 403, 453, 483, 517, 558, 593,643, 670, 699, 733, 783, 817, 883, 911
installation .. 39, 43, 73, 74, 77, 81, 126, 130, 160, 164, 205,207, 211, 230, 232, 241, 245, 272, 277, 281, 311,315, 357, 361, 395, 399, 444, 475, 506, 510, 551,584, 588, 631, 633, 637, 656, 659, 660, 664, 686,693, 718, 722, 726, 773, 777, 802, 807, 811, 855,856, 873, 877, 899, 900, 904, 921, 927, 929, 931,933
Agent Desktop client software ............................921Agent Desktop Displays software ...................... 927Avaya Media Server software ............................ 855CCT (knowledge worker) ................................... 659CS 1000 Data Extraction Tool ............................933external Web server software ....73, 230, 272, 656,
718, 802Instant Messaging chat server ......................74, 232Linux server ........................................................856Multimedia Contact Server ......................... 205, 631Orchestration Designer client software .............. 931Security Framework ........................................... 899service packs ....43, 81, 130, 164, 211, 245, 281, 315,
361, 399, 510, 588, 637, 664, 693, 726, 777,811, 877, 904
Windows Server 2008 Release 2 ... 39, 77, 126, 160,207, 241, 277, 311, 357, 395, 444, 475, 506,551, 584, 633, 660, 686, 722, 773, 807, 873,900
Windows update KB917607 ...............................929installation procedure ....50, 89, 138, 173, 254, 290, 323,
369, 406, 456, 486, 520, 561, 596, 690, 700, 734,784, 818
operating system components . 50, 89, 138, 173, 254,290, 323, 369, 406, 456, 486, 520, 561, 596,690, 700, 734, 784, 818
installing ....................................................................924services for Agent Desktop QoS ........................924
Instant Messaging ...............................................74, 232install Instant Messaging chat server ........... 74, 232
Internet Information Services ............................ 218, 644configuration ............................................... 218, 644
J
job aid .................................................872, 899, 931, 933CS 1000 Data Extraction Tool installation ..........933NCC standby software installation ..................... 872Orchestration Designer client software installation
............................................................... 931Security Framework installation ......................... 899
L
License Manager installation ....69, 121, 154, 201, 716,763, 800, 850, 894
configure WebLM licensing ... 69, 121, 154, 201, 716,763, 800, 850, 894
Linux uninstallation ................................................... 959Avaya Media server ........................................... 959
Linux, packages ........................................................859local workstation AD-LDS replication account .. 410, 600
standby CCMA ............................................410, 600
M
Microsoft updates ....52, 92, 140, 175, 256, 258, 292, 326,371, 408, 458, 489, 522, 564, 599, 702, 736, 786,820
configure MIME types ....52, 92, 140, 175, 256, 258,292, 326, 371, 408, 458, 489, 522, 564, 599,702, 736, 786, 820
MIME types ....52, 92, 140, 175, 256, 258, 292, 326,371, 408, 458, 489, 522, 564, 599, 702, 736,786, 820
configuration ....52, 92, 140, 175, 256, 258, 292,326, 371, 408, 458, 489, 522, 564, 599,702, 736, 786, 820
Multimedia Complement for Elite ...................... 685, 721Multimedia Complement For Elite ............................ 679Multimedia Complement For Elite software ..............704
installation procedure .........................................704Multimedia Contact Server software ................. 205, 631
installation ...................................................205, 631Multimedia Contact Server software installation ....206,
221, 632, 647installation procedure ..................................221, 647prerequisites ............................................... 206, 632
multimedia only contact center .................. 772, 805, 806Multimedia only contact center ..........................771, 805Multimedia only software installation .................788, 823
installation procedure ..................................788, 823
N
NCC standby software installation ............................872time .................................................................... 872
NetBios .. 252, 288, 321, 367, 404, 454, 484, 518, 559, 594disable 252, 288, 321, 367, 404, 454, 484, 518, 559, 594
Network Control Center Server ................................ 869No Switch Configured ...............................................767
Avaya Aura® Contact Center Installation May 2013 981

O
open source ..............................................................961software licensing ...............................................961
Orchestration Designer client ................................... 956uninstall ..............................................................956
Orchestration Designer client software .....................931installation .......................................................... 931installation procedure .........................................931
Orchestration Designer client software installation ...931time .................................................................... 931
overview ..................................................................... 27Third Party Software Upgrade Utility ....................27
P
packages, Linux ................................................ 859, 861preparation ............................................................... 863
Linux operating system for Avaya Media Server 863prerequisites ...............................................................28
installation ............................................................28uninstallation ........................................................28
primary CCMA server ....71, 156, 307, 387, 388, 502, 578,579, 719, 803
add domain AD-LDS replication ....71, 156, 307, 502,719, 803
add local (workgroup) AD-LDS replication ..388, 579create user account .................................... 387, 578
procedure job aid ....41, 78, 128, 162, 208, 242, 279, 312,359, 396, 446, 476, 508, 552, 586, 634, 662, 688,724, 774, 808, 874, 902
installing Windows Server 2008 Release 2 ... 41, 78,128, 162, 208, 242, 279, 312, 359, 396, 446,476, 508, 552, 586, 634, 662, 688, 724, 774,808, 874, 902
publishing AACC software with Citrix ....................... 935publishing Agent Desktop Displays software ............945
Citrix ...................................................................945publishing Agent Desktop software .......................... 935
Citrix ...................................................................935publishing CCMA software ................................940, 942
Citrix ............................................................940, 942
R
related resources ........................................................29Avaya Mentor videos ........................................... 29
Remote Geographic Node Multimedia Contact Server.............................................................. 205, 631
Remote Geographic Node Voice and Multimedia ContactServer ............................................. 75, 309, 393
Remote Geographic Node Voice Contact Server ....159,505, 583
removal ............................................................. 951–953server software ........................................... 952, 953server software patches .....................................951
requirements for server .............................................. 26
S
secure .......................................................................867Avaya Media Server ...........................................867
security ....71, 122, 155, 202, 230, 272, 307, 354, 386, 441,470, 501, 548, 576, 629, 656, 677, 717, 764, 801,851, 895, 916
Security Framework ..................................................899installation .......................................................... 899
Security Framework installation ........................ 899, 912installation procedure .........................................912prerequisites .......................................................899time .................................................................... 899
Security Framework Server ...................................... 897server preparation ... 38, 39, 42–49, 54, 76, 77, 79, 81–87,
92, 126, 129, 130, 132–137, 141, 160, 163, 164,166–171, 176, 206, 207, 209, 211–217, 220, 240,241, 243, 245–251, 257, 276, 277, 280–287, 293,310, 311, 313, 315–320, 328, 356, 357, 360–366,372, 394, 395, 397, 399–403, 412, 444, 447,449–453, 459, 474, 475, 477, 479–483, 489, 506,509, 510, 512–517, 524, 550, 551, 553, 555–558,564, 584, 587–593, 603, 632, 633, 635, 637–643,646, 659, 660, 663–670, 686, 689, 693–699, 703,722, 725, 726, 728–733, 738, 772, 773, 775,777–783, 787, 806, 807, 809, 811–817, 822, 872,873, 875, 877–883, 900, 903, 904, 906–911
adding a server to a domain ....44, 82, 132, 166, 212,246, 282, 316, 449, 479, 512, 638, 665, 694,728, 778, 812, 878, 906
configure DEP ... 48, 86, 136, 170, 216, 250, 286, 320,365, 402, 452, 483, 516, 558, 593, 642, 669,698, 732, 782, 816, 882, 910
configuring SNMP on your server ... 46, 84, 133, 167,214, 248, 284, 318, 363, 401, 450, 480, 513,555, 590, 640, 667, 696, 729, 780, 814, 880,907
configuring Windows Server 2008 ...42, 79, 129, 163,209, 243, 280, 313, 360, 397, 447, 477, 509,553, 587, 635, 663, 689, 725, 775, 809, 875,903
disabling the remote access services ....45, 83, 133,167, 213, 247, 283, 317, 362, 400, 513, 589,639, 666, 695, 729, 779, 813, 879, 907
982 Avaya Aura® Contact Center Installation May 2013
disabling unused Network Adapters ....47, 85, 135,169, 215, 249, 285, 319, 364, 401, 451, 482,515, 557, 592, 641, 668, 697, 731, 781, 815,881, 909
download recent patches to the server ...47, 85, 134,168, 215, 249, 285, 364, 450, 481, 514, 556,591, 641, 668, 697, 730, 781, 815, 881, 908
downloading latest documentation .. 38, 76, 126, 160,206, 240, 276, 310, 356, 394, 444, 474, 506,550, 584, 632, 659, 686, 722, 772, 806, 872,900
enable Microsoft Remote Desktop connection ... 48,86, 135, 169, 216, 250, 286, 319, 365, 402, 452,482, 515, 557, 592, 642, 669, 698, 731, 782,816, 882, 909
import Contact Center firewall security policy ....49,87, 137, 171, 217, 251, 287, 320, 366, 403, 453,483, 517, 558, 593, 643, 670, 699, 733, 783,817, 883, 911
installing the latest supported operating systemservice packs ....43, 81, 130, 164, 211, 245,281, 315, 361, 399, 510, 588, 637, 664, 693,726, 777, 811, 877, 904
installing Windows Server 2008 Release 2 ... 39, 77,126, 160, 207, 241, 277, 311, 357, 395, 444,475, 506, 551, 584, 633, 660, 686, 722, 773,807, 873, 900
update server for a network location installation ....54, 92, 141, 176, 220, 257, 293, 328, 372, 412,459, 489, 524, 564, 603, 646, 703, 738, 787,822
server requirements verification ................................. 26server software ......................................................... 951
uninstallation ...................................................... 951server software uninstallation ............................951–953
prerequisites .......................................................951remove Avaya Media Serverr software ..............953remove Multimedia Contact Server software ..... 953remove server software ......................................952remove server software patches ........................951
server types ................................................................21software licensing ....................... 961, 962, 966, 969, 976
Apache ...............................................................962Eclipse ................................................................966open source ....................................................... 961OpenSSL ............................................................976SUN ....................................................................969TAO ....................................................................961
Software Uninstall .....................................................949standby CCMA server 88, 172, 326, 411, 523, 601, 737, 821
add domain AD-LDS replication ....88, 172, 326, 523,737, 821
add local (workgroup) AD-LDS replication ..411, 601Standby Multimedia Complement For Elite software 739
installation procedure .........................................739standby server ...................................................409, 599
resolve managed CLAN server name .........409, 599Standby Voice and Multimedia Contact Server .. 75, 309,
393Standby Voice and Multimedia Contact Server software
.........................................................94, 329, 414installation procedure ............................94, 329, 414
Standby Voice Contact Server ...................159, 505, 583Standby Voice Contact Server installation,
prerequisites ................................................ 160Standby Voice Contact Server software .... 177, 525, 604
installation procedure .......................... 177, 525, 604support ....................................................................... 29
contact ................................................................. 29
T
third-party headset ....................................................925registration ......................................................... 925
time .....................................................872, 899, 931, 933CS 1000 Data Extraction Tool installation ..........933NCC standby software installation ..................... 872Orchestration Designer client software installation
............................................................... 931Security Framework installation ......................... 899
tools for checking platform ......................................... 26
U
Unified Communications platform .............................. 31uninstall ............................................................. 955, 956
Agent Desktop client .......................................... 955Agent Desktop Displays .....................................955Orchestration Designer client .............................956
uninstallation .............................................................951server software ...................................................951
uninstalling ................................................................957services for Agent Desktop QoS ........................957
update server ... 54, 92, 141, 176, 220, 257, 293, 328, 372,412, 459, 489, 524, 564, 603, 646, 703, 738, 787,822
network location installation ....54, 92, 141, 176, 220,257, 293, 328, 372, 412, 459, 489, 524, 564,603, 646, 703, 738, 787, 822
upgrade JRE ...69, 120, 153, 200, 229, 271, 306, 353, 385,440, 470, 501, 547, 576, 628, 655, 677, 715, 762,799, 849, 893, 916
Avaya Aura® Contact Center Installation May 2013 983

Third Party Software Upgrade Utility ....69, 120, 153,200, 229, 271, 306, 353, 385, 440, 470, 501,547, 576, 628, 655, 677, 715, 762, 799, 849,893, 916
upgrade Tomcat ....69, 120, 153, 200, 229, 271, 306, 353,385, 440, 470, 501, 547, 576, 628, 655, 677, 715,762, 799, 849, 893, 916
Third Party Software Upgrade Utility ....69, 120, 153,200, 229, 271, 306, 353, 385, 440, 470, 501,547, 576, 628, 655, 677, 715, 762, 799, 849,893, 916
upgrade JDK ... 69, 120, 153, 200, 229, 271, 306, 353,385, 440, 470, 501, 547, 576, 628, 655, 677,715, 762, 799, 849, 893, 916
Third Party Software Upgrade Utility ....69, 120,153, 200, 229, 271, 306, 353, 385, 440,470, 501, 547, 576, 628, 655, 677, 715,762, 799, 849, 893, 916
Utility ...........................................................................27Third Party Software Upgrade ............................. 27
V
verification server requirements ................................. 26verify ..................................................................391, 582
AD-LDS Replication account ...................... 391, 582
videos ......................................................................... 29Avaya Mentor .......................................................29
view online help ........................................................ 929install Windows update KB917607 .....................929
Voice and Multimedia Contact Server .................37, 239Voice and Multimedia Contact Server installation,
prerequisites ....... 38, 76, 240, 276, 310, 356, 394Voice and Multimedia Contact Server software .. 55, 259,
294, 373installation procedure .....................55, 259, 294, 373
Voice Contact Server ......................... 125, 443, 473, 549Voice Contact Server installation, prerequisites ....126,
474, 505, 550, 583Voice Contact Server software ...........142, 460, 491, 566
installation procedure ...................142, 460, 491, 566
W
Web communications ............ 73, 230, 272, 656, 718, 802install external Web server software ....73, 230, 272,
656, 718, 802Windows Server 2008 ................................................ 53
disable UAC .........................................................53Windows services for QoS ....................................... 924
984 Avaya Aura® Contact Center Installation May 2013