23
NodeXL Pro Tutorial: Social network and content analysis with Twitter network data – step by step Last updated: Februrary 12th, 2019

NodeXL Pro Tutorial:Social network and content analysis with Twitter network data – step by step
Last updated: Februrary 12th, 2019

This tutorial shows you how you can run a full social network and content analysis with NodeXL Pro.
While we will use Twitter network data as an example, this approach can be applied to any network dataset of your choice (depending on the available metadata).
If you have any questions, please send us an email: [email protected]
More NodeXL Pro Tutorials can be found here: https://www.smrfoundation.org/nodexl/tutorials
About this Tutorial
1. Getting Started2. Data import3. Prepare data4. Group by cluster5. Calculate metrics6. Time series analysis7. Text/sentiment analysis8. Network Top Items9. Autofill columns
10. Customize graph 11. Save the network map12. Automation
Literature/Links
2
About this Tutorial

2.
1. Before downloading network data, save the file to your machine. It is helpful to add the data source and date to the name file e.g.:
Social Network Analysis Twitter 2019-01-25.xlsx
2. Open the Import Data Options window to select basic options related to the data import: Data > Import > Import Options
3. Select the options shown below and click OK.
3.3
About this Tutorial
1. Getting Started2. Data import3. Prepare data4. Group by cluster5. Calculate metrics6. Time series analysis7. Text/sentiment analysis8. Network Top Items9. Autofill columns
10. Customize graph 11. Save the network map12. Automation
Literature/Links
1. Getting Started

1. Open the Twitter Search Network importer: Data > Import > From Twitter Search Network…
2. Enter a search query of your choice.
3. Select Basic network.
4. Limit # of tweets to 1.000.
5. Click OK.
6. Wait for approx. 3-5 minutes.
7. Save the file after the data download is finished.
The Edges and Vertices spreadsheets now contains network data and additional metadata. Take a look at the worksheets and explore the data.
2.
4.
5.
3.
4
About this Tutorial
1. Getting Started2. Data import3. Prepare data4. Group by cluster5. Calculate metrics6. Time series analysis7. Text/sentiment analysis8. Network Top Items9. Autofill columns
10. Customize graph 11. Save the network map12. Automation
Literature/Links
2. Data Import

2. Data Import
5
You can build advanced search queries with Twitter Standard Search Operators:
https://developer.twitter.com/en/docs/tweets/rules-and-filtering/overview/standard-operators
Standard search: Tesla
Exact phrase: “Tesla Autopilot“
Exclude term: Tesla –Nikola
Boolean query: electric (car OR vehicle)
User search: @Tesla
Search by language: Tesla lang:en (fr/de/nl/…)
Search by date: Tesla from:2019-02-05
Tesla until:2018-02-12
(!) Test your query before downloading data: https://twitter.com/search-home
About this Tutorial
1. Getting Started2. Data import3. Prepare data4. Group by cluster5. Calculate metrics6. Time series analysis7. Text/sentiment analysis8. Network Top Items9. Autofill columns
10. Customize graph 11. Save the network map12. Automation
Literature/Links

When you click on Show Graph/Refresh Graph at the top of the graph window, you can already observe the connected structure of the downloaded raw data.
6
About this Tutorial
1. Getting Started2. Data import3. Prepare data4. Group by cluster5. Calculate metrics6. Time series analysis7. Text/sentiment analysis8. Network Top Items9. Autofill columns
10. Customize graph 11. Save the network map12. Automation
Literature/Links
2. Data Import

3. Prepare Data
1. Click on Data > Prepare Data > Count and Merge Duplicate Edges.
2. Check the box Count duplicate edges and insert the counts into an Edge Weight column and click OK.
3. Navigate to column BA Edge Weight that has just been created in the Edges worksheet. This column will be used later to visulize the strength of connections between the vertices.
7
1.
2. 3.
About this Tutorial
1. Getting Started2. Data import3. Prepare data4. Group by cluster5. Calculate metrics6. Time series analysis7. Text/sentiment analysis8. Network Top Items9. Autofill columns
10. Customize graph 11. Save the network map12. Automation
Literature/Links

4. Group by Cluster
1. Open the Group by cluster window: Analysis > Groups > Group by Cluster…
2. Select Clauset-Newman-Moore.
3. Select Put all neighborless vertices into one group.
4. Click OK and wait.
5. Take a look the Group Vertices and Group Edges worksheets which have just been created. Further, group related columns have been added to the Edges and Verticesworksheets.
6. Click Refresh Graph. Vertex colors and shapes have been added automatically.
8
Learn more about the Clauset-Newman-Moore clustering algorithm: A. Clauset, M. E. J. Newman, and C. Moore (2004): Finding community structure in very large networks. In: Phys. Rev. E 70.
1.
2.
3.
4.
About this Tutorial
1. Getting Started2. Data import3. Prepare data4. Group by cluster5. Calculate metrics6. Time series analysis7. Text/sentiment analysis8. Network Top Items9. Autofill columns
10. Customize graph 11. Save the network map12. Automation
Literature/Links

5. Calculate Metrics
1. Open the Graph Metrics window: Analysis > Graph Metrics > Graph Metrics
2. Check the boxes as seen on the right.
3. Click Calculate Metrics and wait.
4. Have a look at the newly created worksheet Overall Metrics to analyze the composition of the network. Also take a look at the Vertices and Groupsworksheets where the metrics have been added.
1.
2.
3.
4.
9
About this Tutorial
1. Getting Started2. Data import3. Prepare data4. Group by cluster5. Calculate metrics6. Time series analysis7. Text/sentiment analysis8. Network Top Items9. Autofill columns
10. Customize graph 11. Save the network map12. Automation
Literature/Links

6. Time Series Analysis
1. Open the Graph Metrics window: Analysis > Graph Metrics > Graph Metrics
2. Deselect everything but Time Series.
3. Click on Options to open the Time Series window.
4. Select the options as seen on the right.
5. Click OK and then Calculate Metrics to create the new spreadsheet Time Series.
2.
3.
4.
5.
1.
10
About this Tutorial
1. Getting Started2. Data import3. Prepare data4. Group by cluster5. Calculate metrics6. Time series analysis7. Text/sentiment analysis8. Network Top Items9. Autofill columns
10. Customize graph 11. Save the network map12. Automation
Literature/Links

7. Text / Sentiment Analysis
NodeXL Pro is shipped with a skip word list as well as a positive and a negative sentiment words list in English language. These lists can be modified to your needs.
This feature counts the frequency of words and word pairs in a text column. At the same time any word is checked for occurence in one of the sentiment lists.
1. Open the Graph Metrics window: Analysis > Graph Metrics > Graph Metrics
2. Deselect everything but Words and Word Pairs.
3. Click on Options to open the Word and Word Pair Metrics window.
4. Choose column Tweet.
5. Optional: Enter your own list of keywords into List 3.
6. Click OK and then Calculate Metrics.
7. Take a look at the two new spreadsheets Words and Word Pairs that have just been created. Further, sentiment related columns have been added to the Edges and Vertices spreadsheets.
1.
3.
2.
4.
6.
5.
11
About this Tutorial
1. Getting Started2. Data import3. Prepare data4. Group by cluster5. Calculate metrics6. Time series analysis7. Text/sentiment analysis8. Network Top Items9. Autofill columns
10. Customize graph 11. Save the network map12. Automation
Literature/Links

8. Network Top Items
This feature summarizes the top contents of the network data by collecting the most frequently occuring URLs, domains, hashtags, words and word pairs from the Edges worksheet.
1. Open the Graph Metrics window: Analysis > Graph Metrics > Graph Metrics
2. Deselect everything but Network Top Items.
3. Click on Options to open the Network Top Items window.
4. Select Tweet to collect top words and word pairs from the Edges worksheet).
5. Click on Add… to open the window below.
6. Select the column URLs in Tweet, choose the number of items to get and set the column delimiter to Space. Click OK.
2.
3.
4.
1.
5.
6.
12
About this Tutorial
1. Getting Started2. Data import3. Prepare data4. Group by cluster5. Calculate metrics6. Time series analysis7. Text/sentiment analysis8. Network Top Items9. Autofill columns
10. Customize graph 11. Save the network map12. Automation
Literature/Links

8. Network Top Items
7. Repeat step six from the previous page for columns Domains in Tweet and Hashtags in Tweet.
8. When the Network Top Items window looks like the one on the right, click OK and then Calculate Metrics. This step may take a few minutes.
9. Have a look at the new worksheet Network Top items.
8.
9.
13
About this Tutorial
1. Getting Started2. Data import3. Prepare data4. Group by cluster5. Calculate metrics6. Time series analysis7. Text/sentiment analysis8. Network Top Items9. Autofill columns
10. Customize graph 11. Save the network map12. Automation
Literature/Links

9. Autofill Columns
Based on the previous calculations, we will now start with the visualization. The Autofill Columns feature helps to fill a number of columns with a few clicks.
1. Go to Visual Properties > Autofill columns to open the Autofill Columns window seen on the right.
2. Choose source columns and set the options for Edges, Vertices and Groups as shown on the next three pages.
14
About this Tutorial
1. Getting Started2. Data import3. Prepare data4. Group by cluster5. Calculate metrics6. Time series analysis7. Text/sentiment analysis8. Network Top Items9. Autofill columns
10. Customize graph 11. Save the network map12. Automation
Literature/Links

9. Autofill Columns: Edges
15
About this Tutorial
1. Getting Started2. Data import3. Prepare data4. Group by cluster5. Calculate metrics6. Time series analysis7. Text/sentiment analysis8. Network Top Items9. Autofill columns
10. Customize graph 11. Save the network map12. Automation
Literature/Links
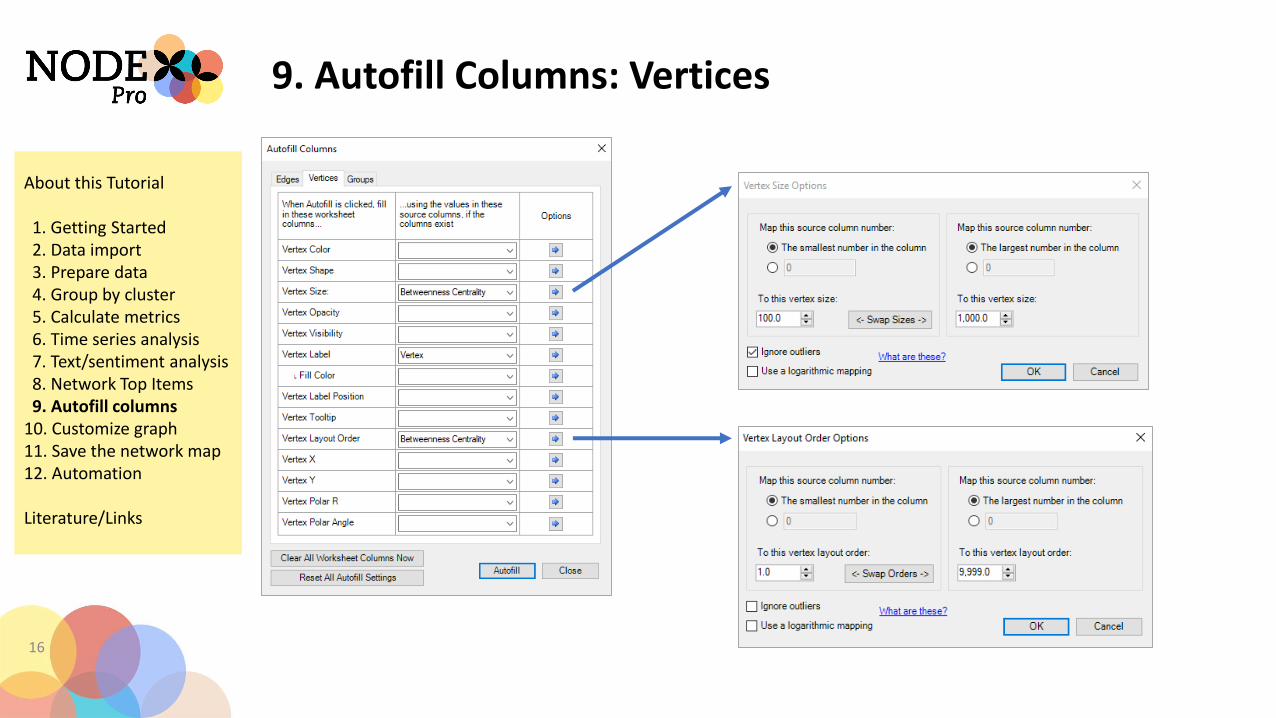
9. Autofill Columns: Vertices
16
About this Tutorial
1. Getting Started2. Data import3. Prepare data4. Group by cluster5. Calculate metrics6. Time series analysis7. Text/sentiment analysis8. Network Top Items9. Autofill columns
10. Customize graph 11. Save the network map12. Automation
Literature/Links

9. Autofill Columns: Groups
17
3. When all options are set, click Autofill.
4. Wait. This step may take up to a few minutes. The graph will automatically refresh.
3.
About this Tutorial
1. Getting Started2. Data import3. Prepare data4. Group by cluster5. Calculate metrics6. Time series analysis7. Text/sentiment analysis8. Network Top Items9. Autofill columns
10. Customize graph 11. Save the network map12. Automation
Literature/Links

10. Customize Graph: Layout Options
1. Open the Layout Options window: Graph > Layout > Layout Options
2. Set the Layout style to: Lay out each of the graph‘s groups in ist own box.
3. Set the Box layout algorithm to: Treemap.
4. Click OK and then Lay Out Again.
1.
2.3.
4.
18
About this Tutorial
1. Getting Started2. Data import3. Prepare data4. Group by cluster5. Calculate metrics6. Time series analysis7. Text/sentiment analysis8. Network Top Items9. Autofill columns
10. Customize graph 11. Save the network map12. Automation
Literature/Links

10. Customize Graph: Add Images to Vertices
4. Open the Group Options window: Analysis > Groups > Group Options
5. Set the option: The shapes specified in the Shape column on the Vertices worksheet.
6. Click OK.
7. Click Refresh Graph.1.
2.
5.
3.
7.
6.
1. Open the Graph Options window.
2. Go to page Vertices and set the Vertex Shape to Image.
3. Click OK.
4.
19
About this Tutorial
1. Getting Started2. Data import3. Prepare data4. Group by cluster5. Calculate metrics6. Time series analysis7. Text/sentiment analysis8. Network Top Items9. Autofill columns
10. Customize graph 11. Save the network map12. Automation
Literature/Links

10. Customize Graph: Label Options
1. Open the Graph Options window above the graph pane.
2. Go to page Other and click on Labels to open the Label Options Window.
3. Customize the position, font and size of vertex and group box labels.
4. Click OK to close the Label Options window.
5. Then click OK to close the graph options.
1.
2.
4.
5.
3.
3.3.
20
About this Tutorial
1. Getting Started2. Data import3. Prepare data4. Group by cluster5. Calculate metrics6. Time series analysis7. Text/sentiment analysis8. Network Top Items9. Autofill columns
10. Customize graph 11. Save the network map12. Automation
Literature/Links

1. To open the Image Options window, right-click in the graph window, then select Image Options…
2. Customize the options and click OK.
3. Right-click in the graph window and then select Save Image…
Congratulations! You have successfully analyzed and visualized Twitter network data.
11. Save the Network Map as Image
1.3. 2.
21
About this Tutorial
1. Getting Started2. Data import3. Prepare data4. Group by cluster5. Calculate metrics6. Time series analysis7. Text/sentiment analysis8. Network Top Items9. Autofill columns
10. Customize graph 11. Save the network map12. Automation
Literature/Links

12. Automation
22
1.
You can automate all previous steps with the Automation feature:
1. Open the Automation window: Graph > Automate.
2. Set the Options… for each task.
3. Click Run and wait.
4. Click Options > Export to save your customized Data Recipe.
Learn more about automating NodeXL Pro:
NodeXL Pro Tutorial (pdf): How to automate NodeXL Pro
• https://www.smrfoundation.org/nodexl/tutorials
NodeXL Pro Video Tutorial on Automation
• https://www.youtube.com/watch?v=mjAq8eA7uOM
4.
2.
5.
3.
About this Tutorial
1. Getting Started2. Data import3. Prepare data4. Group by cluster5. Calculate metrics6. Time series analysis7. Text/sentiment analysis8. Network Top Items9. Autofill columns
10. Customize graph 11. Save the network map12. Automation
Literature/Links

Useful Links
Social Media Research Foundation: http://www.smrfoundation.org/
NodeXL Graph Gallery: https://nodexlgraphgallery.org/
Video: Marc Smith | Network Mapping the Ecosystem: https://www.youtube.com/watch?v=kDiGl-2m868
Viedo: How to Automate NodeXL Pro: https://www.youtube.com/watch?v=mjAq8eA7uOM
Twittter search operators: https://developer.twitter.com/en/docs/tweets/rules-and-filtering/overview/standard-operators
Literature
Derek Hansen, Ben Shneiderman and Marc Smith (2009): Analyzing Social Media Networks with NodeXL: https://www.elsevier.com/books/analyzing-social-media-networks-with-nodexl/hansen/978-0-12-382229-1
Eduarda Mendes Rodrigues, Natasa Milic-Frayling, Marc Smith, Ben Shneiderman, Derek Hansen (2011): Group-in-a-box Layout for Multi-faceted Analysis of Communities. In: IEEE Third International Conference on Social Computing, October 9-11, 2011. Boston, MA: https://www.cs.umd.edu/hcil/trs/2011-24/2011-24.pdf
Marc A. Smith, Lee Rainie, Ben Shneiderman and Itai Himelboim (2014): Mapping Twitter Topic Networks: From Polarized Crowds to Community Clusters. PEW Research Report: https://www.pewinternet.org/2014/02/20/mapping-twitter-topic-networks-from-polarized-crowds-to-community-clusters/
Itai Himelboim, Marc A. Smith, Lee Rainie, Ben Shneiderman and Camila Espina: Classifying Twitter Topic-Networks Using Social Network Analysis. In: Social Media + Society (January-March 2017: 1 –13). https://journals.sagepub.com/doi/full/10.1177/2056305117691545
Borgatti, Stephen P. (2006): Identifying sets of key players in a social network. In: Comput Math Organiz Theor (2006) 12: 21–34
Aaron Clauset, M. E. J. Newman, and Cristopher Moore (2004): Finding community structure in very large networks. In: Phys. Rev. E 70.
23
About this Tutorial
1. Getting Started2. Data import3. Prepare data4. Group by cluster5. Calculate metrics6. Time series analysis7. Text/sentiment analysis8. Network Top Items9. Autofill columns
10. Customize graph 11. Save the network map12. Automation
Literature/Links
Links and Literature


