Page 1
NOKIA CARE SUITE
Nokia Service Software User Guide
NOKIA CARE SUITE PST AND
MULTI SW UPDATER
Owner: Nokia, Care, GTM, Competence Management
Scope: User Guide Nokia Service Software for NCP Level 1 & 2
Originator: GSS Software
Version: 1.7.14
Document ID: CareSuiteUserGuide.doc
Location: Salo, Finland
Page 2
Page 2
Change History Version Date Status Comments V 0.1 16.09.11 Draft
V 0.2 18.11.11 Draft Section 3 Install – pre-requisites installation and NCS installation have
been updated.
Sections 5.1.1 and 5.1.2 have been updated.
Screenshots of the Application Launcher have been updated.
Section 9.1 File Menu has been updated.
Section 9.3 Features has been updated.
Section 11.1 ZIP Package Generator for Report Errors has been updated.
V1.0 01.12.11 Approved Section 1 - exclamation mark in the last sentence changed to point.
Section 1.1 Legal Notice – year updated to 2011.
Section 5.1 Product specific data is needed to all software update
methods, manual recovery, type label printing, product code change and
hardware tests.
Section 6.1 Typo corrected in step 6.
V1.1 20.12.11 Draft Section 4 – screenshots has been updated.
Section 5.2.2 – screenshot has been updated.
Section 6.1 – screenshots has been updated.
Section 6.3.3 Recovery of Nokia Lumia 710 has been added.
Section 6.7 Vibra test – has been updated.
Section 6.8 Audio Tests – has been updated.
Section 6.9 Ambient Light Sensor – has been updated.
Section 6.10 Display Tests – has been updated.
Section 9 with subsections has been updated.
V1.2 03.02.12 Draft Section 6.8.3 Audio Loopback Test has been added.
Section 6.13 Keyboard Test with subsections has been updated.
Section 6.15 Touch Display Test has been updated.
Section 6.16 Touch Display Calibration has been updated.
Sections: 9.2, 9.4, 9.5 have been updated.
V1.3 07.02.12 Draft Year has been updated in the 1.1 Legal Notice.
V1.4 19.03.12 Draft Section 6.1 Layout – pictures has been updated.
Section 6.17 Camera Configuration has been added.
Section 9 Description of Menu Structure has been updated.
V1.5 15.05.12 Draft Section 2.6 – not added that UAC can be turned on after installation.
Section 3.1 changed to Install Microsoft .NET framework 4.0.
Section 6.3 – information about post conditions for recovery tool has
been added.
Section 6.3.3 has been renamed to Recover of Windows Phone Devices.
Section 6.3.4 Finding Variant Online has been added.
Section 9 Description of Menu Structure has been updated.
Section 11.1 ZIP Package Generator for Reporting Errors has been
updated.
V1.6 25.05.12 Draft Product Code Change has been renamed to Language Package Change
Section 3.1 – Occurrences of .NET framework 2.0 replaced to .NET
Framework 4.0
V1.7 04.07.12 Draft Support for Windows XP is discontinued. All related information about
Windows XP has been removed.
Section troubleshooting added: out of disk space and formatting disk
message after connecting device described.
V1.7.1 31.10.12 Draft Hardware tests for Windows Phone 8 devices have been described.
Multi Software Updater section has been removed.
Page 3
Page 3
V1.7.2 05.11.12 Draft Symbian S40 / S60 Hardware Tests section renamed to S40 / S60
Hardware Tests.
V1.7.3 18.12.12 Draft Windows Phone 8 Hardware Tests added.
6.1 Layout has been updated.
6.3.4 Finding Variant Online has been updated.
6.5.6.2 Pattern Test has been updated.
8. Multi Software Updater has been added.
V1.7.4 20.12.12 Draft Section 6.2 has been updated – information about SW Update is
removed.
Sections 5.2.2, 5.2.3 and 5.2.4 have been updated.
Sign In process described in sections: 5.1.2 and 6.
V1.7.5 19.03.13 Draft Section 6.6.17 Charging Test has been added.
Section 6.6.18 IHF Calibration has been added.
V1.7.6 05.04.13 Draft Section 8.1 Multi Refurbish – instruction how to flash 16 devices
simultaneously has been added.
Section 6.6.15 has been updated.
Section 6.6 has been renamed to Lumia Hardware Tests.
Section 7 Multi IMEI Reader has been updated.
V1.7.7 18.06.13 Draft Section 6.9 HV Battery Information has been added.
V1.7.8 21.06.13 Draft Updates in sections: 6.6.1 Self Test, 6.6.6 Keyboard Test,
6.6.14 ALS Calibration
V1.7.9 16.09.13 Draft Section 6.4 Language Package Change has been updated.
V1.7.10 20.09.13 Draft Section 6.7 Nokia 108 Hardware Tests has been added.
V1.7.11 07.11.13 Draft Section 6.8.1 Type Label Printing for Lumia 2520 has been added.
V1.7.12 06.12.13 Draft Section 6.6.19 Antenna Tuner Calibration has been added.
Section 6.6.20 Barometer Test has been added.
V1.7.13 27.02.14 Draft Section 6.2 Refurbish / Software Reset updated.
Section 6.4 Language Package Change updated.
Section 9.1 File Menu updated.
Section 12.3 Nokia X device is not detected has been added.
V1.7.14 02.04.14 Draft Section 3 Install has been updated.
Section 6.5 Switching Product Mode has been added.
Page 4
Page 4
Table of Contents
1. General ............................................................................................................................................... 71.1 Legal Notice ............................................................................................................................................................. 7 1.2 License Issues .......................................................................................................................................................... 7 1.2.1 OpenSSL License .................................................................................................................................................. 7 1.3 Nokia Online (NOL) ................................................................................................................................................... 7 1.4 Installation path ....................................................................................................................................................... 7 2. Prepare ............................................................................................................................................... 82.1 Supported OS .......................................................................................................................................................... 8 2.2 Minimum HW Requirements ..................................................................................................................................... 8 2.3 SW Requirements ..................................................................................................................................................... 8 2.4 Other Requirements ................................................................................................................................................. 8 2.5 Download Software from NOL ................................................................................................................................... 8 2.6 Turn off User Account Control .................................................................................................................................... 8 3. Install.................................................................................................................................................. 93.1.1 Troubleshooting: Care Suite Installation Fails ...................................................................................................... 13 3.1.2 Troubleshooting: Manual Deletion of Previous Care Suite Version (Windows 32bit). .............................................. 14 3.1.3 Troubleshooting: Manual Deletion of Previous Care Suite Version (Windows 64bit). .............................................. 15 4. Launch Care Suite .............................................................................................................................. 164.1 Update Care Suite applications from the Application Launcher ................................................................................ 17 5. Configure .......................................................................................................................................... 185.1 Product Specific Data Packages ............................................................................................................................. 18 5.1.1 Use Local Software Packages .............................................................................................................................. 18 5.1.2 Use Online Software Packages from Firmware Repository ..................................................................................... 20 5.2 Configure Connections between Phone and PC ....................................................................................................... 21 5.2.1 Check that USB Drivers are Installed Correctly (for devices with USB service cable) ............................................... 21 5.2.2 Configure Connection Using Nokia Fuse (for devices with service adapter) ............................................................ 22 5.2.3 Add a Connection ................................................................................................................................................ 23 5.2.4 Edit a Connection ................................................................................................................................................ 27 6. Product Support Tool For Store ............................................................................................................ 286.1 Layout .................................................................................................................................................................... 29 6.1.1 Device Panel, Selection of the Connected Device ................................................................................................. 30 6.1.2 Navigation Menu ................................................................................................................................................. 31 6.1.3 Phone Information .............................................................................................................................................. 31 6.1.4 Action Report Log ................................................................................................................................................ 32 6.1.5 Data Package Selection ...................................................................................................................................... 32 6.1.6 Downloads Panel (Downloading Packages) .......................................................................................................... 32 6.2 Refurbish / Software Reset ..................................................................................................................................... 34 6.3 Recovery ................................................................................................................................................................ 35 6.3.1 Recovery of Devices Connected via USB ............................................................................................................... 35 6.3.2 Recovery of Devices Connected via Service Adapter ............................................................................................. 38 6.3.3 Recovery of Windows Phone Devices .................................................................................................................... 40 6.3.4 Finding Variant Online ......................................................................................................................................... 43 6.4 Language Package Change .................................................................................................................................... 45 6.5 Switching Product Mode ......................................................................................................................................... 46 6.6 S40 / S60 Hardware Tests ..................................................................................................................................... 47 6.6.1 Hardware Test ..................................................................................................................................................... 47 6.6.2 Self Test .............................................................................................................................................................. 48 6.6.3 Vibra Test ............................................................................................................................................................ 51 6.6.4 Audio Tests ......................................................................................................................................................... 51 6.6.5 Ambient Light Sensor .......................................................................................................................................... 53 6.6.6 Display Test ........................................................................................................................................................ 60 6.6.7 Keyboard Test ..................................................................................................................................................... 63
Page 5
Page 5
6.6.8 Switch Test ......................................................................................................................................................... 64 6.6.9 Touch Display Test ............................................................................................................................................... 66 6.6.10 Touchpad Calibration ........................................................................................................................................ 67 6.6.11 Camera Configuration ....................................................................................................................................... 68 6.7 Lumia Hardware Tests ............................................................................................................................................ 69 6.7.1 Self Test .............................................................................................................................................................. 69 6.7.2 Touch Display Test ............................................................................................................................................... 70 6.7.3 Display Test ........................................................................................................................................................ 70 6.7.4 Vibra Test ............................................................................................................................................................ 70 6.7.5 SIM Test ............................................................................................................................................................. 71 6.7.6 Keyboard Test ..................................................................................................................................................... 71 6.7.7 Microphones ....................................................................................................................................................... 71 6.7.8 Accelerometer Test .............................................................................................................................................. 72 6.7.9 Audio Output Test ................................................................................................................................................ 73 6.7.10 Memory Card Test ............................................................................................................................................. 74 6.7.11 Proximity Sensor Test ........................................................................................................................................ 75 6.7.12 Proximity Sensor Calibration ............................................................................................................................. 76 6.7.13 ALS Test............................................................................................................................................................ 77 6.7.14 ALS Calibration ................................................................................................................................................. 78 6.7.15 Light Test .......................................................................................................................................................... 79 6.7.16 Gyroscope Calibration ....................................................................................................................................... 80 6.7.17 Charging Test .................................................................................................................................................... 81 6.7.18 IHF Calibration .................................................................................................................................................. 82 6.7.19 Antenna Tuner Calibration ................................................................................................................................. 83 6.7.20 Barometer Test ................................................................................................................................................. 84 6.8 Nokia 108 Hardware Tests ...................................................................................................................................... 85 6.8.1 Self Test .............................................................................................................................................................. 85 6.8.2 Vibra Test ............................................................................................................................................................ 87 6.8.3 Microphones Test ................................................................................................................................................ 87 6.8.4 Light Test ............................................................................................................................................................ 88 6.8.5 Pattern Test ........................................................................................................................................................ 89 6.8.6 Keyboard Test ..................................................................................................................................................... 90 6.8.7 Memory Card Test ............................................................................................................................................... 92 6.8.8 SIM Test ............................................................................................................................................................. 92 6.8.9 FM Radio Test ..................................................................................................................................................... 93 6.9 Type Label Printing ................................................................................................................................................. 95 6.9.1 Type Label Printing for Lumia 2520...................................................................................................................... 98 6.10 DBI Battery Info ................................................................................................................................................. 100 6.11 HV Battery Information ...................................................................................................................................... 101 6.12 Firmware Download........................................................................................................................................... 102 7. Multi IMEI Reader ............................................................................................................................ 103 8. Multi Software Updater ..................................................................................................................... 106 8.1 Multi Refurbish ................................................................................................................................................... 107 9. Description Of Menu Structure .......................................................................................................... 110 9.1 File Menu ............................................................................................................................................................ 110 9.2 View Menu .......................................................................................................................................................... 111 9.3 Tools ................................................................................................................................................................... 111 9.4 Help Menu .......................................................................................................................................................... 111 10. Known Errors ................................................................................................................................... 112 11. Reporting Errors and Change Requests .............................................................................................. 113 11.1 ZIP Package Generator for Reporting Errors ........................................................................................................ 113 11.2 Manual Error Reporting ..................................................................................................................................... 115 12. Troubleshooting ............................................................................................................................... 117 12.1 Out of disk space .............................................................................................................................................. 117
Page 6
Page 6
12.2 After Connecting Device a Question about Formatting is Displayed ..................................................................... 117 12.3 Nokia X device is not detected. .......................................................................................................................... 117 13. Notes .............................................................................................................................................. 118
Page 7
Page 7
Nokia Care Suite User Manual
1. GENERAL
Care Suite (CS) is multi-protocol service software that supports Nokia CDMA, GSM and WCDMA products. Please see product
specific technical bulletins for phone model specific information and instructions.
Important: This document does not claim to be exhaustive. The actual software install or uninstall process may vary from this
description depending on the computer hardware used, the software already installed and the entries in the registry.
Close all applications before installing Nokia service software.
Read the information provided by the installation program carefully, it often points out important steps in the installation.
1.1 Legal Notice
Copyright © Nokia Corporation 2013. This material, including documentation and any related computer programs, is protected by
copyright controlled by Nokia Corporation. All rights are reserved. Copying, including reproducing, storing, adapting or translating,
any or all of this material requires the prior written consent of Nokia Corporation. This material also contains confidential
information, which may not be disclosed to others without the prior written consent of Nokia Corporation.
1.2 License Issues
1.2.1 OpenSSL License
http://www.openssl.org/source/license.html
1.3 Nokia Online (NOL)
Information and software for all Nokia products is available on Nokia Online (NOL) (www.nokiaonline.com). After logging in with a
valid user name and password, select the Care Service menu and then Support Library.
If you do not have access to NOL, please go to the site and click on Registration Request.
For documents which have been released after May 31st 2010, please see Nokia Online / KICS Information Page
(https://icknowledge.online.nokia.com). After logging in with a valid user name and password, select the S&R Documents
category and then Service Sw sub category.
If you do not have access to NOL, please go to the site and click on Registration Request.
1.4 Installation path
A default installation path is provided (C:\Program Files\Nokia\Nokia Care Suite or C:\Program Files (x86)\Nokia\Nokia Care
Suite).
Page 8
Page 8
2. PREPARE
2.1 Supported OS
Microsoft Windows 7
2.2 Minimum HW Requirements
CPU: Intel or Intel compatible 1 GHz or faster
RAM: Minimum 1 GB
Hard Disk: 300 MB available
Product-specific service cable or service adapter
2.3 SW Requirements
Microsoft .NET Framework 4.0
Care Suite package: file NokiaCareSuiteStore-<MajorVersion>.<MinorVersion>.<BuildNumber>.<YYWW>.exe where year (Y),
week (W), build number, major and minor versions are variable
Product-specific data packages from NOL, or online access to Nokia Firmware Repository (FiRe) for product-specific data
2.4 Other Requirements
SIM card: Some phones may require that a SIM card is inserted before you can update software.
SPC number: For CDMA phones only. Some CDMA phones may require an SPC number before you can write PRL/ERI or PRI
settings.
Windows Phone 8 devices require Microsoft Windows 7 or newer system.
2.5 Download Software from NOL
Before you install the Care Suite software and product-specific data packages, download them from NOL and save them on your
computer or a network server in a suitable folder structure.
2.6 Turn off User Account Control
Before you start installation the User Account Control should be turned off. Go to Control Panel -> User accounts -> Turn user account
control on /off -> Uncheck UAC box -> click OK.
After successful installation the User Account Control can be turned on.
Page 9
Page 9
3. INSTALL
You can install Care Suite on top of previous versions.
1. Locate file NokiaCareSuiteStore-<MajorVersion>.<MinorVersion>.<BuildNumber>.<YYWW>.exe where year (Y), week (W), build
number, major and minor versions are variable.
2. Double-click NokiaCareSuiteStore-<MajorVersion>.<MinorVersion>.<BuildNumber>.<YYWW>.exe and follow the prompts for
installation.
3. Click Install to install prerequisites.
Wait until prerequisites installation finishes.
4. After installation of prerequisites space requirements computing is done and installation process starts. Click Next.
Page 10
Page 10
5. Select “I accept…” and then click Next.
6. Enter user name and organization.
Page 11
Page 11
7. Select setup type.
If you select custom, you can select components to be installed and path for installation.
Page 12
Page 12
8. Click Install to begin installation. You can select a desktop shortcut and quick launch shortcut to be created.
NOTE: On the Windows 7 the Quick Launch task bar is not visible by default. Instructions how to enable the Quick Launch task bar
can be found under following link: http://www.sevenforums.com/tutorials/888-quick-launch-enable-disable.html
Page 13
Page 13
9. Wait while Nokia Care Suite is being installed.
10. Click Finish.
NOTE: After successful installation the User Account Control can be turned on.
3.1.1 Troubleshooting: Care Suite Installation Fails
Please use the Nokia Service Application Manager tool to uninstall previous Care Suite and other Nokia Service Software Applications
in case of any problems with installing Care Suite on top of a previously installed version.
You can also manually delete previous versions and plug-in components.
Page 14
Page 14
3.1.2 Troubleshooting: Manual Deletion of Previous Care Suite Version (Windows 32bit).
Below you can find instructions how to manually delete previous versions of Nokia Care Suite and other Nokia Service Software
Applications.
1. Select Start -> Control Panel -> Hardware and Sound -> Device Manager and remove the following Nokia applications if they are
visible in the list of installed programs:
o NSL Service Modules (e.g. Nsl_service_module_00003)
o Nokia Service Layer
o Nokia Care Suite (all versions)
o Nokia Mobile USB Device Driver
o Nokia Mobile Phone Driver
o Nokia Flashing Cable Driver
o Nokia Connectivity Cable Driver
o Nokia 3806 USB Driver
o Nokia Software Updater
o Nokia Software Updater Pro
o FLS-4 Driver Installation
o Fuse Drivers
o WinUSB Drivers (all versions)
o Microsoft .NET Framework (all versions, service and language packs)
o Microsoft Visual C++ Redistributable
o Microsoft .NET Framework (all versions)
o MSXML (all versions and service packs)
2. Restart your computer.
3. Delete the following folders:
o C:\Program Files\Nokia\Nokia Care Suite
o C:\Program Files\Nokia\Troubleshooting
o C:\Program Files\Nokia\Envira
o C:\Program Files\Nokia\ZuneDrivers
o C:\Program Files\Nokia\Phoenix (optionally, if Phoenix is installed, uninstall Phoenix first)
o C:\Program Files\Nokia\Connectivity Cable Driver
o C:\Program Files\Nokia\3806_USB_Driver
o C:\Program Files\Common Files\Nokia\Fuse
o C:\Program Files\Common Files\Nokia\Service Layer
o C:\Program Files\Common Files\Nokia\Tss
o C:\ProgramData\Nokia\Fuse
o C:\ProgramData\Nokia\Nokia Care Suite
o C:\ProgramData\Nokia\UCM
o C:\Users\[username]\AppData\Roaming\Nokia\Nokia Care Suite
4. Uninstall any plug-in components (if installed).
5. Restart your computer.
6. Install Care Suite.
7. If this does not solve the problem, uninstall the following applications:
Phoenix (and remove directory C:\Program Files\Nokia\Phoenix)
FastTrace
8. Install Care Suite again.
Page 15
Page 15
3.1.3 Troubleshooting: Manual Deletion of Previous Care Suite Version (Windows 64bit).
Below you can find instructions how to manually delete previous versions of Nokia Care Suite and other Nokia Service Software
Applications.
1. Select Start -> Control Panel -> Hardware and Sound -> Device Manager and remove the following Nokia applications if they are
visible in the list of installed programs:
o NSL Service Modules (e.g. Nsl_service_module_00003)
o Nokia Service Layer
o Nokia Care Suite (all versions)
o Nokia Mobile USB Device Driver
o Nokia Mobile Phone Driver
o Nokia Flashing Cable Driver
o Nokia Connectivity Cable Driver
o Nokia 3806 USB Driver
o Nokia Software Updater
o Nokia Software Updater Pro
o FLS-4 Driver Installation
o Fuse Drivers
o WinUSB Drivers (all versions)
o Microsoft .NET Framework (all versions, service and language packs)
o Microsoft Visual C++ Redistributable
o Microsoft .NET Framework (all versions)
o MSXML (all versions and service packs)
2. Restart your computer.
3. Delete the following folders:
o C:\Program Files (x86)\Nokia\Nokia Care Suite
o C:\Program Files (x86)\Nokia\Troubleshooting
o C:\Program Files (x86)\Nokia\Envira
o C:\Program Files (x86)\Nokia\ZuneDrivers
o C:\Program Files (x86)\Nokia\Phoenix (optionally, if Phoenix is installed, uninstall Phoenix first)
o C:\Program Files (x86)\Nokia\Connectivity Cable Driver
o C:\Program Files (x86)\Nokia\3806_USB_Driver
o C:\Program Files (x86)\Common Files\Nokia\Fuse
o C:\Program Files (x86)\Common Files\Nokia\Service Layer
o C:\Program Files (x86)\Common Files\Nokia\Tss
o C:\ProgramData\Nokia\Fuse
o C:\ProgramData\Nokia\Nokia Care Suite
o C:\ProgramData\Nokia\UCM
o C:\Users\[username]\AppData\Roaming\Nokia\Nokia Care Suite
4. Uninstall any plug-in components (if installed).
5. Restart your computer.
6. Install Care Suite.
7. If this does not solve the problem, uninstall the following applications:
Phoenix (and remove directory C:\Program Files (x86)\Nokia\Phoenix)
FastTrace
8. Install Care Suite again.
Page 16
Page 16
4. LAUNCH CARE SUITE
You can launch Care Suite in the following ways:
If the “Shortcut on desktop” option was selected during installation, double-click the Nokia Care Suite shortcut on the desktop.
If you used the default installation path, launch the application from C:\Program Files\Nokia\Nokia Care Suite
\ApplicationLauncher\Bin\applicationlauncher.exe or Start -> All Programs –> Nokia -> Nokia Care Suite –> Launch Nokia Care
Suite.
Nokia Care Suite application launcher shows the available applications for use with CDMA and for use with GSM/WCDMA.
NOTE: The selection of applications shown depends on what Nokia Tools are installed on your PC.
Application Launcher
Page 17
Page 17
4.1 Update Care Suite applications from the Application Launcher
If there is an online connection to Firmware Repository (FiRe), the Application Launcher also enables you to check Care Suite updates
and install them if available.
1. To check available updates, click on Updates and click Check for updates link.
2. If update is available click Download.
3. After the update is downloaded click Install.
Page 18
Page 18
5. CONFIGURE
5.1 Product Specific Data Packages
Product specific data is needed to all software update methods, manual recovery, type label printing, language package change and
hardware tests. There are two options for accessing product specific data:
Local software packages are downloaded from NOL and installed to local storage location. They can be used when the
Firmware Repository (FiRe) connection is not available or your PC is offline.
Online software packages are automatically fetched from FiRe to local storage location. This requires that your PC is online
and has a connection to FiRe.
5.1.1 Use Local Software Packages
1. Configure Care Suite to use local packages:
a. Launch Nokia Care Suite and select Product Support Tool for Store or Multi SW Updater.
b. On the bottom of window from the status bar click the Online icon.
c. Click Work Offline to switch application to the offline mode.
You can also set in which mode will operate the application after launching from Preferences dialog:
a. Open Preferences dialog from File->Preferences menu.
b. Go to Network tab.
c. Set Application Startup Mode to Offline.
2. Navigate to the desired data package on NOL or a local storage location where the data package is available.
3. Double click on the msi filename.
Page 19
Page 19
4. Follow the prompts and accept the default settings or select an alternate location.
The default paths for the installation are C:\Program Files\Common Files\Nokia\DataPackage\Products and C:\Program
Files\Nokia\Phoenix\Products
5. When prompted to start the installation of the selected data package, click Next. The following shows an example of a product
specific data package installation.
6. Wait while the data package is installed.
7. When the installation is complete, click Finish.
Page 20
Page 20
After you have installed the data package, Care Suite is able to find the appropriate software for the device.
5.1.2 Use Online Software Packages from Firmware Repository
1. Launch Nokia Care Suite and select Product Support Tool for Store or Multi SW Updater.
2. On the bottom of window from the status bar click on the Offline icon.
3. Click Work Offline to remove the checkmark and switch the application to the online mode.
NOTE: If you switching to Online mode the Sign In dialog can be displayed:
To Sign In select proper channel from Sign in to drop-down menu (preferred one is Care Pro), enter proper user name and password and
click Sign In button.
To resign from switching to Online and continue work in offline mode click the Work offline button.
NOTE: If user gives NOL login credentials three times wrong, the account will be blocked for security reasons. The username is blocked
from accessing Nokia Online to prevent unauthorized login attempts. Please try again in half an hour.
You can also set in which mode will operate the application after launching from Preferences dialog:
1. Open Preferences dialog from File->Preferences menu.
2. Go to Network tab
3. Set Application Operating Mode to Online.
When you are online and connect a new device to the computer, Care Suite automatically connects to Firmware Repository (FiRe) to
download the latest software versions for the device.
NOTE: In case of access through firewall following domains and protocols should be opened in the firewall configuration:
www.caresuite.nokia.com, protocol: https (port 443)
nds2.fds-fire.nokia.com, protocol: http (port 80)
Page 21
Page 21
5.2 Configure Connections between Phone and PC
For devices with a USB service cable, see section Check that USB Drivers are Installed Correctly (for devices with USB service
cable).
For Easy Flash II devices (for example Nokia 1202), see section Configure Connection Using Nokia Fuse (for devices with
service adapter).
5.2.1 Check that USB Drivers are Installed Correctly (for devices with USB service cable)
Devices with a USB service cable (for example, Nokia BB5 products) are automatically detected and do not require configuration. The
product is recognized as a new USB device and installed by the computer operating system.
When you connect a device to the computer, WHQL-signed Nokia USB drivers (USB phone, USB modem, USB port) are installed
automatically in the background. The following message is displayed on the notification panel in the bottom right corner:
5.2.1.1 Troubleshooting: USB Driver Installation Fails
If the automatic USB driver installation is not successful, follow the procedure below:
1. Open Control Panel –> Hardware and Sound –>Device Manager.
2. Locate any incomplete devices. Incomplete devices will be marked with a yellow question mark.
3. Right-click on the device and select Update Driver Software.
4. When the Hardware Update Wizard starts and asks whether Windows should search for software, select “Browse my computer for
driver software”.
Page 22
Page 22
5. Click Browse, select the folder C:\Program Files\Nokia\Nokia Care Suite\Drivers and click Next.
Note: Under 64bit operating system the folder with drivers is C:\Program Files (x86)\Nokia\Nokia Care Suite\Drivers
The driver is now installed.
6. Repeat the steps above for all devices with yellow question marks.
5.2.2 Configure Connection Using Nokia Fuse (for devices with service adapter)
Easy Flash II devices such as the Nokia 1202 (RH-111) are FBUS devices and require manual configuration using the Nokia Fuse
application.
1. Launch Nokia Care Suite.
2. In Nokia Care Suite Application Launcher, double-click Fuse.
Nokia Fuse opens, showing all currently configured connections (if any).
Page 23
Page 23
Meanings of columns:
Column 1 – Name – name of the connection
Column 2 – Type – type of connection (USB, FBUS, etc)
Column 3 – Product type – information about product type
Column 4 – Devices – an icon is displayed if a device is connected
3. To add, edit or remove a connection, see the instructions below:
Add a Connection
Edit a Connection
Remove a Connection
5.2.3 Add a Connection
1. Launch Nokia Care Suite and select Fuse.
2. Connect the phone to your computer with the service device and switch on the phone.
3. To add a connection manually, click Add.
4. Select the type of connection you want to add. For example:
For an FLS-5 flash device, select USB FBUS or FBUS.
NOTE: FLS-5 flash device is supported only under 32bit operating system.
For a USB-connected prommer, select NFPD_USB.
Page 24
Page 24
Click Next to continue.
5. Enter a name for the connection.
Tip: Select a name that is self-explanatory and helps you distinguish the connection from other connections. For example, if you
have color-coded your connection cables you could name the connection “FLS5-Red”. The name will be visible in Care Suite.
6. Edit the connection parameters.
Page 25
Page 25
The example below shows the default parameters for an FBUS connection. For most applications it is sufficient to set the default
parameters. If you want to edit the advanced parameters for the connection, check the “Show Advanced Parameters” checkbox.
NOTE: The Pair with service adapter checkbox is for energy management purpose. It’s not used in the Product Support Tool.
Note: You must always change the value of the communication port number parameter to match the port number for your
connection. Do not use the default value “1”. You can click the Scan… button to find a port number. After clicking the Scan…
button the dialog shows up where you can start scanning for available communication port numbers.
Tip: The communication port number is the virtual COM port number given by the driver. If scanning fails for some reason you can
find the correct value using the FLS Device Control Panel. To open the FLS Device Control Panel, go to the Control Panel -> FLS
virtual port or click the icon in the system tray. Then take the value from USB Flash Device Virtual Ports list:
Page 26
Page 26
You can also go to Control Panel -> Hardware and Sound -> Device Manager -> Ports (COM & LPT).
In the example below, the correct value for the communication port number is 4.
Note: FLS is supported only under 32bit operating systems.
7. When you have edited the parameters, click Next.
The Nokia Fuse dialog shows a summary of the new connection name and parameters, as in the example below.
Page 27
Page 27
8. To start using the new connection, click Finish. You can now use the device with Store PST or Multi SW Updater.
5.2.4 Edit a Connection
1. Launch Nokia Care Suite and select Fuse.
2. Select the connection you want to edit and click Edit.
3. Edit the connection name and/or parameters and click Ok.
5.2.4.1 Remove a Connection
1. Launch Nokia Care Suite and select Fuse.
2. Select the connection you want to remove and click Remove.
Page 28
Page 28
6. PRODUCT SUPPORT TOOL FOR STORE
To launch the Nokia Care Suite Product Support Tool for Store, double-click on the Product Support Tool for Store.
When the Product Support Tool is launching the Sign In dialog is displayed:
In order to Sign In:
1. Select proper channel from Sing in to drop-down menu.
NOTE: Preferred channel is Care Pro
2. Enter correct user name and password.
3. Click Sign In button.
NOTE: If user gives NOL login credentials three times wrong, the account will be blocked for security reasons. The username is
blocked from accessing Nokia Online to prevent unauthorized login attempts. Please try again in half an hour.
Page 29
Page 29
6.1 Layout
Welcome screen is displayed when PST Store is started.
Click on Open Connection Management link to open Nokia Fuse application. Connection management is also available from File
menu.
When a device is connected the Welcome Screen is dismissed and you can select tool from Navigation Menu.
Page 30
Page 30
Main screen of the Product Support Tool have following areas:
1) Device Panel – where you can select device/connection and change product mode.
2) Navigation Menu – where you can open a tool.
3) Tool Workspace – where content of the selected tool is displayed.
4) Phone Information – panel where you can find various informations about selected device.
5) Action report log – list of activities on selected device. By default the panel is not visible.
6) Status Bar – shows Product Support Tool statuses (downloads, data package selection status, application operating mode).
7) Downloads – shows currently downloaded items (data packages).
6.1.1 Device Panel, Selection of the Connected Device
When multiple devices are connected, use the connection drop-down menu (1) above the device picture to select the desired
device.
Page 31
Page 31
If you want to refresh selected connection click button next to the drop-down menu.
Check Automatic product selection checkbox (2) when you want that the device which has been recently connected is selected
automatically.
No connection item from connection drop-down menu (1) enables user to deselect any connection.
If no device is connected an empty connections are available for selection.
You can also set desired product mode (3). If undetermined is displayed you can click on refresh button next to the product mode
drop-down menu. Clicking on the refresh button reads current mode.
6.1.2 Navigation Menu
Select the desired tool.
6.1.3 Phone Information
Information about the connected product is displayed in the Phone information panel which can be found on the left of the main window.
Phone information panel can be hidden or shown clicking on the arrow which is placed on the splitter bar.
Information divided into sections. Each section can be expanded or collapsed independently. To expand or collapse section click on the
header’s section.
Page 32
Page 32
6.1.4 Action Report Log
To show Action Report Log mark option Action Report Log in View menu. The Action Report Log is displayed under the Phone information
panel.
Logs all activities done for a particular device by serial number (=MEID).
6.1.5 Data Package Selection
Information about data package selection is displayed on the status bar.
On the left the icon is displayed which notifies data package selection state. You can click on the data package icon ( ) to open the
context menu.
Open data package location opens folder, where data packages are stored, in the explorer window.
Extended information opens dialog where details about current data selection state are displayed.
Rescan data packages forces scanning of available data packages and reselection of data package.
6.1.6 Downloads Panel (Downloading Packages)
Downloads panel shows history of downloaded packages and packages of which downloading progress is ongoing.
To download package:
1. Select Tools from main menu and click the Firmware Download tool.
2. Enter the product code:
Page 33
Page 33
3. Click the Check online button and wait a while.
4. The information about package is displayed if found:
NOTE: If needed select Optional content files option.
5. Click the Download button.
6. Downloading starts (the notification is shown about that fact and the position is added to the Downloads panel).
Notification:
Downloads panel:
7. Click the X button in the top-right corner of the Firmware Download window to close it.
8. After the downloads completes the progress of item in the Downloads panel is shown with a green color:
NOTE: Hover with mouse pointer the item in order to check the details:
Page 34
Page 34
6.2 Refurbish / Software Reset
Refurbish: User data will be deleted.
Reset Software: Updates software and resets settings to the factory defaults. Some user data can be lost.
NOTE: In order to detect the Nokia X device please enter *#*#2273#*#* in dial pad and enable WinUsb on the device.
1. Launch Nokia Care Suite and open Product Support Tool.
2. Ensure that the Nokia phone is connected to the computer via service cable or service adapter.
3. Turn the phone on.
4. From connection drop-down menu select a connection to which the phone is connected.
5. From the navigation menu select Programming > Refurbish or Software Reset tool.
6. Product Support Tool automatically selects data package with the latest available software version which will be used for
refurbishing / updating or resetting.
7. Click Start.
8. After successful run, check the software version from the device.
If refurbish, software update or software reset fails, you will be prompted to try to recover the phone.
Page 35
Page 35
6.3 Recovery
With manual phone recovery you can try to recover a device that cannot be started. Note that user data is lost after phone recovery.
NOTE: Recovery tool requires that:
No connection is selected
Open product is made
Automatic product selection is cleared
6.3.1 Recovery of Devices Connected via USB
1. Launch Nokia Care Suite and open Product Support Tool.
2. Disconnect all phones from the computer.
3. Ensure that the Nokia phone, which is going to be recovered, is connected to the computer via service cable.
4. Select No connection from the connection drop-down menu.
5. From File menu select Open Product.
6. Search connected product and click Open.
Page 36
Page 36
NOTE: You can type text in the Filter box to filter products list.
7. From the navigation menu select Programming > Recovery tool.
If the list is empty click on the Update list button.
You can mark Update automatically checkbox to force list update on Recovery entrance.
If there is no variant on the list to which device should be recovered you can click the Find online… button.
Please refer to section 6.3.4 for more details.
8. From the Properties list select appropriate variant and software version.
9. Click Start button.
10. Follow instructions when following dialog is displayed.
Page 37
Page 37
11. Wait until recovery completes.
Page 38
Page 38
6.3.2 Recovery of Devices Connected via Service Adapter
1. Launch Nokia Care Suite and open Product Support Tool.
2. Disconnect all phones from the computer.
3. Ensure that the Nokia phone, which is going to be recovered, is connected to the computer via service adapter.
4. From connection drop-down menu select Connection to which the service adapter is connected.
NOTE: On above example the service adapter is connected to the FBUS Connection 1.
5. From File menu select Open Product.
6. Search connected product and click Open.
Page 39
Page 39
NOTE: You can type text in the Filter box to filter products list.
7. From the navigation menu select Programming > Recovery tool.
If the list is empty click on the Update list button.
You can mark Update automatically checkbox to force list update on Recovery entrance.
If there is no variant on the list to which device should be recovered you can click the Find online… button.
Please refer to Finding Variants Online section for more details.
Page 40
Page 40
8. From the Properties list select appropriate variant and software version.
9. Click Start button.
10. Wait until recovery completes.
6.3.3 Recovery of Windows Phone Devices
Note: Some Windows Phones devices do not support recovery.
1. Launch Nokia Care Suite and open Product Support Tool.
2. Disconnect all phones from the computer.
3. Select No connection from the connection drop-down menu.
Page 41
Page 41
4. From File menu select Open Product.
5. Search connected product and click Open.
NOTE: You can type text in the Filter box to filter products list.
6. From the navigation menu select Programming and then select Recovery tool.
Page 42
Page 42
If the list is empty click on the Update list button.
You can mark Update automatically checkbox to force list update on Recovery entrance.
If there is no variant on the list to which device should be recovered you can click the Find online… button.
Please refer to Finding Variants Online section for more details.
7. From the Properties list select appropriate variant and software version.
8. Click Start button.
9. Follow instructions when dialog is displayed
a. Disconnect your device from USB.
b. Ensure that your device is powered off.
c. Press and hold volume-up key on the device.
d. Connect device to USB while pressing volume up key.
e. You should feel short device vibration.
f. Click the Retry button during 30 sec to continue recovery.
Page 43
Page 43
10. Wait until recovery completes.
6.3.4 Finding Variant Online
After clicking the Find online… button on the Recovery tool the Online Variant List window is opened.
In the Online variant list window user can find required package for a variant and download it.
You can also use Firmware download tool to download data package for a variant.
1. Click the Find online… button (can be found on the Recovery tool or Language Package Change tool).
2. Wait until variant list loading is completed.
3. From the list select variant for which you would like to download data package.
Page 44
Page 44
4. Click Download button.
5. Online Variant List window gets closed and download starts.
Page 45
Page 45
6.4 Language Package Change
NOTE: Language Package Change is not supported for the devices with a sim-lock.
With this feature you can change the language package of the device. Please note that this plug-in doesn’t interact with Tucson so real
product code change can’t be done with this plug-in.
NOTE: In order to detect the Nokia X device please enter *#*#2273#*#* in dial pad and enable WinUsb on the device.
1. Launch Nokia Care Suite and open Product Support Tool.
2. Connect the device.
3. From the navigation menu select Language Package Change tool.
If the Properties list is empty click on the Update list button.
You can mark Update list automatically to force list update on Language Package Change entrance.
To search other variants than listed click Find Online… button. For more details see section 6.3.4.
4. Select destination product code for the device from the list of available product codes.
5. Click the Start button.
The header of the list of available product codes contains filter boxes:
If you type something into the filter boxes the list will be filtered and only items which contain entered text are shown.
Page 46
Page 46
6.5 Switching Product Mode
To switch product mode use Product mode drop-down menu from device panel:
1. Launch Nokia Care Suite and open Product Support Tool.
2. Ensure that the Nokia phone is connected to the computer via service cable or service adapter.
3. Turn the phone on.
4. Select connection to which phone is connected from connection drop-down menu.
5. Product mode show current mode in which is selected device
NOTE: If no mode is displayed after connection selection click the refresh button next to the product mode drop down menu.
6. Click Product mode to open drop-down menu with supported modes
7. Select mode and wait until switching finishes
NOTE: For some device there might be additional steps when switching between modes e.g. for Windows Phone 8.1 devices
downloading and package verifying steps are done.
Page 47
Page 47
6.6 S40 / S60 Hardware Tests
6.6.1 Hardware Test
With Hardware Test you can test vibra, speaker and earpiece.
8. Launch Nokia Care Suite and open Product Support Tool.
9. Ensure that the Nokia phone is connected to the computer via service cable or service adapter.
10. Turn the phone on.
11. Select connection to which phone is connected from connection drop-down menu.
12. From the navigation menu select Tests > Hardware tool.
13. Click on one of the buttons to open the test. The dialog should be opened.
14. Click Start button to start the test.
15. Wait until test finishes.
16. Click Close button.
Page 48
Page 48
6.6.2 Self Test
With the Self Test you can check main functionalities and components of the connected device. Tests are semi-automated.
1. Launch Nokia Care Suite and open Product Support Tool.
2. Ensure that the Nokia phone is connected to the computer via service cable or service adapter.
3. Turn the phone on.
4. From connection drop-down menu select connection to which the phone is connected.
5. Set proper product mode.
6. From the navigation menu select Tests > Self Test tool.
7. Click the Read tests button.
Page 49
Page 49
8. Click the Run All button.
9. Wait until self test finishes.
10. When self test finishes you will get full report.
Page 50
Page 50
By default only Failed tests are expanded.
You can collapse/expand each section by clicking on the section header.
Sorting is available by clicking on the header of the list.
You can repeat selected test by clicking the Run selected button.
Page 51
Page 51
6.6.3 Vibra Test
With vibra test you can check functionality of the vibra of the connected device.
1. Launch Nokia Care Suite and open Product Support Tool.
2. Ensure that the Nokia phone is connected to the computer via service cable or service adapter.
3. Turn the phone on.
4. From connection drop-down menu select the connection to which the device is connected.
5. From drop-down menu select proper product mode.
6. From navigation menu select Tests > Vibra tool.
7. Select state of the vibra.
NOTE: Selection of the vibra state takes immediate effect on the device.
6.6.4 Audio Tests
With audio test you can check internal and external speakers and microphones.
6.6.4.1 Microphones Test
1. Launch Nokia Care Suite and open Product Support Tool.
2. Ensure that the Nokia phone is connected to the computer via service cable or service adapter.
Page 52
Page 52
3. Turn the phone on.
4. From connection drop-down menu select the connection to which the device is connected.
5. From drop-down menu select proper product mode.
6. From navigation menu select Tests > Audio Tests and select Microphones.
7. Select microphone you want to test.
8. Click the Start button.
9. Follow instructions displayed on the dialog.
10. Click Stop button to finish microphone test.
6.6.4.2 Tone Generator
1. Launch Nokia Care Suite and open Product Support Tool.
2. Ensure that the Nokia phone is connected to the computer via service cable or service adapter.
3. Turn the phone on.
4. From connection drop-down menu select the connection to which the device is connected.
5. From drop-down menu select proper product mode.
Page 53
Page 53
6. From navigation menu select Tests > Audio Tests and select Tone Generator.
7. Select Output mode and set Tone properties (volume, frequency, tone length).
8. Click the Start button to generate tone on the connected device.
6.6.5 Ambient Light Sensor
With Ambient Light Sensor you can calibrate sensor coefficient and test the sensor.
6.6.5.1 ALS Calibration
1. Launch Nokia Care Suite and open Product Support Tool.
2. Ensure that the Nokia phone is connected to the computer via service cable or service adapter.
3. Turn the phone on.
4. From connection drop-down menu select connection to which the device is connected.
5. From navigation menu select Tests > Ambient Light Sensor and select ALS Calibration tool.
There are five different types of ambient light sensors (Charlie, Poliwag, Greymon, Pupumon and Dipro) for which different
calibrations are available. Each calibration method is described in further subsections.
Page 54
Page 54
6.6.5.2 Calibration for Dipro, Pupumon, Poliwag ALS Types
Manual Calibration
1. Select Calibrate manually option from Calibration Type.
2. Type value of reference level.
Default reference level is read from data package and always displayed in the default edit box.
Above picture shows only example values. Please use your own values.
3. Click Calibrate button and wait until writing new values to the device finishes.
4. Check if value of coefficient is between minimum and maximum.
Minimum (3) and maximum (4) are bounds for the coefficient value.
If the value (1) is between minimum and maximum the calibration has succeed.
If the value (1) is beyond minimum and maximum the calibration has failed and you should repeat procedure from step 2.
Below example of failed calibration:
Page 55
Page 55
Default coefficient is read from data package and displayed for informative purposes.
5. If calibration is successful click Close button.
6. Read button reads sensor values from device which are displayed in the Other Sensor Values part.
NOTE: Above picture shows only Luminance. There can be other values displayed if available.
Calibration with Default Coefficient
1. Select Use default coefficient option from Calibration Type.
2. Click Calibrate button.
3. If calibration has failed try to calibrate ALS manually.
6.6.5.3 Calibration for Greymon ALS Types
Page 56
Page 56
Manual Calibration
1. Select Calibrate manually option from Calibration Type.
2. Type values of reference level for Channel 0 and Channel 1.
Default reference levels are read from data package and always displayed in the default edit boxes.
Above picture shows only example values. Please use your own values.
3. Click Calibrate button and wait until writing new values to the device finishes.
4. Check if values of coefficients for both channels are between minimum and maximum.
Minimum (3, 4) and maximum (5, 6) are bounds for the coefficient value.
If the values (1, 2) are between minimum and maximum the calibration has succeed.
If the values (1, 2) are beyond minimum and maximum the calibration has failed and you should repeat procedure from step 2.
Default coefficients are read from data package and displayed for informative purposes.
5. If calibration is successful click Close button.
6. Read button reads sensor values from device which are displayed in the Other Sensor Values.
Calibration with Default Coefficient
1. Select Use default coefficient option from Calibration Type.
2. Click Calibrate button.
3. If calibration has failed try to calibrate ALS manually.
6.6.5.4 Calibration for Charlie ALS Types
First you need to calibrate pull-up resistor in case of Charlie ALS type. After pull-up resistor calibration is done you can calibrate ambient
light sensor.
Page 57
Page 57
Pull-up Resistor Calibration
Pull up resistor calibration must be done in darkness. Make sure that the phone is covered during the calibration.
1. Select Pull up resistor calibration option from Calibration.
2. Make sure that phone is covered.
3. Click the Calibrate button.
4. If calibration has succeeded the green icon is displayed next to the Value edit box.
Page 58
Page 58
Ambient Light Sensor Manual Calibration
1. Select Calibrate manually option from Calibration Type.
2. Type value of reference level.
Default reference level is read from data package and always displayed in the default edit box.
Above picture shows only example values. Please use your own values.
3. Click Calibrate button and wait until writing new values to the device finishes.
4. Check if value of coefficient is between minimum and maximum.
Page 59
Page 59
Minimum (3) and maximum (4) are bounds for the coefficient value.
If the value (1) is between minimum and maximum the calibration has succeed.
If the value (1) is beyond minimum and maximum the calibration has failed and you should repeat procedure from step 2.
Below example of failed calibration:
Default coefficient is read from data package and displayed for informative purposes.
5. If calibration is successful click Close button.
6. Read button reads sensor values from device which are displayed in the Other Sensor Values part.
Ambient Light Sensor Calibration with Default Coefficient
1. Select Use default coefficient option from Calibration Type.
2. Click Calibrate button.
3. If calibration has failed try to calibrate ALS manually.
Page 60
Page 60
6.6.5.5 ALS Test
With the ALS Test tool you can set the ALS mode and read luminance from the ALS.
1. Launch Nokia Care Suite and open Product Support Tool.
2. Ensure that the Nokia phone is connected to the computer via service cable or service adapter.
3. Turn the phone on.
4. From connection drop-down menu select connection to which the device is connected.
5. From navigation menu select Tests > Ambient Light Sensor and select ALS Test tool.
6. Select sensor mode from the Sensor Mode from Mode drop-down menu.
7. Click the Apply button to set ALS mode on the device.
8. Click the Read button to read luminance value from the ALS.
6.6.6 Display Test
With display test you can check device display and backlights.
6.6.6.1 Light Test
With light test you can test backlights and other lightening of the device.
1. Launch Nokia Care Suite and open Product Support Tool.
2. Ensure that the Nokia phone is connected to the computer via service cable or service adapter.
3. Turn the phone on.
4. From connection drop-down menu select connection to which the device is connected.
5. From drop-down menu select proper product mode.
Page 61
Page 61
6. From navigation menu select Tests > Display Tests and select Lighting tool.
7. Select Target, State and Color.
8. Click the Apply button.
6.6.6.2 Pattern Test
With pattern test you can test display by applying selected pattern to the device.
1. Launch Nokia Care Suite and open Product Support Tool.
2. Ensure that the Nokia phone is connected to the computer via service cable or service adapter.
3. Turn the phone on.
4. From connection drop-down menu select connection to which the device is connected.
5. From drop-down menu select proper product mode.
Page 62
Page 62
6. From navigation menu select Tests > Display Tests and select Patterns tool.
7. From the list select pattern which should be displayed on the device’s display.
8. The pattern should be displayed immediately after the pattern selection.
Page 63
Page 63
6.6.7 Keyboard Test
With keyboard test you can register states of pressed keys on the device.
1. Launch Nokia Care Suite and open Product Support Tool.
2. Ensure that the Nokia phone is connected to the computer via service cable or service adapter.
3. Turn the phone on.
4. From connection drop-down menu select connection to which the device is connected.
5. Set proper product mode.
6. From navigation menu select Tests > Keyboard Tests and select Keyboard Test tool.
7. Press any key on the device. Key states are registered and added to the list.
Some keys had been pressed and their states are registered:
Page 64
Page 64
8. Click the Clear button to clear the key states history.
6.6.8 Switch Test
With Switch test you can register states of switches.
1. Launch Nokia Care Suite and open Product Support Tool.
2. Ensure that the Nokia phone is connected to the computer via service cable or service adapter.
3. Turn the phone on.
4. From connection drop-down menu select connection to which the device is connected.
5. Set proper product mode.
Page 65
Page 65
6. From navigation menu select Tests > Keyboard Tests and select Switch Test tool.
7. Change switches states on the device.
8. Click the Read button.
9. Check if states are proper on the Switches states list.
10. You can mark the Read states automatically checkbox to force automatic reading of switches states from the device.
NOTE: When the Read states automatically checkbox is marked you can change switches states on the device. Their
states are refreshed on the list automatically so you don’t need to click the Read button.
Page 66
Page 66
6.6.9 Touch Display Test
1. Launch Nokia Care Suite and open Product Support Tool.
2. Ensure that the Nokia phone is connected to the computer via service cable or service adapter.
3. Turn the phone on.
4. From connection drop-down menu select connection to which the device is connected.
5. Set proper product mode.
6. From navigation menu select Tests > Keyboard Tests and select Switch Test tool.
7. Touch the touch display on the device.
8. If touch is detected the red circle and touch coordinates are shown.
Page 67
Page 67
6.6.10 Touchpad Calibration
1. Launch Nokia Care Suite and open Product Support Tool.
2. Ensure that the Nokia phone is connected to the computer via service cable or service adapter.
3. Turn the phone on.
4. From connection drop-down menu select connection to which the device is connected.
5. Set proper product mode.
6. From navigation menu select Tests > Keyboard Tests and select Touchpad Calibration tool.
7. Touch the display at the first point.
NOTE: Crosses where the touch display should be touched are also displayed on the device.
Page 68
Page 68
8. Touch the display at the second point.
9. Touch the display at the third point.
10. After the third point has been touched on the display the calibration is finished.
6.6.11 Camera Configuration
1. Launch Nokia Care Suite and open Product Support Tool.
2. Ensure that the Nokia phone is connected to the computer via service cable or service adapter.
3. Turn the phone on.
4. From connection drop-down menu select connection to which the device is connected.
5. Set proper product mode.
6. From navigation menu select Tests > Camera Related and select Camera Configuration tool.
7. Click the Write button to write new DCC files into the phone.
Page 69
Page 69
6.7 Lumia Hardware Tests
6.7.1 Self Test
1. Launch Nokia Care Suite and open Product Support Tool.
2. Ensure that the Nokia phone is connected to the computer via service cable or service adapter.
3. Turn the phone on.
4. From connection drop-down menu select connection to which the device is connected.
5. Set proper product mode.
6. From navigation menu select Tests > Self Test.
7. Click Run All Tests button to start all tests.
To start selected tests select tests from list. To select more than one test keep CTRL key while clicking on a test. After the tests were
selected click the button Run Selected Tests.
8. Wait until testing finishes
Page 70
Page 70
6.7.2 Touch Display Test
Touch Display Test for Windows Phone Devices is similar as for the Symbian S40 / S60 devices. For instructions please see Touch
Display Test for Symbian S40 / S60 devices.
6.7.3 Display Test
1. Launch Nokia Care Suite and open Product Support Tool.
2. Ensure that the Nokia phone is connected to the computer via service cable or service adapter.
3. Turn the phone on.
4. From connection drop-down menu select connection to which the device is connected.
5. Set proper product mode.
6. From navigation menu select Tests > Display Test.
7. By clicking on the picture select pattern which should be displayed on the device.
8. Check if selected pattern is displayed correctly on the device.
6.7.4 Vibra Test
1. Launch Nokia Care Suite and open Product Support Tool.
2. Ensure that the Nokia phone is connected to the computer via service cable or service adapter.
3. Turn the phone on.
4. From connection drop-down menu select connection to which the device is connected.
5. Set proper product mode.
6. From navigation menu select Tests > Vibra Test.
7. Using the slider select vibra intensity and click the Start button.
8. While vibra test is ongoing you can change the vibra intensity with the slider.
9. Click Stop button to finish the test.
Page 71
Page 71
6.7.5 SIM Test
1. Launch Nokia Care Suite and open Product Support Tool.
2. Ensure that the Nokia phone is connected to the computer via service cable or service adapter.
3. Turn the phone on.
4. From connection drop-down menu select connection to which the device is connected.
5. Set proper product mode.
6. From navigation menu select Tests > SIM Test.
7. Click the Read button.
8. The information about SIM card presence and SIM card test should be displayed.
6.7.6 Keyboard Test
Keyboard Test for Windows Phone Devices is similar as for the Symbian S40 / S60 devices. For instructions please see Keyboard Test
for Symbian S40 / S60 devices.
NOTE: Some devices have a touch key as a part of the touch display. Such keys can be tested with a Touch Display Test.
6.7.7 Microphones
1. Launch Nokia Care Suite and open Product Support Tool.
2. Ensure that the Nokia phone is connected to the computer via service cable or service adapter.
Page 72
Page 72
3. Turn the phone on.
4. From connection drop-down menu select connection to which the device is connected.
5. Set proper product mode.
6. From navigation menu select Tests > Microphones.
7. From Audio recording options select which microphone will be tested.
8. Click the Rec button. The recording starts. You can now say something to the selected microphone (your voice is recorded).
9. After few seconds recording should stop.
10. From Audio playback options select on which speaker the recorded voice will be played.
11. Click the Play button. While playing you should hear recorded voice on the selected speaker.
With Microphone test it’s possible also to check if the headset has been detected by the phone or not. In order to do those click the
Read button in the Headset test group:
6.7.8 Accelerometer Test
1. Launch Nokia Care Suite and open Product Support Tool.
2. Ensure that the Nokia phone is connected to the computer via service cable or service adapter.
3. Turn the phone on.
4. From connection drop-down menu select connection to which the device is connected.
5. Set proper product mode.
6. From navigation menu select Tests > Accelerometer Test.
7. Click the Start button.
8. Rotate the device in all dimensions. The gravity X, Y, Z signs should change between + and -.
Page 73
Page 73
9. Click Stop button to finish testing.
6.7.9 Audio Output Test
1. Launch Nokia Care Suite and open Product Support Tool.
2. Ensure that the Nokia phone is connected to the computer via service cable or service adapter.
3. Turn the phone on.
4. From connection drop-down menu select connection to which the device is connected.
5. Set proper product mode.
6. From navigation menu select Tests > Audio Output Test.
7. From Audio outputs options select which speaker will be tested.
8. From volume drop-down menu select sound volume.
9. Click Start button.
10. While testing the tone is played on the selected speaker.
Page 74
Page 74
The frequency of the tone is changed periodically.
Current tone frequency which is played is marked with green color:
6.7.10 Memory Card Test
1. Launch Nokia Care Suite and open Product Support Tool.
2. Ensure that the Nokia phone is connected to the computer.
3. Turn the phone on.
4. From connection drop-down menu select connection to which the device is connected.
5. Set proper product mode.
6. From navigation menu select Tests > Memory Card Test.
7. Click the Read button. The results are displayed:
Page 75
Page 75
6.7.11 Proximity Sensor Test
1. Launch Nokia Care Suite and open Product Support Tool.
2. Ensure that the Nokia phone is connected to the computer.
3. Turn the phone on.
4. From connection drop-down menu select connection to which the device is connected.
5. Set proper product mode.
6. From navigation menu select Tests > Proximity Sensor Test.
7. Click the Start button. The values Sensor status and Crosstalk should show some values.
8. Cover and uncover upper part of the device with your hand (or some opaque material).
Note that while covering / uncovering the Crosstalk value should change:
Page 76
Page 76
9. Click the Stop button to finish the Proximity Sensor Test.
6.7.12 Proximity Sensor Calibration
1. Launch Nokia Care Suite and open Product Support Tool.
2. Ensure that the Nokia phone is connected to the computer.
3. Turn the phone on.
4. From connection drop-down menu select connection to which the device is connected.
5. Set proper product mode.
6. From navigation menu select Tests > Proximity Sensor Calibration.
7. Ensure that device’s proximity sensor is uncovered.
8. Click the Calibrate button.
Page 77
Page 77
6.7.13 ALS Test
1. Launch Nokia Care Suite and open Product Support Tool.
2. Ensure that the Nokia phone is connected to the computer.
3. Turn the phone on.
4. From connection drop-down menu select connection to which the device is connected.
5. Set proper product mode.
6. From navigation menu select Tests > ALS Test.
7. Click the Start button to start testing the ambient light sensor.
8. Cover and uncover top of the phone (ALS sensor). The Light intensity values should change.
9. Click the Stop button to finish ALS Test.
Page 78
Page 78
6.7.14 ALS Calibration
1. Launch Nokia Care Suite and open Product Support Tool.
2. Ensure that the Nokia phone is connected to the computer.
3. Ensure that the reference device is connected too.
The reference device should be similar product to the product which is going to be calibrated.
The reference device should be in test mode to be able to select it from Reference phone drop-down menu.
4. Turn the phone on.
5. From connection drop-down menu select connection to which the device, which is going to be calibrated, is connected.
6. Set proper product mode.
7. From navigation menu select Tests > ALS Calibration.
8. From Reference phone drop-down menu select reference phone.
9. Ensure that reference phone and phone which is going to be calibrated are placed near to each other.
10. Click the Calibrate button to start the ambient light calibration.
Page 79
Page 79
6.7.15 Light Test
1. Launch Nokia Care Suite and open Product Support Tool.
2. Ensure that the Nokia phone is connected to the computer.
3. Turn the phone on.
4. From connection drop-down menu select connection to which the device is connected.
5. Set proper product mode.
6. From navigation menu select Tests > Light Test.
7. Using checkboxes you can turn on/off lights on the device.
8. To generate single flash by device’s camera flash click the Flash button.
NOTE: There are devices for which lights names cannot be retrieved. In such cases the numbers are only displayed:
Page 80
Page 80
6.7.16 Gyroscope Calibration
Gyroscope calibration is self-calibration where device lays in flat surface. The device cannot be moved when calibration is ongoing.
1. Launch Nokia Care Suite and open Product Support Tool.
2. Ensure that the Nokia phone is connected to the computer.
3. Turn the phone on.
4. From connection drop-down menu select connection to which the device is connected.
5. Set proper product mode.
6. From navigation menu select Tests > Gyroscope Calibration.
7. Ensure that device lies on flat surface and will not be moved during calibration.
8. Click the Calibrate button and wait until calibration is done.
Page 81
Page 81
6.7.17 Charging Test
Charging test measures the battery current when charging is on or off. Also battery level and capacity can be read.
1. Launch Nokia Care Suite and open Product Support Tool.
2. Ensure that the Nokia phone is connected to the computer.
3. Turn the phone on.
4. From connection drop-down menu select connection to which the device is connected.
5. Set proper product mode.
6. From navigation menu select Tests > Charging Test.
7. To read battery level and capacity click the Read button.
8. To measure the battery current select charger type (wireless or USB) and click the Start button.
Page 82
Page 82
6.7.18 IHF Calibration
IHF Calibration performs self-calibration of the integrated hands free speaker.
1. Launch Nokia Care Suite and open Product Support Tool.
2. Ensure that the Nokia phone is connected to the computer.
3. Turn the phone on.
4. From connection drop-down menu select connection to which the device is connected.
5. Set proper product mode.
6. From navigation menu select Tests > IHF Calibration.
7. To start the calibration click the Calibrate button.
Page 83
Page 83
8. Wait until calibration process finishes.
6.7.19 Antenna Tuner Calibration
Antenna Tuner Calibration performs self-calibration of the built-in antenna tuner.
1. Launch Nokia Care Suite and open Product Support Tool.
2. Ensure that the Nokia phone is connected to the computer.
3. Turn the phone on.
4. From connection drop-down menu select connection to which the device is connected.
5. Set proper product mode.
6. From navigation menu select Tests > Antenna Tuner Calibration.
7. To start the calibration click the Calibrate button.
8. Result is displayed and phone restarted
Page 84
Page 84
6.7.20 Barometer Test
With Barometer test the barometer sensor can be checked.
1. Launch Nokia Care Suite and open Product Support Tool.
2. Ensure that the Nokia phone is connected to the computer.
3. Turn the phone on.
4. From connection drop-down menu select connection to which the device is connected.
5. Set proper product mode.
6. From navigation menu select Tests > Barometer Test.
7. Click the Start button.
8. Result is displayed.
Page 85
Page 85
6.8 Nokia 108 Hardware Tests
6.8.1 Self Test
With the Self Test you can check main functionalities and components of the connected device. Tests are semi-automated.
1. Launch Nokia Care Suite and open Product Support Tool.
2. Ensure that the Nokia phone is connected to the computer via service cable or service adapter.
3. Turn the phone on.
4. From connection drop-down menu select connection to which the phone is connected.
5. Set proper product mode.
6. From the navigation menu select Tests > Selftest.
7. Select test which should be executed.
8. Click the Run button.
9. Wait until self test finishes.
Page 86
Page 86
10. When self test finishes you will get a report.
Page 87
Page 87
6.8.2 Vibra Test
With vibra test you can check functionality of the vibra of the connected device.
1. Launch Nokia Care Suite and open Product Support Tool.
2. Ensure that the Nokia phone is connected to the computer via service cable or service adapter.
3. Turn the phone on.
4. From connection drop-down menu select the connection to which the device is connected.
5. From drop-down menu select proper product mode.
6. From navigation menu select Tests > Vibra Test.
7. Select Vibration check box to turn on vibra on device.
NOTE: Selection of the Vibration check box takes immediate effect on the device.
8. Clear Vibration check box to turn off vibra on device.
6.8.3 Microphones Test
1. Launch Nokia Care Suite and open Product Support Tool.
2. Ensure that the Nokia phone is connected to the computer via service cable or service adapter.
3. Turn the phone on.
4. From connection drop-down menu select the connection to which the device is connected.
5. From drop-down menu select proper product mode.
Page 88
Page 88
6. From navigation menu select Tests > Audio Input Test.
7. Connect headset to device
NOTE: Headset with 3,5mm jack is required to run the test.
Using Open Mobile Terminal Platform can produce extremely loud sound.
8. Select microphone you want to test and on which speaker should be voice played (audio loop).
9. Say something to microphone you selected to test.
You should hear voice on speaker you selected (audio loop).
10. Select Loopback off option to turn off the test.
6.8.4 Light Test
With light test you can test backlights and other lightening of the device.
1. Launch Nokia Care Suite and open Product Support Tool.
2. Ensure that the Nokia phone is connected to the computer via service cable or service adapter.
3. Turn the phone on.
4. From connection drop-down menu select connection to which the device is connected.
5. From drop-down menu select proper product mode.
Page 89
Page 89
6. From navigation menu select Tests > Light Test.
7. List of available lights is shown. To turn on light select proper check box. To turn off clear proper check box.
6.8.5 Pattern Test
With pattern test you can test display by applying selected pattern to the device.
1. Launch Nokia Care Suite and open Product Support Tool.
2. Ensure that the Nokia phone is connected to the computer via service cable or service adapter.
3. Turn the phone on.
4. From connection drop-down menu select connection to which the device is connected.
5. From drop-down menu select proper product mode.
Page 90
Page 90
6. From navigation menu select Tests > Pattern Test.
7. From the options select pattern which should be displayed on the device’s display.
8. The pattern should be displayed immediately after the pattern selection.
6.8.6 Keyboard Test
With keyboard test you can register states of pressed keys on the device.
1. Launch Nokia Care Suite and open Product Support Tool.
2. Ensure that the Nokia phone is connected to the computer via service cable or service adapter.
3. Turn the phone on.
4. From connection drop-down menu select connection to which the device is connected.
5. Set proper product mode.
Page 91
Page 91
6. From navigation menu select Tests > Keyboard Test.
7. Click Start button.
8. Press some keys on the device.
NOTE: Maximum number of stored keys is 15.
9. Click Stop button. Results will be filled:
Page 92
Page 92
6.8.7 Memory Card Test
1. Launch Nokia Care Suite and open Product Support Tool.
2. Ensure that the Nokia phone is connected to the computer.
3. Turn the phone on.
4. From connection drop-down menu select connection to which the device is connected.
5. Set proper product mode.
6. From navigation menu select Tests > Memory Card Test.
7. Click the Run test button. Results are displayed:
6.8.8 SIM Test
1. Launch Nokia Care Suite and open Product Support Tool.
2. Ensure that the Nokia phone is connected to the computer via service cable or service adapter.
3. Turn the phone on.
4. From connection drop-down menu select connection to which the device is connected.
5. Set proper product mode.
6. From navigation menu select Tests > SIM Test.
Page 93
Page 93
7. Click the Read SIM status button.
8. The information about SIM card presence and SIM card test should be displayed:
6.8.9 FM Radio Test
With FM Radio Test FM radio receiver can be tested. The test requires instrument which generates FM modulated signal.
Note that connected headset is also required.
1. Launch Nokia Care Suite and open Product Support Tool.
2. Ensure that the Nokia phone is connected to the computer via service cable or service adapter.
3. Turn the phone on.
4. From connection drop-down menu select connection to which the device is connected.
5. Set proper product mode.
6. From navigation menu select Tests > FM Radio Test.
Page 94
Page 94
7. Ensure that device which is going to be tested has connected headset.
8. Setup FM modulated signal generator to desired frequency and set the same frequency in FM Radio test.
NOTE: Selected frequency should be different from any local radio station.
9. On the signal generator setup signal level to -45dBm and 1 kHz tone modulation.
10. Click Read RSSI button to measure signal strength.
11. Turn off the signal generator.
12. Click Read RSSI button.
You should notice difference in RSSI value when signal generator was turned on.
It is possible to use another phone having FM transceiver feature as a signal generator:
1. Set phone having FM Tx to send in some frequency.
NOTE: Selected frequency should be different from any local radio station.
2. FM radio plugin and set same frequency FM Tx phone uses.
3. Click Read RSSI button to measure signal strength.
4. Turn FM Tx phone off.
5. Click Read RSSI button.
You should notice difference in RSSI value when FM Tx phone was turned on.
Page 95
Page 95
6.9 Type Label Printing
With type label printing user can print label for the connected device.
NOTE: For Lumia 2520 device please read Type Label Printing for Lumia 2520 section.
1. Launch Nokia Care Suite and open Product Support Tool.
2. Ensure that the Nokia phone is connected to the computer via service cable or service adapter.
3. Turn the phone on.
4. From connection drop-down menu select connection to which the device is connected.
5. From navigation menu select Type Label Printing tool.
6. Click the Generate type labels button and wait until labels are generated.
NOTE: You can mark the Generate labels automatically checkbox to force automatic labels generation on Type Label Printing tool
entrance.
Page 96
Page 96
7. Click Settings button to configure printer.
Page 97
Page 97
a) Select proper printer from Printer drop-down menu
b) Set label offsets in the Printer Offsets. X and Y values define position of the top left corner of the printed label.
c) Set proper Multiplier.
d) Click OK button to apply printer settings and close the dialog.
8. Form drop-down menus Select proper Factory and Source Factory
9. Enter missing parameters if required.
If entered parameter is invalid the exclamation red icon is displayed
You can put mouse pointer over the icon to get more information:
10. Click the Print button to print label for the device.
Under the image of the label navigation buttons are available for scrolling through labels:
Click one of the buttons to switch to the next or previous label.
Page 98
Page 98
6.9.1 Type Label Printing for Lumia 2520
With type label printing for Lumia 2520 user can print label for the Lumia 2520 devices.
1. Launch Nokia Care Suite and open Product Support Tool.
2. From File menu select Open Product.
3. In Filter text box type Lumia 2520 and select proper product.
4. Click Open button.
5. From navigation menu select Type Label Printing tool.
6. Ensure that data package for Lumia 2520 is available locally (in offline mode).
Page 99
Page 99
7. Click update list button to show packages available in offline mode.
8. Select package from list.
9. From drop down menu select type of label to print.
10. Follow steps from 7 till last step from previous chapter.
Page 100
Page 100
6.10 DBI Battery Info
With DBI Battery Info tool you can inspect and reset history of battery charging cycles.
1. Launch Nokia Care Suite and open Product Support Tool.
2. Ensure that the Nokia phone is connected to the computer via service cable or service adapter.
3. Turn the phone on.
4. From connection drop-down menu select connection to which the device is connected.
5. From navigation menu select DBI Battery Info tool.
6. Click the Reset button if you want to remove charging cycles from the connected device.
NOTE: After successful reset the Charging Cycles list should be empty.
Page 101
Page 101
6.11 HV Battery Information
HV battery information tool reads information about high voltage battery from selected device.
NOTE: To use HV Battery Information tool the device should have at least NCSd version 2.3 installed.
To check installed NCSd version please check Extended Info in the Phone information panel.
1. Launch Nokia Care Suite and open Product Support Tool.
2. Ensure that the Nokia phone is connected to the computer via service cable or service adapter.
3. Turn the phone on.
4. From connection drop-down menu select connection to which the device is connected.
5. From navigation menu select HV Battery Information tool.
6. Click the Read button to read information about high voltage battery.
Page 102
Page 102
6.12 Firmware Download
1. Launch Nokia Care Suite and open Product Support Tool.
2. From Tools menu select Firmware Download
3. Type product code in the Product Code box.
4. Select or clear Optional content files.
5. Click the Check online button.
6. Wait until Product Support Tool checks firmware for the typed product code.
7. Click the Download button.
Page 103
Page 103
7. MULTI IMEI READER
With Multi IMEI Reader tool you can simply read IMEIs of the connected devices and print them.
1. Launch Nokia Care Suite and open Multi IMEI Reader.
2. Connect phones for which you want to read and print IMEIs.
3. Click Print all button to print IMEIs of the connected phones.
NOTE: Phones which are connected to the PC first time can be not detected because the driver installation takes place. You can try to
reconnect the phone after the driver installation finishes. Please note also that IMEI reading from the phone can take around one
minute.
Mark Print labels automatically checkbox if you want to print IMEIs as soon as the device is connected and IMEI is read.
If you have connected a bar-code reader to the PC you can compare scanned IMEI with IMEIs from connected phones. To do so just scan
bar code with you reader and Care Suite will notify you if IMEI has been found on the list or not.
You can change printer settings by clicking on the Settings… button
1. Click the Settings… button
Page 104
Page 104
2. Define label position in the X Offset and Y Offset boxes.
3. Define label size in the Width and Height boxes. You can restore default size (if changed) clicking on the Restore to default button.
4. Click OK button.
To set name of the cables please follow steps:
1. Launch Nokia Care Suite and select PST Store.
2. Select Multi IMEI Reader from tools.
3. Disconnect all USB phones from the PC.
4. Connect a phone to the PC via USB.
5. Select detected phone from the Connected Devices list.
6. Click Rename… button and enter new name for the cable.
7. After the name has been set put label on the cable to which the phone is connected.
8. Disconnect the phone and connect to the next cable. Repeat steps from 5 to 7 until all USB cables are labeled.
It’s also possible to manually create the labels so device doesn’t need to be connected:
1. Click the Create button.
2. Type the Cable name and IMEI
Page 105
Page 105
3. Click the OK button. New position should be added to the list:
Such position, which was created manually, can be edited by clicking the Edit button or double-click on the cell whish is going to
be edited.
Page 106
Page 106
8. MULTI SOFTWARE UPDATER
Multi Software Updater allows to execute operations on connected devices to PC.
Available tools are:
Multi Refurbish
Page 107
Page 107
8.1 Multi Refurbish
Refurbish: User data will be deleted. For CDMA devices, PRI settings will be reset to default as specified by CDMA carrier. Before
refurbishing, ensure that you back up user data.
1. Launch Nokia Care Suite and Multi Software Updater.
2. Ensure that the Nokia phones are connected to the computer via service cables or service adapters.
3. Turn on the phones and wait a few seconds for the idle screen display.
4. Select Multi Refurbish if not active.
5. In the New Software column from drop-down menu select destination software versions.
6. Click Start All.
NOTE: For maximum 16 device simultaneous refurbish following requirements must be fulfilled:
Use a PC that has at least four independent USB 2.0 host controllers.
Connect no more than one powered external USB hub to each host controller
Each external hub must have its own independent power source, with the capability to supply at least 500 mA per device
connected to it.
Connect no more than four devices to each hub.
Result: no more than these four devices will share the entire bandwidth of a single USB host controller, and according to our testing, this
is sufficient throughput at the current time for reliable use of the USB bus when doing Windows Phone 8 device flashing.
In order to check what USB controllers are used please follow these steps:
1. Open Device Control Panel
2. From Device Control Panel open Device Manager
3. In Device Manager select open View menu and select Devices by connection
Page 108
Page 108
4. From the tree view open ACPI x64-based PC -> Microsoft ACPI-Compliant System -> PCI Bus.
Above picture shows eight USB controllers on the bottom.
NOTE: For the 32bit operating system instead the ACPI x64-based PC the ACPI x86-based PC is shown.
5. To check what is connected to the USB Controller open the position which is going to be checked:
Page 109
Page 109
Above picture shows that:
- To the USB Enhanced Host controller – 3A6A two devices are connected:
Nokia C6-00 USB Phone Parent
USB Composite Device
- To the USB Enhanced Host Controller – 3A6C one device is connected:
USB Input Device
- The rest of controllers has no connected devices
Page 110
Page 110
9. DESCRIPTION OF MENU STRUCTURE
9.1 File Menu
Preferences:
Network:
Application Startup Mode
Select application startup mode.
Data Package:
Package download path
Destination path for downloaded data packages.
Package search paths
List of search paths of data packages.
Logs:
Diagnostic Logs
Enable – turn on helpful logs which can be used for reporting errors. To apply any change on this setting an application
restart is required.
Show containing folder – displays folder where logs are stored.
Refurbish Logs
Enable – select whether you want to enable the refurbish log.
Log format – select file format of the refurbish logs.
AT&T Log location – select folder in which AT&T logs will be stored. This setting is active only for AT&T log format.
Phone Information Logs
Enable – select whether you want to enable the phone information logs creation.
Proxy:
Proxy Type
Select whether a proxy is used for the internet connection. Also manual configuration of proxy is available.
Open Connection Management
Opens connection manager – Nokia Fuse.
Open product
Opens data package of the selected product – used during Recovery procedure.
Close product
Page 111
Page 111
Closes previously opened product – used during Recovery procedure.
Work Offline
Switches application to Offline mode if selected.
Exit
Exits Application.
9.2 View Menu
Action Report Log
Set the visibility of the action report log panel.
9.3 Tools
Firmware Download
9.4 Help Menu
Supported Products
Select to view all the supported products (name, type, and product cable).
System Information
Select to view the current operating system, system hardware configuration, and the applications and versions.
About Nokia Care Suite
Select to view the current version of Care Suite.
Check Application Update
Select to check if newer version of application is available.
Page 112
10. KNOWN ERRORS
For up-to-date information about known errors, see Service Bulletins in NOL.
Page 113
Page 113
11. REPORTING ERRORS AND CHANGE REQUESTS
If you are not able to solve problems locally, a case can be escalated to local Nokia care or by using the GENIUS tool directly.
The ZIP file containing log files should be attached to the Genius case. The ZIP file can be created with ZIP Package Generator tool. If it’s
not possible to use ZIP Package Generator you can manually report an error.
11.1 ZIP Package Generator for Reporting Errors
You can use the ZIP Package Generate tool to create a ZIP package with necessary files to report an error. Please do the following steps
to generate the ZIP package file:
1. Launch Nokia Care Suite Application Launcher.
2. Launch Troubleshooting. The Zip Package Generator will be opened.
3. From Generate zip package for drop-down menu select a tool for which you would like to generate ZIP package.
4. In hours define period from which log files will be gathered in the ZIP package.
Page 114
Page 114
5. Click Generate button and wait a while.
6. When ZIP package is generated the list of attached files is displayed:
Page 115
Page 115
7. Click Open Location button to open Explorer window with folder containing the generated ZIP package:
Notice that the generated ZIP package is highlighted by default. The ZIP packages should be removed manually when they are
not needed any more.
8. Attach the generated ZIP package to the Genius Case.
9. Brief step by step description about how the error can be reproduced should be attached to the Genius Case.
10. Please also attach screenshot of error to the Genius Case.
11.2 Manual Error Reporting
You can try manually report the error if ZIP Package Generator can’t be used for some reason. Following information should be attached
to the Genius case:
Service Software versions used ( Care Suite, Phoenix, prommer software)
Do you have both Phoenix and Care Suite installed on the same PC
Are you using Care Suite with local datapackages in offline mode or without them in online mode
Product software version. If version change ( upgrade old -> new or downgrade new-> old) is involved, both software versions
are needed
Data package version(s)
Variant version / product code. In case of variant change both old and new product codes are needed.
Connection method to phone, tools used ( prommer, cables, adapters)
Screenshot of error
Screenshot of “Phone information” UI
IMEI number and date of event
Brief step by step description about how the error can be reproduced
Log files. If the default configuration hasn’t been changed via the preferences dialog, the log files for Nokia Care Suite are
located at:
The Nokia Care Suite logs are located at (if the default configuration hasn’t been changed via the preferences dialog):
C:\ProgramData\Nokia\Nokia Care Suite\Logs
Please also add flash logs from when reporting software update, refurbish or language package change related errors.
Logs can be found in the C:\Users\lackitom\AppData\Local\Temp
adl_flash.log. This file is created when USB connection is used for flashing.
ta_hwaprogrammer.log. This log is generated with non-direct USB flashing, when flash prommers are used.
Page 116
Page 116
Please note that you may find all or some of the flash log files from specified location depending on the tools and
connection you use. For example adl_flash.log is not created if you use flash prommer and ta_hwaprogrammer.log are
not created if you only use direct USB cable.
please attach them to the case with screenshots.
Page 117
Page 117
12. TROUBLESHOOTING
12.1 Out of disk space
If you have out of disk space you can:
Try to use Disk Cleanup tool from MS Windows.
Remove old data packages from Care Suite. To do this please follow steps:
1. Go to the data packages storage folder. Default storage folder is C:\ProgramData\Nokia\Packages\Products. Current
storage folder can be found on the Data Packages tab in the Preferences.
2. Under the Products folder a folders for each product are created (whenever a data package for a product is downloaded).
Folders are named using type designator of the devices. These folders contain data packages.
3. Remove folders which are named using type designator of devices which you don’t use. Please notice that all data
packages in the removed folders will be lost. In case if these data packages will be required they will be downloaded
automatically by the Nokia Care Suite.
12.2 After Connecting Device a Question about Formatting is Displayed
If following pop-up about formatting disk appears after connecting a device please click the Cancel button.
NOTE: Formatting disk may harm your device.
12.3 Nokia X device is not detected.
In order to detect Nokia X device please enter *#*#2273#*#* in dial pad and enable WinUsb on the device.
Page 118
Page 118
13. NOTES
This product includes software developed by the OpenSSL Project for use in the OpenSSL Toolkit (http://www.openssl.org/).
Copyright (c) 1998-2005 The OpenSSL Project. All rights reserved.
Copyright (c) 1995-1998 Eric Young ([email protected] ). All rights reserved.
OpenSSL license text can be found from http://www.openssl.org/source/license.html.
Microsoft, Windows, Windows Vista and Windows XP are either registered trademarks or trademarks of Microsoft Corporation in the
United States and/or other countries.

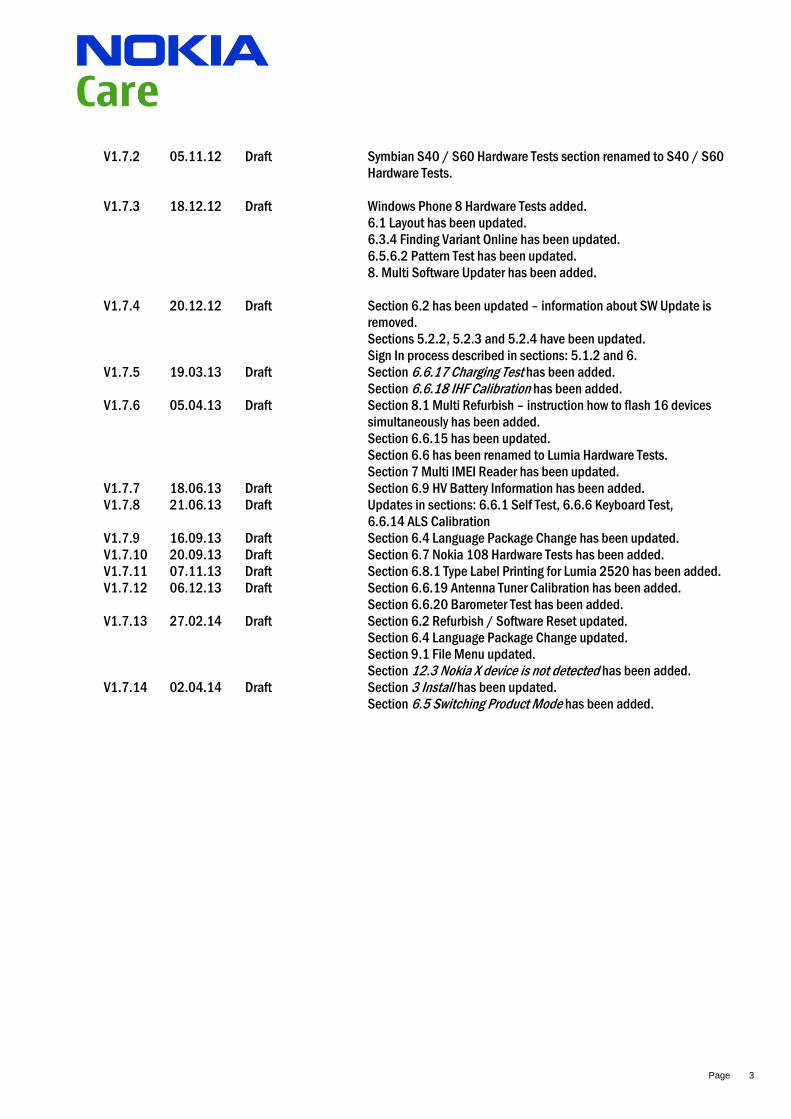


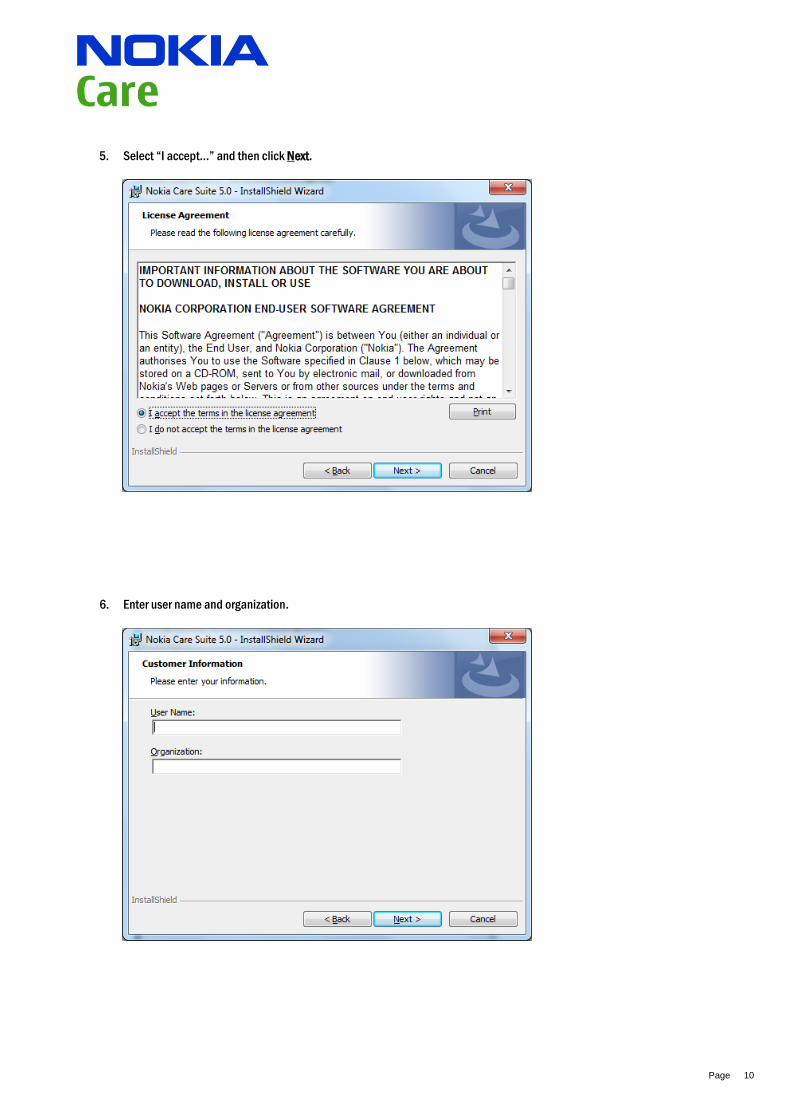
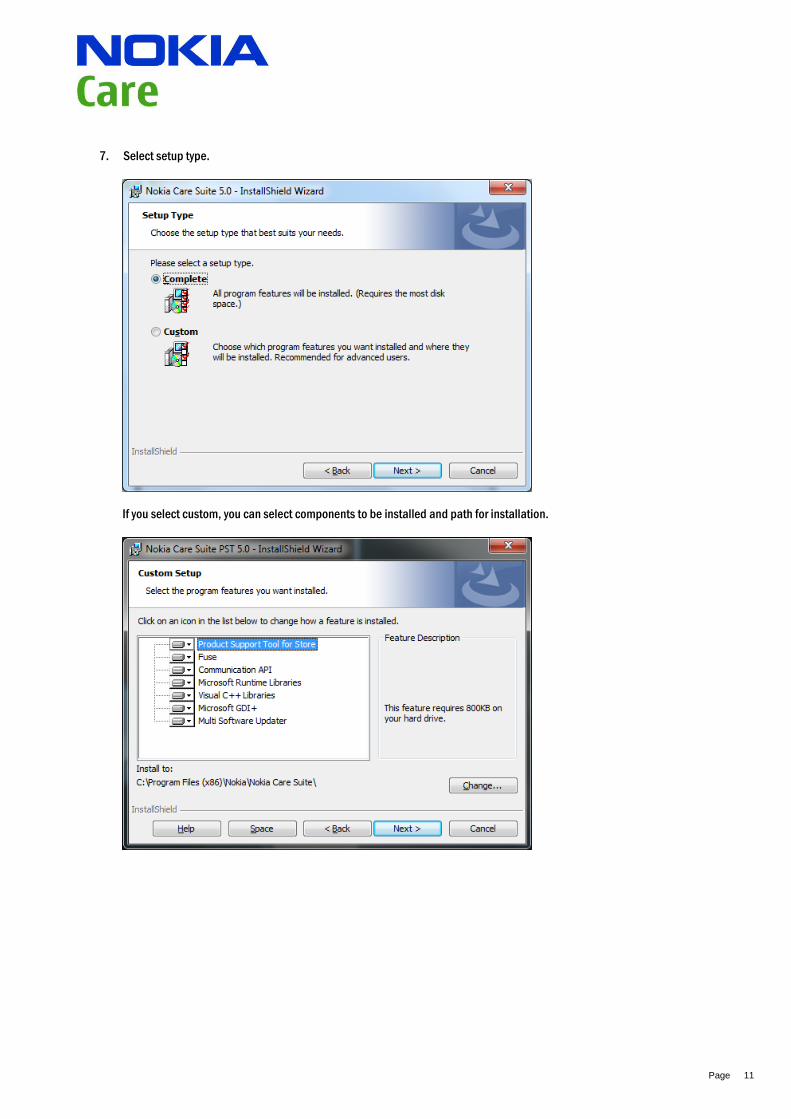

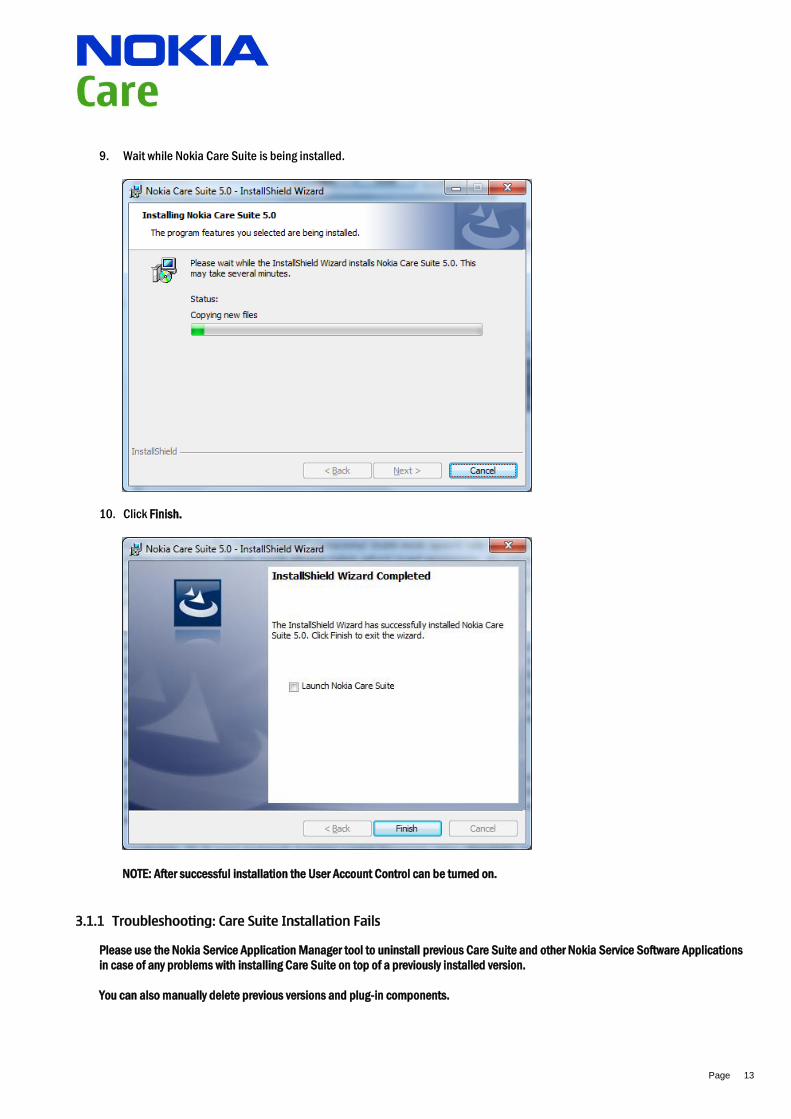
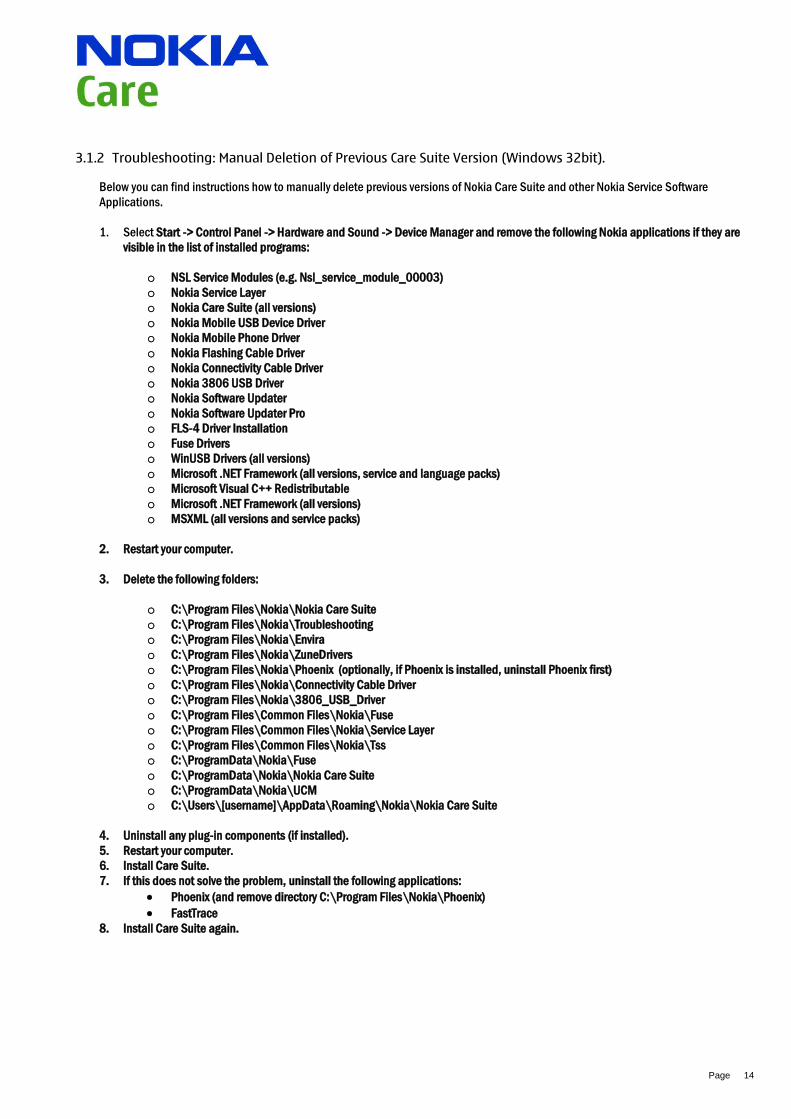

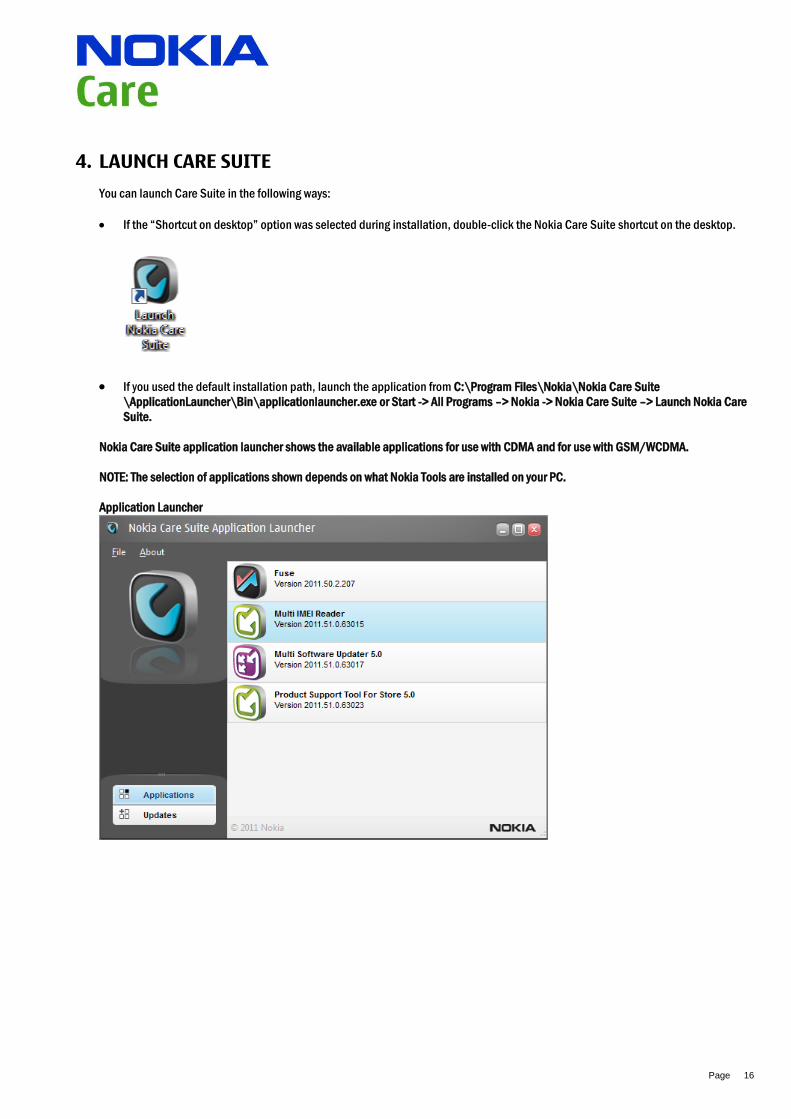
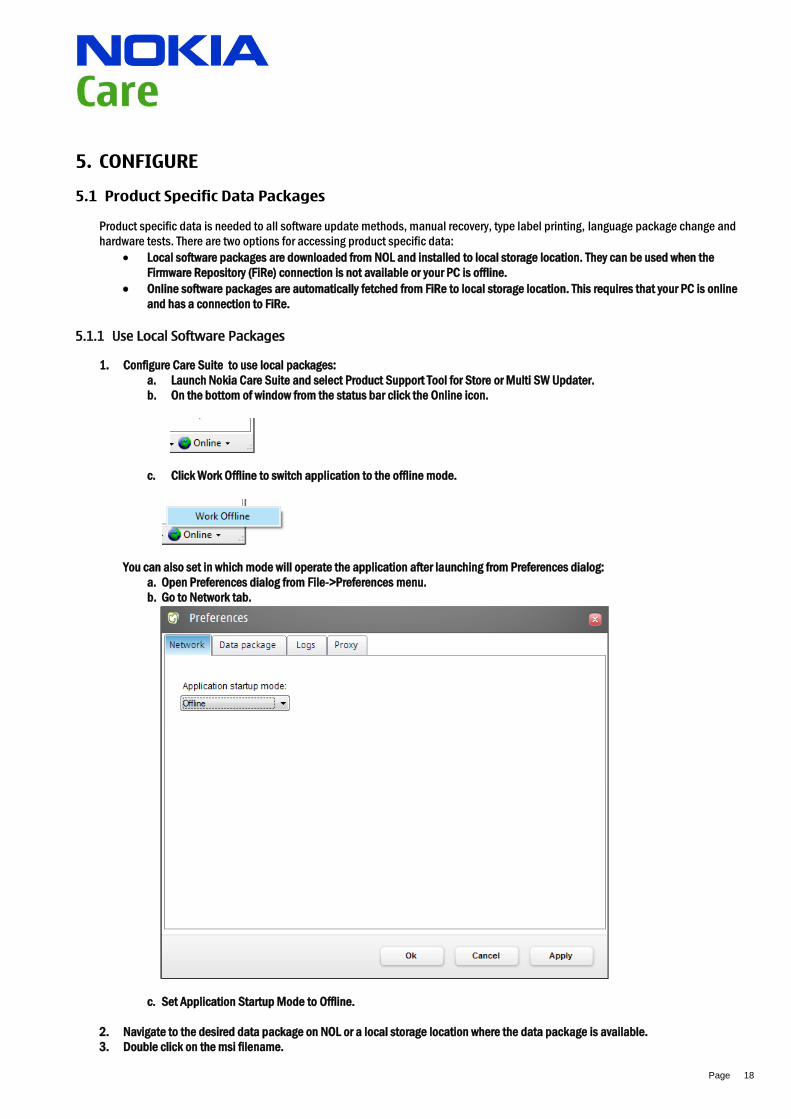
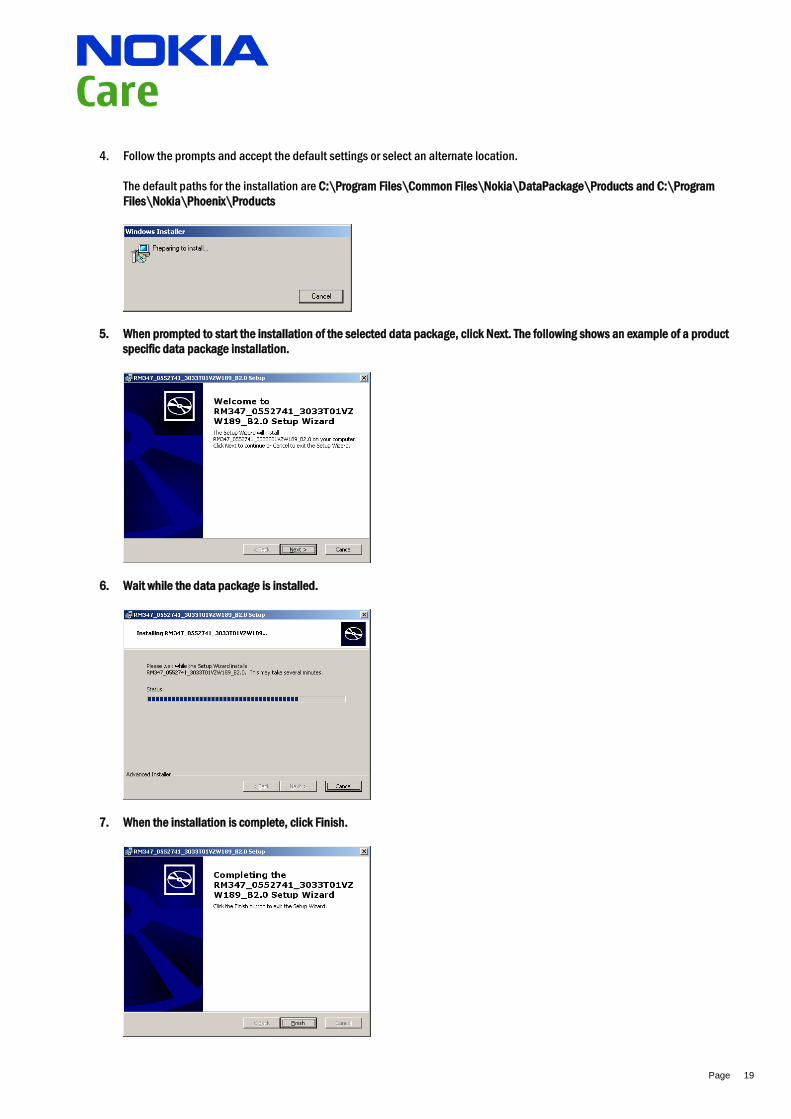
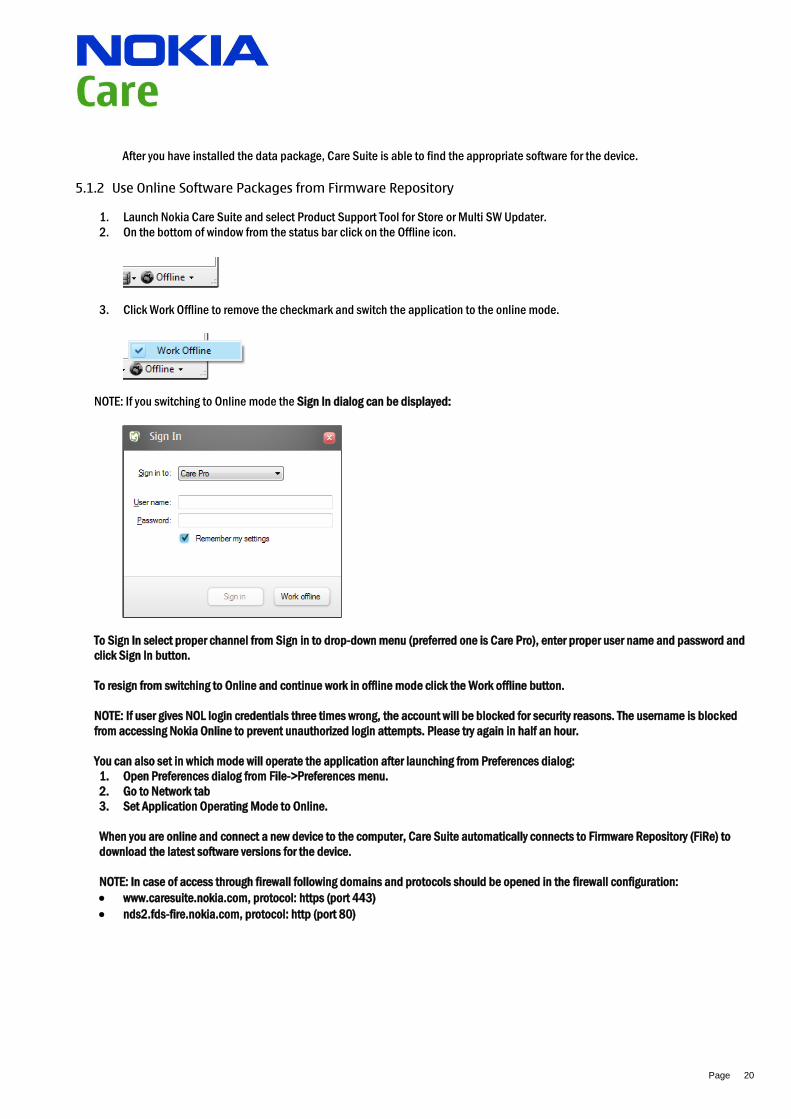
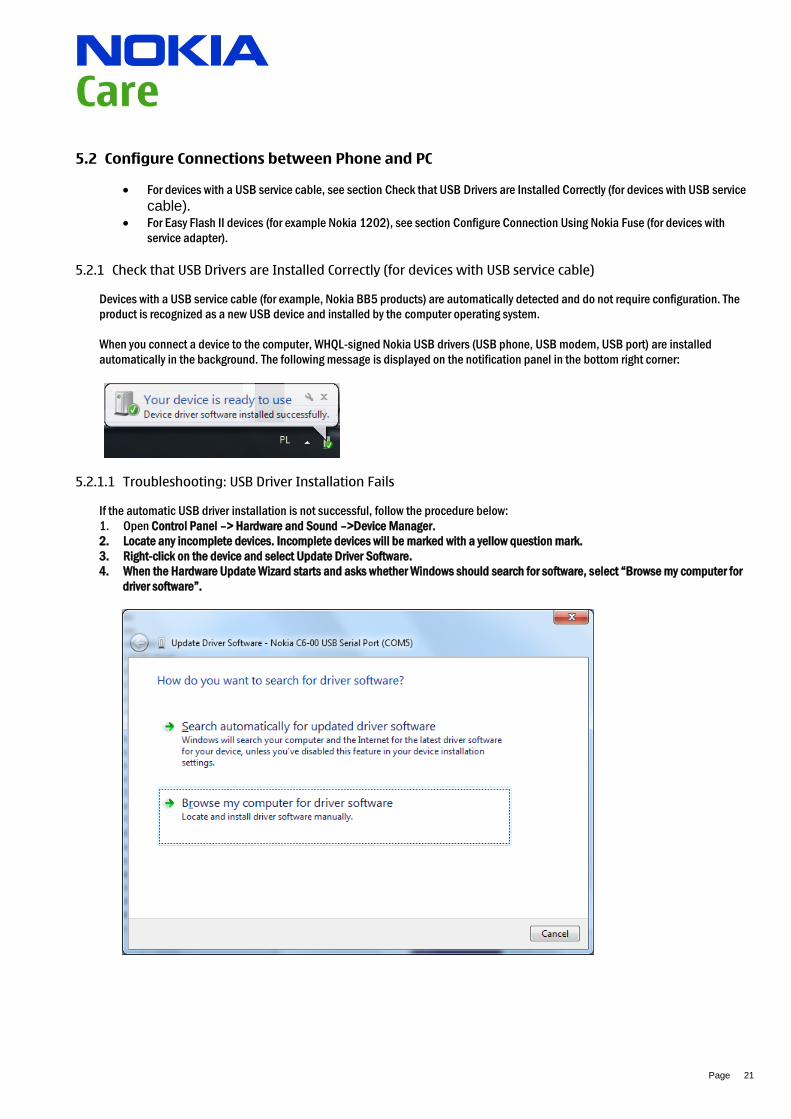
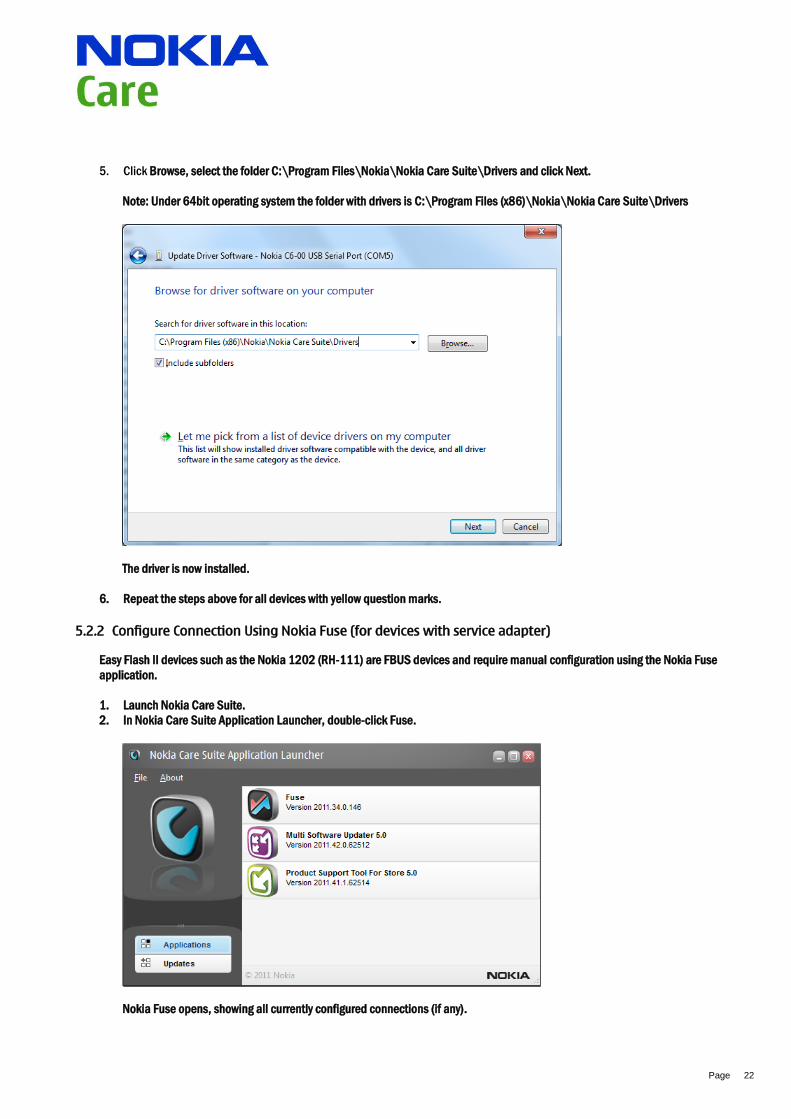
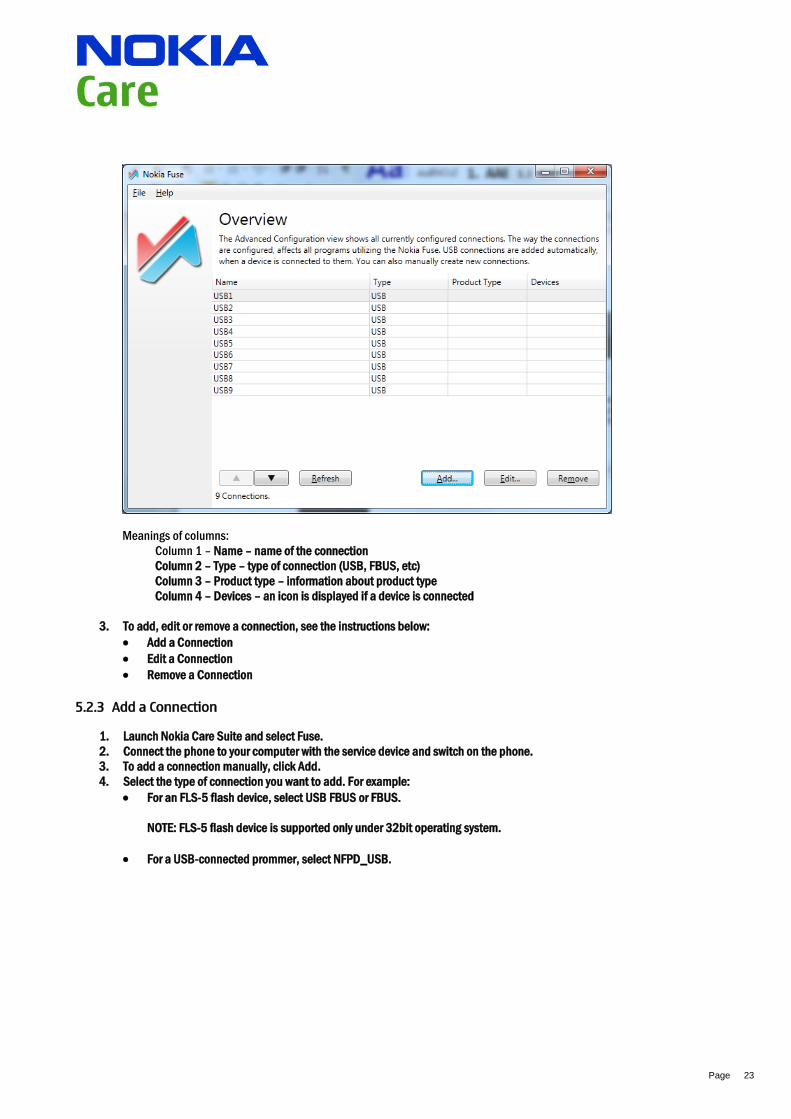
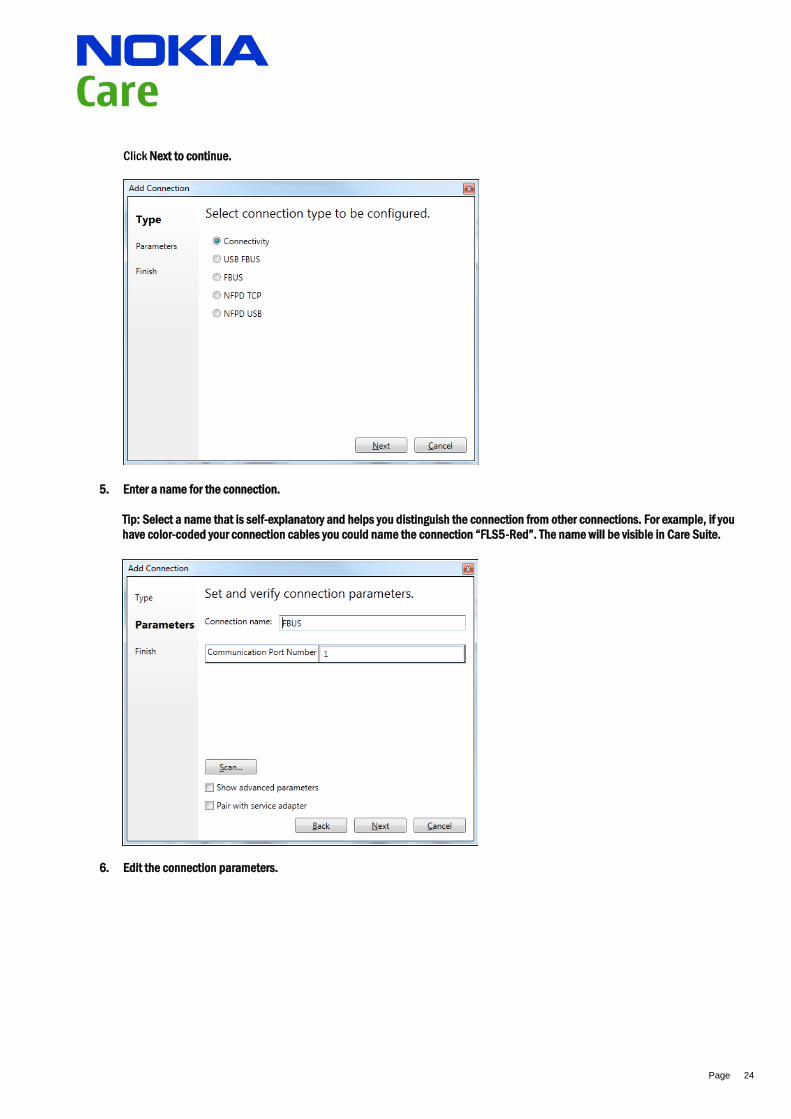
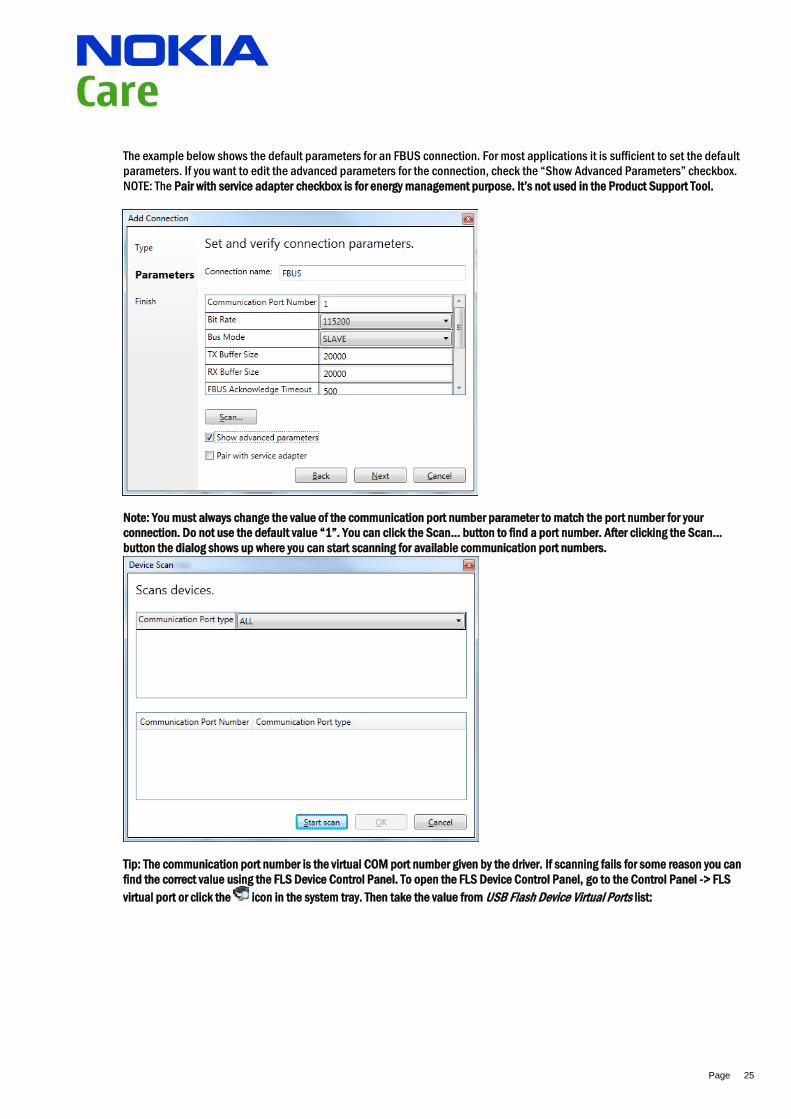
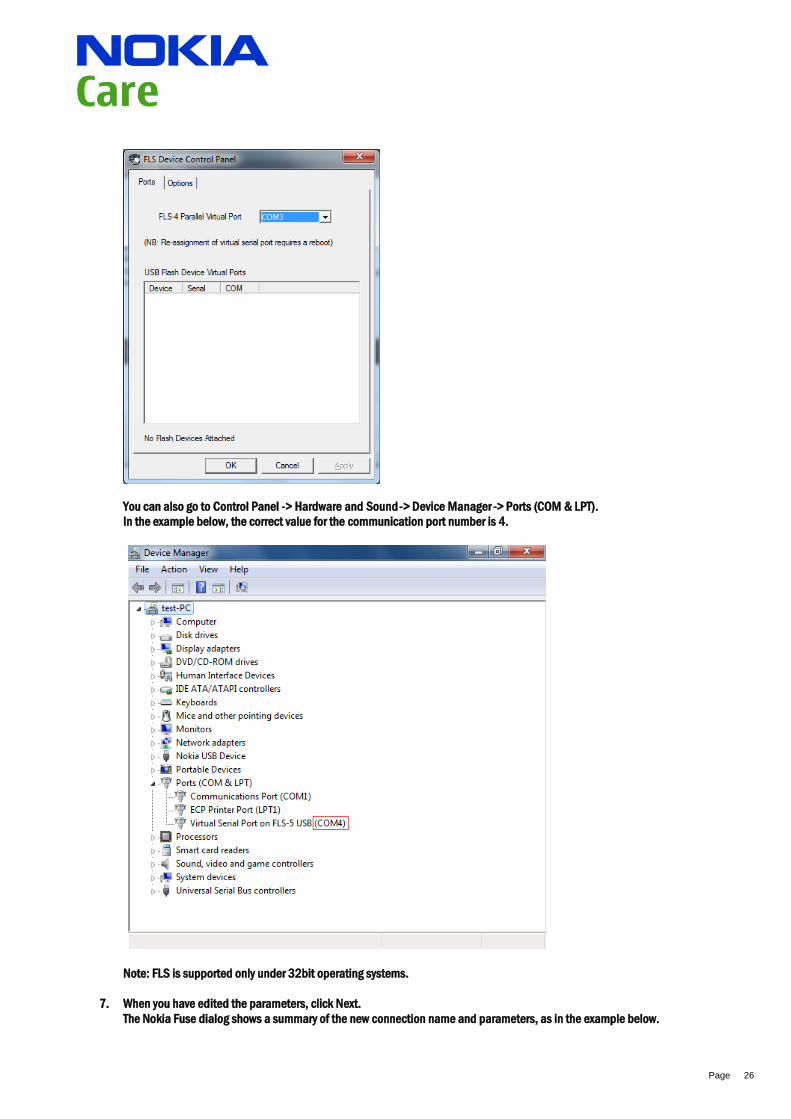
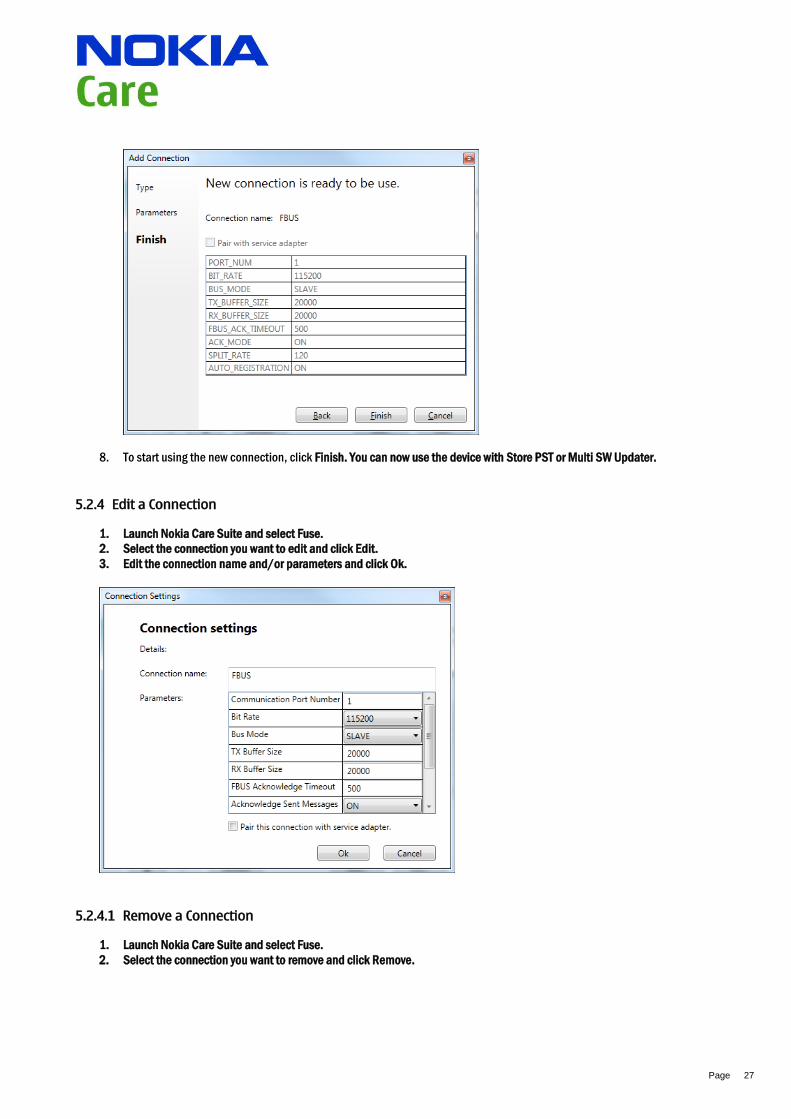


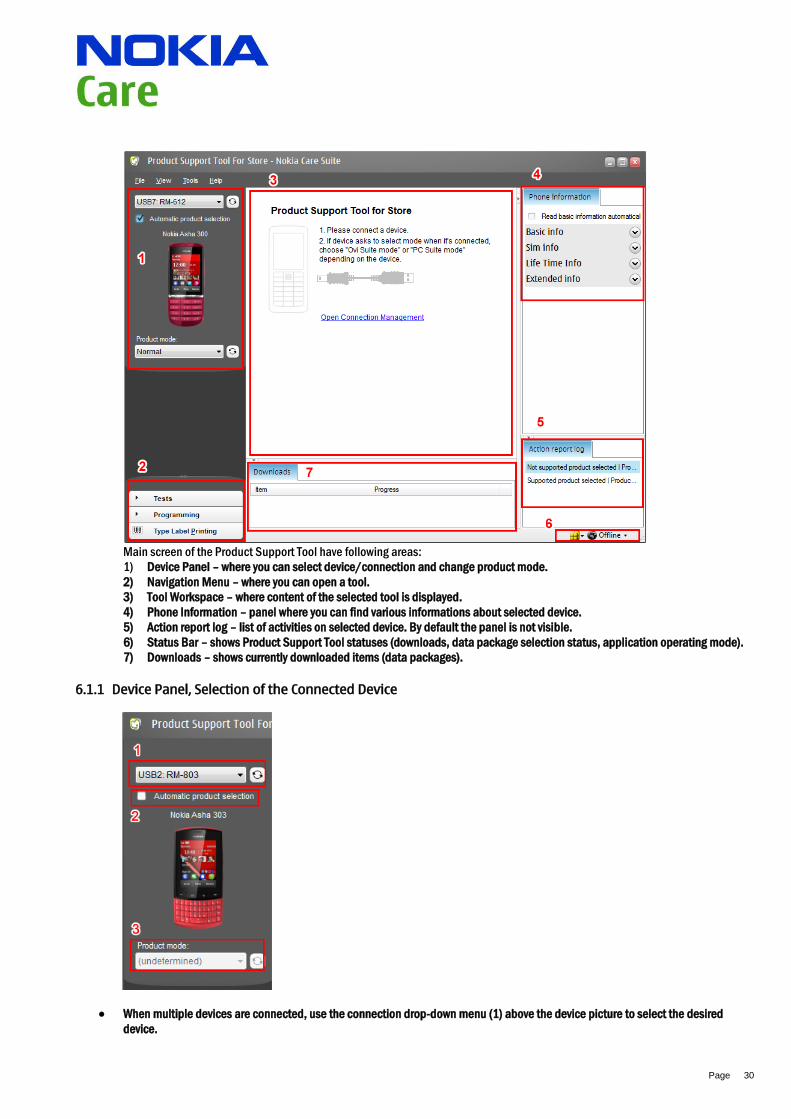
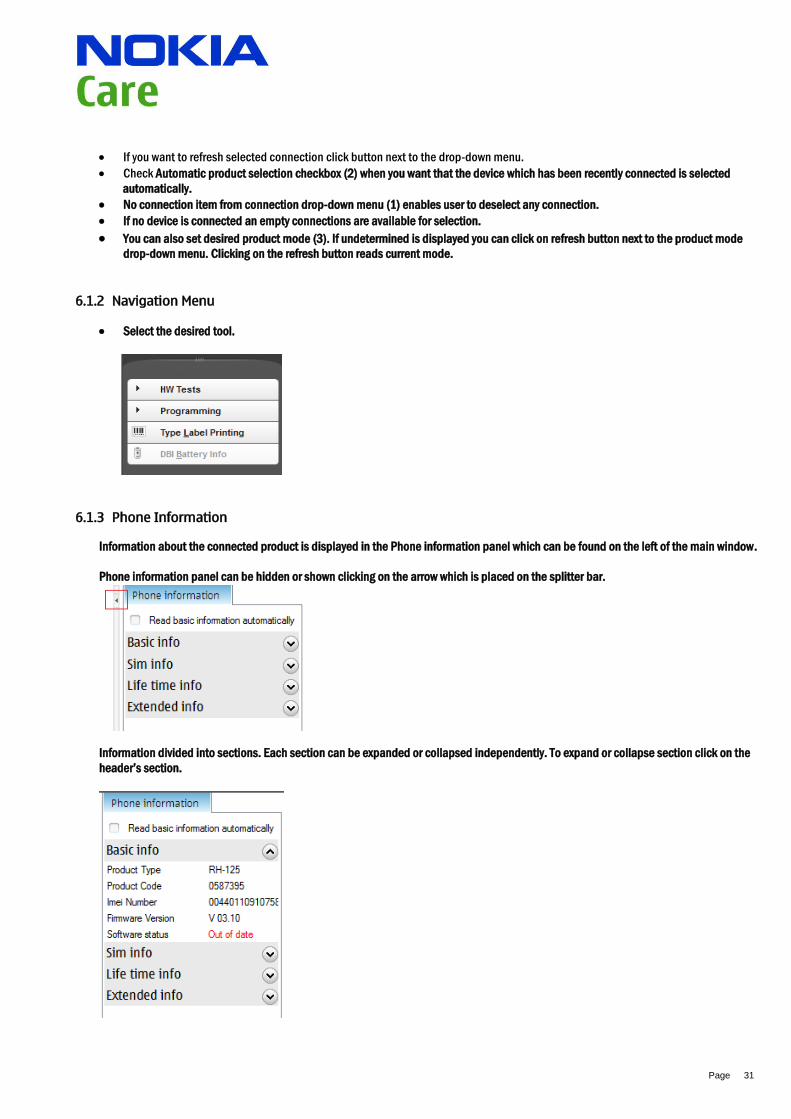
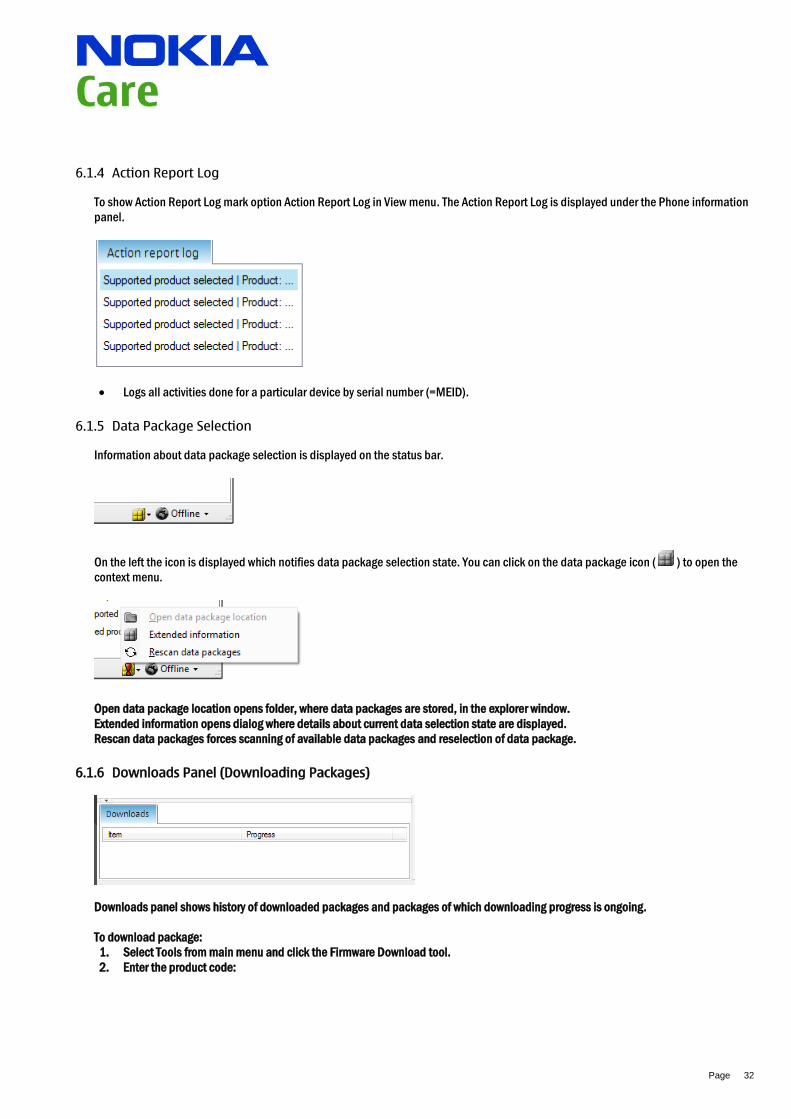

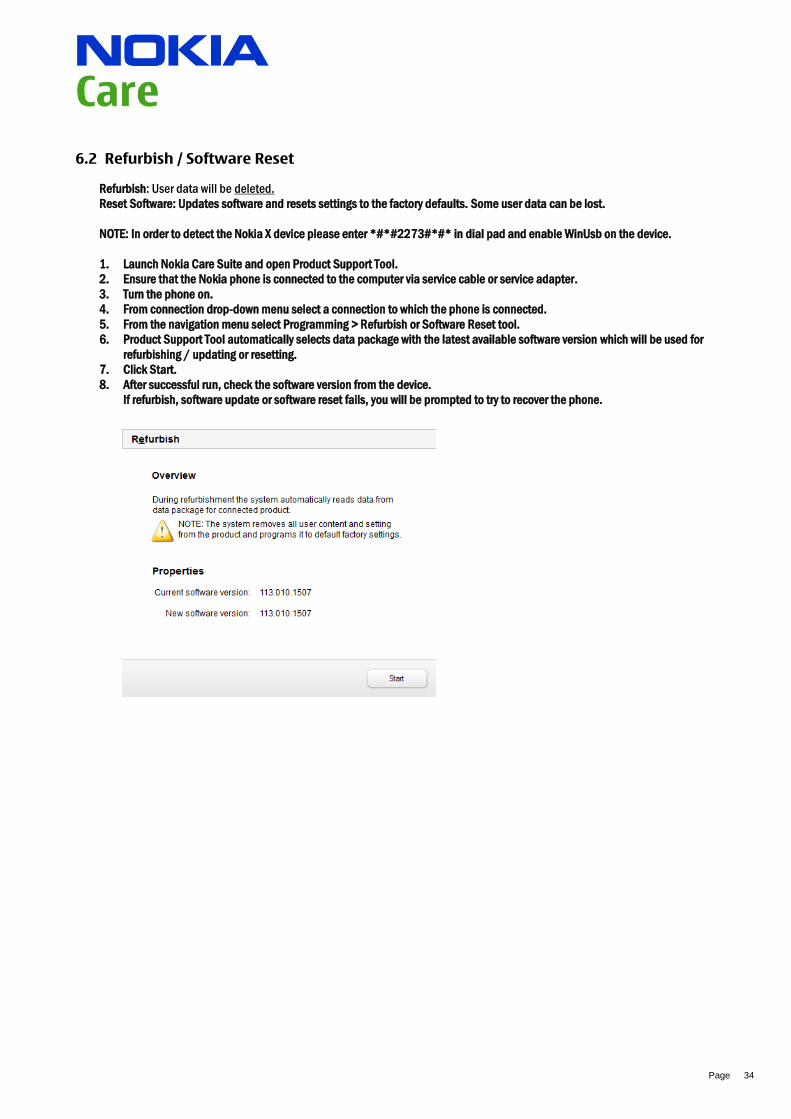
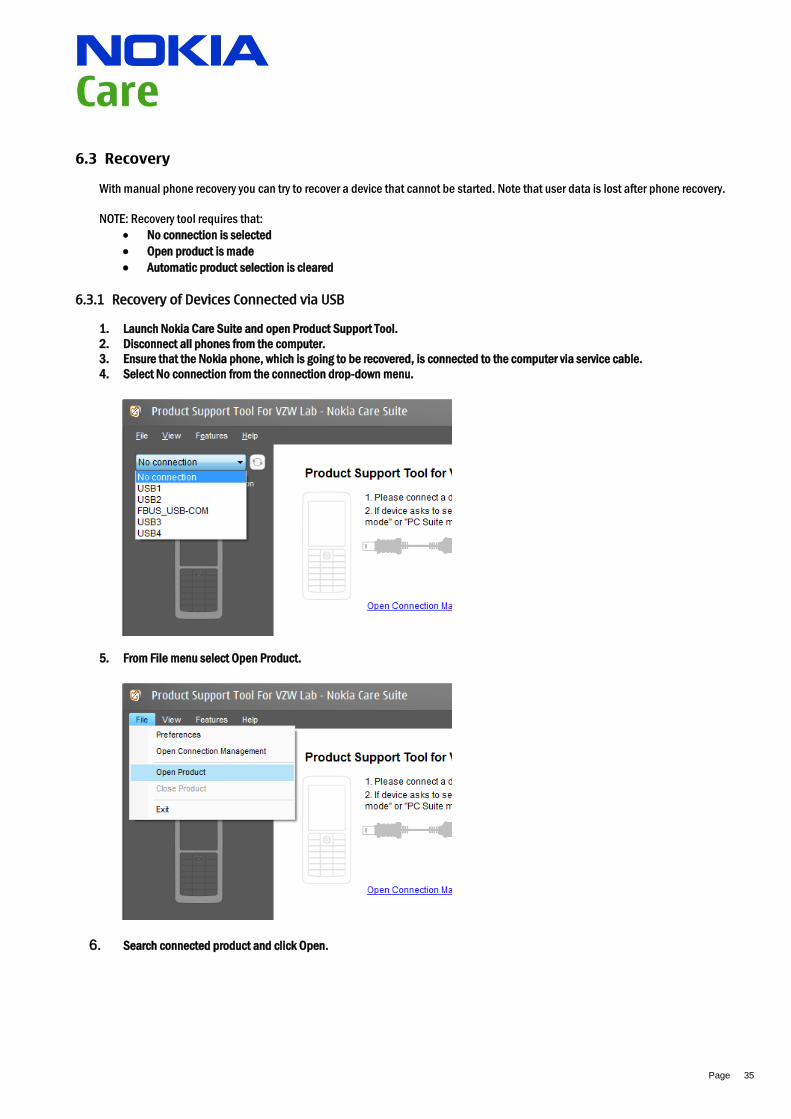
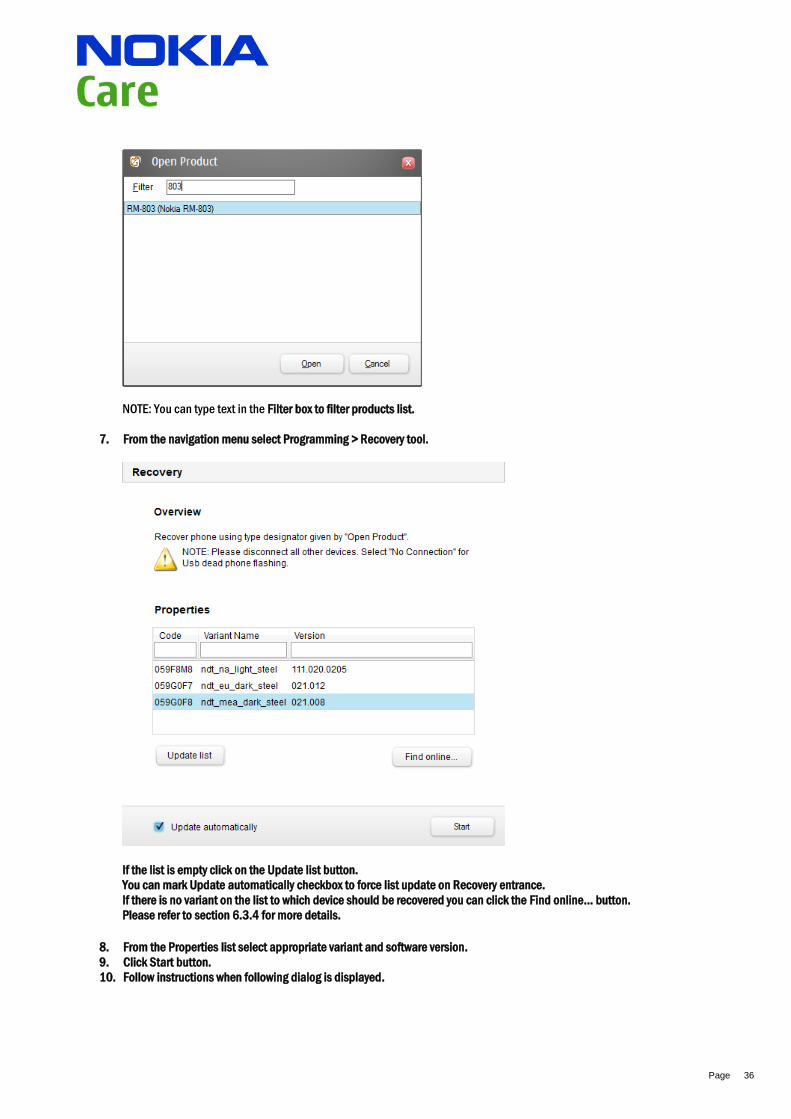
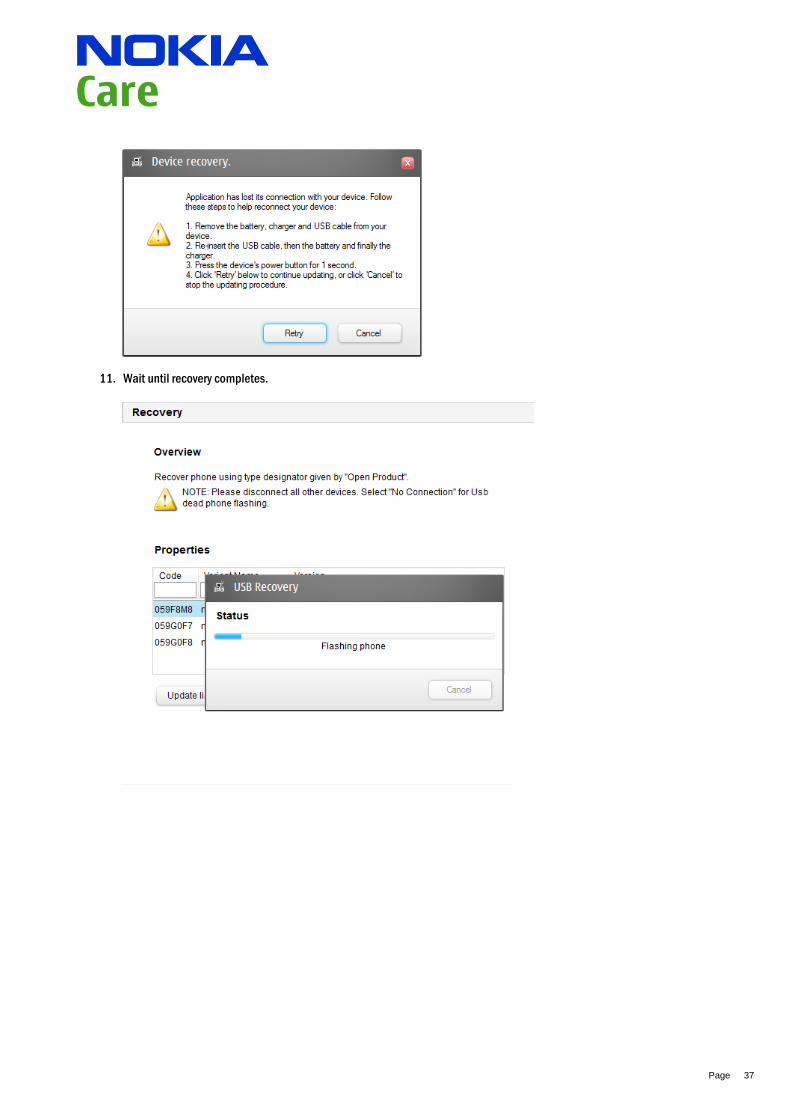
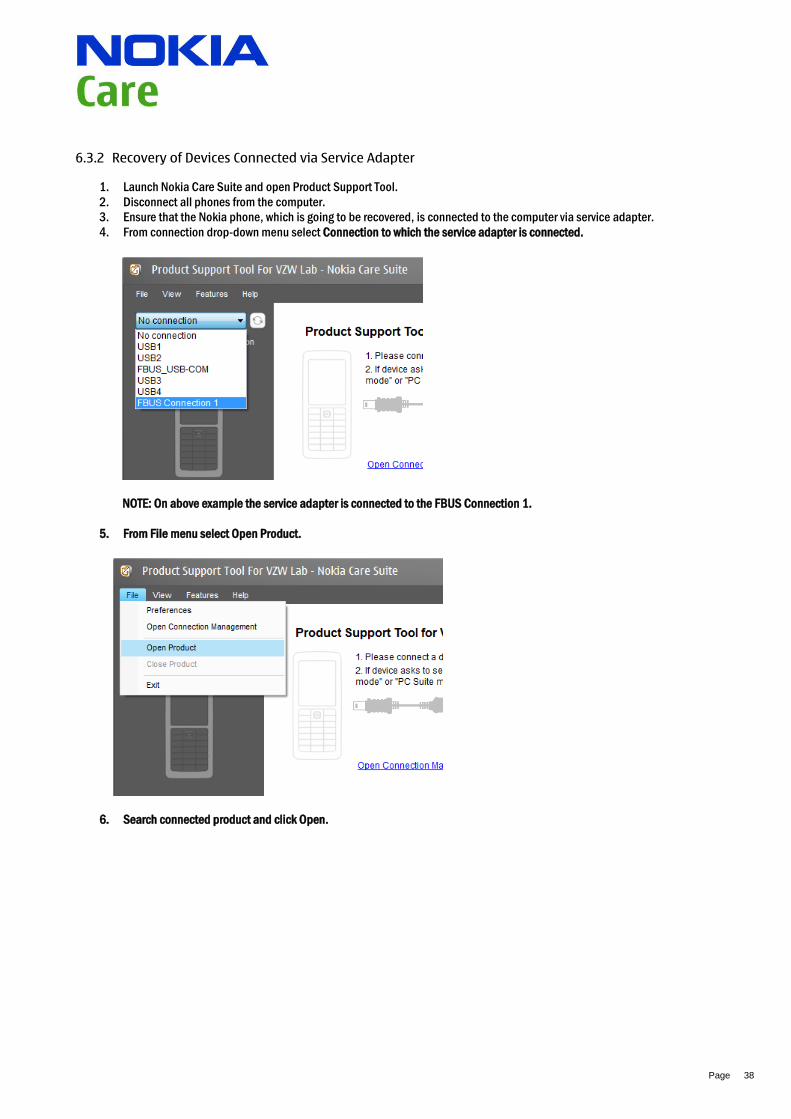
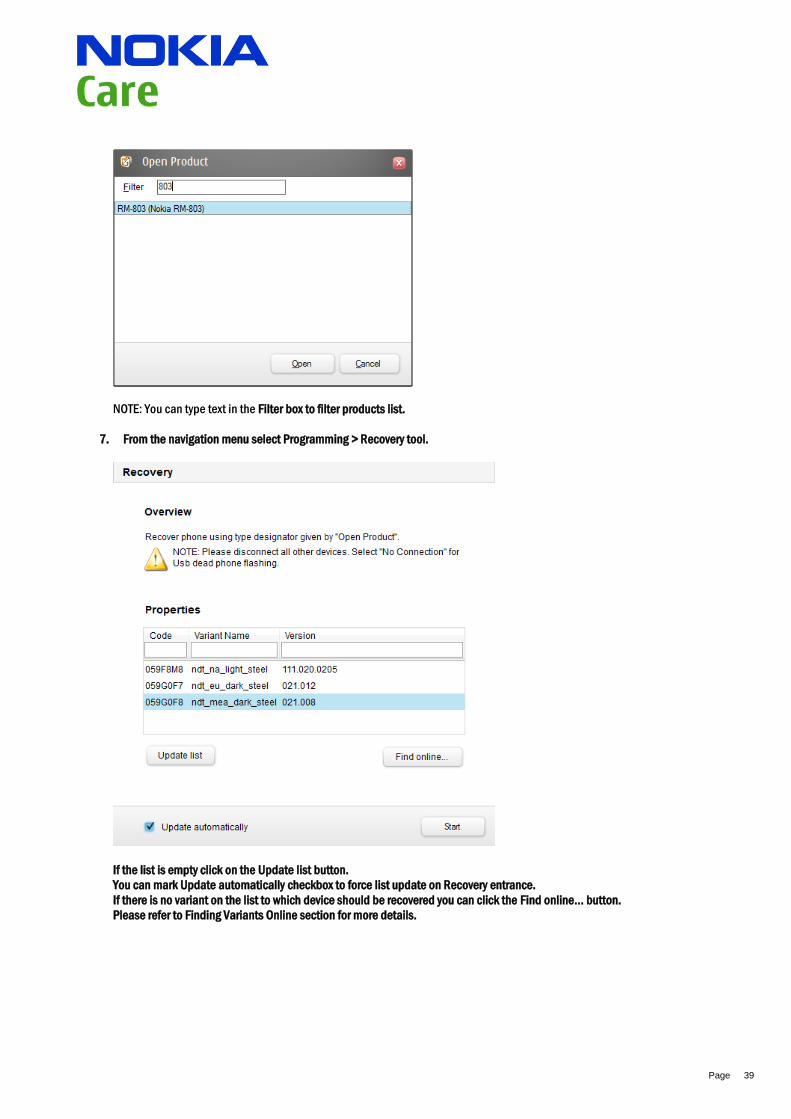
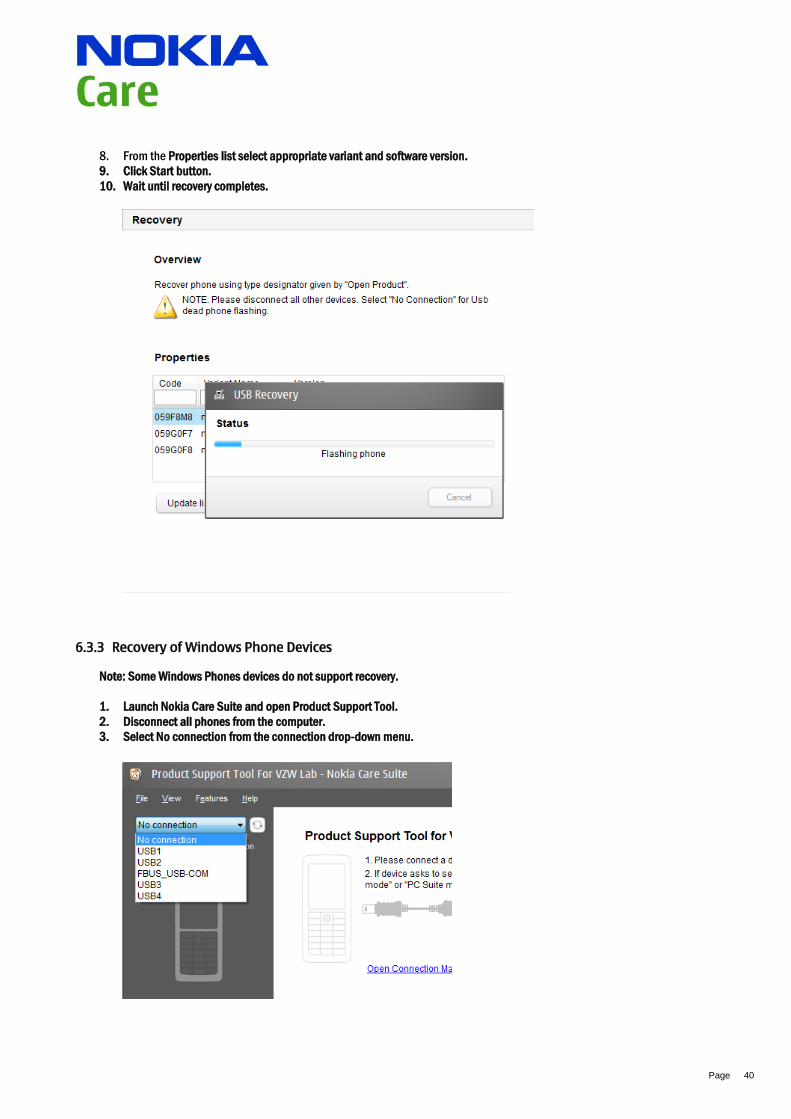

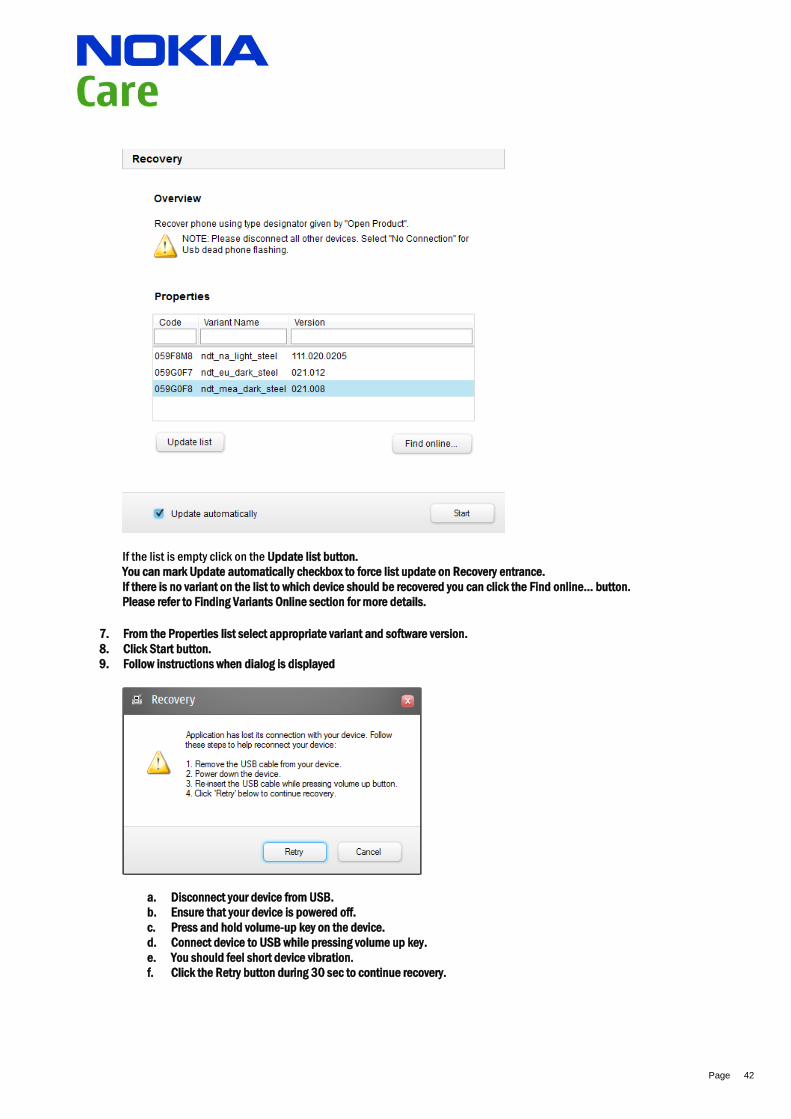
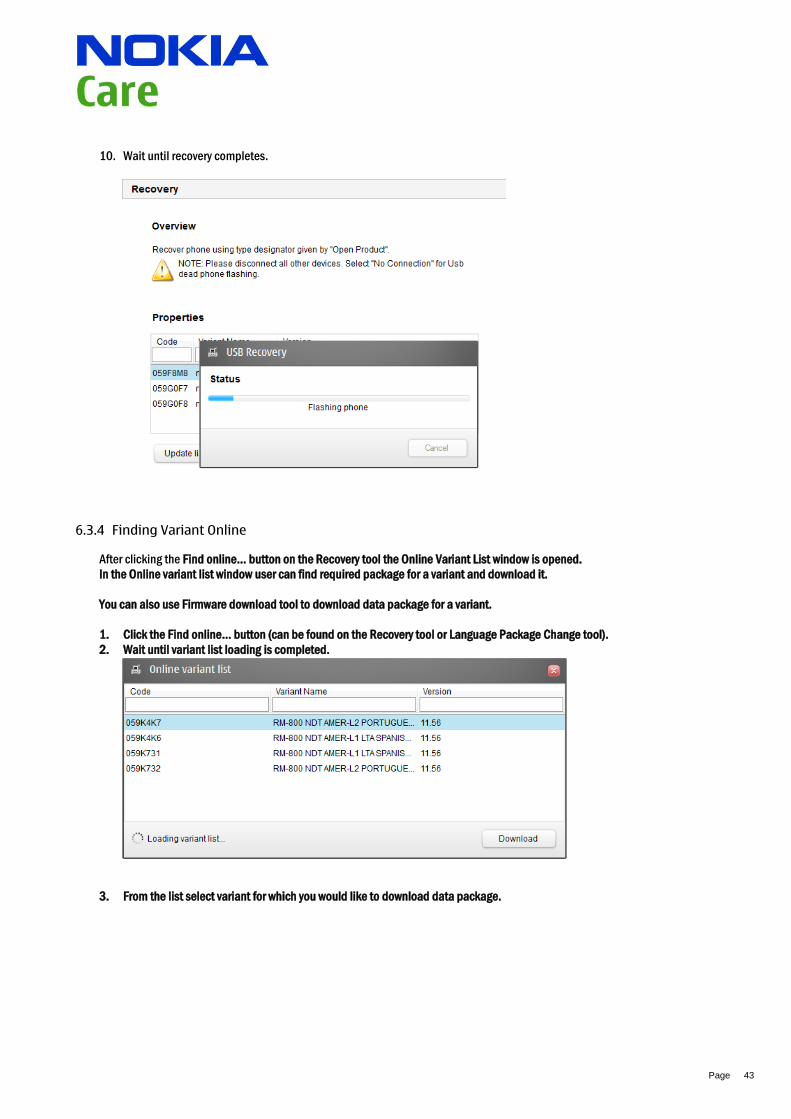
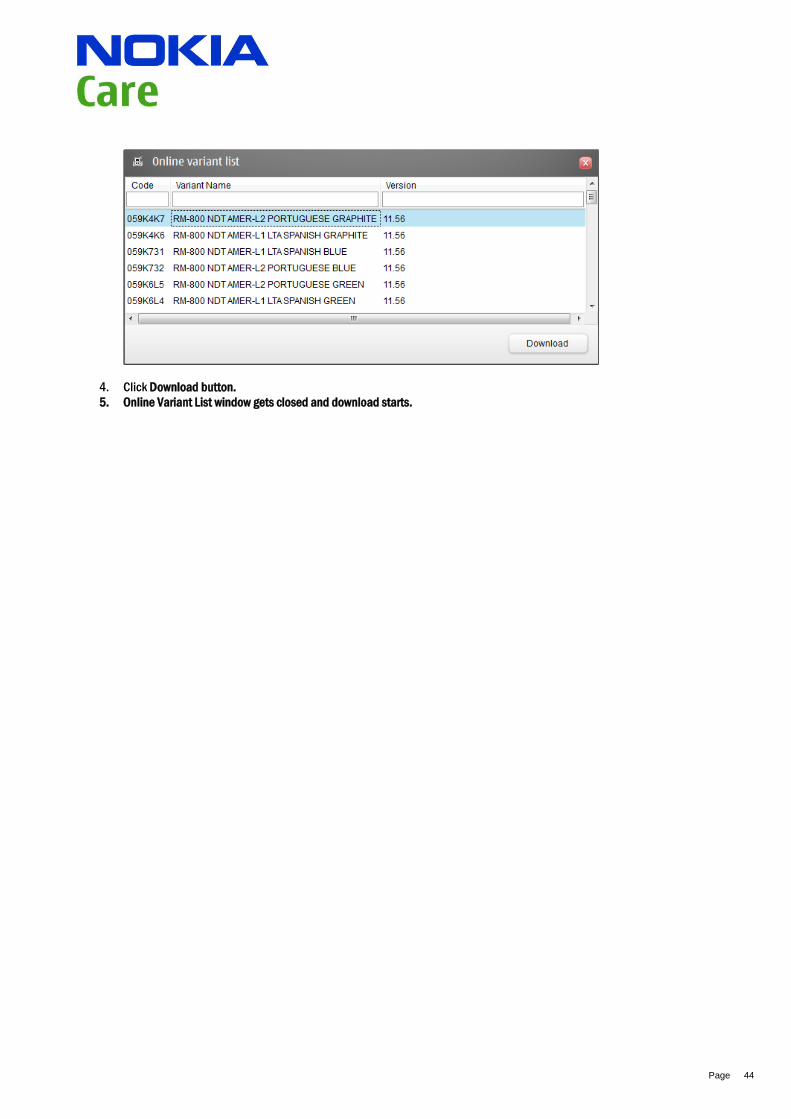
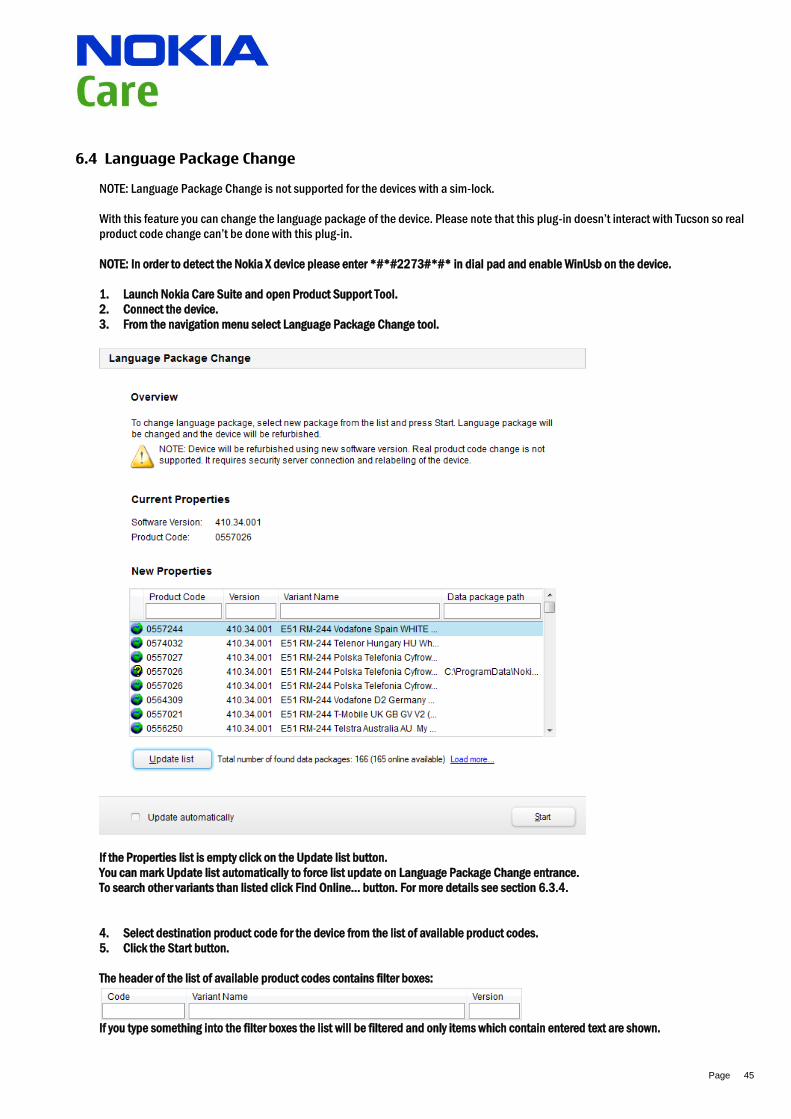
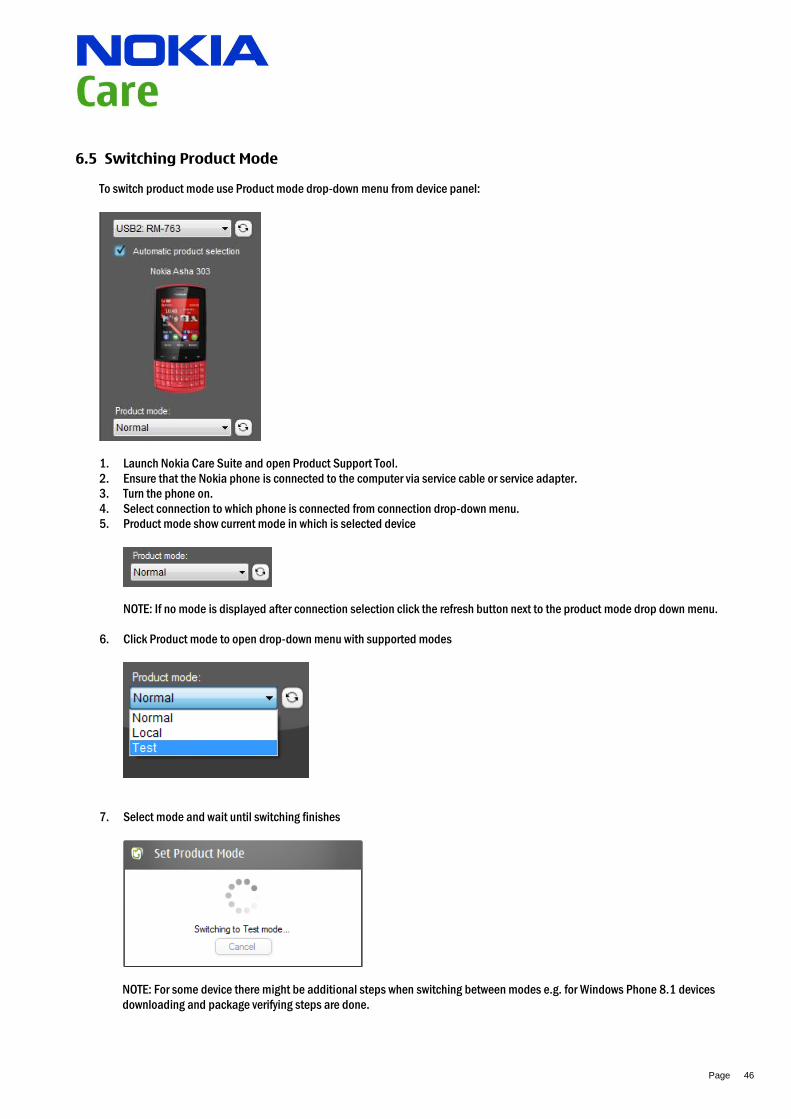

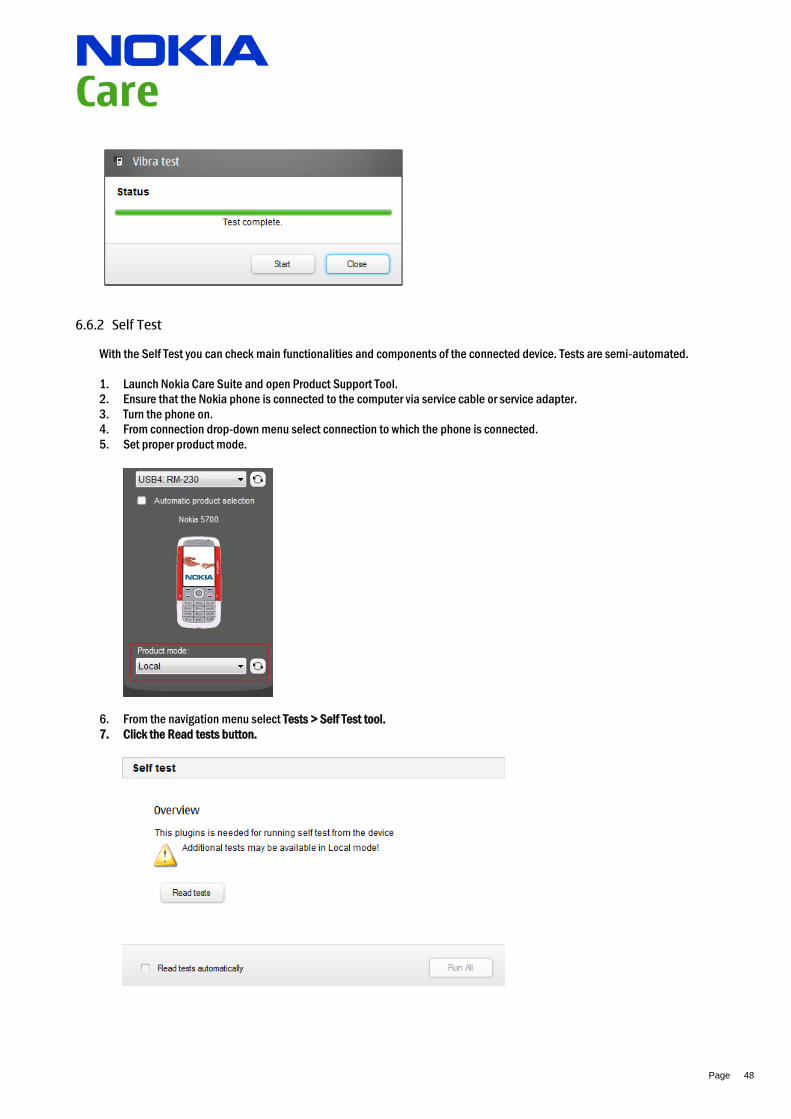
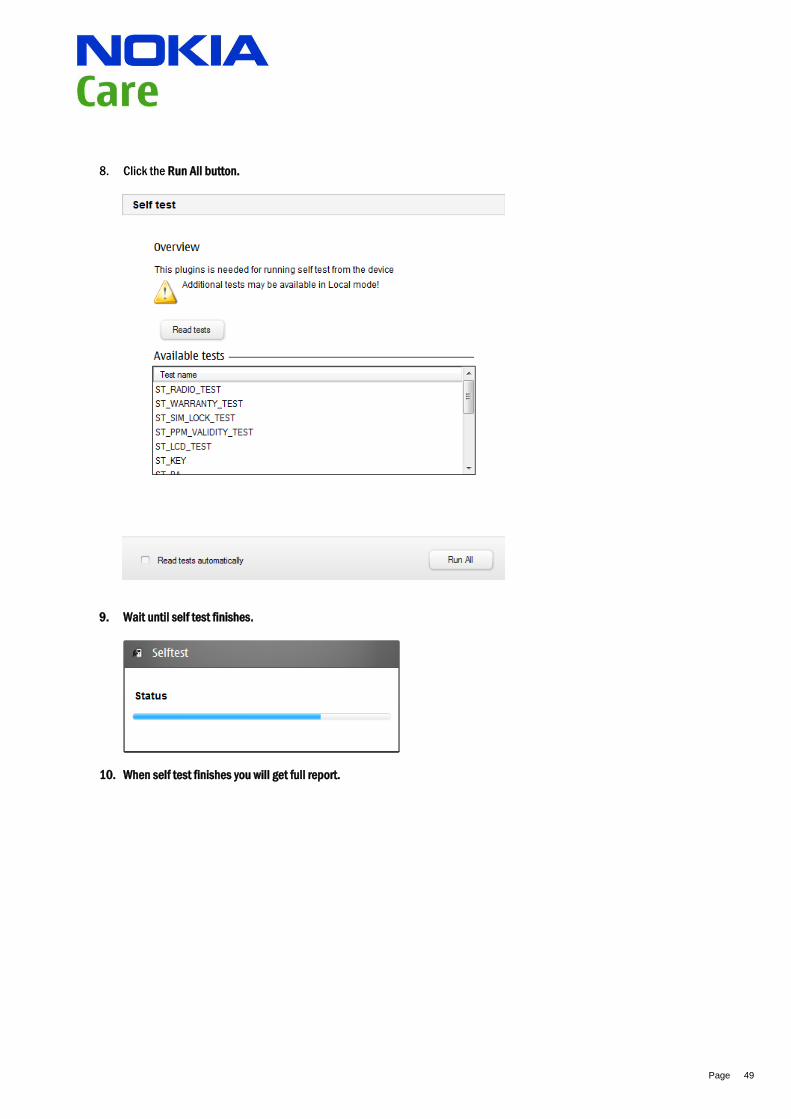
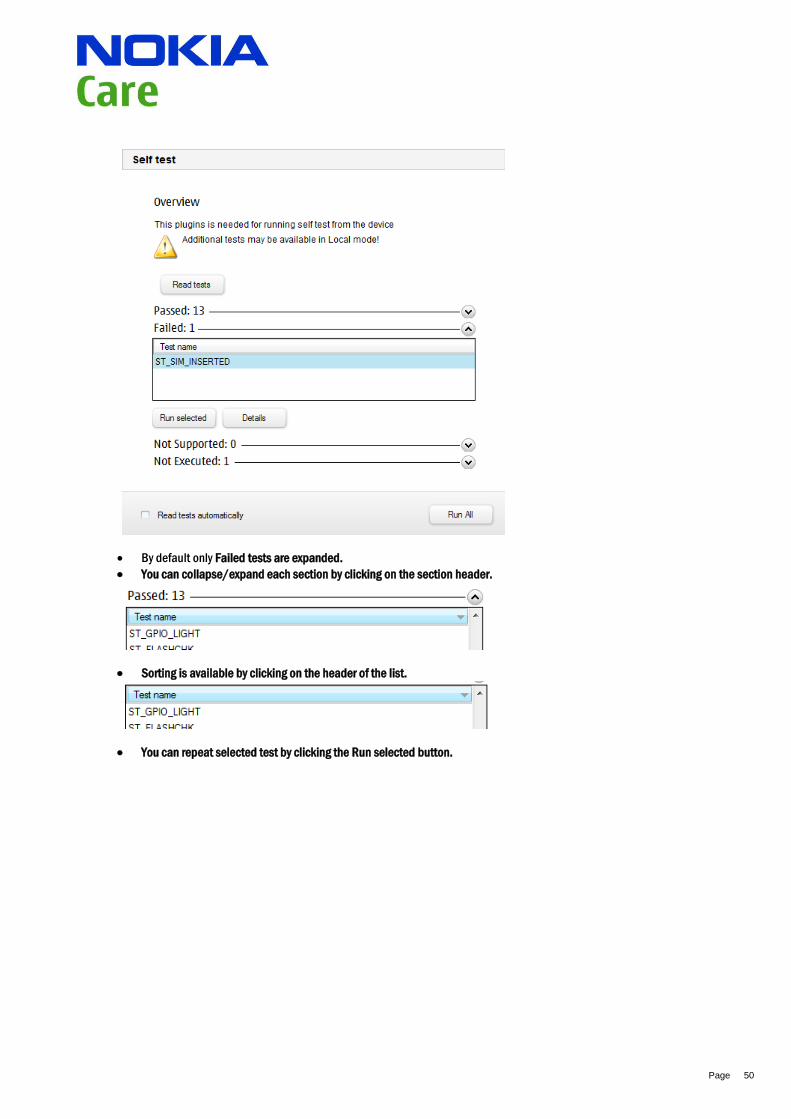
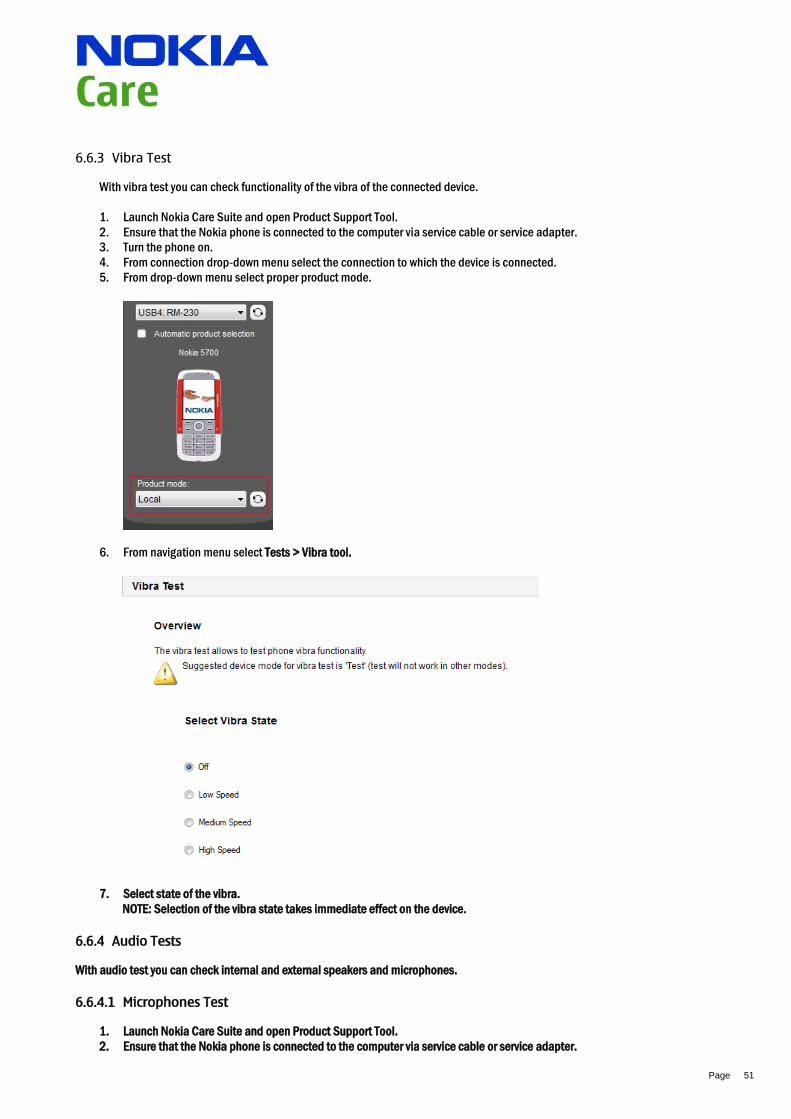

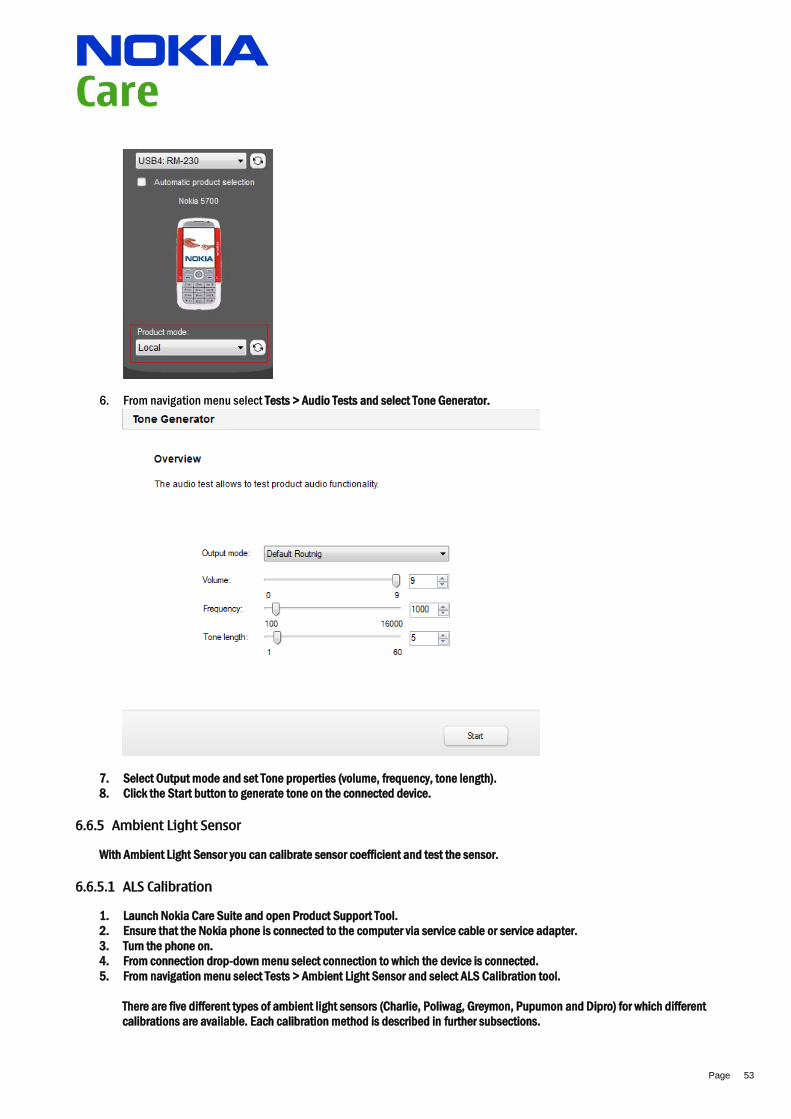
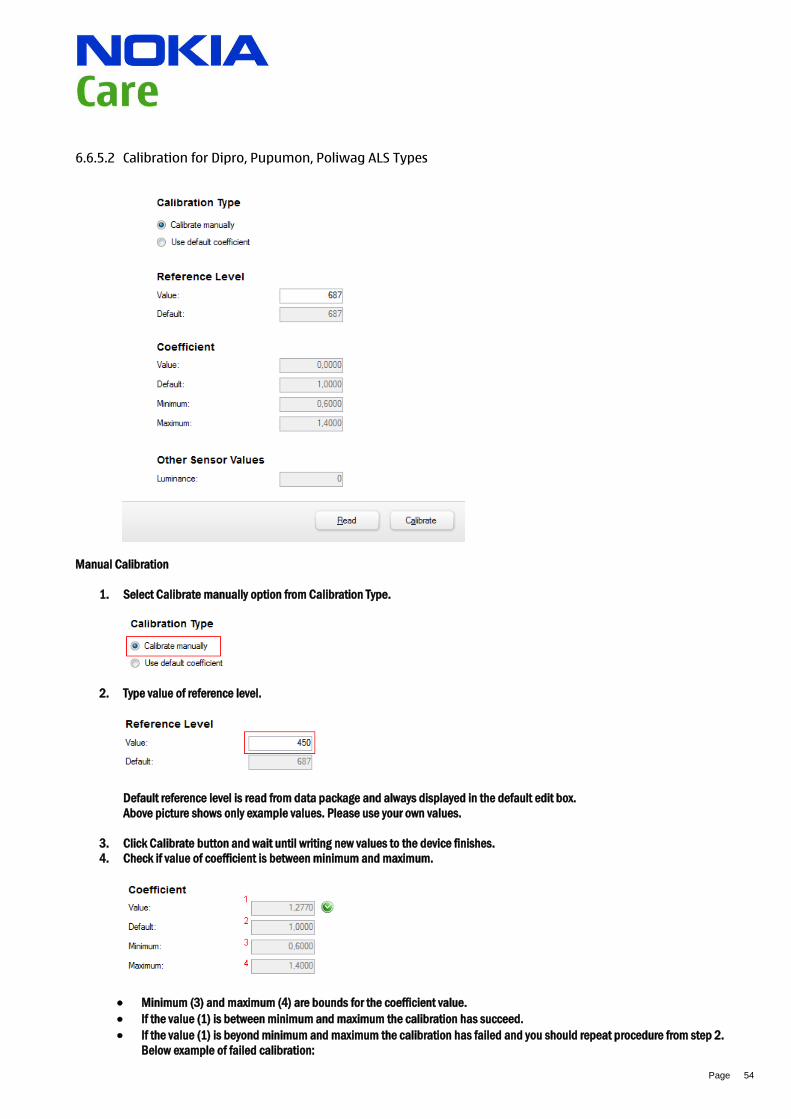
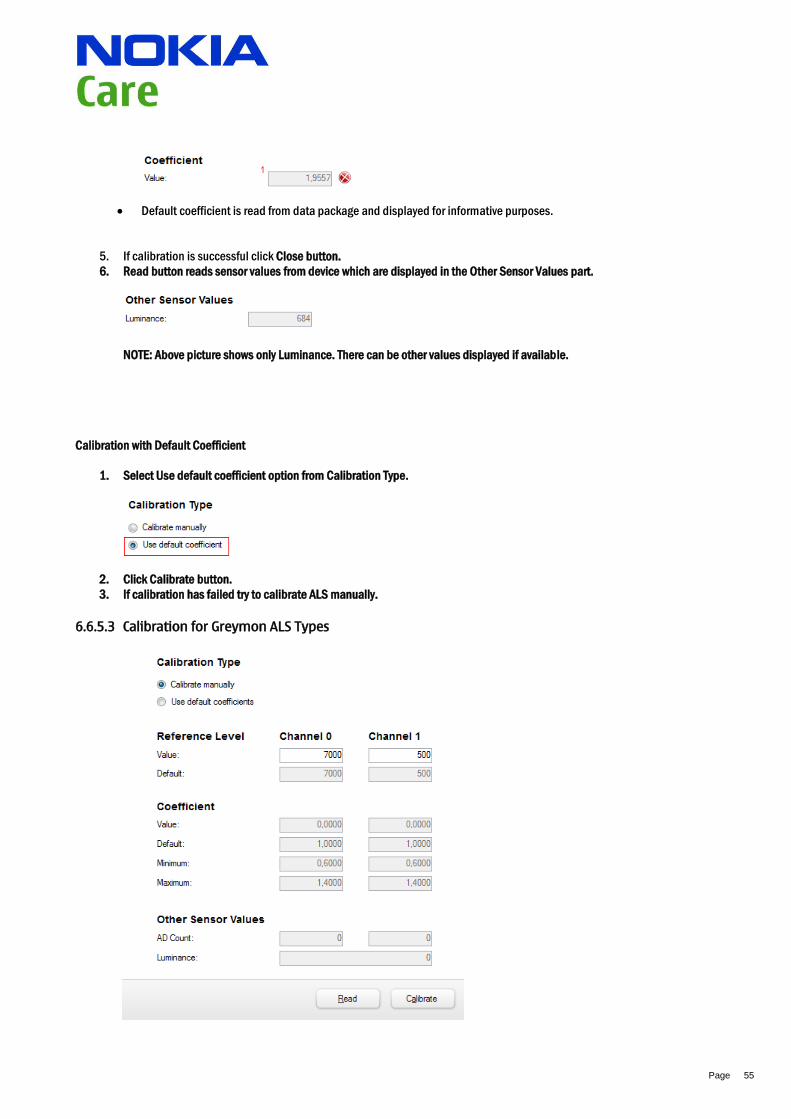
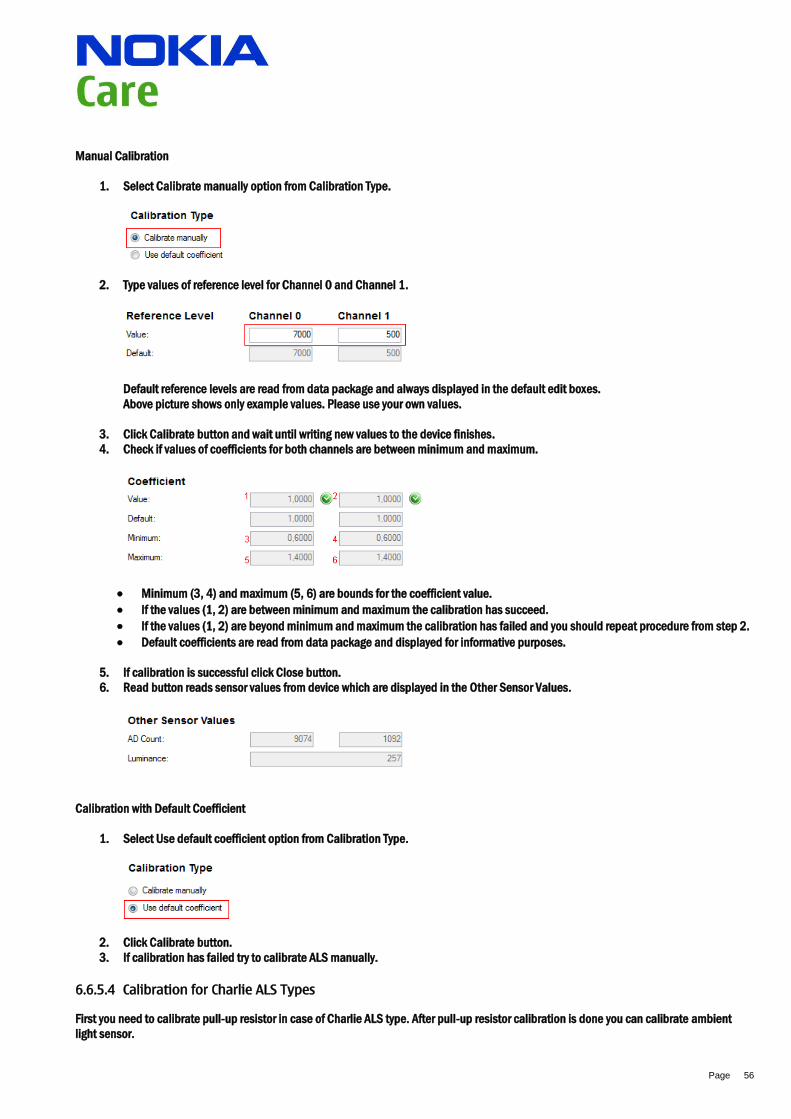
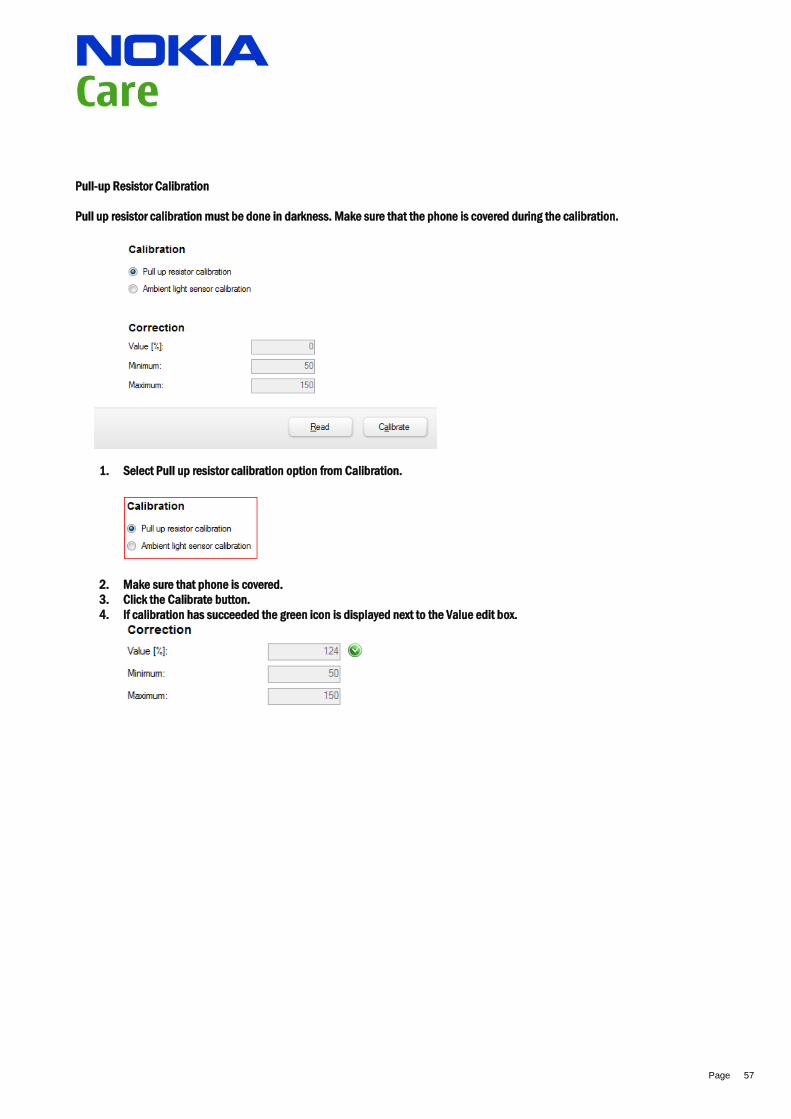

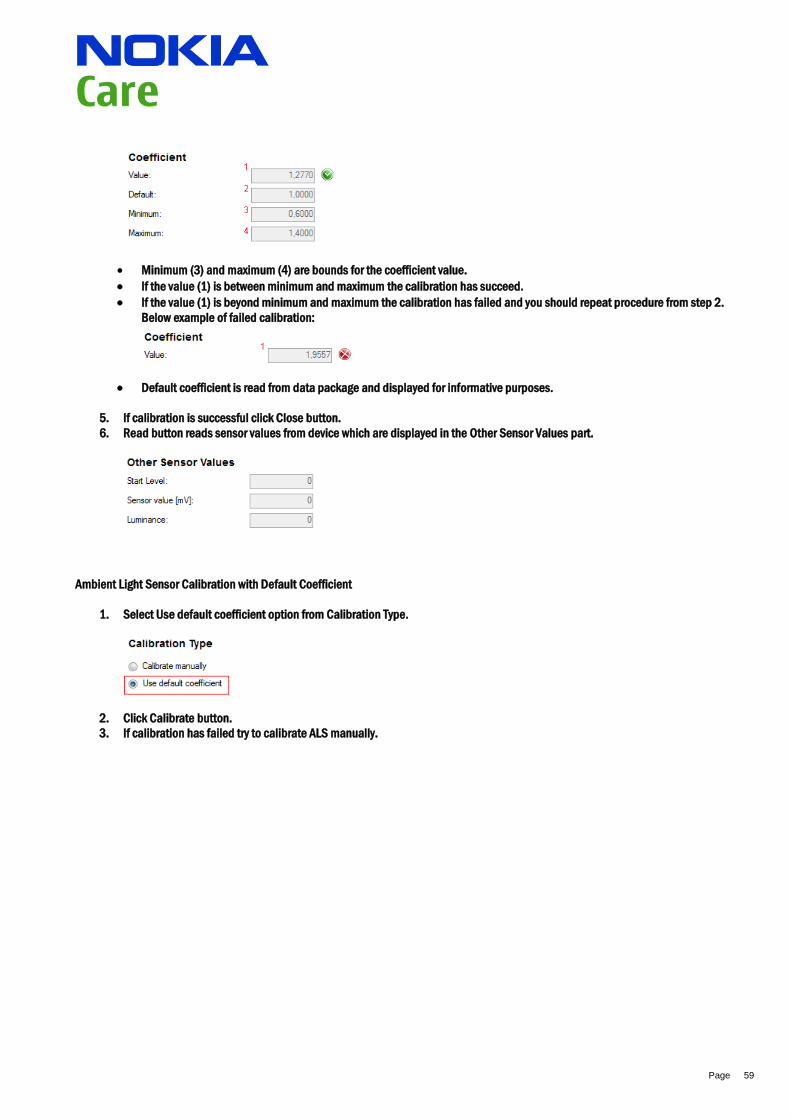
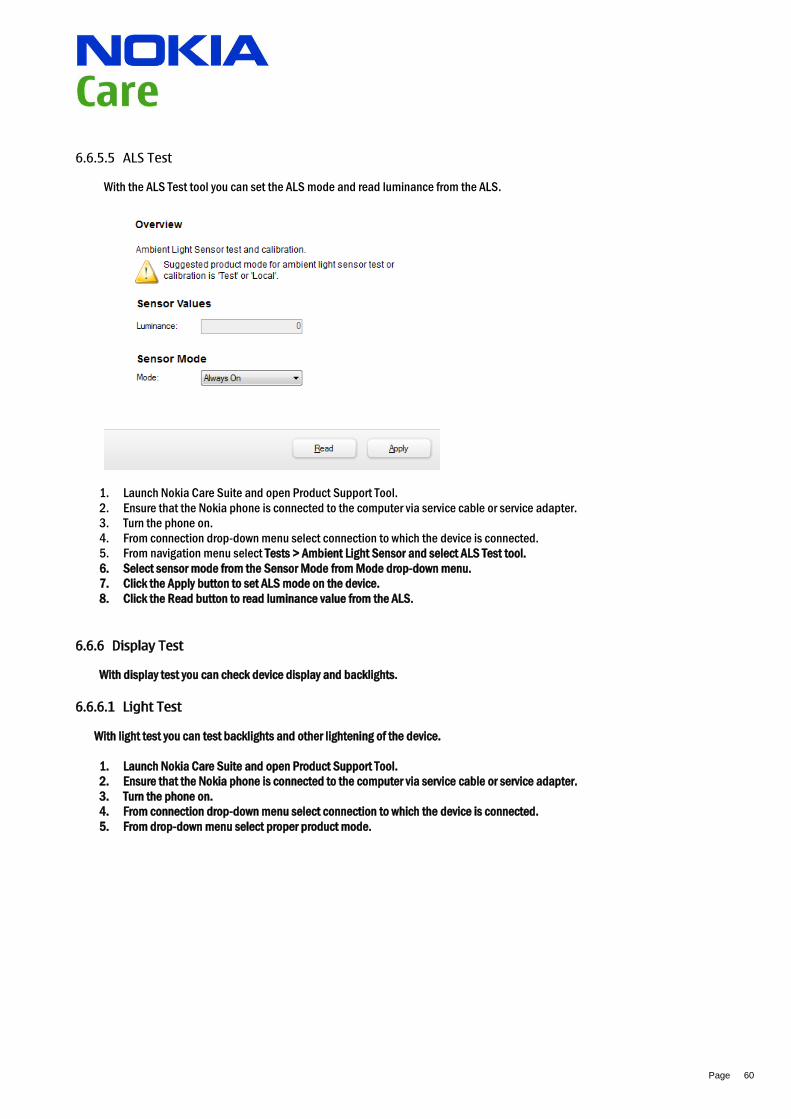
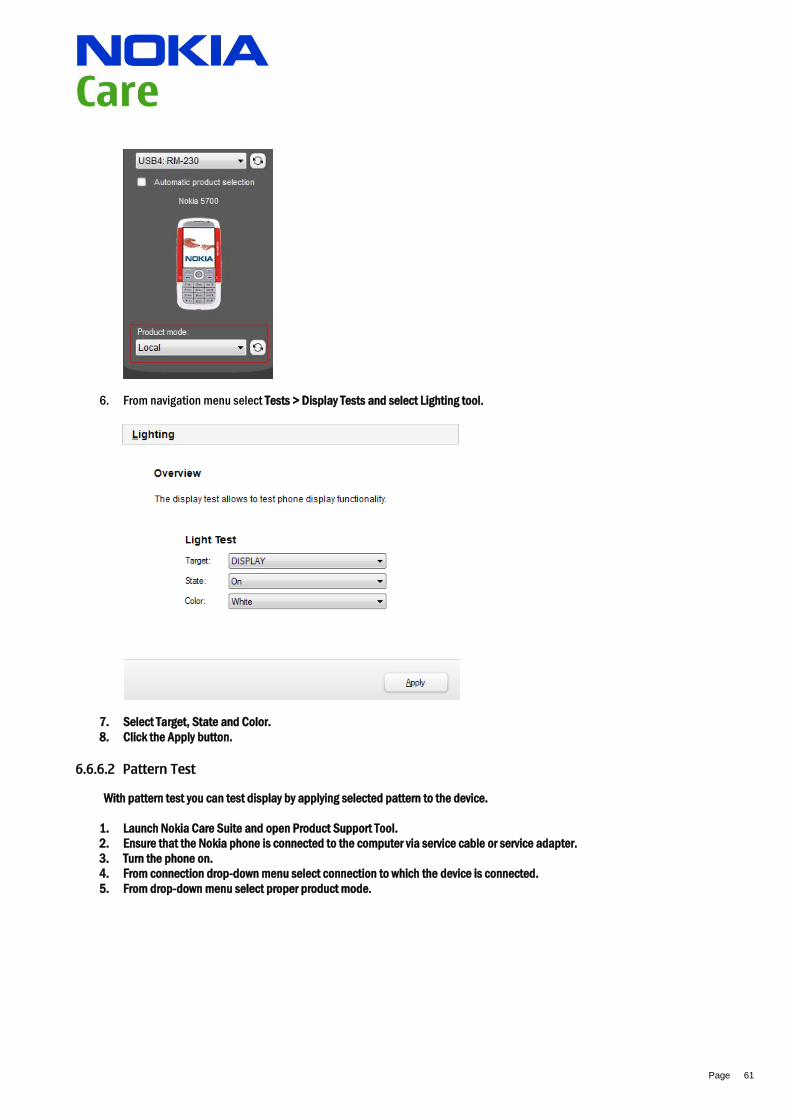

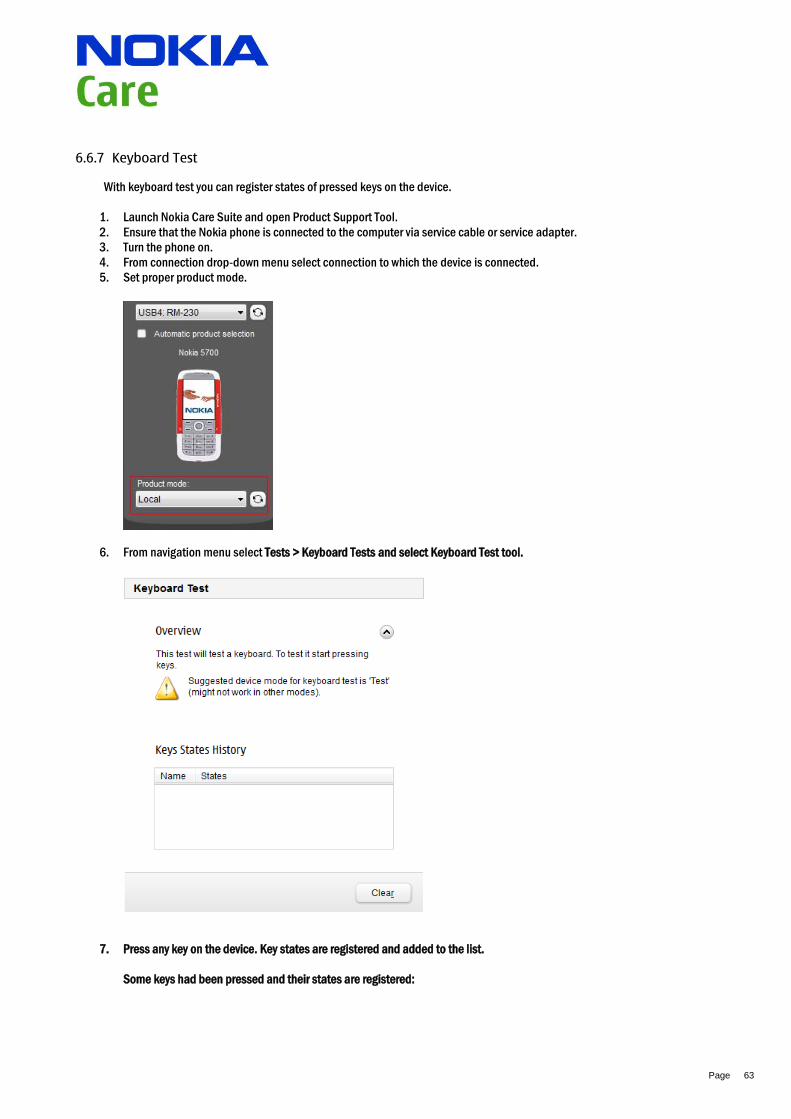
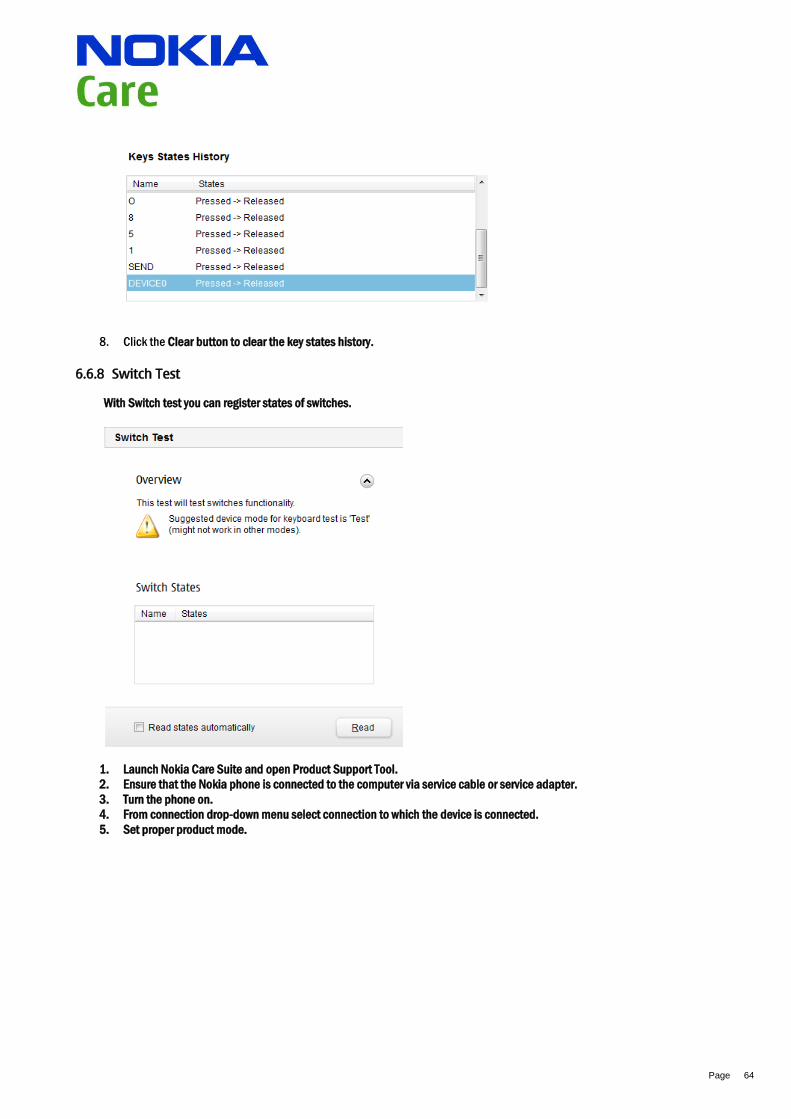
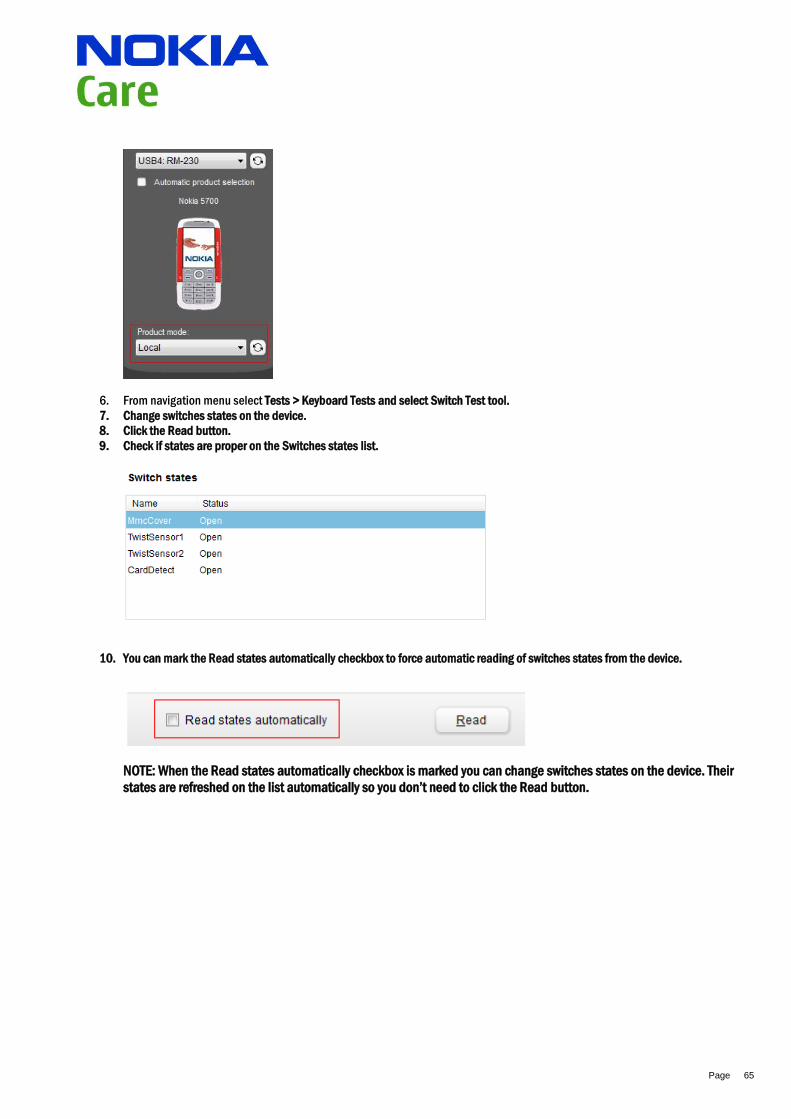
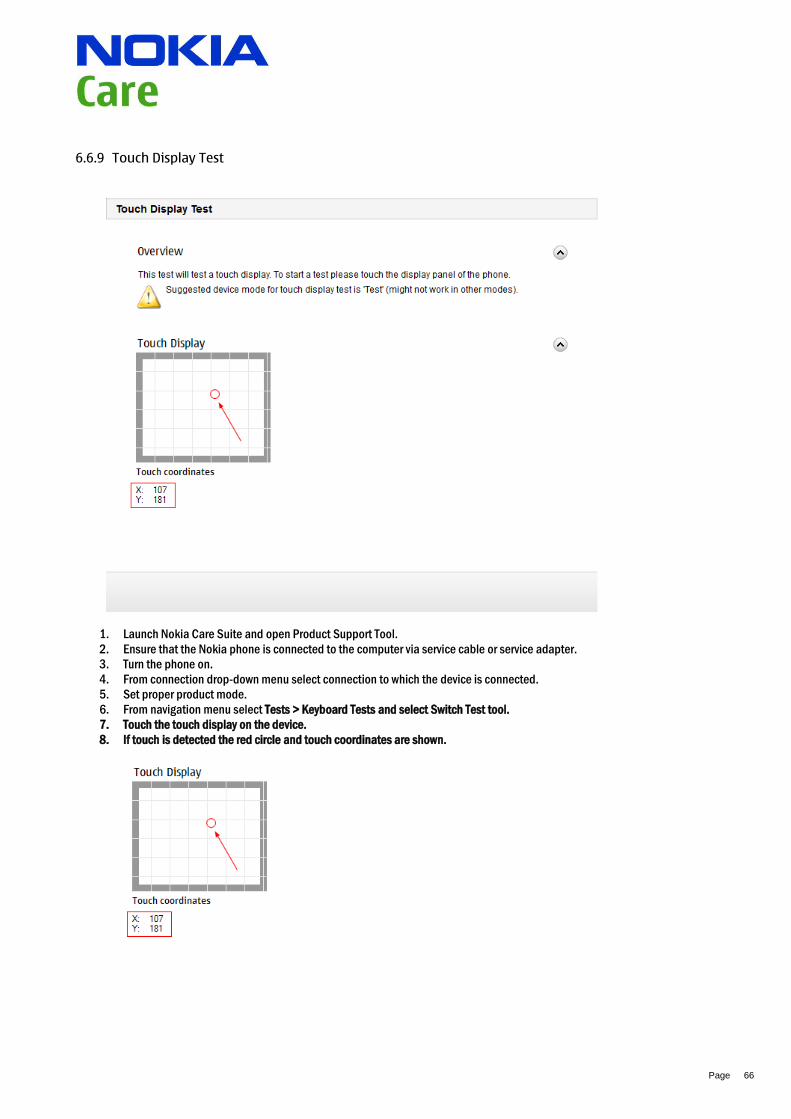

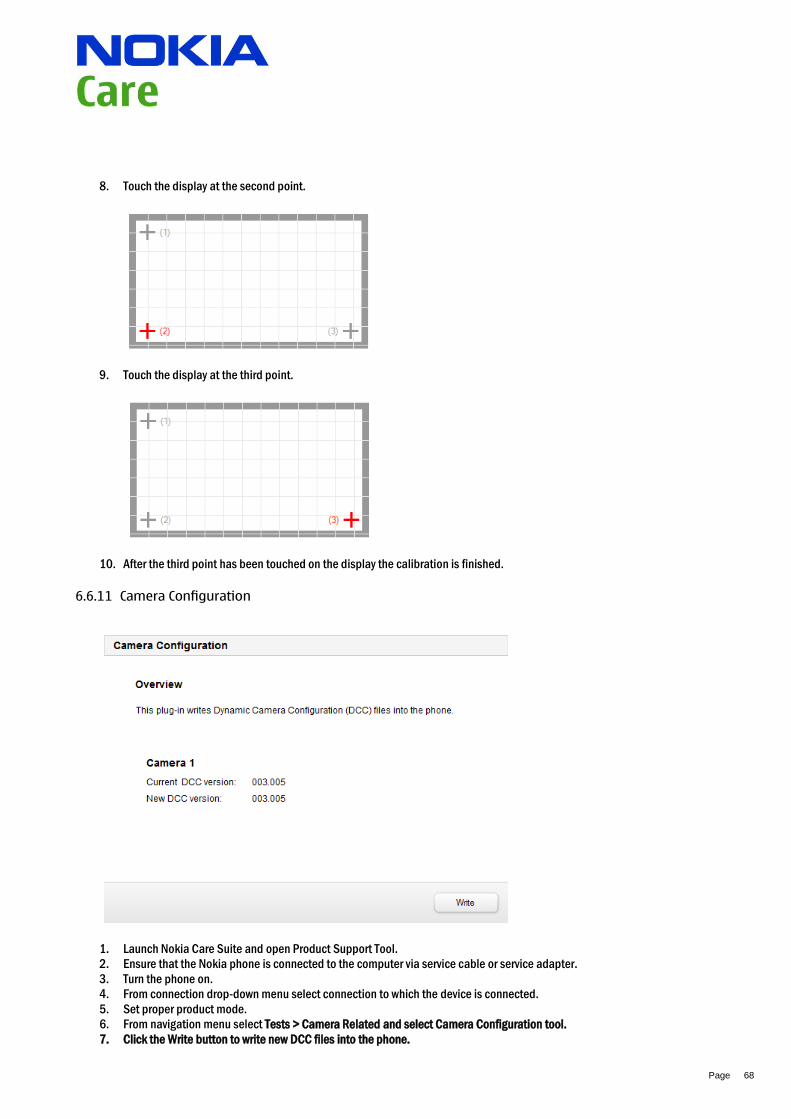
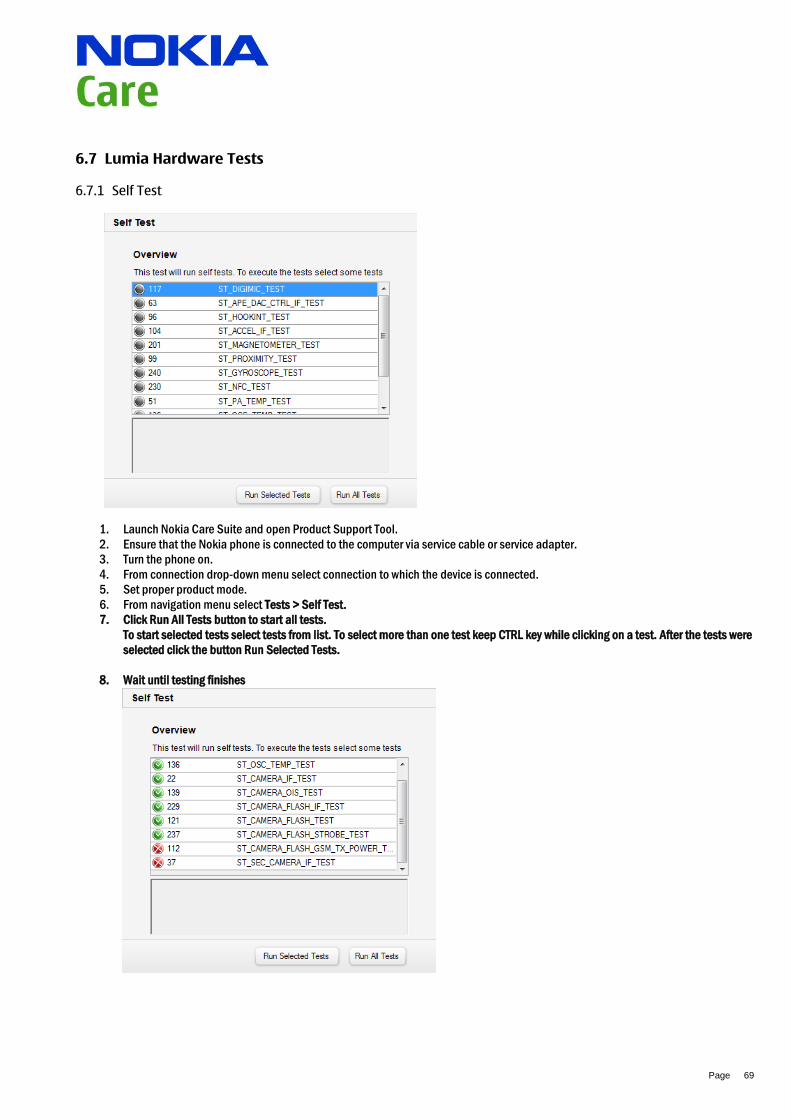
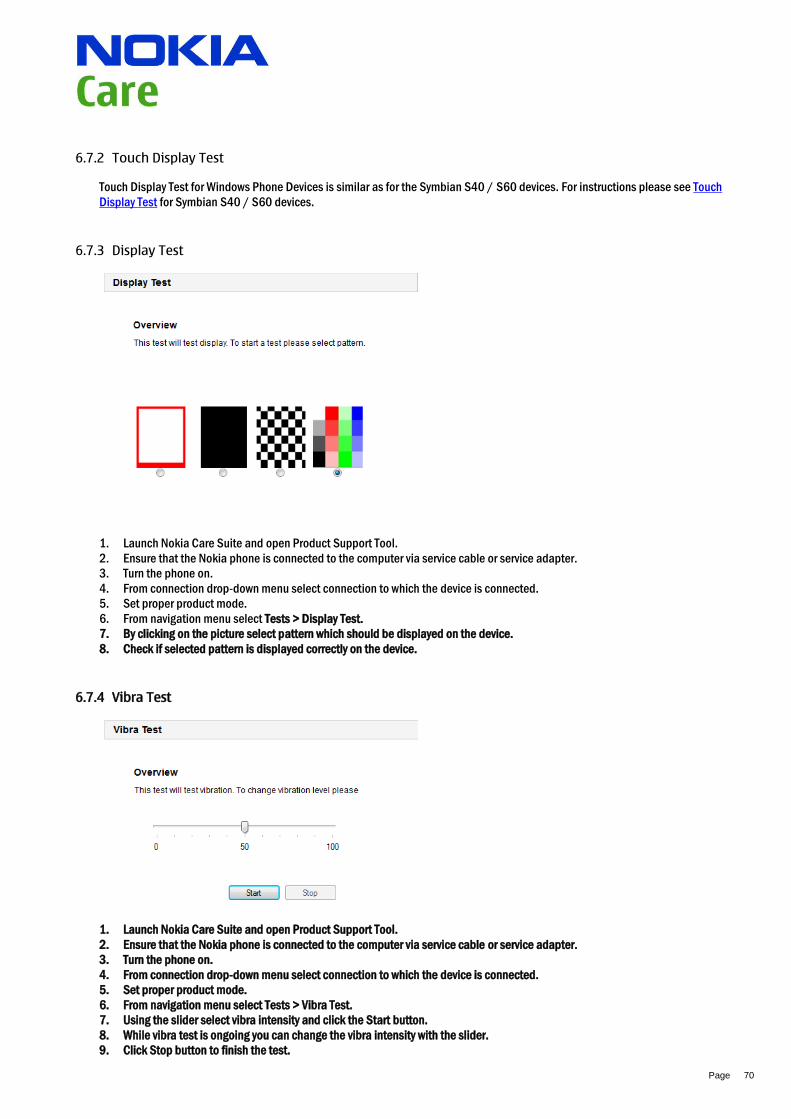
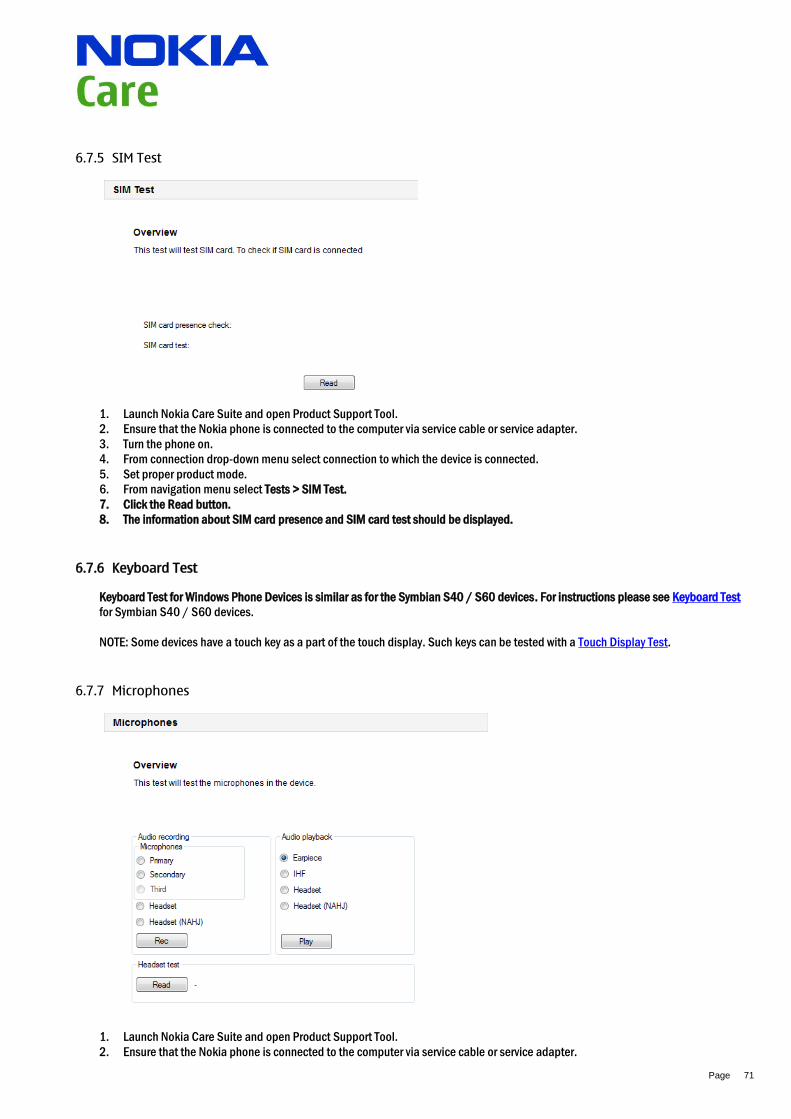
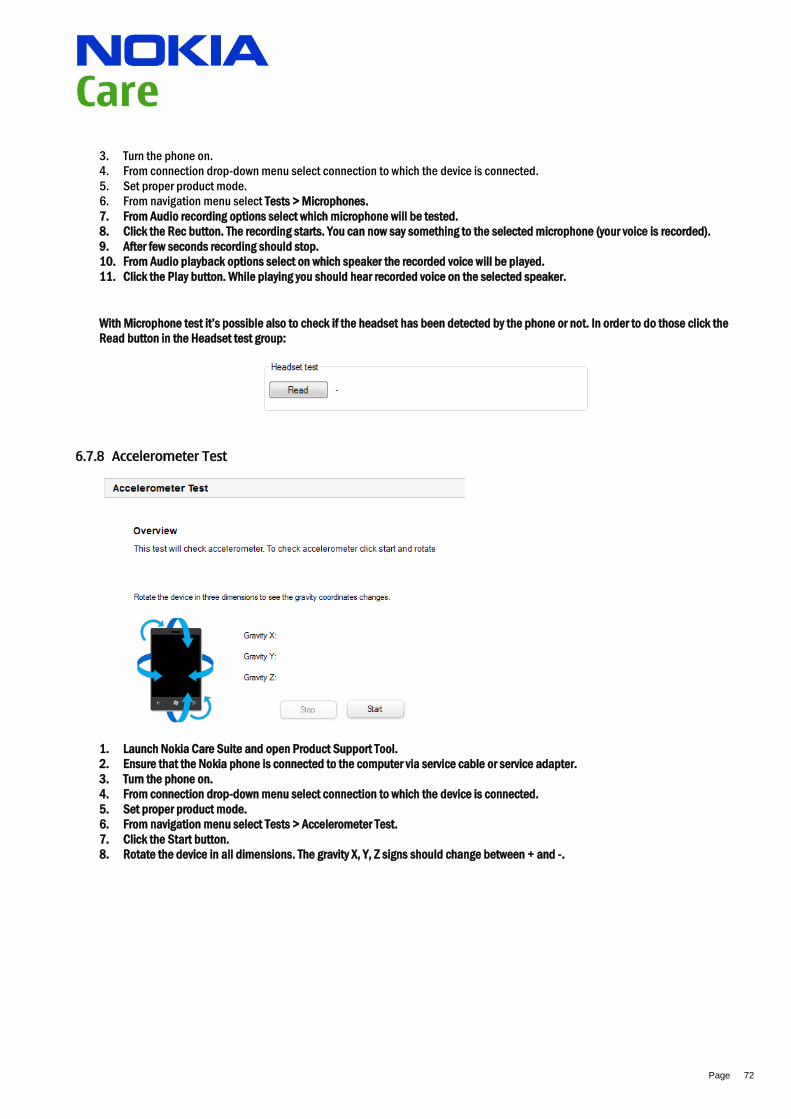

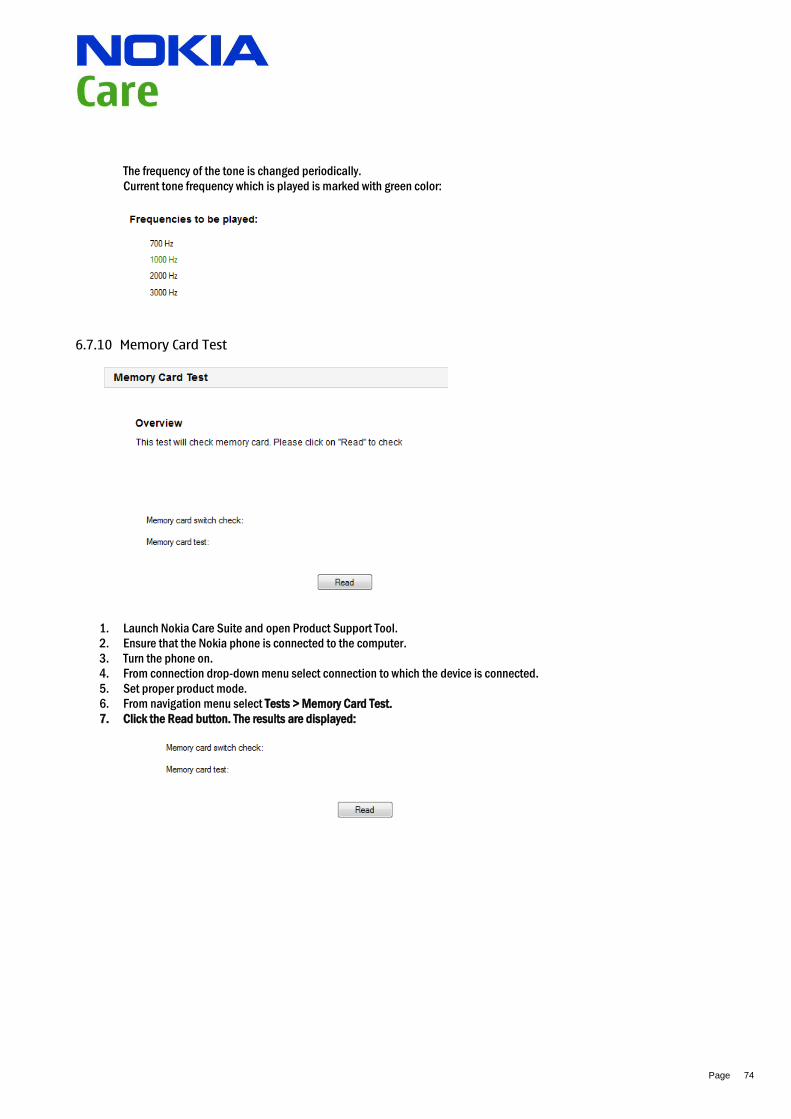

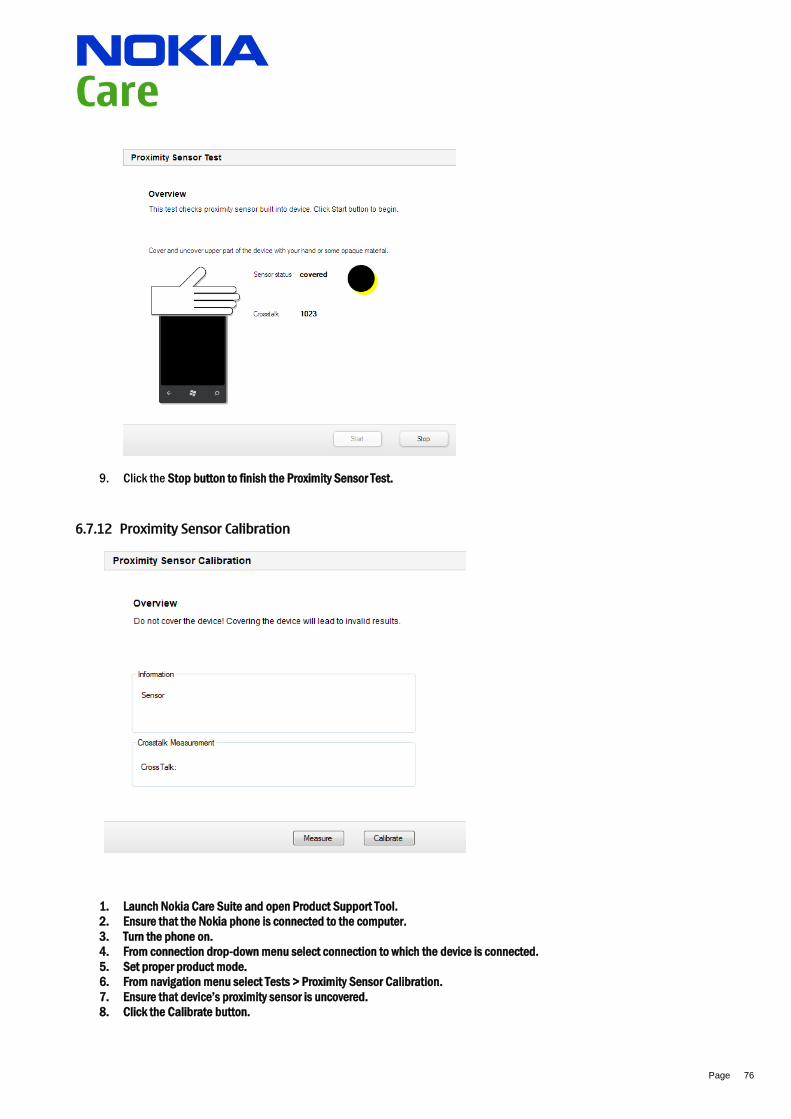
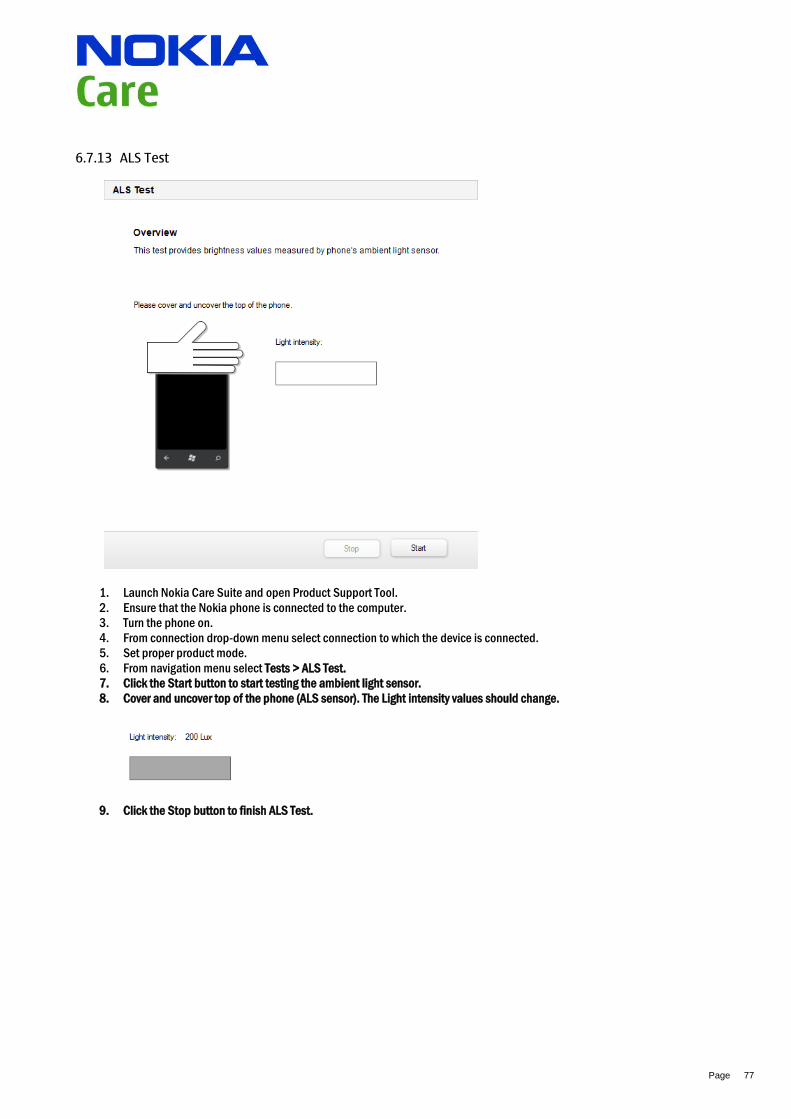
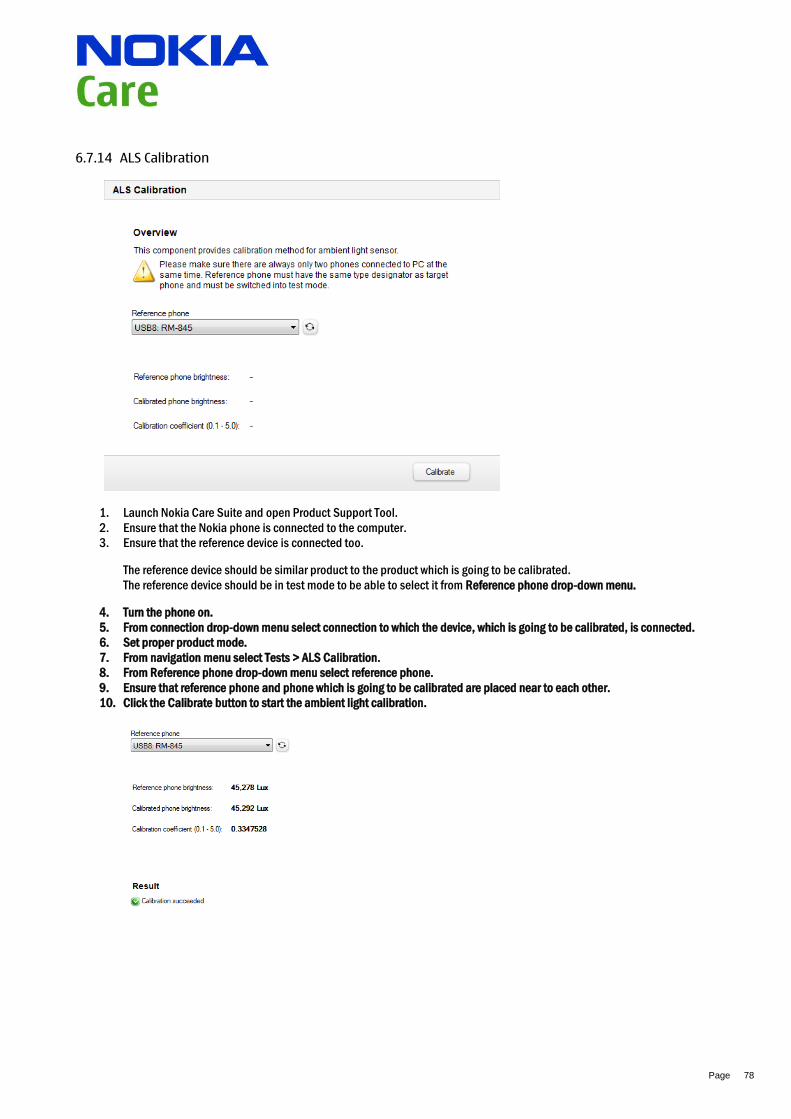
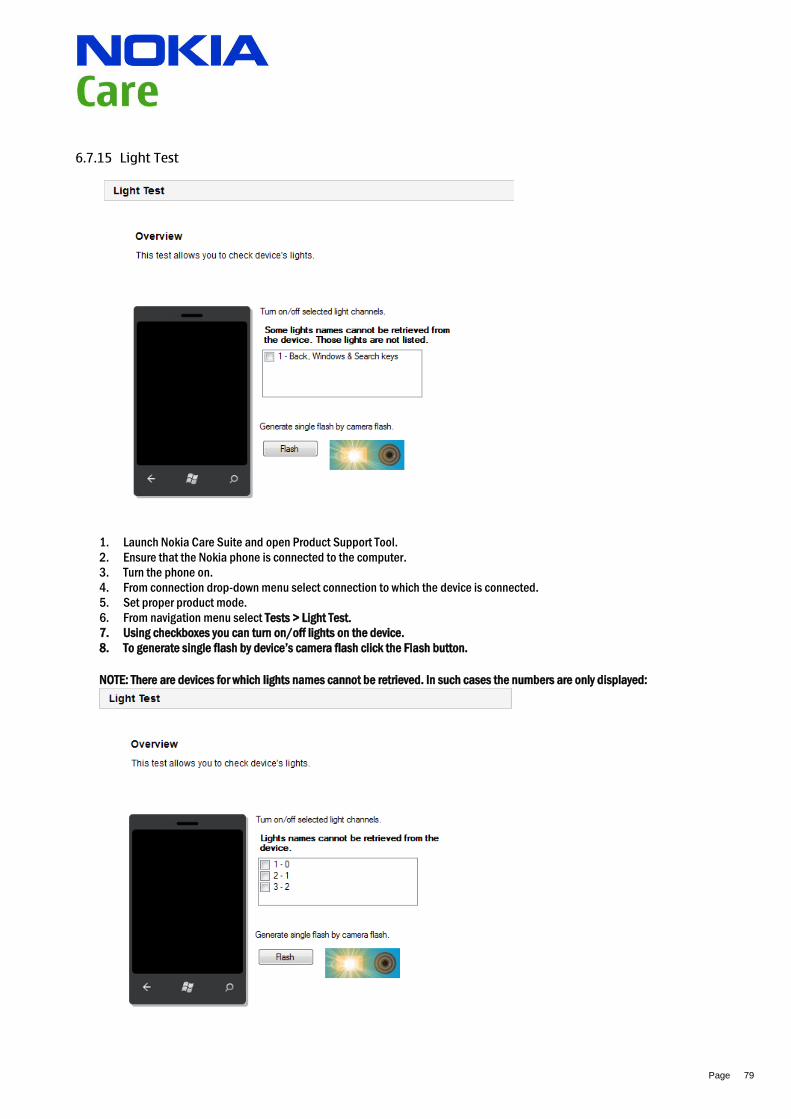
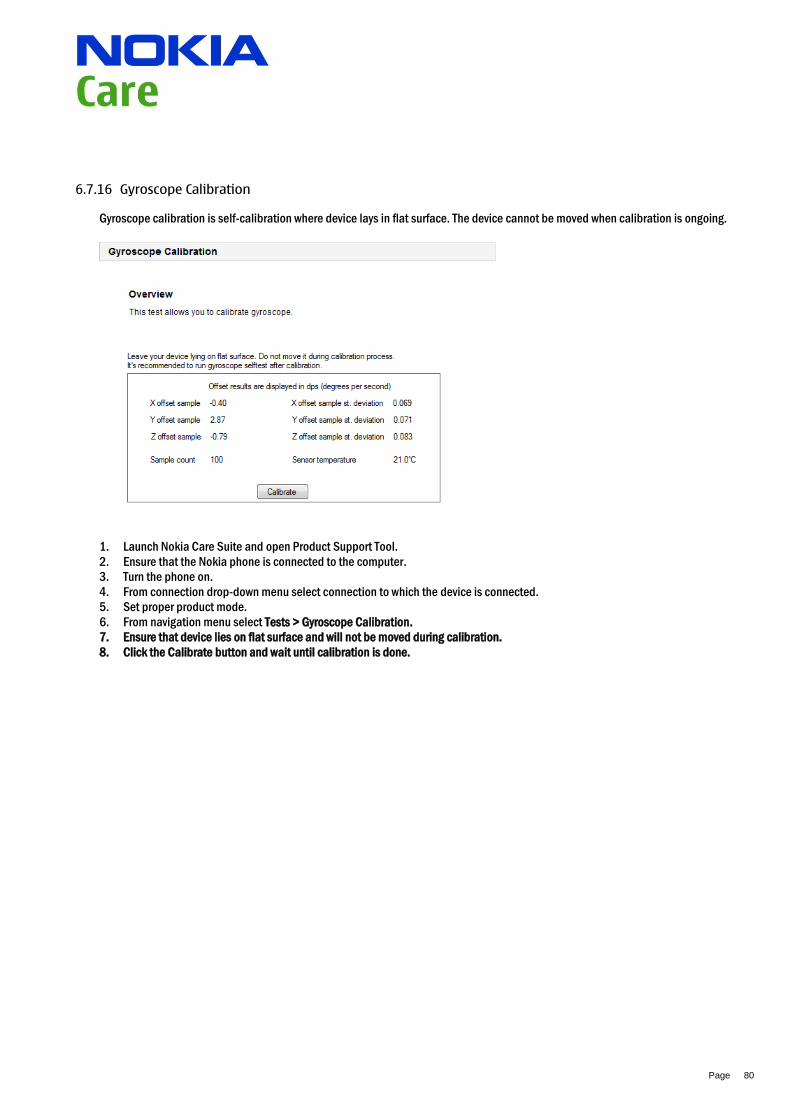

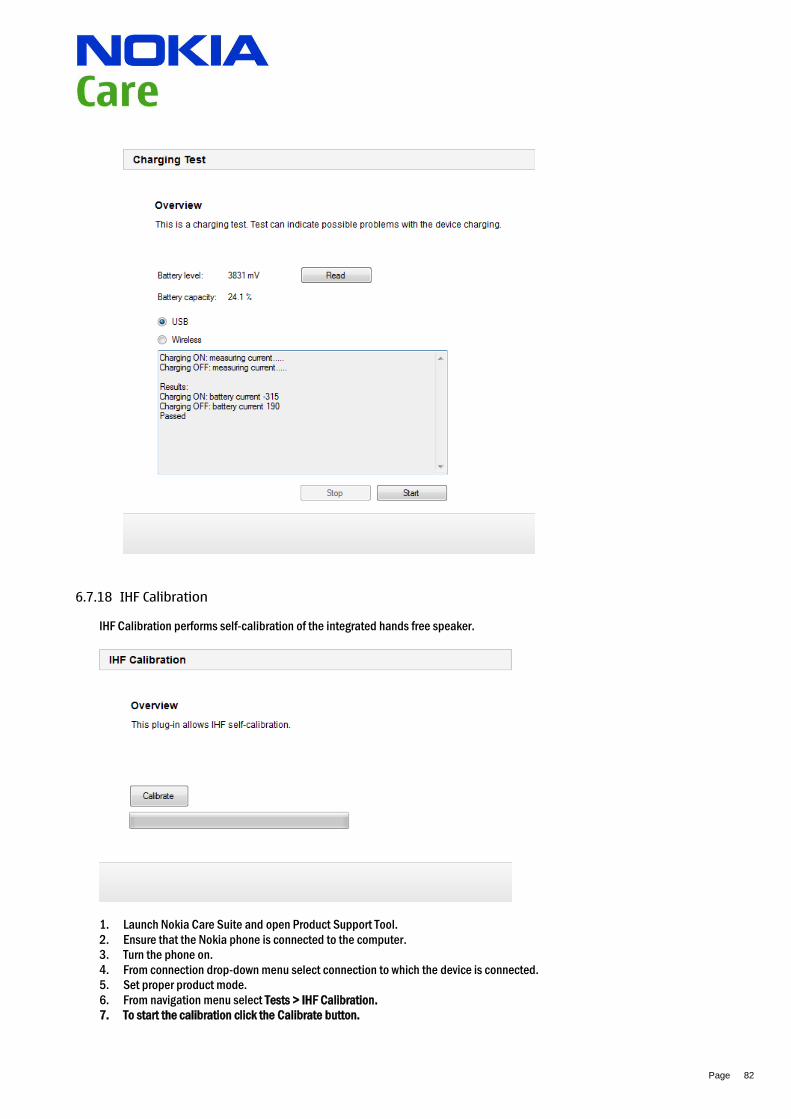
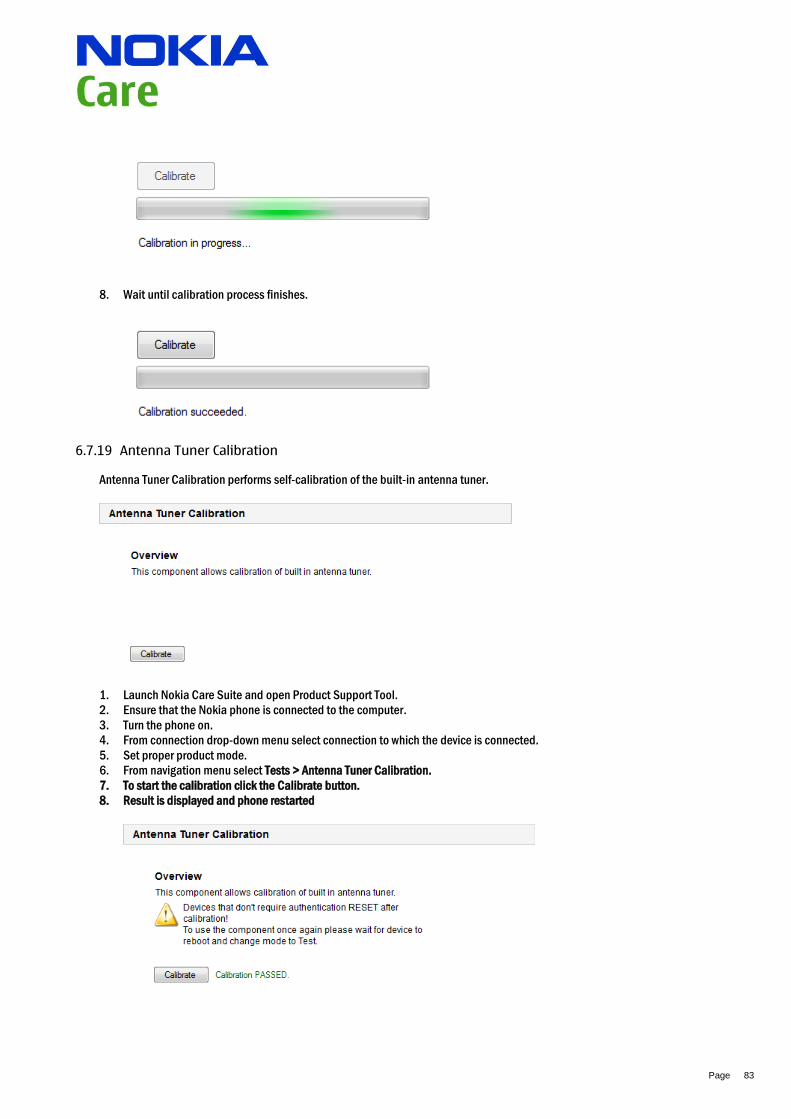
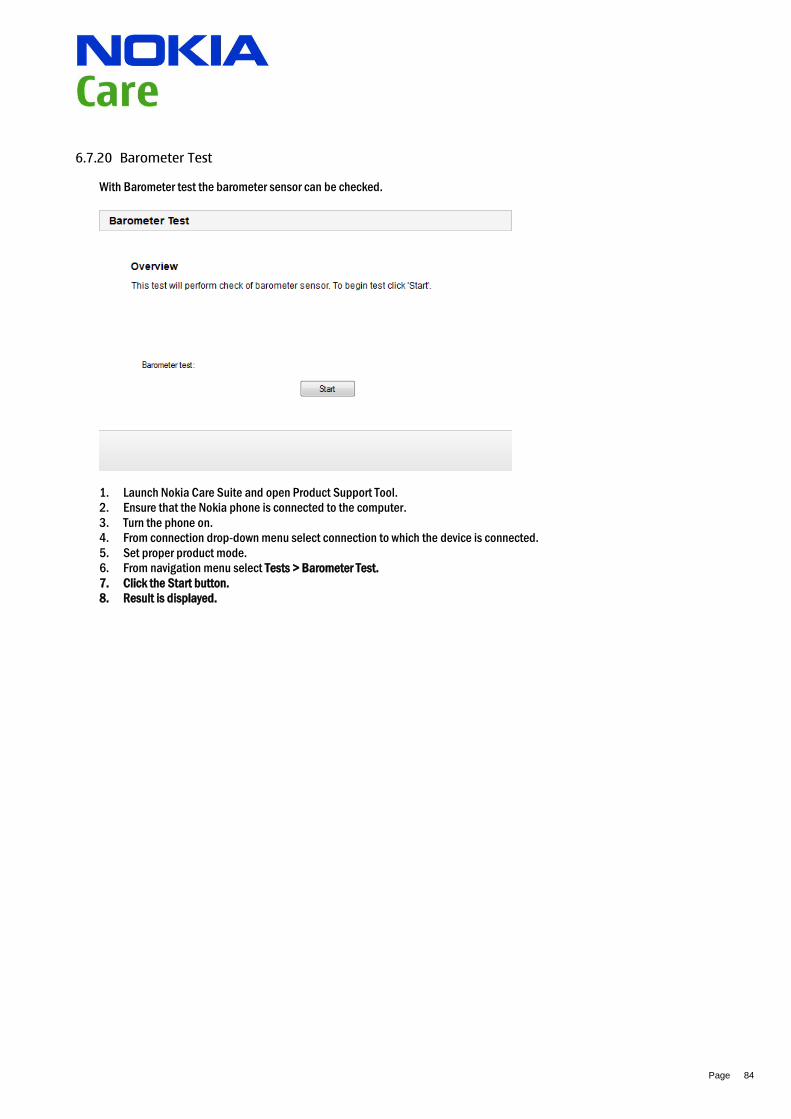

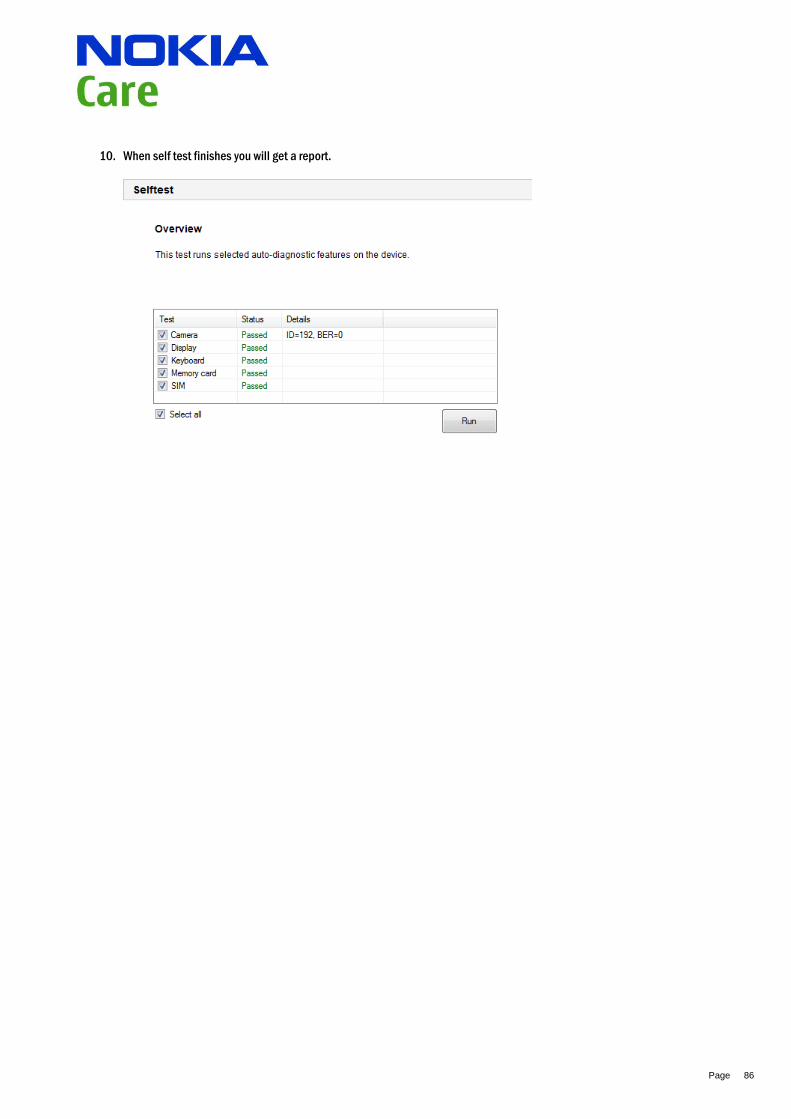
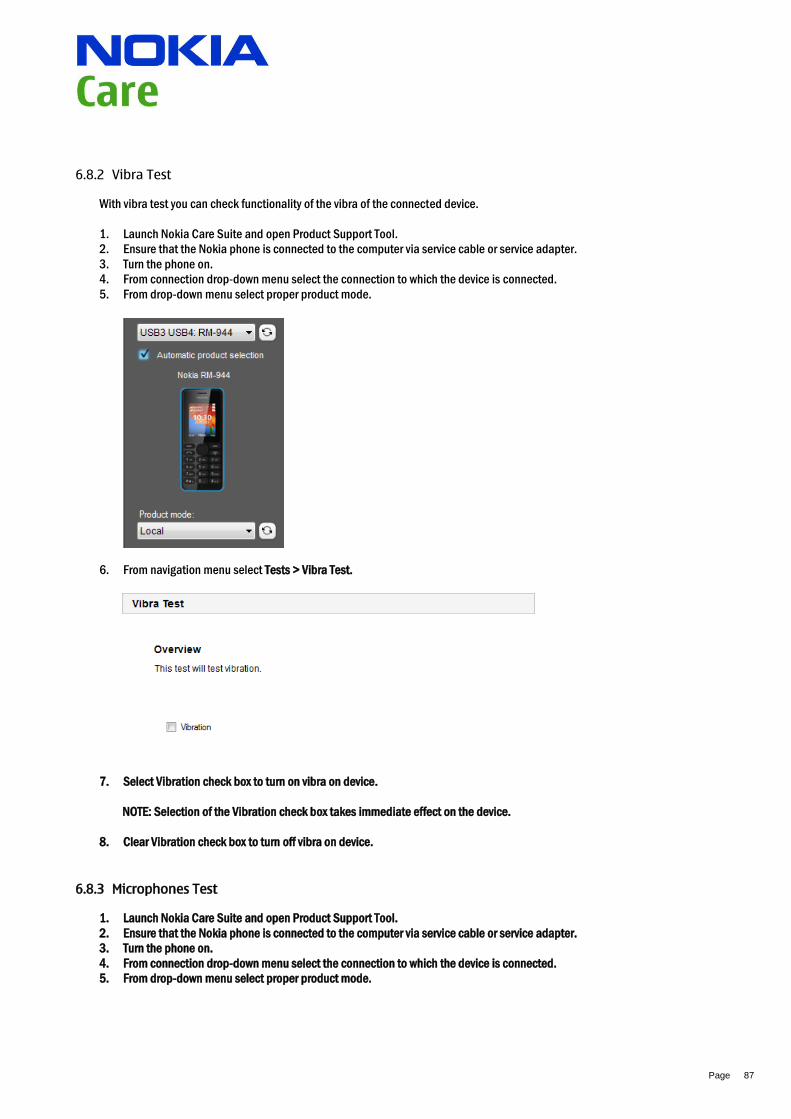
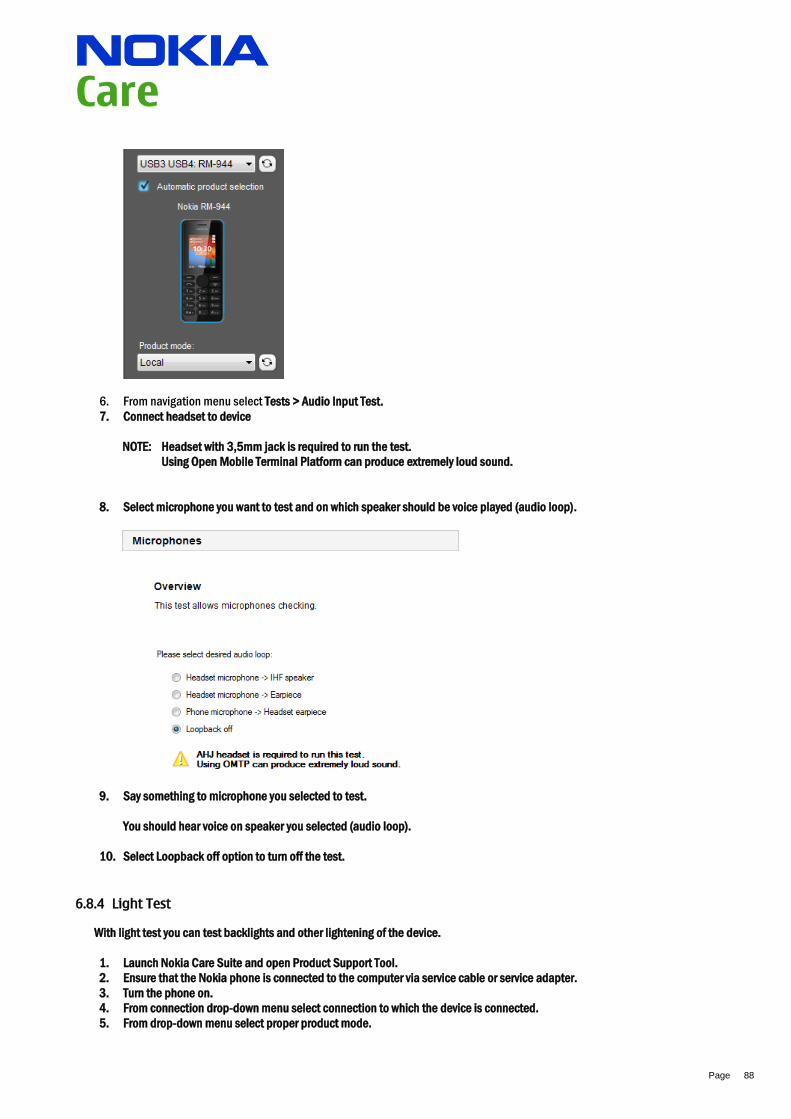
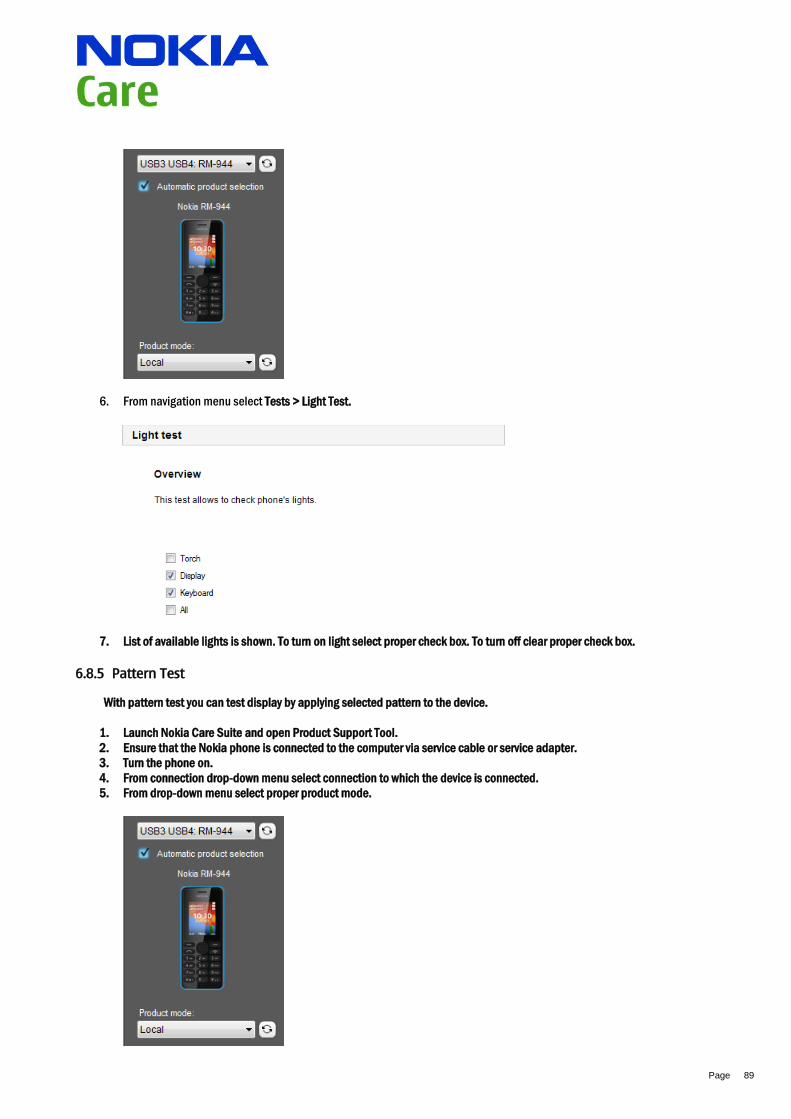
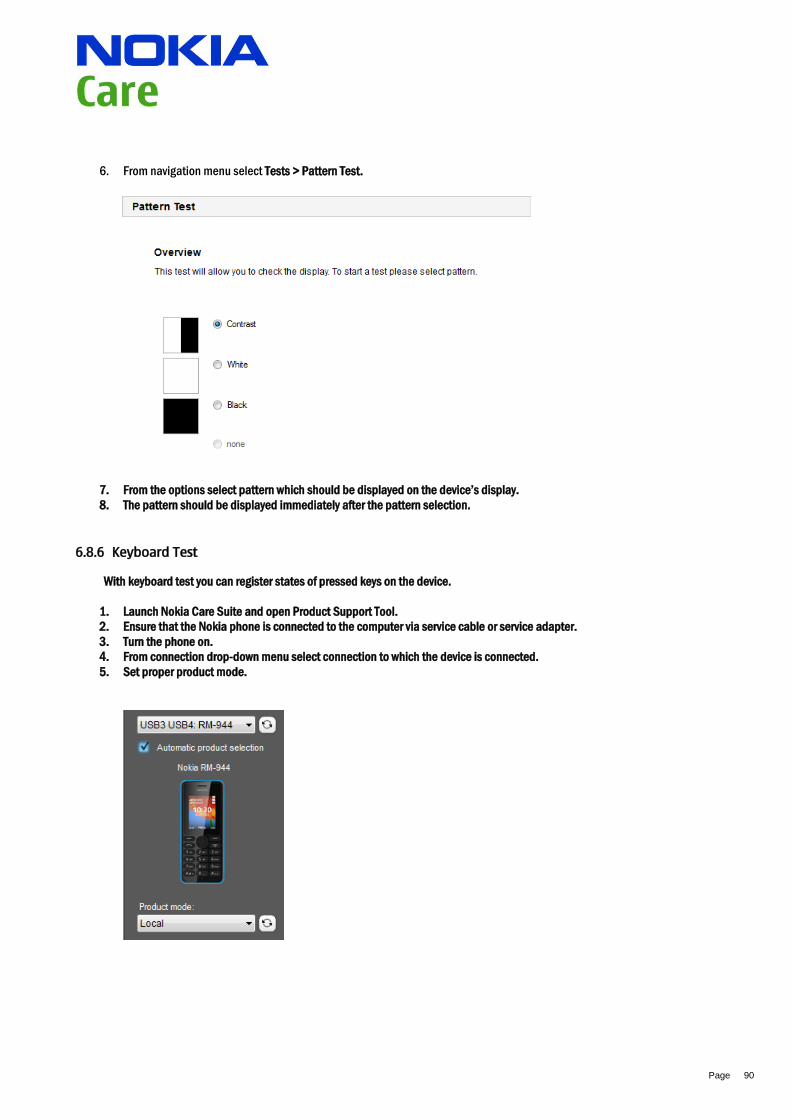
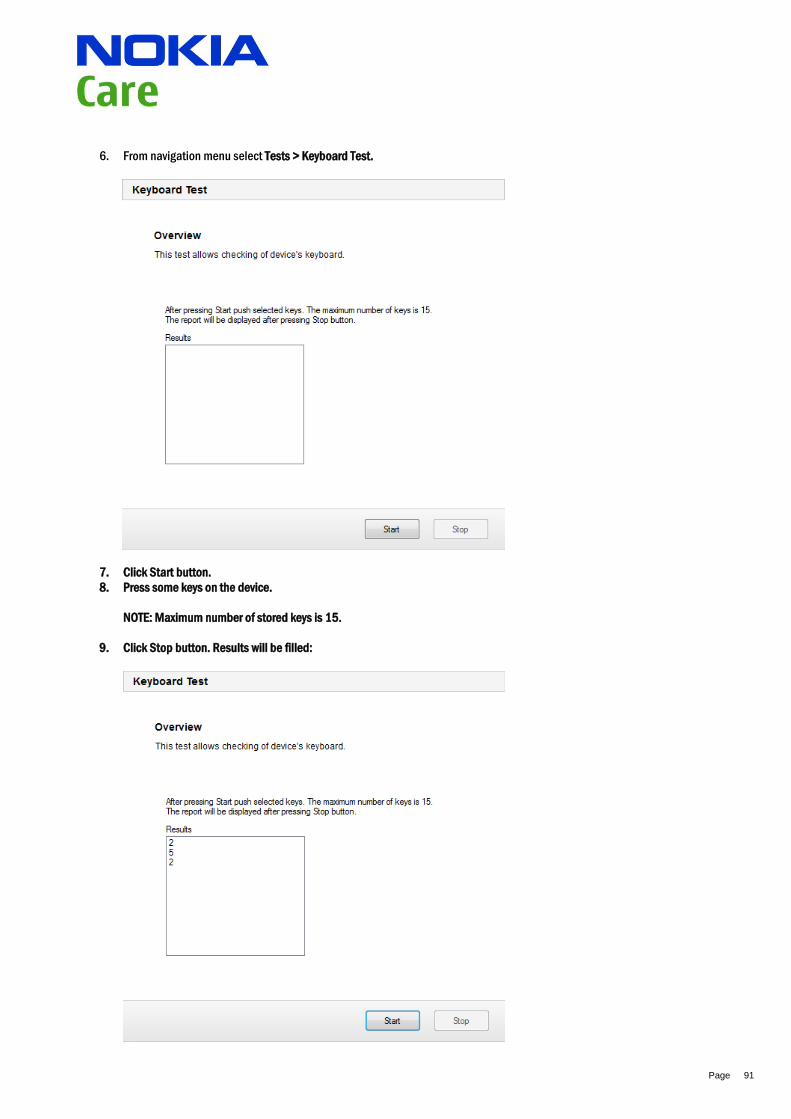
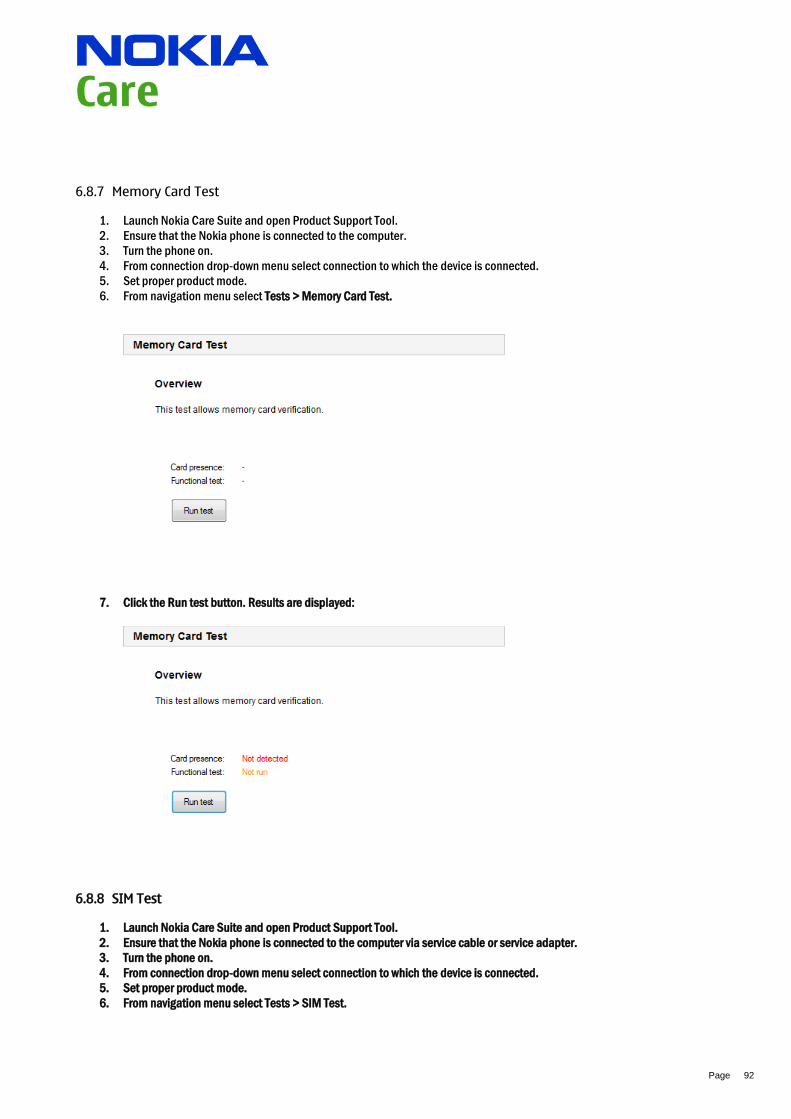
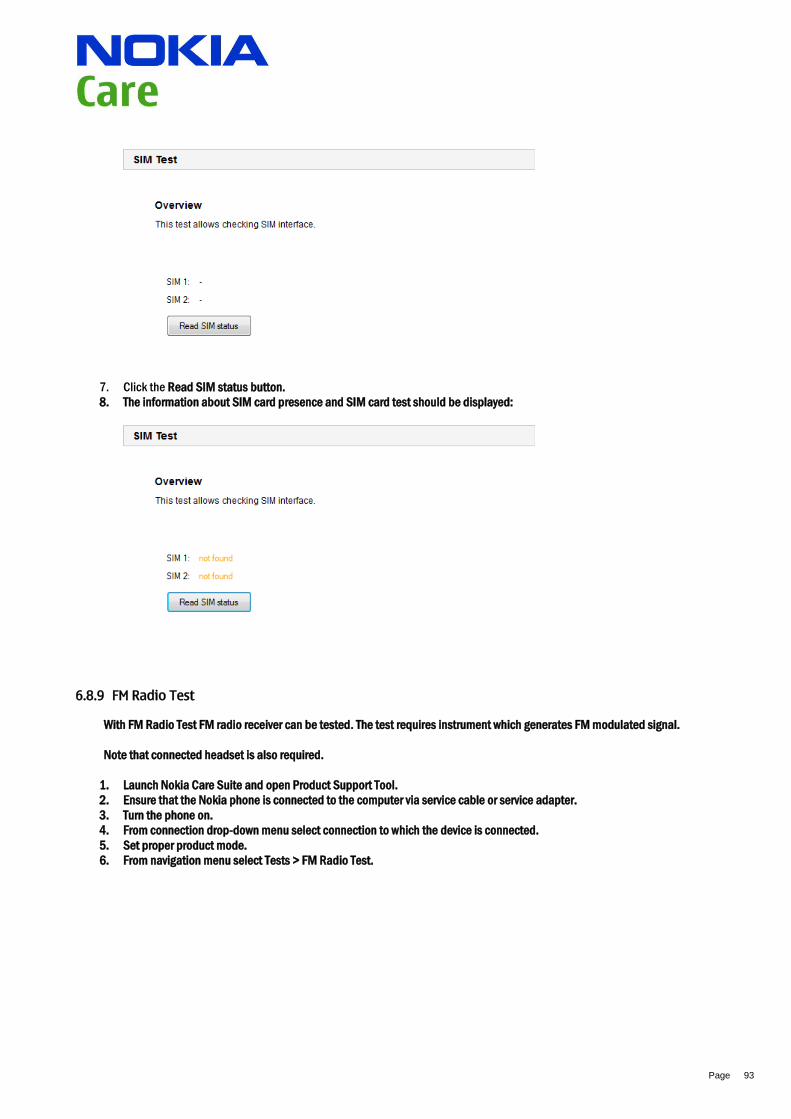
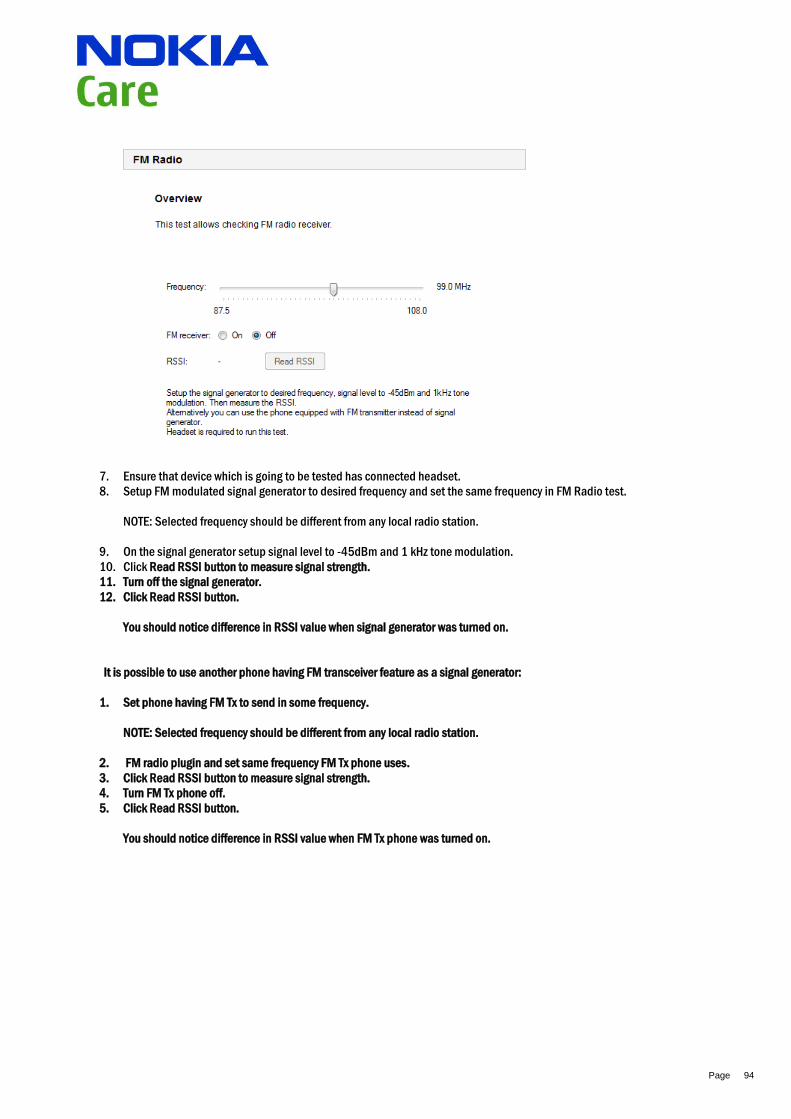
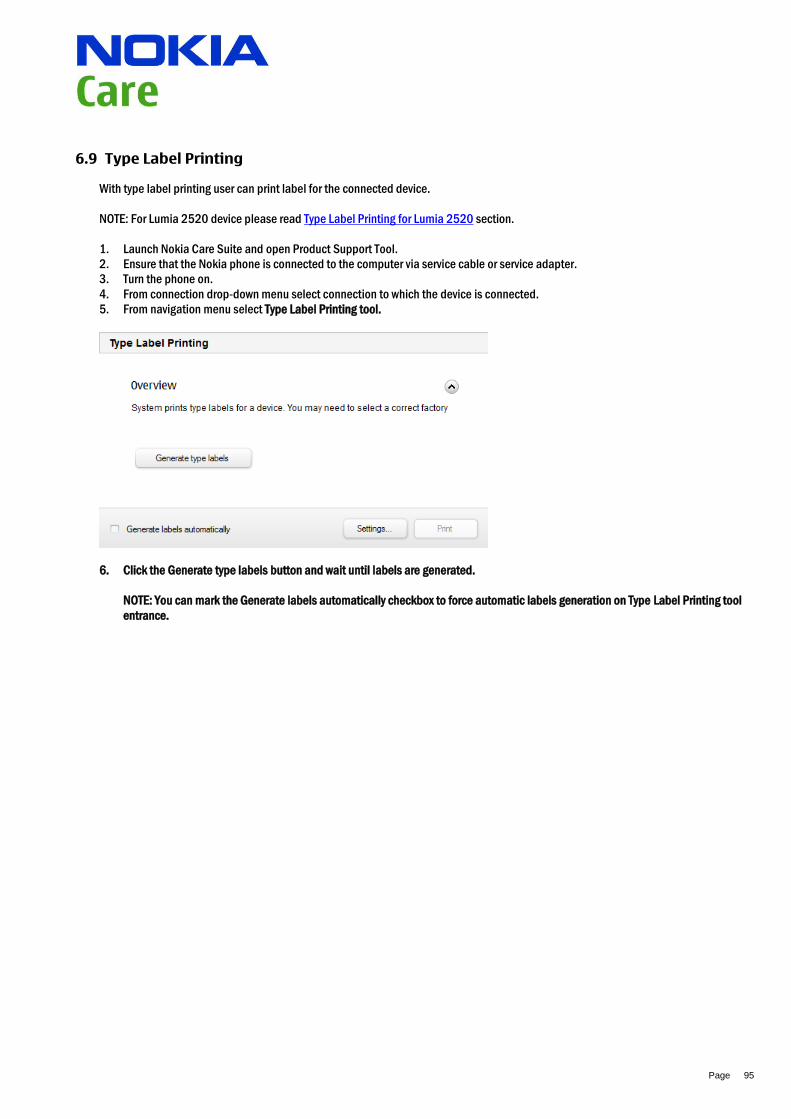

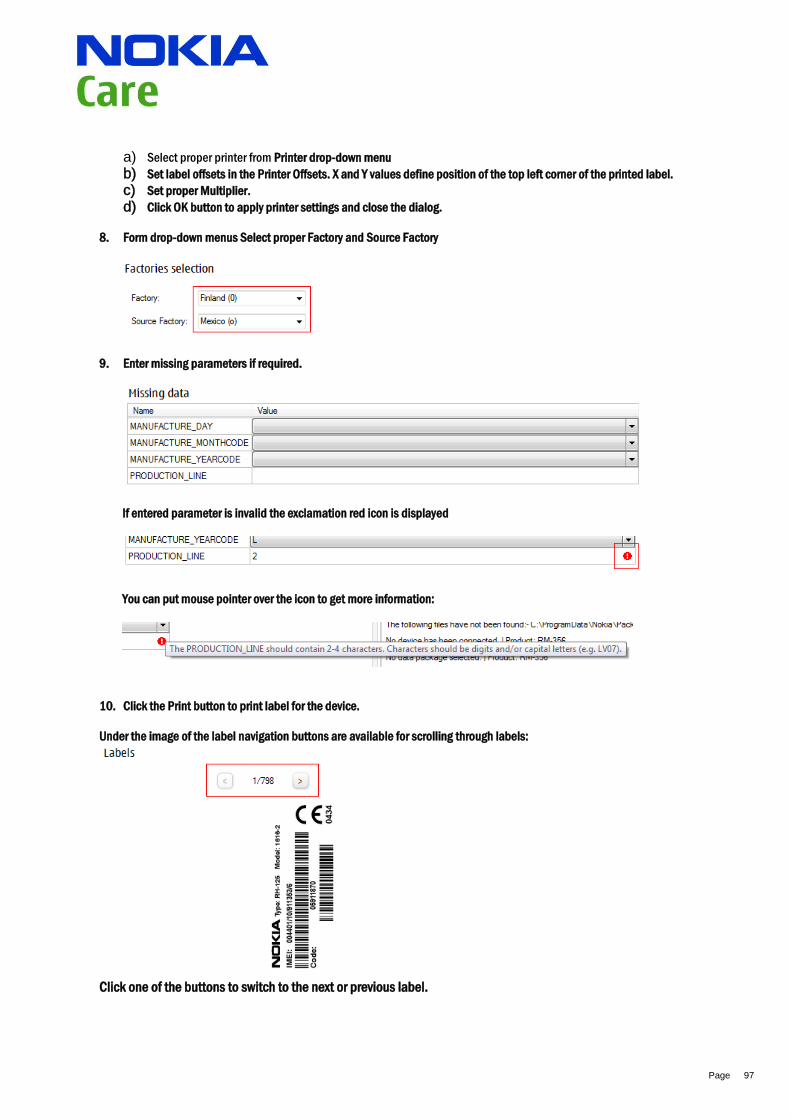
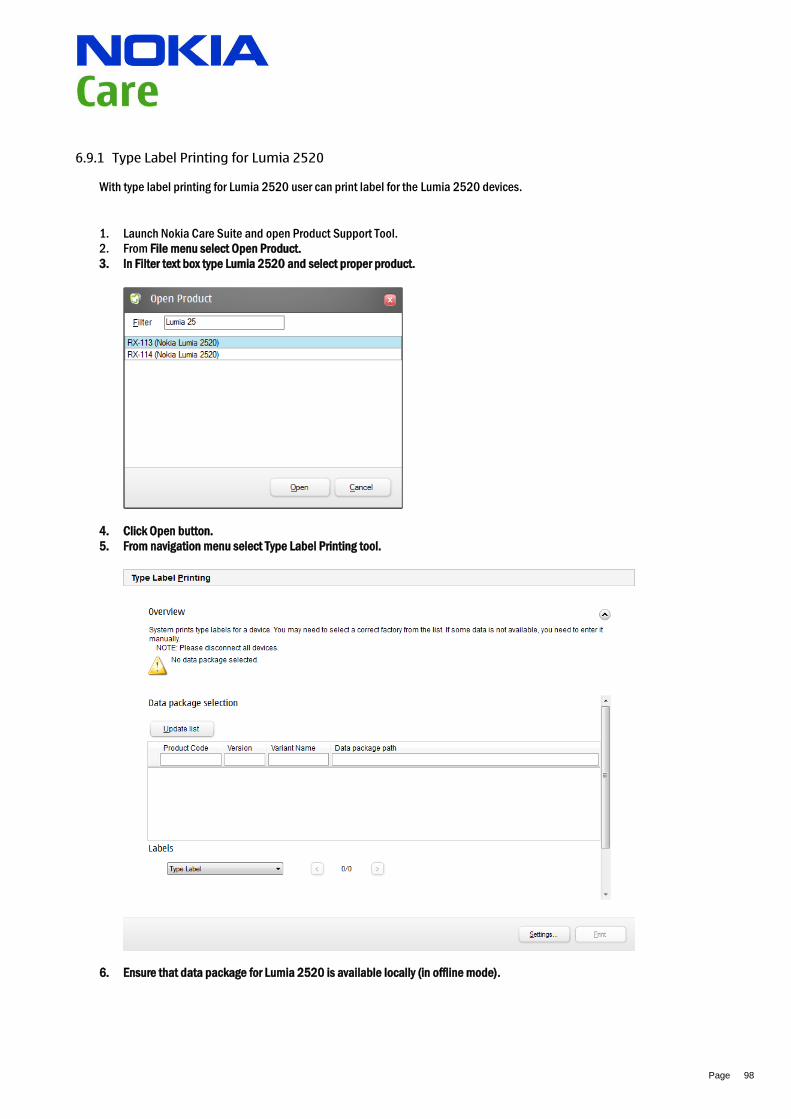
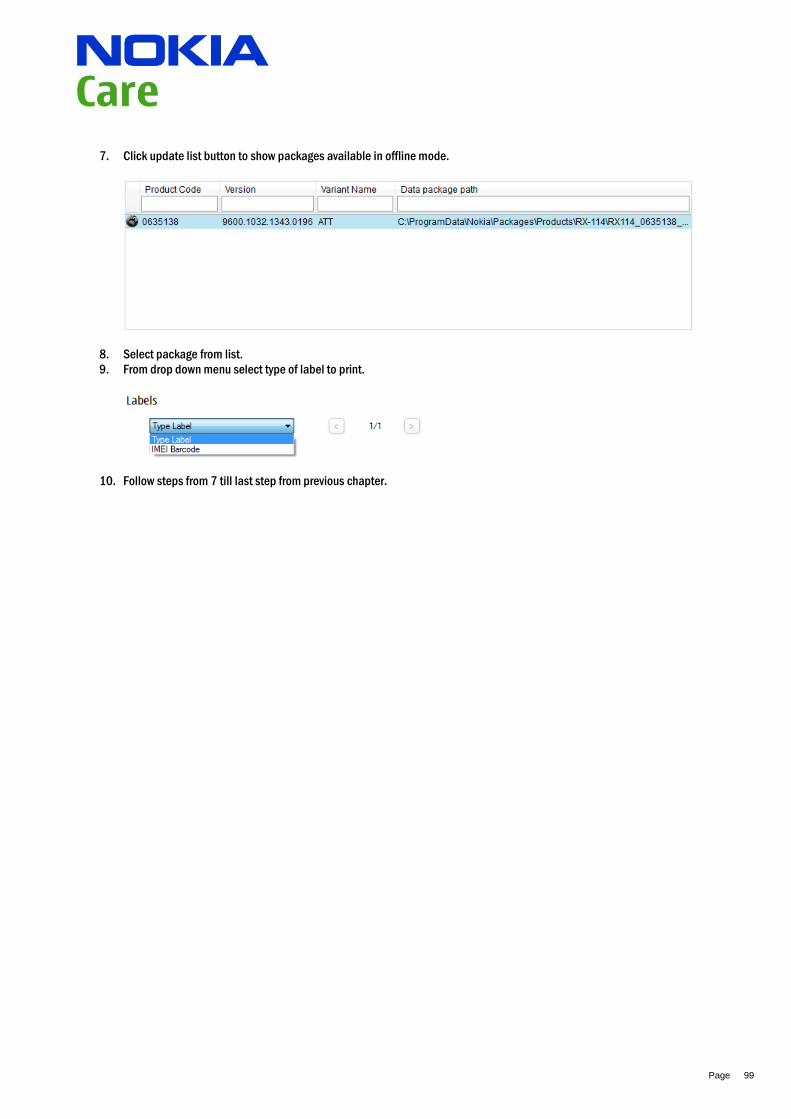
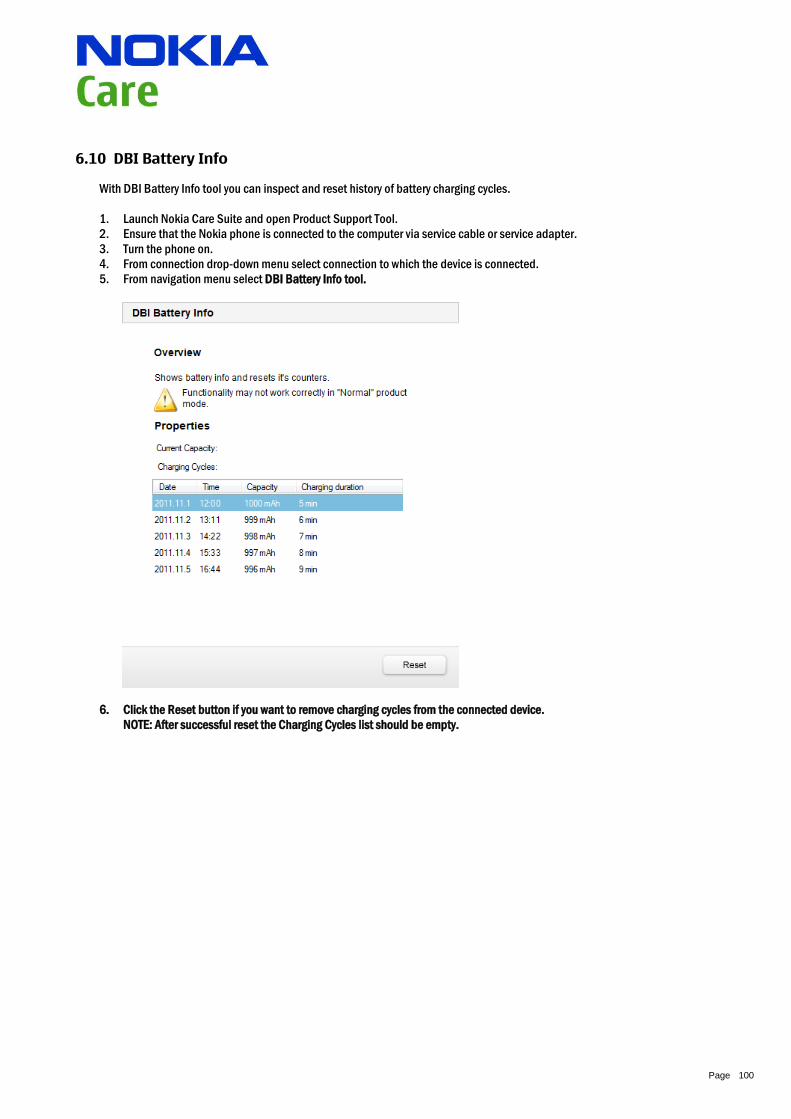

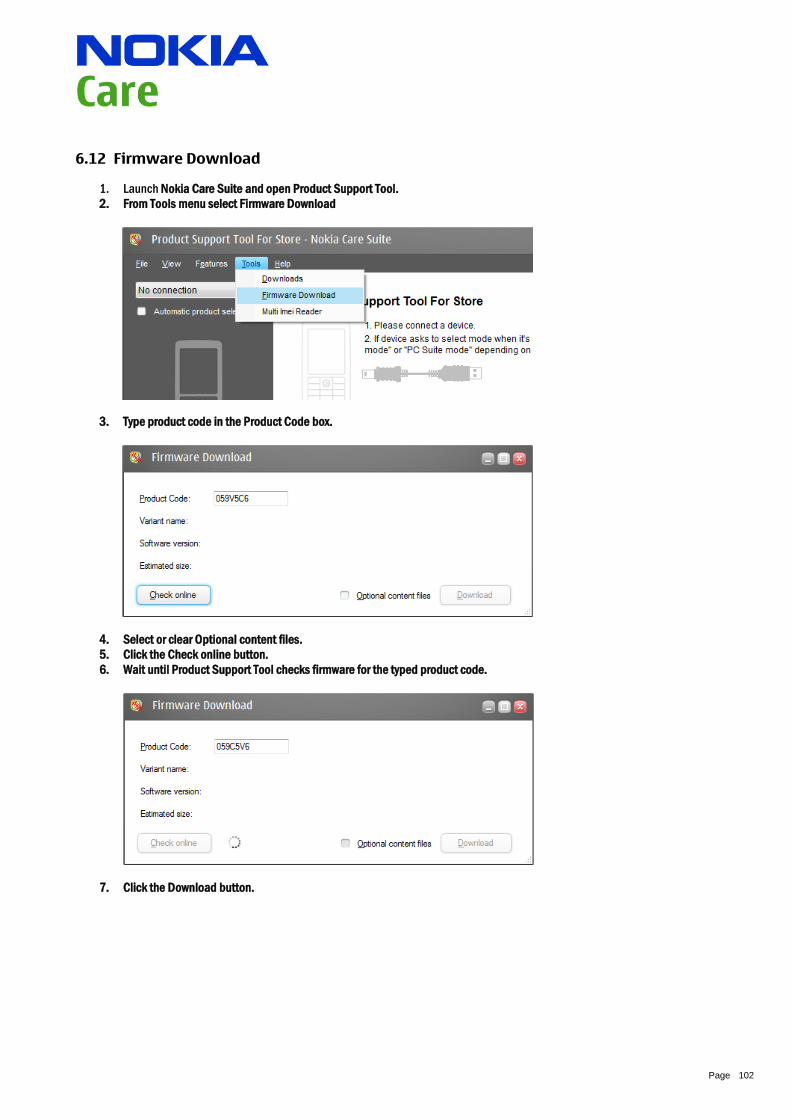
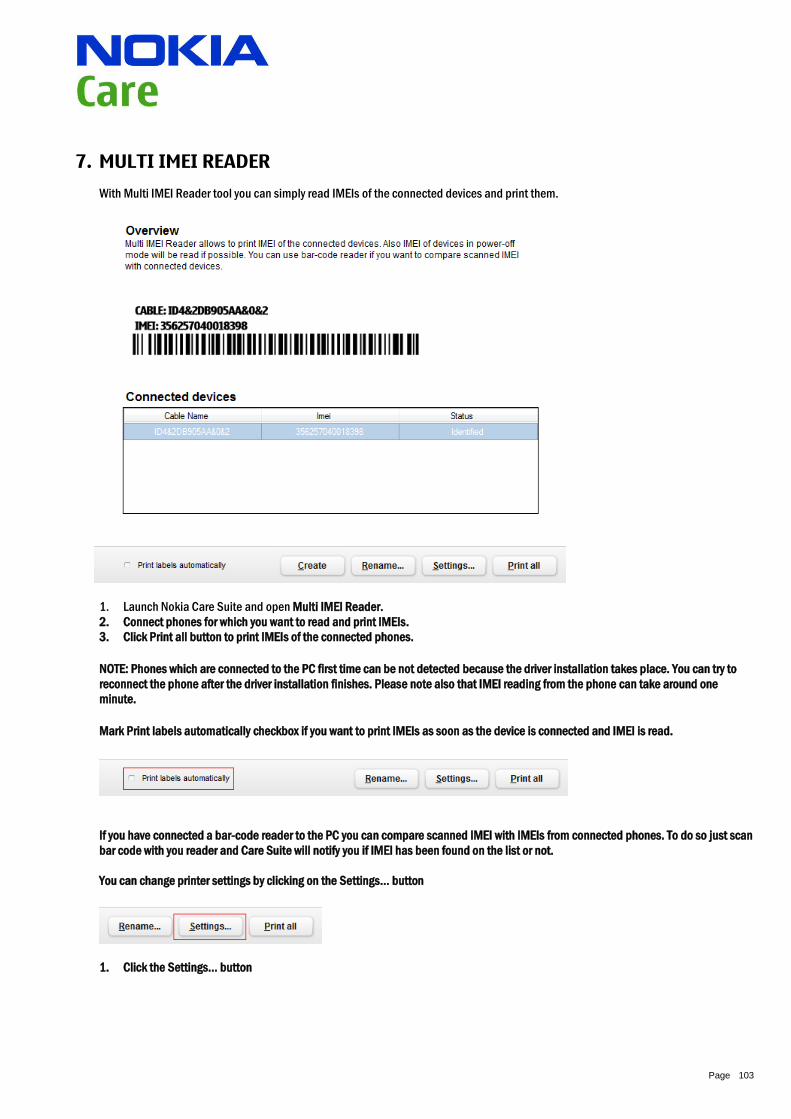
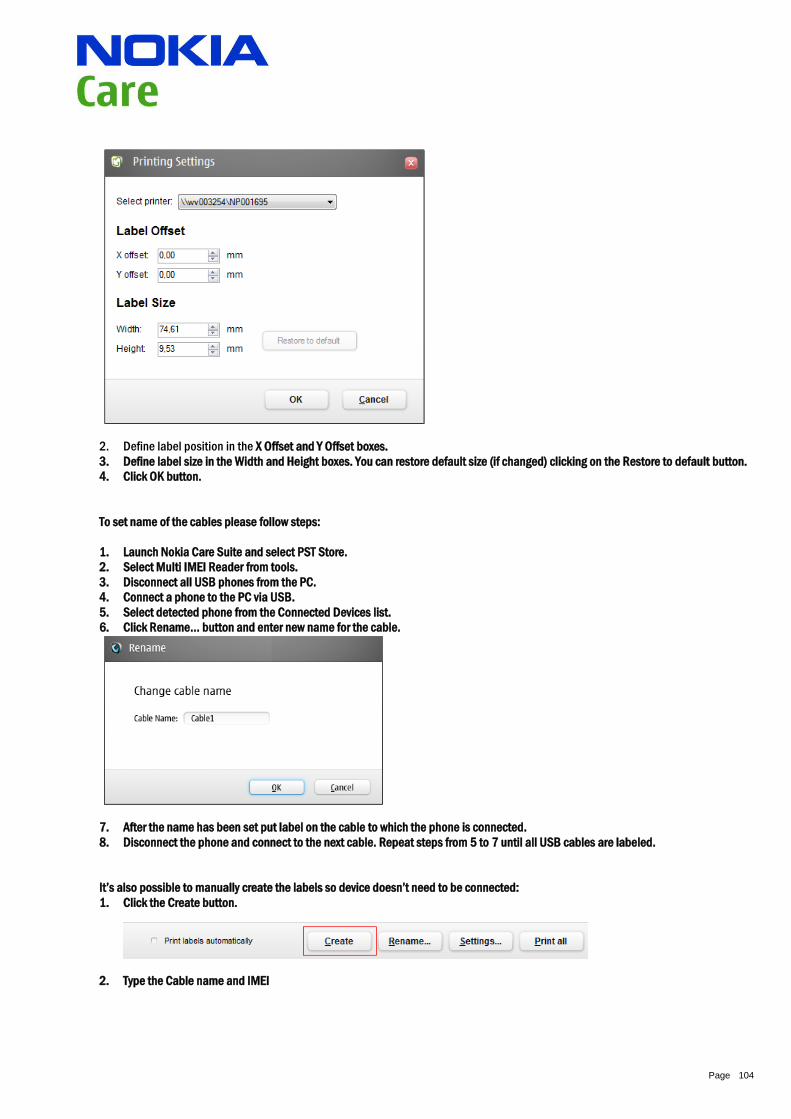
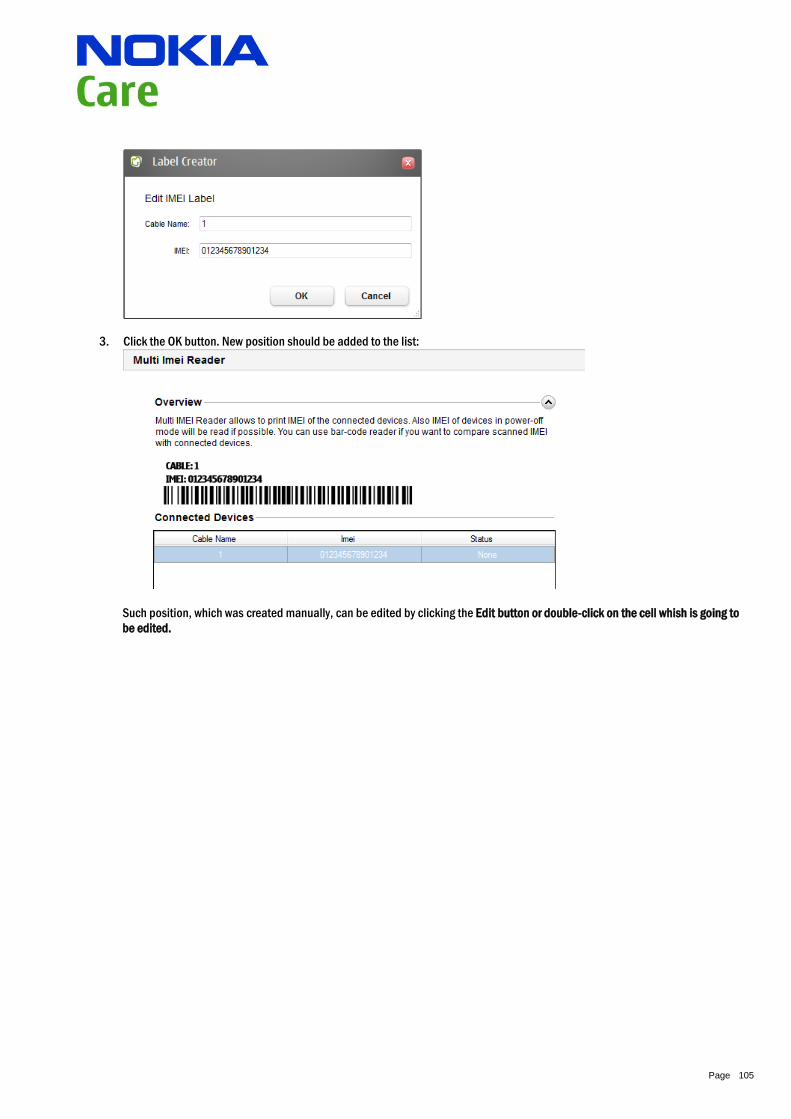
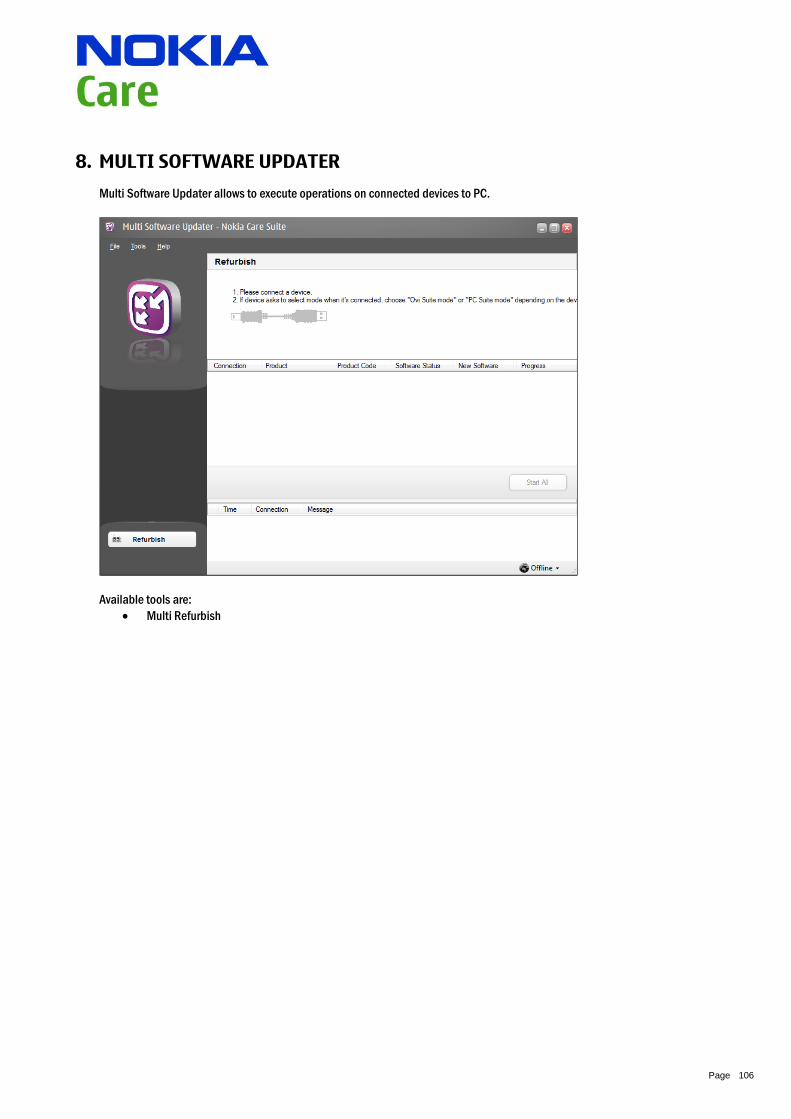
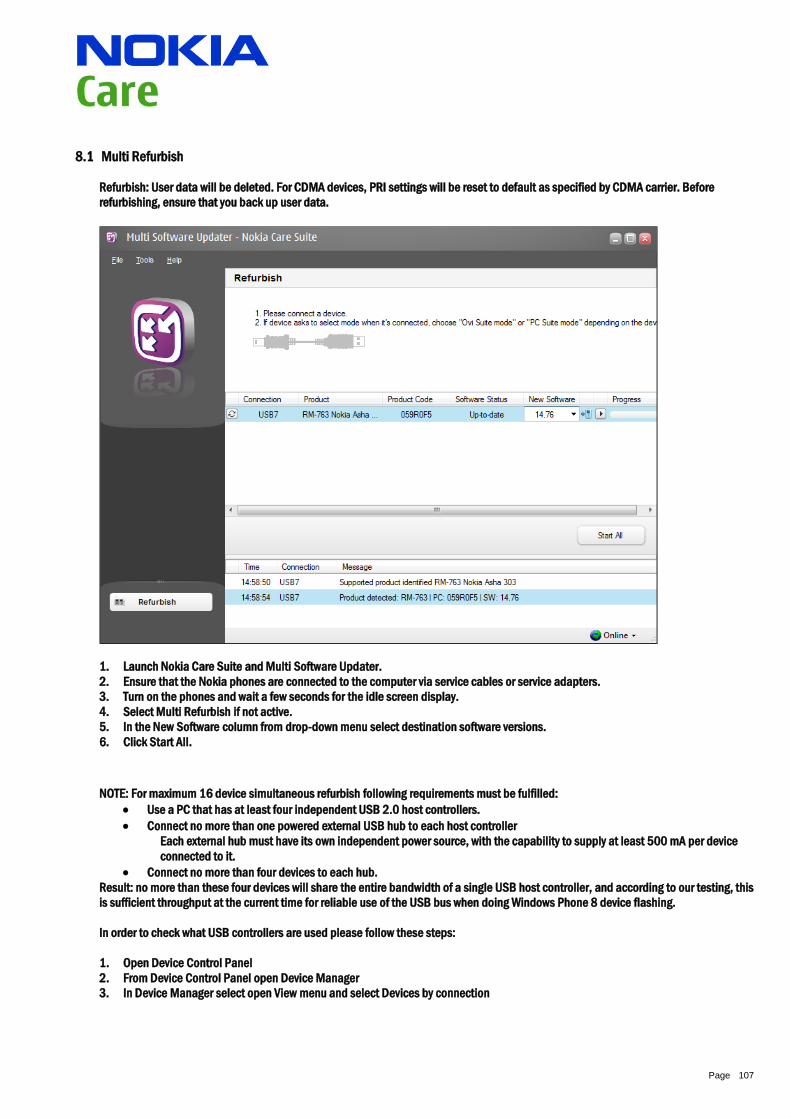
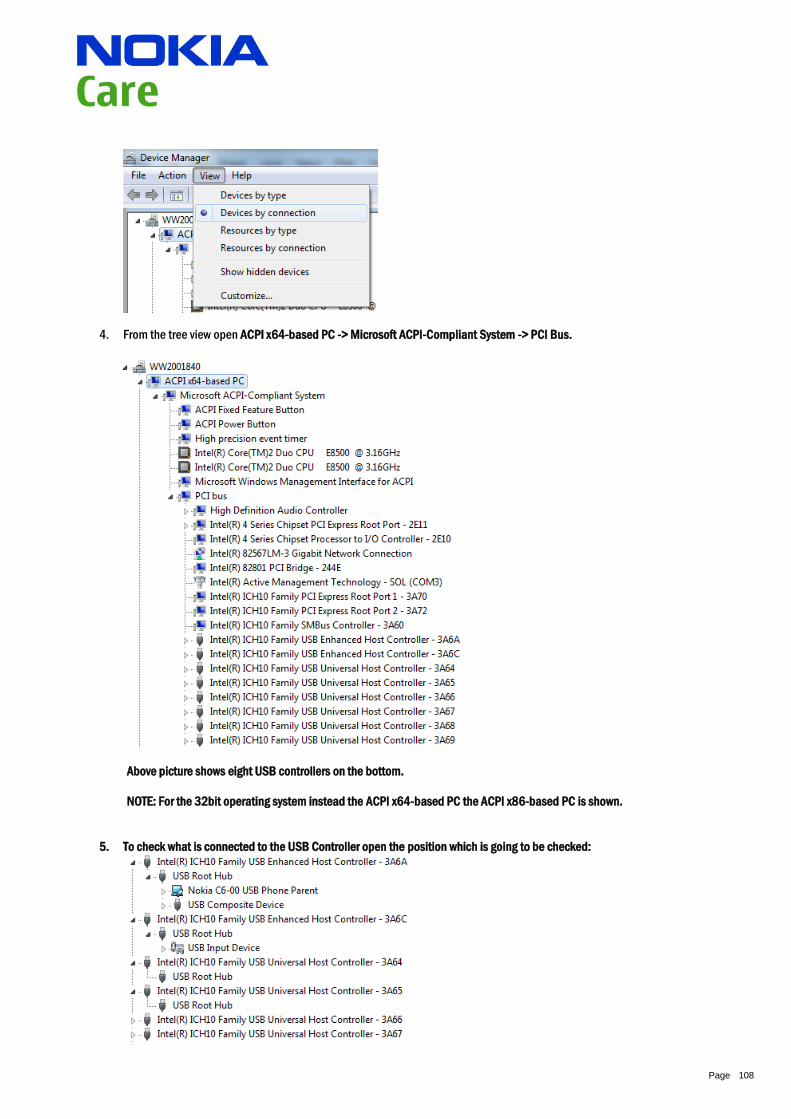


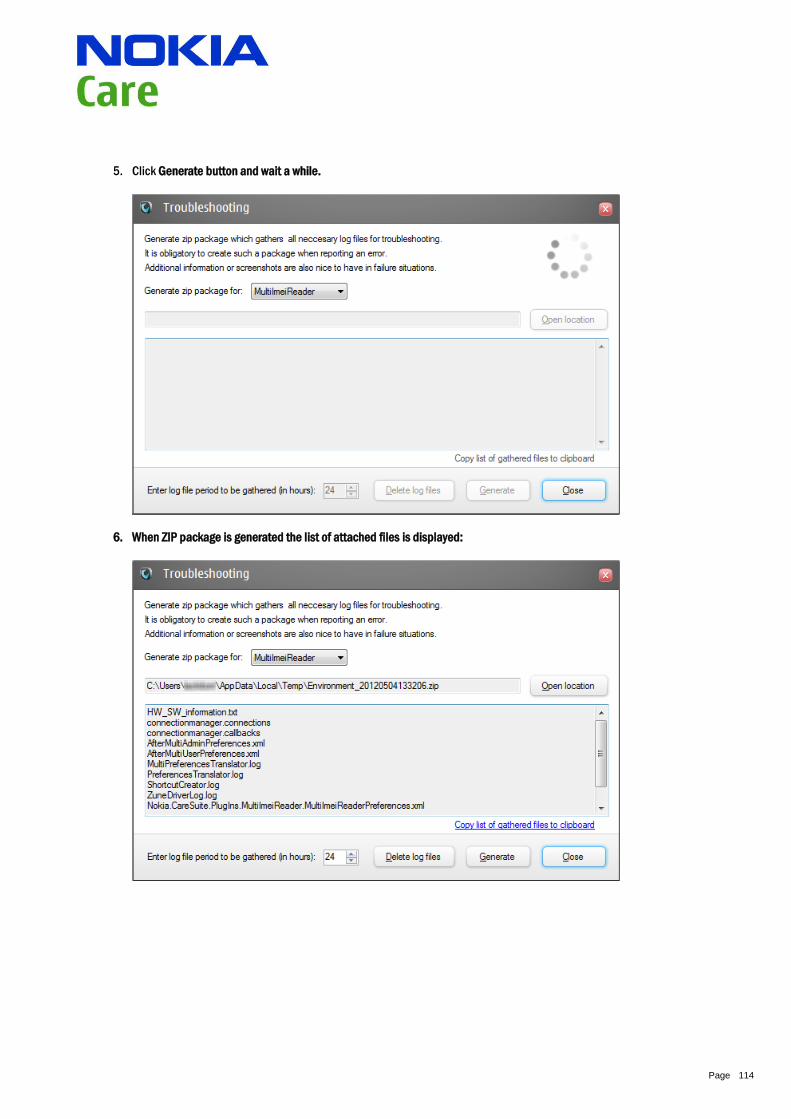
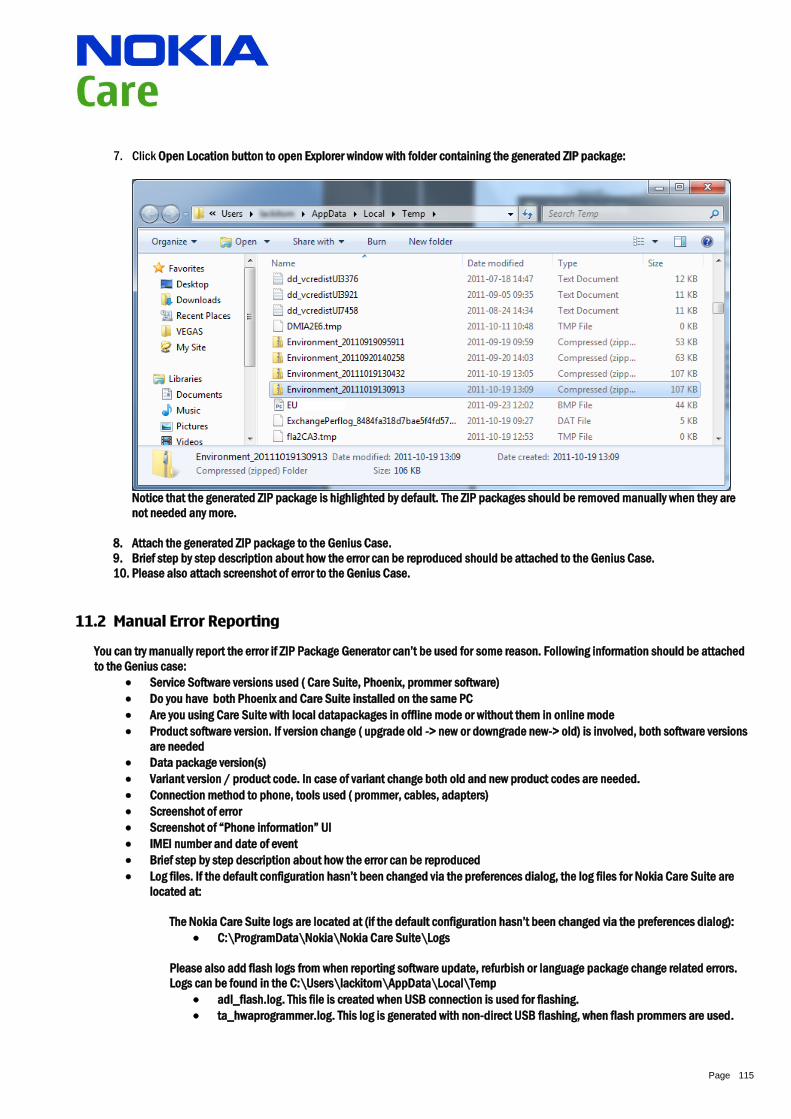
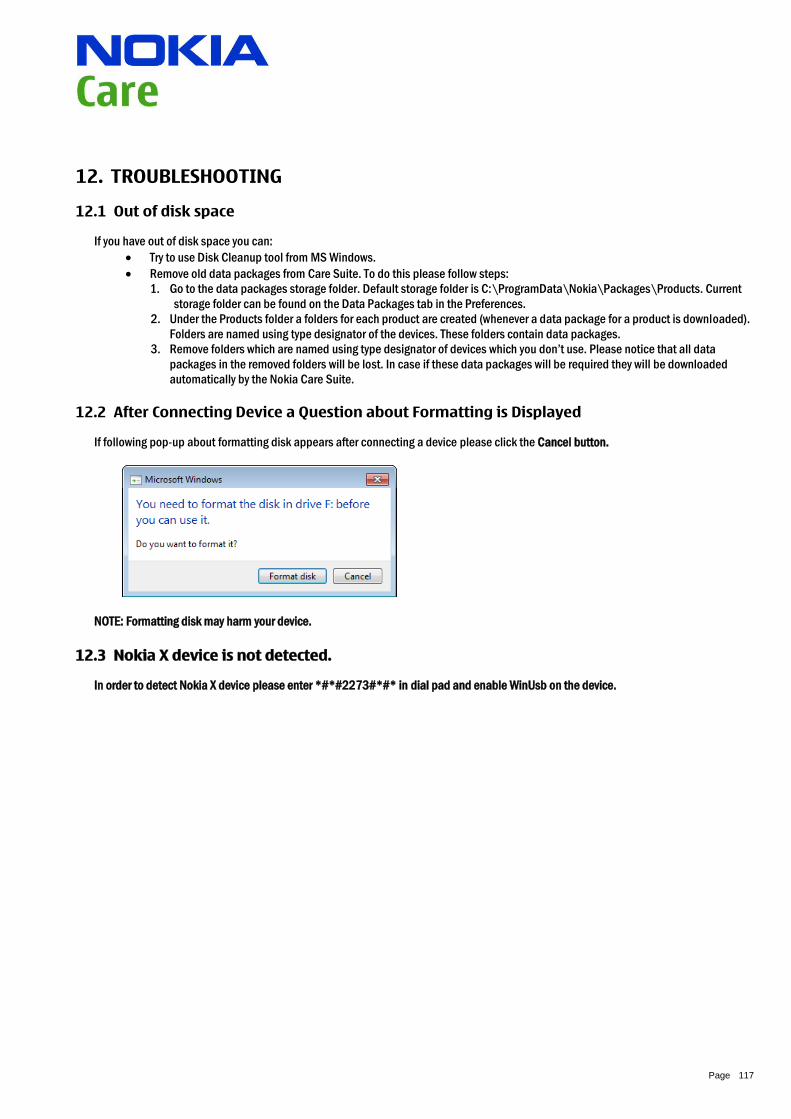


![and PC/PDA Connectivity Guide for the Nokia 6360 Phonedl.owneriq.net/7/7540613b-75ed-49d2-ba1c-cca5604b5453.pdfInstall Nokia PC Suite 4.4 [ 3 ] 2 2 Install Nokia PC Suite 4.4 Nokia](https://static.documents.pub/doc/80x56/611eefcb6314dd5f4a4d2298/and-pcpda-connectivity-guide-for-the-nokia-6360-install-nokia-pc-suite-44-3.jpg)


