24
Nokia Developer’s Suite for MMS Version 1.1 User’s Guide 30 July 2003
| Date post: | 05-May-2018 |
| Category: |
Documents |
| Upload: | hoangquynh |
| View: | 225 times |
| Download: | 0 times |
Nokia Developer’s Suite for MMSVersion 1.1
User’s Guide30 July 2003
Copyright © Nokia 2003. All rights reserved.
This document is for use with the Nokia Developer’s Suite for MMS. Reproduction, transfer, distribution or storage of part or all of the contents in this document in any form without the prior written permission of Nokia is prohibited.
Nokia, Nokia Developer’s Suite for MMS, and the Nokia Connecting People logo are trademarks or registered trademarks of Nokia Corporation. Other product and company names mentioned herein may be trademarks or trade names of their respective owners.
Java and all Java-based trademarks and logos are trademarks or registered trademarks of Sun Microsystems, Inc.
Nokia operates a policy of on-going development. Nokia reserves the right to make changes and improvements to any of the products described in this document without prior notice.
UNDER NO CIRCUMSTANCES SHALL NOKIA BE RESPONSIBLE FOR ANY LOSS OF DATA OR INCOME OR ANY SPECIAL, INCIDENTAL, CONSEQUENTIAL OR INDIRECT DAMAGES HOWSOEVER CAUSED.
THE CONTENTS OF THIS DOCUMENT ARE PROVIDED "AS IS". EXCEPT AS REQUIRED BY APPLICABLE LAW, NO WARRANTIES OF ANY KIND, EITHER EXPRESS OR IMPLIED, INCLUDING, BUT NOT LIMITED TO, THE IMPLIED WARRANTIES OF MERCHANTABILITY AND FITNESS FOR A PARTICULAR PURPOSE, ARE MADE IN RELATION TO THE ACCURACY, RELIABILITY OR CONTENTS OF THIS DOCUMENT. NOKIA RESERVES THE RIGHT TO REVISE THIS DOCUMENT OR WITHDRAW IT AT ANY TIME WITHOUT PRIOR NOTICE.
The availability of particular phone products may vary by region. Please check with the Nokia dealer nearest to you.
Visit Forum Nokia (http://www.forum.nokia.com), the site designed for developers using technologies supported by Nokia.
NDS for MMS User’s Guide 3
Contents
Preface........................................................................................................................................ 5What’s New in Version 1.1............................................................................................................. 5Document Overview ...................................................................................................................... 5Audience........................................................................................................................................ 5Typographical Conventions ........................................................................................................... 5Other Product Documents.............................................................................................................. 6Related Forum Nokia Documents .................................................................................................. 6
Getting Started........................................................................................................................... 7What is NDS for MMS .................................................................................................................. 7Installation Requirements for NDS for MMS ................................................................................. 8What is Installed With NDS for MMS 1.1....................................................................................... 9What to do Before Installation ..................................................................................................... 10Running the Installation Wizard................................................................................................... 10Starting NDS for MMS ................................................................................................................ 10
Starting NDS for MMS as a Standalone Application .................................................................. 11Starting NDS for MMS Within Adobe ® GoLive ®.................................................................... 11
A look at the NDS for MMS Main Window ................................................................................. 12
Using NDS for MMS ................................................................................................................. 13Overview of MMS Messages ........................................................................................................ 13Creating an MMS Message Within NDS Main Window ............................................................... 14Choosing an MMS Message to Send............................................................................................. 15Choosing a Message Recipient Type............................................................................................. 16Starting a Phone SDK Instance ..................................................................................................... 17Sending an MMS Message to a Phone SDK Instance ..................................................................... 18Sending an MMS Message to the MMSC EAIF Emulator.............................................................. 18Exiting from the NDS for MMS ................................................................................................... 20Creating an MMS Message From a Batch File............................................................................... 21
Syntax of the createmms Command........................................................................................... 21Creating Messages With the createmms Command .................................................................... 22
Creating an MMS Message From a SMIL File ......................................................................... 22Creating an MMS Message From Media Files ......................................................................... 22Creating a Batch File to Automate MMS Message Creation .................................................... 23
Customizing NDS for MMS......................................................................................................... 23
4
NDS for MMS User’s Guide 4
Nokia Developer’s Suite for MMS User’s Guide 5
Preface
What’s New in Version 1.1Nokia Developer’s Suite for MMS Version 1.1 (referred to in this document as NDS for MMS) now works as a plug-in to both Adobe ® GoLive ® CS and Adobe ® GoLive ® Version 6.0. However, this is true only if either of these is installed prior to installing NDS for MMS.
Document OverviewThis document describes how to install and use the NDS for MMS, which lets an MMS application developer:• Create an MMS message, given a SMIL file and the media files it references.• Send the created MMS message to one or more mobile handset simulators or to Nokia MMSC
EAIF Emulator.
AudienceThe NDS for MMS lets a developer compare the display characteristics of the same message on different phone SDKs by providing an interface for easily displaying an MMS message on one or more phone SDKs.
In addition, developers wanting to test their MMS messages in a simulated network environment can choose to send an MMS message to Nokia MMSC EAIF emulator, which simulates an MMSC server. The developer can then examine information about the message, such as all included headers, as these would be received by an MMSC server.
Typographical ConventionsThe following typographical conventions are used in this guide:
Notation Explanation
Courier • Text that you enter (as opposed to system prompts and responses)• File paths• Commands• Program code
Italic • Names of books and documents• New terminology
Preface
6 Nokia Developer’s Suite for MMS User’s Guide
Other Product DocumentsTake a moment to read the NDS for MMS, Release Notes, located in the directory where you installed this application.
Related Forum Nokia DocumentsThe following documents, in addition to many others, are created and maintained by Forum Nokia. They are freely available at http://www.forum.nokia.com/.
• Nokia Mobile Internet Toolkit User’s Guide, Version 4.0• How to Create MMS Services, Versions 3.2 and 4.0• External Application Developer’s Guide. (Explains how to interface external applications to
a Nokia MMSC.)• Quick Guide to Nokia MMS Development Tools.• Nokia 5100 SDK, Version 1.0, User’s Guide• Nokia 3510i Content Authoring SDK User’s Guide, Version 1.0• Nokia 7210 Content Authoring SDK User’s Guide, Version 1.0• Series 60 Content Authoring SDK 1.0.6 for Symbian OS, Nokia edition, User’s Guide.• Series 60 Content Authoring SDK 1.2 for Symbian OS, Nokia edition, User’s Guide.
See the Tools and SDKs page at the Forum Nokia site for other MMS-related documents.
The following software works with NDS for MMS and is freely available athttp://www.forum.nokia.com/.
• MMSC EAIF Emulator• Nokia 5100 SDK 1.0• Nokia 3510i Content Authoring SDK 1.0• Nokia 7210 Content Authoring SDK 1.0• Series 60 Content Authoring SDK 1.2 for Symbian OS, Nokia edition. (Included with the
NDS for MMS.)• Series 60 Content Authoring SDK 1.0.6 for Symbian OS, Nokia edition
See the Tools and SDKs page at the Forum Nokia site for other MMS-capable SDKs.
Bold Names of Windows menus, commands, buttons, and icons
URL link Active link to an external URL.
Notation Explanation
What is NDS for MMS
Nokia Developer’s Suite for MMS User’s Guide 7
Getting Started
This chapter provides an overview of Nokia Developer’s Suite for MMS (referred to subsequently as NDS for MMS) and covers information about installing and starting it.
What is NDS for MMSNDS for MMS is an application development tool for developers of MMS messaging applications. With this tool, you can:
• Create an MMS message from an existing SMIL file. You enter the required and optional MMS headers. NDS for MMS assembles the message using the parts specified in the SMIL file, encodes the message parts and headers, and produces an MMS message ready to be saved or sent to a phone SDK.
• Open an existing MMS message. NDS for MMS lets you view the MMS message headers, media files, and size.
• List the size in bytes of any new or existing MMS message.
• Send an MMS message to one or more phone SDKs. You select which available phone SDKs are the targets. You can also specify that an existing phone SDK instance should be used or that a new instance should be launched.
• Launch or close down phone SDK instances. When you start NDS for MMS, all supported phone SDKs that are installed on your computer are discovered and listed in the GUI. This enables you to freely start and stop phone SDK instances.
• Test whether messages are acceptable when they are received by a Multi Media Messaging Service Center (MMSC). This function requires that you install the MMSC EAIF emulator.
These features may be integrated such that you can create a SMIL file and then use NDS for MMS to create and send the resultant MMS message to phone SDKs. Both Adobe ® GoLive ® CS or Adobe ® GoLive ® 6.0 support this integration.
You can also use NDS for MMS through a command line interface (CLI) to facilitate rapid MMS creation.
NDS for MMS functions as a standalone application that can be launched from the Windows Start menu or from the command line. When installed as a plug-in to GoLive ®, it can be launched from within the application.
NDS for MMS provides an interface for opening and closing multiple phone SDKs, as well as multiple instances of a single phone SDK. Additionally, an MMS message can be sent to any currently running phone SDK instance or to a newly launched instance.
When you install NDS for MMS 1.1, Nokia Series 60 Content Authoring SDK, Version 1.2, Nokia Edition, is also installed.
Getting Started
8 Nokia Developer’s Suite for MMS User’s Guide
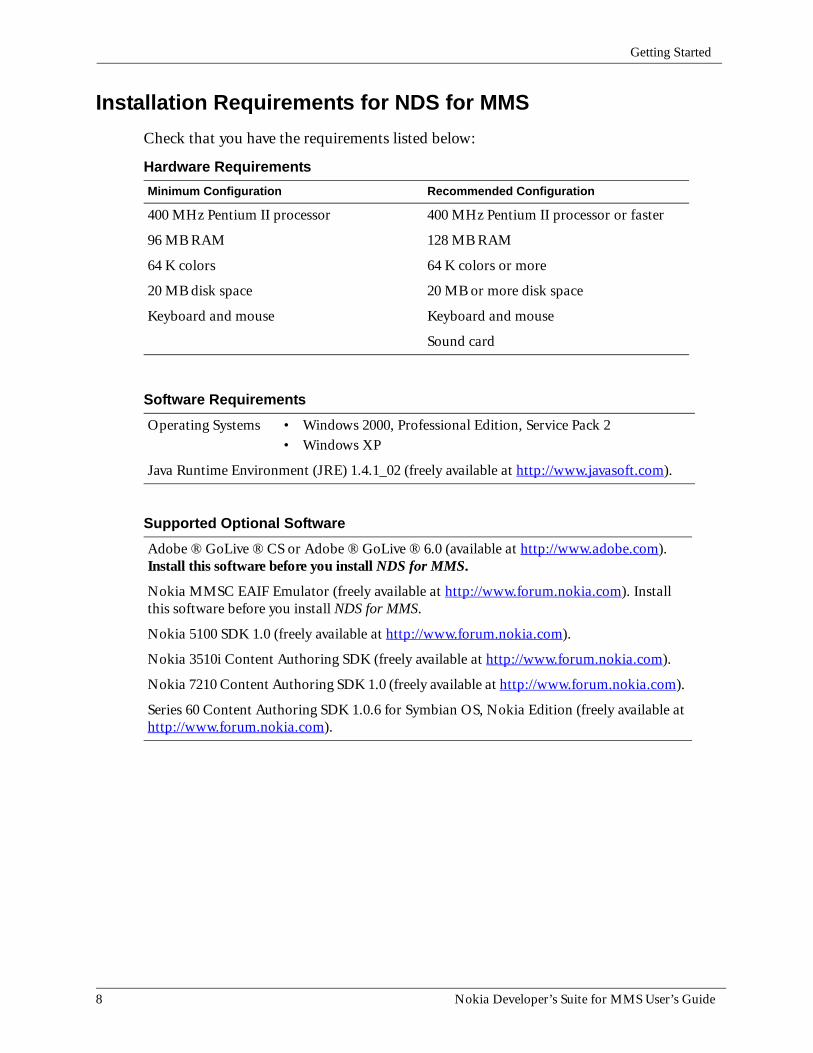
Installation Requirements for NDS for MMSCheck that you have the requirements listed below:
Hardware RequirementsMinimum Configuration Recommended Configuration
400 MHz Pentium II processor 400 MHz Pentium II processor or faster
96 MB RAM 128 MB RAM
64 K colors 64 K colors or more
20 MB disk space 20 MB or more disk space
Keyboard and mouse Keyboard and mouse
Sound card
Software RequirementsOperating Systems • Windows 2000, Professional Edition, Service Pack 2
• Windows XP
Java Runtime Environment (JRE) 1.4.1_02 (freely available at http://www.javasoft.com).
Supported Optional SoftwareAdobe ® GoLive ® CS or Adobe ® GoLive ® 6.0 (available at http://www.adobe.com). Install this software before you install NDS for MMS.
Nokia MMSC EAIF Emulator (freely available at http://www.forum.nokia.com). Install this software before you install NDS for MMS.
Nokia 5100 SDK 1.0 (freely available at http://www.forum.nokia.com).
Nokia 3510i Content Authoring SDK (freely available at http://www.forum.nokia.com).
Nokia 7210 Content Authoring SDK 1.0 (freely available at http://www.forum.nokia.com).
Series 60 Content Authoring SDK 1.0.6 for Symbian OS, Nokia Edition (freely available at http://www.forum.nokia.com).
What is Installed With NDS for MMS 1.1
Nokia Developer’s Suite for MMS User’s Guide 9
What is Installed With NDS for MMS 1.1When you install NDS for MMS, the following software is installed:
• NDS for MMS, Version 1.1.
• Series 60 Content Authoring SDK, Version 1.2, for Symbian OS, Nokia Edition.
• Plug-in integration software for either Adobe ® GoLive ® CS or Adobe ® GoLive ® 6.0, only if (1) GoLive ® is found to be installed on your machine and (2) you request during the installation process that you wish to integrate NDS for MMS with GoLive ®.
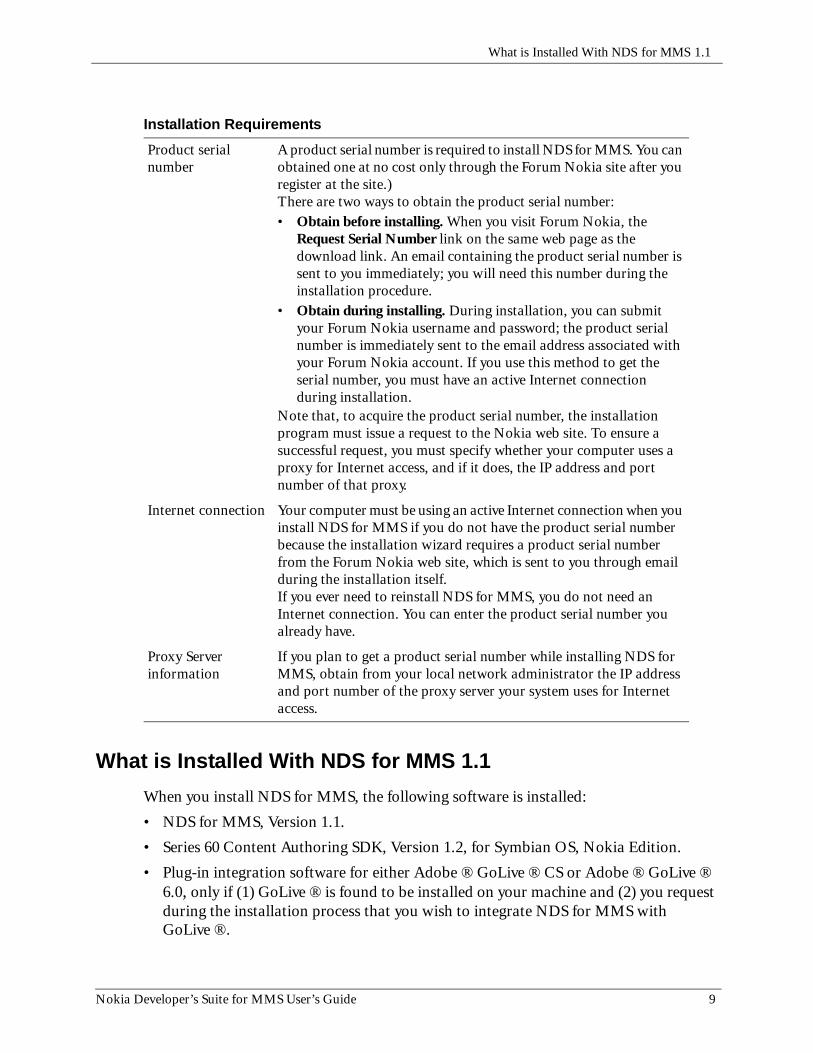
Installation RequirementsProduct serial number
A product serial number is required to install NDS for MMS. You can obtained one at no cost only through the Forum Nokia site after you register at the site.)There are two ways to obtain the product serial number:• Obtain before installing. When you visit Forum Nokia, the
Request Serial Number link on the same web page as the download link. An email containing the product serial number is sent to you immediately; you will need this number during the installation procedure.
• Obtain during installing. During installation, you can submit your Forum Nokia username and password; the product serial number is immediately sent to the email address associated with your Forum Nokia account. If you use this method to get the serial number, you must have an active Internet connection during installation.
Note that, to acquire the product serial number, the installation program must issue a request to the Nokia web site. To ensure a successful request, you must specify whether your computer uses a proxy for Internet access, and if it does, the IP address and port number of that proxy.
Internet connection Your computer must be using an active Internet connection when you install NDS for MMS if you do not have the product serial number because the installation wizard requires a product serial number from the Forum Nokia web site, which is sent to you through email during the installation itself.If you ever need to reinstall NDS for MMS, you do not need an Internet connection. You can enter the product serial number you already have.
Proxy Server information
If you plan to get a product serial number while installing NDS for MMS, obtain from your local network administrator the IP address and port number of the proxy server your system uses for Internet access.
Getting Started
10 Nokia Developer’s Suite for MMS User’s Guide
• Nokia Update Manager, Version 1.1. (Note that the installation will remove Nokia Update Manager, Version 1.0, if installed, and replace it with Version 1.1. Also note that you can launch Update Manager by choosing the NDS for MMS command Utilities>Nokia Product Updates.)
What to do Before InstallationBefore installing NDS for MMS:
• Ensure that your system meets the requirements described in the section titled Installation Requirements for NDS for MMS on page 8.
• Obtain a product serial number when you download the NDS for MMS software from Forum Nokia (see on page 9). Note that you can also obtain the serial number during the installation process itself.
• Install Adobe ® GoLive ® CS or Adobe ® GoLive ® 6.0 or if you plan to use NDS for MMS in conjunction with GoLive ®.
• Install the MMSC EAIF Emulator if you plan to use NDS for MMS in conjunction with it.
• Read the product Release Notes.
Running the Installation WizardNDS for MMS is provided as a single, self-extracting executable file that is available for downloading from the Forum Nokia web site (www.forum.nokia.com/).
To start the NDS for MMS installation wizard:
1 Download NDS for MMS from Forum Nokia and unzip the downloaded file.
2 Double-click the file install.exe.. The installation wizard begins to run.
3 Follow the instructions given with the installation dialogs.Note: Cancelling the wizard midway through an installation is not recommended. If you decide
you do not want to install the product, complete the installation anyway and then uninstall the product. This approach prevents the product from being partially installed on your computer in a way that an uninstaller cannot automatically remove.
Starting NDS for MMSYou can start NDS for MMS as a standalone application or as a plug-in from within Adobe ® GoLive ® CS or Adobe ® GoLive ® 6.0.
NDS for MMS is a single-instance application; only one instance can be running at any time. For example, if an NDS for MMS instance is running, any new NDS for MMS you invoke does not create another instance. Instead, the window for the currently running instance is “popped to the top.”
Starting NDS for MMS
Nokia Developer’s Suite for MMS User’s Guide 11
If you plan to use Nokia MMSC EAIF Emulator with NDS for MMS, start the emulator before you send a message.
Starting NDS for MMS as a Standalone ApplicationTo start NDS for MMS from the Start menu, chooseStart > Programs > Nokia Developer Tools > Developer’s Suite for MMS > NDS for MMS 1.1.
To start NDS for MMS from a command line, first navigate to the installation directory, which by default is C:\Nokia\Tools\Developers_Suite_for_MMS. Then enter one of the following commands:
Starting NDS for MMS Within Adobe ® GoLive ®Both Adobe ® GoLive ® CS or Adobe ® GoLive ® 6.0, available from Adobe Systems, Inc., provide numerous content authoring features, including a DTD-based editor for authoring SMIL content. You can use the GoLive ® editor to create a SMIL file that references the media content files to be included in an MMS message and to specify the presentation options for these media files.
GoLive ® integrates NDS for MMS so that, after you create a SMIL file, you can select Nokia Tools >Create/Send MMS Messages from the GoLive ® menu bar to launch NDS for MMS.
When NDS for MMS starts, the SMIL file you created within GoLive ® is loaded. You then use its interface to create an MMS file and send it to your chosen phone SDKs. The next chapter titled Using NDS for MMS describes this process in greater detail.
ndsmms Starts NDS for MMS with no SMIL or MMS file loaded.
ndsmms -smil <smil filename> Starts NDS for MMS, opening the specified SMIL file.
ndsmms -mms <mms filename> Starts NDS for MMS, opening the specified MMS file.
Getting Started
12 Nokia Developer’s Suite for MMS User’s Guide
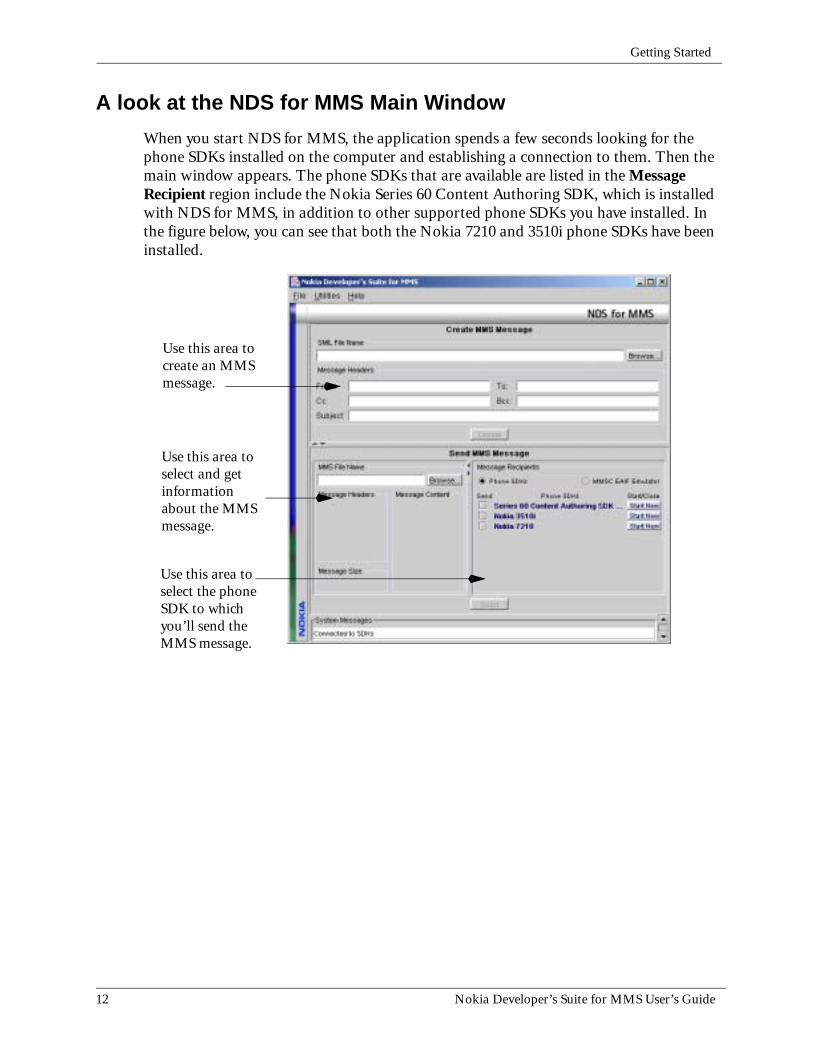
A look at the NDS for MMS Main WindowWhen you start NDS for MMS, the application spends a few seconds looking for the phone SDKs installed on the computer and establishing a connection to them. Then the main window appears. The phone SDKs that are available are listed in the Message Recipient region include the Nokia Series 60 Content Authoring SDK, which is installed with NDS for MMS, in addition to other supported phone SDKs you have installed. In the figure below, you can see that both the Nokia 7210 and 3510i phone SDKs have been installed.
Use this area to select and get information about the MMS message.
Use this area to select the phone SDK to which you’ll send the MMS message.
Use this area to create an MMS message.
Overview of MMS Messages
Nokia Developer’s Suite for MMS User’s Guide 13
Using NDS for MMS
In general, the tasks you’ll be performing with NDS fall into these categories:
1 Making sure you have all the parts you need to create an MMS message, such as SMIL files, text, image, or audio components, and that the parts are in the correct directory.
2 Creating or selecting an MMS message to send.
3 Selecting a phone SDK to which you will send the message.
4 Sending the MMS message.
You’ll also be able to customize some aspects of NDS, such as default directories and the types of information you want logged.
Overview of MMS MessagesAn MMS message contains rich media content that may include one or more text, image, or audio components. The message optionally can also include a SMIL (Synchronized Multimedia Integration Language) component that specifies how the client handset presents the parts of the message. The SMIL part specifies the layout, sequence, and timing of the parts in the MMS message.
An MMS message, which is encoded and includes headers for individual parts and for the message as a whole, is constructed from these parts:
• At the outermost (WSP) level, an MMS message consists of a Header section and a Content section. The Content-Type header specified within the WSP Header section must be application/vnd.wap.mms-message.
• The Content section consists of a multipart message consisting of an MMS Header section and an MMS Content section (also called “message body”).
• The MMS Header section must specify a Content-Type header of (1) application/vnd.wap.multipart.related if there is a SMIL file included (which defines or coordinates the presentation of the parts) or (2) application/vnd.wap.multipart.mixed if there is no included SMIL file.
• The MMS Content section (or message body) consists of each included part, where each part consists of a Part Header section and Part Content section. Parts are separated from one another by a boundary string defined in the MMS Header section.
• The Part Header section consists of a number of headers particular to the part.
• The Part Content section contains the actual part content.
Using NDS for MMS
14 Nokia Developer’s Suite for MMS User’s Guide
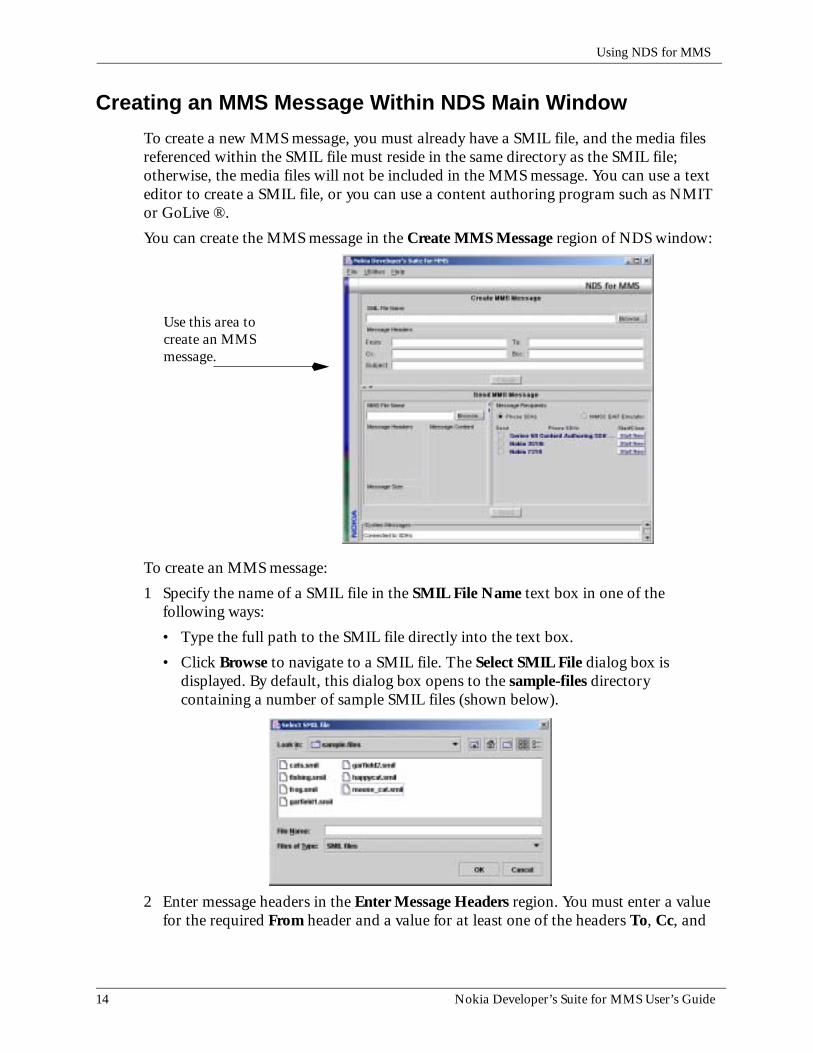
Creating an MMS Message Within NDS Main WindowTo create a new MMS message, you must already have a SMIL file, and the media files referenced within the SMIL file must reside in the same directory as the SMIL file; otherwise, the media files will not be included in the MMS message. You can use a text editor to create a SMIL file, or you can use a content authoring program such as NMIT or GoLive ®.
You can create the MMS message in the Create MMS Message region of NDS window:
To create an MMS message:
1 Specify the name of a SMIL file in the SMIL File Name text box in one of the following ways:
• Type the full path to the SMIL file directly into the text box.
• Click Browse to navigate to a SMIL file. The Select SMIL File dialog box is displayed. By default, this dialog box opens to the sample-files directory containing a number of sample SMIL files (shown below).
2 Enter message headers in the Enter Message Headers region. You must enter a value for the required From header and a value for at least one of the headers To, Cc, and
Use this area to create an MMS message.
Choosing an MMS Message to Send
Nokia Developer’s Suite for MMS User’s Guide 15
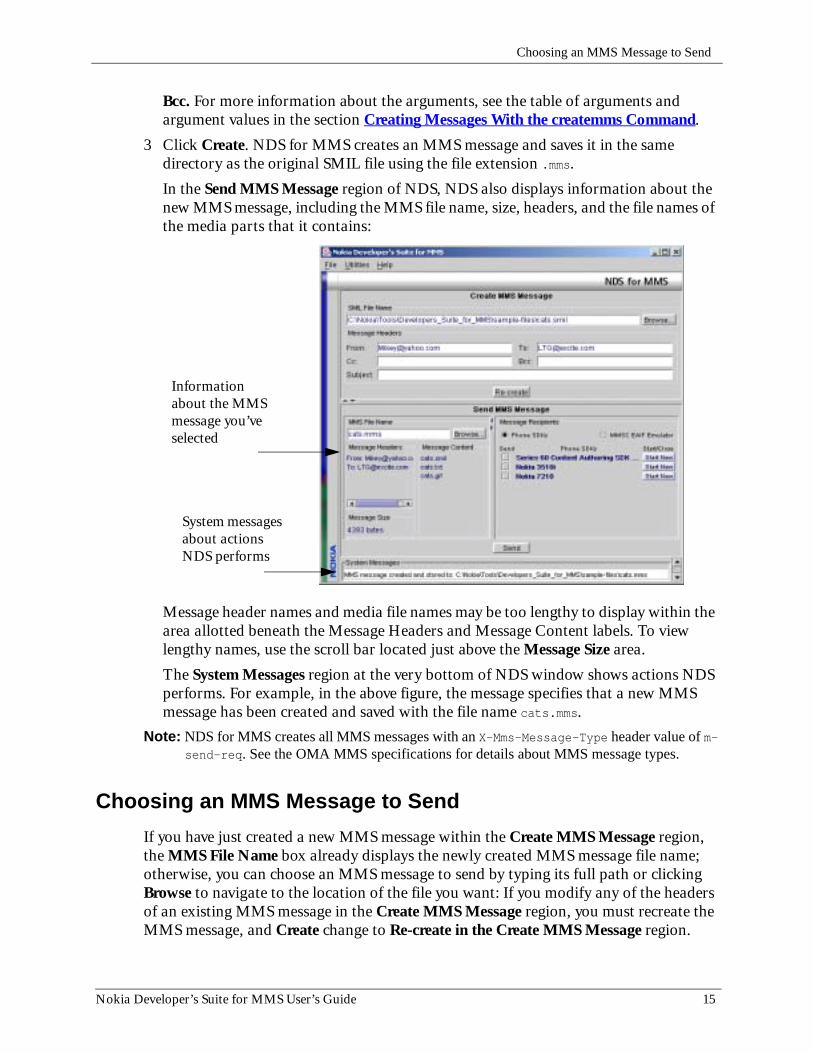
Bcc. For more information about the arguments, see the table of arguments and argument values in the section Creating Messages With the createmms Command.
3 Click Create. NDS for MMS creates an MMS message and saves it in the same directory as the original SMIL file using the file extension .mms.
In the Send MMS Message region of NDS, NDS also displays information about the new MMS message, including the MMS file name, size, headers, and the file names of the media parts that it contains:
Message header names and media file names may be too lengthy to display within the area allotted beneath the Message Headers and Message Content labels. To view lengthy names, use the scroll bar located just above the Message Size area.
The System Messages region at the very bottom of NDS window shows actions NDS performs. For example, in the above figure, the message specifies that a new MMS message has been created and saved with the file name cats.mms.
Note: NDS for MMS creates all MMS messages with an X-Mms-Message-Type header value of m-send-req. See the OMA MMS specifications for details about MMS message types.
Choosing an MMS Message to SendIf you have just created a new MMS message within the Create MMS Message region, the MMS File Name box already displays the newly created MMS message file name; otherwise, you can choose an MMS message to send by typing its full path or clicking Browse to navigate to the location of the file you want: If you modify any of the headers of an existing MMS message in the Create MMS Message region, you must recreate the MMS message, and Create change to Re-create in the Create MMS Message region.
Information about the MMS message you’ve selected
System messages about actions NDS performs
Using NDS for MMS
16 Nokia Developer’s Suite for MMS User’s Guide
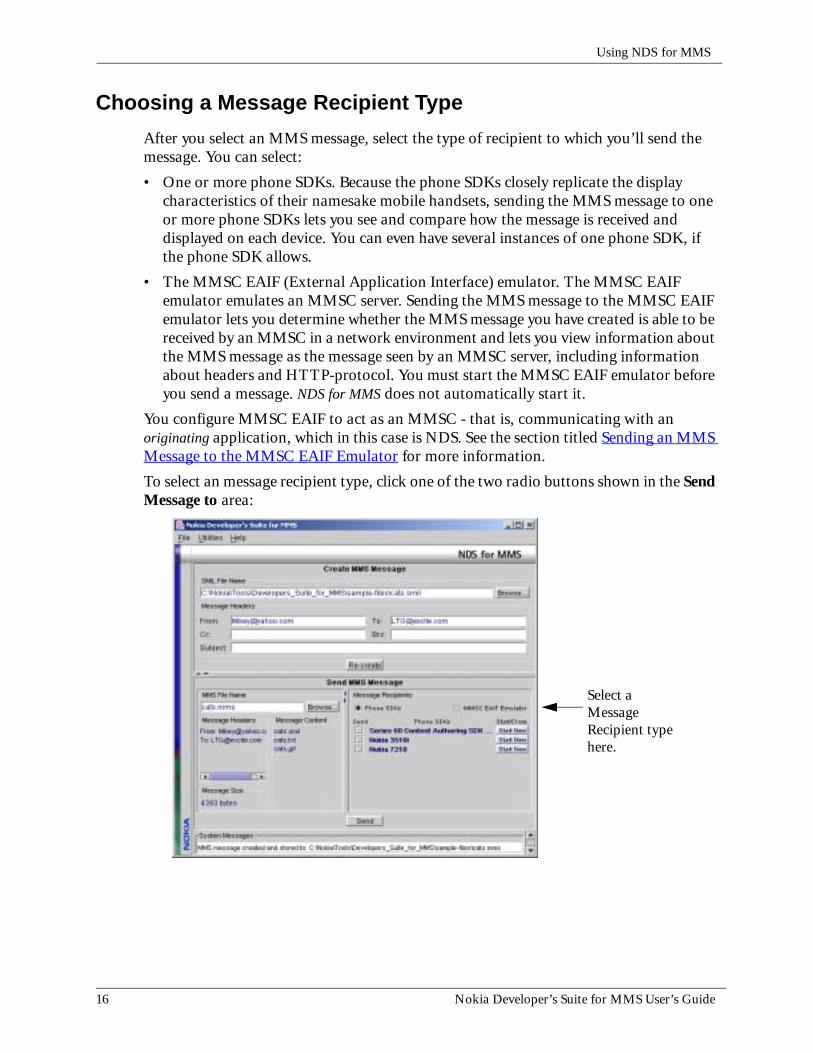
Choosing a Message Recipient TypeAfter you select an MMS message, select the type of recipient to which you’ll send the message. You can select:
• One or more phone SDKs. Because the phone SDKs closely replicate the display characteristics of their namesake mobile handsets, sending the MMS message to one or more phone SDKs lets you see and compare how the message is received and displayed on each device. You can even have several instances of one phone SDK, if the phone SDK allows.
• The MMSC EAIF (External Application Interface) emulator. The MMSC EAIF emulator emulates an MMSC server. Sending the MMS message to the MMSC EAIF emulator lets you determine whether the MMS message you have created is able to be received by an MMSC in a network environment and lets you view information about the MMS message as the message seen by an MMSC server, including information about headers and HTTP-protocol. You must start the MMSC EAIF emulator before you send a message. NDS for MMS does not automatically start it.
You configure MMSC EAIF to act as an MMSC - that is, communicating with an originating application, which in this case is NDS. See the section titled Sending an MMS Message to the MMSC EAIF Emulator for more information.
To select an message recipient type, click one of the two radio buttons shown in the Send Message to area:
Select a Message Recipient type here.
Starting a Phone SDK Instance
Nokia Developer’s Suite for MMS User’s Guide 17
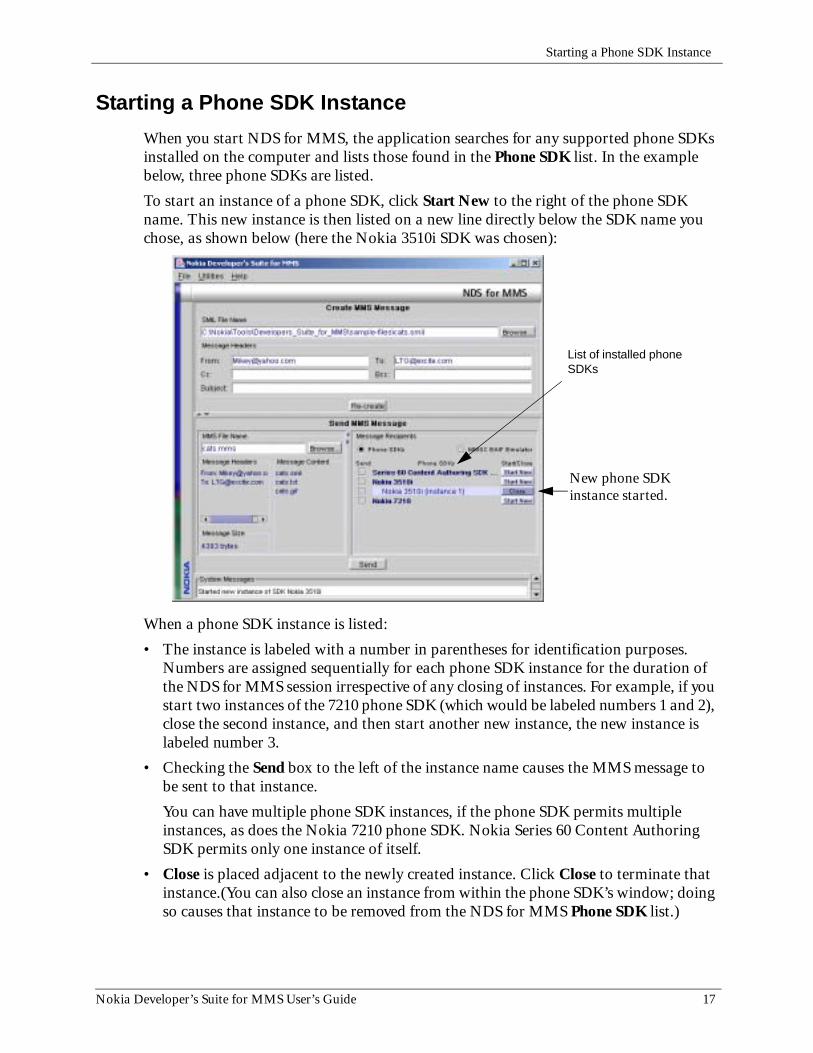
Starting a Phone SDK Instance When you start NDS for MMS, the application searches for any supported phone SDKs installed on the computer and lists those found in the Phone SDK list. In the example below, three phone SDKs are listed.
To start an instance of a phone SDK, click Start New to the right of the phone SDK name. This new instance is then listed on a new line directly below the SDK name you chose, as shown below (here the Nokia 3510i SDK was chosen):
When a phone SDK instance is listed:
• The instance is labeled with a number in parentheses for identification purposes. Numbers are assigned sequentially for each phone SDK instance for the duration of the NDS for MMS session irrespective of any closing of instances. For example, if you start two instances of the 7210 phone SDK (which would be labeled numbers 1 and 2), close the second instance, and then start another new instance, the new instance is labeled number 3.
• Checking the Send box to the left of the instance name causes the MMS message to be sent to that instance.
You can have multiple phone SDK instances, if the phone SDK permits multiple instances, as does the Nokia 7210 phone SDK. Nokia Series 60 Content Authoring SDK permits only one instance of itself.
• Close is placed adjacent to the newly created instance. Click Close to terminate that instance.(You can also close an instance from within the phone SDK’s window; doing so causes that instance to be removed from the NDS for MMS Phone SDK list.)
New phone SDK instance started.
List of installed phone SDKs
Using NDS for MMS
18 Nokia Developer’s Suite for MMS User’s Guide
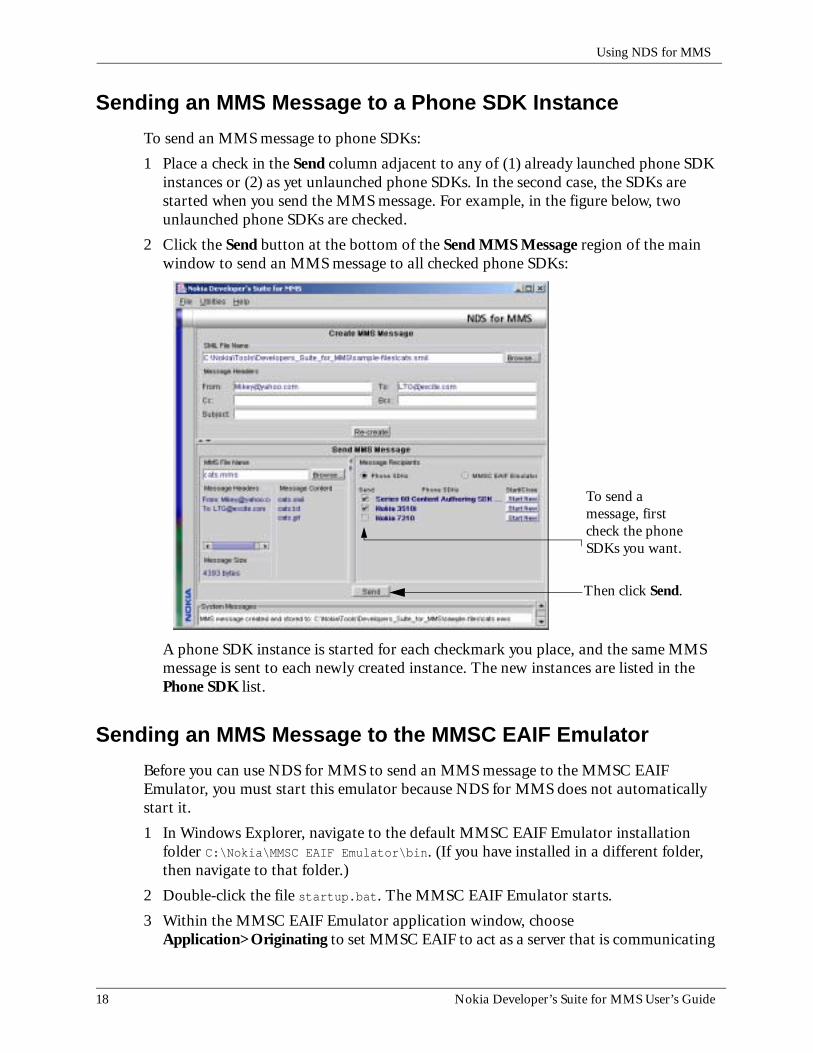
Sending an MMS Message to a Phone SDK Instance To send an MMS message to phone SDKs:
1 Place a check in the Send column adjacent to any of (1) already launched phone SDK instances or (2) as yet unlaunched phone SDKs. In the second case, the SDKs are started when you send the MMS message. For example, in the figure below, two unlaunched phone SDKs are checked.
2 Click the Send button at the bottom of the Send MMS Message region of the main window to send an MMS message to all checked phone SDKs:
A phone SDK instance is started for each checkmark you place, and the same MMS message is sent to each newly created instance. The new instances are listed in the Phone SDK list.
Sending an MMS Message to the MMSC EAIF EmulatorBefore you can use NDS for MMS to send an MMS message to the MMSC EAIF Emulator, you must start this emulator because NDS for MMS does not automatically start it.
1 In Windows Explorer, navigate to the default MMSC EAIF Emulator installation folder C:\Nokia\MMSC EAIF Emulator\bin. (If you have installed in a different folder, then navigate to that folder.)
2 Double-click the file startup.bat. The MMSC EAIF Emulator starts.
3 Within the MMSC EAIF Emulator application window, choose Application>Originating to set MMSC EAIF to act as a server that is communicating
To send a message, first check the phone SDKs you want.
Then click Send.
Sending an MMS Message to the MMSC EAIF Emulator
Nokia Developer’s Suite for MMS User’s Guide 19
with an originating application. NDS for MMS is the originating application. (NDS for MMS works with MMSC EAIF only in this originating mode.)
Now, to send an MMS message to the running MMSC EAIF emulator:
1 Within NDS for MMS, choose the MMSC EAIF Emulator radio button to select this emulator as the Message Recipient.
2 Within NDS for MMS, choose the Send button to send the current MMS message to the MMSC EAIF Emulator.
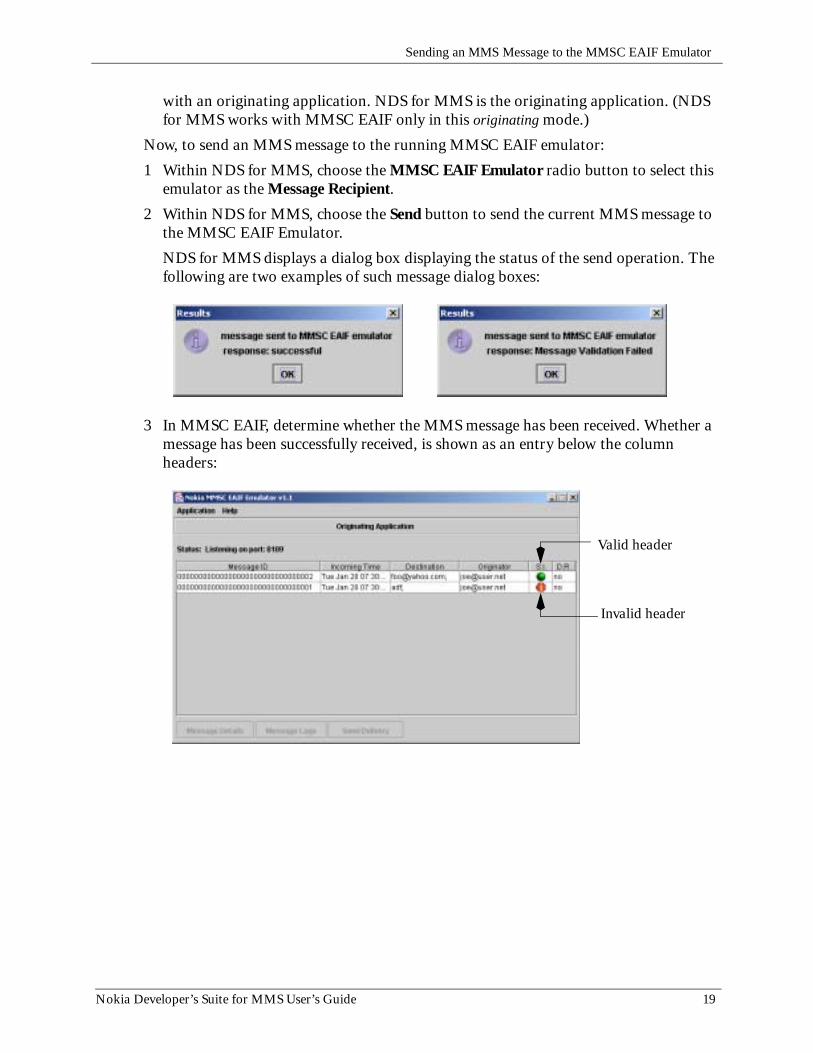
NDS for MMS displays a dialog box displaying the status of the send operation. The following are two examples of such message dialog boxes:
3 In MMSC EAIF, determine whether the MMS message has been received. Whether a message has been successfully received, is shown as an entry below the column headers:
Valid header
Invalid header
Using NDS for MMS
20 Nokia Developer’s Suite for MMS User’s Guide
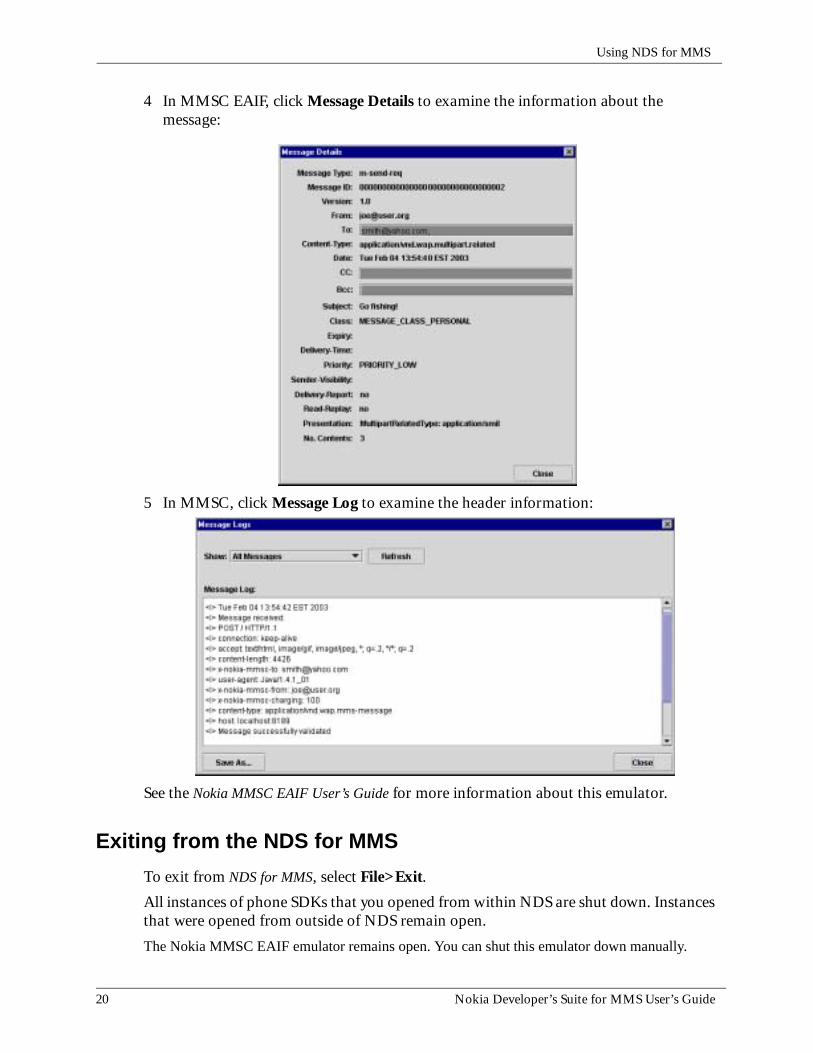
4 In MMSC EAIF, click Message Details to examine the information about the message:
5 In MMSC, click Message Log to examine the header information:
See the Nokia MMSC EAIF User’s Guide for more information about this emulator.
Exiting from the NDS for MMSTo exit from NDS for MMS, select File>Exit.
All instances of phone SDKs that you opened from within NDS are shut down. Instances that were opened from outside of NDS remain open.
The Nokia MMSC EAIF emulator remains open. You can shut this emulator down manually.
Creating an MMS Message From a Batch File
Nokia Developer’s Suite for MMS User’s Guide 21
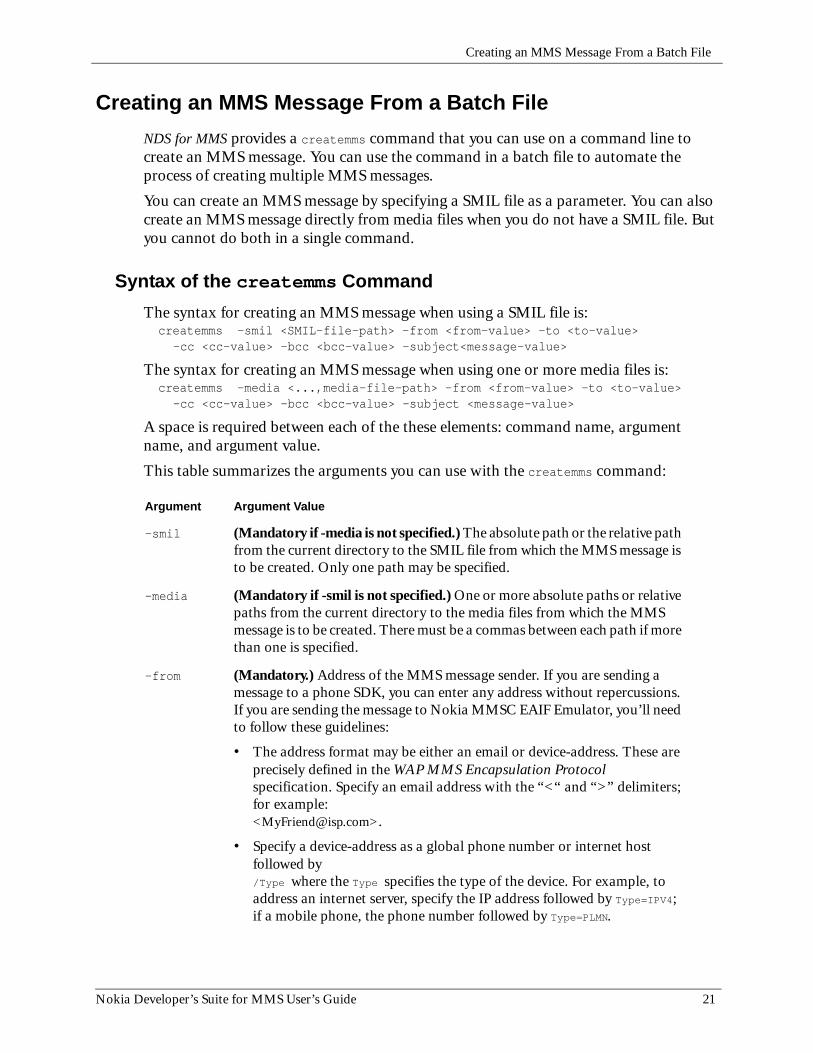
Creating an MMS Message From a Batch FileNDS for MMS provides a createmms command that you can use on a command line to create an MMS message. You can use the command in a batch file to automate the process of creating multiple MMS messages.
You can create an MMS message by specifying a SMIL file as a parameter. You can also create an MMS message directly from media files when you do not have a SMIL file. But you cannot do both in a single command.
Syntax of the createmms CommandThe syntax for creating an MMS message when using a SMIL file is:
createmms -smil <SMIL-file-path> -from <from-value> -to <to-value>-cc <cc-value> -bcc <bcc-value> -subject<message-value>
The syntax for creating an MMS message when using one or more media files is:createmms -media <...,media-file-path> -from <from-value> -to <to-value>
-cc <cc-value> -bcc <bcc-value> -subject <message-value>
A space is required between each of the these elements: command name, argument name, and argument value.
This table summarizes the arguments you can use with the createmms command:
Argument Argument Value
-smil (Mandatory if -media is not specified.) The absolute path or the relative path from the current directory to the SMIL file from which the MMS message is to be created. Only one path may be specified.
-media (Mandatory if -smil is not specified.) One or more absolute paths or relative paths from the current directory to the media files from which the MMS message is to be created. There must be a commas between each path if more than one is specified.
-from (Mandatory.) Address of the MMS message sender. If you are sending a message to a phone SDK, you can enter any address without repercussions. If you are sending the message to Nokia MMSC EAIF Emulator, you’ll need to follow these guidelines:
• The address format may be either an email or device-address. These are precisely defined in the WAP MMS Encapsulation Protocol specification. Specify an email address with the “<“ and “>” delimiters; for example:<[email protected]>.
• Specify a device-address as a global phone number or internet host followed by /Type where the Type specifies the type of the device. For example, to address an internet server, specify the IP address followed by Type=IPV4; if a mobile phone, the phone number followed by Type=PLMN.
22 Using NDS for MMS
Nokia Developer’s Suite for MMS User’s Guide 22
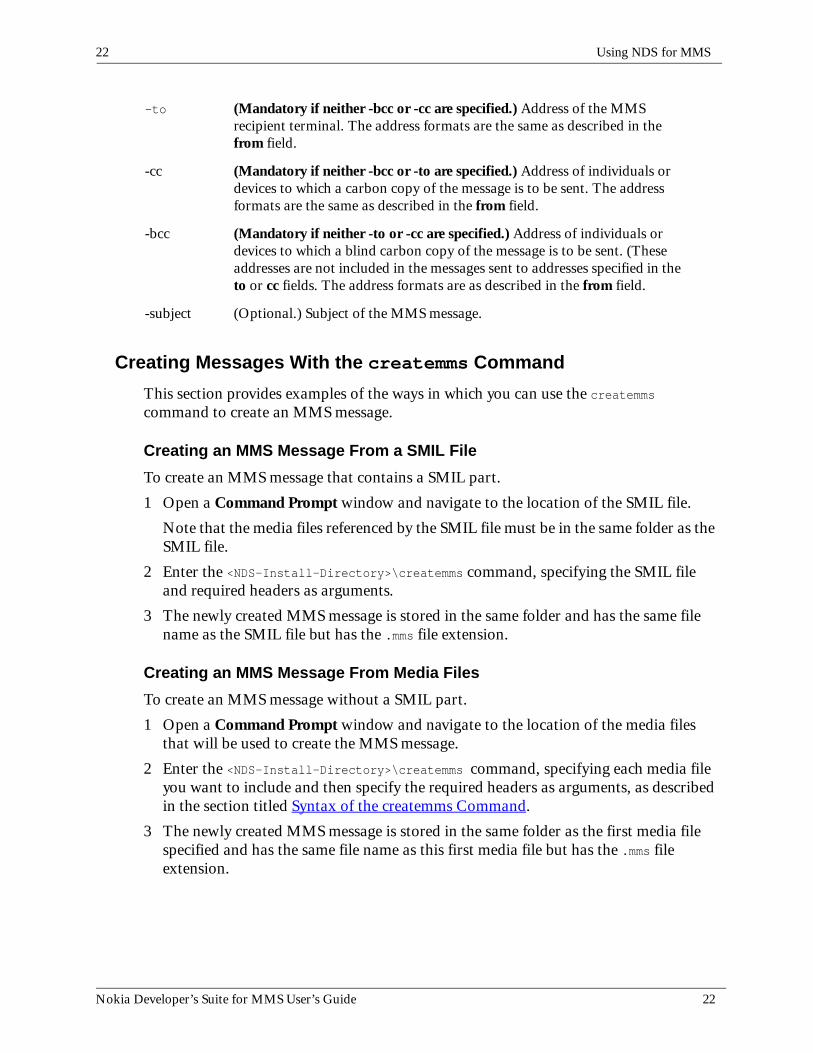
Creating Messages With the createmms CommandThis section provides examples of the ways in which you can use the createmms command to create an MMS message.
Creating an MMS Message From a SMIL FileTo create an MMS message that contains a SMIL part.
1 Open a Command Prompt window and navigate to the location of the SMIL file.
Note that the media files referenced by the SMIL file must be in the same folder as the SMIL file.
2 Enter the <NDS-Install-Directory>\createmms command, specifying the SMIL file and required headers as arguments.
3 The newly created MMS message is stored in the same folder and has the same file name as the SMIL file but has the .mms file extension.
Creating an MMS Message From Media FilesTo create an MMS message without a SMIL part.
1 Open a Command Prompt window and navigate to the location of the media files that will be used to create the MMS message.
2 Enter the <NDS-Install-Directory>\createmms command, specifying each media file you want to include and then specify the required headers as arguments, as described in the section titled Syntax of the createmms Command.
3 The newly created MMS message is stored in the same folder as the first media file specified and has the same file name as this first media file but has the .mms file extension.
-to (Mandatory if neither -bcc or -cc are specified.) Address of the MMS recipient terminal. The address formats are the same as described in the from field.
-cc (Mandatory if neither -bcc or -to are specified.) Address of individuals or devices to which a carbon copy of the message is to be sent. The address formats are the same as described in the from field.
-bcc (Mandatory if neither -to or -cc are specified.) Address of individuals or devices to which a blind carbon copy of the message is to be sent. (These addresses are not included in the messages sent to addresses specified in the to or cc fields. The address formats are as described in the from field.
-subject (Optional.) Subject of the MMS message.

Customizing NDS for MMS
Nokia Developer’s Suite for MMS User’s Guide 23
Creating a Batch File to Automate MMS Message CreationTo automate MMS message creation by running a batch file containing one or more createmms commands.
1 Create a new file using a text editor and save the file with an extension of .bat.
2 In the new file, enter as many createmms commands as you wish, each on a new line. You may intermix createmms commands that specify a SMIL file with others that specify media files. Then close the .bat file.
3 Run the .bat file by double-clicking it.
Customizing NDS for MMSYou can customize some aspects of NDS by changing the values in the file, NDSforMMS.config. Locate this file by selecting Start menu>Search>for Files or Folders and entering NDSforMMS.config as the file you want to find. These are the aspects you can customize:
You can customize ... Default settings Options/Comments
Language Name of Language. Default is English_US
Directory where SMIL and MMS files are located. This directory is displayed when you click Browse in the Create MMS Message region of the main window.
SmilMmsFilesDir=C:/Nokia/Tools/Developers_Suite_for_MMS/sample-files
Must be an absolute path. Use forward slashes to delimit directories.
Should system messages be logged to a log file (yes/no)
LogToFile=yes Yes, NoIn standalone NDS, messages are logged to NDSforMMS.log.In NDS from GoLive ®, messages are logged to NDSforMMSAGL.log.
Should system messages also be printed out to the console (yes/no)
SendToStdout=yes Yes, No
Should debug messages be logged/printed? (yes/no)
LogDebug=no Yes, No
Should information messages be logged/printed? (yes/no)
LogInfo=no Yes, No
Should warning messages be logged/printed? (yes/no)
LogWarning=yes Yes, No
24 Using NDS for MMS
Nokia Developer’s Suite for MMS User’s Guide 24
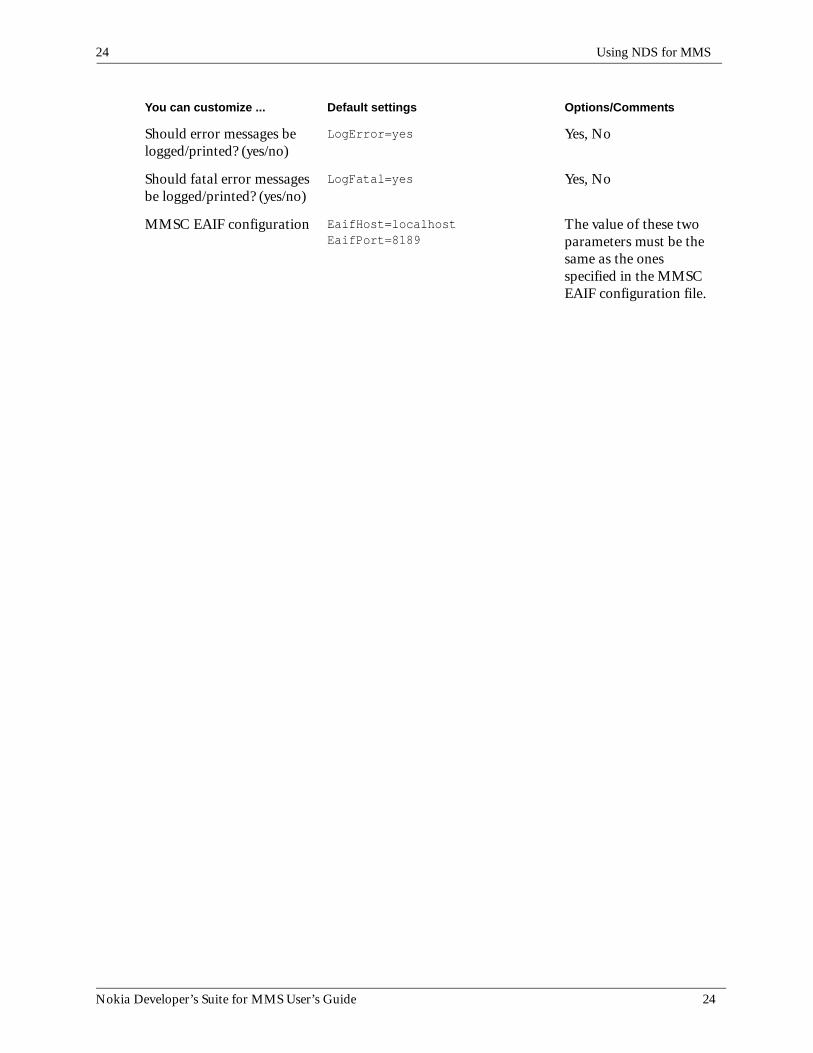
Should error messages be logged/printed? (yes/no)
LogError=yes Yes, No
Should fatal error messages be logged/printed? (yes/no)
LogFatal=yes Yes, No
MMSC EAIF configuration EaifHost=localhostEaifPort=8189
The value of these two parameters must be the same as the ones specified in the MMSC EAIF configuration file.
You can customize ... Default settings Options/Comments


