183
Nokia X6-00 User guide Issue 5.4
Nokia X6-00 User guide
Issue 5.4
Contents
Safety 6About your device 7Network services 8
Get started 10Keys and parts 10Insert the SIM card and battery 12Charge the battery 15Switch the device on 16Lock or unlock the keys and touchscreen 16Home screen 17Media key 19Access the menu 19Touch screen actions 19Change the ringing tone 22Support 22Nokia Services 22About Ovi Store 23
Find help 23In-device help 23Update phone software using yourPC 24Settings 24Access codes 25Prolong battery life 26Increase available memory 27
Your device 28Device setup 28Copy contacts or pictures from yourold device 28Display indicators 29Volume and loudspeaker control 32Shortcuts 33Antenna locations 33Contacts bar 34Offline profile 35Sensor settings and display rotation 35Headset 36Remove the SIM card 37Attach a wrist strap 38Remote lock 38
Make calls 38Touch screen during calls 38Voice calls 39During a call 39Voice mailbox 41Answer or reject a call 41Make a conference call 42Speed dial a phone number 43Call waiting 43Voice dialling 44Make a video call 45During a video call 46Answer or reject a video call 47Video sharing 47Log 51
2 Contents
Write text 53Automatic input modes 53Virtual keyboard 54Enter text with the virtual keypad 55Touch input settings 57
Contacts 57Save and edit names and numbers 57Contacts toolbar 58Manage names and numbers 58Assign default numbers andaddresses 59Ringing tones, images, and call textfor contacts 60Copy contacts 61SIM services 61
Messaging 63Messaging main view 63Write and send messages 64Messaging inbox 65Set up e-mail 67Nokia Messaging 68Mailbox 68Mail for Exchange 71View messages on a SIM card 72Cell broadcast messages 73Service commands 73Messaging settings 73
Personalise your device 76Change the look of your device 76
Profiles 77
Music folder 77Music player 77Ovi Music 81Nokia Podcasting 82Radio 84
Gallery 85View and organise files 85View images and videos 86Organise images and video clips 86TV-out mode 87
Camera 89Activate the camera 89Image capture 89Video recording 96
Positioning (GPS) 97About GPS 97Assisted GPS (A-GPS) 98Tips on creating a GPS connection 99Position requests 100Landmarks 100GPS data 101Positioning settings 101
Maps 102Maps overview 102View your location and the map 103Map view 105
Contents 3

Change the look of the map 105Download and update maps 106About positioning methods 106Find a location 107View location details 108Save places and routes 109View and organise places or routes 110Send places to your friends 111Synchronise your Favourites 111Get voice guidance 112Drive to your destination 112Navigation view 114Get traffic and safety information 114Walk to your destination 115Plan a route 116
Connectivity 117Data connections and access points 118Network settings 118Wireless LAN 119Access points 122View your active data connections 128Synchronisation 129Bluetooth connectivity 129Transfer data using a USB cable 134PC connections 135Administrative settings 136
Nokia Video Centre 137View and download video clips 138Video feeds 139My videos 140
Transfer videos from your PC 141Video centre settings 141
Internet 142About the web browser 142Browse the web 142Add a bookmark 143Subscribe to a web feed 143Discover nearby events 144
Other applications 144Clock 144Calendar 146File manager 147Quickoffice 148Application manager 149Update software using your device 153RealPlayer 153Recorder 155Write a note 155Make a calculation 156Converter 156Dictionary 156
Settings 157Phone settings 157Call settings 166
Protect the environment 168Save energy 168Recycle 169
4 Contents
Product and safety information 170
Index 177
Contents 5
Safety
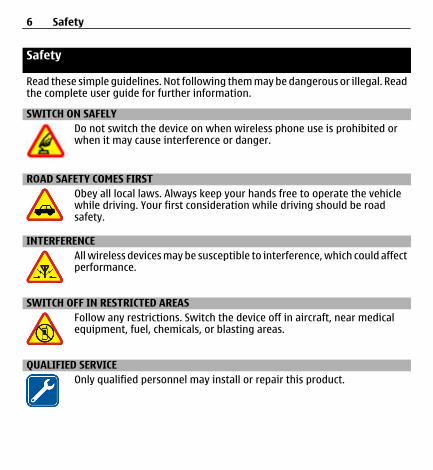
Read these simple guidelines. Not following them may be dangerous or illegal. Readthe complete user guide for further information.
SWITCH ON SAFELYDo not switch the device on when wireless phone use is prohibited orwhen it may cause interference or danger.
ROAD SAFETY COMES FIRSTObey all local laws. Always keep your hands free to operate the vehiclewhile driving. Your first consideration while driving should be roadsafety.
INTERFERENCEAll wireless devices may be susceptible to interference, which could affectperformance.
SWITCH OFF IN RESTRICTED AREASFollow any restrictions. Switch the device off in aircraft, near medicalequipment, fuel, chemicals, or blasting areas.
QUALIFIED SERVICEOnly qualified personnel may install or repair this product.
6 Safety
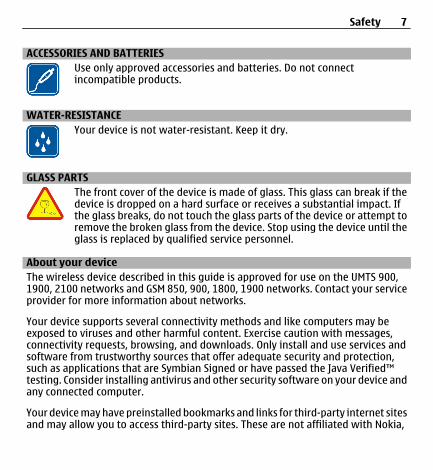
ACCESSORIES AND BATTERIESUse only approved accessories and batteries. Do not connectincompatible products.
WATER-RESISTANCEYour device is not water-resistant. Keep it dry.
GLASS PARTSThe front cover of the device is made of glass. This glass can break if thedevice is dropped on a hard surface or receives a substantial impact. Ifthe glass breaks, do not touch the glass parts of the device or attempt toremove the broken glass from the device. Stop using the device until theglass is replaced by qualified service personnel.
About your deviceThe wireless device described in this guide is approved for use on the UMTS 900,1900, 2100 networks and GSM 850, 900, 1800, 1900 networks. Contact your serviceprovider for more information about networks.
Your device supports several connectivity methods and like computers may beexposed to viruses and other harmful content. Exercise caution with messages,connectivity requests, browsing, and downloads. Only install and use services andsoftware from trustworthy sources that offer adequate security and protection,such as applications that are Symbian Signed or have passed the Java Verified™testing. Consider installing antivirus and other security software on your device andany connected computer.
Your device may have preinstalled bookmarks and links for third-party internet sitesand may allow you to access third-party sites. These are not affiliated with Nokia,
Safety 7
and Nokia does not endorse or assume liability for them. If you access such sites,take precautions for security or content.
Warning:To use any features in this device, other than the alarm clock, the device must beswitched on. Do not switch the device on when wireless device use may causeinterference or danger.
When using this device, obey all laws and respect local customs, privacy andlegitimate rights of others, including copyrights. Copyright protection may preventsome images, music, and other content from being copied, modified, or transferred.
Make back-up copies or keep a written record of all important information storedin your device.
When connecting to any other device, read its user guide for detailed safetyinstructions. Do not connect incompatible products.
The images in this guide may differ from your device display.
Refer to the user guide for other important information about your device.
Network servicesTo use the device you must have service from a wireless service provider. Somefeatures are not available on all networks; other features may require that you makespecific arrangements with your service provider to use them. Network servicesinvolve transmission of data. Check with your service provider for details about feesin your home network and when roaming on other networks. Your service providercan explain what charges will apply. Some networks may have limitations that affecthow you can use some features of this device requiring network support such assupport for specific technologies like WAP 2.0 protocols (HTTP and SSL) that run onTCP/IP protocols and language-dependent characters.
8 Safety
Your service provider may have requested that certain features be disabled or notactivated in your device. If so, these features will not appear on your device menu.Your device may also have customized items such as menu names, menu order, andicons.
Safety 9
Get started
Keys and parts
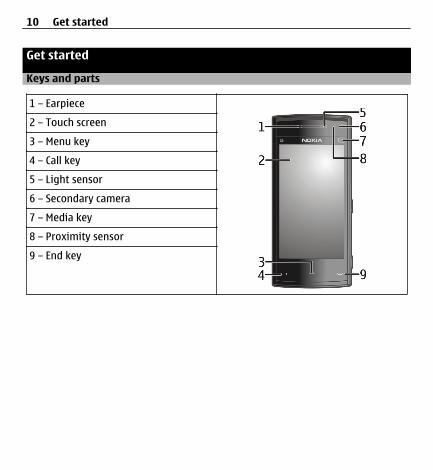
1 – Earpiece2 – Touch screen3 – Menu key4 – Call key5 – Light sensor6 – Secondary camera7 – Media key8 – Proximity sensor9 – End key
10 Get started
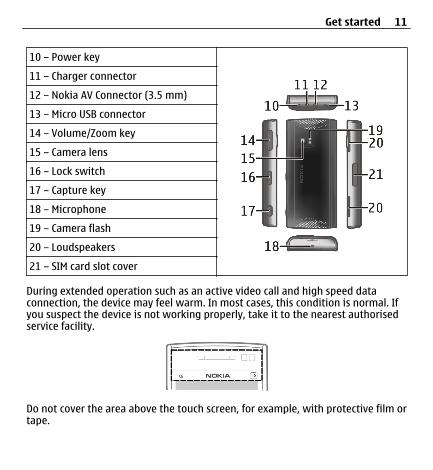
10 – Power key11 – Charger connector12 – Nokia AV Connector (3.5 mm)13 – Micro USB connector14 – Volume/Zoom key15 – Camera lens16 – Lock switch17 – Capture key18 – Microphone19 – Camera flash20 – Loudspeakers21 – SIM card slot cover
During extended operation such as an active video call and high speed dataconnection, the device may feel warm. In most cases, this condition is normal. Ifyou suspect the device is not working properly, take it to the nearest authorisedservice facility.
Do not cover the area above the touch screen, for example, with protective film ortape.
Get started 11

Insert the SIM card and batteryInsert the SIM card
Important: To prevent damage to the SIM card, always remove the batterybefore you insert or remove the card.
Important: Do not use a mini-UICC SIM card, also known as a micro-SIM card,a micro-SIM card with an adapter, or a SIM card that has a mini-UICC cutout (seefigure) in this device. A micro SIM card is smaller than the standard SIM card. Thisdevice does not support the use of micro-SIM cards and use of incompatible SIMcards may damage the card or the device, and may corrupt data stored on the card.
1 Remove the back cover.2 If the battery is inserted, remove the battery.
Always switch the device off and disconnect the charger before removing thebattery.
12 Get started
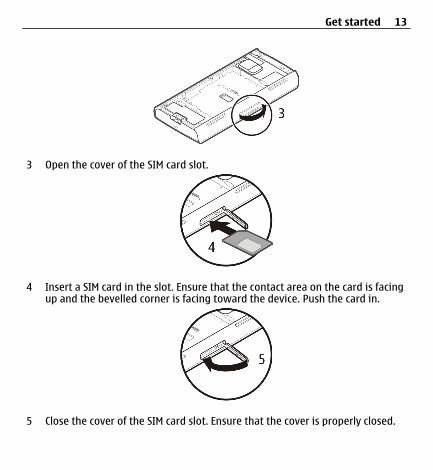
3 Open the cover of the SIM card slot.
4 Insert a SIM card in the slot. Ensure that the contact area on the card is facingup and the bevelled corner is facing toward the device. Push the card in.
5 Close the cover of the SIM card slot. Ensure that the cover is properly closed.
Get started 13
If the SIM card is not properly in place, the device can only be used in the offlineprofile.
Insert the battery
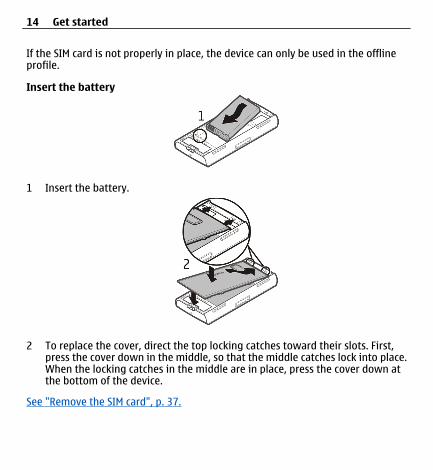
1 Insert the battery.
2 To replace the cover, direct the top locking catches toward their slots. First,press the cover down in the middle, so that the middle catches lock into place.When the locking catches in the middle are in place, press the cover down atthe bottom of the device.
See "Remove the SIM card", p. 37.
14 Get started

Charge the batteryYour battery has been partially charged at the factory. If the device indicates a lowcharge, do the following:
1 Connect the charger to a wall outlet.2 Connect the charger to the device.
3 When the device indicates a full charge, disconnect the charger from the device,then from the wall outlet.
You do not need to charge the battery for a specific length of time, and you can usethe device while it is charging. If the battery is completely discharged, it may takeseveral minutes before the charging indicator appears on the display or before anycalls can be made.
Tip: Disconnect the charger from the wall outlet when the charger is not in use. Acharger that is connected to the outlet consumes power even when it is notconnected to the device.
Get started 15
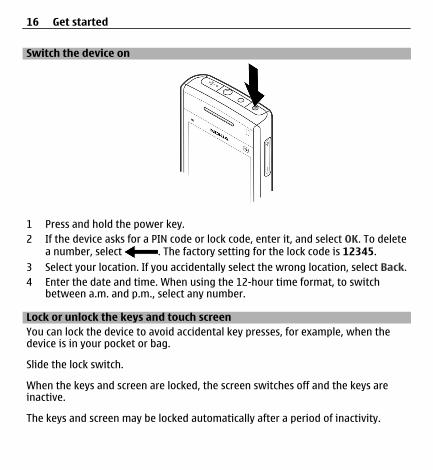
Switch the device on
1 Press and hold the power key.2 If the device asks for a PIN code or lock code, enter it, and select OK. To delete
a number, select . The factory setting for the lock code is 12345.3 Select your location. If you accidentally select the wrong location, select Back.4 Enter the date and time. When using the 12-hour time format, to switch
between a.m. and p.m., select any number.
Lock or unlock the keys and touch screenYou can lock the device to avoid accidental key presses, for example, when thedevice is in your pocket or bag.
Slide the lock switch.
When the keys and screen are locked, the screen switches off and the keys areinactive.
The keys and screen may be locked automatically after a period of inactivity.
16 Get started
Change the settings for automatic key and screen lockingSelect Menu > Settings and Phone > Phone mgmt. > Auto. keyguard and thedesired option.
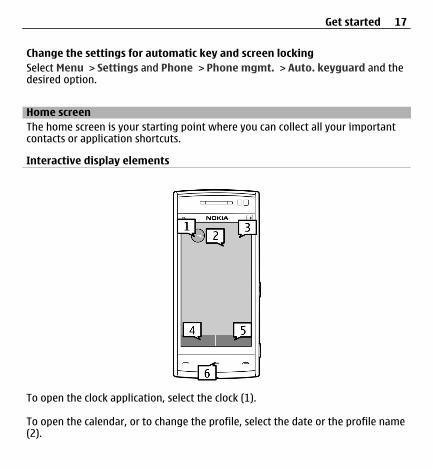
Home screenThe home screen is your starting point where you can collect all your importantcontacts or application shortcuts.
Interactive display elements
To open the clock application, select the clock (1).
To open the calendar, or to change the profile, select the date or the profile name(2).
Get started 17

To view or modify connectivity settings ( ), to view the available wireless LANs(WLAN) if WLAN scanning is enabled, or to view missed events, select the top rightcorner (3).
To make a phone call, select Telephone or (4).
To open the contacts list, select Contacts or (5).
To open the main menu, press the menu key (6).
Start using the contacts barTo start using the contacts bar, and to add your contacts to the home screen, select
> Options > New contact, and follow the instructions.
Change the home screen themeTo change the home screen theme or the shortcuts, select Menu > Settings andPersonal > Home screen.
Swipe to unlockTo unlock the device display, press the menu key, and swipe the display. You canalso swipe a locked display to answer a call, stop a calendar alarm, or stop or snoozea clock alarm. Follow the visual cues.
Music keysWhen music or the radio is playing in the background, music keys (play/pause, skipbackward, and skip forward) are displayed in the home screen.
18 Get started
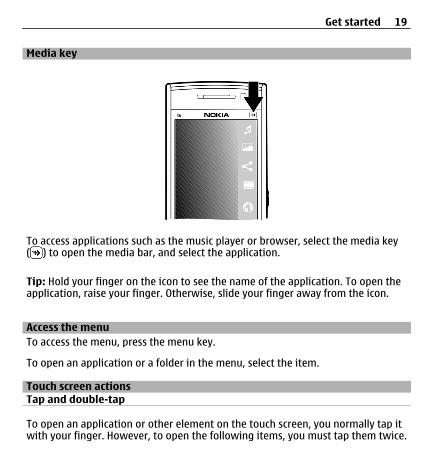
Media key
To access applications such as the music player or browser, select the media key( ) to open the media bar, and select the application.
Tip: Hold your finger on the icon to see the name of the application. To open theapplication, raise your finger. Otherwise, slide your finger away from the icon.
Access the menuTo access the menu, press the menu key.
To open an application or a folder in the menu, select the item.
Touch screen actionsTap and double-tap
To open an application or other element on the touch screen, you normally tap itwith your finger. However, to open the following items, you must tap them twice.
Get started 19
• List items in an application, such as the Drafts folder in the folder list inMessaging
Tip: When you open a list view, the first item is already highlighted. To openthe highlighted item, tap it once.
• Applications and folders in the menu when using the list view type• Files in a file list, for example, an image in the images and videos view in Gallery.
If you tap a file or similar item once, it is not opened, it becomes highlighted.To view the options available for the item, select Options or, if available, selectan icon from a toolbar.
Select
In this user documentation, opening applications or items by tapping them once ortwice is called "selecting". If you need to select several items in a sequence, thedisplay texts to select are separated by arrows.
Example: To select Options > Help, tap Options, and then tap Help.
Drag
To drag, place your finger on the screen, and slide it across the screen.
Example: To scroll up or down on a web page, drag the page with your finger.
20 Get started

Swipe
To swipe, slide your finger quickly left or right on the screen.
Example: When viewing an image, to view the next or previous image, swipe theimage left or right, respectively.
Tip: When the touch screen is locked, to answer a call, or to stop a clock or calendaralarm, swipe the screen. Follow the visual cues.
Scroll
To scroll up or down in lists that have a scroll bar, drag the slider of the scroll bar.
To scroll longer lists, flick the list. The faster you flick, the faster the list moves. Ifyou flick up, the list continues the movement and moves down.To select an item from a spinning list and to stop the movement, tap the item.
Tip: To view a brief description of an icon, place your finger on the icon. Descriptionsare not available for all icons.
Touch screen light
The touch screen light is turned off after a period of inactivity.
Get started 21
To turn the screen light on, tap it.
If the touch screen and keys are locked, tapping the screen does not turn the screenlight on. To unlock the screen and keys, slide the lock switch.
Change the ringing toneSelect Menu > Settings and Personal > Profiles.
You can use profiles to set and customise the ringing tones, message alert tones,and other tones for different events, environments, or caller groups.To personalise a profile, scroll to the profile, and select Options > Personalise.
SupportWhen you want to learn more about how to use your product or you are unsurehow your phone should function, read the user guide in your phone. Select Menu >Help.
If this does not resolve your issue, do one of the following:
• Reboot your phone. Switch off the phone, and remove the battery. After abouta minute, replace the battery, and switch on the phone.
• Update your phone software• Restore the original factory settings
If your issue remains unsolved, contact Nokia for repair options. Go towww.nokia.com/repair. Before sending your phone for repair, always back up yourdata.
Nokia ServicesWith Nokia Services, you can find new places and services, and stay in touch withyour friends. You can do, for example, the following:
22 Get started
• Download games, applications, videos, and ringtones to your phone• Find your way with free walk and drive navigation, plan trips, and view locations
on a map• Get a free Nokia Mail powered by Yahoo! account• Get music
Some items are free of charge, others you may need to pay for.
The available services may also vary by country or region, and not all languages aresupported.
To use Nokia Services, you need a Nokia account. When you access a service on yourphone, you are prompted to create an account.
For more information, go to www.nokia.com/support.
About Ovi Store In Ovi Store, you can download mobile games, applications, videos, images,
themes, and ringing tones to your device. Some items are free of charge; others youneed to pay for with your credit card or in your phone bill. The availability ofpayment methods depends on your country of residence and your network serviceprovider. Ovi Store offers content that is compatible with your mobile device andrelevant to your tastes and location.
Find help
In-device helpYour device contains instructions to help to use the applications in your device.
To open help texts from the main menu, select Menu > Help and the applicationfor which you want to read instructions.
Find help 23
When an application is open, to access the help text for the current view, selectOptions > Help.
When you are reading the instructions, to change the size of the help text, selectOptions > Decrease font size or Increase font size.
You may find links to related topics at the end of the help text.If you select an underlined word, a short explanation is displayed.
Help texts use the following indicators:
Link to a related help topic.Link to the application being discussed.
When you are reading the instructions, to switch between help texts and theapplication that is open in the background, select Options > Show open apps. andthe desired application.
Update phone software using your PCYou can use the Nokia Ovi Suite PC application to update your phone software. Youneed a compatible PC, a high-speed internet connection, and a compatible USB datacable to connect your phone to the PC.
To get more information and to download the Nokia Ovi Suite application, go towww.nokia.com/software.
SettingsYour device normally has MMS, GPRS, streaming, and mobile internet settingsautomatically configured in the device, based on your network service providerinformation. You may have settings from your service providers already installed inyour device, or you may receive or request the settings from the network serviceproviders as a special message.
24 Find help

Access codes
PIN or PIN2 code
(4-8 digits)
These protect your SIM card against unauthorised use or arerequired to access some features.
You can set your device to ask for the PIN code when youswitch it on.
If not supplied with your SIM card or you forget the codes,contact your service provider.
If you enter the code incorrectly three times in a row, youneed to unblock the code with the PUK or PUK2 code.
PUK or PUK2 code
(8 digits)
These are required to unblock a PIN or PIN2 code.
If not supplied with your SIM card, contact your serviceprovider.
IMEI number
(15 digits)
This is used to identify valid devices in the network. Thenumber can also be used to block, for example, stolendevices.
To view your IMEI number, dial *#06#.Lock code (securitycode)
(min. 4 digits orcharacters)
This helps you protect your device against unauthorised use.
You can set your device to ask for the lock code that youdefine.
Keep the code secret and in a safe place, separate from yourdevice.
If you forget the code and your device is locked, your devicewill require service. Additional charges may apply, and all thepersonal data in your device may be deleted.
Find help 25
For more information, contact a Nokia Care Point or yourdevice dealer.
Prolong battery lifeMany features in your device increase the demand on battery power and reduce thebattery lifetime. To save battery power, note the following:
• Features that use Bluetooth technology, or allowing such features to run in thebackground while using other features, increase the demand on battery power.Turn Bluetooth technology off when you do not need it.
• Features that use wireless LAN (WLAN), or allowing such features to run in thebackground while using other features, increase the demand on battery power.WLAN on your Nokia device switches off when you are not trying to connect,not connected to an access point, or not scanning for available networks. Tofurther reduce battery consumption, you can specify that your device does notscan, or scans less often, for available networks in the background.
• If you have set Packet data connection to When available in connectionsettings, and there is no packet data coverage (GPRS), the device periodicallytries to establish a packet data connection. To prolong the operating time ofyour device, select Packet data connection > When needed.
• The Maps application downloads new map information when you move to newareas on the map, which increases the demand on battery power. You canprevent the automatic download of new maps.
• If the signal strength of the cellular network varies much in your area, yourdevice must scan for the available network repeatedly. This increases thedemand on battery power.
If the network mode is set to dual mode in the network settings, the devicesearches for the UMTS network. You can set the device to use only the GSMnetwork. To only use the GSM network, select Menu > Settings andConnectivity > Network > Network mode > GSM.
26 Find help
• The backlight of the display increases the demand on battery power. In thedisplay settings, you can change the time-out after which the backlight isswitched off, and adjust the light sensor that observes lighting conditions andadjusts the display brightness. Select Menu > Settings and Phone > Display >Light time-out or Light sensor.
• Leaving applications running in the background increases the demand onbattery power. To close the applications you do not use, press and hold themenu key, select Options > Show open apps., and navigate to the applicationwith the menu key. Press and hold the menu key, and select Exit.
Increase available memoryDo you need more available device memory for new applications and content?
View how much space is available for different data typesSelect Menu > Applications > Office > File mgr..
Many features of the device use memory to store data. The device notifies you if thememory in different memory locations is low.
Increase available memoryTransfer data to the mass memory or to a compatible computer.
To remove data you no longer need, use File manager or open the respectiveapplication. You can remove the following:
• Messages in the folders in Messaging and retrieved e-mail messages in themailbox
• Saved web pages• Contact information• Calendar notes• Applications shown in Application manager that you do not need
Find help 27
• Installation files (.sis or .sisx) of applications you have installed. Transfer theinstallation files to a compatible computer.
• Images and video clips in Gallery. Back up the files to a compatible computer.
Your device
Device setup With the Phone setup application, you can do the following, for example:
• Define the regional settings, such as the language of the device.• Transfer data from your old device.• Personalise your device.• Set up your mail accounts.• Activate Ovi services.
When you switch on your device for the first time, the Phone setup applicationopens. To open the application later, select Menu > Applications > Phonesetup.
Copy contacts or pictures from your old deviceWant to copy important information from your previous compatible Nokia deviceand start using your new device quickly? Use the Phone switch application to copy,for example, contacts, calendar entries, and pictures to your new device, free ofcharge.
Your previous Nokia device needs to support Bluetooth.
Select Menu > Applications > Phone setup and Data transfer.
28 Your device
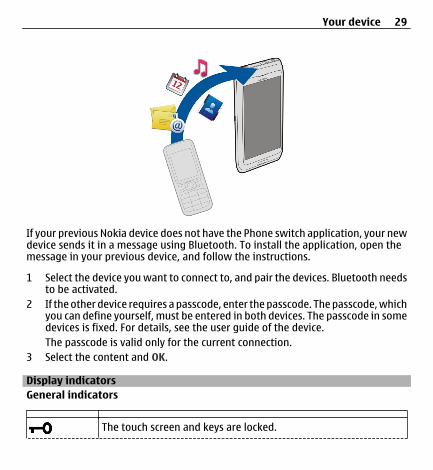
If your previous Nokia device does not have the Phone switch application, your newdevice sends it in a message using Bluetooth. To install the application, open themessage in your previous device, and follow the instructions.
1 Select the device you want to connect to, and pair the devices. Bluetooth needsto be activated.
2 If the other device requires a passcode, enter the passcode. The passcode, whichyou can define yourself, must be entered in both devices. The passcode in somedevices is fixed. For details, see the user guide of the device.The passcode is valid only for the current connection.
3 Select the content and OK.
Display indicatorsGeneral indicators
The touch screen and keys are locked.
Your device 29
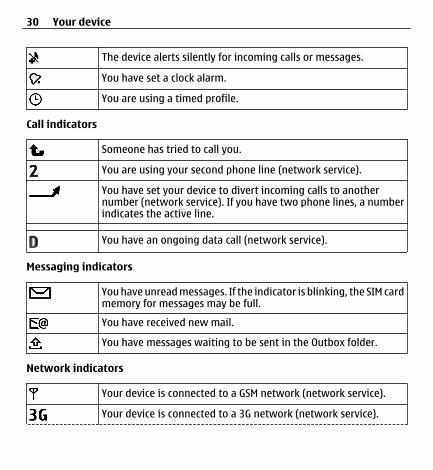
The device alerts silently for incoming calls or messages.
You have set a clock alarm.
You are using a timed profile.
Call indicators
Someone has tried to call you.
You are using your second phone line (network service).
You have set your device to divert incoming calls to anothernumber (network service). If you have two phone lines, a numberindicates the active line.
You have an ongoing data call (network service).
Messaging indicators
You have unread messages. If the indicator is blinking, the SIM cardmemory for messages may be full.You have received new mail.
You have messages waiting to be sent in the Outbox folder.
Network indicators
Your device is connected to a GSM network (network service).
Your device is connected to a 3G network (network service).
30 Your device
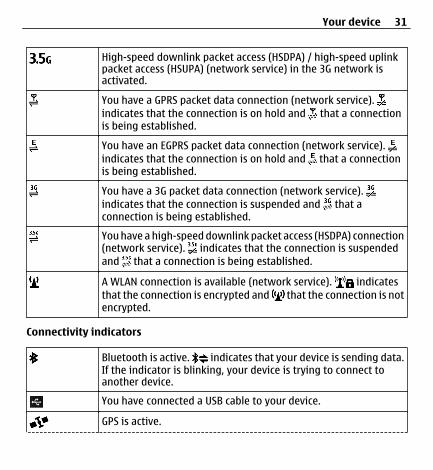
High-speed downlink packet access (HSDPA) / high-speed uplinkpacket access (HSUPA) (network service) in the 3G network isactivated.
You have a GPRS packet data connection (network service). indicates that the connection is on hold and that a connectionis being established.
You have an EGPRS packet data connection (network service). indicates that the connection is on hold and that a connectionis being established.
You have a 3G packet data connection (network service). indicates that the connection is suspended and that aconnection is being established.You have a high-speed downlink packet access (HSDPA) connection(network service). indicates that the connection is suspendedand that a connection is being established.
A WLAN connection is available (network service). indicatesthat the connection is encrypted and that the connection is notencrypted.
Connectivity indicators
Bluetooth is active. indicates that your device is sending data.If the indicator is blinking, your device is trying to connect toanother device.You have connected a USB cable to your device.
GPS is active.
Your device 31
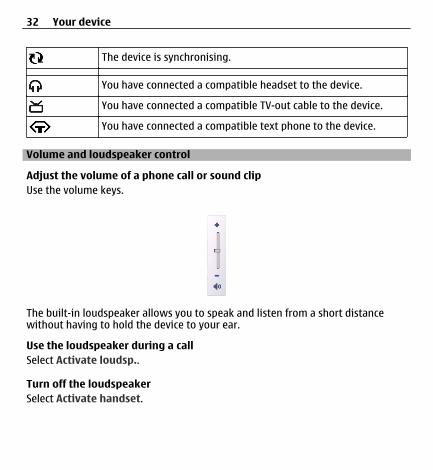
The device is synchronising.
You have connected a compatible headset to the device.
You have connected a compatible TV-out cable to the device.
You have connected a compatible text phone to the device.
Volume and loudspeaker control
Adjust the volume of a phone call or sound clipUse the volume keys.
The built-in loudspeaker allows you to speak and listen from a short distancewithout having to hold the device to your ear.
Use the loudspeaker during a callSelect Activate loudsp..
Turn off the loudspeakerSelect Activate handset.
32 Your device

Warning:Continuous exposure to high volume may damage your hearing. Listen to music ata moderate level, and do not hold the device near your ear when the loudspeakeris in use.
Shortcuts
To switch between open applications, press and hold the menu key.Leaving applications running in the background increases the demand on batterypower and reduces the battery life.
To start a web connection (network service), in the dialler, tap and hold 0.
To access applications available in the media bar, such as the music player and webbrowser, in any view, press the media key.
To change the profile, press the power key, and select a profile.
To call your voice mailbox (network service), in the dialler, tap and hold 1.
To open a list of last dialled numbers, in the home screen, press the call key.
To use voice commands, in the home screen, press and hold the call key.
Antenna locationsYour device may have internal and external antennas. Avoid touching the antennaarea unnecessarily while the antenna is transmitting or receiving. Contact withantennas affects the communication quality and may cause a higher power levelduring operation and may reduce the battery life.
Your device 33
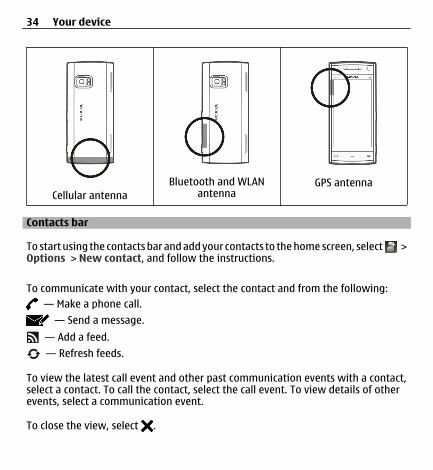
Cellular antennaBluetooth and WLAN
antennaGPS antenna
Contacts bar
To start using the contacts bar and add your contacts to the home screen, select >Options > New contact, and follow the instructions.
To communicate with your contact, select the contact and from the following: — Make a phone call.
— Send a message. — Add a feed. — Refresh feeds.
To view the latest call event and other past communication events with a contact,select a contact. To call the contact, select the call event. To view details of otherevents, select a communication event.
To close the view, select .
34 Your device
Offline profileThe offline profile lets you use the device without connecting to the wireless cellularnetwork. When the offline profile is active, you can use your device without a SIMcard.
Activate the offline profilePress the power key briefly, and select Offline.
When you activate the offline profile, the connection to the cellular network isclosed. All radio frequency signals to and from the device to the cellular networkare prevented. If you try to send messages using the cellular network, they areplaced in the Outbox folder to be sent later.
Important: In the Offline profile you cannot make or receive any calls, or useother features that require cellular network coverage. Calls may still be possible tothe official emergency number programmed into your device. To make calls, youmust first activate the phone function by changing profiles. If the device has beenlocked, enter the lock code.
When you have activated the offline profile, you can still use a wireless LAN (WLAN),for example, to read your e-mail or browse on the internet. You can also useBluetooth connectivity while in the offline profile. Remember to comply with anyapplicable safety requirements when establishing and using WLAN or Bluetoothconnections.
Sensor settings and display rotationWhen you activate the sensors in your device, you can control certain functions byturning the device.
Select Menu > Settings and Phone > Sensor settings.
Select from the following:Sensors — Activate the sensors.
Your device 35
Turning control — Select Silencing calls and Snoozing alarms to mute calls andsnooze alarms by turning your device so that the display faces down. Select Auto-rotate display to rotate the display content automatically when you turn the deviceon its left side or back to a vertical position. Some applications and features maynot support rotating the display content.
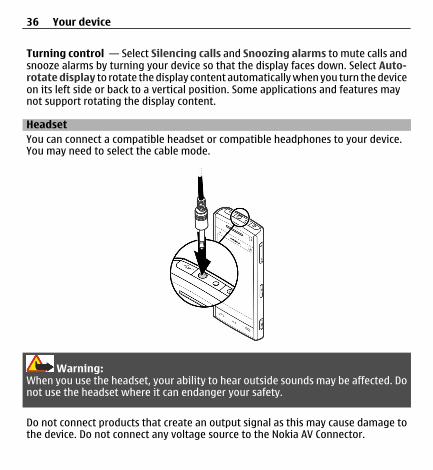
HeadsetYou can connect a compatible headset or compatible headphones to your device.You may need to select the cable mode.
Warning:When you use the headset, your ability to hear outside sounds may be affected. Donot use the headset where it can endanger your safety.
Do not connect products that create an output signal as this may cause damage tothe device. Do not connect any voltage source to the Nokia AV Connector.
36 Your device

When connecting any external device or any headset, other than those approvedby Nokia for use with this device, to the Nokia AV Connector, pay special attentionto volume levels.
Remove the SIM card1 Remove the back cover by lifting it from the bottom end of the device.2 Remove the battery.
3 Open the cover of the SIM card slot. In the opening under the battery, push thelip sideways to slide the SIM card out of the slot. Pull the SIM card out.
4 Replace the battery and back cover.
Your device 37
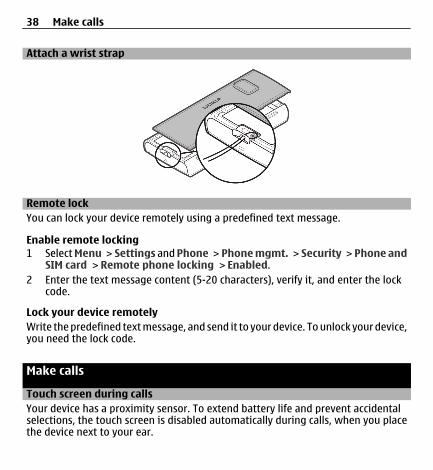
Attach a wrist strap
Remote lockYou can lock your device remotely using a predefined text message.
Enable remote locking1 Select Menu > Settings and Phone > Phone mgmt. > Security > Phone and
SIM card > Remote phone locking > Enabled.2 Enter the text message content (5-20 characters), verify it, and enter the lock
code.
Lock your device remotelyWrite the predefined text message, and send it to your device. To unlock your device,you need the lock code.
Make calls
Touch screen during callsYour device has a proximity sensor. To extend battery life and prevent accidentalselections, the touch screen is disabled automatically during calls, when you placethe device next to your ear.
38 Make calls
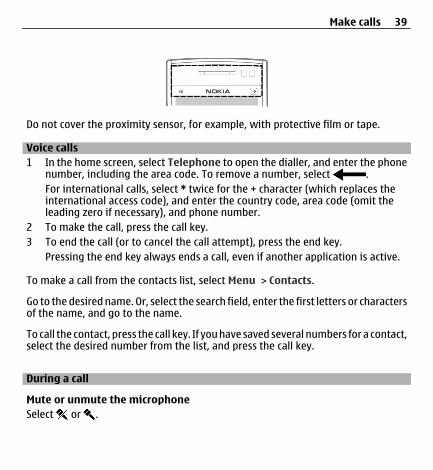
Do not cover the proximity sensor, for example, with protective film or tape.
Voice calls 1 In the home screen, select Telephone to open the dialler, and enter the phone
number, including the area code. To remove a number, select .For international calls, select * twice for the + character (which replaces theinternational access code), and enter the country code, area code (omit theleading zero if necessary), and phone number.
2 To make the call, press the call key.3 To end the call (or to cancel the call attempt), press the end key.
Pressing the end key always ends a call, even if another application is active.
To make a call from the contacts list, select Menu > Contacts.
Go to the desired name. Or, select the search field, enter the first letters or charactersof the name, and go to the name.
To call the contact, press the call key. If you have saved several numbers for a contact,select the desired number from the list, and press the call key.
During a call
Mute or unmute the microphoneSelect or .
Make calls 39
Put an active voice call on holdSelect or .
Activate the loudspeakerSelect . If you have attached a compatible headset with Bluetooth connectivity,to route the sound to the headset, select Options > Activate BT handsfree.
Switch back to the handsetSelect .
End a callSelect .
Switch between active and held callsSelect Options > Swap.
Tip: To put an active call on hold, press the call key. To activate the held call, pressthe call key again.
Send DTMF tone strings1 Select Options > Send DTMF.2 Enter the DTMF string or search for it from the contacts list.3 To enter a wait character (w) or a pause character (p), press * repeatedly.4 To send the tone, select OK. You can add DTMF tones to the phone number or
DTMF field in contact details.
End an active call and replace it with another incoming callSelect Options > Replace.
End all callsSelect Options > End all calls.
40 Make calls
Many of the options that you can use during a voice call are network services.
Voice mailbox
To call your voice mailbox (network service), in the home screen, selectTelephone, and select and hold 1.
1 To change the phone number of your voice mailbox, select Menu > Settingsand Calling > Call mailbox, a mailbox, and Options > Change number.
2 Enter the number (obtained from your network service provider), and selectOK.
Answer or reject a call
To answer a call when the touch screen is locked, swipe the screen. Follow the visualcues.
To answer a call when the touch screen is unlocked, press the call key.
To mute the ringing tone of an incoming call when the touch screen is locked, swipeto unlock the screen.
To mute the ringing tone of an incoming call when the touch screen is unlocked, ,select .
You can send a text message without rejecting the call, informing the caller thatyou cannot answer the call. To activate the text message option and write astandard reply message, select Menu > Settings and Calling > Call > Reject callwith message, and Message text. To send the reply message, select Send msg.,edit the message text, and press the call key.
Make calls 41
If you do not want to answer a call, when the touch screen is unlocked, press theend key. If you activate the Call divert > Voice calls > If busy function in phonesettings, rejecting an incoming call also diverts the call.
To reject a call when the touch screen is locked, swipe to unlock the screen, andselect Options > Reject.
Make a conference callYour device supports conference calls between a maximum of six participants,including yourself.
Conference calling is a network service.
1 Make a call to the first participant.2 To make a call to another participant, select Options > New call. The first call
is put on hold.3 When the new call is answered, to add the first participant to the conference
call, select .
Add a new participant to a conference callMake a call to another participant, and add the new call to the conference call.
Have a private conversation with a conference call participantSelect .Go to the participant, and select . The conference call is put on hold on yourdevice. The other participants continue the conference call.To return to the conference call, select .
Drop a participant from a conference callSelect , go to the participant, and select .
42 Make calls
End an active conference callPress the end key.
Speed dial a phone numberTo activate speed dialling, select Menu > Settings and Calling > Call > Speeddialling.
1 To assign a phone number to one of the number keys, select Menu > Settingsand Calling > Speed dialling.
2 Go to the key to which you want to assign the phone number, and selectOptions > Assign.1 is reserved for the voice mailbox.
To call in the home screen, select Telephone and the assigned key, and press thecall key.
To call in the home screen when speed dialling is active, select Telephone, andselect and hold the assigned key.
Call waitingWith call waiting (network service), you can answer a call when you have anothercall in progress.
Activate call waitingSelect Menu > Settings and Calling > Call > Call waiting.
Answer a waiting callPress the call key. The first call is put on hold.
Swap between an active call and a call on holdSelect Options > Swap.
Make calls 43

Connect the call on hold to the active callSelect Options > Transfer. You disconnect yourself from the calls.
End an active callPress the end key.
End both callsSelect Options > End all calls.
Voice diallingYour device automatically creates a voice tag for contacts.
Listen to a voice tag for a contact1 Select a contact and Options > Voice tag details.2 Go to a contact detail, and select Options > Play voice tag.
Make a call with a voice tag
Note: Using voice tags may be difficult in a noisy environment or during anemergency, so you should not rely solely upon voice dialling in all circumstances.
When you use voice dialling, the loudspeaker is in use. Hold the device at a shortdistance away when you say the voice tag.
1 To start voice dialling, in the home screen, press and hold the call key. If acompatible headset with the headset key is attached, press and hold theheadset key to start voice dialling.
2 A short tone sounds, and Speak now is displayed. Say clearly the name that issaved for the contact.
3 The device plays a synthesised voice tag for the recognised contact in theselected device language, and displays the name and number. To cancel thevoice dialling, select Quit.
44 Make calls
If several numbers are saved for a name, you can say also the name and the numbertype, such as mobile or telephone.
Make a video callWhen you make a video call (network service), you can see a real-time, two-wayvideo between you and the recipient of the call. The live video image, or video imagecaptured by the camera in your device is shown to the video call recipient.
To be able to make a video call, you must have a USIM card and be in the coverageof a UMTS network. For availability, pricing and subscription to video call services,contact your network service provider.
A video call can only be made between two parties. The video call can be made toa compatible mobile device or an ISDN client. Video calls cannot be made whileanother voice, video, or data call is active.
Icons
You are not receiving video (the recipient is not sending video or thenetwork is not transmitting it).You have denied video sending from your device. To send a still imageinstead, select Menu > Settings and Calling > Call > Image in videocall.
Even if you denied video sending during a video call, the call is still chargedas a video call. Check the pricing with your service provider.
1 In the home screen, select or Telephone to open the dialler, and enter thephone number.
2 Select Options > Call > Video call.By default, the secondary camera on the front is used for video calls. Starting avideo call may take a while. If the call is not successful (for example, video callsare not supported by the network, or the receiving device is not compatible),you are asked if you want to try a normal call or send a message instead.
Make calls 45
The video call is active when you see two video images, and hear the soundthrough the loudspeaker. The call recipient may deny video sending (indicatedwith ), and you only hear the voice of the caller and may see a still image ora grey screen.
3 To end the video call, press the end key.
During a video call
View live video or listen to the caller onlySelect or .
Mute or unmute the microphoneSelect or .
Activate the loudspeakerSelect . If you have attached a compatible headset with Bluetooth connectivity,to route the sound to the headset, select Options > Activate BT handsfree.
Switch back to the handsetSelect .
Use the main camera to send videoSelect Options > Use secondary camera.
Switch back to using the secondary camera to send videoSelect Options > Use main camera.
Take a snapshot of the video you are sendingSelect Options > Send snapshot. Video sending is paused and the snapshot isdisplayed to the recipient. The snapshot is not saved.
46 Make calls
Zoom your imageSelect Options > Zoom.
Set the video qualitySelect Options > Adjust > Video preference > Normal quality, Clearer detail,or Smoother motion.
Answer or reject a video callWhen a video call arrives, is displayed.
Answer a video callPress the call key.
To start sending live video, select Yes.
If you do not start sending video, you only hear the voice of the caller. A grey screenreplaces your own video.
Start sending video during a video callSelect Options > Enable > Sending video.
Replace the grey screen with an image captured by the cameraSelect Menu > Settings and Calling > Call > Image in video call.
Reject a video callPress the end key.
Video sharingUse video sharing (network service) to send live video or a video clip from yourmobile device to another compatible mobile device during a voice call.
Make calls 47
The loudspeaker is active when you activate video sharing. If you do not want touse the loudspeaker for the voice call while you share video, you can also use acompatible headset.
Warning:Continuous exposure to high volume may damage your hearing. Listen to music ata moderate level, and do not hold the device near your ear when the loudspeakeris in use.
Video sharing requirementsVideo sharing requires a 3G connection. Your ability to use video sharing dependson the availability of the 3G network. For more information on the service, 3Gnetwork availability, and fees associated with using this service, contact yourservice provider.
To use video sharing, ensure the following:
• Your device is set up for person-to-person connections.• You have an active 3G connection and are within 3G network coverage. If you
move outside the 3G network during a video sharing session, the sharing stops,while your voice call continues.
• Both the sender and recipient are registered to the 3G network. If you invitesomeone to a sharing session and the recipient’s device is not within 3Gnetwork coverage or does not have video sharing installed or person-to-personconnections set up, the recipient does not receive invitations. You receive anerror message that indicates that the recipient cannot accept the invitation.
Video sharing settingsTo set up video sharing, you need person-to-person and 3G connection settings.
A person-to-person connection is also known as a Session Initiation Protocol (SIP)connection. The SIP profile settings must be configured in your device before you
48 Make calls
can use video sharing. Ask your service provider for the SIP profile settings, and savethem to your device. Your service provider may send you the settings or give you alist of the needed parameters.
Add a SIP address to a contact1 Select Menu > Contacts.2 Select a contact or create a new contact.3 Select Options > Edit.4 Select Options > Add detail > Share video.5 Enter the SIP address in the format username@domainname (you can use an
IP address instead of a domain name).If you do not know the SIP address for the contact, you can use the phonenumber of the recipient, including the country code, to share video (if supportedby the network service provider).
Set up your 3G connectionContact your service provider to establish an agreement for you to use the 3Gnetwork.
Ensure that the 3G access point connection settings for your device are configuredproperly. For more information about the settings, contact your service provider.
Share live video or video clipsDuring an active voice call, select Options > Share video.
1 To share live video during the call, select Live video.To share a video clip, select Video clip. A list of video clips saved in the devicememory or the mass memory opens. Select the clip you want to share.You may need to convert the video clip into a suitable format to be able to shareit. If your device notifies you that the video clip must be converted, select OK.Your device must have a video editor for the conversion to work.
Make calls 49
2 If the recipient has several SIP addresses or phone numbers including thecountry code saved in Contacts, select the desired address or number. If the SIPaddress or phone number of the recipient is not available, enter the address ornumber of the recipient including the country code, and select OK to send theinvitation. Your device sends the invitation to the SIP address.Sharing begins automatically when the recipient accepts the invitation.
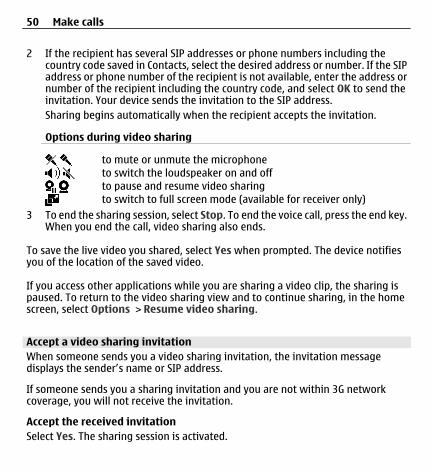
Options during video sharing
to mute or unmute the microphone to switch the loudspeaker on and off
to pause and resume video sharingto switch to full screen mode (available for receiver only)
3 To end the sharing session, select Stop. To end the voice call, press the end key.When you end the call, video sharing also ends.
To save the live video you shared, select Yes when prompted. The device notifiesyou of the location of the saved video.
If you access other applications while you are sharing a video clip, the sharing ispaused. To return to the video sharing view and to continue sharing, in the homescreen, select Options > Resume video sharing.
Accept a video sharing invitationWhen someone sends you a video sharing invitation, the invitation messagedisplays the sender’s name or SIP address.
If someone sends you a sharing invitation and you are not within 3G networkcoverage, you will not receive the invitation.
Accept the received invitationSelect Yes. The sharing session is activated.
50 Make calls
Reject the received invitationSelect No. The sender receives a message that you rejected the invitation. You canalso press the end key to reject the invitation and end the voice call.
End the sharing sessionSelect Stop or end the voice call. When you end the call, video sharing also ends.
LogThe Log application stores information about the communication history of thedevice. The device registers missed and received calls only if the network supportsthese functions, and the device is switched on and within the network service area.
Recent callsYou can view information about your recent calls.
Select Menu > Log and Recent calls.
View missed, received, and dialled callsSelect Missed calls, Received calls, or Dialled numbers.
Tip: To open the dialled numbers list in the home screen, press the call key.
Select Options and from the following:Save to Contacts — Save a phone number from a recent calls list to your contacts.Clear list — Clear the selected recent calls list.Delete — Clear an event in the selected list.Settings — Select Log duration and the length of time that the communicationinformation is saved in the log. If you select No log, no information is saved in thelog.
Make calls 51
Packet dataSelect Menu > Log.
You may be charged for your packet data connections by the amount of data sentand received.
Check the amount of data sent or received during packet data connectionsSelect Data counter > All sent data or All received data.
Clear both sent and received informationSelect Data counter > Options > Clear counters. You need the lock code to clearthe information.
Call durationYou can view the approximate duration of your last call, dialled and received calls,and all calls.
Select Menu > Log and Call duration.
Monitor all communication eventsIn the general log, you can view information on communication events, such asvoice calls, text messages, or data and wireless LAN (WLAN) connections registeredby your device.
Select Menu > Log.
Open the general logOpen the general log tab .Subevents, such as a text message sent in more than one part and packet dataconnections, are logged as one communication event. Connections to your mailbox,multimedia messaging centre, or web pages are shown as packet data connections.
52 Make calls
View the packet data connection detailsGo to an incoming or outgoing packet data connection event indicated with GPRS,and select Options > View.
Copy a phone number from the logSelect Options > Use number > Copy. You can, for example, paste the phonenumber to a text message.
Filter the logSelect Options > Filter and a filter.
Define the log durationSelect Options > Settings > Log duration. If you select No log, all the logcontents, recent calls register, and messaging delivery reports are permanentlydeleted.
Write text
Tap any text input field to enter letters, numbers, and special characters.
Your device can complete words based on the built-in dictionary for the selectedtext input language. The device also learns new words from your input.
Automatic input modesWhen the sensors and display rotation in your device are activated, the input modeis automatically switched to full-screen keyboard in landscape mode and toalphanumeric keypad in portrait mode.
To activate the sensors and display rotation, do the following:
1 Select Menu > Settings and Phone > Sensor settings > Sensors > On.2 Select Turning control > Auto-rotate display.
Write text 53
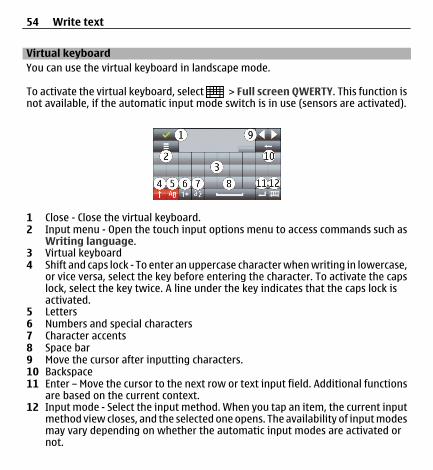
Virtual keyboardYou can use the virtual keyboard in landscape mode.
To activate the virtual keyboard, select > Full screen QWERTY. This function isnot available, if the automatic input mode switch is in use (sensors are activated).
1 Close - Close the virtual keyboard.2 Input menu - Open the touch input options menu to access commands such as
Writing language.3 Virtual keyboard4 Shift and caps lock - To enter an uppercase character when writing in lowercase,
or vice versa, select the key before entering the character. To activate the capslock, select the key twice. A line under the key indicates that the caps lock isactivated.
5 Letters6 Numbers and special characters7 Character accents8 Space bar9 Move the cursor after inputting characters.10 Backspace11 Enter – Move the cursor to the next row or text input field. Additional functions
are based on the current context.12 Input mode - Select the input method. When you tap an item, the current input
method view closes, and the selected one opens. The availability of input modesmay vary depending on whether the automatic input modes are activated ornot.
54 Write text
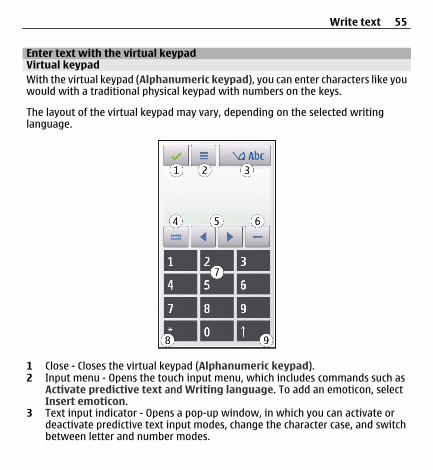
Enter text with the virtual keypadVirtual keypadWith the virtual keypad (Alphanumeric keypad), you can enter characters like youwould with a traditional physical keypad with numbers on the keys.
The layout of the virtual keypad may vary, depending on the selected writinglanguage.
1 Close - Closes the virtual keypad (Alphanumeric keypad).2 Input menu - Opens the touch input menu, which includes commands such as
Activate predictive text and Writing language. To add an emoticon, selectInsert emoticon.
3 Text input indicator - Opens a pop-up window, in which you can activate ordeactivate predictive text input modes, change the character case, and switchbetween letter and number modes.
Write text 55
4 Input mode - Opens a pop-up window, in which you can select the input mode.When you tap an item, the current input method view closes, and the selectedone opens. The availability of input modes may vary depending on whether theautomatic input mode (sensor settings) is activated or not.
5 Arrow keys - Scroll left or right.6 Backspace7 Numbers8 Star - Opens a special characters table.9 Shift - Changes the character case, activates or deactivates predictive text input
modes, and switches between letter and number modes.
Traditional text input
Tap a number key (1-9) repeatedly until the desired character appears. There aremore characters available for a number key than are visible on the key.
If the next letter is located on the same key as the present one, wait until the cursorappears (or move the cursor forward to end the time-out period), and enter theletter.
To insert a space, tap 0. To move the cursor to the next line, tap 0 three times.
Predictive text inputWith predictive text input, to enter a word, select one number key for each letterin the word. Predictive text input is based on a built-in dictionary to which you canadd new words. Predictive text input is not available for all languages.
1 To activate predictive text input for all editors on the device, select >Activate prediction.
2 Write a word. For example, to write "Nokia" when the English dictionary isselected, select 6 for N, 6 for o, 5 for k, 4 for i, and 2 for a.The word suggestion changes after each key selection.
56 Write text

3 If the word is not correct, select * repeatedly, until the correct match isdisplayed. If the word is not in the dictionary, select Spell, enter the word usingtraditional text input mode, and select OK.If ? is displayed after the word, the word is not in the dictionary. To add a wordto the dictionary, select *, enter the word using traditional text input mode,and select OK.
4 To insert a punctuation mark, select *.5 To insert a space, select 0.
Touch input settingsSelect Menu > Settings and Phone > Touch input.
Select from the following:Writing language — Change the writing language and the language of thedictionary in predictive text input.Adaptive search — Filter the contents of a list in an application according to thecharacters written in the search field.
Contacts
You can save and update contact information, such as phone numbers, homeaddresses, or e-mail addresses of your contacts. You can add a personal ringing toneor a thumbnail image to a contact. You can also create contact groups, which allowyou to send text messages or e-mail to many recipients at the same time.
To open the contacts list, in the home screen, depending on the home screen theme,select Contacts or .
Save and edit names and numbersSelect Menu > Contacts.
Contacts 57
Add a new contact to the contacts list1 Select .2 Select a field to enter information. To close the text input, select . Fill in the
appropriate fields, and select Done.
Edit contactsSelect a contact and Options > Edit.
Contacts toolbarSelect Menu > Contacts.
Call a contactGo to a contact, and select .
Send a message to a contactGo to a contact, and select .
Create a new contactSelect .
Manage names and numbersSelect Menu > Contacts.
Delete a contactGo to a contact, and select Options > Delete.
Delete several contacts1 To mark a contact to be deleted, go to the contact, and select Options > Mark/
Unmark.2 To delete the marked contacts, select Options > Delete.
58 Contacts
Copy a contactGo to a contact, and select Options > Copy and the desired location.
Send a contact to another deviceSelect and hold a contact, and from the pop-up menu, select Send business card.
Add a contact to your favouritesSelect and hold a contact, and from the pop-up menu, select Add to favourites.
Listen to the voice tag assigned to a contactSelect the contact and Options > Voice tag details > Options > Play voice tag.
Before using voice tags, note the following:
• Voice tags are not language-dependent. They are dependent on the speaker'svoice.
• You must say the name exactly as you said it when you recorded it.• Voice tags are sensitive to background noise. Record voice tags and use them
in a quiet environment.• Very short names are not accepted. Use long names, and avoid similar names
for different numbers.
Note: Using voice tags may be difficult in a noisy environment or during anemergency, so you should not rely solely upon voice dialling in all circumstances.
Assign default numbers and addressesIf a contact has several numbers or addresses, a default number or address makesit easier for you to call or send a message to the contact. The default number is alsoused in voice dialling.
1 Select Menu > Contacts.
Contacts 59
2 Select a contact and Options > Defaults.3 Select a default to which you want to add a number or an address, and select
Assign.4 Select a number or an address you want to set as a default.5 To exit the Defaults view and save the changes, tap outside the view.
Ringing tones, images, and call text for contactsYou can define a ringing tone for a contact or contact group, and an image and calltext for a contact. When the contact calls you, the device plays the selected ringingtone and shows the call text or image (if the caller’s phone number is sent with thecall and your device recognises it).
Select Menu > Contacts.
Add more fields to a contact details viewSelect the contact and Options > Edit > Options > Add detail.
Define a ringing tone for a contact or contact groupSelect the contact or contact group and Options > Ringing tone, and select aringing tone.
Remove the ringing tone from a contactSelect Default tone from the list of ringing tones.
Add an image for a contactSelect a contact saved in the device memory and Options > Add image, and selectan image from Gallery.
Define a call text for a contactSelect the contact and Options > Add call alert text. Enter the call text, and select
.
60 Contacts

View, change or remove the image from a contactSelect a contact and Options > Image, and the desired option.
Copy contactsSelect Menu > Contacts.
When you open the contacts list for the first time, the device asks if you want tocopy names and numbers from the SIM card to your device.
Start copyingSelect OK.
Cancel copyingSelect Cancel.The device asks if you want to view the SIM card contacts in the contacts list. Toview the contacts, select OK. The contacts list opens, and the names stored on yourSIM card are indicated with .
SIM servicesFor availability and information on using SIM card services, contact your SIM cardvendor. This may be the network service provider or other vendor.
SIM contactsThe number of contacts that can be stored on the SIM card is limited.
Display contacts stored on the SIM card in the contacts listSelect Options > Settings > Contacts to display > SIM memory.
The numbers you save in the contacts list may not be automatically saved to yourSIM card.
Contacts 61
Copy contacts to the SIM cardGo to a contact, and select Options > Copy > SIM memory.
Select the default memory where to save the new contactsSelect Options > Settings > Default saving memory > Phone memory or SIMmemory.
Contacts stored in the device memory can contain more than one phone numberand an image.
Fixed diallingWith the fixed dialling service, you can restrict calls from your device to certainphone numbers. Not all SIM cards support the fixed dialling service. For moreinformation, contact your service provider.
Select Menu > Contacts and Options > SIM numbers > Fixed dial contacts.
When security features that restrict calls are in use (such as call barring, closed usergroup, and fixed dialling), calls may be possible to the official emergency numberprogrammed into your device. Call barring and call diverting cannot be active at thesame time.
You need your PIN2 code to activate and deactivate fixed dialling or edit your fixeddialling contacts. Contact your service provider for your PIN2 code.
Select Options and from the following:Activate fixed dialling or Deactivate fixed dialling — Activate or deactivate fixeddialling.New SIM contact — Enter the contact name and phone number to which calls areallowed.Add from Contacts — Copy a contact from the contacts list to the fixed diallinglist.
62 Contacts
To send text messages to the SIM contacts while the fixed dialling service is active,you need to add the text message centre number to the fixed dialling list.
Messaging
Messaging main viewSelect Menu > Messaging (network service).
Create a new messageSelect New message.
Tip: To avoid rewriting messages that you send often, use saved messages in theTemplates folder in My folders. You can also create and save your own templates.
Messaging contains the following folders: Inbox — Received messages, except e-mail and cell broadcast messages. My folders — Organise your messages into folders.
Mailbox — Connect to your remote mailbox to retrieve your new e-mailmessages, or view your previously retrieved e-mail messages offline.
Drafts — Draft messages that have not been sent. Sent — The last messages that have been sent, excluding messages sent using
Bluetooth connectivity. You can define the number of messages that can be savedin this folder.
Outbox — Messages waiting to be sent are temporarily stored in the Outbox,for example, when your device is outside network coverage.
Delivery reports — Request the network to send you a delivery report of thetext messages and multimedia messages you have sent (network service).
Messaging 63
Write and send messagesSelect Menu > Messaging.
Important: Exercise caution when opening messages. Messages may containmalicious software or otherwise be harmful to your device or PC.
Before you can create a multimedia message or write a mail, you must have thecorrect connection settings defined.
The wireless network may limit the size of MMS messages. If the inserted pictureexceeds this limit, the device may make it smaller so that it can be sent by MMS.
Only devices that have compatible features can receive and display multimediamessages. The appearance of a message may vary depending on the receivingdevice.
Check the size limit of mail messages with your service provider. If you attempt tosend a mail message that exceeds the size limit of the mail server, the message isleft in the Outbox folder, and the device attempts to resend it periodically. Sendinga mail requires a data connection, and continuous attempts to resend the mail mayincur charges from your service provider. In the Outbox folder, you can delete sucha message or move it to the Drafts folder.
Messaging requires network services.
Send a text or multimedia messageSelect New message.
Send an audio or mail messageSelect Options > Create message, and the relevant option.
Select recipients or groups from the contacts listSelect from the toolbar.
64 Messaging
Enter the number or mail address manuallyTap the To field.
Enter the subject of the mail or multimedia messageEnter it in the Subject field. If the Subject field is not visible, select Options >Message header fields to change the fields that are visible.
Write the messageTap the message field.
Add an object to a message or mailSelect and the relevant type of content.The message type may change to multimedia message based on the insertedcontent.
Send the message or mailSelect , or press the call key.
Your device supports text messages beyond the limit for a single message. Longermessages are sent as two or more messages. Your service provider may chargeaccordingly. Characters with accents, other marks, or some language options takemore space, and limit the number of characters that can be sent in a single message.
Messaging inboxReceive messagesSelect Menu > Messaging and Inbox.
An unread text messageAn unread multimedia messageAn unread audio messageData received through Bluetooth connectivity
Messaging 65

When you receive a message, and 1 new message are displayed in the homescreen.
Open a message from the home screenSelect Show.
Open a message in the Inbox folderSelect the message.
Reply to a received messageSelect Options > Reply.
Multimedia messagesSelect Menu > Messaging.
Important: Exercise caution when opening messages. Messages may containmalicious software or otherwise be harmful to your device or PC.
Retrieve multimedia messagesSelect Options > Retrieve. A packet data connection is opened to retrieve themessage to your device. You may receive a notification that a multimedia messageis waiting in the multimedia message centre.
When you open a multimedia message ( ), you may see an image and a message. indicates that a sound clip is included. indicates that a video clip is included.
Play the sound or video clipSelect the indicator.
66 Messaging
View the media objects that have been included in a multimedia messageSelect Options > Objects.
If the message includes a multimedia presentation, is displayed.
Play the presentationSelect the indicator.
Data, settings, and web service messagesYour device can receive many kinds of messages that contain data, such as businesscards, ringing tones, operator logos, calendar entries, and e-mail notifications. Youmay also receive settings from your service provider in a configuration message.
Save the data in a messageSelect Options and the corresponding option.
Web service messages are notifications (for example, news headlines), and maycontain a text message or a link. For availability and subscription, contact yourservice provider.
Set up e-mailTo set up e-mail, select Menu > Messaging and Mailbox.
You can set up several e-mail accounts, for example, a personal e-mail account anda corporate e-mail account.
To set up e-mail from your home screen, select the relevant plug-in. Alternatively,to set up an e-mail account, select Menu > Applications > Sett. wizard.
Messaging 67
Nokia MessagingThe Nokia Messaging service automatically transfers e-mail from your existing e-mail address to your device. You can read, respond to, and organise your e-mailson the go. The Nokia Messaging service works with a number of internet e-mailproviders that are often used for personal e-mail.
The Nokia Messaging service may be chargeable. For information on possible costs,contact your service provider or the Nokia Messaging service.
The Nokia Messaging service must be supported by your network and may not beavailable in all regions.
Nokia Messaging is currently provided on a trial basis.
Install the Nokia messaging application1 Select Menu > Applications > Sett. wizard.2 When the Settings wizard is opened for the first time, you are asked to define
the e-mail settings after the operator settings. If you have used the Settingswizard before, select E-mail setup.
3 In the e-mail setup, read the information on the display, and select Start.4 Accept the installation of the Nokia Messaging application.5 Enter your e-mail account details.
The Nokia Messaging application is installed in Menu > Applications.
For more information, see www.email.nokia.com.
MailboxDefine e-mail settingsSelect Menu > Messaging and Mailbox.
To use e-mail, you must have defined a valid internet access point (IAP) in yourdevice and have defined your e-mail settings correctly.
68 Messaging
You must have a separate e-mail account. Follow the instructions given by yourremote mailbox and internet service provider (ISP).
If you select Messaging > Mailbox, and have not set up your e-mail account, youare prompted to do so. To start defining the e-mail settings with the mailbox guide,select Start.
When you create a new mailbox, the name you give to the mailbox replaces Mailboxin the Messaging main view. You can have up to six mailboxes.
Open the mailboxSelect Menu > Messaging and a mailbox.
When you open the mailbox, the device asks if you want to connect to the mailbox.
Connect to your mailbox and retrieve new e-mail headers or messagesSelect Yes. When you view messages online, you are continuously connected to aremote mailbox using a data connection.
View previously retrieved e-mail messages offlineSelect No.
Create a new e-mail messageSelect Options > Create message > E-mail.
Close the data connection to the remote mailboxSelect Options > Disconnect.
Retrieve e-mail messagesSelect Menu > Messaging and a mailbox.
If you are offline, select Options > Connect to open a connection to the remotemailbox.
Messaging 69
Important: Exercise caution when opening messages. Messages may containmalicious software or otherwise be harmful to your device or PC.
Retrieve messages when you have an open connection to a remote mailboxSelect Options > Retrieve e-mail > New to retrieve all new messages, Selectedto retrieve only selected messages, or All to retrieve all messages from the mailbox.To stop retrieving messages, select Cancel.
Close the connection and view the e-mail messages offlineSelect Options > Disconnect.
Open an e-mail message offlineTo open an e-mail message, select the message. If the e-mail message has not beenretrieved and you are offline, you are asked if you want to retrieve this messagefrom the mailbox.
View e-mail attachmentsOpen the message, and select the attachment field indicated with . If theattachment has not been retrieved to the device, select Options > Retrieve.
Retrieve e-mail messages automaticallySelect Options > E-mail settings > Automatic retrieval.
Setting the device to retrieve e-mail automatically may involve the transmission oflarge amounts of data through your service provider's network. Contact your serviceprovider for information about data transmission charges.
Delete e-mail messagesSelect Menu > Messaging and a mailbox.
70 Messaging
Delete the content of an e-mail from the device onlySelect Options > Delete > Phone only. The e-mail is not deleted from the remotemailbox.
The device mirrors the e-mail headers in the remote mailbox. If you delete themessage content, the e-mail header stays in your device. If you want to remove theheader as well, you must be connected to the server when deleting the messagefrom your device and the remote mailbox. It there is no connection to the server,the header is deleted when you make a connection from your device to the remotemailbox again to update the status.
Delete an e-mail from the device and the remote mailboxSelect Options > Delete > Phone and server.
Cancel deleting an e-mail that has been marked to be deleted from the deviceand serverSelect Options > Restore.
Disconnect from the mailbox
When you are online, to end the data connection to the remote mailbox, selectOptions > Disconnect.
Mail for ExchangeWith Mail for Exchange, you can receive your work e-mail to your device. You canread and reply to your e-mails, view and edit compatible attachments, viewcalendar information, receive and reply to meeting requests, schedule meetings,and view, add, and edit contact information.
Messaging 71
ActiveSyncUse of the Mail for Exchange is limited to over-the-air synchronisation of PIMinformation between the Nokia device and the authorised Microsoft Exchangeserver.
Mail for Exchange can be set up only if your company has Microsoft Exchange Server.In addition, your company's IT administrator must have activated Mail for Exchangefor your account.
Before starting to set up Mail for Exchange, ensure that you have the following:
• A corporate e-mail ID• Your office network user name• Your office network password• Your network domain name (contact your company's IT department)• Your Mail for Exchange server name (contact your company's IT department)
Depending on your company's Mail for Exchange server configuration, you may needto enter other information in addition to those listed. If you do not know the correctinformation, contact your company's IT department.
With Mail for Exchange, the use of the lock code may be mandatory. The default lockcode of your device is 12345, but your company's IT administrator may have set adifferent one for you to use.
You can access and modify the Mail for Exchange profile and settings in theMessaging settings.
View messages on a SIM cardYou can view messages that are stored on a SIM card.
Select Menu > Messaging and Options > SIM messages.
Before you can view SIM messages, you must copy them to a folder in your device.
72 Messaging
1 Mark the messages. Select Options > Mark/Unmark > Mark or Mark all.2 Open a list of folders. Select Options > Copy.3 Select a folder to copy.4 To view the messages, open the folder .
Cell broadcast messagesCell broadcast (network service) allows you to receive messages on various topics,such as weather or traffic conditions, from your service provider. For available topicsand relevant topic numbers, contact your service provider. This service may not beavailable for all regions.Cell broadcast messages cannot be received in 3G networks.A packet data connection may prevent cell broadcast reception.
Select Menu > Messaging and Options > Cell broadcast.
Service commandsWith service commands (network service) you can enter and send service requests(also known as USSD commands), such as activation commands for networkservices, to your service provider. This service may not be available for all regions.
Select Menu > Messaging and Options > Service commands.
Messaging settingsThe settings may be preconfigured in your device, or you may receive them in amessage. To enter settings manually, fill in all fields marked with Must be definedor an asterisk.
Some or all message centres or access points may be preset for your device by yourservice provider, and you may not be able to change, create, edit, or remove them.
Text message settingsSelect Menu > Messaging and Options > Settings > Text message.
Select from the following:
Messaging 73

Message centres — View a list of all text message centres that have been defined.Message centre in use — Select which message centre to use to deliver textmessages.Character encoding — To use character conversion to another encoding systemwhen available, select Reduced support.Receive report — Request the network to send you a delivery report of the textmessages you have sent (network service).Message validity — Select for how long the message centre resends your messageif the first attempt fails (network service). If the message cannot be sent within thistime period, the message is deleted from the message centre.Message sent as — To find out if your message centre is able to convert textmessages into these other formats, contact your service provider.Preferred connection — Select the connection to use.Reply via same centre — Reply to messages using the same text message centrenumber (network service).
Multimedia message settingsSelect Menu > Messaging and Options > Settings > Multimedia message.
Select from the following:Image size — Define the size of the image in a multimedia message.MMS creation mode — If you select Guided, the device informs you if you try tosend a message that may not be supported by the recipient. If you selectRestricted, the device prevents you from sending messages that may not besupported. To include content in your messages without notifications, select Free.Access point in use — Select which access point is used as the preferredconnection.Multimedia retrieval — Select how you want to receive messages, if available. Toreceive messages automatically in your home network, select Auto in homenetw.. Outside your home network, you receive a notification that there is amessage to retrieve in the multimedia message centre. If you select Always
74 Messaging
automatic, your device automatically makes an active packet data connection toretrieve the message both in and outside your home network. Select Manual toretrieve multimedia messages from the message centre manually, or Off to preventreceipt of any multimedia messages. Automatic retrieval may not be supported inall regions.Allow anonymous msgs. — Reject messages from anonymous senders.Receive adverts — Receive multimedia message advertisements (networkservice).Receive reports — Display the status of sent messages in the log (network service).Deny report sending — Prevent your device from sending delivery reports ofreceived messages.Message validity — Select for how long the message centre resends your messageif the first attempt fails (network service). If the message cannot be sent within thistime period, the message is deleted from the message centre.
The device requires network support to indicate that a sent message has beenreceived or read. Depending on the network and other circumstances, thisinformation may not always be reliable.
E-mail settingsManage mailboxesSelect Menu > Messaging and Options > Settings > E-mail.
Select which mailbox you want to use to send and receive e-mailSelect Mailbox in use and a mailbox.
Remove a mailbox and its messages from your deviceSelect Mailboxes, go to the desired mailbox, and select Options > Delete.
Messaging 75
Create a new mailboxSelect Mailboxes > Options > New mailbox. The name you give to the newmailbox replaces Mailbox in the Messaging main view. You can have up to sixmailboxes.
Change the connection settings, user settings, retrieval settings, andautomatic retrieval settingsSelect Mailboxes and a mailbox.
Personalise your device
You can personalise your device by changing the home screen, tones, or themes.
Change the look of your device You can use themes to change the look of the display, such as background image
and main menu layout.
Select Menu > Settings and Personal > Themes.
Preview a themeSelect General, go to the theme, and wait for a few seconds.
Activate the themeSelect Options > Set.
Change the layout of the main menuSelect Menu.
Change the look of the home screenSelect Home scr. theme.
76 Personalise your device

Set an image or a slideshow as the background in the home screenSelect Wallpaper > Image or Slide show.
Change the image displayed in the home screen when a call is receivedSelect Call image.
Profiles You can use profiles to set and customise the ringing tones, message alert tones,
and other tones for different events, environments, or caller groups. The name ofthe selected profile is displayed in the home screen. If the general profile is in use,only the date is displayed.
Select Menu > Settings and Personal > Profiles.
Music folder
Music playerMusic player supports file formats such as AAC, AAC+, eAAC+, MP3, and WMA. Musicplayer does not necessarily support all features of a file format or all the variationsof file formats.
You can also use Music player to listen to podcasts. Podcasting is a method fordelivering audio or video content over the internet using either RSS or Atomtechnologies for playback on mobile devices and computers.
Play a song or a podcastTo open Music player, select > .
You may have to refresh the music and podcast libraries after you have updated thesong or podcast selection in your device. To add all available items to the library,select Options > Refresh library.
Music folder 77
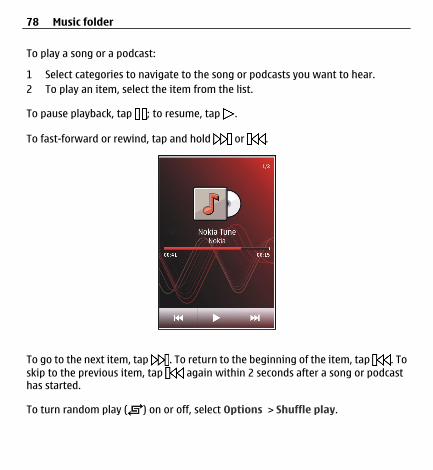
To play a song or a podcast:
1 Select categories to navigate to the song or podcasts you want to hear.2 To play an item, select the item from the list.
To pause playback, tap ; to resume, tap .
To fast-forward or rewind, tap and hold or .
To go to the next item, tap . To return to the beginning of the item, tap . Toskip to the previous item, tap again within 2 seconds after a song or podcasthas started.
To turn random play ( ) on or off, select Options > Shuffle play.
78 Music folder
To repeat the current item ( ), all items ( ), or to turn repeat off, selectOptions > Repeat.
If you play podcasts, shuffle and repeat are automatically turned off.
To adjust the volume, press the volume key.
To modify the tone of the music playback, select Options > Equaliser.
To modify the balance and stereo image or to enhance the bass, select Options >Settings.
To return to the home screen and leave the player playing in the background, pressthe end key.
To close the player, select Options > Exit.
PlaylistsSelect > and Playlists.
To view details of the playlist, select Options > Playlist details.
Create a playlist1 Select Options > New playlist.2 Enter a name for the playlist, and select OK.3 To add songs now, select Yes; or to add the songs later, select No.4 If you select Yes, select artists to find the songs you want to add to the playlist.
Select Add to add items.To show the song list under an artist title, select Expand. To hide the song list,select Collapse.
Music folder 79

5 When you have made your selections, select Done.The playlist is saved to the mass memory of your device.
To add more songs later, when viewing the playlist, select Options > Add songs.
To add songs, albums, artists, genres, and composers to a playlist from the differentviews of the music menu, select an item and Options > Add to playlist > Savedplaylist or New playlist.
To remove a song from a playlist, select Options > Remove.This does not delete the song from the device; it only removes it from the playlist.
To reorder songs in a playlist, select the song you want to move, and Options >Reorder playlist.
To grab a song and drop it to a new position, select the song in the desired positionand Drop.
To finish reordering the playlist, select Done.
PodcastsSelect > and Podcasts.
Podcast episodes have three states: never played, partially played, and completelyplayed. If the state is partially played, the episode plays from the last playbackposition the next time it is played. If the state is never played or completely played,the episode plays from the beginning.
Transfer music from a computerYou can use the following methods to transfer music:
• To view your device on a computer as a mass memory device where you cantransfer any data files, make the connection with a compatible USB data cable
80 Music folder
or Bluetooth connectivity. If you are using a USB data cable, select Mass storageas the connection mode.
• To synchronise music with Windows Media Player, connect a compatible USBdata cable, and select Media transfer as the connection mode.
To change the default USB connection mode, select Menu > Settings andConnectivity > USB > USB connection mode.
Ovi MusicWith Ovi Music (network service), you can search, browse, buy, and download musicto your device.
Select Menu > Music > Ovi Music.
To download music, you first need to register for the service.
Downloading music may involve additional costs and the transmission of largeamounts of data (network service). For information about data transmissioncharges, contact your network service provider.
To access Ovi Music, you must have a valid internet access point in the device. Youmay be asked to select the access point to use when connecting to Ovi Music.
Select the access pointSelect Default access point.
The availability and appearance of Ovi Music settings may vary. The settings mayalso be predefined and you may not be able to modify them. When browsing OviMusic, you may be able to modify the settings.
Modify Ovi Music settingsSelect Options > Settings.
Music folder 81
Ovi Music is not available for all countries or regions.
Nokia PodcastingWith the Nokia Podcasting application (network service), you can search, discover,subscribe to, and download podcasts over the air, and play, manage, and shareaudio and video podcasts with your device.
Podcasting settingsSelect Menu > Music > Podcasting.
To start using Podcasting, define your connection and download settings.
Connection settingsSelect Options > Settings > Connection and from the following:Default access point — Select the access point to use to connect to the internet.Search service URL — Define the podcast search service web address, to use tosearch for podcasts.
Download settingsSelect Options > Settings > Download and from the following:Save to — Define where to save podcasts. For optimal use of storage space, massmemory is recommended.Update interval — Define how often podcasts are updated.Next update time — Define the time of the next automatic update.
Automatic updates only occur if a specific default access point is selected and thePodcasting application is open.Download limit (%) — Define the percentage of memory that is reserved forpodcast downloads.If limit exceeds — Define what to do if the download limit is exceeded.
82 Music folder
Setting the application to retrieve podcasts automatically may involve thetransmission of large amounts of data through your service provider’s network. Forinformation on data transmission charges, contact your service provider.
Restore default settingsSelect Options > Settings > Options > Restore default.
Download podcastsAfter you have subscribed to a podcast, you can download, play, and manage thepodcast episodes.
Select Menu > Music > Podcasting.
View a list of subscribed podcastsSelect Podcasts.
View individual episode titlesSelect the podcast title.An episode is a particular media file of a podcast.
Start a downloadSelect the episode title.You can download multiple episodes at the same time.
Start playing a podcast before the download is completeGo to a podcast, and select Options > Play preview.
Successfully downloaded podcasts are stored in the Podcasts folder, but may notbe displayed immediately.
Music folder 83
RadioListen to the radioSelect Menu > Music > Radio.
The FM radio depends on an antenna other than the wireless device antenna. Acompatible headset or accessory needs to be attached to the device for the FM radioto function properly.
When you open the application for the first time, you can choose to have the localstations tuned automatically.
To listen to the next or the previous station, select or .
To mute the radio, select .
Select Options and from the following:Stations — View saved radio stations.Tune stations — Search for radio stations.Save — Save the radio station.Activate loudspeaker or Deactivate loudspeaker — Turn the loudspeaker on oroff.Alternative frequencies — Select whether you want the radio to automaticallysearch for a better RDS frequency for the station if the frequency level becomes low.Play in background — Return to the home screen with the radio playing in thebackground.
Manage radio stationsSelect Menu > Music > Radio.
84 Music folder
To listen to saved stations, select Options > Stations, and select a station from thelist.
To remove or rename a station, select Options > Stations > Options > Delete orRename.
To set the desired frequency manually, select Options > Tune stations >Options > Manual tuning.
Gallery
To store and organise your images, video clips, sound clips, and streaming links,select > .
Tip: To access the images and video clips view quickly, tap the media key ( ) toopen the media bar, and select .
View and organise filesSelect > .
Select from the following:
Images & videos — View images in the image viewer and video clips in Videocentre.
Songs — Open Music player. Sound clips — Listen to sound clips. Other media — View presentations.
Open a fileSelect a file from the list. Video clips and files with the .ram file extension open andplay in Video centre, and music and sound clips in Music player.
Gallery 85

View images and videosSelect > and Images & videos.
By default, the images, video clips, and folders are organised by date and time.
To open a file, select a file from the list. To zoom in an image, use the volume key.
To print your images on a compatible printer, select Options > Print.
To edit a video clip or an image, select Options > Edit.
Select Options > Use file and from the following:Set as wallpaper — Use the image as wallpaper in the home screen.Set as call image — Set the image as a generic call image.Assign to contact — Set the image as a call image for a contact.
The toolbar helps you select frequently used functions with images, video clips, andfolders.
From the toolbar, select from the following: Send — Send an image or a video clip.
Edit — Edit an image or a video clip. Delete — Delete an image or a video clip.
Organise images and video clipsSelect > .
Create a new folderSelect Images & videos > Options > Folder options > New folder.
86 Gallery
Move a fileSelect the file and Options > Folder options > Move to folder.
TV-out modeYou can view your images and video clips on a compatible TV.
Select Menu > Settings.
To view your images and video clips on a compatible TV, use a Nokia Video-OutCable.
Before viewing images and video clips on the TV, you may need to define the TVsystem (PAL or NTSC) and TV aspect ratio (Widescreen or Normal).
Define the TV system and aspect ratioSelect Phone > Accessories > TV-Out.
In TV-out mode, you cannot use the TV as the camera viewfinder.
View images and play video clips on a TV1 Connect a Nokia Video-Out Cable to the video input of a compatible TV.2 Connect the other end of the cable to the Nokia AV Connector of your device.3 You may need to select the USB cable mode.4 Select > , and an image or a video clip.
Gallery 87
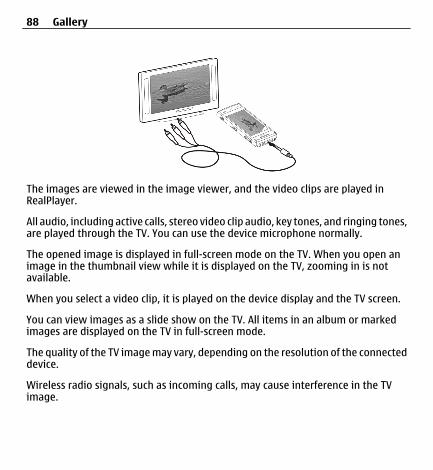
The images are viewed in the image viewer, and the video clips are played inRealPlayer.
All audio, including active calls, stereo video clip audio, key tones, and ringing tones,are played through the TV. You can use the device microphone normally.
The opened image is displayed in full-screen mode on the TV. When you open animage in the thumbnail view while it is displayed on the TV, zooming in is notavailable.
When you select a video clip, it is played on the device display and the TV screen.
You can view images as a slide show on the TV. All items in an album or markedimages are displayed on the TV in full-screen mode.
The quality of the TV image may vary, depending on the resolution of the connecteddevice.
Wireless radio signals, such as incoming calls, may cause interference in the TVimage.
88 Gallery
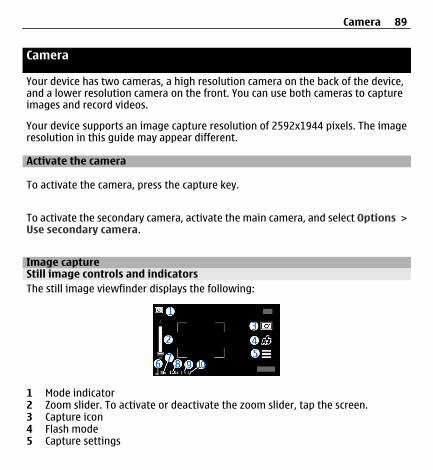
Camera
Your device has two cameras, a high resolution camera on the back of the device,and a lower resolution camera on the front. You can use both cameras to captureimages and record videos.
Your device supports an image capture resolution of 2592x1944 pixels. The imageresolution in this guide may appear different.
Activate the camera
To activate the camera, press the capture key.
To activate the secondary camera, activate the main camera, and select Options >Use secondary camera.
Image captureStill image controls and indicatorsThe still image viewfinder displays the following:
1 Mode indicator2 Zoom slider. To activate or deactivate the zoom slider, tap the screen.3 Capture icon4 Flash mode5 Capture settings
Camera 89
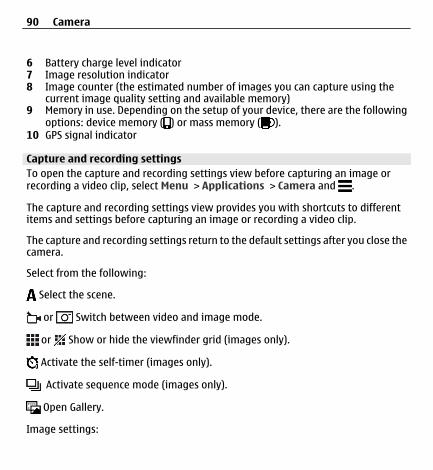
6 Battery charge level indicator7 Image resolution indicator8 Image counter (the estimated number of images you can capture using the
current image quality setting and available memory)9 Memory in use. Depending on the setup of your device, there are the following
options: device memory ( ) or mass memory ( ).10 GPS signal indicator
Capture and recording settingsTo open the capture and recording settings view before capturing an image orrecording a video clip, select Menu > Applications > Camera and .
The capture and recording settings view provides you with shortcuts to differentitems and settings before capturing an image or recording a video clip.
The capture and recording settings return to the default settings after you close thecamera.
Select from the following:
Select the scene.
or Switch between video and image mode.
or Show or hide the viewfinder grid (images only).
Activate the self-timer (images only).
Activate sequence mode (images only).
Open Gallery.
Image settings:
90 Camera
Select a colour effect.
Adjust the white balance. Select the current lighting conditions. This allows thecamera to reproduce colours more accurately.
Adjust the exposure compensation (images only). If you are shooting a darksubject against a very light background, such as snow, adjust the exposure to +1 or+2 to compensate for the background brightness. For light subjects against a darkbackground, use -1 or -2.
Adjust light sensitivity (images only). Increase the light sensitivity in low lightconditions to avoid too dark images and blurry images. Increasing the lightsensitivity may also increase the image noise.
Adjust contrast (images only). Adjust the difference between the lightest anddarkest parts of the image.
Adjust sharpness (images only).
The screen display changes to match the settings you define.
The capture settings are shooting-mode specific. Switching between the modesdoes not reset the defined settings.
If you select a new scene, the capture settings are replaced by the selected scene.You can change the capture settings after selecting a scene if needed.
Saving the captured image may take longer if you change the zoom, lighting, orcolour settings.
Capture an imageWhen capturing an image, note the following:
• Use both hands to keep the camera steady.
Camera 91
• The quality of a digitally zoomed image is lower than that of a non-zoomedimage.
• The camera goes into battery saving mode after about a minute of inactivity.• Keep a safe distance when using the flash. Do not use the flash on people or
animals at close range. Do not cover the flash while taking a picture.
1 To switch from video mode to image mode, if necessary, select > .2 Press the capture key. Do not move the device before the image is saved and
the final image displayed.
Capture images with the secondary camera1 Select Options > Use secondary camera.2 To capture an image, select . Do not move the device before the image is
saved and the final image displayed.
Zoom in or out when capturing an imageUse the zoom slider.
Leave the camera open in the background and use other applicationsPress the menu key. To return to the camera, press and hold the capture key.
After capturing an imageAfter you capture an image, select from the following options (available only if youhave selected Options > Settings > Show captured image > Yes):
— Send the image in a multimedia or e-mail message, or through connectionmethods such as Bluetooth connectivity.
To send the image to the person you are talking to, select during a call. — Delete the image.
92 Camera

To use the image as wallpaper in the home screen, select Options > Use image >Set as wallpaper.
To set the image as a default call image to be used for every call situation, selectOptions > Use image > Set as call image.
To assign the image to a contact, Options > Use image > Assign to contact.
To return to the viewfinder to capture a new image, press the capture key.
Flash and video lightThe camera of your device has a dual LED flash for low light conditions.
To select the desired flash mode, select the current flash mode indicator, which isone of the following: Automatic, Reduce red, On, and Off.
Avoid touching the flash LEDs. The LEDs may get hot after prolonged usage.
Keep a safe distance when using the flash. Do not use the flash on people or animalsat close range. Do not cover the flash while taking a picture.
Increase light levels when recording video in low lightSelect .
ScenesA scene helps you to find the right colour and lighting settings for the currentenvironment. The settings of each scene have been set according to a certain styleor environment.
The default scene in image and video modes is Automatic (indicated with ).
Camera 93
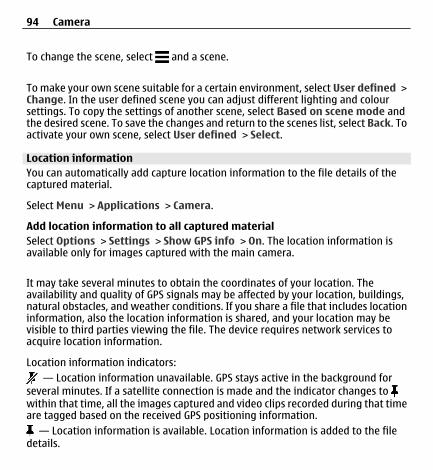
To change the scene, select and a scene.
To make your own scene suitable for a certain environment, select User defined >Change. In the user defined scene you can adjust different lighting and coloursettings. To copy the settings of another scene, select Based on scene mode andthe desired scene. To save the changes and return to the scenes list, select Back. Toactivate your own scene, select User defined > Select.
Location informationYou can automatically add capture location information to the file details of thecaptured material.
Select Menu > Applications > Camera.
Add location information to all captured materialSelect Options > Settings > Show GPS info > On. The location information isavailable only for images captured with the main camera.
It may take several minutes to obtain the coordinates of your location. Theavailability and quality of GPS signals may be affected by your location, buildings,natural obstacles, and weather conditions. If you share a file that includes locationinformation, also the location information is shared, and your location may bevisible to third parties viewing the file. The device requires network services toacquire location information.
Location information indicators: — Location information unavailable. GPS stays active in the background for
several minutes. If a satellite connection is made and the indicator changes to within that time, all the images captured and video clips recorded during that timeare tagged based on the received GPS positioning information.
— Location information is available. Location information is added to the filedetails.
94 Camera
Self-timerUse the self-timer to delay the capture, so that you can include yourself in the image.
Set the self-timer delaySelect > and the delay desired before the image is captured.
Activate the self-timerSelect Activate. The stopwatch icon on the screen blinks and the remaining time isdisplayed when the timer is running. The camera captures the image after theselected delay elapses.
Deactivate the self-timerSelect > > .
Tip: To keep your hand steady when capturing an image, try using a delay of 2seconds.
Capture images in a sequenceSelect Menu > Applications > Camera.
The sequence mode is available only in the main camera.
To start capturing images in a quick sequence, select Menu > Applications >Camera and > Sequence. To close the settings window, tap the screen abovethe window. Press and hold the capture key. The device captures images until yourelease the key or until the memory runs out. If you press the capture key briefly,the device captures 18 images in a sequence.
The captured images are displayed in a grid. To view an image, select the image.To return to the sequence mode viewfinder, press the capture key.
Camera 95
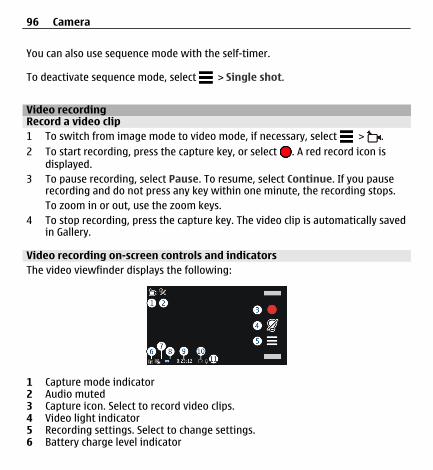
You can also use sequence mode with the self-timer.
To deactivate sequence mode, select > Single shot.
Video recordingRecord a video clip1 To switch from image mode to video mode, if necessary, select > .2 To start recording, press the capture key, or select . A red record icon is
displayed.3 To pause recording, select Pause. To resume, select Continue. If you pause
recording and do not press any key within one minute, the recording stops.To zoom in or out, use the zoom keys.
4 To stop recording, press the capture key. The video clip is automatically savedin Gallery.
Video recording on-screen controls and indicatorsThe video viewfinder displays the following:
1 Capture mode indicator2 Audio muted3 Capture icon. Select to record video clips.4 Video light indicator5 Recording settings. Select to change settings.6 Battery charge level indicator
96 Camera
7 Video quality indicator. To change this setting, select Options > Settings >Video quality.
8 Video clip file type9 Available recording time. When you are recording, the current video length
indicator also shows the elapsed and remaining time.10 The location to which the video clip is saved11 GPS signal indicator
After recording a video clipAfter you record a video clip, select from the following options (available only if youhave selected Options > Settings > Show last captured video > Yes):
— Play the video clip you just recorded. — Delete the video clip.
To send the video clip to the person you are talking to, select Options > Send tocaller during a call.
To return to the viewfinder to record a new video clip, press the capture key.
Positioning (GPS)
About GPSThe Global Positioning System (GPS) is operated by the government of the UnitedStates, which is solely responsible for its accuracy and maintenance. The accuracyof location data can be affected by adjustments to GPS satellites made by the UnitedStates government and is subject to change with the United States Department ofDefense civil GPS policy and the Federal Radionavigation Plan. Accuracy can also beaffected by poor satellite geometry. Availability and quality of GPS signals may beaffected by your location, buildings, natural obstacles, and weather conditions. GPSsignals may not be available inside buildings or underground and may be impairedby materials such as concrete and metal.
Positioning (GPS) 97
GPS should not be used for precise location measurement, and you should neverrely solely on location data from the GPS receiver and cellular radio networks forpositioning or navigation.
The trip meter has limited accuracy, and rounding errors may occur. Accuracy canalso be affected by availability and quality of GPS signals.
The coordinates in the GPS are expressed using the international WGS-84 coordinatesystem. The availability of the coordinates may vary by region.
Assisted GPS (A-GPS)Your device also supports assisted GPS (A-GPS).
A-GPS is a network service.
Assisted GPS (A-GPS) is used to retrieve assistance data over a packet dataconnection, which assists in calculating the coordinates of your current locationwhen your device is receiving signals from satellites.
When you activate A-GPS, your device receives useful satellite information from anassistance data server over the cellular network. With the help of assisted data, yourdevice can obtain the GPS position faster.
Your device is preconfigured to use the Nokia A-GPS service, if no service provider-specific A-GPS settings are available. The assistance data is retrieved from the NokiaA-GPS service server only when needed.
You must have an internet access point defined in the device to retrieve assistancedata from the Nokia A-GPS service over a packet data connection. To define an accesspoint for A-GPS, select Menu > Applications > Location and Positioning >Positioning server > Access point. A wireless LAN (WLAN) access point cannot beused for this service. Only a packet data internet access point can be used. Yourdevice asks for the internet access point when GPS is used for the first time.
98 Positioning (GPS)
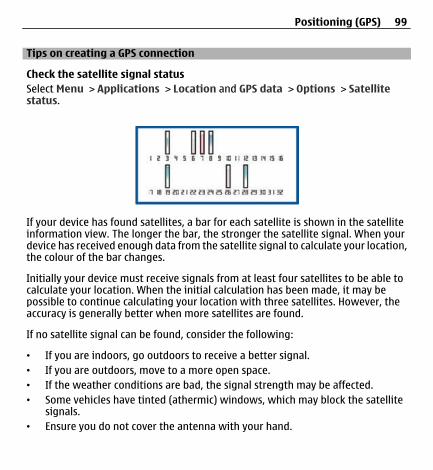
Tips on creating a GPS connection
Check the satellite signal statusSelect Menu > Applications > Location and GPS data > Options > Satellitestatus.
If your device has found satellites, a bar for each satellite is shown in the satelliteinformation view. The longer the bar, the stronger the satellite signal. When yourdevice has received enough data from the satellite signal to calculate your location,the colour of the bar changes.
Initially your device must receive signals from at least four satellites to be able tocalculate your location. When the initial calculation has been made, it may bepossible to continue calculating your location with three satellites. However, theaccuracy is generally better when more satellites are found.
If no satellite signal can be found, consider the following:
• If you are indoors, go outdoors to receive a better signal.• If you are outdoors, move to a more open space.• If the weather conditions are bad, the signal strength may be affected.• Some vehicles have tinted (athermic) windows, which may block the satellite
signals.• Ensure you do not cover the antenna with your hand.
Positioning (GPS) 99
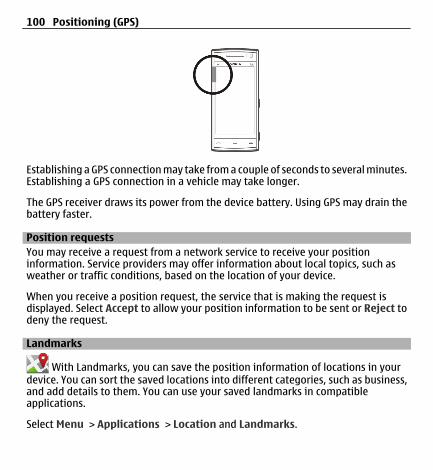
Establishing a GPS connection may take from a couple of seconds to several minutes.Establishing a GPS connection in a vehicle may take longer.
The GPS receiver draws its power from the device battery. Using GPS may drain thebattery faster.
Position requestsYou may receive a request from a network service to receive your positioninformation. Service providers may offer information about local topics, such asweather or traffic conditions, based on the location of your device.
When you receive a position request, the service that is making the request isdisplayed. Select Accept to allow your position information to be sent or Reject todeny the request.
Landmarks
With Landmarks, you can save the position information of locations in yourdevice. You can sort the saved locations into different categories, such as business,and add details to them. You can use your saved landmarks in compatibleapplications.
Select Menu > Applications > Location and Landmarks.
100 Positioning (GPS)
Select Options and from the following:New landmark — Create a new landmark. To request position information of yourcurrent location, select Current position. To enter the position informationmanually, select Enter manually.Edit — Edit a saved landmark (for example, add a street address).Add to category — Add a landmark to a category. Select each category to whichyou want to add the landmark.Send — Send one or several landmarks to a compatible device.
Create a new landmark categoryOn the categories tab, select Options > Edit categories.
GPS dataGPS data is designed to provide route guidance information to a selecteddestination and traveling information, such as the approximate distance to thedestination and approximate duration of travel. You can also view positioninformation about your current location.
Select Menu > Applications > Location and GPS data.
Positioning settingsPositioning settings define the methods, server, and notation settings used inpositioning.
Select Menu > Applications > Location and Positioning.
Define positioning methods
Use only the integrated GPS receiver of your deviceSelect Integrated GPS.
Positioning (GPS) 101
Use Assisted GPS (A-GPS) to receive assistance data from a positioning serverSelect Assisted GPS.
Use information from the cellular network (network service)Select Network based.
Define positioning server
Define an access point and positioning server for network-assistedpositioningSelect Positioning server.This is used for assisted GPS or network-based positioning. The positioning servermay be preset by your service provider, and you may not be able to edit the settings.
Define notation settings
Select the measurement system to use for speeds and distancesSelect Measurement system > Metric or Imperial.
Define in which format the coordinate information is displayed in your deviceSelect Coordinate format and the desired format.
Maps
Maps overview
Select Menu > Maps.
Welcome to Maps.
102 Maps
Maps shows you what is nearby, helps you plan your route, and guides you whereyou want to go.
• Find cities, streets, and services.• Find your way with turn-by-turn directions.• Synchronise your favourite locations and routes between your mobile device
and the Ovi Maps internet service.• Check weather forecasts and other local information, if available.
Note: Downloading content such as maps, satellite images, voice files, guidesor traffic information may involve transmission of large amounts of data (networkservice).
Some services may not be available in all countries, and may be provided only inselected languages. The services may be network dependent. For more information,contact your network service provider.
Almost all digital cartography is inaccurate and incomplete to some extent. Neverrely solely on the cartography that you download for use in this device.
Content such as satellite images, guides, weather and traffic information andrelated services are generated by third parties independent of Nokia. The contentmay be inaccurate and incomplete to some extent and is subject to availability.Never rely solely on the aforementioned content and related services.
View your location and the mapSee your current location on the map, and browse maps of different cities andcountries.
Select Menu > Maps and My position.
Maps 103
marks your current position, if available. When your device is searching for yourposition, blinks. If your position is not available, indicates your last knownposition.
If only cell ID based positioning is available, a red halo around the positioning iconindicates the general area you might be in. In densely populated areas, the accuracyof the estimate increases, and the red halo is smaller than in lightly populated areas.
Move on the mapDrag the map with your finger. By default, the map is oriented north.
View your current or last known locationSelect .
Zoom in or outSelect + or -.
If you browse to an area not covered by the maps that are stored on your deviceand you have an active data connection, new maps are automatically downloaded.
Map coverage varies by country and region.
104 Maps
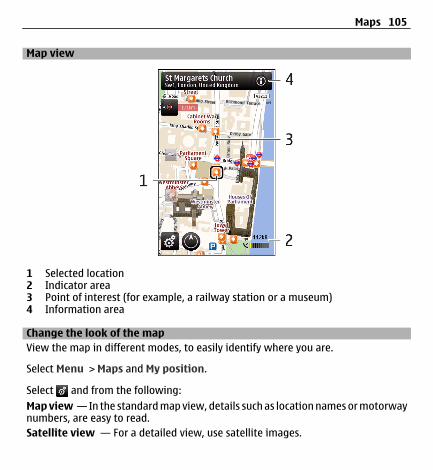
Map view
1 Selected location2 Indicator area3 Point of interest (for example, a railway station or a museum)4 Information area
Change the look of the mapView the map in different modes, to easily identify where you are.
Select Menu > Maps and My position.
Select and from the following:Map view — In the standard map view, details such as location names or motorwaynumbers, are easy to read.Satellite view — For a detailed view, use satellite images.
Maps 105

Terrain view — View at a glance the ground type, for example, when you aretravelling off-road.3D view — For a more realistic view, change the perspective of the map.Landmarks — Display prominent buildings and attractions on the map.Night mode — Dim the colours of the map. When travelling at night, the map iseasier to read in this mode.
Download and update mapsTo avoid mobile data transfer costs, download the latest maps and voice guidancefiles to your computer, and then transfer and save them to your device.
Use the Nokia Ovi Suite application to download the latest maps and voice guidancefiles to your compatible computer. To download and install Nokia Ovi Suite on yourcompatible computer, go to www.ovi.com.
Tip: Save new maps to your device before a journey, so you can browse the mapswithout an internet connection when travelling abroad.
To make sure your device does not use an internet connection, in the main menu,select > Internet > Connection > Offline.
About positioning methodsMaps displays your location on the map using GPS, A-GPS, WLAN, or cell ID basedpositioning.
The Global Positioning System (GPS) is a satellite-based navigation system used forcalculating your location. Assisted GPS (A-GPS) is a network service that sends youGPS data, improving the speed and accuracy of the positioning.
Wireless local area network (WLAN) positioning improves position accuracy whenGPS signals are not available, especially when you are indoors or between tallbuildings.
106 Maps
With cell ID based positioning, the position is determined through the antennatower your mobile device is currently connected to.
Depending on the available positioning method, the accuracy of positioning mayvary from a few metres to several kilometres.
When you use Maps for the first time, you are prompted to define the internet accesspoint to use to download map information, use A-GPS, or connect to a WLAN.
The Global Positioning System (GPS) is operated by the government of the UnitedStates, which is solely responsible for its accuracy and maintenance. The accuracyof location data can be affected by adjustments to GPS satellites made by the UnitedStates government and is subject to change with the United States Department ofDefense civil GPS policy and the Federal Radionavigation Plan. Accuracy can also beaffected by poor satellite geometry. Availability and quality of GPS signals may beaffected by your location, buildings, natural obstacles, and weather conditions. GPSsignals may not be available inside buildings or underground and may be impairedby materials such as concrete and metal.
GPS should not be used for precise location measurement, and you should neverrely solely on location data from the GPS receiver and cellular radio networks forpositioning or navigation.
The trip meter has limited accuracy, and rounding errors may occur. Accuracy canalso be affected by availability and quality of GPS signals.
Note: Using WLAN may be restricted in some countries. For example, inFrance, you are only allowed to use WLAN indoors. For more information, contactyour local authorities.
Find a locationMaps helps you find specific locations and businesses.
Select Menu > Maps and Search.
Maps 107
1 Select the search field, and enter search words, such as a street address orpostcode.
2 Select . To clear the search field, select .3 Select an item from the list of proposed matches.
The location is displayed on the map. To view the other locations of the searchresult list on the map, select one of the arrows beside the information area( ).
Return to the list of proposed matchesSelect List.
Search for different types of nearby placesSelect Browse categories and a category, such as shopping, accommodation, ortransport.
If no search results are found, ensure the spelling of your search terms is correct.Problems with your internet connection may also affect results when searchingonline.
To avoid data transfer costs, you can also get search results without an activeinternet connection, if you have maps of the searched area stored on your device.
View location detailsView more information about a specific location or place, such as a hotel orrestaurant, if available.
Select Menu > Maps and My position.
View the details of a placeSelect a place, its information area ( ), and Show details.
108 Maps
Rate a placeSelect a place, its information area ( ), Show details, and the star rating. Forexample, to rate a place as being 3 out of 5 stars, select the third star. To rate aplace, you need an active internet connection.
When you find a place that does not exist or contains inappropriate information orincorrect details, such as the wrong contact information or location, it isrecommended that you report it to Nokia.
Report incorrect informationSelect a place and its information area ( ), and select Show details > Report thisPlace and the appropriate option. To report a place, you need an active internetconnection.
The available options may vary.
Save places and routesSave addresses, places of interest, and routes, so they can be quickly used later.
Select Menu > Maps.
Save a place1 Select My position.2 Tap the location. To search for an address or place, select Search.3 Tap the location's information area ( ).4 Select Save place.
Save a route1 Select My position.2 Tap the location. To search for an address or place, select Search.3 Tap the location's information area ( ).
Maps 109
4 To add another route point, select Add to route.5 Select Add new route point and the appropriate option.6 Select Show route > Options > Save route.
View your saved places and routesSelect Favourites > Places or Routes.
View and organise places or routesYou can quickly access the places and routes you have saved.
Group the places and routes into a collection, for example, when planning a trip.
Select Menu > Maps and Favourites.
View a saved place on the map1 Select Places, and go to the place.2 Select Show on map.
To return to the list of saved places, select List.
Create a collectionSelect Create new collection, and enter a collection name.
Add a saved place to a collection1 Select Places, and go to the place.2 Select Organise collections.3 Select New collection or an existing collection.
If you need to delete a route, go to the Ovi Maps internet service at www.ovi.com.
110 Maps
Send places to your friendsWhen you want to share place information with your friends, send these detailsdirectly to their devices.
Select Menu > Maps and My position.
Send a place to your friend's compatible deviceSelect a location on the map, tap the location's information area ( ), and selectSend.
Synchronise your FavouritesPlan a trip on your computer at the Ovi Maps website, synchronise the saved placesand routes with your mobile device, and access the plan on the go.
To synchronise places or routes between your mobile device and the Ovi Mapsinternet service, you need to be signed in to your Nokia account.
Synchronise saved places and routesSelect Favourites > Synchronise with Ovi. If you do not have a Nokia account, youare prompted to create one.
You can set your device to synchronise your Favourites automatically when youopen or close the Maps application.
Synchronise Favourites automaticallySelect > Synchronisation > Synchronisation > At start-up and shut-d..
Synchronising requires an active internet connection, and may involve thetransmission of large amounts of data through your service provider’s network. Forinformation about data transmission charges, contact your service provider.
To use the Ovi Maps internet service, go to www.ovi.com.
Maps 111
Get voice guidanceVoice guidance, if available for your language, helps you find your way to adestination, leaving you free to enjoy the journey.
Select Menu > Maps and Drive or Walk.
When you use drive or walk navigation for the first time, you are asked to select thelanguage of the voice guidance, and download the appropriate files.
If you select a language that includes street names, also the street names are saidaloud. Voice guidance may not be available for your language.
Change the voice guidance languageIn the main view, select and Navigation > Drive guidance or Walk guidanceand the appropriate option.
Deactivate voice guidanceIn the main view, select and Navigation > Drive guidance or Walk guidanceand None.
Repeat the voice guidance for car navigationIn the navigation view, select Options > Repeat.
Adjust the volume of the voice guidance for car navigationIn the navigation view, select Options > Volume.
Drive to your destinationWhen you need turn-by-turn directions while driving, Maps helps you get to yourdestination.
Select Menu > Maps and Drive.
112 Maps
Drive to a destinationSelect Set destination and the appropriate option.
Drive to your homeSelect Drive home.
When you select Drive home or Walk home for the first time, you are promptedto define your home location. To later change the home location, do the following:
1 In the main view, select .2 Select Navigation > Home Location > Redefine.3 Select the appropriate option.
Tip: To drive without a set destination, select Map. Your location is displayed onthe centre of the map as you move.
Change views during navigationSwipe the screen to select 2D view, 3D view, Arrow view, or Route overview.
Obey all local laws. Always keep your hands free to operate the vehicle while driving.Your first consideration while driving should be road safety.
Maps 113
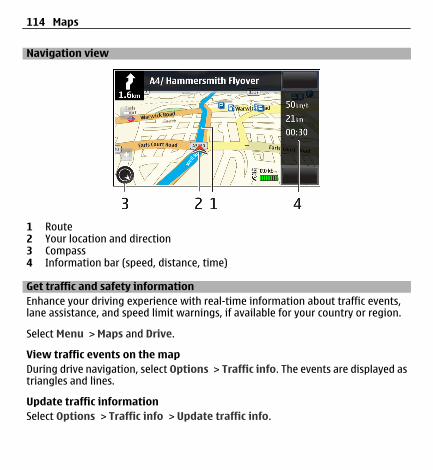
Navigation view
1 Route2 Your location and direction3 Compass4 Information bar (speed, distance, time)
Get traffic and safety informationEnhance your driving experience with real-time information about traffic events,lane assistance, and speed limit warnings, if available for your country or region.
Select Menu > Maps and Drive.
View traffic events on the mapDuring drive navigation, select Options > Traffic info. The events are displayed astriangles and lines.
Update traffic informationSelect Options > Traffic info > Update traffic info.
114 Maps
When planning a route, you can set the device to avoid traffic events, such as trafficjams or roadworks.
Avoid traffic eventsIn the main view, select > Navigation > Reroute due to traffic.
Warning:The location of speed/safety cameras can be shown on your route duringnavigation, if this feature is enabled. Some jurisdictions prohibit or regulate the useof speed/safety camera location data. Nokia is not responsible for the accuracy, orthe consequences of use of speed/safety camera location data.
Walk to your destinationWhen you need directions to follow a route on foot, Maps guides you over squares,and through parks, pedestrian zones, and even shopping centres.
Select Menu > Maps and Walk.
Walk to a destinationSelect Set destination and the appropriate option.
Walk to your homeSelect Walk home.
When you select Drive home or Walk home for the first time, you are promptedto define your home location. To later change the home location, do the following:
1 In the main view, select .2 Select Navigation > Home Location > Redefine.3 Select the appropriate option.
Maps 115
Tip: To walk without a set destination, select Map. Your location is displayed onthe centre of the map as you move.
Plan a routePlan your journey, and create your route and view it on the map before setting off.
Select Menu > Maps and My position.
Create a route1 Tap the location of your starting point. To search for an address or place, select
Search.2 Tap the location's information area ( ).3 Select Add to route.4 To add another route point, select Add new route point and the appropriate
option.
Change the order of the route points1 Select a route point.2 Select Move.3 Tap the place where you want to move the route point to.
Edit the location of a route pointTap the route point, and select Edit and the appropriate option.
View the route on the mapSelect Show route.
Navigate to the destinationSelect Show route > Options > Start driving or Start walking.
116 Maps
Change the settings for a routeThe route settings affect the navigation guidance and the way the route is displayedon the map.
1 In the route planner view, open the Settings tab. To get to the route plannerview from the navigation view, select Options > Route points or Route pointlist.
2 Set the transportation mode to Drive or Walk. If you select Walk, one-waystreets are regarded as normal streets, and walkways and routes through, forexample, parks and shopping centres, can be used.
3 Select the desired option.
Select the walking modeOpen the Settings tab, and select Walk > Preferred route > Streets or Straightline. Straight line is useful on off-road terrain as it indicates the walking direction.
Use the faster or shorter driving routeOpen the Settings tab, and select Drive > Route selection > Faster route orShorter route.
Use the optimised driving routeOpen the Settings tab, and select Drive > Route selection > Optimised. Theoptimised driving route combines the advantages of both the shorter and the fasterroutes.
You can also choose to allow or avoid using, for example, motorways, toll roads, orferries.
Connectivity
Your device offers several options to connect to the internet or to anothercompatible device or PC.
Connectivity 117
Data connections and access pointsYour device supports packet data connections (network service), such as GPRS inthe GSM network. When you use your device in GSM and 3G networks, multiple dataconnections can be active at the same time, and access points can share a dataconnection. In the 3G network, data connections remain active during voice calls.
You can also use a WLAN data connection. Only one connection in one wireless LANcan be active at a time, but several applications can use the same internet accesspoint.
To establish a data connection, an access point is required. You can define differentkinds of access points, such as the following:
• MMS access point to send and receive multimedia messages• Internet access point (IAP) to send and receive e-mail and connect to the
internet
Check the type of access point you need with your service provider for the serviceyou want to access. For availability and subscription to packet data connectionservices, contact your service provider.
Network settingsSelect Menu > Settings and Connectivity > Network.
Your device can automatically switch between GSM and UMTS networks. GSMnetworks are indicated with . UMTS networks are indicated with .
Select from the following:
Network mode — Select which network to use. If you select Dual mode, the deviceuses the GSM or UMTS network automatically, according to the network parametersand the roaming agreements between the wireless service providers. For detailsand roaming costs, contact your network service provider. This option is shown onlyif supported by the wireless service provider.
118 Connectivity
A roaming agreement is an agreement between two or more service providers toenable the users of one service provider to use the services of other serviceproviders.Operator selection — Select Automatic to set the device to search for and selectone of the available networks, or Manual to manually select the network from alist. If the connection to the manually selected network is lost, the device soundsan error tone and asks you to reselect a network. The selected network must havea roaming agreement with your home network.Cell info display — Set the device to indicate when it is used in a cellular networkbased on microcellular network (MCN) technology and to activate cell info reception.
Wireless LAN Your device can detect and connect to wireless local area networks (WLAN). Usinga WLAN, you can connect your device to the internet and compatible devices thathave WLAN support.
About WLANYour device can detect and connect to wireless local area networks (WLAN). Usinga WLAN, you can connect your device to the internet and compatible devices thatsupport WLAN.
To use a WLAN connection, you need the following:
• WLAN must be available in your location.• Your device must be connected to the WLAN. Some WLANs are protected, and
you need an access key from the service provider to connect to them.• An internet access point created for WLAN. Use the access point for applications
that need to connect to the internet.
A WLAN connection is established when you create a data connection using a WLANinternet access point. The active WLAN connection ends when you end the dataconnection.
Connectivity 119
You can use WLAN during a voice call or when packet data is active. You can only beconnected to one WLAN access point device at a time, but several applications canuse the same access point.
Features that use WLAN, or that are allowed to run in the background while usingother features, increase the demand on battery power and reduce the battery life.
Your device supports the following WLAN features:
• IEEE 802.11b/g standard• Operation at 2.4 GHz• WEP, WPA/WPA2, and 802.1x authentication methods. These functions can be
used only if they are supported by the network.
Important: Always enable one of the available encryption methods toincrease the security of your wireless LAN connection. Using encryption reduces therisk of unauthorised access to your data.
When the device is in the offline profile, you can still use WLAN, if available.Remember to comply with any applicable safety requirements when establishingand using a WLAN connection.
Tip: To check the unique media access control (MAC) address that identifies yourdevice, open the dialler, and enter *#62209526#.
Note: Using WLAN may be restricted in some countries. For example, inFrance, you are only allowed to use WLAN indoors. For more information, contactyour local authorities.
WLAN wizardSelect Menu > Settings and Connectivity > Wireless LAN.
120 Connectivity
The WLAN wizard helps you to connect to a wireless LAN (WLAN) and manage yourWLAN connections.
If the search finds WLANs, to create an internet access point (IAP) for a connectionand start the web browser using this IAP, select the connection and Start webbrowsing.
If you select a secured WLAN, you are asked to enter the relevant password. Toconnect to a hidden network, you must enter the correct network name (service setidentifier, SSID).
If you already have the web browser running using the currently active WLANconnection, to return to the web browser, select Continue web browsing.
To end the active connection, select the connection and Disconnect WLAN.
WLAN internet access pointsSelect Menu > Settings and Connectivity > Wireless LAN > Options.
Select from the following:
Filter WLAN networks — Filter out wireless LANs (WLANs) from the list of foundnetworks. The selected networks are not displayed the next time the applicationsearches for WLANs.Details — View the details of a network shown in the list. If you select an activeconnection, the connection details are displayed.
Operating modesThere are two operating modes in WLAN: infrastructure and ad hoc.
The infrastructure operating mode allows two kinds of communication: wirelessdevices are connected to each other through a WLAN access point device, or wirelessdevices are connected to a wired LAN through a WLAN access point device.
Connectivity 121

In the ad hoc operating mode, devices can send and receive data directly with eachother.
Wireless LAN settingsSelect Menu > Settings and Connectivity > Wireless LAN > Options >Settings.
Select from the following:
Show WLAN availability — Select whether is displayed when a wireless LAN(WLAN) is available.
Tip: To access the WLAN Wizard application and view the available options, selectthe WLAN icon, and in the pop-up window, select the highlighted text next to theWLAN icon.
Scan for networks — If you set Show WLAN availability to Yes, you can selecthow often the device searches for available WLANs and updates the indicator.Internet connectivity test — Select whether you want the device to test theinternet capability of the selected WLAN automatically, to ask for permission everytime, or to never perform the connectivity test. If you select Run automatically orallow the test to be performed when the device asks for it, and the connectivity testis performed successfully, the access point is saved to the internet destinations.
To view advanced settings, select Options > Advanced settings. Changing theadvanced settings for the WLAN is not recommended.
Access pointsCreate a new access pointSelect Menu > Settings and Connectivity > Destinations.
122 Connectivity
You may receive access point settings in a message from a service provider. Someor all access points may be preset for your device by your service provider, and youmay not be able to change, create, edit, or remove them.
1 Select Access point.2 The device asks to check for available connections. After the search, connections
that are already available are shown and can be shared by a new access point.If you skip this step, you are asked to select a connection method and to definethe settings needed.
To view access points stored in your device, select an access point group. Thedifferent access point groups are the following:
Internet access pointsMultimedia messaging access pointsWAP access pointsUncategorised access points
The different access point types are indicated with the following:
Protected access pointPacket data access pointWireless LAN (WLAN) access point
Manage access point groupsTo avoid selecting a single access point every time the device makes a networkconnection, you can create a group that contains various access points to connectto that network and define the order in which the access points are used. Forexample, you can add wireless LAN (WLAN) and packet data access points to aninternet access point group, and use the group for browsing the web. If you giveWLAN the highest priority, the device connects to the internet through WLAN, ifavailable, and through a packet data connection if not.
Select Menu > Settings and Connectivity > Destinations.
Connectivity 123
Create a new access point groupSelect Options > Manage > New destination.
Add access points to an access point groupSelect the group and Options > New access point.
Copy an existing access point from another groupSelect the group, go to the access point to copy, and select Options > Organise >Copy to other dest..
Change the priority of an access point within a groupSelect Options > Organise > Change priority.
Packet data access point settingsSelect Menu > Settings and Connectivity > Destinations > Access point, andfollow the instructions.
Edit a packet data access pointSelect an access point group and access point marked with . Follow theinstructions from your service provider.
Select from the following:Access point name — The access point name is provided by your service provider.User name — The user name may be needed to make a data connection, and isusually provided by your service provider.Prompt password — If you must enter the password every time you log in to aserver, or if you do not want to save your password in the device, select Yes.Password — A password may be needed to make a data connection, and is usuallyprovided by your service provider.
124 Connectivity
Authentication — To always send your password encrypted, select Secure. Tosend your password encrypted when possible, select Normal.Homepage — Depending on the access point you are setting up, enter the webaddress or the address of the multimedia message centre.Use access point — Set the device to connect to the destination using this accesspoint after confirmation or automatically.
Modify advanced packet data access point settingsSelect Options > Advanced settings.
Select from the following:Network type — Select the internet protocol type to transfer data to and fromyour device. The other settings depend on the selected network type.Phone IP address (for IPv4 only) — Enter the IP address of your device.DNS addresses — Enter the IP addresses of the primary and secondary DNS servers,if required by your service provider. To obtain these addresses, contact your internetservice provider.Proxy server address — Enter the address of the proxy server. Proxy port number — Enter the port number of the proxy server.
WLAN access point settingsSelect Menu > Settings and Connectivity > Destinations > Access point, andfollow the instructions.
Edit a wireless LAN (WLAN) access pointSelect an access point group and access point marked with . Follow theinstructions from your WLAN service provider.
Select from the following:
Connectivity 125
WLAN network name — Select Enter manually or Search for networks. If youselect an existing network, the WLAN network mode and WLAN security mode aredetermined by the settings of its access point device.Network status — Define whether the network name is displayed.WLAN network mode — Select Ad-hoc to create an ad hoc network and to allowdevices to send and receive data directly; a WLAN access point device is not needed.In an ad hoc network, all devices must use the same WLAN network name.WLAN security mode — Select the encryption used: WEP, 802.1x, orWPA/WPA2(802.1x and WPA/WPA2 are not available for ad hoc networks). If you select Opennetwork, no encryption is used. The WEP, 802.1x and WPA functions can be usedonly if the network supports them.Homepage — Enter the web address of the starting page.Use access point — Set the device to create a connection using this access pointautomatically or after confirmation.
The available options may vary.
Security settings for WEPDefine the WEP security settings if you have selected the wired equivalent privacy(WEP) as the WLAN security mode.
1 Select Menu > Settings and Connectivity > Destinations.2 Select the access point group that has the desired WLAN access point, and select
the access point.You can also define WEP settings when creating a new WLAN access point.
3 Select WLAN security mode > WEP.4 Select WLAN security settings, and define the following:
WEP key in use — Select the wired equivalent privacy (WEP) key number. Youcan create up to four WEP keys. The same settings must be entered on the WLANaccess point device.
126 Connectivity
Authentication type — Select Open or Shared for the authentication typebetween your device and the WLAN access point device.WEP key settings — Enter WEP encryption (length of the key), WEP keyformat (ASCII or Hexadecimal), and WEP key (the WEP key data in the selectedformat).
Security settings for 802.1x and WPA/WPA2Define the 802.1x or WPA/WPA2 security settings if you have selected either as theWLAN security mode.
1 Select Menu > Settings and Connectivity > Destinations.2 Open the access point group that has the desired WLAN access point, and select
the access point.You can also define 802.1x or WPA/WPA2 settings when creating a new WLANaccess point.
3 Select WLAN security mode > WPA/WPA2 or 802.1x.4 Select WLAN security settings > WPA/WPA2 > EAP to use an extensible
authentication protocol (EAP) plug-in, or Pre-shared key to use a password.The same password must be entered on the WLAN access point device.If you selected EAP, define the EAP plug-in settings according to the instructionsfrom your service provider.Connections in WPA2 only mode are applicable to WPA2 enabled devices only.
The available options may vary.
Advanced WLAN settings1 Select Menu > Settings and Connectivity > Destinations.2 Open the access point group that has the desired WLAN access point, and select
the WLAN access point.You can also define advanced WLAN settings when creating a new WLAN accesspoint.
Connectivity 127

3 Select Options > Advanced settings, and define the following:
IPv4 settings — Enter the IP address of your device, the subnet IP address, thedefault gateway, and the IP addresses of the primary and secondary DNS servers.For these addresses, contact your internet service provider.IPv6 settings — Define the type of DNS address.Ad-hoc channel (only for Ad-hoc) — To enter a channel number (1-11) manually,select User defined.Proxy server address — Enter the address for the proxy server.Proxy port number — Enter the proxy port number.
The available options may vary.
View your active data connectionsSelect Menu > Settings and Connectivity > Connection mgr..
In the active data connections view, you can see your data connections:
data callspacket data connectionsWLAN connections
Close a connectionSelect Options > Disconnect.
Close all open connectionsSelect Options > Disconnect all.
View the details of a connectionSelect Options > Details.
128 Connectivity
SynchronisationWith the Sync application, you can synchronise your notes, messages, contacts, andother information with a remote server.
Select Menu > Connectivity > Data transfer.
You may receive synchronisation settings as a configuration message from yourservice provider.
A synchronisation profile contains the necessary settings for synchronisation. Whenyou open the application, the default or previously used synchronisation profile isdisplayed.
Include or exclude content typesSelect a content type.
Synchronise dataSelect Options > Synchronise.
Create a new synchronisation profileSelect Options > New sync profile.
Manage synchronisation profilesSelect Options and the desired option.
Bluetooth connectivityAbout Bluetooth connectivityWith Bluetooth connectivity, you can make a wireless connection to othercompatible devices, such as mobile devices, computers, headsets, and car kits.
You can use the connection to send items from your device, transfer files from yourcompatible PC, and print files with a compatible printer.
Connectivity 129
Select Menu > Settings and Connectivity > Bluetooth.
Since devices with Bluetooth wireless technology communicate using radio waves,they do not need to be in direct line-of-sight. However, they must be within 10metres (33 feet) of each other, although the connection may be subject tointerference from obstructions such as walls or from other electronic devices.
This device is compliant with Bluetooth Specification 2.0 + EDR supporting thefollowing profiles: generic access, network access, control, hands-free, headset,object push, file transfer, dial-up networking, SIM access, and serial port. To ensureinteroperability between other devices supporting Bluetooth technology, use Nokiaapproved accessories for this model. Check with the manufacturers of other devicesto determine their compatibility with this device.
When the device is locked, only connections to authorised devices are possible.
Features using Bluetooth technology increase the demand on battery power andreduce the battery life.
Bluetooth settingsSelect Menu > Settings and Connectivity > Bluetooth.
Select from the following:
Bluetooth — Activate Bluetooth connectivity.My phone's visibility — To allow your device to be visible to other Bluetoothdevices, select Shown to all. To set a length of time, after which the visibility is setfrom shown to hidden, select Set visibility period. To hide your device from otherdevices, select Hidden.My phone's name — Edit the name of your device. The name is shown to otherBluetooth devices.Remote SIM mode — Allow another device, such as a compatible car kit accessory,to use the SIM card in your device to connect to the network.
130 Connectivity
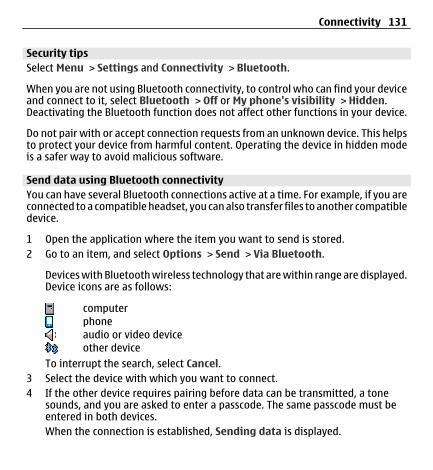
Security tipsSelect Menu > Settings and Connectivity > Bluetooth.
When you are not using Bluetooth connectivity, to control who can find your deviceand connect to it, select Bluetooth > Off or My phone's visibility > Hidden.Deactivating the Bluetooth function does not affect other functions in your device.
Do not pair with or accept connection requests from an unknown device. This helpsto protect your device from harmful content. Operating the device in hidden modeis a safer way to avoid malicious software.
Send data using Bluetooth connectivityYou can have several Bluetooth connections active at a time. For example, if you areconnected to a compatible headset, you can also transfer files to another compatibledevice.
1 Open the application where the item you want to send is stored.2 Go to an item, and select Options > Send > Via Bluetooth.
Devices with Bluetooth wireless technology that are within range are displayed.Device icons are as follows:
computerphoneaudio or video deviceother device
To interrupt the search, select Cancel.3 Select the device with which you want to connect.4 If the other device requires pairing before data can be transmitted, a tone
sounds, and you are asked to enter a passcode. The same passcode must beentered in both devices.When the connection is established, Sending data is displayed.
Connectivity 131
Tip: When searching for devices, some devices may show only the unique address(device address). To find the unique address of your device, in the dialler, enter*#2820#.
Pair devicesYou can pair your device with a compatible device to make subsequent Bluetoothconnections between the devices quicker. Before pairing, create your own passcode(1 to 16 digits), and agree with the owner of the other device to use the same code.Devices that do not have a user interface have a factory-set passcode. The passcodeis used only once.
Select Menu > Settings and Connectivity > Bluetooth.
1 Open the Paired devices tab.2 Select Options > New paired device. Devices that are within range are
displayed.3 Select the device.4 Enter the passcode on both devices.
indicates a paired device in the device search view.
Connect to an accessory after pairingSelect Options > Connect to audio device. Some audio accessories connectautomatically to your device after pairing.
Set a device as authorisedSelect Set as authorised. Connections between your device and the authoriseddevice can be made without your knowledge. Use this only for your own devices,such as your compatible headset or PC, or devices that belong to someone you trust.
indicates authorised devices in the paired devices view.
Cancel a pairing with a deviceSelect Options > Delete.
132 Connectivity
Cancel all pairingsSelect Options > Delete all.
Receive data using Bluetooth connectivityWhen you receive data using Bluetooth connectivity, a tone sounds, and the deviceasks you if you want to accept the message. If you accept, is displayed, andyou can find an informative message about the data in the Inbox folder inMessaging. Messages received using Bluetooth connectivity are indicated with .
Block devicesYou can prevent devices from establishing a Bluetooth connection to your device.
Select Menu > Settings and Connectivity > Bluetooth.
Block a deviceOn the Paired devices tab, go to a device you want to block, and select Options >Block.
Unblock a deviceOn the Blocked devices tab, go to a device, and select Options > Delete.
Unblock all blocked devicesSelect Options > Delete all.
If you reject a pairing request from another device, you are asked if you want toblock all future connection requests from this device. If you accept the query, thedevice is added to the list of blocked devices.
Remote SIM modeWith remote SIM mode, you can use a compatible car kit accessory. Before remoteSIM mode can be activated, the two devices must be paired and the pairing initiated
Connectivity 133
from the other device. When pairing, use a 16-digit passcode, and set the otherdevice as authorised.
Select Menu > Settings and Connectivity > Bluetooth.
Activate remote SIM mode1 Activate Bluetooth connectivity. Select Bluetooth.2 Activate remote SIM mode in your device. Select Remote SIM mode.3 Activate remote SIM mode in the other device.
When remote SIM mode is activated, Remote SIM mode is displayed in the homescreen. The connection to the wireless network is closed, and you cannot use SIMcard services or features that require cellular network coverage.
When your device is in remote SIM mode, you can only make or receive calls usingthe connected accessory. Your device can only make calls to the emergency numbersprogrammed into your device.
Deactivate remote SIM modePress the power key, and select Exit remote SIM mode.
Transfer data using a USB cable
Select Menu > Settings and Connectivity > USB.
134 Connectivity

Select the USB mode every time a compatible data cable is connectedSelect Ask on connection > Yes.
If the Ask on connection option is not active, or you want to change the USB modeduring an active connection, select USB connection mode and from the following:Ovi Suite — Use Nokia PC applications such as Nokia Ovi Suite or Nokia SoftwareUpdater.Mass storage — Transfer data between your device and a compatible PC.Image transfer — Print images using a compatible printer.Media transfer — Synchronise music with Nokia Music or Windows Media Player.
PC connectionsYou can use your mobile device with a variety of compatible PC connectivity anddata communications applications. With Nokia Ovi Suite you can, for example,transfer files and images between your device and a compatible computer.
Connectivity 135
To use Ovi Suite with USB connection mode, select Ovi Suite.
For more information about Ovi Suite, see the support area at www.ovi.com.
Administrative settingsSet the online time for the data call connectionSelect Menu > Settings and Connectivity > Admin. settings > Data call.
The data call settings affect all access points that use a GSM data call.
Packet data settingsSelect Menu > Settings and Connectivity > Admin. settings > Packet data.
The packet data settings affect all access points using a packet data connection.
Open a packet data connection whenever the network is availableSelect Packet data connection > When available.It is quicker, for example, to send an e-mail, if the connection is always open. Ifthere is no network coverage, the device periodically tries to open a packet dataconnection.
Open a packet data connection only when neededSelect Packet data connection > When needed.Every time you, for example, send an e-mail, the connection needs to be openedfirst.
Use HSDPA (network service) in UMTS networksSelect High speed packet access.
You can use your device as a modem for your computer, to access the internet overa packet data connection.
136 Connectivity
Define the access point to use when using your device as a modemSelect Access point.
SIP settingsSession Initiation Protocol (SIP) settings are needed for certain network servicesusing SIP. You may receive the settings in a special text message from your serviceprovider. You can view, delete, or create these setting profiles in SIP settings.
Select Menu > Settings and Connectivity > Admin. settings > SIP settings.
Access point name controlWith the access point name control service, you can restrict packet data connectionsand allow your device to use only certain packet data access points.
Select Menu > Settings and Connectivity > Admin. settings > APN control.
This setting is only available if your SIM card supports the access point controlservice.
Activate the service, or set the allowed access pointsSelect Options and the appropriate option.To modify the settings, you need to enter your PIN2 code. The code is provided byyour service provider.
Nokia Video Centre
With Nokia Video Centre (network service), you can download and stream videoclips over the air from compatible internet video services using a packet data orWLAN connection. You can also transfer video clips from a compatible PC to yourdevice and view them in Video centre.
Nokia Video Centre 137
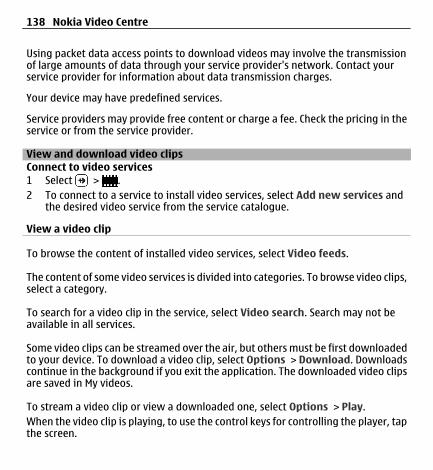
Using packet data access points to download videos may involve the transmissionof large amounts of data through your service provider's network. Contact yourservice provider for information about data transmission charges.
Your device may have predefined services.
Service providers may provide free content or charge a fee. Check the pricing in theservice or from the service provider.
View and download video clipsConnect to video services1 Select > .2 To connect to a service to install video services, select Add new services and
the desired video service from the service catalogue.
View a video clip
To browse the content of installed video services, select Video feeds.
The content of some video services is divided into categories. To browse video clips,select a category.
To search for a video clip in the service, select Video search. Search may not beavailable in all services.
Some video clips can be streamed over the air, but others must be first downloadedto your device. To download a video clip, select Options > Download. Downloadscontinue in the background if you exit the application. The downloaded video clipsare saved in My videos.
To stream a video clip or view a downloaded one, select Options > Play.When the video clip is playing, to use the control keys for controlling the player, tapthe screen.
138 Nokia Video Centre
To adjust the volume, use the volume key.
Warning:Continuous exposure to high volume may damage your hearing. Listen to music ata moderate level, and do not hold the device near your ear when the loudspeakeris in use.
Select Options and from the following:Resume download — Resume a paused or failed download.Cancel download — Cancel a download.Preview — Preview a video clip. This option is available if supported by the service.Video details — View information about a video clip.Refresh list — Refresh the list of video clips.Open link in browser — Open a link in the web browser.
Schedule downloads
Setting the application to download video clips automatically may involve thetransmission of large amounts of data through your service provider's network. Forinformation about data transmission charges, contact your service provider.To schedule an automatic download for video clips in a service, select Options >Schedule downloads.Video centre automatically downloads new video clips daily at the time you define.
To cancel scheduled downloads, select Manual download as the downloadmethod.
Video feedsSelect > .
Nokia Video Centre 139
The content of the installed video services is distributed using RSS feeds. To viewand manage your feeds, select Video feeds.
Select Options and from the following:Feed subscriptions — Check your current feed subscriptions.Feed details — View information about a video.Add feed — Subscribe to new feeds. Select Via Video directory to select a feedfrom the services in the video directory.Refresh feeds — Refresh the content of all feeds.Manage account — Manage your account options for a particular feed, if available.
To view the videos available in a feed, select a feed from the list.
My videosMy videos is a storage place for all videos. You can list downloaded videos and videoclips recorded with the device camera in separate views.
To open a folder and view video clips, select the folder. When a video clip is playing,to use the control keys for controlling the player, tap the screen.
To adjust the volume, press the volume key.
Select Options and from the following:Resume download — Resume a paused or failed download.Cancel download — Cancel a download.Video details — View information about a video clip.Find — Find a video clip. Enter search text that matches the file name.Memory status — View the amount of free and used memory.Sort by — Sort video clips. Select the desired category.
140 Nokia Video Centre
Move and copy — Move or copy video clips. Select Copy or Move and the desiredlocation.
Transfer videos from your PCTransfer your own video clips to Video centre from compatible devices using acompatible USB data cable. Video centre displays only the video clips which are ina format supported by your device.
1 To view your device on a PC as a mass memory device where you can transferany data files, make the connection with a USB data cable.
2 Select Mass storage as the connection mode.3 Select the video clips you want to copy from your PC.4 Transfer the video clips to E:\My Videos in the mass memory of your device.
The transferred video clips appear in the My videos folder in Video centre. Videofiles in other folders of your device are not displayed.
Video centre settingsIn the Video centre main view, select Options > Settings and from the following:Video service selection — Select the video services that you want to appear inVideo centre. You can also add, remove, edit, and view the details of a video service.You cannot edit preinstalled video services.Connection settings — To define the network destination used for the networkconnection, select Network connection. To select the connection manually eachtime Video centre opens a network connection, select Always ask.
To set GPRS connection on or off, select Confirm GPRS usage.
To set roaming on or off, select Confirm roaming.Parental control — Set an age limit to videos. The required password is the sameas the device lock code. The factory setting for the lock code is 12345. In video-on-demand services, videos which have the same or a higher age limit than you haveset, are hidden.
Nokia Video Centre 141
Preferred memory — Select whether downloaded videos are saved in the devicememory or in the mass memory.Thumbnails — Select whether to download and view thumbnail images in videofeeds.
Internet
About the web browser
Select > .
Catch up on the news, and visit your favourite websites. You can use your phoneweb browser to view web pages on the internet.
To browse the web, you must be connected to the internet.
Browse the webSelect > .
Tip: If you do not have a flat-rate data plan from your service provider, to save datacosts in your phone bill, you can use a WLAN to connect to the internet.
Go to a websiteSelect the web address bar, enter a web address, and select .
Tip: To search the internet, select the web address bar, enter the search word, andselect the link below the web address bar.
Zoom in or outDouble-tap the screen.
A cache is a memory location that is used to store data temporarily. If you have triedto access or have accessed confidential information requiring passwords, empty the
142 Internet
cache after each use. The information or services you have accessed are stored inthe cache.
Empty the cacheSelect > > Privacy > Clear privacy data > Cache.
Add a bookmarkIf you visit the same websites all the time, add them to your Bookmarks view, soyou can easily access them.
Select > .
While browsing, select > .
Go to a bookmarked website while browsingSelect and a bookmark.
Subscribe to a web feedYou don't have to visit your favourite websites regularly to keep up with what's newon them. You can subscribe to web feeds and get links to latest contentautomatically.
Select > .
Web feeds on web pages are usually indicated with . They are used to share, forexample, the latest news headlines or blog entries.
Go to a blog or web page that contains a web feed, and select > and thedesired feed.
Internet 143
Update a feedIn the Web feeds view, select and hold the feed, and from the pop-up menu, selectRefresh.
Set a feed to automatically updateIn the Web feeds view, select and hold the feed, and from the pop-up menu, selectEdit > Automatic updates.
Discover nearby eventsAre you looking for interesting things to do near your current location? With Hereand now, you can get information about, for example, the weather, events, cinematimes, or restaurants nearby.
Select > .
1 Select > Here and now.2 Browse the available services, and for more information, select the service.
Content such as satellite images, guides, weather and traffic information andrelated services are generated by third parties independent of Nokia. The contentmay be inaccurate and incomplete to some extent and is subject to availability.Never rely solely on the aforementioned content and related services.
Some services may not be available in all countries, and may be provided only inselected languages. The services may be network dependent. For more information,contact your network service provider.
Other applications
ClockSet time and dateSelect Menu > Applications > Clock.
144 Other applications

Select Options > Settings and from the following:Time — Set the time.Date — Set the date.Automatic time update — Set the network to automatically update the time, date,and time zone information for your device (network service).
Alarm clockSelect Menu > Applications > Clock.
Set a new alarm1 Select New alarm.2 Set the alarm time.3 Select Repeat to set whether and when the alarm is repeated.4 Select Done.
View your alarmsSelect Alarms. indicates an active alarm. indicates a repeated alarm.
Remove an alarmSelect Alarms, go to the alarm, and select Options > Remove alarm.
Stop the alarmSelect Stop. If your device is switched off when an alarm expires, your deviceswitches itself on and starts sounding the alarm tone.
Set the alarm to snoozeSelect Snooze.
Define the snooze timeSelect Options > Settings > Alarm snooze time.
Other applications 145
Change the alarm toneSelect Options > Settings > Clock alarm tone.
World clockWith the world clock, you can view the current time in different locations.
Select Menu > Applications > Clock.
View the timeSelect World clock.
Add locations to the listSelect Options > Add location.
Set your current locationGo to a location, and select Options > Set as current location. The time in yourdevice is changed according to the selected location. Ensure that the time is correctand matches your time zone.
CalendarTo open the calendar, select Menu > Calendar.
Calendar viewsSelect Menu > Calendar.
Switch between calendar viewsSelect Options > Change view > Day, Week, or To-do.
Change the starting day of the week, or modify calendar alarm settingsSelect Options > Settings. The starting day of the week is the view that is displayedwhen you open the calendar.
146 Other applications
Go to a specific dateSelect Options > Go to date.
Calendar toolbarSelect Menu > Calendar.
From the calendar toolbar, select from the following: Next view — Select the month view. Next view — Select the week view. Next view — Select the day view. Next view — Select the to-do view. New meeting — Add a new meeting reminder. New to-do note — Add a new to-do note.
File managerAbout File managerSelect Menu > Applications > Office > File mgr..
With File manager, you can browse, manage, and open files on your device or acompatible external drive.
Find and organise filesSelect Menu > Applications > Office > File mgr..
Search for a fileSelect Options > Find. Enter search text that matches the file name.
Move and copy files and foldersSelect Options > Organise and the desired option.
Other applications 147
Sort filesSelect Options > Sort by and the desired category.
Format the mass memory1 Select Menu > Applications > Office > File mgr..2 Select the mass memory.3 Select Options > Format mass memory. Do not format the mass memory
using PC software because it may cause degraded performance.
When the mass memory is reformatted, all data in the memory is permanentlydeleted. Back up data you want to keep before formatting the mass memory. Youcan use Nokia Ovi Suite to back up data to a compatible computer. Digital rightsmanagement (DRM) technologies may prevent some backup data from beingrestored. For more information about DRM used for your content, contact yourservice provider.
Formatting does not guarantee that all confidential data stored in the device massmemory is permanently destroyed. Standard formatting only marks the formattedarea as available space and deletes the address to find the files again. The recoveryof formatted or even overwritten data may still be possible with special recoverytools and software.
QuickofficeAbout Quickoffice
Select Menu > Applications > Office > Quickoffice.
Quickoffice consists of the following:
• Quickword for viewing Microsoft Word documents• Quicksheet for viewing Microsoft Excel worksheets• Quickpoint for viewing Microsoft PowerPoint presentations
148 Other applications

Not all file formats or features are supported.
To purchase the editor version of Quickoffice, select Updates and upgrades.
Read Microsoft Word, Excel, and PowerPoint documentsWith Quickoffice, you can view Microsoft Office documents, such as Worddocuments, Excel worksheets, or PowerPoint presentations.
Select Menu > Applications > Office > Quickoffice.
Open a fileSelect the memory where the file is stored, browse to the correct folder, and selectthe file.
Sort filesSelect Options > Sort by.
Send files to a compatible deviceSelect and the sending method.
Not all formats or features are supported.
Application managerAbout Application manager
Select Menu > Settings and Application mgr..
With Application manager, you can see the software packages installed in yourdevice. You can view details of installed applications, remove applications, anddefine installation settings.
You can install the following types of applications and software:
• JME applications based on Java™ technology with .jad or .jar file extensions
Other applications 149
• Other applications and software suitable for the Symbian operating systemwith .sis or .sisx file extensions
• Widgets with the .wgz file extension
Only install software that is compatible with your device.
Install applicationsYou can transfer installation files to your device from a compatible computer,download them during browsing, or receive them in a multimedia message, as ane-mail attachment, or using other connectivity methods, such as Bluetoothconnectivity.
You can use Nokia Application Installer in Nokia Ovi Suite to install an applicationto your device.
Icons in Application manager indicate the following:
SIS or SISX application
Java application
widgets
application installed in the mass memory
Important: Only install and use applications and other software from trustedsources, such as applications that are Symbian Signed or have passed the JavaVerified™ testing.
Before installation, note the following:
• To view the application type, version number, and the supplier or manufacturerof the application, select Options > View details.
150 Other applications
To view the security certificate details of the application, select Details: >Certificates: > View details. Control the use of digital certificates in Certificatemanagement.
• If you install a file that contains an update or repair to an existing application,you can only restore the original application if you have the original installationfile or a full backup copy of the removed software package. To restore theoriginal application, remove the application, and install the application againfrom the original installation file or the backup copy.
The JAR file is required for installing Java applications. If it is missing, the devicemay ask you to download it. If there is no access point defined for theapplication, you are asked to select one.
To install an application, do the following:
1 To locate an installation file, select Menu > Settings and Application mgr..Alternatively, search installation files using File manager, or selectMessaging > Inbox, and open a message that contains an installation file.
2 In Application manager, select Options > Install. In other applications, selectthe installation file to start the installation.During installation, the device shows information about the progress of theinstallation. If you install an application without a digital signature orcertification, the device displays a warning. Continue installation only if you aresure of the origin and contents of the application.
To start an installed application, locate the application in the menu, and select theapplication. If the application does not have a default folder defined, it is installedin the Installed apps. folder in the main menu.
To see which software packages are installed or removed and when, selectOptions > View log.
Other applications 151
Important: Your device can only support one antivirus application. Havingmore than one application with antivirus functionality could affect performanceand operation or cause the device to stop functioning.
After you install applications to mass memory, installation files (.sis, .sisx) remainin the device memory. The files may use large amounts of memory and prevent youfrom storing other files. To maintain sufficient memory, use Nokia Ovi Suite to backup installation files to a compatible PC, then use the file manager to remove theinstallation files from the device memory. If the .sis file is a message attachment,delete the message from the Messaging inbox.
Remove applicationsYou can remove applications that you have installed, for example, to increase theamount of available memory.
Select Menu > Settings.
1 Select Application mgr..2 Select Installed apps. > Options > Uninstall.3 Select Yes.
If you remove an application, you can only reinstall it if you have the originalsoftware package or a full backup of the removed software package. If you removea software package, you may no longer be able to open documents created withthat software.
If another software package depends on the software package that you removed,the other software package may stop working. See the documentation of theinstalled software package for details.
Application manager settingsSelect Menu > Settings and Application mgr..
152 Other applications
Select Installation settings and from the following:Software installation — Allow or deny installation of Symbian software that doesnot have a verified digital signature.Online certificate check — Check online certificates before installing anapplication.Default web address — Set the default web address used to check onlinecertificates.
Update software using your deviceYou can check if there are updates available for your device, and download them toyour device (network service).
Select Menu > Settings > Phone > Phone mgmt. > SW update and Options >Check for updates.
RealPlayer With RealPlayer, you can play video clips or stream media files over the air withoutsaving them to the device first.
RealPlayer does not necessarily support all file formats or all the variations of fileformats.
Select Menu > Applications > RealPlayer.
RealPlayer toolbarSelect Menu > Applications > RealPlayer.
In the Video clips, Streaming links, and Recently played views, the following toolbaricons may be available:
Send — Send a video clip or streaming link. Play — Play a video clip or video stream.
Other applications 153
Delete — Delete a video clip or streaming link. Remove — Remove a file from the recently played list.
Play a video clipSelect Menu > Applications > RealPlayer.
Play a video clipSelect Video clips and a video clip.
List recently played filesIn the main view, select Recently played.
Go to a video clip, and select Options and from the following:Use video clip — Assign a video clip to a contact or set it as a ringing tone.Mark/Unmark — Mark or unmark an item, to send or delete multiple items at thesame time.View details — View details, such as format, resolution, and duration.Settings — Edit settings for video playback and streaming.
Stream content over the airSelect Menu > Applications > RealPlayer.
Streaming content over the air is a network service. Select Streaming links and alink. You can also receive a streaming link in a text or multimedia message, or opena link on a web page.
Before live content begins streaming, your device connects to the site and startsloading the content. The content is not saved in your device.
In RealPlayer, you can only open RTSP links. However, RealPlayer can also play a RAMfile if you open a HTTP link to it in a browser.
154 Other applications
Recorder
You can use the recorder to record voice memos and telephone conversations.You can also send sound clips to your friends.
Select Menu > Music > Recorder.
Record a sound clipSelect .
Stop recording a sound clipSelect .
Listen to the sound clipSelect .
Send a sound clip as a messageSelect Options > Send.
Record a telephone conversationOpen the recorder during a voice call, and select . Both parties hear a tone atregular intervals during recording.
Select the recording quality or where to save sound clipsSelect Options > Settings.
The recorder cannot be used when a data call or GPRS connection is active.
Write a note1 Select Menu > Applications > Office > Notes.2 Select Options > New note.3 Enter text in the note field.
Other applications 155
4 Select .
Make a calculation1 Select Menu > Applications > Office > Calculator.2 Enter the first number of the calculation.3 Select a function, such as add or subtract.4 Enter the second number of the calculation.5 Select =.
This calculator has limited accuracy and is designed for simple calculations.
ConverterWith Converter, you can convert measures from one unit to another.
The converter has limited accuracy, and rounding errors may occur.
Select Menu > Applications > Office > Converter.
DictionaryYou can translate words from one language to another. Not all languages may besupported.
Look up a word to translate1 Select Menu > Applications > Office > Dictionary.2 Enter text in the search field. As you enter text, suggestions of words to translate
are displayed.3 Select the word from the list.
Select Options and from the following:Listen — Listen to the selected word.
156 Other applications
History — Find previously translated words from the current session.Languages — Change the source or target language, download languages fromthe internet, or remove a language from the dictionary. You cannot remove theEnglish language from the dictionary. You can have two additional languagesinstalled, besides English.Speech — Edit the voice feature settings. You can adjust the speed and volume ofthe voice.
Settings
Some settings may be preset for the device by your service provider, and you maynot be able to change them.
Phone settingsDate and time settingsSelect Menu > Settings and Phone > Date and time.
Select from the following:Time — Enter the current time.Time zone — Select your location.Date — Enter the current date.Date format — Select the date format.Date separator — Select the symbol that separates days, months, and years.Time format — Select the time format.Time separator — Select the symbol that separates hours and minutes.Clock type — Select the clock type.Clock alarm tone — Select the tone for the alarm clock.Alarm snooze time — Adjust the snooze time.Workdays — Select your working days. You can then set an alarm only for workingday mornings, for example.
Settings 157
Automatic time update — Set the device to update the time, date, and time zoneautomatically. This network service may not be available on all networks.
Change languageYou can change the device language and the language in which you write yourmessages and mails. You can also activate predictive text input.
Select Menu > Settings and Phone > Language.
Change the device languageSelect Phone language.
Change the writing languageSelect Writing language.
Activate predictive text inputSelect Predictive text.
Display settingsSelect Menu > Settings and Phone > Display.
Select from the following:Light sensor — Adjust the light sensor sensitivity of your device. The light sensorturns the lights on when the lighting of your location is dim and off when it is bright.Font size — Select the size of text and icons on the display.Welcome note / logo — Select whether you want to display a note or image whenyou switch on the device.Light time-out — Set how long the light stays on when you stop using the device.
158 Settings
Voice commands
Activate voice commandsPress and hold the call key in the home screen, and say a command. The voicecommand is the name of the application or profile displayed in the list.
To view the list of voice commands, select Menu > Settings and Phone > Voicecommands.
Select Options and from the following:Change command — Edit the voice commands.Playback — Listen to the synthesised voice tag.Remove voice command — Remove a voice command that you added manually.Settings — Adjust the settings.Voice command tutorial — Open the tutorial for voice commands.
Accessory settingsSelect Menu > Settings and Phone > Accessories.
Some accessory connectors indicate which type of accessory is connected to thedevice.
Select an accessory and from the following:Default profile — Set the profile you want activated each time you connect acertain compatible accessory to your device.Automatic answer — Set the device to answer an incoming call automaticallyafter 5 seconds. If the ringing type is set to Beep once or Silent, automatic answeris disabled.Lights — Set the lights to remain on after the time-out.
The available settings depend on the type of accessory.
Settings 159
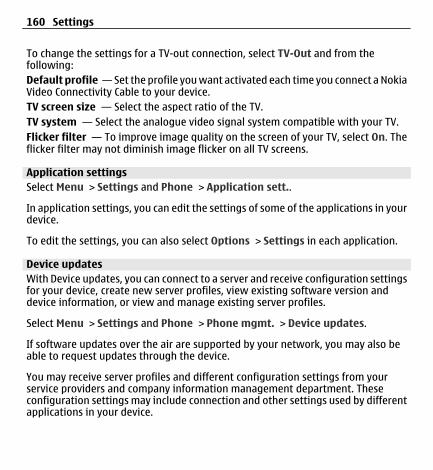
To change the settings for a TV-out connection, select TV-Out and from thefollowing:Default profile — Set the profile you want activated each time you connect a NokiaVideo Connectivity Cable to your device.TV screen size — Select the aspect ratio of the TV.TV system — Select the analogue video signal system compatible with your TV.Flicker filter — To improve image quality on the screen of your TV, select On. Theflicker filter may not diminish image flicker on all TV screens.
Application settingsSelect Menu > Settings and Phone > Application sett..
In application settings, you can edit the settings of some of the applications in yourdevice.
To edit the settings, you can also select Options > Settings in each application.
Device updatesWith Device updates, you can connect to a server and receive configuration settingsfor your device, create new server profiles, view existing software version anddevice information, or view and manage existing server profiles.
Select Menu > Settings and Phone > Phone mgmt. > Device updates.
If software updates over the air are supported by your network, you may also beable to request updates through the device.
You may receive server profiles and different configuration settings from yourservice providers and company information management department. Theseconfiguration settings may include connection and other settings used by differentapplications in your device.
160 Settings
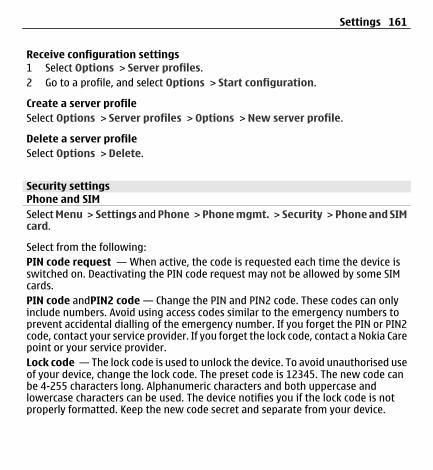
Receive configuration settings1 Select Options > Server profiles.2 Go to a profile, and select Options > Start configuration.
Create a server profileSelect Options > Server profiles > Options > New server profile.
Delete a server profileSelect Options > Delete.
Security settingsPhone and SIMSelect Menu > Settings and Phone > Phone mgmt. > Security > Phone and SIMcard.
Select from the following:PIN code request — When active, the code is requested each time the device isswitched on. Deactivating the PIN code request may not be allowed by some SIMcards.PIN code andPIN2 code — Change the PIN and PIN2 code. These codes can onlyinclude numbers. Avoid using access codes similar to the emergency numbers toprevent accidental dialling of the emergency number. If you forget the PIN or PIN2code, contact your service provider. If you forget the lock code, contact a Nokia Carepoint or your service provider.Lock code — The lock code is used to unlock the device. To avoid unauthorised useof your device, change the lock code. The preset code is 12345. The new code canbe 4-255 characters long. Alphanumeric characters and both uppercase andlowercase characters can be used. The device notifies you if the lock code is notproperly formatted. Keep the new code secret and separate from your device.
Settings 161

Phone autolock period — To avoid unauthorised use, you can set a time-out afterwhich the device automatically locks. A locked device cannot be used until thecorrect lock code is entered. To turn off autolock, select None.Lock if SIM card changed — Set the device to ask for the lock code when anunknown SIM card is inserted into your device. The device maintains a list of SIMcards that are recognised as the owner’s cards.Remote phone locking — Enable or disable remote lock.Closed user group — Specify a group of people to whom you can call and who cancall you (network service).Confirm SIM services — Set the device to display confirmation messages whenyou are using a SIM card service (network service).
Certificate managementSelect Menu > Settings and Phone > Phone mgmt. > Security > Certificatemanagement.
Digital certificates should be used if you want to connect to an online bank oranother site or remote server for actions that involve transferring confidentialinformation. They should also be used if you want to reduce the risk of viruses orother malicious software and be sure of the authenticity of software whendownloading and installing software.
Select from the following:Authority certificates — View and edit authority certificates.Trusted site certificates — View and edit trusted site certificates.Personal certificates — View and edit personal certificates.Phone certificates — View and edit device certificates.
Digital certificates do not guarantee safety; they are used to verify the origin ofsoftware.
162 Settings
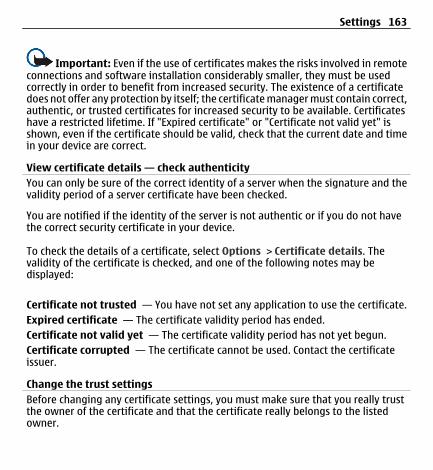
Important: Even if the use of certificates makes the risks involved in remoteconnections and software installation considerably smaller, they must be usedcorrectly in order to benefit from increased security. The existence of a certificatedoes not offer any protection by itself; the certificate manager must contain correct,authentic, or trusted certificates for increased security to be available. Certificateshave a restricted lifetime. If "Expired certificate" or "Certificate not valid yet" isshown, even if the certificate should be valid, check that the current date and timein your device are correct.
View certificate details — check authenticityYou can only be sure of the correct identity of a server when the signature and thevalidity period of a server certificate have been checked.
You are notified if the identity of the server is not authentic or if you do not havethe correct security certificate in your device.
To check the details of a certificate, select Options > Certificate details. Thevalidity of the certificate is checked, and one of the following notes may bedisplayed:
Certificate not trusted — You have not set any application to use the certificate.Expired certificate — The certificate validity period has ended.Certificate not valid yet — The certificate validity period has not yet begun.Certificate corrupted — The certificate cannot be used. Contact the certificateissuer.
Change the trust settingsBefore changing any certificate settings, you must make sure that you really trustthe owner of the certificate and that the certificate really belongs to the listedowner.
Settings 163
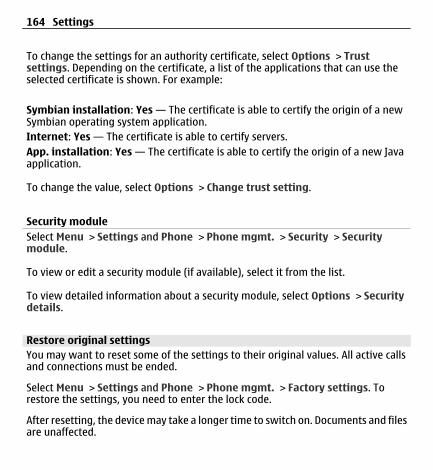
To change the settings for an authority certificate, select Options > Trustsettings. Depending on the certificate, a list of the applications that can use theselected certificate is shown. For example:
Symbian installation: Yes — The certificate is able to certify the origin of a newSymbian operating system application.Internet: Yes — The certificate is able to certify servers.App. installation: Yes — The certificate is able to certify the origin of a new Javaapplication.
To change the value, select Options > Change trust setting.
Security moduleSelect Menu > Settings and Phone > Phone mgmt. > Security > Securitymodule.
To view or edit a security module (if available), select it from the list.
To view detailed information about a security module, select Options > Securitydetails.
Restore original settingsYou may want to reset some of the settings to their original values. All active callsand connections must be ended.
Select Menu > Settings and Phone > Phone mgmt. > Factory settings. Torestore the settings, you need to enter the lock code.
After resetting, the device may take a longer time to switch on. Documents and filesare unaffected.
164 Settings
Protected contentDigital rights management (DRM) protected content, for example some media files,such as images, music, or video clips, comes with an associated licence that definesyour rights to use the content.
You can view the details and status of the licences, and reactivate and removelicences.
Manage digital rights licencesSelect Menu > Settings > Phone > Phone mgmt. > Security > Protectedcontent.
Digital rights management
Content owners may use different types of digital rights management (DRM)technologies to protect their intellectual property, including copyrights. This deviceuses various types of DRM software to access DRM-protected content. With thisdevice you can access content protected with WMDRM 10, OMA DRM 1.0, and OMADRM 2.0. If certain DRM software fails to protect the content, content owners mayask that such DRM software's ability to access new DRM-protected content berevoked. Revocation may also prevent renewal of such DRM-protected contentalready in your device. Revocation of such DRM software does not affect the use ofcontent protected with other types of DRM or the use of non-DRM-protected content.
Digital rights management (DRM) protected content comes with an associatedlicence that defines your rights to use the content.
If your device has OMA DRM-protected content, to back up both the activation keysand the content, use the backup feature of Nokia Ovi Suite.
If your device has WMDRM-protected content, both the licence and the content willbe lost if the device memory is formatted. You may also lose the licence and thecontent if the files on your device get corrupted. Losing the licence or the content
Settings 165
may limit your ability to use the same content on your device again. For moreinformation, contact your service provider.
Some licence may be connected to a specific SIM card, and the protected contentcan be accessed only if the SIM card is inserted in the device.
Notification lightsSelect Menu > Settings and Phone > Notification lights.
To turn the standby breathing light on or off, select Standby br. light.When the standby breathing light is turned on, the menu key lights up periodically.
To turn the notification light on or off, select Notification light.When the notification light is turned on, the menu key lights up for a period youdefine to notify of missed events, such as missed calls or unread messages.
Call settingsCall settingsWith call settings, you can define call specific settings in your device.
Select Menu > Settings and Calling > Call.
Select from the following:
Send my caller ID — Select Yes to show your phone number to the person you arecalling. To use the setting agreed upon with your service provider, select Set bynetwork (network service).Call waiting — Set your device to notify you of incoming calls while you are in acall (network service), or check whether the feature is activated.Reject call with message — Send a text message when you reject a call, informingthe caller why you could not answer the call.
166 Settings

Message text — Write the standard text message that is sent when you reject acall.Own video in recvd. call — Allow or deny video sending during a video call fromyour device.Image in video call — If video is not sent during a video call, select the image tobe displayed instead.Automatic redial — Set your device to make a maximum of 10 attempts to connectthe call after an unsuccessful call attempt. To stop automatic redialling, press theend key.Show call duration — Display the length of a call during a call.Summary after call — Display the length of a call after a call ends.Speed dialling — Activate speed dialling.Anykey answer — Activate anykey answer.Line in use — This setting (network service) is shown only if the SIM card supportstwo subscriber numbers, that is, two phone lines. Select which phone line you wantto use to make calls or send text messages. Calls on both lines can be answeredirrespective of the selected line. If you select Line 2, and have not subscribed to thisnetwork service, you are not able to make calls. When line 2 is selected, isdisplayed in the home screen.Line change — Prevent phone line selection (network service), if supported byyour SIM card. To change this setting, you need the PIN2 code.
The available options may vary.
Call divertYou can divert incoming calls to your voice mailbox or another phone number. Fordetails, contact your service provider.
Select Menu > Settings and Calling > Call divert.
Settings 167
Divert all voice calls to your voice mailbox or another phone number1 Select Voice calls > All voice calls.2 To activate call divert, select Activate.3 To divert calls to your voice mailbox, select To voice mailbox.4 To divert calls to another phone number, select To other number, and enter
the number, or select Find to retrieve a number saved in the contacts list.
Several diverting options can be active at the same time. In the home screen, indicates that all calls are diverted.
Call barringWith call barring (network service), you can restrict the calls that you make orreceive with the device. For example, you can restrict all outgoing international callsor incoming calls when you are abroad. To modify the settings, you need the barringpassword from your service provider.
Select Menu > Settings and Calling > Call barring.
When security features that restrict calls are in use (such as call barring, closed usergroup, and fixed dialling), calls may be possible to the official emergency numberprogrammed into your device. Call barring and call diverting cannot be active at thesame time.
Bar voice calls or check the barring statusSelect the desired barring option and Activate or Check status. Call barring affectsall calls, including data calls.
Protect the environment
Save energyYou do not need to charge your battery so often if you do the following:
168 Protect the environment
• Close applications and data connections, such as your WLAN or Bluetoothconnection, when not in use.
• Deactivate unnecessary sounds, such as touch screen and key tones.
Recycle
When this phone has reached the end of its working life, all of its materials can berecovered as materials and energy. To guarantee the correct disposal and reuse,Nokia co-operates with its partners through a program called We:recycle. Forinformation on how to recycle your old Nokia products and where to find collectionsites, go to www.nokia.com/werecycle, or call the Nokia Contact Center.
Recycle packaging and user guides at your local recycling scheme.
The crossed-out wheeled-bin symbol on your product, battery, literature, orpackaging reminds you that all electrical and electronic products, batteries, andaccumulators must be taken to separate collection at the end of their working life.This requirement applies in the European Union. Do not dispose of these productsas unsorted municipal waste. For more information on the environmental attributesof your phone, go to www.nokia.com/ecoprofile.
Protect the environment 169
Product and safety information
Accessories
Warning:Use only batteries, chargers, and accessories approved by Nokia for use with this particular model. The use of any othertypes may invalidate any approval or warranty, and may be dangerous. In particular, use of unapproved chargers orbatteries may present a risk of fire, explosion, leakage, or other hazard.
For availability of approved accessories, please check with your dealer. When you disconnect the power cord of anyaccessory, grasp and pull the plug, not the cord.
BatteryBattery and charger informationYour device is powered by a rechargeable battery. The battery intended for use with this device is BL-5J. Nokia may makeadditional battery models available for this device.
This device is intended for use when supplied with power from the following chargers: AC-8. The exact Nokia chargermodel number may vary depending on the plug type, identified by E, X, AR, U, A, C, K, or B.
The battery can be charged and discharged hundreds of times, but it will eventually wear out. When the talk and standbytimes are noticeably shorter than normal, replace the battery. Use only Nokia approved batteries, and recharge yourbattery only with Nokia approved chargers designated for this device.
If a battery is being used for the first time or if the battery has not been used for a prolonged period, it may be necessaryto connect the charger, then disconnect and reconnect it to begin charging the battery. If the battery is completelydischarged, it may take several minutes before the charging indicator appears on the display or before any calls can bemade.
Safe removal. Always switch the device off and disconnect the charger before removing the battery.
Proper charging. Unplug the charger from the electrical plug and the device when not in use. Do not leave a fully chargedbattery connected to a charger, since overcharging may shorten its lifetime. If left unused, a fully charged battery willlose its charge over time.
Avoid extreme temperatures. Always try to keep the battery between 15°C and 25°C (59°F and 77°F). Extremetemperatures reduce the capacity and lifetime of the battery. A device with a hot or cold battery may not work temporarily.Battery performance is particularly limited in temperatures well below freezing.
170 Product and safety information
Do not short-circuit. Accidental short-circuiting can occur when a metallic object such as a coin, clip, or pen causes directconnection of the positive (+) and negative (-) terminals of the battery. (These look like metal strips on the battery.) Thismight happen, for example, when you carry a spare battery in your pocket or purse. Short-circuiting the terminals maydamage the battery or the connecting object.
Disposal. Do not dispose of batteries in a fire as they may explode. Dispose of batteries according to local regulations.Please recycle when possible. Do not dispose as household waste.
Leak. Do not dismantle, cut, open, crush, bend, puncture, or shred cells or batteries. In the event of a battery leak, preventbattery liquid contact with skin or eyes. If this happens, flush the affected areas immediately with water, or seek medicalhelp.
Damage. Do not modify, remanufacture, attempt to insert foreign objects into the battery, or immerse or expose it towater or other liquids. Batteries may explode if damaged.
Correct use. Use the battery only for its intended purpose. Improper battery use may result in a fire, explosion, or otherhazard. If the device or battery is dropped, especially on a hard surface, and you believe the battery has been damaged,take it to a service centre for inspection before continuing to use it. Never use any charger or battery that is damaged.Keep your battery out of the reach of small children.
Take care of your deviceHandle your device, battery, charger and accessories with care. The following suggestions help you protect your warrantycoverage.
• Keep the device dry. Precipitation, humidity, and all types of liquids or moisture can contain minerals that corrodeelectronic circuits. If your device gets wet, remove the battery, and allow the device to dry.
• Do not use or store the device in dusty or dirty areas. Moving parts and electronic components can be damaged.• Do not store the device in high temperatures. High temperatures can shorten the life of the device, damage the
battery, and warp or melt plastics.• Do not store the device in cold temperatures. When the device warms to its normal temperature, moisture can form
inside the device and damage electronic circuits.• Do not attempt to open the device other than as instructed in the user guide.• Unauthorised modifications may damage the device and violate regulations governing radio devices.• Do not drop, knock, or shake the device. Rough handling can break internal circuit boards and mechanics.• Only use a soft, clean, dry cloth to clean the surface of the device.• Do not paint the device. Paint can clog moving parts and prevent proper operation.• Switch off the device and remove the battery from time to time for optimum performance.• Keep your device away from magnets or magnetic fields.
Product and safety information 171
• To keep your important data safe, store it in at least two separate places, such as your device, memory card, orcomputer, or write down important information.
During extended operation, the device may feel warm. In most cases, this is normal. If you suspect the device is notworking properly, take it to the nearest authorised service facility.
RecycleAlways return your used electronic products, batteries, and packaging materials to dedicated collection points. This wayyou help prevent uncontrolled waste disposal and promote the recycling of materials. Check how to recycle your Nokiaproducts at www.nokia.com/recycling.
Additional safety information
Note: The surface of this device does not contain nickel in the platings. The surface of this device containsstainless steel.
Small childrenYour device and its accessories are not toys. They may contain small parts. Keep them out of the reach of small children.
Operating environmentThis device meets RF exposure guidelines in the normal use position at the ear or at least 1.5 centimetre (5/8 inch) awayfrom the body. Any carry case, belt clip, or holder for body-worn operation should not contain metal and should positionthe device the above-stated distance from your body.
To send data files or messages requires a quality connection to the network. Data files or messages may be delayed untilsuch a connection is available. Follow the separation distance instructions until the transmission is completed.
Parts of the device are magnetic. Metallic materials may be attracted to the device. Do not place credit cards or othermagnetic storage media near the device, because information stored on them may be erased.
Medical devicesOperation of radio transmitting equipment, including wireless phones, may interfere with the function of inadequatelyprotected medical devices. Consult a physician or the manufacturer of the medical device to determine whether they areadequately shielded from external RF energy. Switch off your device when regulations posted instruct you to do so.Hospitals or health care facilities may use equipment sensitive to external RF energy.
Implanted medical devicesManufacturers of medical devices recommend a minimum separation of 15.3 centimetres (6 inches) between a wirelessdevice and an implanted medical device, such as a pacemaker or implanted cardioverter defibrillator, to avoid potentialinterference with the medical device. Persons who have such devices should:
172 Product and safety information

• Always keep the wireless device more than 15.3 centimetres (6 inches) from the medical device.• Not carry the wireless device in a breast pocket.• Hold the wireless device to the ear opposite the medical device.• Turn the wireless device off if there is any reason to suspect that interference is taking place.• Follow the manufacturer directions for the implanted medical device.
If you have any questions about using your wireless device with an implanted medical device, consult your health careprovider.
Hearing aidsSome digital wireless devices may interfere with some hearing aids.
VehiclesRF signals may affect improperly installed or inadequately shielded electronic systems in motor vehicles such as electronicfuel injection, electronic antilock braking, electronic speed control, and air bag systems. For more information, check withthe manufacturer of your vehicle or its equipment.
Only qualified personnel should service the device or install the device in a vehicle. Faulty installation or service may bedangerous and may invalidate your warranty. Check regularly that all wireless device equipment in your vehicle ismounted and operating properly. Do not store or carry flammable liquids, gases, or explosive materials in the samecompartment as the device, its parts, or accessories. Remember that air bags inflate with great force. Do not place yourdevice or accessories in the air bag deployment area.
Switch off your device before boarding an aircraft. The use of wireless teledevices in an aircraft may be dangerous to theoperation of the aircraft and may be illegal.
Potentially explosive environmentsSwitch off your device in any area with a potentially explosive atmosphere. Obey all posted instructions. Sparks in suchareas could cause an explosion or fire resulting in bodily injury or death. Switch off the device at refuelling points suchas near gas pumps at service stations. Observe restrictions in fuel depots, storage, and distribution areas; chemical plants;or where blasting operations are in progress. Areas with a potentially explosive atmosphere are often, but not always,clearly marked. They include areas where you would be advised to turn off your vehicle engine, below deck on boats,chemical transfer or storage facilities and where the air contains chemicals or particles such as grain, dust, or metalpowders. You should check with the manufacturers of vehicles using liquefied petroleum gas (such as propane or butane)to determine if this device can be safely used in their vicinity.
Emergency calls
Important: This device operates using radio signals, wireless networks, landline networks, and user-programmed functions. If your device supports voice calls over the internet (internet calls), activate both the internet
Product and safety information 173
calls and the cellular phone. The device will attempt to make emergency calls over both the cellular networks and throughyour internet call provider if both are activated. Connections in all conditions cannot be guaranteed. You should neverrely solely on any wireless device for essential communications like medical emergencies.
To make an emergency call:
1 If the device is not on, switch it on. Check for adequate signal strength. Depending on your device, you may alsoneed to complete the following:
• Insert a SIM card if your device uses one.• Remove certain call restrictions you have activated in your device.• Change your profile from offline profile mode to an active profile.• If the screen and keys are locked, slide the lock switch on the side of the device to unlock them.
2 Press the end key as many times as needed to clear the display and ready the device for calls.
3 To open the dialler, select Telephone or .
4 Enter the official emergency number for your present location. Emergency numbers vary by location.5 Press the call key.
When making an emergency call, give all the necessary information as accurately as possible. Your wireless device maybe the only means of communication at the scene of an accident. Do not end the call until given permission to do so.
Certification information (SAR)This mobile device meets guidelines for exposure to radio waves.
Your mobile device is a radio transmitter and receiver. It is designed not to exceed the limits for exposure to radio wavesrecommended by international guidelines. These guidelines were developed by the independent scientific organisationICNIRP and include safety margins designed to assure the protection of all persons, regardless of age and health.
The exposure guidelines for mobile devices employ a unit of measurement known as the Specific Absorption Rate or SAR.The SAR limit stated in the ICNIRP guidelines is 2.0 watts/kilogram (W/kg) averaged over 10 grams of tissue. Tests for SARare conducted using standard operating positions with the device transmitting at its highest certified power level in alltested frequency bands. The actual SAR level of an operating device can be below the maximum value because the deviceis designed to use only the power required to reach the network. That amount changes depending on a number of factorssuch as how close you are to a network base station.
The highest SAR value under the ICNIRP guidelines for use of the device at the ear is 1.11 W/kg.
Use of device accessories may result in different SAR values. SAR values may vary depending on national reporting andtesting requirements and the network band. Additional SAR information may be provided under product information atwww.nokia.com.
174 Product and safety information
Copyright and other notices
DECLARATION OF CONFORMITY
Hereby, NOKIA CORPORATION declares that this RM-559 product is in compliance with the essential requirements and otherrelevant provisions of Directive 1999/5/EC. A copy of the Declaration of Conformity can be found at http://www.nokia.com/phones/declaration_of_conformity/.
© 2011 Nokia. All rights reserved.
Nokia, Nokia Connecting People, Nokia Original Accessories logo, and Nokia Original Enhancements logo are trademarksor registered trademarks of Nokia Corporation. Nokia tune is a sound mark of Nokia Corporation. Other product andcompany names mentioned herein may be trademarks or tradenames of their respective owners
Reproduction, transfer, distribution, or storage of part or all of the contents in this document in any form without theprior written permission of Nokia is prohibited. Nokia operates a policy of continuous development. Nokia reserves theright to make changes and improvements to any of the products described in this document without prior notice.
Java and all Java-based marks are trademarks or registered trademarks of Sun Microsystems, Inc.
This product is licensed under the MPEG-4 Visual Patent Portfolio License (i) for personal and noncommercial use inconnection with information which has been encoded in compliance with the MPEG-4 Visual Standard by a consumerengaged in a personal and noncommercial activity and (ii) for use in connection with MPEG-4 video provided by a licensedvideo provider. No license is granted or shall be implied for any other use. Additional information, including that relatedto promotional, internal, and commercial uses, may be obtained from MPEG LA, LLC. See http://www.mpegla.com.
TO THE MAXIMUM EXTENT PERMITTED BY APPLICABLE LAW, UNDER NO CIRCUMSTANCES SHALL NOKIA OR ANY OF ITS LICENSORSBE RESPONSIBLE FOR ANY LOSS OF DATA OR INCOME OR ANY SPECIAL, INCIDENTAL, CONSEQUENTIAL OR INDIRECT DAMAGESHOWSOEVER CAUSED.
THE CONTENTS OF THIS DOCUMENT ARE PROVIDED "AS IS". EXCEPT AS REQUIRED BY APPLICABLE LAW, NO WARRANTIES OF ANYKIND, EITHER EXPRESS OR IMPLIED, INCLUDING, BUT NOT LIMITED TO, THE IMPLIED WARRANTIES OF MERCHANTABILITY AND
Copyright and other notices 175

FITNESS FOR A PARTICULAR PURPOSE, ARE MADE IN RELATION TO THE ACCURACY, RELIABILITY OR CONTENTS OF THIS DOCUMENT.NOKIA RESERVES THE RIGHT TO REVISE THIS DOCUMENT OR WITHDRAW IT AT ANY TIME WITHOUT PRIOR NOTICE.
Reverse engineering of software in the device is prohibited to the extent permitted by applicable law. Insofar as this userguide contains any limitations on Nokia's representations, warranties, damages and liabilities, such limitations shalllikewise limit any representations, warranties, damages and liabilities of Nokia's licensors.The third-party applications provided with your device may have been created and may be owned by persons or entitiesnot affiliated with or related to Nokia. Nokia does not own the copyrights or intellectual property rights to the third-partyapplications. As such, Nokia does not take any responsibility for end-user support, functionality of the applications, orthe information in the applications or these materials. Nokia does not provide any warranty for the third-partyapplications. BY USING THE APPLICATIONS YOU ACKNOWLEDGE THAT THE APPLICATIONS ARE PROVIDED AS IS WITHOUTWARRANTY OF ANY KIND, EXPRESS OR IMPLIED, TO THE MAXIMUM EXTENT PERMITTED BY APPLICABLE LAW. YOU FURTHERACKNOWLEDGE THAT NEITHER NOKIA NOR ITS AFFILIATES MAKE ANY REPRESENTATIONS OR WARRANTIES, EXPRESS OR IMPLIED,INCLUDING BUT NOT LIMITED TO WARRANTIES OF TITLE, MERCHANTABILITY OR FITNESS FOR A PARTICULAR PURPOSE, OR THATTHE APPLICATIONS WILL NOT INFRINGE ANY THIRD-PARTY PATENTS, COPYRIGHTS, TRADEMARKS, OR OTHER RIGHTS.The availability of particular products and applications and services for these products may vary by region. Please checkwith your Nokia dealer for details and availability of language options. This device may contain commodities, technologyor software subject to export laws and regulations from the US and other countries. Diversion contrary to law is prohibited.
FCC/INDUSTRY CANADA NOTICEYour device may cause TV or radio interference (for example, when using a telephone in close proximity to receivingequipment). The FCC or Industry Canada can require you to stop using your telephone if such interference cannot beeliminated. If you require assistance, contact your local service facility. This device complies with part 15 of the FCC rules.Operation is subject to the following two conditions: (1) This device may not cause harmful interference, and (2) thisdevice must accept any interference received, including interference that may cause undesired operation. Any changesor modifications not expressly approved by Nokia could void the user's authority to operate this equipment.
Model number: X6-00
/Issue 5.4 EN
176 Copyright and other notices
Index
Symbols/Numbers802.1x security settings 127
AA-GPS (assisted GPS) 98access codes 25access points 121, 122, 123, 124, 125,137accessories 159alarm clock 145answering calls 41antennas 33application settings 160applications 149, 152assisted GPS (A-GPS) 97attachments 67audio messages 64
Bbacking up device memory 147barring calls 168battery— charging/discharging 15— inserting 12— saving power 26blocking— device 133blogs 143
Bluetooth 129, 131, 132, 133bookmarks 143browser
See web browser
Ccable connection 134cache memory 142calculator 156calendar 146, 147call log 51, 52call waiting 43calls 39— answering 41— conference 42— duration of 52— ending 43— options during 39— redialling 166— rejecting 41— restricting 62— settings 166, 167camera— capturing images 91— flash 93— image mode 91— indicators 89, 96— location information 94— options 92— recording 97— scenes 93
Index 177
— sequence mode 95— video mode 96capture settings— in camera 90cell broadcast messages 73certificates 162charger, battery 15clock 144, 146computer connections 135
See also data connectionsconference calls 42connectivity 128contacts 34, 58, 61— adding 57— copying 28, 61— defaults 59— editing 57— managing 58— overview 57— ringing tones 60— saving 57— synchronising 129— voice tags 58copying content 28copyright protection 165
Ddata calls 136data connections 128— Bluetooth 129— PC connectivity 135
— synchronisation 129— wireless 119date and time 157declining calls
See rejecting callsdevice— updating 160device setup 28dictionary 156dismissing calls 41display settings 35, 158downloads— podcasts 83DRM (digital rights management) 165duration of calls 52
Ee-mail 68, 71— attachments 69— deleting 70— downloading 69— mailbox 69, 75— settings 68e-mail messages 68environmental tips 168
Ffactory settings, restoring 164feeds, news 143file management 147, 148file manager 147
178 Index

fixed dialling 62
GGallery 85, 86gallery 85general information 23GPS— position requests 100GPS (Global Positioning System) 97GPS (global positioning system) 97,99, 101
Hheadset 36help application 23home screen 17
IIAPs (internet access points) 121icons 29images 86IMEI number 25inbox, message 65inbox, messages 65indicators 29, 65installing, applications 150internet
See web browser
JJava applications 149
Kkey, WEP security 126keypad lock 16keys 10
Llandmarks 100language settings 158licences 165local events and services 144location information 97lock code 25lock switch 16locking— remotely 38locking the keys 16logs 52loudspeaker 32
MMail for Exchange 71mailbox— e-mail 68— voice 41Maps 102— browsing 103— changing views 105— display elements 105, 114— downloading maps 106— driving routes 112— finding locations 107
Index 179
— location details 108— navigating 112, 115— organising places 110— organising routes 110— planning routes 116— positioning 106— saved places 110— saving places 109— saving routes 109— sending places 111— synchronising 111— traffic information 114— voice guidance 112— walking routes 115mass memory 148media— music player 77— RealPlayer 153media bar 19media key 19memory— clearing 27menu 19messages 65— e-mail 68— folders for 63— multimedia 66— settings 73— voice 41MMS (multimedia message service) 64,66, 74
multimedia messages 64, 66, 74music player 77— playlists 79muting sound 41
Nnavigation tools 97network settings 118news feeds 143Nokia Ovi Player 80Nokia Services 22Nokia support information 22Notes 155notification light 166
Ooffice applications 148, 149offline profile 35outbox 63Ovi Music 81Ovi Store 23
Ppacket data connection 52, 124, 136pairing devices 132personal certificates 162personalising your device 28Phone switch 28photos
See camera
180 Index
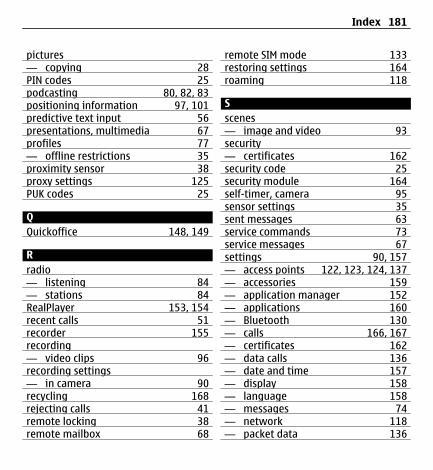
pictures— copying 28PIN codes 25podcasting 80, 82, 83positioning information 97, 101predictive text input 56presentations, multimedia 67profiles 77— offline restrictions 35proximity sensor 38proxy settings 125PUK codes 25
QQuickoffice 148, 149
Rradio— listening 84— stations 84RealPlayer 153, 154recent calls 51recorder 155recording— video clips 96recording settings— in camera 90recycling 168rejecting calls 41remote locking 38remote mailbox 68
remote SIM mode 133restoring settings 164roaming 118
Sscenes— image and video 93security— certificates 162security code 25security module 164self-timer, camera 95sensor settings 35sent messages 63service commands 73service messages 67settings 90, 157— access points 122, 123, 124, 137— accessories 159— application manager 152— applications 160— Bluetooth 130— calls 166, 167— certificates 162— data calls 136— date and time 157— display 158— language 158— messages 74— network 118— packet data 136
Index 181
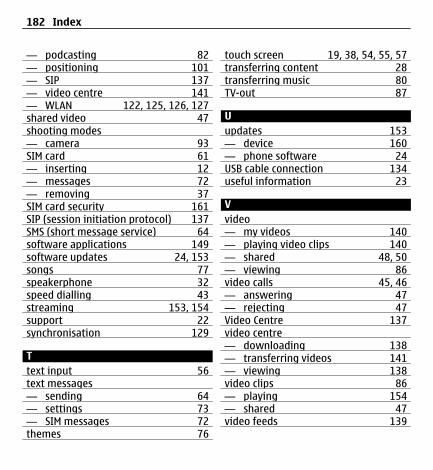
— podcasting 82— positioning 101— SIP 137— video centre 141— WLAN 122, 125, 126, 127shared video 47shooting modes— camera 93SIM card 61— inserting 12— messages 72— removing 37SIM card security 161SIP (session initiation protocol) 137SMS (short message service) 64software applications 149software updates 24, 153songs 77speakerphone 32speed dialling 43streaming 153, 154support 22synchronisation 129
Ttext input 56text messages— sending 64— settings 73— SIM messages 72themes 76
touch screen 19, 38, 54, 55, 57transferring content 28transferring music 80TV-out 87
Uupdates 153— device 160— phone software 24USB cable connection 134useful information 23
Vvideo— my videos 140— playing video clips 140— shared 48, 50— viewing 86video calls 45, 46— answering 47— rejecting 47Video Centre 137video centre— downloading 138— transferring videos 141— viewing 138video clips 86— playing 154— shared 47video feeds 139
182 Index
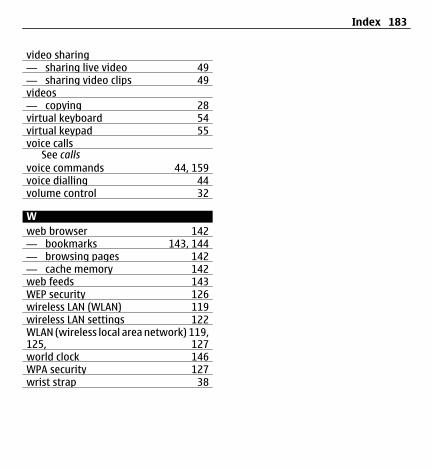
video sharing— sharing live video 49— sharing video clips 49videos— copying 28virtual keyboard 54virtual keypad 55voice calls
See callsvoice commands 44, 159voice dialling 44volume control 32
Wweb browser 142— bookmarks 143, 144— browsing pages 142— cache memory 142web feeds 143WEP security 126wireless LAN (WLAN) 119wireless LAN settings 122WLAN (wireless local area network) 119,125, 127world clock 146WPA security 127wrist strap 38
Index 183


![Nokia X6 User Guide [ENG]](https://static.documents.pub/doc/80x56/546a8539b4af9f0a5d8b48b1/nokia-x6-user-guide-eng.jpg)


