37
Version 1.4 — 03 February 2014 — Page 1 Reference Manual
Version 1.4 — 03 February 2014 — Page 1
Reference Manual
SmartMove DocketKiller Reference Manual
Version 1.4 — 03 February 2014 — Page 2
Contents
1 Introduction ....................................................................................................................... 3
2 Preparation ......................................................................................................................... 4
2.1 Setting up accounts .................................................................................................... 4
2.1.1 Standard account details .................................................................................... 4
2.1.2 Account properties ............................................................................................. 6
2.2 Setting up options ...................................................................................................... 8
2.3 Report Format ............................................................................................................ 9
2.3.1 Report header..................................................................................................... 9
2.3.2 Account holder invoice format .......................................................................... 9
2.4 Web Bookings on Account ...................................................................................... 10
3 Recording fare details in vehicles .................................................................................... 11
3.1 Connecting meters to SmartMove ........................................................................... 11
3.2 Recording the fare ................................................................................................... 11
3.3 Recording payment method ..................................................................................... 12
4 Generating invoices for account work ............................................................................. 15
4.1 Invoices from fleet to account holders for account work ........................................ 15
4.2 Invoices from operators to fleet for account work................................................... 18
4.3 Correcting errors ...................................................................................................... 20
4.4 Claims for subsidy work and lift fees ...................................................................... 20
5 Working with MYOB ...................................................................................................... 21
5.1 Preparing for MYOB transfer .................................................................................. 21
5.1.1 MYOB Income account ................................................................................... 21
5.1.2 Prepare MYOB card for each account holder ................................................. 22
5.2 MYOB transfer ........................................................................................................ 23
6 End-of-shift report ........................................................................................................... 26
6.1 Financial Reconciliation .......................................................................................... 28
6.2 End-of-shift report – page 2 – log ........................................................................... 31
6.3 Recording Expenses ................................................................................................ 32
7 Bailment Report .............................................................................................................. 32
8 Options ............................................................................................................................ 33
8.1 Fleet-wide options ................................................................................................... 33
8.2 Driver-specific options ............................................................................................ 33
8.3 Vehicle-specific options .......................................................................................... 34
8.4 Docket Killer parameters ......................................................................................... 36

SmartMove DocketKiller Reference Manual
Version 1.4 — 03 February 2014 — Page 3
1 Introduction
SmartMove provides an integrated set of features that streamline much of the bookkeeping
associated with running a fleet.
The key concept to grasp is that if drivers record fares and payment details as each job is
completed then the subsequent paperwork is dramatically reduced. This occurs in a variety of
ways:
Invoices to account holders for work done on account are produced with virtually no
manual intervention – see section 4.
Financial transactions for invoiced work and claims from owners can be loaded into an
accounting system such as MYOB or QuickBooks. No data entry is required. See
section 5.
An end-of-shift report providing a complete history of work done on a shift along with
a financial reconciliation can be produced in a few seconds. This is particularly useful
for fleet-owned cars. See section 0.
An invoice from bailor to bailee for work done can also be generated to assist with
GST reporting – see section 7.
Web booking users can have jobs charged to their account. This might remove the
need to justify claims as the users themselves have made the bookings. See section 2.4.
This document describes in some detail how the system works and the preparation required.

SmartMove DocketKiller Reference Manual
Version 1.4 — 03 February 2014 — Page 4
2 Preparation
2.1 Setting up accounts
The first step in using SmartMove for processing billing to account holders is to decide what
accounts will be set up. This is not as simple as it might appear as a SmartMove ‘account’ is
the basis for a tax invoice so the choice of account holders directly affects the invoices that
will be produced.
Some examples will illustrate the decisions that must be made.
1. If the local hospital has an account should all work for the hospital be included on a
single invoice or should there be a separate invoice for each department (cost centre)?
If multiple invoices are required then a SmartMove ‘account’ will need to be set up for
each one.
2. If school runs are done the invoicing is often used to record which students were picked
up. How is this work to be billed in a way that will show this? Possibilities include
having one invoice for each ‘run’ or one invoice for each student.
Details are entered into SmartMove using the Add/Edit Accounts option on the fleet
management website – click on New Account to create a new account. The information is in
two parts – the standard details and the properties that control how the account is handled.
2.1.1 Standard account details
OR

SmartMove DocketKiller Reference Manual
Version 1.4 — 03 February 2014 — Page 5
The fields are:
Field Data
Customer
account number
+
SmartMove
account number
The customer number must be unique. Any number may be entered.
Two extra ‘check digits’ may be added to the number and the new number is
used as the account number in SmartMove . These extra digits form part of the
account number in SmartMove and are used to catch data entry errors.
Account name This is the account name that will appear on the tax invoice. If invoicing totals
are being transferred to MYOB (see section 5) the name entered here must
be exactly the same as the name in the corresponding MYOB card.
This name appears on the printed invoice as the addressee so should be a
readable name. If necessary change the MYOB card name so that the names
match.
Contact name This name normally appears on the tax invoice after the word ‘Attention:’
Contact phone This number normally appears on the tax invoice after the contact name.
Contact fax This number normally appears on the phone after the word ‘fax:’
Address Line 1
Address Line 2
Address to be printed on the tax invoice.
ABN Australian Business Number to be printed on the tax invoice. May be found at
the website www.abr.business.gov.au
ACN Australian Company Number to be printed on the tax invoice. May be found at
the website www.abr.business.gov.au
For MYOB (Quicken fleet property set to blank)
Sales Ledger
Acct
MYOB account to be used for recording ‘sales’ to account holders. One entry
will appear for each batch of invoices generated. Normally this number will start
with 4 and often the same MYOB account number is used for all SmartMove
work.
Card ID MYOB card number to be used for recording ‘sales’ to account holders. One
entry will appear for each invoice generated. Note that the name given in the
account name field above must be exactly the same as the name in the
MYOB card.
For QuickBooks (Quicken fleet property not set to blank)
QuickBooks
Item Name
QuickBooks Item Name
Account name QuickBooks account name.

SmartMove DocketKiller Reference Manual
Version 1.4 — 03 February 2014 — Page 6
2.1.2 Account properties
The properties that govern how an account is handled are listed below. Note that there are a
number of other properties that handle how all accounts are handled – see section 8.4 for
more details.
Field Data
Account expiry
date
An account may be given an expiry date. It cannot be used after this date.
Account includes
lift fee data
This field should be set to Y if the account includes lift-fee claims. These are
entered in the subsidy section of the fare payment screen. Normally only one
account has this field ticked.
Account includes
subsidy data
This field should be set to Y if the account includes subsidy claims.
Account
Maximum
Percentage of
Fare
If set to a value the amount that can be charged to the account cannot be more
than that percentage of the fare.
Account
Password
If set, this password must be entered by the driver when charging an amount to
the account.
Account requires
odometer
If set the driver is required to enter the odometer readings.

SmartMove DocketKiller Reference Manual
Version 1.4 — 03 February 2014 — Page 7
readings on
booking
Account
Requires
Reference
Number
The driver is required to enter a reference number when charging an amount to
the account. Normally this reference number would be some sort of docket
number or purchase order.
Additional
Account Fields
May be set to a list of fields that must be supplied by the driver. For example, a
shipping company may wish to know the name of the ship.
Customer email
address for
accounts
Email address to be used if sending invoices by email.
Fare calculate
Flag Fall
Flag fall used when calculating estimated fare.
Fare Calculation
KM Rate
Per km rate used when calculating estimated fare.
Fare Calculation
Minimum
Minimum fare to be quoted when calculating estimated fare.
Payment terms Payment terms printed on the invoice.

SmartMove DocketKiller Reference Manual
Version 1.4 — 03 February 2014 — Page 8
2.2 Setting up options
There are three settings that affect the amount of data collected and used. These may be set
for individual drivers, for individual cars or set fleet-wide so that they apply to all drivers.
The first of these controls whether or not
the odometer reading is collected at the
start and end of a shift. Entering the
reading can be mandatory, optional or
not required. The main use for the
odometer readings is to calculate the
$/km earning rate.
The second and third settings control
whether or not fare details are collected
at the end of a job. Bookings that
include an account number are treated
separately from other jobs and it is
possible to collect payment details for
account jobs only.
Note that the fare will appear
automatically if the meter is linked to
SmartMove. If the meter is not linked
the fare the amount needs to be entered
by the driver.
Many networks operating as co-operatives will enable fare collection for all account work so
that invoices can be generated for account customers. In addition these fleets normally enable
fare collection for all jobs in vehicles that are owned by the co-operative. Odometer readings
are likely to be recorded for these vehicles as well.
Where a single owner owns all the vehicles or a number of vehicles it is normal to enable fare
collection for all jobs to ease the paperwork burden.
Section 8 has more details on setting these options.

SmartMove DocketKiller Reference Manual
Version 1.4 — 03 February 2014 — Page 9
2.3 Report Format
There is some flexibility in the format of invoices that can be produced and some decisions
have to be made.
2.3.1 Report header
A logo may be included in the invoice header if required. Examples are given below.
The logo is loaded on the Details tab of the Fleet Configuration section of the Fleet
Management website.
2.3.2 Account holder invoice format
The top section of the invoice contains the details for the fleet issuing the invoice. The values
come from various properties set on the Details tab of the Fleet Configuration section of the
Fleet Management website.
Note that the car number is not included in this report. It is not needed as there is a separate
report listing account work done by each vehicle – see section 4.2.

SmartMove DocketKiller Reference Manual
Version 1.4 — 03 February 2014 — Page 10
2.4 Web Bookings on Account
The web booking system allows account holders to book jobs. They can also indicate that a
booking is to be put on an account.
To use this feature the account number(s) the web user is allowed to use needs to be set up.
This is done on the page used to create web users.

SmartMove DocketKiller Reference Manual
Version 1.4 — 03 February 2014 — Page 11
3 Recording fare details in vehicles
The bookkeeping functions are based on the fact that drivers record fares at the moment they
are paid. This is done using a series of screens.
3.1 Connecting meters to SmartMove
If the meter is wired to SmartMove fare details can be transferred from the meter to
SmartMove. This avoids the need to enter the amount – see section 3.2 below.
See Appendix A for details on how to connect a meter to SmartMove.
3.2 Recording the fare
The first step is to record the amount being paid. If the meter is connected to SmartMove the
amount is transferred from the meter otherwise the driver must enter the amount.
The fare details are recorded on the fare collection screen. This screen may appear
automatically if the appropriate options are set or may be displayed using the and
buttons..
If necessary the fare is entered by pressing the Fare button. Any of the values may be
changed and the total amount payable is shown at the bottom right of the screen.

SmartMove DocketKiller Reference Manual
Version 1.4 — 03 February 2014 — Page 12
3.3 Recording payment method
The second step is to record how the amount was paid. This is done by pressing the Paid By
button.
If the fare is paid in cash normally the 100% cash button is pressed. Similarly if the fare is
paid with a credit card then the 100% card button is used. In both cases the amount To pay
will show as $0.00 and the Done button is pressed to finish the payment.
If part of the fare is paid on some sort of subsidy then the Subsidy button is used.

SmartMove DocketKiller Reference Manual
Version 1.4 — 03 February 2014 — Page 13
A percentage of the amount or a fixed amount may be set. A voucher number can be entered
if required and the ‘lift fee’ claimed if appropriate. The Accept button is pressed when the
details are correct.
If some or all of the payment is to be on an account then the Account button is used.
The account number will be displayed if it was entered when the booking was made. A
reference number (order number) can be entered if required. The amount can be change if
necessary and the Accept button is used when the details are correct.

SmartMove DocketKiller Reference Manual
Version 1.4 — 03 February 2014 — Page 14
Every effort should be made to ensure that the details recorded here are correct. However if
any error is made the details can be corrected using the fleet management website.

SmartMove DocketKiller Reference Manual
Version 1.4 — 03 February 2014 — Page 15
4 Generating invoices for account work
At the end of a period invoices may be sent to account customers for account work. This is
very easy once drivers have recorded all the details needed for the invoices.
Two sets of invoices are normally produced – one set to account holders for work done and
another set from vehicle owners to the fleet for work done by each vehicle.
4.1 Invoices from fleet to account holders for account work
The invoices to account holders are prepared using the Invoice to Account Holder option on
the fleet management website.
The normal procedure is to generate invoices for all account holders, check them, correct
errors, re-generate the invoices, transfer totals to MYOB, then lock all the records.
The following information must be supplied:
The period of interest: All jobs with a meter on event in the period from 00:00:00 on
the start date to 23:59:59 on the end date will be included in the invoice.
Service fee for period: May be set if an ‘account keeping fee’ is charged.
Service fee per job: May be set if a ‘processing fee’ is charged for each job.
Sequence number: May be set to an invoice sequence number if required. Invoices are
normally printed with a invoice number made up as the account number followed by

SmartMove DocketKiller Reference Manual
Version 1.4 — 03 February 2014 — Page 16
the sequence number. All invoices generated will have the same sequence number. The
default is the current date.
Once these values have been entered a number of options are available:
Select account and click on Generate Invoice: The invoice for the selected account is
generated as a .pdf file. The file may be printed or saved to disk.
Click on Generate All Invoices. Invoices for all the accounts with a non-zero balance
are generated in a .zip file*. The file is normally saved to disk.
Click on Generate MYOB transactions. This will produce a file for import into MYOB.
The file will contain a transaction for every account with a non-zero balance. The file
produced is normally saved to disk before being loaded into MYOB - see section 5.
(TO BE COMPLETED) Click on Generate Email Invoices. A .pdf file will be
produced for each account with a non-zero balance and with an e-mail address. The file
will then be e-mailed to the e-mail address held with a BCC copy to the fleet.
(TO BE COMPLETED) Click on Generate non-Email Invoices. A .zip file* will be
produced containing the invoices for all accounts that have a non-zero balance and
which do not have an e-mail address recorded. The file is normally saved to disk.
Click on Export as CSV. This produces a file in ‘comma separated values’ format
which can be read by Excel and other packages. The file has a line for every job done
and includes the following fields: Account number, job number, date, name, booked
time, pick-up time (= meter on time), time job completed (= meter off time), pick-up
address, destination address, fare including GST, GST, and fare excluding GST.
* When invoices have been combined into a single .zip file right click on Exported File and
select the Save Target As option. Open the file after the file has been downloaded and select
all the files (use CTRL/A) and copy the files to a directory. To look at any invoice just double
click on the name. To print a single invoice right click on the name and select Print. To print
multiple invoices highlight the ones required by holding down the Shift key and clicking on
the ones required then right click and select Print. To print all the invoices in the set use
CTRL/A to select them all then right click and select Print.
An example of an invoice generated is given below.

SmartMove DocketKiller Reference Manual
Version 1.4 — 03 February 2014 — Page 17

SmartMove DocketKiller Reference Manual
Version 1.4 — 03 February 2014 — Page 18
4.2 Invoices from operators to fleet for account work
The operator of a vehicle expects to be paid by the fleet when work is done on account. This
is triggered by an invoice from the vehicle owner to the fleet listing the work done and the
amount owing.
These invoices are produced using the Operator Invoice for Account Work option on the
website. Often these will be produced by the fleet after producing the invoices to account
holders.
The invoice produced will list work done by the vehicle. An example is given below.

SmartMove DocketKiller Reference Manual
Version 1.4 — 03 February 2014 — Page 19

SmartMove DocketKiller Reference Manual
Version 1.4 — 03 February 2014 — Page 20
4.3 Correcting errors
Errors in fare details can be corrected using the Edit Fare Information option on the website.
The options are similar to those available in the vehicle. Enter the booking number for the job
to be edited, make sure the fare to be paid is correct then make sure the payment details are
correct.
4.4 Claims for subsidy work and lift fees
Apart from account work a significant amount of income is derived from various ‘subsidy’
schemes. Invoices for this work can also be produced using the information collected in the
vehicles.
First create an account that has a name starting with “SUBSIDY:” . Note that the colon (:) at
the end of the name is required. Once this account is created it will list all the amounts
claimed as ‘subsidy’ payments in the vehicles. The layout is identical to the tax invoices
produced for account holders – see section 4.1. See section 3.3 for details on claiming a
subsidy payment.
Lift fees are listed on the shift report described in sections 6.1 and 6.2. The bailment report
described in section 7 gives the total claim for lift fees.

SmartMove DocketKiller Reference Manual
Version 1.4 — 03 February 2014 — Page 21
5 Working with MYOB
5.1 Preparing for MYOB transfer
If invoice totals are to be transferred to MYOB it is necessary to have one or more MYOB
accounts and cards.
5.1.1 MYOB Income account
If necessary create the account(s) required to hold invoice totals. Often a single account is
used to record the total for all the invoices issued but one can have more accounts if that is
useful – one might have one account for each school and one card for each student, for
example.
First create an income account. Get the list of Income accounts
Add a new account

SmartMove DocketKiller Reference Manual
Version 1.4 — 03 February 2014 — Page 22
Make sure GST is set if it applies.
5.1.2 Prepare MYOB card for each account holder
Apart from the MYOB account(s) set up in the previous step a MYOB card is required for
each account holder.
Get the list of cards and add a new card:

SmartMove DocketKiller Reference Manual
Version 1.4 — 03 February 2014 — Page 23
It is essential that the Name entered for the card is exactly the same as the account name used
in SmartMove. Make sure GST is set.
5.2 MYOB transfer
The totals of invoices issues can be transferred to MYOB.
It is essential that there be a MYOB card number for every account holder. The name on the
card must be the same as the name used for that account in SmartMove. See section 5.1.2
above.

SmartMove DocketKiller Reference Manual
Version 1.4 — 03 February 2014 — Page 24
Once a file of transactions has been prepared (see section 4.1) and saved to disk start MYOB
and click on File/Import Data/Sales/Service Sales. Make sure the format is set to comma-
separated then click Continue.
Select the file to be imported

SmartMove DocketKiller Reference Manual
Version 1.4 — 03 February 2014 — Page 25
You should then see a list of field names:
Click on the first field on the left then click on the matching field on the right. Repeat for all
the fields on the left. If the Invoice # field is not matched MYOB will generate a number for
each transaction.
When all fields have been matched click on Import and wait for the import to finish. It should
take only a few seconds and should end with a summary.
NOTE: DO NOT IMPORT THE DATA AGAIN.
If any errors are reported or records have been skipped then check the error log to determine
the cause of the error. Possible errors are:
Error -190: Customer not found. Sale invoice not imported.
Probably means that the name in the MYOB card isn’t exactly the same as the name
held in SmartMove for that account holder.
Rejected transactions need to be entered into MYOB by hand. Setup errors should be fixed so
that the transfer will work for the next batch of transactions.

SmartMove DocketKiller Reference Manual
Version 1.4 — 03 February 2014 — Page 26
6 End-of-shift report
If fares are recorded for all jobs it is possible to produce an end-of-shift report that
summarises the work done and income earned during the shift. The first page is a financial
reconciliation and the second page lists the work done.
The report is requested from the fleet management website.
First select the date for the start of the shift and the vehicle. SmartMove will then allow a shift
to be selected.
Various items of information may be entered if they are available. Some of this information
comes come from the CabCharge docket printed at the end of the shift. The information that
may be entered is listed in the following table.

SmartMove DocketKiller Reference Manual
Version 1.4 — 03 February 2014 — Page 27
Exceptional Loss Accepted by Bailor ($) Enter the amount the bailor is prepared to
accept as an exceptional loss. Typically this
applies when a passenger doesn’t pay a fare
– sometimes the bailor is prepared to take
some or all of the lost amount and
sometimes the bailor refuses to take any
loss.
Cash Received at the Start of the Shift ($) Enter the ‘float’ at the start of the shift.
Bailee Rate (%) Enter the percentage of income kept by the
bailee. This excludes lift fees.
Expenses Paid by Bailor ($) This applies only if expenses are claimed –
see section 6.3. Normally this is set to ‘all’
and any expenses claimed are charged to the
bailor. However if the bailor accepts only
some of the expenses (or none) the amount
should be entered here.
Lift Fee for Vehicle ($) Enter the amount payable as a lift fee. This
is the amount the Government is prepared to
pay for the handling of a wheelchair
passenger. This figure is used when the
driver claims the lift fee – see section 3.3.
Bailee Lift Fee Rate (%) Enter the percentage of the lift fee payable
to the bailee.
From CabCharge docket
Receipt: EFT Debit ($) Treated as credit card payments in
SmartMove (column C of report) Receipt: Credit ($)
Receipt: Charge ($)
Receipt: E-Ticket ($)
Receipt: Subsidy ($) Treated as subsidy – column S of report.

SmartMove DocketKiller Reference Manual
Version 1.4 — 03 February 2014 — Page 28
6.1 Financial Reconciliation
The first page of the end-of-shift report gives a summary of the shift and includes a financial
reconciliation.

SmartMove DocketKiller Reference Manual
Version 1.4 — 03 February 2014 — Page 29
The top left section gives a summary of the values
entered for the report – see previous section.
The top right section gives the financial
reconciliation. It shows the cash expected at the end
of the shift and the total income after allowing for
exceptional losses.
If the odometer reading is entered at the start and end
of each shift (see section 2.2) then the $/km figure is
calculated.
The report at the bottom left shows the bailee’s income
in the shift. The Credit card tips is the difference
between the cost of jobs charged (Column C in Special
Jobs section of the report – see section 6.2) and the
figure given for Receipt: Credit ($).
The bailee’s share of expenses is shown separately.
Note that cash tips are not calculated. The bailee is entitled to all the cash after the bailor has
been paid.
The report at the bottom right shows the bailor’s
share of the income. The cash to be paid to the
bailor is also shown at the bottom. This calculation
assumes that the bailor keeps the payments
received electronically.
The bailor’s share of expenses is shown separately.

SmartMove DocketKiller Reference Manual
Version 1.4 — 03 February 2014 — Page 30
Note that there is no need to count the cash. Once the bailor has been paid the rest of the cash
goes to the bailee and includes any tips. Any errors in payments are the bailee’s
responsibility.
SmartMove DocketKiller Reference Manual
Version 1.4 — 03 February 2014 — Page 31
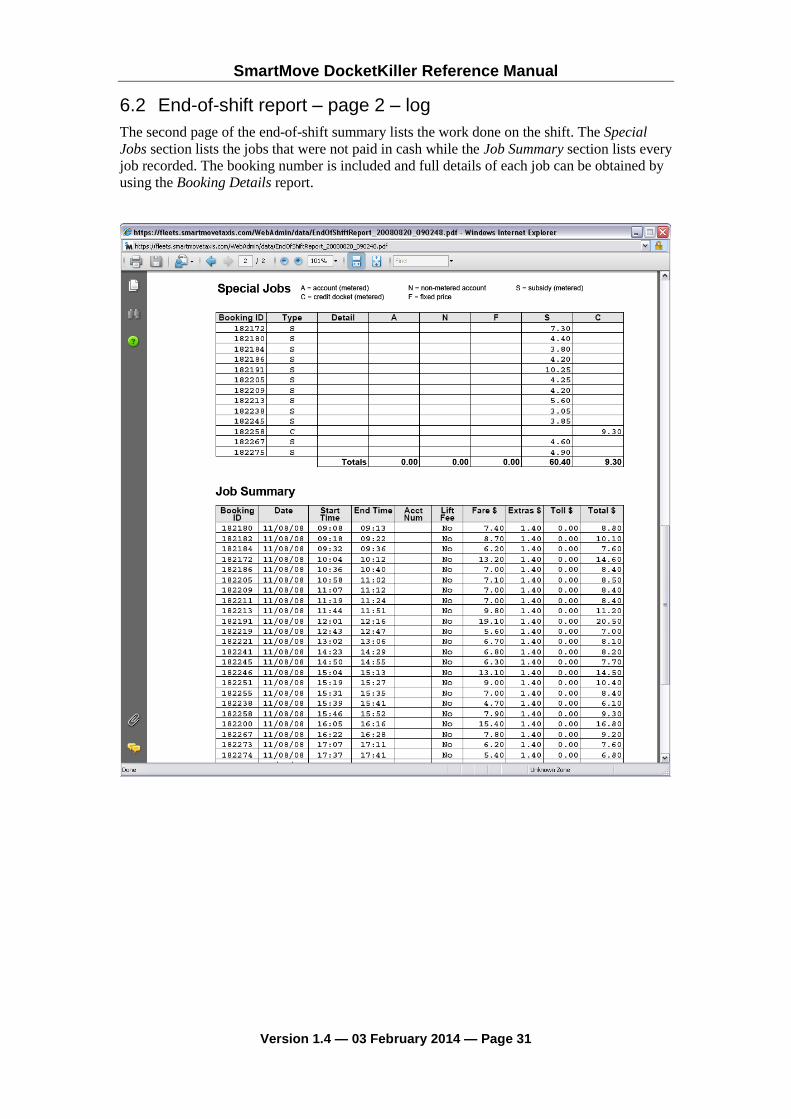
6.2 End-of-shift report – page 2 – log
The second page of the end-of-shift summary lists the work done on the shift. The Special
Jobs section lists the jobs that were not paid in cash while the Job Summary section lists every
job recorded. The booking number is included and full details of each job can be obtained by
using the Booking Details report.

SmartMove DocketKiller Reference Manual
Version 1.4 — 03 February 2014 — Page 32
6.3 Recording Expenses
SmartMove allows cash expenses paid by the driver to be recorded at the time they are made.
This might be for a new light bulb, oil, etc.
The expenses are recorded in the vehicle using the expense screen. Use the and
buttons to access this screen.
Press the button that best represents the type of expense then enter the amount by pressing the
Set $ button. Press Accept when the details are entered.
7 Bailment Report
The bailment report applies only if the end-of-shift report is produced for every shift. It
produces a tax invoice from the vehicle owner to the vehicle driver for work done in a period
of time. In effect it aggregates the daily amounts paid by the driver to the owner into a single
invoice.
(TO BE COMPLETED)

SmartMove DocketKiller Reference Manual
Version 1.4 — 03 February 2014 — Page 33
8 Options
8.1 Fleet-wide options
The options listed below can be set at a fleet level. An option set at this level may be
overridden by an option set at the car level or driver level.
At present these options are set by SmartMove staff – send an e-mail to
Option Setting Effect
Odometer
reading
Mandatory All drivers must enter the odometer reading at the start and end of
each shift.
Optional Drivers will be invited to enter the odometer reading at the start
and end of each shift. It is not necessary to enter a value.
Not
required
The screen used to set the odometer reading at the start and end of
each shift is not displayed.
Fare collection
for account work
Mandatory The fare collection screen is automatically displayed every time a
job with an account number in the booking is completed. The
Cancel button is not available and the details must be provided.
Optional The fare collection screen is displayed every time a job with an
account number in the booking is completed. The Cancel button
is displayed and the details need not be provided.
Not
required
The fare collection screen is not automatically displayed at the
end of a job with an account number in the booking. It may be
displayed using the and buttons.
Fare collection
for non-account
work
Mandatory The fare collection screen is automatically displayed every time a
job without an account number in the booking is completed. The
Cancel button is not available and the details must be provided.
Optional The fare collection screen is displayed every time a job without
an account number in the booking is completed. The Cancel
button is displayed and the details need not be provided.
Not
required
The fare collection screen is not automatically displayed at the
end of a job without an account number in the booking. It may be
displayed using the and buttons.
(TO BE COMPLETED) If any of the invoices to account customers are to be sent by e-mail it
is possible to have a copy sent to the base. An e-mail address needs to be set up.
8.2 Driver-specific options
The options listed below can be set individually for each driver. An option set at this level
normally overrides the option set at the fleet-wide level but may be overridden by the option
set at vehicle level.
At present these options are set by SmartMove staff – send an e-mail to
[email protected]. In future whey will be set using the web page used to setup
and modify driver details.

SmartMove DocketKiller Reference Manual
Version 1.4 — 03 February 2014 — Page 34
Option Setting Effect
Odometer
reading
Mandatory Driver must enter the odometer reading at the start and end of each
shift.
Optional Driver will be invited to enter the odometer reading at the start and
end of each shift. It is not necessary to enter a value.
Not
required
The screen used to set the odometer reading at the start and end of
each shift is not displayed. Overrides fleet-wide option.
Not set The screen used to set the odometer reading at the start and end of
each shift is not displayed. Does not override fleet-wide option.
Fare collection
for account work
Mandatory The fare collection screen is automatically displayed every time a
job with an account number in the booking is completed. The
Cancel button is not available and the details must be provided.
Optional The fare collection screen is displayed every time a job with an
account number in the booking is completed. The Cancel button is
displayed and the details need not be provided.
Not
required
The fare collection screen is not automatically displayed at the end
of a job with an account number in the booking. It may be
displayed using the and buttons. Overrides the
fleet-wide option.
Not set The fare collection screen is not automatically displayed at the end
of a job with an account number in the booking. It may be
displayed using the and buttons. Does not override
fleet-wide option.
Fare collection
for non-account
work
Mandatory The fare collection screen is automatically displayed every time a
job without an account number in the booking is completed. The
Cancel button is not available and the details must be provided.
Optional The fare collection screen is displayed every time a job without an
account number in the booking is completed. The Cancel button is
displayed and the details need not be provided.
Not
required
The fare collection screen is not automatically displayed at the end
of a job without an account number in the booking. It may be
displayed using the and buttons. Overrides the
fleet-wide option.
Not set The fare collection screen is not automatically displayed at the end
of a job without an account number in the booking. It may be
displayed using the and buttons. Does not override
fleet-wide option.
8.3 Vehicle-specific options
The options listed below can be set for each vehicle. An option set at this level normally
overrides the option set at the fleet-wide level or at the driver level.
At present these options are set by SmartMove staff – send an e-mail to

SmartMove DocketKiller Reference Manual
Version 1.4 — 03 February 2014 — Page 35
Option Setting Effect
Odometer
reading
Mandatory Driver must enter the odometer reading at the start and end of each
shift.
Optional Driver will be invited to enter the odometer reading at the start and
end of each shift. It is not necessary to enter a value.
Not
required
The screen used to set the odometer reading at the start and end of
each shift is not displayed. Overrides the fleet-wide and driver-
specific options.
Not set The screen used to set the odometer reading at the start and end of
each shift is not displayed. Does not override the fleet-wide and
driver-specific options.
Fare collection
for account
work
Mandatory The fare collection screen is automatically displayed every time a
job with an account number in the booking is completed. The
Cancel button is not available and the details must be provided.
Optional The fare collection screen is displayed every time a job with an
account number in the booking is completed. The Cancel button is
displayed and the details need not be provided.
Not
required
The fare collection screen is not automatically displayed at the end
of a job with an account number in the booking. It may be
displayed using the and buttons.. Overrides the
fleet-wide and driver-specific options.
Not set The fare collection screen is not automatically displayed at the end
of a job with an account number in the booking. It may be
displayed using the and buttons.
Fare collection
for non-account
work
Mandatory The fare collection screen is automatically displayed every time a
job without an account number in the booking is completed. The
Cancel button is not available and the details must be provided.
Optional The fare collection screen is displayed every time a job without an
account number in the booking is completed. The Cancel button is
displayed and the details need not be provided.
Not
required
The fare collection screen is not automatically displayed at the end
of a job without an account number in the booking. It may be
displayed using the and buttons. Overrides the
fleet-wide and driver-specific options.
Not set The fare collection screen is not automatically displayed at the end
of a job without an account number in the booking. It may be
displayed using the and buttons.
Lift fee Amount payable as a “lift fee” – see section 3.3
SmartMove DocketKiller Reference Manual
Version 1.4 — 03 February 2014 — Page 36
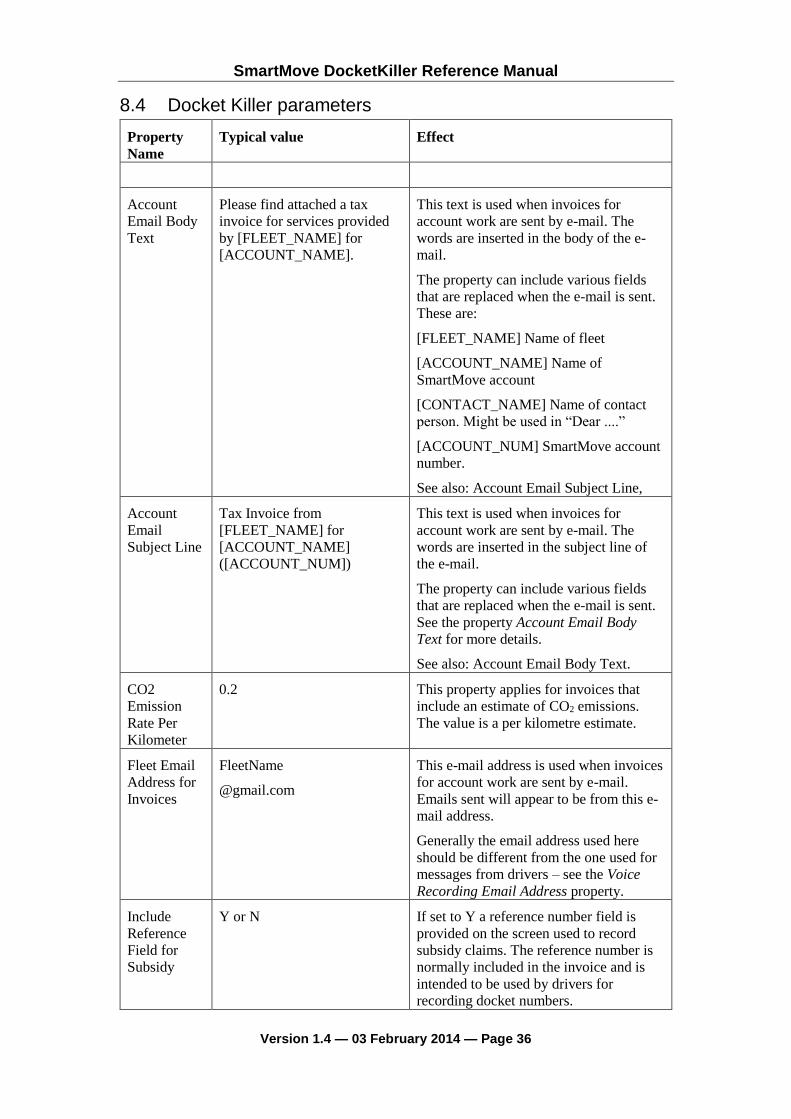
8.4 Docket Killer parameters
Property
Name
Typical value Effect
Account
Email Body
Text
Please find attached a tax
invoice for services provided
by [FLEET_NAME] for
[ACCOUNT_NAME].
This text is used when invoices for
account work are sent by e-mail. The
words are inserted in the body of the e-
mail.
The property can include various fields
that are replaced when the e-mail is sent.
These are:
[FLEET_NAME] Name of fleet
[ACCOUNT_NAME] Name of
SmartMove account
[CONTACT_NAME] Name of contact
person. Might be used in “Dear ....”
[ACCOUNT_NUM] SmartMove account
number.
See also: Account Email Subject Line,
Account
Subject Line
Tax Invoice from
[FLEET_NAME] for
[ACCOUNT_NAME]
([ACCOUNT_NUM])
This text is used when invoices for
account work are sent by e-mail. The
words are inserted in the subject line of
the e-mail.
The property can include various fields
that are replaced when the e-mail is sent.
See the property Account Email Body
Text for more details.
See also: Account Email Body Text.
CO2
Emission
Rate Per
Kilometer
0.2 This property applies for invoices that
include an estimate of CO2 emissions.
The value is a per kilometre estimate.
Fleet Email
Address for
Invoices
FleetName
@gmail.com
This e-mail address is used when invoices
for account work are sent by e-mail.
Emails sent will appear to be from this e-
mail address.
Generally the email address used here
should be different from the one used for
messages from drivers – see the Voice
Recording Email Address property.
Include
Reference
Field for
Subsidy
Y or N If set to Y a reference number field is
provided on the screen used to record
subsidy claims. The reference number is
normally included in the invoice and is
intended to be used by drivers for
recording docket numbers.
SmartMove DocketKiller Reference Manual
Version 1.4 — 03 February 2014 — Page 37
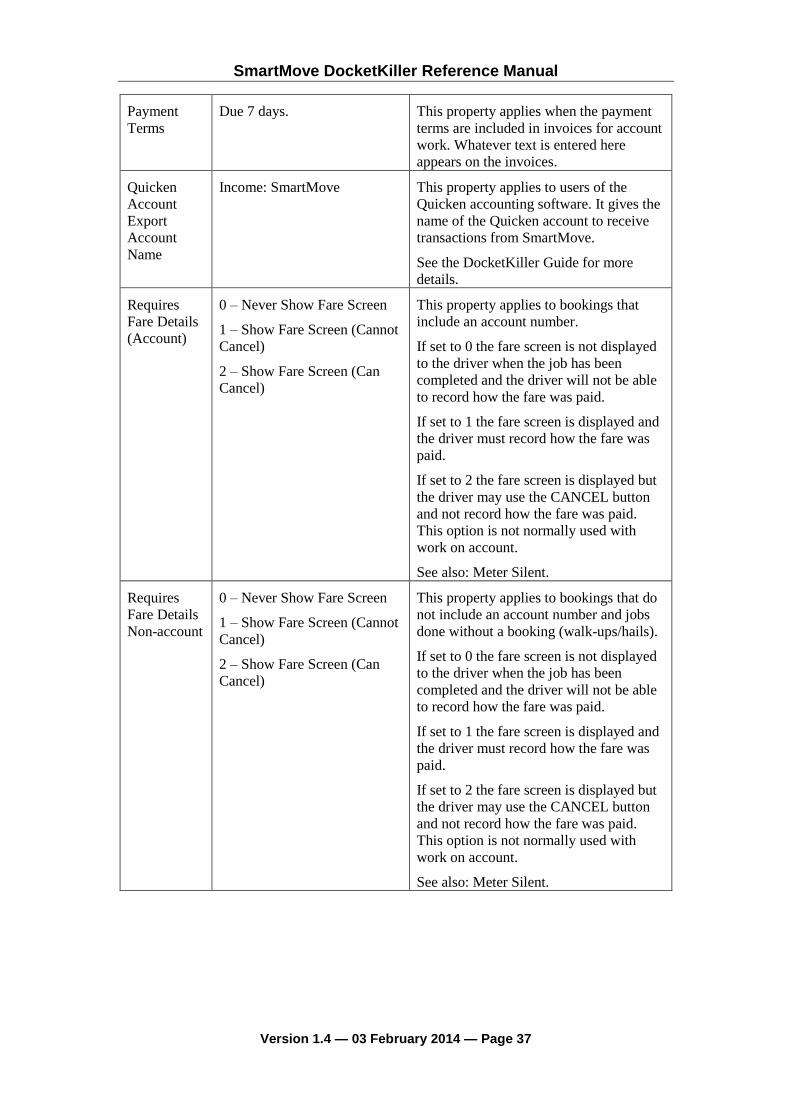
Payment
Terms
Due 7 days. This property applies when the payment
terms are included in invoices for account
work. Whatever text is entered here
appears on the invoices.
Quicken
Account
Export
Account
Name
Income: SmartMove This property applies to users of the
Quicken accounting software. It gives the
name of the Quicken account to receive
transactions from SmartMove.
See the DocketKiller Guide for more
details.
Requires
Fare Details
(Account)
0 – Never Show Fare Screen
1 – Show Fare Screen (Cannot
Cancel)
2 – Show Fare Screen (Can
Cancel)
This property applies to bookings that
include an account number.
If set to 0 the fare screen is not displayed
to the driver when the job has been
completed and the driver will not be able
to record how the fare was paid.
If set to 1 the fare screen is displayed and
the driver must record how the fare was
paid.
If set to 2 the fare screen is displayed but
the driver may use the CANCEL button
and not record how the fare was paid.
This option is not normally used with
work on account.
See also: Meter Silent.
Requires
Fare Details
Non-account
0 – Never Show Fare Screen
1 – Show Fare Screen (Cannot
Cancel)
2 – Show Fare Screen (Can
Cancel)
This property applies to bookings that do
not include an account number and jobs
done without a booking (walk-ups/hails).
If set to 0 the fare screen is not displayed
to the driver when the job has been
completed and the driver will not be able
to record how the fare was paid.
If set to 1 the fare screen is displayed and
the driver must record how the fare was
paid.
If set to 2 the fare screen is displayed but
the driver may use the CANCEL button
and not record how the fare was paid.
This option is not normally used with
work on account.
See also: Meter Silent.


