[email protected] This manual has been reproduced with his permission. Manual scanned by Paul Collins. OCRed by Kevin Thacker. 18-August-2002
MAXAM Z80 Development System
??Assembler ??Monitor ??Text Editor
AMSTRAD CPC464/CPC664 (C) ARNOR LTD 1985
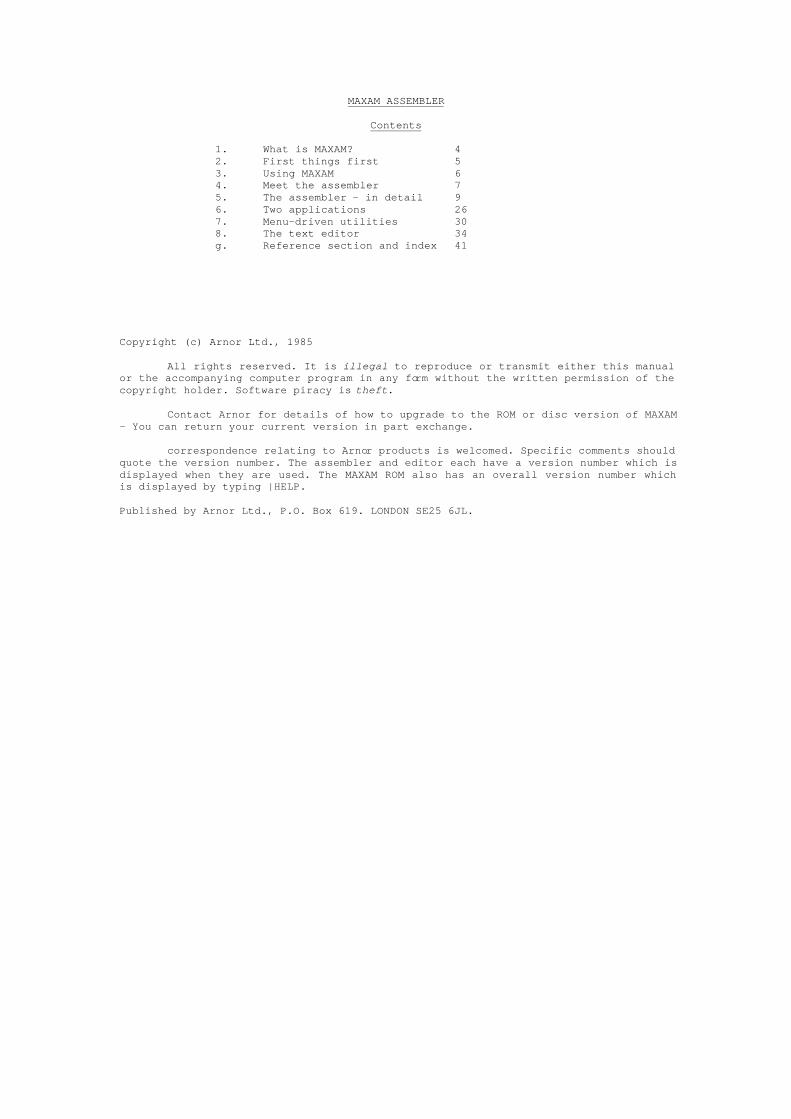
MAXAM ASSEMBLER
Contents
1. What is MAXAM? 4 2. First things first 5 3. Using MAXAM 6 4. Meet the assembler 7 5. The assembler - in detail 9 6. Two applications 26 7. Menu-driven utilities 30 8. The text editor 34 g. Reference section and index 41
Copyright (c) Arnor Ltd., 1985 All rights reserved. It is illegal to reproduce or transmit either this manual or the accompanying computer program in any form without the written permission of the copyright holder. Software piracy is theft. Contact Arnor for details of how to upgrade to the ROM or disc version of MAXAM - You can return your current version in part exchange. correspondence relating to Arnor products is welcomed. Specific comments should quote the version number. The assembler and editor each have a version number which is displayed when they are used. The MAXAM ROM also has an overall version number which is displayed by typing |HELP. Published by Arnor Ltd., P.O. Box 619. LONDON SE25 6JL.
All that is gold does not glitter. Not all those who wander are lost; The old that is strong does not wither. Deep roots are not reached by the frost. From the ashes a fire shall be woken. A light from the shadows shall spring; Renewed shall be blade that was broken, The crownless again shall be king
J.R.R. Tolkein
1. WHAT IS MAXAM?
MAXAM is a comprehensive machine code development system written specially for the Amstrad CPC 464/664. The whole program was carefully designed to complement the excellent Amstrad firmware, and is compatible with Amstrad BASIC down to the finest detail. In particular it supports the ability to create hybrid BASIC/machine code programs. Z80 source code may for simplicity be entered as part of a BASIC program. The assembler itself is perhaps the most powerful and the most user friendly currently available on any home computer. Although just about every conceivable feature is included, it is easy for the beginner to get started - most of the facilities are optional and the assembler will do something sensible if not specifically directed. Debugging machine code programs is made much easier by using MAXAM. A special breakpoint instruction is added to the set of Z80 mnemonics, which allows interactive debugging from BASIC with the minimum fuss. MAXAM also includes a full feature screen editor, which can be used for entering assembler or BASIC programs, or as a simple word processor for writing letters, reports, etc. The editor produces pure ASCII files which YOU can then use with, for example, other editors, languages, and CP/M utilities. Other utilities provided by MAXAM include: disassembler, memory dump, move block, relocate, find string, compare blocks, and a powerful memory editor. Self explanatory menus guide you through using all these commands. All parts of MAXAM run in either 40 or 80 column mode. When in the 40 column mode colours are used to make the display clearer: the 80 column display is required for the full professional assembler listing, and is more useful for editing. This manual does not attempt to teach machine code programming, and assumes basic familiarity with the Z80 assembly language. If you are a newcomer to machine code programming you will need to consult a book on the subject. Though it may seem bewildering at first, persevere; machine code programming is both rewarding and enjoyable. You have made the right decision to purchase MAXAM - it is the ideal system for learning machine code. An essential reference for machine code programming on the Amstrad CPC 464/664 is the “Complete firmware specification”. published by Amsoft. This gives full details of all operating system routines that are needed for communication with the hardware. About this manual Section 2 explains how to get started. Section 3 introduces MAXAM's commands and mentions some general points. Section 4 provides a gentle introduction to using the assembler with example
programs which can be typed in and experimented with. Section 5 describes every feature of the assembler in detail. Section 6 describes two application programs. Section 7 describes MAXAM's utility commands. Section 8 describes the text editor. Section 9 is a reference section with index and glossary. This includes a
complete list of all the Z80 mnemonics.
2. FIRST THINGS FIRST ROM version The ROM version of MAXAM is supplied in a 16K EPROM in an adaptor. The adaptor is attached to the edge connector marked 'FLOPPY DISC' on the back of the computer, and has an edge connector at the back for connecting a disc drive to. Consult the separate fitting instructions before attempting to fit the adaptor. When installed MAXAM is immediately available to the user, being automatically initialised by BASIC. MAXAM uses just 256 bytes of RAM (background ROM workspace). You may find that some programs will not run because they need to use this memory. If so, enter the command ‘|MAXOFF’. This will cause the machine to be reset as if MAXAM were not installed. Disc version Reset the machine first by typing CTRL-SHIFT-ESC. This is important. Insert the MAXAM disc and type ‘RUN “MAXAM”’. You will then be given the option of loading (1) the complete program. (2) the editor only. (3) everything except the editor. When loaded the program will be relocated to the highest possible address in memory. Only as much memory as required is used, so by loading only the editor more memory will be available for text. Finally you will be asked: “How many bytes do You want to reserve for code?” You can just press ENTER in response, in which case no action will be taken. If a number is entered, HIMEM is reduced by this number to reserve memory for storing machine code (the use of this is explained in section 5). The loader program may be configured to initialise the machine however you wish (e.g. set colours, program function keys). To do this load the program 'MAXUSER' (which is unprotected BASIC). This contains instructions as to where to insert your code. Cassette version Reset the machine by typing CTRL-SHIFT-ESC. This is important. Two copies are supplied, one on each side of the tape. To load type: RUN “MAXAM” or just RUN “ You will then be asked: “Do you want to load the editor?” If you do not want to use the editor at all answer ‘N'. and you will leave more memory free. Finally you will be asked: “How many bytes do you want to reserve for code?” You can just press ENTER in response, in which case no action will be taken. If a number is entered, HIMEM is reduced by this number to reserve memory for storing machine code (the use of this is explained in section 5).
3. USING MAXAM When MAXAM is installed, a number of commands are added to the system. These are known as external commands and are called from BASIC by prefixing the command name with a vertical bar (SHIFT @). For completeness the commands are all listed here. though they are dealt with in detail in the relevant section. Commands available on all versions
MAXAM enter the main MAXAM menu, from which the text editor and utility commands are available.
MAXAM,2 enter the main menu in mode 2. M same as MAXAM. ASSEMBLE assemble Z80 code within BASIC program. ASSEM as ASSEMBLE, suppressing all messages. CAT catalogue files in the same way as the BASIC command CAT. CLEAR delete the editor text. FIND search for a string in assembler section of BASIC program MODE switches between mode 1 and mode 2. SPEED set cassette write speed.
Commands available on ROM version only
HELP list all ROMs with version numbers. HELP,n list commands for ROM number n. MAXOFF turn off MAXAM. MSL move screen memory low. MSH move screen memory high. ROMOFF turn off selected ROMs.
Note: CLEAR, FIND, and HELP may be prefixed with 'M' (for MAXAM). This is in case any
future ROMs use these command names and intercept the command before MAXAM. However, we hope that writers of ROM software will avoid these names.
Some general points 1. Throughout MAXAM, the ESC key works in the same way as in BASIC. This means that any operation can be halted by pressing ESC once. Pressing ESC again will abort, any other key will resume. If MAXAM is trying to send a character to the printer when the printer is not ready the cursor will be turned on. Either put the printer on-line. or press ESC to give up (you may have to hold the ESC key for about half a second). 2. The DEL key works in the same way as in BASIC, i.e. it deletes the last character typed. 3. The cursor is disabled when any operation is being carried out. Whenever the cursor is visible the computer is waiting for some input. If no prompt is given it is simply waiting for any key to continue or ESC to abort the current operation. This again is consistent with BASIC. 4. MAXAM uses colour displays when in 40 column mode. The default ink settings are used. Since one of the default colours is red, which does not show clearly on a green screen monitor you may want to change it. For example, to change red to bright green enter 'INK 3,8' from BASIC.
4. MEET THE ASSEMBLER The aim of this section is to provide a gentle introduction to using the assembler. There are two complete short programs in this section, with full explanations of what they are doing. Typing these programs in and running them is recommended, particularly if you have not used an assembler before. One or two details are glossed over here and are fully explained in section 5. There are a couple of points to be noted when typing in these programs. (i) Anything may be typed in either upper or lower case - it makes no difference at all. (ii) Take care to enter the single quote character where it appears after a line
number. This is the SHIFT-7 character. Program 1 displays the ASCII character set. The equivalent BASIC program is given. Program 1(a): Machine code Program 1(b): BASIC 10 MEMORY HIMEM-11 10 FOR I%=32 TO 127 20 start=HIMEM+1 20 PRINT CHR$(I%); 30 GOSUB 1000 30 NEXT 40 CALL start 50 END 1000 |ASSEMBLE 1010 'LD A,32 ; first ASCII code in accumulator 1020 '.loop ; define a label 'loop' 1030 'CALL &BB5A ; CALL txt_output, the firmware output routine 1040 'INC A ; move to next character 1050 'CP 128 ; have we done them all? 1060 'JR C,loop ; no - go back for another one 1070 'RET ; yes - return 1080 'END ; stop assembler 1090 RETURN Line by line explanation of program 1(a)
10 : This reserves memory for the machine code routine. In this case 11 bytes are needed.
20 : The BASIC variable 'start' is made to contain the start address of the machine code routine.
30 : The subroutine assembles the code. It is good practice to put the assembler instructions in a separate subroutine.
40 : Calls the (now assembled) machine code program. 1000 : An external command which calls the assembler, and causes the assembly
language instructions In the subsequent lines to be assembled. 1010 : The machine code program. The quote characters tell BASIC that these
lines are comments, and therefore to ignore them. The semicolons tell the assembler that what follows is a comment.
1090 : The assembler returns control to BASIC which returns from the subroutine.
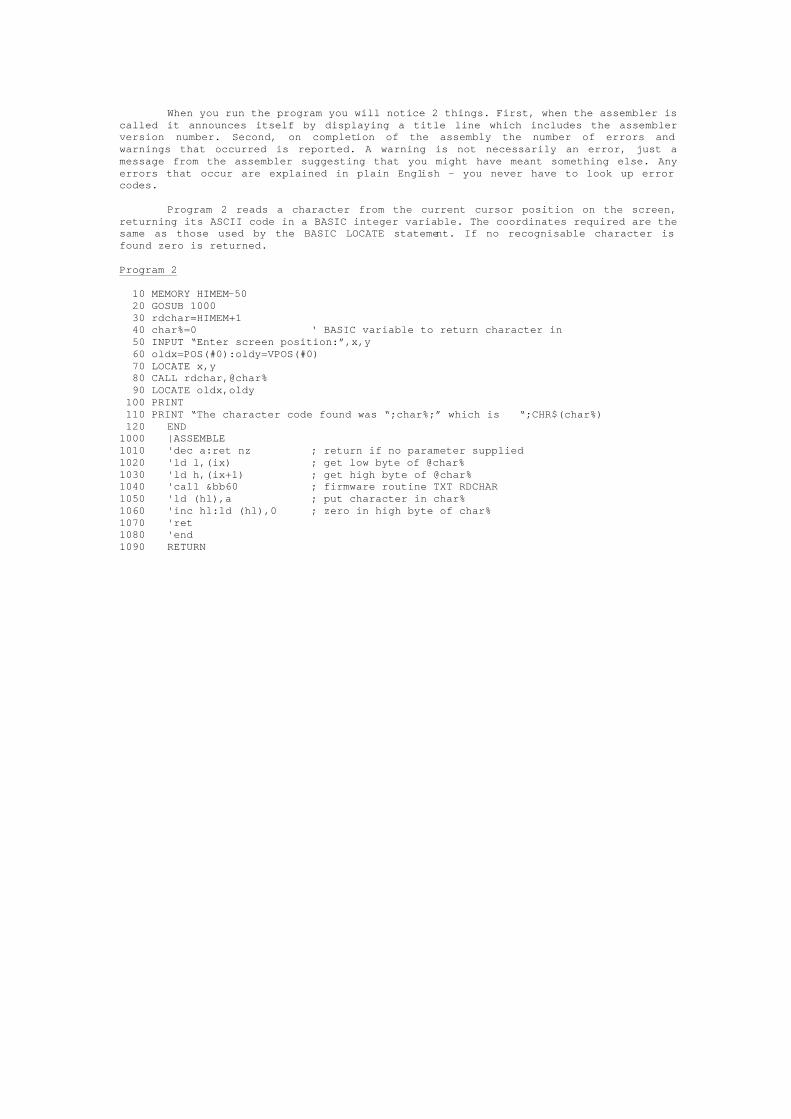
When you run the program you will notice 2 things. First, when the assembler is called it announces itself by displaying a title line which includes the assembler version number. Second, on completion of the assembly the number of errors and warnings that occurred is reported. A warning is not necessarily an error, just a message from the assembler suggesting that you might have meant something else. Any errors that occur are explained in plain English - you never have to look up error codes. Program 2 reads a character from the current cursor position on the screen, returning its ASCII code in a BASIC integer variable. The coordinates required are the same as those used by the BASIC LOCATE statement. If no recognisable character is found zero is returned. Program 2 10 MEMORY HIMEM-50 20 GOSUB 1000 30 rdchar=HIMEM+1 40 char%=0 ‘ BASIC variable to return character in 50 INPUT “Enter screen position:”,x,y 60 oldx=POS(#0):oldy=VPOS(#0) 70 LOCATE x,y 80 CALL rdchar,@char% 90 LOCATE oldx,oldy 100 PRINT 110 PRINT “The character code found was “;char%;” which is “;CHR$(char%) 120 END 1000 |ASSEMBLE 1010 'dec a:ret nz ; return if no parameter supplied 1020 'ld l,(ix) ; get low byte of @char% 1030 'ld h,(ix+1) ; get high byte of @char% 1040 'call &bb60 ; firmware routine TXT RDCHAR 1050 'ld (hl),a ; put character in char% 1060 'inc hl:ld (hl),0 ; zero in high byte of char% 1070 'ret 1080 'end 1090 RETURN
5. THE ASSEMBLER - IN DETAIL Program format The program to be assembled consists of a sequence of statements. Each statement has the format: <label_field> <instruction_field> <comment_field> One line may contain several statements, separated by colons, just as in BASIC. A statement is made up of the three parts shown above, each of which may be empty. The comment field, if present, must start with a semicolon - the effect of a semicolon is that the assembler will ignore all characters until the next colon or end of line. To allow colons in comments use two semicolons together. All characters to the end of the line are then ignored. Instructions and names used in the source code may be typed in upper or lower case. Thus 'START', 'start' and 'Start' all refer to the same label. The label may be preceded by a full stop. This tells the assembler tnat what follows is a label. If there is no full stop the assembler will attempt to recognize a Z80 instruction or assembler directive, and if it fails will take the first item as a label. Labels must begin with a letter and can be any length. Thus to use a Z80 instruction as a label it must be prefixed with a full stop. e.g. '.halt'. A warning message is given if a label that is not preceded by a full stop starts with the name of a mnemonic or directive. So if you accidentally leave out a space (e.g. by typing ‘inca' instead of ‘inc a') the assembler will warn you. Putting in the full stop will prevent the warning message if you meant to declare a label.
Using the assembler from BASIC MAXAM can be used in two ways; either by entering Z80 source code as part of a BASIC program, or by using the full screen editor. The editor is left to section 8. The assembler is called from within a BASIC program by the command '|ASSEMBLE'. It will then read Z80 assembly language instructions from the subsequent lines of the BASIC program. The lines cannot be entered directly, because BASIC would attempt to tokenise the line. So every line of Z80 code must begin with a single quote.
e.g. 100 'LD A,10 Source code may be entered on the same line as |ASSEMBLE: e.g |ASSEMBLE:'ld a,”?”:jp &bb5a This can be executed in direct mode. The quote character tells BASIC to treat the line as a comment, and so completely ignore it. At the end of a section of machine code - which is automatically detected by the assembler when it finds a line without a quote BASIC resumes execution at the line following |ASSEMBLE. The assembler source code will then be skipped over, and BASIC lines after the assembler lines will be executed. Any number of sections of assembly language may be contained within a program. each preceded by |ASSEMBLE. It is good practice to put each assembler section in a separate subroutine as in the example programs in this manual.
Correcting errors The program can be edited in exactly the same way as any BASIC program. If a quote is accidentally missed out in an assembler section the assembler will terminate and BASIC will attempt to execute the line. This will almost certainly give a syntax error, and BASIC will enter the line editor - allowing the correction to be made very easily. The |FIND command FIND is a utility included to speed up program editing. Type '|FIND' and you will be asked for a string to find. All occurrences of the string in lines beginning with a quote character will be found and the line number displayed in each case. This is designed for finding occurrences of a particular symbol in a assembly language program, and does not work with BASIC variables because of the unusual way that BASIC tokenises its lines. The maximum string length is 17 characters. Debugging and breakpoints Debugging machine code programs is made much easier by using MAXAM, and can be done from BASIC - there is no need to learn to use a lot of complicated commands. This is achieved by allowing breakpoints to be placed anywhere in the program. A breakpoint is a special instruction which, when executed, causes a subroutine jump to a routine which displays the values of the Z80 registers and disassembles the next instruction to be executed. By examining the values held in the registers you can see whether the program is working correctly. If not, press ESC to return to BASIC, check the program, make the necessary correction, re-assemble and try again. If the registers are correct press a key and execution will continue to the next breakpoint or the final RET instruction.
The mnemonic for a breakpoint is 'BRK'. In fact, BRK is the same as RST 6, which means that if you intercept RST 6 for your own purposes a BRK instruction will cause your routine to be executed instead of the MAXAM breakpoint routine. Reset the machine to restore MAXAM’s routine.
Look at program 1(a) again and add the following line: 1025 ‘ BRK
Now when the program is run the registers will be displayed every time the loop is executed. Running hybrid BASIC/machine code programs If ESC is pressed while assembling, then whether assembly is aborted (by pressing ESC again) or not, BASIC will wait afte completion of the assembly as if ESC had been pressed once. Thus to abort the assembly and stop the BASIC program, ESC should be pressed 3 times. Invisible assembly, the |ASSEM command When a program has been fully debugged it may be desirable to assemble the code without the assembler displaying any messages. This can be done by replacing |ASSEMBLE with |ASSEM. The effect is to suppress all output from the assembler except error messages.
Assembler error messages
Whenever an error occurs during an assembly the offending line is listed, a beep is sounded, and a self explanatory message is displayed.
There are 3 degrees of severity of error that can be produced by the assembler. The most serious is 'fatal error' which causes the assembler to give up immediately. There are 10 different fatal errors, and they are listed in the reference section.
With one exception ('Code limit exceeded') fatal errors are reported on the first pass. All other errors are reported on the second pass, and do not cause the assembler to give up. Instead the numbers of each type are counted and the total numbers are printed when the assembly is finished.
The least serious is 'warning'. A warning message is given for something which can be assembled but it is likely that the programmer meant something different. This occurs in the following cases:
1. A label not preceded by a full stop starts with the name of a Z80 mnemonic or assembler directive or command.e.g. INPUT.
2. An expression evaluates to more than 8 bits, when an 8 bit value is required. e.g. LD A,300. Note: a warning is not given if the high order 8 bits are all 1, so e.g. LD C,-3 is allowed.
3. Spurious text is found after the statement has been correctly assembled. This may be the result of missing out a colon or semicolon.
All other errors are labelled 'error'. If any occur the program will have to be re-assembled before calling the machine code. If any errors or warnings occur the BASIC program will be stopped. This avoids any possibility of calling a routine which was assembled incorrectly.
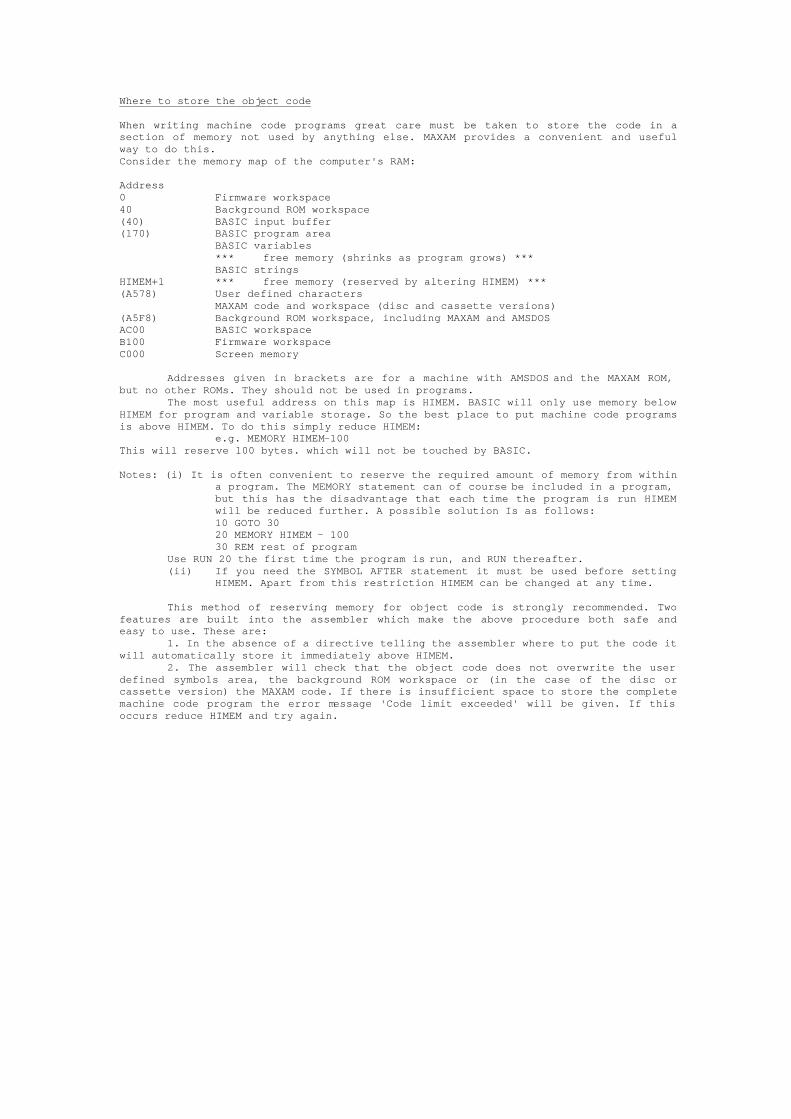
Where to store the object code When writing machine code programs great care must be taken to store the code in a section of memory not used by anything else. MAXAM provides a convenient and useful way to do this. Consider the memory map of the computer's RAM: Address 0 Firmware workspace 40 Background ROM workspace (40) BASIC input buffer (170) BASIC program area BASIC variables *** free memory (shrinks as program grows) *** BASIC strings HIMEM+1 *** free memory (reserved by altering HIMEM) *** (A578) User defined characters MAXAM code and workspace (disc and cassette versions) (A5F8) Background ROM workspace, including MAXAM and AMSDOS AC00 BASIC workspace B100 Firmware workspace C000 Screen memory Addresses given in brackets are for a machine with AMSDOS and the MAXAM ROM, but no other ROMs. They should not be used in programs. The most useful address on this map is HIMEM. BASIC will only use memory below HIMEM for program and variable storage. So the best place to put machine code programs is above HIMEM. To do this simply reduce HIMEM:
e.g. MEMORY HIMEM-100 This will reserve 100 bytes. which will not be touched by BASIC. Notes: (i) It is often convenient to reserve the required amount of memory from within
a program. The MEMORY statement can of course be included in a program, but this has the disadvantage that each time the program is run HIMEM will be reduced further. A possible solution Is as follows: 10 GOTO 30 20 MEMORY HIMEM - 100
30 REM rest of program Use RUN 20 the first time the program is run, and RUN thereafter. (ii) If you need the SYMBOL AFTER statement it must be used before setting
HIMEM. Apart from this restriction HIMEM can be changed at any time. This method of reserving memory for object code is strongly recommended. Two features are built into the assembler which make the above procedure both safe and easy to use. These are: 1. In the absence of a directive telling the assembler where to put the code it will automatically store it immediately above HIMEM. 2. The assembler will check that the object code does not overwrite the user defined symbols area, the background ROM workspace or (in the case of the disc or cassette version) the MAXAM code. If there is insufficient space to store the complete machine code program the error message 'Code limit exceeded' will be given. If this occurs reduce HIMEM and try again.
The ORG directive The above mechanism is ideal for testing virtually all programs, but sometimes a program is required to execute in a different part of memory. The ORG directive tells the assembler what address to use. There are 2 forms: Syntax: 1. ORG <expression>
2. ORG <expressionl> , <expression2> With the first form the assembler will evaluate the expression, and use this as the 'Code origin' (i.e. the address where the code is to run). The assembled code will be stored starting at this address. Often it is not possible to store the code at the address where it is to run, because it is being used by something else (e.g. MAXAM or BASIC). In this case use the second form. The assembler will evaluate both expressions, set the code origin to the first, but store the code at the second address (the 'storage location'). This is usually only necessary when a program is fully debugged, and is to be saved and run from disc or tape. Notes: (i) Any number of ORG directives may be used.
(ii) The expressions may not contain undefined symbols.
The LIMIT directive If an ORG directive is used the assembler still cheeks for the code overwriting the user defined characters. The way it does this is by keeping an internal variable called 'LIMIT', which is set to the highest byte of memory available for storage of object code. Initially this is set to the address of the byte just below BASIC's user defined character buffer. However it can be set to any value: Syntax: LIMIT <expression> Three uses of the LIMIT directive: 1. To prevent memory used by something else being overwritten. 2. When writing a program with a fixed maximum size (e.g. the size of an EPROM). 3. Many programs will intercept firmware routines (see the Amsoft dicumentation for details of how to do this). The firmware jump blocks are higher in memory than the default LIMIT, so the LIMIT directive must be used before it is possible to assemble directly into the firmware jump block. 'LIMIT &FFFF' will allow assembling in any area of memory. Notes:
(i) LIMIT only affects storage of code In memory, not the code location (if this is different).
(ii) The checking is only done on pass 2, since code is only stored on pass 2.
NOCODE and CODE Syntax: NOCODE Syntax: CODE Occasionally it is useful to assemble a program without storing any code - perhaps just to check that it assembles correctly, or to assemble a small routine which is to be input in hexadecimal (maybe on another computer). The directive NOCODE achieves this. The directive CODE cancels the effect of NOCODE, and causes storage of object code to be resumed. The END directive Syntax: END The END directive simply tells the assembler to stop. It may be omitted. but has two uses: 1. To avoid assembling the whole program - temporarily put in an END directive. 2. END causes the storage location to be output in the listing. A useful ploy is to put 'LIST:END' as the last line of source code so you can see where the end of the program is.
Expressions Arithmetic expressions may be used throughout the assembler - wherever a number is required. This includes operands of Z80 instructions and assembler directives. The expression evaluator works from left to right and allows the following: NUMBERS:
1. decimal constants. e.g. 132. 2. hexadecimal constants. e.g. &BB5A or #2A. Either & or # may be used for compatibilty with BASIC and the firmware documentation.
3. binary constants. e.g. %1011101 4. character constants. e.g. 'A',”3”,’”’. Either single or double quotes may be used - to specify a quote character enclose it in the other type of quote. The value of a character constant is the ASCII code of the character, so “3” is the same as #33. A null character constant,”” has the value 0.
5. an identifier. 6. one of the two special symbols:
$ represents the current code location (program counter). @ represents the current storage location. OPERATORS:
All expressions are evaluated to 16 bit unsigned integers. Overflow is ignored,
and the least significant 16 bits of the result is used.
Symbols
The assembler keeps a table of symbols, each with an assigned 16 bit value. A Symbol is similar to a BASIC variable. The assembler makes two passes; on the first pass it sets up the symbol table and on the second pass it creates the object code using the symbol table to calculate jump addresses etc. On the first pass, when a symbol that has not yet been defined is referred to it is put into the symbol table. The value is filled in when the symbol is defined. These forward references must all be resolved on the first pass; error messages will indicate any symbols that remained undefined. No symbol may be assigned different values on the two passes - if this occurs the assembler may generate many errors. There are some assembler directives which do not allow any forward references because the expression value must be known on pass 1. These include ORG - the code origin must be well-defined for it would otherwise be impossible for the assembler to generate the correct symbol table. The full list of these directives is given in the reference section. An identifier is the name of a symbol. Valid identifiers must satisfy the following rules:
1. the first character must be a letter. 2. The other characters may any of: letter, digit, question mark (?), full stop (.), underline (_).
There is no length restriction, nor are there any reserved words. 4 ways to define a symbol 1. As a label. This is an identifier at the start of a statement, possibly preceded by a full stop. The symbol is assigned the value of the current code location.
2. By the EQU (equate) directive. <identifier> EQU <expression>
The symbol is defined and assigned the value of the expression, which must be well-defined (i.e. contain no forward references). If the symbol is already defined an error message will be given (unless the old value and the new are the same). In other words, EQU may not be used to redefine a symbol.
3. By the LET directive. LET <identifier> = <expression>
This has the same effect as EQU except that LET allows redefinition of symbols. Note: for compatibility with other assemblers this may be written
<identifier> DEFL <expression>. 4. By the GET directive. See section on GET and PUT.
Putting data into the object code The 3 directives explained in this section cause data to be assembled at the current code location. In all cases both the code location and storage location are incremented. BYTE <list of expressions and strings> TEXT <list of expressions and strings> BYTE and TEXT are different names for the same thing. They take a list of parameters, each of which can be an arithmetic expression or a text string. Each expression is evaluated and the result put in the objecr code. Each string is sent directly to the object code, character by character. Strings may be enclosed in either single or double quotes; if the closing quote is omitted the string is assumed to be the rest of the line. Note: a single character string is considered a numeric constant. expressions such as “A”+&80 are allowed.
Examples: BYTE 1,3,count*3+1,”q” or 128 TEXT “A string ending with cr-lf”,13,10
WORD <list of expressions> Each expression is evaluated and the 2 byte result put in the object code, low byte first. Example: WORD &C000,address RMEM <expression> RMEM causes the assembler to reserve the specified number of bytes of memory. Both the object code and the storage location are incremented by the value of the expression. The reserved space is filled with zeros. The expression may not contain forward references.
Examples: .buffer256 RMEM 256 .word RMEM 2
Occasionally the reserved space needs to be filled with a value other than zero. This can be done by giving a second expression parameter. The space is filled with the least significant byte of the expression's value.
Example: RMEM &200,&FF Compatibilty with other assemblers: The following alternarive directive names are allowed: DEFB, DB, DEFM ... same as BYTE, TEXT. DEFW, DW ... same as WORD. DEFS, DS ... same as RMEM.
GET and PUT GET and PUT are the two directives used to pass parameters between a BASIC program and the assembler at the time of assembly. Uses for this include:
1. passing the address where code is to be stored. 2. passing variables to control conditional assembly. 3. returning entry point addresses to BASIC.
To use these directives, a list of parameters is appended to the |ASSEMBLE command, separated by commas.
e.g. |ASSEMBLE,start,x,@startl Each parameter must be either a BASIC numeric variable or constant, or the address of a BASIC numeric (integer or real) variable (e.g. @startl). The GET directive is used within the assembler program to read the values of these parameters.
Syntax: GET <list of identifiers> So a GET directive corresponding to the parameters list example above could be: GET start,x,start_adr The effect of this is just to assign the 2 byte values to the symbols listed in the GET Instruction. The names chosen have no connection with the names of the BASIC variables, but it is a good idea to use the same name to avoid confusion. There is no need to read all the values with a single GET. so the following is equally good:
GET start GET x,start-adr
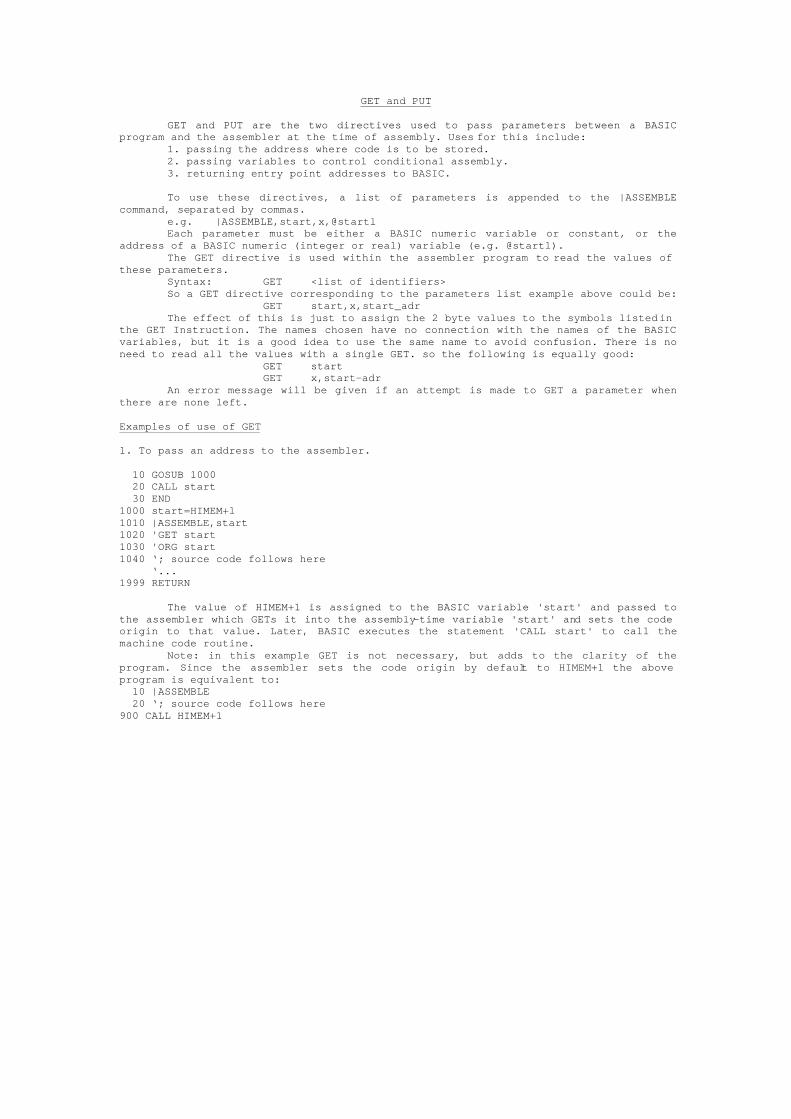
An error message will be given if an attempt is made to GET a parameter when there are none left. Examples of use of GET 1. To pass an address to the assembler. 10 GOSUB 1000 20 CALL start 30 END 1000 start=HIMEM+l 1010 |ASSEMBLE,start 1020 'GET start 1030 'ORG start 1040 ‘; source code follows here ‘... 1999 RETURN The value of HIMEM+1 is assigned to the BASIC variable 'start' and passed to the assembler which GETs it into the assembly-time variable 'start' and sets the code origin to that value. Later, BASIC executes the statement 'CALL start' to call the machine code routine. Note: in this example GET is not necessary, but adds to the clarity of the program. Since the assembler sets the code origin by default to HIMEM+1 the above program is equivalent to: 10 |ASSEMBLE 20 ‘; source code follows here 900 CALL HIMEM+1
2. To pass variables for conditiorial assembly.
See the section on conditional assembly. 3. To return entry point addresses to BASIC. Often a machine code program has more than one entry point. The simple use of GET only allows calling the start of the code, but by using PUT as well, any number of addresses can be returned to BASIC.
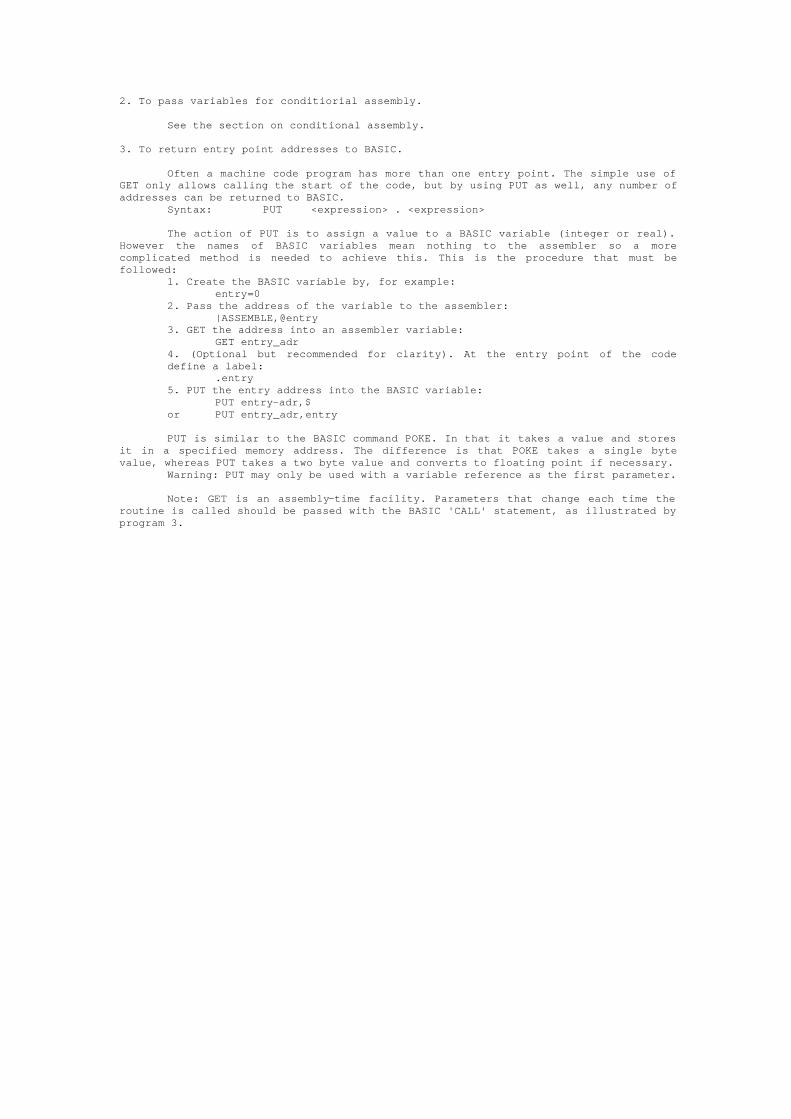
Syntax: PUT <expression> . <expression> The action of PUT is to assign a value to a BASIC variable (integer or real). However the names of BASIC variables mean nothing to the assembler so a more complicated method is needed to achieve this. This is the procedure that must be followed:
1. Create the BASIC variable by, for example: entry=0
2. Pass the address of the variable to the assembler: |ASSEMBLE,@entry
3. GET the address into an assembler variable: GET entry_adr
4. (Optional but recommended for clarity). At the entry point of the code define a label:
.entry 5. PUT the entry address into the BASIC variable:
PUT entry-adr,$ or PUT entry_adr,entry
PUT is similar to the BASIC command POKE. In that it takes a value and stores it in a specified memory address. The difference is that POKE takes a single byte value, whereas PUT takes a two byte value and converts to floating point if necessary. Warning: PUT may only be used with a variable reference as the first parameter. Note: GET is an assembly-time facility. Parameters that change each time the routine is called should be passed with the BASIC 'CALL' statement, as illustrated by program 3.
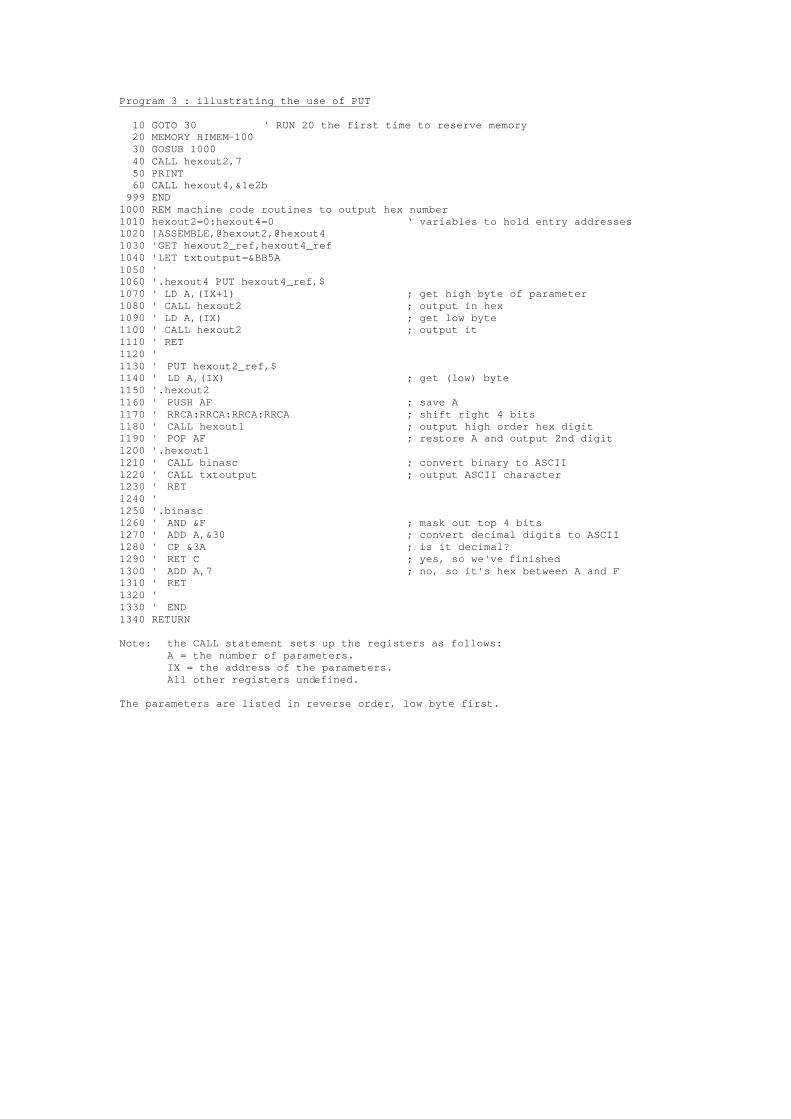
Program 3 : illustrating the use of PUT 10 GOTO 30 ‘ RUN 20 the first time to reserve memory 20 MEMORY HIMEM-100 30 GOSUB 1000 40 CALL hexout2,7 50 PRINT 60 CALL hexout4,&1e2b 999 END 1000 REM machine code routines to output hex number 1010 hexout2=0:hexout4=0 ‘ variables to hold entry addresses 1020 |ASSEMBLE,@hexout2,@hexout4 1030 'GET hexout2_ref,hexout4_ref 1040 'LET txtoutput=&BB5A 1050 ' 1060 '.hexout4 PUT hexout4_ref,$ 1070 ' LD A,(IX+1) ; get high byte of parameter 1080 ' CALL hexout2 ; output in hex 1090 ' LD A,(IX) ; get low byte 1100 ' CALL hexout2 ; output it 1110 ' RET 1120 ' 1130 ' PUT hexout2_ref,$ 1140 ' LD A,(IX) ; get (low) byte 1150 '.hexout2 1160 ' PUSH AF ; save A 1170 ' RRCA:RRCA:RRCA:RRCA ; shift right 4 bits 1180 ' CALL hexout1 ; output high order hex digit 1190 ' POP AF ; restore A and output 2nd digit 1200 '.hexout1 1210 ' CALL binasc ; convert binary to ASCII 1220 ' CALL txtoutput ; output ASCII character 1230 ' RET 1240 ' 1250 '.binasc 1260 ' AND &F ; mask out top 4 bits 1270 ' ADD A,&30 ; convert decimal digits to ASCII 1280 ' CP &3A ; is it decimal? 1290 ' RET C ; yes, so we've finished 1300 ' ADD A,7 ; no, so it's hex between A and F 1310 ' RET 1320 ' 1330 ' END 1340 RETURN Note: the CALL statement sets up the registers as follows: A = the number of parameters. IX = the address of the parameters. All other registers undefined. The parameters are listed in reverse order, low byte first.
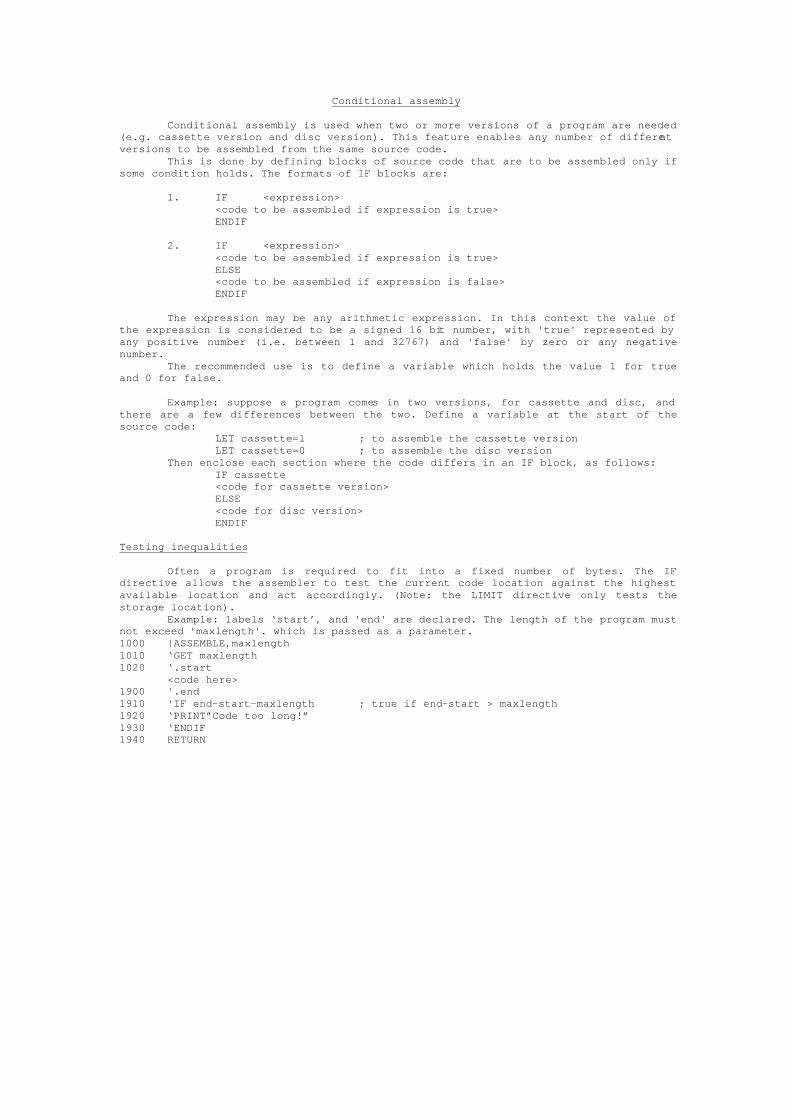
Conditional assembly Conditional assembly is used when two or more versions of a program are needed (e.g. cassette version and disc version). This feature enables any number of different versions to be assembled from the same source code. This is done by defining blocks of source code that are to be assembled only if some condition holds. The formats of IF blocks are:
1. IF <expression> <code to be assembled if expression is true> ENDIF
2. IF <expression>
<code to be assembled if expression is true> ELSE <code to be assembled if expression is false> ENDIF
The expression may be any arithmetic expression. In this context the value of the expression is considered to be a signed 16 bit number, with 'true' represented by any positive number (i.e. between 1 and 32767) and 'false' by zero or any negative number. The recommended use is to define a variable which holds the value 1 for true and 0 for false. Example: suppose a program comes in two versions, for cassette and disc, and there are a few differences between the two. Define a variable at the start of the source code:
LET cassette=l ; to assemble the cassette version LET cassette=0 ; to assemble the disc version
Then enclose each section where the code differs in an IF block, as follows: IF cassette <code for cassette version> ELSE <code for disc version> ENDIF
Testing inequalities Often a program is required to fit into a fixed number of bytes. The IF directive allows the assembler to test the current code location against the highest available location and act accordingly. (Note: the LIMIT directive only tests the storage location).
Example: labels ‘start’, and 'end' are declared. The length of the program must not exceed 'maxlength'. which is passed as a parameter. 1000 |ASSEMBLE,maxlength 1010 ‘GET maxlength 1020 ‘.start <code here> 1900 '.end 1910 'IF end-start-maxlength ; true if end-start > maxlength 1920 ‘PRINT”Code too long!” 1930 ‘ENDIF 1940 RETURN
Logical operators AND, OR and XOR may be used with care in IF directives. These are bitwise logical operators, and will work as expected if true is only represented by 1 and false only by 0. So if variables which only ever hold the values 0 or 1 are used the usual results hold (1 OR 0 is true, 1 AND 0 is false, 1 XOR 1 is false, etc.)
Example: IF cassette_version AND English_version Warning: although 1 and 2 both represent true, the expression 1 AND 2 evaluates to 0 (i.e. false). IFNOT For convenience IFNOT may be used instead of IF. It simply reverses the logic of the IF directive:
IFNOT <expression> <code to be assembled if expression is false> ELSE <code to be assembled if expression is true> ENDIF
Nesting IF blocks IF blocks may be nested up to a depth of 10. It is, however, unusual to need nesting deeper than 2 levels.
Example: IF rom_verclon <ROM code> ELSE : IF disc_version
<disc code> ELSE <cassette code> ENDIF
ENDIF IF1, IF2 These special forms of the IF directive return the value 'true' on pass 1 and 2 of the assembly, respectively. They may be of some use for printing different messages on each pass, but Z80 instructions and directives should not be placed within an IF1 or IF2 block.
Reading source code from a file Syntax: READ <filename> When the assembler finds a READ directive it will open the specified file (on the currently selected input filing system), assemble the contents of the file, and then return to the line in memory following the READ directive. The file may be a BASIC file (tokenised or ASCII format) or a text file (produced by the MAXAM editor, or a word processor). The first nonblank character after the word 'READ' is taken as the filename delimiter. Only one file may be opened at any time. Thus the READ directive itself must be in memory. If the entire program is contained in one file the program in memory can be as simple as |ASSEMBLE:|’READ”file”. Using READ with cassette The file will be read on each pass of the assembler, so it will be necessary to position the tape correctly for each pass. (It may be easier to record the source code file twice on the tape to avoid the need to rewind). If several files are being used the PRINT command can be useful to display a message saying which file is required. If the filename is omitted the first file found on the tape will be used. A useful hint If the program is split between several text files it is helpful for the assembler to print the name of each file it reads. This is easily accomplished by making the first line of each file something like:
1 PRINT “<name of file> <date>” This is also useful when editing: without a name at the top of a file it is easy to forget which file you are editing. The number 1 causes the assembler to reset its line counter to 1. This means that error messages will give the correct physical line number within the file where the error occurred. The editor has a command to move to a specified line, so using these features together speeds up debugging.
Writing object code to a file Syntax: WRITE <filename> The WRITE directive tells the assembler to create a binary file, and store all subsequent object code in the file (unless disabled with NOCODE). Disc users only: if the filename has a ‘.COM’ suffix a CP/M object file will be created, which is directly executable under CP/M. The code origin must be defined by 'ORG &100'. Such a file is not in binary format, so cannot be used under AMSDOS. Syntax: CLOSE The CLOSE directive tells the assembler to close the currently open output file and resume storage of code in memory. CLOSE may usually be omitted since the file is automatically closed at the end of the assembly or by a new WRITE directive. Example: to read source from one file and write to another WRITE “object” ; note WRITE before READ READ “source”
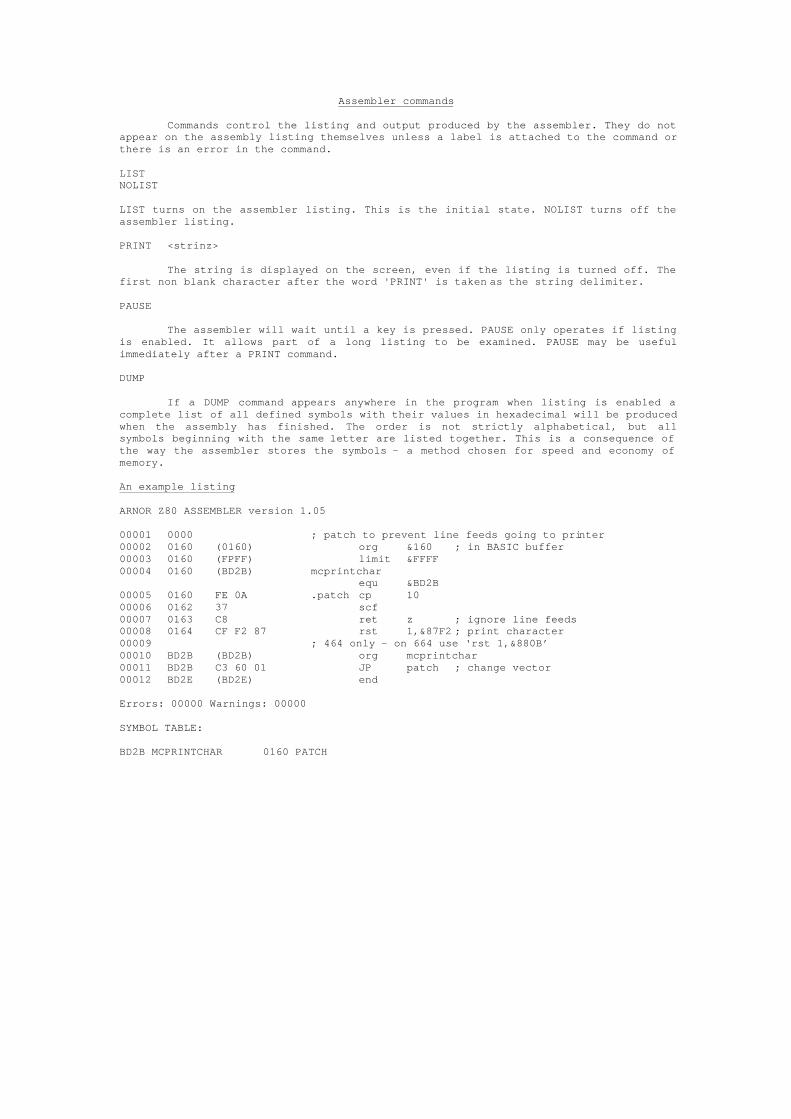
Assembler commands Commands control the listing and output produced by the assembler. They do not appear on the assembly listing themselves unless a label is attached to the command or there is an error in the command. LIST NOLIST LIST turns on the assembler listing. This is the initial state. NOLIST turns off the assembler listing. PRINT <strinz> The string is displayed on the screen, even if the listing is turned off. The first non blank character after the word 'PRINT' is taken as the string delimiter. PAUSE The assembler will wait until a key is pressed. PAUSE only operates if listing is enabled. It allows part of a long listing to be examined. PAUSE may be useful immediately after a PRINT command. DUMP If a DUMP command appears anywhere in the program when listing is enabled a complete list of all defined symbols with their values in hexadecimal will be produced when the assembly has finished. The order is not strictly alphabetical, but all symbols beginning with the same letter are listed together. This is a consequence of the way the assembler stores the symbols - a method chosen for speed and economy of memory. An example listing ARNOR Z80 ASSEMBLER version 1.05 00001 0000 ; patch to prevent line feeds going to printer 00002 0160 (0160) org &160 ; in BASIC buffer 00003 0160 (FPFF) limit &FFFF 00004 0160 (BD2B) mcprintchar equ &BD2B 00005 0160 FE 0A .patch cp 10 00006 0162 37 scf 00007 0163 C8 ret z ; ignore line feeds 00008 0164 CF F2 87 rst 1,&87F2 ; print character 00009 ; 464 only - on 664 use ‘rst 1,&880B’ 00010 BD2B (BD2B) org mcprintchar 00011 BD2B C3 60 01 JP patch ; change vector 00012 BD2E (BD2E) end Errors: 00000 Warnings: 00000 SYMBOL TABLE: BD2B MCPRINTCHAR 0160 PATCH
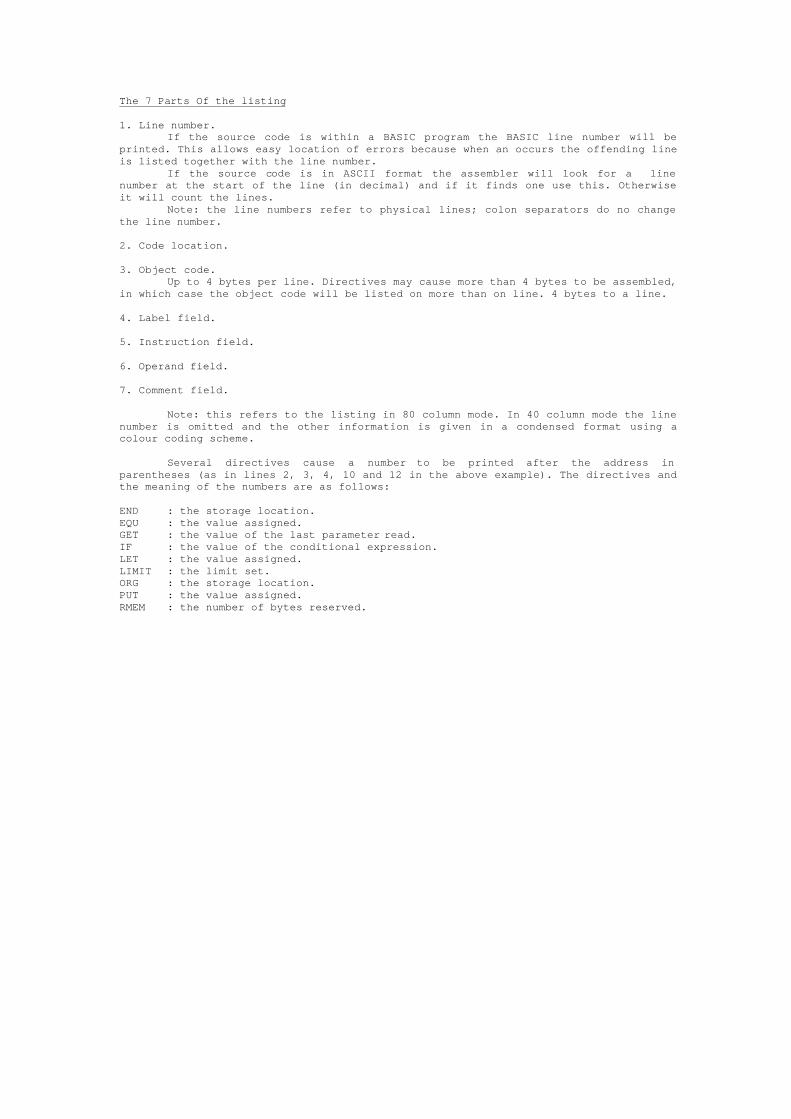
The 7 Parts Of the listing 1. Line number. If the source code is within a BASIC program the BASIC line number will be printed. This allows easy location of errors because when an occurs the offending line is listed together with the line number. If the source code is in ASCII format the assembler will look for a line number at the start of the line (in decimal) and if it finds one use this. Otherwise it will count the lines. Note: the line numbers refer to physical lines; colon separators do no change the line number. 2. Code location. 3. Object code. Up to 4 bytes per line. Directives may cause more than 4 bytes to be assembled, in which case the object code will be listed on more than on line. 4 bytes to a line. 4. Label field. 5. Instruction field. 6. Operand field. 7. Comment field. Note: this refers to the listing in 80 column mode. In 40 column mode the line number is omitted and the other information is given in a condensed format using a colour coding scheme. Several directives cause a number to be printed after the address in parentheses (as in lines 2, 3, 4, 10 and 12 in the above example). The directives and the meaning of the numbers are as follows: END : the storage location. EQU : the value assigned. GET : the value of the last parameter read. IF : the value of the conditional expression. LET : the value assigned. LIMIT : the limit set. ORG : the storage location. PUT : the value assigned. RMEM : the number of bytes reserved.
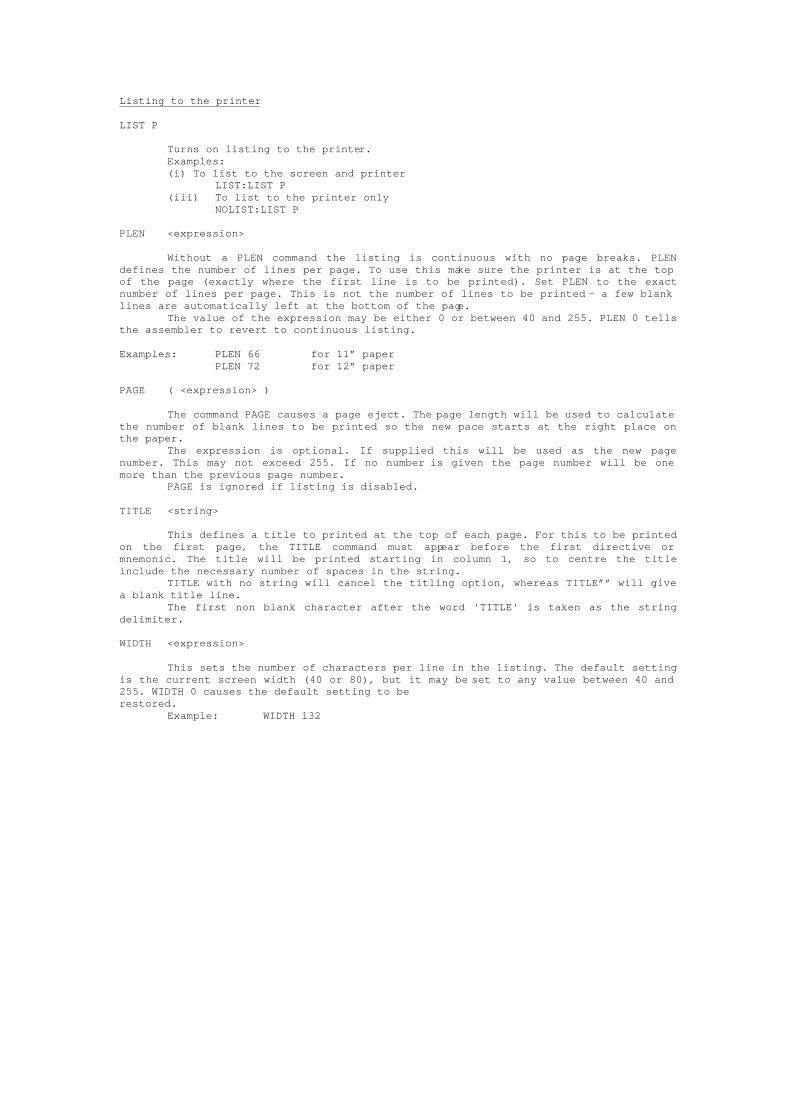
Listing to the printer LIST P
Turns on listing to the printer. Examples: (i) To list to the screen and printer
LIST:LIST P (iii) To list to the printer only
NOLIST:LIST P PLEN <expression> Without a PLEN command the listing is continuous with no page breaks. PLEN defines the number of lines per page. To use this make sure the printer is at the top of the page (exactly where the first line is to be printed). Set PLEN to the exact number of lines per page. This is not the number of lines to be printed - a few blank lines are automatically left at the bottom of the page. The value of the expression may be either 0 or between 40 and 255. PLEN 0 tells the assembler to revert to continuous listing. Examples: PLEN 66 for 11” paper PLEN 72 for 12” paper PAGE ( <expression> ) The command PAGE causes a page eject. The page length will be used to calculate the number of blank lines to be printed so the new pace starts at the right place on the paper. The expression is optional. If supplied this will be used as the new page number. This may not exceed 255. If no number is given the page number will be one more than the previous page number.
PAGE is ignored if listing is disabled. TITLE <string> This defines a title to printed at the top of each page. For this to be printed on the first page, the TITLE command must appear before the first directive or mnemonic. The title will be printed starting in column 1, so to centre the title include the necessary number of spaces in the string. TITLE with no string will cancel the titling option, whereas TITLE”” will give a blank title line. The first non blank character after the word 'TITLE' is taken as the string delimiter. WIDTH <expression> This sets the number of characters per line in the listing. The default setting is the current screen width (40 or 80), but it may be set to any value between 40 and 255. WIDTH 0 causes the default setting to be restored. Example: WIDTH 132
6. TWO APPLICATIONS
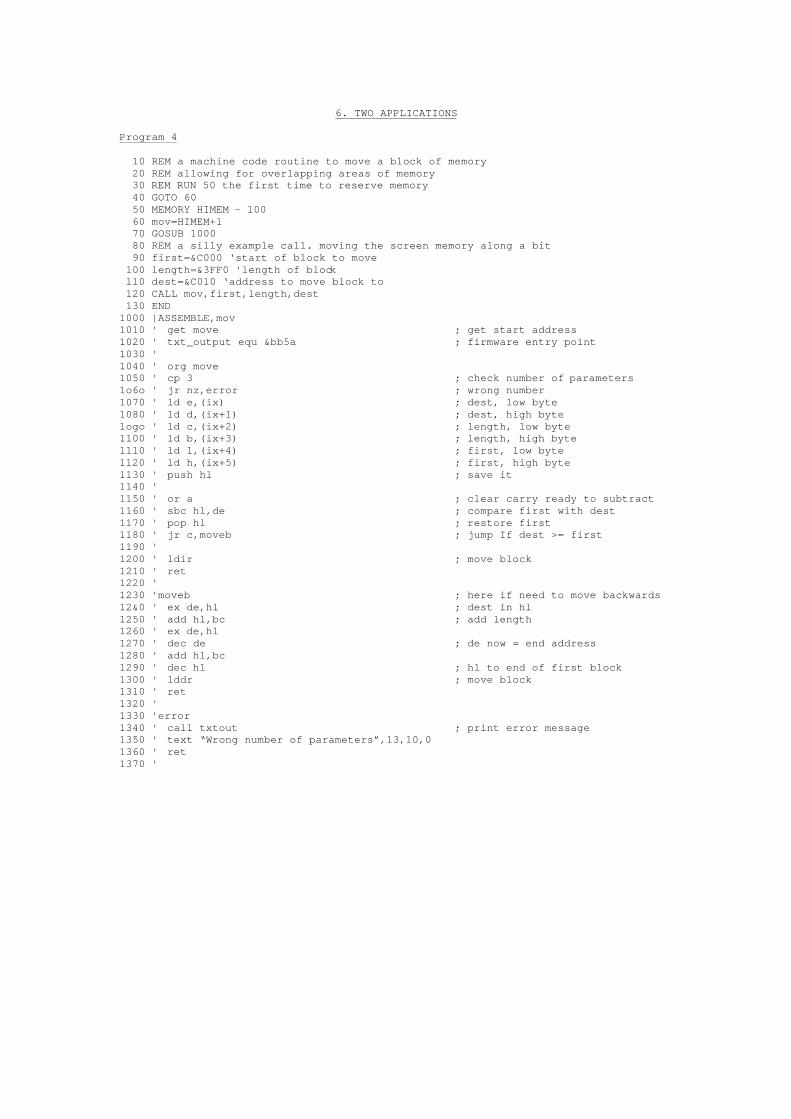
Program 4 10 REM a machine code routine to move a block of memory 20 REM allowing for overlapping areas of memory 30 REM RUN 50 the first time to reserve memory 40 GOTO 60 50 MEMORY HIMEM - 100 60 mov=HIMEM+1 70 GOSUB 1000 80 REM a silly example call. moving the screen memory along a bit 90 first=&C000 ‘start of block to move 100 length=&3FF0 'length of block 110 dest=&C010 ‘address to move block to 120 CALL mov,first,length,dest 130 END 1000 |ASSEMBLE,mov 1010 ' get move ; get start address 1020 ' txt_output equ &bb5a ; firmware entry point 1030 ' 1040 ' org move 1050 ' cp 3 ; check number of parameters 1o6o ' jr nz,error ; wrong number 1070 ' ld e,(ix) ; dest, low byte 1080 ' ld d,(ix+l) ; dest, high byte logo ' ld c,(ix+2) ; length, low byte 1100 ' ld b,(ix+3) ; length, high byte 1110 ' ld 1,(ix+4) ; first, low byte 1120 ' ld h,(ix+5) ; first, high byte 1130 ' push hl ; save it 1140 ' 1150 ' or a ; clear carry ready to subtract 1160 ' sbc hl,de ; compare first with dest 1170 ' pop hl ; restore first 1180 ' jr c,moveb ; jump If dest >= first 1190 ' 1200 ' ldir ; move block 1210 ' ret 1220 ' 1230 'moveb ; here if need to move backwards 12&0 ' ex de,hl ; dest in hl 1250 ' add hl,bc ; add length 1260 ' ex de,hl 1270 ' dec de ; de now = end address 1280 ' add hl,bc 1290 ' dec hl ; hl to end of first block 1300 ' lddr ; move block 1310 ' ret 1320 ' 1330 'error 1340 ' call txtout ; print error message 1350 ' text “Wrong number of parameters”,13,10,0 1360 ' ret 1370 '
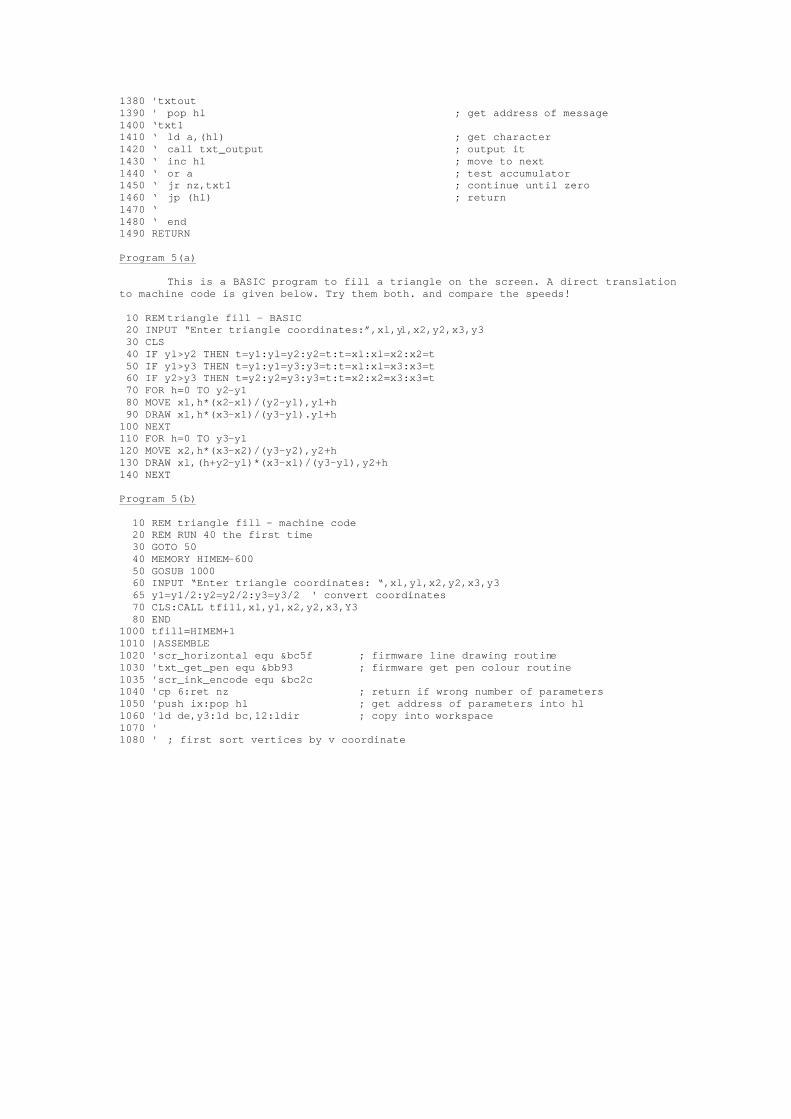
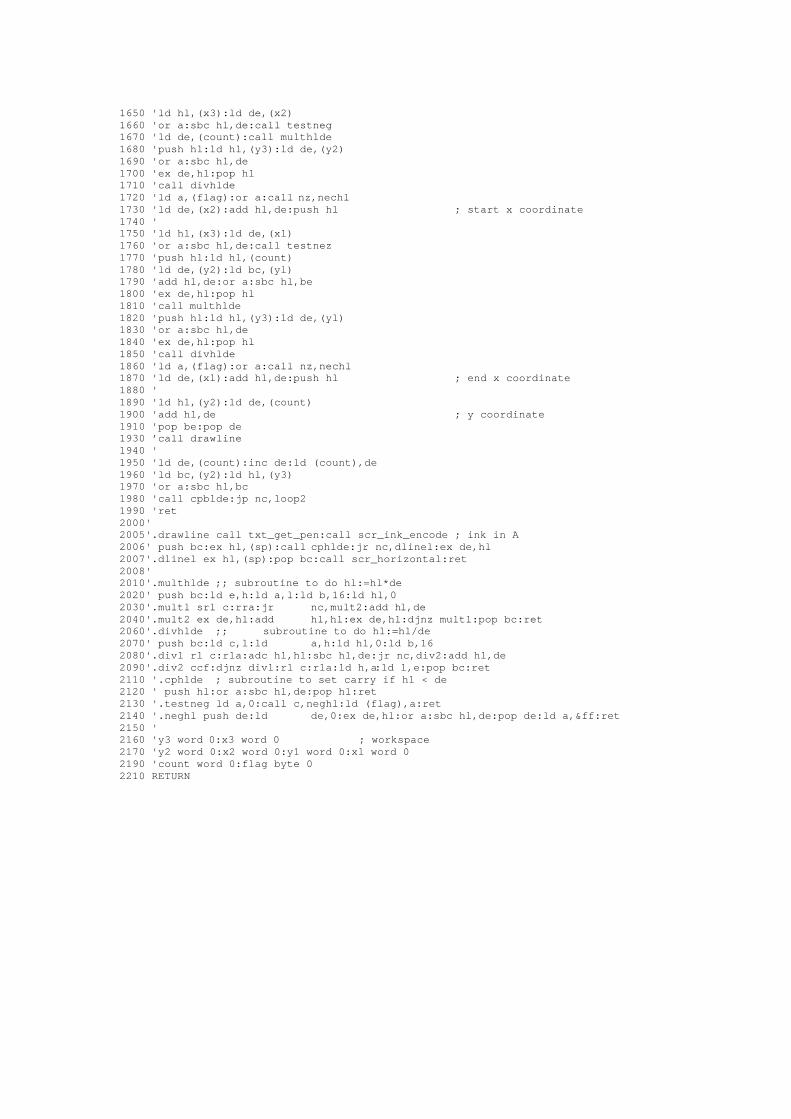
1380 'txtout 1390 ' pop hl ; get address of message 1400 ‘txt1 1410 ‘ ld a,(hl) ; get character 1420 ‘ call txt_output ; output it 1430 ‘ inc hl ; move to next 1440 ‘ or a ; test accumulator 1450 ‘ jr nz,txt1 ; continue until zero 1460 ‘ jp (hl) ; return 1470 ‘ 1480 ‘ end 1490 RETURN Program 5(a) This is a BASIC program to fill a triangle on the screen. A direct translation to machine code is given below. Try them both. and compare the speeds! 10 REM triangle fill - BASIC 20 INPUT “Enter triangle coordinates:”,xl,yl,x2,y2,x3,y3 30 CLS 40 IF yl>y2 THEN t=y1:yl=y2:y2=t:t=xl:xl=x2:x2=t 50 IF y1>y3 THEN t=y1:y1=y3:y3=t:t=xl:xl=x3:x3=t 60 IF y2>y3 THEN t=y2:y2=y3:y3=t:t=x2:x2=x3:x3=t 70 FOR h=0 TO y2-y1 80 MOVE xl,h*(x2-xl)/(y2-yl),yl+h 90 DRAW xl,h*(x3-xl)/(y3-yl).yl+h 100 NEXT 110 FOR h=0 TO y3-y1 120 MOVE x2,h*(x3-x2)/(y3-y2),y2+h 130 DRAW xl,(h+y2-yl)*(x3-xl)/(y3-yl),y2+h 140 NEXT Program 5(b) 10 REM triangle fill - machine code 20 REM RUN 40 the first time 30 GOTO 50 40 MEMORY HIMEM-600 50 GOSUB 1000 60 INPUT “Enter triangle coordinates: “,xl,yl,x2,y2,x3,y3 65 y1=y1/2:y2=y2/2:y3=y3/2 ‘ convert coordinates 70 CLS:CALL tfill,xl,yl,x2,y2,x3,Y3 80 END 1000 tfill=HIMEM+1 1010 |ASSEMBLE 1020 'scr_horizontal equ &bc5f ; firmware line drawing routine 1030 'txt_get_pen equ &bb93 ; firmware get pen colour routine 1035 'scr_ink_encode equ &bc2c 1040 'cp 6:ret nz ; return if wrong number of parameters 1050 'push ix:pop hl ; get address of parameters into hl 1060 'ld de,y3:1d bc,12:ldir ; copy into workspace 1070 ' 1080 ' ; first sort vertices by v coordinate
7. MENU-DRIVEN UTILITIES The command '|MAXAM’ takes you into the MAXAM main menu. The menu lists all the available commands - each is selected by a one or two letter code. To use a command type the code and press ENTER. On-screen prompts advise you what input is required for each command. You will see that the value of HIMEM is displayed on the top line, together with the ROM selections (which are explained below). ESC always returns you to the menu.
Note: all addresses are entered in hexadecimal. This section explains each command in turn.
T enters the text editor, which is dealt with in the next section B returns you to BASIC preserving editor text and BASIC program. D Disassemble DP Disassemble to printer Start and end addresses are requested. which must be entered in hexadecimal. If omitted they default to 0 and &FFFF respectively. The memory contents are disassembled into Z80 mnemonics; the hex and ASCII representations are also listed. Standard Zilog mnemonics are shown (see the reference section for a complete list). RST instructions are disassembled with the appropriate parameters (see reference section). L List memory LP List memory to printer This works in the same way as D, but lists hex and ASCII only. 8 or 16 bytes to a line. The ASCII display ignores bit 7 and shows a full stop for control codes. This allows text to be easily recognised, including strings with the top bit of the last character set. The memory editor (described below) displays the complete character set. S Select upper ROM The ROM selected is used by all commands in the main menu that access addresses between &COOO and &FFFF. (The ROM numbers are listed by the HELP command - see below). So to disassemble ROM 7:
S <ENTER> 7 <ENTER> D <ENTER> COOO <ENTER> <ENTER>
The currently selected ROM is displayed above the menu. Initially ROM 0 is selected, which is the BASIC ROM. O Lower ROM on/off This command selects either the lower RAM or ROM to be used by commands that access addresses between 0 and &3FFF. The current setting is shown on the top line. The initial setting is lower ROM = off. To list the lower ROM:
0 <ENTER> L <ENTER> <ENTER> <ENTER>
E Edit memory The memory editor allows you to change directly the contents of memory simply by overtypint what is displayed on the screen. You are asked for an address to edit, then a screenful of memory is displayed in a similar format to that used by the L command. The address you choose will be in the middle of the screen and the cursor will be on the byte that is at that address. To change the contents of any byte just type the new value. There is no need to press ENTER after the number, just enter the two hex digits. A single digit number can be terminated by ENTER or any cursor key. DEL will cancel a single digit. The cursor keys can be used to move around the screen. Your other functions are Provided:
SHIFT-<up> or CTRL-<up> : move back one screenful. SHIFT-<down> or CTRL-<down> : move forward one screenful. SHIFT-<left> or CTRL-<left> : move to top left. SHIFT-<right> or CTRL-<right> : move to bottom right.
The editor can also be used to enter ASCII characters directly into memory. Press TAB and the cursor will move to the right part of the display, positioned on the ASCII representation of the current byte. Now, the editor works in the same way except that ASCII characters are typed instead of hex numbers. Press TAB again to return to hex editing.
Press ESC to exit from the editor and return to the menu. F Find string FP Find string and print These commands search a block of memory for a string. You are asked to choose between ASCII and hex. In the first case the string can be up to 20 characters, in the second case up to 8 bytes. ENTER is used to terminate string entry, and ESC will abort the command at any time. Each time the string is found a single line memory listing starting at the first byte of the string is printed. FP sends the output to the printer. Wildeards may be used in a string. A wildcard is a character that will be matched by any byte. To signify a wildcard type '?'. Example of use of wildcard: enter the hex string CD,?,B9. This will find all unconditional subroutine calls to addresses between &B900 and &B9FF. M Move block You are asked for 3 inputs; start and end address to define a block of memory, and the address to copy the block to. The lower and upper ROM selections are taken into account so blocks can be copied from any ROM. Overlapping blocks are allowed. C Compare blocks CP Compare and print The two blocks specified are compared byte by byte. Any differences are listed, showing the two different values. The ROM selections are taken into account, so RAM may be compared with ROM. CP sends the output to the orinter.
R Relocate block There are two ways to use the relocator, a simple way and a complicated way. To use the simple command reply ‘Y’ to the prompt ‘Simple (Y/N)?'. You will then be asked for start address, end address, and address to move to. This works in the same way as move block except that at the same time the code is relocated to run at the new address. This is fine in many cases but will not always work. Although you will probably never need to use the general relocate command (as described below) it is as well to be aware that relocation can fail. The basic reason is that the relocator cannot tell the difference between code and data, and so will attempt to relocate data as if it were program. So the block of memory being relocated should contain pure program. The second form of the command asks you for 5 inputs. The meaning of each is as follows: Start and end address - define a block of memory containing the code to be relocated. First and last - define the range of addresses, references to which are to be altered. On a simple relocation these are the same as start and end.
Offset - the number to add to all addresses in the range (first,last). With this form of the command the code is relocated in place and moved. This allows many variations: you can relocate code that is to go in ROM, you can move code first and then relocate to run at any address you like. Warning: one thing to look out for when relocating is an instruction like 'LD HL,&3090', where the operand is meant as a literal. The relocator will assume it is an address and possibly alter it. The instruction should be replaced by 'LD H, &30:LD L, &90' if the code is to be relocated. I Initialise block A block of memory can be filled with any byte value. This is most useful for filling a block of memory with zeros. X External commands When 'X' is selected a prompt ‘|’ will be displayed. Any external command can now be entered with its Parameters typed straightforwardly. This avoids the awkward syntax needed to use external commands from BASIC. Both string and numeric parameters can be entered. The details of each command must be checked in the appropriate documentation to see what parameters are required. Strings may be enclosed in quotes (single or double) but the quotes are optional. However, if the string begins with a decimal digit the quotes are essential because otherwise it will be assumed to be a numeric parameter. Parameters may be separated by spaces, commas, or equals signs. Hex numbers in external commands must be prefixed by ‘&’, just as in BASIC. For example, to rename a file called JUNK.BAS to PROG.BAS, enter any of:
REN PROG.BAS=JUNK.BAS REN “PROG.BAS”,”JUNK.BAS” REN ‘PROG.BAS’ Junk.bas After each command has been executed the ‘|’ prompt will return. Either enter another command or press ESC to return to the menu.
Miscellaneous external commands MODE Toggles the display between mode 1 (40 columns) and mode 2 (80 columns). HELP Typing 'HELP' when in external command mode. or ‘|HELP' from BASIC will produce a list of all ROMs with their version numbers. HELP,n Here n is a ROM number as listed by HELP. The external commands provided by ROM n will be listed. ROMOFF This will turn off all background ROMs. The machine will be completely reset. BASIC will be entered but no other ROMs will be initialised. This may be useful to gain extra memory but do not forget that any programs in memory are destroyed by this command. ROMOFF <list of ROM numbers> The machine is reset, destroying memory contents, and the specified ROMs are not initialized. MSL Move screen low. This command makes the screen memory start at &4000 instead of &C000. HIMEM must be set below &4000 before using MSL. The screen is cleared. MSH Move screen high. The screen memory is restored to &C000. The screen is cleared. Why should anyone want to move the screen memory? Moving the screen memory to &4000 reduces the available RAM by up to 27K, so it is rarely a good idea! The use of MSL is to enable editing of sideways RAM. Sideways RAM is located at &C000 which is the usual position of the screen memory. The sideways RAM can be edited but the screen display would be simultaneously corrupted. So to edit sideways RAM enter MSL before and MSH after
8. THE TEXT EDITOR
To enter the text editor type: |MAXAM T The editor menu will then be displayed. Select option 'E' to enter editing mode. You can return to the menu at any time by pressing ESC. Having entered edit mode you will be presented with a mostly empty screen, but with some information on the top line. This is the status line and always contains up to date status Information. From left to right:
1. Cursor line and column number. This is useful among other things for tabulating data or moving a number of lines.
2. Bytes free. The amount of memory remaining for text. This is initially about 40K with the ROM version, less with the other versions.
3. Insert/overwrite. The editor operates in these two modes. To switch between them press CTRL-TAB. You will see the status line display change.
4. Caps lock/shift lock status. Press CAPS LOCK and CTRL-CAPS LOCK to see this information change.
The status line is also used at other times for messages, including error messages. Entering text with the editor is very simple - just type it in whatever way you want it set out. The cursor keys are used to move the cursor left, right, up and down in the obvious way. When used in combination with SHIFT or CTRL various useful cursor movements are possible (see table, below, for full details). SHIFT-<up> and SHIFT-<down> are useful when you want to continue editing the same line but see the following few lines. Removal of characters is done by moving the cursor to the appropriate place and using DEL and CLR for backwards and forwards delete. These work as in BASIC, so in particular DEL will cancel the last character typed. If you are typing an assembler program into the editor, there is no need for line numbers, quotes, or |ASSEMBLE. Insert mode When characters are entered the rest of the line to the right of current position is moved along. Pressing ENTER inserts a <cr-lf> (carriage return and line feed) in the text (i.e. a new line is inserted). <cr-lf> characters can be deleted with DEL and CLR - this makes joining lines very easy. Overwrite mode Characters overwrite what is there already. Pressing ENTER doees not insert a line but moves to the start of the next line. <cr-lf> cannot be deleted with DEL and CLR. To insert and delete lines when in overwrite mode use SHIFT-TAB and SHIFT-DEL. Horizontal scrolling
Text line lengths are not limited to the width of the screen. When the cursor needs to move past the right hand edge of the screen the text is scrolled sideways by half the screen width. The editor does not impose a maximum line length (but the assembler cannot cope with lines longer than 255 characters).
Moving to a specified line number Type CTRL-G while in edit mode. A message will be displayed on the status line asking you to enter a line number. The cursor will then be moved to the line. This has nothing to do with any line numbers in the text but is the position of the line within the text as displayed on the status line. Markers and blocks Many useful facilities are provided by blocks. A block is a section of the text, defined by two markers. Pressing SHIFT-COPY puts a marker at the current position, or removes one if there is one there already. A short beep is sounded when SHIFT-COPY is pressed, unless both markers are in use. In that case a higher beep warns you of the error and an error message is printed on the status line. ESC must be pressed to continue after an error. To delete markers press SHIFT-CLR. Markers are shown by inverting the display at the marker position. The block includes the first marker position, but not the second. This means that if the block consists of complete lines both markers should be set in column 1. An error message will be given if an attempt is made to use a block command if you have not defined a block by setting both markers. Editing mode block commands CTRL-CLR move block The block is moved to the current cursor position, which must not be within the block. The markers are deleted. Note: this command will fail If there Is insufficient free memory for a copy of the block. CTRL-COPY copy block The block is copied to the cursor position leaving the original block in place. The cursor must not be within the block. The markers remain in place on the new copy. CTRL-DEL. delete block The block is deleted. To delete the entire text from within edit mode use the key sequence: CTRL-<left>, SHIFT-COPY, CTRL-<right>, SHIFT-COPY, CTRL-DEL.
Summary of edit mode commands Key Normal With SHIFT key With CONTROL key left arrow cursor left cursor to start cursor to start
of line of text right arrow cursor right cursor to end cursor to end
of line of text up arrow cursor up scroll back scroll back
1 line 1 page
down arrow cursor down scroll forward scroll forward 1 line 1 page
COPY next find toggle marker copy block
at cursor
CLR delete at clear markers move block cursor
DEL delete before delete line delete block
cursor TAB cursor to next insert line toggle insert
tab position mode
ESC return to menu return to menu return to menu Note to aid memory of the above: (i) block, page or text based functions use the CTRL key. (ii) line based functions and marker functions use the SHIFT key. (iii) character based functions just take a single key. Editor menu commands L Load file. You are asked for a filename. The file is loaded into memory replacing any previous text. Tape users only: you can just press ENTER and the first file found will be loaded. LB Load block.
The file is loaded and inserted at the current cursor position. S Save file. The whole of the current text is saved with the specified filename. Tape users only: just pressing ENTER will save an unnamed file. SB Save block. The text between the markers is saved. Use SB and LB to transfer part of one file into another file. Markers remain in place after SB so more than one copy can be saved.
p Print text. The current text is output to the printer.
PB Print block.
The current block is printed. Creating BASIC compatible files M Modify text MB Modify block Modify is a special command which enables BASIC compatible files to be produced, and the editor facilities to be used on BASIC programs. The options available are:
1. Add line numbers with any starting value and increment. 2. Add quotes between line numbers (if any) and text. 3. Remove line numbers. 4. Remove quotes.
Modify is best explained by examples: (a) To create a mixed BASIC/machine code program with the editor.
1. Type in the program, omitting line numbers and quotes. 2. Define a block containing the assembler section. 3. Use modify block to add quotes only. Note: the markers are deleted. 4. Repeat 2 and 3 for each assembler section. 5. Use modify to number the whole program. 6. Save the file.
(b) To print a file with the lines numbered sequentially. Use the default starting value and increment by just pressing ENTER when asked for these parameters. The default is 1 in each case. These numbers will correspond to those printed by the assembler. Note: the assembler will work with BASIC files or text files (with or without line numbers).
F Find string. This will search the text for the specified string, starting from the current cursor position. If found the cursor will be placed immediately after the string. To find the next occurrence of the string press COPY. If the string is not found a message is displayed on status line and ESC must be pressed to continue. COPY will always move the cursor to the next occurrence of the string entered the last time ‘F’ or 'R' was used. If neither has been used at all COPY will do nothing. R Find and replace string. Two strings are asked for. Each time the first string is found the cursor is placed immediately after the string and the message 'Replace (Y/N)?' appears on the status line. Press Y to replace the string by the second string. N or ESC to leave it as it Is. The next occurrence will automatically be found, unless ESC is pressed. This command also allows a global replace. If selected then occurrences of the first string after the current cursor position will be replaced without asking for confirmation. This should be used with great care.
Note: to delete a string enter an empty replace string. T Set or clear tabs Up to 8 tabs may be set. When TAB is pressed in edit mode the cursor is moved to the next column at which a tab is set. If you are in insert mode spaces are inserted up to the tab position. Tab control codes are not used in order that the text contains only printable characters and is easily transportable. Initially, 3 default tab settings are set (9, 17, and 27). These have beenchosen to be convenient for assembler source code – start the 1abel field in column 1. Press tab, enter the instruction field press tab, enter the operand field,press tab, enter the comment field.
The 'T' command performs 3 functions: 1. Lists the current tab settings. 2. Allows you to set tabs. 3. Allows you to delete tabs.
You are asked to choose 'set' or 'clear'. Whichever you select you can input several column numbers (press ENTER after each one). Press ESC to finish and return to the menu. Assembling and testing code from the editor A Assemble The current text will be assembled. When the assembly has finished will need to press a key to return to the menu. J Jump to code An execution address is asked for, and the code at that address is executed. A RET instruction will return control to the menu. If no address is specified it will default to HIMEM+1 (the default origin used by assembler), unless no memory has been reserved there (when it will do nothing). The Z80 register values are undefined on entry.
So most code can be executed simply by typing J <ENTER> <ENTER> Important note: memory must be reserved by the MEMORY command in BASIC.
Debugging procedure The BRK Instruction can be used from the editor in exactly the same way as from BASIC.
1. Edit text, put BRKs in strategic places. 2. Assemble. 3. Jump to code. 4. Examine the registers when displayed. If incorrect press ESC and go to step 1. 5. Press any key to continue each time the registers are displayed and are
correct. 6. Control returns to the menu. Hopefully the code is now perfect!
Miscellaneous options G Go to line. This is the same as using CTRL-G In edit mode. This is useful when correcting assembly errors since the assembler gives the line number where each error occurs. X External commands The X command allows external commands to be entered exactly as described in the previous section.
Two commands provided by MAXAM are particularly useful in the editor: CAT : the same as the BASIC command 'CAT', this lists the files on cassette or disc. For disc users it is more useful than DIR since it sorts the filenames and gives the approximate size of each file. SPEED : the same as the BASIC command 'SPEED WRITE’. Enter 'SPEED 0’ or 'SPEED 1' to set the cassette write speed. AMDOS commands which are often needed in the editor:
ERA : delete a file REN : rename a file.
Q Quit editor
The Q command returns you to the main menu. User defined characters The characters with ASCII codes 32 to 127 may be redefined (from BASIC) by the user to give, for example, accented letters. These definitions will only be used in the editor If a 'SYMBOL AFTER 0' command has been issued. 'SYMBOL AFTER 32' allows definition of the characters in BASIC but the editor would still display the original characters.
The text editor and BASIC The text editor is compatible with BASIC - editor text and a BASIC program can be in the memory at the same time. Editing one does not affect the other. BASIC variables are preserved when the MAXAM main menu is used, but destroyed when the editor menu is entered. There is one unavoidable side effect of allowing BASIC and editor text together which it is as well to be aware of. If a BASIC program Is saved when editor text is present the editor text will be saved with the BASIC program. When reloaded, however, the editor text will not be useable. There are two possible solutions to this problem: 1. Delete the editor text before saving the BASIC program. This can done from BASIC by typing '|CLEAR'. 2. Save the BASIC program in ASCII format. The editor text is not then saved. Saving in ASCII has the considerable advantage that the program can then be edited directly with the editor. The disadvantages are that saving in the ASCII representation makes the file slightly larger and, for disc users, takes much longer. Deleting programs and text
1. To delete both the BASIC program and the editor text: NEW
2. To delete just the BASIC program: DELETE
3. To delete just the editor text: |CLEAR
Loading BASIC programs Loading a BASIC program will cause the editor text to be wiped out. one exception to this is if the program was saved as ASCII, then it can be loaded using the MERGE command, without destroying the editor text. To edit a BASIC program using the text editor 1. Save from BASIC in ASCII format: SAVE “PROG”,A 2. Go into the editor. 3. Load the file into the editor. L <ENTER> PROG 4. Edit the file. 5. Save the file. S <ENTER> PROG 6. Return to BASIC. 7. Load the file. LOAD “PROG”
9. MAXAM REFERENCE SECTION AND INDEX (a) Bibliography 1. "The concise firmware specification", (Amsoft) 2. "The concise BASIC specification", (Amsoft) 2. "Disc drive firmware specification", (Amsoft) 4. "Programming the Z80", Rodnay Zaks (Sybex) 5. "Z80 Assembly Language Programming", Lance A. Leventhal (Osborne/MCGraw Hill) 6. "The Lord of the Rings", J.R.R. Tolkein
(George Allen and Unwin) (b) Assembler Directives page BYTE put byte string in object code 16 CLOSE close object file 22 CODE cancel NOCODE 14 DB same as BYTE 16 DEFB same as BYTE 16 DEFM same as BYTE 16 DEFS same as RMEM 16 DEFW same as WORD 16 DS same as RMEM 16 DW same as WORD 16 ELSE assemble otherwise 20 END end assembly 14 ENDIF end IF block 20 EQU equate 15 GET get parameters 17 IF assemble if 20 IFNOT assemble unless 21 IF1 assemble if pass 1 21 IF2 assemble If pass 2 21 LET define symbol 15 LIMIT set code limit 13 NOCODE suppress storage of code 14 ORG define code orgin 13 PUT pass value back to BASIC 18 READ define source file 22 RMEM reserve block of memory 16 TEXT same as BYTE 16 WORD put 2-byte numbers in object code 16 WRITE define object file 22 (c) Assembler Commands page DUMP dump symbol table 23 LIST (P) enable listing to screen (printer) 23 (25) NOLIST disable listing 23 PAGE start new page 25 PAUSE wait for key press 23 PLEN set printer page length 25 PRINT display string on screen 23 TITLE define title 25 WIDTH set printer page width 25
(d) Assembler Fatal Errors
1. An ORG directive with an undefined expression. 2. An EQU directive with an undefined expression. 3. An RMEM directive with an undefined expression. 4. An IF or IFNOT directive with an undefined expression. 5. A PUT directive with an undefined variable address. 6. A badly nested IF block. 7. A line longer than 255 characters. 8. The assembler runs out of memory for the symbol table or file buffer. 9. The file specified by a READ directive is of an invalid type (e.g. binary). 10. An attempt to nest READ directives. 11. A disc I/0 error occurs, e.g. 'disc full', 'file not found'. 12. An attempt to store code at an address greater than that set by LIMIT.
(e) External commands page ASSEM assemblen suppressing messages 10 ASSEMBLE assemble from BASIC program 9 CAT catalogue files 39 CLEAR clear editor text 40 FIN find string in embedded source code 10 HELP list ROMS 33 MAXAM or M enter main menu 30, 6 MAXOFF turn off MAXAM 5 MCLEAR same as CLEAR 6 MFIND same as FIND 6 MHELP same as HELP 6 MODE switch screen display. 33 MSH move screen memory high 33 MSL move screen memory low 33 ROMOFF turn off selected ROMs 33 SPEED set cassette write speed 39 (f) BASIC Commands important to machine code page CALL call a machine code routine 19 MEMORY change the value of HIMEM 12
(g) Main Menu Commands page T text editor 34 D disassemble to screen 30 DP disassemble to printer 30 L list memory to screen 30 LP list memory to printer 30 S select upper ROM 30 0 toggle lower RAM on/off 30 E memory editor 31 F find string 31 FP find string and print 31 M move memory block 31 R relocate memory block 32 I initialise memory block 32 C compare memory blocks 31 CP compare memory blocks and print 31 X external commands 32 B warm start BASIC 30 (h) Editor Commands page E enter edit mode 34 L load file 36 LB load file at cursor position 36 S save text 36 SB save block 36 P print text 37 PB print block 37 M modify text 37 MB modify block 37 G go to line 39 F find string 38 R find string and replace 38 T set and clear tabs 38 A assemble text 38 J dump to code 38 X external commands 39 Q quit editor 39
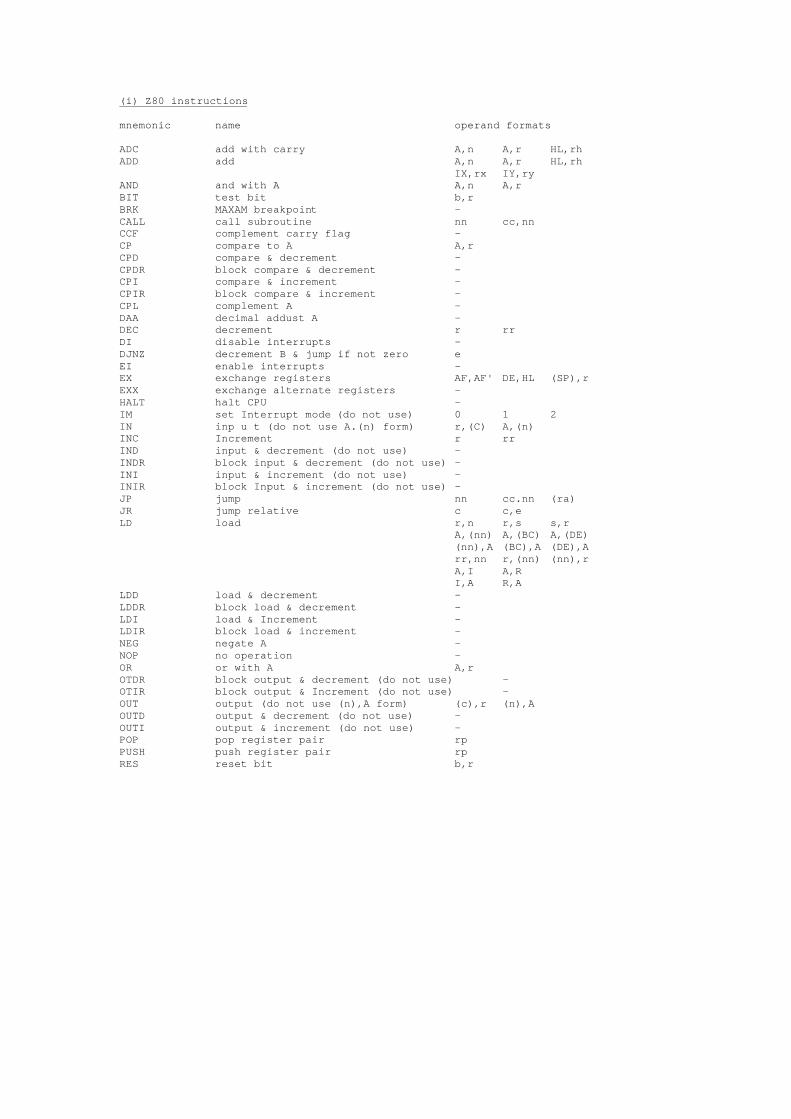
(i) Z80 instructions mnemonic name operand formats ADC add with carry A,n A,r HL,rh ADD add A,n A,r HL,rh IX,rx IY,ry AND and with A A,n A,r BIT test bit b,r BRK MAXAM breakpoint - CALL call subroutine nn cc,nn CCF complement carry flag - CP compare to A A,r CPD compare & decrement - CPDR block compare & decrement - CPI compare & increment - CPIR block compare & increment - CPL complement A - DAA decimal addust A - DEC decrement r rr DI disable interrupts - DJNZ decrement B & jump if not zero e EI enable interrupts - EX exchange registers AF,AF' DE,HL (SP),r EXX exchange alternate registers - HALT halt CPU - IM set Interrupt mode (do not use) 0 1 2 IN inp u t (do not use A.(n) form) r,(C) A,(n) INC Increment r rr IND input & decrement (do not use) - INDR block input & decrement (do not use) - INI input & increment (do not use) - INIR block Input & increment (do not use) - JP jump nn cc.nn (ra) JR jump relative c c,e LD load r,n r,s s,r
LDD load & decrement - LDDR block load & decrement - LDI load & Increment - LDIR block load & increment - NEG negate A - NOP no operation - OR or with A A,r OTDR block output & decrement (do not use) - OTIR block output & Increment (do not use) - OUT output (do not use (n),A form) (c),r (n),A OUTD output & decrement (do not use) - OUTI output & increment (do not use) - POP pop register pair rp PUSH push register pair rp RES reset bit b,r
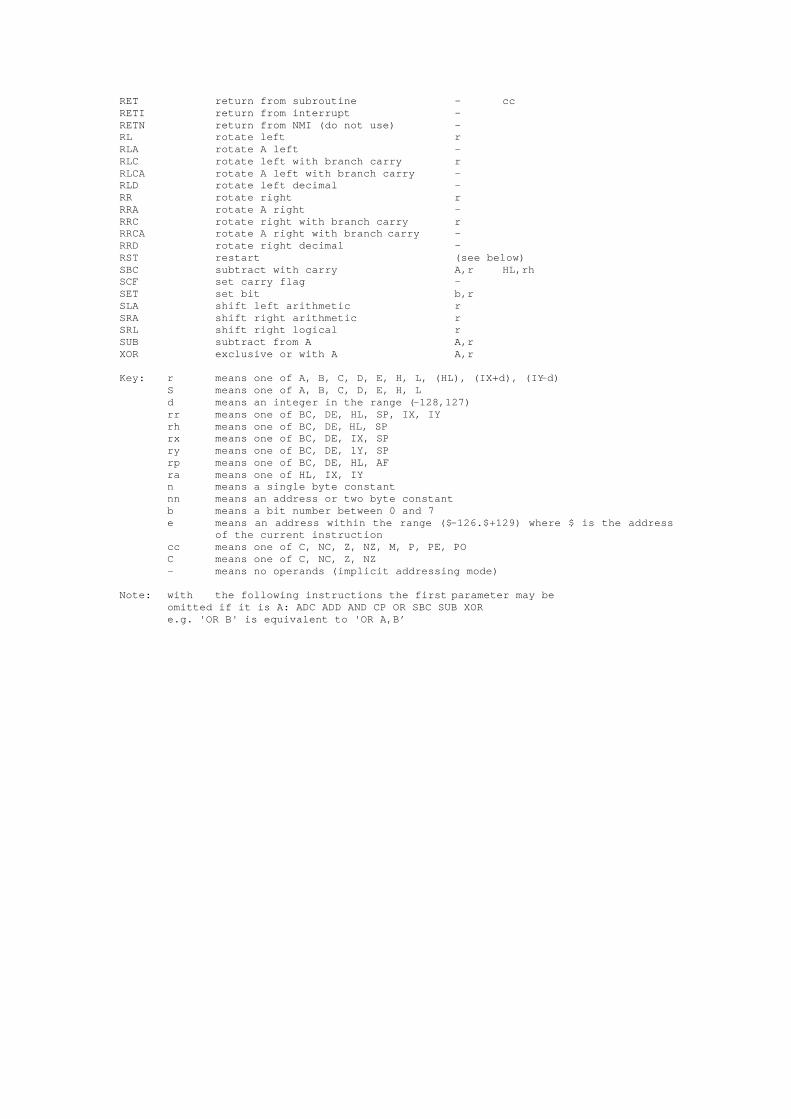
RET return from subroutine - cc RETI return from interrupt - RETN return from NMI (do not use) - RL rotate left r RLA rotate A left - RLC rotate left with branch carry r RLCA rotate A left with branch carry - RLD rotate left decimal - RR rotate right r RRA rotate A right - RRC rotate right with branch carry r RRCA rotate A right with branch carry - RRD rotate right decimal - RST restart (see below) SBC subtract with carry A,r HL,rh SCF set carry flag - SET set bit b,r SLA shift left arithmetic r SRA shift right arithmetic r SRL shift right logical r SUB subtract from A A,r XOR exclusive or with A A,r Key: r means one of A, B, C, D, E, H, L, (HL), (IX+d), (IY-d) S means one of A, B, C, D, E, H, L d means an integer in the range (-128,127) rr means one of BC, DE, HL, SP, IX, IY rh means one of BC, DE, HL, SP rx means one of BC, DE, IX, SP ry means one of BC, DE, 1Y, SP rp means one of BC, DE, HL, AF ra means one of HL, IX, IY n means a single byte constant nn means an address or two byte constant b means a bit number between 0 and 7
e means an address within the range ($-126.$+129) where $ is the address of the current instruction
cc means one of C, NC, Z, NZ, M, P, PE, PO C means one of C, NC, Z, NZ - means no operands (implicit addressing mode) Note: with the following instructions the first parameter may be omitted if it is A: ADC ADD AND CP OR SBC SUB XOR e.g. 'OR B' is equivalent to 'OR A,B’
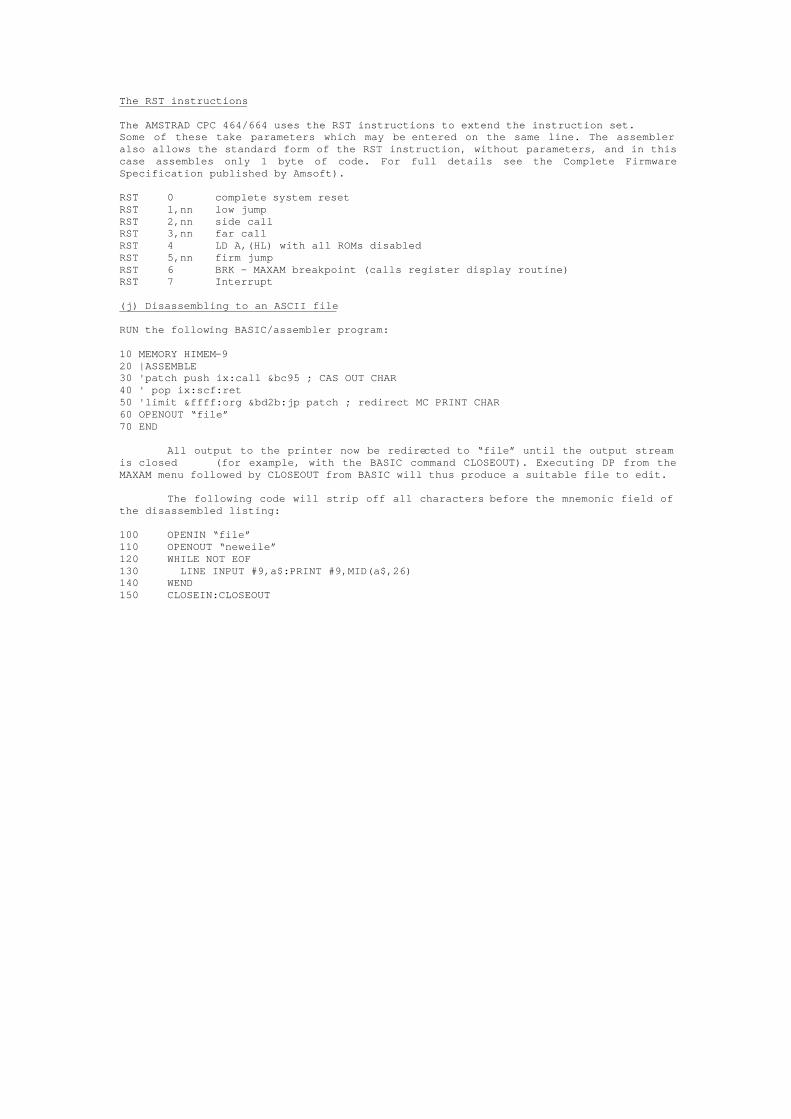
The RST instructions The AMSTRAD CPC 464/664 uses the RST instructions to extend the instruction set. Some of these take parameters which may be entered on the same line. The assembler also allows the standard form of the RST instruction, without parameters, and in this case assembles only 1 byte of code. For full details see the Complete Firmware Specification published by Amsoft). RST 0 complete system reset RST 1,nn low jump RST 2,nn side call RST 3,nn far call RST 4 LD A,(HL) with all ROMs disabled RST 5,nn firm jump RST 6 BRK - MAXAM breakpoint (calls register display routine) RST 7 Interrupt (j) Disassembling to an ASCII file RUN the following BASIC/assembler program: 10 MEMORY HIMEM-9 20 |ASSEMBLE 30 'patch push ix:call &bc95 ; CAS OUT CHAR 40 ' pop ix:scf:ret 50 'limit &ffff:org &bd2b:jp patch ; redirect MC PRINT CHAR 60 OPENOUT “file” 70 END
All output to the printer now be redirected to “file” until the output stream is closed (for example, with the BASIC command CLOSEOUT). Executing DP from the MAXAM menu followed by CLOSEOUT from BASIC will thus produce a suitable file to edit. The following code will strip off all characters before the mnemonic field of the disassembled listing: 100 OPENIN “file” 110 OPENOUT “neweile” 120 WHILE NOT EOF 130 LINE INPUT #9,a$:PRINT #9,MID(a$,26) 140 WEND 150 CLOSEIN:CLOSEOUT
(k) Glossary of terms ADDRESS
A number representing the position of a byte in memory. ARNOR “The land of the King”. In the Third Age of Middle Earth Arnor was known as the “lost realm of the North”. The kingdom was re-established by Elessar after the War of the Ring. ASCII (American Standard Code for Information Interchange) 1. The codes which the computer uses to represents letters, digits, punctuation symbols, etc. 2. The form of representation of a program using no special tokens, only ASCII codes. ASSEMBLER
1. A program which converts assembly language mnemonics into binary machine code. 2. Another name for assembly language. ASSEMBLY LANGUAGE The set of mnemonics which correspond to the operations the Z80 processor is capable of performing. BINARY
The base 2 number system, in which all numbers are represented using just 2 digits, 0 and 1. BIT A binary digit, 0 or 1. BREAKPOINT A debugging aid. A program stops at a breakpoint allowing you to see whether it is working correctly. BYTE
8 bits. The unit of memory usually used for data transfer. CODE ORIGIN
The address of the start of the object code. CODE LOCATION While assembling, the address where the next byte of code is to be assembled. COMMAND 1. An instruction to the assembler which affects the listing in some way.
2. An instruction to BASIC or MAXAM to do something.
CONDITIONAL ASSEMBLY A feature of the assembler which allows code to be assembled differently depending on the setting of variables. DELIMITER A special character which tells the computer where a string starts and ends. DIRECTIVE A instruction to the assembler which affects the object code in some way. DISASSEMBLE
Convert binary machine code to assembly language mnemonics. ENTRY POINT
The address to begin execution of a machine code program. EPROM (Erasable Programmable Read Only Memory)
ROM which can be erased by ultra-violet light and used again. EXTERNAL COMMAND A command provided by one program (e.g. MAXAM) that can be used in another (e.g. BASIC). FIRMWARE
1. The operating system. 2. Any program contained in ROM.
HEXADECIMAL (HEX.)
The base 16 number system, where the letters A to F represent 10 to 15. IDENTIFIER
A string of characters which is the name of a symbol. INSTRUCTION
In the assembler, a Z80 mnemonic or a directive or a command. LABEL
A symbol which represents a position within a program. LISTING The output produced by the assembler on the screen or printer, showing the source code, object code, and addresses at which the code has been assembled. LOWER ROM
The operating system ROM which resides between addresses 0 and &3FFF.
MACHINE CODE A sequence of binary, numbers which the Z80 Processor interprets as simple operations. MARKER
In the editor, a pointer to a particular location in the text. MNEMONIC
A string of characters which represents a Z80 operation. OBJECT CODE
The machine code program produced by the assembler. OPCODE
The binary number representing a Z80 operation. OPERAND
The data which an operation acts on, often a memory address. OPERATING SYSTEM The machine code program which accesses the hardware directly and is called by user programs using the jumpblocks. RAM (Random Access Memory) The main memory of the computer which can be written to and read from, of which the Amstrad CPC 464/664 has 64K. REGISTER
A 1 or 2 bvte memory location within the Z80 processor which is accessed very, quickly, and is used by Z80 operations. RELOCATE Take a machine code program and change the address references throughout it so it will run at a different memory address. ROM (Read Only, Memory) Memory which can only be read from. The Amstrad CPC 464/664 has 32K on-board ROM containing BASIC and the firmware, the ROM version of MAXAM is supplied in a 16K EPROM. SIDEWAYS RAM Externally fitted RAM residing between address &COOO and &FFFF. It is very useful for developing software for ROM because it behaves exactly like a ROM. SIDEWAYS ROM
An upper ROM fitted externally, e.g. AMSDOS, MAXAM.
SOURCE CODE The assembly language program, consisting of mnemonics, directives, and commands. STORAGE LOCATION While assembling, the address where the next byte of code is to be stored. This is usually, but not always, the same as the code 1ocation. STRING
A sequence of characters. SYMBOL
A variable used when assembling. SYMBOL TABLE
The list of symbols maintained by the assembler. TOKENISATION An operation performed by the BASIC interpreter, converting keywords in the from of textual strings into single byte numbers, called tokens. This saves memory and decreases execution time. UPPER ROM A ROM that resides between addresses &COOO and &FFFF. Examples include BASIC, AMSDOS, MAXAM. Z80
The central processor (CPU) of the Amstrad CPC 464/664.
Acknowledgement We thank George Allen and Unwi,. for permission to quote from "The Lord of the Rings".