NOTICE It is the Purchaser’s/Owner’s obligation: 1. To disclose and post all Rules & Regulations, Danger, Warning and Caution labels affixed on the machine to their customers/users. 2. Equipment to be installed by TuffStuff Authorized Dealer or a service company approved by TuffStuff. 3. Provide trained personnel, supervision and correct usage of the equipment. 4. Provide scheduled inspection, maintenance & repairs and must be performed by TuffStuff Authorized Dealer or a service company approved by TuffStuff. 5. Must use only genuine TuffStuff replacement parts. HTX-2000 Dual-Stack Functional Trainer HTX-2000_Rev0 Revision Date 4-11-2013 OWNER’S MANUAL Maintenance & Assembly Instructions IMPORTANT: KEEP THIS MANUAL FOR FUTURE REFERENCE
Transcript
NOTICEIt is the Purchaser’s/Owner’s obligation: 1. To disclose and post all Rules & Regulations, Danger, Warning and Caution labels affixed on the machine to their customers/users. 2. Equipment to be installed by TuffStuff Authorized Dealer or a service company approved by TuffStuff.3. Provide trained personnel, supervision and correct usage of the equipment.4. Provide scheduled inspection, maintenance & repairs and must be performed by TuffStuff Authorized Dealer or a service company approved by TuffStuff. 5. Must use only genuine TuffStuff replacement parts.
HTX-2000Dual-Stack Functional Trainer
HTX-2000_Rev0Revision Date 4-11-2013
OWNER’S MANUALMaintenance & Assembly Instructions
IMPORTANT: KEEP THIS MANUAL FOR FUTURE REFERENCE
HTX-2000 Dual Stack-Funtional Trainer
TuffStuff Fitness Equipment Inc. continually engages in research related to product improvements. Please take the time to carefully read through this manual thoroughly. Instructions contained in this manual are not intended to cover all details or variations possible with equipment, or to cover every contingency that may be met in conjunction with assembly, installation, operation, maintenance or troubleshooting of the equipment. Eventhough we have prepared this manual with extreme care, neither the manufacturer nor the author can accept responsibility for any errors in, or omission from, the information given. Should additional information be required, or should situations arise that are not covered by this manual, the matter should be directed to Customer Service at TuffStuff Fitness Equipment Inc. in Chino, California.
Carefully read ALL Danger, Warning & Caution labels posted on the machine
125112115
HTX-2000 Dual-Stack-Funtional Trainer 5
123
114
116
124
129
115117
119
Carefully read ALL Danger, Warning & Caution labels posted on the machine
HTX-2000 Dual-Stack-Funtional Trainer6
114
117
116
112
115
118
113
119
123
127
130129
CHEST PRESS CHEST FLY CROSSOVER
TUFFSTUFF FITNESS EQUIPMENT INC., 13971 Norton Avenue, Chino, CA 91710, USA.
Before using this equipment, read and understand the Owner’s Manual and allDANGER, WARNING and CAUTION labels affixed on the machine. If you still need help, seek assistance from floor personnel.Use this equipment only for its intended use. When using the machine the firsttime, always choose a light resistance and train at a control rate of speed.Obtain a medical exam before beginning any exercise program. Stop exercisingif you feel faint, dizzy or pain. Consult a physician immediately.
DO NOT USE this machine if appears to be inoperable or damaged. Do not attempt to fix or free any jammed parts by yourself. Inform floor personnel immediately.
Make sure the selector pin is fully inserted in the hole and never pin the weightplates in an elevated position. Do not use this machine if found in this condition.
Serious injuries or death can occur if these safety rules and precautions are not observed. Questions or for more information, please contact TuffStuff at 909-629-1600 or email: [email protected]
BASIC EXERCISE GUIDE
OFFER UPS LAT PULLDOWN IRON CROSS PULLDOWN
SEATED ROW ONE ARM ROW UPRIGHT ROW
SHOULDER PRESS LATERAL RAISE
TRICEP KICKBACK
TRICEP EXTENSION
TRICEP PRESSDOWN
AB CRUNCH SIT UPS
BICEP CURL
OVERHEAD CURL
INNER THIGH OUTER THIGHCORE ROTATION
LEG EXTENSION STANDING LEG CURLSQUATS
! WARNING Important Safety Instructions:
BNH3049
Carefully read ALL Danger, Warning & Caution labels posted on the machine
HTX-2000 Dual-Stack-Funtional Trainer 7
It is extremely important that the Facility Sign shown to the left be installed in plain view of the unit�
You should have received it along with this Owners Manual� If you did not receive this Facility Sign with your order, you can obtain one at no cost to you from TuffStuff Fitness by contacting our service department at:
BE ALERT!THE FITNESS EQUIPMENT IN THISFACILITY PRESENTS HAZARDSWHICH, IF NOT AVOIDED, COULDCAUSE SERIOUS INJURY OR DEATH.
Prior to using the equipment, READ the warning labels and instruction placards affixed to each machine.
If you are unsure on how to use a machine,seek the assistance of our floor personnel. We will be happy to instruct you on how touse the equipment properly.
Immediately report any piece of equipmentthat is not functioning properly to our floorpersonnel so that it may be evaluated and service promptly.
DO NOT ATTEMPT to use or fix any piece ofequipment that is not functioning properly.
TUFFSTUFF FITNESS EQUIPMENT INC. CHINO, CA 91710ASTM F1749-96
126
128
Carefully read ALL Danger, Warning & Caution labels posted on the machine
HTX-2000 Dual Stack-Funtional Trainer8
Important Safety InstructionsIt is the responsibility of the facility owner and/or owner of the equipment to review the Owner’s Manual with their facility personnel and understand all Danger, Warning and Caution labels affixed on the machine. It is the responsibility of the floor personnel to instruct users on proper operation of the equipment and review all danger, warning and caution labels.
SERIOUS INJURY OR DEATH CAN OCCUR IF THESE SAFETY PRECAUTIONS ARE NOT OBSERVED:
1. Obtain a medical exam before beginning any exercise program.2. Read and understand Owner’s Manual and all Danger, Warning and Caution labels before using this equipment. If you still need help, seek assistance from floor personnel. 3. Inspect the equipment before each use for wear and tear, loose fittings, worn or frayed cables and frame welds. DO NOT USE if it appears to be inoperable or damaged.4. Stop exercising if you feel faint or dizzy. Consult a physician if you are experiencing pain.5. Use this equipment only for the intended use and for exercise(s) shown on page 34-37.6. Keep body, clothing and hair clear from all moving parts. Do not attempt to free any jammed parts by yourself.7. Always warm-up before and cool-down after weight training. Warm-up for 10-15 minutes with stretching and cardiovascular exercises. Cool-down should include light stretching exercises for 5-15 minutes.8. Never hold your breath – will limit the flow of oxygen to your brain and may cause dizziness. The most often used breathing pattern is inhaling during least resistance and exhaling during maximum resistance.9. Do not use accessories or accessory attachments that are not recommended by TuffStuff.10. Make sure selector pin is completely inserted. Use only the selector pin provided by the manufacturer.11. Never pin the weights in an elevated position. Do not use the machine if found in this condition.
Facility Safety Guidelines and Practices1. Read and understand the Owner’s Manual before assembling, servicing or using the equipment. 2. Equipment to be installed by TuffStuff Authorized Dealer or Professional Service Company approved by TuffStuff.3. Make sure each machine is set up and operated on a solid level surface. Do not install equipment on an uneven surface.
DANGER: indicates an imminently hazardous situation which, if not avoided, will result in death or serious injury.
WARNING: indicates a potentially hazardous situation which, if not avoided, will result in death or serious injury.
CAUTION: indicates a hazardous situation which, if not avoided, could result in minor or moderate injury.
5. Provide an adequate safety perimeter between the machine, walls and other equipment to ensure that the facility has proper clearance for usage and training.6. Post and disclose all safety, rules and regulations on a bulletin board easily accessible to users. 7. Perform regular maintenance (see Inspection Label). Pay special attention to areas most susceptible to wear and tear, including but not limited to cables, pulleys and rubber grips. 8. Do not lean against or pull on the framework, weight stack or any component at all times.9. Children must not be allowed near the equipment. Teenager must be supervised.10. Replace immediately all parts at first sign of wear or damage. If unable to replace worn or damaged components/parts, remove machine from service until the repair is made.11. Use only genuine TuffStuff replacement parts. Failure to do so will void warranty and could result in serious injury or death to the users.12. Do not remove any decals affixed to the machine. Replace if damaged.13. Do not alter or modify the original manufacturer’s 200 lbs. weight stack with any add-on incremental weights, weight plates or dumbbells except those with standard factory installed option.14. Maintain a service contract with a TuffStuff Authorized Dealer or a Professional Service Company approved by TuffStuff. Keep a service log of all maintenance and repair activities. NOTICE: It is the sole responsiblity of the owner or facility operator to ensure that regular maintenance is performed.
HTX-2000 Dual Stack-Funtional Trainer 9
Registration, Service & AssemblyThank you for purchasing the HTX-2000 Dual-Stack Functional Trainer. This machine is part of the TuffStuff line of quality strength training equipment. To maximize your use of the equipment, please study the Owner’s Manual thoroughly.
Required ToolsThe basic tools that you will need to assemble the HTX-2000 but are not limited to:• 9/16” , 3/4”, 1/2” combination wrenches•Hex bit socket set• Adjustable wrench• Ratchet wrench with 9/16” , 3/4”, 1/2” sockets• External retaining ring pliers• Rubber mallet, measuring tape & utility knife• Super Lube® spray lubricant and grease • Windex or household glass cleaner
Assembly RequirementsFollow these installation requirements when assemblying the HTX-2000. Use the overhead view on Page 3 to layout your floor plan beforeassemblying.
Set up the HTX-2000 on a clean, solid, flat surface. A smooth, flat surface under the machine helps keep it level.
Allow ample space around the machine for safe unrestricted use an-deasier access.
Insert all bolts in the same direction. For aesthetic appearance, insert all bolts in the same direction unless specified (in text or illustration) to do otherwise.
Leave room for adjustments. Do not fully tighten fasteners until in-structed in the assembly steps to do so (to prevent any difficulty with alignment of parts during the assembly process). When not instructed, tighten fasteners such as bolts, nuts and screws so the unit is stable, but leave room for adjustments.
Assembly TipsRead all “Notes” on each page before beginning each step.
While you may be able to assemble the HTX-2000 using the illustrations only, IMPORTANT safety notes and other tips are included in the text.
Some pieces may have extra holes that you will not use. Use only those holes indicated in the instructions and illustration.
NOTE: With so many assembled parts, proper alignment and adjustment is critical. While tightening the nuts and bolts, be sure to leave room for final adjustments.
CAUTION: Obtain assistance from TuffStuff if you have difficulty assemblying the HTX-2000. Please do not attempt to complete the assembly as this could result in equipment failure and serious injuries to the users.
Symbols & Description
Registration To avoid unnecessary delays on warranty parts and to insure that a permanent record of your purchase is on file with our company, be sure to register online at www.tuffstuffitness.com or mail to address shown below within 10 days of purchase.
Obtaining ServicePlease use this Owner’s Manual as your guide to all parts included in your shipment. When ordering parts, you must specify the part number and description from this manual. Use only genuine TuffStuff replacement parts when servicing the equipment. Failure to do so will void warranty and could result in serious injury or death.
For information about product operation or service:Phone: 909-629-1600 Toll Free 888-884-8275Fax: 909-629-4967E-mail: [email protected] or [email protected]: M–F 8:00 – 4:30 PSTOr write to: TuffStuff Fitness Equipment Inc. Customer Service 13971 Norton Avenue, Chino, CA 91710
Retain this Owner’s Manual for future reference when ordering service or parts. To assist you better, please be prepared to provide the following information: 1. Model Number 2. Place of Purchase 3. Serial Number 4. Part # and Description
Loosely FastenFinger tighten all hardware in this step. DO NOT wrench tighten. Some component(s) may need pre-assembly and alignment during the assembly process.
Fully FastenWrench tighten all hardware in this step.
HTX-2000 Dual Stack-Funtional Trainer10
Perform regular maintenance (see Inspection Label). Pay special attention to areas most susceptible to wear and tear, including but not limited to cables, pulleys and rubber grip. TuffStuff recommends you maintain a service contract with a TuffStuff Authorized Dealer or a Professional Service Company approved by TuffStuff. Keep a service log of all maintenance and repair activities. Extra copies can be downloaded from our website tuffstuffitness.com
Inspection/Maintenance
INSPECTION / MAINTENANCE RECORDS
DATE REPLACEMENT REPAIRS INSPECTED BY
WARRANTY REPAIRS
DATE REPLACEMENT REPAIRS INSPECTED BY
HTX-2000 Dual Stack-Funtional Trainer 11
WARNING:THE FOLLOWING CONDITIONS MAY INDICATE A WORN CABLE� REPLACE IMMEDIATELY�
IMPORTANT NOTE:DAMAGED OR WORNED CABLE (AS SHOWN ABOVE) MAY DAMAGE THE PULLEY(S)� YOU MUST INSPECT THE PULLEYS AT THIS TIME FOR WEAR AND TEAR� REPLACE IF NEEDED�
“NECKING”, STRECHED CABLE COVERING
A TEAR IN THE CABLE COVER
CABLE END SLIPPING OUT
A CRACK IN THE CABLE COVER
A BREAK ON THE CABLE
Cable Inspection
HTX-2000 Dual Stack-Funtional Trainer
94 71 69 69
74
79 94
94 79
3
48
71
946969
44
44
74
12
Step 1
Congratulations on your new purchase of the Smith-Half Cage
Series. This gym is capable of a variety of different exercises, as-
well-as, smooth and user-friendly adjustment features. In addition,
this gym has been designed to meet the needs and performance
requirements for a suitable home exercise machine. We hope you
are completely satisfi ed with this product and wish you many years
of enjoyment.
This Tuffstuff product has been built to precise quality standards
and has been carefully packaged to ensure that damage will
not occur during shipment. The Home Lifetime Warranty and
signature indicating fi nal inspection has been conducted by our line
foreman, is an expression of our confi dence in the completeness,
the materials, and workmanship of this product.
SEE A COPY OF WARRANTY ON BACK PAGE.
To avoid unnecessary delays in warranty service and to insure that
a permanent record of your purchase is on fi le with our factory, be
sure to complete the warranty registration card and send it to Task
Industries today.
1. We advise you to consult your local Tuff Stuff retailer if you
should have a question or problem regarding the proper
assembly of this unit.
2. Consider the complete surface area of the Smith-Half Cage
Series. Use the overhead view located on the front page for
designing your layout before assembling. Once the Smith-Half
Cage Series has been fully assembled it will be heavy and
diffi cult to move, therefore you should assemble the unit in the
area where it is to be used upon completion.
3. It is recommended that another person assist you with the
assembly of this unit.
4. Neatly organize and identify all parts according to the Parts List
and the Exploded View Diagrams on pages 7 - 9.
1. One 3/4” combination wrench
2. One 9/16” combination wrench
3. One ratchet
4. One 3/4” socket
5. One 9/16” socket
6. One rubber mallet
7. Windex or household glass cleaner
8. One can silicone spray/ tefl on spray lubricant
9. Measuring tape
10. Utility knife
The icons displayed in this Assembly Instructions are used to
facilitate the correct assembly and safe use of this Product, as-
well-as to prevent injury to yourself or anyone else.
provides information necessary to properly
complete a procedure or information which will
make the procedure easier to understand.
indicates a potentially hazardous
situation, which, if not avoided, may result in minor
or moderate injury. It may also be used to alert
against unsafe practices.
provides a instruction to loosely
fasten ( ) a hardware assembly
only. This instruction is intended for the alignment
of hardware components during the assembly
process.
provides a instruction to fully fasten
() a hardware assembly.
SCREWfiW
IDTH
WASHERfiD
IAMETER
NUTfiDIA
METER
SCREWfiLENGHT
1. Read and follow each step of this Assembly Instruction Manual
in sequence. Do not skip ahead, as it will result in an improper
assembly or in having to disassemble parts later.
2. During the assembly of this unit you will be instructed to leave
some Hex Head Cap Screws loosely fastened. Naturally, they
will be fully fastened later in the assembly process. This is done
to prevent any diffi culty with alignment of some parts during this
assembly.
Due to continuing product improvements, specifi cations and designs are subject to change
without notice.
TBU-335 THC-43C TSM-45L
1. Maximum Wt. Capacity N/A 400 Lbs. 300 Lbs.
2. Total Machine Weight 220 Lbs. 40 Lbs. 80 Lbs.
3. Footprint (LWH) - See Front Cover
FULLY FASTEN
HTX-2000 Dual Stack-Funtional Trainer 13
94
84
94
71
1
3
94 7971
4479
7194
79
94
71
94
44
44
48
Step 2
Congratulations on your new purchase of the Smith-Half Cage
Series. This gym is capable of a variety of different exercises, as-
well-as, smooth and user-friendly adjustment features. In addition,
this gym has been designed to meet the needs and performance
requirements for a suitable home exercise machine. We hope you
are completely satisfi ed with this product and wish you many years
of enjoyment.
This Tuffstuff product has been built to precise quality standards
and has been carefully packaged to ensure that damage will
not occur during shipment. The Home Lifetime Warranty and
signature indicating fi nal inspection has been conducted by our line
foreman, is an expression of our confi dence in the completeness,
the materials, and workmanship of this product.
SEE A COPY OF WARRANTY ON BACK PAGE.
To avoid unnecessary delays in warranty service and to insure that
a permanent record of your purchase is on fi le with our factory, be
sure to complete the warranty registration card and send it to Task
Industries today.
1. We advise you to consult your local Tuff Stuff retailer if you
should have a question or problem regarding the proper
assembly of this unit.
2. Consider the complete surface area of the Smith-Half Cage
Series. Use the overhead view located on the front page for
designing your layout before assembling. Once the Smith-Half
Cage Series has been fully assembled it will be heavy and
diffi cult to move, therefore you should assemble the unit in the
area where it is to be used upon completion.
3. It is recommended that another person assist you with the
assembly of this unit.
4. Neatly organize and identify all parts according to the Parts List
and the Exploded View Diagrams on pages 7 - 9.
1. One 3/4” combination wrench
2. One 9/16” combination wrench
3. One ratchet
4. One 3/4” socket
5. One 9/16” socket
6. One rubber mallet
7. Windex or household glass cleaner
8. One can silicone spray/ tefl on spray lubricant
9. Measuring tape
10. Utility knife
The icons displayed in this Assembly Instructions are used to
facilitate the correct assembly and safe use of this Product, as-
well-as to prevent injury to yourself or anyone else.
provides information necessary to properly
complete a procedure or information which will
make the procedure easier to understand.
indicates a potentially hazardous
situation, which, if not avoided, may result in minor
or moderate injury. It may also be used to alert
against unsafe practices.
provides a instruction to loosely
fasten ( ) a hardware assembly
only. This instruction is intended for the alignment
of hardware components during the assembly
process.
provides a instruction to fully fasten
() a hardware assembly.
SCREWfiW
IDTH
WASHERfiD
IAMETER
NUTfiDIA
METER
SCREWfiLENGHT
1. Read and follow each step of this Assembly Instruction Manual
in sequence. Do not skip ahead, as it will result in an improper
assembly or in having to disassemble parts later.
2. During the assembly of this unit you will be instructed to leave
some Hex Head Cap Screws loosely fastened. Naturally, they
will be fully fastened later in the assembly process. This is done
to prevent any diffi culty with alignment of some parts during this
assembly.
Due to continuing product improvements, specifi cations and designs are subject to change
without notice.
TBU-335 THC-43C TSM-45L
1. Maximum Wt. Capacity N/A 400 Lbs. 300 Lbs.
2. Total Machine Weight 220 Lbs. 40 Lbs. 80 Lbs.
3. Footprint (LWH) - See Front Cover
FULLY FASTEN
NOTE:MAKE SURE TO SUPPORT MAIN FRAME #1 THROUGH THIS STEP TO AVOID INJURY.
HTX-2000 Dual Stack-Funtional Trainer
71 94 69
22
4444 94
79 74
2
48
66
22
23
23
87
93
95 95 93 87
74
94
79
44 94 71
71
69
44
66
Congratulations on your new purchase of the Smith-Half Cage
Series. This gym is capable of a variety of different exercises, as-
well-as, smooth and user-friendly adjustment features. In addition,
this gym has been designed to meet the needs and performance
requirements for a suitable home exercise machine. We hope you
are completely satisfi ed with this product and wish you many years
of enjoyment.
This Tuffstuff product has been built to precise quality standards
and has been carefully packaged to ensure that damage will
not occur during shipment. The Home Lifetime Warranty and
signature indicating fi nal inspection has been conducted by our line
foreman, is an expression of our confi dence in the completeness,
the materials, and workmanship of this product.
SEE A COPY OF WARRANTY ON BACK PAGE.
To avoid unnecessary delays in warranty service and to insure that
a permanent record of your purchase is on fi le with our factory, be
sure to complete the warranty registration card and send it to Task
Industries today.
1. We advise you to consult your local Tuff Stuff retailer if you
should have a question or problem regarding the proper
assembly of this unit.
2. Consider the complete surface area of the Smith-Half Cage
Series. Use the overhead view located on the front page for
designing your layout before assembling. Once the Smith-Half
Cage Series has been fully assembled it will be heavy and
diffi cult to move, therefore you should assemble the unit in the
area where it is to be used upon completion.
3. It is recommended that another person assist you with the
assembly of this unit.
4. Neatly organize and identify all parts according to the Parts List
and the Exploded View Diagrams on pages 7 - 9.
1. One 3/4” combination wrench
2. One 9/16” combination wrench
3. One ratchet
4. One 3/4” socket
5. One 9/16” socket
6. One rubber mallet
7. Windex or household glass cleaner
8. One can silicone spray/ tefl on spray lubricant
9. Measuring tape
10. Utility knife
The icons displayed in this Assembly Instructions are used to
facilitate the correct assembly and safe use of this Product, as-
well-as to prevent injury to yourself or anyone else.
provides information necessary to properly
complete a procedure or information which will
make the procedure easier to understand.
indicates a potentially hazardous
situation, which, if not avoided, may result in minor
or moderate injury. It may also be used to alert
against unsafe practices.
provides a instruction to loosely
fasten ( ) a hardware assembly
only. This instruction is intended for the alignment
of hardware components during the assembly
process.
provides a instruction to fully fasten
() a hardware assembly.
SCREWfiW
IDTH
WASHERfiD
IAMETER
NUTfiDIA
METER
SCREWfiLENGHT
1. Read and follow each step of this Assembly Instruction Manual
in sequence. Do not skip ahead, as it will result in an improper
assembly or in having to disassemble parts later.
2. During the assembly of this unit you will be instructed to leave
some Hex Head Cap Screws loosely fastened. Naturally, they
will be fully fastened later in the assembly process. This is done
to prevent any diffi culty with alignment of some parts during this
assembly.
Due to continuing product improvements, specifi cations and designs are subject to change
without notice.
TBU-335 THC-43C TSM-45L
1. Maximum Wt. Capacity N/A 400 Lbs. 300 Lbs.
2. Total Machine Weight 220 Lbs. 40 Lbs. 80 Lbs.
3. Footprint (LWH) - See Front Cover
FULLY FASTEN14
Step 3
HTX-2000 Dual Stack-Funtional Trainer
87 93 95
87
95
93
95 93 87
4
71 94 69
22
4444 94
79 74
2
48
66
22
23
23
87
93
95 95 93 87
74
94
79
44 94 71
71
69
44
66
15
Step 4
Congratulations on your new purchase of the Smith-Half Cage
Series. This gym is capable of a variety of different exercises, as-
well-as, smooth and user-friendly adjustment features. In addition,
this gym has been designed to meet the needs and performance
requirements for a suitable home exercise machine. We hope you
are completely satisfi ed with this product and wish you many years
of enjoyment.
This Tuffstuff product has been built to precise quality standards
and has been carefully packaged to ensure that damage will
not occur during shipment. The Home Lifetime Warranty and
signature indicating fi nal inspection has been conducted by our line
foreman, is an expression of our confi dence in the completeness,
the materials, and workmanship of this product.
SEE A COPY OF WARRANTY ON BACK PAGE.
To avoid unnecessary delays in warranty service and to insure that
a permanent record of your purchase is on fi le with our factory, be
sure to complete the warranty registration card and send it to Task
Industries today.
1. We advise you to consult your local Tuff Stuff retailer if you
should have a question or problem regarding the proper
assembly of this unit.
2. Consider the complete surface area of the Smith-Half Cage
Series. Use the overhead view located on the front page for
designing your layout before assembling. Once the Smith-Half
Cage Series has been fully assembled it will be heavy and
diffi cult to move, therefore you should assemble the unit in the
area where it is to be used upon completion.
3. It is recommended that another person assist you with the
assembly of this unit.
4. Neatly organize and identify all parts according to the Parts List
and the Exploded View Diagrams on pages 7 - 9.
1. One 3/4” combination wrench
2. One 9/16” combination wrench
3. One ratchet
4. One 3/4” socket
5. One 9/16” socket
6. One rubber mallet
7. Windex or household glass cleaner
8. One can silicone spray/ tefl on spray lubricant
9. Measuring tape
10. Utility knife
The icons displayed in this Assembly Instructions are used to
facilitate the correct assembly and safe use of this Product, as-
well-as to prevent injury to yourself or anyone else.
provides information necessary to properly
complete a procedure or information which will
make the procedure easier to understand.
indicates a potentially hazardous
situation, which, if not avoided, may result in minor
or moderate injury. It may also be used to alert
against unsafe practices.
provides a instruction to loosely
fasten ( ) a hardware assembly
only. This instruction is intended for the alignment
of hardware components during the assembly
process.
provides a instruction to fully fasten
() a hardware assembly.
SCREWfiW
IDTH
WASHERfiD
IAMETER
NUTfiDIA
METER
SCREWfiLENGHT
1. Read and follow each step of this Assembly Instruction Manual
in sequence. Do not skip ahead, as it will result in an improper
assembly or in having to disassemble parts later.
2. During the assembly of this unit you will be instructed to leave
some Hex Head Cap Screws loosely fastened. Naturally, they
will be fully fastened later in the assembly process. This is done
to prevent any diffi culty with alignment of some parts during this
assembly.
Due to continuing product improvements, specifi cations and designs are subject to change
without notice.
TBU-335 THC-43C TSM-45L
1. Maximum Wt. Capacity N/A 400 Lbs. 300 Lbs.
2. Total Machine Weight 220 Lbs. 40 Lbs. 80 Lbs.
3. Footprint (LWH) - See Front Cover
FULLY FASTEN
HTX-2000 Dual Stack-Funtional Trainer
86
92
94
14
105 88
105709
8
2727
76
36
869294
949286
106
106
Step 5
Congratulations on your new purchase of the Smith-Half Cage
Series. This gym is capable of a variety of different exercises, as-
well-as, smooth and user-friendly adjustment features. In addition,
this gym has been designed to meet the needs and performance
requirements for a suitable home exercise machine. We hope you
are completely satisfi ed with this product and wish you many years
of enjoyment.
This Tuffstuff product has been built to precise quality standards
and has been carefully packaged to ensure that damage will
not occur during shipment. The Home Lifetime Warranty and
signature indicating fi nal inspection has been conducted by our line
foreman, is an expression of our confi dence in the completeness,
the materials, and workmanship of this product.
SEE A COPY OF WARRANTY ON BACK PAGE.
To avoid unnecessary delays in warranty service and to insure that
a permanent record of your purchase is on fi le with our factory, be
sure to complete the warranty registration card and send it to Task
Industries today.
1. We advise you to consult your local Tuff Stuff retailer if you
should have a question or problem regarding the proper
assembly of this unit.
2. Consider the complete surface area of the Smith-Half Cage
Series. Use the overhead view located on the front page for
designing your layout before assembling. Once the Smith-Half
Cage Series has been fully assembled it will be heavy and
diffi cult to move, therefore you should assemble the unit in the
area where it is to be used upon completion.
3. It is recommended that another person assist you with the
assembly of this unit.
4. Neatly organize and identify all parts according to the Parts List
and the Exploded View Diagrams on pages 7 - 9.
1. One 3/4” combination wrench
2. One 9/16” combination wrench
3. One ratchet
4. One 3/4” socket
5. One 9/16” socket
6. One rubber mallet
7. Windex or household glass cleaner
8. One can silicone spray/ tefl on spray lubricant
9. Measuring tape
10. Utility knife
The icons displayed in this Assembly Instructions are used to
facilitate the correct assembly and safe use of this Product, as-
well-as to prevent injury to yourself or anyone else.
provides information necessary to properly
complete a procedure or information which will
make the procedure easier to understand.
indicates a potentially hazardous
situation, which, if not avoided, may result in minor
or moderate injury. It may also be used to alert
against unsafe practices.
provides a instruction to loosely
fasten ( ) a hardware assembly
only. This instruction is intended for the alignment
of hardware components during the assembly
process.
provides a instruction to fully fasten
() a hardware assembly.
SCREWfiW
IDTH
WASHERfiD
IAMETER
NUTfiDIA
METER
SCREWfiLENGHT
1. Read and follow each step of this Assembly Instruction Manual
in sequence. Do not skip ahead, as it will result in an improper
assembly or in having to disassemble parts later.
2. During the assembly of this unit you will be instructed to leave
some Hex Head Cap Screws loosely fastened. Naturally, they
will be fully fastened later in the assembly process. This is done
to prevent any diffi culty with alignment of some parts during this
assembly.
Due to continuing product improvements, specifi cations and designs are subject to change
without notice.
TBU-335 THC-43C TSM-45L
1. Maximum Wt. Capacity N/A 400 Lbs. 300 Lbs.
2. Total Machine Weight 220 Lbs. 40 Lbs. 80 Lbs.
3. Footprint (LWH) - See Front Cover
FULLY FASTEN16
HTX-2000 Dual Stack-Funtional Trainer
94817
4171
17
Congratulations on your new purchase of the Smith-Half Cage
Series. This gym is capable of a variety of different exercises, as-
well-as, smooth and user-friendly adjustment features. In addition,
this gym has been designed to meet the needs and performance
requirements for a suitable home exercise machine. We hope you
are completely satisfi ed with this product and wish you many years
of enjoyment.
This Tuffstuff product has been built to precise quality standards
and has been carefully packaged to ensure that damage will
not occur during shipment. The Home Lifetime Warranty and
signature indicating fi nal inspection has been conducted by our line
foreman, is an expression of our confi dence in the completeness,
the materials, and workmanship of this product.
SEE A COPY OF WARRANTY ON BACK PAGE.
To avoid unnecessary delays in warranty service and to insure that
a permanent record of your purchase is on fi le with our factory, be
sure to complete the warranty registration card and send it to Task
Industries today.
1. We advise you to consult your local Tuff Stuff retailer if you
should have a question or problem regarding the proper
assembly of this unit.
2. Consider the complete surface area of the Smith-Half Cage
Series. Use the overhead view located on the front page for
designing your layout before assembling. Once the Smith-Half
Cage Series has been fully assembled it will be heavy and
diffi cult to move, therefore you should assemble the unit in the
area where it is to be used upon completion.
3. It is recommended that another person assist you with the
assembly of this unit.
4. Neatly organize and identify all parts according to the Parts List
and the Exploded View Diagrams on pages 7 - 9.
1. One 3/4” combination wrench
2. One 9/16” combination wrench
3. One ratchet
4. One 3/4” socket
5. One 9/16” socket
6. One rubber mallet
7. Windex or household glass cleaner
8. One can silicone spray/ tefl on spray lubricant
9. Measuring tape
10. Utility knife
The icons displayed in this Assembly Instructions are used to
facilitate the correct assembly and safe use of this Product, as-
well-as to prevent injury to yourself or anyone else.
provides information necessary to properly
complete a procedure or information which will
make the procedure easier to understand.
indicates a potentially hazardous
situation, which, if not avoided, may result in minor
or moderate injury. It may also be used to alert
against unsafe practices.
provides a instruction to loosely
fasten ( ) a hardware assembly
only. This instruction is intended for the alignment
of hardware components during the assembly
process.
provides a instruction to fully fasten
() a hardware assembly.
SCREWfiW
IDTH
WASHERfiD
IAMETER
NUTfiDIA
METER
SCREWfiLENGHT
1. Read and follow each step of this Assembly Instruction Manual
in sequence. Do not skip ahead, as it will result in an improper
assembly or in having to disassemble parts later.
2. During the assembly of this unit you will be instructed to leave
some Hex Head Cap Screws loosely fastened. Naturally, they
will be fully fastened later in the assembly process. This is done
to prevent any diffi culty with alignment of some parts during this
assembly.
Due to continuing product improvements, specifi cations and designs are subject to change
without notice.
TBU-335 THC-43C TSM-45L
1. Maximum Wt. Capacity N/A 400 Lbs. 300 Lbs.
2. Total Machine Weight 220 Lbs. 40 Lbs. 80 Lbs.
3. Footprint (LWH) - See Front Cover
FULLY FASTEN
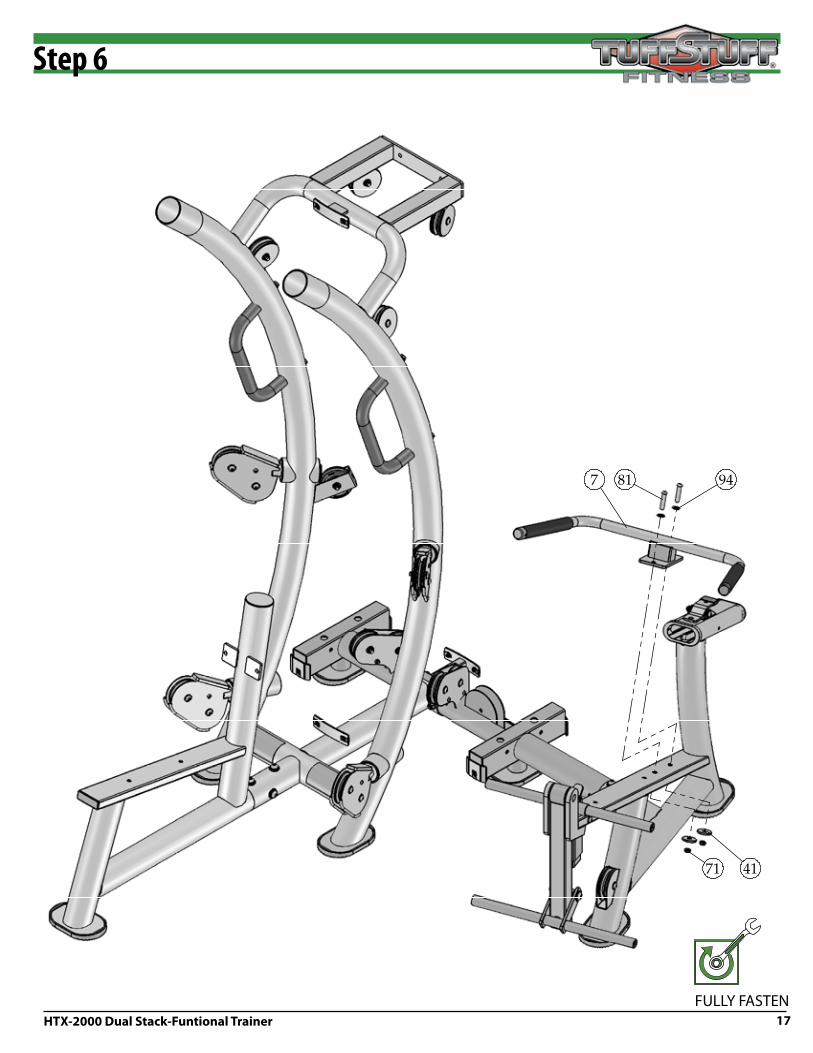
Step 6
HTX-2000 Dual Stack-Funtional Trainer
59
31
10
43
71
94
47
44 94
79
19
68
93
Step 7
Congratulations on your new purchase of the Smith-Half Cage
Series. This gym is capable of a variety of different exercises, as-
well-as, smooth and user-friendly adjustment features. In addition,
this gym has been designed to meet the needs and performance
requirements for a suitable home exercise machine. We hope you
are completely satisfi ed with this product and wish you many years
of enjoyment.
This Tuffstuff product has been built to precise quality standards
and has been carefully packaged to ensure that damage will
not occur during shipment. The Home Lifetime Warranty and
signature indicating fi nal inspection has been conducted by our line
foreman, is an expression of our confi dence in the completeness,
the materials, and workmanship of this product.
SEE A COPY OF WARRANTY ON BACK PAGE.
To avoid unnecessary delays in warranty service and to insure that
a permanent record of your purchase is on fi le with our factory, be
sure to complete the warranty registration card and send it to Task
Industries today.
1. We advise you to consult your local Tuff Stuff retailer if you
should have a question or problem regarding the proper
assembly of this unit.
2. Consider the complete surface area of the Smith-Half Cage
Series. Use the overhead view located on the front page for
designing your layout before assembling. Once the Smith-Half
Cage Series has been fully assembled it will be heavy and
diffi cult to move, therefore you should assemble the unit in the
area where it is to be used upon completion.
3. It is recommended that another person assist you with the
assembly of this unit.
4. Neatly organize and identify all parts according to the Parts List
and the Exploded View Diagrams on pages 7 - 9.
1. One 3/4” combination wrench
2. One 9/16” combination wrench
3. One ratchet
4. One 3/4” socket
5. One 9/16” socket
6. One rubber mallet
7. Windex or household glass cleaner
8. One can silicone spray/ tefl on spray lubricant
9. Measuring tape
10. Utility knife
The icons displayed in this Assembly Instructions are used to
facilitate the correct assembly and safe use of this Product, as-
well-as to prevent injury to yourself or anyone else.
provides information necessary to properly
complete a procedure or information which will
make the procedure easier to understand.
indicates a potentially hazardous
situation, which, if not avoided, may result in minor
or moderate injury. It may also be used to alert
against unsafe practices.
provides a instruction to loosely
fasten ( ) a hardware assembly
only. This instruction is intended for the alignment
of hardware components during the assembly
process.
provides a instruction to fully fasten
() a hardware assembly.
SCREWfiW
IDTH
WASHERfiD
IAMETER
NUTfiDIA
METER
SCREWfiLENGHT
1. Read and follow each step of this Assembly Instruction Manual
in sequence. Do not skip ahead, as it will result in an improper
assembly or in having to disassemble parts later.
2. During the assembly of this unit you will be instructed to leave
some Hex Head Cap Screws loosely fastened. Naturally, they
will be fully fastened later in the assembly process. This is done
to prevent any diffi culty with alignment of some parts during this
assembly.
Due to continuing product improvements, specifi cations and designs are subject to change
without notice.
TBU-335 THC-43C TSM-45L
1. Maximum Wt. Capacity N/A 400 Lbs. 300 Lbs.
2. Total Machine Weight 220 Lbs. 40 Lbs. 80 Lbs.
3. Footprint (LWH) - See Front Cover
FULLY FASTEN18
HTX-2000 Dual Stack-Funtional Trainer
79
94
71
94
71
35
44
10 10
47
43
68
9379
94
31
59
Congratulations on your new purchase of the Smith-Half Cage
Series. This gym is capable of a variety of different exercises, as-
well-as, smooth and user-friendly adjustment features. In addition,
this gym has been designed to meet the needs and performance
requirements for a suitable home exercise machine. We hope you
are completely satisfi ed with this product and wish you many years
of enjoyment.
This Tuffstuff product has been built to precise quality standards
and has been carefully packaged to ensure that damage will
not occur during shipment. The Home Lifetime Warranty and
signature indicating fi nal inspection has been conducted by our line
foreman, is an expression of our confi dence in the completeness,
the materials, and workmanship of this product.
SEE A COPY OF WARRANTY ON BACK PAGE.
To avoid unnecessary delays in warranty service and to insure that
a permanent record of your purchase is on fi le with our factory, be
sure to complete the warranty registration card and send it to Task
Industries today.
1. We advise you to consult your local Tuff Stuff retailer if you
should have a question or problem regarding the proper
assembly of this unit.
2. Consider the complete surface area of the Smith-Half Cage
Series. Use the overhead view located on the front page for
designing your layout before assembling. Once the Smith-Half
Cage Series has been fully assembled it will be heavy and
diffi cult to move, therefore you should assemble the unit in the
area where it is to be used upon completion.
3. It is recommended that another person assist you with the
assembly of this unit.
4. Neatly organize and identify all parts according to the Parts List
and the Exploded View Diagrams on pages 7 - 9.
1. One 3/4” combination wrench
2. One 9/16” combination wrench
3. One ratchet
4. One 3/4” socket
5. One 9/16” socket
6. One rubber mallet
7. Windex or household glass cleaner
8. One can silicone spray/ tefl on spray lubricant
9. Measuring tape
10. Utility knife
The icons displayed in this Assembly Instructions are used to
facilitate the correct assembly and safe use of this Product, as-
well-as to prevent injury to yourself or anyone else.
provides information necessary to properly
complete a procedure or information which will
make the procedure easier to understand.
indicates a potentially hazardous
situation, which, if not avoided, may result in minor
or moderate injury. It may also be used to alert
against unsafe practices.
provides a instruction to loosely
fasten ( ) a hardware assembly
only. This instruction is intended for the alignment
of hardware components during the assembly
process.
provides a instruction to fully fasten
() a hardware assembly.
SCREWfiW
IDTH
WASHERfiD
IAMETER
NUTfiDIA
METER
SCREWfiLENGHT
1. Read and follow each step of this Assembly Instruction Manual
in sequence. Do not skip ahead, as it will result in an improper
assembly or in having to disassemble parts later.
2. During the assembly of this unit you will be instructed to leave
some Hex Head Cap Screws loosely fastened. Naturally, they
will be fully fastened later in the assembly process. This is done
to prevent any diffi culty with alignment of some parts during this
assembly.
Due to continuing product improvements, specifi cations and designs are subject to change
without notice.
TBU-335 THC-43C TSM-45L
1. Maximum Wt. Capacity N/A 400 Lbs. 300 Lbs.
2. Total Machine Weight 220 Lbs. 40 Lbs. 80 Lbs.
3. Footprint (LWH) - See Front Cover
FULLY FASTENFULLY FASTEN19
Step 8
HTX-2000 Dual Stack-Funtional Trainer
94 85 41 85
94
79
6
68 93
95
95
68
71
94
44
18
9471
45
71 45
7145
94
79
94
71
79
Step 9
20
Congratulations on your new purchase of the Smith-Half Cage
Series. This gym is capable of a variety of different exercises, as-
well-as, smooth and user-friendly adjustment features. In addition,
this gym has been designed to meet the needs and performance
requirements for a suitable home exercise machine. We hope you
are completely satisfi ed with this product and wish you many years
of enjoyment.
This Tuffstuff product has been built to precise quality standards
and has been carefully packaged to ensure that damage will
not occur during shipment. The Home Lifetime Warranty and
signature indicating fi nal inspection has been conducted by our line
foreman, is an expression of our confi dence in the completeness,
the materials, and workmanship of this product.
SEE A COPY OF WARRANTY ON BACK PAGE.
To avoid unnecessary delays in warranty service and to insure that
a permanent record of your purchase is on fi le with our factory, be
sure to complete the warranty registration card and send it to Task
Industries today.
1. We advise you to consult your local Tuff Stuff retailer if you
should have a question or problem regarding the proper
assembly of this unit.
2. Consider the complete surface area of the Smith-Half Cage
Series. Use the overhead view located on the front page for
designing your layout before assembling. Once the Smith-Half
Cage Series has been fully assembled it will be heavy and
diffi cult to move, therefore you should assemble the unit in the
area where it is to be used upon completion.
3. It is recommended that another person assist you with the
assembly of this unit.
4. Neatly organize and identify all parts according to the Parts List
and the Exploded View Diagrams on pages 7 - 9.
1. One 3/4” combination wrench
2. One 9/16” combination wrench
3. One ratchet
4. One 3/4” socket
5. One 9/16” socket
6. One rubber mallet
7. Windex or household glass cleaner
8. One can silicone spray/ tefl on spray lubricant
9. Measuring tape
10. Utility knife
The icons displayed in this Assembly Instructions are used to
facilitate the correct assembly and safe use of this Product, as-
well-as to prevent injury to yourself or anyone else.
provides information necessary to properly
complete a procedure or information which will
make the procedure easier to understand.
indicates a potentially hazardous
situation, which, if not avoided, may result in minor
or moderate injury. It may also be used to alert
against unsafe practices.
provides a instruction to loosely
fasten ( ) a hardware assembly
only. This instruction is intended for the alignment
of hardware components during the assembly
process.
provides a instruction to fully fasten
() a hardware assembly.
SCREWfiW
IDTH
WASHERfiD
IAMETER
NUTfiDIA
METER
SCREWfiLENGHT
1. Read and follow each step of this Assembly Instruction Manual
in sequence. Do not skip ahead, as it will result in an improper
assembly or in having to disassemble parts later.
2. During the assembly of this unit you will be instructed to leave
some Hex Head Cap Screws loosely fastened. Naturally, they
will be fully fastened later in the assembly process. This is done
to prevent any diffi culty with alignment of some parts during this
assembly.
Due to continuing product improvements, specifi cations and designs are subject to change
without notice.
TBU-335 THC-43C TSM-45L
1. Maximum Wt. Capacity N/A 400 Lbs. 300 Lbs.
2. Total Machine Weight 220 Lbs. 40 Lbs. 80 Lbs.
3. Footprint (LWH) - See Front Cover
FULLY FASTEN
LOOSLY TIGHTEN ITEMS #85UNTIL AFTER COMPLETING STEP 10.
HTX-2000 Dual Stack-Funtional Trainer
94
81
7194129
21
Step 10
LIFT GUIDE RODS AND INSERT SCREWS AS SHOWN.
Congratulations on your new purchase of the Smith-Half Cage
Series. This gym is capable of a variety of different exercises, as-
well-as, smooth and user-friendly adjustment features. In addition,
this gym has been designed to meet the needs and performance
requirements for a suitable home exercise machine. We hope you
are completely satisfi ed with this product and wish you many years
of enjoyment.
This Tuffstuff product has been built to precise quality standards
and has been carefully packaged to ensure that damage will
not occur during shipment. The Home Lifetime Warranty and
signature indicating fi nal inspection has been conducted by our line
foreman, is an expression of our confi dence in the completeness,
the materials, and workmanship of this product.
SEE A COPY OF WARRANTY ON BACK PAGE.
To avoid unnecessary delays in warranty service and to insure that
a permanent record of your purchase is on fi le with our factory, be
sure to complete the warranty registration card and send it to Task
Industries today.
1. We advise you to consult your local Tuff Stuff retailer if you
should have a question or problem regarding the proper
assembly of this unit.
2. Consider the complete surface area of the Smith-Half Cage
Series. Use the overhead view located on the front page for
designing your layout before assembling. Once the Smith-Half
Cage Series has been fully assembled it will be heavy and
diffi cult to move, therefore you should assemble the unit in the
area where it is to be used upon completion.
3. It is recommended that another person assist you with the
assembly of this unit.
4. Neatly organize and identify all parts according to the Parts List
and the Exploded View Diagrams on pages 7 - 9.
1. One 3/4” combination wrench
2. One 9/16” combination wrench
3. One ratchet
4. One 3/4” socket
5. One 9/16” socket
6. One rubber mallet
7. Windex or household glass cleaner
8. One can silicone spray/ tefl on spray lubricant
9. Measuring tape
10. Utility knife
The icons displayed in this Assembly Instructions are used to
facilitate the correct assembly and safe use of this Product, as-
well-as to prevent injury to yourself or anyone else.
provides information necessary to properly
complete a procedure or information which will
make the procedure easier to understand.
indicates a potentially hazardous
situation, which, if not avoided, may result in minor
or moderate injury. It may also be used to alert
against unsafe practices.
provides a instruction to loosely
fasten ( ) a hardware assembly
only. This instruction is intended for the alignment
of hardware components during the assembly
process.
provides a instruction to fully fasten
() a hardware assembly.
SCREWfiW
IDTH
WASHERfiD
IAMETER
NUTfiDIA
METER
SCREWfiLENGHT
1. Read and follow each step of this Assembly Instruction Manual
in sequence. Do not skip ahead, as it will result in an improper
assembly or in having to disassemble parts later.
2. During the assembly of this unit you will be instructed to leave
some Hex Head Cap Screws loosely fastened. Naturally, they
will be fully fastened later in the assembly process. This is done
to prevent any diffi culty with alignment of some parts during this
assembly.
Due to continuing product improvements, specifi cations and designs are subject to change
without notice.
TBU-335 THC-43C TSM-45L
1. Maximum Wt. Capacity N/A 400 Lbs. 300 Lbs.
2. Total Machine Weight 220 Lbs. 40 Lbs. 80 Lbs.
3. Footprint (LWH) - See Front Cover
FULLY FASTEN
NOTES:1. REPEAT ASSEMBLY STEP ON OTHER WEIGHT STACK.2. ONCE GUIDE RODS ARE SECURED ON BOTH WEIGHT STACKS, TIGHTEN SCREWS (#85) FROM PREVIOUS STEP.
HTX-2000 Dual Stack-Funtional Trainer22
Weight stack label and lubrication instructions1� Wipe front surface of weight stack with rubbing alcohol and wipe dry�2� Peel off back sheet (adhesive side) from label #129 and make sure that the labels remain attached to the application tape�3� Line up hole on the second label to hole on the first weight plate�4� Make sure the hole on the last label lines up with last weight plate and slowly press into place�5� Gently remove application tape and rub each label firmly against the weight stack�6� Once this is complete, repeat this procedure for top plate label�6� Allow labels to stand for 2 days to allow adhesive to cure fully�7� Open the lube package provided and apply a thin film of lubricant around the first 3 inches of the guide rods above the top plate� 8� After the cables are installed, do a set of reps to spread the lubricant thoroughly�
NOTE:1� TOP PLATE LABEL GOES ON HOLE OFF CENTER AS SHOWN� LABEL WILL COVER HOLE ON CENTER�2� FOLLOW THESE INSTRUCTIONS FOR BOTH WEIGHT STACKS�
Step 11
HTX-2000 Dual Stack-Funtional Trainer
33
17
23
Step 12 Lat Cable Routing
91 37
33
38
59
30
7594
92
35
21
CONTINUE ON NEXT PAGE
Congratulations on your new purchase of the Smith-Half Cage
Series. This gym is capable of a variety of different exercises, as-
well-as, smooth and user-friendly adjustment features. In addition,
this gym has been designed to meet the needs and performance
requirements for a suitable home exercise machine. We hope you
are completely satisfi ed with this product and wish you many years
of enjoyment.
This Tuffstuff product has been built to precise quality standards
and has been carefully packaged to ensure that damage will
not occur during shipment. The Home Lifetime Warranty and
signature indicating fi nal inspection has been conducted by our line
foreman, is an expression of our confi dence in the completeness,
the materials, and workmanship of this product.
SEE A COPY OF WARRANTY ON BACK PAGE.
To avoid unnecessary delays in warranty service and to insure that
a permanent record of your purchase is on fi le with our factory, be
sure to complete the warranty registration card and send it to Task
Industries today.
1. We advise you to consult your local Tuff Stuff retailer if you
should have a question or problem regarding the proper
assembly of this unit.
2. Consider the complete surface area of the Smith-Half Cage
Series. Use the overhead view located on the front page for
designing your layout before assembling. Once the Smith-Half
Cage Series has been fully assembled it will be heavy and
diffi cult to move, therefore you should assemble the unit in the
area where it is to be used upon completion.
3. It is recommended that another person assist you with the
assembly of this unit.
4. Neatly organize and identify all parts according to the Parts List
and the Exploded View Diagrams on pages 7 - 9.
1. One 3/4” combination wrench
2. One 9/16” combination wrench
3. One ratchet
4. One 3/4” socket
5. One 9/16” socket
6. One rubber mallet
7. Windex or household glass cleaner
8. One can silicone spray/ tefl on spray lubricant
9. Measuring tape
10. Utility knife
The icons displayed in this Assembly Instructions are used to
facilitate the correct assembly and safe use of this Product, as-
well-as to prevent injury to yourself or anyone else.
provides information necessary to properly
complete a procedure or information which will
make the procedure easier to understand.
indicates a potentially hazardous
situation, which, if not avoided, may result in minor
or moderate injury. It may also be used to alert
against unsafe practices.
provides a instruction to loosely
fasten ( ) a hardware assembly
only. This instruction is intended for the alignment
of hardware components during the assembly
process.
provides a instruction to fully fasten
() a hardware assembly.
SCREWfiW
IDTH
WASHERfiD
IAMETER
NUTfiDIA
METER
SCREWfiLENGHT
1. Read and follow each step of this Assembly Instruction Manual
in sequence. Do not skip ahead, as it will result in an improper
assembly or in having to disassemble parts later.
2. During the assembly of this unit you will be instructed to leave
some Hex Head Cap Screws loosely fastened. Naturally, they
will be fully fastened later in the assembly process. This is done
to prevent any diffi culty with alignment of some parts during this
assembly.
Due to continuing product improvements, specifi cations and designs are subject to change
without notice.
TBU-335 THC-43C TSM-45L
1. Maximum Wt. Capacity N/A 400 Lbs. 300 Lbs.
2. Total Machine Weight 220 Lbs. 40 Lbs. 80 Lbs.
3. Footprint (LWH) - See Front Cover
FULLY FASTEN
NOTE:1. SOME PARTS CUT OUT/NOT SHOWN FOR CLARITY.
33
17
BEGIN HERE
BEGIN BY RUNNING CABLE INSIDE THE TUBE TO UPPER PULLEY AND ASSEMBLE TOP BEARING HOUSING (35) AS SHOWN.
HTX-2000 Dual Stack-Funtional Trainer
33
17
100
Continue Lat Cable Routing
24
21
7594
92
35
CABLE INSIDE TUBE
NOTE:1. SOME PARTS CUT OUT/NOT SHOWN FOR CLARITY.
91 37
33
38
59
30
CONTINUE FROMPREVIOUS PAGE
Congratulations on your new purchase of the Smith-Half Cage
Series. This gym is capable of a variety of different exercises, as-
well-as, smooth and user-friendly adjustment features. In addition,
this gym has been designed to meet the needs and performance
requirements for a suitable home exercise machine. We hope you
are completely satisfi ed with this product and wish you many years
of enjoyment.
This Tuffstuff product has been built to precise quality standards
and has been carefully packaged to ensure that damage will
not occur during shipment. The Home Lifetime Warranty and
signature indicating fi nal inspection has been conducted by our line
foreman, is an expression of our confi dence in the completeness,
the materials, and workmanship of this product.
SEE A COPY OF WARRANTY ON BACK PAGE.
To avoid unnecessary delays in warranty service and to insure that
a permanent record of your purchase is on fi le with our factory, be
sure to complete the warranty registration card and send it to Task
Industries today.
1. We advise you to consult your local Tuff Stuff retailer if you
should have a question or problem regarding the proper
assembly of this unit.
2. Consider the complete surface area of the Smith-Half Cage
Series. Use the overhead view located on the front page for
designing your layout before assembling. Once the Smith-Half
Cage Series has been fully assembled it will be heavy and
diffi cult to move, therefore you should assemble the unit in the
area where it is to be used upon completion.
3. It is recommended that another person assist you with the
assembly of this unit.
4. Neatly organize and identify all parts according to the Parts List
and the Exploded View Diagrams on pages 7 - 9.
1. One 3/4” combination wrench
2. One 9/16” combination wrench
3. One ratchet
4. One 3/4” socket
5. One 9/16” socket
6. One rubber mallet
7. Windex or household glass cleaner
8. One can silicone spray/ tefl on spray lubricant
9. Measuring tape
10. Utility knife
The icons displayed in this Assembly Instructions are used to
facilitate the correct assembly and safe use of this Product, as-
well-as to prevent injury to yourself or anyone else.
provides information necessary to properly
complete a procedure or information which will
make the procedure easier to understand.
indicates a potentially hazardous
situation, which, if not avoided, may result in minor
or moderate injury. It may also be used to alert
against unsafe practices.
provides a instruction to loosely
fasten ( ) a hardware assembly
only. This instruction is intended for the alignment
of hardware components during the assembly
process.
provides a instruction to fully fasten
() a hardware assembly.
SCREWfiW
IDTH
WASHERfiD
IAMETER
NUTfiDIA
METER
SCREWfiLENGHT
1. Read and follow each step of this Assembly Instruction Manual
in sequence. Do not skip ahead, as it will result in an improper
assembly or in having to disassemble parts later.
2. During the assembly of this unit you will be instructed to leave
some Hex Head Cap Screws loosely fastened. Naturally, they
will be fully fastened later in the assembly process. This is done
to prevent any diffi culty with alignment of some parts during this
assembly.
Due to continuing product improvements, specifi cations and designs are subject to change
without notice.
TBU-335 THC-43C TSM-45L
1. Maximum Wt. Capacity N/A 400 Lbs. 300 Lbs.
2. Total Machine Weight 220 Lbs. 40 Lbs. 80 Lbs.
3. Footprint (LWH) - See Front Cover
FULLY FASTEN
HTX-2000 Dual Stack-Funtional Trainer
34
100
18
Step 13 Low Row Cable Routing
25
91
37
34 38
59
39
NOTE:1. SOME PARTS CUT OUT/NOT SHOWN FOR CLARITY.2. ONCE PULLEYS ARE INPLACE, MAKE NECESARY ADJUSMENT TO THE CABLE ON THE ADJUSTABLE PULLEY BRACKET #18.
MAKE SURE CABLE RUNS UNDERNEATH THE SCREW #74 AS SHOWN ABOVE.
Congratulations on your new purchase of the Smith-Half Cage
Series. This gym is capable of a variety of different exercises, as-
well-as, smooth and user-friendly adjustment features. In addition,
this gym has been designed to meet the needs and performance
requirements for a suitable home exercise machine. We hope you
are completely satisfi ed with this product and wish you many years
of enjoyment.
This Tuffstuff product has been built to precise quality standards
and has been carefully packaged to ensure that damage will
not occur during shipment. The Home Lifetime Warranty and
signature indicating fi nal inspection has been conducted by our line
foreman, is an expression of our confi dence in the completeness,
the materials, and workmanship of this product.
SEE A COPY OF WARRANTY ON BACK PAGE.
To avoid unnecessary delays in warranty service and to insure that
a permanent record of your purchase is on fi le with our factory, be
sure to complete the warranty registration card and send it to Task
Industries today.
1. We advise you to consult your local Tuff Stuff retailer if you
should have a question or problem regarding the proper
assembly of this unit.
2. Consider the complete surface area of the Smith-Half Cage
Series. Use the overhead view located on the front page for
designing your layout before assembling. Once the Smith-Half
Cage Series has been fully assembled it will be heavy and
diffi cult to move, therefore you should assemble the unit in the
area where it is to be used upon completion.
3. It is recommended that another person assist you with the
assembly of this unit.
4. Neatly organize and identify all parts according to the Parts List
and the Exploded View Diagrams on pages 7 - 9.
1. One 3/4” combination wrench
2. One 9/16” combination wrench
3. One ratchet
4. One 3/4” socket
5. One 9/16” socket
6. One rubber mallet
7. Windex or household glass cleaner
8. One can silicone spray/ tefl on spray lubricant
9. Measuring tape
10. Utility knife
The icons displayed in this Assembly Instructions are used to
facilitate the correct assembly and safe use of this Product, as-
well-as to prevent injury to yourself or anyone else.
provides information necessary to properly
complete a procedure or information which will
make the procedure easier to understand.
indicates a potentially hazardous
situation, which, if not avoided, may result in minor
or moderate injury. It may also be used to alert
against unsafe practices.
provides a instruction to loosely
fasten ( ) a hardware assembly
only. This instruction is intended for the alignment
of hardware components during the assembly
process.
provides a instruction to fully fasten
() a hardware assembly.
SCREWfiW
IDTH
WASHERfiD
IAMETER
NUTfiDIA
METER
SCREWfiLENGHT
1. Read and follow each step of this Assembly Instruction Manual
in sequence. Do not skip ahead, as it will result in an improper
assembly or in having to disassemble parts later.
2. During the assembly of this unit you will be instructed to leave
some Hex Head Cap Screws loosely fastened. Naturally, they
will be fully fastened later in the assembly process. This is done
to prevent any diffi culty with alignment of some parts during this
assembly.
Due to continuing product improvements, specifi cations and designs are subject to change
without notice.
TBU-335 THC-43C TSM-45L
1. Maximum Wt. Capacity N/A 400 Lbs. 300 Lbs.
2. Total Machine Weight 220 Lbs. 40 Lbs. 80 Lbs.
3. Footprint (LWH) - See Front Cover
FULLY FASTEN
HTX-2000 Dual Stack-Funtional Trainer
34
17
56
26
Step 14 Low Row Cable Routing
91
37
34 38
59
39
MAKE SURE CABLE RUNS UNDERNEATH THE SCREW #74 AS SHOWN ABOVE.
NOTE:1. SOME PARTS CUT OUT/NOT SHOWN FOR CLARITY.
Congratulations on your new purchase of the Smith-Half Cage
Series. This gym is capable of a variety of different exercises, as-
well-as, smooth and user-friendly adjustment features. In addition,
this gym has been designed to meet the needs and performance
requirements for a suitable home exercise machine. We hope you
are completely satisfi ed with this product and wish you many years
of enjoyment.
This Tuffstuff product has been built to precise quality standards
and has been carefully packaged to ensure that damage will
not occur during shipment. The Home Lifetime Warranty and
signature indicating fi nal inspection has been conducted by our line
foreman, is an expression of our confi dence in the completeness,
the materials, and workmanship of this product.
SEE A COPY OF WARRANTY ON BACK PAGE.
To avoid unnecessary delays in warranty service and to insure that
a permanent record of your purchase is on fi le with our factory, be
sure to complete the warranty registration card and send it to Task
Industries today.
1. We advise you to consult your local Tuff Stuff retailer if you
should have a question or problem regarding the proper
assembly of this unit.
2. Consider the complete surface area of the Smith-Half Cage
Series. Use the overhead view located on the front page for
designing your layout before assembling. Once the Smith-Half
Cage Series has been fully assembled it will be heavy and
diffi cult to move, therefore you should assemble the unit in the
area where it is to be used upon completion.
3. It is recommended that another person assist you with the
assembly of this unit.
4. Neatly organize and identify all parts according to the Parts List
and the Exploded View Diagrams on pages 7 - 9.
1. One 3/4” combination wrench
2. One 9/16” combination wrench
3. One ratchet
4. One 3/4” socket
5. One 9/16” socket
6. One rubber mallet
7. Windex or household glass cleaner
8. One can silicone spray/ tefl on spray lubricant
9. Measuring tape
10. Utility knife
The icons displayed in this Assembly Instructions are used to
facilitate the correct assembly and safe use of this Product, as-
well-as to prevent injury to yourself or anyone else.
provides information necessary to properly
complete a procedure or information which will
make the procedure easier to understand.
indicates a potentially hazardous
situation, which, if not avoided, may result in minor
or moderate injury. It may also be used to alert
against unsafe practices.
provides a instruction to loosely
fasten ( ) a hardware assembly
only. This instruction is intended for the alignment
of hardware components during the assembly
process.
provides a instruction to fully fasten
() a hardware assembly.
SCREWfiW
IDTH
WASHERfiD
IAMETER
NUTfiDIA
METER
SCREWfiLENGHT
1. Read and follow each step of this Assembly Instruction Manual
in sequence. Do not skip ahead, as it will result in an improper
assembly or in having to disassemble parts later.
2. During the assembly of this unit you will be instructed to leave
some Hex Head Cap Screws loosely fastened. Naturally, they
will be fully fastened later in the assembly process. This is done
to prevent any diffi culty with alignment of some parts during this
assembly.
Due to continuing product improvements, specifi cations and designs are subject to change
without notice.
TBU-335 THC-43C TSM-45L
1. Maximum Wt. Capacity N/A 400 Lbs. 300 Lbs.
2. Total Machine Weight 220 Lbs. 40 Lbs. 80 Lbs.
3. Footprint (LWH) - See Front Cover
FULLY FASTEN
HTX-2000 Dual Stack-Funtional Trainer
32
71
45
94 79
4
3257
107
72
101
68 95
93
95
68
57
16
32
72
27
Step 15 Leg Extension Cable RoutingNOTE:1. ASSEMBLE PULLEYS (#44, #45) SHOWN ON THIS STEP UNTILL CABLE IS COMPLETELY ROUTED AND SECURED.2. ONCE PULLEYS ARE INPLACE, MAKE NECESARY ADJUSMENT TO THE CABLE ON THE ADJUSTABLE CABLE BRACKET #16.
NOTE:1. SOME PARTS CUT OUT/NOT SHOWN FOR CLARITY.
Congratulations on your new purchase of the Smith-Half Cage
Series. This gym is capable of a variety of different exercises, as-
well-as, smooth and user-friendly adjustment features. In addition,
this gym has been designed to meet the needs and performance
requirements for a suitable home exercise machine. We hope you
are completely satisfi ed with this product and wish you many years
of enjoyment.
This Tuffstuff product has been built to precise quality standards
and has been carefully packaged to ensure that damage will
not occur during shipment. The Home Lifetime Warranty and
signature indicating fi nal inspection has been conducted by our line
foreman, is an expression of our confi dence in the completeness,
the materials, and workmanship of this product.
SEE A COPY OF WARRANTY ON BACK PAGE.
To avoid unnecessary delays in warranty service and to insure that
a permanent record of your purchase is on fi le with our factory, be
sure to complete the warranty registration card and send it to Task
Industries today.
1. We advise you to consult your local Tuff Stuff retailer if you
should have a question or problem regarding the proper
assembly of this unit.
2. Consider the complete surface area of the Smith-Half Cage
Series. Use the overhead view located on the front page for
designing your layout before assembling. Once the Smith-Half
Cage Series has been fully assembled it will be heavy and
diffi cult to move, therefore you should assemble the unit in the
area where it is to be used upon completion.
3. It is recommended that another person assist you with the
assembly of this unit.
4. Neatly organize and identify all parts according to the Parts List
and the Exploded View Diagrams on pages 7 - 9.
1. One 3/4” combination wrench
2. One 9/16” combination wrench
3. One ratchet
4. One 3/4” socket
5. One 9/16” socket
6. One rubber mallet
7. Windex or household glass cleaner
8. One can silicone spray/ tefl on spray lubricant
9. Measuring tape
10. Utility knife
The icons displayed in this Assembly Instructions are used to
facilitate the correct assembly and safe use of this Product, as-
well-as to prevent injury to yourself or anyone else.
provides information necessary to properly
complete a procedure or information which will
make the procedure easier to understand.
indicates a potentially hazardous
situation, which, if not avoided, may result in minor
or moderate injury. It may also be used to alert
against unsafe practices.
provides a instruction to loosely
fasten ( ) a hardware assembly
only. This instruction is intended for the alignment
of hardware components during the assembly
process.
provides a instruction to fully fasten
() a hardware assembly.
SCREWfiW
IDTH
WASHERfiD
IAMETER
NUTfiDIA
METER
SCREWfiLENGHT
1. Read and follow each step of this Assembly Instruction Manual
in sequence. Do not skip ahead, as it will result in an improper
assembly or in having to disassemble parts later.
2. During the assembly of this unit you will be instructed to leave
some Hex Head Cap Screws loosely fastened. Naturally, they
will be fully fastened later in the assembly process. This is done
to prevent any diffi culty with alignment of some parts during this
assembly.
Due to continuing product improvements, specifi cations and designs are subject to change
without notice.
TBU-335 THC-43C TSM-45L
1. Maximum Wt. Capacity N/A 400 Lbs. 300 Lbs.
2. Total Machine Weight 220 Lbs. 40 Lbs. 80 Lbs.
3. Footprint (LWH) - See Front Cover
FULLY FASTEN
79 94
71 45
4
3271
94
79
44
HTX-2000 Dual Stack-Funtional Trainer
97
73
97
73
13
97
73
12
97 73
Step 16
28
Congratulations on your new purchase of the Smith-Half Cage
Series. This gym is capable of a variety of different exercises, as-
well-as, smooth and user-friendly adjustment features. In addition,
this gym has been designed to meet the needs and performance
requirements for a suitable home exercise machine. We hope you
are completely satisfi ed with this product and wish you many years
of enjoyment.
This Tuffstuff product has been built to precise quality standards
and has been carefully packaged to ensure that damage will
not occur during shipment. The Home Lifetime Warranty and
signature indicating fi nal inspection has been conducted by our line
foreman, is an expression of our confi dence in the completeness,
the materials, and workmanship of this product.
SEE A COPY OF WARRANTY ON BACK PAGE.
To avoid unnecessary delays in warranty service and to insure that
a permanent record of your purchase is on fi le with our factory, be
sure to complete the warranty registration card and send it to Task
Industries today.
1. We advise you to consult your local Tuff Stuff retailer if you
should have a question or problem regarding the proper
assembly of this unit.
2. Consider the complete surface area of the Smith-Half Cage
Series. Use the overhead view located on the front page for
designing your layout before assembling. Once the Smith-Half
Cage Series has been fully assembled it will be heavy and
diffi cult to move, therefore you should assemble the unit in the
area where it is to be used upon completion.
3. It is recommended that another person assist you with the
assembly of this unit.
4. Neatly organize and identify all parts according to the Parts List
and the Exploded View Diagrams on pages 7 - 9.
1. One 3/4” combination wrench
2. One 9/16” combination wrench
3. One ratchet
4. One 3/4” socket
5. One 9/16” socket
6. One rubber mallet
7. Windex or household glass cleaner
8. One can silicone spray/ tefl on spray lubricant
9. Measuring tape
10. Utility knife
The icons displayed in this Assembly Instructions are used to
facilitate the correct assembly and safe use of this Product, as-
well-as to prevent injury to yourself or anyone else.
provides information necessary to properly
complete a procedure or information which will
make the procedure easier to understand.
indicates a potentially hazardous
situation, which, if not avoided, may result in minor
or moderate injury. It may also be used to alert
against unsafe practices.
provides a instruction to loosely
fasten ( ) a hardware assembly
only. This instruction is intended for the alignment
of hardware components during the assembly
process.
provides a instruction to fully fasten
() a hardware assembly.
SCREWfiW
IDTH
WASHERfiD
IAMETER
NUTfiDIA
METER
SCREWfiLENGHT
1. Read and follow each step of this Assembly Instruction Manual
in sequence. Do not skip ahead, as it will result in an improper
assembly or in having to disassemble parts later.
2. During the assembly of this unit you will be instructed to leave
some Hex Head Cap Screws loosely fastened. Naturally, they
will be fully fastened later in the assembly process. This is done
to prevent any diffi culty with alignment of some parts during this
assembly.
Due to continuing product improvements, specifi cations and designs are subject to change
without notice.
TBU-335 THC-43C TSM-45L
1. Maximum Wt. Capacity N/A 400 Lbs. 300 Lbs.
2. Total Machine Weight 220 Lbs. 40 Lbs. 80 Lbs.
3. Footprint (LWH) - See Front Cover
FULLY FASTEN
HTX-2000 Dual Stack-Funtional Trainer
97
11
73
73
97
11
10310373
97
11
97
Step 17
29
Congratulations on your new purchase of the Smith-Half Cage
Series. This gym is capable of a variety of different exercises, as-
well-as, smooth and user-friendly adjustment features. In addition,
this gym has been designed to meet the needs and performance
requirements for a suitable home exercise machine. We hope you
are completely satisfi ed with this product and wish you many years
of enjoyment.
This Tuffstuff product has been built to precise quality standards
and has been carefully packaged to ensure that damage will
not occur during shipment. The Home Lifetime Warranty and
signature indicating fi nal inspection has been conducted by our line
foreman, is an expression of our confi dence in the completeness,
the materials, and workmanship of this product.
SEE A COPY OF WARRANTY ON BACK PAGE.
To avoid unnecessary delays in warranty service and to insure that
a permanent record of your purchase is on fi le with our factory, be
sure to complete the warranty registration card and send it to Task
Industries today.
1. We advise you to consult your local Tuff Stuff retailer if you
should have a question or problem regarding the proper
assembly of this unit.
2. Consider the complete surface area of the Smith-Half Cage
Series. Use the overhead view located on the front page for
designing your layout before assembling. Once the Smith-Half
Cage Series has been fully assembled it will be heavy and
diffi cult to move, therefore you should assemble the unit in the
area where it is to be used upon completion.
3. It is recommended that another person assist you with the
assembly of this unit.
4. Neatly organize and identify all parts according to the Parts List
and the Exploded View Diagrams on pages 7 - 9.
1. One 3/4” combination wrench
2. One 9/16” combination wrench
3. One ratchet
4. One 3/4” socket
5. One 9/16” socket
6. One rubber mallet
7. Windex or household glass cleaner
8. One can silicone spray/ tefl on spray lubricant
9. Measuring tape
10. Utility knife
The icons displayed in this Assembly Instructions are used to
facilitate the correct assembly and safe use of this Product, as-
well-as to prevent injury to yourself or anyone else.
provides information necessary to properly
complete a procedure or information which will
make the procedure easier to understand.
indicates a potentially hazardous
situation, which, if not avoided, may result in minor
or moderate injury. It may also be used to alert
against unsafe practices.
provides a instruction to loosely
fasten ( ) a hardware assembly
only. This instruction is intended for the alignment
of hardware components during the assembly
process.
provides a instruction to fully fasten
() a hardware assembly.
SCREWfiW
IDTH
WASHERfiD
IAMETER
NUTfiDIA
METER
SCREWfiLENGHT
1. Read and follow each step of this Assembly Instruction Manual
in sequence. Do not skip ahead, as it will result in an improper
assembly or in having to disassemble parts later.
2. During the assembly of this unit you will be instructed to leave
some Hex Head Cap Screws loosely fastened. Naturally, they
will be fully fastened later in the assembly process. This is done
to prevent any diffi culty with alignment of some parts during this
assembly.
Due to continuing product improvements, specifi cations and designs are subject to change
without notice.
TBU-335 THC-43C TSM-45L
1. Maximum Wt. Capacity N/A 400 Lbs. 300 Lbs.
2. Total Machine Weight 220 Lbs. 40 Lbs. 80 Lbs.
3. Footprint (LWH) - See Front Cover
FULLY FASTEN
HTX-2000 Dual Stack-Funtional Trainer
Step 18
77 99
94
81 29 28 29 99 92 77
29 28 29 99
92 77
36
7792
77941526
76 54
99
28
30
Congratulations on your new purchase of the Smith-Half Cage
Series. This gym is capable of a variety of different exercises, as-
well-as, smooth and user-friendly adjustment features. In addition,
this gym has been designed to meet the needs and performance
requirements for a suitable home exercise machine. We hope you
are completely satisfi ed with this product and wish you many years
of enjoyment.
This Tuffstuff product has been built to precise quality standards
and has been carefully packaged to ensure that damage will
not occur during shipment. The Home Lifetime Warranty and
signature indicating fi nal inspection has been conducted by our line
foreman, is an expression of our confi dence in the completeness,
the materials, and workmanship of this product.
SEE A COPY OF WARRANTY ON BACK PAGE.
To avoid unnecessary delays in warranty service and to insure that
a permanent record of your purchase is on fi le with our factory, be
sure to complete the warranty registration card and send it to Task
Industries today.
1. We advise you to consult your local Tuff Stuff retailer if you
should have a question or problem regarding the proper
assembly of this unit.
2. Consider the complete surface area of the Smith-Half Cage
Series. Use the overhead view located on the front page for
designing your layout before assembling. Once the Smith-Half
Cage Series has been fully assembled it will be heavy and
diffi cult to move, therefore you should assemble the unit in the
area where it is to be used upon completion.
3. It is recommended that another person assist you with the
assembly of this unit.
4. Neatly organize and identify all parts according to the Parts List
and the Exploded View Diagrams on pages 7 - 9.
1. One 3/4” combination wrench
2. One 9/16” combination wrench
3. One ratchet
4. One 3/4” socket
5. One 9/16” socket
6. One rubber mallet
7. Windex or household glass cleaner
8. One can silicone spray/ tefl on spray lubricant
9. Measuring tape
10. Utility knife
The icons displayed in this Assembly Instructions are used to
facilitate the correct assembly and safe use of this Product, as-
well-as to prevent injury to yourself or anyone else.
provides information necessary to properly
complete a procedure or information which will
make the procedure easier to understand.
indicates a potentially hazardous
situation, which, if not avoided, may result in minor
or moderate injury. It may also be used to alert
against unsafe practices.
provides a instruction to loosely
fasten ( ) a hardware assembly
only. This instruction is intended for the alignment
of hardware components during the assembly
process.
provides a instruction to fully fasten
() a hardware assembly.
SCREWfiW
IDTH
WASHERfiD
IAMETER
NUTfiDIA
METER
SCREWfiLENGHT
1. Read and follow each step of this Assembly Instruction Manual
in sequence. Do not skip ahead, as it will result in an improper
assembly or in having to disassemble parts later.
2. During the assembly of this unit you will be instructed to leave
some Hex Head Cap Screws loosely fastened. Naturally, they
will be fully fastened later in the assembly process. This is done
to prevent any diffi culty with alignment of some parts during this
assembly.
Due to continuing product improvements, specifi cations and designs are subject to change
without notice.
TBU-335 THC-43C TSM-45L
1. Maximum Wt. Capacity N/A 400 Lbs. 300 Lbs.
2. Total Machine Weight 220 Lbs. 40 Lbs. 80 Lbs.
3. Footprint (LWH) - See Front Cover
FULLY FASTEN
HTX-2000 Dual Stack-Funtional Trainer
Step 19
77 99
94
81 29 28 29 99 92 77
29 28 29 99
92 77
36
7792
77941526
76 54
99
28
24
2577
94
9481
31
Congratulations on your new purchase of the Smith-Half Cage
Series. This gym is capable of a variety of different exercises, as-
well-as, smooth and user-friendly adjustment features. In addition,
this gym has been designed to meet the needs and performance
requirements for a suitable home exercise machine. We hope you
are completely satisfi ed with this product and wish you many years
of enjoyment.
This Tuffstuff product has been built to precise quality standards
and has been carefully packaged to ensure that damage will
not occur during shipment. The Home Lifetime Warranty and
signature indicating fi nal inspection has been conducted by our line
foreman, is an expression of our confi dence in the completeness,
the materials, and workmanship of this product.
SEE A COPY OF WARRANTY ON BACK PAGE.
To avoid unnecessary delays in warranty service and to insure that
a permanent record of your purchase is on fi le with our factory, be
sure to complete the warranty registration card and send it to Task
Industries today.
1. We advise you to consult your local Tuff Stuff retailer if you
should have a question or problem regarding the proper
assembly of this unit.
2. Consider the complete surface area of the Smith-Half Cage
Series. Use the overhead view located on the front page for
designing your layout before assembling. Once the Smith-Half
Cage Series has been fully assembled it will be heavy and
diffi cult to move, therefore you should assemble the unit in the
area where it is to be used upon completion.
3. It is recommended that another person assist you with the
assembly of this unit.
4. Neatly organize and identify all parts according to the Parts List
and the Exploded View Diagrams on pages 7 - 9.
1. One 3/4” combination wrench
2. One 9/16” combination wrench
3. One ratchet
4. One 3/4” socket
5. One 9/16” socket
6. One rubber mallet
7. Windex or household glass cleaner
8. One can silicone spray/ tefl on spray lubricant
9. Measuring tape
10. Utility knife
The icons displayed in this Assembly Instructions are used to
facilitate the correct assembly and safe use of this Product, as-
well-as to prevent injury to yourself or anyone else.
provides information necessary to properly
complete a procedure or information which will
make the procedure easier to understand.
indicates a potentially hazardous
situation, which, if not avoided, may result in minor
or moderate injury. It may also be used to alert
against unsafe practices.
provides a instruction to loosely
fasten ( ) a hardware assembly
only. This instruction is intended for the alignment
of hardware components during the assembly
process.
provides a instruction to fully fasten
() a hardware assembly.
SCREWfiW
IDTH
WASHERfiD
IAMETER
NUTfiDIA
METER
SCREWfiLENGHT
1. Read and follow each step of this Assembly Instruction Manual
in sequence. Do not skip ahead, as it will result in an improper
assembly or in having to disassemble parts later.
2. During the assembly of this unit you will be instructed to leave
some Hex Head Cap Screws loosely fastened. Naturally, they
will be fully fastened later in the assembly process. This is done
to prevent any diffi culty with alignment of some parts during this
assembly.
Due to continuing product improvements, specifi cations and designs are subject to change
without notice.
TBU-335 THC-43C TSM-45L
1. Maximum Wt. Capacity N/A 400 Lbs. 300 Lbs.
2. Total Machine Weight 220 Lbs. 40 Lbs. 80 Lbs.
3. Footprint (LWH) - See Front Cover
FULLY FASTEN
HTX-2000 Dual Stack-Funtional Trainer
Parts List
32
REV0
Item No. Description Rev. Part No. Qty. Item No. Description Part No. Qty.1 MAIN FRAME 0 UP6816 1 66 RETAINING SNAP RING EXT. PLAIN 1 1/4ʺ BNH1718 62 BENCH FRAME 0 UP6801 1 67 BALL BEARING R20‐RS ( 4 I.D. X 2 1/4 X 1/2 ) BNH1712 123 REAR BASE FRAME 0 UP6817 1 68 FINISHED HEX NUT Z/P 1/2‐13 BNH0206 64 LEG EXTENSION BENCH FRAME 0 UP6811 1 69 NYLON INSERT LOCK NUT B‐Z/P 1/4‐20 BNH2502 85 LOCKING LEVER, ADJ FOAM ROLL FRAME 0 UP6815 1 70 NYLON INSERT THIN PATTERN LOCK NUT Z/P 1/2‐13 BNH2027 16 TOP GUIDE ROD HOUSING 0 UP6822 1 71 NYLON INSERT LOCK NUT Z/P 3/8‐16 BNH2028 497 LEG EXTENSION HANDLES 0 UP6812 1 72 NYLON INSERT LOCK NUT Z/P 5/16‐18 BNH2056 28 LEG EXT PIVOT ARM 0 UP6809 1 73 BUTTON HEAD SOCKET CAP SCREW GR‐8 B‐Z/P 1/4‐20 X 3/4 BNH2447 169 LEX EXT FOOT ROLL FRAME 0 UP6814 1 74 BUTTON HEAD SOCKET CAP SCREW GR‐8 B‐Z/P 1/4‐20 X 1 1/2 BNH4002 810 GUIDE ROD 3/4 X 67 3/4 0 UP6808 4 75 BUTTON HEAD SOCKET CAP SCREW B‐Z/P 3/8‐16 X 3/4 BNH2592 411 WEIGHT SHIELD 0 UP6821 4 76 BUTTON HEAD SOCKET CAP SCREW GR‐8 B‐Z/P 3/8‐16 X 1 BNH2528 212 FRONT WEIGHT SHIELD 0 UP6819 1 77 BUTTON HEAD SOCKET CAP SCREW GR‐8 Z/P 3/8‐16 X 1 1/4 BNH2034 813 REAR WEIGHT SHIELD 0 UP6820 1 78 RELEASE LEVER PROTECTIVE COVER BNH3201 114 CHROME, ADJ FOAM ROLL FRAME 0 UP6806 1 79 BUTTON HEAD SOCKET CAP SCREW B‐Z/P 3/8‐16 X 1 3/4 BNH2590 3315 CHROME, ADJ BACK PAD FRAME 0 UP6805 1 80 HTX‐2000 EXERCISE DVD BNH3090 116 ADJUSTABLE CABLE BRACKET 0 UP0591 1 81 BUTTON HEAD SOCKET CAP SCREW GR‐8 B‐Z/P 3/8‐16 X 2 1/2 BNH2428 1117 FLOATING DOUBLE 3 1/2 PULLEY BRACKET LT 0 UP6807 1 82 RUBBER HANDLE, 1 ID, 0.125T, 8 L BNH0966 218 ADJUSTABLE 3 1/2 PULLEY BRACKET 0 UP6800 1 83 SOCKET CAP SCREW GR‐8 Z/P 3/8‐16 X 3 3/4 BNH2372 119 TOP PLATE 3 1/2 PULLEY BRACKET 0 UP6823 1 84 SOCKET CAP SCREW GR‐8 Z/P 3/8‐16 X 4 BNH2374 220 TOP PLATE DOUBLE 3 1/2 PULLEY BRACKET 0 UP6824 1 85 SOCKET CAP SCREW GR‐8 Z/P 3/8‐16 X 3 BNH3202 321 TOP SWIVEL PULLEY BRACKET 0 UP3634 2 86 SOCKET CAP SCREW GR‐8 Z/P 3/8‐16 X 4 1/4 BNH2376 422 SHORT DOUBLE SWIVEL PULLEY BRKT 0 UP6182 2 87 BUTTON HEAD SOCKET CAP SCREW GR‐8 B‐Z/P 1/2‐13 X 1 BNH2401 823 LONG DOUBLE SWIVEL PULLEY BRKT 0 UP6173 2 88 BUTTON HEAD SOCKET CAP SCREW GR‐8 B‐Z/P 1/2‐13 X 3 1/4 BNH2407 124 SEAT PAD 0 UP6825 1 89 PIVOT AXLE 3/4 X 3 UP7718 125 BACK PAD 0 UP6826 1 90 SOCKET SET SCREW B‐Z/P 10‐32 X 1/8 BNH2518 526 LEG EXTENSION BACK PAD 0 UP6810 1 91 PHILLIPS MACHINE SCREW Z/P #10‐32 X 1 1/8 BNH2793 627 HANDLE 0 UP7075 2 92 SPLIT LOCK WASHER B‐Z/P 3/8ʺ BNH2032 1228 FOAM FOOT ROLL 1 X 4 X 7 W/VINYL 0 UP3785 4 93 SPLIT LOCK WASHER B‐Z/P 1/2ʺ BNH2519 1229 BNH3204 8 94 FLAT WASHER SAE B‐Z/P 3/8ʺ BNH2524 11030 BNH2739 2 95 FLAT WASHER SAE B‐Z/P 1/2ʺ BNH2523 1231 BNH1650 38 96 SOCKET SET SCREW ALLOY 1/4‐20 X 1/4 BNH0790 232 CABLE, LEG EXTENSION (HTX‐2000) 0 UP6803 1 97 FLAT SAE WASHER B‐Z/P #12 BNH4008 1633 CABLE, LAT (HTX‐2000) 0 UP6802 1 98 BRONZE BUSHING W/FLANGE 3/4ʺ 102118‐FF‐1015‐1 BNH0243 234 CABLE, LOW ROW (HTX‐2000) 0 UP6804 2 99 ALUMINUM WASHER .390 ID X 1.500 OD X .150 THK BNH1541 435 TOP BEARING HOUSING 0 UP6166 2 100 FLOATING DOUBLE 3 1/2 PULLEY BRACKET RT UP6654 136 FOOT ROLL TUBE 1 X 19 1/2 0 UP7717 1 101 BRONZE BUSHING 10 MM X 14 MM X 5 MM BNH3205 137 HARD PVC CABLE STOPPER SØ1.5 X 1.75 SET 6 102 RUBBER FLAT TUBE .94 ID X .115 WALL X 19 BNH2485 238 HARD PVC CABLE STOPPER SØ1.5 X 1.75 SET 6 103 WEIGHT STACK LID (2ʺ SQ. NOTCH) BNH4108 239 BNH2738 4 104 SUPER LUBE TEFLON LUBRICANT 82340 BNH0704 440 BNH0053 2 105 STEEL BUMPER WASHER Z/P 1/2ʺ BNH1800 241 BNH1015 4 106 PLASTIC END CAP BLACK‐BUMPER (1/2 BOLT) BNH1801 242 BNH0537 2 107 STRAP BRACKET 20 #SF20 STAINLESS STEEL 3/32ʺ BNH1904 143 SELECTOR PIN W/COIL 3/8 X 4 GOLD KNOB 0 UP3035 2 108 HEX KEY LONG ARM ALLOY 3/16ʺ BNH0371 144 BNH0553 27 109 HEX KEY ALLOY 7/32ʺ BNH0575 145 BNH0069 8 110 HEX KEY ALLOY 5/16ʺ BNH0374 146 BNH0708 16 111 HEX KEY LONG ARM ALLOY 1/8ʺ BNH0767 147 BNH1982 2 112 LABEL‐DANGER CHECK RETAINING NUT… BNH2902 148 BNH1647 7 113 LABEL‐DANGER USE THIS EQUIPMENT... BNH3088 149 BNH0401 4 114 LABEL DANGER DO NOT LEAN AGAINST OR PULL... BNH2955 250 BNH3200 2 115 LABEL‐WARNING KEEP BODY, HANDS, 1 1/2 X 2 1/4 BNH2908 151 BNH1794 1 116 LABEL‐WARNING KEEP BODY, HANDS... BNH2926 252 BNH0181 1 117 LABEL TUFFSTUFF FITNESS (LG VERTICAL) BNH2933 153 RELEASE LEVER, SPRING ACTUATED 0 UP6818 1 118 LABEL WARNING_SERIOUS INJURY OR DEATH BNH2939 154 LEG EXTENSION SEAT PAD 0 UP6813 1 119 LABEL‐CAUTION CHECK PULL‐PIN IS FULLY... BNH2912 155 BNH1760 1 120 LABEL WARRANTY LIGHT COMMERCIAL BNH3008 156 BNH3203 1 121 LABEL‐INSPECTIONS RECOMMENDED INSPECTIO BNH2922 157 BNH0718 2 122 LABEL SCHEDULE REPLACEMENT PARTS... BNH2957 158 BNH0866 1 123 LABEL‐IMPORTANT ADJUST CABLE TENSION HERE BNH2924 259 BNH0065 6 124 LABEL‐IMPORTANT FOR SMOOTH PERFORMANCE... BNH2925 260 BNH0528 2 125 LABEL‐IMPORTANT FOR SMOOTH PERFORMANCE... BNH2916 261 BNH0068 4 126 FACILITY SIGN BE ALERT! THE FITNESS EQUIPMENT... BNH3002 162 BNH4106 2 127 TUFF STUFF LOGO ALUMINUM SMALL (REV1) BNH1323 163 BNH3049 1 128 LABEL_SERIAL# _HTX‐2000 BNH3046 164 BNH0519 2 129 LABEL NUMBERS 10‐200 LBS/KGS BNH4069 265 BNH0007 1
HTX‐2000Parts List
BNH4117‐01BNH4117‐02
ALUMINUM FOOT ROLL END CAPCONTOUR ERGO HANDLE SHORT STRAP10 LB STEEL WEIGHT PLATE BLACK 4 9/16 X 9 7/16 ASSY
CONTOUR ERGO HANDLE LONG STRAPPLASTIC INSERT CAP 1 3/4ʺ SQ 10‐14 GACHROME WASHER 3/8 X 1 1/2ALUMINUM CAP 1.020ʺ RD (CAP‐100)
BLACK NYLON PULLEY 3/8 X 1 X 3 1/2 (P‐35375‐H)NYLON PULLEY 3/8 X 1 X 4 1/2 BLACKU‐STYLE TAPPED HOLE NUT 1/4‐2010 LB TOP PLATE W/ADJ SLTR BAR 19 BLK WTS ASSYRUBBER FOOT FOR 6 X 4 1/4 PLATERUBBER GROMMET 3/4ʺ ID (2867‐012)SAFETY TAPE ANTI‐SLIP 125mm X 125mmPLASTIC INSERT CAP ELLIPTICAL 2 X 4PULL PIN NUT 25/64 X 3/4‐10 K‐103
PLASTIC INSERT ELLIPTICAL GUIDE (2X4)NYLON ANKLE STRAPSHOULDER BOLT ALLOY 3/8 X 3/4Pull Pin Axle 2 3/4 X 1/2 K‐101aSNAP LINK Z/P 8MM X 80MMBRONZE BUSHING 1/2 X 5/8 X 1/2 X 7/8 X 1/8 RUBBER DONUT 3/4 X 2 1/2URETHANE BUMPER .500 X .975 X .276 X .122LABEL EXERCISE GUIDE PULL PIN STIFF SPRING 17/32 X 1 1/2 K‐105SSPLASTIC INSERT CAP 1ʺ X 3ʺ
COLOR CHARTGRAY= SUB-ASSEMBLY PARTSBLACK=HARDWARE
HTX-2000 Dual Stack-Funtional Trainer
Basic Exercise Guide
36
CHEST PRESS CHEST FLY CROSSOVER
TUFFSTUFF FITNESS EQUIPMENT INC., 13971 Norton Avenue, Chino, CA 91710, USA.
Before using this equipment, read and understand the Owner’s Manual and allDANGER, WARNING and CAUTION labels affixed on the machine. If you still need help, seek assistance from floor personnel.Use this equipment only for its intended use. When using the machine the firsttime, always choose a light resistance and train at a control rate of speed.Obtain a medical exam before beginning any exercise program. Stop exercisingif you feel faint, dizzy or pain. Consult a physician immediately.
DO NOT USE this machine if appears to be inoperable or damaged. Do not attempt to fix or free any jammed parts by yourself. Inform floor personnel immediately.
Make sure the selector pin is fully inserted in the hole and never pin the weightplates in an elevated position. Do not use this machine if found in this condition.
Serious injuries or death can occur if these safety rules and precautions are not observed. Questions or for more information, please contact TuffStuff at 909-629-1600 or email: [email protected]
BASIC EXERCISE GUIDE
OFFER UPS LAT PULLDOWN IRON CROSS PULLDOWN
SEATED ROW ONE ARM ROW UPRIGHT ROW
SHOULDER PRESS LATERAL RAISE
TRICEP KICKBACK
TRICEP EXTENSION
TRICEP PRESSDOWN
AB CRUNCH SIT UPS
BICEP CURL
OVERHEAD CURL
INNER THIGH OUTER THIGHCORE ROTATION
LEG EXTENSION STANDING LEG CURLSQUATS
! WARNING Important Safety Instructions:
BNH3049
TRIM LINE/ROUND CORNERS
Use this equipment only for the exercises as shown. Know your limitations. If you are new to weight training, always start with lighter weight, learn how to perform the exercise correctly and train at a controlled rate of speed. Warm up properly with stretchings, calisthenics or cardiovascular exercises. Never hold your breath – general rule of thumb is to exhale when you exert. For additional recommended exercises please refer to DVD.
Before working out, read and understand the Owner’s Manual, all danger, warning and caution labels listed on pages 4-7. This equipment is for LIGHT COMMERCIAL use only. Obtain a medical examination before beginning any exercise program. If you feel faint, dizzy or pain, stop exercising immediately.
HTX-2000 Dual Stack-Funtional Trainer
Basic Exercise GuideUse this equipment only for the exercises as shown. Know your limitations. If you are new to weight training, always start with lighter weight, learn how to perform the exercise correctly and train at a controlled rate of speed. Warm up properly with stretchings, calisthenics or cardiovascular exercises. Never hold your breath – general rule of thumb is to exhale when you exert. For additional recommended exercises please refer to DVD.
Before working out, read and understand the Owner’s Manual, all danger, warning and caution labels listed on pages 4-7. This equipment is for LIGHT COMMERCIAL use only. Obtain a medical examination before beginning any exercise program. If you feel faint, dizzy or pain, stop exercising immediately.
37
CHEST PRESS CHEST FLY CROSSOVER
TUFFSTUFF FITNESS EQUIPMENT INC., 13971 Norton Avenue, Chino, CA 91710, USA.
Before using this equipment, read and understand the Owner’s Manual and allDANGER, WARNING and CAUTION labels affixed on the machine. If you still need help, seek assistance from floor personnel.Use this equipment only for its intended use. When using the machine the firsttime, always choose a light resistance and train at a control rate of speed.Obtain a medical exam before beginning any exercise program. Stop exercisingif you feel faint, dizzy or pain. Consult a physician immediately.
DO NOT USE this machine if appears to be inoperable or damaged. Do not attempt to fix or free any jammed parts by yourself. Inform floor personnel immediately.
Make sure the selector pin is fully inserted in the hole and never pin the weightplates in an elevated position. Do not use this machine if found in this condition.
Serious injuries or death can occur if these safety rules and precautions are not observed. Questions or for more information, please contact TuffStuff at 909-629-1600 or email: [email protected]
BASIC EXERCISE GUIDE
OFFER UPS LAT PULLDOWN IRON CROSS PULLDOWN
SEATED ROW ONE ARM ROW UPRIGHT ROW
SHOULDER PRESS LATERAL RAISE
TRICEP KICKBACK
TRICEP EXTENSION
TRICEP PRESSDOWN
AB CRUNCH SIT UPS
BICEP CURL
OVERHEAD CURL
INNER THIGH OUTER THIGHCORE ROTATION
LEG EXTENSION STANDING LEG CURLSQUATS
! WARNING Important Safety Instructions:
BNH3049
TRIM LINE/ROUND CORNERS
HTX-2000 Dual Stack-Funtional Trainer
Notes
38
LIGHT COMMERCIAL WARRANTY This warranty applies only in the United States to the products manufactured or distributed by TuffStuff Fitness Equipment Inc. under the TUFFSTUFF brand name. TuffStuff warrants to the original purchaser that TuffStuff equipment will be free from defects in material and workmanship. All warranty periods begin to run from the date of purchase to the original purchaser. The warranty and remedies set forth herein are conditioned upon proper storage, installation, use and maintenance and conformance with any recommendations of TuffStuff. This warranty does not cover products not manufactured by TuffStuff or products which are altered without the express written consent of TuffStuff.
Light Commercial Warranty:Ten (10) Years: Structural Main Frames, Welds, Cams and Weight Plates.Five (5) Years: Pivot Bearings, Pulleys, Bushings, Guide Rods and Gas Shocks.One (1) Year: Linear Bearings and Pull-Pin Components All other parts not mentioned elsewhere in the warranty will expire from the date of delivery to the original purchaser.Six (6) Months: Upholstery, Cables, Finish and Rubber Grips.
The obligation of TuffStuff under this warranty is limited to repairing or replacing warranted defective parts as TuffStuff may elect, at TuffStuff’s facility in Chino, California without charge to the purchaser. Purchaser is responsible for installation of repaired or replaced parts, and all transportation and insurance costs on returned or replaced equipment to and from TuffStuff’s facility in Chino.
THE FOREGOING SHALL CONSTITUTE THE SOLE REMEDY OF THE PURCHASER AND THE SOLE LIABILITY OF TUFFSTUFF WITH REGARD TO WARRANTY. NO IMPLIED STATUTORY WARRANTY OR IMPLIED STATUTORY WARRANTY OF MERCHANTABILITY OR FITNESS FOR A PARTICULAR PURPOSE SHALL APPLY. IN NO EVENT, WHETHER AS A RESULT OF BREACH OF CONTRACT, WARRANTY, NEGLIGENCE OR OTHERWISE, SHALL TUFFSTUFF BE LIABLE FOR SPECIAL, INCIDENTAL OR CONSEQUENTIAL DAMAGES INCLUDING, BUT NOT LIMITED TO, LOSS OF PROFITS OR REVENUE, LOSS OF USE OF EQUIPMENT, COST OF CAPITAL, COST OF SUBSTITUTION EQUIPMENT, DOWNTIME COST, OR CLAIMS OF CUSTOMERS OR PURCHASER FROM SUCH DAMAGE.This written warranty is the final, complete and exclusive agreement of the parties with respect to the quality or performance of the equipment and no action for breach of this written warranty or any implied warranty shall be commenced more than one (1) year after the accrual of the cause of action. No modification of this warranty or waiver of its terms shall be binding on either party unless approved in writing by an authorized representative of the party. Contact TuffStuff Fitness Equipment Inc. at 13971 Norton Avenue, Chino, CA 91710, before returning any defective equipment.
This warranty gives you specific legal rights and you may also have other rights, which may vary from state to state.
SERIAL #Write your Serial number here for future reference Purchase Date
TuffStuff Fitness Equipment Inc.13971 Norton Avenue, Chino, CA 91710, USA Phone: 909-629-1600 Fax: 909-629-4967www.tuffstuffitness.com [email protected] or [email protected]
Home Lifetime Warranty:Lifetime of the equipment while owned by the original purchaser (applies to defects from manufacturer only).
This warranty DOES NOT cover:1. TuffStuff equipment sold for and used in a commercial or institutional environment.2. Any damage, failure or loss caused by accident, misuse, neglect, abuse, improper assembly & maintenance, or failure to follow instructions or understand all danger, warning and caution labels affixed on the machine and in the owner’s manual 3. Use of the equipment in a manner for which it was not designed.4. Original equipment that is altered, or the use of replacement parts and components of another manufacturer other than TuffStuff.
Light Commercial Use: Light Commercial warranty applies only to facilities like hotels, apartment complexes, personal training studios, fire & police stations, etc. where the equipment would be used no more than 30 people per day.