120
Novell www.novell.com novdocx (en) 24 April 2008 Novell Teaming 1.0 Administration Guide Teaming 1.0 June 25, 2008 ADMINISTRATION GUIDE
| Date post: | 10-Jun-2018 |
| Category: |
Documents |
| Upload: | nguyenkien |
| View: | 221 times |
| Download: | 0 times |

n
Novell Teaming 1.0 Administration GuideNovell
ovdocx (en) 24 April 2008
w w w . n o v e l l . c o m
Teaming
1 . 0
J u n e 2 5 , 2 0 0 8
A D M I N I S T R A T I O N G U I D E
novdocx (en) 24 April 2008
Legal Notices
Novell, Inc., makes no representations or warranties with respect to the contents or use of this documentation, and specifically disclaims any express or implied warranties of merchantability or fitness for any particular purpose. Further, Novell, Inc., reserves the right to revise this publication and to make changes to its content, at any time, without obligation to notify any person or entity of such revisions or changes.
Further, Novell, Inc., makes no representations or warranties with respect to any software, and specifically disclaims any express or implied warranties of merchantability or fitness for any particular purpose. Further, Novell, Inc., reserves the right to make changes to any and all parts of Novell software, at any time, without any obligation to notify any person or entity of such changes.
Any products or technical information provided under this Agreement may be subject to U.S. export controls and the trade laws of other countries. You agree to comply with all export control regulations and to obtain any required licenses or classification to export, re-export or import deliverables. You agree not to export or re-export to entities on the current U.S. export exclusion lists or to any embargoed or terrorist countries as specified in the U.S. export laws. You agree to not use deliverables for prohibited nuclear, missile, or chemical biological weaponry end uses. See the Novell International Trade Services Web page (http://www.novell.com/info/exports/) for more information on exporting Novell software. Novell assumes no responsibility for your failure to obtain any necessary export approvals.
Copyright © 2008 Novell, Inc. All rights reserved. No part of this publication may be reproduced, photocopied, stored on a retrieval system, or transmitted without the express written consent of the publisher.
Novell, Inc., has intellectual property rights relating to technology embodied in the product that is described in this document. In particular, and without limitation, these intellectual property rights may include one or more of the U.S. patents listed on the Novell Legal Patents Web page (http://www.novell.com/company/legal/patents/) and one or more additional patents or pending patent applications in the U.S. and in other countries.
Novell, Inc.404 Wyman Street, Suite 500Waltham, MA 02451U.S.A.www.novell.com
Online Documentation: To access the latest online documentation for this and other Novell products, see the Novell Documentation Web page (http://www.novell.com/documentation).

novdocx (en) 24 April 2008
Novell Trademarks
For Novell trademarks, see the Novell Trademark and Service Mark list (http://www.novell.com/company/legal/trademarks/tmlist.html).
Third-Party Materials
All third-party trademarks are the property of their respective owners.

novdocx (en) 24 April 2008

Contents
novdocx (en) 24 April 2008
About This Guide 71 Introduction 91.1 Configuring Novell Teaming. . . . . . . . . . . . . . . . . . . . . . . . . . . . . . . . . . . . . . . . . . . . . . . . . . . . 91.2 What Is a Workflow Process? . . . . . . . . . . . . . . . . . . . . . . . . . . . . . . . . . . . . . . . . . . . . . . . . . . 91.3 Workflow Tasks and Workflow States . . . . . . . . . . . . . . . . . . . . . . . . . . . . . . . . . . . . . . . . . . . 101.4 Custom Entries. . . . . . . . . . . . . . . . . . . . . . . . . . . . . . . . . . . . . . . . . . . . . . . . . . . . . . . . . . . . . 11
2 Configuring Novell Teaming 132.1 Logging in as a Liferay Site Manager. . . . . . . . . . . . . . . . . . . . . . . . . . . . . . . . . . . . . . . . . . . . 13
2.1.1 Logging in with the Administrator Account: . . . . . . . . . . . . . . . . . . . . . . . . . . . . . . . . 132.1.2 Adding the Teaming Administration Portlet to Your Home Page. . . . . . . . . . . . . . . . 14
2.2 Initial Logon . . . . . . . . . . . . . . . . . . . . . . . . . . . . . . . . . . . . . . . . . . . . . . . . . . . . . . . . . . . . . . . 152.3 Adding Your Company Logo . . . . . . . . . . . . . . . . . . . . . . . . . . . . . . . . . . . . . . . . . . . . . . . . . . 152.4 Managing Users and LDAP Authentication . . . . . . . . . . . . . . . . . . . . . . . . . . . . . . . . . . . . . . . 16
2.4.1 Basic User Management . . . . . . . . . . . . . . . . . . . . . . . . . . . . . . . . . . . . . . . . . . . . . . 162.4.2 Authenticating Users by E-Mail Address . . . . . . . . . . . . . . . . . . . . . . . . . . . . . . . . . . 172.4.3 Configuring Liferay for LDAP Authentication . . . . . . . . . . . . . . . . . . . . . . . . . . . . . . . 182.4.4 Configuring Novell Teaming for LDAP Authentication . . . . . . . . . . . . . . . . . . . . . . . . 212.4.5 Testing LDAP Authentication and Synchronization . . . . . . . . . . . . . . . . . . . . . . . . . . 232.4.6 Secure LDAP/eDirectory Setup . . . . . . . . . . . . . . . . . . . . . . . . . . . . . . . . . . . . . . . . . 232.4.7 Adding a User Internal Identifier in Novell Teaming . . . . . . . . . . . . . . . . . . . . . . . . . 24
2.5 Mail Setup . . . . . . . . . . . . . . . . . . . . . . . . . . . . . . . . . . . . . . . . . . . . . . . . . . . . . . . . . . . . . . . . 272.5.1 System E-Mail Configuration . . . . . . . . . . . . . . . . . . . . . . . . . . . . . . . . . . . . . . . . . . . 282.5.2 Using Alias E-Mail Addresses for Posting . . . . . . . . . . . . . . . . . . . . . . . . . . . . . . . . . 282.5.3 Using Real E-Mail Accounts for Posting . . . . . . . . . . . . . . . . . . . . . . . . . . . . . . . . . . 282.5.4 Setting Up a Schedule for Incoming Mail. . . . . . . . . . . . . . . . . . . . . . . . . . . . . . . . . . 282.5.5 Setting Up a Folder for Posting . . . . . . . . . . . . . . . . . . . . . . . . . . . . . . . . . . . . . . . . . 292.5.6 Establishing a Notification Schedule for a Folder . . . . . . . . . . . . . . . . . . . . . . . . . . . 30
2.6 Adjusting Access Control for the Site. . . . . . . . . . . . . . . . . . . . . . . . . . . . . . . . . . . . . . . . . . . . 312.6.1 Default Role Definitions . . . . . . . . . . . . . . . . . . . . . . . . . . . . . . . . . . . . . . . . . . . . . . . 312.6.2 Changing a Default Role Definition . . . . . . . . . . . . . . . . . . . . . . . . . . . . . . . . . . . . . . 322.6.3 Editing Default Team Workspace Access Rights . . . . . . . . . . . . . . . . . . . . . . . . . . . 34
2.7 Create Your Initial Workspaces . . . . . . . . . . . . . . . . . . . . . . . . . . . . . . . . . . . . . . . . . . . . . . . . 372.7.1 Creating Teams . . . . . . . . . . . . . . . . . . . . . . . . . . . . . . . . . . . . . . . . . . . . . . . . . . . . . 382.7.2 Creating an Administration Team Workspace . . . . . . . . . . . . . . . . . . . . . . . . . . . . . . 382.7.3 Setting the Administration Team Access Rights . . . . . . . . . . . . . . . . . . . . . . . . . . . . 402.7.4 Using the Root Team Workspace . . . . . . . . . . . . . . . . . . . . . . . . . . . . . . . . . . . . . . . 41
2.8 Invite Users to the Site . . . . . . . . . . . . . . . . . . . . . . . . . . . . . . . . . . . . . . . . . . . . . . . . . . . . . . . 432.9 Configuring Mirrored Folders . . . . . . . . . . . . . . . . . . . . . . . . . . . . . . . . . . . . . . . . . . . . . . . . . . 432.10 Document Support . . . . . . . . . . . . . . . . . . . . . . . . . . . . . . . . . . . . . . . . . . . . . . . . . . . . . . . . . . 45
2.10.1 Uploaded Files. . . . . . . . . . . . . . . . . . . . . . . . . . . . . . . . . . . . . . . . . . . . . . . . . . . . . . 452.10.2 Editing Support . . . . . . . . . . . . . . . . . . . . . . . . . . . . . . . . . . . . . . . . . . . . . . . . . . . . . 45
3 Creating a Basic Workflow Process 473.1 Creating a Workflow. . . . . . . . . . . . . . . . . . . . . . . . . . . . . . . . . . . . . . . . . . . . . . . . . . . . . . . . . 47
3.1.1 Defining a Workflow. . . . . . . . . . . . . . . . . . . . . . . . . . . . . . . . . . . . . . . . . . . . . . . . . . 47
Contents 5

6 Novell
novdocx (en) 24 April 2008
3.1.2 Adding States to a Workflow . . . . . . . . . . . . . . . . . . . . . . . . . . . . . . . . . . . . . . . . . . . 493.1.3 Defining Manual Transitions for a Workflow . . . . . . . . . . . . . . . . . . . . . . . . . . . . . . . 533.1.4 Configuring a Folder to Use This Workflow . . . . . . . . . . . . . . . . . . . . . . . . . . . . . . . . 573.1.5 Testing the New Workflow . . . . . . . . . . . . . . . . . . . . . . . . . . . . . . . . . . . . . . . . . . . . . 58
3.2 Setting Access Controls . . . . . . . . . . . . . . . . . . . . . . . . . . . . . . . . . . . . . . . . . . . . . . . . . . . . . . 603.2.1 What is Access Control? . . . . . . . . . . . . . . . . . . . . . . . . . . . . . . . . . . . . . . . . . . . . . . 613.2.2 Planning Access Control . . . . . . . . . . . . . . . . . . . . . . . . . . . . . . . . . . . . . . . . . . . . . . 613.2.3 Setting Access Rights . . . . . . . . . . . . . . . . . . . . . . . . . . . . . . . . . . . . . . . . . . . . . . . . 623.2.4 Summary . . . . . . . . . . . . . . . . . . . . . . . . . . . . . . . . . . . . . . . . . . . . . . . . . . . . . . . . . . 64
3.3 Notifying Participants . . . . . . . . . . . . . . . . . . . . . . . . . . . . . . . . . . . . . . . . . . . . . . . . . . . . . . . . 653.3.1 Defining an On Entry Process: . . . . . . . . . . . . . . . . . . . . . . . . . . . . . . . . . . . . . . . . . 653.3.2 Adding a Notification to the On Entry Process. . . . . . . . . . . . . . . . . . . . . . . . . . . . . . 673.3.3 Testing the Notifications . . . . . . . . . . . . . . . . . . . . . . . . . . . . . . . . . . . . . . . . . . . . . . 693.3.4 Summary . . . . . . . . . . . . . . . . . . . . . . . . . . . . . . . . . . . . . . . . . . . . . . . . . . . . . . . . . . 69
3.4 Using the Workflow in a Folder . . . . . . . . . . . . . . . . . . . . . . . . . . . . . . . . . . . . . . . . . . . . . . . . 70
4 Using Custom Entries 734.1 Creating a Custom Entry . . . . . . . . . . . . . . . . . . . . . . . . . . . . . . . . . . . . . . . . . . . . . . . . . . . . . 73
4.1.1 Creating the Custom Entry . . . . . . . . . . . . . . . . . . . . . . . . . . . . . . . . . . . . . . . . . . . . 734.1.2 The Entry Designer Editing Window . . . . . . . . . . . . . . . . . . . . . . . . . . . . . . . . . . . . . 764.1.3 Creating a Custom Form for an Entry . . . . . . . . . . . . . . . . . . . . . . . . . . . . . . . . . . . . 774.1.4 Creating a Custom View for an Entry . . . . . . . . . . . . . . . . . . . . . . . . . . . . . . . . . . . . 85
4.2 Using a Custom Entry . . . . . . . . . . . . . . . . . . . . . . . . . . . . . . . . . . . . . . . . . . . . . . . . . . . . . . . 864.2.1 Configuring a Folder to Use Your Custom Entry . . . . . . . . . . . . . . . . . . . . . . . . . . . . 864.2.2 Adding a Time Off Entry . . . . . . . . . . . . . . . . . . . . . . . . . . . . . . . . . . . . . . . . . . . . . . 884.2.3 View the Time Off Entry. . . . . . . . . . . . . . . . . . . . . . . . . . . . . . . . . . . . . . . . . . . . . . . 89
5 Advanced Workflow 915.1 Reviewing the Workflow Features . . . . . . . . . . . . . . . . . . . . . . . . . . . . . . . . . . . . . . . . . . . . . . 915.2 Adding a Question to the Workflow . . . . . . . . . . . . . . . . . . . . . . . . . . . . . . . . . . . . . . . . . . . . . 955.3 Adding Transitions on Response . . . . . . . . . . . . . . . . . . . . . . . . . . . . . . . . . . . . . . . . . . . . . . . 99
5.3.1 Adding the Response Transitions . . . . . . . . . . . . . . . . . . . . . . . . . . . . . . . . . . . . . . . 995.3.2 Removing Older Transitions . . . . . . . . . . . . . . . . . . . . . . . . . . . . . . . . . . . . . . . . . . 103
6 The Profile Designer 107
A Documentation Updates 113A.1 June 25, 2008 (Teaming 1.0 SP 3) . . . . . . . . . . . . . . . . . . . . . . . . . . . . . . . . . . . . . . . . . . . . 113
Glossary 115
Teaming 1.0 Administration Guide
novdocx (en) 24 April 2008
About This Guide
The Novell Teaming 1.0 Administration Guide provides administration information for Novell® Teaming. In this guide, the name “Novell Teaming” applies to all versions of Novell Teaming unless otherwise noted. The guide contains the following sections:
Chapter 1, “Introduction,” on page 9Chapter 2, “Configuring Novell Teaming,” on page 13Chapter 3, “Creating a Basic Workflow Process,” on page 47Chapter 4, “Using Custom Entries,” on page 73Chapter 5, “Advanced Workflow,” on page 91Chapter 6, “The Profile Designer,” on page 107Appendix A, “Documentation Updates,” on page 113“Glossary” on page 115
Audience
This guide is intended for Novell Teaming administrators.
Feedback
We want to hear your comments and suggestions about this manual and the other documentation included with this product. Please use the User Comments feature at the bottom of each page of the online documentation, or go to www.novell.com/documentation/feedback.html and enter your comments there.
Documentation Updates
For the most recent version of the Novell Teaming 1.0 Administration Guide, visit the Novell Web site (http://www.novell.com/documentation/team_plus_conf/).
Additional Documentation
You can find more information in the Novell Teaming documentation, which is accessible from links within Novell Teaming:
Novell Teaming Help systemNovell Teaming Quick Start GuideNovell Teaming User GuideNovell Teaming Installation GuideNovell Teaming Web Services Guide
To access the Novell Teaming Help system, log in to Novell Teaming, then click the Help link.
To access the Novell Teaming guides from within Novell Teaming, click the Getting Started link on the Novell Teaming Home page.
About This Guide 7
8 Novell
novdocx (en) 24 April 2008
All Novell Teaming guides are also available on the Novell Teaming + Conferencing Documentation Web site (http://www.novell.com/documentation/team_plus_conf).
Documentation Conventions
In Novell documentation, a greater-than symbol (>) is used to separate actions within a step and items in a cross-reference path.
A trademark symbol (®, TM, etc.) denotes a Novell trademark. An asterisk (*) denotes a third-party trademark.
When a single pathname can be written with a backslash for some platforms or a forward slash for other platforms, the pathname is presented with a backslash. Users of platforms that require a forward slash, such as Linux* or UNIX*, should use forward slashes as required by your software.
Teaming 1.0 Administration Guide

1novdocx (en) 24 A
pril 2008
1Introduction
Companies are focused on creating efficient and cost-effective methods that enable them to bring their products or services to the marketplace. Thanks to the Internet, and to video and networking innovations, companies now have many tools at their disposal, and can enhance and streamline their existing business processes.
Section 1.1, “Configuring Novell Teaming,” on page 9Section 1.2, “What Is a Workflow Process?,” on page 9Section 1.3, “Workflow Tasks and Workflow States,” on page 10Section 1.4, “Custom Entries,” on page 11
1.1 Configuring Novell TeamingThe first section in this guide, “Configuring Novell Teaming” on page 13, contains information on configuring Novell® Teaming after you have it installed. See the Novell Teaming Installation Guide for installation instruction.
1.2 What Is a Workflow Process?When a business process is defined and put into operation through the use of software and other tools, it becomes a workflow process. The workflow process provides the online forms that participants use. A workflow process can also indicate the reassignment of work from one person to the next.
Well-designed workflow processes identify and integrate the possible outcomes of each task, because different outcomes change the way in which one task transitions to another. When a user makes a decision, the flow of work changes based upon his or her response. In a workflow process, a decision can be made either manually (by selecting a label from a drop-down list) or automatically (such as after ten days of inaction occur). After a decision has been made, Novell Teaming sends the appropriate notification to the next participant in the workflow. Decisions, information, and a history of the completed work can be stored and later accessed in Novell Teaming.
Workflow allows you to move work quickly and efficiently throughout the organization. When developing an online workflow process, you should try to represent the associated business process in its fullest detail. To do this, workflow processes usually use a workflow-management system to support the design, implementation, testing, maintenance, and administration of processes.
NOTE: A workflow-management system is a software-based system that allows IT to create and manage the execution of workflows that serve their organization, and that assists participants in completing tasks within the business process.
Most workflow management systems provide a common set of tools. These tools allow IT to define the business processes, initiate and control specific tasks, or create rules for determining how specific data is processed and shared.
Introduction 9

10 Novell
novdocx (en) 24 April 2008
1.3 Workflow Tasks and Workflow StatesTo track work within a business process, a participant (most often a manager) periodically checks the status of the work. For example, the manager can request that the employees produce status reports using e-mail or the manager can hold weekly status meetings. The purpose of these efforts is to communicate where within the business process the work currently resides. A manager who understands the status of the work can make appropriate decisions about who must perform subsequent tasks.
After a request is submitted for review, the manager or other reviewer is then responsible for deciding whether to approve or deny the request. In the workflow process, the labels (submit, approve, and deny) quickly communicate the state of the work at a given point in the process and who is responsible for the next task.
NOTE: A state is a label that identifies the result of a completed task and that indicates who is responsible for performing a subsequent task in the process (if any).
For example, a user submits a form to HR indicating that he wants to take a vacation day. After the user has finished filling in the Time Off Request form, the state transitions to Submit. Later in the process, after the request is entered into the Time Off database, the state transitions to the Record state.
NOTE: A transition indicates that work moved from one workflow state to another.
One or more discrete actions must be taken with the work in order for its state to change; however, a task can be composed of more than one discrete action. With an online workflow process, some actions can be automated. For example, after a user completes a form and clicks OK, Novell Teaming can automatically transition the work to the Submit state and can notify the manager through e-mail that the Time Off request is ready for review. As another example, the work can transition to Deny, if more than ten days of inaction occur.
Other actions require that a participant use the workflow-management system to manually report the status of work. For example, before a manager begins reviewing the request, he or she can select a label from a drop-down list that indicates that the work is to transition to the Review state. As another example, while in the Review state, the manager can manually select the Deny label.
NOTE: A state transition occurs when one or more discrete conditions are met. Depending on conditions that are met, a state can potentially transition to one of many subsequent states.
States allow participants to track and identify the progress of the work. By seeing the work in the Submit state, the user and HR know that the request has yet to be reviewed by the manager. Based upon the decision that the manager makes in the Review state, the state can transition to one of two different states. If the manager manually denies the request or if ten days of inaction occur, one of the required conditions has been met to make the state transition to the Deny state. When the state transitions to Deny, the actions required are different than if the state had transitioned to Approve.
Workflows, which are based upon business processes, are comprised of tasks that are completed by workflow participants. Tasks are associated with states that identify the status of the work. States transition based upon conditions that are defined in the workflow.
Teaming 1.0 Administration Guide

novdocx (en) 24 April 2008
1.4 Custom EntriesCustom entries allow you to design custom forms and views for specific types of entries, and allow you to configure your workspaces in Novell® Teaming to manage the data and interactions for your company and teams in the most effective manner possible. Custom entries (and default entries) can be linked to workflow processes in Novell Teaming to manage your business processes in a comprehensive manner.
NOTE: A workflow process is an online representation of a business process. It allows the participants of the workflow to organize, automate, and track all aspects of the business process.
Introduction 11

12 Novell
novdocx (en) 24 April 2008
Teaming 1.0 Administration Guide

2novdocx (en) 24 A
pril 2008
2Configuring Novell Teaming
Before using Novell® Teaming, you need to perform initial configuration tasks to set up Novell Teaming so that all default features are operable. The following sections are covered in this section:
Section 2.1, “Logging in as a Liferay Site Manager,” on page 13Section 2.2, “Initial Logon,” on page 15Section 2.3, “Adding Your Company Logo,” on page 15Section 2.4, “Managing Users and LDAP Authentication,” on page 16Section 2.5, “Mail Setup,” on page 27Section 2.6, “Adjusting Access Control for the Site,” on page 31Section 2.7, “Create Your Initial Workspaces,” on page 37Section 2.8, “Invite Users to the Site,” on page 43Section 2.9, “Configuring Mirrored Folders,” on page 43Section 2.10, “Document Support,” on page 45
2.1 Logging in as a Liferay Site ManagerYou need to log in using an administrator account in order to set up Novell Teaming for your users.
Section 2.1.1, “Logging in with the Administrator Account:,” on page 13Section 2.1.2, “Adding the Teaming Administration Portlet to Your Home Page,” on page 14
2.1.1 Logging in with the Administrator Account:1 Type your company’s fully qualified hostname for Novell Teaming into the browser window
and press Enter.
For example,http://myhosthttp://myhost.mycompany.comhttp://somehost.foo.com:8080
The Sign In page appears.2 In the Login field, type:admin
3 In the Password field, type:admin
4 Click Login.The Novell Teaming Home Page appears. You are now logged in as administrator.
NOTE: You need to change this password as part of the initial login.
Configuring Novell Teaming 13
14 Novell
novdocx (en) 24 April 2008
The Liferay portal management links are in the upper right corner of the page below the Welcome Mary Admin! text. This is the name associated with the default administration account (administrator). When the name appears in the upper right corner, you are logged into the system. (You can change the name Mary Admin by modifying the user profile for the administration account.)
When you begin managing Novell Teaming, there are only two management levels: site managers (who manage the server machine) and portal managers.
By default, administrator is the only member of the Administrators group for the Liferay portal Administrators group. Members of the Administrators group have the right to perform portal management tasks. If you choose, you can add other members to this group, so that they can help manage the portal.
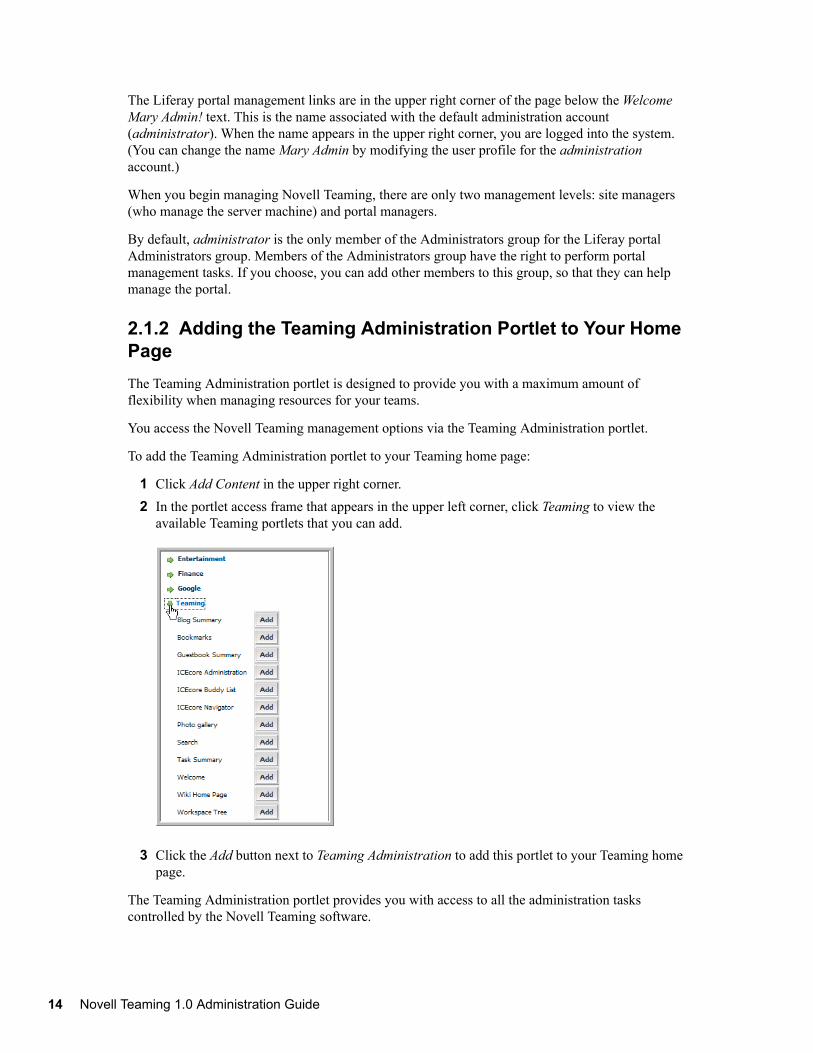
2.1.2 Adding the Teaming Administration Portlet to Your Home PageThe Teaming Administration portlet is designed to provide you with a maximum amount of flexibility when managing resources for your teams.
You access the Novell Teaming management options via the Teaming Administration portlet.
To add the Teaming Administration portlet to your Teaming home page:
1 Click Add Content in the upper right corner.2 In the portlet access frame that appears in the upper left corner, click Teaming to view the
available Teaming portlets that you can add.
3 Click the Add button next to Teaming Administration to add this portlet to your Teaming home page.
The Teaming Administration portlet provides you with access to all the administration tasks controlled by the Novell Teaming software.
Teaming 1.0 Administration Guide

novdocx (en) 24 April 2008
NOTE: Because Novell Teaming is embedded within Liferay, a portion of user management is delegated to Liferay. For example, Liferay is responsible for all user authentications using the Enterprise Admin portlet.
2.2 Initial LogonAfter installing Novell Teaming/Liferay, you need to log in. The Novell Teaming installation creates one system administrator account and a default format for users. The following procedure uses the initial admin login, which is also the same procedure that each user uses to login for the first time.
NOTE: When using LDAP/eDirectoryTM as the authentication source, a new user cannot log in until the e-mail attribute is populated. Liferay requires only a non-null value for this attribute to authenticate the source, so this does not need to be a valid e-mail.
1 Access your installation with a browser via the following URL:
http://yourhost.name.here:8080 2 At the login screen, enter your user name: admin3 Enter your initial password: admin
You are brought to a Change Password page the first time you log in (regular users see this page only if the admin turns this functionality on for all users under Password Policies in the Liferay Enterprise Admin portlet).
4 Change your password and click OK.This brings up the initial Liferay portal window.When you change your password (here or in the Liferay portal), the new password is not resynchronized into Novell Teaming until you log in again. This means that WebDAV and Web services use the outdated password until you log in again.
5 To add more portlets, click the Add Content link in the upper right corner. This brings up a panel of portlets along the left margin:
Expand the Teaming section to add more Novell Teaming features, such as the Teaming Administration portlet.Expand the Admin section to add useful Liferay features, such as the Admin and Enterprise Admin portlets.
The portlets are placed in the narrow column on the left side. To move a portlet to the wider right column, drag the title to the right column and drop it when a blue bar with arrows on each side appears.
2.3 Adding Your Company LogoThe Novell Teaming logo in the upper left corner of each Teaming site page is replaceable.
The Novell Teaming logo file is teaming_logo.gif. By default, it is located in the following directory:/opt/icecore/liferay-portal-tomcat-5.5-jdk5-4.3.0/webapps/ROOT/html/themes/Novell_theme/images
Configuring Novell Teaming 15

16 Novell
novdocx (en) 24 April 2008
where Novell_theme represents one of the three Novell theme directories:
Novellblue
Novellgrey
Novellwhite
NOTE: The part of the path before the webapps directory might be different on your system depending on where you installed Novell Teaming.
To replace the Novell Teaming logo with your own logo:
1 Create a GIF file for your logo that is approximately the same size as the Novell Teaming logo.2 Name the GIF file teaming_logo.gif.3 Make a backup copy of the original teaming_logo.gif file.4 Under in images subdirectory of each Novell_theme directory, replace the existing teaming_logo.gif file with your company logo teaming_logo.gif file.
5 Restart Novell Teaming.
2.4 Managing Users and LDAP AuthenticationThere are two methods of managing users:
Basic User Management lets you create and manage individual accounts manuallyLDAP/eDirectoryTM lets you synchronize user account management to a corporate directory
Regardless of which method you choose, it is important to realize that because Novell Teaming is embedded within Liferay, a portion of user management is delegated to the Liferay. For example, Liferay is responsible for all user authentications.
The section includes the following topics:
Section 2.4.1, “Basic User Management,” on page 16Section 2.4.2, “Authenticating Users by E-Mail Address,” on page 17Section 2.4.3, “Configuring Liferay for LDAP Authentication,” on page 18Section 2.4.4, “Configuring Novell Teaming for LDAP Authentication,” on page 21Section 2.4.5, “Testing LDAP Authentication and Synchronization,” on page 23Section 2.4.6, “Secure LDAP/eDirectory Setup,” on page 23Section 2.4.7, “Adding a User Internal Identifier in Novell Teaming,” on page 24
2.4.1 Basic User ManagementThis capability comes “out of the box” with the product. No additional setup is required.
1 Using the Liferay Enterprise Admin portlet, click the Users tab.
Liferay has two portlets, Enterprise Admin and Admin. Both have Users tabs, but they do very different things. Make sure you are using the correct portlet. In the Enterprise Admin portlet, the Users tab brings up a list of current Liferay accounts. You can refer to the Liferay
Teaming 1.0 Administration Guide

novdocx (en) 24 April 2008
documentation (http://www.liferay.com/web/guest/documentation/4_3) for more advanced management.
2 Click Add.3 Fill in the First Name and Last Name fields, assign a User ID, specify the e-mail address, then
click Save.
NOTE: Do not use any forbidden characters (/\*?"<>;|) in a user’s name.
4 Liferay shows an extended form.5 Click Save. 6 Click the Password tab, type in the password, then click Save.7 Repeat these steps to add additional users.
The account is now ready for use, but not fully created. The administrator and other users cannot see the new user until after the user logs in for the first time. After the new user logs in, Novell Teaming creates his or her user workspace, including a blog, calendar, and file area.
2.4.2 Authenticating Users by E-Mail AddressTo use this option:
Each e-mail address must be unique (if multiple users share the same e-mail account, authentication can encounter problems).If you are using LDAP synchronization, you must change the search filter. For example, from cn=@screen_name@ to mail=@email_address@. For more information, see “Configuring Liferay for LDAP Authentication” on page 18. You must still map a screen name value to the appropriate Liferay attribute. Novell Teaming requires that each user has a unique screen name. Web services and WebDAV authentications only support login by username.
For more information on these settings, see Configuring Liferay for LDAP Authentication.
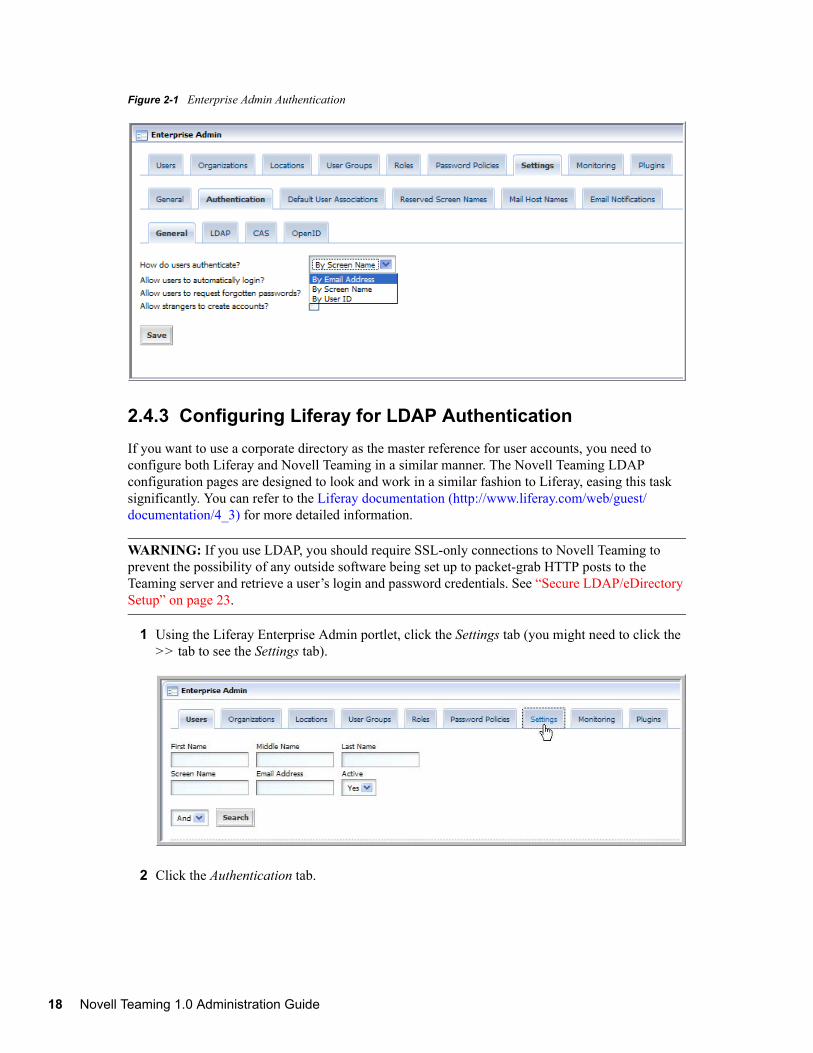
To authenticate users by their e-mail addresses, click Enterprise Admin > Settings > Authentication > General, then select By Email Address in the How do users authenticate? drop-down list.
Configuring Novell Teaming 17
18 Novell
novdocx (en) 24 April 2008
Figure 2-1 Enterprise Admin Authentication
2.4.3 Configuring Liferay for LDAP Authentication If you want to use a corporate directory as the master reference for user accounts, you need to configure both Liferay and Novell Teaming in a similar manner. The Novell Teaming LDAP configuration pages are designed to look and work in a similar fashion to Liferay, easing this task significantly. You can refer to the Liferay documentation (http://www.liferay.com/web/guest/documentation/4_3) for more detailed information.
WARNING: If you use LDAP, you should require SSL-only connections to Novell Teaming to prevent the possibility of any outside software being set up to packet-grab HTTP posts to the Teaming server and retrieve a user’s login and password credentials. See “Secure LDAP/eDirectory Setup” on page 23.
1 Using the Liferay Enterprise Admin portlet, click the Settings tab (you might need to click the >> tab to see the Settings tab).
2 Click the Authentication tab.
Teaming 1.0 Administration Guide

novdocx (en) 24 April 2008
3 Click the LDAP tab.
4 Under Connection Settings, fill out the form with the values needed to map to your corporate directory:4a Select Enabled.
4b In the Base Provider URL field, specify the IP address of your LDAP server, followed by the port number it uses (typically, 389 for non-secure connections or 636 for secure SSL connections).
4c In the Base DN field, specify the eDirectory context where Novell Teaming users’ User objects are located (for example, ou=users,o=corporate).
4d In the Principle field, specify the full context of your eDirectory Admin User object (for example, cn=admin, ou=users, o=corporate).
4e In the Credentials field, specify the password of your eDirectory Admin user.
Configuring Novell Teaming 19
20 Novell
novdocx (en) 24 April 2008
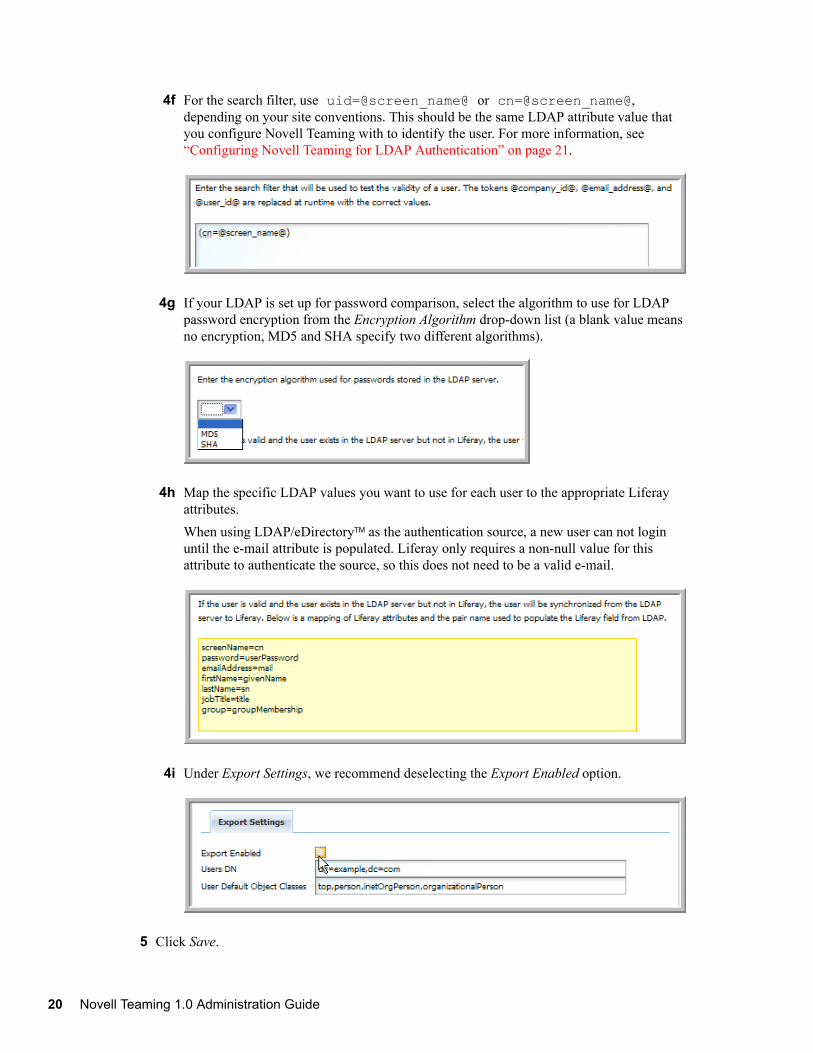
4f For the search filter, use uid=@screen_name@ or cn=@screen_name@, depending on your site conventions. This should be the same LDAP attribute value that you configure Novell Teaming with to identify the user. For more information, see “Configuring Novell Teaming for LDAP Authentication” on page 21.
4g If your LDAP is set up for password comparison, select the algorithm to use for LDAP password encryption from the Encryption Algorithm drop-down list (a blank value means no encryption, MD5 and SHA specify two different algorithms).
4h Map the specific LDAP values you want to use for each user to the appropriate Liferay attributes.When using LDAP/eDirectoryTM as the authentication source, a new user can not login until the e-mail attribute is populated. Liferay only requires a non-null value for this attribute to authenticate the source, so this does not need to be a valid e-mail.
4i Under Export Settings, we recommend deselecting the Export Enabled option.
5 Click Save.
Teaming 1.0 Administration Guide

novdocx (en) 24 April 2008
The LDAP connection is tested and an initial test connection to the LDAP server is attempted. A successful connection or failure is reported:Your request processed successfully.
orYou have entered invalid data. Please try again. Failed to bind to the LDAP server with given values.
To connect to a secure LDAP server, you need to import the server’s certificate into Novell Teaming’s keystore. See “Secure LDAP/eDirectory Setup” on page 23.
2.4.4 Configuring Novell Teaming for LDAP AuthenticationThe Teaming LDAP Configuration form is similar to the Liferay form, but includes additional information on scheduling synchronization of all users and, optionally, groups.
1 In the Teaming Administration portlet, click Configure LDAP.
2 With Enable Schedule selected, click Schedule, then set the schedule as needed for LDAP synchronization for your Teaming site.
3 Click Connection.
4 In the URL field, specify the IP address or DNS hostname of your LDAP server, followed by the port number it uses (typically, 389 for non-secure connections or 636 for secure SSL connections).
5 After the port number, type a slash (/), then specify the eDirectory context where Teaming users’ User objects are located (for example, ou=users,o=corporate).
IMPORTANT: Be sure to specify the eDirectory context in the URL field, not in the Search DN field.
Configuring Novell Teaming 21

22 Novell
novdocx (en) 24 April 2008
6 In the Principal field, specify the full context of your eDirectory Admin User object (for example, cn=admin,ou=users,o=corporate).
7 In the Credentials field, specify the password of your eDirectory Admin user.8 Scroll down to the Users section.
9 Set the LDAP Attribute field to cn. Use the LDAP attribute that identifies the user, such as uid or cn.For the LDAP attribute that identifies the user, cn might be a better choice than uid for many sites. This should be the same attribute value you used for the search filter in the Liferay LDAP configuration. For more information, see Section 2.4.3, “Configuring Liferay for LDAP Authentication,” on page 18.
10 Map the LDAP attribute names of the user record to the Novell Teaming internal identifiers. The syntax is: TeamingId=ldapAttName. For example:
lastName=sn
name=uid
TeamingIds: lastName, firstName, name, description, email, address, phone.If you need to add additional internal identifiers for your users in Novell Teaming, see “Adding a User Internal Identifier in Novell Teaming” on page 24.
11 Select Synchronize User Profiles.12 Select Register LDAP User Profiles Automatically.
Do not select Delete Users That Are Not in LDAP or Delete Associated User Workspaces and Content.
Teaming 1.0 Administration Guide

novdocx (en) 24 April 2008
13 If you want to synchronize groups:13a Select Register LDAP Group Profiles Automatically.13b Select Synchronize Group Membership.
Do not select Delete Local Groups That Are Not in LDAP.14 Click Apply to save your Novell Teaming LDAP synchronization settings.
This returns you to the top of the Configure LDAP Synchronization page.15 Select Run Immediately, then click Apply.
NOTE: Users do not display in the user list until after they have logged in for the first time.
2.4.5 Testing LDAP Authentication and SynchronizationIf you complete the instructions in “Configuring Liferay for LDAP Authentication” on page 18 and “Configuring Novell Teaming for LDAP Authentication” on page 21, and you receive no error message in your browser, LDAP authentication should be configured and occurring on the schedule you specified during configuration. You cannot see the Novell Teaming accounts on the Users tab of the Liferay Enterprise Admin portlet until each user logs into the Teaming site, but you can see that the eDirectory accounts are available to the Teaming site.
As a test:
1 Display the Teaming home page.2 Place your cursor in the Find People field, then type the first letter of an eDirectory username.
If eDirectory synchronization is taking place, a drop-down list displays eDirectory usernames that start with the letter you typed.
3 Sign in to the Teaming site as yourself, using your eDirectory username and password.After you log in, your account and your personal workspace become visible to other Teaming users.
Changes to user information that are made in eDirectory are automatically synchronized to users’ Teaming accounts.
To verify that synchronization is taking place:
1 In ConsoleOne®, make a change to the information in your eDirectory user account.2 Run LDAP synchronization immediately from the Teaming Administration portlet.3 Check your Teaming account to see if the information has been synchronized.
NOTE: Synchronization of user information from Novell Teaming back into eDirectory is not available at the present time.
2.4.6 Secure LDAP/eDirectory SetupTo connect to a secure LDAP server, you need to import the server’s certificate into Novell Teaming’s keystore. If the LDAP server is ldap.company.com, and it’s running on the usual LDAP port (636), then you can follow these steps in the command line interface:
Configuring Novell Teaming 23

24 Novell
novdocx (en) 24 April 2008
NOTE: An administrator who understands the openssl tool should perform this procedure.
This technique only works for certificates from an external certificate signing authority. If the LDAP server is using a self-signed certificate, you also need to get the certificate for this internal CA and add it to the cacerts file on the Novell Teaming machine. The code at http://blogs.sun.com/andreas/entry/no_more_unable_to_find to get the other certificate appears to be a good example.
1 Make sure you have openssl available.2 Enter openssl s_client -connect ldap.company.com:6363 Copy everything from the ‘----BEGIN CERTIFICATE----’ to the ‘----END CERTIFICATE----’ lines (inclusive) into a file, such as cert.ldap (the name does not matter).
4 Change directories to the java/bin directory, then enter (this uses the default directory path /opt/icecore/): keytool -import -alias ldap.company.com -keystore /opt/icecore/liferay-portal-tomcat-5.5-jdk5-4.3.0/conf/.keystore -file cert.ldap
In order for this command to succeed, the java/bin directory must be in the PATH variable, or the command must be launched from the java/bin directory, for example:/usr/java/jdk1.5.0_12/bin/keytool -import -alias ldap.company.com -keystore /sitescape-team-0.1.0/liferay-portal-tomcat-5.5-jdk5-4.3.0/conf/.keystore -file cert.ldap
5 If prompted for a password, the keystore’s default password is: changeit6 Restart Tomcat.7 Make sure you use ldaps://ldap.company.com:636 as the LDAP URL, rather than
the default ldap://ldap.company.com:389 (note protocol and port number changes).
2.4.7 Adding a User Internal Identifier in Novell TeamingUse the Profile Designer to add a new user element (internal identifier) in Novell Teaming.
1 From the Teaming Administration portlet on the initial Liferay portal window, click the plus sign (+) to the left of Form and view designers to expand this section and view the available designers.
To add the Teaming Administration portlet to the Liferay portal window, see “Adding the Teaming Administration Portlet to Your Home Page” on page 14.
Teaming 1.0 Administration Guide

novdocx (en) 24 April 2008
2 Click Profile designer.
3 Expand Profile view, then click User.
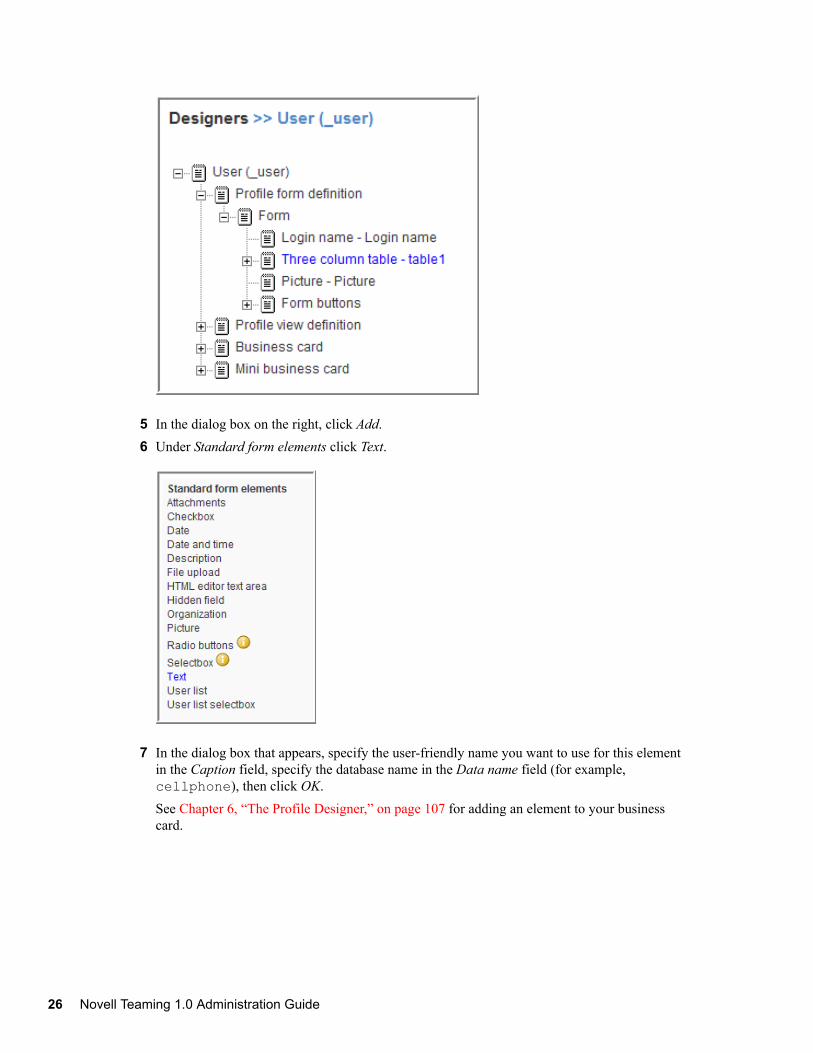
4 Expand the following items in the designer tree: User > Profile form definition > Form, then click Three column table - table1.
Configuring Novell Teaming 25
26 Novell
novdocx (en) 24 April 2008
5 In the dialog box on the right, click Add.6 Under Standard form elements click Text.
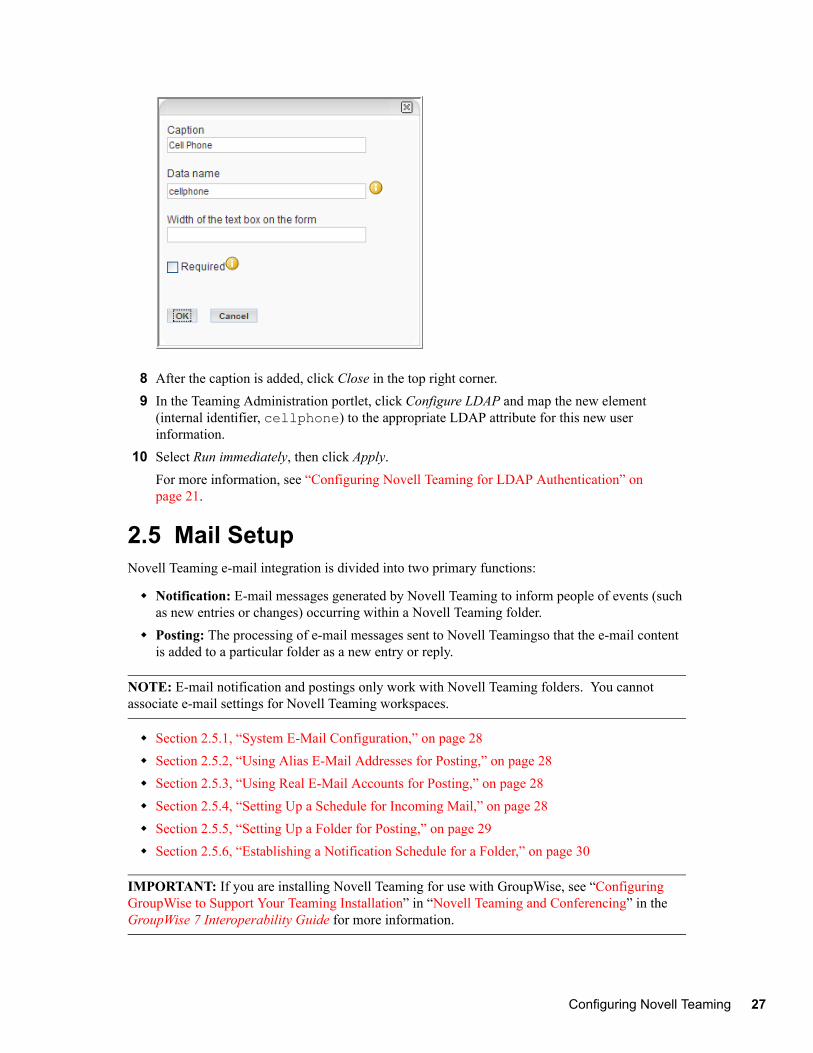
7 In the dialog box that appears, specify the user-friendly name you want to use for this element in the Caption field, specify the database name in the Data name field (for example, cellphone), then click OK. See Chapter 6, “The Profile Designer,” on page 107 for adding an element to your business card.
Teaming 1.0 Administration Guide
novdocx (en) 24 April 2008
8 After the caption is added, click Close in the top right corner.9 In the Teaming Administration portlet, click Configure LDAP and map the new element
(internal identifier, cellphone) to the appropriate LDAP attribute for this new user information.
10 Select Run immediately, then click Apply.For more information, see “Configuring Novell Teaming for LDAP Authentication” on page 21.
2.5 Mail SetupNovell Teaming e-mail integration is divided into two primary functions:
Notification: E-mail messages generated by Novell Teaming to inform people of events (such as new entries or changes) occurring within a Novell Teaming folder.Posting: The processing of e-mail messages sent to Novell Teamingso that the e-mail content is added to a particular folder as a new entry or reply.
NOTE: E-mail notification and postings only work with Novell Teaming folders. You cannot associate e-mail settings for Novell Teaming workspaces.
Section 2.5.1, “System E-Mail Configuration,” on page 28Section 2.5.2, “Using Alias E-Mail Addresses for Posting,” on page 28Section 2.5.3, “Using Real E-Mail Accounts for Posting,” on page 28Section 2.5.4, “Setting Up a Schedule for Incoming Mail,” on page 28Section 2.5.5, “Setting Up a Folder for Posting,” on page 29Section 2.5.6, “Establishing a Notification Schedule for a Folder,” on page 30
IMPORTANT: If you are installing Novell Teaming for use with GroupWise, see “Configuring GroupWise to Support Your Teaming Installation” in “Novell Teaming and Conferencing” in the GroupWise 7 Interoperability Guide for more information.
Configuring Novell Teaming 27

28 Novell
novdocx (en) 24 April 2008
2.5.1 System E-Mail ConfigurationAs part of installing and configuring Novell Teaming, the system administrator must supply information so that Novell Teaming can access the mail system (e-mail integration is not required). You can configure the level of Novell Teaming e-mail integration.
When you run the installer, there are pages for both outbound and inbound e-mail communication. Outbound configuration requires the basic information for generating SMTP mail messages: server, port, and optional authentication information.
The Username field for the Outbound configuration is the address used for any e-mail notifications generated by the system. This name is also used for authenticated access to the SMTP server. To support e-mail sent by users, either the Novell Teaming server or the authenticated user must be authorized to use different From addresses.
Novell Teaming posting uses real accounts or alias e-mail addresses in your folders, according to how you configure your inbound e-mail settings in the installer. To use alias e-mail addresses, select the Use aliases option in the Inbound email configuration page of the installer.
2.5.2 Using Alias E-Mail Addresses for PostingWhen you use alias e-mail addresses for posting, the system accesses a single e-mail account (sometimes referred to as the “posting account”). You must enter an account name, which might not resemble an e-mail address, and a password in the Username and Password fields in the installer’s Inbound Email Configuration page. Multiple alias e-mail addresses can be mapped to this account and Novell Teaming periodically reads e-mail sent to this account and forwards the messages to individual folders according to the alias e-mail addresses assigned to the folders. Each folder needs a unique alias for the Novell Teaming posting feature to work correctly.
Create the posting account by using your normal e-mail system management tools. You can configure the posting account to use either POP3 or IMAP. Novell Teaming needs a host, port, e-mail account ID, and password configured in the installer for the posting feature to work.
2.5.3 Using Real E-Mail Accounts for PostingWhen you use real accounts for each folder you want to post in, you need to create multiple posting accounts by using your normal e-mail system management tools. You can leave the Username and Password fields in the installer’s Inbound Email Configuration page blank (they are not used if you enter any information in these fields when not using alias e-mail addresses). You can configure the posting accounts to use either POP3 or IMAP. Novell Teaming needs a host, and port configured in the installer for the posting feature to work. An e-mail account ID and password are added to each folder’s configuration for posting with real e-mail accounts. You must use a unique posting e-mail account for each folder if you want the Novell Teaming posting feature to work correctly.
2.5.4 Setting Up a Schedule for Incoming Mail1 In the Teaming Administration portlet, click the Configure site incoming email schedule link.2 Select the Enable incoming mail option.3 Select the type of schedule you want to use for checking the posting e-mail accounts. You can
configure the schedule for a specific time of the day or a regular frequency. 4 Click Apply to save your changes.
Teaming 1.0 Administration Guide

novdocx (en) 24 April 2008
The right side of the setup page lists the folders and their e-mail addresses or accounts. You set up the e-mail address-to-folder mapping within the folders themselves (see “Setting Up a Folder for Posting” on page 29).
2.5.5 Setting Up a Folder for PostingIf you want to enable posting for a particular folder, you need to map a particular alias e-mail address or account to the folder. When this is done, e-mail sent to the mapped address or account is “read” by the folder and turned into entries or replies.
1 In Novell Teaming, navigate to the folder where you want to post e-mail and select the Manage > Email settings menu item.
2 In the Receive email from this address (incoming) field, specify the alias e-mail address if you are using aliases, or specify the e-mail account name (it might not resemble an e-mail address) if you are using real accounts for each folder. See “Using Alias E-Mail Addresses for Posting” on page 28 and “Using Real E-Mail Accounts for Posting” on page 28.
3 If you are using real e-mail accounts, specify the password for this e-mail account in the Password field. If you are using alias e-mail addresses, leave this field blank.
Configuring Novell Teaming 29

30 Novell
novdocx (en) 24 April 2008
4 Click Apply to save the e-mail account or alias address.
You can optionally set up the notification schedule for this folder at the same time (see “Establishing a Notification Schedule for a Folder” on page 30).
2.5.6 Establishing a Notification Schedule for a FolderYou can configure each folder to send e-mail messages indicating activity within the folder.
1 In Novell Teaming, navigate to the folder where you want to post e-mail and select the Manage > Email settings menu item.
2 Select the Enable outgoing email option.3 Select the type of schedule you want for notification. You can configure the schedule for a
specific time of the day or a regular frequency.
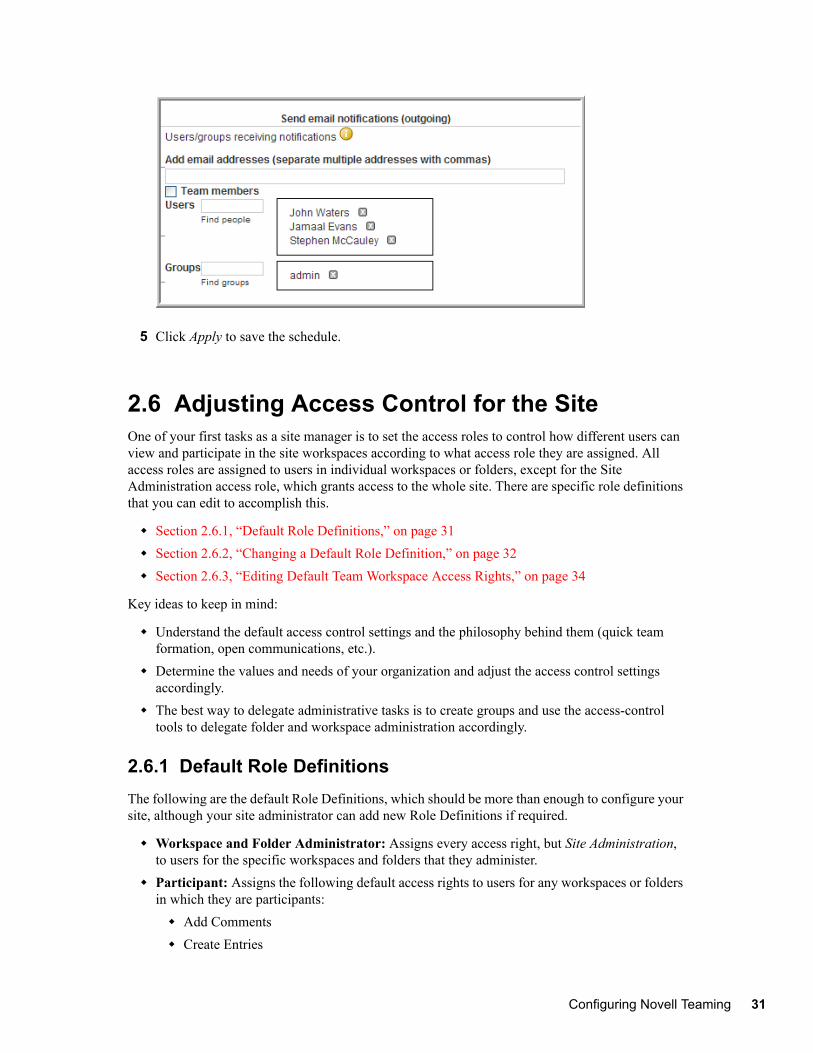
4 Specify who is to receive the e-mail. This can be a combination of users, groups, and arbitrary e-mail addresses.
Teaming 1.0 Administration Guide
novdocx (en) 24 April 2008
5 Click Apply to save the schedule.
2.6 Adjusting Access Control for the SiteOne of your first tasks as a site manager is to set the access roles to control how different users can view and participate in the site workspaces according to what access role they are assigned. All access roles are assigned to users in individual workspaces or folders, except for the Site Administration access role, which grants access to the whole site. There are specific role definitions that you can edit to accomplish this.
Section 2.6.1, “Default Role Definitions,” on page 31Section 2.6.2, “Changing a Default Role Definition,” on page 32Section 2.6.3, “Editing Default Team Workspace Access Rights,” on page 34
Key ideas to keep in mind:
Understand the default access control settings and the philosophy behind them (quick team formation, open communications, etc.). Determine the values and needs of your organization and adjust the access control settings accordingly.The best way to delegate administrative tasks is to create groups and use the access-control tools to delegate folder and workspace administration accordingly.
2.6.1 Default Role DefinitionsThe following are the default Role Definitions, which should be more than enough to configure your site, although your site administrator can add new Role Definitions if required.
Workspace and Folder Administrator: Assigns every access right, but Site Administration, to users for the specific workspaces and folders that they administer.Participant: Assigns the following default access rights to users for any workspaces or folders in which they are participants:
Add CommentsCreate Entries
Configuring Novell Teaming 31

32 Novell
novdocx (en) 24 April 2008
Delete His or Her Own EntriesModify His or Her Own EntriesRead Entries
Site Administrator: Has every access right. These rights apply to every workspace and folder.Team Member: Assigns the following default access rights to users for any workspaces or folders in which they are team members:
Add CommentsAdd FoldersAdd WorkspacesCreate EntriesDelete EntriesDelete His or Her Own EntriesGenerate ReportsManage Community TagsModify EntriesModify His or Her Own EntriesRead Entries
Visitor: Assigns the following default access rights to users for workspaces or folders in which they are visitors:
Add CommentsRead Entries
Workspace Creator: This Role Definition is a special definition assigned to all users at the Top Team Workspace to give every user the right to create a new Team Workspace. The Site Administrator can edit the Top Team Workspace access rights so that only specific users can add Team Workspaces. For more information, see “Editing Default Team Workspace Access Rights” on page 34.
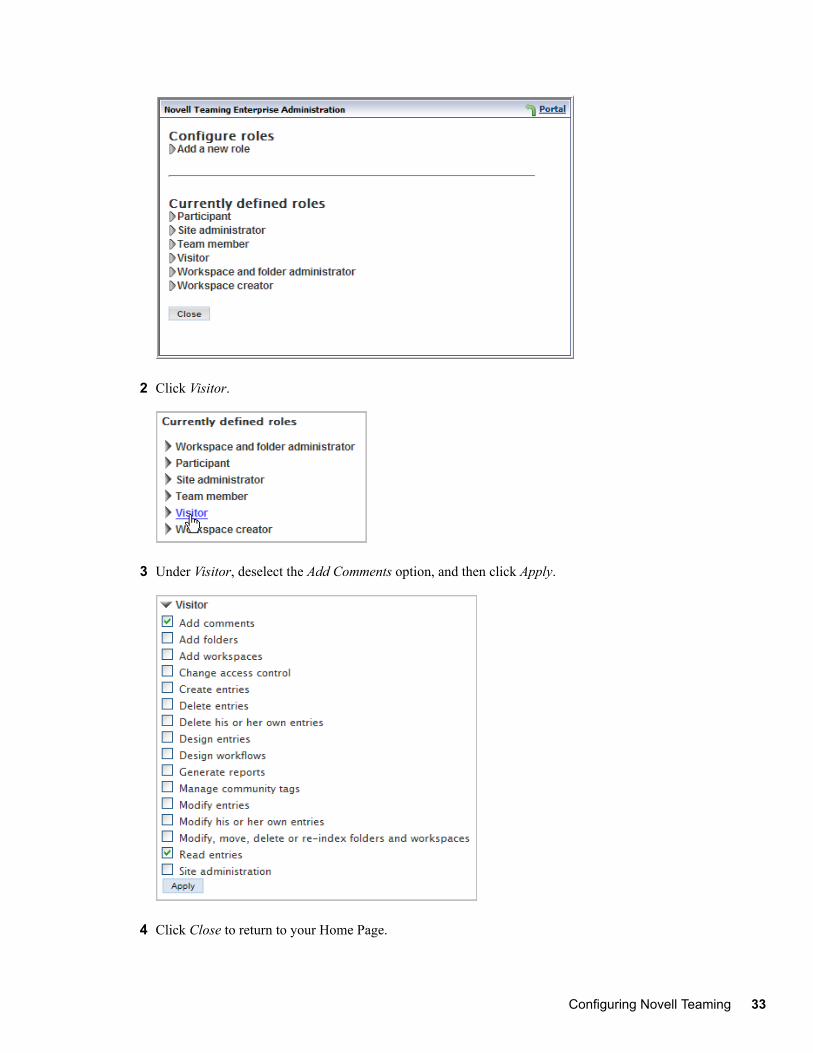
2.6.2 Changing a Default Role DefinitionFor example, you might choose to prevent visitors from adding comments in the site.
1 In the Teaming Administration portlet, click Configure Role Definitions.
The Configure Roles page appears.
Teaming 1.0 Administration Guide
novdocx (en) 24 April 2008
2 Click Visitor.
3 Under Visitor, deselect the Add Comments option, and then click Apply.
4 Click Close to return to your Home Page.
Configuring Novell Teaming 33
34 Novell
novdocx (en) 24 April 2008
Visitors to your site can now view entries, but can no longer add comments.
2.6.3 Editing Default Team Workspace Access RightsEvery workspace and folder has its own access rights, created through the assignment of Role Definitions to groups and individuals for a workspace or folder. When you create a new workspace, it starts off with the default access rights according to the type of workspace you created: Global, Personal, or Team.
NOTE: A personal workspace is created when a user signs into Novell Teaming for the first time.
The Site Administrator can edit these default settings; for example, you might want to edit the Top Team Workspace access rights so that only specific users or groups can add Team Workspaces.
First you want to create a Team Creator group to be in charge of Team Workspace creation, and then you want to remove the Workspace Creator Role Definition from All Users and assign it to the Team Creator group in the Top Team Workspace access rights. The site administrator can add new users to the Team Creator group at any time.
To do this, perform the following tasks:
“Creating the Team Creator Group” on page 34“Granting the Team Creator Group Sole Team Workspace Creation Rights” on page 36
Creating the Team Creator Group
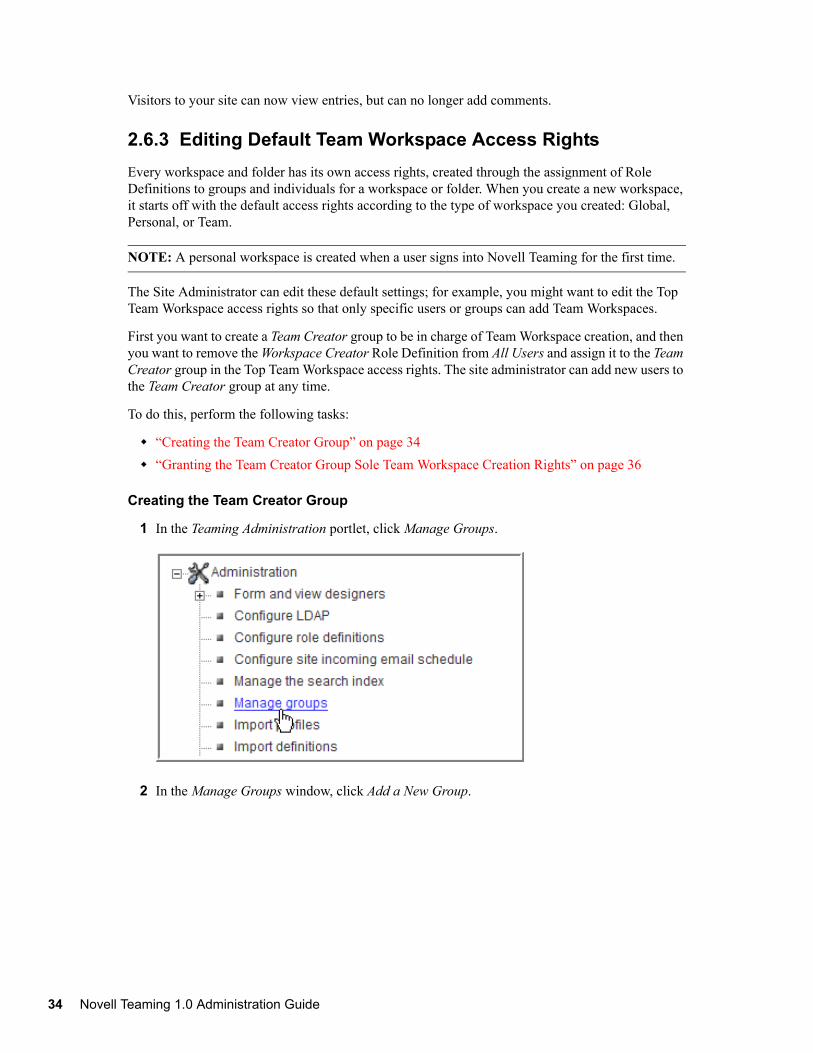
1 In the Teaming Administration portlet, click Manage Groups.
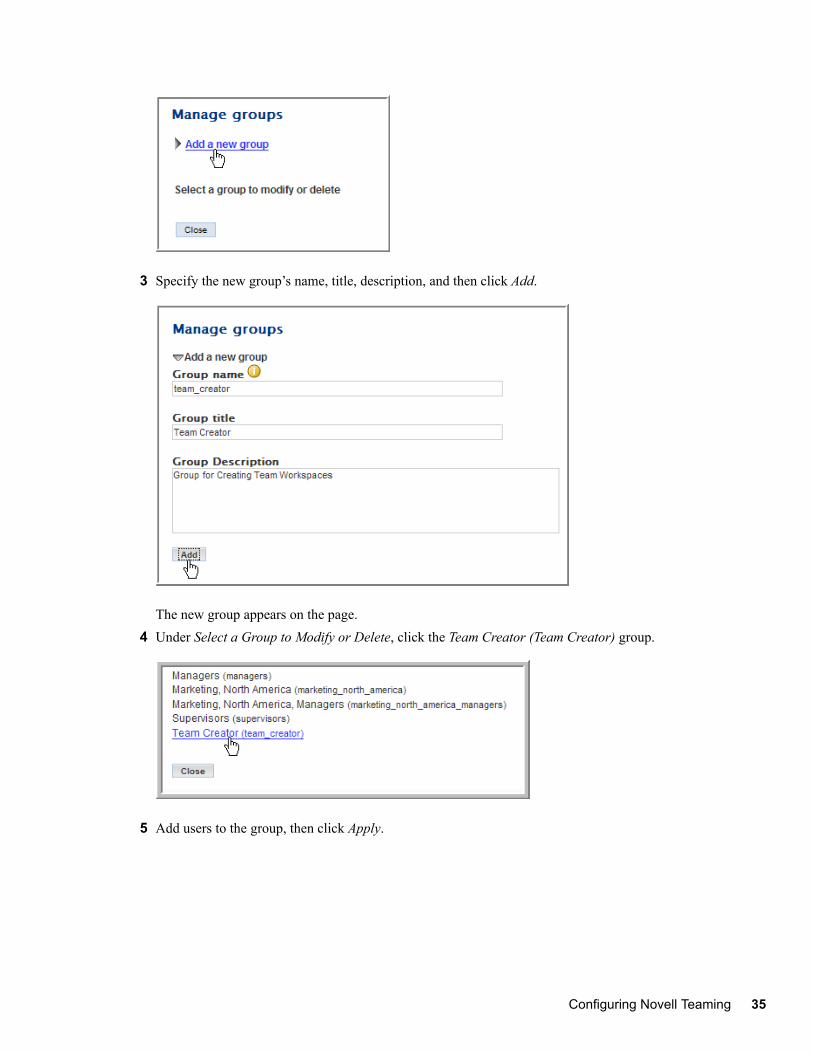
2 In the Manage Groups window, click Add a New Group.
Teaming 1.0 Administration Guide
novdocx (en) 24 April 2008
3 Specify the new group’s name, title, description, and then click Add.
The new group appears on the page.4 Under Select a Group to Modify or Delete, click the Team Creator (Team Creator) group.
5 Add users to the group, then click Apply.
Configuring Novell Teaming 35

36 Novell
novdocx (en) 24 April 2008
6 Click Close.See the Online Help or Novell Teaming User Guide for details on adding users to groups.
Granting the Team Creator Group Sole Team Workspace Creation Rights
1 Click Team Workspace.
2 Select the Manage > Access Control menu item.
The Configure Access Control page appears. This page allows you to assign the Role Definitions to specific groups and users from the workspaces and folders. The current page controls the access rights for the Top Team Workspace area.
3 Click Add a Group in the Access Rights table.
Teaming 1.0 Administration Guide

novdocx (en) 24 April 2008
4 Start typing Team Creator in the Add a Group dialog box that appears, then select Team Creator from the drop-down list.
The Team Creator groups appears in the Access Rights table. 5 Deselect the Workspace Creator option for the All Users group and select the same right for the
Team Creator group.
6 Click Save Changes.
7 Click Close.
You have now created a specific group to control the creation of Team Workspaces. This is an example of how you use Role Definitions and access rights to configure your site. You should plan the access issues for your site so you can edit the default Role Definitions and default access rights for your workspaces prior to granting all your users access to the site.
2.7 Create Your Initial WorkspacesThere are three types of workspaces in Novell Teaming: Global Workspaces (company-wide), Personal Workspaces (individual), and Team Workspaces (smaller teams). After a new workspace is created, every sub-workspace and subfolder inherits its access rights from the parent workspace by default. The workspace or folder administrator can deselect this inherit option for any individual sub-workspace and subfolder on the Access Control page for the individual workspace or folder.
Configuring Novell Teaming 37

38 Novell
novdocx (en) 24 April 2008
Planning the initial content for your site is an important step to help your users learn and use the site. Without some content, users are lost. However, too much content (especially empty containers and a complex structure) might cause users to have trouble mapping to the real work they need to do. Before end users access the installation, the Global Workspace should have enough content to engage them, but not to overwhelm them. Also, a workspace hierarchy and set of dedicated applications are best developed in parallel with users using the product and providing feedback about what best serves their needs.
The best approach is to plan out a tight minimal set of content in the Global Workspace to provide the end users with a functional site that they can quickly navigate and start using.
Section 2.7.1, “Creating Teams,” on page 38Section 2.7.2, “Creating an Administration Team Workspace,” on page 38Section 2.7.3, “Setting the Administration Team Access Rights,” on page 40Section 2.7.4, “Using the Root Team Workspace,” on page 41
2.7.1 Creating TeamsThe team creation process can be simplified with some initial planning:
Although, by default, anyone can create a team (unless you edit the default access rights; see “Editing Default Team Workspace Access Rights” on page 34) the process is much easier if a site administrator creates group names for teams before team creation occurs.Thinking through how you want to architect group names is a useful initial task. Access control is greatly simplified and enhanced by utilizing well-planned group names for your site.
2.7.2 Creating an Administration Team Workspace
NOTE: You should create an Administration group first to simplify the process for editing your administration access rights. You can then add this group to the administration team and set the access rights for this group. In the future, you can add or delete users from this administration group and not worry about editing the administration team’s access rights for individual members, because they are assigned to the group. For the following procedure assume that the admin group now exists.
1 On your Home Page, click Team Workspaces.
2 Click Add a team workspace.
Teaming 1.0 Administration Guide

novdocx (en) 24 April 2008
3 Type a Workspace title for the new workspace.
4 Select the team members. Make sure you add the admin group, which we will also use for setting access rights so that you only need to control membership to this group to control administrative access rights and administration workspace membership.
See the Online Help or the Novell Teaming User Guide for details on selecting users.5 Select all the initial Workspace folders you want to create in this workspace.
Configuring Novell Teaming 39

40 Novell
novdocx (en) 24 April 2008
6 Click OK.
2.7.3 Setting the Administration Team Access Rights1 In the ICEcore Administration Team workspace, select the Manage > Access Control menu
item.
2 In the Access Rights table, click Add a group.
Teaming 1.0 Administration Guide

novdocx (en) 24 April 2008
3 Start typing admin, then select admin from the drop-down list.
4 For the admin group, select the Workspace and folder administrator, Participant, and Team member roles.
5 Click Save Changes.6 Click Close.
2.7.4 Using the Root Team WorkspaceYou can set any workspace to be a “root” team workspace, which allows anyone with the correct access rights to add workspaces under the root workspace. A root team workspace has the Add a team workspace button available to anyone with the appropriate access rights.
An administrator can set a workspace to be a root team workspace temporarily, while the sub-workspaces your company needs to set up are added, or set it to permanently be a root team workspace so that users can always create additional workspaces under the root team workspace. How you configure a specific area depends on what the workspaces are used for and how much control you want the users to have over the layout of the site.
To configure a Workspace to be a Root Team Workspace:
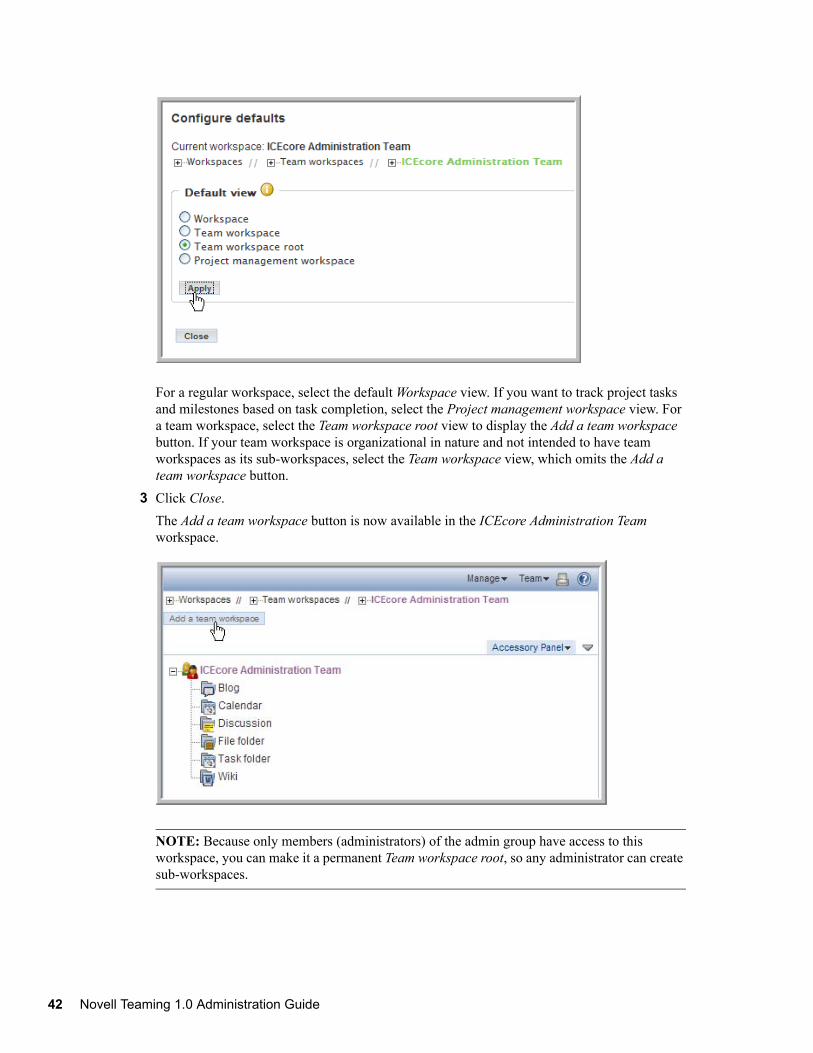
1 In the ICEcore Administration Team workspace, select the Manage > Configure menu item.
2 Select the Team workspace root option, then click Apply.
Configuring Novell Teaming 41
42 Novell
novdocx (en) 24 April 2008
For a regular workspace, select the default Workspace view. If you want to track project tasks and milestones based on task completion, select the Project management workspace view. For a team workspace, select the Team workspace root view to display the Add a team workspace button. If your team workspace is organizational in nature and not intended to have team workspaces as its sub-workspaces, select the Team workspace view, which omits the Add a team workspace button.
3 Click Close.The Add a team workspace button is now available in the ICEcore Administration Team workspace.
NOTE: Because only members (administrators) of the admin group have access to this workspace, you can make it a permanent Team workspace root, so any administrator can create sub-workspaces.
Teaming 1.0 Administration Guide

novdocx (en) 24 April 2008
2.8 Invite Users to the SiteMost end users require some minimal guidance before entering the site. They need to be invited (there is no automatic way to do this, unless you invite them during team creation (Novell Teaming is designed to be team-centric). The invitation should contain the URL to the site. Also, you might want to include the Novell Teaming Quick Start Guide and Novell Teaming User Guide in the e-mail invitation.
Your organization might want to run some training sessions before having people enter the site.
2.9 Configuring Mirrored FoldersA mirrored folder is a Novell Teaming folder that uses a server file system directory as its file storage area instead of the normal Novell Teaming repository. Typically the directory is a file share, accessed via normal file sharing mechanisms. Novell Teaming attempts to keep its knowledge about the folder contents in sync with whatever is in the directory. The mirrored folder feature can mirror any WebDAV or local file path into Novell Teaming.
NOTE: This feature mirrors the files, but does not mirror ACLs.
You need to individually configure each mirrored folder. You must provide either a WebDAV path and one user’s credentials to access all the files, or provide a local path via a mount command with one user’s credentials to access all the files.
Because of the way mirrored folders are configured, they are intended to bring common (relatively static) file shares into the Novell Teaming environment. They are not appropriate for individual file shares or mounting a data volume into Novell Teaming. You can use Novell Teaming to add additional metadata around these files, including Novell Teaming access controls.
The Novell Teaming installer allows you to initially add up to three mirrored folders. If you need to add more than three, the installer.xml has a section devoted to specifying mirrored folder resource drivers. These drivers make the files in the specified directory available to the Novell Teaming folders. It is important to note that the Novell Teaming process accesses the directories and that the user ID for Novell Teaming acts as a proxy for all Novell Teaming users.
To create a mirrored folder:
IMPORTANT: If you are a Window’s user, you MUST use forward slashes when specifying path information for mirrored folders. For example, use C:/Documents NOT C:\Documents.
1 If it is not already present, add a MirroredFolder section to the installer.xml file.
This creates a mirrored folder resource driver. (Use sample-installer.xml as a template.)1a Set the enabled attribute to true and specify a unique ID, title, the path to the
directory to share, and the users and groups that can utilize this resource. To prevent accidental modifications to the file share, set the readonly attribute to true.
1b After updating your installer.xml file, you need to run the Novell Teaming installer with the Apply settings only option, and then restart Novell Teaming to create the resource drivers.
2 Log into Novell Teaming as admin.
Configuring Novell Teaming 43

44 Novell
novdocx (en) 24 April 2008
3 Create a custom entry type representing mirrored files:3a In the Teaming Administration portlet, click Form and view designers > Entry designer.3b Click Entry definitions.3c In the dialog box on the right, click Add a new entry definition.3d Type a Caption (for example, Mirrored File entry) and Name (for example,
Mirrored File entry), then click OK.3e Expand Entry form definition and click Form.3f In the dialog box on the right, click Add.
3g In the Standard form elements dialog box on the right, click File upload.3h Type a Caption (for example, Mirrored File) and Name (database name, for
example, mirrored_file), select External Resource Adapter (Mirrored folder only) from the Repository system drop-down list, select the Required option, then click OK.
3i Under Entry form definition > Form, click Attachments - Attachments.3j In the dialog box on the right, click Modify.3k Select Hide this form element, then click OK.3l Under Entry form definition > Form, click Title - Title.
3m In the dialog box on the right, click Modify.3n Select Use file name as entry title, then click OK.3o Exit the Teaming Administration portlet.
4 In Novell Teaming, create a folder of type File folder.5 Within the folder, select the Manage > Modify this folder menu item.6 Select the Mirror external folders option.7 Select the mirrored folder resource driver that you created in Step 1.8 (Optional) Specify a subdirectory within the resource driver’s root directory structure that you
want this folder to mirror.9 Click OK to make the folder a mirrored folder.
After you make a folder a mirrored folder, you cannot change it back to a regular folder or change the information you provided (that is, the resource driver name and path).
10 Configure the mirrored folder with the custom entry type that you defined in Step 3 (Mirrored File entry):10a Within the mirrored folder, select the Manage > Configure menu item.10b In the Default entry types section, select the custom entry type you defined in Step 3
(Mirrored File entry) and deselect all other entry types.10c Click Apply.10d Click Close.
11 Perform initial synchronization/loading by selecting the Manage this folder > Synchronize menu item from the folder listing.For the current release of Novell Teaming, only synchronous/manual synchronization is supported.
Teaming 1.0 Administration Guide

novdocx (en) 24 April 2008
2.10 Document SupportSection 2.10.1, “Uploaded Files,” on page 45Section 2.10.2, “Editing Support,” on page 45
2.10.1 Uploaded FilesWhen a file is uploaded into Novell Teaming, it is processed in a number of ways:
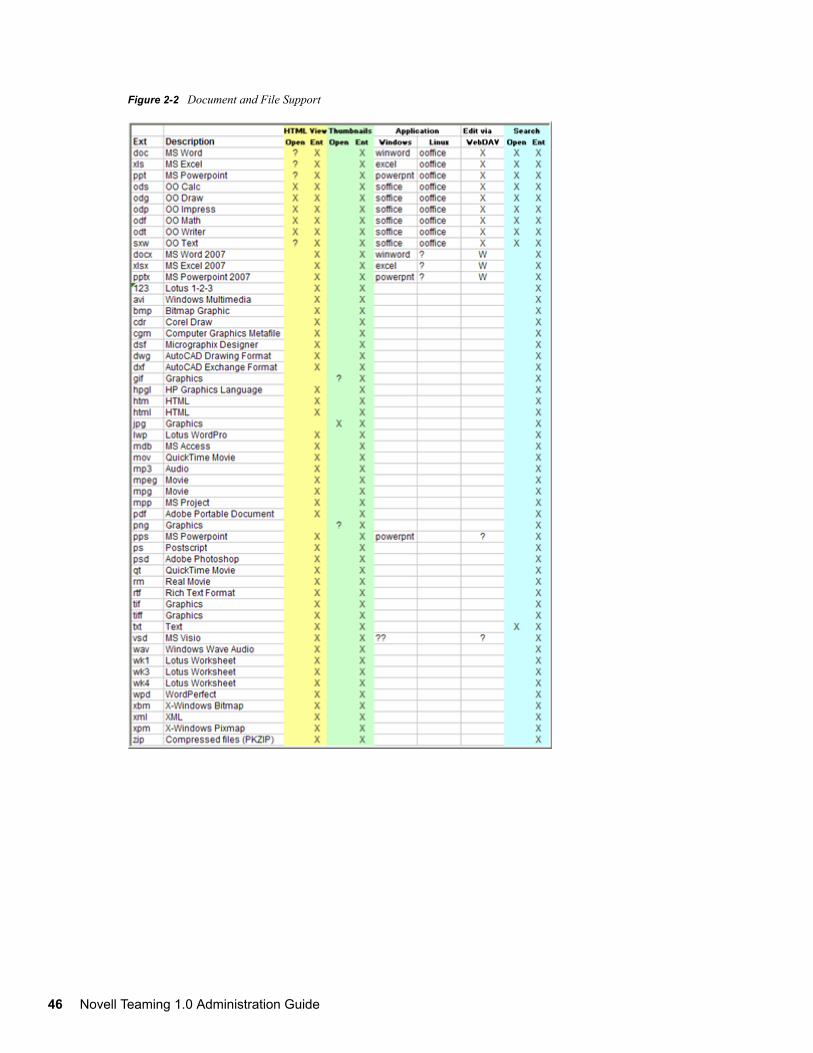
Textual content is extracted and sent to the search engine. For some file types (such as word processing documents) the textual content is obvious. For others, such as graphics files, there might be little or no textual content beyond basic metadata.If possible, a thumbnail and a scaled image somewhat larger than a thumbnail of the file are created. The thumbnail of a multi-page document shows the first page.If possible, a browser-only (HTML) version of the file is created. This allows people who do not have the ability to open the file with its native application to get an idea of what is in the file. The rendering is on a “best effort” basis and the level of detail and fidelity of the rendering varies greatly.
A licensed technology from the Stellent* company (now part of Oracle) provides processing capabilities to a wide spectrum of file types (over 200).
2.10.2 Editing SupportThere are two ways of editing files stored in Novell Teaming:
Download the file to your desktop, edit the file, and upload the file to the entry (as an attachment).
A new version of the attachment is created reflecting your changes. It is possible to manually lock the entry if you want to prevent other people from modifying any of the attached files.Certain file types provide an Edit button, which allows for “edit in place” functionality. When it is available, clicking on the Edit button launches a small Java applet, which launches the associated edit program for the file. The program accesses the file stored in Novell Teaming through WebDAV and is subject to the individual file locking protocols that WebDAV provides. Saving the file (or exiting the application) creates a new version of the attachment. No interaction with the browser is needed.
Because the edit in place option requires WebDAV URL support, which is not universally supported by the operating systems, you need to configure Novell Teaming to know which applications are WebDAV-aware.
The following illustration shows the default configuration of file and document support in Novell Teaming.
Configuring Novell Teaming 45
46 Novell
novdocx (en) 24 April 2008
Figure 2-2 Document and File Support
Teaming 1.0 Administration Guide

3novdocx (en) 24 A
pril 2008
3Creating a Basic Workflow Process
When you are developing a workflow process with Novell® Teaming, use the Teaming Administration portlet. In Novell Teaming, the completed workflow process is a separate function that you can then apply to entries, using one of several methods Novell Teaming provides to start the workflow.
As one example, you can begin by creating a discussion topic in a folder, and then initiating an allowed workflow process for that entry (workflow availability is assigned in each folder’s configuration). The topic enters into the first state of the initiated process, and the workflow begins only for that one particular entry. As another example, you can specify in a folder’s configuration to initiate a specific workflow process automatically every time a user creates an entry of a specific type (including your own customized entries).
This section shows you how to implement a basic workflow design. The Advanced Workflow section expands the design (using Novell Teaming’s Advanced Workflow add-on module) to more closely match the needs of a typical production-ready system (for example, using questions).
See Section 5.1, “Reviewing the Workflow Features,” on page 91 for a overview of all the workflow features in the designer (this includes the Advanced Workflow features).
The following topics are covered in this section:
Section 3.1, “Creating a Workflow,” on page 47Section 3.2, “Setting Access Controls,” on page 60Section 3.3, “Notifying Participants,” on page 65Section 3.4, “Using the Workflow in a Folder,” on page 70
3.1 Creating a WorkflowThe following procedures show you how to define a workflow, add the states it requires, and define the transitions it requires. The example used is the creation of a Paid Time Off (PTO) request workflow.
Section 3.1.1, “Defining a Workflow,” on page 47Section 3.1.2, “Adding States to a Workflow,” on page 49Section 3.1.3, “Defining Manual Transitions for a Workflow,” on page 53Section 3.1.4, “Configuring a Folder to Use This Workflow,” on page 57Section 3.1.5, “Testing the New Workflow,” on page 58
3.1.1 Defining a Workflow1 From the Teaming Administration portlet on the initial Liferay portal window, click the plus
sign (+) to the left of Form and view designers to expand this section and view the available designers. To add the Teaming Administration portlet to the Liferay portal window, click the
Creating a Basic Workflow Process 47

48 Novell
novdocx (en) 24 April 2008
Add Content link in the upper right corner. This brings up a panel of portlets along the left margin. Expand the Teaming section to add more Novell Teaming features, such as the Teaming Administration portlet.
2 Click Workflow designer.
3 Click Workflow processes.
4 In the options dialog on the right, click Add a new workflow process.
Teaming 1.0 Administration Guide

novdocx (en) 24 April 2008
5 In the form that appears on the right, type the Name (workflow name) and Caption (name thatappears in Novell Teaming) for this workflow.
6 Click OK.The PTO workflow is now defined in Novell Teaming.
3.1.2 Adding States to a Workflow1 From the Teaming Administration portlet on the initial Liferay portal window, click the plus
sign (+) to the left of Form and view designers to expand this section and view the available designers. To add the Teaming Administration portlet to the Liferay portal window, click the Add Content link in the upper right corner. This brings up a panel of portlets along the left margin. Expand the Teaming section to add more Novell Teaming features, such as the Teaming Administration portlet.
Creating a Basic Workflow Process 49

50 Novell
novdocx (en) 24 April 2008
2 Click Workflow designer.
3 Expand Workflow processes.
4 Click PTO Request.
Teaming 1.0 Administration Guide

novdocx (en) 24 April 2008
5 Click Workflow process.
6 In the options dialog on the right, click Add.
7 Click State to add a state to this workflow.
8 Type the Caption (name used in Novell Teaming), Data Name (database name), and Description for this workflow as follows:The Data Name is an internal-use database name. Names for elements in one definition must be unique. The first character must be an alphabetic character (a-z, A-Z). For the rest, legal characters are alphanumeric characters (a-z, A-Z, 0-9), hyphens (-), and underscores (_).
Caption: SubmitData Name: Submit_PTO_RequestDescription: PTO Request Submitted
Creating a Basic Workflow Process 51

52 Novell
novdocx (en) 24 April 2008
9 Click OK.The new state is added to the workflow and appears in the Workflow Preview area at the bottom part of the window.
10 Repeat these steps to add the Review, Approve, Deny, and Record states.
Teaming 1.0 Administration Guide

novdocx (en) 24 April 2008
NOTE: After the states are defined, the next step is to develop transitions that move an entry from one state to the next. You can also take action when a process enters into or exits from a state. For example, upon entry (or exit) you can send a notification, begin or end a parallel process, or set a variable.
3.1.3 Defining Manual Transitions for a WorkflowThe following steps show you how to set up manual transitions (only manual transitions are available without the Advanced Workflow add-on module) between the states in this workflow.
1 From the Teaming Administration portlet on the initial Liferay portal window, click the plus sign (+) to the left of Form and view designers to expand this section and view the available designers. To add the Teaming Administration portlet to the Liferay portal window, click the Add Content link in the upper right corner. This brings up a panel of portlets along the left margin. Expand the Teaming section to add more Novell Teaming features, such as the Teaming Administration portlet.
Creating a Basic Workflow Process 53

54 Novell
novdocx (en) 24 April 2008
2 Click Workflow designer.
3 Expand Workflow processes.
4 Click PTO Request.
Teaming 1.0 Administration Guide

novdocx (en) 24 April 2008
5 Click Workflow process.
6 Under Workflow process, expand State - Submit and click Transitions.
7 In the options dialog on the right, click Add.
8 In the options dialog, click Manual Transition.
Creating a Basic Workflow Process 55

56 Novell
novdocx (en) 24 April 2008
The Manual Transition is the only available transition in Novell Teaming unless you are using the Advanced Workflow add-on module.
9 In the To state list box, select Review (Review_PTO_Request) and click OK.
After you successfully complete the previous steps, the preview portion of the page displays an arrow in the flowchart that represents the newly defined transition.
10 Repeat these steps to create the following manual transitions:Review to ApproveReview to DenyApprove to Record
Teaming 1.0 Administration Guide

novdocx (en) 24 April 2008
NOTE: You can drag each state to the position you want it to appear in the preview area and click Save layout to save these positions for ease of viewing.
3.1.4 Configuring a Folder to Use This WorkflowYou need to configure each folder in which you want to use this new workflow. The following is an example procedure.
1 In Novell Teaming, go to the PTO Requests folder in Human Resources.2 Select the Manage > Configure menu item.
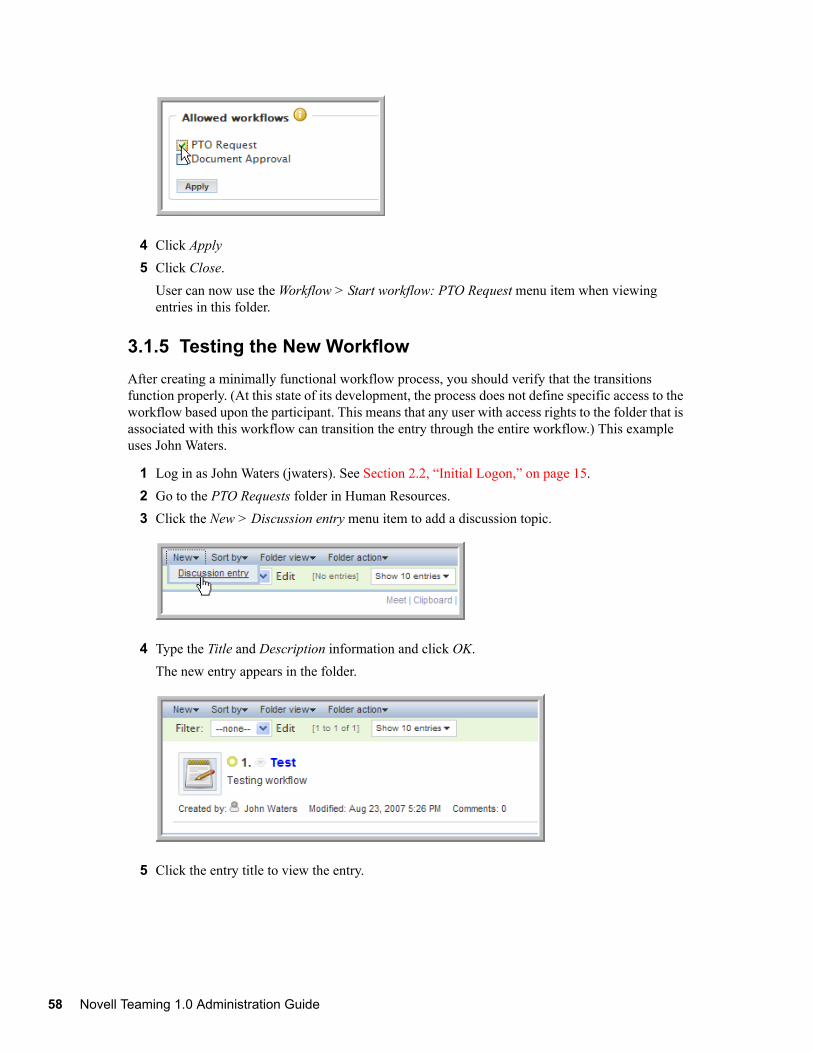
3 Under Allowed Workflows, select the PTO Request option.
Creating a Basic Workflow Process 57
58 Novell
novdocx (en) 24 April 2008
4 Click Apply5 Click Close.
User can now use the Workflow > Start workflow: PTO Request menu item when viewing entries in this folder.
3.1.5 Testing the New WorkflowAfter creating a minimally functional workflow process, you should verify that the transitions function properly. (At this state of its development, the process does not define specific access to the workflow based upon the participant. This means that any user with access rights to the folder that is associated with this workflow can transition the entry through the entire workflow.) This example uses John Waters.
1 Log in as John Waters (jwaters). See Section 2.2, “Initial Logon,” on page 15.2 Go to the PTO Requests folder in Human Resources.3 Click the New > Discussion entry menu item to add a discussion topic.
4 Type the Title and Description information and click OK.The new entry appears in the folder.
5 Click the entry title to view the entry.
Teaming 1.0 Administration Guide

novdocx (en) 24 April 2008
6 Select the Workflow > Start workflow: PTO Request menu item.
7 In the confirmation dialog that appears, click OK to start the PTO Request workflow.
The PTO Request workflow is added to entry with the entry in the initial Submit state.
Creating a Basic Workflow Process 59
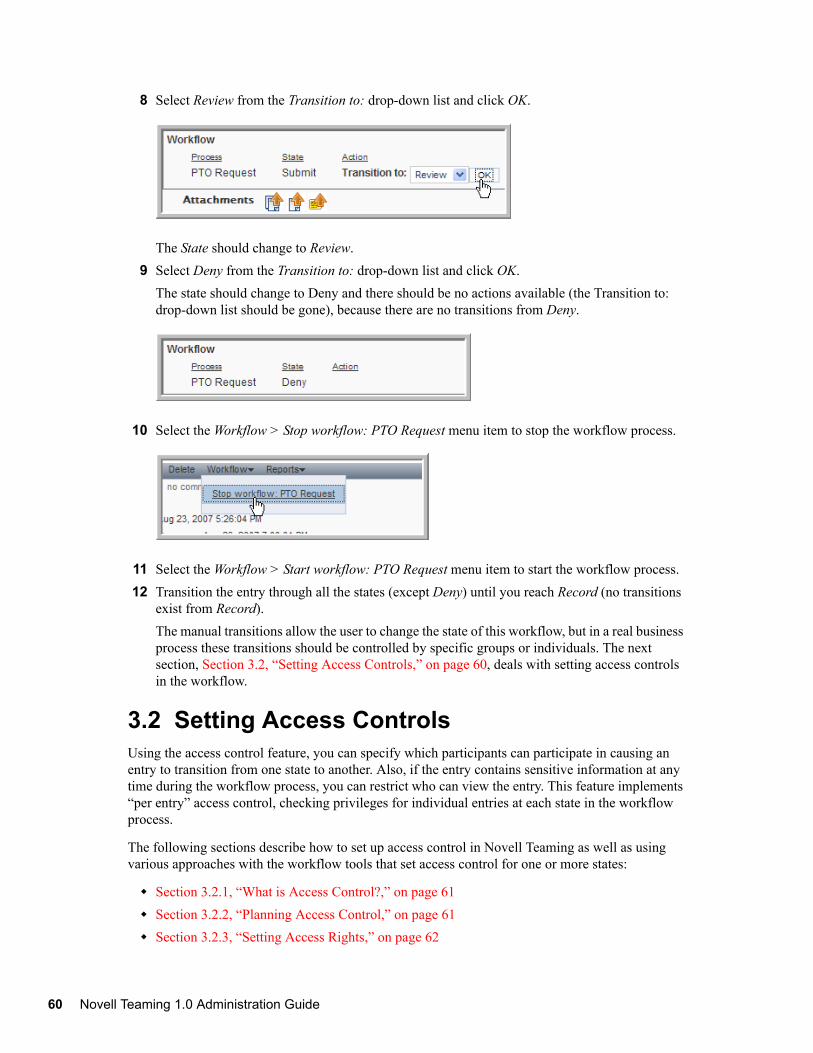
60 Novell
novdocx (en) 24 April 2008
8 Select Review from the Transition to: drop-down list and click OK.
The State should change to Review.9 Select Deny from the Transition to: drop-down list and click OK.
The state should change to Deny and there should be no actions available (the Transition to: drop-down list should be gone), because there are no transitions from Deny.
10 Select the Workflow > Stop workflow: PTO Request menu item to stop the workflow process.
11 Select the Workflow > Start workflow: PTO Request menu item to start the workflow process.12 Transition the entry through all the states (except Deny) until you reach Record (no transitions
exist from Record).The manual transitions allow the user to change the state of this workflow, but in a real business process these transitions should be controlled by specific groups or individuals. The next section, Section 3.2, “Setting Access Controls,” on page 60, deals with setting access controls in the workflow.
3.2 Setting Access ControlsUsing the access control feature, you can specify which participants can participate in causing an entry to transition from one state to another. Also, if the entry contains sensitive information at any time during the workflow process, you can restrict who can view the entry. This feature implements “per entry” access control, checking privileges for individual entries at each state in the workflow process.
The following sections describe how to set up access control in Novell Teaming as well as using various approaches with the workflow tools that set access control for one or more states:
Section 3.2.1, “What is Access Control?,” on page 61Section 3.2.2, “Planning Access Control,” on page 61Section 3.2.3, “Setting Access Rights,” on page 62
Teaming 1.0 Administration Guide

novdocx (en) 24 April 2008
Section 3.2.4, “Summary,” on page 64
3.2.1 What is Access Control?When you create a workflow process using default settings, every user who can enter the discussion forum has access to view the entry and to participate in state changes. For almost all production-ready workflow systems, it is necessary to alter this default access control, so that:
Only members of the team assigned to the business process can participate in the workflow process.Only designated responsible individuals participate in changing states.
NOTE: Access control is the term used to identify which users have the right to perform specific tasks at each state within the workflow process.
3.2.2 Planning Access ControlBefore configuring access, identify the following:
States: You defined these in Section 3.1.2, “Adding States to a Workflow,” on page 49.Access rights: For each state, define who can view, modify or delete, respond to, and participate in state transitions.Users or Groups: Map “participants” to usernames and group names within Novell Teaming.
Create a table to use for access-control planning as follows:
Table 3-1 Access Control Planning
Subsequent topics in this section describe how to implement this plan for access control.
State Participant Access Required
Submit The employee, or individual requesting time off
Only the manager and employee can see an employee's request.
The manager is the only one allowed to transition the work to Review.
Review The manager The manager is the only one allowed to transition the work to Approve or Deny.
Employees can review only their own pending requests in this state.
Approve The manager and employee The manager, employee, and HR may view the request in this state.
Only HR can transition to Record.
Deny The manager and employee The manager and employee can review requests in the Deny state.
Record Human Resources The manager, employee, and HR can view the work in this completed state.
Creating a Basic Workflow Process 61

62 Novell
novdocx (en) 24 April 2008
3.2.3 Setting Access RightsEntries in the Submit state need to be viewable by the users who created the PTO Requests, but not by any of their peers. In addition, only a manager can transition an entry from Submit to Review, and from Review to Deny or Approve. Human Resources needs to transition each entry from Approve to Record.
1 From the Teaming Administration portlet on the initial Liferay portal window, click the plus sign (+) to the left of Form and view designers to expand this section and view the available designers. To add the Teaming Administration portlet to the Liferay portal window, click the Add Content link in the upper right corner. This brings up a panel of portlets along the left margin. Expand the Teaming section to add more Novell Teaming features, such as the Teaming Administration portlet.
2 Click Workflow designer.3 Expand Workflow processes.4 Click PTO Request.5 Expand Workflow process.6 Add the Access controls to the workflow states:
6a Click State - Submit.
6b In the options dialog on the right, click Add.6c Click Access controls.
Access controls is added below Transitions.
6d Repeat Step 6a through Step 6c for each state to add the Access controls.7 Set the Read access rights:
Teaming 1.0 Administration Guide
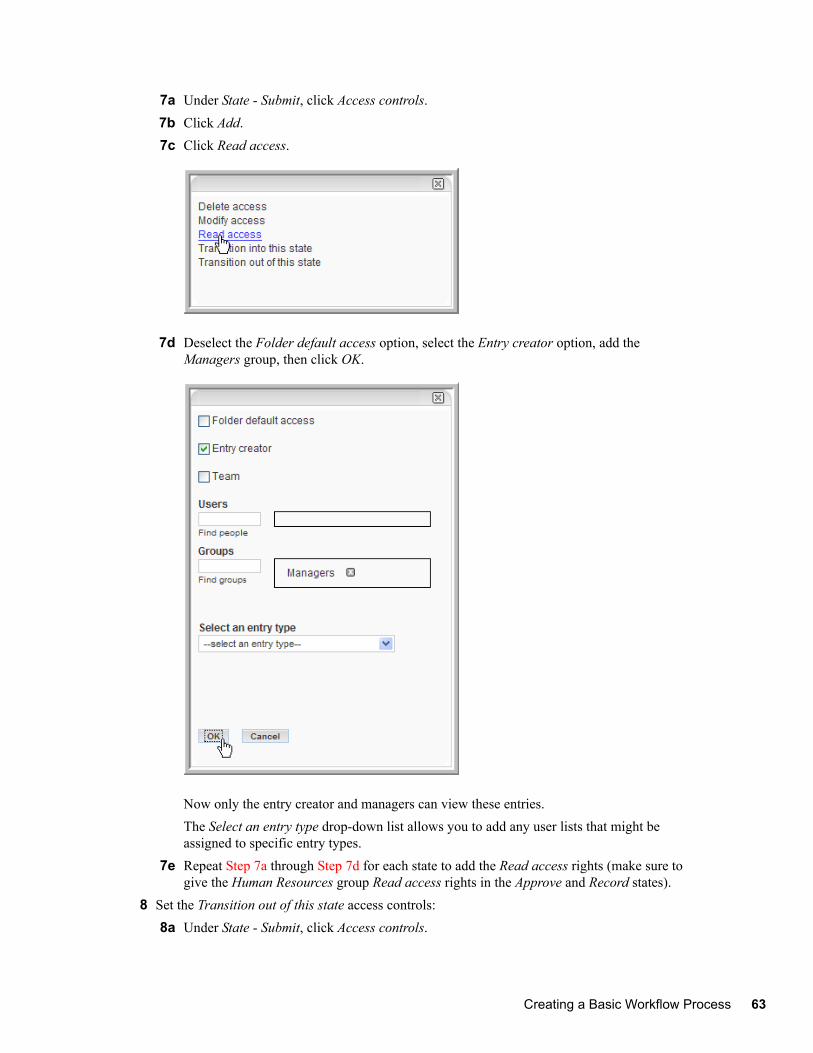
novdocx (en) 24 April 2008
7a Under State - Submit, click Access controls.7b Click Add.7c Click Read access.
7d Deselect the Folder default access option, select the Entry creator option, add the Managers group, then click OK.
Now only the entry creator and managers can view these entries.The Select an entry type drop-down list allows you to add any user lists that might be assigned to specific entry types.
7e Repeat Step 7a through Step 7d for each state to add the Read access rights (make sure to give the Human Resources group Read access rights in the Approve and Record states).
8 Set the Transition out of this state access controls:8a Under State - Submit, click Access controls.
Creating a Basic Workflow Process 63
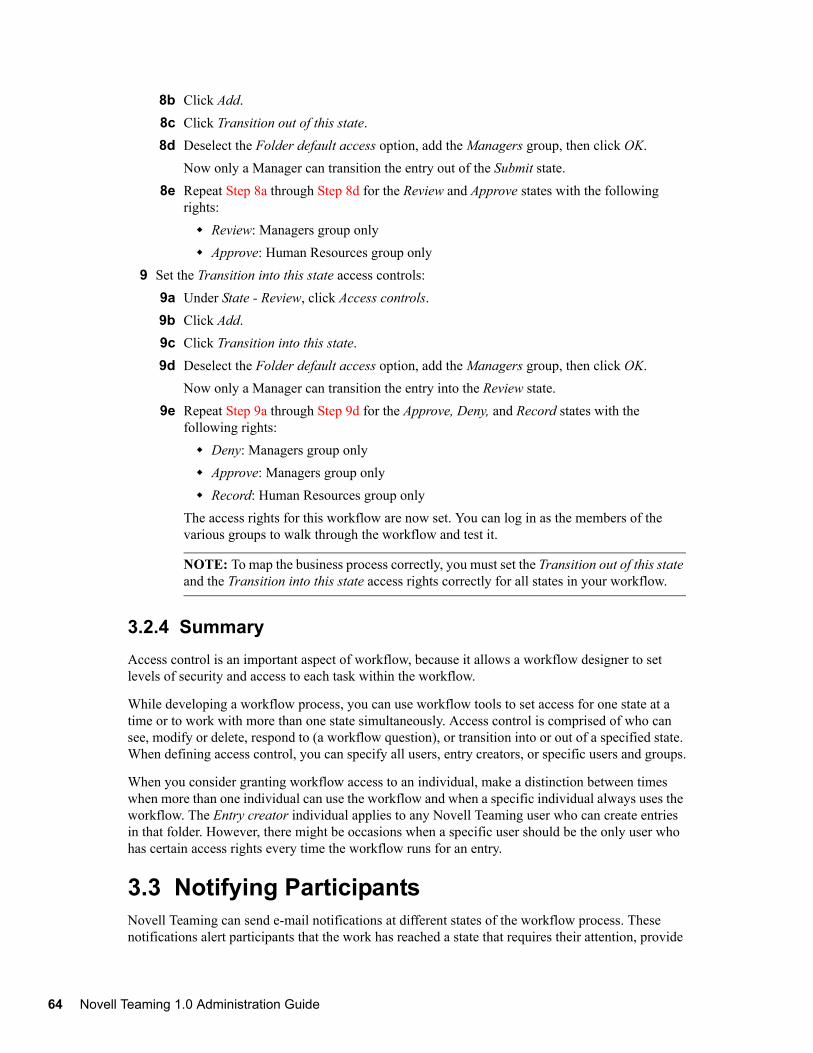
64 Novell
novdocx (en) 24 April 2008
8b Click Add.8c Click Transition out of this state.8d Deselect the Folder default access option, add the Managers group, then click OK.
Now only a Manager can transition the entry out of the Submit state.8e Repeat Step 8a through Step 8d for the Review and Approve states with the following
rights:Review: Managers group onlyApprove: Human Resources group only
9 Set the Transition into this state access controls:9a Under State - Review, click Access controls.9b Click Add.9c Click Transition into this state.9d Deselect the Folder default access option, add the Managers group, then click OK.
Now only a Manager can transition the entry into the Review state.9e Repeat Step 9a through Step 9d for the Approve, Deny, and Record states with the
following rights:Deny: Managers group onlyApprove: Managers group onlyRecord: Human Resources group only
The access rights for this workflow are now set. You can log in as the members of the various groups to walk through the workflow and test it.
NOTE: To map the business process correctly, you must set the Transition out of this state and the Transition into this state access rights correctly for all states in your workflow.
3.2.4 SummaryAccess control is an important aspect of workflow, because it allows a workflow designer to set levels of security and access to each task within the workflow.
While developing a workflow process, you can use workflow tools to set access for one state at a time or to work with more than one state simultaneously. Access control is comprised of who can see, modify or delete, respond to (a workflow question), or transition into or out of a specified state. When defining access control, you can specify all users, entry creators, or specific users and groups.
When you consider granting workflow access to an individual, make a distinction between times when more than one individual can use the workflow and when a specific individual always uses the workflow. The Entry creator individual applies to any Novell Teaming user who can create entries in that folder. However, there might be occasions when a specific user should be the only user who has certain access rights every time the workflow runs for an entry.
3.3 Notifying ParticipantsNovell Teaming can send e-mail notifications at different states of the workflow process. These notifications alert participants that the work has reached a state that requires their attention, provide
Teaming 1.0 Administration Guide
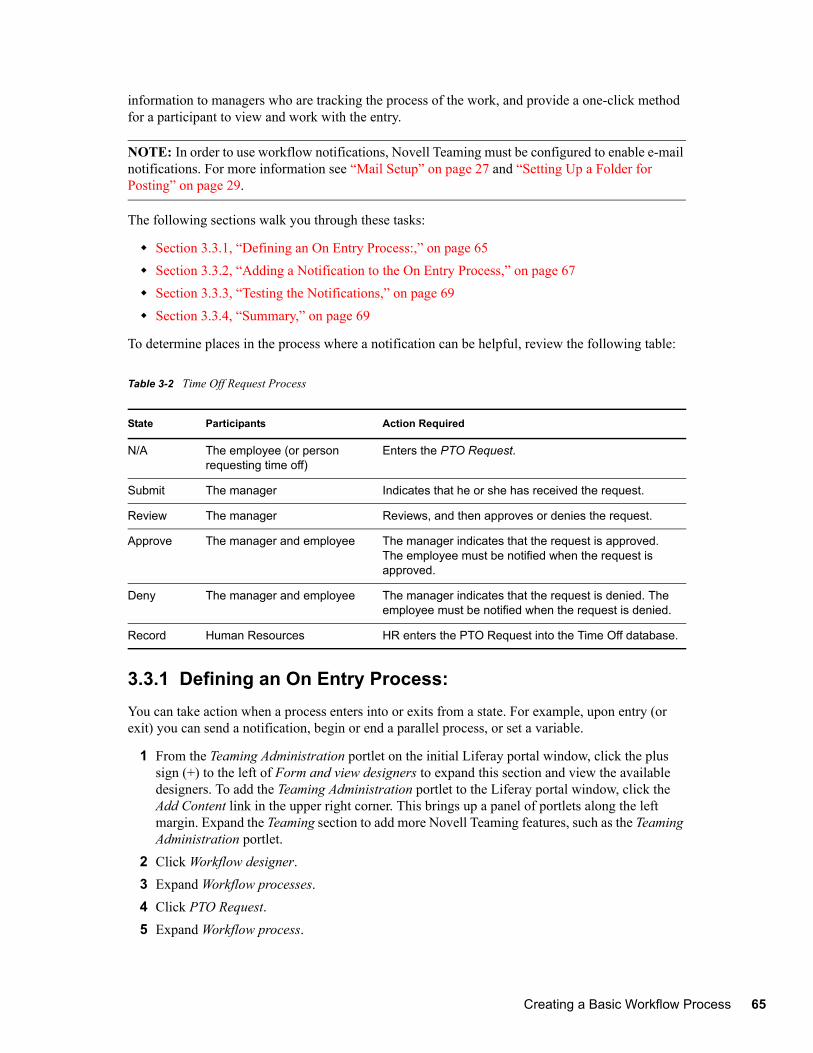
novdocx (en) 24 April 2008
information to managers who are tracking the process of the work, and provide a one-click method for a participant to view and work with the entry.
NOTE: In order to use workflow notifications, Novell Teaming must be configured to enable e-mail notifications. For more information see “Mail Setup” on page 27 and “Setting Up a Folder for Posting” on page 29.
The following sections walk you through these tasks:
Section 3.3.1, “Defining an On Entry Process:,” on page 65Section 3.3.2, “Adding a Notification to the On Entry Process,” on page 67Section 3.3.3, “Testing the Notifications,” on page 69Section 3.3.4, “Summary,” on page 69
To determine places in the process where a notification can be helpful, review the following table:
Table 3-2 Time Off Request Process
3.3.1 Defining an On Entry Process:You can take action when a process enters into or exits from a state. For example, upon entry (or exit) you can send a notification, begin or end a parallel process, or set a variable.
1 From the Teaming Administration portlet on the initial Liferay portal window, click the plus sign (+) to the left of Form and view designers to expand this section and view the available designers. To add the Teaming Administration portlet to the Liferay portal window, click the Add Content link in the upper right corner. This brings up a panel of portlets along the left margin. Expand the Teaming section to add more Novell Teaming features, such as the Teaming Administration portlet.
2 Click Workflow designer.3 Expand Workflow processes.4 Click PTO Request.5 Expand Workflow process.
State Participants Action Required
N/A The employee (or person requesting time off)
Enters the PTO Request.
Submit The manager Indicates that he or she has received the request.
Review The manager Reviews, and then approves or denies the request.
Approve The manager and employee The manager indicates that the request is approved. The employee must be notified when the request is approved.
Deny The manager and employee The manager indicates that the request is denied. The employee must be notified when the request is denied.
Record Human Resources HR enters the PTO Request into the Time Off database.
Creating a Basic Workflow Process 65
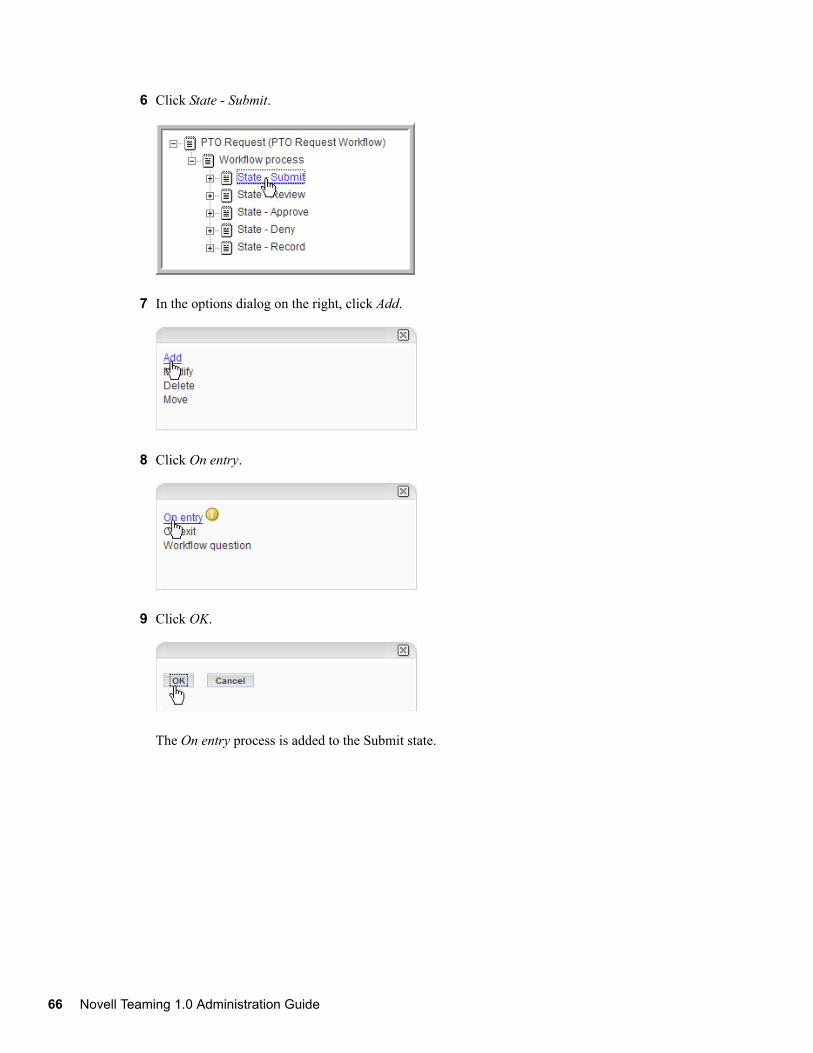
66 Novell
novdocx (en) 24 April 2008
6 Click State - Submit.
7 In the options dialog on the right, click Add.
8 Click On entry.
9 Click OK.
The On entry process is added to the Submit state.
Teaming 1.0 Administration Guide

novdocx (en) 24 April 2008
3.3.2 Adding a Notification to the On Entry Process1 From the Teaming Administration portlet on the initial Liferay portal window, click the plus
sign (+) to the left of Form and view designers to expand this section and view the available designers. To add the Teaming Administration portlet to the Liferay portal window, click the Add Content link in the upper right corner. This brings up a panel of portlets along the left margin. Expand the Teaming section to add more Novell Teaming features, such as the Teaming Administration portlet.
2 Click Workflow designer.3 Expand Workflow processes.4 Click PTO Request.5 Expand Workflow process.6 Expand State - Submit.7 Click On entry.
8 Click Add.
Creating a Basic Workflow Process 67

68 Novell
novdocx (en) 24 April 2008
9 Click Notifications.
10 Add the Managers group to the form that appears.
11 Type a subject line for this notification and click the Append the entry body option to use the entry in the body of the notification e-mail.
Teaming 1.0 Administration Guide
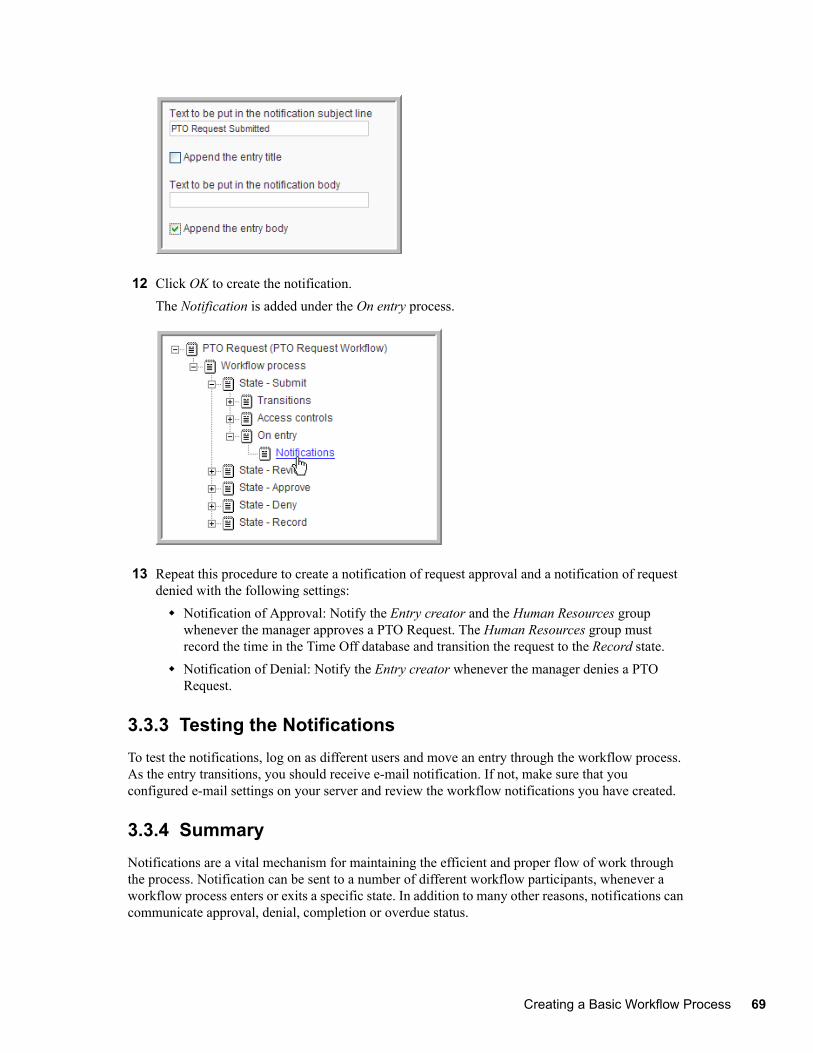
novdocx (en) 24 April 2008
12 Click OK to create the notification.The Notification is added under the On entry process.
13 Repeat this procedure to create a notification of request approval and a notification of request denied with the following settings:
Notification of Approval: Notify the Entry creator and the Human Resources group whenever the manager approves a PTO Request. The Human Resources group must record the time in the Time Off database and transition the request to the Record state.Notification of Denial: Notify the Entry creator whenever the manager denies a PTO Request.
3.3.3 Testing the NotificationsTo test the notifications, log on as different users and move an entry through the workflow process. As the entry transitions, you should receive e-mail notification. If not, make sure that you configured e-mail settings on your server and review the workflow notifications you have created.
3.3.4 SummaryNotifications are a vital mechanism for maintaining the efficient and proper flow of work through the process. Notification can be sent to a number of different workflow participants, whenever a workflow process enters or exits a specific state. In addition to many other reasons, notifications can communicate approval, denial, completion or overdue status.
Creating a Basic Workflow Process 69
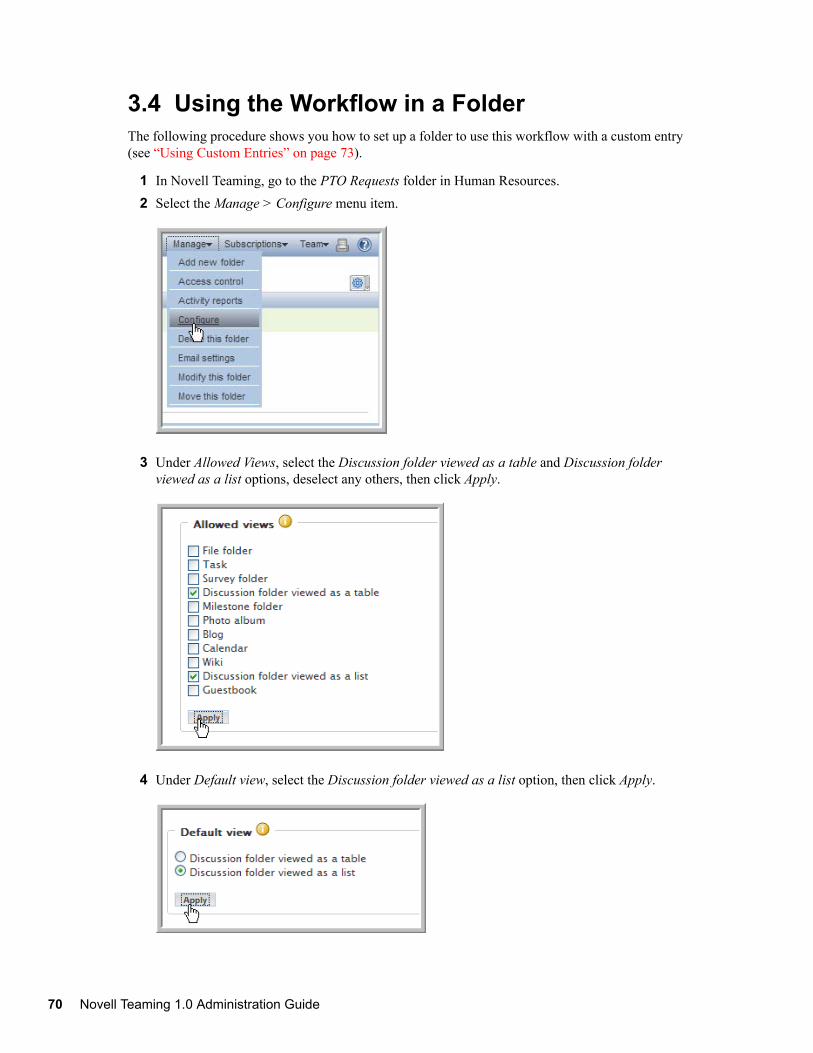
70 Novell
novdocx (en) 24 April 2008
3.4 Using the Workflow in a FolderThe following procedure shows you how to set up a folder to use this workflow with a custom entry (see “Using Custom Entries” on page 73).
1 In Novell Teaming, go to the PTO Requests folder in Human Resources.2 Select the Manage > Configure menu item.
3 Under Allowed Views, select the Discussion folder viewed as a table and Discussion folder viewed as a list options, deselect any others, then click Apply.
4 Under Default view, select the Discussion folder viewed as a list option, then click Apply.
Teaming 1.0 Administration Guide

novdocx (en) 24 April 2008
5 Under Default entry types, select the Time Off entry type, deselect any others, then click Apply.
6 Under Allowed Workflows, select the PTO Request option.
7 Click Apply8 Under Workflow associations, select PTO Request from the Time Off drop-down list, then click
Apply.
A drop-down list appears for each Default entry type you select. When you use a drop-down list to select a workflow process, that process begins automatically whenever a user creates an entry of that type.
9 Click Close.Users can now only enter Time Off entries in this folder, which automatically triggers the PTO Request workflow process.
Creating a Basic Workflow Process 71

72 Novell
novdocx (en) 24 April 2008
Teaming 1.0 Administration Guide

4novdocx (en) 24 A
pril 2008
4Using Custom Entries
Novell® Teaming allows you to create custom entries with custom forms and views. These entries allow you to use unique forms and views when making specific types of entries. This section shows you how to design these entries and assign them to a workspace folder. The next section, “Advanced Workflow” on page 91, shows you how to create advanced workflows in Novell Teaming. You can design custom entries to enhance the functionality of your workflows. The advanced workflow chapter shows you some of the functionality of the Advanced Workflow Add-On module that you can purchase.
This section contains the following topics:
Section 4.1, “Creating a Custom Entry,” on page 73Section 4.2, “Using a Custom Entry,” on page 86
4.1 Creating a Custom EntryThe following procedures show you how to create a custom entry with a custom form and view. The example used in these procedures show you how to create a Time Off custom entry that can be added to a team workspace so that members can alert their team about the days when they plan to be out.
The following procedures and topics are included in this section:
Section 4.1.1, “Creating the Custom Entry,” on page 73Section 4.1.2, “The Entry Designer Editing Window,” on page 76Section 4.1.3, “Creating a Custom Form for an Entry,” on page 77Section 4.1.4, “Creating a Custom View for an Entry,” on page 85
4.1.1 Creating the Custom Entry1 From the Teaming Administration portlet on the initial Liferay portal window, click the plus
sign (+) to the left of Form and view designers to expand this section and view the available designers. To add the Teaming Administration portlet to the Liferay portal window, click the Add Content link in the upper right corner. This brings up a panel of portlets along the left margin. Expand the Teaming section to add more Novell Teaming features, such as the Teaming Administration portlet.
Using Custom Entries 73

74 Novell
novdocx (en) 24 April 2008
2 Click Entry designer.
3 In the Designers window that appears, click Entry definitions.
4 On the right side of the window, click Add a new entry definition.
Teaming 1.0 Administration Guide

novdocx (en) 24 April 2008
5 In the Caption field, type the name for the entry that you want to see in Novell Teaming.
6 In the Name field, type the name for this entry type.
7 Select the family for this entry from the Family list box.Select the item type that is closest to the function of the item you are creating. People can use the family type when performing filtered searches. This custom entry has an -unspecified- family.
8 From the Allowed comment types list box, select the comment types you want to allow for this new custom entry (use the Ctrl key to select multiple comment types).
Using Custom Entries 75
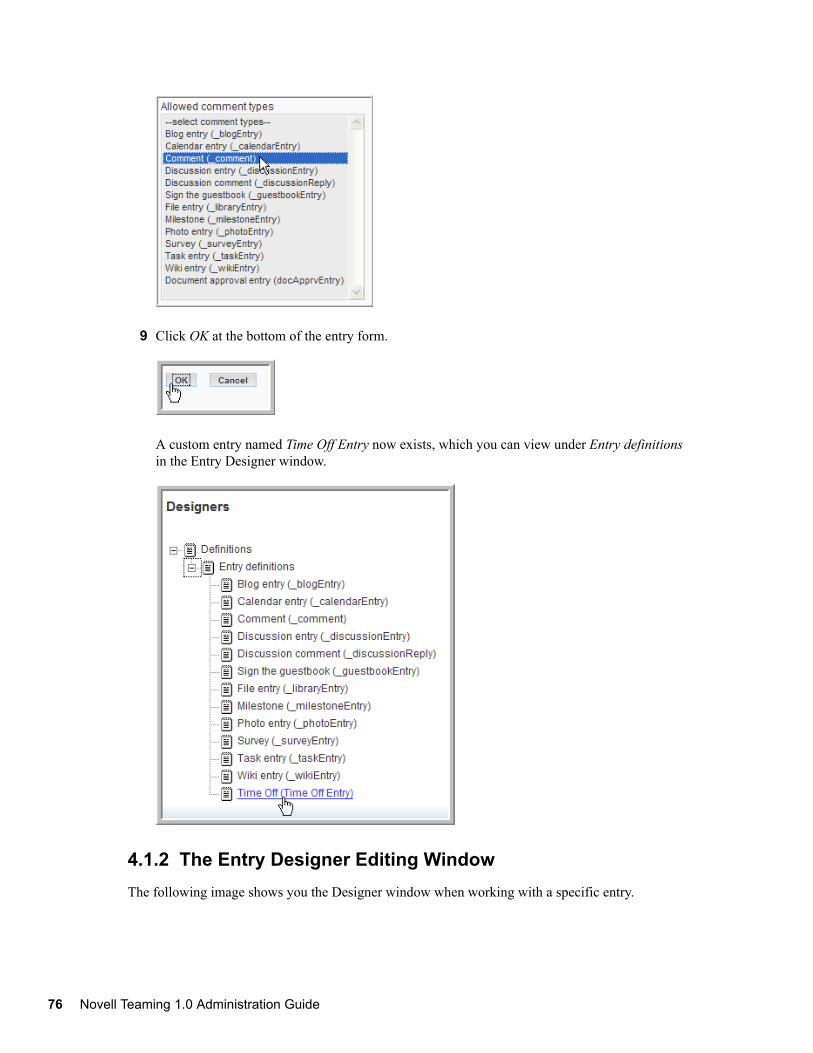
76 Novell
novdocx (en) 24 April 2008
9 Click OK at the bottom of the entry form.
A custom entry named Time Off Entry now exists, which you can view under Entry definitions in the Entry Designer window.
4.1.2 The Entry Designer Editing WindowThe following image shows you the Designer window when working with a specific entry.
Teaming 1.0 Administration Guide

novdocx (en) 24 April 2008
Figure 4-1 Entry Designer Window
4.1.3 Creating a Custom Form for an Entry1 Click the plus sign (+) to the left of Entry form definition to expand this section.
2 Click the plus sign (+) to the left of Form to expand this section and view the current elements in this form.
Using Custom Entries 77

78 Novell
novdocx (en) 24 April 2008
3 Delete an element:3a Click the element (Description).
For this custom form, a simple text box element is going to be used instead of the Description element.
3b In the options dialog that appears to the right, click the Delete option.
3c Click OK to confirm that you want to delete the Description element.
The Description element is deleted and is removed from the Entry tree and the Form preview area.
Teaming 1.0 Administration Guide

novdocx (en) 24 April 2008
4 Hide an element from appearing in the form view:4a Click the element you want to hide (such as Attachments).
This custom entry is for entering your time off, so there is no need to attach files to these entries.
4b In the options dialog, click Modify.
4c In the Attachments element form that appears, select the Hide this form element option.
4d Click OK.
Using Custom Entries 79
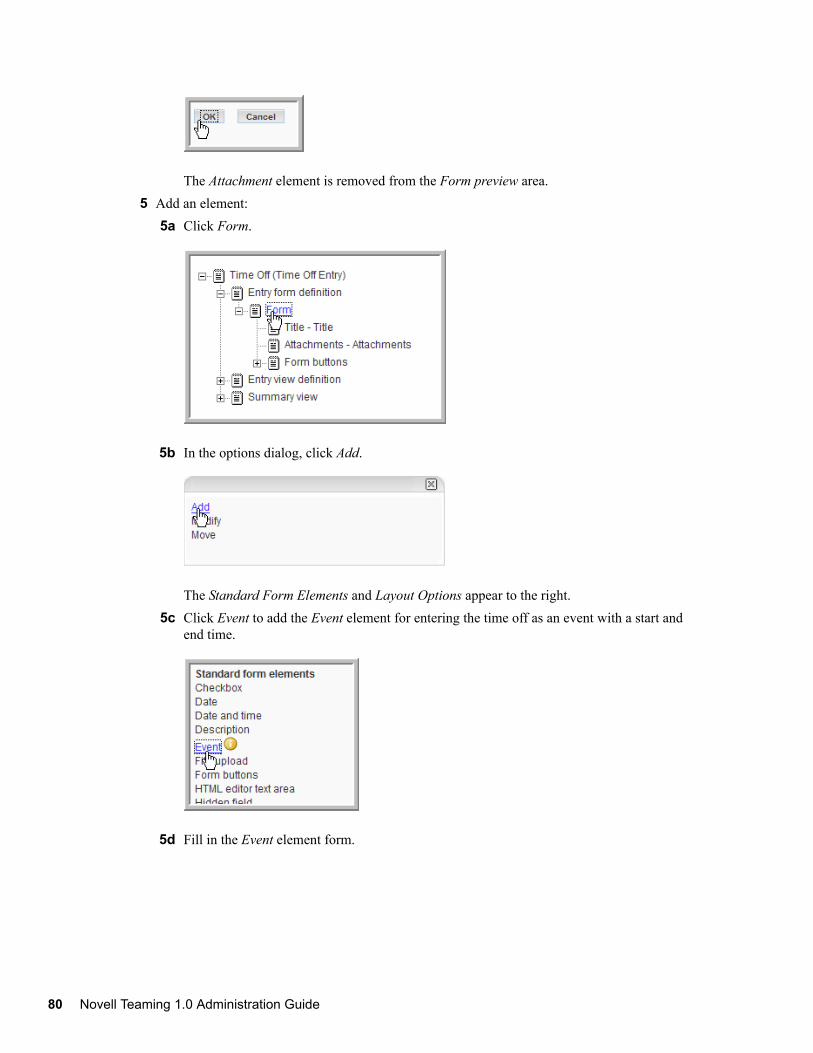
80 Novell
novdocx (en) 24 April 2008
The Attachment element is removed from the Form preview area.5 Add an element:5a Click Form.
5b In the options dialog, click Add.
The Standard Form Elements and Layout Options appear to the right.5c Click Event to add the Event element for entering the time off as an event with a start and
end time.
5d Fill in the Event element form.
Teaming 1.0 Administration Guide
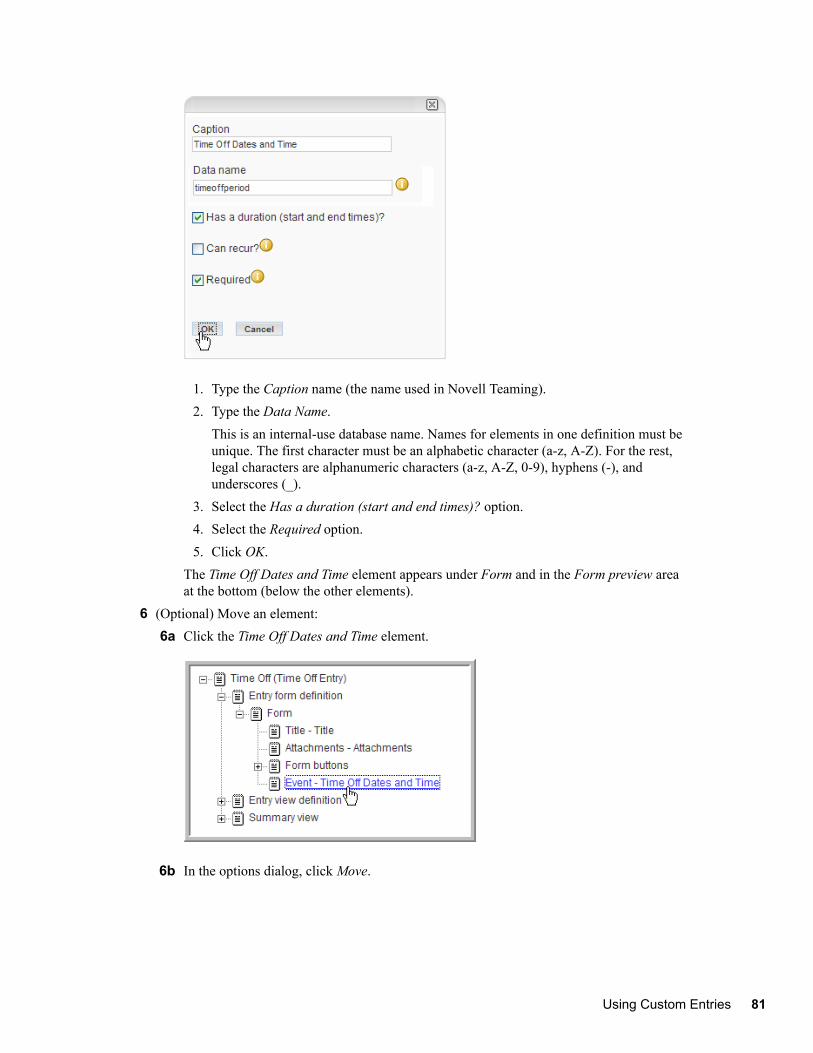
novdocx (en) 24 April 2008
1. Type the Caption name (the name used in Novell Teaming).2. Type the Data Name.
This is an internal-use database name. Names for elements in one definition must be unique. The first character must be an alphabetic character (a-z, A-Z). For the rest, legal characters are alphanumeric characters (a-z, A-Z, 0-9), hyphens (-), and underscores (_).
3. Select the Has a duration (start and end times)? option.4. Select the Required option.5. Click OK.
The Time Off Dates and Time element appears under Form and in the Form preview area at the bottom (below the other elements).
6 (Optional) Move an element:6a Click the Time Off Dates and Time element.
6b In the options dialog, click Move.
Using Custom Entries 81

82 Novell
novdocx (en) 24 April 2008
6c If you want this element to appear below another element, click the element under Form that you want this element to appear under (Title).
6d Select the Move to below the selected item option and click OK.
The Time Off Dates and Time element moves to below the Title element.Or, if you want the element to appear above a selected element, click the Move to above the selected item option and click OK.
7 Add a required Text element named Total Hours Off and move it below the Time Off Dates and Time element.
8 Add a required Text element named Reason for Time Off and move it to below the Title element.9 Add a container:
So far all the elements have been added below Form, which is itself a container. In this step you want to add a Box container below form and move the Time Off Dates and Time element into the box.9a Click Form.
Teaming 1.0 Administration Guide

novdocx (en) 24 April 2008
9b In the options dialog, click Add.
The Standard Form Elements and Layout Options appear to the right. Every element under Layout Options, except Divider, is a container.
9c Click Box.
9d Select Square with border and click OK.
9e Click Time Off Dates and Time.
Using Custom Entries 83

84 Novell
novdocx (en) 24 April 2008
9f In the options dialog, click Move.
9g Click Box.
9h Select Move into the selected item and click OK.
Your custom form should now look like this:
Teaming 1.0 Administration Guide
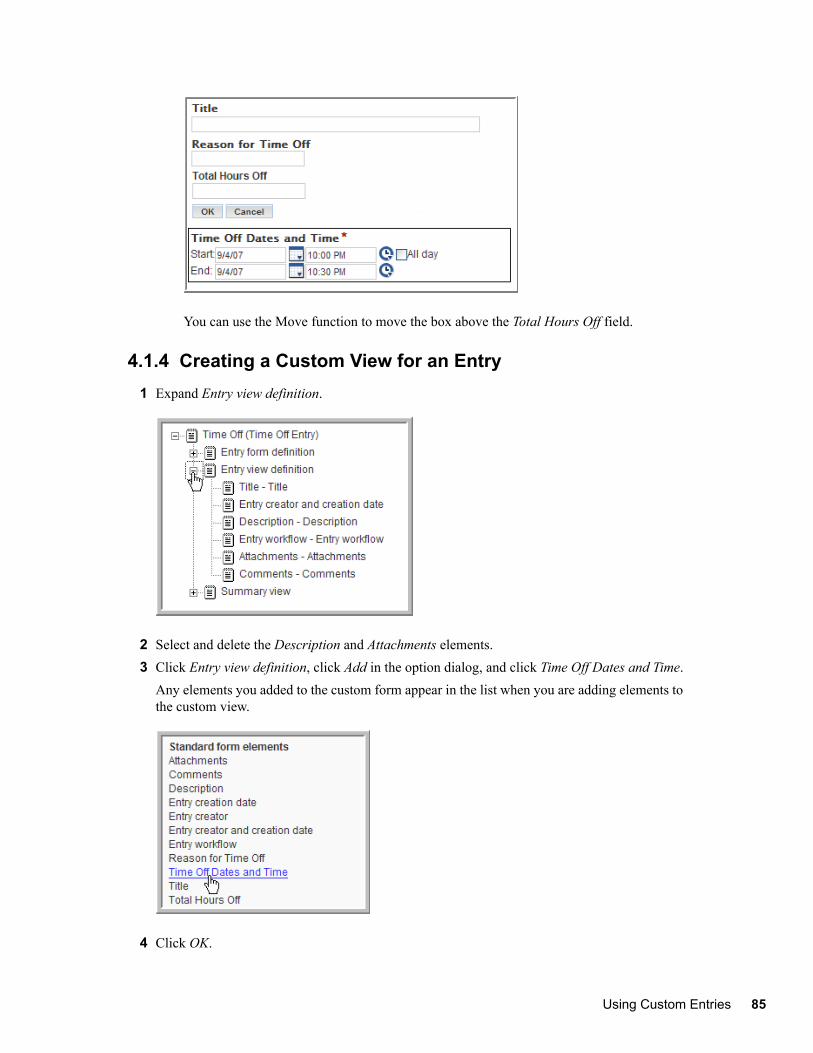
novdocx (en) 24 April 2008
You can use the Move function to move the box above the Total Hours Off field.
4.1.4 Creating a Custom View for an Entry1 Expand Entry view definition.
2 Select and delete the Description and Attachments elements.3 Click Entry view definition, click Add in the option dialog, and click Time Off Dates and Time.
Any elements you added to the custom form appear in the list when you are adding elements to the custom view.
4 Click OK.
Using Custom Entries 85

86 Novell
novdocx (en) 24 April 2008
5 Click Add in the option dialog, click Reason for Time Off, then click OK.6 Move the Reason for Time Off element to below the Entry creator and creation date element,
and move the Time Off Dates and Time element to below the Reason for Time Off element.Your custom view for this custom entry should now contain these elements in the following order:
NOTE: The Summary view is used for Blogs or Guestbooks. You can create a custom Summary view in the same manner as the custom view in this procedure.
4.2 Using a Custom EntryCustom entries can be assigned to any folder, but you might want to configure specific folders for some types of custom entries, depending on their purpose. For example, you might want a folder that only contains the Time Off custom entries.
For the Time Off custom entry, assume that a team plans to create a special folder that only contains these specific entry types. The following procedures show you how to add this custom entry to a team folder and configure the folder to only utilize this entry type.
Section 4.2.1, “Configuring a Folder to Use Your Custom Entry,” on page 86Section 4.2.2, “Adding a Time Off Entry,” on page 88Section 4.2.3, “View the Time Off Entry,” on page 89
4.2.1 Configuring a Folder to Use Your Custom Entry1 Find the folder you want to use for the team’s Time Off entries (Engineering > Time Off Entries
for this example procedure).2 Select the Manage > Configure menu item.
Teaming 1.0 Administration Guide

novdocx (en) 24 April 2008
3 Under Allowed Views, select the Discussion folder viewed as a table and Discussion folder viewed as a list options, deselect any others, then click Apply.
4 Under Default view, select the Discussion folder viewed as a list option and click Apply.
5 Under Default entry types, select the Time Off entry type (deselect any others) and click Apply.
Users can now only enter Time Off entries in this folder.
Using Custom Entries 87

88 Novell
novdocx (en) 24 April 2008
6 At the top or bottom of this window, click Close.
4.2.2 Adding a Time Off Entry1 Select the New > Time Off menu item.
Time Off should be the only available menu item.2 Fill out the Time Off entry form.
Type in Title, Reason, select your time off period Start and End dates (time), and type the Total Hours Off.
3 Click OK.The new entry is added to the Time Off folder.
Teaming 1.0 Administration Guide
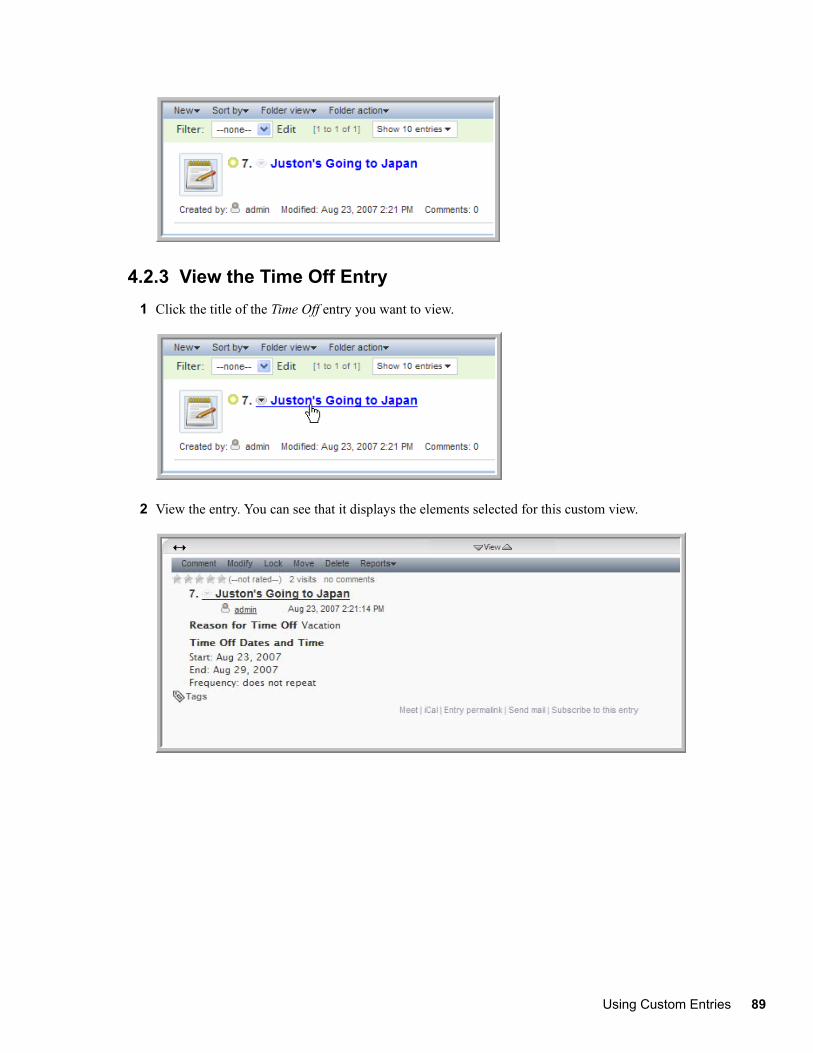
novdocx (en) 24 April 2008
4.2.3 View the Time Off Entry1 Click the title of the Time Off entry you want to view.
2 View the entry. You can see that it displays the elements selected for this custom view.
Using Custom Entries 89

90 Novell
novdocx (en) 24 April 2008
Teaming 1.0 Administration Guide
5novdocx (en) 24 A
pril 2008
5Advanced Workflow
This section expands the workflow design presented in “Creating a Basic Workflow Process” on page 47 by using Novell Teaming’s Advanced Workflow add-on module to more closely match the needs of a typical production-ready system (for example, using questions).
NOTE: You must purchase the Advanced Workflow add-on module to perform any transitions in your workflows other than manual transitions.
Despite the power of manual transitions, there are many times when a business process calls for a more complex set of conditions, such as when someone adds a reply to a question in the entry, or when a certain number of days have passed without a transaction occurring.
In many complex transition scenarios, it can be helpful to define a workflow question for your process.
This section provides two example procedures; one for adding a question to a workflow and one for configuring state transitions based upon responses to a workflow question, which appears when the entry is in a specific state. The first section walks through the workflow designer to describe all the various features.
Section 5.1, “Reviewing the Workflow Features,” on page 91Section 5.2, “Adding a Question to the Workflow,” on page 95Section 5.3, “Adding Transitions on Response,” on page 99
NOTE: A workflow question allows the workflow process to use a set of answers to determine whether and how an entry should transition.
5.1 Reviewing the Workflow FeaturesThis section demonstrates and defines the various workflow features.
To open the workflow designer:
1 From the Teaming Administration portlet on the initial Liferay portal window, click the plus sign (+) to the left of Form and view designers to expand this section and view the available designers.
To add the Teaming Administration portlet to the Liferay portal window, see “Adding the Teaming Administration Portlet to Your Home Page” on page 14.
Advanced Workflow 91
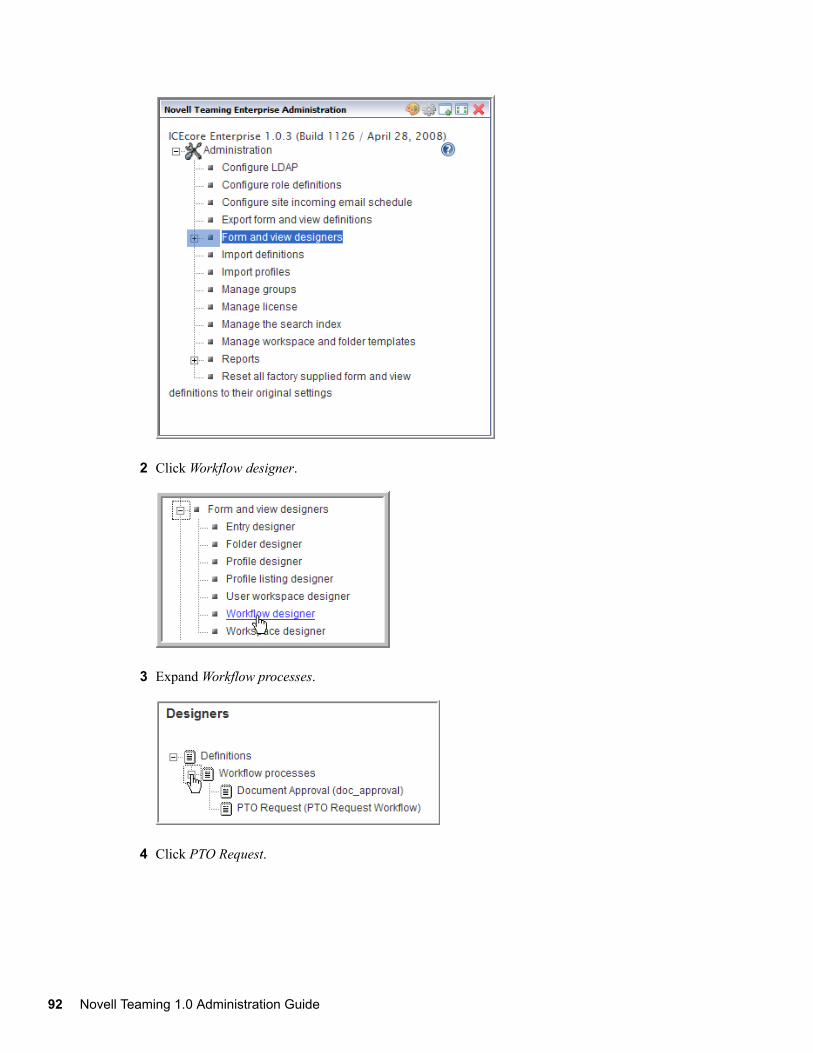
92 Novell
novdocx (en) 24 April 2008
2 Click Workflow designer.
3 Expand Workflow processes.
4 Click PTO Request.
Teaming 1.0 Administration Guide
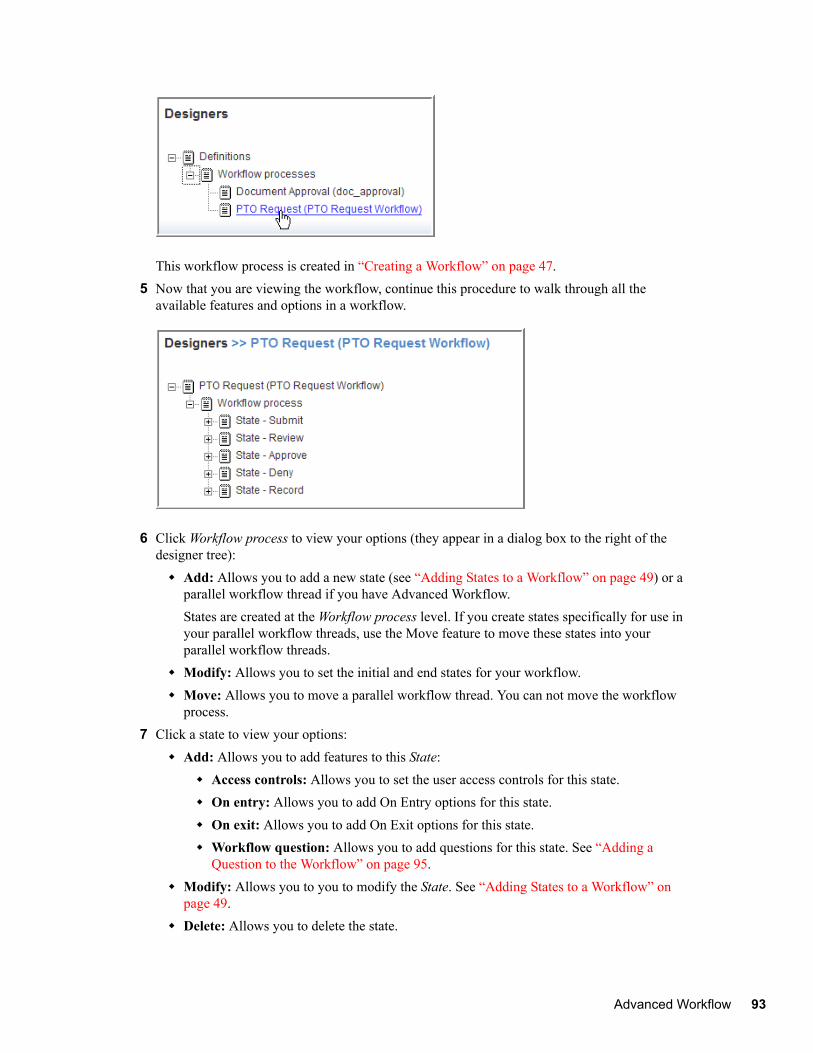
novdocx (en) 24 April 2008
This workflow process is created in “Creating a Workflow” on page 47.5 Now that you are viewing the workflow, continue this procedure to walk through all the
available features and options in a workflow.
6 Click Workflow process to view your options (they appear in a dialog box to the right of the designer tree):
Add: Allows you to add a new state (see “Adding States to a Workflow” on page 49) or a parallel workflow thread if you have Advanced Workflow.States are created at the Workflow process level. If you create states specifically for use in your parallel workflow threads, use the Move feature to move these states into your parallel workflow threads.Modify: Allows you to set the initial and end states for your workflow.Move: Allows you to move a parallel workflow thread. You can not move the workflow process.
7 Click a state to view your options:Add: Allows you to add features to this State:
Access controls: Allows you to set the user access controls for this state.On entry: Allows you to add On Entry options for this state.On exit: Allows you to add On Exit options for this state.Workflow question: Allows you to add questions for this state. See “Adding a Question to the Workflow” on page 95.
Modify: Allows you to you to modify the State. See “Adding States to a Workflow” on page 49.Delete: Allows you to delete the state.
Advanced Workflow 93

94 Novell
novdocx (en) 24 April 2008
Move: Allows you to move the state.8 Expand the Review state:
9 Click Transitions, then click Add to review the types of transitions you can add to your workflow:
Manual transition: Creates a workflow drop-down list in the entry. It is used to manually transition the entry to a new state.
NOTE: This is the only transition type in basic workflow.
Transition after time elapsed: Allows you to automatically transition an entry to a new state after a designated time period.Transition on a variable: Allows you to transition an entry to a new state based on a variable’s value. You can create and change variable values using the On entry and On exit options.Transition on comment: Allows you to transition an entry to a new state when a comment is added to the entry (this is useful for review purposes).Transition on entry data values: Allows you to transition an entry to a new state based on the value that a user specifies for a custom element in the entry. For example:
If you wanted to assign an entry to a specific state based on a value the user selects, you define a custom element with multiple values from which a user selects (from a drop-down list on the form). Map each of these values to specific states in the initial workflow state by using the Transition on entry data values option. This option is useful for assigning help tickets in a help desk, assigning entries to the appropriate review contact, etc.If you wanted to transition an entry at a specific time, you could transition the entry based on a custom date element.
Transition on modify: Allows you to transition an entry to a new state when it is modified (this is useful for review purposes).
Teaming 1.0 Administration Guide
novdocx (en) 24 April 2008
Transition on response: Allows you to transition an entry to a new state based on a response to a question in the entry. Map each possible answer to a workflow question to one of these transitions using the Data name of for each Workflow response. See “Adding Transitions on Response” on page 99.Wait for parallel thread(s) to end: Allows you to transition an entry to a new state when one or more specified parallel workflows end.
10 Click Access controls, then click Add to review the types of access controls you can add to each state (only use these features to limit access):
Read access: Grants read access to an entry in this state to the users and groups you specify.Transition into this state: Grants the ability to move an entry into this state to the users and groups you specify. This state appears in the manual transitions drop-down list in an entry only if the user has the appropriate access rights.Transition out of this state: Grants the ability to move an entry out of this state to the users and groups you specify.Modify access: Grants modify access to an entry in this state to the users and groups you specify.
For more information, see “Setting Access Controls” on page 60.11 Click Workflow question > Add > Workflow response to add a response to a workflow question.
See “Adding a Question to the Workflow” on page 95.12 Click On entry or On exit, then click Add to review the types of on entry and exit features you
can add to each state:Move entry: Allows you to move an entry to a new location in Novell Teaming when it transitions into or out of a specific state.Notifications: Allows you to notify specific users or groups about a specific entry when it enters or exits a specific state.Start a parallel workflow thread: Allows you to start a parallel workflow when an entry enters or exits a specific state. Stop a workflow thread: Allows you to stop a parallel workflow when an entry enters or exits a specific state.Workflow variable: Allows you to create or change the value of a variable when an entry enters or exits a specific state. This is used with the Transition on a variable option to create automated workflows.
5.2 Adding a Question to the WorkflowNOTE: A question can be specific to one state. As another option, you can define a global question, which you can then associate with any number of states; this is helpful when multiple states require the same question and answer set. Each state can have only one associated question.
For example, consider the following table:
Advanced Workflow 95

96 Novell
novdocx (en) 24 April 2008
Table 5-1 PTO Request Process
When reviewing the conditions table, look for conditions that can be automated. For example, the third and fourth items are excellent examples of conditions that can be determined automatically by using workflow tools.
For example, you can alter the implementation of the PTO Request workflow, so that the manager’s answer to a workflow question determines if a request is Approved or Denied. Given the design of the PTO Request workflow, the workflow question should appear to the manager in the Review state.
To add a Workflow Question and Responses to the Review State:
NOTE: The Transition out of this state access control determines who can view a Workflow question in a given state (see Section 3.2.3, “Setting Access Rights,” on page 62).
1 From the Teaming Administration portlet on the initial Liferay portal window, click the plus sign (+) to the left of Form and view designers to expand this section and view the available designers. To add the Teaming Administration portlet to the Liferay portal window, See “Adding the Teaming Administration Portlet to Your Home Page” on page 14.
Condition Causes the work to transition to…
The employee enters a PTO Request. Submit
The manager indicates receipt. Review
The manager approves the request. Approve
The manager denies the request. Deny
HR has entered the approved vacation Record
Teaming 1.0 Administration Guide

novdocx (en) 24 April 2008
2 Click Workflow designer.
3 Expand Workflow processes.
4 Click PTO Request.
5 Expand Workflow process and click State - Review.
6 In the options dialog on the right, click Add.
Advanced Workflow 97

98 Novell
novdocx (en) 24 April 2008
7 Click Workflow question.
8 Type the Question text (Do you approve of this request?) and the Data name (approve_request), then click OK.
The Workflow question process appears below the Review state.9 Click Workflow question.
10 Click Add.
Teaming 1.0 Administration Guide

novdocx (en) 24 April 2008
11 Click Workflow response.
12 Type the Data name (approve_request_yes) and the Response text (Yes), then click OK.
The Workflow response is added below the Workflow question.13 Repeat Step 9 through Step 12 to add a “No” response to this Workflow question.
5.3 Adding Transitions on ResponseIMPORTANT: For the entry to transition to another state based on participants’ responses to the workflow questions, the responses must be associated with the new non-manual response transitions.
The following sections describe how to add response transitions and remove the manual transitions:
Section 5.3.1, “Adding the Response Transitions,” on page 99Section 5.3.2, “Removing Older Transitions,” on page 103
5.3.1 Adding the Response TransitionsThe question, “Do you approve of this request?” has two possible responses. To implement our design, both of the responses must have an associated transition.
Advanced Workflow 99

100 Novell
novdocx (en) 24 April 2008
NOTE: The Transition out of this state access control determines who can view a Workflow question in a given state (see Section 3.2.3, “Setting Access Rights,” on page 62).
1 From the Teaming Administration portlet on the initial Liferay portal window, click the plus sign (+) to the left of Form and view designers to expand this section and view the available designers. To add the Teaming Administration portlet to the Liferay portal window, See “Adding the Teaming Administration Portlet to Your Home Page” on page 14.
2 Click Workflow designer.
3 Expand Workflow processes.
Teaming 1.0 Administration Guide

novdocx (en) 24 April 2008
4 Click PTO Request.
5 Expand Workflow process, expand State - Review, then click Transitions.
6 Click Add.
7 Click Transition on response.
Advanced Workflow 101

102 Novell
novdocx (en) 24 April 2008
Only the Manual transition option is available for the basic workflow. All other transition types are part of the Advanced Workflow add-on module.
8 In the __transition_on_question field, type in the Data name for your Workflow question (approve_request).
9 In the Transition on response field, type the Data name for your Workflow response (approve_request_yes).
10 In the To State drop-down list, select the state to which you are transitioning (Approve).11 Click OK.
The new Transition on response process is added under Transitions.
Teaming 1.0 Administration Guide

novdocx (en) 24 April 2008
12 Repeat this procedure to add a Transition on response for the “No” Workflow response (approve_request_no) that transitions to the Deny state.
5.3.2 Removing Older TransitionsCreating a Transition on response renders the existing manual transitions unnecessary.
1 From the Teaming Administration portlet on the initial Liferay portal window, click the plus sign (+) to the left of Form and view designers to expand this section and view the available designers. To add the Teaming Administration portlet to the Liferay portal window, See “Adding the Teaming Administration Portlet to Your Home Page” on page 14.
2 Click Workflow designer.
Advanced Workflow 103

104 Novell
novdocx (en) 24 April 2008
3 Expand Workflow processes.
4 Click PTO Request.
5 Expand Workflow process, expand State - Review, expand Transitions, then click the first Manual transition.
Teaming 1.0 Administration Guide

novdocx (en) 24 April 2008
6 In the options dialog on the right, click Delete.
7 In the confirmation dialog that appears, click OK to delete the Manual transition.
8 Repeat this procedure to delete the remaining Manual transition for the Review state.
The Workflow section of an entry in the Review state now shows the question and answers for those users with the correct access rights (Managers).
Advanced Workflow 105

106 Novell
novdocx (en) 24 April 2008
Teaming 1.0 Administration Guide

6novdocx (en) 24 A
pril 2008
6The Profile Designer
You use the Profile designer to edit the business card that appears on every user’s workspace. The following procedure shows you how to edit the business cards layout to tailor it for your specific company.
1 From the Teaming Administration portlet on the initial Liferay portal window, click the plus sign (+) to the left of Form and view designers to expand this section and view the available designers. To add the Teaming Administration portlet to the Liferay portal window, See “Adding the Teaming Administration Portlet to Your Home Page” on page 14.
2 Click Profile designer.
3 Expand Profile view and click User.
The Profile Designer 107

108 Novell
novdocx (en) 24 April 2008
You see the following for the user business card.
4 To edit the layout of the business card, expand Business card.
Any element you add to Business card appears below the picture on the business card. Any element you add to the Business card elements appears to the right of the picture on the business card.
5 Add the user’s first name below the picture:5a Click Business card.
Teaming 1.0 Administration Guide

novdocx (en) 24 April 2008
5b Click Add.
The following elements are available:
The upper section has elements for the business card; some are already included in the Business card elements. The Layout options allow you to add custom elements (including additional containers). See “Creating a Custom Form for an Entry” on page 77.
5c Click First name.
The Profile Designer 109

110 Novell
novdocx (en) 24 April 2008
5d Click OK in the dialog that appears.
Profile element - First name appears below the business card.
6 Edit Business card elements:6a Click Business card elements.
You can perform the same steps to add a new element below the Business card elements, which would appear to the right of the picture on the business card, or you can edit the Business card elements to select or deselect the elements that are already in the Business card elements.
Teaming 1.0 Administration Guide

novdocx (en) 24 April 2008
6b Click Modify.
The dialog for Business card elements appears.
6c Select the profile elements you want to appear to the right of the user’s picture on the business card (use the Shift or Ctrl keys to select multiple elements).For this example, select all elements.The Maximum width and Maximum height fields allow you to limit the size of the users’ pictures on their business cards. The graphic is scaled to fit within the maximum width and height that you specify, without distorting the picture (the aspect ratio is maintained).
6d Click OK.You might also need to add the Organization element in the Profile form definition so that users can specify their organizations when they modify their profiles. This is true for any new elements you add to the business card (you need to add the new elements to the Profile form definition so that users can input values when they modify their profiles).
7 Go to a user’s workspace and view the changes. In this example, the Organization element has been given a value for the user.
The Profile Designer 111

112 Novell
novdocx (en) 24 April 2008
Teaming 1.0 Administration Guide

Anovdocx (en) 24 A
pril 2008
ADocumentation Updates
This section lists updates to the Novell Teaming 1.0 Administration Guide that have been made since the initial release of Novell® Teaming. The information helps you to keep current on documentation updates and, in some cases, software updates (such as a Support Pack release).
The information is grouped according to the date when the Novell Teaming 1.0 Administration Guide was republished.
The Novell Teaming 1.0 Administration Guide has been updated on the following dates:
Section A.1, “June 25, 2008 (Teaming 1.0 SP 3),” on page 113
A.1 June 25, 2008 (Teaming 1.0 SP 3)
Location Update
Chapter 2, “Configuring Novell Teaming,” on page 13
Moved the post-installation configuration information from the Novell Teaming Installation Guide to the Novell Teaming Administration Guide.
Section 2.1.2, “Adding the Teaming Administration Portlet to Your Home Page,” on page 14
Added a new section.
Section 2.4.2, “Authenticating Users by E-Mail Address,” on page 17
Added a new section.
Section 2.4.4, “Configuring Novell Teaming for LDAP Authentication,” on page 21
Improved the instructions.
Section 2.4.5, “Testing LDAP Authentication and Synchronization,” on page 23
Added a new section.
Section 2.4.7, “Adding a User Internal Identifier in Novell Teaming,” on page 24
Added a new section.
Section 2.5, “Mail Setup,” on page 27 Improved the instructions.
Section 2.9, “Configuring Mirrored Folders,” on page 43
Improved the instructions.
Section 5.1, “Reviewing the Workflow Features,” on page 91
Added a new overview section.
Documentation Updates 113

114 Novell
novdocx (en) 24 April 2008
Teaming 1.0 Administration Guide

novdocx (en) 24 April 2008
Glossary
access controlThe tool that determines who has the right to perform which tasks in which places. See also role-based access control.
accessibility modeAn optimized user interface that facilitates use by assistive devices, such as auditory readers.
accessoryA section located at the top of a workspace or folder page that provides a summary view, most likely of the information contained within the item. For example, an accessory can show all of the entries within a folder that are authored by someone designated as a subject-matter expert.
advanced searchExtra search tools that allow you to specify more specific criteria (such as the author of an item, or restricting the search to a portion of the workspace tree).
aliasSee e-mail alias.
attachmentA file attached to an entry.
authorThe person who created an entry.
blogA folder that contains a chronological listing of journal entries.
blog archiveA feature of blog folders that allows you to see entries authored in a specific month.
buddy listA list of people whose presence you want to check and whom you contact frequently.
calendarA folder containing entries for scheduled appointments.
clipboardA tool that gathers people’s names. Later, when using a tool that requires names, you can take them from your clipboard.
commentA reply to an entry.
Glossary 115
116 Novell
novdocx (en) 24 April 2008
community tagA keyword tag applied to an item by the owner of a workspace or folder. Other users of the workspace or folder can perform searches based on community tags.
configurationA set of tools that alter the way item content is presented. There are many types of configuration, ranging from setting allowable views for an item, selecting a color scheme, creating custom entries, and enabling workflow processes.
default viewThe configuration of the information you see when you first view a workspace or folder. Some items might be configured to allow alternate views, which you can select.
definitionA set of elements for both the form and view of a workspace, folder, or entry.
designerA tool used to create definitions or workflow processes.
discussionA folder whose entries are discussion topics and comments about those topics.
e-mail aliasAn alternative e-mail address for an e-mail account. To enable e-mail posting into a folder, you must provide an e-mail alias for the one account used to post into all folders in your Novell Teaming installation. Consult with your Novell Teaming site administrator for further assistance; site administrators, consult with the IT person responsible for creating e-mail accounts to create new aliases.
e-mail notificationAn e-mail message that Novell Teaming sends indicating new or changed entries in a folder or subfolder.
entryAn item in a folder.
favorites panelA tool used to save links to workspaces and folders most important to you, providing a method of accessing these places quickly.
file folderA folder whose entries are configured to highlight an attached file and to facilitate file management.
filterA setting that limits a folder listing to only the entries that match the filter’s search criteria. For example, you can create a filter that shows only the contents of a folder authored by you or that were created past a certain date.
folderA container for entries and other folders. Each folder has a type, such as blog, wiki, or calendar, that determines its appearance and features.
Teaming 1.0 Administration Guide

novdocx (en) 24 April 2008
formAn HTML form used to create a workspace, folder, or entry.
global workspaceA workspace that, by default, allows everyone in your organization to participate.
guestbookA folder or accessory whose entries indicate who has visited the place.
help modeA dimmed page and information icons (“i”). When you click on an information icon, Novell Teaming presents a panel of information about that section of the page.
inheritA process by which a workspace or folder automatically uses configuration settings from its parent.
instant message (IM)A quick communication between teammates, using the Conferencing messaging software.
LiferayThe portal software within which Novell Teaming runs by default.
meetingAn online communication by teammates, using the Conferencing messaging software. Conferencing provides tools that assist with online meetings, such as people designated as running the meeting, a way for participants to “raise their hands,” and a whiteboard.
milestoneA folder that, by default, summarizes the status of tasks in a task folder as they relate to meeting project milestones.
navigatorA set of tools that you can use to go anyplace within Novell Teaming you want to go. The tools include “My workspace,” “Favorites,” viewing your teams, search, Help, and a workspace tree.
ownerThe person who created the workspace, folder, or entry.
parallel workflow processA set of state transitions that happen at the same time as other state transitions. A state in the main thread initiates the parallel process, and a state later in the main thread can wait for the completion of the parallel thread.
parentA workspace or folder that contains another workspace or folder. The item contained within the parent is sometimes called its child.
participantAn access role that, generally, by default, allows people to author entries in a folder.
Glossary 117

118 Novell
novdocx (en) 24 April 2008
permalinkA Web address (URL) for a Novell Teaming workspace, folder, or entry that you can copy, paste, and send to teammates so that they can access a page directly by specifying the address in their web browsers.
personal tagA keyword tag that you apply to an item, and that only you can see and use.
personal workspaceA workspace that serves as a person’s home page in Novell Teaming, including contact information, pictures, a personal blog, and more.
photo galleryA folder whose entries are pictures.
portal pageA Web page that can run various applications in sections of its page. For example, Google and Yahoo use portal pages. Sections within a portal page can display the local time, the local weather, your favorite stock quotes, and more.
portletA section on a portal page. Novell Teaming runs within portlets.
presenceA person’s online status (online, away from the computer, offline, status unknown), represented in Novell Teaming by people icons of certain colors.
project-management workspaceA workspace configured to facilitate the tracking of tasks and completion of complex project work.
role-based access controlA mechanism that controls access by assigning people and groups to roles, and the roles determine the rights assigned to those people. See the online help for a list of Novell Teaming default role definitions.
site administratorThe person or people who have the right to perform any task in the Novell Teaming installation.
stateSee workflow state.
subscriptionA way to track new or changed items in Novell Teaming.
tagA keyword that anyone can apply to a workspace, folder, or entry to make it easier to find. See also personal tag and community tag.
Teaming 1.0 Administration Guide

novdocx (en) 24 April 2008
taskA folder that, by default, contains entries that track progress in regard to completing an assignment.
teamAn access role that, by default, allows people to participate in a workspace or folder, to do some minor administrative tasks, and to communicate easily with each other.
team workspaceA workspace that restricts participation to teammates.
templateA set of default configuration settings used to create a new workspace or folder. A template includes at least one definition, access control, and a possible hierarchy of defined items.
type to findA Novell Teaming tool that uses the characters you have typed so far to present a list of possible choices. This tool is active for text boxes whose values are within a defined set: for example, people, places (workspaces and folders), and tags.
viewA presentation of an item’s content. For example, you can view a discussion folder in either a list or table format. By default, most folders use one view (calendar folders use a calendar view, blog folders use a blog view, and so on).
visitorAn access role that, by default, allows people to read entries and make comments on them, but not create new entries.
WebDAVThe Web Distributed Authoring and Versioning protocol. If your system provides a tool that uses this protocol, it allows you to manage Novell Teaming file and folder entries by using the WebDAV window.
wikiA folder whose entries are authored by all participants.
workflowAn online representation of a business process (for example, document review, paid time-off requests, document sign-off, and so on). An entry can have an associated workflow process, which places the entry into various workflow states.
workflow stateA status label for an entry in a workflow process. A state determines who has the right to work with an entry (including who can see it), who needs to be notified, who needs to perform the next task, and which subsequent states are possible.
workspaceA container for folders and other workspaces.
Glossary 119

120 Novell
novdocx (en) 24 April 2008
workspace treeA tool that allows you to navigate the hierarchy of workspaces, sub-workspaces, folders, and subfolders within Novell Teaming.
Teaming 1.0 Administration Guide

![Mining Program Workflow from Interleaved Logs...workflow process. In [3] and [7], a constrained DAG, namely an AND/OR workflow graph (AO graph), is proposed to model a workflow process.](https://static.documents.pub/doc/80x56/5f029b937e708231d4051bcb/mining-program-workflow-from-interleaved-logs-workflow-process-in-3-and-7.jpg)


