Web Graphics with Fireworks November 19, 2003 Page 1 November 19, 2003 http://www.eee.uci.edu/workshops/ Web Images: A Snapshot What kinds of images are used on the web? GIF JPEG What does the name stand for? Graphics Interchange Format Joint Photographic Experts Group Animations Yes No Transparent parts of the image Yes No Color Optimal for low-color or monochrome text Optimal for photos, or images that contain extensive colors What is a source image? A file that is used to generate GIFs and JPEGs. The source file contains information about how the image was created and can be manipulated as needed. Source files are generally not loaded onto webpages, but stored for web development. These newly generated GIF and JPEG files will generally be loaded onto a webpage, but will have a smaller file size and be accessible from Internet browsers. While working in Fireworks, you will want to maintain the Fireworks file as a source file. Always be sure you save the original working document! For more general information about images, check out the “Capturing and Manipulating Digital Images for the Web” workshop! What is “resolution”? Resolution is a fancy way to describe the “sharpness and clarity” of an image. It typically looks like a mathematical expression, like 72 dpi, or 300 dpi. The “dpi” stands for dots per inch. Higher resolution images are usually used for printing publications, and typically have larger file sizes. This is because the computer has to store more information – each dot is assigned a “value”. When creating images for the web, be sure you use 72 dpi. This will keep your file-size low, while ensuring quality “viewing images”.
Transcript
Web Graphics with Fireworks November 19, 2003
Page 1
November 19, 2003 http://www.eee.uci.edu/workshops/
Web Images: A Snapshot
What kinds of images are used on the web? GIF JPEG
What does the name stand for? Graphics Interchange Format
Joint Photographic Experts Group
Animations Yes No Transparent parts of the image Yes No Color Optimal for low-color or
monochrome text Optimal for photos, or images that contain extensive colors
What is a source image? A file that is used to generate GIFs and JPEGs. The source file contains information about how the image was created and can be manipulated as needed. Source files are generally not loaded onto webpages, but stored for web development. These newly generated GIF and JPEG files will generally be loaded onto a webpage, but will have a smaller file size and be accessible from Internet browsers.
While working in Fireworks, you will want to maintain the Fireworks file as a source file. Always be sure you save the original working document!
For more general information about images, check out the “Capturing and Manipulating Digital Images for the Web” workshop!
What is “resolution”? Resolution is a fancy way to describe the “sharpness and clarity” of an image. It typically looks like a mathematical expression, like 72 dpi, or 300 dpi. The “dpi” stands for dots per inch. Higher resolution images are usually used for printing publications, and typically have larger file sizes. This is because the computer has to store more information – each dot is assigned a “value”.
When creating images for the web, be sure you use 72 dpi. This will keep your file-size low, while ensuring quality “viewing images”.
Web Graphics with Fireworks November 19, 2003
Page 2
Web Design: Images in Context There are a few factors to keep in mind when planning the images for your Web site: Consistency: Select a particular graphic motif, and use it throughout your site. (i.e. a
picture of the Sistene chapel as a button on a page with a Picaso type background would NOT be consistent)
Know your audience: If your webpage will be visited by artists, you will want to design a very visual webpage (buttons, backgrounds, etc). If scientists will visit your web page, it should be very clean (drop-down menus, clear colors, etc).
Keep your important stuff “Above the Fold”: You have space of approximately 500 X 300 pixels that will appear on just about every browser, without doing any scrolling. Use this space wisely!
Beware of Image Filesize: It’s very easy to create huge graphic files that look beautiful and load relatively quickly on your browser, but are so huge that they crash the computers of your visitors. One simple way to avoid this is to create your image as usual, then break it into pieces (this is called slicing) before exporting your final file. You can then use HTML to bring those pieces back together.
For example, a file that’s this size Can be broken into four smaller files like this
For more information about Web design, visit the EEE Help and How To Section at http://www.eee.uci.edu/help/, or enroll in one of the Web design workshops
Why Fireworks? Integration with a variety of programs
(Dreamweaver, CorelDRAW, Photoshop and Illustrator, to name a few) Advanced functionality – animations, JavaScript, HTML Coding, etc. Great Price - sold as part of the Macromedia Studio MX 2004 Package!
Free 30-day trial version, http://www.macromedia.com/software/fireworks/ A few of the cool features of Macromedia Fireworks: Photo Manipulation Tools: including red-eye reduction, color adjustments, etc. History Panel: “Undo” and “Redo” actions taken many steps ago through the history panel. Cross Platform Viewers: See what your graphic will look like on a Mac or a PC (View >
{Macintosh or Windows} Gamma)
100 KB
25 KB
25 KB
25 KB
25 KB
Web Graphics with Fireworks November 19, 2003
Page 3
Becoming Familiar with Fireworks!
The opening window of Fireworks looks like the image below. Notice that Fireworks won’t let you do anything, until you open either a new file, or an existing file.
When you click “Create New Fireworks File”, you see this window:
This will establish a new Fireworks file without anything in it. This creates your “blank canvas”.
Connects you to the web, where you can download “bells and whistles” for using Fireworks.
Either open a file that you’ve been working on, or click “Open…” to browse for another file to work on.
Additional Help Options.
If you don’t want to see this window every time you open Fireworks, click “Don’t show again.”
Specify your image size and resolution here
The canvas color will be the “background” for your image. If you decide to change this later, from the menu bar, select Modify > Canvas > Canvas Color…
Notice, Fireworks tells you how large the image will start…
Web Graphics with Fireworks November 19, 2003
Page 4
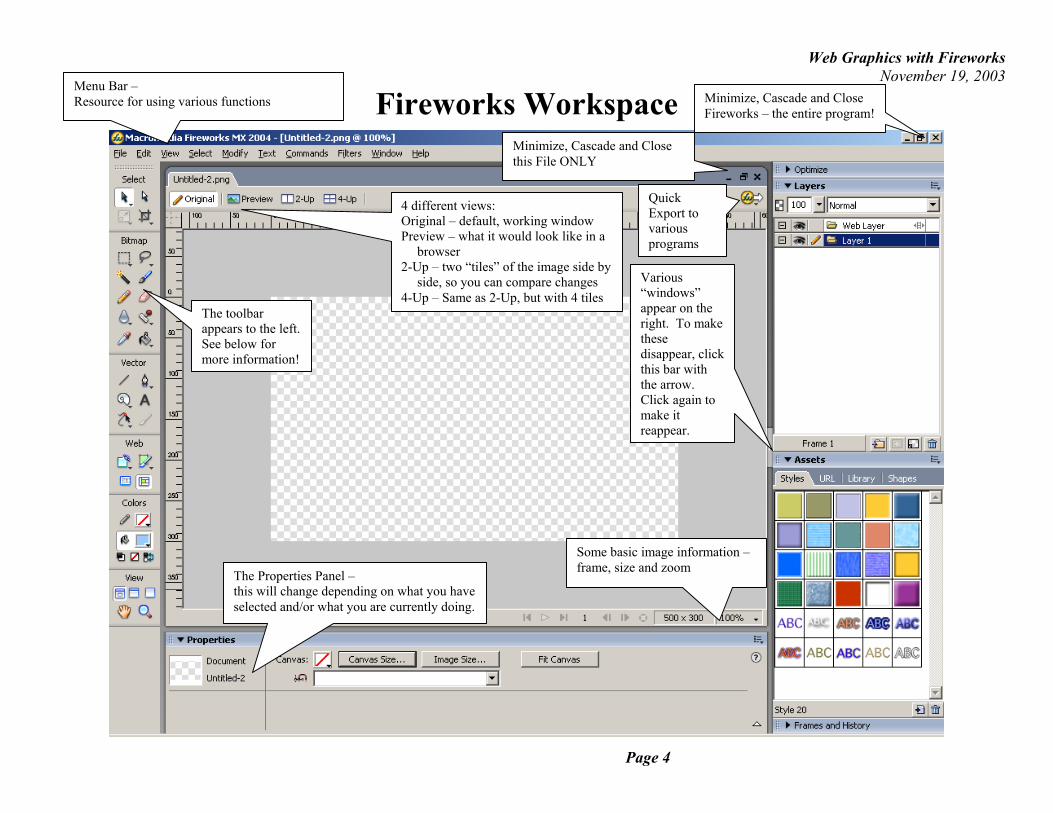
Fireworks Workspace
Minimize, Cascade and Close this File ONLY
Minimize, Cascade and Close Fireworks – the entire program!
4 different views: Original – default, working window Preview – what it would look like in a
browser 2-Up – two “tiles” of the image side by
side, so you can compare changes 4-Up – Same as 2-Up, but with 4 tiles
Some basic image information – frame, size and zoom
Various “windows” appear on the right. To make these disappear, clickthis bar with the arrow. Click again to make it reappear.
Menu Bar – Resource for using various functions
The toolbar appears to the left. See below for more information!
The Properties Panel – this will change depending on what you have selected and/or what you are currently doing.
Quick Export to various programs
Web Graphics with Fireworks November 19, 2003
Page 5
The Fireworks Toolbar The Fireworks toolbar is broken into 6 sections, all of which contain different functionality.
If the button has a small arrow in the lower right hand corner, then there are additional options. Hold the button down, and you’ll see the other choices.
Notice, when you select one of the buttons on the toolbar, your Properties Panel changes according to which button you’ve selected. This allows you to specify particular parameters for the tool you’ve chosen. Be careful adjusting the defaults, until you’re familiar with the tool and how it works.
Select: pick the items to work on
“Pointer”: Selection tool - selects an entire object – all components of an object at once
“Subselection”: Selection tool - selects individual components of an object
To select more than one object, using your “Subselection Tool”, click on the first component. While holding the Shift (Apple Key on a Mac), click on the second item. Repeat for subsequent additions.
NOTE: these tips apply to a vast majority of software programs.
Fireworks Only: To select all the items in a particular area, hold the Control key down and click and drag a box around the area.
“Scale”: Modification tool - change the size of an object while retaining its relative dimensions, once it has been selected
“Crop”: Modification tool - Reduce the size of the image. Once you’ve selected this, you can draw a box around what you want to cut. After you hit enter, everything outside the box disappears.
Web Graphics with Fireworks November 19, 2003
Page 6
Bitmap: Treats objects as a collection of dots, called pixels. Basically views the elements as a mosaic.
“Marquee”: Selection tool –click and drag a box on the image to select a particular area.
“Lasso”: Selection tool –click and drag a boundary around a section of the image to select that section. This tool is not constrained to a box.
“Magic Wand”: Selection tool – click on a color in your image to select similar colors.
“Paint Brush”: Creation tool – “paint” on your canvas.
“Pencil”: Creation tool –draw on your canvas.
In general, the pencil is sharper than the paint brush. This can be changed in the properties panel, but this is generally the difference.
“Eraser”: Modification tool –the only way to delete the characteristics of pixels in bitmap mode.
“Blur”: Modification tool – reduce the sharpness of a section of the image.
“Rubber Stamp”: Modification tool – replace current pixels with other pixels in the image a specified distance away.
“Eyedropper”: Color selection tool – click on any color in the image and it will become the main color in your palette.
“Paint bucket”: Modification tool – fill the selected area with the main color in your color palette. If nothing is selected, the paint bucket will fill the entire canvas.
Web Graphics with Fireworks November 19, 2003
Page 7
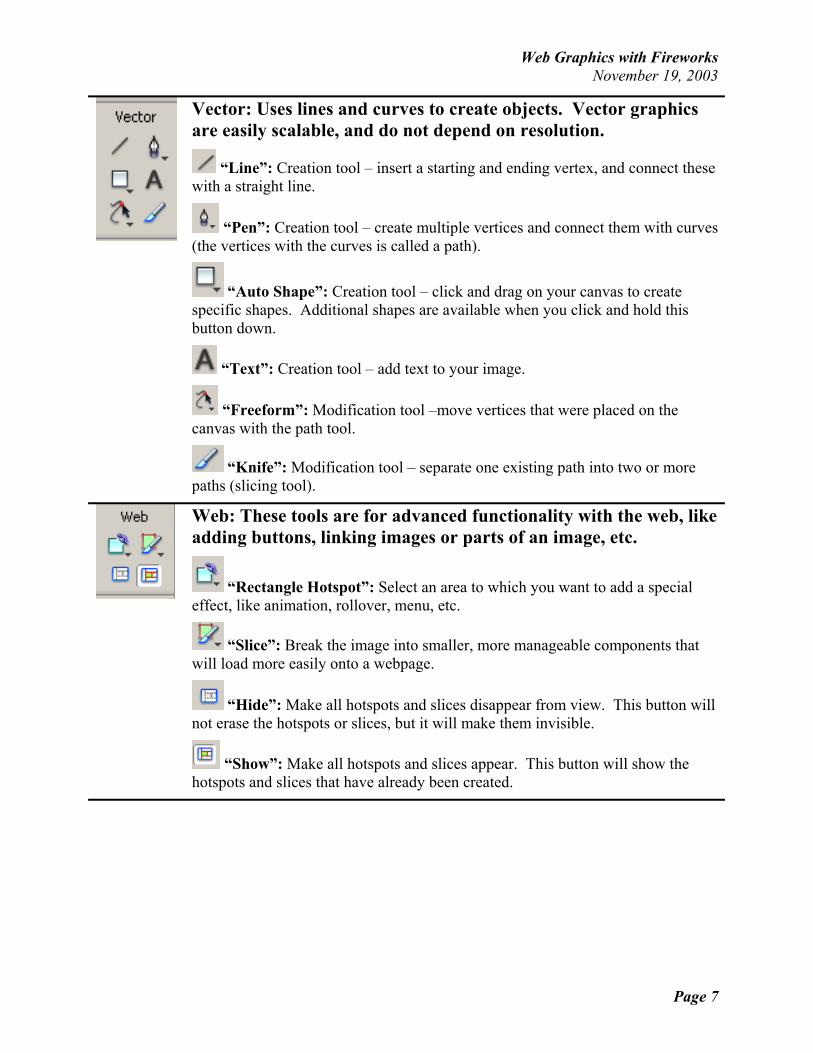
Vector: Uses lines and curves to create objects. Vector graphics are easily scalable, and do not depend on resolution.
“Line”: Creation tool – insert a starting and ending vertex, and connect these with a straight line.
“Pen”: Creation tool – create multiple vertices and connect them with curves (the vertices with the curves is called a path).
“Auto Shape”: Creation tool – click and drag on your canvas to create specific shapes. Additional shapes are available when you click and hold this button down.
“Text”: Creation tool – add text to your image.
“Freeform”: Modification tool –move vertices that were placed on the canvas with the path tool.
“Knife”: Modification tool – separate one existing path into two or more paths (slicing tool).
Web: These tools are for advanced functionality with the web, like adding buttons, linking images or parts of an image, etc.
“Rectangle Hotspot”: Select an area to which you want to add a special effect, like animation, rollover, menu, etc.
“Slice”: Break the image into smaller, more manageable components that will load more easily onto a webpage.
“Hide”: Make all hotspots and slices disappear from view. This button will not erase the hotspots or slices, but it will make them invisible.
“Show”: Make all hotspots and slices appear. This button will show the hotspots and slices that have already been created.
Web Graphics with Fireworks November 19, 2003
Page 8
Colors: Establishes the color palette for your graphic. Specific colors can be chosen for particular components of the graphic.
“Line Color”: Pick a color for the border of the selected item by clicking on the arrow in the lower right corner of the button.
“Fill Color”: Pick a color for the inside of the selected item by clicking on the arrow in the lower right corner of the button.
“Black / White”: Specifies a black line with a white fill for the object that you’ve selected.
“Transparent”: Changes the current selected category (line or fill) to transparent – basically erases all color.
“Switch”: Reverse the line and fill color.
View: Alters the appearance of your window or your place in the window, while you are working on the graphic
“Standard Screen”: Shows program bar (typically the blue bar at the top of the screen that indicates you are in a particular file in Fireworks), menu bar (File, Edit, View, etc), toolbars and docked tabs on the right.
“Full Screen with Menu”: Shows menu bar, toolbars and docked tabs on the right.
“Full Screen without Menu”: Shows toolbar and docked tabs on the right.
“Hand”: Moves your view of the entire graphic, so you can work on/view a specific areas of the graphic. You can click and drag with the hand.
To see the entire image in the current window, double click the hand button.
“Magnify”: Makes your view of the graphic larger, so you can do more detailed editing. You can click in the image to magnify.
To make the graphic smaller, while the magnify button is selected, hold down the Alt key (Apple Key on a Mac) and click in the image.
To quickly see the image in 100% magnification, double click the Magnify button.
Web Graphics with Fireworks November 19, 2003
Page 9
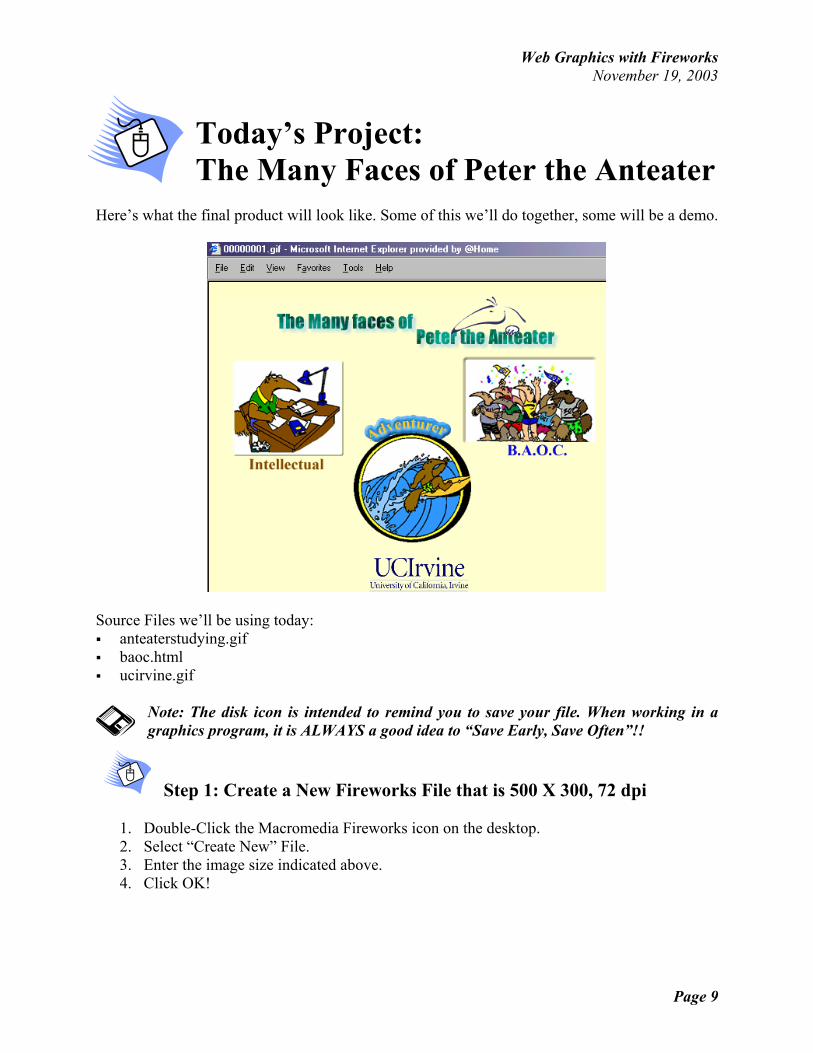
Today’s Project: The Many Faces of Peter the Anteater
Here’s what the final product will look like. Some of this we’ll do together, some will be a demo.
Source Files we’ll be using today: anteaterstudying.gif baoc.html ucirvine.gif
Note: The disk icon is intended to remind you to save your file. When working in a graphics program, it is ALWAYS a good idea to “Save Early, Save Often”!!
Step 1: Create a New Fireworks File that is 500 X 300, 72 dpi
1. Double-Click the Macromedia Fireworks icon on the desktop. 2. Select “Create New” File. 3. Enter the image size indicated above. 4. Click OK!
Web Graphics with Fireworks November 19, 2003
Page 10
Step 2: Add the Title for the Page
1. Select the text tool from the Vector portion of the Toolbar. 2. Click near the top of the page, and type “The Many Faces of Peter the Anteater”.
Fireworks automatically uses the default text parameters.
Where should we look to change the default characteristics of the text?
As you continue to use Fireworks, explore the various sections of the Properties
Panel – these options will greatly enhance your graphics and can be used to create very professional graphics.
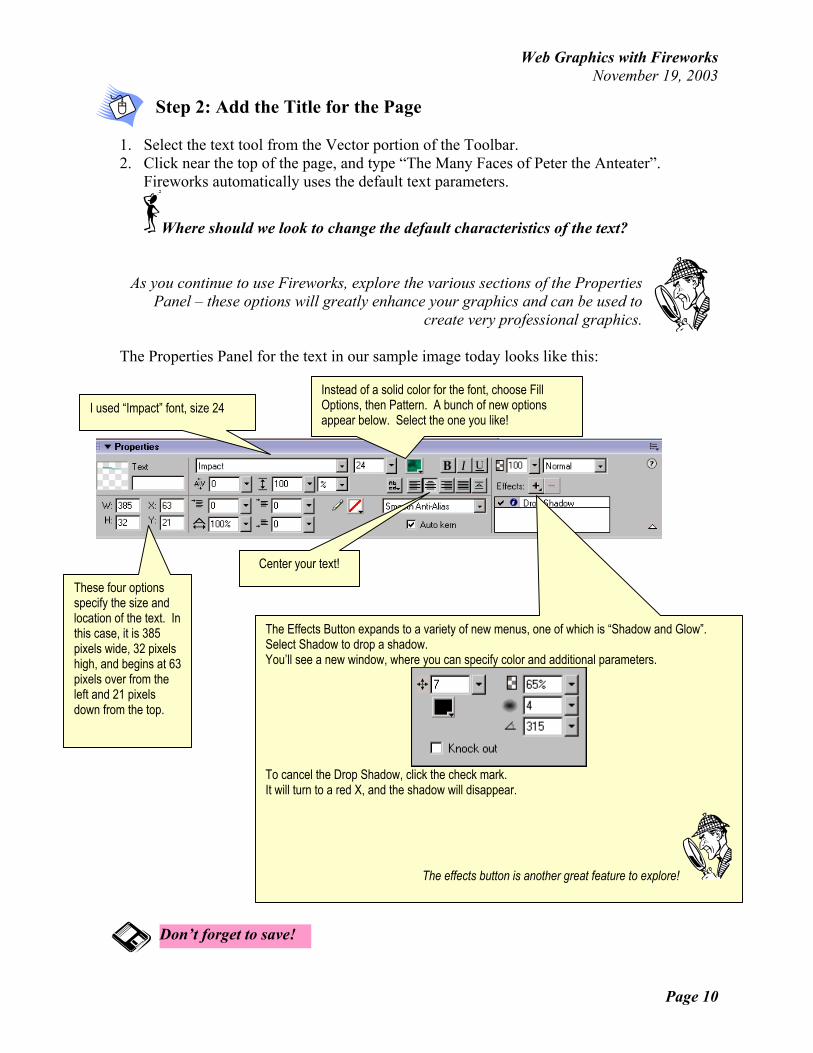
The Properties Panel for the text in our sample image today looks like this:
These four options specify the size and location of the text. Inthis case, it is 385 pixels wide, 32 pixels high, and begins at 63pixels over from the left and 21 pixels down from the top.
I used “Impact” font, size 24 Instead of a solid color for the font, choose Fill Options, then Pattern. A bunch of new options appear below. Select the one you like!
Center your text!
The Effects Button expands to a variety of new menus, one of which is “Shadow and Glow”. Select Shadow to drop a shadow. You’ll see a new window, where you can specify color and additional parameters.
To cancel the Drop Shadow, click the check mark. It will turn to a red X, and the shadow will disappear.
The effects button is another great feature to explore!
Don’t forget to save!
Web Graphics with Fireworks November 19, 2003
Page 11
Demonstration: Adding Peter to the Title of the Page
1. Select the words “Peter the Anteater”.
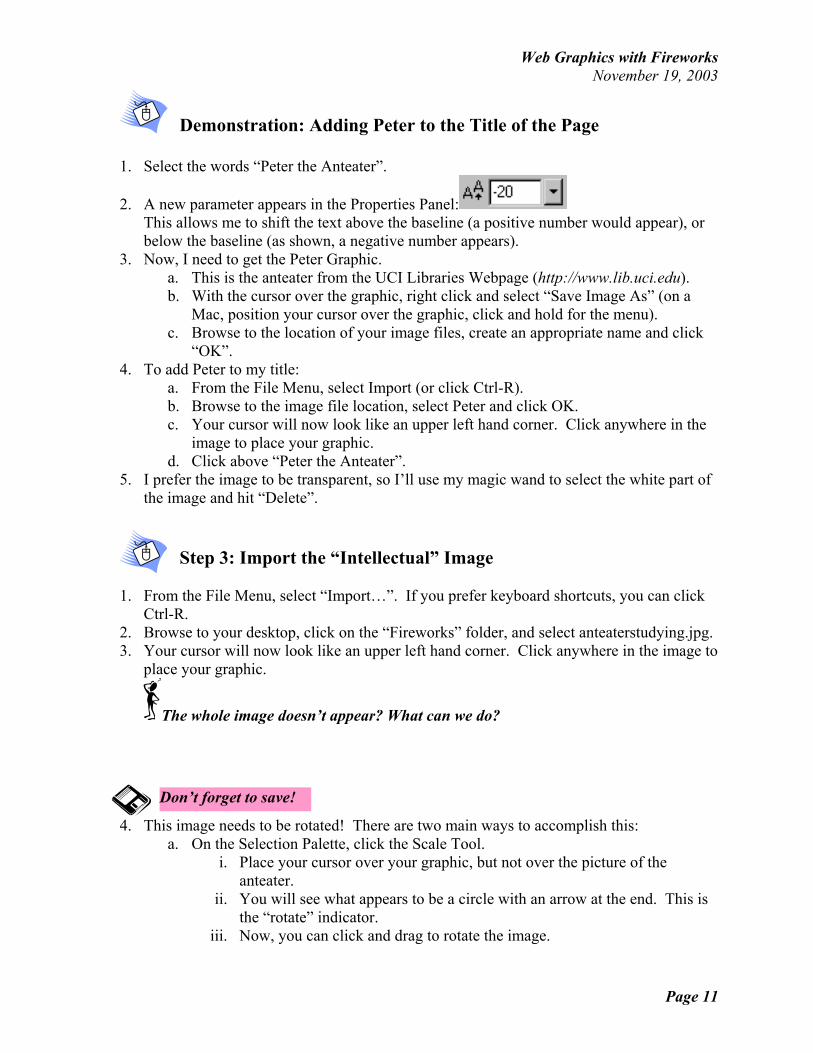
2. A new parameter appears in the Properties Panel: This allows me to shift the text above the baseline (a positive number would appear), or below the baseline (as shown, a negative number appears).
3. Now, I need to get the Peter Graphic. a. This is the anteater from the UCI Libraries Webpage (http://www.lib.uci.edu). b. With the cursor over the graphic, right click and select “Save Image As” (on a
Mac, position your cursor over the graphic, click and hold for the menu). c. Browse to the location of your image files, create an appropriate name and click
“OK”. 4. To add Peter to my title:
a. From the File Menu, select Import (or click Ctrl-R). b. Browse to the image file location, select Peter and click OK. c. Your cursor will now look like an upper left hand corner. Click anywhere in the
image to place your graphic. d. Click above “Peter the Anteater”.
5. I prefer the image to be transparent, so I’ll use my magic wand to select the white part of the image and hit “Delete”.
Step 3: Import the “Intellectual” Image
1. From the File Menu, select “Import…”. If you prefer keyboard shortcuts, you can click Ctrl-R.
2. Browse to your desktop, click on the “Fireworks” folder, and select anteaterstudying.jpg. 3. Your cursor will now look like an upper left hand corner. Click anywhere in the image to
place your graphic.
The whole image doesn’t appear? What can we do?
4. This image needs to be rotated! There are two main ways to accomplish this: a. On the Selection Palette, click the Scale Tool.
i. Place your cursor over your graphic, but not over the picture of the anteater.
ii. You will see what appears to be a circle with an arrow at the end. This is the “rotate” indicator.
iii. Now, you can click and drag to rotate the image.
Don’t forget to save!
Web Graphics with Fireworks November 19, 2003
Page 12
b. Modify > Transform > Free Transform (or hit Ctrl-T). i. Again, you will see the rotate indicator when you hover outside the picture
on your canvas. ii. You can click and drag to rotate.
iii. Hit Enter to “Save” your rotation. 5. This image is way too big for our space, because we want a variety of things to appear
above the fold.
How can we scale the image so that it is sufficiently small? 6. To add a caption, we will need to add some text.
a. From the Vector section of the toolbar, click the “Text” tool. b. Now, click directly below the image, and type “Intellectual”. c. In the sample, the text is the same color as Peter’s skin. d. Select all the text.
e. In the Properties window, click the color box. You’ll see a new popup window that gives you a bunch of colors. However, we want to select a color that’s already in our image.
f. You’ll probably notice that your cursor suddenly turned into an eyedropper. This will allow you to pick any color in the window. Click anywhere in Peter’s skin, and you’ll see that the color of the text has changed to the color of Peter’s skin.
Don’t forget to save!
Web Graphics with Fireworks November 19, 2003
Page 13
Step 4: Peter the B.A.O.C.
1. We want to use an image from another source, without saving the file to our computer. The newest version of Fireworks has a fancy shmancy feature that let’s us accomplish this.
2. Open the following URL in an Internet Browser window: http://www.reg.uci.edu/IMAGES/ANTEATERS/
3. Be sure both Fireworks and your Browser window are visible. If not, click the “Restore” button in the upper right corner of the application window.
4. Click on the “Celebration” image in the browser window (it’s the second to last image). 5. While still holding the mouse button down, drag the image into Fireworks. You’ll see a
“+” in the Fireworks window. 6. Release the mouse button. 7. The image should be in your Fireworks file!!
Technology makes it very easy to copy an image from just about any site. When creating webpages, always be cognizant of copyright issues associated with images and source files!
8. Now, scale your image as necessary, and add the B.A.O.C. caption.
Step 5: Add the internal link to B.A.O.C.
1. With your pointer tool, select the “B.A.O.C.” Caption. 2. From the Edit Menu, select Insert > Hotspot (or, Ctrl-Shift-U on the keyboard). 3. Now, Fireworks knows that you might want to add some functionality to your caption. 4. Your Property Window will again look different. To add your link, type the file location
in the “Link” box and alternate text in the “Alt” box. Your screen should look like this:
5. Now, click anywhere outside the “Hotspot”. 6. Your link has been created!
Don’t forget to save!
Don’t forget to save!
Web Graphics with Fireworks November 19, 2003
Page 14
Demonstration: Peter the Adventurer!
1. Import the anteatersurfing.jpg graphic. 2. Hold the marquee tool down, until you see a circle marquee. Click and drag a marquee
around the center of the graphic. 3. From the Select Menu, choose “Select Inverse”. This deselects what you’ve selected, and
selects what you didn’t select originally. 4. Click “Delete”. The rest of the black box surrounding the circular center is now gone! 5. Now, I want to add fancy text that goes in a bit of a circle around this new image.
a. Using the text tool, type “Adventurer” near the image. b. In the Vector section of the palette, click and hold the rectangle tool until you see
all the options. Select “Ellipse”. c. In the image, click and drag a circle around the anteater surfing graphic.
Make the ellipse slightly larger than the original graphic. d. Since I don’t want this image to show over my original graphic, I’ll choose
Modify > Arrange > Send to Back. This will put the new ellipse behind everything else.
e. Now I want to attach the “Adventurer” text to my ellipse. Using the pointer tool, select the text, hold the shift key down and select the ellipse.
f. From the Text Menu, click “Attach to Path” (or Ctrl-Shift-Y from the keyboard). Now, the text follows the path of the ellipse.
g. To make the text fancy, Use the pointer tool to select the text and click on the “+” by the Effects section of the Properties Panel.
h. Just to be sure the text moves with the graphic, click on the Pointer Tool (if not already selected), and using the Control key, create a box around the whole thing.
i. From the Modify Menu, select Group (or Ctrl-G from the keyboard). This will ensure that the entire graphic (caption and image) will move as a single unit.
Step 6: UC Irvine Logo
1. Import the “ucirvine.gif” image from the Fireworks folder on the desktop. 2. Place it near the bottom of the graphic. 3. To make the logo a bit more aesthetically pleasing, use the magic wand tool to select the
white background of the logo. 4. Once selected, hit “Delete”. 5. Insert a hotspot on the image, and link it to http://www.uci.edu.
Don’t forget to save!
Web Graphics with Fireworks November 19, 2003
Created by Caryn Neiswender, November 2003 Page 15
Step 7: Cropping
1. There is a significant portion of the canvas that is not filled with any images. To remove this “blank” section, we will need to crop the document.
2. On the Selection palette, click the Crop tool. 3. In the image, click and drag a box of appropriate size around the graphic. 4. When you release, you will see a new selection box around your image. This box can be
resized as necessary using the white boxes on the border. The areas of the graphic that are not selected will have a “gray cover” over them. This allows you to focus in on your selection visually.
5. Once you have sized your selection appropriately, hit the “Enter” key on the keyboard. 6. The unselected portion will disappear, and you will be left with a smaller graphic.
Demonstration: Slicing and Export to Dreamweaver Slicing is the process of breaking a larger image into more manageable pieces. These new sections of your graphic will be smaller in size, and easier to load for web browsers.
1. On the Web palette, click the Slice tool. 2. Click and drag rectangles around the graphic. Each rectangle will become a “slice.” 3. There are three main ways to export your graphic into a Dreamweaver document:
a. File Menu > “Export Wizard”. This will walk you through the process of exporting your graphic and will help in the optimization of your image.
b. File Menu > “Export Preview”. This preview is a shorter process, wherein you can select parameters and optimize your graphic without prompts.
c. Icon in the upper right corner of the window: click “Export HTML” to make your graphic accessible to Dreamweaver
Additional Topics to Explore: Try adding a Pop-Up Menu.
Insert a hotspot, then from the Modify Menu, Click “Add Pop-Up Menu”. Try adding a button – Fireworks has some of these built in.
From the Edit Menu, Select Insert, then “New Button”. Check out the bullets and images available in Fireworks’ Libraries (Edit >
Libraries)
If you get stuck… Contact Dwayne or Caryn! Dwayne: [email protected], 824.5274 (from on campus, ext 45274) Caryn: [email protected], 824.3638 (from on campus, ext 43638)