NSX SRS Module Removal and Check Symptoms: SRS light on, flickering, or turns on and off depending on acceleration or deceleration. Added Concerns: Air Conditioner Drain Blocked (or was) Water under Rugs (Passenger or Driver) NOTE: If while the SRS light is on, the horn or cruise control doesn’t work, this may be due to a stretched ‘cable reel’ or fuse. If you have that situation, I would CHECK THIS FIRST! Created 8/30/2009 Updated: 8/31/2009 Michael Lohr
Transcript
NSX SRS Module Removal and CheckSymptoms:
SRS light on, flickering, or turns on and off depending on acceleration or deceleration.
Added Concerns:
Air Conditioner Drain Blocked (or was)
Water under Rugs (Passenger or Driver)
NOTE: If while the SRS light is on, the horn or cruise control doesn’t work, this may be due to a stretched ‘cable reel’ or fuse. If you have that situation, I would CHECK THIS FIRST!
Created 8/30/2009
Updated: 8/31/2009
Michael Lohr
NSXPrime ID: Madbox
Forward• Everything written in this document is from my experience. I’m not a certified mechanic or in anyway affiliated with Honda. It is the best advice I can give for the situation I ran into.
• I have posted this for use by anyone who may need it.
• All that said, if you have symptoms suggesting you may need to check your SRS Module, get yourself in the right mind set for this job:
From the movie 300…“This will not be over quickly; you will not enjoy this.”
Situation• Your SRS light is on. It can remain on, flicker or it may go on or off depending on acceleration or deceleration. NOTE: First check to see if the horn or cruise control works while the light is on, if one or both doesn’t, this may be due to the ‘cable reel’ or fuse. CHECK THAT FIRST!
• It has been discovered by a few people that condensation from the air conditioning system can accumulate and overflow onto the SRS module located beneath the radio under the dashboard.
• This is nearly always due to the AC drain being plugged. Reportedly it can also happen on extremely humid days with heavy AC use.
• Generally the rugs on the driver side, passenger side or both will be wet. Once the water hits the SRS module, most of it will make it’s way to the rugs but some of it can get inside the module and cause corrosion.
• This is documentation on how to remove the SRS module, disassemble it and check for corrosion. It took me 13hrs with mild direction. The intent of this is to get you complete under 6, maybe as low as 3. It was done on a 1992 NSX. I can’t speak to weather it would be different on other models.
Tools Needed.Definitely:• Phillips head screw driver• Flat head screw driver• Paper towel or old shirt• T-30 torque screw driver or socket
Likely:• Standard Pliers• Metric Socket Set• Drill• 7/32 Drill bit• Self Tapping Screws (medium size)• Heavy duty trash bag (for plastic material)• Zip Ties
Hopefully not:• Dremel
Preparation
1. Start your NSX2. Turn on the climate control and turn the fan on (neither the temperature or
fan speed is important)3. Manually select the air flow so it is all directed to the feet. This is
important because there is a lever which moves out of interference when in this position. If the air direction is in any other position you will be unable to remove the passenger center counsel rug.
4. Turn car off.5. Remove the key from the ignition.6. Remove negative battery lead followed by the positive (To be safe we
disconnect the battery). People have removed the module with only the key out of the ignition. I couldn’t confirm that this was safe so I unplugged the battery.
7. Take note of the time. You will need to wait 30 minutes prior to un-connecting the SRS module because there is a battery backup in case there is a loss of power in a crash. 30 minutes is the safe amount of time to wait according to the manual.
8. We’ll keep going as it will probably take us at least 30 minutes to get to the module.
Remove Center Council
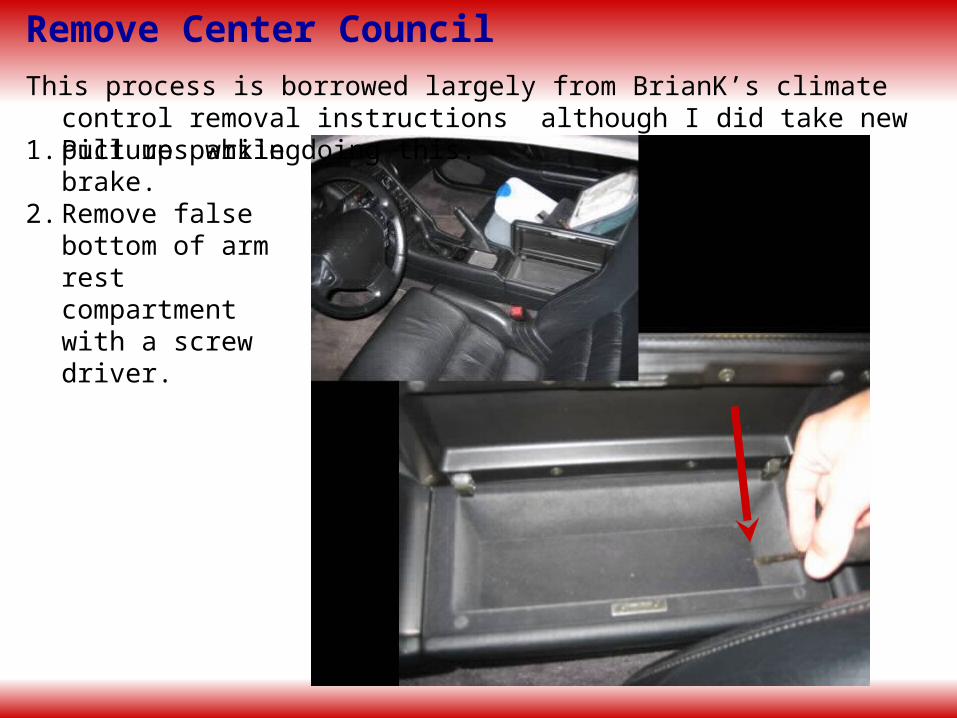
This process is borrowed largely from BrianK’s climate control removal instructions although I did take new pictures while doing this.
1. Pull up parking brake.
2. Remove false bottom of arm rest compartment with a screw driver.
Remove Center Council• Remove the 4 screws holding the
arm rest.
• Remove arm rest (It pulls straight up).
• Remove 1 screw from where the front of the arm rest sat.
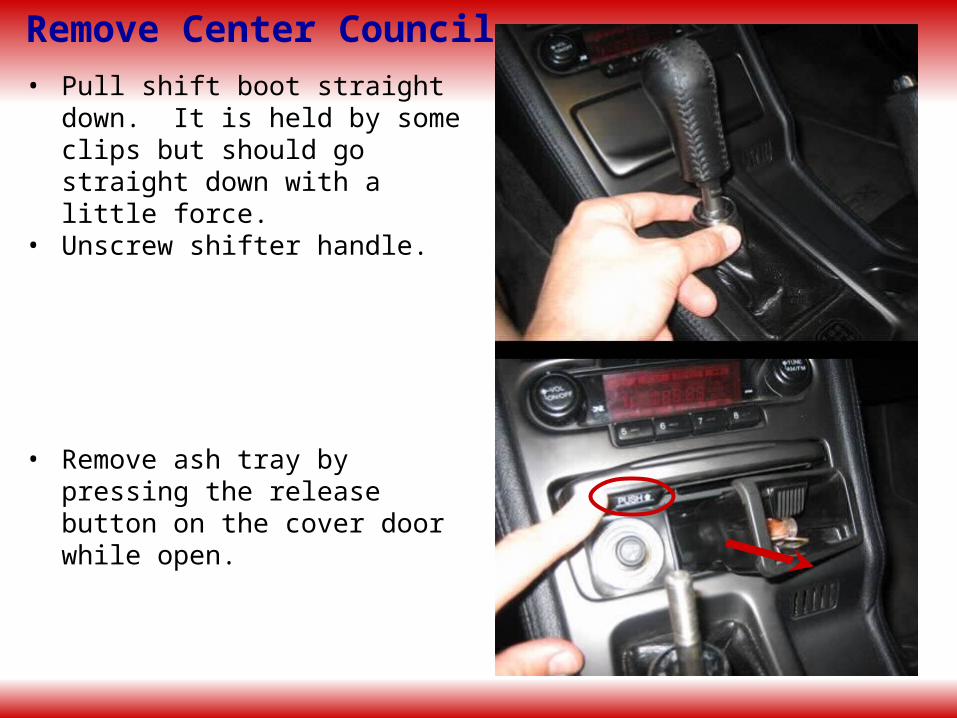
Remove Center Council• Pull shift boot straight down. It is
held by some clips but should go straight down with a little force.
• Unscrew shifter handle.
• Remove ash tray by pressing the release button on the cover door while open.
Remove Center Council• Remove the two screws under
where the ash tray was.
• Carefully remove the clock. There are two clips, one per side. Using one of the upper corners seems to work best with a flat head screw driver. Use a paper towel or something to protect the plastic. Do one side then the other. Disconnect the harness once you have it out.
Remove Center Council• Remove the two screws under
where the clock was.
• Carefully remove vent package. There are two clips on the under side. I find the best way to get them out to use a driver license with a paper towel over it. It seems to be just strong enough to push the clips. They are on the bottom far right and left.Disconnect the connector.
Remove Center Council• You can now remove the center
council cover, but be sure to disconnect cigarette lighter and aspirator fan connections.
• Pull cover entirely off and put aside.
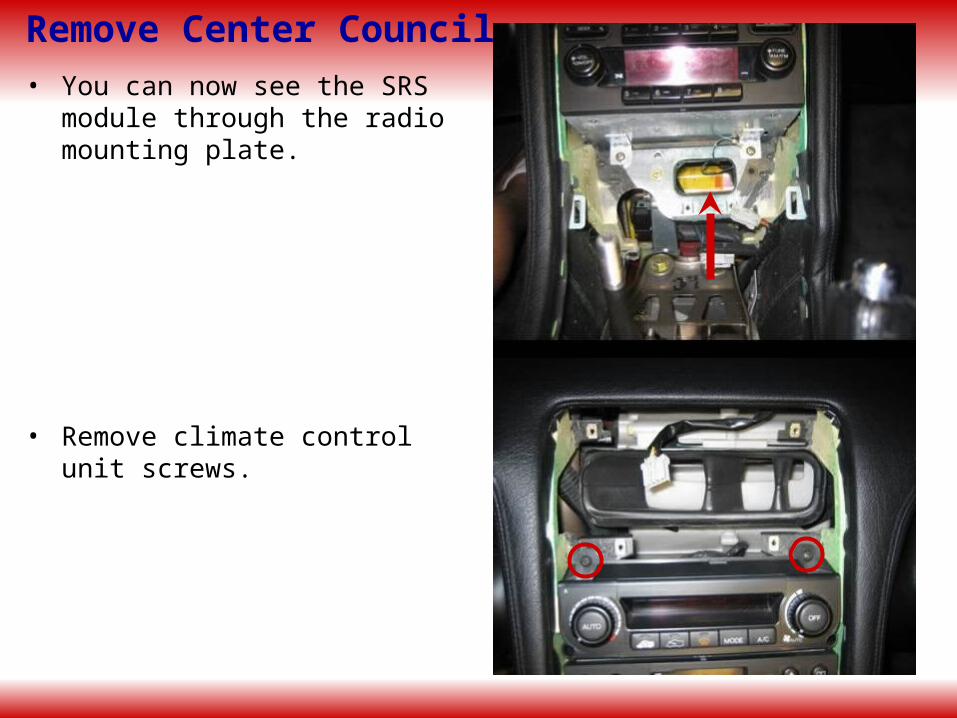
Remove Center Council• You can now see the SRS module
through the radio mounting plate.
• Remove climate control unit screws.
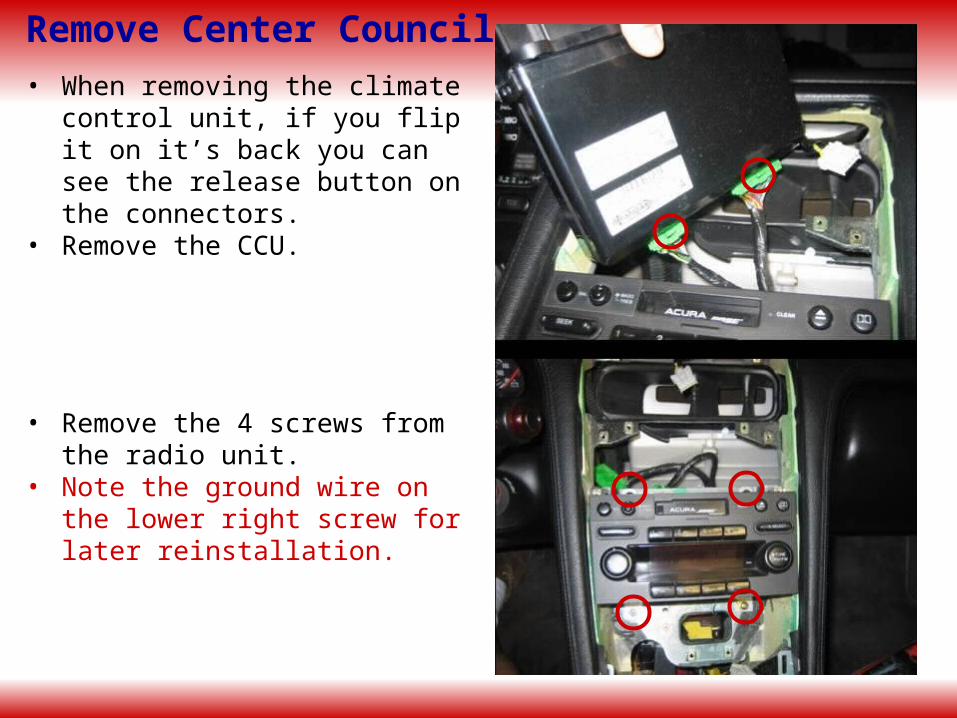
Remove Center Council• When removing the climate
control unit, if you flip it on it’s back you can see the release button on the connectors.
• Remove the CCU.
• Remove the 4 screws from the radio unit.
• Note the ground wire on the lower right screw for later reinstallation.
Remove Center Council• Remove the radio by carefully
removing the two antenna cables, the CD Changer connector and the radio harness (presumably you would have less if you don’t have a CD changer).
• Now we can fully see the SRS unit. Unfortunately we cannot take it out yet because the bolts are on the sides…
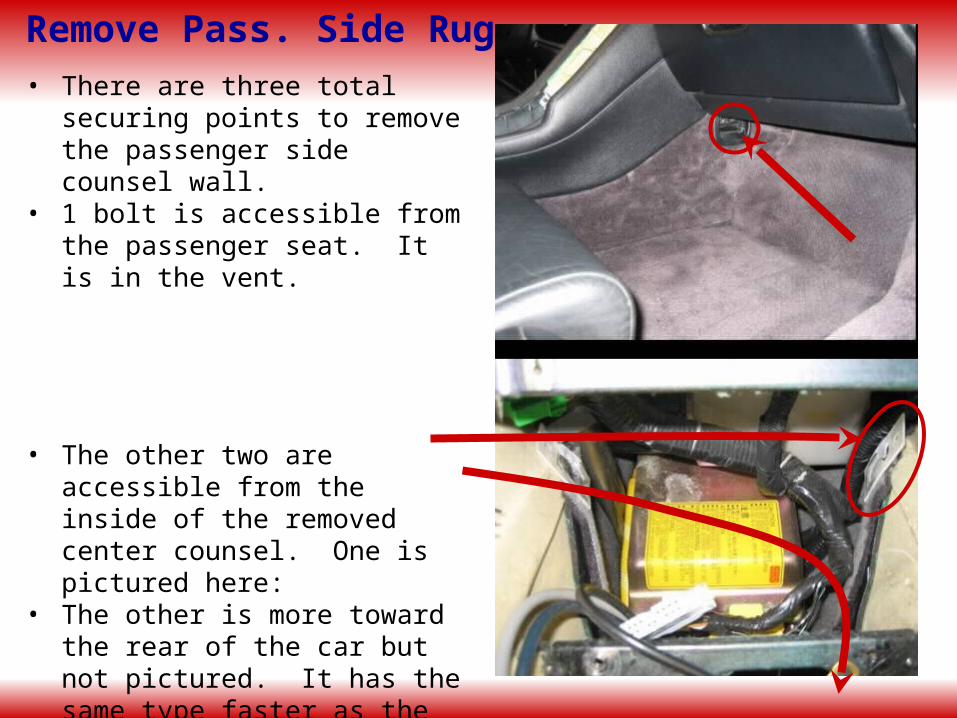
Remove Pass. Side Rug• There are three total securing
points to remove the passenger side counsel wall.
• 1 bolt is accessible from the passenger seat. It is in the vent.
• The other two are accessible from the inside of the removed center counsel. One is pictured here:
• The other is more toward the rear of the car but not pictured. It has the same type faster as the one shown. Neither really have to be unscrewed, you can lift the tab off the bolt with a pair of pliers.
• If this white plastic piece is in the way of removing the passenger rug, you did not listen to the preparation slide telling you to set the CCU air to all feet. If that’s the case you need to hook up the battery and CCU to get the air flow to feet so this lever moves out of the way.
• Pull the rug back.• Now 2 of the four SRS module
bolts accessible.
Remove Pass. Side Rug
• There are three fasteners holding the driver side counsel rug in. I didn’t take pictures. There isn’t one on the vent like the passenger. It’s about 6” forward and above the vent. It is a pain to get to, but doable. The others are inside the center counsel like the passenger ones were.
• Pull the rug back.• Now the final 2 bolts are
accessible.
Remove Driver Side Rug
• Confirm it has been 30 minutes since you disconnected the battery.
• Disconnect the SRS Module connector. It is accessible from the top through the center counsel. There is a release button top center.
• Now remove the bolts which are T-30 sized torque bolts. I suggest a socket. The inserts are different on each side, horrible and strip easy. I broke the welds on the passenger side ones taking them off. Try penetrating oil (although it didn’t work for me). This is the painful part. If they strip you will need to drill them out (I used a 7/32 bit). Don’t worry though it’s not too difficult to re-secure. Being careful not to bang the unit too hard.
• Remove it from the passenger side.• You could very likely have water pour
out of this thing while removing it...
Remove SRS Module
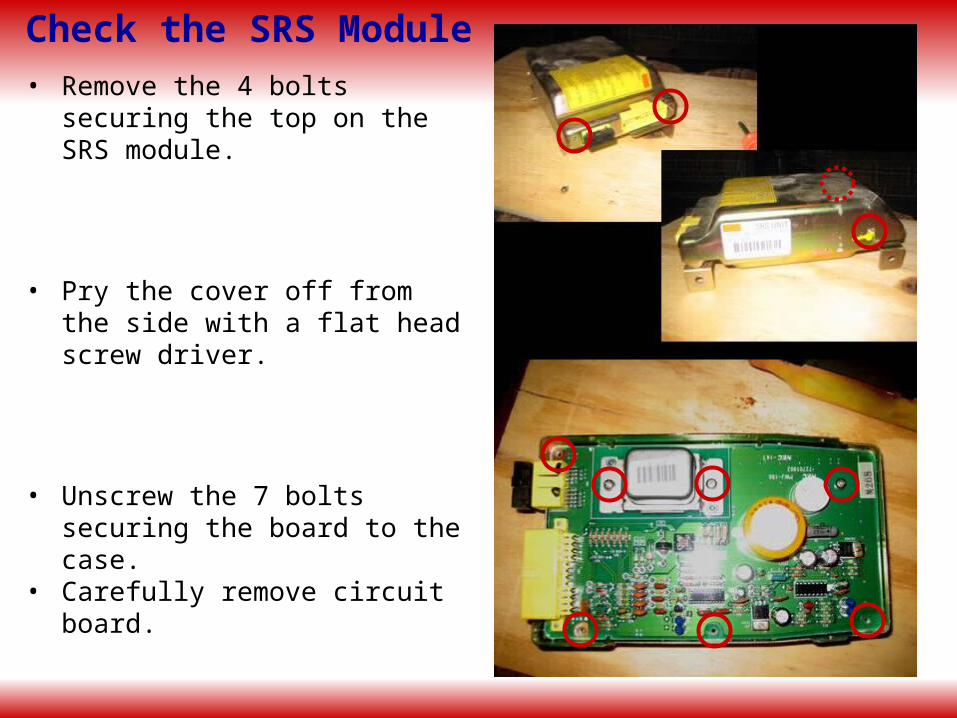
• Remove the 4 bolts securing the top on the SRS module.
• Pry the cover off from the side with a flat head screw driver.
• Unscrew the 7 bolts securing the board to the case.
• Carefully remove circuit board.
Check the SRS Module
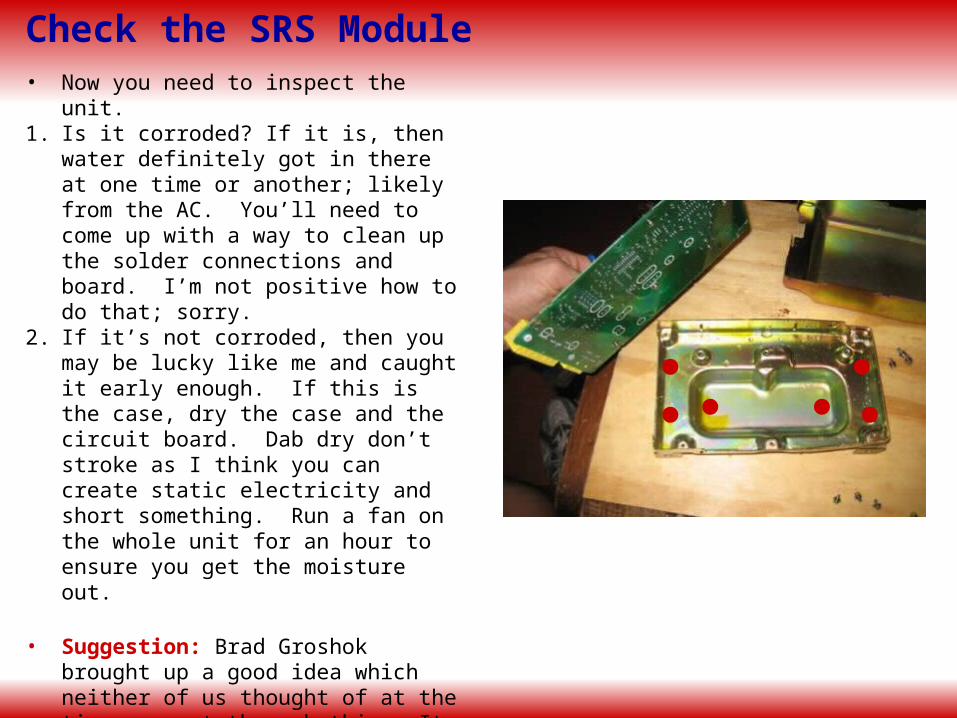
• Now you need to inspect the unit.1. Is it corroded? If it is, then water definitely
got in there at one time or another; likely from the AC. You’ll need to come up with a way to clean up the solder connections and board. I’m not positive how to do that; sorry.
2. If it’s not corroded, then you may be lucky like me and caught it early enough. If this is the case, dry the case and the circuit board. Dab dry don’t stroke as I think you can create static electricity and short something. Run a fan on the whole unit for an hour to ensure you get the moisture out.
• Suggestion: Brad Groshok brought up a good idea which neither of us thought of at the time we went through this. It may not be a bad idea to drill some drain wholes in the bottom of this case. If I had to do it again I would. I suggest drilling where there are red dots are with a reasonably sized bit maybe that 7/32 bit or ¼ inch.
• Now reassemble for testing.
Check the SRS Module
• From the passenger side, place the unit in the location where it will ultimately return (it takes a bit to get it back in there).
• Plug it back in.• Connect the car battery.• Start car or put to accessory and wait for lights to go out.• Check to see if the SRS light is still on.• If it is we have the unfortunate list of possibilities.1. Your SRS Module needs to be replaced.2. The SRS Module is not the problem. • I’ve heard of the ‘Cable reel’ being a possible reason or a fuse. If you
check this previously as suggested then I’m sad to say, I don’t know have a solution for you
• Assuming all is working, continue.
Check the SRS Module
• It’s really just the reverse process to get the car back together. I opted to put a piece of plastic under the air vent. This may be a bad idea. I don’t know how much heat is in there. To the right is what I did.
• One thing to be sure of: When you re-install the driver side rug be 100% sure you have the vent connected to the air source. It shouldn’t be too difficult with the center council open (I put the plastic up first which caused some difficulty.
• On the next slide I have the process I used assuming the bolts stripped (I’ll bet at least one did).
Reinstall the SRS Module
• Since I broke the welds on the inserts on both passenger side bolts, there was pretty much no way I was getting back to an OEM setup.
• The good news is, the brackets are huge and I simply used self tapping screws. It’s a bit hack, but I don’t know how I would get a welder in there.
Stripped Bolt Work Around
• That’s my story and I’m sticking too it.
• This documentation file turned out to be about 40 meg due to the large pictures. I will post a low resolution version (<800k).
• Acknowledgements: I would like to thank ‘Brian K’ for his instructions on the center counsel removal and Brad Groshok (NSXPrime ID ody) for his memory on what he experienced that led him to this process (not to mention the moral support for getting me through this)
Drive Safe. Long live the NSX…
Michael LohrNSXPrime ID: Madbox.
Good Luck
(No, I don’t drive around like this, but it’s funny…)