41
NVIDIA CUDA INSTALLATION GUIDE FOR LINUX DU-05347-001_v8.0 | September 2016 Installation and Verification on Linux Systems

NVIDIA CUDA INSTALLATION GUIDE FORLINUX
DU-05347-001_v8.0 | September 2016
Installation and Verification on Linux Systems
www.nvidia.comNVIDIA CUDA Installation Guide for Linux DU-05347-001_v8.0 | ii
TABLE OF CONTENTS
Chapter 1. Introduction.........................................................................................11.1. System Requirements.................................................................................... 11.2. About This Document.................................................................................... 2
Chapter 2. Pre-installation Actions...........................................................................42.1. Verify You Have a CUDA-Capable GPU................................................................ 42.2. Verify You Have a Supported Version of Linux.......................................................52.3. Verify the System Has gcc Installed................................................................... 52.4. Verify the System has the Correct Kernel Headers and Development Packages Installed.... 52.5. Choose an Installation Method......................................................................... 72.6. Download the NVIDIA CUDA Toolkit....................................................................72.7. Handle Conflicting Installation Methods.............................................................. 7
Chapter 3. Package Manager Installation....................................................................93.1. Overview................................................................................................... 93.2. Redhat/CentOS............................................................................................ 93.3. Fedora..................................................................................................... 103.4. SLES........................................................................................................113.5. OpenSUSE................................................................................................. 123.6. Ubuntu.................................................................................................... 123.7. Additional Package Manager Capabilities............................................................13
3.7.1. Available Packages................................................................................. 133.7.2. Package Upgrades..................................................................................133.7.3. Meta Packages...................................................................................... 14
Chapter 4. Runfile Installation...............................................................................154.1. Overview.................................................................................................. 154.2. Installation................................................................................................154.3. Disabling Nouveau.......................................................................................17
4.3.1. Fedora................................................................................................174.3.2. RHEL/CentOS....................................................................................... 174.3.3. OpenSUSE............................................................................................174.3.4. SLES.................................................................................................. 184.3.5. Ubuntu............................................................................................... 18
4.4. Device Node Verification...............................................................................184.5. Advanced Options....................................................................................... 194.6. Uninstallation............................................................................................ 21
Chapter 5. CUDA Cross-Platform Environment........................................................... 225.1. CUDA Cross-Platform Installation..................................................................... 225.2. CUDA Cross-Platform Samples.........................................................................23
TARGET_ARCH............................................................................................... 23TARGET_OS.................................................................................................. 23TARGET_FS...................................................................................................24

www.nvidia.comNVIDIA CUDA Installation Guide for Linux DU-05347-001_v8.0 | iii
Copying Libraries........................................................................................ 245.3. Nsight Eclipse Edition.................................................................................. 24
Chapter 6. Post-installation Actions........................................................................ 256.1. Mandatory Actions.......................................................................................25
6.1.1. Environment Setup.................................................................................256.2. Recommended Actions..................................................................................25
6.2.1. Install Writable Samples.......................................................................... 266.2.2. Verify the Installation............................................................................. 26
6.2.2.1. Verify the Driver Version.................................................................... 266.2.2.2. Compiling the Examples..................................................................... 266.2.2.3. Running the Binaries......................................................................... 26
6.3. Optional Actions......................................................................................... 286.3.1. Install Third-party Libraries...................................................................... 286.3.2. Install the source code for cuda-gdb........................................................... 28
Chapter 7. Advanced Setup.................................................................................. 30Chapter 8. Frequently Asked Questions................................................................... 33
How do I install the Toolkit in a different location?.................................................... 33Why do I see "nvcc: No such file or directory" when I try to build a CUDA application?........... 33Why do I see "error while loading shared libraries: <lib name>: cannot open shared object file:
No such file or directory" when I try to run a CUDA application that uses a CUDA library?... 33Why do I see multiple "404 Not Found" errors when updating my repository meta-data on
Ubuntu?......................................................................................................34How can I tell X to ignore a GPU for compute-only use?.............................................. 34Why doesn't the cuda-repo package install the CUDA Toolkit and Drivers?.......................... 34How do I get CUDA to work on a laptop with an iGPU and a dGPU running Ubuntu14.04?........ 34What do I do if the display does not load after updating the Linux kernel on Fedora?............ 35
Chapter 9. Additional Considerations...................................................................... 36

www.nvidia.comNVIDIA CUDA Installation Guide for Linux DU-05347-001_v8.0 | iv

www.nvidia.comNVIDIA CUDA Installation Guide for Linux DU-05347-001_v8.0 | 1
Chapter 1.INTRODUCTION
CUDA® is a parallel computing platform and programming model invented by NVIDIA.It enables dramatic increases in computing performance by harnessing the power of thegraphics processing unit (GPU).
CUDA was developed with several design goals in mind:
‣ Provide a small set of extensions to standard programming languages, like C, thatenable a straightforward implementation of parallel algorithms. With CUDA C/C++,programmers can focus on the task of parallelization of the algorithms rather thanspending time on their implementation.
‣ Support heterogeneous computation where applications use both the CPU andGPU. Serial portions of applications are run on the CPU, and parallel portions areoffloaded to the GPU. As such, CUDA can be incrementally applied to existingapplications. The CPU and GPU are treated as separate devices that have their ownmemory spaces. This configuration also allows simultaneous computation on theCPU and GPU without contention for memory resources.
CUDA-capable GPUs have hundreds of cores that can collectively run thousands ofcomputing threads. These cores have shared resources including a register file and ashared memory. The on-chip shared memory allows parallel tasks running on thesecores to share data without sending it over the system memory bus.
This guide will show you how to install and check the correct operation of the CUDAdevelopment tools.
1.1. System RequirementsTo use CUDA on your system, you will need the following installed:
‣ CUDA-capable GPU‣ A supported version of Linux with a gcc compiler and toolchain‣ NVIDIA CUDA Toolkit (available at http://developer.nvidia.com/cuda-downloads)
The CUDA development environment relies on tight integration with the hostdevelopment environment, including the host compiler and C runtime libraries, and

Introduction
www.nvidia.comNVIDIA CUDA Installation Guide for Linux DU-05347-001_v8.0 | 2
is therefore only supported on distribution versions that have been qualified for thisCUDA Toolkit release.
Table 1 Native Linux Distribution Support in CUDA 8.0
Distribution Kernel GCC GLIBC ICC PGI XLC CLANG
x86_64
RHEL 7.x 3.10 4.8.2 2.17
RHEL 6.x 2.6.32 4.4.7 2.12
CentOS 7.x 3.10 4.8.2 2.17
CentOS 6.x 2.6.32 4.4.7 2.12
Fedora 23 4.2.3 5.3.1 2.22
OpenSUSE 13.2 3.16.6 4.8.3 2.19
SLES 12 3.12.28 4.8.6 2.19
SLES 11 SP4 3.0.101 4.3.4 2.11
Ubuntu 16.04 4.4.0 5.3.1 2.23
Ubuntu 14.04 3.13 4.8.2 2.19
15.0.4
16.016.3+ NO 3.8+
ARMv8 (aarch64)
Ubuntu 14.04 3.13 4.8.2 2.19 NO NO NO NO
POWER8(*)
RHEL 7.x 3.10 4.8.2 2.17 NO NO 13.1.2 NO
Ubuntu 16.04 4.4.0 5.3.1 2.23 NO NO 13.1.2 NO
Table 2 Cross-build Environment Linux Distribution Support in CUDA 8.0
Host Distribution Targeting Architectures (Linux)
x86_64 ARMv8 (aarch64)
Ubuntu 14.04 YES
(*) Only the Tesla K40m and K80 GPUs are supported for CUDA 8.0 on POWER8.
1.2. About This DocumentThis document is intended for readers familiar with the Linux environment andthe compilation of C programs from the command line. You do not need previous

Introduction
www.nvidia.comNVIDIA CUDA Installation Guide for Linux DU-05347-001_v8.0 | 3
experience with CUDA or experience with parallel computation. Note: This guide coversinstallation only on systems with X Windows installed.
Many commands in this document might require superuser privileges. On mostdistributions of Linux, this will require you to log in as root. For systems that haveenabled the sudo package, use the sudo prefix for all necessary commands.
www.nvidia.comNVIDIA CUDA Installation Guide for Linux DU-05347-001_v8.0 | 4
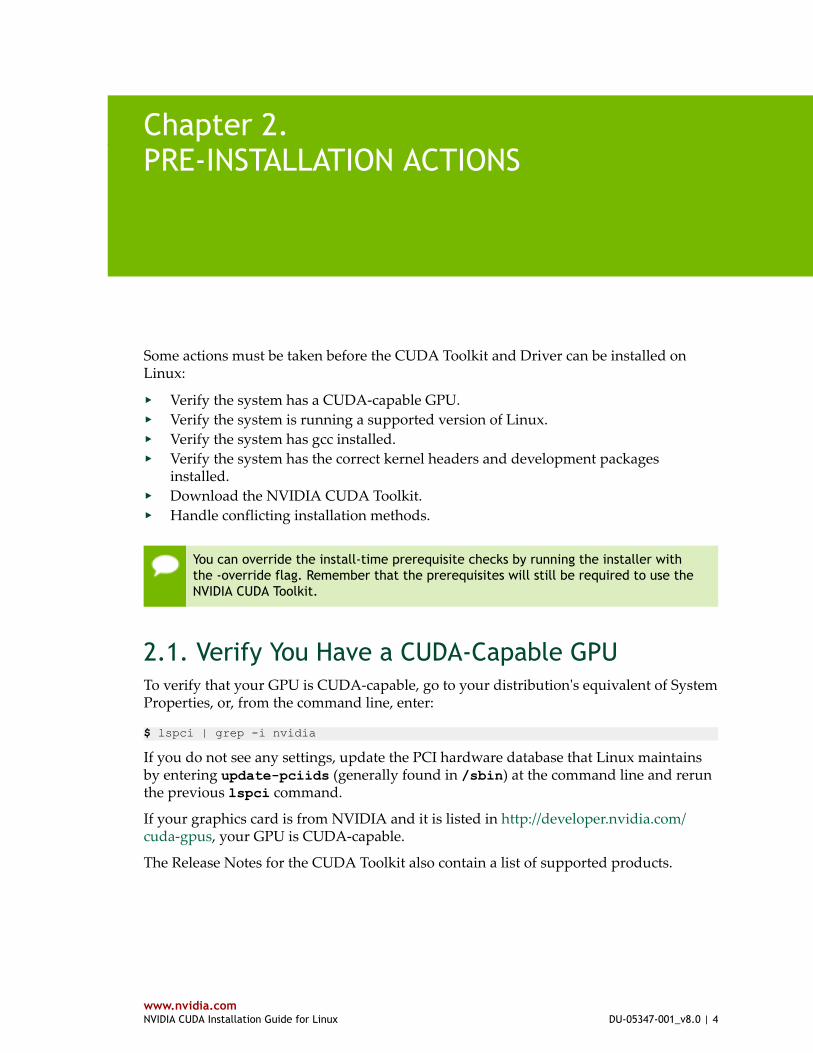
Chapter 2.PRE-INSTALLATION ACTIONS
Some actions must be taken before the CUDA Toolkit and Driver can be installed onLinux:
‣ Verify the system has a CUDA-capable GPU.‣ Verify the system is running a supported version of Linux.‣ Verify the system has gcc installed.‣ Verify the system has the correct kernel headers and development packages
installed.‣ Download the NVIDIA CUDA Toolkit.‣ Handle conflicting installation methods.
You can override the install-time prerequisite checks by running the installer withthe -override flag. Remember that the prerequisites will still be required to use theNVIDIA CUDA Toolkit.
2.1. Verify You Have a CUDA-Capable GPUTo verify that your GPU is CUDA-capable, go to your distribution's equivalent of SystemProperties, or, from the command line, enter:
$ lspci | grep -i nvidia
If you do not see any settings, update the PCI hardware database that Linux maintainsby entering update-pciids (generally found in /sbin) at the command line and rerunthe previous lspci command.
If your graphics card is from NVIDIA and it is listed in http://developer.nvidia.com/cuda-gpus, your GPU is CUDA-capable.
The Release Notes for the CUDA Toolkit also contain a list of supported products.

Pre-installation Actions
www.nvidia.comNVIDIA CUDA Installation Guide for Linux DU-05347-001_v8.0 | 5
2.2. Verify You Have a Supported Version of LinuxThe CUDA Development Tools are only supported on some specific distributions ofLinux. These are listed in the CUDA Toolkit release notes.
To determine which distribution and release number you're running, type the followingat the command line:
$ uname -m && cat /etc/*release
You should see output similar to the following, modified for your particular system:
x86_64Red Hat Enterprise Linux Workstation release 6.0 (Santiago)
The x86_64 line indicates you are running on a 64-bit system. The remainder givesinformation about your distribution.
2.3. Verify the System Has gcc InstalledThe gcc compiler is required for development using the CUDA Toolkit. It is notrequired for running CUDA applications. It is generally installed as part of the Linuxinstallation, and in most cases the version of gcc installed with a supported version ofLinux will work correctly.
To verify the version of gcc installed on your system, type the following on thecommand line:
$ gcc --version
If an error message displays, you need to install the development tools from your Linuxdistribution or obtain a version of gcc and its accompanying toolchain from the Web.
2.4. Verify the System has the Correct KernelHeaders and Development Packages InstalledThe CUDA Driver requires that the kernel headers and development packages forthe running version of the kernel be installed at the time of the driver installation,as well whenever the driver is rebuilt. For example, if your system is running kernelversion 3.17.4-301, the 3.17.4-301 kernel headers and development packages must also beinstalled.
While the Runfile installation performs no package validation, the RPM and Debinstallations of the driver will make an attempt to install the kernel header anddevelopment packages if no version of these packages is currently installed. However,it will install the latest version of these packages, which may or may not match theversion of the kernel your system is using. Therefore, it is best to manually ensure the

Pre-installation Actions
www.nvidia.comNVIDIA CUDA Installation Guide for Linux DU-05347-001_v8.0 | 6
correct version of the kernel headers and development packages are installed prior toinstalling the CUDA Drivers, as well as whenever you change the kernel version.
The version of the kernel your system is running can be found by running the followingcommand:
$ uname -r
This is the version of the kernel headers and development packages that must beinstalled prior to installing the CUDA Drivers. This command will be used multipletimes below to specify the version of the packages to install. Note that below are thecommon-case scenarios for kernel usage. More advanced cases, such as custom kernelbranches, should ensure that their kernel headers and sources match the kernel buildthey are running.
RHEL/CentOS
The kernel headers and development packages for the currently running kernel can beinstalled with:
$ sudo yum install kernel-devel-$(uname -r) kernel-headers-$(uname -r)
Fedora
The kernel headers and development packages for the currently running kernel can beinstalled with:
$ sudo dnf install kernel-devel-$(uname -r) kernel-headers-$(uname -r)
OpenSUSE/SLES
Use the output of the uname command to determine the running kernel's version andvariant:
$ uname -r3.16.6-2-default
In this example, the version is 3.16.6-2 and the variant is default. The kernel headersand development packages can then be installed with the following command, replacing<variant> and <version> with the variant and version discovered from the previousuname command:
$ sudo zypper install kernel-<variant>-devel=<version>
Ubuntu
The kernel headers and development packages for the currently running kernel can beinstalled with:
$ sudo apt-get install linux-headers-$(uname -r)

Pre-installation Actions
www.nvidia.comNVIDIA CUDA Installation Guide for Linux DU-05347-001_v8.0 | 7
2.5. Choose an Installation MethodThe CUDA Toolkit can be installed using either of two different installation mechanisms:distribution-specific packages, or a distribution-independent package. The distribution-independent package has the advantage of working across a wider set of Linuxdistributions, but does not update the distribution's native package management system.The distribution-specific packages interface with the distribution's native packagemanagement system. It is recommended to use the distribution-specific packages, wherepossible.
Standalone installers are not provided for architectures other than the x86_64release. For both native as well as cross development, the toolkit must be installedusing the distribution-specific installer. See the CUDA Cross-Platform Installationsection for more details.
2.6. Download the NVIDIA CUDA ToolkitThe NVIDIA CUDA Toolkit is available at http://developer.nvidia.com/cuda-downloads.
Choose the platform you are using and download the NVIDIA CUDA Toolkit
The CUDA Toolkit contains the CUDA driver and tools needed to create, build and runa CUDA application as well as libraries, header files, CUDA samples source code, andother resources.
Download Verification
The download can be verified by comparing the MD5 checksum posted at http://developer.nvidia.com/cuda-downloads/checksums with that of the downloadedfile. If either of the checksums differ, the downloaded file is corrupt and needs to bedownloaded again.
To calculate the MD5 checksum of the downloaded file, run the following:
$ md5sum <file>
2.7. Handle Conflicting Installation MethodsBefore installing CUDA, any previously installations that could conflict should beuninstalled. This will not affect systems which have not had CUDA installed previously,or systems where the installation method has been preserved (RPM/Deb vs. Runfile). Seethe following charts for specifics.

Pre-installation Actions
www.nvidia.comNVIDIA CUDA Installation Guide for Linux DU-05347-001_v8.0 | 8
Table 3 CUDA Toolkit Installation Compatibility Matrix
Installed Toolkit Version == X.Y Installed Toolkit Version != X.Y
RPM/Deb run RPM/Deb run
RPM/Deb No Action Uninstall Run No Action No ActionInstallingToolkit
Version X.Y run UninstallRPM/Deb
Uninstall Run No Action No Action
Table 4 NVIDIA Driver Installation Compatibility Matrix
Installed Driver Version == X.Y Installed Driver Version != X.Y
RPM/Deb run RPM/Deb run
RPM/Deb No Action Uninstall Run No Action Uninstall RunInstalling DriverVersion X.Y
run Uninstall RPM/Deb
No Action Uninstall RPM/Deb
No Action
Use the following command to uninstall a Toolkit runfile installation:
$ sudo /usr/local/cuda-X.Y/bin/uninstall_cuda_X.Y.pl
Use the following command to uninstall a Driver runfile installation:
$ sudo /usr/bin/nvidia-uninstall
Use the following commands to uninstall a RPM/Deb installation:
$ sudo yum remove <package_name> # Redhat/CentOS$ sudo dnf remove <package_name> # Fedora$ sudo zypper remove <package_name> # OpenSUSE/SLES$ sudo apt-get --purge remove <package_name> # Ubuntu

www.nvidia.comNVIDIA CUDA Installation Guide for Linux DU-05347-001_v8.0 | 9
Chapter 3.PACKAGE MANAGER INSTALLATION
3.1. OverviewThe Package Manager installation interfaces with your system's package managementsystem. When using RPM or Deb, the downloaded package is a repository package.Such a package only informs the package manager where to find the actual installationpackages, but will not install them.
If those packages are available in an online repository, they will be automaticallydownloaded in a later step. Otherwise, the repository package also installs a localrepository containing the installation packages on the system. Whether the repository isavailable online or installed locally, the installation procedure is identical and made ofseveral steps.
Distribution-specific instructions detail how to install CUDA:
‣ Redhat/CentOS‣ Fedora‣ SLES‣ OpenSUSE‣ Ubuntu
Finally, some helpful package manager capabilities are detailed.
These instructions are for native development only. For cross-platform development, seethe CUDA Cross-Platform Environment section.
3.2. Redhat/CentOS 1. Perform the pre-installation actions. 2. Satisfy DKMS dependency
The NVIDIA driver RPM packages depend on other external packages, such asDKMS and libvdpau. Those packages are only available on third-party repositories,

Package Manager Installation
www.nvidia.comNVIDIA CUDA Installation Guide for Linux DU-05347-001_v8.0 | 10
such as EPEL. Any such third-party repositories must be added to the packagemanager repository database before installing the NVIDIA driver RPM packages, ormissing dependencies will prevent the installation from proceeding.
3. Address custom xorg.conf, if applicable
The driver relies on an automatically generated xorg.conf file at /etc/X11/xorg.conf.If a custom-built xorg.conf file is present, this functionality will be disabled and thedriver may not work. You can try removing the existing xorg.conf file, or adding thecontents of /etc/X11/xorg.conf.d/00-nvidia.conf to the xorg.conf file. The xorg.conffile will most likely need manual tweaking for systems with a non-trivial GPUconfiguration.
4. Install repository meta-data
$ sudo rpm --install cuda-repo-<distro>-<version>.<architecture>.rpm
5. Clean Yum repository cache
$ sudo yum clean expire-cache
6. Install CUDA
$ sudo yum install cuda
If the i686 libvdpau package dependency fails to install, try using the followingsteps to fix the issue:
$ yumdownloader libvdpau.i686$ sudo rpm -U --oldpackage libvdpau*.rpm
7. Add libcuda.so symbolic link, if necessary
The libcuda.so library is installed in the /usr/lib{,64}/nvidia directory. For pre-existing projects which use libcuda.so, it may be useful to add a symbolic link fromlibcuda.so in the /usr/lib{,64} directory.
8. Perform the post-installation actions.
3.3. Fedora 1. Perform the pre-installation actions. 2. Address custom xorg.conf, if applicable
The driver relies on an automatically generated xorg.conf file at /etc/X11/xorg.conf.If a custom-built xorg.conf file is present, this functionality will be disabled and thedriver may not work. You can try removing the existing xorg.conf file, or adding thecontents of /etc/X11/xorg.conf.d/00-nvidia.conf to the xorg.conf file. The xorg.conffile will most likely need manual tweaking for systems with a non-trivial GPUconfiguration.
3. Satisfy Akmods dependency
The NVIDIA driver RPM packages depend on the Akmods framework which isprovided by the RPMFusion free repository. The RPMFusion free repository mustbe added to the package manager repository database before installing the NVIDIAdriver RPM packages, or missing dependencies will prevent the installation fromproceeding.

Package Manager Installation
www.nvidia.comNVIDIA CUDA Installation Guide for Linux DU-05347-001_v8.0 | 11
4. Install repository meta-data
$ sudo rpm --install cuda-repo-<distro>-<version>.<architecture>.rpm
5. Clean DNF repository cache
$ sudo dnf clean expire-cache
6. Install CUDA
$ sudo dnf install cuda
The CUDA driver installation may fail if the RPMFusion non-free repository isenabled. In this case, CUDA installations should temporarily disable the RPMFusionnon-free repository:
$ sudo dnf --disablerepo="rpmfusion-nonfree*" install cuda
If a system has installed both packages with the same instance of dnf, some drivercomponents may be missing. Such an installation can be corrected by running:
$ sudo dnf install cuda-drivers
If the i686 libvdpau package dependency fails to install, try using the followingsteps to fix the issue:
$ dnf download libvdpau.i686$ sudo rpm -U --oldpackage libvdpau*.rpm
7. Add libcuda.so symbolic link, if necessary
The libcuda.so library is installed in the /usr/lib{,64}/nvidia directory. For pre-existing projects which use libcuda.so, it may be useful to add a symbolic link fromlibcuda.so in the /usr/lib{,64} directory.
8. Perform the post-installation actions.
3.4. SLES 1. Perform the pre-installation actions. 2. Install repository meta-data
$ sudo rpm --install cuda-repo-<distro>-<version>.<architecture>.rpm
3. Refresh Zypper repository cache
$ sudo zypper refresh
4. Install CUDA
$ sudo zypper install cuda
The driver is provided in multiple packages, nvidia-gfxG04-kmp-desktop, nvidia-gfxG04-kmp-default, nvidia-gfxG04-kmp-trace, and their Unified Memory variants.When installing cuda, the correct driver packages should also be specified. Withoutdoing this, zypper will select packages that may not work on the system. Run thefollowing to detect the flavor of kernel and install cuda with the appropriate driverpackages:

Package Manager Installation
www.nvidia.comNVIDIA CUDA Installation Guide for Linux DU-05347-001_v8.0 | 12
$ uname -r 3.4.6-2.10-<flavor>$ sudo zypper install cuda nvidia-gfxG04-kmp-<flavor>
5. Add the user to the video group
$ sudo usermod -a -G video <username>
6. Install CUDA Samples GL dependencies
The CUDA Samples package on SLES does not include dependencies on GL and X11libraries as these are provided in the SLES SDK. These packages must be installedseparately, depending on which samples you want to use.
7. Perform the post-installation actions.
3.5. OpenSUSE 1. Perform the pre-installation actions. 2. Install repository meta-data
$ sudo rpm --install cuda-repo-<distro>-<version>.<architecture>.rpm
3. Refresh Zypper repository cache
$ sudo zypper refresh
4. Install CUDA
$ sudo zypper install cuda
The driver is provided in multiple packages, nvidia-gfxG04-kmp-desktop, nvidia-gfxG04-kmp-default, nvidia-gfxG04-kmp-trace, and their Unified Memory variants.When installing cuda, the correct driver packages should also be specified. Withoutdoing this, zypper will select packages that may not work on the system. Run thefollowing to detect the flavor of kernel and install cuda with the appropriate driverpackages:
$ uname -r 3.4.6-2.10-<flavor>$ sudo zypper install cuda nvidia-gfxG04-kmp-<flavor>
5. Add the user to the video group
$ sudo usermod -a -G video <username>
6. Perform the post-installation actions.
3.6. Ubuntu 1. Perform the pre-installation actions. 2. Install repository meta-data
When using a proxy server with aptitude, ensure that wget is set up to use thesame proxy settings before installing the cuda-repo package.

Package Manager Installation
www.nvidia.comNVIDIA CUDA Installation Guide for Linux DU-05347-001_v8.0 | 13
$ sudo dpkg -i cuda-repo-<distro>_<version>_<architecture>.deb
3. Update the Apt repository cache
$ sudo apt-get update
4. Install CUDA
$ sudo apt-get install cuda
5. Perform the post-installation actions.
3.7. Additional Package Manager CapabilitiesBelow are some additional capabilities of the package manager that users can takeadvantage of.
3.7.1. Available PackagesThe recommended installation package is the cuda package. This package will install thefull set of other CUDA packages required for native development and should cover mostscenarios.
The cuda package installs all the available packages for native developments. Thatincludes the compiler, the debugger, the profiler, the math libraries,... For x86_64patforms, this also include NSight Eclipse Edition and the visual profiler It also includesthe NVIDIA driver package.
On supported platforms, the cuda-cross-armhf, cuda-cross-aarch64, andcuda-cross-ppc64el packages install all the packages required for cross-platformdevelopment to ARMv7, ARMv8, and POWER8, respectively. The libraries and headerfiles of the target architecture's display driver package are also installed to enable thecross compilation of driver applications. The cuda-cross-<arch> packages do notinstall the native display driver.
The packages installed by the packages above can also be installed individually byspecifying their names explicitly. The list of available packages be can obtained with:
$ yum --disablerepo="*" --enablerepo="cuda*" list available # RedHat$ dnf --disablerepo="*" --enablerepo="cuda*" list available # Fedora$ zypper packages -r cuda # OpenSUSE & SLES$ cat /var/lib/apt/lists/*cuda*Packages | grep "Package:" # Ubuntu
3.7.2. Package UpgradesThe cuda package points to the latest stable release of the CUDA Toolkit. When a newversion is available, use the following commands to upgrade the toolkit and driver:
$ sudo yum install cuda # RedHat$ sudo dnf install cuda # Fedora$ sudo zypper install cuda # OpenSUSE & SLES$ sudo apt-get install cuda # Ubuntu
The cuda-cross-<arch> packages can also be upgraded in the same manner.
Package Manager Installation
www.nvidia.comNVIDIA CUDA Installation Guide for Linux DU-05347-001_v8.0 | 14
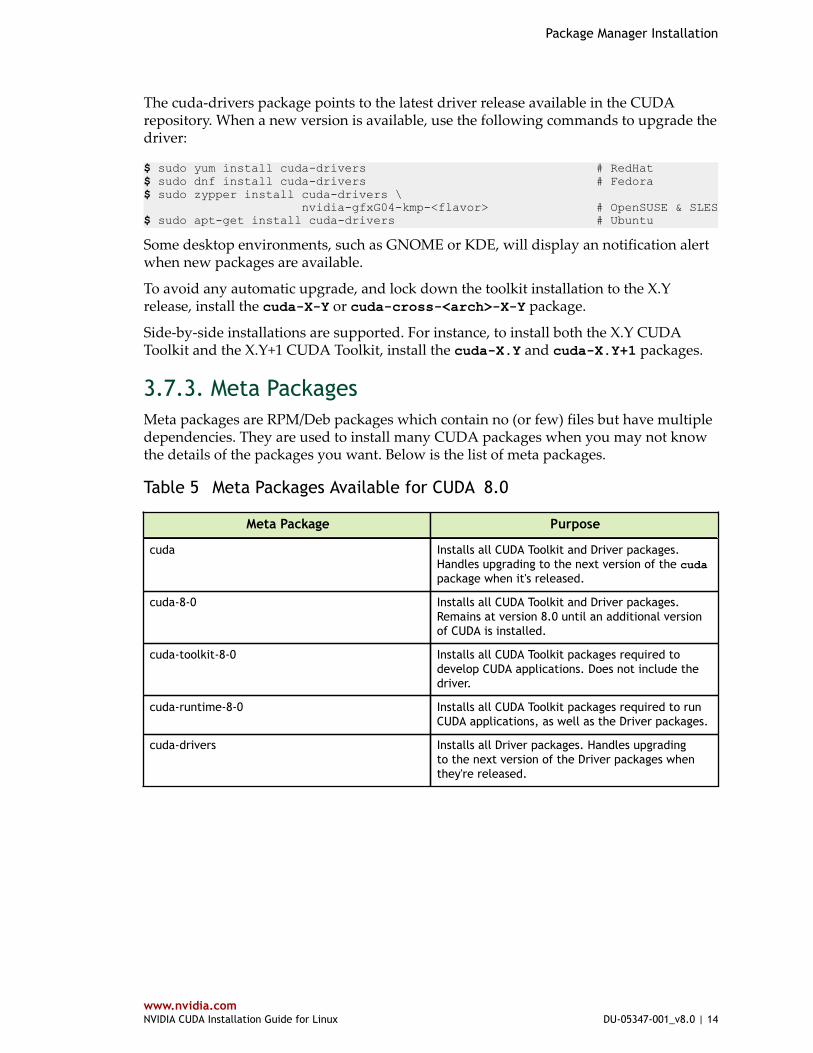
The cuda-drivers package points to the latest driver release available in the CUDArepository. When a new version is available, use the following commands to upgrade thedriver:
$ sudo yum install cuda-drivers # RedHat$ sudo dnf install cuda-drivers # Fedora$ sudo zypper install cuda-drivers \ nvidia-gfxG04-kmp-<flavor> # OpenSUSE & SLES$ sudo apt-get install cuda-drivers # Ubuntu
Some desktop environments, such as GNOME or KDE, will display an notification alertwhen new packages are available.
To avoid any automatic upgrade, and lock down the toolkit installation to the X.Yrelease, install the cuda-X-Y or cuda-cross-<arch>-X-Y package.
Side-by-side installations are supported. For instance, to install both the X.Y CUDAToolkit and the X.Y+1 CUDA Toolkit, install the cuda-X.Y and cuda-X.Y+1 packages.
3.7.3. Meta PackagesMeta packages are RPM/Deb packages which contain no (or few) files but have multipledependencies. They are used to install many CUDA packages when you may not knowthe details of the packages you want. Below is the list of meta packages.
Table 5 Meta Packages Available for CUDA 8.0
Meta Package Purpose
cuda Installs all CUDA Toolkit and Driver packages.Handles upgrading to the next version of the cudapackage when it's released.
cuda-8-0 Installs all CUDA Toolkit and Driver packages.Remains at version 8.0 until an additional versionof CUDA is installed.
cuda-toolkit-8-0 Installs all CUDA Toolkit packages required todevelop CUDA applications. Does not include thedriver.
cuda-runtime-8-0 Installs all CUDA Toolkit packages required to runCUDA applications, as well as the Driver packages.
cuda-drivers Installs all Driver packages. Handles upgradingto the next version of the Driver packages whenthey're released.

www.nvidia.comNVIDIA CUDA Installation Guide for Linux DU-05347-001_v8.0 | 15
Chapter 4.RUNFILE INSTALLATION
This section describes the installation and configuration of CUDA when using thestandalone installer. The standalone installer is a ".run" file and is completely self-contained.
4.1. OverviewThe Runfile installation installs the NVIDIA Driver, CUDA Toolkit, and CUDA Samplesvia an interactive text-based interface.
The installation steps are listed below. Distribution-specific instructions on disabling theNouveau drivers as well as steps for verifying device node creation are also provided.
Finally, advanced options for the installer and uninstallation steps are detailed below.
The Runfile installation does not include support for cross-platform development. Forcross-platform development, see the CUDA Cross-Platform Environment section.
4.2. Installation 1. Perform the pre-installation actions. 2. Disable the Nouveau drivers. 3. Reboot into text mode (runlevel 3).
This can usually be accomplished by adding the number "3" to the end of thesystem's kernel boot parameters.
Since the NVIDIA drivers are not yet installed, the text terminals may not displaycorrectly. Temporarily adding "nomodeset" to the system's kernel boot parametersmay fix this issue.
Consult your system's bootloader documentation for information on how to makethe above boot parameter changes.

Runfile Installation
www.nvidia.comNVIDIA CUDA Installation Guide for Linux DU-05347-001_v8.0 | 16
The reboot is required to completely unload the Nouveau drivers and prevent thegraphical interface from loading. The CUDA driver cannot be installed while theNouveau drivers are loaded or while the graphical interface is active.
4. Verify that the Nouveau drivers are not loaded. If the Nouveau drivers are stillloaded, consult your distribution's documentation to see if further steps are neededto disable Nouveau.
5. Run the installer and follow the on-screen prompts:
$ sudo sh cuda_<version>_linux.run
The installer will prompt for the following:
‣ EULA Acceptance‣ CUDA Driver installation‣ CUDA Toolkit installation, location, and /usr/local/cuda symbolic link‣ CUDA Samples installation and location
The default installation locations for the toolkit and samples are:
Component Default Installation Directory
CUDA Toolkit /usr/local/cuda-8.0
CUDA Samples $(HOME)/NVIDIA_CUDA-8.0_Samples
The /usr/local/cuda symbolic link points to the location where the CUDAToolkit was installed. This link allows projects to use the latest CUDA Toolkitwithout any configuration file update.
The installer must be executed with sufficient privileges to perform some actions.When the current privileges are insufficient to perform an action, the installer willask for the user's password to attempt to install with root privileges. Actions thatcause the installer to attempt to install with root privileges are:
‣ installing the CUDA Driver‣ installing the CUDA Toolkit to a location the user does not have permission to
write to‣ installing the CUDA Samples to a location the user does not have permission to
write to‣ creating the /usr/local/cuda symbolic link
Running the installer with sudo, as shown above, will give permission to install todirectories that require root permissions. Directories and files created while runningthe installer with sudo will have root ownership.
If installing the driver, the installer will also ask if the openGL libraries should beinstalled. If the GPU used for display is not an NVIDIA GPU, the NVIDIA openGLlibraries should not be installed. Otherwise, the openGL libraries used by thegraphics driver of the non-NVIDIA GPU will be overwritten and the GUI will notwork. If performing a silent installation, the --no-opengl-libs option should be usedto prevent the openGL libraries from being installed. See the Advanced Optionssection for more details.

Runfile Installation
www.nvidia.comNVIDIA CUDA Installation Guide for Linux DU-05347-001_v8.0 | 17
If the GPU used for display is an NVIDIA GPU, the X server configurationfile, /etc/X11/xorg.conf, may need to be modified. In some cases, nvidia-xconfig can be used to automatically generate a xorg.conf file that works forthe system. For non-standard systems, such as those with more than one GPU,it is recommended to manually edit the xorg.conf file. Consult the xorg.confdocumentation for more information.
Installing Mesa may overwrite the /usr/lib/libGL.so that was previouslyinstalled by the NVIDIA driver, so a reinstallation of the NVIDIA driver might berequired after installing these libraries.
6. Reboot the system to reload the graphical interface. 7. Verify the device nodes are created properly. 8. Perform the post-installation actions.
4.3. Disabling NouveauTo install the Display Driver, the Nouveau drivers must first be disabled. Eachdistribution of Linux has a different method for disabling Nouveau.
The Nouveau drivers are loaded if the following command prints anything:
$ lsmod | grep nouveau
4.3.1. Fedora 1. Create a file at /usr/lib/modprobe.d/blacklist-nouveau.conf with the
following contents:
blacklist nouveauoptions nouveau modeset=0
2. Regenerate the kernel initramfs:
$ sudo dracut --force
4.3.2. RHEL/CentOS 1. Create a file at /etc/modprobe.d/blacklist-nouveau.conf with the following
contents:
blacklist nouveauoptions nouveau modeset=0
2. Regenerate the kernel initramfs:
$ sudo dracut --force
4.3.3. OpenSUSE 1. Create a file at /etc/modprobe.d/blacklist-nouveau.conf with the following
contents:
Runfile Installation
www.nvidia.comNVIDIA CUDA Installation Guide for Linux DU-05347-001_v8.0 | 18
blacklist nouveauoptions nouveau modeset=0
2. Regenerate the kernel initrd:
$ sudo /sbin/mkinitrd
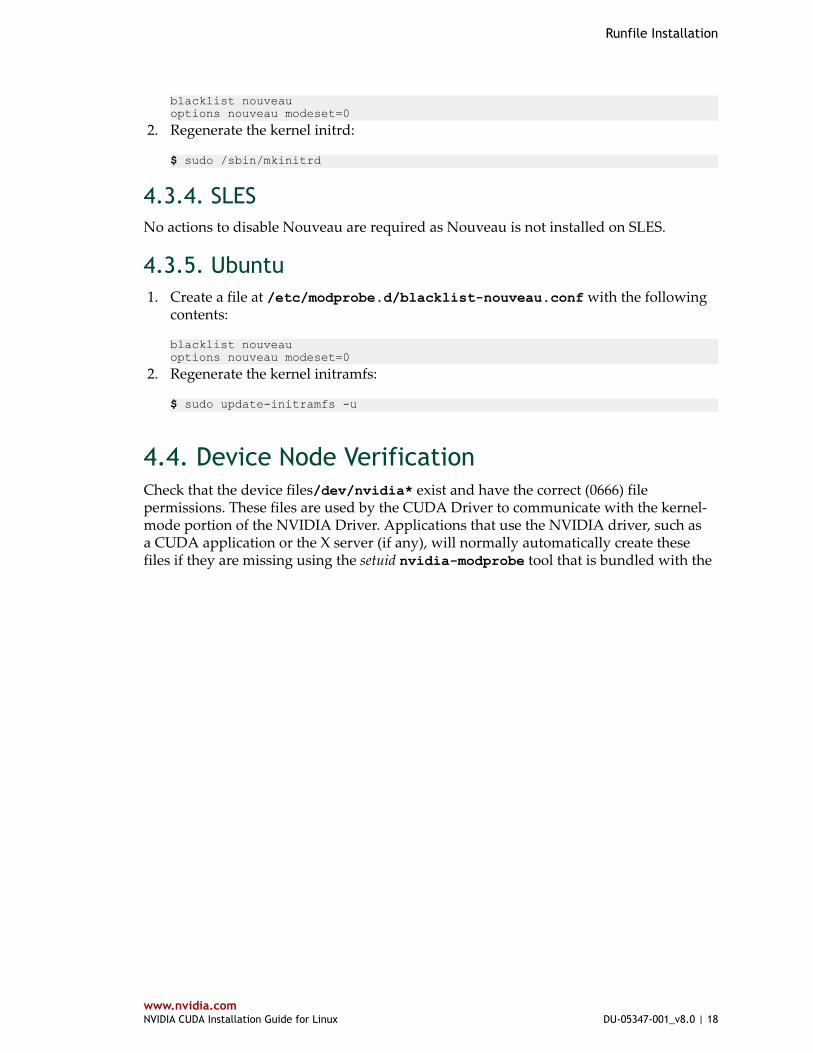
4.3.4. SLESNo actions to disable Nouveau are required as Nouveau is not installed on SLES.
4.3.5. Ubuntu 1. Create a file at /etc/modprobe.d/blacklist-nouveau.conf with the following
contents:
blacklist nouveauoptions nouveau modeset=0
2. Regenerate the kernel initramfs:
$ sudo update-initramfs -u
4.4. Device Node VerificationCheck that the device files/dev/nvidia* exist and have the correct (0666) filepermissions. These files are used by the CUDA Driver to communicate with the kernel-mode portion of the NVIDIA Driver. Applications that use the NVIDIA driver, such asa CUDA application or the X server (if any), will normally automatically create thesefiles if they are missing using the setuid nvidia-modprobe tool that is bundled with the

Runfile Installation
www.nvidia.comNVIDIA CUDA Installation Guide for Linux DU-05347-001_v8.0 | 19
NVIDIA Driver. However, some systems disallow setuid binaries, so if these files do notexist, you can create them manually by using a startup script such as the one below:#!/bin/bash
/sbin/modprobe nvidia
if [ "$?" -eq 0 ]; then # Count the number of NVIDIA controllers found. NVDEVS=`lspci | grep -i NVIDIA` N3D=`echo "$NVDEVS" | grep "3D controller" | wc -l` NVGA=`echo "$NVDEVS" | grep "VGA compatible controller" | wc -l`
N=`expr $N3D + $NVGA - 1` for i in `seq 0 $N`; do mknod -m 666 /dev/nvidia$i c 195 $i done
mknod -m 666 /dev/nvidiactl c 195 255
else exit 1fi
/sbin/modprobe nvidia-uvm
if [ "$?" -eq 0 ]; then # Find out the major device number used by the nvidia-uvm driver D=`grep nvidia-uvm /proc/devices | awk '{print $1}'`
mknod -m 666 /dev/nvidia-uvm c $D 0else exit 1fi
4.5. Advanced OptionsAction Options Used Explanation
--silent Required for any silentinstallation. Performs aninstallation with no further user-input and minimal command-line output based on theoptions provided below. Silentinstallations are useful forscripting the installation ofCUDA. Using this option impliesacceptance of the EULA. Thefollowing flags can be used tocustomize the actions takenduring installation. At leastone of --driver, --uninstall, --toolkit, and --samples must bepassed if running with non-rootpermissions.
--driver Install the CUDA Driver.
Silent Installation
--toolkit Install the CUDA Toolkit.

Runfile Installation
www.nvidia.comNVIDIA CUDA Installation Guide for Linux DU-05347-001_v8.0 | 20
Action Options Used Explanation
--toolkitpath=<path> Install the CUDA Toolkit to the<path> directory. If not provided,the default path of /usr/local/cuda-8.0 is used.
--samples Install the CUDA Samples.
--samplespath=<path> Install the CUDA Samples to the<path> directory. If not provided,the default path of $(HOME)/NVIDIA_CUDA-8.0_Samples isused.
--uninstall (DEPRECATED) Unnstall the CUDA Driver.
Extraction --extract=<path> Extracts the individual driver,toolkit, and samples runfileinstallers to <path>.
This is especially useful whenone wants to install the driverusing one or more of thecommand-line options providedby the driver installer which arenot exposed in this installer.
Overriding Installation Checks --override Ignores compiler, third-partylibrary, and toolkit detectionchecks which would prevent theCUDA Toolkit and CUDA Samplesfrom installing.
No OpenGL Libraries --no-opengl-libs Prevents the driver installationfrom installing NVIDIA's GLlibraries. Useful for systemswhere the display is drivenby a non-NVIDIA GPU. In suchsystems, NVIDIA's GL librariescould prevent X from loadingproperly.
Overriding Kernel Source --kernel-source-path=<path> Tells the driver installation touse <path> as the kernel sourcedirectory when building theNVIDIA kernel module. Requiredfor systems where the kernelsource is installed to a non-standard location.
Running nvidia-xconfig --run-nvidia-xconfig Tells the driver installation torun nvidia-xconfig to update thesystem X configuration file sothat the NVIDIA X driver is used.The pre-existing X configurationfile will be backed up.
Custom Temporary DirectorySelection
--tmpdir=<path> Performs any temporary actionswithin <path> instead of /tmp.Useful in cases where /tmpcannot be used (doesn't exist, is

Runfile Installation
www.nvidia.comNVIDIA CUDA Installation Guide for Linux DU-05347-001_v8.0 | 21
Action Options Used Explanation
full, is mounted with 'noexec',etc.).
Show Verbose Output --verbose Prints all logging information tostdout as well as the log file.
Show Installer Options --help Prints the list of command-lineoptions to stdout.
4.6. UninstallationTo uninstall the CUDA Toolkit, run the uninstallation script provided in the bindirectory of the toolkit. By default, it is located in /usr/local/cuda-8.0/bin:
$ sudo /usr/local/cuda-8.0/bin/uninstall_cuda_8.0.pl
To uninstall the NVIDIA Driver, run nvidia-uninstall:
$ sudo /usr/bin/nvidia-uninstall
To enable the Nouveau drivers, remove the blacklist file created in the DisablingNouveau section, and regenerate the kernel initramfs/initrd again as described in thatsection.

www.nvidia.comNVIDIA CUDA Installation Guide for Linux DU-05347-001_v8.0 | 22
Chapter 5.CUDA CROSS-PLATFORM ENVIRONMENT
Cross-platform development is only supported on Ubuntu systems, and is onlyprovided via the Package Manager installation process.
We recommend selecting Ubuntu 14.04 as your cross-platform developmentenvironment. This selection helps prevent host/target incompatibilities, such as GCC orGLIBC version mismatches.
5.1. CUDA Cross-Platform InstallationSome of the following steps may have already been performed as part of the nativeUbuntu installation. Such steps can safely be skipped.
These steps should be performed on the x86_64 host system, rather than the targetsystem. To install the native CUDA Toolkit on the target system, refer to the nativeUbuntu installation section.
1. Perform the pre-installation actions. 2. Enable the foreign architecture
The foreign architecture must be enabled in order to install the cross-platformtoolkit. To enable armhf, arm64 (aarch64), or ppc64el as a foreign architecture,the following commands must be executed, replacing <arch> with the desiredarchitecture:
$ sudo dpkg --add-architecture <arch>$ sudo apt-get update
3. Install repository meta-data
When using a proxy server with aptitude, ensure that wget is set up to use thesame proxy settings before installing the cuda-repo package.
$ sudo dpkg -i cuda-repo-<distro>_<version>_amd64.deb
4. Update the Apt repository cache
$ sudo apt-get update

CUDA Cross-Platform Environment
www.nvidia.comNVIDIA CUDA Installation Guide for Linux DU-05347-001_v8.0 | 23
5. Install the cross-platform CUDA Toolkit
To install the cross-platform toolkit for armhf, aarch64, or ppc64el, the followingcommand must be executed, replacing <arch> with the desired architecture:
$ sudo apt-get install cuda-cross-<arch>
6. Perform the post-installation actions.
5.2. CUDA Cross-Platform SamplesThis section describes the options used to build cross-platform samples.TARGET_ARCH=<arch> and TARGET_OS=<os> should be chosen based on the supportedtargets shown below. TARGET_FS=<path> can be used to point nvcc to libraries andheaders used by the sample.
Table 6 Supported Target Arch/OS Combinations
TARGET OS
linux darwin android qnx
x86_64 YES YES NO NO
armv7l YES NO YES YES
aarch64 NO NO YES NOTARGET ARCH
ppc64le YES NO NO NO
TARGET_ARCHThe target architecture must be specified when cross-compiling applications. If notspecified, it defaults to the host architecture. Allowed architectures are:
‣ x86_64 - 64-bit x86 CPU architecture‣ armv7l - 32-bit ARM CPU architecture, like that found on Jetson TK1‣ aarch64 - 64-bit ARM CPU architecture, found on certain Android systems‣ ppc64le - 64-bit little-endian IBM POWER8 architecture
TARGET_OSThe target OS must be specified when cross-compiling applications. If not specified, itdefaults to the host OS. Allowed OSes are:
‣ linux - for any Linux distributions‣ darwin - for Mac OS X‣ android - for any supported device running Android‣ qnx - for any supported device running QNX

CUDA Cross-Platform Environment
www.nvidia.comNVIDIA CUDA Installation Guide for Linux DU-05347-001_v8.0 | 24
TARGET_FSThe most reliable method to cross-compile the CUDA Samples is to use the TARGET_FSvariable. To do so, mount the target's filesystem on the host, say at /mnt/target. This istypically done using exportfs. In cases where exportfs is unavailable, it is sufficientto copy the target's filesystem to /mnt/target. To cross-compile a sample, execute:
$ make TARGET_ARCH=<arch> TARGET_OS=<os> TARGET_FS=/mnt/target
Copying LibrariesIf the TARGET_FS option is not available, the libraries used should be copied fromthe target system to the host system, say at /opt/target/libs. If the sample usesGL, the GL headers must also be copied, say at /opt/target/include. The linkermust then be told where the libraries are with the -rpath-link and/or -L options. Toignore unresolved symbols from some libraries, use the --unresolved-symbols optionas shown below. SAMPLE_ENABLED should be used to force the sample to build. Forexample, to cross-compile a sample which uses such libraries, execute:
$ make TARGET_ARCH=<arch> TARGET_OS=<os> \ EXTRA_LDFLAGS="-rpath-link=/opt/target/libs -L/opt/target/libs --unresolved-symbols=ignore-in-shared-libs" \ EXTRA_CCFLAGS="-I /opt/target/include" \ SAMPLE_ENABLED=1
5.3. Nsight Eclipse EditionNsight Eclipse Edition supports cross-platform development. See the Nsight EclipseEdition Getting Started Guide for more details.
www.nvidia.comNVIDIA CUDA Installation Guide for Linux DU-05347-001_v8.0 | 25
Chapter 6.POST-INSTALLATION ACTIONS
The post-installation actions must be manually performed. These actions are split intomandatory, recommended, and optional sections.
6.1. Mandatory ActionsSome actions must be taken after the installation before the CUDA Toolkit and Drivercan be used.
6.1.1. Environment SetupThe PATH variable needs to include /usr/local/cuda-8.0/bin
To add this path to the PATH variable:
$ export PATH=/usr/local/cuda-8.0/bin${PATH:+:${PATH}}
In addition, when using the runfile installation method, the LD_LIBRARY_PATH variableneeds to contain /usr/local/cuda-8.0/lib64 on a 64-bit system, or /usr/local/cuda-8.0/lib on a 32-bit system
‣ To change the environment variables for 64-bit operating systems:
$ export LD_LIBRARY_PATH=/usr/local/cuda-8.0/lib64\ ${LD_LIBRARY_PATH:+:${LD_LIBRARY_PATH}}
‣ To change the environment variables for 32-bit operating systems:
$ export LD_LIBRARY_PATH=/usr/local/cuda-8.0/lib\ ${LD_LIBRARY_PATH:+:${LD_LIBRARY_PATH}}
Note that the above paths change when using a custom install path with the runfileinstallation method.
6.2. Recommended ActionsOther actions are recommended to verify the integrity of the installation.

Post-installation Actions
www.nvidia.comNVIDIA CUDA Installation Guide for Linux DU-05347-001_v8.0 | 26
6.2.1. Install Writable SamplesIn order to modify, compile, and run the samples, the samples must be installed withwrite permissions. A convenience installation script is provided:
$ cuda-install-samples-8.0.sh <dir>
This script is installed with the cuda-samples-8-0 package. The cuda-samples-8-0package installs only a read-only copy in /usr/local/cuda-8.0/samples.
6.2.2. Verify the InstallationBefore continuing, it is important to verify that the CUDA toolkit can find andcommunicate correctly with the CUDA-capable hardware. To do this, you need tocompile and run some of the included sample programs.
Ensure the PATH and, if using the runfile installation method, LD_LIBRARY_PATHvariables are set correctly.
6.2.2.1. Verify the Driver VersionIf you installed the driver, verify that the correct version of it is loaded. If you did notinstall the driver, or are using an operating system where the driver is not loaded via akernel module, such as L4T, skip this step.
When the driver is loaded, the driver version can be found by executing the command
$ cat /proc/driver/nvidia/version
Note that this command will not work on an iGPU/dGPU system.
6.2.2.2. Compiling the ExamplesThe version of the CUDA Toolkit can be checked by running nvcc -V in a terminalwindow. The nvcc command runs the compiler driver that compiles CUDA programs. Itcalls the gcc compiler for C code and the NVIDIA PTX compiler for the CUDA code.
The NVIDIA CUDA Toolkit includes sample programs in source form. You shouldcompile them by changing to ~/NVIDIA_CUDA-8.0_Samples and typing make. Theresulting binaries will be placed under ~/NVIDIA_CUDA-8.0_Samples/bin.
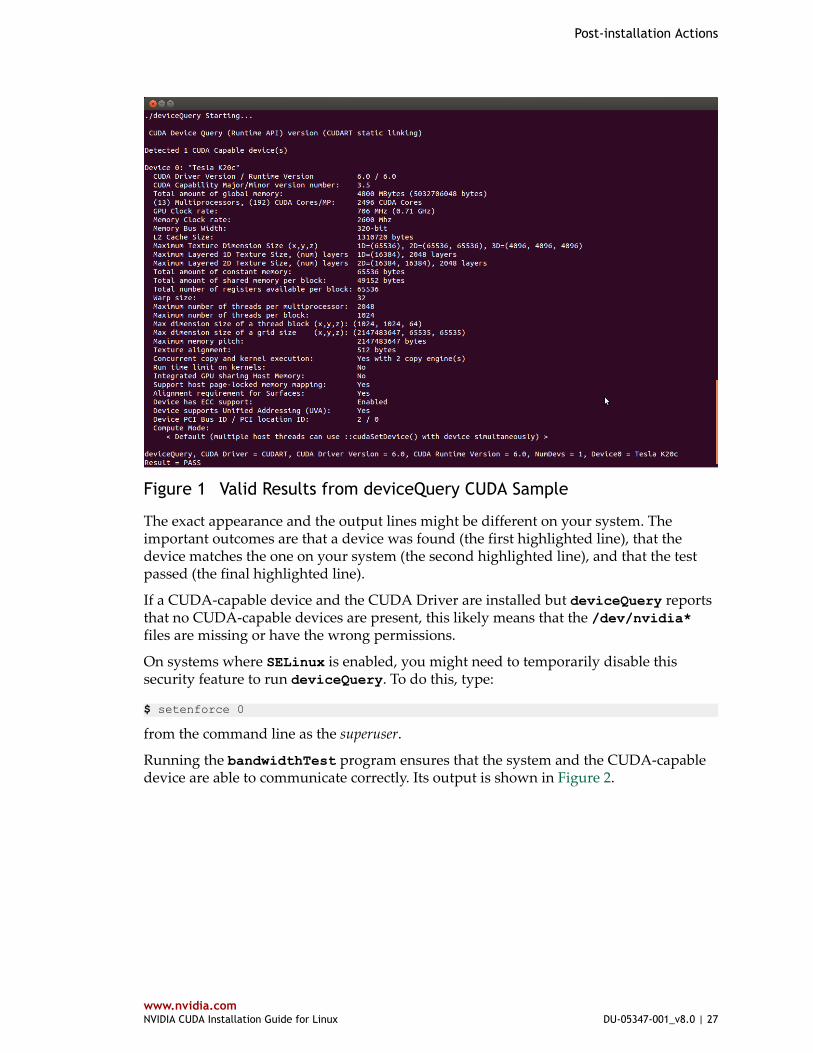
6.2.2.3. Running the BinariesAfter compilation, find and run deviceQuery under ~/NVIDIA_CUDA-8.0_Samples.If the CUDA software is installed and configured correctly, the output for deviceQueryshould look similar to that shown in Figure 1.
Post-installation Actions
www.nvidia.comNVIDIA CUDA Installation Guide for Linux DU-05347-001_v8.0 | 27
Figure 1 Valid Results from deviceQuery CUDA Sample
The exact appearance and the output lines might be different on your system. Theimportant outcomes are that a device was found (the first highlighted line), that thedevice matches the one on your system (the second highlighted line), and that the testpassed (the final highlighted line).
If a CUDA-capable device and the CUDA Driver are installed but deviceQuery reportsthat no CUDA-capable devices are present, this likely means that the /dev/nvidia*files are missing or have the wrong permissions.
On systems where SELinux is enabled, you might need to temporarily disable thissecurity feature to run deviceQuery. To do this, type:
$ setenforce 0
from the command line as the superuser.
Running the bandwidthTest program ensures that the system and the CUDA-capabledevice are able to communicate correctly. Its output is shown in Figure 2.

Post-installation Actions
www.nvidia.comNVIDIA CUDA Installation Guide for Linux DU-05347-001_v8.0 | 28
Figure 2 Valid Results from bandwidthTest CUDA Sample
Note that the measurements for your CUDA-capable device description will vary fromsystem to system. The important point is that you obtain measurements, and that thesecond-to-last line (in Figure 2) confirms that all necessary tests passed.
Should the tests not pass, make sure you have a CUDA-capable NVIDIA GPU on yoursystem and make sure it is properly installed.
If you run into difficulties with the link step (such as libraries not being found), consultthe Linux Release Notes found in the doc folder in the CUDA Samples directory.
6.3. Optional ActionsOther options are not necessary to use the CUDA Toolkit, but are available to provideadditional features.
6.3.1. Install Third-party LibrariesSome CUDA samples use third-party libraries which may not be installed by default onyour system. These samples attempt to detect any required libraries when building. If alibrary is not detected, it waives itself and warns you which library is missing. To buildand run these samples, you must install the missing libraries.
6.3.2. Install the source code for cuda-gdbThe cuda-gdb source is automatically installed with the runfile installation method.

Post-installation Actions
www.nvidia.comNVIDIA CUDA Installation Guide for Linux DU-05347-001_v8.0 | 29
To obtain a copy of the source code for cuda-gdb using the RPM and Debian installationmethods, the cuda-gdb-src package must be installed.
The source code is installed as a tarball in the /usr/local/cuda-8.0/extras directory.
www.nvidia.comNVIDIA CUDA Installation Guide for Linux DU-05347-001_v8.0 | 30
Chapter 7.ADVANCED SETUP
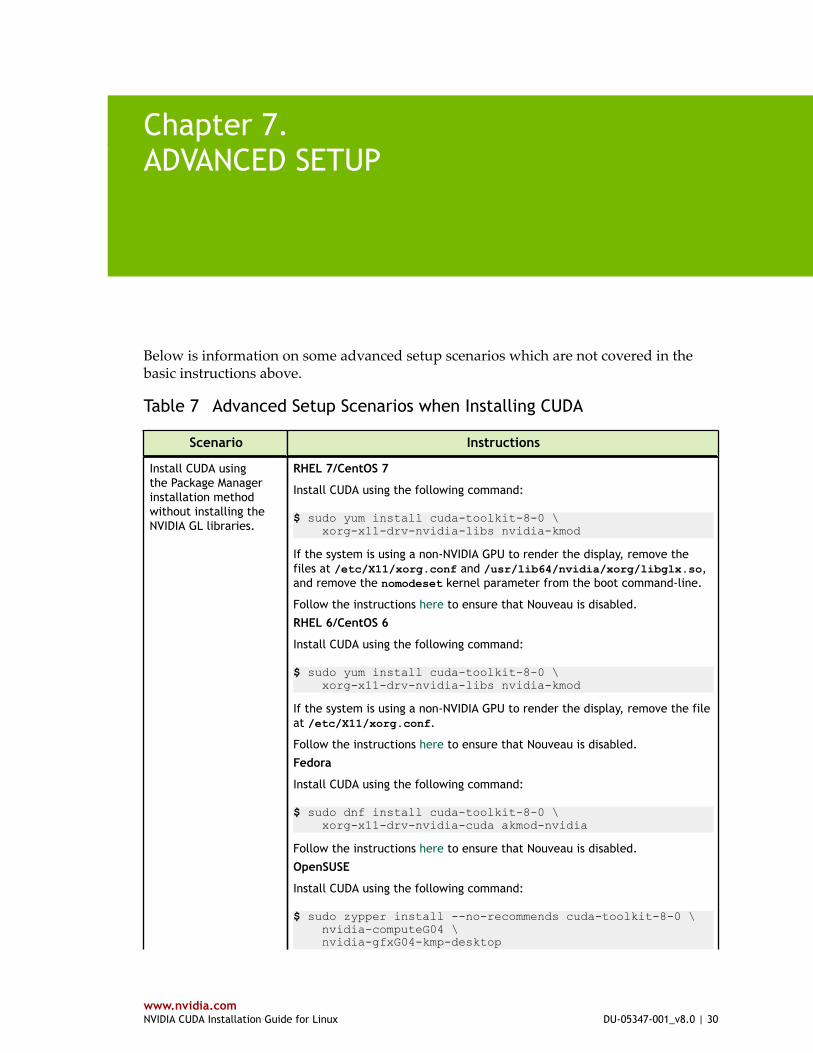
Below is information on some advanced setup scenarios which are not covered in thebasic instructions above.
Table 7 Advanced Setup Scenarios when Installing CUDA
Scenario Instructions
Install CUDA usingthe Package Managerinstallation methodwithout installing theNVIDIA GL libraries.
RHEL 7/CentOS 7
Install CUDA using the following command:
$ sudo yum install cuda-toolkit-8-0 \ xorg-x11-drv-nvidia-libs nvidia-kmod
If the system is using a non-NVIDIA GPU to render the display, remove thefiles at /etc/X11/xorg.conf and /usr/lib64/nvidia/xorg/libglx.so,and remove the nomodeset kernel parameter from the boot command-line.
Follow the instructions here to ensure that Nouveau is disabled.
RHEL 6/CentOS 6
Install CUDA using the following command:
$ sudo yum install cuda-toolkit-8-0 \ xorg-x11-drv-nvidia-libs nvidia-kmod
If the system is using a non-NVIDIA GPU to render the display, remove the fileat /etc/X11/xorg.conf.
Follow the instructions here to ensure that Nouveau is disabled.
Fedora
Install CUDA using the following command:
$ sudo dnf install cuda-toolkit-8-0 \ xorg-x11-drv-nvidia-cuda akmod-nvidia
Follow the instructions here to ensure that Nouveau is disabled.
OpenSUSE
Install CUDA using the following command:
$ sudo zypper install --no-recommends cuda-toolkit-8-0 \ nvidia-computeG04 \ nvidia-gfxG04-kmp-desktop

Advanced Setup
www.nvidia.comNVIDIA CUDA Installation Guide for Linux DU-05347-001_v8.0 | 31
Scenario Instructions
Follow the instructions here to ensure that Nouveau is disabled.
SLES
Install CUDA using the following command:
$ sudo zypper install --no-recommends cuda-toolkit-8-0 \ nvidia-computeG04 \ nvidia-gfxG04-kmp-default
Ubuntu
This functionality isn't supported on Ubuntu. Instead, the driver packagesintegrate with the Bumblebee framework to provide a solution for userswho wish to control what applications the NVIDIA drivers are used for. SeeUbuntu's Bumblebee wiki for more information.
Use a specific GPU forrendering the display.
Add or replace a Device entry in your xorg.conf file, located at /etc/X11/xorg.conf. The Device entry should resemble the following:
Section "Device" Identifier "Device0" Driver "driver_name" VendorName "vendor_name" BusID "bus_id"EndSection
The details will you will need to add differ on a case-by-case basis. Forexample, if you have two NVIDIA GPUs and you want the first GPU to be usedfor display, you would replace "driver_name" with "nvidia", "vendor_name"with "NVIDIA Corporation" and "bus_id" with the Bus ID of the GPU.
The Bus ID will resemble "PCI:00:02.0" and can be found by running lspci.
Install CUDA to aspecific directory usingthe Package Managerinstallation method.
RPM
The RPM packages don't support custom install locations through the packagemanagers (Yum and Zypper), but it is possible to install the RPM packages toa custom location using rpm's --relocate parameter:
$ sudo rpm --install --relocate /usr/local/cuda-8.0=/new/toolkit package.rpm
You will need to install the packages in the correct dependency order; thistask is normally taken care of by the package managers. For example, ifpackage "foo" has a dependency on package "bar", you should install package"bar" first, and package "foo" second. You can check the dependencies of aRPM package as follows:
$ rpm -qRp package.rpm
Note that the driver packages cannot be relocated.
Deb
The Deb packages do not support custom install locations. It is howeverpossible to extract the contents of the Deb packages and move the filesto the desired install location. See the next scenario for more details onextracting Deb packages.
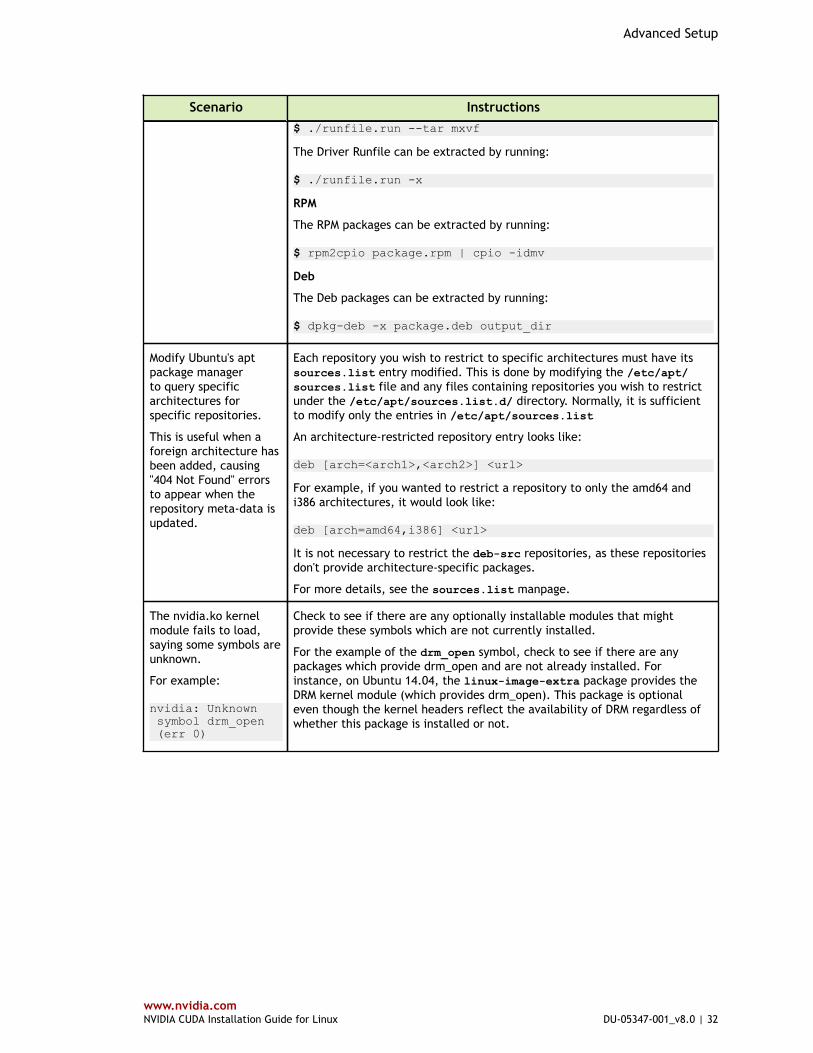
Extract the contents ofthe installers.
Runfile
The Runfile can be extracted into the standalone Toolkit, Samples andDriver Runfiles by using the --extract parameter. The Toolkit and Samplesstandalone Runfiles can be further extracted by running:
Advanced Setup
www.nvidia.comNVIDIA CUDA Installation Guide for Linux DU-05347-001_v8.0 | 32
Scenario Instructions$ ./runfile.run --tar mxvf
The Driver Runfile can be extracted by running:
$ ./runfile.run -x
RPM
The RPM packages can be extracted by running:
$ rpm2cpio package.rpm | cpio -idmv
Deb
The Deb packages can be extracted by running:
$ dpkg-deb -x package.deb output_dir
Modify Ubuntu's aptpackage managerto query specificarchitectures forspecific repositories.
This is useful when aforeign architecture hasbeen added, causing"404 Not Found" errorsto appear when therepository meta-data isupdated.
Each repository you wish to restrict to specific architectures must have itssources.list entry modified. This is done by modifying the /etc/apt/sources.list file and any files containing repositories you wish to restrictunder the /etc/apt/sources.list.d/ directory. Normally, it is sufficientto modify only the entries in /etc/apt/sources.list
An architecture-restricted repository entry looks like:
deb [arch=<arch1>,<arch2>] <url>
For example, if you wanted to restrict a repository to only the amd64 andi386 architectures, it would look like:
deb [arch=amd64,i386] <url>
It is not necessary to restrict the deb-src repositories, as these repositoriesdon't provide architecture-specific packages.
For more details, see the sources.list manpage.
The nvidia.ko kernelmodule fails to load,saying some symbols areunknown.
For example:
nvidia: Unknown symbol drm_open (err 0)
Check to see if there are any optionally installable modules that mightprovide these symbols which are not currently installed.
For the example of the drm_open symbol, check to see if there are anypackages which provide drm_open and are not already installed. Forinstance, on Ubuntu 14.04, the linux-image-extra package provides theDRM kernel module (which provides drm_open). This package is optionaleven though the kernel headers reflect the availability of DRM regardless ofwhether this package is installed or not.

www.nvidia.comNVIDIA CUDA Installation Guide for Linux DU-05347-001_v8.0 | 33
Chapter 8.FREQUENTLY ASKED QUESTIONS
How do I install the Toolkit in a different location?The Runfile installation asks where you wish to install the Toolkit and the Samplesduring an interactive install. If installing using a non-interactive install, you can use the--toolkitpath and --samplespath parameters to change the install location:
$ ./runfile.run --silent \ --toolkit --toolkitpath=/my/new/toolkit \ --samples --samplespath=/my/new/samples
The RPM and Deb packages cannot be installed to a custom install location directlyusing the package managers. See the "Install CUDA to a specific directory using thePackage Manager installation method" scenario in the Advanced Setup section for moreinformation.
Why do I see "nvcc: No such file or directory"when I try to build a CUDA application?Your PATH environment variable is not set up correctly. Ensure that your PATH includesthe bin directory where you installed the Toolkit, usually /usr/local/cuda-8.0/bin.
$ export PATH=/usr/local/cuda-8.0/bin${PATH:+:${PATH}}
Why do I see "error while loading shared libraries:<lib name>: cannot open shared object file: No

Frequently Asked Questions
www.nvidia.comNVIDIA CUDA Installation Guide for Linux DU-05347-001_v8.0 | 34
such file or directory" when I try to run a CUDAapplication that uses a CUDA library?Your LD_LIBRARY_PATH environment variable is not set up correctly. Ensure that yourLD_LIBRARY_PATH includes the lib and/or lib64 directory where you installed theToolkit, usually /usr/local/cuda-8.0/lib{,64}:
$ export LD_LIBRARY_PATH=/usr/local/cuda-8.0/lib\ ${LD_LIBRARY_PATH:+:${LD_LIBRARY_PATH}}
Why do I see multiple "404 Not Found" errorswhen updating my repository meta-data onUbuntu?These errors occur after adding a foreign architecture because apt is attempting toquery for each architecture within each repository listed in the system's sources.list file.Repositories that do not host packages for the newly added architecture will present thiserror. While noisy, the error itself does no harm. Please see the Advanced Setup sectionfor details on how to modify your sources.list file to prevent these errors.
How can I tell X to ignore a GPU for compute-onlyuse?To make sure X doesn't use a certain GPU for display, you need to specify which otherGPU to use for display. For more information, please refer to the "Use a specific GPU forrendering the display" scenario in the Advanced Setup section.
Why doesn't the cuda-repo package install theCUDA Toolkit and Drivers?When using RPM or Deb, the downloaded package is a repository package. Sucha package only informs the package manager where to find the actual installationpackages, but will not install them.
See the Package Manager Installation section for more details.
How do I get CUDA to work on a laptop with aniGPU and a dGPU running Ubuntu14.04?After installing CUDA, set the driver value for the intel device in /etc/X11/xorg.conf to'modesetting' as shown below:
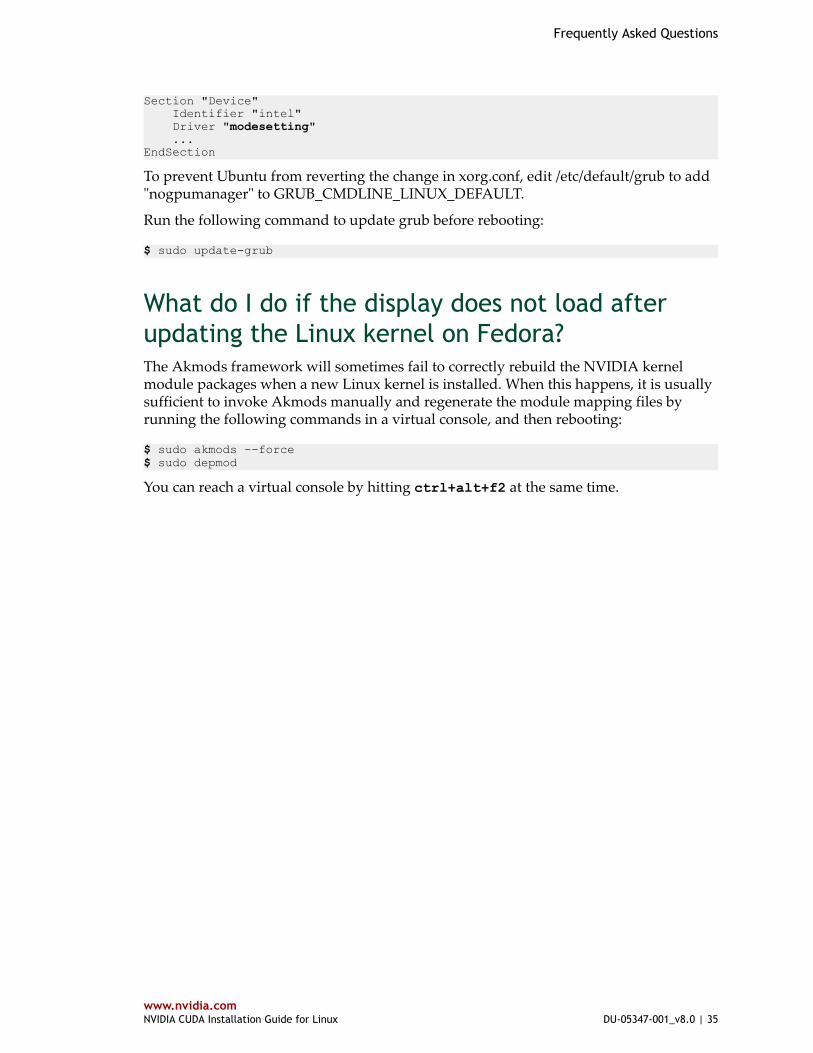
Frequently Asked Questions
www.nvidia.comNVIDIA CUDA Installation Guide for Linux DU-05347-001_v8.0 | 35
Section "Device" Identifier "intel" Driver "modesetting" ...EndSection
To prevent Ubuntu from reverting the change in xorg.conf, edit /etc/default/grub to add"nogpumanager" to GRUB_CMDLINE_LINUX_DEFAULT.
Run the following command to update grub before rebooting:
$ sudo update-grub
What do I do if the display does not load afterupdating the Linux kernel on Fedora?The Akmods framework will sometimes fail to correctly rebuild the NVIDIA kernelmodule packages when a new Linux kernel is installed. When this happens, it is usuallysufficient to invoke Akmods manually and regenerate the module mapping files byrunning the following commands in a virtual console, and then rebooting:
$ sudo akmods --force$ sudo depmod
You can reach a virtual console by hitting ctrl+alt+f2 at the same time.

www.nvidia.comNVIDIA CUDA Installation Guide for Linux DU-05347-001_v8.0 | 36
Chapter 9.ADDITIONAL CONSIDERATIONS
Now that you have CUDA-capable hardware and the NVIDIA CUDA Toolkit installed,you can examine and enjoy the numerous included programs. To begin using CUDA toaccelerate the performance of your own applications, consult the CUDA C ProgrammingGuide, located in /usr/local/cuda-8.0/doc.
A number of helpful development tools are included in the CUDA Toolkit to assistyou as you develop your CUDA programs, such as NVIDIA® Nsight™ Eclipse Edition,NVIDIA Visual Profiler, cuda-gdb, and cuda-memcheck.
For technical support on programming questions, consult and participate in thedeveloper forums at http://developer.nvidia.com/cuda/.
Notice
ALL NVIDIA DESIGN SPECIFICATIONS, REFERENCE BOARDS, FILES, DRAWINGS,DIAGNOSTICS, LISTS, AND OTHER DOCUMENTS (TOGETHER AND SEPARATELY,"MATERIALS") ARE BEING PROVIDED "AS IS." NVIDIA MAKES NO WARRANTIES,EXPRESSED, IMPLIED, STATUTORY, OR OTHERWISE WITH RESPECT TO THEMATERIALS, AND EXPRESSLY DISCLAIMS ALL IMPLIED WARRANTIES OFNONINFRINGEMENT, MERCHANTABILITY, AND FITNESS FOR A PARTICULARPURPOSE.
Information furnished is believed to be accurate and reliable. However, NVIDIACorporation assumes no responsibility for the consequences of use of suchinformation or for any infringement of patents or other rights of third partiesthat may result from its use. No license is granted by implication of otherwiseunder any patent rights of NVIDIA Corporation. Specifications mentioned in thispublication are subject to change without notice. This publication supersedes andreplaces all other information previously supplied. NVIDIA Corporation productsare not authorized as critical components in life support devices or systemswithout express written approval of NVIDIA Corporation.
Trademarks
NVIDIA and the NVIDIA logo are trademarks or registered trademarks of NVIDIACorporation in the U.S. and other countries. Other company and product namesmay be trademarks of the respective companies with which they are associated.
Copyright
© 2009-2016 NVIDIA Corporation. All rights reserved.
www.nvidia.com


