46
NVIDIA Quadro Plex 1000 Installation Guide
ii
Introduction to the NVIDIA Quadro Plex 1000
iii
NVIDIA Quadro Plex 1000 Visual Computing System

NVIDIA Quadro Plex 1000 Installation Guide
iv
v
Table of Contents
Introduction to the NVIDIA Quadro Plex 1000 .............................1 About This Guide ...................................................................................................................1 Features.....................................................................................................................................2 Minimum System Requirements ......................................................................................4
Unpacking the NVIDIA Quadro Plex 1000....................................5 Unpacking .................................................................................................................................5
NVIDIA Quadro Plex 1000 Equipment .....................................................................6 NVIDIA Quadro Plex Rack-mount Kit (Optional)..................................................8
NVIDIA Quadro Plex 1000 Models..................................................................................9 NVIDIA Quadro Plex 1000 Model I............................................................................9 NVIDIA Quadro Plex 1000 Model II ....................................................................... 10 NVIDIA Quadro Plex 1000 Model III ..................................................................... 11 NVIDIA Quadro Plex 1000 Model IV ...................................................................... 12
Hardware Installation and Connections..................................... 13 Safety Instructions ............................................................................................................. 13 Before You Begin ................................................................................................................ 13
Optional Low Profile Bracket ..................................................................................... 14 Installation Instructions .............................................................................................. 15
Connecting to the Host System .................................................................................... 15 Removing Old Drivers .................................................................................................. 15
NVIDIA Quadro Plex 1000 Installation Guide
vi
Installing the NVIDIA Quadro Plex Interface Card .......................................... 16 Installing and Connecting the NVIDIA Quadro Plex 1000........................ 16 Installing NVIDIA Quadro G-Sync Cable Model II Only............................. 18 Installing NVIDIA Quadro Plex 1000 Model III Only .................................. 18 Connecting the Power Cord .................................................................................. 19 Connecting the Power Cord .................................................................................. 20
Installing NVIDIA Quadro Plex Rack-mount Kit (Optional) ............................... 21
Driver Installation .................................................................... 27 Windows Installation ......................................................................................................... 27
Verifying Windows Installation................................................................................. 31 Linux Installation ................................................................................................................ 32
Verifying Linux Installation ........................................................................................ 34
Troubleshooting....................................................................... 35
Compliance and Certifications ................................................... 37
1
Introduction to the NVIDIA Quadro Plex 1000
The NVIDIA Quadro® Plex dedicated visual computing system (VCS) represents a quantum leap in visual computing, enabling breakthrough levels of capability and productivity from an industry-standard architecture. Achieving unprecedented visual computing density, the NVIDIA Quadro Plex is easily deployed in a wide range of environments. Featuring NVIDIA® SLI™ multi-GPU technology, this dedicated VCS scales graphics computing to meet the most demanding professional application requirements. Multiple NVIDIA Quadro Plex VCSs can be combined using the NVIDIA Quadro G-Sync to further scale performance, quality, and channels. Based on proven, industry-standard architectures, NVIDIA Quadro Plex can be deployed with any NVIDIA-certified PCI Express platform.
Note: It is important to register your NVIDIA Quadro Plex 1000 in order to receive NVIDIA Customer Care online and phone support. You can register your NVIDIA Quadro Plex 1000 at www.nvidia.com/register.
About This Guide This Installation Guide provides instructions to connect the NVIDIA Quadro Plex 1000 VCS to a certified host system1 in a desktop or rack-mount environment. For information on using the system with applications, refer to the NVIDIA web site at:
www.nvidia.com/quadroplex
1 For a list of certified host systems visit www.nvidia.com/quadroplex.
NVIDIA Quadro Plex 1000 Installation Guide
2
Features 1.5 GB, 1 GB or 512 MB Frame Buffer per GPU
Delivers high throughput for interactive visualization of large models and high performance for real time processing of large textures and frames and enables the highest quality and resolution full-scene antialiasing (FSAA). (512 MB available on Model II; 1 GB available on Models I and III, 1.5 GB available on Model IV)
Breakthrough Visual Compute Density Unmatched graphics compute per cubic centimeter provides highest visual compute density enabling breakthrough levels of capability and productivity.
Flexible Form Factor Compact design can be easily deployed in a desktop workspace or can be transformed to fit any standard 19" 3U rack environment.
Frame Synchronization Allows the display channels from multiple workstations to be synchronized, thus creating one large "virtual display" that can be driven by a multisystem cluster for performance scalability. (Available on Models I, II and IV)
Full-Scene Antialiasing (FSAA) Up to 64× SLI FSAA on Model IV and 32× SLI FSAA on Models I, II and III dramatically reduces visual aliasing artifacts or jaggies resulting in highly realistic scenes.
Genlock/Frame Lock Also known as house sync, Genlock allows the graphics output to be synchronized to an external source, typically for film and broadcast video applications.
Two to Eight Dual-Link Digital Display Connectors Full dual-link TMDS transmitters support ultra-high-resolution panels (up to 3840 × 2400 at 24 Hz on each panel), which result in amazing image quality producing detailed photorealistic images. (Up to eight on Model II, four on Models 1 and IV, and two on Model III)
Ultra Quiet Design Sub 40 db delivers acoustics lower than most desktop workstations to maintain a quiet and productive environment.
Unified Driver Architecture (UDA) The NVIDIA UDA guarantees forward and backward compatibility with software drivers.
Introduction to the NVIDIA Quadro Plex 1000
3
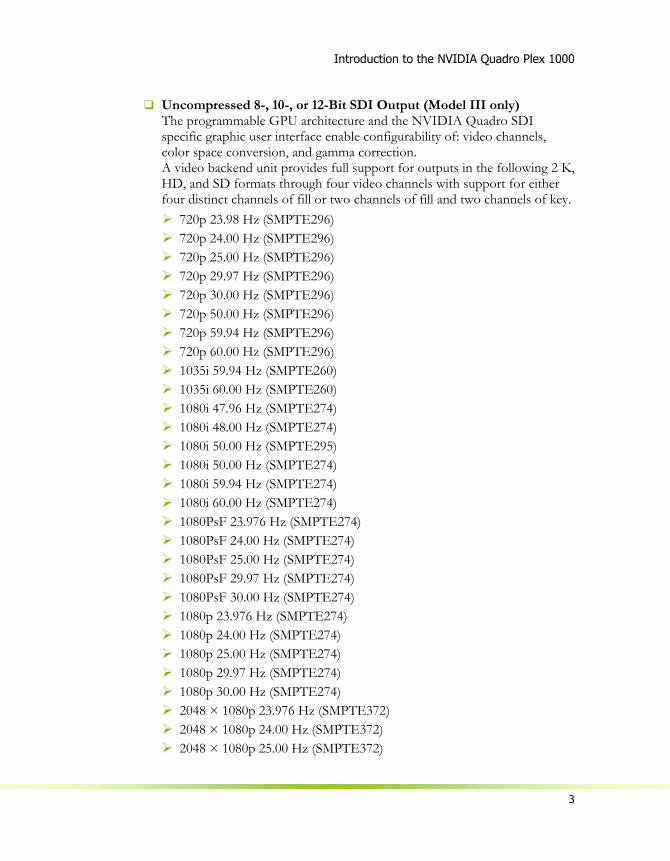
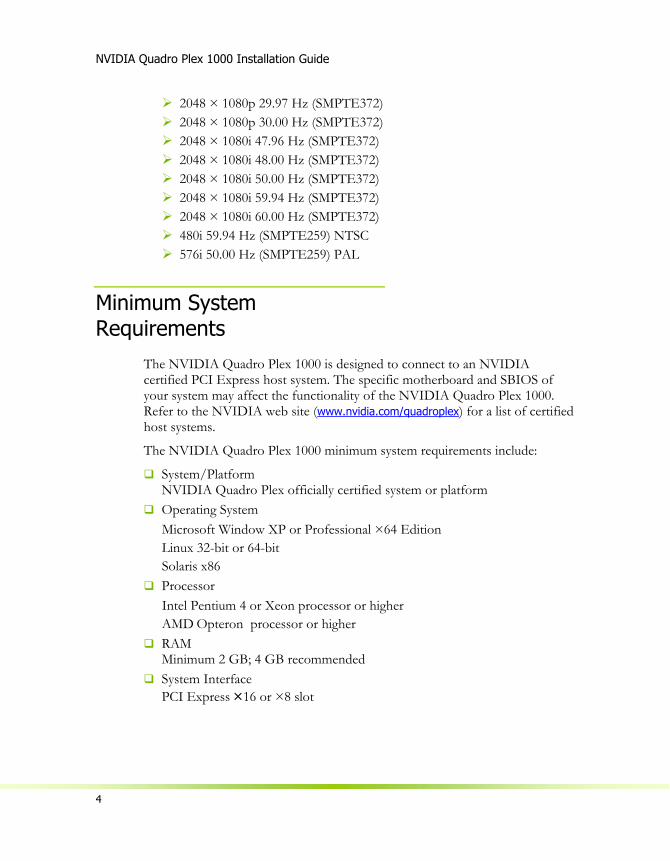
Uncompressed 8-, 10-, or 12-Bit SDI Output (Model III only) The programmable GPU architecture and the NVIDIA Quadro SDI specific graphic user interface enable configurability of: video channels, color space conversion, and gamma correction. A video backend unit provides full support for outputs in the following 2 K, HD, and SD formats through four video channels with support for either four distinct channels of fill or two channels of fill and two channels of key.
720p 23.98 Hz (SMPTE296) 720p 24.00 Hz (SMPTE296) 720p 25.00 Hz (SMPTE296) 720p 29.97 Hz (SMPTE296) 720p 30.00 Hz (SMPTE296) 720p 50.00 Hz (SMPTE296) 720p 59.94 Hz (SMPTE296) 720p 60.00 Hz (SMPTE296) 1035i 59.94 Hz (SMPTE260) 1035i 60.00 Hz (SMPTE260) 1080i 47.96 Hz (SMPTE274) 1080i 48.00 Hz (SMPTE274) 1080i 50.00 Hz (SMPTE295) 1080i 50.00 Hz (SMPTE274) 1080i 59.94 Hz (SMPTE274) 1080i 60.00 Hz (SMPTE274) 1080PsF 23.976 Hz (SMPTE274) 1080PsF 24.00 Hz (SMPTE274) 1080PsF 25.00 Hz (SMPTE274) 1080PsF 29.97 Hz (SMPTE274) 1080PsF 30.00 Hz (SMPTE274) 1080p 23.976 Hz (SMPTE274) 1080p 24.00 Hz (SMPTE274) 1080p 25.00 Hz (SMPTE274) 1080p 29.97 Hz (SMPTE274) 1080p 30.00 Hz (SMPTE274) 2048 × 1080p 23.976 Hz (SMPTE372) 2048 × 1080p 24.00 Hz (SMPTE372) 2048 × 1080p 25.00 Hz (SMPTE372)
NVIDIA Quadro Plex 1000 Installation Guide
4
2048 × 1080p 29.97 Hz (SMPTE372) 2048 × 1080p 30.00 Hz (SMPTE372) 2048 × 1080i 47.96 Hz (SMPTE372) 2048 × 1080i 48.00 Hz (SMPTE372) 2048 × 1080i 50.00 Hz (SMPTE372) 2048 × 1080i 59.94 Hz (SMPTE372) 2048 × 1080i 60.00 Hz (SMPTE372) 480i 59.94 Hz (SMPTE259) NTSC 576i 50.00 Hz (SMPTE259) PAL
Minimum System Requirements
The NVIDIA Quadro Plex 1000 is designed to connect to an NVIDIA certified PCI Express host system. The specific motherboard and SBIOS of your system may affect the functionality of the NVIDIA Quadro Plex 1000. Refer to the NVIDIA web site (www.nvidia.com/quadroplex) for a list of certified host systems.
The NVIDIA Quadro Plex 1000 minimum system requirements include:
System/Platform NVIDIA Quadro Plex officially certified system or platform
Operating System Microsoft Window XP or Professional ×64 Edition Linux 32-bit or 64-bit Solaris x86
Processor Intel Pentium 4 or Xeon processor or higher AMD Opteron processor or higher
RAM Minimum 2 GB; 4 GB recommended
System Interface PCI Express ×16 or ×8 slot
5
Unpacking the NVIDIA Quadro Plex 1000
Unpacking The NVIDIA Quadro Plex 1000 is shipped as a standard desktop tower configuration for connection to a host system. An optional rack-mount kit is available if you are going to install the NVIDIA Quadro Plex 1000 VCS into a cabinet. You will need one kit for each VCS to be rack-mounted.
Be sure to inspect each piece of equipment shipped in the packing box. If anything is missing or damaged, contact your reseller.
NVIDIA Quadro Plex 1000 Installation Guide
6
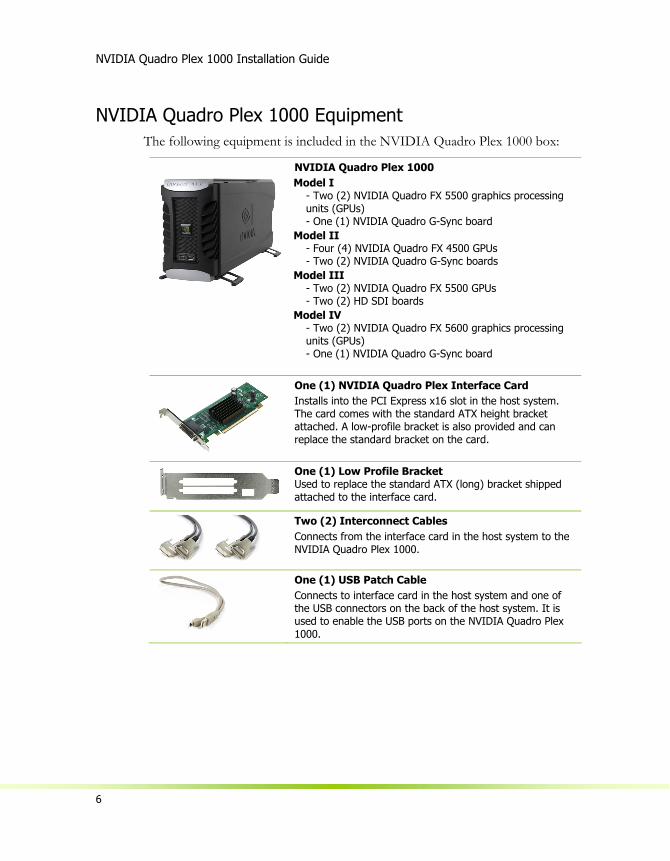
NVIDIA Quadro Plex 1000 Equipment The following equipment is included in the NVIDIA Quadro Plex 1000 box:
NVIDIA Quadro Plex 1000 Model I
- Two (2) NVIDIA Quadro FX 5500 graphics processing units (GPUs) - One (1) NVIDIA Quadro G-Sync board
Model II - Four (4) NVIDIA Quadro FX 4500 GPUs - Two (2) NVIDIA Quadro G-Sync boards
Model III - Two (2) NVIDIA Quadro FX 5500 GPUs - Two (2) HD SDI boards
Model IV - Two (2) NVIDIA Quadro FX 5600 graphics processing units (GPUs) - One (1) NVIDIA Quadro G-Sync board
One (1) NVIDIA Quadro Plex Interface Card Installs into the PCI Express x16 slot in the host system. The card comes with the standard ATX height bracket attached. A low-profile bracket is also provided and can replace the standard bracket on the card.
One (1) Low Profile Bracket Used to replace the standard ATX (long) bracket shipped attached to the interface card.
Two (2) Interconnect Cables Connects from the interface card in the host system to the NVIDIA Quadro Plex 1000.
One (1) USB Patch Cable Connects to interface card in the host system and one of the USB connectors on the back of the host system. It is used to enable the USB ports on the NVIDIA Quadro Plex 1000.
Unpacking the NVIDIA Quadro Plex 1000
7
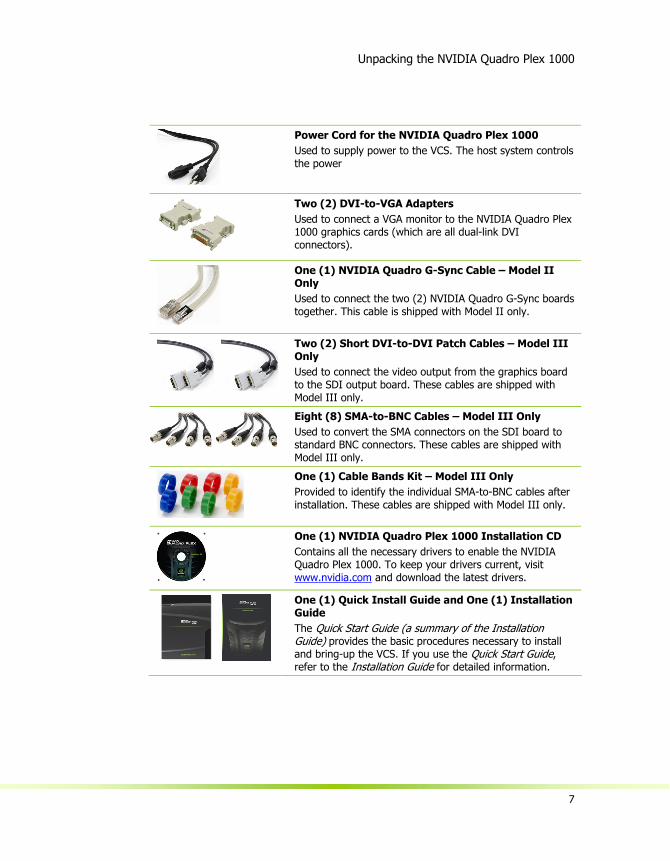
Power Cord for the NVIDIA Quadro Plex 1000 Used to supply power to the VCS. The host system controls the power
Two (2) DVI-to-VGA Adapters Used to connect a VGA monitor to the NVIDIA Quadro Plex 1000 graphics cards (which are all dual-link DVI connectors).
One (1) NVIDIA Quadro G-Sync Cable – Model II Only Used to connect the two (2) NVIDIA Quadro G-Sync boards together. This cable is shipped with Model II only.
Two (2) Short DVI-to-DVI Patch Cables – Model III Only Used to connect the video output from the graphics board to the SDI output board. These cables are shipped with Model III only.
Eight (8) SMA-to-BNC Cables – Model III Only Used to convert the SMA connectors on the SDI board to standard BNC connectors. These cables are shipped with Model III only.
One (1) Cable Bands Kit – Model III Only Provided to identify the individual SMA-to-BNC cables after installation. These cables are shipped with Model III only.
One (1) NVIDIA Quadro Plex 1000 Installation CD Contains all the necessary drivers to enable the NVIDIA Quadro Plex 1000. To keep your drivers current, visit www.nvidia.com and download the latest drivers.
One (1) Quick Install Guide and One (1) Installation Guide The Quick Start Guide (a summary of the Installation Guide) provides the basic procedures necessary to install and bring-up the VCS. If you use the Quick Start Guide, refer to the Installation Guide for detailed information.
NVIDIA Quadro Plex 1000 Installation Guide
8
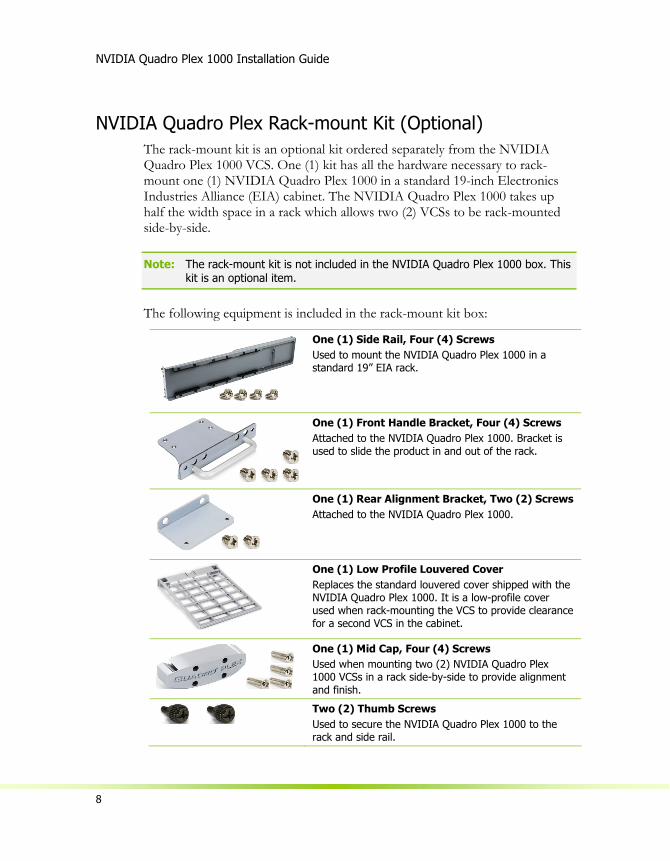
NVIDIA Quadro Plex Rack-mount Kit (Optional) The rack-mount kit is an optional kit ordered separately from the NVIDIA Quadro Plex 1000 VCS. One (1) kit has all the hardware necessary to rack-mount one (1) NVIDIA Quadro Plex 1000 in a standard 19-inch Electronics Industries Alliance (EIA) cabinet. The NVIDIA Quadro Plex 1000 takes up half the width space in a rack which allows two (2) VCSs to be rack-mounted side-by-side.
Note: The rack-mount kit is not included in the NVIDIA Quadro Plex 1000 box. This kit is an optional item.
The following equipment is included in the rack-mount kit box:
One (1) Side Rail, Four (4) Screws Used to mount the NVIDIA Quadro Plex 1000 in a standard 19” EIA rack.
One (1) Front Handle Bracket, Four (4) Screws Attached to the NVIDIA Quadro Plex 1000. Bracket is used to slide the product in and out of the rack.
One (1) Rear Alignment Bracket, Two (2) Screws Attached to the NVIDIA Quadro Plex 1000.
One (1) Low Profile Louvered Cover Replaces the standard louvered cover shipped with the NVIDIA Quadro Plex 1000. It is a low-profile cover used when rack-mounting the VCS to provide clearance for a second VCS in the cabinet.
One (1) Mid Cap, Four (4) Screws Used when mounting two (2) NVIDIA Quadro Plex 1000 VCSs in a rack side-by-side to provide alignment and finish.
Two (2) Thumb Screws Used to secure the NVIDIA Quadro Plex 1000 to the rack and side rail.
Unpacking the NVIDIA Quadro Plex 1000
9
NVIDIA Quadro Plex 1000 Models
The NVIDIA Quadro Plex 1000 is available in the following four (4) models.
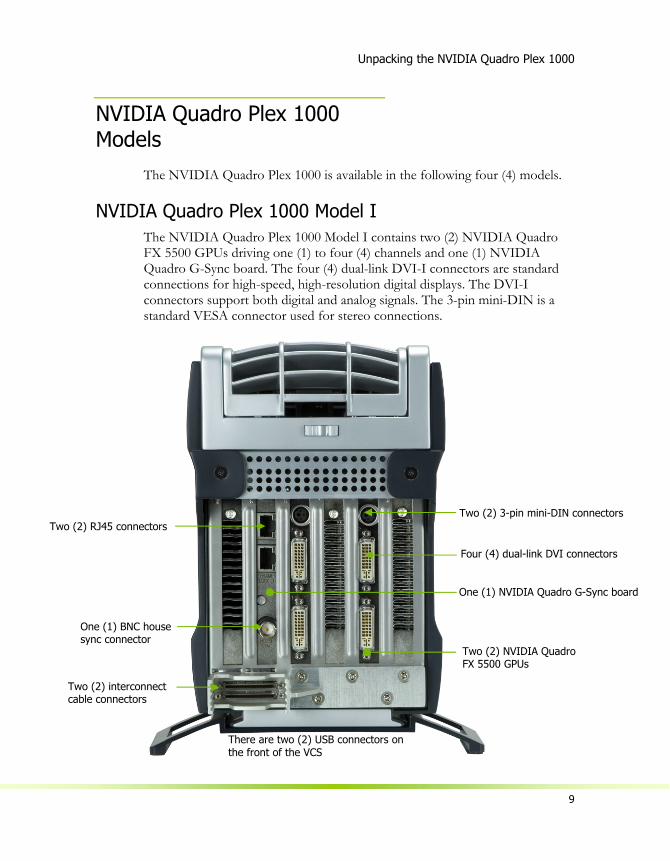
NVIDIA Quadro Plex 1000 Model I The NVIDIA Quadro Plex 1000 Model I contains two (2) NVIDIA Quadro FX 5500 GPUs driving one (1) to four (4) channels and one (1) NVIDIA Quadro G-Sync board. The four (4) dual-link DVI-I connectors are standard connections for high-speed, high-resolution digital displays. The DVI-I connectors support both digital and analog signals. The 3-pin mini-DIN is a standard VESA connector used for stereo connections.
One (1) NVIDIA Quadro G-Sync board
Two (2) 3-pin mini-DIN connectors
Four (4) dual-link DVI connectors
Two (2) RJ45 connectors
One (1) BNC house sync connector
Two (2) interconnect cable connectors
Two (2) NVIDIA Quadro FX 5500 GPUs
There are two (2) USB connectors on the front of the VCS
NVIDIA Quadro Plex 1000 Installation Guide
10
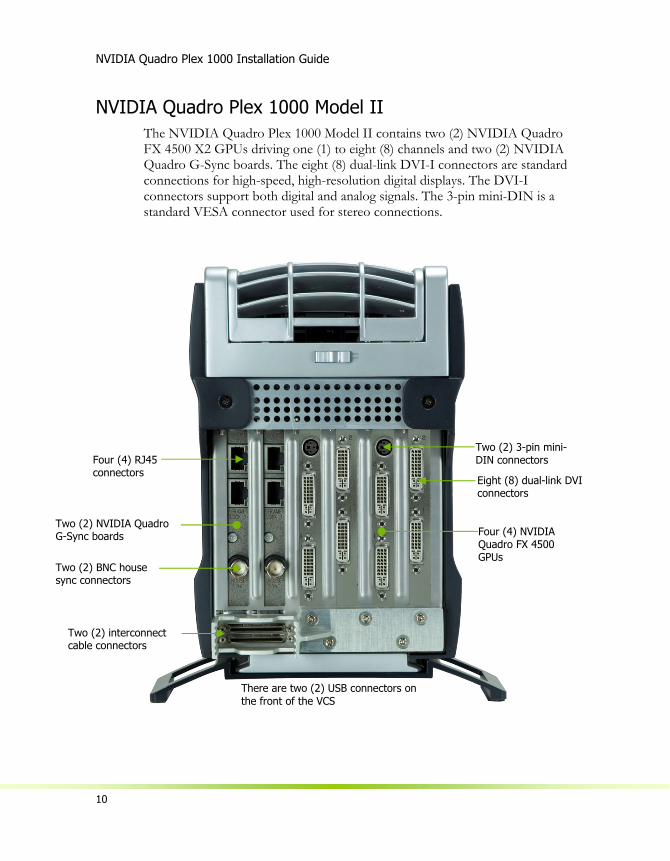
NVIDIA Quadro Plex 1000 Model II The NVIDIA Quadro Plex 1000 Model II contains two (2) NVIDIA Quadro FX 4500 X2 GPUs driving one (1) to eight (8) channels and two (2) NVIDIA Quadro G-Sync boards. The eight (8) dual-link DVI-I connectors are standard connections for high-speed, high-resolution digital displays. The DVI-I connectors support both digital and analog signals. The 3-pin mini-DIN is a standard VESA connector used for stereo connections.
Two (2) 3-pin mini-DIN connectors Eight (8) dual-link DVI connectors
Four (4) RJ45 connectors
Two (2) BNC house sync connectors
Four (4) NVIDIA Quadro FX 4500 GPUs
Two (2) NVIDIA Quadro G-Sync boards
Two (2) interconnect cable connectors
There are two (2) USB connectors on the front of the VCS
Unpacking the NVIDIA Quadro Plex 1000
11
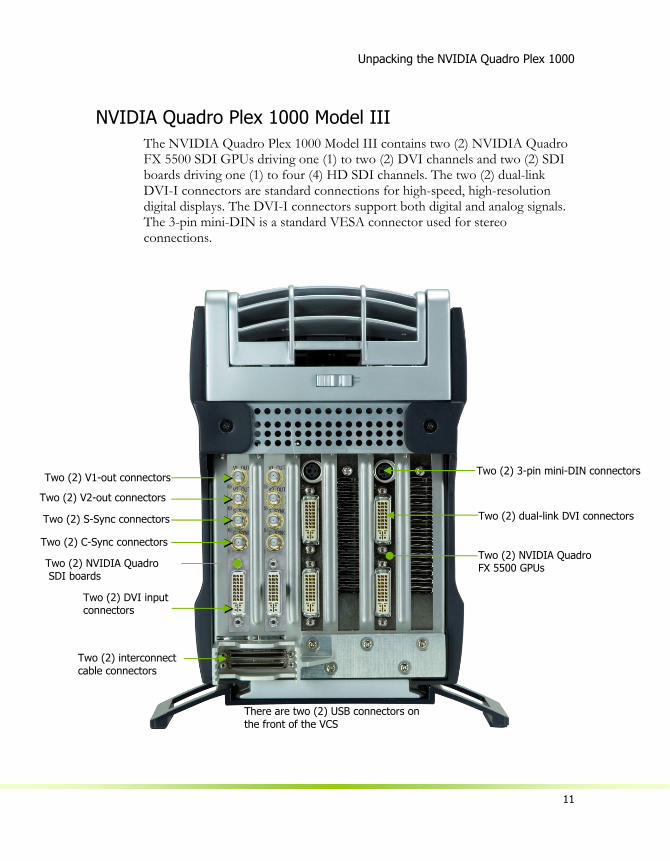
NVIDIA Quadro Plex 1000 Model III The NVIDIA Quadro Plex 1000 Model III contains two (2) NVIDIA Quadro FX 5500 SDI GPUs driving one (1) to two (2) DVI channels and two (2) SDI boards driving one (1) to four (4) HD SDI channels. The two (2) dual-link DVI-I connectors are standard connections for high-speed, high-resolution digital displays. The DVI-I connectors support both digital and analog signals. The 3-pin mini-DIN is a standard VESA connector used for stereo connections.
Two (2) 3-pin mini-DIN connectors
Two (2) dual-link DVI connectors
Two (2) C-Sync connectors
Two (2) S-Sync connectors Two (2) V2-out connectors Two (2) V1-out connectors
Two (2) DVI input connectors
Two (2) interconnect cable connectors
Two (2) NVIDIA Quadro FX 5500 GPUs Two (2) NVIDIA Quadro
SDI boards
There are two (2) USB connectors on the front of the VCS
NVIDIA Quadro Plex 1000 Installation Guide
12
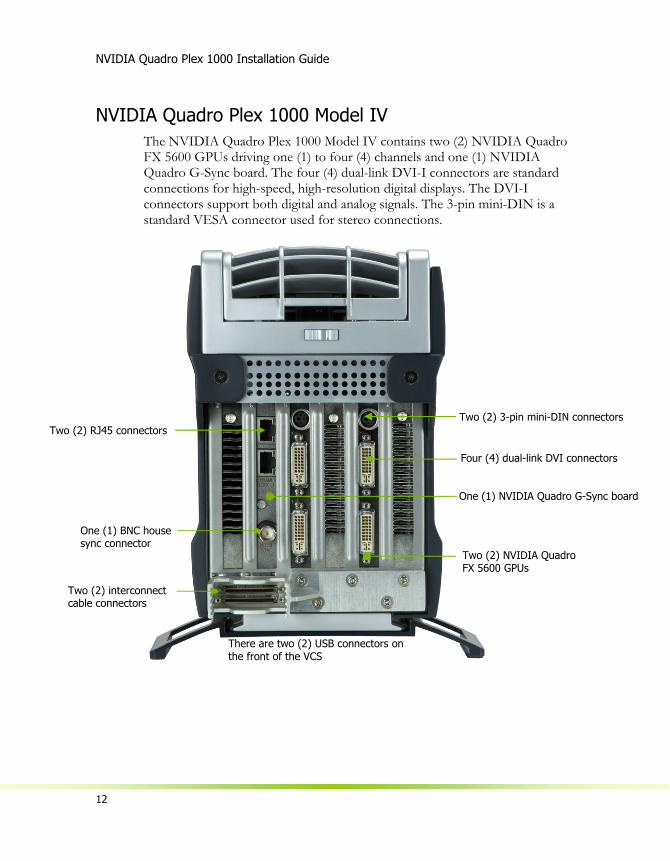
NVIDIA Quadro Plex 1000 Model IV The NVIDIA Quadro Plex 1000 Model IV contains two (2) NVIDIA Quadro FX 5600 GPUs driving one (1) to four (4) channels and one (1) NVIDIA Quadro G-Sync board. The four (4) dual-link DVI-I connectors are standard connections for high-speed, high-resolution digital displays. The DVI-I connectors support both digital and analog signals. The 3-pin mini-DIN is a standard VESA connector used for stereo connections.
One (1) NVIDIA Quadro G-Sync board
Two (2) 3-pin mini-DIN connectors
Four (4) dual-link DVI connectors
Two (2) RJ45 connectors
One (1) BNC house sync connector
Two (2) interconnect cable connectors
Two (2) NVIDIA Quadro FX 5600 GPUs
There are two (2) USB connectors on the front of the VCS
13
Hardware Installation and Connections
Installing and connecting the NVIDIA Quadro Plex 1000 requires opening the host system. Follow all of the safety instructions provided here to ensure that there is no damage to you, your host system, or the NVIDIA Quadro Plex 1000.
Safety Instructions To reduce the risk of fire, electric shock, and injury always follow basic safety precautions.
Remember to remove power from your host system by disconnecting the AC main source before installing any equipment into the host system chassis.
Note: All hardware must be installed prior to installation of the drivers.
Before You Begin The NVIDIA Quadro Plex 1000 can be connected to a host system in a desktop or rack mount environment (an optional rack-mount kit is required for installation into an equipment rack). In either situation, the host system accessing the NVIDIA Quadro Plex 1000 must have the proper graphics drivers installed and have an open ×16 PCI Express slot. To avoid conflicts, any current graphics drivers must be uninstalled prior to installing the hardware and software associated with the NVIDIA Quadro Plex 1000.
NVIDIA Quadro Plex 1000 Installation Guide
14
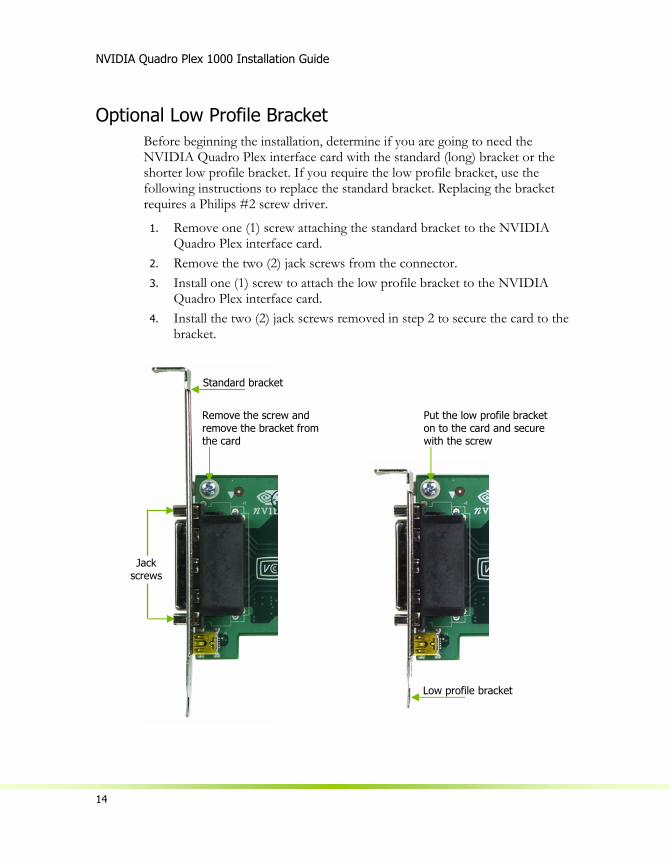
Optional Low Profile Bracket Before beginning the installation, determine if you are going to need the NVIDIA Quadro Plex interface card with the standard (long) bracket or the shorter low profile bracket. If you require the low profile bracket, use the following instructions to replace the standard bracket. Replacing the bracket requires a Philips #2 screw driver.
1. Remove one (1) screw attaching the standard bracket to the NVIDIA Quadro Plex interface card.
2. Remove the two (2) jack screws from the connector. 3. Install one (1) screw to attach the low profile bracket to the NVIDIA
Quadro Plex interface card. 4. Install the two (2) jack screws removed in step 2 to secure the card to the
bracket.
Remove the screw and remove the bracket from the card
Standard bracket
Low profile bracket
Put the low profile bracket on to the card and secure with the screw
Jack screws
Hardware Installation and Connections
15
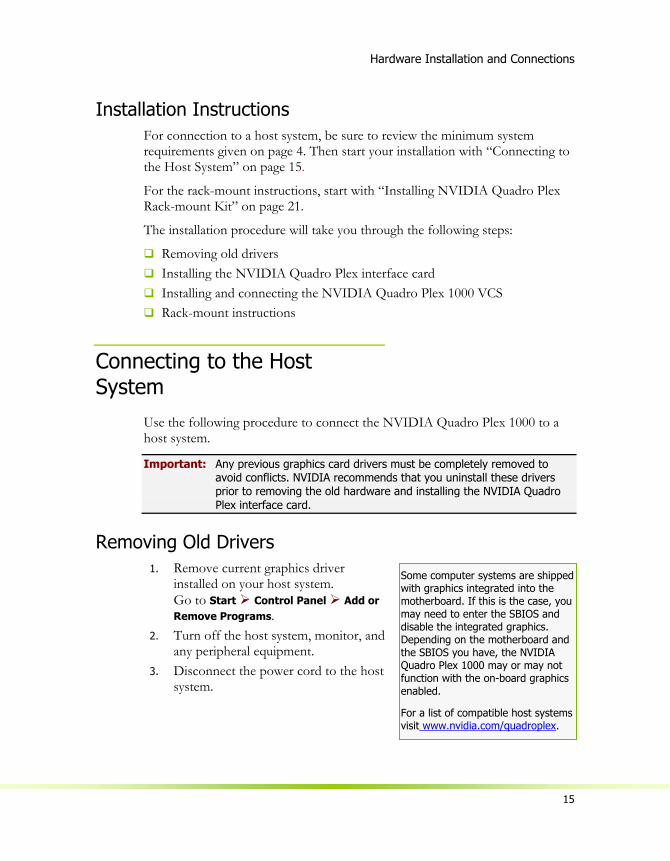
Some computer systems are shipped with graphics integrated into the motherboard. If this is the case, you may need to enter the SBIOS and disable the integrated graphics. Depending on the motherboard and the SBIOS you have, the NVIDIA Quadro Plex 1000 may or may not function with the on-board graphics enabled.
For a list of compatible host systems visit www.nvidia.com/quadroplex.
Installation Instructions For connection to a host system, be sure to review the minimum system requirements given on page 4. Then start your installation with “Connecting to the Host System” on page 15.
For the rack-mount instructions, start with “Installing NVIDIA Quadro Plex Rack-mount Kit” on page 21.
The installation procedure will take you through the following steps:
Removing old drivers Installing the NVIDIA Quadro Plex interface card Installing and connecting the NVIDIA Quadro Plex 1000 VCS Rack-mount instructions
Connecting to the Host System
Use the following procedure to connect the NVIDIA Quadro Plex 1000 to a host system.
Important: Any previous graphics card drivers must be completely removed to avoid conflicts. NVIDIA recommends that you uninstall these drivers prior to removing the old hardware and installing the NVIDIA Quadro Plex interface card.
Removing Old Drivers 1. Remove current graphics driver
installed on your host system. Go to Start Control Panel Add or Remove Programs.
2. Turn off the host system, monitor, and any peripheral equipment.
3. Disconnect the power cord to the host system.
NVIDIA Quadro Plex 1000 Installation Guide
16
Installing the NVIDIA Quadro Plex Interface Card 4. Open the host system. Refer to your host system documentation from the
original manufacturer for assistance. 5. Locate your graphics card (usually the monitor is connected to the
graphics card) or open the ×16 PCI Express slot. 6. Remove the graphics card (if there is one) from the host system. Save any
hardware (such as screws and brackets) to use when installing the NVIDIA Quadro Plex interface card.
7. Install the NVIDIA Quadro Plex interface card into the PCI Express ×16 graphics card slot. (To replace the standard bracket with a low profile bracket, see the instructions given on page 14.)
8. Secure the NVIDIA Quadro Plex interface card using any applicable hardware removed in step 6.
9. Reinstall the cover on your host system.
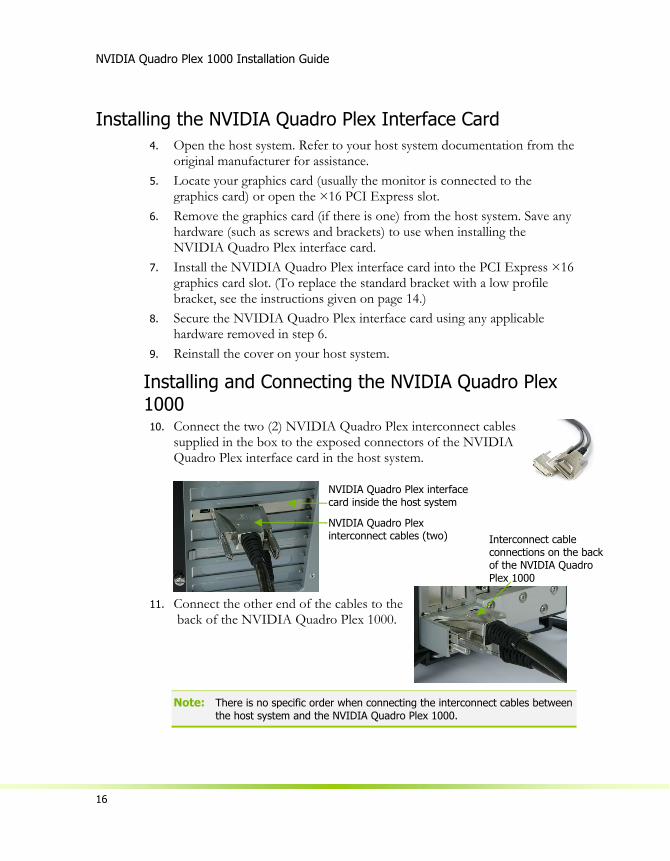
Installing and Connecting the NVIDIA Quadro Plex 1000 10. Connect the two (2) NVIDIA Quadro Plex interconnect cables
supplied in the box to the exposed connectors of the NVIDIA Quadro Plex interface card in the host system.
11. Connect the other end of the cables to the
back of the NVIDIA Quadro Plex 1000.
Note: There is no specific order when connecting the interconnect cables between the host system and the NVIDIA Quadro Plex 1000.
NVIDIA Quadro Plex interface card inside the host system
NVIDIA Quadro Plex interconnect cables (two) Interconnect cable
connections on the back of the NVIDIA Quadro Plex 1000
Hardware Installation and Connections
17
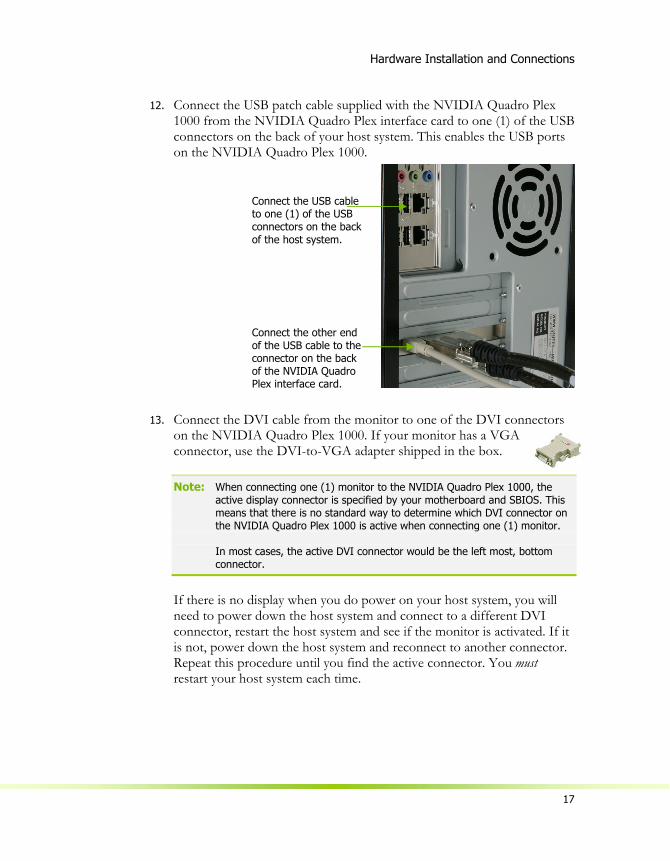
12. Connect the USB patch cable supplied with the NVIDIA Quadro Plex 1000 from the NVIDIA Quadro Plex interface card to one (1) of the USB connectors on the back of your host system. This enables the USB ports on the NVIDIA Quadro Plex 1000.
13. Connect the DVI cable from the monitor to one of the DVI connectors on the NVIDIA Quadro Plex 1000. If your monitor has a VGA connector, use the DVI-to-VGA adapter shipped in the box.
Note: When connecting one (1) monitor to the NVIDIA Quadro Plex 1000, the active display connector is specified by your motherboard and SBIOS. This means that there is no standard way to determine which DVI connector on the NVIDIA Quadro Plex 1000 is active when connecting one (1) monitor. In most cases, the active DVI connector would be the left most, bottom connector.
If there is no display when you do power on your host system, you will need to power down the host system and connect to a different DVI connector, restart the host system and see if the monitor is activated. If it is not, power down the host system and reconnect to another connector. Repeat this procedure until you find the active connector. You must restart your host system each time.
Connect the USB cable to one (1) of the USB connectors on the back of the host system. Connect the other end of the USB cable to the connector on the back of the NVIDIA Quadro Plex interface card.
NVIDIA Quadro Plex 1000 Installation Guide
18
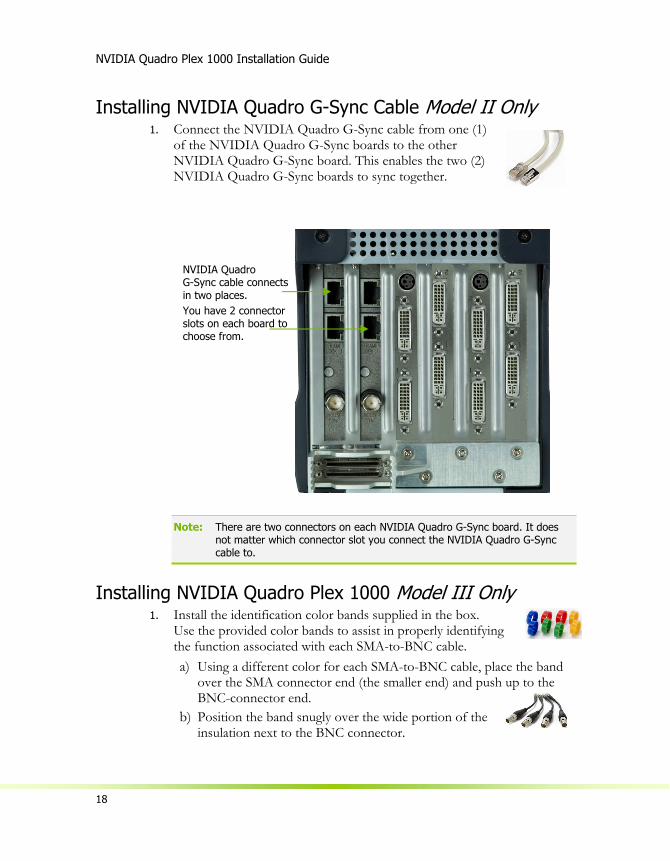
Installing NVIDIA Quadro G-Sync Cable Model II Only 1. Connect the NVIDIA Quadro G-Sync cable from one (1)
of the NVIDIA Quadro G-Sync boards to the other NVIDIA Quadro G-Sync board. This enables the two (2) NVIDIA Quadro G-Sync boards to sync together.
Note: There are two connectors on each NVIDIA Quadro G-Sync board. It does not matter which connector slot you connect the NVIDIA Quadro G-Sync cable to.
Installing NVIDIA Quadro Plex 1000 Model III Only 1. Install the identification color bands supplied in the box.
Use the provided color bands to assist in properly identifying the function associated with each SMA-to-BNC cable. a) Using a different color for each SMA-to-BNC cable, place the band
over the SMA connector end (the smaller end) and push up to the BNC-connector end.
b) Position the band snugly over the wide portion of the insulation next to the BNC connector.
NVIDIA Quadro G-Sync cable connects in two places. You have 2 connectorslots on each board to choose from.
Hardware Installation and Connections
19
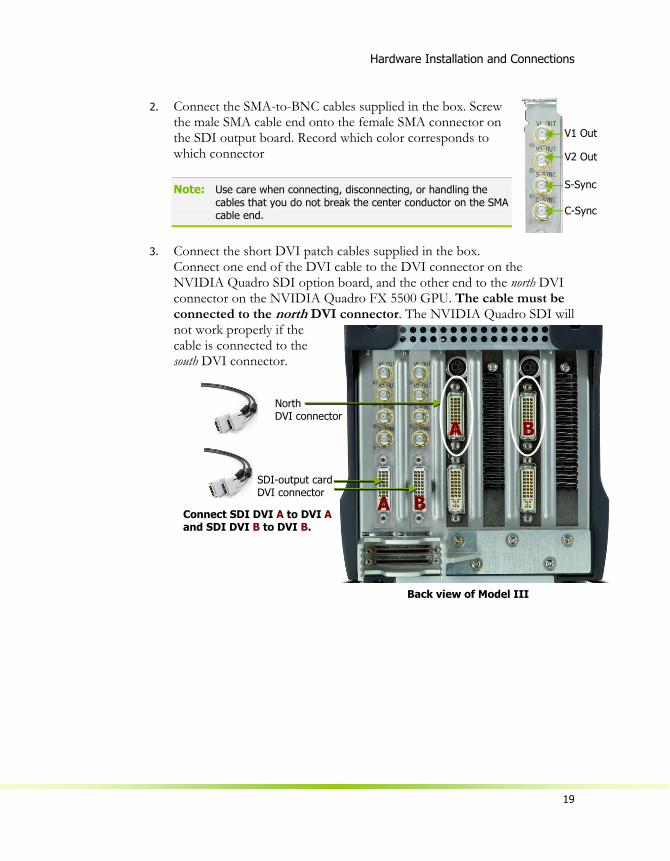
2. Connect the SMA-to-BNC cables supplied in the box. Screw the male SMA cable end onto the female SMA connector on the SDI output board. Record which color corresponds to which connector
Note: Use care when connecting, disconnecting, or handling the cables that you do not break the center conductor on the SMA cable end.
3. Connect the short DVI patch cables supplied in the box. Connect one end of the DVI cable to the DVI connector on the NVIDIA Quadro SDI option board, and the other end to the north DVI connector on the NVIDIA Quadro FX 5500 GPU. The cable must be connected to the north DVI connector. The NVIDIA Quadro SDI will not work properly if the cable is connected to the south DVI connector.
V1 Out
V2 Out
S-Sync
C-Sync
North DVI connector
SDI-output card DVI connector
Back view of Model III
A
A
B
B
Connect SDI DVI A to DVI A and SDI DVI B to DVI B.
NVIDIA Quadro Plex 1000 Installation Guide
20
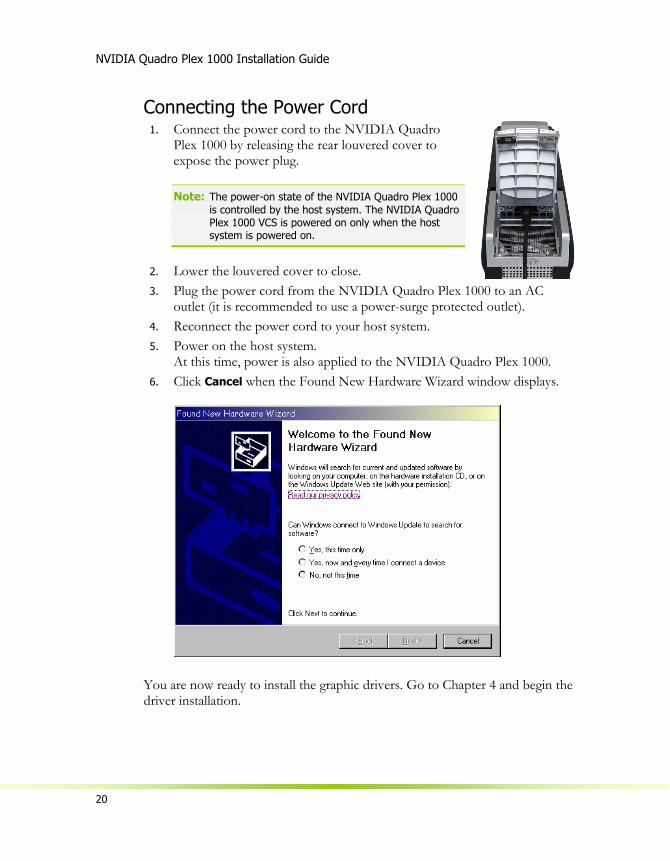
Connecting the Power Cord 1. Connect the power cord to the NVIDIA Quadro
Plex 1000 by releasing the rear louvered cover to expose the power plug.
Note: The power-on state of the NVIDIA Quadro Plex 1000 is controlled by the host system. The NVIDIA Quadro Plex 1000 VCS is powered on only when the host system is powered on.
2. Lower the louvered cover to close. 3. Plug the power cord from the NVIDIA Quadro Plex 1000 to an AC
outlet (it is recommended to use a power-surge protected outlet). 4. Reconnect the power cord to your host system. 5. Power on the host system.
At this time, power is also applied to the NVIDIA Quadro Plex 1000. 6. Click Cancel when the Found New Hardware Wizard window displays.
You are now ready to install the graphic drivers. Go to Chapter 4 and begin the driver installation.
Hardware Installation and Connections
21
Installing NVIDIA Quadro Plex Rack-mount Kit (Optional)
The NVIDIA Quadro Plex 1000 can be installed in a standard 19-inch EIA equipment cabinet. To perform this installation, the optional NVIDIA Quadro Plex rack-mount installation kit is necessary. The installation kit is not included in the NVIDIA Quadro Plex 1000 shipping box. The kit is a separate order item and one kit will be required for each VCS installed in the cabinet.
Use the following procedure to install the NVIDIA Quadro Plex 1000 into an equipment cabinet.
Note: The hardware in the rack-mount kit is intended for a standard 19” EIA rack only.
You will need a Philips #2 screw driver to install the rack mount kit hardware. Due to cable length, the NVIDIA Quadro Plex 1000 system must be mounted within 2 meters of the host system.
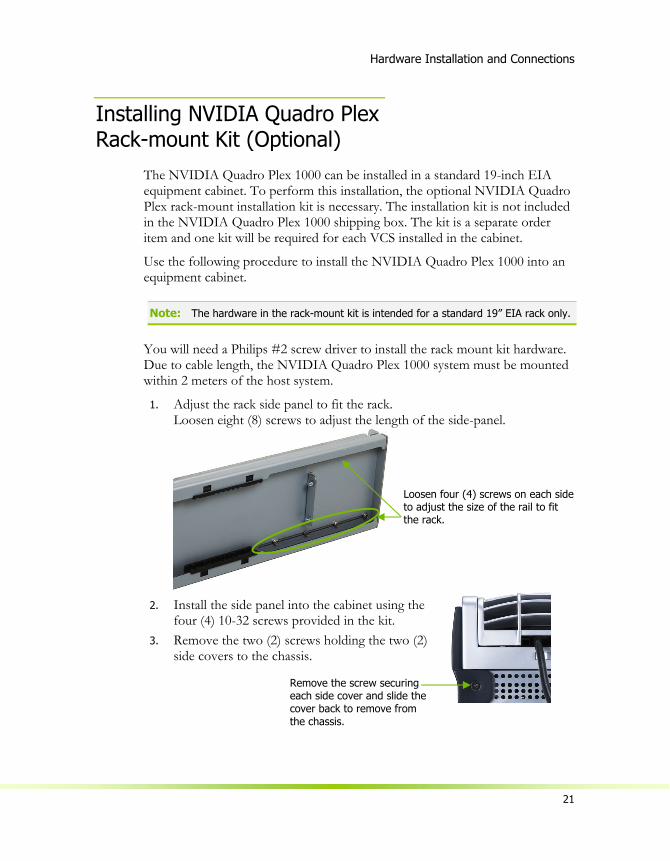
1. Adjust the rack side panel to fit the rack. Loosen eight (8) screws to adjust the length of the side-panel.
2. Install the side panel into the cabinet using the
four (4) 10-32 screws provided in the kit. 3. Remove the two (2) screws holding the two (2)
side covers to the chassis.
Loosen four (4) screws on each side to adjust the size of the rail to fit the rack.
Remove the screw securing each side cover and slide the cover back to remove from the chassis.
NVIDIA Quadro Plex 1000 Installation Guide
22
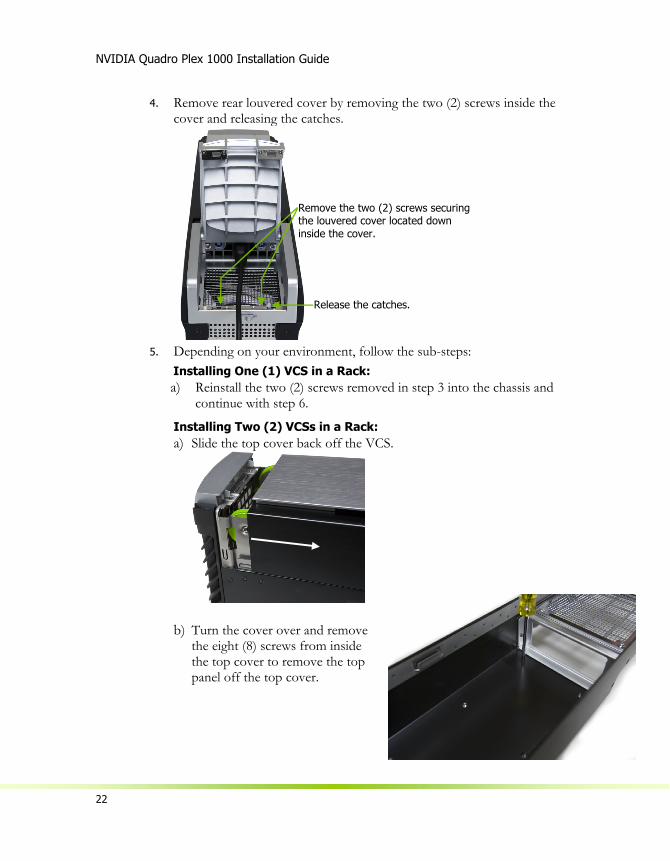
4. Remove rear louvered cover by removing the two (2) screws inside the cover and releasing the catches.
5. Depending on your environment, follow the sub-steps:
Installing One (1) VCS in a Rack: a) Reinstall the two (2) screws removed in step 3 into the chassis and
continue with step 6.
Installing Two (2) VCSs in a Rack: a) Slide the top cover back off the VCS.
b) Turn the cover over and remove the eight (8) screws from inside the top cover to remove the top panel off the top cover.
Remove the two (2) screws securing the louvered cover located down inside the cover.
Release the catches.
Hardware Installation and Connections
23
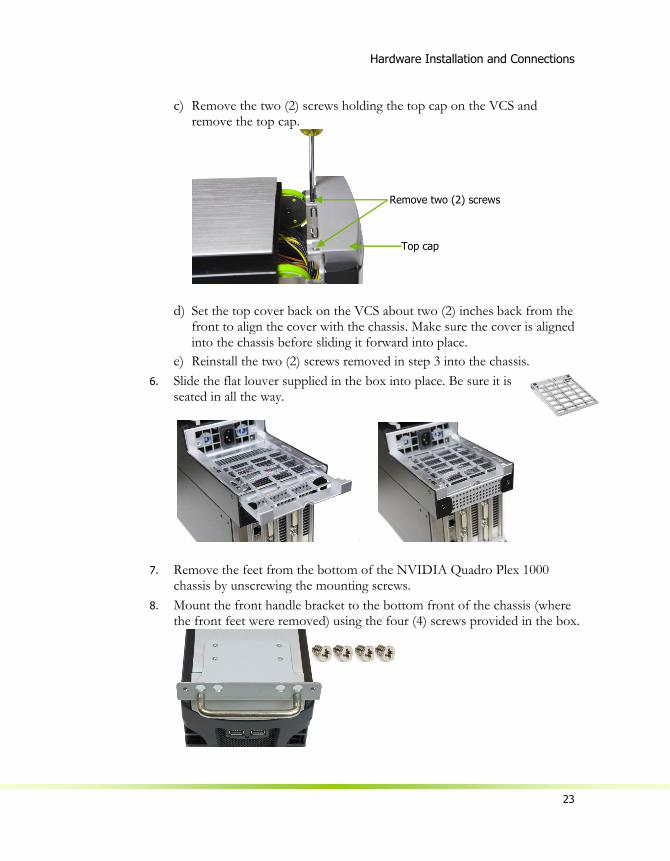
c) Remove the two (2) screws holding the top cap on the VCS and remove the top cap.
d) Set the top cover back on the VCS about two (2) inches back from the front to align the cover with the chassis. Make sure the cover is aligned into the chassis before sliding it forward into place.
e) Reinstall the two (2) screws removed in step 3 into the chassis. 6. Slide the flat louver supplied in the box into place. Be sure it is
seated in all the way.
7. Remove the feet from the bottom of the NVIDIA Quadro Plex 1000 chassis by unscrewing the mounting screws.
8. Mount the front handle bracket to the bottom front of the chassis (where the front feet were removed) using the four (4) screws provided in the box.
Top cap
Remove two (2) screws
NVIDIA Quadro Plex 1000 Installation Guide
24
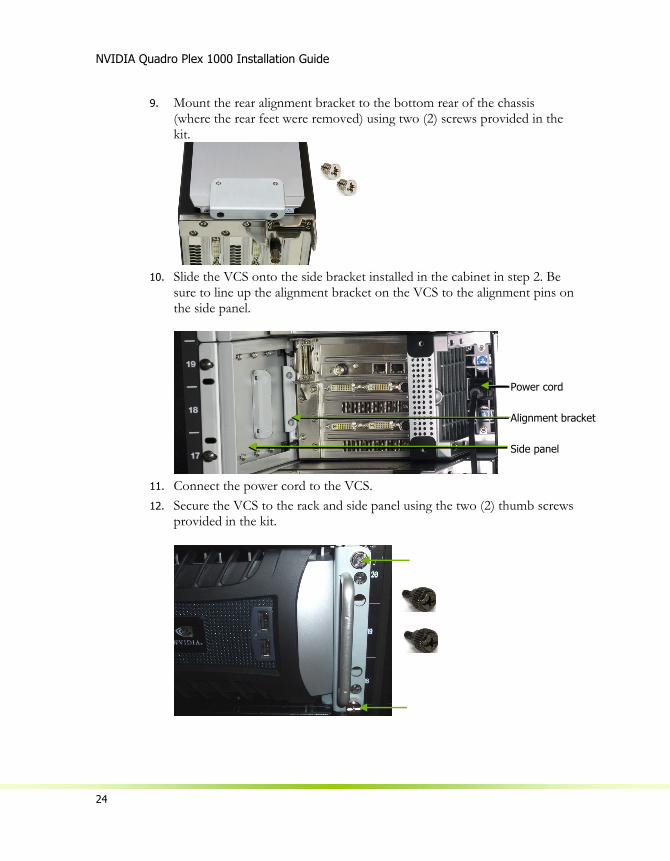
9. Mount the rear alignment bracket to the bottom rear of the chassis (where the rear feet were removed) using two (2) screws provided in the kit.
10. Slide the VCS onto the side bracket installed in the cabinet in step 2. Be
sure to line up the alignment bracket on the VCS to the alignment pins on the side panel.
11. Connect the power cord to the VCS. 12. Secure the VCS to the rack and side panel using the two (2) thumb screws
provided in the kit.
Power cord Alignment bracket Side panel
Hardware Installation and Connections
25
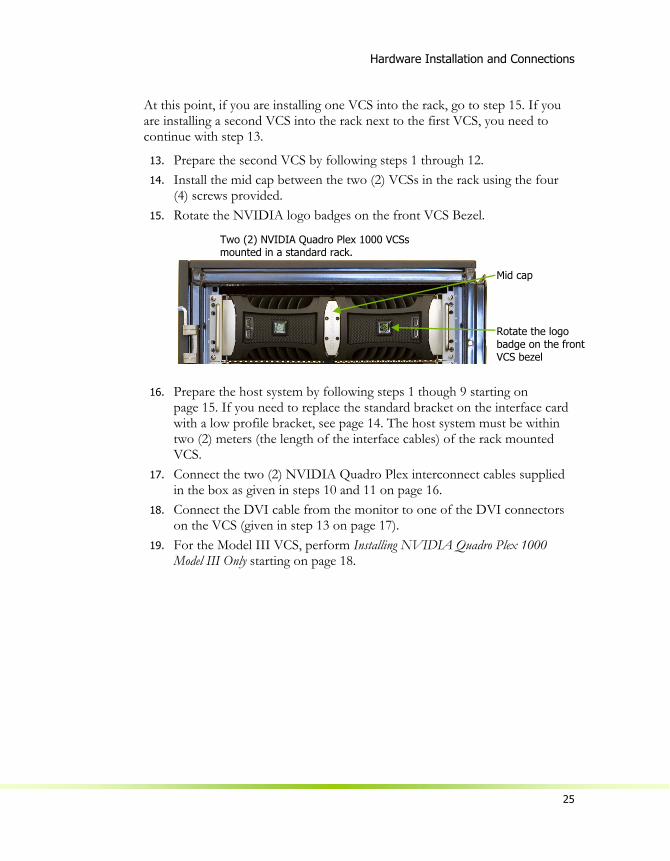
At this point, if you are installing one VCS into the rack, go to step 15. If you are installing a second VCS into the rack next to the first VCS, you need to continue with step 13.
13. Prepare the second VCS by following steps 1 through 12. 14. Install the mid cap between the two (2) VCSs in the rack using the four
(4) screws provided. 15. Rotate the NVIDIA logo badges on the front VCS Bezel.
16. Prepare the host system by following steps 1 though 9 starting on page 15. If you need to replace the standard bracket on the interface card with a low profile bracket, see page 14. The host system must be within two (2) meters (the length of the interface cables) of the rack mounted VCS.
17. Connect the two (2) NVIDIA Quadro Plex interconnect cables supplied in the box as given in steps 10 and 11 on page 16.
18. Connect the DVI cable from the monitor to one of the DVI connectors on the VCS (given in step 13 on page 17).
19. For the Model III VCS, perform Installing NVIDIA Quadro Plex 1000 Model III Only starting on page 18.
Two (2) NVIDIA Quadro Plex 1000 VCSs mounted in a standard rack.
Mid cap Rotate the logo badge on the front VCS bezel

NVIDIA Quadro Plex 1000 Installation Guide
26
27
Driver Installation
This section contains the instruction to install the NVIDIA Quadro Plex 1000 software drivers within a Windows environment or within a Linux environment on page 32.
Windows Installation
Note: When installing the graphics drivers, the resolution will default to the lowest setting (typically 800 x 600), making your display very large. Adjust accordingly.
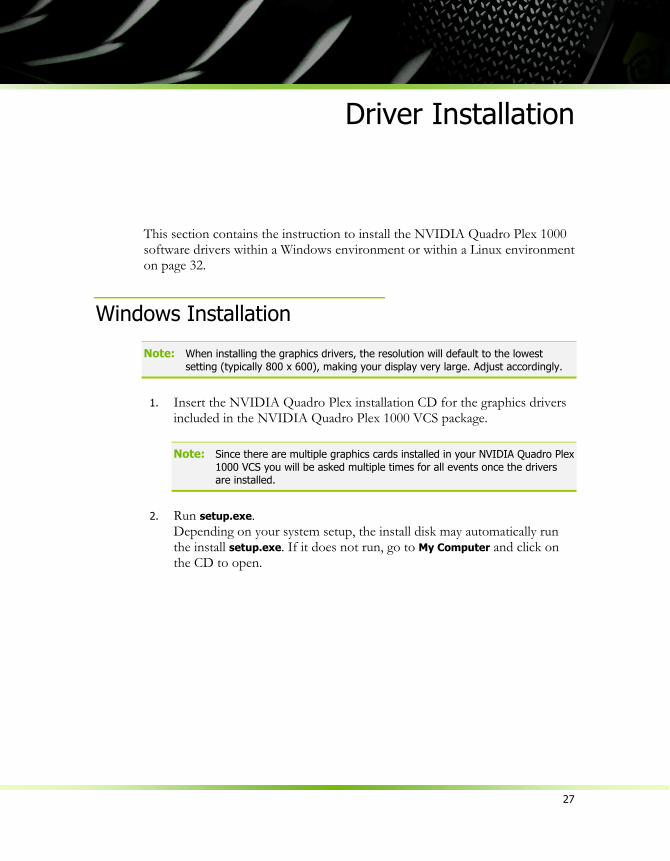
1. Insert the NVIDIA Quadro Plex installation CD for the graphics drivers included in the NVIDIA Quadro Plex 1000 VCS package.
Note: Since there are multiple graphics cards installed in your NVIDIA Quadro Plex 1000 VCS you will be asked multiple times for all events once the drivers are installed.
2. Run setup.exe. Depending on your system setup, the install disk may automatically run the install setup.exe. If it does not run, go to My Computer and click on the CD to open.
NVIDIA Quadro Plex 1000 Installation Guide
28
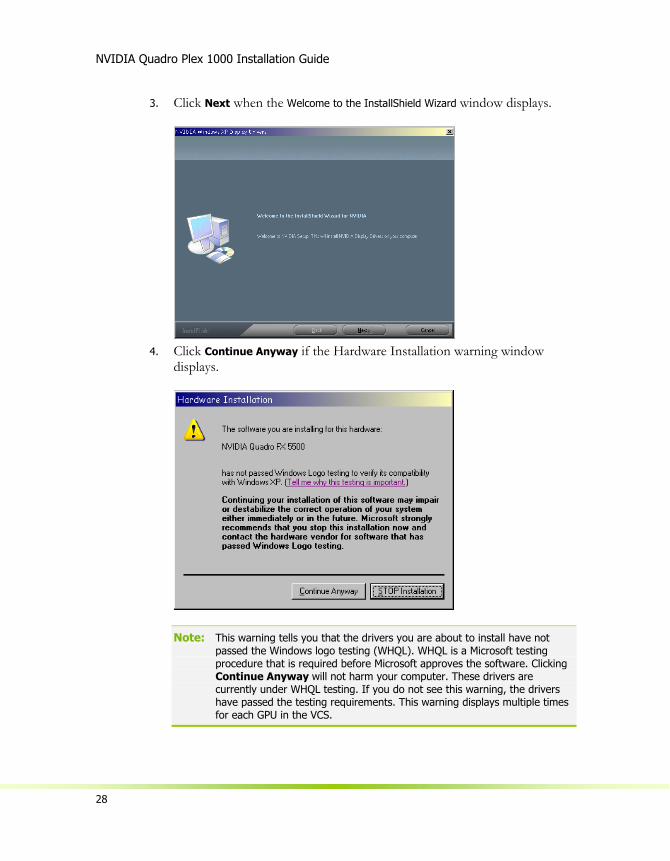
3. Click Next when the Welcome to the InstallShield Wizard window displays.
4. Click Continue Anyway if the Hardware Installation warning window
displays.
Note: This warning tells you that the drivers you are about to install have not passed the Windows logo testing (WHQL). WHQL is a Microsoft testing procedure that is required before Microsoft approves the software. Clicking Continue Anyway will not harm your computer. These drivers are currently under WHQL testing. If you do not see this warning, the drivers have passed the testing requirements. This warning displays multiple times for each GPU in the VCS.
Driver Installation
29
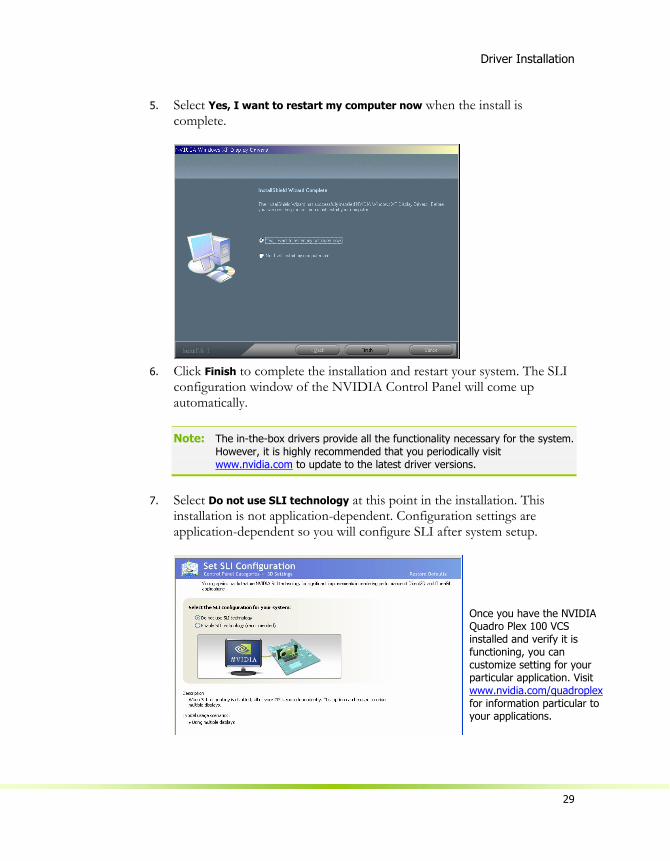
5. Select Yes, I want to restart my computer now when the install is complete.
6. Click Finish to complete the installation and restart your system. The SLI
configuration window of the NVIDIA Control Panel will come up automatically.
Note: The in-the-box drivers provide all the functionality necessary for the system. However, it is highly recommended that you periodically visit www.nvidia.com to update to the latest driver versions.
7. Select Do not use SLI technology at this point in the installation. This installation is not application-dependent. Configuration settings are application-dependent so you will configure SLI after system setup.
Once you have the NVIDIA Quadro Plex 100 VCS installed and verify it is functioning, you can customize setting for your particular application. Visit www.nvidia.com/quadroplex for information particular to your applications.
NVIDIA Quadro Plex 1000 Installation Guide
30
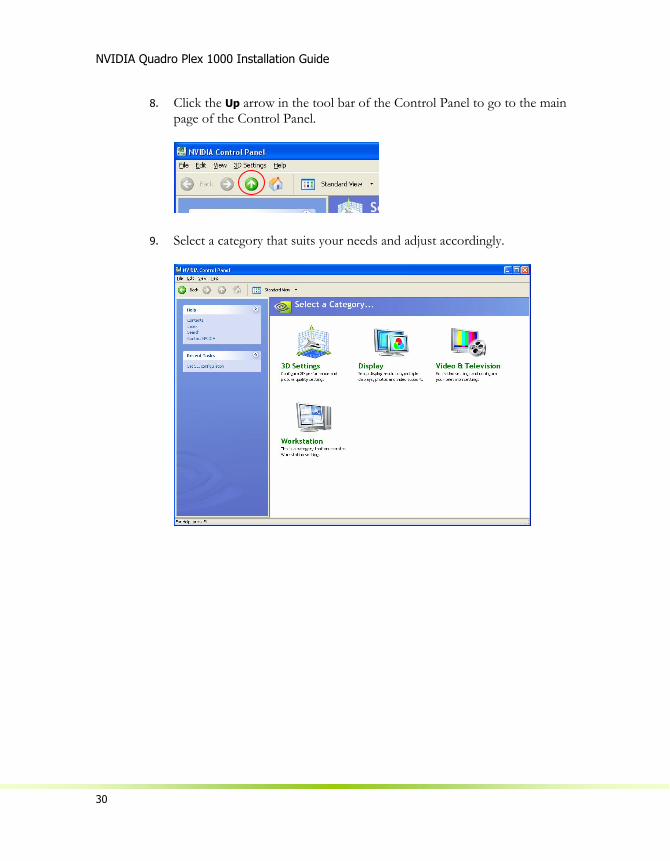
8. Click the Up arrow in the tool bar of the Control Panel to go to the main page of the Control Panel.
9. Select a category that suits your needs and adjust accordingly.
Driver Installation
31
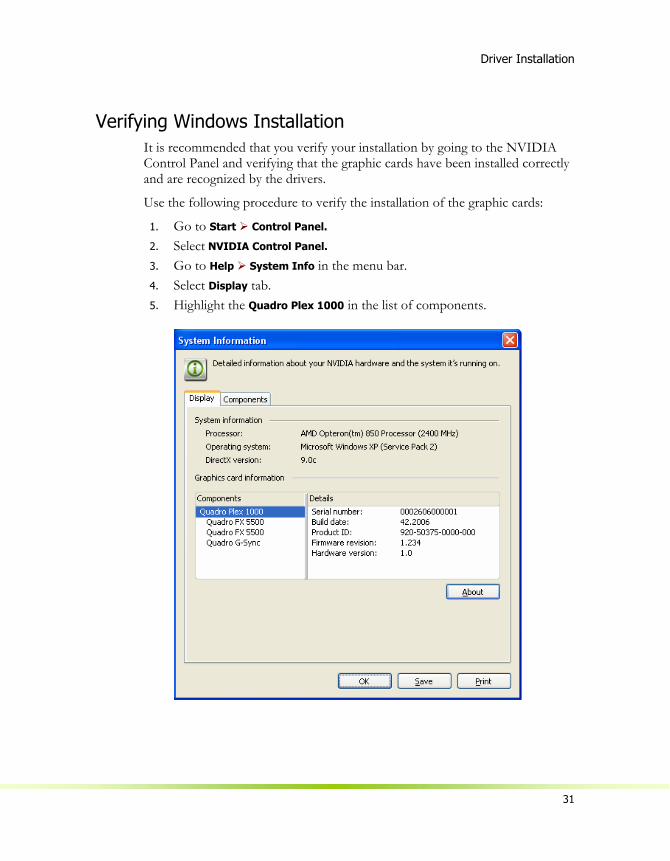
Verifying Windows Installation It is recommended that you verify your installation by going to the NVIDIA Control Panel and verifying that the graphic cards have been installed correctly and are recognized by the drivers.
Use the following procedure to verify the installation of the graphic cards:
1. Go to Start Control Panel. 2. Select NVIDIA Control Panel. 3. Go to Help System Info in the menu bar. 4. Select Display tab. 5. Highlight the Quadro Plex 1000 in the list of components.
NVIDIA Quadro Plex 1000 Installation Guide
32
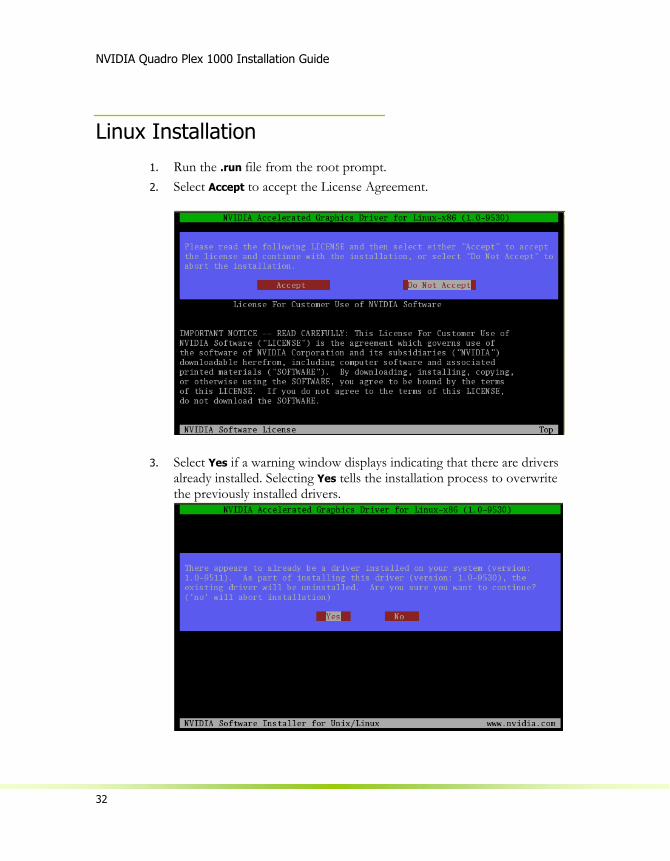
Linux Installation 1. Run the .run file from the root prompt. 2. Select Accept to accept the License Agreement.
3. Select Yes if a warning window displays indicating that there are drivers already installed. Selecting Yes tells the installation process to overwrite the previously installed drivers.
Driver Installation
33
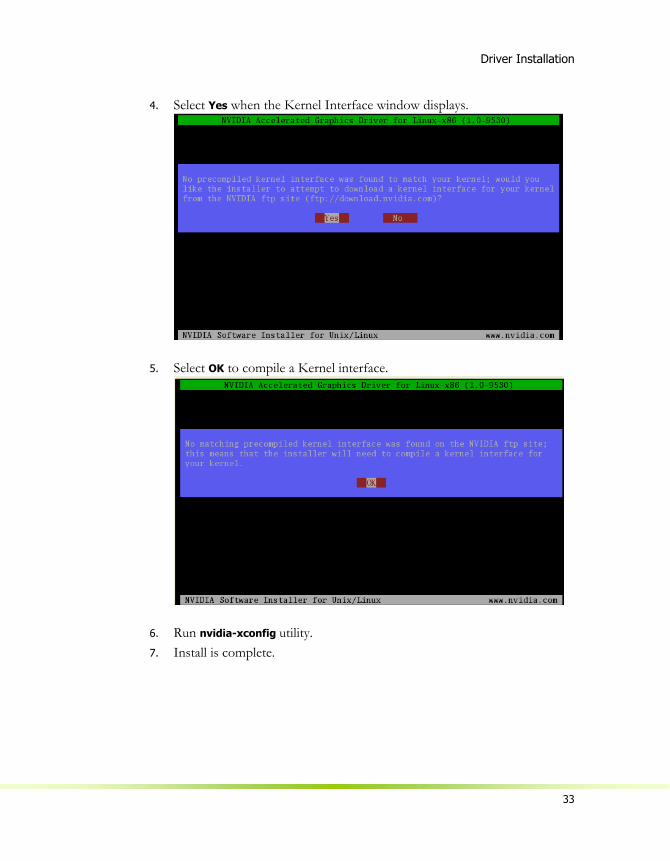
4. Select Yes when the Kernel Interface window displays.
5. Select OK to compile a Kernel interface.
6. Run nvidia-xconfig utility. 7. Install is complete.
NVIDIA Quadro Plex 1000 Installation Guide
34
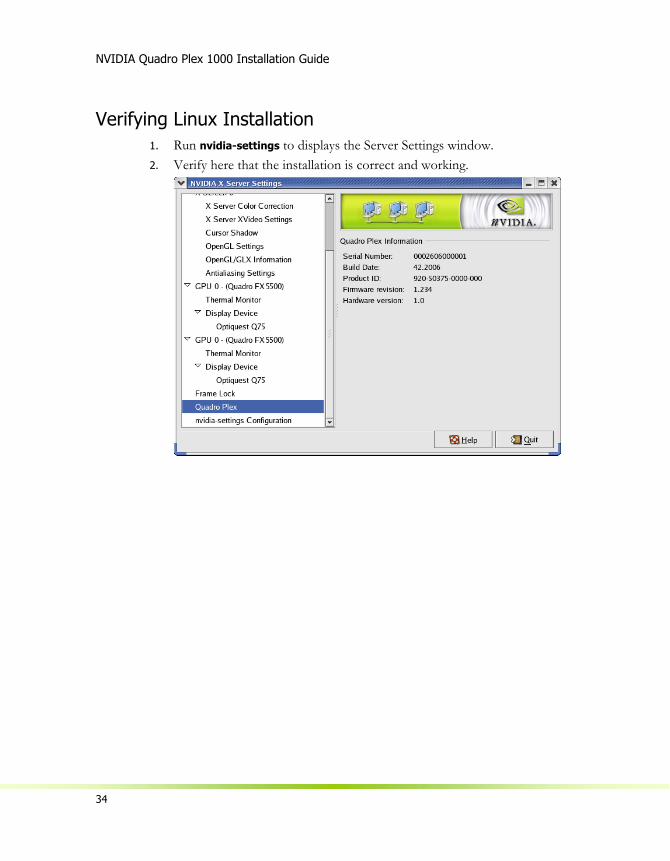
Verifying Linux Installation 1. Run nvidia-settings to displays the Server Settings window. 2. Verify here that the installation is correct and working.
35
Troubleshooting
Don’t forget to register your NVIDIA Quadro Plex 1000 and gain access to NVIDIA Customer Care with online and phone support at www.nvidia.com/register.
Use the following guidelines to troubleshoot your unit. If you require further assistance, go to www.nvidia.com/support.
NVIDIA Quadro Plex 1000 Installation Guide
36
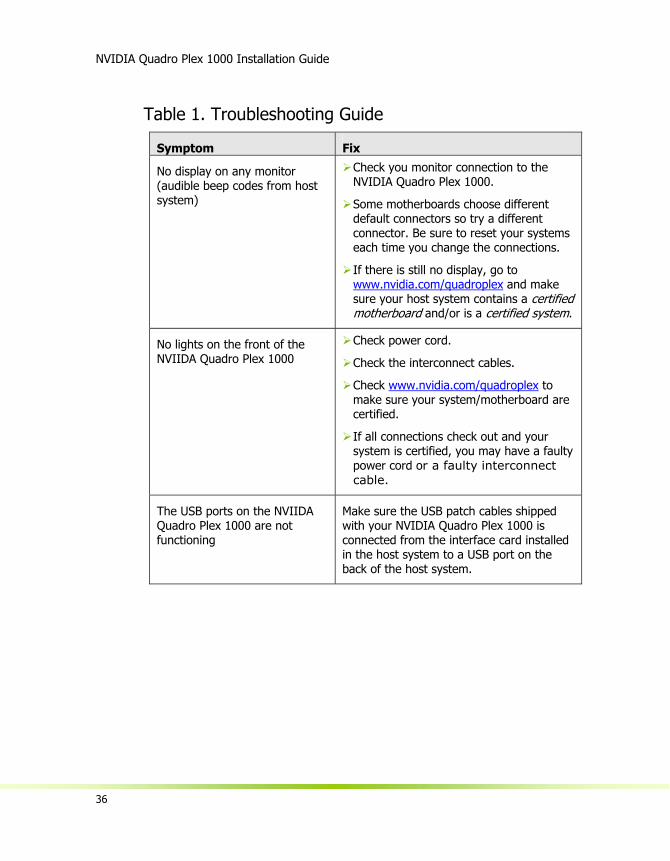
Table 1. Troubleshooting Guide
Symptom Fix
No display on any monitor (audible beep codes from host system)
Check you monitor connection to the NVIDIA Quadro Plex 1000.
Some motherboards choose different default connectors so try a different connector. Be sure to reset your systems each time you change the connections.
If there is still no display, go to www.nvidia.com/quadroplex and make sure your host system contains a certified motherboard and/or is a certified system.
No lights on the front of the NVIIDA Quadro Plex 1000
Check power cord.
Check the interconnect cables.
Check www.nvidia.com/quadroplex to make sure your system/motherboard are certified.
If all connections check out and your system is certified, you may have a faulty power cord or a faulty interconnect cable.
The USB ports on the NVIIDA Quadro Plex 1000 are not functioning
Make sure the USB patch cables shipped with your NVIDIA Quadro Plex 1000 is connected from the interface card installed in the host system to a USB port on the back of the host system.
37
Compliance and Certifications
Bureau of Standards, Metrology, and Inspection (BSMI) C-Tick China Compulsory Certification (CCC) Conformité Européenne (CE) Federal Communications Commission (FCC) - Class B Interference-Causing Equipment Standard (ICES) Ministry of Information and Communication (MIC) Underwriters Laboratories (UL) Voluntary Control Council for Interference (VCCI)
NVIDIA Quadro Plex 1000 Installation Guide
38
NVIDIA Corporation 2701 San Tomas Expressway
Santa Clara, CA 95050 www.nvidia.com
Notice
ALL INFORMATION PROVIDED HEREIN ( “MATERIALS”) ARE BEING PROVIDED “AS IS.” NVIDIA MAKES NO WARRANTIES, EXPRESSED, IMPLIED, STATUTORY, OR OTHERWISE WITH RESPECT TO THE MATERIALS, AND EXPRESSLY DISCLAIMS ALL IMPLIED WARRANTIES OF NONINFRINGEMENT, MERCHANTABILITY, AND FITNESS FOR A PARTICULAR PURPOSE.
Information furnished is believed to be accurate and reliable. However, NVIDIA Corporation assumes no responsibility for the consequences of use of such information or for any infringement of patents or other rights of third parties that may result from its use. No license is granted by implication or otherwise under any patent or patent rights of NVIDIA Corporation. Specifications mentioned in this publication are subject to change without notice. This publication supersedes and replaces all information previously supplied. NVIDIA Corporation products are not authorized for use as critical components in life support devices or systems without express written approval of NVIDIA Corporation.
Trademarks NVIDIA, the NVIDIA logo, NVIDIA Quadro, and NVIDIA SLI are trademarks or registered trademarks of NVIDIA Corporation. Other company and product names may be trademarks of the respective companies with which they are associated.
Copyright © 2006, 2007 NVIDIA Corporation. All rights reserved.
Document Number DI-02500-001_v03

2


