63
nVision for Finance Users Financial Reports Training Manual Last Revised: 3/20/2007
| Date post: | 20-Mar-2018 |
| Category: |
Documents |
| Upload: | phamkhuong |
| View: | 218 times |
| Download: | 0 times |

nVision for Finance Users
Financial Reports Training Manual
Last Revised: 3/20/2007

2 Financial Reports Training Manual

Financial Reports Training Manual 3
Table of Contents
Overview .................................................................................................................. 3 Who Do I Call For Help? ............................................................................................ 3 PeopleSoft nVision Reporting Tools: Available Reports ................................................ 4 Viewing Reports ........................................................................................................ 5 nVision Reports: Creating a Budget Summary Report Request..................................... 8 nVision Reports: Creating an Expense Detail Report Request .................................... 20 nVision Reports: Creating a Grant Summary/Detail Report Request ........................... 39 Running Reports ..................................................................................................... 52 Drilldown to AP Details from Budget Summary Report ............................................... 55 Searching for your DCC/Grant Reports...................................................................... 58 Appendix A: Source Listing ..................................................................................... 60 Appendix B: Accounting Dates ................................................................................ 63

4 Financial Reports Training Manual
Overview The PeopleSoft Financials Management System (FMS) provides a financial reporting tool that includes various pre-formatted reports and is used to track and reconcile financial transactions posted to the general ledger. The nVision reporting tool provides Budget Managers with real-time financial reporting capability. It does this by extracting the requested financial data from the PeopleSoft Systems and placing it into an Excel spreadsheet where it can easily be re-viewed and manipulated. This training manual provides information on:
• Viewing Reports
• Creating Report Requests
• Running Reports
Who Do I Call For Help? The PeopleSoft Campus Support Team is available to answer your PeopleSoft questions such as “How do I view a report?” or “How do I access the Report Manager?” Contact PeopleSoft Campus Support at: [email protected] (419) 372-0999 You may also refer to the BG@100 web site for additional PeopleSoft information and docu-mentation: http://www.bgsu.edu/offices/cio/page838.html

Financial Reports Training Manual 5
Viewing Reports
Use the following steps to add a new Budget Summary report request:
1. Sign in to FMS. The Menu Pagelet is displayed at the left of the screen.
2. From the Menu Pagelet, click Reporting Tools, PS/nVision, Report Manager.
3. All the reports created in the last day which you are eligible to view are displayed. To view re-ports that were created prior to the last day, change the number of days from 1 to any number up to 75. The greater the number of days, the more reports you will see. Change the number to 75.
4. Click .
5. To look for a particular report, enter its name or a portion of it in the name field. This is case sensitive. Enter Budget in the Name field.
6. Click .

6 Financial Reports Training Manual
7. Only the reports with Budget in their title are now displayed.
8. Click the link to the report you want to view.
9. If you get a warning asking if you want to display nonsecure items, click .
10. If you get a security warning asking if you want to open a site in your Trusted sites list, click
.
11. Click the name of the report again.

Financial Reports Training Manual 7
12. You want to be sure to save the report to your hard drive. If you get a dialog box that gives you the option to save the report, be sure to save it to your hard drive.
13. If you get a security warning asking if you want to open a site in your Trusted sites list, click
.
14. If you get a Security Alert, click .
15. If you get a warning saying the workbook contains links to other data sources, click
.
16. If you get a warning saying the workbook contains one or more links that cannot be updated,
click .
17. The report is displayed as an Excel worksheet.
18. If you have not already saved the report, be sure to save it. In Excel, click File and select Save As. Save the report on your hard drive.

8 Financial Reports Training Manual
nVision Reports: Creating a Budget Summary Report Request
Use the following steps to add a new Budget Summary report request:
1. Sign in to FMS. The Menu Pagelet is displayed at the left of the screen.
2. Click Reporting Tools, PS/nVision, Define Report Request. The Report Request page is displayed. To add a new report request, you must start by cloning a template for that request. The first step is to find the template that you are going to clone.
3. If necessary, click the Find an Existing Value tab.
4. In the Business Unit field, enter BGSUN.
5. The name of the template you want is BUDSUMTP, which stands for Budget Summary Tem-plate. Enter budsum in the Report ID field.
6. Click .
7. The search results are displayed. Click BUDSUMTP.
8. The nVision Report Request page for the template is displayed. Click the Copy to Another Business Unit/Clone link.

Financial Reports Training Manual 9
9. The Copy Report Request page is displayed. Enter BGSUN as the Business Unit. If your report is for only one Department Cost Center (DCC), enter the DCC number for the ReportID preceded by B for Budget (for example, B025100). If your report is for all the DCCs associated with a department enter the department name preceded by B for Budget (for example BBIOLGY) for the ReportID. The Report ID can be up to 8 characters.
10. Click
11. The nVision Report Request page is displayed. Next you have to find the clone you just cre-
ated. Click .
12. The Report Request page is displayed. If necessary, enter BGSUN as the Business Unit.
13. In the Report ID field, enter the first few characters of your Report ID name.
14. Click .

10 Financial Reports Training Manual
15. Under Search Results, click the name of your Report ID.
16. The nVision Report Request page for your clone is displayed. You can now make changes to define your specific report. Change the Report Title to describe your specific report.
17. Next you need to add the DCC number(s) to the scope. Click the Scope and Delivery Tem-plates link.
18. The nVision Web Ouput page is displayed. Click the Scope Definition link.

Financial Reports Training Manual 11
19. A new window opens and the Scope Definition page is displayed. Click the Add a New Value tab.
20. Enter BGSUN in the SetID field.
21. Enter the name of your Report Scope. If the report is for one DCC, enter that number (for ex-ample B025100). If the report is for all the DCCs associated with a department, enter the name of the department (for example BBIOLOGY).
22. Click .
23. The scope definition page is displayed. Enter a description of the report in the Description field.
24. Enter BGSUN in the Business Unit field.
25. Leave the Field Combination Table field blank.
26. Click the Lookup icon for the Field Name field.

12 Financial Reports Training Manual
27. Enter deptid in the Field Name field.
28. Click .
29. In the Field Long Name column, click DEPTID.
30. Click the drop-down box for the How Specified field, and select the Selected Detail Values option.
31. Click the Look Up icon for the Value Table field.

Financial Reports Training Manual 13
32. From the Look Up Value table, click DEPT_TBL.
33. In the Select Value field, enter your DCC number.
34. If you want to add more DCCs to the report, click the Plus Sign icon next to the Select Value field. You can add as many DCCs as you want.

14 Financial Reports Training Manual
35. Click .
36. The scope is now defined. Click the close button to close the open window.
37. The nVision Web Output page should be displayed. Click the Look Up icon for Report Scope. Select the Report Scope you just created.
38. If you leave the Security Template field blank the report will only be distributed to you. If you

Financial Reports Training Manual 15
want to distribute it to other people in addition to yourself, in the Security Template field en-ter U:BGNET USERNAME; for each person who should get the report. The BGNet username must be entered using all capital letters. Be sure to include your BGNet username. See the ex-ample in the following screen capture.
39. Click .
40. The nVision Report Request page is displayed. The other links on this page are:
Delete This Report Request: Deletes the report request
Transfer to Report Books: The option enables you to place all your report requests into a “book”. You can then run the book which will create all of the reports contained within that book.
Process Monitor: Monitors the progress for creating the report
Report Manager: Enables you to access reports that have been created

16 Financial Reports Training Manual
Share This Report Request: When you create a report, the default is for the report to be “Public”, which means the entire campus can view or modify your report request. In order to limit the access to your report request to only the users who you designate, you need to click the Share This Report Request link and change the access from “Public” to “Secured”.
41. Click .
42. To share your report request with only those people you specify rather than with the entire cam-pus, make sure the Type filed under Output Options is Web.
43. Click the Share This Report Request link.
44. The nVision Share Report Request page is displayed. Click the Secured button to select it. This means the report request will only be available to those users that you designate. The Public access mode means it would be available to the entire campus.
45. Enter the BGNet username of anyone you want to be able to view or modify your report request.
If you want more than one person to be able to run the report, click the plus sign, , to add
more rows. You can look up BGNet usernames by clicking the Lookup icon, .

Financial Reports Training Manual 17
46. Click .
47. You should be on the nVision Report Request page. Check to make sure the date is the correct end date for this report.
48. Click .
49. The Process Scheduler Request page is displayed. Click the drop-down box for the Server Name field and select PSNT.
50. Click .
51. Click the Process Monitor link.
52. Click the button until the Run Status says Success.

18 Financial Reports Training Manual
53. From the Menu Pagelet click Report Manager.
54. Click the name of the report you just created.
55. If you get a warning asking if you want to display nonsecure items, click .
56. If you get a security warning asking if you want to open a site in your Trusted sites list, click
.
57. Click the name of the report again.
58. If you get a security warning asking if you want to open a site in your Trusted sites list, click
.
59. If you get a message box asking if you want to open or save the file, click Save.

Financial Reports Training Manual 19
60. If you get a Security Alert, click .
61. If you get a warning saying the workbook contains links to other data sources, click
.
62. If you get a warning saying the workbook contains one or more links that cannot be updated,
click .
63. The report is displayed as an Excel worksheet.
64. If you have not already saved the report, in Excel, click File and select Save As. Save the report on your hard drive.
20 Financial Reports Training Manual
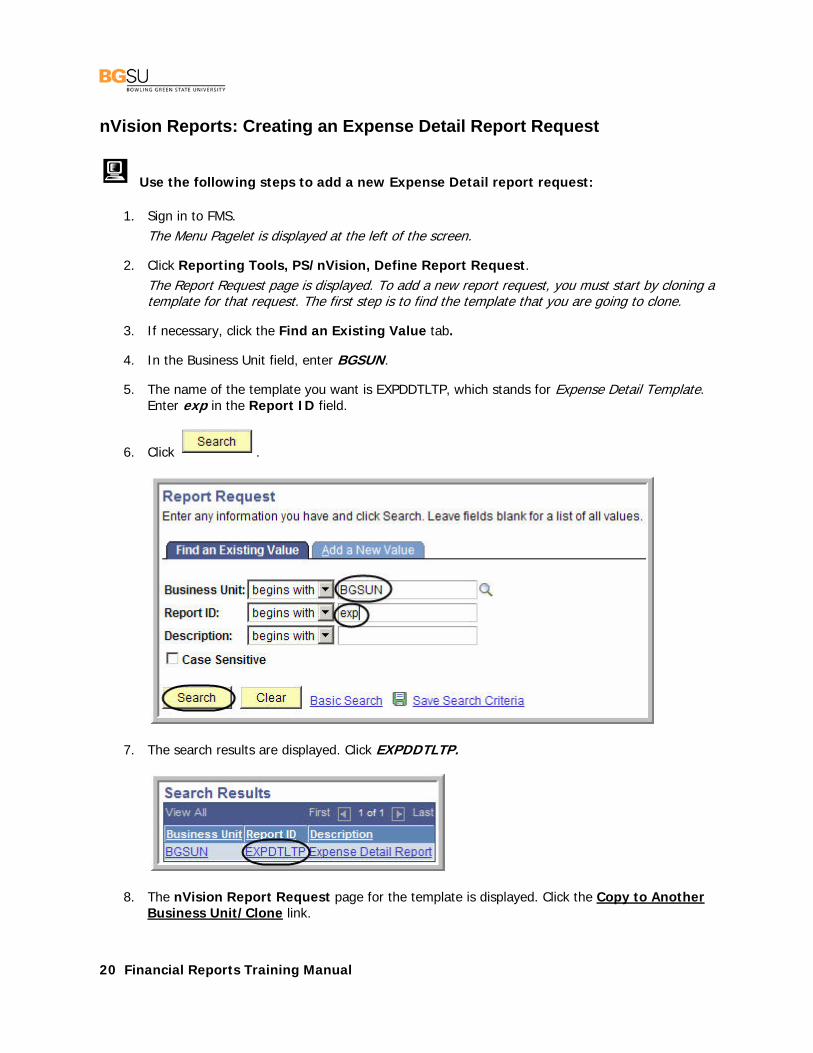
nVision Reports: Creating an Expense Detail Report Request
Use the following steps to add a new Expense Detail report request:
1. Sign in to FMS. The Menu Pagelet is displayed at the left of the screen.
2. Click Reporting Tools, PS/nVision, Define Report Request. The Report Request page is displayed. To add a new report request, you must start by cloning a template for that request. The first step is to find the template that you are going to clone.
3. If necessary, click the Find an Existing Value tab.
4. In the Business Unit field, enter BGSUN.
5. The name of the template you want is EXPDDTLTP, which stands for Expense Detail Template. Enter exp in the Report ID field.
6. Click .
7. The search results are displayed. Click EXPDDTLTP.
8. The nVision Report Request page for the template is displayed. Click the Copy to Another Business Unit/Clone link.

Financial Reports Training Manual 21
9. The Copy Report Request page is displayed. Enter BGSUN as the Business Unit. If your report is for only one Department Cost Center (DCC), enter the DCC number for the ReportID preceded by EX for Expense (for example, EX025100). If your report is for all the DCCs asso-ciated with a department enter the department name preceded by EX for Expense (for example EXBIOLGY) for the ReportID. The Report ID can be up to eight characters long.
10. Click .
11. The nVision Report Request page is displayed. Next you have to find the clone you just cre-
ated. Click .
12. The Report Request page is displayed. If necessary, enter BGSUN as the Business Unit.
13. In the Report ID field, enter the first few characters of your Report ID name.
14. Click .

22 Financial Reports Training Manual
15. Under Search Results, click the name of your Report ID.
16. The nVision Report Request page for your clone is displayed. You can now make changes to define your specific report. Change the Report Title to describe your specific report.
17. Next you need to add the DCC number(s) to the scope. Click the Scope and Delivery Tem-plates link.

Financial Reports Training Manual 23
18. The nVision Web Ouput page is displayed. Click the Scope Definition link.
19. A new window opens and the Scope Definition page is displayed. Click the Add a New Value tab.
20. Enter BGSUN in the SetID field.
21. Enter the name of your Report Scope. If the report is for one DCC, enter that number (for ex-ample EX025100). If the report is for all the DCCs associated with a department, enter the name of the department (for example EXBIOLGY).
22. Click .

24 Financial Reports Training Manual
23. The scope definition page is displayed. Enter a description of the report in the Description field.
24. Enter BGSUN in the Business Unit field.
25. Leave the Field Combination Table field blank.
26. Click the Lookup icon for the Field Name field.
27. Enter deptid in the Field Name field.
28. Click .
29. The search results for Look Up Field Name is displayed. In the Field Long Name column, click DEPTID.
30. Click the drop-down box for the How Specified field, and select the Selected Detail Values option.
31. Click the Look Up icon for the Value Table field.

Financial Reports Training Manual 25
32. From the Look Up Value table, click DEPT_TBL.
33. In the Select Value field, enter your DCC number.
34. If you wanted to add more DCCs to the report, click the Plus Sign icon next to the Select Value field. You can add as many DCCs as you want.

26 Financial Reports Training Manual
35. When defining the Scope for a Budget Summary report request, you only have to define what DCC’s you want included in the report. When creating a report request for the Expense Detail you also must include the fiscal year and the accounting period as part of the scope. Therefore, you need to add two more Scope Fields to your Scope Definition. To add another Scope Field,
click the under the Scope Fields line.
36. A new Scope Field is displayed. Notice in the Scope Field header it says 2 of 2. Click the Look
Up icon for the Field Name field.
37. Enter fiscal in the Field Name field and click .

Financial Reports Training Manual 27
38. Select Fiscal Year from the Look Up table.
39. Click the drop-down box for the How Specified field, and select the Selected Detail Values option.
40. Click the Look Up icon for the Value Table field.
41. Select BG_GL_CALYR_VW from the Look Up table.

28 Financial Reports Training Manual
42. Click the Look Up icon for the Selected Value field.
43. Select the appropriate year from the Look Up table (see Appendix B).
44. You have now defined the scope for the fiscal year. If you want to see all activity from 2007, you can ignore defining the scope for the accounting period. However, if you want to view one or more particular months, you need to define the accounting period as part of the scope. To add
another Scope Field for defining the accounting period, click the under the Scope Fields line.

Financial Reports Training Manual 29
45. A new Scope Field is displayed. Notice in the Scope Field header it says 3 of 3. Click the Look
Up icon for the Field Name field.
46. Enter accounting in the Field Name field and click .
47. Select Accounting Period from the Look Up table.

30 Financial Reports Training Manual
48. Click the drop-down box for the How Specified field, and select the Selected Detail Values option.
49. Click the Look Up icon for the Value Table field.
50. Select CAL_DETP_ALL_VW from the Look Up table.
51. Click the Look Up icon for the Selected Value field.
52. Select the appropriate accounting period from the Look Up table (see Appendix B).

Financial Reports Training Manual 31
53. In the Scope Fields header, click the View All link.
54. Your Scope Definitions for the DCC, fiscal year, and accounting period are all displayed.

32 Financial Reports Training Manual
55. Click .
56. The scope is now defined. Click the close button to close the open window.
57. The nVision Web Output page should be displayed. Click the Look Up icon for Report Scope. Select the Report Scope you just created.

Financial Reports Training Manual 33
58. If you leave the Security Template field blank the report will only be distributed to you. If you want to distribute it to other people in addition to yourself, in the Security Template field en-ter U:BGNET USERNAME; for each person who should get the report. The BGNet username must be entered using all capital letters. Be sure to include your BGNet username. See the ex-ample in the following screen capture.

34 Financial Reports Training Manual
59. Click .
60. The nVision Report Request page is displayed. The other links on this page are:
Delete This Report Request: Deletes the report request
Transfer to Report Books: The option enables you to place all your report requests into a “book”. You can then run the book which will create all of the reports contained within that book.
Process Monitor: Monitors the progress for creating the report
Report Manager: Enables you to access reports that have been created
Share This Report Request: When you create a report, the default is for the report to be “Public”, which means the entire campus can view or modify your report request. In order to limit the access to your report request to only the users who you designate, you need to click the Share This Report Request link and change the access from “Public” to “Secured”.

Financial Reports Training Manual 35
61. Click .
62. To share your report request with only those people you specify rather than with the entire cam-pus, make sure the Type filed under Output Options is Web.
63. Click the Share This Report Request link.

36 Financial Reports Training Manual
64. The nVision Share Report Request page is displayed. Click the Secured button to select it. This means the report request will only be available to those users that you designate. The Public access mode means it would be available to the entire campus.
65. Enter the BGNet username of anyone you want to be able to view or modify your report request.
If you want more than one person to be able to run the report, click the plus sign, , to add
more rows. You can look up BGNet usernames by clicking the Lookup icon, .
66. Click .
67. You should be on the nVision Report Request page. Check to make sure the date is the correct end date for this report.
68. Click .
69. The Process Scheduler Request page is displayed. Click the drop-down box for the Server Name field and select PSNT.

Financial Reports Training Manual 37
70. Click .
71. Click the Process Monitor link.
72. Click the button until the Run Status says Success.
73. From the Menu Pagelet click Report Manager.
74. Click the name of the report you just created.

38 Financial Reports Training Manual
75. If you get a warning asking if you want to display nonsecure items, click .
76. If you get a security warning asking if you want to open a site in your Trusted sites list, click
.
77. Click the name of the report again.
78. If you get a security warning asking if you want to open a site in your Trusted sites list, click
.
79. If you get a message box asking if you want to open or save the file, click Save.
80. If you get a Security Alert, click .
81. The report is displayed as an Excel worksheet.
82. If you have not already saved the report, in Excel, click File and select Save As. Save the report on your hard drive.

Financial Reports Training Manual 39
Running nVision Reports: Grant Summary/Detail
Use the following steps to add a new Grant Summary/Detail report request:
1. Sign in to FMS. The Menu Pagelet is displayed at the left of the screen.
2. Click Reporting Tools, PS/nVision, Define Report Request. The Report Request page is displayed. To add a new report request, you must start by cloning a template for that request. The first step is to find the template that you are going to clone.
3. If necessary, click the Find an Existing Value tab.
4. In the Business Unit field, enter BGSUN.
5. The name of the template you want is GRANTTP, which stands for Grant Template. Enter grant in the Report ID field.
6. Click .
7. The search results are displayed. Click GRANTTP.
8. The nVision Report Request page for the template is displayed. Click the Copy to Another business Unit/Clone link.

40 Financial Reports Training Manual
9. The Copy Report Request page is displayed. Enter BGSUN as the Business Unit. Enter the project number for the Report ID.
10. Click .
11. The nVision Report Request page is displayed. Next you have to find the clone you just cre-
ated. Click .
12. The Report Request page is displayed. If necessary, enter BGSUN as the Business Unit.
13. In the Report ID field, enter the first few characters of your Report ID name.
14. Click .

Financial Reports Training Manual 41
15. Under Search Results, click the name of your Report ID.
16. The nVision Report Request page for your clone is displayed. You can now make changes to define your specific report. Change the Report Title to describe your specific report.
17. Next you need to add the DCC number(s) to the scope. Click the Scope and Delivery Tem-plates link.

42 Financial Reports Training Manual
18. The nVision Web Ouput page is displayed. Click the Scope Definition link.
19. A new window opens and the Scope Definition page is displayed. Click the Add a New Value tab.
20. Enter BGSUN in the SetID field.
21. Enter the name of your Report Scope. Click .
22. The scope definition page is displayed. Enter a description of the report in the Description field.
23. Enter BGSUN in the Business Unit field.
24. Leave the Field Combination Table field blank.
25. Click the Lookup icon for the Field Name field.
26. Enter project_id in the Field Name field.
27. Click .
28. The search results for Look Up Field Name is displayed. In the Field Long Name column, click PROJECT_ID.

Financial Reports Training Manual 43
29. Click the drop-down box for the How Specified field, and select the Selected Detail Values option.
30. Click the Look Up icon for the Value Table field.
31. From the Look Up Value table, click PROJECT.

44 Financial Reports Training Manual
32. In the Select Value field, enter your Project/Grant number.

Financial Reports Training Manual 45
33. If you want to add more Project/Grants to the report, click the Plus Sign icon next to the Select Value field. You can add as many Project/Grants as you want.
34. Click .
35. The scope is now defined. Click the close button to close the open window.
36. The nVision Web Output page should be displayed. Click the Look Up icon for Report Scope. Select the Report Scope you just created.

46 Financial Reports Training Manual
37. If you leave the Security Template field blank the report will only be distributed to you. If you want to distribute it to other people in addition to yourself, in the Security Template field en-ter U:BGNET USERNAME; for each person who should get the report. The BGNet username must be entered using all capital letters. Be sure to include your BGNet username. See the ex-ample in the following screen capture.

Financial Reports Training Manual 47
38. Click .
39. The nVision Report Request page is displayed. The other links on this page are:
Delete This Report Request: Deletes the report request
Transfer to Report Books: The option enables you to place all your report requests into a “book”. You can then run the book which will create all of the reports contained within that book.
Process Monitor: Monitors the progress for creating the report
Report Manager: Enables you to access reports that have been created
Share This Report Request: When you create a report, the default is for the report to be “Public”, which means the entire campus can view or modify your report request. In order to limit the access to your report request to only the users who you designate, you need to click the Share This Report Request link and change the access from “Public” to “Secured”.

48 Financial Reports Training Manual
40. Click .
41. To share your report request with only those people you specify rather than with the entire cam-pus, make sure the Type filed under Output Options is Web.
42. Click the Share This Report Request link.
43. The nVision Share Report Request page is displayed. Click the Secured button to select it. This means the report request will only be available to those users that you designate. The Public access mode means it would be available to the entire campus.
44. Enter the BGNet username of anyone you want to be able to view or modify your report request.
If you want more than one person to be able to run the report, click the plus sign, , to add
more rows. You can look up BGNet usernames by clicking the Lookup icon, .
45. Click .

Financial Reports Training Manual 49
46. You should be on the nVision Report Request page. Check to make sure the date is the correct end date for this report.
47. Click .
48. The Process Scheduler Request page is displayed. Click the drop-down box for the Server Name field and select PSNT.
49. Click .
50. Click the Process Monitor link.
51. Click the button until the Run Status says Success.

50 Financial Reports Training Manual
52. From the Menu Pagelet click Report Manager.
53. Click the name of the report you just created.
54. If you get a warning asking if you want to display nonsecure items, click .
55. If you get a security warning asking if you want to open a site in your Trusted sites list, click
.
56. Click the name of the report again.

Financial Reports Training Manual 51
57. If you get a security warning asking if you want to open a site in your Trusted sites list, click
.
58. If you get a message box asking if you want to open or save the file, click Save.
59. If you get a Security Alert, click .
60. If you get a warning saying the workbook contains links to other data sources, click
.
61. If you get a warning saying the workbook contains one or more links that cannot be updated,
click .
62. The report is displayed as an Excel worksheet.
63. If you have not already saved the report, in Excel, click File and select Save As. Save the report on your hard drive.

52 Financial Reports Training Manual
Running Reports
Use the following steps to run a report from Report Manager:
1. Sign in to FMS. The Menu Pagelet is displayed at the left of the screen.
2. Click Reporting Tools, PS/nVision, Define Report Request. The Report Request page is displayed.
3. Make sure the Find an Existing Value tab is selected.
4. Check to make sure that BGSU is entered as the Business Unit.
5. Click .
6. Click a report request that you have created.
7. Check the date to make sure it is the end date you want for the report. The date is going to be the date you entered when you first created the report request. This may no longer be the date you want. If necessary, change the date.
8. Click .

Financial Reports Training Manual 53
9. The Process Scheduler Request page is displayed. Click the drop-down box for the Server Name field and select PSNT.
10. Click .
11. Click the Process Monitor link.
12. Click the button until the Run Status says Success.
13. From the Menu Pagelet click Report Manager.
14. Click the name of the report you just created.
15. If you get a warning asking if you want to display nonsecure items, click .
16. If you get a security warning asking if you want to open a site in your Trusted sites list, click
.
17. Click the name of the report again.
18. If you get a security warning asking if you want to open a site in your Trusted sites list, click
.
19. If you get a Security Alert, click .
20. If you get a warning saying the workbook contains links to other data sources, click
.

54 Financial Reports Training Manual
21. If you get a warning saying the workbook contains one or more links that cannot be updated,
click .
22. The report is displayed as an Excel worksheet.
23. In Excel, click File and select Save As. Save the report on your hard drive.

Financial Reports Training Manual 55
Drilldown to AP Details from Budget Summary Report
Use the following steps to drilldown in a Budget Summary Report:
1. Sign in to FMS. The Menu Pagelet is displayed at the left of the screen.
2. From Report Manager, open your Budget Summary Report.
3. Click the plus sign to open the row containing the account you want to examine.
4. Select the cell containing the expense for which you want to see the AP details.
5. In order to drilldown nVisionDrill menu must be in Excel. If the nVisionDrill menu is not in your Excel menu, call the Technology Support Center (372-0999) for help.
6. Click the nVisionDrill menu and then click Drill.
7. A new window opens. Click the button for AP Detail. If the FMS sign-in page is displayed in the new open window rather than the Run Drill down page shown below, close the new open window and close the Budget Summary report and start all over again from step 2.

56 Financial Reports Training Manual
8. A second new window opens. Eventually the message should change to “Success” as shown below.
9. Return to the Menu Pagelet and click Report Manager.
10. Click the link to the drilldown report in Excel.
11. The drilldown report with AP details is displayed in an Excel spreadsheet.

Financial Reports Training Manual 57
12. Scroll to the right to see more details.
13. When you have finished viewing the AP details, you can close all the extra open windows in FMS.

58 Financial Reports Training Manual
Searching for your DCC/Grant Reports
Use the following steps to search for a particular DCC/Grant report:
You may get the following message in report manager when you have budget responsibilities for more than 100 DCCs.
This document will walk you through how to add the filter in your report manager so that you can retrieve needed reports quickly.
1. If the above message appears, click .
2. From the menu pagelet, click Reporting Tools, Report Magager.
3. All monthly reports use the following standard naming conventions. To search for a specific re-port, all you need to do is search on part of the name for the report you want to access.
4. In Report Manager, enter the first word of the report name you want to retrieve, for example enter Budget to retrieve your Budget Summary report. Adjust the number of days to, for ex-
ample, 75. Click . Only the Budget Summary reports will be displayed.
Naming Convention Example
Budget Summary Report-XXXXXX-yyyy-mm-dd (XXXXXX stands for DCC number) Budget Summary Report -025100-2007-02-28
Expense Detail Report-XXXXXX-yyyy-accounting period (XXXXXX stands for DCC number) Expense Detail Report-025100-2007-8
Revenue Detail Report-XXXXXX-yyyy-accounting period (XXXXXX stands for DCC number) Revenue Detail Report-025100-2007-02-28
Revenue Summary Report-XXXXXX-yyyy-mm-dd (XXXXXX stands for DCC number) Revenue Summary Report-025100-2007-02-28
Payroll Expense Details- XXXXXX-yyyy-accounting pe-riod (XXXXXX stands for DCC number)
Payroll Expense Details-025100-2007-8
Grant Budget Summary-XXXXXXXX-yyyy-mm-dd (XXXXXX stands for Grant ID) Grant Budget Summary-10100029-2007-02-28

Financial Reports Training Manual 59
5. To retrieve only Payroll Expense reports enter Payroll in the Name field, adjust the number of
days, and click .
6. Please do not use the Explore tab if you have more than 500 reports in your report manager. Clicking on the tab will freeze your browser window if you have more than 500 reports.

60 Financial Reports Training Manual
Appendix A Source Listing
SOURCE DESCR
AD0 Conversion - Auto Draft -Check
ADD Address Label Charges ITS
AM Asset Management System
AP Accounts Payable
AR Accounts Receivable
BCT Bursar Charge Template
BIL Billing
BKS Bookstore Interface
BRS Bursar's Office
CEE Continuing Education
CLK Cindy L Koontz
CNV Conversion records from AFIN
COC Campus One Card
CRL Cash Receipt - Library
CS Campus Solutions Interface
CTT Cash Transmittal Template
CXB Conv - Check Cancellation
DDT Dept to Dept Charge Template
DIN Dining Services Interface
FDJ Conv - Asset Disposal
FDK Conv - Asset Disposal
FHP Fall Housing Deposit - Bursar
FIN Financial Interface Upload
FTJ Conv - Asset Transfer
GM Grants
HCT Health Center
INL Conv - Customer Invoice - Libr
IX Expense Transfer

Financial Reports Training Manual 61
JPM JP Morgan
JV$ Conv - Grants Overhead Return
JV0 Conv - Journal Voucher
JV2 Conv - Journal Voucher
JVA Conv - Journal Voucher
JVB Conv - Journal Voucher
JVC Conv - Journal Voucher
JVD Conv - Journal Voucher
JVF Conv - Journal Voucher
JVI Conv - Journal Voucher
JVJ Conv - Journal Voucher
JVK Conv - Journal Voucher
JVL Conv - Journal Voucher
JVM Conv - Journal Voucher
JVO Conv - Journal Voucher
JVR Conv - Journal Voucher
JVS Conv - Journal Voucher
JVT Conv - Journal Voucher
JVV Conv - Journal Voucher
MW1 Conv - Manual Warrant/Check
MWA Conv - Manual Warrant/Check
OCK Conv - Over the Counter Invent
OCP Conv - Over the Counter Invent
OCS Conv - Over the Counter Invent
OFC Office Supplies - Office Depot

62 Financial Reports Training Manual
PC Project Costing
PO Purchasing System
POF Post Office
PR Payroll Journal Entry Source
PRK Parking Services
PRY Perry Corporation
PV. Conv - Payment Voucher
PV0 Conv - Payment Voucher
PV1 Conv - Payment Voucher
PV8 Conv - Payment Voucher
PVA Conv - Auto Payment Voucher
PVB Conv - Payment Voucher
PVC Conv - Payment Voucher
PVF Conv - Payment Voucher
PVG Conv - Payment Voucher
PVI Conv - Payment Voucher
PVJ Conv - Payment Voucher
PVK Conv - Payment Voucher
PVL Conv - Payment Voucher
PVM Conv - Payment Voucher
PVP Conv - Payment Voucher
PVS Conv - Payment Voucher
PVT Conv - Payment Voucher
PVU Conv - Payment Voucher
RSP Recreational Sports
SAR Student Admin Receivables
SMC Sallie Mae Conference
SMH Sallie Mae Housing Deposit
SMO Sallie Mae for OREG
SMP Sallie Mae Bursar Payments
TEL Telecommunications Services
TJ Trish Jenkins 2-2208

Financial Reports Training Manual 63
Appendix B Accounting Dates Fiscal Year 2005 July 1, 2004 – June 30, 2005 2006 July 1, 2005 – June 30, 2006 2007 July 1, 2006 – June 30, 2007 2008 July 1, 2007 – June 30, 2008
Accounting Period
1 July 07/01 – 07/31 2 August 08/01 – 08/31 3 September 09/01 – 09/30 4 October 10/01 – 10/31 5 November 11/01 – 11/30 6 December 12/01 – 12/31 7 January 01/01 – 01/31 8 February 02/01 – 02/28(9) 9 March 03/01 – 03/31 10 April 04/01 – 04/30 11 May 05/01 – 05/31 12 June 06/01 – 06/30


