O-LEVEL CHEMISTRY Ideal Chemistry – A complete approach for “O” level Page 1 INTRODUCTION TO CHEMISTRY Chemistry is a branch of science that deals with the study of structure, composition and properties of matter. Chemistry as an experimental subject relies on: - Careful handling of apparatus - Carrying out chemical tests or chemical analysis - Making critical observation - Critical reporting of observations - Drawing appropriate conclusions from observations Chemistry as a practical science tries to answer the following question. What are materials made up of? How is matter formed? How does matter behave? Why does matter behave the way it does? There are quite a number of branches of chemistry such as Organic chemistry, Physical chemistry, Inorganic Chemistry and Analytical chemistry. Importance of chemistry - The knowledge of chemistry makes us to understand the properties of substances and handle these substances with great care. Some may be poisonous, corrosive, toxic etc. - Makes us to understand how to extract substances from the earth and use them e.g. gold, copper etc. - Chemistry knowledge opens up way to science professional courses such as medicine, education and pharmacy. - The knowledge of chemistry makes us to know the effects of chemicals on the environment and subsequently puts us in position to protect our environment. - Broad knowledge in chemistry puts us in better positions to contribute towards more advancement in science and technology for better and quality human life. - The knowledge of chemistry is relevant in many ways such as making of food supplements, distillation of fuel, making of plastics, making cosmetics and dental creams, manufacture of soap and detergents, making insecticides and herbicides.etc. LABORATORY A laboratory is a special place with special equipments where scientific investigations or experiments are carried out. The laboratory is a place of adventure and discovery; in fact some of the most exciting events in the history of science have taken place in laboratories e.g. the discovery of oxygen. When experiments are carried out in the laboratory, chemical materials and are used. Chemicals are substances usually in solid or liquid forms that are consumed during reactions. They get usedup in reactions during the course of an experiment. E.g. Sodium hydroxide and Hydrochloric acid.
Transcript
O-LEVEL CHEMISTRY
Ideal Chemistry – A complete approach for “O” level Page 1
INTRODUCTION TO CHEMISTRY Chemistry is a branch of science that deals with the study of structure, composition and properties of matter. Chemistry as an experimental subject relies on: - Careful handling of apparatus - Carrying out chemical tests or chemical analysis - Making critical observation - Critical reporting of observations - Drawing appropriate conclusions from observations Chemistry as a practical science tries to answer the following question. What are materials made up of? How is matter formed? How does matter behave? Why does matter behave the way it does? There are quite a number of branches of chemistry such as Organic chemistry, Physical chemistry, Inorganic Chemistry and Analytical chemistry.
Importance of chemistry - The knowledge of chemistry makes us to understand the properties of substances
and handle these substances with great care. Some may be poisonous, corrosive, toxic etc.
- Makes us to understand how to extract substances from the earth and use them e.g. gold, copper etc.
- Chemistry knowledge opens up way to science professional courses such as medicine, education and pharmacy.
- The knowledge of chemistry makes us to know the effects of chemicals on the environment and subsequently puts us in position to protect our environment.
- Broad knowledge in chemistry puts us in better positions to contribute towards more advancement in science and technology for better and quality human life.
- The knowledge of chemistry is relevant in many ways such as making of food supplements, distillation of fuel, making of plastics, making cosmetics and dental creams, manufacture of soap and detergents, making insecticides and herbicides.etc.
LABORATORY A laboratory is a special place with special equipments where scientific investigations or experiments are carried out. The laboratory is a place of adventure and discovery; in fact some of the most exciting events in the history of science have taken place in
laboratories e.g. the discovery of oxygen. When experiments are carried out in the laboratory, chemical materials and are used. Chemicals are substances usually in solid or liquid forms that are consumed during reactions. They get usedup in reactions during the course of an experiment. E.g. Sodium hydroxide and Hydrochloric acid.
O-LEVEL CHEMISTRY
Ideal Chemistry – A complete approach for “O” level Page 2
Apparatus are scientific tools that are used in carrying out scientific experiments. They are not usedup or consumed and can be used repeatedly. E.g. Beaker.
Laboratory safety rules
- Do not enter the laboratory without permission. - Perform only the experiments assigned by the teacher. - Learn at once the location and operation of fire extinguishers and other first aid
materials. - No equipment should be used until proper instructions are received from the
teacher and you have proven proficiency. - Avoid unnecessary movements in the laboratory. - Do not play about with electrical or gas devices. - Handle apparatus with great care. - In case of accidents such as burns, cuts or splash of chemicals, wash with plenty
of water and report to the teacher or laboratory technician. - Do not taste or smell gases continuously. - Do not eat or drink anything in the laboratory. - When heating using boiling tubes or test tubes, do not turn the open end towards
yourself or any one. - Whenever in the laboratory, use clean and dry apparatus. - Never use faulty equipments. Check and make sure that the devices you are given
are not damaged. - Never dispose off solid material into sinks instead throw them in solid waste
containers or pits. - Always make sure that you follow instructions that are given and read labels on
bottles making sure that you use correct reagents. - Do not leave reagent bottles open. As soon as you finish using a bottle, put its
stopper and return it to its right position. - Do not keep your work space too congested.
Simple laboratory equipments or apparatus In order to carry out experiments in the laboratory, we need special tools such as measuring device. Such a tool is referred to as an apparatus. Table of different laboratory apparatus and their functions.
Round bottomed flask
Use -gas preparation when heating is involved
-holding liquids
Flat bottomed flask
Use -gas preparation at room Temperature -holding liquids and mixing
solutions.
Beaker Use
-holding reagents -mixing solutions and
sometimes heating
Conical flask Use
-mixing reagents
O-LEVEL CHEMISTRY
Ideal Chemistry – A complete approach for “O” level Page 3
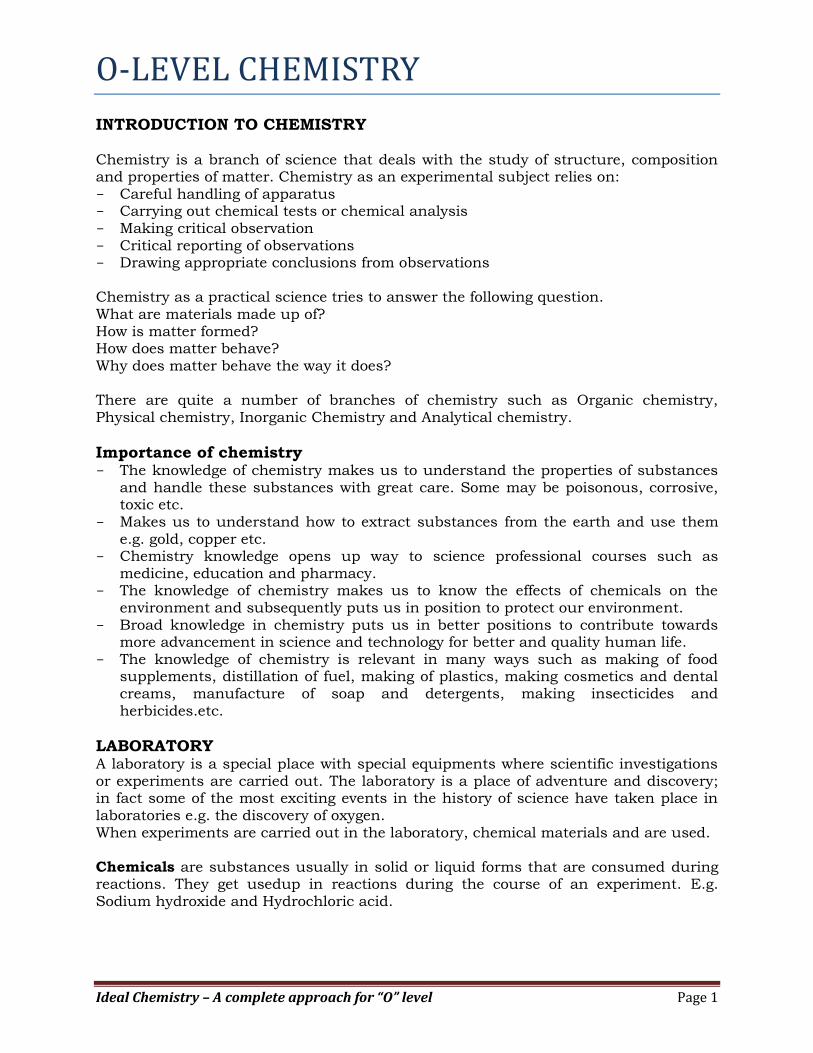
Measuring cylinder
Use -measuring volumes of liquids
Pipette
Use -measuring a fixed
volume of a liquid
Burette Use
-measuring exact volume of a liquid during titration
Test tube Use
-mixing small volumes of reagents
-heating small volumes of
liquid
Boiling tube
Use -heating small quantities of substances -holding small volumes of substance
Test tube holder
Use -holding test tubes or
boiling tube when heating
O-LEVEL CHEMISTRY
Ideal Chemistry – A complete approach for “O” level Page 4
The Bunsen Burner This is a piece of apparatus that is used for heating substances in the laboratory.
Structure
Filter funnel Use
-filtering i.e. separating liquid from solids
-directing liquids into
containers
Separating funnel Use
-separating immiscible liquids
Spatula Use
-scooping small amounts
of substance
Bunsen burner
Use
-heating substances
Glass rod
Use
-stirring mixtures
O-LEVEL CHEMISTRY
Ideal Chemistry – A complete approach for “O” level Page 5
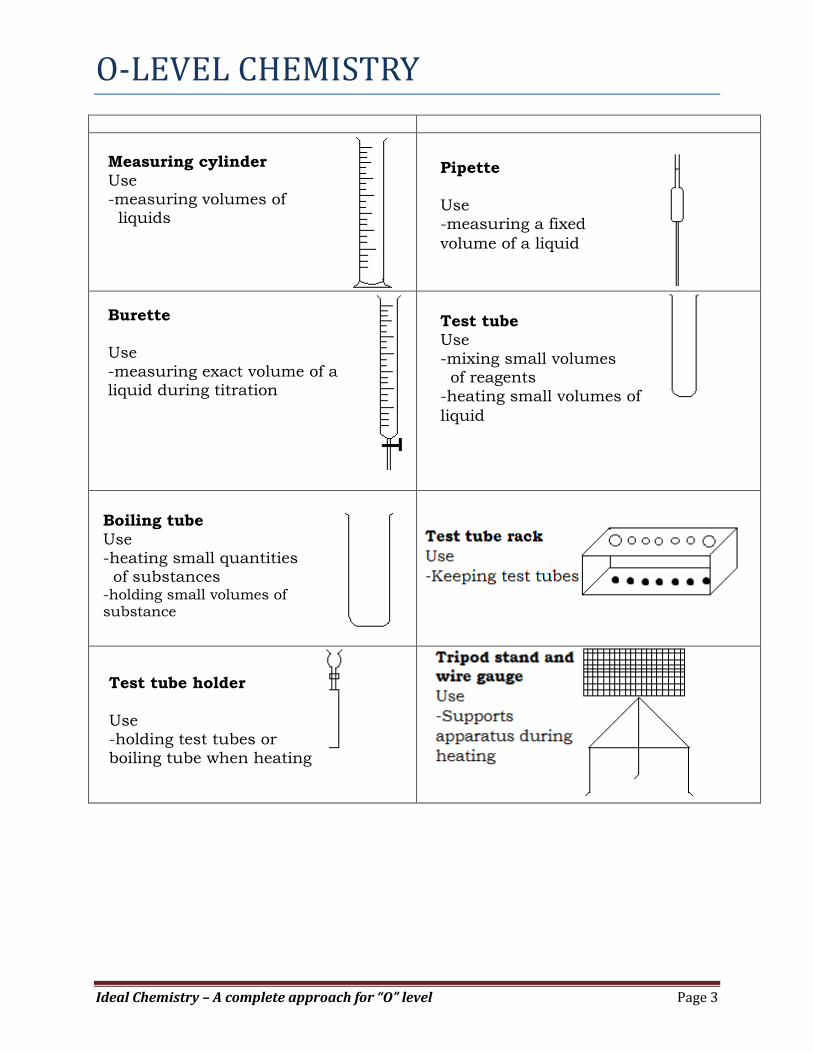
Functions of the labeled parts Chimney/barrel: is a long metallic pipe through which the gas passes to be lit. Collar/metal ring: is a metallic ring with a hole in it that regulates the amount of air entering the air hole. Jet: is a tiny hole through which the gas enters the chimney. It is narrow so that the gas enters the chimney at high pressure. Gas inlet: it connects the Bunsen burner to the gas supply. Base: it is a heavy metal and used as a stand for the Bunsen burner i.e. it supports the Bunsen burner in an upright position.
How to light a Bunsen burner 1. Connect the Bunsen burner to the gas tap. 2. Close the air hole. 3. Open the gas on fully. 4. Light the Bunsen burner at the top of the chimney. 5. Open the air hole to get a hot non luminous flame used for heating.
Bunsen burner flames A flame is a burning gas that produces heat and light. A Bunsen burner produces two types of flames i.e. luminous and non luminous flames.
Luminous flame This type of flame is produced when the air hole of the Bunsen burner in closed. The flame is large, bright, yellow and not very hot. Examples of luminous flame include; candle flame, bush fire flames and lantern flame
O-LEVEL CHEMISTRY
Ideal Chemistry – A complete approach for “O” level Page 6
Structure
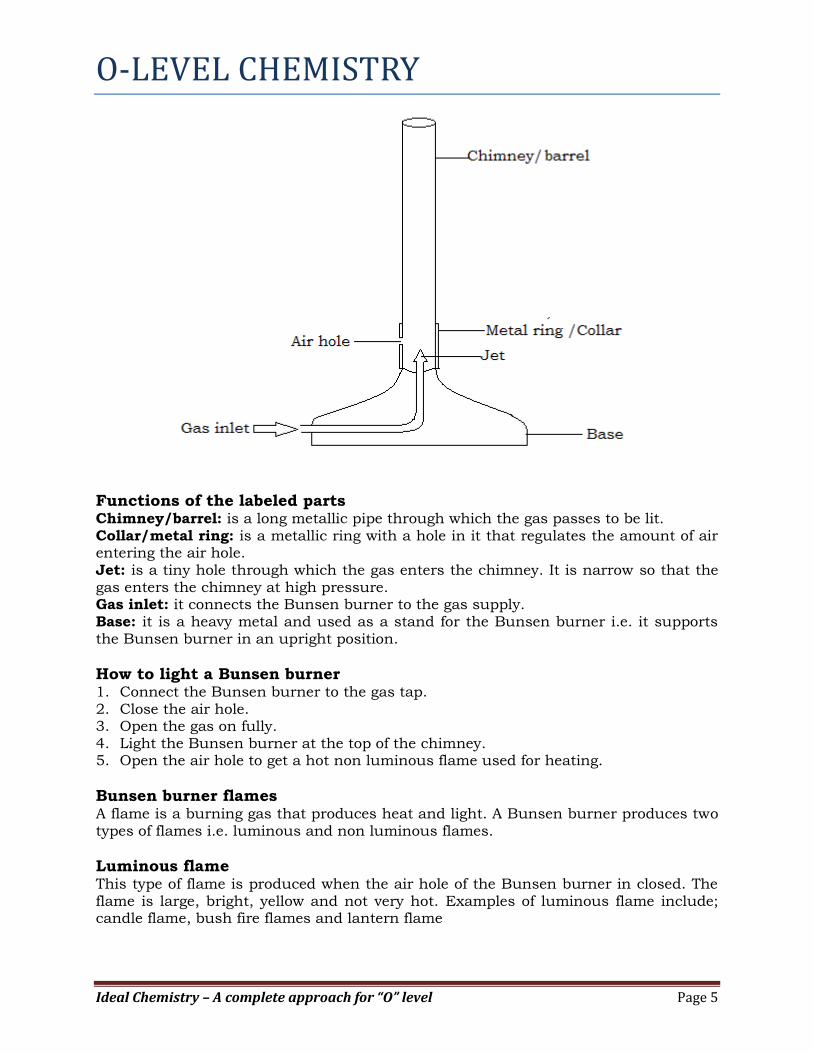
Zones of a luminous flame
The luminous flame has four zones namely: 1. Dark zone/ zone of un burnt gas; burning of the gas does not take place here, it
is dark and cool. 2. Luminous yellow zone; the gas burns in this zone but not completely because of
limited air. Tiny particles glow in this region to give out light. 3. Thin outer zone; the zone is colourless and gas burns completely due to plenty of
air. 4. Blue zone; this zone receives plenty of air and burning is more complete than in
luminous zone.
Non luminous flame This is the flame produced when the air hole of the Bunsen burner is open. Air enters through the air hole and mixes with the gas. This makes the gas to burn completely producing a very hot flame used for heating. The flame does not produce soot. Examples of non luminous flame include; gas cooker fame and stove flame.
Structure
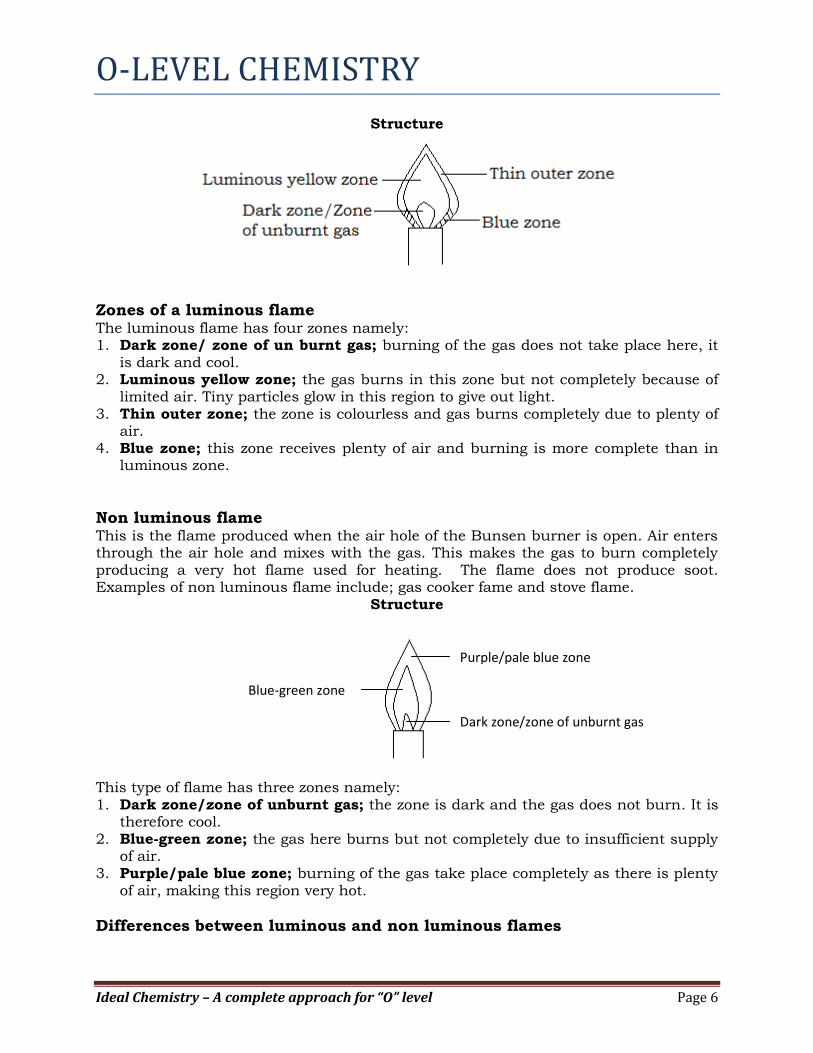
This type of flame has three zones namely:
1. Dark zone/zone of unburnt gas; the zone is dark and the gas does not burn. It is therefore cool.
2. Blue-green zone; the gas here burns but not completely due to insufficient supply of air.
3. Purple/pale blue zone; burning of the gas take place completely as there is plenty of air, making this region very hot.
Differences between luminous and non luminous flames
Purple/pale blue zone
Dark zone/zone of unburnt gas
Blue-green zone
O-LEVEL CHEMISTRY
Ideal Chemistry – A complete approach for “O” level Page 7
Luminous flame Non luminous flame
- Has four zone - Has three zones
- Not very hot - Very hot
- Larger is size - Smaller in size
- Produces soot - Does not produce soot
- Produces much light - Produces less light
- Burns silently - Burns with a lot of noise
- The flame is yellow and unsteady - The flame is stable and steady
Similarities between luminous and non luminous flames - Both flames have the dark zone (zone of un burnt gas) - Both flames have luminous zone where the gas do not burn completely. In this
zone, the carbon particles glow to give out light.
- Both flames have the non luminous zone where gas burns completely.
Strike back Strike back occurs when the gas burns at the inner point jet or at the air hole instead of burning at the top of the chimney. It occurs normally when the air hole is left open when lighting the Bunsen burner. Strike back can cause explosion leading to destruction of property and lives.
MATTER Matter is anything that occupies space and has weight. Matter is made up of very tiny particles known as ions, atoms or molecules. An atom is the smallest electrically neutral particles of an element that takes part in a chemical reaction. A molecule is the smallest electrically neutral particle of a compound or element that can exist on its own. An ion is an electrically charged particle of an atom or a group of chemically combined atoms after losing or gaining electrons. Matter exists in three state i.e. liquid, solid and gas.
Properties of the states of matter Solids - Consist of particles that are fixed together i.e. particles that are not mobile. - The particles are held by very strong forces of attraction. - Solids have fixed shape.
- Solids have very high density. - Solids are practically incompressible. Arrangement of particles in a solid
Liquids
O-LEVEL CHEMISTRY
Ideal Chemistry – A complete approach for “O” level Page 8
- A liquid has a definite volume but no definite shape i.e. it takes up the shape of the container in which it is placed.
- Particles in a liquid are held together by weak intermolecular forces of attraction making the particles to move freely to some extent around each other.
- Liquids are slightly compressible - Liquids are less dense compared to solids. - Particles in a solid are relatively spread apart. Arrangement of particles in a liquid
Gases - Particles in a gas are far apart from each other. - Particles in a gas are free to move randomly as they have negligible forces of
attraction. - Gases are easily compressible - Gases have no definite shape and volume. - Gases are very light. Arrangement of particles in a gas
KINETIC THEORY OF MATTER Kinetic theory of matter states that; Particles that make up matter have kinetic energy and they are always in motion. The extent of the movement of the particles depends on the amount of kinetic energy the particles have. In solids, the particles are held together by very strong intermolecular forces of attraction; the particles do not have enough kinetic energy to make them move from one place to another but they can vibrate in their mean position. When a solid is heated, the kinetic energy of the particles increase as they absorb the heat energy which weakens the forces of attraction between the particles. When the melting point is reached, the molecules break free and the solid changes to liquid. In liquids, the particles are held together by weak forces of attraction. However, they have enough kinetic energy to enable the particles move from one place to another within the liquid. When a liquid is heated, the forces of attraction between the
particles are weakened further until when they are completely broken and at this point, the liquid changes to a gas. This is the boiling point of the liquid. In a gas, the particles are free to move randomly as they posses much kinetic energy and the particles are not held together by any particular forces of attraction (or negligible forces of attraction) CHANGE OF STATES
O-LEVEL CHEMISTRY
Ideal Chemistry – A complete approach for “O” level Page 9
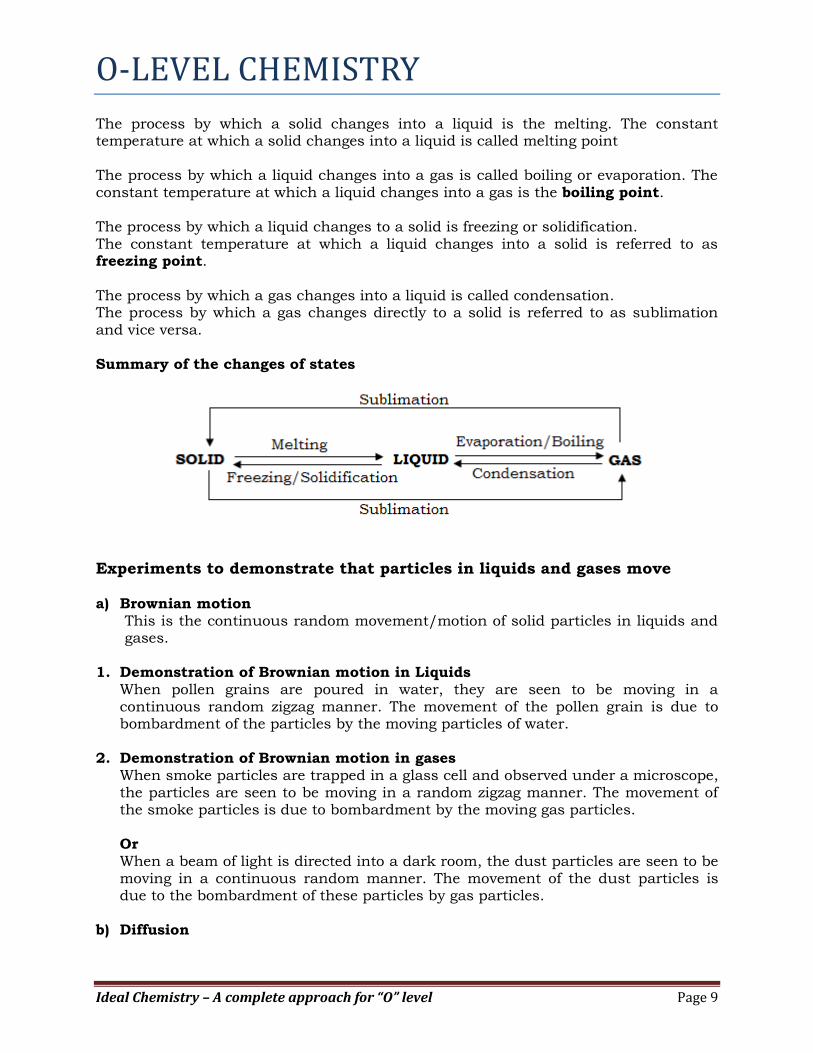
The process by which a solid changes into a liquid is the melting. The constant temperature at which a solid changes into a liquid is called melting point The process by which a liquid changes into a gas is called boiling or evaporation. The constant temperature at which a liquid changes into a gas is the boiling point. The process by which a liquid changes to a solid is freezing or solidification. The constant temperature at which a liquid changes into a solid is referred to as freezing point. The process by which a gas changes into a liquid is called condensation. The process by which a gas changes directly to a solid is referred to as sublimation and vice versa. Summary of the changes of states
Experiments to demonstrate that particles in liquids and gases move a) Brownian motion
This is the continuous random movement/motion of solid particles in liquids and gases.
1. Demonstration of Brownian motion in Liquids
When pollen grains are poured in water, they are seen to be moving in a continuous random zigzag manner. The movement of the pollen grain is due to bombardment of the particles by the moving particles of water.
2. Demonstration of Brownian motion in gases When smoke particles are trapped in a glass cell and observed under a microscope, the particles are seen to be moving in a random zigzag manner. The movement of the smoke particles is due to bombardment by the moving gas particles. Or When a beam of light is directed into a dark room, the dust particles are seen to be moving in a continuous random manner. The movement of the dust particles is due to the bombardment of these particles by gas particles.
b) Diffusion
O-LEVEL CHEMISTRY
Ideal Chemistry – A complete approach for “O” level Page 10
This is the spreading of particles or molecules from a region of high concentration to a region of low concentration.
1. Demonstration of diffusion in liquids
Place a crystal of potassium permanganate in a beaker of water and watch. After sometimes, the water turns pink due to the particles of potassium permanganate spreading throughout the water.
2. Demonstration of diffusion in gas
Open a bottle of concentrated ammonia solution and place the bottle at the corner of a room. After sometimes, ammonia smell will spread through out the room due to diffusion of the ammonia particles.
Rate of diffusion of gases The rate of diffusion of a gas depends on; - Density of the gas. The lighter the gas, the higher the rate of diffusion. - Density of the diffusion medium. The lighter the density of the diffusion medium,
the faster is the rate of diffusion. - Concentration gradient. The steeper the concentration gradient, the higher the rate
of diffusion. - Surface area. The smaller the surface area of diffusion, the higher the rate of
diffusion. - Temperature of the diffusion medium. The higher the temperature, the faster is the
rate of diffusion of the particles. - Size of the particles. Smaller particles diffuse faster the larger particles. - Distance through which diffusion occurs. The smaller the diffusion distance, the
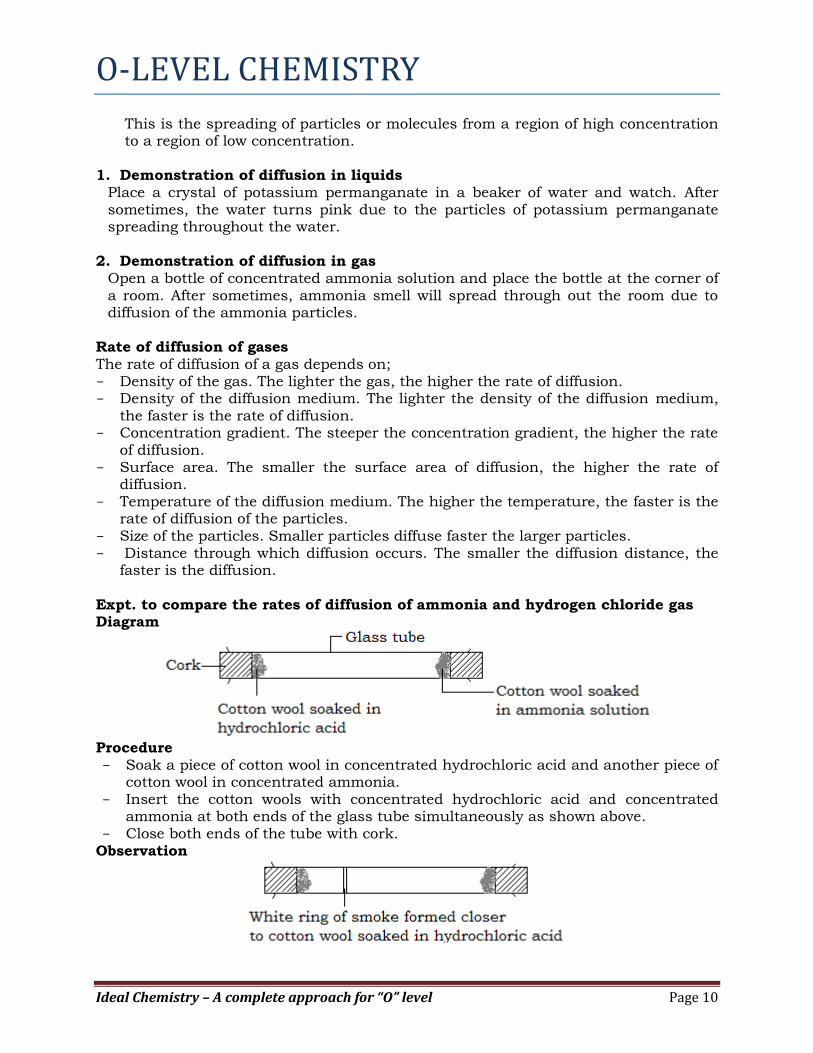
faster is the diffusion. Expt. to compare the rates of diffusion of ammonia and hydrogen chloride gas Diagram
Procedure - Soak a piece of cotton wool in concentrated hydrochloric acid and another piece of
cotton wool in concentrated ammonia. - Insert the cotton wools with concentrated hydrochloric acid and concentrated
ammonia at both ends of the glass tube simultaneously as shown above. - Close both ends of the tube with cork.
Observation
O-LEVEL CHEMISTRY
Ideal Chemistry – A complete approach for “O” level Page 11
After some times, a white ring of smoke of ammonium chloride is formed in the tube, indicating the ammonia and hydrogen chloride gas diffused through some distance before they met. The white ring was formed closer to the end of the tube with cotton wool containing hydrochloric acid indicating that ammonia diffused through a longer distance than hydrogen chloride. Conclusion Ammonia gas diffuses faster than hydrogen chloride gas.
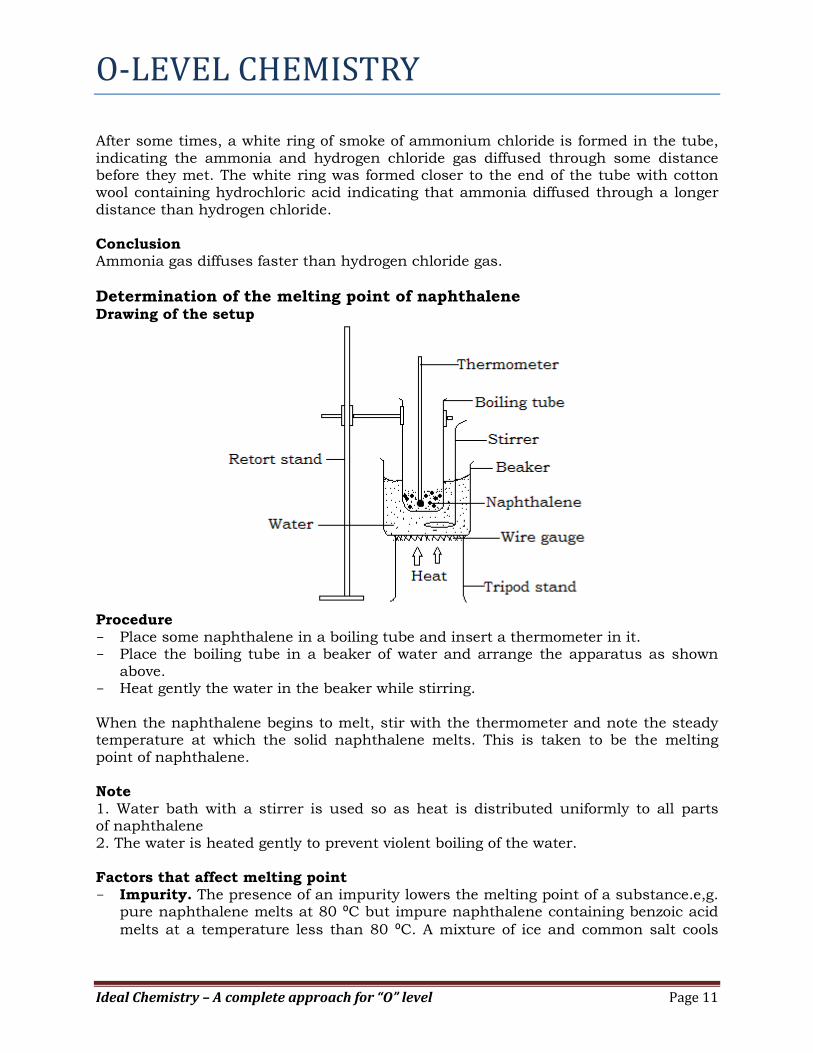
Determination of the melting point of naphthalene Drawing of the setup
Procedure - Place some naphthalene in a boiling tube and insert a thermometer in it. - Place the boiling tube in a beaker of water and arrange the apparatus as shown
above. - Heat gently the water in the beaker while stirring.
When the naphthalene begins to melt, stir with the thermometer and note the steady temperature at which the solid naphthalene melts. This is taken to be the melting point of naphthalene. Note
1. Water bath with a stirrer is used so as heat is distributed uniformly to all parts of naphthalene 2. The water is heated gently to prevent violent boiling of the water. Factors that affect melting point - Impurity. The presence of an impurity lowers the melting point of a substance.e,g.
pure naphthalene melts at 80 ⁰C but impure naphthalene containing benzoic acid
melts at a temperature less than 80 ⁰C. A mixture of ice and common salt cools
O-LEVEL CHEMISTRY
Ideal Chemistry – A complete approach for “O” level Page 12
faster than pure ice because common salt acts as an impurity which lowers the freezing point of ice.
- Pressure. Pressure affects the melting points of substances differently. Substances that decrease in volume when melted e.g. water, their melting points are decreased with increase in pressure. But substances that increase in volume on melting e.g. tin, paraffin wax, their melting points are increased with increase in pressure.
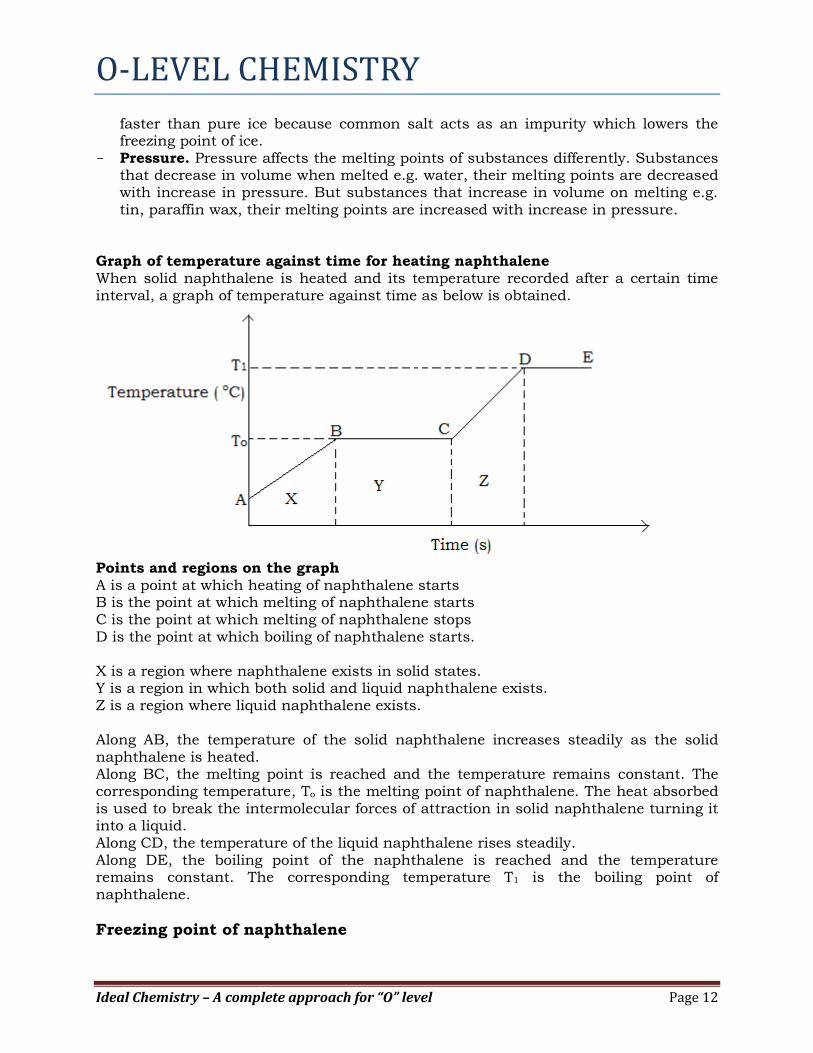
Graph of temperature against time for heating naphthalene When solid naphthalene is heated and its temperature recorded after a certain time interval, a graph of temperature against time as below is obtained.
Points and regions on the graph A is a point at which heating of naphthalene starts B is the point at which melting of naphthalene starts C is the point at which melting of naphthalene stops D is the point at which boiling of naphthalene starts.
X is a region where naphthalene exists in solid states. Y is a region in which both solid and liquid naphthalene exists. Z is a region where liquid naphthalene exists.
Along AB, the temperature of the solid naphthalene increases steadily as the solid naphthalene is heated. Along BC, the melting point is reached and the temperature remains constant. The corresponding temperature, To is the melting point of naphthalene. The heat absorbed
is used to break the intermolecular forces of attraction in solid naphthalene turning it into a liquid. Along CD, the temperature of the liquid naphthalene rises steadily. Along DE, the boiling point of the naphthalene is reached and the temperature remains constant. The corresponding temperature T1 is the boiling point of naphthalene.
Freezing point of naphthalene
O-LEVEL CHEMISTRY
Ideal Chemistry – A complete approach for “O” level Page 13
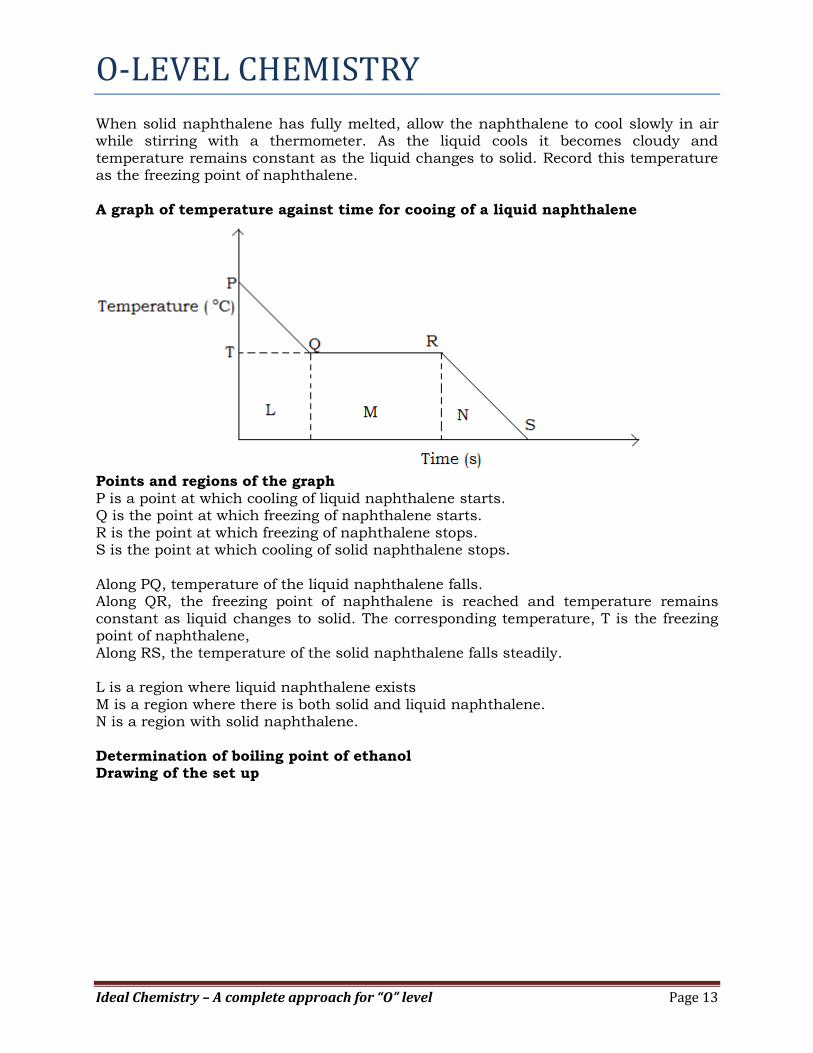
When solid naphthalene has fully melted, allow the naphthalene to cool slowly in air while stirring with a thermometer. As the liquid cools it becomes cloudy and temperature remains constant as the liquid changes to solid. Record this temperature as the freezing point of naphthalene. A graph of temperature against time for cooing of a liquid naphthalene
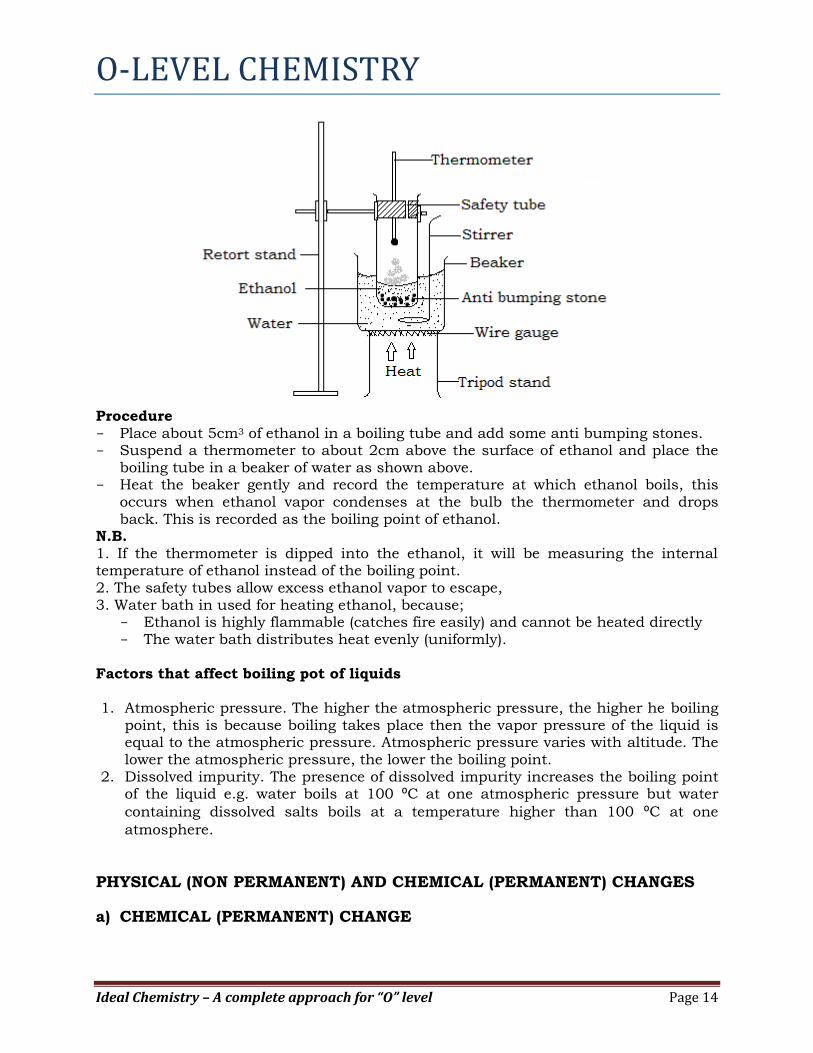
Points and regions of the graph P is a point at which cooling of liquid naphthalene starts. Q is the point at which freezing of naphthalene starts. R is the point at which freezing of naphthalene stops. S is the point at which cooling of solid naphthalene stops. Along PQ, temperature of the liquid naphthalene falls. Along QR, the freezing point of naphthalene is reached and temperature remains constant as liquid changes to solid. The corresponding temperature, T is the freezing point of naphthalene, Along RS, the temperature of the solid naphthalene falls steadily. L is a region where liquid naphthalene exists M is a region where there is both solid and liquid naphthalene. N is a region with solid naphthalene. Determination of boiling point of ethanol Drawing of the set up
O-LEVEL CHEMISTRY
Ideal Chemistry – A complete approach for “O” level Page 14
Procedure - Place about 5cm3 of ethanol in a boiling tube and add some anti bumping stones. - Suspend a thermometer to about 2cm above the surface of ethanol and place the
boiling tube in a beaker of water as shown above. - Heat the beaker gently and record the temperature at which ethanol boils, this
occurs when ethanol vapor condenses at the bulb the thermometer and drops back. This is recorded as the boiling point of ethanol.
N.B. 1. If the thermometer is dipped into the ethanol, it will be measuring the internal temperature of ethanol instead of the boiling point. 2. The safety tubes allow excess ethanol vapor to escape, 3. Water bath in used for heating ethanol, because;
- Ethanol is highly flammable (catches fire easily) and cannot be heated directly - The water bath distributes heat evenly (uniformly).
Factors that affect boiling pot of liquids 1. Atmospheric pressure. The higher the atmospheric pressure, the higher he boiling
point, this is because boiling takes place then the vapor pressure of the liquid is equal to the atmospheric pressure. Atmospheric pressure varies with altitude. The lower the atmospheric pressure, the lower the boiling point.
2. Dissolved impurity. The presence of dissolved impurity increases the boiling point of the liquid e.g. water boils at 100 ⁰C at one atmospheric pressure but water
containing dissolved salts boils at a temperature higher than 100 ⁰C at one
atmosphere.
PHYSICAL (NON PERMANENT) AND CHEMICAL (PERMANENT) CHANGES
a) CHEMICAL (PERMANENT) CHANGE
O-LEVEL CHEMISTRY
Ideal Chemistry – A complete approach for “O” level Page 15
This is a change in which a new substance is formed and the change is irreversible i.e the substance formed cannot be turned back to its original form. Characteristics of chemical changes
- Great heat changes occur i.e. heat is either absorbed or released. - Changes in mass occur i.e. there is increase or decrease in the mass of the product
formed. - New substances are formed during chemical changes. - The reaction is not reversible (irreversible). Examples of chemical changes include: burning of charcoal; rusting of iron; burning of substances in air e.g. magnesium; addition of water to calcium oxide; explosion of
natural gas or hydrogen with air.
b) PHYSICAL (NON PERMANENT) CHANGE This is a change in which no new substance is formed and the change is reversible.i.e the substance formed can be converted back to its original form. Characteristics of physical changes - The reaction is not accompanied by great heat changes(except latent heat changes
accompanying the reaction) - No new substance is formed - No changes in mass occurs i.e. the mass of the product is the same as that of the
reactant. - The reaction is reversible. Examples of physical changes include: melting of ice; vaporization of a liquid; magnetization of iron; sublimation of iodine.
Differences between physical and chemical changes
Chemical change Physical change
- A new substance is formed No new substance is formed
- The reaction is not reversible The reaction is reversible
- Changes in mass occur No changes in mass occur
- Considerable heat changes occur No considerable heat changes occur
Effects of heat on some substances
O-LEVEL CHEMISTRY
Ideal Chemistry – A complete approach for “O” level Page 16
a) Magnesium When magnesium is burnt, it burns with a brilliant white flame producing white fumes and white ash.
b) Iodine When the grey shinny solids of iodine are heated in a test tube, it forms a purple vapor which settles as grey shinny solids at the cooler parts of the test tube.
c) Candle wax When candle wax is heated in a test tube, it forms a colorless liquid which turns back into a solid on cooling.
d) Sulphur
When sulphur is heated gently in a test tube, it melts into a brown liquid and on cooling, it turn to yellow solids. However, when heated strongly, itburns with a blue flame producing a colorless gas with a choking smell.
e) Potassium permanganate When potassium permanganate is heated in a boiling tube, it decomposes with a cracking sound producing black fumes and black powder.
f) Copper (II) sulphate crystals (Hydrated) When the blue copper (II) sulphate crystals are heated in a test tube, a colorless vapor condenses at the cooler part of the test tube forming a colorless liquid and the blue crystals turn to white powder. However when water is added to the white powder, blue crystals of copper (II) sulphate are formed back.
g) Zinc oxide When white powder of zinc oxide is heated in a boiling tube, it turns to yellow and on cooling in turns back to white.
h) Nicrome wire On heating nicrome wire, it glows white hot and on cooling turns back into its original state.
i) Lead (II)nitrate When the lead (II) nitrate is heated in a test tube, it burns with a cracking sound and melts into brown liquid producing fumes of brown gas with an irritating smell and finally yellow residue is left in the test tube.
CLASSIFICATION OF SUBSTANCES
O-LEVEL CHEMISTRY
Ideal Chemistry – A complete approach for “O” level Page 17
In chemistry, substances are classified as elements, compounds and mixtures.
ELEMENTS An element is a pure substance that cannot be split or divided into two or more simpler forms by any known chemical means. An element is made up of atoms. Examples of elements with their symbols (first twenty elements)
Name of element Symbol of element Name of element Symbol of element
1. Hydrogen H 11. Sodium Na
2. Helium He 12. Magnesium Mg
3. Lithium Li 13. Aluminium Al
4. Beryllium Be 14. Silicon Si
5. Boron B 15. Phosphorus P
6. Carbon C 16. Sulphur S
7. Nitrogen N 17. Chlorine Cl
8. Oxygen O 18. Argon Ar
9. Fluorine F 19. Potassium K
10. Neon Ne 20. Calcium Ca
Other examples of elements and their symbols include: Copper (Cu);Zinc (Zn);Iron (Fe);Mercury (Hg);Lead (Pb);Gold (Au);Bromine (Br)Cobalt (Co);Manganese (Mn). Naming of elements In naming elements, the 1st letter or the 1st two letters are used as symbols for the elements. Examples
Element Symbol Element Symbol
Hydrogen H Carbon C
Helium He Argon Ar
Beryllium Be Calcium Ca
Fluorine F Oxygen O
However, there are elements whose symbols are different from the 1st letters of their names. This is because; the symbols used are of old latin names. Examples of these elements include the following.
Element Latin name Symbol
Sodium Natrium Na
Potassium Kalium Ka
Copper Cuprum Cu
Iron Ferrum Fe
Lead Plumbum Pb
Gold Aurum Au
Silver Argentum Ag
Mercury Hydrargyrum Hg
O-LEVEL CHEMISTRY
Ideal Chemistry – A complete approach for “O” level Page 18
COMPOUNDS A compound is a substance made up of two of more elements chemically combined together. Examples of compounds include the following.
Name of compound Formula Elements contained
Water H2O Hydrogen and oxygen
Ammonia NH3 Nitrogen and hydrogen
Carbondioxide CO2 Carbon and oxygen
Sodium chloride NaCl Sodium and chlorine
Copper(II)sulphate CuSO4 Copper, sulphur and oxygen
Potassium permanganate KMnO4 Potassium, manganese and oxygen
Sulphuric acid H2SO4 Hydrogen, sulphur and oxygen
Calcium carbonate CaCO3 Calcium, carbon and oxygen
Lead(II)nitrate Pb(NO3)2 Lead, nitrogen and oxygen
Oxygen gas O2 Oxygen
During the formation of compounds (chemicals combination of elements), atoms of elements combine in definite proportions and energy in the form of heat, light or electrical form is either released or absorbed.
MIXTURES A mixture is a substance made up of two or more elements or compounds physically combined together.
Classes of mixture - Solid-solid mixture e.g. copper and tin, salt and sugar, sand and salt. - Solid-liquid mixture e.g. sand and water, chalk and water. - Liquid-liquid mixture e.g. ethanol and water, oil and water. - Liquid-gas mixture e.g. water and air. - Gas-gas mixture e.g. carbondioxide and oxygen, nitrogen and oxygen.
SEPARATION OF MIXTURES Mixtures can be separated by a number of physical methods depending on the properties of the components such as solubility, boiling point and magnetic properties. Some common methods of separating mixtures include: decantation, filtration, centrifuge method, sublimation method, use of a separating funnel, evaporation, simple distillation, fractional distillation, separation by a magnet and chromatography.
a) Separation of insoluble solids from liquids e.g. sand from water. The
methods used are: Decantation, centrifuging and filtration.
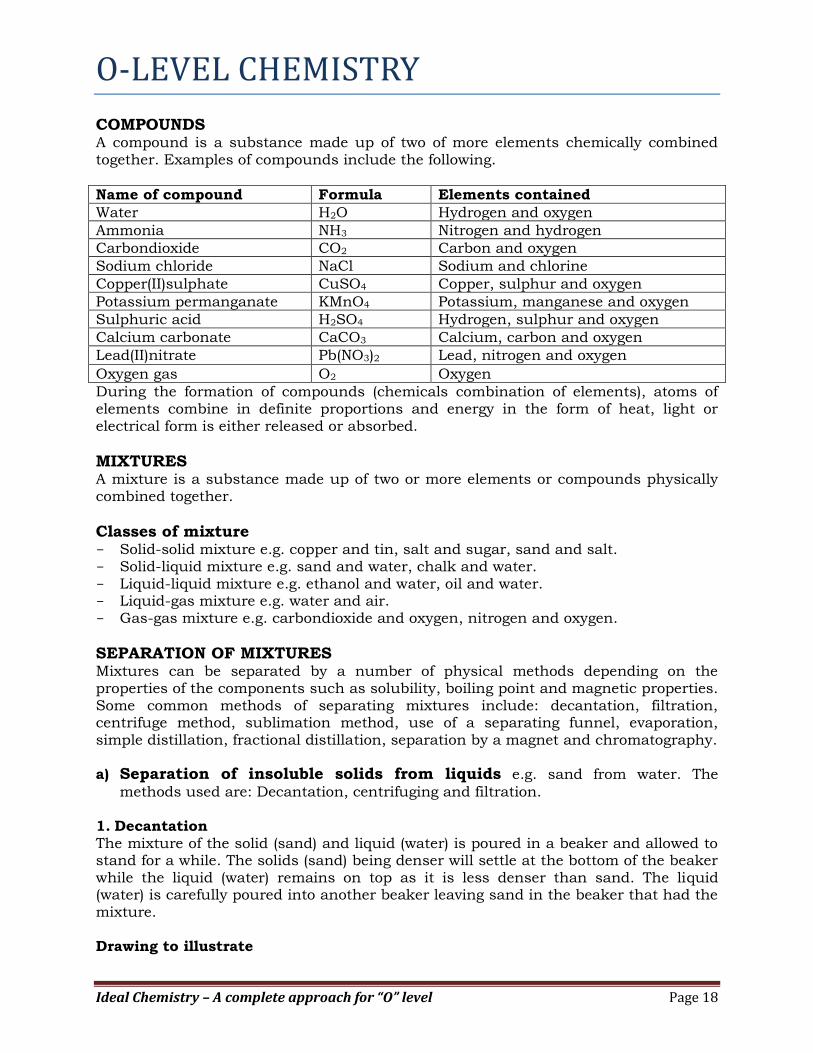
1. Decantation The mixture of the solid (sand) and liquid (water) is poured in a beaker and allowed to stand for a while. The solids (sand) being denser will settle at the bottom of the beaker while the liquid (water) remains on top as it is less denser than sand. The liquid (water) is carefully poured into another beaker leaving sand in the beaker that had the mixture. Drawing to illustrate
O-LEVEL CHEMISTRY
Ideal Chemistry – A complete approach for “O” level Page 19
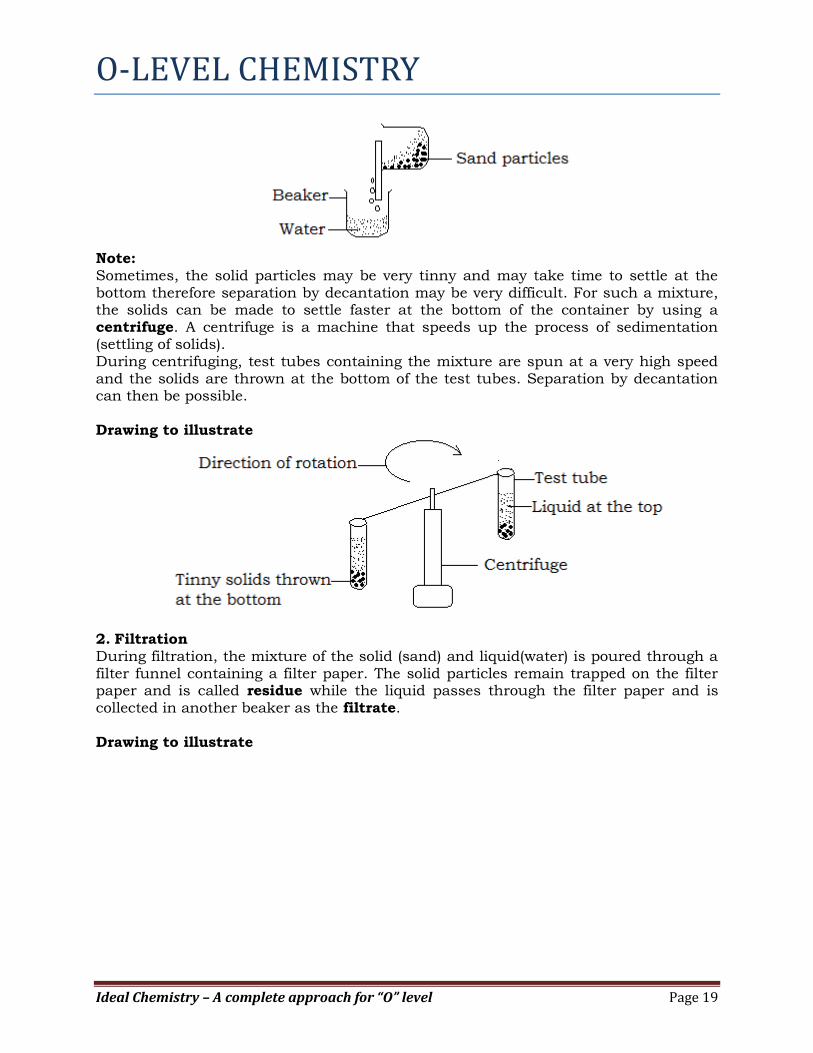
Note: Sometimes, the solid particles may be very tinny and may take time to settle at the bottom therefore separation by decantation may be very difficult. For such a mixture, the solids can be made to settle faster at the bottom of the container by using a centrifuge. A centrifuge is a machine that speeds up the process of sedimentation (settling of solids). During centrifuging, test tubes containing the mixture are spun at a very high speed and the solids are thrown at the bottom of the test tubes. Separation by decantation can then be possible. Drawing to illustrate
2. Filtration During filtration, the mixture of the solid (sand) and liquid(water) is poured through a filter funnel containing a filter paper. The solid particles remain trapped on the filter paper and is called residue while the liquid passes through the filter paper and is collected in another beaker as the filtrate. Drawing to illustrate
O-LEVEL CHEMISTRY
Ideal Chemistry – A complete approach for “O” level Page 20
b) Separation of a solute from a solvent e.g. sugar (salt) from water. Methods
used include: evaporation and simple distillation. A solute (e.g. salt) is a substance that dissolves in a solvent (e.g. water) and a solvent is a substance that dissolves a solute. A mixture of the solute and solvent forms a solution (e.g. salt solution).
3. Evaporation method In this method, the solution is put in an evaporating dish and heated gently over a steam bath as shown below.
Drawing to illustrate
Continue heating until when all the water has evaporated. As the water evaporates, crystals of the salt or sugar are formed in the evaporating dish (crystallization occurs).
4. Simple distillation Distillation is the process of heating a liquid to form vapor and condensing the vapor to form a more pure liquid. This method can be used to separate solutes from solvents and for separating liquid mixtures whose boiling points are wide apart(i.e. separating liquids with a big difference in boiling point.) such as ink and water. Separating salt from water by simple distillation The salt solution is placed in a distillation flask and the apparatus arranged as shown below.