(E) 46HM84 52HM84 62HM84 46HM84 52HM84 62HM84 DLP TM Projection Television OWNER'S MANUAL Owner's Record The model number and serial number are on the back of your TV. Record these numbers in the spaces below. Refer to these numbers whenever you communicate with your Toshiba dealer about this TV. Model: Serial No.: Introduction Connecting y our TV Using the Remote Control Setting up y our TV Using the TV’s F eatures Appendix Index 23566346 46,52,62HM84(E)01_R1 9/30/04, 2:25 PM 1
Transcript
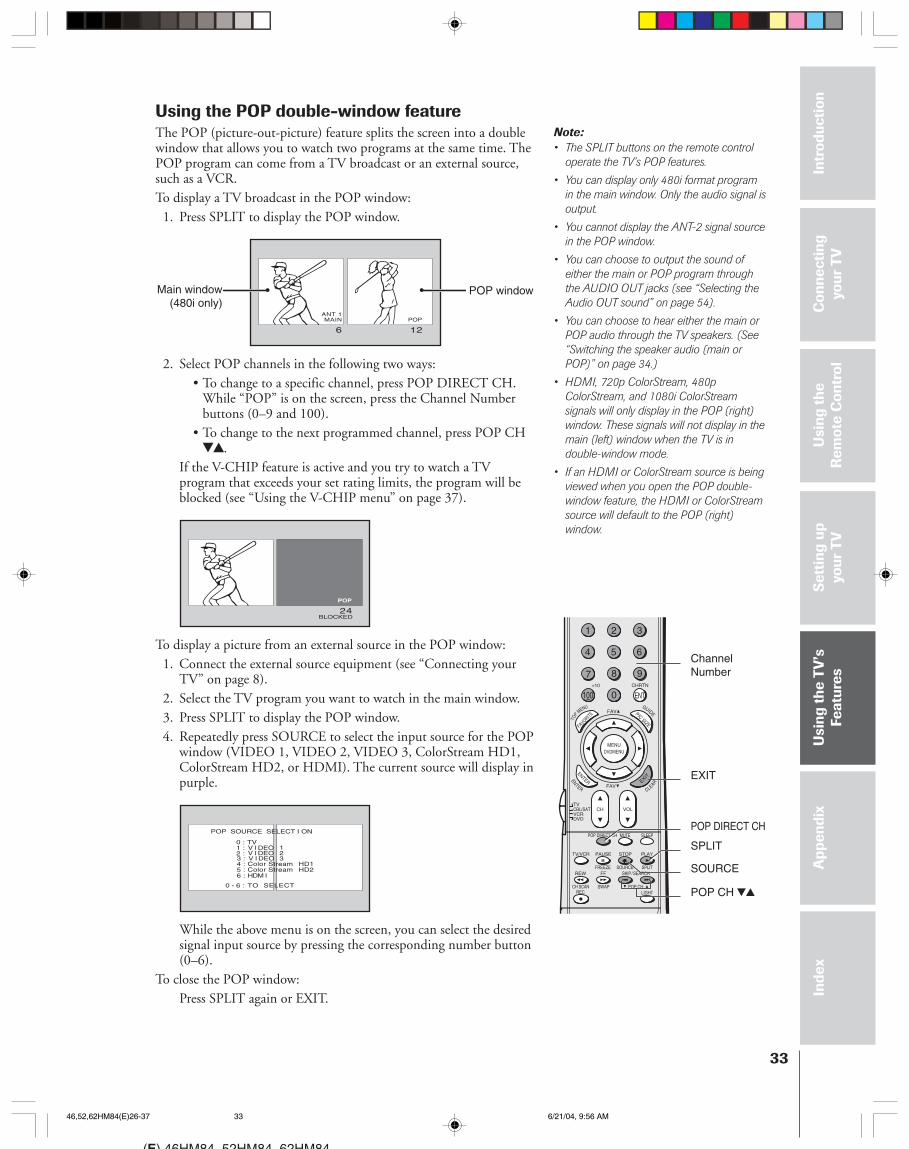
(E) 46HM84 52HM84 62HM84
46HM8452HM8462HM84
DLPTM Projection TelevisionOWNER'S MANUAL
Owner's RecordThe model number and serial number are on the back of your TV. Record these numbers in the spaces below. Refer to these numbers whenever you communicate with your Toshiba dealer about this TV.
Model:
Serial No.:
Intr
oduc
tion
Con
nect
ing
your
TV
Usi
ng th
eR
emot
e C
ontr
olS
etti
ng u
pyo
ur T
VU
sing
the
TV
’sFe
atur
esA
ppen
dix
Inde
x
23566346
46,52,62HM84(E)01_R1 9/30/04, 2:25 PM1
2
(E) 46HM84 52HM84 62HM84
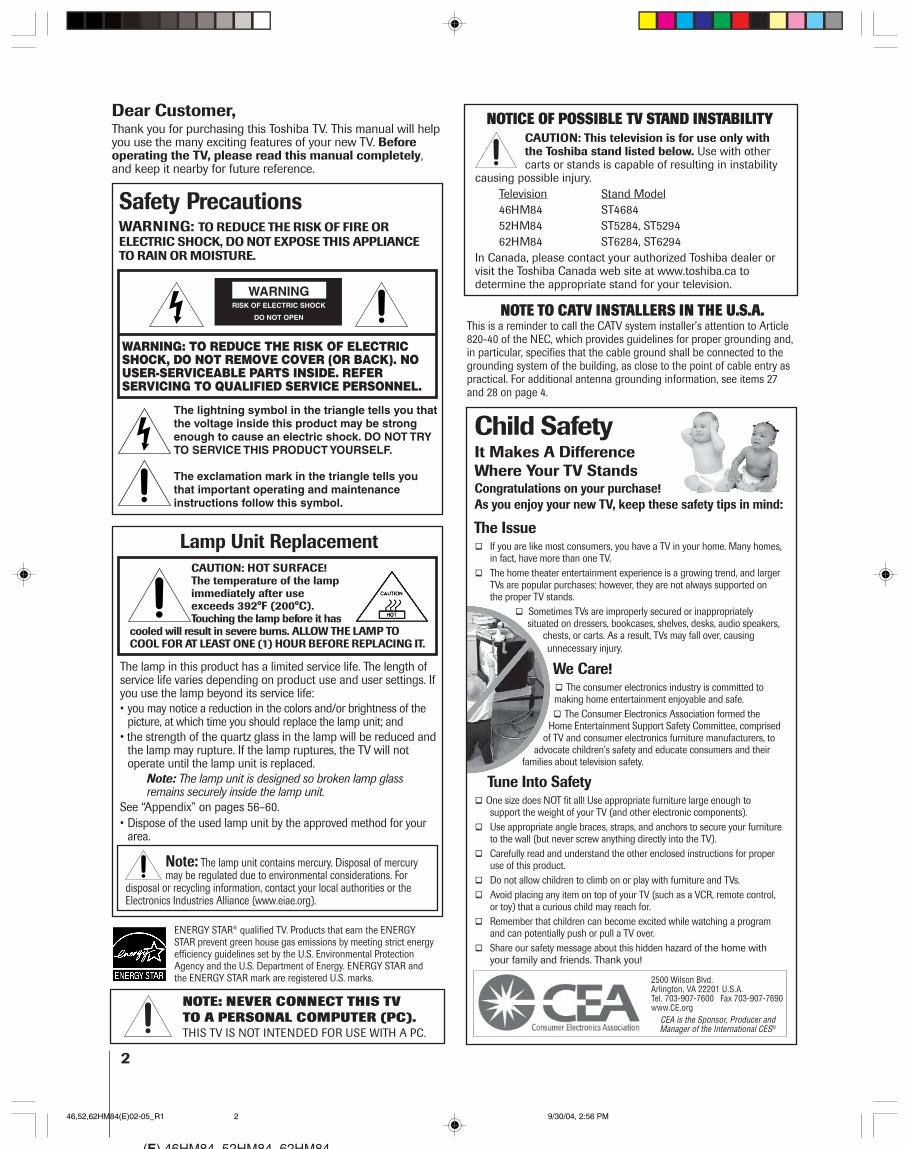
Dear Customer,Thank you for purchasing this Toshiba TV. This manual will helpyou use the many exciting features of your new TV. Beforeoperating the TV, please read this manual completely,and keep it nearby for future reference.
The lamp in this product has a limited service life. The length ofservice life varies depending on product use and user settings. Ifyou use the lamp beyond its service life:• you may notice a reduction in the colors and/or brightness of the
picture, at which time you should replace the lamp unit; and• the strength of the quartz glass in the lamp will be reduced and
the lamp may rupture. If the lamp ruptures, the TV will notoperate until the lamp unit is replaced.
Note: The lamp unit is designed so broken lamp glassremains securely inside the lamp unit.
See “Appendix” on pages 56–60.• Dispose of the used lamp unit by the approved method for your
area.
Note: The lamp unit contains mercury. Disposal of mercurymay be regulated due to environmental considerations. For
disposal or recycling information, contact your local authorities or theElectronics Industries Alliance (www.eiae.org).
The lightning symbol in the triangle tells you thatthe voltage inside this product may be strongenough to cause an electric shock. DO NOT TRYTO SERVICE THIS PRODUCT YOURSELF.
The exclamation mark in the triangle tells youthat important operating and maintenanceinstructions follow this symbol.
Safety PrecautionsWARNING: TO REDUCE THE RISK OF FIRE ORELECTRIC SHOCK, DO NOT EXPOSE THIS APPLIANCETO RAIN OR MOISTURE.
WARNING: TO REDUCE THE RISK OF ELECTRICSHOCK, DO NOT REMOVE COVER (OR BACK). NOUSER-SERVICEABLE PARTS INSIDE. REFERSERVICING TO QUALIFIED SERVICE PERSONNEL.
Lamp Unit ReplacementCAUTION: HOT SURFACE!The temperature of the lampimmediately after useexceeds 392°F (200°C).Touching the lamp before it has
cooled will result in severe burns. ALLOW THE LAMP TOCOOL FOR AT LEAST ONE (1) HOUR BEFORE REPLACING IT.
ENERGY STAR® qualified TV. Products that earn the ENERGYSTAR prevent green house gas emissions by meeting strict energyefficiency guidelines set by the U.S. Environmental ProtectionAgency and the U.S. Department of Energy. ENERGY STAR andthe ENERGY STAR mark are registered U.S. marks.
Child SafetyIt Makes A DifferenceWhere Your TV StandsCongratulations on your purchase!As you enjoy your new TV, keep these safety tips in mind:
The Issue� If you are like most consumers, you have a TV in your home. Many homes,
in fact, have more than one TV.� The home theater entertainment experience is a growing trend, and larger
TVs are popular purchases; however, they are not always supported onthe proper TV stands.
� Sometimes TVs are improperly secured or inappropriatelysituated on dressers, bookcases, shelves, desks, audio speakers,
chests, or carts. As a result, TVs may fall over, causingunnecessary injury.
We Care!� The consumer electronics industry is committed tomaking home entertainment enjoyable and safe.� The Consumer Electronics Association formed the
Home Entertainment Support Safety Committee, comprisedof TV and consumer electronics furniture manufacturers, to
advocate children’s safety and educate consumers and theirfamilies about television safety.
Tune Into Safety� One size does NOT fit all! Use appropriate furniture large enough to
support the weight of your TV (and other electronic components).� Use appropriate angle braces, straps, and anchors to secure your furniture
to the wall (but never screw anything directly into the TV).� Carefully read and understand the other enclosed instructions for proper
use of this product.� Do not allow children to climb on or play with furniture and TVs.� Avoid placing any item on top of your TV (such as a VCR, remote control,
or toy) that a curious child may reach for.� Remember that children can become excited while watching a program
and can potentially push or pull a TV over.� Share our safety message about this hidden hazard of the home with
your family and friends. Thank you!
2500 Wilson Blvd.Arlington, VA 22201 U.S.A.Tel. 703-907-7600 Fax 703-907-7690www.CE.org
CEA is the Sponsor, Producer andManager of the International CES®
NOTE TO CATV INSTALLERS IN THE U.S.A.This is a reminder to call the CATV system installer’s attention to Article820-40 of the NEC, which provides guidelines for proper grounding and,in particular, specifies that the cable ground shall be connected to thegrounding system of the building, as close to the point of cable entry aspractical. For additional antenna grounding information, see items 27and 28 on page 4.
NOTICE OF POSSIBLE TV STAND INSTABILITYCAUTION: This television is for use only withthe Toshiba stand listed below. Use with othercarts or stands is capable of resulting in instability
causing possible injury.Television Stand Model46HM84 ST468452HM84 ST5284, ST529462HM84 ST6284, ST6294
In Canada, please contact your authorized Toshiba dealer orvisit the Toshiba Canada web site at www.toshiba.ca todetermine the appropriate stand for your television.
NOTE: NEVER CONNECT THIS TV
TO A PERSONAL COMPUTER (PC).THIS TV IS NOT INTENDED FOR USE WITH A PC.
46,52,62HM84(E)02-05_R1 9/30/04, 2:56 PM2
3
(E) 46HM84 52HM84 62HM84
Installation, Care, and Service
InstallationFollow these recommendations and precautions and heed allwarnings when installing your TV:
17) Never modify this equipment. Changes or modificationsmay void: a) the warranty, and b) the user’s authority tooperate this equipment under the rules of the FederalCommunications Commission.
18) DANGER: RISK OF SERIOUS PERSONALINJURY, DEATH, OR EQUIPMENTDAMAGE! Never place the TV on
an unstable cart, stand, or table. The TVmay fall, causing serious personal injury,death, or serious damage to the TV.
19) Never place or store the TV in direct sunlight; hot, humidareas; areas subject to excessive dust or vibration; orlocations with temperatures at or below 41°F (5°C).
20) Always place the TV on the floor or a sturdy, level, stablesurface that can support the weight of the unit.
21) Never expose the apparatus to dripping or splashing orplace items such as vases, aquariums, any other item filledwith liquid, or candles on top of the TV.
22) Always place the back of the television at least one (1)inch away from any vertical surface (such as a wall) toallow proper ventilation.
23) Never block or cover the slots or openings in the TVcabinet back, bottom, and sides. Never place the TV:• on a bed, sofa, rug, or similar surface;• too close to drapes, curtains, or walls; or• in a confined space such as a bookcase, built-in cabinet,
or any other place with poor ventilation.The slots and openings are provided to protect the TVfrom overheating and to help maintain reliable operationof the TV.
24) Never allow anything to rest on or roll over the powercord, and never place the TV where the power cord issubject to wear or abuse.
25) Never overload wall outlets and extension cords.
26) Always operate this equipment from a 120 VAC, 60 Hzpower source only.
Important Safety Instructions1) Read these instructions.2) Keep these instructions.3) Heed all warnings.4) Follow all instructions.
5) Do not use this apparatus near water.
6) Clean only with a dry cloth.
7) Do not block any ventilation openings. Install inaccordance with the manufacturer’s instructions.
8) Do not install near any heat sources such as radiators,heat registers, stoves, or other apparatus (includingamplifiers) that produce heat.
9) Do not defeat the safety purpose of the polarized orgrounding type plug. A polarized plug has two bladeswith one wider than the other. A grounding type plug hastwo blades and a third groundingprong. The wide blade or the thirdprong are provided for your safety.If the provided plug does not fit intoyour outlet, consult an electricianfor replacement of the obsolete outlet.
10) Protect the power cord from beingwalked on or pinched, particularly atplugs, convenience receptacles, andthe point where it exits the apparatus.
11) Only use attachments/accessories specified by themanufacturer.
12) Use only with the cart, stand, tripod,bracket, or table specified by themanufacturer, or sold with theapparatus. When a cart is used, usecaution when moving the cart/apparatuscombination to avoid injury from tip-over.
13) Unplug this apparatus during lightning storms orwhen unused for long periods of time.
14) Refer all servicing to qualified service personnel.Servicing is required when the apparatus has beendamaged in any way, such as power-supply cord or plugis damaged, liquid has been spilled or objects have falleninto the apparatus, or the apparatus has been exposed torain or moisture, does not operate normally, or has beendropped. This applies to all items except thosespecified on pages 56–60 of this manual.
15) CAUTION: To reduce the risk of electric shock, do notuse the polarized plug with an extension cord, receptacle,or other outlet unless the blades can be inserted completelyto prevent blade exposure.
16) WARNING: This product contains a lamp to projectthe picture, and requires special safety precautions:• See pages 56–60 for instructions on lamp unit
replacement.• DO NOT attempt to service this product except as
specified on pages 56–60. The only user-serviceableitem in this product is the lamp unit.
Wide plug
(continued on next page)
46,52,62HM84(E)02-05 6/21/04, 9:55 AM3
4
(E) 46HM84 52HM84 62HM84
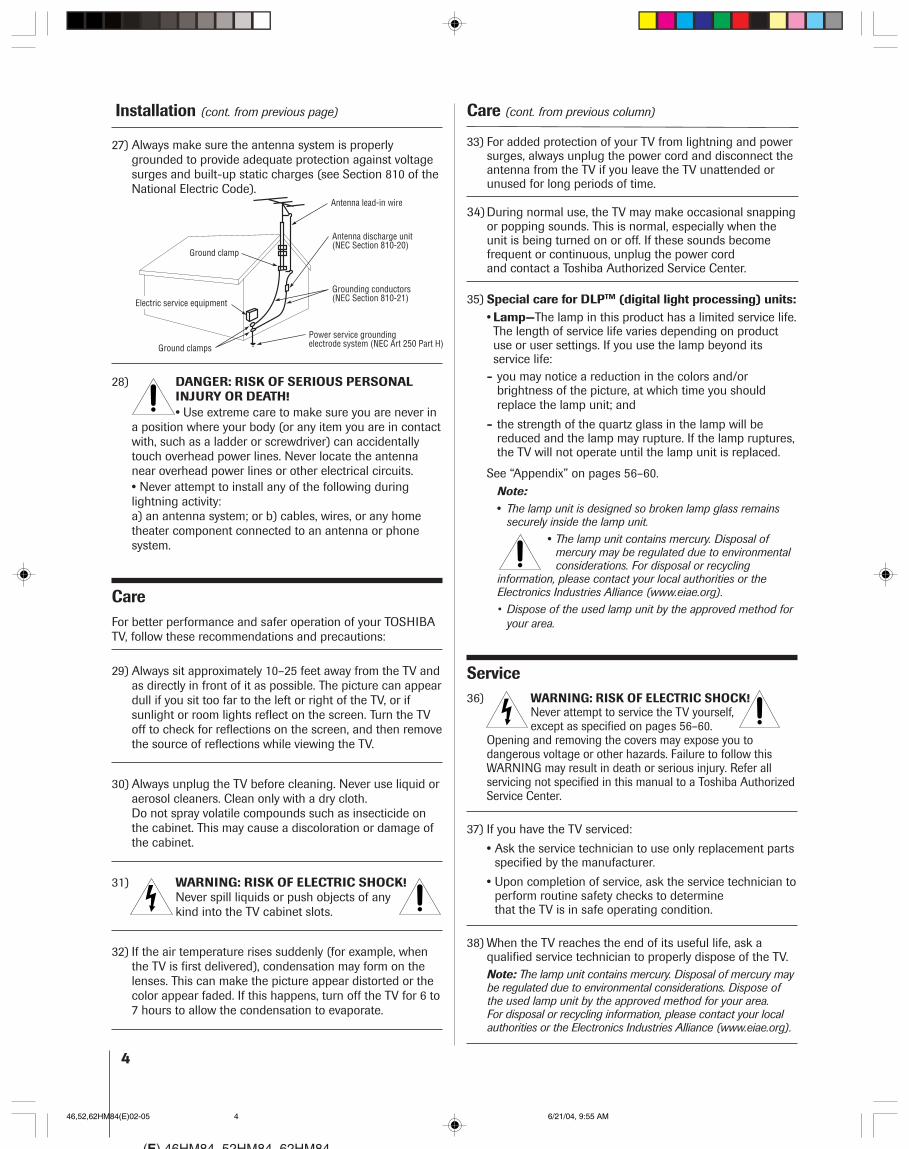
Ground clamp
Antenna discharge unit(NEC Section 810-20)
Grounding conductors(NEC Section 810-21)
Power service groundingelectrode system (NEC Art 250 Part H)Ground clamps
Antenna lead-in wire
Electric service equipment
Installation (cont. from previous page)
27) Always make sure the antenna system is properlygrounded to provide adequate protection against voltagesurges and built-up static charges (see Section 810 of theNational Electric Code).
28) DANGER: RISK OF SERIOUS PERSONALINJURY OR DEATH!• Use extreme care to make sure you are never in
a position where your body (or any item you are in contactwith, such as a ladder or screwdriver) can accidentallytouch overhead power lines. Never locate the antennanear overhead power lines or other electrical circuits.• Never attempt to install any of the following duringlightning activity:a) an antenna system; or b) cables, wires, or any hometheater component connected to an antenna or phonesystem.
CareFor better performance and safer operation of your TOSHIBATV, follow these recommendations and precautions:
29) Always sit approximately 10–25 feet away from the TV andas directly in front of it as possible. The picture can appeardull if you sit too far to the left or right of the TV, or ifsunlight or room lights reflect on the screen. Turn the TVoff to check for reflections on the screen, and then removethe source of reflections while viewing the TV.
30) Always unplug the TV before cleaning. Never use liquid oraerosol cleaners. Clean only with a dry cloth.Do not spray volatile compounds such as insecticide onthe cabinet. This may cause a discoloration or damage ofthe cabinet.
31) WARNING: RISK OF ELECTRIC SHOCK!Never spill liquids or push objects of anykind into the TV cabinet slots.
32) If the air temperature rises suddenly (for example, whenthe TV is first delivered), condensation may form on thelenses. This can make the picture appear distorted or thecolor appear faded. If this happens, turn off the TV for 6 to7 hours to allow the condensation to evaporate.
Care (cont. from previous column)
33) For added protection of your TV from lightning and powersurges, always unplug the power cord and disconnect theantenna from the TV if you leave the TV unattended orunused for long periods of time.
34) During normal use, the TV may make occasional snappingor popping sounds. This is normal, especially when theunit is being turned on or off. If these sounds becomefrequent or continuous, unplug the power cordand contact a Toshiba Authorized Service Center.
35) Special care for DLPTM (digital light processing) units:• Lamp—The lamp in this product has a limited service life.The length of service life varies depending on productuse or user settings. If you use the lamp beyond itsservice life:
- you may notice a reduction in the colors and/orbrightness of the picture, at which time you shouldreplace the lamp unit; and
- the strength of the quartz glass in the lamp will bereduced and the lamp may rupture. If the lamp ruptures,the TV will not operate until the lamp unit is replaced.
See “Appendix” on pages 56–60.Note:• The lamp unit is designed so broken lamp glass remains
securely inside the lamp unit.• The lamp unit contains mercury. Disposal of
mercury may be regulated due to environmentalconsiderations. For disposal or recycling
information, please contact your local authorities or theElectronics Industries Alliance (www.eiae.org).• Dispose of the used lamp unit by the approved method for
your area.
Service36) WARNING: RISK OF ELECTRIC SHOCK!
Never attempt to service the TV yourself,except as specified on pages 56–60.
Opening and removing the covers may expose you todangerous voltage or other hazards. Failure to follow thisWARNING may result in death or serious injury. Refer allservicing not specified in this manual to a Toshiba AuthorizedService Center.
37) If you have the TV serviced:
• Ask the service technician to use only replacement partsspecified by the manufacturer.
• Upon completion of service, ask the service technician toperform routine safety checks to determinethat the TV is in safe operating condition.
38) When the TV reaches the end of its useful life, ask aqualified service technician to properly dispose of the TV.Note: The lamp unit contains mercury. Disposal of mercury maybe regulated due to environmental considerations. Dispose ofthe used lamp unit by the approved method for your area.For disposal or recycling information, please contact your localauthorities or the Electronics Industries Alliance (www.eiae.org).
46,52,62HM84(E)02-05 6/21/04, 9:55 AM4
5
(E) 46HM84 52HM84 62HM84
Important notes about your DLPTM projection TV
1) The light source for this TV is a projection lamp unit with alimited service life. When the lamp wears out, the picturemay become dark or black, or the lamp may fail, at whichtime you must replace the lamp unit. See “Lamp unitreplacement” on pages 56-60.
2) Each time you turn on the TV, it may take up to severalseconds to go from no picture to full picture brightness.
3) The display on this TV is manufactured using a chip that maycontain up to 1.3 million microscopic mirrors. Each of thesemicromirrors measures less than one-fifth the width of ahuman hair and represents a single pixel on the televisiondisplay. These micromirrors are mounted on tiny hinges thatenable them to tilt either toward the light source (ON) oraway from it (OFF). Occasionally, one of these mirrors maybecome inoperative, creating a light or dark pixel on theprojection surface. This is a structural property of DLP™projection TV technology, and is not a sign of malfunction.Such pixels are not visible when the picture is viewed from anormal viewing distance (see item 29 on page 4).
4) Depending on the media you are viewing, it is possible,although unlikely, that a limited number of viewers maysee a “rainbow effect” on the screen, which can, in rareinstances, result in eye fatigue. This is a rare occurrencerelated to technology of this type, and is not a sign of TVmalfunction.
5) Always sit approximately 10–25 feet away from the TV andas directly in front of it as possible. The picture quality maybe affected by your viewing position and length of viewingtime. If you sit too closely to the TV for too long, you maysuffer from eye fatigue. See item 29 on page 4.
6) This TV contains several cooling fans to moderatethe internal temperature. You may be able to hearthe fans for several minutes after the TV is turned
off. This is a function of the Quick Restart standby modeand is not a sign of TV malfunction. You can set the QuickRestart feature to stop the fans as soon as the TV isturned off. See “Selecting the Quick Restart” on page 25.
7) The green and red LED lights on the control touchpad (onthe lower right corner of the TV screen) indicate your TV’scurrent status. If either light flashes, see “LED indications”on page 60 for details.
8) Review all safety and operating information in this owner’smanual before you use your TV.
The DLP logo and DLP medallion are trademarks of Texas Instruments.
46,52,62HM84(E)02-05_R1 9/30/04, 4:15 PM5
6
(E) 46HM84 52HM84 62HM84
Using the programmed channel search function ............. 35Using the favorite channel search function .............. 36About the auto favorite feature ................................ 36
Using the LOCKS menu ............................................... 37Entering the PIN code ............................................ 37If you cannot remember your PIN code .................. 37
Using the V-CHIP menu ............................................... 37ENABLE BLOCKING .......................................... 38TV RATING (Independent rating system forbroadcasters) ........................................................... 38MPAA RATING (Independent rating system formovies) ................................................................... 39BLOCKING OPTION .......................................... 39Unlocking programs temporarily ............................ 40
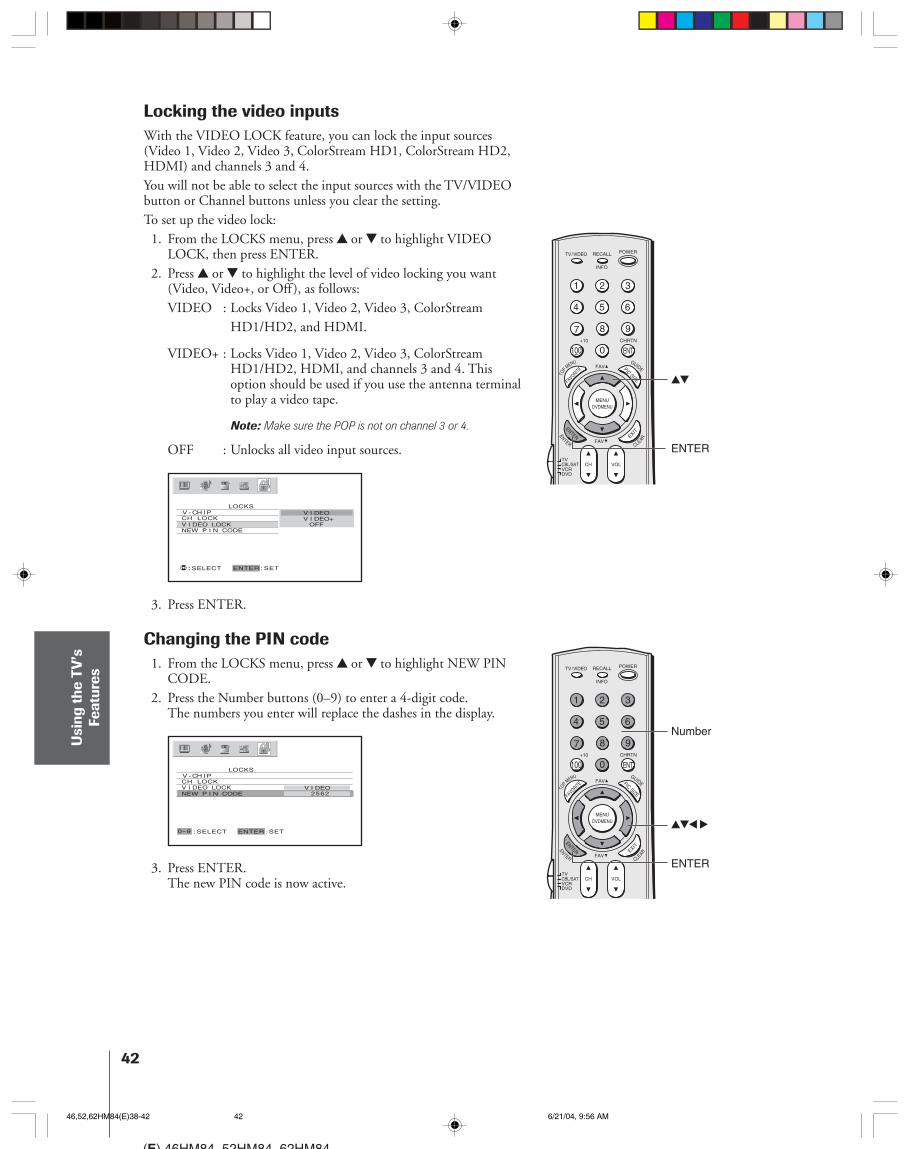
Locking channels ........................................................... 40Locking the video inputs ................................................ 42Changing the PIN code ................................................. 42Adjusting the picture ..................................................... 43
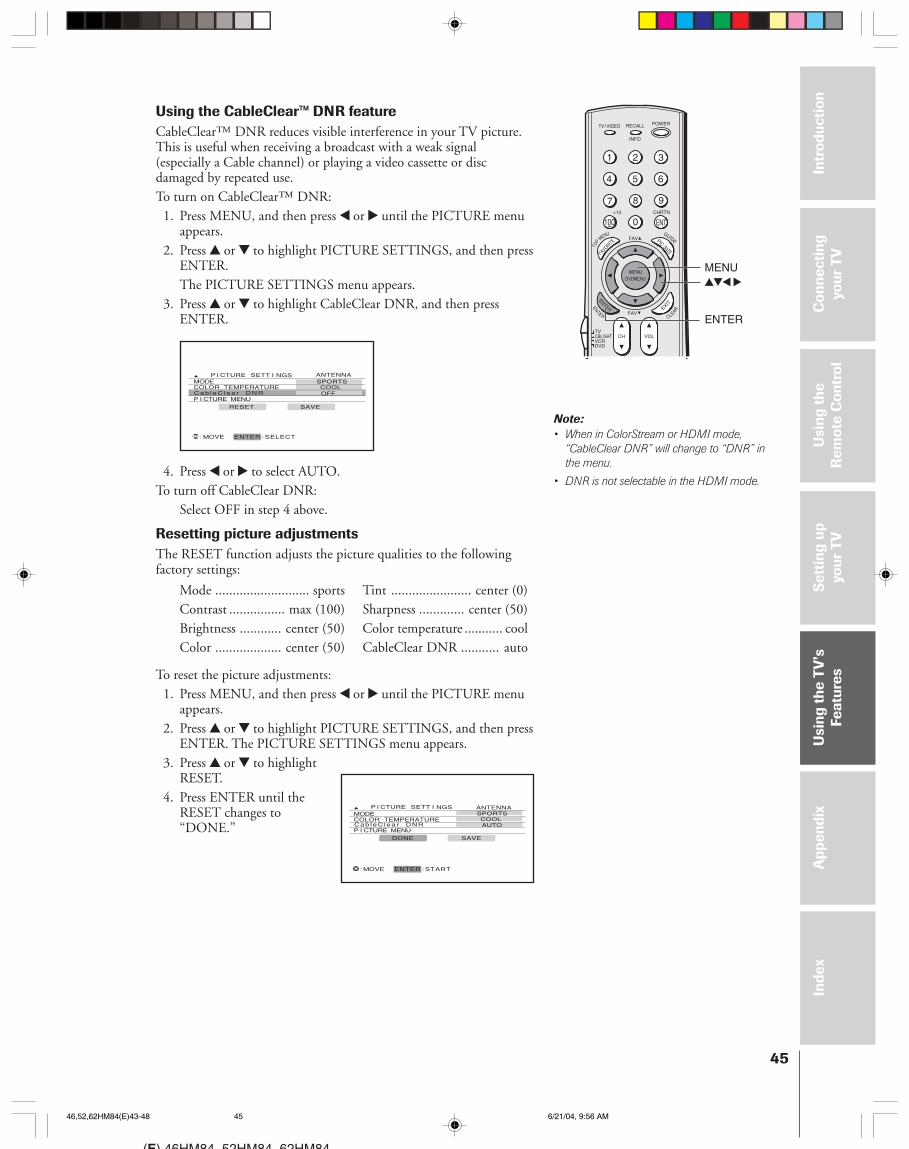
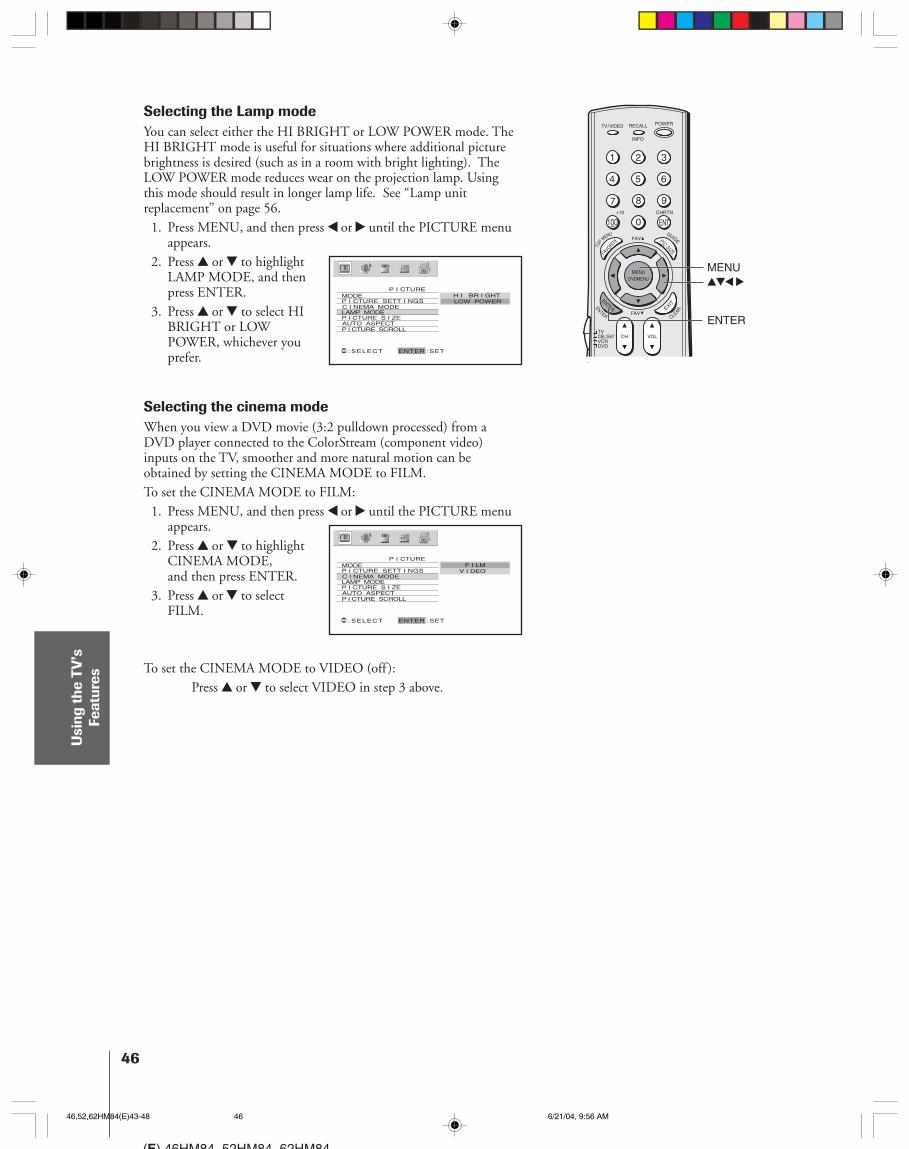
Selecting the picture mode ...................................... 43Adjusting the picture quality ................................... 43Saving your new preferences ................................... 44Selecting the color temperature ............................... 44Using the CableClear™ DNR feature .................... 45Resetting picture adjustments ................................. 45Selecting the lamp mode ......................................... 46Selecting the cinema mode ...................................... 46
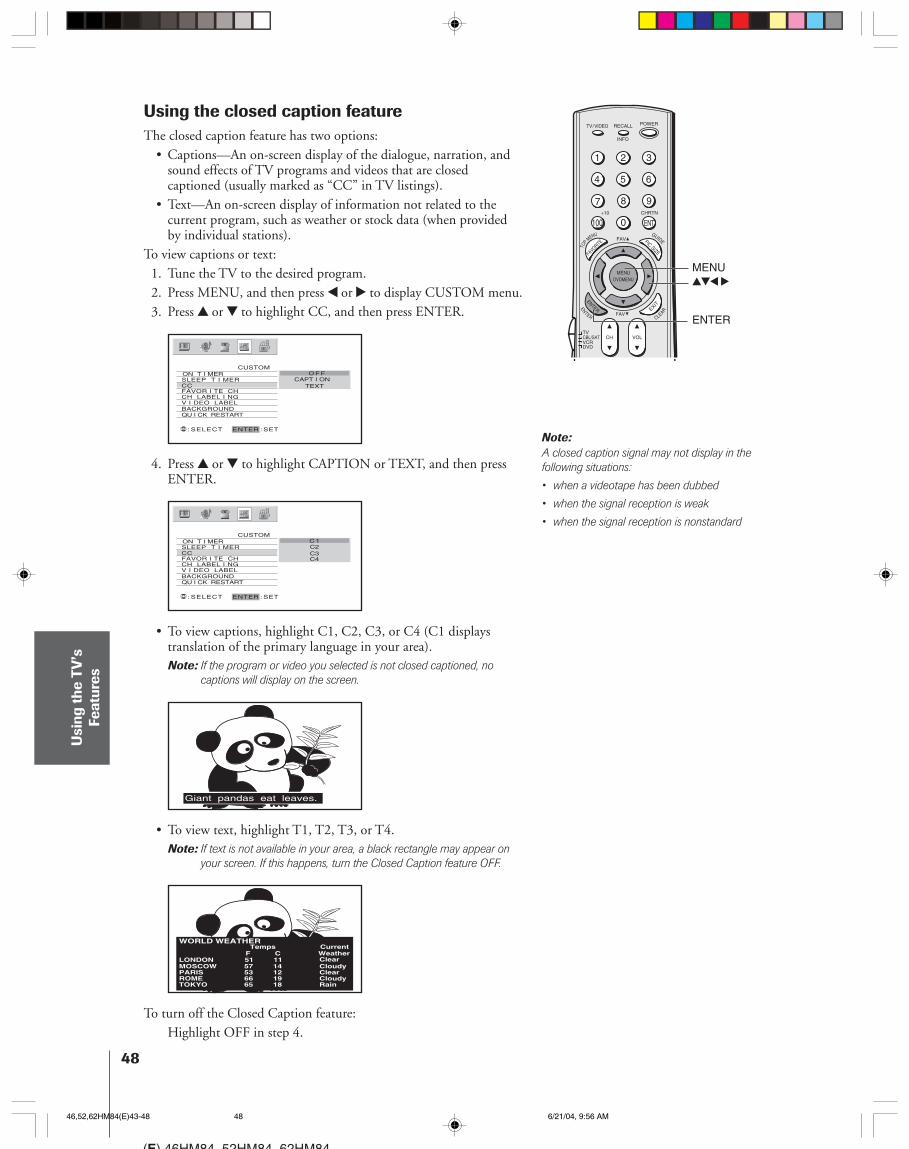
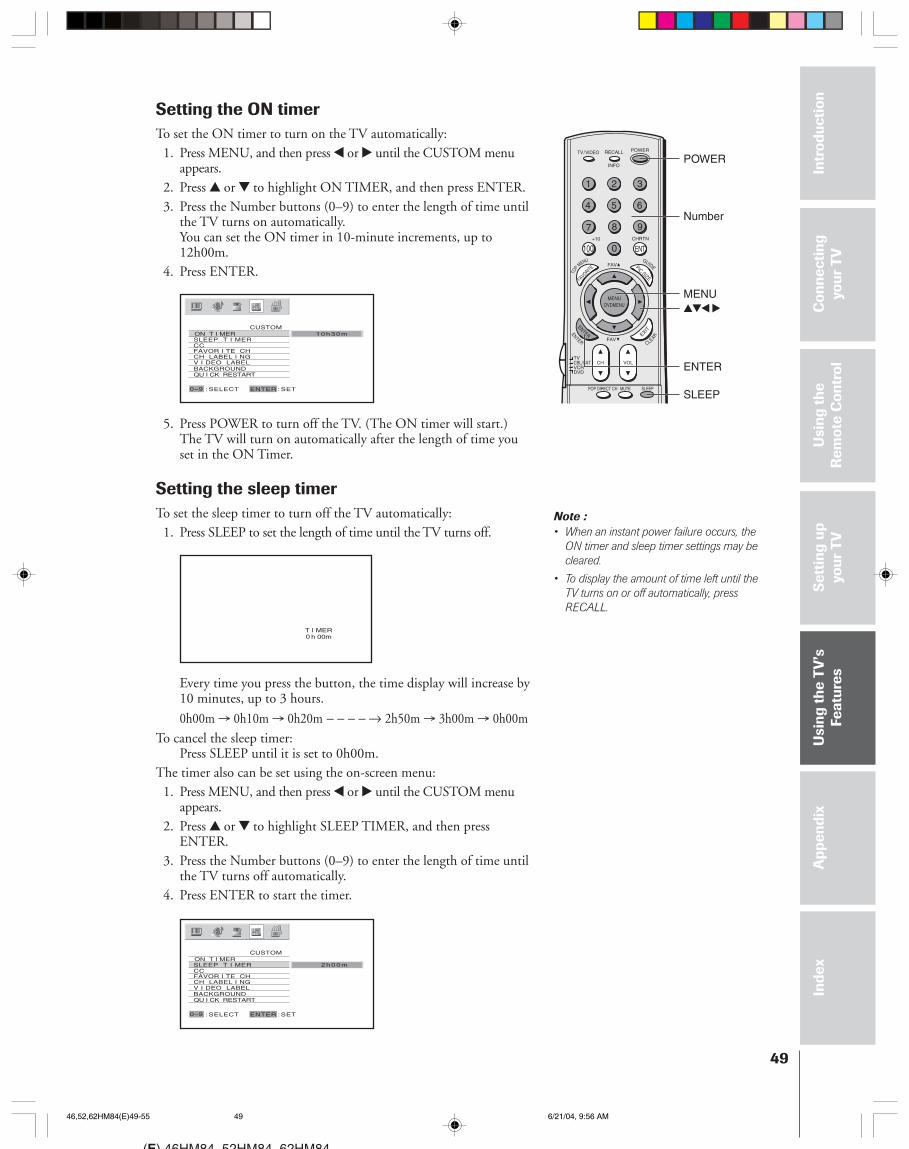
Selecting the video input source ..................................... 47Labeling the video input sources .................................... 47Using the closed caption feature ..................................... 48Setting the ON timer ..................................................... 49Setting the sleep timer .................................................... 49Setting the clock ............................................................ 50Adjusting the sound ....................................................... 51
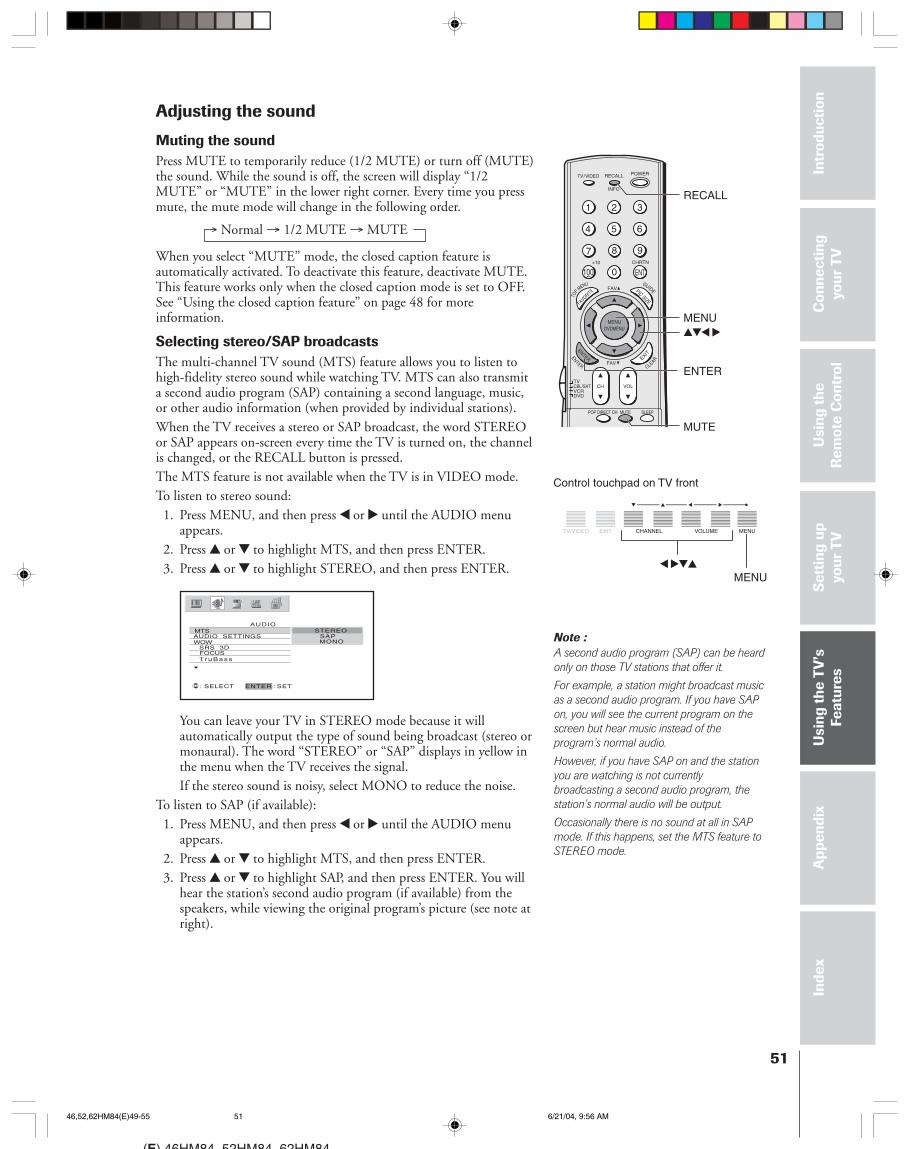
Muting the sound ................................................... 51Selecting stereo/SAP broadcasts .............................. 51Using the WOW™ surround sound feature ........... 52Adjusting the sound quality .................................... 52Resetting your audio adjustments ........................... 53Using the StableSound® feature .............................. 53Turning off the built-in speakers ............................. 54Selecting the Audio OUT sound ............................. 54
Selecting the background of the menu display ............... 55Displaying on-screen information .................................. 55Understanding the auto power off feature ...................... 55Understanding the last mode memory feature ................ 55
Appendix ................................................................... 56Lamp unit replacement .................................................. 56
When to replace the lamp unit ................................ 56How to replace the lamp unit ................................. 57Lamp unit disposal ................................................. 60
LED indications ............................................................ 60Specifications ................................................................. 61Troubleshooting ............................................................. 62Limited United States Warranty ..................................... 63Limited Canada Warranty .............................................. 64
Index .......................................................................... 65
Important Safety Information ............................. 2-5Introduction................................................................ 7
Welcome to Toshiba ......................................................... 7Exploring your new TV ................................................... 7
Connecting your TV .................................................. 8Connecting an antenna or cable TV................................. 8Connecting a VCR .......................................................... 9Connecting a cable converter box .................................... 9Connecting a cable converter box and VCR ................... 10Connecting a DVD player or satellite receiver anda VCR............................................................................ 11Connecting a DVD player with ColorStream®
(component video) and a VCR ...................................... 12Connecting a DTV receiver/set-top box withColorStream® (component video) and a VCR ................ 13Connecting two VCRs ................................................... 14Connecting a camcorder ................................................ 14Connecting an HDMI™ or a DVI device to theHDMI input ................................................................. 15Connecting an audio system .......................................... 16
Using the remote control ...................................... 17Preparing the remote control for use .............................. 17Installing the remote control batteries ............................ 17Remote control effective range ....................................... 17Programming the remote control to operate a cableconverter box, satellite receiver, VCR, DVD player,or HTIB (home theater in a box) ................................... 18Remote control codes .................................................... 18Remote control codes (cont.) ......................................... 19Using the remote control to operate a cable converterbox, satellite receiver, VCR, DVD player, or HTIB(home theater in a box) .................................................. 20Learning about the remote control ................................. 21
Setting up your TV .................................................. 22Learning about the menu system ................................... 22Changing the on-screen display language ....................... 23Selecting the antenna input ............................................ 23Adding channels to the TV’s memory ............................ 24
Changing channels ........................................................ 25Selecting the Quick Restart ............................................ 25
Using the TV’s features.......................................... 26Adjusting the channel settings ........................................ 26
Switching between two channels using ChannelReturn .................................................................... 26Switching between two channels usingSurfLock™............................................................. 26Programming your favorite channels ....................... 26Labeling channels ................................................... 28
Viewing the wide-screen picture formats(480i, 480p and 1080i signals only) ............................ 29
Selecting the picture size ......................................... 29Scrolling the Theater Wide picture(Theater Wide 2 and 3 only) .................................. 31Using the AUTO ASPECT feature ......................... 32
Using the POP double-window feature .......................... 33Switching the main and POP pictures ..................... 34Switching the speaker audio (main or POP) ............ 34Double-Window aspect ratio .................................. 35
46,52,62HM84(E)06 6/21/04, 9:55 AM6
Intr
oduc
tion
Con
nect
ing
your
TV
Usi
ng th
eR
emot
e C
ontr
olS
etti
ng u
pyo
ur T
VU
sing
the
TV
’sFe
atur
esA
ppen
dix
Inde
x
7
(E) 46HM84 52HM84 62HM84
Introduction
Welcome to ToshibaCongratulations! You have purchased one of the finest DLPTM
projection TVs on the market. The goal of this manual is to guide youthrough setting up and operating your Toshiba TV as quickly aspossible.This manual applies to models 46HM84, 52HM84 and 62HM84.The model and serial numbers are on the back of your TV. Writethese numbers in the space provided on the front cover of this manualfor your records.Instructions in this manual are based on using the remote control.You can also use the controls on the TV if they have the same name asthose on the remote control.Please read all the safety and operating instructions carefully, and keepthe manual for future reference.
Exploring your new TVYou can operate your TV using the control touchpad on the TV frontor the remote control. The back panel and side panel (behind thedoor) provide terminals for connecting other equipment to your TV.See “Connecting your TV” on page 8.Illustrations represent 52HM84.
1 2 3
4 5 6
7 8 9
ENT100 0
POWERRECALL
CHRTN
FAV
FAV
TV / VIDEO
+10
PIC SIZE
EXIT
INFO
STOP
POP DIRECT CH MUTE SLEEP
TV/VCR PAUSE
FFREW SKIP / SEARCHSPLIT
SWAP POP CHLIGHTREC
CH SCAN
FREEZE SOURCE
PLAY
TVCBL/SATVCRDVD
VOLCH
FAVORITE
ENTER
DVDMENUMENU
TOP MENU GUIDE
CLEAR
ENTER
CT-90159
Front
Remote control sensor(Behind the screen)
VIDEO 3Video/audio inputs
MENU
TV/VIDEO
EXIT zyx •
Remote control
POWER
See “Important notes aboutyour DLP TM projection TV” onpage 5.
Push to open.
MENUVOLUMECHANNELEXITTV/VIDEO POWERMENUVOLUMECHANNELEXITTV/VIDEO POWER
* Green ON = Touchpad key being pressed;Red ON = Power ON.See page 60 for additional LED indications.
Channel zyVolume x • Green and Red
LED indicators*
Side
Control touchpad on TV front (Gently touch the printed keys.)
Back
HDMI IN
ANT-2IN
ANT-1IN
VIDEO 1/2
ColorStreamHD-1/HD-2
Video/Audio OUT
ANT OUTAUDIOIN
VariableAudio OUT
46,52,62HM84(E)07 6/21/04, 9:55 AM7
Intr
oduc
tion
Con
nect
ing
your
TV
Usi
ng th
eR
emot
e C
ontr
olS
etti
ng u
pyo
ur T
VU
sing
the
TV
’sFe
atur
esA
ppen
dix
Inde
x
8
(E) 46HM84 52HM84 62HM84
Component video cables
Coaxial (antenna) cable
Standard A/V cables (red/white/yellow)
S-video cable
CAUTION: RISK OFEQUIPMENT DAMAGE !Never plug in any power cords
until you have finished connecting all
equipment.
HDMI cable
From Antenna or Cable
TV
Connecting your TVNote: Cables are not supplied with your TV.
● Coaxial cable is the cable that comes in from your antenna, cable TVservice, or cable converter box. Coaxial cable uses “F” connectors.
● Standard A/V (audio/video) cables usually come in sets of three, andare typically color-coded according to use: yellow for video, red forstereo right audio, and white for stereo left (or mono) audio.On your TV’s back panel, the standard A/V inputs are color-coded inthe same manner as the cables.
● S-Video cable is for use with video equipment that has S-Video output.● Component video cables come in sets of three, and are for use with
video equipment that has component video output. (ColorStream® isToshiba’s brand of component video.)
● HDMI is for use with video equipment that has HDMI output (typeA connector) (see page 15).
Connecting an antenna or cable TVThis connection allows you to watch TV programs or basic cablechannels.
46,52,62HM84(E)08-16 6/21/04, 9:56 AM8
Intr
oduc
tion
Con
nect
ing
your
TV
Usi
ng th
eR
emot
e C
ontr
olS
etti
ng u
pyo
ur T
VU
sing
the
TV
’sFe
atur
esA
ppen
dix
Inde
x
9
(E) 46HM84 52HM84 62HM84
Connecting a VCRThis connection allows you to watch local channels and videoprograms, play or record on the VCR while watching TV, and recordfrom one channel while watching another channel.You will need:
• two coaxial cables• one set of standard A/V cables
IN from ANT OUT to TV
CH 3CH 4 VIDEO
AUDIOL R
IN
OUT
Connecting a cable converter boxThis connection allows you to watch basic and premium cable channels.To watch basic cable and use the TV’s features, select ANT-1. To viewpremium channels, select ANT-2, tune the TV to channel 3 or 4(whichever channel is vacant in your area), and use the converter boxto change channels.You will need:
• three coaxial cables
INOUT
Cable converter box
Note:When you use a converter box with your TV,
the remote control will not operate some
features, such as programming your favorite
channels, labeling channels, and locking
channels.
Note:If you have a mono VCR, connect L/Mono to
VCR Audio OUT using only one audio cable.
If you have a VCR with S-video, use an S-
video cable (in the S-video jacks) instead of
the standard video cable.
Do not connect a standard video cable and
an S-video cable to Video-1 (or Video-2) at
the same time, or the picture performance
will be unacceptable.
The unauthorized recording, use,distribution, or revision of televisionprograms, videotapes, DVDs, and othermaterials is prohibited under theCopyright Laws of the United States andother countries, and may subject you tocivil and criminal liability.
From Cable Box or Antenna
From Cable
Stereo VCR
TV
TV
46,52,62HM84(E)08-16 6/21/04, 9:56 AM9
Intr
oduc
tion
Con
nect
ing
your
TV
Usi
ng th
eR
emot
e C
ontr
olS
etti
ng u
pyo
ur T
VU
sing
the
TV
’sFe
atur
esA
ppen
dix
Inde
x
10
(E) 46HM84 52HM84 62HM84
Connecting a cable converter box and VCRThis connection allows you to watch and record basic and premiumcable channels, watch videotapes, and record one channel whilewatching another channel. To watch basic cable and use the TV’sfeatures, select ANT-1.To view premium channels or record with the VCR, select ANT-2,tune the TV and VCR to channel 3 or 4 (whichever channel is vacantin your area), and use the converter box to change channels.You will need:
• four coaxial cables• one set of standard A/V cables
Stereo VCR
Note:If you have a mono VCR, connect L/Mono to
VCR Audio OUT using only one audio cable.
If you have a VCR with S-video, use an
S-video cable (in the S-video jacks) instead of
a standard video cable. Do not connect a
standard video cable and an S-video cable to
Video-1 (or Video-2) at the same time, or the
picture performance will be unacceptable.
When you use a converter box with your TV,
the remote control will not operate some
features, such as programming your favorite
channels, labeling channels, and locking
channels.
The unauthorized recording, use,distribution, or revision of televisionprograms, videotapes, DVDs, and othermaterials is prohibited under theCopyright Laws of the United States andother countries, and may subject you tocivil and criminal liability.
From Cable
TV
IN from ANT OUT to TV
CH 3CH 4 VIDEO
AUDIOL R
IN
OUT
INOUT
Cable converter box
46,52,62HM84(E)08-16 6/21/04, 9:56 AM10
Intr
oduc
tion
Con
nect
ing
your
TV
Usi
ng th
eR
emot
e C
ontr
olS
etti
ng u
pyo
ur T
VU
sing
the
TV
’sFe
atur
esA
ppen
dix
Inde
x
11
(E) 46HM84 52HM84 62HM84
Connecting a DVD player or satellite receiverand a VCRThis connection allows you to watch DVD/satellite, VCR, and TVprograms, and record one TV channel while watching anotherchannel.You will need:
• two (or three, if satellite receiver is used) coaxial cables• one set of standard A/V cables• one S-video cable• one pair of standard audio cables
IN from ANT OUT to TV
CH 3CH 4 VIDEO
AUDIOL R
IN
OUT
VIDEO OUTOUT
S-VIDEO
AUDIOOUT
L
R
IN from ANT
VIDEO OUTOUT
S-VIDEO
AUDIOOUT
L
R
TVFrom
Antenna
FromSatellite
Dish
DVD Player
Satellite Receiver
Stereo VCR
Note:For the highest possible picture quality from a
DVD player or satellite receiver without
component video or HDMI, use an S-video
cable. (If your DVD player has component
video, see page 12. If your DVD player or
satellite receiver has HDMI or DVI, see page
15.)
Do not connect both an S-video cable and a
standard video cable between the TV and
DVD player/satellite receiver at the same time
or the picture performance will be
unacceptable.
Do not connect the DVD player/satellite
receiver and VCR to the same set of Video
inputs on the TV. (See the illustration, which
shows the DVD player/satellite receiver
connected to VIDEO 1 on the TV, and the
VCR connected to VIDEO 2 on the TV.)
The unauthorized recording, use,distribution, or revision of televisionprograms, videotapes, DVDs, and othermaterials is prohibited under theCopyright Laws of the United States andother countries, and may subject you tocivil and criminal liability.
46,52,62HM84(E)08-16 6/21/04, 9:56 AM11
Intr
oduc
tion
Con
nect
ing
your
TV
Usi
ng th
eR
emot
e C
ontr
olS
etti
ng u
pyo
ur T
VU
sing
the
TV
’sFe
atur
esA
ppen
dix
Inde
x
12
(E) 46HM84 52HM84 62HM84
IN from ANT OUT to TV
CH 3CH 4 VIDEO
AUDIOL R
IN
OUT
VIDEO OUT
S-VIDEO
AUDIO
COMPONENT VIDEO
OUTL
R
L
R
PRPBY
Connecting a DVD player with ColorStream®
(component video) and a VCRThis connection allows you to watch DVD, VCR, and TV programs,and record TV programs.Your TV has ColorStream® (component video) inputs. Connectingyour TV to a DVD player with component video (such as a ToshibaDVD player with ColorStream®) can greatly enhance picture qualityand realism.– To record one TV program while watching another TV program,
tune the VCR to the channel to record, and tune the TV to thechannel to watch.
– To record a TV program while watching a DVD, tune the VCR tothe channel to record, and select ColorStream HD1 on the TV (see“Selecting the antenna input” on page 23).
You will need:• two coaxial cables• one set of standard A/V cables• one pair of standard audio cables• one set of component video cables
DVD player with component video
Stereo VCR
FromAntenna
The unauthorized recording, use,distribution, or revision of televisionprograms, videotapes, DVDs, and othermaterials is prohibited under theCopyright Laws of the United States andother countries, and may subject you tocivil and criminal liability.
Note:For the highest possible picture quality, use
component video cables (or an HDMI cable)
between the TV and DVD player.
You can connect the component video cables
to either set of ColorStream inputs on the TV
(HD1 or HD2).
For HDMI or DVI connection, see page 15.
The ColorStream HD1/HD2 and HDMI
inputs can be used with Progressive (480p,
720p) and Interlaced (480i, 1080i) scan
systems; however, a 1080i signal will provide
the best picture performance.
If your DVD player is not compatible with
component video, HDMI, or DVI, use the
S-video connections (plus the standard audio
connections) instead (see page 11).
TV
46,52,62HM84(E)08-16 6/21/04, 9:56 AM12
Intr
oduc
tion
Con
nect
ing
your
TV
Usi
ng th
eR
emot
e C
ontr
olS
etti
ng u
pyo
ur T
VU
sing
the
TV
’sFe
atur
esA
ppen
dix
Inde
x
13
(E) 46HM84 52HM84 62HM84
IN from ANT OUT to TV
CH 3CH 4 VIDEO
AUDIOL R
IN
OUT
VIDEO OUT
S-VIDEO
AUDIO
COMPONENT VIDEO
OUTL
R
L
R
PRPBYSatelite IN
Connecting a DTV receiver/set-top box withColorStream® (component video) and a VCRThis connection allows you to watch DTV (digital TV), VCR, andTV programs, and record DTV and TV programs.Your TV has ColorStream (component video) inputs. Connectingyour TV to a DTV receiver with component video can greatlyenhance picture quality and realism.– To record and watch a DTV program, select LINE IN on the
VCR, and select ColorStream HD2 (or VIDEO 1 for a non-ColorStream connection) on the TV (see “Selecting the antennainput” on page 23).
– To record a TV program while watching a DTV program, tune theVCR to the channel to record, and select ColorStream HD2 on theTV.
– To record and watch the same TV program, tune the VCR to thechannel to record, and select VIDEO 1 on the TV.
– To record one TV program while watching another TV program,tune the VCR to the channel to record, and tune the TV to thechannel to watch.
You will need:• three coaxial cables• two sets of standard A/V cables• one pair of standard audio cables• one set of component video cables
Note:For the highest possible picture quality, use
component video cables (or an HDMI cable)
between the TV and DTV receiver/set-top
box.
You can connect component video cables to
either set of ColorStream inputs on the TV
(HD1 or HD2).
For HDMI or DVI connection, see page 15.
The ColorStream HD1/HD2 and HDMI
inputs can be used with Progressive (480p,
720p) and Interlaced (480i, 1080i) scan
systems; however, a 1080i signal will provide
the best picture performance.
If your DTV receiver or set-top box is not
compatible with component video or HDMI,
use the S-video connections (plus the
standard audio connections) instead (see
page 11).
The unauthorized recording, use,distribution, or revision of televisionprograms, videotapes, DVDs, and othermaterials is prohibited under theCopyright Laws of the United States andother countries, and may subject you tocivil and criminal liability.
DTV Receiver with component video
TV
From Antenna
Stereo VCR
FromDTV Antenna
46,52,62HM84(E)08-16 6/21/04, 9:56 AM13
Intr
oduc
tion
Con
nect
ing
your
TV
Usi
ng th
eR
emot
e C
ontr
olS
etti
ng u
pyo
ur T
VU
sing
the
TV
’sFe
atur
esA
ppen
dix
Inde
x
14
(E) 46HM84 52HM84 62HM84
Connecting two VCRsThis connection allows you to record (dub/edit) from one VCR toanother VCR while watching a videotape. You also can record fromone TV channel while watching another TV channel.You will need:
• two coaxial cables• two sets of standard A/V cables
IN from ANT OUT to TV
CH 3CH 4 VIDEO
AUDIOL R
IN
OUT
VIDEO AUDIO
CH 3
L R
CH 4
IN
OUT
Connecting a camcorderThis connection allows you to watch video materials recorded on acamcorder.You will need:
• one set of standard A/V cables
VIDEO AUDIOOUT
L
R
**
Note:If you have VCRs with S-video, use S-video
cables instead of standard video cables for
better picture performance. Do not connect
both a standard video cable and an S-video
cable to Video-1 (or Video-2) at the same
time, or the picture performance will be
unacceptable.
Do not connect the same VCR to the output
and input jacks on the TV at the same time.
To dub or edit, VCR 2 must select Line IN,
and the TV must select VIDEO 1 (see
“Selecting the antenna input” on page 23).
* The VIDEO OUT jack does not output the
POP picture.
** The AUDIO OUT jacks can output the
sound of either the Main or POP picture
(see “Selecting the Audio OUT sound” on
page 54).
VCR1
FromAntenna
TV
VCR2 *
Note:If you have a camcorder with S-video, use an
S-video cable instead of a standard video
cable for better picture performance. Do not
connect both a standard video cable and an
S-video cable at the same time, or the picture
performance will be unacceptable.
The unauthorized recording, use,distribution, or revision of televisionprograms, videotapes, DVDs, and othermaterials is prohibited under theCopyright Laws of the United States andother countries, and may subject you tocivil and criminal liability.
Camcorder
Video-3 (side panel)
46,52,62HM84(E)08-16 6/21/04, 9:56 AM14
Intr
oduc
tion
Con
nect
ing
your
TV
Usi
ng th
eR
emot
e C
ontr
olS
etti
ng u
pyo
ur T
VU
sing
the
TV
’sFe
atur
esA
ppen
dix
Inde
x
15
(E) 46HM84 52HM84 62HM84
[1] HDMI = High-Definition Multimedia Interface.[2] DVI = Digital Video Interface.[3] HDCP = High-bandwidth Digital Content Protection.[4] EIA/CEA-861/861B compliance covers the transmission of
uncompressed digital video with high-bandwidth digital
content protection, which is being standardized for reception
of high-definition video signals. Because this is an evolving
technology, it is possible that some devices may not operate
properly with the TV.
Connecting an HDMI™ or a DVI device to the HDMI input
TV
HDMI device
HDMI, the HDMI logo, and High-Definition Multimedia Interface aretrademarks or registered trademarks of HDMI Licensing, LLC.
To connect a DVI device, you will need:• one HDMI–to–DVI adapter cable
(HDMI type A connector)
For proper operation, the length of an HDMI-to-DVI
adapter cable should not exceed 9.8 ft (3m). The
recommended length is 6.6 ft (2m).
• one pair of standard analog audio cables
An HDMI-to-DVI adapter cable transfers only video.
Separate analog audio cables are required (see
illustration below).
VIDEO AUDIOL R
IN
OUT
DVIOUT
TV
DVI device
To ensure that the HDMI or DVI device is resetproperly, it is recommended that you followthese procedures:
• When turning on your electronic components,turn on the TV first, and then the HDMI orDVI device.
• When turning off your electronic components,turn off the HDMI or DVI device first, andthen the TV.
The HDMI[1] input on your TV receives digital audioand uncompressed digital video from an HDMIdevice or uncompressed digital video from a DVI[2]
device.
This input is designed to accept HDCP[3] programmaterial in digital form from EIA/CEA-861/861B–compliant[4] consumer electronic devices (such as a set-top box or DVD player with HDMI or DVI output).
The HDMI input is designed for best performancewith 1080i high-definition video signals, but will alsoaccept and display 480i, 480p, and 720p signals.
Note: This TV is not intended for connection toand should not be used with a PC (personalcomputer).
To connect an HDMI device, you will need:• one HDMI cable (type A connector)
For proper operation, it is recommended that you
use a short HDMI cable. You should not encounter
difficulty if you use an HDMI cable that is shorter than
16.4ft (5m).
HDMI cable transfers both video and audio. Separate
analog audio cables are not required (see illustration
below). Some CDVs (Video CDs) may not output
digital audio signals. In that case, you may hear
sound by connecting analog audio cables. However, if
you connect analog audio cables with this connection,
the HDMI terminal on the TV will not receive the
HDMI digital audio signal and you will hear analog
audio only.
VIDEO AUDIOL R
IN
OUT
HDMI OUT
46,52,62HM84(E)08-16 6/21/04, 9:56 AM15
Intr
oduc
tion
Con
nect
ing
your
TV
Usi
ng th
eR
emot
e C
ontr
olS
etti
ng u
pyo
ur T
VU
sing
the
TV
’sFe
atur
esA
ppen
dix
Inde
x
16
(E) 46HM84 52HM84 62HM84
Connecting an audio systemThis connection allows you to use an audio amplifier and externalspeakers, and adjust the audio level by using the TV’s remote control.To control the audio, turn on the TV and the stereo amplifier, andturn off the built-in speakers (see “Turning off the built-in speakers”on page 54).You will need:
• one pair of standard audio cablesNote:To hear sound when using an external audio amplifier, the
volume of both the TV and the amplifier must be set
above 0 (zero).
For example, if the volume of the TV is set to 0, you will
not be able to hear any sound, even the volume of the
amplifier is at its highest level.
LINE INL R
TV
Amplifier
46,52,62HM84(E)08-16 6/21/04, 9:56 AM16
Intr
oduc
tion
Con
nect
ing
your
TV
Usi
ng th
eR
emot
e C
ontr
olS
etti
ng u
pyo
ur T
VU
sing
the
TV
’sFe
atur
esA
ppen
dix
Inde
x
17
(E) 46HM84 52HM84 62HM84
Note:• If your Toshiba TV remote control does not
operate all the features of your other
device, use the original remote control for
that device.
• Dispose of batteries in a designated
disposal area.
• Attention should be drawn to the
environmental aspects of battery disposal.
• Do not mix battery types or combine used
batteries with new ones.
• If the remote control does not operate
correctly, or if the operating range becomes
reduced, replace both batteries with new
ones.
• If the batteries are dead or if you will not
use the remote control for a long time,
remove the batteries to prevent battery acid
from leaking into the battery compartment.
Squeeze tab andlift cover.
Caution:• Never throw batteries into a fire.
Using the remote control
Preparing the remote control for useYour TV remote control can operate your TV and many cableconverter boxes, satellite receivers, VCRs, DVD players, and HTIBs(home theater in a box), even if they are different brands.
If you have a Toshiba device:Your TV remote control is preprogrammed to operate most Toshibadevices. See page 20.
If you have a non-Toshiba device or a Toshiba devicethat the remote control is not preprogrammed tooperate:You can program the TV remote control so it will operate the otherdevice. See pages 18–20.
Installing the remote control batteries1. Remove the battery cover from the back of the remote control.
2. Install two “AA” size batteries, making sure to match the + and –signs on the batteries to the signs on the battery compartment.
3. Reinsert the battery cover in the remote control until the tabsnaps.
Remote control effective rangeFor optimum performance, aim the remote control directly at the TVand make sure there is no obstruction between the remote control andthe TV.
46,52,62HM84(E)17-21 6/21/04, 9:56 AM17
Intr
oduc
tion
Con
nect
ing
your
TV
Usi
ng th
eR
emot
e C
ontr
olS
etti
ng u
pyo
ur T
VU
sing
the
TV
’sFe
atur
esA
ppen
dix
Inde
x
18
(E) 46HM84 52HM84 62HM84
1 2 3
4 5 6
7 8 9
ENT100 0
POWERRECALL
CHRTN
FAV
FAV
TV / VIDEO
+10
PIC SIZE
EXIT
INFO
STOP
POP DIRECT CH MUTE SLEEP
TV/VCR PAUSE
FFREW SKIP / SEARCHSPLIT
SWAP POP CHLIGHTREC
CH SCAN
FREEZE SOURCE
PLAY
TVCBL/SATVCRDVD
VOLCH
FAVORITE
ENTER
DVDMENUMENU
TOP MENU GUIDE
CLEAR
ENTER
Programming the remote control to operate acable converter box, satellite receiver, VCR,DVD player, or HTIB (home theater in a box)Your Toshiba TV remote control is preprogrammed to operate mostToshiba devices. To program your TV remote control to operate anon-Toshiba device (or a Toshiba device that it is not preprogrammedto operate), follow the steps below. For details on using the remotecontrol to operate the device, see page 20.
1. In the remote control code table (below and on the next page),find the code for your device. If more than one code is listed, tryeach one separately until you find one that works.
2. Set the Device Switch to the type of device you are programmingthe remote control to operate — CBL/SAT (for a cable converterbox or satellite receiver), VCR (for a VCR or TV/VCR combo),or DVD (for a DVD player or HTIB [home theater in a box]).
3. While holding down RECALL, press the Channel Numberbuttons to enter the 3-digit code for your device.
4. To test the code, turn on the device, point the remote control atit, and press POWER. See note at right.
• If the correct code was entered, the device will turn off.• If the device does not respond, repeat steps 1–4 using
another code.• If the device does not respond to another code, you will need
to use the remote control that came with the device.5. Remember to set the Device Switch back to TV to control the TV.6. For future reference, write down the code(s) you used:
Remote control codesIn some cases you may not be able to operate your device with the TVremote control. Your other device may use a code that is notrecognized by the TV remote control. If this happens, use the device’sremote control.
SKIP/SEARCH (DVD only)Skips back to beginning of current DVDchapter or locates previous chapters.
SKIP/SEARCH (DVD only)Skips forward to locate later DVDchapters.
STOPStops the tape or DVD.
PLAYBegins playback of a tape or DVD.
PAUSEPress during play or record mode to
pause the picture; press again to restart.
CH y zy selects the next higher channel;z selects the next lower channel.
CLEAR (DVD only)Press to reset the title and chapternumber.
y z x • (DVD only)Press to navigate DVD menus (may notwork on some DVD players).
GUIDE (CBL/SAT only)Displays channel guide.
Channel Numbers (0-9)Press to directly access channels (asopposed to CH y z).
INFO (CBL/SAT only)Displays on-screen information.
POWERTurns the selected device on and off.
Using the remote control to operate a cableconverter box, satellite receiver, VCR, DVDplayer, or HTIB (home theater in a box)If you have a non-Toshiba device or a Toshiba device that the remotecontrol is not preprogrammed to operate, you must first program theremote control to recognize the device (if you have not already doneso). See pages 18 and 19.To use your TV remote control to operate a:
• Cable converter box or satellite receiver, set the Device Switch toCBL/SAT.
• VCR, set the Device Switch to VCR.• DVD player or HTIB, set the Device Switch to DVD.
Note:Even after the TV remote control is
programmed, it may not operate certain
features on your other device. If this happens
and you wish to use those features, you will
need to use the device’s original remote
control.
1 2 3
4 5 6
7 8 9
ENT100 0
POWERRECALL
CHRTN
FAV
FAV
TV / VIDEO
+10
PIC SIZE
EXIT
INFO
STOP
POP DIRECT CH MUTE SLEEP
TV/VCR PAUSE
FFREW SKIP / SEARCHSPLIT
SWAP POP CHLIGHTREC
CH SCAN
FREEZE SOURCE
PLAY
TVCBL/SATVCRDVD
VOLCH
FAVORITE
ENTER
DVDMENUMENU
TOP
MENU GUIDE
CLEAR
ENTER
CT-90159FF
Fast-forwards the tape or DVD.(Press during play mode to view the
picture moving rapidly forward.)
Point the remote controldirectly at the device.
+10 (DVD only)Press to directly access
DVD chapters higher than 10.
TOP MENU (DVD only)Accesses a DVD’s top menu.
ENTERRequired by some VCRs and cable
converter boxes to change the channel.
Device SwitchSet to “TV” to control the TV; “CBL/SAT” to
control a cable converter box or satellitereceiver; “VCR” to control a VCR; “DVD”
to control a DVD player or HTIB.
TV/VCR (VCR only)To view one program while recording
another, press to select TV mode.
REWRewinds the tape or DVD. (Press during play mode
to view the picture moving rapidly backward.)
REC (VCR only)Starts tape recording.
46,52,62HM84(E)17-21 6/21/04, 9:56 AM20
Intr
oduc
tion
Con
nect
ing
your
TV
Usi
ng th
eR
emot
e C
ontr
olS
etti
ng u
pyo
ur T
VU
sing
the
TV
’sFe
atur
esA
ppen
dix
Inde
x
21
(E) 46HM84 52HM84 62HM84
1 2 3
4 5 6
7 8 9
ENT100 0
POWERRECALL
CHRTN
FAV
FAV
TV / VIDEO
+10
PIC SIZE
EXIT
INFO
STOP
POP DIRECT CH MUTE SLEEP
TV/VCR PAUSE
FFREW SKIP / SEARCHSPLIT
SWAP POP CHLIGHTREC
CH SCAN
FREEZE SOURCE
PLAY
TVCBL/SATVCRDVD
VOLCH
FAVORITE
ENTER
DVDMENUMENU
TOP
MENU GUIDE
CLEAR
ENTER
CT-90159
Note:The error message “Not Available” will appear
if you press a key for a function that is not
available.
Learning about the remote controlThe buttons used for operating the TV only are described here.
POWER turns the TV on and off.Press POWER to turn the TV on. The Red LED indicator willbe illuminated. Press POWER again to turn the TV off.
Note:If the Quick Restart feature is in ON mode, it can take up to several seconds for
the picture to appear. See page 25 for details.
RECALL displays screen information (page 55)
SLEEP sets the TV to turn off at a specific time (page 49)
TV/VIDEO selects the video input source (page 47)
MUTE mutes the sound (page 51)
Device Switch switches between TV, CBL/SAT, VCR, and DVD(Pages 18–20) Set to “TV” to control the TV.
CH (channel) y z cycles through programmed channels (page 25)
Channel Numbers (0–9, 100) allow direct access to channels (page 25)
VOL (volume) y z adjusts the volume level
CH RTN returns to the memorized channel (page 26)
MENU allows access to on-screen programming menus (page 22)
ENTER activates the function settings in the menu (page 22)
y z x • select or adjust programming menus (page 22)
POP CH y z selects the POP (picture-out-picture) channel (page 33)
FAV y z cycles through favorite channels (page 27)
FAVORITE allows access to the favorite channel search function(page 36)
PIC SIZE cycles through the five picture sizes: Natural, Theater Wide1, 2, 3, and Full (page 29)
EXIT exits programming menus (page 22)
SPLIT turns the POP feature on and off (page 33)
SOURCE selects the POP picture source (page 33)
FREEZE freezes the picture. Press again to restore the picture.
SWAP switches the main and POP pictures (page 34)
POP DIRECT CH allows direct access to POP channels (page 33)
CH SCAN allows access to the programmed channel search function (page 35)
LIGHT illuminates the keypad for five seconds
46,52,62HM84(E)17-21 6/21/04, 9:56 AM21
Intr
oduc
tion
Con
nect
ing
your
TV
Usi
ng th
eR
emot
e C
ontr
olS
etti
ng u
pyo
ur T
VU
sing
the
TV
’sFe
atur
esA
ppen
dix
Inde
x
22
(E) 46HM84 52HM84 62HM84
Setting up your TV
Learning about the menu systemAfter you have installed the batteries and programmed the remotecontrol, you will need to set some preferences on the TV using themenu system. You can access the menu system by using the controltouchpad on the TV front or the remote control.
1. Press MENU to display the menu system.2. Press x or • to select a menu.3. Press y or z to select an item, then press ENTER.4. Press y or z to select or adjust a setting.5. Press ENTER to activate the settings.6. To close the menu, press EXIT.
If you do not make a selection within 15 seconds, the menudisplay will disappear automatically.
END: :SELECT EXT
MODEP I CTURE
P I CTURE SETT I NGSSPORTS
H I BR I GHT
RESET SAVE
LAMP MODEV I DEO
ON
C I NEMA MODE
P I CTURE S I ZE
P I CTURE SCROLLAUTO ASPECT
MOVE: : SELECTENTER
MODE
P
CONTRASTSPORTS
BR I GHTNESS
RESET SAVE
COLORT I NTSHARPNESS
5 05 0
05 0
1 0 0
ANTENNAP CTUREI ISETT NGS
MOVE: : SELECTENTER
MODEP CTUREI ISETT NGS
COLOR TEMPERATUREPREFERENCE
COOLOFF
RESET DONE
C a b l e C l e a r D N RP I CTURE MENU
ANTENNA
SELECT: : ENDE X I T
MTSAUDIO
AUDIO SETTINGSSTEREO
WOWSRS 3D ON
OFFH I GH
FOCUST r u B a s s
: : SELECTMOVE ENTER
STABLE SOUNDAUDIO
SPEAKERS ONMA I NAUD I O OUT
OFF
MOVE: ADJUST:
BASSAUD I O ISETT NGS
TREBLEBALANCE
RESET SAVE
RESETAUD I O MENU
0
5 05 0
: SELECT
LANGUAGESET UP
CLOCK SET 0 0 : 0 0ENGLISH
ANT 1 / 2 ANT1TV / CABLE CABLE
ADDCH PROGRAMADD / ERASE
: ENDSELECT EX I T
: : ENDSELECT EX I T
ON T I MERCUSTOM
SLEEP T I MER0 0 h 0 0 m
0 h 0 0 mCC OFF
OFF
FAVOR I TE CH
SHADED
CH LABEL I NGV I DEO LABELBACKGROUNDQU I CK RESTART
: : ENDSELECT EXIT
V - CH I PLOCKS
CH LOCKV I DEO LOCK OFFNEW P I N CODE
MENUVOLUMECHANNELEXITTV/VIDEO PO
1 2 3
4 5 6
7 8 9
ENT100 0
POWERRECALL
CHRTN
FAV
FAV
TV / VIDEO
+10
PIC SIZE
EXIT
INFO
STOP
POP DIRECT CH MUTE SLEEP
TV/VCR PAUSE
FFREW SKIP / SEARCHSPLIT
SWAP POP CHLIGHTREC
CH SCAN
FREEZE SOURCE
PLAY
TVCBL/SATVCRDVD
VOLCH
FAVORITE
ENTER
DVDMENUMENU
TOP MENU GUIDE
CLEAR
ENTER
CT-90159
Note:You can change the background of the
menu. See page 55 for details.
EXIT
yzx •
ENTER
MENU
MENU(ENTER)
zyx •
Control touchpad on TV front
EXIT
46,52,62HM84(E)22-25 6/21/04, 9:56 AM22
Intr
oduc
tion
Con
nect
ing
your
TV
Usi
ng th
eR
emot
e C
ontr
olS
etti
ng u
pyo
ur T
VU
sing
the
TV
’sFe
atur
esA
ppen
dix
Inde
x
23
(E) 46HM84 52HM84 62HM84
Changing the on-screen display languageYou can choose from three different languages (English, French andSpanish) for the on-screen display of adjustment menus and messages.To select a language:
1. Press MENU, and then press x or • until the SET UP menuappears.
2. Press y or z to highlight LANGUAGE, and then press ENTERto display the pull-down menu.
SELECT: : SETENTER
LANGUAGESET UP
CLOCK SETENGLISH
ESPAÑOLFRANÇAIS
ANT 1 / 2TV / CABLECH PROGRAMADD / ERASE
3. Press y or z to highlight your desired language.
Selecting the antenna inputYou can connect to two different antenna input sources (ANT 1 orANT 2).To select the antenna input using the menu system:
1. Press MENU, and then press x or • to highlight the SET UPmenu.
2. Press y or z to highlight ANT 1/2, and then press ENTER todisplay the pull-down menu.
LANGUAGESET UP
CLOCK SETANT1ANT2
ANT 1 / 2TV / CABLECH PROGRAMADD / ERASE
SELECT: : SETENTER
3. Press y or z to highlight either ANT 1 or ANT 2, dependingon the antenna terminal you wish to use.
To select the antenna input using the TV/VIDEO button:1. Press the TV/VIDEO button on the remote control or TV. The
current signal source displays in purple.2. Continue pressing the TV/VIDEO button to select ANT 1 or
ANT 2.
SOURCE
0 :1 :2 :3 :4 :
ANT 1
HDM I
V I DEO 1V I DEO 2VColor Stream
5 :6 :
ANT 27 :
I DEOHD1
Color Stream HD2
3
SELECT I ON
0- 7 TO SELECT:
SOURCE
ANT 1
HDM I
V I DEO 1V I DEO 2VColor Stream
ANT 2
I DEOHD1
Color Stream HD2
3
SELECT I ON
TV / V I DEO : TO SELECT
MENUVOLUMECHANNELEXITTV/VIDEO
1 2 3
4 5 6
7 8 9
ENT100 0
POWERRECALL
CHRTN
FAV
FAV
TV / VIDEO
+10
PIC SIZE
EXIT
INFO
STOP
POP DIRECT CH MUTE SLEEP
TV/VCR PAUSE
FFREW SKIP / SEARCHSPLIT
SWAP POP CHLIGHTREC
CH SCAN
FREEZE SOURCE
PLAY
TVCBL/SATVCRDVD
VOLCH
FAVORITE
ENTER
DVDMENUMENU
TOP MENU GUIDE
CLEAR
ENTER
MENUx •zy
yzx •
TV/VIDEO
MENUVOLUMECHANNELEXITTV/VIDEO
TV/VIDEO
ENTER
MENU
Control touchpad on TV front
Control touchpad on TV front
Pressing TV/VIDEO on the remote
control displays the current signal
source (press TV/VIDEO again or 0–7
to change)
Pressing TV/VIDEO on the TV changes
the current signal source
46,52,62HM84(E)22-25 6/21/04, 9:56 AM23
Intr
oduc
tion
Con
nect
ing
your
TV
Usi
ng th
eR
emot
e C
ontr
olS
etti
ng u
pyo
ur T
VU
sing
the
TV
’sFe
atur
esA
ppen
dix
Inde
x
24
(E) 46HM84 52HM84 62HM84
Adding channels to the TV’s memoryWhen you press Channel y or z, your TV will stop only on thechannels stored in the TV’s channel memory.Follow the steps below and on the next page to program all activechannels into the TV’s memory.
Programming channels automaticallyYour TV can automatically detect all active channels in your area andstore them in its memory. After the channels are stored automatically,you can manually add or erase individual channels (see page 25).To program channels automatically:
1. Press MENU, and then press x or • until the SET UP menuappears.
2. Press y or z until TV/CABLE is highlighted, and then pressENTER to display the pull-down menu.
3. Press y or z to highlight either TV or CABLE, depending onwhich you use. If you use an antenna, highlight TV; if you usecable, highlight CABLE.
LANGUAGESET UP
CLOCK SETTV
CABLEANT 1 / 2TV / CABLECH PROGRAMADD / ERASE
SELECT: : SETENTER
4. Press ENTER.5. Press z to select CH PROGRAM.
LANGUAGESET UP
CLOCK SET 0 0 : 0 0ENGLISH
ANT 1 / 2 ANT1TV / CABLE CABLE
ADDCH PROGRAMADD / ERASE
MOVE: : STARTENTER
6. Press ENTER to start channel programming. The TV willautomatically cycle through all the TV or Cable channels(depending on which you selected), and store all active channelsin the channel memory.While the TV is cycling through the channels, the message“Programming Now—Please Wait” appears.
7. When channel programming is complete, the message“Completed” appears.
8. Press Channel y or z to view the programmed channels.
1 2 3
4 5 6
7 8 9
ENT100 0
POWERRECALL
CHRTN
FAV
FAV
TV / VIDEO
+10
PIC SIZE
EXIT
INFO
STOP
POP DIRECT CH MUTE SLEEP
TV/VCR PAUSE
FFREW SKIP / SEARCHSPLIT
SWAP POP CHLIGHTREC
CH SCAN
FREEZE SOURCE
PLAY
TVCBL/SATVCRDVD
VOLCH
FAVORITE
ENTER
DVDMENUMENU
TOP MENU GUIDE
CLEAR
ENTER
MENUyzx •
Channel yz
Note:To tune the TV to a channel not programmed
in the channel memory, you must use the
Channel Number buttons on the remote
control.
ENTER
46,52,62HM84(E)22-25 6/21/04, 9:56 AM24
Intr
oduc
tion
Con
nect
ing
your
TV
Usi
ng th
eR
emot
e C
ontr
olS
etti
ng u
pyo
ur T
VU
sing
the
TV
’sFe
atur
esA
ppen
dix
Inde
x
25
(E) 46HM84 52HM84 62HM84
MENUVOLUMECHANNELEXITTV/VIDEO
1 2 3
4 5 6
7 8 9
ENT100 0
POWERRECALL
CHRTN
FAV
FAV
TV / VIDEO
+10
PIC SIZE
EXIT
INFO
STOP
POP DIRECT CH MUTE SLEEP
TV/VCR PAUSE
FFREW SKIP / SEARCHSPLIT
SWAP POP CHLIGHTREC
CH SCAN
FREEZE SOURCE
PLAY
TVCBL/SATVCRDVD
VOLCH
FAVORITE
ENTER
DVDMENUMENU
TOP MENU GUIDE
CLEAR
ENTER
MENUyzx •
MENUx •zy
Adding and erasing channels manually
After you have programmed the channels automatically, you canmanually add or erase specific channels.To add or erase channels:
1. Select the channel you want to add or erase. If you are adding achannel, you must select the channel using the Channel Numberbuttons.
2. Press MENU, and then press x or • until the SET UP menuappears.
3. Press y or z to highlight ADD/ERASE, and then press ENTERto display the pull-down menu.
LANGUAGESET UP
CLOCK SETADD
ERASEANT 1 / 2TV / CABLECH PROGRAMADD / ERASE
SELECT: : SETENTER
4. Press y or z to select ADD or ERASE, depending on thefunction you want to perform.
5. Repeat steps 1–4 for other channels you want to add or erase.
Changing channelsTo change to a specific channel (programmed or unprogrammed):
Press the Channel Number buttons (0–9 and 100).For channels 100 and higher, press the 100 button, and then thenext two numbers. For example, to select channel 125, press 100,2, 5.
To change to the next programmed channel:Press Channel y or z on the TV or remote control.
Selecting the Quick RestartWith the Quick Restart feature set to ON, the TV stays in standbymode for several minutes after the TV is turned off.If the TV is turned on from standby mode, the full picture appearsimmediately.
1. Press MENU, and then press x or • until the CUSTOM menuappears.
2. Press y or z to highlight QUICK RESTART, and then pressENTER.
3. Press y or z to select ON or OFF, and then press ENTER.
ONOFF
SELECT: : SETENTER
ON T I MERCUSTOM
SLEEP T I MERCCFAVOR I TE CHCH LABEL I NGV I DEO LABELBACKGROUNDQU I CK RESTART
Channel yz
ENTER
ChannelNumber
Note:If Quick Restart is set to OFF and you turn off
the TV, it can take up to several seconds for
the picture to appear when you turn on the
TV again.
If Quick Restart is set to ON and you turn off
the TV, the following will occur for a few
minutes:
• The screen (lamp) lights dimly.
• The fans continue to run.
This is a function of the Quick Restart standby
mode and is not a TV malfunction. If you do
not prefer this, set the Quick Restart feature to
OFF.
When the Quick Restart feature is set to OFF,
if you repeatedly turn the TV on and off in a
short period of time, the useful service life for
the lamp may be shorter than the average
useful service life. See page 56.
Control touchpad on TV front
46,52,62HM84(E)22-25 6/21/04, 9:56 AM25
Intr
oduc
tion
Con
nect
ing
your
TV
Usi
ng th
eR
emot
e C
ontr
olS
etti
ng u
pyo
ur T
VU
sing
the
TV
’sFe
atur
esA
ppen
dix
Inde
x
26
(E) 46HM84 52HM84 62HM84
1 2 3
4 5 6
7 8 9
ENT100 0
POWERRECALL
CHRTN
FAV
FAV
TV / VIDEO
+10
PIC SIZE
EXIT
INFO
STOP
POP DIRECT CH MUTE SLEEP
TV/VCR PAUSE
FFREW SKIP / SEARCHSPLIT
SWAP POP CHLIGHTREC
CH SCAN
FREEZE SOURCE
PLAY
TVCBL/SATVCRDVD
VOLCH
FAVORITE
ENTER
DVDMENUMENU
TOP MENU GUIDE
CLEAR
ENTER
1 2 3
4 5 6
7 8 9
ENT100 0
POWERRECALL
CHRTN
FAV
FAV
TV / VIDEO
+10
PIC SIZE
EXIT
INFO
STOP
POP DIRECT CH MUTE SLEEP
TV/VCR PAUSE
FFREW SKIP / SEARCHSPLIT
SWAP POP CHLIGHTREC
CH SCAN
FREEZE SOURCE
PLAY
TVCBL/SATVCRDVD
VOLCH
FAVORITE
ENTER
DVDMENUMENU
TOP MENU GUIDE
CLEAR
ENTER
(continued on next page)
TV/VIDEO
ChannelNumber
CH RTN
MENUyzx •
CHANNEL MEMOR I ZED ANT 1
CABLE 6
Using the TV’s features
Adjusting the channel settings
Switching between two channels using Channel ReturnThe Channel Return feature allows you to switch between twochannels without entering an actual channel number each time.
1. Select the first channel (or video mode) you want to view.2. Select a second channel using the Channel Number buttons
(0–9, 100).3. Press CH RTN. The previous channel will display.
Each time you press CH RTN, the TV will switch back and forthbetween the last two channels that were selected.
Switching between two channels using SurfLock™The SurfLock™ feature temporarily stores one channel in theCH RTN button, so you can return to that channel quickly from anyother channel by pressing CH RTN.To store a channel in the CH RTN button:
1. Tune the TV to the channel youwant to store in the CH RTNbutton.
2. Press and hold CH RTN for about2 seconds until the message“Channel Memorized” appears onthe screen. The channel has beenstored in the CH RTN button.
3. Continue to change channels until your desired channel isselected.
4. Press CH RTN. The stored channel will be selected.The TV will return to the stored channel one time only. Once youpress CH RTN and then change channels again, the CH RTNbutton memory will be cleared and the button will function asChannel Return, by switching back and forth between the last twochannels that were selected.
Programming your favorite channelsYou can preset up to 12 of your favorite channels using the FavoriteChannel Programming feature. Because this feature scans throughonly your favorite channels, it allows you to skip other channels youdo not normally watch.To program your favorite channels:
1. Press MENU, and then press x or • until the CUSTOM menuappears.
2. Press y or z to highlight FAVORITE CH.
: : STARTMOVE ENTER
ON T I MERCUSTOM
SLEEP T I MER0 0 h 0 0 m
0 h 0 0 mCC OFF
ON
FAVOR I TE CH
SHADED
CH LABEL I NGV I DEO LABELBACKGROUNDQU I CK RESTART
46,52,62HM84(E)26-37 6/21/04, 9:56 AM26
Intr
oduc
tion
Con
nect
ing
your
TV
Usi
ng th
eR
emot
e C
ontr
olS
etti
ng u
pyo
ur T
VU
sing
the
TV
’sFe
atur
esA
ppen
dix
Inde
x
27
(E) 46HM84 52HM84 62HM84
1 2 3
4 5 6
7 8 9
ENT100 0
POWERRECALL
CHRTN
FAV
FAV
TV / VIDEO
+10
PIC SIZE
EXIT
INFO
STOP
POP DIRECT CH MUTE SLEEP
TV/VCR PAUSE
FFREW SKIP / SEARCHSPLIT
SWAP POP CHLIGHTREC
CH SCAN
FREEZE SOURCE
PLAY
TVCBL/SATVCRDVD
VOLCH
FAVORITE
ENTER
DVDMENUMENU
TOP MENU GUIDE
CLEAR
ENTER
ChannelNumber
MENU
yzx •FAV zy
FAVORITE
ENTERTV CABLE
SELECT: : SETENTER0–9
CH I NPUT
2 3 4 56 7 8 9
10 11 12 13
FAVOR I TE CH– – –
CLEAR ALLCUSTOM MENU
SELECT: : CLEARENTER
CH I NPUT
3 4 56 7 8 9
10 11 12 13
– – –
CLEAR ALLCUSTOM MENU
TV CABLE
2
FAVOR I TE CH
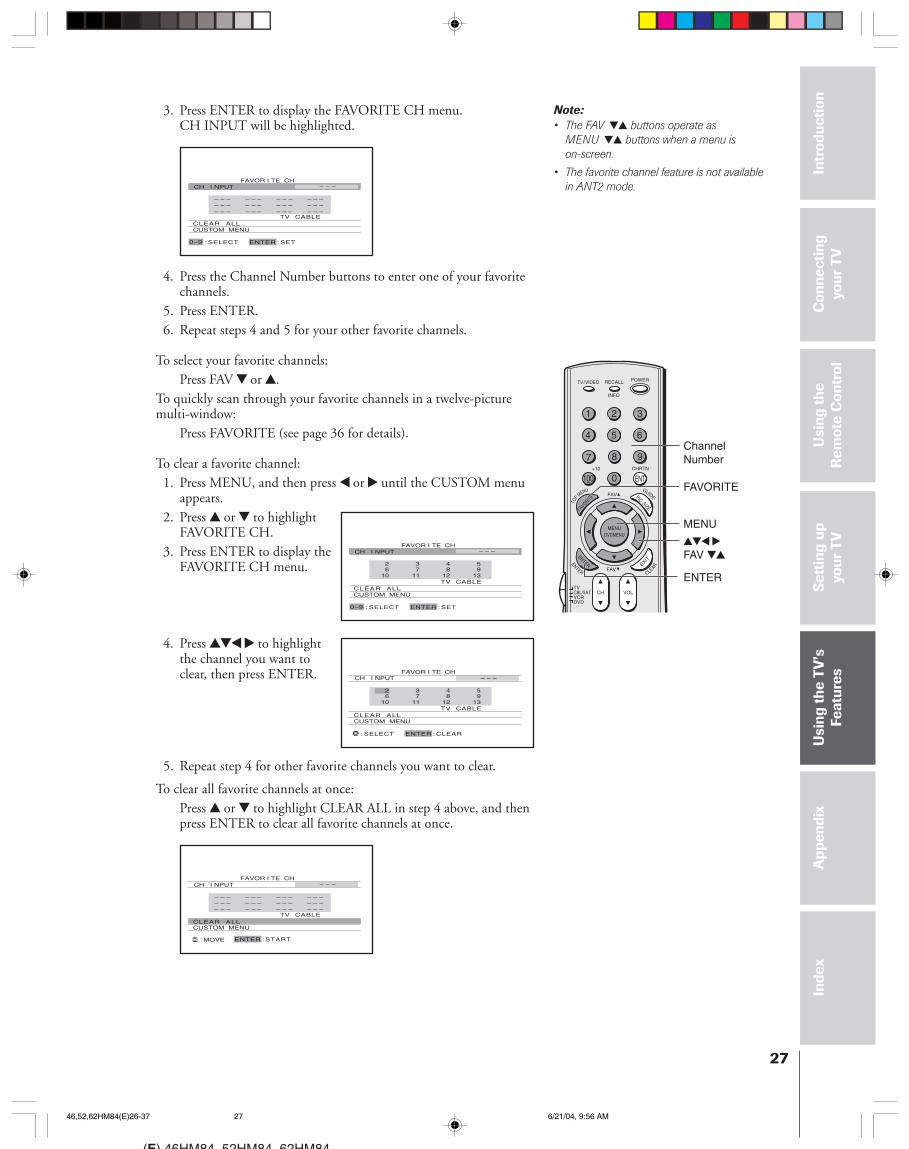
Note:• The FAV zy buttons operate as
MENU zy buttons when a menu is
on-screen.
• The favorite channel feature is not available
in ANT2 mode.
3. Press ENTER to display the FAVORITE CH menu.CH INPUT will be highlighted.
4. Press the Channel Number buttons to enter one of your favoritechannels.
5. Press ENTER.6. Repeat steps 4 and 5 for your other favorite channels.
To select your favorite channels:Press FAV z or y.
To quickly scan through your favorite channels in a twelve-picturemulti-window:
Press FAVORITE (see page 36 for details).
To clear a favorite channel:1. Press MENU, and then press x or • until the CUSTOM menu
appears.2. Press y or z to highlight
FAVORITE CH.3. Press ENTER to display the
FAVORITE CH menu.
4. Press yzx • to highlightthe channel you want toclear, then press ENTER.
5. Repeat step 4 for other favorite channels you want to clear.
To clear all favorite channels at once:Press y or z to highlight CLEAR ALL in step 4 above, and thenpress ENTER to clear all favorite channels at once.
Labeling channelsChannel labels appear above the on-screen channel number displayeach time you turn on the TV, change a channel, or press RECALL.You can choose any four characters to identify a channel.To create channel labels:
1. Press MENU, and then press x or • until the CUSTOM menuappears.
2. Press y or z to highlight CH LABELING.3. Press ENTER to display the CH LABELING menu.
CH INPUT will be highlighted.
SELECT:MOVE: 0–9
CH I NPUTCH LABEL I NG
– – – LABEL – – – –CLEARCUSTOM MENU
4. Press the Channel Number buttons to select a channel you wantto label.
5. Press z to highlight LABEL.6. Press x or • repeatedly to select a character for the first space,
and then press ENTER.
SELECT: : SETENTER0–9
CH I NPUTCH LABEL I NG
06LABEL – – – –CLEARCUSTOM MENU
SELECT: : SETENTER
CH I NPUTCH LABEL I NG
0 6LABEL A – – –CLEARCUSTOM MENU
7. Repeat step 6 to enter the rest of the characters.If you would like a blank space in the label name, you mustchoose an empty space from the list of characters. Otherwise, adash “–” will appear in that space.
8. Repeat steps 4–7 to label other channels. You can assign labels toa maximum of 32 channels.
To erase channel labels:1. Press MENU, and then press x or • until the CUSTOM menu
appears.2. Press y or z to highlight CH LABELING.3. Press ENTER to display the CH LABELING menu.4. Press z to highlight CH INPUT, then select the channel you
want to clear with the Channel Number buttons.5. Press z or y to highlight
CLEAR.6. Press ENTER to erase the
channel label.7. Repeat steps 4–6 to erase
other channel labels.
CH I NPUTCH LABEL I NG
0 6LABEL A B C D
MOVE: : STARTENTER
CLEARCUSTOM MENU
RECALL
46,52,62HM84(E)26-37 6/21/04, 9:56 AM28
Intr
oduc
tion
Con
nect
ing
your
TV
Usi
ng th
eR
emot
e C
ontr
olS
etti
ng u
pyo
ur T
VU
sing
the
TV
’sFe
atur
esA
ppen
dix
Inde
x
29
(E) 46HM84 52HM84 62HM84
1 2 3
4 5 6
7 8 9
ENT100 0
POWERRECALL
CHRTN
FAV
FAV
TV / VIDEO
+10
PIC SIZE
EXIT
INFO
STOP
POP DIRECT CH MUTE SLEEP
TV/VCR PAUSE
FFREW SKIP / SEARCHSPLIT
SWAP POP CHLIGHTREC
CH SCAN
FREEZE SOURCE
PLAY
TVCBL/SATVCRDVD
VOLCH
FAVORITE
ENTER
TOP MENU GUIDE
CLEAR
ENTER
DVDMENUMENU
yzx •
PIC SIZE
Number
ENTER
Natural picture size example: The way the image displays will varydepending on the format of the program you are currently watching.
(continued on next page)
Note:You also can change the picture size by
selecting PICTURE SIZE in the PICTURE
menu.
MOVE: : STARTENTER
MODEP CTUREI
P I CTURE SETT I NGSSPORTS
V I DEO
ON
H I BR I GHTC I NEMA MODELAMP MODEP I CTURE S I ZEAUTO ASPECTP I CTURE SCROLL
MENU
Viewing the wide-screen picture formats(480i, 480p, and 1080i signals only)You can view 480i, 480p, and 1080i format programs in a variety ofpicture sizes—Natural, Theater Wide 1, Theater Wide 2, TheaterWide 3, and Full. (The Full picture size is not selectable for 1080iformat programs.)The way the image displays in any of the picture sizes will varydepending on the format of the program you are viewing. Select thepicture size that displays the current program the way that looks bestto you.
Selecting the picture size1. Press PIC SIZE on the remote control.2. Press the corresponding number button (0-4) to select the desired
picture size, as described below and on the next page.
P I CTURE S I ZE
0 : NATURAL1 : THEATER W I DE 12 : THEATER W I DE 23 : THEATER W I DE 34 : FULL
0 4 : TO SELECT –
Natural picture size• The image is displayed close to its originally formatted
proportion. Some program formats will display with side barsand/or bars at the top and bottom.
Conventional picture on aconventional TV screen
Conventional picture in Natural sizeon your wide-screen TV
46,52,62HM84(E)26-37 6/21/04, 9:56 AM29
Intr
oduc
tion
Con
nect
ing
your
TV
Usi
ng th
eR
emot
e C
ontr
olS
etti
ng u
pyo
ur T
VU
sing
the
TV
’sFe
atur
esA
ppen
dix
Inde
x
30
(E) 46HM84 52HM84 62HM84
Theater Wide 1 picture size (For 4:3 format programs)• The picture is non-uniformly
enlarged—the center of thepicture remains close to itsoriginal proportion, but the leftand right edges are stretchedwider to fill the screen.
• A small part of the picture at thetop and bottom is hidden;however, this mode cannot bescrolled.
Theater Wide 2 picture size (For Letter box programs)• The entire picture is uniformly
enlarged—it is stretched the sameamount both wider and taller(retains its original proportion).
• Part of the picture at the top andbottom is hidden. To view thehidden areas, see “Scrolling theTheater Wide picture” on page31.
Theater Wide 3 picture size (For Letter box programs withsubtitles)
• The picture is non-uniformlyenlarged—it is stretched wider tofill the width of the screen, butonly slightly stretched taller.
• A small part of the picture at thetop and bottom is hidden. Toview the hidden areas (such assubtitles or captions), see“Scrolling the Theater Widepicture” on page 31.
Full picture size (For 16:9 format programs)• The picture is non-uniformly
enlarged. If you are receiving a4:3 format program, it isstretched wider to fill the widthof the screen, but not stretchedtaller.
• None of the picture is hidden.
Note:• To select the picture size, press PIC SIZE
on the remote control or select PICTURE
SIZE in the PICTURE menu.
• The PICTURE SIZE feature is not available
for some program formats (such as 720p).
Such formats will display in Natural picture
size (see page 29).
• If you select Theater Wide 2 or 3, the top
and bottom edges of the picture may be
hidden. To see the hidden edges, either
scroll the picture (see page 31) or try
viewing the program in Full picture size.
Note:
Using these functions to change thepicture size (i.e., changing the height/width ratio) for any purpose other thanyour private viewing may be prohibitedunder the Copyright Laws of the UnitedStates and other countries, and maysubject you to civil and criminal liability.
Theater Wide 2 picture size example
A B C D E F G - - - - - - - - - - - - - - - -
Full picture size example
Theater Wide 1 picture size example
Theater Wide 3 picture size example
A B C D E F G - - - - - - - - - - - - - - - -
A B C D E F G - - - - - - - - - - - - - - - - - - - - - - - - - -
46,52,62HM84(E)26-37 6/21/04, 9:56 AM30
Intr
oduc
tion
Con
nect
ing
your
TV
Usi
ng th
eR
emot
e C
ontr
olS
etti
ng u
pyo
ur T
VU
sing
the
TV
’sFe
atur
esA
ppen
dix
Inde
x
31
(E) 46HM84 52HM84 62HM84
1 2 3
4 5 6
7 8 9
ENT100 0
POWERRECALL
CHRTN
FAV
FAV
TV / VIDEO
+10
PIC SIZE
EXIT
INFO
STOP
POP DIRECT CH MUTE SLEEP
TV/VCR PAUSE
FFREW SKIP / SEARCHSPLIT
SWAP POP CHLIGHTREC
CH SCAN
FREEZE SOURCE
PLAY
TVCBL/SATVCRDVD
VOLCH
FAVORITE
ENTER
DVDMENUMENU
TOP MENU GUIDE
CLEAR
ENTER
yzx •
PIC SIZE
ENTER
Note:You can scroll the picture in Theater Wide 2
and Theater Wide 3 only. The scroll amounts
are as follows:
• 480i/480p/1080i signal source:
Theater Wide 1: Not adjustable
Theater Wide 2: -10 to +20
Theater Wide 3: -10 to +20
Scrolling the Theater Wide picture(Theater Wide 2 and 3 only)
1. Press PIC SIZE to select the Theater Wide 2 or 3 mode.2. Press MENU, and then press x or • until PICTURE menu
appears.3. Press y or z to highlight PICTURE SCROLL.
MOVE: : STARTENTER
MODEP CTUREI
P I CTURE SETT I NGSSPORTS
V I DEO
ON
H I BR I GHTC I NEMA MODELAMP MODEP I CTURE S I ZEAUTO ASPECTP I CTURE SCROLL
4. Press ENTER to display the Scroll Adjustment mode.
SCROL L ADJUSTMENT 0
TO ADJUST:
5. Press y or z to adjust the vertical position of the picture.• Normal (center) position
SCROL L ADJUSTMENT 0
TO ADJUST:
• To raise the picture, press y .
SCROL L ADJUSTMENT +20
TO ADJUST:
• To lower the picture, press z.
SCROL L ADJUSTMENT –10
TO ADJUST:
MENU
46,52,62HM84(E)26-37 6/21/04, 9:56 AM31
Intr
oduc
tion
Con
nect
ing
your
TV
Usi
ng th
eR
emot
e C
ontr
olS
etti
ng u
pyo
ur T
VU
sing
the
TV
’sFe
atur
esA
ppen
dix
Inde
x
32
(E) 46HM84 52HM84 62HM84
1 2 3
4 5 6
7 8 9
ENT100 0
POWERRECALL
CHRTN
FAV
FAV
TV / VIDEO
+10
PIC SIZE
EXIT
INFO
STOP
POP DIRECT CH MUTE SLEEP
TV/VCR PAUSE
FFREW SKIP / SEARCHSPLIT
SWAP POP CHLIGHTREC
CH SCAN
FREEZE SOURCE
PLAY
TVCBL/SATVCRDVD
VOLCH
FAVORITE
ENTER
DVDMENUMENU
TOP MENU GUIDE
CLEAR
ENTER
yzx •MENU
Note:The AUTO ASPECT feature is available for
additional formats when viewing HDMI
sources because AUTO ASPECT operates
based on information found in the digital
HDMI signal (not ID–1signal).
Using the AUTO ASPECT featureWhen the AUTO ASPECT feature is set to ON and the TV receives a480i signal, the picture size is automatically selected (as described inthe following table).
*If the signal does not include aspect information, the picture size youselected on pages 29–30 is displayed.To turn on the AUTO ASPECT feature:
1. Press MENU, and then press x or • until the PICTURE menuappears.
SELECT: : ENDEX I T
MODEP CTUREI
P I CTURE SETT I NGSSPORTS
V I DEO
ON
H I BR I GHTC I NEMA MODELAMP MODEP I CTURE S I ZEAUTO ASPECTP I CTURE SCROLL
2. Press y or z to highlight AUTO ASPECT, and then pressENTER.
SELECT: : SETENTER
MODEP CTUREI
P I CTURE SETT I NGSON
OFFC I NEMA MODELAMP MODEP I CTURE S I ZEAUTO ASPECTP I CTURE SCROLL
3. Press y or z to select ON, and then press ENTER.
ENTER
Aspect ratio of signal source
4:3 Normal
16:9 Full4:3 Letter box
Not defined (no ID-1 data)*
Automatic aspect size(automatically selected
when AUTO ASPECT is ON)Natural
FullTheater wide 2
User-set mode
46,52,62HM84(E)26-37 6/21/04, 9:56 AM32
Intr
oduc
tion
Con
nect
ing
your
TV
Usi
ng th
eR
emot
e C
ontr
olS
etti
ng u
pyo
ur T
VU
sing
the
TV
’sFe
atur
esA
ppen
dix
Inde
x
33
(E) 46HM84 52HM84 62HM84
Note:• The SPLIT buttons on the remote control
operate the TV’s POP features.
• You can display only 480i format program
in the main window. Only the audio signal is
output.
• You cannot display the ANT-2 signal source
in the POP window.
• You can choose to output the sound of
either the main or POP program through
the AUDIO OUT jacks (see “Selecting the
Audio OUT sound” on page 54).
• You can choose to hear either the main or
POP audio through the TV speakers. (See
“Switching the speaker audio (main or
POP)” on page 34.)
• HDMI, 720p ColorStream, 480p
ColorStream, and 1080i ColorStream
signals will only display in the POP (right)
window. These signals will not display in the
main (left) window when the TV is in
double-window mode.
• If an HDMI or ColorStream source is being
viewed when you open the POP double-
window feature, the HDMI or ColorStream
source will default to the POP (right)
window.
Main window(480i only)
POP window
1 2 3
4 5 6
7 8 9
ENT100 0
POWERRECALL
CHRTN
FAV
FAV
TV / VIDEO
+10
PIC SIZE
EXIT
INFO
STOP
POP DIRECT CH MUTE SLEEP
TV/VCR PAUSE
FFREW SKIP / SEARCHSPLIT
SWAP POP CHLIGHTREC
CH SCAN
FREEZE SOURCE
PLAY
TVCBL/SATVCRDVD
VOLCH
FAVORITE
ENTER
DVDMENUMENU
TOP MENU GUIDE
CLEAR
ENTER
POP CH zy
SPLIT
SOURCE
EXIT
POP DIRECT CH
ChannelNumber
Using the POP double-window featureThe POP (picture-out-picture) feature splits the screen into a doublewindow that allows you to watch two programs at the same time. ThePOP program can come from a TV broadcast or an external source,such as a VCR.To display a TV broadcast in the POP window:
1. Press SPLIT to display the POP window.
ANT 1POP
12MAIN
6
2. Select POP channels in the following two ways:• To change to a specific channel, press POP DIRECT CH.
While “POP” is on the screen, press the Channel Numberbuttons (0–9 and 100).
• To change to the next programmed channel, press POP CHzy.
If the V-CHIP feature is active and you try to watch a TVprogram that exceeds your set rating limits, the program will beblocked (see “Using the V-CHIP menu” on page 37).
BLOCKED
POP
24
To display a picture from an external source in the POP window:1. Connect the external source equipment (see “Connecting your
TV” on page 8).2. Select the TV program you want to watch in the main window.3. Press SPLIT to display the POP window.4. Repeatedly press SOURCE to select the input source for the POP
window (VIDEO 1, VIDEO 2, VIDEO 3, ColorStream HD1,ColorStream HD2, or HDMI). The current source will display inpurple.
POP SOURCE SELECT I ON
0 : TV1
V I DEOV1 :
2 : 3 : 4 : Color Stream HD15 : Color Stream HD2
I DEO2
V I DEO 3
6 : HDM I
0 - 6 : TO SELECT
While the above menu is on the screen, you can select the desiredsignal input source by pressing the corresponding number button(0–6).
To close the POP window:Press SPLIT again or EXIT.
46,52,62HM84(E)26-37 6/21/04, 9:56 AM33
Intr
oduc
tion
Con
nect
ing
your
TV
Usi
ng th
eR
emot
e C
ontr
olS
etti
ng u
pyo
ur T
VU
sing
the
TV
’sFe
atur
esA
ppen
dix
Inde
x
34
(E) 46HM84 52HM84 62HM84
Switching the main and POP picturesPress SWAP while you are using the POP feature to switch the mainand POP pictures.
Switching the speaker audio (main or POP)Press x or • while you are using the POP feature to switch the sound(main or POP) from the speakers. The POP sound in the TV mode ismonaural only.The selected audio source indicator is displayed in purple.
POP
12MAIN
6POP
12MAIN
6
Note:• If the POP program is not 480i format,
it will not display in the main window
when you press SWAP.
• The SAP channel will not be decoded
when the speaker source is switched to
POP. Even if SAP is selected in the
menu (page 51), the main audio
channel will be heard when the
speaker sound is switched to POP.
• The VARIBLE AUDIO OUT jacks will
switch with the speaker sound;
however, the source of the regular
AUDIO OUT jacks is determined by
the AUDIO OUT menu settting (page
54). The regular AUDO OUT jacks do
not switch with the speaker sound.
purple
Example: Press x Example: Press •
purple FAV
FAV
PIC SIZE
EXIT
STOP
POP DIRECT CH MUTE SLEEP
TV/VCR PAUSE
FFREW SKIP / SEARCHSPLIT
SWAP POP CHLIGHTREC
CH SCAN
FREEZE SOURCE
PLAY
TVCBL/SATVCRDVD
VOLCH
FAVORITE
ENTER
DVDMENUMENU
TOP MENU GUIDE
CLEAR
ENTER
SWAP
x •
46,52,62HM84(E)26-37 6/21/04, 9:56 AM34
Intr
oduc
tion
Con
nect
ing
your
TV
Usi
ng th
eR
emot
e C
ontr
olS
etti
ng u
pyo
ur T
VU
sing
the
TV
’sFe
atur
esA
ppen
dix
Inde
x
35
(E) 46HM84 52HM84 62HM84
1 2 3
4 5 6
7 8 9
ENT100 0CHRTN
FAV
FAV
+10
PIC SIZE
EXIT
STOP
POP DIRECT CH MUTE SLEEP
TV/VCR PAUSE
FFREW SKIP / SEARCHSPLIT
SWAP POP CHLIGHTREC
CH SCAN
FREEZE SOURCE
PLAY
TVCBL/SATVCRDVD
VOLCH
FAVORITE
ENTER
DVDMENUMENU
TOP MENU GUIDE
CLEAR
ENTER
Double-Window aspect ratioThe Double-Window feature displays each picture according to itsinput signal aspect ratio, as illustrated below.
480i 480i 480p/720p/1080i480i
Using the programmed channel search functionYou can use the programmed channel search function to quickly scanthe channels you programmed into the TV’s memory (page 24).
1. Press CH SCAN.The TV automatically enters multi-window mode, and begins atwelve-picture scan of your programmed channels in the multi-window.(Press CH SCAN again to return to a normal picture.)
10
2 3 4 5
6 7 8 9
10 11 12 13
2. Press the Channel Number buttons to select one of the twelvepictures.
2 3 4 5
6 7 8 9
10 11 12 13
CH SCAN
Note:• The AUTO ASPECT feature (page 32)
does not operate in double-window mode.
• Aspect ratio is the ratio of width to height
of the picture.
Note:During the programmed channel search, the
multi-window pictures display in 4:3 aspect
ratio, regardless of the signal format. The
sound is not output.
ChannelNumber
Channel yz
46,52,62HM84(E)26-37 6/21/04, 9:56 AM35
Intr
oduc
tion
Con
nect
ing
your
TV
Usi
ng th
eR
emot
e C
ontr
olS
etti
ng u
pyo
ur T
VU
sing
the
TV
’sFe
atur
esA
ppen
dix
Inde
x
36
(E) 46HM84 52HM84 62HM84
Using the favorite channel search functionYou can use the favorite channel search function to quickly scan yourfavorite channels (see “Programming your favorite channels” on page26).
1. Press FAVORITE.The TV automatically enters multi-window mode, and begins atwelve-picture scan of your favorite channels in themulti-window. (Press FAVORITE again to return to a normalpicture.)
5
2 3 4 5
6 7 8 9
10 11 12 13
2. Press yzx • to select one of the twelve pictures (becomes amoving picture). The selected channel number is in purple andthe monaural sound of the selected channel is output.
3. Press ENTER to display the channel you selected in step 2 as anormal picture.
2 3 4 5
6 7 8 9
10 11 12 13
About the auto favorite featureIf your TV is in the program lock mode (page 40), after 4 seconds theTV starts the auto favorite channel search function.
2 3 4 5
6 7
8 10 11 13
9X
12X
Moving picture
1 2 3
4 5 6
7 8 9
ENT100 0
POWERRECALL
CHRTN
FAV
FAV
TV / VIDEO
+10
PIC SIZE
EXIT
INFO
TVCBL/SATVCRDVD
VOLCH
FAVORITE
ENTER
DVDMENUMENU
TOP MENU GUIDE
CLEAR
ENTER
yzx •
FAVORITE
ENTER
Moving picture
purple
purple
46,52,62HM84(E)26-37 6/21/04, 9:56 AM36
Intr
oduc
tion
Con
nect
ing
your
TV
Usi
ng th
eR
emot
e C
ontr
olS
etti
ng u
pyo
ur T
VU
sing
the
TV
’sFe
atur
esA
ppen
dix
Inde
x
37
(E) 46HM84 52HM84 62HM84
Using the LOCKS menuThe LOCKS menu includes the V-Chip, CH Lock, Video Lock, andNew PIN Code functions. You can use these functions after enteringthe correct PIN code.
Entering the PIN code1. Press MENU, and then press x or • until the LOCKS menu
appears.
: : ENDSELECT EXIT
V - CH I PLOCKS
CH LOCKV I DEO LOCK OFFNEW P I N CODE
2. Press y or z to display the PIN code entering mode.
1 2 3
4 5 6
7 8 9
ENT100 0
POWERRECALL
CHRTN
FAV
FAV
TV / VIDEO
+10
PIC SIZE
EXIT
INFO
TVCBL/SATVCRDVD
VOLCH
FAVORITE
ENTER
DVDMENUMENU
TOP MENU GUIDE
CLEAR
ENTER
yzx •
RECALL
Number
MENU• Blocking Reset status:
Set a new 4-digit code bypressing the Number buttons(0–9).
• When the PIN code is alreadystored:Press the Number buttons(0–9) to enter your 4-digitPIN code.
SELECT: : SETENTER0–9
BLOCK I NG RESETLOCKS
P I N CODE 1 1 1 0
BLOCK I NG ACT I VELOCKS
P I N CODE 1 2 3 4
SELECT: : SETENTER0–9
If the wrong PIN code is entered, the message “Incorrect”appears. Enter the code again, and then press ENTER.
If you cannot remember your PIN code1. While the PIN code entering screen is displayed, press RECALL
four times within five seconds. The PIN code will be released(Blocking Reset status restored).
2. Enter a new 4-digit code, and then press ENTER.The LOCKS menu appears.
V - CH I PLOCKS
CH LOCKV I DEO LOCKNEW P I N CODE
: MOVE
OFF
: STARTENTER
Continue to set each item following the steps on pages 38-41.
Using the V-CHIP menuSome TV programs and movies include signals that classify thecontent of the program (violence, sex, dialog, language). The V-CHIPcontrol feature in this TV detects the signals and blocks the programsaccording to your selections. To use this feature, perform thefollowing setup.
ENTER
Note:The V-Chip function is available for the U.S.
V-Chip system only. The Canadian V-Chip
system is not supported.
(continued on next page)
46,52,62HM84(E)26-37 6/21/04, 9:56 AM37
Intr
oduc
tion
Con
nect
ing
your
TV
Usi
ng th
eR
emot
e C
ontr
olS
etti
ng u
pyo
ur T
VU
sing
the
TV
’sFe
atur
esA
ppen
dix
Inde
x
38
(E) 46HM84 52HM84 62HM84
1 2 3
4 5 6
7 8 9
ENT100 0
POWERRECALL
CHRTN
FAV
FAV
TV / VIDEO
+10
PIC SIZE
EXIT
INFO
STOP
POP DIRECT CH MUTE SLEEP
TV/VCR PAUSE
FFREW SKIP / SEARCHSPLIT
SWAP POP CHLIGHTREC
CH SCAN
FREEZE SOURCE
PLAY
TVCBL/SATVCRDVD
VOLCH
FAVORITE
ENTER
DVDMENUMENU
TOP MENU GUIDE
CLEAR
ENTER
ENABLE BLOCKING1. From the LOCKS menu, press z or y to highlight V-CHIP, and
then press ENTER.The V-CHIP menu appears.
2. Press z or y to highlightENABLE BLOCKING,and then press ENTER.
3. Press y or z to select ON or OFF.ON : To enable your setting (Lock)OFF: To release your setting (Unlock)Note: The CH LOCK function is not affected by this setting.
TV RATING (Independent rating system forbroadcasters)
1. From the V-CHIP menu, press z or y to highlight TVRATING, and then press ENTER.The TV RATING menu appears.
2. Press z or y to select an item.3. Press • to lock (displays “X” ).
Press x to unlock (displays “✓”).4. Repeat steps 2 and 3 to set
the next item.
The TV age-based ratings and content themes you can lock are listedin the table below.
Ratings Description and Content themesMA Mature Audience Only (This program is specifically
designed to be viewed by adults and therefore may beunsuitable for children under 17.)L) Crude or indecent language S) Explicit sexual activityV) Graphic violence
14 Parents Strongly Cautioned (This program contains somematerial that many parents would find unsuitable forchildren under 14 years of age.)D) Intensely suggestive dialog L) Strong, coarse languageS) Intense sexual situations V) Intense violence
PG Parental Guidance Suggested (This program containsmaterial that parents may find unsuitable for youngerchildren.)D) Some suggestive dialog L) Infrequent coarselanguage S) Some sexual situations V) Moderateviolence
G General Audience (Most parents would find this programsuitable for all ages.)
Y7, Directed to Older Children (This program is designed forY7FV children age 7 and above. Note: Programs in which fantasy
violence may be more intense or more combative than otherprograms in this category are designated Y7FV.)
Y All Children (This program is designed to be appropriate forall children.)
Press RECALL to display the rating ofthe TV program you are currentlywatching.
33 34 35
ANT
FULL
STEREOSAPTV L VPG–
CABLECLOCK 9 : 2 5
1
6
PGLV
yzx •
XX
XX
XX
XX
D I ALOGTV RAT I NG GPG14MA
Y7FV Y7 Y
LANGUAGESEXV I OLENCENO DLSV
YOUTH TV RAT I NGV – CH I P MENU
MOVE: :SELECT
ENTER
ENABLE BLOCK I NG ONOFF
V – CH I P
TV RAT I NGMPAA RAT I NGBLOCK I NG OPT I ONLOCKS MENU
: SETENTERSELECT:
LOCKS menu
V - CH I PLOCKS
CH LOCKV I DEO LOCKNEW P I N CODE
: MOVE
OFF
: STARTENTER
46,52,62HM84(E)38-42 6/21/04, 9:56 AM38
Intr
oduc
tion
Con
nect
ing
your
TV
Usi
ng th
eR
emot
e C
ontr
olS
etti
ng u
pyo
ur T
VU
sing
the
TV
’sFe
atur
esA
ppen
dix
Inde
x
39
(E) 46HM84 52HM84 62HM84
1 2 3
4 5 6
7 8 9
ENT100 0
POWERRECALL
CHRTN
FAV
FAV
TV / VIDEO
+10
PIC SIZE
EXIT
INFO
STOP
POP DIRECT CH MUTE SLEEP
TV/VCR PAUSE
FFREW SKIP / SEARCHSPLIT
SWAP POP CHLIGHTREC
CH SCAN
FREEZE SOURCE
PLAY
TVCBL/SATVCRDVD
VOLCH
FAVORITE
ENTER
DVDMENUMENU
TOP MENU GUIDE
CLEAR
ENTER
MPAA RATING (Independent rating system for movies)1. From the V-CHIP menu, press z or y to highlight MPAA
RATING, and then press ENTER.MPAA RATING menu appears.
2. Press y or z to highlightMPAA RATING.
3. Press • to lock (“X”) orpress x to unlock (“✓”).
The movie ratings you can lock are described as follows:
X : X-rated (For adults only)
NC17: Not intended for anyone 17 and under
R : Restricted (Under 17 requires accompanying parent or adultguardian.)
PG13 : Parents Strongly Cautioned (Some material may beinappropriate for children under 13.)
PG : Parental Guidance Suggested (Some material may not besuitable for children.)
G : General Audience (Appropriate for all ages)
BLOCKING OPTION1. From the V-CHIP menu, press z or y to highlight BLOCKING
OPTION, and then press ENTER.The BLOCKING OPTION menu appears.
2. Press y or z to select item.MPAA UNRATED :
1. Highlight MPAA UNRATED, and then press ENTER.2. Press y or z to select ON (Lock) or OFF (Unlock) for unrated
programs in the MPAA rating system, and then press ENTER.
ENABLE BLOCK I NG ONV – CH I P
TV RAT I NGMPAA RAT I NGBLOCK I NG OPT I ONLOCKS MENU
MOVE: : STARTENTER
MPAA UNRATED ONOFF
BLOCK I NG OPT I ON
TV NONE RAT I NGV – CH I P MENU
SELECT: : SETENTER
TV NONE RATING :1. Highlight TV NONE RATING, and then press ENTER.2. Press y or z to select ON (Lock) or OFF (Unlock) for programs
rated NONE in the TV PARENTAL GUIDELINES, then pressENTER.
MPAA UNRATED
NOTE : ENABL I NG TH I S OPT I ONMAY BLOCK EMERGENCYMESSAGES
ONOFFTV NONE RAT I NG
V – CH I P MENU
BLOCK I NG OPT I ON
SELECT: : SETENTER
V-CHIP MENU :Highlight V-CHIP menu, then press ENTER to return to theV-CHIP menu.
V-CHIP menu
ENABLE BLOCK I NG ONV – CH I P
TV RAT I NGMPAA RAT I NGBLOCK I NG OPT I ONLOCKS MENU
MOVE: : STARTENTER
yzx •
CautionBe aware that setting the TV None Rating to
ON may block the broadcast of emergency
information.The menu will display the note,
“Enabling this option may block emergency
messages” to warn you of this possibility.
ENTER
X X XMPAA RAT I NGX NC17 PG13 PG GR
V – CH I P MENU
MOVE: :SELECT
MPAA RAT I NG
46,52,62HM84(E)38-42 6/21/04, 9:56 AM39
Intr
oduc
tion
Con
nect
ing
your
TV
Usi
ng th
eR
emot
e C
ontr
olS
etti
ng u
pyo
ur T
VU
sing
the
TV
’sFe
atur
esA
ppen
dix
Inde
x
40
(E) 46HM84 52HM84 62HM84
Unlocking programs temporarily1. If you try to watch a TV program that exceeds the rating limits
you set, the TV enters program lock mode. After 4 seconds, theTV starts the auto favorite channel search function (page 36).You can either unlock the program temporarily (see steps 2–4below) or select a non-locked program to watch.
THIS PROGRAM HAS BEEN BLOCKED!
9
TV
EXCEEDS
PUSH MUTE TO ENTER
SET L I M I TS
I NP
PG L V–
CABLE
2 3 4 5
6 8
10 11 12 13
7 9X
2. To temporarily unlock the program, press MUTE while themessage is on the screen.
3. Press the Number buttons (0–9) to enter your 4-digit PIN code.
BLOCK ACT
ENTER
TO TEMPORAR
I NG I VE
I N
I
––––
UN–BLOCKLY
CODEP
0 –9 TO SELECT ENTER: TO SET:
4. Press ENTER.If the correct code is entered, the program lock mode is releasedand the normal picture appears.All locking is disabled until the TV is turned off, and will beenabled when the TV is turned on again.
Locking channelsWith the CH LOCK feature, you can lock specific channels. The TVwill not be able to tune locked channels with the Channel y zbuttons or Channel Number buttons, unless you clear the setting.You can lock a maximum of nine channels.To lock channels:
1. From the LOCKS menu, press y or z to highlight CH LOCK,and then press ENTER.CH LOCK menu appears, and CH INPUT will be highlighted.
2. Press the Channel Number buttons to enter the channel youwant to lock.
To unlock individual channels:1. From the LOCKS menu, press y or z to highlight CH LOCK,
then press ENTER.CH LOCK menu appears.
2. Press yzx • to highlight the channel you want to unlock, andthen press ENTER.
CH I NPUT
12 1833
CH LOCK
CLEAR ALLTV CABLE
LOCKS MENU
28
SELECT: : CLEARENTER
– – –
– – – – – –– – – – – – – – –
CH I NPUT
12 18
CH LOCK
CLEAR ALLTV CABLE
LOCKS MENU
33
SELECT: : CLEARENTER
– – –
– – –– – – – – –– – – – – – – – –
3. Repeat step 2 for other channels.To unlock all locked channels at once:
Press y or z to highlight CLEAR ALL, and then press ENTER.
MOVE: : STARTENTER
CH I NPUTCH LOCK
CLEAR ALLTV CABLE
LOCKS MENU
– – –
– – –– – – – – –– – –– – – – – –
– – – – – – – – –
1 2 3
4 5 6
7 8 9
ENT100 0
POWERRECALL
CHRTN
FAV
FAV
TV / VIDEO
+10
PIC SIZE
EXIT
INFO
STOP
POP DIRECT CH MUTE SLEEP
TV/VCR PAUSE
FFREW SKIP / SEARCHSPLIT
SWAP POP CHLIGHTREC
CH SCAN
FREEZE SOURCE
PLAY
TVCBL/SATVCRDVD
VOLCH
FAVORITE
ENTER
DVDMENUMENU
TOP MENU GUIDE
CLEAR
ENTER
ENTER
yzx •
46,52,62HM84(E)38-42 6/21/04, 9:56 AM41
Intr
oduc
tion
Con
nect
ing
your
TV
Usi
ng th
eR
emot
e C
ontr
olS
etti
ng u
pyo
ur T
VU
sing
the
TV
’sFe
atur
esA
ppen
dix
Inde
x
42
(E) 46HM84 52HM84 62HM84
Locking the video inputsWith the VIDEO LOCK feature, you can lock the input sources(Video 1, Video 2, Video 3, ColorStream HD1, ColorStream HD2,HDMI) and channels 3 and 4.You will not be able to select the input sources with the TV/VIDEObutton or Channel buttons unless you clear the setting.To set up the video lock:
1. From the LOCKS menu, press y or z to highlight VIDEOLOCK, then press ENTER.
2. Press y or z to highlight the level of video locking you want(Video, Video+, or Off ), as follows:VIDEO : Locks Video 1, Video 2, Video 3, ColorStream
HD1/HD2, and HDMI.
VIDEO+ : Locks Video 1, Video 2, Video 3, ColorStreamHD1/HD2, HDMI, and channels 3 and 4. Thisoption should be used if you use the antenna terminalto play a video tape.
Note: Make sure the POP is not on channel 3 or 4.
OFF : Unlocks all video input sources.
: : SETENTER
V - CH I PLOCKS
CH LOCKV I DEO LOCK
V I DEOV I DEO+
OFFNEW P I N CODE
SELECT:
3. Press ENTER.
Changing the PIN code1. From the LOCKS menu, press y or z to highlight NEW PIN
CODE.2. Press the Number buttons (0–9) to enter a 4-digit code.
The numbers you enter will replace the dashes in the display.
SELECT: : SETENTER0–9
V - CH I PLOCKS
CH LOCKV I DEO LOCK V I DEO
2562NEW P I N CODE
3. Press ENTER.The new PIN code is now active.
1 2 3
4 5 6
7 8 9
ENT100 0
POWERRECALL
CHRTN
FAV
FAV
TV / VIDEO
+10
PIC SIZE
EXIT
INFO
STOP
POP DIRECT CH MUTE SLEEP
TV/VCR PAUSE
FFREW SKIP / SEARCHSPLIT
SWAP POP CHLIGHTREC
CH SCAN
FREEZE SOURCE
PLAY
TVCBL/SATVCRDVD
VOLCH
FAVORITE
ENTER
DVDMENUMENU
TOP MENU GUIDE
CLEAR
ENTER
yzx •
ENTER
Number
1 2 3
4 5 6
7 8 9
ENT100 0
POWERRECALL
CHRTN
FAV
FAV
TV / VIDEO
+10
PIC SIZE
EXIT
INFO
STOP
POP DIRECT CH MUTE SLEEP
TV/VCR PAUSE
FFREW SKIP / SEARCHSPLIT
SWAP POP CHLIGHTREC
CH SCAN
FREEZE SOURCE
PLAY
TVCBL/SATVCRDVD
VOLCH
FAVORITE
ENTER
DVDMENUMENU
TOP MENU GUIDE
CLEAR
ENTER
yz
ENTER
46,52,62HM84(E)38-42 6/21/04, 9:56 AM42
Intr
oduc
tion
Con
nect
ing
your
TV
Usi
ng th
eR
emot
e C
ontr
olS
etti
ng u
pyo
ur T
VU
sing
the
TV
’sFe
atur
esA
ppen
dix
Inde
x
43
(E) 46HM84 52HM84 62HM84
Adjusting the picture
Selecting the picture modeYou can select your desired picture type from four picture modes:Sports, Standard, Movie, and Preferences.
*(see “Saving your new preferences” on page 44.)To select the picture mode:
1. Press MENU, and then press x or • until the PICTURE menuappears.
2. Press z or y to highlightMODE, and thenpress ENTER.
3. Press z or y to select themode you prefer,then press ENTER.
Adjusting the picture qualityYou can adjust the picture quality to your personal preferences,including the contrast, brightness, color, tint, sharpness, and colortemperature.
To adjust the picture quality:1. Press MENU, and then press x or • until the PICTURE menu
appears.2. Press z or y to highlight PICTURE SETTINGS, then press
ENTER.The PICTURESETTINGS menuappears.
3. Press y or z until theitem you want toadjust is highlighted,then press ENTER.
4. Press x or • to adjust the level.
The PICTURE qualities you adjusted can be saved in the TV’smemory (see page 44).You can keep these settings or choose factory set options, as describedunder “Selecting the picture mode” above.
Mode Picture Quality
Sports Bright and dynamic picture (factory setting)Standard Standard picture setting (factory setting)Movie Movie-like picture setting (factory setting)Preference Your personal preferences*
Note:If you select one of the factory-set picture
modes (SPORTS, STANDARDS, or MOVIE)
and then change a picture quality setting (for
example, increase the contrast), the picture
mode automatically changes to
PREFERENCE in the Picture menu.
To save your new picture quality settings, you
must select SAVE before closing the Picture
menu or the TV will return to the previous
picture mode. See “Saving your new
preferences” on page 44.
MENUVOLUMECHANNELEXITTV/VIDEO
MENUx •zy
1 2 3
4 5 6
7 8 9
ENT100 0
POWERRECALL
CHRTN
FAV
FAV
TV / VIDEO
+10
PIC SIZE
EXIT
INFO
STOP
POP DIRECT CH MUTE SLEEP
TV/VCR PAUSE
FFREW SKIP / SEARCHSPLIT
SWAP POP CHLIGHTREC
CH SCAN
FREEZE SOURCE
PLAY
TVCBL/SATVCRDVD
VOLCH
FAVORITE
ENTER
DVDMENUMENU
TOP MENU GUIDE
CLEAR
ENTER
MENUyzx •
ENTER
SELECT: : SETENTER
P I CTURE SPORTS
PREFERENCE
RESET SAVE
MOV I ESTANDARD
MODEP I CTURE SETT I NGSC I NEMA MODELAMP MODEP I CTURE S I ZEAUTO ASPECTP I CTURE SCROLL
MOVE: : SELECTENTER
MODEP CTUREI ISETT NGS ANTENNA
CONTRAST 1 0 0 PREFERENCE
BR I GHTNESS
RESET SAVE
COLORT I NTSHARPNESS
5 05 0
05 0
Selection x Pressing •
contrast lower higherbrightness darker lightercolor paler deepertint reddish greenishsharpness softer sharpercolor temperature cool medium warm
CONTRAST 7 5
Control touchpad on TV front
46,52,62HM84(E)43-48 6/21/04, 9:56 AM43
Intr
oduc
tion
Con
nect
ing
your
TV
Usi
ng th
eR
emot
e C
ontr
olS
etti
ng u
pyo
ur T
VU
sing
the
TV
’sFe
atur
esA
ppen
dix
Inde
x
44
(E) 46HM84 52HM84 62HM84
Saving your new preferencesYou can save the PICTURE qualities you adjusted (contrast,brightness, color, tint, sharpness, color temperature and CableClearDNR) in the picture PREFERENCE mode.To save your new preferences:
1. Press MENU, and then press x or • until the PICTURE menuappears.
2. Press y or z to highlight PICTURE SETTINGS, and then pressENTER.The PICTURE SETTINGS menu appears.
3. Press yzx • to highlight SAVE, and then press ENTER.When complete, SAVE changes to “DONE.”
MOVE: : STARTENTER
MODEP CTUREI ISETT NGS
COLOR TEMPERATUREPREFERENCE
COOLOFF
RESET DONE
C a b l e C l e a r D N RP I CTURE MENU
ANTENNA
The picture mode automatically changes to PREFERENCE (see“Selecting the picture mode” on page 43).
Selecting the color temperatureYou can change the quality of the picture by selecting from threepreset color temperatures: cool, medium, and warm.To select the color temperature:
1. Press MENU, and then press x or • until the PICTURE menuappears.
2. Press y or z to highlight PICTURE SETTINGS, and then pressENTER.The PICTURE SETTINGS menu appears.
3. Press y or z to highlight COLOR TEMPERATURE, and thenpress ENTER.
MOVE: : SELECTENTER
MODEP CTUREI ISETT NGS ANTENNA
COLOR TEMPERATURESPORTSCOOL
RESET SAVE
C a b l e C l e a r D N RP I CTURE MENU
OFF
4. Press x or • to select the mode you prefer.
Mode Picture Quality
cool bluishmedium neutralwarm reddish
1 2 3
4 5 6
7 8 9
ENT100 0
POWERRECALL
CHRTN
FAV
FAV
TV / VIDEO
+10
PIC SIZE
EXIT
INFO
TVCBL/SATVCRDVD
VOLCH
FAVORITE
ENTER
DVDMENUMENU
TOP MENU GUIDE
CLEAR
ENTER
MENUyzx •
ENTER
46,52,62HM84(E)43-48 6/21/04, 9:56 AM44
Intr
oduc
tion
Con
nect
ing
your
TV
Usi
ng th
eR
emot
e C
ontr
olS
etti
ng u
pyo
ur T
VU
sing
the
TV
’sFe
atur
esA
ppen
dix
Inde
x
45
(E) 46HM84 52HM84 62HM84
Using the CableClear™ DNR featureCableClear™ DNR reduces visible interference in your TV picture.This is useful when receiving a broadcast with a weak signal(especially a Cable channel) or playing a video cassette or discdamaged by repeated use.To turn on CableClear™ DNR:
1. Press MENU, and then press x or • until the PICTURE menuappears.
2. Press y or z to highlight PICTURE SETTINGS, and then pressENTER.The PICTURE SETTINGS menu appears.
3. Press y or z to highlight CableClear DNR, and then pressENTER.
MOVE: : SELECTENTER
MODEP CTUREI ISETT NGS
COLOR TEMPERATURE
RESET SAVE
C a b l e C l e a r D N RP I CTURE MENU
SPORTSCOOLOFF
ANTENNA
4. Press x or • to select AUTO.To turn off CableClear DNR:
Select OFF in step 4 above.
Resetting picture adjustmentsThe RESET function adjusts the picture qualities to the followingfactory settings:
1 2 3
4 5 6
7 8 9
ENT100 0
POWERRECALL
CHRTN
FAV
FAV
TV / VIDEO
+10
PIC SIZE
EXIT
INFO
TVCBL/SATVCRDVD
VOLCH
FAVORITE
ENTER
DVDMENUMENU
TOP MENU GUIDE
CLEAR
ENTER
MENUyzx •
Note:• When in ColorStream or HDMI mode,
“CableClear DNR” will change to “DNR” in
the menu.
• DNR is not selectable in the HDMI mode.
ENTER
Tint ....................... center (0)Sharpness ............. center (50)Color temperature ........... coolCableClear DNR ........... auto
To reset the picture adjustments:1. Press MENU, and then press x or • until the PICTURE menu
appears.2. Press y or z to highlight PICTURE SETTINGS, and then press
ENTER. The PICTURE SETTINGS menu appears.3. Press y or z to highlight
RESET.4. Press ENTER until the
RESET changes to“DONE.”
Mode ........................... sportsContrast ................ max (100)Brightness ............ center (50)Color ................... center (50)
MOVE: : STARTENTER
MODEP CTUREI ISETT NGS
COLOR TEMPERATURESPORTSCOOLAUTO
SAVEDONE
C a b l e C l e a r D N RP I CTURE MENU
ANTENNA
46,52,62HM84(E)43-48 6/21/04, 9:56 AM45
Intr
oduc
tion
Con
nect
ing
your
TV
Usi
ng th
eR
emot
e C
ontr
olS
etti
ng u
pyo
ur T
VU
sing
the
TV
’sFe
atur
esA
ppen
dix
Inde
x
46
(E) 46HM84 52HM84 62HM84
1 2 3
4 5 6
7 8 9
ENT100 0
POWERRECALL
CHRTN
FAV
FAV
TV / VIDEO
+10
PIC SIZE
EXIT
INFO
POP DIRECT CH MUTE SLEEP
TVCBL/SATVCRDVD
VOLCH
FAVORITE
ENTER
DVDMENUMENU
TOP MENU GUIDE
CLEAR
ENTER
MENUyzx •
Selecting the Lamp modeYou can select either the HI BRIGHT or LOW POWER mode. TheHI BRIGHT mode is useful for situations where additional picturebrightness is desired (such as in a room with bright lighting). TheLOW POWER mode reduces wear on the projection lamp. Usingthis mode should result in longer lamp life. See “Lamp unitreplacement” on page 56.
1. Press MENU, and then press x or • until the PICTURE menuappears.
2. Press y or z to highlightLAMP MODE, and thenpress ENTER.
3. Press y or z to select HIBRIGHT or LOWPOWER, whichever youprefer.
Selecting the cinema modeWhen you view a DVD movie (3:2 pulldown processed) from aDVD player connected to the ColorStream (component video)inputs on the TV, smoother and more natural motion can beobtained by setting the CINEMA MODE to FILM.To set the CINEMA MODE to FILM:
1. Press MENU, and then press x or • until the PICTURE menuappears.
2. Press y or z to highlightCINEMA MODE,and then press ENTER.
3. Press y or z to selectFILM.
To set the CINEMA MODE to VIDEO (off ):Press y or z to select VIDEO in step 3 above.
ENTER
SELECT: : SETENTER
P I CTURE H I BR I GHT
RESET SAVE
LOW POWERMODEP I CTURE SETT I NGSC I NEMA MODELAMP MODEP I CTURE S I ZEAUTO ASPECTP I CTURE SCROLL
SELECT: : SETENTER
P I CTURE F I LM
RESET SAVE
V I DEOMODEP I CTURE SETT I NGSC I NEMA MODELAMP MODEP I CTURE S I ZEAUTO ASPECTP I CTURE SCROLL
46,52,62HM84(E)43-48 6/21/04, 9:56 AM46
Intr
oduc
tion
Con
nect
ing
your
TV
Usi
ng th
eR
emot
e C
ontr
olS
etti
ng u
pyo
ur T
VU
sing
the
TV
’sFe
atur
esA
ppen
dix
Inde
x
47
(E) 46HM84 52HM84 62HM84
MENUVOLUMECHANNELEXITTV/VIDEO
Selecting the video input sourcePress TV/VIDEO on the remote control or TV to view a signal fromanother device connected to your TV, such as a VCR or DVD player.You can select ANT 1, VIDEO 1, VIDEO 2, VIDEO 3, ColorStreamHD1, ColorStream HD2, HDMI, or ANT 2 depending on whichinput jacks are used for connecting the devices (see “Connecting yourTV” on page 8).
SOURCE
0 :1 :2 :3 :4 :
ANT 1
HDM I
V I DEO 1V I DEO 2VColor Stream
5 :6 :
ANT 27 :
I DEOHD1
Color Stream HD2
3
SELECT I ON
0- 7 TO SELECT:
SOURCE
ANT 1
HDM I
V I DEO 1V I DEO 2VColor Stream
ANT 2
I DEOHD1
Color Stream HD2
3
SELECT I ON
TV / V I DEO : TO SELECT
Labeling the video input sourcesThe video label feature allows you to label each input source for yourTV from the following preset list of labels:
– – – : Uses the default label nameVCR : Video cassette recorderDVD : DVD videoDTV : Digital TV set-top box
SAT : Satellite boxCBL : Cable box
To label the video input sources:1. Press MENU, and then
press x or • until theCUSTOM menu appears.
2. Press y or z to highlightVIDEO LABEL.
3. Press ENTER to display the VIDEO LABEL menu.4. Press y or z to highlight the video source you want to label and
then press ENTER.5. Press y or z to select
the desired label forthat input source.
6. Finish labeling the other video sources as desired. To return to theprevious menu, press y or z to highlight CUSTOM MENU,and then press ENTER.
7. To exit the menu, press EXIT.
Note:• When ColorStream HD 1 or HD 2 is
selected, the VIDEO OUT jack does not
output a signal. To receive a VIDEO OUT
signal, use a standard video or S-video IN
connection instead of the ColorStream
connection.
• In POP double-window mode, the main
window will display 480i signals only. If you
select ColorStream HD1 or ColorStream
HD2 while the POP picture is active, the
message “Not Available” will display.
1 2 3
4 5 6
7 8 9
ENT100 0
POWERRECALL
CHRTN
FAV
FAV
TV / VIDEO
+10
PIC SIZE
EXIT
INFO
TVCBL/SATVCRDVD
VOLCH
FAVORITE
ENTER
DVDMENUMENU
TOP MENU GUIDE
CLEAR
ENTER
TV/VIDEO
MENUyzx •
EXIT
TV/VIDEO
Pressing TV/VIDEO on the remote
control displays the current signal
source (press TV/VIDEO again or
0–7 to change)
Pressing TV/VIDEO on the TV changes
the current signal source
Please note the following regardingthe HDMI source selection:
This TV is not intended for connectionto and should not be used with a PC(personal computer). See “Connectingan HDMI or DVI device to the HDMIinput” on page 15 for details.
ENTER
MOVE: : STARTENTER
ON T I MERCUSTOM
SLEEP T I MER0 0 h 0 0 m
0 h 0 0 mCC OFF
ON
FAVOR I TE CH
SHADED
CH LABEL I NGV I DEO LABELBACKGROUNDQU I CK RESTART
V I DEO1V I DEO LABEL
– – –V I DEO2 VCR
DVDDTVSATCBL
V I DEO3C o l o r S t r e a m HD1C o l o r S t r e a m HD2HDM I CUSTOM MENU
SELECT: : SETENTER
Control touchpad on TV front
46,52,62HM84(E)43-48 6/21/04, 9:56 AM47
Intr
oduc
tion
Con
nect
ing
your
TV
Usi
ng th
eR
emot
e C
ontr
olS
etti
ng u
pyo
ur T
VU
sing
the
TV
’sFe
atur
esA
ppen
dix
Inde
x
48
(E) 46HM84 52HM84 62HM84
Using the closed caption featureThe closed caption feature has two options:
• Captions—An on-screen display of the dialogue, narration, andsound effects of TV programs and videos that are closedcaptioned (usually marked as “CC” in TV listings).
• Text—An on-screen display of information not related to thecurrent program, such as weather or stock data (when providedby individual stations).
To view captions or text:1. Tune the TV to the desired program.2. Press MENU, and then press x or • to display CUSTOM menu.3. Press y or z to highlight CC, and then press ENTER.
ON T I MERCUSTOM
SLEEP T I MER CAPT I ONTEXT
O F F
CCFAVOR I TE CHCH LABEL I NGV I DEO LABELBACKGROUND
SELECT: : SETENTER
QU I CK RESTART
4. Press y or z to highlight CAPTION or TEXT, and then pressENTER.
ON T I MERCUSTOM
SLEEP T I MER C2C3C4
C 1
CCFAVOR I TE CHCH LABEL I NGV I DEO LABELBACKGROUND
SELECT: : SETENTER
QU I CK RESTART
• To view captions, highlight C1, C2, C3, or C4 (C1 displaystranslation of the primary language in your area).Note: If the program or video you selected is not closed captioned, no
captions will display on the screen.
Giant pandas eat leaves.
• To view text, highlight T1, T2, T3, or T4.Note: If text is not available in your area, a black rectangle may appear on
your screen. If this happens, turn the Closed Caption feature OFF.
WORLD WEATHER Temps Current F C WeatherLONDON 51 11MOSCOW PARIS ROME TOKYO
57 1453 1266 1965 18
CloudyClearCloudyRain
Clear
To turn off the Closed Caption feature:Highlight OFF in step 4.
1 2 3
4 5 6
7 8 9
ENT100 0
POWERRECALL
CHRTN
FAV
FAV
TV / VIDEO
+10
PIC SIZE
EXIT
INFO
TVCBL/SATVCRDVD
VOLCH
FAVORITE
ENTER
DVDMENUMENU
TOP MENU GUIDE
CLEAR
ENTER
MENUyzx •
Note:A closed caption signal may not display in the
following situations:
• when a videotape has been dubbed
• when the signal reception is weak
• when the signal reception is nonstandard
ENTER
46,52,62HM84(E)43-48 6/21/04, 9:56 AM48
Intr
oduc
tion
Con
nect
ing
your
TV
Usi
ng th
eR
emot
e C
ontr
olS
etti
ng u
pyo
ur T
VU
sing
the
TV
’sFe
atur
esA
ppen
dix
Inde
x
49
(E) 46HM84 52HM84 62HM84
1 2 3
4 5 6
7 8 9
ENT100 0
POWERRECALL
CHRTN
FAV
FAV
TV / VIDEO
+10
PIC SIZE
EXIT
INFO
STOP
POP DIRECT CH MUTE SLEEP
TV/VCR PAUSE
FFREW SKIP / SEARCHSPLIT
SWAP POP CHLIGHTREC
CH SCAN
FREEZE SOURCE
PLAY
TVCBL/SATVCRDVD
VOLCH
FAVORITE
ENTER
DVDMENUMENU
TOP MENU GUIDE
CLEAR
ENTER
Setting the ON timerTo set the ON timer to turn on the TV automatically:
1. Press MENU, and then press x or • until the CUSTOM menuappears.
2. Press y or z to highlight ON TIMER, and then press ENTER.3. Press the Number buttons (0–9) to enter the length of time until
the TV turns on automatically.You can set the ON timer in 10-minute increments, up to12h00m.
4. Press ENTER.
1 0 h 3 0 mON T I MERCUSTOM
SLEEP T I MERCCFAVOR I TE CHCH LABEL I NGV I DEO LABELBACKGROUND
SELECT: : SETENTER0–9
QU I CK RESTART
5. Press POWER to turn off the TV. (The ON timer will start.)The TV will turn on automatically after the length of time youset in the ON Timer.
Setting the sleep timerTo set the sleep timer to turn off the TV automatically:
1. Press SLEEP to set the length of time until the TV turns off.
T I MER0 h 00m
Every time you press the button, the time display will increase by10 minutes, up to 3 hours.
0h00m → 0h10m → 0h20m 2h50m → 3h00m → 0h00m
To cancel the sleep timer:Press SLEEP until it is set to 0h00m.
The timer also can be set using the on-screen menu:1. Press MENU, and then press x or • until the CUSTOM menu
appears.2. Press y or z to highlight SLEEP TIMER, and then press
ENTER.3. Press the Number buttons (0–9) to enter the length of time until
the TV turns off automatically.4. Press ENTER to start the timer.
ON T I MERCUSTOM
SLEEP T I MERCCFAVOR I TE CHCH LABEL I NGV I DEO LABELBACKGROUND
2 h 0 0 m
SELECT: : SETENTER0–9
QU I CK RESTART
Note :• When an instant power failure occurs, the
ON timer and sleep timer settings may be
cleared.
• To display the amount of time left until the
TV turns on or off automatically, press
RECALL.
ENTER
POWER
yzx •MENU
Number
SLEEP
46,52,62HM84(E)49-55 6/21/04, 9:56 AM49
Intr
oduc
tion
Con
nect
ing
your
TV
Usi
ng th
eR
emot
e C
ontr
olS
etti
ng u
pyo
ur T
VU
sing
the
TV
’sFe
atur
esA
ppen
dix
Inde
x
50
(E) 46HM84 52HM84 62HM84
POWERRECALL
FAV
FAV
TV / VIDEO
PIC SIZE
EXIT
INFO
STOP
POP DIRECT CH MUTE SLEEP
TV/VCR PAUSE
FFREW SKIP / SEARCHSPLIT
SWAP POP CHLIGHTREC
CH SCAN
FREEZE SOURCE
PLAY
TVCBL/SATVCRDVD
VOLCH
FAVORITE
ENTER
DVDMENUMENU
TOP MENU GUIDE
CLEAR
ENTER
1 2 3
4 5 6
7 8 9
ENT100 0CHRTN+10
yzx •
RECALL
MENU
Note :If the TV’s power source is interrupted (the
power cord is unplugged or a power failure
occurs), the clock must be reset.
ENTER
Number
Setting the clockTo set the clock:
1. Press MENU, and then press x or • until the SET UP menuappears.
2. Press y or z to highlight CLOCK SET, and then press ENTER.3. Press the Number buttons (0–9) to enter the correct time. The
clock operates on a 24-hour cycle.4. Press ENTER to start the clock.
LANGUAGESET UP
CLOCK SETANT 1 / 2TV / CABLECH PROGRAMADD / ERASE
0 9 : 2 5
SELECT: : SETENTER0–9
To display the time on-screen:Press RECALL.
46,52,62HM84(E)49-55 6/21/04, 9:56 AM50
Intr
oduc
tion
Con
nect
ing
your
TV
Usi
ng th
eR
emot
e C
ontr
olS
etti
ng u
pyo
ur T
VU
sing
the
TV
’sFe
atur
esA
ppen
dix
Inde
x
51
(E) 46HM84 52HM84 62HM84
1 2 3
4 5 6
7 8 9
ENT100 0
POWERRECALL
CHRTN
FAV
FAV
TV / VIDEO
+10
PIC SIZE
EXIT
INFO
STOP
POP DIRECT CH MUTE SLEEP
TV/VCR PAUSE
FFREW SKIP / SEARCHSPLIT
SWAP POP CHLIGHTREC
CH SCAN
FREEZE SOURCE
PLAY
TVCBL/SATVCRDVD
VOLCH
FAVORITE
ENTER
DVDMENUMENU
TOP MENU GUIDE
CLEAR
ENTER
RECALL
MUTE
MENUVOLUMECHANNELEXITTV/VIDEO P
x •zyMENU
Note :A second audio program (SAP) can be heard
only on those TV stations that offer it.
For example, a station might broadcast music
as a second audio program. If you have SAP
on, you will see the current program on the
screen but hear music instead of the
program’s normal audio.
However, if you have SAP on and the station
you are watching is not currently
broadcasting a second audio program, the
station’s normal audio will be output.
Occasionally there is no sound at all in SAP
mode. If this happens, set the MTS feature to
STEREO mode.
yzx •MENU
ENTER
Control touchpad on TV front
Adjusting the sound
Muting the soundPress MUTE to temporarily reduce (1/2 MUTE) or turn off (MUTE)the sound. While the sound is off, the screen will display “1/2MUTE” or “MUTE” in the lower right corner. Every time you pressmute, the mute mode will change in the following order.
→ Normal → 1/2 MUTE → MUTE
When you select “MUTE” mode, the closed caption feature isautomatically activated. To deactivate this feature, deactivate MUTE.This feature works only when the closed caption mode is set to OFF.See “Using the closed caption feature” on page 48 for moreinformation.
Selecting stereo/SAP broadcastsThe multi-channel TV sound (MTS) feature allows you to listen tohigh-fidelity stereo sound while watching TV. MTS can also transmita second audio program (SAP) containing a second language, music,or other audio information (when provided by individual stations).When the TV receives a stereo or SAP broadcast, the word STEREOor SAP appears on-screen every time the TV is turned on, the channelis changed, or the RECALL button is pressed.The MTS feature is not available when the TV is in VIDEO mode.To listen to stereo sound:
1. Press MENU, and then press x or • until the AUDIO menuappears.
2. Press y or z to highlight MTS, and then press ENTER.3. Press y or z to highlight STEREO, and then press ENTER.
SELECT: : SETENTER
MTSAUDIO
AUDIO SETTINGSWOW
SRS 3DFOCUST r u B a s s
STEREOSAPMONO
You can leave your TV in STEREO mode because it willautomatically output the type of sound being broadcast (stereo ormonaural). The word “STEREO” or “SAP” displays in yellow inthe menu when the TV receives the signal.If the stereo sound is noisy, select MONO to reduce the noise.
To listen to SAP (if available):1. Press MENU, and then press x or • until the AUDIO menu
appears.2. Press y or z to highlight MTS, and then press ENTER.3. Press y or z to highlight SAP, and then press ENTER. You will
hear the station’s second audio program (if available) from thespeakers, while viewing the original program’s picture (see note atright).
46,52,62HM84(E)49-55 6/21/04, 9:56 AM51
Intr
oduc
tion
Con
nect
ing
your
TV
Usi
ng th
eR
emot
e C
ontr
olS
etti
ng u
pyo
ur T
VU
sing
the
TV
’sFe
atur
esA
ppen
dix
Inde
x
52
(E) 46HM84 52HM84 62HM84
1 2 3
4 5 6
7 8 9
ENT100 0
POWERRECALL
CHRTN
FAV
FAV
TV / VIDEO
+10
PIC SIZE
EXIT
INFO
STOP
POP DIRECT CH MUTE SLEEP
TV/VCR PAUSE
FFREW SKIP / SEARCHSPLIT
SWAP POP CHLIGHTREC
CH SCAN
FREEZE SOURCE
PLAY
TVCBL/SATVCRDVD
VOLCH
FAVORITE
ENTER
DVDMENUMENU
TOP MENU GUIDE
CLEAR
ENTER
yzx •MENU
Note:If the broadcast is monaural, the WOW SRS
3D surround sound effect will not work.
ENTER
WOW, SRS, and the symbol are trademarks of SRS Labs, Inc.WOW technology is incorporated under license from SRS Labs, Inc.
Using the WOW™ surround sound featureWOW is a special combination of SRS Labs audio technologies thatcreates a thrilling surround sound experience with deep, rich bassfrom stereo sound sources. Your TV’s audio will sound fuller, richer,and wider. WOW consists of three features: SRS3D, FOCUS, andTruBass.To adjust the WOW feature:
1. Select STEREO mode (see “selecting stereo/SAP broadcasts” onpage 51).
2. Press MENU, and then press x or • until the AUDIO menuappears.
3. Press y or z to highlight the desired WOW feature you want toadjust, then press ENTER.• SRS 3D — To turn on or off the surround sound effect.• FOCUS — To turn on or off the vocal emphasis effect.• TruBass — To select your desired bass expansion level (HIGH,
LOW or OFF).
MTSAUDIO
AUDIO SETTINGSWOW
SRS 3DFOCUST r u B a s s
ONOFF
SELECT: : SETENTER
4. Press y or z to adjust the item, then press ENTER.
Adjusting the sound qualityYou can change the quality of your TV’s sound by adjusting the bass,treble, and balance.To adjust the sound quality:
1. Press MENU, and then press x or • until the AUDIO menuappears.
2. Press y or z to highlight AUDIO SETTINGS, and then pressENTER.The AUDIO SETTINGS menu appears.
MOVE: : ADJUST
BASSAUD I O ISETT NGS
TREBLEBALANCE
RESET SAVE
RESETAUD I O MENU
0
7 05 0
3. Press y or z to highlight the item you want to adjust.4. Press x or • to adjust the level.• x makes the sound quality weaker or increases the balance in the
left channel, depending on the item selected.• • makes the sound quality stronger or increases the balance in
the right channel, depending on the item selected.
46,52,62HM84(E)49-55 6/21/04, 9:56 AM52
Intr
oduc
tion
Con
nect
ing
your
TV
Usi
ng th
eR
emot
e C
ontr
olS
etti
ng u
pyo
ur T
VU
sing
the
TV
’sFe
atur
esA
ppen
dix
Inde
x
53
(E) 46HM84 52HM84 62HM84
1 2 3
4 5 6
7 8 9
ENT100 0
POWERRECALL
CHRTN
FAV
FAV
TV / VIDEO
+10
PIC SIZE
EXIT
INFO
STOP
POP DIRECT CH MUTE SLEEP
TV/VCR PAUSE
FFREW SKIP / SEARCHSPLIT
SWAP POP CHLIGHTREC
CH SCAN
FREEZE SOURCE
PLAY
TVCBL/SATVCRDVD
VOLCH
FAVORITE
ENTER
DVDMENUMENU
TOP MENU GUIDE
CLEAR
ENTER
yzx •MENU
ENTER
Resetting your audio adjustmentsThe RESET function returns your audio adjustments to the followingfactory settings:
Bass .................. center (50)Treble ............... center (50)Balance ............ center (0)
To reset your audio adjustments:1. Press MENU, and then press x or • until the AUDIO menu
appears.2. Press y or z to highlight AUDIO SETTINGS, and then press
ENTER. The AUDIO SETTINGS menu appears.3. Press y or z to highlight RESET, and then press ENTER.
BASSAUD I O ISETT NGS
TREBLEBALANCE
RESET SAVE
RESETAUD I O MENU
0
5 05 0
MOVE: : STARTENTER
Using the StableSound® featureWhen the signal source is changed, the StableSound feature limits thehighest volume level to prevent extreme changes in volume (forexample, to prevent the sudden increase in volume that often happenswhen a TV program switches to a commercial).To turn on the StableSound feature:
1. Press MENU, and then press x or • until the AUDIO menuappears.
2. Press y or z to highlight STABLE SOUND, and then pressENTER.
3. Press y or z to select ON, and then press ENTER.
: : SETSELECT ENTER
STABLE SOUNDAUDIO
SPEAKERSONOFF
AUD I O OUT
To turn off the StableSound feature:Select OFF in step 3 above.
46,52,62HM84(E)49-55 6/21/04, 9:56 AM53
Intr
oduc
tion
Con
nect
ing
your
TV
Usi
ng th
eR
emot
e C
ontr
olS
etti
ng u
pyo
ur T
VU
sing
the
TV
’sFe
atur
esA
ppen
dix
Inde
x
54
(E) 46HM84 52HM84 62HM84
Note:Make sure the volume control of your audio
amplifier is set to a moderate listening level.
1 2 3
4 5 6
7 8 9
ENT100 0
POWERRECALL
CHRTN
FAV
FAV
TV / VIDEO
+10
PIC SIZE
EXIT
INFO
STOP
POP DIRECT CH MUTE SLEEP
TV/VCR PAUSE
FFREW SKIP / SEARCHSPLIT
SWAP POP CHLIGHTREC
CH SCAN
FREEZE SOURCE
PLAY
TVCBL/SATVCRDVD
VOLCH
FAVORITE
ENTER
DVDMENUMENU
TOP MENU GUIDE
CLEAR
ENTER
yzx •
ENTER
Note:When the POP window is closed, the sound of
the main program is output through the
AUDIO OUT terminals, even if POP is
selected in the AUDIO OUT menu.
MENU
Turning off the built-in speakersUse this feature to turn off the TV speakers when you connect anaudio system (see “Connecting an audio system” on page 16).To turn off the built-in speakers:
1. Press MENU, then press x or • until the AUDIO menuappears.
2. Press y or z to highlight SPEAKERS, and then press ENTER.3. Press y or z to select OFF, and then press ENTER.
: : SETSELECT ENTER
STABLE SOUNDAUDIO
SPEAKERSONOFF
AUD I O OUT
To turn on the built-in speakers:Select ON in step 3 above.
Selecting the AUDIO OUT soundThis feature allows you to select the sound source (MAIN or POP)that is output from the AUDIO OUT terminals (for example, see“Connecting two VCRs” on page 14).This is useful when amplifying or recording the POP sound withexternal equipment while listening to the sound of the main picturethrough the TV’s speakers.To select the AUDIO OUT sound:
1. Press MENU, and then press x or • until the AUDIO menuappears.
2. Press y or z to highlight AUDIO OUT, and then pressENTER.
3. Press y or z to select MAIN or POP, and then press ENTER.
: : SETSELECT ENTER
STABLE SOUNDAUDIO
SPEAKERSMA I NPOP
AUD I O OUT
• MAIN: Outputs the sound of the main (left window) programthrough the AUDIO OUT terminals.
• POP: Outputs the sound of the POP (right window) programthrough the AUDIO OUT terminals.
46,52,62HM84(E)49-55 6/21/04, 9:56 AM54
Intr
oduc
tion
Con
nect
ing
your
TV
Usi
ng th
eR
emot
e C
ontr
olS
etti
ng u
pyo
ur T
VU
sing
the
TV
’sFe
atur
esA
ppen
dix
Inde
x
55
(E) 46HM84 52HM84 62HM84
Selecting the background of the menu displayYou can change the background of the menu display by selecting fromtwo preset types: shaded and solid (gray).To select the background:
1. Press MENU, and then press x or • until the CUSTOM menuappears.
2. Press y or z to highlight BACKGROUND, and then pressENTER.
3. Press y or z to select either a SHADED or SOLID background,and then press ENTER.
ON T I MERCUSTOM
SLEEP T I MERSHADEDSOL I D
CCFAVOR I TE CHCH LABEL I NGV I DEO LABELBACKGROUND
: : SETSELECT ENTER
QU I CK RESTART
Displaying on-screen informationPress RECALL to display the following information on-screen:
• Antenna mode (when in TV mode)• Channel number or VIDEO mode selected• Time (if set)• Remaining time of ON/SLEEP timer (if set)• Channel label (if set)• Video label (when in video mode)• Stereo or SAP audio status• V-CHIP rating status• Picture size• Lamp mode selected (when in the HI BRIGHT mode)
1
2
3
4
5
6
7
8
9
10
11
12
13
14
15
16
17
18
33 34 35
33 34 35
ANTABCDFULL
H I GH BR I GHTLAMP
STEREOSAPTVON T I MER 12h34mSLEEP T I MER 1h23m
D L S VPG–
CABLECLOCK 9 : 2 5
1
6
1
2
3
4
5
6
7
8
9
10
11
12
13
14
15
16
17
18
33 34 35
33 34 35HD1DVDTHEATER W I DE 1
TV D L S VPG–
ColorStream12 : 3 4
ON T I MER 12h34mSLEEP T I MER 1h23m
CLOCK
Understanding the auto power off featureThe TV will automatically turn itself off after approximately 15minutes if it is tuned to a vacant channel or a station that completesits broadcast for the day. This feature does not work in VIDEO mode.
Understanding the last mode memory featureIf the power is cut off while you are viewing the TV, the Last ModeMemory feature turns on the TV automatically when the power isresupplied.If the power is going to be off for a long time and you are going to beaway from your TV, unplug the power cord to prevent the TV fromturning on in your absence.
1 2 3
4 5 6
7 8 9
ENT100 0
POWERRECALL
CHRTN
FAV
FAV
TV / VIDEO
+10
PIC SIZE
EXIT
INFO
STOP
POP DIRECT CH MUTE SLEEP
TV/VCR PAUSE
FFREW SKIP / SEARCHSPLIT
SWAP POP CHLIGHTREC
CH SCAN
FREEZE SOURCE
PLAY
TVCBL/SATVCRDVD
VOLCH
FAVORITE
ENTER
DVDMENUMENU
TOP MENU GUIDE
CLEAR
ENTER
yzx •MENU
RECALL
ENTER
46,52,62HM84(E)49-55 6/21/04, 9:56 AM55
Intr
oduc
tion
Con
nect
ing
your
TV
Usi
ng th
eR
emot
e C
ontr
olS
etti
ng u
pyo
ur T
VU
sing
the
TV
’sFe
atur
esA
ppen
dix
Inde
x
56
(E) 46HM84 52HM84 62HM84
Appendix
Lamp unit replacement(User-replaceable component)The light source for this TV is a mercury lamp with internalatmospheric pressure that increases during use. The lamp has a limitedservice life that varies depending on product use and user settings.As is generally the case with all projection TVs that use projectionlamps as a light source, the brightness of the lamp in this TV mayvary somewhat over the expected service life and will generallydecrease over time. The average useful service life for the lamp isapproximately 8,000 hours in LOW POWER mode or 6,000 hours inHI BRIGHT mode. See “Selecting the Lamp mode” on page 46 forinformation on switching the lamp mode. Because these are averages,some lamps will require earlier replacement.If you use the lamp beyond its service life:• you may notice a reduction in the colors and/or brightness of the
picture; and• the strength of the quartz glass in the lamp will be reduced and the
lamp may rupture (often making a loud noise when this happens).If the lamp ruptures, the TV will not operate until the lamp unit isreplaced.
Note: The lamp unit is designed so broken lamp glass remains securely
inside the lamp unit.
When to replace the lamp unitYou should replace the lamp unit:• if the picture darkens and/or colors fade;• if the screen (lamp) does not light (LED Indication 3); or• if you hear a loud noise and the picture goes black, which may
indicate a lamp rupture (LED Indication 3). See “LED indications”on page 60.
To obtain a replacement lamp unit:• In the U.S.:
• In Canada, contact a Toshiba parts distributor by directing yourweb browser to www.toshiba.ca. Click “Home Entertainment,” andthen click “Support.”
Use the replacement lamp unit model listed below only. Using anyother lamp may cause damage to the TV and/or lamp.
CAUTION: Always handle the lamp unit with care.The lamp unit in this TV was designed for safe replacement
by consumers; however, if the lamp unit is subjected to intentionalabuse (such as excessive mechanical abuse or handling by childrenor pets), the unit may break, exposing sharp edges or pinch points.
WARNING: RISK OFELECTRIC SHOCK!
TO REDUCE THE RISK OF ELECTRIC SHOCK,NEVER REMOVE TV COVERS, EXCEPT ASSPECIFIED HEREIN. REFER ALL SERVICINGNOT SPECIFIED IN THIS MANUAL TOQUALIFIED SERVICE PERSONNEL. Failureto follow this WARNING may result in deathor serious injury.
Note :The lamp is warranted only for the periods
and to the extent set forth in the Limited
Warranty applicable to this set, which is a
substantially shorter period of time than the
average useful service period. See “Limited
United States Warranty” on page 63 or
“Limited Canada Warranty” on page 64, as
applicable.
(Continued on next page)
CAUTION: Always replace with same type lampunit: Model No. TB25-LMP (Stock no. 23311083)
Web ContactIn warranty www.tacp.toshiba.com/service Call toll-free 1-800-631-3811.
Out of www.ceaccessories.toshiba.comwarranty
Consult your consumerelectronics dealer foravailability.
46,52,62HM84(E)56-60 6/21/04, 9:56 AM56
Intr
oduc
tion
Con
nect
ing
your
TV
Usi
ng th
eR
emot
e C
ontr
olS
etti
ng u
pyo
ur T
VU
sing
the
TV
’sFe
atur
esA
ppen
dix
Inde
x
57
(E) 46HM84 52HM84 62HM84
How to replace the lamp unit
Required tool: Manual Phillips screwdriver; gloves.Optional tool: 5/32” or 4mm Allen wrench.
1. Turn off the TV and unplug the power cord.
2. STOP! Allow the lamp to cool for at least one (1) hour beforereplacing it.
3. On the lamp unit door on the side of the TV, loosen the thumbscrew by hand or by using a 5/32” or 4mm Allen wrench, and thenremove the lamp unit door.
WARNING: Eye damage may result fromdirectly viewing the light produced by this
lamp. Always turn off the TV and unplug the power cord beforeopening the lamp unit door.
Lamp unit screws
(Continued on next page)
TV back
Thumbscrew
Lamp unit door detail
WARNING: RISK OFELECTRIC SHOCK!
TO REDUCE THE RISK OF ELECTRIC SHOCK,NEVER REMOVE TV COVERS, EXCEPT ASSPECIFIED HEREIN. REFER ALL SERVICINGNOT SPECIFIED IN THIS MANUAL TOQUALIFIED SERVICE PERSONNEL. Failureto follow this WARNING may result in deathor serious injury.
CAUTION: HOT SURFACEThe temperature of the lamp immediately
after use exceeds 392˚F (200˚C). Touching the lamp before it hascooled will result in severe burns. ALLOW THE LAMP TO COOLFOR AT LEAST ONE (1) HOUR BEFORE REPLACING IT.
4. Using a manual Phillips screwdriver, loosen the two screws on thelamp unit.
WARNING: RISK OFELECTRIC SHOCK! The lampunit door is provided with an interlock to
reduce the risk of electric shock and excessive ultravioletradiation. Never defeat its purpose or attempt to servicewithout removing the lamp unit door completely. Failureto follow this WARNING may result in death or serious injury.
46,52,62HM84(E)56-60 6/21/04, 9:56 AM57
Intr
oduc
tion
Con
nect
ing
your
TV
Usi
ng th
eR
emot
e C
ontr
olS
etti
ng u
pyo
ur T
VU
sing
the
TV
’sFe
atur
esA
ppen
dix
Inde
x
58
(E) 46HM84 52HM84 62HM84
How to replace the lamp unit (continued)
5. Grasp the lamp unit handle and gently pull the lamp unit straightout of the TV. Set the old lamp unit aside (see “Lamp unit disposal”on page 60).
6. Carefully insert the new lamp unit straight into the TV until it isfully seated.
Note :• Never subject the lamp unit to excessive shock.
• Never touch the lamp unit glass or otherwise get it dirty.
Doing so may affect the image quality and reduce the service life of the
lamp. See “Cleaning the lamp unit glass” at right.
7. Using a manual Phillips screwdriver, tighten the two lamp unitscrews.Note: Hand-tighten only. Do not use an electric screwdriver.
CAUTION: NEVER cleana hot lamp with any type of
flammable liquid or aerosol cleaningagent. Many ordinary cleaning agents(such as glass cleaners) contain chemicalsthat may be flammable at certaintemperatures. If the lamp unit is notallowed to cool for at least one (1) hour,such chemicals may ignite.
Lamp unit screws(use manual Phillipsscrewdriver only)
NOTE : Make sure the lamp unit and screws areinstalled securely; otherwise, the TV may not turn on
and the lamp life may be shortened.
(Continued on next page)
Wear gloves when replacingthe lamp unit.
Cleaning the lamp unit glassIf you accidentally touch the lamp unitglass or otherwise get it dirty, wipe it with alint-free lens cleaning cloth (such as a clothfor cleaning camera lenses or eyeglasses).
46,52,62HM84(E)56-60 6/21/04, 9:56 AM58
Intr
oduc
tion
Con
nect
ing
your
TV
Usi
ng th
eR
emot
e C
ontr
olS
etti
ng u
pyo
ur T
VU
sing
the
TV
’sFe
atur
esA
ppen
dix
Inde
x
59
(E) 46HM84 52HM84 62HM84
How to replace the lamp unit (continued)
8. Reattach the lamp unit door, making sure to insert the hooks onthe left side of the lamp unit door inside the opening in the TVcabinet.
9. Replace the thumb screw and hand-tighten.
10. Plug in the power cord and turn on the TV. After the initial warmupperiod (which may take up to several seconds for full picturebrightness), the TV should operate normally. If any of the followingconditions exist, turn off the TV, unplug the power cord, and repeatsteps 1–9 to ensure that the lamp unit and lamp unit door areinstalled correctly:• No picture• Dark picture• TV will not turn onIf, after repeating steps 1–9, the problem still exists:• In the U.S., call Customer Service at 1-800-631-3811.• In Canada, locate the nearest Toshiba authorized service depot by
directing your web browser to www.toshiba.ca; click “HomeEntertainment,” and then click “Support.”
Thumb screw(hand-tighten only)
Insert the hooks insidethe TV cabinet opening.
Lamp unit door
Lamp unit door
NOTE : Make sure the lamp unit door is installedsecurely; otherwise, the TV may not turn on.
46,52,62HM84(E)56-60 6/21/04, 9:56 AM59
Intr
oduc
tion
Con
nect
ing
your
TV
Usi
ng th
eR
emot
e C
ontr
olS
etti
ng u
pyo
ur T
VU
sing
the
TV
’sFe
atur
esA
ppen
dix
Inde
x
60
(E) 46HM84 52HM84 62HM84
LED Indication Condition Solution
LED indicationsThe green and red LED lights on the TV controltouchpad (on the lower right corner of the TV screen)indicate the TV’s current status, as follows:
• Green ON = Control touchpad being pressed.• Red ON = Power ON.• Green and/or Red blinking (see table below for
condition and solution).
MENUVOLUMECHANNELEXITTV/VIDEO POWER
Green indicator
Red indicator
Lamp unit disposal• Place the used lamp unit in the empty box from the new lamp unit.• Keep the lamp unit out of reach of children and pets.
• Dispose of the used lamp unit by the approved method for yourarea.
Control touchpad on TV front
CAUTION: Always handle the lamp unit with care.The lamp unit in this TV was designed for safe replacement
by consumers; however, if the lamp unit is subjected to intentional oraccidental abuse (such as excessive mechanical abuse or handlingby children or pets), the unit may break, exposing sharp edges orpinch points.
1) Green lights solid;Red blinks at0.5-second intervals.
2) Green blinks at0.3-second intervals;Red lights solid.
3) Green and Red blinkat 1-second intervals.
4) Green is off;Red blinks.
5) Green and Red blinkthree times.
The lamp unit door is notseated properly.
The lamp is not workingproperly.
The lamp is not workingproperly after the eighthautomatic restart (see item#2).
For service personnel only.
An abnormal temperatureincrease has occurred.
Turn the POWER OFF and unplug the power cord. Review“How to replace the lamp unit” on pages 57–59 to ensurethat the lamp unit door is installed securely. If the problempersists, contact a Toshiba Authorized Service Center.
The TV automatically will try to restart itself eight times.
Turn the POWER OFF and then ON again. If the problempersists, replace the lamp unit (see pages 57–59). If theproblem still persists, contact a Toshiba Authorized ServiceCenter.
Turn the POWER OFF and unplug the power cord. If theproblem persists, contact a Toshiba Authorized ServiceCenter.
Do not block or cover the slots or openings in the TVcabinet.If the problem persists, contact a Toshiba AuthorizedService Center.
NOTE : The lamp unit contains mercury. Disposal ofmercury may be regulated due to environmental
considerations. For disposal or recycling information, contact yourlocal authorities or the Electronics Industries Alliance (www.eiae.org).
46,52,62HM84(E)56-60 6/21/04, 9:56 AM60
Intr
oduc
tion
Con
nect
ing
your
TV
Usi
ng th
eR
emot
e C
ontr
olS
etti
ng u
pyo
ur T
VU
sing
the
TV
’sFe
atur
esA
ppen
dix
Inde
x
61
(E) 46HM84 52HM84 62HM84
Television SystemNTSC standard
Channel CoverageVHF: 2 through 13UHF: 14 through 69Cable TV: Mid band (A-8 through A-1, A through I)
Super band (J through W)Hyper band (AA through ZZ, AAA, BBB)Ultra band (65 through 94, 100 through 125)
Power Source120 V AC, 60 Hz
Power Consumption190 W (average)
Audio Power20 W + 20 W
Speaker TypeMain: Two 4 inches (10 cm) roundTweeter: Two 1-5/8 inches (4 cm) round
32/44.1/48 kHz sampling frequency16/20/24 bits per sample
SpecificationsNote: This model complies with the specifications listed below. Designs and specifications are subject to change withoutnotice. This model may not be compatible with features and/or specifications that may be added in the future.
WARNING: RISK OF ELECTRIC SHOCK !Never attempt to service the TV yourself. Opening and removing the covers may expose you todangerous voltage or other hazards. Refer all servicing to a Toshiba Authorized Service Center.
46,52,62HM84(E)61-64 9/30/04, 3:04 PM61
Intr
oduc
tion
Con
nect
ing
your
TV
Usi
ng th
eR
emot
e C
ontr
olS
etti
ng u
pyo
ur T
VU
sing
the
TV
’sFe
atur
esA
ppen
dix
Inde
x
62
(E) 46HM84 52HM84 62HM84
TroubleshootingBefore calling a service technician, please check the following table for a possible cause of the symptom andsome solutions.
Symptom SolutionTV will not turn on • Make sure the power cord is plugged in, then press POWER.
• The remote control batteries may be dead. Replace the batteries.• If you have recently replaced the lamp unit, make sure the lamp unit
and lamp unit door are installed properly.• The lamp unit may need to be replaced. (See “LED indications” on
page 60.)
No picture or too dark • The lamp unit may need to be replaced.
No picture, no sound • Check the antenna/cable connections.
No sound, picture OK • The sound may be muted. Press VOLUME.• The station may have broadcast difficulties. Try another channel.• Make sure the SPEAKERS function in the AUDIO menu is set
properly.
Poor picture, sound OK • Check the antenna connections.• The station may have broadcast difficulties. Try another channel.• Adjust the PICTURE menu.
Poor reception of broadcast channels • The station may have broadcast difficulties. Try another channel.• Check the antenna connections.• If you are using a VCR, make sure the TV/VCR button is set
correctly.
Cannot receive above channel 13 • Make sure the TV/CABLE switch is set to the mode thatcorresponds with the signal source type (cable company or outsideantenna).
Black box appears on the screen • The closed caption feature may be set to one of the Text modes (T1,T2, T3, or T4). Turn closed captioning OFF.
Unable to select a certain channel • The channel may be locked with the CH LOCK feature, or erasedwith the ADD/ERASE feature.
Multiple images • The station may have broadcast difficulties. Try another channel.• Antenna reception may be poor. Use a highly directional outdoor
antenna.
Poor color or no color • The station may have broadcast difficulties. Try another channel.• Adjust the TINT and/or COLOR in the PICTURE menu.• The lamp unit may need to be replaced.
No stereo or SAP sound from a • Make sure the MTS feature is set properly.known MTS broadcast
The screen lights dimly and the fan • The Quick Restart feature may be in ON mode. Set to OFF if youcontinues to run when the power is OFF. do not prefer this.
The remote control does not operate • Make sure the appropriate device mode is selected.• Remove all obstructions between the remote control and the remote
control sensor in the TV.• The remote control batteries may be dead. Replace the batteries.
Cannot access signal input sources • Check the VIDEO LOCK feature. (See page 42.)(Video1, Video2, Video3,ColorStream HD1/HD2, HDMI)and/or Channels 3 and 4.
46,52,62HM84(E)61-64 6/21/04, 9:56 AM62
Intr
oduc
tion
Con
nect
ing
your
TV
Usi
ng th
eR
emot
e C
ontr
olS
etti
ng u
pyo
ur T
VU
sing
the
TV
’sFe
atur
esA
ppen
dix
Inde
x
63
Toshiba America Consumer Products, L.L.C. (“TACP”) makes thefollowing limited warranties to original consumers in the UnitedStates.
THESE LIMITED WARRANTIES EXTEND TO THE ORIGINALCONSUMER PURCHASER OR ANY PERSON RECEIVING THISDLP TELEVISION AS A GIFT FROM THE ORIGINALCONSUMER PURCHASER AND TO NO OTHER PURCHASEROR TRANSFEREE.
PRODUCTS PURCHASED IN THE U.S.A. AND USED INCANADA ARE NOT COVERED BY THESE WARRANTIES.
PRODUCTS PURCHASED IN CANADA AND USED IN THEU.S.A. ARE NOT COVERED BY THESE WARRANTIES.
Limited One (1) Year Warranty on Parts and Labor*TACP warrants this DLP television and its parts against defects inmaterials or workmanship for a period of one (1) year after the dateof original retail purchase. DURING THIS PERIOD, TACP WILL, ATTACP’S OPTION, REPAIR OR REPLACE A DEFECTIVE PARTWITH A NEW OR REFURBISHED PART WITHOUT CHARGE TOYOU FOR PARTS OR LABOR. TACP Authorized Service Stationpersonnel will come to your home when warranty service isrequired. Depending on the type of repair required, either theservice will be performed in your home or the set will be taken tothe TACP Authorized Service Station for repair and returned to yourhome at no cost to you.
Limited One (1) Year Warranty on Lamp Unit*TACP warrants the lamp unit in this DLP television against defects inmaterials or workmanship for a period of one (1) year after the dateof original retail purchase. DURING THIS PERIOD, TACP WILL, ATTACP’S OPTION, EXCHANGE A DEFECTIVE LAMP UNIT WITHA NEW OR REFURBISHED LAMP UNIT WITHOUT CHARGE TOYOU. LABOR CHARGES FOR LAMP UNIT REPLACEMENT ARENOT COVERED UNDER WARRANTY. The lamp unit is a user-replaceable component.
Rental UnitsThe warranty for rental units, including the lamp units containedtherein, begins with the date of first rental or thirty (30) days fromthe date of shipment to the rental firm, whichever comes first.
*Limited Warranty for Commercial UnitsTACP warrants DLP televisions, including the lamp units containedtherein, sold and used for commercial purposes as follows: all partsare warranted against defects in materials or workmanship for aperiod of ninety (90) days after the date of original purchase.DURING THIS PERIOD, TACP WILL, AT TACP’S OPTION, REPAIROR REPLACE A DEFECTIVE PART WITH A NEW ORREFURBISHED PART WITHOUT CHARGE TO YOU.
Owner’s Manual and Product RegistrationRead this owner’s manual thoroughly before operating this DLPtelevision.
Complete and mail the enclosed product registration card or registeryour product online at www.tacp.toshiba.com/service as soonas possible. By registering your product you will enable TACP toprovide you with better customer service and improved productsupport. Failure to register your product does not diminish yourrights under this warranty.
Your ResponsibilityTHE ABOVE WARRANTIES ARE SUBJECT TO THE FOLLOWINGCONDITIONS:(1) You must provide your bill of sale or other proof of purchase.(2) All warranty servicing of this DLP television must be performed
by an Authorized TACP Service Station.(3) These warranties from TACP are effective only if the DLP television
is purchased and operated in the U.S.A. or Puerto Rico.(4) Labor charges for installation, setup, adjustment of customer
controls, and installation or repair of antenna systems are notcovered by these warranties. Reception problems caused byinadequate antenna systems are your responsibility.
(5) Warranties extend only to defects in materials or workmanshipas limited above, and do not extend to any DLP television orparts that have been lost or discarded by you or to damage tothe DLP television or parts caused by fires, misuse, accident,Acts of God (such as lightning or fluctuations in electric power),improper installation, improper maintenance, or use in violationof instructions furnished by TACP; use or malfunction throughsimultaneous use of this product and connected equipment; orto units that have been modified or had the serial numberremoved, altered, defaced, or rendered illegible.
How to Obtain Warranty ServicesIf, after following all of the operating instructions in this manual andchecking the “Troubleshooting” section, you find that service isneeded:
(1) To find the nearest TACP Authorized Service Station, visitTACP’s web site at www.tacp.toshiba.com/service or calltoll free 1-800-631-3811.
(2) Present your bill of sale or other proof of purchase to theAuthorized Service Station.
For additional information, visit TACP’s web site:www.tacp.toshiba.com
ALL WARRANTIES IMPLIED BY THE LAW OF ANY STATE OFTHE U.S.A., INCLUDING THE IMPLIED WARRANTIES OFMERCHANTABILITY AND FITNESS FOR A PARTICULARPURPOSE, ARE EXPRESSLY LIMITED TO THE DURATION OFTHE LIMITED WARRANTIES SET FORTH ABOVE. WITH THEEXCEPTION OF ANY WARRANTIES IMPLIED BY THE LAW OFANY STATE OF THE U.S.A. AS HEREBY LIMITED, THEFOREGOING WARRANTY IS EXCLUSIVE AND IN LIEU OF ALLOTHER WARRANTIES, GUARANTEES, AGREEMENTS, ANDSIMILAR OBLIGATIONS OF TACP WITH RESPECT TO THEREPAIR OR REPLACEMENT OF ANY PARTS. IN NO EVENTSHALL TACP BE LIABLE FOR CONSEQUENTIAL ORINCIDENTAL DAMAGES (INCLUDING, BUT NOT LIMITED TO,LOST PROFITS, BUSINESS INTERRUPTION, ORMODIFICATION OR ERASURE OF RECORDED DATA CAUSEDBY USE, MISUSE, OR INABILITY TO USE THIS PRODUCT).No person, agent, distributor, dealer, or company is authorized tochange, modify, or extend the terms of these warranties in anymanner whatsoever. The time within which action must becommenced to enforce any obligation of TACP arising under thiswarranty or under any law of the United States or of any statethereof is hereby limited to 90 days from the date you discover, orshould have discovered, the defect. This limitation does not apply toimplied warranties arising under the law of any state of the U.S.A.
THIS WARRANTY GIVES YOU SPECIFIC LEGAL RIGHTS, ANDYOU MAY ALSO HAVE OTHER RIGHTS, WHICH MAY VARYFROM STATE TO STATE IN THE U.S.A. SOME STATES OF THEU.S.A. DO NOT ALLOW LIMITATIONS ON THE DURATION OFAN IMPLIED WARRANTY, LIMITATIONS ON THE TIME WITHINWHICH AN ACTION MAY BE BROUGHT, OR THE EXCLUSIONOR LIMITATION OF INCIDENTAL OR CONSEQUENTIALDAMAGES; THEREFORE, THE ABOVE LIMITATIONS OREXCLUSIONS MAY NOT APPLY TO YOU UNDER SUCHCIRCUMSTANCES. 051704
Limited United States Warrantyfor DLP Television Models
46,52,62HM84(E)61-64 6/21/04, 9:56 AM63
Intr
oduc
tion
Con
nect
ing
your
TV
Usi
ng th
eR
emot
e C
ontr
olS
etti
ng u
pyo
ur T
VU
sing
the
TV
’sFe
atur
esA
ppen
dix
Inde
x
64
(E) 46HM84 52HM84 62HM84
Toshiba of Canada Limited (“TCL”) makes the following limitedwarranties to original consumers in Canada.
THESE LIMITED WARRANTIES EXTEND TO THE ORIGINALCONSUMER PURCHASER OR ANY PERSON RECEIVING THISDLP TELEVISION AS A GIFT FROM THE ORIGINALCONSUMER PURCHASER AND TO NO OTHER PURCHASEROR TRANSFEREE.
PRODUCTS PURCHASED IN THE U.S.A. AND USED INCANADA ARE NOT COVERED BY THESE WARRANTIES.
PRODUCTS PURCHASED IN CANADA AND USED IN THEU.S.A. ARE NOT COVERED BY THESE WARRANTIES.
Limited One (1) Year Warranty on Parts and Labor*TCL warrants this DLP television television and its parts againstdefects in materials or workmanship for a period of one (1) yearafter the date of original retail purchase. DURING THIS PERIOD,TCL WILL, AT TCL’S OPTION, REPAIR OR REPLACE ADEFECTIVE PART WITH A NEW OR REFURBISHED PARTWITHOUT CHARGE TO YOU FOR PARTS OR LABOR. TCLAuthorized Service Depot personnel will come to your home whenwarranty service is required. Depending on the type of repairrequired, either the service will be performed in your home or theset will be taken to the TCL Authorized Service Depot for repair andreturned to your home at no cost to you. IN-HOME SERVICE ONLYAPPLIES WITHIN 100 KILOMETERS OF AN AUTHORIZED TCLSERVICE DEPOT.
Limited One (1) Year Warranty on Lamp Unit*TCL warrants the lamp unit in this DLP television against defects inmaterials or workmanship for a period of one (1) year after the dateof original retail purchase. DURING THIS PERIOD, TCL WILL, ATTCL’S OPTION, EXCHANGE A DEFECTIVE LAMP UNIT WITH ANEW OR REFURBISHED LAMP UNIT WITHOUT CHARGE TOYOU. LABOR CHARGES FOR LAMP UNIT REPLACEMENT ARENOT COVERED UNDER WARRANTY. The lamp unit is a user-replaceable component.
Rental UnitsThe warranty for rental units, including the lamp units containedtherein, begins with the date of first rental or thirty (30) days fromthe date of shipment to the rental firm, whichever comes first.
*Limited Warranty for Commercial UnitsTCL warrants DLP televisions, including the lamp units containedtherein, sold and used for commercial purposes as follows: all partsare warranted against defects in materials or workmanship for aperiod of ninety (90) days after the date of original purchase.DURING THIS PERIOD, TCL WILL, AT TCL’S OPTION, REPAIROR REPLACE A DEFECTIVE PART WITH A NEW ORREFURBISHED PART WITHOUT CHARGE TO YOU. ON-SITESERVICE ONLY APPLIES WITHIN 100 KILOMETERS OF ANAUTHORIZED TCL SERVICE DEPOT.
Owner’s Manual and Product RegistrationRead this owner’s manual thoroughly before operating this DLPtelevision.
Register your product online at www.toshiba.ca as soon aspossible. By registering your product you will enable TCL to provideyou with better customer service and improved product support.Failure to register your product does not diminish your rights underthis warranty.
Your ResponsibilityTHE ABOVE WARRANTIES ARE SUBJECT TO THE FOLLOWINGCONDITIONS:(1) You must provide your bill of sale or other proof of purchase.(2) All warranty servicing of this DLP television must be performed
by an Authorized TCL Service Depot.(3) These warranties from TCL are effective only if the DLP
television is purchased in Canada from an authorized TCL dealerand operated in Canada.
(4) Labor charges for installation, setup, adjustment of customercontrols, and installation or repair of antenna systems are notcovered by these warranties. Reception problems caused byinadequate antenna systems are your responsibility.
(5) Warranties extend only to defects in materials or workmanshipas limited above, and do not extend to any DLP television orparts that have been lost or discarded by you or to damage tothe television or parts caused by fires, misuse, accident, Acts ofGod (such as lightning or fluctuations in electric power),improper installation, improper maintenance, or use in violationof instructions furnished by TCL; use or malfunction throughsimultaneous use of this product and connected equipment; orto units that have been modified or had the serial numberremoved, altered, defaced, or rendered illegible.
How to Obtain Warranty ServicesIf, after following all of the operating instructions in this manual andchecking the “Troubleshooting” section, you find that service isneeded:
(1) To find the nearest TCL Authorized Service Depot, visit TCL’sweb site at www.toshiba.ca.
(2) Present your bill of sale or other proof of purchase to theAuthorized Service Depot.
For additional information, visit TCL’s web site:www.toshiba.ca
ALL WARRANTIES IMPLIED BY THE LAW OF ANY PROVINCEOF CANADA, INCLUDING THE IMPLIED WARRANTIES OFMERCHANTABILITY AND FITNESS FOR A PARTICULARPURPOSE, ARE EXPRESSLY LIMITED TO THE DURATION OFTHE LIMITED WARRANTIES SET FORTH ABOVE. WITH THEEXCEPTION OF ANY WARRANTIES IMPLIED BY THE LAW OFANY PROVINCE OF CANADA AS HEREBY LIMITED, THEFOREGOING WARRANTY IS EXCLUSIVE AND IN LIEU OF ALLOTHER WARRANTIES, GUARANTEES, AGREEMENTS, ANDSIMILAR OBLIGATIONS OF TCL WITH RESPECT TO THE REPAIROR REPLACEMENT OF ANY PARTS. IN NO EVENT SHALL TCLBE LIABLE FOR CONSEQUENTIAL OR INCIDENTAL DAMAGES(INCLUDING, BUT NOT LIMITED TO, LOST PROFITS,BUSINESS INTERRUPTION, OR MODIFICATION OR ERASUREOF RECORDED DATA CAUSED BY USE, MISUSE, ORINABILITY TO USE THIS PRODUCT).No person, agent, distributor, dealer, or company is authorized tochange, modify, or extend the terms of these warranties in anymanner whatsoever. The time within which action must becommenced to enforce any obligation of TCL arising under thiswarranty or under any law of Canada or of any province thereof ishereby limited to 90 days from the date you discover, or should havediscovered, the defect. This limitation does not apply to impliedwarranties arising under the law of any province of Canada.
THIS WARRANTY GIVES YOU SPECIFIC LEGAL RIGHTS, ANDYOU MAY ALSO HAVE OTHER RIGHTS, WHICH MAY VARYFROM PROVINCE TO PROVINCE IN CANADA. SOMEPROVINCES OF CANADA DO NOT ALLOW LIMITATIONS ONTHE DURATION OF AN IMPLIED WARRANTY, LIMITATIONS ONTHE TIME WITHIN WHICH AN ACTION MAY BE BROUGHT, ORTHE EXCLUSION OR LIMITATION OF INCIDENTAL ORCONSEQUENTIAL DAMAGES; THEREFORE, THE ABOVELIMITATIONS OR EXCLUSIONS MAY NOT APPLY TO YOUUNDER SUCH CIRCUMSTANCES.
051704
Limited Canada Warrantyfor DLP Television Models
46,52,62HM84(E)61-64 6/21/04, 9:56 AM64
Intr
oduc
tion
Con
nect
ing
your
TV
Usi
ng th
eR
emot
e C
ontr
olS
etti
ng u
pyo
ur T
VU
sing
the
TV
’sFe
atur
esA
ppen
dix
Inde
x
65
(E) 46HM84 52HM84 62HM84
AA/V cables (standard) ......................................................... 8ANT 1/2 ...................................................................................23Antenna cables (coaxial) ................................................... 8AUDIO OUT sound, selecting ....................................... 54Audio system connection ................................................. 16Auto aspect ............................................................................32Auto favorite .................................................................. 36, 40Auto power off ......................................................................55
BBACKGROUND selection ................................................ 55Back of the TV ........................................................................ 7
F G HFAV yz buttons .................................................................. 27FAVORITE button .................................................................36Favorite channels, programming................................... 26Front of the TV ........................................................................ 7HDMI™ connection ............................................................15
L MLabeling channels ............................................................... 28Labeling video inputs ........................................................ 47Lamp mode ........................................................................... 46Lamp unit replacement .............................................. 56-60Language selection ............................................................23Last mode memory ............................................................. 55Locking channels ................................................................40Locking video inputs .......................................................... 42Locks menu ........................................................................... 37Menu system .........................................................................22MTS feature ...........................................................................51MUTE button .........................................................................51
O PON timer .................................................................................49Picture adjustments
COLOR TEMPERATURE ..............................................44Picture mode ....................................................................43Picture quality ..................................................................43
Picture-out-picture (POP)CH SCAN button ............................................................35POP CH yz buttons .....................................................33POP DIRECT CH button ............................................... 33SOURCE button ..............................................................33SPLIT button .....................................................................33SWAP button ....................................................................34
Q RQuick restart .........................................................................25RECALL button ....................................................................55Remote control
Battery installation ......................................................... 17Learning about the buttons ........................................ 21Programming ....................................................................18
HEAD OFFICE: 82 TOTOWA ROAD, WAYNE, NJ 07470, U.S.A.NATIONAL SERVICE DIVISION:1420-B TOSHIBA DRIVE, LEBANON, TN 37087, U.S.A.
ColorStream, StableSound, and TheaterWide are registered trademarks of Toshiba America Consumer Products, L.L.C.CableClear and SurfLock are trademarks of Toshiba America Consumer Products, L.L.C.The DLP logo and DLP medallion are trademarks of Texas Instruments.