47
OFS-FS-220-3802 v.1 August 2016 Odyssey File & Serve™ Firm Administrator User Guide – Release 3.15

OFS-FS-220-3802 v.1 August 2016
Odyssey File & Serve™Firm AdministratorUser Guide – Release 3.15

COPYRIGHT AND CONFIDENTIALITY
Copyright © 2016 Tyler Technologies, Inc. All rights reserved.Use of these materials is governed by the applicable Tyler Technologies, Inc. license agreement.This notification constitutes part of the documentation and must not be removed.
ii August 2016 OFS-FS-220-3802 v.1
Contents
CONTENTS
COPYRIGHT AND CONFIDENTIALITY ........................................................................................................ IICHAPTER 1 RELEASE 3.15 NEW FEATURES .........................................................................................1CHAPTER 2 SYSTEM OVERVIEW ........................................................................................................2
BEFORE YOU BEGIN ..................................................................................................................2SYSTEM REQUIREMENTS ......................................................................................................2PAGE NAVIGATION ..............................................................................................................2ERROR MESSAGES .............................................................................................................4
CHAPTER 3 E-FILING OVERVIEW.......................................................................................................6FILING QUEUE STATUS ...............................................................................................................6
CHAPTER 4 FILE & SERVE HOME PAGE ..............................................................................................9CHAPTER 5 FILE & SERVE REGISTRATION.......................................................................................... 11
REGISTERING AS A NEW FIRM .................................................................................................... 11REGISTERING AS A USER WITH AN EXISTING FIRM ............................................................................16REGISTERING AS AN INDEPENDENT USER .......................................................................................18RESETTING YOUR PASSWORD .....................................................................................................19
CHAPTER 6 LOGIN AND LOGOUT......................................................................................................21LOGGING IN ...........................................................................................................................21LOGGING OUT........................................................................................................................22
CHAPTER 7 CASE SEARCH ............................................................................................................23SEARCHING FOR A CASE ...........................................................................................................23ADVANCED SEARCH.................................................................................................................24
PERFORMING AN ADVANCED SEARCH BY PERSON......................................................................24PERFORMING AN ADVANCED SEARCH BY BUSINESS....................................................................25
CHAPTER 8 FIRM ADMINISTRATOR FUNCTIONS.....................................................................................26MANAGE NEW USERS ..............................................................................................................26
FILTER NEW USERS OPTIONS..............................................................................................26APPROVING AND REJECTING NEW USERS ...............................................................................27
MANAGE FIRM USER ACCOUNTS .................................................................................................27FILTER FIRM USERS OPTIONS..............................................................................................27ADDING FIRM USER ACCOUNTS ...........................................................................................28EDITING FIRM USER ACCOUNTS ...........................................................................................29DELETING FIRM USER ACCOUNTS.........................................................................................30RESENDING ACTIVATION E-MAIL............................................................................................31RESETTING USER PASSWORDS ............................................................................................32UNLOCKING USER ACCOUNTS..............................................................................................34
MANAGE ATTORNEYACCOUNTS ..................................................................................................35ADDING ATTORNEYACCOUNTS.............................................................................................35EDITING ATTORNEYACCOUNTS.............................................................................................36DELETING ATTORNEYACCOUNT............................................................................................36
MANAGE PAYMENTACCOUNTS....................................................................................................37ADDING PAYMENTACCOUNTS ..............................................................................................37DEACTIVATING PAYMENTACCOUNTS.......................................................................................39EDITING PAYMENTACCOUNTS ..............................................................................................40
MANAGE FIRM INFORMATION ......................................................................................................41UPDATING FIRM INFORMATION ..............................................................................................41
TYLER TECHNOLOGIES TECHNICAL SUPPORT CONTACT INFORMATION ...........................................................43
OFS-FS-220-3802 v.1 August 2016 iii

CHAPTER 1 RELEASE 3.15 NEWFEATURESThe following are new features for Release 3.15.
Note: Features vary based on your system configuration.There are no new features for this release.
OFS-FS-220-3802 v.1 August 2016 1
CHAPTER 2 SYSTEM OVERVIEW
TOPICS COVERED IN THIS CHAPTER
♦ BEFORE YOU BEGIN
This product enables registered users to file documents with the court anytime, anywhere, 24 hours a day,seven days a week. This highly automated, scalable system provides customers the opportunity totransition from an inefficient paper-based process to a streamlined technology-based electronic filing (e-filing) system.
BEFORE YOU BEGINBefore you begin, there are several items you should be aware of to assist you with the successfuloperation of your software.
Note: Depending on your setup, all featuresmay not be available. As a result, your screen mayvary from what is shown in the document.
SYSTEM REQUIREMENTSThis section describes the recommended system requirements to successfully use the system.
• Browser Requirements – The system supports current versions of the Windows operating systemusing Internet Explorer 7 or above or Firefox. If your browser does not meet these minimumrequirements, please contact your network administrator.
• Connection Requirements – A high-speed Internet connection is recommended.
• Minimum Screen Resolution – For best results, a setting of 1024x768 or better is highlyrecommended. If necessary, users can set their monitors to 800x600 pixels, but doing so maycompromise the graphic display.
• Document Format – PDF is the only format allowed for attaching documents when using thesystem.
PAGE NAVIGATIONThe following sections describe how to navigate the system and populate data fields throughout the filingprocess.
Navigate with BreadcrumbsBreadcrumbs are a visual representation of the page you are currently on in the filing process. As youcomplete a page, the next page's title illuminates to show where you are in the process.
Note: Breadcrumb navigation requires information to be entered in a sequential order. You cannotmove to the next breadcrumb until all of the required information on the current or previous page iscompleted.
2 August 2016 OFS-FS-220-3802 v.1

Figure 2.1 – Breadcrumb Navigation
Populate the Data TableThe Data Title is populated using information entered or selected when completing the forms throughout thefiling process.
Figure 2.2 – Data Table
Enter User InformationThe user information you enter or select populates the Data Table.
Figure 2.3 – Data Fields
Resume FilingAt any point in the filing process, the system automatically saves a draft of the page on which you havecompleted all required fields. This feature allows you to stop work on a filing and resume the filing at a latertime. To resume filing of a saved draft, click the link at the top of the page, find your case on theFILINGS screen, and click the icon to resume your filing.
OFS-FS-220-3802 v.1 August 2016 3
Page Navigation

Odyssey File & Serve™
Figure 2.4 – Work Space
ERROR MESSAGESThe system displays several error messages to alert users when required information is not entered orinvalid information is provided.
Password Reset Errors ScenariosInvalid User – To reset the password for your account, you will need to provide the username for theaccount and answer the security question for the account.
Note: That user does not exist.No Security question on File – No security question on file for (username). Your firm administrator may stillreset your password.
Note: Reset your password.
Enter Data in Required FieldsRequired fields are those that contain an asterisk (*) next to the field name. If you don't enter the informationrequired into a required field and try to advance, you will receive error messages.
Note: Required fields may vary in different sections.Look for a field outlined in red in your form. Place a cursor on the outline of the field, a required fieldmessage is displayed.
4 August 2016 OFS-FS-220-3802 v.1
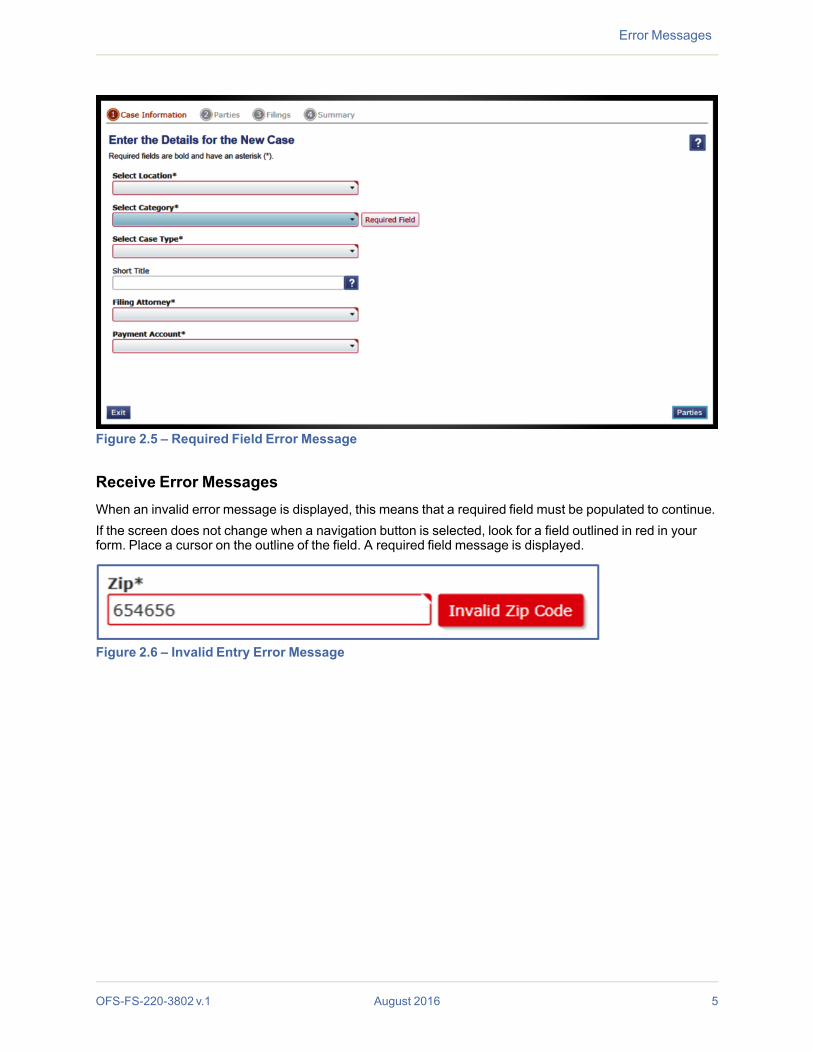
Figure 2.5 – Required Field Error Message
Receive Error MessagesWhen an invalid error message is displayed, this means that a required field must be populated to continue.If the screen does not change when a navigation button is selected, look for a field outlined in red in yourform. Place a cursor on the outline of the field. A required field message is displayed.
Figure 2.6 – Invalid Entry Error Message
OFS-FS-220-3802 v.1 August 2016 5
Error Messages
CHAPTER 3 E-FILING OVERVIEW
TOPICS COVERED IN THIS CHAPTER
♦ FILING QUEUE STATUS
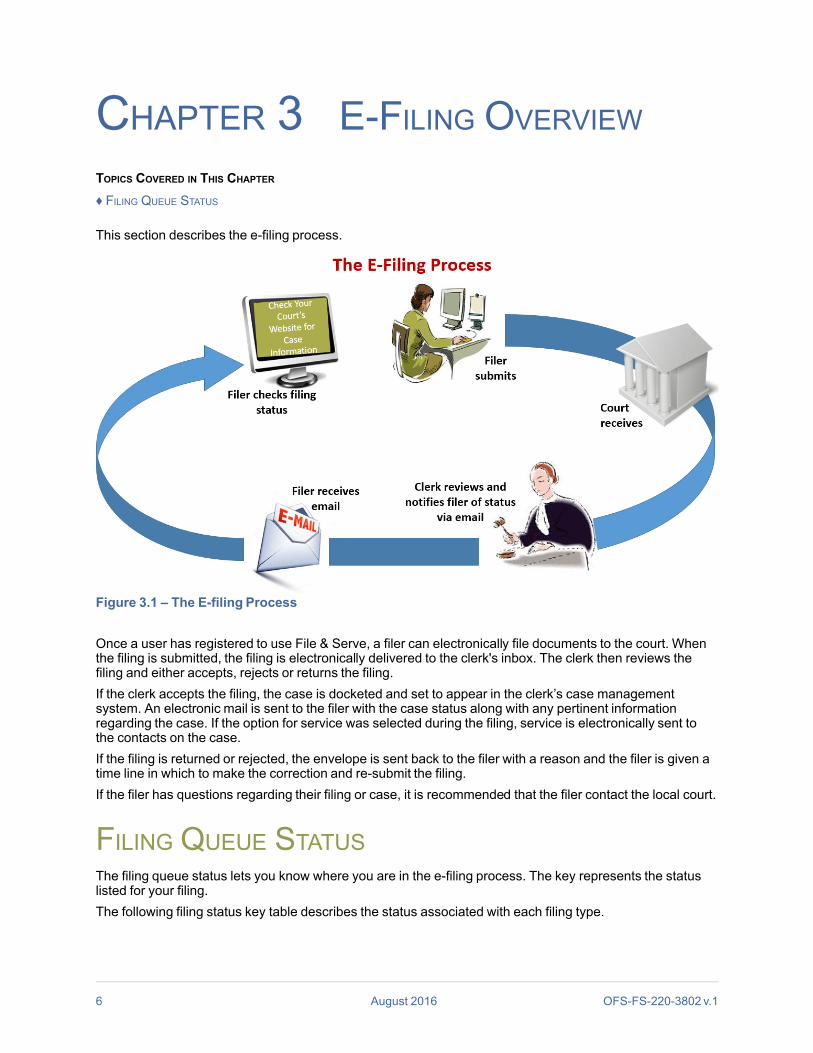
This section describes the e-filing process.
Figure 3.1 – The E-filing Process
Once a user has registered to use File & Serve, a filer can electronically file documents to the court. Whenthe filing is submitted, the filing is electronically delivered to the clerk's inbox. The clerk then reviews thefiling and either accepts, rejects or returns the filing.If the clerk accepts the filing, the case is docketed and set to appear in the clerk’s case managementsystem. An electronic mail is sent to the filer with the case status along with any pertinent informationregarding the case. If the option for service was selected during the filing, service is electronically sent tothe contacts on the case.If the filing is returned or rejected, the envelope is sent back to the filer with a reason and the filer is given atime line in which to make the correction and re-submit the filing.If the filer has questions regarding their filing or case, it is recommended that the filer contact the local court.
FILING QUEUE STATUSThe filing queue status lets you know where you are in the e-filing process. The key represents the statuslisted for your filing.The following filing status key table describes the status associated with each filing type.
6 August 2016 OFS-FS-220-3802 v.1
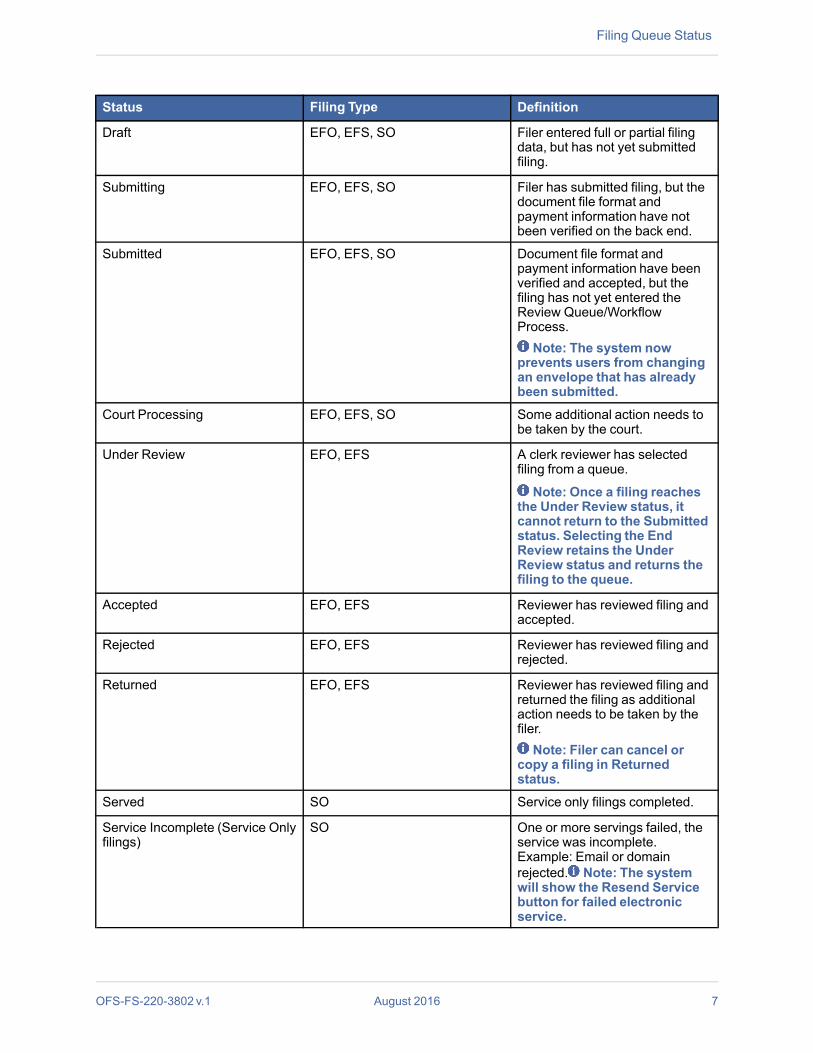
Status Filing Type Definition
Draft EFO, EFS, SO Filer entered full or partial filingdata, but has not yet submittedfiling.
Submitting EFO, EFS, SO Filer has submitted filing, but thedocument file format andpayment information have notbeen verified on the back end.
Submitted EFO, EFS, SO Document file format andpayment information have beenverified and accepted, but thefiling has not yet entered theReview Queue/WorkflowProcess.Note: The system now
prevents users from changingan envelope that has alreadybeen submitted.
Court Processing EFO, EFS, SO Some additional action needs tobe taken by the court.
Under Review EFO, EFS A clerk reviewer has selectedfiling from a queue.
Note: Once a filing reachesthe Under Review status, itcannot return to the Submittedstatus. Selecting the EndReview retains the UnderReview status and returns thefiling to the queue.
Accepted EFO, EFS Reviewer has reviewed filing andaccepted.
Rejected EFO, EFS Reviewer has reviewed filing andrejected.
Returned EFO, EFS Reviewer has reviewed filing andreturned the filing as additionalaction needs to be taken by thefiler.Note: Filer can cancel or
copy a filing in Returnedstatus.
Served SO Service only filings completed.
Service Incomplete (Service Onlyfilings)
SO One or more servings failed, theservice was incomplete.Example: Email or domainrejected. Note: The systemwill show the Resend Servicebutton for failed electronicservice.
OFS-FS-220-3802 v.1 August 2016 7
Filing Queue Status
Odyssey File & Serve™
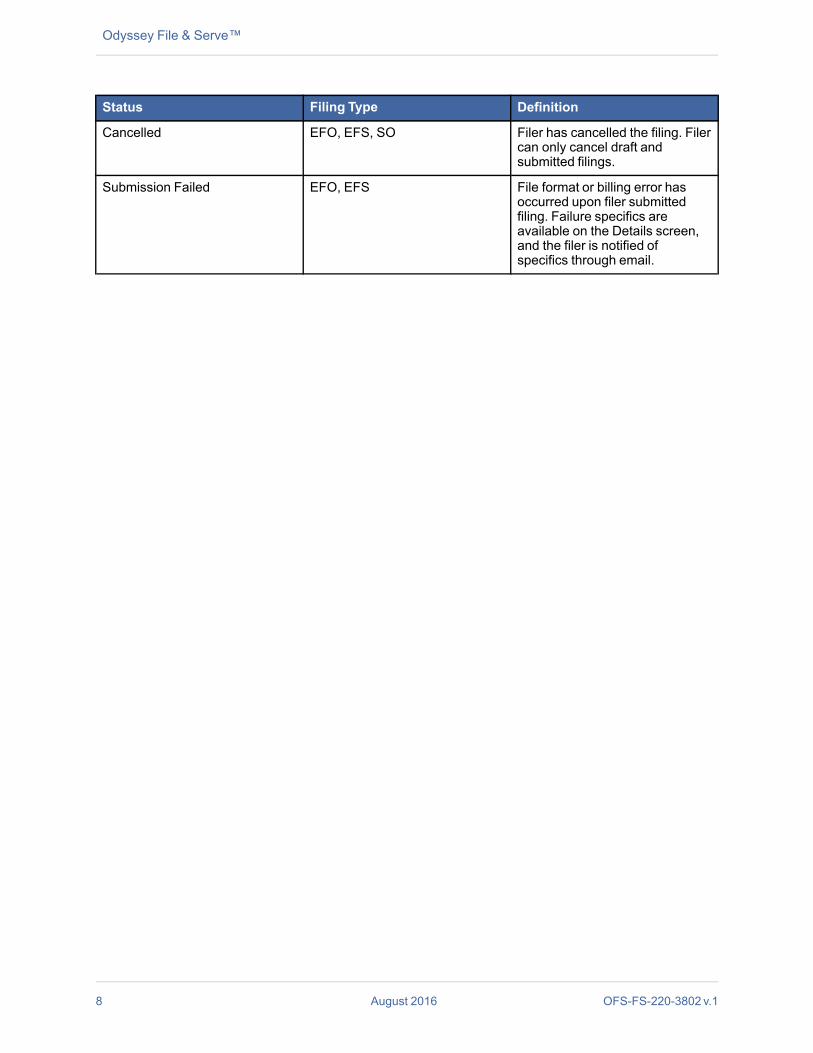
Status Filing Type Definition
Cancelled EFO, EFS, SO Filer has cancelled the filing. Filercan only cancel draft andsubmitted filings.
Submission Failed EFO, EFS File format or billing error hasoccurred upon filer submittedfiling. Failure specifics areavailable on the Details screen,and the filer is notified ofspecifics through email.
8 August 2016 OFS-FS-220-3802 v.1
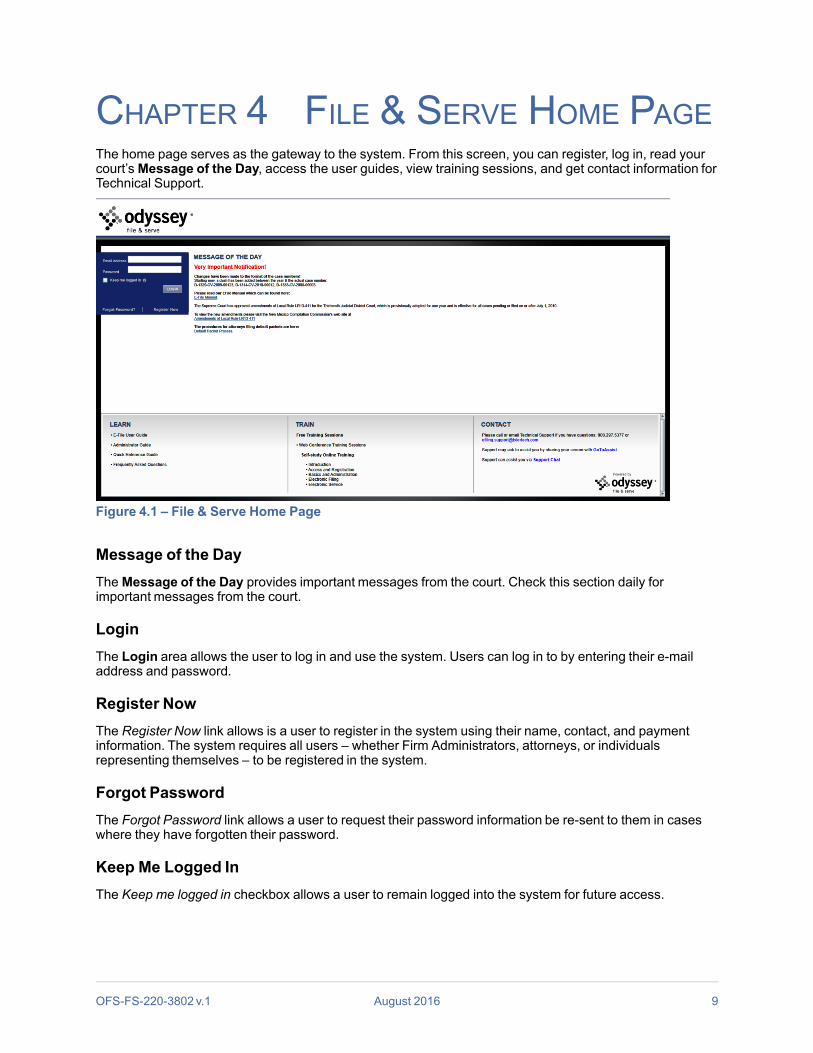
CHAPTER 4 FILE & SERVE HOME PAGEThe home page serves as the gateway to the system. From this screen, you can register, log in, read yourcourt’sMessage of the Day, access the user guides, view training sessions, and get contact information forTechnical Support.
Figure 4.1 – File & Serve Home Page
Message of the DayTheMessage of the Day provides important messages from the court. Check this section daily forimportant messages from the court.
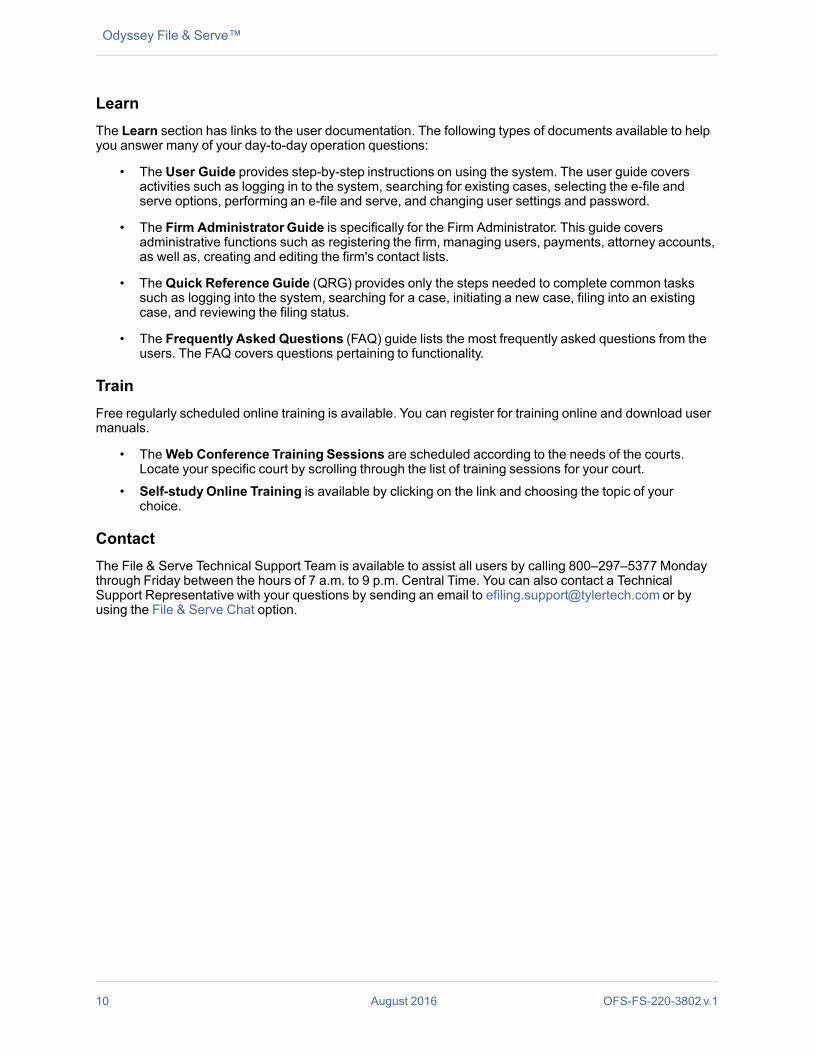
LoginThe Login area allows the user to log in and use the system. Users can log in to by entering their e-mailaddress and password.
Register NowThe Register Now link allows is a user to register in the system using their name, contact, and paymentinformation. The system requires all users – whether Firm Administrators, attorneys, or individualsrepresenting themselves – to be registered in the system.
Forgot PasswordThe Forgot Password link allows a user to request their password information be re-sent to them in caseswhere they have forgotten their password.
Keep Me Logged InThe Keep me logged in checkbox allows a user to remain logged into the system for future access.
OFS-FS-220-3802 v.1 August 2016 9
Odyssey File & Serve™
LearnThe Learn section has links to the user documentation. The following types of documents available to helpyou answer many of your day-to-day operation questions:
• The User Guide provides step-by-step instructions on using the system. The user guide coversactivities such as logging in to the system, searching for existing cases, selecting the e-file andserve options, performing an e-file and serve, and changing user settings and password.
• The Firm AdministratorGuide is specifically for the Firm Administrator. This guide coversadministrative functions such as registering the firm, managing users, payments, attorney accounts,as well as, creating and editing the firm's contact lists.
• The Quick Reference Guide (QRG) provides only the steps needed to complete common taskssuch as logging into the system, searching for a case, initiating a new case, filing into an existingcase, and reviewing the filing status.
• The Frequently Asked Questions (FAQ) guide lists the most frequently asked questions from theusers. The FAQ covers questions pertaining to functionality.
TrainFree regularly scheduled online training is available. You can register for training online and download usermanuals.
• TheWeb Conference Training Sessions are scheduled according to the needs of the courts.Locate your specific court by scrolling through the list of training sessions for your court.
• Self-studyOnline Training is available by clicking on the link and choosing the topic of yourchoice.
ContactThe File & Serve Technical Support Team is available to assist all users by calling 800–297–5377 Mondaythrough Friday between the hours of 7 a.m. to 9 p.m. Central Time. You can also contact a TechnicalSupport Representative with your questions by sending an email to [email protected] or byusing the File & Serve Chat option.
10 August 2016 OFS-FS-220-3802 v.1
CHAPTER 5 FILE & SERVEREGISTRATION
TOPICS COVERED IN THIS CHAPTER
♦ REGISTERING AS A NEW FIRM♦ REGISTERING AS A USER WITH AN EXISTING FIRM♦ REGISTERING AS AN INDEPENDENT USER♦ RESETTING YOUR PASSWORD
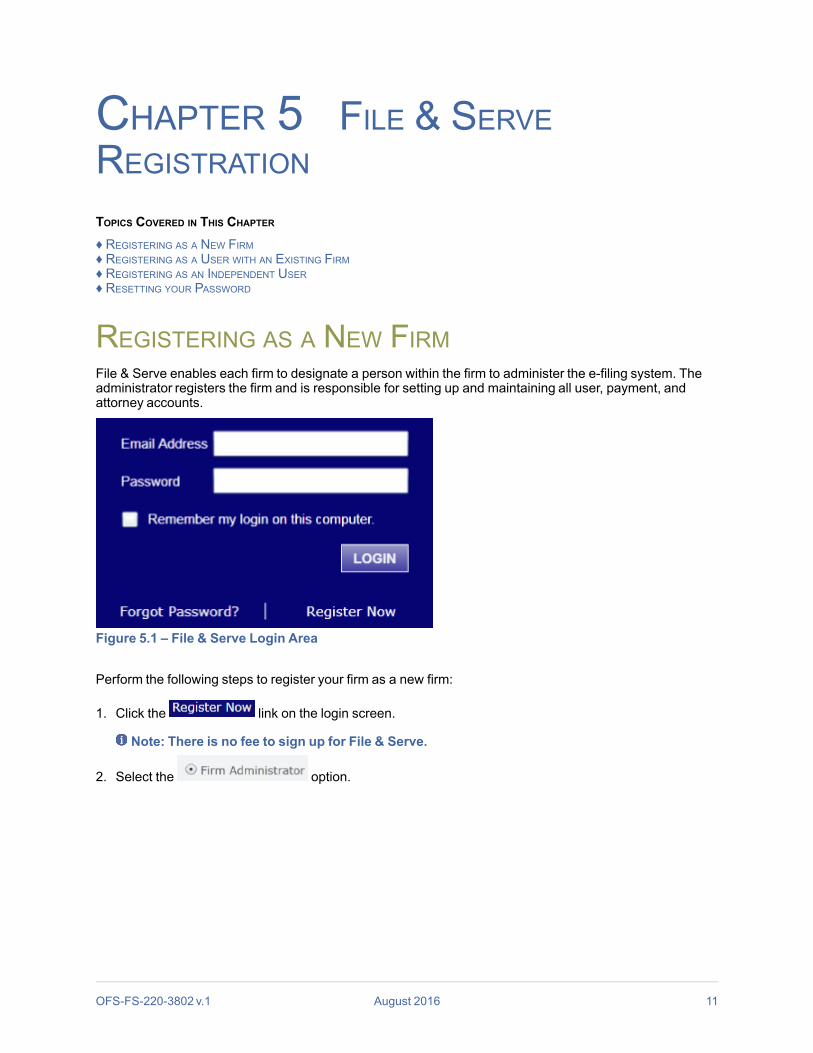
REGISTERING AS A NEW FIRMFile & Serve enables each firm to designate a person within the firm to administer the e-filing system. Theadministrator registers the firm and is responsible for setting up and maintaining all user, payment, andattorney accounts.
Figure 5.1 – File & Serve Login Area
Perform the following steps to register your firm as a new firm:
1. Click the link on the login screen.
Note: There is no fee to sign up for File & Serve.
2. Select the option.
OFS-FS-220-3802 v.1 August 2016 11
Odyssey File & Serve™
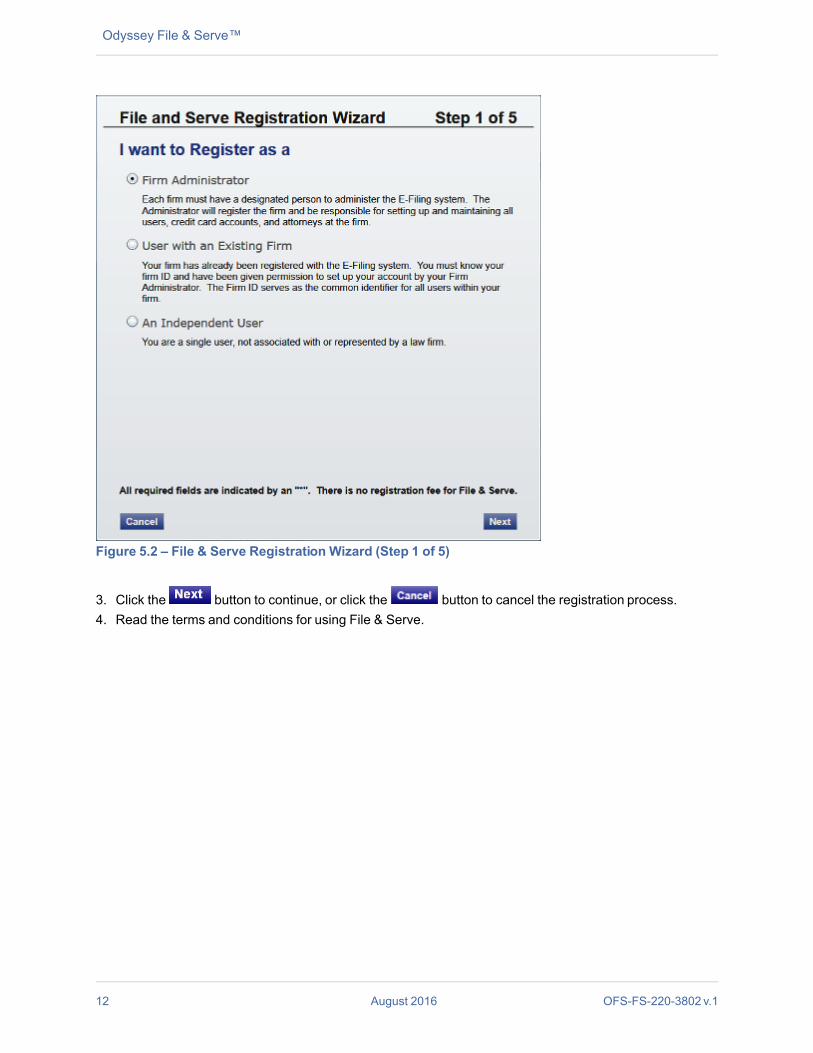
Figure 5.2 – File & Serve Registration Wizard (Step 1 of 5)
3. Click the button to continue, or click the button to cancel the registration process.4. Read the terms and conditions for using File & Serve.
12 August 2016 OFS-FS-220-3802 v.1
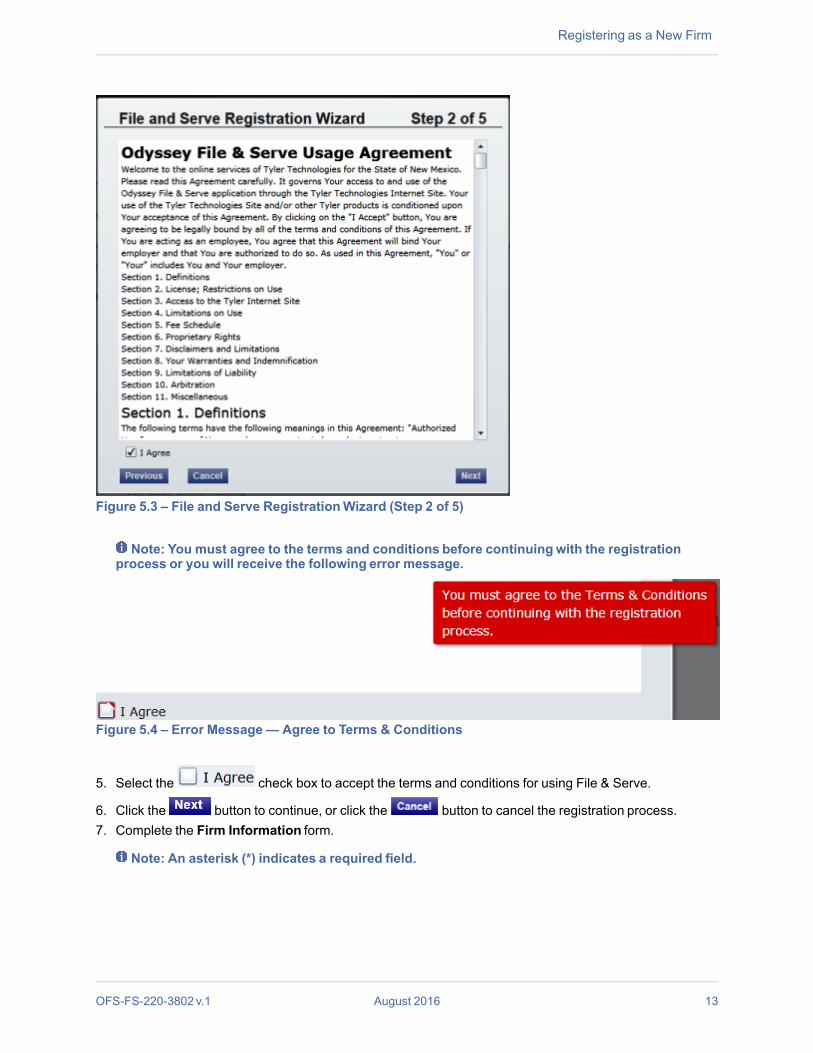
Figure 5.3 – File and Serve RegistrationWizard (Step 2 of 5)
Note: You must agree to the terms and conditions before continuingwith the registrationprocess or you will receive the following error message.
Figure 5.4 – Error Message— Agree to Terms & Conditions
5. Select the check box to accept the terms and conditions for using File & Serve.
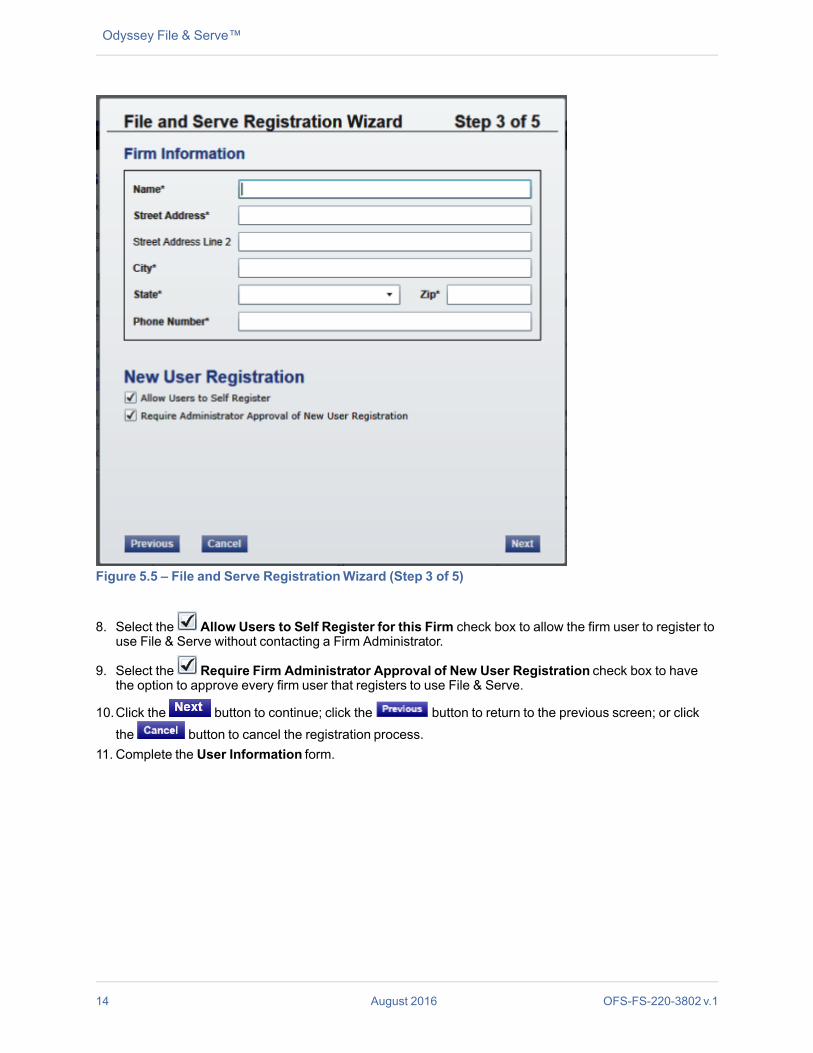
6. Click the button to continue, or click the button to cancel the registration process.7. Complete the Firm Information form.
Note: An asterisk (*) indicates a required field.
OFS-FS-220-3802 v.1 August 2016 13
Registering as a New Firm
Odyssey File & Serve™
Figure 5.5 – File and Serve RegistrationWizard (Step 3 of 5)
8. Select the Allow Users to Self Register for this Firm check box to allow the firm user to register touse File & Serve without contacting a Firm Administrator.
9. Select the Require Firm Administrator Approval of New User Registration check box to havethe option to approve every firm user that registers to use File & Serve.
10.Click the button to continue; click the button to return to the previous screen; or clickthe button to cancel the registration process.
11. Complete the User Information form.
14 August 2016 OFS-FS-220-3802 v.1
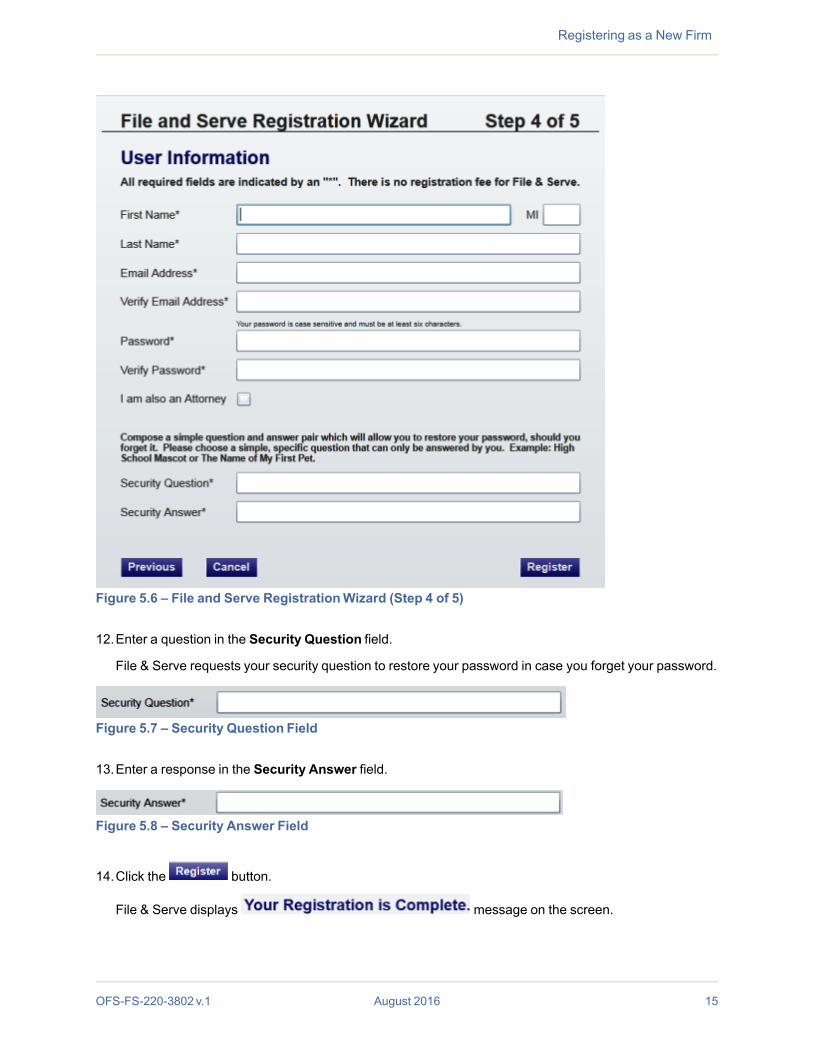
Figure 5.6 – File and Serve RegistrationWizard (Step 4 of 5)
12.Enter a question in the Security Question field.
File & Serve requests your security question to restore your password in case you forget your password.
Figure 5.7 – Security Question Field
13.Enter a response in the Security Answer field.
Figure 5.8 – Security Answer Field
14.Click the button.
File & Serve displays message on the screen.
OFS-FS-220-3802 v.1 August 2016 15
Registering as a New Firm
Odyssey File & Serve™
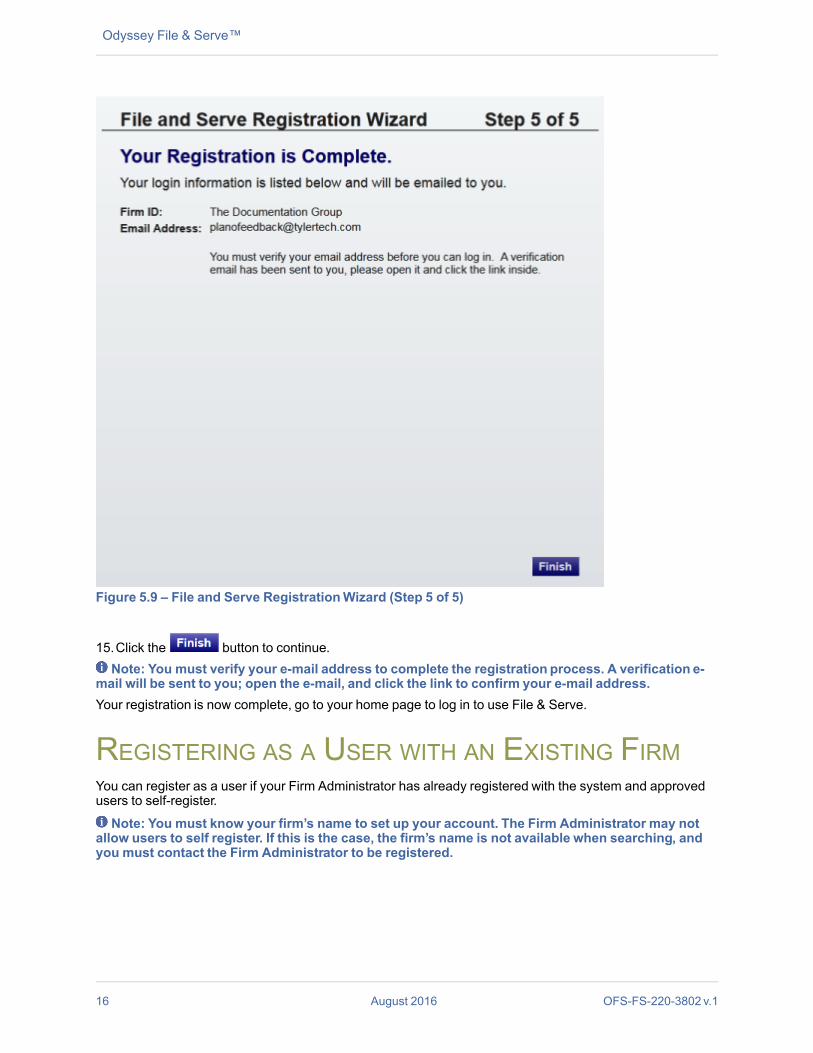
Figure 5.9 – File and Serve RegistrationWizard (Step 5 of 5)
15.Click the button to continue.Note: You must verify your e-mail address to complete the registration process. A verification e-
mail will be sent to you; open the e-mail, and click the link to confirm your e-mail address.Your registration is now complete, go to your home page to log in to use File & Serve.
REGISTERING AS A USER WITH AN EXISTING FIRMYou can register as a user if your Firm Administrator has already registered with the system and approvedusers to self-register.
Note: You must know your firm’s name to set up your account. The Firm Administrator may notallow users to self register. If this is the case, the firm’s name is not available when searching, andyou must contact the Firm Administrator to be registered.
16 August 2016 OFS-FS-220-3802 v.1
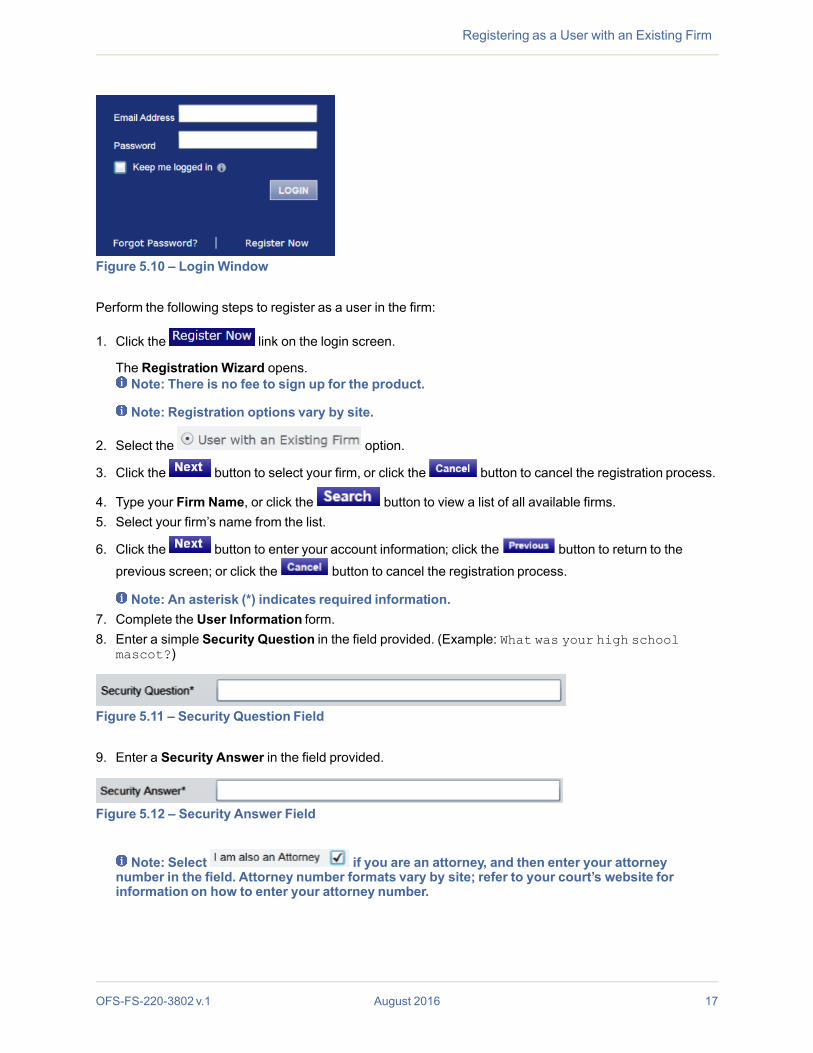
Figure 5.10 – LoginWindow
Perform the following steps to register as a user in the firm:
1. Click the link on the login screen.
The Registration Wizard opens.Note: There is no fee to sign up for the product.
Note: Registration options vary by site.
2. Select the option.
3. Click the button to select your firm, or click the button to cancel the registration process.
4. Type your Firm Name, or click the button to view a list of all available firms.5. Select your firm’s name from the list.
6. Click the button to enter your account information; click the button to return to theprevious screen; or click the button to cancel the registration process.
Note: An asterisk (*) indicates required information.7. Complete the User Information form.8. Enter a simple Security Question in the field provided. (Example: What was your high school
mascot?)
Figure 5.11 – Security Question Field
9. Enter a Security Answer in the field provided.
Figure 5.12 – Security Answer Field
Note: Select if you are an attorney, and then enter your attorneynumber in the field. Attorney number formats vary by site; refer to your court’s website forinformation on how to enter your attorney number.
OFS-FS-220-3802 v.1 August 2016 17
Registering as a User with an Existing Firm
Odyssey File & Serve™
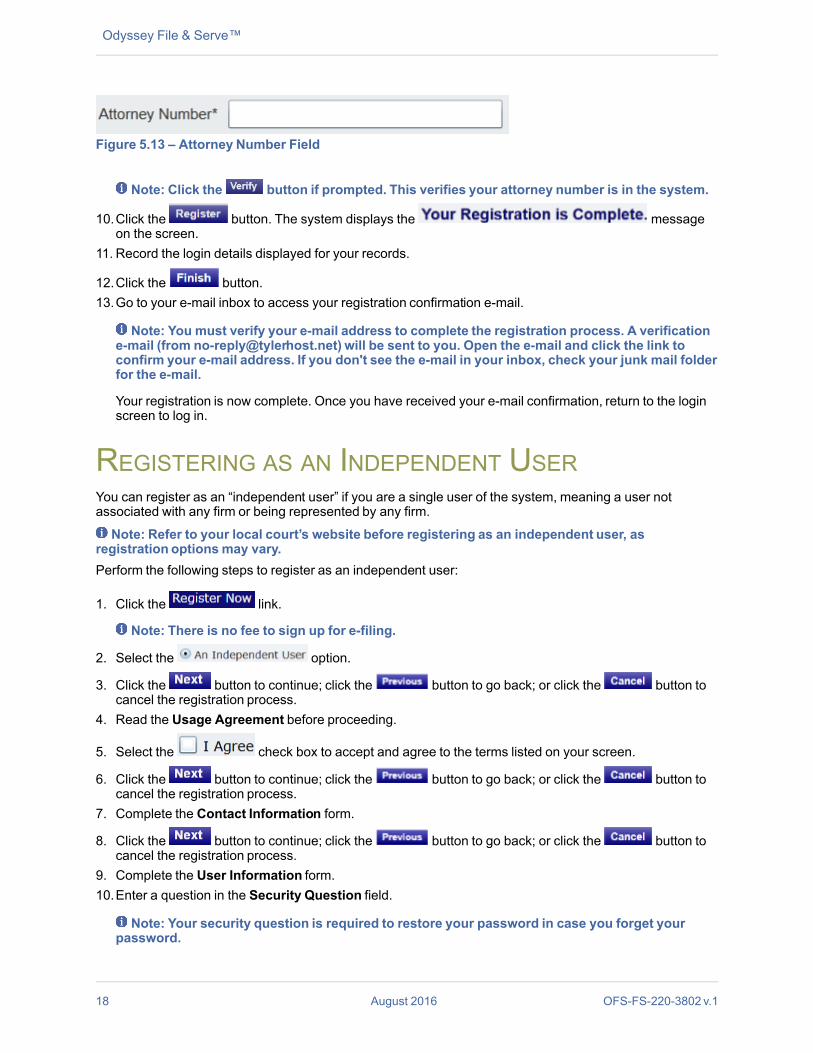
Figure 5.13 – Attorney Number Field
Note: Click the button if prompted. This verifies your attorney number is in the system.
10.Click the button. The system displays the messageon the screen.
11. Record the login details displayed for your records.
12.Click the button.13.Go to your e-mail inbox to access your registration confirmation e-mail.
Note: You must verify your e-mail address to complete the registration process. A verificatione-mail (from [email protected]) will be sent to you. Open the e-mail and click the link toconfirm your e-mail address. If you don't see the e-mail in your inbox, check your junk mail folderfor the e-mail.
Your registration is now complete. Once you have received your e-mail confirmation, return to the loginscreen to log in.
REGISTERING AS AN INDEPENDENT USERYou can register as an “independent user” if you are a single user of the system, meaning a user notassociated with any firm or being represented by any firm.
Note: Refer to your local court’s website before registering as an independent user, asregistration optionsmay vary.Perform the following steps to register as an independent user:
1. Click the link.
Note: There is no fee to sign up for e-filing.
2. Select the option.
3. Click the button to continue; click the button to go back; or click the button tocancel the registration process.
4. Read the Usage Agreement before proceeding.
5. Select the check box to accept and agree to the terms listed on your screen.
6. Click the button to continue; click the button to go back; or click the button tocancel the registration process.
7. Complete the Contact Information form.
8. Click the button to continue; click the button to go back; or click the button tocancel the registration process.
9. Complete the User Information form.10.Enter a question in the Security Question field.
Note: Your security question is required to restore your password in case you forget yourpassword.
18 August 2016 OFS-FS-220-3802 v.1

11. Enter a response in the Security Answer field.
12.Click the button.
The message Your Registration is Complete displays on the screen.
13.Click the button.
Note: You must verify your e-mail address to complete the registration process. A verificatione-mail (from [email protected]) will be sent to you; open the e-mail and click the link toconfirm your e-mail address. If you don't see the e-mail in your inbox, check your junk mail folderfor the e-mail.
Your registration is complete, go to your home page to log in.
RESETTING YOUR PASSWORDIf you have forgotten your password, you can reset your password by entering the e-mail address providedduring registration and clicking the link.
Note: Your password is case-sensitive. Make sure your caps lock is not on.Note: You can unlock your account by using the Forgot Password? option and reset your
password without having to contact the Firm Administrator if a security question is associated withthe account.
Figure 5.14 – LoginWindow
1. Click the link on the Login window.
The Reset Password window opens.
OFS-FS-220-3802 v.1 August 2016 19
Resetting your Password
Odyssey File & Serve™
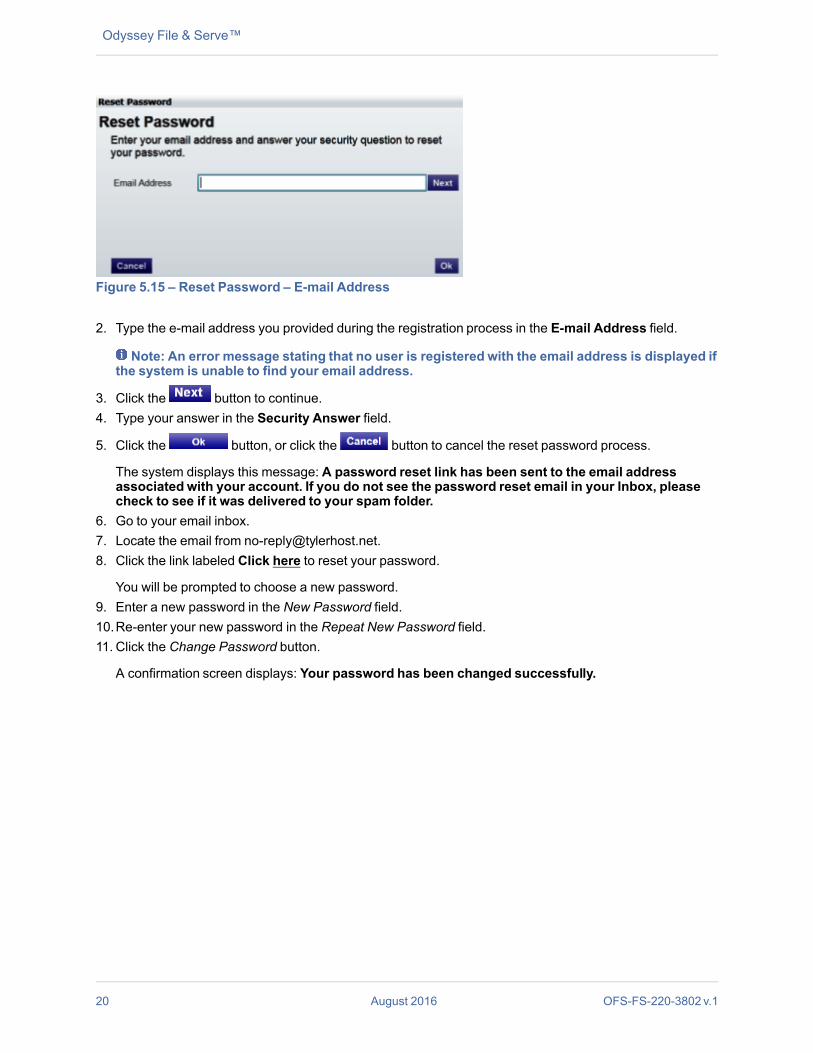
Figure 5.15 – Reset Password – E-mail Address
2. Type the e-mail address you provided during the registration process in the E-mail Address field.
Note: An error message stating that no user is registered with the email address is displayed ifthe system is unable to find your email address.
3. Click the button to continue.4. Type your answer in the Security Answer field.
5. Click the button, or click the button to cancel the reset password process.
The system displays this message: A password reset link has been sent to the email addressassociated with your account. If you do not see the password reset email in your Inbox, pleasecheck to see if it was delivered to your spam folder.
6. Go to your email inbox.7. Locate the email from [email protected]. Click the link labeled Click here to reset your password.
You will be prompted to choose a new password.9. Enter a new password in the New Password field.10.Re-enter your new password in the Repeat New Password field.11. Click the Change Password button.
A confirmation screen displays: Your password has been changed successfully.
20 August 2016 OFS-FS-220-3802 v.1
CHAPTER 6 LOGIN AND LOGOUTTOPICS COVERED IN THIS CHAPTER
♦ LOGGING IN♦ LOGGING OUT
All users are required to log in to e-file and serve a document or to check the status of an existing filing. It isalso a best practice for users to log out after they have completed their transactions.
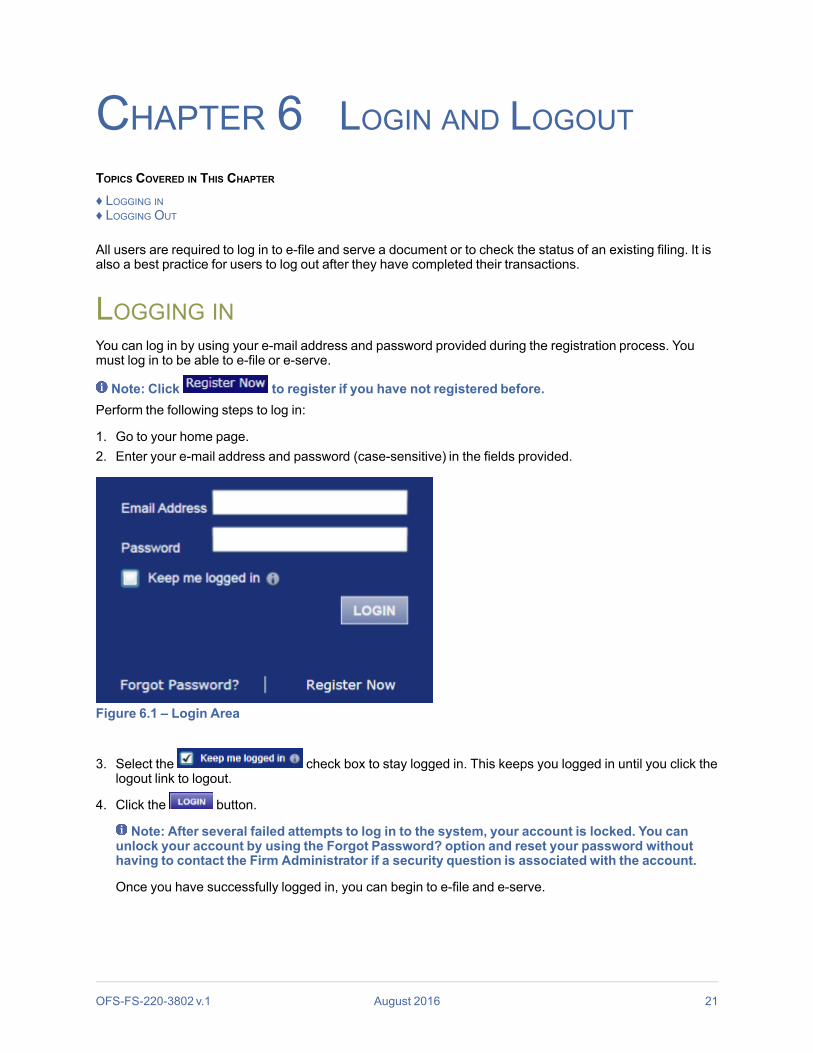
LOGGING INYou can log in by using your e-mail address and password provided during the registration process. Youmust log in to be able to e-file or e-serve.
Note: Click to register if you have not registered before.Perform the following steps to log in:
1. Go to your home page.2. Enter your e-mail address and password (case-sensitive) in the fields provided.
Figure 6.1 – Login Area
3. Select the check box to stay logged in. This keeps you logged in until you click thelogout link to logout.
4. Click the button.
Note: After several failed attempts to log in to the system, your account is locked. You canunlock your account by using the Forgot Password? option and reset your password withouthaving to contact the Firm Administrator if a security question is associated with the account.
Once you have successfully logged in, you can begin to e-file and e-serve.
OFS-FS-220-3802 v.1 August 2016 21
Odyssey File & Serve™
LOGGING OUTThis section describes how to properly log out.Perform the following steps to log out:
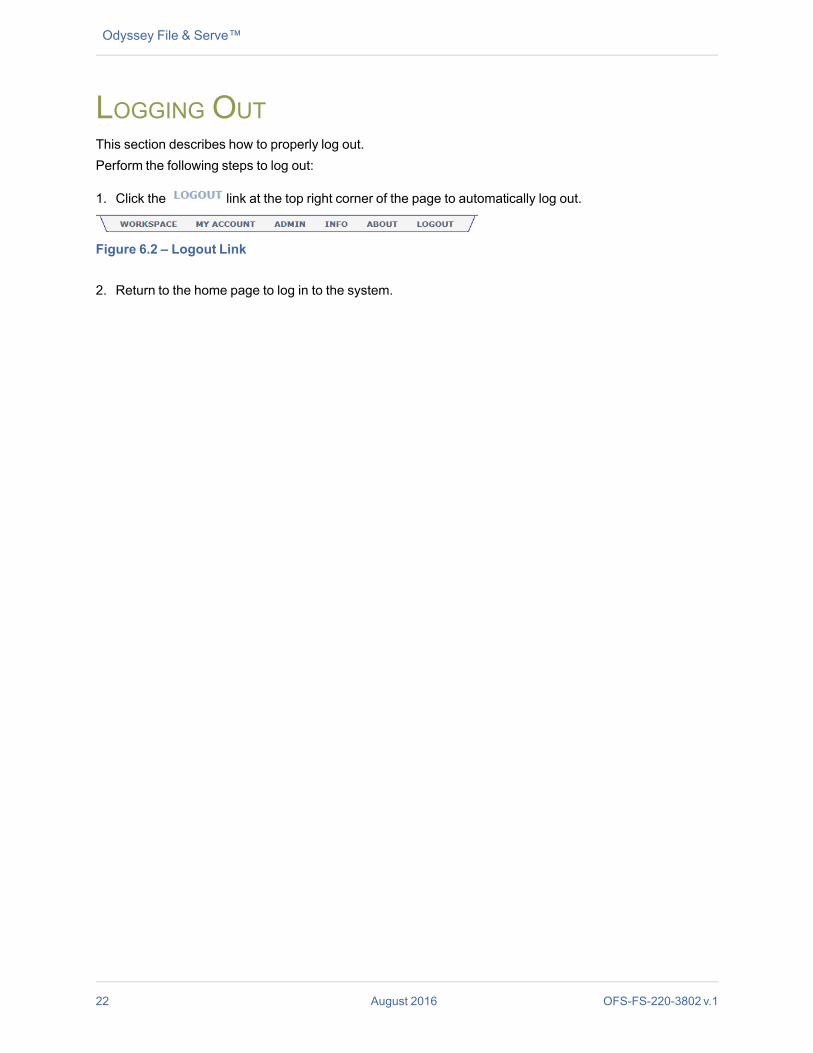
1. Click the link at the top right corner of the page to automatically log out.
Figure 6.2 – Logout Link
2. Return to the home page to log in to the system.
22 August 2016 OFS-FS-220-3802 v.1
CHAPTER 7 CASE SEARCH
TOPICS COVERED IN THIS CHAPTER
♦ SEARCHING FOR A CASE♦ ADVANCED SEARCH
Search for a case by selecting a location, entering a case number or a party name.
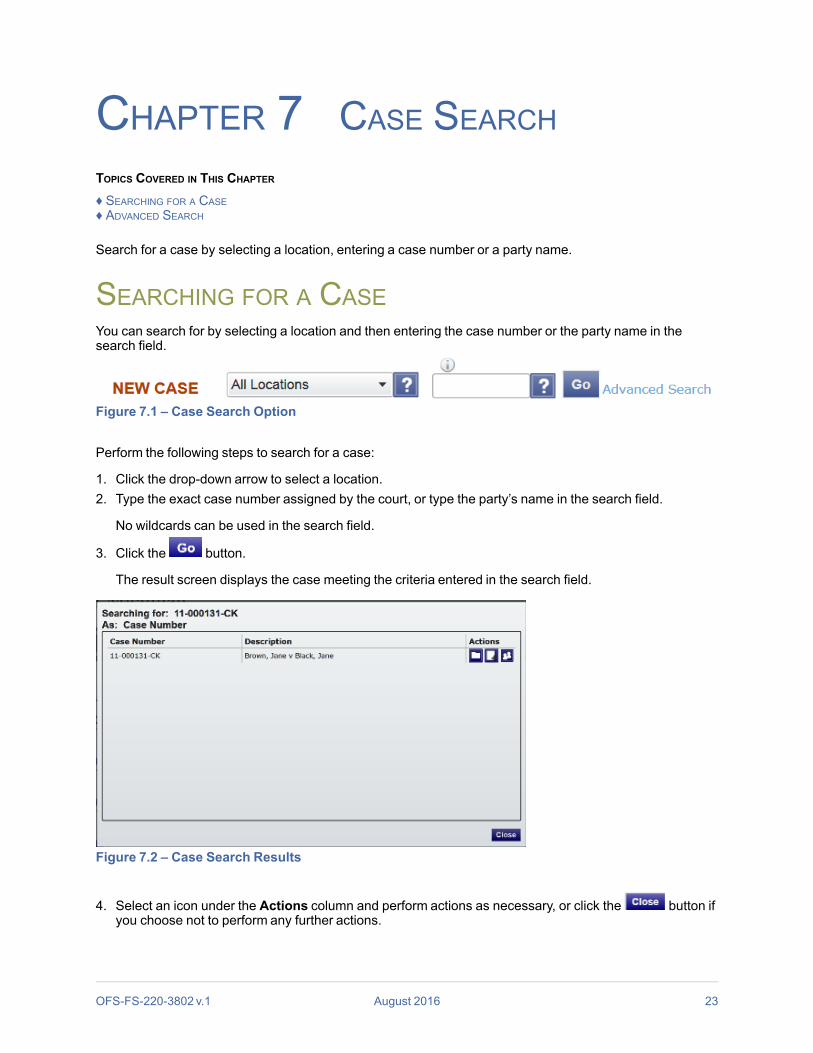
SEARCHING FOR A CASEYou can search for by selecting a location and then entering the case number or the party name in thesearch field.
Figure 7.1 – Case Search Option
Perform the following steps to search for a case:
1. Click the drop-down arrow to select a location.2. Type the exact case number assigned by the court, or type the party’s name in the search field.
No wildcards can be used in the search field.
3. Click the button.
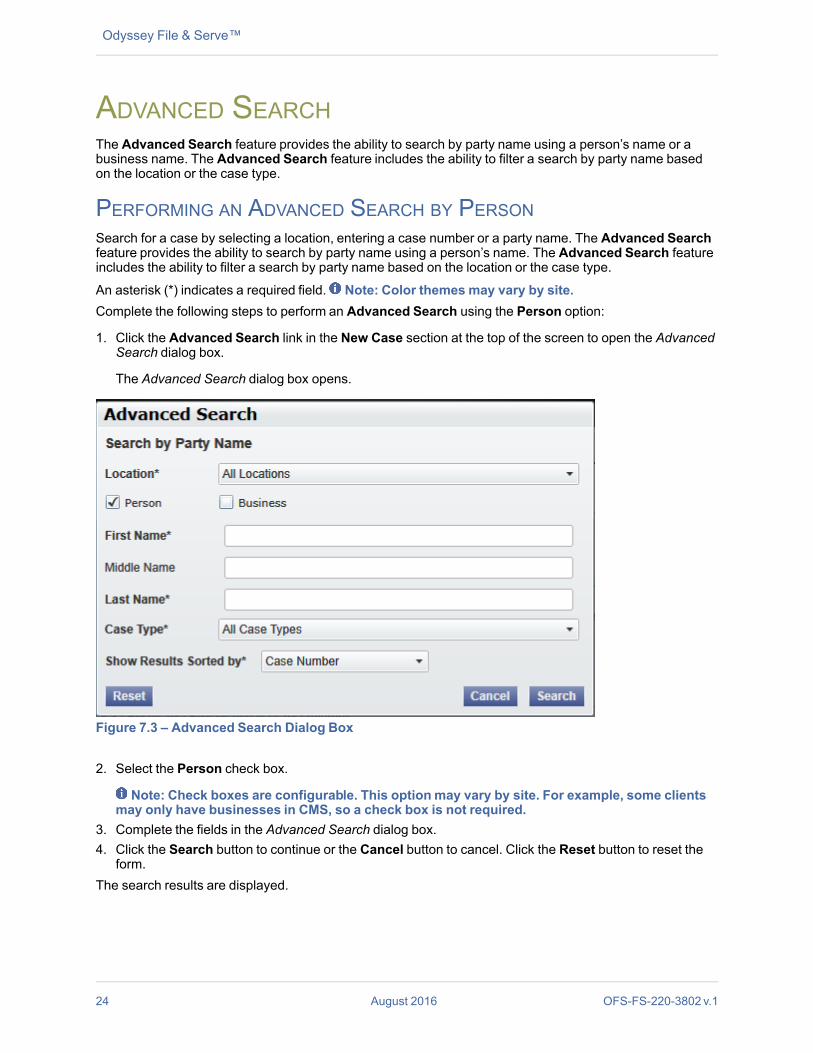
The result screen displays the case meeting the criteria entered in the search field.
Figure 7.2 – Case Search Results
4. Select an icon under the Actions column and perform actions as necessary, or click the button ifyou choose not to perform any further actions.
OFS-FS-220-3802 v.1 August 2016 23
Odyssey File & Serve™
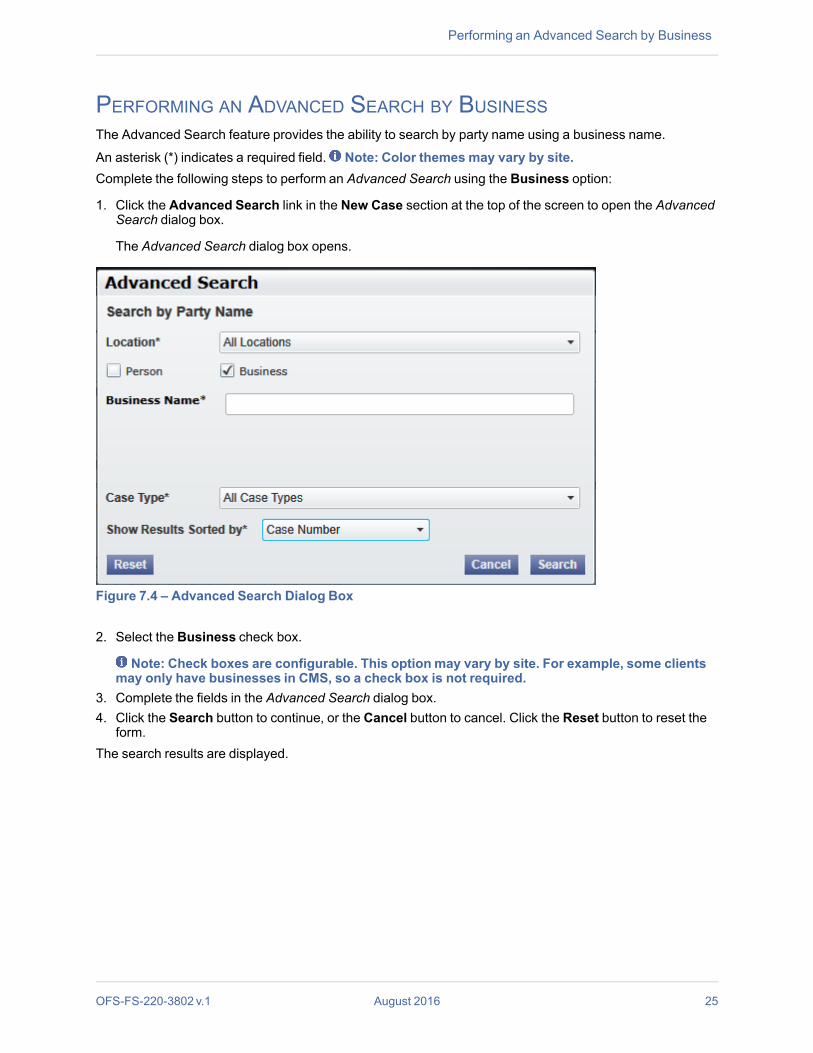
ADVANCED SEARCHThe Advanced Search feature provides the ability to search by party name using a person’s name or abusiness name. The Advanced Search feature includes the ability to filter a search by party name basedon the location or the case type.
PERFORMING AN ADVANCED SEARCH BY PERSONSearch for a case by selecting a location, entering a case number or a party name. The Advanced Searchfeature provides the ability to search by party name using a person’s name. The Advanced Search featureincludes the ability to filter a search by party name based on the location or the case type.
An asterisk (*) indicates a required field. Note: Color themes may vary by site.Complete the following steps to perform an Advanced Search using the Person option:
1. Click the Advanced Search link in the New Case section at the top of the screen to open the AdvancedSearch dialog box.
The Advanced Search dialog box opens.
Figure 7.3 – Advanced Search Dialog Box
2. Select the Person check box.
Note: Check boxes are configurable. This optionmay vary by site. For example, some clientsmay only have businesses in CMS, so a check box is not required.
3. Complete the fields in the Advanced Search dialog box.4. Click the Search button to continue or the Cancel button to cancel. Click the Reset button to reset the
form.The search results are displayed.
24 August 2016 OFS-FS-220-3802 v.1
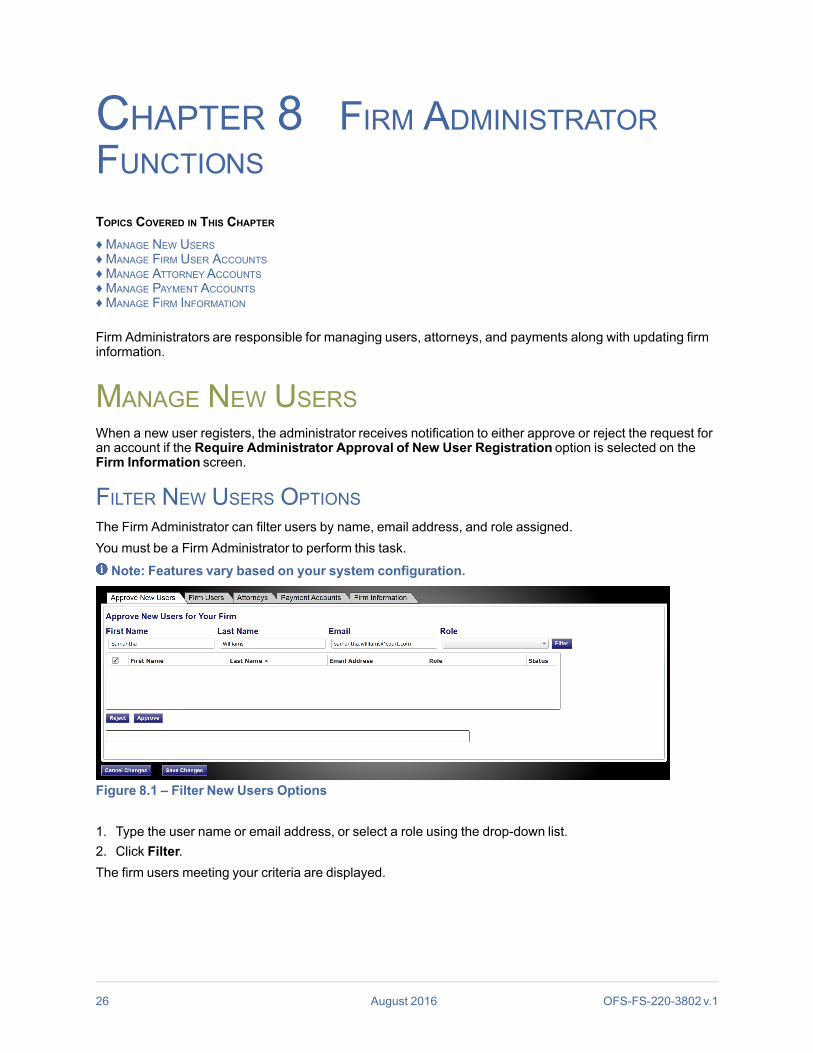
PERFORMING AN ADVANCED SEARCH BY BUSINESSThe Advanced Search feature provides the ability to search by party name using a business name.
An asterisk (*) indicates a required field. Note: Color themes may vary by site.Complete the following steps to perform an Advanced Search using the Business option:
1. Click the Advanced Search link in the New Case section at the top of the screen to open the AdvancedSearch dialog box.
The Advanced Search dialog box opens.
Figure 7.4 – Advanced Search Dialog Box
2. Select the Business check box.
Note: Check boxes are configurable. This optionmay vary by site. For example, some clientsmay only have businesses in CMS, so a check box is not required.
3. Complete the fields in the Advanced Search dialog box.4. Click the Search button to continue, or the Cancel button to cancel. Click the Reset button to reset the
form.The search results are displayed.
OFS-FS-220-3802 v.1 August 2016 25
Performing an Advanced Search by Business
CHAPTER 8 FIRM ADMINISTRATORFUNCTIONSTOPICS COVERED IN THIS CHAPTER
♦ MANAGE NEW USERS♦ MANAGE FIRM USER ACCOUNTS♦ MANAGE ATTORNEYACCOUNTS♦ MANAGE PAYMENTACCOUNTS♦ MANAGE FIRM INFORMATION
Firm Administrators are responsible for managing users, attorneys, and payments along with updating firminformation.
MANAGE NEW USERSWhen a new user registers, the administrator receives notification to either approve or reject the request foran account if the Require Administrator Approval of New User Registration option is selected on theFirm Information screen.
FILTER NEW USERS OPTIONSThe Firm Administrator can filter users by name, email address, and role assigned.You must be a Firm Administrator to perform this task.
Note: Features vary based on your system configuration.
Figure 8.1 – Filter New Users Options
1. Type the user name or email address, or select a role using the drop-down list.2. Click Filter.The firm users meeting your criteria are displayed.
26 August 2016 OFS-FS-220-3802 v.1
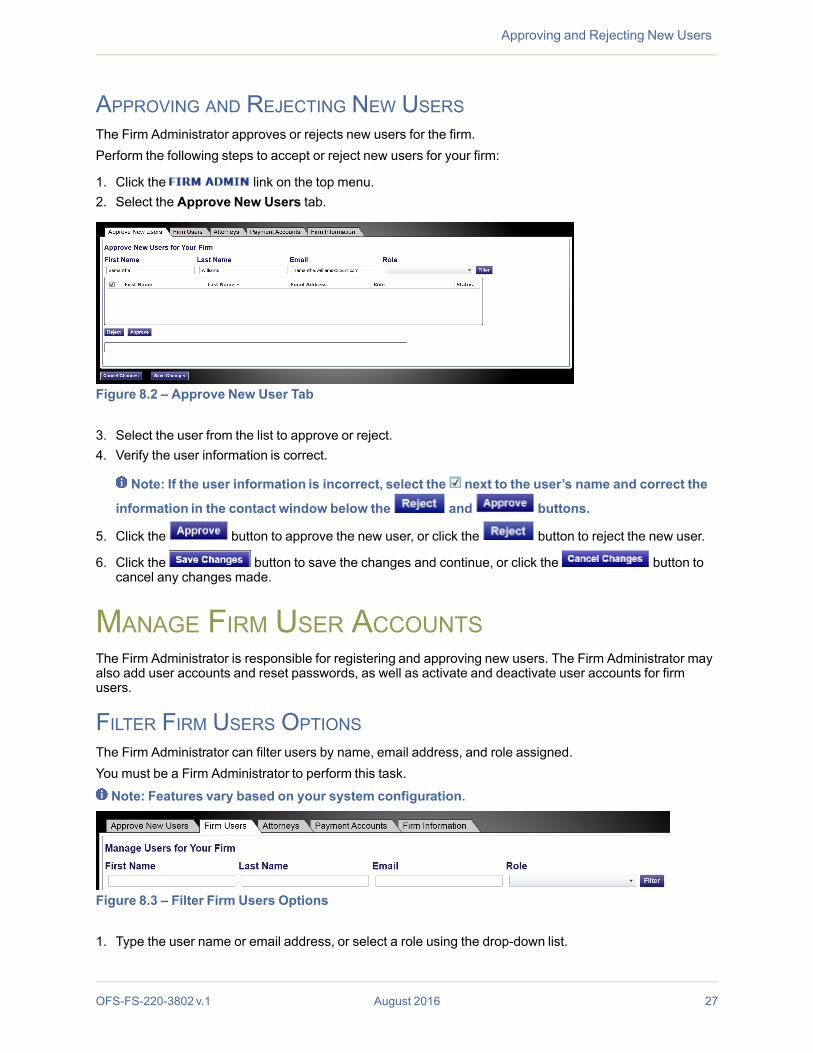
APPROVING AND REJECTING NEW USERSThe Firm Administrator approves or rejects new users for the firm.Perform the following steps to accept or reject new users for your firm:
1. Click the link on the top menu.2. Select the Approve New Users tab.
Figure 8.2 – Approve New User Tab
3. Select the user from the list to approve or reject.4. Verify the user information is correct.
Note: If the user information is incorrect, select the next to the user’s name and correct the
information in the contact window below the and buttons.
5. Click the button to approve the new user, or click the button to reject the new user.
6. Click the button to save the changes and continue, or click the button tocancel any changes made.
MANAGE FIRM USER ACCOUNTSThe Firm Administrator is responsible for registering and approving new users. The Firm Administrator mayalso add user accounts and reset passwords, as well as activate and deactivate user accounts for firmusers.
FILTER FIRM USERS OPTIONSThe Firm Administrator can filter users by name, email address, and role assigned.You must be a Firm Administrator to perform this task.
Note: Features vary based on your system configuration.
Figure 8.3 – Filter Firm Users Options
1. Type the user name or email address, or select a role using the drop-down list.
OFS-FS-220-3802 v.1 August 2016 27
Approving and Rejecting New Users
Odyssey File & Serve™
2. Click Filter.The firm users meeting your criteria are displayed.
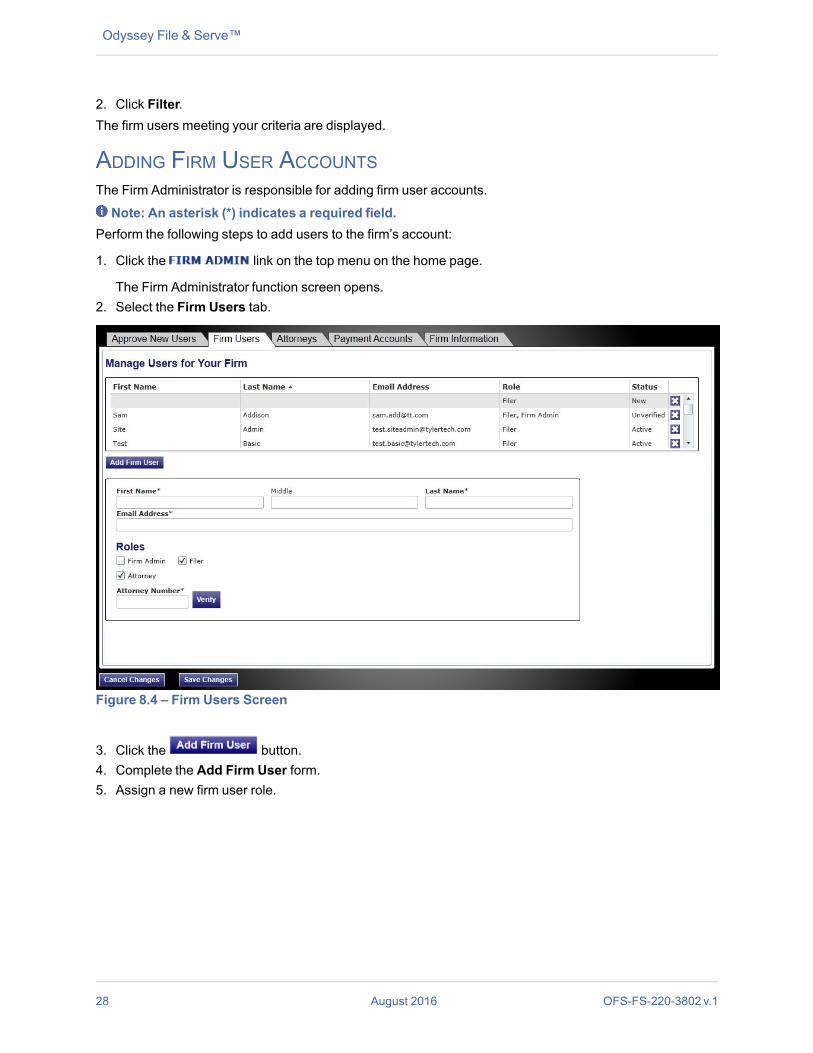
ADDING FIRM USER ACCOUNTSThe Firm Administrator is responsible for adding firm user accounts.
Note: An asterisk (*) indicates a required field.Perform the following steps to add users to the firm’s account:
1. Click the link on the top menu on the home page.
The Firm Administrator function screen opens.2. Select the Firm Users tab.
Figure 8.4 – Firm Users Screen
3. Click the button.4. Complete the Add Firm User form.5. Assign a new firm user role.
28 August 2016 OFS-FS-220-3802 v.1
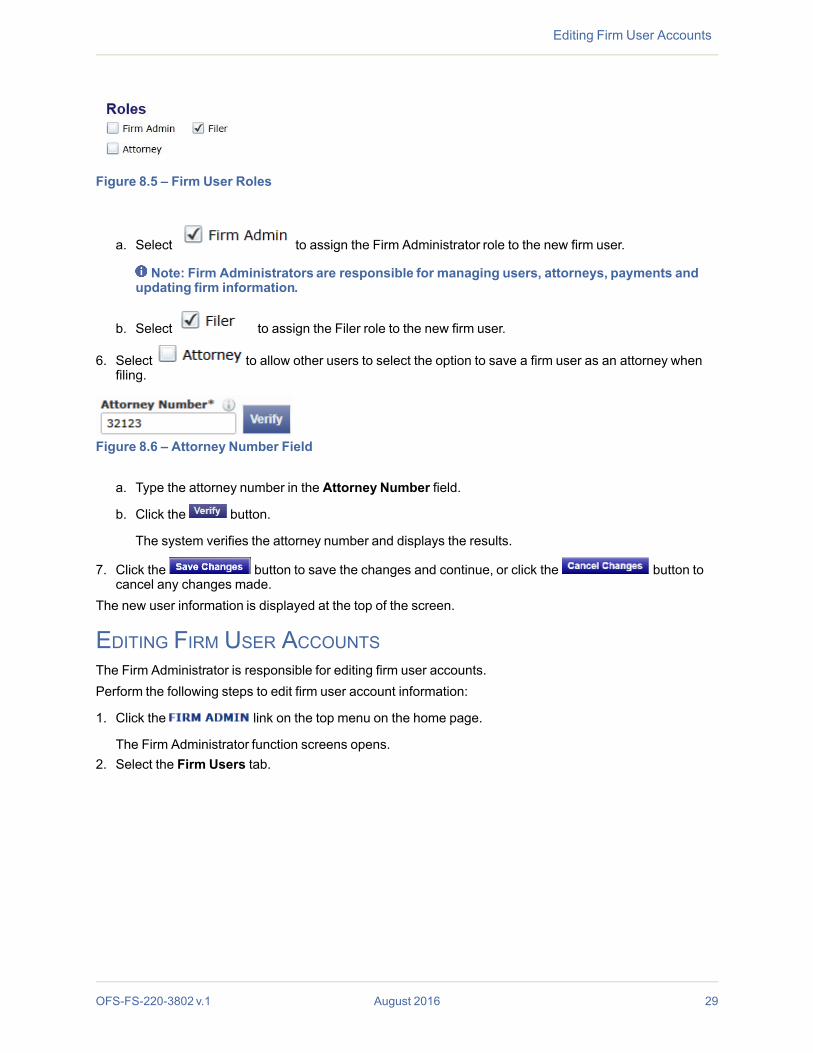
Figure 8.5 – Firm User Roles
a. Select to assign the Firm Administrator role to the new firm user.
Note: Firm Administrators are responsible for managing users, attorneys, payments andupdating firm information.
b. Select to assign the Filer role to the new firm user.
6. Select to allow other users to select the option to save a firm user as an attorney whenfiling.
Figure 8.6 – Attorney Number Field
a. Type the attorney number in the Attorney Number field.
b. Click the button.
The system verifies the attorney number and displays the results.
7. Click the button to save the changes and continue, or click the button tocancel any changes made.
The new user information is displayed at the top of the screen.
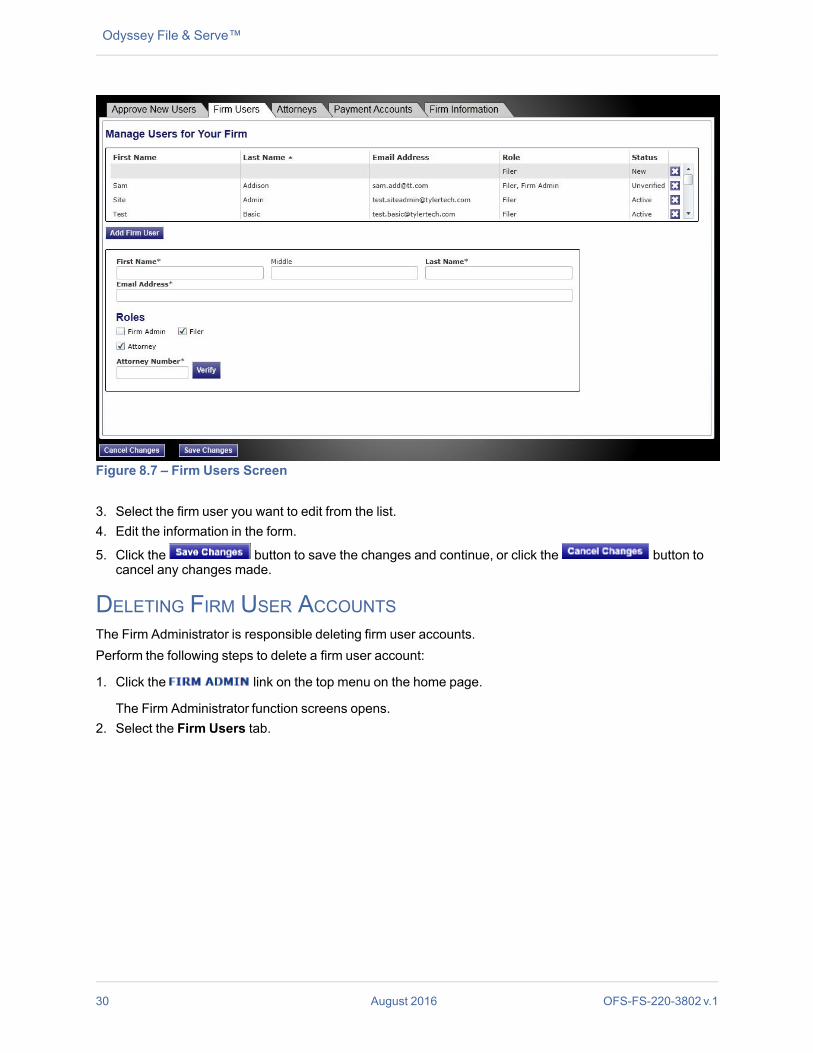
EDITING FIRM USER ACCOUNTSThe Firm Administrator is responsible for editing firm user accounts.Perform the following steps to edit firm user account information:
1. Click the link on the top menu on the home page.
The Firm Administrator function screens opens.2. Select the Firm Users tab.
OFS-FS-220-3802 v.1 August 2016 29
Editing Firm User Accounts
Odyssey File & Serve™
Figure 8.7 – Firm Users Screen
3. Select the firm user you want to edit from the list.4. Edit the information in the form.
5. Click the button to save the changes and continue, or click the button tocancel any changes made.
DELETING FIRM USER ACCOUNTSThe Firm Administrator is responsible deleting firm user accounts.Perform the following steps to delete a firm user account:
1. Click the link on the top menu on the home page.
The Firm Administrator function screens opens.2. Select the Firm Users tab.
30 August 2016 OFS-FS-220-3802 v.1
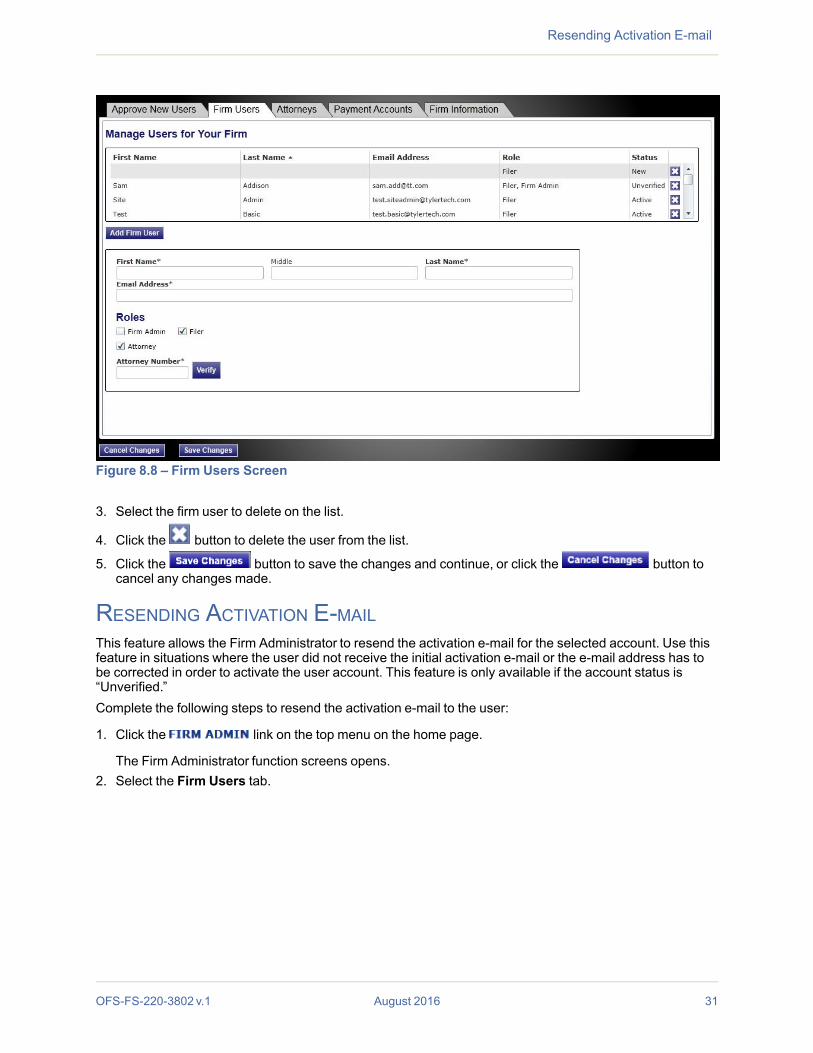
Figure 8.8 – Firm Users Screen
3. Select the firm user to delete on the list.
4. Click the button to delete the user from the list.
5. Click the button to save the changes and continue, or click the button tocancel any changes made.
RESENDING ACTIVATION E-MAILThis feature allows the Firm Administrator to resend the activation e-mail for the selected account. Use thisfeature in situations where the user did not receive the initial activation e-mail or the e-mail address has tobe corrected in order to activate the user account. This feature is only available if the account status is“Unverified.”Complete the following steps to resend the activation e-mail to the user:
1. Click the link on the top menu on the home page.
The Firm Administrator function screens opens.2. Select the Firm Users tab.
OFS-FS-220-3802 v.1 August 2016 31
Resending Activation E-mail
Odyssey File & Serve™
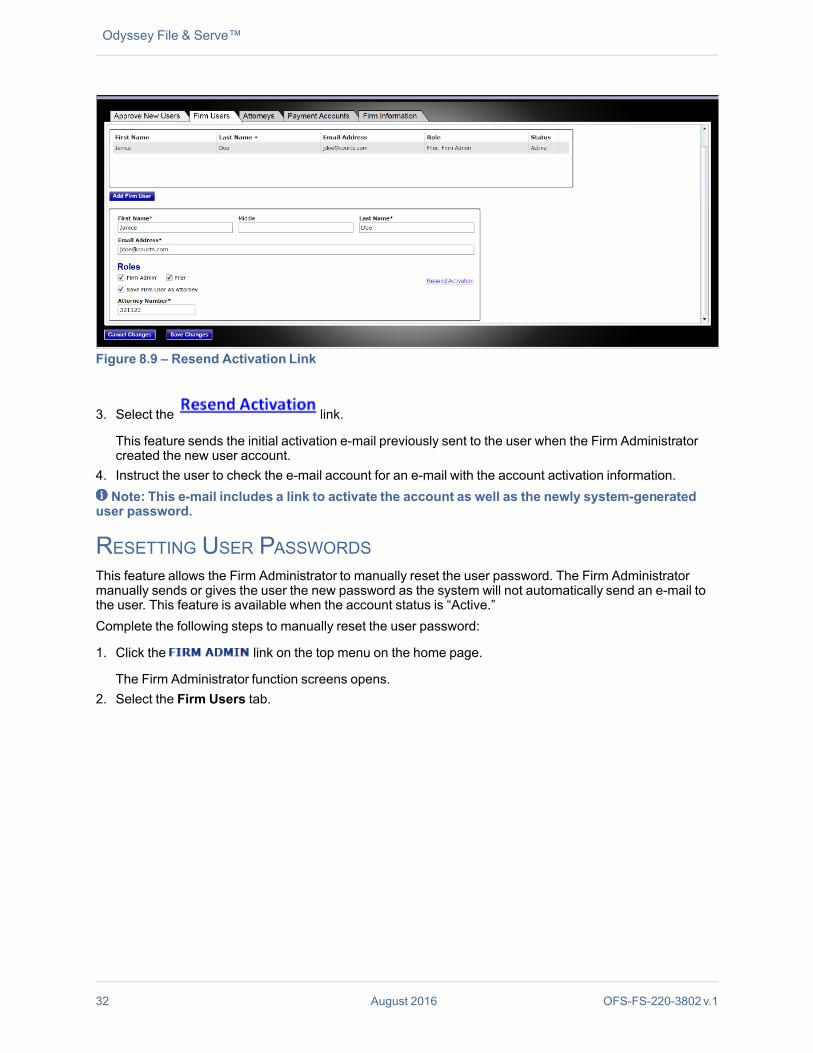
Figure 8.9 – Resend Activation Link
3. Select the link.
This feature sends the initial activation e-mail previously sent to the user when the Firm Administratorcreated the new user account.
4. Instruct the user to check the e-mail account for an e-mail with the account activation information.Note: This e-mail includes a link to activate the account as well as the newly system-generated
user password.
RESETTING USER PASSWORDSThis feature allows the Firm Administrator to manually reset the user password. The Firm Administratormanually sends or gives the user the new password as the system will not automatically send an e-mail tothe user. This feature is available when the account status is “Active.”Complete the following steps to manually reset the user password:
1. Click the link on the top menu on the home page.
The Firm Administrator function screens opens.2. Select the Firm Users tab.
32 August 2016 OFS-FS-220-3802 v.1

Figure 8.10 – Reset Password Link
3. Click the link.
The Enter New Password window opens.
Figure 8.11 – Enter New PasswordWindow
4. Enter a new password in the New Password field.
Note: Passwords are case sensitive. A password must be six to 10 characters long and shouldnot contain any spaces or special characters.
5. Re-enter the new password in the Re-enter New Password field.
6. Click the button to continue, or click the button to cancel the new password process.
OFS-FS-220-3802 v.1 August 2016 33
Resetting User Passwords
Odyssey File & Serve™
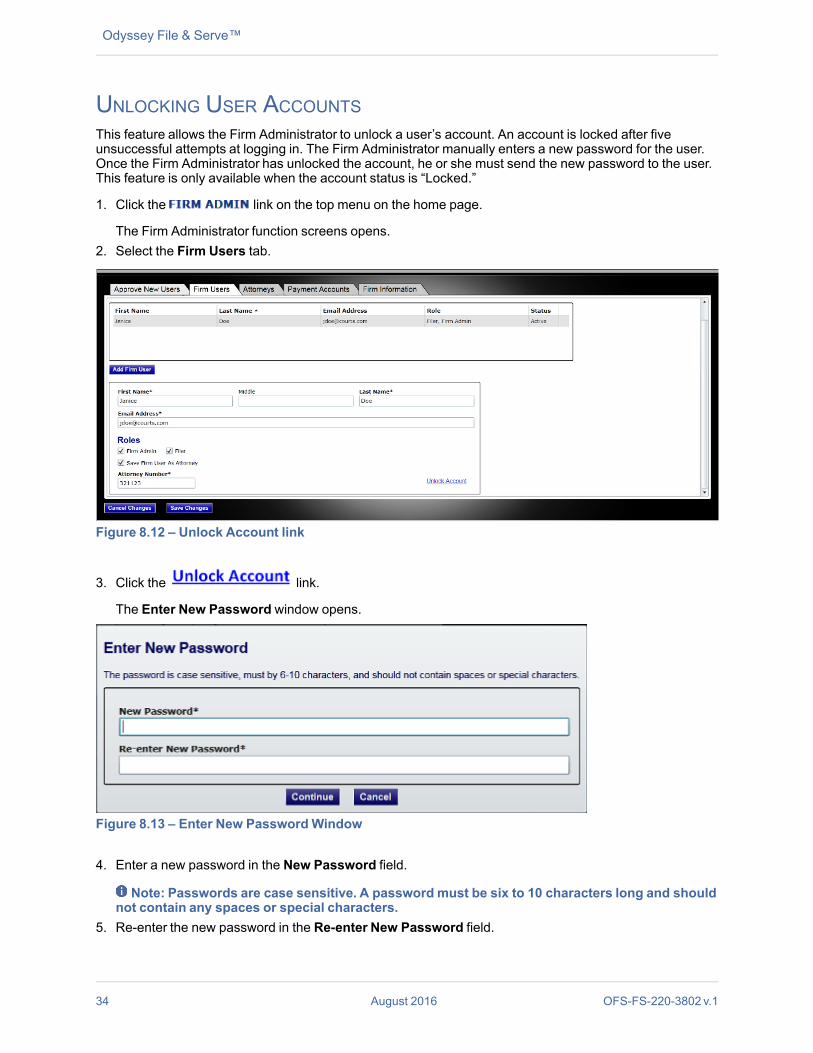
UNLOCKING USER ACCOUNTSThis feature allows the Firm Administrator to unlock a user’s account. An account is locked after fiveunsuccessful attempts at logging in. The Firm Administrator manually enters a new password for the user.Once the Firm Administrator has unlocked the account, he or she must send the new password to the user.This feature is only available when the account status is “Locked.”
1. Click the link on the top menu on the home page.
The Firm Administrator function screens opens.2. Select the Firm Users tab.
Figure 8.12 – Unlock Account link
3. Click the link.
The Enter New Password window opens.
Figure 8.13 – Enter New PasswordWindow
4. Enter a new password in the New Password field.
Note: Passwords are case sensitive. A password must be six to 10 characters long and shouldnot contain any spaces or special characters.
5. Re-enter the new password in the Re-enter New Password field.
34 August 2016 OFS-FS-220-3802 v.1
6. Click the button to continue, or click the button to cancel the new password process.
Note: The Firm Administrator must manually send an e-mail or contact the user with the newpassword. The system will not automatically send the user an e-mail with the new user password.
MANAGE ATTORNEYACCOUNTSThe Firm Administrator is responsible for managing attorney accounts.
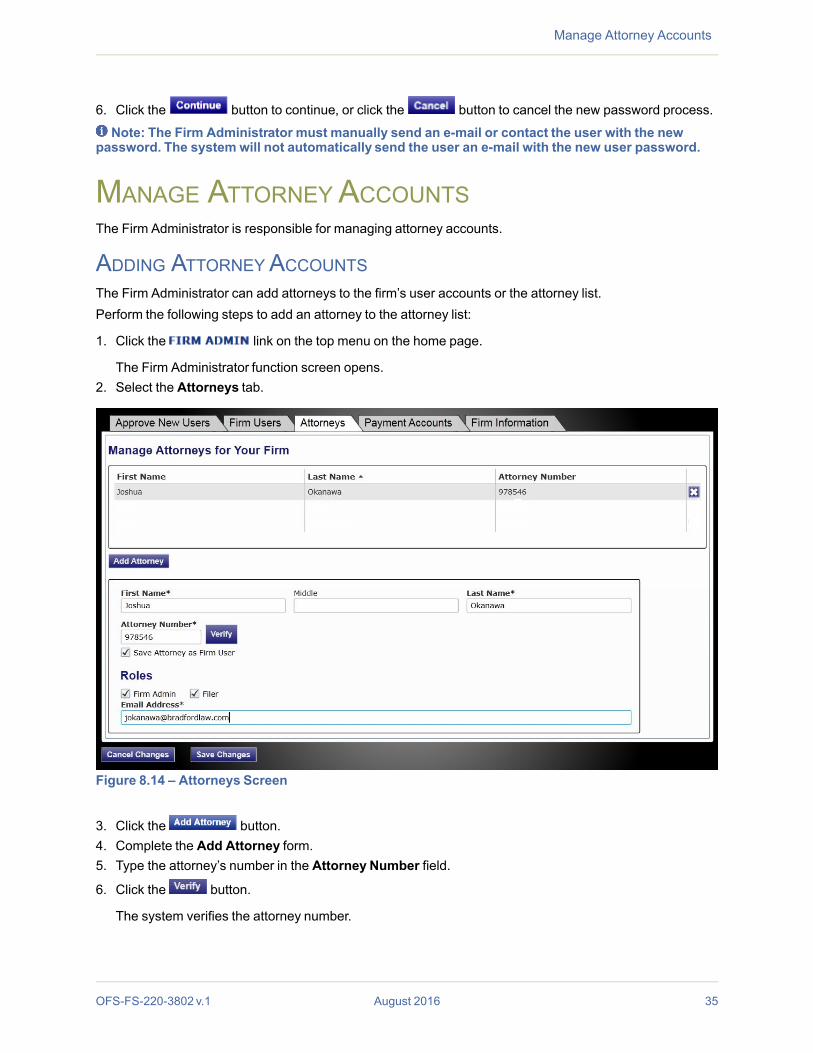
ADDING ATTORNEYACCOUNTSThe Firm Administrator can add attorneys to the firm’s user accounts or the attorney list.Perform the following steps to add an attorney to the attorney list:
1. Click the link on the top menu on the home page.
The Firm Administrator function screen opens.2. Select the Attorneys tab.
Figure 8.14 – Attorneys Screen
3. Click the button.4. Complete the Add Attorney form.5. Type the attorney’s number in the Attorney Number field.
6. Click the button.
The system verifies the attorney number.
OFS-FS-220-3802 v.1 August 2016 35
Manage Attorney Accounts
Odyssey File & Serve™
7. Click the button to save the changes and continue, or click the button tocancel any changes made.
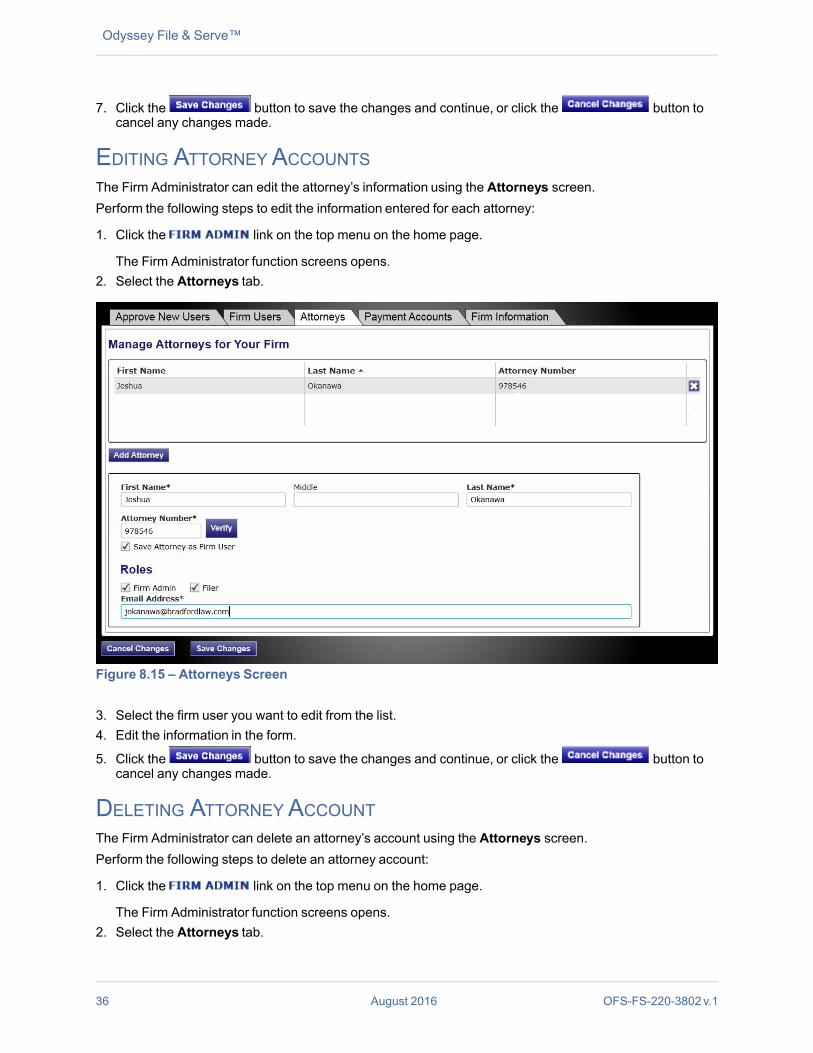
EDITING ATTORNEY ACCOUNTSThe Firm Administrator can edit the attorney’s information using the Attorneys screen.Perform the following steps to edit the information entered for each attorney:
1. Click the link on the top menu on the home page.
The Firm Administrator function screens opens.2. Select the Attorneys tab.
Figure 8.15 – Attorneys Screen
3. Select the firm user you want to edit from the list.4. Edit the information in the form.
5. Click the button to save the changes and continue, or click the button tocancel any changes made.
DELETING ATTORNEYACCOUNTThe Firm Administrator can delete an attorney’s account using the Attorneys screen.Perform the following steps to delete an attorney account:
1. Click the link on the top menu on the home page.
The Firm Administrator function screens opens.2. Select the Attorneys tab.
36 August 2016 OFS-FS-220-3802 v.1
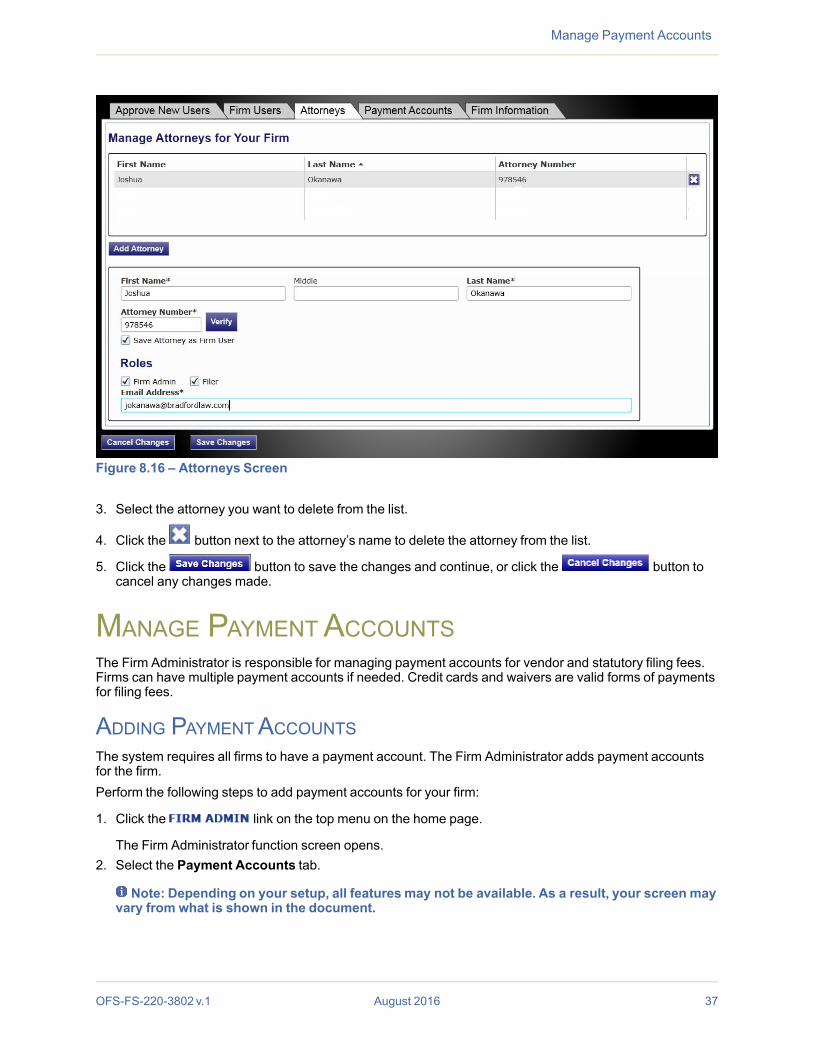
Figure 8.16 – Attorneys Screen
3. Select the attorney you want to delete from the list.
4. Click the button next to the attorney’s name to delete the attorney from the list.
5. Click the button to save the changes and continue, or click the button tocancel any changes made.
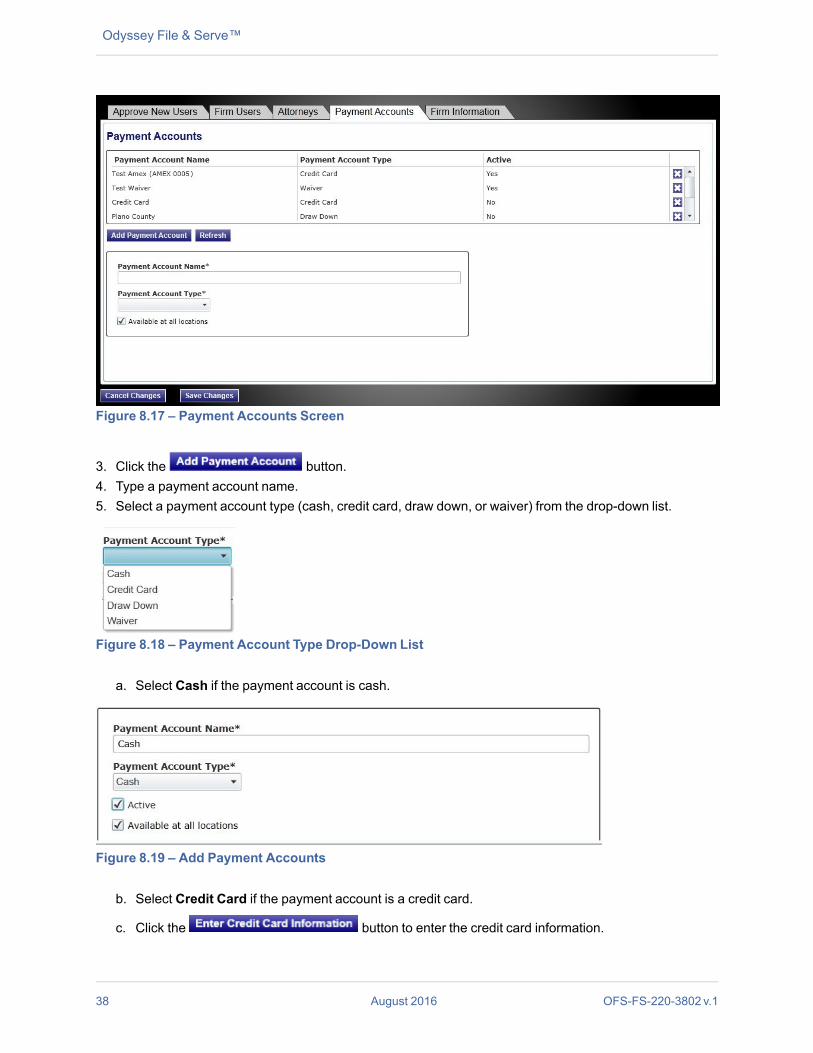
MANAGE PAYMENTACCOUNTSThe Firm Administrator is responsible for managing payment accounts for vendor and statutory filing fees.Firms can have multiple payment accounts if needed. Credit cards and waivers are valid forms of paymentsfor filing fees.
ADDING PAYMENTACCOUNTSThe system requires all firms to have a payment account. The Firm Administrator adds payment accountsfor the firm.Perform the following steps to add payment accounts for your firm:
1. Click the link on the top menu on the home page.
The Firm Administrator function screen opens.2. Select the Payment Accounts tab.
Note: Depending on your setup, all features may not be available. As a result, your screen mayvary from what is shown in the document.
OFS-FS-220-3802 v.1 August 2016 37
Manage Payment Accounts
Odyssey File & Serve™
Figure 8.17 – Payment Accounts Screen
3. Click the button.4. Type a payment account name.5. Select a payment account type (cash, credit card, draw down, or waiver) from the drop-down list.
Figure 8.18 – Payment Account Type Drop-Down List
a. Select Cash if the payment account is cash.
Figure 8.19 – Add Payment Accounts
b. Select Credit Card if the payment account is a credit card.
c. Click the button to enter the credit card information.
38 August 2016 OFS-FS-220-3802 v.1
Note: The systemmay re-direct you to a secure payment processing site to enter the creditcard information. You may need to turn off your browser’s pop-up blocker to be able to addthe credit card information.
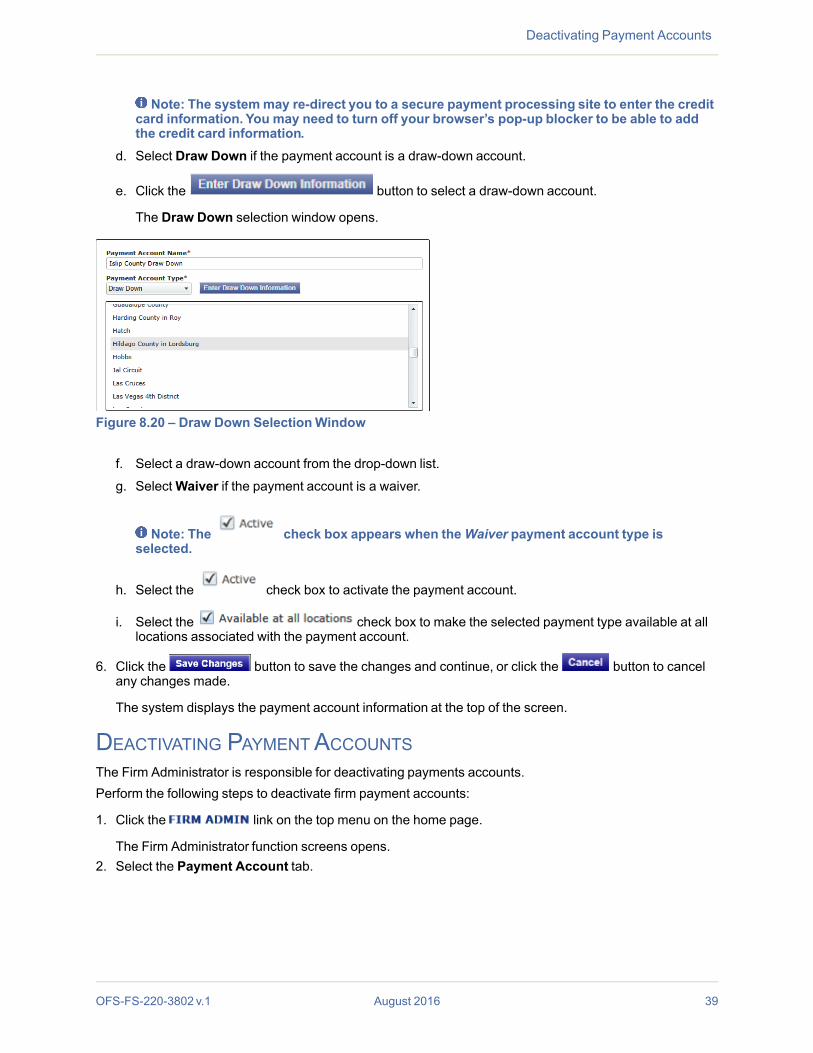
d. Select Draw Down if the payment account is a draw-down account.
e. Click the button to select a draw-down account.
The Draw Down selection window opens.
Figure 8.20 – Draw Down SelectionWindow
f. Select a draw-down account from the drop-down list.
g. SelectWaiver if the payment account is a waiver.
Note: The check box appears when theWaiver payment account type isselected.
h. Select the check box to activate the payment account.
i. Select the check box to make the selected payment type available at alllocations associated with the payment account.
6. Click the button to save the changes and continue, or click the button to cancelany changes made.
The system displays the payment account information at the top of the screen.
DEACTIVATING PAYMENTACCOUNTSThe Firm Administrator is responsible for deactivating payments accounts.Perform the following steps to deactivate firm payment accounts:
1. Click the link on the top menu on the home page.
The Firm Administrator function screens opens.2. Select the Payment Account tab.
OFS-FS-220-3802 v.1 August 2016 39
Deactivating Payment Accounts
Odyssey File & Serve™
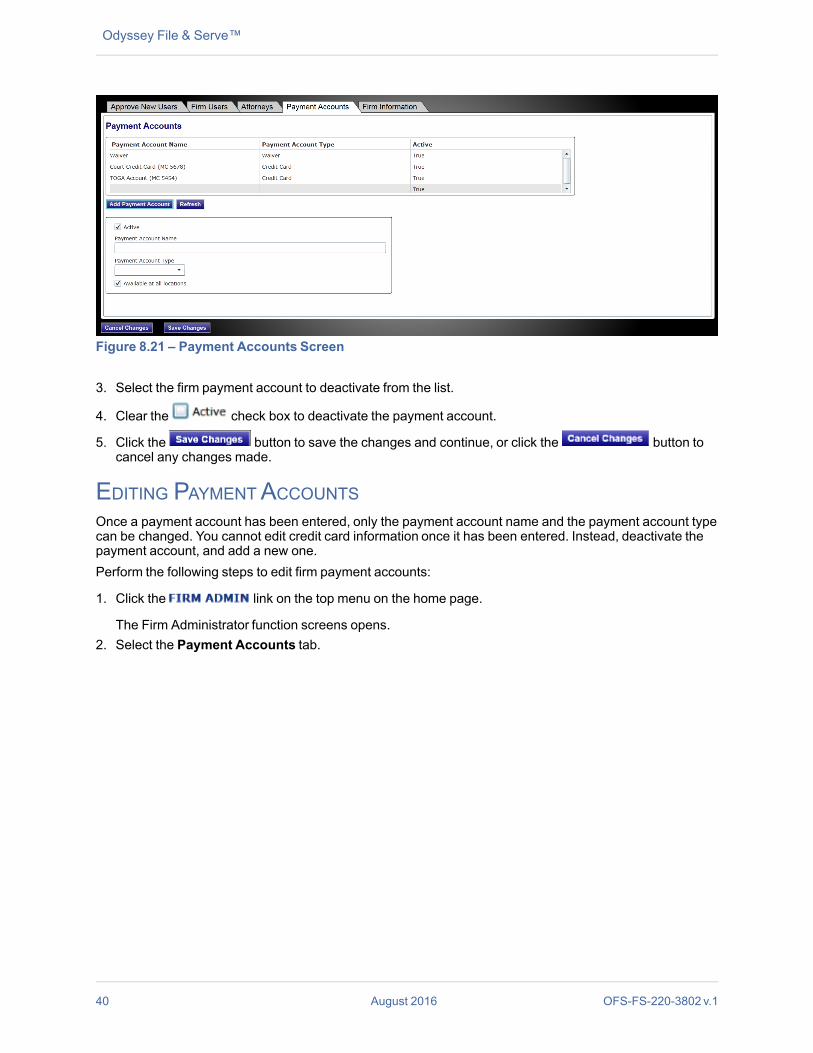
Figure 8.21 – Payment Accounts Screen
3. Select the firm payment account to deactivate from the list.
4. Clear the check box to deactivate the payment account.
5. Click the button to save the changes and continue, or click the button tocancel any changes made.
EDITING PAYMENTACCOUNTSOnce a payment account has been entered, only the payment account name and the payment account typecan be changed. You cannot edit credit card information once it has been entered. Instead, deactivate thepayment account, and add a new one.Perform the following steps to edit firm payment accounts:
1. Click the link on the top menu on the home page.
The Firm Administrator function screens opens.2. Select the Payment Accounts tab.
40 August 2016 OFS-FS-220-3802 v.1

Figure 8.22 – Payment Accounts Screen
3. Select the firm payment account you want to edit from the list.4. Edit the payment account name or type in the form.
5. Click the button to save the changes and continue, or click the button tocancel any changes made.
MANAGE FIRM INFORMATIONThe Firm Administrator uses the Firm Information tab to update the contact information for the firm (name,address, phone number). The Firm Administrator can also use the Firm information tab to manage theregistration process by maintaining the authority to register new users or allowing users to self register.
UPDATING FIRM INFORMATIONUse the Firm Information form to update your firm’s contact information, change how a new user registersto use the system, allow the users to self-register, or change the approval process.Perform the following steps to update firm information:
1. Click the link on the top menu on the home page.
The Firm Administrator function screens opens.2. Select the Firm Information tab.
OFS-FS-220-3802 v.1 August 2016 41
Manage Firm Information
Odyssey File & Serve™
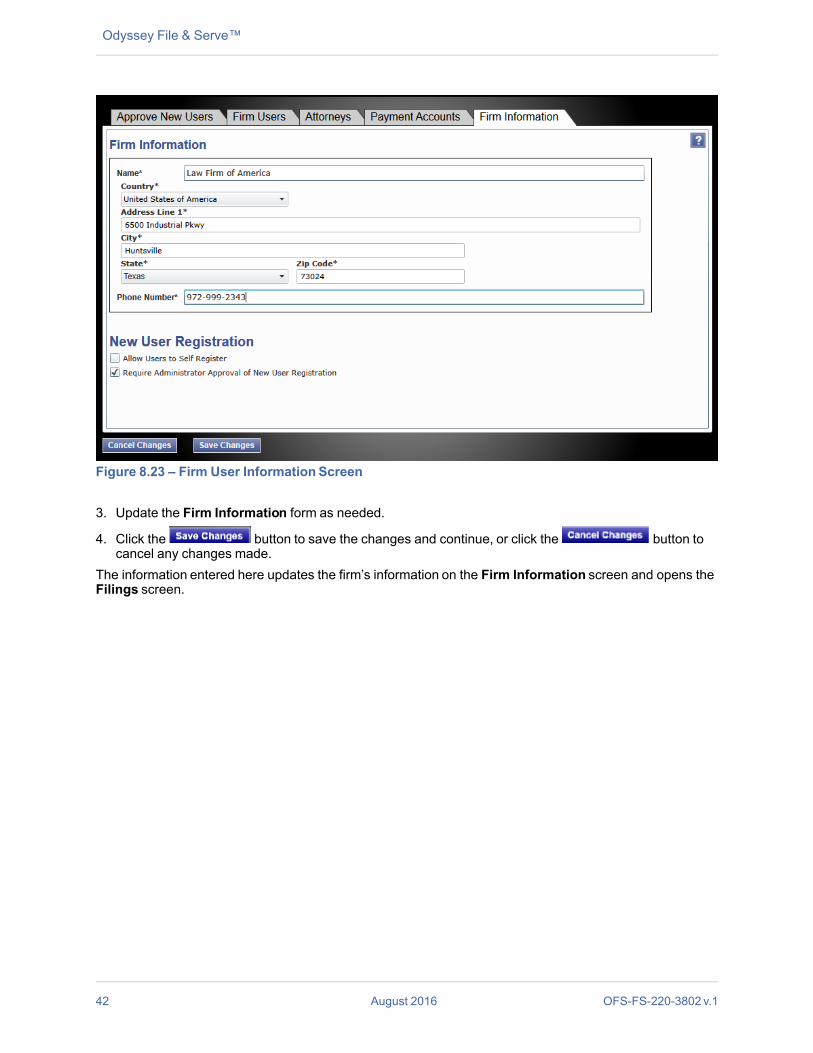
Figure 8.23 – Firm User Information Screen
3. Update the Firm Information form as needed.
4. Click the button to save the changes and continue, or click the button tocancel any changes made.
The information entered here updates the firm’s information on the Firm Information screen and opens theFilings screen.
42 August 2016 OFS-FS-220-3802 v.1
Tyler Technologies TechnicalSupport Contact Information
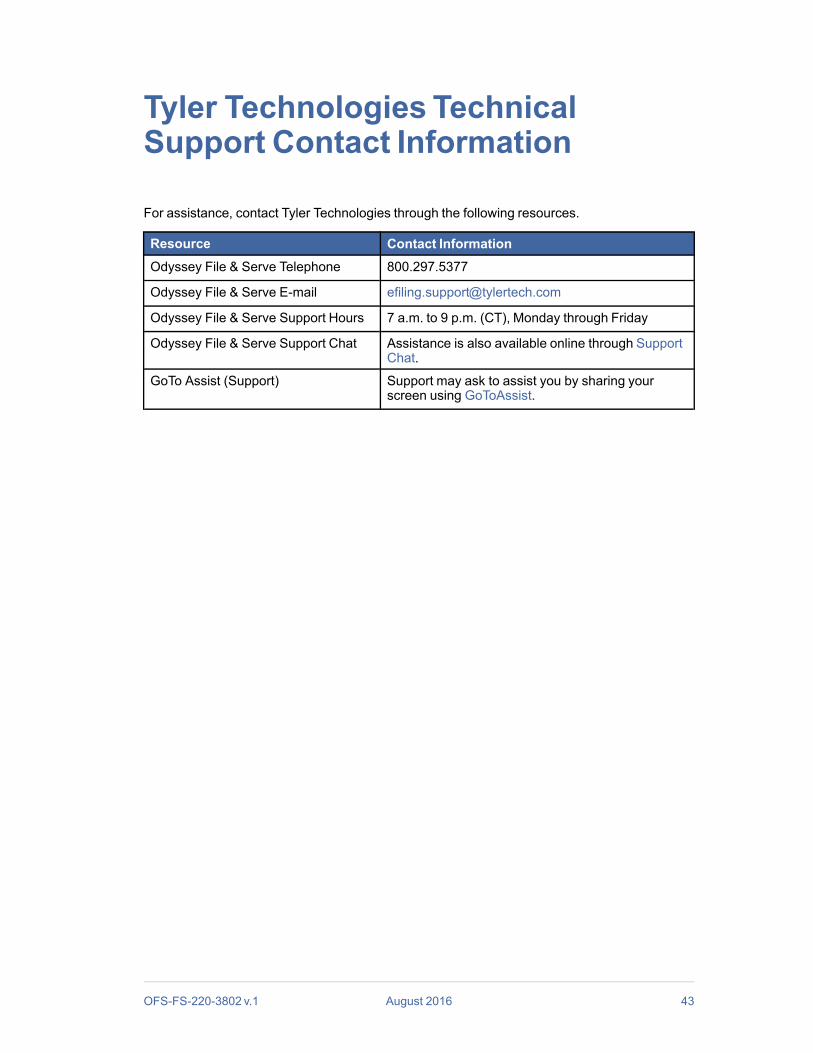
For assistance, contact Tyler Technologies through the following resources.
Resource Contact InformationOdyssey File & Serve Telephone 800.297.5377
Odyssey File & Serve E-mail [email protected]
Odyssey File & Serve Support Hours 7 a.m. to 9 p.m. (CT), Monday through Friday
Odyssey File & Serve Support Chat Assistance is also available online through SupportChat.
GoTo Assist (Support) Support may ask to assist you by sharing yourscreen using GoToAssist.
OFS-FS-220-3802 v.1 August 2016 43


