CATALOGUE of an by CAPT. F. HURLEY, late Official Photographer with the A.I.F., held at THE KODAK SALON, SYDNEY. Authorised by the Minister (or Defence and the Repatriation Department. All expenses have been defrayed by Kodak (Australasia) Ltd., and the entire proceeds w.ll be donated to the Red Cross by the Company Admission l/- Catalogues 6d. EXHIBITION of WAR PHOTOGRAPHS
Transcript
CATALOGUEof an
by
CAPT. F. HURLEY,late Official Photographer with the A.I.F.,
held at
THE KODAK SALON,SYDNEY.
Authorised by the Minister (or Defence and the Repatriation Department.All expenses have been defrayed by Kodak (Australasia) Ltd., and the
entire proceeds w.ll be donated to the Red Cross by the Company
Admission l/- Catalogues 6d.
EXHIBITIONof
WAR PHOTOGRAPHS
FOREWORD
The collection of pictures exhibited in the Kodak Salon consistsof reproductions in miniature of the photographs in a largeexhibition made recently in London by the High Commissionerfor Australia. The series is selected from the extensive collectionmade by me for the A.I.F. and depicts scenes on the Westernfront, and in Egypt and Palestine.
The ramifications of photography in modern warefare are so vast,universal, and diverse that its applications are administered byseveral departments. That which came directly under my chargewas the Photographic Section, Official War Records. As thename suggests this department deals with the photographicrecording of operations, fields of operation, personnel, and in factall incidents of historic value or interest to the A.I.F. Theformation of this department is directly attributable to Capt.C. E. W. Bean, though it is to be deplored that the establishmentdid not come into anything like active operation until compara-tively late in the war, when those brilliant achievements whichfocussed the eyes of the world on our forces had passed and beenlost forever.
I make no claim to pictorial merit; the pictures are records, andexcept for several of the larger ones are faithful reproductions ofthe scenes they portray. In order to convey accurate battleimpressions, I have made several composite pictures, utilising anumber of negatives for the purpose. The elements of thesecomposites were all taken in action and submitted to the G.O.C.A.I.F., who gave his approval for their production.
It is expected that the collection of large pictures displayed inLondon will shortly be exhibited throughout Australia. • In thelatter collection are some of the largest photographs ever made,measuring no less than 20 feet by 18 feet.
In conclusion, my sincere thanks are due to the members of thesection who faced peril and hazard unswervingly, and who at alltimes applied themselves loyally and enthusiastically. We alldid our best.
My thanks, too, should be extended to Mr. J. J. Rouse, Director,Kodak (Australasia) Ltd., for making this exhibition possible, andto the Hon. the Minister for Defence who kindly gave permissionto exhibit the pictures at this time.
FRANK HURLEY, Capt.
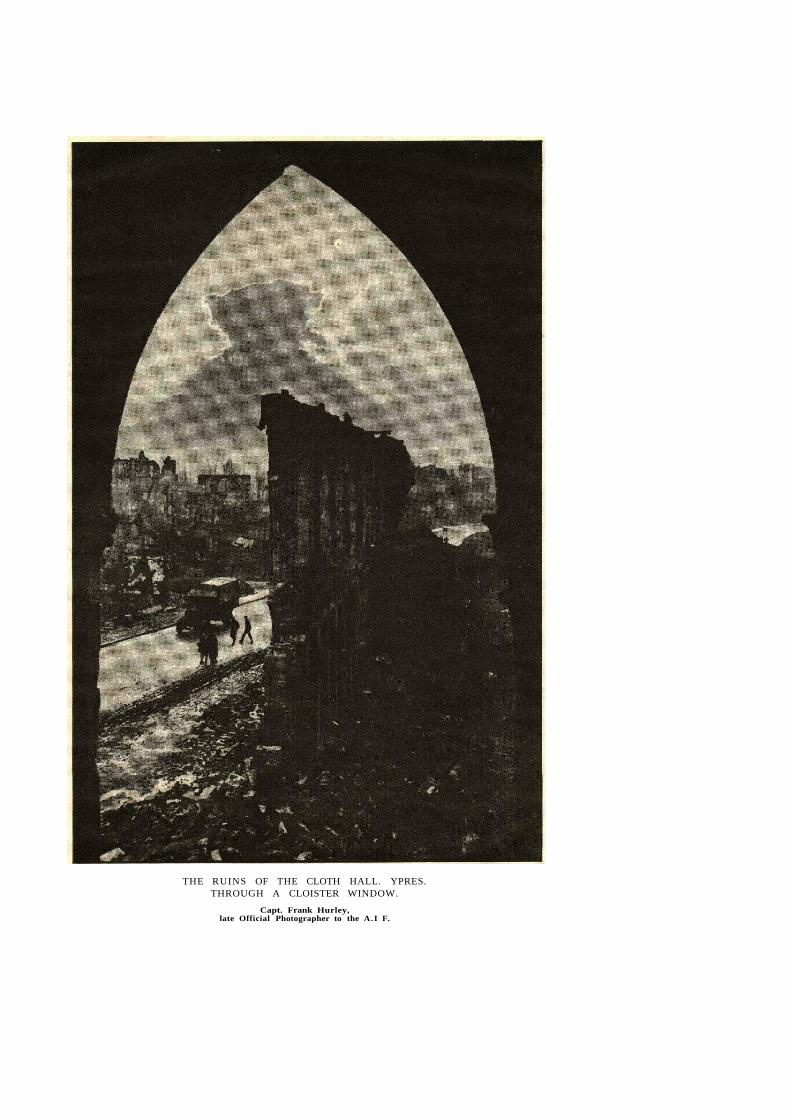
THE RUINS OF THE CLOTH HALL. YPRES.THROUGH A CLOISTER WINDOW.
Capt. Frank Hurley,late Official Photographer to the A.I F.
BY C A P T A I N F. H U R L E Y
WESTERN FRONT
War Photographs
1. The country in the vicinity of Gallipoli.2. A Battery of 18 pounders cleaning up preparatory to going into line.4. Transport scene on the Ypres—Poperinghe Road.3. Reminiscences of Home—"Aussies" chaff-making in Flanders.5. Limbers carrying up ammunition at sunset.6. Transport conveying small ammunition from a dump to the Front.7. A refuge in the cellars of Ypres.
Owing to incessant bombing and shelling it was impossible to live above ground.
8. Around the camp fire.9. The Battle-Scarred Barracks, Ypres. Australian Infantry awaiting
orders to take over the line.1 0. The camouflaged Menin Road at sunset.1 1 . Infantry marching ahead in single file to the front line.
Along the sky line a train of mules is carrying ammunition forward to thelight guns. All around may be seen the wastage of battle which typifiesWesthoek.
1 2. Camouflaged German Pill-boxes in the Wood of Nonne Bosschen.1 3. The shell shattered areas of Chateau Wood.14. Registering up a battery of Australian "Heavies."
The "spotting planes" which report on and direct the shooting by wireless,are to be seen flying above the battery.
1 5. Unloading 1 5 inch Howitzer shells* Each shell weighs about 11501bs.16. An observation balloon over the ruins of Ypres.1 7. A road on the battlefield. Carrying up rations to the front line, West-
hoek.18. Infantry moving forward to take over the front line at evening, re-
flected in a rain-filled mine crater, Hooge.19. "Zero Hour"—Study of a 6in. Howitzer operating in a barrage.20. "The Subjugator." A mighty Howitzer pounding away at the Hinden-
burg line.2 1 . A Hun Pill-box amid surroundings characteristic of the Ypres salient.
Pill-boxes were built of concrete with sides 4 to 5 feet thick.
22. Scene in the trenches.In the foreground are two gunners operating a Lewis gun and behind a cap-tured German trench mortar.
23. Laying a duckboard track.During the campaign on the Western Front, it was impossible, during the wetweather, to move from place to place, except by keeping to the duckboards.
THE MORNING OF PASSCHENDAELECapt. Frank Hurley,
late Official Photographer to the A . I . F .
24. "Just as it was."A characteristic scene on the Flanders Front During rains it was only bymeans of the duckboards that this awful shell-torn quagmire could be crossed.In the foreground stands a remnant of the old Boche front line entanglements.
25. Derelict tanks knocked out of action by an enemy tank straffing gun.The vicinity is torn by shell fire.
26. 54 Battery Australian Seige Artillery in Action.27. Surrounded by invisible death. Australian gunners of the 55th Siege
Battery working during a gas attack.28. The World's most infamous highway. The Menin road by a winter's
sunset.29. A Battle-torn Wood. Chateau Wood near Ypres.30. In an elephant iron dugout on Hill 60.
Such dugouts merely afford protection from small shell splinters and shrapnel.
3 1 . Attending to wounded in the advanced dressing station on Hill 60.32. Hell-Fire Corner. Showing the difficulty of transport along an exposed
highway. •33. Death the Reaper.
Attention is directed to the remarkable wraith-like form of the shell burst ,and to the outline of a white skull surmounting it.
34. The Battle of the Menin Road, in which the Australians took a promin-ent part.
Returning from the advanced front line is a continuous stream of walkingwounded and prisoners. littering the side of the road are stretchers bearingseriously wounded awaiting motor ambulance transport.
35. The Battle of the Menin Road.Walking wounded returning from the battle and by the roadside a relay ofseriously wounded The battle is still raging in the background.
36. "Fix Bayonets" Australian Infantry preparing to resist a counterattack at Zonnebeke.
37. The Front Line.38. Motor transport passing through the ruined village of Vlamertinghe.39. A windy outpost on Westhoek Ridge.40. A dump of material accumulated in an advanced position the day be-
fore a battle.The bundles of corkscrews are used for wiring off captured ground. Theycan be bored noiselessly into the ground during the night and form posts onwhich the barbed entanglements are strained.
4 1 . A wave of Infantry going over the top to resist a counter attack, Zon-nebeke.
42. A stretcher case. Attending to a badly wounded case in an advanceddressing station.
43. Conducting a battle in a shell proof dugout, 25 feet below ground.Communication is maintained by telephone and foot runners.
44. Sniping enemy planes with a Lewis gun. The tree has been severedby a shell.
45. Shrapnel bursting amongst reconnoitring planes. Picture taken overthe tail of a leading machine.
"DEATH'S HIGHWAY."An exposed roadway on the battlefield
Capt Frank Hurley,late Official Photographer to the A I F.
46. The ruins of the Cloth Hall through a cloister window.47. Looking out of a ruined cathedral window on to the graves of the
fallen.48. A camouflaged road.
Roads under enemy observation were rendered obscure by long screens offibre netting.
49. A well concealed Australian Heavy in action.50. A Howitzer of the 55th Australian Siege Artillery in its lair. The gun
has just been fired.5 1 . During a gas attack. Funk holes in the trenches.52. Scene in an advanced dressing station during a battle.53. Zonnebeke.54. Voormezeele.55. Ypres.56. Hauling up an 18 pounder across captured ground to an advanced
position.57. A few Huns captured by the Australians at Broodseinde.58. Knocked out of action. This picture gives a fine idea of shell-torn
ground.59. A Battery of six inch Howitzers in action.60. The interior of the Albert Cathedral.61. The famous leaning Madonna and Child at Albert.
Early in the War a German shell hit and almost severed the supports of thestatue which surmounted the tower. In falling, the base became entangledin some ironwork and for a long while remained poised head downward withthe child held out suppliantly to those who passed beneath. The peasantryfirmly believed that when the statue should fall, peace would come. Strangelyenough the Armistice was signed only a short while after the statute fell to theground.
62. Evening by the Cloth Hall, Ypres.63. Ruins of the Church at Voormezeele.64. The ruins of the Cloth Hall (extreme right), Cathedral (centre), and
Bishop's Palace (left), Ypres.65. A street in Ypres.66. The Lille Gate.67. Infantry marching through Ypres.68. Evening in the ruined City of Ypres.69. Entire cities and villages along the Western Front lay in heaps of ruins.70. The ruined Cathedral, Ypres, viewed from the Cloth Hall.7 1 . A tired Battalion marching out of line.72. Reveries of Home.
Veterans of the labor corps gathered around the cook's hearth.
73. "And Alone I Did It."An Australian Infantryman recounting an experience to his comrades.
74. Carrying in the wounded during the height of battle.75. Australian Pioneers salving a 4.5 Howitzer which has become bogged
in a muddy crater.
LOOKING THROUGH A RUINED CATHEDRAL WINDOWON TO A BATTLEFIELD CEMETERY.
Capt. Frank Hurley,late Official Photographer to the A
76. The Price of Victory. German dead strewing the conquered battle-field.
77. An episode after the Battle of Zonnebeke.Australian Infantry moving forward to resist a counter attack. On theextreme right a machine brought down in flames is burning fiercely. Ouradvance is supported by bombing planes, whilst the enemy is supporting hisattack with a heavy barrage.
78. The dawn of Passchendaele. The Relay Station near ZonnebekeStation.
79. Battle scarred sentinels.Remnant of a fine old avenue on the infamous track through Chateau Wood.
80. Looking out from the entrance of a captured Pill-box on to the shellravaged battlefield.
81. Brought down in flames.82. Passchendaele.83. An Historic Battlefield section of the Ypres salient showing the shell
torn ground viewed from an aeroplane.
EGYPT AND PALESTINE.84. Changing guard, The Citadel, Cairo.85. Looking out of a Mosque window to the Citadel, Cairo.86. An Australian Light Horseman in Palestine viewing the Promised
Land.87. The advance through the desert with the A.L.H. in Palestine.88. A Camp of Australian Light Horsemen amongst the sandhills, Belah.89. An Oasis in the Desert.90. Australian Light Horse watering in the Desert.91. A halt in the Desert with the Australian Light Horse.92. Ruins of the Grand Mosque, Gaza.
The Mosque was used by the Turks as a vast ammunition storehouse It wasexploded by our Artillery fire.
93. The interior ruins of the Grand Mosque, Gaza.94. "Gibit Baksheesh." A familiar scene in Palestine.95. Discharging army stores along the beach. Sukerier.96. The Imperial Camel Corps going into action.97. An Anzac and some of his friends, "The Donks."98. Camel transport conveying Tibbin (Barley Straw) from the rail-head
to an advanced distributing centre. Ramleh.99. Camel transport passing through a flooded waddy during the torren-
tential rains of the wet season. Esdud.100. Loading camels at a railhead dump, from whence the stores are trans-
ported to advanced positions.101. An outpost in Palestine,
102. Australian Light Horsemen acting as Infantrymen during the campaignamongst the Judaean Hills.
103. Australian Light Horsemen taking part in the fight for the Heights ofNalin.
104. Clearing the Heights of enemy snipers. Nalin.105. Scene at the Hangars of the 1st Australian Flying Corps, Palestine.106. A flight of bombing planes, 1 st Australian Flying Corps, Palestine.107. A machine descending to the Hangars of the 1st Australian Flying
Corps, Palestine.The marks on the ground are made by the tail skid of machines.
108. Machines returning to the Hangars after carrying out a successfulbombing operation. 1 st Australian Flying Corps.
109. Aerial photograph showing the Turkish defences of Jerusalem.The trenches may be observed cut around the crowns of the hills. Thesepositions controlled all the roadways and approaches.
110. Jerusalem from an aeroplane.To the top right of the picture lies the Mount of Olives.
1 1 1 . View of the Holy City from the Mount of Olives.Right hand bottom corner—Russian Church. The domed building is thefamous Mosque of Omar.
112. Australian Light Horsemen passing along the Bethlehem-JerusalemRoad. The walls of Old Jerusalem stand on the hilltop.
113. A.L.H. watering horses on Mount Zion, Jerusalem.114. The 1st Brigade A.L.H. passing through Bethlehem on their way to
Jericho.115. Australian Light Horse crossing the field "Where Shepherds Watched
Their Flocks by Night"—Bethlehem, during the advance on Jericho.116. The Jordan Valley. Jericho lies near the centre.117 . Camp at the foot of the Judaean Hills in the Jordan Valley, near
Jericho.118. Australian Light Horse on the move across the Desert.119. Australian Light Horse riding through Zernuka.120. In the Courtyard of a Mosque.121 . The entrance to a Mosque in Cairo.122. Australian Light Horse Machine Gunners in action amongst the Juda-
ean Hills.123. Three Army Mules.124. The Minarets of Cairo.125. Infantry advancing through the Latron Gorge after the capture of
Jerusalem.126. Imperial Camel Corps going into action.127. The Jordan Valley.


![James Larmer - Notebook of Australian Aboriginal ...acms.sl.nsw.gov.au/_transcript/2007/D00007/mss7213_Larmer.pdf · ML MSS 7213 Mitchell Library, State Library of NSW [page 23] At](https://static.documents.pub/doc/80x56/5fb437ec79d6a6265266380b/james-larmer-notebook-of-australian-aboriginal-acmsslnswgovautranscript2007d00007mss7213.jpg)


