Ohio EPA Laboratory Manual for Microbiological Analyses of Public Drinking Water 2014 Publication Information This manual is available on Ohio EPA’s website at http://www.epa.ohio.gov/ddagw/labcert.aspx This document replaces all previous versions of this manual. Contact Information Drinking Water Laboratory Certification Section Division of Environmental Services Ohio Environmental Protection Agency 8955 East Main Street Reynoldsburg Ohio 43068 Phone: (614) 644-4247 Website: http://www.epa.ohio.gov/ddagw/labcert.aspx 1
Transcript
Ohio EPA Laboratory Manual
for Microbiological Analyses
of Public Drinking Water
2014
Publication Information This manual is available on Ohio EPA’s website at
http://www.epa.ohio.gov/ddagw/labcert.aspx
This document replaces all previous versions of this manual.
Contact Information Drinking Water Laboratory Certification Section
Division of Environmental Services Ohio Environmental Protection Agency
A. Glossary and Acronyms ......................................................................................... 234
B. Still Produced Reagent Grade Water ..................................................................... 235
C. General Laboratory Benchsheets .......................................................................... 236
3
Chapter 1 – Purpose and Introduction A. Purpose of This Manual The purpose of this manual is to present the requirements and procedures necessary to obtain laboratory certification to analyze drinking water samples for the purpose of determining compliance with Chapters 3745-81 and 3745-82 and rules 3745-83-01, 3745-91-06 and 3745-9-09 of the Ohio Administrative Code (OAC). This includes plant control tests and other analyses required by the Director of the Ohio Environmental Protection Agency (Ohio EPA). The drinking water laboratory certification program requirements are found in Chapter 3745-89 of the OAC. The requirements, criteria and procedures described in this publication represent current practices of Ohio EPA. They are subject to change when, in the judgment of Ohio EPA, such a change will be more effective in fulfilling its responsibility under the law. This version of the “Ohio EPA Laboratory Manual for Microbiological Analyses of Public Drinking Water” incorporates rule revisions effective on XXXXX. This document replaces the “Ohio EPA Laboratory Manual for Microbiological Analyses of Public Drinking Water 2001” and all previous versions. B. Introduction As authorized by the Safe Drinking Water Act (SDWA), the United States Environmental Protection Agency (USEPA) has set health-based standards in the form of the National Primary Drinking Water Regulations (NPDWR) to protect against contaminants that may be found in drinking water. In accordance with the SDWA and the NPDWR, public water systems must conduct periodic analyses of drinking water served to the public. As delegated by the USEPA, Ohio EPA has primary enforcement responsibility for the SDWA in Ohio. This includes the responsibility to certify laboratory facilities and personnel to perform analytical measurements of all contaminants specified in the State primary drinking water regulations and parameters necessary for the operation of public water systems. Ohio EPA implements the drinking water laboratory certification program through the Laboratory Certification Section in the Division of Environmental Services (DES). The program is implemented in conjunction with Ohio EPA’s Division of Drinking and Ground Waters. Following rules in Chapters 3745-81, 3745-82 and 3745-89 of the OAC, the Laboratory Certification Section recommends to the Director of Ohio EPA whether to grant or deny certification to laboratories and laboratory personnel. The “Ohio EPA Laboratory Manual for Chemical Analyses of Public Drinking Water 2014” and the “Ohio EPA Laboratory Manual for Microbiological Analyses of Public Drinking Water 2014” outline requirements for obtaining and maintaining certification for the analysis of drinking water in the State. These manuals contain methods and general laboratory facility requirements for the analysis of drinking water necessary for public water system operation.
4
Chapter 2 – Critical Elements for Certification A. Laboratory Construction and Remodeling Requirements
Plans for any type of laboratory construction or remodeling must be submitted to the Laboratory Certification Section for review and approval. Laboratory plan approval is covered under rule 3745-89-03 of the OAC. In addition, Ohio EPA has developed a “Laboratory Construction and Remodeling Checklist” located at: http://www.epa.ohio.gov/ddagw/labcert.aspx. All items listed below may not be applicable to a particular laboratory. If you have questions or need assistance, contact the Laboratory Certification Section. Laboratories are encouraged to contact the Laboratory Certification Section staff early in the planning stages for construction or remodeling of a laboratory.
1. Laboratory Space
• The door(s) entering the laboratory area must be equipped with a locking system keyed separately from the other doors in the building.
• The door(s) entering the laboratory must be equipped with a clear glass pane large enough to allow forced entry in cases of emergency.
• The laboratory must be equipped with heating and air conditioning capable of maintaining an ambient temperature of between 65° and 80°F.
• Electrical outlets must be provided every six feet along the work benches. Adequate gas and vacuum outlets must be provided for microbiological testing.
• Acid and alkaline resistant sinks are required. All sinks must be of double bowl construction unless written exemption is issued by the Laboratory Certification Section.
• Stone balance tables or stone balance slabs must be provided for all analytical balances.
• The laboratory must not be constructed or located as to allow thoroughfare, nor have non-emergency doors directly to the outside of building.
• Emergency exit doors must be equipped with an audible alarm and breaker bar.
• The laboratory area must be isolated from and not allow direct entry into bathrooms or shower
areas.
• Physical isolation of a microbiological section of the laboratory from chemical analytical sections is not mandatory, with the exception of laboratories conducting either organic or viral analysis, in which case isolation of the areas is required.
• All laboratory facilities must be constructed as to not be adversely affected by vibration or dust.
• Laboratories must not be constructed with windows intended for ventilation purposes.
• Adequate floor or wall type storage cabinets must be provided for glassware and non-corrosive
• A minimum of six linear feet of work bench must be provided per certified method for each chemical analytical group.
• A minimum of five feet per analyst is required for microbiological testing. 3. Equipment
• A list of all analytical equipment to be used for drinking water analyses must be submitted to the Laboratory Certification Section. The list must include manufacturer and model number so each piece of equipment can be evaluated and approved for use.
• In a microbiological laboratory a horizontal steam operated autoclave must be provided, and
must be vented to the outside of the building or be equipped with a condenser to allow steam discharge to enter the sanitary sewer.
• If a dish washing machine is to be used for glassware, it must be installed to provide a final distilled or deionized water rinse.
• Exhaust hoods used for acid digestions must be corrosion resistant. An exhaust hood must be equipped with explosion-proof motors and switches if it is to be used in conjunction with solvents, and must be labeled as such.
• All refrigerator systems to be used for storage of solvents must be suitable for flammable materials storage.
• Commercial gas and electric cooking stoves cannot be used in laboratories as substitutes for drying ovens or for other heating purposes.
• If in-line turbidimeters, pH meters, or chlorine analyzers are to be installed, a bench model is required for calibrations and reference samples.
• All bench tops and shelving for corrosion storage cabinets must be of alkaline and acid resistant construction.
• A safety shower and/or emergency eye wash is to be provided and equipped to provide tempered water in the 65° to 80°F range for a minimum of 15 minutes.
• Distilled or deionized water is required for microbiological and chemical laboratories. If a still is provided, it can be mounted on the wall above the work bench area. Adequate work bench area must be provided for either a still or purchase water. However, this bench area cannot detract from the six linear feet of work bench area per certified method.
• The laboratory must be equipped with piped hot and cold water.
• Separate full size or under the counter refrigerators must be provided when non-compatible samples and/or standards are stored in the same laboratory space.
6
B. Quality Assurance Plan (QAP)
1. Requirements for the QAP The QAP, as required by rule 3745-89-03(A)(2) of the OAC, must include the following information:
• Table of laboratory organization delineating responsibilities of all laboratory personnel. • Standard operating procedures including identification of the reference methods used to perform
the drinking water analysis. These standard operating procedures must be reviewed and/or revised at least annually.
• Sample handling procedures, including:
o Directions for maintaining sample integrity from collection to receipt to testing to disposal.
o Directions for sample preservation, as required by the reference method.
o Directions to ensure sample information accuracy.
o Chain of custody forms, where applicable.
o Directions for rejecting samples not meeting method requirements.
• Routine practices to maintain the precision and accuracy of data.
• Corrective analytical action procedures.
• Preventative instrument maintenance procedures.
• Documentation of standard preparation and reagent expiration dates.
• Reporting procedures.
This manual may be used by public water system laboratories seeking certification for plant control tests and microbiological tests as their QAP. In addition, these laboratories may use the Analytical Methods Standard Operating Procedures (SOPs) located in Chapter 7 of these manuals as the SOP of record for each analytical method for which the laboratory and its personnel are certified. Laboratories not using this manual as their QAP must develop a QAP as described in USEPA's "Manual for the Certification of Laboratories Analyzing Drinking Water", dated January 2005 and designated "EPA 815-R-05-004", as supplemented in June 2008 and designated "EPA 815-F-08-006". These documents are available at http://water.epa.gov/scitech/drinkingwater/labcert/index.cfm C. Laboratory Contingency Plan Ohio EPA strongly recommends each certified laboratory have in place a written contingency plan, with a course of action outlining steps to be taken during an event which might prevent the sample analyses required for daily operation of the public water system. Public water systems should include this information in the contingency plan required by rule 3745-85-01 of the OAC.
D. Reporting of Analytical Results Results of drinking water samples are reported to Ohio EPA by public water systems and certified laboratories to demonstrate that drinking water meets health based standards. Rule 3745-89-08 of the OAC requires analytical results to be reported to Ohio EPA electronically via a method acceptable to the Director. Ohio EPA created electronic Drinking Water Reports (eDWR) for laboratories to use for submitting drinking water data. Microbiological Sample Submission Reports (SSRs), Chemical SSRs and Monthly Operating Reports (MORs) are required to be submitted to Ohio EPA through eDWR. For additional information about eDWR, please go to Ohio EPA’s website at: http://www.epa.ohio.gov/ddagw/reporting.aspx. E. Data Management 1. Document Management
Public water supply laboratories are required to record standardizations and calibrations on a standardized record form or bench sheet. Record forms for each method are located on the last few pages following each method in this manual. Record forms are to be completed entirely and entries on the forms must be legible. One record space must contain only one entry or one data result.
Entries or data results must be recorded in ink or an electronic version approved by the Laboratory Certification Section. Incorrect entries are common in laboratory work and the incorrect entry should be crossed using one line through the entire row or column; this method should leave the crossed out entry still legible. The correction should be entered in the following dated row or column with a statement describing the cause and solution to the previous incorrect entry. 2. Record Retention All laboratory records including, but not limited to, sample identification records, sample analytical result records, calibration and standardization records, and original bench sheets, are to be retained for the following minimum periods in accordance with rule 3745-89-04 of the OAC:
5 Years - Microbiological Laboratory Data Records 10 Years - Chemical Laboratory Data Records 12 Years - Lead & Copper Laboratory Data Records
Records must be kept readily available in the laboratory for a minimum of three years. For the remainder of the retention period the records may be kept off-site.
F. Proficiency Test (PT) Samples In accordance with rule 3745-89-03 of the OAC, laboratories seeking to obtain or maintain laboratory certification must participate in a proficiency test (PT) sample study at least once annually resulting in an “Acceptable” evaluation, as described by this rule, for all regulated analytes for which the laboratory is certified. Laboratories seeking initial certification must pass a PT sample for each analyte for which it is seeking certification prior to the scheduled survey. An annual basis is considered January 1 through December 31 of each year. Arrangements must be made with the PT provider to order a make-up PT sample for any regulated analyte(s) resulting in a “Not Acceptable” evaluation. A Laboratory receiving a “Not Acceptable” evaluation for the scheduled PT sample and the make-up PT sample for any regulated analyte(s) for which it is certified, is advised to immediately attempt to
determine the cause of the “Not Acceptable” evaluation, submit a corrective actions report to the Laboratory Certification Section and obtain a second make-up PT sample for the analyte(s) in question. Arrangements must be made with the PT provider to submit all PT sample results to the Laboratory Certification Section either by e-mail or mail.
A provider of PT samples must be accredited by a Proficiency Testing Provider Accreditor that meets the National Environmental Laboratory Accreditation Conference requirements. G. Interim Authorization for New Contaminants and New Methods Interim authorization for new contaminants and new methods, as defined in rule 3745-89-01 of the OAC, may be granted for certified laboratories following these procedures:
• Interim authorization shall only be available to laboratories which currently have valid certification for the same type of drinking water analysis (microbiological contaminants, inorganic, trace metals, etc.) as the drinking water analyses to be included in the interim authorization.
• In order to be considered for interim authorization, the laboratory must submit an application for
interim authorization which includes the following information:
o The name, address and telephone number of the laboratory and of the individual(s) responsible for the laboratory.
o Statement of the drinking water analyses and methods for which interim authorization is
sought and the analysts to be included in the interim authorization to perform the analyses. The analysts must be individuals already identified on a valid certificate for the laboratory for performing similar analyses or for analyzing the same type of contaminant.
o Documentation that the laboratory obtained acceptable results within the past twelve
months for at least one proficiency test (PT), in accordance with Chapter 2, Section F of this manual, for each drinking water analysis to be included in the interim authorization.
o Documentation that the laboratory has successfully passed one microbiological PT set,
in accordance with Chapter 2, Section F of this manual, with the method not approved by Ohio EPA. The test data must be sent directly to the Laboratory Certification Section from the PT provider. The laboratory must pass the PT study with the method for which interim authorization is being sought.
• When granted, the interim authorization must state the individual(s) and drinking water analyses
included in the interim authorization and the length of time the interim authorization will remain in effect.
• An on-site survey must be scheduled to verify acceptable performance by the laboratory granted
interim authorization. Interim authorization will remain in effect until the on-site survey is completed and certification is granted.
9
H. Laboratory Safety The Laboratory Certification Section strongly recommends each laboratory seeking certification have in place a safety program developed to meet the specific requirements of the laboratory. The laboratory safety plan should focus on the methods for which it is seeking certification and the requirements needed to safely conduct those analyses. While safety criteria are not part of the laboratory certification survey, the safety equipment identified in Laboratory Construction and Remodeling Requirements, Chapter 2, Section A of this manual, are required in order for a laboratory to be considered for certification.
The Laboratory Certification Section recommends reviewing “Standard Methods for the Examination of Water and Wastewater,” Part 1090 “Laboratory Occupational Health and Safety” for a detailed reference on the requirements of a laboratory safety plan.
10
Chapter 3 - Requirements for Participating in the Laboratory Certification Program
A. Applying for Certification and Paying Fees Applications for certification to perform drinking water analysis are to be completed and include all materials and information as detailed in rule 3745-89-03 of the OAC. An application will be considered incomplete and may not be accepted if it is not accompanied by a laboratory plan approval letter or include the date which laboratory plans were approved by Ohio EPA.
Applications can be acquired at the Laboratory Certification Section website: http://www.epa.ohio.gov/ddagw/labcert.aspx
1. Initial Certification
An application for initial certification must be submitted in writing to the Laboratory Certification Section indicating which analysis methods are requested for certification. The requirements for initial drinking water laboratory certification, in accordance with rule 3745-89-03 of the OAC, include, but are not limited to:
• Obtain Ohio EPA Director’s approval of a detailed laboratory floor plan. • Submit a complete application and pay the appropriate fee. • Submit an acceptable quality assurance plan. • Submit documentation of initial QC procedures required by the methods. • Successfully analyze required proficiency test samples. • Pass an on-site survey.
2. Certification Renewal and Maintenance The requirements to renew and maintain certification, in accordance with rules 3745-89-04 and 3745-89-05 of the OAC, include, but are not limited to:
• Maintain a valid and unexpired laboratory certification. • Submit results of proficiency test sample analyses. • Make required improvements in its quality assurance plan. • Report significant changes in facility, equipment, personnel or quality assurance plan. • Submit a renewal application and pay the appropriate fee. • Submit to required audits and implement any required corrective actions.
An application for certification renewal must be submitted no more than 120 days and no less than 30 days prior to the expiration of the current laboratory certification. When applications for renewal are submitted in accordance with rule 3745-89-04 of the OAC and are deemed complete, the laboratory certification will be extended until such time as an on-site survey is completed. Should failure to follow guidelines result in loss of certification for a period of time, it will be the laboratory’s responsibility to have required water analysis completed by a certified lab during that time.
Chapter 4 - On-Site Surveys The Laboratory Certification Section conducts two types of on-site surveys: announced (scheduled with laboratory) and unannounced (not scheduled with laboratory). The surveys are to confirm the information provided to the Laboratory Certification Section by the laboratory on its application, review and evaluate each analyst and review records maintained by the laboratory. The following personnel are required to be available during an announced on-site survey:
• All personnel requesting initial certification. • All certified personnel requesting recertification.
Surveys are conducted between 8:00 a.m. – 5:00 p.m. Required laboratory records must be located in the laboratory, clearly labeled and easily accessible. Copies of the records must be made available upon request by the certification officer. It is recommended that at least two people be designated as responsible for allowing access to the laboratory (e.g., city hall employee, plant operator, police officer, etc.). Telephone numbers of the responsible personnel must be posted in a location visible outside the facility to allow access for certification officers. A. Typical Agenda During the on-site survey the laboratory must demonstrate acceptable levels of performance including, but not limited to:
• Proficiency in appropriate analytical procedures, methodologies, techniques, and use of equipment by analysts participating in the on-site survey.
• Analysis of proficiency test samples.
• For laboratories seeking initial certification, maintenance of laboratory records for at least thirty (30) days prior to the on-site survey, with the records documenting: o All appropriate laboratory equipment and auxiliary equipment is operational within prescribed
limits.
o Sufficient practice analyses have been conducted by each analyst participating in the on-site survey to demonstrate the analyst's proficiency.
o An acceptable quality assurance plan has been documented and implemented.
o The analyses, QC procedures and preparation of standards were correctly performed by
each analyst participating in the on-site survey, except for analysts to be designated for operational certification.
o Acceptable method detection limit studies have been completed for each method and
instrument.
• Conformance to the laboratory plan as approved by the Director.
• Conformance by the laboratory to the analytical reporting limits identified in rule 3745-89-03 of the OAC.
13
• Correction of deviations noted in previous survey reports.
B. Review of Survey Findings At the completion of the on-site survey the certification officer will meet with the appropriate laboratory representatives to review the findings of the survey. A copy of the deviations noted during the survey will be provided within 45 days of the survey. C. Survey Report A survey report will be issued to the applicant by the Laboratory Certification Section within forty-five (45) days of an on-site survey. The survey report will indicate the acceptability of the applicant’s performance during the on-site survey and will state deviations required to be corrected prior to certification of the laboratory. If the survey report includes deviations, the Director of Ohio EPA may deny, suspend or revoke certification in accordance with rule 3745-89-06 of the OAC. In accordance with rule 3745-89-01 of the OAC, a deviation is non-compliance with laboratory certification requirements which cover the physical facility, testing equipment, analytical methods, reporting and all QC requirements whether they are in the method, the laboratory certification manual or the OAC. Laboratories are generally given 30 days to respond to deviations identified during the survey.
14
Chapter 5 - Requirements for Analyst Certification
A. Certification Certified Each certified analyst is required to perform all QC requirements, including calibrations, standardizations and verifications as detailed in Chapter 7.0 of in this manual, for each test method. Each certified analyst must complete drinking water sample analysis at a minimum rate 10% of the routine samples for all methods which the analyst is certified. B. Interim Authorization for MMO-MUG (SM 9223) Tests A laboratory with a valid and unexpired certification may apply for interim authorization for an analyst to perform MMO-MUG (SM 9223) tests, according to the following requirements:
• Interim Authorization will be granted to the applying analyst(s) upon demonstration of acceptable performance. “Acceptable performance” is defined as including seven samples per day totaling at least twenty-one samples, containing no false negatives and no more than one false positive, including the required quality control samples. The results generated in parallel testing must be performed with an analyst included on a certificate for MMO-MUG (SM 9223) tests.
• The number of individuals requested for interim authorization by the laboratory may not be more than two.
• A laboratory must submit an application for interim authorization including the following
information:
o The name, address and telephone number of the laboratory and of the individual(s) responsible for the laboratory.
o The list of analysts specified on the laboratory's applicable certificates and the plant control
tests which each analyst currently performs. o The list of individuals and MMO-MUG (SM 9223) tests for which interim authorization is
sought. o Documentation for each individual requesting interim authorization for MMO-MUG (SM
9223) must include seven samples per day totaling at least twenty-one samples, including the required quality control samples, with results generated in parallel testing with an analyst included on a certificate for MMO-MUG (SM 9223) tests. The previous certification of an individual to perform MMO-MUG (SM 9223) tests may be considered for satisfying this requirement.
An on-site survey will be scheduled within six months of an interim authorization. Interim authorization shall remain in effect for a period not to exceed six months unless an extension is granted.
15
Chapter 6 - Issuance of Laboratory Certification Based on the results of the on-site survey, Laboratory Certification Section staff provides a recommendation to the Director concerning the certification status of the laboratory. Categories are as follows: Certified A certificate will be issued by Ohio EPA for the analytical method(s) identified on the application for certification. Certificates are valid for a time period not to exceed three years from the date of issue. Analysts are only certified at a laboratory for methods noted on their certificate. An analyst must undergo an on-site survey to add additional certified methods for drinking water analysis. Analysts must be certified during an on-site survey or obtain interim authorization prior to analyzing drinking water samples and reporting results. Provisionally Certified Provisional certification is limited to laboratories which have been previously certified for analytical method(s) identified in the application. Provisional certification may be granted to a laboratory with deviations noted on the survey report. The provisional certification will remain in effect during the period of time between the completion of the on-site survey and the deadline for the lab to respond to the deviations listed on the survey report. The laboratory will be certified for the analytical method(s) by the Laboratory Certification Section if the laboratory provides an acceptable response addressing the deviations by the deadline. Failure to respond or to provide an acceptable response will result in a loss of certification. Provisional certification is not available to laboratories requesting initial certification. Not Certified The laboratory, personnel or equipment did not meet minimum requirements for drinking water analysis certification as detailed in Chapter 3745-89 of the OAC. Certificates Certificates are nontransferable. It is the laboratory’s responsibility to notify the Laboratory Certification Section of all personnel changes. All certificates of approval remain the property of Ohio EPA and must be returned to the Laboratory Certification Section upon analyst separation from the certified laboratory. Certification will remain in effect for a laboratory changing facility locations if the certified personnel are retained and the new laboratory plans are approved in writing by Ohio EPA prior to the move. Denial, Suspension, or Revocation of Laboratory Certification In accordance with rule 3745-89-06 of the OAC, the Director may deny, suspend or revoke a laboratory certification upon finding:
• The laboratory or any laboratory personnel has falsified laboratory data.
• The laboratory failed to meet laboratory certification requirements as described in rules 3745-89-03 to 3745-89-05 of the OAC.
• The laboratory fails to meet the reporting requirements in rule 3745-89-08 of the OAC.
• The laboratory has submitted unacceptable data.
16
• The laboratory has submitted a proficiency test sample to another laboratory for analysis and reported the data as its own.
• A person not named on a valid laboratory certificate performed analysis of a water PT sample for purposes of retaining a valid laboratory certification.
• The laboratory or any laboratory personnel is performing, reporting, or failing to report drinking
water analyses in such a manner as to threaten public health or welfare.
• The laboratory failed to satisfactorily correct deviations. In addition to the items listed above, examples of when the Director of Ohio EPA may take an action to deny, suspend or revoke a laboratory’s certification are:
• Failure to maintain at least one certified analyst for each method.
• Any facility changes to approved laboratory plans without prior Ohio EPA approval.
Should failure to follow guidelines result in loss of certification for a period of time, it will be the laboratory’s responsibility to have the required analysis completed by a certified laboratory during that time.
17
Chapter 7 - Standard Operating Procedures A. Standard Operating Procedures (SOPs) All approved methods for the analysis of drinking water in the State of Ohio are located in rule 3745-81-27 of the OAC. Public water system laboratories may use the methods in Chapter 8 of this manual as the SOP of record for each method for which laboratory personnel are certified. Each method in this manual includes the following sections:
1. General Method Summary.
2. Equipment.
3. Reagents.
4. Sample Collection/Preservation/Holding Time.
5. Analysis Procedure.
6. Quality Control Requirements.
7. Calibration, Standardization or Verification Procedure.
8.-10. Any notes detailing unique aspects of individual SOPs.
Any use of product or firm names in this publication is for descriptive purposes only and does not imply endorsement by the author or the Ohio Environmental Protection Agency.
18
Chapter 8 – Analytical Methods
19
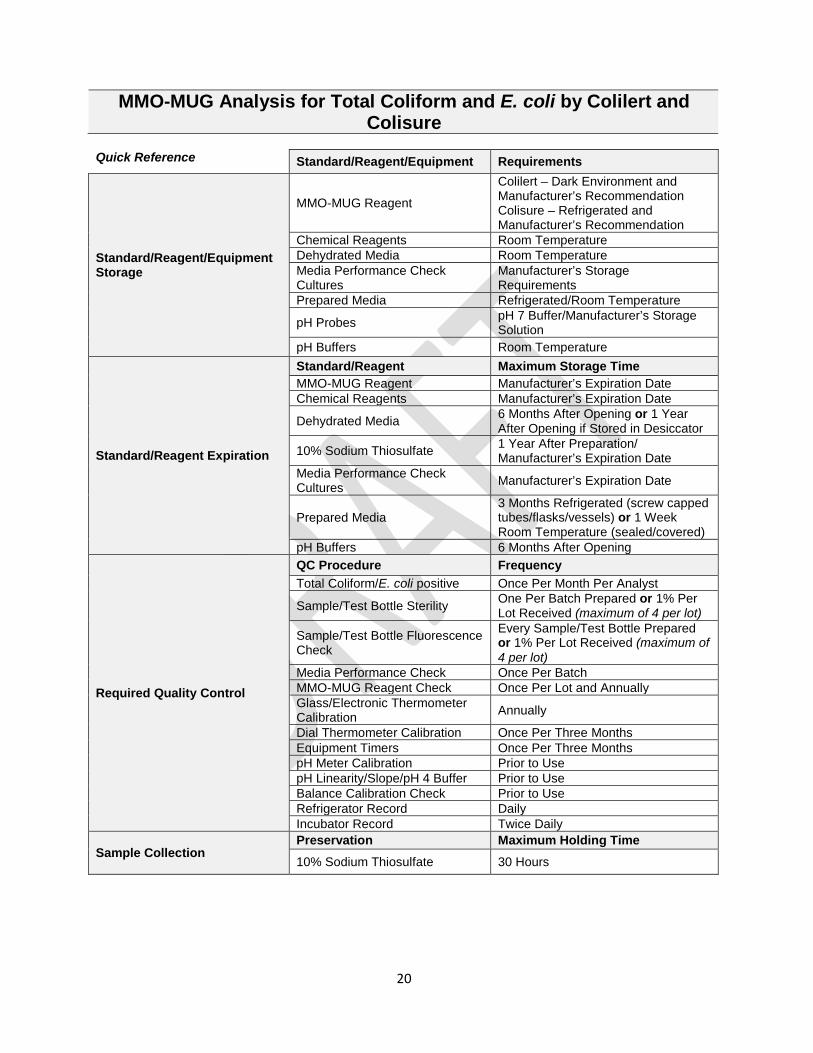
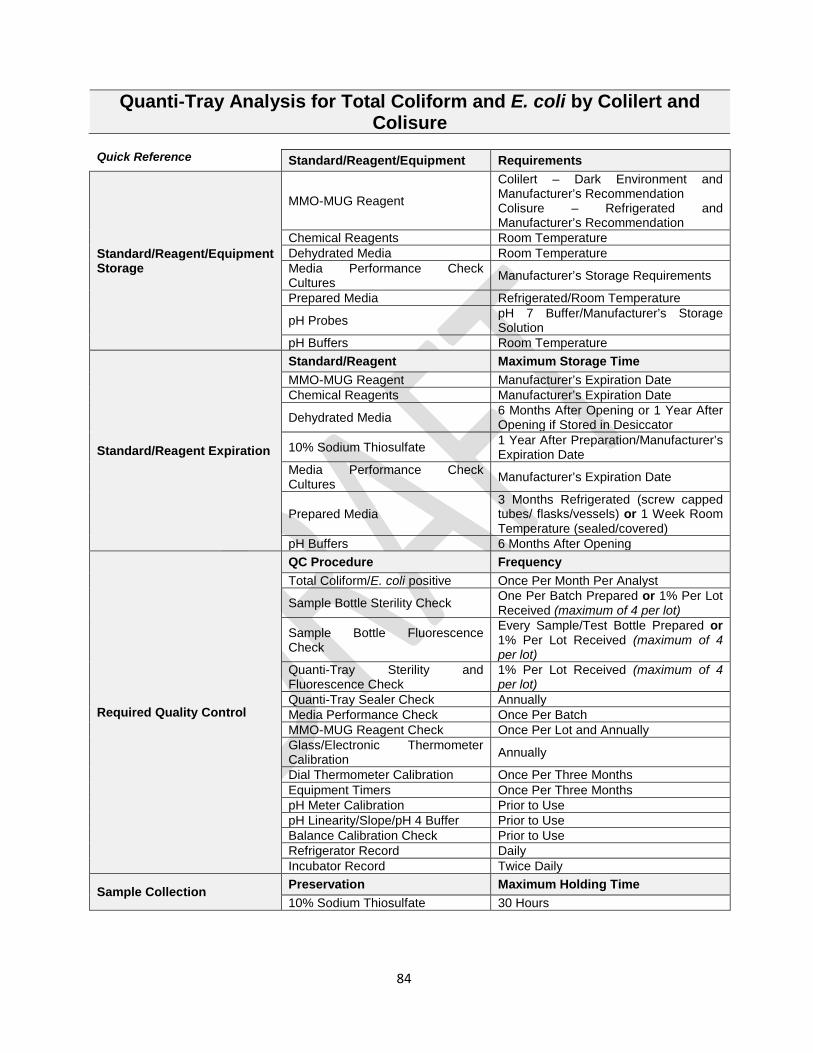
MMO-MUG Analysis for Total Coliform and E. coli by Colilert and Colisure
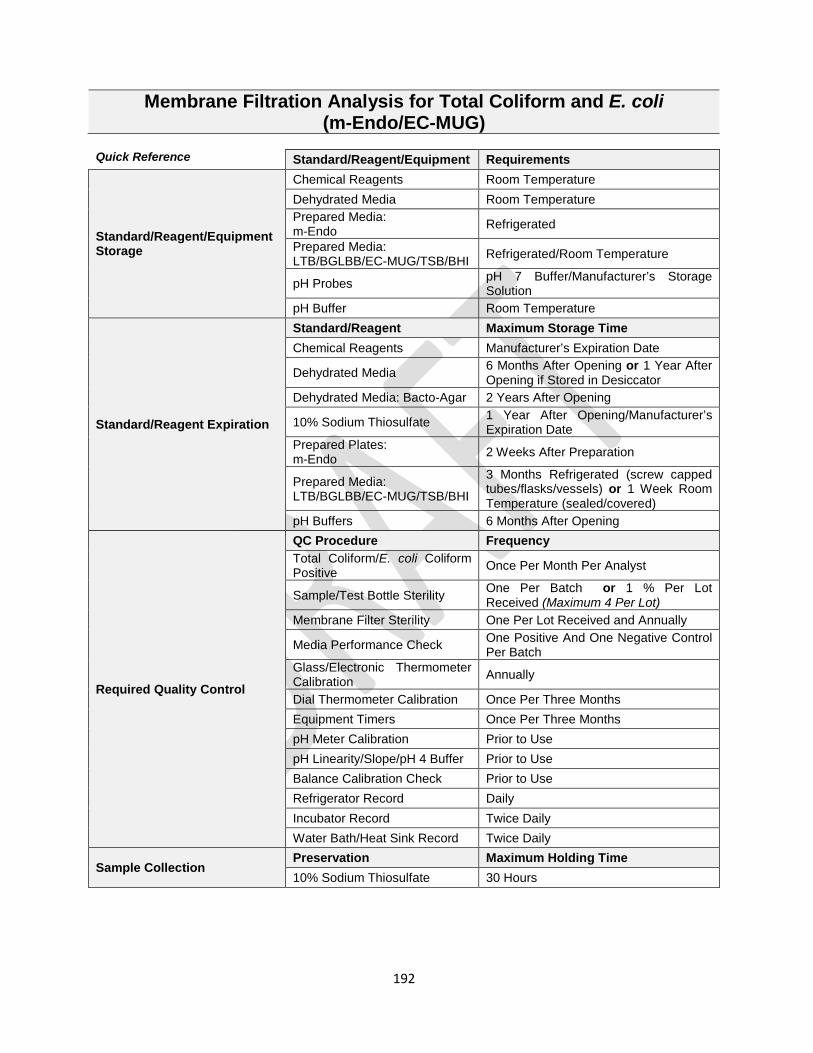
Standard/Reagent Maximum Storage Time MMO-MUG Reagent Manufacturer’s Expiration Date Chemical Reagents Manufacturer’s Expiration Date
Dehydrated Media 6 Months After Opening or 1 Year After Opening if Stored in Desiccator
10% Sodium Thiosulfate 1 Year After Preparation/ Manufacturer’s Expiration Date
Media Performance Check Cultures Manufacturer’s Expiration Date
Prepared Media 3 Months Refrigerated (screw capped tubes/flasks/vessels) or 1 Week Room Temperature (sealed/covered)
pH Buffers 6 Months After Opening
Required Quality Control
QC Procedure Frequency Total Coliform/E. coli positive Once Per Month Per Analyst
Sample/Test Bottle Sterility One Per Batch Prepared or 1% Per Lot Received (maximum of 4 per lot)
Sample/Test Bottle Fluorescence Check
Every Sample/Test Bottle Prepared or 1% Per Lot Received (maximum of 4 per lot)
Media Performance Check Once Per Batch MMO-MUG Reagent Check Once Per Lot and Annually Glass/Electronic Thermometer Calibration Annually
Dial Thermometer Calibration Once Per Three Months Equipment Timers Once Per Three Months pH Meter Calibration Prior to Use pH Linearity/Slope/pH 4 Buffer Prior to Use Balance Calibration Check Prior to Use Refrigerator Record Daily Incubator Record Twice Daily
Sample Collection Preservation Maximum Holding Time 10% Sodium Thiosulfate 30 Hours
20
Method Reference Standard Methods 22nd Edition (9223 B) On-Site Survey Requirements
• Each certified analyst must be able to demonstrate proper collection and analysis of a typical sample for MMO-MUG.
• Prior to the survey, each certified analyst must prepare a reagent QC check using the three bacteria as illustrated in Section 6.4 of this method.
• Prior to the survey, a batch of TSB/BHI must be prepared. This will be checked for proper pH during the survey.
• Procedural technique will be observed.
• All reagents and solutions used with this method will be audited for correct labeling and dating.
• All records will be audited.
1.0 General Method Summary
MMO-MUG is a presence-absence test that is used to simultaneously detect total coliform bacteria and Escherichia coli (E. coli). A color change occurs from the hydrolysis of the β-D-galactosidase enzyme that is produced by total coliform bacteria. In the case of Colilert, the color change is from colorless to yellow. In the case of Colisure, the color change is from yellow to red. The hydrolysis of the β-glucuronidase enzyme causes the sample to fluoresce under an ultraviolet light when E. coli is present in the sample.
Interferences
• Sunlight may hydrolyze the indicator compounds resulting in a false positive test.
• Samples with high iron/manganese in combination with hydrogen sulfide may turn greenish-black with a black precipitate after the 24 hour incubation period. In this case the sample must be rejected and not reported. A different method is recommended to analyze a re-collected sample.
• Samples containing chlorine levels above the amount that is neutralized by the sodium thiosulfate dechlorinating agent will briefly flash a blue color after the addition of the MMO-MUG reagent. These samples should be discarded and reported as “Chlorine Present”.
• If after collection, the sample exhibits any innate yellow or amber color (for Colilert) that may interfere with final interpretation, collect a duplicate sample to be used as a color control blank. Do not add test reagent or incubate the color control blank. Assign this portion the corresponding sample id number and hold at room temperature until post-incubation analysis.
21
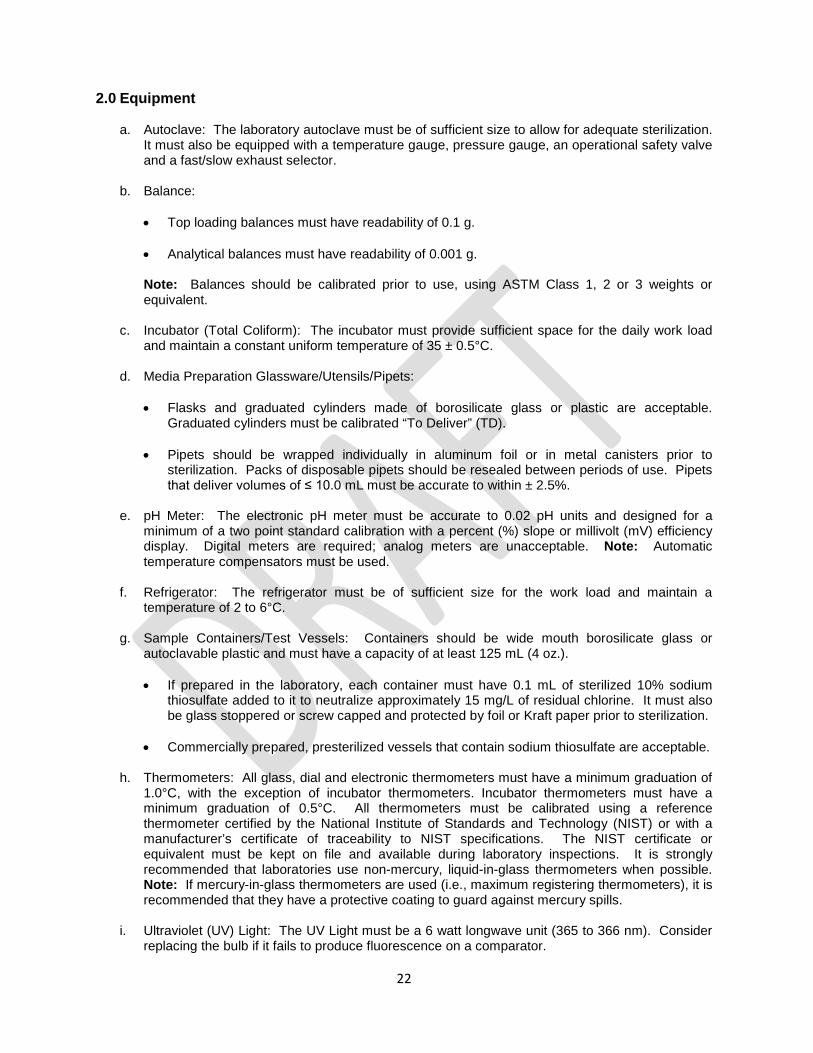
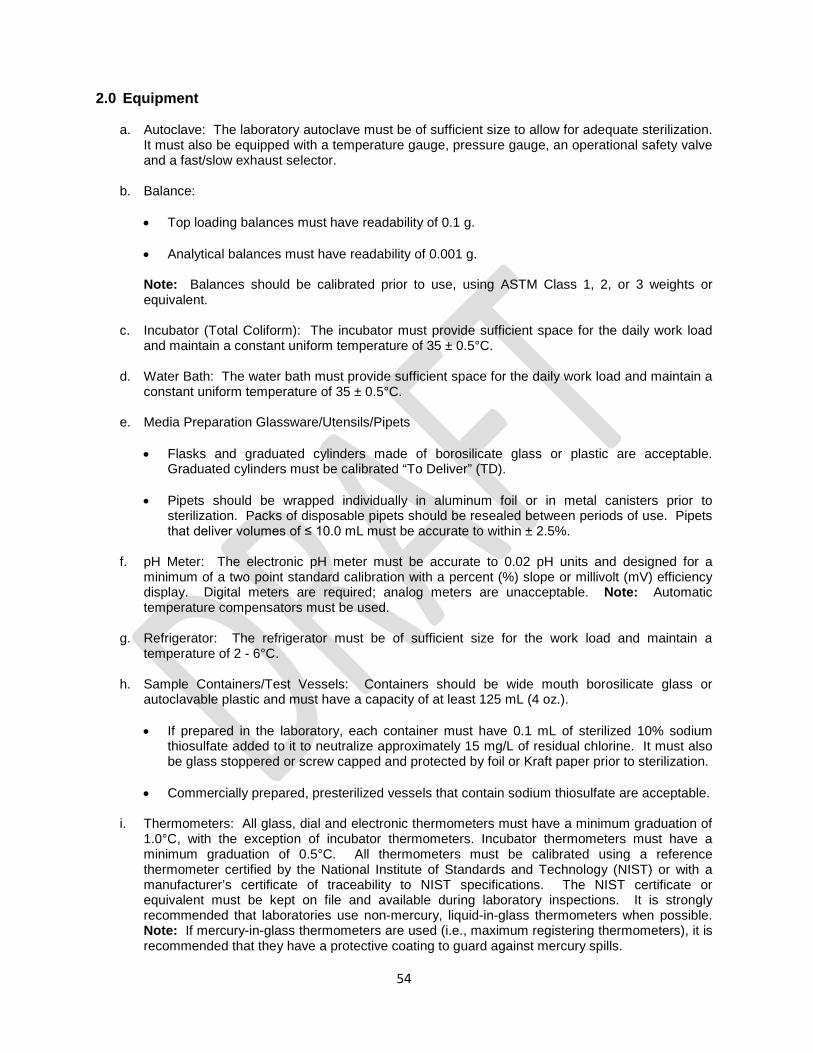
2.0 Equipment a. Autoclave: The laboratory autoclave must be of sufficient size to allow for adequate sterilization.
It must also be equipped with a temperature gauge, pressure gauge, an operational safety valve and a fast/slow exhaust selector.
b. Balance:
• Top loading balances must have readability of 0.1 g.
• Analytical balances must have readability of 0.001 g. Note: Balances should be calibrated prior to use, using ASTM Class 1, 2 or 3 weights or equivalent.
c. Incubator (Total Coliform): The incubator must provide sufficient space for the daily work load and maintain a constant uniform temperature of 35 ± 0.5°C.
d. Media Preparation Glassware/Utensils/Pipets:
• Flasks and graduated cylinders made of borosilicate glass or plastic are acceptable.
Graduated cylinders must be calibrated “To Deliver” (TD).
• Pipets should be wrapped individually in aluminum foil or in metal canisters prior to sterilization. Packs of disposable pipets should be resealed between periods of use. Pipets that deliver volumes of ≤ 10.0 mL must be accurate to within ± 2.5%.
e. pH Meter: The electronic pH meter must be accurate to 0.02 pH units and designed for a
minimum of a two point standard calibration with a percent (%) slope or millivolt (mV) efficiency display. Digital meters are required; analog meters are unacceptable. Note: Automatic temperature compensators must be used.
f. Refrigerator: The refrigerator must be of sufficient size for the work load and maintain a temperature of 2 to 6°C.
g. Sample Containers/Test Vessels: Containers should be wide mouth borosilicate glass or autoclavable plastic and must have a capacity of at least 125 mL (4 oz.). • If prepared in the laboratory, each container must have 0.1 mL of sterilized 10% sodium
thiosulfate added to it to neutralize approximately 15 mg/L of residual chlorine. It must also be glass stoppered or screw capped and protected by foil or Kraft paper prior to sterilization.
• Commercially prepared, presterilized vessels that contain sodium thiosulfate are acceptable.
h. Thermometers: All glass, dial and electronic thermometers must have a minimum graduation of 1.0°C, with the exception of incubator thermometers. Incubator thermometers must have a minimum graduation of 0.5°C. All thermometers must be calibrated using a reference thermometer certified by the National Institute of Standards and Technology (NIST) or with a manufacturer’s certificate of traceability to NIST specifications. The NIST certificate or equivalent must be kept on file and available during laboratory inspections. It is strongly recommended that laboratories use non-mercury, liquid-in-glass thermometers when possible. Note: If mercury-in-glass thermometers are used (i.e., maximum registering thermometers), it is recommended that they have a protective coating to guard against mercury spills.
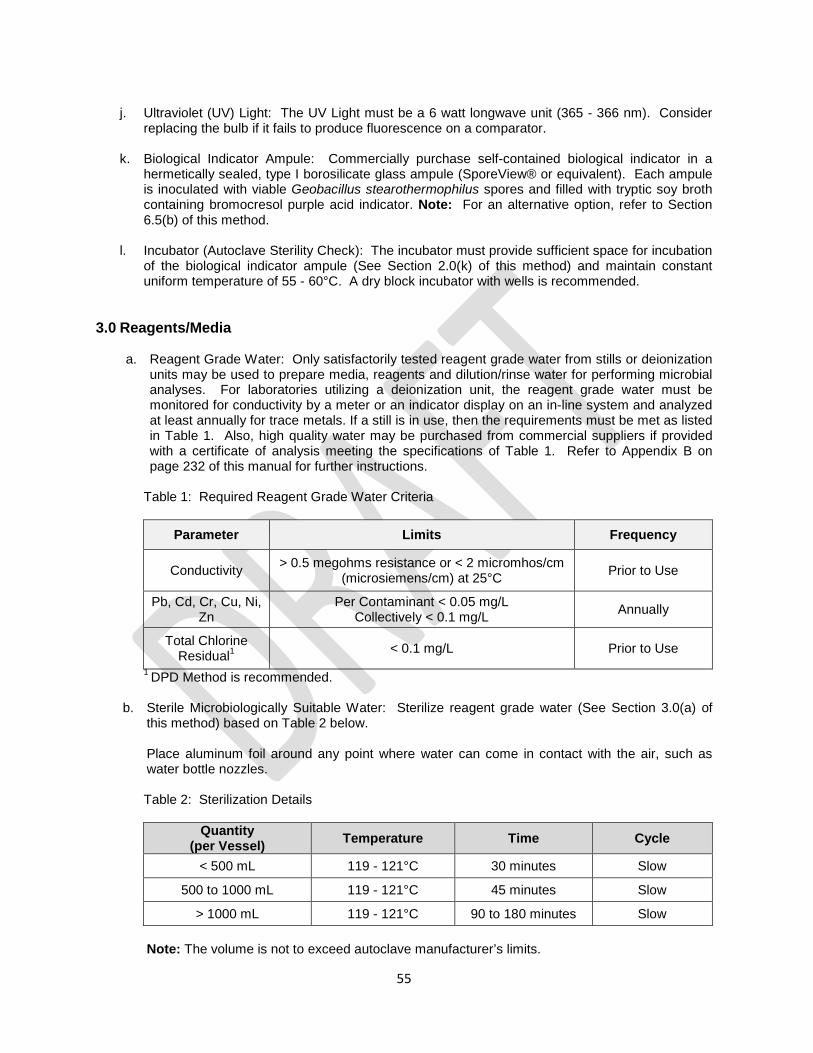
i. Ultraviolet (UV) Light: The UV Light must be a 6 watt longwave unit (365 to 366 nm). Consider replacing the bulb if it fails to produce fluorescence on a comparator.
22
j. Biological Indicator Ampule: Commercially purchase self-contained biological indicator in a
hermetically sealed, type I borosilicate glass ampule (SporeView® or equivalent). Each ampule is inoculated with viable Geobacillus stearothermophilus spores and filled with tryptic soy broth containing bromocresol purple acid indicator. Note: For an alternative option, refer to Section 6.5(b) of this method.
k. Incubator (Autoclave Sterility Check): The incubator must provide sufficient space for incubation
of the biological indicator ampule (See Section 2.0(j) of this method) and maintain constant uniform temperature of 55 to 60°C. A dry block incubator with wells is recommended.
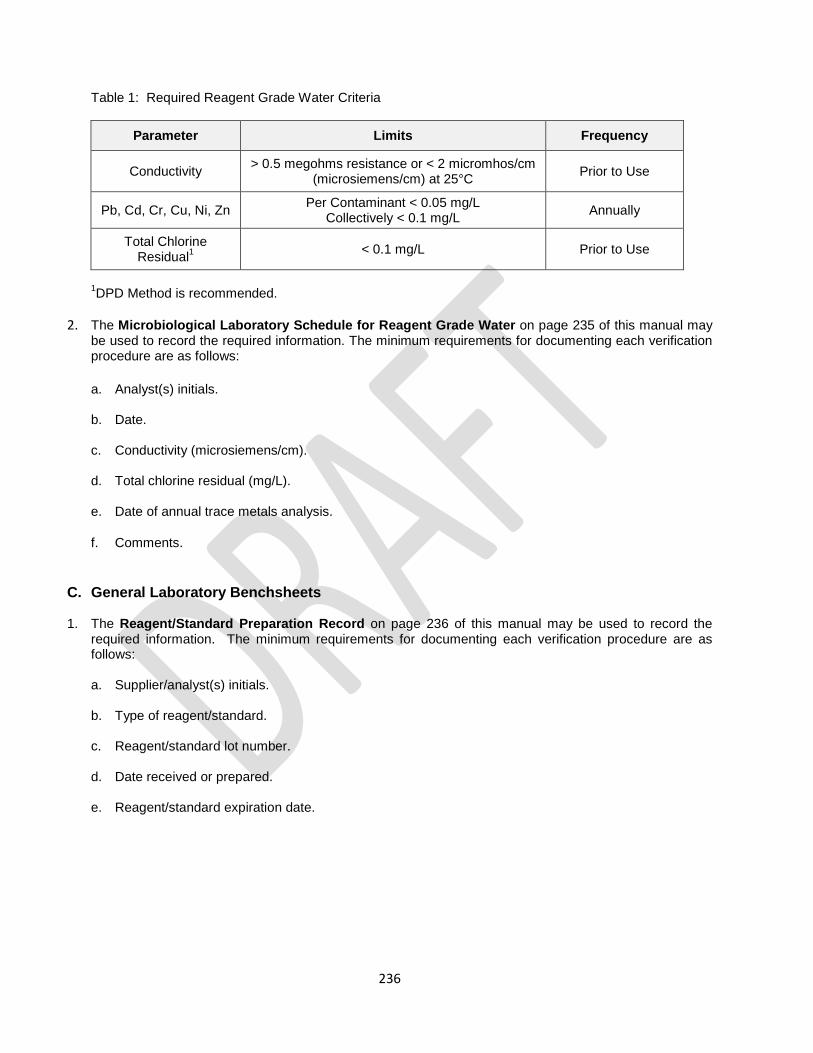
3.0 Reagents/Media a. Reagent Grade Water: Only satisfactorily tested reagent grade water from stills or deionization
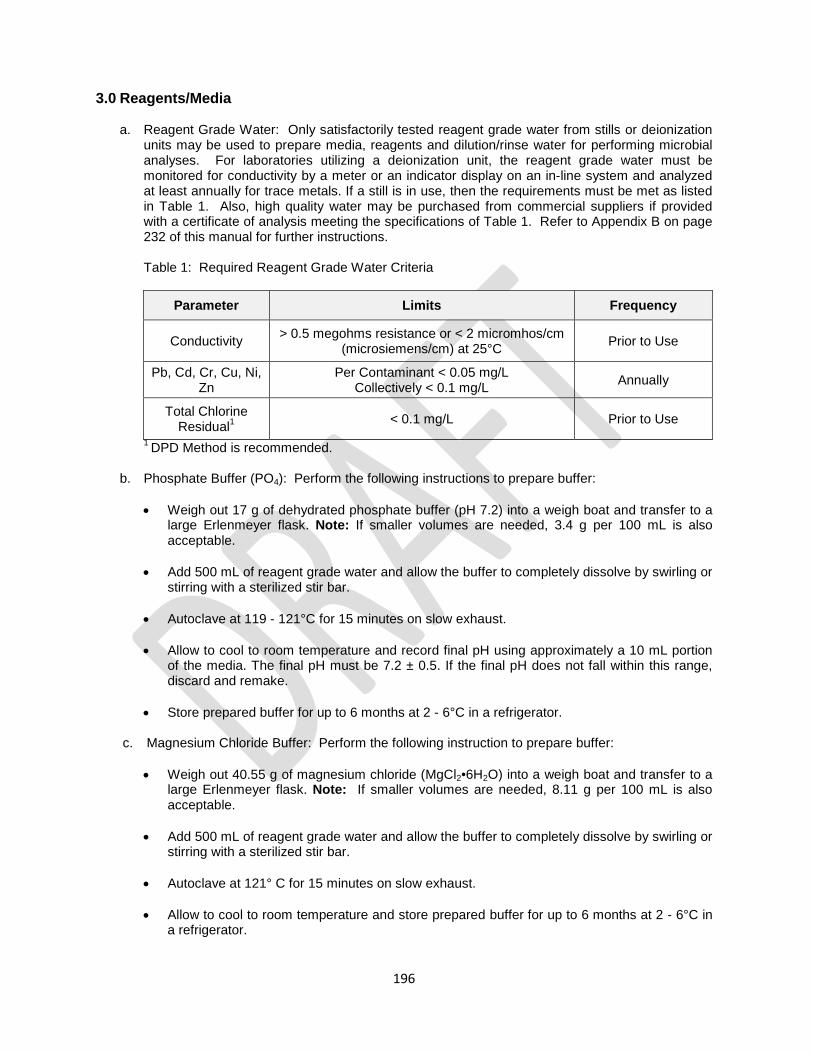
units may be used to prepare media, reagents and dilution/rinse water for performing microbial analyses. For laboratories utilizing a deionization unit, the reagent grade water must be monitored for conductivity by a meter or an indicator display on an in-line system and analyzed at least annually for trace metals. If a still is in use, then the requirements must be met as listed in Table 1. Also, high quality water may be purchased from commercial suppliers if provided with a certificate of analysis meeting the specifications of Table 1. Refer to Appendix B on page 232 of this manual for further instructions. Table 1: Required Reagent Grade Water Criteria
Parameter Limits Frequency
Conductivity > 0.5 megohms resistance or < 2 micromhos/cm (microsiemens/cm) at 25°C Prior to Use
Pb, Cd, Cr, Cu, Ni, Zn
Per Contaminant < 0.05 mg/L Collectively < 0.1 mg/L Annually
Total Chlorine Residual1 < 0.1 mg/L Prior to Use
1 DPD Method is recommended.
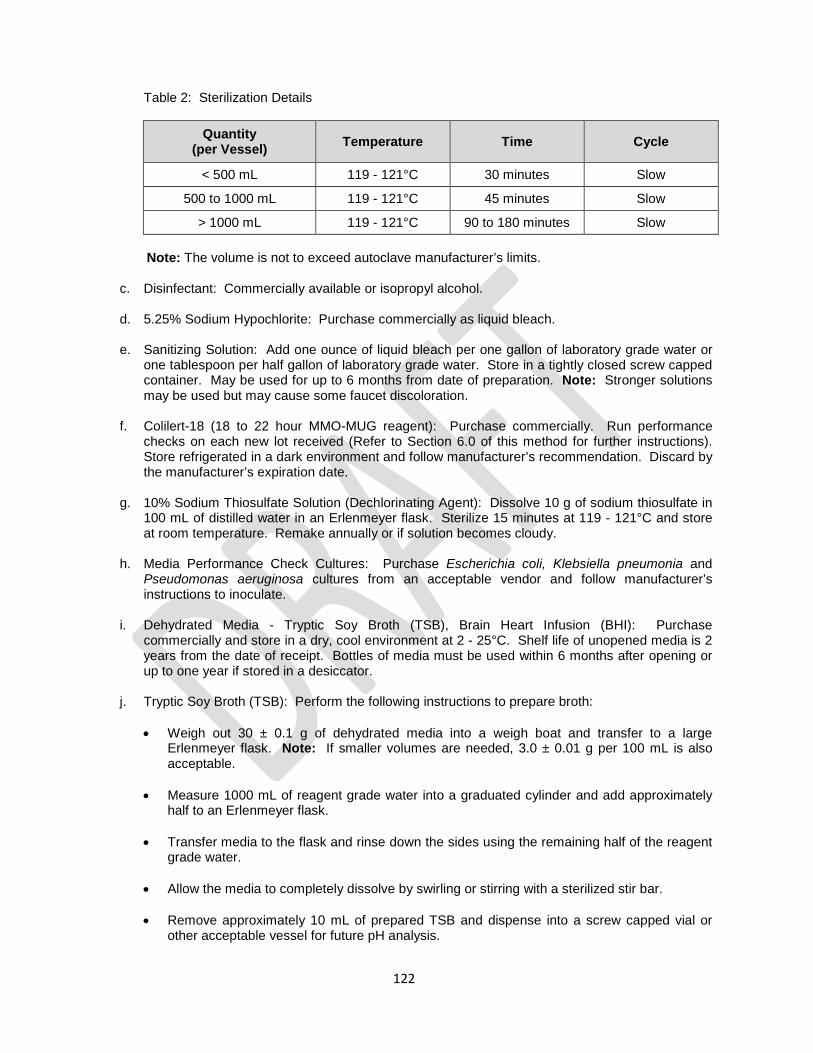
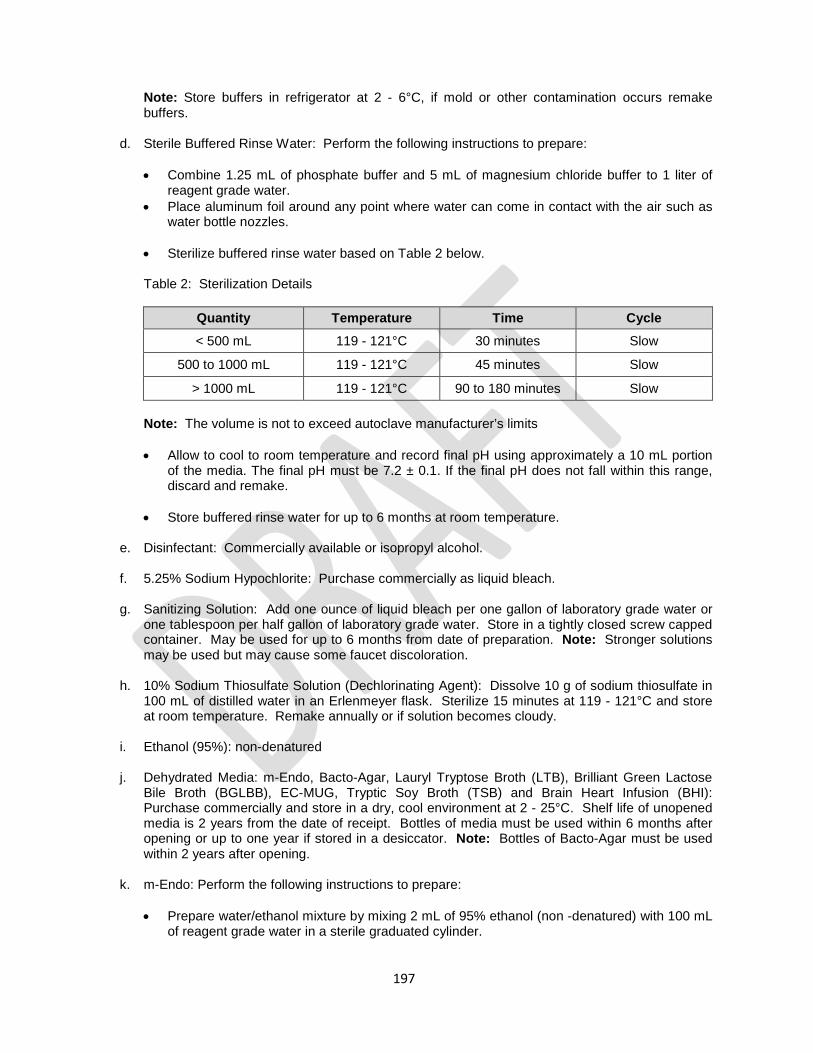
b. Sterile Microbiologically Suitable Water: Sterilize reagent grade water based on Table 2 below. See Section 3.0(a) of this method. Place aluminum foil around any point where water can come in contact with the air, such as water bottle nozzles. Table 2: Sterilization Details
Quantity (per Vessel) Temperature Time Cycle
< 500 mL 119 - 121°C 30 minutes Slow
500 to 1000 mL 119 - 121°C 45 minutes Slow
> 1000 mL 119 - 121°C 90 to 180 minutes Slow Note: The volume is not to exceed autoclave manufacturer’s limits.
c. Disinfectant: Commercially available or isopropyl alcohol.
23
d. 5.25% Sodium Hypochlorite: Purchase commercially as liquid bleach.
e. Sanitizing Solution: Add one ounce of liquid bleach per one gallon of laboratory grade water or one tablespoon per half gallon of laboratory grade water. Store in a tightly closed screw capped container. May be used for up to 6 months from date of preparation. Note: Stronger solutions may be used but may cause some faucet discoloration.
f. Colilert (24 to 28 hour MMO-MUG Reagent): Purchase commercially. Run performance checks on each new lot received. (Refer to Section 6.0 of this method for further instructions.) Store in a dark environment and follow manufacturer’s recommendation. Discard by the manufacturer’s expiration date.
g. Colisure (24 to 48 hour MMO-MUG reagent): Purchase commercially. Run performance checks on each new lot received. (Refer to Section 6.0 of this method for further instructions.) Store refrigerated in a dark environment and follow manufacturer’s recommendation. Discard by the manufacturer’s expiration date.
h. 10% Sodium Thiosulfate Solution (Dechlorinating Agent): Dissolve 10 g of sodium thiosulfate in 100 mL of distilled water in an Erlenmeyer flask. Sterilize 15 minutes at 119 - 121°C and store at room temperature. Remake annually or if solution becomes cloudy.
i. Media Performance Check Cultures: Purchase Escherichia coli, Klebsiella pneumonia and Pseudomonas aeruginosa cultures from an acceptable vendor and follow manufacturer’s instructions to inoculate.
j. Dehydrated Media - Tryptic Soy Broth (TSB), Brain Heart Infusion (BHI): Purchase commercially and store in a dry, cool environment at 2 - 25°C. Shelf life of unopened media is 2 years from the date of receipt. Bottles of media must be used within 6 months after opening or up to one year if stored in a desiccator.
k. Tryptic Soy Broth (TSB): Perform the following instructions to prepare broth:
• Weigh out 30 ± 0.1 g of dehydrated media into a weigh boat and transfer to a large Erlenmeyer flask. Note: If smaller volumes are needed, 3.0 ± 0.01 g per 100 mL is also acceptable.
• Measure 1000 mL of reagent grade water into a graduated cylinder and add approximately half to an Erlenmeyer flask.
• Transfer media to the flask and rinse down the sides using the remaining half of the reagent
grade water. • Allow the media to completely dissolve by swirling or stirring with a sterilized stir bar.
• Remove approximately 10 mL of prepared TSB and dispense into a screw capped vial or
other acceptable vessel for future pH analysis.
• Dispense into 30 mL screw capped vessels. If not screw capped, cover flask opening with aluminum foil.
• Autoclave at 119 - 121°C for 12 to 15 minutes on slow exhaust. Refer to Table 8.
• Allow to cool to room temperature and record the final pH using the 10 mL portion of the
media. The final pH must be 7.3 ± 0.2. If the final pH does not fall within this range, discard the media and remake.
24
• Store prepared media in screw capped vessels for up to 3 months in a refrigerator or up to one week (sealed/covered) at room temperature.
l. Brain Heart Infusion (BHI) Broth: Perform the following instructions to prepare the broth:
• Weigh out 37 ± 0.1 g of dehydrated media into a weigh boat and transfer to a large
Erlenmeyer flask. Note: If smaller volumes are needed, 3.7 ± 0.01 g per 100 mL is also acceptable.
• Measure 1000 mL of reagent grade water into a graduated cylinder and add approximately half to an Erlenmeyer flask.
• Transfer media to the flask and rinse down the sides using the remaining half of the reagent
grade water. • Allow the media to completely dissolve by swirling or stirring with a sterilized stir bar.
• Remove approximately 10 mL of prepared BHI and dispense into a screw capped vial or
other acceptable vessel for future pH analysis.
• Dispense into 30 mL screw capped vessels. If not screw capped, cover flask opening with aluminum foil.
• Autoclave at 119 - 121°C for 12 to 15 minutes on slow exhaust. Refer to Table 8.
• Allow to cool to room temperature and record the final pH using the 10 mL portion of the
media. The final pH must be 7.4 ± 0.2. If the final pH does not fall within this range, discard the media and remake.
• Store prepared media in screw capped vessels for up to 3 months in a refrigerator or up to
one week (sealed/covered) at room temperature.
m. Colilert Comparator: Purchase commercially and store in a dark environment at room temperature. Discard by the manufacturer’s expiration date.
4.0 Sample Collection/Preservation/Holding Time
a. Sample collection:
• Select an appropriate sampling tap such as a faucet, petcock or small valve. Avoid taps with
a leaky stem or a swivel joint.
• Prior to collection, remove the aerator since it may harbor bacteria.
• Prior to collection in the distribution system place all carbon filters, sediment filters and water softeners on bypass.
• Flush the sample tap to waste for approximately one minute then close valve.
• It is recommended to disinfect the nozzle for two minutes with the sanitizing solution (See Section 3.0(e) of this method for preparation instructions) using either a spray bottle to saturate the opening or a plastic bag to squeeze the solution into the faucet. Use a fresh solution each time.
25
• Open the tap fully and flush tap for approximately 3 to 5 minutes (until a constant temperature is detected), then reduce flow enough to allow sample bottles to be filled without splashing.
• Verify water is within the expected concentration range for chlorine using a digital
colorimetric/DPD colorimeter.
• Aseptically fill the sample bottles and avoid contaminating the cap or bottle. Note: If using commercially purchase pre-sterilized bottles, be sure to completely remove any plastic seal from the cap prior to filling the sample bottle.
• Do not allow the sample bottle to overflow as this will wash out the sodium thiosulfate. If the
sample bottle overflows or water splashes out, discard and collect another sample.
• Immediately recap the sample bottle tightly.
• Refer to Chapter 2(B) on page 7 of this manual for sample identification requirements.
b. Preservation: Sodium thiosulfate is used to remove residual chlorine. Add 0.1 mL of 10% sodium thiosulfate per 125 mL (4 oz.) sample container. This will neutralize approximately 15 mg/L of residual chlorine. Refer to Section 3.0(h) of this method for preparation instructions.
c. Maximum sample holding time: No more than 30 hours after collection. Store samples at 4°C until time of analysis.
5.0 MMO-MUG Analysis Procedure
5.1 Sample Setup
1. Vigorously shake the sample. Note: Sample bottle must contain at least 1 inch of headspace to
allow for adequate mixing.
2. Measure 100 mL of sample into an MMO-MUG test vessel. Alternatively, if using the MMO-MUG test vessel as the sample container, aseptically adjust the volume to the 100 mL mark. Note: If volume is less than 100 mL, the test is not valid and must be recorded as Sample Rejected: Insufficient Volume. Another sample must be collected for analysis.
3. Mark the corresponding sample number on the test vessel.
4. Aseptically open and add a packet of MMO-MUG reagent (Colilert or Colisure) to the test vessel. Recap and shake vigorously to dissolve the reagent. Incubation must be initiated within 30 minutes after addition of MMO-MUG reagent. Note: Some particles may remain un-dissolved initially; however the reagent will continue to dissolve during the incubation period.
5. Both positive and negative controls are required with each set of samples tested. A set is defined as up to 60 samples having incubation initiated within four hours. Each incubator used must contain at least one set of controls. • Positive Control: Aseptically fill an MMO-MUG test vessel with sterile reagent water and
inoculate using a known control of either a live E. coli culture or with water known to contain E. coli, such as raw wastewater.
• Negative control: Aseptically fill an MMO-MUG test vessel with only sterile reagent water.
• Aseptically add a packet of MMO-MUG reagent to both test vessels.
26
7. Incubate all test vessels at 35 ± 0.5°C for the following incubation times:
• Colilert from 24 to 28 hours
• Colisure from 24 to 48 hours 5.2 Interpreting and Reporting MMO-MUG Results
Colilert:
a. After the 24 to 28 hour incubation period, remove the test vessels from the incubator. Compare each test vessel to the Colilert comparator and negative control.
b. For sample interpretation refer to Table 3, Colilert Interpretation. If after the 24 hour incubation
period the interpretation is inconclusive go to (c), otherwise go to (d).
c. If the sample displays a slight yellow color but appears less intense than the Colilert comparator after 24 hours, continue the incubation for up to 28 hours. The total incubation time must not exceed 28 hours.
• After 28 hours, a total coliform positive sample will display further color development greater
than or equal to the comparator.
• If after 28 hours, the sample color is less intense than the comparator, report the sample as Total Coliform: Absence.
Note: Samples that display an innate yellow or amber color prior to analysis must be compared to their corresponding un-incubated color control blank.
• After incubation, if the sample color is less than or equal to the color control blank, report the sample as Total Coliform: Absence.
• After incubation, if the sample color is greater than the color control blank and more intense than the comparator, refer to Table 3, Colilert Interpretation, and then go to (d).
d. Examine all total coliform positive samples for presence of E. coli using a UV light in a darkened
room or observation box. Compare samples to the comparator. • If the sample is negative for fluorescence, the sample is considered negative for E. coli.
• If the sample is positive for fluorescence, the sample is considered positive for E. coli.
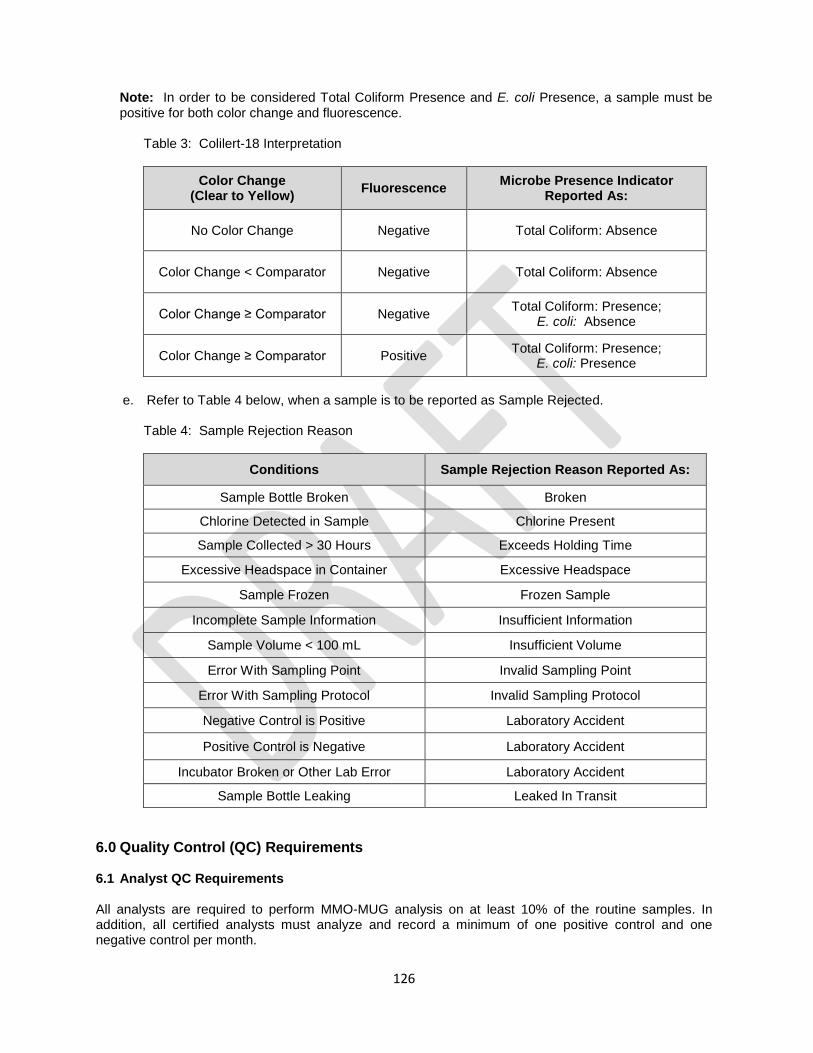
Note: In order to be considered Total Coliform Presence and E. coli Presence, a sample must be positive for both color change and fluorescence.
27
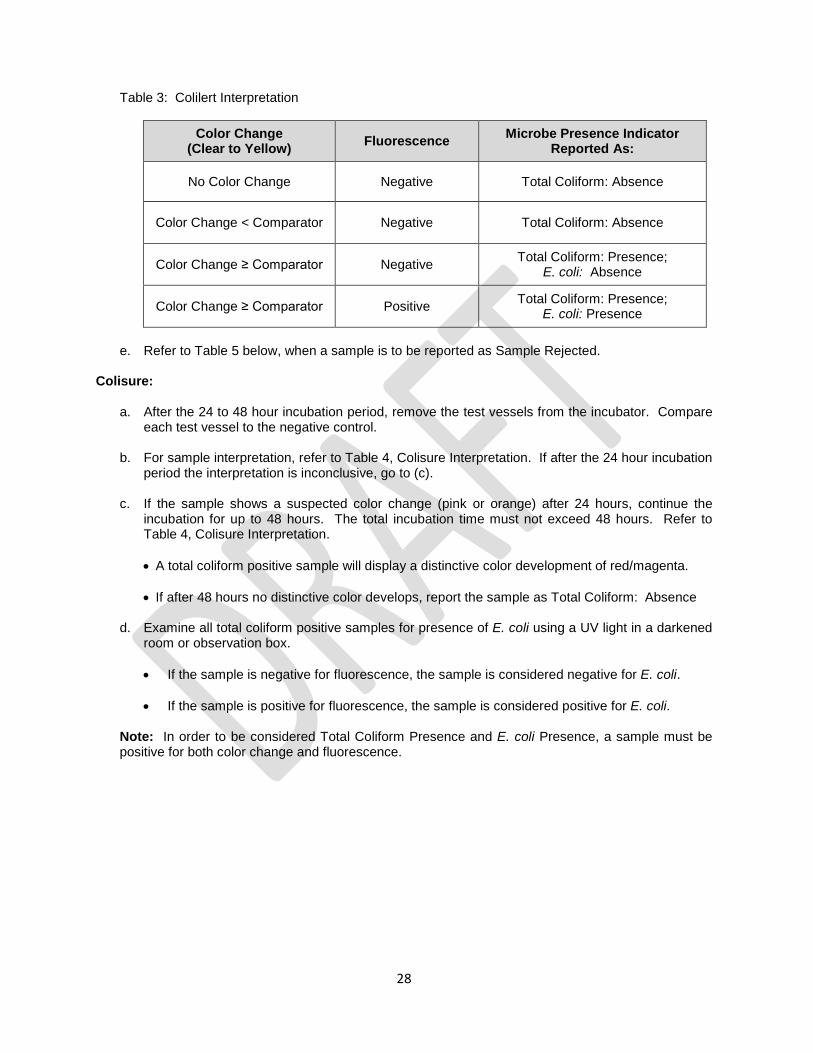
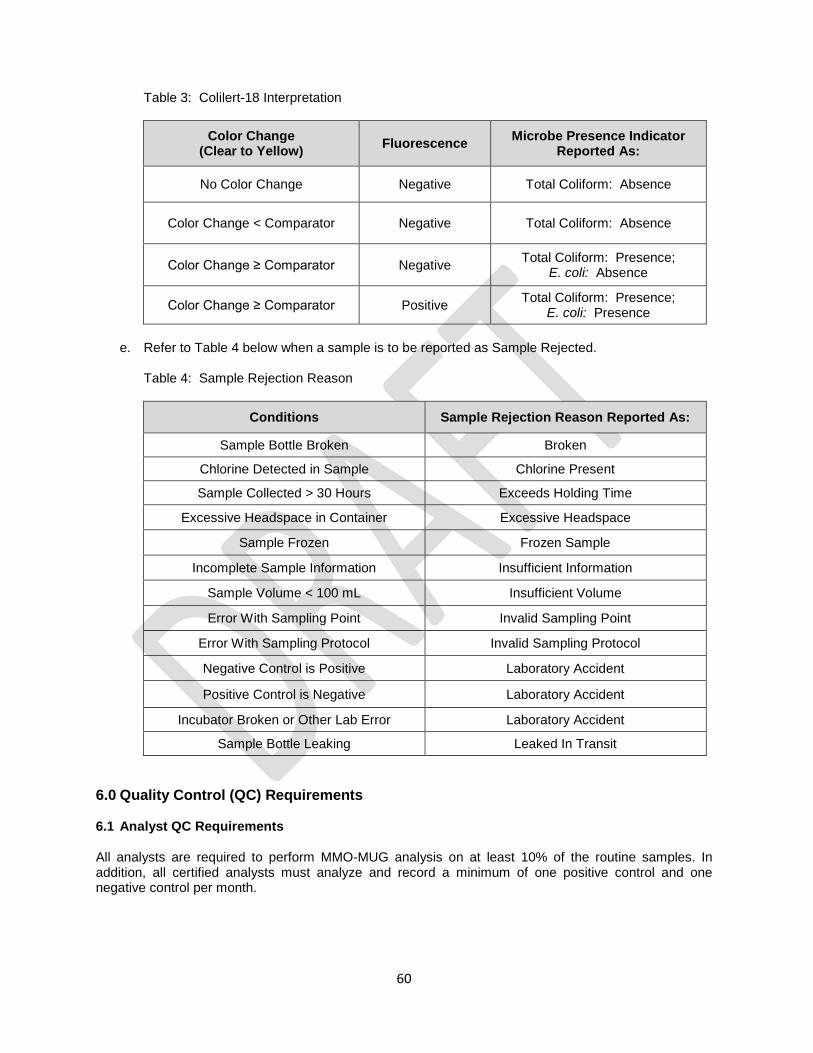
Table 3: Colilert Interpretation
Color Change (Clear to Yellow) Fluorescence Microbe Presence Indicator
Reported As:
No Color Change Negative Total Coliform: Absence
Color Change < Comparator Negative Total Coliform: Absence
Color Change ≥ Comparator Negative Total Coliform: Presence; E. coli: Absence
Color Change ≥ Comparator Positive Total Coliform: Presence; E. coli: Presence
e. Refer to Table 5 below, when a sample is to be reported as Sample Rejected.
Colisure:
a. After the 24 to 48 hour incubation period, remove the test vessels from the incubator. Compare
each test vessel to the negative control.
b. For sample interpretation, refer to Table 4, Colisure Interpretation. If after the 24 hour incubation period the interpretation is inconclusive, go to (c).
c. If the sample shows a suspected color change (pink or orange) after 24 hours, continue the incubation for up to 48 hours. The total incubation time must not exceed 48 hours. Refer to Table 4, Colisure Interpretation.
• A total coliform positive sample will display a distinctive color development of red/magenta.
• If after 48 hours no distinctive color develops, report the sample as Total Coliform: Absence
d. Examine all total coliform positive samples for presence of E. coli using a UV light in a darkened
room or observation box. • If the sample is negative for fluorescence, the sample is considered negative for E. coli.
• If the sample is positive for fluorescence, the sample is considered positive for E. coli.
Note: In order to be considered Total Coliform Presence and E. coli Presence, a sample must be positive for both color change and fluorescence.
28
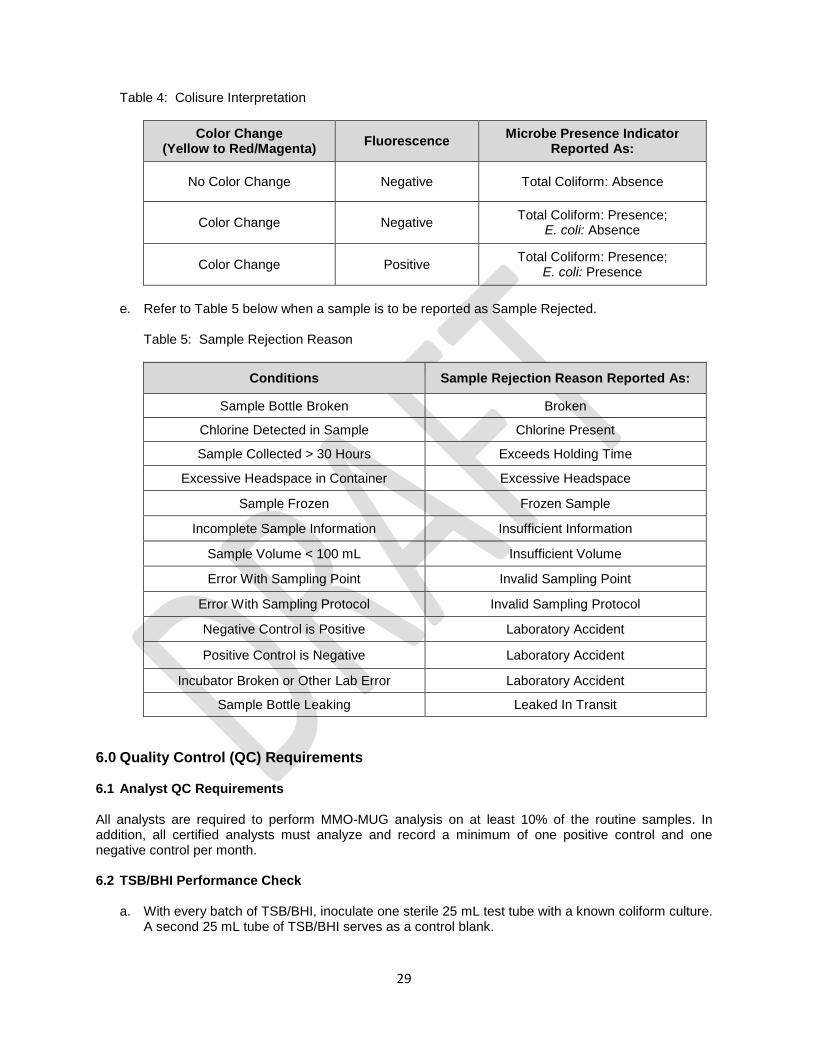
Table 4: Colisure Interpretation
Color Change (Yellow to Red/Magenta) Fluorescence Microbe Presence Indicator
Reported As:
No Color Change Negative Total Coliform: Absence
Color Change Negative Total Coliform: Presence; E. coli: Absence
Color Change Positive Total Coliform: Presence; E. coli: Presence
e. Refer to Table 5 below when a sample is to be reported as Sample Rejected.
Table 5: Sample Rejection Reason
Conditions Sample Rejection Reason Reported As:
Sample Bottle Broken Broken
Chlorine Detected in Sample Chlorine Present
Sample Collected > 30 Hours Exceeds Holding Time
Excessive Headspace in Container Excessive Headspace
Sample Frozen Frozen Sample
Incomplete Sample Information Insufficient Information
Sample Volume < 100 mL Insufficient Volume
Error With Sampling Point Invalid Sampling Point
Error With Sampling Protocol Invalid Sampling Protocol
Negative Control is Positive Laboratory Accident
Positive Control is Negative Laboratory Accident
Incubator Broken or Other Lab Error Laboratory Accident
Sample Bottle Leaking Leaked In Transit
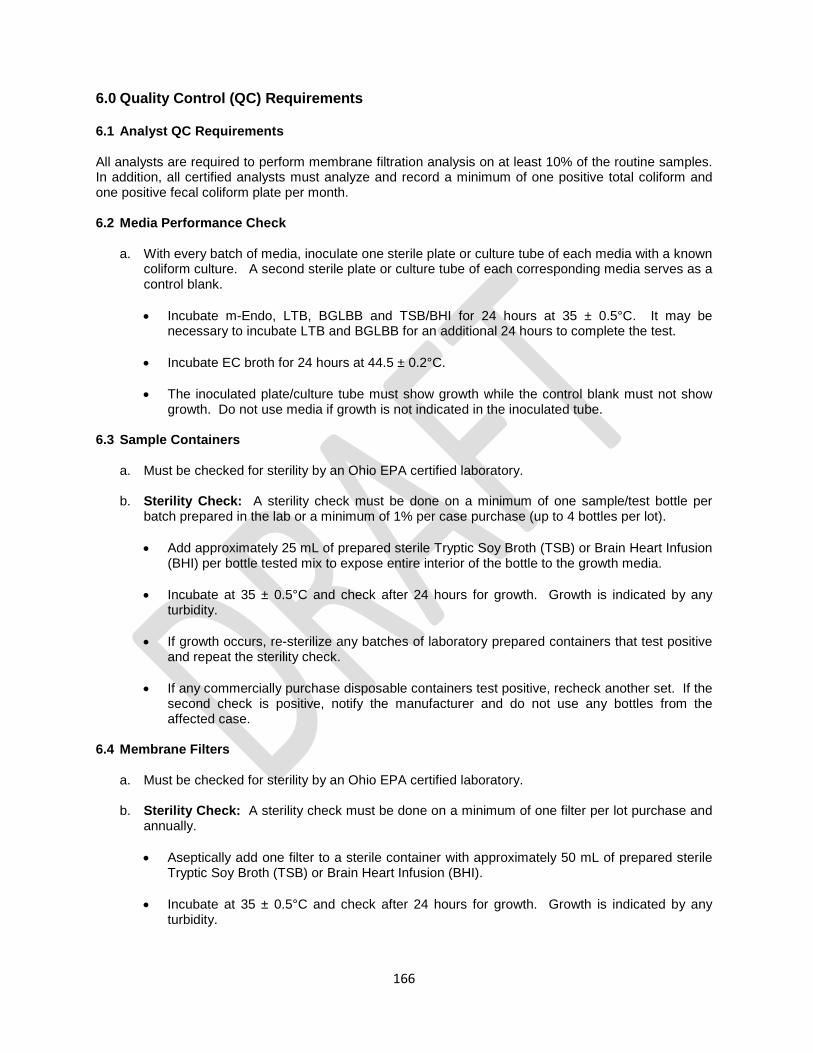
6.0 Quality Control (QC) Requirements 6.1 Analyst QC Requirements
All analysts are required to perform MMO-MUG analysis on at least 10% of the routine samples. In addition, all certified analysts must analyze and record a minimum of one positive control and one negative control per month. 6.2 TSB/BHI Performance Check
a. With every batch of TSB/BHI, inoculate one sterile 25 mL test tube with a known coliform culture.
A second 25 mL tube of TSB/BHI serves as a control blank.
29
• Incubate both tubes for 24 hours at 35 ± 0.5°C.
• The inoculated tube must show cloudy growth while the control blank must not show cloudy growth. Do not use media if growth is not indicated in the inoculated tube.
6.3 Sample Containers
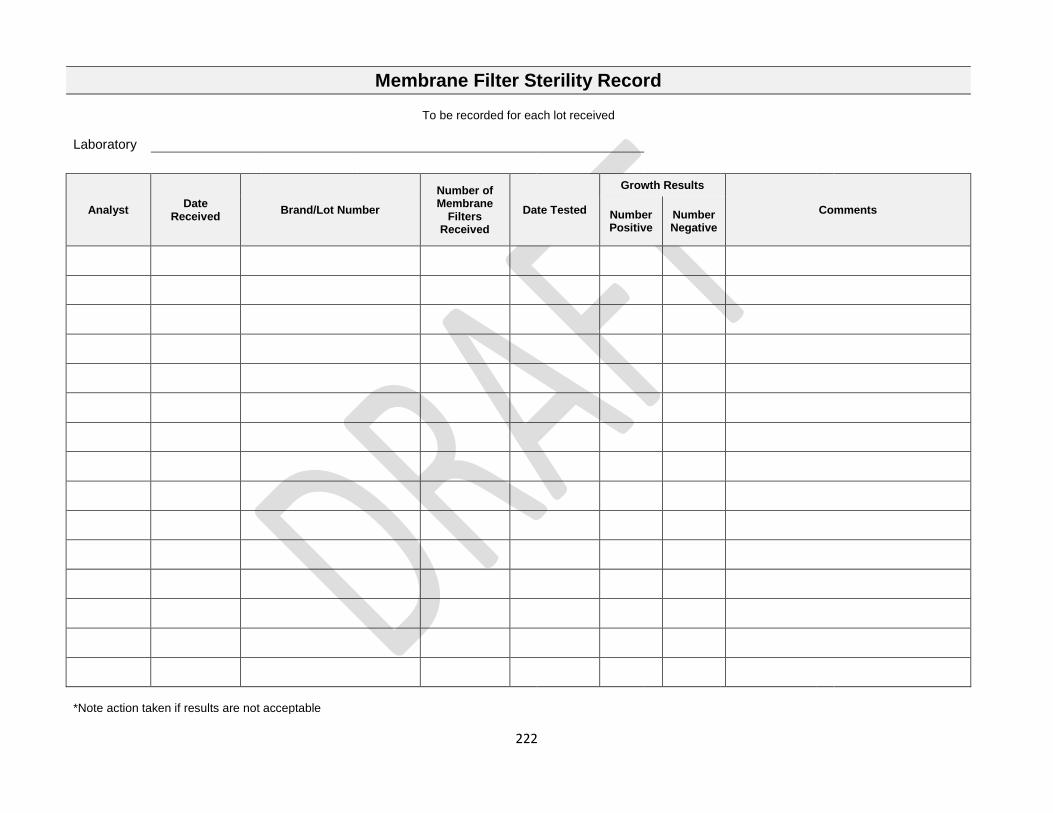
a. Must be checked for sterility and auto-fluorescence by an Ohio EPA certified laboratory.
b. Sterility Check: A sterility check must be done on a minimum of one sample/test bottle per
batch prepared in the lab or a minimum of 1% per case purchase (up to 4 bottles per lot).
• Add approximately 25 mL of prepared sterile Tryptic Soy Broth (TSB) or Brain Heart Infusion (BHI) per bottle tested mix to expose entire interior of the bottle to the growth media.
• Incubate at 35 ± 0.5°C and check after 24 hours for growth. Growth is indicated by any turbidity.
• If growth occurs, re-sterilize any batches of laboratory prepared containers that test positive
and repeat the sterility check.
• If any commercially purchase disposable containers test positive, recheck another set. If the second check is positive, notify the manufacturer and do not use any bottles from the affected case.
c. Auto-Fluorescence: Check all sample bottles prepared in the laboratory for fluorescence, or a
minimum of 1% per case purchase (up to 4 bottles per lot) using a UV light. If any containers fluoresce, notify the manufacturer and do not use any bottles from the affected case.
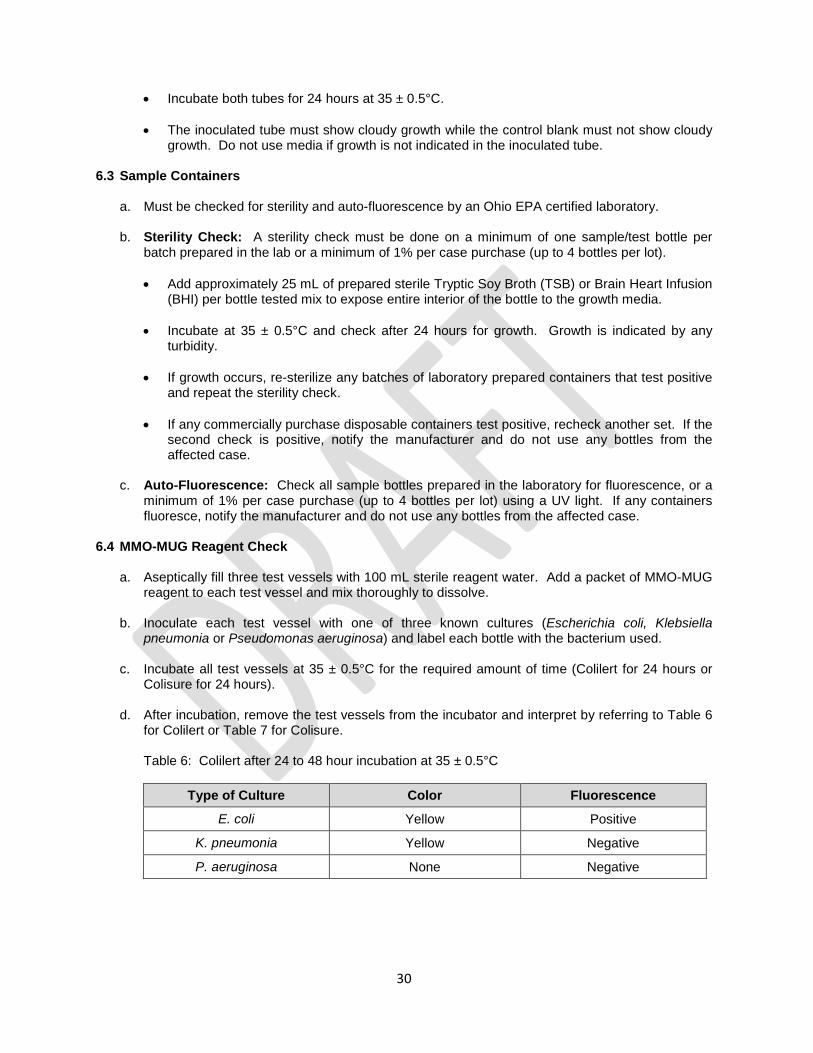
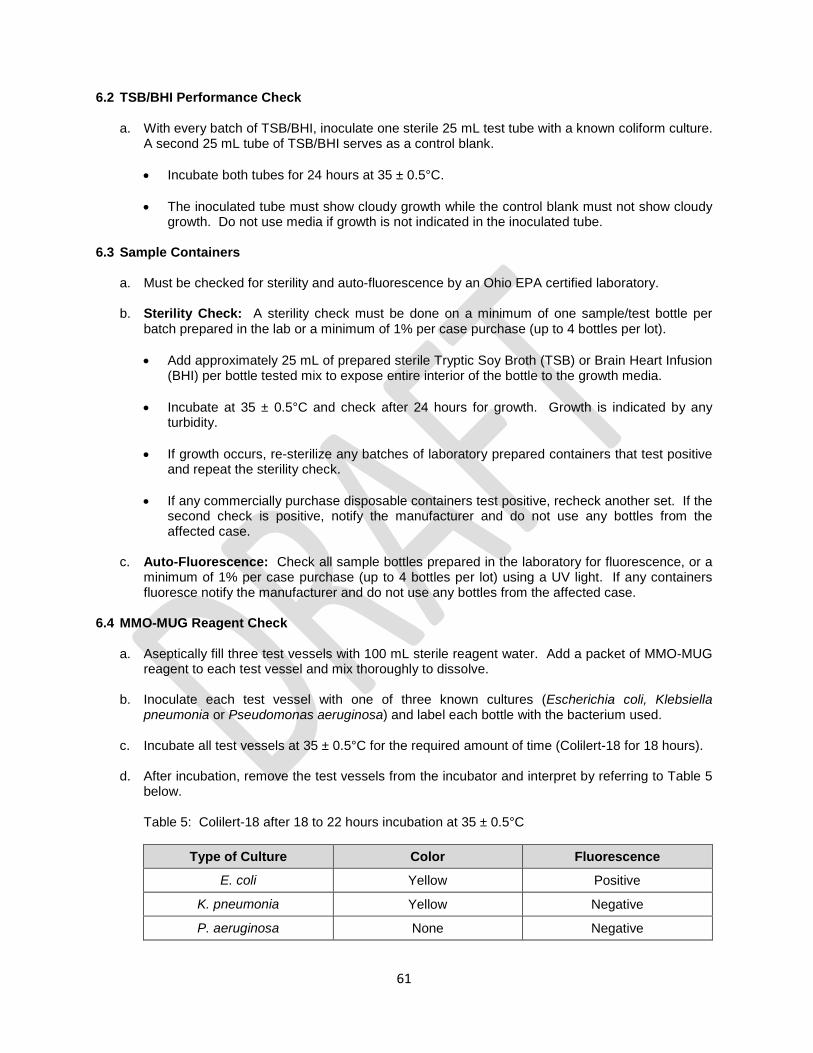
6.4 MMO-MUG Reagent Check
a. Aseptically fill three test vessels with 100 mL sterile reagent water. Add a packet of MMO-MUG
reagent to each test vessel and mix thoroughly to dissolve.
b. Inoculate each test vessel with one of three known cultures (Escherichia coli, Klebsiella pneumonia or Pseudomonas aeruginosa) and label each bottle with the bacterium used.
c. Incubate all test vessels at 35 ± 0.5°C for the required amount of time (Colilert for 24 hours or
Colisure for 24 hours).
d. After incubation, remove the test vessels from the incubator and interpret by referring to Table 6 for Colilert or Table 7 for Colisure.
Table 6: Colilert after 24 to 48 hour incubation at 35 ± 0.5°C
Type of Culture Color Fluorescence
E. coli Yellow Positive
K. pneumonia Yellow Negative
P. aeruginosa None Negative
30
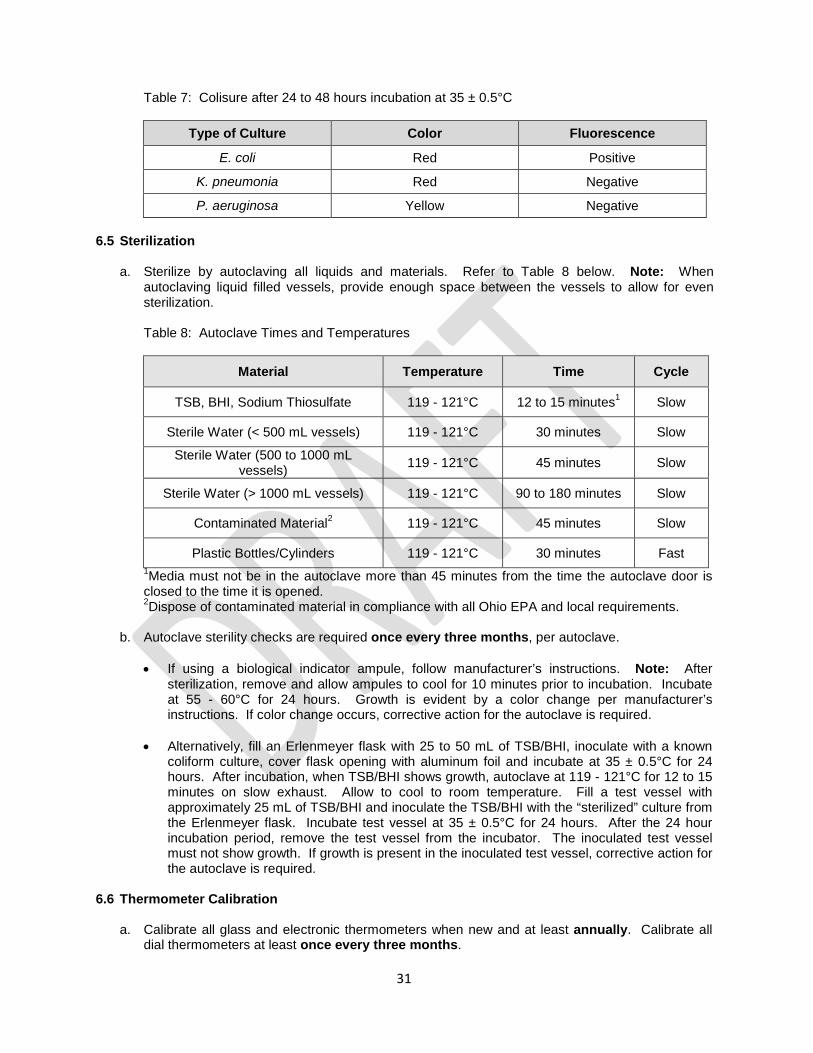
Table 7: Colisure after 24 to 48 hours incubation at 35 ± 0.5°C
Type of Culture Color Fluorescence
E. coli Red Positive
K. pneumonia Red Negative
P. aeruginosa Yellow Negative 6.5 Sterilization
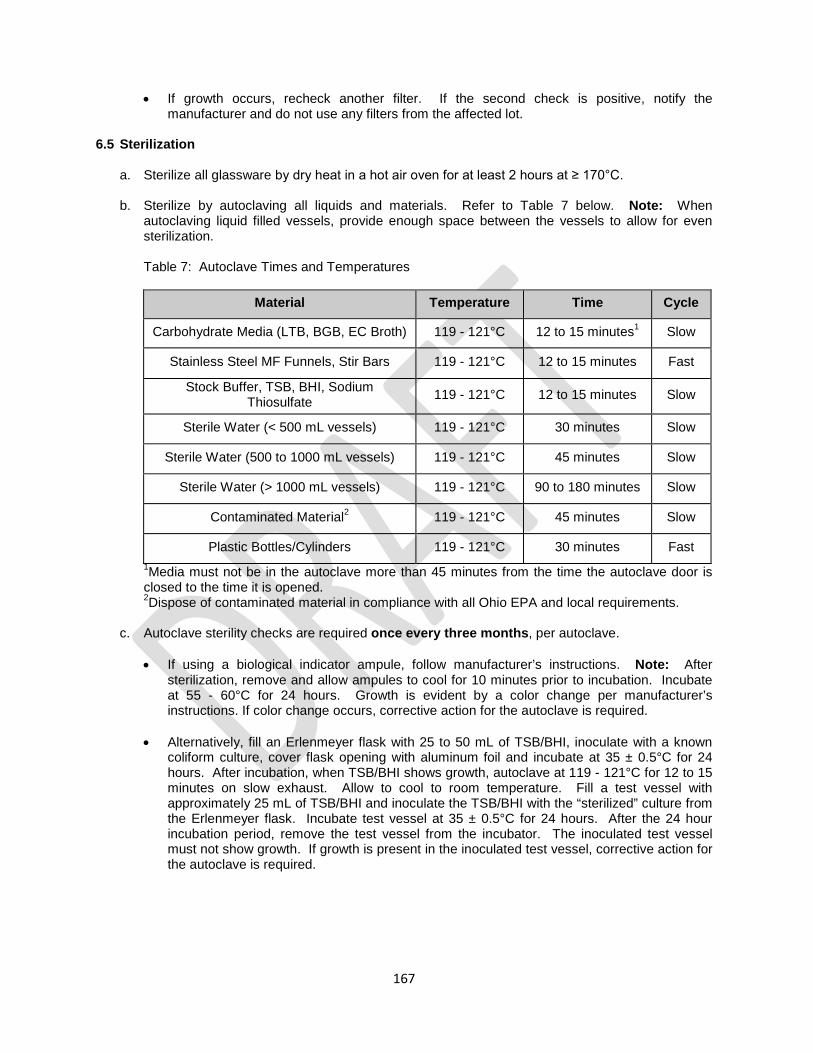
a. Sterilize by autoclaving all liquids and materials. Refer to Table 8 below. Note: When
autoclaving liquid filled vessels, provide enough space between the vessels to allow for even sterilization. Table 8: Autoclave Times and Temperatures
Plastic Bottles/Cylinders 119 - 121°C 30 minutes Fast 1Media must not be in the autoclave more than 45 minutes from the time the autoclave door is closed to the time it is opened. 2Dispose of contaminated material in compliance with all Ohio EPA and local requirements.
b. Autoclave sterility checks are required once every three months, per autoclave. • If using a biological indicator ampule, follow manufacturer’s instructions. Note: After
sterilization, remove and allow ampules to cool for 10 minutes prior to incubation. Incubate at 55 - 60°C for 24 hours. Growth is evident by a color change per manufacturer’s instructions. If color change occurs, corrective action for the autoclave is required.
• Alternatively, fill an Erlenmeyer flask with 25 to 50 mL of TSB/BHI, inoculate with a known coliform culture, cover flask opening with aluminum foil and incubate at 35 ± 0.5°C for 24 hours. After incubation, when TSB/BHI shows growth, autoclave at 119 - 121°C for 12 to 15 minutes on slow exhaust. Allow to cool to room temperature. Fill a test vessel with approximately 25 mL of TSB/BHI and inoculate the TSB/BHI with the “sterilized” culture from the Erlenmeyer flask. Incubate test vessel at 35 ± 0.5°C for 24 hours. After the 24 hour incubation period, remove the test vessel from the incubator. The inoculated test vessel must not show growth. If growth is present in the inoculated test vessel, corrective action for the autoclave is required.
6.6 Thermometer Calibration
a. Calibrate all glass and electronic thermometers when new and at least annually. Calibrate all
dial thermometers at least once every three months.
31
b. Reference/NIST Certified Thermometer (Ice Point) Calibration
1. Create an ice bath in an insulated container using distilled/deionized water and crushed ice
made using distilled/deionized water.
2. Submerge the reference/certified thermometer in the ice bath until a stable temperature is reached.
3. The thermometer must read 0.0°C or, for thermometers without a 0.0°C mark, the “ice-point
calibration” mark.
4. If reference/certified thermometer does not read 0.0°C corrective action must be taken.
c. Incubator Thermometer (Total Coliform) Calibration 1. Place incubator thermometer and reference thermometer in a covered beaker or flask of
water and incubate overnight in a 35°C incubator. Optionally, use mineral oil instead of water to eliminate the need for a covered vessel.
2. After 24 hours, record readings of the incubator and reference thermometers.
3. Label each thermometer with the correction factor based on the reference thermometer. Note: Remove thermometer from use if correction factor is > 1.0°C.
d. Incubator Thermometer (Autoclave Sterility Check) Calibration
1. Place incubator thermometer and reference thermometer in a covered beaker or flask of
water and incubate overnight in a 55 - 60°C incubator. Optionally, use mineral oil instead of water to eliminate the need for a covered vessel. Note: If using a dry block incubator with wells, place incubator thermometer and reference thermometer in adjacent wells overnight at 55 - 60°C.
2. After 24 hours, record readings of the incubator and reference thermometers.
3. Label each thermometer with the correction factor based on the reference thermometer.
Note: Remove thermometer from use if correction factor is > 1.0°C.
e. Refrigerator Thermometer Calibration
1. Place refrigerator thermometer and reference thermometer inside a refrigerator overnight
side by side in the same covered beaker or flask of water. Optionally, use mineral oil instead of water to eliminate the need for a covered vessel.
2. After 24 hours, record readings of the refrigerator and reference thermometers.
3. Label each thermometer with the correction factor based on the reference thermometer.
4. Alternatively, the refrigerator thermometer may be calibrated at “ice-point” when the reference thermometer is checked.
Note: Remove thermometer from use if correction factor is > 1.0°C.
32
g. Maximum Registering Thermometer
1. Calibration will be done by the laboratory certification officer at the time of the survey.
2. The laboratory must have at least one spare maximum registering thermometer.
3. Tag each thermometer with the correction factor base on the onsite calibration.
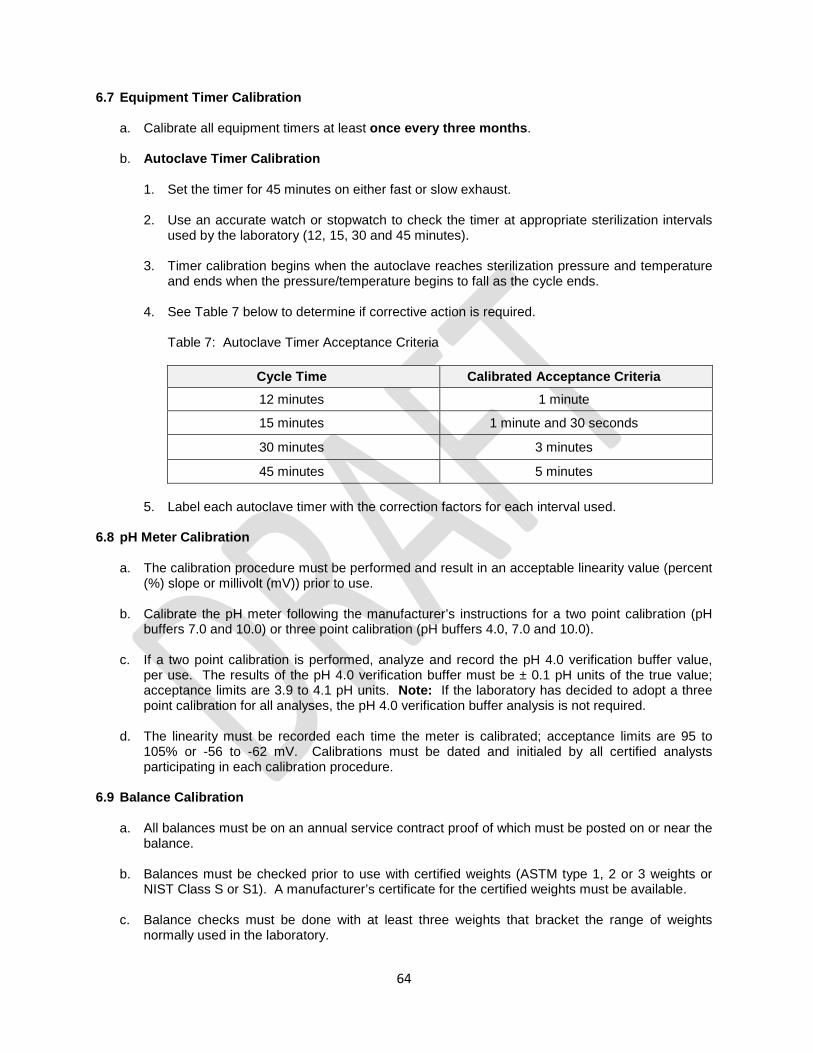
6.7 Equipment Timer Calibration a. Calibrate all equipment timers at least once every three months. b. Autoclave Timer Calibration
1. Set the timer for 45 minutes on either fast or slow exhaust. 2. Use an accurate watch or stopwatch to check the timer at appropriate sterilization intervals
used by the laboratory (12, 15, 30 and 45 minutes).
3. Timer calibration begins when the autoclave reaches sterilization pressure and temperature and ends when the pressure/temperature begins to fall as the cycle ends.
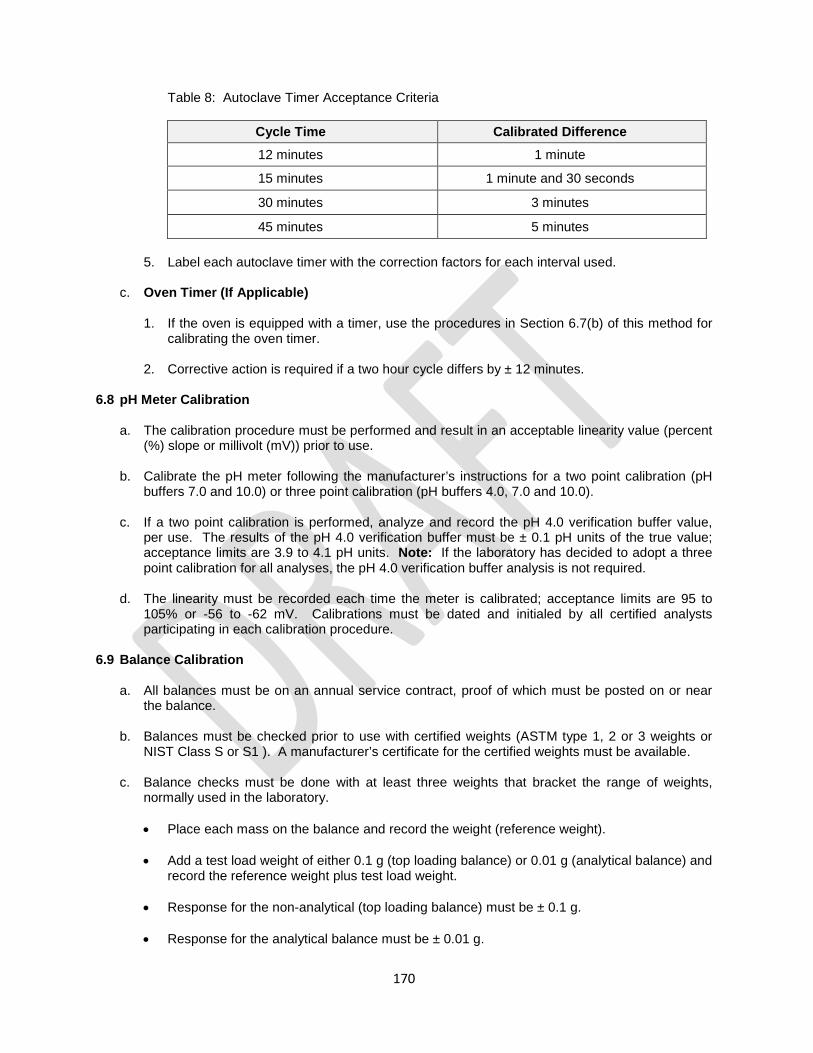
4. See Table 9 below to determine if corrective action is required. Table 9: Autoclave Timer Acceptance Criteria
Cycle Time Calibrated Acceptance Criteria 12 minutes 1 minute
15 minutes 1 minute and 30 seconds
30 minutes 3 minutes
45 minutes 5 minutes
5. Label each autoclave timer with the correction factors for each interval used.
6.8 pH Meter Calibration a. The calibration procedure must be performed and result in an acceptable linearity value (percent
(%) slope or millivolt (mV)) prior to use.
b. Calibrate the pH meter following the manufacturer’s instructions for a two point calibration (pH buffers 7.0 and 10.0) or three point calibration (pH buffers 4.0, 7.0 and 10.0).
c. If a two point calibration is performed, analyze and record the pH 4.0 verification buffer value, per use. The results of the pH 4.0 verification buffer must be ± 0.1 pH units of the true value; acceptance limits are 3.9 to 4.1 pH units. Note: If the laboratory has decided to adopt a three point calibration for all analyses, the pH 4.0 verification buffer analysis is not required.
d. The linearity must be recorded each time the meter is calibrated; acceptance limits are 95 to
105% or -56 to -62 mV. Calibrations must be dated and initialed by all certified analysts participating in each calibration procedure.
33
6.9 Balance Calibration
a. All balances must be on an annual service contract, proof of which must be posted on or near the balance.
b. Balances must be checked prior to use with certified weights (ASTM type 1, 2 or 3 weights or
NIST Class S or S1). A manufacturer’s certificate for the certified weights must be available.
c. Balance checks must be done with at least three weights that bracket the range of weights normally used in the laboratory.
• Place each mass on the balance and record the weight (reference weight).
• Add a test load weight of either 0.1 g (top loading balance) or 0.01 g (analytical balance) and
record the reference weight plus test load weight.
• Response for the non-analytical (top loading balance) must be ± 0.1 g.
• Response for the analytical balance must be ± 0.01 g. 6.10 Refrigerator Record
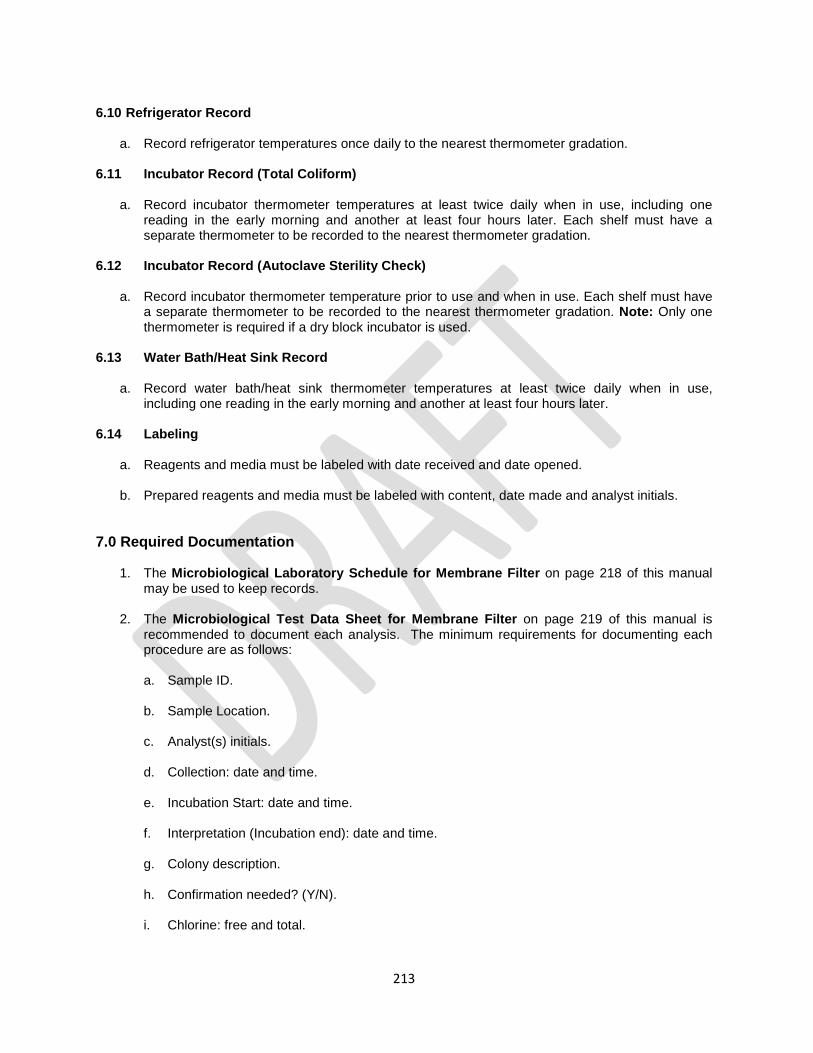
a. Record refrigerator temperatures once daily to the nearest thermometer gradation. 6.11 Incubator Record (Total Coliform)
a. Record incubator thermometer temperatures at least twice daily when in use, including one
reading in the early morning and another at least four hours later. Each shelf must have a separate thermometer to be recorded to the nearest thermometer gradation.
6.12 Incubator Record (Autoclave Sterility Check)
a. Record incubator thermometer temperature prior to use and when in use. Each shelf must have
a separate thermometer to be recorded to the nearest thermometer gradation. Note: Only one thermometer is required if a dry block incubator is used.
6.13 Labeling a. Reagents and media must be labeled with date received and date opened.
b. Prepared reagents and media must be labeled with content, date made and analyst initials.
7.0 Required Documentation
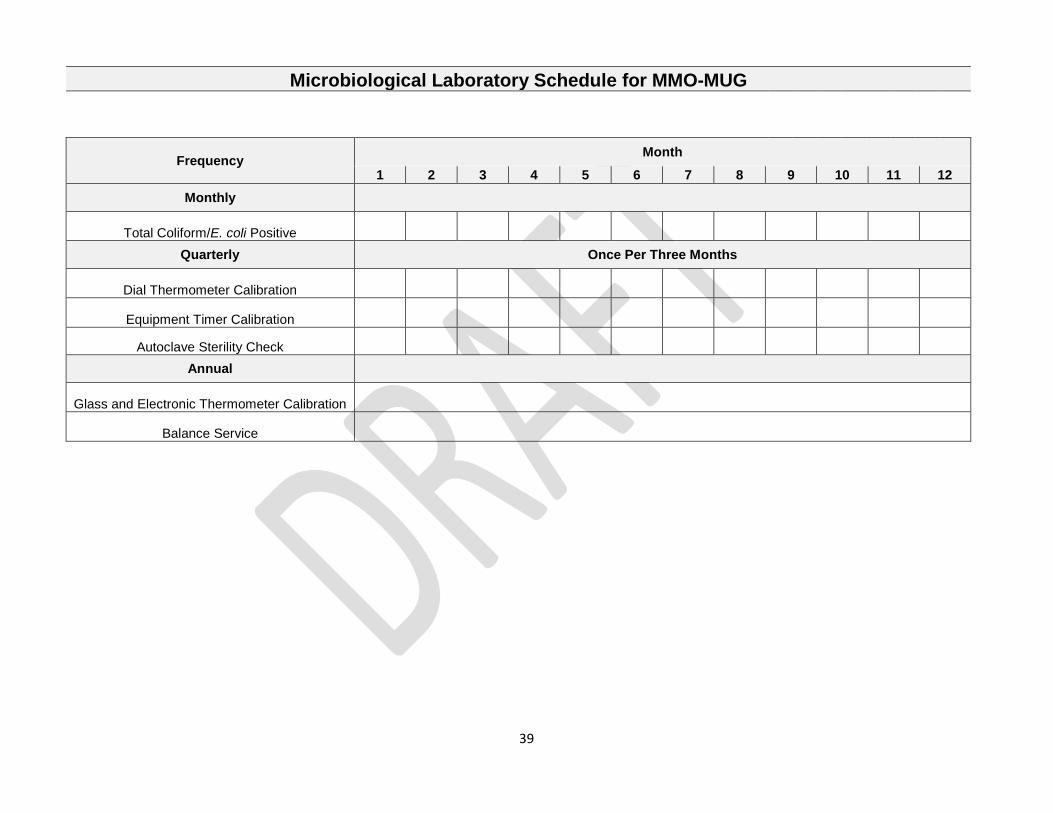
1. The Microbiological Laboratory Schedule for MMO-MUG on page 39 of this manual may be used to keep records.
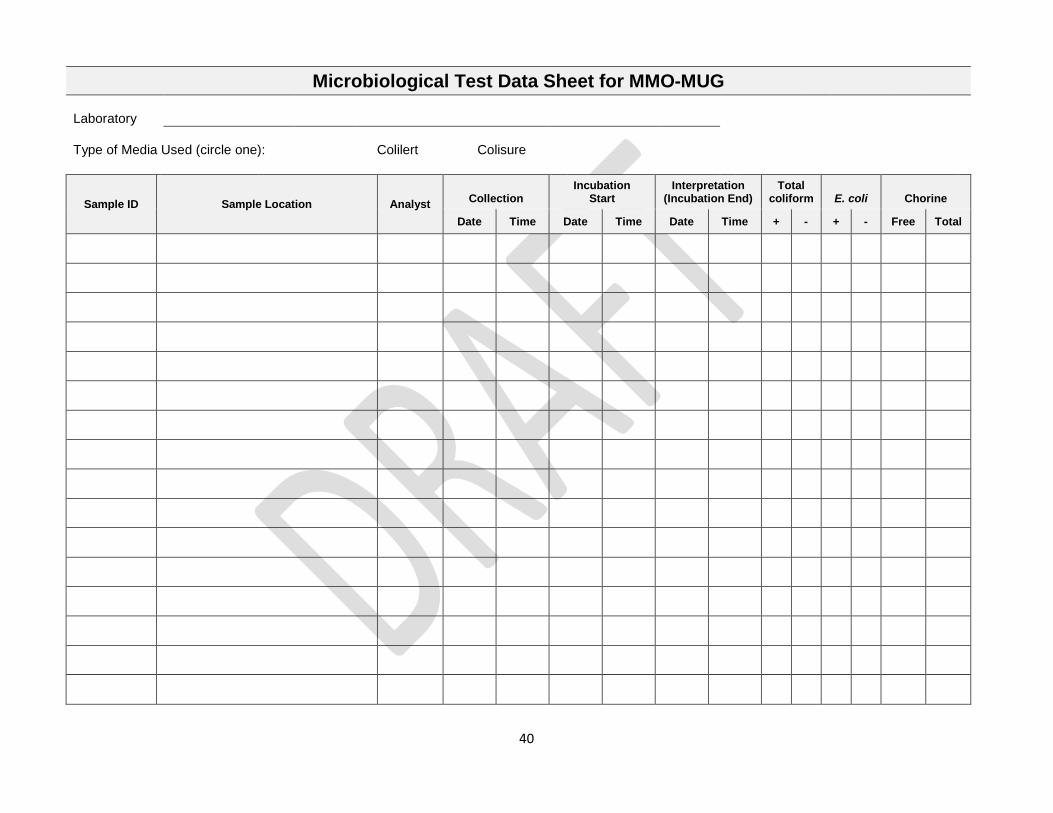
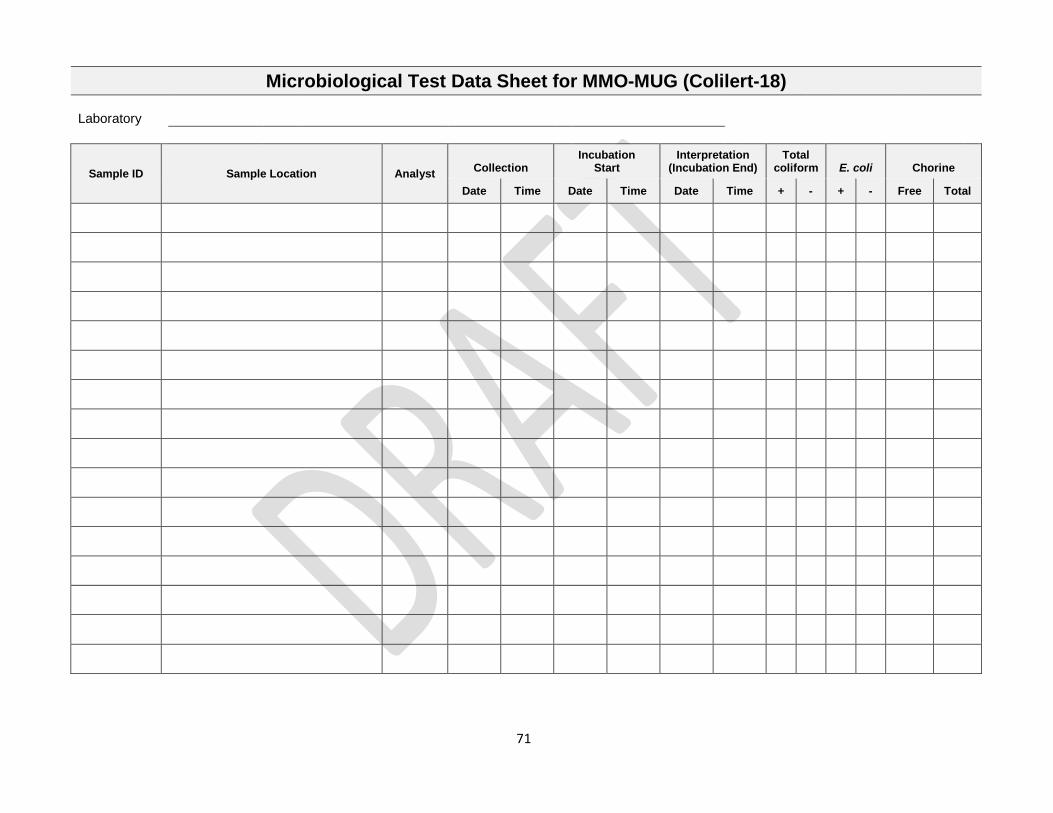
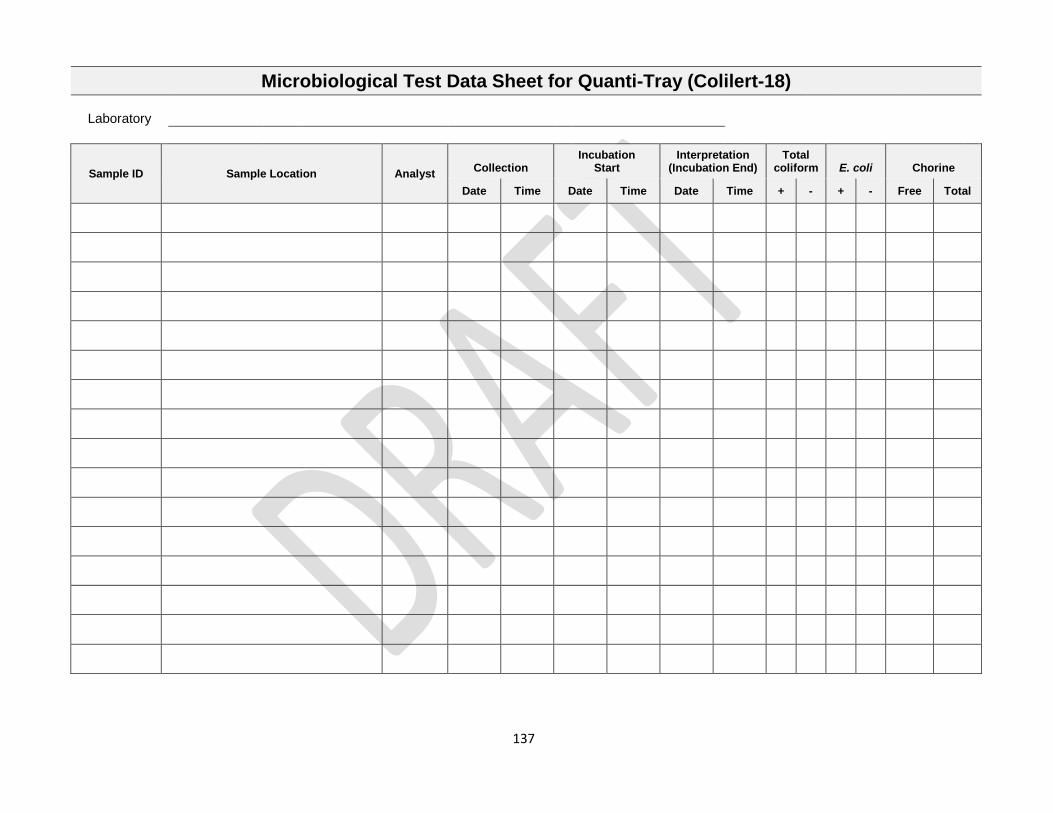
2. The Microbiological Test Data Sheet for MMO-MUG on page 40 of this manual is recommended to document each analysis. The minimum requirements for documenting each procedure are as follows:
a. Type of Media Used: Colilert or Colisure.
b. Sample ID.
34
c. Sample Location.
d. Analyst(s) initials.
e. Collection: date and time.
f. Incubation Start: date and time.
g. Interpretation (Incubation end): date and time.
h. Total coliform: Positive (+) or Negative (-).
i. E. coli: Positive (+) or Negative (-). j. Chlorine: free and total.
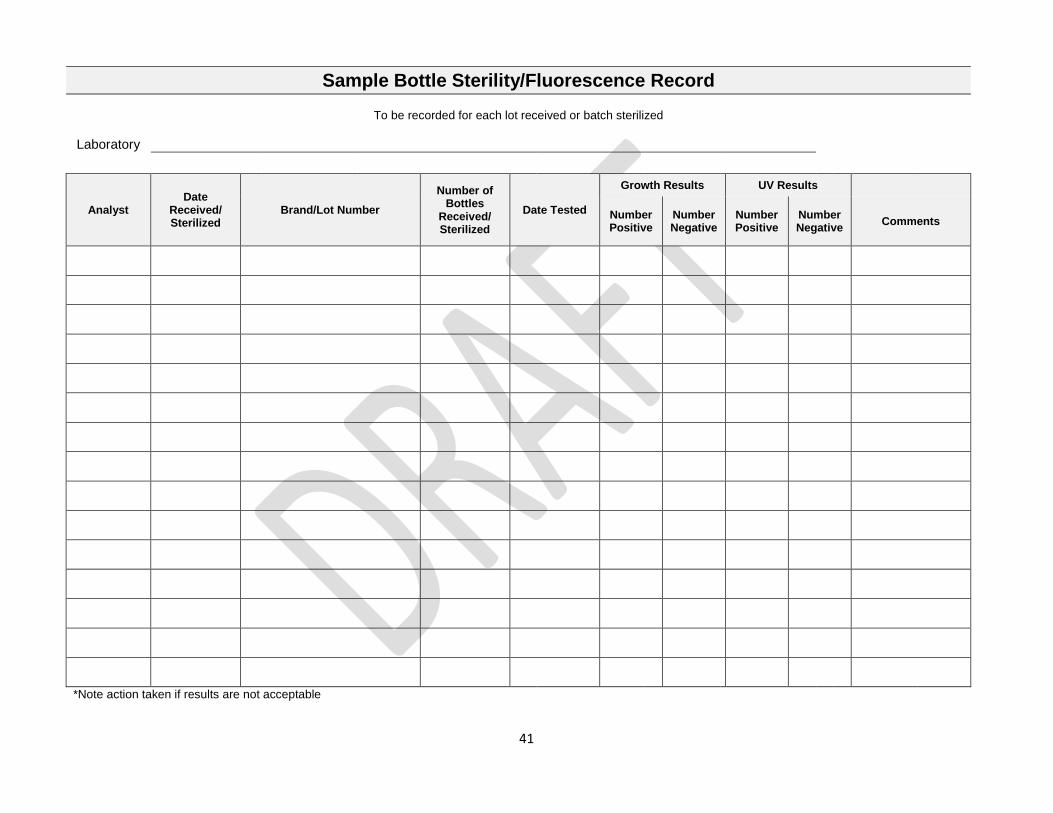
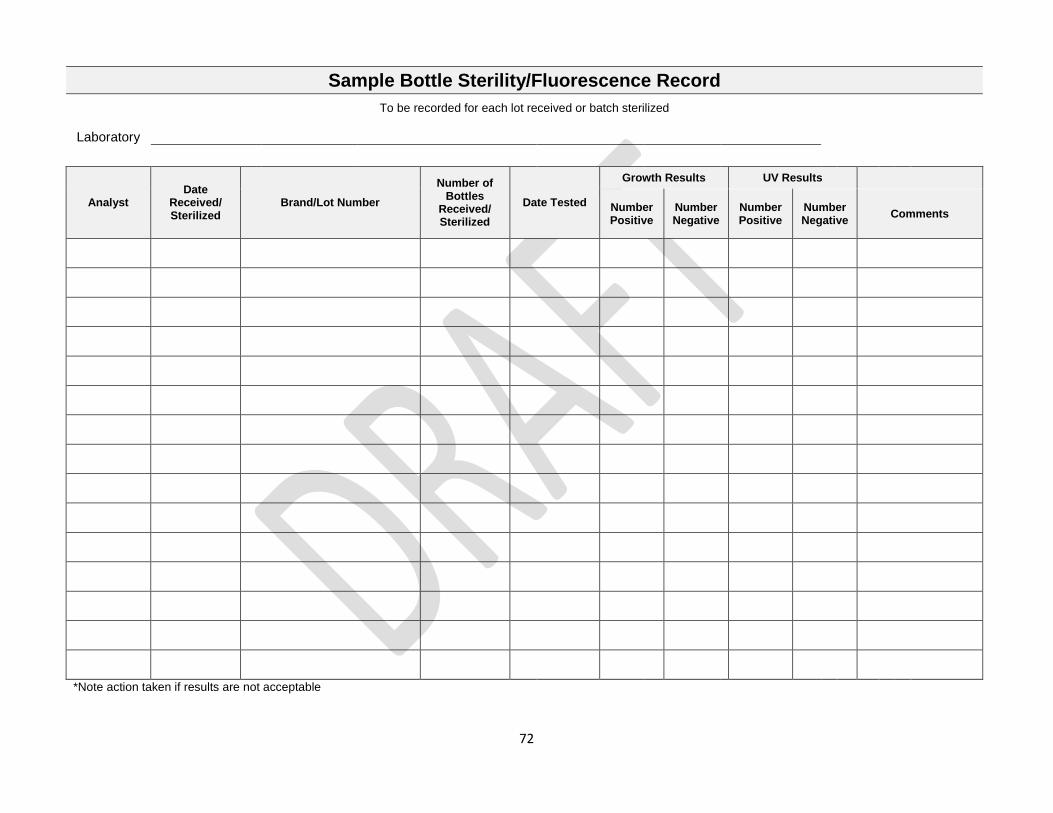
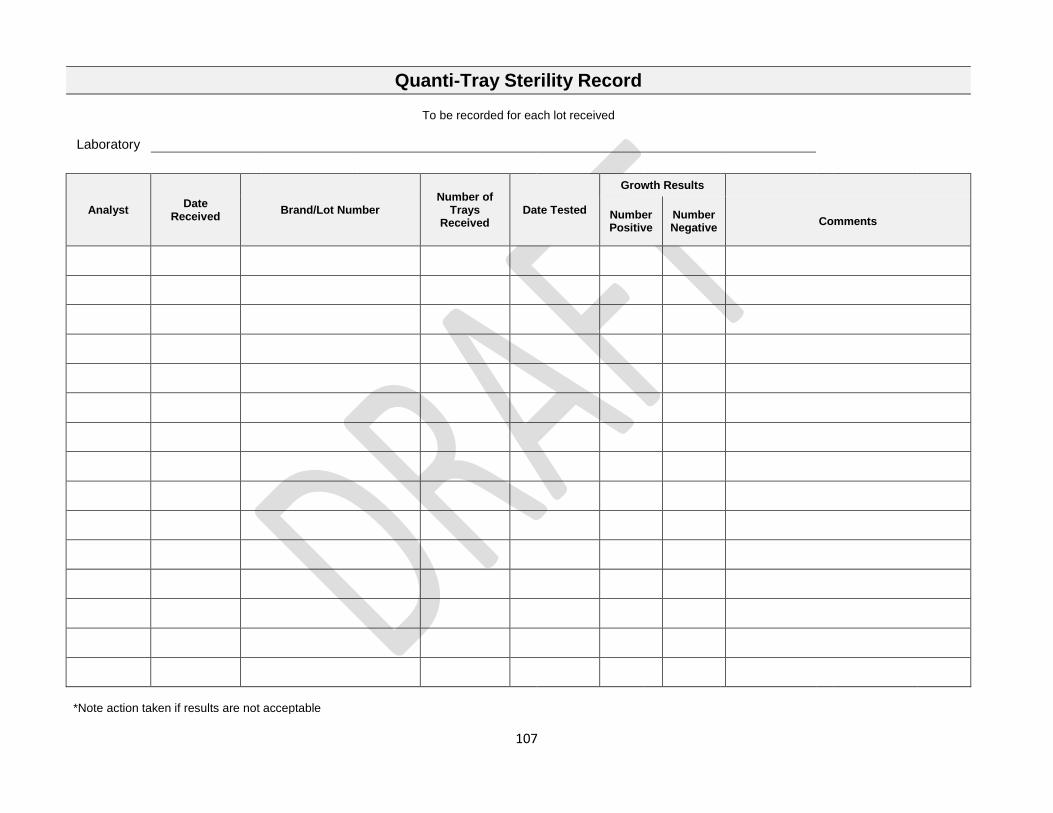
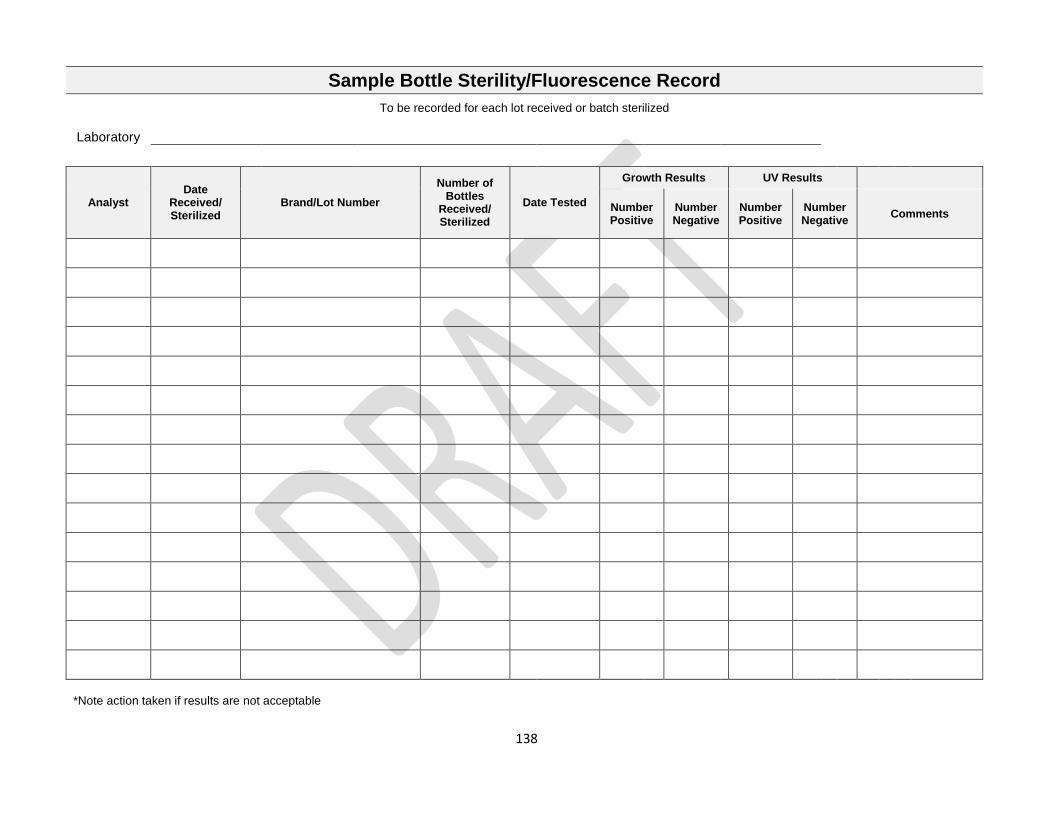
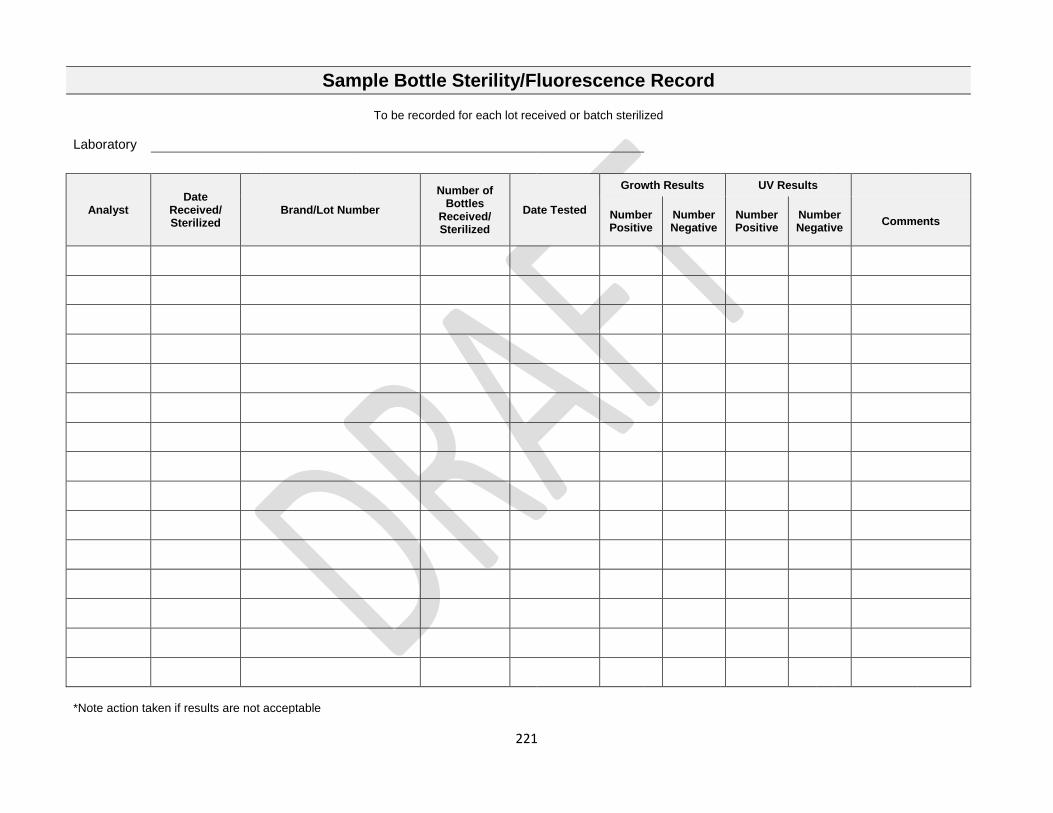
3. The Sample Bottle Sterility/Fluorescence Record on page 41 of this manual may be used to
keep these records. The minimum requirements for documenting each procedure are as follows:
a. Analyst(s) initials.
b. Date sample bottles were received or sterilized. c. Brand and lot number. d. Number of bottles received or sterilized. e. Date tested. f. Growth results: number positive or negative. g. UV results: number positive or negative. h. Comments.
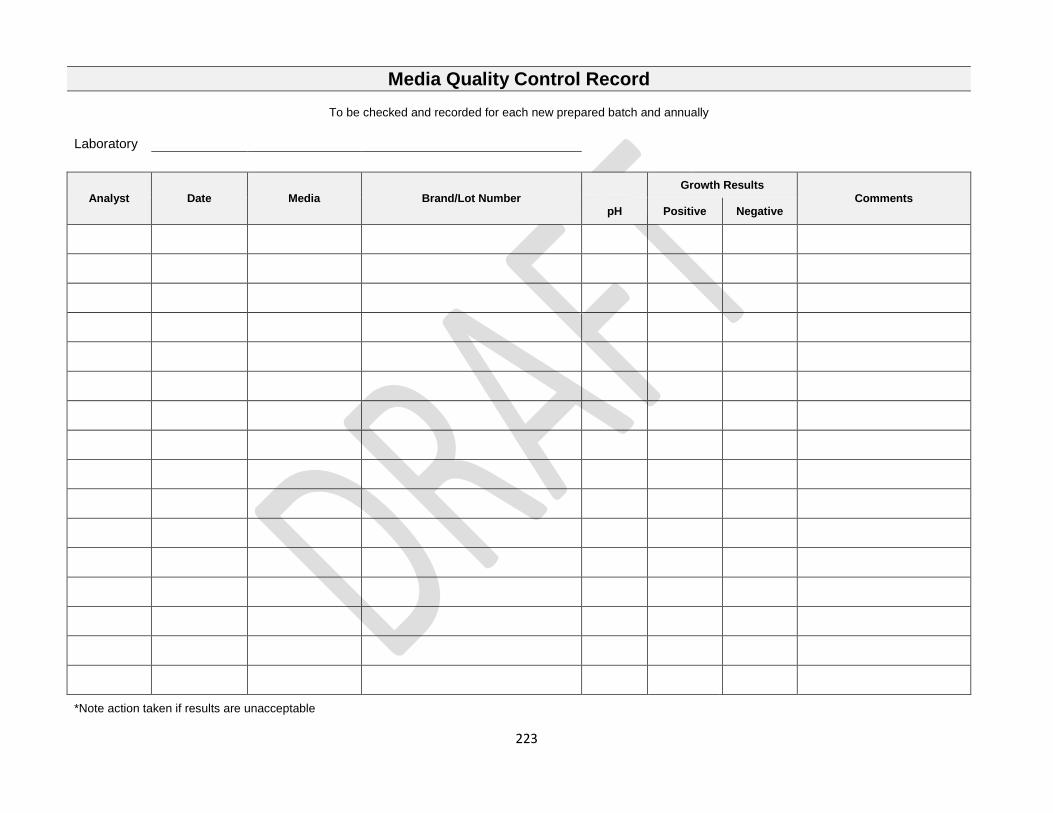
4. The Media Quality Control Record on page 42 of this manual may be used to keep these
records. The minimum requirements for documenting each procedure are as follows:
a. Analyst(s) initials.
b. Date.
c. Media to be tested. d. Brand and lot number. e. pH of media after sterilization.
f. Growth results: positive or negative. g. Comments.
35
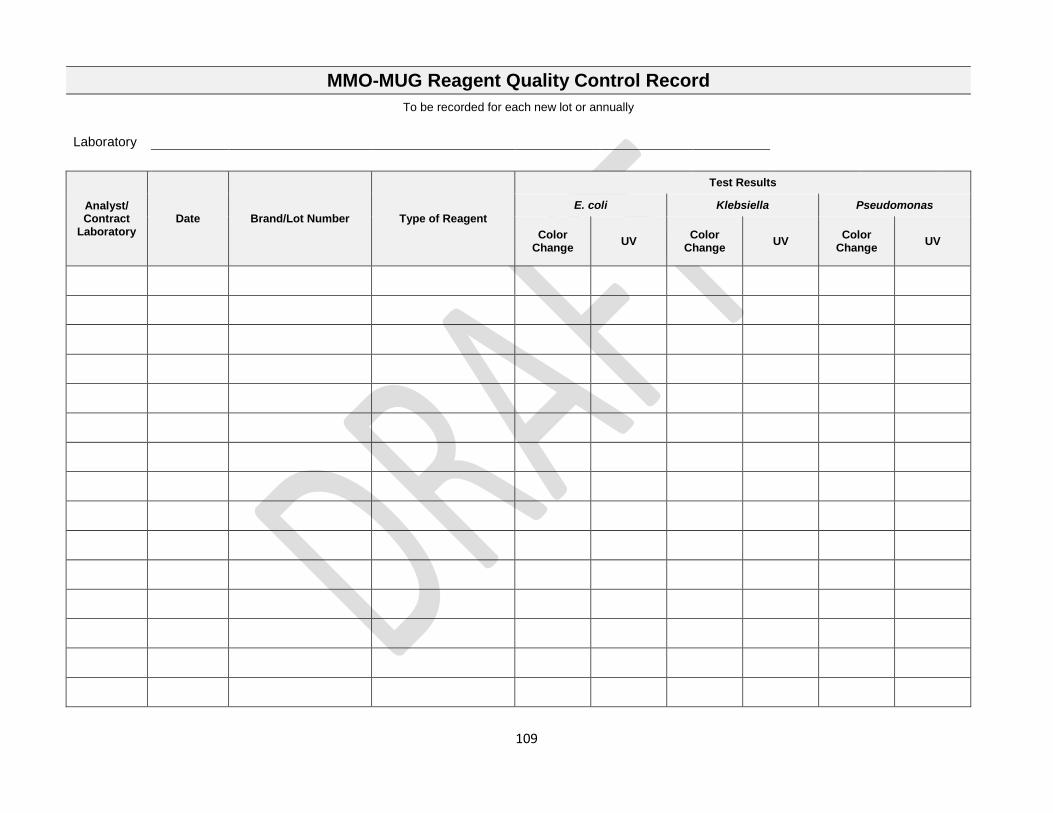
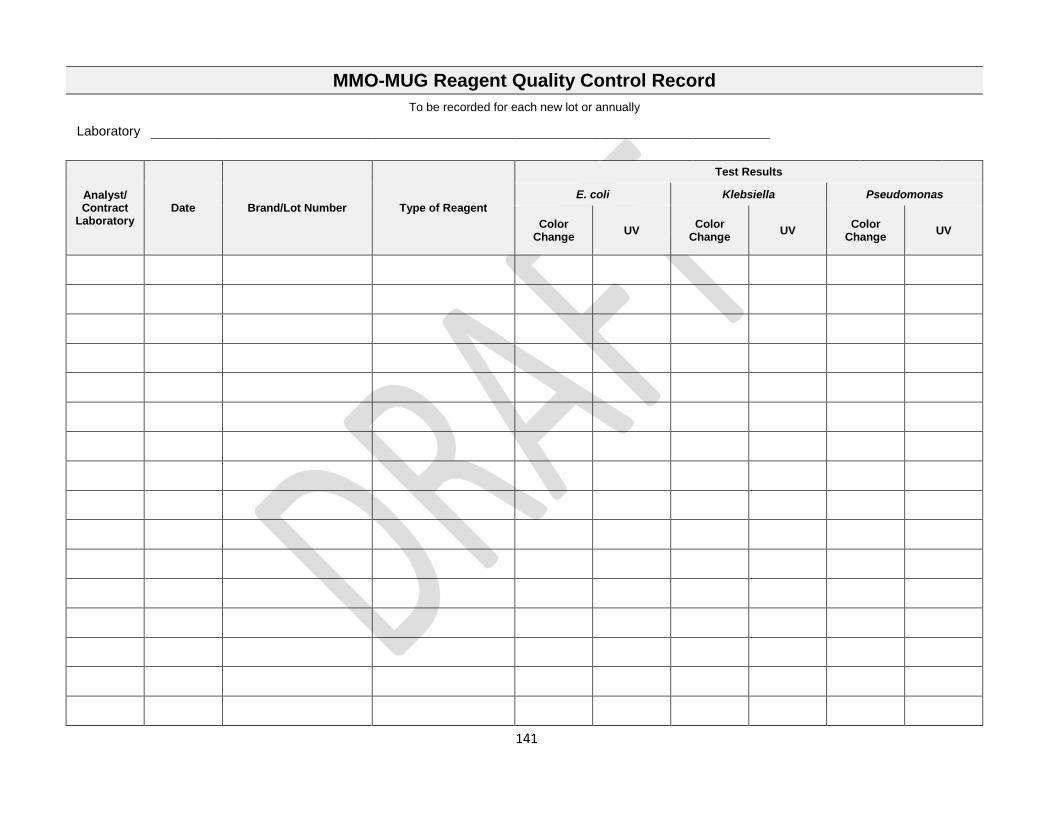
5. The MMO-MUG Reagent Quality Control Record on page 43 of this manual may be used to keep these records. The minimum requirements for documenting each procedure are as follows:
a. Analyst(s) initials/contract laboratory.
b. Date. c. Brand and lot number. d. Type of reagent to be tested. e. Test results:
• E. coli: color change/UV.
• Klebsiella: color change/UV.
• Pseudomonas: color change/UV.
6. The Autoclave Sterilization Record on page 44 of this manual may be used to keep these records. The minimum requirements for documenting each procedure are as follows:
a. Analyst(s) initials.
b. Date.
c. Time in. d. Time out. e. Total time (minutes). f. Sterilization time (minutes). g. Internal Thermometer (°C). h. Material sterilized.
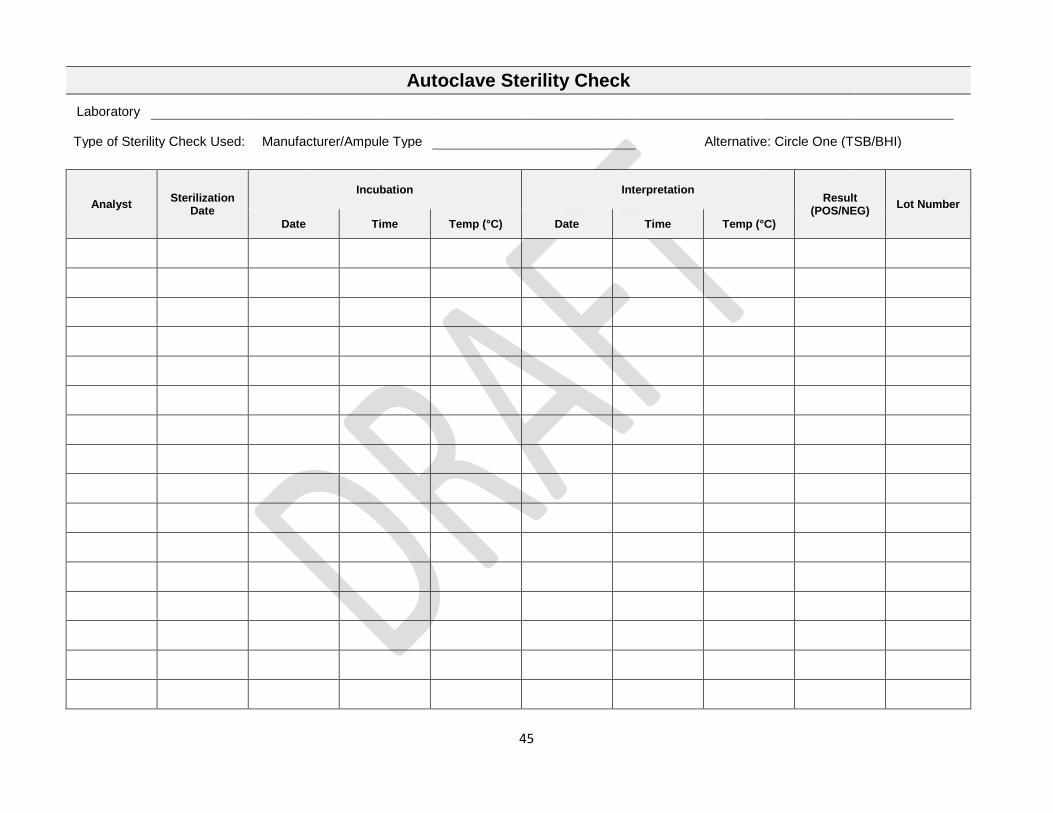
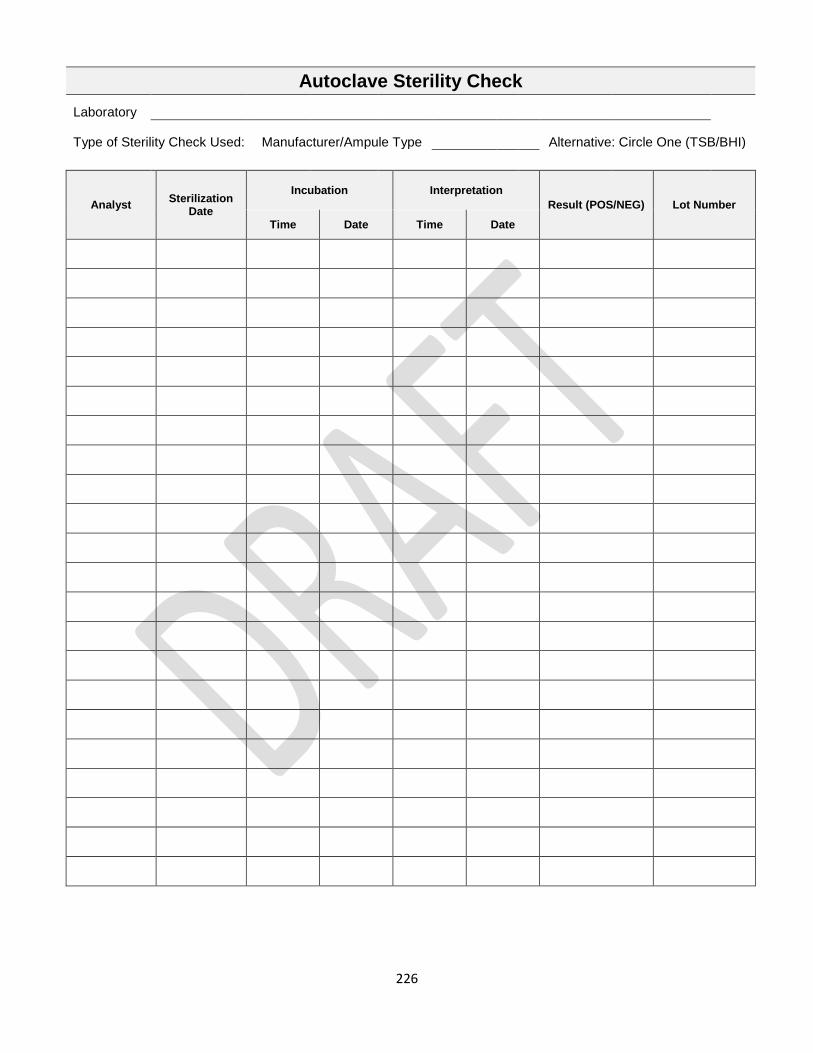
7. The Autoclave Sterility Check record on page 45 of this manual may be used to keep these
records. The minimum requirements for documenting each procedure are as follows:
a. Type of Sterility Check Used: Manufacture/Ampule Type or Alternative: Circle One (TSB/BHI).
b. Analyst(s) initials.
c. Sterilization date.
d. Incubation: date, time and temperature (°C). e. Interpretation: date, time and temperature (°C).
f. Result: positive or negative. g. Lot number.
36
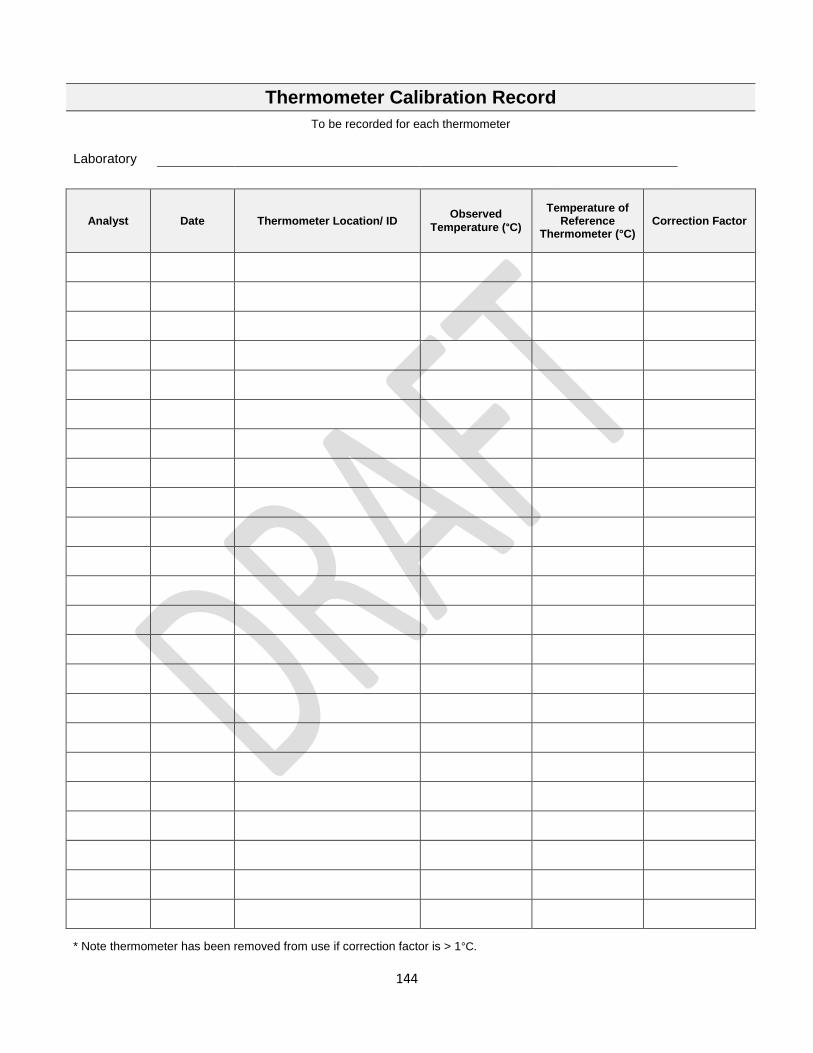
8. The Thermometer Calibration Record on page 46 of this manual may be used to keep these records. The minimum requirements for documenting each procedure are as follows:
a. Analyst(s) initials.
b. Date.
c. Thermometer location and identification. d. Observed temperature (°C). e. Temperature of reference thermometer (°C). f. Correction factor.
9. The Timer Calibration Record on page 47 of this manual may be used to keep these records. The minimum requirements for documenting each procedure are as follows:
a. Analyst(s) initials.
b. Date.
c. Timer location. d. Equipment time (minutes). e. Stopwatch time (minutes). f. Correction factor.
10. The pH Meter Slope/Linearity Verification (4.0 Buffer) record on page 48 of this manual may
be used to keep these records. The minimum requirements for documenting each procedure are as follows:
a. Analyst(s) initials.
b. Date.
c. Slope (%). d. pH 4.0 Verification (pH Units). e. Comments.
11. The Balance Calibration Record on page 49 of this manual may be used to keep these
records. The minimum requirements for documenting each procedure are as follows:
a. Analyst(s) initials.
b. Date.
c. Reference weight and test load readings in grams (200 to 1.0 grams). d. Comments/corrective action.
37
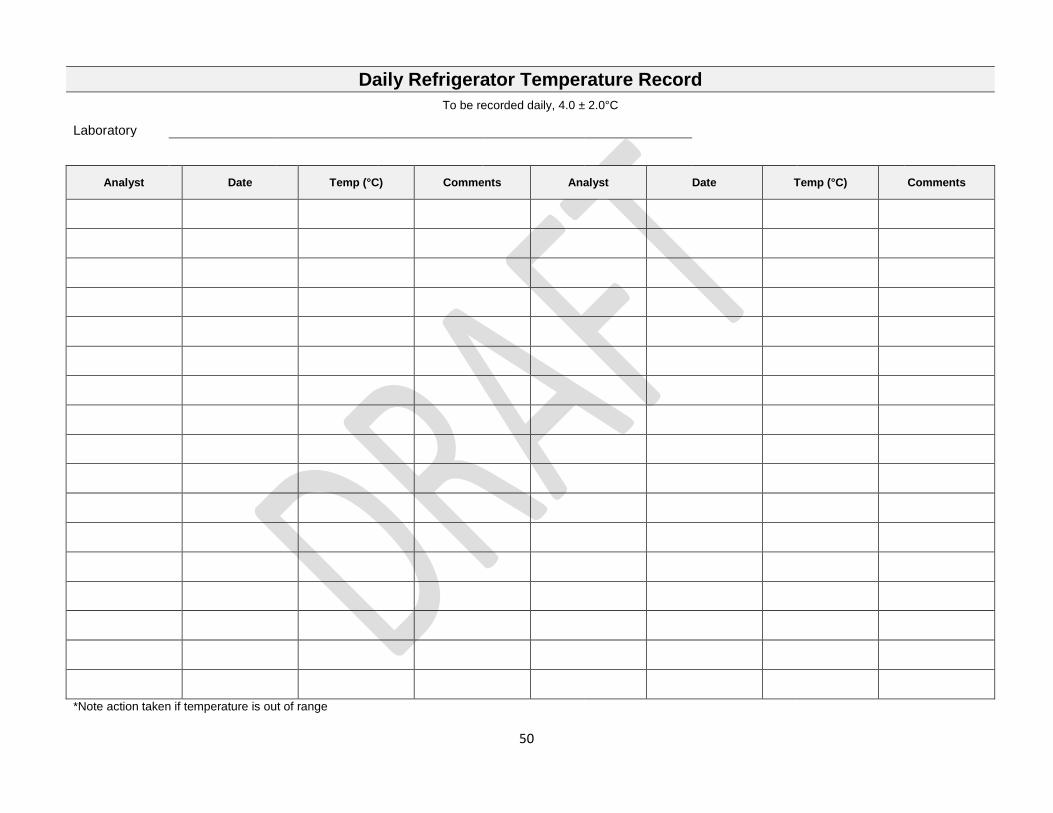
12. The Daily Refrigerator Temperature Record on page 50 of this manual may be used to keep these records. The minimum requirements for documenting each procedure are as follows:
a. Analyst(s) initials.
b. Date.
c. Temperature (°C).
d. Comments.
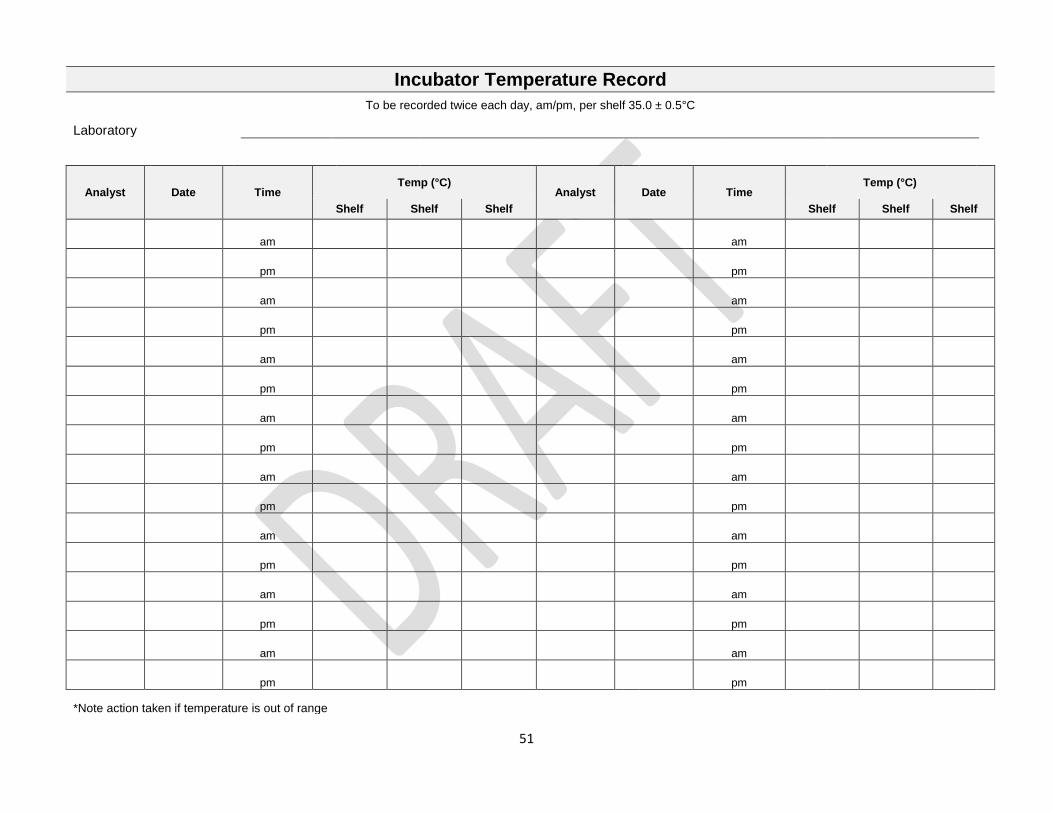
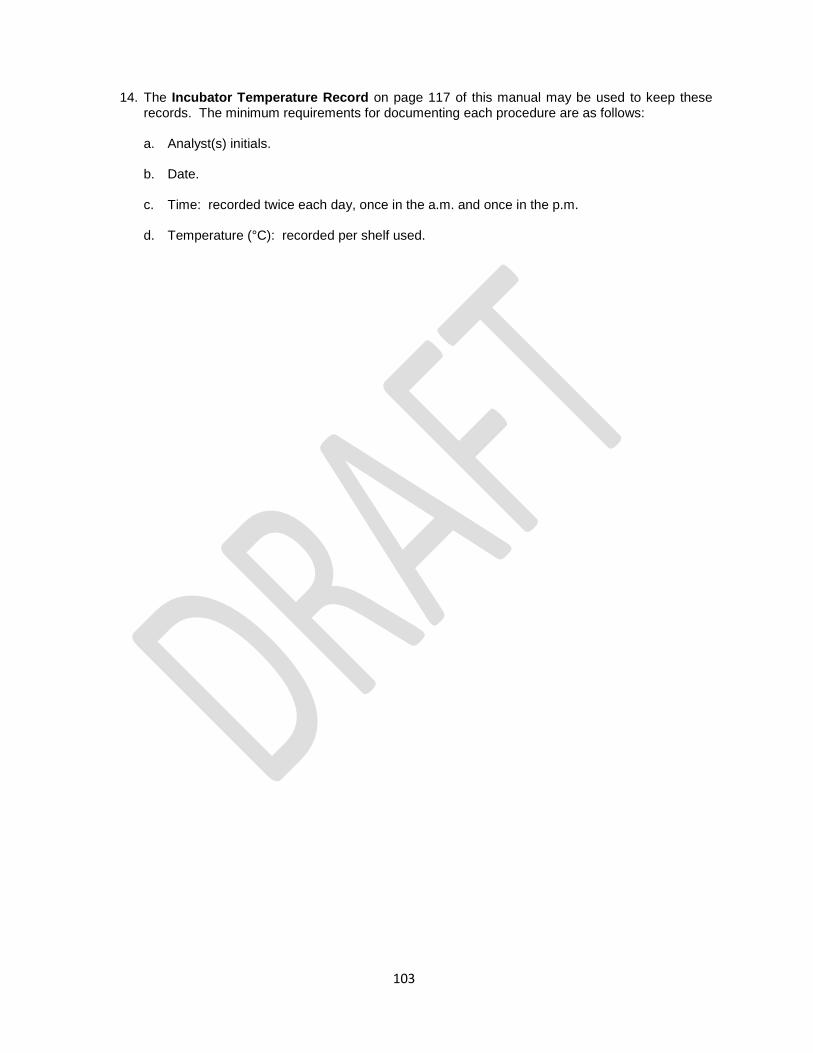
13. The Incubator Temperature Record on page 51 of this manual may be used to keep these
records. The minimum requirements for documenting each procedure are as follows:
a. Analyst(s) initials.
b. Date.
c. Time: recorded twice each day, once in the a.m. and once in the p.m. d. Temperature (°C): recorded per shelf used.
38
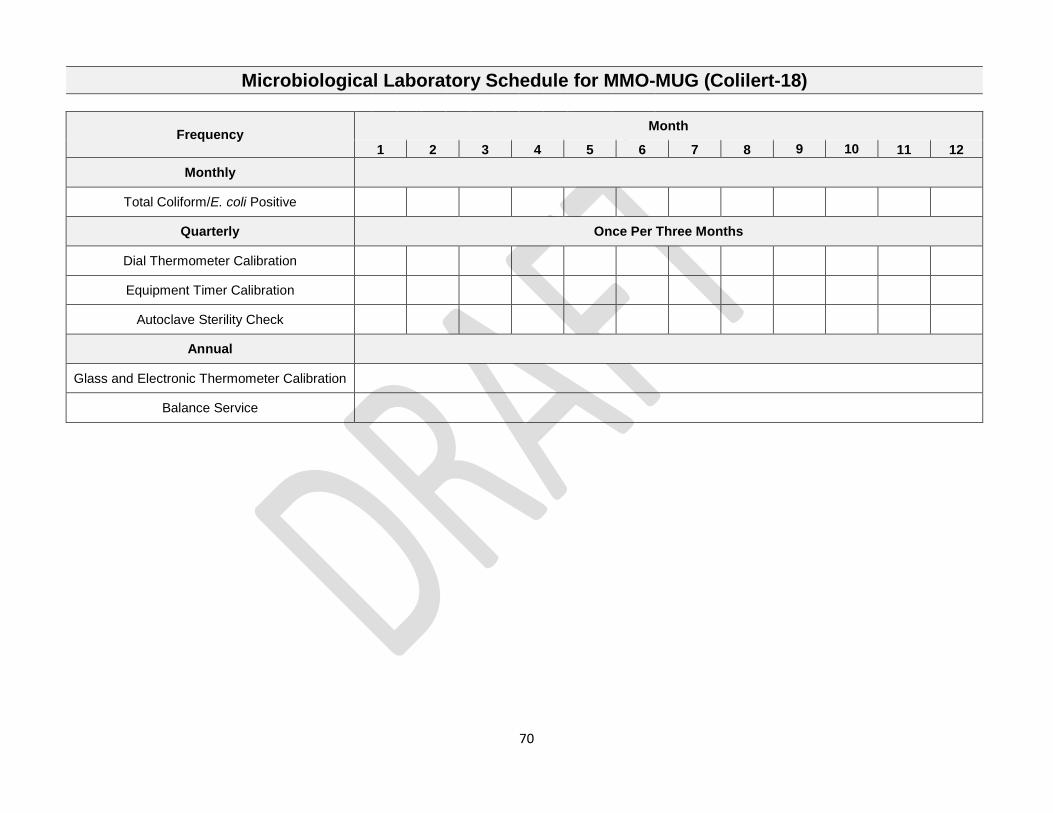
Microbiological Laboratory Schedule for MMO-MUG
Frequency Month
1 2 3 4 5 6 7 8 9 10 11 12 Monthly
Total Coliform/E. coli Positive Quarterly Once Per Three Months
Dial Thermometer Calibration
Equipment Timer Calibration
Autoclave Sterility Check
Annual
Glass and Electronic Thermometer Calibration
Balance Service
39
Microbiological Test Data Sheet for MMO-MUG
Laboratory
Type of Media Used (circle one): Colilert Colisure
Sample ID Sample Location Analyst
Collection Incubation
Start Interpretation
(Incubation End) Total
coliform
E. coli
Chorine
Date Time Date Time Date Time + - + - Free Total
40
Sample Bottle Sterility/Fluorescence Record
To be recorded for each lot received or batch sterilized
Laboratory
Analyst Date
Received/ Sterilized
Brand/Lot Number Number of
Bottles Received/ Sterilized
Date Tested
Growth Results UV Results
Number Positive
Number Negative
Number Positive
Number Negative Comments
*Note action taken if results are not acceptable
41
Media Quality Control Record
To be checked and recorded for each new prepared batch and annually
Laboratory
Analyst Date Media Brand/Lot Number Growth Results
Comments pH Positive Negative
*Note action taken if results are unacceptable
42
MMO-MUG Reagent Quality Control Record To be recorded for each new lot or annually
Laboratory
Analyst/ Contract
Laboratory Date Brand/Lot Number Type of Reagent
Test Results
E. coli Klebsiella Pseudomonas
Color Change UV Color
Change UV Color Change UV
43
Autoclave Sterilization Record To be recorded for each run
Laboratory
Analyst Date Time In Time Out Total Time
(min) Sterilization Time (min)
Internal Thermometer
(°C) Material Sterilized
44
Autoclave Sterility Check Laboratory
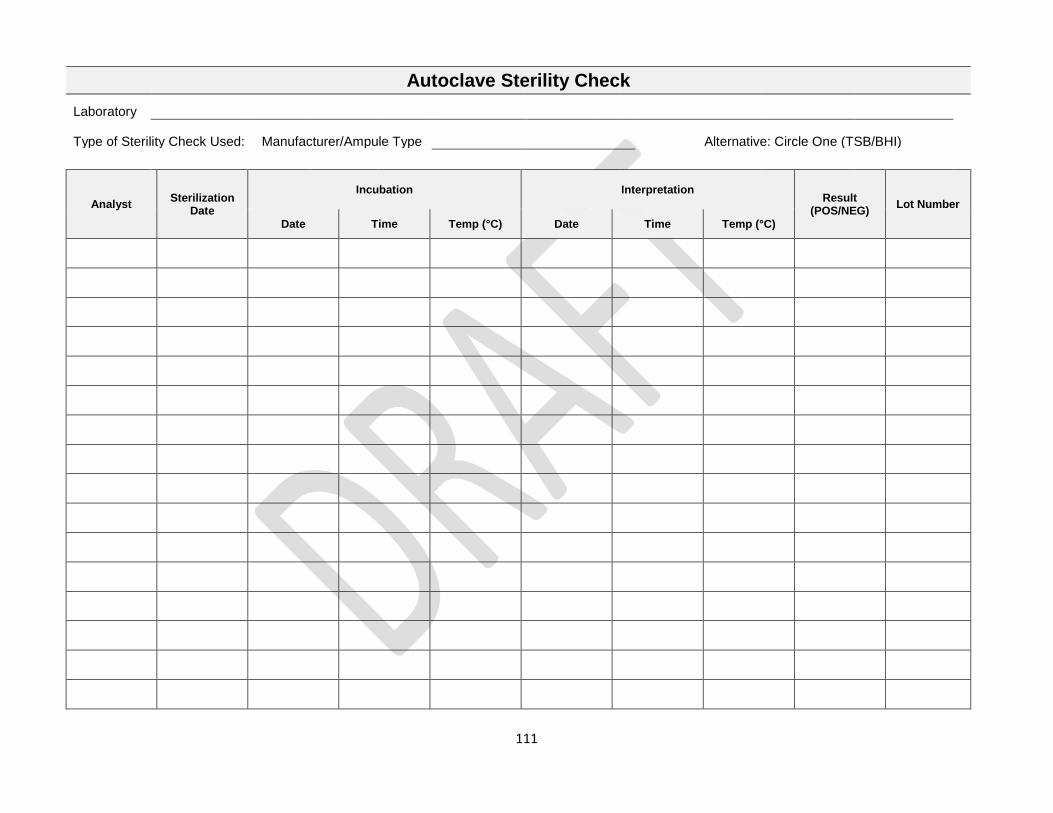
Type of Sterility Check Used: Manufacturer/Ampule Type
Alternative: Circle One (TSB/BHI)
Analyst Sterilization Date
Incubation Interpretation Result
(POS/NEG) Lot Number
Date Time Temp (°C) Date Time Temp (°C)
45
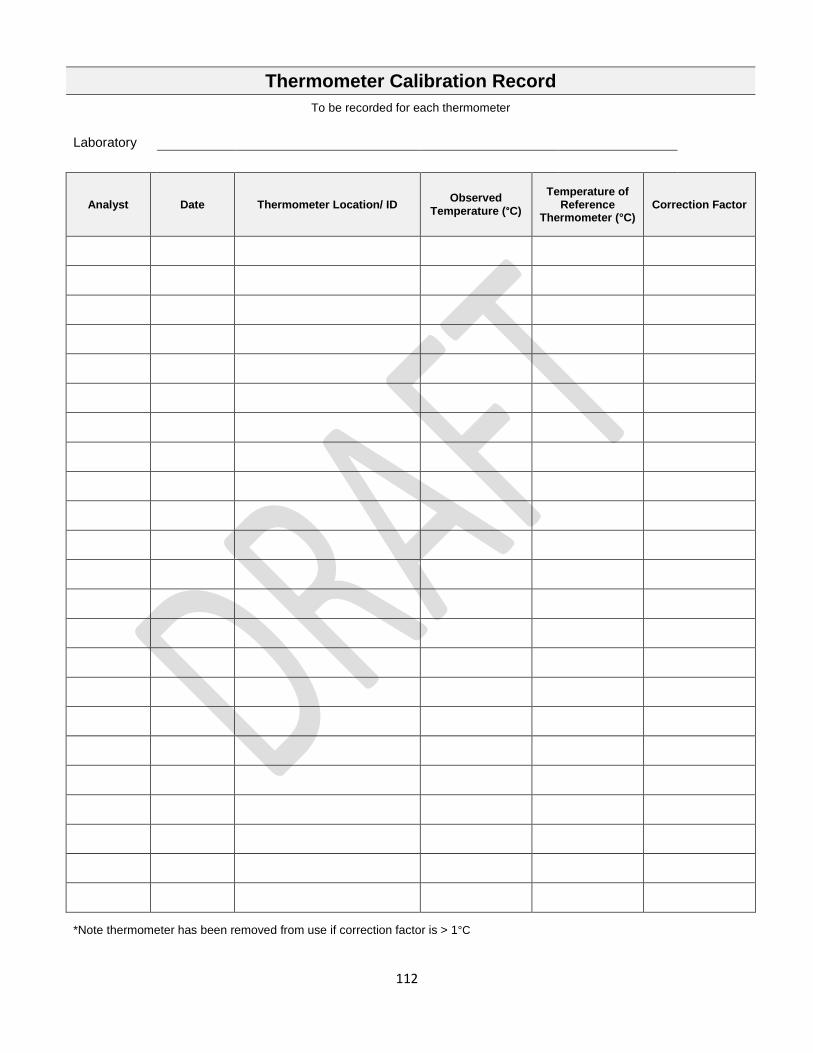
Thermometer Calibration Record To be recorded for each thermometer
Laboratory
Analyst Date Thermometer Location/ ID Observed
Temperature (°C) Temperature of
Reference Thermometer (°C)
Correction Factor
*Note thermometer has been removed from use if correction factor is > 1°C
46
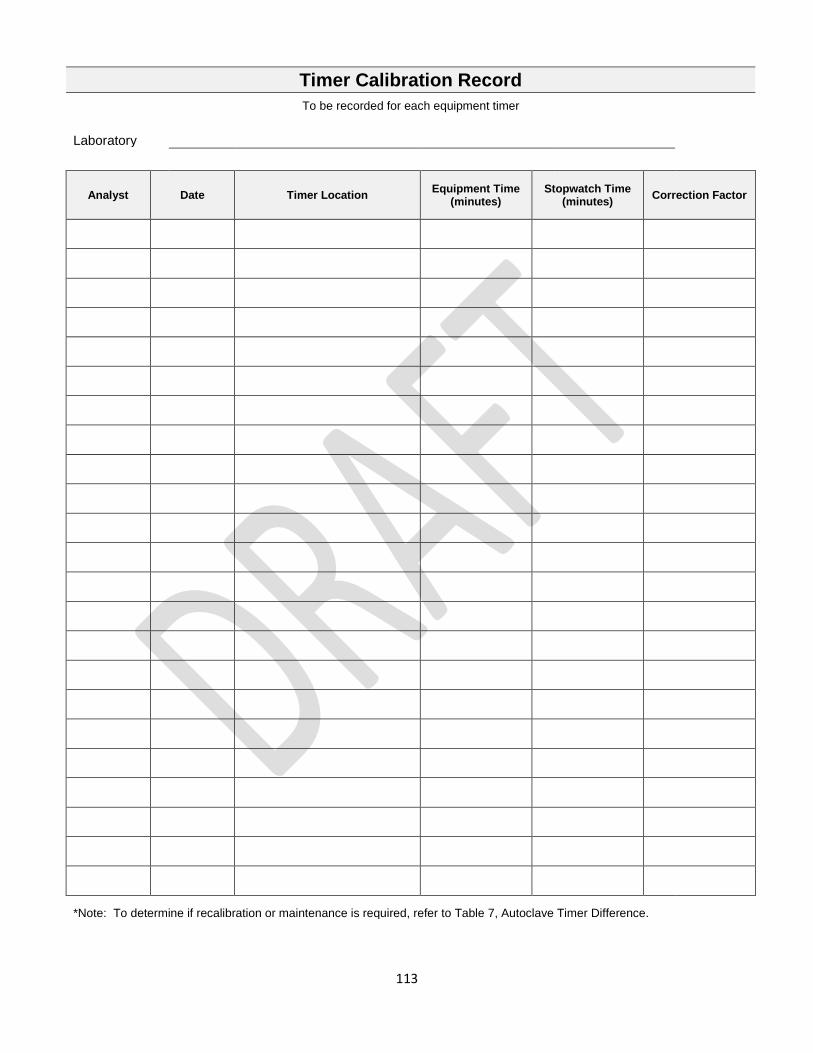
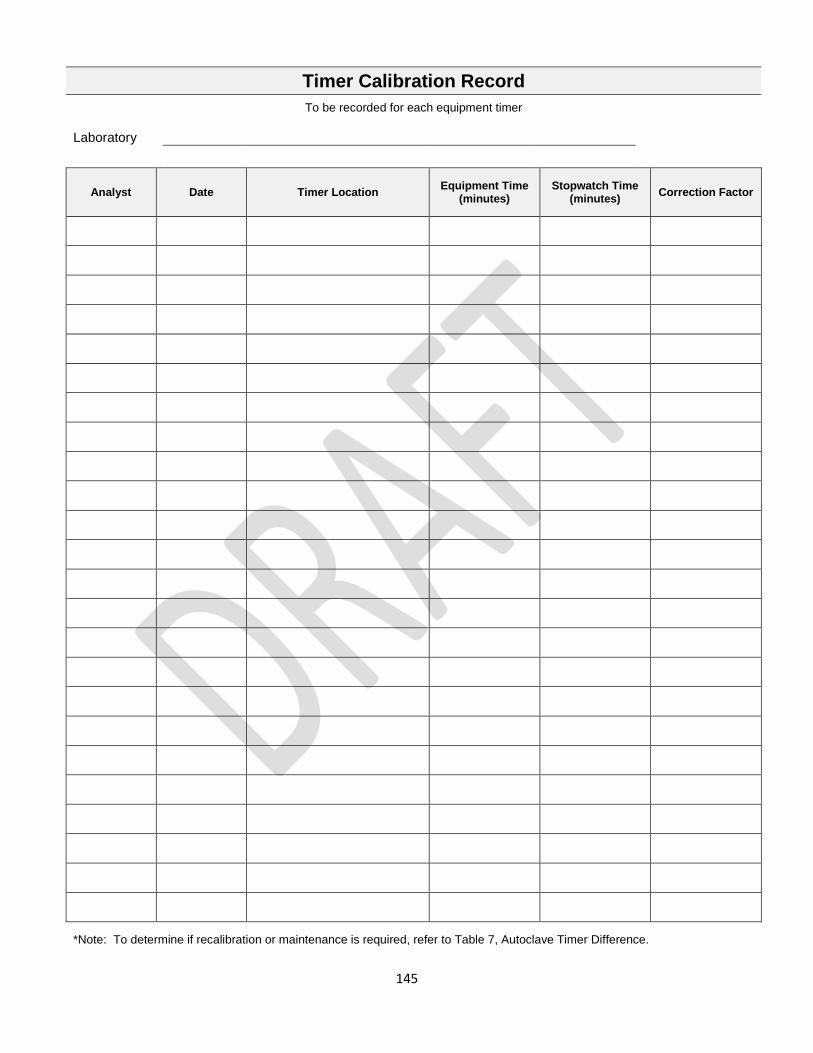
Timer Calibration Record To be recorded for each equipment timer
Laboratory
Analyst Date Timer Location Equipment Time
(minutes) Stopwatch Time
(minutes) Correction Factor
*Note: To determine if recalibration or maintenance is required, refer to Table 7, Autoclave Timer Difference.
47
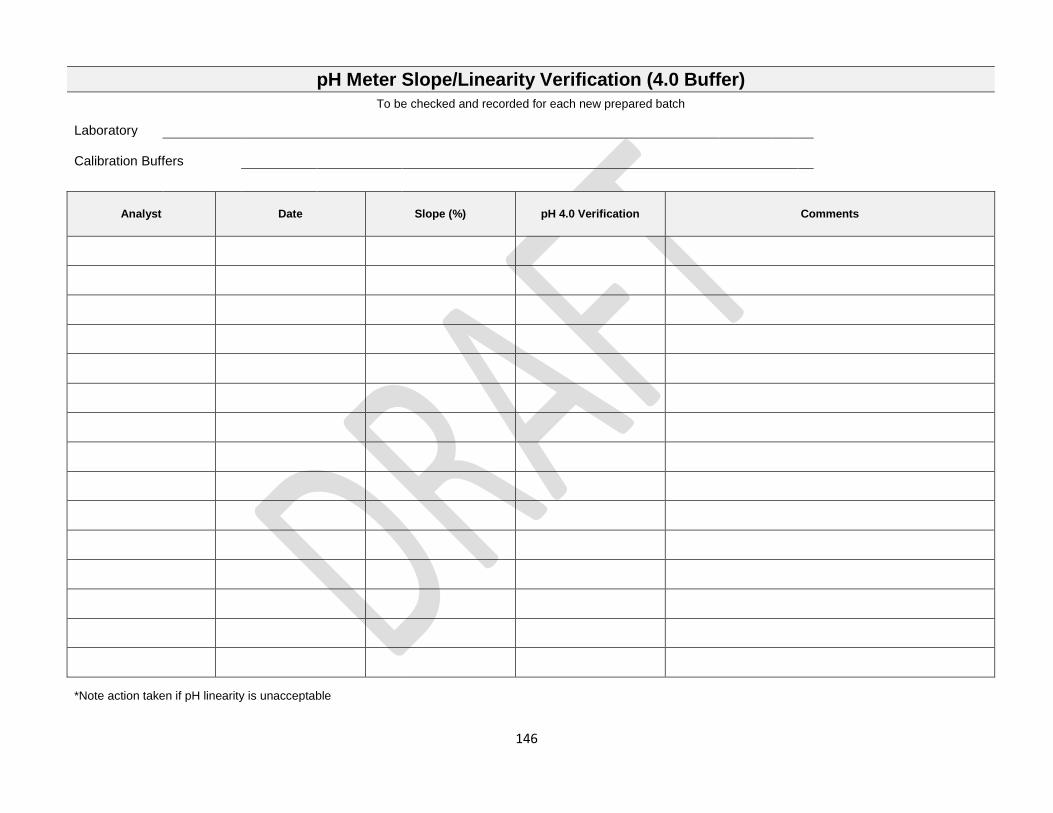
pH Meter Slope/Linearity Verification (4.0 Buffer)
To be checked and recorded for each new prepared batch
Laboratory
Calibration Buffers
Analyst Date Slope (%) pH 4.0 Verification Comments
*Note action taken if pH linearity is unacceptable
48
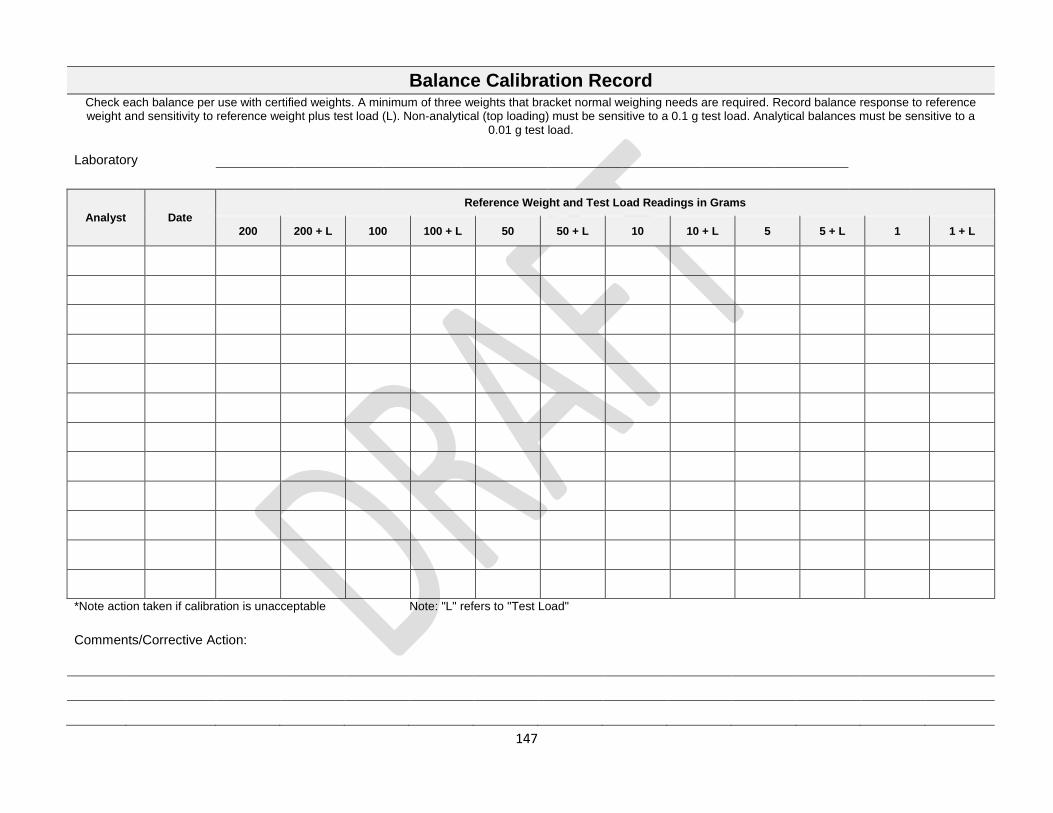
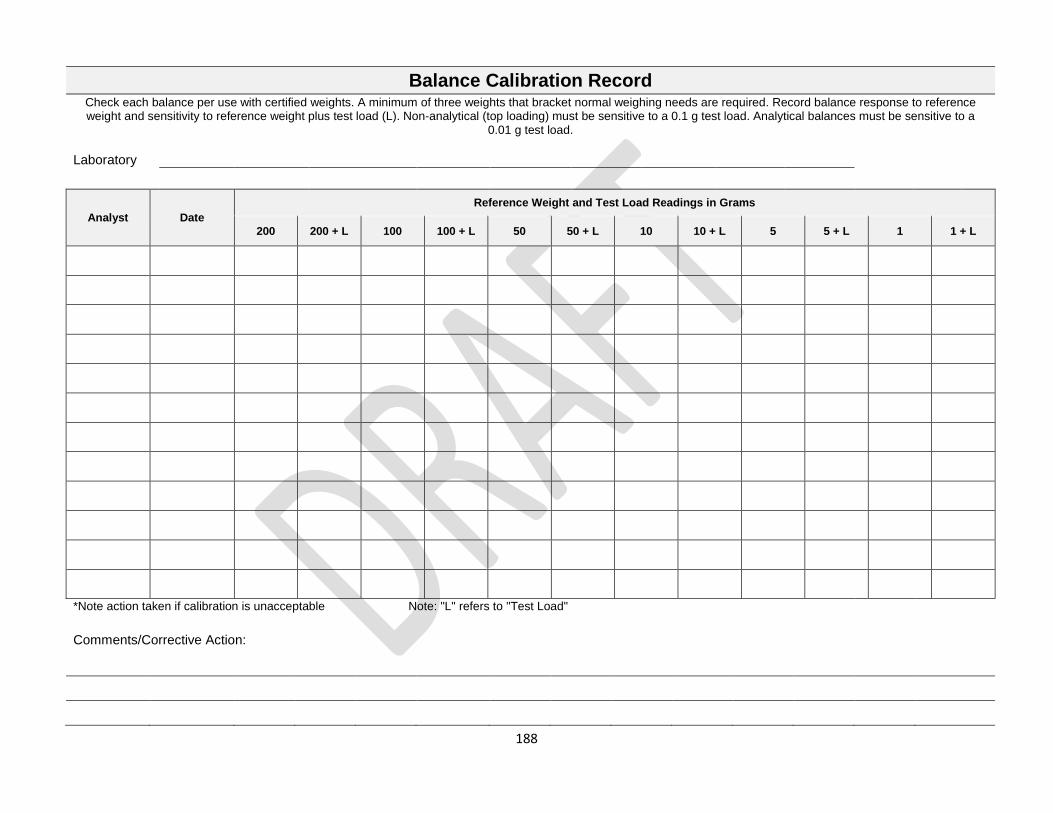
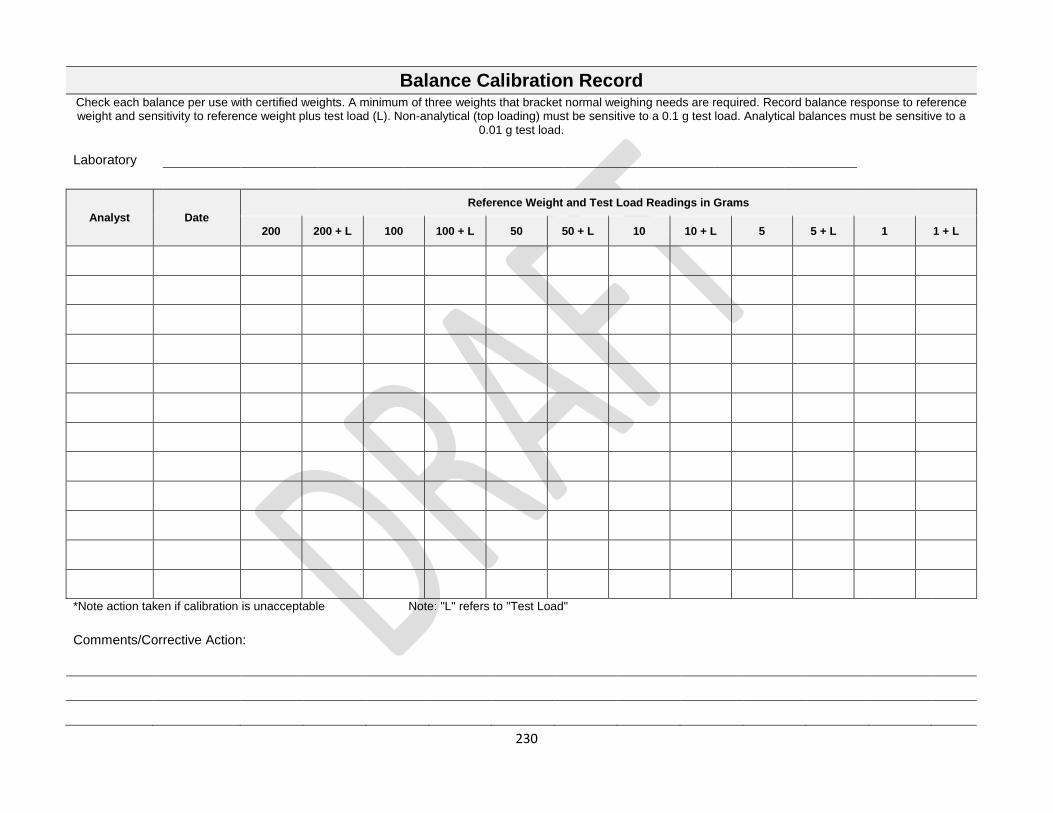
Balance Calibration Record Check each balance per use with certified weights. A minimum of three weights that bracket normal weighing needs are required. Record balance response to reference weight and sensitivity to reference weight plus test load (L). Non-analytical (top loading) must be sensitive to a 0.1 g test load. Analytical balances must be sensitive to a
0.01 g test load.
Laboratory
Analyst Date
Reference Weight and Test Load Readings in Grams
200 200 + L 100 100 + L 50 50 + L 10 10 + L 5 5 + L 1 1 + L
*Note action taken if calibration is unacceptable Note: "L" refers to "Test Load"
Comments/Corrective Action:
49
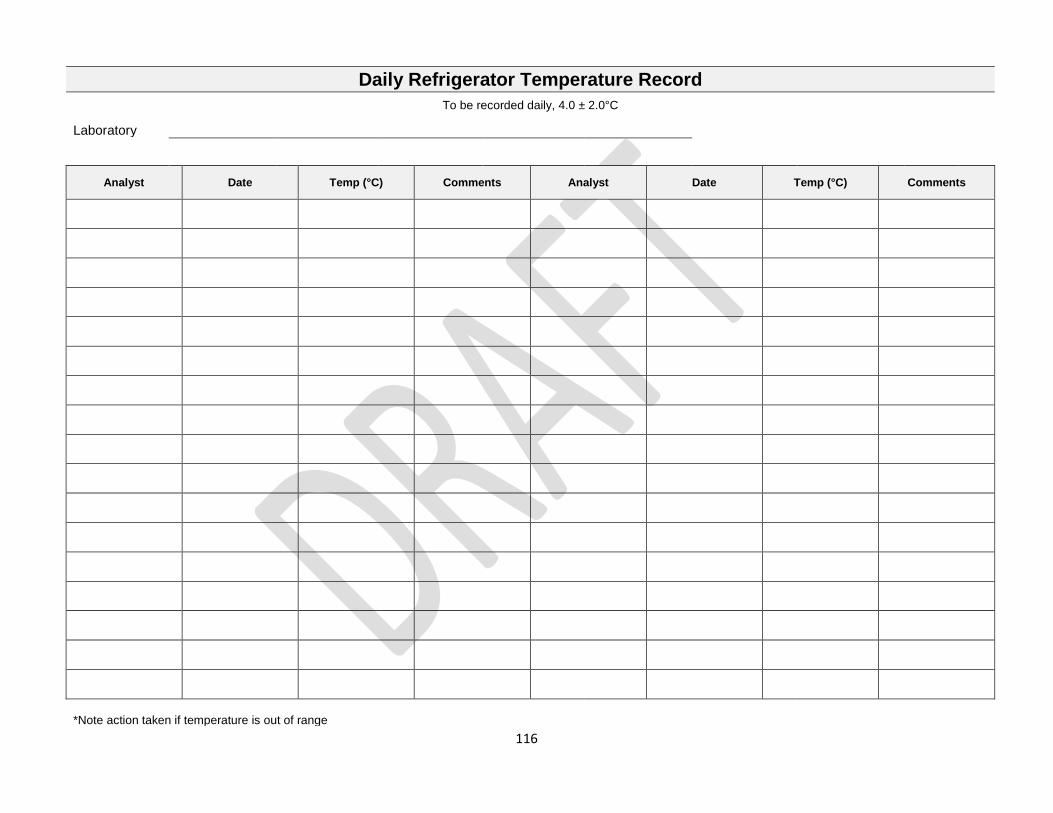
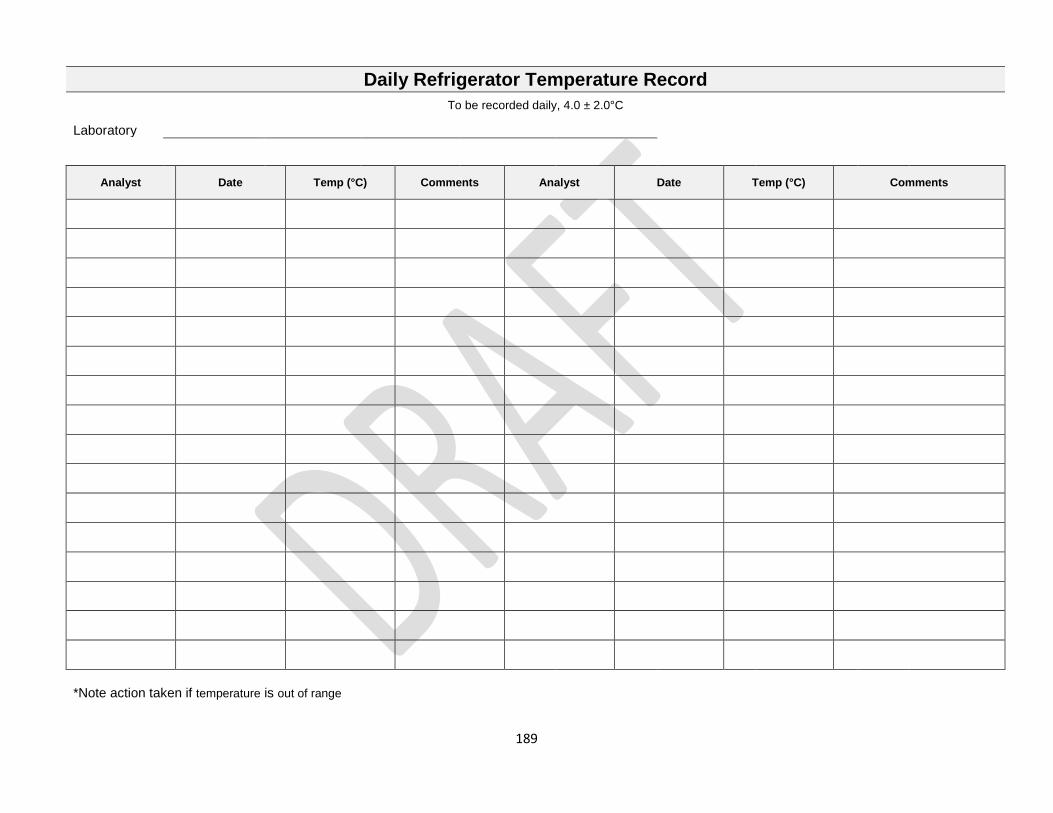
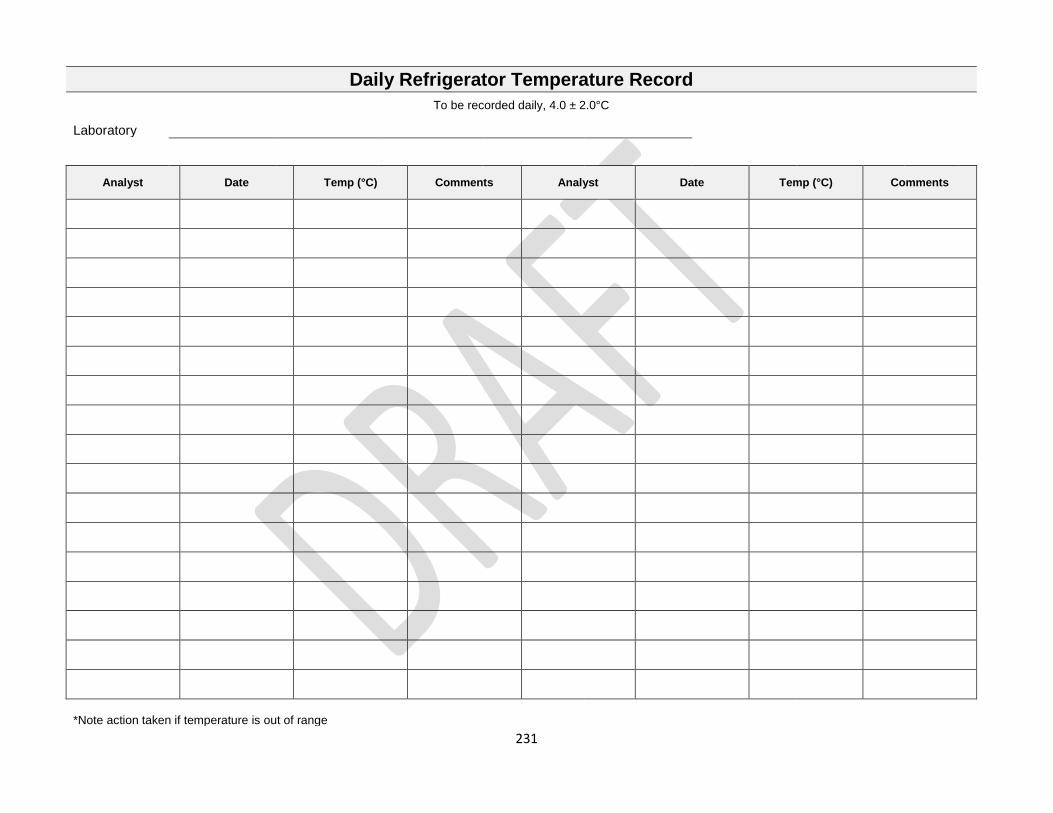
Daily Refrigerator Temperature Record To be recorded daily, 4.0 ± 2.0°C
Laboratory
Analyst Date Temp (°C) Comments Analyst Date Temp (°C) Comments
*Note action taken if temperature is out of range
50
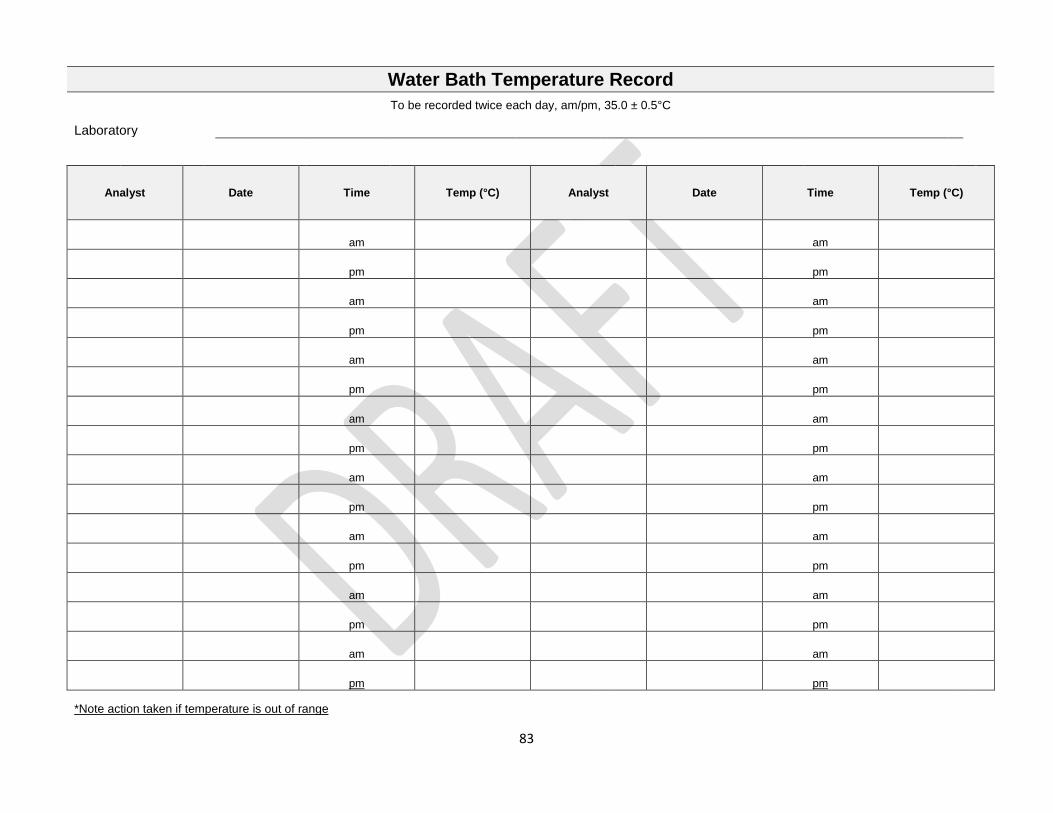
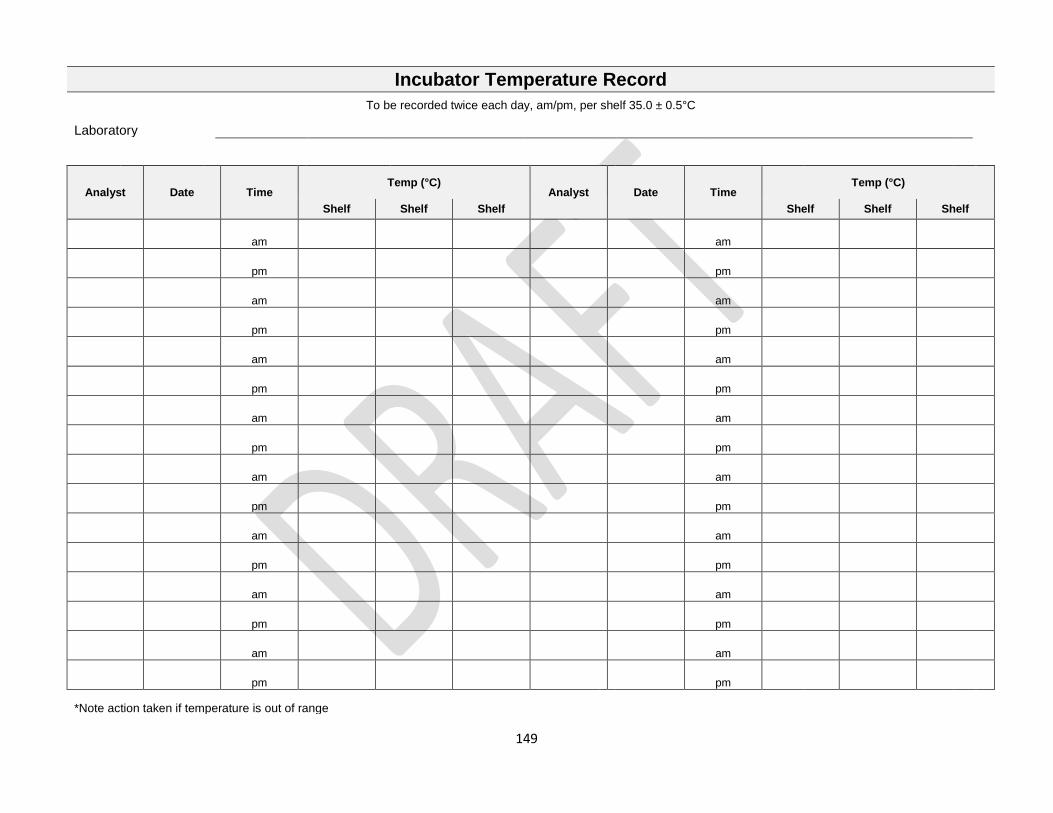
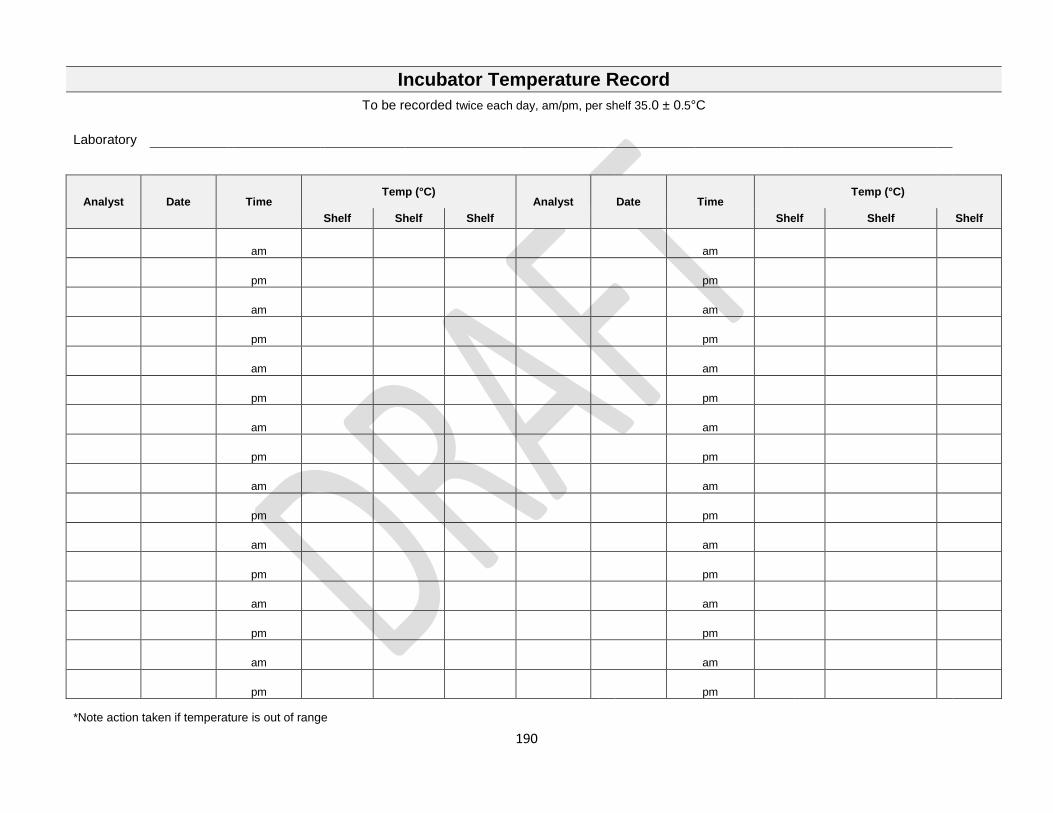
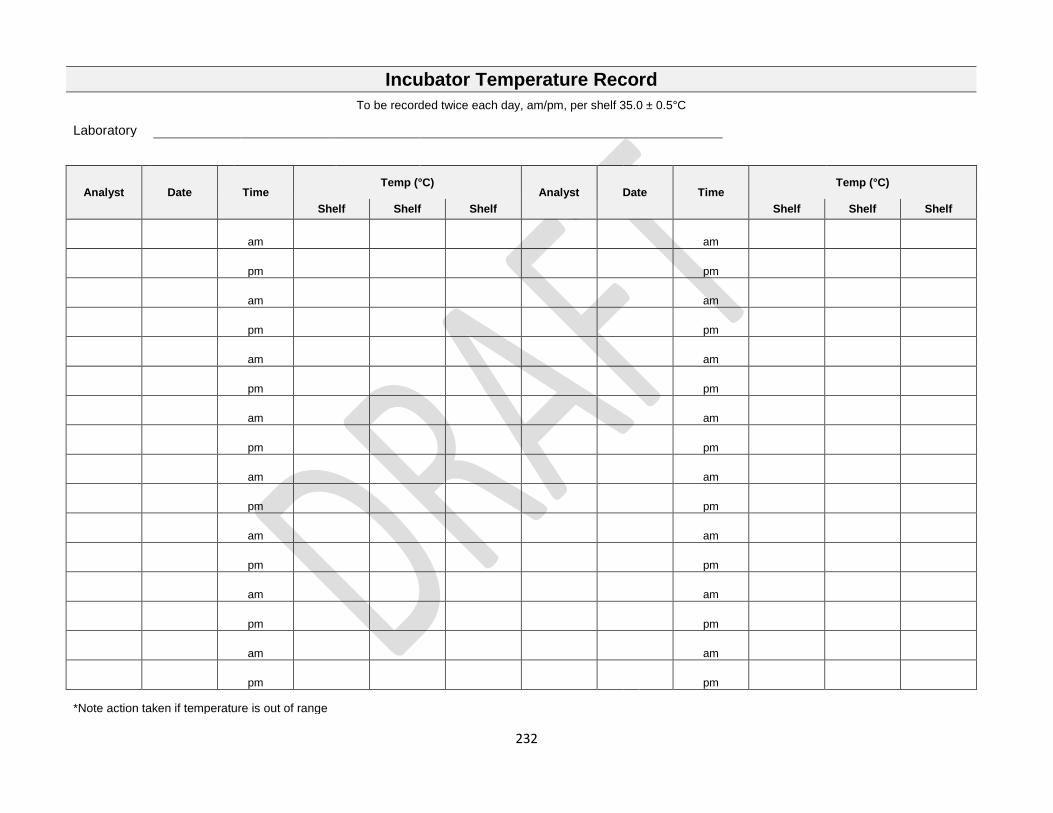
Incubator Temperature Record To be recorded twice each day, am/pm, per shelf 35.0 ± 0.5°C
Laboratory
Analyst Date Time
Temp (°C) Analyst Date Time
Temp (°C)
Shelf Shelf Shelf Shelf Shelf Shelf
am
am
pm
pm
am
am
pm
pm
am
am
pm
pm
am
am
pm
pm
am
am
pm
pm
am
am
pm
pm
am
am
pm
pm
am
am
pm
pm
*Note action taken if temperature is out of range
51
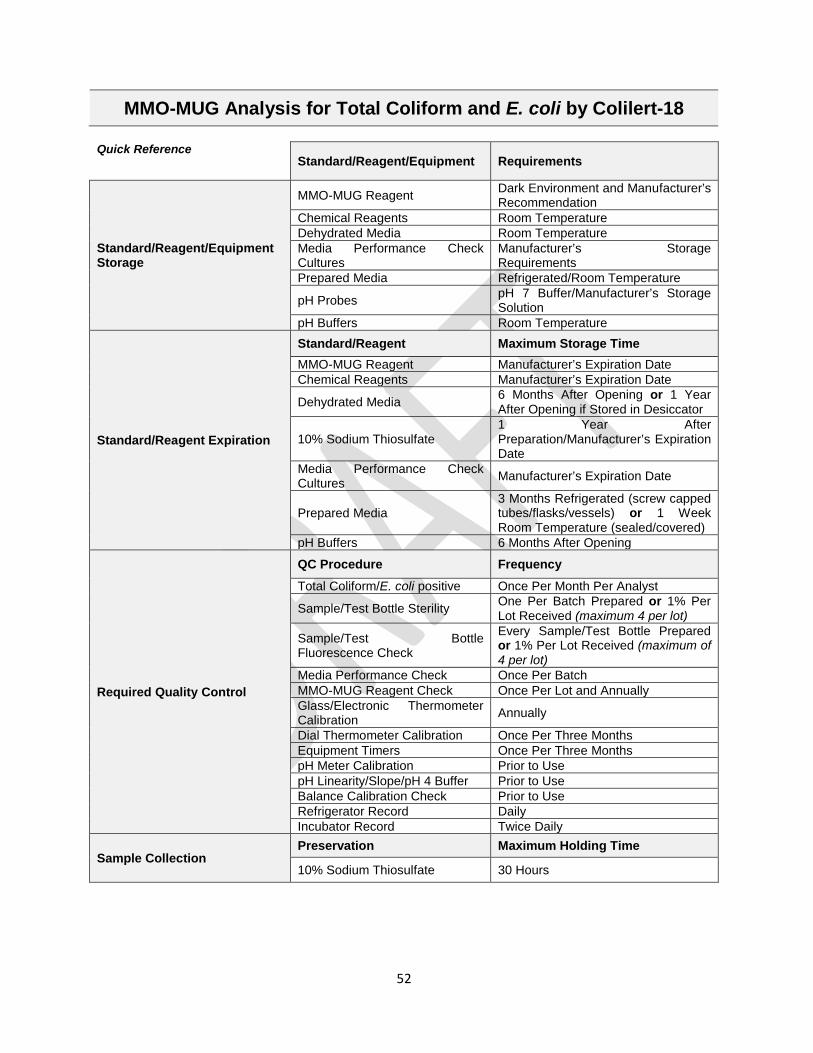
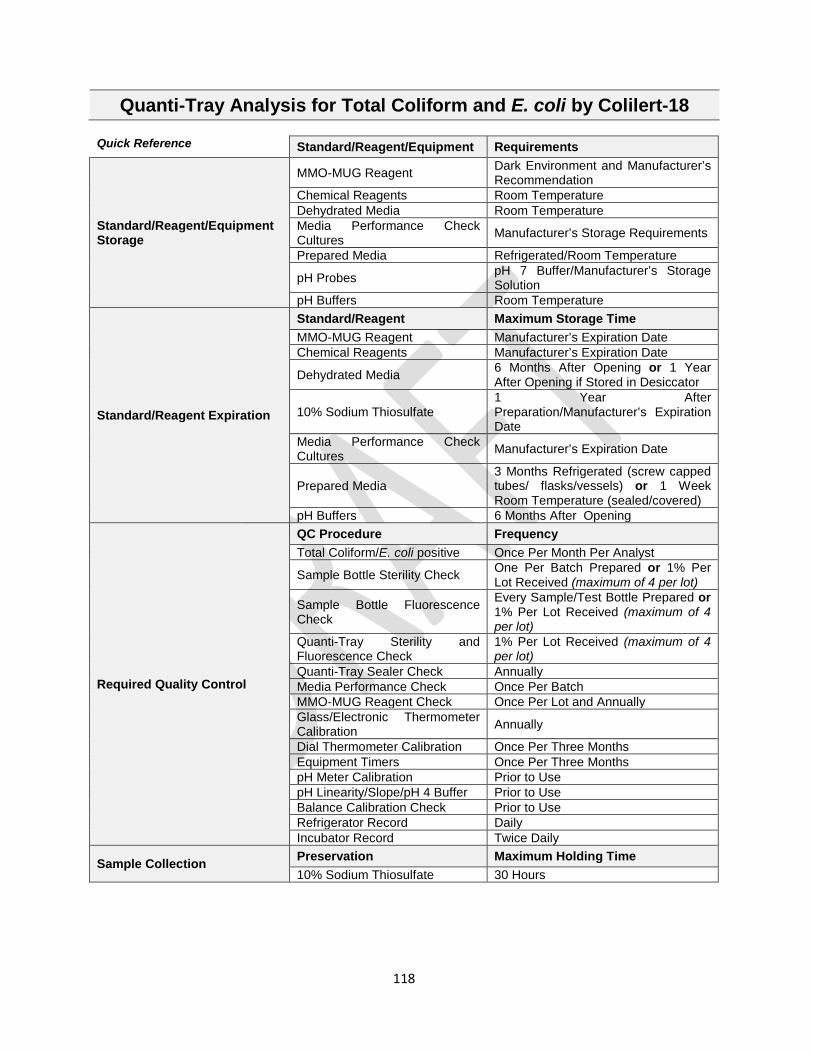
MMO-MUG Analysis for Total Coliform and E. coli by Colilert-18 Quick Reference
Standard/Reagent/Equipment Requirements
Standard/Reagent/Equipment Storage
MMO-MUG Reagent Dark Environment and Manufacturer’s Recommendation
Chemical Reagents Room Temperature Dehydrated Media Room Temperature Media Performance Check Cultures
Standard/Reagent Maximum Storage Time MMO-MUG Reagent Manufacturer’s Expiration Date Chemical Reagents Manufacturer’s Expiration Date
Dehydrated Media 6 Months After Opening or 1 Year After Opening if Stored in Desiccator
10% Sodium Thiosulfate 1 Year After Preparation/Manufacturer’s Expiration Date
Media Performance Check Cultures Manufacturer’s Expiration Date
Prepared Media 3 Months Refrigerated (screw capped tubes/flasks/vessels) or 1 Week Room Temperature (sealed/covered)
pH Buffers 6 Months After Opening
Required Quality Control
QC Procedure Frequency
Total Coliform/E. coli positive Once Per Month Per Analyst
Sample/Test Bottle Sterility One Per Batch Prepared or 1% Per Lot Received (maximum 4 per lot)
Sample/Test Bottle Fluorescence Check
Every Sample/Test Bottle Prepared or 1% Per Lot Received (maximum of 4 per lot)
Media Performance Check Once Per Batch MMO-MUG Reagent Check Once Per Lot and Annually Glass/Electronic Thermometer Calibration Annually
Dial Thermometer Calibration Once Per Three Months Equipment Timers Once Per Three Months pH Meter Calibration Prior to Use pH Linearity/Slope/pH 4 Buffer Prior to Use Balance Calibration Check Prior to Use Refrigerator Record Daily Incubator Record Twice Daily
Sample Collection Preservation Maximum Holding Time
10% Sodium Thiosulfate 30 Hours
52
Method Reference Standard Methods 22nd Edition (9223 B) On-Site Survey Requirements
• Each certified analyst must be able to demonstrate proper collection and analysis of a typical sample for MMO-MUG.
• Prior to the survey, each certified analyst must prepare a reagent QC check using the three bacteria as illustrated in Section 6.4 of this method.
• Prior to the survey, a batch of TSB/BHI must be prepared. This will be checked for proper pH during the survey.
• Procedural technique will be observed.
• All reagents and solutions used with this method will be audited for correct labeling and dating.
• All records will be audited. 1.0 General Method Summary
MMO-MUG is a presence-absence test that is used to simultaneously detect total coliform bacteria and Escherichia coli (E. coli). A color change occurs from the hydrolysis of the β-D-galactosidase enzyme that is produced by total coliform bacteria. In the case of Colilert, the color change is from colorless to yellow. The hydrolysis of the β-glucuronidase enzyme causes the sample to fluoresce under an ultraviolet light when E. coli is present in the sample.
Interferences
• Sunlight may hydrolyze the indicator compounds resulting in a false positive test.
• Samples with high iron/manganese in combination with hydrogen sulfide may turn greenish-black with a black precipitate after the 24 hour incubation period. In this case the sample must be rejected and not reported. A different method is recommended to analyze a re-collected sample.
• Samples containing chlorine levels above the amount that is neutralized by the sodium thiosulfate dechlorinating agent will turn a brownish tea color after incubation. These samples should be discarded and reported as “Chlorine Present”.
• If after collection, the sample exhibits any innate yellow or amber color that may interfere with final interpretation, collect a duplicate sample to be used as a color control blank. Do not add test reagent or incubate the color control blank. Assign this portion the corresponding sample id number and hold at room temperature until post-incubation analysis.
53
2.0 Equipment a. Autoclave: The laboratory autoclave must be of sufficient size to allow for adequate sterilization.
It must also be equipped with a temperature gauge, pressure gauge, an operational safety valve and a fast/slow exhaust selector.
b. Balance: • Top loading balances must have readability of 0.1 g.
• Analytical balances must have readability of 0.001 g. Note: Balances should be calibrated prior to use, using ASTM Class 1, 2, or 3 weights or equivalent.
c. Incubator (Total Coliform): The incubator must provide sufficient space for the daily work load and maintain a constant uniform temperature of 35 ± 0.5°C.
d. Water Bath: The water bath must provide sufficient space for the daily work load and maintain a
constant uniform temperature of 35 ± 0.5°C.
e. Media Preparation Glassware/Utensils/Pipets • Flasks and graduated cylinders made of borosilicate glass or plastic are acceptable.
Graduated cylinders must be calibrated “To Deliver” (TD).
• Pipets should be wrapped individually in aluminum foil or in metal canisters prior to sterilization. Packs of disposable pipets should be resealed between periods of use. Pipets that deliver volumes of ≤ 10.0 mL must be accurate to within ± 2.5%.
f. pH Meter: The electronic pH meter must be accurate to 0.02 pH units and designed for a
minimum of a two point standard calibration with a percent (%) slope or millivolt (mV) efficiency display. Digital meters are required; analog meters are unacceptable. Note: Automatic temperature compensators must be used.
g. Refrigerator: The refrigerator must be of sufficient size for the work load and maintain a temperature of 2 - 6°C.
h. Sample Containers/Test Vessels: Containers should be wide mouth borosilicate glass or autoclavable plastic and must have a capacity of at least 125 mL (4 oz.). • If prepared in the laboratory, each container must have 0.1 mL of sterilized 10% sodium
thiosulfate added to it to neutralize approximately 15 mg/L of residual chlorine. It must also be glass stoppered or screw capped and protected by foil or Kraft paper prior to sterilization.
• Commercially prepared, presterilized vessels that contain sodium thiosulfate are acceptable.
i. Thermometers: All glass, dial and electronic thermometers must have a minimum graduation of 1.0°C, with the exception of incubator thermometers. Incubator thermometers must have a minimum graduation of 0.5°C. All thermometers must be calibrated using a reference thermometer certified by the National Institute of Standards and Technology (NIST) or with a manufacturer’s certificate of traceability to NIST specifications. The NIST certificate or equivalent must be kept on file and available during laboratory inspections. It is strongly recommended that laboratories use non-mercury, liquid-in-glass thermometers when possible. Note: If mercury-in-glass thermometers are used (i.e., maximum registering thermometers), it is recommended that they have a protective coating to guard against mercury spills.
54
j. Ultraviolet (UV) Light: The UV Light must be a 6 watt longwave unit (365 - 366 nm). Consider
replacing the bulb if it fails to produce fluorescence on a comparator.
k. Biological Indicator Ampule: Commercially purchase self-contained biological indicator in a hermetically sealed, type I borosilicate glass ampule (SporeView® or equivalent). Each ampule is inoculated with viable Geobacillus stearothermophilus spores and filled with tryptic soy broth containing bromocresol purple acid indicator. Note: For an alternative option, refer to Section 6.5(b) of this method.
l. Incubator (Autoclave Sterility Check): The incubator must provide sufficient space for incubation
of the biological indicator ampule (See Section 2.0(k) of this method) and maintain constant uniform temperature of 55 - 60°C. A dry block incubator with wells is recommended.
3.0 Reagents/Media a. Reagent Grade Water: Only satisfactorily tested reagent grade water from stills or deionization
units may be used to prepare media, reagents and dilution/rinse water for performing microbial analyses. For laboratories utilizing a deionization unit, the reagent grade water must be monitored for conductivity by a meter or an indicator display on an in-line system and analyzed at least annually for trace metals. If a still is in use, then the requirements must be met as listed in Table 1. Also, high quality water may be purchased from commercial suppliers if provided with a certificate of analysis meeting the specifications of Table 1. Refer to Appendix B on page 232 of this manual for further instructions.
Table 1: Required Reagent Grade Water Criteria
Parameter Limits Frequency
Conductivity > 0.5 megohms resistance or < 2 micromhos/cm (microsiemens/cm) at 25°C Prior to Use
Pb, Cd, Cr, Cu, Ni, Zn
Per Contaminant < 0.05 mg/L Collectively < 0.1 mg/L Annually
Total Chlorine Residual1 < 0.1 mg/L Prior to Use
1 DPD Method is recommended.
b. Sterile Microbiologically Suitable Water: Sterilize reagent grade water (See Section 3.0(a) of this method) based on Table 2 below. Place aluminum foil around any point where water can come in contact with the air, such as water bottle nozzles. Table 2: Sterilization Details
Quantity (per Vessel) Temperature Time Cycle
< 500 mL 119 - 121°C 30 minutes Slow
500 to 1000 mL 119 - 121°C 45 minutes Slow
> 1000 mL 119 - 121°C 90 to 180 minutes Slow Note: The volume is not to exceed autoclave manufacturer’s limits.
55
c. Disinfectant: Commercially available or isopropyl alcohol.
d. 5.25% Sodium Hypochlorite: Purchase commercially as liquid bleach.
e. Sanitizing Solution: Add one ounce of liquid bleach per one gallon of laboratory grade water or
one tablespoon per half gallon of laboratory grade water. Store in a tightly closed screw capped container. May be used for up to 6 months from date of preparation. Note: Stronger solutions may be used but may cause some faucet discoloration.
f. Colilert-18 (18 to 22 hour MMO-MUG Reagent): Purchase commercially. Run performance
checks on each new lot received. (Refer to Section 6.0 of this method for further instructions). Store refrigerated in a dark environment and follow manufacturer’s recommendation. Discard by the manufacturer’s expiration date.
g. 10% Sodium Thiosulfate Solution (Dechlorinating Agent): Dissolve 10 g of sodium thiosulfate in
100 mL of distilled water in an Erlenmeyer flask. Sterilize 15 minutes at 119 - 121°C and store at room temperature. Remake annually or if solution becomes cloudy.
h. Media Performance Check Cultures: Purchase Escherichia coli, Klebsiella pneumonia and
Pseudomonas aeruginosa cultures from an acceptable vendor and follow manufacturer’s instructions to inoculate.
i. Dehydrated Media - Tryptic Soy Broth (TSB), Brain Heart Infusion (BHI): Purchase commercially and store in a dry, cool environment at 2 - 25°C. Shelf life of unopened media is 2 years from the date of receipt. Bottles of media must be used within 6 months after opening or up to one year if stored in a desiccator.
j. Tryptic Soy Broth (TSB): Perform the following instructions to prepare broth:
• Weigh out 30 ± 0.1 g of dehydrated media into a weigh boat and transfer to a large
Erlenmeyer flask. Note: If smaller volumes are needed, 3.0 ± 0.01 g per 100 mL is also acceptable.
• Measure 1000 mL of reagent grade water into a graduated cylinder and add approximately half to an Erlenmeyer flask.
• Transfer media to the flask and rinse down the sides using the remaining half of the reagent
grade water. • Allow the media to completely dissolve by swirling or stirring with a sterilized stir bar.
• Remove approximately 10 mL of prepared TSB and dispense into a screw capped vial or
other acceptable vessel for future pH analysis.
• Dispense into 30 mL screw capped vessels. If not screw capped, cover flask opening with aluminum foil.
• Autoclave at 119 - 121°C for 12 to 15 minutes on slow exhaust. Refer to Table 6.
• Allow to cool to room temperature and record the final pH using the 10 mL portion of the media. The final pH must be 7.3 ± 0.2. If the final pH does not fall within this range, discard the media and remake.
• Store prepared media in screw capped vessels for up to 3 months in a refrigerator or up to
one week (sealed/covered) at room temperature.
56
k. Brain Heart Infusion (BHI) Broth: Perform the following instructions to prepare the broth:
• Weigh out 37 ± 0.1 g of dehydrated media into a weigh boat and transfer to a large
Erlenmeyer flask. Note: If smaller volumes are needed, 3.7 ± 0.01 g per 100 mL is also acceptable.
• Measure 1000 mL of reagent grade water into a graduated cylinder and add approximately half to an Erlenmeyer flask.
• Transfer media to the flask and rinse down the sides using the remaining half of the reagent
grade water. • Allow the media to completely dissolve by swirling or stirring with a sterilized stir bar.
• Remove approximately 10 mL of prepared BHI and dispense into a screw capped vial or
other acceptable vessel for future pH analysis.
• Dispense into 30 mL screw capped vessels. If not screw capped, cover flask opening with aluminum foil.
• Autoclave at 119 - 121°C for 12 to 15 minutes on slow exhaust. Refer to Table 6.
• Allow to cool to room temperature and record the final pH using the 10 mL portion of the media. The final pH must be 7.4 ± 0.2. If the final pH does not fall within this range, discard the media and remake.
• Store prepared media in screw capped vessels for up to 3 months in a refrigerator or up to
one week (sealed/covered) at room temperature.
l. Colilert Comparator: Purchase commercially and store in a dark environment at room temperature. Discard by the manufacturer’s expiration date.
4.0 Sample Collection/Preservation/Holding Time
a. Sample collection:
• Select an appropriate sampling tap such as a faucet, petcock or small valve. Avoid taps with
a leaky stem or a swivel joint.
• Prior to collection, remove the aerator since it may harbor bacteria.
• Prior to collection in the distribution system place all carbon filters, sediment filters and water softeners on bypass.
• Flush the sample tap to waste for approximately one minute then close valve.
• It is recommended to disinfect the nozzle for two minutes with the sanitizing solution (See Section 3.0(e) of the method for preparation instructions) using either a spray bottle to saturate the opening or a plastic bag to squeeze the solution into the faucet. Use a fresh solution each time.
57
• Open the tap fully and flush tap for approximately 3 to 5 minutes (until a constant temperature is detected), then reduce flow enough to allow sample bottles to be filled without splashing.
• Verify water is within the expected concentration range for chlorine using a digital
colorimetric/DPD colorimeter.
• Aseptically fill the sample bottles and avoid contaminating the cap or bottle. Note: If using commercially purchase pre-sterilized bottles, be sure to completely remove any plastic seal from the cap prior to filling the sample bottle.
• Do not allow the sample bottle to overflow as this will wash out the sodium thiosulfate. If the
sample bottle overflows or water splashes out, discard and collect another sample.
• Immediately recap the sample bottle tightly.
• Refer to Chapter 2(B) on page 7 of this manual for sample identification requirements.
b. Preservation: Sodium thiosulfate is used to remove residual chlorine. Add 0.1 mL of 10% sodium thiosulfate per 125 mL (4 oz.) sample container. This will neutralize approximately 15 mg/L of residual chlorine. Refer to Section 3.0(g) of this method for preparation instructions.
c. Maximum sample holding time: No more than 30 hours after collection. Store samples at 4°C until time of analysis.
5.0 MMO-MUG Analysis Procedure
5.1 Sample Setup
1. Vigorously shake the sample. Note: Sample bottle must contain at least 1 inch of headspace to allow for adequate mixing.
2. Measure 100 mL of sample into an MMO-MUG test vessel. Alternatively, if using the MMO-MUG test vessel as the sample container, aseptically adjust the volume to the 100 mL mark. Note: If volume is less than 100 mL, the test is not valid and must be recorded as Sample Rejected: Insufficient Volume. Another sample must be collected for analysis.
3. Mark the corresponding sample number on the test vessel.
4. Aseptically open and add a packet of MMO-MUG reagent (Colilert-18) to the test vessel. Recap and shake vigorously to dissolve the reagent. Pre-warming/incubation must be initiated within 30 minutes after addition of MMO-MUG reagent. Note: Some particles may remain un-dissolved initially; however the reagent will continue to dissolve during the incubation period.
5. Both positive and negative controls are required with each set of samples tested. A set is
defined as up to 60 samples having incubation initiated within four hours. Each incubator used must contain at least one set of controls. • Positive Control: Aseptically fill an MMO-MUG test vessel with sterile reagent water and
inoculate using a known control of either a live E. coli culture or with water known to contain E. coli, such as raw wastewater.
• Negative control: Aseptically fill an MMO-MUG test vessel with only sterile reagent water.
• Aseptically add a packet of MMO-MUG reagent to both test vessels.
58
6. Pre-warm samples in a water bath at 35°C for 20 minutes. The time required for pre-warming is
part of (not in addition to) the 18 hour incubation period.
7. Incubate all test vessels at 35 ± 0.5°C for the remainder of the 18 hour incubation period. 5.2 Interpreting and Reporting Colilert-18 MMO-MUG Results
a. After the 18 to 22 hour incubation period, remove the test vessels from the incubator. Compare each test vessel to the Colilert comparator and negative control.
b. For sample interpretation refer to Table 3, Colilert-18 Interpretation. If after the 18 hour
incubation period the interpretation is inconclusive go to (c), otherwise go to (d).
c. If the sample displays a slight yellow color but appears less intense than the Colilert comparator after 18 hours, continue the incubation for up to 22 hours. The total incubation time must not exceed 22 hours.
• After 22 hours, a total coliform positive sample will display further color development greater
than or equal to the comparator.
• If after 22 hours, the sample color is less intense than the comparator, report the sample as Total Coliform: Absence.
Note: Samples that display an innate yellow or amber color prior to analysis must be compared to their corresponding un-incubated color control blank.
• After incubation, if the sample color is less than or equal to the color control blank, report the sample as Total Coliform: Absence.
• After incubation, if the sample color is greater than the color control blank and more intense than the comparator, refer to Table 3, Colilert-18 Interpretation, and then go to (d).
d. Examine all total coliform positive samples for presence of E. coli using a UV light in a darkened
room or observation box. Compare samples to the comparator. • If the sample is negative for fluorescence, the sample is considered negative for E. coli.
• If the sample is positive for fluorescence, the sample is considered positive for E. coli.
Note: In order to be considered Total Coliform Presence and E. coli Presence, a sample must be positive for both color change and fluorescence.
59
Table 3: Colilert-18 Interpretation
Color Change (Clear to Yellow) Fluorescence Microbe Presence Indicator
Reported As:
No Color Change Negative Total Coliform: Absence
Color Change < Comparator Negative Total Coliform: Absence
Color Change ≥ Comparator Negative Total Coliform: Presence; E. coli: Absence
Color Change ≥ Comparator Positive Total Coliform: Presence; E. coli: Presence
e. Refer to Table 4 below when a sample is to be reported as Sample Rejected.
Table 4: Sample Rejection Reason
Conditions Sample Rejection Reason Reported As:
Sample Bottle Broken Broken
Chlorine Detected in Sample Chlorine Present
Sample Collected > 30 Hours Exceeds Holding Time
Excessive Headspace in Container Excessive Headspace
Sample Frozen Frozen Sample
Incomplete Sample Information Insufficient Information
Sample Volume < 100 mL Insufficient Volume
Error With Sampling Point Invalid Sampling Point
Error With Sampling Protocol Invalid Sampling Protocol
Negative Control is Positive Laboratory Accident
Positive Control is Negative Laboratory Accident
Incubator Broken or Other Lab Error Laboratory Accident
Sample Bottle Leaking Leaked In Transit
6.0 Quality Control (QC) Requirements 6.1 Analyst QC Requirements All analysts are required to perform MMO-MUG analysis on at least 10% of the routine samples. In addition, all certified analysts must analyze and record a minimum of one positive control and one negative control per month.
60
6.2 TSB/BHI Performance Check a. With every batch of TSB/BHI, inoculate one sterile 25 mL test tube with a known coliform culture.
A second 25 mL tube of TSB/BHI serves as a control blank.
• Incubate both tubes for 24 hours at 35 ± 0.5°C.
• The inoculated tube must show cloudy growth while the control blank must not show cloudy growth. Do not use media if growth is not indicated in the inoculated tube.
6.3 Sample Containers
a. Must be checked for sterility and auto-fluorescence by an Ohio EPA certified laboratory.
b. Sterility Check: A sterility check must be done on a minimum of one sample/test bottle per
batch prepared in the lab or a minimum of 1% per case purchase (up to 4 bottles per lot).
• Add approximately 25 mL of prepared sterile Tryptic Soy Broth (TSB) or Brain Heart Infusion (BHI) per bottle tested mix to expose entire interior of the bottle to the growth media.
• Incubate at 35 ± 0.5°C and check after 24 hours for growth. Growth is indicated by any turbidity.
• If growth occurs, re-sterilize any batches of laboratory prepared containers that test positive
and repeat the sterility check.
• If any commercially purchase disposable containers test positive, recheck another set. If the second check is positive, notify the manufacturer and do not use any bottles from the affected case.
c. Auto-Fluorescence: Check all sample bottles prepared in the laboratory for fluorescence, or a
minimum of 1% per case purchase (up to 4 bottles per lot) using a UV light. If any containers fluoresce notify the manufacturer and do not use any bottles from the affected case.
6.4 MMO-MUG Reagent Check
a. Aseptically fill three test vessels with 100 mL sterile reagent water. Add a packet of MMO-MUG reagent to each test vessel and mix thoroughly to dissolve.
b. Inoculate each test vessel with one of three known cultures (Escherichia coli, Klebsiella
pneumonia or Pseudomonas aeruginosa) and label each bottle with the bacterium used.
c. Incubate all test vessels at 35 ± 0.5°C for the required amount of time (Colilert-18 for 18 hours).
d. After incubation, remove the test vessels from the incubator and interpret by referring to Table 5 below.
Table 5: Colilert-18 after 18 to 22 hours incubation at 35 ± 0.5°C
Type of Culture Color Fluorescence
E. coli Yellow Positive
K. pneumonia Yellow Negative
P. aeruginosa None Negative
61
6.5 Sterilization
a. Sterilize by autoclaving all liquids and materials. Refer to Table 6 below. Note: When autoclaving liquid filled vessels, provide enough space between the vessels to allow for even sterilization. Table 6: Autoclave Times and Temperatures
Plastic Bottles/Cylinders 119 - 121°C 30 minutes Fast 1Media must not be in the autoclave more than 45 minutes from the time the autoclave door is closed to the time it is opened. 2Dispose of contaminated material in compliance with all Ohio EPA and local requirements.
b. Autoclave sterility checks are required once every three months, per autoclave. • If using a biological indicator ampule, follow manufacturer’s instructions. Note: After
sterilization, remove and allow ampules to cool for 10 minutes prior to incubation. Incubate at 55 - 60°C for 24 hours. Growth is evident by a color change per manufacturer’s instructions. If color change occurs, corrective action for the autoclave is required.
• Alternatively, fill an Erlenmeyer flask with 25 to 50 mL of TSB/BHI, inoculate with a known coliform culture, cover flask opening with aluminum foil and incubate at 35 ± 0.5°C for 24 hours. After incubation, when TSB/BHI shows growth, autoclave at 119 - 121°C for 12 to 15 minutes on slow exhaust. Allow to cool to room temperature. Fill a test vessel with approximately 25 mL of TSB/BHI and inoculate the TSB/BHI with the “sterilized” culture from the Erlenmeyer flask. Incubate test vessel at 35 ± 0.5°C for 24 hours. After the 24 hour incubation period, remove the test vessel from the incubator. The inoculated test vessel must not show growth. If growth is present in the inoculated test vessel, corrective action for the autoclave is required.
6.6 Thermometer Calibration
a. Calibrate all glass and electronic thermometers when new and at least annually. Calibrate all
dial thermometers at least once every three months.
b. Reference/NIST Certified Thermometer (Ice Point) Calibration
1. Create an ice bath in an insulated container using distilled/deionized water and crushed ice made using distilled/deionized water.
2. Submerge the reference/certified thermometer in the ice bath until a stable temperature is reached.
62
3. The thermometer must read 0.0°C or, for thermometers without a 0.0°C mark, the “ice-point calibration” mark.
4. If reference/certified thermometer does not read 0.0°C corrective action must be taken.
c. Incubator Thermometer (Total Coliform) Calibration
1. Place incubator thermometer and reference thermometer in a covered beaker or flask of
water and incubate overnight in a 35°C incubator. Optionally, use mineral oil instead of water to eliminate the need for a covered vessel.
2. After 24 hours, record readings of the incubator and reference thermometers.
3. Label each thermometer with the correction factor based on the reference thermometer. Note: Remove thermometer from use if correction factor is > 1.0°C.
d. Incubator Thermometer (Autoclave Sterility Check) Calibration
1. Place incubator thermometer and reference thermometer in a covered beaker or flask of
water and incubate overnight in a 55 - 60°C incubator. Optionally, use mineral oil instead of water to eliminate the need for a covered vessel. Note: If using a dry block incubator with wells, place incubator thermometer and reference thermometer in adjacent wells overnight at 55 - 60°C.
2. After 24 hours, record readings of the incubator and reference thermometers.
3. Label each thermometer with the correction factor based on the reference thermometer.
Note: Remove thermometer from use if correction factor is > 1.0°C.
e. Refrigerator Thermometer Calibration
1. Place refrigerator thermometer and reference thermometer inside a refrigerator overnight
side by side in the same covered beaker or flask of water. Optionally, use mineral oil instead of water to eliminate the need for a covered vessel.
2. After 24 hours, record readings of the refrigerator and reference thermometers.
3. Label each thermometer with the correction factor based on the reference thermometer.
4. Alternatively, the refrigerator thermometer may be calibrated at “ice-point” when the reference thermometer is checked.
Note: Remove thermometer from use if correction factor is > 1.0°C.
f. Maximum Registering Thermometer
1. Calibration will be done by the laboratory certification officer at the time of the survey.
2. The laboratory must have at least one spare maximum registering thermometer.
3. Tag each thermometer with the correction factor base on the onsite calibration.
63
6.7 Equipment Timer Calibration a. Calibrate all equipment timers at least once every three months.
b. Autoclave Timer Calibration
1. Set the timer for 45 minutes on either fast or slow exhaust. 2. Use an accurate watch or stopwatch to check the timer at appropriate sterilization intervals
used by the laboratory (12, 15, 30 and 45 minutes).
3. Timer calibration begins when the autoclave reaches sterilization pressure and temperature and ends when the pressure/temperature begins to fall as the cycle ends.
4. See Table 7 below to determine if corrective action is required. Table 7: Autoclave Timer Acceptance Criteria
Cycle Time Calibrated Acceptance Criteria 12 minutes 1 minute
15 minutes 1 minute and 30 seconds
30 minutes 3 minutes
45 minutes 5 minutes
5. Label each autoclave timer with the correction factors for each interval used.
6.8 pH Meter Calibration a. The calibration procedure must be performed and result in an acceptable linearity value (percent
(%) slope or millivolt (mV)) prior to use.
b. Calibrate the pH meter following the manufacturer’s instructions for a two point calibration (pH buffers 7.0 and 10.0) or three point calibration (pH buffers 4.0, 7.0 and 10.0).
c. If a two point calibration is performed, analyze and record the pH 4.0 verification buffer value,
per use. The results of the pH 4.0 verification buffer must be ± 0.1 pH units of the true value; acceptance limits are 3.9 to 4.1 pH units. Note: If the laboratory has decided to adopt a three point calibration for all analyses, the pH 4.0 verification buffer analysis is not required.
d. The linearity must be recorded each time the meter is calibrated; acceptance limits are 95 to
105% or -56 to -62 mV. Calibrations must be dated and initialed by all certified analysts participating in each calibration procedure.
6.9 Balance Calibration
a. All balances must be on an annual service contract proof of which must be posted on or near the balance.
b. Balances must be checked prior to use with certified weights (ASTM type 1, 2 or 3 weights or
NIST Class S or S1). A manufacturer’s certificate for the certified weights must be available.
c. Balance checks must be done with at least three weights that bracket the range of weights normally used in the laboratory.
64
• Place each mass on the balance and record the weight (reference weight).
• Add a test load weight of either 0.1 g (top loading balance) or 0.01 g (analytical balance) and
record the reference weight plus test load weight.
• Response for the non-analytical (top loading balance) must be ± 0.1 g.
• Response for the analytical balance must be ± 0.01 g.
6.10 Refrigerator Record
a. Record refrigerator temperatures once daily to the nearest thermometer gradation.
6.11 Incubator Record (Total Coliform)
a. Record incubator thermometer temperatures at least twice daily when in use, including one reading in the early morning and another at least four hours later. Each shelf must have a separate thermometer to be recorded to the nearest thermometer gradation.
6.12 Incubator Record (Autoclave Sterility Check)
a. Record incubator thermometer temperature prior to use and when in use. Each shelf must have
a separate thermometer to be recorded to the nearest thermometer gradation. Note: Only one thermometer is required if a dry block incubator is used.
6.13 Water Bath Record
a. Record water bath thermometer temperatures at least twice daily when in use, including one
reading in the early morning and another at least four hours later, to the nearest thermometer gradation.
6.14 Labeling
a. Reagents and media must be labeled with date received and date opened.
b. Prepared reagents and media must be labeled with content, date made and analyst initials.
7.0 Required Documentation
1. The Microbiological Laboratory Schedule for MMO-MUG (Colilert-18) on page 70 of this manual may be used to keep these records.
2. The Microbiological Test Data Sheet for MMO-MUG (Colilert-18) on page 71 of this manual is recommended to document each analysis. The minimum requirements for documenting each procedure are as follows:
a. Sample ID.
b. Sample Location.
c. Analyst(s) initials.
d. Collection: date and time.
65
e. Incubation Start: date and time.
f. Interpretation (Incubation end): date and time.
g. Total coliform: Positive (+) or Negative (-).
h. E. coli: Positive (+) or Negative (-). i. Chlorine: free and total.
3. The Sample Bottle Sterility/Fluorescence Record on page 72 of this manual may be used to
keep these records. The minimum requirements for documenting each procedure are as follows:
a. Analyst(s) initials.
b. Date sample bottles were received or sterilized. c. Brand and lot number. d. Number of bottles received or sterilized. e. Date tested. f. Growth results: number positive or negative. g. UV results: number positive or negative. h. Comments.
4. The Media Quality Control Record on page 73 of this manual may be used to keep these
records. The minimum requirements for documenting each procedure are as follows:
a. Analyst(s) initials.
b. Date.
c. Media to be tested. d. Brand and lot number. e. pH of media after sterilization.
f. Growth results: positive or negative. g. Comments.
5. The MMO-MUG Reagent Quality Control Record on page 74 of this manual may be used to
keep these records. The minimum requirements for documenting each procedure are as follows:
a. Analyst(s) initials/contract laboratory.
b. Date. c. Brand and lot number.
66
d. Type of reagent to be tested. e. Test results:
• E. coli: color change/UV.
• Klebsiella: color change/UV.
• Pseudomonas: color change/UV
6. The Autoclave Sterilization Record on page 75 of this manual may be used to keep these records. The minimum requirements for documenting each procedure are as follows:
a. Analyst(s) initials.
b. Date.
c. Time in. d. Time out. e. Total time (minutes). f. Sterilization time (minutes). g. Internal Thermometer (°C). h. Material sterilized.
7. The Autoclave Sterility Check record on page 76 of this manual may be used to keep these
records. The minimum requirements for documenting each procedure are as follows:
a. Type of Sterility Check Used: Manufacture/Ampule Type or Alternative: Circle One (TSB/BHI).
b. Analyst(s) initials.
c. Sterilization date.
d. Incubation: date, time and temperature (°C).
e. Interpretation: date, time and temperature (°C). f. Result: positive or negative. g. Lot number.
8. The Thermometer Calibration Record on page 77 of this manual may be used to keep these
records. The minimum requirements for documenting each procedure are as follows:
a. Analyst(s) initials.
b. Date.
c. Thermometer location and identification.
67
d. Observed temperature (°C). e. Temperature of reference thermometer (°C). f. Correction factor.
9. The Timer Calibration Record on page 78 of this manual may be used to keep these records. The minimum requirements for documenting each procedure are as follows:
a. Analyst(s) initials.
b. Date.
c. Timer location. d. Equipment time (minutes). e. Stopwatch time (minutes). f. Correction factor.
10. The pH Meter Slope/Linearity Verification (4.0 Buffer) record on page 79 of manual may be
used to keep these records. The minimum requirements for documenting each procedure are as follows:
a. Analyst(s) initials.
b. Date.
c. Slope (%). d. pH 4.0 Verification (pH Units). e. Comments.
11. The Balance Calibration Record on page 80 of this manual may be used to keep these
records. The minimum requirements for documenting each procedure are as follows:
a. Analyst(s) initials.
b. Date.
c. Reference weight and test load readings in grams (200 to 1.0 grams). d. Comments/corrective action.
12. The Daily Refrigerator Temperature Record on page 81 of manual may be used to keep these
records. The minimum requirements for documenting each procedure are as follows:
a. Analyst(s) initials.
b. Date.
c. Temperature (°C).
68
d. Comments.
13. The Incubator Temperature Record on page 82 of this manual may be used to keep these records. The minimum requirements for documenting each procedure are as follows:
a. Analyst(s) initials.
b. Date.
c. Time: recorded twice each day, once in the a.m. and once in the p.m. d. Temperature (°C): recorded per shelf used.
14. The Water Bath Temperature Record on page 83 of this manual may be used to keep these
records. The minimum requirements for documenting each procedure are as follows:
a. Analyst(s) initials.
b. Date.
c. Time: recorded twice each day, once in the a.m. and once in the p.m. d. Temperature (°C): recorded per shelf used.
69
Microbiological Laboratory Schedule for MMO-MUG (Colilert-18)
Frequency Month
1 2 3 4 5 6 7 8 9 10 11 12 Monthly
Total Coliform/E. coli Positive
Quarterly Once Per Three Months
Dial Thermometer Calibration
Equipment Timer Calibration
Autoclave Sterility Check
Annual
Glass and Electronic Thermometer Calibration
Balance Service
70
Microbiological Test Data Sheet for MMO-MUG (Colilert-18)
Laboratory
Sample ID Sample Location Analyst
Collection Incubation
Start Interpretation
(Incubation End) Total
coliform
E. coli
Chorine
Date Time Date Time Date Time + - + - Free Total
71
Sample Bottle Sterility/Fluorescence Record To be recorded for each lot received or batch sterilized
Laboratory
Analyst Date
Received/ Sterilized
Brand/Lot Number Number of
Bottles Received/ Sterilized
Date Tested
Growth Results UV Results
Number Positive
Number Negative
Number Positive
Number Negative Comments
*Note action taken if results are not acceptable
72
Media Quality Control Record To be checked and recorded for each new prepared batch
Laboratory
Analyst Date Media Brand/Lot Number Growth Results
pH Positive Negative Comments
*Note action taken if results are unacceptable
73
MMO-MUG Reagent Quality Control Record To be recorded for each new lot or annually
Laboratory
Analyst/ Contract
Laboratory Date Brand/Lot Number Type of Reagent
Test Results
E. coli Klebsiella Pseudomonas
Color Change UV Color
Change UV Color Change UV
74
Autoclave Sterilization Record To be recorded for each run
Laboratory
Analyst Date Time In Time Out Total Time
(min) Sterilization Time (min)
Internal Thermometer
(°C) Material Sterilized
75
Autoclave Sterility Check Laboratory
Type of Sterility Check Used: Manufacturer/Ampule Type
Alternative: Circle One (TSB/BHI)
Analyst Sterilization Date
Incubation Interpretation Result
(POS/NEG) Lot Number
Date Time Temp (°C) Date Time Temp (°C)
76
Thermometer Calibration Record To be recorded for each thermometer
Laboratory
Analyst Date Thermometer Location/ ID Observed Temperature (°C)
Temperature of Reference
Thermometer (°C)
Correction Factor
*Note thermometer has been removed from use if correction factor is > 1°C
77
Timer Calibration Record To be recorded for each equipment timer
Laboratory
Analyst Date Timer Location Equipment Time
(minutes) Stopwatch Time
(minutes) Correction Factor
*Note: To determine if recalibration or maintenance is required, refer to Table 7, Autoclave Timer Difference.
78
pH Meter Slope/Linearity Verification (4.0 Buffer)
To be checked and recorded for each new prepared batch
Laboratory
Calibration Buffers
Analyst Date Slope (%) pH 4.0 Verification Comments
*Note action taken if pH linearity is unacceptable
79
Balance Calibration Record Check each balance per use with certified weights. A minimum of three weights that bracket normal weighing needs are required. Record balance response to reference weight and sensitivity to reference weight plus test load (L). Non-analytical (top loading) must be sensitive to a 0.1 g test load. Analytical balances must be sensitive to a
0.01 g test load.
Laboratory
Analyst Date
Reference Weight and Test Load Readings in Grams
200 200 + L 100 100 + L 50 50 + L 10 10 + L 5 5 + L 1 1 + L
*Note action taken if calibration is unacceptable Note: "L" refers to "Test Load"
Comments/Corrective Action:
80
Daily Refrigerator Temperature Record To be recorded daily, 4.0 ± 2.0°C
Laboratory
Analyst Date Temp (°C) Comments Analyst Date Temp (°C) Comments
*Note action taken if temperature is out of range
81
Incubator Temperature Record To be recorded twice each day, am/pm, per shelf 35.0 ± 0.5°C
Laboratory
Analyst Date Time
Temp (°C) Analyst Date Time
Temp (°C)
Shelf Shelf Shelf Shelf Shelf Shelf
am
am
pm
pm
am
am
pm
pm
am
am
pm
pm
am
am
pm
pm
am
am
pm
pm
am
am
pm
pm
am
am
pm
pm
am
am
pm
pm
*Note action taken if temperature is out of range
82
Water Bath Temperature Record To be recorded twice each day, am/pm, 35.0 ± 0.5°C
Laboratory
Analyst Date Time Temp (°C) Analyst Date Time Temp (°C)
am
am
pm
pm
am
am
pm
pm
am
am
pm
pm
am
am
pm
pm
am
am
pm
pm
am
am
pm
pm
am
am
pm
pm
am
am
pm
pm
*Note action taken if temperature is out of range
83
Quanti-Tray Analysis for Total Coliform and E. coli by Colilert and Colisure
Standard/Reagent Maximum Storage Time MMO-MUG Reagent Manufacturer’s Expiration Date Chemical Reagents Manufacturer’s Expiration Date
Dehydrated Media 6 Months After Opening or 1 Year After Opening if Stored in Desiccator
10% Sodium Thiosulfate 1 Year After Preparation/Manufacturer’s Expiration Date
Media Performance Check Cultures Manufacturer’s Expiration Date
Prepared Media 3 Months Refrigerated (screw capped tubes/ flasks/vessels) or 1 Week Room Temperature (sealed/covered)
pH Buffers 6 Months After Opening
Required Quality Control
QC Procedure Frequency Total Coliform/E. coli positive Once Per Month Per Analyst
Sample Bottle Sterility Check One Per Batch Prepared or 1% Per Lot Received (maximum of 4 per lot)
Sample Bottle Fluorescence Check
Every Sample/Test Bottle Prepared or 1% Per Lot Received (maximum of 4 per lot)
Quanti-Tray Sterility and Fluorescence Check
1% Per Lot Received (maximum of 4 per lot)
Quanti-Tray Sealer Check Annually Media Performance Check Once Per Batch MMO-MUG Reagent Check Once Per Lot and Annually Glass/Electronic Thermometer Calibration Annually
Dial Thermometer Calibration Once Per Three Months Equipment Timers Once Per Three Months pH Meter Calibration Prior to Use pH Linearity/Slope/pH 4 Buffer Prior to Use Balance Calibration Check Prior to Use Refrigerator Record Daily Incubator Record Twice Daily
Sample Collection Preservation Maximum Holding Time 10% Sodium Thiosulfate 30 Hours
84
Method Reference Standard Methods 22nd Edition (9223 B) On-Site Survey Requirements
• Each certified analyst must be able to demonstrate proper collection and analysis of a typical sample for Quanti-Tray.
• Prior to the survey, each certified analyst must prepare a reagent QC check using the three bacteria as illustrated in Section 6.4 of this method.
• Prior to the survey, a batch of TSB/BHI must be prepared. This will be checked for proper
pH during the survey.
• Procedural technique will be observed.
• All reagents and solutions used with this method will be audited for correct labeling and dating.
• All records will be audited.
1.0 General Method Summary
Quanti-Tray® and Quanti-Tray/2000® with MMO-MUG reagent is a presence-absence test that is used to simultaneously detect total coliform bacteria and Escherichia coli (E. coli). A color change occurs from the hydrolysis of the β-D-galactosidase enzyme that is produced by total coliform bacteria. In the case of Colilert, the color change is from colorless to yellow. In the case of Colisure, the color change is from yellow to red/magenta. The hydrolysis of the β-glucuronidase enzyme causes the sample to fluoresce under an ultraviolet light when E. coli is present in the sample.
Interferences
• Sunlight may hydrolyze the indicator compounds resulting in a false positive test.
• Samples with high iron/manganese in combination with hydrogen sulfide may turn greenish-black with a black precipitate after the 24 hour incubation period. In this case the sample must be rejected and not reported. A different method is recommended to analyze a re-collected sample.
• Samples containing chlorine levels above the amount that is neutralized by the sodium thiosulfate dechlorinating agent will briefly flash a blue color after the addition of the MMO-MUG reagent. These samples should be discarded and reported as “Chlorine Present”.
• If after collection, the sample exhibits any innate yellow or amber color (for Colilert) that may interfere with final interpretation, collect a duplicate sample to be used as a color control blank. Do not add test reagent or incubate the color control blank. Assign this portion the corresponding sample id number and hold at room temperature until post-incubation analysis.
85
2.0 Equipment a. Autoclave: The laboratory autoclave must be of sufficient size to allow for adequate sterilization.
It must also be equipped with a temperature gauge, pressure gauge, an operational safety valve and a fast/slow exhaust selector.
b. Balance: • Top loading balances must have readability of 0.1 g.
• Analytical balances must have readability of 0.001 g. Note: Balances should be calibrated prior to use, using ASTM Class 1, 2, or 3 weights or equivalent.
c. Incubator (Total Coliform): The incubator must provide sufficient space for the daily work load and maintain a constant uniform temperature of 35 ± 0.5°C.
d. Media Preparation Glassware/Utensils/Pipets
• Flasks and graduated cylinders made of borosilicate glass or plastic are acceptable.
Graduated cylinders must be calibrated “To Deliver” (TD).
• Pipets should be wrapped individually in aluminum foil or in metal canisters prior to sterilization. Packs of disposable pipets should be resealed between periods of use. Pipets that deliver volumes of ≤ 10.0 mL must be accurate to within ± 2.5%.
e. pH Meter: The electronic pH meter must be accurate to 0.02 pH units and designed for a
minimum of a two point standard calibration with a percent (%) slope or millivolt (mV) efficiency display. Digital meters are required; analog meters are unacceptable. Note: Automatic temperature compensators must be used.
f. Refrigerator: The refrigerator must be of sufficient size for the work load and maintain a temperature of 2 - 6°C.
g. Sample Containers/Test Vessels: Containers should be wide mouth borosilicate glass or autoclavable plastic and must have a capacity of at least 125 mL (4 oz.). • If prepared in the laboratory, each container must have 0.1 mL of sterilized 10% sodium
thiosulfate added to it to neutralize approximately 15 mg/L of residual chlorine. It must also be glass stoppered or screw capped and protected by foil or Kraft paper prior to sterilization.
• Commercially prepared, presterilized vessels that contain sodium thiosulfate are acceptable.
h. Quanti-Tray® Sealer with Rubber Inserts: Purchase commercially.
i. Quanti-Tray® or Quanti-Tray/2000® Trays: Purchase commercially and use with corresponding rubber inserts.
j. Thermometers: All glass, dial and electronic thermometers must have a minimum graduation of 1.0°C, with the exception of incubator thermometers. Incubator thermometers must have a minimum graduation of 0.5°C. All thermometers must be calibrated using a reference thermometer certified by the National Institute of Standards and Technology (NIST) or with a manufacturer’s certificate of traceability to NIST specifications. The NIST certificate or equivalent must be kept on file and available during laboratory inspections. It is strongly recommended that laboratories use non-mercury, liquid-in-glass thermometers when possible.
86
Note: If mercury-in-glass thermometers are used (i.e., maximum registering thermometers), it is recommended that they have a protective coating to guard against mercury spills.
k. Ultraviolet (UV) Light: The UV Light must be a 6 watt longwave unit (365 - 366 nm). Consider
replacing the bulb if it fails to produce fluorescence on a comparator.
m. Biological Indicator Ampule: Commercially purchase self-contained biological indicator in a hermetically sealed, type I borosilicate glass ampule (SporeView® or equivalent). Each ampule is inoculated with viable Geobacillus stearothermophilus spores and filled with tryptic soy broth containing bromocresol purple acid indicator. Note: For an alternative option, refer to Section 6.7(b) of this method.
n. Incubator (Autoclave Sterility Check): The incubator must provide sufficient space for incubation
of the biological indicator ampule (See Section 2.0(m) of this method) and maintain constant uniform temperature of 55 - 60°C. A dry block incubator with wells is recommended.
3.0 Reagents/Media a. Reagent Grade Water: Only satisfactorily tested reagent grade water from stills or deionization
units may be used to prepare media, reagents and dilution/rinse water for performing microbial analyses. For laboratories utilizing a deionization unit, the reagent grade water must be monitored for conductivity by a meter or an indicator display on an in-line system and analyzed at least annually for trace metals. If a still is in use, then the requirements must be met as listed in Table 1. Also, high quality water may be purchased from commercial suppliers if provided with a certificate of analysis meeting the specifications of Table 1. Refer to Appendix B on page 232 of this manual for further instructions. Table 1: Required Reagent Grade Water Criteria
Parameter Limits Frequency
Conductivity > 0.5 megohms resistance or < 2 micromhos/cm (microsiemens/cm) at 25°C Prior to Use
Pb, Cd, Cr, Cu, Ni, Zn
Per Contaminant < 0.05 mg/L Collectively < 0.1 mg/L Annually
Total Chlorine Residual1 < 0.1 mg/L Prior to Use
1 DPD Method is recommended.
b. Sterile Microbiologically Suitable Water: Sterilize reagent grade water (See Section 3.0(a) of this method) based on Table 2 below. Place aluminum foil around any point where water can come in contact with the air, such as water bottle nozzles. Table 2: Sterilization Details
Quantity (per Vessel) Temperature Time Cycle
< 500 mL 119 - 121°C 30 minutes Slow
500 to 1000 mL 119 - 121°C 45 minutes Slow
> 1000 mL 119 - 121°C 90 to 180 minutes Slow
87
Note: The volume is not to exceed autoclave manufacturer’s limits.
c. Disinfectant: Commercially available or isopropyl alcohol.
d. 5.25% Sodium Hypochlorite: Purchase commercially as liquid bleach.
e. Sanitizing Solution: Add one ounce of liquid bleach per one gallon of laboratory grade water or one tablespoon per half gallon of laboratory grade water. Store in a tightly closed screw capped container. May be used for up to 6 months from date of preparation. Note: Stronger solutions may be used but may cause some faucet discoloration.
f. Colilert (24 to 28 hour MMO-MUG Reagent): Purchase commercially. Run performance checks on each new lot received. (Refer to Section 6.0 of this method for further instructions.) Store in a dark environment and follow manufacturer’s recommendation. Discard by the manufacturer’s expiration date.
g. Colisure (24 to 48 hour MMO-MUG reagent): Purchase commercially. Run performance checks on each new lot received. (Refer to Section 6.0 of this method for further instructions.) Store refrigerated in a dark environment and follow manufacturer’s recommendation. Discard by the manufacturer’s expiration date.
h. 10% Sodium Thiosulfate Solution (Dechlorinating Agent): Dissolve 10 g of sodium thiosulfate in 100 mL of distilled water in an Erlenmeyer flask. Sterilize 15 minutes at 119 - 121°C and store at room temperature. Remake annually or if solution becomes cloudy.
i. Media Performance Check Cultures: Purchase Escherichia coli, Klebsiella pneumonia and Pseudomonas aeruginosa cultures from an acceptable vendor and follow manufacturer’s instructions to inoculate.
j. Dehydrated Media - Tryptic Soy Broth (TSB), Brain Heart Infusion (BHI): Purchase commercially and store in a dry, cool environment at 2 - 25°C. Shelf life of unopened media is 2 years from the date of receipt. Bottles of media must be used within 6 months after opening or up to one year if stored in a desiccator.
k. Tryptic Soy Broth (TSB): Perform the following instructions to prepare broth: • Weigh out 30 ± 0.1 g of dehydrated media into a weigh boat and transfer to a large
Erlenmeyer flask. Note: If smaller volumes are needed, 3.0 ± 0.01 g per 100 mL is also acceptable.
• Measure 1000 mL of reagent grade water into a graduated cylinder and add approximately half to an Erlenmeyer flask.
• Transfer media to the flask and rinse down the sides using the remaining half of the reagent
grade water. • Allow the media to completely dissolve by swirling or stirring with a sterilized stir bar.
• Remove approximately 10 mL of prepared TSB and dispense into a screw capped vial or
other acceptable vessel for future pH analysis.
• Dispense into 30 mL screw capped vessels. If not screw capped, cover flask opening with aluminum foil.
• Autoclave at 119 - 121°C for 12 to 15 minutes on slow exhaust. Refer to Table 8.
88
• Allow to cool to room temperature and record the final pH using the 10 mL portion of the
media. The final pH must be 7.3 ± 0.2. If the final pH does not fall within this range, discard the media and remake.
• Store prepared media in screw capped vessels for up to 3 months in a refrigerator or up to
one week (sealed/covered) at room temperature.
l. Brain Heart Infusion (BHI) Broth: Perform the following instructions to prepare the broth: • Weigh out 37 ± 0.1 g of dehydrated media into a weigh boat and transfer to a large
Erlenmeyer flask. Note: If smaller volumes are needed, 3.7 ± 0.01 g per 100 mL is also acceptable.
• Measure 1000 mL of reagent grade water into a graduated cylinder and add approximately half to an Erlenmeyer flask.
• Transfer media to the flask and rinse down the sides using the remaining half of the reagent
grade water.
• Allow the media to completely dissolve by swirling or stirring with a sterilized stir bar.
• Remove approximately 10 mL of prepared BHI and dispense into a screw capped vial or other acceptable vessel for future pH analysis.
• Dispense into 30 mL screw capped vessels. If not screw capped, cover flask opening with
aluminum foil.
• Autoclave at 119 - 121°C for 12 to 15 minutes on slow exhaust. Refer to Table 8.
• Allow to cool to room temperature and record the final pH using the 10 mL portion of the media. The final pH must be 7.4 ± 0.2. If the final pH does not fall within this range, discard the media and remake.
• Store prepared media in screw capped vessels for up to 3 months in a refrigerator or up to
one week (sealed/covered) at room temperature.
m. Colilert Quanti-Tray® or Colilert Quanti-Tray/2000® Comparator: Purchase commercially and store in a dark environment at room temperature. Discard by the manufacturer’s expiration date.
4.0 Sample Collection/Preservation/Holding Time
a. Sample collection:
• Select an appropriate sampling tap such as a faucet, petcock or small valve. Avoid taps with
a leaky stem or a swivel joint.
• Prior to collection, remove the aerator since it may harbor bacteria.
• Prior to collection in the distribution system place all carbon filters, sediment filters and water softeners on bypass.
• Flush the sample tap to waste for approximately one minute then close valve.
89
• It is recommended to disinfect the nozzle for two minutes with the sanitizing solution (See Section 3.0(e) of this method for preparation instructions) using either a spray bottle to saturate the opening or a plastic bag to squeeze the solution into the faucet. Use a fresh solution each time.
• Open the tap fully and flush tap for approximately 3 to 5 minutes (until a constant
temperature is detected), then reduce flow enough to allow sample bottles to be filled without splashing.
• Verify water is within the expected concentration range for chlorine using a digital
colorimetric/DPD colorimeter.
• Aseptically fill the sample bottles and avoid contaminating the cap or bottle. Note: If using commercially purchase pre-sterilized bottles, be sure to completely remove any plastic seal from the cap prior to filling the sample bottle.
• Do not allow the sample bottle to overflow as this will wash out the sodium thiosulfate. If the
sample bottle overflows or water splashes out, discard and collect another sample.
• Immediately recap the sample bottle tightly.
• Refer to Chapter 2(B) on page 7 of this manual for sample identification requirements.
b. Preservation: Sodium thiosulfate is used to remove residual chlorine. Add 0.1 mL of 10% sodium thiosulfate per 125 mL (4 oz.) sample container. This will neutralize approximately 15 mg/L of residual chlorine. Refer to Section 3.0(h) of this method for preparation instructions.
c. Maximum sample holding time: No more than 30 hours after collection. Store samples at 4°C until time of analysis.
5.0 Quanti-Tray Analysis Procedure
5.1 Sample Setup
1. Bring samples to room temperature prior to analysis.
2. Vigorously shake the sample. Note: Sample bottle must contain at least 1 inch of headspace to allow for adequate mixing.
3. Measure 100 mL of sample into an MMO-MUG test vessel. Alternatively, if using the MMO-MUG test vessel as the sample container, aseptically adjust the volume to the 100 mL mark. Note: If volume is less than 100 mL, the test is not valid and must be recorded as Sample Rejected: Insufficient Volume. Another sample must be collected for analysis.
4. Mark the corresponding sample number on the Quanti-Tray.
5. Aseptically open and add a packet of MMO-MUG reagent (Colilert or Colisure) to the test vessel. Recap and shake vigorously to dissolve the reagent. Incubation must be initiated within 30 minutes after addition of MMO-MUG reagent. The reagent must be completely dissolved before continuing.
6. Aseptically transfer sample/MMO-MUG reagent mixture into a Quanti-Tray or Quanti-Tray/2000
and seal in Quanti-Tray Sealer.
90
7. Both positive and negative controls are required with each set of samples tested. A set is defined as up to 30 samples having incubation initiated within four hours. Each incubator used must contain at least one set of controls.
• Positive Control: Aseptically fill an MMO-MUG test vessel with sterile reagent water and
inoculate using a known control of either a live E. coli culture or with water known to contain E. coli, such as raw wastewater.
• Negative control: Aseptically fill an MMO-MUG test vessel with only sterile reagent water.
• Aseptically add a packet of MMO-MUG reagent to both test vessels.
• Aseptically transfer and seal controls as outlined in section 5.1(6).
8. Incubate all sealed trays in an incubator at 35 ± 0.5°C for the following incubation times: • Colilert from 24 to 28 hours
• Colisure from 24 to 48 hours
Note: Stacking height must not exceed five trays.
5.2 Interpreting and Reporting Quanti-Tray Results
Colilert:
a. After the 24 to 28 hour incubation period, remove the Quanti-Trays from the incubator. Compare each tray to the Colilert Quanti-Tray® or Colilert Quanti-Tray/2000® comparator and negative control.
b. For sample interpretation, refer to Table 3, Colilert Interpretation. If after the 24 hour incubation period the interpretation is inconclusive go to (c), otherwise go to (d).
c. If the sample displays a slight yellow color but appears less intense than the Colilert comparator after 24 hours, continue the incubation for up to 28 hours. The total incubation time must not exceed 28 hours.
• After 28 hours a total coliform positive sample will display further color development greater
than or equal to the comparator.
• If after 28 hours the sample color is less intense than the comparator, report the sample as Total Coliform: Absence.
Note: Samples that display an innate yellow or amber color prior to analysis must be compared to their corresponding un-incubated color control blank.
• After incubation, if the sample color is less than or equal to the color control blank, report the sample as Total Coliform: Absence.
• After incubation, if the sample color is greater than the color control blank and more intense than the comparator, refer to Table 3, Colilert Interpretation, and then go to (d).
d. Examine all total coliform positive samples for presence of E. coli using a UV light in a darkened
room or observation box. Compare samples to the comparator.
91
• If the sample is negative for fluorescence, the sample is considered negative for E. coli.
• If the sample is positive for fluorescence, the sample is considered positive for E. coli.
Note: In order to be considered Total Coliform Presence and E. coli Presence, a sample must be positive for both color change and fluorescence.
Table 3: Colilert Interpretation
Color Change (Clear to Yellow) Fluorescence Microbe Presence Indicator
Reported As:
No Color Change Negative Total Coliform: Absence
Color Change < Comparator Negative Total Coliform: Absence
Color Change ≥ Comparator Negative Total Coliform: Presence; E. coli: Absence
Color Change ≥ Comparator Positive Total Coliform: Presence; E. coli: Presence
e. Refer to Table 5 below, when a sample is to be reported as Sample Rejected.
Colisure:
a. After the 24 to 48 hour incubation period, remove the Quanti-Trays from the incubator. Compare
each Quanti-Tray to the negative control.
b. For sample interpretation, refer to Table 4, Colisure Interpretation. If after the 24 hour incubation period the interpretation is inconclusive, go to (c).
c. If the sample shows a suspected color change (pink or orange) after 24 hours, continue the incubation for up to 48 hours. The total incubation time must not exceed 48 hours. Refer to Table 4, Colisure Interpretation.
• A total coliform positive sample will display a distinctive color development of red/magenta.
• If after 48 hours no distinctive color develops, report the sample as Total Coliform: Absence
d. Examine all total coliform positive samples for presence of E. coli using a UV light in a darkened
room or observation box. • If the sample is negative for fluorescence, the sample is considered negative for E. coli.
• If the sample is positive for fluorescence, the sample is considered positive for E. coli.
Note: In order to be considered Total Coliform Presence and E. coli Presence, a sample must be positive for both color change and fluorescence.
92
Table 4: Colisure Interpretation
Color Change (Yellow to Red/Magenta) Fluorescence Microbe Presence Indicator
Reported As:
No Color Change Negative Total Coliform: Absence
Color Change Negative Total Coliform: Presence; E. coli: Absence
Color Change Positive Total Coliform: Presence; E. coli: Presence
e. Refer to Table 5 below, when a sample is to be reported as Sample Rejected.
Table 5: Sample Rejection Reason
Conditions Sample Rejection Reason Reported As:
Sample Bottle Broken Broken
Chlorine Detected in Sample Chlorine Present
Sample Collected > 30 Hours Exceeds Holding Time
Excessive Headspace in Container Excessive Headspace
Sample Frozen Frozen Sample
Incomplete Sample Information Insufficient Information
Sample Volume < 100 mL Insufficient Volume
Error With Sampling Point Invalid Sampling Point
Error With Sampling Protocol Invalid Sampling Protocol
Negative Control is Positive Laboratory Accident
Positive Control is Negative Laboratory Accident
Incubator Broken or Other Lab Error Laboratory Accident
Sample Bottle Leaking Leaked In Transit
6.0 Quality Control (QC) Requirements 6.1 Analyst QC Requirements All analysts are required to perform MMO-MUG analysis on at least 10% of the routine samples. In addition, all certified analysts must analyze and record a minimum of one positive control and one negative control per month. 6.2 TSB/BHI Performance Check
a. With every batch of TSB/BHI, inoculate one sterile 25 mL test tube with a known coliform culture.
A second 25 mL tube of TSB/BHI serves as a control blank.
93
• Incubate both tubes for 24 hours at 35 ± 0.5°C.
• The inoculated tube must show cloudy growth while the control blank must not show cloudy growth. Do not use media if growth is not indicated in the inoculated tube.
6.3 Sample Containers
a. Must be checked for sterility and auto-fluorescence by an Ohio EPA certified laboratory.
b. Sterility Check: A sterility check must be done on a minimum of one sample/test bottle per
batch prepared in the lab or a minimum of 1% per case purchase (up to 4 bottles per lot).
• Add approximately 25 mL of prepared sterile Tryptic Soy Broth (TSB) or Brain Heart Infusion (BHI) per bottle tested mix to expose entire interior of the bottle to the growth media.
• Incubate at 35 ± 0.5°C and check after 24 hours for growth. Growth is indicated by any turbidity.
• If growth occurs, re-sterilize any batches of laboratory prepared containers that test positive
and repeat the sterility check.
• If any commercially purchase disposable containers test positive, recheck another set. If the second check is positive, notify the manufacturer and do not use any bottles from the affected case.
c. Auto-Fluorescence: Check all sample bottles prepared in the laboratory for fluorescence, or a
minimum of 1% per case purchase (up to 4 bottles per lot) using a UV light. If any containers fluoresce, notify the manufacturer and do not use any bottles from the affected case.
6.4 Quanti-Tray® or Quanti-Tray/2000® Trays a. Must be checked for sterility and auto-fluorescence by an Ohio EPA certified laboratory.
b. Sterility Check: A sterility check must be done on a minimum of 1% per case purchase (up to 4
trays per lot).
• Add approximately 100 mL of prepared sterile Tryptic Soy Broth (TSB) or Brain Heart Infusion (BHI) per tray tested mix to expose entire interior of the bottle to the growth media.
• Incubate at 35 ± 0.5°C and check after 24 hours for growth. Growth is indicated by any turbidity.
• If any trays test positive, recheck another set. If the second check is positive, notify the
manufacturer and do not use any trays from the affected case.
c. Auto-Fluorescence: Check a minimum of 1% per case purchase (up to 4 trays per lot) using a UV light. If any trays fluoresce notify the manufacturer and do not use any trays from the affected case.
6.5 Quanti-Tray Sealer Check a. Must be checked annually by adding dye (e.g., bromocresol purple or food coloring) to the water.
If dye is observed outside the wells, either perform maintenance or use another sealer.
94
6.6 MMO-MUG Reagent Check
a. Aseptically fill three test vessels with 100 mL sterile reagent water. Add a packet of MMO-MUG reagent to each test vessel and mix thoroughly to dissolve.
b. Inoculate each test vessel with one of three known cultures (Escherichia coli, Klebsiella
pneumonia or Pseudomonas aeruginosa) and label each bottle with the bacterium used.
c. Incubate all test vessels at 35 ± 0.5°C for the required amount of time (Colilert for 24 hours and Colisure for 24 hours).
d. After incubation, remove the test vessels from the incubator and interpret by referring to Table 6
for Colilert or Table 7 for Colisure. Table 6: Colilert after 24 hour to 28 incubation at 35 ± 0.5°C
Type of Culture Color Fluorescence
E. coli Yellow Positive
K. pneumonia Yellow Negative
P. aeruginosa None Negative
Table 7: Colisure after 24 to 48 hour incubation at 35 ± 0.5°C
Type of Culture Color Fluorescence
E. coli Red Positive
K. pneumonia Red Negative
P. aeruginosa Yellow Negative 6.7 Sterilization
a. Sterilize by autoclaving all liquids and materials. Refer to Table 8 below. Note: When
autoclaving liquid filled vessels, provide enough space between the vessels to allow for even sterilization.
Table 8: Autoclave Times and Temperatures
Material Temperature Time Cycle TSB, BHI, Sodium Thiosulfate 119 - 121°C 12 to 15 minutes1 Slow
Sterile Water (< 500 mL vessels) 119 - 121°C 30 minutes Slow
Sterile Water (500 to 1000 mL vessels) 119 - 121°C 45 minutes Slow Sterile Water (> 1000 mL vessels) 119 - 121°C 90 to 180 minutes Slow
Plastic Bottles/Cylinders 119 - 121°C 30 minutes Fast 1Media must not be in the autoclave more than 45 minutes from the time the autoclave door is closed to the time it is opened. 2Dispose of contaminated material in compliance with all Ohio EPA and local requirements.
95
b. Autoclave sterility checks are required once every three months, per autoclave. • If using a biological indicator ampule, follow manufacturer’s instructions. Note: After
sterilization, remove and allow ampules to cool for 10 minutes prior to incubation. Incubate at 55 - 60°C for 24 hours. Growth is evident by a color change per manufacturer’s instructions. If color change occurs, corrective action for the autoclave is required.
• Alternatively, fill an Erlenmeyer flask with 25 to 50 mL of TSB/BHI, inoculate with a known coliform culture, cover flask opening with aluminum foil and incubate at 35 ± 0.5°C for 24 hours. After incubation, when TSB/BHI shows growth, autoclave at 119 - 121°C for 12 to 15 minutes on slow exhaust. Allow to cool to room temperature. Fill a test vessel with approximately 25 mL of TSB/BHI and inoculate the TSB/BHI with the “sterilized” culture from the Erlenmeyer flask. Incubate test vessel at 35 ± 0.5°C for 24 hours. After the 24 hour incubation period, remove the test vessel from the incubator. The inoculated test vessel must not show growth. If growth is present in the inoculated test vessel, corrective action for the autoclave is required.
6.8 Thermometer Calibration
a. Calibrate all glass and electronic thermometers when new and at least annually. Calibrate all
dial thermometers at least once every three months.
b. Reference/NIST Certified Thermometer (Ice Point) Calibration
1. Create an ice bath in an insulated container using distilled/deionized water and crushed ice made using distilled/deionized water.
2. Submerge the reference/certified thermometer in the ice bath until a stable temperature is reached.
3. The thermometer must read 0.0°C or, for thermometers without a 0.0°C mark, the “ice-point
calibration” mark.
4. If reference/certified thermometer does not read 0.0°C corrective action must be taken.
c. Incubator Thermometer (Total Coliform) Calibration 1. Place incubator thermometer and reference thermometer in a covered beaker or flask of
water and incubate overnight in a 35°C incubator. Optionally, use mineral oil instead of water to eliminate the need for a covered vessel.
2. After 24 hours, record readings of the incubator and reference thermometers.
3. Label each thermometer with the correction factor based on the reference thermometer. Note: Remove thermometer from use if correction factor is > 1.0°C.
d. Incubator Thermometer (Autoclave Sterility Check) Calibration
1. Place incubator thermometer and reference thermometer in a covered beaker or flask of
water and incubate overnight in a 55 - 60°C incubator. Optionally, use mineral oil instead of water to eliminate the need for a covered vessel. Note: If using a dry block incubator with wells, place incubator thermometer and reference thermometer in adjacent wells overnight at 55 - 60°C.
2. After 24 hours, record readings of the incubator and reference thermometers.
96
3. Label each thermometer with the correction factor based on the reference thermometer.
Note: Remove thermometer from use if correction factor is > 1.0°C.
e. Refrigerator Thermometer Calibration
1. Place refrigerator thermometer and reference thermometer inside a refrigerator overnight
side by side in the same covered beaker or flask of water. Optionally, use mineral oil instead of water to eliminate the need for a covered vessel.
2. After 24 hours, record readings of the refrigerator and reference thermometers.
3. Label each thermometer with the correction factor based on the reference thermometer.
4. Alternatively, the refrigerator thermometer may be calibrated at “ice-point” when the reference thermometer is checked.
Note: Remove thermometer from use if correction factor is > 1.0°C.
f. Maximum Registering Thermometer
1. Calibration will be done by the laboratory certification officer at the time of the survey.
2. The laboratory must have at least one spare maximum registering thermometer.
3. Tag each thermometer with the correction factor base on the onsite calibration.
6.9 Equipment Timer Calibration a. Calibrate all equipment timers at least once every three months.
b. Autoclave Timer Calibration
1. Set the timer for 45 minutes on either fast or slow exhaust. 2. Use an accurate watch or stopwatch to check the timer at appropriate sterilization intervals
used by the laboratory (12, 15, 30 and 45 minutes).
3. Timer calibration begins when the autoclave reaches sterilization pressure and temperature and ends when the pressure/temperature begins to fall as the cycle ends.
4. See Table 9 below to determine if corrective action is required. Table 9: Autoclave Timer Acceptance Criteria
Cycle Time Calibrated Acceptance Criteria 12 minutes 1 minute
15 minutes 1 minute and 30 seconds
30 minutes 3 minutes
45 minutes 5 minutes
5. Label each autoclave timer with the correction factors for each interval used.
97
6.10 pH Meter Calibration a. The calibration procedure must be performed and result in an acceptable linearity value (percent
(%) slope or millivolt (mV)) prior to use.
b. Calibrate the pH meter following the manufacturer’s instructions for a two point calibration (pH buffers 7.0 and 10.0) or three point calibration (pH buffers 4.0, 7.0 and 10.0).
c. If a two point calibration is performed, analyze and record the pH 4.0 verification buffer value,
per use. The results of the pH 4.0 verification buffer must be ± 0.1 pH units of the true value; acceptance limits are 3.9 to 4.1 pH units. Note: If the laboratory has decided to adopt a three point calibration for all analyses, the pH 4.0 verification buffer analysis is not required.
d. The linearity must be recorded each time the meter is calibrated; acceptance limits are 95 to
105% or -56 to -62 mV. Calibrations must be dated and initialed by all certified analysts participating in each calibration procedure.
6.11 Balance Calibration
a. All balances must be on an annual service contract, proof of which must be posted on or near the balance.
b. Balances must be checked prior to use with certified weights (ASTM type 1, 2 or 3 weights or NIST Class S or S1). A manufacturer’s certificate for the certified weights must be available.
c. Balance checks must be done with at least three weights that bracket the range of weights normally used in the laboratory. • Place each mass on the balance and record the weight (reference weight).
• Add a test load weight of either 0.1 g (top loading balance) or 0.01 g (analytical balance) and
record the reference weight plus test load weight.
• Response for the non-analytical (top loading balance) must be ± 0.1 g. • Response for the analytical balance must be ± 0.01 g.
6.12 Refrigerator Record
a. Record refrigerator temperatures once daily to the nearest thermometer gradation.
6.13 Incubator Record (Total Coliform)
a. Record incubator thermometer temperatures at least twice daily when in use, including one
reading in the early morning and another at least four hours later. Each shelf must have a separate thermometer to be recorded to the nearest thermometer gradation.
6.14 Incubator Record (Autoclave Sterility Check)
a. Record incubator thermometer temperature prior to use and when in use. Each shelf must have
a separate thermometer to be recorded to the nearest thermometer gradation. Note: Only one thermometer is required if a dry block incubator is used.
98
6.15 Labeling a. Reagents and media must be labeled with date received and date opened.
b. Prepared reagents and media must be labeled with content, date made and analyst initials.
7.0 Required Documentation
1. The Microbiological Laboratory Schedule for MMO-MUG on page 104 of this manual may be used to keep records.
2. The Microbiological Test Data Sheet for MMO-MUG on page 105 of this manual is recommended to document each analysis. The minimum requirements for documenting each procedure are as follows:
a. Type of Media Used: Colilert or Colisure.
b. Sample ID.
c. Sample Location.
d. Analyst(s) initials.
e. Collection: date and time.
f. Incubation Start: date and time.
g. Interpretation (Incubation end): date and time.
h. Total coliform: Positive (+) or Negative (-).
i. E. coli: Positive (+) or Negative (-). j. Chlorine: free and total.
3. The Sample Bottle Sterility/Fluorescence Record on page 106 of this manual may be used to
keep these records. The minimum requirements for documenting each procedure are as follows:
a. Analyst(s) initials.
b. Date sample bottles were received or sterilized. c. Brand and lot number. d. Number of bottles received or sterilized. e. Date tested. f. Growth results: number positive or negative. g. UV results: number positive or negative. h. Comments.
99
4. The Quanti-Tray Sterility Record on page 107 of this manual may be used to keep these records. The minimum requirements for documenting each procedure are as follows:
a. Analyst(s) initials.
b. Date trays were received. c. Brand and lot number. d. Number of trays received. e. Date tested. f. Growth results: number positive or negative.
g. Comments.
5. The Media Quality Control Record on page 108 of this manual may be used to keep these
records. The minimum requirements for documenting each procedure are as follows:
a. Analyst(s) initials.
b. Date.
c. Media to be tested. d. Brand and lot number. e. pH of media after sterilization.
f. Growth results: positive or negative. g. Comments.
6. The MMO-MUG Reagent Quality Control Record on page 109 of this manual may be used to
keep these records. The minimum requirements for documenting each procedure are as follows:
a. Analyst(s) initials/contract laboratory.
b. Date. c. Brand and lot number. d. Type of reagent to be tested. e. Test results:
• E. coli: color change/UV.
• Klebsiella: color change/UV.
• Pseudomonas: color change/UV.
100
7. The Autoclave Sterilization Record on page 110 of this manual may be used to keep these records. The minimum requirements for documenting each procedure are as follows:
a. Analyst(s) initials.
b. Date.
c. Time in. d. Time out. e. Total time (minutes). f. Sterilization time (minutes). g. Internal Thermometer (°C). h. Material sterilized.
8. The Autoclave Sterility Check record on page 111 of this manual may be used to keep these
records. The minimum requirements for documenting each procedure are as follows:
a. Type of Sterility Check Used: Manufacture/Ampule Type or Alternative: Circle One (TSB/BHI).
b. Analyst(s) initials.
c. Sterilization date.
d. Incubation: date, time and temperature (°C). e. Interpretation: date, time and temperature (°C). f. Result: positive or negative. g. Lot number.
9. The Thermometer Calibration Record on page 112 of this manual may be used to keep these
records. The minimum requirements for documenting each procedure are as follows:
a. Analyst(s) initials.
b. Date.
c. Thermometer location and identification. d. Observed temperature (°C). e. Temperature of reference thermometer (°C). f. Correction factor.
101
10. The Timer Calibration Record on page 113 of this manual may be used to keep these records. The minimum requirements for documenting each procedure are as follows:
a. Analyst(s) initials.
b. Date.
c. Timer location. d. Equipment time (minutes). e. Stopwatch time (minutes). f. Correction factor.
11. The pH Meter Slope/Linearity Verification (4.0 Buffer) record on page 114 of this manual may
be used to keep these records. The minimum requirements for documenting each procedure are as follows:
a. Analyst(s) initials.
b. Date.
c. Slope (%). d. pH 4.0 Verification (pH Units). e. Comments.
12. The Balance Calibration Record on page 115 of this manual may be used to keep these
records. The minimum requirements for documenting each procedure are as follows:
a. Analyst(s) initials.
b. Date.
c. Reference weight and test load readings in grams (200 to 1.0 grams). d. Comments/corrective action.
13. The Daily Refrigerator Temperature Record on page 116 of this manual may be used to keep
these records. The minimum requirements for documenting each procedure are as follows:
a. Analyst(s) initials.
b. Date.
c. Temperature (°C).
d. Comments.
102
14. The Incubator Temperature Record on page 117 of this manual may be used to keep these records. The minimum requirements for documenting each procedure are as follows:
a. Analyst(s) initials.
b. Date.
c. Time: recorded twice each day, once in the a.m. and once in the p.m. d. Temperature (°C): recorded per shelf used.
103
Microbiological Laboratory Schedule for Quanti-Tray
Frequency Month
1 2 3 4 5 6 7 8 9 10 11 12
Monthly
Total Coliform/E. coli Positive
Quarterly Once Per Three Months
Dial Thermometer Calibration
Equipment Timer Calibration
Autoclave Sterility Check
Annual
Glass and Electronic Thermometer Calibration
Balance Service
Quanti-Tray Sealer Check
104
Microbiological Test Data Sheet for Quanti-Tray
Laboratory
Type of Media Used (circle one): Colilert Colisure
Sample ID Sample Location Analyst
Collection Incubation
Start Interpretation
(Incubation End) Total
coliform
E. coli
Chorine
Date Time Date Time Date Time + - + - Free Total
105
Sample Bottle Sterility/Fluorescence Record
To be recorded for each lot received or batch sterilized
Laboratory
Analyst Date
Received/ Sterilized
Brand/Lot Number Number of
Bottles Received/ Sterilized
Date Tested
Growth Results UV Results
Number Positive
Number Negative
Number Positive
Number Negative Comments
*Note action taken if results are not acceptable
106
Quanti-Tray Sterility Record
To be recorded for each lot received
Laboratory
Analyst Date Received Brand/Lot Number
Number of Trays
Received Date Tested
Growth Results
Number Positive
Number Negative Comments
*Note action taken if results are not acceptable
107
Media Quality Control Record
To be checked and recorded for each new prepared batch and annually
Laboratory
Analyst Date Media Brand/Lot Number Growth Results
Comments pH Positive Negative
*Note action taken if results are unacceptable
108
MMO-MUG Reagent Quality Control Record To be recorded for each new lot or annually
Laboratory
Analyst/ Contract
Laboratory Date Brand/Lot Number Type of Reagent
Test Results
E. coli Klebsiella Pseudomonas
Color Change UV Color
Change UV Color Change UV
109
Autoclave Sterilization Record To be recorded for each run
Laboratory
Analyst Date Time In Time Out Total Time
(min) Sterilization Time (min)
Internal Thermometer
(°C) Material Sterilized
110
Autoclave Sterility Check Laboratory
Type of Sterility Check Used: Manufacturer/Ampule Type
Alternative: Circle One (TSB/BHI)
Analyst Sterilization Date
Incubation Interpretation Result
(POS/NEG) Lot Number
Date Time Temp (°C) Date Time Temp (°C)
111
Thermometer Calibration Record To be recorded for each thermometer
Laboratory
Analyst Date Thermometer Location/ ID Observed
Temperature (°C) Temperature of
Reference Thermometer (°C)
Correction Factor
*Note thermometer has been removed from use if correction factor is > 1°C
112
Timer Calibration Record To be recorded for each equipment timer
Laboratory
Analyst Date Timer Location Equipment Time
(minutes) Stopwatch Time
(minutes) Correction Factor
*Note: To determine if recalibration or maintenance is required, refer to Table 7, Autoclave Timer Difference.
113
pH Meter Slope/Linearity Verification (4.0 Buffer)
To be checked and recorded for each new prepared batch
Laboratory
Calibration Buffers
Analyst Date Slope (%) pH 4.0 Verification Comments
*Note action taken if pH linearity is unacceptable
114
Balance Calibration Record Check each balance per use with certified weights. A minimum of three weights that bracket normal weighing needs are required. Record balance response to reference weight and sensitivity to reference weight plus test load (L). Non-analytical (top loading) must be sensitive to a 0.1 g test load. Analytical balances must be sensitive to a
0.01 g test load.
Laboratory
Analyst Date
Reference Weight and Test Load Readings in Grams
200 200 + L 100 100 + L 50 50 + L 10 10 + L 5 5 + L 1 1 + L
*Note action taken if calibration is unacceptable Note: "L" refers to "Test Load"
Comments/Corrective Action:
115
Daily Refrigerator Temperature Record To be recorded daily, 4.0 ± 2.0°C
Laboratory
Analyst Date Temp (°C) Comments Analyst Date Temp (°C) Comments
*Note action taken if temperature is out of range
116
Incubator Temperature Record To be recorded twice each day, am/pm, per shelf 35.0 ± 0.5°C
Laboratory
Analyst Date Time
Temp (°C) Analyst Date Time
Temp (°C)
Shelf Shelf Shelf Shelf Shelf Shelf
am
am
pm
pm
am
am
pm
pm
am
am
pm
pm
am
am
pm
pm
am
am
pm
pm
am
am
pm
pm
am
am
pm
pm
am
am
pm
pm
*Note action taken if temperature is out of range
117
Quanti-Tray Analysis for Total Coliform and E. coli by Colilert-18 Quick Reference Standard/Reagent/Equipment Requirements
Standard/Reagent/Equipment Storage
MMO-MUG Reagent Dark Environment and Manufacturer’s Recommendation
Chemical Reagents Room Temperature Dehydrated Media Room Temperature Media Performance Check Cultures Manufacturer’s Storage Requirements
Standard/Reagent Maximum Storage Time MMO-MUG Reagent Manufacturer’s Expiration Date Chemical Reagents Manufacturer’s Expiration Date
Dehydrated Media 6 Months After Opening or 1 Year After Opening if Stored in Desiccator
10% Sodium Thiosulfate 1 Year After Preparation/Manufacturer’s Expiration Date
Media Performance Check Cultures Manufacturer’s Expiration Date
Prepared Media 3 Months Refrigerated (screw capped tubes/ flasks/vessels) or 1 Week Room Temperature (sealed/covered)
pH Buffers 6 Months After Opening
Required Quality Control
QC Procedure Frequency Total Coliform/E. coli positive Once Per Month Per Analyst
Sample Bottle Sterility Check One Per Batch Prepared or 1% Per Lot Received (maximum of 4 per lot)
Sample Bottle Fluorescence Check
Every Sample/Test Bottle Prepared or 1% Per Lot Received (maximum of 4 per lot)
Quanti-Tray Sterility and Fluorescence Check
1% Per Lot Received (maximum of 4 per lot)
Quanti-Tray Sealer Check Annually Media Performance Check Once Per Batch MMO-MUG Reagent Check Once Per Lot and Annually Glass/Electronic Thermometer Calibration Annually
Dial Thermometer Calibration Once Per Three Months Equipment Timers Once Per Three Months pH Meter Calibration Prior to Use pH Linearity/Slope/pH 4 Buffer Prior to Use Balance Calibration Check Prior to Use Refrigerator Record Daily Incubator Record Twice Daily
Sample Collection Preservation Maximum Holding Time 10% Sodium Thiosulfate 30 Hours
118
Method Reference Standard Methods 22nd Edition (9223 B) On-Site Survey Requirements
• Each certified analyst must be able to demonstrate proper collection and analysis of a typical sample for Quanti-Tray.
• Prior to the survey, each certified analyst must prepare a reagent QC check using the three bacteria as illustrated in Section 6.4 of this method.
• Prior to the survey, a batch of TSB/BHI must be prepared. This will be checked for proper pH during the survey.
• Procedural technique will be observed.
• All reagents and solutions used with this method will be audited for correct labeling and dating.
• All records will be audited. 1.0 General Method Summary
Quanti-Tray® and Quanti-Tray/2000® with MMO-MUG reagent is a presence-absence test that is used to simultaneously detect total coliform bacteria and Escherichia coli (E. coli). A color change occurs from the hydrolysis of the β-D-galactosidase enzyme that is produced by total coliform bacteria. In the case of Colilert-18, the color change is from colorless to yellow. The hydrolysis of the β-glucuronidase enzyme causes the sample to fluoresce under an ultraviolet light when E. coli is present in the sample.
Interferences
• Sunlight may hydrolyze the indicator compounds resulting in a false positive test.
• Samples with high iron/manganese in combination with hydrogen sulfide may turn greenish-black with a black precipitate after the 24 hour incubation period. In this case the sample must be rejected and not reported. A different method is recommended to analyze a re-collected sample.
• Samples containing chlorine levels above the amount that is neutralized by the sodium thiosulfate dechlorinating agent will turn a brownish tea color after incubation. These samples should be discarded and reported as “Chlorine Present”.
• If after collection, the sample exhibits any innate yellow or amber color that may interfere with final interpretation, collect a duplicate sample to be used as a color control blank. Do not add test reagent or incubate the color control blank. Assign this portion the corresponding sample id number and hold at room temperature until post-incubation analysis.
119
2.0 Equipment a. Autoclave: The laboratory autoclave must be of sufficient size to allow for adequate sterilization.
It must also be equipped with a temperature gauge, pressure gauge, an operational safety valve and a fast/slow exhaust selector.
b. Balance:
• Top loading balances must have readability of 0.1 g.
• Analytical balances must have readability of 0.001 g. Note: Balances should be calibrated prior to use, using ASTM Class 1, 2, or 3 weights or equivalent.
c. Incubator (Total Coliform): The incubator must provide sufficient space for the daily work load and maintain a constant uniform temperature of 35 ± 0.5°C.
d. Media Preparation Glassware/Utensils/Pipets:
• Flasks and graduated cylinders made of borosilicate glass or plastic are acceptable.
Graduated cylinders must be calibrated “To Deliver” (TD).
• Pipets should be wrapped individually in aluminum foil or in metal canisters prior to sterilization. Packs of disposable pipets should be resealed between periods of use. Pipets that deliver volumes of ≤ 10.0 mL must be accurate to within ± 2.5%.
e. pH Meter: The electronic pH meter must be accurate to 0.02 pH units and designed for a
minimum of a two point standard calibration with a percent (%) slope or millivolt (mV) efficiency display. Digital meters are required; analog meters are unacceptable. Note: Automatic temperature compensators must be used.
f. Refrigerator: The refrigerator must be of sufficient size for the work load and maintain a temperature of 2 - 6°C.
g. Sample Containers/Test Vessels: Containers should be wide mouth borosilicate glass or autoclavable plastic and must have a capacity of at least 125 mL (4 oz.). • If prepared in the laboratory, each container must have 0.1 mL of sterilized 10% sodium
thiosulfate added to it to neutralize approximately 15 mg/L of residual chlorine. It must also be glass stoppered or screw capped and protected by foil or Kraft paper prior to sterilization.
• Commercially prepared, presterilized vessels that contain sodium thiosulfate are acceptable.
h. Quanti-Tray® Sealer with Rubber Inserts: Purchase commercially.
i. Quanti-Tray® or Quanti-Tray/2000® Trays: Purchase commercially and use with corresponding rubber inserts.
j. Thermometers: All glass, dial and electronic thermometers must have a minimum graduation of
1.0°C, with the exception of incubator thermometers. Incubator thermometers must have a minimum graduation of 0.5°C. All thermometers must be calibrated using a reference thermometer certified by the National Institute of Standards and Technology (NIST) or with a manufacturer’s certificate of traceability to NIST specifications. The NIST certificate or equivalent must be kept on file and available during laboratory inspections. It is strongly recommended that laboratories use non-mercury, liquid-in-glass thermometers when possible.
120
Note: If mercury-in-glass thermometers are used (i.e., maximum registering thermometers), it is recommended that they have a protective coating to guard against mercury spills
k. Ultraviolet (UV) Light: The UV Light must be a 6 watt longwave unit (365 - 366 nm). Consider
replacing the bulb if it fails to produce fluorescence on a comparator.
m. Biological Indicator Ampule: Commercially purchase self-contained biological indicator in a hermetically sealed, type I borosilicate glass ampule (SporeView® or equivalent). Each ampule is inoculated with viable Geobacillus stearothermophilus spores and filled with tryptic soy broth containing bromocresol purple acid indicator. Note: For an alternative option, refer to Section 6.7(b) of this method.
n. Incubator (Autoclave Sterility Check): The incubator must provide sufficient space for incubation
of the biological indicator ampule (See Section 2.0(m) of this method) and maintain constant uniform temperature of 55 - 60°C. A dry block incubator with wells is recommended.
3.0 Reagents/Media a. Reagent Grade Water: Only satisfactorily tested reagent grade water from stills or deionization
units may be used to prepare media, reagents and dilution/rinse water for performing microbial analyses. For laboratories utilizing a deionization unit, the reagent grade water must be monitored for conductivity by a meter or an indicator display on an in-line system and analyzed at least annually for trace metals. If a still is in use, then the requirements must be met as listed in Table 1. Also, high quality water may be purchased from commercial suppliers if provided with a certificate of analysis meeting the specifications of Table 1. Refer to Appendix B on page 232 of this manual for further instructions. Table 1: Required Reagent Grade Water Criteria
Parameter Limits Frequency
Conductivity > 0.5 megohms resistance or < 2 micromhos/cm (microsiemens/cm) at 25°C Prior to Use
Pb, Cd, Cr, Cu, Ni, Zn
Per Contaminant < 0.05 mg/L Collectively < 0.1 mg/L Annually
Total Chlorine Residual1 < 0.1 mg/L Prior to Use
1 DPD Method is recommended.
b. Sterile Microbiologically Suitable Water: Sterilize reagent grade water (See Section 3.0(a) of this method) based on Table 2 below. Place aluminum foil around any point where water can come in contact with the air such as water bottle nozzles.
121
Table 2: Sterilization Details
Quantity (per Vessel) Temperature Time Cycle
< 500 mL 119 - 121°C 30 minutes Slow
500 to 1000 mL 119 - 121°C 45 minutes Slow
> 1000 mL 119 - 121°C 90 to 180 minutes Slow Note: The volume is not to exceed autoclave manufacturer’s limits.
c. Disinfectant: Commercially available or isopropyl alcohol.
d. 5.25% Sodium Hypochlorite: Purchase commercially as liquid bleach.
e. Sanitizing Solution: Add one ounce of liquid bleach per one gallon of laboratory grade water or one tablespoon per half gallon of laboratory grade water. Store in a tightly closed screw capped container. May be used for up to 6 months from date of preparation. Note: Stronger solutions may be used but may cause some faucet discoloration.
f. Colilert-18 (18 to 22 hour MMO-MUG reagent): Purchase commercially. Run performance
checks on each new lot received (Refer to Section 6.0 of this method for further instructions). Store refrigerated in a dark environment and follow manufacturer’s recommendation. Discard by the manufacturer’s expiration date.
g. 10% Sodium Thiosulfate Solution (Dechlorinating Agent): Dissolve 10 g of sodium thiosulfate in 100 mL of distilled water in an Erlenmeyer flask. Sterilize 15 minutes at 119 - 121°C and store at room temperature. Remake annually or if solution becomes cloudy.
h. Media Performance Check Cultures: Purchase Escherichia coli, Klebsiella pneumonia and Pseudomonas aeruginosa cultures from an acceptable vendor and follow manufacturer’s instructions to inoculate.
i. Dehydrated Media - Tryptic Soy Broth (TSB), Brain Heart Infusion (BHI): Purchase commercially and store in a dry, cool environment at 2 - 25°C. Shelf life of unopened media is 2 years from the date of receipt. Bottles of media must be used within 6 months after opening or up to one year if stored in a desiccator.
j. Tryptic Soy Broth (TSB): Perform the following instructions to prepare broth: • Weigh out 30 ± 0.1 g of dehydrated media into a weigh boat and transfer to a large
Erlenmeyer flask. Note: If smaller volumes are needed, 3.0 ± 0.01 g per 100 mL is also acceptable.
• Measure 1000 mL of reagent grade water into a graduated cylinder and add approximately half to an Erlenmeyer flask.
• Transfer media to the flask and rinse down the sides using the remaining half of the reagent
grade water. • Allow the media to completely dissolve by swirling or stirring with a sterilized stir bar. • Remove approximately 10 mL of prepared TSB and dispense into a screw capped vial or
other acceptable vessel for future pH analysis.
122
• Dispense into 30 mL screw capped vessels. If not screw capped, cover flask opening with
aluminum foil.
• Autoclave at 119 - 121°C for 12 to 15 minutes on slow exhaust. Refer to Table 6.
• Allow to cool to room temperature and record the final pH using the 10 mL portion of the media. The final pH must be 7.3 ± 0.2. If the final pH does not fall within this range, discard the media and remake.
• Store prepared media in screw capped vessels for up to 3 months in a refrigerator or up to
one week (sealed/covered) at room temperature.
k. Brain Heart Infusion (BHI) Broth: Perform the following instructions to prepare the broth: • Weigh out 37 ± 0.1 g of dehydrated media into a weigh boat and transfer to a large
Erlenmeyer flask. Note: If smaller volumes are needed, 3.7 ± 0.01 g per 100 mL is also acceptable.
• Measure 1000 mL of reagent grade water into a graduated cylinder and add approximately half to an Erlenmeyer flask.
• Transfer media to the flask and rinse down the sides using the remaining half of the reagent
grade water. • Allow the media to completely dissolve by swirling or stirring with a sterilized stir bar.
• Remove approximately 10 mL of prepared BHI and dispense into a screw capped vial or
other acceptable vessel for future pH analysis.
• Dispense into 30 mL screw capped vessels. If not screw capped, cover flask opening with aluminum foil.
• Autoclave at 119 - 121°C for 12 to 15 minutes on slow exhaust. Refer to Table 6.
• Allow to cool to room temperature and record the final pH using the 10 mL portion of the media. The final pH must be 7.4 ± 0.2. If the final pH does not fall within this range, discard the media and remake.
• Store prepared media in screw capped vessels for up to 3 months in a refrigerator or up to
one week (sealed/covered) at room temperature.
l. Colilert Quanti-Tray® or Colilert Quanti-Tray/2000® Comparator: Purchase commercially and store in a dark environment at room temperature. Discard by the manufacturer’s expiration date.
4.0 Sample Collection/Preservation/Holding Time
a. Sample collection:
• Select an appropriate sampling tap such as a faucet, petcock, or small valve. Avoid taps with a leaky stem or a swivel joint.
• Prior to collection, remove the aerator since it may harbor bacteria.
123
• Prior to collection in the distribution system place all carbon filters, sediment filters and water softeners on bypass.
• Flush the sample tap to waste for approximately one minute, then close valve.
• It is recommended to disinfect the nozzle for two minutes with the sanitizing solution (See Section 3.0(e) for preparation instructions) using either a spray bottle to saturate the opening or a plastic bag to squeeze the solution into the faucet. Use a fresh solution each time.
• Open the tap fully and flush tap for approximately 3 to 5 minutes (until a constant
temperature is detected), then reduce flow enough to allow sample bottles to be filled without splashing.
• Verify water is within the acceptance limits of 0.2 and 4.0 mg/L for chlorine.
• Aseptically fill the sample bottles and avoid contaminating the cap or bottle. Note: If using
commercially purchase pre-sterilized bottles, be sure to completely remove any plastic seal from the cap prior to filling the sample bottle.
• Do not allow the sample bottle to overflow as this will wash out the sodium thiosulfate. If the
sample bottle overflows or water splashes out, discard and collect another sample.
• Immediately recap the sample bottle tightly.
• Refer to Section 2(B) on page 7 of this manual for sample identification requirements.
b. Preservation: Sodium thiosulfate is used to remove residual chlorine. Add 0.1 mL of 10% sodium thiosulfate per 125 mL (4 oz.) sample container. This will neutralize approximately 15 mg/L of residual chlorine. Refer to Section 3.0(g) for preparation instructions.
c. Maximum sample holding time: No more than 30 hours after collection. Store samples at 4°C until time of analysis.
5.0 Quanti-Tray Analysis Procedure
5.1 Sample Setup
1. Bring samples to room temperature prior to analysis.
2. Vigorously shake the sample. Note: Sample bottle must contain at least 1 inch of headspace to
allow for adequate mixing.
3. Measure 100 mL of sample into an MMO-MUG test vessel. Alternatively, if using the MMO-MUG test vessel as the sample container, aseptically adjust the volume to the 100 mL mark. Note: If volume is less than 100 mL, the test is not valid and must be recorded as Sample Rejected: Insufficient Volume. Another sample must be collected for analysis.
4. Mark the corresponding sample number on the Quanti-Tray.
5. Aseptically open and add a packet of MMO-MUG reagent (Colilert-18) to the test vessel. Recap and shake vigorously to dissolve the reagent. Incubation must be initiated within 30 minutes after addition of MMO-MUG reagent. The reagent must be completely dissolved before continuing.
124
6. Aseptically transfer sample/MMO-MUG reagent mixture into a Quanti-Tray or Quanti-Tray/2000 and seal in Quanti-Tray Sealer.
7. Both positive and negative controls are required with each set of samples tested. A set is defined as up to 30 samples having incubation initiated within four hours. Each incubator used must contain at least one set of controls.
• Positive Control: Aseptically fill an MMO-MUG test vessel with sterile reagent water and
inoculate using a known control of either a live E. coli culture or with water known to contain E. coli, such as raw wastewater.
• Negative control: Aseptically fill an MMO-MUG test vessel with only sterile reagent water.
• Aseptically add a packet of MMO-MUG reagent to both test vessels.
• Aseptically transfer and seal controls as outlined in section 5.1(6).
8. Incubate all sealed trays in an incubator at 35 ± 0.5°C for 18 to 22 hours. Note: Stacking height must not exceed five trays.
5.2 Interpreting and Reporting Quanti-Tray Colilert-18 Results
a. After the 18 to 22 hour incubation period, remove the Quanti-Trays from the incubator. Compare
each tray to the Colilert Quanti-Tray® or Colilert Quanti-Tray/2000® comparator and negative control.
b. For sample interpretation refer to Table 3, Colilert-18 Interpretation. If after the 18 hour incubation period the interpretation is inconclusive go to (c), otherwise go to (d).
c. If the sample displays a slight yellow color but appears less intense than the Colilert comparator
after 18 hours, continue the incubation for up to 22 hours. The total incubation time must not exceed 22 hours.
• After 22 hours, a total coliform positive sample will display further color development, greater
than or equal to the comparator.
• If after 22 hours the sample color is less intense than the comparator, report the sample as Total Coliform: Absence.
Note: Samples that displayed an innate yellow or amber color prior to analysis should be compared to their corresponding un-incubated color control blank.
• After incubation, if the sample color is less than or equal to the color control blank, report the sample as Total Coliform: Absence.
• After incubation, if the sample color is greater than the color control blank and more intense than the comparator refer to Table 3, Colilert-18 Interpretation, then go to (d).
d. Examine all total coliform positive samples for presence of E. coli using a UV light in a darkened
room or observation box. Compare samples to the comparator. • If sample is negative for fluorescence, the sample is considered negative for E. coli.
• If sample is positive for fluorescence, the sample is considered positive for E. coli.
125
Note: In order to be considered Total Coliform Presence and E. coli Presence, a sample must be positive for both color change and fluorescence.
Table 3: Colilert-18 Interpretation
Color Change (Clear to Yellow) Fluorescence Microbe Presence Indicator
Reported As:
No Color Change Negative Total Coliform: Absence
Color Change < Comparator Negative Total Coliform: Absence
Color Change ≥ Comparator Negative Total Coliform: Presence; E. coli: Absence
Color Change ≥ Comparator Positive Total Coliform: Presence; E. coli: Presence
e. Refer to Table 4 below, when a sample is to be reported as Sample Rejected.
Table 4: Sample Rejection Reason
Conditions Sample Rejection Reason Reported As:
Sample Bottle Broken Broken
Chlorine Detected in Sample Chlorine Present
Sample Collected > 30 Hours Exceeds Holding Time
Excessive Headspace in Container Excessive Headspace
Sample Frozen Frozen Sample
Incomplete Sample Information Insufficient Information
Sample Volume < 100 mL Insufficient Volume
Error With Sampling Point Invalid Sampling Point
Error With Sampling Protocol Invalid Sampling Protocol
Negative Control is Positive Laboratory Accident
Positive Control is Negative Laboratory Accident
Incubator Broken or Other Lab Error Laboratory Accident
Sample Bottle Leaking Leaked In Transit
6.0 Quality Control (QC) Requirements
6.1 Analyst QC Requirements
All analysts are required to perform MMO-MUG analysis on at least 10% of the routine samples. In addition, all certified analysts must analyze and record a minimum of one positive control and one negative control per month.
126
6.2 TSB/BHI Performance Check a. With every batch of TSB/BHI, inoculate one sterile 25 mL test tube with a known coliform culture.
A second 25 mL tube of TSB/BHI serves as a control blank.
• Incubate both tubes for 24 hours at 35 ± 0.5°C.
• The inoculated tube must show cloudy growth while the control blank must not show cloudy growth. Do not use media if growth is not indicated in the inoculated tube.
6.3 Sample Containers
a. Must be checked for sterility and auto-fluorescence by an Ohio EPA certified laboratory.
b. Sterility Check: A sterility check must be done on a minimum of one sample/test bottle per
batch prepared in the lab or a minimum of 1% per case purchase (up to 4 bottles per lot).
• Add approximately 25 mL of prepared sterile Tryptic Soy Broth (TSB) or Brain Heart Infusion (BHI) per bottle tested mix to expose entire interior of the bottle to the growth media.
• Incubate at 35 ± 0.5°C and check after 24 hours for growth. Growth is indicated by any turbidity.
• If growth occurs, re-sterilize any batches of laboratory prepared containers that test positive
and repeat the sterility check.
• If any commercially purchase disposable containers test positive, recheck another set. If the second check is positive, notify the manufacturer and do not use any bottles from the affected case.
c. Auto-Fluorescence: Check all sample bottles prepared in the laboratory for fluorescence, or a
minimum of 1% per case purchase (up to 4 bottles per lot) using a UV light. If any containers fluoresce notify the manufacturer and do not use any bottles from the affected case.
6.4 Quanti-Tray® or Quanti-Tray/2000® Trays a. Must be checked for sterility and auto-fluorescence by an Ohio EPA certified laboratory.
b. Sterility Check: A sterility check must be done on a minimum of 1% per case purchase (up to 4
trays per lot).
• Add approximately 100 mL of prepared sterile Tryptic Soy Broth (TSB) or Brain Heart Infusion (BHI) per tray tested mix to expose entire interior of the bottle to the growth media.
• Incubate at 35 ± 0.5°C and check after 24 hours for growth. Growth is indicated by any turbidity.
• If any trays test positive, recheck another set. If the second check is positive, notify the
manufacturer and do not use any trays from the affected case.
c. Auto-Fluorescence: Check a minimum of 1% per case purchase (up to 4 trays per lot) using a UV light. If any trays fluoresce, notify the manufacturer and do not use any trays from the affected case.
127
6.5 Quanti-Tray Sealer Check a. Must be checked annually by adding dye (e.g., bromocresol purple or food coloring) to the water.
If dye is observed outside the wells, either perform maintenance or use another sealer.
6.6 MMO-MUG Reagent Check a. Aseptically fill three test vessels with 100 mL sterile reagent water. Add a packet of MMO-MUG
reagent to each test vessel and mix thoroughly to dissolve.
b. Inoculate each test vessel with one of three known cultures (Escherichia coli, Klebsiella pneumonia or Pseudomonas aeruginosa) and label each bottle with the bacterium used.
c. Incubate all test vessels at 35 ± 0.5°C for the required amount of time (Colilert-18 for 18 hours).
d. After incubation, remove the test vessels from the incubator and interpret by referring to Table 5
below for interpretation.
Table 5: Colilert-18 after 18 to 22 hours incubation at 35 ± 0.5°C
Type of Culture Color Fluorescence
E. coli Yellow Positive
K. pneumonia Yellow None
P. aeruginosa None None
6.7 Sterilization a. Sterilize by autoclaving all liquids and materials. Refer to Table 6 below. Note: When
autoclaving liquid filled vessels, provide enough space between the vessels to allow for even distribution of heat.
Table 6: Autoclave Times and Temperatures
Material Temperature Time Cycle TSB, BHI, Sodium Thiosulfate 119 - 121°C 12 to 15 minutes1 Slow
Sterile Water (< 500 mL vessels) 119 - 121°C 30 minutes Slow
Sterile Water (500 to 1000 mL vessels) 119 - 121°C 45 minutes Slow Sterile Water (> 1000 mL vessels) 119 - 121°C 90 to 180 minutes Slow
Plastic Bottles/Cylinders 119 - 121°C 30 minutes Fast 1Media must not be in the autoclave more than 45 minutes from the time the autoclave door is closed to the time it is opened. 2Dispose of contaminated material in compliance with all Ohio EPA and local requirements.
b. Autoclave sterility checks are required once every three months, per autoclave. • If using a biological indicator ampule, follow manufacturer’s instructions. Note: After
sterilization, remove and allow ampules to cool for 10 minutes prior to incubation. Incubate at 55 - 60°C for 24 hours. Growth is evident by a color change per manufacturer’s instructions. If color change occurs, corrective action for the autoclave is required.
128
• Alternatively, fill an Erlenmeyer flask with 25 to 50 mL of TSB/BHI, inoculate with a known coliform culture, cover flask opening with aluminum foil and incubate at 35 ± 0.5°C for 24 hours. After incubation, when TSB/BHI shows growth, autoclave at 119 - 121°C for 12 to 15 minutes on slow exhaust. Allow to cool to room temperature. Fill a test vessel with approximately 25 mL of TSB/BHI and inoculate the TSB/BHI with the “sterilized” culture from the Erlenmeyer flask. Incubate test vessel at 35 ± 0.5°C for 24 hours. After the 24 hour incubation period, remove the test vessel from the incubator. The inoculated test vessel must not show growth. If growth is present in the inoculated test vessel, corrective action for the autoclave is required.
6.8 Thermometer Calibration
a. Calibrate all glass and electronic thermometers when new and at least annually. Calibrate all
dial thermometers at least once every three months.
b. Reference/NIST Certified Thermometer (Ice Point) Calibration
1. Create an ice bath in an insulated container using distilled/deionized water and crushed ice made using distilled/deionized water.
2. Submerge the reference/certified thermometer in the ice bath until a stable temperature is reached.
3. The thermometer must read 0.0°C or, for thermometers without a 0.0°C mark, the “ice-point
calibration” mark.
4. If reference/certified thermometer does not read 0.0°C, corrective action must be taken.
c. Incubator Thermometer (Total Coliform) Calibration 1. Place incubator thermometer and reference thermometer in a covered beaker or flask of
water and incubate overnight in a 35°C incubator. Optionally, use mineral oil instead of water to eliminate the need for a covered vessel.
2. After 24 hours, record readings of the incubator and reference thermometers.
3. Label each thermometer with the correction factor based on the reference thermometer. Note: Remove thermometer from use if correction factor is > 1.0°C.
d. Incubator Thermometer (Autoclave Sterility Check) Calibration
1. Place incubator thermometer and reference thermometer in a covered beaker or flask of
water and incubate overnight in a 55 - 60°C incubator. Optionally, use mineral oil instead of water to eliminate the need for a covered vessel. Note: If using a dry block incubator with wells, place incubator thermometer and reference thermometer in adjacent wells overnight at 55 - 60°C.
2. After 24 hours, record readings of the incubator and reference thermometers.
3. Label each thermometer with the correction factor based on the reference thermometer.
Note: Remove thermometer from use if correction factor is > 1.0°C.
129
e. Refrigerator Thermometer Calibration
1. Place refrigerator thermometer and reference thermometer inside a refrigerator overnight side by side in the same covered beaker or flask of water. Optionally, use mineral oil instead of water to eliminate the need for a covered vessel.
2. After 24 hours, record readings of the refrigerator and reference thermometers.
3. Label each thermometer with the correction factor based on the reference thermometer.
4. Alternatively, the refrigerator thermometer may be calibrated at “ice-point” when the reference thermometer is checked.
Note: Remove thermometer from use if correction factor is > 1.0°C.
f. Maximum Registering Thermometer
1. Calibration will be done by the laboratory certification officer at the time of the survey.
2. The laboratory must have at least one spare maximum registering thermometer.
3. Tag each thermometer with the correction factor base on the onsite calibration. Note: Remove thermometer from use if correction factor is > 1.0°C.
6.9 Equipment Timer Calibration
a. Calibrate all equipment timers at least once every three months.
b. Autoclave Timer Calibration
1. Set the timer for 45 minutes. 2. Use an accurate watch or stopwatch to time it at appropriate sterilization intervals used by
the laboratory (i.e., 12, 15, 30 and 45 minutes).
3. Timer calibration begins when the autoclave reaches sterilization pressure and temperature and ends when the pressure/temperature begins to fall as the cycle ends.
4. See Table 7 below to determine if corrective action is required.
Table 7: Autoclave Timer Acceptance Criteria
Cycle Time Calibrated Acceptance Criteria 12 minutes 1 minute
15 minutes 1 minute and 30 seconds
30 minutes 3 minutes
45 minutes 5 minutes
5. Label each autoclave timer with the correction factor for each interval used.
130
6.10 pH Meter Calibration a. The calibration procedure must be performed resulting in an acceptable linearity value (percent
(%) slope or millivolt (mV)) prior to use.
b. Calibrate the pH meter following the manufacturer’s instructions for a two point calibration (pH buffers 7.0 and 10.0) or three point calibration (pH buffers 4.0, 7.0 and 10.0).
c. If a two point calibration is performed, analyze and record the pH 4.0 verification buffer value,
per use. The results of the pH 4.0 verification buffer must be ± 0.1 pH units of the true value; acceptance limits are 3.9 to 4.1 pH units. Note: If the laboratory has decided to adopt a three point calibration for all analyses, the pH 4.0 verification buffer analysis is not required.
d. The linearity must be recorded each time the meter is calibrated; acceptance limits are 95 to
105% or -56 to -62 mV. Calibrations must be dated and initialed by all certified analysts participating in each calibration procedure.
6.11 Balance Calibration
a. All balances must be on an annual service contract, proof of which must be posted on or near the balance.
b. Balances must be checked prior to use with certified weights (ASTM type 1, 2 or 3 weights or NIST Class S or S1). A manufacturer’s certificate for the certified weights must be available.
c. Balance checks must be done with at least three weights that bracket the range of weights, normally used in the laboratory. • Place each mass on the balance and record the weight (reference weight).
• Add a test load weight of either 0.1 g (top loading balance) or 0.01 g (analytical balance) and
record the reference weight plus test load weight.
• Response for the non-analytical (top loading balance) must be ± 0.1 g. • Response for the analytical balance must be ± 0.01 g.
6.12 Refrigerator Record
a. Record refrigerator temperatures once daily to the nearest thermometer gradation.
6.13 Incubator Record (Total Coliform)
a. Record incubator thermometer temperatures at least twice daily when in use, including one
reading in the early morning and another at least four hours later. Each shelf must have a separate thermometer to be recorded to the nearest thermometer gradation.
6.14 Incubator Record (Autoclave Sterility Check)
a. Record incubator thermometer temperature prior to use and when in use. Each shelf must have
a separate thermometer to be recorded to the nearest thermometer gradation. Note: Only one thermometer is required if a dry block incubator is used.
131
6.15 Labeling a. Reagents and media must be labeled with date received and date opened.
b. Prepared reagents and media must be labeled with content, date made and analyst initials.
7.0 Required Documentation
1. The Microbiological Laboratory Schedule for MMO-MUG (Colilert-18) on page 136 of this manual may be used to keep records.
2. The Microbiological Test Data Sheet for MMO-MUG (Colilert-18) on page 137 of this manual is recommended to document each analysis. The minimum requirements for documenting each procedure are as follows:
a. Sample ID.
b. Sample Location.
c. Analyst(s) initials.
d. Collection: date and time.
e. Incubation Start: date and time.
f. Interpretation (Incubation end): date and time.
g. Total coliform: Positive (+) or Negative (-).
h. E. coli: Positive (+) or Negative (-). i. Chlorine: free and total.
3. The Sample Bottle Sterility/Fluorescence Record on page 138 of this manual may be used to
keep these records. The minimum requirements for documenting each procedure are as follows:
a. Analyst(s) initials.
b. Date sample bottles were received or sterilized. c. Brand and lot number. d. Number of bottles received or sterilized. e. Date tested. f. Growth results: number positive or negative. g. UV results: number positive or negative. h. Comments.
132
4. The Quanti-Tray Sterility Record on page 139 of this manual may be used to keep these records. The minimum requirements for documenting each procedure are as follows:
a. Analyst(s) initials.
b. Date trays were received. c. Brand and lot number. d. Number of trays received. e. Date tested. f. Growth results: number positive or negative.
g. Comments.
5. The Media Quality Control Record on page 140 of this manual may be used to keep these
records. The minimum requirements for documenting each procedure are as follows:
a. Analyst(s) initials.
b. Date.
c. Media to be tested. d. Brand and lot number. e. pH of media after sterilization.
f. Growth results: positive or negative. g. Comments.
6. The MMO-MUG Reagent Quality Control Record on page 141 of this manual may be used to
keep these records. The minimum requirements for documenting each procedure are as follows:
a. Analyst(s) initials/contract laboratory.
b. Date. c. Brand and lot number. d. Type of reagent to be tested. e. Test results:
• E. coli: color change/UV.
• Klebsiella: color change/UV.
• Pseudomonas: color change/UV.
133
7. The Autoclave Sterilization Record on page 142 of this manual may be used to keep these records. The minimum requirements for documenting each procedure are as follows:
a. Analyst(s) initials.
b. Date.
c. Time in. d. Time out. e. Total time (minutes). f. Sterilization time (minutes). g. Internal Thermometer (°C). h. Material sterilized.
8. The Autoclave Sterility Check record on page 143 of this manual may be used to keep these
records. The minimum requirements for documenting each procedure are as follows:
a. Type of Sterility Check Used: Manufacture/Ampule Type or Alternative: Circle One (TSB/BHI).
b. Analyst(s) initials.
c. Sterilization date.
d. Incubation: date, time and temperature (°C). e. Interpretation: date, time and temperature (°C).
f. Result: positive or negative. g. Lot number.
9. The Thermometer Calibration Record on page 144 of this manual may be used to keep these
records. The minimum requirements for documenting each procedure are as follows:
a. Analyst(s) initials.
b. Date.
c. Thermometer location and identification. d. Observed temperature (°C). e. Temperature of reference thermometer (°C). f. Correction factor.
10. The Timer Calibration Record on page 145 of this manual may be used to keep these records. The minimum requirements for documenting each procedure are as follows:
a. Analyst(s) initials.
134
b. Date.
c. Timer location. d. Equipment time (minutes). e. Stopwatch time (minutes). f. Correction factor.
11. The pH Meter Slope/Linearity Verification (4.0 Buffer) record on page 146 of this manual may
be used to keep these records. The minimum requirements for documenting each procedure are as follows:
a. Analyst(s) initials.
b. Date.
c. Slope (%). d. pH 4.0 Verification (pH Units). e. Comments.
12. The Balance Calibration Record on page 147 of this manual may be used to keep these
records. The minimum requirements for documenting each procedure are as follows:
a. Analyst(s) initials.
b. Date.
c. Reference weight and test load readings in grams (200 to 1.0 grams). d. Comments/corrective action.
13. The Daily Refrigerator Temperature Record on page 148 of this manual may be used to keep
these records. The minimum requirements for documenting each procedure are as follows:
a. Analyst(s) initials.
b. Date.
c. Temperature (°C).
d. Comments.
14. The Incubator Temperature Record on page 149 of this manual may be used to keep these records. The minimum requirements for documenting each procedure are as follows:
a. Analyst(s) initials.
b. Date.
c. Time: recorded twice each day, once in the a.m. and once in the p.m. d. Temperature (°C): recorded per shelf used.
135
Microbiological Laboratory Schedule for Quanti-Tray (Colilert-18)
Frequency Month
1 2 3 4 5 6 7 8 9 10 11 12
Monthly
Total Coliform/E. coli Positive Quarterly Once Per Three Months
Dial Thermometer Calibration
Equipment Timer Calibration
Autoclave Sterility Check
Annual
Glass and Electronic Thermometer Calibration
Balance Service
Quanti-Tray Sealer Check
136
Microbiological Test Data Sheet for Quanti-Tray (Colilert-18)
Laboratory
Sample ID Sample Location Analyst
Collection Incubation
Start Interpretation
(Incubation End) Total
coliform
E. coli
Chorine
Date Time Date Time Date Time + - + - Free Total
137
Sample Bottle Sterility/Fluorescence Record To be recorded for each lot received or batch sterilized
Laboratory
Analyst Date
Received/ Sterilized
Brand/Lot Number Number of
Bottles Received/ Sterilized
Date Tested
Growth Results UV Results
Number Positive
Number Negative
Number Positive
Number Negative Comments
*Note action taken if results are not acceptable
138
Quanti-Tray Sterility Record
To be recorded for each lot received
Laboratory
Analyst Date Received Brand/Lot Number
Number of Trays
Received Date Tested
Growth Results
Number Positive
Number Negative Comments
*Note action taken if results are not acceptable
139
Media Quality Control Record To be checked and recorded for each new prepared batch
Laboratory
Analyst Date Media Brand/Lot Number Growth Results
pH Positive Negative Comments
*Note action taken if results are unacceptable
140
MMO-MUG Reagent Quality Control Record To be recorded for each new lot or annually
Laboratory
Analyst/ Contract
Laboratory Date Brand/Lot Number Type of Reagent
Test Results
E. coli Klebsiella Pseudomonas
Color Change UV Color
Change UV Color Change UV
141
Autoclave Sterilization Record To be recorded for each run
Laboratory
Analyst Date Time In Time Out Total Time
(min) Sterilization Time (min)
Internal Thermometer
(°C) Material Sterilized
142
Autoclave Sterility Check Laboratory
Type of Sterility Check Used: Manufacturer/Ampule Type
Alternative: Circle One (TSB/BHI)
Analyst Sterilization Date
Incubation Interpretation Result
(POS/NEG) Lot Number
Date Time Temp (°C) Date Time Temp (°C)
143
Thermometer Calibration Record To be recorded for each thermometer
Laboratory
Analyst Date Thermometer Location/ ID Observed
Temperature (°C) Temperature of
Reference Thermometer (°C)
Correction Factor
* Note thermometer has been removed from use if correction factor is > 1°C.
144
Timer Calibration Record To be recorded for each equipment timer
Laboratory
Analyst Date Timer Location Equipment Time
(minutes) Stopwatch Time
(minutes) Correction Factor
*Note: To determine if recalibration or maintenance is required, refer to Table 7, Autoclave Timer Difference.
145
pH Meter Slope/Linearity Verification (4.0 Buffer)
To be checked and recorded for each new prepared batch
Laboratory
Calibration Buffers
Analyst Date Slope (%) pH 4.0 Verification Comments
*Note action taken if pH linearity is unacceptable
146
Balance Calibration Record Check each balance per use with certified weights. A minimum of three weights that bracket normal weighing needs are required. Record balance response to reference weight and sensitivity to reference weight plus test load (L). Non-analytical (top loading) must be sensitive to a 0.1 g test load. Analytical balances must be sensitive to a
0.01 g test load.
Laboratory
Analyst Date
Reference Weight and Test Load Readings in Grams
200 200 + L 100 100 + L 50 50 + L 10 10 + L 5 5 + L 1 1 + L
*Note action taken if calibration is unacceptable Note: "L" refers to "Test Load"
Comments/Corrective Action:
147
Daily Refrigerator Temperature Record To be recorded daily, 4.0 ± 2.0°C
Laboratory
Analyst Date Temp (°C) Comments Analyst Date Temp (°C) Comments
*Note action taken if temperature is out of range
148
Incubator Temperature Record To be recorded twice each day, am/pm, per shelf 35.0 ± 0.5°C
Laboratory
Analyst Date Time
Temp (°C) Analyst Date Time
Temp (°C)
Shelf Shelf Shelf Shelf Shelf Shelf
am
am
pm
pm
am
am
pm
pm
am
am
pm
pm
am
am
pm
pm
am
am
pm
pm
am
am
pm
pm
am
am
pm
pm
am
am
pm
pm
*Note action taken if temperature is out of range
149
Membrane Filtration Analysis for Total Coliform and Fecal Coliform (m-Endo/EC Broth)
Standard/Reagent Maximum Storage Time Chemical Reagents Manufacturer’s Expiration Date
Dehydrated Media 6 Months After Opening or 1 Year After Opening if Stored in Desiccator
Dehydrated Media: Bacto-Agar 2 Years After Opening
10% Sodium Thiosulfate 1 Year After Opening/Manufacturer’s Expiration Date
Prepared Plates: m-Endo 2 Weeks After Preparation
Prepared Media: LTB/BGLBB/EC Broth/TSB/BHI
3 Months Refrigerated (screw capped tubes/flasks/vessels) or 1 Week Room Temperature (sealed/covered)
pH Buffers 6 Months After Opening
Required Quality Control
QC Procedure Frequency Total Coliform/Fecal Coliform Positive Once Per Month Per Analyst
Sample/Test Bottle Sterility One Per Batch or 1% Per Lot Received (Maximum 4 Per Lot)
Membrane Filter Sterility One Per Lot Received and Annually
Media Performance Check One Positive And One Negative Control Per Batch
Glass/Electronic Thermometer Calibration Annually
Dial Thermometer Calibration Once Per Three Months Equipment Timers Once Per Three Months pH Meter Calibration Prior to Use pH Linearity/Slope/pH 4 Buffer Prior to Use Balance Calibration Check Prior to Use Refrigerator Record Daily Incubator Record Twice Daily Water Bath/Heat Sink Record Twice Daily
Sample Collection Preservation Maximum Holding Time 10% Sodium Thiosulfate 30 Hours
150
Method Reference Standard Methods 22nd Edition (9222 B) Note: Until March 31, 2016, fecal coliform analysis, for cases in which membrane filter analysis gives total coliform-positive results, shall use EC medium. On-Site Survey Requirements
• Each certified analyst must be able to demonstrate proper collection and analysis of a typical sample for membrane filtration.
• Prior to the survey, each certified analyst must prepare a positive and negative m-Endo plate for interpretation during the survey.
• Prior to the survey, each certified analyst must inoculate a LTB, BGLBB and EC tube for
interpretation during the survey.
• Prior to the survey, a batch of TSB/BHI must be prepared. This will be checked for proper pH during the survey.
• A set of prepared un-inoculated LTB, BGLBB and EC tubes must be at room temperature,
ready for inoculation during the survey.
• Procedural technique will be observed.
• All reagents and solutions used with this method will be audited for correct labeling and dating.
• All records will be audited.
1.0 General Method Summary
A 100 mL volume of sample is filtered through a 47 mm diameter membrane filter with a pore size of 0.45 µm using standard aseptic techniques. The filter is transferred to a 50 x 12 mm or 48 x 8.5 mm plate containing m-Endo and then incubated at 35 ± 0.5°C for 22 to 24 hours. If coliform bacteria are present in the sample, colored colonies with a golden-green metallic sheen may appear. Further verification is required using LTB and BGLBB for total coliform and EC broth for fecal coliform. Presence of total coliform is confirmed by growth in LTB and BGLBB and gas formation in Durham tubes. Fecal coliform is confirmed by growth in EC broth and gas formation in Durham tubes.
Interferences Chlorine, heavy metals, turbidity and suspended solids may affect results. 2.0 Equipment
a. Autoclave: The laboratory autoclave must be of sufficient size to allow for adequate sterilization.
It must also be equipped with a temperature gauge, pressure gauge, an operational safety valve and a fast/slow exhaust selector.
151
b. Balance: • Top loading balances must have readability of 0.1 g.
• Analytical balances must have readability of 0.001 g. Note: Balances should be calibrated prior to use, using ASTM Class 1, 2, or 3 weights or equivalent.
c. Hot Air Sterilizing Oven: The oven must be of sufficient size to allow for adequate sterilization and constructed to give a uniform sterilization temperature of 170°C or greater. Additionally, it must be equipped with an accurate thermometer placed in sand, or an acceptable heat sink with a range of 160 - 180°C.
d. Incubator (Total Coliform): The incubator must provide sufficient space for the daily work load and maintain a constant uniform temperature of 35 ± 0.5°C.
e. Water Bath/Heat Sink: The water bath/heat sink must provide sufficient space for the daily work
load and maintain a constant uniform temperature of 44.5 ± 0.2°C.
f. Media Preparation Glassware/Utensils/Pipets: • Flasks and graduated cylinders made of borosilicate glass or plastic are acceptable.
Graduated cylinders must be calibrated “To Deliver” (TD).
• Pipets should be wrapped individually in aluminum foil or in metal canisters prior to sterilization. Packs of disposable pipets should be resealed between periods of use. Pipets that deliver volumes of ≤ 10.0 mL must be accurate to within ± 2.5%.
g. pH Meter: The electronic pH meter must be accurate to 0.02 pH units and designed for a
minimum of a two point standard calibration with a percent (%) slope or millivolt (mV) efficiency display. Digital meters are required; analog meters are unacceptable. Note: Automatic temperature compensators must be used.
h. Refrigerator: The refrigerator must be of sufficient size for the work load and maintain a temperature of 2 - 6°C.
i. Sample Containers/Test Vessels: Containers should be wide mouth borosilicate glass or autoclavable plastic and must have a capacity of at least 125 mL (4 oz.). • If prepared in the laboratory, each container must have 0.1 mL of sterilized 10% sodium
thiosulfate added to it to neutralize approximately 15 mg/L of residual chlorine. It must also be glass stoppered or screw capped and protected by foil or Kraft paper prior to sterilization.
• Commercially prepared, presterilized vessels that contain sodium thiosulfate are acceptable.
j. Thermometers: All glass, dial and electronic thermometers must have a minimum graduation of 1.0°C, with the exception of incubator thermometers. Incubator thermometers must have a minimum graduation of 0.5°C. All thermometers must be calibrated using a reference thermometer certified by the National Institute of Standards and Technology (NIST) or with a manufacturer’s certificate of traceability to NIST specifications. The NIST certificate or equivalent must be kept on file and available during laboratory inspections. It is strongly recommended that laboratories use non-mercury, liquid-in-glass thermometers when possible. Note: If mercury-in-glass thermometers are used (i.e., maximum registering thermometers), it is recommended that they have a protective coating to guard against mercury spills.
152
k. Culture Tubes and Durham Tubes: Tubes made of borosilicate glass must be of sufficient size so the total volume of medium and inoculum does not fill the tube more than 2/3. Durham tubes must not be less than 40% of the culture tube (i.e., a 20 mm culture tube requires at least an 8 mm Durham tube). Culture tubes must be covered by aluminum, plastic or stainless steel caps. Note: Cotton or foam plugs are not acceptable.
l. Inoculating Equipment: Sterile metal or disposable plastic loops, sterile swabs or sterile plastic disposable pipet tips should be used. If metal inoculating loops are used they must be made of nickel alloy or platinum.
m. Membrane Filtration Equipment: • Membrane Filter Units: The units must be stainless steel, glass, porcelain or autoclavable
plastic, not scratched or corroded, and must not leak. Note: Single service disposable funnels are not acceptable.
• Membrane Filters: The filters must be grid-marked, 47 mm diameter and 0.45 μm pore size. They should also be white and of cellulose ester. Membrane filters must be purchase pre-sterilized.
• Forceps: Tips should be blunt and smooth without corrugations on the inside.
• Microscope and Lamp: A 10X to 15X stereo microscope with a fluorescent light source must
be used to count the target colonies.
n. Petri Dishes (loose or tight lids): • Presterilized plastic or sterilizable glass petri dishes should be used. To maintain sterility of
glass petri dishes, use stainless steel or aluminum canisters, or a wrap of heavy aluminum foil or char-resistant paper.
• Loose-lid petri dishes must be incubated in a tight-fitting container (e.g., plastic vegetable crisper containing a moistened paper towel) to prevent dehydration of membrane filter and medium.
• Opened packs of disposable petri dishes must be resealed between use periods.
• Use disposable sterile tight fitting petri dishes, 50 X 12 mm or 48 X 8.5 mm.
o. Biological Indicator Ampule: Commercially purchase self-contained biological indicator in a
hermetically sealed, type I borosilicate glass ampule (SporeView® or equivalent). Each ampule is inoculated with viable Geobacillus stearothermophilus spores and filled with tryptic soy broth containing bromocresol purple acid indicator. Note: For an alternative option, refer to Section 6.5(c) of this method.
p. Incubator (Autoclave Sterility Check): The incubator must provide sufficient space for incubation
of the biological indicator ampule (See Section 2.0(o) of this method) and maintain constant uniform temperature of 55 - 60°C. A dry block incubator with wells is recommended.
3.0 Reagents/Media
a. Reagent Grade Water: Only satisfactorily tested reagent grade water from stills or deionization
units may be used to prepare media, reagents and dilution/rinse water for performing microbial analyses. For laboratories utilizing a deionization unit, the reagent grade water must be monitored for conductivity by a meter or an indicator display on an in-line system and analyzed
153
at least annually for trace metals. If a still is in use, then the requirements must be met as listed in Table 1. Also, high quality water may be purchased from commercial suppliers if provided with a certificate of analysis meeting the specifications of Table 1. Refer to Appendix B on page 232 of this manual for further instructions. Table 1: Required Reagent Grade Water Criteria
Parameter Limits Frequency
Conductivity > 0.5 megohms resistance or < 2 micromhos/cm (microsiemens/cm) at 25°C Prior to Use
Pb, Cd, Cr, Cu, Ni, Zn
Per Contaminant < 0.05 mg/L Collectively < 0.1 mg/L Annually
Total Chlorine Residual1 < 0.1 mg/L Prior to Use
1 DPD Method is recommended.
b. Phosphate Buffer (PO4): Perform the following instructions to prepare buffer: • Weigh out 17 g of dehydrated phosphate buffer (pH 7.2) into a weigh boat and transfer to a
large Erlenmeyer flask. Note: If smaller volumes are needed, 3.4 g per 100 mL is also acceptable.
• Add 500 mL of reagent grade water and allow the buffer to completely dissolve by swirling or stirring with a sterilized stir bar.
• Autoclave at 119 - 121°C for 15 minutes on slow exhaust.
• Allow to cool to room temperature and record final pH using approximately a 10 mL portion
of the media. The final pH must be 7.2 ± 0.5. If the final pH does not fall within this range, discard and remake.
• Store prepared buffer for up to 6 months at 2 - 6°C in a refrigerator.
c. Magnesium Chloride Buffer: Perform the following instruction to prepare buffer:
• Weigh out 40.55 g of magnesium chloride (MgCl2•6H2O) into a weigh boat and transfer to a
large Erlenmeyer flask. Note: If smaller volumes are needed, 8.11 g per 100 mL is also acceptable.
• Add 500 mL of reagent grade water and allow the buffer to completely dissolve by swirling or
stirring with a sterilized stir bar.
• Autoclave at 121° C for 15 minutes on slow exhaust.
• Allow to cool to room temperature and store prepared buffer for up to 6 months at 2 - 6°C in a refrigerator.
Note: Store buffers in refrigerator at 2 - 6°C, if mold or other contamination occurs remake buffers.
154
d. Sterile Buffered Rinse Water: Perform the following instructions to prepare: • Combine 1.25 mL of phosphate buffer and 5 mL of magnesium chloride buffer to 1 liter of
reagent grade water.
• Place aluminum foil around any point where water can come in contact with the air such as water bottle nozzles.
• Sterilize buffered rinse water based on Table 2 below.
Table 2: Sterilization Details
Quantity Temperature Time Cycle < 500 mL 119 - 121°C 30 minutes Slow
500 to 1000 mL 119 - 121°C 45 minutes Slow
> 1000 mL 119 - 121°C 90 to 180 minutes Slow
Note: The volume is not to exceed autoclave manufacturer’s limits • Allow to cool to room temperature and record final pH using approximately a 10 mL portion
of the media. The final pH must be 7.2 ± 0.1. If the final pH does not fall within this range, discard and remake.
• Store buffered rinse water for up to 6 months at room temperature.
e. Disinfectant: Commercially available or isopropyl alcohol.
f. 5.25% Sodium Hypochlorite: Purchase commercially as liquid bleach.
g. Sanitizing Solution: Add one ounce of liquid bleach per one gallon of laboratory grade water or
one tablespoon per half gallon of laboratory grade water. Store in a tightly closed screw capped container. May be used for up to 6 months from date of preparation. Note: Stronger solutions may be used but may cause some faucet discoloration.
h. 10% Sodium Thiosulfate Solution (Dechlorinating Agent): Dissolve 10 g of sodium thiosulfate in 100 mL of distilled water in an Erlenmeyer flask. Sterilize 15 minutes at 119 - 121°C and store at room temperature. Remake annually or if solution becomes cloudy.
i. Ethanol (95%): non-denatured.
j. Dehydrated Media – m-Endo, Bacto-Agar, Lauryl Tryptose Broth (LTB), Brilliant Green Lactose Bile Broth (BGLBB), EC Broth, Tryptic Soy Broth (TSB) and Brain Heart Infusion (BHI): Purchase commercially and store in a dry, cool environment at 2 - 25°C. Shelf life of unopened media is 2 years from the date of receipt. Bottles of media must be used within 6 months after opening or up to one year if stored in a desiccator. Note: Bottles of Bacto-Agar must be used within 2 years after opening.
k. m-Endo: Perform the following instructions to prepare:
• Prepare water/ethanol mixture by mixing 2 mL of 95% ethanol (non-denatured) with 100 mL of reagent grade water in a sterile graduated cylinder.
• Add half of the water/ethanol mixture to a sterile glass Erlenmeyer flask.
155
• While stirring, add 4.8 ± 0.01 g of dehydrated m-Endo broth and 1.5 ± 0.01 g Bacto-Agar.
Note: If a stir bar is used to mix media, it must be sterilized either in a hot air oven placed inside the Erlenmeyer flask, or wrapped in aluminum foil and autoclaved on fast exhaust.
• Bring to a final volume of 100 mL, using the remaining half of the water/ethanol mixture, being careful to rinse down any residue from the sides of the flask.
• Heat, with stirring, until first bubbles of boiling appear (do NOT autoclave).
• Immediately dispense 6 to 10 mL of m-Endo into plates.
• Allow to solidify and then cover petri dishes.
• Record the final pH by touching a surface probe to one of the prepared plates or a separate
pH portion of media. The final pH must be 7.2 ± 0.2. If the final pH does not fall within this range, discard the media and remake.
• Dishes should be inverted and stored for up to 2 weeks at 2 - 6°C in a refrigerator.
l. Lauryl Tryptose Broth (LTB): Perform the following instructions to prepare broth:
• Weigh out 35.6 ± 0.1 g of dehydrated media into a weigh boat and transfer to a large
Erlenmeyer flask. Note: If smaller volumes are needed, 3.56 ± 0.01 g per 100 mL is also acceptable.
• Measure 1000 mL of reagent grade water into a graduated cylinder and add approximately half to an Erlenmeyer flask.
• Transfer media to the flask and rinse down the sides using the remaining half of the reagent
grade water.
• Allow the media to completely dissolve by swirling or stirring with a sterilized stir bar.
• Pipette into Durham tubes (about 10 mL per tube) and cap.
• Autoclave at 119 - 121°C for 12 to 15 minutes on slow exhaust. Refer to Table 7.
• Allow to cool to room temperature and record the final pH using approximately a 10 mL portion of the media. The final pH must be 6.8 ± 0.2. If the final pH does not fall within this range, discard the media and remake.
• Store prepared media in screw capped vessels for up to 3 months in a refrigerator or up to
one week (sealed/covered) at room temperature.
Note: Before using refrigerated tubes, you must incubate them overnight and discard any tubes with air bubbles in the Durham tube portion.
m. Brilliant Green Lactose Bile Broth (BGLBB): Perform the following instructions to prepare broth:
• Weigh out 40 ± 0.1 g of dehydrated media into a weigh boat and transfer to a large
Erlenmeyer flask. Note: If smaller volumes are needed, 4.0 ± 0.01 g per 100 mL is also acceptable.
• Measure 1000 mL of reagent grade water into a graduated cylinder and add approximately
156
half to an Erlenmeyer flask.
• Transfer media to the flask and rinse down the sides using the remaining half of the reagent grade water.
• Allow the media to completely dissolve by swirling or stirring with a sterilized stir bar.
• Pipette into Durham tubes (about 10 mL per tube) and cap.
• Autoclave at 119 - 121°C for 12 to 15 minutes on slow exhaust. Refer to Table 7.
• Allow to cool to room temperature and record final pH using approximately a 10 mL portion
of the media. The final pH must be 7.2 ± 0.2. If the final pH does not fall within this range, discard the media and remake.
• Store prepared media in screw capped vessels for up to 3 months in a refrigerator or up to
one week (sealed/covered) at room temperature.
Note: Before using refrigerated tubes, you must incubate them overnight and discard any tubes with air bubbles in the Durham tube portion.
n. EC Broth: Perform the following instructions to prepare broth:
• Weigh out 37.0 ± 0.1 g of dehydrated media into a weigh boat and transfer to a large
Erlenmeyer flask. Note: If smaller volumes are needed, 3.70 ± 0.01 g per 100 mL is also acceptable.
• Measure 1000 mL of reagent grade water into a graduated cylinder and add approximately
half to an Erlenmeyer flask.
• Transfer media to the flask and rinse down the sides using the remaining half of the reagent grade water.
• Allow the media to completely dissolve by swirling or stirring with a sterilized stir bar.
• Pipette into Durham tubes (about 10 mL per tube) and cap.
• Autoclave at 119 - 121°C for 15 minutes on slow exhaust. Refer to Table 7.
• Allow to cool to room temperature and record final pH using approximately a 10 mL portion
of the media. The final pH must be 6.9 ± 0.2. If the final pH does not fall within this range, discard the media and remake.
• Store prepared media in screw capped vessels for up to 3 months in a refrigerator or up to
one week (sealed/covered) at room temperature.
Note: Before using refrigerated tubes, incubate tubes overnight and discard any with air bubbles in the Durham tube portion.
o. Tryptic Soy Broth (TSB): Perform the following instructions to prepare broth:
• Weigh out 30 ± 0.1 g of dehydrated media into a weigh boat and transfer to a large
Erlenmeyer flask. Note: If smaller volumes are needed, 3.0 ± 0.01 g per 100 mL is also acceptable.
157
• Measure 1000 mL of reagent grade water into a graduated cylinder and add approximately half to an Erlenmeyer flask.
• Transfer media to the flask and rinse down the sides using the remaining half of the reagent
grade water.
• Allow the media to completely dissolve by swirling or stirring with a sterilized stir bar.
• Remove approximately 10 mL of prepared TSB and dispense into a screw capped vial or other acceptable vessel for future pH analysis.
• Dispense into 30 mL screw capped vessels. If not screw capped, cover flask opening with
aluminum foil.
• Autoclave at 119 - 121°C for 12 to 15 minutes on slow exhaust. Refer to Table 7.
• Allow to cool to room temperature and record the final pH using the 10 mL portion of the media. The final pH must be 7.3 ± 0.2. If the final pH does not fall within this range, discard the media and remake.
• Store prepared media in screw capped vessels for up to 3 months in a refrigerator or up to
one week (sealed/covered) at room temperature.
p. Brain Heart Infusion (BHI) Broth: Perform the following instructions to prepare the broth: • Weigh out 37 ± 0.1 g of dehydrated media into a weigh boat and transfer to a large
Erlenmeyer flask. Note: If smaller volumes are needed, 3.7 ± 0.01 g per 100 mL is also acceptable.
• Measure 1000 mL of reagent grade water into a graduated cylinder and add approximately half to an Erlenmeyer flask.
• Transfer media to the flask and rinse down the sides using the remaining half of the reagent
grade water.
• Allow the media to completely dissolve by swirling or stirring with a sterilized stir bar.
• Remove a 10 mL portion of the prepared BHI and dispense into a screw capped vial or other acceptable vessel for future pH analysis.
• Dispense into 30 mL screw capped vessels. If not screw capped, cover flask opening with
aluminum foil.
• Autoclave at 119 - 121°C for 15 minutes on slow exhaust. Refer to Table 7.
• Allow to cool to room temperature and record final pH using approximately a 10 mL portion of the media. The final pH must be 7.2 ± 0.2. If the final pH does not fall within this range, discard the media and remake.
• Store prepared media in screw capped vessels for up to 3 months in a refrigerator or up to
one week (sealed/covered) at room temperature.
158
4.0 Sample Collection/Preservation/Holding Time a. Sample collection:
• Select an appropriate sampling tap such as a faucet, petcock or small valve. Avoid taps with
a leaky stem or a swivel joint.
• Prior to collection, remove the aerator since it may harbor bacteria.
• Prior to collection in the distribution system place all carbon filters, sediment filters and water softeners on bypass.
• Flush the sample tap to waste for approximately one minute, then close valve.
• It is recommended to disinfect the nozzle for two minutes with the sanitizing solution (See Section 3.0(g) of this method for preparation instructions) using either a spray bottle to saturate the opening or a plastic bag to squeeze the solution into the faucet. Use a fresh solution each time.
• Open the tap fully and flush tap for approximately 3 to 5 minutes (until a constant
temperature is detected), then reduce flow enough to allow sample bottles to be filled without splashing.
• Verify water is within the expected concentration range for chlorine using a digital
colorimetric/DPD colorimeter.
• Aseptically fill the sample bottles and avoid contaminating the cap or bottle. Note: If using commercially purchase pre-sterilized bottles, be sure to completely remove any plastic seal from the cap prior to filling the sample bottle.
• Do not allow the sample bottle to overflow as this will wash out the sodium thiosulfate. If the
sample bottle overflows or water splashes out, discard and collect another sample.
• Immediately recap the sample bottle tightly.
• Refer to Chapter 2(B) on page 7 of this manual for sample identification requirements.
b. Preservation: Sodium thiosulfate is used to remove residual chlorine. Add 0.1 mL of 10% sodium thiosulfate per 125 mL (4 oz.) sample container. This will neutralize approximately 15 mg/L of residual chlorine. Refer to Section 3.0(h) of this method for preparation instructions.
c. Maximum sample holding time: No more than 30 hours after collection. Store samples at 4°C until time of analysis.
5.0 Membrane Filtration Procedure
5.1 Sample Setup Use sterile filtration units at the beginning of each filtration series. A filtration series is interrupted when an interval of 30 minutes or longer elapses between sample filtrations after such interruption, treat any further sample filtration as a new filtration series and sterilize all membrane filter holders in use.
1. Label plate with sample number and volume of sample to be analyzed.
159
2. With sterile forceps, place a membrane filter, grid side up, on filter base and attach funnel. Note: Sterilize forceps by immersing in 95% ethanol (or absolute methanol) and ignite with a flame. Allow the flame to self-extinguish.
3. Vigorously shake sample. Note: Sample bottle must contain at least 1 inch of headspace to
allow for adequate mixing.
4. Measure 100 mL of sample and transfer to funnel. Do not rinse out the graduated cylinder or calibrated bottle. Note: If sample is too turbid to filter, split the 100 mL over two or more plates. If the original sample volume is less than 100 mL, the test is not valid and must be recorded as Sample Rejected: Insufficient Volume. Another sample must be collected for analysis.
5. Turn on the vacuum and filter the sample, rinsing the sides of the funnel three times with 20-30 mL of sterile buffered rinse water. Allow the filter to go near dryness between each rinse.
6. Remove funnel from the base of the filter unit and store aseptically between filtrations.
7. Transfer membrane filter using sterile forceps to m-Endo plate, grid-side up, ensuring complete contact with media, using a rolling motion to avoid air bubbles.
8. Both negative and positive controls are required with each set of samples tested.
• Negative Control: At the beginning and end of a sample set with sterile forceps, place a membrane filter, grid side up, on filter base and attach funnel. Add 20 to 30 mL of sterile buffered rinse water.
• Positive Control: At the end of a sample set, after the negative controls, with sterile forceps, place a membrane filter, grid side up, on filter base and attach funnel. Add 20 to 30 mL of sterile buffered rinse water and inoculate using a known control of either a live E. coli culture or with water known to contain E. coli, such as raw wastewater.
• Turn on the vacuum and filter the sample, rinsing the sides of the funnel three times with 20 to 30 mL of sterile buffered rinse water. Allow the filter to go near dryness between each rinse.
• Remove funnel from the base of the filter unit.
• Transfer membrane filter using sterile forceps to plate, grid-side up, ensuring complete contact with media, using a rolling motion to avoid air bubbles
9. Cap and invert plate. Then place inside a sealed container with moist paper towels to maintain
proper humidity.
10. Incubate within 30 minutes at 35 ± 0.5°C for 22 to 24 hours.
5.2 Interpreting and Reporting Membrane Filtration Results
a. After the 22 to 24 hour incubation period, remove the plates from the incubator.
b. All colonies are to be counted under magnification and description recorded.
c. Refer to Table 3 or Table 4 for assistance.
160
Table 3: Reportable - No Confirmation Required
m-Endo Results Reported Result
No Growth Total Coliform: Absence
≤ 200 Colorless Colonies Total Coliform: Absence
Table 4: Inconclusive – Confirmation Required
m-Endo Results Confirmation Required
Colored/Golden-Green Metallic Sheen Colonies Yes
Confluent Growth Yes
> 200 Colorless Colonies Yes
d. Using a sterile cotton swab, collect all growth from the m-Endo plate. Transfer a portion of the
collected growth to three separate tubes. Note: Inoculation must occur in the order listed. • EC broth tube • LTB tube • BGLBB tube
e. Incubate the EC broth tube for 24 ± 2 hours at 44.5 ± 0.2°C. After the 24 hour incubation
period, check the Durham tube for gas. • If gas is present, go to (i) or (j) for interpretation.
• If gas is absent, report the sample as Fecal Coliform: Absence. Refer to (h) for further
confirmation.
f. Incubate the LTB and BGLBB tubes for 24 ± 2 hours at 35 ± 0.5°C. After the 24 hour incubation period, check the Durham tube for gas. • If gas is present in the LTB and BGLBB tubes, go to (i) or (j) for interpretation.
• If gas is absent in the LTB and BGLBB tubes go to (g) for further confirmation.
g. Samples absent of gas in the LTB and BGLBB tubes must be re-incubated for 24 ± 1 hour.
• If gas is present in the LTB and BGLBB tubes, go to (i) or (j) for interpretation.
• If gas is absent in the LTB and BGLBB tubes, go to (i) or (j) for interpretation.
• If gas is present in the LTB tube but not the BGLBB tube go to (h) for further confirmation.
h. Re-inoculate a new BGLBB tube and EC broth tube (from the growth present LTB tube) and incubate. • Incubate BGLBB at 35 ± 0.5°C for 24 ± 2 hours; if no gas is present, re-incubate at 35 ±
0.5°C for an additional 24 ± 1 hour. Go to (i) or (j) for interpretation.
161
• Incubate EC broth at 44.5 ± 0.2°C for 24 ± 2 hours. Go to (i) or (j) for interpretation.
Note: A Fecal Coliform: Presence result is considered a Total Coliform: Presence result, even if the confirmation results for BGLBB is absent of gas.
Table 5: Colony Counts ≤ 200 Colonies
Gas Present or Absent Reported Results LTB
Results BGLBB Results
EC Broth Results
Absent Absent Absent Total Coliform: Absence; Fecal Coliform: Absence
Present Absent Absent Total Coliform: Absence; Fecal Coliform: Absence
Present Present Absent Total Coliform: Presence; Fecal Coliform: Absence
Present Present Present Total Coliform: Presence; Fecal Coliform: Presence
Present Absent Present Total Coliform: Presence; Fecal Coliform: Presence
i. After confirmation of colony counts with > 200 colonies or confluent growth, a result of Total
Coliform: Absence must be reported as Data Quality Rejected with a reason of Other. In this instance, the type of interference (i.e., Confluent Growth or Too Numerous To Count) must be noted in the comment field.
j. Refer to Table 6 below, when a sample is to be reported as Sample Rejected.
162
Table 6: Sample Rejection Reason
Conditions Sample Rejection Reason Reported As:
Sample Bottle Broken Broken
Chlorine Detected in Sample Chlorine Present
Sample Collected > 30 Hours Exceeds Holding Time
Excessive Headspace in Container Excessive Headspace
Sample Frozen Frozen Sample
Incomplete Sample Information Insufficient Information
Sample Volume < 100 mL Insufficient Volume
Error With Sampling Point Invalid Sampling Point
Error With Sampling Protocol Invalid Sampling Protocol
Negative Control is Positive Laboratory Accident
Positive Control is Negative Laboratory Accident
Incubator Broken or Other Lab Error Laboratory Accident
Sample Bottle Leaking Leaked In Transit
163
Membrane Filtration Result Interpretation Flow Chart (EC Broth, LTB, BGLBB)
Bacterial growth present on m-Endo plates?
Yes Record Colony Count and Description of Colonies
Swab Petri Dish and Inoculate EC Broth, LTB, then BGLBB
Incubate EC Broth for 24 ± 2 hours at 44.5 ± 0.2°C
Incubate LTB and BGLBB for 24 ± 2 hours at 35 ± 0.5°C
Result: Fecal Coliform –
Presence
See Next Page if Further Confirmation
is Required. If Further Confirmation is Not Required, Result: Fecal Coliform –
Absence
Was Gas Produced in Durham Tube?
Yes No
Was Gas Produced in Durham Tubes?
Go to Next Page
164
No
Continued From Previous Page: Was
Gas Produced?
Yes
No
Gas Present in LTB and BGLBB
Gas Absent in LTB and BGLBB
Gas Present in LTB but Absent in BGLBB
Result: Total Coliform –
Presence
Incubate LTB and BGLBB for 24 ± 1 hour at 35 ± 0.5°C Re-inoculate EC Broth
and BGLBB from LTB
Was Gas Present in LTB and BGLBB?
Result: Total Coliform –
Absence
*Note: If Gas Present in LTB but Absent in
BGLBB
Incubate BGLBB for 24 ± 2 hours at
35 ± 0.5°C
Incubate EC Broth for 24 ± 2 hours at
44.5 ± 0.2°C
Was gas produced?
Yes
Result: Fecal Coliform –
Presence
Result: Fecal Coliform –
Absence
Was gas produced?
Result: Total Coliform –
Presence
Yes
No Incubate BGLBB for 24 ± 1 hour at 35 ± 0.5°C
Was gas produced?
Yes No Result:
Total Coliform –Absence
*Note
165
6.0 Quality Control (QC) Requirements
6.1 Analyst QC Requirements
All analysts are required to perform membrane filtration analysis on at least 10% of the routine samples. In addition, all certified analysts must analyze and record a minimum of one positive total coliform and one positive fecal coliform plate per month.
6.2 Media Performance Check
a. With every batch of media, inoculate one sterile plate or culture tube of each media with a known
coliform culture. A second sterile plate or culture tube of each corresponding media serves as a control blank.
• Incubate m-Endo, LTB, BGLBB and TSB/BHI for 24 hours at 35 ± 0.5°C. It may be
necessary to incubate LTB and BGLBB for an additional 24 hours to complete the test. • Incubate EC broth for 24 hours at 44.5 ± 0.2°C. • The inoculated plate/culture tube must show growth while the control blank must not show
growth. Do not use media if growth is not indicated in the inoculated tube.
6.3 Sample Containers
a. Must be checked for sterility by an Ohio EPA certified laboratory.
b. Sterility Check: A sterility check must be done on a minimum of one sample/test bottle per batch prepared in the lab or a minimum of 1% per case purchase (up to 4 bottles per lot).
• Add approximately 25 mL of prepared sterile Tryptic Soy Broth (TSB) or Brain Heart Infusion
(BHI) per bottle tested mix to expose entire interior of the bottle to the growth media.
• Incubate at 35 ± 0.5°C and check after 24 hours for growth. Growth is indicated by any turbidity.
• If growth occurs, re-sterilize any batches of laboratory prepared containers that test positive
and repeat the sterility check.
• If any commercially purchase disposable containers test positive, recheck another set. If the second check is positive, notify the manufacturer and do not use any bottles from the affected case.
6.4 Membrane Filters
a. Must be checked for sterility by an Ohio EPA certified laboratory.
b. Sterility Check: A sterility check must be done on a minimum of one filter per lot purchase and
annually.
• Aseptically add one filter to a sterile container with approximately 50 mL of prepared sterile Tryptic Soy Broth (TSB) or Brain Heart Infusion (BHI).
• Incubate at 35 ± 0.5°C and check after 24 hours for growth. Growth is indicated by any turbidity.
166
• If growth occurs, recheck another filter. If the second check is positive, notify the manufacturer and do not use any filters from the affected lot.
6.5 Sterilization
a. Sterilize all glassware by dry heat in a hot air oven for at least 2 hours at ≥ 170°C. b. Sterilize by autoclaving all liquids and materials. Refer to Table 7 below. Note: When
autoclaving liquid filled vessels, provide enough space between the vessels to allow for even sterilization. Table 7: Autoclave Times and Temperatures
Material Temperature Time Cycle
Carbohydrate Media (LTB, BGB, EC Broth) 119 - 121°C 12 to 15 minutes1 Slow
Stainless Steel MF Funnels, Stir Bars 119 - 121°C 12 to 15 minutes Fast
Plastic Bottles/Cylinders 119 - 121°C 30 minutes Fast 1Media must not be in the autoclave more than 45 minutes from the time the autoclave door is closed to the time it is opened. 2Dispose of contaminated material in compliance with all Ohio EPA and local requirements.
c. Autoclave sterility checks are required once every three months, per autoclave.
• If using a biological indicator ampule, follow manufacturer’s instructions. Note: After
sterilization, remove and allow ampules to cool for 10 minutes prior to incubation. Incubate at 55 - 60°C for 24 hours. Growth is evident by a color change per manufacturer’s instructions. If color change occurs, corrective action for the autoclave is required.
• Alternatively, fill an Erlenmeyer flask with 25 to 50 mL of TSB/BHI, inoculate with a known coliform culture, cover flask opening with aluminum foil and incubate at 35 ± 0.5°C for 24 hours. After incubation, when TSB/BHI shows growth, autoclave at 119 - 121°C for 12 to 15 minutes on slow exhaust. Allow to cool to room temperature. Fill a test vessel with approximately 25 mL of TSB/BHI and inoculate the TSB/BHI with the “sterilized” culture from the Erlenmeyer flask. Incubate test vessel at 35 ± 0.5°C for 24 hours. After the 24 hour incubation period, remove the test vessel from the incubator. The inoculated test vessel must not show growth. If growth is present in the inoculated test vessel, corrective action for the autoclave is required.
167
6.6 Thermometer Calibration a. Calibrate all glass and electronic thermometers when new and at least annually. Calibrate all
dial thermometers at least once every three months.
b. Reference/NIST Certified Thermometer (Ice Point) Calibration
1. Create an ice bath in an insulated container using distilled/deionized water and crushed ice made using distilled/deionized water.
2. Submerge the reference/certified thermometer in the ice bath until a stable temperature is reached.
3. The thermometer must read 0.0°C or, for thermometers without a 0.0°C mark, the “ice-point
calibration” mark.
4. If reference/certified thermometer does not read 0.0°C corrective action must be taken.
c. Incubator Thermometer (Total Coliform) Calibration 1. Place incubator thermometers and reference thermometer in a covered beaker or flask of
water and incubate overnight in a 35°C incubator. Optionally, use mineral oil instead of water to eliminate the need for a covered vessel.
2. After 24 hours, record readings of the incubator and reference thermometers. 3. Label each thermometer with the correction factor based on the reference thermometer.
Note: Remove thermometer from use if correction factor is > 1.0°C.
d. Incubator Thermometer (Autoclave Sterility Check) Calibration
1. Place incubator thermometer and reference thermometer in a covered beaker or flask of
water and incubate overnight in a 55 - 60°C incubator. Optionally, use mineral oil instead of water to eliminate the need for a covered vessel. Note: If using a dry block incubator with wells, place incubator thermometer and reference thermometer in adjacent wells overnight at 55 - 60°C.
2. After 24 hours, record readings of the incubator and reference thermometers.
3. Label each thermometer with the correction factor based on the reference thermometer.
Note: Remove thermometer from use if correction factor is > 1.0°C.
e. Water Bath/Heat Sink Thermometer (44.5°C) Calibration
1. Place water bath/heat sink thermometer and reference thermometer inside a water bath/heat
sink to incubate overnight in a 44.5°C water bath/heat sink.
2. After 24 hours, record readings of the water bath/heat sink and reference thermometers.
3. Label each thermometer with the correction factor based on the reference thermometer. Note: Remove thermometer from use if correction factor is > 1.0°C.
168
f. Hot Air Oven Thermometer Calibration 1. Place oven thermometer and reference thermometer inside an oven side by side in the
same container of sand or heat sink.
2. Heat to approximately 170°C or as high as the reference thermometer will allow.
3. Check the readings of both thermometers.
4. Label each thermometer with the correction factor based on the reference thermometer.
Note: Remove thermometer from use if correction factor is > 1.0°C.
g. Refrigerator Thermometer Calibration
1. Place refrigerator thermometer and reference thermometer inside a refrigerator overnight side by side in the same covered beaker or flask of water. Optionally, use mineral oil instead of water to eliminate the need for a covered vessel.
2. After 24 hours, record readings of the refrigerator and reference thermometers.
3. Label each thermometer with the correction factor based on the reference thermometer.
4. Alternatively, the refrigerator thermometer may be calibrated at “ice-point” when the reference thermometer is checked.
Note: Remove thermometer from use if correction factor is > 1.0°C.
h. Maximum Registering Thermometer
1. Calibration will be done by the laboratory certification officer at the time of the survey.
2. The laboratory must have at least one spare maximum registering thermometer.
3. Tag each thermometer with the correction factor base on the onsite calibration.
6.7 Equipment Timer Calibration a. Calibrate all equipment timers at least once every three months.
b. Autoclave Timer Calibration
1. Set the timer for 45 minutes on either fast or slow exhaust. 2. Use an accurate watch or stopwatch to time it at appropriate sterilization intervals used by
the laboratory (12, 15, 30 and 45 minutes).
3. Timer calibration begins when the autoclave reaches sterilization pressure and temperature and ends when the pressure/temperature begins to fall as the cycle ends.
4. See Table 8 to determine if corrective action is required.
169
Table 8: Autoclave Timer Acceptance Criteria
Cycle Time Calibrated Difference 12 minutes 1 minute
15 minutes 1 minute and 30 seconds
30 minutes 3 minutes
45 minutes 5 minutes
5. Label each autoclave timer with the correction factors for each interval used.
c. Oven Timer (If Applicable)
1. If the oven is equipped with a timer, use the procedures in Section 6.7(b) of this method for calibrating the oven timer.
2. Corrective action is required if a two hour cycle differs by ± 12 minutes.
6.8 pH Meter Calibration a. The calibration procedure must be performed and result in an acceptable linearity value (percent
(%) slope or millivolt (mV)) prior to use.
b. Calibrate the pH meter following the manufacturer’s instructions for a two point calibration (pH buffers 7.0 and 10.0) or three point calibration (pH buffers 4.0, 7.0 and 10.0).
c. If a two point calibration is performed, analyze and record the pH 4.0 verification buffer value,
per use. The results of the pH 4.0 verification buffer must be ± 0.1 pH units of the true value; acceptance limits are 3.9 to 4.1 pH units. Note: If the laboratory has decided to adopt a three point calibration for all analyses, the pH 4.0 verification buffer analysis is not required.
d. The linearity must be recorded each time the meter is calibrated; acceptance limits are 95 to
105% or -56 to -62 mV. Calibrations must be dated and initialed by all certified analysts participating in each calibration procedure.
6.9 Balance Calibration
a. All balances must be on an annual service contract, proof of which must be posted on or near the balance.
b. Balances must be checked prior to use with certified weights (ASTM type 1, 2 or 3 weights or
NIST Class S or S1 ). A manufacturer’s certificate for the certified weights must be available.
c. Balance checks must be done with at least three weights that bracket the range of weights, normally used in the laboratory.
• Place each mass on the balance and record the weight (reference weight).
• Add a test load weight of either 0.1 g (top loading balance) or 0.01 g (analytical balance) and
record the reference weight plus test load weight.
• Response for the non-analytical (top loading balance) must be ± 0.1 g.
• Response for the analytical balance must be ± 0.01 g.
170
6.10 Refrigerator Record
a. Record refrigerator temperatures once daily to the nearest thermometer gradation.
6.11 Incubator Record (Total Coliform) a. Record incubator thermometer temperatures at least twice daily when in use, including one
reading in the early morning and another at least four hours later. Each shelf must have a separate thermometer to be recorded to the nearest thermometer gradation.
6.12 Incubator Record (Autoclave Sterility Check)
a. Record incubator thermometer temperature prior to use and when in use. Each shelf must have
a separate thermometer to be recorded to the nearest thermometer gradation. Note: Only one thermometer is required if a dry block incubator is used.
6.13 Water Bath/Heat Sink Record
a. Record water bath/heat sink thermometer temperatures at least twice daily when in use,
including one reading in the early morning and another at least four hours later.
6.14 Labeling a. Reagents and media must be labeled with date received and date opened.
b. Prepared reagents and media must be labeled with content, date made and analyst initials.
7.0 Required Documentation
1. The Microbiological Laboratory Schedule for Membrane Filter on page 176 of this manual may be used to keep records.
2. The Microbiological Test Data Sheet for Membrane Filter on page 177 of this manual is recommended to document each analysis. The minimum requirements for documenting each procedure are as follows:
a. Sample ID.
b. Sample Location.
c. Analyst(s) initials.
d. Collection: date and time.
e. Incubation Start: date and time.
f. Interpretation (Incubation end): date and time.
g. Colony description.
h. Confirmation needed? (Y/N). i. Chlorine: free and total.
171
3. The Total Coliform/Fecal Coliform Confirmation for Membrane Filter on page 178 of this manual may be used to keep these records. The minimum requirements for documenting each procedure are as follows. a. Sample ID.
b. Analyst(s) initials.
c. EC Broth1: date, time and gas formation (Y/N).
d. LTB 24 hours: date, time and gas formation (Y/N).
e. LTB 48 hours: date, time and gas formation (Y/N).
f. BGLBB1: date, time and gas formation (Y/N).
1If re-inoculation is required; a separate line must be used with the same sample ID.
4. The Sample Bottle Sterility/Fluorescence Record on page 179 of this manual may be used to keep these records. The minimum requirements for documenting each procedure are as follows:
a. Analyst(s) initials.
b. Date sample bottles were received or sterilized. c. Brand and lot number. d. Number of bottles received or sterilized. e. Date tested. f. Growth results: number positive or negative.
g. UV results: number positive or negative. h. Comments.
5. The Membrane Filter Sterility Record on page 180 of this manual may be used to keep these
records. The minimum requirements for documenting each procedure are as follows:
a. Analyst(s) initials.
b. Date membrane filters were received.
c. Brand and lot number. d. Number of membrane filters received.
e. Date tested. f. Growth results: number positive or negative. g. Comments.
172
6. The Media Quality Control Record on page 181 of this manual may be used to keep these records. The minimum requirements for documenting each procedure are as follows:
a. Analyst(s) initials.
b. Date.
c. Media to be tested. d. Brand and lot number. e. pH of media after sterilization.
f. Growth results: positive or negative. g. Comments.
7. The Oven Sterilization Record on page 182 of this manual may be used to keep these records.
The minimum requirements for documenting each procedure are as follows:
a. Analyst(s) initials.
b. Date.
c. Time in. d. Time to 170°C. e. Time out. f. Sterilization Temp (°C). g. Material sterilized.
8. The Autoclave Sterilization Record on page 183 of this manual may be used to keep these
records. The minimum requirements for documenting each procedure are as follows:
a. Analyst(s) initials.
b. Date.
c. Time in. d. Time out. e. Total time (minutes). f. Sterilization time (minutes). g. Internal Thermometer (°C). h. Material sterilized.
173
9. The Autoclave Sterility Check record on page 184 of this manual may be used to keep these records. The minimum requirements for documenting each procedure are as follows:
a. Type of Sterility Check Used: Manufacture/Ampule Type or Alternative: Circle One
(TSB/BHI).
b. Analyst(s) initials.
c. Sterilization date.
d. Incubation: time and date. e. Interpretation: time and date. f. Result: positive or negative. g. Lot number.
10. The Thermometer Calibration Record on page 185 of this manual may be used to keep these
records. The minimum requirements for documenting each procedure are as follows:
a. Analyst(s) initials.
b. Date.
c. Thermometer location and identification. d. Observed temperature (°C). e. Temperature of reference thermometer (°C). f. Correction factor.
11. The Timer Calibration Record on page 186 of this manual may be used to keep these records. The minimum requirements for documenting each procedure are as follows:
a. Analyst(s) initials.
b. Date.
c. Timer location. d. Equipment time (minutes). e. Stopwatch time (minutes). f. Correction factor.
12. The pH Meter Slope/Linearity Verification (4.0 Buffer) record on page 187 of this manual may
be used to keep these records. The minimum requirements for documenting each procedure are as follows:
a. Analyst(s) initials.
b. Date.
174
c. Slope (%). d. pH 4.0 Verification (pH Units). e. Comments.
13. The Balance Calibration Record on page 188 of this manual may be used to keep these
records. The minimum requirements for documenting each procedure are as follows:
a. Analyst(s) initials.
b. Date.
c. Reference weight and test load readings in grams (200 to 1.0 grams). d. Comments/corrective action.
14. The Daily Refrigerator Temperature Record on page 189 of this manual may be used to keep
these records. The minimum requirements for documenting each procedure are as follows:
a. Analyst(s) initials.
b. Date.
c. Temperature (°C).
d. Comments.
15. The Incubator Temperature Record on page 190 of this manual may be used to keep these records. The minimum requirements for documenting each procedure are as follows:
a. Analyst(s) initials.
b. Date.
c. Time: recorded twice each day, once in the a.m. and once in the p.m. d. Temperature (°C): recorded per shelf used.
16. The Water Bath/Heat Sink Temperature Record on page 191 of this manual may be used to keep these records. The minimum requirements for documenting each procedure are as follows:
a. Analyst(s) initials.
b. Date.
c. Time: recorded twice each day, once in the a.m. and once in the p.m. d. Temperature (°C): recorded per shelf used.
175
Microbiological Laboratory Schedule for Membrane Filter
Frequency Month
1 2 3 4 5 6 7 8 9 10 11 12
Monthly
Total Coliform/Fecal Coliform-Positive
Quarterly Once Per Three Months
Dial Thermometer Calibration
Equipment Timer Calibration
Autoclave Sterility Check
Annual
Glass and Electronic Thermometer Calibration
Balance Service
176
Microbiological Test Data Sheet for Membrane Filtration
Laboratory
Sample ID Sample Location Analyst Collection Incubation
Start Interpretation
(Incubation End) Colony Description Confirmation
Needed? Chlorine
Date Time Date Time Date Time (Y/N) Free Total
177
Total Coliform/Fecal Coliform Confirmation for Membrane Filtration
Laboratory
Sample ID Analyst
EC Broth1 LTB 24 Hours LTB 48 Hours1 BGLBB1
Date Time Gas
Formation (Y/N)
Date Time Gas
Formation (Y/N)
Date Time Gas
Formation (Y/N)
Date Time Gas
Formation (Y/N)
1 If re-inoculation is required; a separate line must be used with the same sample ID.
178
Sample Bottle Sterility/Fluorescence Record
To be recorded for each lot received or batch sterilized
Laboratory
Analyst Date
Received/ Sterilized
Brand/Lot Number Number of
Bottles Received/ Sterilized
Date Tested
Growth Results UV Results
Number Positive
Number Negative
Number Positive
Number Negative Comments
*Note action taken if results are not acceptable
179
Membrane Filter Sterility Record
To be recorded for each lot received
Laboratory
Analyst Date Received Brand/Lot Number
Number of Membrane
Filters Received
Date Tested
Growth Results
Number Positive
Number Negative Comments
*Note action taken if results are not acceptable
180
Media Quality Control Record
To be checked and recorded for each new prepared batch and annually
Laboratory
Analyst Date Media Brand/Lot Number Growth Results
Comments pH Positive Negative
*Note action taken if results are unacceptable
181
Oven Sterilization Record To be recorded for each run
Laboratory
Analyst Date Time In Time to 170°C Time Out Sterilization
Temp (°C) Material Sterilized
182
Autoclave Sterilization Record To be recorded for each run
Laboratory
Analyst Date Time In Time Out Total Time
(min) Sterilization Time (min)
Internal Thermometer
(°C) Material Sterilized
183
Autoclave Sterility Check Laboratory
Type of Sterility Check Used: Manufacturer/Ampule Type Alternative: Circle One (TSB/BHI)
Analyst Sterilization Date
Incubation Interpretation Result (POS/NEG) Lot Number
Time Date Time Date
184
Thermometer Calibration Record To be recorded for each thermometer
Laboratory
Analyst Date Thermometer Location/ ID Observed
Temperature (°C) Temperature of
Reference Thermometer (°C)
Correction Factor
*Note thermometer has been removed from use if correction factor is > 1°C
185
Timer Calibration Record To be recorded for each equipment timer
Laboratory
Analyst Date Timer Location Equipment Time
(minutes) Stopwatch Time
(minutes) Correction Factor
*Note: To determine if recalibration or maintenance is required, refer to Table 7, Autoclave Timer Difference.
186
pH Meter Slope/Linearity Verification (4.0 Buffer) To be checked and recorded for each new prepared batch
Laboratory
Calibration Buffers
Analyst Date Slope (%) pH 4.0 Verification Comments
*Note action taken if pH linearity is unacceptable
187
Balance Calibration Record Check each balance per use with certified weights. A minimum of three weights that bracket normal weighing needs are required. Record balance response to reference weight and sensitivity to reference weight plus test load (L). Non-analytical (top loading) must be sensitive to a 0.1 g test load. Analytical balances must be sensitive to a
0.01 g test load.
Laboratory
Analyst Date
Reference Weight and Test Load Readings in Grams
200 200 + L 100 100 + L 50 50 + L 10 10 + L 5 5 + L 1 1 + L
*Note action taken if calibration is unacceptable Note: "L" refers to "Test Load"
Comments/Corrective Action:
188
Daily Refrigerator Temperature Record To be recorded daily, 4.0 ± 2.0°C
Laboratory
Analyst Date Temp (°C) Comments Analyst Date Temp (°C) Comments
*Note action taken if temperature is out of range
189
Incubator Temperature Record To be recorded twice each day, am/pm, per shelf 35.0 ± 0.5°C
Laboratory
Analyst Date Time
Temp (°C) Analyst Date Time
Temp (°C)
Shelf Shelf Shelf Shelf Shelf Shelf
am
am
pm
pm
am
am
pm
pm
am
am
pm
pm
am
am
pm
pm
am
am
pm
pm
am
am
pm
pm
am
am
pm
pm
am
am
pm
pm
*Note action taken if temperature is out of range
190
Water Bath/Heat Sink Temperature Record To be recorded twice each day, am/pm 35.0 ± 0.5°C
Laboratory
Analyst Date Time Temp (°C) Analyst Date Time Temp (°C) Analyst Date Time Temp (°C)
am
am
am
pm
pm
pm
am
am
am
pm
pm
pm
am
am
am
pm
pm
pm
am
am
am
pm
pm
pm
am
am
am
pm
pm
pm
am
am
am
pm
pm
pm
am
am
am
pm
pm
pm
am
am
am
pm
pm
pm
am
am
am
pm
pm
pm
*Note action taken if temperature is out of range
191
Membrane Filtration Analysis for Total Coliform and E. coli (m-Endo/EC-MUG)
Standard/Reagent Maximum Storage Time Chemical Reagents Manufacturer’s Expiration Date
Dehydrated Media 6 Months After Opening or 1 Year After Opening if Stored in Desiccator
Dehydrated Media: Bacto-Agar 2 Years After Opening
10% Sodium Thiosulfate 1 Year After Opening/Manufacturer’s Expiration Date
Prepared Plates: m-Endo 2 Weeks After Preparation
Prepared Media: LTB/BGLBB/EC-MUG/TSB/BHI
3 Months Refrigerated (screw capped tubes/flasks/vessels) or 1 Week Room Temperature (sealed/covered)
pH Buffers 6 Months After Opening
Required Quality Control
QC Procedure Frequency Total Coliform/E. coli Coliform Positive Once Per Month Per Analyst
Sample/Test Bottle Sterility One Per Batch or 1 % Per Lot Received (Maximum 4 Per Lot)
Membrane Filter Sterility One Per Lot Received and Annually
Media Performance Check One Positive And One Negative Control Per Batch
Glass/Electronic Thermometer Calibration Annually
Dial Thermometer Calibration Once Per Three Months Equipment Timers Once Per Three Months pH Meter Calibration Prior to Use pH Linearity/Slope/pH 4 Buffer Prior to Use Balance Calibration Check Prior to Use Refrigerator Record Daily Incubator Record Twice Daily Water Bath/Heat Sink Record Twice Daily
Sample Collection Preservation Maximum Holding Time 10% Sodium Thiosulfate 30 Hours
192
Method Reference Standard Methods 22nd Edition (9222 B and G) On-Site Survey Requirements
• Each certified analyst must be able to demonstrate proper collection and analysis of a typical sample for membrane filtration.
• Prior to the survey, each certified analyst must prepare a positive and negative m-Endo plate for interpretation during the survey.
• Prior to the survey, each certified analyst must inoculate a LTB, BGLBB and EC-MUG tube
for interpretation during the survey.
• Prior to the survey, a batch of TSB/BHI must be prepared. This will be checked for proper pH during the survey.
• A set of prepared un-inoculated LTB, BGLBB and EC-MUG tubes must be at room
temperature, ready for inoculation during survey.
• Procedural technique will be observed.
• All reagents and solutions used with this method will be audited for correct labeling and dating.
• All records will be audited.
1.0 General Method Summary
A 100 mL volume of sample is filtered through a 47 mm diameter membrane filter with a pore size of 0.45 µm using standard aseptic techniques. The filter is transferred to a 50 x 12 mm or 48 x 8.5 mm plate containing m-Endo and then incubated at 35 ± 0.5°C for 22-24 hours. If coliform bacteria are present in the sample, colored colonies with a golden-green metallic sheen may appear. Further verification is required using LTB and BGLBB for total coliform and EC-MUG for E. coli. Presence of total coliform is confirmed by gas formation in Durham tubes for LTB and BGLBB. E. coli is confirmed by UV fluorescence in culture tubes using EC-MUG.
Interferences Chlorine, heavy metals, turbidity and suspended solids may affect results. 2.0 Equipment
a. Autoclave: The laboratory autoclave must be of sufficient size to allow for adequate sterilization.
It must also be equipped with a temperature gauge, pressure gauge, an operational safety valve and a fast/slow exhaust selector.
193
b. Balance: • Top loading balances must have readability of 0.1 g.
• Analytical balances must have readability of 0.001 g. Note: Balances should be calibrated prior to use, using ASTM Class 1, 2, or 3 weights or equivalent.
c. Hot Air Sterilizing Oven: The oven must be of sufficient size to allow for adequate sterilization and constructed to give a uniform sterilization temperature of 170°C or greater. Additionally, it must be equipped with an accurate thermometer placed in sand, or an acceptable heat sink with a range of 160 - 180°C.
d. Incubator (Total Coliform): The incubator must provide sufficient space for the daily work load and maintain a constant uniform temperature of 35 ± 0.5°C.
e. Water Bath/Heat Sink: The water bath/heat sink must provide sufficient space for the daily work
load and maintain a constant uniform temperature of 44.5 ± 0.2°C.
f. Media Preparation Glassware/Utensils/Pipets: • Flasks and graduated cylinders made of borosilicate glass or plastic are acceptable.
Graduated cylinders must be calibrated “To Deliver” (TD).
• Pipets should be wrapped individually in aluminum foil or in metal canisters prior to sterilization. Packs of disposable pipets should be resealed between periods of use. Pipets that deliver volumes of ≤ 10.0 mL must be accurate to within ± 2.5%.
g. pH Meter: The electronic pH meter must be accurate to 0.02 pH units and designed for a
minimum of a two point standard calibration with a percent (%) slope or millivolt (mV) efficiency display. Digital meters are required; analog meters are unacceptable. Note: Automatic temperature compensators must be used.
h. Refrigerator: The refrigerator must be of sufficient size for the work load and maintain a temperature of 2 - 6°C.
i. Sample Containers/Test Vessels: Containers should be wide mouth borosilicate glass or autoclavable plastic and must have a capacity of at least 125 mL (4 oz.). • If prepared in the laboratory, each container must have 0.1 mL of sterilized 10% sodium
thiosulfate added to it to neutralize approximately 15 mg/L of residual chlorine. It must also be glass stoppered or screw capped and protected by foil or Kraft paper prior to sterilization.
• Commercially prepared, presterilized vessels that contain sodium thiosulfate are acceptable.
j. Thermometers: All glass, dial and electronic thermometers must have a minimum graduation of 1.0°C, with the exception of incubator thermometers. Incubator thermometers must have a minimum graduation of 0.5°C. All thermometers must be calibrated using a reference thermometer certified by the National Institute of Standards and Technology (NIST) or with a manufacturer’s certificate of traceability to NIST specifications. The NIST certificate or equivalent must be kept on file and available during laboratory inspections. It is strongly recommended that laboratories use non-mercury, liquid-in-glass thermometers when possible. Note: If mercury-in-glass thermometers are used (i.e., maximum registering thermometers), it is recommended that they have a protective coating to guard against mercury spills.
194
k. Culture Tubes and Durham Tubes: Tubes made of borosilicate glass must be of sufficient size so the total volume of medium and inoculum does not fill the tube more than 2/3. Durham tubes must not be less than 40% of the culture tube (i.e., a 20 mm culture tube requires at least an 8 mm Durham tube). Culture tubes must be covered by aluminum, plastic, or stainless steel caps. Note: Cotton or foam plugs are not acceptable.
l. Inoculating Equipment: Sterile metal or disposable plastic loops, sterile swabs or sterile plastic disposable pipet tips should be used. If metal inoculating loops are used they must be made of nickel alloy or platinum.
m. Membrane Filtration Equipment: • Membrane Filter Units: The units must be stainless steel, glass, porcelain or autoclavable
plastic, not scratched or corroded, and must not leak. Note: Single service disposable funnels are not acceptable.
• Membrane Filters: The filters must be grid-marked, 47 mm diameter and 0.45 μm pore size. They should also be white and of cellulose ester. Membrane filters must be purchase pre-sterilized.
• Forceps: Tips should be blunt and smooth without corrugations on the inside.
• Microscope and Lamp: A 10X to 15X stereo microscope with a fluorescent light source must
be used to count the target colonies.
n. Petri Dishes (loose or tight lids): • Presterilized plastic or sterilizable glass petri dishes should be used. To maintain sterility of
glass petri dishes, use stainless steel or aluminum canisters, or a wrap of heavy aluminum foil or char-resistant paper.
• Loose-lid petri dishes must be incubated in a tight-fitting container (e.g., plastic vegetable crisper containing a moistened paper towel to prevent dehydration of membrane filter and medium.
• Opened packs of disposable petri dishes must be resealed between use periods.
• Use disposable sterile tight fitting petri dishes, 50 X 12 mm or 48 X 8.5 mm.
o. Ultraviolet (UV) Light: The UV Light must be a 6 watt longwave unit (365 - 366 nm). Consider replacing the bulb if it fails to produce fluorescence on a comparator.
p. Biological Indicator Ampule: Commercially purchase self-contained biological indicator in a hermetically sealed, type I borosilicate glass ampule (SporeView® or equivalent). Each ampule is inoculated with viable Geobacillus stearothermophilus spores and filled with tryptic soy broth containing bromocresol purple acid indicator. Note: For an alternative option, refer to Section 6.5(c) of this method.
q. Incubator (Autoclave Sterility Check): The incubator must provide sufficient space for the
incubation of biological indicator ampule (See Section 2.0(p) of this method) and maintain constant uniform temperature of 55 - 60°C. A dry block incubator with wells is recommended.
195
3.0 Reagents/Media
a. Reagent Grade Water: Only satisfactorily tested reagent grade water from stills or deionization units may be used to prepare media, reagents and dilution/rinse water for performing microbial analyses. For laboratories utilizing a deionization unit, the reagent grade water must be monitored for conductivity by a meter or an indicator display on an in-line system and analyzed at least annually for trace metals. If a still is in use, then the requirements must be met as listed in Table 1. Also, high quality water may be purchased from commercial suppliers if provided with a certificate of analysis meeting the specifications of Table 1. Refer to Appendix B on page 232 of this manual for further instructions. Table 1: Required Reagent Grade Water Criteria
Parameter Limits Frequency
Conductivity > 0.5 megohms resistance or < 2 micromhos/cm (microsiemens/cm) at 25°C Prior to Use
Pb, Cd, Cr, Cu, Ni, Zn
Per Contaminant < 0.05 mg/L Collectively < 0.1 mg/L Annually
Total Chlorine Residual1 < 0.1 mg/L Prior to Use
1 DPD Method is recommended.
b. Phosphate Buffer (PO4): Perform the following instructions to prepare buffer: • Weigh out 17 g of dehydrated phosphate buffer (pH 7.2) into a weigh boat and transfer to a
large Erlenmeyer flask. Note: If smaller volumes are needed, 3.4 g per 100 mL is also acceptable.
• Add 500 mL of reagent grade water and allow the buffer to completely dissolve by swirling or stirring with a sterilized stir bar.
• Autoclave at 119 - 121°C for 15 minutes on slow exhaust.
• Allow to cool to room temperature and record final pH using approximately a 10 mL portion
of the media. The final pH must be 7.2 ± 0.5. If the final pH does not fall within this range, discard and remake.
• Store prepared buffer for up to 6 months at 2 - 6°C in a refrigerator.
c. Magnesium Chloride Buffer: Perform the following instruction to prepare buffer:
• Weigh out 40.55 g of magnesium chloride (MgCl2•6H2O) into a weigh boat and transfer to a
large Erlenmeyer flask. Note: If smaller volumes are needed, 8.11 g per 100 mL is also acceptable.
• Add 500 mL of reagent grade water and allow the buffer to completely dissolve by swirling or
stirring with a sterilized stir bar.
• Autoclave at 121° C for 15 minutes on slow exhaust.
• Allow to cool to room temperature and store prepared buffer for up to 6 months at 2 - 6°C in a refrigerator.
196
Note: Store buffers in refrigerator at 2 - 6°C, if mold or other contamination occurs remake buffers.
d. Sterile Buffered Rinse Water: Perform the following instructions to prepare: • Combine 1.25 mL of phosphate buffer and 5 mL of magnesium chloride buffer to 1 liter of
reagent grade water. • Place aluminum foil around any point where water can come in contact with the air such as
water bottle nozzles.
• Sterilize buffered rinse water based on Table 2 below. Table 2: Sterilization Details
Quantity Temperature Time Cycle < 500 mL 119 - 121°C 30 minutes Slow
500 to 1000 mL 119 - 121°C 45 minutes Slow
> 1000 mL 119 - 121°C 90 to 180 minutes Slow
Note: The volume is not to exceed autoclave manufacturer’s limits
• Allow to cool to room temperature and record final pH using approximately a 10 mL portion of the media. The final pH must be 7.2 ± 0.1. If the final pH does not fall within this range, discard and remake.
• Store buffered rinse water for up to 6 months at room temperature.
e. Disinfectant: Commercially available or isopropyl alcohol.
f. 5.25% Sodium Hypochlorite: Purchase commercially as liquid bleach.
g. Sanitizing Solution: Add one ounce of liquid bleach per one gallon of laboratory grade water or one tablespoon per half gallon of laboratory grade water. Store in a tightly closed screw capped container. May be used for up to 6 months from date of preparation. Note: Stronger solutions may be used but may cause some faucet discoloration.
h. 10% Sodium Thiosulfate Solution (Dechlorinating Agent): Dissolve 10 g of sodium thiosulfate in
100 mL of distilled water in an Erlenmeyer flask. Sterilize 15 minutes at 119 - 121°C and store at room temperature. Remake annually or if solution becomes cloudy.
i. Ethanol (95%): non-denatured
j. Dehydrated Media: m-Endo, Bacto-Agar, Lauryl Tryptose Broth (LTB), Brilliant Green Lactose
Bile Broth (BGLBB), EC-MUG, Tryptic Soy Broth (TSB) and Brain Heart Infusion (BHI): Purchase commercially and store in a dry, cool environment at 2 - 25°C. Shelf life of unopened media is 2 years from the date of receipt. Bottles of media must be used within 6 months after opening or up to one year if stored in a desiccator. Note: Bottles of Bacto-Agar must be used within 2 years after opening.
k. m-Endo: Perform the following instructions to prepare:
• Prepare water/ethanol mixture by mixing 2 mL of 95% ethanol (non -denatured) with 100 mL of reagent grade water in a sterile graduated cylinder.
197
• Add half of the water/ethanol mixture to a sterile glass Erlenmeyer flask.
• While stirring, add 4.8 ± 0.01 g of dehydrated m-Endo broth and 1.5 ± 0.01 g Bacto-Agar. Note: If a stir bar is used to mix media, it must be sterilized either in a hot air oven placed inside the Erlenmeyer flask, or wrapped in aluminum foil and autoclaved on fast exhaust.
• Bring to a final volume of 100 mL, using the remaining half of the water/ethanol mixture, being careful to rinse down any residue from the sides of the flask.
• Heat, with stirring, until first bubbles of boiling appear (do NOT autoclave).
• Immediately dispense 6 to 10 mL of m-Endo into plates.
• Allow to solidify and then cover petri dishes. • Record the final pH by touching a surface probe to one of the prepared plates or a separate
pH portion of media. The final pH must be 7.2 ± 0.2. If the final pH does not fall within this range, discard the media and remake.
• Dishes should be inverted and stored for up to 2 weeks at 2 - 6°C in a refrigerator.
l. Lauryl Tryptose Broth (LTB): Perform the following instructions to prepare broth:
• Weigh out 35.6 ± 0.1 g of dehydrated media into a weigh boat and transfer to a large
Erlenmeyer flask. Note: If smaller volumes are needed, 3.56 ± 0.01 g per 100 mL is also acceptable.
• Measure 1000 mL of reagent grade water into a graduated cylinder and add approximately half to an Erlenmeyer flask.
• Transfer media to the flask and rinse down the sides using the remaining half, of the reagent
grade water.
• Allow the media to completely dissolve by swirling or stirring with a sterilized stir bar.
• Pipette into Durham tubes (about 10 mL per tube) and cap.
• Autoclave at 119 - 121°C for 12 to 15 minutes on slow exhaust. Refer to Table 7.
• Allow to cool to room temperature and record the final pH using approximately a 10 mL portion of the media. The final pH must be 6.8 ± 0.2. If the final pH does not fall within this range, discard the media and remake.
• Store prepared media in screw capped vessels for up to 3 months in a refrigerator or up to
one week (sealed/covered) at room temperature.
Note: Before using refrigerated tubes, you must incubate them overnight and discard any tubes with air bubbles in the Durham tube portion.
m. Brilliant Green Lactose Bile Broth (BGLBB): Perform the following instructions to prepare broth:
• Weigh out 40 ± 0.1 g of dehydrated media into a weigh boat and transfer to a large
Erlenmeyer flask. Note: If smaller volumes are needed, 4.0 ± 0.01 g per 100 mL is also acceptable.
198
• Measure 1000 mL of reagent grade water into a graduated cylinder and add approximately half to an Erlenmeyer flask.
• Transfer media to the flask and rinse down the sides using the remaining half, of the reagent
grade water.
• Allow the media to completely dissolve by swirling or stirring with a sterilized stir bar.
• Pipette into Durham tubes (about 10 mL per tube) and cap.
• Autoclave at 119 - 121°C for 12 to 15 minutes on slow exhaust. Refer to Table 7.
• Allow to cool to room temperature and record final pH using approximately a 10 mL portion of the media. The final pH must be 7.2 ± 0.2. If the final pH does not fall within this range, discard the media and remake.
• Store prepared media in screw capped vessels for up to 3 months in a refrigerator or up to
one week (sealed/covered) at room temperature.
Note: Before using refrigerated tubes, you must incubate them overnight and discard any tubes with air bubbles in the Durham tube portion.
n. EC-MUG: Perform the following instructions to prepare broth:
• Weigh out 37.1 ± 0.1 g of dehydrated media into a weigh boat and transfer to a large
Erlenmeyer flask. Note: If smaller volumes are needed, 3.71 ± 0.01 g per 100 mL is also acceptable.
• Measure 1000 mL of reagent grade water into a graduated cylinder and add approximately
half to an Erlenmeyer flask.
• Transfer media to the flask and rinse down the sides using the remaining half of the reagent grade water.
• Allow the media to completely dissolve by swirling or stirring with a sterilized stir bar
• Pipette into Durham tubes (about 10 mL per tube) and cap.
• Autoclave at 119 - 121°C for 15 minutes on slow exhaust. Refer to Table 7.
• Allow to cool to room temperature and record final pH using approximately a 10 mL portion
of the media. The final pH must be 6.9 ± 0.2. If the final pH does not fall within this range, discard the media and remake.
• Store prepared media in screw capped vessels for up to 3 months in a refrigerator or up to
one week (sealed/covered) at room temperature.
Note: Before using refrigerated tubes, you must incubate tubes overnight and discard any with air bubbles in the Durham tube portion.
o. Tryptic Soy Broth (TSB): Perform the following instructions to prepare broth:
• Weigh out 30 ± 0.1 g of dehydrated media into a weigh boat and transfer to a large
Erlenmeyer flask. Note: If smaller volumes are needed, 3.0 ± 0.01 g per 100 mL is also acceptable.
199
• Measure 1000 mL of reagent grade water into a graduated cylinder and add approximately
half to an Erlenmeyer flask.
• Transfer media to the flask and rinse down the sides using the remaining half of the reagent grade water.
• Allow the media to completely dissolve by swirling or stirring with a sterilized stir bar.
• Remove approximately 10 mL of prepared TSB and dispense into a screw capped vial or
other acceptable vessel for future pH analysis.
• Dispense into 30 mL screw capped vessels. If not screw capped, cover flask opening with aluminum foil.
• Autoclave at 119 - 121°C for 12 to 15 minutes on slow exhaust. Refer to Table 7.
• Allow to cool to room temperature and record the final pH using the 10 mL portion of the
media. The final pH must be 7.3 ± 0.2. If the final pH does not fall within this range, discard the media and remake.
• Store prepared media in screw capped vessels for up to 3 months in a refrigerator or up to
one week (sealed/covered) at room temperature.
p. Brain Heart Infusion (BHI) Broth: Perform the following instructions to prepare the broth: • Weigh out 37 ± 0.1 g of dehydrated media into a weigh boat and transfer to a large
Erlenmeyer flask. Note: If smaller volumes are needed, 3.7 ± 0.01 g per 100 mL is also acceptable.
• Measure 1000 mL of reagent grade water into a graduated cylinder and add approximately half to an Erlenmeyer flask.
• Transfer media to the flask and rinse down the sides using the remaining half of the reagent
grade water. • Allow the media to completely dissolve by swirling or stirring with a sterilized stir bar.
• Remove a 10 mL portion of the prepared BHI and dispense into a screw capped vial or other
acceptable vessel for future pH analysis.
• Dispense into 30 mL screw capped vessels. If not screw capped, cover flask opening with aluminum foil.
• Autoclave at 119 - 121°C for 15 minutes on slow exhaust. Refer to Table 7.
• Allow to cool to room temperature and record final pH using approximately a 10 mL portion of the media. The final pH must be 7.2 ± 0.2. If the final pH does not fall within this range, discard the media and remake.
• Store prepared media in screw capped vessels for up to 3 months in a refrigerator or up to
one week (sealed/covered) at room temperature.
200
4.0 Sample Collection/Preservation/Holding Time a. Sample collection:
• Select an appropriate sampling tap such as a faucet, petcock, or small valve. Avoid taps
with a leaky stem or a swivel joint.
• Prior to collection, remove the aerator since it may harbor bacteria.
• Prior to collection in the distribution system place all carbon filters, sediment filters and water softeners on bypass.
• Flush the sample tap to waste for approximately one minute then close valve.
• It is recommended to disinfect the nozzle for two minutes with the sanitizing solution (See Section 3.0(g) of this method for preparation instructions) using either a spray bottle to saturate the opening or a plastic bag to squeeze the solution into the faucet. Use a fresh solution each time.
• Open the tap fully and flush tap for approximately 3 to 5 minutes (until a constant
temperature is detected), then reduce flow enough to allow sample bottles to be filled without splashing.
• Verify water is within the expected concentration range for chlorine using a digital
colorimetric/DPD colorimeter.
• Aseptically fill the sample bottles and avoid contaminating the cap or bottle. Note: If using commercially purchase pre-sterilized bottles, be sure to completely remove any plastic seal from the cap prior to filling the sample bottle.
• Do not allow the sample bottle to overflow as this will wash out the sodium thiosulfate. If the
sample bottle overflows or water splashes out, discard and collect another sample.
• Immediately recap the sample bottle tightly.
• Refer to Chapter 2(B) on page 7 of this manual for sample identification requirements.
b. Preservation: Sodium thiosulfate is used to remove residual chlorine. Add 0.1 mL of 10% sodium thiosulfate per 125 mL (4 oz.) sample container. This will neutralize approximately 15 mg/L of residual chlorine. Refer to Section 3.0(h) of this method for preparation instructions.
c. Maximum sample holding time: No more than 30 hours after collection. Store samples at 4°C until time of analysis.
5.0 Membrane Filtration Procedure
5.1 Sample Setup Use sterile filtration units at the beginning of each filtration series. A filtration series is interrupted when an interval of 30 minutes or longer elapses between sample filtrations after such interruption, treat any further sample filtration as a new filtration series and sterilize all membrane filter holders in use.
1. Label plate with sample number and volume of sample to be analyzed.
201
2. With sterile forceps, place a membrane filter, grid-side up, on filter base and attach funnel. Note: Sterilize forceps by immersing in 95% ethanol (or absolute methanol) and ignite with a flame. Allow the flame to self-extinguish.
3. Vigorously shake sample. Note: Sample bottle must contain at least 1 inch of headspace to
allow for adequate mixing.
4. Measure 100 mL of sample and transfer to funnel. Do not rinse out the graduated cylinder or calibrated bottle. Note: If sample is too turbid to filter, split the 100 mL over two or more plates. If the original sample volume is less than 100 mL, the test is not valid and must be recorded as Sample Rejected: Insufficient Volume. Another sample must be collected for analysis.
5. Turn on the vacuum and filter the sample, rinsing the sides of the funnel three times with 20 to
30 mL of sterile buffered rinse water. Allow the filter to go near dryness between each rinse.
6. Remove funnel from the base of the filter unit and store aseptically between filtrations.
7. Transfer membrane filter using sterile forceps to m-Endo plate, grid-side up, ensuring complete contact with media, using a rolling motion to avoid air bubbles.
8. Both negative and positive controls are required with each set of samples tested. • Negative Control: At the beginning and end of a sample set with sterile forceps, place a
membrane filter, grid-side up, on filter base and attach funnel. Add 20 to 30 mL of sterile buffered rinse water.
• Positive Control: At the end of a sample set, after the negative controls, with sterile forceps, place a membrane filter, grid-side up, on filter base and attach funnel. Add 20 to 30 mL of sterile buffered rinse water and inoculate using a known control of either a live E. coli culture or with water known to contain E. coli, such as raw wastewater.
• Turn on the vacuum and filter the sample, rinsing the sides of the funnel three times with 20
to 30 mL of sterile buffered rinse water. Allow the filter to go near dryness between each rinse.
• Remove funnel from the base of the filter unit.
• Transfer membrane filter using sterile forceps to plate, grid-side up, ensuring complete contact with media, using a rolling motion to avoid air bubbles.
9. Cap and invert plate. Then place inside a sealed container with moist paper towels to maintain
proper humidity.
10. Incubate within 30 minutes at 35 ± 0.5°C for 22 to 24 hours.
5.2 Interpreting and Reporting Membrane Filtration Results
a. After the 22 to 24 hour incubation period, remove the plates from the incubator.
b. All colonies are to be counted under magnification and description recorded.
c. Refer to Table 3 or Table 4 for assistance.
202
Table 3: Reportable - No Confirmation Required
m-Endo Results Reported Result
No Growth Total Coliform: Absence
≤ 200 Colorless Colonies Total Coliform: Absence
Table 4: Inconclusive – Confirmation Required
m-Endo Results Confirmation Required
Colored/Golden-Green Metallic Sheen Colonies Yes
Confluent Growth Yes
> 200 Colorless Colonies Yes
d. Using a sterile cotton swab, collect all growth from the m-Endo plate. Transfer a portion of the
collected growth to three separate tubes. Note: Inoculation must occur in the order listed. • EC-MUG tube • LTB tube • BGLBB tube
e. Use a separate un-inoculated EC-MUG tube as a fluorescence comparator and carry it through
the entire verification cycle. Incubate the EC-MUG tubes for 24 ± 2 hours at 44.5 ± 0.2°C. After the 24 hour incubation period, examine the culture tubes for fluorescence using a UV light in a darkened room or observation box. • If, when compared to the comparator, fluorescence is present, go to (i) or (j) for
interpretation.
• If fluorescence is absent, report the sample as E. coli: Absence. Refer to (h) for further confirmation.
f. Incubate the LTB and BGLBB tubes for 24 ± 2 hours at 35 ± 0.5°C. After the 24 hour incubation
period check the Durham tube for gas. • If gas is present in the LTB and BGLBB tubes, go to (i) or (j) for interpretation.
• If gas is absent in the LTB and BGLBB tubes go to (g) for further confirmation.
g. Samples absent of gas in the LTB and BGLBB tubes must be re-incubated for 24 ± 1 hour.
• If gas is present in the LTB and BGLBB tubes, go to (i) or (j) for interpretation.
• If gas is absent in the LTB and BGLBB tubes, go to (i) or (j) for interpretation.
• If gas is present in the LTB tube but not the BGLBB tube go to (h) for further confirmation.
203
h. Re-inoculate a new BGLBB tube and EC-MUG tube (from the growth present LTB tube) and incubate. Use a new un-inoculated EC-MUG tube as a fluorescence comparator and carry it through the entire verification cycle. • Incubate BGLBB at 35 ± 0.5°C for 24 ± 2 hours; if no gas is present re-incubate at 35 ±
0.5°C for an additional 24 ± 1 hour. Go to (i) or (j) for interpretation. • Incubate EC-MUG at 44.5 ± 0.2°C for 24 ± 2 hours. Go to (i) or (j) for interpretation.
Note: An E. coli: Presence result is considered a Total Coliform: Presence result, even if the confirmation results for BGLBB is absent of gas. Table 5: Colony Counts ≤ 200 Colonies
Gas Present or Absent Fluorescence Reported Results
LTB Results BGLBB Results
EC-MUG Results
Absent Absent Absent Total Coliform: Absence; E. coli: Absence
Present Absent Absent Total Coliform: Absence; E. coli: Absence
Present Present Absent Total Coliform: Presence;
E. coli: Absence
Present Present Present Total Coliform: Presence; E. coli: Presence
Present Absent Present Total Coliform: Presence; E. coli: Presence
i. After confirmation of colony counts with > 200 colonies or confluent growth, a result of Total
Coliform: Absence must be reported as Data Quality Rejected with a reason of Other. In this instance, the type of interference (i.e., Confluent Growth or Too Numerous To Count) must be noted in the comment field.
j. Refer to Table 6 below, when a sample is to be reported as Sample Rejected.
204
Table 6: Sample Rejection Reason
Conditions Sample Rejection Reason Reported As:
Sample Bottle Broken Broken
Chlorine Detected in Sample Chlorine Present
Sample Collected > 30 Hours Exceeds Holding Time
Excessive Headspace in Container Excessive Headspace
Sample Frozen Frozen Sample
Incomplete Sample Information Insufficient Information
Sample Volume < 100 mL Insufficient Volume
Error With Sampling Point Invalid Sampling Point
Error With Sampling Protocol Invalid Sampling Protocol
Negative Control is Positive Laboratory Accident
Positive Control is Negative Laboratory Accident
Incubator Broken or Other Lab Error Laboratory Accident
Sample Bottle Leaking Leaked In Transit
205
Membrane Filtration Result Interpretation Flow Chart (EC-MUG, LTB, BGLBB)
Swab Petri Dish and Inoculate EC-MUG, LTB, then BGLBB
Incubate EC-MUG for 24 ± 2 hours at 44.5 ± 0.2°C
Incubate LTB and BGLBB for 24 ± 2 hours at 35 ± 0.5°C
Result: E. coli - Presence
See Next Page if Further Confirmation is Required. If Further
Confirmation is Not Required, Result: E. coli - Absence
Did the Culture Fluoresce?
Yes No
Was Gas Produced in Durham Tubes?
Go to Next Page
206
No
Continued from Previous Page: Was Gas
Produced?
Yes
No
Gas Present in LTB and BGLBB
Gas Absent in LTB and BGLBB
Gas Present in LTB and Absent in BGLBB
Result: Total Coliform –
Presence
Incubate LTB and BGLBB for 24 ± 1 hour at 35 ± 0.5°C Re-inoculate EC-MUG
and BGLBB from LTB
Was Gas Present in LTB and BGLBB?
Result: Total Coliform –
Absence
*Note: If Gas Present in LTB but Absent in BGLBB
Incubate BGLBB for 24 ± 2 hours at
35 ± 0.5°C
Incubate EC-MUG for 24 ± 2 hours at
44.5 ± 0.2°C Was gas
produced?
Yes
Result: E. coli – Presence
Result: E. coli – Absence
Was gas produced?
Result: Total Coliform –
Presence
Yes
No Incubate BGLBB for 24 ± 1 hour at 35 ± 0.5°C
Was gas produced?
Yes No Result:
Total Coliform –Absence
*Note:
207
6.0 Quality Control (QC) Requirements
6.1 Analyst QC Requirements
All analysts are required to perform membrane filtration analysis on at least 10% of the routine samples. In addition, all certified analysts must analyze and record a minimum of one positive total and fecal coliform plate per month.
6.2 Media Performance Check
a. With every batch of media, inoculate one sterile plate or culture tube of each media with a known
coliform culture. A second sterile plate or culture tube of each corresponding media serves as a control blank.
• Incubate m-Endo, LTB, BGLBB and TSB/BHI for 24 hours at 35 ± 0.5°C. It may be
necessary to incubate LTB and BGLBB for an additional 24 hours to complete the test.
• Incubate EC-MUG for 24 hours at 44.5 ± 0.2°C. • The inoculated plate/culture tube must show growth/fluorescence while the control blank
must not show growth. Do not use media if growth is not indicated in the inoculated tube.
6.3 Sample Containers
a. Must be checked for sterility by an Ohio EPA certified laboratory.
b. Sterility Check: A sterility check must be done on a minimum of one sample/test bottle per batch prepared in the lab or a minimum of 1% per case purchase (up to 4 bottles per lot).
• Add approximately 25 mL of prepared sterile Tryptic Soy Broth (TSB) or Brain Heart Infusion
(BHI) per bottle tested mix to expose entire interior of the bottle to the growth media.
• Incubate at 35 ± 0.5°C and check after 24 hours for growth. Growth is indicated by any turbidity.
• If growth occurs, re-sterilize any batches of laboratory prepared containers that test positive
and repeat the sterility check.
• If any commercially purchase disposable containers test positive, recheck another set. If the second check is positive, notify the manufacturer and do not use any bottles from the affected case.
6.4 Membrane Filters
a. Must be checked for sterility by an Ohio EPA certified laboratory.
b. Sterility Check: A sterility check must be done on a minimum of one filter per lot purchase and
annually.
• Aseptically add one filter to a sterile container with approximately 50 mL of prepared sterile Tryptic Soy Broth (TSB) or Brain Heart Infusion (BHI).
• Incubate at 35 ± 0.5°C and check after 24 hours for growth. Growth is indicated by any turbidity.
208
• If growth occurs, recheck another filter. If the second check is positive, notify the manufacturer and do not use any filters from the affected lot.
6.5 Sterilization
a. Sterilize all glassware by dry heat in a hot air oven for at least 2 hours at ≥ 170°C. b. Sterilize by autoclaving all liquids and materials. Refer to Table 7 below. Note: When
autoclaving liquid filled vessels, provide enough space between the vessels to allow for even sterilization. Table 7: Autoclave Times and Temperatures
Material Temperature Time Cycle
Carbohydrate Media (LTB, BGLBB, EC-MUG) 119 - 121°C 12 to 15 minutes1 Slow
Stainless Steel MF Funnels, Stir Bars 119 - 121°C 12 to 15 minutes Fast
Plastic Bottles/Cylinders 119 - 121°C 30 minutes Fast 1Media must not be in the autoclave more than 45 minutes from the time the autoclave door is closed to the time it is opened. 2Dispose of contaminated material in compliance with all Ohio EPA and local requirements.
c. Autoclave sterility checks are required once every three months, per autoclave.
• If using a biological indicator ampule, follow manufacturer’s instructions. Note: After
sterilization, remove and allow ampules to cool for 10 minutes prior to incubation. Incubate at 55 - 60°C for 24 hours. Growth is evident by a color change per manufacturer’s instructions. If color change occurs, corrective action for the autoclave is required.
• Alternatively, fill an Erlenmeyer flask with 25 to 50 mL of TSB/BHI, inoculate with a known coliform culture, cover flask opening with aluminum foil and incubate at 35 ± 0.5°C for 24 hours. After incubation, when TSB/BHI shows growth, autoclave at 119 - 121°C for 12 to 15 minutes on slow exhaust. Allow to cool to room temperature. Fill a test vessel with approximately 25 mL of TSB/BHI and inoculate the TSB/BHI with the “sterilized” culture from the Erlenmeyer flask. Incubate test vessel at 35 ± 0.5°C for 24 hours. After the 24 hour incubation period, remove the test vessel from the incubator. The inoculated test vessel must not show growth. If growth is present in the inoculated test vessel, corrective action for the autoclave is required.
209
6.6 Thermometer Calibration a. Calibrate all glass and electronic thermometers when new and at least annually. Calibrate all
dial thermometers at least once every three months.
b. Reference/NIST Certified Thermometer (Ice Point) Calibration
1. Create an ice bath in an insulated container using distilled/deionized water and crushed ice made using distilled/deionized water.
2. Submerge the reference/certified thermometer in the ice bath until a stable temperature is reached.
3. The thermometer must read 0.0°C or, for thermometers without a 0.0°C mark, the “ice-point
calibration” mark.
4. If reference/certified thermometer does not read 0.0°C corrective action must be taken.
c. Incubator Thermometer (Total Coliform) Calibration 1. Place incubator thermometers and reference thermometer in a covered beaker or flask of
water and incubate overnight in a 35°C incubator. Optionally, use mineral oil instead of water to eliminate the need for a covered vessel.
2. After 24 hours, record readings of the incubator and reference thermometers. 3. Label each thermometer with the correction factor based on the reference thermometer.
Note: Remove thermometer from use if correction factor is > 1.0°C.
d. Incubator Thermometer (Autoclave Sterility Check) Calibration
1. Place incubator thermometer and reference thermometer in a covered beaker or flask of
water and incubate overnight in a 55 - 60°C incubator. Optionally, use mineral oil instead of water to eliminate the need for a covered vessel. Note: If using a dry block incubator with wells, place incubator thermometer and reference thermometer in adjacent wells overnight at 55 - 60°C.
2. After 24 hours, record readings of the incubator and reference thermometers.
3. Label each thermometer with the correction factor based on the reference thermometer.
Note: Remove thermometer from use if correction factor is > 1.0°C.
e. Water Bath/Heat Sink Thermometer (44.5°C) Calibration
1. Place water bath/heat sink thermometer and reference thermometer inside a water bath/heat
sink to incubate overnight in a 44.5°C water bath/heat sink.
2. After 24 hours, record readings of the water bath/heat sink and reference thermometers.
3. Label each thermometer with the correction factor based on the reference thermometer. Note: Remove thermometer from use if correction factor is > 1.0°C.
210
f. Hot Air Oven Thermometer Calibration 1. Place oven thermometer and reference thermometer inside an oven side by side in the
same container of sand or heat sink.
2. Heat to approximately 170°C or as high as the reference thermometer will allow.
3. Check the readings of both thermometers.
4. Label each thermometer with the correction factor based on the reference thermometer.
Note: Remove thermometer from use if correction factor is > 1.0°C.
g. Refrigerator Thermometer Calibration
1. Place refrigerator thermometer and reference thermometer inside a refrigerator overnight side by side in the same covered beaker or flask of water. Optionally, use mineral oil instead of water to eliminate the need for a covered vessel.
2. After 24 hours, record readings of the refrigerator and reference thermometers.
3. Label each thermometer with the correction factor based on the reference thermometer.
4. Alternatively, the refrigerator thermometer may be calibrated at “ice-point” when the reference thermometer is checked.
Note: Remove thermometer from use if correction factor is > 1.0°C.
h. Maximum Registering Thermometer
1. Calibration will be done by the laboratory certification officer at the time of the survey.
2. The laboratory must have at least one spare maximum registering thermometer.
3. Tag each thermometer with the correction factor base on the onsite calibration.
6.7 Equipment Timer Calibration
a. Calibrate all equipment timers at least once every three months.
b. Autoclave Timer Calibration
1. Set the timer for 45 minutes on either fast or slow exhaust. 2. Use an accurate watch or stopwatch to time it at appropriate sterilization intervals used by
the laboratory (12, 15, 30 and 45 minutes).
3. Timer calibration begins when the autoclave reaches sterilization pressure and temperature and ends when the pressure/temperature begins to fall as the cycle ends.
4. See Table 8 below to determine if corrective action is required.
211
Table 8: Autoclave Timer Acceptance Criteria
Cycle Time Calibrated Acceptance Criteria 12 minutes 1 minute
15 minutes 1 minute and 30 seconds
30 minutes 3 minutes
45 minutes 5 minutes
5. Label each autoclave timer with the correction factors for each interval used.
c. Oven Timer (If Applicable)
1. If the oven is equipped with a timer, use the procedures in Section 6.7(b) of this method for calibrating the oven timer.
2. Corrective action is required if a two hour cycle differs by ± 12 minutes.
6.8 pH Meter Calibration a. The calibration procedure must be performed and result in an acceptable linearity value (percent
(%) slope or millivolt (mV)) prior to use.
b. Calibrate the pH meter following the manufacturer’s instructions for a two point calibration (pH buffers 7.0 and 10.0) or three point calibration (pH buffers 4.0, 7.0 and 10.0).
c. If a two point calibration is performed, analyze and record the pH 4.0 verification buffer value,
per use. The results of the pH 4.0 verification buffer must be ± 0.1 pH units of the true value; acceptance limits are 3.9 to 4.1 pH units. Note: If the laboratory has decided to adopt a three point calibration for all analyses, the pH 4.0 verification buffer analysis is not required.
d. The linearity must be recorded each time the meter is calibrated; acceptance limits are 95 to
105% or -56 to -62 mV. Calibrations must be dated and initialed by all certified analysts participating in each calibration procedure.
6.9 Balance Calibration
a. All balances must be on an annual service contract, proof of which must be posted on or near the balance.
b. Balances must be checked prior to use with certified weights (ASTM type 1, 2 or 3 weights or
NIST Class S or S1). A manufacturer’s certificate for the certified weights must be available.
c. Balance checks must be done with at least three weights that bracket the range of weights, normally used in the laboratory.
• Place each mass on the balance and record the weight (reference weight).
• Add a test load weight of either 0.1 g (top loading balance) or 0.01 g (analytical balance) and
record the reference weight plus test load weight.
• Response for the non-analytical (top loading balance) must be ± 0.1 g.
• Response for the analytical balance must be ± 0.01 g.
212
6.10 Refrigerator Record
a. Record refrigerator temperatures once daily to the nearest thermometer gradation.
6.11 Incubator Record (Total Coliform) a. Record incubator thermometer temperatures at least twice daily when in use, including one
reading in the early morning and another at least four hours later. Each shelf must have a separate thermometer to be recorded to the nearest thermometer gradation.
6.12 Incubator Record (Autoclave Sterility Check)
a. Record incubator thermometer temperature prior to use and when in use. Each shelf must have
a separate thermometer to be recorded to the nearest thermometer gradation. Note: Only one thermometer is required if a dry block incubator is used.
6.13 Water Bath/Heat Sink Record
a. Record water bath/heat sink thermometer temperatures at least twice daily when in use,
including one reading in the early morning and another at least four hours later.
6.14 Labeling a. Reagents and media must be labeled with date received and date opened.
b. Prepared reagents and media must be labeled with content, date made and analyst initials.
7.0 Required Documentation
1. The Microbiological Laboratory Schedule for Membrane Filter on page 218 of this manual may be used to keep records.
2. The Microbiological Test Data Sheet for Membrane Filter on page 219 of this manual is recommended to document each analysis. The minimum requirements for documenting each procedure are as follows:
a. Sample ID.
b. Sample Location.
c. Analyst(s) initials.
d. Collection: date and time.
e. Incubation Start: date and time.
f. Interpretation (Incubation end): date and time.
g. Colony description.
h. Confirmation needed? (Y/N). i. Chlorine: free and total.
213
3. The Total Coliform/E. coli Coliform Confirmation for Membrane Filter on page 220 of this manual may be used to keep these records. The minimum requirements for documenting each procedure are as follows. a. Sample ID.
b. Analyst(s) initials.
c. EC-MUG1: date, time and fluorescence (Y/N).
d. LTB 24 hours: date, time and gas formation (Y/N).
e. LTB 48 hours: date, time and gas formation (Y/N).
f. BGLBB1: date, time and gas formation (Y/N).
1If re-inoculation is required; a separate line must be used with the same sample ID.
4. The Sample Bottle Sterility/Fluorescence Record on page 221 of this manual may be used to keep these records. The minimum requirements for documenting each procedure are as follows:
a. Analyst(s) initials.
b. Date sample bottles were received or sterilized. c. Brand and lot number. d. Number of bottles received or sterilized. e. Date tested. f. Growth results: number positive or negative. g. UV results: number positive or negative. h. Comments.
5. The Membrane Filter Sterility Record on page 222 of this manual may be used to keep these
records. The minimum requirements for documenting each procedure are as follows:
a. Analyst(s) initials.
b. Date membrane filters were received. c. Brand and lot number. d. Number of membrane filters received. e. Date tested. f. Growth results: number positive or negative. g. Comments.
214
6. The Media Quality Control Record on page 223 of this manual may be used to keep these records. The minimum requirements for documenting each procedure are as follows:
a. Analyst(s) initials.
b. Date.
c. Media to be tested. d. Brand and lot number. e. pH of media after sterilization.
f. Growth results: positive or negative. g. Comments.
7. The Oven Sterilization Record on page 224 of this manual may be used to keep these records.
The minimum requirements for documenting each procedure are as follows:
a. Analyst(s) initials.
b. Date.
c. Time in.
d. Time to 170°C.
e. Time out.
f. Sterilization Temp (°C).
g. Material sterilized.
8. The Autoclave Sterilization Record on page 225 of this manual may be used to keep these records. The minimum requirements for documenting each procedure are as follows:
a. Analyst(s) initials
b. Date.
c. Time in.
d. Time out.
e. Total time (minutes).
f. Sterilization time (minutes).
g. Internal Thermometer (°C).
h. Material sterilized.
215
9. The Autoclave Sterility Check record on page 226 of this manual may be used to keep these records. The minimum requirements for documenting each procedure are as follows:
a. Type of Sterility Check Used: Manufacture/Ampule Type or Alternative: Circle One
(TSB/BHI).
b. Analyst(s) initials.
c. Sterilization date.
d. Incubation: time and date. e. Interpretation: time and date. f. Result: positive or negative. g. Lot number.
10. The Thermometer Calibration Record on page 227 of this manual may be used to keep these
records. The minimum requirements for documenting each procedure are as follows:
a. Analyst(s) initials.
b. Date.
c. Thermometer location and identification. d. Observed temperature (°C). e. Temperature of reference thermometer (°C). f. Correction factor.
11. The Timer Calibration Record on page 228 of this manual may be used to keep these records. The minimum requirements for documenting each procedure are as follows:
a. Analyst(s) initials.
b. Date.
c. Timer location. d. Equipment time (minutes). e. Stopwatch time (minutes). f. Correction factor.
12. The pH Meter Slope/Linearity Verification (4.0 Buffer) record on page 229 of this manual may
be used to keep these records. The minimum requirements for documenting each procedure are as follows:
a. Analyst(s) initials.
b. Date.
216
c. Slope (%). d. pH 4.0 Verification (pH Units). e. Comments.
13. The Balance Calibration Record on page 230 of this manual may be used to keep these
records. The minimum requirements for documenting each procedure are as follows:
a. Analyst(s) initials.
b. Date.
c. Reference weight and test load readings in grams (200 to 1.0 grams). d. Comments/corrective action.
14. The Daily Refrigerator Temperature Record on page 231 of this manual may be used to keep
these records. The minimum requirements for documenting each procedure are as follows:
a. Analyst(s) initials.
b. Date.
c. Temperature (°C).
d. Comments.
15. The Incubator Temperature Record on page 232 of this manual may be used to keep these records. The minimum requirements for documenting each procedure are as follows:
a. Analyst(s) initials.
b. Date.
c. Time: recorded twice each day, once in the a.m. and once in the p.m. d. Temperature (°C): recorded per shelf used.
16. The Water Bath/Heat Sink Temperature Record on page 233 of this manual may be used to keep these records. The minimum requirements for documenting each procedure are as follows:
a. Analyst(s) initials.
b. Date.
c. Time: recorded twice each day, once in the a.m. and once in the p.m. d. Temperature (°C): recorded per shelf used.
217
Microbiological Laboratory Schedule for Membrane Filter
Frequency Month
1 2 3 4 5 6 7 8 9 10 11 12
Monthly
Total Coliform/E. coli Positive
Quarterly Once Per Three Months
Dial Thermometer Calibration
Equipment Timer Calibration
Autoclave Sterility Check
Annual
Glass and Electronic Thermometer Calibration
Balance Service
218
Microbiological Test Data Sheet for Membrane Filtration
Laboratory
Sample ID Sample Location Analyst Collection Incubation
Start Interpretation
(Incubation End) Colony Description Confirmation
Needed? Chlorine
Date Time Date Time Date Time (Y/N) Free Total
219
Total Coliform/E. coli Confirmation for Membrane Filtration
Laboratory
Sample ID Analyst
EC-MUG1 LTB 24 Hours LTB 48 Hours1 BGLBB1
Date Time Fluorescence (Y/N) Date Time
Gas Formation
(Y/N) Date Time
Gas Formation
(Y/N) Date Time
Gas Formation
(Y/N)
1 If re-inoculation is required, a separate line must be used with the same sample ID.
220
Sample Bottle Sterility/Fluorescence Record
To be recorded for each lot received or batch sterilized
Laboratory
Analyst Date
Received/ Sterilized
Brand/Lot Number Number of
Bottles Received/ Sterilized
Date Tested
Growth Results UV Results
Number Positive
Number Negative
Number Positive
Number Negative Comments
*Note action taken if results are not acceptable
221
Membrane Filter Sterility Record
To be recorded for each lot received
Laboratory
Analyst Date Received Brand/Lot Number
Number of Membrane
Filters Received
Date Tested
Growth Results
Comments Number Positive
Number Negative
*Note action taken if results are not acceptable
222
Media Quality Control Record
To be checked and recorded for each new prepared batch and annually
Laboratory
Analyst Date Media Brand/Lot Number Growth Results
Comments pH Positive Negative
*Note action taken if results are unacceptable
223
Oven Sterilization Record To be recorded for each run
Laboratory
Analyst Date Time In Time to 170°C Time Out Sterilization
Temp (°C) Material Sterilized
224
Autoclave Sterilization Record To be recorded for each run
Laboratory
Analyst Date Time In Time Out Total Time
(min) Sterilization Time (min)
Internal Thermometer
(°C) Material Sterilized
225
Autoclave Sterility Check Laboratory
Type of Sterility Check Used: Manufacturer/Ampule Type Alternative: Circle One (TSB/BHI)
Analyst Sterilization Date
Incubation Interpretation Result (POS/NEG) Lot Number
Time Date Time Date
226
Thermometer Calibration Record To be recorded for each thermometer
Laboratory
Analyst Date Thermometer Location/ ID Observed
Temperature (°C) Temperature of
Reference Thermometer (°C)
Correction Factor
*Note thermometer has been removed from use if correction factor is > 1°C
227
Timer Calibration Record To be recorded for each equipment timer
Laboratory
Analyst Date Timer Location Equipment Time
(minutes) Stopwatch Time
(minutes) Correction Factor
*Note: To determine if recalibration or maintenance is required, refer to Table 7, Autoclave Timer Difference.
228
pH Meter Slope/Linearity Verification (4.0 Buffer)
To be checked and recorded for each new prepared batch
Laboratory
Calibration Buffers
Analyst Date Slope (%) pH 4.0 Verification Comments
*Note action taken if pH linearity is unacceptable
229
Balance Calibration Record Check each balance per use with certified weights. A minimum of three weights that bracket normal weighing needs are required. Record balance response to reference weight and sensitivity to reference weight plus test load (L). Non-analytical (top loading) must be sensitive to a 0.1 g test load. Analytical balances must be sensitive to a
0.01 g test load.
Laboratory
Analyst Date
Reference Weight and Test Load Readings in Grams
200 200 + L 100 100 + L 50 50 + L 10 10 + L 5 5 + L 1 1 + L
*Note action taken if calibration is unacceptable Note: "L" refers to "Test Load"
Comments/Corrective Action:
230
Daily Refrigerator Temperature Record To be recorded daily, 4.0 ± 2.0°C
Laboratory
Analyst Date Temp (°C) Comments Analyst Date Temp (°C) Comments
*Note action taken if temperature is out of range
231
Incubator Temperature Record To be recorded twice each day, am/pm, per shelf 35.0 ± 0.5°C
Laboratory
Analyst Date Time
Temp (°C) Analyst Date Time
Temp (°C)
Shelf Shelf Shelf Shelf Shelf Shelf
am
am
pm
pm
am
am
pm
pm
am
am
pm
pm
am
am
pm
pm
am
am
pm
pm
am
am
pm
pm
am
am
pm
pm
am
am
pm
pm
*Note action taken if temperature is out of range
232
Water Bath/Heat Sink Temperature Record To be recorded twice each day, am/pm 35.0 ± 0.5°C
Laboratory
Analyst Date Time Temp (°C) Analyst Date Time Temp (°C) Analyst Date Time Temp (°C)
am
am
am
pm
pm
pm
am
am
am
pm
pm
pm
am
am
am
pm
pm
pm
am
am
am
pm
pm
pm
am
am
am
pm
pm
pm
am
am
am
pm
pm
pm
am
am
am
pm
pm
pm
am
am
am
pm
pm
pm
am
am
am
pm
pm
pm
*Note action taken if temperature is out of range
233
Appendices A. Glossary and Acronyms 1. Glossary Analyte: The constituent or property of a sample to be measured. Analytical Data: The qualitative or quantitative results from a chemical, physical, microbiological, toxicological, radiochemical, or other scientific determination. Analytical Result: A numerical estimate of the quantity of an analyte in a sample, obtained by carrying out the procedure specified in the analytical method once (unless the method calls for the result to be the average of two or more responses). The result also can be thought of as the final value reported to the user. Batch: A set of samples analyzed together without interruption. Results are usually calculated from the same calibration curve or factor. Blank: A synthetic sample, free of the analyte(s) of interest. For example, in water analysis, pure water is used for the blank. In chemical analysis, a blank is used to estimate the analytical response to all factors other than the analyte in the sample. Field blanks are used to obtain information on contamination introduced during sample collection, transport, or storage. Method blanks are used to reveal contamination introduced by laboratory. Calibration Standard: Solution of a known analyte concentration, used in the calibration procedure to determine the relationship between concentration and analytical response. Certification Officer: An Ohio EPA person who evaluates laboratories for the purpose of certification. Check Standard: A solution of known concentration used to indicate bias and the precision of an analytical system. When used in conjunction with a control chart, it becomes a control standard. Check standards are prepared from different sources than standards used for calibration. Acceptance Limits: Statistical warning and action limits calculated for control charts, used to make decisions on acceptability of QC results. Drinking Water Certification Manual: EPA’s Manual for the Certification of Laboratories Analyzing Drinking Water. Environmental Laboratory: A facility in a specific geographic location, owned or managed by a single entity where scientific determinations are performed on samples taken from the environment, including drinking water samples. Holding Time: The allowed time from when a sample was taken or extracted until it must be analyzed. For composite samples, the holding time starts when the last composite aliquot is collected. Laboratory Certification Section: The section at Ohio EPA administering the Ohio Drinking Water Laboratory Certification Program. Laboratory: (See Environmental Laboratory.) Method: A formalized group of procedures and techniques for performing an activity (e.g., sampling, chemical analysis, data analysis), systematically presented in the order in which they are to be executed.
234
On-site Survey: An on-site inspection of laboratory capabilities. On-site surveys can be scheduled or unannounced. Quality Assurance (QA): A set of activities designed to establish and document the reliability and usability of measurement data. Quality Assurance Plan (QAP): A QA manual that contains documents policies, organizational information, objectives, and specific QC and QA activities. Volume and scope of QA manuals vary with complexity of the laboratory mission. Quality Control (QC): The routine application of statistically based procedures to assess the accuracy of measurement data. Spike: A known amount of analyte added to a sample to reveal bias due to interference present in the sample. The magnitude of bias is estimated as percent recovery. If the spike is added to an environmental sample, the sample is called a matrix spike. Standard: A solution of known and documented concentration, either a check or control standard, or a calibration standard that is used to prepare a calibration curve. Standard Operating Procedure (SOP): A detailed written description of a procedure designed to systematize performance of the procedure. 2. Acronyms
Ohio EPA: Ohio Environmental Protection Agency USEPA: United States Environmental Protection Agency NELAP: National Environmental Laboratory Accreditation Program NPDWR: National Primary Drinking Water Regulations QA: Quality Assurance QAP: Quality Assurance Plan QC: Quality Control ORC: Ohio Revised Code SOP: Standard Operating Procedure OAC: Ohio Administrative Code SDWA: Safe Drinking Water Act DES: Division of Environmental Services PT: Proficiency Test B. Still Produced Reagent Grade Water 1. A still may be used to produce reagent grade water for the purposes of preparing media, reagents, and
dilution/rinse water when performing microbial analysis. The quality of water must be tested on a regular basis. The requirements and frequency of testing must be met as described in Table 1, Required Reagent Grade Water Criteria.
235
Table 1: Required Reagent Grade Water Criteria
Parameter Limits Frequency
Conductivity > 0.5 megohms resistance or < 2 micromhos/cm (microsiemens/cm) at 25°C Prior to Use
2. The Microbiological Laboratory Schedule for Reagent Grade Water on page 235 of this manual may be used to record the required information. The minimum requirements for documenting each verification procedure are as follows:
a. Analyst(s) initials.
b. Date.
c. Conductivity (microsiemens/cm).
d. Total chlorine residual (mg/L).
e. Date of annual trace metals analysis.
f. Comments.
C. General Laboratory Benchsheets
1. The Reagent/Standard Preparation Record on page 236 of this manual may be used to record the required information. The minimum requirements for documenting each verification procedure are as follows:
a. Supplier/analyst(s) initials.
b. Type of reagent/standard.
c. Reagent/standard lot number.
d. Date received or prepared.
e. Reagent/standard expiration date.
236
Microbiological Laboratory Schedule for Reagent Grade Water Laboratory
Analyst Date Conductivity
(microsiemens/cm) Total Chlorine
Residual (mg/L)
Date of Annual Trace Metals Analysis Comments
237
Reagent/Standard Preparation Record
Laboratory
Supplier/Analyst(s) Initials Type of Reagent/Standard Reagent/Standard Lot
Number Date Received/Prepared Reagent/Standard Expiration Date