64
Original Operating Manual Operating manual OilControl air Art. No.: 030 480 030
| Date post: | 03-May-2019 |
| Category: |
Documents |
| Upload: | nguyenhanh |
| View: | 217 times |
| Download: | 0 times |

Original Operating Manual
Operating manual
OilControl air
Art. No.: 030 480 030

2 OilControl air
Copyright
It is essential that you read this manual thoroughly before installing and using this
software. Warranty claims for malfunctions and damage resulting from insufficient
knowledge of the content of this manual will be deemed null and void.
© HORN GmbH & Co. KG. All rights reserved.
The text, images and layout of this publication are protected by copyright law.
Reproductions and copies, including reproductions and copies of parts of this
publication, are permitted only with express written consent. Subject to technical
changes.
Service hotline +49 1805 900 301
Repair service +49 1805 900 302
(€0.14/min: when calling from a German land line, max. €0.42/min when calling from a
mobile phone)
Document No.:
Updated on: 10/2017

OilControl air 3
Contents
1 Safety instructions .............................................................................................. 5
2 OilControl air - Description ............................................................................... 6
3 Installation ............................................................................................................ 7
3.1 Web server ................................................................................................................ 7
3.2 “OilControl Air” server program ......................................................................... 8
3.3 Clients „OilControl Air“ ........................................................................................... 8
4 First Starting the Program Server ................................................................... 9
5 First Starting the Program Client ................................................................... 11
6 Login .................................................................................................................... 12
7 Orders .................................................................................................................. 13
7.1 Dispensation ........................................................................................................... 14
7.2 Creation .................................................................................................................... 17
7.3 Editing ...................................................................................................................... 17
8 Dispensation data ............................................................................................. 18
9 Display................................................................................................................. 19
9.1 Display ..................................................................................................................... 20
9.2 Tank fill level.......................................................................................................... 20
9.3 Configuration ......................................................................................................... 21
10 Master data ........................................................................................................ 21
10.1 Products ................................................................................................................... 22
10.2 Mechanic .................................................................................................................. 22
10.3 Units .......................................................................................................................... 22
10.4 Language.................................................................................................................. 23
10.5 EDP ............................................................................................................................ 25
10.6 User administration ............................................................................................. 33
11 Device configuration ........................................................................................ 34
11.1 Devices ..................................................................................................................... 34
11.2 WIFI/LAN ................................................................................................................. 37
12 Database ............................................................................................................. 38
13 Import protocols ................................................................................................ 39
13.1 Import protocol - File, Automaster, Visma ................................................... 39
13.2 Import protocol - Visma, only order numbers ............................................ 40
13.3 Import protocol – Autoline CN .......................................................................... 41
13.4 Import protocol – Autoline XML ...................................................................... 43
14 Export protocol.................................................................................................. 44
14.1 Data export protocol - File ................................................................................ 44
14.2 Data export protocol – Automaster ................................................................ 45
14.3 Data export protocol – Autoline CN ................................................................ 46
14.4 Data export protocol – Visma ........................................................................... 48
14.5 Data export protocol – Autoline XML ............................................................ 49
14.6 Export files ............................................................................................................. 50
15 Other .................................................................................................................... 51
16 Dispensation quality ......................................................................................... 51
10.5.1 Protocol 25
10.5.2 Data export settings 27
10.5.3 Registration in use protocol 30
10.5.4 Activating simple order creation 32
11.1.1 Pumping station 35
11.1.2 Tank 36
4 OilControl air
17 Troubleshooting ................................................................................................ 52
17.1 Client cannot connect to the server ............................................................... 52
17.2 Server Offline ......................................................................................................... 52
18 WEB Interface .................................................................................................... 54
18.1 Login ......................................................................................................................... 54
18.2 Orders ....................................................................................................................... 55
18.3 Dispensations ......................................................................................................... 58
18.4 Active ........................................................................................................................ 58
18.5 Product ..................................................................................................................... 58
18.6 Creation .................................................................................................................... 59
18.7 View .......................................................................................................................... 60
18.8 Tank ........................................................................................................................... 61
18.9 Devices ..................................................................................................................... 61
18.10Password ................................................................................................................ 62
17.2.1 Status Bar Messages 53

OilControl air 5
1 Safety instructions
This software has been programmed according to the very latest technical standards
and to recognized safety and technical regulations. Nevertheless, improper use could
result in loss of data. Therefore, it is essential that you follow the instructions
provided in this manual, in particular the safety instructions and the sections marked
with warning symbols.
Warning notices and symbols
The following symbols are used for especially important points in this operating
manual.
Please note
Specific details and/or instructions for damage prevention
Warning
Organizational Measures
This operating manual is to be kept within easy reach at the place of operation! Each
and every person involved in the installation and use of this software must have read
and understood the entire operating manual.
Qualified personnel
All persons who install and use this software must possess the necessary
qualifications for these tasks. The scope of responsibility, scope of competence and
monitoring of personnel must be precisely regulated by the operator. Any personnel
not possessing the required knowledge are to be trained and instructed accordingly.
In addition, the operator is to ensure that all personnel fully understand the content
of this operating manual.

6 OilControl air
2 OilControl air - Description
The Oil Control air program serves to facilitate communication between the present
TMS air/LevelController air units and the intranet. With the program, dispensing
orders can be set up, order information administer, and completed release
information saved as well was exported from the program.
The required login credentials are shown for each menu item. The server
administrator does not appear in this list as it has access to all areas.
The program version is displayed on the startup screen under the “TECALEMIT”
company logo, as well as in the program title bar.
The help file shown here can be opened via the highlighted button. The link found
there opens the program page online. Here you can learn about program updates at
regular intervals.

OilControl air 7
3 Installation
Minimum system requirements
Runs on Windows 7 or newer.
Processor (CPU)
• Intel Pentium® IV 2.0 GHz
• AMD Athlon® XP 2000+
Memory (RAM)
• 2 GB
Resolution (monitor):
• 1024x768
Communication from “TMS air” as well as “LevelController air” units takes place over
the local intranet. The devices communicate via the UPD and TCP/IP protocol. When
shipped, the default port for data transfer is pre-set to 64937.
Thus, for operation the server PC must be permanently reachable on the intranet for
the units present. The web server as well as the database must run set up as a service
on this server PC, along with the “OilControl air” program installed and running
constantly.
3.1 Web server
The web server must always receive a fixed assigned IP address at which it can
be reached at all times on the intranet.
The complete “XAMPP” index from the installation CD should be copied to the server
PC on the intranet. C:\ is the recommended path for the directory. After copying the
web server then has the directory: C:\XAMPP\
The file “setup_xampp.bat” is located in this directory.
This should be run once by right-clicking on the file and by selecting “Open.” The
following directions are to be followed as the web server is configured in the
installation directory.
Later on in the description it’s assumed that the web server is located in the
“C:\xampp\” directory for the configuration. If another directory was chosen, then the
next steps should be run accordingly.
Firewall
When setting up the following two services a firewall message can occur. Access
to the domain network must be granted to each service. Without access, no data
connection to the units can be made. Additional information available at:
Troubleshooting, Chapter 17
Configuring the firewall

8 OilControl air
The file “xampp-control.exe” is located in the “xampp” directory. It can be started
“Run as administrator” by right-clicking on the file. Start the Apache or MySQL
module under “Actions” and grant access to the domain network for each firewall
notification. After starting each module, then stop it again and close the “XAMPP
Control Panel” via the “Exit” button. The services are then installed.
Apache service
In order to install the Apache web server as a service, the file
“apache_installservice.bat” in the “C:\xampp\apache\” directory must be opened by
right-clicking with the mouse on the file “Run as administrator.” The service should
then be successfully installed.
MySQL Service
The MySql database should also be configured on the Apache Server. To do this, the
file “mysql_installservice.bat” in the “C:\xampp\mysql” directory must be opened by
right-clicking with the mouse on the file “Run as administrator.” The service should
then likewise be successfully installed.
In the Windows system control under services, both services should now be in the list
(Apache 2.4 as well as MySQL).
3.2 “OilControl Air” server program
After the Apache web server and the MySQL database are set up as services and are
running, the program “OilControlAir-Setup” can be run from the installation CD.
Follow the on-screen instructions during installation. After the first start of the
program the connection to the database then has to be correspondingly configured.
The program “OilControl air” must permanently run on the computer running the web
server. The program is necessary for the connection of “TMS air” as well as the
“LevelController air-” units to the server.
3.3 Clients „OilControl Air“
As soon as the “OilControl air” program is running as a server on the server PC,
additional client installations can take place on the intranet. Once again the
“OilControlAir-Setup” program from the installation CD should be used on each
computer. The connection to the server via the IP address of the server PC should be
set up correspondingly for the clients.

OilControl air 9
4 First Starting the Program Server
Requirement: Apache Server and MySQL database running on the same PC as a
service.
At the first starting of the program of the OilControl air software on the PC, which is
acting as a server, only the database button is activated. The program default setting
must first be made here.
After clicking the "Database" button, the following view opens. Enter the IP address of
the server PC running this software "OilControl air."
If you don't know the IP, simply press the “My IP Address” button. The command
“ipconfig” is now carried out in the DOS prompt. The IP address shown under “IPv4
Address” in the Ethernet adapter LAN is to be entered as shown into the “IP Address”
field. In the following example: 192.168.109.217

10 OilControl air
After entering the IP address, press the “Connect” button. A connection to the MySQL
database is created.
Upon successful connection to the server the window, as can be seen in the display, is
expanded. Without a connection, the entered IP address must first be checked. If this
doesn't work, then switch to the chapter 17“Causes of error.”
The port for communicating with the devices can be changed on the server. The
factory default is set to 64937. A change might be necessary if this port is already in
use by other devices on a network, or if this port or port area is locked by the system
administrator.
At the bottom right of the start screen, the URL on which the web interface is to be
accessed is displayed on the server. The standard browser opens the corresponding
site with a mouse click on the URL. The displayed barcode can be scanned with a
smartphone or tablet. If the device is located on the same network (intranet) as the
server, the corresponding URL can also be opened on the respective device.

OilControl air 11
On the start screen, the program version with the corresponding additional
server/client is displayed under the company logo, here "(server).”
5 First Starting the Program Client
If the program is not installed on the server but on another computer on the intranet,
it is automatically a client installation.
At the first starting of the program of the client, only the database button is
activated.
Press the "Database" button to open the following view. Enter the IP address of the
server PC. This IP address can be read in the status line of the server installation
"OilControl air".

12 OilControl air
If the connection to the server is successful, the program is displayed as a client
version under the company logo:
If no connection is established, a fault message is output. Additional information
available in Chapter 17: “Troubleshooting.”
6 Login
There are four different access permissions for access to "OilControl air." In
descending order, these are:
• Server administrator
• Installer
• Administrator

OilControl air 13
• User
Only the server administrator has all permissions on the server. If the server
administrator logs on to a client, the menu item becomes "Database is hidden".
Database settings can only be made on the server itself.
In the delivery state, the password and access rights are identical, but however are
written lowercase (see Chapter 10.6).
The installer has the same permissions as an administrator. In addition, he can
configure the devices on the network from each client.
The administrator can execute basic functions. This includes, among other things, the
creation of orders or the assignment of codes to technicians. For details, see the
specific menu item in this help.
The user can carry out dispensations and inspect the completed dispensations. He has
the possibility to display a monitor window for an overview.
7 Orders
Orders can be manually set up in the “Set up” menu rider (Chapter: 7.2). It’s also
possible to import orders from a Dealer Management System (DMS)10.5.310.5.3). All
open orders in the program are displayed in this form for selection in table form.
If only the value of the dispensation data is set, the "simplified order creation" can be
activated for dispensation (Chapter 10.5.4).

14 OilControl air
7.1 Dispensation
Permission level: User, Administrator, Installer
By selecting an order in the table, the order number and position are displayed. The
product name and quality are displayed for this order. If an order as a preselection
quantity is 0.00 liters, this means that this order number may be issued indefinitely.
The actual dispensation quantity is displayed summed up accordingly after a
dispensation. In the "Edit" menu bar the unlimited dispensation can be manually
canceled later.
To start a dispensation, the operator must enter his/her code (see Chapter: 10.2). The
dispensing unit as well as the pumping station are to be selected and the desired
dispensing quantity has to be entered.
If simple order generation is activated, a complete order with order number and
position can simply be created and issued immediately. If an order list is also being
worked with at the same time, the order is selected from the order list if the entry is
correct. In this case, the quantities and the quality of the already existing order are
taken into account when starting.

OilControl air 15
If 0.00 is permitted as a preselection quantity (Chapter 10.5.1), an order can be
started by entering 0.00 liters. The maximum dispensing quantity of the dispensing
point is set as the preselection quantity (Chapter 11.1.1). If the maximum preselection
quantity is not fully output, the remaining quantity (difference between preselection
quantity and dispensing quantity) is still available as an order. An additional
dispensation could be made on this order.
If the entry of 0.00 liters is not permitted as a preselection quantity, a job can only be
started if a preselection quantity has been entered.
By pressing the "Start dispensation" button, the desired dispensation is saved in the
server database. The server now sends the release to the selected TMS air
dispensation device.
As soon as a dispensation is started, an additional dispensing window appears. The
status as well as the dispensation quantity are displayed running up to date in this. A
current dispensation can be canceled at any time via the “Cancel” button.
The dispensing window automatically closes 2 minutes after the end of the
dispensation.
If a dispensing quantity is entered which is higher than the pre-selection quantity,
then a notification is issued that this quantity cannot be dispensed.
The available dispensing quantity is calculated from the preselection quantity of the
job minus the quantity already dispensed to this job.

16 OilControl air
The conformity of permissible product quality in the job and product quality at the
selected pumping station is examined. If these do not match, then the dispensation
cannot be started. The button for starting dispensation is deactivated.
The qualities of the pumping stations are set by the server administrator or the
installer (Chapter 10.6) in the device configuration (Chapter 11.1.1).
If a job has the quality of 0, a dispensation can take place to any pumping station. Job
quality 10 can only dispensed at pumping stations that have the quality 11, 19, etc. A
job with quality 11 can only be dispensed at a pumping station that also has quality
11, etc.
As soon as a dispensation to a job with quality 0 or 10 takes place, the quality in the
job is replaced with that of the pumping station. Further dispensing on this order is
only possible with an exactly matching quality of the pumping station.
A dispensation is declined for an incorrectly set quality.
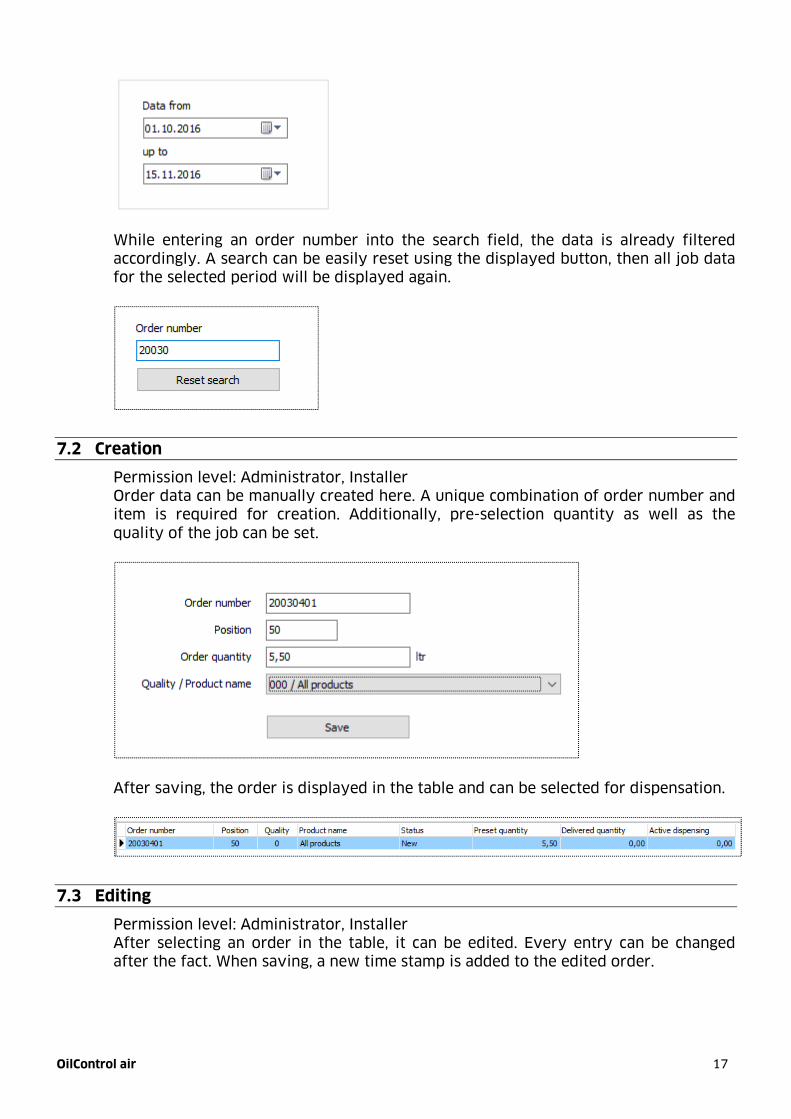
The display of the order data can be limited to a freely selectable period.
OilControl air 17
While entering an order number into the search field, the data is already filtered
accordingly. A search can be easily reset using the displayed button, then all job data
for the selected period will be displayed again.
7.2 Creation
Permission level: Administrator, Installer
Order data can be manually created here. A unique combination of order number and
item is required for creation. Additionally, pre-selection quantity as well as the
quality of the job can be set.
After saving, the order is displayed in the table and can be selected for dispensation.
7.3 Editing
Permission level: Administrator, Installer
After selecting an order in the table, it can be edited. Every entry can be changed
after the fact. When saving, a new time stamp is added to the edited order.

18 OilControl air
Orders that have not yet been dispensed can be removed from the system using the
"Delete" button. It is also possible to delete all orders for which no dispensation was
made at once.
Before the final deletion, a security query must first be confirmed.
The order status can also be changed here. If an order is switched from “canceled” to
“complete,” it is then removed from this display. An additional dispensation on this
order number/item is thus no longer possible. Completed orders are located in the
“Dispensation data” menu item (Chapter 8).
For a button to manually set the status, the order must be backed up for at least 2
minutes without changes to the database.
8 Dispensation data
Permission level: User, Administrator, Installer
Each order for which a dispensation has already been made is located in the
dispensation data. The data can be filtered by status as well as time frame. If no
status is selected, then all the data sets are displayed. It is likewise possible to search
for an order in the selected time frame.
The data displayed can be read out as a report as well as exported. The data export
can take place with column headings. The separator symbol for the data export can
be chosen from the list.

OilControl air 19
All dispensations as well as partial dispensations of the orders are shown in the table.
Product name, TMS air, and user name can be set in the OilControl air program.
The preselection quantity is the quantity that can be given for the order with this
item. The dispensation quantity is the actual quantity that was dispensed on this
order.
Permission level: Administrator, Installer
With the appropriate authorization, jobs in the system can be set to the status
“deleted.” It’s possible to set an individual order or all displayed orders at once to the
status “deleted.”
If, under the selection window for the time period, a check mark is placed on “Display
deleted,” individual records or all those that have the status "deleted" can be set to
the status “existing” again.
9 Display
The selected display can show up to four pumping stations or tanks at the same time.
The display window is always in the foreground. If several displays were stored in
the program, you can switch between them via the selection field.
20 OilControl air
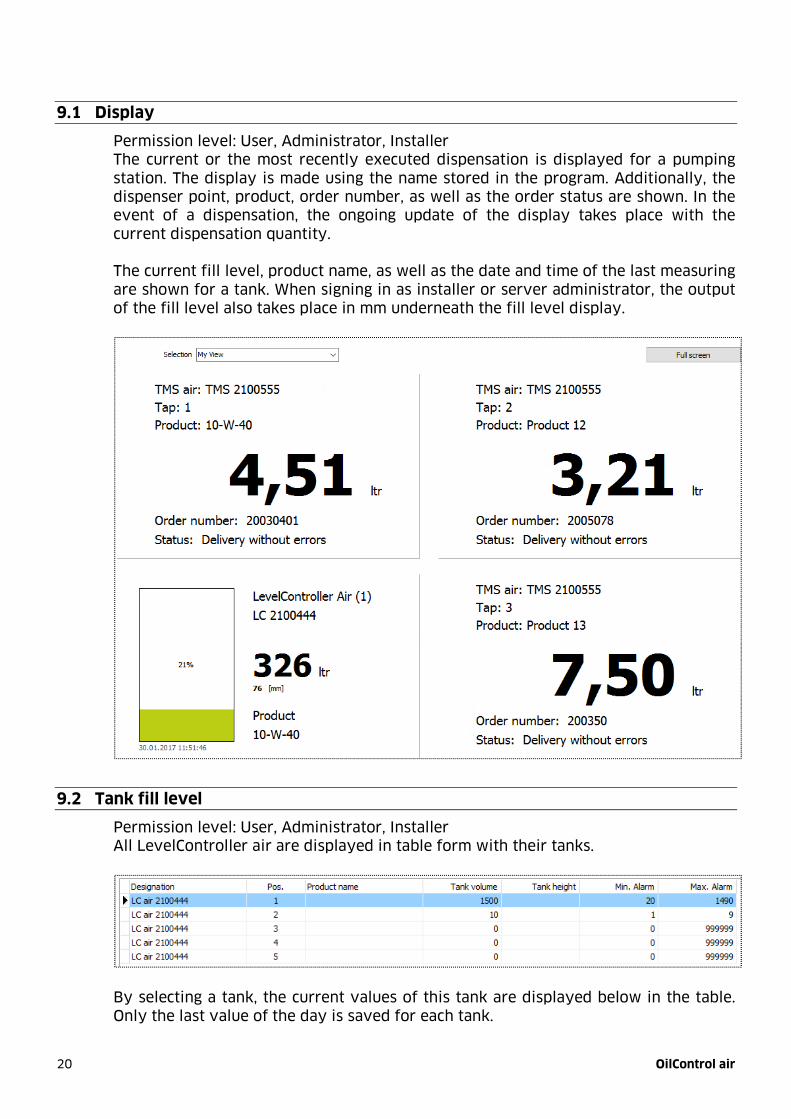
9.1 Display
Permission level: User, Administrator, Installer
The current or the most recently executed dispensation is displayed for a pumping
station. The display is made using the name stored in the program. Additionally, the
dispenser point, product, order number, as well as the order status are shown. In the
event of a dispensation, the ongoing update of the display takes place with the
current dispensation quantity.
The current fill level, product name, as well as the date and time of the last measuring
are shown for a tank. When signing in as installer or server administrator, the output
of the fill level also takes place in mm underneath the fill level display.
9.2 Tank fill level
Permission level: User, Administrator, Installer
All LevelController air are displayed in table form with their tanks.
By selecting a tank, the current values of this tank are displayed below in the table.
Only the last value of the day is saved for each tank.

OilControl air 21
9.3 Configuration
Permission level: Administrator, Installer
Only the description should be entered to create and save a view. Four freely
selectable units with the corresponding pumping stations or tanks can now be
assigned to this. The sequence can be changed by the displayed arrow keys within
the view. The removal of units is also possible via the corresponding button.
10 Master data
Administrators and installers have access to the products and mechanics in the
master data. They only have access to orders if the program OilControl air has not
been registered. The settings for the orders are assigned to the “Log” menu item upon
registration.
Any other settings can only be handled from the server administrator on the server
PC.

22 OilControl air
10.1 Products
Permission level: Administrator, Installer
The names of the product groups can be changed in this view. In addition to the
product name, the individual qualities can also include item number and cost center.
Item number and cost center for example can be required for the dispensation data
export according to the selected log.
A quality can only be deleted if it is no longer assigned to a pumping station.
Qualities can be assigned to pumping stations in device configuration (see Chapter
11.1.1)
10.2 Mechanic
Permission level: Administrator, Installer
To start a dispensation, the mechanic must first enter his/her code. The mechanic can
be set up with a code and name on this screen. It’s possible to block a created
mechanic so that it can no longer start a dispensation.
10.3 Units
Permission level: only server administrator
The display unit, the number of decimals, as well as the displayed measuring unit can
only be set up or changed by the server administrator on the server PC. These
settings however are valid for all users.

OilControl air 23
10.4 Language
Permission level: only server administrator
The display at runtime can be changed via the language selection.
A new language can simply be added to the system. After entering the language
abbreviation (ISO 639-1), the “Save” button is activated. When saving the language,
this is set by default to English terms, which can be translated later.
If the language abbreviation of an existing language - except for DE and EN - is
entered, it can be deleted after confirming a security question.
One language - except for DE and EN - can be freely translated. The individual entries
are displayed in the “Personal translation” text field. The change is made after saving.
If the checkmark “Show the next record automatically” is set, the next record is
automatically written for translation into the field after saving.
You can also choose whether the original term should be displayed in DE and/or EN
for the translation.

24 OilControl air
A language can be saved as a CSV file with the selected delimiter (semicolon or
comma) via the “Export” function. The file build then looks like as shown in the
screenshot.
In the first line, the heading with the number and the exported languages is separated
by the set separator, here a semicolon.
Number;EN;PO;
1004;Abort;Abort;
The last entry between the semicolons would have to be correspondingly translated
for PO (Polish). The rest, including the semicolons, have to be kept in the file.
When translating, the “###” can be seen as a placeholder. It must be correspondingly
placed in the translation. Symbols in tags like <br> for line break or <b> for bold are
to be left unchanged in the text.

OilControl air 25
After compilation and saving, this file can be read again by the program via the
Import button. The language is then correspondingly updated (except for DE and EN).
10.5 EDP
Permission level: only server administrator
If order data is to be read in automatically, this is done via a defined protocol. The
software must be correspondingly registered before for the selection of the protocol
(Chapter: 10.5.3).
10.5.1 Protocol
There are currently the following protocols for data import: “File,” “Automaster,”
“Autoline CN,” “Visma,” as well as “Autoline XML.” The file build of these protocols is
described in the Chapter 13 “Import Protocols.”
A corresponding directory for data exchange must be selected for data import. The
Dealer Management System (DMS) saves the import files with the order data in this
directory.
If the protocol works with a code number for workshop identification, only order data
with the stored code number and the default code 0000 are read in.
The designation of the order import file must always be the same. The program
imports the order data from the file and then deletes them.
If dispensation data have to be saved after a dispensation in the selected directory,
then data export should be activated. By default, the data is saved in the file format.
To select a different format, or create a custom format, use the Export button to open
a corresponding export mask (see Chapter 10.5.2).
Querying mechanic code
If this option is activated, then the mechanic has to enter his code prior to
dispensation. After dispensing, the dispensation is then saved to the order with the
name of the mechanic (Chapter 10.2).

26 OilControl air
Querying preselection quantity
If this option is activated, then the desired dispensation quantity (preselection
quantity) must be entered before dispensation.
Allowing preselection quantity 0.00
If 0.00 liters is permitted as a preselection quantity, the maximum dispensation
quantity or the tap point limit is sent as the dispensation quantity to the dispenser as
the desired dispensation quantity and released. In the software’s default factory
settings this option is deactivated.
ASA
On an ASA network the order data is made available via the ASA network manager
from the DMS. Dispensation queries as well as dispensation data transmission both
take place via the intranet.
OliePcV4
URL, valid apiKey, as well as dealerId must be entered. After saving, an attempt is
made to retrieve existing job data via the interface (URL). The interval, in which the
complete order data is called up and updated, can be configured from “15 min.” all the
way to “24 hours.”
A URL query is carried out before every dispensation, to find out whether the order
number permits a dispensation. Completed dispensation data is transmitted to the set
URL.
DRACAR+
URL, username and password must be entered. After saving, the job data is checked
via the network. If the check is positive, a release is carried out. Submission data is
transferred back to the DMS in the intranet.
If the selection field “Transmit <MecahnicNo>” is set, the number of the
operator on the delivery unit is transmitted to the DRACAR+ DMS. If this
operator is not known in the DRACAR+ system, the order data cannot be stored in
the system.

OilControl air 27
Simplified order creation is not possible with the “ASA” protocol.
Data export
Supported data export protocols are described in Chapter 14.
Simplified order creation as well as blocking all dispensations is described in Chapter
10.5.4.
10.5.2 Data export settings
The data export protocols: “File,” “Automaster,” “Autoline CN,” “Visma,” and “Autoline
XML” are available. Each export protocol can be modified for individual needs.

28 OilControl air
Click the “New” button to set up a new data export protocol. The name for the export
protocol must first be saved. The export file name with file extension (e.g. export.txt)
must be entered next.
The individual fields that are ready for data export can now be selected from the list
and added in the appropriate order.

OilControl air 29
You can subsequently change the order by using the arrow keys. A field can then
later be taken out of the export list via the “Delete” button.
General:
Empty spaces are entered by the symbol °. During actual data export, the ° characters
are replaced by the corresponding number of spaces.
If a field has a line break, this can be handled by entering #13#10. During the data
export, this string is replaced by the line break.
You can set properties for each field in the list:
Field length: If the field is supposed to have a fixed length, the corresponding value
can be entered here. If the entry is shorter, this is filled with the set fill character. If
the field is longer than the set field length, the last characters are ignored.
Prefix: You can enter what should be before the output of the field.
Suffix: You can enter what should be after the output of the field.
Format: If the number field is selected, this number can be output formatted. It is
possible to output a number with more than one decimal place. The corresponding
formatting is to be entered here, e.g. 0.000 for 3 decimal places. If the number isn't
supposed to have any decimal places, just enter a 0 here.
The output can be made at the date/time. The values for the day are output with dd,
for the month mm, and yyyy for the year. For the time hh stands for hour, nn for
minute, and ss for second.
The dispensation time field appears twice. Thus, for example, it is possible to output
the date in the format dd.mm.yyyy and later the time in the format hh:nn.
If an existing format in a field should be deleted, the entry field “Format” should be
cleared.
If the field Dispensation unit is ticked, the unit is converted according to the selected
dispensation unit.

30 OilControl air
A different formatting can be set for each field. The fill character and the fill
orientation can be changed.
The standard file export name is located in general settings. A header can be set for a
file. This is written first when the file is created. The footer is written after inserting
the data to be exported.
The values at which the “Dispensation unit” field has been ticked are converted to the
set dispensation unit.
The decimal separator can be set freely for the conversion.
If a field length is specified for data records, they are filled with the fill character.
Only the actual field content, subsequently the set fill characters.
If the check mark is set to "Last line without line break", no further line break occurs
after writing the dispensation data record.
10.5.3 Registration in use protocol
If the “OilControl air” program is supposed to be used together with a DMS protocol,
the program should be activated first.
Program registration can take place online, by telephone, or via email.
Online activation
A working internet connection is required for online activation. In order to activate
the software, you will need to enter the product code and the name of your company.
After clicking on “Activate online,” an activation code is retrieved from the internet
and then the software is immediately released and executable.
The software can only be re-registered with the same product code if it is reinstalled
on the same partition of the same computer.

OilControl air 31
In the case of an online activation, it is possible to enter the data for an existing
proxy server. By activating the proxy setting, the online registration is performed via
the proxy server.
Activation by email
To activate your software via email, the product code and company name are
required. By clicking on the “Activate by email” button, the following email (see
screenshot) appears and is already populated with information for you to complete
and send. Your activation code will be promptly emailed to the address that you used
to request it. This will be no later than on the following working day.
Note: Check your spam/junk filter, if you have one.

32 OilControl air
Telephone Activation
You can also activate your software by telephone, using the service hotline number
shown. Make sure you have your product code ready for this.
After successful activation, a corresponding message window is displayed and the
display for the protocol selection appears after confirmation.
10.5.4 Activating simple order creation
Permission level: Administrator, Installer
In the basic version without registration, these settings are located in the “Order”
menu. If the registration is successful, the settings under the protocol selection are
displayed in the menu “EDP,” see Chapter 10.5.1.
If simple order creation is activated, a new order can be generated in the Orders
menu with immediate dispensation. If the entered order number is with the position
in the order list, it is marked and output accordingly.
All requested dispensations can be declined on the server PC in order to completely
block oil dispensation. The corresponding checkmark is to be placed on “Decline all
dispensations.” After placing the check mark, this is indicated in red.
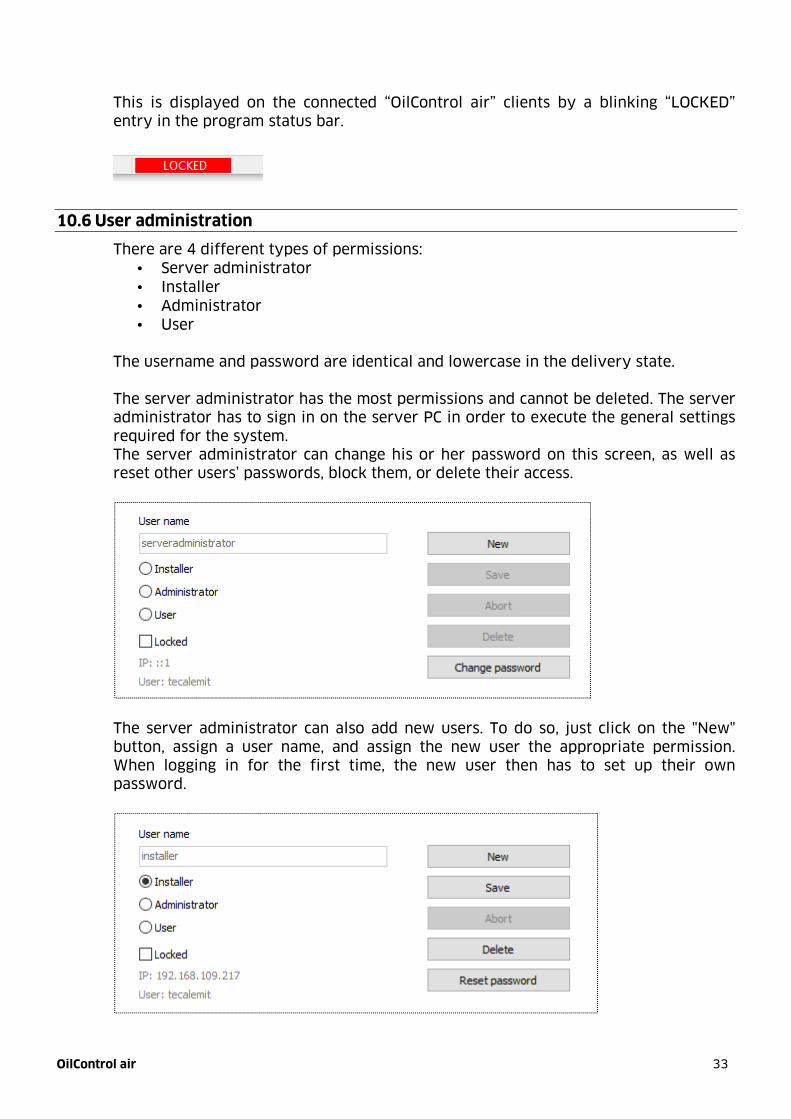
OilControl air 33
This is displayed on the connected “OilControl air” clients by a blinking “LOCKED”
entry in the program status bar.
10.6 User administration
There are 4 different types of permissions:
• Server administrator
• Installer
• Administrator
• User
The username and password are identical and lowercase in the delivery state.
The server administrator has the most permissions and cannot be deleted. The server
administrator has to sign in on the server PC in order to execute the general settings
required for the system.
The server administrator can change his or her password on this screen, as well as
reset other users’ passwords, block them, or delete their access.
The server administrator can also add new users. To do so, just click on the "New"
button, assign a user name, and assign the new user the appropriate permission.
When logging in for the first time, the new user then has to set up their own
password.

34 OilControl air
All the created users are shown in the table. If a user logs on, the used "OilControl air"
software version is saved together with the date and time. The language selected by
the user as well as the “Blocked” status are visible. Permissions can be seen under
“Administrator.”
11 Device configuration
Permission level: Server administrator, Installer
TMS air and LevelController air, which are present in the network, continually
communicate on the network via the set UDP port. If the OilControl air server has
been restarted or a new device has been added to the network, the configuration is
automatically called up. New devices are added to the existing list of selections.
Each device has its own number. The displayed number can be replaced by a
corresponding name. The firmware version and IP address of the present devices are
listed here. When a device is selected, the related data is shown on the right side.
Click the “Delete” button to remove devices that are no longer needed from the
program.
11.1 Devices
The devices are divided into TMS air units each with up to 5 pumping stations, as well
as LevelController air units to which up to 5 tanks can be connected each.
OilControl air 35
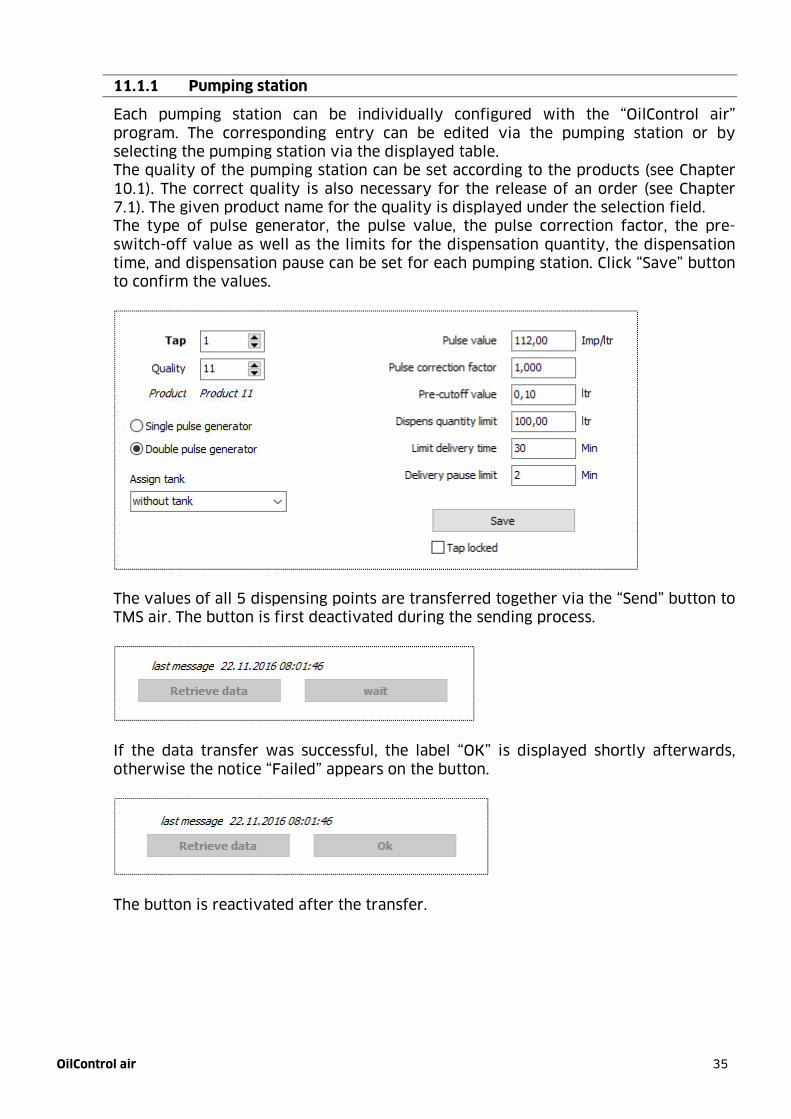
11.1.1 Pumping station
Each pumping station can be individually configured with the “OilControl air”
program. The corresponding entry can be edited via the pumping station or by
selecting the pumping station via the displayed table.
The quality of the pumping station can be set according to the products (see Chapter
10.1). The correct quality is also necessary for the release of an order (see Chapter
7.1). The given product name for the quality is displayed under the selection field.
The type of pulse generator, the pulse value, the pulse correction factor, the pre-
switch-off value as well as the limits for the dispensation quantity, the dispensation
time, and dispensation pause can be set for each pumping station. Click “Save” button
to confirm the values.
The values of all 5 dispensing points are transferred together via the “Send” button to
TMS air. The button is first deactivated during the sending process.
If the data transfer was successful, the label “OK” is displayed shortly afterwards,
otherwise the notice “Failed” appears on the button.
The button is reactivated after the transfer.
36 OilControl air
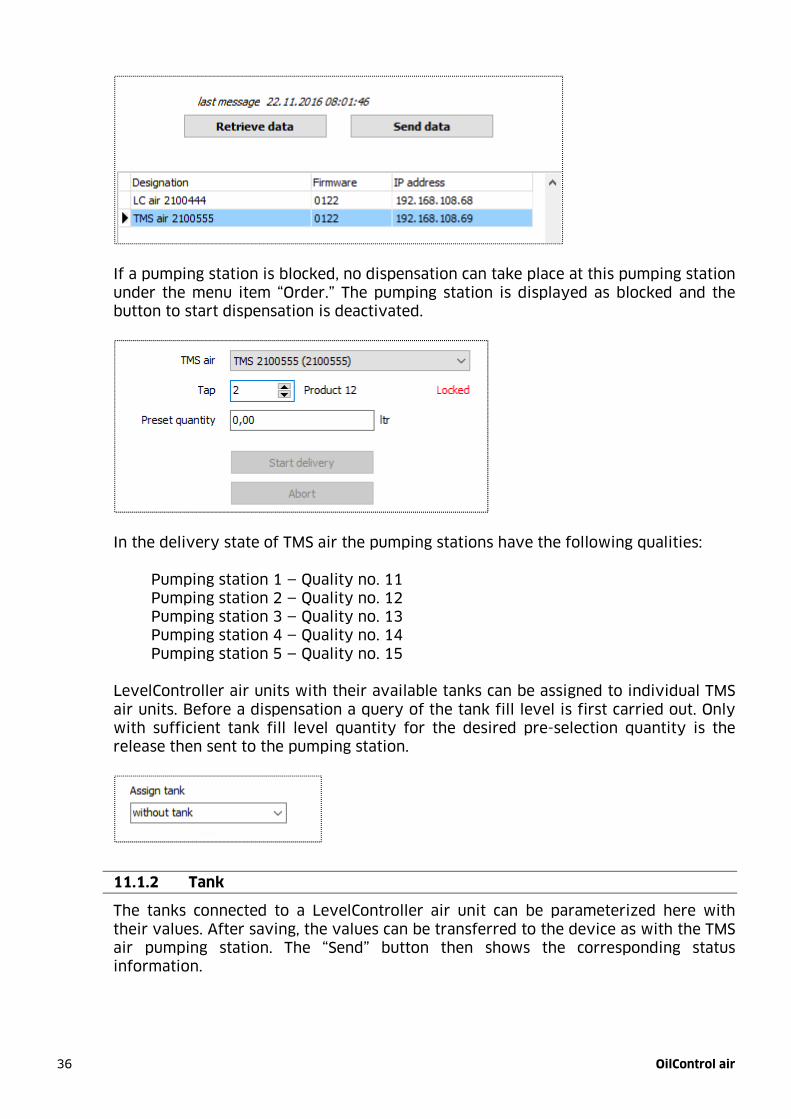
If a pumping station is blocked, no dispensation can take place at this pumping station
under the menu item “Order.” The pumping station is displayed as blocked and the
button to start dispensation is deactivated.
In the delivery state of TMS air the pumping stations have the following qualities:
Pumping station 1 — Quality no. 11
Pumping station 2 — Quality no. 12
Pumping station 3 — Quality no. 13
Pumping station 4 — Quality no. 14
Pumping station 5 — Quality no. 15
LevelController air units with their available tanks can be assigned to individual TMS
air units. Before a dispensation a query of the tank fill level is first carried out. Only
with sufficient tank fill level quantity for the desired pre-selection quantity is the
release then sent to the pumping station.
11.1.2 Tank
The tanks connected to a LevelController air unit can be parameterized here with
their values. After saving, the values can be transferred to the device as with the TMS
air pumping station. The “Send” button then shows the corresponding status
information.

OilControl air 37
The product name is displayed when a tank has been assigned to a pumping station.
11.2 WIFI/LAN
In the delivery state, the software and units are also able to communicate on the
network without explicit configuration. If for example, the standard port 64937
cannot be used, or if devices are not supposed to communicate via LAN, but via WIFI,
or if fixed IP addresses are to be used in the network, the devices can be configured
here.
By saving the device-specific configuration on a USB flash drive, these can be
transferred to the device. To do this, simply insert the USB flash drive into the device
to be configured. After the read-in process has been completed, an acoustic output is
sent to the device.

38 OilControl air
12 Database
For data security, a daily backup of the database can be run. In the input field, enter
the path in which the backup is to be executed, or select the appropriate button. The
daily backup is activated by checking the box next to “every day in the month.”
The file name of the database backup is composed of the name as well as the current
calendar day in the month. An existing back up from e.g. the 15th of the month
(TMS_backup_15.sql) is overwritten in the following month on the 15th. Backups are
available for the last 30 days at most.
In the Support area, clicking on the relevant legend opens the corresponding directory
in Windows Explorer.

OilControl air 39
13 Import protocols
13.1 Import protocol - File, Automaster, Visma
Order data file (“ORDERS.TXT”)
If this file doesn’t exist, it is set up by the DMS, otherwise the datasets are added to
the existing file. Every order is saved in a cell and ended with CR/LF. Values are filled
out with leading zeros.
Item Length Format Description
1 2 nn
Order status
“01:” Create new order
“02:” Delete order number
“03:” Delete all prior existing orders (reset)
3 4 nnnn Code number
“0000:” no meaning
7 11 nnnnnnnnnnn Order number
18 4 nnnn Order sequence number
(=“0000”)
22 2 nn
Product selection
“00:” All products permitted
“10:” Motor oil group permitted
“20:” Transmission fluid group permitted
…
24 7 nnnnnnn Maximum dispensation quantity [ml]
“0000000:” No maximum
31 1 CR (0x0D) Carriage return
32 1 LF (0x0A) Line feed
The code number can be placed in the Administration menu item.
Product selection: Motor oil: “11” - “19,” transmission fluid: “21” - “29,” servo oil “31”
- “39,” brake fluid “41” - “49,” air conditioning: “51” – “59,” coolant: “61” – “69”
Example of an order line:
010000000001234560000130004500<CR><LF>
Description:
01: Create order
0000: no code number
00000123456: Order number 123456
0000: No sequence number
13: Motor oil quality no. 13
0004500: Maximum dispensation quantity 4,500 ml = 4.5 liters are permitted

40 OilControl air
13.2 Import protocol - Visma, only order numbers
Order data list (e.g. “ORDERS.TXT”)
If the order data list doesn't exist, it is set up by the Dealer Management System
(DMS). A new order list completely replaces an existing order list.
Each order number is stored in one line, the lines are completed by CR/LF.
Item Length Format Description
1 max. 11 nnnnnnnnnnn Order number
1 CR (0x0D) Carriage return
1 LF (0x0A) Line feed
Example of an order file:
12345678901<CR><LF>
20030401<CR><LF>
12345<CR><LF>

OilControl air 41
13.3 Import protocol – Autoline CN
Order data file (“ORDERS.TXT”)
If this file doesn’t exist, it is set up by the DMS, otherwise the datasets are added to
the existing file. Every order is saved in a cell and ended with CR/LF. Values are filled
out with leading zeros.
Item Lengt
h Format Description
1 2 nn
Order status
“01:” Create new order
“02:” Delete order number
“03:” Delete all prior existing orders (reset)
3 4 nnnn Code number
“0000:” no meaning
7 12 cccccccccccc Vehicle identifier
19 12 nnnnnnnnnnnn Order number with leading zeros.
31 4 nnnn Order sequence number
(=“0000”)
35 2 nn
Product selection
“00:” All products permitted
“10:” Motor oil group permitted
“20:” Transmission fluid group permitted
…
37 7 nnnnnnn Maximum dispensation quantity [ml]
“0000000:” No maximum
44 7 nnnnnnn
Previous dispensing quantity [mL] on this order with
this sequence number (permits dispensation in
several sequences)
51 1 CR (0x0D) Carriage return
52 1 LF (0x0A) Line feed
The code number can be placed in the Administration menu item.
Product selection: Motor oil: “11” - “19,” transmission fluid: “21” - “29,” servo oil “31”
- “39,” brake fluid “41” - “49,” air conditioning: “51” – “59,” coolant: “61” – “69”
Example of an order line:
01 0000 000000000000 000000123456 0000 13 0004500 0000000<CR><LF>
(empty spaces are added for legibility, they are not in the order)

42 OilControl air
Description:
01: Create order
0000: no code number
000000000000: No identifier
000000123456: Order number 123456
0000: No sequence number
13: Motor oil quality no. 13
0004500: Maximum dispensation quantity 4,500 ml = 4.5 liters are permitted
0000000: No previous dispensation = 4.5 liters are permitted
OilControl air 43
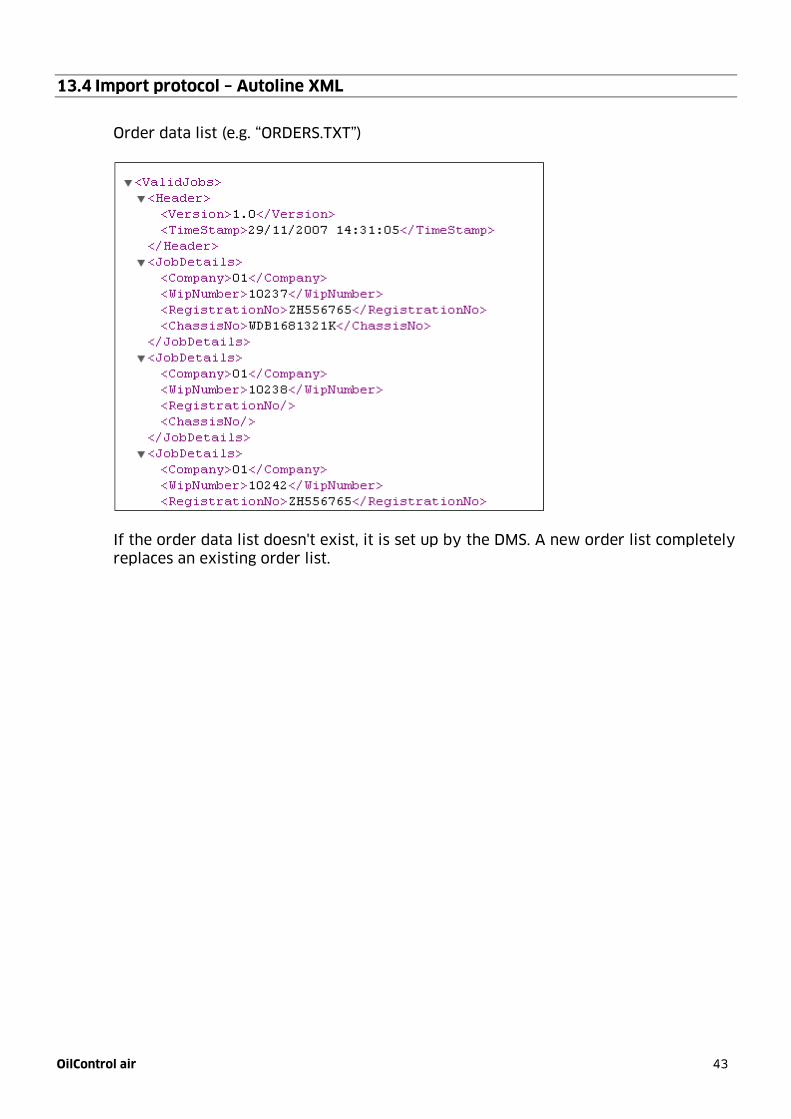
13.4 Import protocol – Autoline XML
Order data list (e.g. “ORDERS.TXT”)
If the order data list doesn't exist, it is set up by the DMS. A new order list completely
replaces an existing order list.

44 OilControl air
14 Export protocol
14.1 Data export protocol - File
Dispensation data (“TRANSACT.TXT”)
If this file doesn’t exist, it is set up by the “OilControl air” program, otherwise the
datasets are added to the existing file. Every dispensation is saved in one cell and
ended with CR/LF. Values are filled out with leading zeros.
Item Length Format Description
1 2 nn
Dispensation status
“01:” Dispensing completed OK
“02:” Dispensation ended with a minor error
“03:” Dispensation ended with a major error
3 4 nnnn Code number
7 11 nnnnnnnnnnn Order number
18 4 nnnn Order sequence number (=“0000”)
22 2 nn Product number
24 7 nnnnnnn Dispensation quantity [ml]
31 3 nnn Pumping station
34 3 nnn Operator number
37 6 nnnnnn Dispensation date (DDMMYY)
43 4 nnnn Dispensation time (HHMM), 24h format
47 12 cccccccccccc Additional information (=„ “)
59 1 CR Carriage return
60 1 LF Line feed
Example of a dispensation line:
0100780000012345600001300044500110971301041445 <CR><LF>
Description:
01: Dispensation ended OK
0078: Code number 78
00000123456: Order number 123456
0000: No sequence number
13: Motor oil quality no. 13
0004450: Dispensing quantity 4,450 ml = 4.45 liters
011: Pumping station 11
097: Operator 97
130104: Dispensation date 01.13.2004
1445: Dispensation time 2:45 p.m.
“ “: Additional Information

OilControl air 45
14.2 Data export protocol – Automaster
Item Length Description Example data
1 12 Fixed value FD1 +-------
13 14 Timestamp 07.14.05 4:12 p.m.
28 10 Dispensation quantity 8.410
39 6 Mechanic number 802
46 6 Order number 224869
87 12 Product name o145066
Example of a dispensation line:
FD1 +------- 07.14.05 4:12 p.m. 8.410 802 224869 0 0 0 DELVAC 5W30
O145066
46 OilControl air
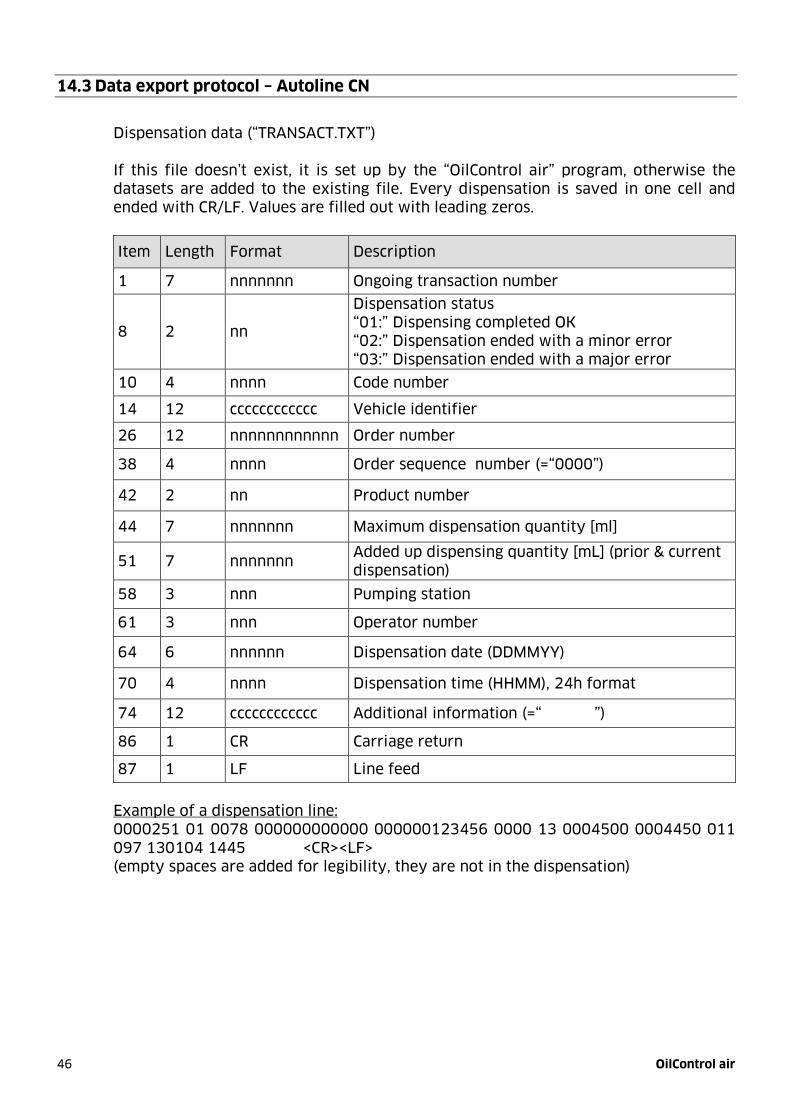
14.3 Data export protocol – Autoline CN
Dispensation data (“TRANSACT.TXT”)
If this file doesn’t exist, it is set up by the “OilControl air” program, otherwise the
datasets are added to the existing file. Every dispensation is saved in one cell and
ended with CR/LF. Values are filled out with leading zeros.
Item Length Format Description
1 7 nnnnnnn Ongoing transaction number
8 2 nn
Dispensation status
“01:” Dispensing completed OK
“02:” Dispensation ended with a minor error
“03:” Dispensation ended with a major error
10 4 nnnn Code number
14 12 cccccccccccc Vehicle identifier
26 12 nnnnnnnnnnnn Order number
38 4 nnnn Order sequence number (=“0000”)
42 2 nn Product number
44 7 nnnnnnn Maximum dispensation quantity [ml]
51 7 nnnnnnn Added up dispensing quantity [mL] (prior & current
dispensation)
58 3 nnn Pumping station
61 3 nnn Operator number
64 6 nnnnnn Dispensation date (DDMMYY)
70 4 nnnn Dispensation time (HHMM), 24h format
74 12 cccccccccccc Additional information (=“ ”)
86 1 CR Carriage return
87 1 LF Line feed
Example of a dispensation line:
0000251 01 0078 000000000000 000000123456 0000 13 0004500 0004450 011
097 130104 1445 <CR><LF>
(empty spaces are added for legibility, they are not in the dispensation)

OilControl air 47
Description:
0000251: Transaction number 251
01: Dispensation ended OK
0078: Code number 78
000000000000: No identifier
000000123456: Order number 123456
0000: No sequence number
13: Motor oil quality no. 13
0004500: Maximum dispensation quantity 4,450 ml = 4.5 liters
0004450: Dispensing quantity 4,450 ml = 4.45 liters
011: Pumping station 11
097: Operator number 97
130104: Dispensation date 01.13.2004
1445: Dispensation time 2:45 p.m.
“ ”: Additional information

48 OilControl air
14.4 Data export protocol – Visma
Dispensation data (“ORDCHGR.edi”)
If this file doesn’t exist, it is set up by the “OilControl air” program, otherwise the
datasets are added to the existing file. Every dispensation is saved in one cell and
ended with CR/LF.
Field name Example Format Comments
Order head start H. Always = H
Order number 372 Integer Must exist in Visma
Transaction type 1 Integer Always = 1
Customer number Integer Optional
Order date Integer Optional Format yyyymmdd.
Mileage String Optional
Work order number 123 Integer Optional
Registration number String Optional
Project Integer Optional
Head status Optional
Order line start L Always = L
Order line number Integer Optional.
Product number 1001 String Must exist in Visma
Product description String Optional
Quantity 3.5 Float Decimal point = .
Memo file path String Optional
NetQty 1 Integer Always = 1
Employee no. 3 Integer Must exist in Visma
Line status 1 Always = 1

OilControl air 49
14.5 Data export protocol – Autoline XML
Dispensation data (“Result.xml”)
If this file doesn’t exist, it is set up by the “OilControl air” program.

50 OilControl air
14.6 Export files
The export files created by the individual protocols appear as follows:
File:
Automaster:
Autoline CN:
Visma:
Autoline XML:

OilControl air 51
15 Other
The display on the start page of the server software "OilControl air" is updated
continuously. A unit is displayed as “offline” if it has not reported in the last 5
minutes.
All open application windows can be closed at the same time by a right mouse click.
The right-click doesn’t work on the opened display window.
16 Dispensation quality
List of qualities (gen. usual convention)
----------------------------------------------------------------
000 Oil, grease, and fluids management
010 Motor oil, gen.
011 Motor oil type 1
012 Motor oil type 2
etc…
020 Transmission fluid, general (incl. rear axle)
021 Transmission fluid type 1 (incl. rear axle)
022 Transmission fluid type 2 (incl. rear axle)
025 Rear axle oil type 1 (only for rear axle)
026 Rear axle oil type 2 (only for rear axle)
etc…
030 Power steering fluid, general
031 Power steering fluid type 1
etc…
040 Brake fluid, gen.
etc…
050 Air conditioner coolant
etc…
060 Radiator fluid
etc…
070 Washing water
etc.

52 OilControl air
17 Troubleshooting
17.1 Client cannot connect to the server
• Is the server PC running?
• Is “OilControl air” software running on the server?
• Is the server reachable from the client? To test using the input prompt (cmd), send a
ping request to the server IP address (see the following screen).
Check the server's firewall settings to allow the Apache HTTP Server and mysqld
services to access the network.
If one of these services is missing, the "xampp-control.exe" can be started by right-
clicking "Run as administrator" in the "xampp" directory on the server. Start the
Apache or MySQL modules under Actions and for a firewall notice grant the service
access to the domain network.
17.2 Server Offline
If the program “OilControl air” isn't running on the server, the following blinking
message will be displayed in the program status bar on the client:

OilControl air 53
17.2.1 Status Bar Messages
The IP address where the server can be reached on the intranet is displayed in the
program status bar.
“ONLINE” or red blinking “OFFLINE” shows the current status of the server. “OFFLINE”
means that the server software “OilControl air” is not running.
If data is sent from an intranet unit, this is indicated in the status line. UDP and TCP/IP
packets from the units are
received by the OilControl air server. The last data reception is displayed with the
time, protocol, and device number for 4 seconds.
Red blinking “LOCKED” shows that all dispensations are blocked on the server.

54 OilControl air
18 WEB Interface
The lower right in the “OilControl air” program shows how the WEB interface can be
reached. By clicking on the displayed http-URL, the standard browser opens and the
"OilControl air" start page is opened. It’s also possible to scan the barcode with a
smartphone or table that is on the same intranet and to also open the displayed URL.
If the "OilControl air" program is not running, the web interface changes to "Offline"
status after 20 seconds. This affects all HTML websites that access data from the
program database of the server.
18.1 Login
Login takes place with the user data that are administered on the “OilControl air”
server program (see Chapter 10.6).

OilControl air 55
Operation of the web interface takes place via the keypad displayed.
The link to log out is located in the upper left. Without logging out, anyone with
access to the browser can launch dispensations and view orders. Depending on user
rights, it is also possible to create orders.
The language of the web area can be switched under the logout link.
18.2 Orders
All available orders for which a dispensation can occur are shown in the table. A
column can be sorted in ascending or descending order with the click of a mouse.

56 OilControl air
An additional menu can be opened via the symbol at the respective end of the
column. Here, additional columns can be selected or deselected for display. If the
table is displayed after the selection is compressed, the page must be updated once
(press F5).
A job can be selected from the table for dispensation via the "Start" button. The
display scrolls to the right and the operator must enter his or her user code. After
selecting the pumping station and the dispensing point, the desired pre-selection
quantity has to be entered and the order can be started. The quality of the pumping
station must match the quality of the order, see also Chapter 7.1.
The current orders of the month and the previous month are displayed as standard.

OilControl air 57
After starting, the display scrolls to the right again and the job status is updated
every second. Click the "Order List" button to return to the order overview table. A
current dispensation can be interrupted at any time via the “Cancel” button.
After the end of the dispensation, the "Cancel" button is deactivated and the
corresponding status for the job is displayed.

58 OilControl air
18.3 Dispensations
Orders for which a dispensation has already been made are displayed in this table.
The columns can also be sorted in ascending or descending order by clicking on the
header.
The current orders of the month and the previous month are displayed as standard.
18.4 Active
In the "Active Dispensation" menu item, all currently running dispensations are
continuously updated in the table. As soon as a delivery is no longer active, it is
removed from the table. An ongoing dispensation can be stopped at any time by
clicking the "Cancel" button.
18.5 Product
The dispensation quantity of the individual products is output as standard for the last
year as a pie chart. In addition to the legend with the product name, the dispensation
quantity is displayed for the individual parts.

OilControl air 59
By clicking on a product in the legend, this can be displayed or hidden again.
18.6 Creation
All operators with a higher access authorization than a user can create jobs manually.
To get started creating an order, an order number must first be entered. By entering
an item an order number can have several sub-items, that nevertheless all belong to
the same order number.
For product quality 0, any pumping station can issue this order. If for example the
upper group 10 is set up as the product quality, then only pumping stations with the
set quality 11..19 dispense this order. In the case of product quality 15, only one
pumping station would be permitted to dispense the order, if the quality is also set to
15.
The order quantity is the total dispensation quantity for this order number. If the
order quantity for an order is saved as 0.00, then this order can be dispensed without
a dispensation limit. The order can later be set to the status “Complete” by the
“OilControl air” program so that no more dispensations are possible.

60 OilControl air
18.7 View
The view of the display of up to four pumping stations. The pumping stations here
can be dispensing points or tank displays. The last dispensation is displayed for each
pumping station. If a dispensation is started, it is continuously updated.
A tank fill status is updated every 30 seconds.
The display is created with the program “OilControl air” (see Chapter: 9).

OilControl air 61
18.8 Tank
In this display the fill status of all the available tanks are displayed. It is updated
every 30 seconds.
18.9 Devices
The TMS air and LevelController air units can be used to display the delivery points or
tanks with their parameters. The configuration of the devices is only done with the
program “OilControl air” (see Chapter 11).

62 OilControl air
18.10Password
The access password for the login area can be changed here. The current password
must first be entered and then the new one twice for confirmation. The new password
is then saved via the “Change Password” button.

OilControl air 63

64 OilControl air
HORN GmbH & Co. KG
Munketoft 42
24937 Flensburg
Germany
T +49 461-8696-0
F +49 461-8696-66
www.tecalemit.de


