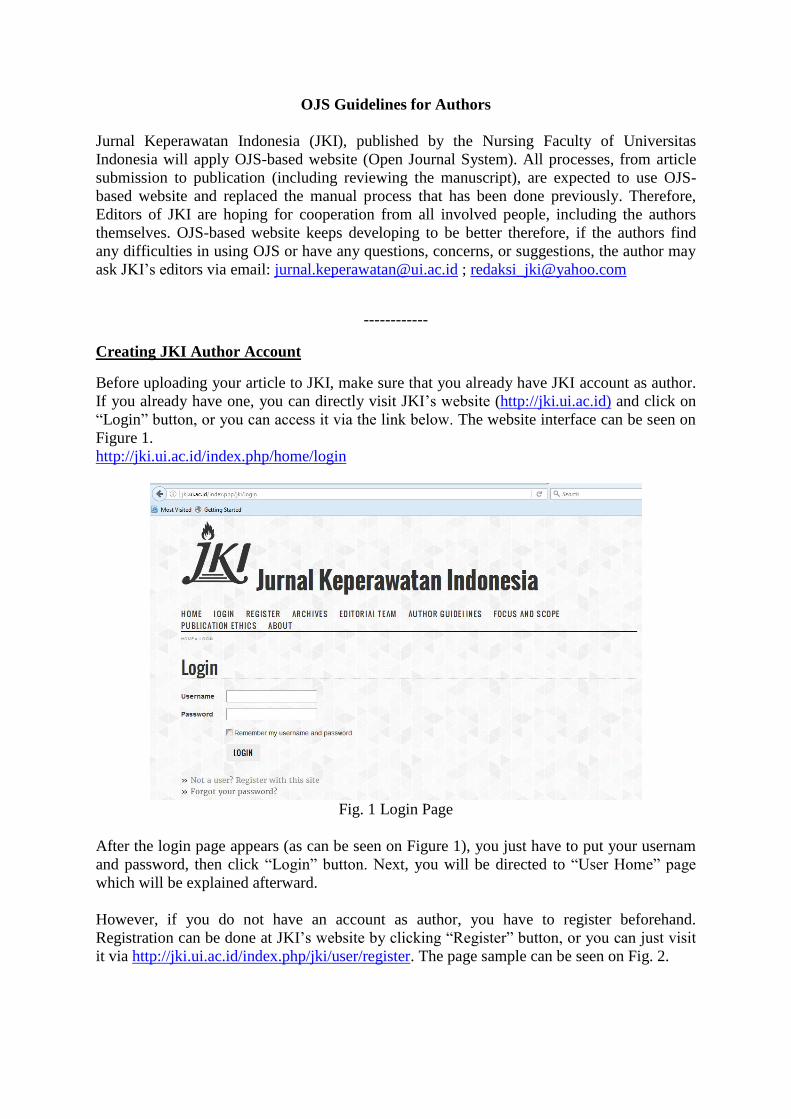
OJS Guidelines for Authors Jurnal Keperawatan Indonesia (JKI), published by the Nursing Faculty of Universitas Indonesia will apply OJS-based website (Open Journal System). All processes, from article submission to publication (including reviewing the manuscript), are expected to use OJS- based website and replaced the manual process that has been done previously. Therefore, Editors of JKI are hoping for cooperation from all involved people, including the authors themselves. OJS-based website keeps developing to be better therefore, if the authors find any difficulties in using OJS or have any questions, concerns, or suggestions, the author may ask JKI’s editors via email: [email protected]; [email protected]------------ Creating JKI Author Account Before uploading your article to JKI, make sure that you already have JKI account as author. If you already have one, you can directly visit JKI’s website (http://jki.ui.ac.id) and click on “Login” button, or you can access it via the link below. The website interface can be seen on Figure 1. http://jki.ui.ac.id/index.php/home/login Fig. 1 Login Page After the login page appears (as can be seen on Figure 1), you just have to put your usernam and password, then click “Login” button. Next, you will be directed to “User Home” page which will be explained afterward. However, if you do not have an account as author, you have to register beforehand. Registration can be done at JKI’s website by clicking “Register” button, or you can just visit it via http://jki.ui.ac.id/index.php/jki/user/register. The page sample can be seen on Fig. 2.
Transcript
OJS Guidelines for Authors
Jurnal Keperawatan Indonesia (JKI), published by the Nursing Faculty of Universitas
Indonesia will apply OJS-based website (Open Journal System). All processes, from article
submission to publication (including reviewing the manuscript), are expected to use OJS-
based website and replaced the manual process that has been done previously. Therefore,
Editors of JKI are hoping for cooperation from all involved people, including the authors
themselves. OJS-based website keeps developing to be better therefore, if the authors find
any difficulties in using OJS or have any questions, concerns, or suggestions, the author may
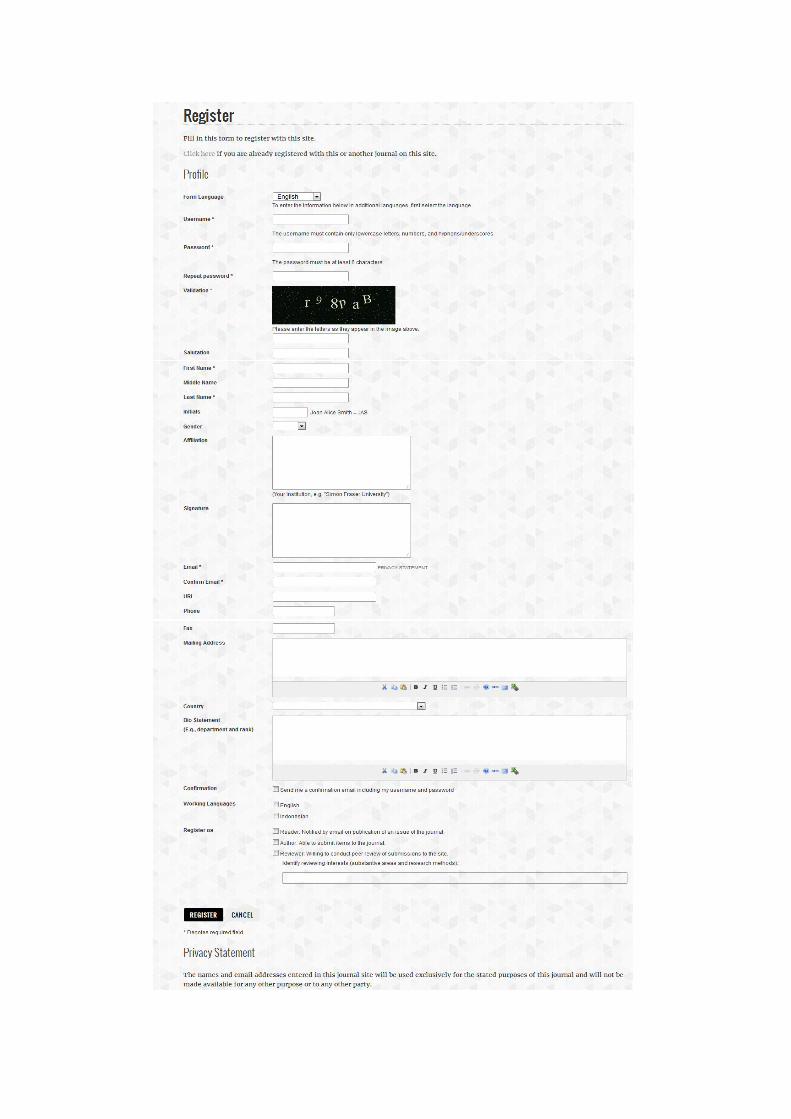
Once you are in registration page, you have to input all of necessary personal data into the
required data fields which are marked with an asterisk (*). The required data are username,
password, repeat password, first name, last name, email, and confirm email. You also have to
click on “Register as” field and choose "Author: Able to submit items to the journal." Once
everything is settled, click on "Register" button to proceed. If the registration is completed,
you will automatically be directed to the "User Home" page. Figure 3.
However, if you have already registered, you can skip the process above and visit directly to
the website (http://jki.ui.ac.id), or you can open it via the link below.
http://jki.ui.ac.id/index.php/home/login (see Figure 1).
Figure 1. Login page
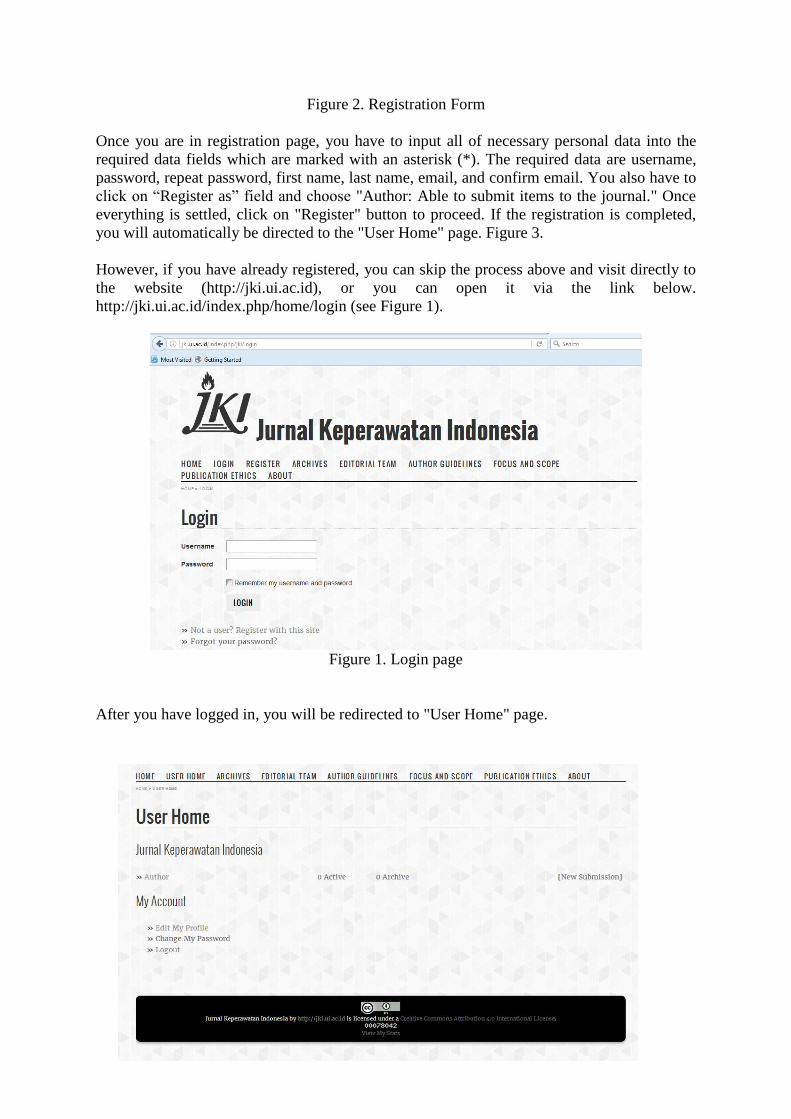
After you have logged in, you will be redirected to "User Home" page.
Figure 3. User Home page
In this page, you can view all articles you have submitted as well as checking your article
progress. Moreover, you can also change your profile by clicking "Edit My Profile", and you
can change your account password by clicking "Change My Password", or log out from your
account by clicking "Logout". If you want to upload new articles, click "New Submission".
After that, you will be in submission page.
Article Submission
Step 1. Starting the Submission
At this point, you have to click on all the checkboxes available in the "Submission Checklist"
and make sure you have met all of the requirements mentioned in it. You also need to click
on the Copyright Notice option. If you wish to add some information on your article, you can
write it in the "Comments for the Editor" box. If you have finished, you can click "Save and
Continue" button.
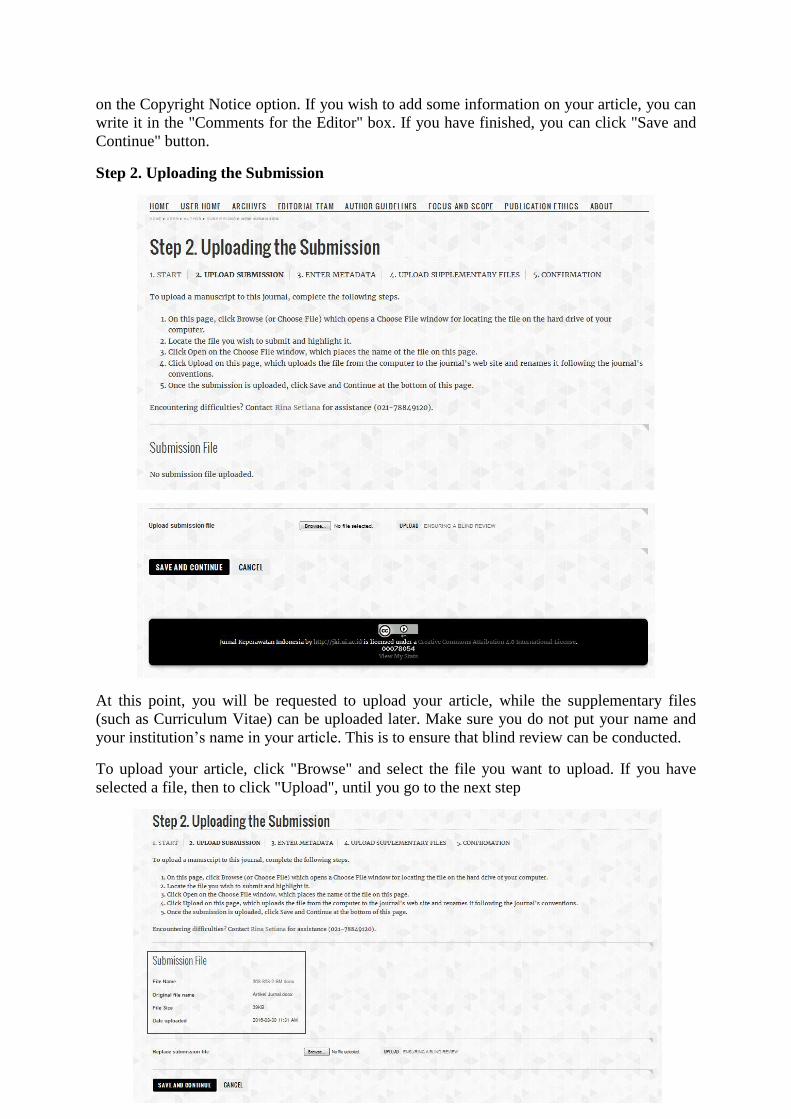
Step 2. Uploading the Submission
At this point, you will be requested to upload your article, while the supplementary files
(such as Curriculum Vitae) can be uploaded later. Make sure you do not put your name and
your institution’s name in your article. This is to ensure that blind review can be conducted.
To upload your article, click "Browse" and select the file you want to upload. If you have
selected a file, then to click "Upload", until you go to the next step
If you want to change the uploaded file, you can click "Browse" and select the file again, and
make sure you click "Upload" button thereafter. If you've managed to upload the file (marked
with "File Submission" as can be seen above, you can proceed to the next step by clicking
"Save and Continue" button.
Step 3. Entering the Submission’s Metadata
At this stage, you will be requested to enter a submission's metadata, such as author’s name,
article’s title, abstract, and more. Also, make sure to put all of the authors’ names in the
“Author” field or page. Click “add author” if there are more than one author. Data required to
be filled are the first name, last name, email, and affiliation.
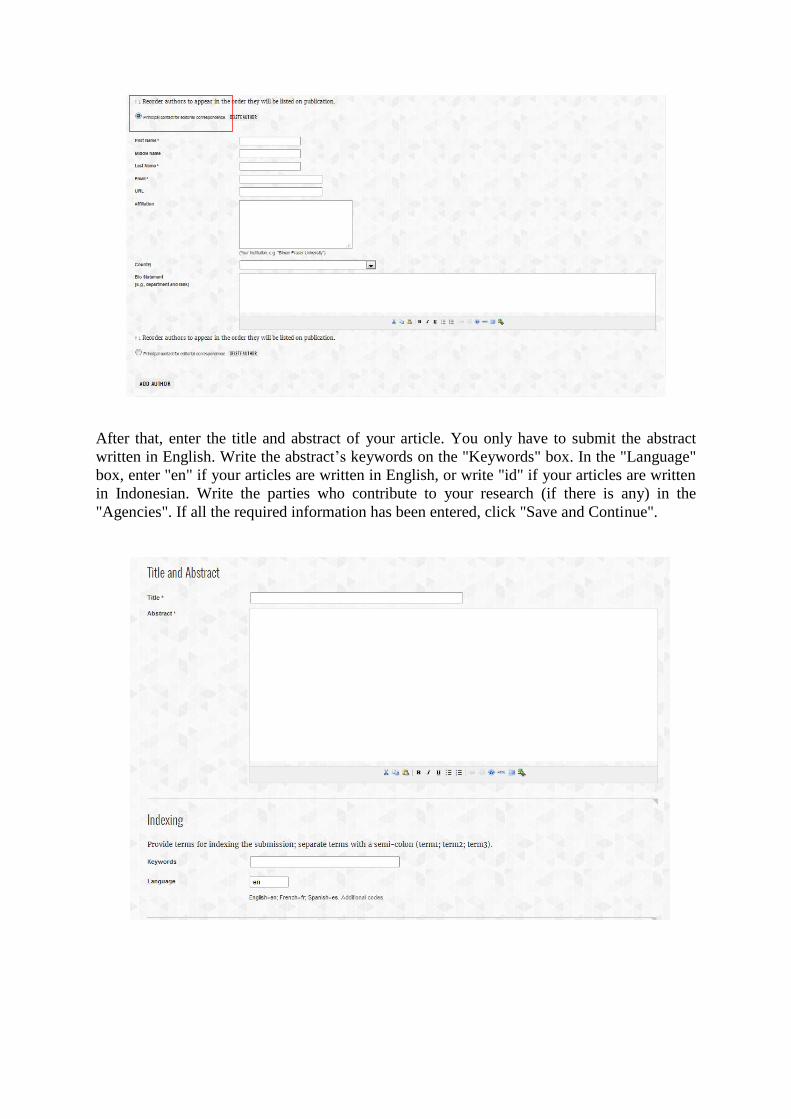
Moreover, if there is more than one author, you may choose one of them who will correspond
with JAKI by clicking on "Principal contact for editorial correspondence" as can be seen
below.
After that, enter the title and abstract of your article. You only have to submit the abstract
written in English. Write the abstract’s keywords on the "Keywords" box. In the "Language"
box, enter "en" if your articles are written in English, or write "id" if your articles are written
in Indonesian. Write the parties who contribute to your research (if there is any) in the
"Agencies". If all the required information has been entered, click "Save and Continue".
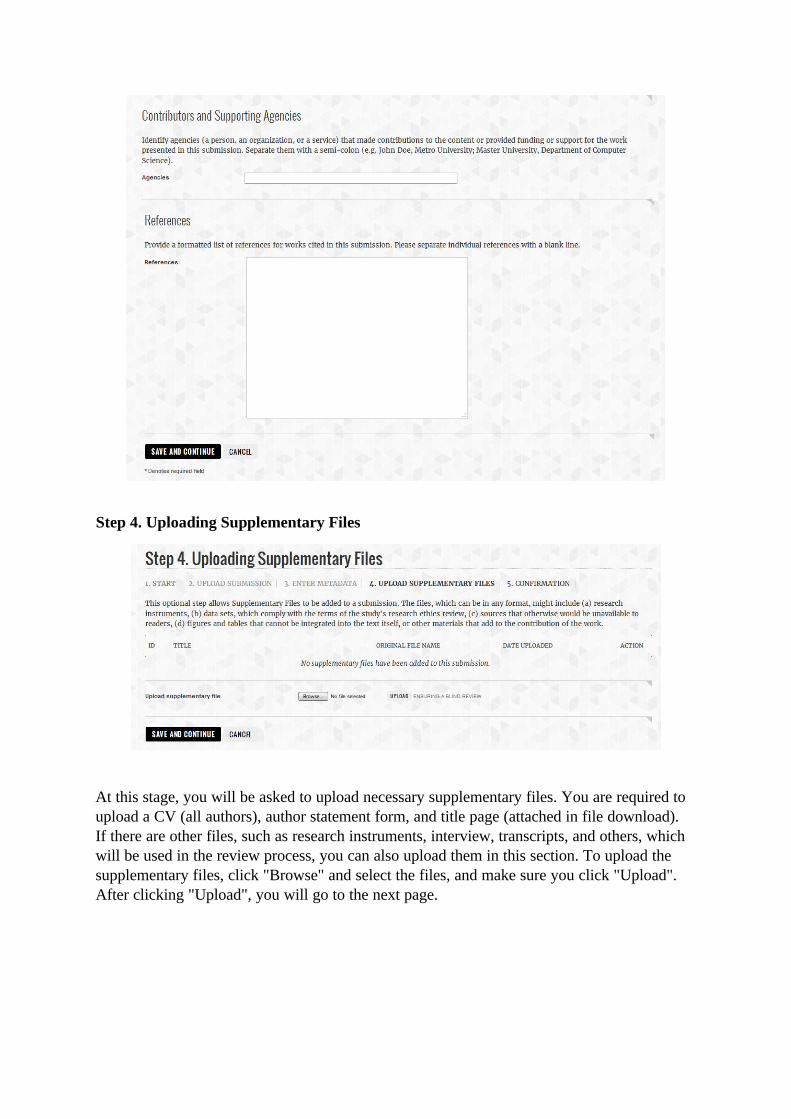
Step 4. Uploading Supplementary Files
At this stage, you will be asked to upload necessary supplementary files. You are required to
upload a CV (all authors). If there are other files, such as research instruments,
interview transcripts, and others, which will be used in the review process, you can also
upload them in this section. To upload the supplementary files, click "Browse" and select
the files, and make sure you click "Upload". After clicking "Upload", you will go to the next
page.
At this stage, you will be asked to upload necessary supplementary files. You are required to upload a CV (all authors) and author statement form (attached in file download). If there are other files, such as research instruments, interview transcripts, and others, which will be used in the review process, you can also upload them in this section. To upload the supplementary files, click "Browse" and select the files, and make sure you click "Upload". After clicking "Upload", you will go to the next page.
At this stage, you will be asked to upload necessary supplementary files. You are required to upload a CV (all authors), author statement form, and title page (attached in file download). If there are other files, such as research instruments, interview, transcripts, and others, which will be used in the review process, you can also upload them in this section. To upload the supplementary files, click "Browse" and select the files, and make sure you click "Upload". After clicking "Upload", you will go to the next page.
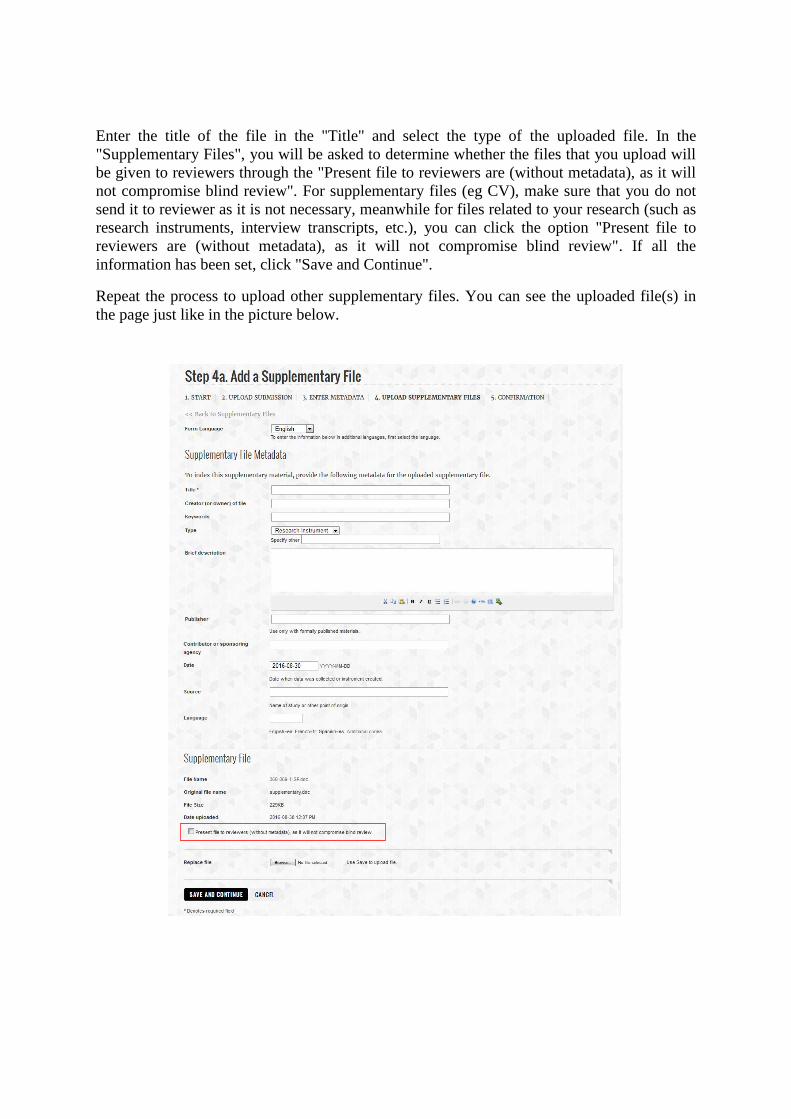
Enter the title of the file in the "Title" and select the type of the uploaded file. In the
"Supplementary Files", you will be asked to determine whether the files that you upload will
be given to reviewers through the "Present file to reviewers are (without metadata), as it will
not compromise blind review". For supplementary files (eg CV), make sure that you do not
send it to reviewer as it is not necessary, meanwhile for files related to your research (such as
research instruments, interview transcripts, etc.), you can click the option "Present file to
reviewers are (without metadata), as it will not compromise blind review". If all the
information has been set, click "Save and Continue".
Repeat the process to upload other supplementary files. You can see the uploaded file(s) in
the page just like in the picture below.
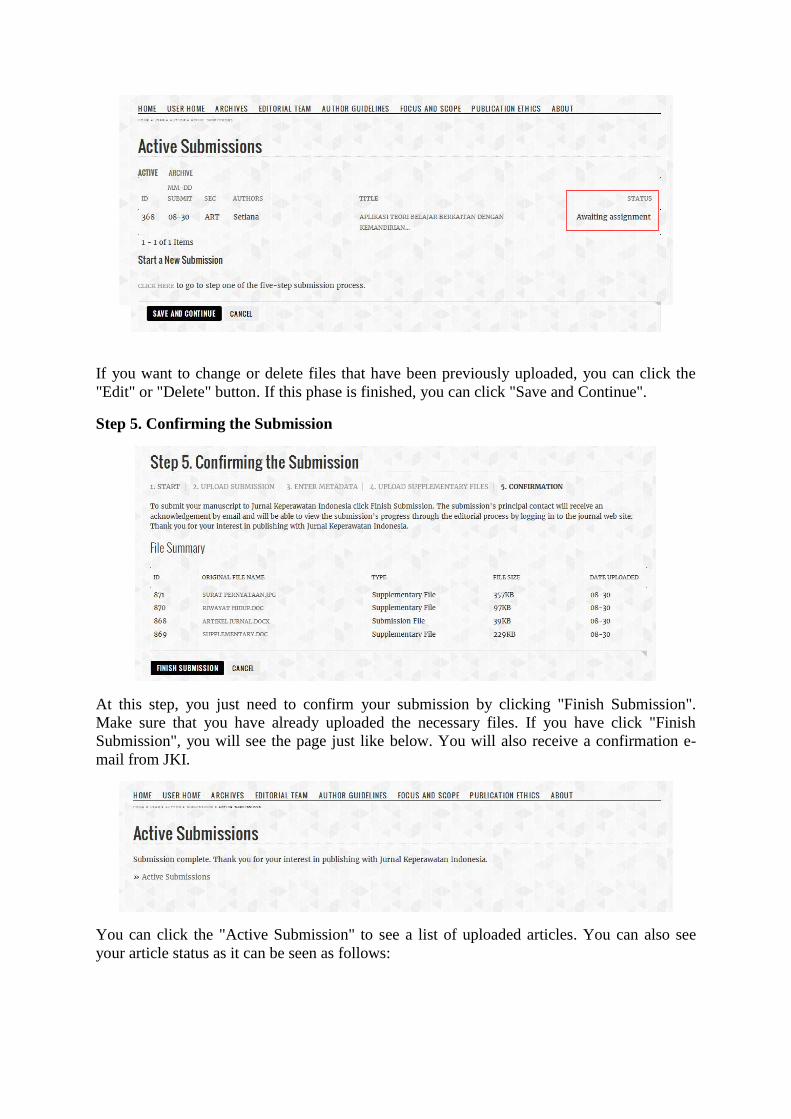
If you want to change or delete files that have been previously uploaded, you can click the
"Edit" or "Delete" button. If this phase is finished, you can click "Save and Continue".
Step 5. Confirming the Submission
At this step, you just need to confirm your submission by clicking "Finish Submission".
Make sure that you have already uploaded the necessary files. If you have click "Finish
Submission", you will see the page just like below. You will also receive a confirmation e-
mail from JKI.
You can click the "Active Submission" to see a list of uploaded articles. You can also see
your article status as it can be seen as follows:
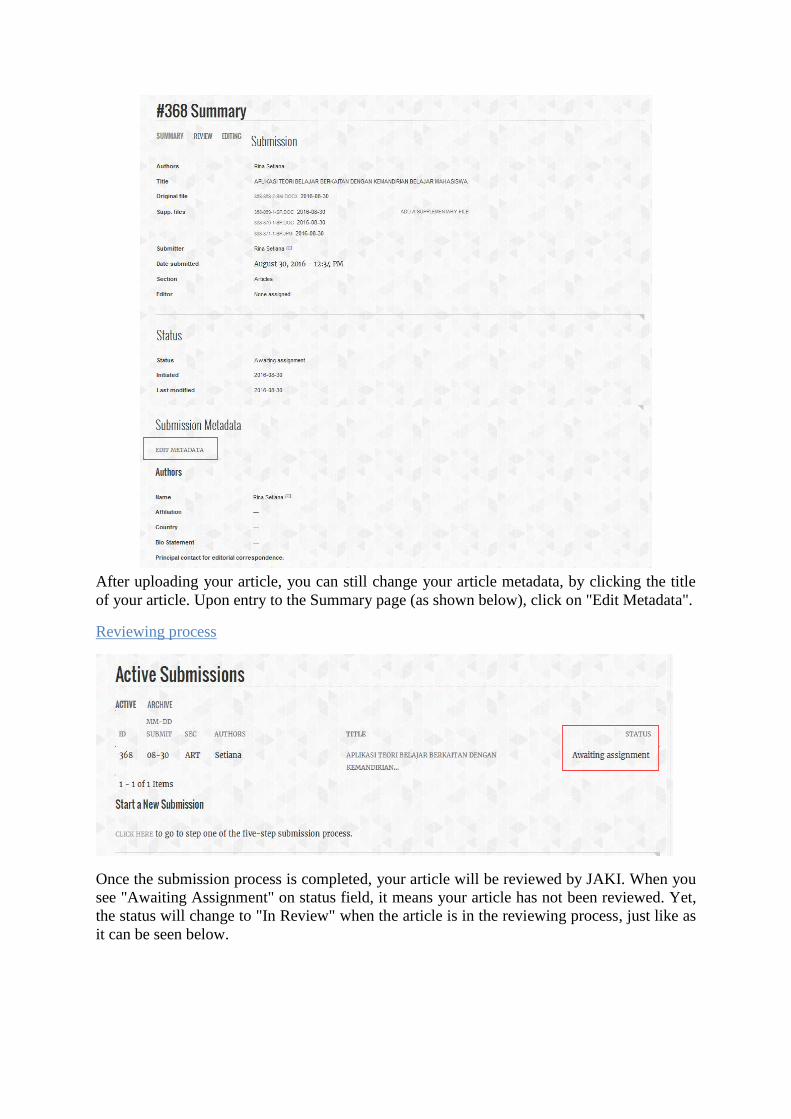
After uploading your article, you can still change your article metadata, by clicking the title
of your article. Upon entry to the Summary page (as shown below), click on "Edit Metadata".
Reviewing process
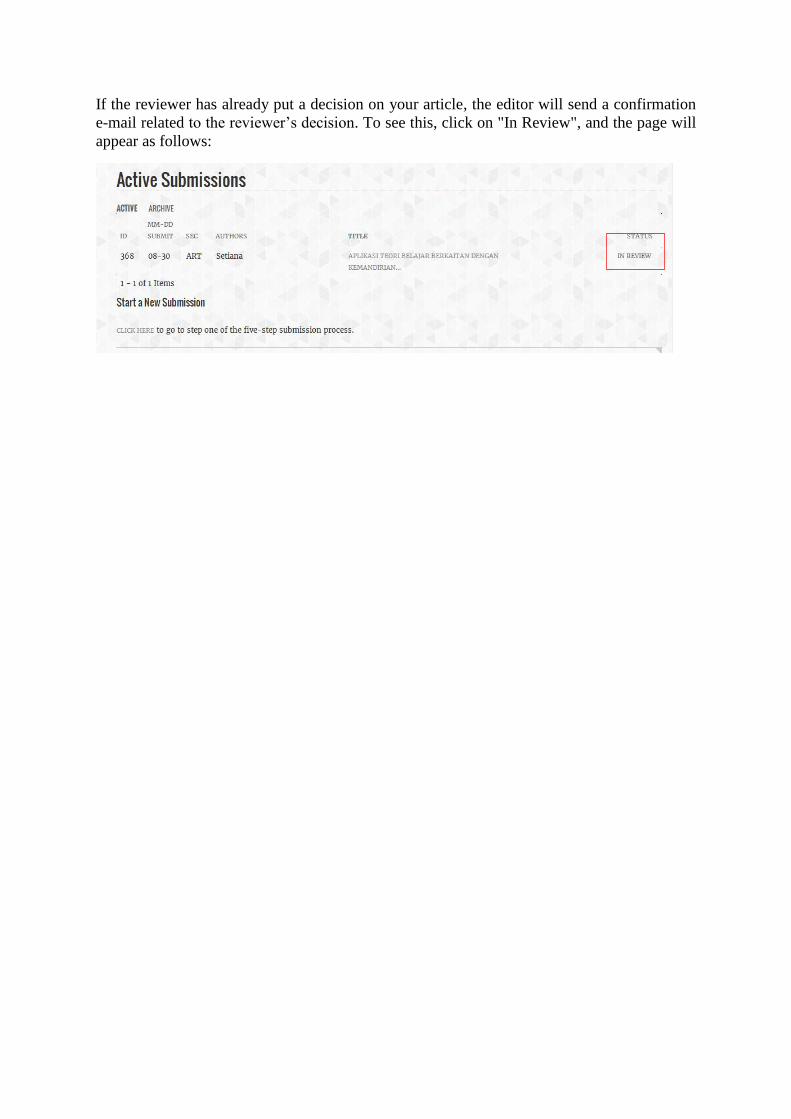
Once the submission process is completed, your article will be reviewed by JAKI. When you
see "Awaiting Assignment" on status field, it means your article has not been reviewed. Yet,
the status will change to "In Review" when the article is in the reviewing process, just like as
it can be seen below.
If the reviewer has already put a decision on your article, the editor will send a confirmation
e-mail related to the reviewer’s decision. To see this, click on "In Review", and the page will
appear as follows:
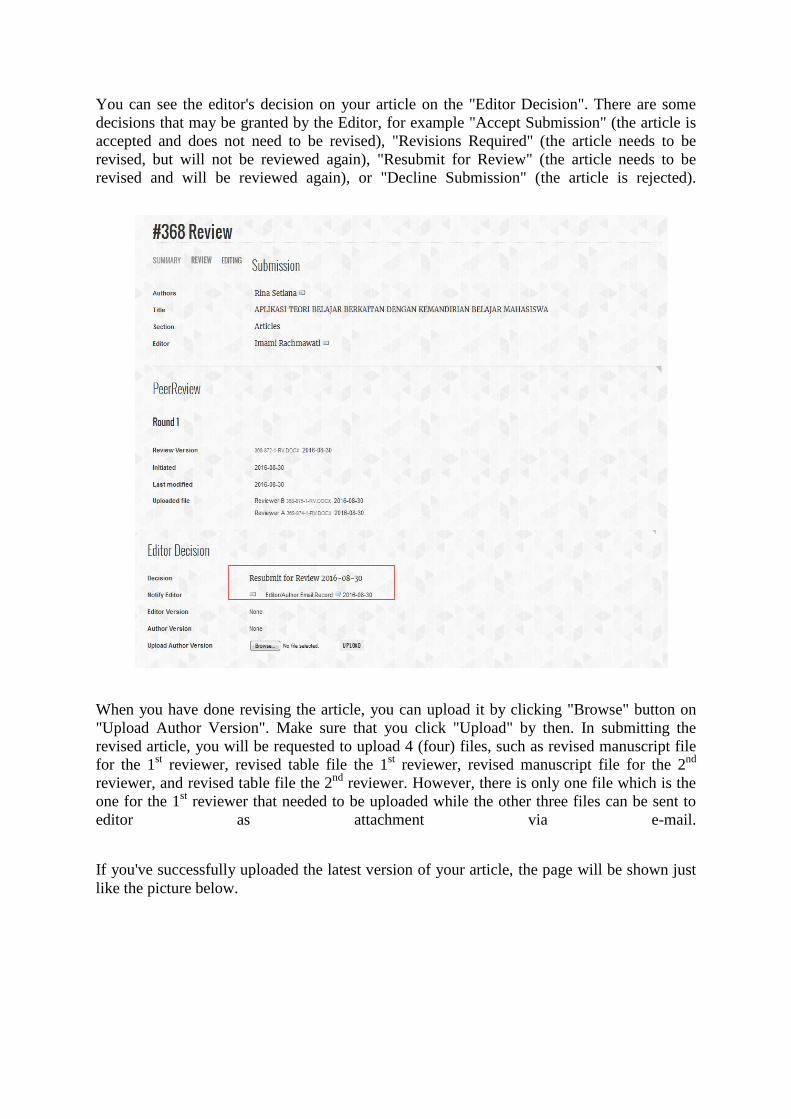
You can see the editor's decision on your article on the "Editor Decision". There are some
decisions that may be granted by the Editor, for example "Accept Submission" (the article is
accepted and does not need to be revised), "Revisions Required" (the article needs to be
revised, but will not be reviewed again), "Resubmit for Review" (the article needs to be
revised and will be reviewed again), or "Decline Submission" (the article is rejected).
When you have done revising the article, you can upload it by clicking "Browse" button on
"Upload Author Version". Make sure that you click "Upload" by then. In submitting the
revised article, you will be requested to upload 4 (four) files, such as revised manuscript file
for the 1st reviewer, revised table file the 1
st reviewer, revised manuscript file for the 2
nd
reviewer, and revised table file the 2nd
reviewer. However, there is only one file which is the
one for the 1st reviewer that needed to be uploaded while the other three files can be sent to
editor as attachment via e-mail.
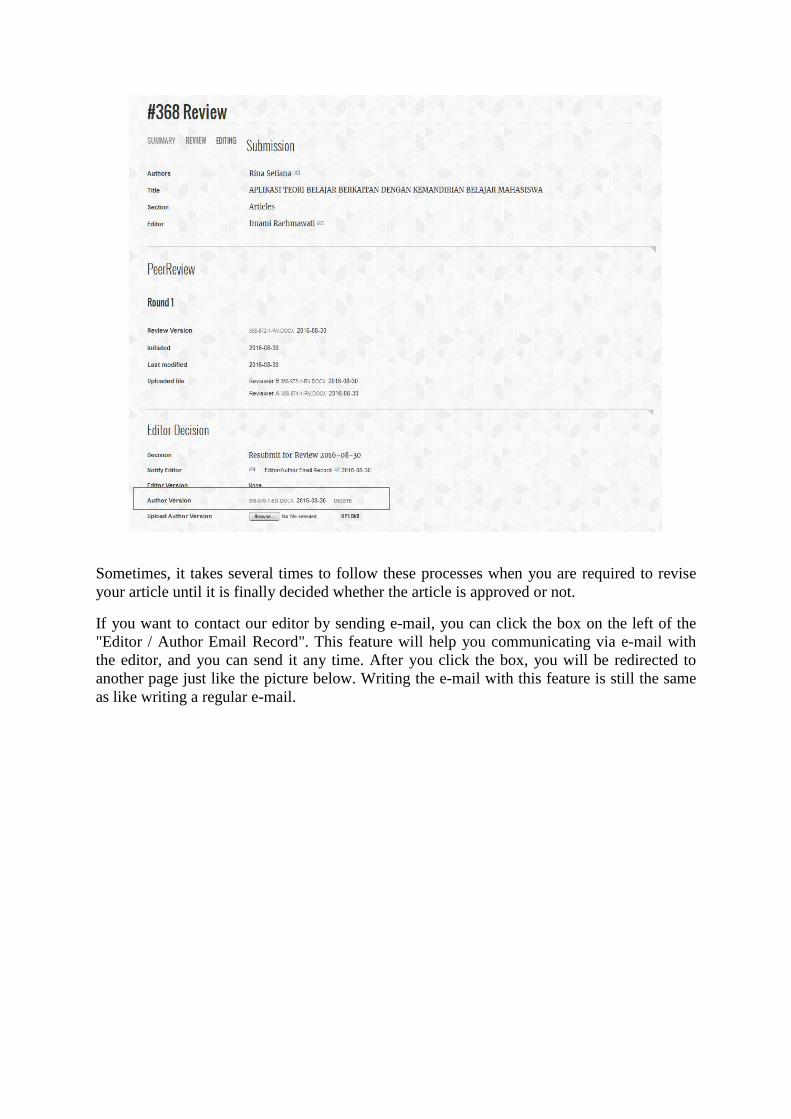
If you've successfully uploaded the latest version of your article, the page will be shown just
like the picture below.
Sometimes, it takes several times to follow these processes when you are required to revise
your article until it is finally decided whether the article is approved or not.
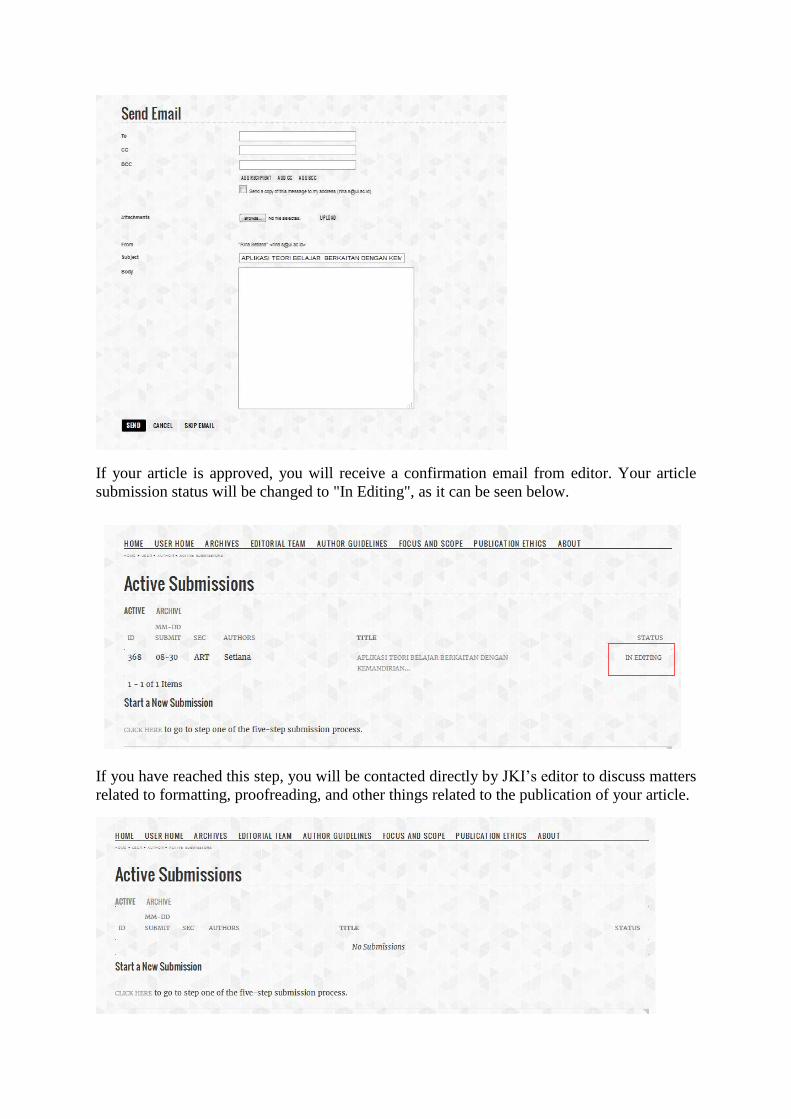
If you want to contact our editor by sending e-mail, you can click the box on the left of the
"Editor / Author Email Record". This feature will help you communicating via e-mail with
the editor, and you can send it any time. After you click the box, you will be redirected to
another page just like the picture below. Writing the e-mail with this feature is still the same
as like writing a regular e-mail.
If your article is approved, you will receive a confirmation email from editor. Your article
submission status will be changed to "In Editing", as it can be seen below.
If you have reached this step, you will be contacted directly by JKI’s editor to discuss matters
related to formatting, proofreading, and other things related to the publication of your article.
If your article is already approved or published by JKI, your article will disappear from the
"Active Submissions" page. You can see your article’s status by clicking "Archive" below
"Active Submissions". You can also see the JAKI’s volume and issue of your published
article on "Status" field, as you can see below.
If your article is disapproved, it will be missing from "Active Submissions", yet it will be