51
TRK502

TRK502
TRK 5022
CONTENTS
CONTENTS ........................................................................................................................................................................................................... Special Reminding ........................................................................................................................................................................................... Preface .................................................................................................................................................................................................................. Safety Notes ........................................................................................................................................................................................................ Safety Driving Rules ................................................................................................................................................................................... Protection Clothes ..................................................................................................................................................................................... Serial Number .................................................................................................................................................................................................... Location of Parts ............................................................................................................................................................................................... Meter & Indicator ........................................................................................................................................................................................Primary Parts ...................................................................................................................................................................................................... Key switch ...................................................................................................................................................................................................... Left Handle .................................................................................................................................................................................................... Right Handle ................................................................................................................................................................................................. Fuel Tank ........................................................................................................................................................................................................ Rear Shock Absorber .................................................................................................................................................................................. Rear Brake Pedal ..........................................................................................................................................................................................
256779
10111315151621222224

CONTENTS
3 TRK 502
Shift Pedal ................................................................................................................................................................................................... Tool Bag .......................................................................................................................................................................................................Notice of Use of Fuel and Engine Oil ......................................................................................................................................................Running In .......................................................................................................................................................................................................Inspection before Driving .......................................................................................................................................................................... How to start the engine ........................................................................................................................................................................ Smooth launching .................................................................................................................................................................................. To change gear ........................................................................................................................................................................................Inspection& Maintenance .......................................................................................................................................................................... Maintenance Schedule ......................................................................................................................................................................... Oil Level & Oil Change ........................................................................................................................................................................... Spark plug .................................................................................................................................................................................................. Catalytic Converter................................................................................................................................................................................... Battery .......................................................................................................................................................................................................... Throttle Cable Adjustment ................................................................................................................................................................... Clutch Adjustment ................................................................................................................................................................................... Chain Adjustment ....................................................................................................................................................................................
2425252627282930303034353536394040

CONTENTS
4TRK 502
Brake ............................................................................................................................................................................................................... Maintenance of Air Filter.......................................................................................................................................................................... Bulb Replacement ...................................................................................................................................................................................... Fuse Replacement ...................................................................................................................................................................................... Lubrication points ...................................................................................................................................................................................... Adjustment of Valve Clearance ............................................................................................................................................................. Tire ................................................................................................................................................................................................................... Storage Guideline ............................................................................................................................................................................................. Speci�cation & Technical Parameter .........................................................................................................................................................
424444454646464850

SPECIAL REMINDING
5 TRK 502
Warning: The motorcycle must be equipped with the quali�ed fuse for a safe driving, any other unquali�ed speci�cations of fuses are not allowed to use, especially the electric wires which would result severe damages to other parts, even �re accidents. Location of fuse: beside the battery; Fuse speci�cation: 40A for main power fuse. Burnt fuse is usually caused by the internal circuit fault of the motorcycle. Simply estimate the whole situation of the motorcycle before changing the spare fuse and if the fuse still burn after changing, send the motorcycle to the maintenance service center as soon as possible. It can only be driven after the fault is resolved. Notes: Before changing the fuse, switch the key to " " in case of short circuit; * Make sure the contact point of fuse is not broken while changing the fuse, which would result bad contact, parts damage, and even �re. No recon�guration: Do not recon�gure the motorcycle or change the places of the parts and accessories at will, which would have a strong impact on the stability and safety of the motorcycle, probably operation faults. All the recon�gurations of the electric system, emission control system, canister and any other systems or parts are against the driving safety and other relative tra�c administration regulations. And all the quality problems and consequences resulted by the user's recon�guration or changing of the parts without authorizations would be taken by the user himself. The user shall obey the speci�c regulations and rules of the tra�c administrative department.

PREFACE
6TRK 502
Notes Running in of Motorcycle The very beginning 1,000km driving-way of the motorcycle is the most important part of its service life. If the running in is carried normally, a longest service life can be assured and the performances of the new motorcycle can be fully ful�lled.
PREFACE
Thanks for choosing Benelli motorcycle, which is combined with international advanced technologies and would bring you happy and safe driving experience. Please fully understand the rules and requirements stated in this manual. This instruction manual covers the maintenance procedures, which would ensure the maximum performances and highest durability of your motorcycle if appropriately operated. Our company is equipped with professional technical maintenance personnel and department, which is able to provide you with high quality technical maintenance services. We make great e�orts to develop the products quality and performances so that the appearances and structures can be improved and may have di�erence than the data in this manual. The picture information here is only for reference, subject to our products.

7 TRK 502
Please carefully read this manual and stand by the key rules. The words of "Alarm", "Caution" and "Note" are used here to indicate the importance degrees, please make sure that you have fully understand the meanings as following: Alarm------------ This is for the important procedures that may endanger safety of the driver and would bring injuries if ignored.Caution------------ This is for the relative operation speci�cations of the motorcycle in case of damages to the motorcycle.Note------------ This is for the maintenance This instruction manual is a daily care issues document of this motorcycle, which should be together transferred to a second owner if this motorcycle is to be transferred.
SAFETY NOTES
Alarm: For the safety purpose, the driver should be speci�cally careful with understanding on the safety notes before driving.
SAFETY NOTES
8TRK 502
1. Have a complete inspection before starting the engine so as to prevent possible accidents or damages of parts.2. Many accidents happen due to inexperienced driver. Make sure the driver is quali�ed before driving the motorcycle. Never give it to any people without a driving license.3. Most of the crashes between cars and motorcycles are caused by the car drivers' "not seeing" the motorcycle drivers. In order to avoid accidents, the driver shall expose himself/herself by: Wearing bright colored and re�ective clothes; Don't drive into the invisible corner of rear-view mirror of the other car drivers.4. The driver shall obey the national and local laws and rules. Speeding is one of the key reasons of the accidents. So keep the speed in the limit stated. Use signals lights before turning or braking/accelerating to prevent accidents5. In the driving, the driver should hold the handles and keep both feet on the pedals and the passenger should grab somewhere on the vehicle or the driver with feet on the passenger pedals.6. Any recon�guration or disassembly of the parts is illegal, which would a�ect the safety driving and maintenance.7. The after-market accessories shall not a�ect the safety driving and operation performances of the motorcycle. Overloading of the electrical systems would result dangers to the vehicle.8. Do not operate the engine within con�ned space as the exhaust gas would cause damage to the body.
SAFETY NOTES

9 TRK 502
SAFETY NOTES
1. Fatal accidents of motorcycle drivers are mostly caused by head injuries. For the purpose of personal safety, the driver should wear a safety helmet, and also motorcycle boots, gloves and protection clothes. The passenger shall also wear the same. 2. The exhaust pipe will be very hot during driving and the heat will last after turning o� the engine. Never touch the mu�er and wear those clothes that can totally cover the legs. 3. Don't wear those loose clothes that may interfere with the control levers, pedals or wheels.
PROTECTION CLOTHES

10TRK 502
Vehicle identi�cation number (VIN) and the serial number are used for the registration of the motorcycle, which can also make sure that the dealer would provide you better services involving accessories purchasing or other services. Record the numbers for the possible use in the future. Vehicle identi�cation number (VIN) is printed on the right side of the head tube. The engine number is printed on lower part of the right case of engine crank case Please write down the numbers for your reference.
SERIAL NUMBER
VIN:
Engine Number:

TRK 50211
LOCATION OF PARTS
1 Clutch lever2 Left handle switch3 Meter4 Right handle switch
6 Front brake lever5 Throttle grip
1 5 42 63

TRK 502 12
LOCATION OF PARTS
7. Rear shock absorber 8. Rear brake pedal 9. Shift pedal 10. Side stand11. Tank
7
89
10
11

TRK 50213
LOCATION OF PARTS
Meter & Indicator 54 6 7 8 9
16
11
10
131415
122
1
3

TRK 502 14
LOCATION OF PARTS
1. TACHOMETERTachometer indicates the revolution per minute of engine.2. ADJUST BUTTONShort press the button to switch between km/h and mph.Long press the button to reset the "Trip" mileage.3. SELECT BUTTON Short press the button to switch between trip and odometer func-tions on the meter.Press button “SELECT” for several seconds, there will appear the interface for time adjustment: “SELECT” for selection of digits of time display and “ADJUST” for adjustment of each value. 4. WATER TEMPERATURE INDICATORThis indicator indicates the temperature of cooling liquid. When the pointer is in between C and H, the temperature is normal. It should stop to check the water tank if the pointer is higher than H level.5.ENGINE CONTROL SYSTEM TROUBLE INDICA-TORReturn to authorized dealer if this indicator is activated during riding.6.TURNING INDICATORThe indication lamps would flash with the turning signals.
7. HIGH BEAM INDICATOR LAMPWhen the high beam lamp of the headlamp turns on, the high beam indicator lamp would be on.8. NEUTRAL INDICATOR LAMPWhen the transmission is in the neutral, the indicator lamp would be on.9.ENGINE OIL PRESSURE WARNING LAMPWhen this indicator light up, that means the bike has the risk of insufficient lubrication and should be checked/ repaired immediately. 10. CLOCK It shows the time.
11. GEAR INDICATOR LAMPNumbers on the meter indicate the gear positions of the vehicle including 1, 2, 3, 4 ,5,and6. 12.ODOMETER & TRIP METERRelative mileage (TRIP): it records the mileage the vehiclecovers in a period of time.Odometer (TOTAL): it recordsthe total mileage the vehicle has covered in km.
TRK 50215
13. WATER TEMPERATURE INDICATORIt should stop to check the water tank if the INDICATOR is light .14.SPEEDOMETERSpeedometer shows the running speed, hours/kilometers.15. FUEL LEVEL INDICATORIt indicates the fuel level in the fuel tank.16. ABS INDICATOR LIGHT1. ABS failure -- If any type of ABS failure is detected and stored, ABS indicator light is lit and stays on after repaired, then ABS indicator light will be unlit after the next Power switch ON/OFF and when vehicle speed exceeds 5km/h.2. ABS is under OFF mode --ABS indicator light Blink 1 time/1.27s(Slow Blink)3. When press the the ABS switch within 3s ~30s --ABS indicator light Blink 1 time/0.32s(Quick Blink)4. ABS is under ON mode -- When keyswitch turned on, the ABS indicator lamp lit and stays activated, until the motorcycle drive o�, reaching about 3~5KM/H will the ABS indicator lamp be unlit.
PRIMARY PARTS
Normally the ABS indicator light comes on when the ignition switch is turned on and goes o� shortly after the vehicle starts moving. If the indi-cator light shows any of the following, a fault or faults may have occurred in the ABS. You should have the vehicle checked by an authorized Benelli dealer. a. The light does not come on when the ignition switch is turned on. b. The light remains lit after the vehicle moving over 5km/h. Remember that the ABS does not function when the indicator light is on, but if only the ABS system fails (without any other malfunctions in mechanical parts, for example, brake hoses, master cylinders, brake calipers), the conventional brake system should still work normally.

TRK 502 16
“ ”(On) position: The circuits are on “ ” Position: turn left to the maximum, press the key to the position of “ ”. Take out the key. In this condition, the vehicle has been locked. If you want to unlock the vehicle, insert the key and turn clockwise. “ ”(O�)position: All the circuits are o�.
1. HORN BUTTON Press down on the button,to activate the horn.2. HIGH & LOW BEAM SWITCH Turn the switch to " " position, the high beam of headlamp turn on and the indicator lamp on the meter would also turn on; turn the switch to " " position, the low beam of headlamp turn on.3. DIRECTION INDICATOR LAMP SWITCH Turn the switch to " " position, the left direction signal lamp �ashes; turn the switch to " " position, the right direction signal lamp �ashes. And the indicator lamps would turn on accordingly.4. PASSING SWITCH When passing other vehicles, press this button so the high beams of the headlamp would �ash to alarm the vehicles in front of you.
PRIMARY PARTS
PU
SH
KEY SWITCH
2
4
3
1
2
4
3
1
7. HIGH BEAM INDICATOR LAMPWhen the high beam lamp of the headlamp turns on, the high beam indicator lamp would be on.8. NEUTRAL INDICATOR LAMPWhen the transmission is in the neutral, the indicator lamp would be on.9.ENGINE OIL PRESSURE WARNING LAMPWhen this indicator light up, that means the bike has the risk of insufficient lubrication and should be checked/ repaired immediately. 10. CLOCK It shows the time.
11. GEAR INDICATOR LAMPNumbers on the meter indicate the gear positions of the vehicle including 1, 2, 3, 4 ,5,and6. 12.ODOMETER & TRIP METERRelative mileage (TRIP): it records the mileage the vehiclecovers in a period of time.Odometer (TOTAL): it recordsthe total mileage the vehicle has covered in km.
orLEFT HANDLE HAZARD SWITCH

TRK 50217
PRIMARY PARTS
Alarm:Turn on the direction signal lamps in time when changing the driveway or turning a direction and turn o� the lamps.
5. ABS SWITCH If you want to enable/disable the ABS , please keep you motorcycle slower than5km/h or stop, because the ABS switch only works when vehicle speed is lower than 5km/h.
5
ABS
From ABS ON mode → OFF modePlease Keep pressing the ABS switch precisely within the range of 3~5 sec-onds, the ABS indicator light should be changed from lit to blink as per 1.27s(Slow Blink) when you release the switch,Now the ABS was turned OFF and the brake will work as conventional system.
From ABS OFF mode → ON modePlease keep pressing the ABS switch precisely within the range of 3~5 sec-onds, the ABS indicator light should be changed from blink as per 1.27s(Slow Blink) to constant lit when you release the switch. Or you can turn the power switch o� and on to reset the ABS system to On mode
ABS
ABS ~
~

BN30218
PRIMARY PARTS
ABS
ABS
The operation will be ignored by the system If you keep pressing the ABS switch within 5s~30s. ABS will keep the current mode.
The ABS will be changed to ON mode from any other mode if the switch was stuck or pressed more than 30s.
ABS is designed to help prevent the wheels from locking up when the brakes are applied hard while running straight. The ABS automatically regulates brake force Intermittently, gaining gripping force and braking force helps prevent wheel lock-up and allows stable steering control while stopping. Brake control function is identical to that of a conventional vehicle. The brake lever is used for the front brake and the brake pedal for the rear brake. Although the ABS provides stability while stopping by preventing wheel lock-up, remember the following characteristics:
~NOTICE
The ABS switch does not work If you press t h e A B S s w i t c h a s whichever of the front and rear wheel speed is over 5km/h.
Anti-lock Brake System (ABS) for models equipped with ABS

BN30219
PRIMARY PARTS
• To apply the brake effectively, use the front brake lever and rear brake pedal simultaneously in the same manner as conventional vehicle brake system. • ABS cannot compensate for adverse road conditions, misjudgment or improper application of brakes. You must take the same care as with vehicles not equipped with ABS. • ABS is not designed to shorten the braking distance. On unpaved, uneven, or downhill surfaces, the stopping distance of a vehicle with ABS may be longer than that of an equivalent vehicle without ABS. Use special caution in such areas. • ABS will help prevent wheel lock-up when braking in a straight line, but it cannot control wheel slip which may be caused by braking during cornering. When leaning in corners, it is better to limit braking to gentle application of both brakes or not to brake at all. Reduce your speed before you enter the corner. Same as conventional brake system, an excessive sudden braking may cause wheel lock up and lose control. • During braking, ABS will not prevent the rear wheel from lifting.
ABS cannot protect the rider from all possible hazards and is not a substitute for safe riding practices. Be aware of how the ABS operates and its limitations. It is the rider’ s responsibility to ride at appropriate speeds and manner for weather, road surface and tra�c conditions.
WARNING!

BN30220
PRIMARY PARTS
The computers integrated in the ABS compare vehicle speed with wheel speed. Since non-recommended tires can a�ect wheel speed, they may confuse the computers, which can extend braking distance.
Use of non-recommended tires may cause malfunctioning of ABS and can lead to extended braking distance. The rider could have an accident as a result. Always use recommended standard tires for this vehicle.
WARNING!
○ ABS indicator light may come on under certain extreme riding condition. For example, wheelie, stoppie, or burn-out, rear-wheel drifting, or any maneuvers may cause the front and rear wheel to have di�erent rotation status. In this case, �rst turn the ignition key to “OFF” , and then back to “ON” . ABS indicator light goes o� by this operation, but if ABS indicator light remains lit after the vehicle runs at the speed of approximately 5 km/h or above, you should have the bike checked by an authorized Benelli dealer. ○ When the ABS is functioning, you may feel a pulsing in the brake lever or pedal. This is normal. You don’ t need and should not stop applying brakes when this speci�c pulsing feeling appears. ○ ABS does not function at speeds of approximate 5 km/h or below. ○ ABS does not function if the battery is discharged.
! NOTICE

TRK 502 21
RIGHT HANDLE1. ENGINE STOP SWITCH When the switch is on " " position and the power is on, the engine runs. When the switch is on " " position and the power is o�, the engine will not run.
2. HAZARD SWITCH” ” Turn to “ ” and the four direction signal lamps would flash to warn for emergency situation;turn to "●" for daytime driving.3. ELECTRIC STARTER BUTTONPull the clutch lever or put in Neutral gear and press the button to run the electric motor and start the engine.4. LIGHT SWITCH Pull the clutch lever or put in Neutral gear and press the button to runthe electric motor and start the engine.Turn switch to position of " " to light up the front lamp; Turn to " " to light up meter lamp, city light and tail lamp; turn to "●" for daytime driving.
PRIMARY PARTS
Note:Under normal conditions, this switch shall be on "Operate" ( ) position. Use this switch under emergency situation, for example accident or key switch problems.
1
23
1
43
or
Without Headlight Switch
With Headlight Switch

TRK 50222
Alarm: Do not over �ll the fuel tank. Do not make fuel splashes on hot engine. Please stop the engine and turn the ignition key to " " (O�) position when you need to refuel. Do not forget to lock the fuel tank cover after adding the fuel in case of evaporation to the air, which is waste of energy and would pollute the environment. Don't use �re when refueling.
REAR SHOCK ABSORBER The motorcycle is equipped with one rear shock absorber on the right side of bike. Spring pre-load adjustment. The rear shock absorber is equipped with adjustment ring nuts for preload adjustment.Adjust the spring preload as follows: To increase the preload setting of the spring, turn the adjustment ring nut with special wrench as illustrated, to make the suspension sti�er. Please rotate opposite direction to achieve a softer setting. Afteradjustment, please make sure the lock nut tightened to ensure safetyof riding.
PRIMARY PARTSFUEL TANK The capacity of fuel tank (including reserve) is about 16L. To open fuel tank cap, please insert the key and turn it clockwise and open the cover. To close the fuel tank, please recap and then press it. Take away the key when you hear the sound of locking.
TRK 502 23
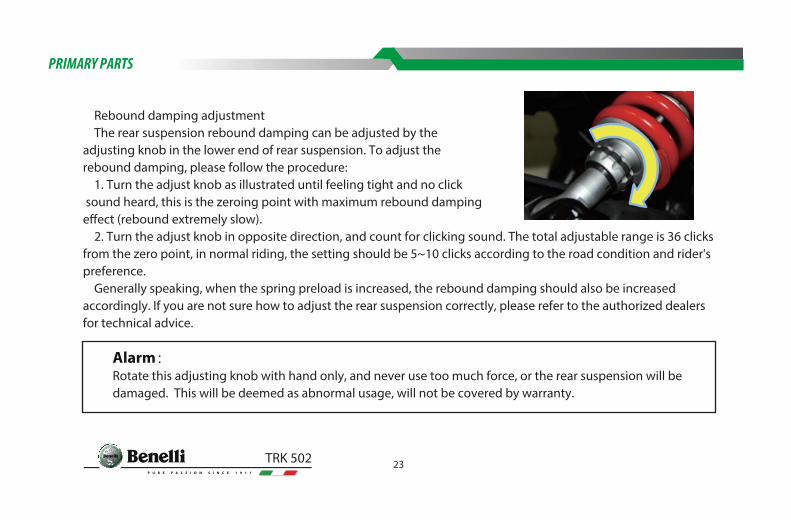
Rebound damping adjustment The rear suspension rebound damping can be adjusted by theadjusting knob in the lower end of rear suspension. To adjust the rebound damping, please follow the procedure: 1. Turn the adjust knob as illustrated until feeling tight and no click sound heard, this is the zeroing point with maximum rebound damping e�ect (rebound extremely slow). 2. Turn the adjust knob in opposite direction, and count for clicking sound. The total adjustable range is 36 clicks from the zero point, in normal riding, the setting should be 5~10 clicks according to the road condition and rider's preference. Generally speaking, when the spring preload is increased, the rebound damping should also be increased accordingly. If you are not sure how to adjust the rear suspension correctly, please refer to the authorized dealers for technical advice.
PRIMARY PARTS
Alarm:Rotate this adjusting knob with hand only, and never use too much force, or the rear suspension will be damaged. This will be deemed as abnormal usage, will not be covered by warranty.

TRK 50224
REAR BRAKE PEDAL Step the rear brake pedal to slow down the rear wheel. Brake light will turn on while rear brake is in use.
SHIFT PEDAL This motorcycle is equipped with six-speed constant mesh gearbox.
PRIMARY PARTS
Caution:When the transmission is on neutral position, the indicator lamp would turn on. Slowly release the clutchlever to make sure the transmission is on the neutral position.
REAR BRAKE PEDAL
SHIFT PEDAL

TRK 502 25
Slow down the motorcycle when turning to the low gear. Revving up the engine slightly to shift gears in more smooth way to avoid damaging gears
TOOL BAG The tool bag is in the seat cushion. By using tools in the bag, you can do basic repair and adjustment and change some parts when needed.
NOTICE OF USE OF FUEL AND ENGINE OIL
Fuel It is a must to use lead free gasoline. Use gasoline contains octane number more than 93. Notice: Use lead free gasoline can extend the working life of spark plug. Engine Oil Please use four-stroke engine oil it should be equal or higher than API SAE service grade SF. The speci�cation is SJ10W/50.
NOTICE OF USE OF FUEL AND ENGINE OIL
TypeFull synthetic oil
SJ10W-50 or SN 15W-50

TRK 50226
For driving a new motorcycle in its �rst 1,000km way, the engine should not be over revved and all the gears shall not be over 80% of red zone engine rpm; don't operate the throttle under a fully open position; change the gears in time to keep the engine rpm in reasonable range. It is strongly suggested to use the motorcycle very carefully during its running in period; also the rider has to be familiar to the performance. Note:In the �rst 300km of break in, you should examine the cleanliness of the engine oil frequently. Check the oil level of engine oil before driving.
INSPECTION BEFORE DRIVING
Please check on the following contents which are very important before driving,
RUNNING IN
Content
Handlebar
Braking
Comments
1) Stable2) Turn smoothly3) No sliding or loose
1)Right clearance of the lever and brake pedal2)No sponge feeling

TRK 502 27
INSPECTION BEFORE DRIVING
Tire1)Appropriate air pressure2)Appropriate tire treads depth3)No crack or cut
Fuel Level Su�cient fuel for the driving
Indicator Lamp High beams indicator lamp, gear Indicator light, and turning indicator.
Horn & Brake Switch Horn & Brake Switch
Engine Oil Correct oil levelCorrect oil level
Throttle1)Appropriate free play in clutch lever2)Smooth operation
Clutch1)Appropriate free play in throttle cable2)Smooth operation, no stuck when returning to full close position
Driving Chain1)Appropriate tightness 2)Appropriate lubrication
LightOperate all the lamps – headlight, taillight, stoplight, instrument-panel light and city light.

TRK 50228
DRIVING TIPS
HOW TO START THE ENGINE Insert the ignition key into the ignition lock and to " ". Step on the shift pedal to the neutral. The neutral indicator light lightens up if the gear box is in neutral position. Start the engine by pushing the start switch.
Warning:Do not start the engine indoor with bad ventilation or without ventilation. Do not leave a starting motorcycle when no one else is around.
Caution: Do not run the engine in high speed when you do not drive the motorcycle, or it will become overheating and damage its inner parts.
INSPECTION BEFORE DRIVING

TRK 502 29
SMOOTH LAUNCHING
Hold the clutch lever, paused for an instant and step on the shift pedal to the �rst gear. Twist the throttle grip towards yourself and release the clutch lever slowly and smoothly at the same time. Then the motorcycle will begin to move forward smoothly.
Gear box usage Gear box can ensure a smooth running of engine within normal engine rpm Driver should choose a proper gear according to driving speed. It is dangerous to drive with clutch disengaged. Lower the gear when you slow down the motorcycle to make engine run within normal rpm range. Drive on slope way When drive on uphill road, motorcycle will slow down and seem to be lack of power. Switch to low gears so that engine can generate normal power. Shift the gear swiftly to prevent motorcycle from losing speed. Turn to low speed gears in order to brake when driving on downhill slope. Don't over rev the engine. Brake usage and stopping
Warning:Put the stands back to retracted position before driving.
INSPECTION& MAINTENANCE

Twist the throttle grip in the direction away from yourself to close the throttle. Use front and rear brake evenly. Shift to low speed gear to slow down. Before stopping the motorcycle, hold the clutch and shift to neutral position. Check the neutral position indicator light to check whether it is in neutral position.
The motorcycle should be parked on �rm and �at road. If you have to park the motorcycle on a slope by the side stand, please shift to the �rst gear to prevent slipping. Shift to neutral position before starting the engine. Turn the power key to the position " " to stop the engine. Remove ignition key from the switch after locking for security reason.
TRK 50230
Warning:It is dangerous only to use either the front brake or rear brake which may causes the motorcycle to skid or lose control. Be careful and use brakes properly when you drive on wet road or curved road.
Notice:Inexperienced drivers usually use rear brake only, which will accelerate abrasion of the brake and result in longer stopping distance.
INSPECTION BEFORE DRIVING

TRK 502 31
MAINTENANCE SCHEDULE Listed below is the scheduled maintenance time table. Inspection, examination, lubrication and speci�ed maintenance should be taken according to the following chart the inspection and maintenance of the key components, are required to be made by professionals. Better to consult authorized dealers to do inspection and maintenance for safety's sake.
MAINTENANCE SCHEDULE: I: Inspection, cleaning, adjustment, replacement C: Cleaning R: Replacement A: Adjustment L: Lubrication
INSPECTION& MAINTENANCE

TRK 50232
PRIMARY PARTS
NO ITEM1000km
Fuel system
Throttle
Operation
Air Filter
Spark Plug
Valve
Clearance
Engine Oil
Oil Filter
Fuel Injection
Drive Chain
4000km 7000km
Per 24000km: I
Per 6000km: R
Per 6000km: R
Per 1000km: I / L /A
Per 6000km: I or R
10000km 13000km 16000km
ODOMETER READING
1
3
4
5
6
7
8
9
Battery10
2
I
I
I
I
I
I
I I
RR
I
I I
I I
I
I I
I

TRK 502 33
NOTICE OF USE OF FUEL AND ENGINE OIL
NO ITEM1000km
Wear of Brake pads
Brake System
Braking HydraulicTube
Braking HydraulicFluid
Clutch
Hanger Bracket
Nut Bolt Fastener
Wheel/Rim
Steering Bearing
4000km 7000km
Replace every two years
Replace every two years
10000km 13000km 16000km
ODOMETER READING
11
13
14
15
16
17
18
19
Cooling System
20
21
22
12
I
I I I
I
I
I I
I
I
I I I
I I
I I
I I
I I
I I
I I
II I I I I

TRK 50234
Be repaired by authorized dealers: with quali�ed tools and inspection materials provided by the owner; by persons with mechanical repair certi�cation; required to be followed the maintenance manual for self-inspection. Examination and repair are suggested to be taken by authorized dealers for the sake of safety, in cases of these itemsNotes: 1. Make more inspections for driving in dusty areas. 2. Repeat the shown regular inspection, if the odometer reading exceeds the �xed value. 3. Take more maintenance to keep good performance for frequent driving in heavy conditions as rugged roads.
OIL LEVEL & OIL CHANGE Check the oil level before starting the engine. Put the motorcycle on side stand. Pull the handle bar and let the bike stand vertical to the �at ground. Check if the oil level is between the maximumand minimum level. If not, �llthe quali�ed engine oil to the proper amount. Oil Change & Oil Filter Replacing 1. Take down the oil �lter with the special tool and oil drain bolt before oil draining. 2. Replace the oil �lter with a new one if needed.
INSPECTION BEFORE DRIVING
2
31
2

TRK 502 35
3. Install the oil �lter with the special tool and oil drain bolt. 4. Fill the engine with quali�ed engine oil 5. Make the engine runs in idling for several minutes and turn o�. 6. Make sure the oil reaches the upper limit mark without any oil leakage.
SPARK PLUG
Clear away carbon deposit on the spark plug with small metal wire brush or spark plug cleaner during inspection period noted in the maintenance schedule. Readjust the electrode gap of spark plug with feeler gauge and keep the gap between 0.6~0.7mm. Replace the sparking plug for each 6000km. Type of Spark Plug: NGK CR8E
CATALYTIC CONVERTER In order to meet the requirements of environmental emission, the mu�er of the motorcycle is equipped with catalytic converter.
INSPECTION& MAINTENANCE
Do not Screw the spark plug too tight to avoid damaging the threads of cylinder cover. Don't let the foreign objects fall into the engine through spark plug hole during dismounting.
GAP

36 TRK 502
The catalytic converter contains precious metals as the catalyst, which will transform the hazardous substances in the exhaust gas, including carbon monoxide, hydrocarbon and nitrogen oxide into non-toxic carbon dioxide, water and nitrogen through chemical reaction. Since the catalytic converter is very important, the defective catalytic converter will pollute the air and damage the performance of the engine, if the replacement is needed, please use the genuine parts or entrust the distributors to replace.
BATTERY
Battery is under the seat cushion. The battery for the motorcycle is maintenancefree type. For the new motorcycle, please ask the dealer of the company to �ll electrolyte into the battery for you. It is not necessary to re�ll electrolyte in the future. If you have to take out the battery for inspection, please follow these steps: a. Shut o� power switch of the motorcycle; b. Remove the seat cushion;
Caution: The catalytic converter is at high temperature area, please do not touch.
INSPECTION BEFORE DRIVING
12V8Ah(YTX9-BS)MF (Maintenance Free) Battery

37TRK 502
d. Take down the negative terminal (-) �rst, and then the positive terminal(+); e. Take out the battery gently. Install the battery in the reverse order of removal.
Please operate on the following requirements for the �rst use: Remove the sealing paper on the battery. Inject specially supplied electrolyte into the battery and put on the battery sealing plug. Leave it for 30 minutes for full chemical reaction and then you can use the battery. For the new battery, initial charge after electrolyte �lling will extend its service life. This operation shall be performed by your local dealers. Connect the wire polarities correctly. Positive wire (red) shall be connected with the positive terminal(+); and negative wire(black)to the negative terminal(-). Tighten terminal bolts. Clean frequently the erosive substances on the terminals with a wire brush while in use. Please operate according to the following requirements while �lling electrolyte into the maintenance-free battery:
INSPECTION& MAINTENANCE
Attention:Connect correctly the battery wires when the battery is re-installed. The red wire shall be connected with the positive terminal (+); and black wire shall be connected to the negative terminal(-). If the wiresare wrongly connected, it may damage the electrical system and the battery.Power switch (key) shall be shut o� while inspecting or replacing battery.

38 TRK 502
a. Place vertically the battery on a horizontal plane and remove the sealing tape. b. Take out the electrolyte from the plastic bag. Open its cover strip and use it as �lling plug for the battery.
c. Lift the electrolyte container upside down vertically and align the six �lling ports of the container with the six �lling ports on the battery. Pull downward hard the electrolyte container so as to puncture the sealing tape on the �lling ports of electrolyte container. Electrolyte thus �ows from the container to the battery. Check the three �lling pipes on both sides. At least there is one pipe that has bubbles coming out on each side, which means that electrolyte �lling begins normally. Attention: Please be sure not to tilt the container, or electrolyte �lling may be interrupted. d. When you are sure that there is at least one pipe that has bubbles coming out on each side (three pipes on each side), leave it there and keep the �lling process over 20minutes. If there is no pipe that has bubbles coming out on each side, tap slightly two to three times the bottom of the electrolyte container and check again if there is at least one pipe that has bubbles coming out on each side (The electrolyte cannot be taken down now). e. When the electrolyte has completely �owed through, tap the container bottom several times to drain residual electrolyte; and then slowly pull out the electrolyte container.
INSPECTION BEFORE DRIVING
Attention: Please do not tear or puncture the sealing tape on the �lling port. The cover strip can be kept as �lling plug for the battery.

39TRK 502
f. The six sealing plugs on the cover strip align respectively to the six �lling ports on the battery. Make sure the ends of the six sealing plug has inserted into the �lling ports on the battery; press them hard into the ports till the cover strip makes a plane with the top surface of the upper part of the battery. After completion of electrolyte �lling, please do not pull out the cover strip or �ll water, electrolyte or other liquid. Pay attention to the following matters while replacing the battery. Before replacing the battery, please �rst determine the model of motorcycle and check if both batteries are of the same type. During motorcycle design, the battery speci�cations are considered as the best choice. If a battery of a di�erent model is used, it may a�ect performance and life time of the motorcycle, and possibly causes electrical failure. If the motorcycle will not be used for a long time, please remove the battery and charge it once a month.
THROTTLE CABLE ADJUSTMENT
1. Screw o� the lock nut. 2. Turn the adjustor to make the cable clearance within10-20mm. 3. Retighten the lock nut after adjustment of cable clearance.
INSPECTION& MAINTENANCE
Warning:Battery will produce explosive gases when chemical reaction occurs in the battery. Keep the battery away from �re, spark and high temperature places.The battery is �lled with sulfuric acid (electrolyte). Electrolyte is poisonous substance. Please keep it out of reach of children.

40 TRK 502
CLUTCH ADJUSTMENT The free play of clutch is measured from the free status of the lever, to the engagement point of the clutch the standard should be 10-20mm. Adjust in following methods, if anything abnormal. (1) Loose the locknut. (2) Screw in or out adjusting bolt and adjusting screw to make required free play. (3) Tighten locknut
CHAIN ADJUSTMENT Adjust the tightness of drive chain for driving each 1000km's in following methods to reach the free play of 10~20mm. Make regular adjustment of the chain according to your driving condition.
INSPECTION BEFORE DRIVING
Warning:Suggestions here are for regular maintenance schedule it's recommended for inspection and adjustment of the chain before each driving. Accident as chain detaching or serious damage on engine can be caused by excessively slack chain.
10-20mm
41TRK 502
Adjust the chain in following methods: 1. Support the motorcycle with side stand. 2. Loosen rear axle nut. 3. Loosen locknut. 4. Turn adjusting nut to adjust the tightness of the chain. Reference marks are adopted on left and right swing arm and should reach the same grid after adjustment. Retighten the rear axle nut after adjust the chain tightness to 10~20mm and con�rm again
During regular maintenance, check the following conditions of the chain: (1) Loose pin (2) Damaged roller (3) Rusty chain link (4) Twisted or snarled link (5) Excessive free play (6) Loose chain The sprocket is probably damaged, if any above-mentioned problems on the chain are found. Check the following items for sprocket:
INSPECTION& MAINTENANCE
Notice:When use new chain, check both front and rear sprockets if they are still in service limit and replace them,if necessary

42 TRK 502
(1) Over worn sprocket tooth (2) Broken or damaged sprocket tooth (3) Loosened sprocket �xing nuts
BRAKE The motorcycle uses disc brake as both the front brake and the rear brake. Adjustment is �nished before delivery. Contact dealer if any problem.
Brake Fluid The motorcycle uses DOT4 brake �uid. Please replace it every two years.
Don't forget to check the amount level in the front brake �uid reservoir. Add appropriate brake �uid if necessary. Brake pads Check the front and rear wheel brake pads whether have been worn to limits. Change the pads if over the limit.
INSPECTION BEFORE DRIVING
Warning:In case of drinking the brake �uid by mistake or contacting with eye or skin, wash with a large amount of water, and seek medical advice immediately if in a serious condition.
43TRK 502
Check the braking system everyday as follows: 1. Whether leak on the front and rear wheel braking system; 2. Whether leak, crack on the brake �uid tubes; 3. Check the feedback feeling on brake lever 4. Check abrasion condition of the front and rear wheel brake pads
Rear Brake To adjust the stroke of rear brake pedal, screw or turn the adjusting bolt of rear brake, the free play be adjusted to 20~30mm.
INSPECTION& MAINTENANCE
Warning:Maintenance of braking system or brake pads should be taken by the authorized dealer which is equipped with necessary tools and can assure the quality of the service.
Caution:The disk braking system has high pressure in the pipe require periodical maintenance in the manual.

44 TRK 502
(1) Over worn sprocket tooth (2) Broken or damaged sprocket tooth (3) Loosened sprocket �xing nuts
BRAKE The motorcycle uses disc brake as both the front brake and the rear brake. Adjustment is �nished before delivery. Contact dealer if any problem.
Brake Fluid The motorcycle uses DOT4 brake �uid. Please replace it every two years.
Don't forget to check the amount level in the front brake �uid reservoir. Add appropriate brake �uid if necessary. Brake pads Check the front and rear wheel brake pads whether have been worn to limits. Change the pads if over the limit.
MAINTENANCE OF AIR FILTER Air �lter should be regularly maintained, especially when driving in areas full of dust and sand. 1. Dismount the seat, fuel tank and the side cover. 2. Remove the screw, open the cover of air �lter and take out the �lter element. 3. Immerse the �lter element in clean solution and take out after cleaning for complete drying. 4. Immerse the �lter element in clean engine oil again, after saturation, take out and squeeze o� excessive oil. 5. Install the components back in the reverse order of dismount.
BULB REPLACEMENT Replacing of Head Lamp Bulb Take o� the cover, replace the old bulb with the same speci�cation one, and �nally set up in the reversed orders.
INSPECTION BEFORE DRIVING
Caution:Those highly �ammable liquid like gasoline and organic solvent cannot be used for cleaning the �lter element.

45TRK 502
FUSE REPLACEMENT The fuse is beside the battery. Frequent blowing of fuse indicates short circuit or overloading. Contact with the authorized dealer for proper repairing.Use the fuses for the same speci�cation as indicated.
INSPECTION& MAINTENANCE
Notice:The new bulb installed must in the same speci�cation with the old one. High-power bulb will increase load to circuit system which will cause faults such like batterypower shortage.
Warning:It's dangerous to use other speci�cations of fuse, which would result severe failures like burning, �ring.
10A
15A
15A
15A
15A
15A
15A
15A
15A
15A
15A
15A
or
POWER LOCK
PUELPUMP
PUELPUMP
FANFAN
POWER LOCK
ECUECU
HEADLIGHT
With Headlight SwitchWithout Headlight Switch
46 TRK 502
LUBRICATION POINTS
Appropriate lubrication is important to keep every part of your motorcycle in normal running and lengthen its working life and to ensure safe driving. Lubricate your motorcycle after you have driven it for a long mileage or the vehicle is wet due to raining or washing. Detail lubrication points are shown in the �gure below:Motorcycle lubricantLubricant grease1. Rear brake pedal shaft 2. Side stand and its spring 3. Throttle cable 4. Pivot of front brake lever5. Pivot of clutch lever
ADJUSTMENT OF VALVE CLEARANCE
Check and adjust the valve clearance when the engine is cold. The Standard Valve Clearance: Intake Valve: 0.13-0.19mm, Exhaust Valve: 0.19-0.25mm
INSPECTION BEFORE DRIVING

47TRK 502
In�aztion pressure and tire tread should be regularly checked. In order to ensure maximum safety and longer service life, in�ation pressure requires more frequent routine check. Tire Pressure Insu�cient tire pressure will not only accelerate wearing, but also have bad impact on driving stability such as making turning di�cult. However, too high pressure will reduce the contact area between tire and ground, thus causing slipping or even getting out of control. Tire pressure should be kept in the standard range. Adjust the tire
INSPECTION& MAINTENANCE
Notice:Adjustment of valve clearance will have direct in�uence on the performance of engine, thus requiring strict accordance with the time interval required in "Maintenance Schedule". Adjustment should be done with professional technicians corresponding tools. In order to keep the valve clearance in good condition, we strongly recommend you to leave it up to consult to authorized dealers about this maintenance.
220kpaFront Wheel
250kpaRear Wheel
TIRE

STORAGE GUIDELINE
48 TRK 502
Tire Tread Driving a motorcycle with wheels excessively worn will reduce driving stability or even get out of control. When the tire tread of front wheel is less than 1.6mm, and the rear wheel's tread is less than 2mm or even less, replacement is strongly recommended.
STORAGE GUIDELINEStorage If you need to keep your motorcycle for a long time without using, it's suggested tofollowing these instructions: 1. Change engine oil. 2. Lubricate drive chain 3. Detach the spark plug and add one teaspoon of (15~20cm3) clean engine oil to cylinder. Pushing the starting switch for several times to distribute oil in the cylinder, and install the spark plug again. 4. Remove the battery. Keep the battery in proper place which can avoid freezing and the direct sunlight. 5. Clean and dry the motorcycle. Wax the surface of the paint. 6. In�ate tire to the required pressure. Put the motorcycle on a block to make two tires o� the ground. 7. Cover the motorcycle (no plastic or coating material) and keep it in the place with consistent temperature and low humidity. Do not keep your motorcycle under direct sunlight.

STORAGE GUIDELINE
49TRK 502
Use the motorcycle after storage 1. Take o� the cover and clean the motorcycle. Change engine oil if you keep your motorcycle for more than four months. 2. Install the battery and do charging as needed. 3. Wash away the anti-rust agent in fuel tank, and add new petrol into fuel tank.

SPECIFICATION & TECHNICAL PARAMETER
50 TRK 502
SIZE AND WEIGHTLength............................................................................... 2200mmWidth................................................................................... 915mmHeight.............................................................................. 1450mmWheelbase........................................................................1525mmDry Weight............................................................................210kgENGINEType................. 2-cylinder/4-stroke/8-valve, water-cooledModel........................................................................ BJ269MR-ABore × Stroke..........................................................ø69x66.8mmDisplacement...................................................................... 500mlMaximum Power........................................ 35KW/8500r/minMaximum Torque..................................... 46N.m/6000r/minIgnition System Type................................................................TLICompression Ratio............................................................ 11.5:1Start Type............................................................Electric StartingTransmission SystemClutch...................................................................Wet multi-plateSIX SPEED TRANSMISSIONS
Front Brake Type ...................................................... disc brake Rear Brake Type ........................................................ disc brakeFront tire Speci�cation................................................120/70ZR17M/CRear tire Speci�cation...............................160/60ZR17M/CELECTRICAL SYSTEMBattery...............................................................................12V 8AhMagneto..................................................... Fly-wheel MagnetoHeadlamp..................................................................12V 55/55WTail/Brake Lamp............................................................. 12V LED Turn Signal Lamp.......................................................... 12V LEDMeter Lamp.......................................................................12V 2WNeutral Position Indicator Lamp................................12V 2WHigh beam indicator lamp...........................................12V 2WTurning indicator ............................................................12V 3WHorn Speci�cation............................................................12V 3ACAPACITYFuel Tank (include reserve tank)...............................20±0.5L

www.benelli.comBenelli Q.J. S.r.l.
Strada della Fornace Vecchia 3, 61122 Pesaro - Italy


