38
One Expert TM Handheld Manager, version 1.1 User’s Guide

One ExpertTM
Handheld Manager, version 1.1
User’s Guide


One ExpertTM
Handheld Manager, version 1.1
User’s Guide

ii Handheld Manager User’s Guide
Notice Every effort was made to ensure that the information in this document was accurate at the time of printing. However, information is subject to change with-out notice, and JDSU reserves the right to provide an addendum to this docu-ment with information not available at the time that this document was created.
Copyright © Copyright 2011, JDS Uniphase Corporation. All rights reserved. JDSU, Enabling Broadband and Optical Innovation, Communications Test and Mea-surement Solutions, and the JDSU logo are trademarks of JDS Uniphase Cor-poration (“JDS Uniphase”). All other trademarks are the property of their respective owners. No part of this guide may be reproduced or transmitted electronically or otherwise without written permission of the publisher.
Trademarks JDS Uniphase, JDSU, and SmartClass are trademarks or registered trade-marks of JDS Uniphase Corporation in the United States and/or other coun-tries.
Specifications, terms, and conditions are subject to change without notice. All trademarks and registered trademarks are the property of their respective companies.
Ordering information This guide is a product of JDSU's Technical Information Development Depart-ment, issued as part of the Handheld Manager Utility. The catalog number for a printed guide is HHM-PML.
Terms and Conditions The provision of hardware, services and/or software are subject to JDSU’s standard terms and conditions available at www.jdsu.com.

Handheld Manager User’s Guide iii
Table of Contents
About this Guide vPurpose and scope . . . . . . . . . . . . . . . . . . . . . . . . . . . . . . . . . . . . . . . . . . . viAssumptions . . . . . . . . . . . . . . . . . . . . . . . . . . . . . . . . . . . . . . . . . . . . . . . . viConventions . . . . . . . . . . . . . . . . . . . . . . . . . . . . . . . . . . . . . . . . . . . . . . . . . vi
Chapter 1 Getting Started 1Features and capabilities . . . . . . . . . . . . . . . . . . . . . . . . . . . . . . . . . . . . . . 2Installation . . . . . . . . . . . . . . . . . . . . . . . . . . . . . . . . . . . . . . . . . . . . . . . . . . 2
System requirements . . . . . . . . . . . . . . . . . . . . . . . . . . . . . . . . . . . . . . . 2Installing the Handheld Manager. . . . . . . . . . . . . . . . . . . . . . . . . . . . . . . 2
Launching the Handheld Manager . . . . . . . . . . . . . . . . . . . . . . . . . . . . . . . 3Setting preferences . . . . . . . . . . . . . . . . . . . . . . . . . . . . . . . . . . . . . . . . . . . 4Connecting a device to the PC . . . . . . . . . . . . . . . . . . . . . . . . . . . . . . . . . . 4Renaming devices . . . . . . . . . . . . . . . . . . . . . . . . . . . . . . . . . . . . . . . . . . . . 6Managing user profiles . . . . . . . . . . . . . . . . . . . . . . . . . . . . . . . . . . . . . . . . 7
Adding a profile . . . . . . . . . . . . . . . . . . . . . . . . . . . . . . . . . . . . . . . . . . . . 7Modifying a profile . . . . . . . . . . . . . . . . . . . . . . . . . . . . . . . . . . . . . . . . . . 7Deleting a profile . . . . . . . . . . . . . . . . . . . . . . . . . . . . . . . . . . . . . . . . . . . 8
Chapter 2 Using the Handheld Manager 9Managing result files . . . . . . . . . . . . . . . . . . . . . . . . . . . . . . . . . . . . . . . . . 10Managing device configurations . . . . . . . . . . . . . . . . . . . . . . . . . . . . . . . 12
Modifying configurations on the SmartClass ADSL Tester . . . . . . . . . . 13Using the file manager . . . . . . . . . . . . . . . . . . . . . . . . . . . . . . . . . . . . . . . 16Capturing screen shots. . . . . . . . . . . . . . . . . . . . . . . . . . . . . . . . . . . . . . . 17Updating the software on a connected unit . . . . . . . . . . . . . . . . . . . . . . 17
Downloading software files . . . . . . . . . . . . . . . . . . . . . . . . . . . . . . . . . . 18Upgrading the software on a SmartClass ADSL unit . . . . . . . . . . . . . . 18Updating software on the SmartClass T1, E1, or Ethernet . . . . . . . . . . 20
Backing up device data. . . . . . . . . . . . . . . . . . . . . . . . . . . . . . . . . . . . . . . 21Saving the device data . . . . . . . . . . . . . . . . . . . . . . . . . . . . . . . . . . . . . 21Importing backup files . . . . . . . . . . . . . . . . . . . . . . . . . . . . . . . . . . . . . . 21
Modifying the splash screen . . . . . . . . . . . . . . . . . . . . . . . . . . . . . . . . . . 22

Table of Contents
Handheld Manager User’s Guide iv
Viewing and enabling software options . . . . . . . . . . . . . . . . . . . . . . . . . 22Logging activity . . . . . . . . . . . . . . . . . . . . . . . . . . . . . . . . . . . . . . . . . . . . . 23
About the log . . . . . . . . . . . . . . . . . . . . . . . . . . . . . . . . . . . . . . . . . . . . . 23Filtering log entries . . . . . . . . . . . . . . . . . . . . . . . . . . . . . . . . . . . . . . . . 24
Updating Handheld Manager . . . . . . . . . . . . . . . . . . . . . . . . . . . . . . . . . . 24
Chapter 3 Troubleshooting 25Getting Technical Assistance. . . . . . . . . . . . . . . . . . . . . . . . . . . . . . . . . . 26Resolving problems . . . . . . . . . . . . . . . . . . . . . . . . . . . . . . . . . . . . . . . . . 26

Handheld Manager User’s Guide v
About this Guide
This chapter describes how to use this guide. Topics discussed in this chapter include the following:
– “Purpose and scope” on page vi– “Assumptions” on page vi– “Conventions” on page vi

About this GuidePurpose and scope
vi Handheld Manager User’s Guide
Purpose and scopeThe purpose of this guide is to help you successfully use the features and capabilities of the SmartClass Handheld Manager.
This guide includes task-based instructions that describe how to configure, use, and troubleshoot the general functions of the SmartClass Handheld Manager.
AssumptionsThis guide is intended for novice, intermediate, and experienced users who want to use the Handheld Manager effectively and efficiently. We are assuming that you have basic computer experience and are familiar with basic telecommunication concepts and terminology.
ConventionsThis symbols and safety terms used in this guide are described in the following tables.
Table 1 Symbol conventions
Table 2 Safety definitions
This symbol represents a general hazard.
This symbol represents a risk of electrical shock.
This symbol represents a Note indicating related information or tip.
This symbol, located on the equipment, battery, or packaging indicates that the equipment or battery must not be disposed of in a land-fill site or as municipal waste, and should be disposed of according to your national reg-ulations.
DANGER Indicates an imminently hazardous situation which, if not avoided, will result in death or serious injury.
WARNING Indicates a potentially hazardous situation which, if not avoided, could result in death or serious injury.
CAUTION Indicates a potentially hazardous situation which, if not avoided, may result in minor or moderate injury.
1
Handheld Manager User’s Guide 1
Chapter 1 Getting Started
This chapter provides information used to get started using the Handheld Manager. Topics discussed in this chapter include the following:
– “Features and capabilities” on page 2– “Installation” on page 2– “Launching the Handheld Manager” on page 3– “Setting preferences” on page 4– “Connecting a device to the PC” on page 4– “Renaming devices” on page 6– “Managing user profiles” on page 7

Chapter 1 Getting StartedFeatures and capabilities
2 Handheld Manager User’s Guide
Features and capabilitiesFeatures and capabilities of the Handheld Manager include the following:
– Transfer test results from your device to your computer for easy viewing, printing, and saving
– View results from multiple devices– Sharing of test configurations between devices– Update the software on connected SmartClass devices– Enable software options– Set a splash screen (Option)– Backup all data from an instrument– Automatic software updates– Supported devices:
– SmartClass ADSL– SmartClass E1/Datacom– SmartClass Ethernet– SmartClass T1– OLP-55
InstallationThis section explains the system requirements as well as how to install the SmartClass Handheld Manager.
System requirements Before installing, verify that your computer system meets the minimum require-ments:
– Processor: Pentium4 2.0G– RAM: 512M– Operating System: Windows 2000, XP, Vista, or Windows 7– Hard drive space: 45M free for program installation and 100M free for firm-
ware download and automatic program updates.
Installing the HandheldManager
After verifying the system requirements, you are ready to install the software.
To install the Handheld Manager utility
1 Do one of the following:– If you have downloaded the zip file from www.jdsu.com, unzip the file
and then double-click the Handheld_Manager_v1.1.0_Setup.exe file.– If installing from the CD or USB drive that came with the device, insert
the CD/USB and then a menu of options appears. Click Install Hand-held Manager.
Chapter 1 Getting StartedLaunching the Handheld Manager
Handheld Manager User’s Guide 3
2 Click Install Handheld Manager, and then let the program guide you through the installation process.
The program is installed.
Launching the Handheld ManagerAfter successfully installing the Handheld Manager, you can launch the program and begin using it.
To launch the Handheld Manager
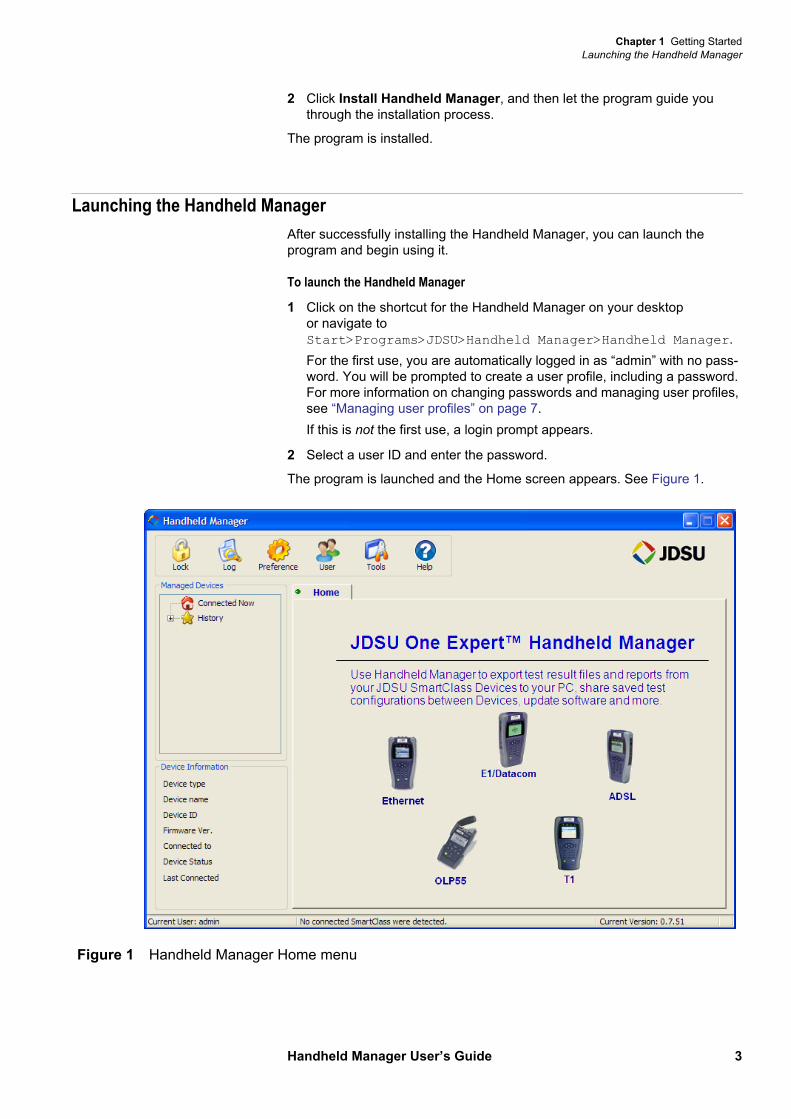
1 Click on the shortcut for the Handheld Manager on your desktop or navigate to Start>Programs>JDSU>Handheld Manager>Handheld Manager.For the first use, you are automatically logged in as “admin” with no pass-word. You will be prompted to create a user profile, including a password. For more information on changing passwords and managing user profiles, see “Managing user profiles” on page 7.If this is not the first use, a login prompt appears.
2 Select a user ID and enter the password.
The program is launched and the Home screen appears. See Figure 1.
Figure 1 Handheld Manager Home menu

Chapter 1 Getting StartedSetting preferences
4 Handheld Manager User’s Guide
Setting preferencesUsing the Preference menu, you can specify Handheld Manager details and Device details.
For the Handheld Manager preferences, you can specify the Language (of the user interface) and whether to automatically check for Handheld Manager updates when the program is started.
For Device preferences, you can specify whether to use NTP (network time protocol) synchronization at session start, which will synchronize the device’s clock with the clock on the PC.
Connecting a device to the PCIn order for the Handheld Manager to download results or upgrade software, the unit must be connected to the PC. You can connect multiple units in a single session.
To connect a device to the PC
1 Using a USB cable, connect the device unit to any one of your computer's USB ports.
2 If you are connecting a SmartClass ADSL unit and wish to update the modem software, also connect a CAT-5 cable from the Ethernet jack to the PC. For more information, see “Updating the software on a connected unit” on page 17.
3 If you haven’t already done so, switch your device’s power to ON. The Handheld Manager will detect the unit and, as shown in Figure 2, two things happen:
a the unit ID it will show in the left pane under “Connected Now”, along with the device information.The default unit ID is the product type plus 6-digits of the device ID. You can change the unit ID, if desired. See “Renaming devices” on page 6.
NOTE:A direct connection to the USB port is recommended. Although you may be able to connect multiple units through a USB hub, a reliable connection can-not be guaranteed. To ensure reliable connection, connect directly to the USB port.

Chapter 1 Getting StartedConnecting a device to the PC
Handheld Manager User’s Guide 5
b a new tab appears in the right pane to view the unit’s configurations and results.
4 After the device is connected and recognized, a device-specific menu is available by right-clicking on the unit ID, as shown in Figure 3.
Figure 2 Connected unit is detected
TIP:If a connected unit is not recognized, unplug the USB cable from the device and then plug it back in. For more troubleshooting tips, see Chapter 3 “Troubleshooting”.
a
b
Figure 3 Device menu

Chapter 1 Getting StartedRenaming devices
6 Handheld Manager User’s Guide
For more information on the items on the device menu, refer to the following:– “Renaming devices” on page 6– “Updating the software on a connected unit” on page 17– “Viewing and enabling software options” on page 22– “Capturing screen shots” on page 17– “Modifying the splash screen” on page 22
Renaming devicesAfter connecting a device, the device information appears in the left area of the screen. The default “Device name” that is used includes the type of device plus the first six digits of the serial number. If you wish to give the device a more personalized name, use the rename function on the device menu.
To rename a device
1 If you haven’t already done so, connect the device and wait for Handheld Manager to recognize it.
2 In the left pane under “Connected Now”, right click on the device you wish to rename, and then select Rename.
3 Enter a name for the device, up to 20 characters, and then click anywhere on the screen.
4 A message box appears asking to confirm the new name. Click OK.As show in Figure 4, the new name appears as the unit ID under “Connected Now”, as the device name in the “Device Information”, and on the device tab
The device is renamed.
Figure 4 Renamed device

Chapter 1 Getting StartedManaging user profiles
Handheld Manager User’s Guide 7
Managing user profilesThe Handheld Manager supports multiple users. One individual user may choose to put their full name, organization, company logo, phone number, and such information on their report, while another may simply want their name. This is managed with user profiles.
Adding a profile If you are logged in as admin, you can add profiles.
To add a profile
1 Click on the User menu and then select Manage Users.
2 Click Add.
3 Enter the user information for the specific profile.– User ID (the * indicates this is a required field)– User password / Confirm user password
In addition, you can enter specific user information to include on the report header.– Full name — this is the name associated with the User ID.– Organization name– Address– Office phone / Cell phone– Email — the address associated with the user ID.
NOTE: If specifying details for the admin, after the profile is setup, a confirmation message will be sent to this address.
– Logo — To include a logo on result reports, specify the location and filename for the logo. The logo should be no larger than 100 x 100 pixels.
4 Click OK.The new user appears in the user list.
Modifying a profile If you wish to change any of the details of a profile, you can modify the user profile.
To modify a profile
1 Click on the User menu, and then do one of the following:
NOTE:Individual users may modify the details of their profile, but only the admin can add or delete profiles.
IMPORTANT:Please note this password. For security reasons, it is not possible to recover the password if you lose it.

Chapter 1 Getting StartedManaging user profiles
8 Handheld Manager User’s Guide
a If you are logged in as admin, do the following:– Select Manage Users.– Choose a user.– Click Modify.
b If you are not logged in as admin, select Modify Current User.
2 Modify the profile as needed.
3 Click OK.The profile is updated.
Deleting a profile If you are logged in as admin, and a profile is no longer needed, you can remove it.
To delete a profile
1 Click on the User menu, and then select Manage Users.
2 Select the user profile and then click Delete.A warning message appears to remind you that all information for this user will be lost.
3 Click OK.The profile is deleted.

2
Handheld Manager User’s Guide 9
Chapter 2 Using the Handheld Manager
This chapter describes how to use the Handheld Manager. Topics discussed in this chapter include the following:
– “Managing result files” on page 10– “Managing device configurations” on page 12– “Using the file manager” on page 16– “Capturing screen shots” on page 17– “Updating the software on a connected unit” on page 17– “Backing up device data” on page 21– “Modifying the splash screen” on page 22– “Viewing and enabling software options” on page 22– “Logging activity” on page 23– “Updating Handheld Manager” on page 24

Chapter 2 Using the Handheld ManagerManaging result files
10 Handheld Manager User’s Guide
Managing result files
After a device has been connected and detected, you can download the results that are saved on that unit, and then view, print, or save them.
To manage result files
1 View the tab for the desired device (such as T1_69FDDF), and then click Get Results.
2 As shown in Figure 5, this copies all of the saved results files from the unit to your computer and then displays a list of files.
NOTE:You must click Get Results to view the latest status of the device. If you have previously connected to the device, the downloaded files from the pre-vious session appear.
Figure 5 Downloaded results

Chapter 2 Using the Handheld ManagerManaging result files
Handheld Manager User’s Guide 11
3 To view the results, double-click the file, or select the file and then click View. See Figure 6.
The result report appears. If the user profile setup includes the name, address, logo and other items, they appear at the top of the report, as shown in Figure 7.
4 If you wish to print the report, click the Print button from the report view screen.
Figure 6 View results
Figure 7 Viewing a result report

Chapter 2 Using the Handheld ManagerManaging device configurations
12 Handheld Manager User’s Guide
5 To save the report, do one of the following:
a to save as PDF, click the Save PDF button on the report view screen.
b to save as PDF, TXT, HTML, CSV, or BMP, do the following:– Close the report to return to the main screen– With the desired result highlighted, click the Save As button– Select the file type.
The available selections change depending on the type of result. For example, graphs (T1/E1 pulse shape or ADSL bits per tone) can only be saved as a BMP or PDF, while a BERT test result can be saved as PDF, TXT, HTML, or CSV.
– Specify the location to save the file, and then click Save.
The file is saved.
Managing device configurations
After a device has been connected and detected, you can download the configuration profiles that are saved on that unit, and then modify, upload, or share them.
To manage result files
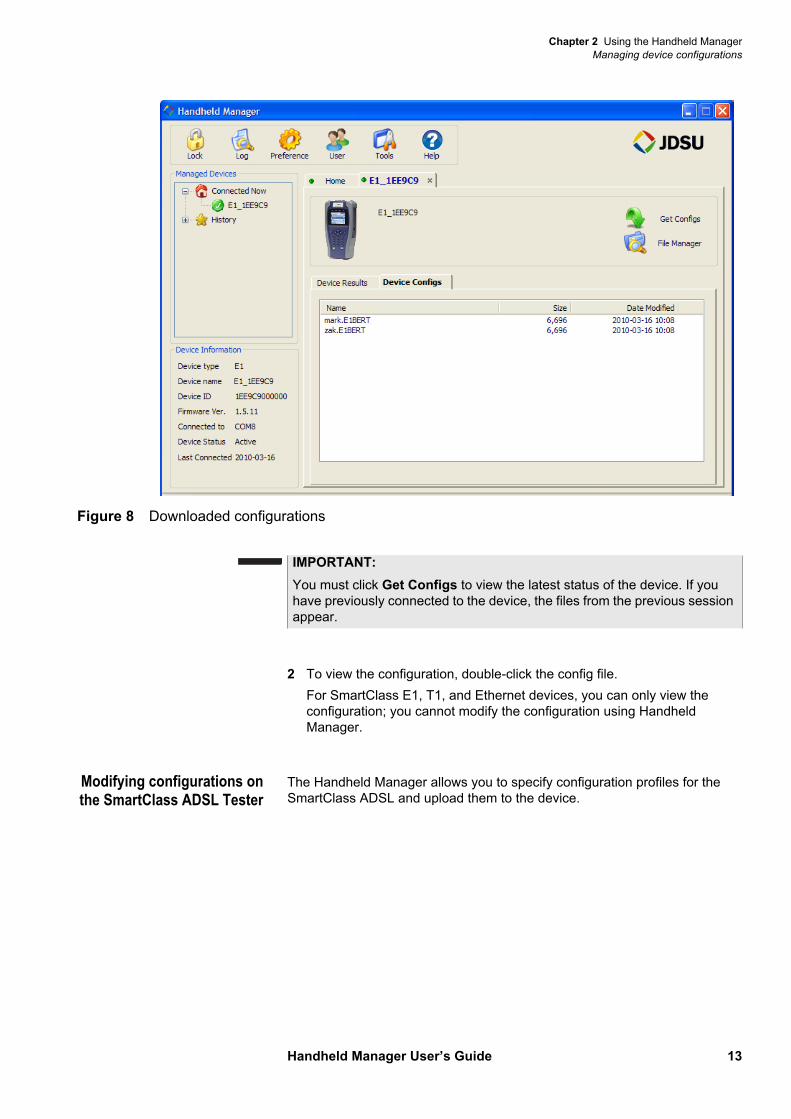
1 View the tab for the desired device (such as E1_1EE9C9), and then click Get Configs.As shown in Figure 8 on page 13, this copies all of the saved configuration files from the unit to your local drive and then displays a list of files.
NOTE:If you haven’t previously done so, a prompt appears asking you to install PDFCreator. To save as PDF from within Handheld Manager, you must install PDFCreator.
NOTE:This feature is not available on the OLP-55 device.
Chapter 2 Using the Handheld ManagerManaging device configurations
Handheld Manager User’s Guide 13
2 To view the configuration, double-click the config file.For SmartClass E1, T1, and Ethernet devices, you can only view the configuration; you cannot modify the configuration using Handheld Manager.
Modifying configurations onthe SmartClass ADSL Tester
The Handheld Manager allows you to specify configuration profiles for the SmartClass ADSL and upload them to the device.
Figure 8 Downloaded configurations
IMPORTANT:You must click Get Configs to view the latest status of the device. If you have previously connected to the device, the files from the previous session appear.

Chapter 2 Using the Handheld ManagerManaging device configurations
14 Handheld Manager User’s Guide
To modify configurations on the SmartClass ADSL Tester
1 Click on “Configs” on the Device Configs tab, as shown in Figure 9.
The ADSL Config menu appears.
2 Select which Configuration Selection to change.This is the “Config Store” slot on the SmartClass ADSL.
3 Specify the Basic and Advanced settings. For more information on the settings, see the SmartClass ADSL Tester User’s Guide.
Figure 9 ADSL configurations
Figure 10 ADSL configuration setup
Chapter 2 Using the Handheld ManagerManaging device configurations
Handheld Manager User’s Guide 15
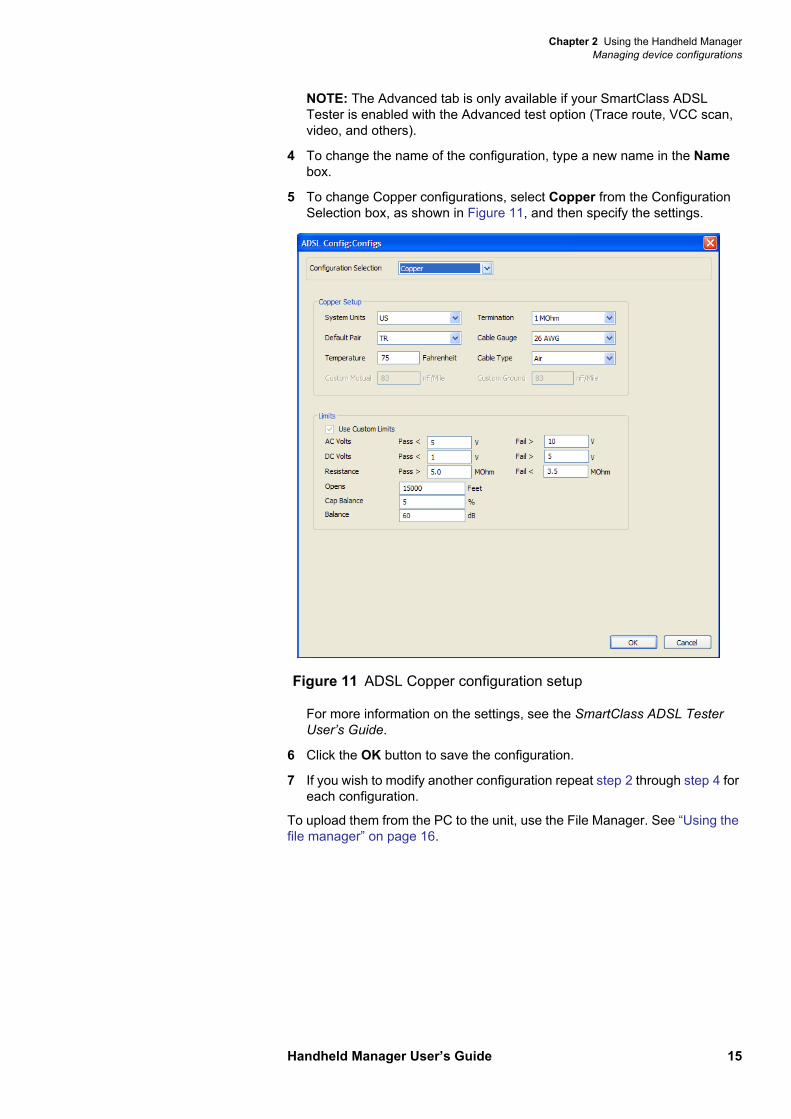
NOTE: The Advanced tab is only available if your SmartClass ADSL Tester is enabled with the Advanced test option (Trace route, VCC scan, video, and others).
4 To change the name of the configuration, type a new name in the Name box.
5 To change Copper configurations, select Copper from the Configuration Selection box, as shown in Figure 11, and then specify the settings.
For more information on the settings, see the SmartClass ADSL Tester User’s Guide.
6 Click the OK button to save the configuration.
7 If you wish to modify another configuration repeat step 2 through step 4 for each configuration.
To upload them from the PC to the unit, use the File Manager. See “Using the file manager” on page 16.
Figure 11 ADSL Copper configuration setup

Chapter 2 Using the Handheld ManagerUsing the file manager
16 Handheld Manager User’s Guide
Using the file managerUsing the file manager, you can export and import files between the PC and the connected device.
To use file manager
1 Click the File Manager button.The list of files appears, similar to Figure 12.
2 To download files, do the following:
a Click on the Result Files or Config Files tab.
b Do one of the following:– To download a single file, select the desired file, and then click the right
arrow .– To download all files, use the double right arrow .
The file is downloaded.
3 To upload files, do the following:
a Click the Config Files tab.
b Do one of the following:– To upload a single file, select the desired file, and then click the left
arrow .– To upload all files, use the double left arrow .The configuration is uploaded.
Figure 12 File Manager
NOTE:Result files can be downloaded only. Thus, the upload arrow (left arrow) is grayed out.

Chapter 2 Using the Handheld ManagerCapturing screen shots
Handheld Manager User’s Guide 17
Capturing screen shotsThe Handheld Manager allows you to capture screen shots from connected devices.
To capture screen shots
1 In the left pane, under “Connected Now”, right click on the unit that you want to get the screen capture from, and then click Screen Capture, as shown in Figure 13.
2 On the connected device, navigate to the desired screen.
3 On the Handheld Manager, click Capture.
4 After several seconds, the device’s screen appears.
5 To save the captured screen, click Save, and then specify a location and file name.
The file is saved as a bitmap ( .bmp).
Updating the software on a connected unitUpdating the software on a connected unit involves two main steps:
– Downloading the software files from the server– Installing the software on the unit.
The procedure for this step varies depending on the device.
You can update up to three units at one time, depending on the number of USB connections you have on the computer.
Figure 13 Screen Capture selection
NOTE:A direct connection to the USB port is recommended. Although you may be able to connect multiple units through a USB hub, a reliable connection can-not be guaranteed. To ensure reliable connection, connect directly to the USB port.
Chapter 2 Using the Handheld ManagerUpdating the software on a connected unit
18 Handheld Manager User’s Guide
Downloading software files To download software files
1 Ensure you have an active connection to the internet.
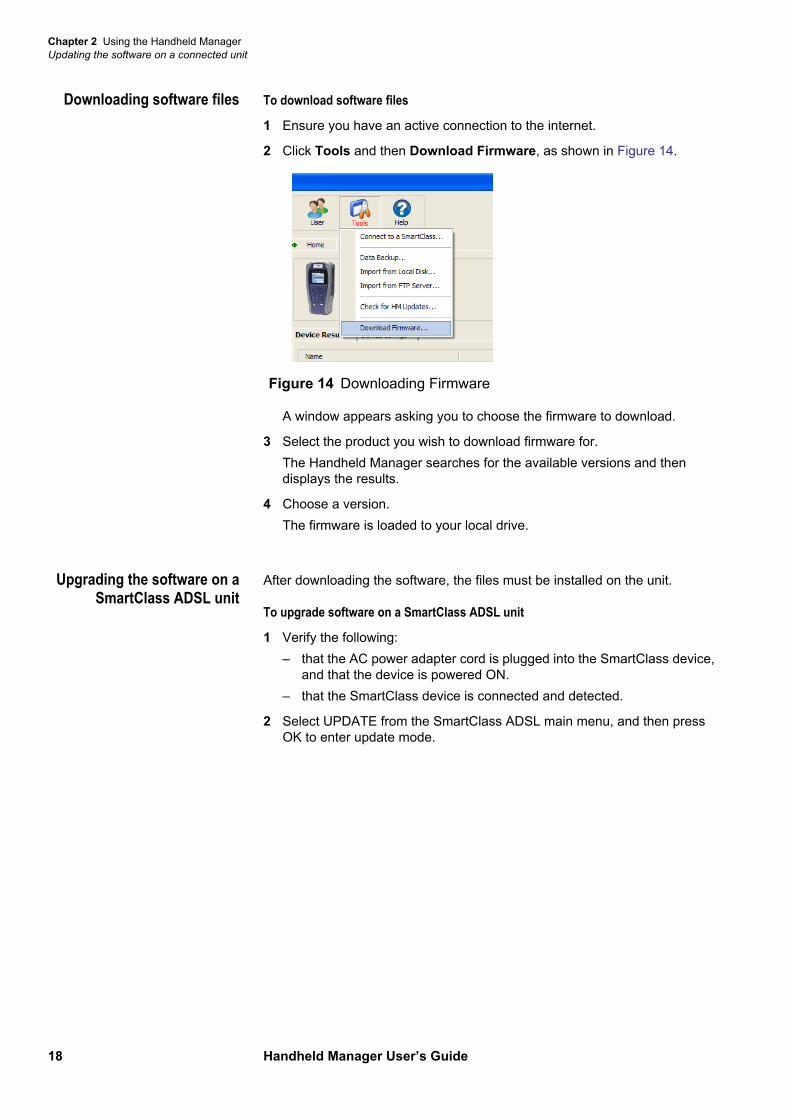
2 Click Tools and then Download Firmware, as shown in Figure 14.
A window appears asking you to choose the firmware to download.
3 Select the product you wish to download firmware for.The Handheld Manager searches for the available versions and then displays the results.
4 Choose a version.The firmware is loaded to your local drive.
Upgrading the software on aSmartClass ADSL unit
After downloading the software, the files must be installed on the unit.
To upgrade software on a SmartClass ADSL unit
1 Verify the following:– that the AC power adapter cord is plugged into the SmartClass device,
and that the device is powered ON.– that the SmartClass device is connected and detected.
2 Select UPDATE from the SmartClass ADSL main menu, and then press OK to enter update mode.
Figure 14 Downloading Firmware
Chapter 2 Using the Handheld ManagerUpdating the software on a connected unit
Handheld Manager User’s Guide 19
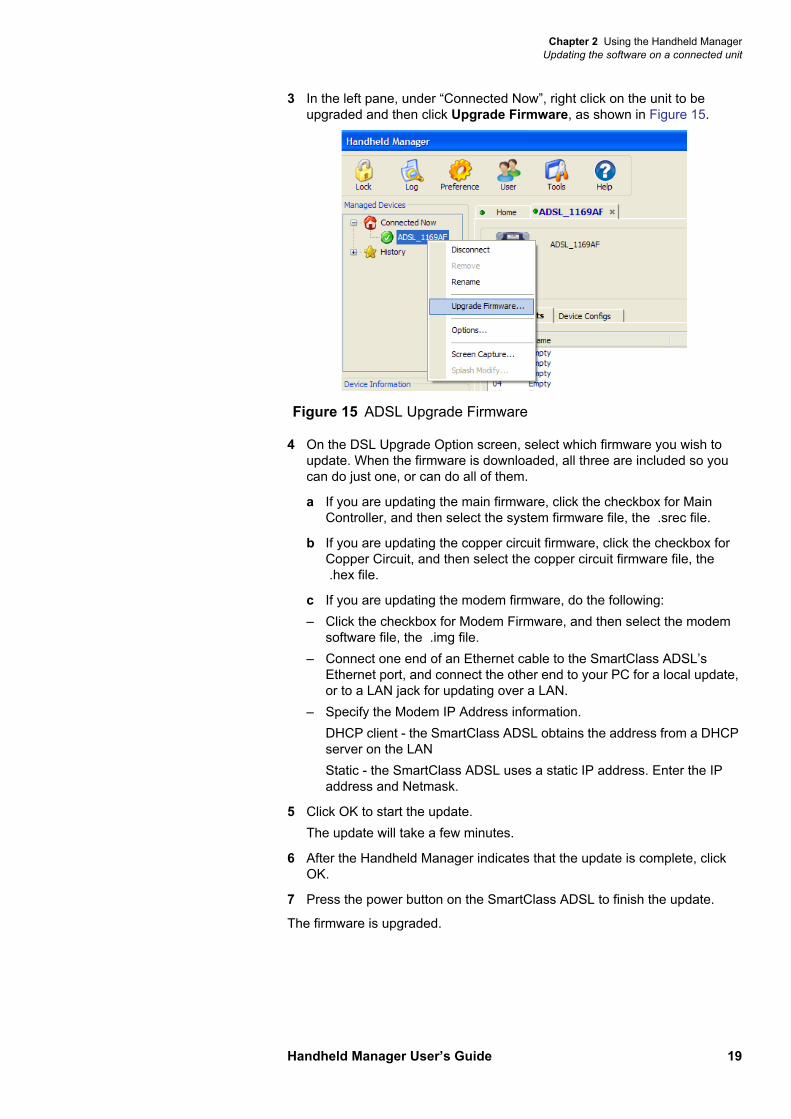
3 In the left pane, under “Connected Now”, right click on the unit to be upgraded and then click Upgrade Firmware, as shown in Figure 15.
4 On the DSL Upgrade Option screen, select which firmware you wish to update. When the firmware is downloaded, all three are included so you can do just one, or can do all of them.
a If you are updating the main firmware, click the checkbox for Main Controller, and then select the system firmware file, the .srec file.
b If you are updating the copper circuit firmware, click the checkbox for Copper Circuit, and then select the copper circuit firmware file, the .hex file.
c If you are updating the modem firmware, do the following:– Click the checkbox for Modem Firmware, and then select the modem
software file, the .img file.– Connect one end of an Ethernet cable to the SmartClass ADSL’s
Ethernet port, and connect the other end to your PC for a local update, or to a LAN jack for updating over a LAN.
– Specify the Modem IP Address information.DHCP client - the SmartClass ADSL obtains the address from a DHCP server on the LANStatic - the SmartClass ADSL uses a static IP address. Enter the IP address and Netmask.
5 Click OK to start the update.The update will take a few minutes.
6 After the Handheld Manager indicates that the update is complete, click OK.
7 Press the power button on the SmartClass ADSL to finish the update.
The firmware is upgraded.
Figure 15 ADSL Upgrade Firmware
Chapter 2 Using the Handheld ManagerUpdating the software on a connected unit
20 Handheld Manager User’s Guide
Updating software on theSmartClass T1, E1, or
Ethernet
After downloading the software, the files must be installed on the unit.
To upgrade software on a SmartClass T1, E1, or Ethernet unit
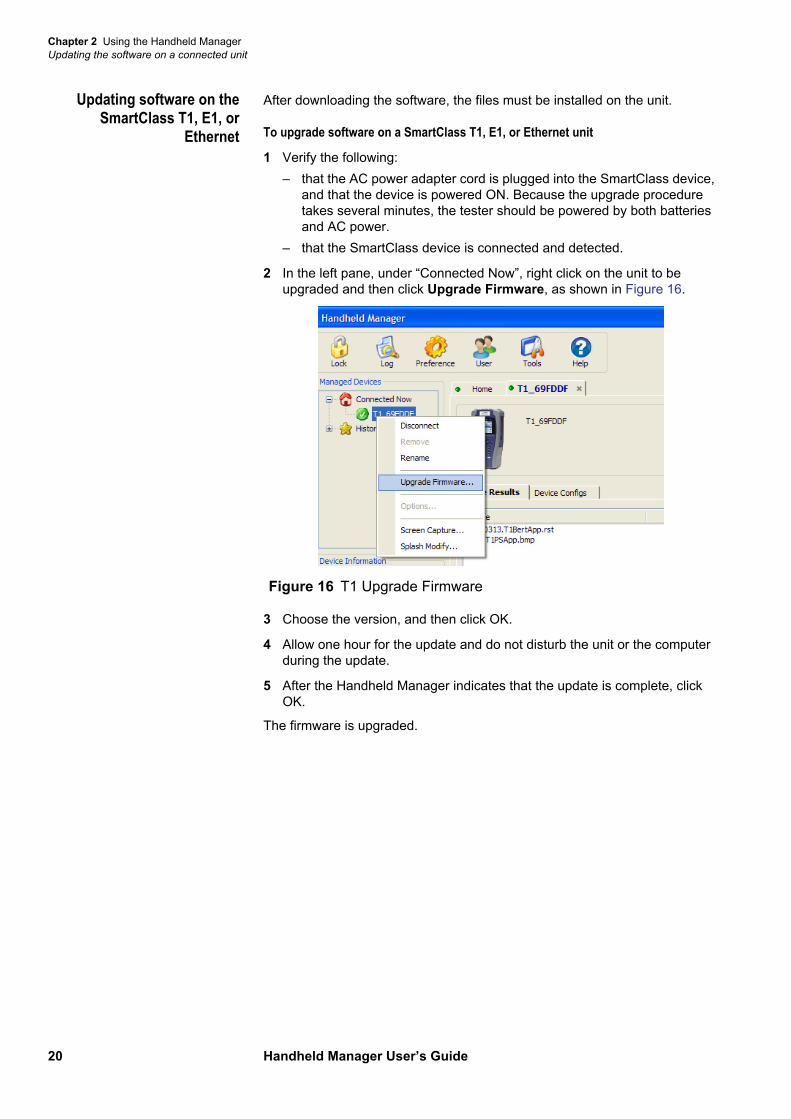
1 Verify the following:– that the AC power adapter cord is plugged into the SmartClass device,
and that the device is powered ON. Because the upgrade procedure takes several minutes, the tester should be powered by both batteries and AC power.
– that the SmartClass device is connected and detected.
2 In the left pane, under “Connected Now”, right click on the unit to be upgraded and then click Upgrade Firmware, as shown in Figure 16.
3 Choose the version, and then click OK.
4 Allow one hour for the update and do not disturb the unit or the computer during the update.
5 After the Handheld Manager indicates that the update is complete, click OK.
The firmware is upgraded.
Figure 16 T1 Upgrade Firmware

Chapter 2 Using the Handheld ManagerBacking up device data
Handheld Manager User’s Guide 21
Backing up device dataThe Tools menu includes a Data Backup feature which allows downloading of all configurations and results into a compressed file. The compressed file contains all the configurations and results that were on the local disk at the time that the backup command was initiated. Files that have not been transferred from connected SmartClass devices to the local disk will not be backed up. The compressed file can be saved to the local disk, sent in an Email or put on a FTP server. In addition, the backup data can be imported back to the device.
Saving the device data The first step to backing up a device is to save the device data.
To save device data
1 Ensure that all files you want to backup have been transferred from any SmartClass devices to the Handheld Manager and can be seen in the local disk window within the file manager.
2 From the Tools menu, select Data Backup.
3 Choose the device to be backed up.The drop-down list will include the unit IDs (for example “1169AF000000”). After you choose a device, the Device Type and Device Name appear, to help identify the specific device.
4 Choose where the backup will be saved.
a If you chose Local Disk, a “Save As” box appears. Specify the directory to save the backup to. You can also change the file name if desired.
b If you chose Email, your Email program opens a new message with the compressed file attached.
c If you chose FTP Server, click FTP Settings and then specify the server name, account and password, and the initial directory.
The data is backed up.
Importing backup files If you wish to restore a unit, you can import backup files.
To import backup files
1 On the Tools menu, choose whether to Import from Local Disk or Import from FTP Server.– If you selected Import from Local Disk, select the backup file.
The default file name is <deviceID.7z>, so choose the file for the desired device.
– If you selected Import from FTP Server, enter the server name, account and password, and the initial directory.
If you are importing the backup from the same PC that it was saved from, a warning box appears warning that the unit has previously synchronized with this PC and importing backups will replace files. Click OK.The imported files appear in the File Manager window.
2 Use the file manager to restore configurations to the instrument or to view the result files that were backed up.
The files are imported.
Chapter 2 Using the Handheld ManagerModifying the splash screen
22 Handheld Manager User’s Guide
Modifying the splash screenIf you ordered the splash screen option, you can add an additional splash screen to the device. For example, an organization may want a “Property of [company]” splash screen.
To modify the splash screen
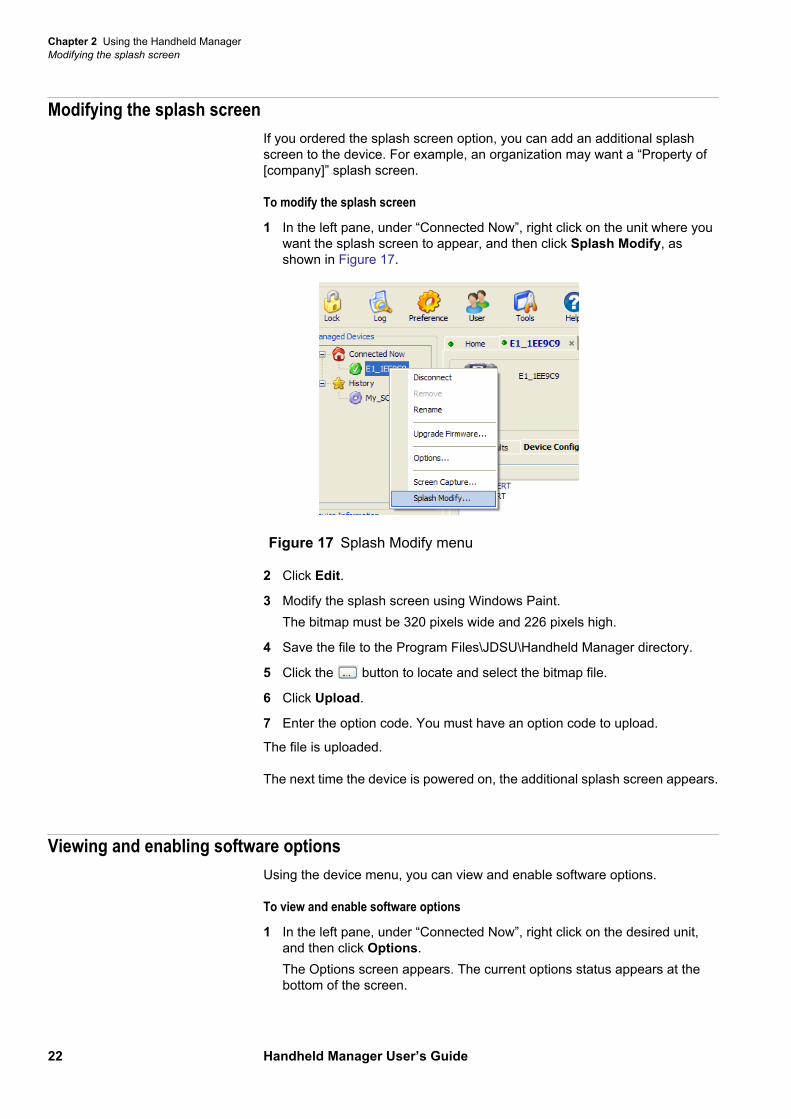
1 In the left pane, under “Connected Now”, right click on the unit where you want the splash screen to appear, and then click Splash Modify, as shown in Figure 17.
2 Click Edit.
3 Modify the splash screen using Windows Paint.The bitmap must be 320 pixels wide and 226 pixels high.
4 Save the file to the Program Files\JDSU\Handheld Manager directory.
5 Click the button to locate and select the bitmap file.
6 Click Upload.
7 Enter the option code. You must have an option code to upload.
The file is uploaded.
The next time the device is powered on, the additional splash screen appears.
Viewing and enabling software optionsUsing the device menu, you can view and enable software options.
To view and enable software options
1 In the left pane, under “Connected Now”, right click on the desired unit, and then click Options.The Options screen appears. The current options status appears at the bottom of the screen.
Figure 17 Splash Modify menu
Chapter 2 Using the Handheld ManagerLogging activity
Handheld Manager User’s Guide 23
2 To enable options, enter the option code.When you purchase software options for your tester, you receive an alpha-numeric option code that is linked to the specific device ID number. The code cannot be used to enable options on another tester, it can only be used to enable options on the tester with the specific device ID.The device reboots automatically.
The next time the Options are viewed, the option will appear as enabled.
Logging activity
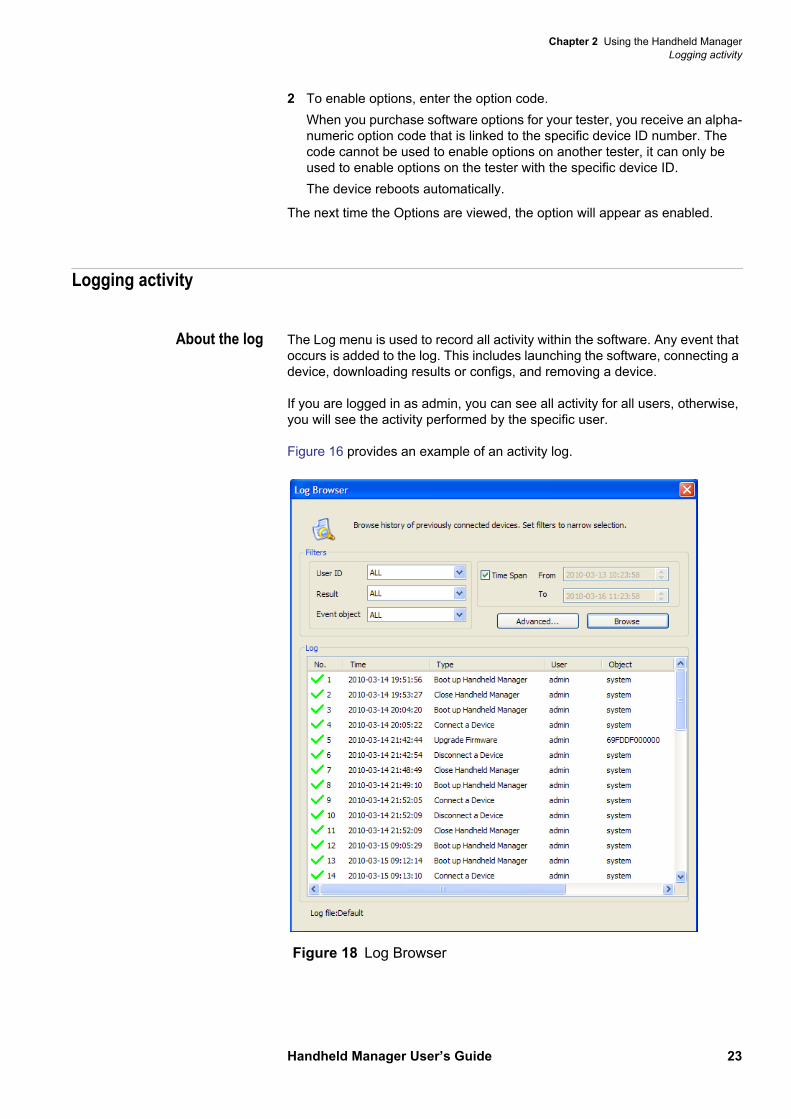
About the log The Log menu is used to record all activity within the software. Any event that occurs is added to the log. This includes launching the software, connecting a device, downloading results or configs, and removing a device.
If you are logged in as admin, you can see all activity for all users, otherwise, you will see the activity performed by the specific user.
Figure 16 provides an example of an activity log.
Figure 18 Log Browser
Chapter 2 Using the Handheld ManagerUpdating Handheld Manager
24 Handheld Manager User’s Guide
Filtering log entries You can narrow your log entries by using filters. For example, the admin might wish to view the log for a specific user.
To filter log entries
1 View the log by clicking the Log button.The Log Browser appears.
2 Select one or more of the following filters:
3 Click Browse to update the log.If the Handheld Manager has been running for some time, the log may run over its 64k limit. When this happens, a backup log file will automatically be saved to the “OpLogsBak” subfolder under the “logs” folder. Use the Advanced button, and then the Custom file path selection to browse the backup log file.
Updating Handheld ManagerWhen the Handheld Manager is launched, it may automatically check for updates, based on the setting in the Preferences menu (see “Setting prefer-ences” on page 4). If automatic checking for updates is not enabled, or you wish to manually check for updates, do the following:
– On the Tools menu, click Check for HM Updates.The Handheld Manager checks the server for updates and if any are found, will install them.
To view... Select...
activity by a specific user UserIDand then choose the userNOTE: This is only applicable if you are logged in as admin; otherwise, only one UserID is available and only activity for that user appears.
only actions that failed or only actions that were successful
Resultand then choose success or failure
activity for a specific device or to view system activity only
Event Objectand then choose the object
activity that occurred during a specific time period
Timespanand then enter the beginning and ending time

3
Handheld Manager User’s Guide 25
Chapter 3 Troubleshooting
This chapter describes how to identify and correct problems related to the Handheld Manager. Topics discussed in this chapter include the following:
– “Getting Technical Assistance” on page 26– “Resolving problems” on page 26
Chapter 3 TroubleshootingGetting Technical Assistance
26 Handheld Manager User’s Guide
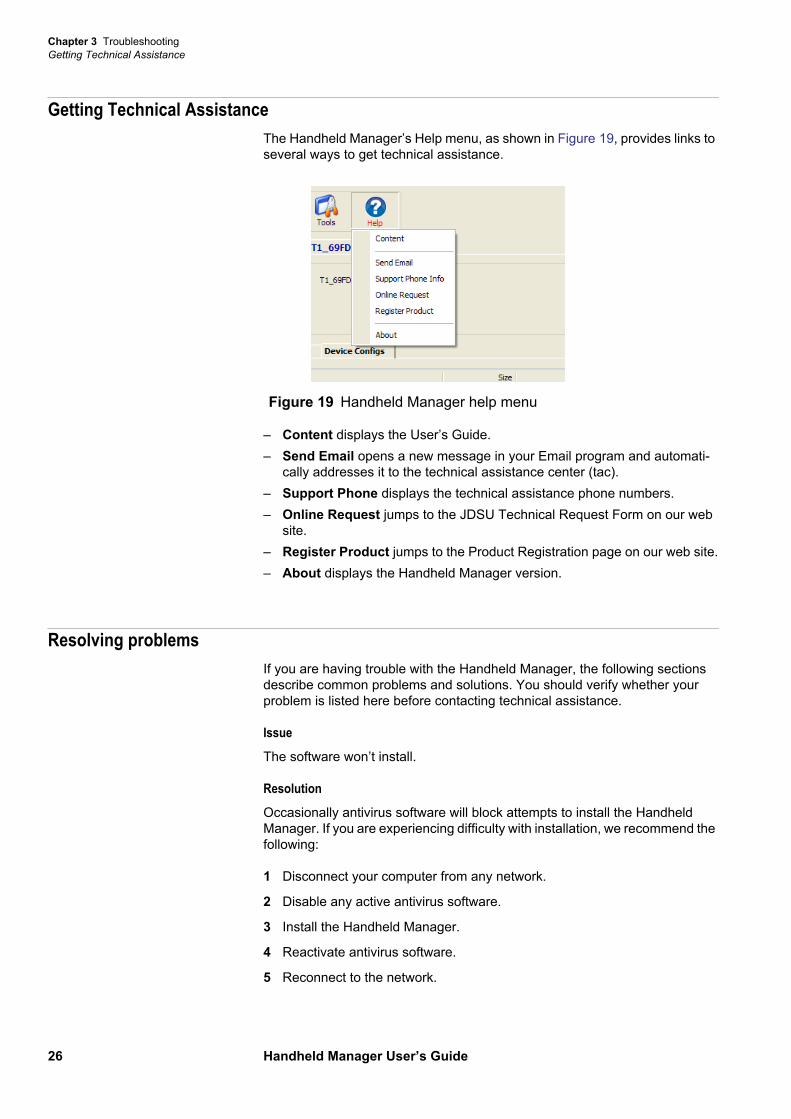
Getting Technical AssistanceThe Handheld Manager’s Help menu, as shown in Figure 19, provides links to several ways to get technical assistance.
– Content displays the User’s Guide.– Send Email opens a new message in your Email program and automati-
cally addresses it to the technical assistance center (tac).– Support Phone displays the technical assistance phone numbers.– Online Request jumps to the JDSU Technical Request Form on our web
site.– Register Product jumps to the Product Registration page on our web site.– About displays the Handheld Manager version.
Resolving problemsIf you are having trouble with the Handheld Manager, the following sections describe common problems and solutions. You should verify whether your problem is listed here before contacting technical assistance.
Issue
The software won’t install.
Resolution
Occasionally antivirus software will block attempts to install the Handheld Manager. If you are experiencing difficulty with installation, we recommend the following:
1 Disconnect your computer from any network.
2 Disable any active antivirus software.
3 Install the Handheld Manager.
4 Reactivate antivirus software.
5 Reconnect to the network.
Figure 19 Handheld Manager help menu
Chapter 3 TroubleshootingResolving problems
Handheld Manager User’s Guide 27
Issue
After installing the software, it doesn’t launch. The login screen appears, but after logging in, it displays an application error.
Resolution
Uninstall the Handheld manager using Start>Programs\JDSU\Handheld Manager\Uninstall Handheld Manager.
Delete the whole directory : “C:\Program Files\JDSU\Handheld Manager”.
Reinstall the software.
Issue
Cannot connect to a unit
Resolution
Do the following:
1 Verify that the USB cable is connected properly between the tester and PC.
2 Verify that the instrument power is ON, or the charger is connected.
3 Close and restart the Handheld Manager.
4 Re-install the USB drivers:
a Click Start > Control Panel.
b Select System then select the Hardware page.
c Click Device Manager then click on the + beside Ports (COM & LPT).This displays the available ports.
d Verify that the following selection appears:CP210x USB to UART Bridge Controller (COM4) or any other COM number.An exclamation point (!) inside a yellow circle indicates a faulty entry.
e Right click on any entry to install (or reinstall) the associated driver.The JDSU driver will be found automatically. If the hardware Update Wizard does not automatically locate and install the required driver, do the following:
– Launch your system's Device Manager (Start>Control Panel>System>Hardware>Device Manager), then right-click on the port you are using to connect to the SmartClass DSL Tester.
– Select Update Driver to launch the Hardware Update Wizard.– Click No, not this time for connecting to Windows Update to search.– Click Install from a list or a specific location.– Click Don't search. I will choose the driver to install.– Click Have Disk…

Chapter 3 TroubleshootingResolving problems
28 Handheld Manager User’s Guide
– Click Browse then specify the path of the “slabbus.inf” driver:..\JDSU\Handheld Manager\Driverswhere “..” represents the path you specified during installation of the Handheld Manager utility. The default path is: C:\Program Files\JDSU\Handheld Manager\DriversFor most PCs, the driver can also be found in C:\WINDOWS\inf (Windows XP) or C:\WINNT\inf (Windows 2000).The wizard warns you about the authenticity of the drivers. Click Continue anyway.
– Click Finish.


Communications Test and Measurement Regional Sales
North AmericaToll Free: 1 800 638 2049Tel: +1 240 404 2999Fax:+1 240 404 2195
Latin AmericaTel: +55 11 5503 3800Fax:+55 11 5505 1598
Asia PacificTel: +852 2892 0990Fax:+852 2892 0770
EMEATel: +49 7121 86 2222Fax:+49 7121 86 1222
www.jdsu.com
21149811Revision 000, May 2010English


