97
Online & Mobile Treasury Management September 2021 Treasury Management Channel Guide

Online & Mobile Treasury Management September 2021
Treasury Management Channel Guide


Old Second Corporate Digital
Commercial Banking Solution Treasury Management Channel Guide 3
Treasury Management. ....................................................................................................................4
Logging in to Treasury Management ........................................................................................... 5
Registering a Secure Token ...................................................................................................... 10
Helpful Hints. .................................................................................................................................... 12
User Menu .......................................................................................................................................... 14
Profile and Preferences .............................................................................................................. 14
Notification Setup ........................................................................................................................ 15
Logging Off Treasury Management .......................................................................................... 17
Cut-off Times. ................................................................................................................................... 17
Notifications. ..................................................................................................................................... 17
Message Center ............................................................................................................................... 18
Composing a Message ............................................................................................................... 19
Archiving a Message .................................................................................................................. 19
Performing an Advanced Search in Message Center ........................................................... 19
Dashboard ......................................................................................................................................... 20
Accounts ............................................................................................................................................ 22
Account List. ................................................................................................................................. 22
Research Transactions .............................................................................................................. 23
Payments ........................................................................................................................................... 24
Transfer. ....................................................................................................................................... 24
Wire. .............................................................................................................................................. 32
ACH. .............................................................................................................................................. 61
Positive Pay. ................................................................................................................................ 80
Stop Payment. ............................................................................................................................. 86
Receivables ....................................................................................................................................... 89
Reporting. .......................................................................................................................................... 89
Running Reports.......................................................................................................................... 89
Deleting Reports .......................................................................................................................... 90
Standard Reports ........................................................................................................................ 91
Electronic Documents ................................................................................................................. 93
Admin. ................................................................................................................................................ 94
User List. ....................................................................................................................................... 94
Creating a User............................................................................................................................ 97
Account Nicknames ..................................................................................................................102

Old Second Corporate Digital
Commercial Banking Solution Treasury Management Channel Guide 4
Treasury Management
Treasury Management is a cash management solution that is available to financial institutions
with the SilverLake core.
This cash management solution has multiple features:
● Dashboard - Access a quick view of key information.
○ View account information in detail views and graph views.
○ Create quick transfers.
○ Create quick loan payments.
○ View favorite reports.
○ View and decision Positive Pay exception items.
○ View, approve, or reject the payments pending approval for ACH, wires, and transfers.
○ View and decision ACH exception items.
○ View news items from the financial institution.
○ Access the resource links commonly used.
● Accounts - Access accounts in this product.
○ View a list of accounts.
○ Search for a specific transaction.
● Payments - Work with transfers, wires, ACH, Positive Pay, and stop payments.
○ Create and search for internal, external, and recurring transfers.
○ Create and search for wires and templates, including one-time and recurring.
○ Create and search for ACH payments, including one-time and recurring.
○ Create, search, and decision Positive Pay items, including checks and ACH.
○ Create stop payments.
● Reporting - View and favorite reports.
○ Current Day Balance
○ Current Day Transaction
○ Date Range Balance
○ Date Range Transaction
○ EDI Report
NOTE
The institution must be contracted for the EDI module for this report to appear.
○ Prior Day Balance
○ Prior Day Transaction
On each page of Treasury Management, where these features are available, you can:
Old Second Corporate Digital
Commercial Banking Solution Treasury Management Channel Guide 5
● Sort information by selecting the column names.
● View hover-help by selecting the question mark.
● View last login time in the top-right corner.
● View cut off times in the top-right corner.
● View notifications in the top-right corner.
If you perform transactions that are considered higher risk by your financial institution, Treasury
Management prompts you to authenticate.
NOTE
Treasury Management supports the most recent release and the last-released versions
of the following browsers: Microsoft® Internet Explorer® and Edge®, Google™ Chrome™,
Mozilla® Firefox®, and Apple® Safari®.
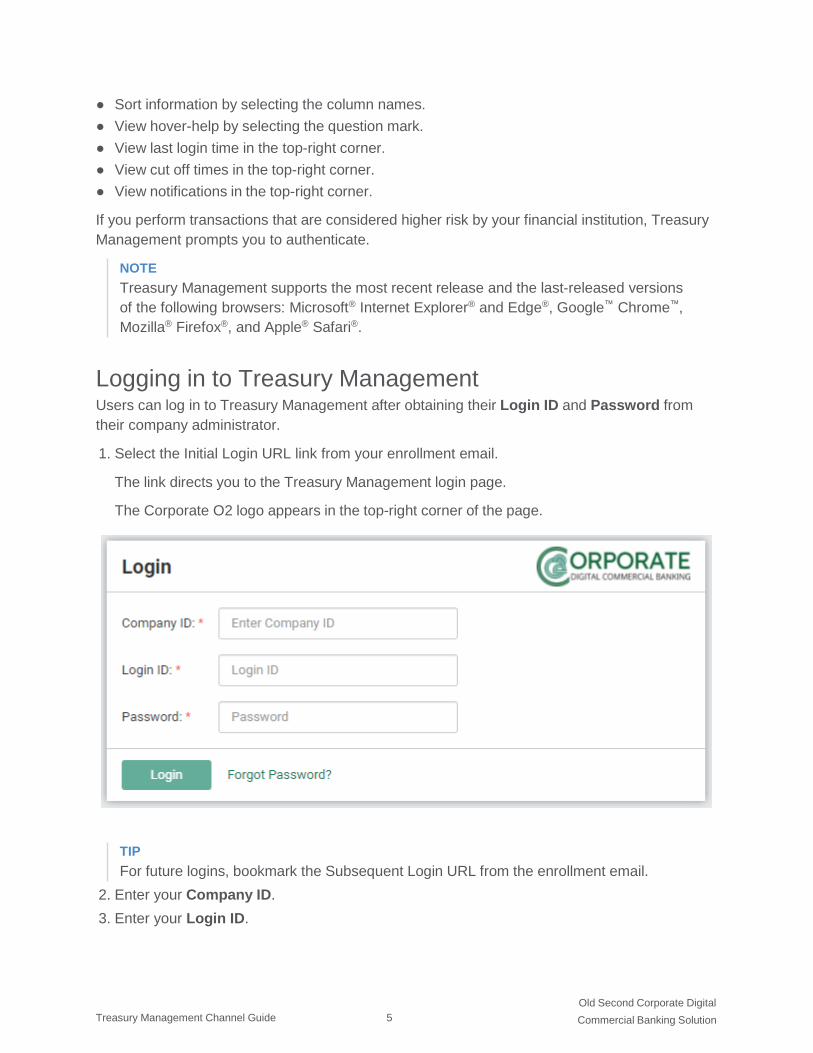
Logging in to Treasury Management Users can log in to Treasury Management after obtaining their Login ID and Password from
their company administrator.
1. Select the Initial Login URL link from your enrollment email.
The link directs you to the Treasury Management login page.
The Corporate O2 logo appears in the top-right corner of the page.
TIP
For future logins, bookmark the Subsequent Login URL from the enrollment email.
2. Enter your Company ID.
3. Enter your Login ID.

Old Second Corporate Digital
Commercial Banking Solution Treasury Management Channel Guide 6
4. Select Submit.
The following Change Password screen appears, prompting you to change your password.
5. Enter your New Password, and then re-enter the new password for the Confirm Password
field.
Ensure that your new password complies with the password requirements listed.
6. Select Submit.
The following Security Questions screen appears.

Old Second Corporate Digital
Commercial Banking Solution Treasury Management Channel Guide 7
7. Set up your security questions, and then select Submit.
NOTE
Answers are not case sensitive and do not have to follow any suggested formatting.
8. On the Confirm Security Questions screen, review the entries for accuracy, and then select
Confirm.
CAUTION
This point is the only time you can edit your questions and/or answers. You must contact
your financial institution to reset them.

Old Second Corporate Digital
Commercial Banking Solution Treasury Management Channel Guide 8
NOTE
You are only asked to enter a PIN if your institution requires it.
9. On the Terms & Conditions screen, read and select the I agree check box, and then select
Accept.
The Dashboard view of Treasury Management opens.
Registering a Secure Token
This option is available if the financial institution has configured their authentication settings to
allow secure tokens and you have downloaded a virtual token or were given a physical token.
1. Log in to Treasury Management.
A prompt appears, asking you to register your token.

Old Second Corporate Digital
Commercial Banking Solution Treasury Management Channel Guide 9
NOTE
You can defer the token collection for up to seven days. After seven days, the system stops
prompting. You cannot complete any activities that require secure token authentication if you
choose to defer collection.
If you select Remind Me Later, the system prompts you again tomorrow. If you select Do
Not Ask Again, the system does not prompt you again unless you contact your financial
institution.
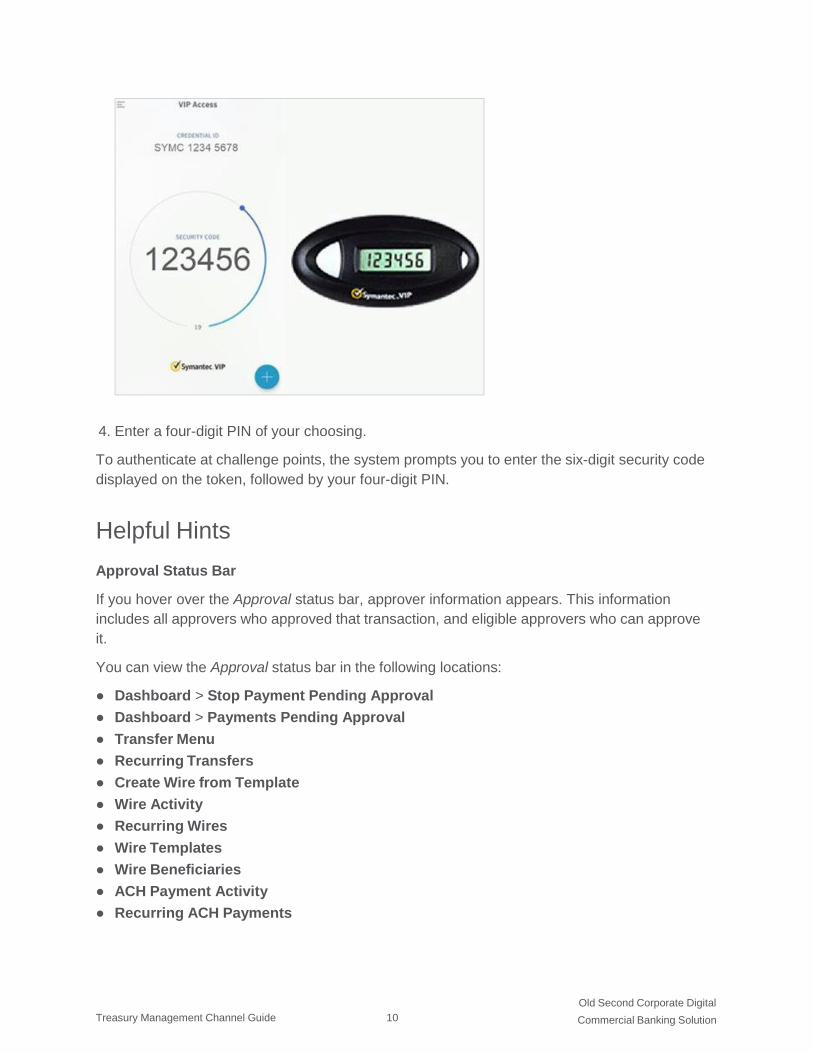
2. Enter your Credential ID, located on the back of physical tokens or the screen of virtual
tokens.
3. Enter the six-digit security code displayed on the token.
Old Second Corporate Digital
Commercial Banking Solution Treasury Management Channel Guide 10
4. Enter a four-digit PIN of your choosing.
To authenticate at challenge points, the system prompts you to enter the six-digit security code
displayed on the token, followed by your four-digit PIN.
Helpful Hints
Approval Status Bar
If you hover over the Approval status bar, approver information appears. This information
includes all approvers who approved that transaction, and eligible approvers who can approve
it.
You can view the Approval status bar in the following locations:
● Dashboard > Stop Payment Pending Approval
● Dashboard > Payments Pending Approval
● Transfer Menu
● Recurring Transfers
● Create Wire from Template
● Wire Activity
● Recurring Wires
● Wire Templates
● Wire Beneficiaries
● ACH Payment Activity
● Recurring ACH Payments
Old Second Corporate Digital
Commercial Banking Solution Treasury Management Channel Guide 11
● ACH Templates
● Stop Payment Activity
● Transfer Templates
● Loan Payment Activity
● ACH Recipients
Downloadable Content
Select Download to download the information into PDF format. A Print option is also available.
You can access this function in the following locations:
● Account List
● Account Transactions
● Research Transactions
● Transfer Templates
● Transfer Activity
● Recurring Transfers
● Loan Payment Activity
● Wire Activity
● Recurring Wires
● Wire Templates
● Wire Template Details
● ACH File Activity
● ACH Payment Activity
● ACH Payment Details
● Recurring ACH Payments
● ACH Templates
● ACH Templates Details
● ACH Recipients
● Check Upload Formats
● ACH Filters
● Reports
Authentication
You may be prompted to authenticate certain activities by replying to a text message, answering
an automated phone call, or entering a secure token code. Your institution defines what
activities require extra authentication. Activities that may require extra authentication are:
● Approving payments/templates/beneficiaries/users
● Creating ACH/wire/transfer/loan payments
● Creating beneficiaries

Old Second Corporate Digital
Commercial Banking Solution Treasury Management Channel Guide 12
● Creating templates
● Creating users
● Deleting payments/templates/beneficiaries/users
● Editing payments/templates/beneficiaries/users
● Updating email address
User Menu
Profile and Preferences Use the Profile & Preferences view to set up your personal and security information.
User Information
This information auto-populates when you open this page the first time.
Use this section to update your personal information. The Name and Login ID cannot be edited.
Your financial institution or company administrator configures this information. You are able to
change your email address and phone, mobile, and fax numbers.
NOTE
If you enter your phone number, messaging and data rates may apply.
Security Preferences
Use this section to update your password. Also, determine if you want to see account
nicknames or account numbers throughout Treasury Management.
NOTE
Depending on your institution, you may also have an account masking option.
Changing Your Password
The specific requirements for the new password are based on your financial institution's
Treasury Management password policy.
1. Navigate to the Treasury Management website.
2. From the [User Name] Menu, select Profile & Preferences.
3. Select Change Password in the Security Preferences section.
4. Enter your Current Password.
5. Enter your New Password.
6. Re-enter the new password for the Re-enter New Password field.
7. Select Save.

Old Second Corporate Digital
Commercial Banking Solution Treasury Management Channel Guide 13
Notification Setup Use the Notification Setup view to set up your notification preferences for each module available
in Treasury Management.
NOTE
Your institution may set some notifications as required.
Filtering is also available. To find information quickly, start typing the notification name in the
filter box at the top of each section.
You can set up notifications in the following modules.
● ACH
○ ACH Payment Created
○ ACH Reversal Payment Created
○ ACH Payment Pending Approval
○ ACH Payment Approved
○ ACH Payment - Approval Rejected
○ ACH Payment - Edited / Deleted
○ ACH Payment Failed
○ ACH Payment Uninitiated
○ ACH Batch Created
○ ACH Batch Pending Approval
○ ACH Batch Approved
○ ACH Batch - Approval Rejected
○ ACH Batch - Edited / Deleted
○ ACH File Upload
○ ACH File Transmitted
● Admin
○ User Created
○ User Pending Approval
○ User Approved
○ User Approval Rejected
○ User Information / Entitlements Changed
● Login
○ User Credentials Locked
○ User Email Address Changed
● Positive Pay
○ Exception Items Ready for Review (ACH)
○ Exception Items Ready for Review (Check)

Old Second Corporate Digital
Commercial Banking Solution Treasury Management Channel Guide 14
● Stop Payment
○ Stop Payment Created
○ Stop Payment Pending Approval
○ Stop Payment Approved
○ Stop Payment - Approval Rejected
● Transfer
○ Transfer Created
○ Transfer Pending Approval
○ Transfer Approved
○ Transfer - Approval Rejected
○ Transfer - Edited / Deleted
○ Transfer Failed
● Wire
○ Wire Payment Created
○ Wire Payment Pending Approval
○ Wire Payment Approved
○ Wires - Approval Rejected
○ Wire - Edited / Deleted
○ Wire File Upload
○ Wire Failed
○ Rate Quote Contract Accepted
○ Rate Quote Contract Approval Rejected
○ Wire Beneficiary Created
○ Wire Beneficiary Pending Approval
○ Wire Beneficiary Approved
○ Wire Beneficiary - Edited / Deleted
○ Wire Beneficiary - Approval Rejected
Configuring Notification Preferences The preferences configured here determine how your notifications are sent and appear within
Treasury Management.
1. From the [User Name] Menu, select Notification Setup.
2. Enter or change your Email address.
3. Enter the phone number to receive text messages on for the Mobile # field.
This field is required if you select Text Message (SMS).
4. Select the toggle to enable the notification.
If it is gray, you do not receive a notification.

Old Second Corporate Digital
Commercial Banking Solution Treasury Management Channel Guide 15
NOTE
If the financial institution requires a particular notification, you cannot change the settings for
that notification.
5. Select the Email, Desktop Notification, or Text Message (SMS) check boxes for each
enabled (green) item to receive a notification using that method.
Repeat this step for every item in all sections.
NOTE
If the financial institution set Text Message (SMS) as required, you are required to enter a
mobile address.
6. Select Submit.
TIP
To return all fields to their default settings, select Reset.
Logging Off Treasury Management
1. From the [User Name] Menu, select Log Off.
A Confirm Log Out dialog box appears.
2. Select Log Out.
Cut-off Times Access Cut-off Times in the top-right corner of Treasury Management.
Cut-off times indicate when a wire, ACH, or internal transfer must take place by. For example,
if the cut-off time for Internal Transfers says 8:00 p.m., then all internal transfers should be
submitted by 8:00 p.m. for processing that day. A notification is sent as a reminder.
Your financial institution manages the cut-off times.
Notifications Access Notifications in the top-right corner of Treasury Management. Notifications also appear
in the bottom right corner of Treasury Management while working.
Archive All
Select the Archive All option to archive, not remove, all notifications. Select Archive to confirm.
View All Notifications
Select the View All Notifications option to see an entire list of notifications, even those that
have been archived. From this page, you can filter by type (All Notifications, Unread, Read,
and High-Priority).

Old Second Corporate Digital
Commercial Banking Solution Treasury Management Channel Guide 16
Select the check mark beside the notification, and then select Mark Read, Mark Unread, or
Delete.
Filter the results by using the search box or by using the fly-out menu.
Message Center Use the Message Center to send and receive secure messages to and from your financial
institution.
Click the Message Center button to access your inbox. You can also view your Sent or
Archived messages. When new messages are received, a notification is sent to your email
address on record.
Select the column headings to sort the messages in each of the available folders. You can also
enter information from one of the column headings in the Filter text box to search for a specific
message.

Old Second Corporate Digital
Commercial Banking Solution Treasury Management Channel Guide 17
Composing a Message
1. Select the Message Center button.
2. Select Compose.
3. Select a Subject from the drop-down list.
● Transaction Inquiry
● Checks
● Stop Payment
● Security
● Reports
● Electronic Documents
● Notifications
● Transfer
● Wire
● ACH
● Positive Pay
4. For the Attach File field, select Select File, and then choose the appropriate file if needed.
Accepted file type extensions are .csv, .doc, .docx, .gif, .jpeg, .jpg, .pdf, .png, and .txt.
5. Enter the Message to send to the financial institution.
6. Select Send.
Archiving a Message
1. Select the Message Center button.
2. Select a message to archive from the Inbox.
3. Select Archive.
An Archive Message dialog box opens.
4. Select Archive.
You can view archived messages by selecting Archived.
Performing an Advanced Search in Message Center
1. Select the Message Center icon.
2. Select Advanced Search beside the Filter text box.
3. Enter the Message ID, if known.
4. Select the Subject of the email from the drop-down list.
● Transaction Inquiry
● Checks
● Stop Payment

Old Second Corporate Digital
Commercial Banking Solution Treasury Management Channel Guide 18
● Security
● Reports
● Electronic Documents
● Notifications
● Transfer
● Wire
● ACH
● Positive Pay
5. Select a Date from the drop-down calendar when the email could have been sent, received,
or archived.
6. Select the Type of email.
● All
● Inbox
● Sent
● Archived
7. Select Search.
Dashboard Use the Dashboard menu to view your accounts, news items, favorite reports, payments
pending approval, and other available widgets. You can also make transfers and quickly access
commonly used resource links.
TIP
Adjust the layout by selecting Configure Dashboard in the top-right corner of the
Dashboard. You can add, remove, edit, resize, and drag widgets to customize the
Dashboard to work best for you.
Accounts
Upon initial login, two account groups appear by default. No accounts appear until you assign
accounts to the groups by selecting Manage Groups. You can also edit the group names and
add or remove groups.
TIP
Select Details to view current, collected, and available balances and line amounts. You can
see a daily balance trend for the last 10 days and view the last 10 days of transactions.
● Manage Groups
○ Add Accounts – Select Add Accounts to assign accounts to groups. Select the box next
to the accounts you want to assign to the group. Select Add Accounts to save.

Old Second Corporate Digital
Commercial Banking Solution Treasury Management Channel Guide 19
NOTE
An account can only be assigned to one group. If an account is currently assigned to a
group, you must first remove it before you can add it to another group. A group can have a
maximum of 50 accounts assigned.
○ Create New Group – Select Create New Group to create an additional group to assign
accounts to. Enter a unique Group Name and then select Add Accounts to assign
accounts.
○ Delete Group – Select Delete Group to remove the group.
Information Center
View news items, added by your financial institution, in this widget. Select the drop-down arrows
to expand or collapse these messages. Different icons may appear in this widget. A blue icon
indicates information. A yellow icon indicates a warning. A black bell icon indicates an alert.
Resources
Access links to helpful and commonly used sites by your financial institution in this widget.
Quick Transfer
Create a simple one-to-one transfer without leaving the Dashboard in this widget.
1. Use the type-ahead fields or select Search to choose the account number or account name
to transfer from and to.
2. Enter the amount and transfer date.
3. Review and confirm the transaction.
TIP
To initiate a bulk one-to-one, one-to-many, or many-to-one transfer, select Advanced
Transfer Options to go to the Create a Transfer - Internal Transfer page.
Quick Loan Payment
Create a quick payment on a loan without leaving the Dashboard in this widget.
Favorite Reports
The reports that have been marked as favorite appear in this widget. Selecting a report in this
widget takes you directly to that report, where you can view and customize the results, and
create a custom report.
TIP
By default, the widget is blank. You must mark reports as favorites in the Reporting
Dashboard for them to appear.

Old Second Corporate Digital
Commercial Banking Solution Treasury Management Channel Guide 20
Positive Pay
View, pay, or return the check and ACH exceptions that are pending approval in this widget.
Stop Payment Pending Approval
View, approve, or reject the stop payments that are pending approval in this widget.
Payments Pending Approval
View, approve, or reject the transfer, ACH, or wire payments that are pending approval in this
widget.
Accounts Use the Accounts menu to search for and view a list of accounts categorized by type (deposit,
time deposits, and loans) and to search for specific transactions of accounts that you are
entitled to view.
Account List Use the Account List view to see specific account details.
To find an account, start typing either the account number, account name, status, current
balance, collected balance, or available balance in the filter box at the top of the page.
Refresh Balances
Select at any point to ensure that you are viewing the most up-to-date account balance
information.
Account Number Link
Select this link to view more information about a particular account. An Account
Transactions window appears, and you are able to select Transaction Dates to view
transactions for a set time period. From the Account Transactions window, if you select
Advanced Transaction Search, you are redirected to the Research Transactions view.
Actions Drop-Down Menu
The following options are available from the Actions drop-down menu on the Account Lists
page:
● Transfer To - Redirected to the Create a Transfer page with account prefilled.
● Transfer From - Redirected to the Create a Transfer page with account prefilled.
● Download - Allows you to download account transactions from a specific Date Range
and in a specific Download Format.
Downloading Account Transactions
1. Go to Accounts > Account List.

Old Second Corporate Digital
Commercial Banking Solution Treasury Management Channel Guide 21
2. From the Actions drop-down list, select Download beside the appropriate account number.
A Download Account Transactions dialog box appears.
3. Select a Date Range.
4. Select a Download Format.
5. Select Download.
Research Transactions Use the Research Transactions view to search for a specific transaction or type of transaction
across all accounts that you are entitled to view.
Research Transactions Panel
Select the link found in the Account column to view more details of the transaction, including the
Account Name, Account Type, Transaction ID, Transaction Type, and Description.
Select the View Check link found in the Check / Reference Number column to view the front
and back of check images.
NOTE
In the Amount column, a negative account balance appears in red and is wrapped in
parentheses, and a positive account balance appears in black.
Researching Transactions
1. Go to Accounts > Research Transactions.
2. Complete the fields in the Search Transactions panel, as necessary.
Transaction Date
Select the desired date or date range.
Account Type
The type of account. Accounts can be Checking, Savings, or Loan.
Accounts
Select the appropriate account numbers, or leave all accounts selected by default.
Check # / Reference #
Select Specific # or Range from the drop-down list. Then, enter the check number or
reference number used in the transaction.
Amount
Select Specific Amount or Range from the drop-down list. Then, enter the amounts in the
text boxes available.
Payment Type
Select any combination from the drop-down list. The options are:
Old Second Corporate Digital
Commercial Banking Solution Treasury Management Channel Guide 22
● All Transactions
● All Credits
● All Debits
● ACH
● Wire
● Transfer
● Check
All payment types are selected by default.
Then, select Debit, Credit, or Both.
3. Select Search.
The transactions meeting the criteria entered appear in the Research Transactions panel.
Select Reset for the fields to return to their default settings.
Payments Use the Payments menu to work with various payments. Access Transfer, Wire, ACH, Positive
Pay, and Stop Payment options from this menu.
Transfer Within Payments > Transfer, you can create various internal transfers, view the transfer list,
search transfers, and approve or reject transfers.
Three icons appear throughout the Transfer view. Hover over or select these icons to view an
informational message.
When this icon appears beside a transfer, it means that there is an information message
available for this transfer.
When this icon appears beside a transfer, it means that the transfer has been changed.
When this icon appears beside a transfer, it means that the transfer has an error.
A negative account balance appears in red, and a positive account balance appears in black
beneath the account numbers.
Old Second Corporate Digital
Commercial Banking Solution Treasury Management Channel Guide 23
Create Transfer Use the Create Transfer view to create a one-to-one transfer, one-to-many transfer, or many-to-
one transfer.
Creating a Transfer
Use this option to submit a one-time or future-dated transfer from one account to one or more
accounts.
1. Go to Payments > Transfer > Create Transfer.
2. On the Create a Transfer tab, select the kind of transfer to create:
● One-to-One Transfers
● Many-to-One Transfers
● One-to-Many Transfers
3. Complete the fields.
Transfer From
Type the account number or select the icon to choose an eligible account from your account
list. The available balance appears under the account.
Transfer To
Type the account number or select the icon to choose an eligible account from your account
list. The available balance appears under the account.
Amount
Enter the amount of the transfer. The field auto-formats to add a dollar sign, commas, and
cents.
Frequency
Select one of the following options:
● One Time
● Weekly
● Every Two Weeks
● Twice a Month
● Monthly
● Quarterly
● Every Six Months
● Yearly
If any option except One Time is selected, you are not able to select Add Another Transfer
from this page.
Depending on your selection, you may be prompted to enter data in the following field
options:

Old Second Corporate Digital
Commercial Banking Solution Treasury Management Channel Guide 24
● Effective Date
● Repeat On Day or Repeat On Days
● Repeat On
● Start On
● End On
Transfer Date
Select the date of the funds transfer using the calendar feature.
Memo
Enter information related to the funds transfer.
4. Select to add additional transfer details, if necessary.
Depending what kind of transfer you are making, you can initiate multiple one-to-one
transfers, add additional Transfer From accounts in a Many-to-One transfer, or add
additional Transfer To accounts in a One-to-Many transfer at one time.
5. Select Review.
You proceed to the Review tab.
6. Review the transfer information entered to ensure that it is accurate.
7. Select Confirm.
The Internal Transfer Confirmation screen appears.
From the Internal Transfer Confirmation screen, you can take the following actions:
● Create Another Transfer
● View Transfer Activity
Creating a Transfer from a Template Use the Create Transfer from Template view to work with transfer templates.
1. Select which templates to use.
NOTE
You can only initiate templates with a Ready status.
2. Select Initiate Payments.
3. Review the transfer information to ensure it is accurate and make any necessary changes to
the Amount, Frequency, or Date fields.
4. Select Review.
5. Select Confirm to submit.
The confirmation screen appears.

Old Second Corporate Digital
Commercial Banking Solution Treasury Management Channel Guide 25
Transfer Activity Use the Transfer Activity view to look at a list of transfers with various statuses and also view
transaction history.
You can search for a specific transfer, or approve, reject, and cancel transfers from this view.
Searching Transfers
1. Go to Payments > Transfer > Transfer Activity.
2. Complete the fields in the Search Transfers panel, as necessary.
Transfer Date
Select either Date Range or Specific Date from this drop-down list, and then enter the date
of the funds transfer using the calendar feature.
Status
Select any combination of the following options for the transfer status:
● Select All
● Pending Approval
● Scheduled
● Submitted
● Approval Rejected
● Cancelled
● Failed
All statuses are selected by default.
Account
Select Both, From, or To, and then select the appropriate From or To account numbers
from the drop-down lists available.
Amount
Select Specific Amount or Range from the drop-down list. Then, enter the amounts in the
text boxes available.
Transaction ID
Enter the transaction ID that generated when the transfer was submitted.
Created Date
Select either Date Range or Specific Date from the drop-down list, and then enter the date
using the calendar feature.
3. Select Search.
The Transfer Activity screen updates with transactions matching the criteria entered, and
the number of results appears at the bottom. The Transfer Activity allows you to view and

Old Second Corporate Digital
Commercial Banking Solution Treasury Management Channel Guide 26
work with transfers that are in the following statuses: Pending Approval, Approval Rejected,
Scheduled, Cancelled, or Failed.
Select Reset for the fields to return to their default settings.
Editing a Scheduled Transfer
The Transfer Activity list allows you to view and work with transfers that are in the following
statuses: Approval Rejected, Scheduled, or Failed.
1. Go to Payments > Transfer > Transfer Activity.
2. Select the Transaction ID of the transfer to change.
3. Select Edit Transfer.
4. Edit the fields, as necessary.
5. Select Confirm.
The Confirm Resubmission dialog box appears.
6. Enter a comment in the field, and then select Resubmit Transfer.
Your transfer has been resubmitted.
Approving or Rejecting a Transfer
1. Go to Payments > Transfer > Transfer Activity.
2. Select the check box beside the Transaction ID to approve or reject.
3. Select either Approve or Reject.
A Confirm Approval or Confirm Rejection dialog box appears.
4. Enter Comments for the approval or rejection, if necessary.
5. Select either Approve Transfer or Reject Transfer.
Canceling a Transfer
1. Go to Payments > Transfer > Transfer Activity.
2. Select Cancel Transfer beside the transaction to cancel.
The Confirm Cancellation dialog box appears.
3. Enter a comment in the field, and then select Cancel Transfer.
You receive a confirmation message that your transfer has been successfully canceled.
Recurring Transfers Use the Recurring Transfers view to locate, approve, reject, and cancel a recurring transfer
series.
Searching Recurring Transfers
1. Go to Payments > Transfer > Recurring Transfers.
2. Complete the fields in the Search Recurring Transfers panel, as necessary.
Status
Old Second Corporate Digital
Commercial Banking Solution Treasury Management Channel Guide 27
Select any combination of the following options for the transfer status:
● Select All
● Pending Approval
● Scheduled
● Submitted
● Approval Rejected
● Cancelled
● Failed
All statuses are selected by default.
Account
Select Both, From, or To, and then select the appropriate From or To account numbers
from the drop-down lists available.
Transaction ID
Enter the transaction ID that generated when the transfer was submitted.
Frequency
Select any combination of the following options:
● One Time
● Weekly
● Every Two Weeks
● Twice a Month
● Monthly
● Quarterly
● Every Six Months
● Yearly
All options are selected by default.
Transfer Amount
Select either Specific Amount or Amount Range from the drop-down list, and then enter the
amount of the recurring transfer.
Next Transfer Date
Select either Date Range or Specific Date from the drop-down list. Then, enter the dates of
the transfer in the text boxes available using the calendar feature.
Created Date
Select either Date Range or Specific Date from the drop-down list, and then enter the date
using the calendar feature.
3. Select Search.

Old Second Corporate Digital
Commercial Banking Solution Treasury Management Channel Guide 28
Recurring Transfers updates with transactions matching the criteria entered. The Recurring
Transfers view allows you to view and work with transfers that are in the following statuses:
Pending Approval, Approval Rejected, Scheduled, Cancelled, or Failed.
TIP
Select Reset for the fields to return to their default settings.
Approving or Rejecting a Recurring Transfer
1. Go to Payments > Transfer > Recurring Transfers.
2. In the Recurring Transfer List panel, select the check box beside the Transaction ID to
approve or reject.
3. Select either Approve or Reject.
An Approve Transfers or Reject Transfers dialog box appears.
4. Enter Comments appropriate for the approval or rejection.
5. Select either Approve Transfers or Reject Transfers.
Canceling a Recurring Transfer Series
1. Go to Payments > Transfer > Recurring Transfers.
2. Select Cancel Series beside the recurring transfer to cancel.
A Confirm Cancellation confirmation dialog box appears.
3. Enter Comments appropriate for the cancellation.
4. Select Cancel Recurring Series.
The series is successfully canceled.
Transfer Templates Use the Transfer Templates view to work with transfer templates.
You can select check boxes for templates that are ready. Use the Actions drop-down menu to
Initiate, View, Edit, or Delete a transfer template. Select the Template Name link to view, edit, or
delete its details.
You can sort the information in ascending or descending order by selecting individual column
headers.
From this view, you can also work with templates to perform the following options, based on
status:
● Approve or reject payments
● View templates
● Initiate payments
● Delete templates
● Edit templates
● Search templates

Old Second Corporate Digital
Commercial Banking Solution Treasury Management Channel Guide 29
● Create templates
Creating a Transfer Template
1. Go to Payments > Transfer > Transfer Templates.
2. Select Create New Template.
3. Select the type of transfer:
● One-to-One Transfers
● One-to-Many Transfers
● Many-to-One Transfers
4. Complete the following fields on the Transfer Template Details tab.
Template Name
Enter the name of the template.
Transfer From
Type the account number or select the icon to choose an eligible account from your account
list. The available balance appears under the account.
Transfer To
Type the account number or select the icon to choose an eligible account from your account
list. The available balance appears under the account.
Amount
Enter the amount of the transfer. The field auto-formats to add a dollar sign, commas, and
cents.
Memo
Enter information related to the funds transfer.
5. Select Review.
You proceed to the Review tab.
6. Review the information entered to ensure that it is accurate.
7. Select Confirm.
You proceed to the Confirmation tab, confirming that the transfer template is ready.
NOTE
From this screen, you can Create Another Transfer Template or View Transfer
Templates.
Searching for a Transfer Template
1. Go to Payments > Transfer > Transfer Templates.
2. Complete the fields in the Search Transfers Templates panel.
TIP
Select Reset for the fields to return to their default settings.

Old Second Corporate Digital
Commercial Banking Solution Treasury Management Channel Guide 30
3. Select Search.
Create Loan Payment Use the Create Loan Payment view to make a loan payment.
1. Go to Payments > Transfer > Create Loan Payment.
2. Enter the From Account.
3. Enter the To Loan Account.
NOTE
If the loan is past-due but the company allows payments submitted anyway, a notification
appears which states that the amount due may not reflect additional fees.
If the company does not allow payments on loans past-due, a message appears, stating that
you must contact your financial institution.
4. Select the Payment Option.
You can choose to make a Regular Payment or pay to Principal Only.
5. Enter the Amount.
6. Enter the Payment Date.
7. Enter a Memo, if desired.
8. Select Review.
9. Confirm that the payment looks accurate.
10. Select Confirm.
Loan Payment Activity Use the Loan Payment Activity view to look at a list of loan payments with various statuses and
also view payment history.
You can search for a specific payment, or approve, reject, and cancel payments from this view.
NOTE
You can only select Edit Payment when the payment status is Approval Rejected,
Scheduled, or Failed.
Wire Within Payments > Wire, you can create recurring, future-dated, and one-time domestic and/or
international wires. You can also create domestic and/or international beneficiaries, view wire
Old Second Corporate Digital
Commercial Banking Solution Treasury Management Channel Guide 31
activity, search wires, download or print a PDF or .csv file for a payment in detail or summary
view, and approve or reject wires.
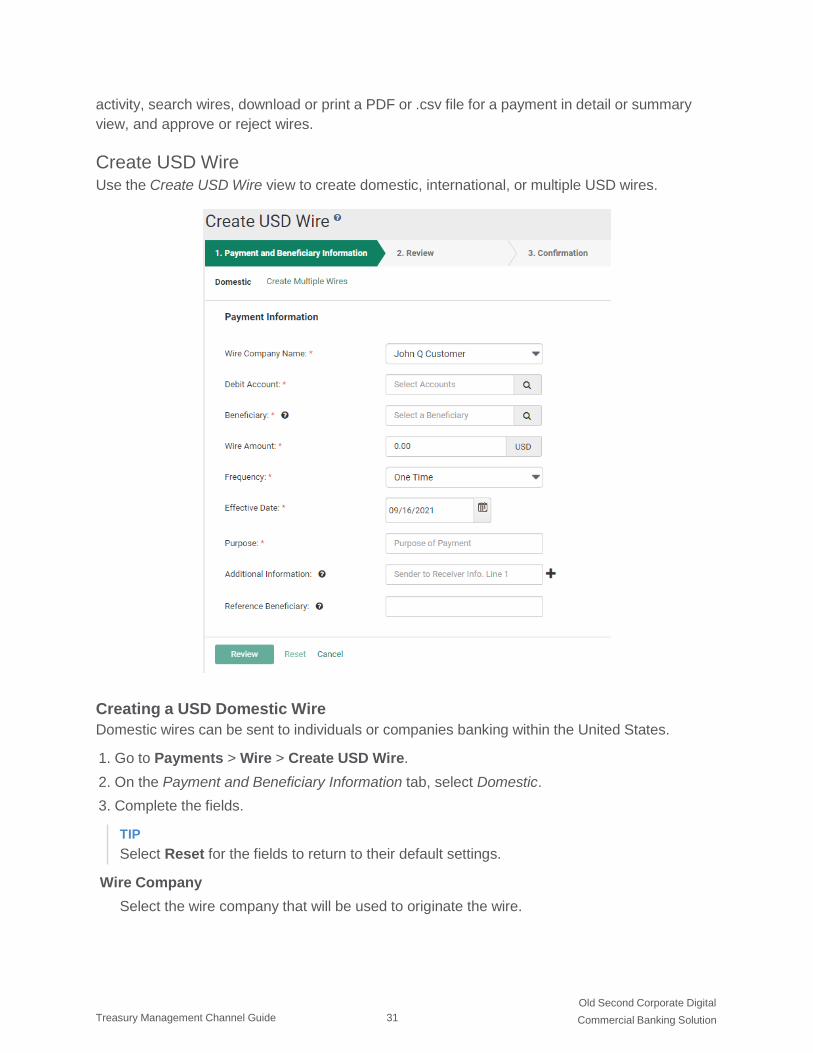
Create USD Wire Use the Create USD Wire view to create domestic, international, or multiple USD wires.
Creating a USD Domestic Wire
Domestic wires can be sent to individuals or companies banking within the United States.
1. Go to Payments > Wire > Create USD Wire.
2. On the Payment and Beneficiary Information tab, select Domestic.
3. Complete the fields.
TIP
Select Reset for the fields to return to their default settings.
Wire Company
Select the wire company that will be used to originate the wire.

Old Second Corporate Digital
Commercial Banking Solution Treasury Management Channel Guide 32
Debit Account
Start typing the account number in this field, and the matching entry auto-completes. Select
Search to select which account to debit.
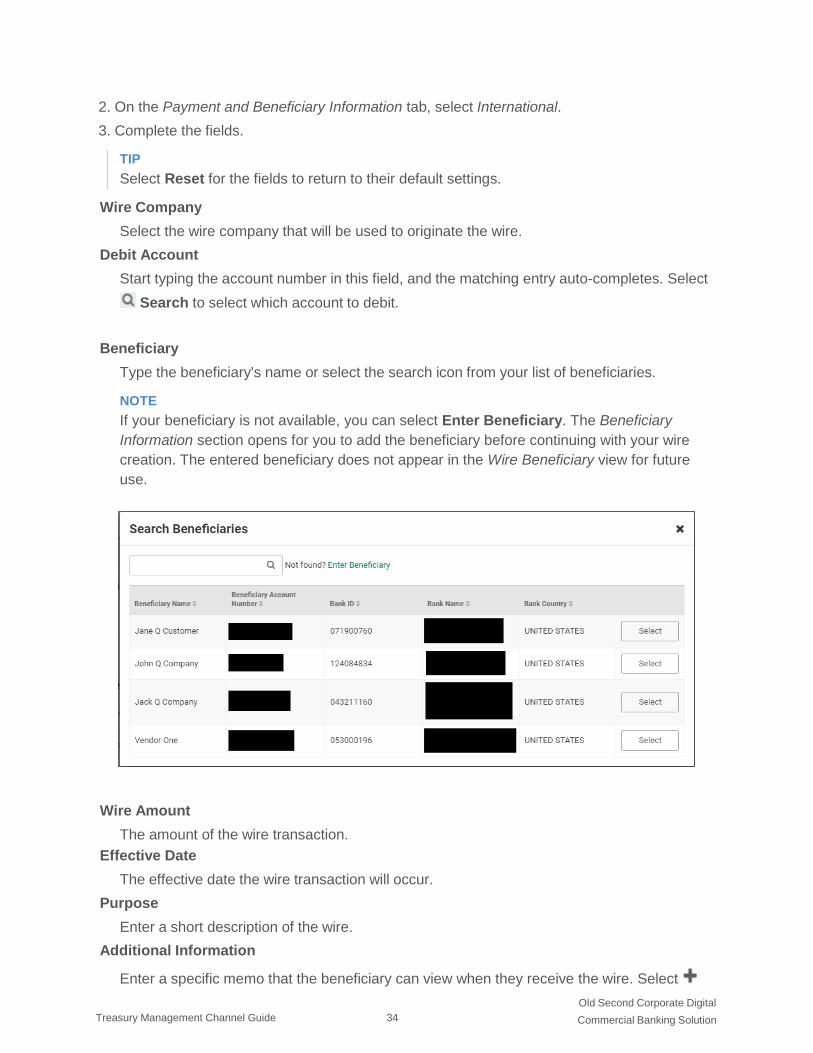
Beneficiary
Type the beneficiary's name or select the search icon from your list of beneficiaries.
NOTE
If your beneficiary is not available, you can select Enter Beneficiary. The Beneficiary
Information section opens for you to add the beneficiary before continuing with your wire
creation. The entered beneficiary does not appear in the Wire Beneficiary view for future
use.
NOTE
When entering a new international beneficiary, all wires must be sent through Wells
Fargo Bank unless otherwise noted in your wire instructions:
Enter the account, name, and address for the beneficiary as provided by them,
as well as any notes you would like to save.
Click Continue.
Under the “Domestic Intermediary Bank” section, enter 026005092 as the Bank
ID / Routing Number.
The remaining fields for the bank and location should fill in automatically.
You do not need to provide an account number in this section.
Wire Amount
The amount of the wire transaction.
Frequency
Select the frequency.

Old Second Corporate Digital
Commercial Banking Solution Treasury Management Channel Guide 33
● One Time
● Weekly
● Every Two Weeks
● Twice a Month
● Monthly
● Quarterly
● Every Six Months
● Yearly
Depending on your selection, you may be prompted to enter wire data in the following field
options:
● Effective Date
● Repeat On Days
● Repeat On
● Start On
● End On
Effective Date
The effective date the wire transaction will occur.
Purpose
Enter a short description of the wire.
Additional Information
Enter a specific memo that the beneficiary can view when they receive the wire. Select
Add to add another additional information line, or select Delete to remove an additional
information line.
4. Select Review.
You proceed to the Review tab.
5. Review the information entered to ensure that it is accurate.
6. Select Confirm.
You proceed to the Confirmation tab, confirming that you have created a domestic wire.
NOTE
From this screen, you can select Create Another Wire, Save as Template, or View Wire
Activity.
TIP
To save the beneficiary and bank details to reuse later, select Save as Template. Enter
a unique Template Name and select Create Template. Templates may be subject to
approval.
Creating a USD International Wire
USD international wires can be sent to individuals or companies that use a domestic
intermediary for a foreign bank.
1. Go to Payments > Wire > Create USD Wire.
Old Second Corporate Digital
Commercial Banking Solution Treasury Management Channel Guide 34
2. On the Payment and Beneficiary Information tab, select International.
3. Complete the fields.
TIP
Select Reset for the fields to return to their default settings.
Wire Company
Select the wire company that will be used to originate the wire.
Debit Account
Start typing the account number in this field, and the matching entry auto-completes. Select
Search to select which account to debit.
Beneficiary
Type the beneficiary's name or select the search icon from your list of beneficiaries.
NOTE
If your beneficiary is not available, you can select Enter Beneficiary. The Beneficiary
Information section opens for you to add the beneficiary before continuing with your wire
creation. The entered beneficiary does not appear in the Wire Beneficiary view for future
use.
Wire Amount
The amount of the wire transaction.
Effective Date
The effective date the wire transaction will occur.
Purpose
Enter a short description of the wire.
Additional Information
Enter a specific memo that the beneficiary can view when they receive the wire. Select

Old Second Corporate Digital
Commercial Banking Solution Treasury Management Channel Guide 35
Add to add another additional information line, or select Delete to remove an additional
information line.
4. Select Review.
You proceed to the Review tab.
5. Review the information entered to ensure that it is accurate.
6. Select Confirm.
You proceed to the Confirmation tab, confirming that you have created an international wire.
NOTE
From this screen, you can select Create Another Wire, Save as Template, or View Wire
Activity.
TIP
To save the beneficiary and bank details to reuse later, select Save as Template. Enter
a unique Template Name and select Create Template. Templates may be subject to
approval.
Creating Multiple USD Wires
1. Go to Payments > Wire > Create USD Wire.
2. On the Payment and Beneficiary Information tab, select Create Multiple Wires.
You are transferred to the Wire Beneficiaries page.

Old Second Corporate Digital
Commercial Banking Solution Treasury Management Channel Guide 36
3. Select one or more check boxes beside the appropriate Beneficiary Name.

Old Second Corporate Digital
Commercial Banking Solution Treasury Management Channel Guide 37
4. Select Initiate Payments.
The Create Multiple Wires page appears.
5. Complete the required fields for each Beneficiary Name selected.
The fields available depend on if the wire is domestic or international.
Beneficiary
Type the beneficiary's name or select the search icon from your list of beneficiaries.
Wire Company
Select the wire company that will be used to originate the wire.
Debit Account
Start typing the account number in this field, and the matching entry auto-completes. Select
Search to select which account to debit.
Wire Amount
The amount of the wire transaction.
Frequency
Select one of the following options:
● One Time
● Weekly

Old Second Corporate Digital
Commercial Banking Solution Treasury Management Channel Guide 38
● Every Two Weeks
● Twice a Month
● Monthly
● Quarterly
● Every Six Months
● Yearly
Effective Date
The effective date the wire transaction will occur.
Purpose
Enter a short description of the wire.
Additional Information
Enter a specific memo that the beneficiary can view when they receive the wire. Select
Add to add another additional information line, or select Delete to remove an additional
information line.
6. Select Review.
You proceed to the Review tab.
7. Review the information entered to ensure that it is accurate.
8. Select Confirm.
You proceed to the Confirmation tab, confirming that you have created multiple wires.
Create USD Wire from Template Use the Create USD Wire from Template view to work with wire templates.
Creating USD Wires from Templates
1. Go to Payments > Wire > Create USD Wire from Template.
The list of wire templates appears.
2. Select the check box next to the wire templates to initiate.
NOTE
You cannot select a check box for templates not in a Ready status.
3. Select Initiate Payments.
The Create Multiple Wires from Templates page appears.
4. Complete the required fields for each template selected.
The fields available depend on if the wire is domestic or international.

Old Second Corporate Digital
Commercial Banking Solution Treasury Management Channel Guide 39
Wire Amount
The amount of the wire transaction.
Frequency
Select one of the following options:
● One Time
● Weekly
● Every Two Weeks
● Twice a Month
● Monthly
● Quarterly
● Every Six Months
● Yearly
Effective Date
The effective date the wire transaction will occur.
5. Select Review.
You proceed to the Review tab.
6. Review the information entered to ensure that it is accurate.
7. Select Confirm.
You proceed to the Confirmation tab, confirming that you have created multiple wires.
Upload Wires Users can upload wire files to import their data into Treasury Management.
Uploading wire files eliminates the need to input individual wires when volume is a concern.
Users can review, edit, and confirm wire file contents before submitting them.
Uploading Wire Files
Uploading wire files eliminates the need to input individual wires when volume is a concern.
Users can review, edit, and confirm wire file contents before submitting them.

Old Second Corporate Digital
Commercial Banking Solution Treasury Management Channel Guide 40
1. Go to Payments > Wire > Upload Wires.
2. Select the wire file to upload.
After the file uploads, an overview of each wire in the file appears, including the file name
and summary details.
3. Select Details to view details for a selected wire.
Users can edit payment information while viewing the details.
4. If necessary, deselect any wires to exclude them from processing.
5. Select Review.
6. Verify that all information appears as expected.
You can view payment details by selecting Details if needed, and select the Back option to
return and edit any incorrect wire details.
7. When all details appear accurate, select Confirm.
Create FX Wire Use the Create FX Wire view to work with foreign currency wires.
Creating Foreign Currency Wires
1. Go to Payments > Wire > Create FX Wire.
2. Obtain a quote by completing the required fields.
Destination Currency
Select the currency that wire funds are converting to.
Wire Amount
Enter the amount of the wire. Use the slide bar to indicate if the entered amount is a USD
value or a destination currency value. For example, indicate if you are sending $1000.00 in
USD or 1000 in Euros.

Old Second Corporate Digital
Commercial Banking Solution Treasury Management Channel Guide 41
Get Quote
Displays the quote information, which includes the exchange rate, USD amount, foreign
currency amount, fees, and total cost.
TIP
Select Get New Quote to change quote options.
3. Enter the payment information by completing the fields.
Wire Company
Select the wire company that will be used to originate the wire.
Debit Account
Start typing the account number in this field, and the matching entry auto-completes. Select
Search to select which account to debit.
Beneficiary
Select Search to select an existing beneficiary. Once selected, the beneficiary's information
appears to the right of the field.
Purpose
Enter a short description of the wire.
Additional Information
Enter a specific memo that the beneficiary can view when they receive the wire. Select
Add to add another additional information line, or select Delete to remove an additional
information line.
4. Select Review.
You proceed to the Review tab.
5. Review the information entered to ensure that it is accurate.
6. Select Confirm & Accept Quote.

Old Second Corporate Digital
Commercial Banking Solution Treasury Management Channel Guide 42
7. Review and agree to quote terms by selecting Accept.
8. Select Confirm to accept the quote contract.
NOTE
Changes cannot be made once the quote contract is accepted and confirmed.
You proceed to the Confirmation tab, confirming that you have created a foreign currency
wire.
NOTE
From this screen, you can select Create FX Wire, Create USD Wire, or View Wire Activity.
Wire Activity Use the Wire Activity view to work with wires.
Three icons appear throughout the Wire Activity view.
When this icon appears beside a wire, it means that there is an information message
available for this wire transaction.
When this icon appears beside a wire, it means that the wire transaction has been changed.
When this icon appears beside a wire, it means that the wire transaction has an error.
Select the Transaction ID, and the Wire Detail window appears and displays both wire payment
and beneficiary information.
Searching for a Wire Payment
1. Go to Payments > Wire > Wire Activity.
2. In the Search Wire Payment panel on the left, complete the fields, as necessary.

Old Second Corporate Digital
Commercial Banking Solution Treasury Management Channel Guide 43
Wire Company Name
Select the wire company or companies to search for from this drop-down list.
Wire Type
Select Both, Domestic, or International to specify the wire search type.
NOTE
The International option may not appear depending on your bank's settings.
Status
Select any combination of the following options:
● Select All
● Pending Approval
● Approval Rejected
● Ready for Quote
● Transmitted
● Cancelled
● Posted
● Failed
● Expired
● Scheduled
All options are selected by default. You can select one or multiple options.
Debit Account
Select the affected debited wire accounts.
Beneficiary Name
Enter the beneficiary's full name.
Transaction ID
The transaction ID that generated when the wire was submitted.
OMAD
Stands for Output Messaging Accountability Data. This entry represents a combination of a
date, destination identifier, and sequence number assigned to a FedWire message when it
is processed by the Federal Reserve Bank Funds Transfer application.
Currency
Select a currency from the drop-down list that the financial institution supports.
Wire Amount
Select Specific Amount or Amount Range from this drop-down list, and then enter the wire
amount, if applicable.
Effective Date
Enter the wire's Specific Date or Date Range, if applicable, and then enter the date using
the calendar feature.

Old Second Corporate Digital
Commercial Banking Solution Treasury Management Channel Guide 44
Created Date
Select either Date Range or Specific Date from the drop-down list, and then enter the date
using the calendar feature.
3. Select Search.
TIP
Select Reset for the fields to return to their default settings.
Editing a Wire
NOTE
You can only edit USD (domestic and international) wires. You cannot edit foreign currency
wires.
1. Go to Payments > Wire > Wire Activity.
2. Select the Transaction ID.
3. Select Edit.
You can only edit if the wire transaction has a status of:
● Approval Rejected
● Failed
● Scheduled
4. Edit the fields, as necessary.
5. Select Review.
6. Select Confirm.
Approving or Rejecting a Wire
1. Go to Payments > Wire > Wire Activity.
2. Select the check box beside the Transaction ID.
3. Select Approve or Reject.
The Approve this Wire or Reject this Wire dialog box appears.
4. Enter a comment in the field, and then select Approve or Reject.
A confirmation message appears.
Canceling a Wire Transfer
You can only cancel USD (domestic and international) wires. You cannot cancel foreign
currency wires.
1. Go to Payments > Wire > Wire Activity.
2. Select Cancel Wire.
The Cancel Wire dialog box appears.
3. Enter Comments about the cancellation, and then select Cancel Wire.
Wire File Activity The Wire File Activity view allows users to work with wire files.
Old Second Corporate Digital
Commercial Banking Solution Treasury Management Channel Guide 45
The Wire File Activity screen shows a list of wire files that users have uploaded. Users can
access this information via the navigation menu by selecting Payments > Wire > Wire File
Activity.
Users can view the following information for uploaded wires:
● File Name
● File Size
● Uploaded By
● Total Amount
● Total Wires
● Wire statuses, including Approved / Submitted, Pending, Rejected, and Expired.
Users can select to Review one or more wires to view only activity associated with the selected
items.
Users are also able to Search Wire File Activity based on the following factors:
● File Name
● Updated By
● Upload Date
● Total Amount
Recurring Wires Use the Recurring Wires view to work with recurring wires.
Only wires that were created with a recurring Frequency appear on this list.
Select the Transaction ID, and then the Recurring Wire Detail screen appears and displays
both wire payment and beneficiary information.
Searching for a Recurring Wire
1. Go to Payments > Wire > Recurring Wires.
2. In the Search Recurring Wire panel, complete the fields, as necessary.
Status
Select any combination of the following options:
● Select All
● Pending Approval
● Approval Rejected
● Cancelled
● Scheduled
● Completed
● Failed
All options are selected by default. You can select one or multiple options.
Debit Account
Select the affected debited wire accounts.

Old Second Corporate Digital
Commercial Banking Solution Treasury Management Channel Guide 46
Beneficiary Name
Enter the beneficiary's full name.
Transaction ID
The transaction ID that generated when the wire was submitted.
Frequency
Select any combination of the following options:
● Weekly
● Every Two Weeks
● Twice a Month
● Monthly
● Quarterly
● Every Six Months
● Yearly
All are selected by default.
Wire Amount
Select Specific Amount or Amount Range from this drop-down list, and then enter the wire
amount, if applicable.
Next Payment Date
Select either Date Range or Specific Date from the drop-down list, and then enter the date
using the calendar feature. Select Specific Date to search for when a scheduled wire is
going to be transmitted next on a specific date. Select Date Range to search for when a
scheduled wire is going to be transmitted next within a date range.
Created Date
Select either Date Range or Specific Date from the drop-down list, and then enter the date
using the calendar feature.
3. Select Search.
TIP
Select Reset for the fields to return to their default settings.
Editing a Recurring Wire
1. Go to Payments > Wire > Recurring Wires.
2. Select the Transaction ID.
3. Select Edit.
NOTE
You cannot edit a recurring wire in a Pending Approval status.
4. Edit the fields as necessary.
5. Select Review.
6. Select Confirm.

Old Second Corporate Digital
Commercial Banking Solution Treasury Management Channel Guide 47
Canceling a Recurring Wire Series
1. Go to Payments > Wire > Recurring Wires.
2. Select Cancel Series beside the recurring wire.
The Cancel Wire dialog box appears.
3. Enter Comments about the cancellation, and then select Cancel Wire.
Wire Templates Use the Wire Templates view to work with wire templates.
You can select check boxes for certain templates or select all that are ready. Use the Actions
drop-down menu to Initiate, View, Edit, or Delete a wire template. Select the Template Name
link to view, edit, or delete its details.
You can sort the information in ascending or descending order by selecting individual column
headers. Select templates with a Ready status to initiate a payment.
From this view, you can also work with templates to perform the following options, based on
status:
● View templates
● Initiate templates
● Delete templates
● Edit templates
● Search templates
● Create templates
Creating a Wire Template
1. Go to Payments > Wire > Wire Templates.
2. Select Create New Template.
3. Select whether the wire template is Domestic or International.
NOTE
The International option may not appear depending on your institution's settings.
4. Complete the following fields on the Payment and Beneficiary Information tab.
Template Name
Enter the name of the template.
Wire Company
Select the wire company that will be used to originate the wire.
Debit Account
Select the affected debited wire accounts.
Beneficiary
Type the beneficiary's name or select the search icon from your list of beneficiaries.
Purpose
Enter a short description of the wire.

Old Second Corporate Digital
Commercial Banking Solution Treasury Management Channel Guide 48
Additional Information
Enter a specific memo that the beneficiary can view when they receive the wire. Select
Add to add another additional information line, or select Delete to remove an additional
information line.
5. Select Review.
You proceed to the Review tab.
6. Review the information entered to ensure that it is accurate.
7. Select Confirm.
You proceed to the Confirmation tab, confirming that the wire template is ready.
NOTE
From this screen, you can Create Another Wire Template or View Wire Templates.
Searching for a Wire Template
1. Go to Payments > Wire > Wire Templates.
2. Complete the fields in the Search Templates panel.
TIP
Select Reset for the fields to return to their default settings.
Template Name
Enter the name of the template.
Wire Company
Select the wire company that will be used to originate the wire.
Wire Type
Select Both, Domestic, or International to specify the wire search type.
NOTE
The International option may not appear depending on your bank's settings.
Status
Select All (default), Pending Approval, Approval Rejected, or Ready to narrow the search
results.
Debit Account
Select the affected debited wire accounts.
Beneficiary Name
Enter the beneficiary's full name.
Created Date
Select either Date Range or Specific Date from the drop-down list, and then enter the date
using the calendar feature.
3. Select Search.
The Wire Templates view allows you to view and work with templates that are in the following
statuses: Pending Approval, Approval Rejected, or Ready.

Old Second Corporate Digital
Commercial Banking Solution Treasury Management Channel Guide 49
Wire Beneficiaries Use the Wire Beneficiaries view to work with beneficiaries.
You can work with beneficiaries that are in Pending Approval, Approval Rejected, or Approved
status. The ability to edit or delete a beneficiary is limited if the beneficiary is linked to a wire
template.
Beneficiary Name
Select to see the Beneficiary Detail window. From this window, depending on the status of
the beneficiary, you can edit the details, and approve or reject this person as a beneficiary.
Actions Drop-Down Menu
The following options are available from the Actions drop-down menu:
● View
● Initiate
● Delete
Initiating Wire Payments
You can only initiate USD (domestic and international) wires using these steps.
1. Go to Payments > Wire > Wire Beneficiaries.
2. Select one or more check boxes beside the appropriate Beneficiary Name.
3. Select Initiate Payments.
The Wire Details page appears.
4. Complete the required fields for each Beneficiary Name selected.
Beneficiary
Type the beneficiary's name or select the search icon from your list of beneficiaries.
Wire Company
Select the wire company that will be used to originate the wire.
Debit Account
Start typing the account number in this field, and the matching entry auto-completes. Select
Search to select which account to debit.
Wire Amount
The amount of the wire transaction.
Frequency
Select one of the following options:
● One Time
● Weekly
● Every Two Weeks
● Twice a Month
● Monthly
● Quarterly

Old Second Corporate Digital
Commercial Banking Solution Treasury Management Channel Guide 50
● Every Six Months
● Yearly
Effective Date
The effective date the wire transaction will occur.
Purpose
Enter a short description of the wire.
Additional Information
Enter a specific memo that the beneficiary can view when they receive the wire. Select
Add to add another additional information line, or select Delete to remove an additional
information line.
5. Select Review.
You proceed to the Review tab.
6. Review the information entered to ensure that it is accurate.
7. Select Confirm.
You proceed to the Confirmation tab, confirming that you have created multiple wires.
Searching Beneficiaries
1. Go to Payments > Wire > Wire Beneficiaries.
2. In the Search Beneficiaries panel on the left, complete the fields as necessary.
Type
Select Both, Domestic, or International to specify the beneficiary search type.
Status
Select All (default), Pending Approval, Rejected, or Ready to narrow the search results
based on the beneficiary's status.
Name
Enter the beneficiary's full name.
Account Number
The account number tied to the beneficiary.
Bank ID
Enter the beneficiary's bank ID.
Bank Name
Enter the beneficiary's bank name.
Country
Select the country in which the beneficiary lives from the drop-down list.
Created Date
Select either Date Range or Specific Date from the drop-down list, and then enter the date
using the calendar feature.
3. Select Search.
TIP

Old Second Corporate Digital
Commercial Banking Solution Treasury Management Channel Guide 51
Select Reset for the fields to return to their default settings.
Editing a Beneficiary
1. Go to Payments > Wire > Wire Beneficiaries.
2. Select the Beneficiary Name.
A Beneficiary Detail window appears.
3. Select Edit.
4. Edit the fields, as necessary.
5. Select Review.
Success! This Beneficiary is ready for use appears.
Approving or Rejecting a Beneficiary
1. Go to Payments > Wire > Wire Beneficiaries.
2. Select the check box next to the Beneficiary Name.
3. Select Approve or Reject.
The Comments For Status Change dialog box appears.
4. Enter a comment in the field, if necessary, and then select Approve or Reject.
You can also approve or reject a beneficiary while editing a beneficiary on the Beneficiary Detail
window. From this window:
1. Select Approve or Reject.
The Comments For Status Change dialog box appears.
2. Enter a comment in the field, if necessary, and then select Approve or Reject.
Deleting a Beneficiary
1. Go to Payments > Wire > Wire Beneficiaries.
2. Select Delete Beneficiary.
The Confirm Deletion dialog box appears.
3. Enter a comment in the field, and then select Delete Beneficiary.
This beneficiary is removed and no longer exists in the system.
Creating a Domestic Beneficiary
Domestic beneficiaries can receive single, future-dated, or recurring domestic wires.
1. Go to Payments > Wire > Wire Beneficiaries.
2. Select Create New Beneficiary.

Old Second Corporate Digital
Commercial Banking Solution Treasury Management Channel Guide 52
3. On the Beneficiary Information tab, select Domestic.
4. Complete the fields.
TIP
Select Reset for the fields to return to their default settings.
Bank ID
Enter the beneficiary's bank ID.
Bank Name
Enter the beneficiary's bank name.
Bank City
Enter the city where the bank that the beneficiary uses is located.
Bank State
Enter the state where the bank that the beneficiary uses is located.
Account Number
Enter the beneficiary's account number that receives the wire credit.
Re-enter Account Number
Re-enter the beneficiary's account number that receives the wire credit.
Name
Enter the beneficiary's full name.
Address
Enter the beneficiary's receiving location's address.
City
Enter the city where the bank that the beneficiary uses is located.
State
Enter the state where the bank that the beneficiary uses is located.

Old Second Corporate Digital
Commercial Banking Solution Treasury Management Channel Guide 53
ZIP Code
Enter the ZIP code of the bank that the beneficiary uses.
Notes
Enter any additional information about this beneficiary.
5. Select Review.
You proceed to the Review tab.
6. Review the information entered to ensure that it is accurate.
7. Select Confirm.
You proceed to the Confirmation tab, confirming that you have successfully created a
domestic beneficiary. Depending on your settings, you may not be able to send a domestic
wire to this beneficiary until they are in an Approved status.
NOTE
From this screen, you can select Send a Wire to this Beneficiary, Create Another
Beneficiary, or Wire Beneficiaries.
Creating an International Beneficiary
International beneficiaries can receive immediate domestic intermediary or foreign bank wires.
1. Go to Payments > Wire > Wire Beneficiaries.
2. Select Create New Beneficiary.
3. On the Beneficiary Information tab, select International.

Old Second Corporate Digital
Commercial Banking Solution Treasury Management Channel Guide 54
4. Select USD or Foreign for the Currency Type field.
NOTE
This option may not appear depending on your institution's settings.
5. Complete the fields.
TIP
Select Reset for the fields to return to their default settings.
Account Number
Enter the beneficiary's account number that receives the wire credit.
Re-enter Account Number
Re-enter the beneficiary's account number that receives the wire credit.
Name
Enter the beneficiary's full name.
Country
Enter the beneficiary's country.
Address
Enter the beneficiary's receiving location's address.
City
Enter the beneficiary's city.
State/Province/Territory
Enter the beneficiary's state, province, or territory information.
Postal Code
Enter the beneficiary's ZIP code.
Notes
Enter any additional information about this beneficiary.
Bank ID
Enter the beneficiary's bank ID. Select the drop-down menu to choose the applicable field
of Swift Code, IBAN Number, or Sort Code.
Bank Name
Enter the name of the bank that the beneficiary uses.
Country
Enter the country where the bank that the beneficiary uses is located.
Bank Address
Enter the bank's address that the beneficiary uses.
City
Enter the city where the bank that the beneficiary uses is located.
State/Province/Territory
Enter the state, province, or territory where the bank that the beneficiary uses is located.
Postal Code

Old Second Corporate Digital
Commercial Banking Solution Treasury Management Channel Guide 55
Enter the ZIP code of the bank that the beneficiary uses.
6. Select a situation and complete the corresponding steps.
Your choice depends on your financial institution's requirements.
Situation Steps
Adding a
domestic
intermediary bank.
Adding an
international
intermediary bank.
1. Select Search, and then select the correct bank from the Bank
Lookup screen.
The system auto-fills the required fields.
2. Enter the Bank ID, Account Number, Notes, Bank Name, City,
and State.
Bank ID and Bank Name are required fields.
NOTE
This option may not appear depending on your institution's settings.
1. Enter the Bank ID, and then select if the ID is a Swift Code, IBAN
Number, or Sort Code from the drop-down list.
2. Enter the Bank City, Notes, Bank Name, and Bank Country.
Bank ID, Bank Name, and Bank Country are required fields.

Old Second Corporate Digital
Commercial Banking Solution Treasury Management Channel Guide 56
7. Select Review.
You proceed to the Review tab.
8. Review the information entered to ensure that it is accurate.
9. Select Confirm.
You proceed to the Confirmation tab, confirming that you have successfully created an
international beneficiary. Depending on your settings, you may not be able to send an
international wire to this beneficiary until they are in an Approved status.
NOTE
From this screen, you can select Send a Wire to this Beneficiary, Create Another
Beneficiary, or Wire Beneficiaries.
Wire Upload Formats Users can manage wire upload formats from this screen.
The Wire Upload Template Formatting Tool allows users to build either a fixed position or
delimited file map by selecting Create New Format.
Users can also delete or view formats from this screen. By selecting the Upload Format name,
users can view and edit the selected format.
Creating Wire Upload Formats
Wire upload formats allow users to manage how Treasury Management imports uploaded wire
files.
1. Go to Payments > Wire > Wire Upload Formats.
2. Select Create New Format.
The Wire Upload Template Formatting Tool launches.
3. Select the tab for the format desired.
Users can select either Delimited or Fixed Position.
4. Complete the fields as desired to determine how amounts and dates appear.
5. Map the field positions as desired.
You can drag and drop the different fields to reorder them.
In delimited file formats, the position in the file appears as the tile number and updates when
the tile is moved. In fixed position file formats, the tiles show the position on the file and the
length of the field. Users can adjust the length by using the up or down arrows.
Optional tiles appear below the required fields. While you cannot move any required fields
into the optional section, you can move optional titles to the primary section. Additionally, you
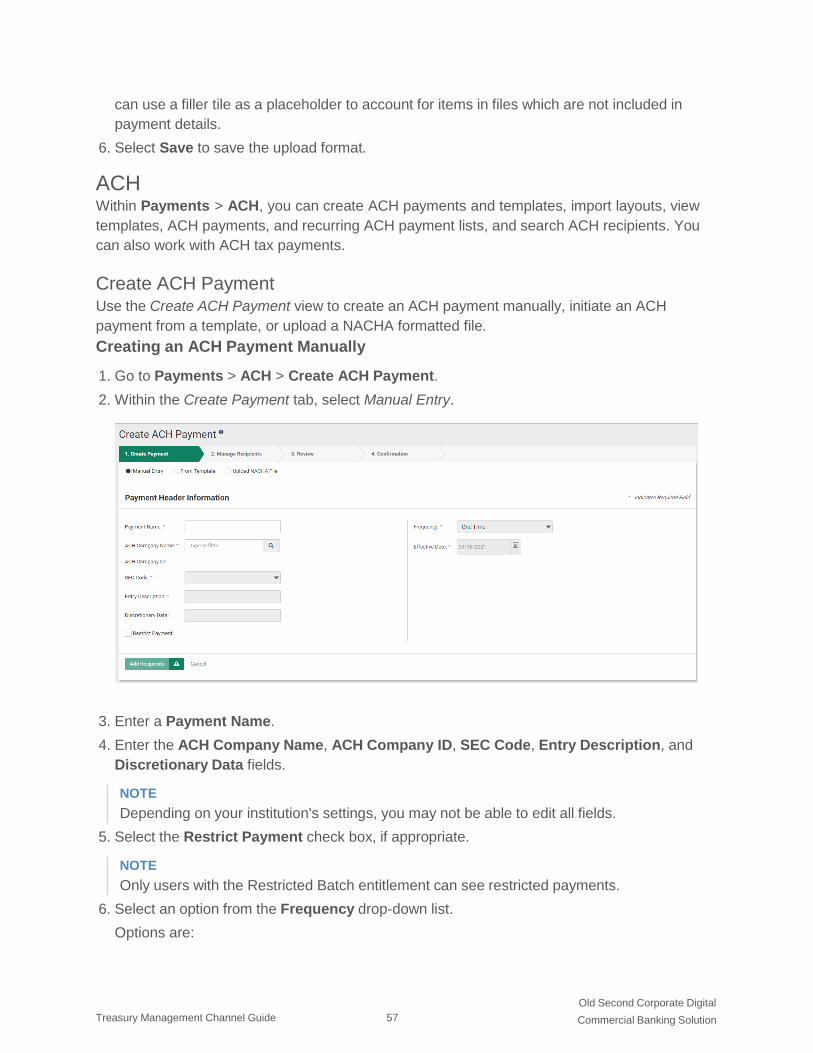
Old Second Corporate Digital
Commercial Banking Solution Treasury Management Channel Guide 57
can use a filler tile as a placeholder to account for items in files which are not included in
payment details.
6. Select Save to save the upload format.
ACH Within Payments > ACH, you can create ACH payments and templates, import layouts, view
templates, ACH payments, and recurring ACH payment lists, and search ACH recipients. You
can also work with ACH tax payments.
Create ACH Payment Use the Create ACH Payment view to create an ACH payment manually, initiate an ACH
payment from a template, or upload a NACHA formatted file.
Creating an ACH Payment Manually
1. Go to Payments > ACH > Create ACH Payment.
2. Within the Create Payment tab, select Manual Entry.
3. Enter a Payment Name.
4. Enter the ACH Company Name, ACH Company ID, SEC Code, Entry Description, and
Discretionary Data fields.
NOTE
Depending on your institution's settings, you may not be able to edit all fields.
5. Select the Restrict Payment check box, if appropriate.
NOTE
Only users with the Restricted Batch entitlement can see restricted payments.
6. Select an option from the Frequency drop-down list.
Options are:

Old Second Corporate Digital
Commercial Banking Solution Treasury Management Channel Guide 58
● One Time
● Weekly
● Every Two Weeks
● Twice a Month
● Monthly
● Quarterly
● Every 6 Months
● Annually
7. Select the Effective Date of this ACH payment using the calendar feature.
8. Select the Offset Account, if applicable.
9. Select Add Recipients to proceed to the Manage Recipients tab.
10. Complete the recipient information.
NOTE
Select to add a recipient row if necessary, and then complete the information.
11. Select Review.
You proceed to the Review tab.
12. Review the information entered to ensure that it is accurate.
13. Select Confirm.
You proceed to the Confirmation tab, confirming that you created an ACH payment.
Creating ACH Payments from Templates
1. Go to Payments > ACH > Create ACH Payment.
2. Within the Create Payment tab, select From Template.

Old Second Corporate Digital
Commercial Banking Solution Treasury Management Channel Guide 59
3. Select the check box beside the appropriate template name, and then select Initiate
Selected Templates.
The ACH Payments Detail screen appears.
4. Change the ACH Company ID, SEC Code, Entry Description, and Discretionary Data
fields, as needed.
5. Select the Restrict Payment check box, if appropriate.
6. Select an option from the Frequency drop-down list.
Options are:
● One Time
● Weekly
● Every Two Weeks
● Twice a Month
● Monthly
● Quarterly
● Every 6 Months
● Annually
7. Select the Effective Date of this ACH payment using the calendar feature.
NOTE
If you initiated multiple templates, the option Use One Effective Date for All Templates
appears.
8. Select the Offset Account, if applicable.
9. Select Add Recipients to proceed to the Manage Recipients tab.
10. Complete the recipient information.
NOTE
Select Add to add a recipient row, if necessary, and then complete the information.
11. Select Review.
You proceed to the Review tab.
12. Review the information entered to ensure that it is accurate.
13. Select the Apply Updates to the Template check box, if appropriate.
This step updates the template saved on the ACH Templates page.
14. Select Confirm.
You proceed to the Confirmation tab, confirming that you created an ACH payment from a
template.
NOTE
From this screen, you can Create Another Payment or view ACH Payment Activity.

Old Second Corporate Digital
Commercial Banking Solution Treasury Management Channel Guide 60
Uploading a NACHA Formatted File
1. Go to Payments > ACH > Create ACH Payment.
2. Within the Create Payment tab, select Upload NACHA File.
3. Select Browse beside Select File, and browse for the appropriate file.
Your file must be formatted to NACHA specifications and all ABA numbers must be accurate.
The company header record must match a company that you are entitled to create ACH
batches for.
4. Select Upload.
5. Select an option from the Frequency drop-down list.
6. Enter the Effective Date of the payment.
7. Select Review and ensure that the displayed information is correct.
8. Select Confirm.
Create ACH Tax Payment Use the Create ACH Tax Payment view to create an ACH tax payment.
Creating an ACH Tax Payment Manually
1. Go to Payments > ACH > Create ACH Tax Payment.
2. Within the Create Payment tab, select Manual Entry.
3. Select whether the payment is Federal or State.
The default selection is Federal.
NOTE
If your organization only selected Allow Federal Tax Payments in Back Office, the only
option is Federal. If your organization only selected Allow State Tax Payments, only State
appears.
4. If State, enter the applicable State.
5. Enter the Tax Payment Name.
6. Enter the Tax Period End Date.
7. Enter the Tax Code.
A drop-down menu with all tax codes your organization configured in Back Office allows you
to select the correct code. If the necessary tax code is not available, you can enter the code
manually.
NOTE
If a tax code is not recognized, a warning indicator appears next to the field, displaying the
following text when your cursor hovers over the icon: The tax code was not recognized,
please validate it is correct.
8. Enter the Tax Payer ID.
Old Second Corporate Digital
Commercial Banking Solution Treasury Management Channel Guide 61
9. Enter the ACH Company Name.
10. Enter the Pay from Account.
11. Select the Effective Date of this ACH payment using the calendar feature.
12. Enter the Amount.
13. Enter the Amount Type field, if applicable.
State taxes allow the following entries:
● T = Tax
● S = State
● P = Penalty
● I = Interest
● L = Local
● C = City
Federal taxes allow the following entries:
● 1 SOCS = Social Security amount
● 2 MEDI = Medicare amount
● 3 WITH = Withholding amount
● 1 FICA = Tier 1 if code CT-1 was used
● 2 Industry = Tier 2 if code CT-1 was used
● 6 Supplemental = Tier 3 if code CT-1 was used
NOTE
If you use a tax code that does not require subcategories, the Amount Type Code field
does not appear.
14. To include up to two additional Amount/Amount Type fields, select the + option.
15. Complete the recipient fields.
16. Select Review.
17. Review the information entered to ensure that it is accurate.
18. Select Confirm.
You proceed to the Confirmation tab, confirming that you created an ACH tax payment.
ACH File Activity Use the ACH File Activity view to see all files and respective details, which have either been
uploaded by entitled users or transmitted machine to machine.
Select the column header to change the priority of the information that appears.

Old Second Corporate Digital
Commercial Banking Solution Treasury Management Channel Guide 62
ACH Payment Activity Use the ACH Payment Activity view to work with ACH payments.
TIP
The Transaction ID for a tax payment shows a T at the end.
Searching ACH Payments
1. Go to Payments > ACH > ACH Payment Activity.
2. Select either the All, Reversal, or Tax Payment option.
3. Complete the fields in the Search ACH Payment Activity panel.
TIP
Select Reset for the fields to return to their default settings.
Status
Select one of the following from the drop-down list:
● All
● Pending Approval
● Approval Rejected
● Initiated
● Uninitiated
● Cancelled
● Failed
● Expired
● Scheduled
The default is All.
ACH Company Name
Select the ACH company or companies to search for from this drop-down list.
Batch Name
Enter the name of the batch.
Transaction ID
Enter the transaction ID number if searching for a specific payment that originated in
Treasury Management.
SEC Code
Select the code from the drop-down list that corresponds to the previous selection.
Debit Amount
Select Specific Amount or Range from the drop-down list. Then, enter the amounts in the
text boxes available.
Old Second Corporate Digital
Commercial Banking Solution Treasury Management Channel Guide 63
Credit Amount
Select Specific Amount or Range from the drop-down list. Then, enter the amounts in the
text boxes available.
Initiated Date
Select either Range or Specific Date from the drop-down list, and then enter the date using
the calendar feature.
Effective Date
Select either Range or Specific Date from the drop-down list, and then enter the date using
the calendar feature.
4. Select Search.
The ACH Payment Activity panel updates with ACH payments matching the criteria entered,
and the number of results appears at the bottom. The ACH Payment Activity panel allows
you to view and work with payments that are in the following statuses:
● Pending Approval
● Approval Rejected
● Initiated
● Uninitiated
● Cancelled
● Failed
● Expired
● Scheduled
Select the Transaction ID link to access the Payment Detail page. This is where you can see
audit, description, and discretionary data.
Editing an ACH Payment
1. Go to Payments > ACH > ACH Payment Activity.
2. Select the Transaction ID.
3. Select Edit Payment.
You can only edit if the ACH payment has a status of:
● Approval Rejected
● Failed
● Scheduled
4. Edit the fields, as necessary.
5. Select Review.
6. Select Confirm.

Old Second Corporate Digital
Commercial Banking Solution Treasury Management Channel Guide 64
Approving or Rejecting an ACH Payment
1. Go to Payments > ACH > ACH Payment Activity.
2. Select the check box beside the Transaction ID.
3. Select Approve or Reject.
The Comments For Status Change dialog box appears.
4. Enter a comment in the field, and then select Approve or Reject.
A confirmation message appears.
Canceling an ACH Payment Activity
1. Go to Payments > ACH > ACH Payment Activity.
2. Select Cancel.
The Confirm Cancel Payment dialog box appears.
3. Enter Comments about the cancellation, and then select Cancel Payment.
Uninitiating an ACH Payment Activity
1. Go to Payments > ACH > ACH Payment Activity.
2. Select Uninitiate.
The Confirm Uninitiate dialog box appears.
3. Enter Comments, and then select Uninitiate Payment.
Recurring ACH Payments Use the Recurring ACH Payments view to work with ACH payments that are recurring.
Searching Recurring ACH Payments
1. Go to Payments > ACH > Recurring ACH Payments.
2. Complete the fields in the Search Recurring ACH Payments panel.
TIP
Select Reset for the fields to return to their default settings.
Status
Select one of the following from the drop-down list:
● All
● Pending Approval
● Approval Rejected
● Cancelled
● Scheduled
● Completed
The default is All.

Old Second Corporate Digital
Commercial Banking Solution Treasury Management Channel Guide 65
ACH Company Name
Select the ACH company or companies to search for from this drop-down list.
Batch Name
Enter the name of the batch.
Transaction ID
Enter the transaction ID number if searching for a specific payment that originated in
Treasury Management.
SEC Code
Select the code from the drop-down list that corresponds to the previous selection.
Debit Amount
Select Specific Amount or Range from the drop-down list. Then, enter the amounts in the
text boxes available.
Credit Amount
Select Specific Amount or Range from the drop-down list. Then, enter the amounts in the
text boxes available.
Created Date
Select either Date Range or Specific Date from the drop-down list, and then enter the date
using the calendar feature.
Frequency
Select any combination of the following options:
● Weekly
● Every Two Weeks
● Twice a Month
● Monthly
● Quarterly
● Every Six Months
● Yearly
All are selected by default.
Next Payment Date
Select either Range or Specific Date from the drop-down list, and then enter the date using
the calendar feature.
3. Select Search.
The Recurring ACH Payments screen updates with the recurring ACH payments matching
the criteria entered and the number of results appears at the bottom. Select the Transaction
ID link to access the Details page.

Old Second Corporate Digital
Commercial Banking Solution Treasury Management Channel Guide 66
Editing a Recurring ACH Payment
1. Go to Payments > ACH > Recurring ACH Payments.
2. Select the Transaction ID.
3. Select Edit Payment.
NOTE
You cannot edit a recurring ACH payment in Pending Approval status.
4. Edit the fields, as necessary.
5. Select Review.
6. Select Confirm.
Canceling a Recurring ACH Payment
1. Go to Payments > ACH > Recurring ACH Payments.
2. Select Cancel beside the recurring ACH payment.
The Confirm Cancel Payment dialog box appears.
3. Enter Comments about the cancellation, and then select Cancel Payment.
ACH Templates You can select to Clone, Delete, or Initiate a template from the Actions drop-down list.
Searching Templates
1. Go to Payments > ACH > ACH Templates.
2. Complete the fields in the Search Templates panel.
TIP
Select Reset for the fields to return to their default settings.
Status
Select All (default), Pending Approval, Approval Rejected, or Ready to narrow the search
results.
ACH Company Name
Select the ACH company or companies to search for from this drop-down list.
Template Name
Enter the name of the template.
SEC Code
Select the code from the drop-down list that corresponds to the previous selection.
Debit Amount
Select Specific Amount or Range from the drop-down list. Then, enter the amounts in the
text boxes available.
Credit Amount
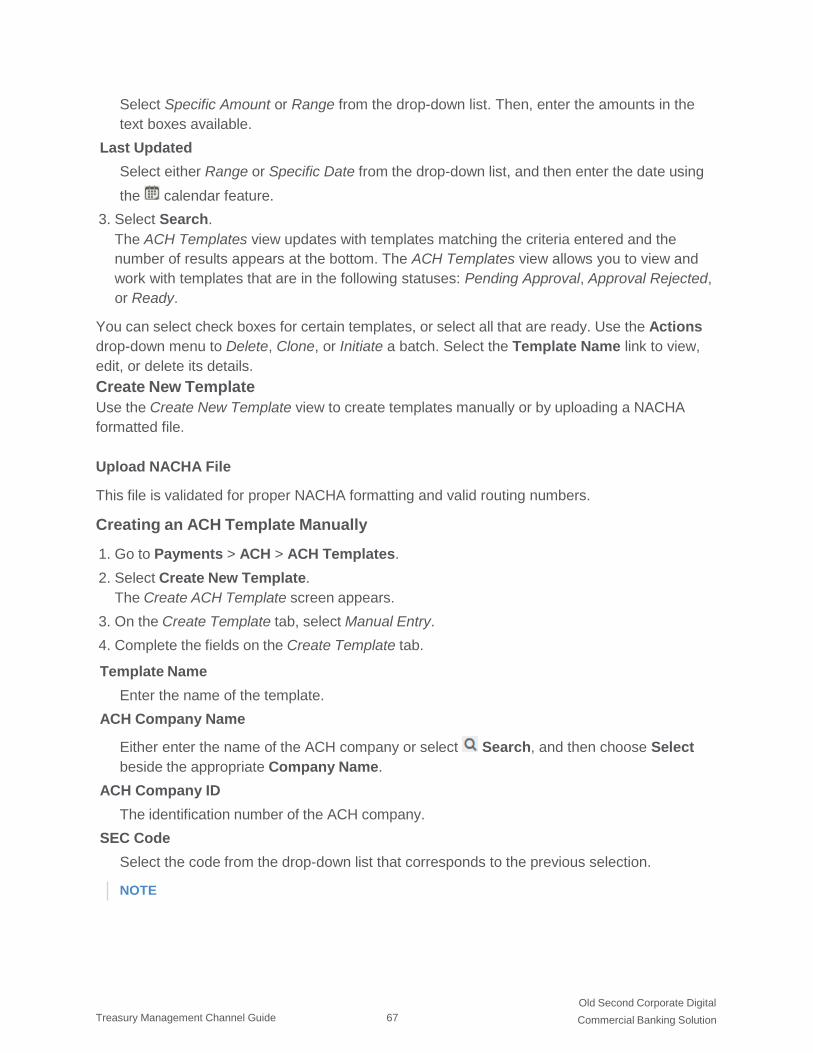
Old Second Corporate Digital
Commercial Banking Solution Treasury Management Channel Guide 67
Select Specific Amount or Range from the drop-down list. Then, enter the amounts in the
text boxes available.
Last Updated
Select either Range or Specific Date from the drop-down list, and then enter the date using
the calendar feature.
3. Select Search.
The ACH Templates view updates with templates matching the criteria entered and the
number of results appears at the bottom. The ACH Templates view allows you to view and
work with templates that are in the following statuses: Pending Approval, Approval Rejected,
or Ready.
You can select check boxes for certain templates, or select all that are ready. Use the Actions
drop-down menu to Delete, Clone, or Initiate a batch. Select the Template Name link to view,
edit, or delete its details.
Create New Template
Use the Create New Template view to create templates manually or by uploading a NACHA
formatted file.
Upload NACHA File
This file is validated for proper NACHA formatting and valid routing numbers.
Creating an ACH Template Manually
1. Go to Payments > ACH > ACH Templates.
2. Select Create New Template.
The Create ACH Template screen appears.
3. On the Create Template tab, select Manual Entry.
4. Complete the fields on the Create Template tab.
Template Name
Enter the name of the template.
ACH Company Name
Either enter the name of the ACH company or select Search, and then choose Select
beside the appropriate Company Name.
ACH Company ID
The identification number of the ACH company.
SEC Code
Select the code from the drop-down list that corresponds to the previous selection.
NOTE

Old Second Corporate Digital
Commercial Banking Solution Treasury Management Channel Guide 68
Depending on your insititution's settings, you may not have the ability to choose SEC
Codes.
Entry Description
Enter a description.
Discretionary Data
Enter any other necessary information.
Select the Restrict Template check box, if appropriate.
5. Select Add Recipients.
You proceed to the Manage Recipients tab.
6. Select Import Recipients From File, if appropriate.
a) Select whether the file is Delimited or Fixed Position.
If selected, the button appears gray.
b) Choose Select File, and then navigate to the file to import.
c) Select Upload.
7. Select Add Recipient.
8. Complete the recipient information fields.
9. Select Review.
You proceed to the Review tab.
10. Review the information entered to ensure that it is accurate.
11. Select Confirm.
You proceed to the Confirmation tab.
NOTE
Depending on your institution's settings, the template may require approval before you can
initiate it.
NOTE
From this screen, you can Create New Template, Initiate Payment, and view ACH
Payment Activity.
ACH Tax Templates From the ACH Tax Templates screen, users can view a list of tax templates, select one or more
templates to initiate payment, and create new templates.

Old Second Corporate Digital
Commercial Banking Solution Treasury Management Channel Guide 69
Creating an ACH Tax Template
1. Go to Payments > ACH > ACH Tax Templates.
2. Select Create New Template.
The Create Tax Template screen appears.
3. On the Create Template tab, select whether you are creating a Federal or State template.
4. Complete the fields on the Create Tax Template tab.
The following information is required when making a federal tax payment:

Old Second Corporate Digital
Commercial Banking Solution Treasury Management Channel Guide 70
● Tax Payment Name
● Tax Period End Date
● Tax Code
● Tax Payer ID
● ACH Company Name
● Pay From Account
● Effective Date
● Amount
● Recipient Name
● Recipient Routing Number
● Recipient Account Number
● Recipient Account Type
The following information is required when making a state tax payment:
● State
● Tax Payment Name
● Tax Period End Date
● Tax Code
● Tax Payer ID
● ACH Company Name
● Pay From Account
● Effective Date
● Amount/Amount Type
● Recipient Name
● Recipient Routing Number
● Recipient Account Number

Old Second Corporate Digital
Commercial Banking Solution Treasury Management Channel Guide 71
● Recipient Account Type
5. Select the Restrict Template check box, if appropriate.
6. Select Review.
You proceed to the Review tab.
7. Review the information entered to ensure that it is accurate.
8. Select Confirm.
You proceed to the Confirmation tab.
NOTE
Depending on your institution's settings, the template may require approval before you can
initiate it.
ACH Recipients
The ACH Recipients page displays all saved recipients, and offers the ability to select recipients
to create payments from. Users can also print or download the list of recipients. Exports are
available as PDF or CSV downloads.
Users with proper entitlements can edit, delete, approve, or reject recipients.
Searching ACH Recipient Activity
1. Go to Payments > ACH > ACH Recipients > ACH Recipient Activity.
2. Complete the fields in the Search Recipients panel.
TIP
Select Reset for the fields to return to their default settings.
Record Type
Select if the recipient receives a Batch or a single Payment, or select Both.

Old Second Corporate Digital
Commercial Banking Solution Treasury Management Channel Guide 72
Recipient Name
Enter the name of the recipient of the single and/or batch payment.
Amount
Select Specific Amount or Range from the drop-down list. Then, enter the amounts in the
text boxes available.
3. Select the Pre Note, Hold, and Reversal check boxes, if applicable.
4. Select Search.
The ACH Recipient Activity screen updates with the recipients matching the criteria entered,
and the number of results appears at the bottom.
Searching for an ACH Recipient
1. Go to Payments > ACH > ACH Recipients.
2. Complete the fields in the Search Recipients panel.
TIP
Select Reset for the fields to return to their default settings.
Status
Select All (default), Pending Approval, Approval Rejected, or Ready to narrow the search
results.
Recipient Name
Enter the name of the recipient of the single and/or batch payment.
Amount
Select Specific Amount or Range from the drop-down list. Then, enter the amounts in the
text boxes available.
3. Select the Pre Note, Hold, and Reversal check boxes, if applicable.
4. Select Search.
The ACH Recipients screen updates with the recipients matching the criteria entered, and
the number of results appears at the bottom.
Adding an ACH Recipient
1. Go to Payments > ACH > ACH Recipients.
2. Select Add Recipient.
3. Complete the fields in the Add Recipients panel.
NOTE
If all fields are identical to another recipient (case-insensitive), the system considers the
entry a duplicate and a warning message appears.
4. Select Save.
NOTE

Old Second Corporate Digital
Commercial Banking Solution Treasury Management Channel Guide 73
If approvals are required, the Status of the recipient changes to Pending Approval.
Editing an ACH Recipient
1. Go to Payments > ACH > ACH Recipients.
2. Select Edit from the Actions menu for the recipient.
3. Modify the fields as desired.
NOTE
If all fields are identical to another recipient (case-insensitive), the system considers the
entry a duplicate and a warning message appears.
4. Select Save.
NOTE
If approvals are required, the Status of the recipient changes to Pending Approval.
ACH Recipient Import Layout You can import recipient data from a file, such as Microsoft® Excel® or Notepad. Before
importing your file, define the Recipient Import Layout so the system can read the file data.

Old Second Corporate Digital
Commercial Banking Solution Treasury Management Channel Guide 74
There are two Upload Format options available. If you select Delimited, indicate the order of
the fields in your file. If you select Fixed Position, indicate the starting and ending positions of
the fields in your file.
Determining the Import Layout
1. Go to Payments > ACH > ACH Recipient Import Layout.
2. Select a situation and follow the corresponding steps.
Situation Steps
The upload
format is
delimited
The upload
format is
fixed
position
1. Select Delimited for the Upload Format field.
2. Enter the field location in the text box available to change the default
positions for Name, ID Number, Routing Number, Account Number,
Amount, and Transaction Code.
TIP
If your file does not use Transaction Code, delete the number from that
field to display the Account Type and Transaction Type fields, and use
those entries instead.
NOTE
All field positions must be unique. If there is a duplicate entry, the box
appears in red with a warning under it.
1. Select Fixed Position for the Upload Format field.
2. Enter a Begin and End field location in the text boxes available to
change the default positions for Name, ID Number, Routing Number,
Account Number, Amount, and Transaction Code.
3. Enter a Begin and End field location for Account Type and Transaction
Type, if the file does not contain transaction codes.
NOTE
The End value must be greater than the Begin value. If the values
match, the End value appears in red with a warning.
3. Complete the Account Type fields for Checking Equals and Savings Equals if the file does
not contain transaction codes.
4. Complete the Transaction Type fields for Debit Equals and Credit Equals if the file does
not contain transaction codes.
5. Select Save.

Old Second Corporate Digital
Commercial Banking Solution Treasury Management Channel Guide 75
ACH Reversals You can reverse full ACH payments or individual transactions, provided your ACH company is
allowed to originate both debits and credits.
You can create an ACH reversal only during a specific window. Reversals are allowed:
● Before cutoff on the first through fifth days after the business day effective date.
● After cutoff on the first through fourth days after the business day effective date.
Reversing an ACH Payment
1. Go to Payments > ACH > ACH Payment Activity.
2. Select a payment to reverse.
3. Select an option:
● Reverse Full Payment
● Reverse Transaction(s)
NOTE
The Reverse Full Payment and Reverse Transaction(s) options only appear if the
transaction is eligible for reversal based on the business day effective date and cutoff
criteria.
If you select Reverse Transaction(s), a Reverse check box appears next to each listed
transaction.
4. Select individual transactions to reverse, if necessary.
Held and prenote transactions cannot be reversed. Use the Reversals Only check box above
the list of transactions to view only those transactions you have selected.

Old Second Corporate Digital
Commercial Banking Solution Treasury Management Channel Guide 76
5. Select Create Reversal.
The Reverse ACH Payment screen appears.
6. Review your reversal selections, and then select Confirm.
Positive Pay Within Payments > Positive Pay, you can create Positive Pay items, work with Positive Pay
and ACH exceptions, and work with Positive Pay upload formats.
Disclaimer: As an authorized positive pay user for your company, it is your
responsibility to ensure that your exceptions have been approved for payment or
return before the daily cutoff time. This includes managing your staff availability to
account for personnel changes, vacations and leave, holidays when the bank remains
open, etc.
If positive pay has been activated for your company within the past 10 business days,
a member of the bank may contact you as a courtesy if you do not work your
exceptions before the cutoff. Once that time period expires, any unworked exceptions
will be returned (default) or paid at the cutoff depending on the action defined in your
service agreement.
Should you encounter any issues during the login process that prevent you from
accessing your exceptions, please contact Treasury Support at (630)966-2455 or
[email protected] for assistance
Check Exceptions Use the Check Exceptions view to search for a specific Positive Pay exception and to view the
available list of Positive Pay exceptions.
To find an exception, start typing either the Account number, Check Number, Issued Amount,
Paid Amount, or Issued Date in the filter box at the top of the page. The exceptions available
narrow down as you type until the matching exception is left.
Select the View Check link in the Check Number column to view the front and back sides of the
check used in the exception.
Select Details to view additional information including who updated the exception, the DDA
Batch Number, and DDA Sequence Number.
Searching Check Exceptions
1. Go to Payments > Positive Pay > Check Exceptions.
2. Expand the Search Check Exceptions panel.
3. Select Open Items or Decision History.
4. Complete the fields.
TIP
Select Reset for the fields to return to their default settings.

Old Second Corporate Digital
Commercial Banking Solution Treasury Management Channel Guide 77
Accounts
Select the appropriate account numbers, or leave all accounts selected by default.
Check Number
Enter the number of the check used in the exception.
Issued Amount
Select either Amount Range or Specific Amount from the drop-down list, and then enter the
amount in the text boxes.
Paid Amount
Select either Amount Range or Specific Amount from the drop-down list, and then enter the
amount in the text boxes.
Posted Date
Select either Date Range or Specific Date from the drop-down list, and then enter the date
using the calendar feature.
Issued Date
Select either Date Range or Specific Date from the drop-down list, and then enter the date
using the calendar feature.
Issued Payee
Enter the payee information.
Payee
Enter the payee information.
Decision Taken
Select from the following options:
● Pay
● Return
● Both
5. Select Search.
Working with Check Exceptions
Users can work with check exceptions from the Positive Pay menu.
1. Go to Payments > Positive Pay > Check Exceptions.

Old Second Corporate Digital
Commercial Banking Solution Treasury Management Channel Guide 78
2. Change the Pay or Return options as needed for each exception item.
Or, you can select the column name check box for all exceptions to be marked the same
way. (For example, if the Pay column check box is selected, all exceptions are marked as
Pay.)
3. Select Review.
A Review Decisions dialog box appears.
4. Ensure that the changes from the Prior Decision to New Decision are accurate.
5. Select Save.
The following confirmation message appears: Check Exception Decisions Saved
Successfully!
ACH Exceptions Use the ACH Exceptions view to locate a specific exception item, mark an exception as pay or
return, and review any decisions made.
To find an exception, start typing either the Account number, Issuing Company name, the
Type of exception, SEC code, Amount, or Description in the filter box at the top of the page.
The exceptions available narrow down as you type until the matching exception is left.

Old Second Corporate Digital
Commercial Banking Solution Treasury Management Channel Guide 79
Searching ACH Exceptions
1. Go to Payments > Positive Pay > ACH Exceptions.
2. Expand the Search ACH Exceptions panel.
3. Complete the fields.
TIP
Select Reset for the fields to return to their default settings.
Accounts
Select the appropriate account numbers, or leave all accounts selected by default.
SEC Code
Select the code from the drop-down list that corresponds to the previous selection.
Amount
Select Specific Amount or Range from the drop-down list. Then, enter the amounts in the
text boxes available.
4. Select Search.
Working with ACH Exceptions
1. Go to Payments > Positive Pay > ACH Exceptions.
2. Change the Pay or Return options, as needed for each exception item.
Or, you can select the column name check box for all exceptions to be marked the same
way. (For example, if the Pay column check box is selected, all exceptions are marked as
Pay.)
3. Select Review to ensure that the changes from the Prior Decision to New Decision are
accurate.
4. Select Save.
The following confirmation message appears: ACH Exception Decisions Saved Successfully!
Create/Import Check Issues Use the Create/Import Check Issues view to upload or create issued items.
Enter Checks
Use this option to enter individual or multiple checks manually that have been issued into
Treasury Management.
Upload File
Use this option to upload a file of issued check items.
Creating Issued Checks
1. Go to Payments > Positive Pay > Create / Import Check Issues.
2. On the Manage Issued Items tab, select Enter Checks.
3. Enter the account number or select the Search icon to choose from a list of accounts.

Old Second Corporate Digital
Commercial Banking Solution Treasury Management Channel Guide 80
4. On the Search Accounts dialog that opens, click Select beside the correct Account
Number.
5. Select Add Row and complete the item details.
6. Select Review.
You proceed to the Review tab.
7. Review the information entered to ensure that it is accurate.
8. Select Confirm.
You proceed to the Confirmation tab, confirming that you successfully processed the issued
items.
Uploading Issued Items
1. Go to Payments > Positive Pay > Create / Import Check Issues.
2. On the Upload Positive Pay File tab, select Upload File.
3. Select the format of the file that you are uploading from the Saved Format drop-down list.
4. Enter the account number for the Account field.
5. Choose Select File, browse to and select the file to upload, and then select Open.
6. Select Upload.
You proceed to the Managed Issued Items tab.
7. Review the information entered to ensure that it is accurate.
Select Add Row or the plus sign at the end of the row to add an issued item. You can also
select the delete icon to remove an issued item.
8. Select Review.
You proceed to the Review tab.
9. Review the information entered to ensure that it is accurate.
10. Select Confirm.
You proceed to the Confirmation tab, confirming that you successfully processed the Positive
Pay items. You can now upload or enter additional Positive Pay checks.
Check Upload Formats Use the Check Upload Formats view to build an individual format for check uploads and to view
the list of current upload formats.
NOTE
If you select Delimited, indicate the order of the columns in your file. If you select Fixed
Position, indicate the starting and ending positions of the columns in your file.
Creating a Check Upload Format
1. Go to Payments > Positive Pay > Check Upload Formats.
2. Select Create New Format.
The Positive Pay Mapping Tool page appears.
3. Select Delimited or Fixed Position for the Upload Format.
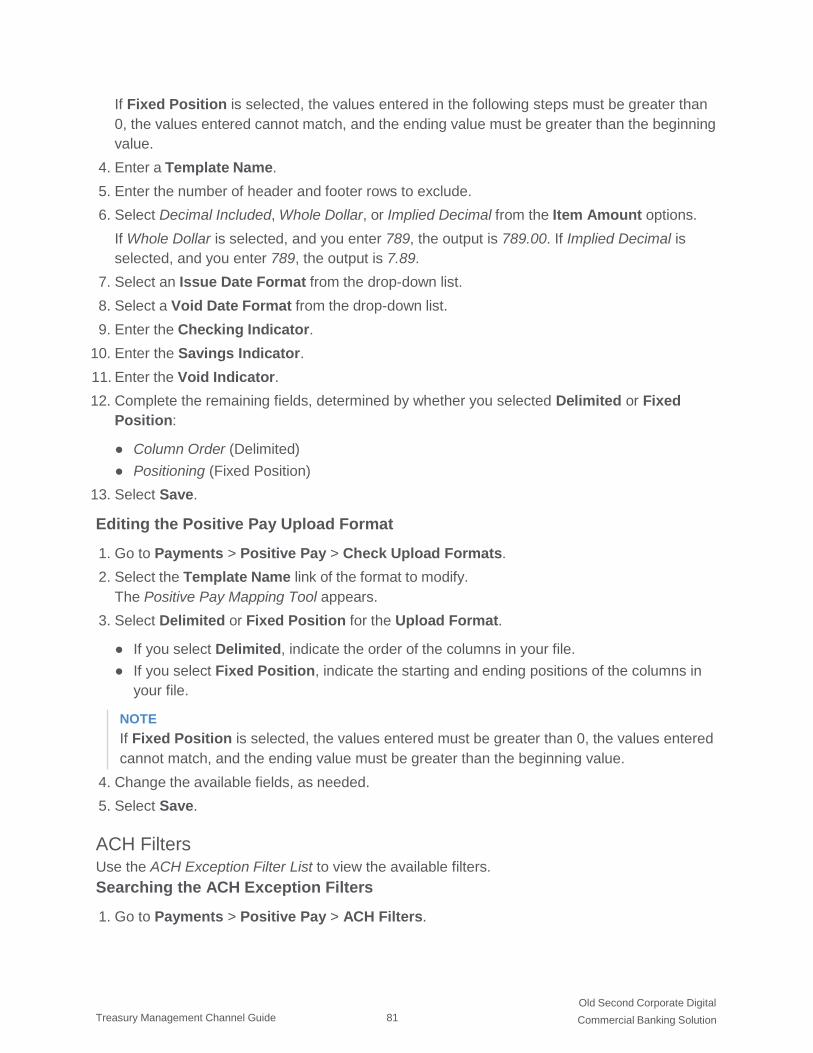
Old Second Corporate Digital
Commercial Banking Solution Treasury Management Channel Guide 81
If Fixed Position is selected, the values entered in the following steps must be greater than
0, the values entered cannot match, and the ending value must be greater than the beginning
value.
4. Enter a Template Name.
5. Enter the number of header and footer rows to exclude.
6. Select Decimal Included, Whole Dollar, or Implied Decimal from the Item Amount options.
If Whole Dollar is selected, and you enter 789, the output is 789.00. If Implied Decimal is
selected, and you enter 789, the output is 7.89.
7. Select an Issue Date Format from the drop-down list.
8. Select a Void Date Format from the drop-down list.
9. Enter the Checking Indicator.
10. Enter the Savings Indicator.
11. Enter the Void Indicator.
12. Complete the remaining fields, determined by whether you selected Delimited or Fixed
Position:
● Column Order (Delimited)
● Positioning (Fixed Position)
13. Select Save.
Editing the Positive Pay Upload Format
1. Go to Payments > Positive Pay > Check Upload Formats.
2. Select the Template Name link of the format to modify.
The Positive Pay Mapping Tool appears.
3. Select Delimited or Fixed Position for the Upload Format.
● If you select Delimited, indicate the order of the columns in your file.
● If you select Fixed Position, indicate the starting and ending positions of the columns in
your file.
NOTE
If Fixed Position is selected, the values entered must be greater than 0, the values entered
cannot match, and the ending value must be greater than the beginning value.
4. Change the available fields, as needed.
5. Select Save.
ACH Filters Use the ACH Exception Filter List to view the available filters.
Searching the ACH Exception Filters
1. Go to Payments > Positive Pay > ACH Filters.

Old Second Corporate Digital
Commercial Banking Solution Treasury Management Channel Guide 82
2. Expand the Search ACH Exception Filters panel.
3. Complete the fields.
TIP
Select Reset for the fields to return to their default settings.
Accounts
Select the appropriate account numbers, or leave all accounts selected by default.
ACH Company Name
Select the ACH company or companies to search for from this drop-down list.
ACH Company ID
The identification number of the ACH company.
SEC Code
Select the code from the drop-down list that corresponds to the previous selection.
Amount
Select Specific Amount or Range from the drop-down list. Then, enter the amounts in the
text boxes available.
Expiration Date
Select either Date Range or Specific Date from the drop-down list, and then enter the date
using the calendar feature.
4. Select Allow or Disallow to determine the availability of the Expiration Filter.
5. Select Search.
Stop Payment Within Payments > Stop Payment, you can view and create stop payments.
NOTE
There may be a charge assessed with processing a stop payment. Review your financial
institution's fee schedule for details.
Creating a Stop Payment
1. Go to Payments > Stop Payment > Create Stop Payments.
2. Enter the account number, nickname, or balance for the Account field, or select Search
to find the account number.
3. Select Single Check or Range of Checks, and then enter the check information in the text
boxes available.
4. Enter the Payee, if applicable.
5. Enter Remarks about the stop payment.
There can be up to four remarks made per stop payment.
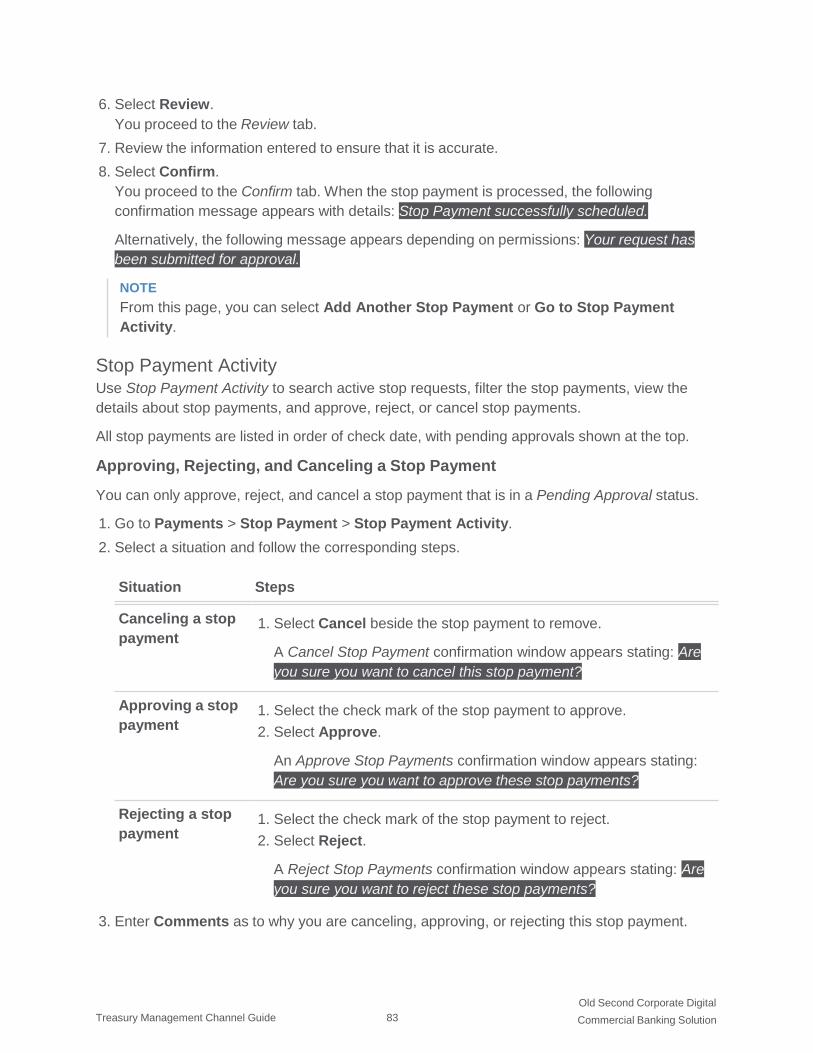
Old Second Corporate Digital
Commercial Banking Solution Treasury Management Channel Guide 83
6. Select Review.
You proceed to the Review tab.
7. Review the information entered to ensure that it is accurate.
8. Select Confirm.
You proceed to the Confirm tab. When the stop payment is processed, the following
confirmation message appears with details: Stop Payment successfully scheduled.
Alternatively, the following message appears depending on permissions: Your request has
been submitted for approval.
NOTE
From this page, you can select Add Another Stop Payment or Go to Stop Payment
Activity.
Stop Payment Activity Use Stop Payment Activity to search active stop requests, filter the stop payments, view the
details about stop payments, and approve, reject, or cancel stop payments.
All stop payments are listed in order of check date, with pending approvals shown at the top.
Approving, Rejecting, and Canceling a Stop Payment
You can only approve, reject, and cancel a stop payment that is in a Pending Approval status.
1. Go to Payments > Stop Payment > Stop Payment Activity.
2. Select a situation and follow the corresponding steps.
Situation Steps
Canceling a stop
payment
Approving a stop
payment
Rejecting a stop
payment
1. Select Cancel beside the stop payment to remove.
A Cancel Stop Payment confirmation window appears stating: Are
you sure you want to cancel this stop payment?
1. Select the check mark of the stop payment to approve.
2. Select Approve.
An Approve Stop Payments confirmation window appears stating:
Are you sure you want to approve these stop payments?
1. Select the check mark of the stop payment to reject.
2. Select Reject.
A Reject Stop Payments confirmation window appears stating: Are
you sure you want to reject these stop payments?
3. Enter Comments as to why you are canceling, approving, or rejecting this stop payment.

Old Second Corporate Digital
Commercial Banking Solution Treasury Management Channel Guide 84
4. Select from the following options.
● Approve
● Confirm
● Reject
Searching Active Stop Payments
1. Go to Payments > Stop Payment > Stop Payment Activity.
2. Expand the Search Active Stop Requests panel.
3. Complete the fields in the Search Active Stop Requests panel, as necessary.
TIP
Select Reset for the fields to return to their default settings.
Accounts
Select the appropriate account numbers, or leave all accounts selected by default.
Status
Select any combination of the following options:
● Select All
● Pending Approval
● Approval Rejected
● Transmitted
● Cancelled
● Posted
● Failed
● Expired
● Scheduled
All options are selected by default. You can select one or multiple options.
Check Number
Select All, Specific Check Number, or Check Range from the drop-down list. Then, enter
the check number information in the text boxes available.
Check Amount
Select Specific Amount or Amount Range from the drop-down list. Then, enter the check
amount information in the text boxes available.
Check Date
Select Specific Date or Date Range from the drop-down list. Then, enter the dates of the
check in the text boxes available using the calendar feature.
Created Date

Old Second Corporate Digital
Commercial Banking Solution Treasury Management Channel Guide 85
Select either Date Range or Specific Date from the drop-down list, and then enter the date
using the calendar feature.
Payee
Enter the payee information.
4. Select Search.
Stop Payment Activity updates with stop payments matching the criteria entered. Stop
Payment Activity allows you to view stop payments that are in the following statuses:
Pending Approval, Approval Rejected, Approved, Cancelled, or Failed.
Receivables Use the Receivables menu to work with remote deposit capture through the ProfitStars
Enterprise Payment System.
Selecting Remode Deposit Capture and then Launch from the Receivables page launches
the ProfitStars Enterprise Payment System dashboard. From the Enterprise Payment System,
users have access to their assigned remote deposit product.
Reporting The default view is All Reports and it contains a combination of the Favorite Reports, Custom
Reports, and Standard Reports views.
To add a report to the Favorite Reports view, select Favorite within the report name box.
To remove the report from the Favorite Reports view, select Favorite again and the report is
removed.
Sort the report's data using the table's column headers.
After running a report:
● You can Download the reports after selecting a format.
● You can Print the report.
Running Reports
Steps 9 through 13 do not apply to all reports.
1. Go to Reporting > All Reports or choose a report type.
2. Select Run Report of the report to generate.
3. Expand the Run Reports search panel.
4. You can change the report selection using the Select a Report drop-down list, if necessary.
The Report Type field defaults to the acceptable type of report that is selected. You cannot
change the selection.

Old Second Corporate Digital
Commercial Banking Solution Treasury Management Channel Guide 86
5. Select either Date Range, Specific Date, or # of Prior Days from the Date drop-down list, and
then enter the dates using the calendar feature.
This field is only available for certain reports. For date-specific reports (e.g., Current Day
Balance, Prior Day Balance, Current Day Transaction, and Prior Day Transaction), the Date
field defaults to the correct selection and you cannot change it.
6. Select Checking or Loan from the Account Type drop-down list.
7. Select one or multiple account numbers, or choose Select All from the Account drop-down
list.
8. Determine how you want the report sorted from the Sort By drop-down list.
9. Select Ascending or Descending.
10. Select an option from the Payment ID drop-down list, if necessary.
● Select Specific Payment ID, and then enter the ID in the Specific Payment ID field.
● Select Payment ID Range, and then enter the dates in the Payment ID Range fields.
11. Select an option from the Amount drop-down list, if necessary.
● Select Specific Amount, and then enter it in the space available.
● Select Between, and then enter the numbers the amount falls between in the spaces
available.
● Select Less Than, and then enter the number you know that the amount is beneath in the
space available.
● Select Greater Than, and then enter the number you know that the amount is above in the
space available.
12. Select an option from the Payment Type drop-down list, if necessary.
13. Select Inbound, Outbound, or Both from the Transaction Type drop-down list, if necessary.
14. Select Debit, Credit, or Both, if necessary.
15. Select Run Report.
The information matching the criteria selected appears in the main panel.
Deleting Reports
You cannot delete any reports available as Standard Reports.
1. Select the Reporting menu.
2. Select Favorite Reports or Custom Reports.
3. Find the report to remove, and then select Delete inside the report box.
A Confirm Deletion dialog box appears.
4. Select Delete Report.

Old Second Corporate Digital
Commercial Banking Solution Treasury Management Channel Guide 87
Standard Reports Select the report to view and/or configure that specific report's data.
The Standard Reports view has several default reports:
● Current Day Balance
● Current Day Transaction
● Date Range Balance
● Date Range Transaction
● EDI
● Prior Day Balance
● Prior Day Transaction
You can download all reports in PDF and CSV formats. The Current Day Balance, Current Day
Transaction, Prior Day Balance, and Prior Day Transaction reports can also be downloaded in
BAI2 format. BAI2 is a file format used to perform electronic cash management balance and
activity reporting. This is a setting your institution controls.
Current Day Balance Report
Current Day Transaction Report

Old Second Corporate Digital
Commercial Banking Solution Treasury Management Channel Guide 88
Date Range Balance Report
Date Range Transaction Report
Prior Day Balance Report

Old Second Corporate Digital
Commercial Banking Solution Treasury Management Channel Guide 89
Prior Day Transaction Report
Electronic Documents When enabled, Electronic Documents allow users to view and manage statements and other
documents in an interactive HTML format.
Electronic Documents is available from the Reporting menu.
Within Electronic Documents, you can access the following tabs to view documents and
configure electronic document preferences:
● Statements and Notices
● Documents and Settings
● Disclosures
● Email Settings
● Additional Recipients
NOTE
This tab only appears if your FI has enabled it.
Admin Use the Admin menu to view the user list, create users, edit user permissions, and assign
nicknames to accounts.
User List Use the User List view to see the master list of users, edit their contact information, edit their
permissions, reset their passwords, and approve or reject enrollments.
To find a user, start typing the Login ID, User Name, or Enrollment Status in the filter box
at the top of the page. The users available narrow down as you type until the matching user
remains.
Enrollment Status options are as follows:
● New - The user has been created but not yet submitted for approval. New users can only be
Not Enrolled or Inactive.
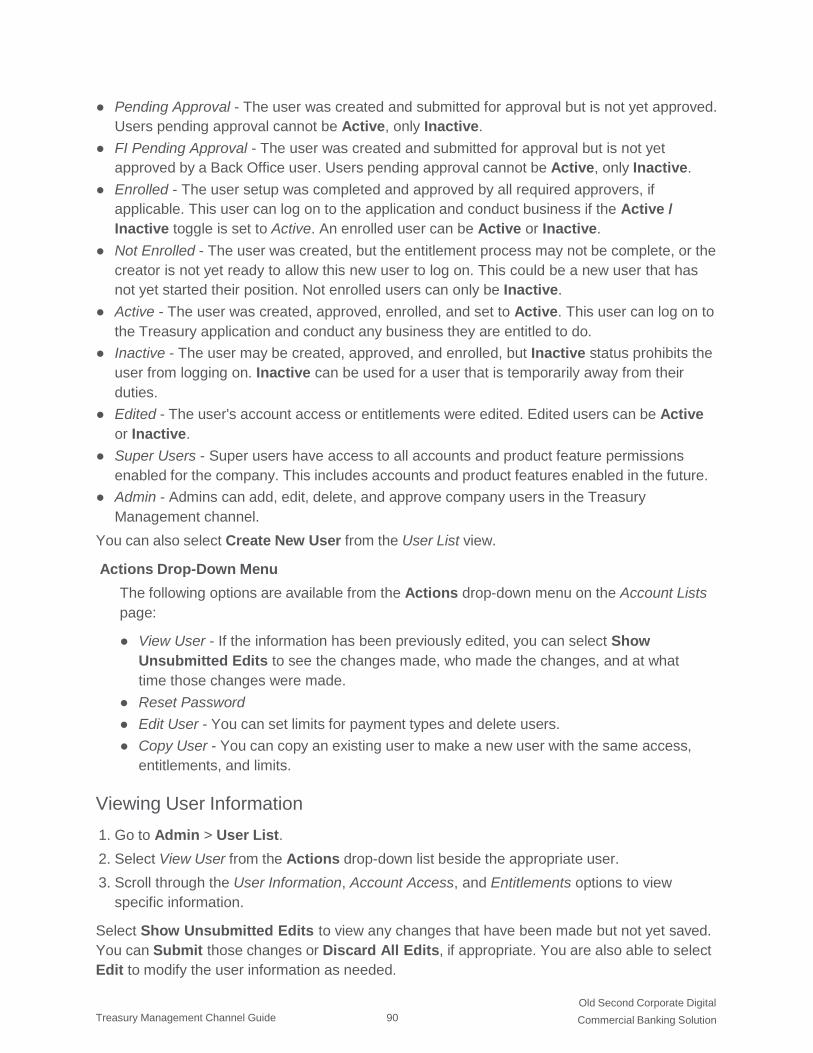
Old Second Corporate Digital
Commercial Banking Solution Treasury Management Channel Guide 90
● Pending Approval - The user was created and submitted for approval but is not yet approved.
Users pending approval cannot be Active, only Inactive.
● FI Pending Approval - The user was created and submitted for approval but is not yet
approved by a Back Office user. Users pending approval cannot be Active, only Inactive.
● Enrolled - The user setup was completed and approved by all required approvers, if
applicable. This user can log on to the application and conduct business if the Active /
Inactive toggle is set to Active. An enrolled user can be Active or Inactive.
● Not Enrolled - The user was created, but the entitlement process may not be complete, or the
creator is not yet ready to allow this new user to log on. This could be a new user that has
not yet started their position. Not enrolled users can only be Inactive.
● Active - The user was created, approved, enrolled, and set to Active. This user can log on to
the Treasury application and conduct any business they are entitled to do.
● Inactive - The user may be created, approved, and enrolled, but Inactive status prohibits the
user from logging on. Inactive can be used for a user that is temporarily away from their
duties.
● Edited - The user's account access or entitlements were edited. Edited users can be Active
or Inactive.
● Super Users - Super users have access to all accounts and product feature permissions
enabled for the company. This includes accounts and product features enabled in the future.
● Admin - Admins can add, edit, delete, and approve company users in the Treasury
Management channel.
You can also select Create New User from the User List view.
Actions Drop-Down Menu
The following options are available from the Actions drop-down menu on the Account Lists
page:
● View User - If the information has been previously edited, you can select Show
Unsubmitted Edits to see the changes made, who made the changes, and at what
time those changes were made.
● Reset Password
● Edit User - You can set limits for payment types and delete users.
● Copy User - You can copy an existing user to make a new user with the same access,
entitlements, and limits.
Viewing User Information
1. Go to Admin > User List.
2. Select View User from the Actions drop-down list beside the appropriate user.
3. Scroll through the User Information, Account Access, and Entitlements options to view
specific information.
Select Show Unsubmitted Edits to view any changes that have been made but not yet saved.
You can Submit those changes or Discard All Edits, if appropriate. You are also able to select
Edit to modify the user information as needed.
Old Second Corporate Digital
Commercial Banking Solution Treasury Management Channel Guide 91
Resetting Passwords
1. Go to Admin > User List.
2. Select Reset Password from the Actions drop-down list beside the appropriate user.
3. Select Auto Generate Password or Manually Set Password.
4. Enter a Temporary Password if Manually Set Password is selected.
5. Select Send Password.
Copying a User
You can copy an existing user to make a new user with the same access, entitlements, and
limits.
1. Go to Admin > User List.
2. Select Copy User from the Actions drop-down list beside the appropriate user.
3. Complete the following fields for the new user.
● Name
● Login ID
● Department*
● Phone
● Fax*
*These fields are not required.
4. Select whether the new user is a Super User, Admin, or both.
Super User
A super user has access to all accounts and product feature permissions that are enabled
for the company. This includes accounts and product features enabled in the future.
Admin
An admin can add, edit, delete, and approve company users.
NOTE
By default, the new user has the same permissions as the copy-from user.
5. Select Save Changes.
6. On the following fields, adjust the new user's access as needed:
● Account Access
● IP Access
● Time Access
● Entitlements
● User Limits
NOTE
By default, the new user has the same access and entitlements as the copy-from user.

Old Second Corporate Digital
Commercial Banking Solution Treasury Management Channel Guide 92
7. Select Submit for Enrollment.
Editing User Information
1. Go to Admin > User List.
2. Select Edit User from the Actions drop-down list beside the appropriate user.
3. On the User Information tab, change the fields as needed, and then select Save Changes.
You can change these fields:
● Name
● Login ID
● Department
● Phone number
● Fax number
● Super User Status
● Admin Status
4. Page through to edit a user's account access, time access, IP restriction, entitlements, and
limits.
NOTE
Select Save on each page before moving on.
5. Select Save to process the changes.
NOTE
Depending on your institution's settings, changes may need to be approved by the institution
or another admin.
Ensure that you have saved all changes throughout this page, and select Back to User List.
Approving or Rejecting a User You can approve or reject pending users from the User List. This step may be required
depending on your financial institution's settings.
1. Go to Admin > User List.
2. Select Approve/Reject from the Actions drop-down list beside the appropriate user.
3. Select whether to Approve or Reject the user.
A comment window appears.
4. Enter any necessary comments.
5. Select Save.
Creating a User Use Create New User to create a user and set their permissions.
Required fields are marked with a red asterisk in Treasury Management.
1. Go to Admin > Create a User.

Old Second Corporate Digital
Commercial Banking Solution Treasury Management Channel Guide 93
2. Complete the following fields.
● Name
● Login ID
● Department – this field is not required.
● Phone
● Fax – this field is not required.
3. Select whether the new user is a Super User, Admin, or both.
Super User
A super user has access to all accounts and product feature permissions that are enabled
for the company. This includes accounts and product features enabled in the future.
Admin
An admin can add, edit, delete, and approve company users.
4. Select Save Changes.
Continue to enter information by navigating the tabs in the sidebar.
5. Page through to edit the user's account access, time access, IP restriction, entitlements, and
limits.
NOTE
You can set entitlements for ACH, Positive Pay, Reporting, Remote Deposit Capture,
Internal Transfer, Stop Payment, Integrated Services, and Wire.
TIP
Select Toggle Row to select all the check boxes that appear in that row. If the user should
have access to all items listed in a certain column, select the check box immediately
beneath the column name.

Old Second Corporate Digital
Commercial Banking Solution Treasury Management Channel Guide 94
6. On the User Limits tabs, enter the Product Daily Limit, Daily Initiation Limit/Total Daily
Limit, and Approval Limit, and then select Save Changes.
You can set user limits for ACH, Internal Transfer, and Wire.
7. After completing all tabs, select Submit for Enrollment.
Entitlement Field Definitions
Product Daily Limit
The product daily limit.
Daily Initiation Limit
The daily limit on initiations.
Approval Limit
The approval limit.
Transaction Limit
The transaction limit.
Daily Limit
The daily limit.
Restricted Batch
Select Restricted Batch, if appropriate. If enabled, the user can restrict batch payments
and batch approvals from the view of other users.
Create ACH Template
If selected, the user can create an ACH template.
Full Edit ACH Template
If selected, the user can edit information within a template.
Partial Edit ACH Template
If selected, the user can only edit amounts, prenote and hold selections, and addenda
information.
Delete ACH Template
If selected, the user can delete an ACH template.

Old Second Corporate Digital
Commercial Banking Solution Treasury Management Channel Guide 95
Approve ACH Template
If selected, the user can approve the creation of a template.
Create ACH Payment
If selected, the user can create and initiate a one-time, future-dated, or recurring ACH
payment.
Full Edit ACH Payment
If selected, the user can edit scheduled and recurring payments.
Delete ACH Payment
If selected, the user can cancel or uninitiate a payment.
Approve ACH Payment
If selected, the user can approve an ACH payment.
Partial Edit ACH Payment
If selected, the user can only edit amounts, prenote and hold selections, and addenda
information.
File Upload Edit
If selected, the user can edit files that are uploaded.
Upload/Create ARP Files
If selected, users can import an issued items file in fixed position or delimited file layout.
Download ARP Files
If selected, users can export their exceptions into CSV or PDF format.
Work ARP Exceptions
If selected, users can choose to pay or return check exceptions.
Work ACH Exceptions
If selected, users can choose to pay or return ACH exceptions.
CDR Balance
The user can work with the CDR Balance.
PDR Balance
The user can manage the PDR balance.
Date Range Balance
The user can work with the date range balance.
CDR Transaction
The user can work with CDR transactions.
PDR Transaction
The user can work with PDR transactions.
Date Range Transaction

Old Second Corporate Digital
Commercial Banking Solution Treasury Management Channel Guide 96
The user can work with date range transactions.
EDI Report
EDI Reporting requires an additional contract.
Create Internal Transfer/Loan Payment
The user can create internal transfers/loan payments.
Edit Internal Transfer/Loan Payment
The user can edit internal transfers/loan payments.
Delete Internal Transfer/Loan Payment
If selected, users can cancel or cancel series.
Approve Transfer/Loan Payment
The user can approve transfers/loan payments.
Add Stop Payment
The user can add stop payments.
Approve Stop Payment
The user can approve stop payments.
Cancel Stop Payment
The user can cancel stop payments.
Create Beneficiary
The user can create beneficiaries.
Edit Beneficiary
The user can edit beneficiaries.
Approve Beneficiary
The user can approve beneficiaries.
Delete Beneficiary
The user can delete beneficiaries.
Create Domestic Wire Payment
The user can create domestic wire payments.
Edit Domestic Wire Payment
The user can edit domestic wire payments.
Delete Domestic Wire Payment
The user can delete domestic wire payments.
Approve Domestic Wire Payment
The user can approve domestic wire payments.
Create Internal Template
The user can create templates.

Old Second Corporate Digital
Commercial Banking Solution Treasury Management Channel Guide 97
Edit Internal Template
The user can edit templates.
Approve Internal Template
The user can approve templates.
Delete Internal Template
The user can delete templates.
Create DLI Wire Payment
The user can create DLI wire payments.
Approve DLI Wire Payment
The user can approve DLI wire payments.
Electronic Documents
The user can work with electronic documents.
Bill Pay
The user can work with bill pay.
Account Nicknames
To find an account, start typing the Account Number, Account Type, or Account Nickname in
the filter box at the top of the page. The accounts available narrow down as you type until the
matching account remains.
Editing Account Nicknames
1. Go to Admin > Account Nicknames.
2. Select a situation and follow the corresponding steps.
Situation Steps
Editing a single account
nickname
Editing all account
nicknames
1. Select beside the appropriate account.
2. Enter the Account Nickname in the available text box.
3. Select the check mark beside the text box to save changes.
1. Select Bulk Edit Nicknames.
2. Enter all the Account Nicknames needed.
3. Select Save.


