55
Online Commercial Registration Plan User Guide Renewal State of Ohio Bureau of Motor Vehicles June, 2012

Online Commercial Registration Plan User Guide Renewal
State of Ohio
Bureau of Motor Vehicles
June, 2012


©2012 Xerox Corporation. All rights reserved. XEROX® and XEROX and
Design® are trademarks of the Xerox Corporation in the United States and/or
other countries. BRXXXXX
Other company trademarks are also acknowledged.
Document Version: 1.0 (November 2011).


i OCRP User Guide -- Renewal
Table of Contents
1 Renewal 1
How to renew an existing fleet 1


1 OCRP User Guide -- Renewal
1 Renewal
How to renew an existing fleet
After successfully logging into the system, the first screen to be viewed is the
Transaction Status Queue. To process a renewal (Renewal Processing), click the Next
push button.

2 OCRP User Guide -- Renewal
The user is advanced to the Ohio Carrier Main Menu (IRP Menu)
The system auto-populates the registration year field to the calendar year
Verify the registration year that you wish to process in.
To change the registration year click the Reg Year field and enter the year you
wish to process in.
The system auto-populates the Carrier Number .
The system auto-populates the Fleet Number if there is only one fleet .
If there are multiple Fleets, click the Fleet Number field then click the Prompt
push button and right click to select the Fleet that you wish to process in.
The system auto-populates the number of registration months (Nbr Reg Months)
To renew the fleet, click on the Renewal Processing push button .
There are five (5) steps in processing a renewal.
A window will display that states “Are you processing in the proper reg year?”

3 OCRP User Guide -- Renewal
Click the drop down arrow
Click “No” or click “Yes”
If “No” is selected, click the Next push button (insert callouts) to proceed or
the Cancel push button to return to the Main Menu screen and change the registration year.
If “Yes” is selected, click the Next push button .
4 OCRP User Guide -- Renewal
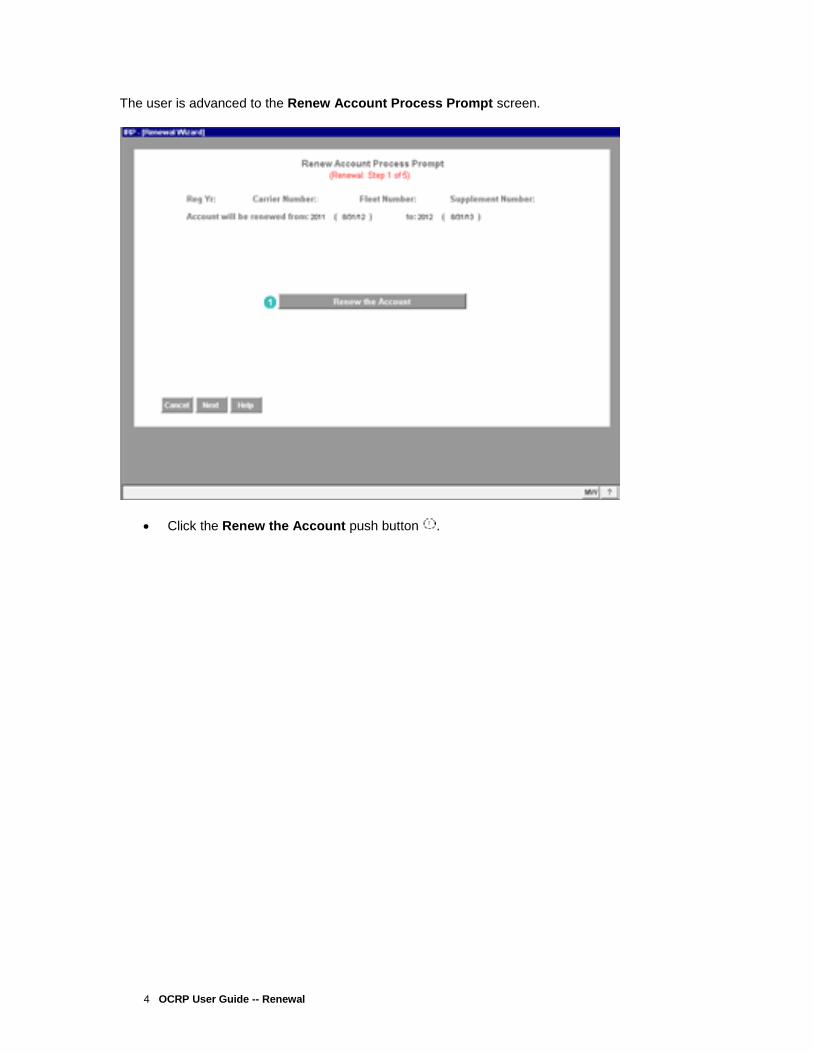
The user is advanced to the Renew Account Process Prompt screen.
Click the Renew the Account push button .

5 OCRP User Guide -- Renewal
A message will appear stating the “Account has been renewed and is ready for
processing.”
It will display “out of #### vehicles, ####### vehicles have been renewed.”
Click the Next push button
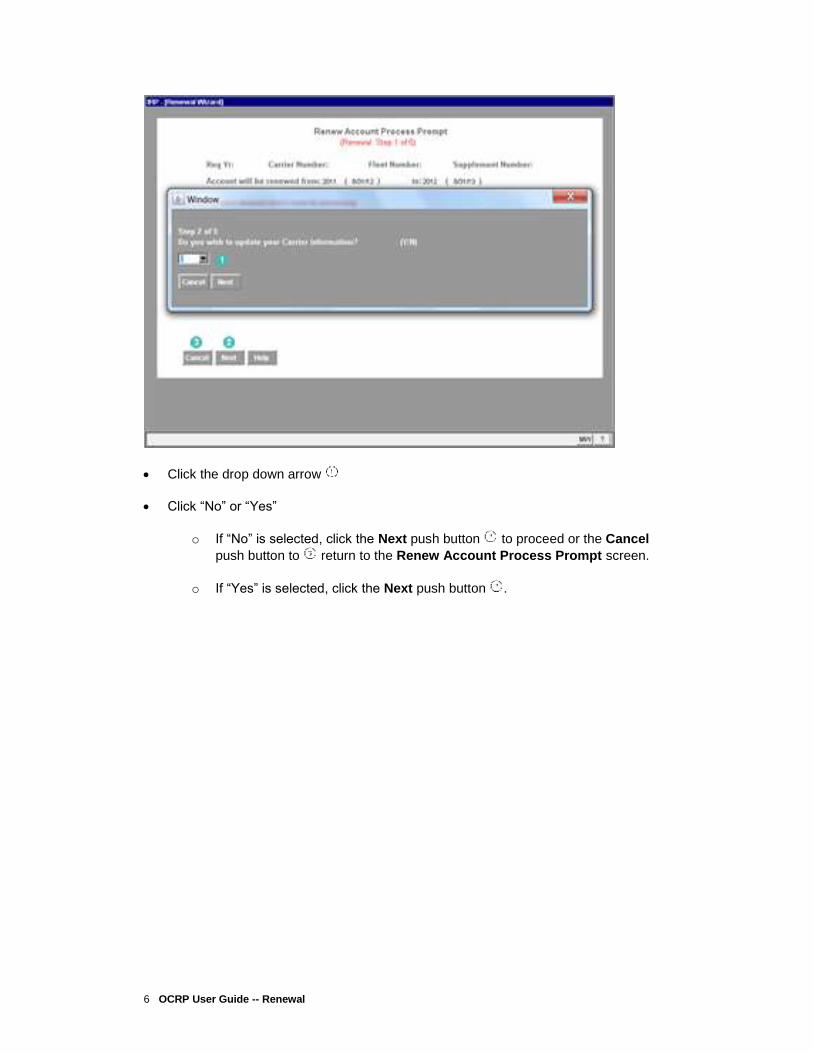
A window will display Step 2 of 5 and states “Do you wish to update your Carrier Information?”
6 OCRP User Guide -- Renewal
Click the drop down arrow
Click “No” or “Yes”
o If “No” is selected, click the Next push button to proceed or the Cancel
push button to return to the Renew Account Process Prompt screen.
o If “Yes” is selected, click the Next push button .
7 OCRP User Guide -- Renewal
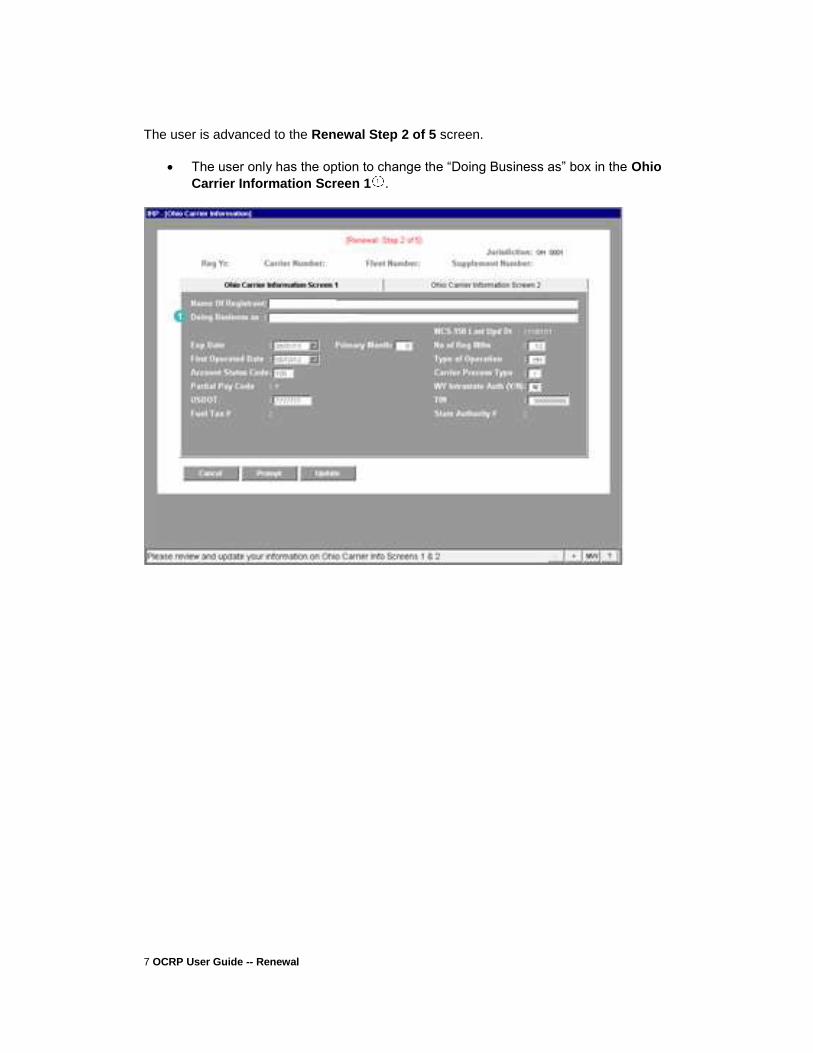
The user is advanced to the Renewal Step 2 of 5 screen.
The user only has the option to change the “Doing Business as” box in the Ohio
Carrier Information Screen 1 .

8 OCRP User Guide -- Renewal
The user can click the Ohio Carrier Information Screen 2 to make any necessary changes to contact name, address, phone, cell, fax, and email address.
After the user has completed necessary changes, click the Update push button to save the new information and advance to next screen.

9 OCRP User Guide -- Renewal
The user is advanced to Renewal Step 3 of 5, Distance FAQ screen to help determine how to report distance. After the user has determined the method of distance, click the Next push button.
.
10 OCRP User Guide -- Renewal
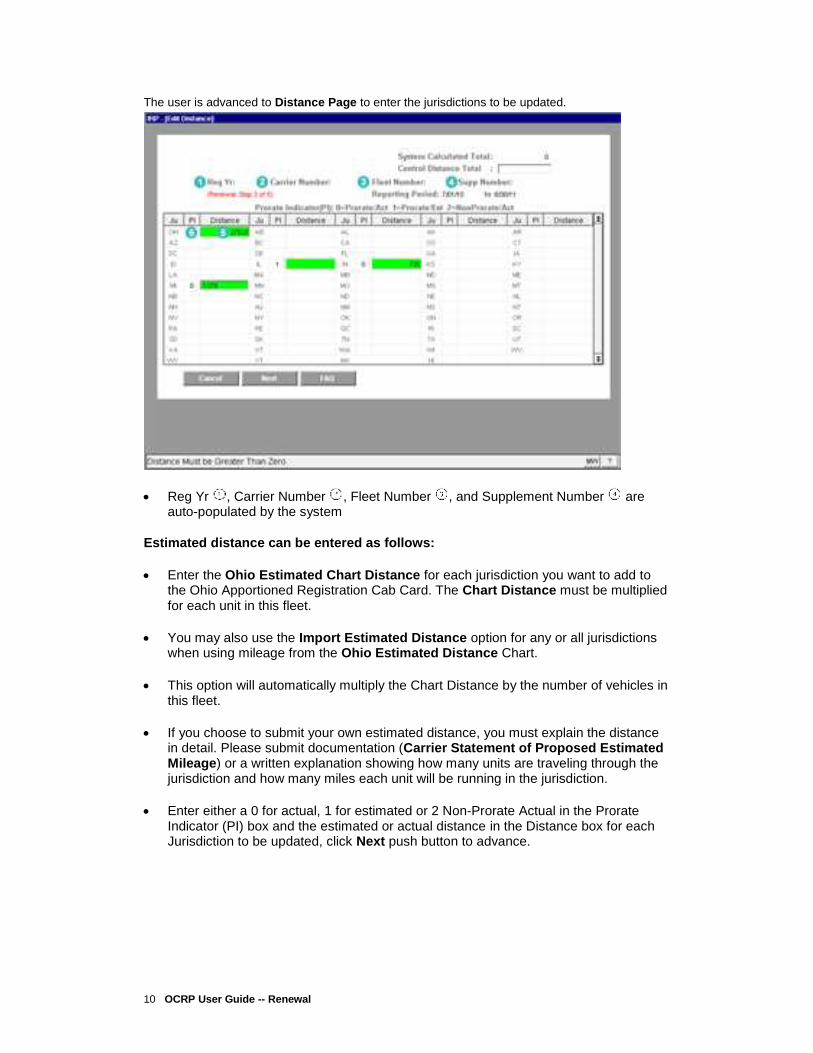
The user is advanced to Distance Page to enter the jurisdictions to be updated.
Reg Yr , Carrier Number , Fleet Number , and Supplement Number are auto-populated by the system
Estimated distance can be entered as follows:
Enter the Ohio Estimated Chart Distance for each jurisdiction you want to add to the Ohio Apportioned Registration Cab Card. The Chart Distance must be multiplied for each unit in this fleet.
You may also use the Import Estimated Distance option for any or all jurisdictions when using mileage from the Ohio Estimated Distance Chart.
This option will automatically multiply the Chart Distance by the number of vehicles in this fleet.
If you choose to submit your own estimated distance, you must explain the distance in detail. Please submit documentation (Carrier Statement of Proposed Estimated Mileage) or a written explanation showing how many units are traveling through the jurisdiction and how many miles each unit will be running in the jurisdiction.
Enter either a 0 for actual, 1 for estimated or 2 Non-Prorate Actual in the Prorate Indicator (PI) box and the estimated or actual distance in the Distance box for each Jurisdiction to be updated, click Next push button to advance.
11 OCRP User Guide -- Renewal
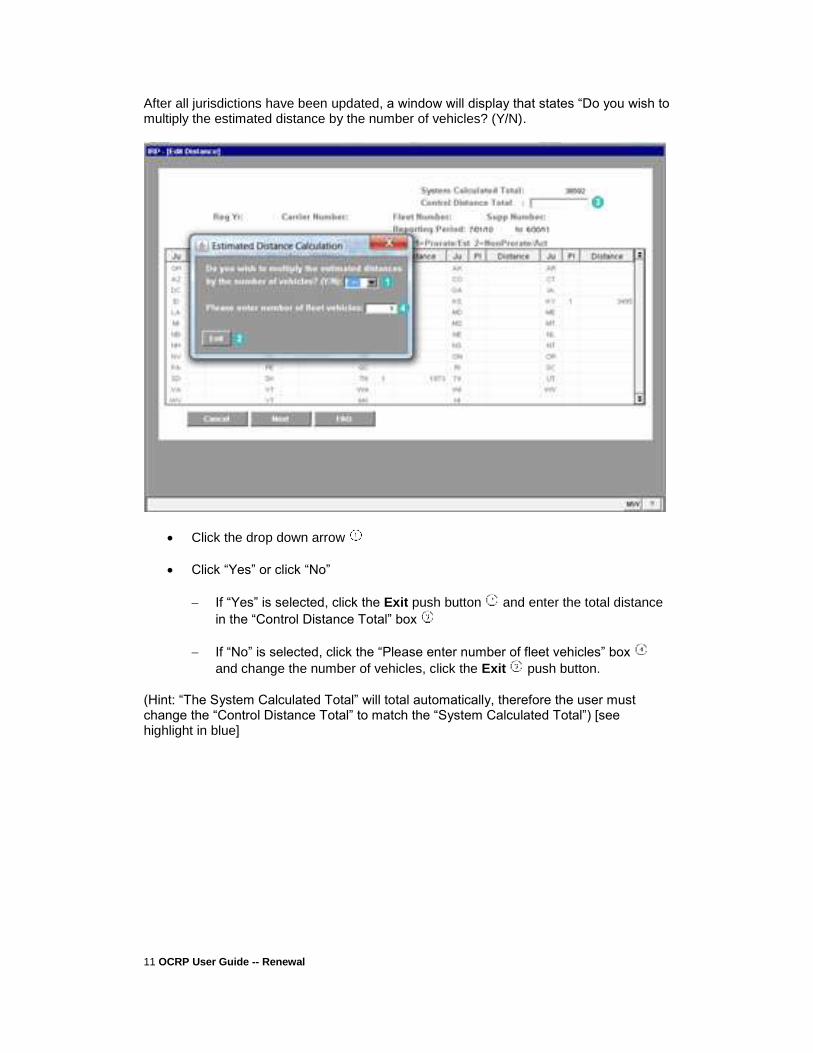
After all jurisdictions have been updated, a window will display that states “Do you wish to multiply the estimated distance by the number of vehicles? (Y/N).
Click the drop down arrow
Click “Yes” or click “No”
If “Yes” is selected, click the Exit push button and enter the total distance
in the “Control Distance Total” box
If “No” is selected, click the “Please enter number of fleet vehicles” box
and change the number of vehicles, click the Exit push button.
(Hint: “The System Calculated Total” will total automatically, therefore the user must change the “Control Distance Total” to match the “System Calculated Total”) [see highlight in blue]

12 OCRP User Guide -- Renewal
The user is advanced to the Comment box screen
Press the Add/Change push button to enter the “Method” used in the Comment
box .
The user will enter either Method “A” or “B” in the Comment box.
If Method “B” is used the user must submit the Carrier Statement of Proposed Estimated Mileage documentation.
Click the Exit push button after completion of the Comment.

13 OCRP User Guide -- Renewal
A window will display that states Step 4 of 5 “Do you wish to perform any vehicle processing? (Y/N)”
Click the drop down arrow
Click “No” or click “Yes”
If “No” is selected, click the Next push button to proceed or the Cancel push
button to return to the Renew Account Process Prompt screen.
If “Yes” is selected, click the Next push button .

14 OCRP User Guide -- Renewal
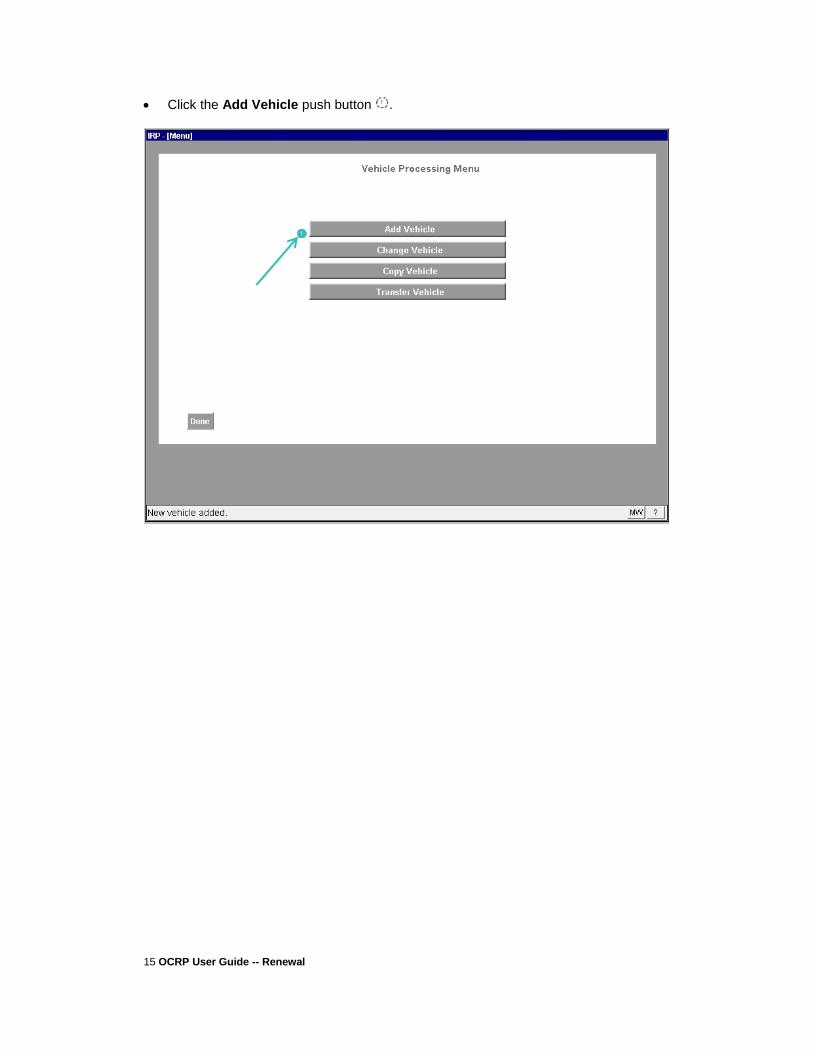
The user is advanced to the Vehicle Processing Menu (Step 4 of 5)
15 OCRP User Guide -- Renewal
Click the Add Vehicle push button .

16 OCRP User Guide -- Renewal
Reg Yr , Carrier Number , Fleet Number , and Supplement Number are auto-filled by the system
Enter the Unit # of the vehicle being added .
Enter the VIN of the vehicle being added .
Click Add Veh (Vehicle) push button
The user is advanced to the Ohio Vehicle Data screen

17 OCRP User Guide -- Renewal
Some of the fields on this screen are auto-filled by the system, while others must be completed by the user. See the “Guide to Required Vehicle Information” table below for the required screens, the information required, and the auto-filled default values (if
any). Click the Prompt push button if unsure of how to complete a selected field. This will reveal a list of values from which the correct option can be selected.
- To cancel a transaction, click the Cancel push button to return to the Add Vehicle Prompt screen.
If unsure of how to continue, click the Help push button and a Vehicle FAQ screen will display.
- When all required data entry is complete, click the Update push button .
The user is returned to the Add Vehicle Prompt screen and a message is
displayed that states “Record Added”
18 OCRP User Guide -- Renewal
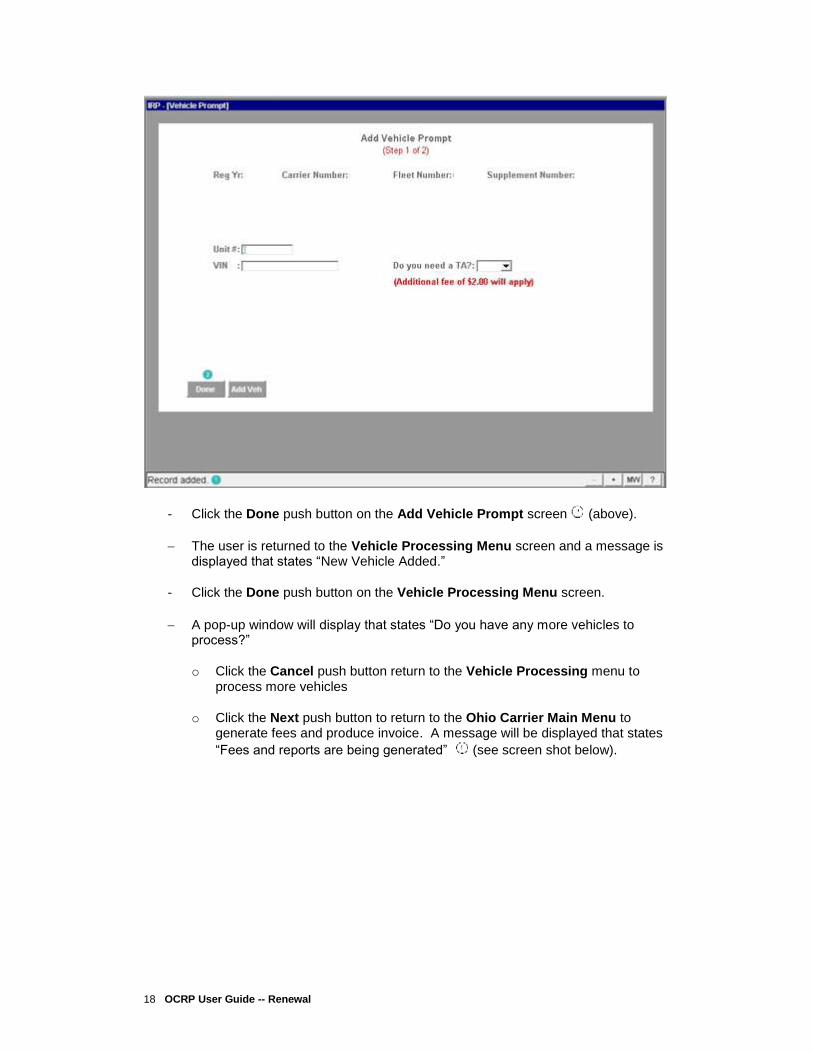
- Click the Done push button on the Add Vehicle Prompt screen (above).
The user is returned to the Vehicle Processing Menu screen and a message is displayed that states “New Vehicle Added.”
- Click the Done push button on the Vehicle Processing Menu screen.
A pop-up window will display that states “Do you have any more vehicles to process?”
o Click the Cancel push button return to the Vehicle Processing menu to process more vehicles
o Click the Next push button to return to the Ohio Carrier Main Menu to generate fees and produce invoice. A message will be displayed that states
“Fees and reports are being generated” (see screen shot below).

19 OCRP User Guide -- Renewal
To Change Vehicle information
The user is advanced to the Vehicle Processing Menu screen
Click the Change Vehicle push button .
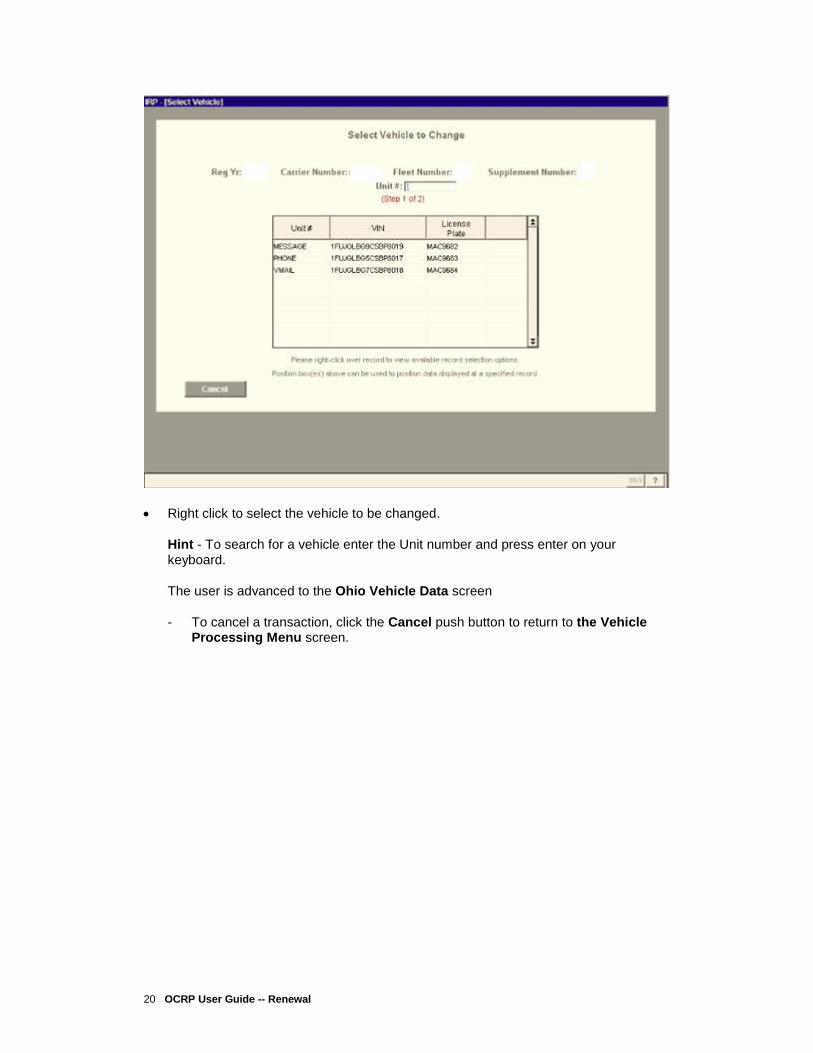
The user is advanced to the Select Vehicle to Change screen
20 OCRP User Guide -- Renewal
Right click to select the vehicle to be changed.
Hint - To search for a vehicle enter the Unit number and press enter on your keyboard.
The user is advanced to the Ohio Vehicle Data screen
- To cancel a transaction, click the Cancel push button to return to the Vehicle Processing Menu screen.

21 OCRP User Guide -- Renewal
The user may make all the appropriate changes to the vehicle with the exception of VIN, Year and Make of Vehicle.

22 OCRP User Guide -- Renewal
Option 1
Vehicle Weight Change (increase only, decreases are not permitted)
Place the cursor in the Weight Group # field, remove the current weight group number then click the Prompt push button on the Ohio Vehicle Data screen. The Select Weight Group screen now appears.
Place the cursor over the desired weight group; right click on the weight group number, click on select request
If the weight group you desire does not exist, please contact the Ohio IRP Center at 800-477-0007.
Change the weight in the Gross/Comb Weight field. Vehicle Screen
Change the Heavy Vehicle Use Tax field to Y if the original Gross/Comb Weight is increasing to 55,000 lbs. or above.
23 OCRP User Guide -- Renewal
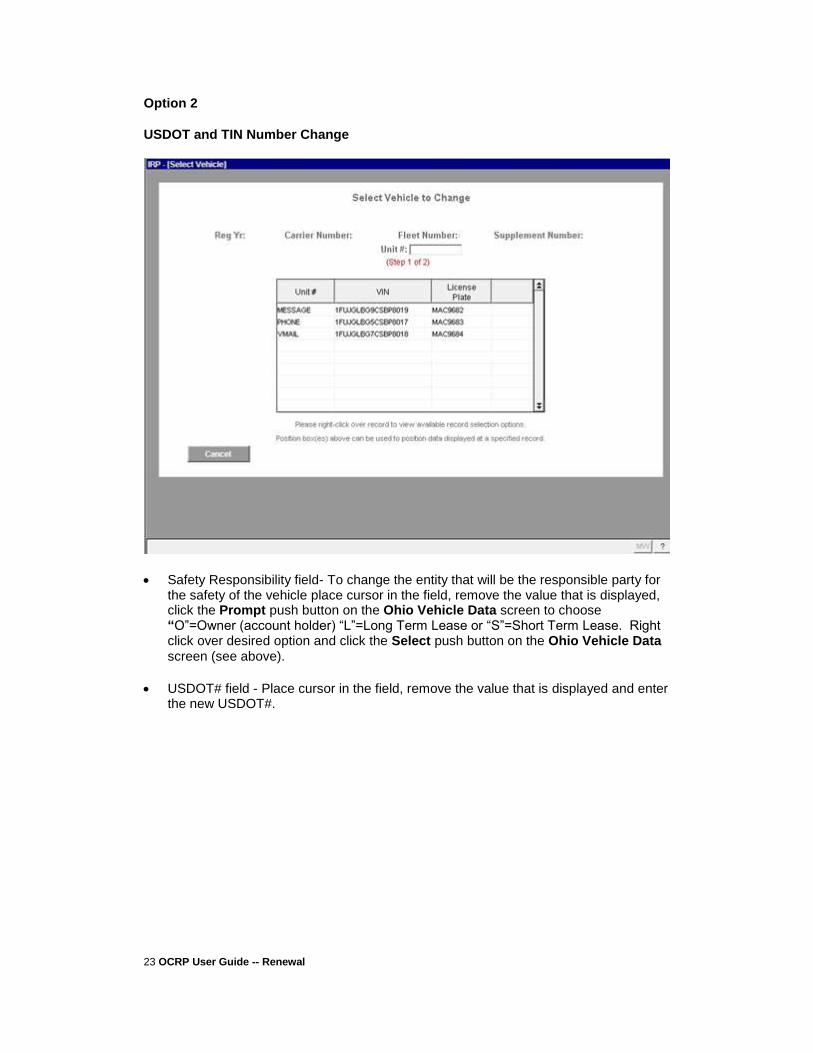
Option 2
USDOT and TIN Number Change
Safety Responsibility field- To change the entity that will be the responsible party for the safety of the vehicle place cursor in the field, remove the value that is displayed, click the Prompt push button on the Ohio Vehicle Data screen to choose “O”=Owner (account holder) “L”=Long Term Lease or “S”=Short Term Lease. Right click over desired option and click the Select push button on the Ohio Vehicle Data screen (see above).
USDOT# field - Place cursor in the field, remove the value that is displayed and enter the new USDOT#.

24 OCRP User Guide -- Renewal
TIN# field - Place cursor in the field, remove the value that is displayed, enter the new TIN#.
Will Safety Change? Field - Defaults to “N” for No. Enter “Y” for Yes if the safety is expected to change during the registration year.
When all changes are complete, click the Update push button.
To cancel a transaction, click the Cancel push button to return to the Change Vehicle Prompt screen.
Click the Help push button and a Vehicle FAQ screen will display if assistance is needed.
When all required data entry is complete, click the Update push button.
The user is returned to the Select Vehicle To Change screen and a message is displayed that states “Record Changed”
Right click to select the vehicle to be changed or Click the Cancel push button on the Select Vehicle To Change screen if all changes are complete.
The user is returned to the Vehicle Processing Menu screen, click the Done button.
A pop-up window will display that states “Do you have any more vehicles to process?”
o Click the Cancel push button to continue processing additional vehicles on to the Vehicle Processing menu.
25 OCRP User Guide -- Renewal
o Click the Next push button to return to Vehicle Processing Menu
o Click the Exit push button if all vehicle processing is complete.

26 OCRP User Guide -- Renewal
To Copy a Vehicle.
Click the Copy Vehicle push button . The user is advanced to the Select Vehicle to Copy screen
Insert screen shot of the Select Vehicle to Copy #1

27 OCRP User Guide -- Renewal
Reg Yr , Carrier Number , Fleet Number , and Supplement Number are auto-filled by the system
Enter the Unit # of the vehicle to copy or right click over the desired unit # and click
Select .
The user is advanced to the Add Vehicle Prompt screen

28 OCRP User Guide -- Renewal
Enter the Unit # of the vehicle being added
Enter the VIN of the vehicle being added
Click Next button
The user is advanced to the Ohio Vehicle Data screen

29 OCRP User Guide -- Renewal
The user is only required to complete the available selections. Click the Prompt push
button if unsure of how to complete a selected field. This will display a list of values from which the correct option can be selected.
- To cancel a transaction, click the Cancel push button to return to the Add Vehicle Prompt screen.
If unsure of how to continue, click the Help push button and a Vehicle FAQ screen will display.
- When all required data entry is complete, click the Update push button .
The user is returned to the Select Vehicle to Copy screen and a message is
displayed that states “Record Added” (insert Select Veh Copy screen w/displayed record added message #5)
- Click the Cancel push button on the Select Vehicle to Copy screen (above).
The user is returned to the Vehicle Processing Menu screen
- Click the Done push button on the Vehicle Processing Menu screen.
A pop-up window will display that states “Do you have any more vehicles to process?”

30 OCRP User Guide -- Renewal
o Click the Cancel push button to continue processing additional vehicles on to the Vehicle Processing menu.
o Click the Next push button to return to Vehicle Processing menu.
o Click the Exit push button if all vehicle processing is complete.

31 OCRP User Guide -- Renewal
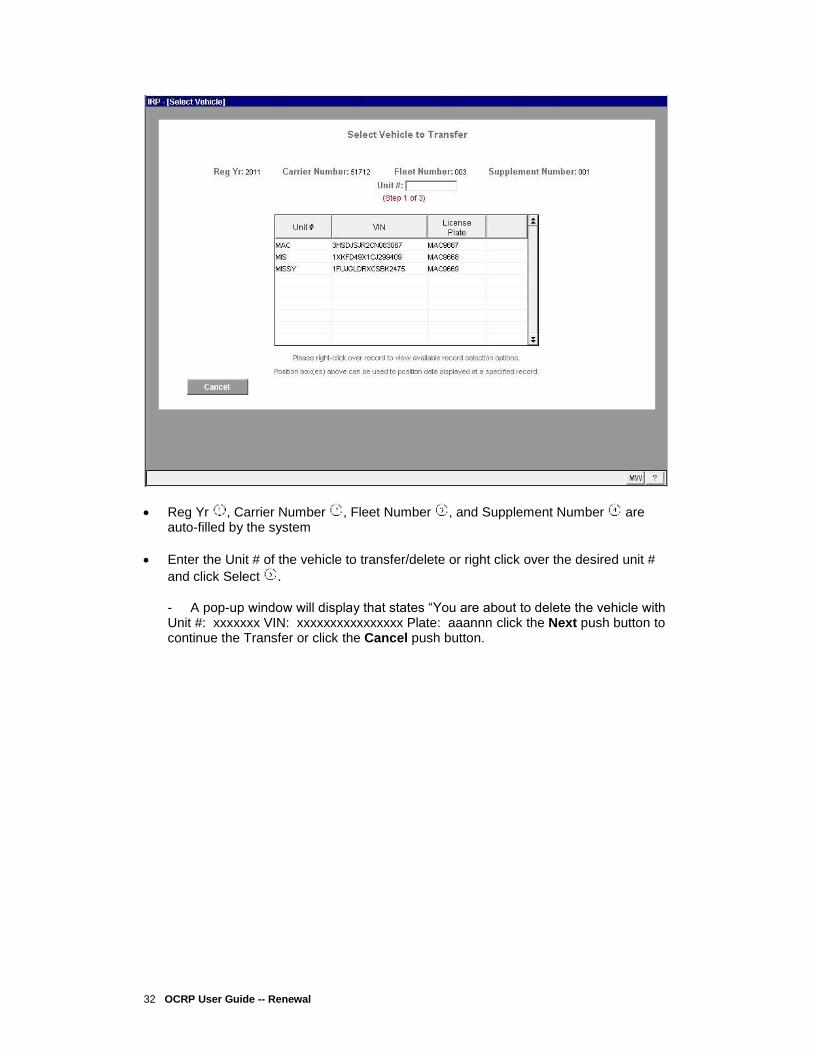
To Transfer a Vehicle
Click the Transfer Vehicle push button . The user is advanced to the Select Vehicle to Transfer screen
32 OCRP User Guide -- Renewal
Reg Yr , Carrier Number , Fleet Number , and Supplement Number are auto-filled by the system
Enter the Unit # of the vehicle to transfer/delete or right click over the desired unit #
and click Select .
- A pop-up window will display that states “You are about to delete the vehicle with Unit #: xxxxxxx VIN: xxxxxxxxxxxxxxxx Plate: aaannn click the Next push button to continue the Transfer or click the Cancel push button.

33 OCRP User Guide -- Renewal
o Click the Cancel push button to cancel the transfer request. User is returned to the Select Vehicle to Transfer screen, a message will appear that the transfer request has been canceled.

34 OCRP User Guide -- Renewal
o Click the Next push button to continue the transfer transaction.
The user is advanced to the Add Vehicle Prompt screen.

35 OCRP User Guide -- Renewal
Enter the Unit # of the vehicle being added
Enter the VIN of the vehicle being added
Click Next push button
The user is advanced to the Ohio Vehicle Data screen.
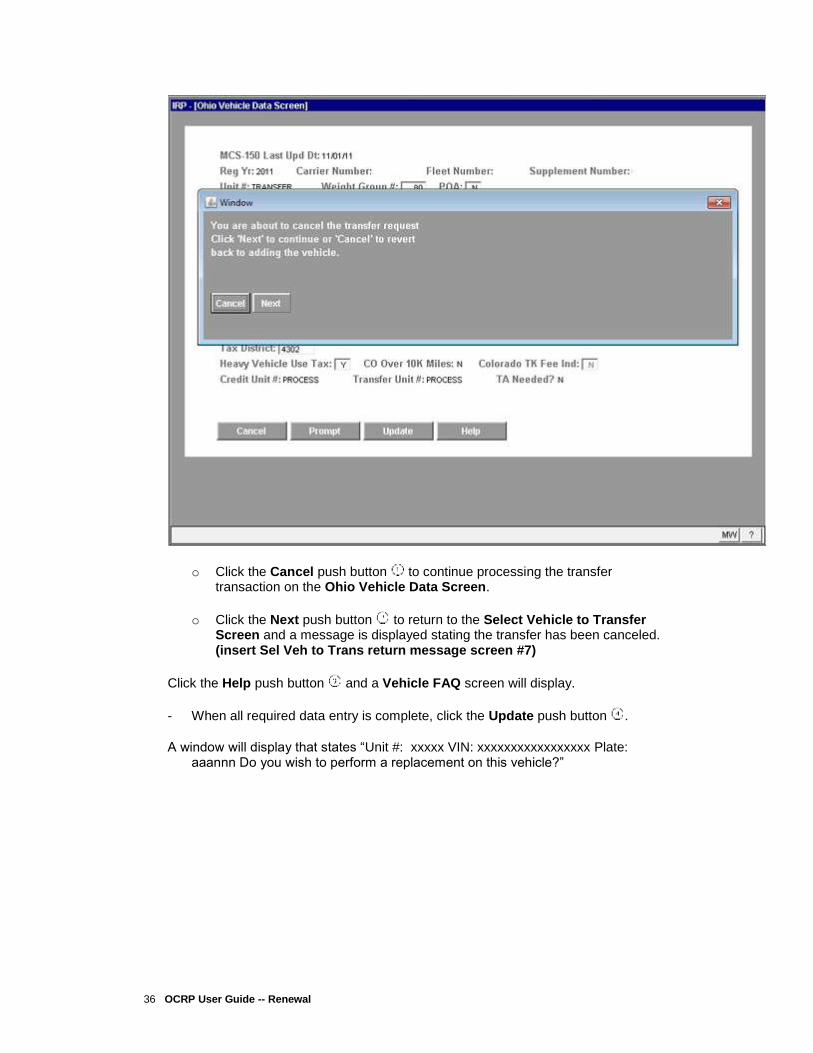
- To cancel the transfer transaction, click the Cancel push button
A pop-up window will display that states “You are about to cancel the transfer request. Click „Next‟ to continue or „Cancel‟ to revert back to adding the vehicle.”
36 OCRP User Guide -- Renewal
o Click the Cancel push button to continue processing the transfer transaction on the Ohio Vehicle Data Screen.
o Click the Next push button to return to the Select Vehicle to Transfer Screen and a message is displayed stating the transfer has been canceled. (insert Sel Veh to Trans return message screen #7)
Click the Help push button and a Vehicle FAQ screen will display.
- When all required data entry is complete, click the Update push button .
A window will display that states “Unit #: xxxxx VIN: xxxxxxxxxxxxxxxxx Plate: aaannn Do you wish to perform a replacement on this vehicle?”

37 OCRP User Guide -- Renewal
Click the drop down arrow
Click “No” or click “Yes”
If “No” is selected, click the Next push button to proceed or the Cancel push
button to return to the Select Vehicle to Transfer screen and a message “record added” is displayed.

38 OCRP User Guide -- Renewal
o Click the Cancel push button to return to the Vehicle Processing Menu screen.
o Click the Done push button on the Vehicle Processing Menu screen.(insert #10)

39 OCRP User Guide -- Renewal
A pop-up window will display that states “Do you have any more vehicles to process?”
o Click the Cancel push button to continue processing additional vehicles on to the Vehicle Processing menu.
o Click the Next push button to return to Vehicle Processing Menu
o Click the Exit push button if all vehicle processing is complete.
If “Yes” is selected, click the Next push button to proceed or the Cancel push
button to return to the Select Vehicle to Transfer screen and the user is returned the message record added.
o If the Next push button has been clicked the user is advance to the Replacement screen. On a Transfer, the user may only replace a plate.
In the Reason field the user is required to select a reason code for the replacement of the plate
Click on the drop down menu arrow
Click “L” for Lost; “S” for Stolen or “O” Opted to Replace
Click Finish button and then a Confirmation box will appear (insert #12)

40 OCRP User Guide -- Renewal
Click the drop down arrow
Click “No” or click “Yes”
The user is returned to the Select Vehicle to Transfer screen and a message is
displayed that states “Record Added”
o Click the Cancel push button to return to the Vehicle Processing Menu screen.
Click the Done push button on the Vehicle Processing Menu
screen Click the drop down arrow
A pop-up window will display that states “Do you have any more vehicles to process?”
o Click the Cancel push button to remove the pop-up window to continue processing additional vehicles on to the Vehicle Processing menu.
o Click the Next push button to return to Vehicle Processing Menu
o Click the Exit push button if all vehicle processing is complete.

41 OCRP User Guide -- Renewal
To Delete a vehicle(s) from renewal.
• Click the Delete Vehicle push button .
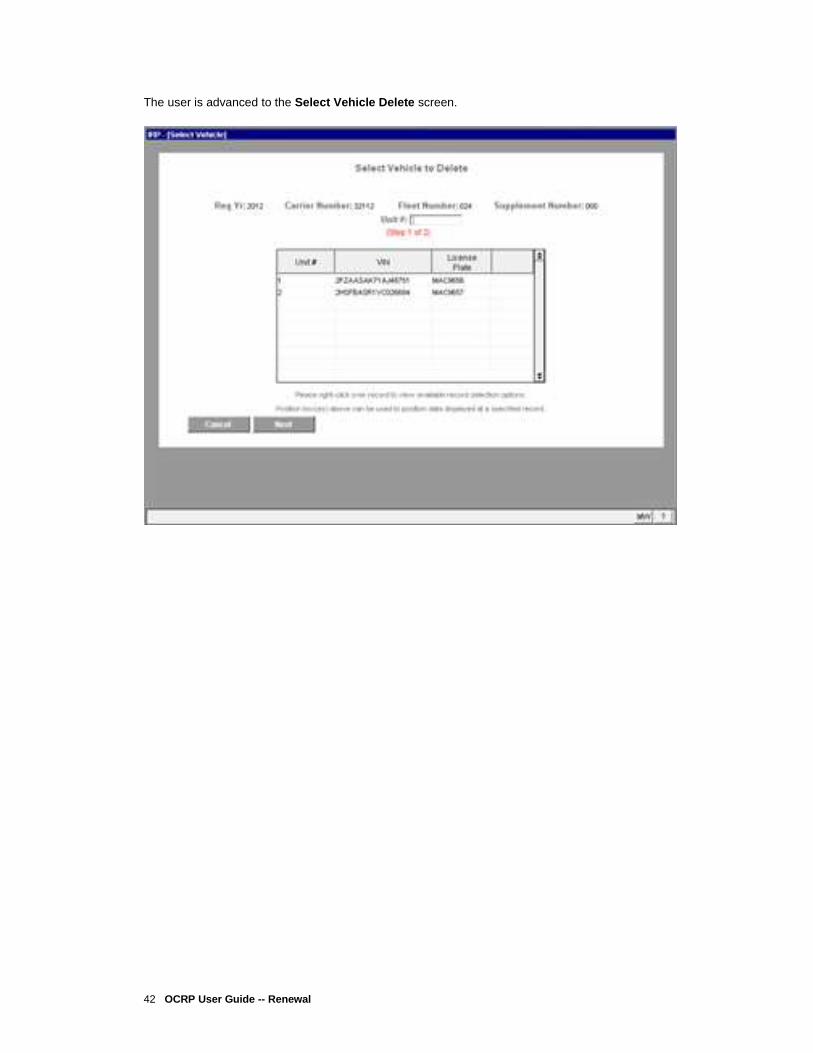
42 OCRP User Guide -- Renewal
The user is advanced to the Select Vehicle Delete screen.
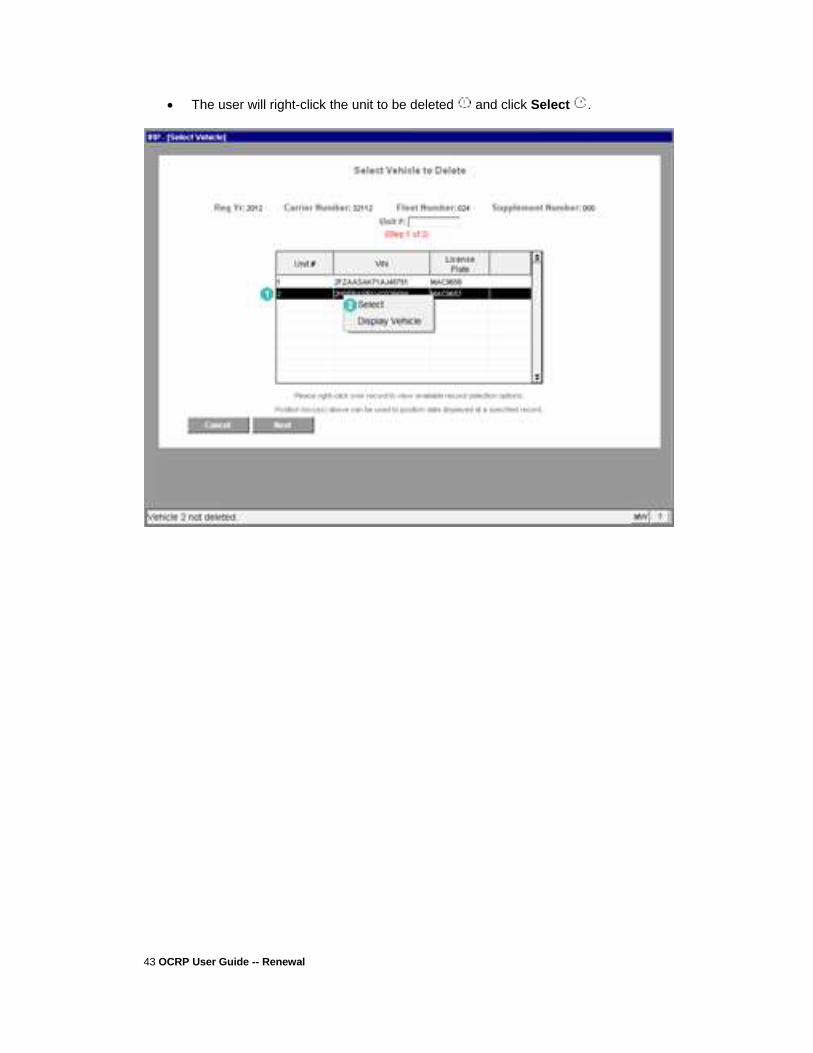
43 OCRP User Guide -- Renewal
The user will right-click the unit to be deleted and click Select .
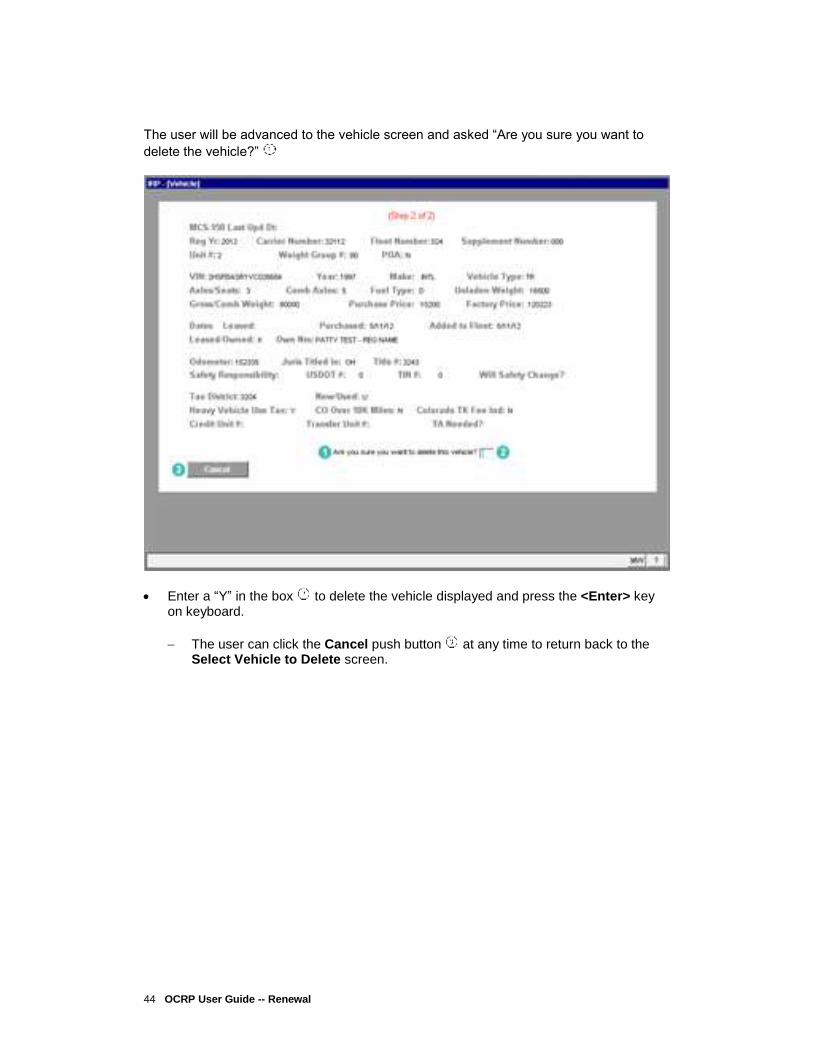
44 OCRP User Guide -- Renewal
The user will be advanced to the vehicle screen and asked “Are you sure you want to
delete the vehicle?”
Enter a “Y” in the box to delete the vehicle displayed and press the <Enter> key on keyboard.
The user can click the Cancel push button at any time to return back to the Select Vehicle to Delete screen.

45 OCRP User Guide -- Renewal
The user is advanced to the Select Vehicle to Delete screen
After the user has completed deleting all vehicles from renewals, press the
Cancel push button .
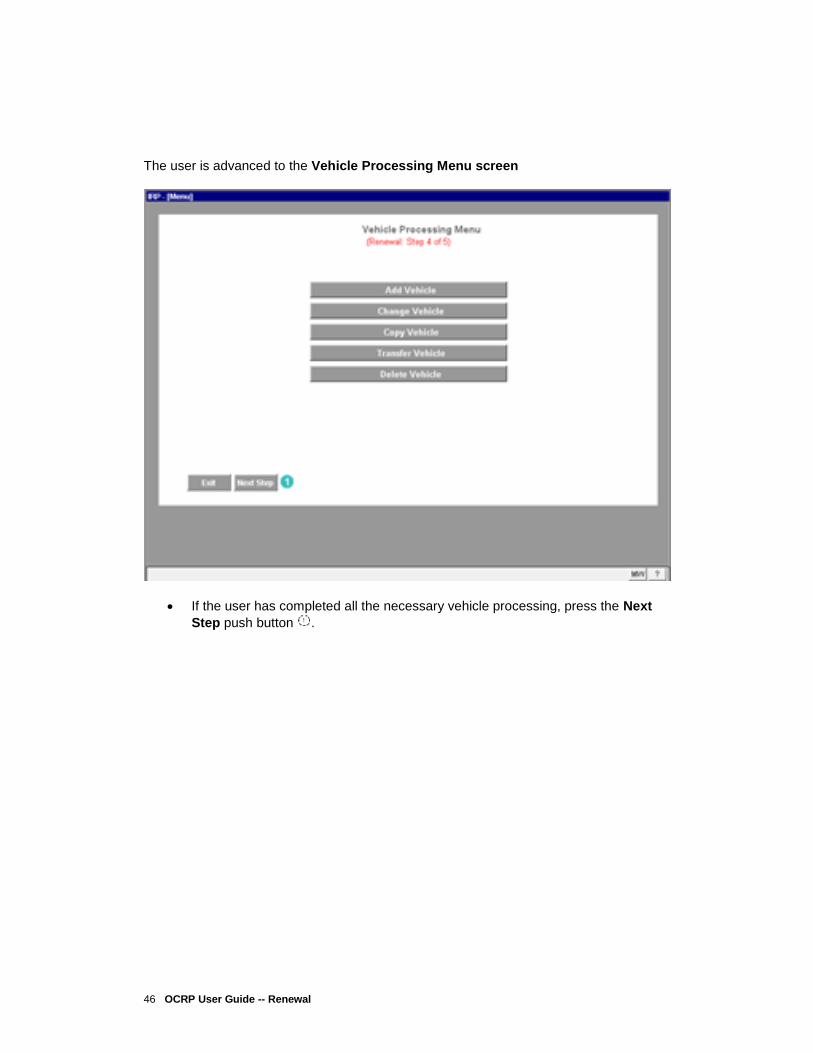
46 OCRP User Guide -- Renewal
The user is advanced to the Vehicle Processing Menu screen
If the user has completed all the necessary vehicle processing, press the Next
Step push button .

47 OCRP User Guide -- Renewal
A window will display stating Step 5 of 5 “Do you wish to perform any replacement processing? (Y/N)”
Click the drop down arrow
Click “Yes” or click “No” on the list of values that appears
o If “Yes” is selected, click Next push button .
o If “No” is selected, click Next push button.

48 OCRP User Guide -- Renewal
The user is advanced to the Renew Account Process Prompt screen
A message will display number #### of vehicles, number ####### vehicles have been renewed .
Another message will display “The renewal is complete.”
A message will appear at the bottom “Your renewal is now complete. Fee and invoice job submitted.”
Click the Cancel push button.
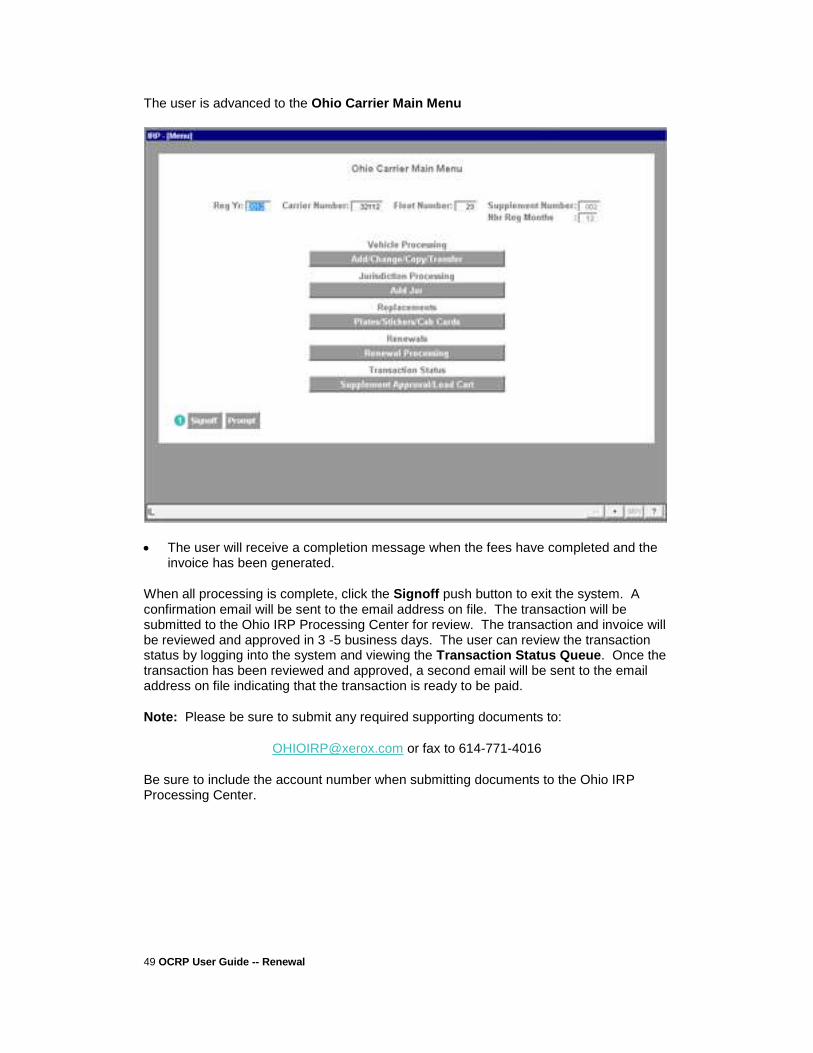
49 OCRP User Guide -- Renewal
The user is advanced to the Ohio Carrier Main Menu
The user will receive a completion message when the fees have completed and the invoice has been generated.
When all processing is complete, click the Signoff push button to exit the system. A confirmation email will be sent to the email address on file. The transaction will be submitted to the Ohio IRP Processing Center for review. The transaction and invoice will be reviewed and approved in 3 -5 business days. The user can review the transaction status by logging into the system and viewing the Transaction Status Queue. Once the transaction has been reviewed and approved, a second email will be sent to the email address on file indicating that the transaction is ready to be paid.
Note: Please be sure to submit any required supporting documents to:
[email protected] or fax to 614-771-4016
Be sure to include the account number when submitting documents to the Ohio IRP Processing Center.


