1 | Page Online Exam Verification – A Guide for Colleges Business process Students are able to verify their exam enrolments via their CamSIS self-service after a prompt from their college. An overview of the business process is as follows; The stages of the enrolment verification process are as follows; 1. Student Registry email colleges to indicate the opening of the Exam verification (EV) window for subjects As there are examinations happening all year, and dates are not standard across all subjects, the ‘trigger’ for you to start the process will be an email from the Student Registry. The email will give you the details for the subjects for which the EV window has opened for, and the deadline. It may be that in some cases, you don’t have any students that you need to run the process for as none of your students are taking those exams. Running the first step in the process will confirm that for you. Points to note here; There will be times when you receive the email from the student registry but you don’t have any students taking that exam in that term. Running the first step in the process will confirm this for you. Some of the dates will overlap, so you may already be running the process for other subjects. Student Registry email colleges to indicate the opening of the Exam verification window for subjects Colleges run process in CamSIS that emails students asking them to verify Student verifies exam enrolments in CamSIS self- service Colleges chase those students not verified and report on the verification output
Transcript
1 | P a g e
Online Exam Verification – A Guide for Colleges
Business process Students are able to verify their exam enrolments via their CamSIS self-service after a prompt from their college. An overview of the business process is as follows; The stages of the enrolment verification process are as follows;
1. Student Registry email colleges to indicate the opening of the Exam verification (EV) window for subjects
As there are examinations happening all year, and dates are not standard across all subjects, the ‘trigger’ for you to start the process will be an email from the Student Registry. The email will give you the details for the subjects for which the EV window has opened for, and the deadline. It may be that in some cases, you don’t have any students that you need to run the process for as none of your students are taking those exams. Running the first step in the process will confirm that for you.
Points to note here;
There will be times when you receive the email from the student registry but you don’t have any students taking that exam in that term. Running the first step in the process will confirm this for you.
Some of the dates will overlap, so you may already be running the process for other subjects.
Student Registry email colleges to indicate the
opening of the Exam verification window for
subjects
Colleges run process in CamSIS that emails
students asking them to verify
Student verifies exam enrolments in CamSIS self-
service
Colleges chase those students not verified and report on the
verification output
2 | P a g e
3 | P a g e
2. College runs process in CamSIS that emails students asking them to verify
Colleges will run a process in CamSIS that emails students who haven’t yet verified their exam enrolment. The process is run by career and term with an additional option of subject (exam) if desired. The user chooses which parameters to use, inserts the email text and then runs the process. CamSIS then sends that email to the students who meet those parameters and who have not yet verified their exam enrolment.
Points to note here;
Once a student has verified their exam enrolment, they will not be included in the email next time the process is run.
Colleges can expect to run the process more than once to chase those students who have not verified their enrolment.
The text of the email is in the control of the user and good practice would suggest that you set up a number of ‘run controls’ within the process so that you can reuse text, instead of overtyping each time.
3. Student verifies exam enrolments in CamSIS self-service
Students will receive the email from their college and should log into CamSIS self-service. There will be an alert indicating that they have an enrolment to verify and they can either click on this link or on the hyperlink on the page called ‘Verify examination enrolment‘. Once they have completed the process, the link will disappear from their self-service.
Points to note here;
If a student doesn’t verify their exam enrolment, the hyperlink will remain on their self-service until the verification window is closed.
The Verify examination enrolment process does not work if you are accessing CamSIS via the Safari Web browser on Apple products. CamSIS works correctly using IE, Chrome or Firefox, please ask your student to access CamSIS using one of these three web browsers.
4. Colleges chase those students who have not verified/monitor the verification process
Colleges can run the process several times to ensure that students verify their exam enrolment is correct. The process will only email those students who have not yet completed for that enrolment and CamSIS will show each time which students it is contacting. There is a query (COL_UGD_REC_EXAM_VERIFY_ALL) that you can use to monitor verifications, the query gives details of those that have verified, those that have requested a change, and those that have yet to complete the process, further details are shown below.
4 | P a g e
Points to note here;
If a student chooses to change their exam enrolment, the ‘Verify examination enrolment’ link will go from CamSIS once they have saved. Once the change has been made, it won’t be possible for them to go back and verify the change. They will be able to see their updated enrolment in self-service in the same way that they currently do and you may choose to invite those students in to view the enrolment together to ensure that it is agreed as correct.
Training Guide – step by step
1. Navigate to Records & Enrolment>Enrol Students>Exam Verification Email Gen Set up a new run control id if you have not run this process previously
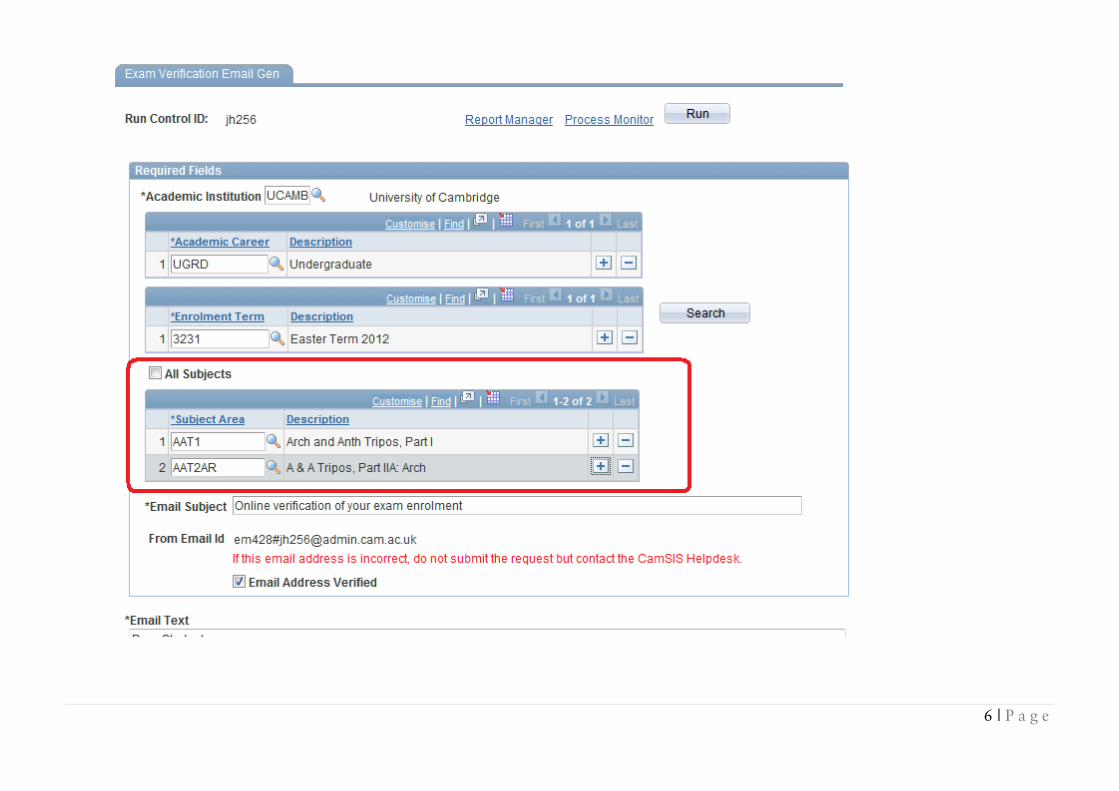
2. Insert parameters as required (you can add extra rows by clicking on the ‘+’ buttons next to the career and term buttons. You should also insert your email text, our example text is:
Dear Student, You now need to log into CamSIS to verify your examination enrolments for your exams in Easter term. You should log into your CamSIS Self Service page and click on the Verify my exam entry link. This will take you through a series of pages, asking you to check the exams you are entered for. If you are unsure, or wish to make a change to your enrolments, it is very important that you come to the Tutorial Office before saving any changes on CamSIS. Regards, This is shown in the screen shot below.
5 | P a g e
Insert the Academic Career and term (the Easter term of the current academic year) 3. You will also note that the example in point 1 is showing ‘All subjects’ ticked – this will automatically email all students enrolled for all subjects
who need to verify, but haven’t. If you only want to email students for a specific subject, they you should untick the box and add in the exam codes as shown below, again using the ‘+’ button to add rows to add in more subjects;
6 | P a g e
7 | P a g e
4. When you have completed all of the fields, click on the ‘Search’ button. This will return a list of all of the students that meet the parameters you have selected and an ‘include in email’ field. This allows you to untick any students you don’t want to receive this email.
8 | P a g e
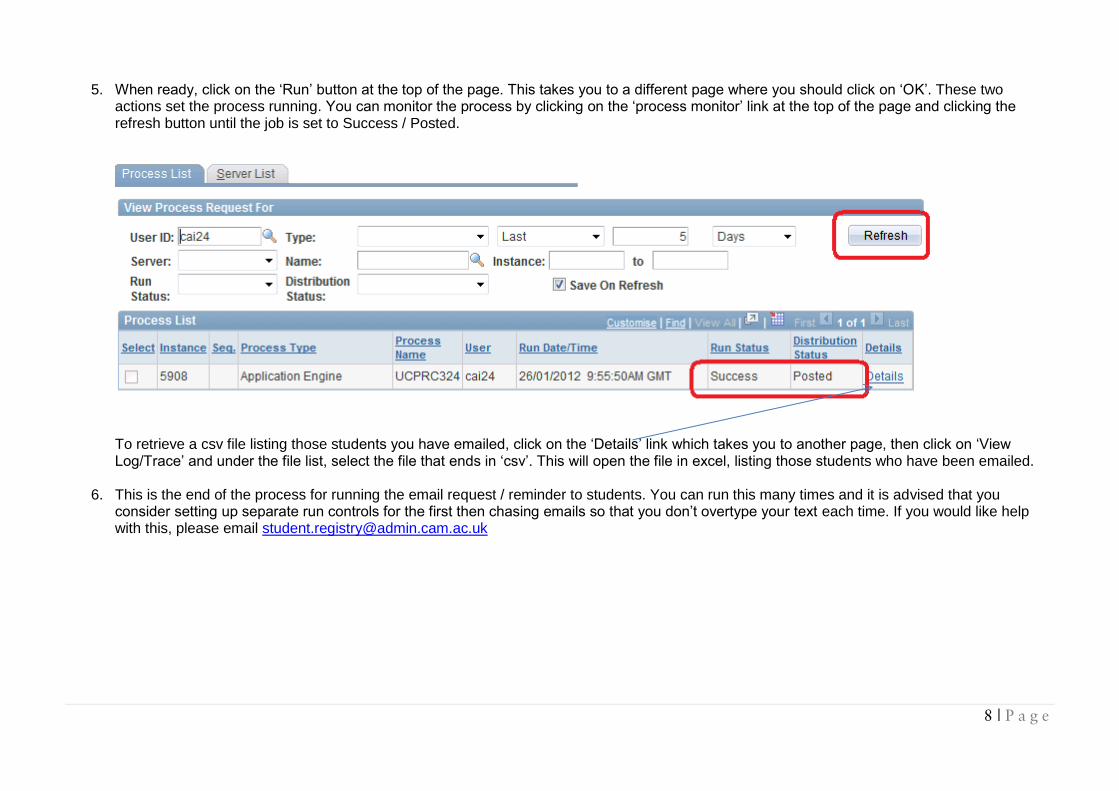
5. When ready, click on the ‘Run’ button at the top of the page. This takes you to a different page where you should click on ‘OK’. These two actions set the process running. You can monitor the process by clicking on the ‘process monitor’ link at the top of the page and clicking the refresh button until the job is set to Success / Posted.
To retrieve a csv file listing those students you have emailed, click on the ‘Details’ link which takes you to another page, then click on ‘View Log/Trace’ and under the file list, select the file that ends in ‘csv’. This will open the file in excel, listing those students who have been emailed.
6. This is the end of the process for running the email request / reminder to students. You can run this many times and it is advised that you consider setting up separate run controls for the first then chasing emails so that you don’t overtype your text each time. If you would like help with this, please email [email protected]
Reporting / Running Reports There are a few ways in which you can report on this process as follows;
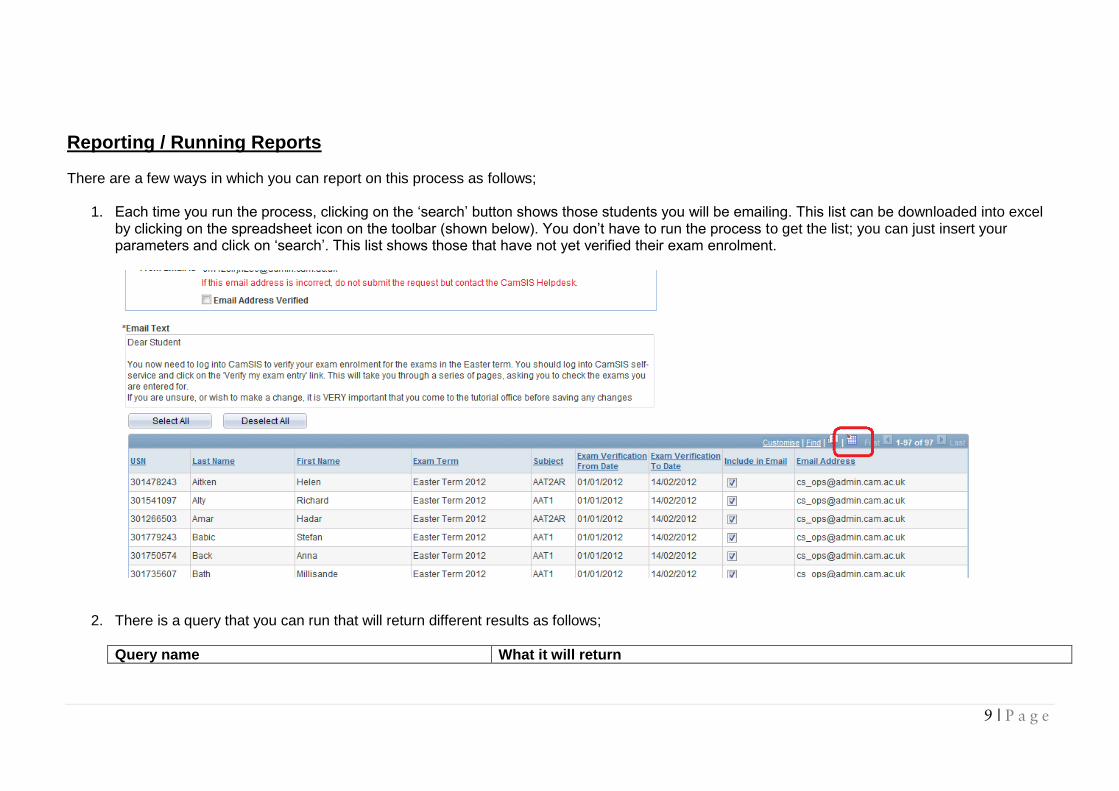
1. Each time you run the process, clicking on the ‘search’ button shows those students you will be emailing. This list can be downloaded into excel by clicking on the spreadsheet icon on the toolbar (shown below). You don’t have to run the process to get the list; you can just insert your parameters and click on ‘search’. This list shows those that have not yet verified their exam enrolment.
2. There is a query that you can run that will return different results as follows;
Query name What it will return
10 | P a g e
COL_UGD_REC_EXAM_VERIFY_ALL
All students enrolled for that term and their verification status, shown in Column G: Blank cell indicates that they have not yet verified V indicates that they have verified C indicates that they have requested a change In column H, the date and time of the Action (verify or change request) is shown, where the cell contains ####, this gives further indicates that the student has yet to verify their enrolments.
Managing Corrections to entries Once you have received an email from a student requesting an examination correction, you should proceed as you have done in previous years. The Student Registry can accept requests for corrections either by email or by completion of a correction form which can be found here - http://www.admin.cam.ac.uk/students/studentregistry/staff/exams/college/index.html . Please ensure that the correction to be made is clearly stated. Once a correction has been received by the student registry, the student’s entry will be amended and you will receive an email confirming when this is complete. The student will not be required to re-verify their entry online in CamSIS; however you may find it useful to ask the student to check their entry in CamSIS. They can do this by selecting ‘My results’ in self-service and selecting the term, this will show their up to date exam entry.
Students view in self-service Once you have run the email process, students will receive the email to their ‘preferred’ email address. Their process looks like this; 1. Once they have logged into self-service, there will be a notification saying that they have exam enrolments to verify. They can click on this
link to progress, or they can click on the ‘Verify examination enrolment’ link
12 | P a g e
2. Once they have clicked on either link, they’re taken to a page showing their enrolment summary.
13 | P a g e
3. They should then select one of the actions from the action drop down
14 | P a g e
4. If they select ‘Verify Enrolment’ and click on save, then they’re taken to another page asking for confirmation;
If they click on yes, then they’re taken to a final page, showing successful verification and the saved date and the task is complete. If they click on no, then they’re taken back to the previous page.
15 | P a g e
5. If they select ‘Request change’ they’re taken to a web email form asking them to complete information;
16 | P a g e
17 | P a g e
6. Once they’ve clicked on submit, they’re given a choice to confirm or go back
and if they click on yes, they get a confirmation page
18 | P a g e
19 | P a g e
7. Once they return to self-service, the notification and link has now disappeared.