27
1 APPALACHIAN MOUNTAIN CLUB AMC Activity Listings: Chapter Trip Contributor User Instructions Appalachian Mountain Club 5 Joy Street Boston, MA 02108 Phone 617.523.0655
1
APPALACHIAN MOUNTAIN CLUB
AMC Activity Listings: Chapter Trip Contributor User
Instructions
Appalachian Mountain Club 5 Joy Street Boston, MA 02108 Phone 617.523.0655
2
Contents
AMC ACTIVITY LISTINGS APPLICATION: AN OVERVIEW ......................................................................................................................................................... 3
LOGGING IN ............................................................................................................................................................................................................................................. 4
CREATING A MEMBER CENTER ACCOUNT ................................................................................................................................................................................................. 4 LOGGING IN AND MERGING ACCOUNTS AT ACTIVITIES.OUTDOORS.ORG/LOGIN ........................................................................................................................................ 6 CHANGING CONTACT INFORMATION AND USER DEFAULTS ...................................................................................................................................................................... 8 CHANGE YOUR ONLINE TRIP LISTING USERNAME AND PASSWORD .......................................................................................................................................................... 9
ENTERING A NEW TRIP OR VOLUNTEER OPPORTUNITY ........................................................................................................................................................ 10
LEADER INFORMATION ............................................................................................................................................................................................................................ 11 CO-LEADER INFORMATION ..................................................................................................................................................................................................................... 12 REGISTRAR INFORMATION ...................................................................................................................................................................................................................... 13 CONTRIBUTOR INFORMATION ................................................................................................................................................................................................................. 13 WEBSITE POSTING INFORMATION ........................................................................................................................................................................................................... 13 NOTES ..................................................................................................................................................................................................................................................... 14
EDITING THE STATUS OF A TRIP/VOLUNTEER OPPORTUNITY ............................................................................................................................................. 17
EDITING & APPROVING TRIPS/VOLUNTEER OPPORTUNITIES .............................................................................................................................................. 18
REVIEWERS & APPROVERS: APPROVING TRIPS/VOLUNTEER OPPORTUNITIES IN BULK ........................................................................................... 20
DOWNLOADING DATA FOR TRIPS/VOLUNTEER OPPORTUNITIES ....................................................................................................................................... 21
DOWNLOAD FOR PRINTING .............................................................................................................................................................................................................. 23
USER RIGHTS MANAGEMENT ........................................................................................................................................................................................................... 24

3
AMC Activity Listings Application: An Overview
The Appalachian Mountain Club has developed a searchable online activity listings database for use by staff and volunteers. The purpose of this application is to present a universal set of searchable upcoming AMC events and volunteer opportunities regardless if sponsored by volunteer committees or staff. The system also automates the process for volunteer committees submitting their Advance Notice trips to AMC Outdoors for inclusion in Backcountry, while at the same time making trips eligible for publication on the AMC website, activities.outdoors.org. Volunteer newsletter editors and webmasters may also extract data from the system to feed their websites and print publications.
The application offers a workflow that allows volunteer committees to create an electronically managed approval process based on the following structure:
o General users have records in the system but not rights. They log in once to verify their account, and then they do not take action within the system unless they later take on one of the following roles..
o Contributors (trip leaders, trail event organizers) input their trips/volunteer opportunities into a web-based form.
o Trips/volunteer opportunities are then sent to an appropriate volunteer Reviewer within the contributor’s committee.
o Once reviewed and approved by the committee Reviewer, the trip is passed to the appropriate volunteer committee Approver, who makes any final edits and approves the trip on behalf of the committee.
o While trips and volunteer opportunities are not subject to approval by AMC staff, AMC staff may periodically review listings for quality and edit as needed.
Chapter and volunteer committee leaders determine the best workflow for their committees within this structure (illustrated on the next page). If you would like to learn more about how your committee’s approval process works check in with your committee chair or click on ”My Approval Workflow” under “Events” on the left side of the screen.
4
Logging In
As of summer 2014 all AMC trip leaders, contributors, reviewers, and approvers must merge their Online Trip Listing System (OLTL) accounts with their AMC Member Center accounts.
Creating a Member Center Account
For those who have not previously signed up for an AMC Member Center account, you will need to create an account. You will need your member number handy to create an account. If you do not know your member number, please contact [email protected].
If you already have a member center account, please skip to the next section – Logging In and Merging Accounts at activities.outdoors.org/login.
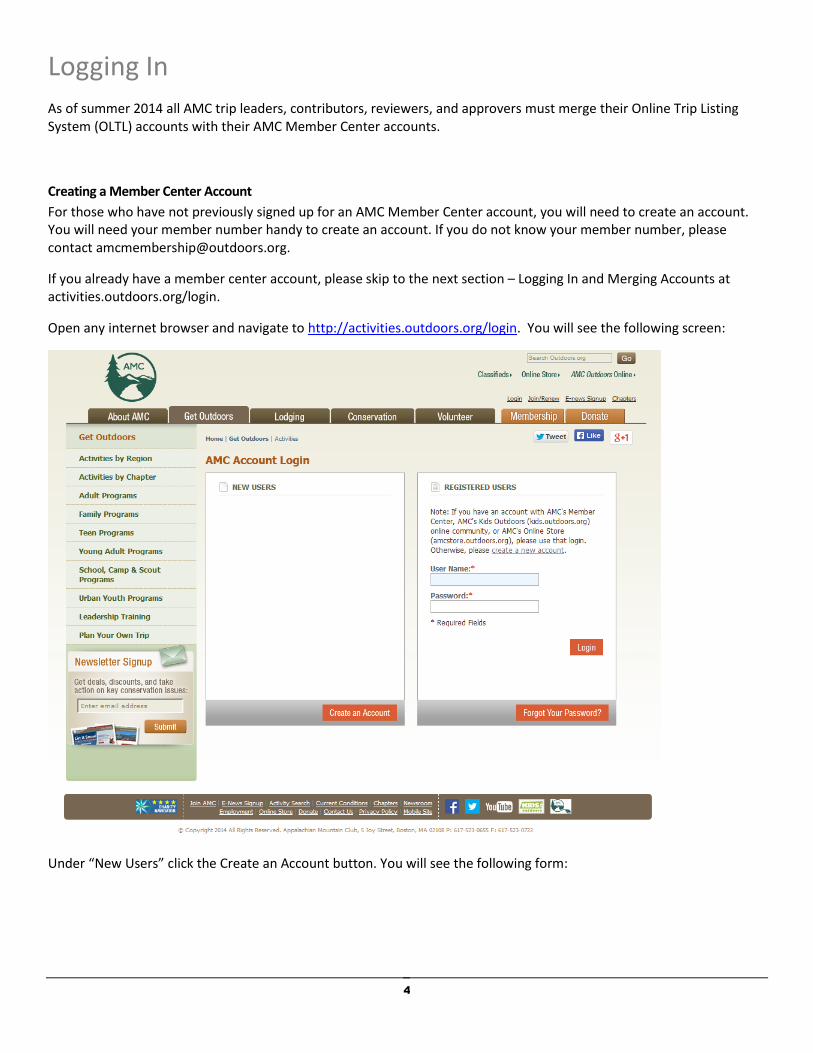
Open any internet browser and navigate to http://activities.outdoors.org/login. You will see the following screen:
Under “New Users” click the Create an Account button. You will see the following form:
5
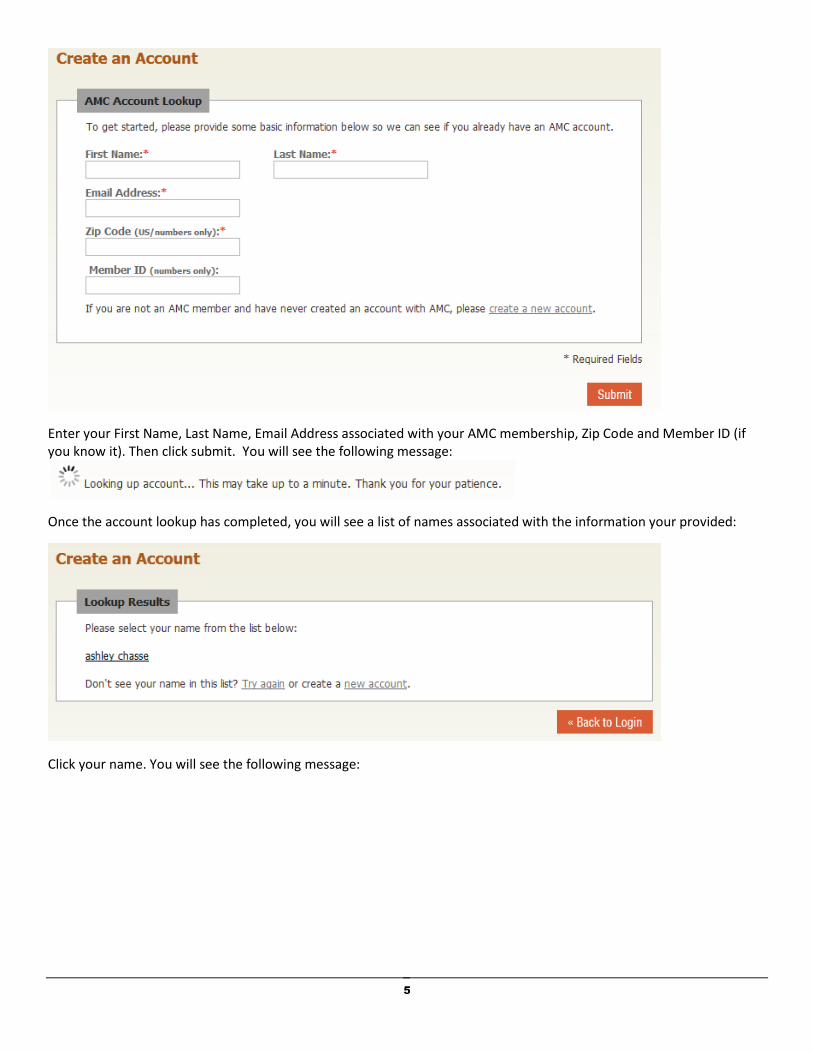
Enter your First Name, Last Name, Email Address associated with your AMC membership, Zip Code and Member ID (if you know it). Then click submit. You will see the following message:
Once the account lookup has completed, you will see a list of names associated with the information your provided:
Click your name. You will see the following message:

6
Once your account has been configured, you will receive two emails to the email address provided:
The first will provide you with a Member Center user name.
The second email will provide you with a Member Center password.
These emails will come from [email protected].
Once you have configured your account, you will be redirected to the login screen at activities.outdoors.org/login. You will then see the following message above the login fields:
From here, you will be able to login to merge your Online Trip Listing System account(s) with your new username and password.
Logging in and Merging Accounts at activities.outdoors.org/login
The following steps will show you how to merge your Online Trip Listing System account(s) with your Member Center account.
For those with multiple OLTL accounts, merging will bring all user levels under one login.

7
If you have any questions, please contact the Web Production Associate at [email protected].
To log into the system, go to: http://activities.outdoors.org/login using your AMC Member Center login information (this is also the same username and password used to access the AMC Online Store and Kids Outdoors).
From the login screen enter your AMC Member Center, Online Store, or Kids Outdoors account information and click the login button. You will see the following screen:
Enter the email address and password associated with your Online Trip Listing account and click the submit button. When your submission is successful you will see the following message:
Repeat this last step for as many accounts you have. When you are finished, click the return to main screen link:
You will see the following page:

8
Upon logging in, you’ll find several options available, including the ability to add a new trip/volunteer opportunity, update/change your user information, and ability to access trips based on several different search parameters. A description of each of these functions will be included in subsequent sections of this guide.
Note: there is a 45-minute timeout on the OLTL system. A countdown in the upper right-hand corner of the screen will help keep track of how much time you have left before you are automatically logged out. The timer resets every time you change screens.
Changing Contact Information and User Defaults
The application allows users, at any time, to edit their contact information (email address), change their password, and set default values for personal information that is often requested in the trip entry form.
Once logged in, you’ll find a central contributor administration area, that will give you several options, including the ability to update your account information, add trips and/or volunteer opportunities, change the status of existing trips (to indicate a trip is full, cancel a trip, etc.), and search current and archived trips.
Select “My Profile” in the left navigation bar to be directed to the account information administration page.
In this form, you are able to easily edit your first & last names, phone number, email address.
9
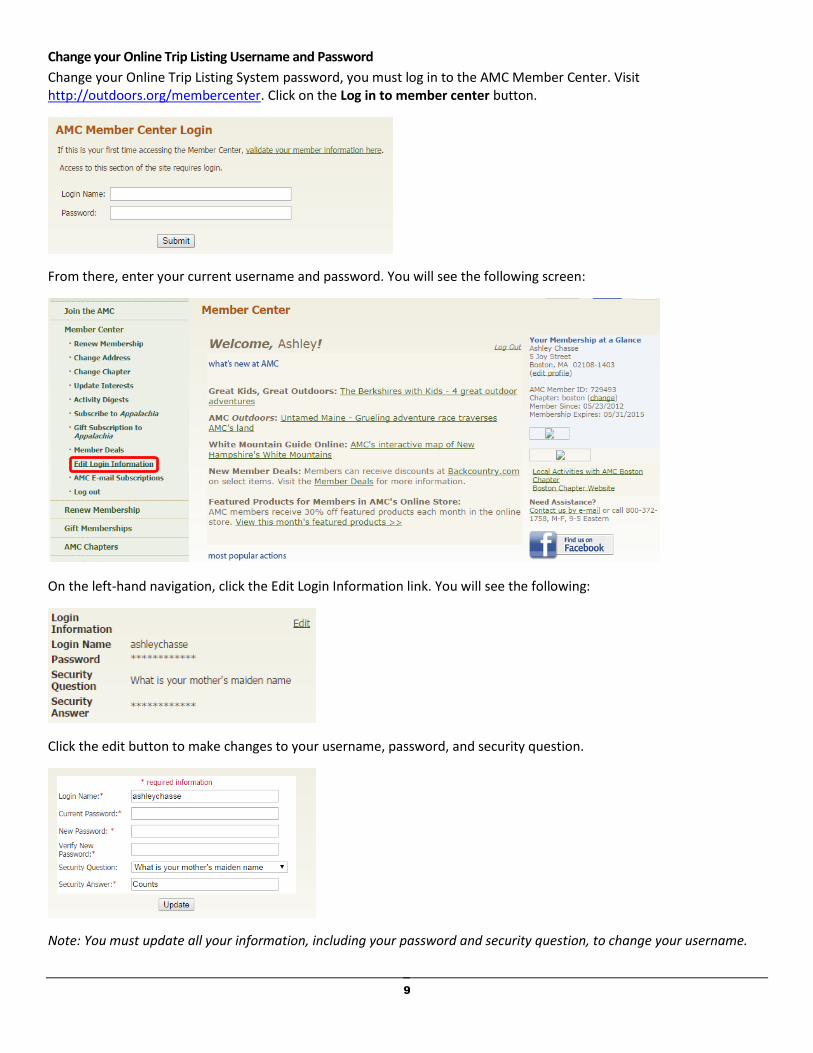
Change your Online Trip Listing Username and Password
Change your Online Trip Listing System password, you must log in to the AMC Member Center. Visit http://outdoors.org/membercenter. Click on the Log in to member center button.
From there, enter your current username and password. You will see the following screen:
On the left-hand navigation, click the Edit Login Information link. You will see the following:
Click the edit button to make changes to your username, password, and security question.
Note: You must update all your information, including your password and security question, to change your username.

10
Entering a New Trip or Volunteer Opportunity
To add an event/trip listing, navigate to the left-hand of the screen. There you will find EVENTS. You can add two types of events, Chapter Trips or Volunteer Opportunities.
Note: The process for entering a Chapter Trip or Volunteer Opportunity is the same.
Before you begin adding a trip listing, make sure to have all necessary information prepared. This will help speed up the process.
Click the drop-down next to the type of listing you would like to add (Chapter Trip or Volunteer Opportunity), and select the committee associated with this listing. Once you’ve selected a committee you will see the event listing page:
Note: Next to each field title is a blue box with an i; hovering over these boxes will produce a pop-up explanation of each field.
The following images and tables describe each form field, its purpose, and whether or not it is required:
Event Type The type of event/trip being listed (Chapter Event/Volunteer Opportunity).
Rates/Fees Optional fields for fees associated with the event/trip.
Rates Include Optional free-form text field explaining the event/trip fee.
Group The Chapter or Group running the event/trip.
Committee The committee running the event/trip.
Status Indicates whether a listing is Open (O), Wait List (W), Full (F), or Canceled (C).
Listing Type Indicates if a listing will appear on the Web, in the Magazine, or both.
Title Free form text header for the event/trip listing.
Dates Single-day Trips - Enter event/trip date in first date box. Second date box (“end date”) will auto-populate with the same date. Multi-day Trips - Enter event/trip start date in first date box. Enter event/trip end date in second date box. Recurring Trips - Enter start date in first box and the end date in second box. In middle box, select the day of the week for the recurring event.
Magazine Issue(s) The issue of AMC Outdoors a listing will be printed in (if applicable).
Registration Required selection for whether a trip requires registration.
Archive on Expiration Optional checkbox to archive an event/trip listing for two years after it expires.

11
Backcountry Designations Optional checkboxes that allow you to designate a trip for special treatment in AMC Outdoors Backcountry. Advance Notice submits a trip for inclusion in the magazine one issue earlier than typically allowed and is only for multi day trips
Trip Photo Optional upload for adding a single image to an event/trip listing (must include a caption).
Magazine Description Free-form text description to be included in print publications.
Long Web Description Free-form text description (450-word max) of a listing on the web.
Short Web Description Free-form text summary (150-word max) of a listing on the web.
Testimonials Free-form text area for adding testimonial of past participants of an event on the web.
Driving Directions Free-form text area for step-by-step driving directions on the web.
Location Free-form text area for indicating an event/trip location.
Latitude/Longitude Optional fields. These fields are populated by using Google Map's pinning functionality. Click on the map icon to open the Google map dialog. If the Location field is populated and the Latitude/Longitude fields are not, the map will try to use the Location field to pin a location on the map. When Latitude/Longitude are specified, the public search details page will display a Google map and pin along with a button link to Google Maps for driving directions. Google Maps driving directions will use the latitude/longitude as the end point and a location lookup of the user's IP address to make a best-guess for the start point of the driving directions.
Difficulty Optional form field indicating the difficulty of an event/trip
Region Required drop-down of the region an event/trip will take place.
State Required drop-down of the state an event/trip will take place.
Country Required drop-down of the country where an event/trip will take place.
Nearby AMC Destination Option selection of an AMC Destination close to an event/trip.
Activity Required selection box indicating the activity best associated with an event/trip.
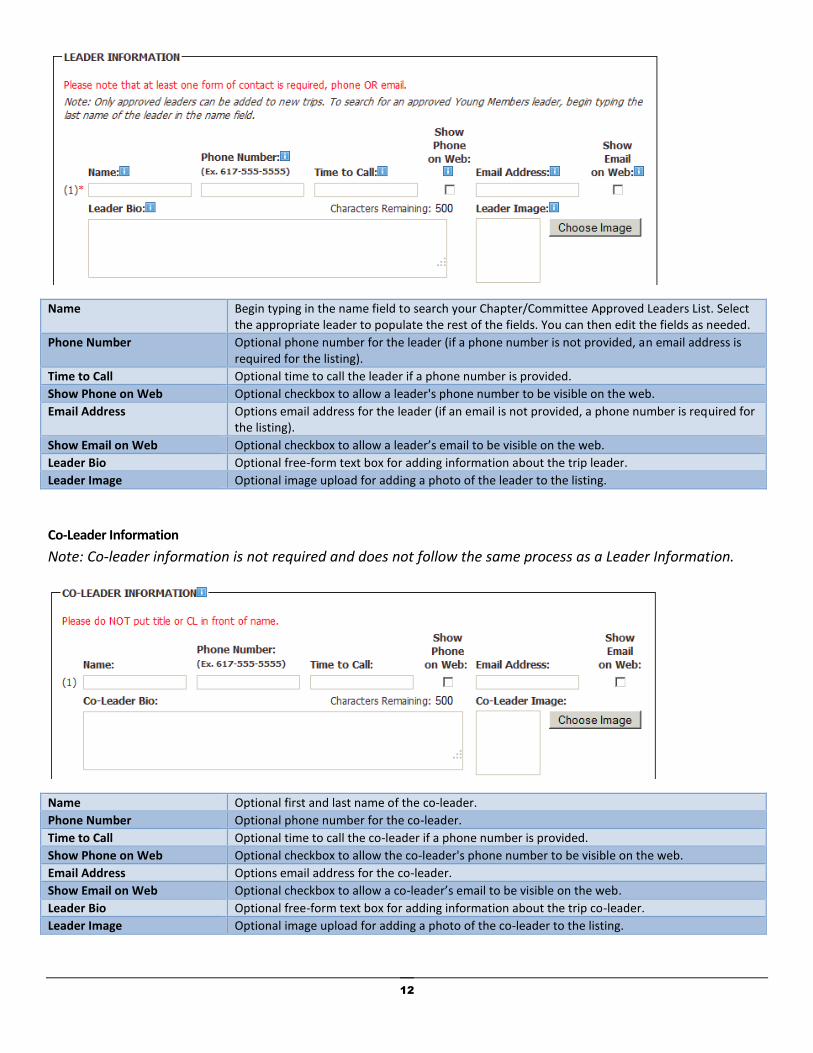
Leader Information
In August 2012, the trip listing process was updated with the launch of the Leader Member Validation Project, which requires users to select from a list of approved trip leaders when entering a new trip. These changes are meant to ensure that the leaders on every AMC trip are current members, as well as to simplify the entry of leader information when posting a trip.
In the Name field of the Leader Information section, begin typing the name of a Valid Leader set to lead the trip/volunteer opportunity. A blue pop-up with the leader’s information should appear. Clicking on the pop-up will fill out the leader information fields, which can be edited.
Note: If a leader’s information is added without clicking the blue pop-up, a trip will not post. If the wrong leader is selected, a red X next to the leader’s name can be clicked to remove the leader.
12
Name Begin typing in the name field to search your Chapter/Committee Approved Leaders List. Select the appropriate leader to populate the rest of the fields. You can then edit the fields as needed.
Phone Number Optional phone number for the leader (if a phone number is not provided, an email address is required for the listing).
Time to Call Optional time to call the leader if a phone number is provided.
Show Phone on Web Optional checkbox to allow a leader's phone number to be visible on the web.
Email Address Options email address for the leader (if an email is not provided, a phone number is required for the listing).
Show Email on Web Optional checkbox to allow a leader’s email to be visible on the web.
Leader Bio Optional free-form text box for adding information about the trip leader.
Leader Image Optional image upload for adding a photo of the leader to the listing.
Co-Leader Information
Note: Co-leader information is not required and does not follow the same process as a Leader Information.
Name Optional first and last name of the co-leader.
Phone Number Optional phone number for the co-leader.
Time to Call Optional time to call the co-leader if a phone number is provided.
Show Phone on Web Optional checkbox to allow the co-leader's phone number to be visible on the web.
Email Address Options email address for the co-leader.
Show Email on Web Optional checkbox to allow a co-leader’s email to be visible on the web.
Leader Bio Optional free-form text box for adding information about the trip co-leader.
Leader Image Optional image upload for adding a photo of the co-leader to the listing.
13
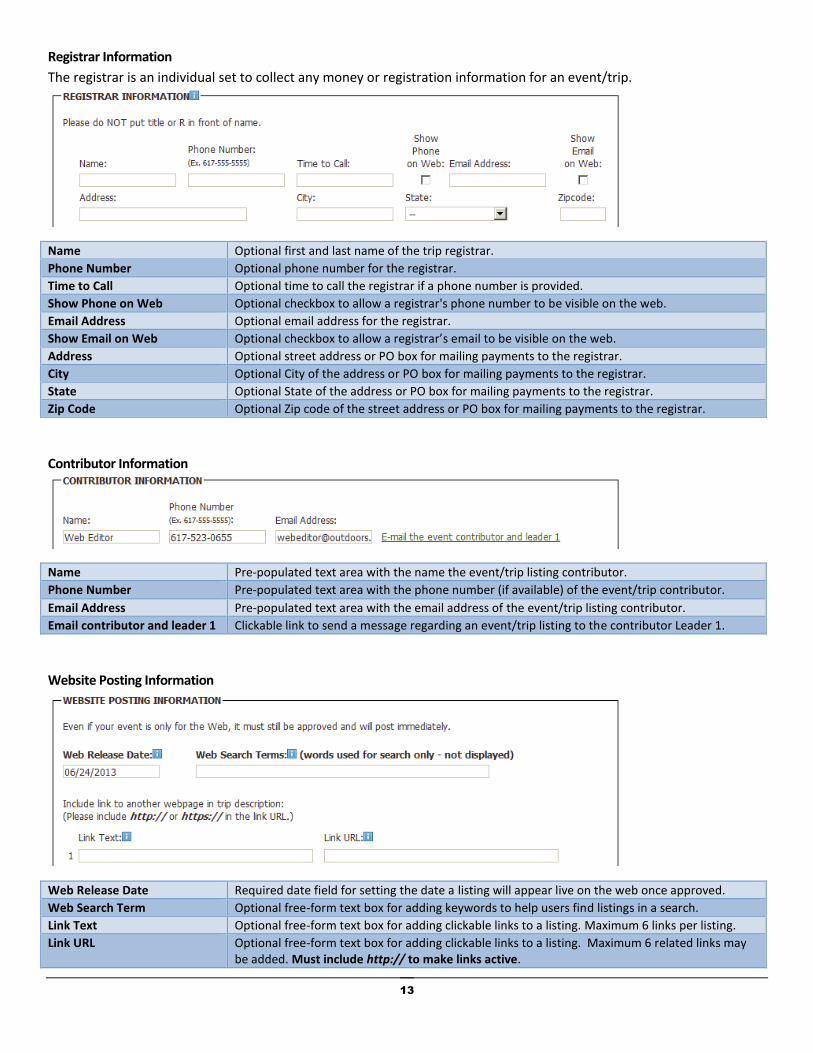
Registrar Information
The registrar is an individual set to collect any money or registration information for an event/trip.
Name Optional first and last name of the trip registrar.
Phone Number Optional phone number for the registrar.
Time to Call Optional time to call the registrar if a phone number is provided.
Show Phone on Web Optional checkbox to allow a registrar's phone number to be visible on the web.
Email Address Optional email address for the registrar.
Show Email on Web Optional checkbox to allow a registrar’s email to be visible on the web.
Address Optional street address or PO box for mailing payments to the registrar.
City Optional City of the address or PO box for mailing payments to the registrar.
State Optional State of the address or PO box for mailing payments to the registrar.
Zip Code Optional Zip code of the street address or PO box for mailing payments to the registrar.
Contributor Information
Name Pre-populated text area with the name the event/trip listing contributor.
Phone Number Pre-populated text area with the phone number (if available) of the event/trip contributor.
Email Address Pre-populated text area with the email address of the event/trip listing contributor.
Email contributor and leader 1 Clickable link to send a message regarding an event/trip listing to the contributor Leader 1.
Website Posting Information
Web Release Date Required date field for setting the date a listing will appear live on the web once approved.
Web Search Term Optional free-form text box for adding keywords to help users find listings in a search.
Link Text Optional free-form text box for adding clickable links to a listing. Maximum 6 links per listing.
Link URL Optional free-form text box for adding clickable links to a listing. Maximum 6 related links may be added. Must include http:// to make links active.
14
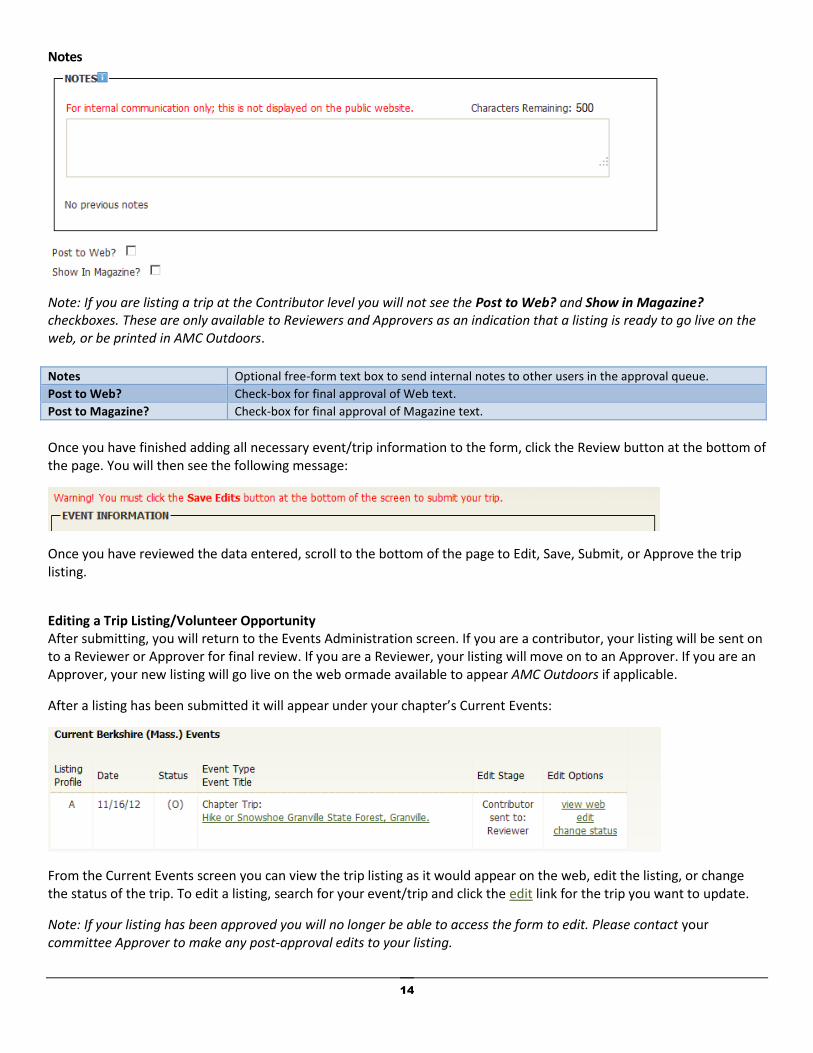
Notes
Note: If you are listing a trip at the Contributor level you will not see the Post to Web? and Show in Magazine? checkboxes. These are only available to Reviewers and Approvers as an indication that a listing is ready to go live on the web, or be printed in AMC Outdoors.
Notes Optional free-form text box to send internal notes to other users in the approval queue.
Post to Web? Check-box for final approval of Web text.
Post to Magazine? Check-box for final approval of Magazine text.
Once you have finished adding all necessary event/trip information to the form, click the Review button at the bottom of the page. You will then see the following message:
Once you have reviewed the data entered, scroll to the bottom of the page to Edit, Save, Submit, or Approve the trip listing.
Editing a Trip Listing/Volunteer Opportunity After submitting, you will return to the Events Administration screen. If you are a contributor, your listing will be sent on to a Reviewer or Approver for final review. If you are a Reviewer, your listing will move on to an Approver. If you are an Approver, your new listing will go live on the web ormade available to appear AMC Outdoors if applicable.
After a listing has been submitted it will appear under your chapter’s Current Events:
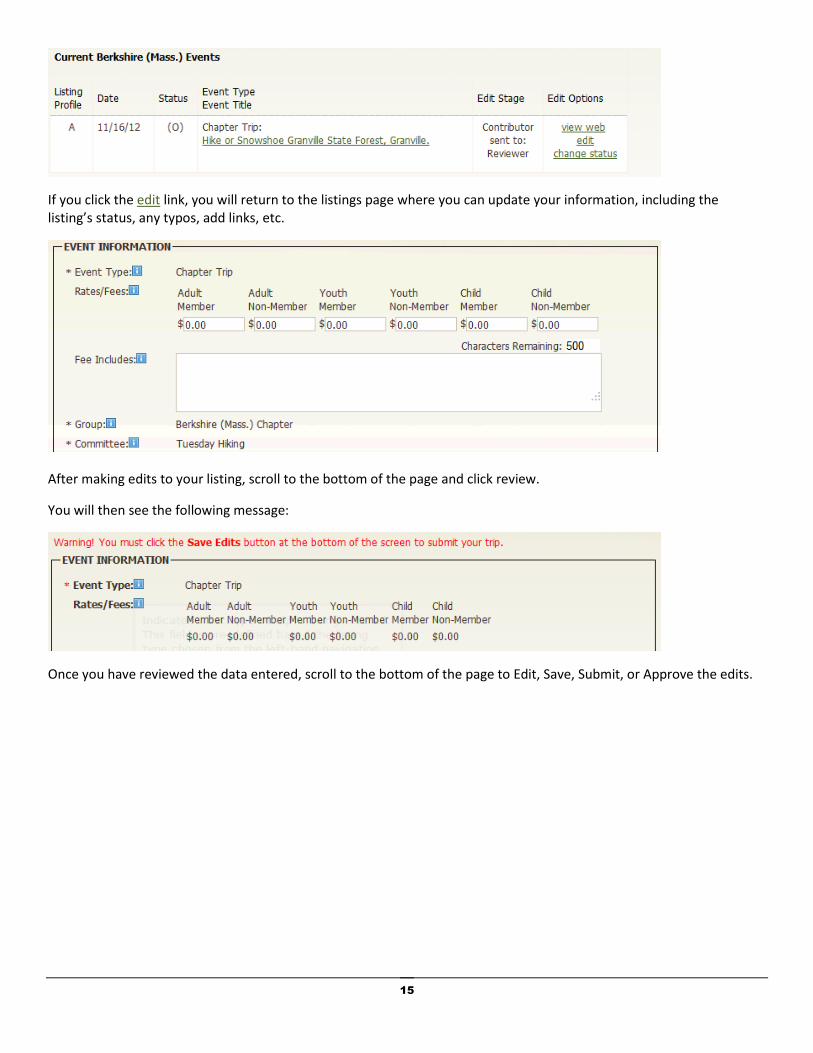
From the Current Events screen you can view the trip listing as it would appear on the web, edit the listing, or change the status of the trip. To edit a listing, search for your event/trip and click the edit link for the trip you want to update.
Note: If your listing has been approved you will no longer be able to access the form to edit. Please contact your committee Approver to make any post-approval edits to your listing.
15
If you click the edit link, you will return to the listings page where you can update your information, including the listing’s status, any typos, add links, etc.
After making edits to your listing, scroll to the bottom of the page and click review.
You will then see the following message:
Once you have reviewed the data entered, scroll to the bottom of the page to Edit, Save, Submit, or Approve the edits.

16
Reusing or ‘Reactivating’ an Archived Trip Listing To reactivate an archived trip, use the “Search <Chapter> Events” option in the left navigation bar.
In the “Show me” search box, select “Archived” in the first dropdown box. Then click on the “More options” link and select your current committee from the “Committee” dropdown box. Click the “Search” button.
You will see a list of all archived trips run by your committee in the last two years. Use the top search box to narrow your criteria (e.g. by keyword or by activity) or page through the search results to locate the trip you’d like to reactivate. Note, if you have many past trips in the system archives, you may narrow your results by using the “Only mine” checkbox – the system will retrieve only your archived trips.
In the “Edit Options” column of the trip list, select “reactivate.” The screen will open to the “Edit Trip” page, with the trip’s date fields now empty. Edit the date fields accordingly. Check the remaining fields for accuracy as conditions may have changed since the trip was last posted.
Note: When selecting “reactivate,” you are not actually reactivating the existing trip, but rather making a copy of the trip and publishing the new copy.
You may refer to “Entering a New Trip Listing” for additional detail on the fields available for trip information entry. Once you are satisfied with the changes, you can click “Save & Forward to Reviewer” to process the trip. The information will then be processed in the same manner as a newly-entered trip.

17
Editing the Status of a Trip/Volunteer Opportunity
Once logged in, on the left navigation bar, you’ll find a central contributor administration area that will give you several options, including the ability search for trips/volunteer opportunities. Under the EVENTS title, click on the Search Events links. You will see the following:
Using the available fields, search for the trip/volunteer opportunity you want to edit. Once you have found it, click on the Change Status link located under the Edit Options row:
You will see the following:
Select the appropriate new status for the trip and click on “Change Status” to save the change. This change is reflected immediately. The “Cancel” button on this page will take you back to the central contributor administration area.

18
Editing & Approving Trips/Volunteer Opportunities
Per the workflow of the system, once trips/volunteer opportunities are added by contributors, they are passed first to committee reviewers for editing and approval, and then to chapter approvers for additional editing and approval. Once this process has been completed within your chapter, the trip listing is published to the web and/or queued for inclusion in the magazine, as designated on the data entry form.
The process of editing and approving trips is the same for both reviewers and approvers. Once logged into the system, trips awaiting your approval will be listed in the table at the bottom of the screen, under Events > Search Events.
Click on the edit link next to the trip to open it for review. You will see the following:
19
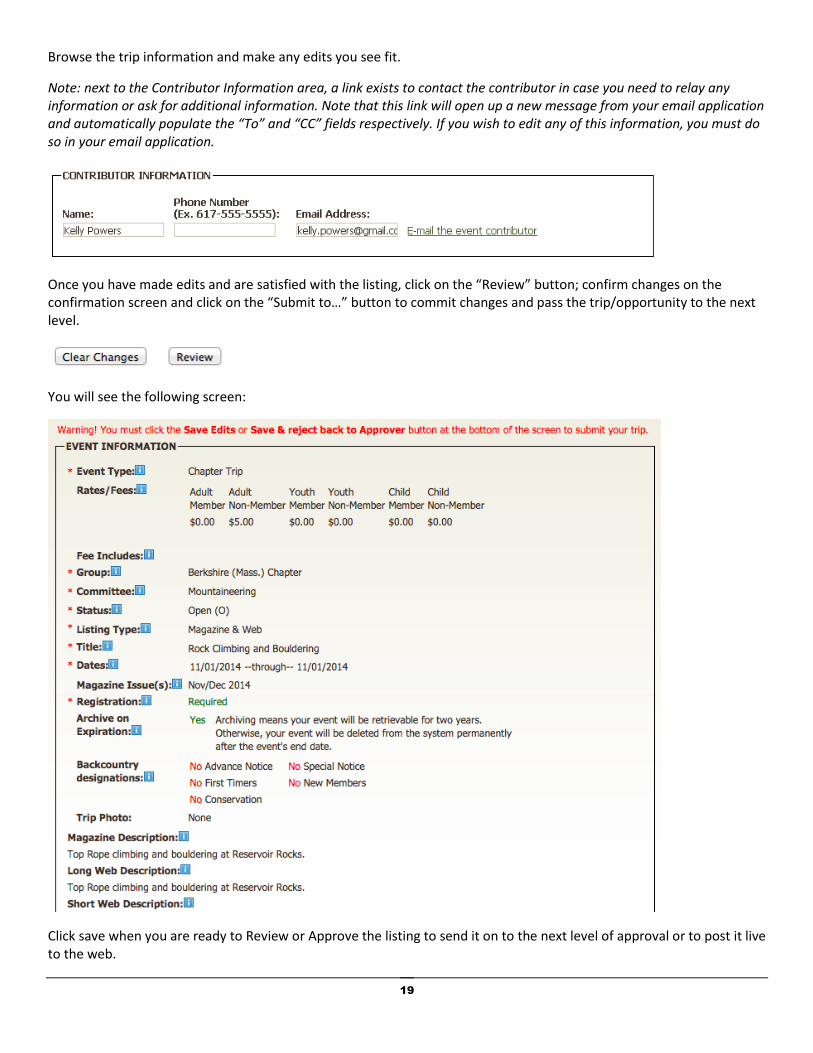
Browse the trip information and make any edits you see fit.
Note: next to the Contributor Information area, a link exists to contact the contributor in case you need to relay any information or ask for additional information. Note that this link will open up a new message from your email application and automatically populate the “To” and “CC” fields respectively. If you wish to edit any of this information, you must do so in your email application.
Once you have made edits and are satisfied with the listing, click on the “Review” button; confirm changes on the confirmation screen and click on the “Submit to…” button to commit changes and pass the trip/opportunity to the next level.
You will see the following screen:
Click save when you are ready to Review or Approve the listing to send it on to the next level of approval or to post it live to the web.
20
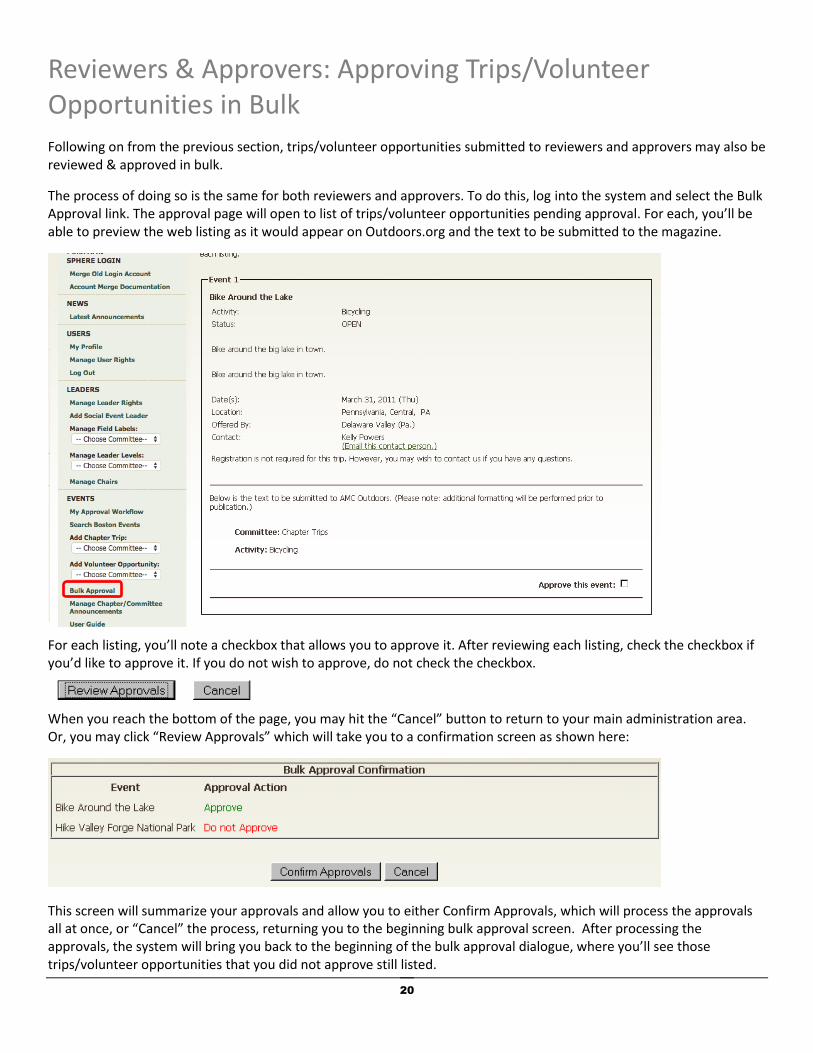
Reviewers & Approvers: Approving Trips/Volunteer Opportunities in Bulk
Following on from the previous section, trips/volunteer opportunities submitted to reviewers and approvers may also be reviewed & approved in bulk.
The process of doing so is the same for both reviewers and approvers. To do this, log into the system and select the Bulk Approval link. The approval page will open to list of trips/volunteer opportunities pending approval. For each, you’ll be able to preview the web listing as it would appear on Outdoors.org and the text to be submitted to the magazine.
For each listing, you’ll note a checkbox that allows you to approve it. After reviewing each listing, check the checkbox if you’d like to approve it. If you do not wish to approve, do not check the checkbox.
When you reach the bottom of the page, you may hit the “Cancel” button to return to your main administration area. Or, you may click “Review Approvals” which will take you to a confirmation screen as shown here:
This screen will summarize your approvals and allow you to either Confirm Approvals, which will process the approvals all at once, or “Cancel” the process, returning you to the beginning bulk approval screen. After processing the approvals, the system will bring you back to the beginning of the bulk approval dialogue, where you’ll see those trips/volunteer opportunities that you did not approve still listed.

21
Downloading Data for Trips/Volunteer Opportunities
Chapter-level approvers are able to download listing information stored in the system for reporting purposes or otherwise.
To do this, log into the system and click on the CSV Data Download link. The field selection screen will open, providing a list of all fields available to be included in the download as well as a number of search/sort options to better customize the data.
To begin creating your report, review the list of fields and select those you’d like included in the report by checking the checkbox next to the applicable fields.
Once you’ve selected the fields you’d like included in the report, use the “Search Criteria” box to filter your report by keyword, region, state, AMC Destination, Committee, Activity, or trip dates.
Click the Submit button to create the report. The Download Trip Data screen will load, with a CSV file link populated in the main area of the screen.

22
To download the report: PC users: Right click on the link and select "Save target as..." Macintosh users: Click on link and hold. Select "Download link to disk".
Save the CSV file to a convenient location on your hard drive. To utilize the file, open it in an application that supports comma-delimited files (e.g. Excel, Access) and manipulate the data as you see fit for your purposes.

23
Download for Printing
This feature of the system, launched in spring 2011, is the ability for Approvers to download trip listings and volunteer opportunities for their chapter exactly as submitted for a given issue of AMC Outdoors. For example, 1-2 days prior to a magazine deadline, an approver may wish to view the magazine data as it’s queued up for the staff of AMC Outdoors to confirm that all trips are appearing as they should.
To do this, log into the system as an approver and click on the “Magazine Download” link.
From the “Select Magazine Issue” dropdown menu, select the issue of the magazine that you’d like to preview and click Submit. The system will produce a text file and make it available to open/download on the subsequent screen.
To download the report: PC users: Right click on the link and select "Save target as..." Macintosh users: Click on link and hold. Select "Download link to disk".
You may also choose to open the text link directly and your computer will use a text editor to open the file.

24
User Rights Management
As of summer 2014 the process for managing user rights in the Online Trip Listing System has changed. Leaders will now log in to the activities database using their AMC Member Center information (see Logging In for more information).
Please be aware that in order to add rights to an individual in the Online Trip Listing System, they must be an Active AMC Member with a Member Center account. The member must first log in to the system, establishing an account for themselves, before rights can be added. This means that new leaders, registrars, etc. must both create their member center account and log into activities.outdoors.org/login before you can add them to your leader list.
For users already associated with a Chapter and Committee within the system, adding and/or removing rights will now be handled using the Manage User Rights section.
Adding Contributors and Reviewers The activity listings application allows approvers and reviewers to add new reviewers and contributors respectively. The process for adding contributor and reviewer rights is the same as adding leaders. For Leader Managers, additional leader level options will show. All new users must have a Member Center account and log into activities.outdoors.org/login before you can apply user rights to their account. Once they have taken these steps, you can search for them using the screen shown below.
To being, click on the Manage User Rights link in the left navigation. You will see a list of current users in the system:
Using the search form, enter the name of the individual you want to add as a contributor or reviewer to your committee. Then, click Search Users. When you find the user you are looking for, click the edit link under the Actions row next to their name:
25
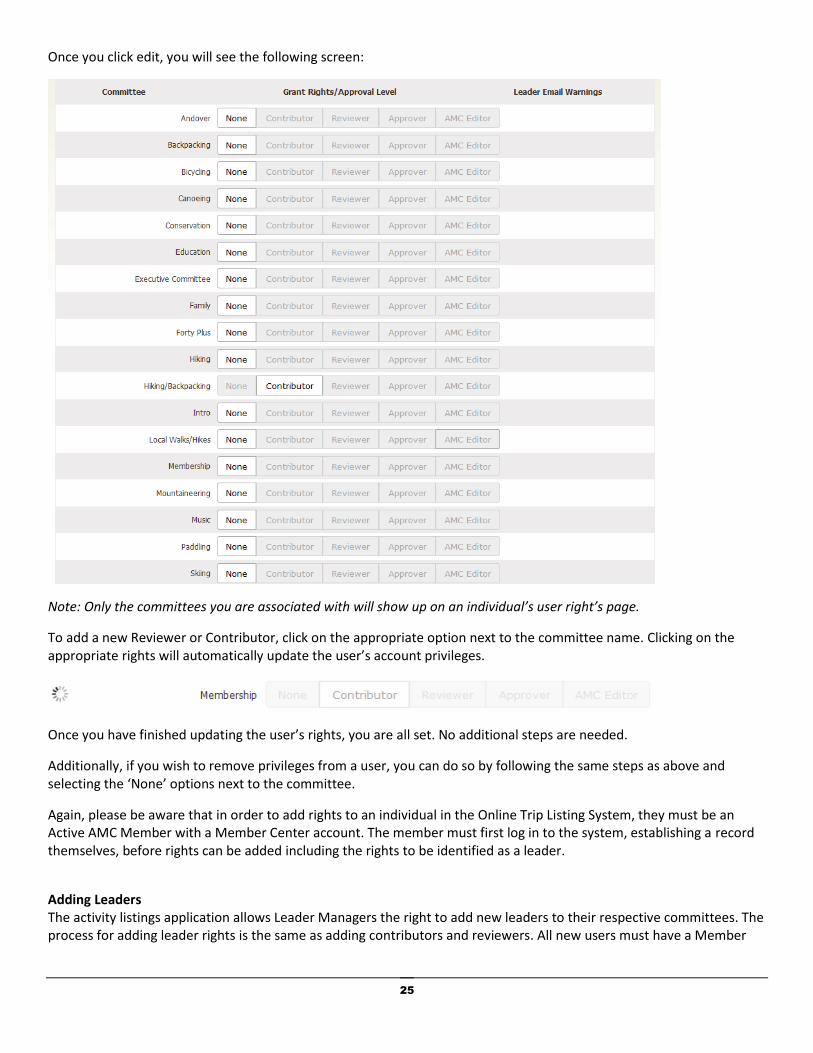
Once you click edit, you will see the following screen:
Note: Only the committees you are associated with will show up on an individual’s user right’s page.
To add a new Reviewer or Contributor, click on the appropriate option next to the committee name. Clicking on the appropriate rights will automatically update the user’s account privileges.
Once you have finished updating the user’s rights, you are all set. No additional steps are needed.
Additionally, if you wish to remove privileges from a user, you can do so by following the same steps as above and selecting the ‘None’ options next to the committee.
Again, please be aware that in order to add rights to an individual in the Online Trip Listing System, they must be an Active AMC Member with a Member Center account. The member must first log in to the system, establishing a record themselves, before rights can be added including the rights to be identified as a leader.
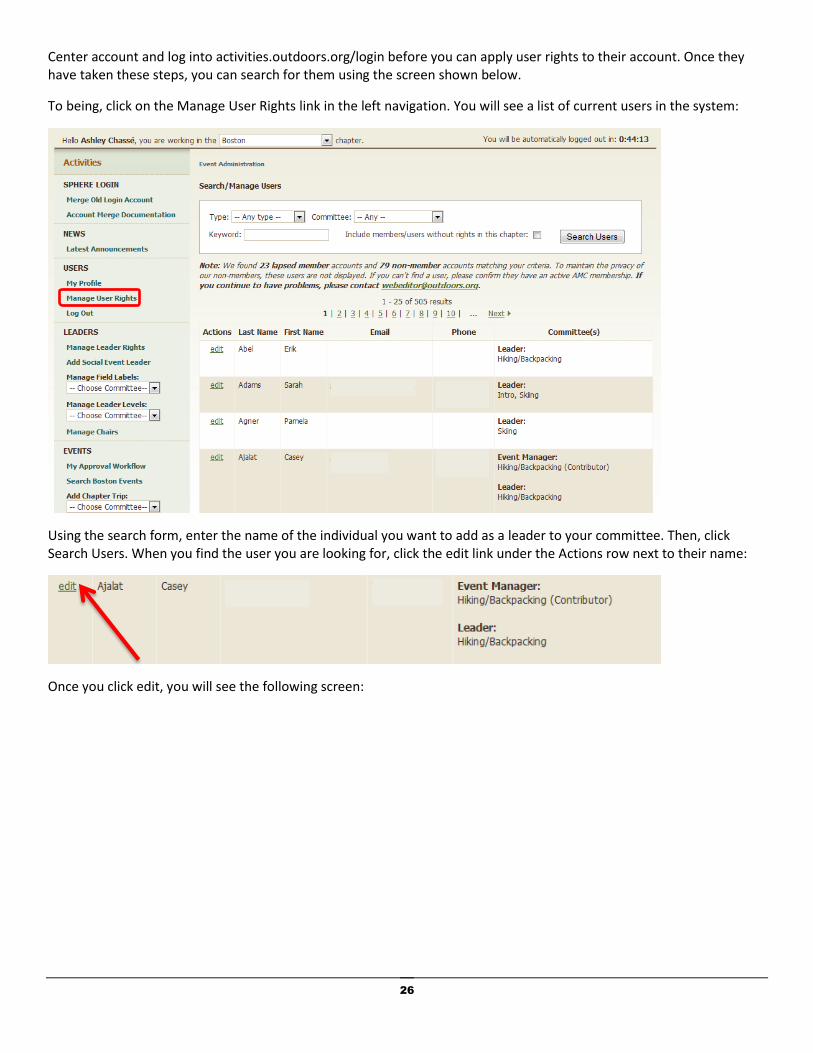
Adding Leaders The activity listings application allows Leader Managers the right to add new leaders to their respective committees. The process for adding leader rights is the same as adding contributors and reviewers. All new users must have a Member
26
Center account and log into activities.outdoors.org/login before you can apply user rights to their account. Once they have taken these steps, you can search for them using the screen shown below.
To being, click on the Manage User Rights link in the left navigation. You will see a list of current users in the system:
Using the search form, enter the name of the individual you want to add as a leader to your committee. Then, click Search Users. When you find the user you are looking for, click the edit link under the Actions row next to their name:
Once you click edit, you will see the following screen:

27
Note: Only the committees you are associated with will show up on an individual’s user right’s page.
To add a new Leader, click on the appropriate option next to the committee name. Clicking on the appropriate rights will automatically update the user’s account privileges.
Additional fields required for leaders in the committee will show when applicable.
Once you have finished update the user’s rights, you are all set. No additional steps are needed.
Additionally, if you wish to remove privileges from a user, you can do so by following the same steps as above and selecting the ‘None’ options next to the committee.


