75
| Date post: | 22-Dec-2015 |
| Category: |
Documents |
| Upload: | georgesar7 |
| View: | 60 times |
| Download: | 1 times |

Copyright © 2013 Dassault Systèmes GEOVIA Inc.
All rights reserved. Dassault Systèmes GEOVIA Inc. publishes this documentation for the sole use of
GEOVIA product licensees.
Without written permission, you may not sell, reproduce, store in a retrieval system, or transmit
any part of this documentation. For such permission, or to obtain extra copies please contact your
local GEOVIA office, or visit www.3ds.com/GEOVIA.
This software and documentation is proprietary to Dassault Systèmes GEOVIA Inc. and, except
where expressly provided otherwise, does not form part of any contract. Changes may bemade in
products or services at any timewithout notice.
While every precaution has been taken in the preparation of this manual, neither the authors nor
GEOVIA assumes responsibility for errors or omissions. Neither will be held liable for any damages
caused or alleged to be caused from the use of the information contained herein.
Dassault Systèmes GEOVIA Inc. offers complete 3D software tools that let you create, simulate,
publish, and manage your data.
GEOVIA, the GEOVIA logo, combinations thereof, and GEMS, Surpac, Minex, MineSched, Whittle,
PCBC, InSite, and Hub are either trademarks or registered trademarks of Dassault Systèmes or its
subsidiaries in the US and/or other countries.
Product
GEOVIAMinex™ 6.3
Last modified: Friday, 30 August 2013
OP Dump Scheduling tutorial

Table of Contents
About this document 5
Overview 5
Requirements 5
Objectives 5
Workflow 7
Document conventions 8
Typographical conventions 8
Keyboard conventions 8
Menu conventions 8
Mouse conventions 9
Form elements 9
Concepts 12
Overview 12
Minex concepts 12
Haul Road Segments 12
Haul Roads 12
Routes 12
Route containing one haul road 13
Route containing more than one haul road 13
Haul road speed limits 13
Setup for this tutorial 15
Tutorial data 15
Activity: Install the data set 15
Data set location 15
Activity: Back up the data set 15
Create a Minex project 16
Activity: Create a Minex project 16
Create a dump schedule database 18
Activity: Create a dump schedule database 18
Create a scenario 20
Activity: Create a scenario 20
Define routes between pits and dumps 21
Activity: Define routes 21

Create a dump sequence 25
Activity: Create a dump sequence 25
Configure the dumps in a scenario 26
Activity: Configure dumps 26
Rank the dumps associated with each pit 26
Activity: Rank dumps 27
Create and run a dump schedule 28
Open prerequisites 28
Activity: Open prerequisites 28
Run a dump schedule 28
Activity: Interactively schedule a dump 28
Activity: Replay an open pit schedule and complete a dump schedule 32
Activity: Replay an existing dump schedule 35
Create haul roads 39
Activity: Create haul road segments between pit 91 and dump 902 39
Activity: View the haulage properties of a haul road segment 44
Activity: Create haul roads 46
Generate ramp distances 51
Activity: Generate ramp distances 51
Create a dump equipment database 53
Configure the equipment in your fleet 54
Activity: Configure loaders 54
Activity: Configure trucks 55
Calculate truck cycle times 58
Activity: Calculate truck cycle times 58
Reporting 60
Generate a detailed dump schedule report 60
Activity: Generate a detailed dump schedule report 60
Generate a truck cycle time report 63
Activity: Generate a truck cycle time report 63
Generate a haulage selection report 69
Activity: Generate a haulage selection report 70
Summary 75

About this document
About this document
OverviewThis tutorial is designed to give you an overview of theMinex OP Dump Scheduling functions. You
use dump scheduling tools to:
l control when and wherematerial can be deposited in dumps
l create infinite dumps to hold wastematerial
l view the percentage of each dump block filled
l visualise the growth of a dump
l generate a detailed report showing the volumes and tonnage of waste that was moved
from pit to dump over a period of time
l define equipment properties for dump scheduling, including rimpull and retard data
l assign speed limits and availability to haul roads
l generate distances for pit ramps and dump ramps
l create routes between pits and dumps, and specify the haul roads used for the routes
l calculate truck cycle times
l report on truck cycle times
This tutorial uses a data set that is copied to your computer when Minex is installed.
When the software has been installed, more detailed information is available in theMinex Help,
which you can open from theHelpmenu. You can also contact your local GEOVIA support office for
training.
RequirementsBefore proceeding with this tutorial, you will need:
l a good understanding of basic Minex concepts
l Minex 6.3 or later installed
l the Dump Scheduling data set
l a licence for the Open Pit Dump Scheduling and Open Pit Haulage Planning modules
If you accept the default settings when you first install Minex, the data sets are installed. If you chose
not to install the data sets, refer to the Set up for this tutorial section of this document.
ObjectivesAfter working through this tutorial, you will be able to:
l create a dump schedule database (.accdb)
l create and configure a scenario:
l define routes between pits and dumps
l create a dump sequence
l rank the dumps associated with a pit
GEOVIA Minex™ 6.3 Page 5 of 75 OP Dump Scheduling tutorial

About this document
l interactively schedule a dump
l replay an open pit schedule and complete a dump schedule
l replay an existing dump schedule
l create haul roads
l generate ramp distances
l create a dump equipment database (.accdb)
l configure the equipment in your fleet
l calculate truck cycle times
l generate reports on waste that was dumped
GEOVIA Minex™ 6.3 Page 6 of 75 OP Dump Scheduling tutorial

Workflow
WorkflowThe following workflow demonstrates the steps in this tutorial. There are other ways to achieve a
similar result.
GEOVIA Minex™ 6.3 Page 7 of 75 OP Dump Scheduling tutorial

Document conventions Typographical conventions
Document conventionsTypographical conventionsSome text in this guide has special formatting to help you identify it as part of a particular element of
information. The following table describes the different text formats and their meanings.
Text format Meaning
<Bold Italic>
Text or data that varies with each input is shown in bold italic font and enclosed in angle brackets.Some examples are installation directories, dates, names, and passwords. When you substitute thetext for the variable, do not include the brackets. For example: <password> requires you tosubstitute a password in place of ‘<password>’.
ItalicA word or phrase to which the author wants to give emphasis. For example: youmust select anitem from the list to continue.
Bold
This font style indicates one of the following:
l A file name, path, or URL.
l Strongly emphasised text. For example, “It is very important to save the data […]”.
l Text that a procedure has instructed you to type.
l A menu option, tab, button, check box, list, option button, text box, or icon.
For example: Save the file as pit1.str.
Keyboard conventionsKey combination Meaning
<key>+<key>Press and hold the first key, then press the second key. For example: CTRL+Z means pressand hold the CTRL key, then press Z.
Menu conventionsWhen you click, or move the pointer over, somemenu commands, a secondary, or subordinate,
menu appears. To indicate that you should select a command on a subordinatemenu, this
documentation uses a greater than (>) sign to separate themain menu command from the
subordinatemenu command. For example, File > Project > Project Managermeans choose the File
menu, move themouse pointer over the Project command, and then select Project Manager on the
subordinatemenu.
GEOVIA Minex™ 6.3 Page 8 of 75 OP Dump Scheduling tutorial

Document conventions Mouse conventions
Mouse conventionsAction Description
Click Press and release the left mouse button without moving the mouse.Right-click Press and release the right mouse button without moving the mouse.Double-click Rapidly click the left mouse button twice without moving the mouse.
Drag <an object>With the mouse pointer over the object, press and hold the left mouse button to select theobject. Move the pointer until the object is in the position you want, and then release themouse button.
RotateUse your finger to make the wheel button roll. Move it forward, that is in a clockwisedirection, or backward, that is in an anticlockwise direction.
Form elementsForms can contain a variety of elements that enable users to carry out operations. Here is an
example form.
Forms can contain the following elements
GEOVIA Minex™ 6.3 Page 9 of 75 OP Dump Scheduling tutorial

Document conventions Form elements
Element Description Example
Title Title of the form.
TabLabelled group of options used for many similar kindsof settings.
Text box orfield
Rectangular box in which you can type text. If the boxalready contains text, you can select that text and editit.
Drop-downcombo box
Closed version of a list box with an arrow next to it.Clicking the arrow opens the list.
Optionbutton
Round button you can use to select one of a group ofmutually exclusive options.
LabelText attached to any option, box, button, or to anyother element of a window or dialog box.
Check boxSquare box that you select or clear to turn an option onor off.
ButtonRectangular or square button that runs a command.Buttons have text labels to indicate their purpose.
IconA graphical button that you can click to run a com-mand.
List boxAny type of box containing a selectable list of items intable format.
GEOVIA Minex™ 6.3 Page 10 of 75 OP Dump Scheduling tutorial

Document conventions Form elements
ElementDescription Example
MenuA set of options or com-mands that you can run.
Spin box
A text box with up anddown arrows that you canclick to move through aset of fixed values. Youcan also type a valid valuein the box.
Tree
A graphical representationof a hierarchical structure.A plus sign next to anitem on the tree indicatesthat you can expand theitem to show subordinateitems; a minus sign indic-ates that you can collapsethe item.
GEOVIA Minex™ 6.3 Page 11 of 75 OP Dump Scheduling tutorial

Concepts HaulRoad Segments
Concepts
OverviewThe concepts presented in this tutorial are concepts from themining domain or concepts specific to
Minex.
Minex concepts
Haul Road SegmentsHaul road segments are physical locations, with coordinates. They are a way to travel from one point
to another. A haul road segment is represented by a string that has a Data Type of Road Design, and
a String Type of CentLine.
Haul RoadsA haul road is a physical path, from a pit to a dump. Haul roads aremade of one or more haul road
segments, and have coordinates.
RoutesA route is a virtual link, that you can use to move from one location to another. A route can contain
one or more haul roads.
GEOVIA Minex™ 6.3 Page 12 of 75 OP Dump Scheduling tutorial

Concepts Haul road speed limits
Route containing one haul road
Route containing more than one haul road
Haul road speed limitsYou can define the speed limits for haul roads when you create the haul road segments. For each
haul road segment and intersection, Minex uses the speed limit that applies to the specific situation.
For example, when the vehicle is travelling from the pit to the dump on along haul road segment 1,
Minex uses:
GEOVIA Minex™ 6.3 Page 13 of 75 OP Dump Scheduling tutorial

Concepts Haul road speed limits
l the Entry Speed Outbound for the start of the segment
l the Speed Limit Outbound for the length of the segment
l the Exit Speed Outbound for the end of the segment
GEOVIA Minex™ 6.3 Page 14 of 75 OP Dump Scheduling tutorial

Setup for this tutorial Activity: Install the data set
Setup for this tutorial
Tutorial dataWhen you install Minex and accept the default installation settings, the tutorial data is installed on
your machine. If you choose not to install the tutorial data sets when installing Minex, you can install
them separately.
Activity: Install the data set
1. Double-click theMinexInstallation.msi file on the installation CD.2. At theWelcomemessage, click Next.3. SelectModify, and click Next.
Minex displays the Custom Setup options.
4. Click the icon next to the Tutorial Data Sets option and select This feature will be
installed on local hard drive.
5. Click Next, and follow the remaining installation messages.
Data set locationThe data set is installed to the following location by default.
Operating system LocationWindows 7 orWindows 8
C:\Users\Public\GEOVIA\GEOVIAMinex\6x\shared\tutorialData\Datasets\Dump_Scheduling\
Windows XP C:\Documents and Settings\All Users\GEOVIA\GEOVIAMinex\6x\shared\tutorialData\Datasets\Dump_Scheduling\
Note: If you changed the default settings when you installed Minex, the files may be in a different
location.
Activity: Back up the data setIt is a good idea to keep a backup copy of the data in case you want to restart the tutorial with a
fresh set of data later.
1. Start Windows Explorer.2. Browse to the data set.3. Right-click theDump_Scheduling folder, and choose Send To > Compressed (zipped)
folder.4. In Windows Explorer, make a new folder for backups, for example C:\minexBackups, and
copy the zip file to that folder.
GEOVIA Minex™ 6.3 Page 15 of 75 OP Dump Scheduling tutorial

Setup for this tutorial Activity: Create aMinexproject
Create a Minex projectTo make it easy to work with your data, you will create a Minex project and set the working directory
to the location of the tutorial data (Dump_Scheduling).
Activity: Create a Minex project
1. Start Minex.2. Select File > Project > Project Manager.3. Click New.4. In the Project Name field, typeDumpSchedulingTutorial.5. Browse to theDump_Scheduling folder.
Tip: When you are browsing to this folder you can click the Jump to My Documentsicon to select a folder that is close to the folder of the data set.
When creating a new project, you have the option of using the 'file collection' setting. You
choose a file collection setting when you want to have the data set organised into
subfolders with meaningful names rather than a single folder. For this tutorial you will not
organise the data.
6. Click Finish.
GEOVIA Minex™ 6.3 Page 16 of 75 OP Dump Scheduling tutorial

Setup for this tutorial Activity: Create aMinexproject
The project is set up and theMinex Explorer displays theDump_Scheduling folder and
subfolders.
Note: If you use Hub to manage your files, Hub status icons are displayed beside the
files in theMinex Explorer. For this tutorial, Hub status icons are not shown. For more
information on Hub, refer to the Help, or the Hub training guide available with theMinex
tutorials.
Tip: In theMinex Explorer you can select the top level folder, which is Dump_Scheduling for this project, look at the Properties pane, and see the full path of the
project. This is useful if you forget, or want to verify, where the data is.
GEOVIA Minex™ 6.3 Page 17 of 75 OP Dump Scheduling tutorial

Create a dump schedule database Activity: Create a dump schedule database
Create a dump schedule databaseYou create a dump schedule database (.accdb) so you can save the dump schedules you create.
Activity: Create a dump schedule databaseTo create a dump schedule database (.accdb):
1. Choose File > New.
TheNew Wizard opens.
2. Select theDumpDB.accdb template, and click Next.
GEOVIA Minex™ 6.3 Page 18 of 75 OP Dump Scheduling tutorial

Create a dump schedule database Activity: Create a dump schedule database
3. In theName field, typeDump.
Note: If you do not provide a name for the dump schedule database, the default name
DumpDB is used.4. Click Finish.
The dump schedule database (.accdb) is created and is visible in theMinex Explorer.
The tick icon beside the database indicates that it is open.
GEOVIA Minex™ 6.3 Page 19 of 75 OP Dump Scheduling tutorial

Create a scenario Activity: Create a scenario
Create a scenarioYou create a scenario to hold all of the information about the relationships between pits and dumps.
You configure your scenario in the Scenario Manager, which is used to manage dump scheduling
data. The Scenario Manager can contain one or more scenarios. Each scenario contains routes
between pits and dumps, and the constraints for each dump, including where and when material can
be dumped, and how the dump is filled. You can also use the Scenario Manager to define truck and
loader parameters for your fleet.
Note: Before you create a scenario, all the pits and dumps you want to use in the scenario must
exist.
Activity: Create a scenarioTo create a scenario:
1. In theMinex Explorer, right-click the reservesDB PIT_DUMP.dbr, and chooseOpen.
A tick icon appears beside the database, indicating that it is open.2. ChooseOP Dump Schedule > Scenario Manager.
The Scenario Manager appears.3. Click the Load Scenario tab.4. In the Load Scenario File section, click Create New.
The Save... dialog opens.5. In the File name field, type dumpScenario, and click Save.
You can now create a scenario.6. In theMake Scenario Current section, click Create New.
A new scenario is visible in the Scenario panel.
GEOVIA Minex™ 6.3 Page 20 of 75 OP Dump Scheduling tutorial
Create a scenario Activity: Define routes
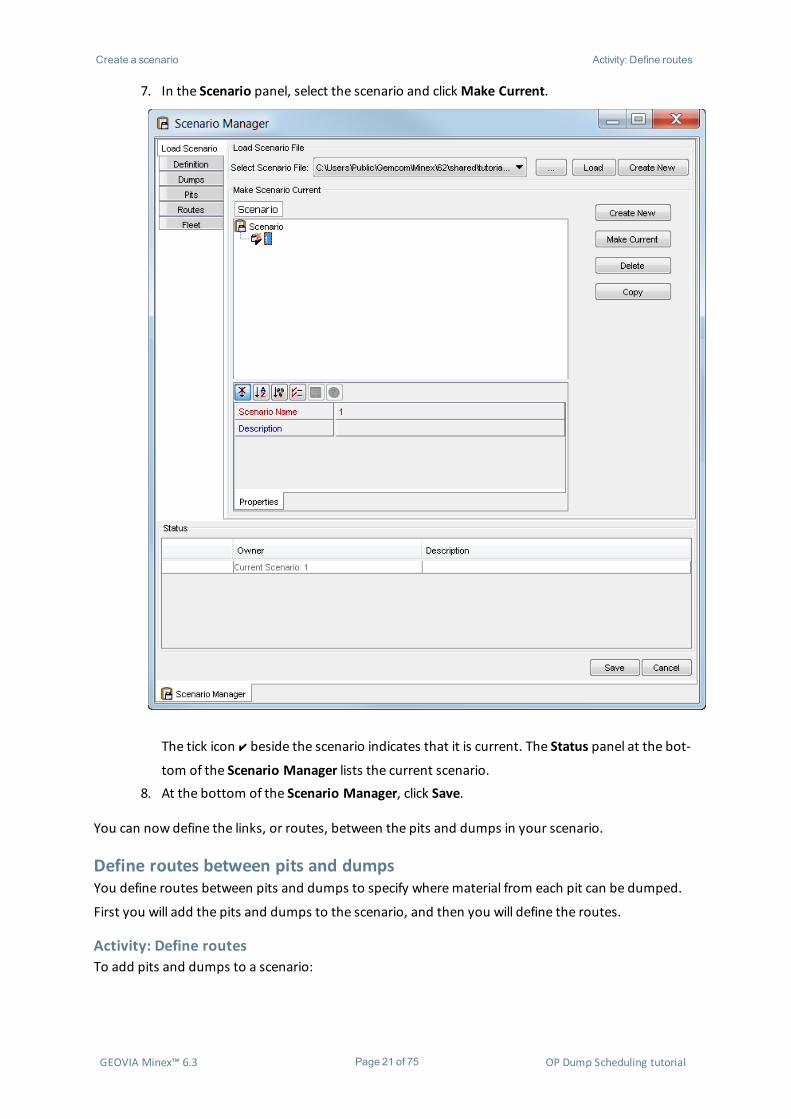
7. In the Scenario panel, select the scenario and clickMake Current.
The tick icon beside the scenario indicates that it is current. The Status panel at the bot-
tom of the Scenario Manager lists the current scenario.8. At the bottom of the Scenario Manager, click Save.
You can now define the links, or routes, between the pits and dumps in your scenario.
Define routes between pits and dumpsYou define routes between pits and dumps to specify wherematerial from each pit can be dumped.
First you will add the pits and dumps to the scenario, and then you will define the routes.
Activity: Define routesTo add pits and dumps to a scenario:
GEOVIA Minex™ 6.3 Page 21 of 75 OP Dump Scheduling tutorial

Create a scenario Activity: Define routes
1. In the Scenario Manager, click theDefinition tab.2. Add a pit to the scenario:
a. In the Palette to the right, click the Pit icon , and drag it into theDefin-ition panel in the centre.
The Select Pit/Dump dialog appears.
b. From the Pit/Dump number list, select 91.
Note: The pits available in the list are those in the current reservesDB.c. Click Ok.
Pit 91 is added to theDefinition panel.3. Add dumps to the scenario:
a. In the Palette, click theDump icon , and drag it into theDefinition panelin the centre.
The Select Pit/Dump dialog appears.
b. From the Pit/Dump number list, select 902.
Note: The dumps available in the list are those in the current reservesDB.c. Click Ok.
Dump 902 is added to theDefinition panel.
Note: The Status panel shows an error for dump 902: The sequence file of
this dump is not set. You will set the sequence file later in the process.
GEOVIA Minex™ 6.3 Page 22 of 75 OP Dump Scheduling tutorial

Create a scenario Activity: Define routes
d. Repeat the process to add Dump 903.
Note: The Status panel shows an error for dump 903: The sequence file of
this dump is not set. You will set the sequence file later in the process.4. Add an infinite dump to the scenario:
Note: You do not necessarily need to add an infinite dump at this stage. You could
begin scheduling without an infinite dump, however, you are adding the infinite dump
here to accommodate overflow from the other dumps. An infinite dump has no geo-
metry, so cannot be displayed. However, it is a location wherematerial may be dumped,
and can be reported on. When you create an infinite dump, it is created in the
reservesDB.
a. In the Palette, click the Infinite Dump icon , and drag it into theDefin-ition panel in the centre.
The Select/Add New Infinite Dump dialog appears.
b. In theNew Dump No field, type 905.c. Click Ok.
The infinite dump is added to the scenario, and to the reservesDB.5. Link the pit and dumps with routes:
a. In the Palette tab, click the Route icon .The Route icon is highlighted.
b. In theDefinition panel, click pit 91, and then dump 902.
You have created a route between pit 91 and dump 902.c. Repeat the process to create routes between pit 91 and dump 903 and pit 91
and dump 905.
GEOVIA Minex™ 6.3 Page 23 of 75 OP Dump Scheduling tutorial

Create a scenario Activity: Define routes
Your finished definition should resemble the following:
6. On the bottom of the Scenario Manager, click Save.
GEOVIA Minex™ 6.3 Page 24 of 75 OP Dump Scheduling tutorial

Create a dump sequence Activity: Create a dump sequence
Create a dump sequenceYou can use theDump Sequence Generator to create a practical sequence for dumping material in a
dump. You can specify rules for dumping material, and you can use the Replay tab to preview the
dump sequence in Graphics.
Activity: Create a dump sequenceTo create a dump sequence:
1. ChooseOP Dump Schedule > Initialize > Dump Sequence Generator.
TheDump Sequence Generator form appears.
2. In theDump Display section, from theDump Pit list, select 902.3. In the File Selection section, in the File field, typeDump902_sequence.4. In the Sequence Generator section of the Automatic Sequence Generator tab, click Auto-
Generator.5. The Sequence Generator table is populated.6. Click Save File.
The sequence file is saved, and is visible in theMinex Explorer.
GEOVIA Minex™ 6.3 Page 25 of 75 OP Dump Scheduling tutorial

Create a dump sequence Activity: Configure dumps
7. Repeat the process to create a dump sequence file, called Dump903_sequence, for dump
903.
Tip: Ensure that the Sequence Generator table shows three benches for dump 903.Note: You do not need to create a dump sequence for dump 905. Dump 905 is an infin-
ite dump, and has no geometry, and therefore no strips, blocks, or layers to fill in any par-
ticular order.8. Close theDump Sequence Generator form.
Configure the dumps in a scenarioYou can specify the parameters of dumps to control when and wherematerial can be placed in
dumps. You can:
l specify when dumps are available
l choose which sequence file is used for each dump
l define any lag associated with dumping material near blocks that have not been com-
pletely mined
For this guide, you will only use a sequence file.
Activity: Configure dumpsTo configure dumps:
1. In the Scenario Manager, click theDumps tab.2. Within theDumps tab, click the Sequence tab.3. In theDump Selection panel, select Dump 902.
4. Use the ellipsis button to locate dump902_sequence.DPSQ, and click Select.5. In the Sequence tab, click Load.
The error message for Dump 902 is removed from the Status panel.6. Repeat steps 3 to 5 to load the sequence file dump903_sequence.DPSQ for dump 903.
Note: You do not need to load a sequence file for the infinite dump 905.7. To save the changes to the scenario file, on the Scenario Manager click Save.
Rank the dumps associated with each pitYou can rank the dumps associated with each pit. Minex uses the ranking to determine the order in
which dumps are filled with waste from a pit. The dump with the highest ranking (for example 1) is
filled completely, then the dump with the next highest ranking (for example 2). All dumps with the
same ranking are filled at the same time based on the sequence of each dump.
Note: Infinite dumps do not contain blocks, so the dump cannot be filled completely. If you
indicate that an infinite dump should be filled before normal dumps, material is dumped only in the
infinite dump. Because the infinite dump is never filled completely, Minex cannot start to dump
material in the next dump. If the infinite dump has a higher priority than the other dumps, the other
dumps will never be filled.
GEOVIA Minex™ 6.3 Page 26 of 75 OP Dump Scheduling tutorial
Create a dump sequence Activity: Rankdumps
Activity: Rank dumpsTo rank dumps:
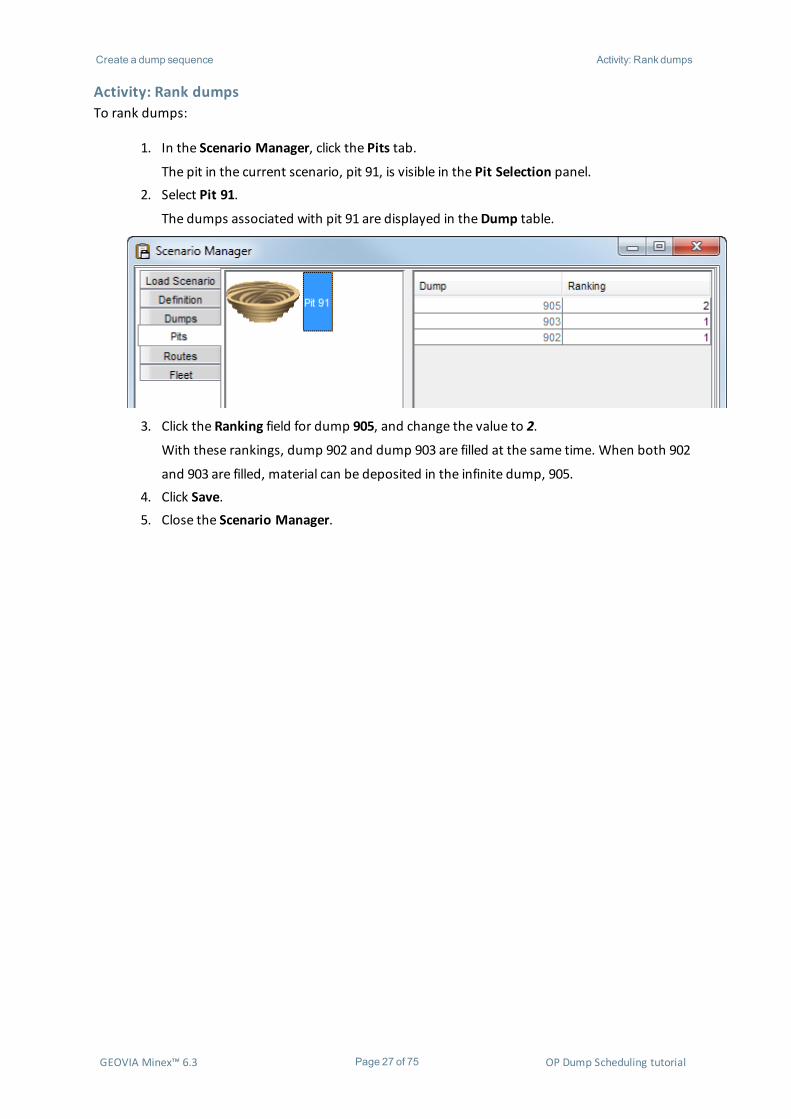
1. In the Scenario Manager, click the Pits tab.
The pit in the current scenario, pit 91, is visible in the Pit Selection panel.2. Select Pit 91.
The dumps associated with pit 91 are displayed in theDump table.
3. Click the Ranking field for dump 905, and change the value to 2.
With these rankings, dump 902 and dump 903 are filled at the same time. When both 902
and 903 are filled, material can be deposited in the infinite dump, 905.4. Click Save.5. Close the Scenario Manager.
GEOVIA Minex™ 6.3 Page 27 of 75 OP Dump Scheduling tutorial

Create and run a dump schedule Activity: Open prerequisites
Create and run a dump scheduleAfter you have created and defined an appropriate scenario, you can create a dump schedule, and
then run the schedule.
You can:
l create a new open pit schedule and a new dump schedule and schedule both together
l replay an existing open pit schedule and watch the dump fill as the pit is mined
l replay an existing dump schedule
Open prerequisitesThere are several prerequisites you will need while working with your dump schedule, you will open
them now.
Activity: Open prerequisitesTo open the prerequisites:
1. In theMinex Explorer, open the following files:
l the calendar file 10x2x7.BCAL
l the open pit schedule database PIT_SCHEDULE.dbs
l the pit schedule equipment file Equipment.csv
l the parameter file PIT_SCHEDULE.mpf
Tip: To open a file, in theMinex Explorer right-click the file and chooseOpen, ordouble-click the file.
Run a dump schedule
Activity: Interactively schedule a dumpTo interactively schedule a dump:
1. Create a dump schedule:a. ChooseOP Dump Schedule > Initialize > Create Schedule.
The Create Schedule form appears.
GEOVIA Minex™ 6.3 Page 28 of 75 OP Dump Scheduling tutorial

Create and run a dump schedule Activity: Interactively schedule a dump
b. Fill in the form as shown, and click New Pit Schedule.
The Create New Schedule form opens, where you can create a new open pit
schedule.c. Fill in the form as shown.
d. Click Ok.
The new open pit schedule, Main 2, is created and is visible in theMinex
Explorer under PIT_SCHEDULE.dbs.e. On the Create Schedule form, click Ok.
The new dump schedule is created and is visible in theMinex Explorer under
Dump.accdb. The associated scenario, 1, and pit schedule, 2, aremade cur-
rent, indicated by a tick icon in theMinex Explorer.2. Set up the OP schedule rules:
a. Make sure the Scheduling tab is selected.b. On theDetailed Schedule toolbar, click .
The Schedule Mining Rules form appears.
Tip: If you can't see theDetailed Schedule toolbar, click the Schedulingtab.
GEOVIA Minex™ 6.3 Page 29 of 75 OP Dump Scheduling tutorial

Create and run a dump schedule Activity: Interactively schedule a dump
c. Define the rules for your open pit schedule.
Typically you would define rules that suit your specific circumstances. For this
activity, leave the default settings in place.3. Display the reserves in Graphics:
a. ChooseOP Dump Schedule > Display > Dump Schedule 3D Display.
TheDump Schedule 3D Display form appears.b. Fill in the form as shown.
TheDump Schedule 3D Display form functions in a similar way to the OP
scheduling Schedule 3D Display form.
c. Click Ok.
The pit reserves are displayed in Graphics. The dump reserves are not dis-
played, because the Current Date is the start of the schedule and the dumps
have not yet been filled.
GEOVIA Minex™ 6.3 Page 30 of 75 OP Dump Scheduling tutorial
Create and run a dump schedule Activity: Interactively schedule a dump
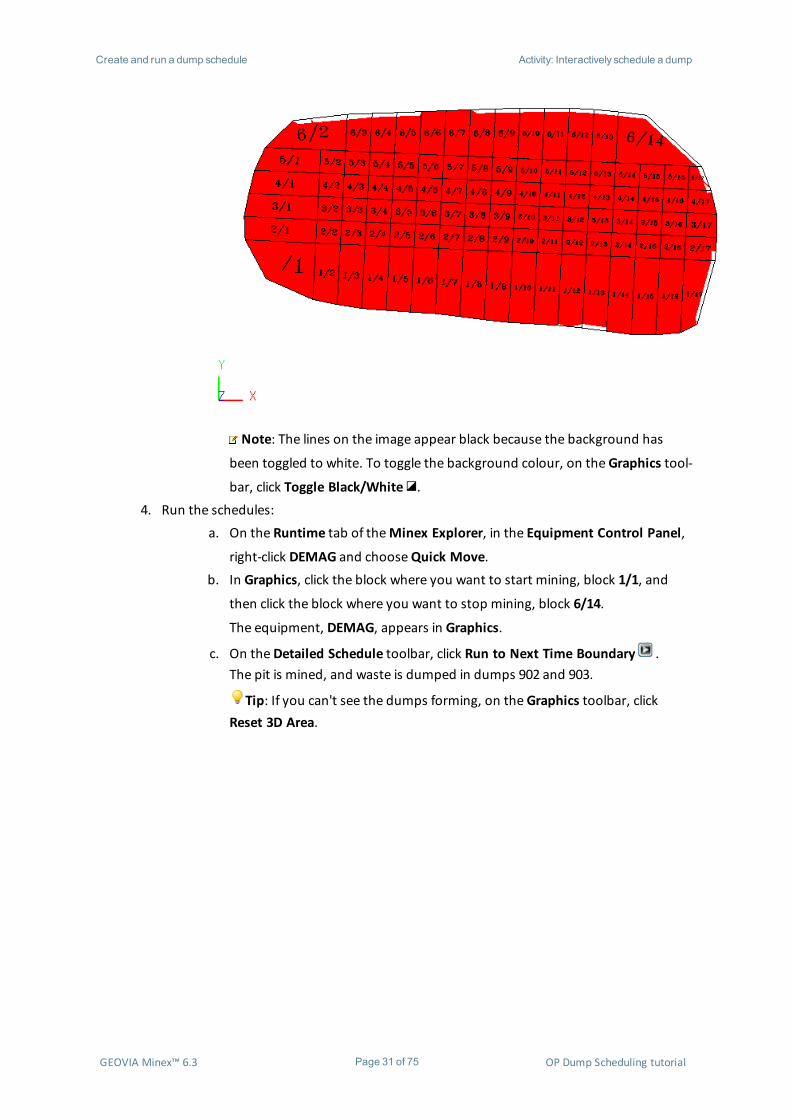
Note: The lines on the image appear black because the background has
been toggled to white. To toggle the background colour, on theGraphics tool-
bar, click Toggle Black/White .4. Run the schedules:
a. On the Runtime tab of theMinex Explorer, in the Equipment Control Panel,
right-click DEMAG and chooseQuick Move.b. In Graphics, click the block where you want to start mining, block 1/1, and
then click the block where you want to stop mining, block 6/14.
The equipment, DEMAG, appears in Graphics.
c. On theDetailed Schedule toolbar, click Run to Next Time Boundary .The pit is mined, and waste is dumped in dumps 902 and 903.
Tip: If you can't see the dumps forming, on theGraphics toolbar, clickReset 3D Area.
GEOVIA Minex™ 6.3 Page 31 of 75 OP Dump Scheduling tutorial

Create and run a dump schedule Activity: Replayan open pit schedule and complete a dump schedule
The details of thematerial movements are displayed in theOutput Window.d. Progress the schedule by, on theDetailed Schedule toolbar, clicking Run to
Next Time Boundary or clicking to run until the next activity.The equipment begins to mine the pit and waste is deposited in dumps 902
and 903.e. Continue scheduling by assigning equipment to mine and progressing the
schedule.
When dump 902 and 903 are filled, the waste is deposited in the infinite dump
905. The infinite dump is not displayed in Graphics, but can be reported on.
Activity: Replay an open pit schedule and complete a dump scheduleTo replay an open pit schedule and fill a dump schedule:
GEOVIA Minex™ 6.3 Page 32 of 75 OP Dump Scheduling tutorial

Create and run a dump schedule Activity: Replayan open pit schedule and complete a dump schedule
1. Open the scenario file:a. In theMinex Explorer, right-click the scenario file SCENARIO.sco, and choose
Open.2. Create a dump schedule:
a. ChooseOP Dump Schedule > Initialize > Create Schedule.
The Create Schedule form appears.b. Fill in the form as shown.
c. Click Ok.
The new dump schedule is visible in theMinex Explorer. Minexmakes the
scenario used in the dump schedule, scenario 6, and the associated pit sched-
ule, 6, current, indicated by a tick icon in theMinex Explorer.3. Display the reserves in Graphics:
a. ChooseOP Dump Schedule > Display > Dump Schedule 3D Display.
TheDump Schedule 3D Display form appears.
GEOVIA Minex™ 6.3 Page 33 of 75 OP Dump Scheduling tutorial

Create and run a dump schedule Activity: Replayan open pit schedule and complete a dump schedule
b. Fill in the form as shown.
Tip: Ensure you select Dump Schedule Number 2, and set the CurrentDate to 01-Jan-13 00:00.
c. Click Ok.
The pit reserves are displayed in Graphics. The dump reserves are not dis-
played, because the Current Date is the start of the schedule and the dumps
have not yet been filled.4. On theDetailed Schedule toolbar, from theMode list, select Schedule Replay.
5. To replay the open pit schedule and complete the dump schedule, on theDetailed Sched-
ule toolbar, click Replay .The equipment mines the pits, and waste is placed in the dumps.
GEOVIA Minex™ 6.3 Page 34 of 75 OP Dump Scheduling tutorial

Create and run a dump schedule Activity: Replayan existing dump schedule
Activity: Replay an existing dump scheduleTo replay an existing dump schedule:
1. In theMinex Explorer, open the dump schedule database, DUMP_SCHEDULE.accdb.2. Make sure that the scenario file SCENARIO.sco is open.
Tip: To open the scenario file, in theMinex Explorer, right-click the scenario fileSCENARIO.sco, and chooseOpen.
3. Expand the database, DUMP_SCHEDULE.accdb, right click the dump schedule 5, and
chooseMake Current.
Minexmakes the scenario used in the dump schedule, scenario 5, and the associated pit
schedule, 5, current, indicated by a tick icon in theMinex Explorer.4. Display the reserves in Graphics:
a. ChooseOP Dump Schedule > Display > Dump Schedule 3D Display.
TheDump Schedule 3D Display form appears.
GEOVIA Minex™ 6.3 Page 35 of 75 OP Dump Scheduling tutorial

Create and run a dump schedule Activity: Replayan existing dump schedule
b. Fill in the form as shown.
Tip: Ensure you select Dump Schedule Number 5, and set the CurrentDate to 01-Jan-13 00:00.
c. Click Ok.
The pit reserves are displayed in Graphics. The dump reserves are not dis-
played, because the Current Date is the start of the schedule and the dumps
have not yet been filled.5. Playback the schedule:
a. ChooseOP Dump Schedule > Display > Dump Schedule Playback.
TheDump Schedule Playback form appears.
GEOVIA Minex™ 6.3 Page 36 of 75 OP Dump Scheduling tutorial

Create and run a dump schedule Activity: Replayan existing dump schedule
b. Fill in the form as shown.
Note: The "D" in the Schedule Number, indicates a dump schedule is being
replayed.c. Click Ok.
The open pit schedule and dump schedule are replayed in Graphics.
GEOVIA Minex™ 6.3 Page 37 of 75 OP Dump Scheduling tutorial

Create and run a dump schedule Activity: Replayan existing dump schedule
GEOVIA Minex™ 6.3 Page 38 of 75 OP Dump Scheduling tutorial

Create haul roads Activity: Create haul road segments between pit 91 and dump 902
Create haul roadsIn theDefinition tab of the Scenario Manager, you created routes to specify wherematerial from
each pit could be dumped. Now, you will create haul roads to define the physical path, from a pit to a
dump. Haul roads aremade of one or more haul road segments.
Activity: Create haul road segments between pit 91 and dump 902To create haul road segments:
1. Clear Graphics.2. Click the 3D Design tab.3. Make sure the geometry file PIT_DUMP_HAULROADS.GM3 is open.4. Press Ctrl + D, to open theGeometry Display form.5. Fill in the form as shown.
Because you are creating haul road segments between pit 91 and dump 902, you only
need to display the geometry for that pit and that dump.6. Click Ok.
Pit 91 and dump 902 are displayed in Graphics.
GEOVIA Minex™ 6.3 Page 39 of 75 OP Dump Scheduling tutorial

Create haul roads Activity: Create haul road segments between pit 91 and dump 902
Next, you will display the topography.7. In theMinex Explorer, expandMerged.grd.8. Select TOPS.grd, right-click, and chooseDisplay and Open.
The grid is displayed in Graphics.
GEOVIA Minex™ 6.3 Page 40 of 75 OP Dump Scheduling tutorial

Create haul roads Activity: Create haul road segments between pit 91 and dump 902
9. Choose String > Create.
The String - Create form appears.10. Fill in the form as shown.
Each haul road segmentmust have a unique combination ofGroup,Map, Ident, and
GEOVIA Minex™ 6.3 Page 41 of 75 OP Dump Scheduling tutorial

Create haul roads Activity: Create haul road segments between pit 91 and dump 902
Class.
It is strongly recommended that you use the following naming convention for haul road
segments:Field ValueGroup The number of the pit.
Map The number of the dump.
IdentHx_SyWhere x is the number of the haul road, and y is the number of the segment within that haulroad.
11. Click Ok.
The default Digitisemode is Snap to Solid, so when you digitise the haul road, it adheres
to the topography represented by the TOPS grid.12. Digitise a haul road segment from Pit 90 towards Dump 902, similar to the image below.
Tip: When you have finished digitising the segment, right-click in Graphics, and chooseAccept.
13. Reopen the String-Create form.
GEOVIA Minex™ 6.3 Page 42 of 75 OP Dump Scheduling tutorial

Create haul roads Activity: Create haul road segments between pit 91 and dump 902
14. Fill in the form as shown.
Tip: If you create the second segment using a differentWeight than the previous seg-ment, it is easier to tell them apart.
15. Click Ok.16. From theDigitise list, select Snap to Point.
The segments in a haul road cannot have gaps between them, so you need to ensure the
new segment connects to the previous segment.17. When Minex indicates the end of the previous segment with a square, digitise the start of
the new segment.
18. From theDigitise list, select Snap to Solid.
Now the rest of the haul road segment will adhere to the topography.
GEOVIA Minex™ 6.3 Page 43 of 75 OP Dump Scheduling tutorial
Create haul roads Activity: View the haulage properties of a haul road segment
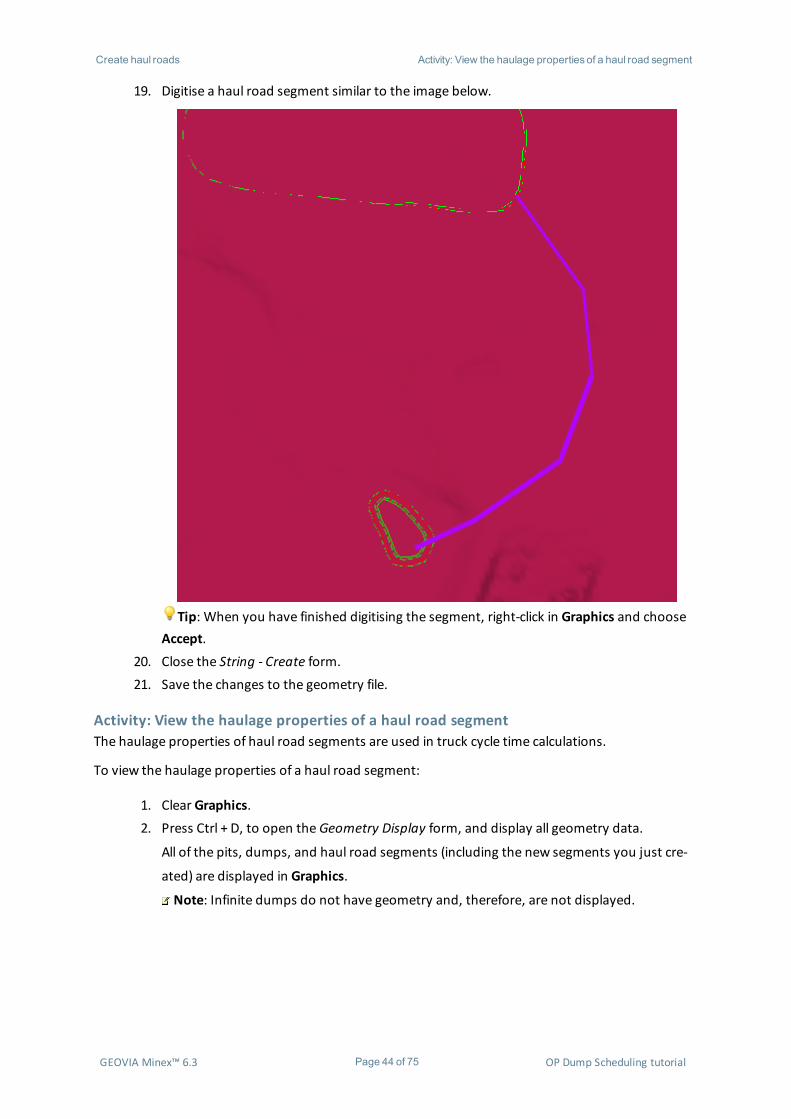
19. Digitise a haul road segment similar to the image below.
Tip: When you have finished digitising the segment, right-click in Graphics and chooseAccept.
20. Close the String - Create form.21. Save the changes to the geometry file.
Activity: View the haulage properties of a haul road segmentThe haulage properties of haul road segments are used in truck cycle time calculations.
To view the haulage properties of a haul road segment:
1. Clear Graphics.2. Press Ctrl + D, to open theGeometry Display form, and display all geometry data.
All of the pits, dumps, and haul road segments (including the new segments you just cre-
ated) are displayed in Graphics.
Note: Infinite dumps do not have geometry and, therefore, are not displayed.
GEOVIA Minex™ 6.3 Page 44 of 75 OP Dump Scheduling tutorial

Create haul roads Activity: View the haulage properties of a haul road segment
3. In Graphics, select the haul road segment you have just created, H8_S2.
The properties of the string are visible in the Properties pane below theMinex Explorer.4. In the Properties pane, click theHaulage tab.
The haulage properties are displayed for the string. The properties on theHaulage tab are
used in truck cycle time calculations.
GEOVIA Minex™ 6.3 Page 45 of 75 OP Dump Scheduling tutorial

Create haul roads Activity: Create haul roads
You can edit the properties of the segment to match the physical haul road at your mine.
For this tutorial, you will leave the default settings in place.
Activity: Create haul roadsTo create a haul road:
1. In theMinex Explorer:a. Right-click Dump.accdb, and chooseOpen.b. Right-click dumpScenario.sco, and chooseOpen.c. Expand Dump.accdb, right-click schedule 1, and chooseMake Current.
2. Make sure that the geometry file PIT_DUMP_HAULROADS.GM3 is open, and that all of
the geometry data is displayed in Graphics.
3. ChooseOP Dump Schedule > Scenario Manager.4. Click the Routes tab.5. In the Routes panel, select P 91 - D 902.
Note: The routes in the Routes panel are those you created when you linked the pit
and dumps in theDefinition tab. This route is the link between pit 91 and dump 902. The
haul road in the route contains the haul road segments you digitised.
GEOVIA Minex™ 6.3 Page 46 of 75 OP Dump Scheduling tutorial

Create haul roads Activity: Create haul roads
6. Click Create New.
TheHaul Road Create/Edit form appears.
Note: You can also open theHaul Road Create/Edit form by choosing OP Dump Sched-
ule > Initialize > Create/Edit Haul Road.7. In theHaul Road Definition section, in theHaul Road field, typeHR8.8. In the Segment Selection section, click Pick.
You can now pick the haul road segments in Graphics. You must pick the segments in the
order they will be used, that is, from the pit to the dump.9. Select the haul road segments as shown, and then right-click in Graphics to finish digit-
ising.
GEOVIA Minex™ 6.3 Page 47 of 75 OP Dump Scheduling tutorial

Create haul roads Activity: Create haul roads
The Selected Segments table is populated.
GEOVIA Minex™ 6.3 Page 48 of 75 OP Dump Scheduling tutorial

Create haul roads Activity: Create haul roads
You have defined the haul road between pit 91 and dump 902 as a sequence of haul road
segments.10. Click Validate.
Minex checks that the haul road segments form a continuous path and are digitised in
the same direction, that is, from pit to dump. Amessage appears in theMessage Box:
Haul Road segment validation successful.11. Click Ok.12. Repeat the process to create the route P 91 - D 903.
Tip: Clear the Selected Segments table before you create the new route by right-click-ing in the table and choosing Clear Table.
GEOVIA Minex™ 6.3 Page 49 of 75 OP Dump Scheduling tutorial

Create haul roads Activity: Create haul roads
13. Close theHaul Road Create/Edit form.14. On the Scenario Manager, click Save.
GEOVIA Minex™ 6.3 Page 50 of 75 OP Dump Scheduling tutorial

Generate ramp distances Activity: Generate ramp distances
Generate ramp distancesYou can generate ramp distances to calculate the estimated distance from a block centroid to the pit
exit or dump entry. The pit exit is the haul road endpoint that is closest to the pit; the dump entry is
the haul road endpoint that is closest to the dump.
The ramp distances and grades are stored in the dump database, and used during cycle time
calculations.
Activity: Generate ramp distancesTo generate ramp distances:
1. Make sure that SCENARIO.sco is open, and that Dump.accdb is open and schedule 2 is
current.2. ChooseOP Dump Schedule > Build > Ramp Distance Generator.
The Ramp Distance Generator form appears.
3. From the Route list, select P 90 - D 904.
The Route is the path the vehicle uses when travelling between the pit and the dump.4. Make sure the All check box is selected.
Tip: To generate ramp distances for a specific haul road, clear the All check box andthen, from theHaul Road list, select the haul road.
5. Make sure the Pit Exit and Dump Entry check boxes are selected.
You can use the Pit Exit and Dump Entry check boxes to generate ramp distances for
GEOVIA Minex™ 6.3 Page 51 of 75 OP Dump Scheduling tutorial
Generate ramp distances Activity: Generate ramp distances
only pit entries or only dump exits. For this exercise, you will generate ramp distances for
both.6. In theMax Gradient field, type 6.
Tip: Ensure that the selected unit is %.TheMax Gradient is themaximum acceptable gradient for the ramp from the block
centroid to the pit entry or dump exit. If the generated ramp exceeds theMax Gradient,
Minex extends the length of the ramp.7. Click Ok.
Minex generates the ramp distances for each 'block: pit/dump entry' and each 'block: pit/-
dump exit' pair, and saves the ramp distances in the dumpDB. Amessage appears in the
Message Box: Ramp distances computed successfully.8. Repeat the process to generate ramp distances for Route P 91 - D 901.9. Close the Ramp Distance Generator form.
GEOVIA Minex™ 6.3 Page 52 of 75 OP Dump Scheduling tutorial

Create a dump equipment database Activity: Generate ramp distances
Create a dump equipment databaseYou create a dump equipment database (.accdb) so you can save the attributes of the dump
equipment you configure.
Note: Dump schedule databases and dump equipment databases both have the same extension
(.accdb). Minex can differentiate between dump schedule databases and dump equipment
databases because they contain different tables.
To create a dump equipment database (.accdb):
1. Choose File > New.
TheNew Wizard opens.
2. Select theDumpEquipDB.accdb template, and click Next.
GEOVIA Minex™ 6.3 Page 53 of 75 OP Dump Scheduling tutorial

Create a dump equipment database Activity: Configure loaders
3. In theName field, typeDumpEquip.
Note: If you do not provide a name for the dump equipment database, the default
nameDumpEquipDB is used.4. Click Finish.
The dump equipment database (.accdb) is created and is visible in theMinex Explorer.
The tick icon beside the database indicates that it is open.
Configure the equipment in your fleetYou can configure the loaders and trucks that are used in OP dump scheduling. The parameters you
specify for the equipment are used in truck cycle time calculation.
Activity: Configure loadersTo configure loaders:
1. Check that the following files are open:
l DumpEquip.accdb
l Equipment.csv2. ChooseOP Dump Schedule > Scenario Manager.
The Scenario Manager appears.3. Click the Fleet tab.4. Click Add New.
The Add Equipment form appears.5. In the Type section, select the Loader option.
A list of available loaders is populated. Because the loaders used to movematerial to
GEOVIA Minex™ 6.3 Page 54 of 75 OP Dump Scheduling tutorial

Create a dump equipment database Activity: Configure trucks
trucks for dumping are the same loaders used in OP scheduling, they have already been
configured. When you configure the loaders in your OP dump scheduling fleet, you are
telling Minex which OP scheduling loaders are in use.
6. Expand the list, so you can see the available loaders, DEMAG, and OK_RH.7. Select DEMAG, and click OK.
DEMAG is visible in the Equipment Selection panel.8. Fill in the Equipment Parameters as shown.
9. On the Scenario Manager, click Save.10. Similarly, add the loaderOK_RH, using the Equipment Parameters shown.
11. Save the changes.
Activity: Configure trucksTo configure trucks:
1. Check that the following files are open:
l DumpEquip.accdb
l Equipment.csv2. ChooseOP Dump Schedule > Scenario Manager.
The Scenario Manager appears.3. Click the Fleet tab.4. Click Add New.
The Add Equipment form appears.5. In the Type section, select the Truck option, and in the field above, typeDPR1_HITACHI.
GEOVIA Minex™ 6.3 Page 55 of 75 OP Dump Scheduling tutorial

Create a dump equipment database Activity: Configure trucks
6. Click OK.
DPR1_HITACHI is visible in the Equipment Selection panel.7. Fill in the top section of the form as shown.
In the Rimpull Parameters section, you can either manually enter the data for the truck,
or you can import data from an external file. For this tutorial, you will import data from
an external file.8. Click Import Rimpull.
TheOpen dialog appears.9. Select DPR1_HITACHI, and click Open.
The Rimpull Parameters section is populated.
10. On the Scenario Manager, click Save.11. Click Add New.
The Add Equipment form appears.12. In the Type section, select the Truck option, and in the field above, typeDPR2_CAT.13. Click OK.
DPR2_CAT is visible in the Equipment Selection panel.
GEOVIA Minex™ 6.3 Page 56 of 75 OP Dump Scheduling tutorial

Create a dump equipment database Activity: Configure trucks
14. Fill in the top section of the form as shown.
In the Rimpull Parameters section, you can either manually enter the data for the truck,
or you can import data from an external file. For this tutorial, you will import data from
an external file.15. Click Import Rimpull.
TheOpen dialog appears.16. Select DPR2_CAT, and click Open.
The Rimpull Parameters section is populated.
17. On the Scenario Manager, click Save.18. Close the Scenario Manager.
Now you can calculate truck cycle times.
GEOVIA Minex™ 6.3 Page 57 of 75 OP Dump Scheduling tutorial

Calculate truck cycle times Activity: Calculate truck cycle times
Calculate truck cycle timesYou can calculate the amount of time it takes for a truck to carry a load of waste from a pit to a
dump, and then return to the pit. You can calculate truck cycle times for all truck-loader-haul road
combinations for all routes in a selected schedule.
The calculated truck cycle time includes:
l Spot Time at Loader: The time the truck takes to park at the loader.
l Load Time: The time it takes for the loader to fill the truck with waste.
l Travel Time: The time the full or empty truck spends travelling on haul roads and
ramps.
l Unload Time: The time it takes the truck to unload at the dump.
l Wait Time: The time the truck spends waiting. For example, waiting to be loaded, wait-
ing to enter the dump.
Tip: For more information on calculating truck cycle times, refer to the Help.
Activity: Calculate truck cycle timesTo calculate truck cycle times:
1. Make sure the following files are open:
l PIT_DUMP_HAULROADS.GM3
l PIT_DUMP.dbr
l Dump.accdb
l DumpEquip.accdb2. ChooseOP Dump Schedule > Build > Calculate Truck Cycle Time.
The Calculate Truck Cycle Time form appears.
GEOVIA Minex™ 6.3 Page 58 of 75 OP Dump Scheduling tutorial

Calculate truck cycle times Activity: Calculate truck cycle times
3. From theDump Schedule list, select 2.4. In theUse simple road length/speed algorithm section, make sure theNever option is
selected.
You can choose to use the simple road length/speed algorithm instead of the default com-
plex algorithm. Both algorithms use the spot time at loader, load time, travel time,
unload time, and wait time. However, unlike the complex algorithm, the simple algorithm
does not use truck performance or road parameter data when calculating travel time. The
simple algorithm can be useful if you do not have truck performance data.
You can choose to use the simple algorithm:
l Never: Minex uses the complex algorithm to calculate all truck cycle times.
Any anomalies are reported to theOutput Window.
Note: Minex identifies anomalies when you have not provided truck per-
formance data, or the truck is incapable of performing the work.
l On calculation anomaly: Minex uses the complex algorithm to calculate
truck cycle times. If a truck cycle time cannot be computed, Minex recal-
culates that truck cycle time using the simple road length/speed algorithm.
The anomaly is reported in theOutput Window as Corrected.
l Always: Minex uses the simple road length/speed algorithm to calculate all
truck cycle times.5. Click Populate From Schedule.
The Pit/Dump table is populated. You can adjust the Traction and Resistance values if
necessary. For this activity, leave the default values in place.6. Click Ok.
Minex calculates the truck cycle times for the selected schedule.
There should be no anomalies when you calculate the truck cycle times in this tutorial.
However, when an anomaly does exist, a message appears in theOutput Window. For
example, Travel time compute anomaly - truck DPR1_HITACHI exceeds speed limit
along Haul road HR1_HR3 for Pit 904, Bench 1, Strip 5, Block 4.
Tip: You could investigate the error by checking:
l the equipment parameters on the Fleet tab of the Scenario Manager
l the haul road segment gradient and properties
l themax gradient of the ramp
GEOVIA Minex™ 6.3 Page 59 of 75 OP Dump Scheduling tutorial

Reporting Activity: Generate a detailed dump schedule report
ReportingThe OP Dump Scheduling module and OP Haulage Planning module have several reporting options:
l Detailed Dump Schedule report
l Truck Cycle Time report
l Haulage Selection report
Note: For the Reporting section, you will use the dump schedule you created in the Replay an
open pit schedule and complete a dump schedule activity.
Generate a detailed dump schedule reportYou can generate a report of the volumes of waste that weremoved from pits to dumps over a
period of time.
Activity: Generate a detailed dump schedule reportTo generate a detailed dump schedule report:
1. Make sure that Dump.accdb is open, and that schedule 2 is current.2. ChooseOP Dump Schedule > Reporting > Detailed Dump Schedule Report.
TheDetailed Dump Schedule Report form opens.3. Fill in the form as shown.
4. Click Ok.
The Report tab opens.
GEOVIA Minex™ 6.3 Page 60 of 75 OP Dump Scheduling tutorial

Reporting Activity: Generate a detailed dump schedule report
The report displays the volume from pit, volume deposited in dump, per pit, per period.5. From the Field List, click Equipment, and drag it into the Column area, and drop it beside
theDump field.
GEOVIA Minex™ 6.3 Page 61 of 75 OP Dump Scheduling tutorial

Reporting Activity: Generate a detailed dump schedule report
The report now also shows the equipment that was used to mine thematerial.
GEOVIA Minex™ 6.3 Page 62 of 75 OP Dump Scheduling tutorial
Reporting Activity: Generate a truck cycle time report
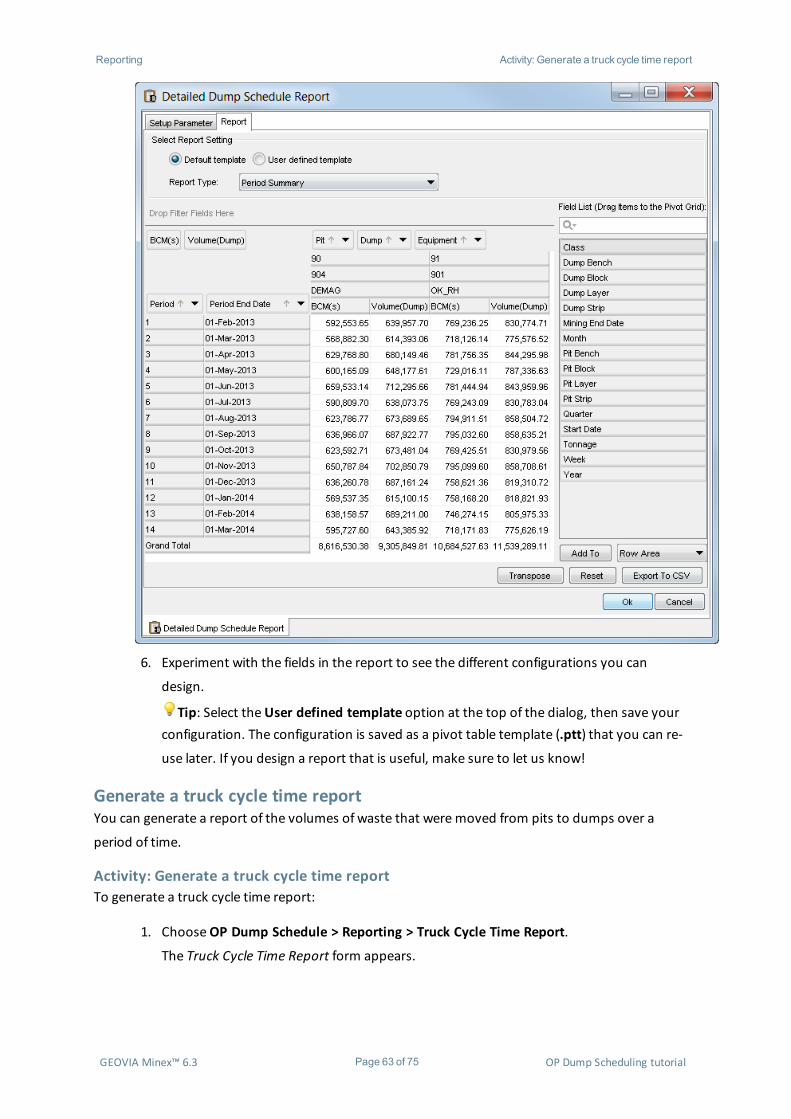
6. Experiment with the fields in the report to see the different configurations you can
design.
Tip: Select theUser defined template option at the top of the dialog, then save yourconfiguration. The configuration is saved as a pivot table template (.ptt) that you can re-
use later. If you design a report that is useful, make sure to let us know!
Generate a truck cycle time reportYou can generate a report of the volumes of waste that weremoved from pits to dumps over a
period of time.
Activity: Generate a truck cycle time reportTo generate a truck cycle time report:
1. ChooseOP Dump Schedule > Reporting > Truck Cycle Time Report.
The Truck Cycle Time Report form appears.
GEOVIA Minex™ 6.3 Page 63 of 75 OP Dump Scheduling tutorial

Reporting Activity: Generate a truck cycle time report
2. Fill in the form as shown.
3. Click Ok.
The Report tab opens.
GEOVIA Minex™ 6.3 Page 64 of 75 OP Dump Scheduling tutorial
Reporting Activity: Generate a truck cycle time report
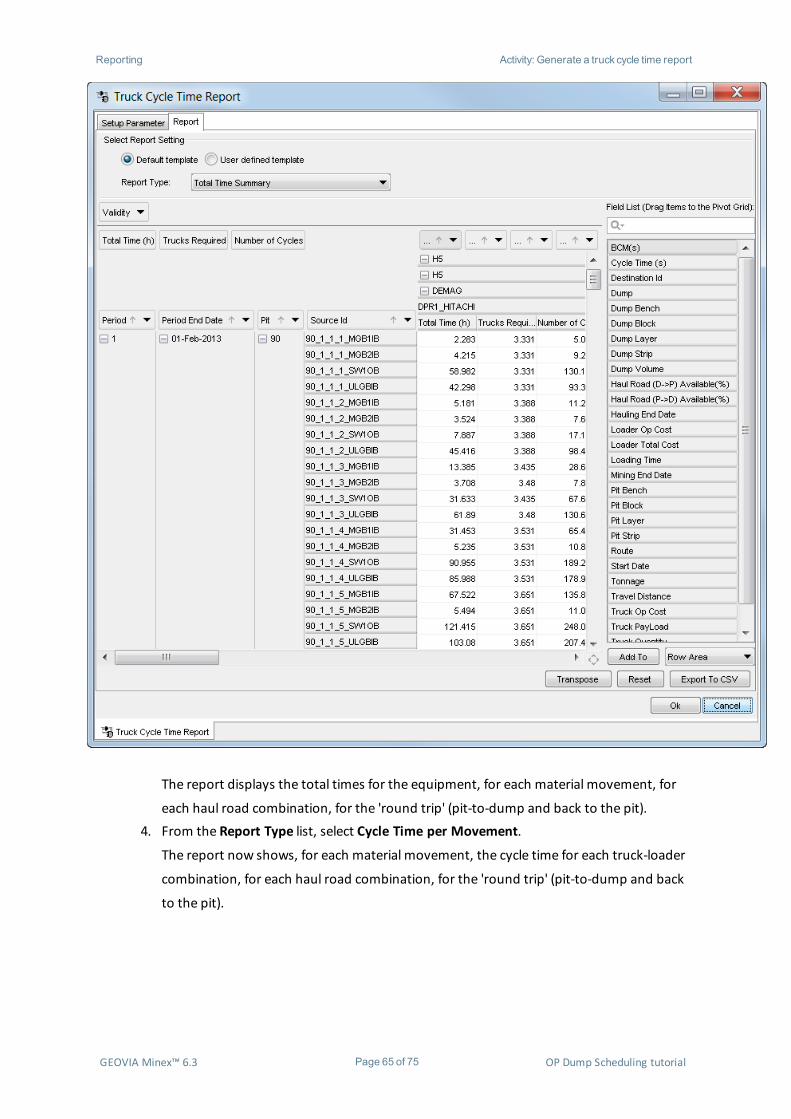
The report displays the total times for the equipment, for each material movement, for
each haul road combination, for the 'round trip' (pit-to-dump and back to the pit).4. From the Report Type list, select Cycle Time per Movement.
The report now shows, for each material movement, the cycle time for each truck-loader
combination, for each haul road combination, for the 'round trip' (pit-to-dump and back
to the pit).
GEOVIA Minex™ 6.3 Page 65 of 75 OP Dump Scheduling tutorial

Reporting Activity: Generate a truck cycle time report
5. From the Report Type list, select Required Trucks.
The report now shows, for each period, the number of trucks required for each truck-
loader combination, for each haul road combination, for the 'round trip' (pit-to-dump
and back to the pit).
GEOVIA Minex™ 6.3 Page 66 of 75 OP Dump Scheduling tutorial

Reporting Activity: Generate a truck cycle time report
GEOVIA Minex™ 6.3 Page 67 of 75 OP Dump Scheduling tutorial

Reporting Activity: Generate a truck cycle time report
6. Drag the Cycle Time field from the Column Area to the Field List.
The cycle times are removed from the report.
GEOVIA Minex™ 6.3 Page 68 of 75 OP Dump Scheduling tutorial

Reporting Activity: Generate a truck cycle time report
7. Experiment with the fields in the report to see the different configurations you can
design.
Tip: Select theUser defined template option at the top of the dialog, then save yourconfiguration. The configuration is saved as a pivot table template (.ptt) that you can re-
use later. If you design a report that is useful, make sure to let us know!
Generate a haulage selection reportYou can determine the number of trucks required to keep a loader working at maximum capacity for
an entire material movement. The number of trucks required is calculated per period. You can then
use the Select filter to export selected truck-loader-haul road combinations to a CSV file.
Note: The output of this report might be different to the output of the Truck Cycle Time Report.
For the Haulage Selection report, only valid records are displayed in the Report table. Those records
that had unavailable haul roads or truck cycle times of zero are not included in the report.
The number of trucks required per loader is calculated as:
GEOVIA Minex™ 6.3 Page 69 of 75 OP Dump Scheduling tutorial

Reporting Activity: Generate a haulage selection report
Because the number of trucks required is calculated per movement for each haul road and truck, the
number of trucks, per loader, per movement is calculated as:
Activity: Generate a haulage selection reportTo generate a haulage selection report:
1. ChooseOP Dump Schedule > Reporting > Haulage Selection.
TheHaulage Selection form appears.2. Fill in the form as shown.
Note: You have selected to report only three of the four possible truck-loader com-
binations.3. Click Ok.
The Report tab opens.
GEOVIA Minex™ 6.3 Page 70 of 75 OP Dump Scheduling tutorial

Reporting Activity: Generate a haulage selection report
The report displays the total time for each truck-loader-haul road combination, for each
material movement.4. Click the Transpose button.
Minex rearranges the report so that the rows become columns, and the columns become
rows.
GEOVIA Minex™ 6.3 Page 71 of 75 OP Dump Scheduling tutorial

Reporting Activity: Generate a haulage selection report
5. Select the records for the truck-loader combinations ofDRP1_HITACHI and DEMAG, and
DPR2_CAT and DEMAG.
GEOVIA Minex™ 6.3 Page 72 of 75 OP Dump Scheduling tutorial

Reporting Activity: Generate a haulage selection report
6. In the Filter area, click the arrow for Selected (Filter), clear the False check box, and then
click OK.
The report is filtered and displays only the records that were Selected.
7. Click Export to CSV.
The Select... form opens.8. In File name field, typeDEMAG, and click Export to csv.
The report is exported to a CSV file.9. Locate the CSV file and open it in the default application for csv files, for exampleMS
Excel.
GEOVIA Minex™ 6.3 Page 73 of 75 OP Dump Scheduling tutorial

Reporting Activity: Generate a haulage selection report
Note: Only the Selected records were exported to the CSV file.10. Experiment with the fields in the report to see the different configurations you can
design.
Tip: Select theUser defined template option at the top of the dialog, then save yourconfiguration. The configuration is saved as a pivot table template (.ptt) that you can re-
use later. If you design a report that is useful, make sure to let us know!
GEOVIA Minex™ 6.3 Page 74 of 75 OP Dump Scheduling tutorial

Summary Activity: Generate a haulage selection report
SummaryCongratulations on completing this tutorial. You should now understand the functions of theMinex
OP Dump Schedule and OP Haulagemodules. You have learnt a number of concepts and topics
including how to:
l create a dump schedule database (.accdb)
l create and configure a scenario:
l define routes between pits and dumps
l create a dump sequence
l rank the dumps associated with a pit
l interactively schedule a dump
l replay an open pit schedule and complete a dump schedule
l replay an existing dump schedule
l create haul roads
l generate ramp distances
l create a dump equipment database (.accdb)
l configure the equipment in your fleet
l calculate truck cycle times
l generate reports on that waste that was dumped
GEOVIA Minex™ 6.3 Page 75 of 75 OP Dump Scheduling tutorial


