Introduction A. B. Operation OpenCNAM Integration with FreePBX OpenCNAM provides a Caller ID Lookup service that adds Caller ID Name to inbound calls on FreePBX systems easily and economically. When a phone service provider sends calls to the PBX with only a number as Caller ID, the number can be looked up using the OpenCNAM service to get the correct Caller ID Name. The Caller ID Name is attached to the incoming call before it is routed to its destination in FreePBX, so that it displays on phone calls and in call logs. FreePBX has two configurations involved in managing incoming calls, the Trunk, and the Inbound Route. A third configuration then also defines CallerID Lookup Sources if that is configured by the Inbound Route. Calls flow from the Trunk through the matching Inbound Route where the optional CallerID Name lookup happens, and then on to the destination. TRUNK DESTINATION INBOUND ROUTE CALL LOOKUP CALL
Transcript
IntroductionA.
B. Operation
OpenCNAM Integrationwith FreePBX
OpenCNAM provides a Caller ID Lookup service that adds Caller ID Name to
inbound calls on FreePBX systems easily and economically. When a phone
service provider sends calls to the PBX with only a number as Caller ID, the
number can be looked up using the OpenCNAM service to get the correct
Caller ID Name. The Caller ID Name is attached to the incoming call before it
is routed to its destination in FreePBX, so that it displays on phone calls and in
call logs.
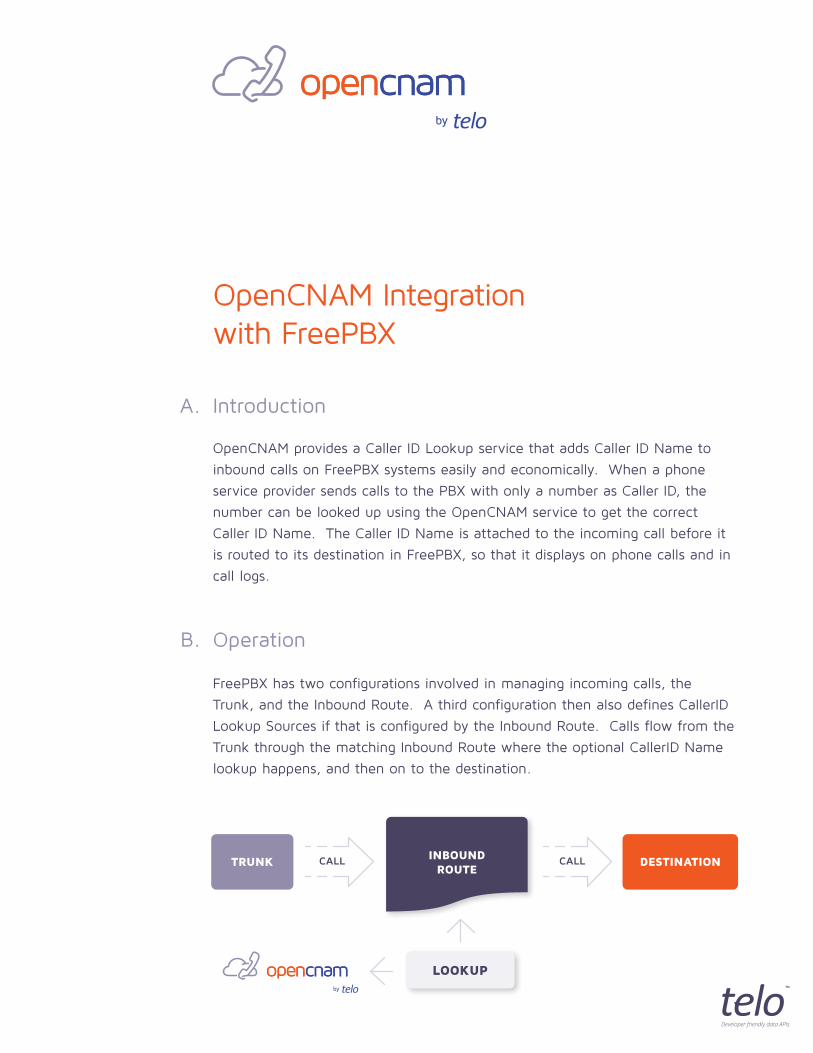
FreePBX has two configurations involved in managing incoming calls, the
Trunk, and the Inbound Route. A third configuration then also defines CallerID
Lookup Sources if that is configured by the Inbound Route. Calls flow from the
Trunk through the matching Inbound Route where the optional CallerID Name
lookup happens, and then on to the destination.
TRUNK DESTINATIONINBOUND
ROUTECALL
LOOKUP
CALL
1
2
3
4
5
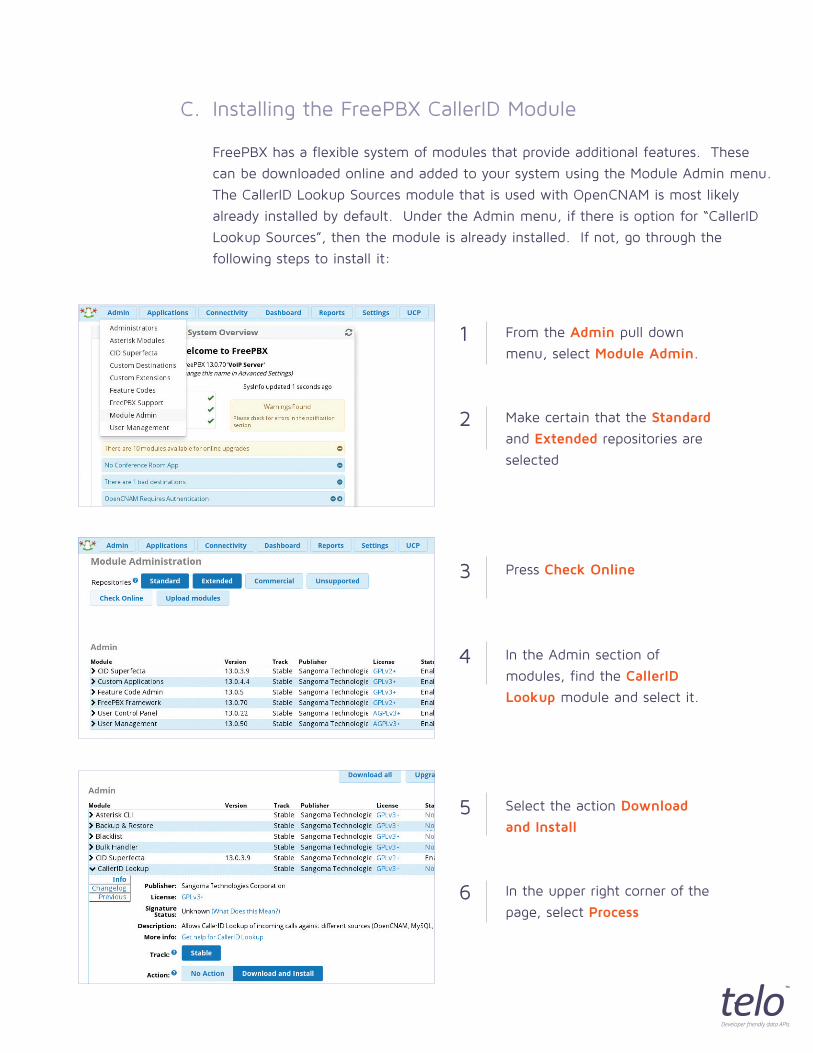
From the Admin pull down
menu, select Module Admin.
In the Admin section of
modules, find the CallerID
Lookup module and select it.
Select the action Download
and Install
Make certain that the Standard
and Extended repositories are
selected
Press Check Online
6 In the upper right corner of the
page, select Process
Installing the FreePBX CallerID Module
FreePBX has a flexible system of modules that provide additional features. These
can be downloaded online and added to your system using the Module Admin menu.
The CallerID Lookup Sources module that is used with OpenCNAM is most likely
already installed by default. Under the Admin menu, if there is option for “CallerID
Lookup Sources”, then the module is already installed. If not, go through the
following steps to install it:
C.
7
8
When it shows the module to be
installed, Press Confirm
After the installation completes,
Press Return
Editing Records
Configuration
In newer versions of FreePBX (13+) existing records are shown with a
pencil icon to edit them. There will also be a button to create new
records. In older versions of FreePBX, the list of existing records
are shown in a list on the right side, along with an empty form to
create a new record. When editing existing information, be sure to
select the original record from the list on the right side rather than
accidentally creating a new record. When changes are complete, the
Submit button at the end of the page must be pressed to store the
changes. In most cases, pressing enter after changing a field will
also activate the Submit button as a convenient shortcut.
FreePBX has many types of configurable data, each on a pull down menu from
the FreePBX Administration page. The Trunk and Inbound Route configurations
are on the Connectivity pulldown menu. The CallerID Lookup Sources
configuration is on the Admin menu. For each configuration, there can be
multiple records, each with different data.
Applying configuration
changes
Trunk Context
Trunk
Inbound Route
When any record is saved, the menu bar shows a red Apply Config
button. This indicates that changes to the configuration have been
saved to the database storage, but not made active on the PBX as
yet. When a set of changes is complete, press the Apply Config
button to make the changes live before checking that the PBX now
operates as desired.
With a SIP or IAX2 trunk, it is possible to assign a context in
the Peer Details section (may be in a settings tab) of the Trunk
configuration. The context value controls how the incoming call is
handled, and this can be changed from the default value to enable
the use of custom call processing logic. It is best to not set the
context and let FreePBX use it’s default behavior, as a different
context can prevent the callerid lookup subroutine from functioning.
However, if it is set, it must be from-pstn, from-trunk, a custom
context that includes the ext-did context, or a custom context that
calls the callerid lookup subroutine directly. Those that understand
Asterisk dialplan configuration can consult the /etc/asterisk/
extensions_additional.conf file for details on contexts and cidlookup
subroutine.
The Trunk is a definition of the connection between FreePBX and the phone
service provider of choice. This can be a SIP connection, IAX2, or DAHDi (used
for PRI and analog POTS hardware interfaces). There can be one or many
Trunks defined on a FreePBX system. The only requirement is that the Caller
ID Number is provided with each call. All inbound calls received over any
Trunk are then passed to the Inbound Route to determine which destination
they should be sent to, and optionally if CallerID Name Lookup is to be
performed first.
The Inbound Route contains many configurable options, but three in particular
are necessary to understand for OpenCNAM operation. The CID and DID
numbers are used to match to incoming calls. The CID number is the Caller ID
Number that the call came from, and the DID is the Direct Inward Dial number
that the caller dialed - i.e. your phone number.
D.
E.
(screenshot here)
The most common configurations are:
• A single default route (DID: ANY, CID: ANY) that matches all incoming calls
• A separate inbound route (DID: 1234567890, CID: ANY) for each DID
• A separate inbound route for some DIDs, and a default route for all others
Note that if route has both a DID and a CID number, both numbers must
match for that route to be used (this is not common and not recommended).
Also, be aware that if an incoming call does not match any inbound routes, the
call is refused.
Lookup Source
Superfecta
One of the configuration options in the Inbound Route is the CID
Lookup Source. This selects which one of the Caller ID Lookup
Sources (if any) will be used to lookup Caller ID Name from the
Caller ID Number. It may be located on the Other tab. This
value defaults to None, and must be changed to OpenCNAM (or
a different Caller ID Lookup Source record as needed) to enable
OpenCNAM. Make certain that each Inbound Route that OpenCNAM
is to be used with has the correct source selected.
If the CID Superfecta module (an alternate CID Lookup method)
is installed, there will also be a Inbound Route configuration entry
Enable Superfecta Lookup. This must be set to No to prevent it
from interfering with OpenCNAM.
OpenCNAM Account
Caller ID Lookup Sources
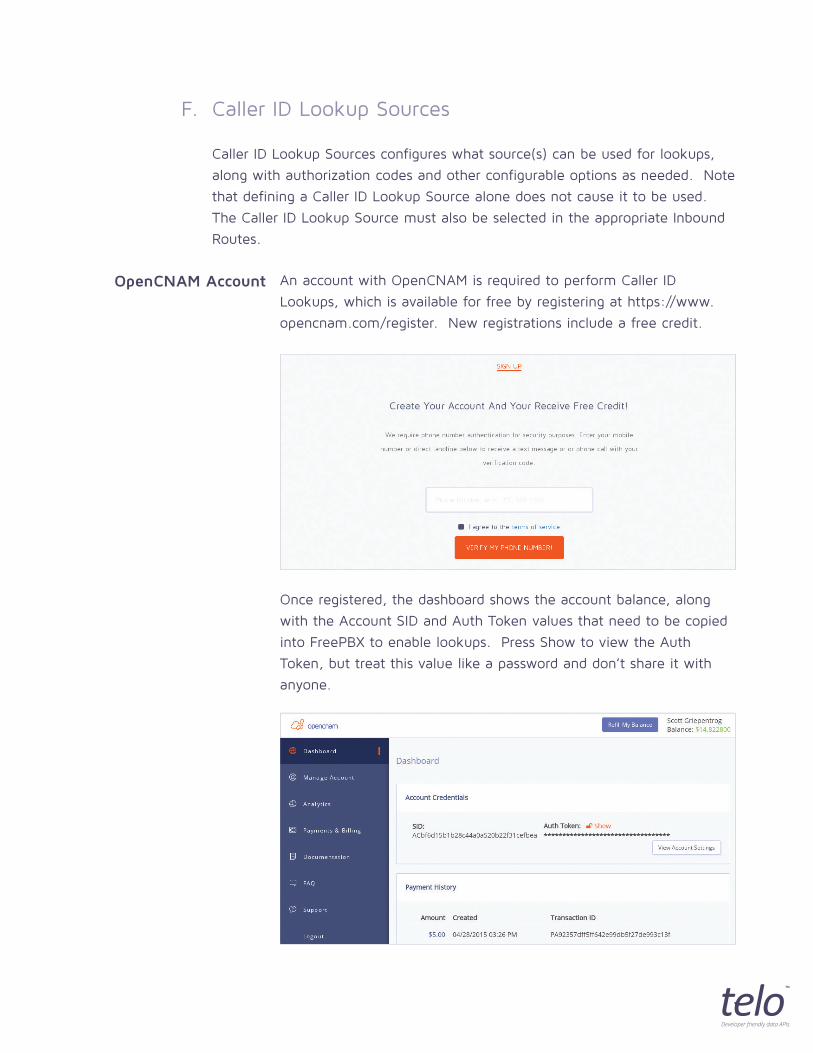
An account with OpenCNAM is required to perform Caller ID
Lookups, which is available for free by registering at https://www.
opencnam.com/register. New registrations include a free credit.
Once registered, the dashboard shows the account balance, along
with the Account SID and Auth Token values that need to be copied
into FreePBX to enable lookups. Press Show to view the Auth
Token, but treat this value like a password and don’t share it with
anyone.
Caller ID Lookup Sources configures what source(s) can be used for lookups,
along with authorization codes and other configurable options as needed. Note
that defining a Caller ID Lookup Source alone does not cause it to be used.
The Caller ID Lookup Source must also be selected in the appropriate Inbound
Routes.
F.
Configuring OpenCNAM with Authorization
Using multiple OpenCNAM accounts
A single CallerID Lookup source named “OpenCNAM” most likely
already exists. If not, use the Admin Module as shown above to
Remove, and then reinstall the CallerID Lookup Module to recreate
it (Note: this will erase other CallerID Lookup configurations). If the
record already exists, press the pencil icon to edit the record.
The Source type must be set to OpenCNAM. The ability to Cache
Results is not supported with OpenCNAM and will be ignored even if
set. The Account SID and Auth Token values must be copied exactly
from the OpenCNAM website dashboard (the Auth Token will not
be **** as in the screenshot above, but will show your real token
string). Once these settings are correct, press the Submit button.
Unfortunately, this is not possible with the 13.0.10 version of the
Caller ID Lookup Sources module.
Review and Apply
At this point, it’s a good idea to go through the Inbound Routes and make sure
that all (or all that need OpenCNAM service) are set to use the OpenCNAM
record as the CallerID Lookup Source. Then press the red Apply Changes
button to cause these changes to be applied to the live running system.
Finally, make some calls into the system to check that the correct name is
appearing.
G.
Troubleshooting
If OpenCNAM does not appear to be working (the number is showing, not a
name or an error), check the following:
1. Confirm that there is no context in the peer settings of the Trunk that the
call arrives on.
2. Which Inbound Route will match the call? Check both the Inbound Route
that should match, and the default (Any/Any) route if you have one just
to be sure. Do the inbound route(s) have OpenCNAM set as the CallerID
Lookup Source?
3. In CallerID Lookup Sources, does the OpenCNAM record have a type of
OpenCNAM, and does it have an Account SID and Auth Token that match
the OpenCNAM Dashboard?
If the Caller ID Name is being changed to an Error or Unknown or similar
message for all numbers, check the following:
1. In the Inbound Route, temporarily change the CallerID Lookup Source to
None and test again. If the Caller ID Name continues to show Unknown
or another message consistently, then the wrong name may actually be
coming from the service provider, and at the same time OpenCNAM is not
configured correctly to replace it. Refer to the troubleshooting checklist
above instead. Make certain to restore the CallerID Source setting to
OpenCNAM.
2. In the CallerID Source record for OpenCNAM, double check that the
Account SID and Auth Token values match exactly the values from the
OpenCNAM Dashboard.
3. In the OpenCNAM Dashboard, check that there is a positive balance.
If the issue persists, please contact OpenCNAM Support from the OpenCNAM