305
OpenShift Dedicated 3 Developer Guide OpenShift Dedicated 3 Developer Reference Last Updated: 2019-01-24
OpenShift Dedicated 3
Developer Guide
OpenShift Dedicated 3 Developer Reference
Last Updated: 2019-01-24


OpenShift Dedicated 3 Developer Guide
OpenShift Dedicated 3 Developer Reference
Legal Notice
Copyright © 2019 Red Hat, Inc.
The text of and illustrations in this document are licensed by Red Hat under a Creative CommonsAttribution–Share Alike 3.0 Unported license ("CC-BY-SA"). An explanation of CC-BY-SA isavailable athttp://creativecommons.org/licenses/by-sa/3.0/. In accordance with CC-BY-SA, if you distribute this document or an adaptation of it, you mustprovide the URL for the original version.
Red Hat, as the licensor of this document, waives the right to enforce, and agrees not to assert,Section 4d of CC-BY-SA to the fullest extent permitted by applicable law.
Red Hat, Red Hat Enterprise Linux, the Shadowman logo, JBoss, OpenShift, Fedora, the Infinitylogo, and RHCE are trademarks of Red Hat, Inc., registered in the United States and othercountries.
Linux ® is the registered trademark of Linus Torvalds in the United States and other countries.
Java ® is a registered trademark of Oracle and/or its affiliates.
XFS ® is a trademark of Silicon Graphics International Corp. or its subsidiaries in the United Statesand/or other countries.
MySQL ® is a registered trademark of MySQL AB in the United States, the European Union andother countries.
Node.js ® is an official trademark of Joyent. Red Hat Software Collections is not formally related toor endorsed by the official Joyent Node.js open source or commercial project.
The OpenStack ® Word Mark and OpenStack logo are either registered trademarks/service marksor trademarks/service marks of the OpenStack Foundation, in the United States and other countriesand are used with the OpenStack Foundation's permission. We are not affiliated with, endorsed orsponsored by the OpenStack Foundation, or the OpenStack community.
All other trademarks are the property of their respective owners.
Abstract
These topics help developers set up and configure a workstation to develop and deploy applicationsin an OpenShift Dedicated cloud environment with a command-line interface (CLI). This guideprovide s detailed instructions and examples to help developers: Monitor and browse projects withthe web console Configure and utilize the CLI Generate configurations using templates Managebuilds and webhooks Define and trigger deployments Integrate external services (databases, SaaSendpoints)
. . . . . . . . . . . . . . . . . . . . . . . . . . . . . . . . . . . . . . . . . . . . . . . . . . . . . . . . . . . . . . . . . . . . . . . . . . . . . . . . . . . . . . . . . . . . . . . . . . . . . . . . . . . . . . . . . . . . . . . . . . . . . . . . . . . . . . . . . . . . . . . . . . . . . . . . . . . . . . . . . . . . . . . . . . . . . . . . . . . . . . . . . . . . . . . . . . . . . . . . . . . . . . . . . . . . . . . . . . . . . . . . . . . . . . . . . . . . . . . . . . . . . . . . . . . . . . . . . . . . . . . . . . . . . . . . . . . . . . . .
. . . . . . . . . . . . . . . . . . . . . . . . . . . . . . . . . . . . . . . . . . . . . . . . . . . . . . . . . . . . . . . . . . . . . . . . . . . . . . . . . . . . . . . . . . . . . . . . . . . . . . . . . . . . . . . . . . . . . . . . . . . . . . . . . . . . . . . . . . . . . . . . . . . . . . . . . . . . . . . . . . . . . . . . . . . . . . . . . . . . . . . . . . . . . . . . . . . . . . . . . . . . . . . . . . . . . . . . . . . . . . . . . . . . . . . . . . . . . . . . . . . . . . . . . . . . . . . . . . . . . . . . . . . . . . . . . . . . . . . .
Table of Contents
CHAPTER 1. OVERVIEW
CHAPTER 2. APPLICATION LIFE CYCLE MANAGEMENT2.1. PLANNING YOUR DEVELOPMENT PROCESS
2.1.1. Overview2.1.2. Using OpenShift Dedicated as Your Development Environment2.1.3. Bringing an Application to Deploy on OpenShift Dedicated
2.2. CREATING NEW APPLICATIONS2.2.1. Overview2.2.2. Creating an Application Using the CLI
2.2.2.1. Creating an Application From Source Code2.2.2.2. Creating an Application From an Image2.2.2.3. Creating an Application From a Template2.2.2.4. Further Modifying Application Creation
2.2.2.4.1. Specifying Environment Variables2.2.2.4.2. Specifying Build Environment Variables2.2.2.4.3. Specifying Labels2.2.2.4.4. Viewing the Output Without Creation2.2.2.4.5. Creating Objects With Different Names2.2.2.4.6. Creating Objects in a Different Project2.2.2.4.7. Creating Multiple Objects2.2.2.4.8. Grouping Images and Source in a Single Pod
2.2.3. Creating an Application Using the Web Console2.3. PROMOTING APPLICATIONS ACROSS ENVIRONMENTS
2.3.1. Overview2.3.2. Application Components
2.3.2.1. API Objects2.3.2.2. Images2.3.2.3. Summary
2.3.3. Deployment Environments2.3.3.1. Considerations2.3.3.2. Summary
2.3.4. Methods and Tools2.3.4.1. Managing API Objects
2.3.4.1.1. Exporting API Object State2.3.4.1.2. Importing API Object State
2.3.4.1.2.1. Initial Creation2.3.4.1.2.2. Iterative Modification
2.3.4.2. Managing Images and Image Streams2.3.4.2.1. Moving Images
2.3.4.2.1.1. When Staging Environments Share a Registry2.3.4.2.1.2. When Staging Environments Use Different Registries
2.3.4.2.2. Deploying2.3.4.2.3. Automating Promotion Flows with Jenkins2.3.4.2.4. Promotion Caveats
2.3.4.2.4.1. API Object References2.3.4.2.4.2. Image Registry References
2.3.4.3. Summary2.3.5. Scenarios and Examples
2.3.5.1. Setting up for Promotion2.3.5.2. Repeatable Promotion Process
13
14141414151616161618191920212121212222222224242525272728282828292930303030303131313132323233333334
Table of Contents
1
. . . . . . . . . . . . . . . . . . . . . . . . . . . . . . . . . . . . . . . . . . . . . . . . . . . . . . . . . . . . . . . . . . . . . . . . . . . . . . . . . . . . . . . . . . . . . . . . . . . . . . . . . . . . . . . . . . . . . . . . . . . . . . . . . . . . . . . . . . . . . . . . . . . . . . . . . . . . . . . . . . . . . . . . . . . . . . . . . . . . . . . . . . . . . . . . . . . . . . . . . . . . . . . . . . . . . . . . . . . . . . . . . . . . . . . . . . . . . . . . . . . . . . . . . . . . . . . . . . . . . . . . . . . . . . . . . . . . . . . .
. . . . . . . . . . . . . . . . . . . . . . . . . . . . . . . . . . . . . . . . . . . . . . . . . . . . . . . . . . . . . . . . . . . . . . . . . . . . . . . . . . . . . . . . . . . . . . . . . . . . . . . . . . . . . . . . . . . . . . . . . . . . . . . . . . . . . . . . . . . . . . . . . . . . . . . . . . . . . . . . . . . . . . . . . . . . . . . . . . . . . . . . . . . . . . . . . . . . . . . . . . . . . . . . . . . . . . . . . . . . . . . . . . . . . . . . . . . . . . . . . . . . . . . . . . . . . . . . . . . . . . . . . . . . . . . . . . . . . . . .
. . . . . . . . . . . . . . . . . . . . . . . . . . . . . . . . . . . . . . . . . . . . . . . . . . . . . . . . . . . . . . . . . . . . . . . . . . . . . . . . . . . . . . . . . . . . . . . . . . . . . . . . . . . . . . . . . . . . . . . . . . . . . . . . . . . . . . . . . . . . . . . . . . . . . . . . . . . . . . . . . . . . . . . . . . . . . . . . . . . . . . . . . . . . . . . . . . . . . . . . . . . . . . . . . . . . . . . . . . . . . . . . . . . . . . . . . . . . . . . . . . . . . . . . . . . . . . . . . . . . . . . . . . . . . . . . . . . . . . . .
. . . . . . . . . . . . . . . . . . . . . . . . . . . . . . . . . . . . . . . . . . . . . . . . . . . . . . . . . . . . . . . . . . . . . . . . . . . . . . . . . . . . . . . . . . . . . . . . . . . . . . . . . . . . . . . . . . . . . . . . . . . . . . . . . . . . . . . . . . . . . . . . . . . . . . . . . . . . . . . . . . . . . . . . . . . . . . . . . . . . . . . . . . . . . . . . . . . . . . . . . . . . . . . . . . . . . . . . . . . . . . . . . . . . . . . . . . . . . . . . . . . . . . . . . . . . . . . . . . . . . . . . . . . . . . . . . . . . . . . .
2.3.5.3. Repeatable Promotion Process Using Jenkins
CHAPTER 3. AUTHENTICATION3.1. WEB CONSOLE AUTHENTICATION3.2. CLI AUTHENTICATION
CHAPTER 4. AUTHORIZATION4.1. OVERVIEW4.2. CHECKING IF USERS CAN CREATE PODS4.3. DETERMINING WHAT YOU CAN DO AS AN AUTHENTICATED USER
CHAPTER 5. PROJECTS5.1. OVERVIEW5.2. CREATING A PROJECT
5.2.1. Using the Web Console5.2.2. Using the CLI
5.3. VIEWING PROJECTS5.4. CHECKING PROJECT STATUS5.5. FILTERING BY LABELS5.6. DELETING A PROJECT
CHAPTER 6. MIGRATING APPLICATIONS6.1. OVERVIEW6.2. MIGRATING DATABASE APPLICATIONS
6.2.1. Overview6.2.2. Supported Databases6.2.3. MySQL6.2.4. PostgreSQL6.2.5. MongoDB
6.3. MIGRATING WEB FRAMEWORK APPLICATIONS6.3.1. Overview6.3.2. Python6.3.3. Ruby6.3.4. PHP6.3.5. Perl6.3.6. Node.js6.3.7. WordPress6.3.8. Ghost6.3.9. JBoss EAP6.3.10. JBoss WS (Tomcat)6.3.11. JBoss AS (Wildfly 10)6.3.12. Supported JBoss Versions
6.4. QUICKSTART EXAMPLES6.4.1. Overview6.4.2. Workflow
6.5. CONTINUOUS INTEGRATION AND DEPLOYMENT (CI/CD)6.5.1. Overview6.5.2. Jenkins
6.6. WEBHOOKS AND ACTION HOOKS6.6.1. Overview6.6.2. Webhooks6.6.3. Action Hooks
6.7. S2I TOOL6.7.1. Overview
36
383838
40404040
424242424343444546
474747474848505254545454555656575758585859595960616161616161626262
OpenShift Dedicated 3 Developer Guide
2
. . . . . . . . . . . . . . . . . . . . . . . . . . . . . . . . . . . . . . . . . . . . . . . . . . . . . . . . . . . . . . . . . . . . . . . . . . . . . . . . . . . . . . . . . . . . . . . . . . . . . . . . . . . . . . . . . . . . . . . . . . . . . . . . . . . . . . . . . . . . . . . . . . . . . . . . . . . . . . . . . . . . . . . . . . . . . . . . . . . . . . . . . . . . . . . . . . . . . . . . . . . . . . . . . . . . . . . . . . . . . . . . . . . . . . . . . . . . . . . . . . . . . . . . . . . . . . . . . . . . . . . . . . . . . . . . . . . . . . . .
. . . . . . . . . . . . . . . . . . . . . . . . . . . . . . . . . . . . . . . . . . . . . . . . . . . . . . . . . . . . . . . . . . . . . . . . . . . . . . . . . . . . . . . . . . . . . . . . . . . . . . . . . . . . . . . . . . . . . . . . . . . . . . . . . . . . . . . . . . . . . . . . . . . . . . . . . . . . . . . . . . . . . . . . . . . . . . . . . . . . . . . . . . . . . . . . . . . . . . . . . . . . . . . . . . . . . . . . . . . . . . . . . . . . . . . . . . . . . . . . . . . . . . . . . . . . . . . . . . . . . . . . . . . . . . . . . . . . . . . .
6.7.2. Creating a Container Image6.8. SUPPORT GUIDE
6.8.1. Overview6.8.2. Supported Databases6.8.3. Supported Languages6.8.4. Supported Frameworks6.8.5. Supported Markers6.8.6. Supported Environment Variables
CHAPTER 7. TUTORIALS7.1. OVERVIEW7.2. QUICKSTART TEMPLATES
7.2.1. Overview7.2.2. Web Framework Quickstart Templates
7.3. RUBY ON RAILS7.3.1. Overview7.3.2. Local Workstation Setup
7.3.2.1. Setting Up the Database7.3.3. Writing Your Application
7.3.3.1. Creating a Welcome Page7.3.3.2. Configuring the Application for OpenShift Dedicated7.3.3.3. Storing Your Application in Git
7.3.4. Deploying Your Application to OpenShift Dedicated7.3.4.1. Creating the Database Service7.3.4.2. Creating the Frontend Service7.3.4.3. Creating a Route for Your Application
7.4. SETTING UP A NEXUS MIRROR FOR MAVEN7.4.1. Introduction7.4.2. Setting up Nexus
7.4.2.1. Using Probes to Check for Success7.4.2.2. Adding Persistence to Nexus
7.4.3. Connecting to Nexus7.4.4. Confirming Success7.4.5. Additional Resources
7.5. OPENSHIFT PIPELINE BUILDS7.5.1. Introduction7.5.2. Creating the Jenkins Master7.5.3. The Pipeline Build Configuration7.5.4. The Jenkinsfile7.5.5. Creating the Pipeline7.5.6. Starting the Pipeline
7.6. BINARY BUILDS7.6.1. Introduction
7.6.1.1. Use Cases7.6.1.2. Limitations
7.6.2. Tutorials Overview7.6.2.1. Tutorial: Building local code changes7.6.2.2. Tutorial: Building private code7.6.2.3. Tutorial: Binary artifacts from pipeline
CHAPTER 8. BUILDS8.1. HOW BUILDS WORK
8.1.1. What Is a Build?
6363636363646466
67676767676868686869707071717273747474757575767677777777777880818181828282838384
878787
Table of Contents
3
8.1.2. What Is a BuildConfig?8.2. BASIC BUILD OPERATIONS
8.2.1. Starting a Build8.2.2. Canceling a Build8.2.3. Deleting a BuildConfig8.2.4. Viewing Build Details8.2.5. Accessing Build Logs
8.3. BUILD INPUTS8.3.1. How Build Inputs Work8.3.2. Dockerfile Source8.3.3. Image Source8.3.4. Git Source
8.3.4.1. Using a Proxy8.3.4.2. Source Clone Secrets
8.3.4.2.1. Automatically Adding a Source Clone Secret to a Build Configuration8.3.4.2.2. Manually Adding Source Clone Secrets8.3.4.2.3. .gitconfig File8.3.4.2.4. .gitconfig File for Secured Git8.3.4.2.5. Basic Authentication8.3.4.2.6. SSH Key Authentication8.3.4.2.7. Trusted Certificate Authorities8.3.4.2.8. Combinations
8.3.5. Binary (Local) Source8.3.6. Input Secrets
8.3.6.1. Adding Input Secrets8.3.6.2. Source-to-Image Strategy8.3.6.3. Docker Strategy8.3.6.4. Custom Strategy
8.3.7. Using External Artifacts8.3.8. Using Docker Credentials for Private Registries
8.4. BUILD OUTPUT8.4.1. Build Output Overview8.4.2. Output Image Environment Variables8.4.3. Output Image Labels8.4.4. Output Image Digest8.4.5. Using Docker Credentials for Private Registries
8.5. BUILD STRATEGY OPTIONS8.5.1. Source-to-Image Strategy Options
8.5.1.1. Force Pull8.5.1.2. Incremental Builds8.5.1.3. Overriding Builder Image Scripts8.5.1.4. Environment Variables
8.5.1.4.1. Environment Files8.5.1.4.2. BuildConfig Environment
8.5.1.5. Adding Secrets via Web Console8.5.1.5.1. Enabling Pulling and Pushing
8.5.1.6. Ignoring Source Files8.5.2. Docker Strategy Options
8.5.2.1. FROM Image8.5.2.2. Dockerfile Path8.5.2.3. No Cache8.5.2.4. Force Pull8.5.2.5. Environment Variables
87898990909091929293939495959697989899
100100101102103103104104105105106107107108108109109110110110110111111111112112112112112113113113113113
OpenShift Dedicated 3 Developer Guide
4
. . . . . . . . . . . . . . . . . . . . . . . . . . . . . . . . . . . . . . . . . . . . . . . . . . . . . . . . . . . . . . . . . . . . . . . . . . . . . . . . . . . . . . . . . . . . . . . . . . . . . . . . . . . . . . . . . . . . . . . . . . . . . . . . . . . . . . . . . . . . . . . . . . . . . . . . . . . . . . . . . . . . . . . . . . . . . . . . . . . . . . . . . . . . . . . . . . . . . . . . . . . . . . . . . . . . . . . . . . . . . . . . . . . . . . . . . . . . . . . . . . . . . . . . . . . . . . . . . . . . . . . . . . . . . . . . . . . . . . . .
8.5.2.6. Adding Secrets via Web Console8.5.2.7. Docker Build Arguments
8.5.2.7.1. Enabling Pulling and Pushing8.5.3. Custom Strategy Options
8.5.3.1. FROM Image8.5.3.2. Exposing the Docker Socket8.5.3.3. Secrets
8.5.3.3.1. Adding Secrets via Web Console8.5.3.3.2. Enabling Pulling and Pushing
8.5.3.4. Force Pull8.5.3.5. Environment Variables
8.5.4. Pipeline Strategy Options8.5.4.1. Providing the Jenkinsfile8.5.4.2. Environment Variables
8.5.4.2.1. Mapping Between BuildConfig Environment Variables and Jenkins Job Parameters8.6. BUILD ENVIRONMENT
8.6.1. Overview8.6.2. Using Build Fields as Environment Variables8.6.3. Using Container Resources as Environment Variables8.6.4. Using Secrets as Environment Variables
8.7. TRIGGERING BUILDS8.7.1. Build Triggers Overview8.7.2. Webhook Triggers
8.7.2.1. GitHub Webhooks8.7.2.2. GitLab Webhooks8.7.2.3. Bitbucket Webhooks8.7.2.4. Generic Webhooks8.7.2.5. Displaying Webhook URLs
8.7.3. Image Change Triggers8.7.4. Configuration Change Triggers
8.7.4.1. Setting Triggers Manually8.8. BUILD HOOKS
8.8.1. Build Hooks Overview8.8.2. Configuring Post Commit Build Hooks
8.8.2.1. Using the CLI8.9. BUILD RUN POLICY
8.9.1. Build Run Policy Overview8.9.2. Serial Run Policy8.9.3. SerialLatestOnly Run Policy8.9.4. Parallel Run Policy
8.10. ADVANCED BUILD OPERATIONS8.10.1. Setting Build Resources8.10.2. Setting Maximum Duration8.10.3. Assigning Builds to Specific Nodes8.10.4. Chaining Builds8.10.5. Build Pruning
8.11. BUILD TROUBLESHOOTING8.11.1. Requested Access to Resources Denied
CHAPTER 9. DEPLOYMENTS9.1. HOW DEPLOYMENTS WORK
9.1.1. What Is a Deployment?9.1.2. Creating a Deployment Configuration
114114114114115115115115116116116116116117118118118118119119119119119120121122123124124126126127127127128129129129129130130130131131132134135135
136136136136
Table of Contents
5
9.2. BASIC DEPLOYMENT OPERATIONS9.2.1. Starting a Deployment9.2.2. Viewing a Deployment9.2.3. Rolling Back a Deployment9.2.4. Executing Commands Inside a Container9.2.5. Viewing Deployment Logs9.2.6. Setting Deployment Triggers
9.2.6.1. Configuration Change Trigger9.2.6.2. ImageChange Trigger
9.2.6.2.1. Using the Command Line9.2.7. Setting Deployment Resources9.2.8. Manual Scaling9.2.9. Running a Pod with a Different Service Account
9.3. DEPLOYMENT STRATEGIES9.3.1. What Are Deployment Strategies?9.3.2. Rolling Strategy
9.3.2.1. Canary Deployments9.3.2.2. When to Use a Rolling Deployment9.3.2.3. Rolling Example
9.3.3. Recreate Strategy9.3.3.1. When to Use a Recreate Deployment
9.3.4. Custom Strategy9.3.5. Lifecycle Hooks
9.3.5.1. Pod-based Lifecycle Hook9.3.5.2. Using the Command Line
9.4. ADVANCED DEPLOYMENT STRATEGIES9.4.1. Advanced Deployment Strategies9.4.2. Blue-Green Deployment
9.4.2.1. Using a Blue-Green DeploymentUsing a Route and Two Services
9.4.3. A/B Deployment9.4.3.1. Load Balancing for A/B Testing
9.4.3.1.1. Managing Weights Using the Web Console9.4.3.1.2. Managing Weights Using the CLI9.4.3.1.3. One Service, Multiple Deployment Configurations
9.4.4. Proxy Shard / Traffic Splitter9.4.5. N-1 Compatibility9.4.6. Graceful Termination
9.5. KUBERNETES DEPLOYMENTS SUPPORT9.5.1. Deployments Object Type9.5.2. Kubernetes Deployments Versus Deployment Configurations
9.5.2.1. Deployment Configuration-Specific Features9.5.2.1.1. Automatic Rollbacks9.5.2.1.2. Triggers9.5.2.1.3. Lifecycle Hooks9.5.2.1.4. Custom Strategies9.5.2.1.5. Canary Deployments9.5.2.1.6. Test Deployments
9.5.2.2. Kubernetes Deployment-Specific Features9.5.2.2.1. Rollover9.5.2.2.2. Proportional Scaling9.5.2.2.3. Pausing Mid-rollout
138138138138139139140140140141141142143143143144144144146146147147149149150150151151151151152152154156157158158159159159160160160160161161161161161161161161
OpenShift Dedicated 3 Developer Guide
6

. . . . . . . . . . . . . . . . . . . . . . . . . . . . . . . . . . . . . . . . . . . . . . . . . . . . . . . . . . . . . . . . . . . . . . . . . . . . . . . . . . . . . . . . . . . . . . . . . . . . . . . . . . . . . . . . . . . . . . . . . . . . . . . . . . . . . . . . . . . . . . . . . . . . . . . . . . . . . . . . . . . . . . . . . . . . . . . . . . . . . . . . . . . . . . . . . . . . . . . . . . . . . . . . . . . . . . . . . . . . . . . . . . . . . . . . . . . . . . . . . . . . . . . . . . . . . . . . . . . . . . . . . . . . . . . . . . . . . . . .
. . . . . . . . . . . . . . . . . . . . . . . . . . . . . . . . . . . . . . . . . . . . . . . . . . . . . . . . . . . . . . . . . . . . . . . . . . . . . . . . . . . . . . . . . . . . . . . . . . . . . . . . . . . . . . . . . . . . . . . . . . . . . . . . . . . . . . . . . . . . . . . . . . . . . . . . . . . . . . . . . . . . . . . . . . . . . . . . . . . . . . . . . . . . . . . . . . . . . . . . . . . . . . . . . . . . . . . . . . . . . . . . . . . . . . . . . . . . . . . . . . . . . . . . . . . . . . . . . . . . . . . . . . . . . . . . . . . . . . . .
. . . . . . . . . . . . . . . . . . . . . . . . . . . . . . . . . . . . . . . . . . . . . . . . . . . . . . . . . . . . . . . . . . . . . . . . . . . . . . . . . . . . . . . . . . . . . . . . . . . . . . . . . . . . . . . . . . . . . . . . . . . . . . . . . . . . . . . . . . . . . . . . . . . . . . . . . . . . . . . . . . . . . . . . . . . . . . . . . . . . . . . . . . . . . . . . . . . . . . . . . . . . . . . . . . . . . . . . . . . . . . . . . . . . . . . . . . . . . . . . . . . . . . . . . . . . . . . . . . . . . . . . . . . . . . . . . . . . . . . .
. . . . . . . . . . . . . . . . . . . . . . . . . . . . . . . . . . . . . . . . . . . . . . . . . . . . . . . . . . . . . . . . . . . . . . . . . . . . . . . . . . . . . . . . . . . . . . . . . . . . . . . . . . . . . . . . . . . . . . . . . . . . . . . . . . . . . . . . . . . . . . . . . . . . . . . . . . . . . . . . . . . . . . . . . . . . . . . . . . . . . . . . . . . . . . . . . . . . . . . . . . . . . . . . . . . . . . . . . . . . . . . . . . . . . . . . . . . . . . . . . . . . . . . . . . . . . . . . . . . . . . . . . . . . . . . . . . . . . . . .
CHAPTER 10. TEMPLATES10.1. OVERVIEW10.2. UPLOADING A TEMPLATE10.3. CREATING FROM TEMPLATES USING THE WEB CONSOLE10.4. CREATING FROM TEMPLATES USING THE CLI
10.4.1. Labels10.4.2. Parameters10.4.3. Generating a List of Objects
10.5. MODIFYING AN UPLOADED TEMPLATE10.6. USING THE INSTANT APP AND QUICKSTART TEMPLATES10.7. WRITING TEMPLATES
10.7.1. Description10.7.2. Labels10.7.3. Parameters10.7.4. Object List10.7.5. Marking Templates as Bindable10.7.6. Exposing Object Fields10.7.7. Waiting for Template Readiness10.7.8. Other Recommendations10.7.9. Creating a Template from Existing Objects
CHAPTER 11. OPENING A REMOTE SHELL TO CONTAINERS11.1. OVERVIEW11.2. START A SECURE SHELL SESSION11.3. SECURE SHELL SESSION HELP
CHAPTER 12. SERVICE ACCOUNTS12.1. OVERVIEW12.2. USER NAMES AND GROUPS12.3. DEFAULT SERVICE ACCOUNTS AND ROLES12.4. MANAGING SERVICE ACCOUNTS12.5. ENABLING SERVICE ACCOUNT AUTHENTICATION12.6. MANAGING ALLOWED SECRETS12.7. USING A SERVICE ACCOUNT’S CREDENTIALS INSIDE A CONTAINER12.8. USING A SERVICE ACCOUNT’S CREDENTIALS EXTERNALLY
CHAPTER 13. MANAGING IMAGES13.1. OVERVIEW13.2. TAGGING IMAGES
13.2.1. Adding Tags to Image Streams13.2.2. Recommended Tagging Conventions13.2.3. Removing Tags from Image Streams13.2.4. Referencing Images in Image Streams
13.3. IMAGE PULL POLICY13.4. ACCESSING THE INTERNAL REGISTRY13.5. USING IMAGE PULL SECRETS
13.5.1. Allowing Pods to Reference Images Across Projects13.5.2. Allowing Pods to Reference Images from Other Secured Registries
13.5.2.1. Pulling from Private Registries with Delegated Authentication13.6. IMPORTING TAG AND IMAGE METADATA
13.6.1. Importing Images from Insecure Registries13.6.1.1. Image Stream Tag Policies
13.6.1.1.1. Insecure Tag Import Policy13.6.1.1.2. Reference Policy
162162162162162162162163165165165166167168170171171173174174
176176176176
177177177178178179179180181
183183183183184185185188188189189189190191193194194194
Table of Contents
7
. . . . . . . . . . . . . . . . . . . . . . . . . . . . . . . . . . . . . . . . . . . . . . . . . . . . . . . . . . . . . . . . . . . . . . . . . . . . . . . . . . . . . . . . . . . . . . . . . . . . . . . . . . . . . . . . . . . . . . . . . . . . . . . . . . . . . . . . . . . . . . . . . . . . . . . . . . . . . . . . . . . . . . . . . . . . . . . . . . . . . . . . . . . . . . . . . . . . . . . . . . . . . . . . . . . . . . . . . . . . . . . . . . . . . . . . . . . . . . . . . . . . . . . . . . . . . . . . . . . . . . . . . . . . . . . . . . . . . . . .
. . . . . . . . . . . . . . . . . . . . . . . . . . . . . . . . . . . . . . . . . . . . . . . . . . . . . . . . . . . . . . . . . . . . . . . . . . . . . . . . . . . . . . . . . . . . . . . . . . . . . . . . . . . . . . . . . . . . . . . . . . . . . . . . . . . . . . . . . . . . . . . . . . . . . . . . . . . . . . . . . . . . . . . . . . . . . . . . . . . . . . . . . . . . . . . . . . . . . . . . . . . . . . . . . . . . . . . . . . . . . . . . . . . . . . . . . . . . . . . . . . . . . . . . . . . . . . . . . . . . . . . . . . . . . . . . . . . . . . . .
. . . . . . . . . . . . . . . . . . . . . . . . . . . . . . . . . . . . . . . . . . . . . . . . . . . . . . . . . . . . . . . . . . . . . . . . . . . . . . . . . . . . . . . . . . . . . . . . . . . . . . . . . . . . . . . . . . . . . . . . . . . . . . . . . . . . . . . . . . . . . . . . . . . . . . . . . . . . . . . . . . . . . . . . . . . . . . . . . . . . . . . . . . . . . . . . . . . . . . . . . . . . . . . . . . . . . . . . . . . . . . . . . . . . . . . . . . . . . . . . . . . . . . . . . . . . . . . . . . . . . . . . . . . . . . . . . . . . . . . .
. . . . . . . . . . . . . . . . . . . . . . . . . . . . . . . . . . . . . . . . . . . . . . . . . . . . . . . . . . . . . . . . . . . . . . . . . . . . . . . . . . . . . . . . . . . . . . . . . . . . . . . . . . . . . . . . . . . . . . . . . . . . . . . . . . . . . . . . . . . . . . . . . . . . . . . . . . . . . . . . . . . . . . . . . . . . . . . . . . . . . . . . . . . . . . . . . . . . . . . . . . . . . . . . . . . . . . . . . . . . . . . . . . . . . . . . . . . . . . . . . . . . . . . . . . . . . . . . . . . . . . . . . . . . . . . . . . . . . . . .
13.6.2. Importing Images from Private Registries13.6.3. Adding Trusted Certificates for External Registries13.6.4. Importing Images Across Projects13.6.5. Creating an Image Stream by Manually Pushing an Image
13.7. TRIGGERING UPDATES ON IMAGE STREAM CHANGES13.7.1. OpenShift Resources13.7.2. Kubernetes Resources
13.8. WRITING IMAGE STREAM DEFINITIONS
CHAPTER 14. QUOTAS AND LIMIT RANGES14.1. OVERVIEW14.2. QUOTAS
14.2.1. Viewing Quotas14.2.2. Resources Managed by Quota14.2.3. Quota Scopes14.2.4. Quota Enforcement14.2.5. Requests Versus Limits
14.3. LIMIT RANGES14.3.1. Viewing Limit Ranges14.3.2. Container Limits14.3.3. Pod Limits
14.4. COMPUTE RESOURCES14.4.1. CPU Requests14.4.2. Viewing Compute Resources14.4.3. CPU Limits14.4.4. Memory Requests14.4.5. Memory Limits14.4.6. Quality of Service Tiers14.4.7. Specifying Compute Resources via CLI
14.5. PROJECT RESOURCE LIMITS
CHAPTER 15. ROUTES15.1. OVERVIEW15.2. CREATING ROUTES15.3. ALLOWING ROUTE ENDPOINTS TO CONTROL COOKIE NAMES
CHAPTER 16. INTEGRATING EXTERNAL SERVICES16.1. OVERVIEW16.2. DEFINING A SERVICE FOR AN EXTERNAL DATABASE
16.2.1. Step 1: Define a Service16.2.1.1. Using an IP address16.2.1.2. Using an External Domain Name
16.2.2. Step 2: Consume a Service16.3. EXTERNAL SAAS PROVIDER
16.3.1. Using an IP address and Endpoints16.3.2. Using an External Domain Name
CHAPTER 17. SECRETS17.1. USING SECRETS
17.1.1. Properties of Secrets17.1.2. Creating Secrets17.1.3. Types of Secrets17.1.4. Updating Secrets
17.2. SECRETS IN VOLUMES AND ENVIRONMENT VARIABLES
195195195196197197197198
200200200200204205206206207207209210210211211212212212212213213
214214214217
218218218218218219220221222224
225225226226227227228
OpenShift Dedicated 3 Developer Guide
8
. . . . . . . . . . . . . . . . . . . . . . . . . . . . . . . . . . . . . . . . . . . . . . . . . . . . . . . . . . . . . . . . . . . . . . . . . . . . . . . . . . . . . . . . . . . . . . . . . . . . . . . . . . . . . . . . . . . . . . . . . . . . . . . . . . . . . . . . . . . . . . . . . . . . . . . . . . . . . . . . . . . . . . . . . . . . . . . . . . . . . . . . . . . . . . . . . . . . . . . . . . . . . . . . . . . . . . . . . . . . . . . . . . . . . . . . . . . . . . . . . . . . . . . . . . . . . . . . . . . . . . . . . . . . . . . . . . . . . . . .
. . . . . . . . . . . . . . . . . . . . . . . . . . . . . . . . . . . . . . . . . . . . . . . . . . . . . . . . . . . . . . . . . . . . . . . . . . . . . . . . . . . . . . . . . . . . . . . . . . . . . . . . . . . . . . . . . . . . . . . . . . . . . . . . . . . . . . . . . . . . . . . . . . . . . . . . . . . . . . . . . . . . . . . . . . . . . . . . . . . . . . . . . . . . . . . . . . . . . . . . . . . . . . . . . . . . . . . . . . . . . . . . . . . . . . . . . . . . . . . . . . . . . . . . . . . . . . . . . . . . . . . . . . . . . . . . . . . . . . . .
. . . . . . . . . . . . . . . . . . . . . . . . . . . . . . . . . . . . . . . . . . . . . . . . . . . . . . . . . . . . . . . . . . . . . . . . . . . . . . . . . . . . . . . . . . . . . . . . . . . . . . . . . . . . . . . . . . . . . . . . . . . . . . . . . . . . . . . . . . . . . . . . . . . . . . . . . . . . . . . . . . . . . . . . . . . . . . . . . . . . . . . . . . . . . . . . . . . . . . . . . . . . . . . . . . . . . . . . . . . . . . . . . . . . . . . . . . . . . . . . . . . . . . . . . . . . . . . . . . . . . . . . . . . . . . . . . . . . . . . .
. . . . . . . . . . . . . . . . . . . . . . . . . . . . . . . . . . . . . . . . . . . . . . . . . . . . . . . . . . . . . . . . . . . . . . . . . . . . . . . . . . . . . . . . . . . . . . . . . . . . . . . . . . . . . . . . . . . . . . . . . . . . . . . . . . . . . . . . . . . . . . . . . . . . . . . . . . . . . . . . . . . . . . . . . . . . . . . . . . . . . . . . . . . . . . . . . . . . . . . . . . . . . . . . . . . . . . . . . . . . . . . . . . . . . . . . . . . . . . . . . . . . . . . . . . . . . . . . . . . . . . . . . . . . . . . . . . . . . . . .
. . . . . . . . . . . . . . . . . . . . . . . . . . . . . . . . . . . . . . . . . . . . . . . . . . . . . . . . . . . . . . . . . . . . . . . . . . . . . . . . . . . . . . . . . . . . . . . . . . . . . . . . . . . . . . . . . . . . . . . . . . . . . . . . . . . . . . . . . . . . . . . . . . . . . . . . . . . . . . . . . . . . . . . . . . . . . . . . . . . . . . . . . . . . . . . . . . . . . . . . . . . . . . . . . . . . . . . . . . . . . . . . . . . . . . . . . . . . . . . . . . . . . . . . . . . . . . . . . . . . . . . . . . . . . . . . . . . . . . . .
. . . . . . . . . . . . . . . . . . . . . . . . . . . . . . . . . . . . . . . . . . . . . . . . . . . . . . . . . . . . . . . . . . . . . . . . . . . . . . . . . . . . . . . . . . . . . . . . . . . . . . . . . . . . . . . . . . . . . . . . . . . . . . . . . . . . . . . . . . . . . . . . . . . . . . . . . . . . . . . . . . . . . . . . . . . . . . . . . . . . . . . . . . . . . . . . . . . . . . . . . . . . . . . . . . . . . . . . . . . . . . . . . . . . . . . . . . . . . . . . . . . . . . . . . . . . . . . . . . . . . . . . . . . . . . . . . . . . . . . .
17.3. IMAGE PULL SECRETS17.4. SOURCE CLONE SECRETS17.5. SERVICE SERVING CERTIFICATE SECRETS17.6. RESTRICTIONS
17.6.1. Secret Data Keys17.7. EXAMPLES17.8. TROUBLESHOOTING
CHAPTER 18. CONFIGMAPS18.1. OVERVIEW18.2. CREATING CONFIGMAPS
18.2.1. Creating from Directories18.2.2. Creating from Files18.2.3. Creating from Literal Values
18.3. USE CASES: CONSUMING CONFIGMAPS IN PODS18.3.1. Consuming in Environment Variables18.3.2. Setting Command-line Arguments18.3.3. Consuming in Volumes
18.4. EXAMPLE: CONFIGURING REDIS18.5. RESTRICTIONS
CHAPTER 19. USING DAEMONSETS19.1. OVERVIEW19.2. CREATING DAEMONSETS
CHAPTER 20. POD AUTOSCALING20.1. OVERVIEW20.2. SUPPORTED METRICS20.3. AUTOSCALING20.4. AUTOSCALING FOR CPU UTILIZATION20.5. AUTOSCALING FOR MEMORY UTILIZATION20.6. VIEWING A HORIZONTAL POD AUTOSCALER
20.6.1. Viewing Horizontal Pod Autoscaler Status Conditions
CHAPTER 21. MANAGING VOLUMES21.1. OVERVIEW21.2. GENERAL CLI USAGE21.3. ADDING VOLUMES
Examples21.4. UPDATING VOLUMES
Examples21.5. REMOVING VOLUMES
Examples21.6. LISTING VOLUMES
Examples21.7. SPECIFYING A SUB-PATH
CHAPTER 22. USING PERSISTENT VOLUMES22.1. OVERVIEW22.2. REQUESTING STORAGE22.3. VOLUME AND CLAIM BINDING22.4. CLAIMS AS VOLUMES IN PODS22.5. VOLUME AND CLAIM PRE-BINDING
CHAPTER 23. EXECUTING REMOTE COMMANDS
228228228228229229231
232232232233234235236236238238240241
242242242
245245245245245247248249
252252252253254254255255255256256256
258258258258258259
261
Table of Contents
9
. . . . . . . . . . . . . . . . . . . . . . . . . . . . . . . . . . . . . . . . . . . . . . . . . . . . . . . . . . . . . . . . . . . . . . . . . . . . . . . . . . . . . . . . . . . . . . . . . . . . . . . . . . . . . . . . . . . . . . . . . . . . . . . . . . . . . . . . . . . . . . . . . . . . . . . . . . . . . . . . . . . . . . . . . . . . . . . . . . . . . . . . . . . . . . . . . . . . . . . . . . . . . . . . . . . . . . . . . . . . . . . . . . . . . . . . . . . . . . . . . . . . . . . . . . . . . . . . . . . . . . . . . . . . . . . . . . . . . . . .
. . . . . . . . . . . . . . . . . . . . . . . . . . . . . . . . . . . . . . . . . . . . . . . . . . . . . . . . . . . . . . . . . . . . . . . . . . . . . . . . . . . . . . . . . . . . . . . . . . . . . . . . . . . . . . . . . . . . . . . . . . . . . . . . . . . . . . . . . . . . . . . . . . . . . . . . . . . . . . . . . . . . . . . . . . . . . . . . . . . . . . . . . . . . . . . . . . . . . . . . . . . . . . . . . . . . . . . . . . . . . . . . . . . . . . . . . . . . . . . . . . . . . . . . . . . . . . . . . . . . . . . . . . . . . . . . . . . . . . . .
. . . . . . . . . . . . . . . . . . . . . . . . . . . . . . . . . . . . . . . . . . . . . . . . . . . . . . . . . . . . . . . . . . . . . . . . . . . . . . . . . . . . . . . . . . . . . . . . . . . . . . . . . . . . . . . . . . . . . . . . . . . . . . . . . . . . . . . . . . . . . . . . . . . . . . . . . . . . . . . . . . . . . . . . . . . . . . . . . . . . . . . . . . . . . . . . . . . . . . . . . . . . . . . . . . . . . . . . . . . . . . . . . . . . . . . . . . . . . . . . . . . . . . . . . . . . . . . . . . . . . . . . . . . . . . . . . . . . . . . .
. . . . . . . . . . . . . . . . . . . . . . . . . . . . . . . . . . . . . . . . . . . . . . . . . . . . . . . . . . . . . . . . . . . . . . . . . . . . . . . . . . . . . . . . . . . . . . . . . . . . . . . . . . . . . . . . . . . . . . . . . . . . . . . . . . . . . . . . . . . . . . . . . . . . . . . . . . . . . . . . . . . . . . . . . . . . . . . . . . . . . . . . . . . . . . . . . . . . . . . . . . . . . . . . . . . . . . . . . . . . . . . . . . . . . . . . . . . . . . . . . . . . . . . . . . . . . . . . . . . . . . . . . . . . . . . . . . . . . . . .
. . . . . . . . . . . . . . . . . . . . . . . . . . . . . . . . . . . . . . . . . . . . . . . . . . . . . . . . . . . . . . . . . . . . . . . . . . . . . . . . . . . . . . . . . . . . . . . . . . . . . . . . . . . . . . . . . . . . . . . . . . . . . . . . . . . . . . . . . . . . . . . . . . . . . . . . . . . . . . . . . . . . . . . . . . . . . . . . . . . . . . . . . . . . . . . . . . . . . . . . . . . . . . . . . . . . . . . . . . . . . . . . . . . . . . . . . . . . . . . . . . . . . . . . . . . . . . . . . . . . . . . . . . . . . . . . . . . . . . . .
. . . . . . . . . . . . . . . . . . . . . . . . . . . . . . . . . . . . . . . . . . . . . . . . . . . . . . . . . . . . . . . . . . . . . . . . . . . . . . . . . . . . . . . . . . . . . . . . . . . . . . . . . . . . . . . . . . . . . . . . . . . . . . . . . . . . . . . . . . . . . . . . . . . . . . . . . . . . . . . . . . . . . . . . . . . . . . . . . . . . . . . . . . . . . . . . . . . . . . . . . . . . . . . . . . . . . . . . . . . . . . . . . . . . . . . . . . . . . . . . . . . . . . . . . . . . . . . . . . . . . . . . . . . . . . . . . . . . . . . .
. . . . . . . . . . . . . . . . . . . . . . . . . . . . . . . . . . . . . . . . . . . . . . . . . . . . . . . . . . . . . . . . . . . . . . . . . . . . . . . . . . . . . . . . . . . . . . . . . . . . . . . . . . . . . . . . . . . . . . . . . . . . . . . . . . . . . . . . . . . . . . . . . . . . . . . . . . . . . . . . . . . . . . . . . . . . . . . . . . . . . . . . . . . . . . . . . . . . . . . . . . . . . . . . . . . . . . . . . . . . . . . . . . . . . . . . . . . . . . . . . . . . . . . . . . . . . . . . . . . . . . . . . . . . . . . . . . . . . . . .
. . . . . . . . . . . . . . . . . . . . . . . . . . . . . . . . . . . . . . . . . . . . . . . . . . . . . . . . . . . . . . . . . . . . . . . . . . . . . . . . . . . . . . . . . . . . . . . . . . . . . . . . . . . . . . . . . . . . . . . . . . . . . . . . . . . . . . . . . . . . . . . . . . . . . . . . . . . . . . . . . . . . . . . . . . . . . . . . . . . . . . . . . . . . . . . . . . . . . . . . . . . . . . . . . . . . . . . . . . . . . . . . . . . . . . . . . . . . . . . . . . . . . . . . . . . . . . . . . . . . . . . . . . . . . . . . . . . . . . . .
23.1. OVERVIEW23.2. BASIC USAGE23.3. PROTOCOL
CHAPTER 24. COPYING FILES TO OR FROM A CONTAINER24.1. OVERVIEW24.2. BASIC USAGE24.3. BACKING UP AND RESTORING DATABASES24.4. REQUIREMENTS24.5. SPECIFYING THE COPY SOURCE24.6. SPECIFYING THE COPY DESTINATION24.7. DELETING FILES AT THE DESTINATION24.8. CONTINUOUS SYNCING ON FILE CHANGE24.9. ADVANCED RSYNC FEATURES
CHAPTER 25. PORT FORWARDING25.1. OVERVIEW25.2. BASIC USAGE25.3. PROTOCOL
CHAPTER 26. SHARED MEMORY26.1. OVERVIEW26.2. POSIX SHARED MEMORY
CHAPTER 27. APPLICATION HEALTH27.1. OVERVIEW27.2. CONTAINER HEALTH CHECKS USING PROBES
CHAPTER 28. EVENTS28.1. OVERVIEW28.2. VIEWING EVENTS WITH THE CLI28.3. VIEWING EVENTS IN THE CONSOLE28.4. COMPREHENSIVE LIST OF EVENTS
CHAPTER 29. MANAGING ENVIRONMENT VARIABLES29.1. SETTING AND UNSETTING ENVIRONMENT VARIABLES29.2. LIST ENVIRONMENT VARIABLES29.3. SET ENVIRONMENT VARIABLES
29.3.1. Automatically Added Environment Variables29.4. UNSET ENVIRONMENT VARIABLES
CHAPTER 30. JOBS30.1. OVERVIEW30.2. CREATING A JOB
30.2.1. Known Limitations30.3. SCALING A JOB30.4. SETTING MAXIMUM DURATION30.5. JOB BACKOFF FAILURE POLICY
CHAPTER 31. OPENSHIFT PIPELINE31.1. OVERVIEW31.2. OPENSHIFT JENKINS CLIENT PLUG-IN
31.2.1. OpenShift DSL31.3. JENKINS PIPELINE STRATEGY31.4. JENKINSFILE
261261261
263263263263264264265265265265
266266266266
268268268
270270270
273273273273273
283283283283284284
285285285286286286287
288288288288288288
OpenShift Dedicated 3 Developer Guide
10
. . . . . . . . . . . . . . . . . . . . . . . . . . . . . . . . . . . . . . . . . . . . . . . . . . . . . . . . . . . . . . . . . . . . . . . . . . . . . . . . . . . . . . . . . . . . . . . . . . . . . . . . . . . . . . . . . . . . . . . . . . . . . . . . . . . . . . . . . . . . . . . . . . . . . . . . . . . . . . . . . . . . . . . . . . . . . . . . . . . . . . . . . . . . . . . . . . . . . . . . . . . . . . . . . . . . . . . . . . . . . . . . . . . . . . . . . . . . . . . . . . . . . . . . . . . . . . . . . . . . . . . . . . . . . . . . . . . . . . . .
. . . . . . . . . . . . . . . . . . . . . . . . . . . . . . . . . . . . . . . . . . . . . . . . . . . . . . . . . . . . . . . . . . . . . . . . . . . . . . . . . . . . . . . . . . . . . . . . . . . . . . . . . . . . . . . . . . . . . . . . . . . . . . . . . . . . . . . . . . . . . . . . . . . . . . . . . . . . . . . . . . . . . . . . . . . . . . . . . . . . . . . . . . . . . . . . . . . . . . . . . . . . . . . . . . . . . . . . . . . . . . . . . . . . . . . . . . . . . . . . . . . . . . . . . . . . . . . . . . . . . . . . . . . . . . . . . . . . . . . .
. . . . . . . . . . . . . . . . . . . . . . . . . . . . . . . . . . . . . . . . . . . . . . . . . . . . . . . . . . . . . . . . . . . . . . . . . . . . . . . . . . . . . . . . . . . . . . . . . . . . . . . . . . . . . . . . . . . . . . . . . . . . . . . . . . . . . . . . . . . . . . . . . . . . . . . . . . . . . . . . . . . . . . . . . . . . . . . . . . . . . . . . . . . . . . . . . . . . . . . . . . . . . . . . . . . . . . . . . . . . . . . . . . . . . . . . . . . . . . . . . . . . . . . . . . . . . . . . . . . . . . . . . . . . . . . . . . . . . . . .
31.5. TUTORIAL31.6. ADVANCED TOPICS
31.6.1. Disabling Jenkins AutoProvisioning31.6.2. Configuring Slave Pods
CHAPTER 32. CREATE FROM URL32.1. OVERVIEW32.2. USING AN IMAGE STREAM AND IMAGE TAG
32.2.1. Query String Parameters32.2.1.1. Example
32.3. USING A TEMPLATE32.3.1. Query String Parameters
32.3.1.1. Example
CHAPTER 33. CREATING AN OBJECT FROM A CUSTOM RESOURCE DEFINITION33.1. KUBERNETES CUSTOM RESOURCE DEFINITIONS33.2. CREATING CUSTOM OBJECTS FROM A CRD
PrerequisitesProcedure
33.3. MANAGING CUSTOM OBJECTSPrerequisitesProcedure
CHAPTER 34. APPLICATION MEMORY SIZING34.1. OVERVIEW34.2. BACKGROUND34.3. STRATEGY34.4. SIZING OPENJDK ON OPENSHIFT DEDICATED
34.4.1. Overriding the JVM Maximum Heap Size34.4.2. Encouraging the JVM to Release Unused Memory to the Operating System34.4.3. Ensuring All JVM Processes Within a Container Are Appropriately Configured
34.5. FINDING THE MEMORY REQUEST AND LIMIT FROM WITHIN A POD34.6. DIAGNOSING AN OOM KILL34.7. DIAGNOSING AN EVICTED POD
289289289289
290290290290291291291292
293293293293293294294294
296296296297297298298298299299301
Table of Contents
11

OpenShift Dedicated 3 Developer Guide
12
CHAPTER 1. OVERVIEWThis guide is intended for application developers, and provides instructions for setting up and configuringa workstation to develop and deploy applications in an OpenShift Dedicated cloud environment. Thisincludes detailed instructions and examples to help developers:
1. Create new applications
2. Monitor and configure projects
3. Generate configurations using templates
4. Manage builds, including build strategy options and webhooks
5. Define deployments, including deployment strategies
6. Create and manage routes
7. Create and configure secrets
8. Integrate external services, such as databases and SaaS endpoints
9. Check application health using probes
CHAPTER 1. OVERVIEW
13
CHAPTER 2. APPLICATION LIFE CYCLE MANAGEMENT
2.1. PLANNING YOUR DEVELOPMENT PROCESS
2.1.1. Overview
OpenShift Dedicated is designed for building and deploying applications. Depending on how much youwant to involve OpenShift Dedicated in your development process, you can choose to:
focus your development within an OpenShift Dedicated project, using it to build an applicationfrom scratch then continuously develop and manage its lifecycle, or
bring an application (e.g., binary, container image, source code) you have already developed ina separate environment and deploy it onto OpenShift Dedicated.
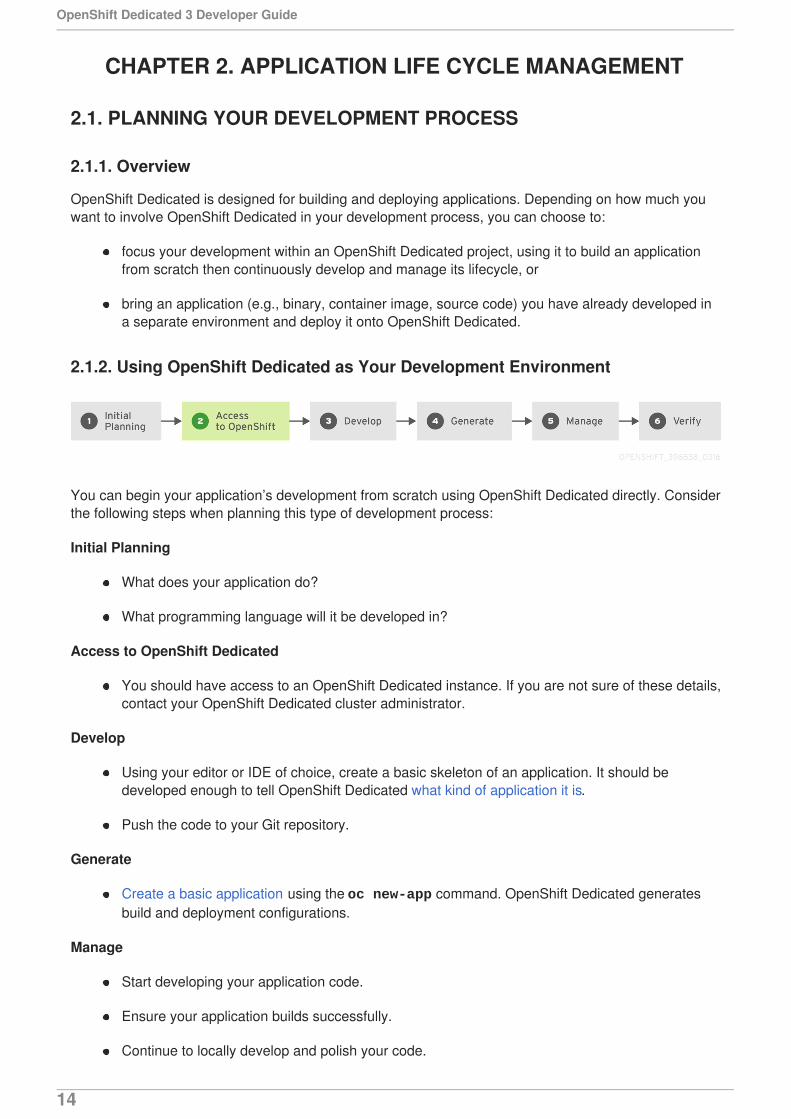
2.1.2. Using OpenShift Dedicated as Your Development Environment
You can begin your application’s development from scratch using OpenShift Dedicated directly. Considerthe following steps when planning this type of development process:
Initial Planning
What does your application do?
What programming language will it be developed in?
Access to OpenShift Dedicated
You should have access to an OpenShift Dedicated instance. If you are not sure of these details,contact your OpenShift Dedicated cluster administrator.
Develop
Using your editor or IDE of choice, create a basic skeleton of an application. It should bedeveloped enough to tell OpenShift Dedicated what kind of application it is.
Push the code to your Git repository.
Generate
Create a basic application using the oc new-app command. OpenShift Dedicated generatesbuild and deployment configurations.
Manage
Start developing your application code.
Ensure your application builds successfully.
Continue to locally develop and polish your code.
OpenShift Dedicated 3 Developer Guide
14
Push your code to a Git repository.
Is any extra configuration needed? Explore the Developer Guide for more options.
Verify
You can verify your application in a number of ways. You can push your changes to yourapplication’s Git repository, and use OpenShift Dedicated to rebuild and redeploy yourapplication. Alternatively, you can hot deploy using rsync to synchronize your code changesinto a running pod.
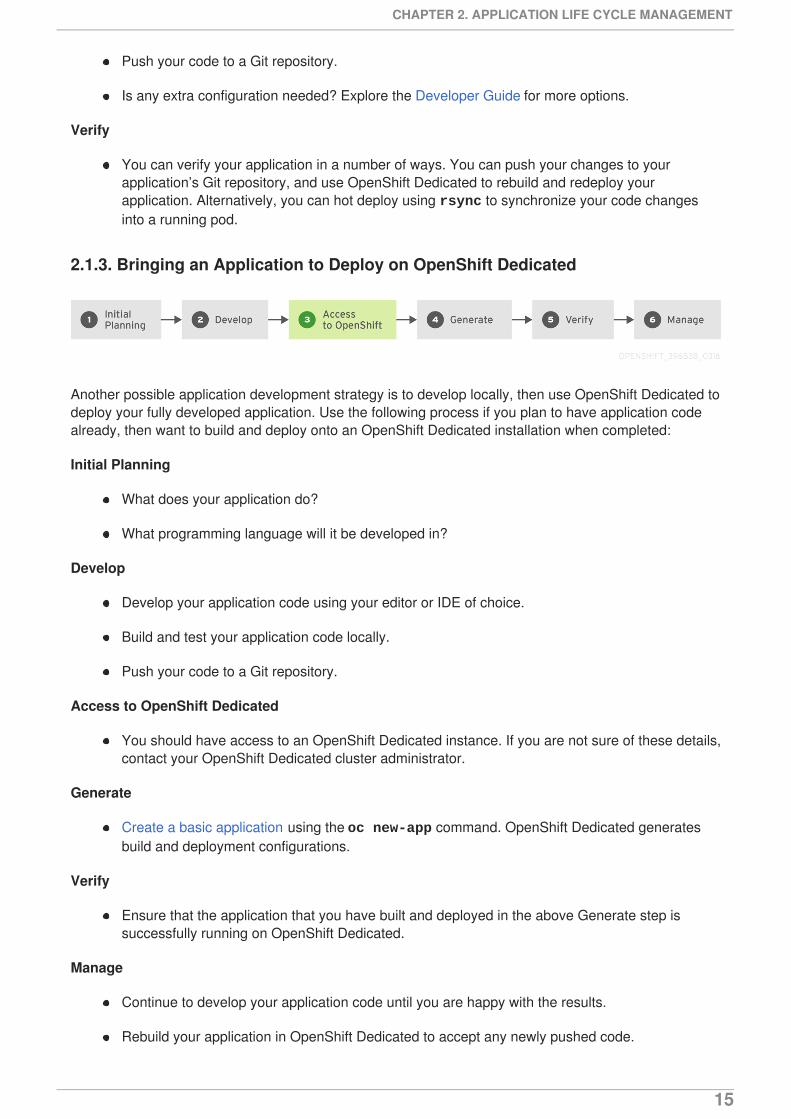
2.1.3. Bringing an Application to Deploy on OpenShift Dedicated
Another possible application development strategy is to develop locally, then use OpenShift Dedicated todeploy your fully developed application. Use the following process if you plan to have application codealready, then want to build and deploy onto an OpenShift Dedicated installation when completed:
Initial Planning
What does your application do?
What programming language will it be developed in?
Develop
Develop your application code using your editor or IDE of choice.
Build and test your application code locally.
Push your code to a Git repository.
Access to OpenShift Dedicated
You should have access to an OpenShift Dedicated instance. If you are not sure of these details,contact your OpenShift Dedicated cluster administrator.
Generate
Create a basic application using the oc new-app command. OpenShift Dedicated generatesbuild and deployment configurations.
Verify
Ensure that the application that you have built and deployed in the above Generate step issuccessfully running on OpenShift Dedicated.
Manage
Continue to develop your application code until you are happy with the results.
Rebuild your application in OpenShift Dedicated to accept any newly pushed code.
CHAPTER 2. APPLICATION LIFE CYCLE MANAGEMENT
15
Is any extra configuration needed? Explore the Developer Guide for more options.
2.2. CREATING NEW APPLICATIONS
2.2.1. Overview
You can create a new OpenShift Dedicated application from components including source or binarycode, images and/or templates by using either the OpenShift CLI or web console.
2.2.2. Creating an Application Using the CLI
2.2.2.1. Creating an Application From Source Code
The new-app command allows you to create applications from source code in a local or remote Gitrepository.
To create an application using a Git repository in a local directory:
$ oc new-app /path/to/source/code
NOTE
If using a local Git repository, the repository should have a remote named origin thatpoints to a URL accessible by the OpenShift Dedicated cluster. If there is no recognisedremote, new-app will create a binary build.
To create an application using a remote Git repository:
$ oc new-app https://github.com/sclorg/cakephp-ex
To create an application using a private remote Git repository:
$ oc new-app https://github.com/youruser/yourprivaterepo --source-secret=yoursecret
NOTE
If using a private remote Git repository, you can use the --source-secret flag tospecify an existing source clone secret that will get injected into your BuildConfig toaccess the repository.
You can use a subdirectory of your source code repository by specifying a --context-dir flag. Tocreate an application using a remote Git repository and a context subdirectory:
$ oc new-app https://github.com/sclorg/s2i-ruby-container.git \ --context-dir=2.0/test/puma-test-app
Also, when specifying a remote URL, you can specify a Git branch to use by appending #<branch_name> to the end of the URL:
OpenShift Dedicated 3 Developer Guide
16
$ oc new-app https://github.com/openshift/ruby-hello-world.git#beta4
The new-app command creates a build configuration, which itself creates a new application image fromyour source code. The new-app command typically also creates a deployment configuration to deploythe new image, and a service to provide load-balanced access to the deployment running your image.
OpenShift Dedicated automatically detects whether the Docker, Pipeline or Sourcebuild strategyshould be used, and in the case of Source builds, detects an appropriate language builder image.
Build Strategy Detection
If a Jenkinsfile exists in the root or specified context directory of the source repository when creating anew application, OpenShift Dedicated generates a Pipeline build strategy. Otherwise, if a Dockerfileis found, OpenShift Dedicated generates a Docker build strategy. Otherwise, it generates a Sourcebuild strategy.
You can override the build strategy by setting the --strategy flag to either docker, pipeline or source.
$ oc new-app /home/user/code/myapp --strategy=docker
NOTE
The oc command requires that files containing build sources are available in a remote Gitrepository. For all source builds, you must use git remote -v.
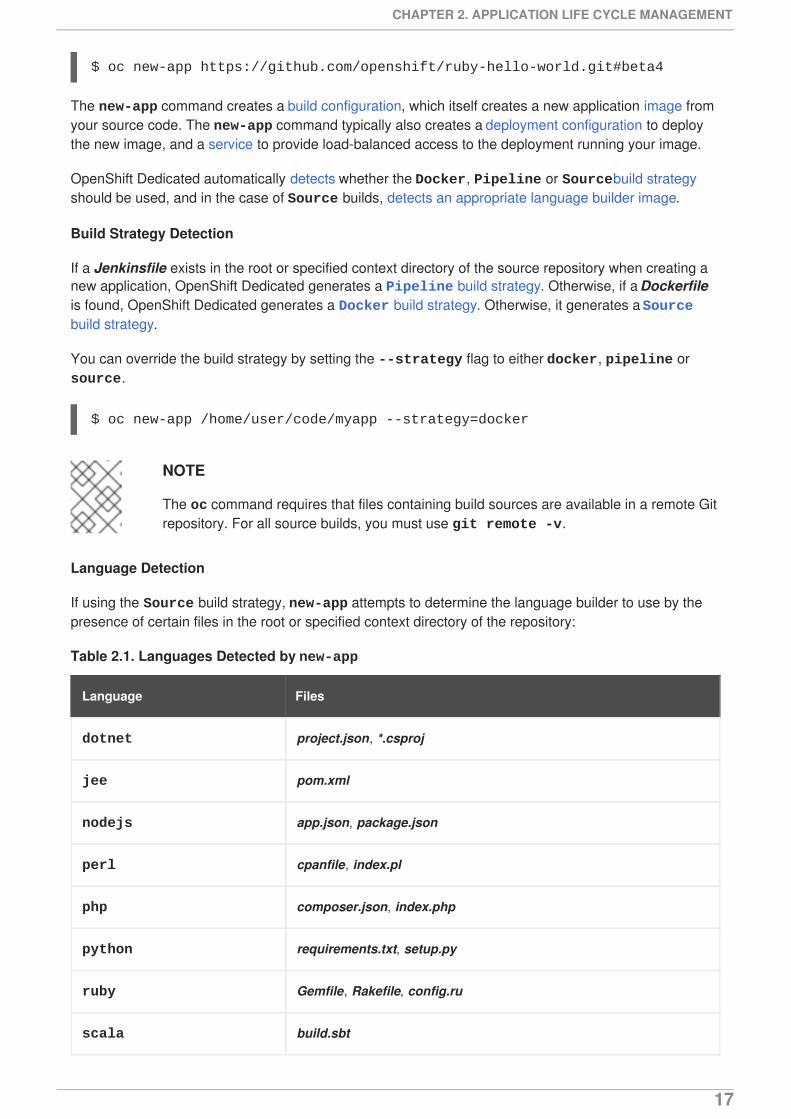
Language Detection
If using the Source build strategy, new-app attempts to determine the language builder to use by thepresence of certain files in the root or specified context directory of the repository:
Table 2.1. Languages Detected by new-app
Language Files
dotnet project.json, *.csproj
jee pom.xml
nodejs app.json, package.json
perl cpanfile, index.pl
php composer.json, index.php
python requirements.txt, setup.py
ruby Gemfile, Rakefile, config.ru
scala build.sbt
CHAPTER 2. APPLICATION LIFE CYCLE MANAGEMENT
17
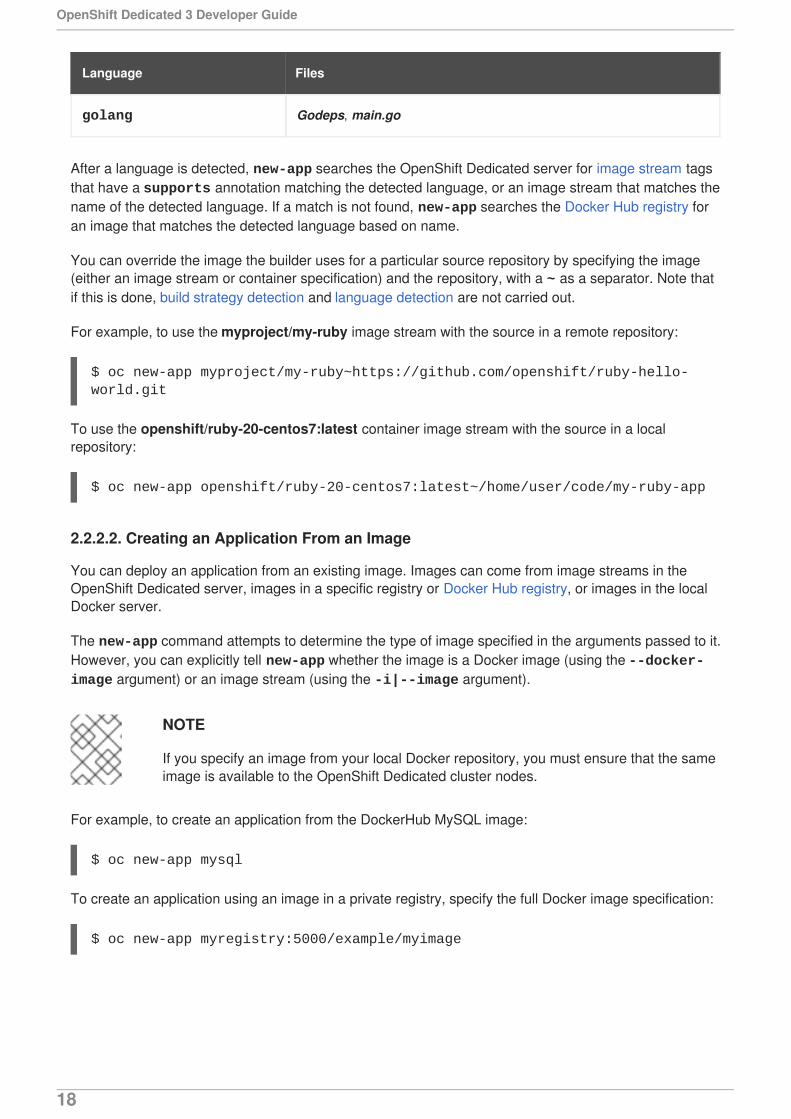
golang Godeps, main.go
Language Files
After a language is detected, new-app searches the OpenShift Dedicated server for image stream tagsthat have a supports annotation matching the detected language, or an image stream that matches thename of the detected language. If a match is not found, new-app searches the Docker Hub registry foran image that matches the detected language based on name.
You can override the image the builder uses for a particular source repository by specifying the image(either an image stream or container specification) and the repository, with a ~ as a separator. Note thatif this is done, build strategy detection and language detection are not carried out.
For example, to use the myproject/my-ruby image stream with the source in a remote repository:
$ oc new-app myproject/my-ruby~https://github.com/openshift/ruby-hello-world.git
To use the openshift/ruby-20-centos7:latest container image stream with the source in a localrepository:
$ oc new-app openshift/ruby-20-centos7:latest~/home/user/code/my-ruby-app
2.2.2.2. Creating an Application From an Image
You can deploy an application from an existing image. Images can come from image streams in theOpenShift Dedicated server, images in a specific registry or Docker Hub registry, or images in the localDocker server.
The new-app command attempts to determine the type of image specified in the arguments passed to it.However, you can explicitly tell new-app whether the image is a Docker image (using the --docker-image argument) or an image stream (using the -i|--image argument).
NOTE
If you specify an image from your local Docker repository, you must ensure that the sameimage is available to the OpenShift Dedicated cluster nodes.
For example, to create an application from the DockerHub MySQL image:
$ oc new-app mysql
To create an application using an image in a private registry, specify the full Docker image specification:
$ oc new-app myregistry:5000/example/myimage
OpenShift Dedicated 3 Developer Guide
18
NOTE
If the registry containing the image is not secured with SSL, cluster administrators mustensure that the Docker daemon on the OpenShift Dedicated node hosts is run with the --insecure-registry flag pointing to that registry. You must also tell new-app that theimage comes from an insecure registry with the --insecure-registry flag.
You can create an application from an existing image stream and optional image stream tag:
$ oc new-app my-stream:v1
2.2.2.3. Creating an Application From a Template
You can create an application from a previously stored template or from a template file, by specifying thename of the template as an argument. For example, you can store a sample application template anduse it to create an application.
To create an application from a stored template:
$ oc create -f examples/sample-app/application-template-stibuild.json$ oc new-app ruby-helloworld-sample
To directly use a template in your local file system, without first storing it in OpenShift Dedicated, use the-f|--file argument:
$ oc new-app -f examples/sample-app/application-template-stibuild.json
Template Parameters
When creating an application based on a template, use the -p|--param argument to set parametervalues defined by the template:
$ oc new-app ruby-helloworld-sample \ -p ADMIN_USERNAME=admin -p ADMIN_PASSWORD=mypassword
You can store your parameters in a file, then use that file with --param-file when instantiating atemplate. If you want to read the parameters from standard input, use --param-file=-:
$ cat helloworld.paramsADMIN_USERNAME=adminADMIN_PASSWORD=mypassword$ oc new-app ruby-helloworld-sample --param-file=helloworld.params$ cat helloworld.params | oc new-app ruby-helloworld-sample --param-file=-
2.2.2.4. Further Modifying Application Creation
The new-app command generates OpenShift Dedicated objects that will build, deploy, and run theapplication being created. Normally, these objects are created in the current project using names derivedfrom the input source repositories or the input images. However, new-app allows you to modify thisbehavior.
CHAPTER 2. APPLICATION LIFE CYCLE MANAGEMENT
19
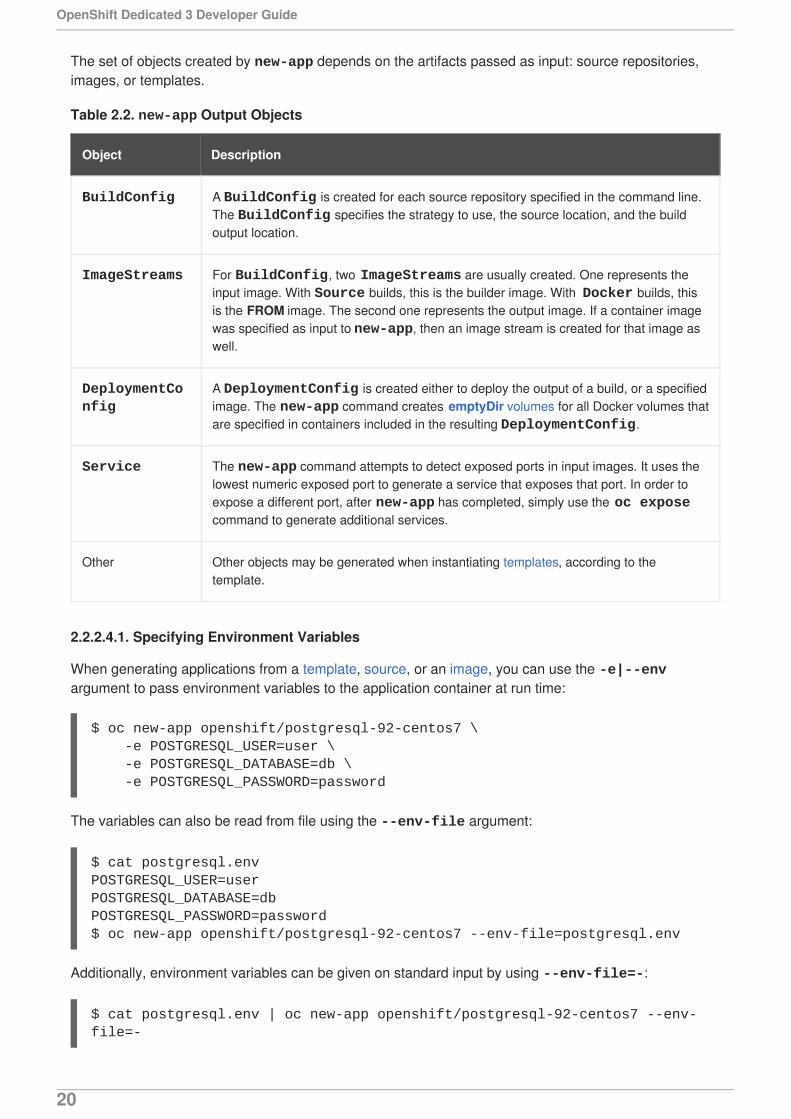
The set of objects created by new-app depends on the artifacts passed as input: source repositories,images, or templates.
Table 2.2. new-app Output Objects
Object Description
BuildConfig A BuildConfig is created for each source repository specified in the command line.The BuildConfig specifies the strategy to use, the source location, and the buildoutput location.
ImageStreams For BuildConfig, two ImageStreams are usually created. One represents theinput image. With Source builds, this is the builder image. With Docker builds, thisis the FROM image. The second one represents the output image. If a container imagewas specified as input to new-app, then an image stream is created for that image aswell.
DeploymentConfig
A DeploymentConfig is created either to deploy the output of a build, or a specifiedimage. The new-app command creates emptyDir volumes for all Docker volumes thatare specified in containers included in the resulting DeploymentConfig.
Service The new-app command attempts to detect exposed ports in input images. It uses thelowest numeric exposed port to generate a service that exposes that port. In order toexpose a different port, after new-app has completed, simply use the oc exposecommand to generate additional services.
Other Other objects may be generated when instantiating templates, according to thetemplate.
2.2.2.4.1. Specifying Environment Variables
When generating applications from a template, source, or an image, you can use the -e|--envargument to pass environment variables to the application container at run time:
$ oc new-app openshift/postgresql-92-centos7 \ -e POSTGRESQL_USER=user \ -e POSTGRESQL_DATABASE=db \ -e POSTGRESQL_PASSWORD=password
The variables can also be read from file using the --env-file argument:
$ cat postgresql.envPOSTGRESQL_USER=userPOSTGRESQL_DATABASE=dbPOSTGRESQL_PASSWORD=password$ oc new-app openshift/postgresql-92-centos7 --env-file=postgresql.env
Additionally, environment variables can be given on standard input by using --env-file=-:
$ cat postgresql.env | oc new-app openshift/postgresql-92-centos7 --env-file=-
OpenShift Dedicated 3 Developer Guide
20
See Managing Environment Variables for more information.
NOTE
Any BuildConfig objects created as part of new-app processing will not be updatedwith environment variables passed via the -e|--env or --env-file argument.
2.2.2.4.2. Specifying Build Environment Variables
When generating applications from a template, source, or an image, you can use the --build-envargument to pass environment variables to the build container at run time:
$ oc new-app openshift/ruby-23-centos7 \ --build-env HTTP_PROXY=http://myproxy.net:1337/ \ --build-env GEM_HOME=~/.gem
The variables can also be read from a file using the --build-env-file argument:
$ cat ruby.envHTTP_PROXY=http://myproxy.net:1337/GEM_HOME=~/.gem$ oc new-app openshift/ruby-23-centos7 --build-env-file=ruby.env
Additionally, environment variables can be given on standard input by using --build-env-file=-:
$ cat ruby.env | oc new-app openshift/ruby-23-centos7 --build-env-file=-
2.2.2.4.3. Specifying Labels
When generating applications from source, images, or templates, you can use the -l|--labelargument to add labels to the created objects. Labels make it easy to collectively select, configure, anddelete objects associated with the application.
$ oc new-app https://github.com/openshift/ruby-hello-world -l name=hello-world
2.2.2.4.4. Viewing the Output Without Creation
To see a dry-run of what new-app will create, you can use the -o|--output argument with a yaml or json value. You can then use the output to preview the objects that will be created, or redirect it to a filethat you can edit. Once you are satisfied, you can use oc create to create the OpenShift Dedicatedobjects.
To output new-app artifacts to a file, edit them, then create them:
$ oc new-app https://github.com/openshift/ruby-hello-world \ -o yaml > myapp.yaml$ vi myapp.yaml$ oc create -f myapp.yaml
2.2.2.4.5. Creating Objects With Different Names
CHAPTER 2. APPLICATION LIFE CYCLE MANAGEMENT
21
Objects created by new-app are normally named after the source repository, or the image used togenerate them. You can set the name of the objects produced by adding a --name flag to thecommand:
$ oc new-app https://github.com/openshift/ruby-hello-world --name=myapp
2.2.2.4.6. Creating Objects in a Different Project
Normally, new-app creates objects in the current project. However, you can create objects in a differentproject that you have access to using the -n|--namespace argument:
$ oc new-app https://github.com/openshift/ruby-hello-world -n myproject
2.2.2.4.7. Creating Multiple Objects
The new-app command allows creating multiple applications specifying multiple parameters to new-app. Labels specified in the command line apply to all objects created by the single command.Environment variables apply to all components created from source or images.
To create an application from a source repository and a Docker Hub image:
$ oc new-app https://github.com/openshift/ruby-hello-world mysql
NOTE
If a source code repository and a builder image are specified as separate arguments, new-app uses the builder image as the builder for the source code repository. If this is notthe intent, specify the required builder image for the source using the ~ separator.
2.2.2.4.8. Grouping Images and Source in a Single Pod
The new-app command allows deploying multiple images together in a single pod. In order to specifywhich images to group together, use the + separator. The --group command line argument can also beused to specify the images that should be grouped together. To group the image built from a sourcerepository with other images, specify its builder image in the group:
$ oc new-app ruby+mysql
To deploy an image built from source and an external image together:
$ oc new-app \ ruby~https://github.com/openshift/ruby-hello-world \ mysql \ --group=ruby+mysql
2.2.3. Creating an Application Using the Web Console
1. While in the desired project, click Add to Project:
OpenShift Dedicated 3 Developer Guide
22
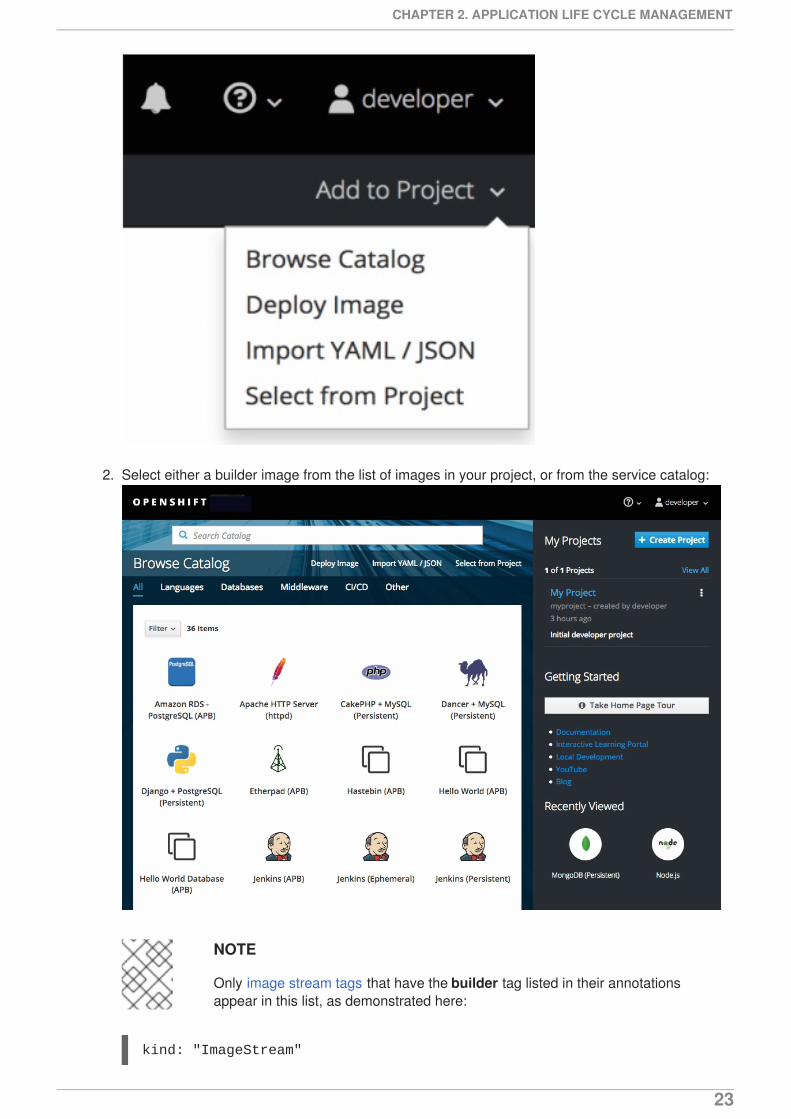
2. Select either a builder image from the list of images in your project, or from the service catalog:
NOTE
Only image stream tags that have the builder tag listed in their annotationsappear in this list, as demonstrated here:
kind: "ImageStream"
CHAPTER 2. APPLICATION LIFE CYCLE MANAGEMENT
23
1
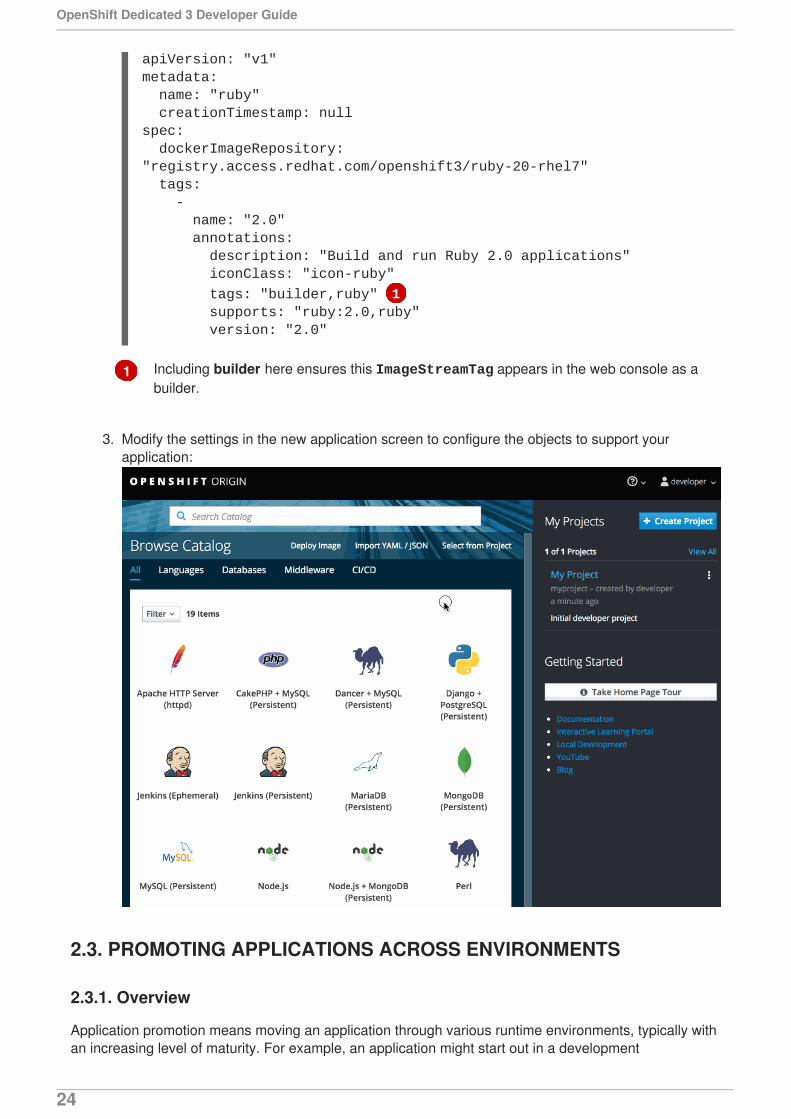
apiVersion: "v1"metadata: name: "ruby" creationTimestamp: nullspec: dockerImageRepository: "registry.access.redhat.com/openshift3/ruby-20-rhel7" tags: - name: "2.0" annotations: description: "Build and run Ruby 2.0 applications" iconClass: "icon-ruby"
tags: "builder,ruby" 1 supports: "ruby:2.0,ruby" version: "2.0"
Including builder here ensures this ImageStreamTag appears in the web console as abuilder.
3. Modify the settings in the new application screen to configure the objects to support yourapplication:
2.3. PROMOTING APPLICATIONS ACROSS ENVIRONMENTS
2.3.1. Overview
Application promotion means moving an application through various runtime environments, typically withan increasing level of maturity. For example, an application might start out in a development
OpenShift Dedicated 3 Developer Guide
24
environment, then be promoted to a stage environment for further testing, before finally being promotedinto a production environment. As changes are introduced in the application, again the changes will startin development and be promoted through stage and production.
The "application" today is more than just the source code written in Java, Perl, Python, etc. It is morenow than the static web content, the integration scripts, or the associated configuration for the languagespecific runtimes for the application. It is more than the application specific archives consumed by thoselanguage specific runtimes.
In the context of OpenShift Dedicated and its combined foundation of Kubernetes and Docker, additionalapplication artifacts include:
Docker container images with their rich set of metadata and associated tooling.
Environment variables that are injected into containers for application use.
API objects (also known as resource definitions; see Core Concepts) of OpenShift Dedicated,which:
are injected into containers for application use.
dictate how OpenShift Dedicated manages containers and pods.
In examining how to promote applications in OpenShift Dedicated, this topic will:
Elaborate on these new artifacts introduced to the application definition.
Describe how you can demarcate the different environments for your application promotionpipeline.
Discuss methodologies and tools for managing these new artifacts.
Provide examples that apply the various concepts, constructs, methodologies, and tools toapplication promotion.
2.3.2. Application Components
2.3.2.1. API Objects
With regard to OpenShift Dedicated and Kubernetes resource definitions (the items newly introduced tothe application inventory), there are a couple of key design points for these API objects that are relevantto revisit when considering the topic of application promotion.
First, as highlighted throughout OpenShift Dedicated documentation, every API object can be expressedvia either JSON or YAML, making it easy to manage these resource definitions via traditional sourcecontrol and scripting.
Also, the API objects are designed such that there are portions of the object which specify the desiredstate of the system, and other portions which reflect the status or current state of the system. This can bethought of as inputs and outputs. The input portions, when expressed in JSON or YAML, in particular areitems that fit naturally as source control managed (SCM) artifacts.
CHAPTER 2. APPLICATION LIFE CYCLE MANAGEMENT
25
NOTE
Remember, the input or specification portions of the API objects can be totally static ordynamic in the sense that variable substitution via template processing is possible oninstantiation.
The result of these points with respect to API objects is that with their expression as JSON or YAMLfiles, you can treat the configuration of the application as code.
Conceivably, almost any of the API objects may be considered an application artifact by yourorganization. Listed below are the objects most commonly associated with deploying and managing anapplication:
BuildConfigs
This is a special case resource in the context of application promotion. While a BuildConfig iscertainly a part of the application, especially from a developer’s perspective, typically the BuildConfig is not promoted through the pipeline. It produces the Image that is promoted (alongwith other items) through the pipeline.
Templates
In terms of application promotion, Templates can serve as the starting point for setting up resourcesin a given staging environment, especially with the parameterization capabilities. Additional post-instantiation modifications are very conceivable though when applications move through a promotionpipeline. See Scenarios and Examples for more on this.
Routes
These are the most typical resources that differ stage to stage in the application promotion pipeline,as tests against different stages of an application access that application via its Route. Also,remember that you have options with regard to manual specification or auto-generation of hostnames, as well as the HTTP-level security of the Route.
Services
If reasons exist to avoid Routers and Routes at given application promotion stages (perhaps forsimplicity’s sake for individual developers at early stages), an application can be accessed via the Cluster IP address and port. If used, some management of the address and port between stagescould be warranted.
Endpoints
Certain application-level services (e.g., database instances in many enterprises) may not bemanaged by OpenShift Dedicated. If so, then creating those Endpoints yourself, along with thenecessary modifications to the associated Service (omitting the selector field on the Service) areactivities that are either duplicated or shared between stages (based on how you delineate yourenvironment).
Secrets
The sensitive information encapsulated by Secrets are shared between staging environments whenthe corresponding entity (either a Service managed by OpenShift Dedicated or an external servicemanaged outside of OpenShift Dedicated) the information pertains to is shared. If there are differentversions of the said entity in different stages of your application promotion pipeline, it may benecessary to maintain a distinct Secret in each stage of the pipeline or to make modifications to itas it traverses through the pipeline. Also, take care that if you are storing the Secret as JSON orYAML in an SCM, some form of encryption to protect the sensitive information may be warranted.
DeploymentConfigs
This object is the primary resource for defining and scoping the environment for a given applicationpromotion pipeline stage; it controls how your application starts up. While there are aspects of it that
OpenShift Dedicated 3 Developer Guide
26
will be common across all the different stage, undoubtedly there will be modifications to this object asit progresses through your application promotion pipeline to reflect differences in the environments foreach stage, or changes in behavior of the system to facilitate testing of the different scenarios yourapplication must support.
ImageStreams, ImageStreamTags, and ImageStreamImage
Detailed in the Images and Image Streams sections, these objects are central to the OpenShiftDedicated additions around managing container images.
ServiceAccounts and RoleBindings
Management of permissions to other API objects within OpenShift Dedicated, as well as the externalservices, are intrinsic to managing your application. Similar to Secrets, the ServiceAccounts and RoleBindings objects can vary in how they are shared between the different stages of yourapplication promotion pipeline based on your needs to share or isolate those different environments.
PersistentVolumeClaims
Relevant to stateful services like databases, how much these are shared between your differentapplication promotion stages directly correlates to how your organization shares or isolates the copiesof your application data.
ConfigMaps
A useful decoupling of Pod configuration from the Pod itself (think of an environment variable styleconfiguration), these can either be shared by the various staging environments when consistent Podbehavior is desired. They can also be modified between stages to alter Pod behavior (usually asdifferent aspects of the application are vetted at different stages).
2.3.2.2. Images
As noted earlier, container images are now artifacts of your application. In fact, of the new applicationsartifacts, images and the management of images are the key pieces with respect to applicationpromotion. In some cases, an image might encapsulate the entirety of your application, and theapplication promotion flow consists solely of managing the image.
Images are not typically managed in a SCM system, just as application binaries were not in previoussystems. However, just as with binaries, installable artifacts and corresponding repositories (that is,RPMs, RPM repositories, Nexus, etc.) arose with similar semantics to SCMs, similar constructs andterminology around image management that are similar to SCMs have arisen:
Image registry == SCM server
Image repository == SCM repository
As images reside in registries, application promotion is concerned with ensuring the appropriate imageexists in a registry that can be accessed from the environment that needs to run the applicationrepresented by that image.
Rather than reference images directly, application definitions typically abstract the reference into animage stream. This means the image stream will be another API object that makes up the applicationcomponents. For more details on image streams, see Core Concepts.
2.3.2.3. Summary
Now that the application artifacts of note, images and API objects, have been detailed in the context ofapplication promotion within OpenShift Dedicated, the notion of where you run your application in thevarious stages of your promotion pipeline is next the point of discussion.
CHAPTER 2. APPLICATION LIFE CYCLE MANAGEMENT
27
2.3.3. Deployment Environments
A deployment environment, in this context, describes a distinct space for an application to run during aparticular stage of a CI/CD pipeline. Typical environments include development, test, stage, andproduction, for example. The boundaries of an environment can be defined in different ways, such as:
Via labels and unique naming within a single project.
Via distinct projects within a cluster.
Via distinct clusters.
And it is conceivable that your organization leverages all three.
2.3.3.1. Considerations
Typically, you will consider the following heuristics in how you structure the deployment environments:
How much resource sharing the various stages of your promotion flow allow
How much isolation the various stages of your promotion flow require
How centrally located (or geographically dispersed) the various stages of your promotion flow are
Also, some important reminders on how OpenShift Dedicated clusters and projects relate to imageregistries:
Multiple project in the same cluster can access the same image streams.
Multiple clusters can access the same external registries.
Clusters can only share a registry if the OpenShift Dedicated internal image registry is exposedvia a route.
2.3.3.2. Summary
After deployment environments are defined, promotion flows with delineation of stages within a pipelinecan be implemented. The methods and tools for constructing those promotion flow implementations arethe next point of discussion.
2.3.4. Methods and Tools
Fundamentally, application promotion is a process of moving the aforementioned applicationcomponents from one environment to another. The following subsections outline tools that can be usedto move the various components by hand, before advancing to discuss holistic solutions for automatingapplication promotion.
OpenShift Dedicated 3 Developer Guide
28
NOTE
There are a number of insertion points available during both the build and deploymentprocesses. They are defined within BuildConfig and DeploymentConfig API objects.These hooks allow for the invocation of custom scripts which can interact with deployedcomponents such as databases, and with the OpenShift Dedicated cluster itself.
Therefore, it is possible to use these hooks to perform component managementoperations that effectively move applications between environments, for example byperforming an image tag operation from within a hook. However, the various hook pointsare best suited to managing an application’s lifecycle within a given environment (forexample, using them to perform database schema migrations when a new version of theapplication is deployed), rather than to move application components betweenenvironments.
2.3.4.1. Managing API Objects
Resources, as defined in one environment, will be exported as JSON or YAML file content in preparationfor importing it into a new environment. Therefore, the expression of API objects as JSON or YAMLserves as the unit of work as you promote API objects through your application pipeline. The oc CLI isused to export and import this content.
TIP
While not required for promotion flows with OpenShift Dedicated, with the JSON or YAML stored in files,you can consider storing and retrieving the content from a SCM system. This allows you to leverage theversioning related capabilities of the SCM, including the creation of branches, and the assignment of andquery on various labels or tags associated to versions.
2.3.4.1.1. Exporting API Object State
API object specifications should be captured with oc export. This operation removes environmentspecific data from the object definitions (e.g., current namespace or assigned IP addresses), allowingthem to be recreated in different environments (unlike oc get operations, which output an unfilteredstate of the object).
Use of oc label, which allows for adding, modifying, or removing labels on API objects, can proveuseful as you organize the set of object collected for promotion flows, because labels allow for selectionand management of groups of pods in a single operation. This makes it easier to export the correct setof objects and, because the labels will carry forward when the objects are created in a new environment,they also make for easier management of the application components in each environment.
NOTE
API objects often contain references such as a DeploymentConfig that references a Secret. When moving an API object from one environment to another, you must ensurethat such references are also moved to the new environment.
Similarly, API objects such as a DeploymentConfig often contain references to ImageStreams that reference an external registry. When moving an API object from oneenvironment to another, you must ensure such references are resolvable within the newenvironment, meaning that the reference must be resolvable and the ImageStream mustreference an accessible registry in the new environment. See Moving Images andPromotion Caveats for more detail.
CHAPTER 2. APPLICATION LIFE CYCLE MANAGEMENT
29
2.3.4.1.2. Importing API Object State
2.3.4.1.2.1. Initial Creation
The first time an application is being introduced into a new environment, it is sufficient to take the JSONor YAML expressing the specifications of your API objects and run oc create to create them in theappropriate environment. When using oc create, keep the --save-config option in mind. Savingconfiguration elements on the object in its annotation list facilitates the later use of oc apply to modifythe object.
2.3.4.1.2.2. Iterative Modification
After the various staging environments are initially established, as promotion cycles commence and theapplication moves from stage to stage, the updates to your application can include modification of theAPI objects that are part of the application. Changes in these API objects are conceivable since theyrepresent the configuration for the OpenShift Dedicated system. Motivations for such changes include:
Accounting for environmental differences between staging environments.
Verifying various scenarios your application supports.
Transfer of the API objects to the next stage’s environment is accomplished via use of the oc CLI. Whilea rich set of oc commands which modify API objects exist, this topic focuses on oc apply, whichcomputes and applies differences between objects.
Specifically, you can view oc apply as a three-way merge that takes in files or stdin as the input alongwith an existing object definition. It performs a three-way merge between:
1. the input into the command,
2. the current version of the object, and
3. the most recent user specified object definition stored as an annotation in the current object.
The existing object is then updated with the result.
If further customization of the API objects is necessary, as in the case when the objects are not expectedto be identical between the source and target environments, oc commands such as oc set can be usedto modify the object after applying the latest object definitions from the upstream environment.
Some specific usages are cited in Scenarios and Examples.
2.3.4.2. Managing Images and Image Streams
Images in OpenShift Dedicated are managed via a series of API objects as well. However, managingimages are so central to application promotion that discussion of the tools and API objects most directlytied to images warrant separate discussion. Both manual and automated forms exist to assist you inmanaging image promotion (the propagation of images through your pipeline).
2.3.4.2.1. Moving Images
NOTE
For all the detailed caveats around managing images, refer to the Managing Images topic.
OpenShift Dedicated 3 Developer Guide
30
2.3.4.2.1.1. When Staging Environments Share a Registry
When your staging environments share the same OpenShift Dedicated registry, for example if they areall on the same OpenShift Dedicated cluster, there are two operations that are the basic means ofmoving your images between the stages of your application promotion pipeline:
1. First, analogous to docker tag and git tag, the oc tag command allows you to update anOpenShift Dedicated image stream with a reference to a specific image. It also allows you tocopy references to specific versions of an image from one image stream to another, even acrossdifferent projects in a cluster.
2. Second, the oc import-image serves as a bridge between external registries and imagestreams. It imports the metadata for a given image from the registry and stores it into the imagestream as an image stream tag. Various BuildConfigs and DeploymentConfigs in yourproject can reference those specific images.
2.3.4.2.1.2. When Staging Environments Use Different Registries
More advanced usage occurs when your staging environments leverage different OpenShift Dedicatedregistries. Accessing the Internal Registry spells out the steps in detail, but in summary you can:
1. Use the docker command in conjunction which obtaining the OpenShift Dedicated accesstoken to supply into your docker login command.
2. After being logged into the OpenShift Dedicated registry, use docker pull, docker tag and docker push to transfer the image.
3. After the image is available in the registry of the next environment of your pipeline, use oc tagas needed to populate any image streams.
2.3.4.2.2. Deploying
Whether changing the underlying application image or the API objects that configure the application, adeployment is typically necessary to pick up the promoted changes. If the images for your applicationchange (for example, due to an oc tag operation or a docker push as part of promoting an imagefrom an upstream environment), ImageChangeTriggers on your DeploymentConfig can trigger thenew deployment. Similarly, if the DeploymentConfig API object itself is being changed, a ConfigChangeTrigger can initiate a deployment when the API object is updated by the promotionstep (for example, oc apply).
Otherwise, the oc commands that facilitate manual deployment include:
oc rollout: The new approach to manage deployments, including pause and resumesemantics and richer features around managing history.
oc rollback: Allows for reversion to a previous deployment; in the promotion scenario, iftesting of a new version encounters issues, confirming it still works with the previous versioncould be warranted.
2.3.4.2.3. Automating Promotion Flows with Jenkins
After you understand the components of your application that need to be moved between environmentswhen promoting it and the steps required to move the components, you can start to orchestrate andautomate the workflow. OpenShift Dedicated provides a Jenkins image and plug-ins to help with thisprocess.
CHAPTER 2. APPLICATION LIFE CYCLE MANAGEMENT
31
The OpenShift Dedicated Jenkins image is detailed in Using Images, including the set of OpenShiftDedicated-centric plug-ins that facilitate the integration of Jenkins, and Jenkins Pipelines. Also, thePipeline build strategy facilitates the integration between Jenkins Pipelines and OpenShift Dedicated. Allof these focus on enabling various aspects of CI/CD, including application promotion.
When moving beyond manual execution of application promotion steps, the Jenkins-related featuresprovided by OpenShift Dedicated should be kept in mind:
OpenShift Dedicated provides a Jenkins image that is heavily customized to greatly easedeployment in an OpenShift Dedicated cluster.
The Jenkins image contains the OpenShift Pipeline plug-in, which provides building blocks forimplementing promotion workflows. These building blocks include the triggering of Jenkins jobsas image streams change, as well as the triggering of builds and deployments within those jobs.
BuildConfigs employing the OpenShift Dedicated Jenkins Pipeline build strategy enableexecution of Jenkinsfile-based Jenkins Pipeline jobs. Pipeline jobs are the strategic directionwithin Jenkins for complex promotion flows and can leverage the steps provided by theOpenShift Pipeline Plug-in.
2.3.4.2.4. Promotion Caveats
2.3.4.2.4.1. API Object References
API objects can reference other objects. A common use for this is to have a DeploymentConfig thatreferences an image stream, but other reference relationships may also exist.
When copying an API object from one environment to another, it is critical that all references can still beresolved in the target environment. There are a few reference scenarios to consider:
The reference is "local" to the project. In this case, the referenced object resides in the sameproject as the object that references it. Typically the correct thing to do is to ensure that you copythe referenced object into the target environment in the same project as the object referencing it.
The reference is to an object in another project. This is typical when an image stream in ashared project is used by multiple application projects (see Managing Images). In this case,when copying the referencing object to the new environment, you must update the reference asneeded so it can be resolved in the target environment. That may mean:
Changing the project the reference points to, if the shared project has a different name in thetarget environment.
Moving the referenced object from the shared project into the local project in the targetenvironment and updating the reference to point to the local project when moving the primaryobject into the target environment.
Some other combination of copying the referenced object into the target environment andupdating references to it.
In general, the guidance is to consider objects referenced by the objects being copied to a newenvironment and ensure the references are resolvable in the target environment. If not, take appropriateaction to fix the references and make the referenced objects available in the target environment.
2.3.4.2.4.2. Image Registry References
OpenShift Dedicated 3 Developer Guide
32
Image streams point to image repositories to indicate the source of the image they represent. When animage stream is moved from one environment to another, it is important to consider whether the registryand repository reference should also change:
If different image registries are used to assert isolation between a test environment and aproduction environment.
If different image repositories are used to separate test and production-ready images.
If either of these are the case, the image stream must be modified when it is copied from the sourceenvironment to the target environment so that it resolves to the correct image. This is in addition toperforming the steps described in Scenarios and Examples to copy the image from one registry andrepository to another.
2.3.4.3. Summary
At this point, the following have been defined:
New application artifacts that make up a deployed application.
Correlation of application promotion activities to tools and concepts provided by OpenShiftDedicated.
Integration between OpenShift Dedicated and the CI/CD pipeline engine Jenkins.
Putting together examples of application promotion flows within OpenShift Dedicated is the final step forthis topic.
2.3.5. Scenarios and Examples
Having defined the new application artifact components introduced by the Docker, Kubernetes, andOpenShift Dedicated ecosystems, this section covers how to promote those components betweenenvironments using the mechanisms and tools provided by OpenShift Dedicated.
Of the components making up an application, the image is the primary artifact of note. Taking thatpremise and extending it to application promotion, the core, fundamental application promotion pattern isimage promotion, where the unit of work is the image. The vast majority of application promotionscenarios entails management and propagation of the image through the promotion pipeline.
Simpler scenarios solely deal with managing and propagating the image through the pipeline. As thepromotion scenarios broaden in scope, the other application artifacts, most notably the API objects, areincluded in the inventory of items managed and propagated through the pipeline.
This topic lays out some specific examples around promoting images as well as API objects, using bothmanual and automated approaches. But first, note the following on setting up the environment(s) for yourapplication promotion pipeline.
2.3.5.1. Setting up for Promotion
After you have completed development of the initial revision of your application, the next logical step is topackage up the contents of the application so that you can transfer to the subsequent stagingenvironments of your promotion pipeline.
1. First, group all the API objects you view as transferable and apply a common label to them:
CHAPTER 2. APPLICATION LIFE CYCLE MANAGEMENT
33
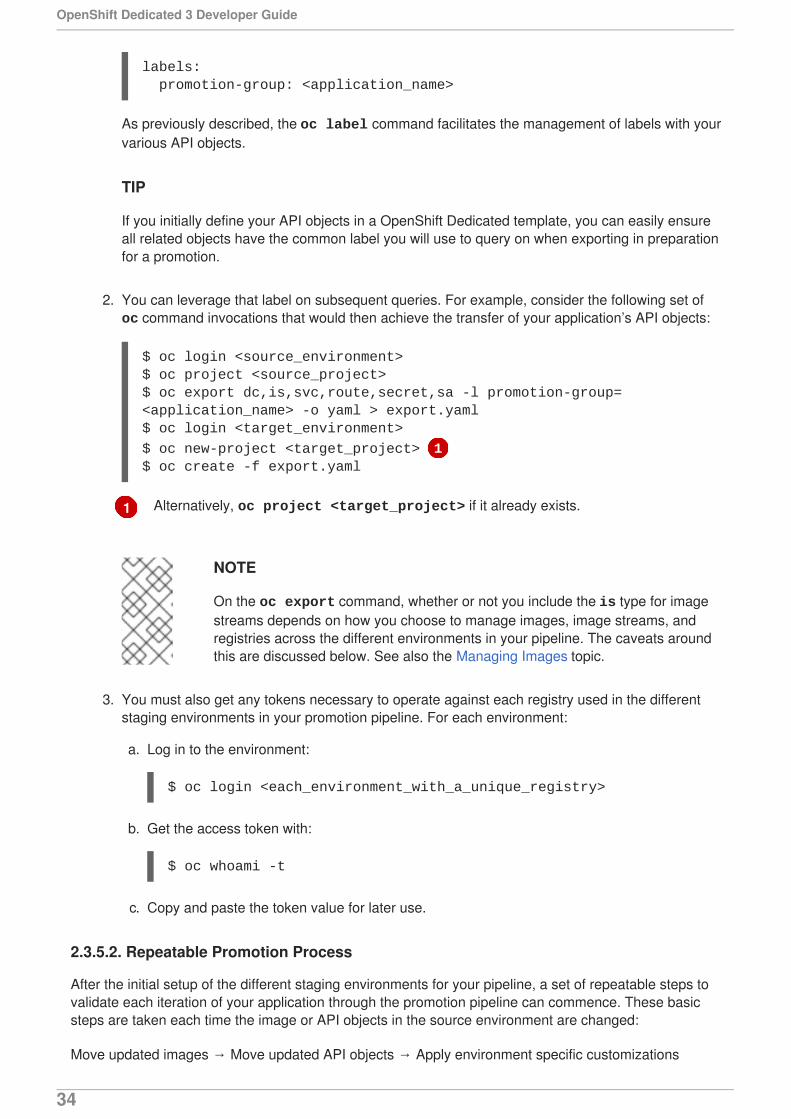
1
labels: promotion-group: <application_name>
As previously described, the oc label command facilitates the management of labels with yourvarious API objects.
TIP
If you initially define your API objects in a OpenShift Dedicated template, you can easily ensureall related objects have the common label you will use to query on when exporting in preparationfor a promotion.
2. You can leverage that label on subsequent queries. For example, consider the following set of oc command invocations that would then achieve the transfer of your application’s API objects:
$ oc login <source_environment>$ oc project <source_project>$ oc export dc,is,svc,route,secret,sa -l promotion-group=<application_name> -o yaml > export.yaml$ oc login <target_environment>
$ oc new-project <target_project> 1$ oc create -f export.yaml
Alternatively, oc project <target_project> if it already exists.
NOTE
On the oc export command, whether or not you include the is type for imagestreams depends on how you choose to manage images, image streams, andregistries across the different environments in your pipeline. The caveats aroundthis are discussed below. See also the Managing Images topic.
3. You must also get any tokens necessary to operate against each registry used in the differentstaging environments in your promotion pipeline. For each environment:
a. Log in to the environment:
$ oc login <each_environment_with_a_unique_registry>
b. Get the access token with:
$ oc whoami -t
c. Copy and paste the token value for later use.
2.3.5.2. Repeatable Promotion Process
After the initial setup of the different staging environments for your pipeline, a set of repeatable steps tovalidate each iteration of your application through the promotion pipeline can commence. These basicsteps are taken each time the image or API objects in the source environment are changed:
Move updated images → Move updated API objects → Apply environment specific customizations
OpenShift Dedicated 3 Developer Guide
34
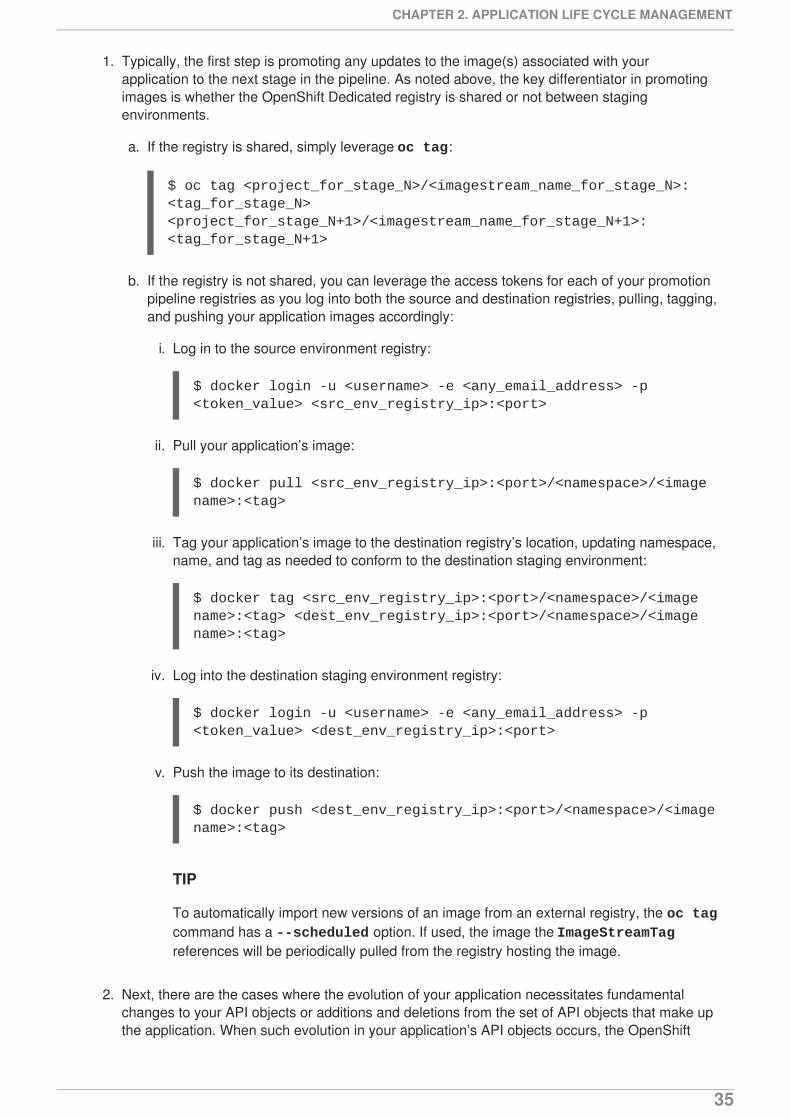
1. Typically, the first step is promoting any updates to the image(s) associated with yourapplication to the next stage in the pipeline. As noted above, the key differentiator in promotingimages is whether the OpenShift Dedicated registry is shared or not between stagingenvironments.
a. If the registry is shared, simply leverage oc tag:
$ oc tag <project_for_stage_N>/<imagestream_name_for_stage_N>:<tag_for_stage_N> <project_for_stage_N+1>/<imagestream_name_for_stage_N+1>:<tag_for_stage_N+1>
b. If the registry is not shared, you can leverage the access tokens for each of your promotionpipeline registries as you log into both the source and destination registries, pulling, tagging,and pushing your application images accordingly:
i. Log in to the source environment registry:
$ docker login -u <username> -e <any_email_address> -p <token_value> <src_env_registry_ip>:<port>
ii. Pull your application’s image:
$ docker pull <src_env_registry_ip>:<port>/<namespace>/<image name>:<tag>
iii. Tag your application’s image to the destination registry’s location, updating namespace,name, and tag as needed to conform to the destination staging environment:
$ docker tag <src_env_registry_ip>:<port>/<namespace>/<image name>:<tag> <dest_env_registry_ip>:<port>/<namespace>/<image name>:<tag>
iv. Log into the destination staging environment registry:
$ docker login -u <username> -e <any_email_address> -p <token_value> <dest_env_registry_ip>:<port>
v. Push the image to its destination:
$ docker push <dest_env_registry_ip>:<port>/<namespace>/<image name>:<tag>
TIP
To automatically import new versions of an image from an external registry, the oc tagcommand has a --scheduled option. If used, the image the ImageStreamTagreferences will be periodically pulled from the registry hosting the image.
2. Next, there are the cases where the evolution of your application necessitates fundamentalchanges to your API objects or additions and deletions from the set of API objects that make upthe application. When such evolution in your application’s API objects occurs, the OpenShift
CHAPTER 2. APPLICATION LIFE CYCLE MANAGEMENT
35
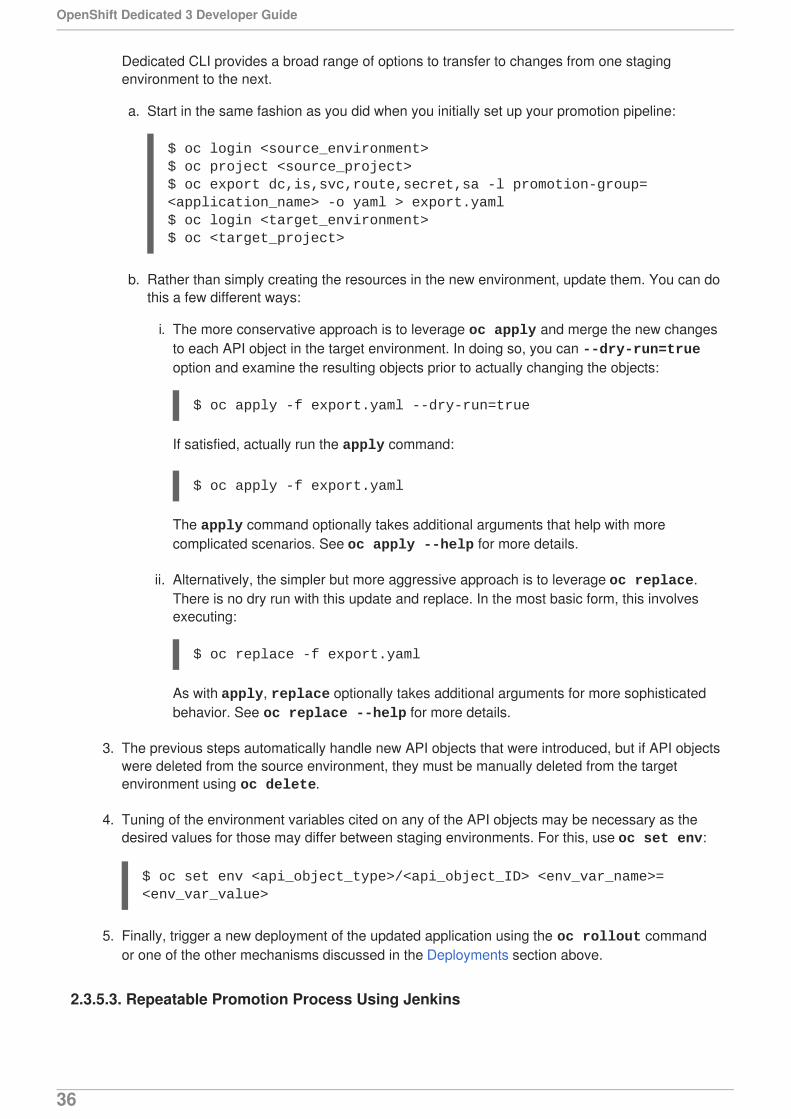
Dedicated CLI provides a broad range of options to transfer to changes from one stagingenvironment to the next.
a. Start in the same fashion as you did when you initially set up your promotion pipeline:
$ oc login <source_environment>$ oc project <source_project>$ oc export dc,is,svc,route,secret,sa -l promotion-group=<application_name> -o yaml > export.yaml$ oc login <target_environment>$ oc <target_project>
b. Rather than simply creating the resources in the new environment, update them. You can dothis a few different ways:
i. The more conservative approach is to leverage oc apply and merge the new changesto each API object in the target environment. In doing so, you can --dry-run=trueoption and examine the resulting objects prior to actually changing the objects:
$ oc apply -f export.yaml --dry-run=true
If satisfied, actually run the apply command:
$ oc apply -f export.yaml
The apply command optionally takes additional arguments that help with morecomplicated scenarios. See oc apply --help for more details.
ii. Alternatively, the simpler but more aggressive approach is to leverage oc replace.There is no dry run with this update and replace. In the most basic form, this involvesexecuting:
$ oc replace -f export.yaml
As with apply, replace optionally takes additional arguments for more sophisticatedbehavior. See oc replace --help for more details.
3. The previous steps automatically handle new API objects that were introduced, but if API objectswere deleted from the source environment, they must be manually deleted from the targetenvironment using oc delete.
4. Tuning of the environment variables cited on any of the API objects may be necessary as thedesired values for those may differ between staging environments. For this, use oc set env:
$ oc set env <api_object_type>/<api_object_ID> <env_var_name>=<env_var_value>
5. Finally, trigger a new deployment of the updated application using the oc rollout commandor one of the other mechanisms discussed in the Deployments section above.
2.3.5.3. Repeatable Promotion Process Using Jenkins
OpenShift Dedicated 3 Developer Guide
36
The OpenShift Sample job defined in the Jenkins Docker Image for OpenShift Dedicated is an exampleof image promotion within OpenShift Dedicated within the constructs of Jenkins. Setup for this sample islocated in the OpenShift Origin source repository.
This sample includes:
Use of Jenkins as the CI/CD engine.
Use of the OpenShift Pipeline plug-in for Jenkins . This plug-in provides a subset of thefunctionality provided by the oc CLI for OpenShift Dedicated packaged as Jenkins Freestyle andDSL Job steps. Note that the oc binary is also included in the Jenkins Docker Image forOpenShift Dedicated, and can also be used to interact with OpenShift Dedicated in Jenkins jobs.
The OpenShift Dedicated-provided templates for Jenkins. There is a template for bothephemeral and persistent storage.
A sample application: defined in the OpenShift Origin source repository, this applicationleverages ImageStreams, ImageChangeTriggers, ImageStreamTags, BuildConfigs,and separate DeploymentConfigs and Services corresponding to different stages in thepromotion pipeline.
The following examines the various pieces of the OpenShift Sample job in more detail:
1. The first step is the equivalent of an oc scale dc frontend --replicas=0 call. This stepis intended to bring down any previous versions of the application image that may be running.
2. The second step is the equivalent of an oc start-build frontend call.
3. The third step is the equivalent of an oc rollout latest dc/frontend call.
4. The fourth step is the "test" for this sample. It ensures that the associated service for thisapplication is in fact accessible from a network perspective. Under the covers, a socketconnection is attempted against the IP address and port associated with the OpenShiftDedicated service. Of course, additional tests can be added (if not via OpenShift Pipepline plug-in steps, then via use of the Jenkins Shell step to leverage OS-level commands and scripts totest your application).
5. The fifth step commences under that assumption that the testing of your application passed andhence intends to mark the image as "ready". In this step, a new prod tag is created for theapplication image off of the latest image. With the frontend DeploymentConfig having an ImageChangeTriggerdefined for that tag, the corresponding "production" deployment islaunched.
6. The sixth and last step is a verification step, where the plug-in confirms that OpenShiftDedicated launched the desired number of replicas for the "production" deployment.
CHAPTER 2. APPLICATION LIFE CYCLE MANAGEMENT
37
CHAPTER 3. AUTHENTICATION
3.1. WEB CONSOLE AUTHENTICATION
When accessing the web console from a browser at <master_public_addr>:8443, you are automaticallyredirected to a login page.
Review the browser versions and operating systems that can be used to access the web console.
You can provide your login credentials on this page to obtain a token to make API calls. After logging in,you can navigate your projects using the web console.
3.2. CLI AUTHENTICATION
You can authenticate from the command line using the CLI command oc login. You can get startedwith the CLI by running this command without any options:
$ oc login
The command’s interactive flow helps you establish a session to an OpenShift Dedicated server with theprovided credentials. If any information required to successfully log in to an OpenShift Dedicated serveris not provided, the command prompts for user input as required. The configuration is automaticallysaved and is then used for every subsequent command.
All configuration options for the oc login command, listed in the oc login --help command output,are optional. The following example shows usage with some common options:
$ oc login [-u=<username>] \ [-p=<password>] \ [-s=<server>] \ [-n=<project>] \ [--certificate-authority=</path/to/file.crt>|--insecure-skip-tls-verify]
The following table describes these common options:
Table 3.1. Common CLI Configuration Options
Option Syntax Description
-s, --server $ oc login -s=
<server>
Specifies the host name of the OpenShift Dedicated server. If aserver is provided through this flag, the command does not ask forit interactively. This flag can also be used if you already have a CLIconfiguration file and want to log in and switch to another server.
-u, --username and -p, --password
$ oc login -u=<username> -p=<password>
Allows you to specify the credentials to log in to the OpenShiftDedicated server. If user name or password are provided throughthese flags, the command does not ask for it interactively. Theseflags can also be used if you already have a configuration file witha session token established and want to log in and switch toanother user name.
OpenShift Dedicated 3 Developer Guide
38
-n, --namespace
$ oc login -u=<username> -p=<password> -n=<project>
A global CLI option which, when used with oc login, allows youto specify the project to switch to when logging in as a given user.
--certificate-authority
$ oc login --certificate-authority=<path/to/file.crt>
Correctly and securely authenticates with an OpenShift Dedicatedserver that uses HTTPS. The path to a certificate authority file mustbe provided.
--insecure-skip-tls-verify
$ oc login --insecure-skip-tls-verify
Allows interaction with an HTTPS server bypassing the servercertificate checks; however, note that it is not secure. If you try to oc login to a HTTPS server that does not provide a validcertificate, and this or the --certificate-authority flagswere not provided, oc login will prompt for user input to confirm(y/N kind of input) about connecting insecurely.
Option Syntax Description
CLI configuration files allow you to easily manage multiple CLI profiles.
NOTE
If you have access to administrator credentials but are no longer logged in as the defaultsystem user system:admin, you can log back in as this user at any time as long as thecredentials are still present in your CLI configuration file. The following command logs inand switches to the default project:
$ oc login -u system:admin -n default
CHAPTER 3. AUTHENTICATION
39
CHAPTER 4. AUTHORIZATION
4.1. OVERVIEW
This topic contains authorization tasks for application developers and their capabilities, as dictated bythe cluster administrator.
4.2. CHECKING IF USERS CAN CREATE PODS
Using the scc-review and scc-subject-review options, you can see if an individual user, or a userunder a specific service account, can create or update a pod.
Using the scc-review option, you can check if a service account can create or update a pod. Thecommand outputs the security context constraints that admit the resource.
For example, to check if a user with the system:serviceaccount:projectname:default serviceaccount can a create a pod:
$ oc policy scc-review -z system:serviceaccount:projectname:default -f my_resource.yaml
You can also use the scc-subject-review option to check whether a specific user can create orupdate a pod:
$ oc policy scc-subject-review -u <username> -f my_resource.yaml
To check if a user belonging to a specific group can create a pod in a specific file:
$ oc policy scc-subject-review -u <username> -g <groupname> -f my_resource.yaml
4.3. DETERMINING WHAT YOU CAN DO AS AN AUTHENTICATEDUSER
From within your OpenShift Dedicated project, you can determine what verbs you can perform againstall namespace-scoped resources (including third-party resources).
The can-i command option tests scopes in terms of the user and role.
$ oc policy can-i --list --loglevel=8
The output helps you to determine what API request to make to gather the information.
To receive information back in a user-readable format, run:
$ oc policy can-i --list
The output provides a full list.
To determine if you can perform specific verbs, run:
OpenShift Dedicated 3 Developer Guide
40

$ oc policy can-i <verb> <resource>
User scopes can provide more information about a given scope. For example:
$ oc policy can-i <verb> <resource> --scopes=user:info
CHAPTER 4. AUTHORIZATION
41
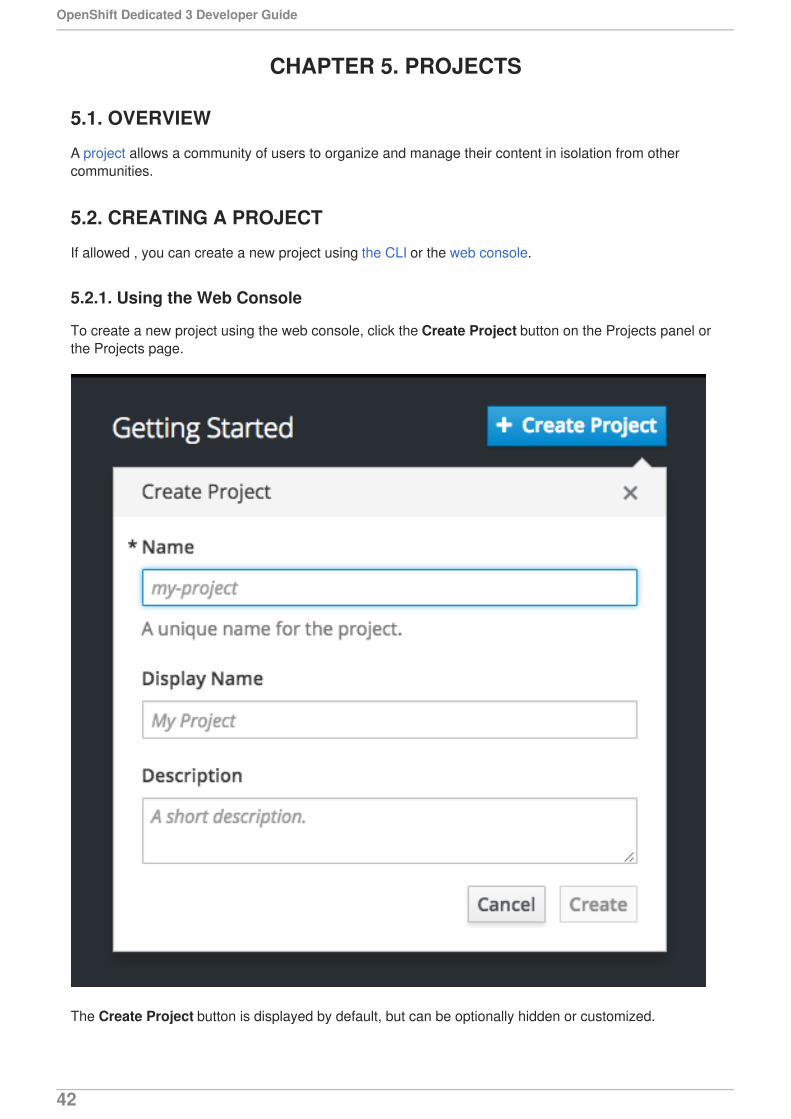
CHAPTER 5. PROJECTS
5.1. OVERVIEW
A project allows a community of users to organize and manage their content in isolation from othercommunities.
5.2. CREATING A PROJECT
If allowed , you can create a new project using the CLI or the web console.
5.2.1. Using the Web Console
To create a new project using the web console, click the Create Project button on the Projects panel orthe Projects page.
The Create Project button is displayed by default, but can be optionally hidden or customized.
OpenShift Dedicated 3 Developer Guide
42
5.2.2. Using the CLI
To create a new project using the CLI:
$ oc new-project <project_name> \ --description="<description>" --display-name="<display_name>"
For example:
$ oc new-project hello-openshift \ --description="This is an example project to demonstrate OpenShift v3" \ --display-name="Hello OpenShift"
NOTE
The number of projects you are allowed to create may be limited by the systemadministrator. Once your limit is reached, you may need to delete an existing project inorder to create a new one.
5.3. VIEWING PROJECTS
When viewing projects, you are restricted to seeing only the projects you have access to view based onthe authorization policy.
To view a list of projects:
$ oc get projects
You can change from the current project to a different project for CLI operations. The specified project isthen used in all subsequent operations that manipulate project-scoped content:
$ oc project <project_name>
You can also use the web console to view and change between projects. After authenticating andlogging in, you are presented with a list of projects that you have access to.
The right panel shown with the service catalog provides quick access to the most recently accessedprojects (up to five projects). For the full list of projects, use the View All link provided at the top of theright panel.
CHAPTER 5. PROJECTS
43
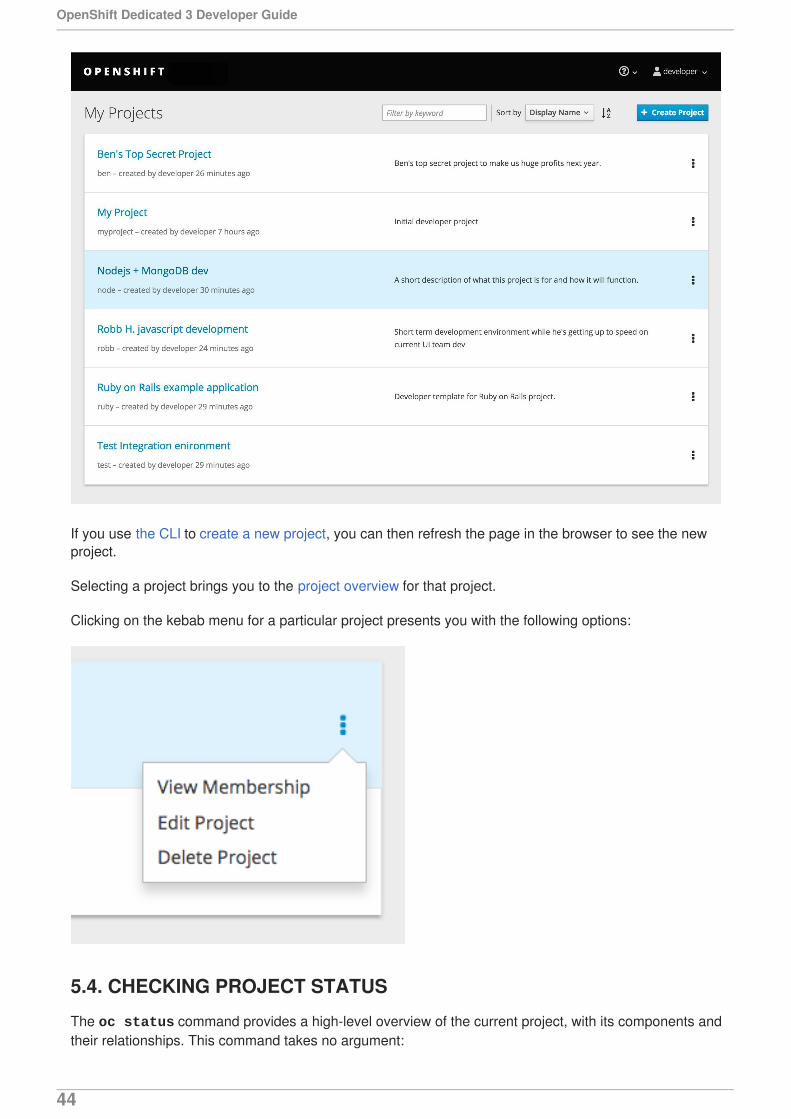
If you use the CLI to create a new project, you can then refresh the page in the browser to see the newproject.
Selecting a project brings you to the project overview for that project.
Clicking on the kebab menu for a particular project presents you with the following options:
5.4. CHECKING PROJECT STATUS
The oc status command provides a high-level overview of the current project, with its components andtheir relationships. This command takes no argument:
OpenShift Dedicated 3 Developer Guide
44
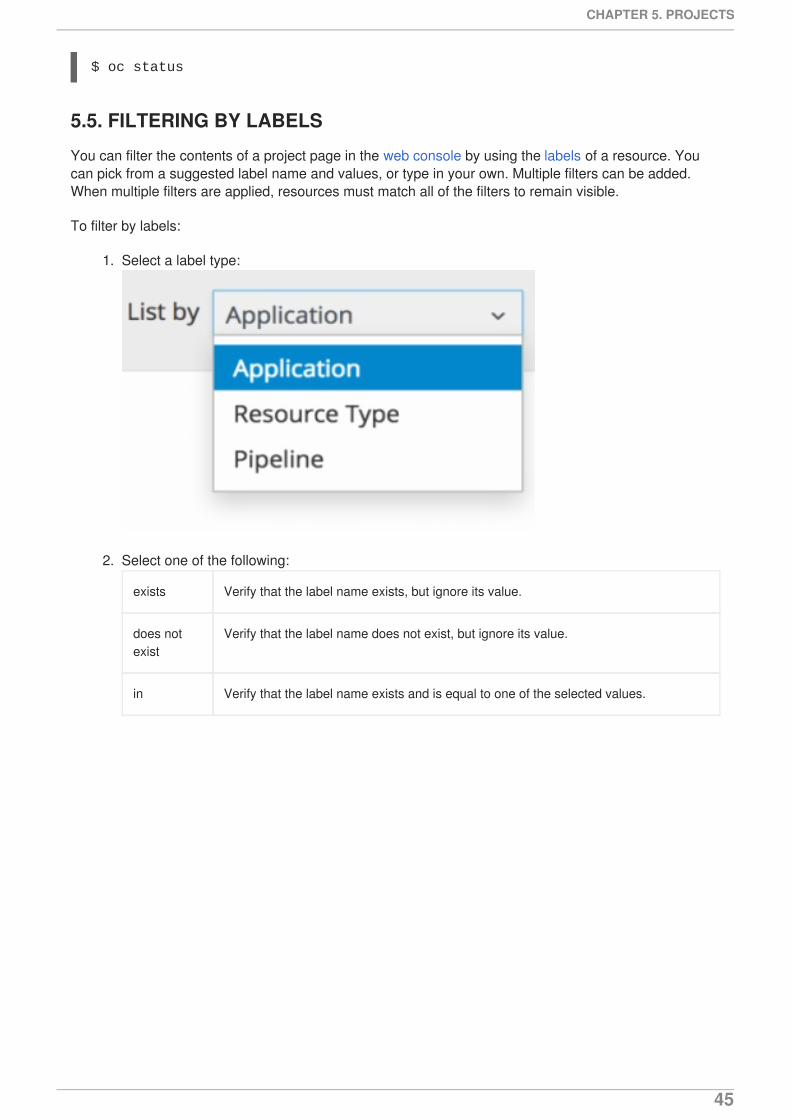
$ oc status
5.5. FILTERING BY LABELS
You can filter the contents of a project page in the web console by using the labels of a resource. Youcan pick from a suggested label name and values, or type in your own. Multiple filters can be added.When multiple filters are applied, resources must match all of the filters to remain visible.
To filter by labels:
1. Select a label type:
2. Select one of the following:
exists Verify that the label name exists, but ignore its value.
does notexist
Verify that the label name does not exist, but ignore its value.
in Verify that the label name exists and is equal to one of the selected values.
CHAPTER 5. PROJECTS
45
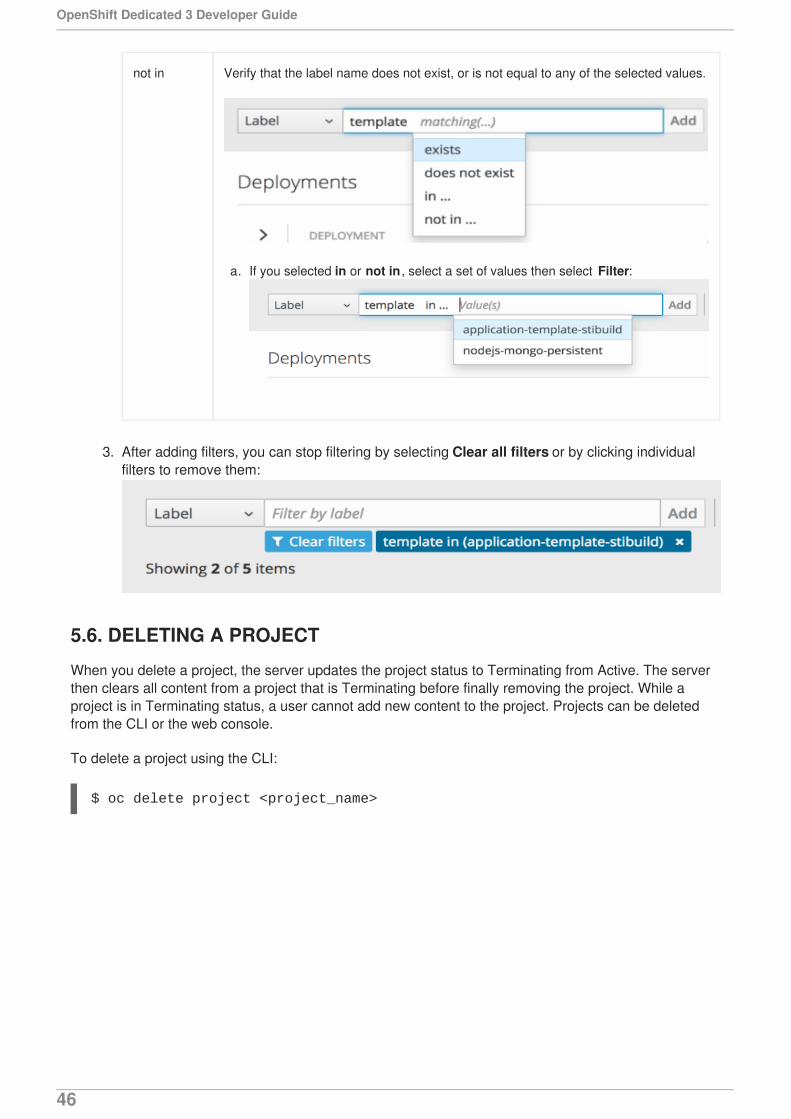
not in Verify that the label name does not exist, or is not equal to any of the selected values.
a. If you selected in or not in , select a set of values then select Filter:
3. After adding filters, you can stop filtering by selecting Clear all filters or by clicking individualfilters to remove them:
5.6. DELETING A PROJECT
When you delete a project, the server updates the project status to Terminating from Active. The serverthen clears all content from a project that is Terminating before finally removing the project. While aproject is in Terminating status, a user cannot add new content to the project. Projects can be deletedfrom the CLI or the web console.
To delete a project using the CLI:
$ oc delete project <project_name>
OpenShift Dedicated 3 Developer Guide
46
CHAPTER 6. MIGRATING APPLICATIONS
6.1. OVERVIEW
This topic covers the migration procedure of OpenShift version 2 (v2) applications to OpenShift version 3(v3).
To migrate OpenShift v2 applications to OpenShift Dedicated v3, all cartridges in the v2 application mustbe recorded as each v2 cartridge is equivalent with a corresponding image or template in OpenShiftDedicated v3 and they must be migrated individually. For each cartridge, all dependencies or requiredpackages also must be recorded, as they must be included in the v3 images.
The general migration procedure is:
1. Back up the v2 application.
Web cartridge: The source code can be backed up to a Git repository such as by pushing toa repository on GitHub.
Database cartridge: The database can be backed up using a dump command (mongodump, mysqldump, pg_dump) to back up the database.
Web and database cartridges: rhc client tool provides snapshot ability to back up multiplecartridges:
$ rhc snapshot save <app_name>
The snapshot is a tar file that can be unzipped, and its content is application source codeand the database dump.
2. If the application has a database cartridge, create a v3 database application, sync the databasedump to the pod of the new v3 database application, then restore the v2 database in the v3database application with database restore commands.
3. For a web framework application, edit the application source code to make it v3 compatible.Then, add any dependencies or packages required in appropriate files in the Git repository.Convert v2 environment variables to corresponding v3 environment variables.
4. Create a v3 application from source (your Git repository) or from a quickstart with your Git URL.Also, add the database service parameters to the new application to link the databaseapplication to the web application.
5. In v2, there is an integrated Git environment and your applications automatically rebuild andrestart whenever a change is pushed to your v2 Git repository. In v3, in order to have a buildautomatically triggered by source code changes pushed to your public Git repository, you mustset up a webhook after the initial build in v3 is completed.
6.2. MIGRATING DATABASE APPLICATIONS
6.2.1. Overview
This topic reviews how to migrate MySQL, PostgreSQL, and MongoDB database applications fromOpenShift version 2 (v2) to OpenShift version 3 (v3).
CHAPTER 6. MIGRATING APPLICATIONS
47
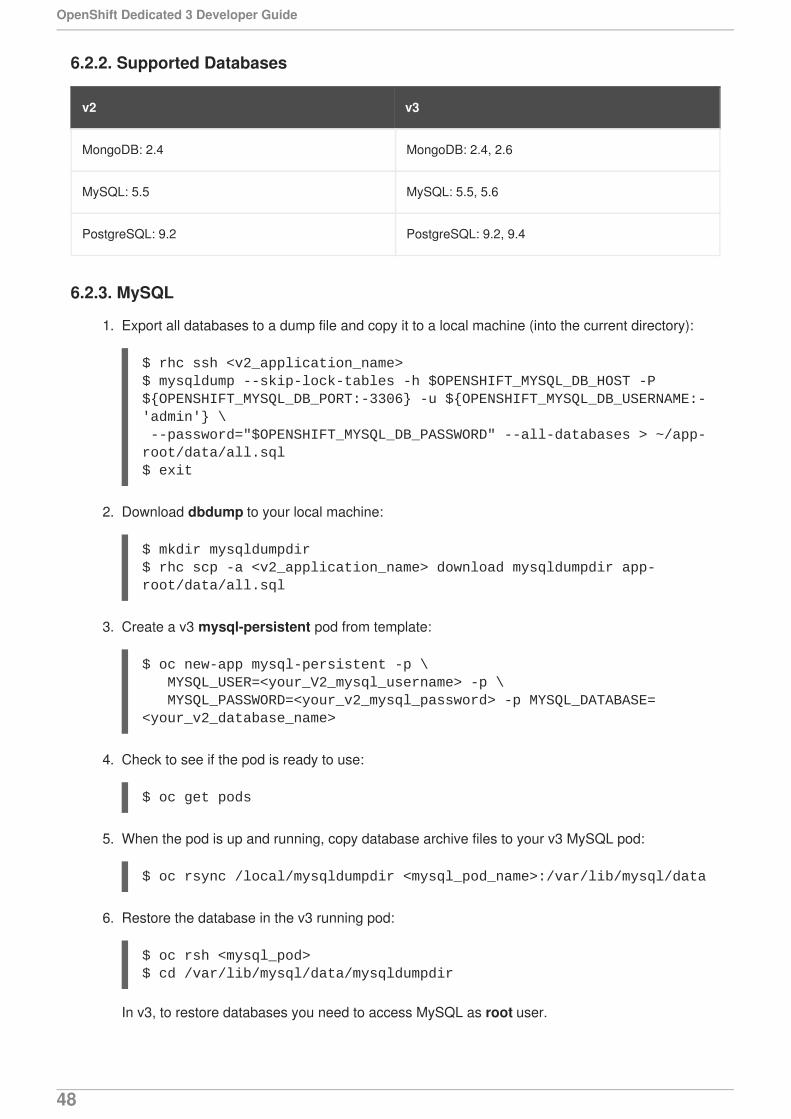
6.2.2. Supported Databases
v2 v3
MongoDB: 2.4 MongoDB: 2.4, 2.6
MySQL: 5.5 MySQL: 5.5, 5.6
PostgreSQL: 9.2 PostgreSQL: 9.2, 9.4
6.2.3. MySQL
1. Export all databases to a dump file and copy it to a local machine (into the current directory):
$ rhc ssh <v2_application_name>$ mysqldump --skip-lock-tables -h $OPENSHIFT_MYSQL_DB_HOST -P ${OPENSHIFT_MYSQL_DB_PORT:-3306} -u ${OPENSHIFT_MYSQL_DB_USERNAME:-'admin'} \ --password="$OPENSHIFT_MYSQL_DB_PASSWORD" --all-databases > ~/app-root/data/all.sql$ exit
2. Download dbdump to your local machine:
$ mkdir mysqldumpdir$ rhc scp -a <v2_application_name> download mysqldumpdir app-root/data/all.sql
3. Create a v3 mysql-persistent pod from template:
$ oc new-app mysql-persistent -p \ MYSQL_USER=<your_V2_mysql_username> -p \ MYSQL_PASSWORD=<your_v2_mysql_password> -p MYSQL_DATABASE=<your_v2_database_name>
4. Check to see if the pod is ready to use:
$ oc get pods
5. When the pod is up and running, copy database archive files to your v3 MySQL pod:
$ oc rsync /local/mysqldumpdir <mysql_pod_name>:/var/lib/mysql/data
6. Restore the database in the v3 running pod:
$ oc rsh <mysql_pod>$ cd /var/lib/mysql/data/mysqldumpdir
In v3, to restore databases you need to access MySQL as root user.
OpenShift Dedicated 3 Developer Guide
48
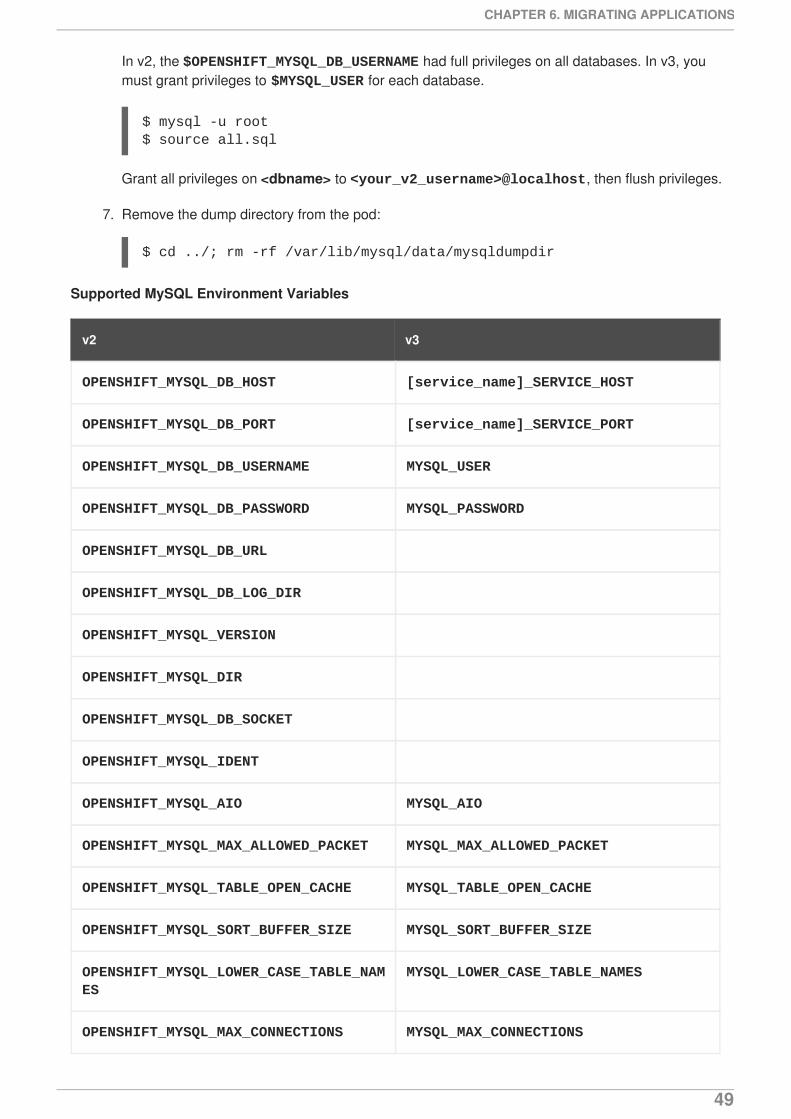
In v2, the $OPENSHIFT_MYSQL_DB_USERNAME had full privileges on all databases. In v3, youmust grant privileges to $MYSQL_USER for each database.
$ mysql -u root$ source all.sql
Grant all privileges on <dbname> to <your_v2_username>@localhost, then flush privileges.
7. Remove the dump directory from the pod:
$ cd ../; rm -rf /var/lib/mysql/data/mysqldumpdir
Supported MySQL Environment Variables
v2 v3
OPENSHIFT_MYSQL_DB_HOST [service_name]_SERVICE_HOST
OPENSHIFT_MYSQL_DB_PORT [service_name]_SERVICE_PORT
OPENSHIFT_MYSQL_DB_USERNAME MYSQL_USER
OPENSHIFT_MYSQL_DB_PASSWORD MYSQL_PASSWORD
OPENSHIFT_MYSQL_DB_URL
OPENSHIFT_MYSQL_DB_LOG_DIR
OPENSHIFT_MYSQL_VERSION
OPENSHIFT_MYSQL_DIR
OPENSHIFT_MYSQL_DB_SOCKET
OPENSHIFT_MYSQL_IDENT
OPENSHIFT_MYSQL_AIO MYSQL_AIO
OPENSHIFT_MYSQL_MAX_ALLOWED_PACKET MYSQL_MAX_ALLOWED_PACKET
OPENSHIFT_MYSQL_TABLE_OPEN_CACHE MYSQL_TABLE_OPEN_CACHE
OPENSHIFT_MYSQL_SORT_BUFFER_SIZE MYSQL_SORT_BUFFER_SIZE
OPENSHIFT_MYSQL_LOWER_CASE_TABLE_NAMES
MYSQL_LOWER_CASE_TABLE_NAMES
OPENSHIFT_MYSQL_MAX_CONNECTIONS MYSQL_MAX_CONNECTIONS
CHAPTER 6. MIGRATING APPLICATIONS
49
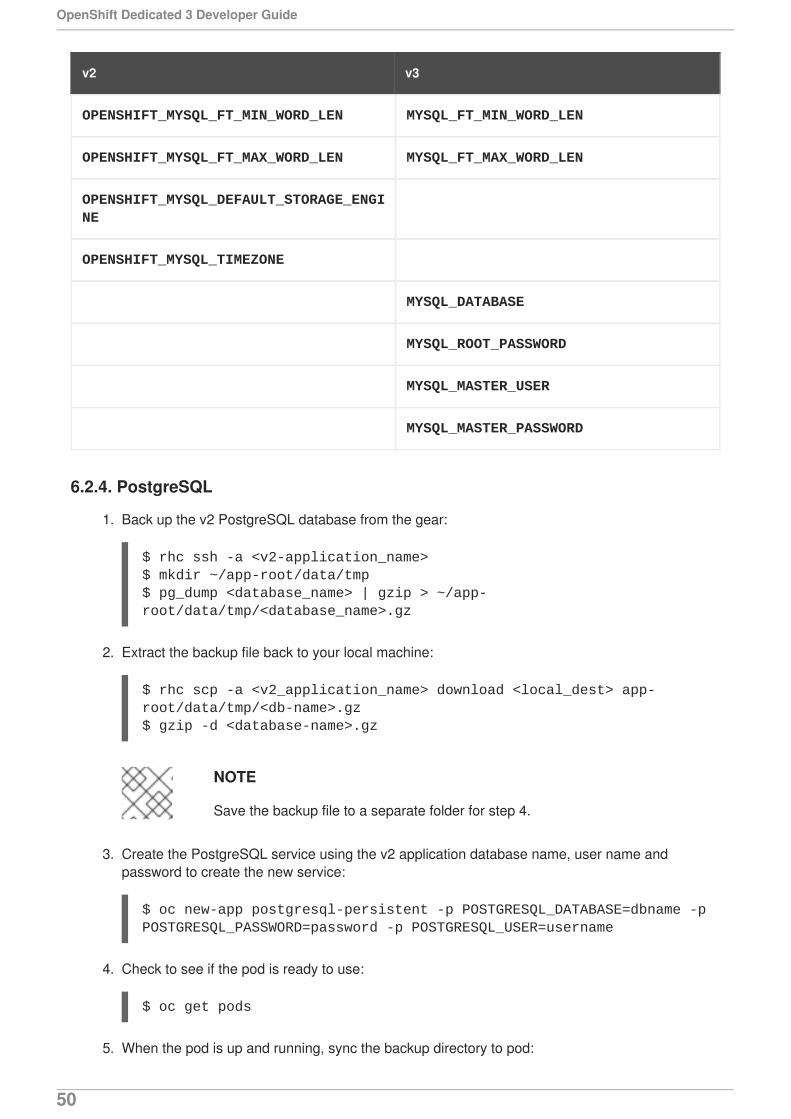
OPENSHIFT_MYSQL_FT_MIN_WORD_LEN MYSQL_FT_MIN_WORD_LEN
OPENSHIFT_MYSQL_FT_MAX_WORD_LEN MYSQL_FT_MAX_WORD_LEN
OPENSHIFT_MYSQL_DEFAULT_STORAGE_ENGINE
OPENSHIFT_MYSQL_TIMEZONE
MYSQL_DATABASE
MYSQL_ROOT_PASSWORD
MYSQL_MASTER_USER
MYSQL_MASTER_PASSWORD
v2 v3
6.2.4. PostgreSQL
1. Back up the v2 PostgreSQL database from the gear:
$ rhc ssh -a <v2-application_name>$ mkdir ~/app-root/data/tmp$ pg_dump <database_name> | gzip > ~/app-root/data/tmp/<database_name>.gz
2. Extract the backup file back to your local machine:
$ rhc scp -a <v2_application_name> download <local_dest> app-root/data/tmp/<db-name>.gz$ gzip -d <database-name>.gz
NOTE
Save the backup file to a separate folder for step 4.
3. Create the PostgreSQL service using the v2 application database name, user name andpassword to create the new service:
$ oc new-app postgresql-persistent -p POSTGRESQL_DATABASE=dbname -pPOSTGRESQL_PASSWORD=password -p POSTGRESQL_USER=username
4. Check to see if the pod is ready to use:
$ oc get pods
5. When the pod is up and running, sync the backup directory to pod:
OpenShift Dedicated 3 Developer Guide
50
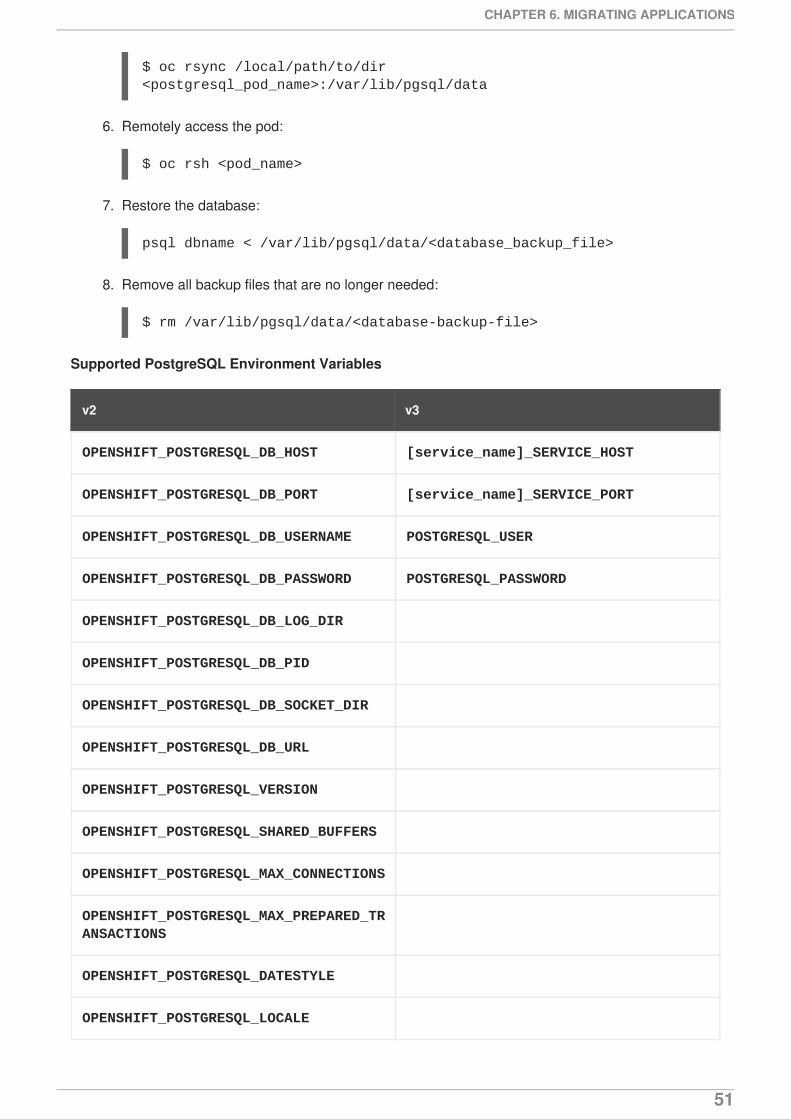
$ oc rsync /local/path/to/dir <postgresql_pod_name>:/var/lib/pgsql/data
6. Remotely access the pod:
$ oc rsh <pod_name>
7. Restore the database:
psql dbname < /var/lib/pgsql/data/<database_backup_file>
8. Remove all backup files that are no longer needed:
$ rm /var/lib/pgsql/data/<database-backup-file>
Supported PostgreSQL Environment Variables
v2 v3
OPENSHIFT_POSTGRESQL_DB_HOST [service_name]_SERVICE_HOST
OPENSHIFT_POSTGRESQL_DB_PORT [service_name]_SERVICE_PORT
OPENSHIFT_POSTGRESQL_DB_USERNAME POSTGRESQL_USER
OPENSHIFT_POSTGRESQL_DB_PASSWORD POSTGRESQL_PASSWORD
OPENSHIFT_POSTGRESQL_DB_LOG_DIR
OPENSHIFT_POSTGRESQL_DB_PID
OPENSHIFT_POSTGRESQL_DB_SOCKET_DIR
OPENSHIFT_POSTGRESQL_DB_URL
OPENSHIFT_POSTGRESQL_VERSION
OPENSHIFT_POSTGRESQL_SHARED_BUFFERS
OPENSHIFT_POSTGRESQL_MAX_CONNECTIONS
OPENSHIFT_POSTGRESQL_MAX_PREPARED_TRANSACTIONS
OPENSHIFT_POSTGRESQL_DATESTYLE
OPENSHIFT_POSTGRESQL_LOCALE
CHAPTER 6. MIGRATING APPLICATIONS
51
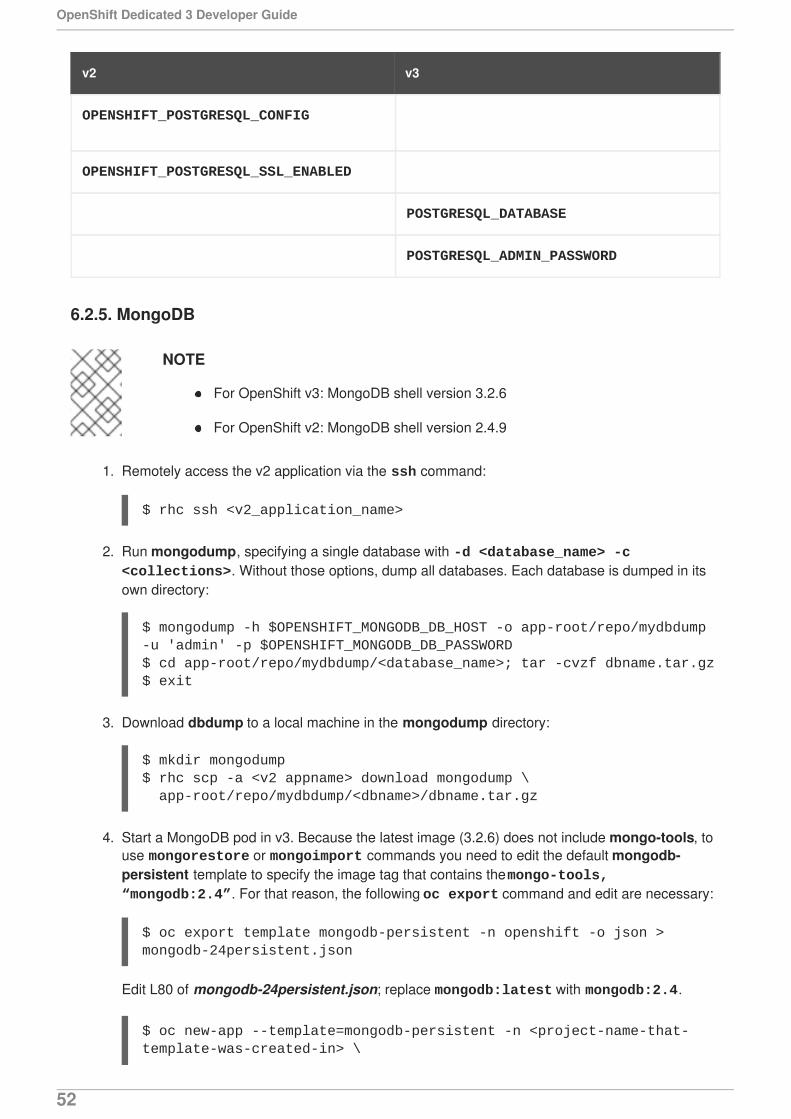
OPENSHIFT_POSTGRESQL_CONFIG
OPENSHIFT_POSTGRESQL_SSL_ENABLED
POSTGRESQL_DATABASE
POSTGRESQL_ADMIN_PASSWORD
v2 v3
6.2.5. MongoDB
NOTE
For OpenShift v3: MongoDB shell version 3.2.6
For OpenShift v2: MongoDB shell version 2.4.9
1. Remotely access the v2 application via the ssh command:
$ rhc ssh <v2_application_name>
2. Run mongodump, specifying a single database with -d <database_name> -c <collections>. Without those options, dump all databases. Each database is dumped in itsown directory:
$ mongodump -h $OPENSHIFT_MONGODB_DB_HOST -o app-root/repo/mydbdump -u 'admin' -p $OPENSHIFT_MONGODB_DB_PASSWORD$ cd app-root/repo/mydbdump/<database_name>; tar -cvzf dbname.tar.gz$ exit
3. Download dbdump to a local machine in the mongodump directory:
$ mkdir mongodump$ rhc scp -a <v2 appname> download mongodump \ app-root/repo/mydbdump/<dbname>/dbname.tar.gz
4. Start a MongoDB pod in v3. Because the latest image (3.2.6) does not include mongo-tools, touse mongorestore or mongoimport commands you need to edit the default mongodb-persistent template to specify the image tag that contains the mongo-tools, “mongodb:2.4”. For that reason, the following oc export command and edit are necessary:
$ oc export template mongodb-persistent -n openshift -o json > mongodb-24persistent.json
Edit L80 of mongodb-24persistent.json; replace mongodb:latest with mongodb:2.4.
$ oc new-app --template=mongodb-persistent -n <project-name-that-template-was-created-in> \
OpenShift Dedicated 3 Developer Guide
52
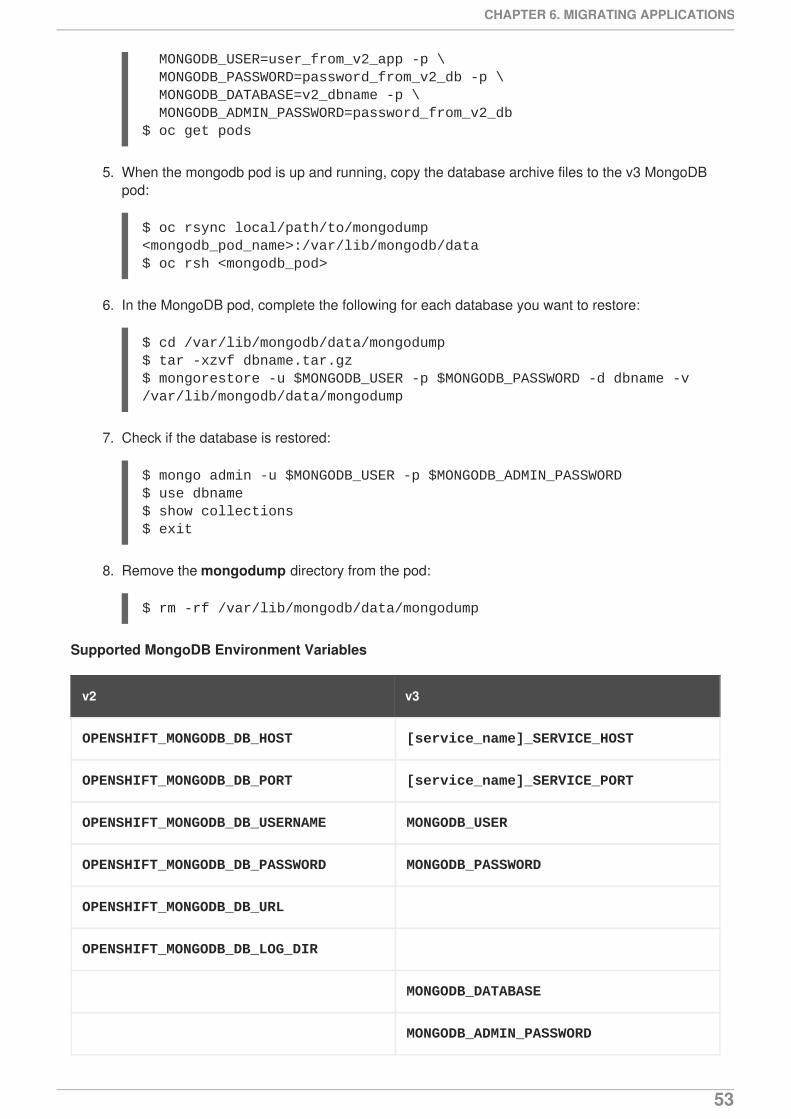
MONGODB_USER=user_from_v2_app -p \ MONGODB_PASSWORD=password_from_v2_db -p \ MONGODB_DATABASE=v2_dbname -p \ MONGODB_ADMIN_PASSWORD=password_from_v2_db$ oc get pods
5. When the mongodb pod is up and running, copy the database archive files to the v3 MongoDBpod:
$ oc rsync local/path/to/mongodump <mongodb_pod_name>:/var/lib/mongodb/data$ oc rsh <mongodb_pod>
6. In the MongoDB pod, complete the following for each database you want to restore:
$ cd /var/lib/mongodb/data/mongodump$ tar -xzvf dbname.tar.gz$ mongorestore -u $MONGODB_USER -p $MONGODB_PASSWORD -d dbname -v /var/lib/mongodb/data/mongodump
7. Check if the database is restored:
$ mongo admin -u $MONGODB_USER -p $MONGODB_ADMIN_PASSWORD$ use dbname$ show collections$ exit
8. Remove the mongodump directory from the pod:
$ rm -rf /var/lib/mongodb/data/mongodump
Supported MongoDB Environment Variables
v2 v3
OPENSHIFT_MONGODB_DB_HOST [service_name]_SERVICE_HOST
OPENSHIFT_MONGODB_DB_PORT [service_name]_SERVICE_PORT
OPENSHIFT_MONGODB_DB_USERNAME MONGODB_USER
OPENSHIFT_MONGODB_DB_PASSWORD MONGODB_PASSWORD
OPENSHIFT_MONGODB_DB_URL
OPENSHIFT_MONGODB_DB_LOG_DIR
MONGODB_DATABASE
MONGODB_ADMIN_PASSWORD
CHAPTER 6. MIGRATING APPLICATIONS
53
MONGODB_NOPREALLOC
MONGODB_SMALLFILES
MONGODB_QUIET
MONGODB_REPLICA_NAME
MONGODB_KEYFILE_VALUE
v2 v3
6.3. MIGRATING WEB FRAMEWORK APPLICATIONS
6.3.1. Overview
This topic reviews how to migrate Python, Ruby, PHP, Perl, Node.js, WordPress, Ghost, JBoss EAP,JBoss WS (Tomcat), and Wildfly 10 (JBoss AS) web framework applications from OpenShift version 2(v2) to OpenShift version 3 (v3).
6.3.2. Python
1. Set up a new GitHub repository and add it as a remote branch to the current, local v2 Gitrepository:
$ git remote add <remote-name> https://github.com/<github-id>/<repo-name>.git
2. Push the local v2 source code to the new repository:
$ git push -u <remote-name> master
3. Ensure that all important files such as setup.py, wsgi.py, requirements.txt, and etc arepushed to new repository.
Ensure all required packages for your application are included in requirements.txt.
4. Use the oc command to launch a new Python application from the builder image and sourcecode:
$ oc new-app --strategy=sourcepython:3.3~https://github.com/<github-id>/<repo-name> --name=<app-name> -e<ENV_VAR_NAME>=<env_var_value>
Supported Python Versions
See Supported Container Images
6.3.3. Ruby
OpenShift Dedicated 3 Developer Guide
54
1. Set up a new GitHub repository and add it as a remote branch to the current, local v2 Gitrepository:
$ git remote add <remote-name> https://github.com/<github-id>/<repo-name>.git
2. Push the local v2 source code to the new repository:
$ git push -u <remote-name> master
3. If you do not have a Gemfile and are running a simple rack application, copy this Gemfile intothe root of your source:
https://github.com/sclorg/ruby-ex/blob/master/Gemfile
NOTE
The latest version of the rack gem that supports Ruby 2.0 is 1.6.4, so the Gemfileneeds to be modified to gem 'rack', “1.6.4”.
For Ruby 2.2 or later, use the rack gem 2.0 or later.
4. Use the oc command to launch a new Ruby application from the builder image and source code:
$ oc new-app --strategy=sourceruby:2.0~https://github.com/<github-id>/<repo-name>.git
Supported Ruby Versions
See Supported Container Images
6.3.4. PHP
1. Set up a new GitHub repository and add it as a remote branch to the current, local v2 Gitrepository:
$ git remote add <remote-name> https://github.com/<github-id>/<repo-name>
2. Push the local v2 source code to the new repository:
$ git push -u <remote-name> master
3. Use the oc command to launch a new PHP application from the builder image and source code:
$ oc new-app https://github.com/<github-id>/<repo-name>.git--name=<app-name> -e <ENV_VAR_NAME>=<env_var_value>
Supported PHP Versions
See Supported Container Images
CHAPTER 6. MIGRATING APPLICATIONS
55
6.3.5. Perl
1. Set up a new GitHub repository and add it as a remote branch to the current, local v2 Gitrepository:
$ git remote add <remote-name> https://github.com/<github-id>/<repo-name>
2. Push the local v2 source code to the new repository:
$ git push -u <remote-name> master
3. Edit the local Git repository and push changes upstream to make it v3 compatible:
a. In v2, CPAN modules reside in .openshift/cpan.txt. In v3, the s2i builder looks for a filenamed cpanfile in the root directory of the source.
$ cd <local-git-repository>$ mv .openshift/cpan.txt cpanfile
Edit cpanfile, as it has a slightly different format:
format of cpanfile format of cpan.txt
requires ‘cpan::mod’; cpan::mod
requires ‘Dancer’; Dancer
requires ‘YAML’; YAML
b. Remove .openshift directory
NOTE
In v3, action_hooks and cron tasks are not supported in the same way. SeeAction Hooks for more information.
4. Use the oc command to launch a new Perl application from the builder image and source code:
$ oc new-app https://github.com/<github-id>/<repo-name>.git
Supported Perl Versions
See Supported Container Images
6.3.6. Node.js
1. Set up a new GitHub repository and add it as a remote branch to the current, local Git repository:
$ git remote add <remote-name> https://github.com/<github-id>/<repo-name>
OpenShift Dedicated 3 Developer Guide
56
2. Push the local v2 source code to the new repository:
$ git push -u <remote-name> master
3. Edit the local Git repository and push changes upstream to make it v3 compatible:
a. Remove the .openshift directory.
NOTE
In v3, action_hooks and cron tasks are not supported in the same way. SeeAction Hooks for more information.
b. Edit server.js.
L116 server.js: 'self.app = express();'
L25 server.js: self.ipaddress = '0.0.0.0';
L26 server.js: self.port = 8080;
NOTE
Lines(L) are from the base V2 cartridge server.js.
4. Use the oc command to launch a new Node.js application from the builder image and sourcecode:
$ oc new-app https://github.com/<github-id>/<repo-name>.git--name=<app-name> -e <ENV_VAR_NAME>=<env_var_value>
Supported Node.js Versions
See Supported Container Images
6.3.7. WordPress
IMPORTANT
Currently, support for migrating WordPress applications is offered by the community onlyand not by Red Hat support.
For guidance on migrating WordPress applications to OpenShift Dedicated v3, see the OpenShift blog.
6.3.8. Ghost
IMPORTANT
Currently, support for migrating Ghost applications is offered by the community only andnot by Red Hat support.
For guidance on migrating Ghost applications to OpenShift Dedicated v3, see the OpenShift blog.
CHAPTER 6. MIGRATING APPLICATIONS
57
6.3.9. JBoss EAP
1. Set up a new GitHub repository and add it as a remote branch to the current, local Git repository:
$ git remote add <remote-name> https://github.com/<github-id>/<repo-name>
2. Push the local v2 source code to the new repository:
$ git push -u <remote-name> master
3. If the repository includes pre-built .war files, they need to reside in the deployments directory offthe root directory of the repository.
4. Create the new application using the JBoss EAP 7 builder image (jboss-eap70-openshift) andthe source code repository from GitHub:
$ oc new-app --strategy=source jboss-eap70-openshift:1.6~https://github.com/<github-id>/<repo-name>.git
6.3.10. JBoss WS (Tomcat)
1. Set up a new GitHub repository and add it as a remote branch to the current, local Git repository:
$ git remote add <remote-name> https://github.com/<github-id>/<repo-name>
2. Push the local v2 source code to the new repository:
$ git push -u <remote-name> master
3. If the repository includes pre-built .war files, they need to reside in the deployments directory offthe root directory of the repository.
4. Create the new application using the JBoss Web Server 3 (Tomcat 7) builder image (jboss-webserver30-tomcat7) and the source code repository from GitHub:
$ oc new-app --strategy=sourcejboss-webserver30-tomcat7-openshift~https://github.com/<github-id>/<repo-name>.git--name=<app-name> -e <ENV_VAR_NAME>=<env_var_value>
6.3.11. JBoss AS (Wildfly 10)
1. Set up a new GitHub repository and add it as a remote branch to the current, local Git repository:
$ git remote add <remote-name> https://github.com/<github-id>/<repo-name>
2. Push the local v2 source code to the new repository:
$ git push -u <remote-name> master
OpenShift Dedicated 3 Developer Guide
58
3. Edit the local Git repository and push the changes upstream to make it v3 compatible:
a. Remove .openshift directory.
NOTE
In v3, action_hooks and cron tasks are not supported in the same way. SeeAction Hooks for more information.
b. Add the deployments directory to the root of the source repository. Move the .war files to‘deployments’ directory.
4. Use the oc command to launch a new Wildfly application from the builder image and sourcecode:
$ oc new-app https://github.com/<github-id>/<repo-name>.git --image-stream=”openshift/wildfly:10.0" --name=<app-name> -e <ENV_VAR_NAME>=<env_var_value>
NOTE
The argument --name is optional to specify the name of your application. Theargument -e is optional to add environment variables that are needed for buildand deployment processes, such as OPENSHIFT_PYTHON_DIR.
6.3.12. Supported JBoss Versions
See Supported Container Images
6.4. QUICKSTART EXAMPLES
6.4.1. Overview
Although there is no clear-cut migration path for v2 quickstart to v3 quickstart, the following quickstartsare currently available in v3. If you have an application with a database, rather than using oc new-appto create your application, then oc new-app again to start a separate database service and linking thetwo with common environment variables, you can use one of the following to instantiate the linkedapplication and database at once, from your GitHub repository containing your source code. You can listall available templates with oc get templates -n openshift:
CakePHP MySQL https://github.com/sclorg/cakephp-ex
template: cakephp-mysql-example
Node.js MongoDB https://github.com/sclorg/nodejs-ex
template: nodejs-mongodb-example
Django PosgreSQL https://github.com/sclorg/django-ex
template: django-psql-example
Dancer MySQL https://github.com/sclorg/dancer-ex
CHAPTER 6. MIGRATING APPLICATIONS
59
1
template: dancer-mysql-example
Rails PostgreSQL https://github.com/sclorg/rails-ex
template: rails-postgresql-example
6.4.2. Workflow
Run a git clone of one of the above template URLs locally. Add and commit your application sourcecode and push a GitHub repository, then start a v3 quickstart application from one of the templates listedabove:
1. Create a GitHub repository for your application.
2. Clone a quickstart template and add your GitHub repository as a remote:
$ git clone <one-of-the-template-URLs-listed-above>$ cd <your local git repository>$ git remote add upstream <https://github.com/<git-id>/<quickstart-repo>.git>$ git push -u upstream master
3. Commit and push your source code to GitHub:
$ cd <your local repository>$ git commit -am “added code for my app”$ git push origin master
4. Create a new application in v3:
$ oc new-app --template=<template> \-p SOURCE_REPOSITORY_URL=<https://github.com/<git-id>/<quickstart_repo>.git> \-p DATABASE_USER=<your_db_user> \-p DATABASE_NAME=<your_db_name> \-p DATABASE_PASSWORD=<your_db_password> \
-p DATABASE_ADMIN_PASSWORD=<your_db_admin_password> 1
Only applicable for MongoDB.
You should now have 2 pods running, a web framework pod, and a database pod. The webframework pod environment should match the database pod environment. You can list theenvironment variables with oc set env pod/<pod_name> --list:
DATABASE_NAME is now <DB_SERVICE>_DATABASE
DATABASE_USER is now <DB_SERVICE>_USER
DATABASE_PASSWORD is now <DB_SERVICE>_PASSWORD
DATABASE_ADMIN_PASSWORD is now MONGODB_ADMIN_PASSWORD (only applicable forMongoDB)
OpenShift Dedicated 3 Developer Guide
60
If no SOURCE_REPOSITORY_URL is specified, the template will use the template URL(https://github.com/openshift/<quickstart>-ex) listed above as the source repository, anda hello-welcome application will be started.
5. If you are migrating a database, export databases to a dump file and restore the database in thenew v3 database pod. Refer to the steps outlined in Database Applications, skipping the oc new-app step as the database pod is already up and running.
6.5. CONTINUOUS INTEGRATION AND DEPLOYMENT (CI/CD)
6.5.1. Overview
This topic reviews the differences in continuous integration and deployment (CI/CD) applicationsbetween OpenShift version 2 (v2) and OpenShift version 3 (v3) and how to migrate these applicationsinto the v3 environment.
6.5.2. Jenkins
The Jenkins applications in OpenShift version 2 (v2) and OpenShift version 3 (v3) are configureddifferently due to fundamental differences in architecture. For example, in v2, the application uses anintegrated Git repository that is hosted in the gear to store the source code. In v3, the source code islocated in a public or private Git repository that is hosted outside of the pod.
Furthermore, in OpenShift v3, Jenkins jobs can not only be triggered by source code changes, but alsoby changes in ImageStream, which are changes on the images that are used to build the applicationalong with its source code. As a result, it is highly recommended that you migrate the Jenkins applicationmanually by creating a new Jenkins application in v3, and then re-creating jobs with the configurationsthat are suitable to OpenShift v3 environment.
Consult these resources for more information on how to create a Jenkins application, configure jobs, anduse Jenkins plug-ins properly:
https://github.com/openshift/origin/blob/master/examples/jenkins/README.md
https://github.com/openshift/jenkins-plugin/blob/master/README.md
https://github.com/openshift/origin/blob/master/examples/sample-app/README.md
6.6. WEBHOOKS AND ACTION HOOKS
6.6.1. Overview
This topic reviews the differences in webhooks and action hooks between OpenShift version 2 (v2) andOpenShift version 3 (v3) and how to migrate these applications into the v3 environment.
6.6.2. Webhooks
1. After creating a BuildConfig from a GitHub repository, run:
This will output a webhook GitHub URL that looks like:
$ oc describe bc/<name-of-your-BuildConfig>
CHAPTER 6. MIGRATING APPLICATIONS
61
<https://api.starter-us-east-1.openshift.com:443/oapi/v1/namespaces/nsname/buildconfigs/bcname/webhooks/secret/github>.
2. Cut and paste this URL into GitHub, from the GitHub web console.
3. In your GitHub repository, select Add Webhook from Settings → Webhooks & Services.
4. Paste the URL output (similar to above) into the Payload URL field.
5. Set the Content Type to application/json.
6. Click Add webhook.
You should see a message from GitHub stating that your webhook was successfully configured.
Now, whenever you push a change to your GitHub repository, a new build will automatically start, andupon a successful build a new deployment will start.
NOTE
If you delete or recreate your application, you will have to update the Payload URL fieldin GitHub with the new BuildConfig webhook url.
6.6.3. Action Hooks
In OpenShift version 2 (v2), there are build, deploy, post_deploy, and pre_build scripts or action_hooksthat are located in the .openshift/action_hooks directory. While there is no one-to-one mapping offunction for these in v3, the S2I tool in v3 does have the option of adding customizable scripts, either in adesignated URL or in the .s2i/bin directory of your source repository.
OpenShift version 3 (v3) also offers a post-build hook for running basic testing of an image after it is builtand before it is pushed to the registry. Deployment hooks are configured in the deployment configuration.
In v2, action_hooks are commonly used to set up environment variables. In v2, any environmentvariables should be passed with:
or:
Also, environment variables can be added or changed using:
6.7. S2I TOOL
6.7.1. Overview
The Source-to-Image (S2I) tool injects application source code into a container image and the final
$ oc new-app <source-url> -e ENV_VAR=env_var
$ oc new-app <template-name> -p ENV_VAR=env_var
$ oc set env dc/<name-of-dc>ENV_VAR1=env_var1 ENV_VAR2=env_var2’
OpenShift Dedicated 3 Developer Guide
62
product is a new and ready-to-run container image that incorporates the builder image and built sourcecode. The S2I tool can be installed on your local machine without OpenShift Dedicated from therepository.
The S2I tool is a very powerful tool to test and verify your application and images locally before usingthem on OpenShift Dedicated.
6.7.2. Creating a Container Image
1. Identify the builder image that is needed for the application. Red Hat offers multiple builderimages for different languages including Python, Ruby, Perl, PHP, and Node.js. Other imagesare available from the community space.
2. S2I can build images from source code in a local file system or from a Git repository. To build anew container image from the builder image and the source code:
$ s2i build <source-location> <builder-image-name> <output-image-name>
NOTE
<source-location> can either be a Git repository URL or a directory to sourcecode in a local file system.
3. Test the built image with the Docker daemon:
$ docker run -d --name <new-name> -p <port-number>:<port-number> <output-image-name>$ curl localhost:<port-number>
6.8. SUPPORT GUIDE
6.8.1. Overview
This topic reviews supported languages, frameworks, databases, and markers for OpenShift version 2(v2) and OpenShift version 3 (v3).
See OpenShift Dedicated tested integrations for more information about common combinations thatOpenShift Dedicated customers are using.
6.8.2. Supported Databases
See the Supported Databases section of the Database Applications topic.
6.8.3. Supported Languages
PHP
Python
Perl
Node.js
CHAPTER 6. MIGRATING APPLICATIONS
63
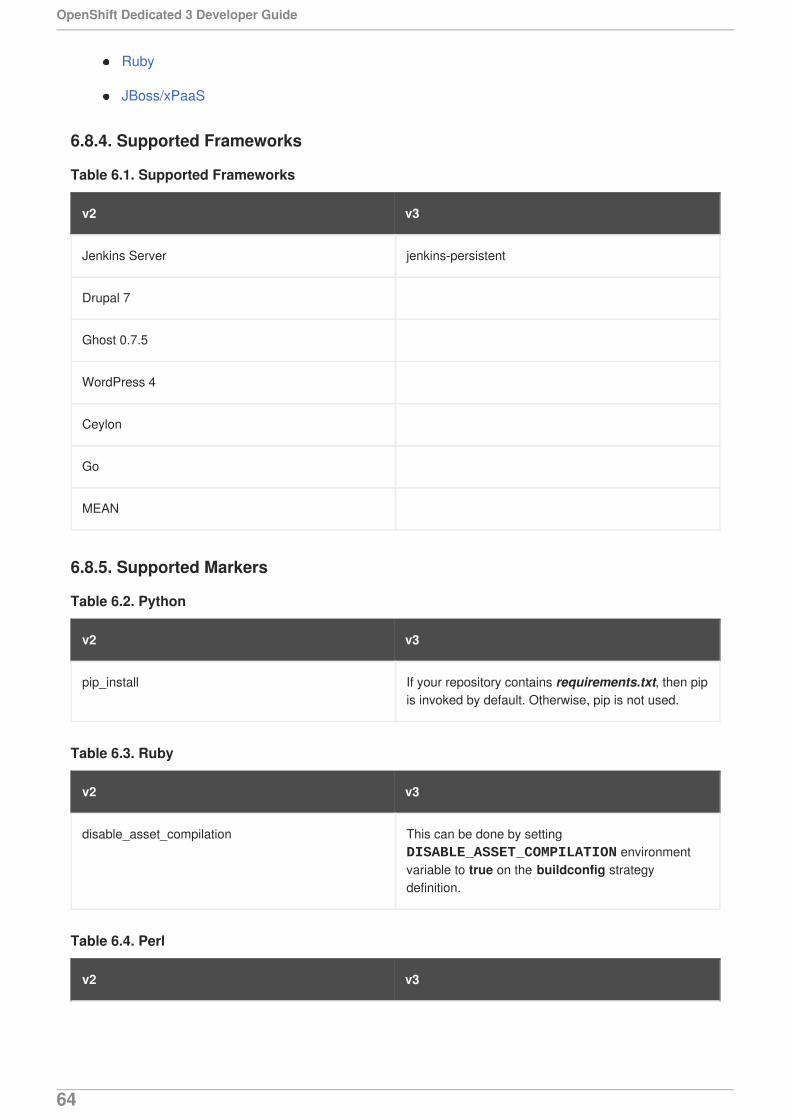
Ruby
JBoss/xPaaS
6.8.4. Supported Frameworks
Table 6.1. Supported Frameworks
v2 v3
Jenkins Server jenkins-persistent
Drupal 7
Ghost 0.7.5
WordPress 4
Ceylon
Go
MEAN
6.8.5. Supported Markers
Table 6.2. Python
v2 v3
pip_install If your repository contains requirements.txt, then pipis invoked by default. Otherwise, pip is not used.
Table 6.3. Ruby
v2 v3
disable_asset_compilation This can be done by setting DISABLE_ASSET_COMPILATION environmentvariable to true on the buildconfig strategydefinition.
Table 6.4. Perl
v2 v3
OpenShift Dedicated 3 Developer Guide
64

enable_cpan_tests This can be done by setting ENABLE_CPAN_TESTenvironment variable to true on the buildconfiguration.
v2 v3
Table 6.5. PHP
v2 v3
use_composer composer is always used if the source repositoryincludes a composer.json in the root directory.
Table 6.6. Node.js
v2 v3
NODEJS_VERSION N/A
use_npm npm is always used to start the application, unless DEV_MODE is set to true, in which case nodemon isused instead.
Table 6.7. JBoss EAP, JBoss WS, WildFly
v2 v3
enable_debugging This option is controlled via the ENABLE_JPDAenvironment variable set on the deploymentconfiguration by setting it to any non-empty value.
skip_maven_build If pom.xml is present, maven will be run.
java7 N/A
java8 JavaEE is using JDK8.
Table 6.8. Jenkins
v2 v3
enable_debugging N/A
Table 6.9. All
CHAPTER 6. MIGRATING APPLICATIONS
65
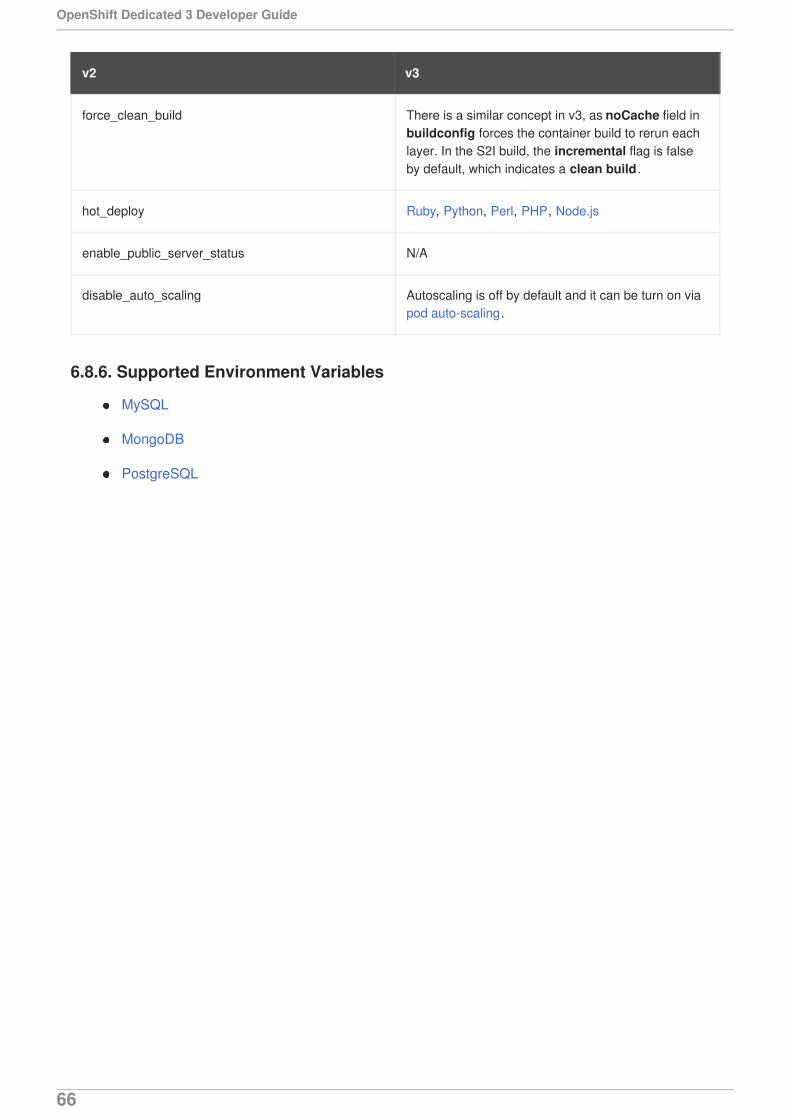
v2 v3
force_clean_build There is a similar concept in v3, as noCache field inbuildconfig forces the container build to rerun eachlayer. In the S2I build, the incremental flag is falseby default, which indicates a clean build .
hot_deploy Ruby, Python, Perl, PHP, Node.js
enable_public_server_status N/A
disable_auto_scaling Autoscaling is off by default and it can be turn on viapod auto-scaling.
6.8.6. Supported Environment Variables
MySQL
MongoDB
PostgreSQL
OpenShift Dedicated 3 Developer Guide
66
CHAPTER 7. TUTORIALS
7.1. OVERVIEW
This topic group includes information on how to get your application up and running in OpenShiftDedicated and covers different languages and their frameworks.
7.2. QUICKSTART TEMPLATES
7.2.1. Overview
A quickstart is a basic example of an application running on OpenShift Dedicated. Quickstarts come in avariety of languages and frameworks, and are defined in a template, which is constructed from a set ofservices, build configurations, and deployment configurations. This template references the necessaryimages and source repositories to build and deploy the application.
To explore a quickstart, create an application from a template. Your administrator may have alreadyinstalled these templates in your OpenShift Dedicated cluster, in which case you can simply select itfrom the web console. See the template documentation for more information on how to upload, createfrom, and modify a template.
Quickstarts refer to a source repository that contains the application source code. To customize thequickstart, fork the repository and, when creating an application from the template, substitute the defaultsource repository name with your forked repository. This results in builds that are performed using yoursource code instead of the provided example source. You can then update the code in your sourcerepository and launch a new build to see the changes reflected in the deployed application.
7.2.2. Web Framework Quickstart Templates
These quickstarts provide a basic application of the indicated framework and language:
CakePHP: a PHP web framework (includes a MySQL database)
Template definition
Source repository
Dancer: a Perl web framework (includes a MySQL database)
Template definition
Source repository
Django: a Python web framework (includes a PostgreSQL database)
Template definition
Source repository
NodeJS: a NodeJS web application (includes a MongoDB database)
Template definition
Source repository
CHAPTER 7. TUTORIALS
67
Rails: a Ruby web framework (includes a PostgreSQL database)
Template definition
Source repository
7.3. RUBY ON RAILS
7.3.1. Overview
Ruby on Rails is a popular web framework written in Ruby. This guide covers using Rails 4 on OpenShiftDedicated.
WARNING
We strongly advise going through the whole tutorial to have an overview of all thesteps necessary to run your application on the OpenShift Dedicated. If youexperience a problem try reading through the entire tutorial and then going back toyour issue. It can also be useful to review your previous steps to ensure that all thesteps were executed correctly.
For this guide you will need:
Basic Ruby/Rails knowledge
Locally installed version of Ruby 2.0.0+, Rubygems, Bundler
Basic Git knowledge
Running instance of OpenShift Dedicated v3
7.3.2. Local Workstation Setup
First make sure that an instance of OpenShift Dedicated is running and is available. Also make sure thatyour oc CLI client is installed and the command is accessible from your command shell, so you can useit to log in using your email address and password.
7.3.2.1. Setting Up the Database
Rails applications are almost always used with a database. For the local development we chose thePostgreSQL database. To install it type:
$ sudo yum install -y postgresql postgresql-server postgresql-devel
Next you need to initialize the database with:
$ sudo postgresql-setup initdb
This command will create the /var/lib/pgsql/data directory, in which the data will be stored.
OpenShift Dedicated 3 Developer Guide
68
Start the database by typing:
$ sudo systemctl start postgresql.service
When the database is running, create your rails user:
$ sudo -u postgres createuser -s rails
Note that the user we created has no password.
7.3.3. Writing Your Application
If you are starting your Rails application from scratch, you need to install the Rails gem first.
$ gem install railsSuccessfully installed rails-4.2.01 gem installed
After you install the Rails gem create a new application, with PostgreSQL as your database:
$ rails new rails-app --database=postgresql
Then change into your new application directory.
$ cd rails-app
If you already have an application, make sure the pg (postgresql) gem is present in your Gemfile. If notedit your Gemfile by adding the gem:
gem 'pg'
To generate a new Gemfile.lock with all your dependencies run:
$ bundle install
In addition to using the postgresql database with the pg gem, you’ll also need to ensure the config/database.yml is using the postgresql adapter.
Make sure you updated default section in the config/database.yml file, so it looks like this:
default: &default adapter: postgresql encoding: unicode pool: 5 host: localhost username: rails password:
Create your application’s development and test databases by using this rake command:
$ rake db:create
CHAPTER 7. TUTORIALS
69
This will create development and test database in your PostgreSQL server.
7.3.3.1. Creating a Welcome Page
Since Rails 4 no longer serves a static public/index.html page in production, we need to create anew root page.
In order to have a custom welcome page we need to do following steps:
Create a controller with an index action
Create a view page for the welcome controller index action
Create a route that will serve applications root page with the created controller and view
Rails offers a generator that will do all this necessary steps for you.
$ rails generate controller welcome index
All the necessary files have been created, now we just need to edit line 2 in config/routes.rb file tolook like:
root 'welcome#index'
Run the rails server to verify the page is available.
$ rails server
You should see your page by visiting http://localhost:3000 in your browser. If you don’t see the page,check the logs that are output to your server to debug.
7.3.3.2. Configuring the Application for OpenShift Dedicated
In order to have your application communicating with the PostgreSQL database service that will berunning in OpenShift Dedicated, you will need to edit the default section in your config/database.yml to use environment variables, which you will define later, upon the databaseservice creation.
The default section in your edited config/database.yml together with pre-defined variablesshould look like:
<% user = ENV.key?("POSTGRESQL_ADMIN_PASSWORD") ? "root" : ENV["POSTGRESQL_USER"] %><% password = ENV.key?("POSTGRESQL_ADMIN_PASSWORD") ? ENV["POSTGRESQL_ADMIN_PASSWORD"] : ENV["POSTGRESQL_PASSWORD"] %><% db_service = ENV.fetch("DATABASE_SERVICE_NAME","").upcase %>
default: &default adapter: postgresql encoding: unicode # For details on connection pooling, see rails configuration guide # http://guides.rubyonrails.org/configuring.html#database-pooling pool: <%= ENV["POSTGRESQL_MAX_CONNECTIONS"] || 5 %> username: <%= user %>
OpenShift Dedicated 3 Developer Guide
70

password: <%= password %> host: <%= ENV["#{db_service}_SERVICE_HOST"] %> port: <%= ENV["#{db_service}_SERVICE_PORT"] %> database: <%= ENV["POSTGRESQL_DATABASE"] %>
For an example of how the final file should look, see Ruby on Rails example applicationconfig/database.yml.
7.3.3.3. Storing Your Application in Git
OpenShift Dedicated requires git, if you don’t have it installed you will need to install it.
Building an application in OpenShift Dedicated usually requires that the source code be stored in a gitrepository, so you will need to install git if you do not already have it.
Make sure you are in your Rails application directory by running the ls -1 command. The output of thecommand should look like:
$ ls -1appbinconfigconfig.rudbGemfileGemfile.lockliblogpublicRakefileREADME.rdoctesttmpvendor
Now run these commands in your Rails app directory to initialize and commit your code to git:
$ git init$ git add .$ git commit -m "initial commit"
Once your application is committed you need to push it to a remote repository. For this you would need aGitHub account, in which you create a new repository.
Set the remote that points to your git repository:
$ git remote add origin [email protected]:<namespace/repository-name>.git
After that, push your application to your remote git repository.
$ git push
7.3.4. Deploying Your Application to OpenShift Dedicated
CHAPTER 7. TUTORIALS
71

To deploy your Ruby on Rails application, create a new Project for the application:
$ oc new-project rails-app --description="My Rails application" --display-name="Rails Application"
After creating the rails-app project, you will be automatically switched to the new project namespace.
Deploying your application in OpenShift Dedicated involves three steps:
Creating a database service from OpenShift Dedicated’s PostgreSQL image
Creating a frontend service from OpenShift Dedicated’s Ruby 2.0 builder image and your Rubyon Rails source code, which we wire with the database service
Creating a route for your application.
7.3.4.1. Creating the Database Service
Your Rails application expects a running database service. For this service use PostgeSQL databaseimage.
To create the database service you will use the oc new-app command. To this command you will need topass some necessary environment variables which will be used inside the database container. Theseenvironment variables are required to set the username, password, and name of the database. You canchange the values of these environment variables to anything you would like. The variables we are goingto be setting are as follows:
POSTGRESQL_DATABASE
POSTGRESQL_USER
POSTGRESQL_PASSWORD
Setting these variables ensures:
A database exists with the specified name
A user exists with the specified name
The user can access the specified database with the specified password
For example:
$ oc new-app postgresql -e POSTGRESQL_DATABASE=db_name -e POSTGRESQL_USER=username -e POSTGRESQL_PASSWORD=password
To also set the password for the database administrator, append to the previous command with:
-e POSTGRESQL_ADMIN_PASSWORD=admin_pw
To watch the progress of this command:
$ oc get pods --watch
OpenShift Dedicated 3 Developer Guide
72
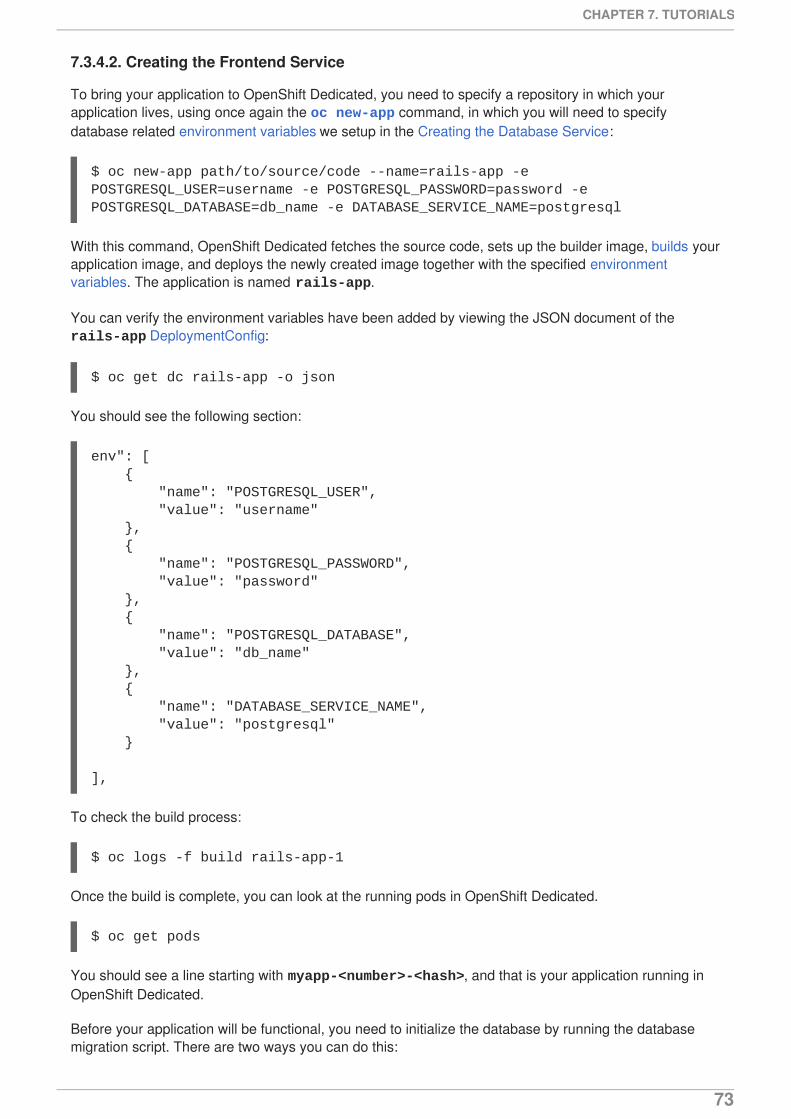
7.3.4.2. Creating the Frontend Service
To bring your application to OpenShift Dedicated, you need to specify a repository in which yourapplication lives, using once again the oc new-app command, in which you will need to specifydatabase related environment variables we setup in the Creating the Database Service:
$ oc new-app path/to/source/code --name=rails-app -e POSTGRESQL_USER=username -e POSTGRESQL_PASSWORD=password -e POSTGRESQL_DATABASE=db_name -e DATABASE_SERVICE_NAME=postgresql
With this command, OpenShift Dedicated fetches the source code, sets up the builder image, builds yourapplication image, and deploys the newly created image together with the specified environmentvariables. The application is named rails-app.
You can verify the environment variables have been added by viewing the JSON document of the rails-app DeploymentConfig:
$ oc get dc rails-app -o json
You should see the following section:
env": [ { "name": "POSTGRESQL_USER", "value": "username" }, { "name": "POSTGRESQL_PASSWORD", "value": "password" }, { "name": "POSTGRESQL_DATABASE", "value": "db_name" }, { "name": "DATABASE_SERVICE_NAME", "value": "postgresql" }
],
To check the build process:
$ oc logs -f build rails-app-1
Once the build is complete, you can look at the running pods in OpenShift Dedicated.
$ oc get pods
You should see a line starting with myapp-<number>-<hash>, and that is your application running inOpenShift Dedicated.
Before your application will be functional, you need to initialize the database by running the databasemigration script. There are two ways you can do this:
CHAPTER 7. TUTORIALS
73
Manually from the running frontend container:
First you need to exec into frontend container with rsh command:
$ oc rsh <FRONTEND_POD_ID>
Run the migration from inside the container:
$ RAILS_ENV=production bundle exec rake db:migrate
If you are running your Rails application in a development or test environment you don’t have tospecify the RAILS_ENV environment variable.
By adding pre-deployment lifecycle hooks in your template. For example check the hooksexample in our Rails example application.
7.3.4.3. Creating a Route for Your Application
To expose a service by giving it an externally-reachable hostname like www.example.com useOpenShift Dedicated route. In your case you need to expose the frontend service by typing:
$ oc expose service rails-app --hostname=www.example.com
WARNING
It’s the user’s responsibility to ensure the hostname they specify resolves into the IPaddress of the router. For more information, check the OpenShift Dedicateddocumentation on:
Routes
Configuring a Highly-available Routing Service (OpenShift Enterprise documentation)
7.4. SETTING UP A NEXUS MIRROR FOR MAVEN
7.4.1. Introduction
While developing your application with Java and Maven, you will most likely be building many times. Inorder to shorten the build times of your pods, Maven dependencies can be cached in a local Nexusrepository. This tutorial will guide you through creating a Nexus repository on your cluster.
This tutorial assumes that you are working with a project that is already set up for use with Maven. If youare interested in using Maven with your Java project, it is highly recommended that you look at theirguide.
In addition, be sure to check your application’s image for Maven mirror capabilities. Many images thatuse Maven have a MAVEN_MIRROR_URL environment variable that you can use to simplify this process.If it does not have this capability, read the Nexus documentation to configure your build properly.
OpenShift Dedicated 3 Developer Guide
74
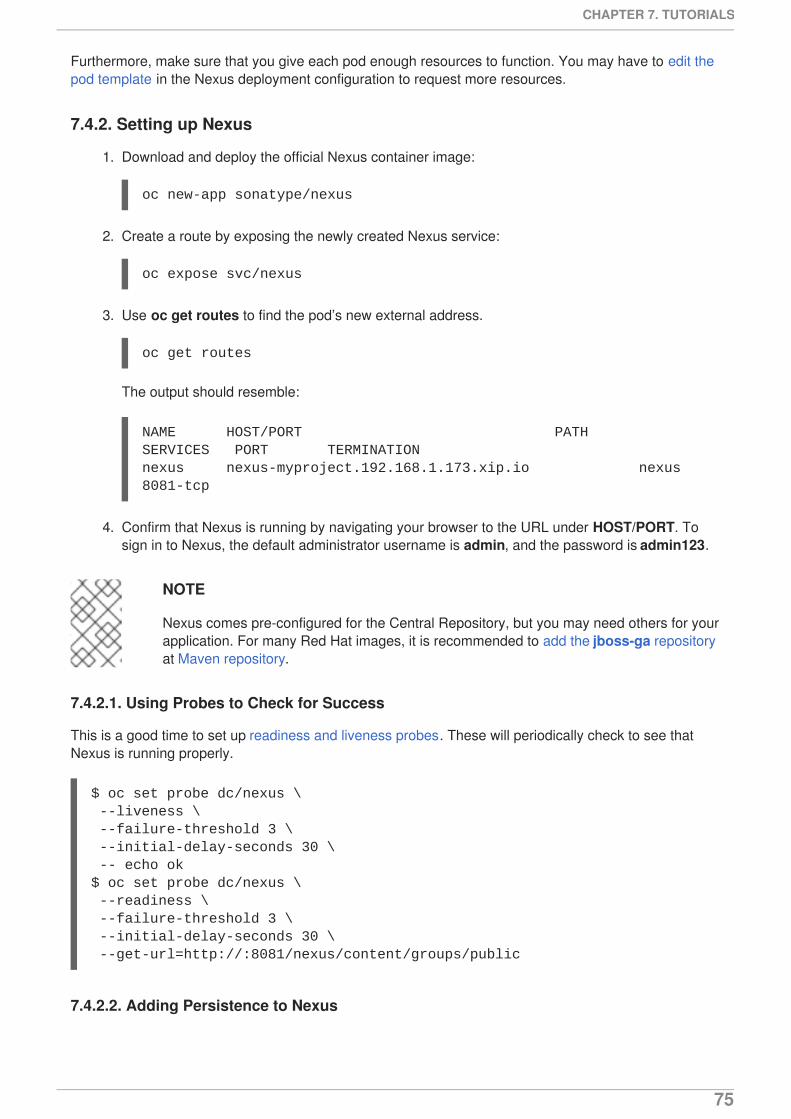
Furthermore, make sure that you give each pod enough resources to function. You may have to edit thepod template in the Nexus deployment configuration to request more resources.
7.4.2. Setting up Nexus
1. Download and deploy the official Nexus container image:
oc new-app sonatype/nexus
2. Create a route by exposing the newly created Nexus service:
oc expose svc/nexus
3. Use oc get routes to find the pod’s new external address.
oc get routes
The output should resemble:
NAME HOST/PORT PATH SERVICES PORT TERMINATIONnexus nexus-myproject.192.168.1.173.xip.io nexus 8081-tcp
4. Confirm that Nexus is running by navigating your browser to the URL under HOST/PORT. Tosign in to Nexus, the default administrator username is admin, and the password is admin123.
NOTE
Nexus comes pre-configured for the Central Repository, but you may need others for yourapplication. For many Red Hat images, it is recommended to add the jboss-ga repositoryat Maven repository.
7.4.2.1. Using Probes to Check for Success
This is a good time to set up readiness and liveness probes. These will periodically check to see thatNexus is running properly.
$ oc set probe dc/nexus \ --liveness \ --failure-threshold 3 \ --initial-delay-seconds 30 \ -- echo ok$ oc set probe dc/nexus \ --readiness \ --failure-threshold 3 \ --initial-delay-seconds 30 \ --get-url=http://:8081/nexus/content/groups/public
7.4.2.2. Adding Persistence to Nexus
CHAPTER 7. TUTORIALS
75

NOTE
If you do not want persistent storage, continue to Connecting to Nexus. However, yourcached dependencies and any configuration customization will be lost if the pod isrestarted for any reason.
Create a persistent volume claim (PVC) for Nexus, so that the cached dependencies are not lost whenthe pod running the server terminates. PVCs require available persistent volumes (PV) in the cluster. Ifthere are no PVs available and you do not have administrator access on your cluster, ask your systemadministrator to create a Read/Write Persistent Volume for you.
Add a PVC to the Nexus deployment configuration.
$ oc volumes dc/nexus --add \ --name 'nexus-volume-1' \ --type 'pvc' \ --mount-path '/sonatype-work/' \ --claim-name 'nexus-pv' \ --claim-size '1G' \ --overwrite
This removes the previous emptyDir volume for the deployment config and adds a claim for onegigabyte of persistent storage mounted at /sonatype-work, which is where the dependencies will bestored. Due to the change in configuration, the Nexus pod will be redeployed automatically.
To verify that Nexus is running, refresh the Nexus page in your browser. You can monitor thedeployment’s progress using:
$ oc get pods -w
7.4.3. Connecting to Nexus
The next steps demonstrate defining a build that uses the new Nexus repository. The rest of the tutorialuses this example repository with wildfly-100-centos7 as a builder, but these changes should work forany project.
The example builder image supports MAVEN_MIRROR_URL as part of its environment, so we can usethis to point our builder image to our Nexus repository. If your image does not support consuming anenvironment variable to configure a Maven mirror, you may need to modify the builder image to providethe correct Maven settings to point to the Nexus mirror.
$ oc new-build openshift/wildfly-100-centos7:latest~https://github.com/openshift/jee-ex.git \ -e MAVEN_MIRROR_URL='http://nexus.<Nexus_Project>:8081/nexus/content/groups/public'$ oc logs build/jee-ex-1 --follow
Replace <Nexus_Project> with the project name of the Nexus repository. If it is in the same project asthe application that is using it, you can remove the <Nexus_Project>.. Learn more about DNSresolution in OpenShift Dedicated.
7.4.4. Confirming Success
OpenShift Dedicated 3 Developer Guide
76
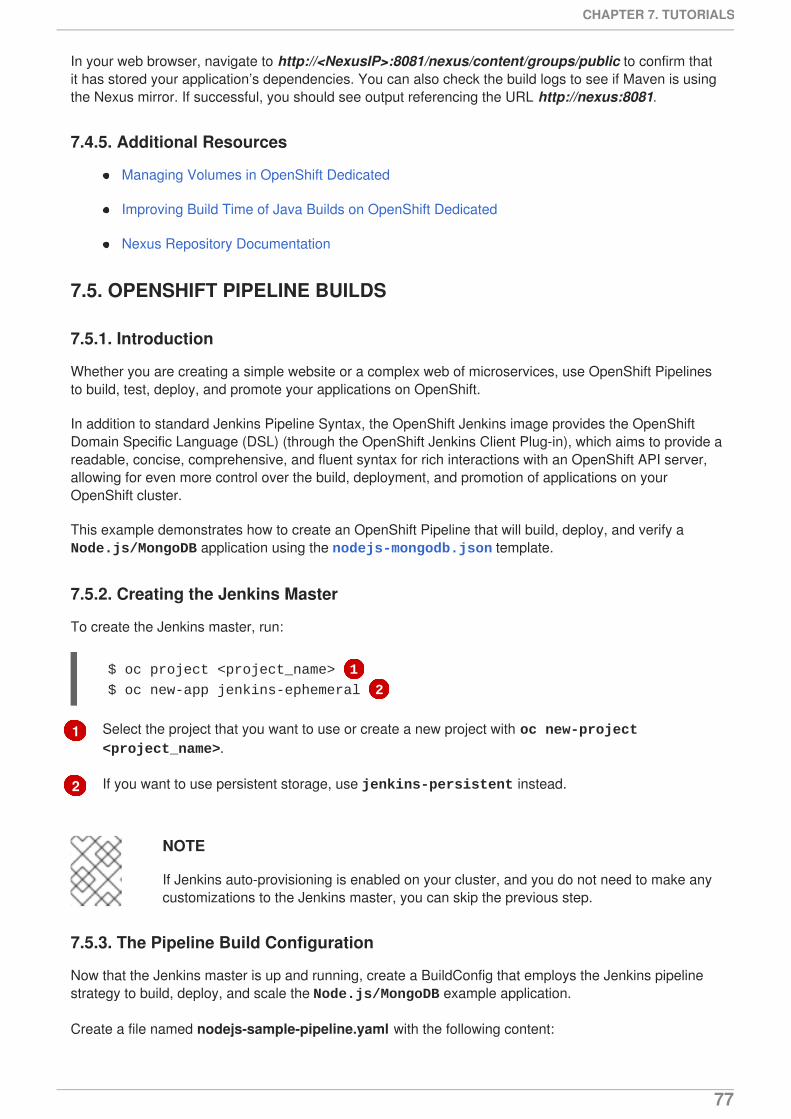
1
2
In your web browser, navigate to http://<NexusIP>:8081/nexus/content/groups/public to confirm thatit has stored your application’s dependencies. You can also check the build logs to see if Maven is usingthe Nexus mirror. If successful, you should see output referencing the URL http://nexus:8081.
7.4.5. Additional Resources
Managing Volumes in OpenShift Dedicated
Improving Build Time of Java Builds on OpenShift Dedicated
Nexus Repository Documentation
7.5. OPENSHIFT PIPELINE BUILDS
7.5.1. Introduction
Whether you are creating a simple website or a complex web of microservices, use OpenShift Pipelinesto build, test, deploy, and promote your applications on OpenShift.
In addition to standard Jenkins Pipeline Syntax, the OpenShift Jenkins image provides the OpenShiftDomain Specific Language (DSL) (through the OpenShift Jenkins Client Plug-in), which aims to provide areadable, concise, comprehensive, and fluent syntax for rich interactions with an OpenShift API server,allowing for even more control over the build, deployment, and promotion of applications on yourOpenShift cluster.
This example demonstrates how to create an OpenShift Pipeline that will build, deploy, and verify a Node.js/MongoDB application using the nodejs-mongodb.json template.
7.5.2. Creating the Jenkins Master
To create the Jenkins master, run:
$ oc project <project_name> 1
$ oc new-app jenkins-ephemeral 2
Select the project that you want to use or create a new project with oc new-project <project_name>.
If you want to use persistent storage, use jenkins-persistent instead.
NOTE
If Jenkins auto-provisioning is enabled on your cluster, and you do not need to make anycustomizations to the Jenkins master, you can skip the previous step.
7.5.3. The Pipeline Build Configuration
Now that the Jenkins master is up and running, create a BuildConfig that employs the Jenkins pipelinestrategy to build, deploy, and scale the Node.js/MongoDB example application.
Create a file named nodejs-sample-pipeline.yaml with the following content:
CHAPTER 7. TUTORIALS
77
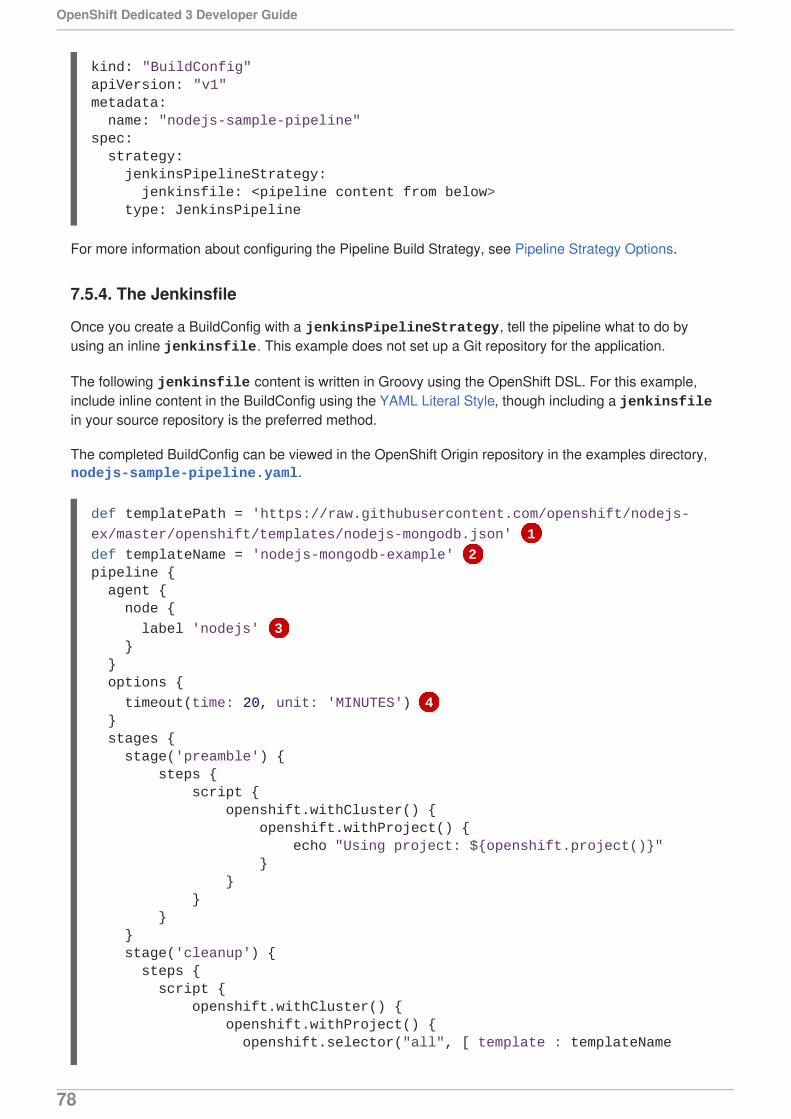
For more information about configuring the Pipeline Build Strategy, see Pipeline Strategy Options.
7.5.4. The Jenkinsfile
Once you create a BuildConfig with a jenkinsPipelineStrategy, tell the pipeline what to do byusing an inline jenkinsfile. This example does not set up a Git repository for the application.
The following jenkinsfile content is written in Groovy using the OpenShift DSL. For this example,include inline content in the BuildConfig using the YAML Literal Style, though including a jenkinsfilein your source repository is the preferred method.
The completed BuildConfig can be viewed in the OpenShift Origin repository in the examples directory, nodejs-sample-pipeline.yaml.
kind: "BuildConfig"apiVersion: "v1"metadata: name: "nodejs-sample-pipeline"spec: strategy: jenkinsPipelineStrategy: jenkinsfile: <pipeline content from below> type: JenkinsPipeline
def templatePath = 'https://raw.githubusercontent.com/openshift/nodejs-
ex/master/openshift/templates/nodejs-mongodb.json' 1
def templateName = 'nodejs-mongodb-example' 2pipeline { agent { node {
label 'nodejs' 3 } } options {
timeout(time: 20, unit: 'MINUTES') 4 } stages { stage('preamble') { steps { script { openshift.withCluster() { openshift.withProject() { echo "Using project: ${openshift.project()}" } } } } } stage('cleanup') { steps { script { openshift.withCluster() { openshift.withProject() { openshift.selector("all", [ template : templateName
OpenShift Dedicated 3 Developer Guide
78
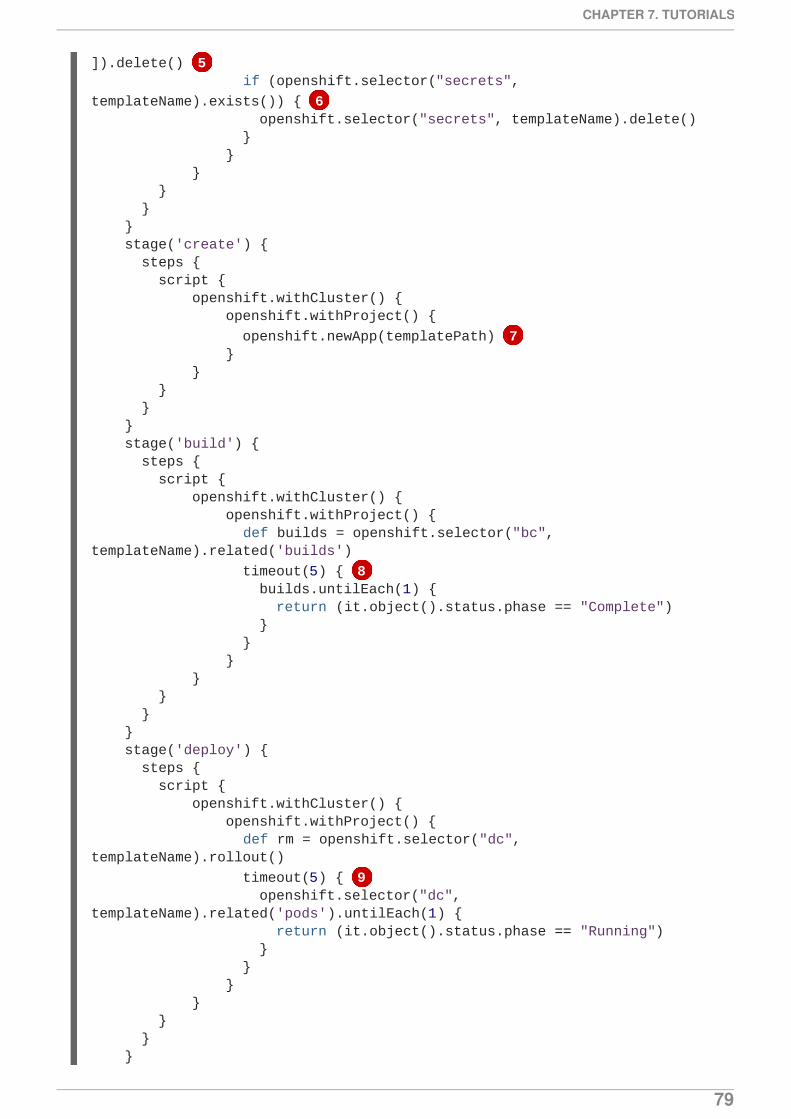
]).delete() 5 if (openshift.selector("secrets",
templateName).exists()) { 6 openshift.selector("secrets", templateName).delete() } } } } } } stage('create') { steps { script { openshift.withCluster() { openshift.withProject() {
openshift.newApp(templatePath) 7 } } } } } stage('build') { steps { script { openshift.withCluster() { openshift.withProject() { def builds = openshift.selector("bc", templateName).related('builds')
timeout(5) { 8 builds.untilEach(1) { return (it.object().status.phase == "Complete") } } } } } } } stage('deploy') { steps { script { openshift.withCluster() { openshift.withProject() { def rm = openshift.selector("dc", templateName).rollout()
timeout(5) { 9 openshift.selector("dc", templateName).related('pods').untilEach(1) { return (it.object().status.phase == "Running") } } } } } } }
CHAPTER 7. TUTORIALS
79
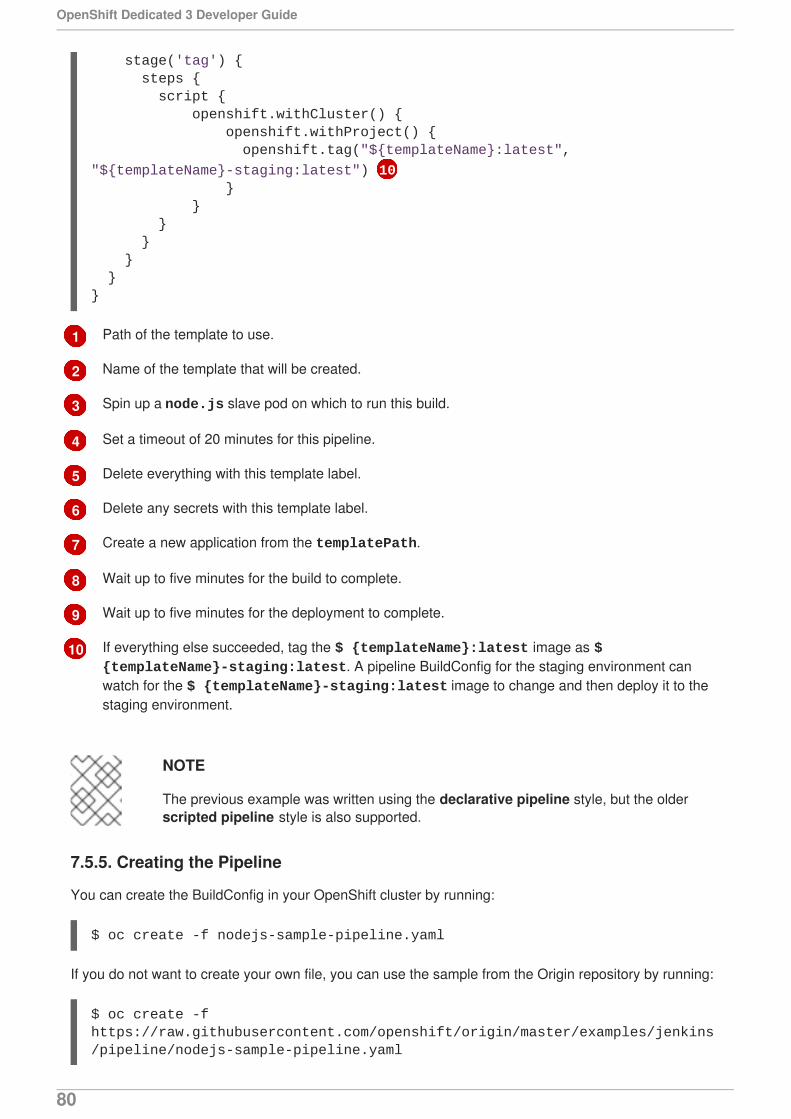
1
2
3
4
5
6
7
8
9
10
Path of the template to use.
Name of the template that will be created.
Spin up a node.js slave pod on which to run this build.
Set a timeout of 20 minutes for this pipeline.
Delete everything with this template label.
Delete any secrets with this template label.
Create a new application from the templatePath.
Wait up to five minutes for the build to complete.
Wait up to five minutes for the deployment to complete.
If everything else succeeded, tag the $ {templateName}:latest image as $ {templateName}-staging:latest. A pipeline BuildConfig for the staging environment canwatch for the $ {templateName}-staging:latest image to change and then deploy it to thestaging environment.
NOTE
The previous example was written using the declarative pipeline style, but the olderscripted pipeline style is also supported.
7.5.5. Creating the Pipeline
You can create the BuildConfig in your OpenShift cluster by running:
$ oc create -f nodejs-sample-pipeline.yaml
If you do not want to create your own file, you can use the sample from the Origin repository by running:
$ oc create -f https://raw.githubusercontent.com/openshift/origin/master/examples/jenkins/pipeline/nodejs-sample-pipeline.yaml
stage('tag') { steps { script { openshift.withCluster() { openshift.withProject() { openshift.tag("${templateName}:latest",
"${templateName}-staging:latest") 10 } } } } } }}
OpenShift Dedicated 3 Developer Guide
80
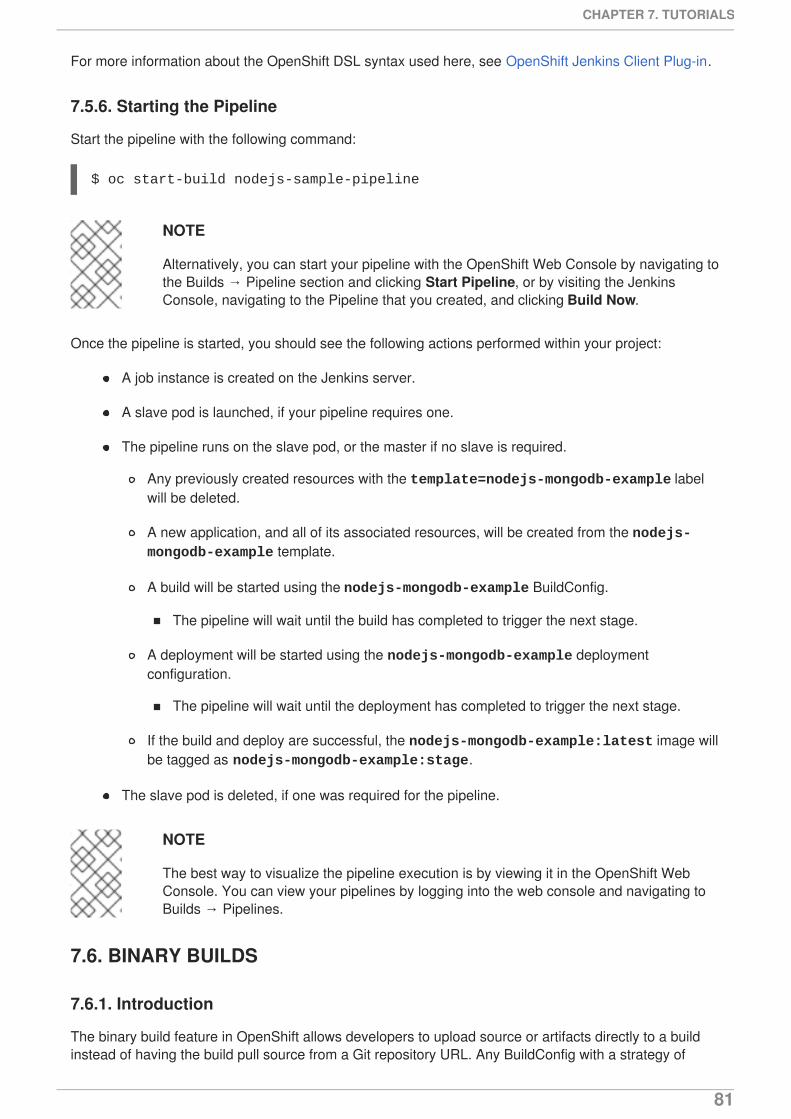
For more information about the OpenShift DSL syntax used here, see OpenShift Jenkins Client Plug-in.
7.5.6. Starting the Pipeline
Start the pipeline with the following command:
$ oc start-build nodejs-sample-pipeline
NOTE
Alternatively, you can start your pipeline with the OpenShift Web Console by navigating tothe Builds → Pipeline section and clicking Start Pipeline, or by visiting the JenkinsConsole, navigating to the Pipeline that you created, and clicking Build Now.
Once the pipeline is started, you should see the following actions performed within your project:
A job instance is created on the Jenkins server.
A slave pod is launched, if your pipeline requires one.
The pipeline runs on the slave pod, or the master if no slave is required.
Any previously created resources with the template=nodejs-mongodb-example labelwill be deleted.
A new application, and all of its associated resources, will be created from the nodejs-mongodb-example template.
A build will be started using the nodejs-mongodb-example BuildConfig.
The pipeline will wait until the build has completed to trigger the next stage.
A deployment will be started using the nodejs-mongodb-example deploymentconfiguration.
The pipeline will wait until the deployment has completed to trigger the next stage.
If the build and deploy are successful, the nodejs-mongodb-example:latest image willbe tagged as nodejs-mongodb-example:stage.
The slave pod is deleted, if one was required for the pipeline.
NOTE
The best way to visualize the pipeline execution is by viewing it in the OpenShift WebConsole. You can view your pipelines by logging into the web console and navigating toBuilds → Pipelines.
7.6. BINARY BUILDS
7.6.1. Introduction
The binary build feature in OpenShift allows developers to upload source or artifacts directly to a buildinstead of having the build pull source from a Git repository URL. Any BuildConfig with a strategy of
CHAPTER 7. TUTORIALS
81
source, Docker, or custom may be started as a binary build. When starting a build from local artifacts,the existing source reference is replaced with the source coming from the local user’s machine.
The source may be supplied in several ways which correspond to arguments available when using thestart-build command:
From a file (--from-file): This is the case when the entire source of the build consists of asingle file. For example, it may be a Dockerfile for a Docker build, pom.xml for a Wildflybuild, or Gemfile for a Ruby build.
From a directory (--from-directory): Use this when the source is in a local directory and isnot committed to a Git repository. The start-build command will create an archive of thegiven directory and upload it to the builder as source.
From an archive (--from-archive): Use this when an archive with the source already exists.The archive may be in either tar, tar.gz, or zip format.
From a Git repository (--from-repo): This is for source that is currently part of a Git repositoryon the user’s local machine. The HEAD commit of the current repository will be archived andsent to OpenShift for building.
7.6.1.1. Use Cases
Binary builds remove the requirement for a build to pull source from an existing Git repository. Reasonsto use binary builds include:
Building and testing local code changes. Source from a public repository can be cloned and localchanges can be uploaded to OpenShift for building. Local changes do not have to be committedor pushed anywhere.
Building private code. New builds can be started from scratch as binary builds. The source canthen be uploaded directly from your local workstation to OpenShift without having to check it into an SCM.
Building images with artifacts from other sources. With Jenkins pipelines, binary builds are usefulto combine artifacts built with tools such as Maven or C compiler, and runtime images that makeuse of those builds.
7.6.1.2. Limitations
Binary builds are not repeatable. Because binary builds rely on the user uploading artifacts atbuild start, OpenShift cannot repeat the same build without the user repeating the same uploadevery time.
Binary builds cannot be triggered automatically. They can only be started manually when theuser uploads the required binary artifacts.
NOTE
Builds that are started as binary builds may also have a configured source URL. If that’sthe case, triggers will successfully launch the build but source will come from theconfigured source URL and not from what was supplied by the user the last time the buildran.
7.6.2. Tutorials Overview
OpenShift Dedicated 3 Developer Guide
82
The following tutorials assume that you have an OpenShift cluster available and that you have a projectwhere you can create artifacts. It requires that you have both git and oc available locally.
7.6.2.1. Tutorial: Building local code changes
1. Create a new application based on an existing source repository and create a route for it:
$ oc new-app https://github.com/openshift/ruby-hello-world.git$ oc expose svc/ruby-hello-world
2. Wait for the initial build to complete and view the application’s page by navigating to the route’shost. You should get a welcome page:
$ oc get route ruby-hello-world
3. Clone the repository locally:
$ git clone https://github.com/openshift/ruby-hello-world.git$ cd ruby-hello-world
4. Make a change to the application’s view. Using your favorite editor, edit views/main.rb:Change the <body> tag to <body style="background-color:blue">.
5. Start a new build with your locally-modified source. From the repository’s local directory, run:
----$ oc start-build ruby-hello-world --from-dir="." --follow----
Once your build has completed and the application has redeployed, navigating to the application’s routehost should result in a page with a blue background.
You can keep making changes locally and building your code with oc start-build --from-dir.
You can also create a branch of the code, commit your changes locally, and use the repository’s HEADas the source for your build:
$ git checkout -b my_branch$ git add .$ git commit -m "My changes"$ oc start-build ruby-hello-world --from-repo="." --follow
7.6.2.2. Tutorial: Building private code
1. Create a local directory to hold your code:
$ mkdir myapp$ cd myapp
2. In the directory create a file named Dockerfile with the following content:
FROM centos:centos7
CHAPTER 7. TUTORIALS
83
EXPOSE 8080
COPY index.html /var/run/web/index.html
CMD cd /var/run/web && python -m SimpleHTTPServer 8080
3. Create a file named index.html with the following content:
<html> <head> <title>My local app</title> </head> <body> <h1>Hello World</h1> <p>This is my local application</p> </body></html>
4. Create a new build for your application:
$ oc new-build --strategy docker --binary --docker-image centos:centos7 --name myapp
5. Start a binary build using the local directory’s content:
$ oc start-build myapp --from-dir . --follow
6. Deploy the application using new-app, then create a route for it:
$ oc new-app myapp$ oc expose svc/myapp
7. Get the host name for your route and navigate to it:
$ oc get route myapp
After having built and deployed your code, you can iterate by making changes to your local files andstarting new builds by invoking oc start-build myapp --from-dir. Once built, the code will beautomatically deployed and the changes will be reflected in your browser when you refresh the page.
7.6.2.3. Tutorial: Binary artifacts from pipeline
Jenkins on OpenShift allows using slave images with the appropriate tools to build your code. Forexample, you can use the maven slave to build a WAR from your code repository. However, once thisartifact is built, you need to commit it to an image that contains the right runtime artifacts to run yourcode. A binary build may be used to add these artifacts to your runtime image. In the following tutorial,we’ll create a Jenkins pipeline that makes use of the maven slave to build a WAR, and then uses a binarybuild with a Dockerfile to add that WAR to a wildfly runtime image.
1. Create a new directory for your application:
$ mkdir mavenapp$ cd mavenapp
OpenShift Dedicated 3 Developer Guide
84

2. Create a Dockerfile that copies a WAR to the appropriate location inside a wildfly image forexecution. Copy the following to a local file named Dockerfile:
FROM wildfly:latestCOPY ROOT.war /wildfly/standalone/deployments/ROOT.warCMD $STI_SCRIPTS_PATH/run
3. Create a new BuildConfig for that Dockerfile:
NOTE
This will automatically start a build that will initially fail because the ROOT.warartifact is not yet available. The pipeline below will pass that WAR to the buildusing a binary build.
$ cat Dockerfile | oc new-build -D - --name mavenapp
4. Create a BuildConfig with the Jenkins pipeline that will build a WAR and then use that WAR tobuild an image using the previously created Dockerfile. The same pattern can be used forother platforms where a binary artifact is built by a set of tools and is then combined with adifferent runtime image for the final package. Save the following code to mavenapp-pipeline.yml:
apiVersion: v1kind: BuildConfigmetadata: name: mavenapp-pipelinespec: strategy: jenkinsPipelineStrategy: jenkinsfile: |- pipeline { agent { label "maven" } stages { stage("Clone Source") { steps { checkout([$class: 'GitSCM', branches: [[name: '*/master']], extensions: [ [$class: 'RelativeTargetDirectory', relativeTargetDir: 'mavenapp'] ], userRemoteConfigs: [[url: 'https://github.com/openshift/openshift-jee-sample.git']] ]) } } stage("Build WAR") { steps { dir('mavenapp') { sh 'mvn clean package -Popenshift' } } }
CHAPTER 7. TUTORIALS
85

stage("Build Image") { steps { dir('mavenapp/target') { sh 'oc start-build mavenapp --from-dir . --follow' } } } } } type: JenkinsPipeline triggers: []
5. Create the pipeline build. If Jenkins is not deployed to your project, creating the BuildConfig withthe pipeline will result in Jenkins getting deployed. It may take a couple of minutes beforeJenkins is ready to build your pipeline. You can check the status of the Jenkins rollout byinvoking, oc rollout status dc/jenkins:
$ oc create -f ./mavenapp-pipeline.yml
6. Once Jenkins is ready, start the pipeline defined previously:
$ oc start-build mavenapp-pipeline
7. When the pipeline has finished building, deploy the new application using new-app and exposeits route:
$ oc new-app mavenapp$ oc expose svc/mavenapp
8. Using your browser, navigate to the route for the application:
$ oc get route mavenapp
OpenShift Dedicated 3 Developer Guide
86
CHAPTER 8. BUILDS
8.1. HOW BUILDS WORK
8.1.1. What Is a Build?
A build in OpenShift Dedicated is the process of transforming input parameters into a resulting object.Most often, builds are used to transform source code into a runnable container image.
A build configuration, or BuildConfig, is characterized by a build strategy and one or more sources.The strategy determines the aforementioned process, while the sources provide its input.
The build strategies are:
Source-to-Image (S2I) (description, options)
Pipeline (description, options)
Docker (description, options)
Custom (description, options)
And there are six types of sources that can be given as build input:
Git
Dockerfile
Binary
Image
Input secrets
External artifacts
It is up to each build strategy to consider or ignore a certain type of source, as well as to determine howit is to be used. Binary and Git are mutually exclusive source types. Dockerfile and Image can be used bythemselves, with each other, or together with either Git or Binary. The Binary source type is unique fromthe other options in how it is specified to the system.
8.1.2. What Is a BuildConfig?
A build configuration describes a single build definition and a set of triggers for when a new build shouldbe created. Build configurations are defined by a BuildConfig, which is a REST object that can beused in a POST to the API server to create a new instance.
Depending on how you choose to create your application using OpenShift Dedicated, a BuildConfig istypically generated automatically for you if you use the web console or CLI, and it can be edited at anytime. Understanding the parts that make up a BuildConfig and their available options can help if youchoose to manually tweak your configuration later.
The following example BuildConfig results in a new build every time a container image tag or thesource code changes:
CHAPTER 8. BUILDS
87

1
2
3
4
5
6
7
BuildConfig Object Definition
This specification will create a new BuildConfig named ruby-sample-build.
The runPolicy field controls whether builds created from this build configuration can be runsimultaneously. The default value is Serial, which means new builds will run sequentially, notsimultaneously.
You can specify a list of triggers, which cause a new build to be created.
The source section defines the source of the build. The source type determines the primary sourceof input, and can be either Git, to point to a code repository location, Dockerfile, to build froman inline Dockerfile, or Binary, to accept binary payloads. It is possible to have multiple sources atonce, refer to the documentation for each source type for details.
The strategy section describes the build strategy used to execute the build. You can specify a Source , Docker, or Custom strategy here. This above example uses the ruby-20-centos7container image that Source-To-Image will use for the application build.
After the container image is successfully built, it will be pushed into the repository described in the output section.
The postCommit section defines an optional build hook.
kind: "BuildConfig"apiVersion: "v1"metadata:
name: "ruby-sample-build" 1spec:
runPolicy: "Serial" 2
triggers: 3 - type: "GitHub" github: secret: "secret101" - type: "Generic" generic: secret: "secret101" - type: "ImageChange"
source: 4 git: uri: "https://github.com/openshift/ruby-hello-world"
strategy: 5 sourceStrategy: from: kind: "ImageStreamTag" name: "ruby-20-centos7:latest"
output: 6 to: kind: "ImageStreamTag" name: "origin-ruby-sample:latest"
postCommit: 7 script: "bundle exec rake test"
OpenShift Dedicated 3 Developer Guide
88
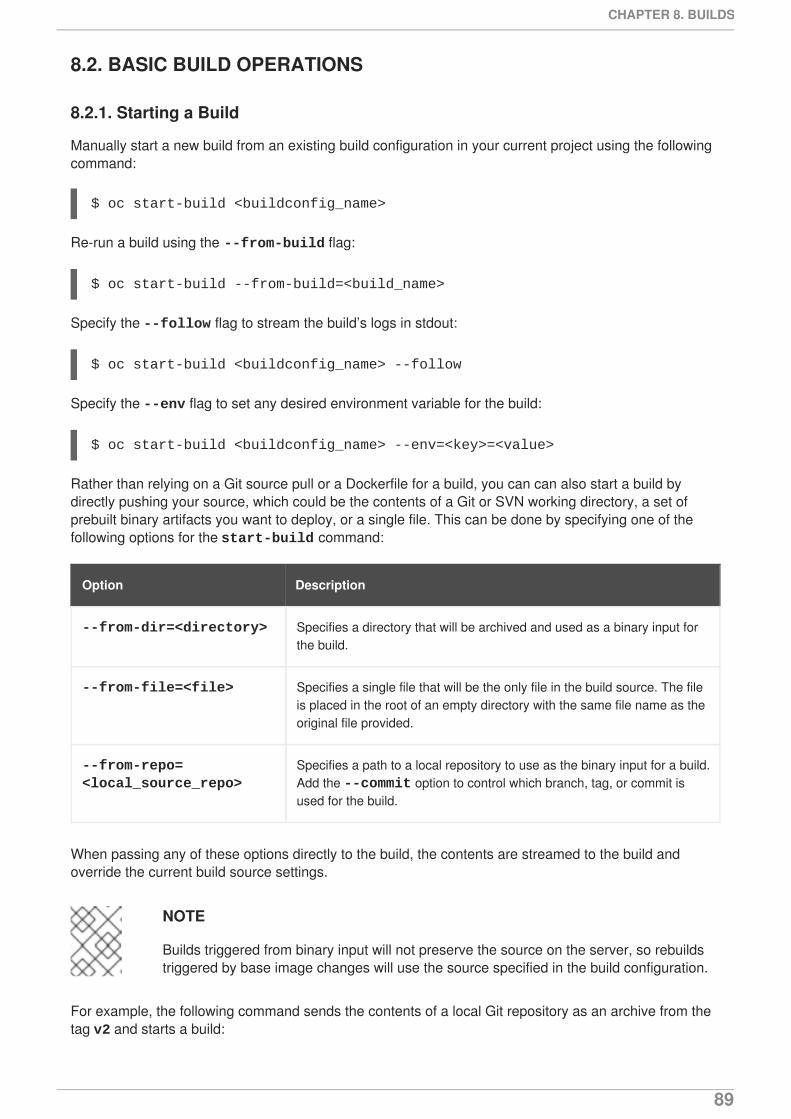
8.2. BASIC BUILD OPERATIONS
8.2.1. Starting a Build
Manually start a new build from an existing build configuration in your current project using the followingcommand:
$ oc start-build <buildconfig_name>
Re-run a build using the --from-build flag:
$ oc start-build --from-build=<build_name>
Specify the --follow flag to stream the build’s logs in stdout:
$ oc start-build <buildconfig_name> --follow
Specify the --env flag to set any desired environment variable for the build:
$ oc start-build <buildconfig_name> --env=<key>=<value>
Rather than relying on a Git source pull or a Dockerfile for a build, you can can also start a build bydirectly pushing your source, which could be the contents of a Git or SVN working directory, a set ofprebuilt binary artifacts you want to deploy, or a single file. This can be done by specifying one of thefollowing options for the start-build command:
Option Description
--from-dir=<directory> Specifies a directory that will be archived and used as a binary input forthe build.
--from-file=<file> Specifies a single file that will be the only file in the build source. The fileis placed in the root of an empty directory with the same file name as theoriginal file provided.
--from-repo=<local_source_repo>
Specifies a path to a local repository to use as the binary input for a build.Add the --commit option to control which branch, tag, or commit isused for the build.
When passing any of these options directly to the build, the contents are streamed to the build andoverride the current build source settings.
NOTE
Builds triggered from binary input will not preserve the source on the server, so rebuildstriggered by base image changes will use the source specified in the build configuration.
For example, the following command sends the contents of a local Git repository as an archive from thetag v2 and starts a build:
CHAPTER 8. BUILDS
89

$ oc start-build hello-world --from-repo=../hello-world --commit=v2
8.2.2. Canceling a Build
Manually cancel a build using the web console, or with the following CLI command:
$ oc cancel-build <build_name>
Cancel multiple builds at the same time:
$ oc cancel-build <build1_name> <build2_name> <build3_name>
Cancel all builds created from the build configuration:
$ oc cancel-build bc/<buildconfig_name>
Cancel all builds in a given state (for example, new or pending), ignoring the builds in other states:
$ oc cancel-build bc/<buildconfig_name> --state=<state>
8.2.3. Deleting a BuildConfig
Delete a BuildConfig using the following command:
$ oc delete bc <BuildConfigName>
This will also delete all builds that were instantiated from this BuildConfig. Specify the --cascade=false flag if you do not want to delete the builds:
$ oc delete --cascade=false bc <BuildConfigName>
8.2.4. Viewing Build Details
You can view build details with the web console or by using the oc describe CLI command:
$ oc describe build <build_name>
This displays information such as:
The build source
The build strategy
The output destination
Digest of the image in the destination registry
How the build was created
If the build uses the Docker or Source strategy, the oc describe output also includes informationabout the source revision used for the build, including the commit ID, author, committer, and message.
OpenShift Dedicated 3 Developer Guide
90
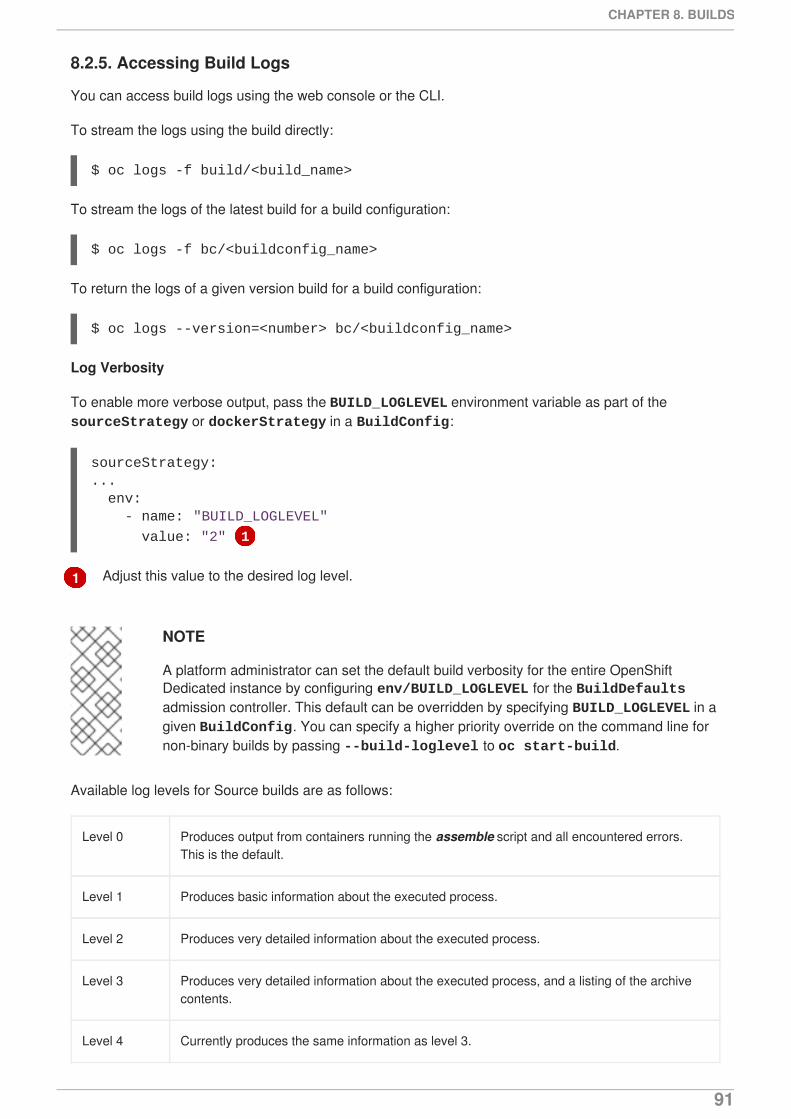
1
8.2.5. Accessing Build Logs
You can access build logs using the web console or the CLI.
To stream the logs using the build directly:
$ oc logs -f build/<build_name>
To stream the logs of the latest build for a build configuration:
$ oc logs -f bc/<buildconfig_name>
To return the logs of a given version build for a build configuration:
$ oc logs --version=<number> bc/<buildconfig_name>
Log Verbosity
To enable more verbose output, pass the BUILD_LOGLEVEL environment variable as part of the sourceStrategy or dockerStrategy in a BuildConfig:
Adjust this value to the desired log level.
NOTE
A platform administrator can set the default build verbosity for the entire OpenShiftDedicated instance by configuring env/BUILD_LOGLEVEL for the BuildDefaultsadmission controller. This default can be overridden by specifying BUILD_LOGLEVEL in agiven BuildConfig. You can specify a higher priority override on the command line fornon-binary builds by passing --build-loglevel to oc start-build.
Available log levels for Source builds are as follows:
Level 0 Produces output from containers running the assemble script and all encountered errors.This is the default.
Level 1 Produces basic information about the executed process.
Level 2 Produces very detailed information about the executed process.
Level 3 Produces very detailed information about the executed process, and a listing of the archivecontents.
Level 4 Currently produces the same information as level 3.
sourceStrategy:... env: - name: "BUILD_LOGLEVEL"
value: "2" 1
CHAPTER 8. BUILDS
91
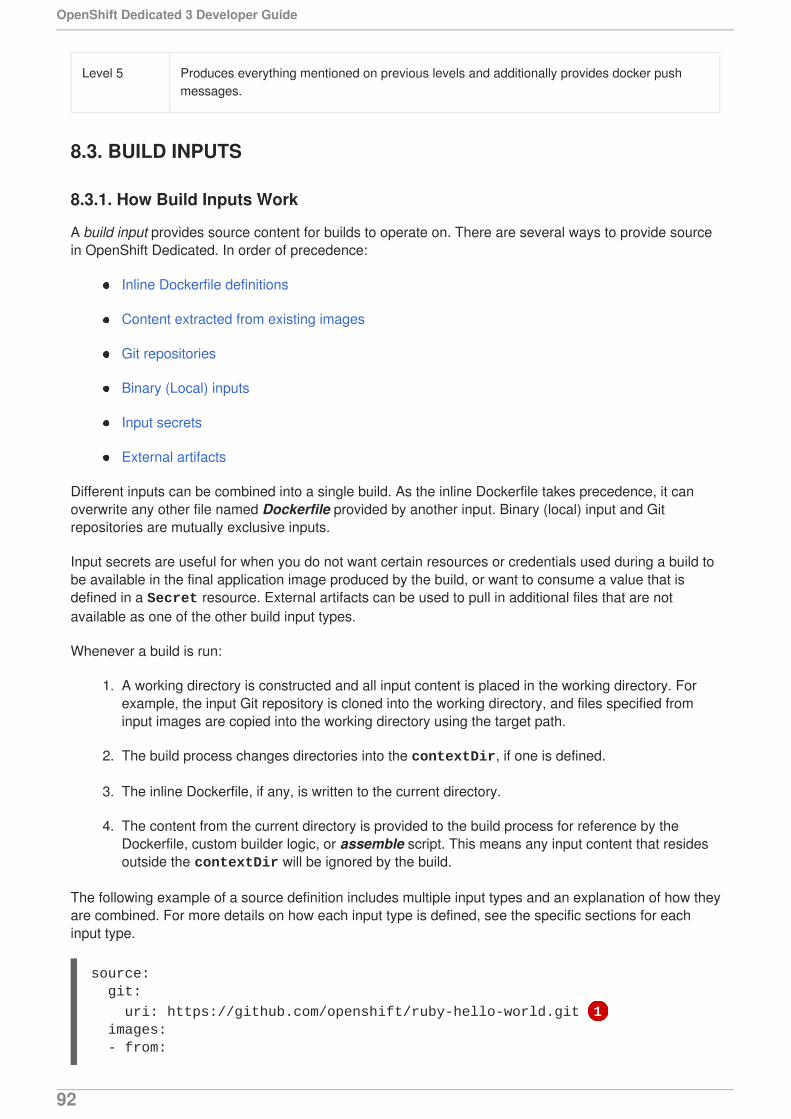
Level 5 Produces everything mentioned on previous levels and additionally provides docker pushmessages.
8.3. BUILD INPUTS
8.3.1. How Build Inputs Work
A build input provides source content for builds to operate on. There are several ways to provide sourcein OpenShift Dedicated. In order of precedence:
Inline Dockerfile definitions
Content extracted from existing images
Git repositories
Binary (Local) inputs
Input secrets
External artifacts
Different inputs can be combined into a single build. As the inline Dockerfile takes precedence, it canoverwrite any other file named Dockerfile provided by another input. Binary (local) input and Gitrepositories are mutually exclusive inputs.
Input secrets are useful for when you do not want certain resources or credentials used during a build tobe available in the final application image produced by the build, or want to consume a value that isdefined in a Secret resource. External artifacts can be used to pull in additional files that are notavailable as one of the other build input types.
Whenever a build is run:
1. A working directory is constructed and all input content is placed in the working directory. Forexample, the input Git repository is cloned into the working directory, and files specified frominput images are copied into the working directory using the target path.
2. The build process changes directories into the contextDir, if one is defined.
3. The inline Dockerfile, if any, is written to the current directory.
4. The content from the current directory is provided to the build process for reference by theDockerfile, custom builder logic, or assemble script. This means any input content that residesoutside the contextDir will be ignored by the build.
The following example of a source definition includes multiple input types and an explanation of how theyare combined. For more details on how each input type is defined, see the specific sections for eachinput type.
source: git:
uri: https://github.com/openshift/ruby-hello-world.git 1 images: - from:
OpenShift Dedicated 3 Developer Guide
92
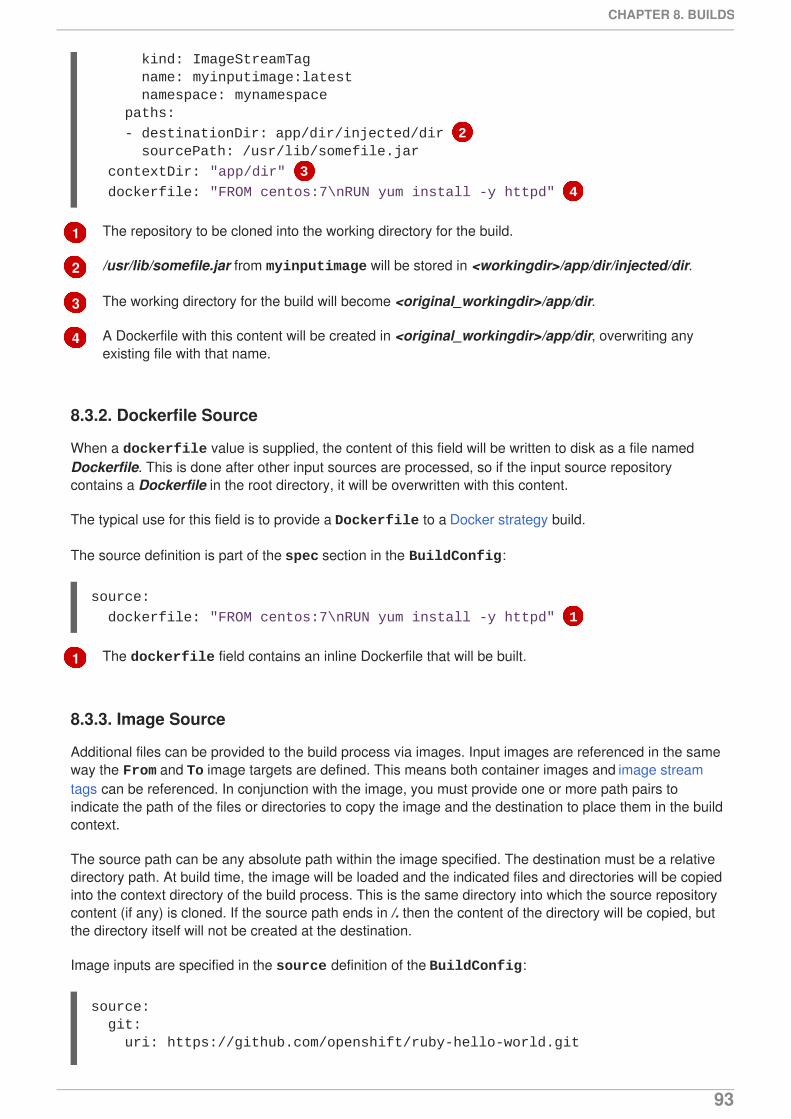
1
2
3
4
1
The repository to be cloned into the working directory for the build.
/usr/lib/somefile.jar from myinputimage will be stored in <workingdir>/app/dir/injected/dir.
The working directory for the build will become <original_workingdir>/app/dir.
A Dockerfile with this content will be created in <original_workingdir>/app/dir, overwriting anyexisting file with that name.
8.3.2. Dockerfile Source
When a dockerfile value is supplied, the content of this field will be written to disk as a file namedDockerfile. This is done after other input sources are processed, so if the input source repositorycontains a Dockerfile in the root directory, it will be overwritten with this content.
The typical use for this field is to provide a Dockerfile to a Docker strategy build.
The source definition is part of the spec section in the BuildConfig:
The dockerfile field contains an inline Dockerfile that will be built.
8.3.3. Image Source
Additional files can be provided to the build process via images. Input images are referenced in the sameway the From and To image targets are defined. This means both container images and image streamtags can be referenced. In conjunction with the image, you must provide one or more path pairs toindicate the path of the files or directories to copy the image and the destination to place them in the buildcontext.
The source path can be any absolute path within the image specified. The destination must be a relativedirectory path. At build time, the image will be loaded and the indicated files and directories will be copiedinto the context directory of the build process. This is the same directory into which the source repositorycontent (if any) is cloned. If the source path ends in /. then the content of the directory will be copied, butthe directory itself will not be created at the destination.
Image inputs are specified in the source definition of the BuildConfig:
kind: ImageStreamTag name: myinputimage:latest namespace: mynamespace paths:
- destinationDir: app/dir/injected/dir 2 sourcePath: /usr/lib/somefile.jar
contextDir: "app/dir" 3
dockerfile: "FROM centos:7\nRUN yum install -y httpd" 4
source:
dockerfile: "FROM centos:7\nRUN yum install -y httpd" 1
source: git: uri: https://github.com/openshift/ruby-hello-world.git
CHAPTER 8. BUILDS
93
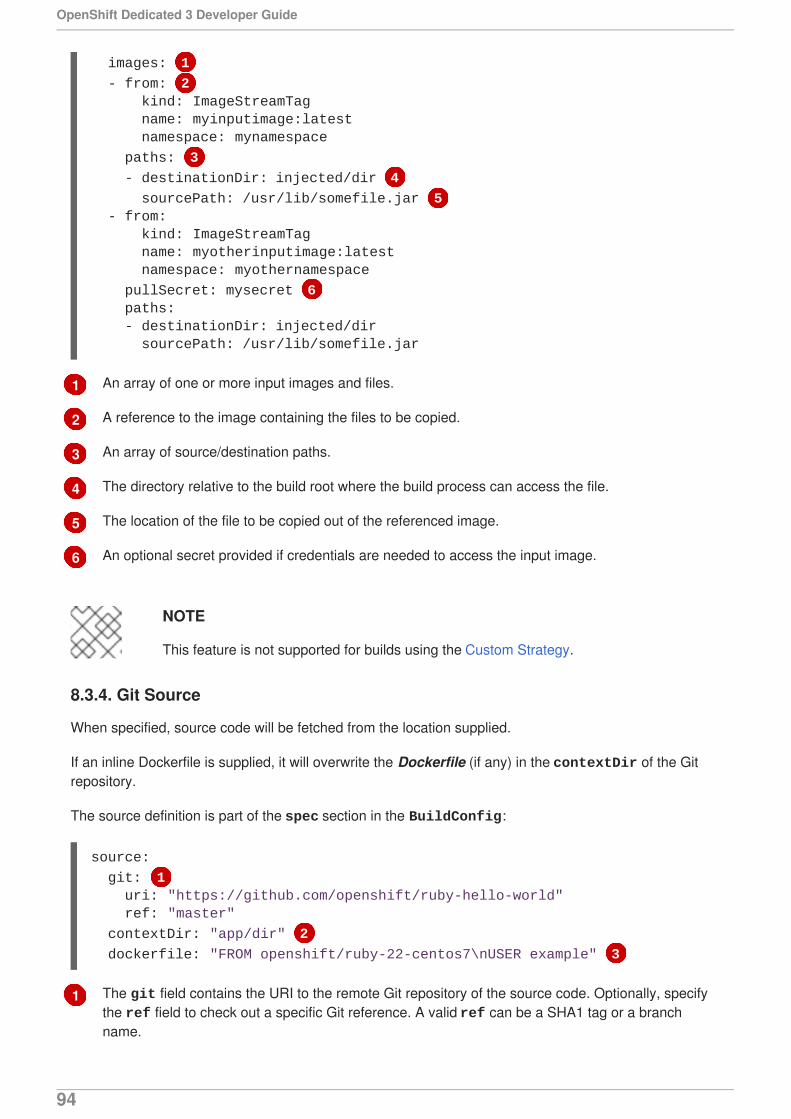
1
2
3
4
5
6
1
An array of one or more input images and files.
A reference to the image containing the files to be copied.
An array of source/destination paths.
The directory relative to the build root where the build process can access the file.
The location of the file to be copied out of the referenced image.
An optional secret provided if credentials are needed to access the input image.
NOTE
This feature is not supported for builds using the Custom Strategy.
8.3.4. Git Source
When specified, source code will be fetched from the location supplied.
If an inline Dockerfile is supplied, it will overwrite the Dockerfile (if any) in the contextDir of the Gitrepository.
The source definition is part of the spec section in the BuildConfig:
The git field contains the URI to the remote Git repository of the source code. Optionally, specifythe ref field to check out a specific Git reference. A valid ref can be a SHA1 tag or a branchname.
images: 1
- from: 2 kind: ImageStreamTag name: myinputimage:latest namespace: mynamespace
paths: 3
- destinationDir: injected/dir 4
sourcePath: /usr/lib/somefile.jar 5 - from: kind: ImageStreamTag name: myotherinputimage:latest namespace: myothernamespace
pullSecret: mysecret 6 paths: - destinationDir: injected/dir sourcePath: /usr/lib/somefile.jar
source:
git: 1 uri: "https://github.com/openshift/ruby-hello-world" ref: "master"
contextDir: "app/dir" 2
dockerfile: "FROM openshift/ruby-22-centos7\nUSER example" 3
OpenShift Dedicated 3 Developer Guide
94
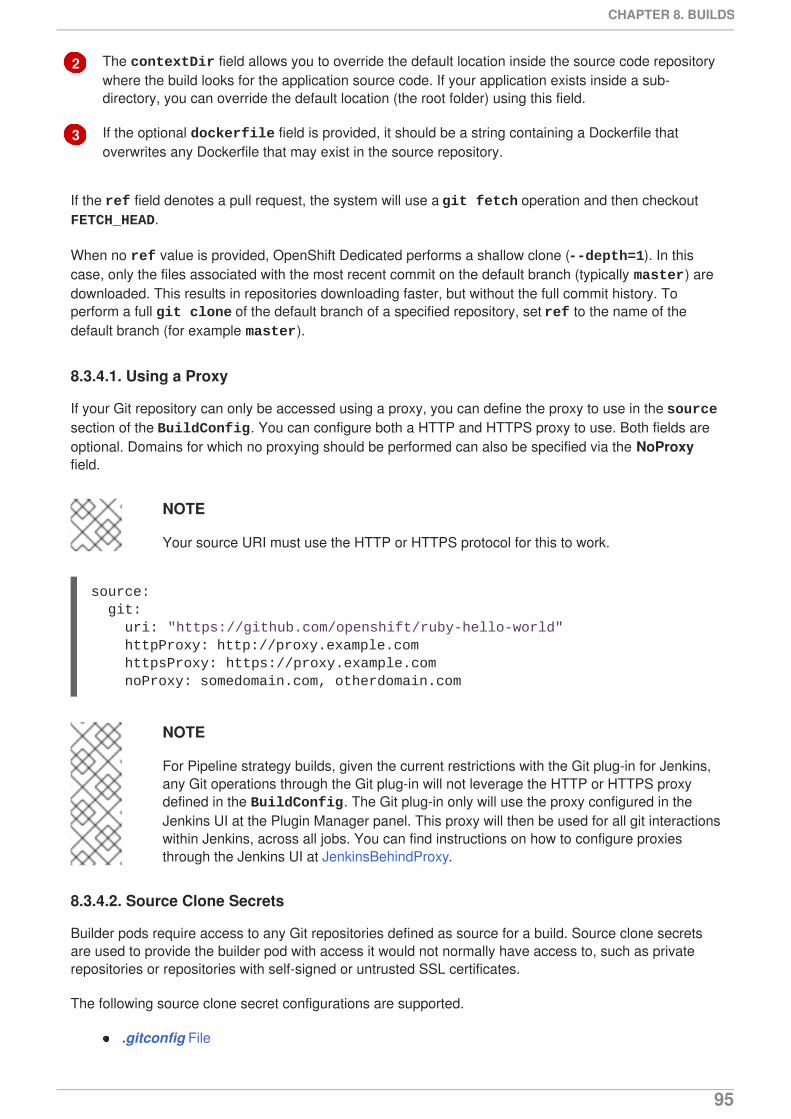
2
3
The contextDir field allows you to override the default location inside the source code repositorywhere the build looks for the application source code. If your application exists inside a sub-directory, you can override the default location (the root folder) using this field.
If the optional dockerfile field is provided, it should be a string containing a Dockerfile thatoverwrites any Dockerfile that may exist in the source repository.
If the ref field denotes a pull request, the system will use a git fetch operation and then checkout FETCH_HEAD.
When no ref value is provided, OpenShift Dedicated performs a shallow clone (--depth=1). In thiscase, only the files associated with the most recent commit on the default branch (typically master) aredownloaded. This results in repositories downloading faster, but without the full commit history. Toperform a full git clone of the default branch of a specified repository, set ref to the name of thedefault branch (for example master).
8.3.4.1. Using a Proxy
If your Git repository can only be accessed using a proxy, you can define the proxy to use in the sourcesection of the BuildConfig. You can configure both a HTTP and HTTPS proxy to use. Both fields areoptional. Domains for which no proxying should be performed can also be specified via the NoProxyfield.
NOTE
Your source URI must use the HTTP or HTTPS protocol for this to work.
NOTE
For Pipeline strategy builds, given the current restrictions with the Git plug-in for Jenkins,any Git operations through the Git plug-in will not leverage the HTTP or HTTPS proxydefined in the BuildConfig. The Git plug-in only will use the proxy configured in theJenkins UI at the Plugin Manager panel. This proxy will then be used for all git interactionswithin Jenkins, across all jobs. You can find instructions on how to configure proxiesthrough the Jenkins UI at JenkinsBehindProxy.
8.3.4.2. Source Clone Secrets
Builder pods require access to any Git repositories defined as source for a build. Source clone secretsare used to provide the builder pod with access it would not normally have access to, such as privaterepositories or repositories with self-signed or untrusted SSL certificates.
The following source clone secret configurations are supported.
.gitconfig File
source: git: uri: "https://github.com/openshift/ruby-hello-world" httpProxy: http://proxy.example.com httpsProxy: https://proxy.example.com noProxy: somedomain.com, otherdomain.com
CHAPTER 8. BUILDS
95
Basic Authentication
SSH Key Authentication
Trusted Certificate Authorities
NOTE
You can also use combinations of these configurations to meet your specific needs.
Builds are run with the builder service account, which must have access to any source clone secretsused. Access is granted with the following command:
$ oc secrets link builder mysecret
NOTE
Limiting secrets to only the service accounts that reference them is disabled by default.This means that if serviceAccountConfig.limitSecretReferences is set to false (the default setting) in the master configuration file, linking secrets to a service isnot required.
8.3.4.2.1. Automatically Adding a Source Clone Secret to a Build Configuration
When a BuildConfig is created, OpenShift Dedicated can automatically populate its source clonesecret reference. This behaviour allows the resulting Builds to automatically use the credentials storedin the referenced Secret to authenticate to a remote Git repository, without requiring furtherconfiguration.
To use this functionality, a Secret containing the Git repository credentials must exist in the namespacein which the BuildConfig will later be created. This Secret must additionally include one or moreannotations prefixed with build.openshift.io/source-secret-match-uri-. The value of eachof these annotations is a URI pattern, defined as follows. When a BuildConfig is created without asource clone secret reference and its Git source URI matches a URI pattern in a Secret annotation,OpenShift Dedicated will automatically insert a reference to that Secret in the BuildConfig.
A URI pattern must consist of:
a valid scheme (*://, git://, http://, https:// or ssh://).
a host (* or a valid hostname or IP address optionally preceded by *.).
a path (/* or / followed by any characters optionally including * characters).
In all of the above, a * character is interpreted as a wildcard.
OpenShift Dedicated 3 Developer Guide
96
IMPORTANT
URI patterns must match Git source URIs which are conformant to RFC3986. Do notinclude a username (or password) component in a URI pattern.
For example, if you use ssh://[email protected]:7999/ATLASSIAN/jira.git for a gitrepository URL, the source secret must be specified as ssh://bitbucket.atlassian.com:7999/* (and not ssh://[email protected]:7999/*).
If multiple Secrets match the Git URI of a particular BuildConfig, OpenShift Dedicated will select thesecret with the longest match. This allows for basic overriding, as in the following example.
The following fragment shows two partial source clone secrets, the first matching any server in thedomain mycorp.com accessed by HTTPS, and the second overriding access to servers mydev1.mycorp.com and mydev2.mycorp.com:
Add a build.openshift.io/source-secret-match-uri- annotation to a pre-existing secretusing:
$ oc annotate secret mysecret \ 'build.openshift.io/source-secret-match-uri-1=https://*.mycorp.com/*'
8.3.4.2.2. Manually Adding Source Clone Secrets
$ oc annotate secret mysecret \ 'build.openshift.io/source-secret-match-uri-1=ssh://bitbucket.atlassian.com:7999/*'
kind: SecretapiVersion: v1metadata: name: matches-all-corporate-servers-https-only annotations: build.openshift.io/source-secret-match-uri-1: https://*.mycorp.com/*data: ...
kind: SecretapiVersion: v1metadata: name: override-for-my-dev-servers-https-only annotations: build.openshift.io/source-secret-match-uri-1: https://mydev1.mycorp.com/* build.openshift.io/source-secret-match-uri-2: https://mydev2.mycorp.com/*data: ...
CHAPTER 8. BUILDS
97
Source clone secrets can be added manually to a build configuration by adding a sourceSecret field tothe source section inside the BuildConfig and setting it to the name of the secret that you created(basicsecret, in this example).
NOTE
You can also use the oc set build-secret command to set the source clone secreton an existing build configuration:
$ oc set build-secret --source bc/sample-build basicsecret
Defining Secrets in the BuildConfig provides more information on this topic.
8.3.4.2.3. .gitconfig File
If the cloning of your application is dependent on a .gitconfig file, then you can create a secret thatcontains it, and then add it to the builder service account, and then your BuildConfig.
To create a secret from a .gitconfig file:
$ oc create secret generic <secret_name> --from-file=<path/to/.gitconfig>
NOTE
SSL verification can be turned off if sslVerify=false is set for the http section inyour .gitconfig file:
[http] sslVerify=false
8.3.4.2.4. .gitconfig File for Secured Git
apiVersion: "v1"kind: "BuildConfig"metadata: name: "sample-build"spec: output: to: kind: "ImageStreamTag" name: "sample-image:latest" source: git: uri: "https://github.com/user/app.git" sourceSecret: name: "basicsecret" strategy: sourceStrategy: from: kind: "ImageStreamTag" name: "python-33-centos7:latest"
OpenShift Dedicated 3 Developer Guide
98
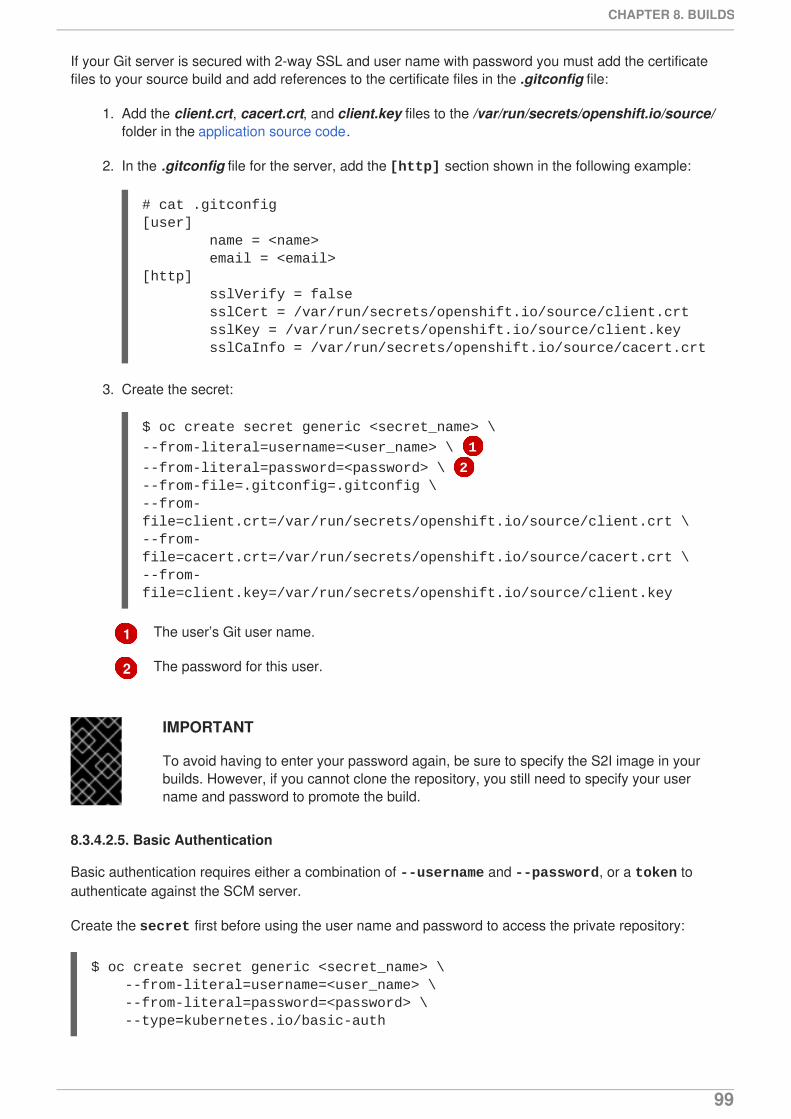
1
2
If your Git server is secured with 2-way SSL and user name with password you must add the certificatefiles to your source build and add references to the certificate files in the .gitconfig file:
1. Add the client.crt, cacert.crt, and client.key files to the /var/run/secrets/openshift.io/source/folder in the application source code.
2. In the .gitconfig file for the server, add the [http] section shown in the following example:
# cat .gitconfig[user] name = <name> email = <email>[http] sslVerify = false sslCert = /var/run/secrets/openshift.io/source/client.crt sslKey = /var/run/secrets/openshift.io/source/client.key sslCaInfo = /var/run/secrets/openshift.io/source/cacert.crt
3. Create the secret:
$ oc create secret generic <secret_name> \
--from-literal=username=<user_name> \ 1
--from-literal=password=<password> \ 2--from-file=.gitconfig=.gitconfig \--from-file=client.crt=/var/run/secrets/openshift.io/source/client.crt \--from-file=cacert.crt=/var/run/secrets/openshift.io/source/cacert.crt \--from-file=client.key=/var/run/secrets/openshift.io/source/client.key
The user’s Git user name.
The password for this user.
IMPORTANT
To avoid having to enter your password again, be sure to specify the S2I image in yourbuilds. However, if you cannot clone the repository, you still need to specify your username and password to promote the build.
8.3.4.2.5. Basic Authentication
Basic authentication requires either a combination of --username and --password, or a token toauthenticate against the SCM server.
Create the secret first before using the user name and password to access the private repository:
$ oc create secret generic <secret_name> \ --from-literal=username=<user_name> \ --from-literal=password=<password> \ --type=kubernetes.io/basic-auth
CHAPTER 8. BUILDS
99
To create a basic authentication secret with a token:
$ oc create secret generic <secret_name> \ --from-literal=password=<token> \ --type=kubernetes.io/basic-auth
8.3.4.2.6. SSH Key Authentication
SSH key based authentication requires a private SSH key.
The repository keys are usually located in the $HOME/.ssh/ directory, and are named id_dsa.pub, id_ecdsa.pub, id_ed25519.pub, or id_rsa.pub by default. Generate SSH key credentials with thefollowing command:
$ ssh-keygen -t rsa -C "[email protected]"
NOTE
Creating a passphrase for the SSH key prevents OpenShift Dedicated from building.When prompted for a passphrase, leave it blank.
Two files are created: the public key and a corresponding private key (one of id_dsa, id_ecdsa, id_ed25519, or id_rsa). With both of these in place, consult your source control management (SCM)system’s manual on how to upload the public key. The private key is used to access your privaterepository.
Before using the SSH key to access the private repository, create the secret first:
$ oc create secret generic <secret_name> \ --from-file=ssh-privatekey=<path/to/ssh/private/key> \ --type=kubernetes.io/ssh-auth
8.3.4.2.7. Trusted Certificate Authorities
The set of TLS certificate authorities that are trusted during a git clone operation are built into theOpenShift Dedicated infrastructure images. If your Git server uses a self-signed certificate or one signedby an authority not trusted by the image, you can create a secret that contains the certificate or disableTLS verification.
If you create a secret for the CA certificate, OpenShift Dedicated uses it to access your Git serverduring the git clone operation. Using this method is significantly more secure than disabling Git’s SSLverification, which accepts any TLS certificate that is presented.
Complete one of the following processes:
Create a secret with a CA certificate file (recommended).
a. If your CA uses Intermediate Certificate Authorities, combine the certificates for all CAs in aca.crt file. Run the following command:
$ cat intermediateCA.crt intermediateCA.crt rootCA.crt > ca.crt
b. Create the secret:
OpenShift Dedicated 3 Developer Guide
100
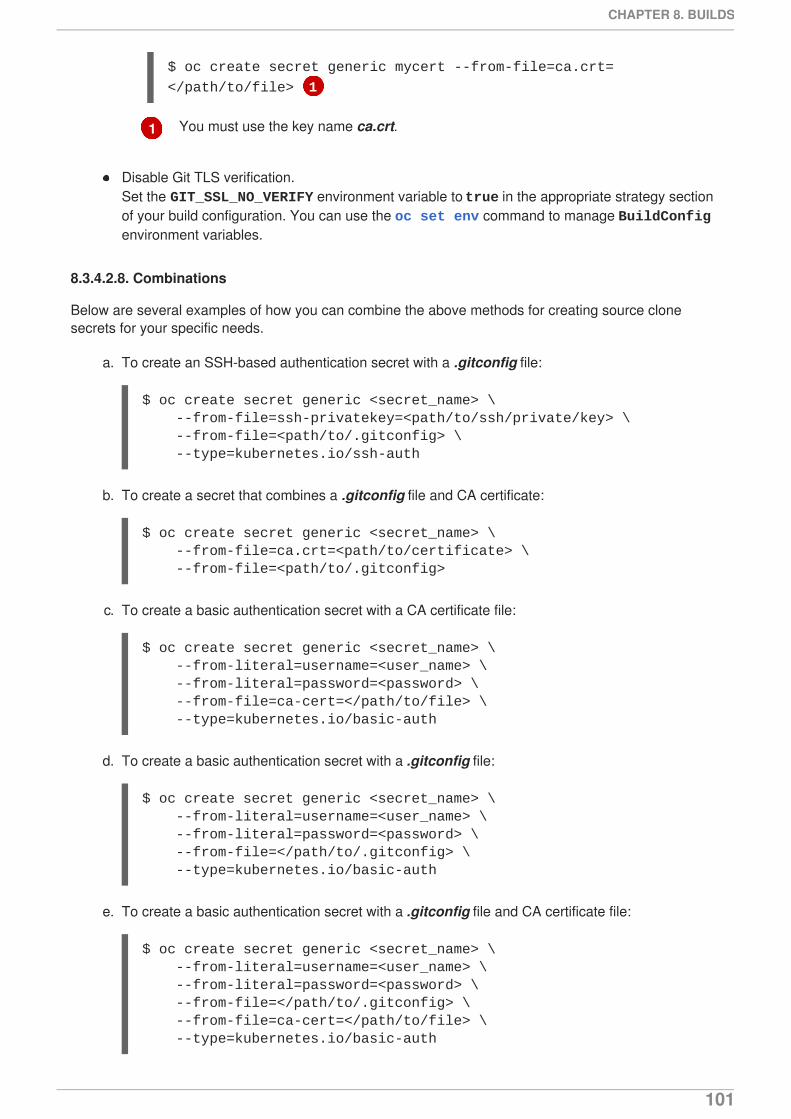
1
$ oc create secret generic mycert --from-file=ca.crt=
</path/to/file> 1
You must use the key name ca.crt.
Disable Git TLS verification.Set the GIT_SSL_NO_VERIFY environment variable to true in the appropriate strategy sectionof your build configuration. You can use the oc set env command to manage BuildConfigenvironment variables.
8.3.4.2.8. Combinations
Below are several examples of how you can combine the above methods for creating source clonesecrets for your specific needs.
a. To create an SSH-based authentication secret with a .gitconfig file:
$ oc create secret generic <secret_name> \ --from-file=ssh-privatekey=<path/to/ssh/private/key> \ --from-file=<path/to/.gitconfig> \ --type=kubernetes.io/ssh-auth
b. To create a secret that combines a .gitconfig file and CA certificate:
$ oc create secret generic <secret_name> \ --from-file=ca.crt=<path/to/certificate> \ --from-file=<path/to/.gitconfig>
c. To create a basic authentication secret with a CA certificate file:
$ oc create secret generic <secret_name> \ --from-literal=username=<user_name> \ --from-literal=password=<password> \ --from-file=ca-cert=</path/to/file> \ --type=kubernetes.io/basic-auth
d. To create a basic authentication secret with a .gitconfig file:
$ oc create secret generic <secret_name> \ --from-literal=username=<user_name> \ --from-literal=password=<password> \ --from-file=</path/to/.gitconfig> \ --type=kubernetes.io/basic-auth
e. To create a basic authentication secret with a .gitconfig file and CA certificate file:
$ oc create secret generic <secret_name> \ --from-literal=username=<user_name> \ --from-literal=password=<password> \ --from-file=</path/to/.gitconfig> \ --from-file=ca-cert=</path/to/file> \ --type=kubernetes.io/basic-auth
CHAPTER 8. BUILDS
101
8.3.5. Binary (Local) Source
Streaming content from a local file system to the builder is called a Binary type build. Thecorresponding value of BuildConfig.spec.source.type is Binary for such builds.
This source type is unique in that it is leveraged solely based on your use of the oc start-build.
NOTE
Binary type builds require content to be streamed from the local file system, soautomatically triggering a binary type build (e.g. via an image change trigger) is notpossible, because the binary files cannot be provided. Similarly, you cannot launch binarytype builds from the web console.
To utilize binary builds, invoke oc start-build with one of these options:
--from-file: The contents of the file you specify are sent as a binary stream to the builder.You can also specify a URL to a file. Then, the builder stores the data in a file with the samename at the top of the build context.
--from-dir and --from-repo: The contents are archived and sent as a binary stream to thebuilder. Then, the builder extracts the contents of the archive within the build context directory.With --from-dir, you can also specify a URL to an archive, which will be extracted.
--from-archive: The archive you specify is sent to the builder, where it is extracted within thebuild context directory. This option behaves the same as --from-dir; an archive is created onyour host first, whenever the argument to these options is a directory.
In each of the above cases:
If your BuildConfig already has a Binary source type defined, it will effectively be ignoredand replaced by what the client sends.
If your BuildConfig has a Git source type defined, it is dynamically disabled, since Binaryand Git are mutually exclusive, and the data in the binary stream provided to the builder takesprecedence.
Instead of a file name, you can pass a URL with HTTP or HTTPS schema to --from-file and --from-archive. When using --from-file with a URL, the name of the file in the builder image isdetermined by the Content-Disposition header sent by the web server, or the last component of theURL path if the header is not present. No form of authentication is supported and it is not possible to usecustom TLS certificate or disable certificate validation.
When using oc new-build --binary=true, the command ensures that the restrictions associatedwith binary builds are enforced. The resulting BuildConfig will have a source type of Binary,meaning that the only valid way to run a build for this BuildConfig is to use oc start-build withone of the --from options to provide the requisite binary data.
The dockerfile and contextDir source options have special meaning with binary builds.
dockerfile can be used with any binary build source. If dockerfile is used and the binary stream isan archive, its contents serve as a replacement Dockerfile to any Dockerfile in the archive. If dockerfile is used with the --from-file argument, and the file argument is named dockerfile,the value from dockerfile replaces the value from the binary stream.
OpenShift Dedicated 3 Developer Guide
102
In the case of the binary stream encapsulating extracted archive content, the value of the contextDirfield is interpreted as a subdirectory within the archive, and, if valid, the builder changes into thatsubdirectory before executing the build.
8.3.6. Input Secrets
In some scenarios, build operations require credentials to access dependent resources, but it isundesirable for those credentials to be available in the final application image produced by the build. Youcan define input secrets for this purpose.
For example, when building a Node.js application, you can set up your private mirror for Node.jsmodules. In order to download modules from that private mirror, you have to supply a custom .npmrc filefor the build that contains a URL, user name, and password. For security reasons, you do not want toexpose your credentials in the application image.
This example describes Node.js, but you can use the same approach for adding SSL certificates into the/etc/ssl/certs directory, API keys or tokens, license files, and more.
8.3.6.1. Adding Input Secrets
To add an input secret to an existing BuildConfig:
1. Create the secret, if it does not exist:
$ oc create secret generic secret-npmrc \ --from-file=.npmrc=<path/to/.npmrc>
This creates a new secret named secret-npmrc, which contains the base64 encoded content ofthe ~/.npmrc file.
2. Add the secret to the source section in the existing BuildConfig:
To include the secret in a new BuildConfig, run the following command:
$ oc new-build \ openshift/nodejs-010-centos7~https://github.com/openshift/nodejs-ex.git \ --build-secret secret-npmrc
During the build, the .npmrc file is copied into the directory where the source code is located. InOpenShift Dedicated S2I builder images, this is the image working directory, which is set using the WORKDIR instruction in the Dockerfile. If you want to specify another directory, add a destinationDirto the secret definition:
source: git: uri: https://github.com/openshift/nodejs-ex.git secrets: - secret: name: secret-npmrc
source: git: uri: https://github.com/openshift/nodejs-ex.git
CHAPTER 8. BUILDS
103
You can also specify the destination directory when creating a new BuildConfig:
$ oc new-build \ openshift/nodejs-010-centos7~https://github.com/openshift/nodejs-ex.git \ --build-secret “secret-npmrc:/etc”
In both cases, the .npmrc file is added to the /etc directory of the build environment. Note that for aDocker strategy the destination directory must be a relative path.
8.3.6.2. Source-to-Image Strategy
When using a Source strategy, all defined input secrets are copied to their respective destinationDir. If you left destinationDir empty, then the secrets are placed in the workingdirectory of the builder image.
The same rule is used when a destinationDir is a relative path; the secrets are placed in the pathsthat are relative to the image’s working directory. The destinationDir must exist or an error willoccur. No directory paths are created during the copy process.
NOTE
Currently, any files with these secrets are world-writable (have 0666 permissions) and willbe truncated to size zero after executing the assemble script. This means that the secretfiles will exist in the resulting image, but they will be empty for security reasons.
8.3.6.3. Docker Strategy
When using a Docker strategy, you can add all defined input secrets into your container image using theADD and COPY instructions in your Dockerfile.
If you do not specify the destinationDir for a secret, then the files will be copied into the samedirectory in which the Dockerfile is located. If you specify a relative path as destinationDir, then thesecrets will be copied into that directory, relative to your Dockerfile location. This makes the secret filesavailable to the Docker build operation as part of the context directory used during the build.
Example 8.1. Example of a Dockerfile referencing secret data
FROM centos/ruby-22-centos7
USER rootADD ./secret-dir /secretsCOPY ./secret2 /
# Create a shell script that will output secrets when the image is runRUN echo '#!/bin/sh' > /secret_report.shRUN echo '(test -f /secrets/secret1 && echo -n "secret1=" && cat /secrets/secret1)' >> /secret_report.shRUN echo '(test -f /secret2 && echo -n "relative-secret2=" && cat
secrets: - secret: name: secret-npmrc destinationDir: /etc
OpenShift Dedicated 3 Developer Guide
104
/secret2)' >> /secret_report.shRUN chmod 755 /secret_report.sh
CMD ["/bin/sh", "-c", "/secret_report.sh"]
NOTE
Users should normally remove their input secrets from the final application image so thatthe secrets are not present in the container running from that image. However, the secretswill still exist in the image itself in the layer where they were added. This removal shouldbe part of the Dockerfile itself.
8.3.6.4. Custom Strategy
When using a Custom strategy, all the defined input secrets are available inside the builder container inthe /var/run/secrets/openshift.io/build directory. The custom build image is responsible for using thesesecrets appropriately. The Custom strategy also allows secrets to be defined as described in CustomStrategy Options.
There is no technical difference between existing strategy secrets and the input secrets. However, yourbuilder image might distinguish between them and use them differently, based on your build use case.
The input secrets are always mounted into the /var/run/secrets/openshift.io/build directory or yourbuilder can parse the $BUILD environment variable, which includes the full build object.
8.3.7. Using External Artifacts
It is not recommended to store binary files in a source repository. Therefore, you may find it necessary todefine a build which pulls additional files (such as Java .jar dependencies) during the build process. Howthis is done depends on the build strategy you are using.
For a Source build strategy, you must put appropriate shell commands into the assemble script:
.s2i/bin/assemble File
.s2i/bin/run File
NOTE
For more information on how to control which assemble and run script is used by aSource build, see Overriding Builder Image Scripts.
For a Docker build strategy, you must modify the Dockerfile and invoke shell commands with the RUNinstruction:
#!/bin/shAPP_VERSION=1.0wget http://repository.example.com/app/app-$APP_VERSION.jar -O app.jar
#!/bin/shexec java -jar app.jar
CHAPTER 8. BUILDS
105

1
2
3
Excerpt of Dockerfile
FROM jboss/base-jdk:8
ENV APP_VERSION 1.0RUN wget http://repository.example.com/app/app-$APP_VERSION.jar -O app.jar
EXPOSE 8080CMD [ "java", "-jar", "app.jar" ]
In practice, you may want to use an environment variable for the file location so that the specific file to bedownloaded can be customized using an environment variable defined on the BuildConfig, ratherthan updating the Dockerfile or assemble script.
You can choose between different methods of defining environment variables:
Using the .s2i/environment file (only for a Source build strategy)
Setting in BuildConfig
Providing explicitly using oc start-build --env (only for builds that are triggered manually)
8.3.8. Using Docker Credentials for Private Registries
You can supply builds with a .docker/config.json file with valid credentials for private Docker registries.This allows you to push the output image into a private Docker registry or pull a builder image from theprivate Docker registry that requires authentication.
NOTE
For the OpenShift Dedicated Docker registry, this is not required because secrets aregenerated automatically for you by OpenShift Dedicated.
The .docker/config.json file is found in your home directory by default and has the following format:
URL of the registry.
Encrypted password.
Email address for the login.
You can define multiple Docker registry entries in this file. Alternatively, you can also add authenticationentries to this file by running the docker login command. The file will be created if it does not exist.
Kubernetes provides Secret objects, which can be used to store configuration and passwords.
1. Create the secret from your local .docker/config.json file:
auths:
https://index.docker.io/v1/: 1
auth: "YWRfbGzhcGU6R2labnRib21ifTE=" 2
email: "[email protected]" 3
OpenShift Dedicated 3 Developer Guide
106
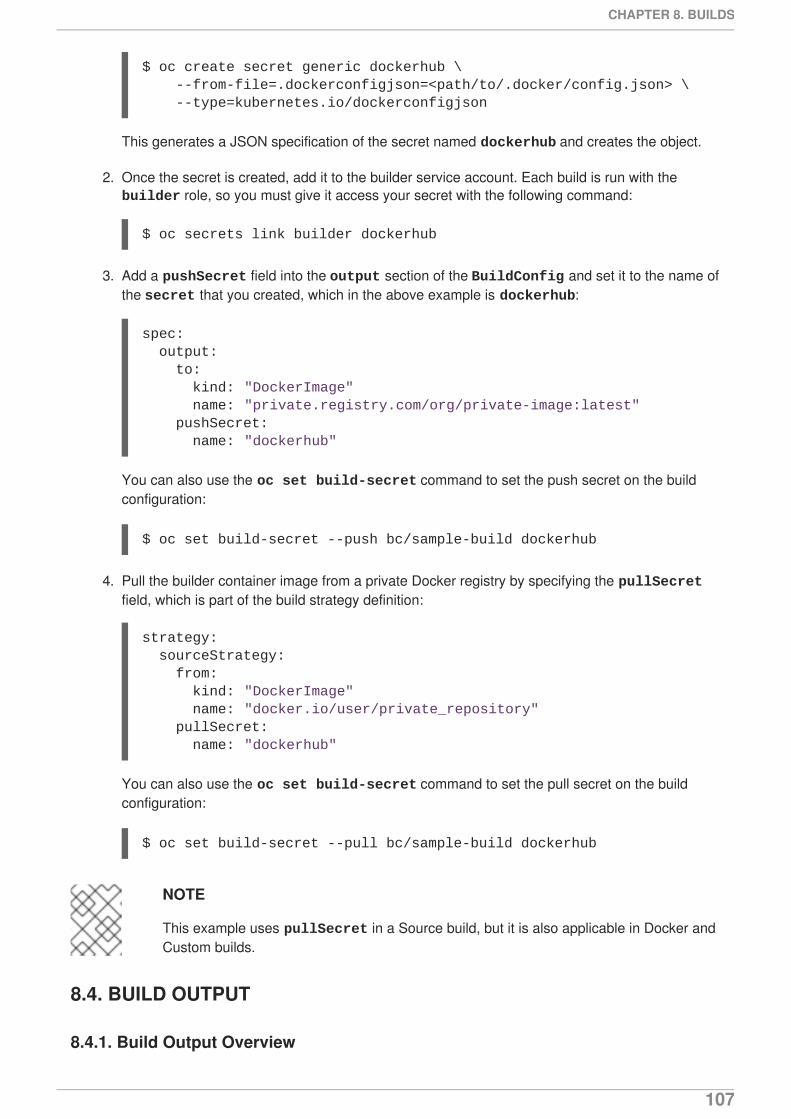
$ oc create secret generic dockerhub \ --from-file=.dockerconfigjson=<path/to/.docker/config.json> \ --type=kubernetes.io/dockerconfigjson
This generates a JSON specification of the secret named dockerhub and creates the object.
2. Once the secret is created, add it to the builder service account. Each build is run with the builder role, so you must give it access your secret with the following command:
$ oc secrets link builder dockerhub
3. Add a pushSecret field into the output section of the BuildConfig and set it to the name ofthe secret that you created, which in the above example is dockerhub:
You can also use the oc set build-secret command to set the push secret on the buildconfiguration:
$ oc set build-secret --push bc/sample-build dockerhub
4. Pull the builder container image from a private Docker registry by specifying the pullSecretfield, which is part of the build strategy definition:
You can also use the oc set build-secret command to set the pull secret on the buildconfiguration:
$ oc set build-secret --pull bc/sample-build dockerhub
NOTE
This example uses pullSecret in a Source build, but it is also applicable in Docker andCustom builds.
8.4. BUILD OUTPUT
8.4.1. Build Output Overview
spec: output: to: kind: "DockerImage" name: "private.registry.com/org/private-image:latest" pushSecret: name: "dockerhub"
strategy: sourceStrategy: from: kind: "DockerImage" name: "docker.io/user/private_repository" pullSecret: name: "dockerhub"
CHAPTER 8. BUILDS
107
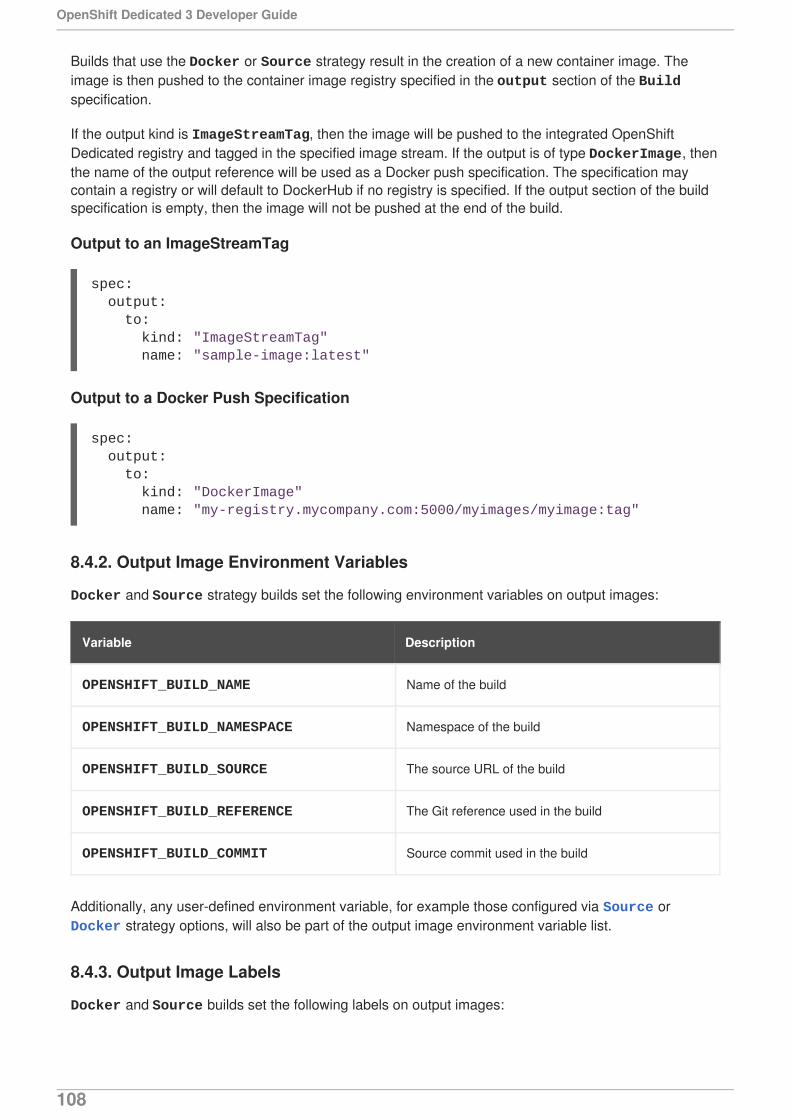
Builds that use the Docker or Source strategy result in the creation of a new container image. Theimage is then pushed to the container image registry specified in the output section of the Buildspecification.
If the output kind is ImageStreamTag, then the image will be pushed to the integrated OpenShiftDedicated registry and tagged in the specified image stream. If the output is of type DockerImage, thenthe name of the output reference will be used as a Docker push specification. The specification maycontain a registry or will default to DockerHub if no registry is specified. If the output section of the buildspecification is empty, then the image will not be pushed at the end of the build.
Output to an ImageStreamTag
Output to a Docker Push Specification
8.4.2. Output Image Environment Variables
Docker and Source strategy builds set the following environment variables on output images:
Variable Description
OPENSHIFT_BUILD_NAME Name of the build
OPENSHIFT_BUILD_NAMESPACE Namespace of the build
OPENSHIFT_BUILD_SOURCE The source URL of the build
OPENSHIFT_BUILD_REFERENCE The Git reference used in the build
OPENSHIFT_BUILD_COMMIT Source commit used in the build
Additionally, any user-defined environment variable, for example those configured via Source or Docker strategy options, will also be part of the output image environment variable list.
8.4.3. Output Image Labels
Docker and Source builds set the following labels on output images:
spec: output: to: kind: "ImageStreamTag" name: "sample-image:latest"
spec: output: to: kind: "DockerImage" name: "my-registry.mycompany.com:5000/myimages/myimage:tag"
OpenShift Dedicated 3 Developer Guide
108
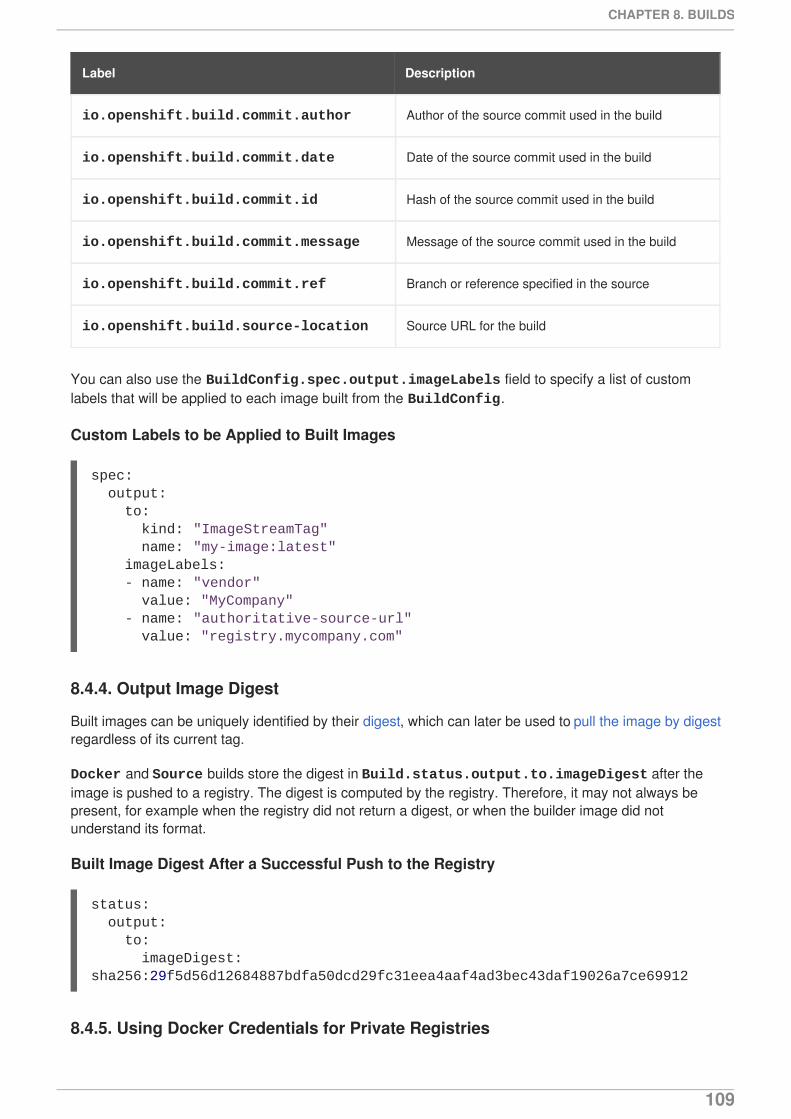
Label Description
io.openshift.build.commit.author Author of the source commit used in the build
io.openshift.build.commit.date Date of the source commit used in the build
io.openshift.build.commit.id Hash of the source commit used in the build
io.openshift.build.commit.message Message of the source commit used in the build
io.openshift.build.commit.ref Branch or reference specified in the source
io.openshift.build.source-location Source URL for the build
You can also use the BuildConfig.spec.output.imageLabels field to specify a list of customlabels that will be applied to each image built from the BuildConfig.
Custom Labels to be Applied to Built Images
8.4.4. Output Image Digest
Built images can be uniquely identified by their digest, which can later be used to pull the image by digestregardless of its current tag.
Docker and Source builds store the digest in Build.status.output.to.imageDigest after theimage is pushed to a registry. The digest is computed by the registry. Therefore, it may not always bepresent, for example when the registry did not return a digest, or when the builder image did notunderstand its format.
Built Image Digest After a Successful Push to the Registry
8.4.5. Using Docker Credentials for Private Registries
spec: output: to: kind: "ImageStreamTag" name: "my-image:latest" imageLabels: - name: "vendor" value: "MyCompany" - name: "authoritative-source-url" value: "registry.mycompany.com"
status: output: to: imageDigest: sha256:29f5d56d12684887bdfa50dcd29fc31eea4aaf4ad3bec43daf19026a7ce69912
CHAPTER 8. BUILDS
109
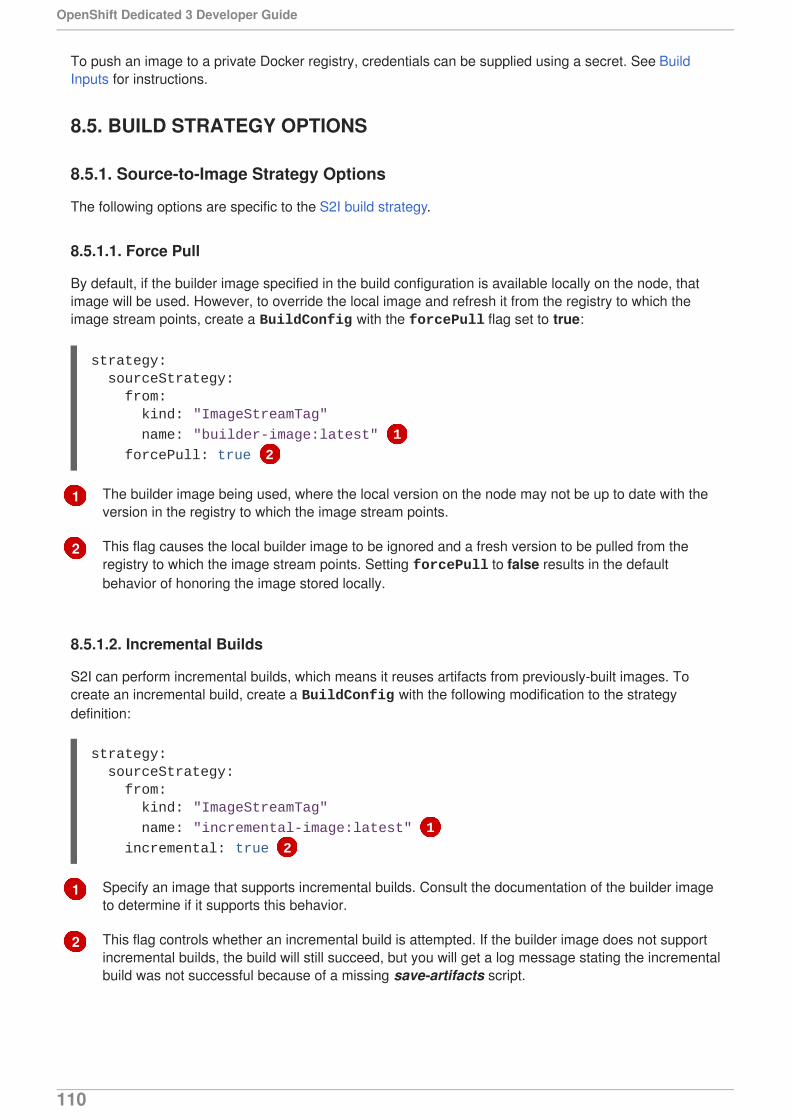
1
2
1
2
To push an image to a private Docker registry, credentials can be supplied using a secret. See BuildInputs for instructions.
8.5. BUILD STRATEGY OPTIONS
8.5.1. Source-to-Image Strategy Options
The following options are specific to the S2I build strategy.
8.5.1.1. Force Pull
By default, if the builder image specified in the build configuration is available locally on the node, thatimage will be used. However, to override the local image and refresh it from the registry to which theimage stream points, create a BuildConfig with the forcePull flag set to true:
The builder image being used, where the local version on the node may not be up to date with theversion in the registry to which the image stream points.
This flag causes the local builder image to be ignored and a fresh version to be pulled from theregistry to which the image stream points. Setting forcePull to false results in the defaultbehavior of honoring the image stored locally.
8.5.1.2. Incremental Builds
S2I can perform incremental builds, which means it reuses artifacts from previously-built images. Tocreate an incremental build, create a BuildConfig with the following modification to the strategydefinition:
Specify an image that supports incremental builds. Consult the documentation of the builder imageto determine if it supports this behavior.
This flag controls whether an incremental build is attempted. If the builder image does not supportincremental builds, the build will still succeed, but you will get a log message stating the incrementalbuild was not successful because of a missing save-artifacts script.
strategy: sourceStrategy: from: kind: "ImageStreamTag"
name: "builder-image:latest" 1
forcePull: true 2
strategy: sourceStrategy: from: kind: "ImageStreamTag"
name: "incremental-image:latest" 1
incremental: true 2
OpenShift Dedicated 3 Developer Guide
110
1
NOTE
See the S2I Requirements topic for information on how to create a builder imagesupporting incremental builds.
8.5.1.3. Overriding Builder Image Scripts
You can override the assemble, run, and save-artifactsS2I scripts provided by the builder image in oneof two ways. Either:
1. Provide an assemble, run, and/or save-artifacts script in the .s2i/bin directory of yourapplication source repository, or
2. Provide a URL of a directory containing the scripts as part of the strategy definition. Forexample:
This path will have run, assemble, and save-artifacts appended to it. If any or all scripts are foundthey will be used in place of the same named script(s) provided in the image.
NOTE
Files located at the scripts URL take precedence over files located in .s2i/bin of thesource repository. See the S2I Requirements topic and the S2I documentation forinformation on how S2I scripts are used.
8.5.1.4. Environment Variables
There are two ways to make environment variables available to the source build process and resultingimage. Environment files and BuildConfig environment values. Variables provided will be present duringthe build process and in the output image.
8.5.1.4.1. Environment Files
Source build enables you to set environment values (one per line) inside your application, by specifyingthem in a .s2i/environment file in the source repository. The environment variables specified in this fileare present during the build process and in the output image. The complete list of supported environmentvariables is available in the documentation for each image.
If you provide a .s2i/environment file in your source repository, S2I reads this file during the build. Thisallows customization of the build behavior as the assemble script may use these variables.
For example, if you want to disable assets compilation for your Rails application, you can add DISABLE_ASSET_COMPILATION=true in the .s2i/environment file to cause assets compilation to beskipped during the build.
strategy: sourceStrategy: from: kind: "ImageStreamTag" name: "builder-image:latest"
scripts: "http://somehost.com/scripts_directory" 1
CHAPTER 8. BUILDS
111
In addition to builds, the specified environment variables are also available in the running applicationitself. For example, you can add RAILS_ENV=development to the .s2i/environment file to cause theRails application to start in development mode instead of production.
8.5.1.4.2. BuildConfig Environment
You can add environment variables to the sourceStrategy definition of the BuildConfig. Theenvironment variables defined there are visible during the assemble script execution and will be definedin the output image, making them also available to the run script and application code.
For example disabling assets compilation for your Rails application:
The Build Environment section provides more advanced instructions.
You can also manage environment variables defined in the BuildConfig with the oc set envcommand.
8.5.1.5. Adding Secrets via Web Console
To add a secret to your build configuration so that it can access a private repository:
1. Create a new OpenShift Dedicated project.
2. Create a secret that contains credentials for accessing a private source code repository.
3. Create a Source-to-Image (S2I) build configuration.
4. On the build configuration editor page or in the create app from builder image page ofthe web console, set the Source Secret.
5. Click the Save button.
8.5.1.5.1. Enabling Pulling and Pushing
Enable pulling to a private registry by setting the Pull Secret in the build configuration and enablepushing by setting the Push Secret.
8.5.1.6. Ignoring Source Files
Source to image supports a .s2iignore file, which contains a list of file patterns that should be ignored.Files in the build working directory, as provided by the various input sources, that match a pattern foundin the .s2iignore file will not be made available to the assemble script.
For more details on the format of the .s2iignore file, see the source-to-image documentation.
8.5.2. Docker Strategy Options
The following options are specific to the Docker build strategy.
sourceStrategy:... env: - name: "DISABLE_ASSET_COMPILATION" value: "true"
OpenShift Dedicated 3 Developer Guide
112
1
8.5.2.1. FROM Image
The FROM instruction of the Dockerfile will be replaced by the from of the BuildConfig:
8.5.2.2. Dockerfile Path
By default, Docker builds use a Dockerfile (named Dockerfile) located at the root of the context specifiedin the BuildConfig.spec.source.contextDir field.
The dockerfilePath field allows the build to use a different path to locate your Dockerfile, relative tothe BuildConfig.spec.source.contextDir field. It can be simply a different file name other thanthe default Dockerfile (for example, MyDockerfile), or a path to a Dockerfile in a subdirectory (forexample, dockerfiles/app1/Dockerfile):
8.5.2.3. No Cache
Docker builds normally reuse cached layers found on the host performing the build. Setting the noCacheoption to true forces the build to ignore cached layers and rerun all steps of the Dockerfile:
8.5.2.4. Force Pull
By default, if the builder image specified in the build configuration is available locally on the node, thatimage will be used. However, to override the local image and refresh it from the registry to which theimage stream points, create a BuildConfig with the forcePull flag set to true:
This flag causes the local builder image to be ignored, and a fresh version to be pulled from theregistry to which the image stream points. Setting forcePull to false results in the defaultbehavior of honoring the image stored locally.
8.5.2.5. Environment Variables
To make environment variables available to the Docker build process and resulting image, you can addenvironment variables to the dockerStrategy definition of the BuildConfig.
strategy: dockerStrategy: from: kind: "ImageStreamTag" name: "debian:latest"
strategy: dockerStrategy: dockerfilePath: dockerfiles/app1/Dockerfile
strategy: dockerStrategy: noCache: true
strategy: dockerStrategy:
forcePull: true 1
CHAPTER 8. BUILDS
113
The environment variables defined there are inserted as a single ENV Dockerfile instruction right after theFROM instruction, so that it can be referenced later on within the Dockerfile.
The variables are defined during build and stay in the output image, therefore they will be present in anycontainer that runs that image as well.
For example, defining a custom HTTP proxy to be used during build and runtime:
You can also manage environment variables defined in the BuildConfig with the oc set envcommand.
8.5.2.6. Adding Secrets via Web Console
To add a secret to your build configuration so that it can access a private repository"
1. Create a new OpenShift Dedicated project.
2. Create a secret that contains credentials for accessing a private source code repository.
3. Create a docker build configuration.
4. On the build configuration editor page or in the fromimage page of the web console, set theSource Secret.
5. Click the Save button.
8.5.2.7. Docker Build Arguments
To set Docker build arguments, add entries to the BuildArgs array, which is located in the dockerStrategy definition of the BuildConfig. For example:
The build arguments will be passed to Docker when a build is started.
8.5.2.7.1. Enabling Pulling and Pushing
Enable pulling to a private registry by setting the Pull Secret in the build configuration and enablepushing by setting the Push Secret.
8.5.3. Custom Strategy Options
The following options are specific to the Custom build strategy.
dockerStrategy:... env: - name: "HTTP_PROXY" value: "http://myproxy.net:5187/"
dockerStrategy:... buildArgs: - name: "foo" value: "bar"
OpenShift Dedicated 3 Developer Guide
114
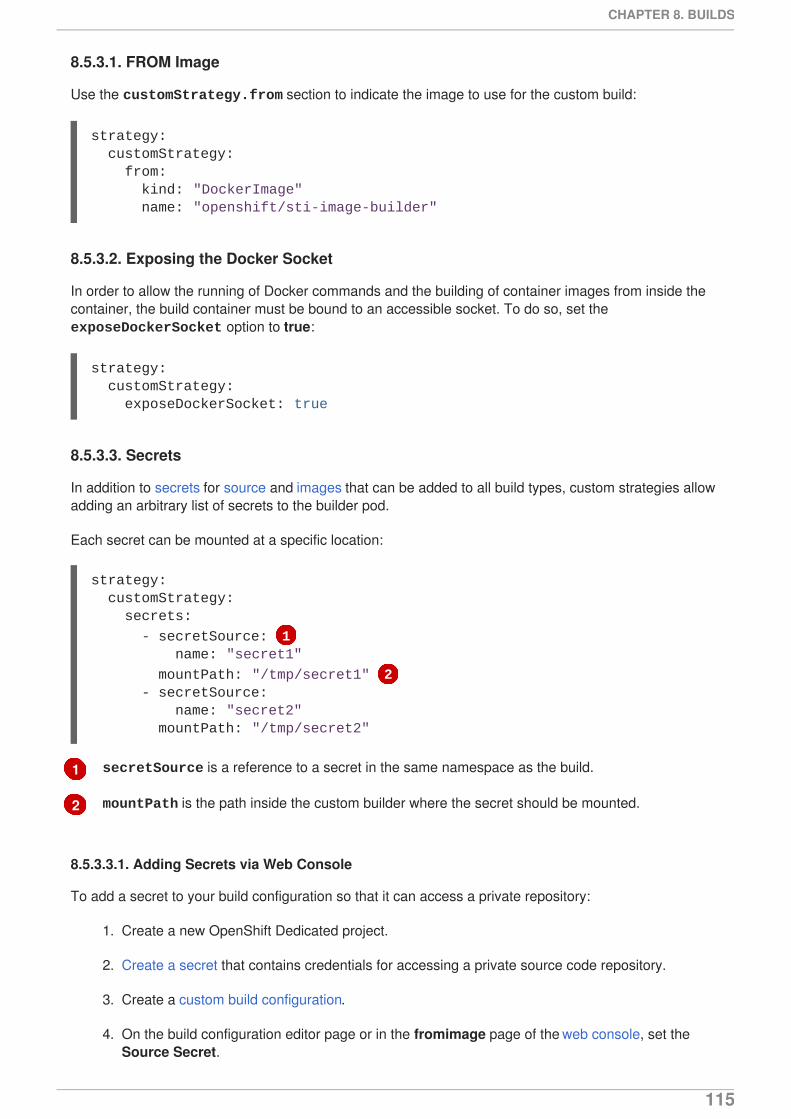
1
2
8.5.3.1. FROM Image
Use the customStrategy.from section to indicate the image to use for the custom build:
8.5.3.2. Exposing the Docker Socket
In order to allow the running of Docker commands and the building of container images from inside thecontainer, the build container must be bound to an accessible socket. To do so, set the exposeDockerSocket option to true:
8.5.3.3. Secrets
In addition to secrets for source and images that can be added to all build types, custom strategies allowadding an arbitrary list of secrets to the builder pod.
Each secret can be mounted at a specific location:
secretSource is a reference to a secret in the same namespace as the build.
mountPath is the path inside the custom builder where the secret should be mounted.
8.5.3.3.1. Adding Secrets via Web Console
To add a secret to your build configuration so that it can access a private repository:
1. Create a new OpenShift Dedicated project.
2. Create a secret that contains credentials for accessing a private source code repository.
3. Create a custom build configuration.
4. On the build configuration editor page or in the fromimage page of the web console, set theSource Secret.
strategy: customStrategy: from: kind: "DockerImage" name: "openshift/sti-image-builder"
strategy: customStrategy: exposeDockerSocket: true
strategy: customStrategy: secrets:
- secretSource: 1 name: "secret1"
mountPath: "/tmp/secret1" 2 - secretSource: name: "secret2" mountPath: "/tmp/secret2"
CHAPTER 8. BUILDS
115

1
5. Click the Save button.
8.5.3.3.2. Enabling Pulling and Pushing
Enable pulling to a private registry by setting the Pull Secret in the build configuration and enablepushing by setting the Push Secret.
8.5.3.4. Force Pull
By default, when setting up the build pod, the build controller checks if the image specified in the buildconfiguration is available locally on the node. If so, that image will be used. However, to override thelocal image and refresh it from the registry to which the image stream points, create a BuildConfigwith the forcePull flag set to true:
This flag causes the local builder image to be ignored, and a fresh version to be pulled from theregistry to which the image stream points. Setting forcePull to false results in the defaultbehavior of honoring the image stored locally.
8.5.3.5. Environment Variables
To make environment variables available to the Custom build process, you can add environmentvariables to the customStrategy definition of the BuildConfig.
The environment variables defined there are passed to the pod that runs the custom build.
For example, defining a custom HTTP proxy to be used during build:
You can also manage environment variables defined in the BuildConfig with the oc set envcommand.
8.5.4. Pipeline Strategy Options
The following options are specific to the Pipeline build strategy.
8.5.4.1. Providing the Jenkinsfile
You can provide the Jenkinsfile in one of two ways:
1. Embed the Jenkinsfile in the build configuration.
2. Include in the build configuration a reference to the Git repository that contains the Jenkinsfile.
Embedded Definition
strategy: customStrategy:
forcePull: true 1
customStrategy:... env: - name: "HTTP_PROXY" value: "http://myproxy.net:5187/"
OpenShift Dedicated 3 Developer Guide
116
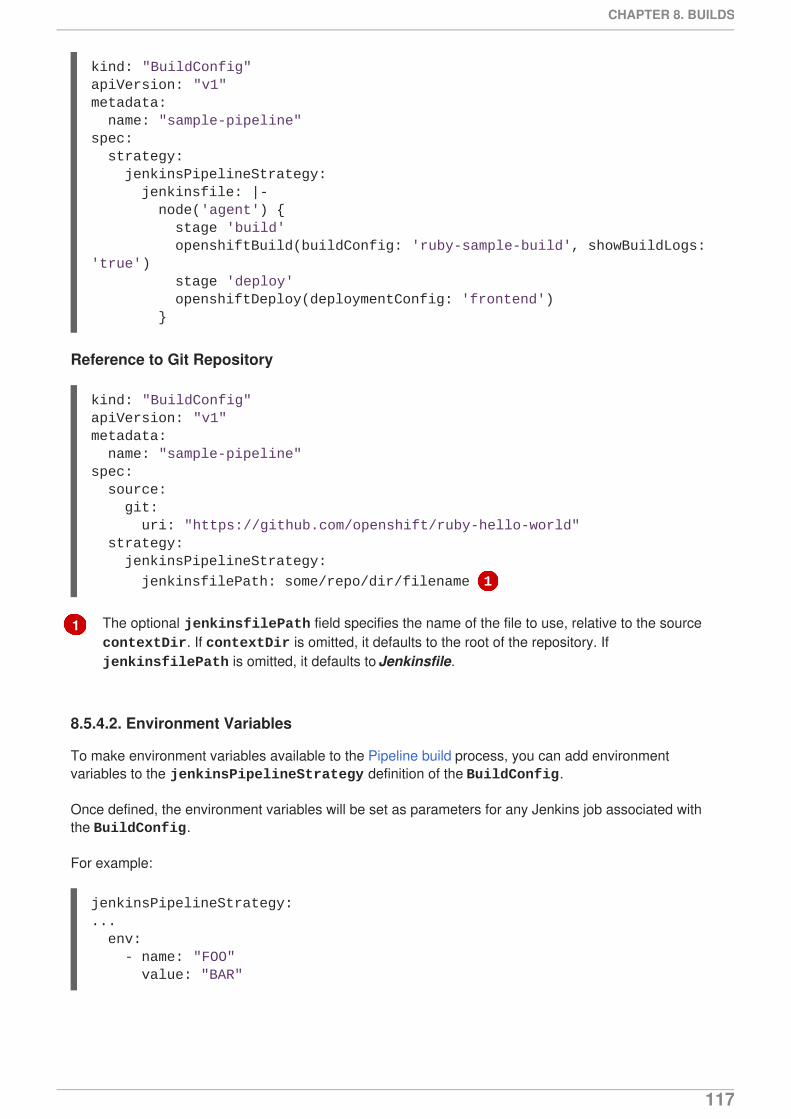
1
Reference to Git Repository
The optional jenkinsfilePath field specifies the name of the file to use, relative to the source contextDir. If contextDir is omitted, it defaults to the root of the repository. If jenkinsfilePath is omitted, it defaults to Jenkinsfile.
8.5.4.2. Environment Variables
To make environment variables available to the Pipeline build process, you can add environmentvariables to the jenkinsPipelineStrategy definition of the BuildConfig.
Once defined, the environment variables will be set as parameters for any Jenkins job associated withthe BuildConfig.
For example:
kind: "BuildConfig"apiVersion: "v1"metadata: name: "sample-pipeline"spec: strategy: jenkinsPipelineStrategy: jenkinsfile: |- node('agent') { stage 'build' openshiftBuild(buildConfig: 'ruby-sample-build', showBuildLogs: 'true') stage 'deploy' openshiftDeploy(deploymentConfig: 'frontend') }
kind: "BuildConfig"apiVersion: "v1"metadata: name: "sample-pipeline"spec: source: git: uri: "https://github.com/openshift/ruby-hello-world" strategy: jenkinsPipelineStrategy:
jenkinsfilePath: some/repo/dir/filename 1
jenkinsPipelineStrategy:... env: - name: "FOO" value: "BAR"
CHAPTER 8. BUILDS
117
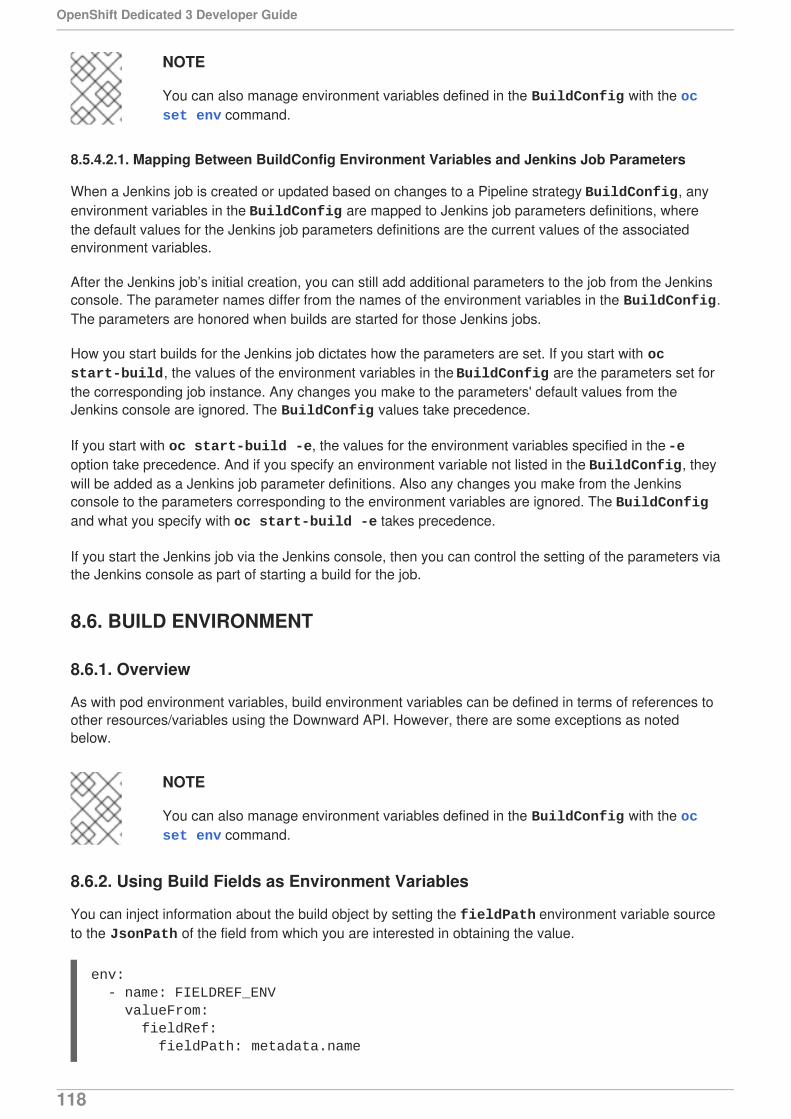
NOTE
You can also manage environment variables defined in the BuildConfig with the oc set env command.
8.5.4.2.1. Mapping Between BuildConfig Environment Variables and Jenkins Job Parameters
When a Jenkins job is created or updated based on changes to a Pipeline strategy BuildConfig, anyenvironment variables in the BuildConfig are mapped to Jenkins job parameters definitions, wherethe default values for the Jenkins job parameters definitions are the current values of the associatedenvironment variables.
After the Jenkins job’s initial creation, you can still add additional parameters to the job from the Jenkinsconsole. The parameter names differ from the names of the environment variables in the BuildConfig.The parameters are honored when builds are started for those Jenkins jobs.
How you start builds for the Jenkins job dictates how the parameters are set. If you start with oc start-build, the values of the environment variables in the BuildConfig are the parameters set forthe corresponding job instance. Any changes you make to the parameters' default values from theJenkins console are ignored. The BuildConfig values take precedence.
If you start with oc start-build -e, the values for the environment variables specified in the -eoption take precedence. And if you specify an environment variable not listed in the BuildConfig, theywill be added as a Jenkins job parameter definitions. Also any changes you make from the Jenkinsconsole to the parameters corresponding to the environment variables are ignored. The BuildConfigand what you specify with oc start-build -e takes precedence.
If you start the Jenkins job via the Jenkins console, then you can control the setting of the parameters viathe Jenkins console as part of starting a build for the job.
8.6. BUILD ENVIRONMENT
8.6.1. Overview
As with pod environment variables, build environment variables can be defined in terms of references toother resources/variables using the Downward API. However, there are some exceptions as notedbelow.
NOTE
You can also manage environment variables defined in the BuildConfig with the oc set env command.
8.6.2. Using Build Fields as Environment Variables
You can inject information about the build object by setting the fieldPath environment variable sourceto the JsonPath of the field from which you are interested in obtaining the value.
env: - name: FIELDREF_ENV valueFrom: fieldRef: fieldPath: metadata.name
OpenShift Dedicated 3 Developer Guide
118
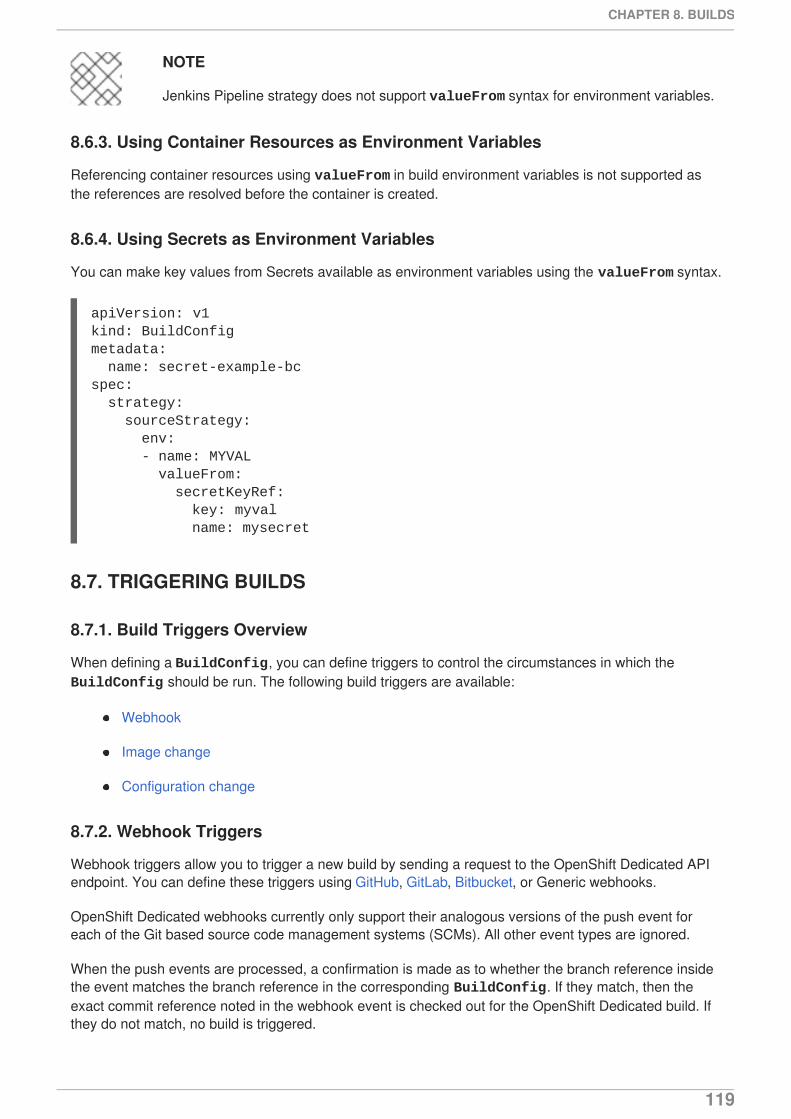
NOTE
Jenkins Pipeline strategy does not support valueFrom syntax for environment variables.
8.6.3. Using Container Resources as Environment Variables
Referencing container resources using valueFrom in build environment variables is not supported asthe references are resolved before the container is created.
8.6.4. Using Secrets as Environment Variables
You can make key values from Secrets available as environment variables using the valueFrom syntax.
8.7. TRIGGERING BUILDS
8.7.1. Build Triggers Overview
When defining a BuildConfig, you can define triggers to control the circumstances in which the BuildConfig should be run. The following build triggers are available:
Webhook
Image change
Configuration change
8.7.2. Webhook Triggers
Webhook triggers allow you to trigger a new build by sending a request to the OpenShift Dedicated APIendpoint. You can define these triggers using GitHub, GitLab, Bitbucket, or Generic webhooks.
OpenShift Dedicated webhooks currently only support their analogous versions of the push event foreach of the Git based source code management systems (SCMs). All other event types are ignored.
When the push events are processed, a confirmation is made as to whether the branch reference insidethe event matches the branch reference in the corresponding BuildConfig. If they match, then theexact commit reference noted in the webhook event is checked out for the OpenShift Dedicated build. Ifthey do not match, no build is triggered.
apiVersion: v1kind: BuildConfigmetadata: name: secret-example-bcspec: strategy: sourceStrategy: env: - name: MYVAL valueFrom: secretKeyRef: key: myval name: mysecret
CHAPTER 8. BUILDS
119
NOTE
oc new-app and oc new-build will create GitHub and Generic webhook triggersautomatically, but any other needed webhook triggers must be added manually (seeSetting Triggers).
For all webhooks, you must define a Secret with a key named WebHookSecretKey and the valuebeing the value to be supplied when invoking the webhook. The webhook definition must then referencethe secret. The secret ensures the uniqueness of the URL, preventing others from triggering the build.The value of the key will be compared to the secret provided during the webhook invocation.
For example here is a GitHub webhook with a reference to a secret named mysecret:
The secret is then defined as follows. Note that the value of the secret is base64 encoded as is requiredfor any data field of a Secret object.
8.7.2.1. GitHub Webhooks
GitHub webhooks handle the call made by GitHub when a repository is updated. When defining thetrigger, you must specify a secret, which will be part of the URL you supply to GitHub when configuringthe webhook.
Example GitHub webhook definition:
NOTE
The secret used in the webhook trigger configuration is not the same as secret field youencounter when configuring webhook in GitHub UI. The former is to make the webhookURL unique and hard to predict, the latter is an optional string field used to create HMAChex digest of the body, which is sent as an X-Hub-Signatureheader.
The payload URL is returned as the GitHub Webhook URL by the oc describe command (seeDisplaying Webhook URLs), and is structured as follows:
type: "GitHub"github: secretReference: name: "mysecret"
- kind: Secret apiVersion: v1 metadata: name: mysecret creationTimestamp: data: WebHookSecretKey: c2VjcmV0dmFsdWUx
type: "GitHub"github: secretReference: name: "mysecret"
OpenShift Dedicated 3 Developer Guide
120
http://<openshift_api_host:port>/oapi/v1/namespaces/<namespace>/buildconfigs/<name>/webhooks/<secret>/github
To configure a GitHub Webhook:
1. After creating a BuildConfig from a GitHub repository, run:
This generates a webhook GitHub URL that looks like:
<https://api.starter-us-east-1.openshift.com:443/oapi/v1/namespaces/nsname/buildconfigs/bcname/webhooks/<secret>/github>.
2. Cut and paste this URL into GitHub, from the GitHub web console.
3. In your GitHub repository, select Add Webhook from Settings → Webhooks & Services.
4. Paste the URL output (similar to above) into the Payload URL field.
5. Change the Content Type from GitHub’s default application/x-www-form-urlencoded toapplication/json.
6. Click Add webhook.
You should see a message from GitHub stating that your webhook was successfully configured.
Now, whenever you push a change to your GitHub repository, a new build will automatically start, andupon a successful build a new deployment will start.
NOTE
Gogs supports the same webhook payload format as GitHub. Therefore, if you are usinga Gogs server, you can define a GitHub webhook trigger on your BuildConfig andtrigger it via your Gogs server also.
Given a file containing a valid JSON payload, such as payload.json, you can manually trigger thewebhook via curl:
$ curl -H "X-GitHub-Event: push" -H "Content-Type: application/json" -k -X POST --data-binary @payload.json https://<openshift_api_host:port>/oapi/v1/namespaces/<namespace>/buildconfigs/<name>/webhooks/<secret>/github
The -k argument is only necessary if your API server does not have a properly signed certificate.
8.7.2.2. GitLab Webhooks
GitLab webhooks handle the call made by GitLab when a repository is updated. As with the GitHubtriggers, you must specify a secret. The following example is a trigger definition YAML within the BuildConfig:
$ oc describe bc/<name-of-your-BuildConfig>
CHAPTER 8. BUILDS
121
The payload URL is returned as the GitLab Webhook URL by the oc describe command (seeDisplaying Webhook URLs), and is structured as follows:
http://<openshift_api_host:port>/oapi/v1/namespaces/<namespace>/buildconfigs/<name>/webhooks/<secret>/gitlab
To configure a GitLab Webhook:
1. Describe the build configuration to get the webhook URL:
$ oc describe bc <name>
2. Copy the webhook URL, replacing <secret> with your secret value.
3. Follow the GitLab setup instructions to paste the webhook URL into your GitLab repositorysettings.
Given a file containing a valid JSON payload, such as payload.json, you can manually trigger thewebhook via curl:
$ curl -H "X-GitLab-Event: Push Hook" -H "Content-Type: application/json" -k -X POST --data-binary @payload.json https://<openshift_api_host:port>/oapi/v1/namespaces/<namespace>/buildconfigs/<name>/webhooks/<secret>/gitlab
The -k argument is only necessary if your API server does not have a properly signed certificate.
8.7.2.3. Bitbucket Webhooks
Bitbucket webhooks handle the call made by Bitbucket when a repository is updated. Similar to theprevious triggers, you must specify a secret. The following example is a trigger definition YAML withinthe BuildConfig:
The payload URL is returned as the Bitbucket Webhook URL by the oc describe command (seeDisplaying Webhook URLs), and is structured as follows:
http://<openshift_api_host:port>/oapi/v1/namespaces/<namespace>/buildconfigs/<name>/webhooks/<secret>/bitbucket
To configure a Bitbucket Webhook:
1. Describe the build configuration to get the webhook URL:
type: "GitLab"gitlab: secretReference: name: "mysecret"
type: "Bitbucket"bitbucket: secretReference: name: "mysecret"
OpenShift Dedicated 3 Developer Guide
122

1
$ oc describe bc <name>
2. Copy the webhook URL, replacing <secret> with your secret value.
3. Follow the Bitbucket setup instructions to paste the webhook URL into your Bitbucket repositorysettings.
Given a file containing a valid JSON payload, such as payload.json, you can manually trigger thewebhook via curl:
$ curl -H "X-Event-Key: repo:push" -H "Content-Type: application/json" -k -X POST --data-binary @payload.json https://<openshift_api_host:port>/oapi/v1/namespaces/<namespace>/buildconfigs/<name>/webhooks/<secret>/bitbucket
The -k argument is only necessary if your API server does not have a properly signed certificate.
8.7.2.4. Generic Webhooks
Generic webhooks are invoked from any system capable of making a web request. As with the otherwebhooks, you must specify a secret, which will be part of the URL that the caller must use to trigger thebuild. The secret ensures the uniqueness of the URL, preventing others from triggering the build. Thefollowing is an example trigger definition YAML within the BuildConfig:
Set to true to allow a generic webhook to pass in environment variables.
To set up the caller, supply the calling system with the URL of the generic webhook endpoint for yourbuild:
http://<openshift_api_host:port>/oapi/v1/namespaces/<namespace>/buildconfigs/<name>/webhooks/<secret>/generic
The caller must invoke the webhook as a POST operation.
To invoke the webhook manually you can use curl:
$ curl -X POST -k https://<openshift_api_host:port>/oapi/v1/namespaces/<namespace>/buildconfigs/<name>/webhooks/<secret>/generic
The HTTP verb must be set to POST. The insecure -k flag is specified to ignore certificate validation.This second flag is not necessary if your cluster has properly signed certificates.
The endpoint can accept an optional payload with the following format:
type: "Generic"generic: secretReference: name: "mysecret"
allowEnv: true 1
git:
CHAPTER 8. BUILDS
123
1 Similar to the BuildConfig environment variables, the environment variables defined here aremade available to your build. If these variables collide with the BuildConfig environmentvariables, these variables take precedence. By default, environment variables passed via webhookare ignored. Set the allowEnv field to true on the webhook definition to enable this behavior.
To pass this payload using curl, define it in a file named payload_file.yaml and run:
$ curl -H "Content-Type: application/yaml" --data-binary @payload_file.yaml -X POST -k https://<openshift_api_host:port>/oapi/v1/namespaces/<namespace>/buildconfigs/<name>/webhooks/<secret>/generic
The arguments are the same as the previous example with the addition of a header and a payload. The -H argument sets the Content-Type header to application/yaml or application/jsondepending on your payload format. The --data-binary argument is used to send a binary payloadwith newlines intact with the POST request.
NOTE
OpenShift Dedicated permits builds to be triggered via the generic webhook even if aninvalid request payload is presented (for example, invalid content type, unparsable orinvalid content, and so on). This behavior is maintained for backwards compatibility. If aninvalid request payload is presented, OpenShift Dedicated returns a warning in JSONformat as part of its HTTP 200 OK response.
8.7.2.5. Displaying Webhook URLs
Use the following command to display any webhook URLs associated with a build configuration:
$ oc describe bc <name>
If the above command does not display any webhook URLs, then no webhook trigger is defined for thatbuild configuration. See Setting Triggers to manually add triggers.
8.7.3. Image Change Triggers
Image change triggers allow your build to be automatically invoked when a new version of an upstreamimage is available. For example, if a build is based on top of a RHEL image, then you can trigger thatbuild to run any time the RHEL image changes. As a result, the application image is always running on
uri: "<url to git repository>" ref: "<optional git reference>" commit: "<commit hash identifying a specific git commit>" author: name: "<author name>" email: "<author e-mail>" committer: name: "<committer name>" email: "<committer e-mail>" message: "<commit message>"
env: 1 - name: "<variable name>" value: "<variable value>"
OpenShift Dedicated 3 Developer Guide
124
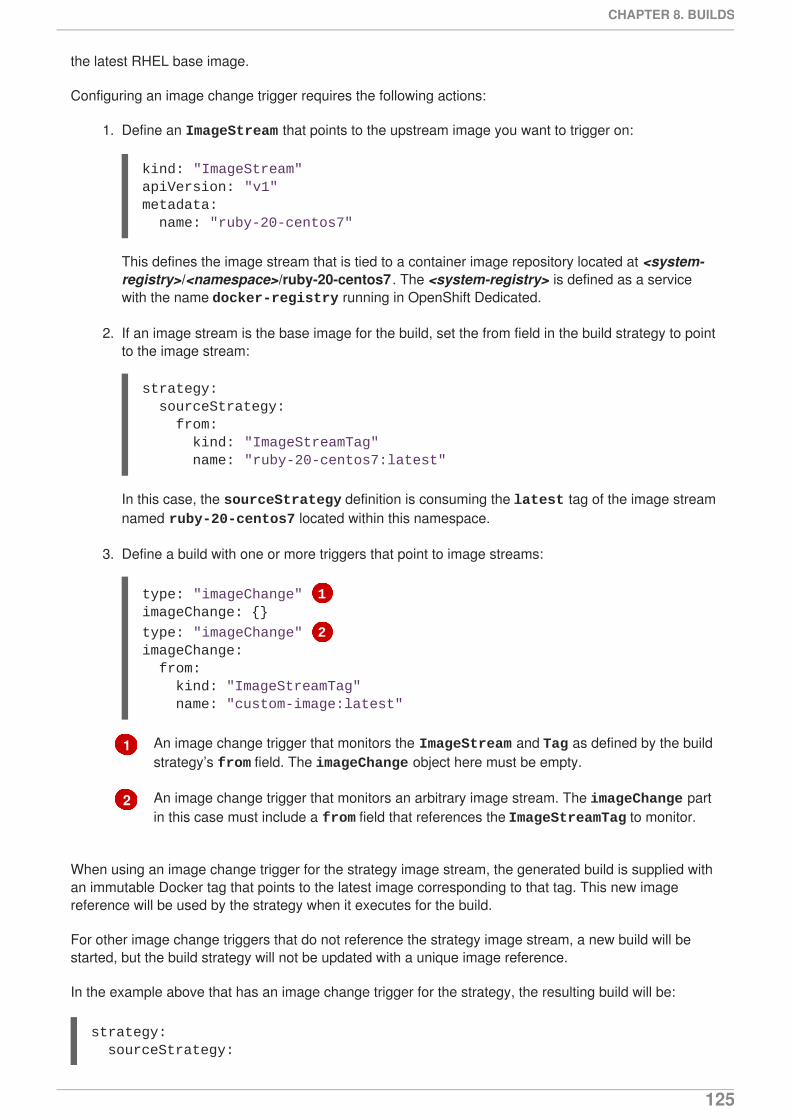
1
2
the latest RHEL base image.
Configuring an image change trigger requires the following actions:
1. Define an ImageStream that points to the upstream image you want to trigger on:
This defines the image stream that is tied to a container image repository located at <system-registry>/<namespace>/ruby-20-centos7 . The <system-registry> is defined as a servicewith the name docker-registry running in OpenShift Dedicated.
2. If an image stream is the base image for the build, set the from field in the build strategy to pointto the image stream:
In this case, the sourceStrategy definition is consuming the latest tag of the image streamnamed ruby-20-centos7 located within this namespace.
3. Define a build with one or more triggers that point to image streams:
An image change trigger that monitors the ImageStream and Tag as defined by the buildstrategy’s from field. The imageChange object here must be empty.
An image change trigger that monitors an arbitrary image stream. The imageChange partin this case must include a from field that references the ImageStreamTag to monitor.
When using an image change trigger for the strategy image stream, the generated build is supplied withan immutable Docker tag that points to the latest image corresponding to that tag. This new imagereference will be used by the strategy when it executes for the build.
For other image change triggers that do not reference the strategy image stream, a new build will bestarted, but the build strategy will not be updated with a unique image reference.
In the example above that has an image change trigger for the strategy, the resulting build will be:
kind: "ImageStream"apiVersion: "v1"metadata: name: "ruby-20-centos7"
strategy: sourceStrategy: from: kind: "ImageStreamTag" name: "ruby-20-centos7:latest"
type: "imageChange" 1imageChange: {}
type: "imageChange" 2imageChange: from: kind: "ImageStreamTag" name: "custom-image:latest"
strategy: sourceStrategy:
CHAPTER 8. BUILDS
125
This ensures that the triggered build uses the new image that was just pushed to the repository, and thebuild can be re-run any time with the same inputs.
In addition to setting the image field for all Strategy types, for custom builds, the OPENSHIFT_CUSTOM_BUILD_BASE_IMAGE environment variable is checked. If it does not exist, then itis created with the immutable image reference. If it does exist then it is updated with the immutableimage reference.
If a build is triggered due to a webhook trigger or manual request, the build that is created uses the <immutableid> resolved from the ImageStream referenced by the Strategy. This ensures thatbuilds are performed using consistent image tags for ease of reproduction.
NOTE
Image streams that point to container images in v1 Docker registries only trigger a buildonce when the image stream tag becomes available and not on subsequent imageupdates. This is due to the lack of uniquely identifiable images in v1 Docker registries.
8.7.4. Configuration Change Triggers
A configuration change trigger allows a build to be automatically invoked as soon as a new BuildConfig is created. The following is an example trigger definition YAML within the BuildConfig:
NOTE
Configuration change triggers currently only work when creating a new BuildConfig. Ina future release, configuration change triggers will also be able to launch a build whenevera BuildConfig is updated.
8.7.4.1. Setting Triggers Manually
Triggers can be added to and removed from build configurations with oc set triggers. For example,to set a GitHub webhook trigger on a build configuration, use:
$ oc set triggers bc <name> --from-github
To set an imagechange trigger, use
$ oc set triggers bc <name> --from-image='<image>'
To remove a trigger, add --remove:
$ oc set triggers bc <name> --from-bitbucket --remove
from: kind: "DockerImage" name: "172.30.17.3:5001/mynamespace/ruby-20-centos7:<immutableid>"
type: "ConfigChange"
OpenShift Dedicated 3 Developer Guide
126
NOTE
When a webhook trigger already exists, adding it again regenerates the webhook secret.
For more information, consult the help documentation with oc set triggers --help
8.8. BUILD HOOKS
8.8.1. Build Hooks Overview
Build hooks allow behavior to be injected into the build process.
The postCommit field of a BuildConfig object executes commands inside a temporary container thatis running the build output image. The hook is executed immediately after the last layer of the image hasbeen committed and before the image is pushed to a registry.
The current working directory is set to the image’s WORKDIR, which is the default working directory of thecontainer image. For most images, this is where the source code is located.
The hook fails if the script or command returns a non-zero exit code or if starting the temporary containerfails. When the hook fails it marks the build as failed and the image is not pushed to a registry. Thereason for failing can be inspected by looking at the build logs.
Build hooks can be used to run unit tests to verify the image before the build is marked complete and theimage is made available in a registry. If all tests pass and the test runner returns with exit code 0, thebuild is marked successful. In case of any test failure, the build is marked as failed. In all cases, the buildlog will contain the output of the test runner, which can be used to identify failed tests.
The postCommit hook is not only limited to running tests, but can be used for other commands as well.Since it runs in a temporary container, changes made by the hook do not persist, meaning that the hookexecution cannot affect the final image. This behavior allows for, among other uses, the installation andusage of test dependencies that are automatically discarded and will be not present in the final image.
8.8.2. Configuring Post Commit Build Hooks
There are different ways to configure the post build hook. All forms in the following examples areequivalent and execute bundle exec rake test --verbose:
Shell script:
The script value is a shell script to be run with /bin/sh -ic. Use this when a shell script isappropriate to execute the build hook. For example, for running unit tests as above. To controlthe image entry point, or if the image does not have /bin/sh, use command and/or args.
NOTE
The additional -i flag was introduced to improve the experience working withCentOS and RHEL images, and may be removed in a future release.
Command as the image entry point:
postCommit: script: "bundle exec rake test --verbose"
CHAPTER 8. BUILDS
127
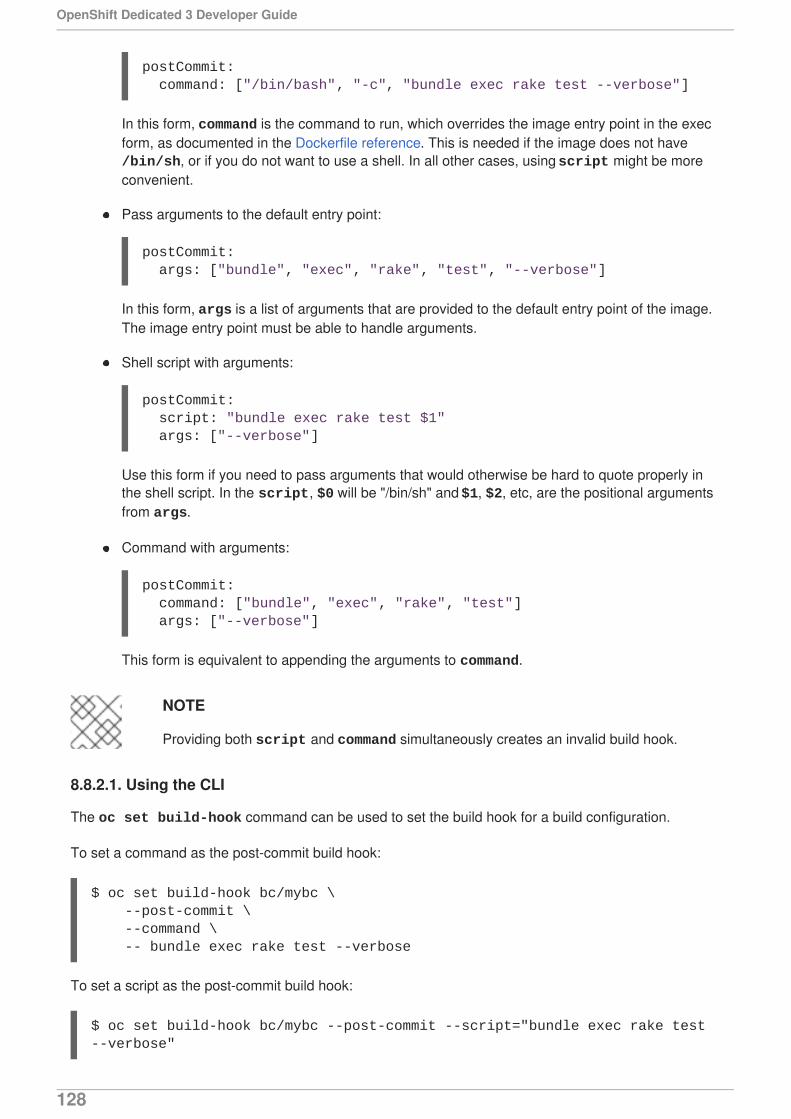
In this form, command is the command to run, which overrides the image entry point in the execform, as documented in the Dockerfile reference. This is needed if the image does not have /bin/sh, or if you do not want to use a shell. In all other cases, using script might be moreconvenient.
Pass arguments to the default entry point:
In this form, args is a list of arguments that are provided to the default entry point of the image.The image entry point must be able to handle arguments.
Shell script with arguments:
Use this form if you need to pass arguments that would otherwise be hard to quote properly inthe shell script. In the script, $0 will be "/bin/sh" and $1, $2, etc, are the positional argumentsfrom args.
Command with arguments:
This form is equivalent to appending the arguments to command.
NOTE
Providing both script and command simultaneously creates an invalid build hook.
8.8.2.1. Using the CLI
The oc set build-hook command can be used to set the build hook for a build configuration.
To set a command as the post-commit build hook:
$ oc set build-hook bc/mybc \ --post-commit \ --command \ -- bundle exec rake test --verbose
To set a script as the post-commit build hook:
$ oc set build-hook bc/mybc --post-commit --script="bundle exec rake test --verbose"
postCommit: command: ["/bin/bash", "-c", "bundle exec rake test --verbose"]
postCommit: args: ["bundle", "exec", "rake", "test", "--verbose"]
postCommit: script: "bundle exec rake test $1" args: ["--verbose"]
postCommit: command: ["bundle", "exec", "rake", "test"] args: ["--verbose"]
OpenShift Dedicated 3 Developer Guide
128
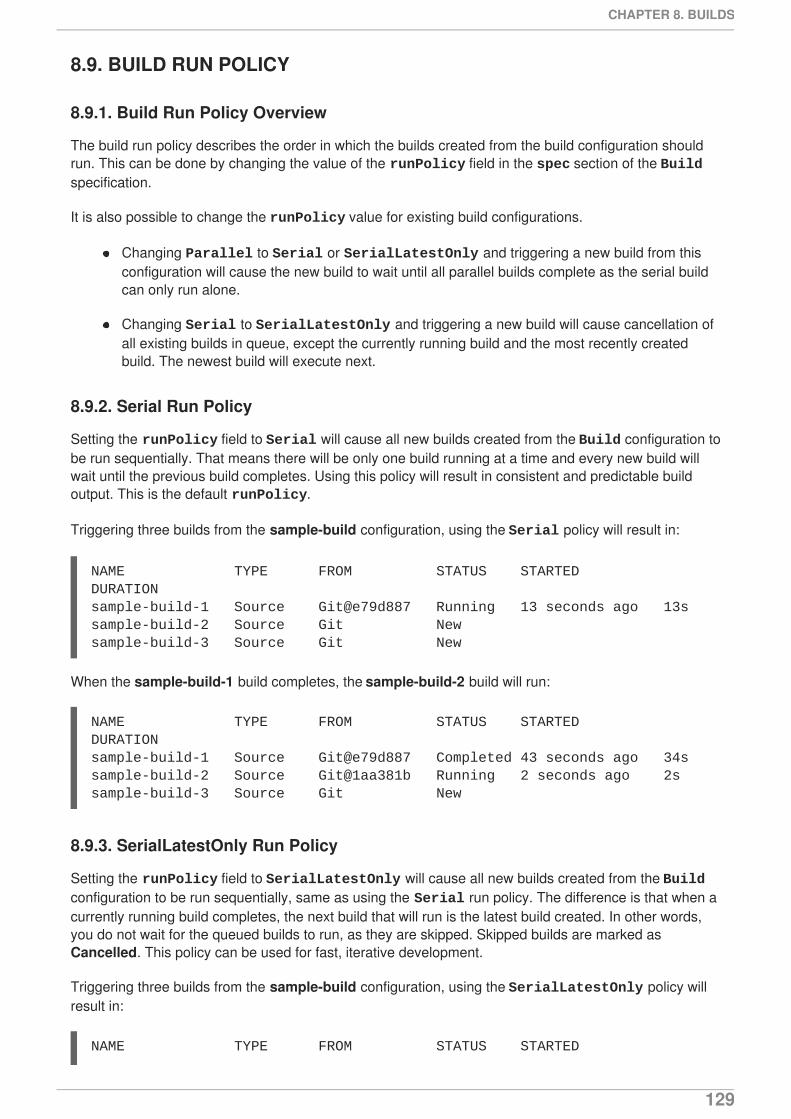
8.9. BUILD RUN POLICY
8.9.1. Build Run Policy Overview
The build run policy describes the order in which the builds created from the build configuration shouldrun. This can be done by changing the value of the runPolicy field in the spec section of the Buildspecification.
It is also possible to change the runPolicy value for existing build configurations.
Changing Parallel to Serial or SerialLatestOnly and triggering a new build from thisconfiguration will cause the new build to wait until all parallel builds complete as the serial buildcan only run alone.
Changing Serial to SerialLatestOnly and triggering a new build will cause cancellation ofall existing builds in queue, except the currently running build and the most recently createdbuild. The newest build will execute next.
8.9.2. Serial Run Policy
Setting the runPolicy field to Serial will cause all new builds created from the Build configuration tobe run sequentially. That means there will be only one build running at a time and every new build willwait until the previous build completes. Using this policy will result in consistent and predictable buildoutput. This is the default runPolicy.
Triggering three builds from the sample-build configuration, using the Serial policy will result in:
NAME TYPE FROM STATUS STARTED DURATIONsample-build-1 Source Git@e79d887 Running 13 seconds ago 13ssample-build-2 Source Git Newsample-build-3 Source Git New
When the sample-build-1 build completes, the sample-build-2 build will run:
NAME TYPE FROM STATUS STARTED DURATIONsample-build-1 Source Git@e79d887 Completed 43 seconds ago 34ssample-build-2 Source Git@1aa381b Running 2 seconds ago 2ssample-build-3 Source Git New
8.9.3. SerialLatestOnly Run Policy
Setting the runPolicy field to SerialLatestOnly will cause all new builds created from the Buildconfiguration to be run sequentially, same as using the Serial run policy. The difference is that when acurrently running build completes, the next build that will run is the latest build created. In other words,you do not wait for the queued builds to run, as they are skipped. Skipped builds are marked asCancelled. This policy can be used for fast, iterative development.
Triggering three builds from the sample-build configuration, using the SerialLatestOnly policy willresult in:
NAME TYPE FROM STATUS STARTED
CHAPTER 8. BUILDS
129
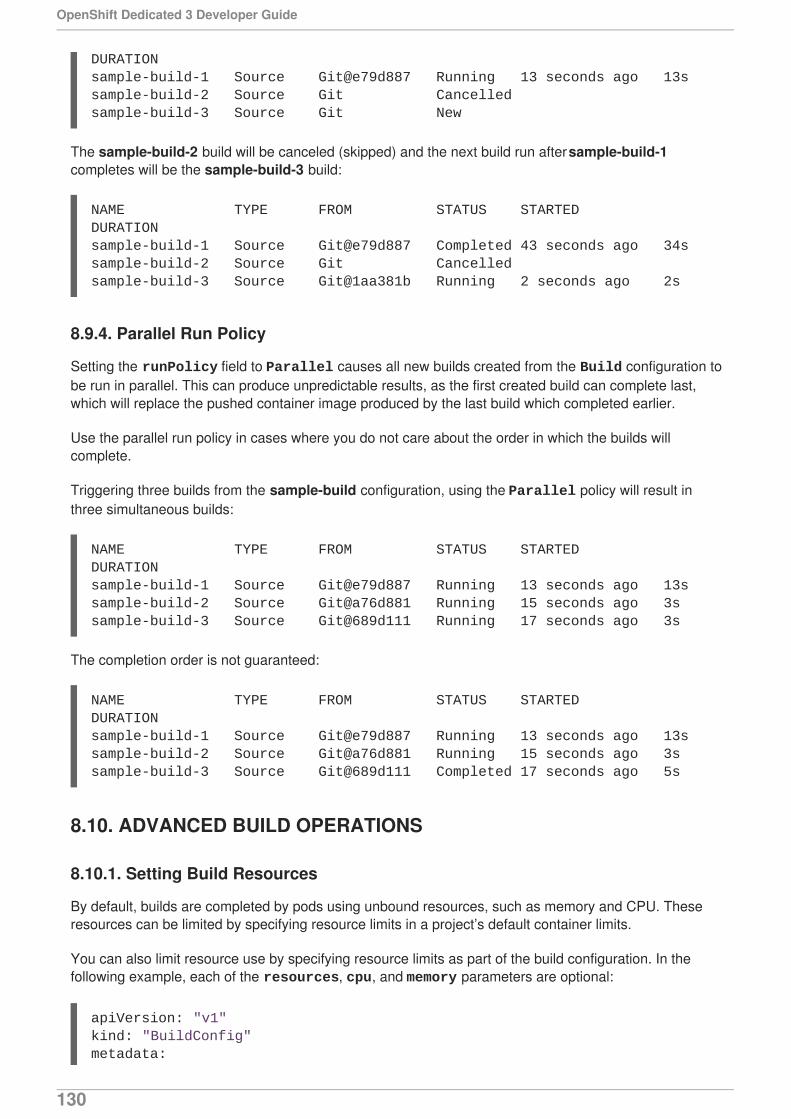
DURATIONsample-build-1 Source Git@e79d887 Running 13 seconds ago 13ssample-build-2 Source Git Cancelledsample-build-3 Source Git New
The sample-build-2 build will be canceled (skipped) and the next build run after sample-build-1completes will be the sample-build-3 build:
NAME TYPE FROM STATUS STARTED DURATIONsample-build-1 Source Git@e79d887 Completed 43 seconds ago 34ssample-build-2 Source Git Cancelledsample-build-3 Source Git@1aa381b Running 2 seconds ago 2s
8.9.4. Parallel Run Policy
Setting the runPolicy field to Parallel causes all new builds created from the Build configuration tobe run in parallel. This can produce unpredictable results, as the first created build can complete last,which will replace the pushed container image produced by the last build which completed earlier.
Use the parallel run policy in cases where you do not care about the order in which the builds willcomplete.
Triggering three builds from the sample-build configuration, using the Parallel policy will result inthree simultaneous builds:
NAME TYPE FROM STATUS STARTED DURATIONsample-build-1 Source Git@e79d887 Running 13 seconds ago 13ssample-build-2 Source Git@a76d881 Running 15 seconds ago 3ssample-build-3 Source Git@689d111 Running 17 seconds ago 3s
The completion order is not guaranteed:
NAME TYPE FROM STATUS STARTED DURATIONsample-build-1 Source Git@e79d887 Running 13 seconds ago 13ssample-build-2 Source Git@a76d881 Running 15 seconds ago 3ssample-build-3 Source Git@689d111 Completed 17 seconds ago 5s
8.10. ADVANCED BUILD OPERATIONS
8.10.1. Setting Build Resources
By default, builds are completed by pods using unbound resources, such as memory and CPU. Theseresources can be limited by specifying resource limits in a project’s default container limits.
You can also limit resource use by specifying resource limits as part of the build configuration. In thefollowing example, each of the resources, cpu, and memory parameters are optional:
apiVersion: "v1"kind: "BuildConfig"metadata:
OpenShift Dedicated 3 Developer Guide
130
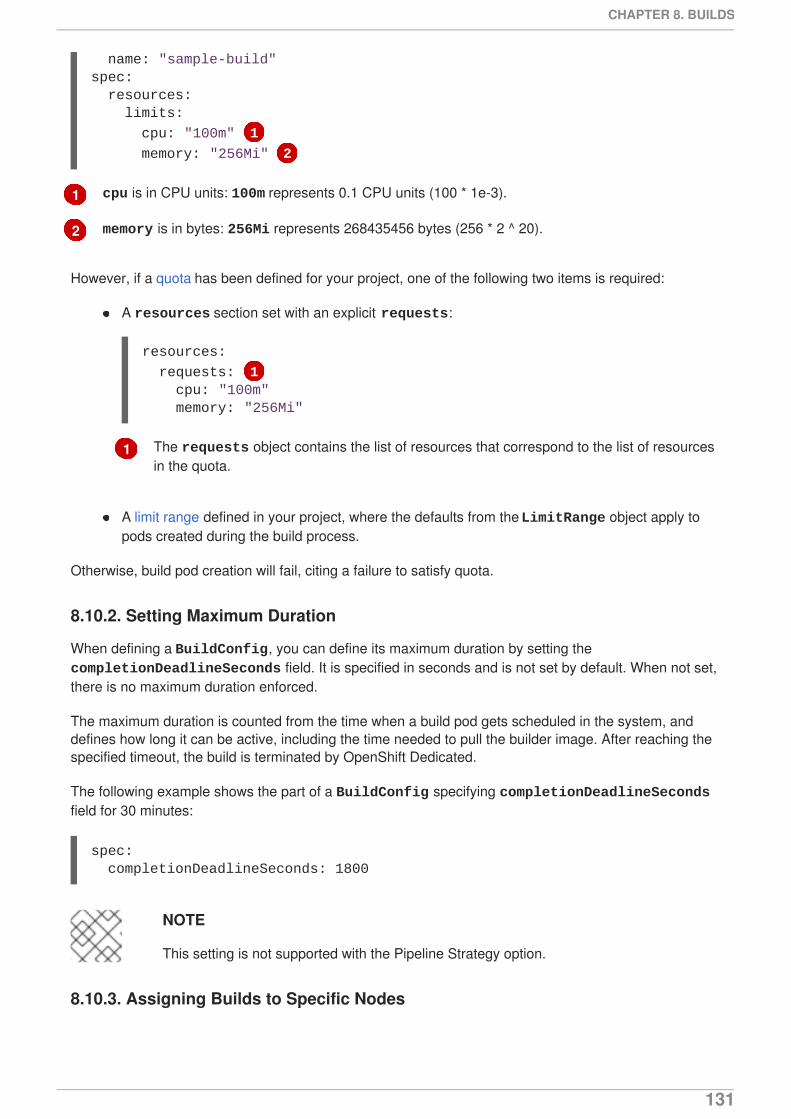
1
2
1
cpu is in CPU units: 100m represents 0.1 CPU units (100 * 1e-3).
memory is in bytes: 256Mi represents 268435456 bytes (256 * 2 ^ 20).
However, if a quota has been defined for your project, one of the following two items is required:
A resources section set with an explicit requests:
The requests object contains the list of resources that correspond to the list of resourcesin the quota.
A limit range defined in your project, where the defaults from the LimitRange object apply topods created during the build process.
Otherwise, build pod creation will fail, citing a failure to satisfy quota.
8.10.2. Setting Maximum Duration
When defining a BuildConfig, you can define its maximum duration by setting the completionDeadlineSeconds field. It is specified in seconds and is not set by default. When not set,there is no maximum duration enforced.
The maximum duration is counted from the time when a build pod gets scheduled in the system, anddefines how long it can be active, including the time needed to pull the builder image. After reaching thespecified timeout, the build is terminated by OpenShift Dedicated.
The following example shows the part of a BuildConfig specifying completionDeadlineSecondsfield for 30 minutes:
spec: completionDeadlineSeconds: 1800
NOTE
This setting is not supported with the Pipeline Strategy option.
8.10.3. Assigning Builds to Specific Nodes
name: "sample-build"spec: resources: limits:
cpu: "100m" 1
memory: "256Mi" 2
resources:
requests: 1 cpu: "100m" memory: "256Mi"
CHAPTER 8. BUILDS
131
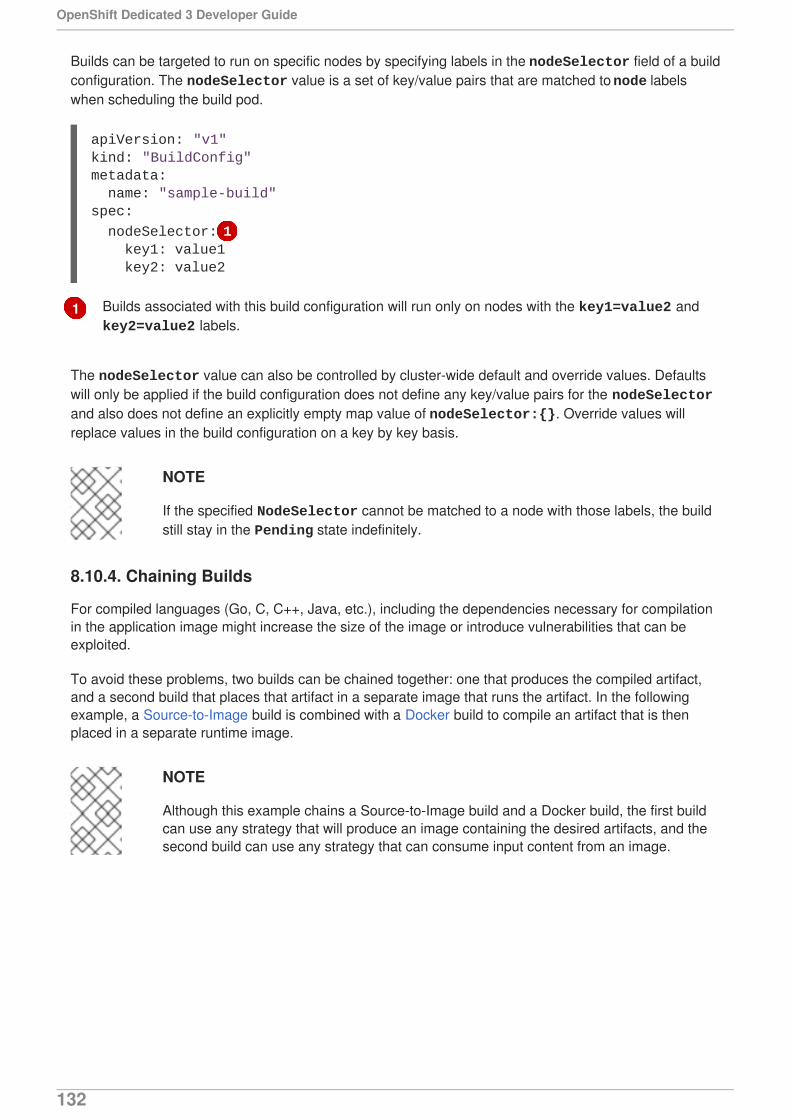
1
Builds can be targeted to run on specific nodes by specifying labels in the nodeSelector field of a buildconfiguration. The nodeSelector value is a set of key/value pairs that are matched to node labelswhen scheduling the build pod.
Builds associated with this build configuration will run only on nodes with the key1=value2 and key2=value2 labels.
The nodeSelector value can also be controlled by cluster-wide default and override values. Defaultswill only be applied if the build configuration does not define any key/value pairs for the nodeSelectorand also does not define an explicitly empty map value of nodeSelector:{}. Override values willreplace values in the build configuration on a key by key basis.
NOTE
If the specified NodeSelector cannot be matched to a node with those labels, the buildstill stay in the Pending state indefinitely.
8.10.4. Chaining Builds
For compiled languages (Go, C, C++, Java, etc.), including the dependencies necessary for compilationin the application image might increase the size of the image or introduce vulnerabilities that can beexploited.
To avoid these problems, two builds can be chained together: one that produces the compiled artifact,and a second build that places that artifact in a separate image that runs the artifact. In the followingexample, a Source-to-Image build is combined with a Docker build to compile an artifact that is thenplaced in a separate runtime image.
NOTE
Although this example chains a Source-to-Image build and a Docker build, the first buildcan use any strategy that will produce an image containing the desired artifacts, and thesecond build can use any strategy that can consume input content from an image.
apiVersion: "v1"kind: "BuildConfig"metadata: name: "sample-build"spec:
nodeSelector: 1 key1: value1 key2: value2
OpenShift Dedicated 3 Developer Guide
132
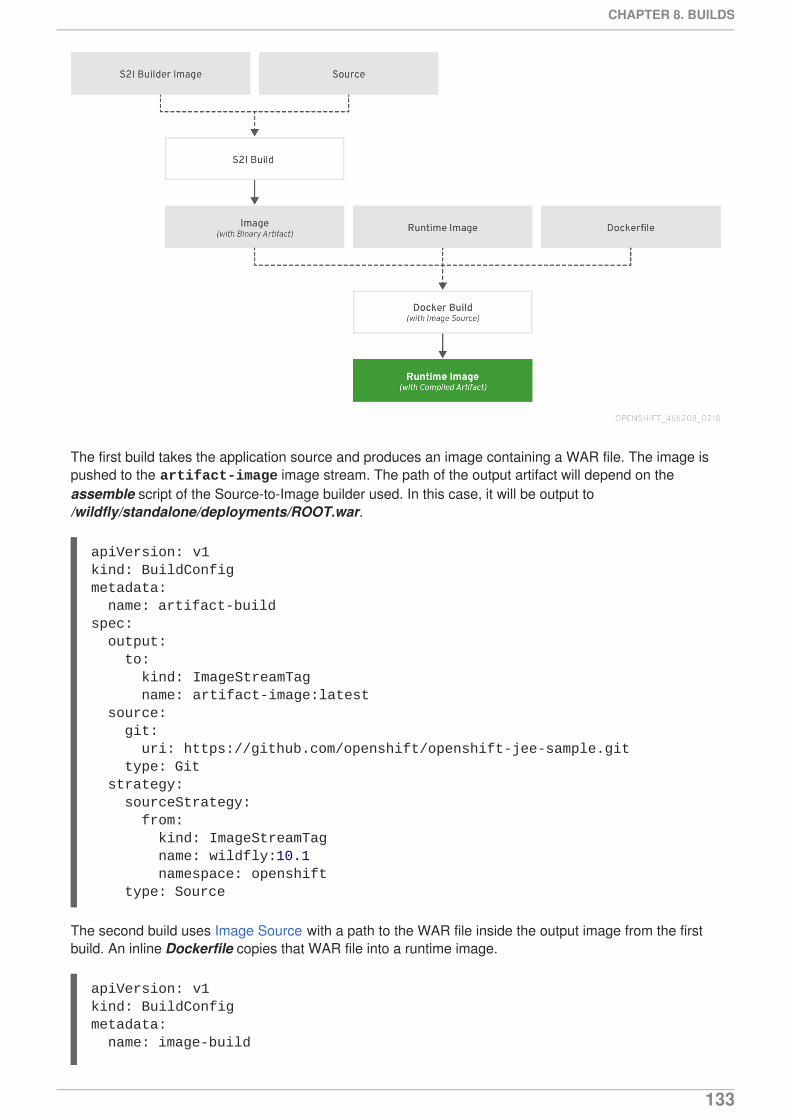
The first build takes the application source and produces an image containing a WAR file. The image ispushed to the artifact-image image stream. The path of the output artifact will depend on theassemble script of the Source-to-Image builder used. In this case, it will be output to/wildfly/standalone/deployments/ROOT.war.
The second build uses Image Source with a path to the WAR file inside the output image from the firstbuild. An inline Dockerfile copies that WAR file into a runtime image.
apiVersion: v1kind: BuildConfigmetadata: name: artifact-buildspec: output: to: kind: ImageStreamTag name: artifact-image:latest source: git: uri: https://github.com/openshift/openshift-jee-sample.git type: Git strategy: sourceStrategy: from: kind: ImageStreamTag name: wildfly:10.1 namespace: openshift type: Source
apiVersion: v1kind: BuildConfigmetadata: name: image-build
CHAPTER 8. BUILDS
133
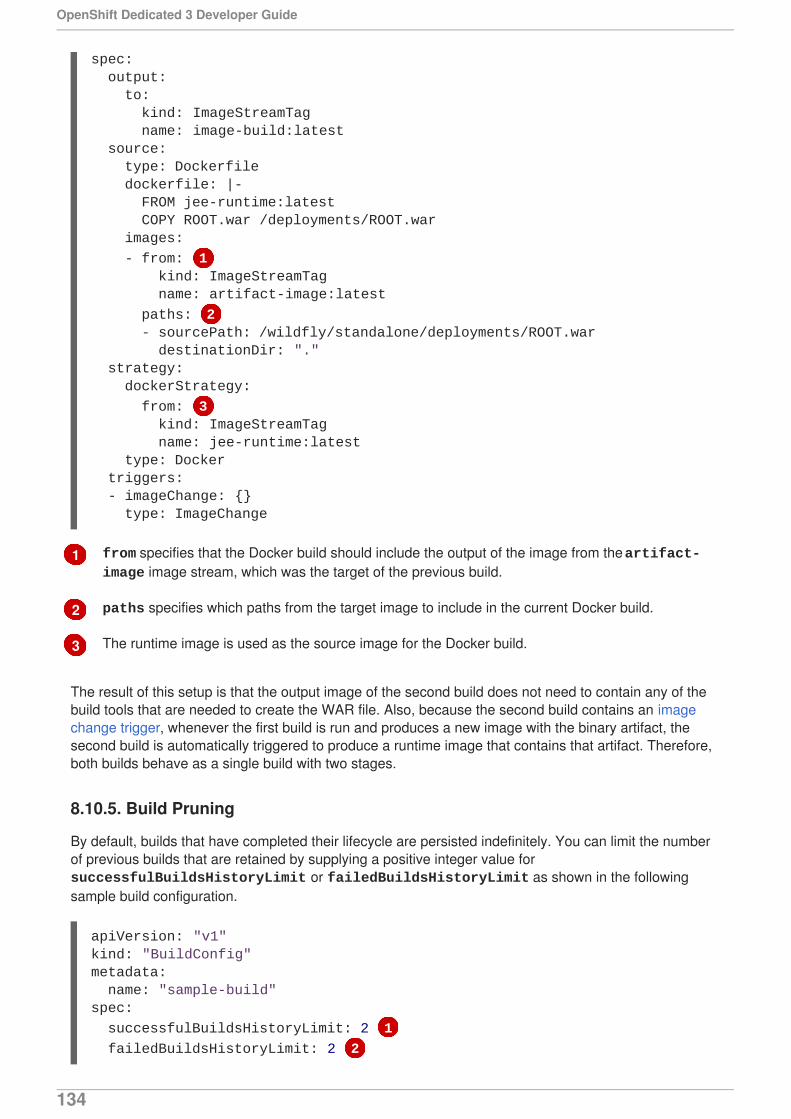
1
2
3
from specifies that the Docker build should include the output of the image from the artifact-image image stream, which was the target of the previous build.
paths specifies which paths from the target image to include in the current Docker build.
The runtime image is used as the source image for the Docker build.
The result of this setup is that the output image of the second build does not need to contain any of thebuild tools that are needed to create the WAR file. Also, because the second build contains an imagechange trigger, whenever the first build is run and produces a new image with the binary artifact, thesecond build is automatically triggered to produce a runtime image that contains that artifact. Therefore,both builds behave as a single build with two stages.
8.10.5. Build Pruning
By default, builds that have completed their lifecycle are persisted indefinitely. You can limit the numberof previous builds that are retained by supplying a positive integer value for successfulBuildsHistoryLimit or failedBuildsHistoryLimit as shown in the followingsample build configuration.
spec: output: to: kind: ImageStreamTag name: image-build:latest source: type: Dockerfile dockerfile: |- FROM jee-runtime:latest COPY ROOT.war /deployments/ROOT.war images:
- from: 1 kind: ImageStreamTag name: artifact-image:latest
paths: 2 - sourcePath: /wildfly/standalone/deployments/ROOT.war destinationDir: "." strategy: dockerStrategy:
from: 3 kind: ImageStreamTag name: jee-runtime:latest type: Docker triggers: - imageChange: {} type: ImageChange
apiVersion: "v1"kind: "BuildConfig"metadata: name: "sample-build"spec:
successfulBuildsHistoryLimit: 2 1
failedBuildsHistoryLimit: 2 2
OpenShift Dedicated 3 Developer Guide
134
1
2
successfulBuildsHistoryLimit will retain up to two builds with a status of completed.
failedBuildsHistoryLimit will retain up to two builds with a status of failed, cancelled,or error.
Build pruning is triggered by the following actions:
Updating a build configuration.
A build completes its lifecycle.
Builds are sorted by their creation timestamp with the oldest builds being pruned first.
8.11. BUILD TROUBLESHOOTING
8.11.1. Requested Access to Resources Denied
Issue
A build fails with:
requested access to the resource is denied
Resolution
You have exceeded one of the image quotas set on your project. Check your current quota and verifythe limits applied and storage in use:
$ oc describe quota
CHAPTER 8. BUILDS
135
CHAPTER 9. DEPLOYMENTS
9.1. HOW DEPLOYMENTS WORK
9.1.1. What Is a Deployment?
OpenShift Dedicated deployments provide fine-grained management over common user applications.They are described using three separate API objects:
A deployment configuration, which describes the desired state of a particular component of theapplication as a pod template.
One or more replication controllers, which contain a point-in-time record of the state of adeployment configuration as a pod template.
One or more pods, which represent an instance of a particular version of an application.
IMPORTANT
Users do not need to manipulate replication controllers or pods owned by deploymentconfigurations. The deployment system ensures changes to deployment configurationsare propagated appropriately. If the existing deployment strategies are not suited for youruse case and you have the need to run manual steps during the lifecycle of yourdeployment, then you should consider creating a custom strategy.
When you create a deployment configuration, a replication controller is created representing thedeployment configuration’s pod template. If the deployment configuration changes, a new replicationcontroller is created with the latest pod template, and a deployment process runs to scale down the oldreplication controller and scale up the new replication controller.
Instances of your application are automatically added and removed from both service load balancers androuters as they are created. As long as your application supports graceful shutdown when it receives theTERM signal, you can ensure that running user connections are given a chance to complete normally.
Features provided by the deployment system:
A deployment configuration, which is a template for running applications.
Triggers that drive automated deployments in response to events.
User-customizable strategies to transition from the previous version to the new version. Astrategy runs inside a pod commonly referred as the deployment process.
A set of hooks for executing custom behavior in different points during the lifecycle of adeployment.
Versioning of your application in order to support rollbacks either manually or automatically incase of deployment failure.
Manual replication scaling and autoscaling.
9.1.2. Creating a Deployment Configuration
OpenShift Dedicated 3 Developer Guide
136
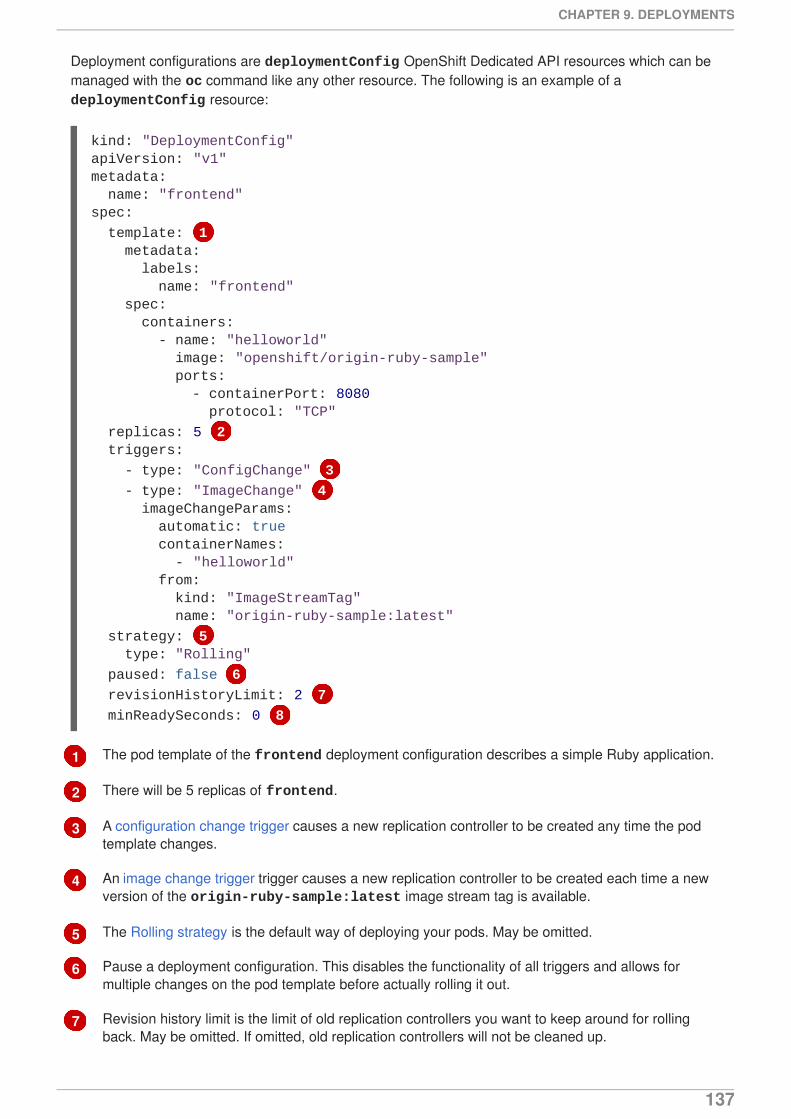
1
2
3
4
5
6
7
Deployment configurations are deploymentConfig OpenShift Dedicated API resources which can bemanaged with the oc command like any other resource. The following is an example of a deploymentConfig resource:
The pod template of the frontend deployment configuration describes a simple Ruby application.
There will be 5 replicas of frontend.
A configuration change trigger causes a new replication controller to be created any time the podtemplate changes.
An image change trigger trigger causes a new replication controller to be created each time a newversion of the origin-ruby-sample:latest image stream tag is available.
The Rolling strategy is the default way of deploying your pods. May be omitted.
Pause a deployment configuration. This disables the functionality of all triggers and allows formultiple changes on the pod template before actually rolling it out.
Revision history limit is the limit of old replication controllers you want to keep around for rollingback. May be omitted. If omitted, old replication controllers will not be cleaned up.
kind: "DeploymentConfig"apiVersion: "v1"metadata: name: "frontend"spec:
template: 1 metadata: labels: name: "frontend" spec: containers: - name: "helloworld" image: "openshift/origin-ruby-sample" ports: - containerPort: 8080 protocol: "TCP"
replicas: 5 2 triggers:
- type: "ConfigChange" 3
- type: "ImageChange" 4 imageChangeParams: automatic: true containerNames: - "helloworld" from: kind: "ImageStreamTag" name: "origin-ruby-sample:latest"
strategy: 5 type: "Rolling"
paused: false 6
revisionHistoryLimit: 2 7
minReadySeconds: 0 8
CHAPTER 9. DEPLOYMENTS
137
8 Minimum seconds to wait (after the readiness checks succeed) for a pod to be consideredavailable. The default value is 0.
9.2. BASIC DEPLOYMENT OPERATIONS
9.2.1. Starting a Deployment
You can start a new deployment process manually using the web console, or from the CLI:
$ oc rollout latest dc/<name>
NOTE
If a deployment process is already in progress, the command will display a message anda new replication controller will not be deployed.
9.2.2. Viewing a Deployment
To get basic information about all the available revisions of your application:
$ oc rollout history dc/<name>
This will show details about all recently created replication controllers for the provided deploymentconfiguration, including any currently running deployment process.
You can view details specific to a revision by using the --revision flag:
$ oc rollout history dc/<name> --revision=1
For more detailed information about a deployment configuration and its latest revision:
$ oc describe dc <name>
NOTE
The web console shows deployments in the Browse tab.
9.2.3. Rolling Back a Deployment
Rollbacks revert an application back to a previous revision and can be performed using the REST API,the CLI, or the web console.
To rollback to the last successful deployed revision of your configuration:
$ oc rollout undo dc/<name>
The deployment configuration’s template will be reverted to match the deployment revision specified inthe undo command, and a new replication controller will be started. If no revision is specified with --to-revision, then the last successfully deployed revision will be used.
OpenShift Dedicated 3 Developer Guide
138
Image change triggers on the deployment configuration are disabled as part of the rollback to preventaccidentally starting a new deployment process soon after the rollback is complete. To re-enable theimage change triggers:
$ oc set triggers dc/<name> --auto
NOTE
Deployment configurations also support automatically rolling back to the last successfulrevision of the configuration in case the latest deployment process fails. In that case, thelatest template that failed to deploy stays intact by the system and it is up to users to fixtheir configurations.
9.2.4. Executing Commands Inside a Container
You can add a command to a container, which modifies the container’s startup behavior by overruling theimage’s ENTRYPOINT. This is different from a lifecycle hook, which instead can be run once perdeployment at a specified time.
Add the command parameters to the spec field of the deployment configuration. You can also add an args field, which modifies the command (or the ENTRYPOINT if command does not exist).
...spec: containers: - name: <container_name> image: 'image' command: - '<command>' args: - '<argument_1>' - '<argument_2>' - '<argument_3>'...
For example, to execute the java command with the -jar and /opt/app-root/springboots2idemo.jararguments:
...spec: containers: - name: example-spring-boot image: 'image' command: - java args: - '-jar' - /opt/app-root/springboots2idemo.jar...
9.2.5. Viewing Deployment Logs
CHAPTER 9. DEPLOYMENTS
139
To stream the logs of the latest revision for a given deployment configuration:
$ oc logs -f dc/<name>
If the latest revision is running or failed, oc logs will return the logs of the process that is responsible fordeploying your pods. If it is successful, oc logs will return the logs from a pod of your application.
You can also view logs from older failed deployment processes, if and only if these processes (oldreplication controllers and their deployer pods) exist and have not been pruned or deleted manually:
$ oc logs --version=1 dc/<name>
For more options on retrieving logs see:
$ oc logs --help
9.2.6. Setting Deployment Triggers
A deployment configuration can contain triggers, which drive the creation of new deployment processesin response to events inside the cluster.
WARNING
If no triggers are defined on a deployment configuration, a ConfigChange trigger isadded by default. If triggers are defined as an empty field, deployments must bestarted manually.
9.2.6.1. Configuration Change Trigger
The ConfigChange trigger results in a new replication controller whenever changes are detected in thepod template of the deployment configuration.
NOTE
If a ConfigChange trigger is defined on a deployment configuration, the first replicationcontroller will be automatically created soon after the deployment configuration itself iscreated and it is not paused.
Example 9.1. A ConfigChange Trigger
9.2.6.2. ImageChange Trigger
triggers: - type: "ConfigChange"
OpenShift Dedicated 3 Developer Guide
140
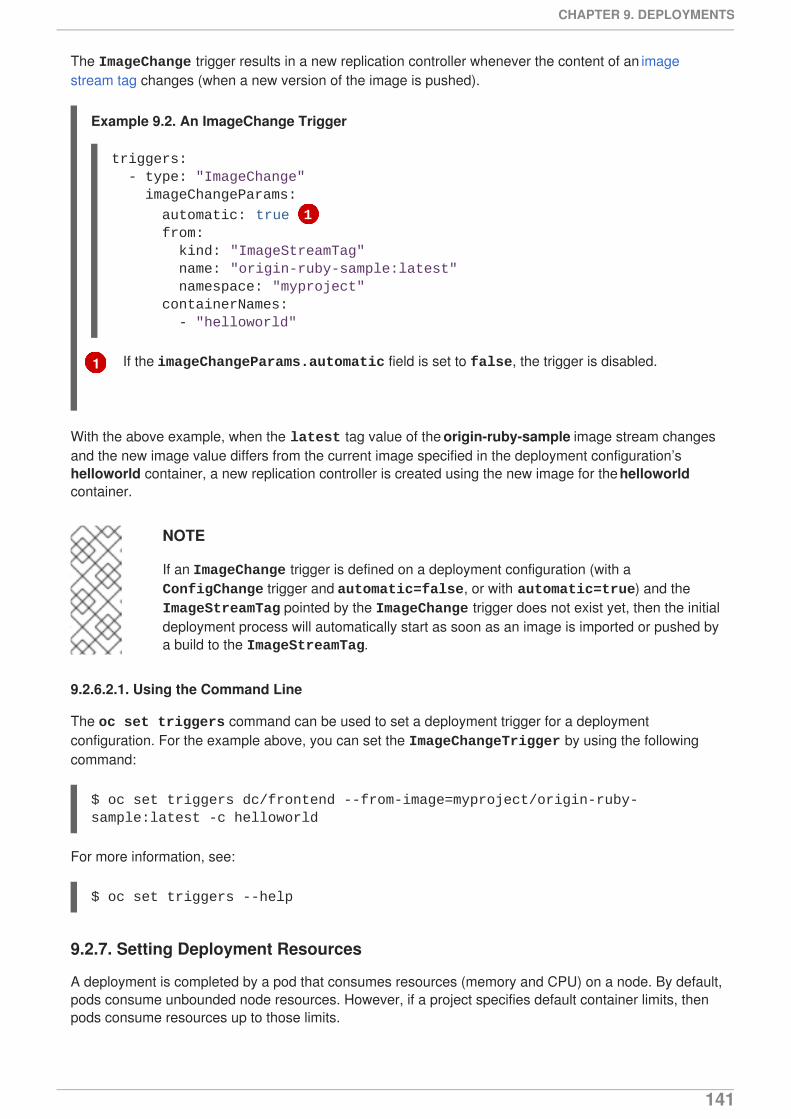
1
The ImageChange trigger results in a new replication controller whenever the content of an imagestream tag changes (when a new version of the image is pushed).
Example 9.2. An ImageChange Trigger
If the imageChangeParams.automatic field is set to false, the trigger is disabled.
With the above example, when the latest tag value of the origin-ruby-sample image stream changesand the new image value differs from the current image specified in the deployment configuration’shelloworld container, a new replication controller is created using the new image for the helloworldcontainer.
NOTE
If an ImageChange trigger is defined on a deployment configuration (with a ConfigChange trigger and automatic=false, or with automatic=true) and the ImageStreamTag pointed by the ImageChange trigger does not exist yet, then the initialdeployment process will automatically start as soon as an image is imported or pushed bya build to the ImageStreamTag.
9.2.6.2.1. Using the Command Line
The oc set triggers command can be used to set a deployment trigger for a deploymentconfiguration. For the example above, you can set the ImageChangeTrigger by using the followingcommand:
$ oc set triggers dc/frontend --from-image=myproject/origin-ruby-sample:latest -c helloworld
For more information, see:
$ oc set triggers --help
9.2.7. Setting Deployment Resources
A deployment is completed by a pod that consumes resources (memory and CPU) on a node. By default,pods consume unbounded node resources. However, if a project specifies default container limits, thenpods consume resources up to those limits.
triggers: - type: "ImageChange" imageChangeParams:
automatic: true 1 from: kind: "ImageStreamTag" name: "origin-ruby-sample:latest" namespace: "myproject" containerNames: - "helloworld"
CHAPTER 9. DEPLOYMENTS
141
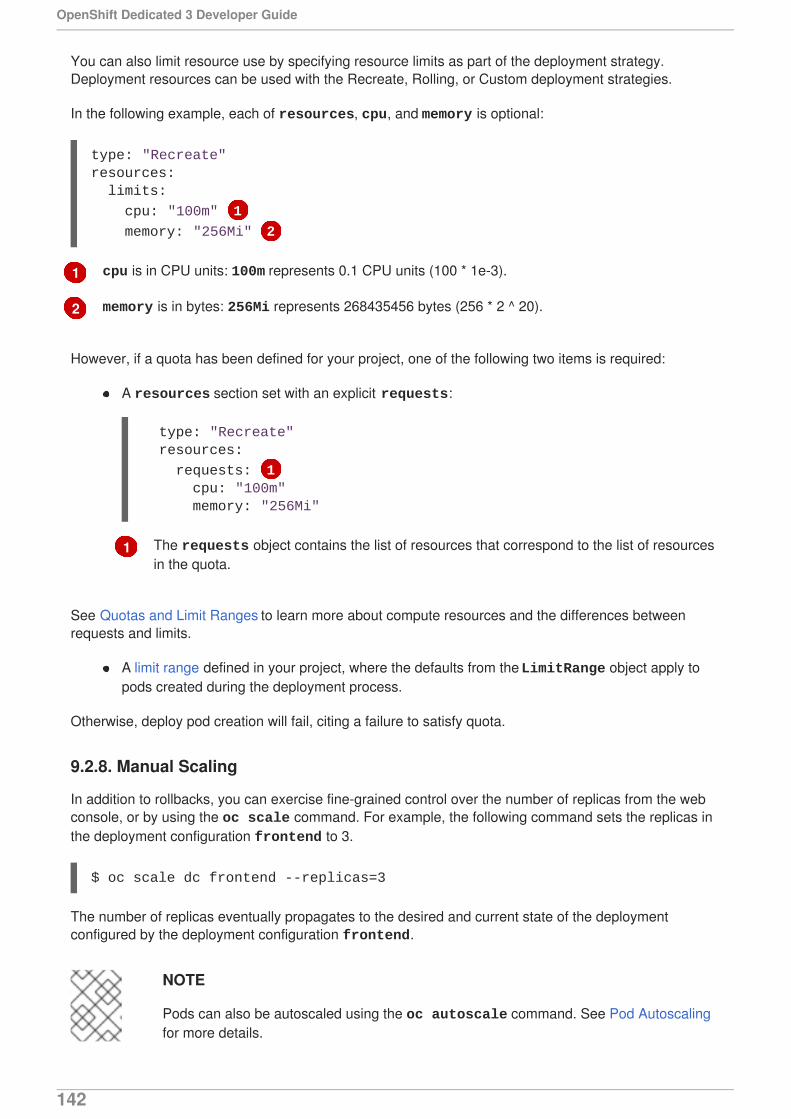
1
2
1
You can also limit resource use by specifying resource limits as part of the deployment strategy.Deployment resources can be used with the Recreate, Rolling, or Custom deployment strategies.
In the following example, each of resources, cpu, and memory is optional:
cpu is in CPU units: 100m represents 0.1 CPU units (100 * 1e-3).
memory is in bytes: 256Mi represents 268435456 bytes (256 * 2 ^ 20).
However, if a quota has been defined for your project, one of the following two items is required:
A resources section set with an explicit requests:
The requests object contains the list of resources that correspond to the list of resourcesin the quota.
See Quotas and Limit Ranges to learn more about compute resources and the differences betweenrequests and limits.
A limit range defined in your project, where the defaults from the LimitRange object apply topods created during the deployment process.
Otherwise, deploy pod creation will fail, citing a failure to satisfy quota.
9.2.8. Manual Scaling
In addition to rollbacks, you can exercise fine-grained control over the number of replicas from the webconsole, or by using the oc scale command. For example, the following command sets the replicas inthe deployment configuration frontend to 3.
$ oc scale dc frontend --replicas=3
The number of replicas eventually propagates to the desired and current state of the deploymentconfigured by the deployment configuration frontend.
NOTE
Pods can also be autoscaled using the oc autoscale command. See Pod Autoscalingfor more details.
type: "Recreate"resources: limits:
cpu: "100m" 1
memory: "256Mi" 2
type: "Recreate" resources:
requests: 1 cpu: "100m" memory: "256Mi"
OpenShift Dedicated 3 Developer Guide
142
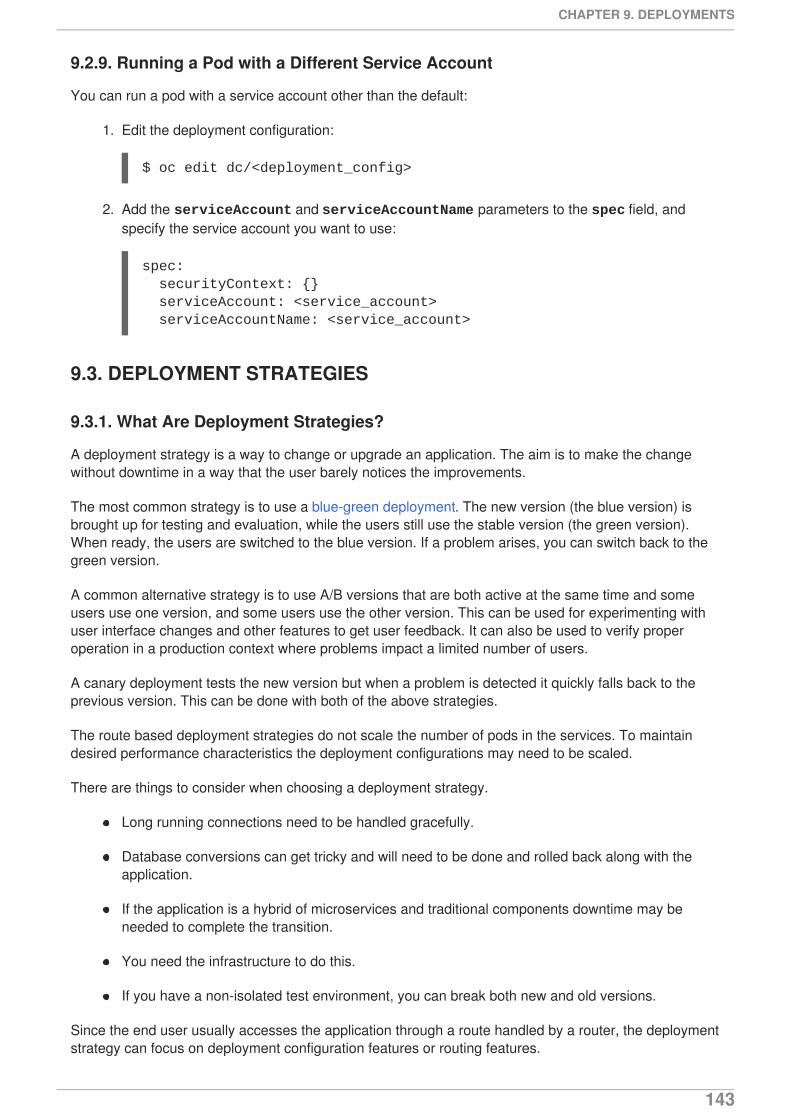
9.2.9. Running a Pod with a Different Service Account
You can run a pod with a service account other than the default:
1. Edit the deployment configuration:
$ oc edit dc/<deployment_config>
2. Add the serviceAccount and serviceAccountName parameters to the spec field, andspecify the service account you want to use:
spec: securityContext: {} serviceAccount: <service_account> serviceAccountName: <service_account>
9.3. DEPLOYMENT STRATEGIES
9.3.1. What Are Deployment Strategies?
A deployment strategy is a way to change or upgrade an application. The aim is to make the changewithout downtime in a way that the user barely notices the improvements.
The most common strategy is to use a blue-green deployment. The new version (the blue version) isbrought up for testing and evaluation, while the users still use the stable version (the green version).When ready, the users are switched to the blue version. If a problem arises, you can switch back to thegreen version.
A common alternative strategy is to use A/B versions that are both active at the same time and someusers use one version, and some users use the other version. This can be used for experimenting withuser interface changes and other features to get user feedback. It can also be used to verify properoperation in a production context where problems impact a limited number of users.
A canary deployment tests the new version but when a problem is detected it quickly falls back to theprevious version. This can be done with both of the above strategies.
The route based deployment strategies do not scale the number of pods in the services. To maintaindesired performance characteristics the deployment configurations may need to be scaled.
There are things to consider when choosing a deployment strategy.
Long running connections need to be handled gracefully.
Database conversions can get tricky and will need to be done and rolled back along with theapplication.
If the application is a hybrid of microservices and traditional components downtime may beneeded to complete the transition.
You need the infrastructure to do this.
If you have a non-isolated test environment, you can break both new and old versions.
Since the end user usually accesses the application through a route handled by a router, the deploymentstrategy can focus on deployment configuration features or routing features.
CHAPTER 9. DEPLOYMENTS
143
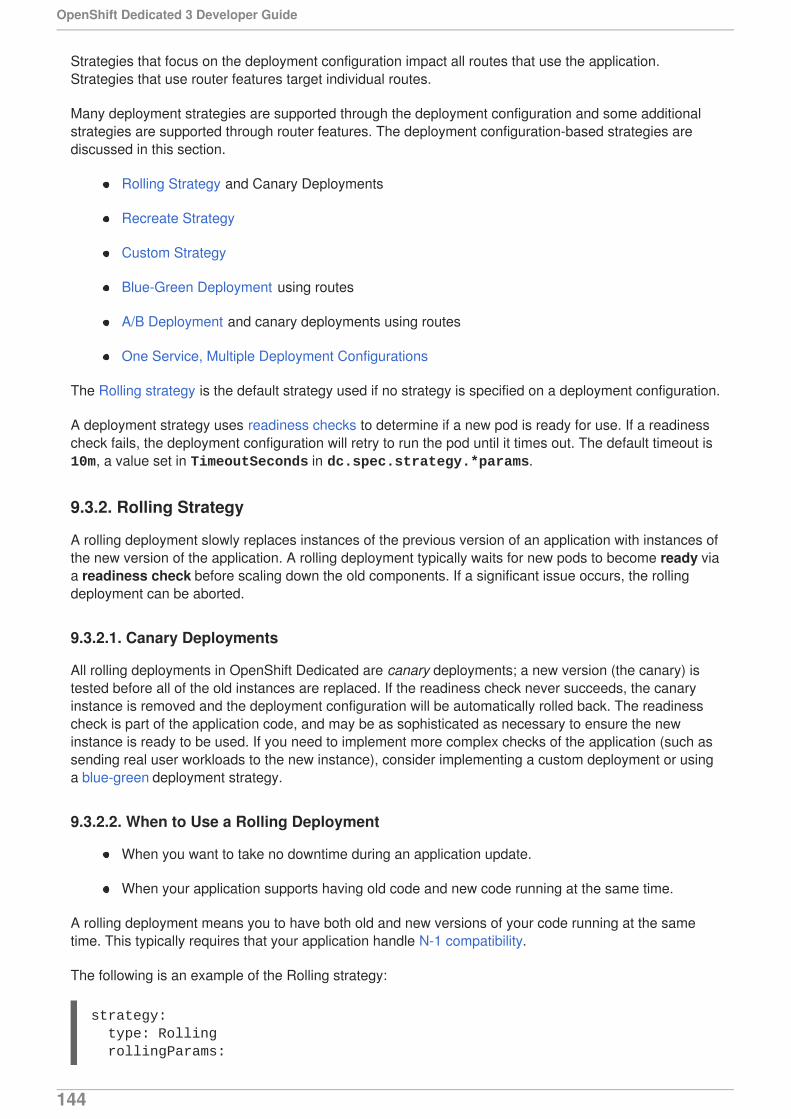
Strategies that focus on the deployment configuration impact all routes that use the application.Strategies that use router features target individual routes.
Many deployment strategies are supported through the deployment configuration and some additionalstrategies are supported through router features. The deployment configuration-based strategies arediscussed in this section.
Rolling Strategy and Canary Deployments
Recreate Strategy
Custom Strategy
Blue-Green Deployment using routes
A/B Deployment and canary deployments using routes
One Service, Multiple Deployment Configurations
The Rolling strategy is the default strategy used if no strategy is specified on a deployment configuration.
A deployment strategy uses readiness checks to determine if a new pod is ready for use. If a readinesscheck fails, the deployment configuration will retry to run the pod until it times out. The default timeout is 10m, a value set in TimeoutSeconds in dc.spec.strategy.*params.
9.3.2. Rolling Strategy
A rolling deployment slowly replaces instances of the previous version of an application with instances ofthe new version of the application. A rolling deployment typically waits for new pods to become ready viaa readiness check before scaling down the old components. If a significant issue occurs, the rollingdeployment can be aborted.
9.3.2.1. Canary Deployments
All rolling deployments in OpenShift Dedicated are canary deployments; a new version (the canary) istested before all of the old instances are replaced. If the readiness check never succeeds, the canaryinstance is removed and the deployment configuration will be automatically rolled back. The readinesscheck is part of the application code, and may be as sophisticated as necessary to ensure the newinstance is ready to be used. If you need to implement more complex checks of the application (such assending real user workloads to the new instance), consider implementing a custom deployment or usinga blue-green deployment strategy.
9.3.2.2. When to Use a Rolling Deployment
When you want to take no downtime during an application update.
When your application supports having old code and new code running at the same time.
A rolling deployment means you to have both old and new versions of your code running at the sametime. This typically requires that your application handle N-1 compatibility.
The following is an example of the Rolling strategy:
strategy: type: Rolling rollingParams:
OpenShift Dedicated 3 Developer Guide
144
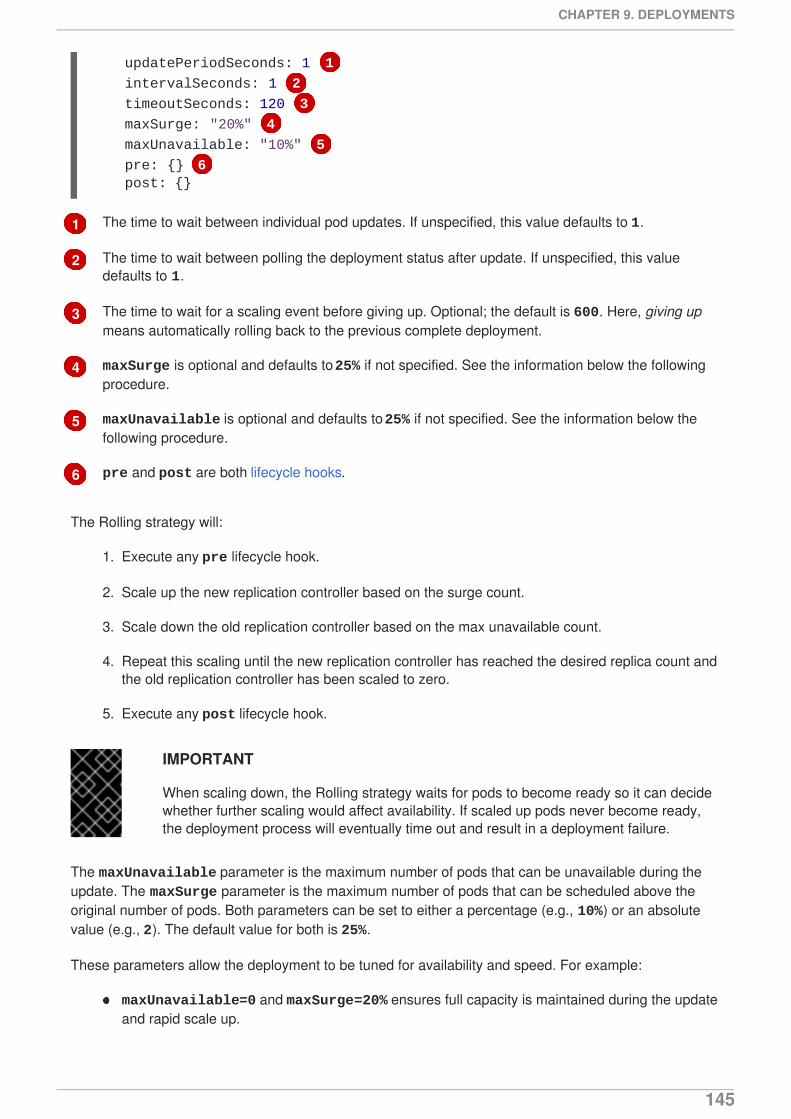
1
2
3
4
5
6
The time to wait between individual pod updates. If unspecified, this value defaults to 1.
The time to wait between polling the deployment status after update. If unspecified, this valuedefaults to 1.
The time to wait for a scaling event before giving up. Optional; the default is 600. Here, giving upmeans automatically rolling back to the previous complete deployment.
maxSurge is optional and defaults to 25% if not specified. See the information below the followingprocedure.
maxUnavailable is optional and defaults to 25% if not specified. See the information below thefollowing procedure.
pre and post are both lifecycle hooks.
The Rolling strategy will:
1. Execute any pre lifecycle hook.
2. Scale up the new replication controller based on the surge count.
3. Scale down the old replication controller based on the max unavailable count.
4. Repeat this scaling until the new replication controller has reached the desired replica count andthe old replication controller has been scaled to zero.
5. Execute any post lifecycle hook.
IMPORTANT
When scaling down, the Rolling strategy waits for pods to become ready so it can decidewhether further scaling would affect availability. If scaled up pods never become ready,the deployment process will eventually time out and result in a deployment failure.
The maxUnavailable parameter is the maximum number of pods that can be unavailable during theupdate. The maxSurge parameter is the maximum number of pods that can be scheduled above theoriginal number of pods. Both parameters can be set to either a percentage (e.g., 10%) or an absolutevalue (e.g., 2). The default value for both is 25%.
These parameters allow the deployment to be tuned for availability and speed. For example:
maxUnavailable=0 and maxSurge=20% ensures full capacity is maintained during the updateand rapid scale up.
updatePeriodSeconds: 1 1
intervalSeconds: 1 2
timeoutSeconds: 120 3
maxSurge: "20%" 4
maxUnavailable: "10%" 5
pre: {} 6 post: {}
CHAPTER 9. DEPLOYMENTS
145
maxUnavailable=10% and maxSurge=0 performs an update using no extra capacity (an in-place update).
maxUnavailable=10% and maxSurge=10% scales up and down quickly with some potentialfor capacity loss.
Generally, if you want fast rollouts, use maxSurge. If you need to take into account resource quota andcan accept partial unavailability, use maxUnavailable.
9.3.2.3. Rolling Example
Rolling deployments are the default in OpenShift Dedicated. To see a rolling update, follow these steps:
1. Create an application based on the example deployment images found in DockerHub:
$ oc new-app openshift/deployment-example
If you have the router installed, make the application available via a route (or use the service IPdirectly)
$ oc expose svc/deployment-example
Browse to the application at deployment-example.<project>.<router_domain> toverify you see the v1 image.
2. Scale the deployment configuration up to three replicas:
$ oc scale dc/deployment-example --replicas=3
3. Trigger a new deployment automatically by tagging a new version of the example as the latesttag:
$ oc tag deployment-example:v2 deployment-example:latest
4. In your browser, refresh the page until you see the v2 image.
5. If you are using the CLI, the following command will show you how many pods are on version 1and how many are on version 2. In the web console, you should see the pods slowly beingadded to v2 and removed from v1.
$ oc describe dc deployment-example
During the deployment process, the new replication controller is incrementally scaled up. Once the newpods are marked as ready (by passing their readiness check), the deployment process will continue. Ifthe pods do not become ready, the process will abort, and the deployment configuration will be rolledback to its previous version.
9.3.3. Recreate Strategy
The Recreate strategy has basic rollout behavior and supports lifecycle hooks for injecting code into thedeployment process.
The following is an example of the Recreate strategy:
OpenShift Dedicated 3 Developer Guide
146
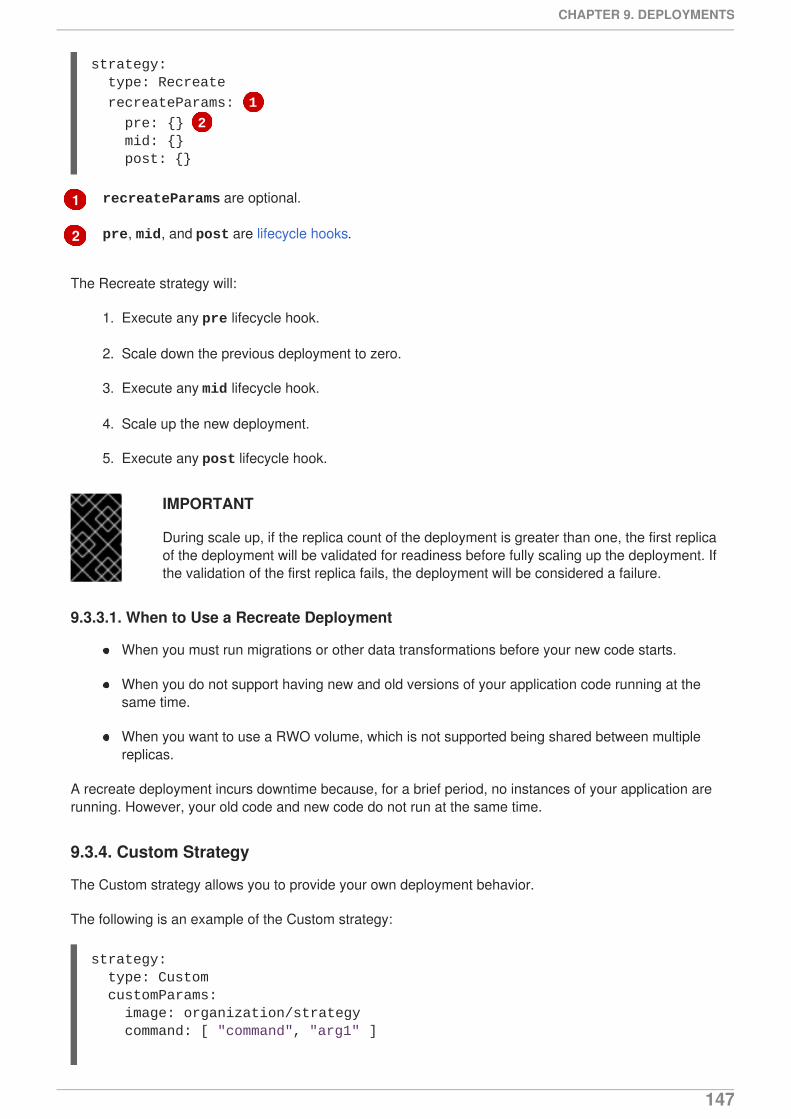
1
2
recreateParams are optional.
pre, mid, and post are lifecycle hooks.
The Recreate strategy will:
1. Execute any pre lifecycle hook.
2. Scale down the previous deployment to zero.
3. Execute any mid lifecycle hook.
4. Scale up the new deployment.
5. Execute any post lifecycle hook.
IMPORTANT
During scale up, if the replica count of the deployment is greater than one, the first replicaof the deployment will be validated for readiness before fully scaling up the deployment. Ifthe validation of the first replica fails, the deployment will be considered a failure.
9.3.3.1. When to Use a Recreate Deployment
When you must run migrations or other data transformations before your new code starts.
When you do not support having new and old versions of your application code running at thesame time.
When you want to use a RWO volume, which is not supported being shared between multiplereplicas.
A recreate deployment incurs downtime because, for a brief period, no instances of your application arerunning. However, your old code and new code do not run at the same time.
9.3.4. Custom Strategy
The Custom strategy allows you to provide your own deployment behavior.
The following is an example of the Custom strategy:
strategy: type: Recreate
recreateParams: 1
pre: {} 2 mid: {} post: {}
strategy: type: Custom customParams: image: organization/strategy command: [ "command", "arg1" ]
CHAPTER 9. DEPLOYMENTS
147
In the above example, the organization/strategy container image provides the deploymentbehavior. The optional command array overrides any CMD directive specified in the image’s Dockerfile.The optional environment variables provided are added to the execution environment of the strategyprocess.
Additionally, OpenShift Dedicated provides the following environment variables to the deploymentprocess:
Environment Variable Description
OPENSHIFT_DEPLOYMENT_NAME
The name of the new deployment (a replication controller).
OPENSHIFT_DEPLOYMENT_NAMESPACE
The name space of the new deployment.
The replica count of the new deployment will initially be zero. The responsibility of the strategy is to makethe new deployment active using the logic that best serves the needs of the user.
Learn more about advanced deployment strategies.
Alternatively, use customParams to inject the custom deployment logic into the existing deploymentstrategies. Provide a custom shell script logic and call the openshift-deploy binary. Users do nothave to supply their custom deployer container image, but the default OpenShift Dedicated deployerimage will be used instead:
This will result in following deployment:
Started deployment #2--> Scaling up custom-deployment-2 from 0 to 2, scaling down custom-deployment-1 from 2 to 0 (keep 2 pods available, don't exceed 3 pods) Scaling custom-deployment-2 up to 1--> Reached 50% (currently 50%)Halfway there--> Scaling up custom-deployment-2 from 1 to 2, scaling down custom-deployment-1 from 2 to 0 (keep 2 pods available, don't exceed 3 pods)
environment: - name: ENV_1 value: VALUE_1
strategy: type: Rolling customParams: command: - /bin/sh - -c - | set -e openshift-deploy --until=50% echo Halfway there openshift-deploy echo Complete
OpenShift Dedicated 3 Developer Guide
148
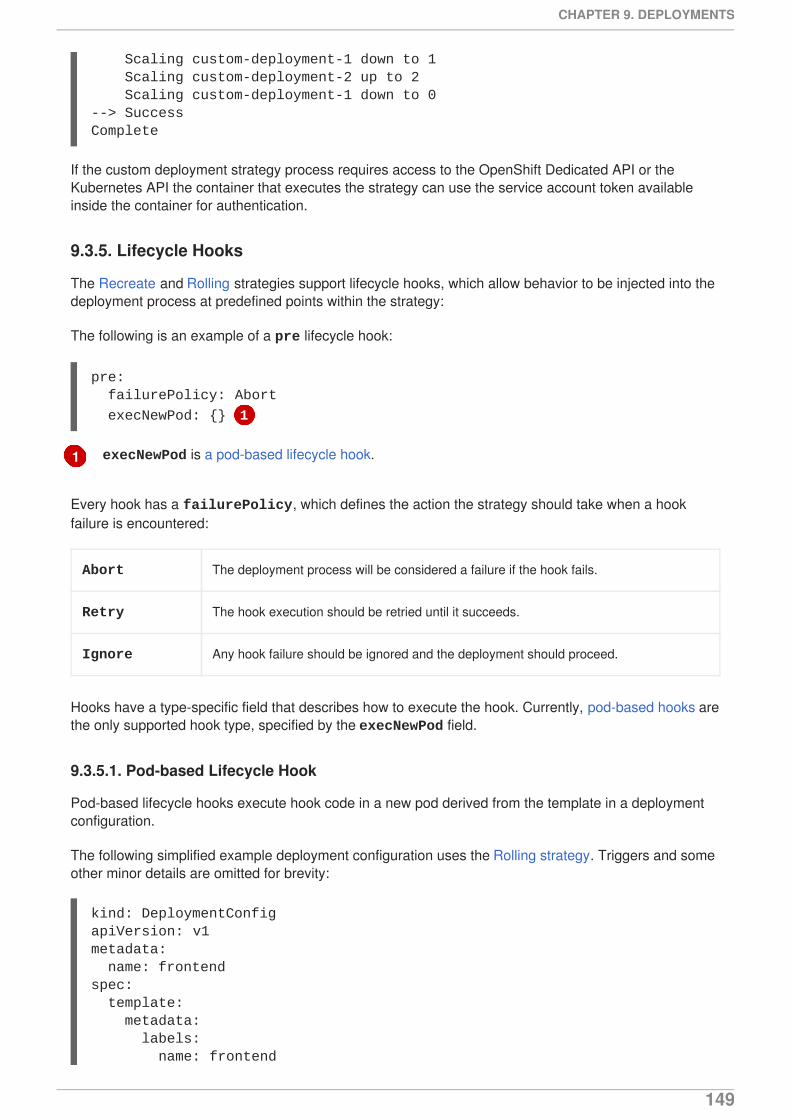
1
Scaling custom-deployment-1 down to 1 Scaling custom-deployment-2 up to 2 Scaling custom-deployment-1 down to 0--> SuccessComplete
If the custom deployment strategy process requires access to the OpenShift Dedicated API or theKubernetes API the container that executes the strategy can use the service account token availableinside the container for authentication.
9.3.5. Lifecycle Hooks
The Recreate and Rolling strategies support lifecycle hooks, which allow behavior to be injected into thedeployment process at predefined points within the strategy:
The following is an example of a pre lifecycle hook:
execNewPod is a pod-based lifecycle hook.
Every hook has a failurePolicy, which defines the action the strategy should take when a hookfailure is encountered:
Abort The deployment process will be considered a failure if the hook fails.
Retry The hook execution should be retried until it succeeds.
Ignore Any hook failure should be ignored and the deployment should proceed.
Hooks have a type-specific field that describes how to execute the hook. Currently, pod-based hooks arethe only supported hook type, specified by the execNewPod field.
9.3.5.1. Pod-based Lifecycle Hook
Pod-based lifecycle hooks execute hook code in a new pod derived from the template in a deploymentconfiguration.
The following simplified example deployment configuration uses the Rolling strategy. Triggers and someother minor details are omitted for brevity:
pre: failurePolicy: Abort
execNewPod: {} 1
kind: DeploymentConfigapiVersion: v1metadata: name: frontendspec: template: metadata: labels: name: frontend
CHAPTER 9. DEPLOYMENTS
149

1
2
3
4
The helloworld name refers to spec.template.spec.containers[0].name.
This command overrides any ENTRYPOINT defined by the openshift/origin-ruby-sampleimage.
env is an optional set of environment variables for the hook container.
volumes is an optional set of volume references for the hook container.
In this example, the pre hook will be executed in a new pod using the openshift/origin-ruby-sampleimage from the helloworld container. The hook pod will have the following properties:
The hook command will be /usr/bin/command arg1 arg2.
The hook container will have the CUSTOM_VAR1=custom_value1 environment variable.
The hook failure policy is Abort, meaning the deployment process will fail if the hook fails.
The hook pod will inherit the data volume from the deployment configuration pod.
9.3.5.2. Using the Command Line
The oc set deployment-hook command can be used to set the deployment hook for a deploymentconfiguration. For the example above, you can set the pre-deployment hook with the followingcommand:
$ oc set deployment-hook dc/frontend --pre -c helloworld -e CUSTOM_VAR1=custom_value1 \ -v data --failure-policy=abort -- /usr/bin/command arg1 arg2
9.4. ADVANCED DEPLOYMENT STRATEGIES
spec: containers: - name: helloworld image: openshift/origin-ruby-sample replicas: 5 selector: name: frontend strategy: type: Rolling rollingParams: pre: failurePolicy: Abort execNewPod:
containerName: helloworld 1
command: [ "/usr/bin/command", "arg1", "arg2" ] 2
env: 3 - name: CUSTOM_VAR1 value: custom_value1 volumes:
- data 4
OpenShift Dedicated 3 Developer Guide
150
9.4.1. Advanced Deployment Strategies
Deployment strategies provide a way for the application to evolve. Some strategies use the deploymentconfiguration to make changes that are seen by users of all routes that resolve to the application. Otherstrategies, such as the ones described here, use router features to impact specific routes.
9.4.2. Blue-Green Deployment
Blue-green deployments involve running two versions of an application at the same time and movingtraffic from the in-production version (the green version) to the newer version (the blue version). You canuse a rolling strategy or switch services in a route.
NOTE
Since many applications depend on persistent data, you will need to have an applicationthat supports N-1 compatibility, which means you share data and implement live migrationbetween your database, store, or disk by creating two copies of your data layer.
Consider the data used in testing the new version. If it is the production data, a bug in thenew version can break the production version.
9.4.2.1. Using a Blue-Green Deployment
Blue-Green deployments use two deployment configurations. Both are running, and the one inproduction depends on the service the route specifies, with each deployment configuration exposed to adifferent service. You can create a new route to the new version and test it. When ready, change theservice in the production route to point to the new service and the new, blue, version is live.
If necessary, you can roll back to the older, green, version by switching service back to the previousversion.
Using a Route and Two ServicesThis example sets up two deployment configurations; one for the stable version (the green version) andthe other for the newer version (the blue version).
A route points to a service, and can be changed to point to a different service at any time. As adeveloper, you can test the new version of your code by connecting to the new service before yourproduction traffic is routed to it.
Routes are intended for web (HTTP and HTTPS) traffic, so this technique is best suited for webapplications.
1. Create two copies of the example application:
$ oc new-app openshift/deployment-example:v1 --name=example-green$ oc new-app openshift/deployment-example:v2 --name=example-blue
This creates two independent application components: one running the v1 image under the example-green service, and one using the v2 image under the example-blue service.
2. Create a route that points to the old service:
$ oc expose svc/example-green --name=bluegreen-example
CHAPTER 9. DEPLOYMENTS
151
3. Browse to the application at bluegreen-example.<project>.<router_domain> to verifyyou see the v1 image.
4. Edit the route and change the service name to example-blue:
$ oc patch route/bluegreen-example -p '{"spec":{"to":{"name":"example-blue"}}}'
5. To verify that the route has changed, refresh the browser until you see the v2 image.
9.4.3. A/B Deployment
The A/B deployment strategy lets you try a new version of the application in a limited way in theproduction environment. You can specify that the production version gets most of the user requests whilea limited fraction of requests go to the new version. Since you control the portion of requests to eachversion, as testing progresses you can increase the fraction of requests to the new version and ultimatelystop using the previous version. As you adjust the request load on each version, the number of pods ineach service may need to be scaled as well to provide the expected performance.
In addition to upgrading software, you can use this feature to experiment with versions of the userinterface. Since some users get the old version and some the new, you can evaluate the user’s reactionto the different versions to inform design decisions.
For this to be effective, both the old and new versions need to be similar enough that both can run at thesame time. This is common with bug fix releases and when new features do not interfere with the old.The versions need N-1 compatibility to properly work together.
OpenShift Dedicated supports N-1 compatibility through the web console as well as the command lineinterface.
9.4.3.1. Load Balancing for A/B Testing
The user sets up a route with multiple services. Each service handles a version of the application.
Each service is assigned a weight and the portion of requests to each service is the service_weightdivided by the sum_of_weights. The weight for each service is distributed to the service’s endpointsso that the sum of the endpoint weights is the service weight.
The route can have up to four services. The weight for the service can be between 0 and 256. Whenthe weight is 0, no new requests go to the service, however existing connections remain active. Whenthe service weight is not 0, each endpoint has a minimum weight of 1. Because of this, a service witha lot of endpoints can end up with higher weight than desired. In this case, reduce the number of podsto get the desired load balance weight. See the Alternate Backends and Weights section for moreinformation.
The web console allows users to set the weighting and show balance between them:
OpenShift Dedicated 3 Developer Guide
152
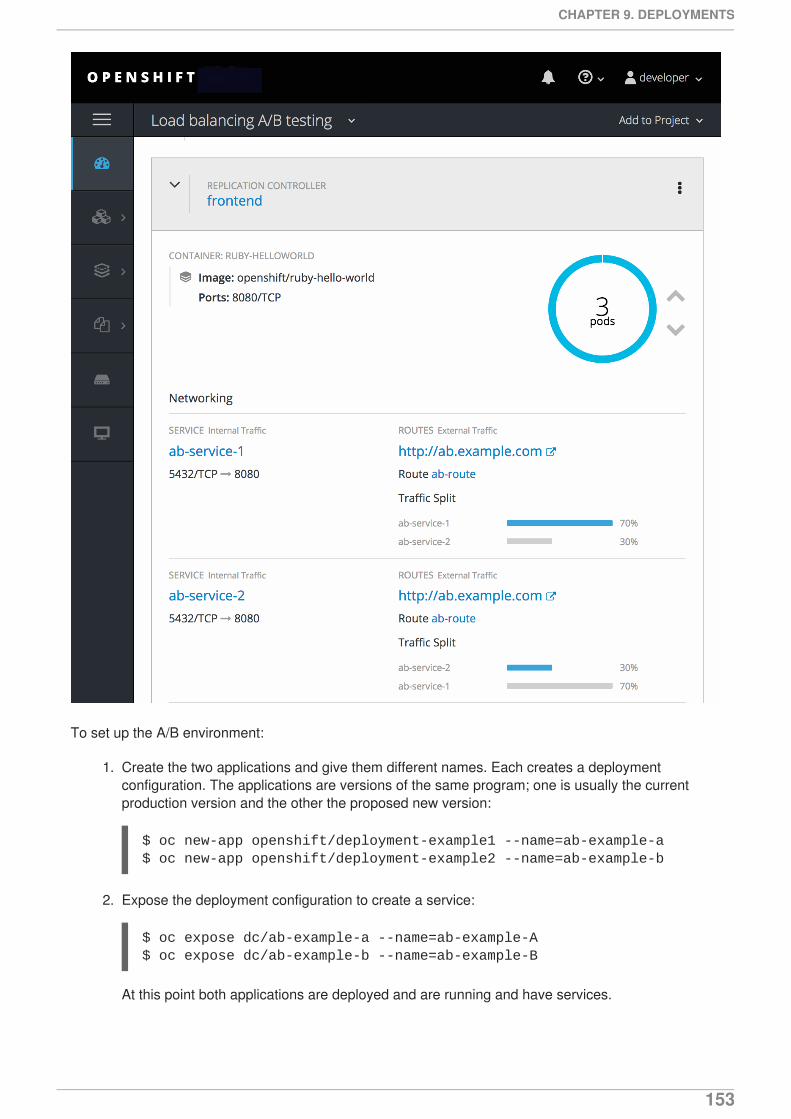
To set up the A/B environment:
1. Create the two applications and give them different names. Each creates a deploymentconfiguration. The applications are versions of the same program; one is usually the currentproduction version and the other the proposed new version:
$ oc new-app openshift/deployment-example1 --name=ab-example-a$ oc new-app openshift/deployment-example2 --name=ab-example-b
2. Expose the deployment configuration to create a service:
$ oc expose dc/ab-example-a --name=ab-example-A$ oc expose dc/ab-example-b --name=ab-example-B
At this point both applications are deployed and are running and have services.
CHAPTER 9. DEPLOYMENTS
153
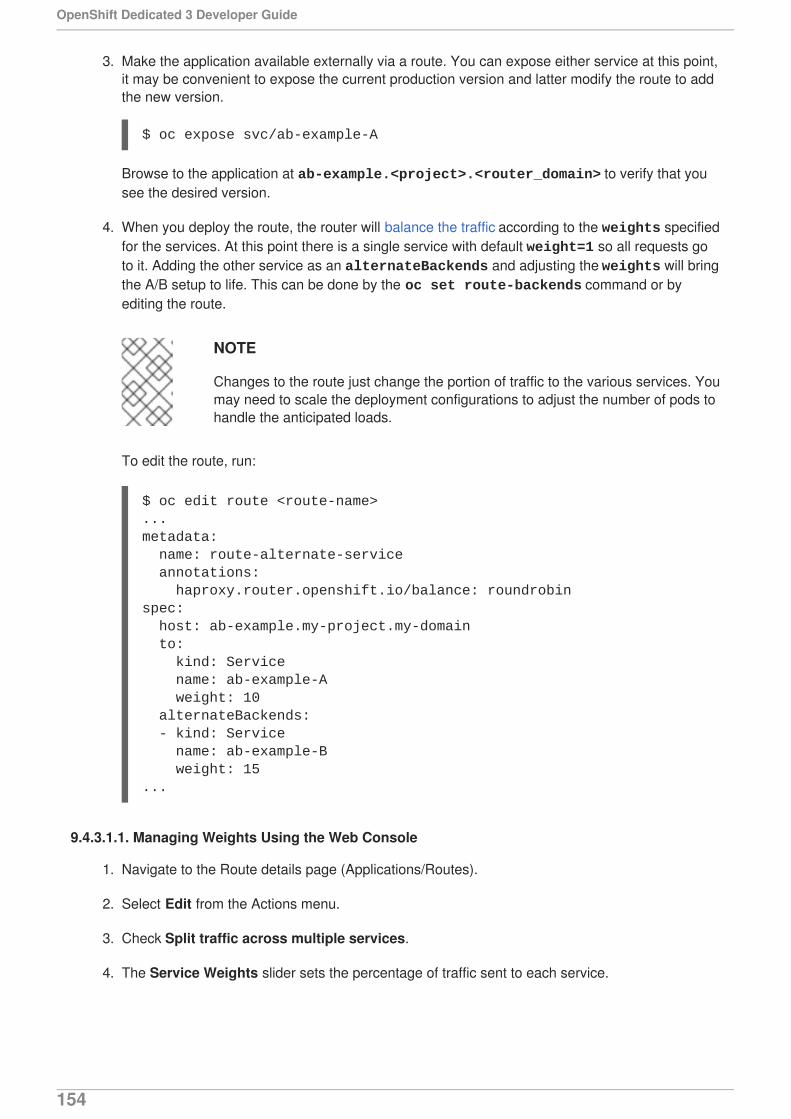
3. Make the application available externally via a route. You can expose either service at this point,it may be convenient to expose the current production version and latter modify the route to addthe new version.
$ oc expose svc/ab-example-A
Browse to the application at ab-example.<project>.<router_domain> to verify that yousee the desired version.
4. When you deploy the route, the router will balance the traffic according to the weights specifiedfor the services. At this point there is a single service with default weight=1 so all requests goto it. Adding the other service as an alternateBackends and adjusting the weights will bringthe A/B setup to life. This can be done by the oc set route-backends command or byediting the route.
NOTE
Changes to the route just change the portion of traffic to the various services. Youmay need to scale the deployment configurations to adjust the number of pods tohandle the anticipated loads.
To edit the route, run:
$ oc edit route <route-name>...metadata: name: route-alternate-service annotations: haproxy.router.openshift.io/balance: roundrobinspec: host: ab-example.my-project.my-domain to: kind: Service name: ab-example-A weight: 10 alternateBackends: - kind: Service name: ab-example-B weight: 15...
9.4.3.1.1. Managing Weights Using the Web Console
1. Navigate to the Route details page (Applications/Routes).
2. Select Edit from the Actions menu.
3. Check Split traffic across multiple services.
4. The Service Weights slider sets the percentage of traffic sent to each service.
OpenShift Dedicated 3 Developer Guide
154
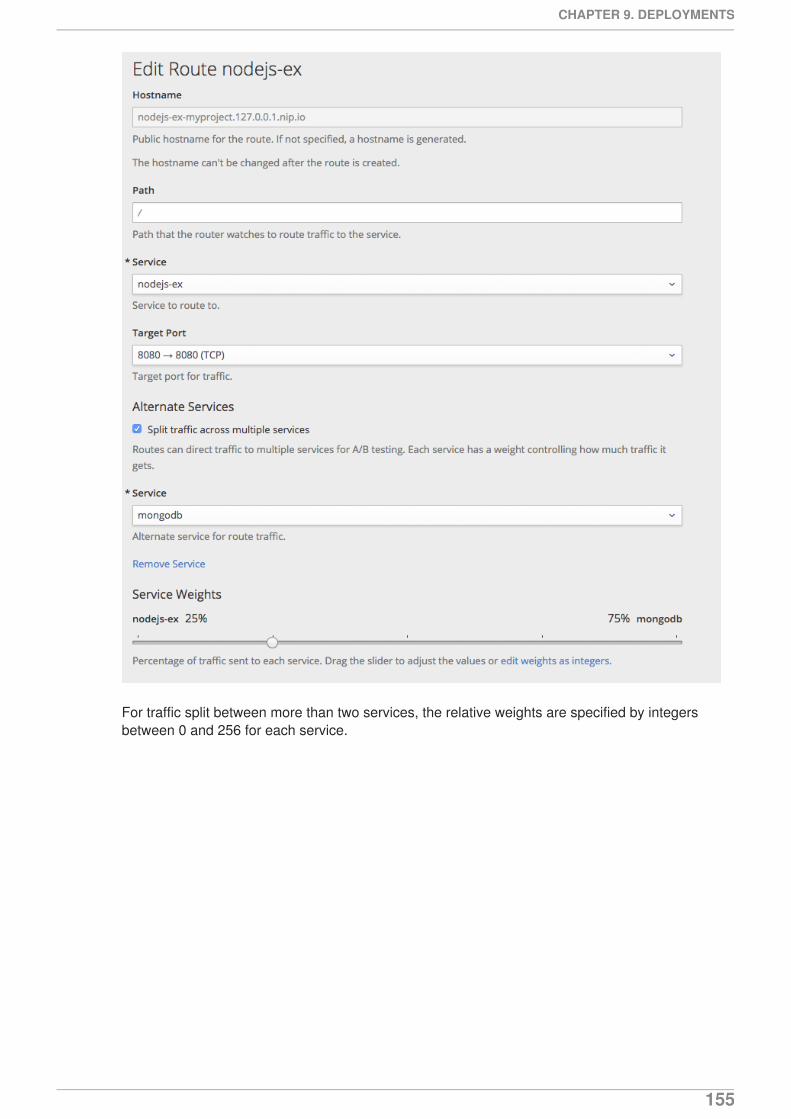
For traffic split between more than two services, the relative weights are specified by integersbetween 0 and 256 for each service.
CHAPTER 9. DEPLOYMENTS
155
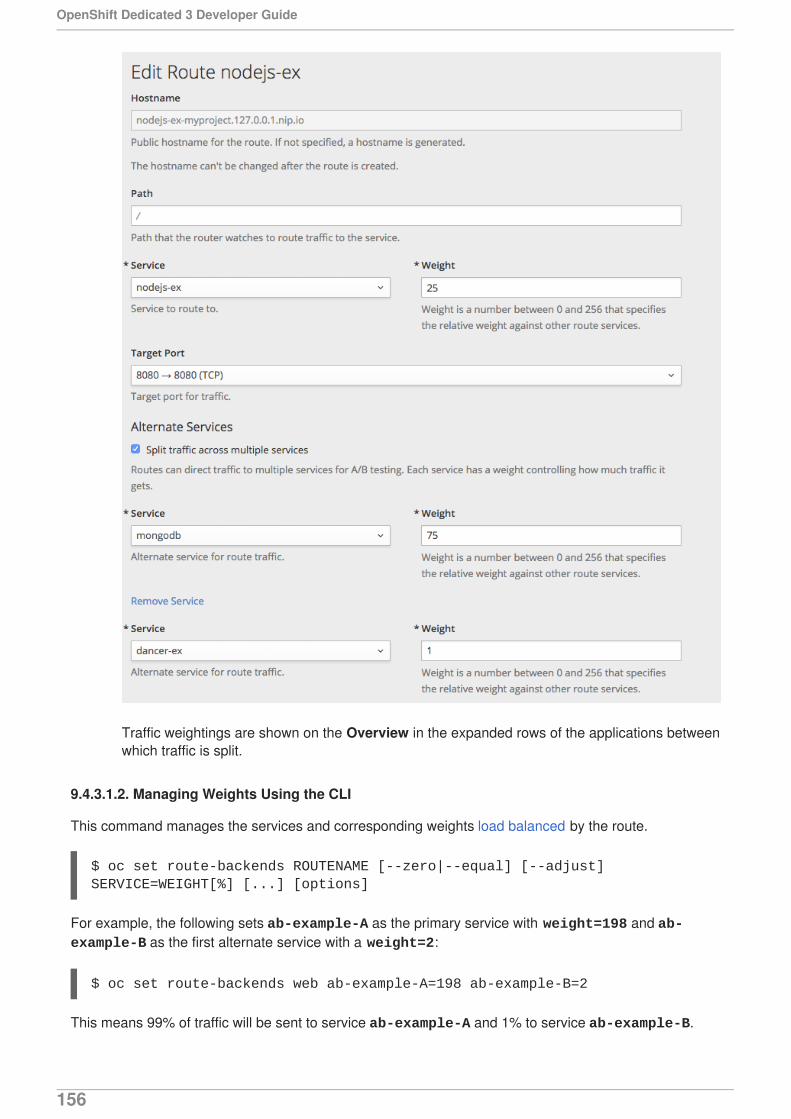
Traffic weightings are shown on the Overview in the expanded rows of the applications betweenwhich traffic is split.
9.4.3.1.2. Managing Weights Using the CLI
This command manages the services and corresponding weights load balanced by the route.
$ oc set route-backends ROUTENAME [--zero|--equal] [--adjust] SERVICE=WEIGHT[%] [...] [options]
For example, the following sets ab-example-A as the primary service with weight=198 and ab-example-B as the first alternate service with a weight=2:
$ oc set route-backends web ab-example-A=198 ab-example-B=2
This means 99% of traffic will be sent to service ab-example-A and 1% to service ab-example-B.
OpenShift Dedicated 3 Developer Guide
156
This command does not scale the deployment configurations. You may need to do that to have enoughpods to handle the request load.
The command with no flags displays the current configuration.
$ oc set route-backends webNAME KIND TO WEIGHTroutes/web Service ab-example-A 198 (99%)routes/web Service ab-example-B 2 (1%)
The --adjust flag allows you to alter the weight of an individual service relative to itself or to theprimary service. Specifying a percentage will adjust the service relative to either the primary or the firstalternate (if you specify the primary). If there are other backends their weights will be kept proportional tothe changed.
$ oc set route-backends web --adjust ab-example-A=200 ab-example-B=10$ oc set route-backends web --adjust ab-example-B=5%$ oc set route-backends web --adjust ab-example-B=+15%
The --equal flag sets the weight of all services to 100
$ oc set route-backends web --equal
The --zero flag sets the weight of all services to 0. All requests will return with a 503 error.
NOTE
Not all routers may support multiple or weighted backends.
9.4.3.1.3. One Service, Multiple Deployment Configurations
If you have the router installed, make the application available via a route (or use the service IP directly):
$ oc expose svc/ab-example
Browse to the application at ab-example.<project>.<router_domain> to verify you see the v1image.
1. Create a second shard based on the same source image as the first shard but different taggedversion, and set a unique value:
$ oc new-app openshift/deployment-example:v2 --name=ab-example-b --labels=ab-example=true SUBTITLE="shard B" COLOR="red"
2. Edit the newly created shard to set a label ab-example=true that will be common to allshards:
$ oc edit dc/ab-example-b
In the editor, add the line ab-example: "true" underneath spec.selector and spec.template.metadata.labels alongside the existing deploymentconfig=ab-example-b label. Save and exit the editor.
CHAPTER 9. DEPLOYMENTS
157
3. Trigger a re-deployment of the second shard to pick up the new labels:
$ oc rollout latest dc/ab-example-b
4. At this point, both sets of pods are being served under the route. However, since both browsers(by leaving a connection open) and the router (by default, through a cookie) will attempt topreserve your connection to a back-end server, you may not see both shards being returned toyou. To force your browser to one or the other shard, use the scale command:
$ oc scale dc/ab-example-a --replicas=0
Refreshing your browser should show v2 and shard B (in red).
$ oc scale dc/ab-example-a --replicas=1; oc scale dc/ab-example-b --replicas=0
Refreshing your browser should show v1 and shard A (in blue).
If you trigger a deployment on either shard, only the pods in that shard will be affected. You caneasily trigger a deployment by changing the SUBTITLE environment variable in eitherdeployment config oc edit dc/ab-example-a or oc edit dc/ab-example-b. You canadd additional shards by repeating steps 5-7.
NOTE
These steps will be simplified in future versions of OpenShift Dedicated.
9.4.4. Proxy Shard / Traffic Splitter
In production environments, you can precisely control the distribution of traffic that lands on a particularshard. When dealing with large numbers of instances, you can use the relative scale of individual shardsto implement percentage based traffic. That combines well with a proxy shard, which forwards or splitsthe traffic it receives to a separate service or application running elsewhere.
In the simplest configuration, the proxy would forward requests unchanged. In more complex setups, youcan duplicate the incoming requests and send to both a separate cluster as well as to a local instance ofthe application, and compare the result. Other patterns include keeping the caches of a DR installationwarm, or sampling incoming traffic for analysis purposes.
While an implementation is beyond the scope of this example, any TCP (or UDP) proxy could be rununder the desired shard. Use the oc scale command to alter the relative number of instances servingrequests under the proxy shard. For more complex traffic management, consider customizing theOpenShift Dedicated router with proportional balancing capabilities.
9.4.5. N-1 Compatibility
Applications that have new code and old code running at the same time must be careful to ensure thatdata written by the new code can be read and handled (or gracefully ignored) by the old version of thecode. This is sometimes called schema evolution and is a complex problem.
This can take many forms — data stored on disk, in a database, in a temporary cache, or that is part of auser’s browser session. While most web applications can support rolling deployments, it is important totest and design your application to handle it.
OpenShift Dedicated 3 Developer Guide
158
For some applications, the period of time that old code and new code is running side by side is short, sobugs or some failed user transactions are acceptable. For others, the failure pattern may result in theentire application becoming non-functional.
One way to validate N-1 compatibility is to use an A/B deployment. Run the old code and new code atthe same time in a controlled way in a test environment, and verify that traffic that flows to the newdeployment does not cause failures in the old deployment.
9.4.6. Graceful Termination
OpenShift Dedicated and Kubernetes give application instances time to shut down before removing themfrom load balancing rotations. However, applications must ensure they cleanly terminate userconnections as well before they exit.
On shutdown, OpenShift Dedicated will send a TERM signal to the processes in the container.Application code, on receiving SIGTERM, should stop accepting new connections. This will ensure thatload balancers route traffic to other active instances. The application code should then wait until all openconnections are closed (or gracefully terminate individual connections at the next opportunity) beforeexiting.
After the graceful termination period expires, a process that has not exited will be sent the KILL signal,which immediately ends the process. The terminationGracePeriodSeconds attribute of a pod orpod template controls the graceful termination period (default 30 seconds) and may be customized perapplication as necessary.
9.5. KUBERNETES DEPLOYMENTS SUPPORT
9.5.1. Deployments Object Type
Kubernetes provides a first-class object type in OpenShift Dedicated called deployments . This objecttype (referred to here as Kubernetes deployments for distinction) serves as a descendant of thedeployment configuration object type.
Like deployment configurations, Kubernetes deployments describe the desired state of a particularcomponent of an application as a pod template. Kubernetes deployments create replica sets (an iterationof replication controllers), which orchestrate pod lifecycles.
For example, this definition of a Kubernetes deployment creates a replica set to bring up one hello-openshift pod:
Example Kubernetes Deployment Definition hello-openshift-deployment.yaml
apiVersion: apps/v1kind: Deploymentmetadata: name: hello-openshiftspec: replicas: 1 selector: matchLabels: app: hello-openshift template: metadata: labels: app: hello-openshift
CHAPTER 9. DEPLOYMENTS
159
spec: containers: - name: hello-openshift image: openshift/hello-openshift:latest ports: - containerPort: 80
After saving the definition to a local file, you could then use it to create a Kubernetes deployment:
$ oc create -f hello-openshift-deployment.yaml
You can use the CLI to inspect and operate on Kubernetes deployments and replica sets like other objecttypes, as described in Common Operations, like get and describe. For the object type, use deployments or deploy for Kubernetes deployments and replicasets or rs for replica sets.
See the Kubernetes documentation for more details about Deployments and Replica Sets, substituting oc for kubectl in CLI usage examples.
9.5.2. Kubernetes Deployments Versus Deployment Configurations
Because deployment configurations existed in OpenShift Dedicated prior to deployments being added inKubernetes 1.2, the latter object type naturally diverges slightly from the former. The long-term goal inOpenShift Dedicated is to reach full feature parity in Kubernetes deployments and switch to using themas a single object type that provides fine-grained management over applications.
Kubernetes deployments are supported to ensure upstream projects and examples that use the newobject type can run smoothly on OpenShift Dedicated. Given the current feature set of Kubernetesdeployments, you may want to use them instead of deployment configurations in OpenShift Dedicated ifyou do not plan to use any of the following in particular:
image streams
lifecycle hooks
Custom deployment strategies
The following sections go into more details on the differences between the two object types to furtherhelp you decide when you might want to use Kubernetes deployments over deployment configurations.
9.5.2.1. Deployment Configuration-Specific Features
9.5.2.1.1. Automatic Rollbacks
Kubernetes deployments do not support automatically rolling back to the last successfully deployedreplica set in case of a failure. This feature should be added soon.
9.5.2.1.2. Triggers
Kubernetes deployments have an implicit ConfigChange trigger in that every change in the podtemplate of a deployment automatically triggers a new rollout. If you do not want new rollouts on podtemplate changes, pause the deployment:
$ oc rollout pause deployments/<name>
OpenShift Dedicated 3 Developer Guide
160
At the moment, Kubernetes deployments do not support ImageChange triggers. A generic triggeringmechanism has been proposed upstream, but it is unknown if and when it may be accepted. Eventually,a OpenShift Dedicated-specific mechanism could be implemented to layer on top of Kubernetesdeployments, but it would be more desirable for it to exist as part of the Kubernetes core.
9.5.2.1.3. Lifecycle Hooks
Kubernetes deployments do not support any lifecycle hooks.
9.5.2.1.4. Custom Strategies
Kubernetes deployments do not yet support user-specified Custom deployment strategies yet.
9.5.2.1.5. Canary Deployments
Kubernetes deployments do not yet run canaries as part of a new rollout.
9.5.2.1.6. Test Deployments
Kubernetes deployments do not support running test tracks.
9.5.2.2. Kubernetes Deployment-Specific Features
9.5.2.2.1. Rollover
The deployment process for Kubernetes deployments is driven by a controller loop, in contrast todeployment configurations which use deployer pods for every new rollout. This means that a Kubernetesdeployment can have as many active replica sets as possible, and eventually the deployment controllerwill scale down all old replica sets and scale up the newest one.
Deployment configurations can have at most one deployer pod running, otherwise multiple deployersend up fighting with each other trying to scale up what they think should be the newest replicationcontroller. Because of this, only two replication controllers can be active at any point in time. Ultimately,this translates to faster rapid rollouts for Kubernetes deployments.
9.5.2.2.2. Proportional Scaling
Because the Kubernetes deployment controller is the sole source of truth for the sizes of new and oldreplica sets owned by a deployment, it is able to scale ongoing rollouts. Additional replicas aredistributed proportionally based on the size of each replica set.
Deployment configurations cannot be scaled when a rollout is ongoing because the deploymentconfiguration controller will end up fighting with the deployer process about the size of the new replicationcontroller.
9.5.2.2.3. Pausing Mid-rollout
Kubernetes deployments can be paused at any point in time, meaning you can also pause ongoingrollouts. On the other hand, you cannot pause deployer pods currently, so if you try to pause adeployment configuration in the middle of a rollout, the deployer process will not be affected and willcontinue until it finishes.
CHAPTER 9. DEPLOYMENTS
161
CHAPTER 10. TEMPLATES
10.1. OVERVIEW
A template describes a set of objects that can be parameterized and processed to produce a list ofobjects for creation by OpenShift Dedicated. A template can be processed to create anything you havepermission to create within a project, for example services, build configurations, and deploymentconfigurations. A template may also define a set of labels to apply to every object defined in the template.
You can create a list of objects from a template using the CLI or, if a template has been uploaded to yourproject or the global template library, using the web console. For a curated set of templates, see theOpenShift Image Streams and Templates library.
10.2. UPLOADING A TEMPLATE
If you have a JSON or YAML file that defines a template, for example as seen in this example, you canupload the template to projects using the CLI. This saves the template to the project for repeated use byany user with appropriate access to that project. Instructions on writing your own templates are providedlater in this topic.
To upload a template to your current project’s template library, pass the JSON or YAML file with thefollowing command:
$ oc create -f <filename>
You can upload a template to a different project using the -n option with the name of the project:
$ oc create -f <filename> -n <project>
The template is now available for selection using the web console or the CLI.
10.3. CREATING FROM TEMPLATES USING THE WEB CONSOLE
See Creating an Application Using the Web Console.
10.4. CREATING FROM TEMPLATES USING THE CLI
You can use the CLI to process templates and use the configuration that is generated to create objects.
10.4.1. Labels
Labels are used to manage and organize generated objects, such as pods. The labels specified in thetemplate are applied to every object that is generated from the template.
There is also the ability to add labels in the template from the command line.
$ oc process -f <filename> -l name=otherLabel
10.4.2. Parameters
OpenShift Dedicated 3 Developer Guide
162
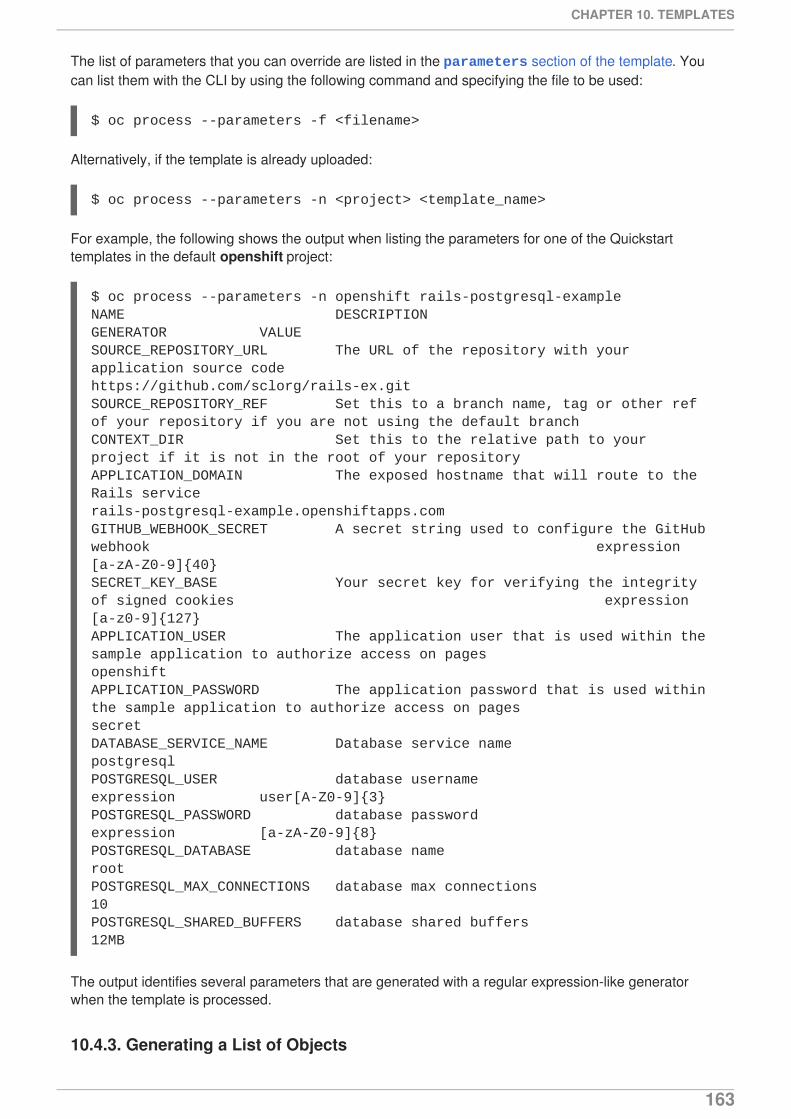
The list of parameters that you can override are listed in the parameters section of the template. Youcan list them with the CLI by using the following command and specifying the file to be used:
$ oc process --parameters -f <filename>
Alternatively, if the template is already uploaded:
$ oc process --parameters -n <project> <template_name>
For example, the following shows the output when listing the parameters for one of the Quickstarttemplates in the default openshift project:
$ oc process --parameters -n openshift rails-postgresql-exampleNAME DESCRIPTION GENERATOR VALUESOURCE_REPOSITORY_URL The URL of the repository with your application source code https://github.com/sclorg/rails-ex.gitSOURCE_REPOSITORY_REF Set this to a branch name, tag or other ref of your repository if you are not using the default branchCONTEXT_DIR Set this to the relative path to your project if it is not in the root of your repositoryAPPLICATION_DOMAIN The exposed hostname that will route to the Rails service rails-postgresql-example.openshiftapps.comGITHUB_WEBHOOK_SECRET A secret string used to configure the GitHub webhook expression [a-zA-Z0-9]{40}SECRET_KEY_BASE Your secret key for verifying the integrity of signed cookies expression [a-z0-9]{127}APPLICATION_USER The application user that is used within the sample application to authorize access on pages openshiftAPPLICATION_PASSWORD The application password that is used within the sample application to authorize access on pages secretDATABASE_SERVICE_NAME Database service name postgresqlPOSTGRESQL_USER database username expression user[A-Z0-9]{3}POSTGRESQL_PASSWORD database password expression [a-zA-Z0-9]{8}POSTGRESQL_DATABASE database name rootPOSTGRESQL_MAX_CONNECTIONS database max connections 10POSTGRESQL_SHARED_BUFFERS database shared buffers 12MB
The output identifies several parameters that are generated with a regular expression-like generatorwhen the template is processed.
10.4.3. Generating a List of Objects
CHAPTER 10. TEMPLATES
163
Using the CLI, you can process a file defining a template to return the list of objects to standard output:
$ oc process -f <filename>
Alternatively, if the template has already been uploaded to the current project:
$ oc process <template_name>
You can create objects from a template by processing the template and piping the output to oc create:
$ oc process -f <filename> | oc create -f -
Alternatively, if the template has already been uploaded to the current project:
$ oc process <template> | oc create -f -
You can override any parameter values defined in the file by adding the -p option for each <name>=<value> pair you want to override. A parameter reference may appear in any text field inside thetemplate items.
For example, in the following the POSTGRESQL_USER and POSTGRESQL_DATABASE parameters of atemplate are overridden to output a configuration with customized environment variables:
Example 10.1. Creating a List of Objects from a Template
$ oc process -f my-rails-postgresql \ -p POSTGRESQL_USER=bob \ -p POSTGRESQL_DATABASE=mydatabase
The JSON file can either be redirected to a file or applied directly without uploading the template bypiping the processed output to the oc create command:
$ oc process -f my-rails-postgresql \ -p POSTGRESQL_USER=bob \ -p POSTGRESQL_DATABASE=mydatabase \ | oc create -f -
If you have large number of parameters, you can store them in a file and then pass this file to oc process:
$ cat postgres.envPOSTGRESQL_USER=bobPOSTGRESQL_DATABASE=mydatabase$ oc process -f my-rails-postgresql --param-file=postgres.env
You can also read the environment from standard input by using "-" as the argument to --param-file:
$ sed s/bob/alice/ postgres.env | oc process -f my-rails-postgresql --param-file=-
OpenShift Dedicated 3 Developer Guide
164
10.5. MODIFYING AN UPLOADED TEMPLATE
You can edit a template that has already been uploaded to your project by using the following command:
$ oc edit template <template>
10.6. USING THE INSTANT APP AND QUICKSTART TEMPLATES
OpenShift Dedicated provides a number of default Instant App and Quickstart templates to make it easyto quickly get started creating a new application for different languages. Templates are provided for Rails(Ruby), Django (Python), Node.js, CakePHP (PHP), and Dancer (Perl). Your cluster administrator shouldhave created these templates in the default, global openshift project so you have access to them. Youcan list the available default Instant App and Quickstart templates with:
$ oc get templates -n openshift
By default, the templates build using a public source repository on GitHub that contains the necessaryapplication code. In order to be able to modify the source and build your own version of the application,you must:
1. Fork the repository referenced by the template’s default SOURCE_REPOSITORY_URL parameter.
2. Override the value of the SOURCE_REPOSITORY_URL parameter when creating from thetemplate, specifying your fork instead of the default value.
By doing this, the build configuration created by the template will now point to your fork of the applicationcode, and you can modify the code and rebuild the application at will.
NOTE
Some of the Instant App and Quickstart templates define a database deploymentconfiguration. The configuration they define uses ephemeral storage for the databasecontent. These templates should be used for demonstration purposes only as alldatabase data will be lost if the database pod restarts for any reason.
10.7. WRITING TEMPLATES
You can define new templates to make it easy to recreate all the objects of your application. Thetemplate will define the objects it creates along with some metadata to guide the creation of thoseobjects.
Example 10.2. A Simple Template Object Definition (YAML)
apiVersion: v1kind: Templatemetadata: name: redis-template annotations: description: "Description" iconClass: "icon-redis" tags: "database,nosql"objects:- apiVersion: v1
CHAPTER 10. TEMPLATES
165
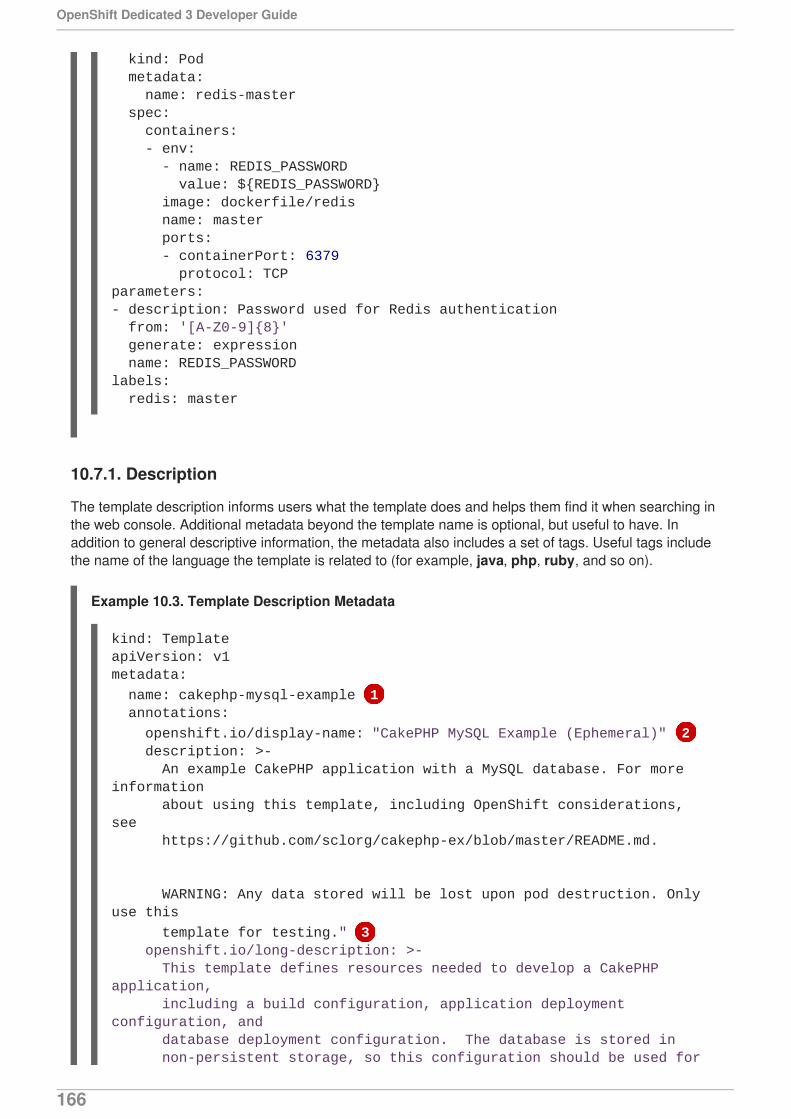
10.7.1. Description
The template description informs users what the template does and helps them find it when searching inthe web console. Additional metadata beyond the template name is optional, but useful to have. Inaddition to general descriptive information, the metadata also includes a set of tags. Useful tags includethe name of the language the template is related to (for example, java, php, ruby, and so on).
Example 10.3. Template Description Metadata
kind: Pod metadata: name: redis-master spec: containers: - env: - name: REDIS_PASSWORD value: ${REDIS_PASSWORD} image: dockerfile/redis name: master ports: - containerPort: 6379 protocol: TCPparameters:- description: Password used for Redis authentication from: '[A-Z0-9]{8}' generate: expression name: REDIS_PASSWORDlabels: redis: master
kind: TemplateapiVersion: v1metadata:
name: cakephp-mysql-example 1 annotations:
openshift.io/display-name: "CakePHP MySQL Example (Ephemeral)" 2 description: >- An example CakePHP application with a MySQL database. For more information about using this template, including OpenShift considerations, see https://github.com/sclorg/cakephp-ex/blob/master/README.md.
WARNING: Any data stored will be lost upon pod destruction. Only use this
template for testing." 3 openshift.io/long-description: >- This template defines resources needed to develop a CakePHP application, including a build configuration, application deployment configuration, and database deployment configuration. The database is stored in non-persistent storage, so this configuration should be used for
OpenShift Dedicated 3 Developer Guide
166
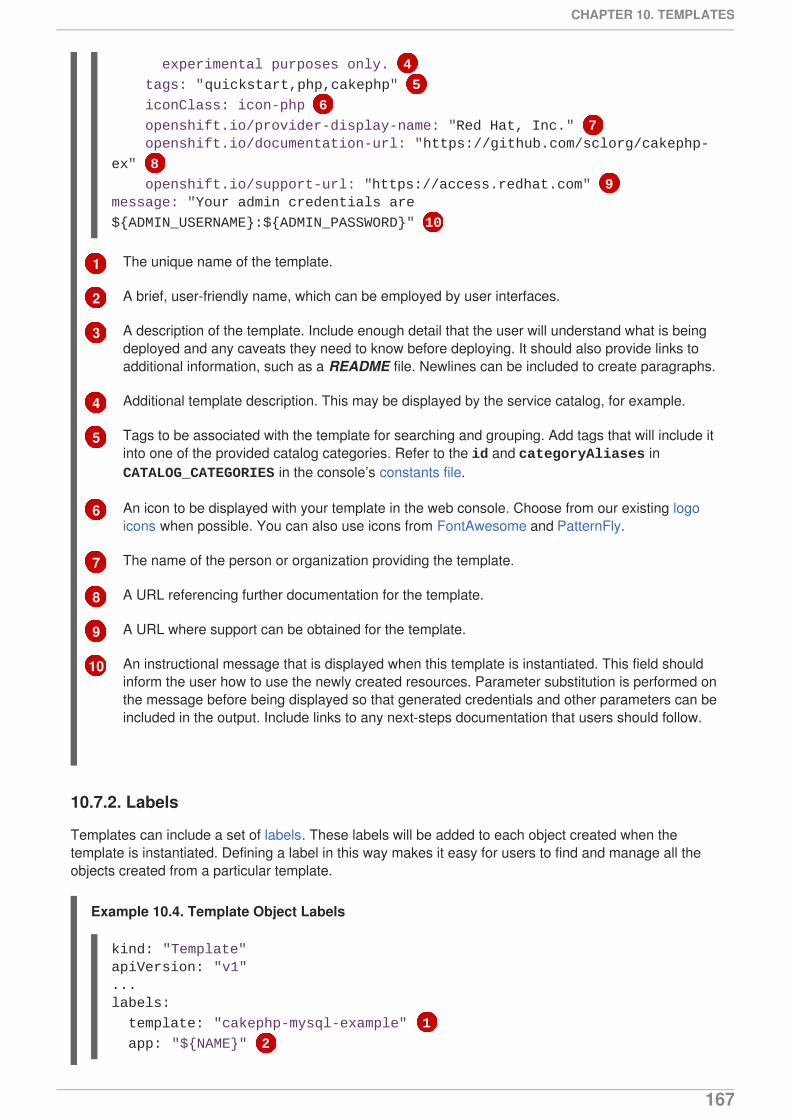
1
2
3
4
5
6
7
8
9
10
The unique name of the template.
A brief, user-friendly name, which can be employed by user interfaces.
A description of the template. Include enough detail that the user will understand what is beingdeployed and any caveats they need to know before deploying. It should also provide links toadditional information, such as a README file. Newlines can be included to create paragraphs.
Additional template description. This may be displayed by the service catalog, for example.
Tags to be associated with the template for searching and grouping. Add tags that will include itinto one of the provided catalog categories. Refer to the id and categoryAliases in CATALOG_CATEGORIES in the console’s constants file.
An icon to be displayed with your template in the web console. Choose from our existing logoicons when possible. You can also use icons from FontAwesome and PatternFly.
The name of the person or organization providing the template.
A URL referencing further documentation for the template.
A URL where support can be obtained for the template.
An instructional message that is displayed when this template is instantiated. This field shouldinform the user how to use the newly created resources. Parameter substitution is performed onthe message before being displayed so that generated credentials and other parameters can beincluded in the output. Include links to any next-steps documentation that users should follow.
10.7.2. Labels
Templates can include a set of labels. These labels will be added to each object created when thetemplate is instantiated. Defining a label in this way makes it easy for users to find and manage all theobjects created from a particular template.
Example 10.4. Template Object Labels
experimental purposes only. 4
tags: "quickstart,php,cakephp" 5
iconClass: icon-php 6
openshift.io/provider-display-name: "Red Hat, Inc." 7 openshift.io/documentation-url: "https://github.com/sclorg/cakephp-
ex" 8
openshift.io/support-url: "https://access.redhat.com" 9message: "Your admin credentials are
${ADMIN_USERNAME}:${ADMIN_PASSWORD}" 10
kind: "Template"apiVersion: "v1"...labels:
template: "cakephp-mysql-example" 1
app: "${NAME}" 2
CHAPTER 10. TEMPLATES
167
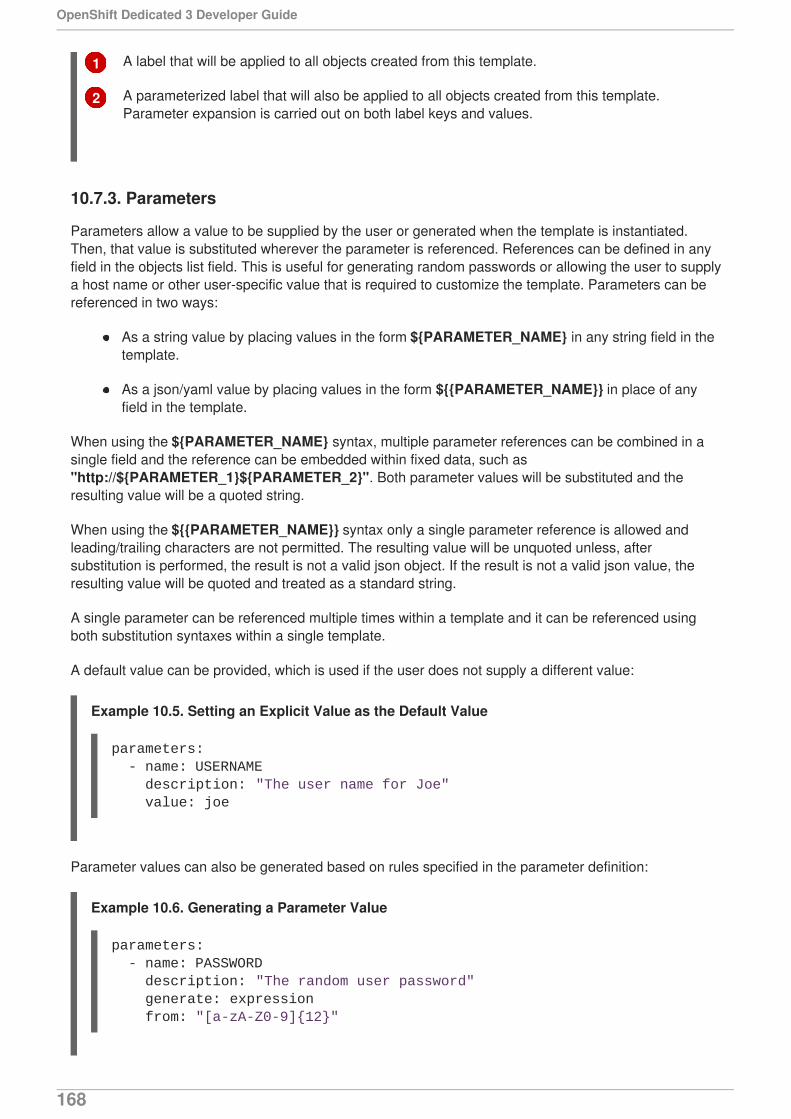
1
2
A label that will be applied to all objects created from this template.
A parameterized label that will also be applied to all objects created from this template.Parameter expansion is carried out on both label keys and values.
10.7.3. Parameters
Parameters allow a value to be supplied by the user or generated when the template is instantiated.Then, that value is substituted wherever the parameter is referenced. References can be defined in anyfield in the objects list field. This is useful for generating random passwords or allowing the user to supplya host name or other user-specific value that is required to customize the template. Parameters can bereferenced in two ways:
As a string value by placing values in the form ${PARAMETER_NAME} in any string field in thetemplate.
As a json/yaml value by placing values in the form ${{PARAMETER_NAME}} in place of anyfield in the template.
When using the ${PARAMETER_NAME} syntax, multiple parameter references can be combined in asingle field and the reference can be embedded within fixed data, such as"http://${PARAMETER_1}${PARAMETER_2}". Both parameter values will be substituted and theresulting value will be a quoted string.
When using the ${{PARAMETER_NAME}} syntax only a single parameter reference is allowed andleading/trailing characters are not permitted. The resulting value will be unquoted unless, aftersubstitution is performed, the result is not a valid json object. If the result is not a valid json value, theresulting value will be quoted and treated as a standard string.
A single parameter can be referenced multiple times within a template and it can be referenced usingboth substitution syntaxes within a single template.
A default value can be provided, which is used if the user does not supply a different value:
Example 10.5. Setting an Explicit Value as the Default Value
Parameter values can also be generated based on rules specified in the parameter definition:
Example 10.6. Generating a Parameter Value
parameters: - name: USERNAME description: "The user name for Joe" value: joe
parameters: - name: PASSWORD description: "The random user password" generate: expression from: "[a-zA-Z0-9]{12}"
OpenShift Dedicated 3 Developer Guide
168
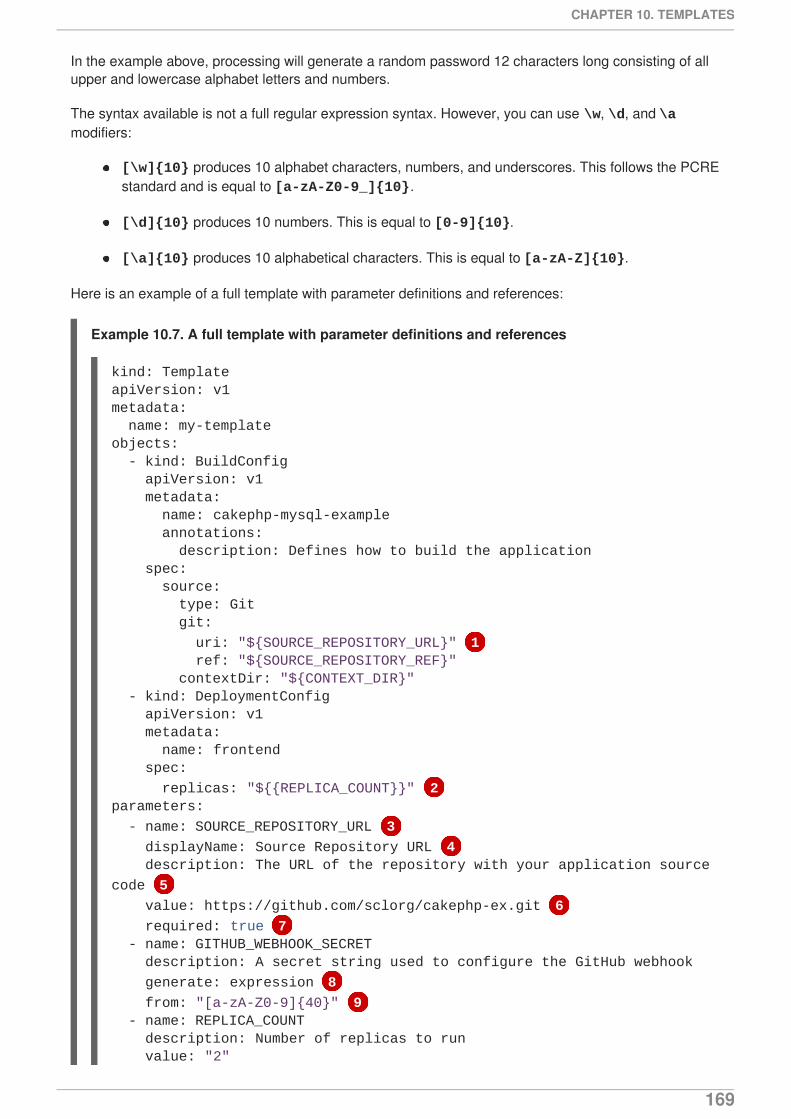
In the example above, processing will generate a random password 12 characters long consisting of allupper and lowercase alphabet letters and numbers.
The syntax available is not a full regular expression syntax. However, you can use \w, \d, and \amodifiers:
[\w]{10} produces 10 alphabet characters, numbers, and underscores. This follows the PCREstandard and is equal to [a-zA-Z0-9_]{10}.
[\d]{10} produces 10 numbers. This is equal to [0-9]{10}.
[\a]{10} produces 10 alphabetical characters. This is equal to [a-zA-Z]{10}.
Here is an example of a full template with parameter definitions and references:
Example 10.7. A full template with parameter definitions and references
kind: TemplateapiVersion: v1metadata: name: my-templateobjects: - kind: BuildConfig apiVersion: v1 metadata: name: cakephp-mysql-example annotations: description: Defines how to build the application spec: source: type: Git git:
uri: "${SOURCE_REPOSITORY_URL}" 1 ref: "${SOURCE_REPOSITORY_REF}" contextDir: "${CONTEXT_DIR}" - kind: DeploymentConfig apiVersion: v1 metadata: name: frontend spec:
replicas: "${{REPLICA_COUNT}}" 2parameters:
- name: SOURCE_REPOSITORY_URL 3
displayName: Source Repository URL 4 description: The URL of the repository with your application source
code 5
value: https://github.com/sclorg/cakephp-ex.git 6
required: true 7 - name: GITHUB_WEBHOOK_SECRET description: A secret string used to configure the GitHub webhook
generate: expression 8
from: "[a-zA-Z0-9]{40}" 9 - name: REPLICA_COUNT description: Number of replicas to run value: "2"
CHAPTER 10. TEMPLATES
169
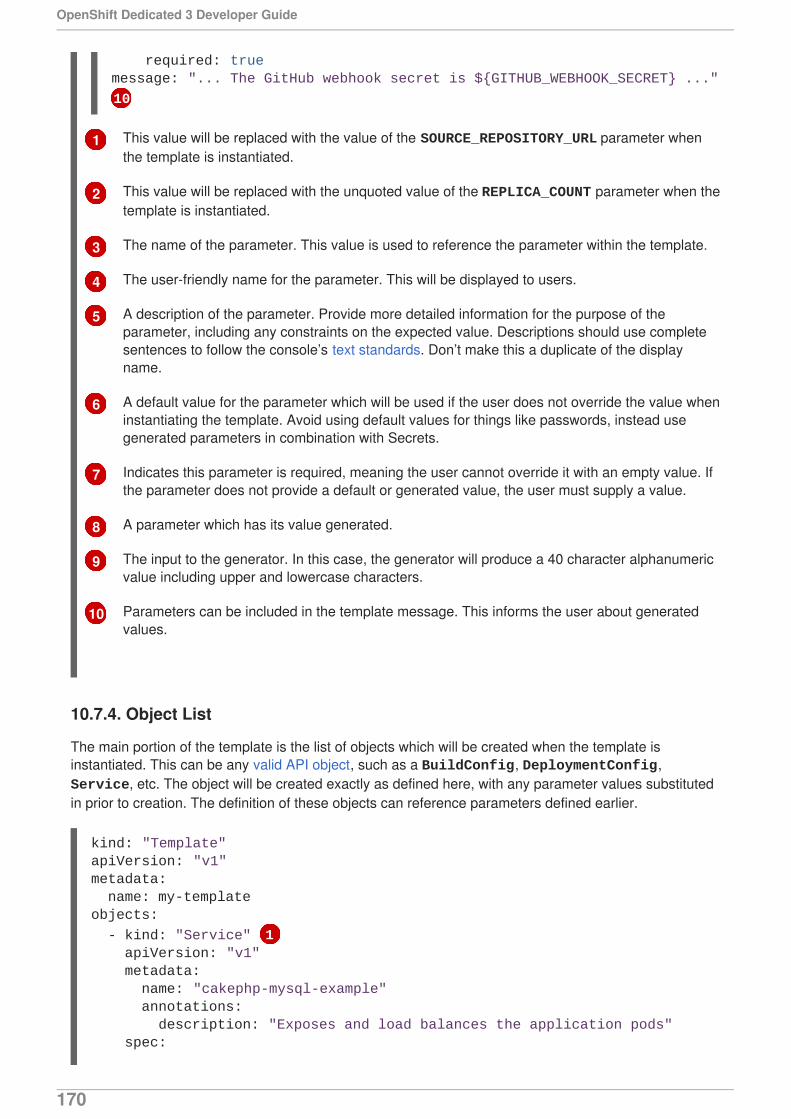
1
2
3
4
5
6
7
8
9
10
This value will be replaced with the value of the SOURCE_REPOSITORY_URL parameter whenthe template is instantiated.
This value will be replaced with the unquoted value of the REPLICA_COUNT parameter when thetemplate is instantiated.
The name of the parameter. This value is used to reference the parameter within the template.
The user-friendly name for the parameter. This will be displayed to users.
A description of the parameter. Provide more detailed information for the purpose of theparameter, including any constraints on the expected value. Descriptions should use completesentences to follow the console’s text standards. Don’t make this a duplicate of the displayname.
A default value for the parameter which will be used if the user does not override the value wheninstantiating the template. Avoid using default values for things like passwords, instead usegenerated parameters in combination with Secrets.
Indicates this parameter is required, meaning the user cannot override it with an empty value. Ifthe parameter does not provide a default or generated value, the user must supply a value.
A parameter which has its value generated.
The input to the generator. In this case, the generator will produce a 40 character alphanumericvalue including upper and lowercase characters.
Parameters can be included in the template message. This informs the user about generatedvalues.
10.7.4. Object List
The main portion of the template is the list of objects which will be created when the template isinstantiated. This can be any valid API object, such as a BuildConfig, DeploymentConfig, Service, etc. The object will be created exactly as defined here, with any parameter values substitutedin prior to creation. The definition of these objects can reference parameters defined earlier.
required: truemessage: "... The GitHub webhook secret is ${GITHUB_WEBHOOK_SECRET} ..."
10
kind: "Template"apiVersion: "v1"metadata: name: my-templateobjects:
- kind: "Service" 1 apiVersion: "v1" metadata: name: "cakephp-mysql-example" annotations: description: "Exposes and load balances the application pods" spec:
OpenShift Dedicated 3 Developer Guide
170
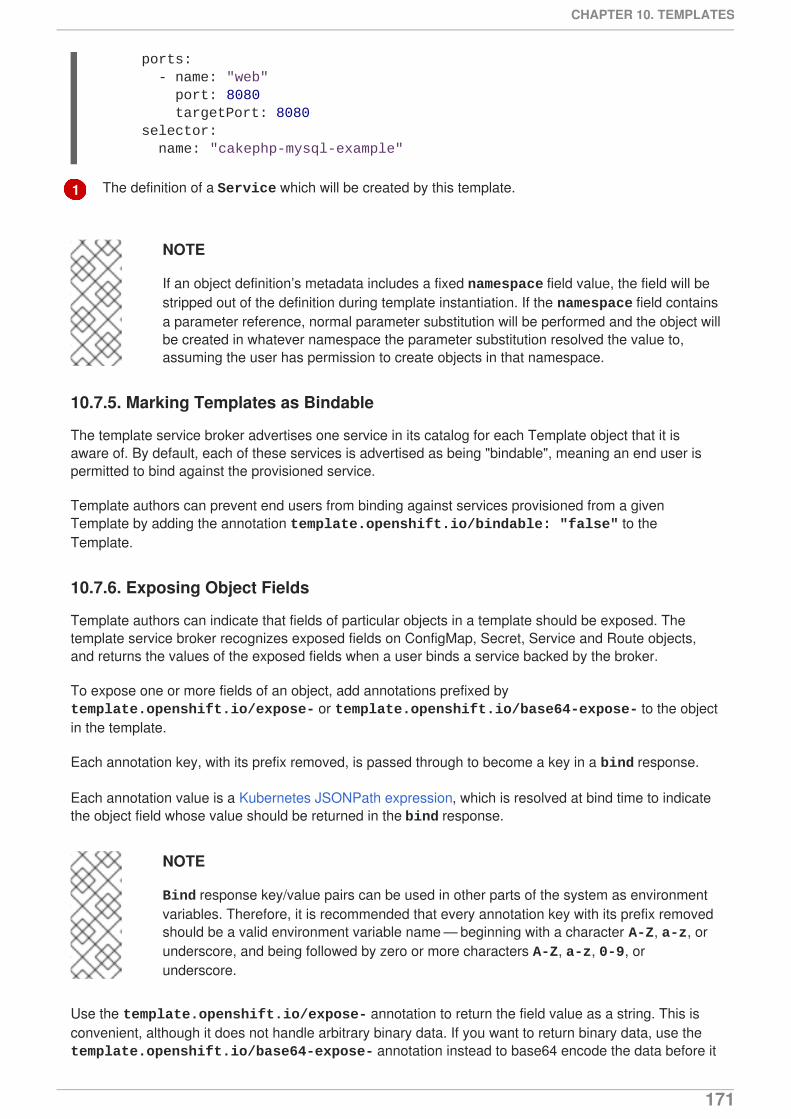
1 The definition of a Service which will be created by this template.
NOTE
If an object definition’s metadata includes a fixed namespace field value, the field will bestripped out of the definition during template instantiation. If the namespace field containsa parameter reference, normal parameter substitution will be performed and the object willbe created in whatever namespace the parameter substitution resolved the value to,assuming the user has permission to create objects in that namespace.
10.7.5. Marking Templates as Bindable
The template service broker advertises one service in its catalog for each Template object that it isaware of. By default, each of these services is advertised as being "bindable", meaning an end user ispermitted to bind against the provisioned service.
Template authors can prevent end users from binding against services provisioned from a givenTemplate by adding the annotation template.openshift.io/bindable: "false" to theTemplate.
10.7.6. Exposing Object Fields
Template authors can indicate that fields of particular objects in a template should be exposed. Thetemplate service broker recognizes exposed fields on ConfigMap, Secret, Service and Route objects,and returns the values of the exposed fields when a user binds a service backed by the broker.
To expose one or more fields of an object, add annotations prefixed by template.openshift.io/expose- or template.openshift.io/base64-expose- to the objectin the template.
Each annotation key, with its prefix removed, is passed through to become a key in a bind response.
Each annotation value is a Kubernetes JSONPath expression, which is resolved at bind time to indicatethe object field whose value should be returned in the bind response.
NOTE
Bind response key/value pairs can be used in other parts of the system as environmentvariables. Therefore, it is recommended that every annotation key with its prefix removedshould be a valid environment variable name — beginning with a character A-Z, a-z, orunderscore, and being followed by zero or more characters A-Z, a-z, 0-9, orunderscore.
Use the template.openshift.io/expose- annotation to return the field value as a string. This isconvenient, although it does not handle arbitrary binary data. If you want to return binary data, use the template.openshift.io/base64-expose- annotation instead to base64 encode the data before it
ports: - name: "web" port: 8080 targetPort: 8080 selector: name: "cakephp-mysql-example"
CHAPTER 10. TEMPLATES
171
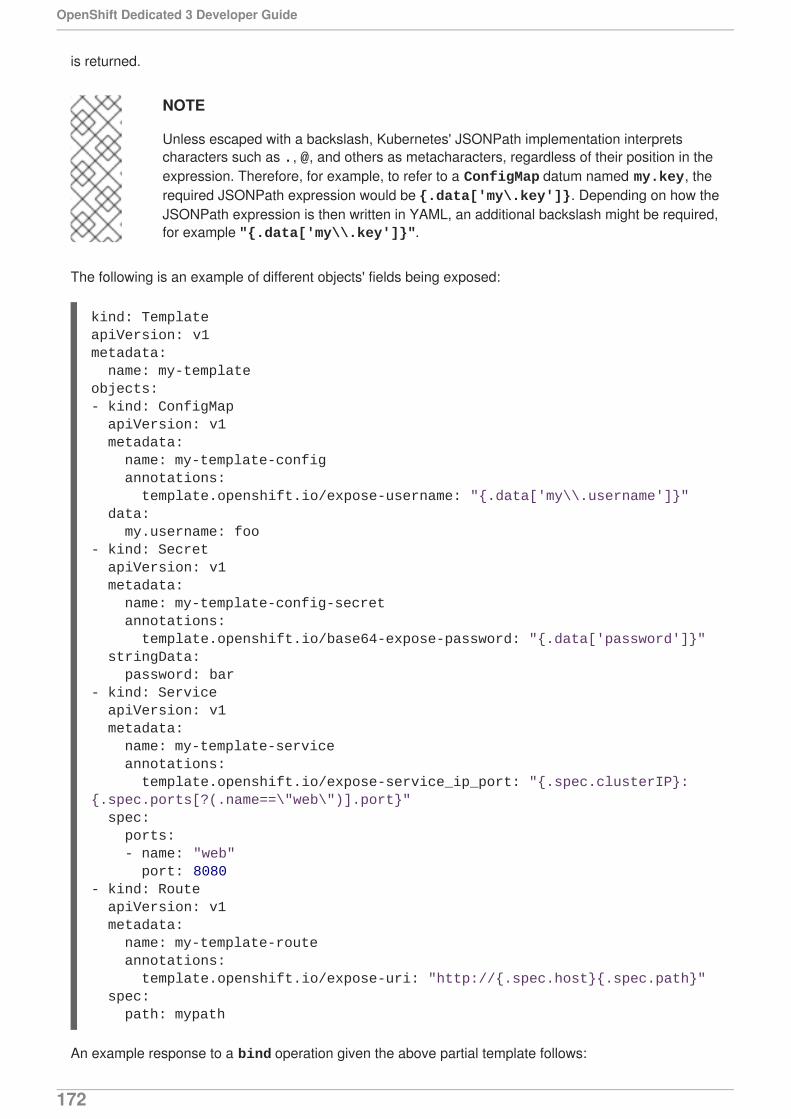
is returned.
NOTE
Unless escaped with a backslash, Kubernetes' JSONPath implementation interpretscharacters such as ., @, and others as metacharacters, regardless of their position in theexpression. Therefore, for example, to refer to a ConfigMap datum named my.key, therequired JSONPath expression would be {.data['my\.key']}. Depending on how theJSONPath expression is then written in YAML, an additional backslash might be required,for example "{.data['my\\.key']}".
The following is an example of different objects' fields being exposed:
An example response to a bind operation given the above partial template follows:
kind: TemplateapiVersion: v1metadata: name: my-templateobjects:- kind: ConfigMap apiVersion: v1 metadata: name: my-template-config annotations: template.openshift.io/expose-username: "{.data['my\\.username']}" data: my.username: foo- kind: Secret apiVersion: v1 metadata: name: my-template-config-secret annotations: template.openshift.io/base64-expose-password: "{.data['password']}" stringData: password: bar- kind: Service apiVersion: v1 metadata: name: my-template-service annotations: template.openshift.io/expose-service_ip_port: "{.spec.clusterIP}:{.spec.ports[?(.name==\"web\")].port}" spec: ports: - name: "web" port: 8080- kind: Route apiVersion: v1 metadata: name: my-template-route annotations: template.openshift.io/expose-uri: "http://{.spec.host}{.spec.path}" spec: path: mypath
OpenShift Dedicated 3 Developer Guide
172
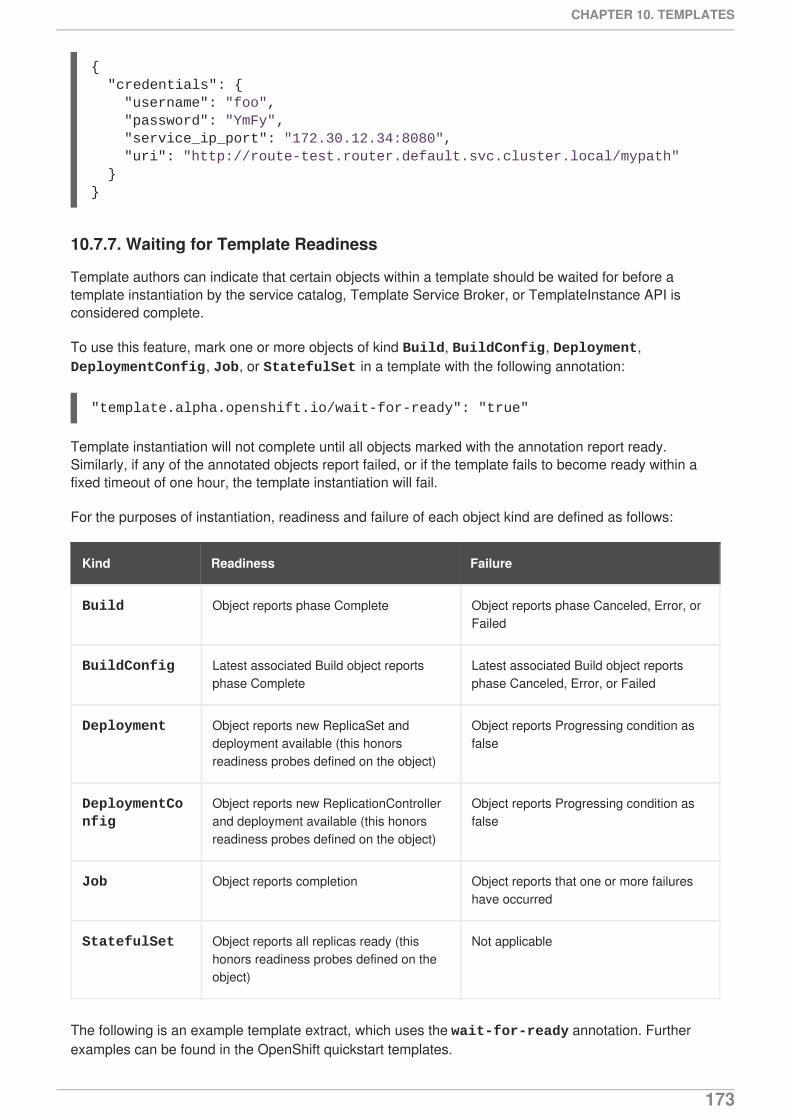
10.7.7. Waiting for Template Readiness
Template authors can indicate that certain objects within a template should be waited for before atemplate instantiation by the service catalog, Template Service Broker, or TemplateInstance API isconsidered complete.
To use this feature, mark one or more objects of kind Build, BuildConfig, Deployment, DeploymentConfig, Job, or StatefulSet in a template with the following annotation:
"template.alpha.openshift.io/wait-for-ready": "true"
Template instantiation will not complete until all objects marked with the annotation report ready.Similarly, if any of the annotated objects report failed, or if the template fails to become ready within afixed timeout of one hour, the template instantiation will fail.
For the purposes of instantiation, readiness and failure of each object kind are defined as follows:
Kind Readiness Failure
Build Object reports phase Complete Object reports phase Canceled, Error, orFailed
BuildConfig Latest associated Build object reportsphase Complete
Latest associated Build object reportsphase Canceled, Error, or Failed
Deployment Object reports new ReplicaSet anddeployment available (this honorsreadiness probes defined on the object)
Object reports Progressing condition asfalse
DeploymentConfig
Object reports new ReplicationControllerand deployment available (this honorsreadiness probes defined on the object)
Object reports Progressing condition asfalse
Job Object reports completion Object reports that one or more failureshave occurred
StatefulSet Object reports all replicas ready (thishonors readiness probes defined on theobject)
Not applicable
The following is an example template extract, which uses the wait-for-ready annotation. Furtherexamples can be found in the OpenShift quickstart templates.
{ "credentials": { "username": "foo", "password": "YmFy", "service_ip_port": "172.30.12.34:8080", "uri": "http://route-test.router.default.svc.cluster.local/mypath" }}
CHAPTER 10. TEMPLATES
173
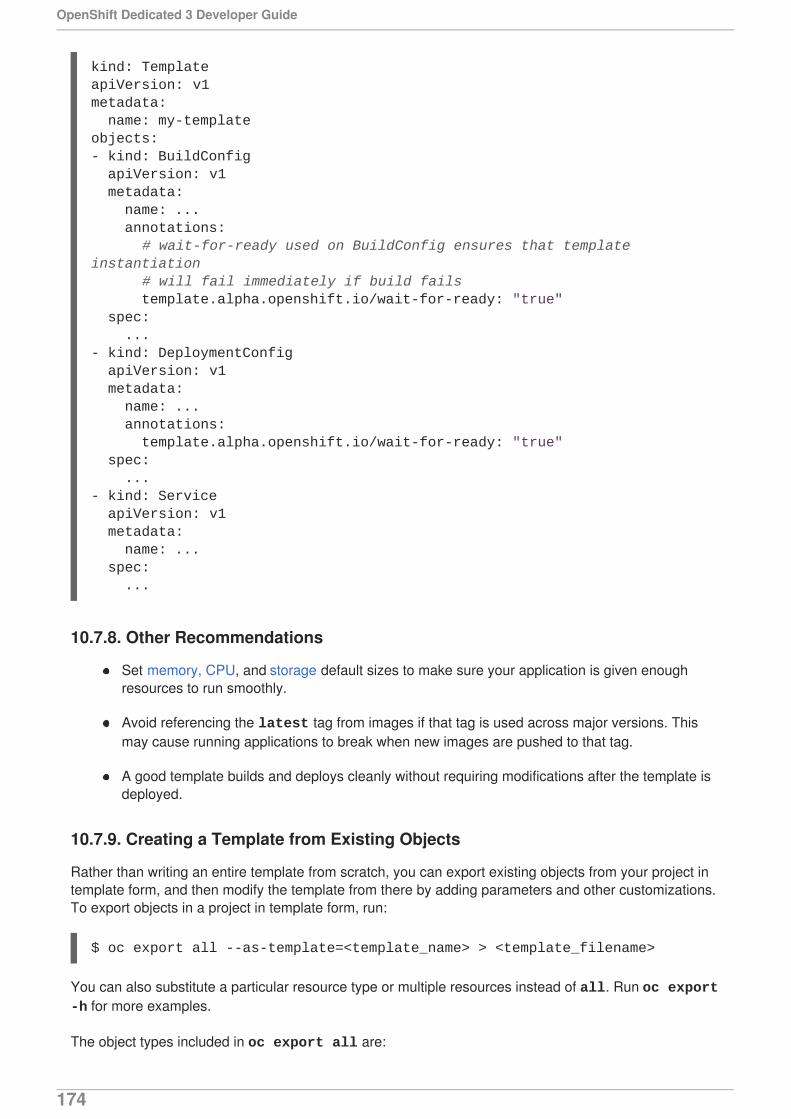
10.7.8. Other Recommendations
Set memory, CPU, and storage default sizes to make sure your application is given enoughresources to run smoothly.
Avoid referencing the latest tag from images if that tag is used across major versions. Thismay cause running applications to break when new images are pushed to that tag.
A good template builds and deploys cleanly without requiring modifications after the template isdeployed.
10.7.9. Creating a Template from Existing Objects
Rather than writing an entire template from scratch, you can export existing objects from your project intemplate form, and then modify the template from there by adding parameters and other customizations.To export objects in a project in template form, run:
$ oc export all --as-template=<template_name> > <template_filename>
You can also substitute a particular resource type or multiple resources instead of all. Run oc export -h for more examples.
The object types included in oc export all are:
kind: TemplateapiVersion: v1metadata: name: my-templateobjects:- kind: BuildConfig apiVersion: v1 metadata: name: ... annotations: # wait-for-ready used on BuildConfig ensures that template instantiation # will fail immediately if build fails template.alpha.openshift.io/wait-for-ready: "true" spec: ...- kind: DeploymentConfig apiVersion: v1 metadata: name: ... annotations: template.alpha.openshift.io/wait-for-ready: "true" spec: ...- kind: Service apiVersion: v1 metadata: name: ... spec: ...
OpenShift Dedicated 3 Developer Guide
174

BuildConfig
Build
DeploymentConfig
ImageStream
Pod
ReplicationController
Route
Service
CHAPTER 10. TEMPLATES
175
CHAPTER 11. OPENING A REMOTE SHELL TO CONTAINERS
11.1. OVERVIEW
The oc rsh command allows you to locally access and manage tools that are on the system. Thesecure shell (SSH) is the underlying technology and industry standard that provides a secure connectionto the application. Access to applications with the shell environment is protected and restricted withSecurity-Enhanced Linux (SELinux) policies.
11.2. START A SECURE SHELL SESSION
Open a remote shell session to a container:
$ oc rsh <pod>
While in the remote shell, you can issue commands as if you are inside the container and perform localoperations like monitoring, debugging, and using CLI commands specific to what is running in thecontainer.
For example, in a MySQL container, you can count the number of records in the database by invokingthe mysql command, then using the prompt to type in the SELECT command. You can also usecommands like ps(1) and ls(1) for validation.
BuildConfigs and DeployConfigs map out how you want things to look and pods (with containersinside) are created and dismantled as needed. Your changes are not persistent. If you make changesdirectly within the container and that container is destroyed and rebuilt, your changes will no longer exist.
NOTE
oc exec can be used to execute a command remotely. However, the oc rsh commandprovides an easier way to keep a remote shell open persistently.
11.3. SECURE SHELL SESSION HELP
For help with usage, options, and to see examples:
$ oc rsh -h
OpenShift Dedicated 3 Developer Guide
176
CHAPTER 12. SERVICE ACCOUNTS
12.1. OVERVIEW
When a person uses the OpenShift Dedicated CLI or web console, their API token authenticates them tothe OpenShift API. However, when a regular user’s credentials are not available, it is common forcomponents to make API calls independently. For example:
Replication controllers make API calls to create or delete pods.
Applications inside containers could make API calls for discovery purposes.
External applications could make API calls for monitoring or integration purposes.
Service accounts provide a flexible way to control API access without sharing a regular user’scredentials.
12.2. USER NAMES AND GROUPS
Every service account has an associated user name that can be granted roles, just like a regular user.The user name is derived from its project and name:
system:serviceaccount:<project>:<name>
For example, to add the view role to the robot service account in the top-secret project:
$ oc policy add-role-to-user view system:serviceaccount:top-secret:robot
IMPORTANT
If you want to grant access to a specific service account in a project, you can use the -zflag. From the project to which the service account belongs, use the -z flag and specifythe <serviceaccount_name>. This is highly recommended, as it helps prevent typosand ensures that access is granted only to the specified service account. For example:
$ oc policy add-role-to-user <role_name> -z <serviceaccount_name>
If not in the project, use the -n option to indicate the project namespace it applies to, asshown in the examples below.
Every service account is also a member of two groups:
system:serviceaccount
Includes all service accounts in the system.
system:serviceaccount:<project>
Includes all service accounts in the specified project.
For example, to allow all service accounts in all projects to view resources in the top-secret project:
$ oc policy add-role-to-group view system:serviceaccount -n top-secret
CHAPTER 12. SERVICE ACCOUNTS
177
To allow all service accounts in the managers project to edit resources in the top-secret project:
$ oc policy add-role-to-group edit system:serviceaccount:managers -n top-secret
12.3. DEFAULT SERVICE ACCOUNTS AND ROLES
Three service accounts are automatically created in every project:
Service Account Usage
builder Used by build pods. It is given the system:image-builder role, which allowspushing images to any image stream in the project using the internal Dockerregistry.
deployer Used by deployment pods and is given the system:deployer role, which allowsviewing and modifying replication controllers and pods in the project.
default Used to run all other pods unless they specify a different service account.
All service accounts in a project are given the system:image-puller role, which allows pulling imagesfrom any image stream in the project using the internal Docker registry.
12.4. MANAGING SERVICE ACCOUNTS
Service accounts are API objects that exist within each project. To manage service accounts, you canuse the oc command with the sa or serviceaccount object type or use the web console.
To get a list of existing service accounts in the current project:
$ oc get saNAME SECRETS AGEbuilder 2 2ddefault 2 2ddeployer 2 2d
To create a new service account:
$ oc create sa robotserviceaccount "robot" created
As soon as a service account is created, two secrets are automatically added to it:
an API token
credentials for the OpenShift Container Registry
These can be seen by describing the service account:
$ oc describe sa robotName: robot
OpenShift Dedicated 3 Developer Guide
178

1
2
3
Namespace: project1Labels: <none>Annotations: <none>
Image pull secrets: robot-dockercfg-qzbhb
Mountable secrets: robot-token-f4khf robot-dockercfg-qzbhb
Tokens: robot-token-f4khf robot-token-z8h44
The system ensures that service accounts always have an API token and registry credentials.
The generated API token and registry credentials do not expire, but they can be revoked by deleting thesecret. When the secret is deleted, a new one is automatically generated to take its place.
12.5. ENABLING SERVICE ACCOUNT AUTHENTICATION
Service accounts authenticate to the API using tokens signed by a private RSA key. The authenticationlayer verifies the signature using a matching public RSA key.
To enable service account token generation, update the serviceAccountConfig stanza in the/etc/origin/master/master-config.yml file on the master to specify a privateKeyFile (for signing),and a matching public key file in the publicKeyFiles list:
serviceAccountConfig: ...
masterCA: ca.crt 1
privateKeyFile: serviceaccount.private.key 2 publicKeyFiles:
- serviceaccount.public.key 3 - ...
CA file used to validate the API server’s serving certificate.
Private RSA key file (for token signing).
Public RSA key files (for token verification). If private key files are provided, then the public keycomponent is used. Multiple public key files can be specified, and a token will be accepted if it canbe validated by one of the public keys. This allows rotation of the signing key, while still acceptingtokens generated by the previous signer.
12.6. MANAGING ALLOWED SECRETS
In addition to providing API credentials, a pod’s service account determines which secrets the pod isallowed to use.
Pods use secrets in two ways:
image pull secrets, providing credentials used to pull images for the pod’s containers
mountable secrets, injecting the contents of secrets into containers as files
CHAPTER 12. SERVICE ACCOUNTS
179
To allow a secret to be used as an image pull secret by a service account’s pods, run:
$ oc secrets link --for=pull <serviceaccount-name> <secret-name>
To allow a secret to be mounted by a service account’s pods, run:
$ oc secrets link --for=mount <serviceaccount-name> <secret-name>
NOTE
Limiting secrets to only the service accounts that reference them is disabled by default.This means that if serviceAccountConfig.limitSecretReferences is set to false (the default setting) in the master configuration file, mounting secrets to a serviceaccount’s pods with the --for=mount option is not required. However, using the --for=pull option to enable using an image pull secret is required, regardless of the serviceAccountConfig.limitSecretReferences value.
This example creates and adds secrets to a service account:
$ oc create secret generic secret-plans \ --from-file=plan1.txt \ --from-file=plan2.txtsecret/secret-plans
$ oc create secret docker-registry my-pull-secret \ --docker-username=mastermind \ --docker-password=12345 \ [email protected]/my-pull-secret
$ oc secrets link robot secret-plans --for=mount
$ oc secrets link robot my-pull-secret --for=pull
$ oc describe serviceaccount robotName: robotLabels: <none>Image pull secrets: robot-dockercfg-624cx my-pull-secret
Mountable secrets: robot-token-uzkbh robot-dockercfg-624cx secret-plans
Tokens: robot-token-8bhpp robot-token-uzkbh
12.7. USING A SERVICE ACCOUNT’S CREDENTIALS INSIDE ACONTAINER
When a pod is created, it specifies a service account (or uses the default service account), and isallowed to use that service account’s API credentials and referenced secrets.
OpenShift Dedicated 3 Developer Guide
180
A file containing an API token for a pod’s service account is automatically mounted at/var/run/secrets/kubernetes.io/serviceaccount/token.
That token can be used to make API calls as the pod’s service account. This example calls the users/~API to get information about the user identified by the token:
$ TOKEN="$(cat /var/run/secrets/kubernetes.io/serviceaccount/token)"
$ curl --cacert /var/run/secrets/kubernetes.io/serviceaccount/ca.crt \ "https://openshift.default.svc.cluster.local/oapi/v1/users/~" \ -H "Authorization: Bearer $TOKEN"
kind: "User"apiVersion: "user.openshift.io/v1"metadata: name: "system:serviceaccount:top-secret:robot" selflink: "/oapi/v1/users/system:serviceaccount:top-secret:robot" creationTimestamp: nullidentities: nullgroups: - "system:serviceaccount" - "system:serviceaccount:top-secret"
12.8. USING A SERVICE ACCOUNT’S CREDENTIALS EXTERNALLY
The same token can be distributed to external applications that need to authenticate to the API.
Use the following syntax to view a service account’s API token:
$ oc describe secret <secret-name>
For example:
$ oc describe secret robot-token-uzkbh -n top-secretName: robot-token-uzkbhLabels: <none>Annotations: kubernetes.io/service-account.name=robot,kubernetes.io/service-account.uid=49f19e2e-16c6-11e5-afdc-3c970e4b7ffe
Type: kubernetes.io/service-account-token
Data
token: eyJhbGciOiJSUzI1NiIsInR5cCI6IkpXVCJ9...
$ oc login --token=eyJhbGciOiJSUzI1NiIsInR5cCI6IkpXVCJ9...Logged into "https://server:8443" as "system:serviceaccount:top-secret:robot" using the token provided.
You don't have any projects. You can try to create a new project, by running
$ oc new-project <projectname>
CHAPTER 12. SERVICE ACCOUNTS
181

$ oc whoamisystem:serviceaccount:top-secret:robot
OpenShift Dedicated 3 Developer Guide
182
CHAPTER 13. MANAGING IMAGES
13.1. OVERVIEW
An image stream comprises any number of container images identified by tags. It presents a singlevirtual view of related images, similar to a Docker image repository.
By watching an image stream, builds and deployments can receive notifications when new images areadded or modified and react by performing a build or deployment, respectively.
There are many ways you can interact with images and set up image streams, depending on where theimages' registries are located, any authentication requirements around those registries, and how youwant your builds and deployments to behave. The following sections cover a range of these topics.
13.2. TAGGING IMAGES
Before working with OpenShift Dedicated image streams and their tags, it helps to first understandimage tags in the context of container images generally.
Container images can have names added to them that make it more intuitive to determine what theycontain, called a tag. Using a tag to specify the version of what is contained in the image is a commonuse case. If you have an image named ruby, you could have a tag named 2.0 for 2.0 version of Ruby,and another named latest to indicate literally the latest built image in that repository overall.
When interacting directly with images using the docker CLI, the docker tag command can add tags,which essentially adds an alias to an image that can consist of several parts. Those parts can include:
<registry_server>/<user_name>/<image_name>:<tag>
The <user_name> part in the above could also refer to a project or namespace if the image is beingstored in an OpenShift Dedicated environment with an internal registry (the OpenShift ContainerRegistry).
OpenShift Dedicated provides the oc tag command, which is similar to the docker tag command, butoperates on image streams instead of directly on images.
NOTE
See Red Hat Enterprise Linux 7’s Getting Started with Containers documentation for moreabout tagging images directly using the docker CLI.
13.2.1. Adding Tags to Image Streams
Keeping in mind that an image stream in OpenShift Dedicated comprises zero or more container imagesidentified by tags, you can add tags to an image stream using the oc tag command:
$ oc tag <source> <destination>
For example, to configure the ruby image streams static-2.0 tag to always refer to the current image forthe ruby image streams 2.0 tag:
$ oc tag ruby:2.0 ruby:static-2.0
CHAPTER 13. MANAGING IMAGES
183
This creates a new image stream tag named static-2.0 in the ruby image stream. The new tag directlyreferences the image id that the ruby:2.0 image stream tag pointed to at the time oc tag was run, andthe image it points to never changes.
There are different types of tags available. The default behavior uses a permanent tag, which points to aspecific image in time; even when the source changes, the new (destination) tag does not change.
A tracking tag means the destination tag’s metadata is be updated during the import of the source tag. Toensure the destination tag is updated whenever the source tag changes, use the --alias=true flag:
$ oc tag --alias=true <source> <destination>
NOTE
Use a tracking tag for creating permanent aliases (for example, latest or stable). Thetag works correctly only within a single image stream. Trying to create a cross-image-stream alias produces an error.
You can also add the --scheduled=true flag to have the destination tag be refreshed (i.e., re-imported) periodically. The period is configured globally at the system level. See Importing Tag andImage Metadata for more details.
The --reference flag creates an image stream tag that is not imported. The tag points to the sourcelocation, permanently.
If you want to instruct Docker to always fetch the tagged image from the integrated registry, use --reference-policy=local. The registry uses the pull-through feature to serve the image to the client.By default, the image blobs are mirrored locally by the registry. As a result, they can be pulled morequickly the next time they are needed. The flag also allows for pulling from insecure registries without aneed to supply --insecure-registry to the Docker daemon as long as the image stream has aninsecure annotation or the tag has an insecure import policy.
13.2.2. Recommended Tagging Conventions
Images evolve over time and their tags reflect this. An image tag always points to the latest image built.
If there is too much information embedded in a tag name (for example, v2.0.1-may-2016), the tagpoints to just one revision of an image and is never updated. Using default image pruning options, suchan image is never removed.
Instead, if the tag is named v2.0, more image revisions are more likely. This results in longer tag historyand, therefore, the image pruner is more likely to remove old and unused images.
Although tag naming convention is up to you, here are a few examples in the format <image_name>:<image_tag>:
Table 13.1. Image Tag Naming Conventions
Description Example
Revision myimage:v2.0.1
Architecture myimage:v2.0-x86_64
OpenShift Dedicated 3 Developer Guide
184
Base image myimage:v1.2-centos7
Latest (potentially unstable) myimage:latest
Latest stable myimage:stable
Description Example
If you require dates in tag names, periodically inspect old and unsupported images and istags andremove them. Otherwise, you might experience increasing resource usage caused by old images.
13.2.3. Removing Tags from Image Streams
To remove a tag completely from an image stream run:
$ oc delete istag/ruby:latest
or:
$ oc tag -d ruby:latest
13.2.4. Referencing Images in Image Streams
Images can be referenced in image streams using the following reference types:
An ImageStreamTag is used to reference or retrieve an image for a given image stream andtag. It uses the following convention for its name:
<image_stream_name>:<tag>
An ImageStreamImage is used to reference or retrieve an image for a given image stream andimage name. It uses the following convention for its name:
<image_stream_name>@<id>
The <id> is an immutable identifier for a specific image, also called a digest.
A DockerImage is used to reference or retrieve an image for a given external registry. It usesstandard Docker pull specification for its name, e.g.:
openshift/ruby-20-centos7:2.0
NOTE
When no tag is specified, it is assumed the latest tag is used.
You can also reference a third-party registry:
registry.access.redhat.com/rhel7:latest
CHAPTER 13. MANAGING IMAGES
185
Or an image with a digest:
centos/ruby-22-centos7@sha256:3a335d7d8a452970c5b4054ad7118ff134b3a6b50a2bb6d0c07c746e8986b28e
When viewing example image stream definitions, such as the example CentOS image streams, you maynotice they contain definitions of ImageStreamTag and references to DockerImage, but nothingrelated to ImageStreamImage.
This is because the ImageStreamImage objects are automatically created in OpenShift Dedicatedwhenever you import or tag an image into the image stream. You should never have to explicitly definean ImageStreamImage object in any image stream definition that you use to create image streams.
You can view an image’s object definition by retrieving an ImageStreamImage definition using theimage stream name and ID:
$ oc export isimage <image_stream_name>@<id>
NOTE
You can find valid <id> values for a given image stream by running:
$ oc describe is <image_stream_name>
For example, from the ruby image stream asking for the ImageStreamImage with the name and ID ofruby@3a335d7:
Definition of an Image Object Retrieved via ImageStreamImage
$ oc export isimage ruby@3a335d7
apiVersion: v1image: dockerImageLayers: - name: sha256:a3ed95caeb02ffe68cdd9fd84406680ae93d633cb16422d00e8a7c22955b46d4 size: 0 - name: sha256:ee1dd2cb6df21971f4af6de0f1d7782b81fb63156801cfde2bb47b4247c23c29 size: 196634330 - name: sha256:a3ed95caeb02ffe68cdd9fd84406680ae93d633cb16422d00e8a7c22955b46d4 size: 0 - name: sha256:a3ed95caeb02ffe68cdd9fd84406680ae93d633cb16422d00e8a7c22955b46d4 size: 0 - name: sha256:ca062656bff07f18bff46be00f40cfbb069687ec124ac0aa038fd676cfaea092 size: 177723024 - name: sha256:63d529c59c92843c395befd065de516ee9ed4995549f8218eac6ff088bfa6b6e size: 55679776
OpenShift Dedicated 3 Developer Guide
186
dockerImageMetadata: Architecture: amd64 Author: SoftwareCollections.org <[email protected]> Config: Cmd: - /bin/sh - -c - $STI_SCRIPTS_PATH/usage Entrypoint: - container-entrypoint Env: - PATH=/opt/app-root/src/bin:/opt/app-root/bin:/usr/local/sbin:/usr/local/bin:/usr/sbin:/usr/bin:/sbin:/bin - STI_SCRIPTS_URL=image:///usr/libexec/s2i - STI_SCRIPTS_PATH=/usr/libexec/s2i - HOME=/opt/app-root/src - BASH_ENV=/opt/app-root/etc/scl_enable - ENV=/opt/app-root/etc/scl_enable - PROMPT_COMMAND=. /opt/app-root/etc/scl_enable - RUBY_VERSION=2.2 ExposedPorts: 8080/tcp: {} Image: d9c3abc5456a9461954ff0de8ae25e0e016aad35700594714d42b687564b1f51 Labels: build-date: 2015-12-23 io.k8s.description: Platform for building and running Ruby 2.2 applications io.k8s.display-name: Ruby 2.2 io.openshift.builder-base-version: 8d95148 io.openshift.builder-version: 8847438ba06307f86ac877465eadc835201241df io.openshift.s2i.scripts-url: image:///usr/libexec/s2i io.openshift.tags: builder,ruby,ruby22 io.s2i.scripts-url: image:///usr/libexec/s2i license: GPLv2 name: CentOS Base Image vendor: CentOS User: "1001" WorkingDir: /opt/app-root/src ContainerConfig: {} Created: 2016-01-26T21:07:27Z DockerVersion: 1.8.2-el7 Id: 57b08d979c86f4500dc8cad639c9518744c8dd39447c055a3517dc9c18d6fccd Parent: d9c3abc5456a9461954ff0de8ae25e0e016aad35700594714d42b687564b1f51 Size: 430037130 apiVersion: "1.0" kind: DockerImage dockerImageMetadataVersion: "1.0" dockerImageReference: centos/ruby-22-centos7@sha256:3a335d7d8a452970c5b4054ad7118ff134b3a6b50a2bb6d0c07c746e8986b28e metadata: creationTimestamp: 2016-01-29T13:17:45Z name:
CHAPTER 13. MANAGING IMAGES
187
sha256:3a335d7d8a452970c5b4054ad7118ff134b3a6b50a2bb6d0c07c746e8986b28e resourceVersion: "352" uid: af2e7a0c-c68a-11e5-8a99-525400f25e34kind: ImageStreamImagemetadata: creationTimestamp: null name: ruby@3a335d7 namespace: openshift selflink: /oapi/v1/namespaces/openshift/imagestreamimages/ruby@3a335d7
13.3. IMAGE PULL POLICY
Each container in a pod has a container image. Once you have created an image and pushed it to aregistry, you can then refer to it in the pod.
When OpenShift Dedicated creates containers, it uses the container’s imagePullPolicy to determineif the image should be pulled prior to starting the container. There are three possible values for imagePullPolicy:
Always - always pull the image.
IfNotPresent - only pull the image if it does not already exist on the node.
Never - never pull the image.
If a container’s imagePullPolicy parameter is not specified, OpenShift Dedicated sets it based on theimage’s tag:
1. If the tag is latest, OpenShift Dedicated defaults imagePullPolicy to Always.
2. Otherwise, OpenShift Dedicated defaults imagePullPolicy to IfNotPresent.
13.4. ACCESSING THE INTERNAL REGISTRY
You can access OpenShift Dedicated’s internal registry directly to push or pull images. For example, thiscould be helpful if you wanted to create an image stream by manually pushing an image, or just to docker pull an image directly.
The internal registry authenticates using the same tokens as the OpenShift Dedicated API. To perform a docker login against the internal registry, you can choose any user name and email, but thepassword must be a valid OpenShift Dedicated token.
To log into the internal registry:
1. Log in to OpenShift Dedicated:
$ oc login
2. Get your access token:
$ oc whoami -t
3. Log in to the internal registry using the token. You must have docker installed on your system:
OpenShift Dedicated 3 Developer Guide
188
$ docker login -u <user_name> -e <email_address> \ -p <token_value> <registry_server>:<port>
NOTE
Contact your cluster administrator if you do not know the registry IP or host nameand port to use.
In order to pull an image, the authenticated user must have get rights on the requested imagestreams/layers. In order to push an image, the authenticated user must have update rightson the requested imagestreams/layers.
By default, all service accounts in a project have rights to pull any image in the same project, and thebuilder service account has rights to push any image in the same project.
13.5. USING IMAGE PULL SECRETS
Docker registries can be secured to prevent unauthorized parties from accessing certain images. If youare using OpenShift Dedicated’s internal registry and are pulling from image streams located in the sameproject, then your pod’s service account should already have the correct permissions and no additionalaction should be required.
However, for other scenarios, such as referencing images across OpenShift Dedicated projects or fromsecured registries, then additional configuration steps are required. The following sections detail thesescenarios and their required steps.
13.5.1. Allowing Pods to Reference Images Across Projects
When using the internal registry, to allow pods in project-a to reference images in project-b, a serviceaccount in project-a must be bound to the system:image-puller role in project-b:
$ oc policy add-role-to-user \ system:image-puller system:serviceaccount:project-a:default \ --namespace=project-b
After adding that role, the pods in project-a that reference the default service account is able to pullimages from project-b.
To allow access for any service account in project-a, use the group:
$ oc policy add-role-to-group \ system:image-puller system:serviceaccounts:project-a \ --namespace=project-b
13.5.2. Allowing Pods to Reference Images from Other Secured Registries
The .dockercfg file (or $HOME/.docker/config.json for newer Docker clients) is a Docker credentialsfile that stores your information if you have previously logged into a secured or insecure registry.
To pull a secured container image that is not from OpenShift Dedicated’s internal registry, you mustcreate a pull secret from your Docker credentials and add it to your service account.
CHAPTER 13. MANAGING IMAGES
189
If you already have a .dockercfg file for the secured registry, you can create a secret from that file byrunning:
$ oc create secret generic <pull_secret_name> \ --from-file=.dockercfg=<path/to/.dockercfg> \ --type=kubernetes.io/dockercfg
Or if you have a $HOME/.docker/config.json file:
$ oc create secret generic <pull_secret_name> \ --from-file=.dockerconfigjson=<path/to/.docker/config.json> \ --type=kubernetes.io/dockerconfigjson
If you do not already have a Docker credentials file for the secured registry, you can create a secret byrunning:
$ oc create secret docker-registry <pull_secret_name> \ --docker-server=<registry_server> \ --docker-username=<user_name> \ --docker-password=<password> \ --docker-email=<email>
To use a secret for pulling images for pods, you must add the secret to your service account. The nameof the service account in this example should match the name of the service account the pod uses;default is the default service account:
$ oc secrets link default <pull_secret_name> --for=pull
To use a secret for pushing and pulling build images, the secret must be mountable inside of a pod. Youcan do this by running:
$ oc secrets link builder <pull_secret_name>
13.5.2.1. Pulling from Private Registries with Delegated Authentication
A private registry can delegate authentication to a separate service. In these cases, image pull secretsmust be defined for both the authentication and registry endpoints.
NOTE
Third-party images in the Red Hat Container Catalog are served from the Red HatConnect Partner Registry (registry.connect.redhat.com). This registry delegatesauthentication to sso.redhat.com, so the following procedure applies.
1. Create a secret for the delegated authentication server:
$ oc create secret docker-registry \ --docker-server=sso.redhat.com \ [email protected] \ --docker-password=******** \ --docker-email=unused \ redhat-connect-sso
OpenShift Dedicated 3 Developer Guide
190

secret/redhat-connect-sso
2. Create a secret for the private registry:
$ oc create secret docker-registry \ --docker-server=privateregistry.example.com \ [email protected] \ --docker-password=******** \ --docker-email=unused \ private-registry
secret/private-registry
NOTE
The Red Hat Connect Partner Registry (registry.connect.redhat.com) does notaccept the auto-generated dockercfg secret type (BZ#1476330). A generic file-basedsecret must be created using the generated file from a docker login command:
$ docker login registry.connect.redhat.com --username [email protected]
Password: *************Login Succeeded
$ oc create secret generic redhat-connect --from-file=.dockerconfigjson=.docker/config.json
$ oc secrets link default redhat-connect --for=pull
13.6. IMPORTING TAG AND IMAGE METADATA
An image stream can be configured to import tag and image metadata from an image repository in anexternal Docker image registry. You can do this using a few different methods.
You can manually import tag and image information with the oc import-image commandusing the --from option:
$ oc import-image <image_stream_name>[:<tag>] --from=<docker_image_repo> --confirm
For example:
$ oc import-image my-ruby --from=docker.io/openshift/ruby-20-centos7 --confirmThe import completed successfully.
Name: my-rubyCreated: Less than a second agoLabels: <none>Annotations: openshift.io/image.dockerRepositoryCheck=2016-05-06T20:59:30ZDocker Pull Spec: 172.30.94.234:5000/demo-project/my-ruby
CHAPTER 13. MANAGING IMAGES
191
Tag Spec Created PullSpec Imagelatest docker.io/openshift/ruby-20-centos7 Less than a second ago docker.io/openshift/ruby-20-centos7@sha256:772c5bf9b2d1e8... <same>
You can also add the --all flag to import all tags for the image instead of just latest.
Like most objects in OpenShift Dedicated, you can also write and save a JSON or YAMLdefinition to a file then create the object using the CLI. Set the spec.dockerImageRepository field to the Docker pull spec for the image:
apiVersion: "v1"kind: "ImageStream"metadata: name: "my-ruby"spec: dockerImageRepository: "docker.io/openshift/ruby-20-centos7"
Then create the object:
$ oc create -f <file>
When you create an image stream that references an image in an external Docker registry, OpenShiftDedicated communicates with the external registry within a short amount of time to get up to dateinformation about the image.
After the tag and image metadata is synchronized, the image stream object would look similar to thefollowing:
apiVersion: v1kind: ImageStreammetadata: name: my-ruby namespace: demo-project selflink: /oapi/v1/namespaces/demo-project/imagestreams/my-ruby uid: 5b9bd745-13d2-11e6-9a86-0ada84b8265d resourceVersion: '4699413' generation: 2 creationTimestamp: '2016-05-06T21:34:48Z' annotations: openshift.io/image.dockerRepositoryCheck: '2016-05-06T21:34:48Z'spec: dockerImageRepository: docker.io/openshift/ruby-20-centos7 tags: - name: latest annotations: null from: kind: DockerImage name: 'docker.io/openshift/ruby-20-centos7:latest' generation: 2 importPolicy: { }status: dockerImageRepository: '172.30.94.234:5000/demo-project/my-ruby' tags:
OpenShift Dedicated 3 Developer Guide
192
1
- tag: latest items: - created: '2016-05-06T21:34:48Z' dockerImageReference: 'docker.io/openshift/ruby-20-centos7@sha256:772c5bf9b2d1e8e80742ed75aab05820419dc4532fa6d7ad8a1efddda5493dc3' image: 'sha256:772c5bf9b2d1e8e80742ed75aab05820419dc4532fa6d7ad8a1efddda5493dc3' generation: 2
You can set a tag to query external registries at a scheduled interval to synchronize tag and imagemetadata by setting the --scheduled=true flag with the oc tag command as mentioned in AddingTags to Image Streams.
Alternatively, you can set importPolicy.scheduled to true in the tag’s definition:
apiVersion: v1kind: ImageStreammetadata: name: rubyspec: tags: - from: kind: DockerImage name: openshift/ruby-20-centos7 name: latest importPolicy: scheduled: true
13.6.1. Importing Images from Insecure Registries
An image stream can be configured to import tag and image metadata from insecure image registries,such as those signed with a self-signed certificate or using plain HTTP instead of HTTPS.
To configure this, add the openshift.io/image.insecureRepository annotation and set it totrue. This setting bypasses certificate validation when connecting to the registry:
Set the openshift.io/image.insecureRepository annotation to true
kind: ImageStreamapiVersion: v1metadata: name: ruby annotations:
openshift.io/image.insecureRepository: "true" 1 spec: dockerImageRepository: my.repo.com:5000/myimage
CHAPTER 13. MANAGING IMAGES
193
IMPORTANT
This option instructs integrated registry to fall back to an insecure transport for anyexternal image tagged in the image stream when serving it, which is dangerous. Ifpossible, avoid this risk by marking just an istag as insecure.
13.6.1.1. Image Stream Tag Policies
13.6.1.1.1. Insecure Tag Import Policy
The above annotation applies to all images and tags of a particular ImageStream. For a finer-grainedcontrol, policies may be set on istags. Set importPolicy.insecure in the tag’s definition to trueto allow a fall-back to insecure transport just for images under this tag.
NOTE
The fall-back to insecure transport for an image under particular istag is enabled eitherwhen the image stream is annotated as insecure or the istag has insecure importpolicy. The importPolicy.insecure` set to false can not override the image streamannotation.
13.6.1.1.2. Reference Policy
The Reference Policy allows you to specify from where resources that reference this image stream tagpulls the image. It is only applicable to remote images (those imported from external registries). Thereare two options to choose from, Local and Source.
The Source policy instructs clients to pull directly from the source registry of the image. The integratedregistry is not involved unless the image is managed by the cluster. (It is not an external image.) This isthe default policy.
The Local policy instructs clients to always pull from the integrated registry. This is useful if you want topull from external insecure registries without modifying Docker daemon settings.
This policy only affects the use of the image stream tag. Components or operations that directlyreference or pull the image using its external registry location is not redirected to the internal registry.
The pull-through feature
of the registry serves the remote image to the client. This feature, which is on by default, must beenabled for the local reference policy to be used. Additionally, by default, all the blobs are mirrored forfaster access later.
You can set the policy in a specification of image stream tag as referencePolicy.type.
Example of Insecure Tag with a Local Reference Policy
kind: ImageStreamapiVersion: v1metadata: name: ruby tags: - from: kind: DockerImage name: my.repo.com:5000/myimage
OpenShift Dedicated 3 Developer Guide
194
1
2
Set tag mytag to use an insecure connection to that registry.
Set tag mytag to use integrated registry for pulling external images. If the reference policy type isset to Source, clients fetch the image directly from my.repo.com:5000/myimage.
13.6.2. Importing Images from Private Registries
An image stream can be configured to import tag and image metadata from private image registries,requiring authentication.
To configure this, you need to create a secret, which is used to store your credentials. See Allowing Podsto Reference Images from Other Secured Registries for instructions on creating a secret using oc create secret command.
After the secret is configured, proceed with creating the new image stream or using the oc import-image command. During the import process, OpenShift Dedicated picks up the secrets and providethem to the remote party.
NOTE
When importing from an insecure registry, the registry URL defined in the secret mustinclude the :80 port suffix or the secret is not used when attempting to import from theregistry.
13.6.3. Adding Trusted Certificates for External Registries
If the registry you are importing from is using a certificate that is not signed by a standard certificateauthority, you need to explicitly configure the system to trust the registry’s certificate or signing authority.This can be done by adding the CA certificate or registry certificate to the host system running theregistry import controller (typically the master node).
You must add the certificate or CA certificate to /etc/pki/tls/certs or /etc/pki/ca-trust,respectively, on the host system. You also need to run the update-ca-trust command on Red Hatdistributions followed by a restart of the master services to pick up the certificate changes.
13.6.4. Importing Images Across Projects
An image stream can be configured to import tag and image metadata from the internal registry, but froma different project. The recommended method for this is to use the oc tag command as shown inAdding Tags to Image Streams:
$ oc tag <source_project>/<image_stream>:<tag> <new_image_stream>:<new_tag>
Another method is to import the image from the other project manually using the pull spec:
name: mytag importPolicy:
insecure: true 1 referencePolicy:
type: Local 2
CHAPTER 13. MANAGING IMAGES
195
WARNING
The following method is strongly discouraged and should be used only if the formerusing oc tag is insufficient.
1. First, add the necessary policy to access the other project:
$ oc policy add-role-to-group \ system:image-puller \ system:serviceaccounts:<destination_project> \ -n <source_project>
This allows <destination_project> to pull images from <source_project>.
2. With the policy in place, you can import the image manually:
$ oc import-image <new_image_stream> --confirm \ --from=<docker_registry>/<source_project>/<image_stream>
13.6.5. Creating an Image Stream by Manually Pushing an Image
An image stream can also be automatically created by manually pushing an image to the internalregistry. This is only possible when using an OpenShift Dedicated internal registry.
Before performing this procedure, the following must be satisfied:
The destination project you push to must already exist.
The user must be authorized to {get, update} "imagestream/layers" in that project. Inaddition, since the image stream does not already exist, the user must be authorized to {create} "imagestream" in that project. If you are a project administrator, then you wouldhave these permissions.
NOTE
The system:image-pusher role does not grant permission to create new image streams,only to push images to existing image streams, so it cannot be used to push images toimage streams that do not yet exist unless additional permissions are also granted to theuser.
To create an image stream by manually pushing an image:
1. First, log in to the internal registry.
2. Then, tag your image using the appropriate internal registry location. For example, if you hadalready pulled the docker.io/centos:centos7 image locally:
$ docker tag docker.io/centos:centos7 https://registry.<clusterID>.openshift.com
OpenShift Dedicated 3 Developer Guide
196
3. Finally, push the image to your internal registry. For example:
$ docker push https://registry.<clusterID>.openshift.comThe push refers to a repository [https://registry.<clusterID>.openshift.com] (len: 1)c8a648134623: Pushed2bf4902415e3: Pushedlatest: digest: sha256:be8bc4068b2f60cf274fc216e4caba6aa845fff5fa29139e6e7497bb57e48d67 size: 6273
4. Verify that the image stream was created:
$ oc get isNAME DOCKER REPO TAGS UPDATEDmy-image 172.30.48.125:5000/test/my-image latest 3 seconds ago
13.7. TRIGGERING UPDATES ON IMAGE STREAM CHANGES
When an image stream tag is updated to point to a new image, OpenShift Dedicated can automaticallytake action to roll the new image out to resources that were using the old image. This is configured indifferent ways depending on the type of resource that is referencing the image stream tag.
13.7.1. OpenShift Resources
OpenShift DeploymentConfigs and BuildConfigs can be automatically triggered by changes toImageStreamTags. The triggered action can be run using the new value of the image referenced by theupdated ImageStreamTag. For more details on using this capability see the documentation onBuildConfig triggers and DeploymentConfig triggers.
13.7.2. Kubernetes Resources
Unlike DeploymentConfigs and BuildConfigs, which include as part of their API definition a set of fieldsfor controlling triggers, Kubernetes resources do not have fields for triggering. Instead, OpenShiftDedicated uses annotations to allow users to request triggering. The annotation is defined as follows:
Key: image.openshift.io/triggersValue: array of triggers, where each item has the schema:[ { "from" :{ "kind": "ImageStreamTag", // required, the resource to trigger from, must be ImageStreamTag "name": "example:latest", // required, the name of an ImageStreamTag "namespace": "myapp", // optional, defaults to the namespace of the object }, // required, JSON path to change // Note that this field is limited today, and only accepts a very specific set // of inputs (a JSON path expression that precisely matches a container by ID or index). // For pods this would be "spec.containers[?(@.name='web')].image". "fieldPath": "spec.template.spec.containers[?(@.name='web')].image",
CHAPTER 13. MANAGING IMAGES
197
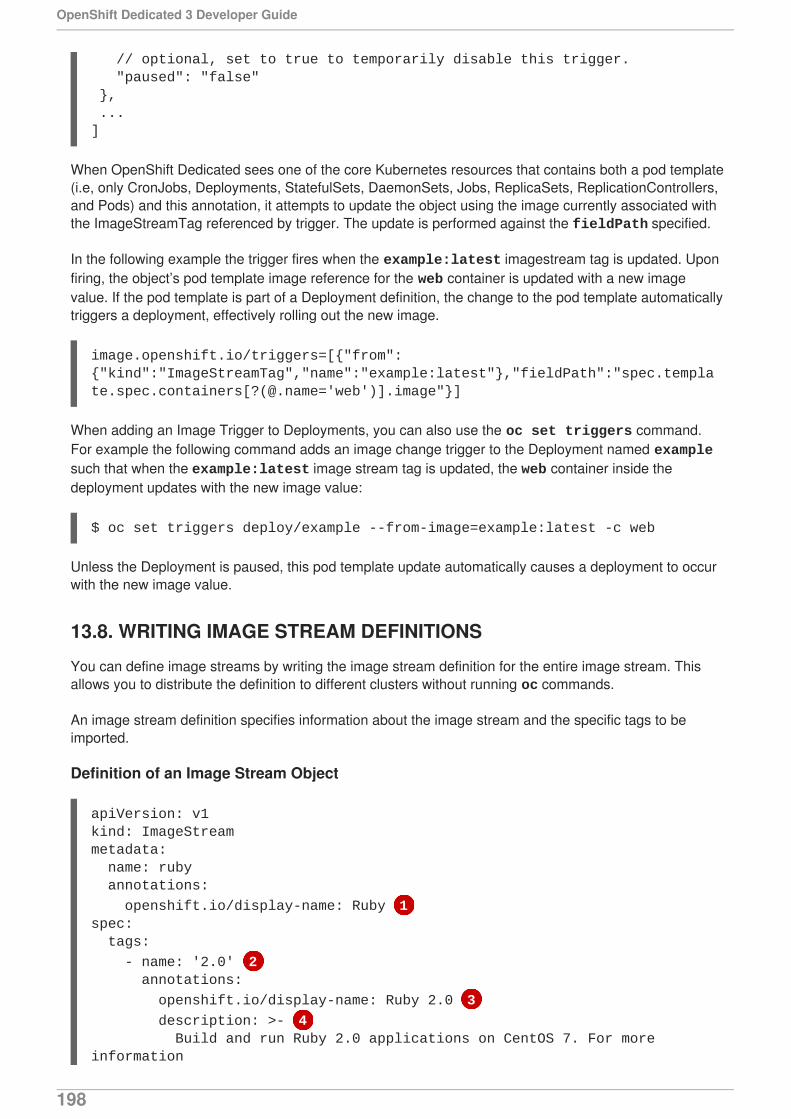
// optional, set to true to temporarily disable this trigger. "paused": "false" }, ...]
When OpenShift Dedicated sees one of the core Kubernetes resources that contains both a pod template(i.e, only CronJobs, Deployments, StatefulSets, DaemonSets, Jobs, ReplicaSets, ReplicationControllers,and Pods) and this annotation, it attempts to update the object using the image currently associated withthe ImageStreamTag referenced by trigger. The update is performed against the fieldPath specified.
In the following example the trigger fires when the example:latest imagestream tag is updated. Uponfiring, the object’s pod template image reference for the web container is updated with a new imagevalue. If the pod template is part of a Deployment definition, the change to the pod template automaticallytriggers a deployment, effectively rolling out the new image.
image.openshift.io/triggers=[{"from":{"kind":"ImageStreamTag","name":"example:latest"},"fieldPath":"spec.template.spec.containers[?(@.name='web')].image"}]
When adding an Image Trigger to Deployments, you can also use the oc set triggers command.For example the following command adds an image change trigger to the Deployment named examplesuch that when the example:latest image stream tag is updated, the web container inside thedeployment updates with the new image value:
$ oc set triggers deploy/example --from-image=example:latest -c web
Unless the Deployment is paused, this pod template update automatically causes a deployment to occurwith the new image value.
13.8. WRITING IMAGE STREAM DEFINITIONS
You can define image streams by writing the image stream definition for the entire image stream. Thisallows you to distribute the definition to different clusters without running oc commands.
An image stream definition specifies information about the image stream and the specific tags to beimported.
Definition of an Image Stream Object
apiVersion: v1kind: ImageStreammetadata: name: ruby annotations:
openshift.io/display-name: Ruby 1spec: tags:
- name: '2.0' 2 annotations:
openshift.io/display-name: Ruby 2.0 3
description: >- 4 Build and run Ruby 2.0 applications on CentOS 7. For more information
OpenShift Dedicated 3 Developer Guide
198
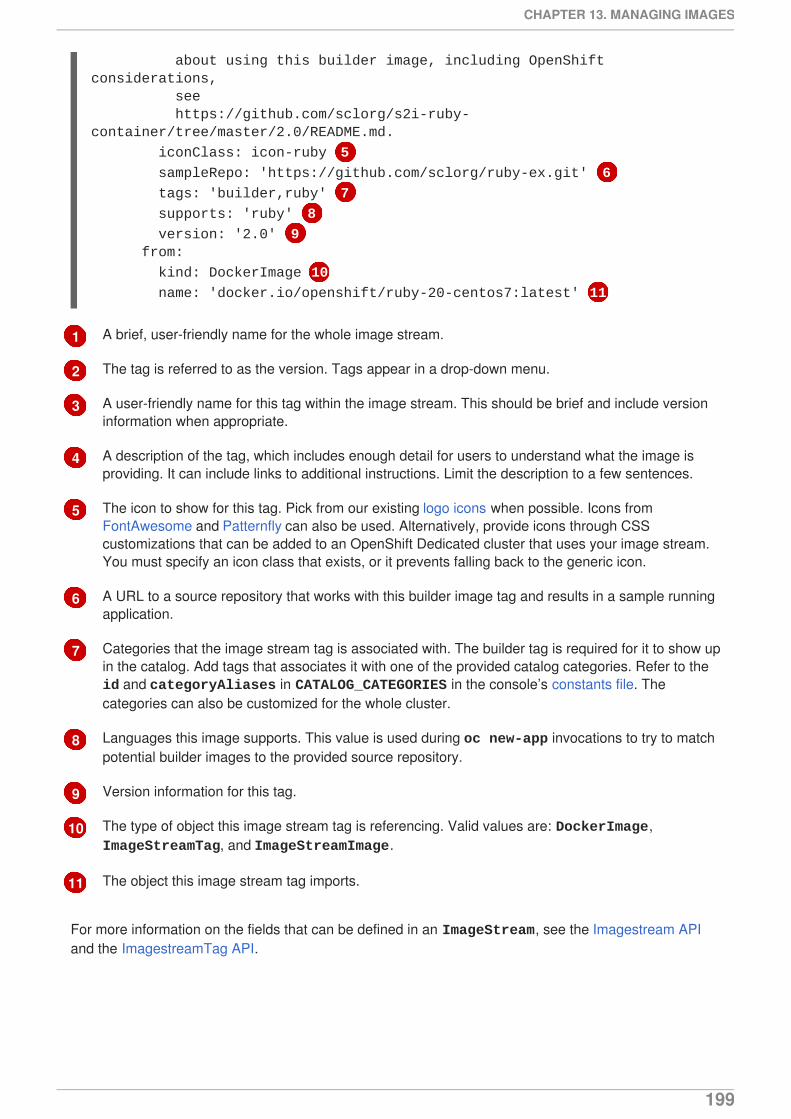
1
2
3
4
5
6
7
8
9
10
11
about using this builder image, including OpenShift considerations, see https://github.com/sclorg/s2i-ruby-container/tree/master/2.0/README.md.
iconClass: icon-ruby 5
sampleRepo: 'https://github.com/sclorg/ruby-ex.git' 6
tags: 'builder,ruby' 7
supports: 'ruby' 8
version: '2.0' 9 from:
kind: DockerImage 10
name: 'docker.io/openshift/ruby-20-centos7:latest' 11
A brief, user-friendly name for the whole image stream.
The tag is referred to as the version. Tags appear in a drop-down menu.
A user-friendly name for this tag within the image stream. This should be brief and include versioninformation when appropriate.
A description of the tag, which includes enough detail for users to understand what the image isproviding. It can include links to additional instructions. Limit the description to a few sentences.
The icon to show for this tag. Pick from our existing logo icons when possible. Icons fromFontAwesome and Patternfly can also be used. Alternatively, provide icons through CSScustomizations that can be added to an OpenShift Dedicated cluster that uses your image stream.You must specify an icon class that exists, or it prevents falling back to the generic icon.
A URL to a source repository that works with this builder image tag and results in a sample runningapplication.
Categories that the image stream tag is associated with. The builder tag is required for it to show upin the catalog. Add tags that associates it with one of the provided catalog categories. Refer to the id and categoryAliases in CATALOG_CATEGORIES in the console’s constants file. Thecategories can also be customized for the whole cluster.
Languages this image supports. This value is used during oc new-app invocations to try to matchpotential builder images to the provided source repository.
Version information for this tag.
The type of object this image stream tag is referencing. Valid values are: DockerImage, ImageStreamTag, and ImageStreamImage.
The object this image stream tag imports.
For more information on the fields that can be defined in an ImageStream, see the Imagestream APIand the ImagestreamTag API.
CHAPTER 13. MANAGING IMAGES
199
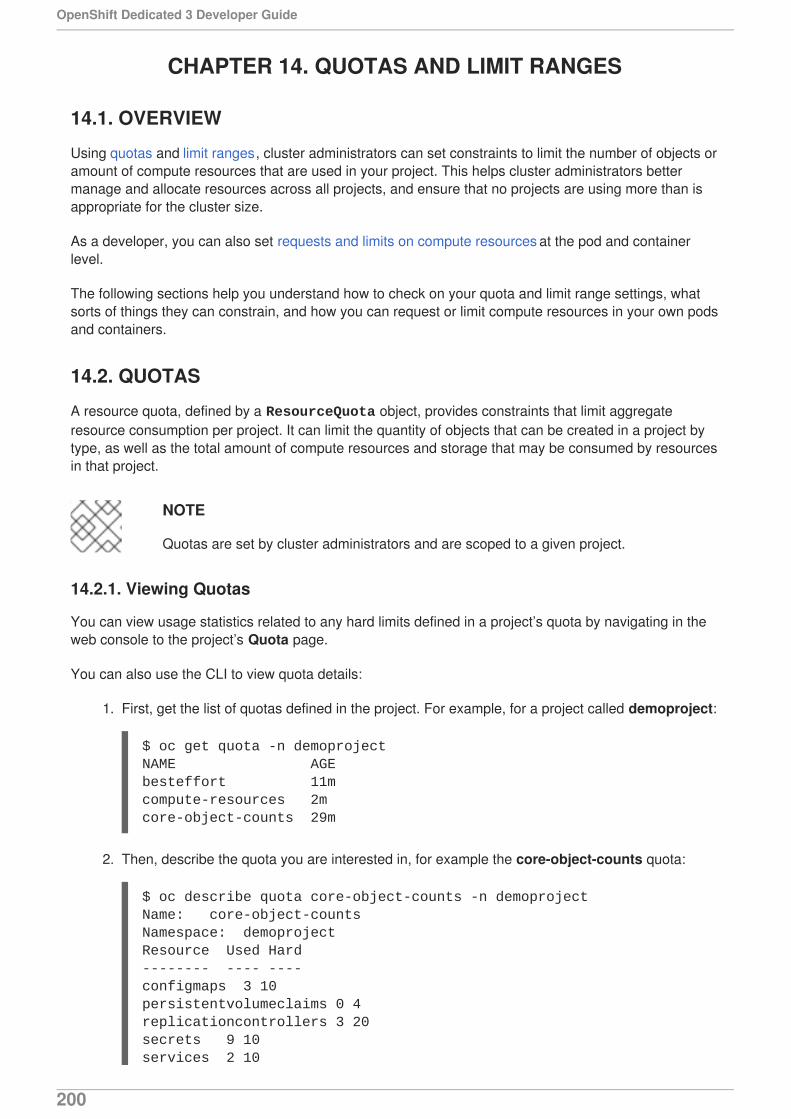
CHAPTER 14. QUOTAS AND LIMIT RANGES
14.1. OVERVIEW
Using quotas and limit ranges, cluster administrators can set constraints to limit the number of objects oramount of compute resources that are used in your project. This helps cluster administrators bettermanage and allocate resources across all projects, and ensure that no projects are using more than isappropriate for the cluster size.
As a developer, you can also set requests and limits on compute resources at the pod and containerlevel.
The following sections help you understand how to check on your quota and limit range settings, whatsorts of things they can constrain, and how you can request or limit compute resources in your own podsand containers.
14.2. QUOTAS
A resource quota, defined by a ResourceQuota object, provides constraints that limit aggregateresource consumption per project. It can limit the quantity of objects that can be created in a project bytype, as well as the total amount of compute resources and storage that may be consumed by resourcesin that project.
NOTE
Quotas are set by cluster administrators and are scoped to a given project.
14.2.1. Viewing Quotas
You can view usage statistics related to any hard limits defined in a project’s quota by navigating in theweb console to the project’s Quota page.
You can also use the CLI to view quota details:
1. First, get the list of quotas defined in the project. For example, for a project called demoproject:
$ oc get quota -n demoprojectNAME AGEbesteffort 11mcompute-resources 2mcore-object-counts 29m
2. Then, describe the quota you are interested in, for example the core-object-counts quota:
$ oc describe quota core-object-counts -n demoprojectName: core-object-countsNamespace: demoprojectResource Used Hard-------- ---- ----configmaps 3 10persistentvolumeclaims 0 4replicationcontrollers 3 20secrets 9 10services 2 10
OpenShift Dedicated 3 Developer Guide
200
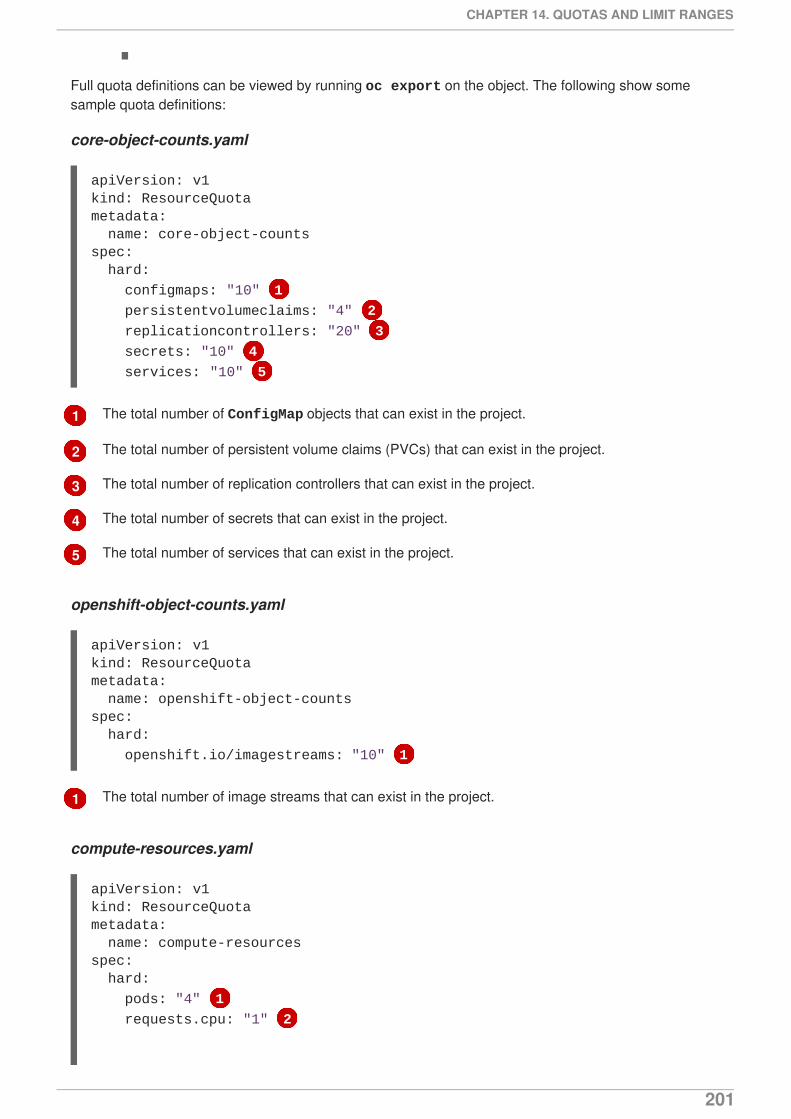
1
2
3
4
5
1
Full quota definitions can be viewed by running oc export on the object. The following show somesample quota definitions:
core-object-counts.yaml
The total number of ConfigMap objects that can exist in the project.
The total number of persistent volume claims (PVCs) that can exist in the project.
The total number of replication controllers that can exist in the project.
The total number of secrets that can exist in the project.
The total number of services that can exist in the project.
openshift-object-counts.yaml
The total number of image streams that can exist in the project.
compute-resources.yaml
apiVersion: v1kind: ResourceQuotametadata: name: core-object-countsspec: hard:
configmaps: "10" 1
persistentvolumeclaims: "4" 2
replicationcontrollers: "20" 3
secrets: "10" 4
services: "10" 5
apiVersion: v1kind: ResourceQuotametadata: name: openshift-object-countsspec: hard:
openshift.io/imagestreams: "10" 1
apiVersion: v1kind: ResourceQuotametadata: name: compute-resourcesspec: hard:
pods: "4" 1
requests.cpu: "1" 2
CHAPTER 14. QUOTAS AND LIMIT RANGES
201
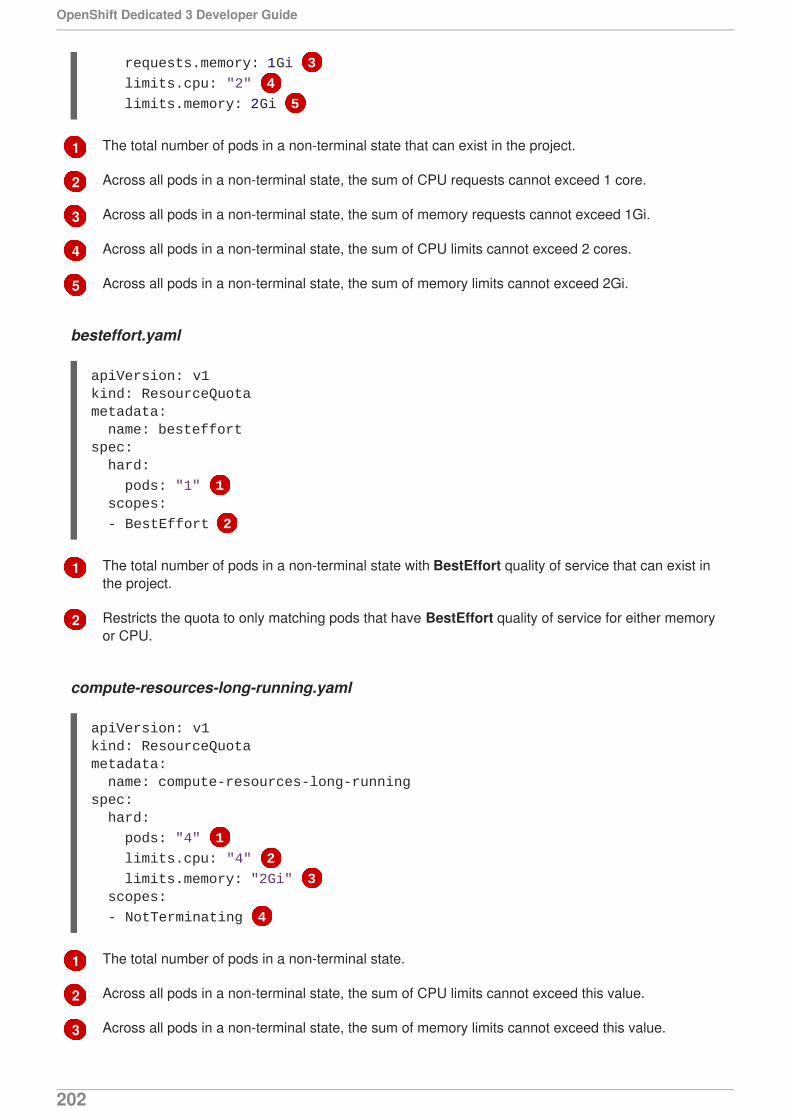
1
2
3
4
5
1
2
1
2
3
The total number of pods in a non-terminal state that can exist in the project.
Across all pods in a non-terminal state, the sum of CPU requests cannot exceed 1 core.
Across all pods in a non-terminal state, the sum of memory requests cannot exceed 1Gi.
Across all pods in a non-terminal state, the sum of CPU limits cannot exceed 2 cores.
Across all pods in a non-terminal state, the sum of memory limits cannot exceed 2Gi.
besteffort.yaml
The total number of pods in a non-terminal state with BestEffort quality of service that can exist inthe project.
Restricts the quota to only matching pods that have BestEffort quality of service for either memoryor CPU.
compute-resources-long-running.yaml
The total number of pods in a non-terminal state.
Across all pods in a non-terminal state, the sum of CPU limits cannot exceed this value.
Across all pods in a non-terminal state, the sum of memory limits cannot exceed this value.
requests.memory: 1Gi 3
limits.cpu: "2" 4
limits.memory: 2Gi 5
apiVersion: v1kind: ResourceQuotametadata: name: besteffortspec: hard:
pods: "1" 1 scopes:
- BestEffort 2
apiVersion: v1kind: ResourceQuotametadata: name: compute-resources-long-runningspec: hard:
pods: "4" 1
limits.cpu: "4" 2
limits.memory: "2Gi" 3 scopes:
- NotTerminating 4
OpenShift Dedicated 3 Developer Guide
202
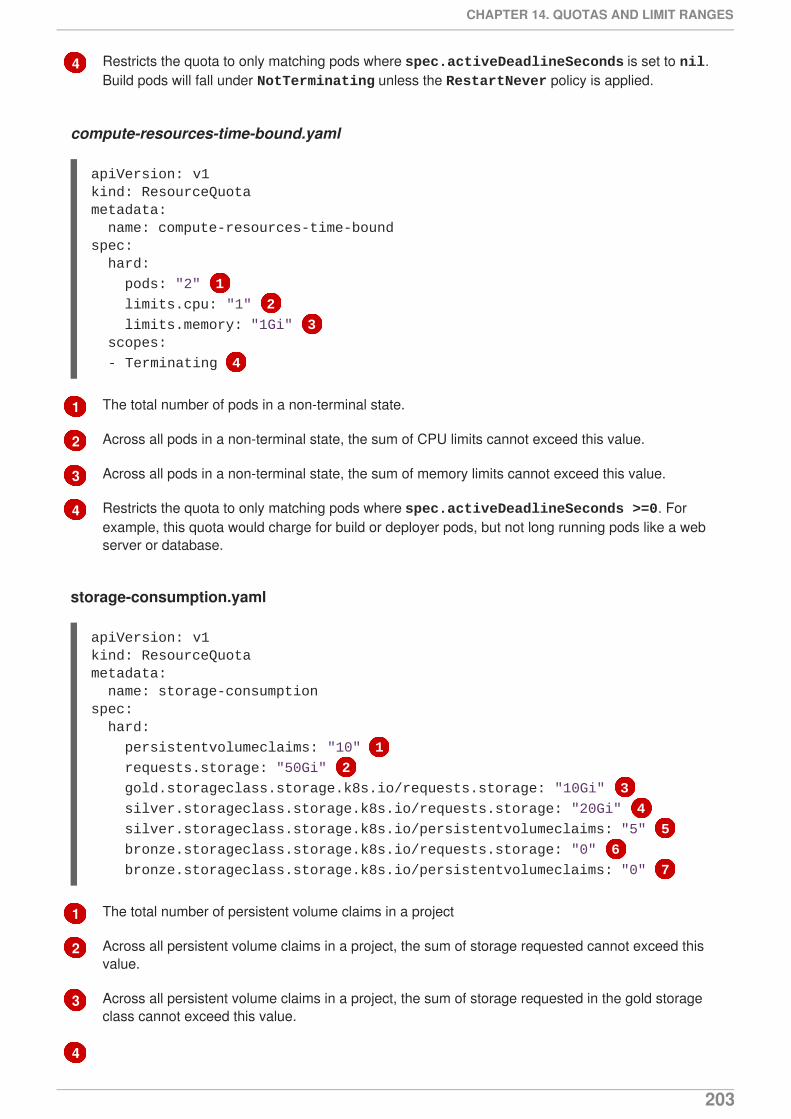
4
1
2
3
4
1
2
3
4
Restricts the quota to only matching pods where spec.activeDeadlineSeconds is set to nil.Build pods will fall under NotTerminating unless the RestartNever policy is applied.
compute-resources-time-bound.yaml
The total number of pods in a non-terminal state.
Across all pods in a non-terminal state, the sum of CPU limits cannot exceed this value.
Across all pods in a non-terminal state, the sum of memory limits cannot exceed this value.
Restricts the quota to only matching pods where spec.activeDeadlineSeconds >=0. Forexample, this quota would charge for build or deployer pods, but not long running pods like a webserver or database.
storage-consumption.yaml
The total number of persistent volume claims in a project
Across all persistent volume claims in a project, the sum of storage requested cannot exceed thisvalue.
Across all persistent volume claims in a project, the sum of storage requested in the gold storageclass cannot exceed this value.
apiVersion: v1kind: ResourceQuotametadata: name: compute-resources-time-boundspec: hard:
pods: "2" 1
limits.cpu: "1" 2
limits.memory: "1Gi" 3 scopes:
- Terminating 4
apiVersion: v1kind: ResourceQuotametadata: name: storage-consumptionspec: hard:
persistentvolumeclaims: "10" 1
requests.storage: "50Gi" 2
gold.storageclass.storage.k8s.io/requests.storage: "10Gi" 3
silver.storageclass.storage.k8s.io/requests.storage: "20Gi" 4
silver.storageclass.storage.k8s.io/persistentvolumeclaims: "5" 5
bronze.storageclass.storage.k8s.io/requests.storage: "0" 6
bronze.storageclass.storage.k8s.io/persistentvolumeclaims: "0" 7
CHAPTER 14. QUOTAS AND LIMIT RANGES
203

5
6
7
Across all persistent volume claims in a project, the sum of storage requested in the silver storageclass cannot exceed this value.
Across all persistent volume claims in a project, the total number of claims in the silver storageclass cannot exceed this value.
Across all persistent volume claims in a project, the sum of storage requested in the bronze storageclass cannot exceed this value. When this is set to 0, it means bronze storage class cannot requeststorage.
Across all persistent volume claims in a project, the sum of storage requested in the bronze storageclass cannot exceed this value. When this is set to 0, it means bronze storage class cannot createclaims.
14.2.2. Resources Managed by Quota
The following describes the set of compute resources and object types that may be managed by a quota.
NOTE
A pod is in a terminal state if status.phase in (Failed, Succeeded) is true.
Table 14.1. Compute Resources Managed by Quota
Resource Name Description
cpu The sum of CPU requests across all pods in a non-terminal state cannotexceed this value. cpu and requests.cpu are the same value and can beused interchangeably.
memory The sum of memory requests across all pods in a non-terminal state cannotexceed this value. memory and requests.memory are the same value andcan be used interchangeably.
requests.cpu The sum of CPU requests across all pods in a non-terminal state cannotexceed this value. cpu and requests.cpu are the same value and can beused interchangeably.
requests.memory The sum of memory requests across all pods in a non-terminal state cannotexceed this value. memory and requests.memory are the same value andcan be used interchangeably.
limits.cpu The sum of CPU limits across all pods in a non-terminal state cannot exceedthis value.
limits.memory The sum of memory limits across all pods in a non-terminal state cannotexceed this value.
Table 14.2. Storage Resources Managed by Quota
OpenShift Dedicated 3 Developer Guide
204
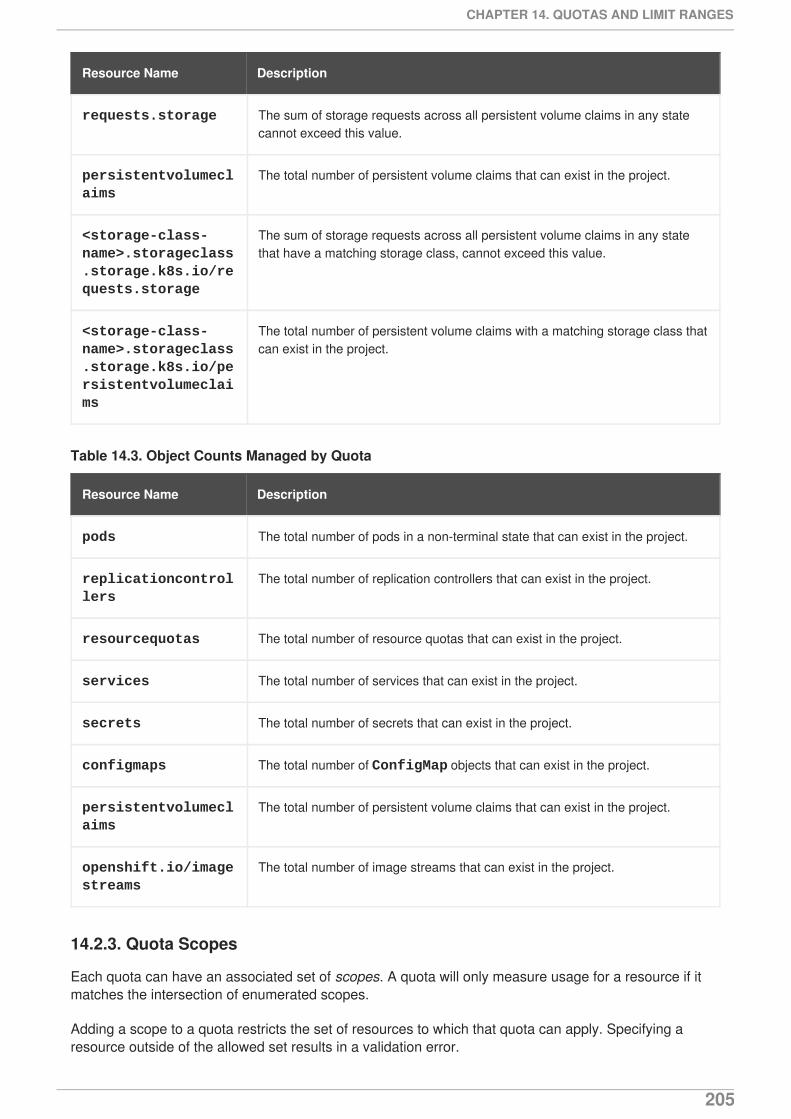
Resource Name Description
requests.storage The sum of storage requests across all persistent volume claims in any statecannot exceed this value.
persistentvolumeclaims
The total number of persistent volume claims that can exist in the project.
<storage-class-name>.storageclass.storage.k8s.io/requests.storage
The sum of storage requests across all persistent volume claims in any statethat have a matching storage class, cannot exceed this value.
<storage-class-name>.storageclass.storage.k8s.io/persistentvolumeclaims
The total number of persistent volume claims with a matching storage class thatcan exist in the project.
Table 14.3. Object Counts Managed by Quota
Resource Name Description
pods The total number of pods in a non-terminal state that can exist in the project.
replicationcontrollers
The total number of replication controllers that can exist in the project.
resourcequotas The total number of resource quotas that can exist in the project.
services The total number of services that can exist in the project.
secrets The total number of secrets that can exist in the project.
configmaps The total number of ConfigMap objects that can exist in the project.
persistentvolumeclaims
The total number of persistent volume claims that can exist in the project.
openshift.io/imagestreams
The total number of image streams that can exist in the project.
14.2.3. Quota Scopes
Each quota can have an associated set of scopes. A quota will only measure usage for a resource if itmatches the intersection of enumerated scopes.
Adding a scope to a quota restricts the set of resources to which that quota can apply. Specifying aresource outside of the allowed set results in a validation error.
CHAPTER 14. QUOTAS AND LIMIT RANGES
205
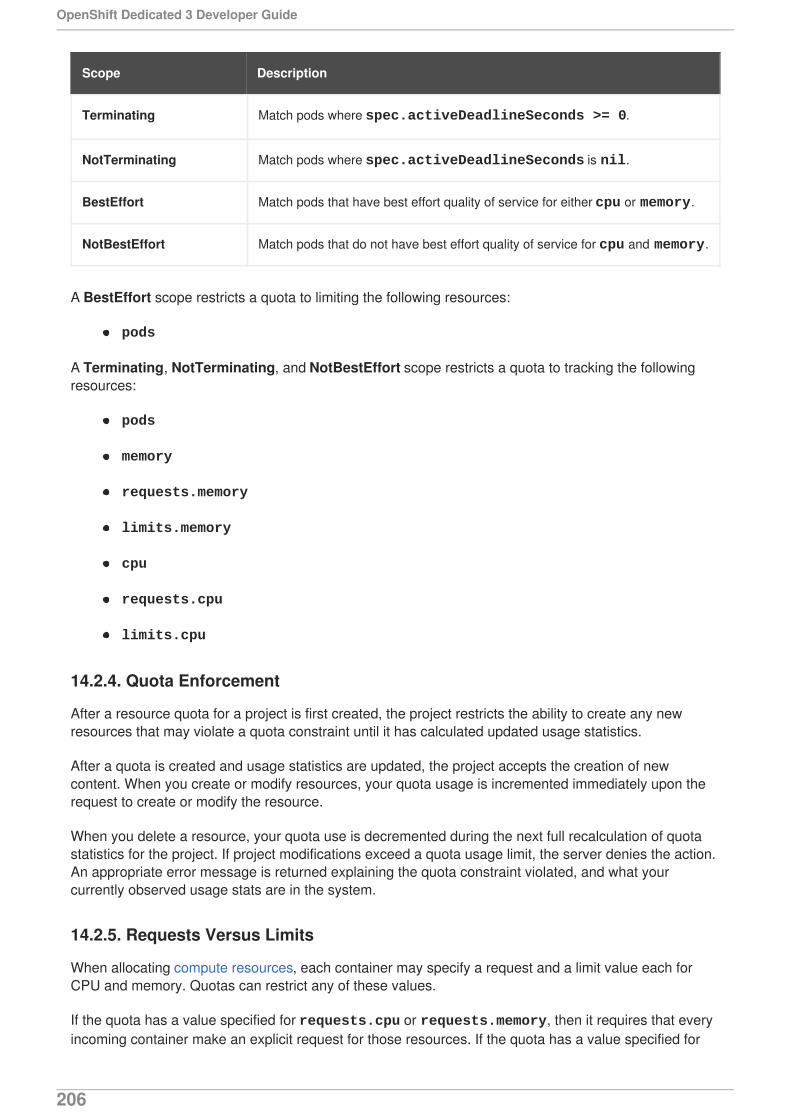
Scope Description
Terminating Match pods where spec.activeDeadlineSeconds >= 0.
NotTerminating Match pods where spec.activeDeadlineSeconds is nil.
BestEffort Match pods that have best effort quality of service for either cpu or memory.
NotBestEffort Match pods that do not have best effort quality of service for cpu and memory.
A BestEffort scope restricts a quota to limiting the following resources:
pods
A Terminating, NotTerminating, and NotBestEffort scope restricts a quota to tracking the followingresources:
pods
memory
requests.memory
limits.memory
cpu
requests.cpu
limits.cpu
14.2.4. Quota Enforcement
After a resource quota for a project is first created, the project restricts the ability to create any newresources that may violate a quota constraint until it has calculated updated usage statistics.
After a quota is created and usage statistics are updated, the project accepts the creation of newcontent. When you create or modify resources, your quota usage is incremented immediately upon therequest to create or modify the resource.
When you delete a resource, your quota use is decremented during the next full recalculation of quotastatistics for the project. If project modifications exceed a quota usage limit, the server denies the action.An appropriate error message is returned explaining the quota constraint violated, and what yourcurrently observed usage stats are in the system.
14.2.5. Requests Versus Limits
When allocating compute resources, each container may specify a request and a limit value each forCPU and memory. Quotas can restrict any of these values.
If the quota has a value specified for requests.cpu or requests.memory, then it requires that everyincoming container make an explicit request for those resources. If the quota has a value specified for
OpenShift Dedicated 3 Developer Guide
206
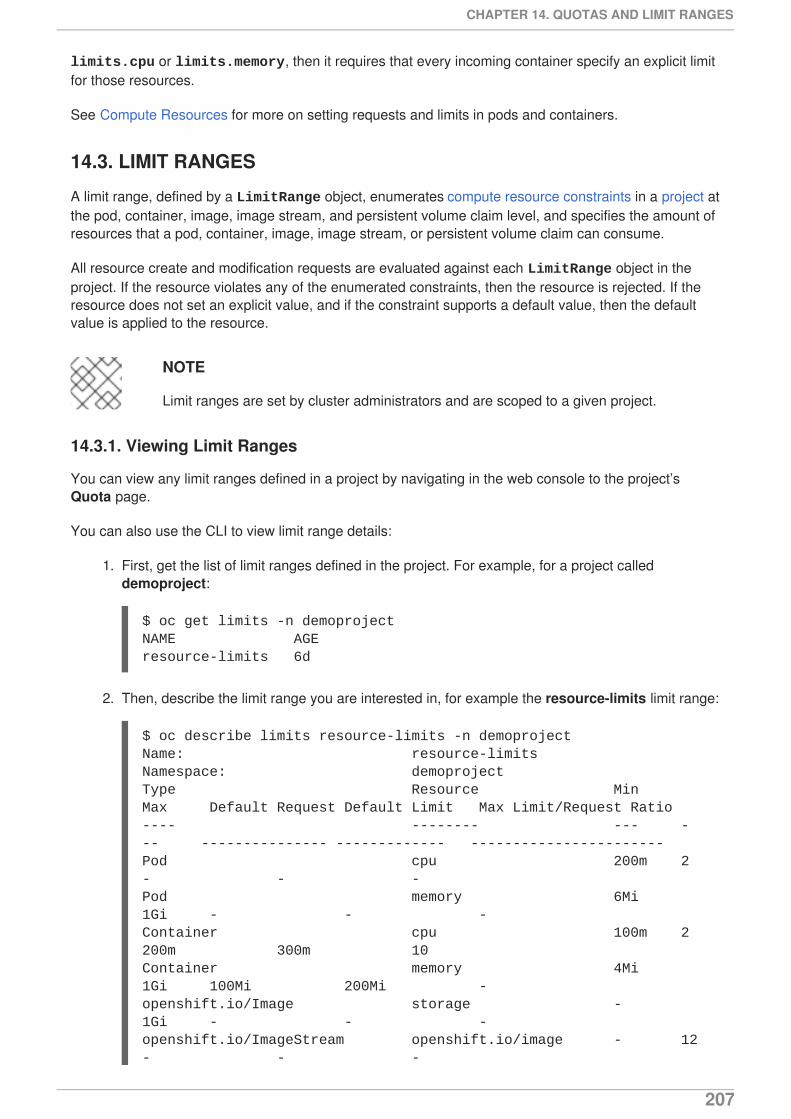
limits.cpu or limits.memory, then it requires that every incoming container specify an explicit limitfor those resources.
See Compute Resources for more on setting requests and limits in pods and containers.
14.3. LIMIT RANGES
A limit range, defined by a LimitRange object, enumerates compute resource constraints in a project atthe pod, container, image, image stream, and persistent volume claim level, and specifies the amount ofresources that a pod, container, image, image stream, or persistent volume claim can consume.
All resource create and modification requests are evaluated against each LimitRange object in theproject. If the resource violates any of the enumerated constraints, then the resource is rejected. If theresource does not set an explicit value, and if the constraint supports a default value, then the defaultvalue is applied to the resource.
NOTE
Limit ranges are set by cluster administrators and are scoped to a given project.
14.3.1. Viewing Limit Ranges
You can view any limit ranges defined in a project by navigating in the web console to the project’sQuota page.
You can also use the CLI to view limit range details:
1. First, get the list of limit ranges defined in the project. For example, for a project calleddemoproject:
$ oc get limits -n demoprojectNAME AGEresource-limits 6d
2. Then, describe the limit range you are interested in, for example the resource-limits limit range:
$ oc describe limits resource-limits -n demoprojectName: resource-limitsNamespace: demoprojectType Resource Min Max Default Request Default Limit Max Limit/Request Ratio---- -------- --- --- --------------- ------------- -----------------------Pod cpu 200m 2 - - -Pod memory 6Mi 1Gi - - -Container cpu 100m 2 200m 300m 10Container memory 4Mi 1Gi 100Mi 200Mi -openshift.io/Image storage - 1Gi - - -openshift.io/ImageStream openshift.io/image - 12 - - -
CHAPTER 14. QUOTAS AND LIMIT RANGES
207
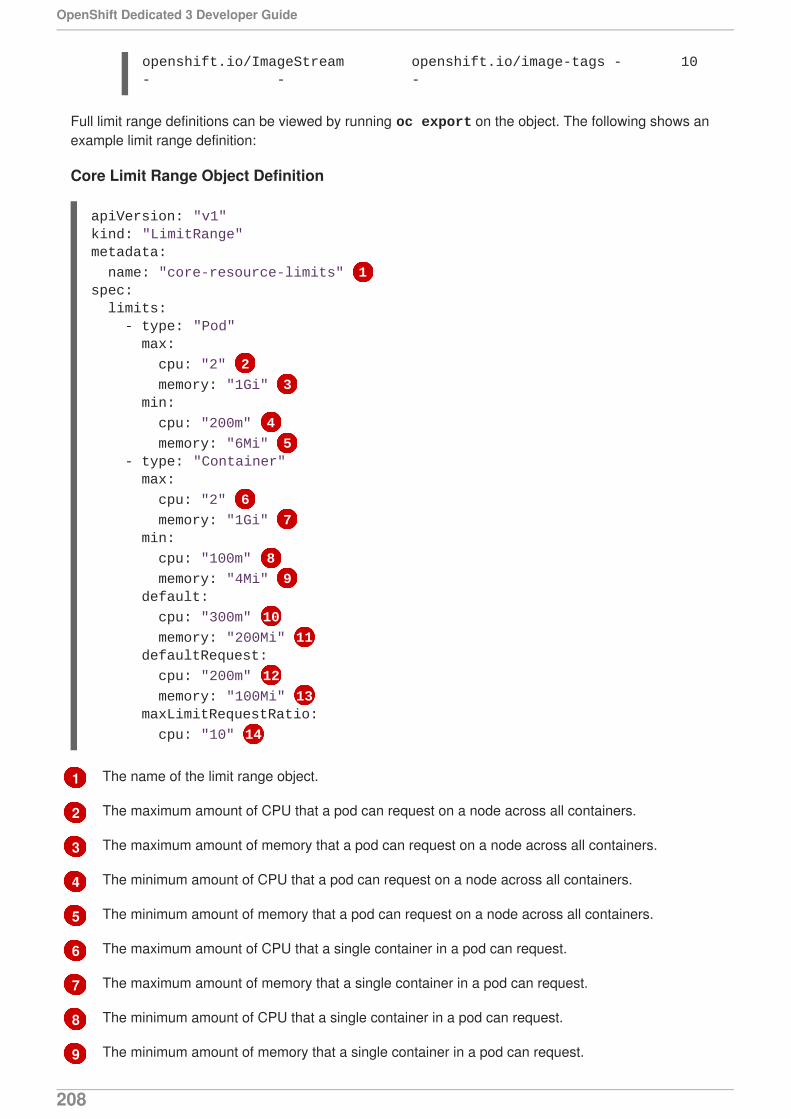
1
2
3
4
5
6
7
8
9
openshift.io/ImageStream openshift.io/image-tags - 10 - - -
Full limit range definitions can be viewed by running oc export on the object. The following shows anexample limit range definition:
Core Limit Range Object Definition
The name of the limit range object.
The maximum amount of CPU that a pod can request on a node across all containers.
The maximum amount of memory that a pod can request on a node across all containers.
The minimum amount of CPU that a pod can request on a node across all containers.
The minimum amount of memory that a pod can request on a node across all containers.
The maximum amount of CPU that a single container in a pod can request.
The maximum amount of memory that a single container in a pod can request.
The minimum amount of CPU that a single container in a pod can request.
The minimum amount of memory that a single container in a pod can request.
apiVersion: "v1"kind: "LimitRange"metadata:
name: "core-resource-limits" 1spec: limits: - type: "Pod" max:
cpu: "2" 2
memory: "1Gi" 3 min:
cpu: "200m" 4
memory: "6Mi" 5 - type: "Container" max:
cpu: "2" 6
memory: "1Gi" 7 min:
cpu: "100m" 8
memory: "4Mi" 9 default:
cpu: "300m" 10
memory: "200Mi" 11 defaultRequest:
cpu: "200m" 12
memory: "100Mi" 13 maxLimitRequestRatio:
cpu: "10" 14
OpenShift Dedicated 3 Developer Guide
208

10
11
12
13
14
The default amount of CPU that a container will be limited to use if not specified.
The default amount of memory that a container will be limited to use if not specified.
The default amount of CPU that a container will request to use if not specified.
The default amount of memory that a container will request to use if not specified.
The maximum amount of CPU burst that a container can make as a ratio of its limit over request.
For more information on how CPU and memory are measured, see Compute Resources.
14.3.2. Container Limits
Supported Resources:
CPU
Memory
Supported Constraints:
Per container, the following must hold true if specified:
Table 14.4. Container
Constraint Behavior
Min Min[resource] less than or equal to container.resources.requests[resource] (required) less than orequal to container/resources.limits[resource] (optional)
If the configuration defines a min CPU, then the request value must be greaterthan the CPU value. A limit value does not need to be specified.
Max container.resources.limits[resource] (required) less than orequal to Max[resource]
If the configuration defines a max CPU, then you do not need to define arequest value, but a limit value does need to be set that satisfies the maximumCPU constraint.
MaxLimitRequestRatio
MaxLimitRequestRatio[resource] less than or equal to ( container.resources.limits[resource] / container.resources.requests[resource])
If a configuration defines a maxLimitRequestRatio value, then any newcontainers must have both a request and limit value. Additionally, OpenShiftDedicated calculates a limit to request ratio by dividing the limit by the request.This value should be a non-negative integer greater than 1.
For example, if a container has cpu: 500 in the limit value, and cpu: 100 in the request value, then its limit to request ratio for cpu is 5. Thisratio must be less than or equal to the maxLimitRequestRatio.
CHAPTER 14. QUOTAS AND LIMIT RANGES
209
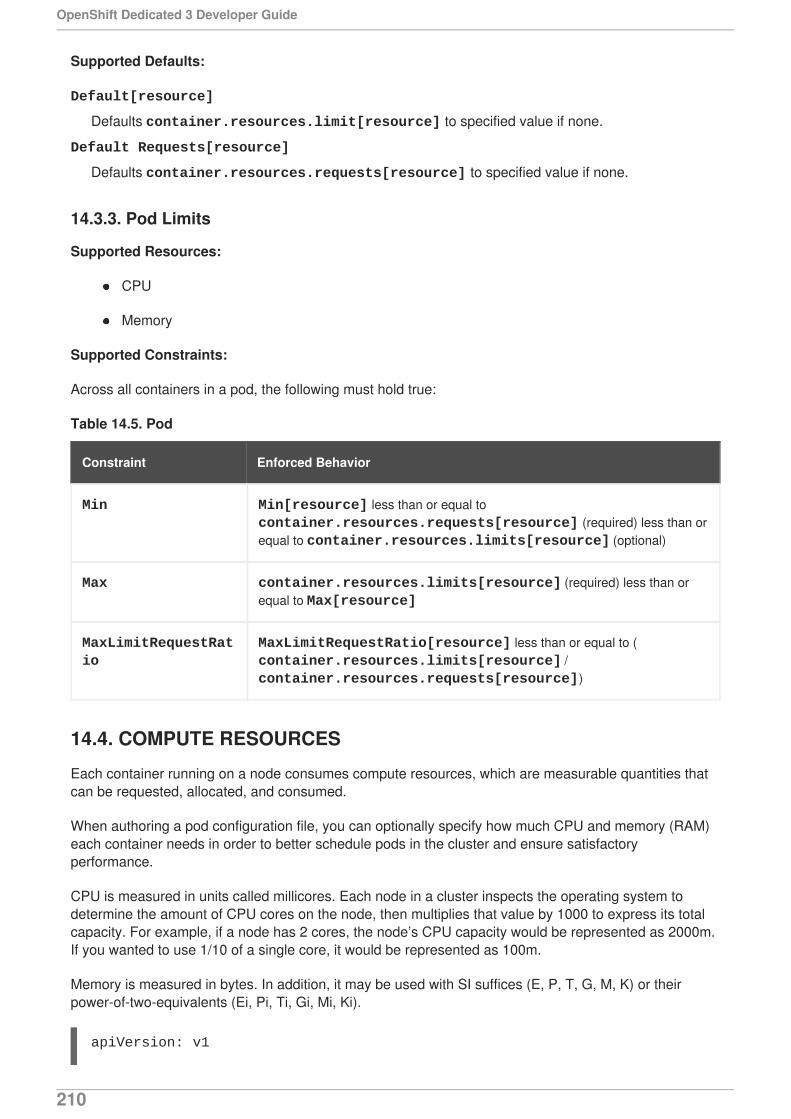
Supported Defaults:
Default[resource]
Defaults container.resources.limit[resource] to specified value if none.
Default Requests[resource]
Defaults container.resources.requests[resource] to specified value if none.
14.3.3. Pod Limits
Supported Resources:
CPU
Memory
Supported Constraints:
Across all containers in a pod, the following must hold true:
Table 14.5. Pod
Constraint Enforced Behavior
Min Min[resource] less than or equal to container.resources.requests[resource] (required) less than orequal to container.resources.limits[resource] (optional)
Max container.resources.limits[resource] (required) less than orequal to Max[resource]
MaxLimitRequestRatio
MaxLimitRequestRatio[resource] less than or equal to ( container.resources.limits[resource] / container.resources.requests[resource])
14.4. COMPUTE RESOURCES
Each container running on a node consumes compute resources, which are measurable quantities thatcan be requested, allocated, and consumed.
When authoring a pod configuration file, you can optionally specify how much CPU and memory (RAM)each container needs in order to better schedule pods in the cluster and ensure satisfactoryperformance.
CPU is measured in units called millicores. Each node in a cluster inspects the operating system todetermine the amount of CPU cores on the node, then multiplies that value by 1000 to express its totalcapacity. For example, if a node has 2 cores, the node’s CPU capacity would be represented as 2000m.If you wanted to use 1/10 of a single core, it would be represented as 100m.
Memory is measured in bytes. In addition, it may be used with SI suffices (E, P, T, G, M, K) or theirpower-of-two-equivalents (Ei, Pi, Ti, Gi, Mi, Ki).
apiVersion: v1
OpenShift Dedicated 3 Developer Guide
210
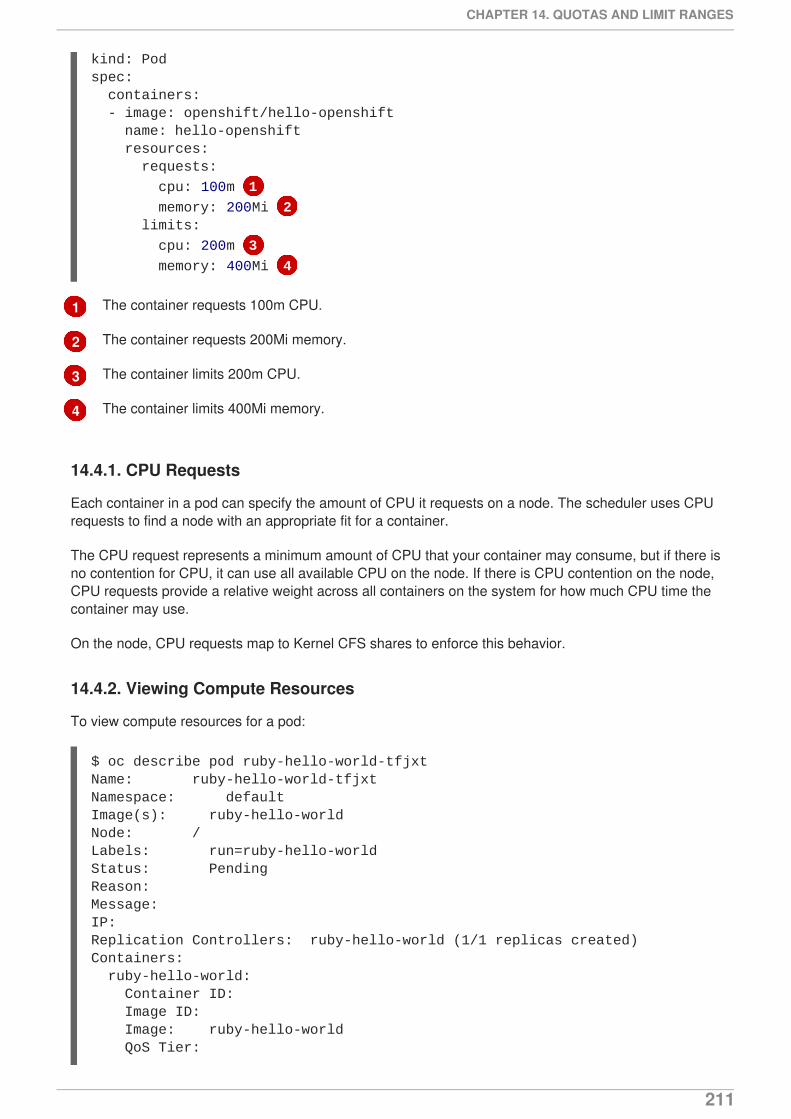
1
2
3
4
The container requests 100m CPU.
The container requests 200Mi memory.
The container limits 200m CPU.
The container limits 400Mi memory.
14.4.1. CPU Requests
Each container in a pod can specify the amount of CPU it requests on a node. The scheduler uses CPUrequests to find a node with an appropriate fit for a container.
The CPU request represents a minimum amount of CPU that your container may consume, but if there isno contention for CPU, it can use all available CPU on the node. If there is CPU contention on the node,CPU requests provide a relative weight across all containers on the system for how much CPU time thecontainer may use.
On the node, CPU requests map to Kernel CFS shares to enforce this behavior.
14.4.2. Viewing Compute Resources
To view compute resources for a pod:
$ oc describe pod ruby-hello-world-tfjxtName: ruby-hello-world-tfjxtNamespace: defaultImage(s): ruby-hello-worldNode: /Labels: run=ruby-hello-worldStatus: PendingReason:Message:IP:Replication Controllers: ruby-hello-world (1/1 replicas created)Containers: ruby-hello-world: Container ID: Image ID: Image: ruby-hello-world QoS Tier:
kind: Podspec: containers: - image: openshift/hello-openshift name: hello-openshift resources: requests:
cpu: 100m 1
memory: 200Mi 2 limits:
cpu: 200m 3
memory: 400Mi 4
CHAPTER 14. QUOTAS AND LIMIT RANGES
211
cpu: Burstable memory: Burstable Limits: cpu: 200m memory: 400Mi Requests: cpu: 100m memory: 200Mi State: Waiting Ready: False Restart Count: 0 Environment Variables:
14.4.3. CPU Limits
Each container in a pod can specify the amount of CPU it is limited to use on a node. CPU limits controlthe maximum amount of CPU that your container may use independent of contention on the node. If acontainer attempts to exceed the specified limit, the system will throttle the container. This allows thecontainer to have a consistent level of service independent of the number of pods scheduled to the node.
14.4.4. Memory Requests
By default, a container is able to consume as much memory on the node as possible. In order to improveplacement of pods in the cluster, specify the amount of memory required for a container to run. Thescheduler will then take available node memory capacity into account prior to binding your pod to a node.A container is still able to consume as much memory on the node as possible even when specifying arequest.
14.4.5. Memory Limits
If you specify a memory limit, you can constrain the amount of memory the container can use. Forexample, if you specify a limit of 200Mi, a container will be limited to using that amount of memory on thenode. If the container exceeds the specified memory limit, it will be terminated and potentially restarteddependent upon the container restart policy.
14.4.6. Quality of Service Tiers
When created, a compute resource is classified with a quality of service (QoS). There are three tiers,and each is based on the request and limit value specified for each resource:
Quality of Service Description
BestEffort Provided when a request and limit are not specified.
Burstable Provided when a request is specified that is less than an optionally specifiedlimit.
Guaranteed Provided when a limit is specified that is equal to an optionally specifiedrequest.
A container may have a different quality of service for each compute resource. For example, a containercan have Burstable CPU and Guaranteed memory qualities of service.
OpenShift Dedicated 3 Developer Guide
212
The quality of service has different impacts on different resources, depending on whether the resource iscompressible or not. CPU is a compressible resource, whereas memory is an incompressible resource.
With CPU Resources:
A BestEffort CPU container is able to consume as much CPU as is available on a node butruns with the lowest priority.
A Burstable CPU container is guaranteed to get the minimum amount of CPU requested, butit may or may not get additional CPU time. Excess CPU resources are distributed based onthe amount requested across all containers on the node.
A Guaranteed CPU container is guaranteed to get the amount requested and no more, evenif there are additional CPU cycles available. This provides a consistent level of performanceindependent of other activity on the node.
With Memory Resources:
A BestEffort memory container is able to consume as much memory as is available on thenode, but there are no guarantees that the scheduler will place that container on a node withenough memory to meet its needs. In addition, a BestEffort container has the greatestchance of being killed if there is an out of memory event on the node.
A Burstable memory container is scheduled on the node to get the amount of memoryrequested, but it may consume more. If there is an out of memory event on the node,Burstable containers are killed after BestEffort containers when attempting to recovermemory.
A Guaranteed memory container gets the amount of memory requested, but no more. In theevent of an out of memory event, it will only be killed if there are no more BestEffort orBurstable containers on the system.
14.4.7. Specifying Compute Resources via CLI
To specify compute resources via the CLI:
$ oc run ruby-hello-world --image=ruby-hello-world --limits=cpu=200m,memory=400Mi --requests=cpu=100m,memory=200Mi
14.5. PROJECT RESOURCE LIMITS
Resource limits can be set per-project by cluster administrators. Developers do not have the ability tocreate, edit, or delete these limits, but can view them for projects they have access to.
CHAPTER 14. QUOTAS AND LIMIT RANGES
213
CHAPTER 15. ROUTES
15.1. OVERVIEW
An OpenShift Dedicated route exposes a service at a host name, like www.example.com, so thatexternal clients can reach it by name.
DNS resolution for a host name is handled separately from routing; your administrator may haveconfigured a cloud domain that will always correctly resolve to the OpenShift Dedicated router, or if usingan unrelated host name you may need to modify its DNS records independently to resolve to the router.
15.2. CREATING ROUTES
You can create unsecured and secured routes using the web console or the CLI.
Using the web console, you can navigate to the Routes page, found under the Applications section ofthe navigation.
Click Create Route to define and create a route in your project:
OpenShift Dedicated 3 Developer Guide
214

Figure 15.1. Creating a Route Using the Web Console
Using the CLI, the following example creates an unsecured route:
$ oc expose svc/frontend --hostname=www.example.com
The new route inherits the name from the service unless you specify one using the --name option.
YAML Definition of the Unsecured Route Created Above
apiVersion: v1
CHAPTER 15. ROUTES
215
1 For path-based routing, specify a path component that can be compared against a URL.
For information on configuring routes using the CLI, see Route Types.
Unsecured routes are the default configuration, and are therefore the simplest to set up. However,secured routes offer security for connections to remain private. To create a secured HTTPS routeencrypted with a key and certificate (PEM-format files which you must generate and sign separately), youcan use the create route command and optionally provide certificates and a key.
NOTE
TLS is the replacement of SSL for HTTPS and other encrypted protocols.
$ oc create route edge --service=frontend \ --cert=${MASTER_CONFIG_DIR}/ca.crt \ --key=${MASTER_CONFIG_DIR}/ca.key \ --ca-cert=${MASTER_CONFIG_DIR}/ca.crt \ --hostname=www.example.com
YAML Definition of the Secured Route Created Above
kind: Routemetadata: name: frontendspec: host: www.example.com
path: "/test" 1 to: kind: Service name: frontend
apiVersion: v1kind: Routemetadata: name: frontendspec: host: www.example.com to: kind: Service name: frontend tls: termination: edge key: |- -----BEGIN PRIVATE KEY----- [...] -----END PRIVATE KEY----- certificate: |- -----BEGIN CERTIFICATE----- [...] -----END CERTIFICATE----- caCertificate: |-
OpenShift Dedicated 3 Developer Guide
216
Currently, password protected key files are not supported. HAProxy prompts for a password uponstarting and does not have a way to automate this process. To remove a passphrase from a keyfile, youcan run:
# openssl rsa -in <passwordProtectedKey.key> -out <new.key>
You can create a secured route without specifying a key and certificate, in which case the router’sdefault certificate will be used for TLS termination.
NOTE
TLS termination in OpenShift Dedicated relies on SNI for serving custom certificates. Anynon-SNI traffic received on port 443 is handled with TLS termination and a defaultcertificate, which may not match the requested host name, resulting in validation errors.
Further information on all types of TLS termination as well as path-based routing are available in theArchitecture section.
15.3. ALLOWING ROUTE ENDPOINTS TO CONTROL COOKIE NAMES
OpenShift Dedicated provides sticky sessions, which enables stateful application traffic by ensuring alltraffic hits the same endpoint. However, if the endpoint pod terminates, whether through restart, scaling,or a change in configuration, this statefulness can disappear.
OpenShift Dedicated can use cookies to configure session persistence. The router selects an endpoint tohandle any user requests, and creates a cookie for the session. The cookie is passed back in theresponse to the request and the user sends the cookie back with the next request in the session. Thecookie tells the router which endpoint is handling the session, ensuring that client requests use thecookie so that they are routed to the same pod.
You can set a cookie name to overwrite the default, auto-generated one for the route. This allows theapplication receiving route traffic to know the cookie name. By deleting the cookie it can force the nextrequest to re-choose an endpoint. So, if a server was overloaded it tries to shed the requests from theclient and redistribute them.
1. Annotate the route with the desired cookie name:
$ oc annotate route <route_name> router.openshift.io/<cookie_name>="-<cookie_annotation>"
For example, to annotate the cookie name of my_cookie to the my_route with the annotationof my_cookie_anno:
$ oc annotate route my_route router.openshift.io/my_cookie="-my_cookie_anno"
2. Save the cookie, and access the route:
$ curl $my_route -k -c /tmp/my_cookie
-----BEGIN CERTIFICATE----- [...] -----END CERTIFICATE-----
CHAPTER 15. ROUTES
217
CHAPTER 16. INTEGRATING EXTERNAL SERVICES
16.1. OVERVIEW
Many OpenShift Dedicated applications use external resources, such as external databases, or anexternal SaaS endpoint. These external resources can be modeled as native OpenShift Dedicatedservices, so that applications can work with them as they would any other internal service.
Egress traffic can be controlled by firewall rules. This permits having a static IP address for theirapplication service.
16.2. DEFINING A SERVICE FOR AN EXTERNAL DATABASE
One of the most common types of external services is an external database. To support an externaldatabase, an application needs:
1. An endpoint to communicate with.
2. A set of credentials and coordinates, including:
A user name
A passphrase
A database name
The solution for integrating with an external database includes:
A Service object to represent the SaaS provider as an OpenShift Dedicated service.
One or more Endpoints for the service.
Environment variables in the appropriate pods containing the credentials.
The following steps outline a scenario for integrating with an external MySQL database:
16.2.1. Step 1: Define a Service
You can define a service either by providing an IP address and endpoints, or by providing a Fullyqualified domain name (FQDN).
16.2.1.1. Using an IP address
1. Create an OpenShift Dedicated service to represent your external database. This is similar tocreating an internal service; the difference is in the service’s Selector field.Internal OpenShift Dedicated services use the Selector field to associate pods with servicesusing labels. The EndpointsController system component synchronizes the endpoints forservices that specify selectors with the pods that match the selector. The service proxy andOpenShift Dedicated router load-balance requests to the service amongst the service’sendpoints.
Services that represent an external resource do not require associated pods. Instead, leave the Selector field unset. This represents the external service, making the EndpointsController ignore the service and allows you to specify endpoints manually:
OpenShift Dedicated 3 Developer Guide
218
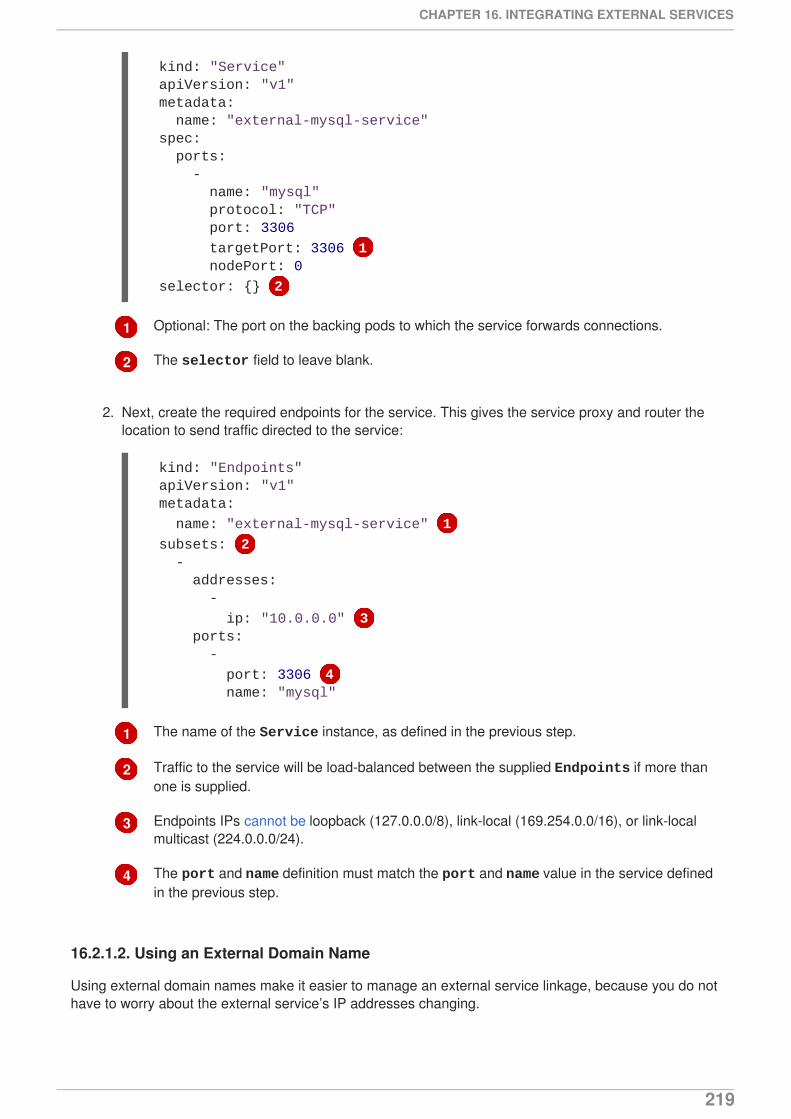
1
2
1
2
3
4
Optional: The port on the backing pods to which the service forwards connections.
The selector field to leave blank.
2. Next, create the required endpoints for the service. This gives the service proxy and router thelocation to send traffic directed to the service:
The name of the Service instance, as defined in the previous step.
Traffic to the service will be load-balanced between the supplied Endpoints if more thanone is supplied.
Endpoints IPs cannot be loopback (127.0.0.0/8), link-local (169.254.0.0/16), or link-localmulticast (224.0.0.0/24).
The port and name definition must match the port and name value in the service definedin the previous step.
16.2.1.2. Using an External Domain Name
Using external domain names make it easier to manage an external service linkage, because you do nothave to worry about the external service’s IP addresses changing.
kind: "Service" apiVersion: "v1" metadata: name: "external-mysql-service" spec: ports: - name: "mysql" protocol: "TCP" port: 3306
targetPort: 3306 1 nodePort: 0
selector: {} 2
kind: "Endpoints" apiVersion: "v1" metadata:
name: "external-mysql-service" 1
subsets: 2 - addresses: -
ip: "10.0.0.0" 3 ports: -
port: 3306 4 name: "mysql"
CHAPTER 16. INTEGRATING EXTERNAL SERVICES
219
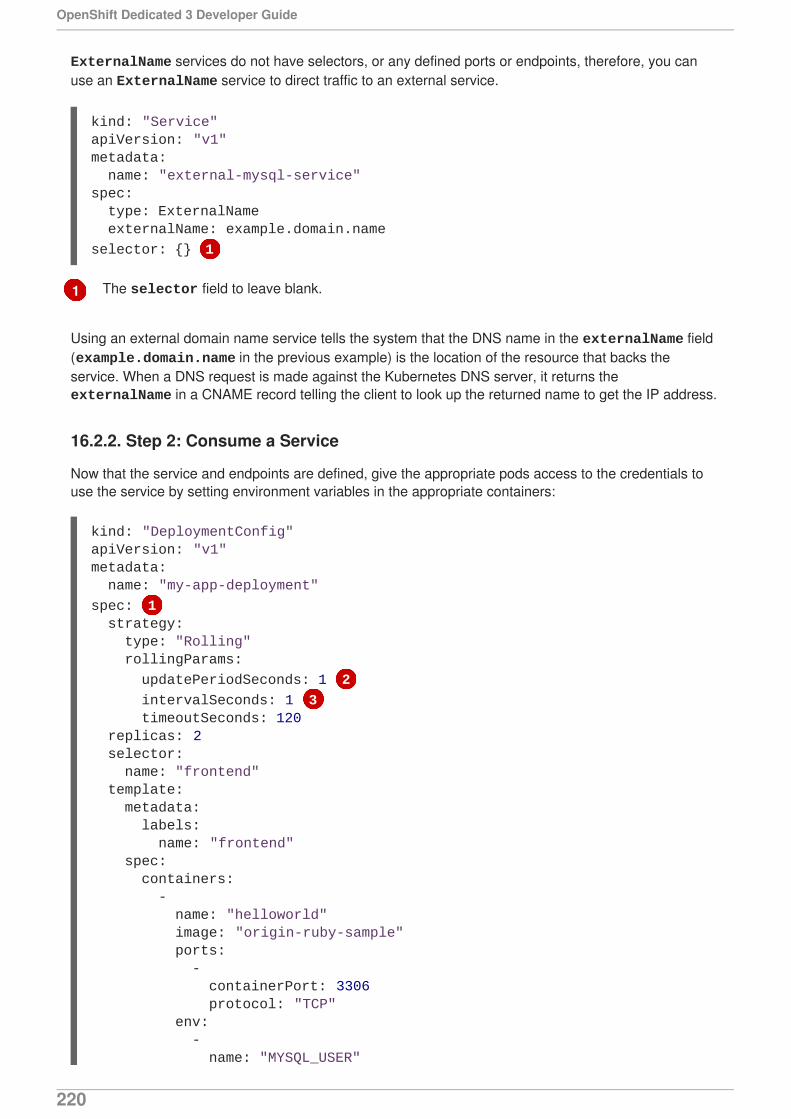
1
ExternalName services do not have selectors, or any defined ports or endpoints, therefore, you canuse an ExternalName service to direct traffic to an external service.
The selector field to leave blank.
Using an external domain name service tells the system that the DNS name in the externalName field(example.domain.name in the previous example) is the location of the resource that backs theservice. When a DNS request is made against the Kubernetes DNS server, it returns the externalName in a CNAME record telling the client to look up the returned name to get the IP address.
16.2.2. Step 2: Consume a Service
Now that the service and endpoints are defined, give the appropriate pods access to the credentials touse the service by setting environment variables in the appropriate containers:
kind: "Service"apiVersion: "v1"metadata: name: "external-mysql-service"spec: type: ExternalName externalName: example.domain.name
selector: {} 1
kind: "DeploymentConfig"apiVersion: "v1"metadata: name: "my-app-deployment"
spec: 1 strategy: type: "Rolling" rollingParams:
updatePeriodSeconds: 1 2
intervalSeconds: 1 3 timeoutSeconds: 120 replicas: 2 selector: name: "frontend" template: metadata: labels: name: "frontend" spec: containers: - name: "helloworld" image: "origin-ruby-sample" ports: - containerPort: 3306 protocol: "TCP" env: - name: "MYSQL_USER"
OpenShift Dedicated 3 Developer Guide
220
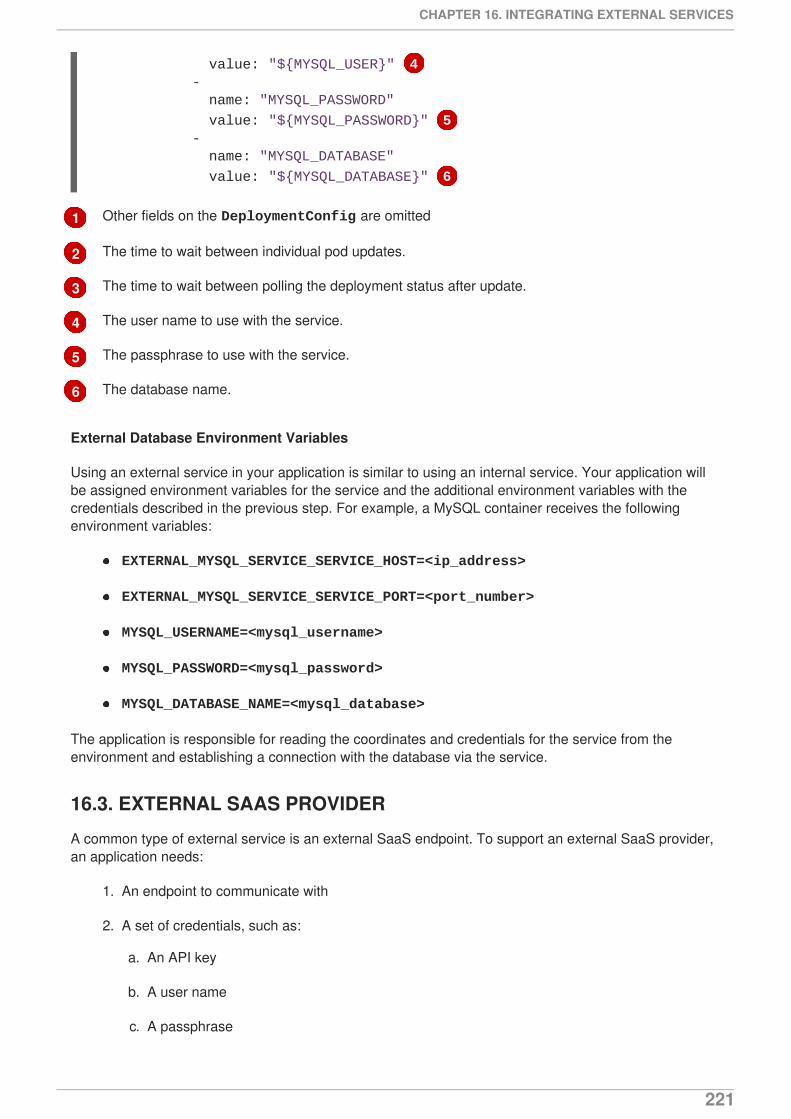
1
2
3
4
5
6
Other fields on the DeploymentConfig are omitted
The time to wait between individual pod updates.
The time to wait between polling the deployment status after update.
The user name to use with the service.
The passphrase to use with the service.
The database name.
External Database Environment Variables
Using an external service in your application is similar to using an internal service. Your application willbe assigned environment variables for the service and the additional environment variables with thecredentials described in the previous step. For example, a MySQL container receives the followingenvironment variables:
EXTERNAL_MYSQL_SERVICE_SERVICE_HOST=<ip_address>
EXTERNAL_MYSQL_SERVICE_SERVICE_PORT=<port_number>
MYSQL_USERNAME=<mysql_username>
MYSQL_PASSWORD=<mysql_password>
MYSQL_DATABASE_NAME=<mysql_database>
The application is responsible for reading the coordinates and credentials for the service from theenvironment and establishing a connection with the database via the service.
16.3. EXTERNAL SAAS PROVIDER
A common type of external service is an external SaaS endpoint. To support an external SaaS provider,an application needs:
1. An endpoint to communicate with
2. A set of credentials, such as:
a. An API key
b. A user name
c. A passphrase
value: "${MYSQL_USER}" 4 - name: "MYSQL_PASSWORD"
value: "${MYSQL_PASSWORD}" 5 - name: "MYSQL_DATABASE"
value: "${MYSQL_DATABASE}" 6
CHAPTER 16. INTEGRATING EXTERNAL SERVICES
221
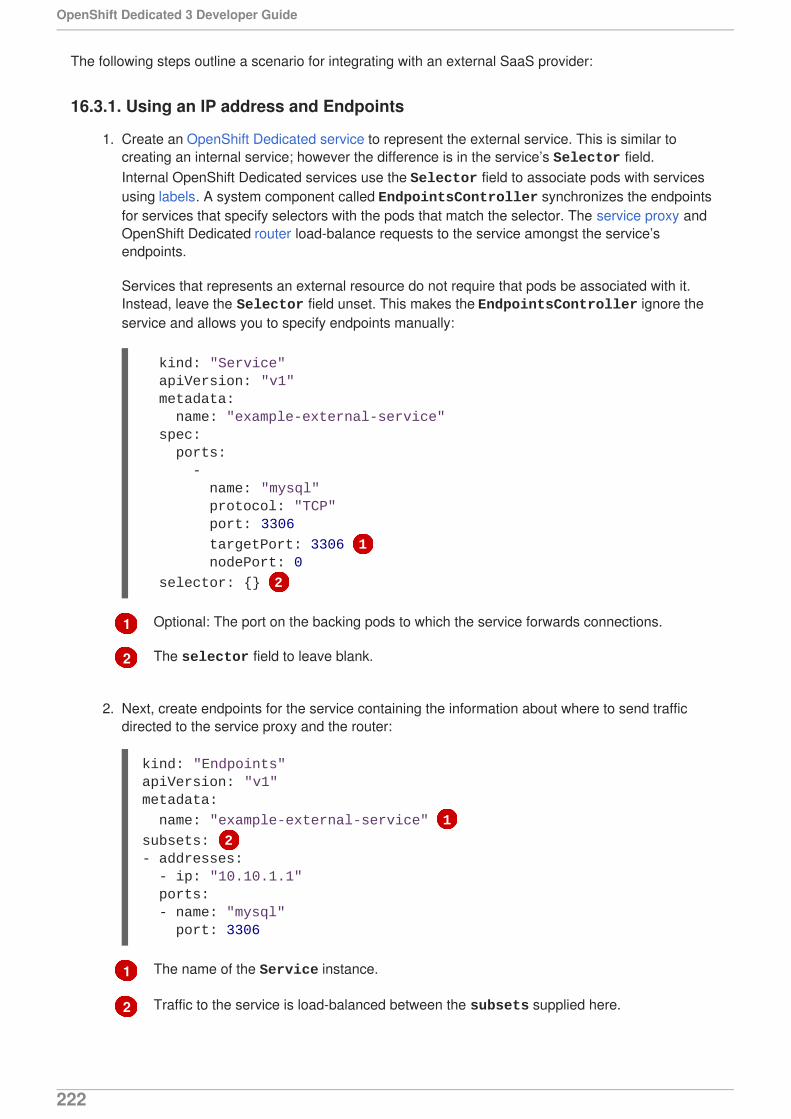
1
2
1
2
The following steps outline a scenario for integrating with an external SaaS provider:
16.3.1. Using an IP address and Endpoints
1. Create an OpenShift Dedicated service to represent the external service. This is similar tocreating an internal service; however the difference is in the service’s Selector field.Internal OpenShift Dedicated services use the Selector field to associate pods with servicesusing labels. A system component called EndpointsController synchronizes the endpointsfor services that specify selectors with the pods that match the selector. The service proxy andOpenShift Dedicated router load-balance requests to the service amongst the service’sendpoints.
Services that represents an external resource do not require that pods be associated with it.Instead, leave the Selector field unset. This makes the EndpointsController ignore theservice and allows you to specify endpoints manually:
Optional: The port on the backing pods to which the service forwards connections.
The selector field to leave blank.
2. Next, create endpoints for the service containing the information about where to send trafficdirected to the service proxy and the router:
The name of the Service instance.
Traffic to the service is load-balanced between the subsets supplied here.
kind: "Service" apiVersion: "v1" metadata: name: "example-external-service" spec: ports: - name: "mysql" protocol: "TCP" port: 3306
targetPort: 3306 1 nodePort: 0
selector: {} 2
kind: "Endpoints"apiVersion: "v1"metadata:
name: "example-external-service" 1
subsets: 2- addresses: - ip: "10.10.1.1" ports: - name: "mysql" port: 3306
OpenShift Dedicated 3 Developer Guide
222
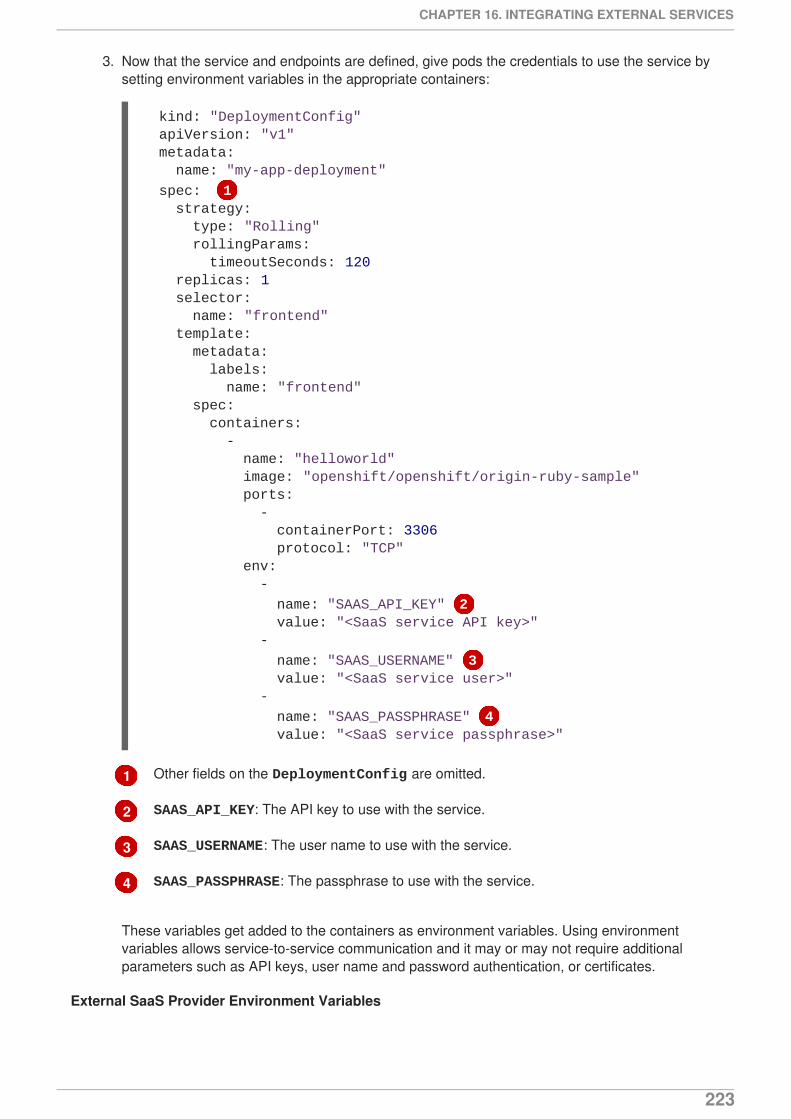
1
2
3
4
3. Now that the service and endpoints are defined, give pods the credentials to use the service bysetting environment variables in the appropriate containers:
Other fields on the DeploymentConfig are omitted.
SAAS_API_KEY: The API key to use with the service.
SAAS_USERNAME: The user name to use with the service.
SAAS_PASSPHRASE: The passphrase to use with the service.
These variables get added to the containers as environment variables. Using environmentvariables allows service-to-service communication and it may or may not require additionalparameters such as API keys, user name and password authentication, or certificates.
External SaaS Provider Environment Variables
kind: "DeploymentConfig" apiVersion: "v1" metadata: name: "my-app-deployment"
spec: 1 strategy: type: "Rolling" rollingParams: timeoutSeconds: 120 replicas: 1 selector: name: "frontend" template: metadata: labels: name: "frontend" spec: containers: - name: "helloworld" image: "openshift/openshift/origin-ruby-sample" ports: - containerPort: 3306 protocol: "TCP" env: -
name: "SAAS_API_KEY" 2 value: "<SaaS service API key>" -
name: "SAAS_USERNAME" 3 value: "<SaaS service user>" -
name: "SAAS_PASSPHRASE" 4 value: "<SaaS service passphrase>"
CHAPTER 16. INTEGRATING EXTERNAL SERVICES
223
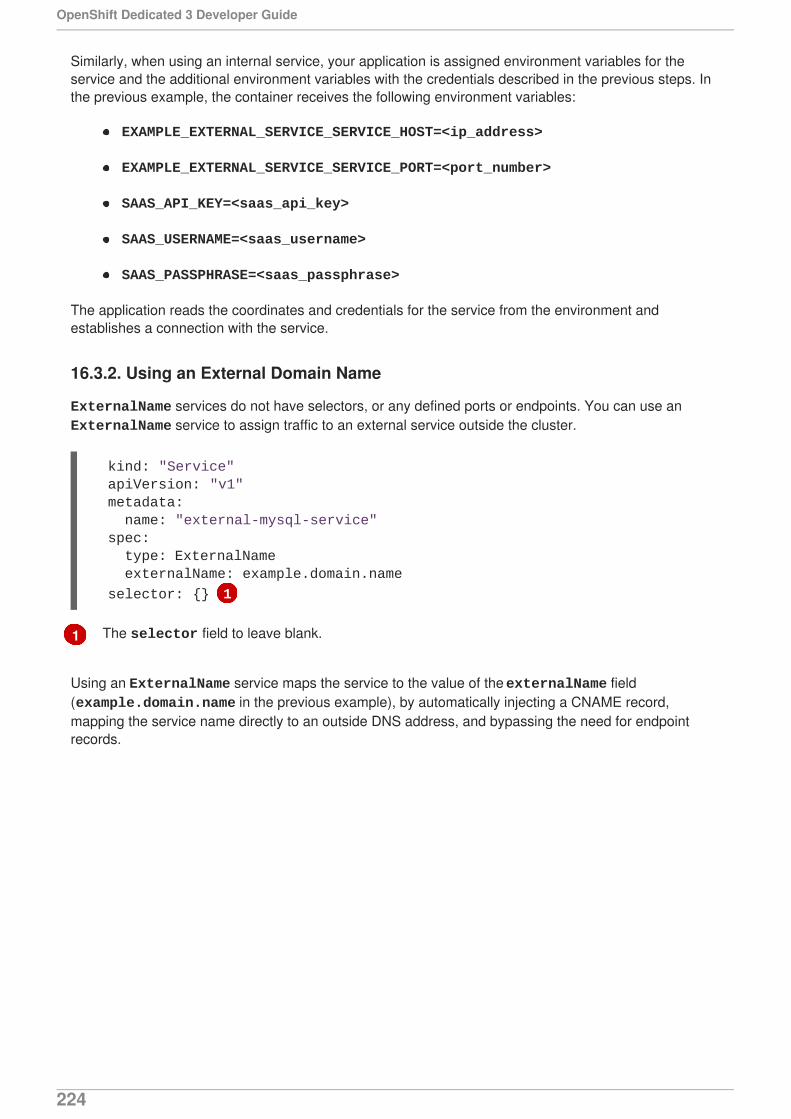
1
Similarly, when using an internal service, your application is assigned environment variables for theservice and the additional environment variables with the credentials described in the previous steps. Inthe previous example, the container receives the following environment variables:
EXAMPLE_EXTERNAL_SERVICE_SERVICE_HOST=<ip_address>
EXAMPLE_EXTERNAL_SERVICE_SERVICE_PORT=<port_number>
SAAS_API_KEY=<saas_api_key>
SAAS_USERNAME=<saas_username>
SAAS_PASSPHRASE=<saas_passphrase>
The application reads the coordinates and credentials for the service from the environment andestablishes a connection with the service.
16.3.2. Using an External Domain Name
ExternalName services do not have selectors, or any defined ports or endpoints. You can use an ExternalName service to assign traffic to an external service outside the cluster.
The selector field to leave blank.
Using an ExternalName service maps the service to the value of the externalName field(example.domain.name in the previous example), by automatically injecting a CNAME record,mapping the service name directly to an outside DNS address, and bypassing the need for endpointrecords.
kind: "Service" apiVersion: "v1" metadata: name: "external-mysql-service" spec: type: ExternalName externalName: example.domain.name
selector: {} 1
OpenShift Dedicated 3 Developer Guide
224
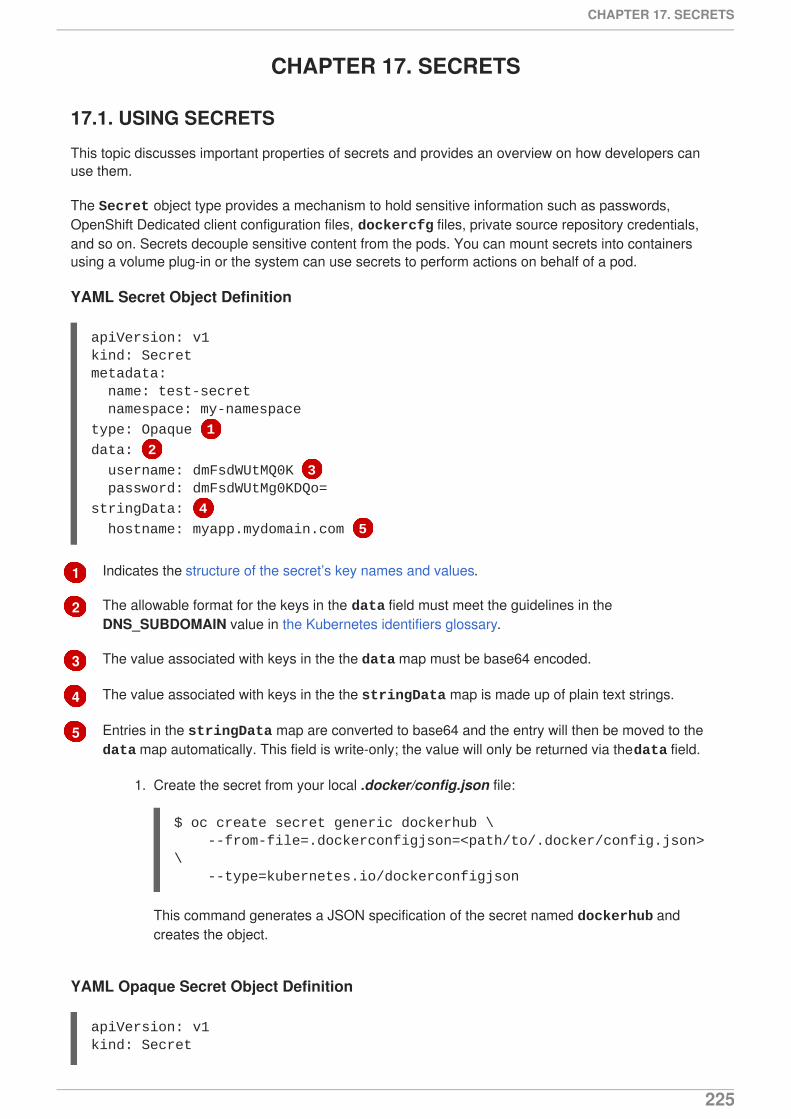
1
2
3
4
5
CHAPTER 17. SECRETS
17.1. USING SECRETS
This topic discusses important properties of secrets and provides an overview on how developers canuse them.
The Secret object type provides a mechanism to hold sensitive information such as passwords,OpenShift Dedicated client configuration files, dockercfg files, private source repository credentials,and so on. Secrets decouple sensitive content from the pods. You can mount secrets into containersusing a volume plug-in or the system can use secrets to perform actions on behalf of a pod.
YAML Secret Object Definition
Indicates the structure of the secret’s key names and values.
The allowable format for the keys in the data field must meet the guidelines in theDNS_SUBDOMAIN value in the Kubernetes identifiers glossary.
The value associated with keys in the the data map must be base64 encoded.
The value associated with keys in the the stringData map is made up of plain text strings.
Entries in the stringData map are converted to base64 and the entry will then be moved to the data map automatically. This field is write-only; the value will only be returned via the data field.
1. Create the secret from your local .docker/config.json file:
$ oc create secret generic dockerhub \ --from-file=.dockerconfigjson=<path/to/.docker/config.json> \ --type=kubernetes.io/dockerconfigjson
This command generates a JSON specification of the secret named dockerhub andcreates the object.
YAML Opaque Secret Object Definition
apiVersion: v1kind: Secretmetadata: name: test-secret namespace: my-namespace
type: Opaque 1
data: 2
username: dmFsdWUtMQ0K 3 password: dmFsdWUtMg0KDQo=
stringData: 4
hostname: myapp.mydomain.com 5
apiVersion: v1kind: Secret
CHAPTER 17. SECRETS
225
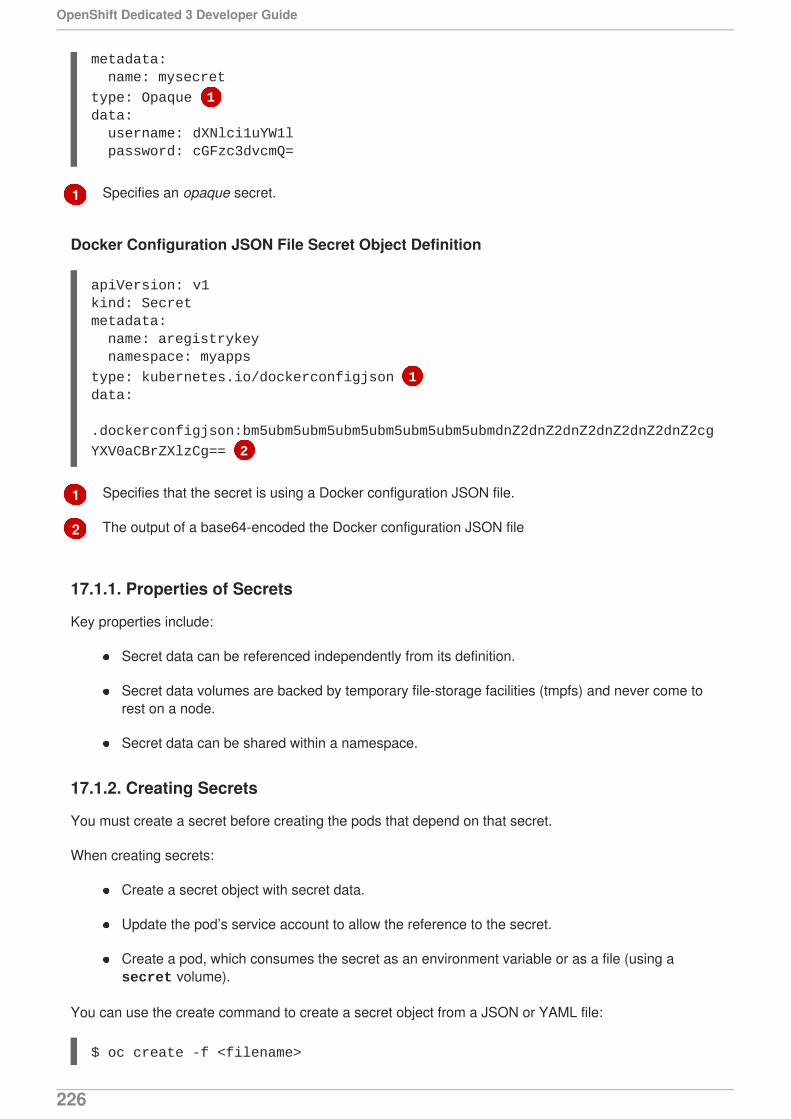
1
1
2
Specifies an opaque secret.
Docker Configuration JSON File Secret Object Definition
Specifies that the secret is using a Docker configuration JSON file.
The output of a base64-encoded the Docker configuration JSON file
17.1.1. Properties of Secrets
Key properties include:
Secret data can be referenced independently from its definition.
Secret data volumes are backed by temporary file-storage facilities (tmpfs) and never come torest on a node.
Secret data can be shared within a namespace.
17.1.2. Creating Secrets
You must create a secret before creating the pods that depend on that secret.
When creating secrets:
Create a secret object with secret data.
Update the pod’s service account to allow the reference to the secret.
Create a pod, which consumes the secret as an environment variable or as a file (using a secret volume).
You can use the create command to create a secret object from a JSON or YAML file:
$ oc create -f <filename>
metadata: name: mysecret
type: Opaque 1data: username: dXNlci1uYW1l password: cGFzc3dvcmQ=
apiVersion: v1kind: Secretmetadata: name: aregistrykey namespace: myapps
type: kubernetes.io/dockerconfigjson 1data: .dockerconfigjson:bm5ubm5ubm5ubm5ubm5ubm5ubm5ubmdnZ2dnZ2dnZ2dnZ2dnZ2dnZ2cg
YXV0aCBrZXlzCg== 2
OpenShift Dedicated 3 Developer Guide
226
17.1.3. Types of Secrets
The value in the type field indicates the structure of the secret’s key names and values. The type can beused to enforce the presence of user names and keys in the secret object. If you do not want validation,use the opaque type, which is the default.
Specify one of the following types to trigger minimal server-side validation to ensure the presence ofspecific key names in the secret data:
kubernetes.io/service-account-token. service account token.
kubernetes.io/dockercfg. Uses the .dockercfg file for required Docker credentials.
kubernetes.io/dockerconfigjson. Uses the .docker/config.json file for required Dockercredentials.
kubernetes.io/basic-auth. Use with Basic Authentication.
kubernetes.io/ssh-auth. Use with SSH Key Authentication.
kubernetes.io/tls. Use with TLS certificate authorities
Specify type= Opaque if you do not want validation, which means the secret does not claim to conformto any convention for key names or values. An opaque secret, allows for unstructured key:value pairsthat can contain arbitrary values.
NOTE
You can specify other arbitrary types, such as example.com/my-secret-type. Thesetypes are not enforced server-side, but indicate that the creator of the secret intended toconform to the key/value requirements of that type.
For examples of differet secret types, see the code samples in Using Secrets.
17.1.4. Updating Secrets
When you modify the value of a secret, the value (used by an already running pod) will not dynamicallychange. To change a secret, you must delete the original pod and create a new pod (perhaps with anidentical PodSpec).
Updating a secret follows the same workflow as deploying a new container image. You can use the kubectl rolling-update command.
The resourceVersion value in a secret is not specified when it is referenced. Therefore, if a secret isupdated at the same time as pods are starting, then the version of the secret will be used for the pod willnot be defined.
NOTE
Currently, it is not possible to check the resource version of a secret object that was usedwhen a pod was created. It is planned that pods will report this information, so that acontroller could restart ones using a old resourceVersion. In the interim, do not updatethe data of existing secrets, but create new ones with distinct names.
CHAPTER 17. SECRETS
227
17.2. SECRETS IN VOLUMES AND ENVIRONMENT VARIABLES
See examples of YAML files with secret data.
After you create a secret, you can:
1. Create the pod to reference your secret:
$ oc create -f <your_yaml_file>.yaml
2. Get the logs:
$ oc logs secret-example-pod
3. Delete the pod:
$ oc delete pod secret-example-pod
17.3. IMAGE PULL SECRETS
See Using Image Pull Secrets for more information.
17.4. SOURCE CLONE SECRETS
See Build Inputs for more information about using source clone secrets during a build.
17.5. SERVICE SERVING CERTIFICATE SECRETS
Service serving certificate secrets are intended to support complex middleware applications that needout-of-the-box certificates. It has the same settings as the server certificates generated by theadministrator tooling for nodes and masters.
To secure communication to your service, have the cluster generate a signed serving certificate/key pairinto a secret in your namespace. To do this, set the service.alpha.openshift.io/serving-cert-secret-name annotation on your service with the value set to the name you want to use for yoursecret. Then, your PodSpec can mount that secret. When it is available, your pod will run. The certificatewill be good for the internal service DNS name, <service.name>.<service.namespace>.svc.
The certificate and key are in PEM format, stored in tls.crt and tls.key respectively. Thecertificate/key pair is automatically replaced when it gets close to expiration. View the expiration date inthe service.alpha.openshift.io/expiry annotation on the secret, which is in RFC3339 format.
Other pods can trust cluster-created certificates (which are only signed for internal DNS names), byusing the CA bundle in the /var/run/secrets/kubernetes.io/serviceaccount/service-ca.crt file that isautomatically mounted in their pod.
The signature algorithm for this feature is x509.SHA256WithRSA. To manually rotate, delete thegenerated secret. A new certificate is created.
17.6. RESTRICTIONS
To use a secret, a pod needs to reference the secret. A secret can be used with a pod in three ways:
OpenShift Dedicated 3 Developer Guide
228
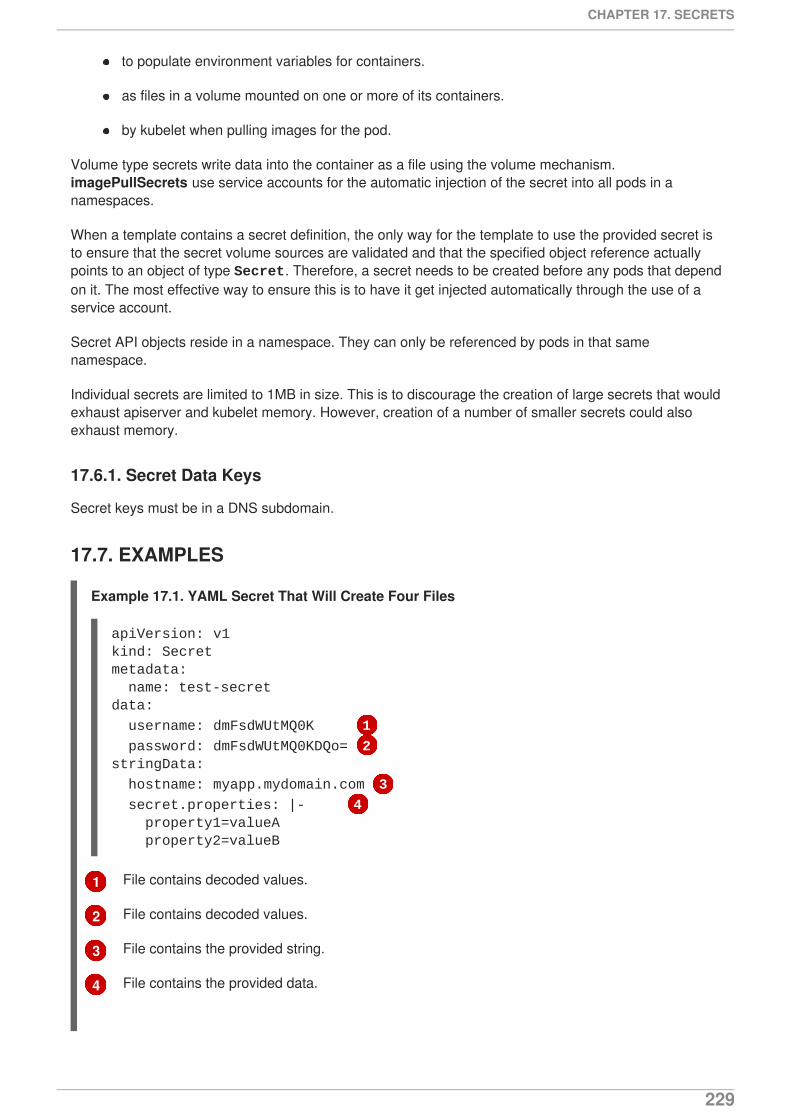
1
2
3
4
to populate environment variables for containers.
as files in a volume mounted on one or more of its containers.
by kubelet when pulling images for the pod.
Volume type secrets write data into the container as a file using the volume mechanism.imagePullSecrets use service accounts for the automatic injection of the secret into all pods in anamespaces.
When a template contains a secret definition, the only way for the template to use the provided secret isto ensure that the secret volume sources are validated and that the specified object reference actuallypoints to an object of type Secret. Therefore, a secret needs to be created before any pods that dependon it. The most effective way to ensure this is to have it get injected automatically through the use of aservice account.
Secret API objects reside in a namespace. They can only be referenced by pods in that samenamespace.
Individual secrets are limited to 1MB in size. This is to discourage the creation of large secrets that wouldexhaust apiserver and kubelet memory. However, creation of a number of smaller secrets could alsoexhaust memory.
17.6.1. Secret Data Keys
Secret keys must be in a DNS subdomain.
17.7. EXAMPLES
Example 17.1. YAML Secret That Will Create Four Files
File contains decoded values.
File contains decoded values.
File contains the provided string.
File contains the provided data.
apiVersion: v1kind: Secretmetadata: name: test-secretdata:
username: dmFsdWUtMQ0K 1
password: dmFsdWUtMQ0KDQo= 2stringData:
hostname: myapp.mydomain.com 3
secret.properties: |- 4 property1=valueA property2=valueB
CHAPTER 17. SECRETS
229
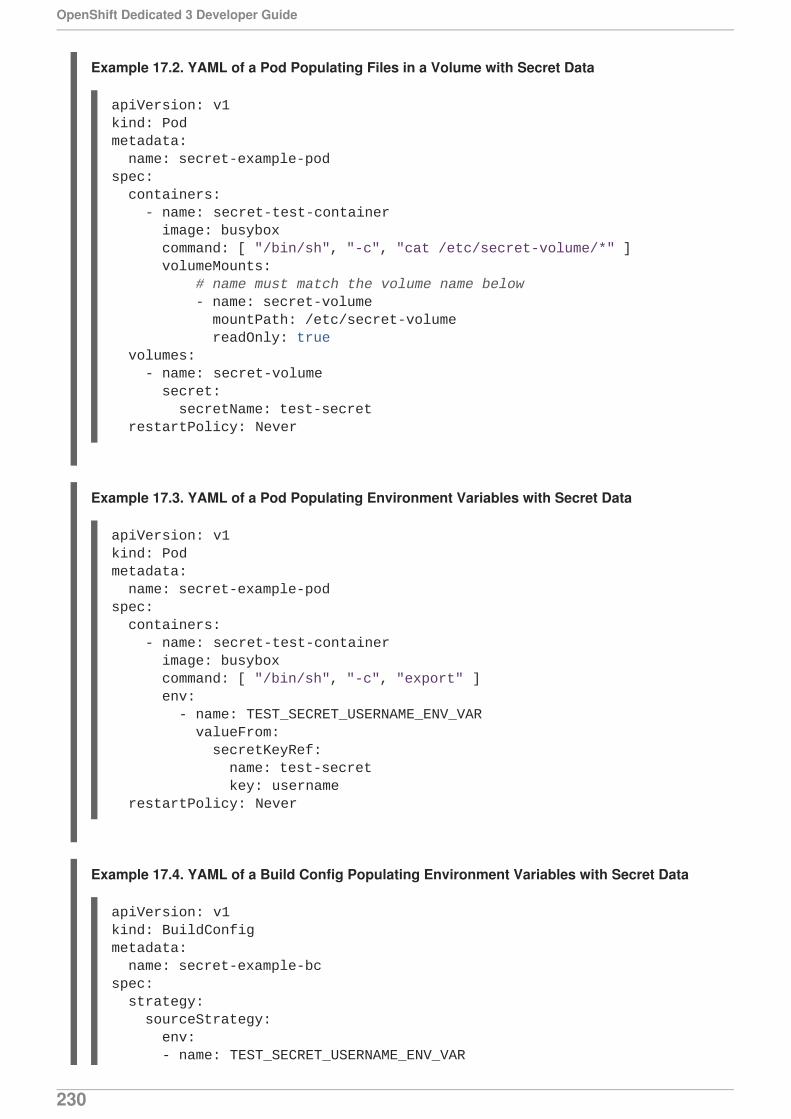
Example 17.2. YAML of a Pod Populating Files in a Volume with Secret Data
Example 17.3. YAML of a Pod Populating Environment Variables with Secret Data
Example 17.4. YAML of a Build Config Populating Environment Variables with Secret Data
apiVersion: v1kind: Podmetadata: name: secret-example-podspec: containers: - name: secret-test-container image: busybox command: [ "/bin/sh", "-c", "cat /etc/secret-volume/*" ] volumeMounts: # name must match the volume name below - name: secret-volume mountPath: /etc/secret-volume readOnly: true volumes: - name: secret-volume secret: secretName: test-secret restartPolicy: Never
apiVersion: v1kind: Podmetadata: name: secret-example-podspec: containers: - name: secret-test-container image: busybox command: [ "/bin/sh", "-c", "export" ] env: - name: TEST_SECRET_USERNAME_ENV_VAR valueFrom: secretKeyRef: name: test-secret key: username restartPolicy: Never
apiVersion: v1kind: BuildConfigmetadata: name: secret-example-bcspec: strategy: sourceStrategy: env: - name: TEST_SECRET_USERNAME_ENV_VAR
OpenShift Dedicated 3 Developer Guide
230

17.8. TROUBLESHOOTING
If a service certificate generations fails with (service’s service.alpha.openshift.io/serving-cert-generation-error annotation contains):
secret/ssl-key references serviceUID 62ad25ca-d703-11e6-9d6f-0e9c0057b608, which does not match 77b6dd80-d716-11e6-9d6f-0e9c0057b60
The service that generated the certificate no longer exists, or has a different serviceUID. You mustforce certificates regeneration by removing the old secret, and clearing the following annotations on theservice service.alpha.openshift.io/serving-cert-generation-error, service.alpha.openshift.io/serving-cert-generation-error-num:
$ oc delete secret <secret_name>$ oc annotate service <service_name> service.alpha.openshift.io/serving-cert-generation-error-$ oc annotate service <service_name> service.alpha.openshift.io/serving-cert-generation-error-num-
NOTE
The command removing annotation has a - after the annotation name to be removed.
valueFrom: secretKeyRef: name: test-secret key: username
CHAPTER 17. SECRETS
231

1
CHAPTER 18. CONFIGMAPS
18.1. OVERVIEW
Many applications require configuration using some combination of configuration files, command linearguments, and environment variables. These configuration artifacts should be decoupled from imagecontent in order to keep containerized applications portable.
The ConfigMap object provides mechanisms to inject containers with configuration data while keepingcontainers agnostic of OpenShift Dedicated. A ConfigMap can be used to store fine-grained informationlike individual properties or coarse-grained information like entire configuration files or JSON blobs.
The ConfigMap API object holds key-value pairs of configuration data that can be consumed in pods orused to store configuration data for system components such as controllers. ConfigMap is similar tosecrets, but designed to more conveniently support working with strings that do not contain sensitiveinformation.
For example:
ConfigMap Object Definition
Contains the configuration data.
Configuration data can be consumed in pods in a variety of ways. A ConfigMap can be used to:
1. Populate the value of environment variables.
2. Set command-line arguments in a container.
3. Populate configuration files in a volume.
Both users and system components may store configuration data in a ConfigMap.
18.2. CREATING CONFIGMAPS
You can use the following command to create a ConfigMap easily from directories, specific files, orliteral values:
$ oc create configmap <configmap_name> [options]
kind: ConfigMapapiVersion: v1metadata: creationTimestamp: 2016-02-18T19:14:38Z name: example-config namespace: default
data: 1 example.property.1: hello example.property.2: world example.property.file: |- property.1=value-1 property.2=value-2 property.3=value-3
OpenShift Dedicated 3 Developer Guide
232
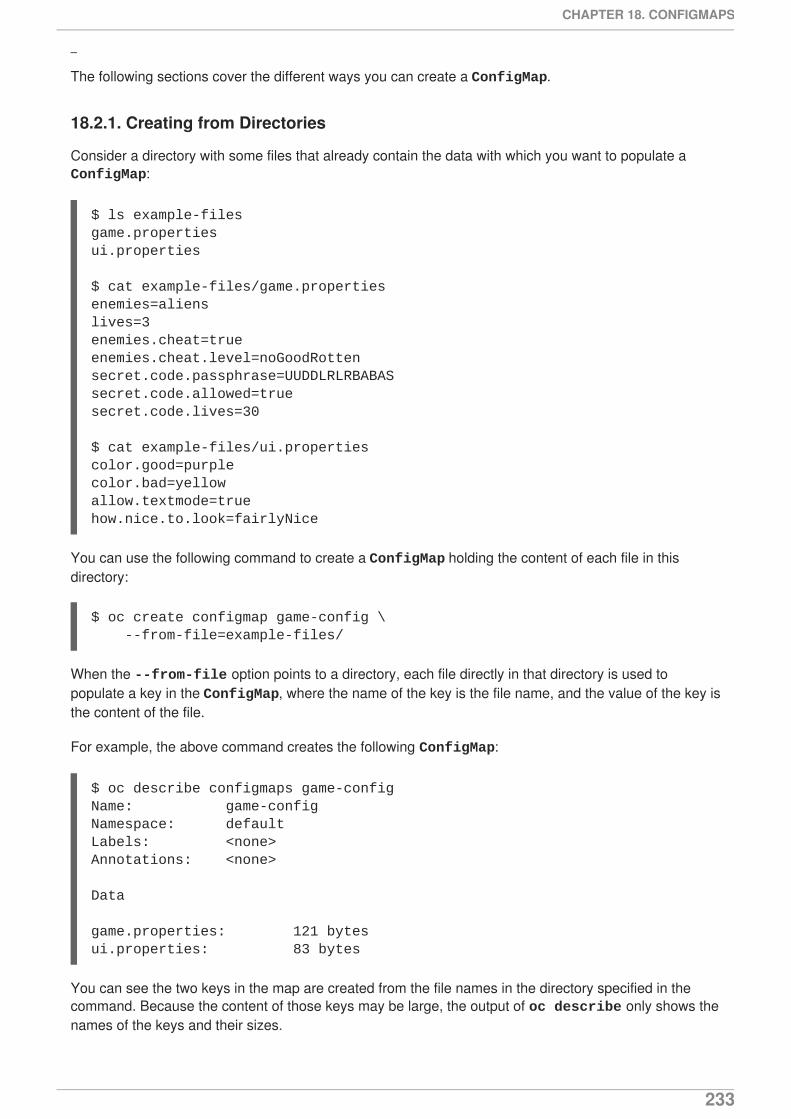
The following sections cover the different ways you can create a ConfigMap.
18.2.1. Creating from Directories
Consider a directory with some files that already contain the data with which you want to populate a ConfigMap:
$ ls example-filesgame.propertiesui.properties
$ cat example-files/game.propertiesenemies=alienslives=3enemies.cheat=trueenemies.cheat.level=noGoodRottensecret.code.passphrase=UUDDLRLRBABASsecret.code.allowed=truesecret.code.lives=30
$ cat example-files/ui.propertiescolor.good=purplecolor.bad=yellowallow.textmode=truehow.nice.to.look=fairlyNice
You can use the following command to create a ConfigMap holding the content of each file in thisdirectory:
$ oc create configmap game-config \ --from-file=example-files/
When the --from-file option points to a directory, each file directly in that directory is used topopulate a key in the ConfigMap, where the name of the key is the file name, and the value of the key isthe content of the file.
For example, the above command creates the following ConfigMap:
$ oc describe configmaps game-configName: game-configNamespace: defaultLabels: <none>Annotations: <none>
Data
game.properties: 121 bytesui.properties: 83 bytes
You can see the two keys in the map are created from the file names in the directory specified in thecommand. Because the content of those keys may be large, the output of oc describe only shows thenames of the keys and their sizes.
CHAPTER 18. CONFIGMAPS
233
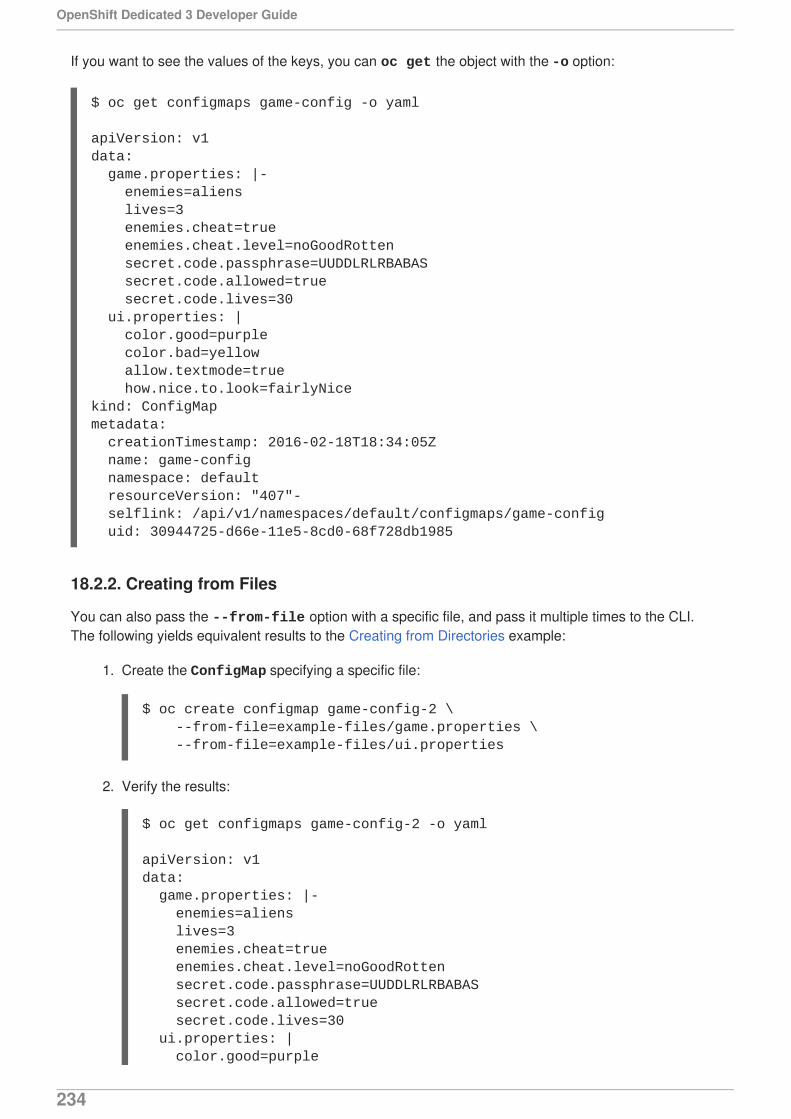
If you want to see the values of the keys, you can oc get the object with the -o option:
$ oc get configmaps game-config -o yaml
apiVersion: v1data: game.properties: |- enemies=aliens lives=3 enemies.cheat=true enemies.cheat.level=noGoodRotten secret.code.passphrase=UUDDLRLRBABAS secret.code.allowed=true secret.code.lives=30 ui.properties: | color.good=purple color.bad=yellow allow.textmode=true how.nice.to.look=fairlyNicekind: ConfigMapmetadata: creationTimestamp: 2016-02-18T18:34:05Z name: game-config namespace: default resourceVersion: "407"- selflink: /api/v1/namespaces/default/configmaps/game-config uid: 30944725-d66e-11e5-8cd0-68f728db1985
18.2.2. Creating from Files
You can also pass the --from-file option with a specific file, and pass it multiple times to the CLI.The following yields equivalent results to the Creating from Directories example:
1. Create the ConfigMap specifying a specific file:
$ oc create configmap game-config-2 \ --from-file=example-files/game.properties \ --from-file=example-files/ui.properties
2. Verify the results:
$ oc get configmaps game-config-2 -o yaml
apiVersion: v1data: game.properties: |- enemies=aliens lives=3 enemies.cheat=true enemies.cheat.level=noGoodRotten secret.code.passphrase=UUDDLRLRBABAS secret.code.allowed=true secret.code.lives=30 ui.properties: | color.good=purple
OpenShift Dedicated 3 Developer Guide
234
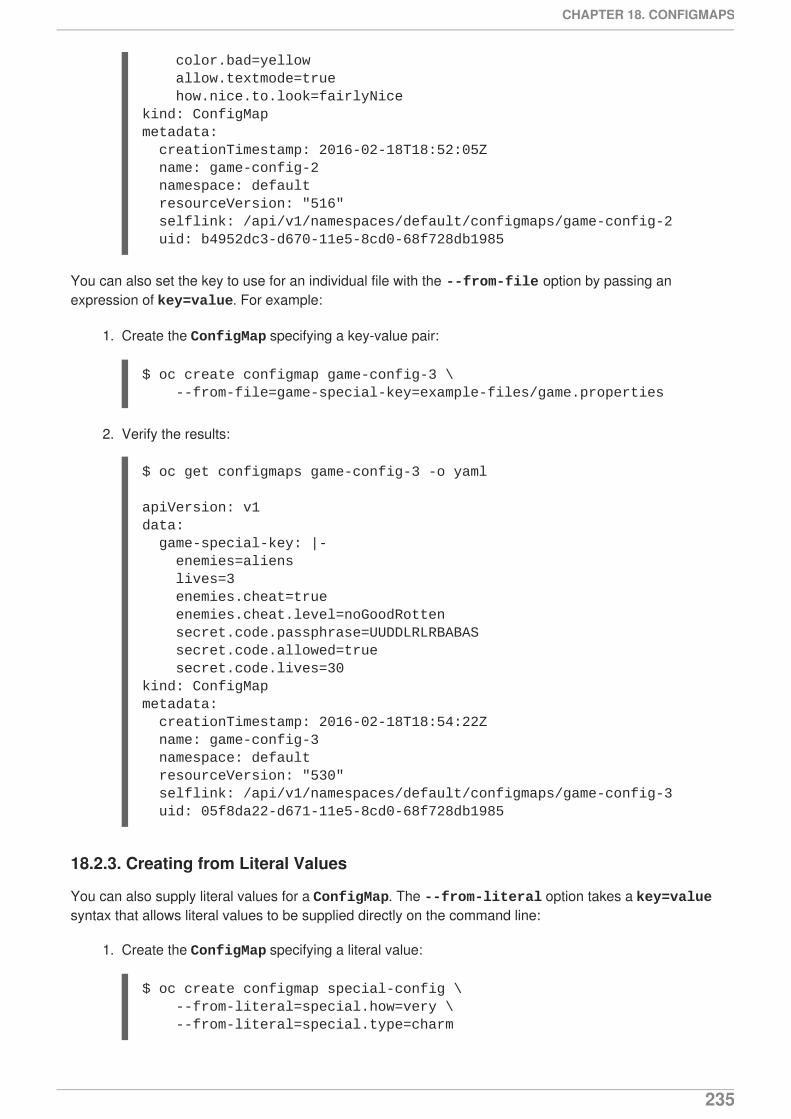
color.bad=yellow allow.textmode=true how.nice.to.look=fairlyNicekind: ConfigMapmetadata: creationTimestamp: 2016-02-18T18:52:05Z name: game-config-2 namespace: default resourceVersion: "516" selflink: /api/v1/namespaces/default/configmaps/game-config-2 uid: b4952dc3-d670-11e5-8cd0-68f728db1985
You can also set the key to use for an individual file with the --from-file option by passing anexpression of key=value. For example:
1. Create the ConfigMap specifying a key-value pair:
$ oc create configmap game-config-3 \ --from-file=game-special-key=example-files/game.properties
2. Verify the results:
$ oc get configmaps game-config-3 -o yaml
apiVersion: v1data: game-special-key: |- enemies=aliens lives=3 enemies.cheat=true enemies.cheat.level=noGoodRotten secret.code.passphrase=UUDDLRLRBABAS secret.code.allowed=true secret.code.lives=30kind: ConfigMapmetadata: creationTimestamp: 2016-02-18T18:54:22Z name: game-config-3 namespace: default resourceVersion: "530" selflink: /api/v1/namespaces/default/configmaps/game-config-3 uid: 05f8da22-d671-11e5-8cd0-68f728db1985
18.2.3. Creating from Literal Values
You can also supply literal values for a ConfigMap. The --from-literal option takes a key=valuesyntax that allows literal values to be supplied directly on the command line:
1. Create the ConfigMap specifying a literal value:
$ oc create configmap special-config \ --from-literal=special.how=very \ --from-literal=special.type=charm
CHAPTER 18. CONFIGMAPS
235
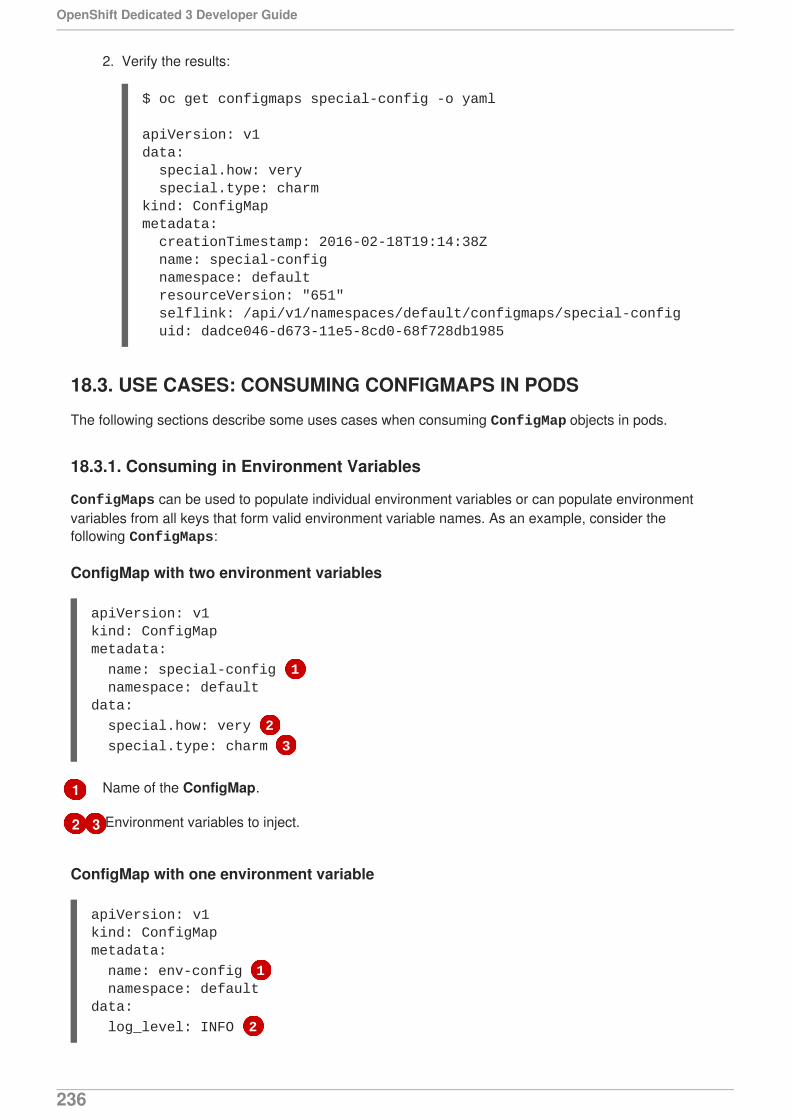
1
2 3
2. Verify the results:
$ oc get configmaps special-config -o yaml
apiVersion: v1data: special.how: very special.type: charmkind: ConfigMapmetadata: creationTimestamp: 2016-02-18T19:14:38Z name: special-config namespace: default resourceVersion: "651" selflink: /api/v1/namespaces/default/configmaps/special-config uid: dadce046-d673-11e5-8cd0-68f728db1985
18.3. USE CASES: CONSUMING CONFIGMAPS IN PODS
The following sections describe some uses cases when consuming ConfigMap objects in pods.
18.3.1. Consuming in Environment Variables
ConfigMaps can be used to populate individual environment variables or can populate environmentvariables from all keys that form valid environment variable names. As an example, consider thefollowing ConfigMaps:
ConfigMap with two environment variables
Name of the ConfigMap.
Environment variables to inject.
ConfigMap with one environment variable
apiVersion: v1kind: ConfigMapmetadata:
name: special-config 1 namespace: defaultdata:
special.how: very 2
special.type: charm 3
apiVersion: v1kind: ConfigMapmetadata:
name: env-config 1 namespace: defaultdata:
log_level: INFO 2
OpenShift Dedicated 3 Developer Guide
236
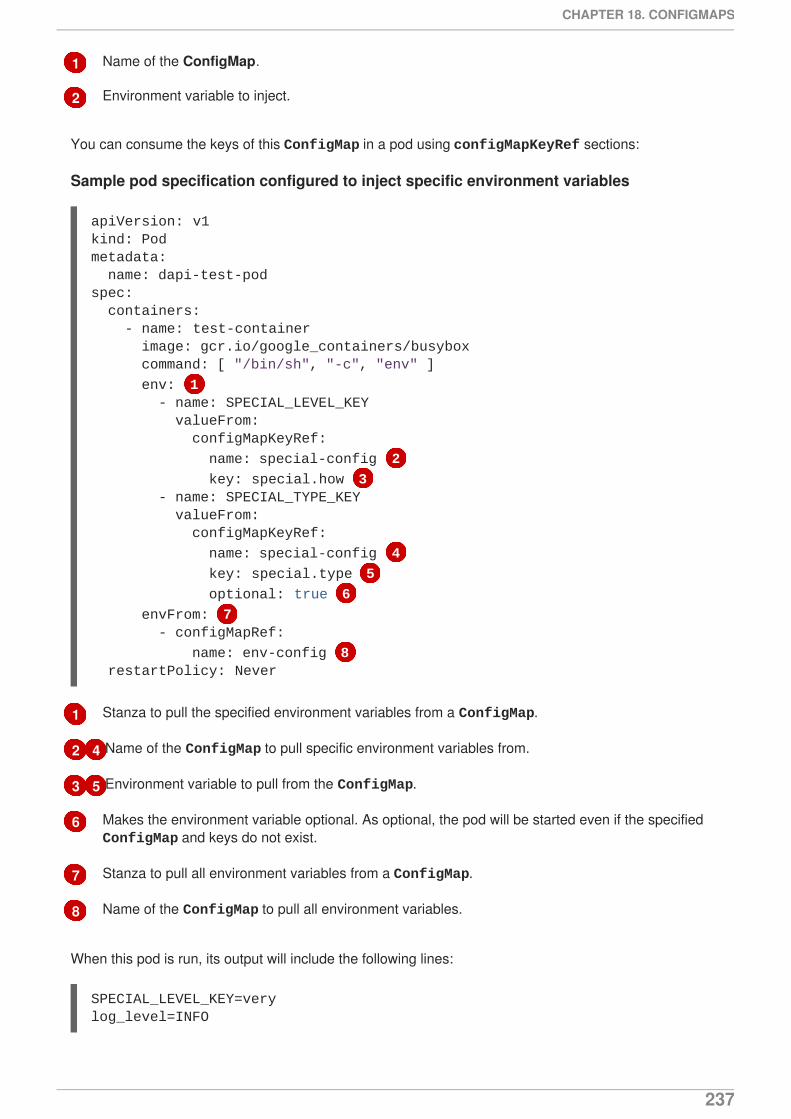
1
2
1
2 4
3 5
6
7
8
Name of the ConfigMap.
Environment variable to inject.
You can consume the keys of this ConfigMap in a pod using configMapKeyRef sections:
Sample pod specification configured to inject specific environment variables
Stanza to pull the specified environment variables from a ConfigMap.
Name of the ConfigMap to pull specific environment variables from.
Environment variable to pull from the ConfigMap.
Makes the environment variable optional. As optional, the pod will be started even if the specified ConfigMap and keys do not exist.
Stanza to pull all environment variables from a ConfigMap.
Name of the ConfigMap to pull all environment variables.
When this pod is run, its output will include the following lines:
SPECIAL_LEVEL_KEY=verylog_level=INFO
apiVersion: v1kind: Podmetadata: name: dapi-test-podspec: containers: - name: test-container image: gcr.io/google_containers/busybox command: [ "/bin/sh", "-c", "env" ]
env: 1 - name: SPECIAL_LEVEL_KEY valueFrom: configMapKeyRef:
name: special-config 2
key: special.how 3 - name: SPECIAL_TYPE_KEY valueFrom: configMapKeyRef:
name: special-config 4
key: special.type 5
optional: true 6
envFrom: 7 - configMapRef:
name: env-config 8 restartPolicy: Never
CHAPTER 18. CONFIGMAPS
237
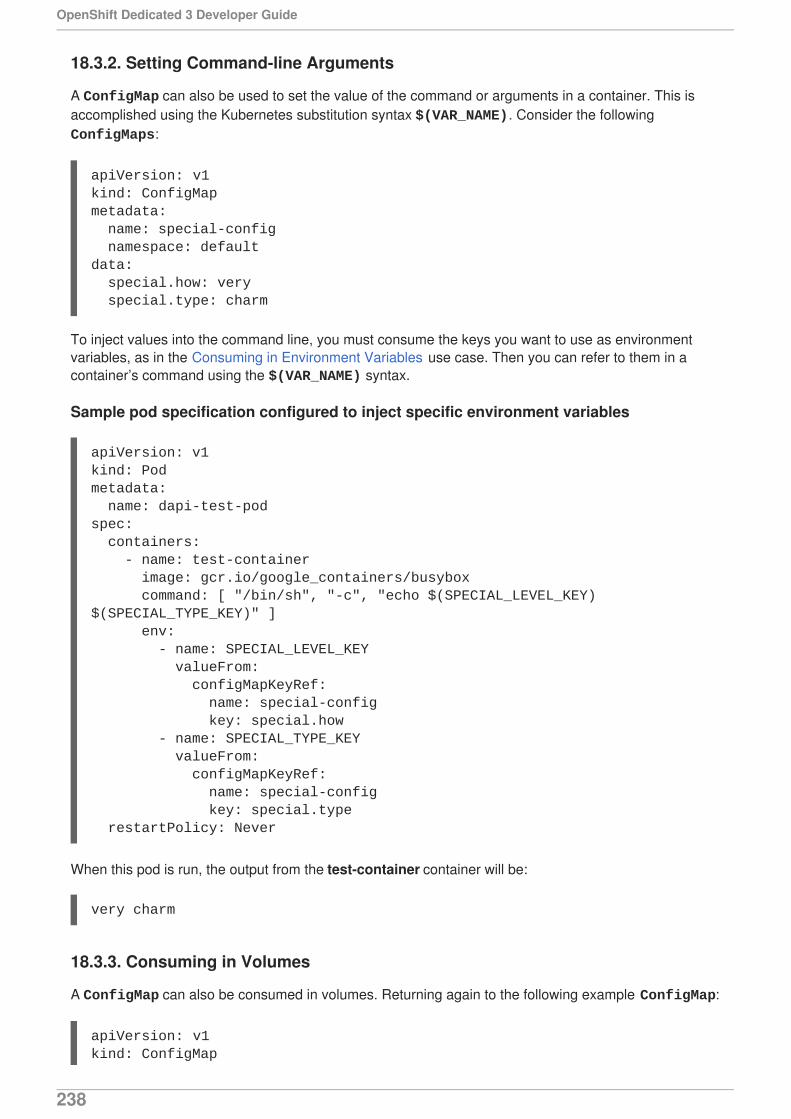
18.3.2. Setting Command-line Arguments
A ConfigMap can also be used to set the value of the command or arguments in a container. This isaccomplished using the Kubernetes substitution syntax $(VAR_NAME). Consider the following ConfigMaps:
To inject values into the command line, you must consume the keys you want to use as environmentvariables, as in the Consuming in Environment Variables use case. Then you can refer to them in acontainer’s command using the $(VAR_NAME) syntax.
Sample pod specification configured to inject specific environment variables
apiVersion: v1kind: Podmetadata: name: dapi-test-podspec: containers: - name: test-container image: gcr.io/google_containers/busybox command: [ "/bin/sh", "-c", "echo $(SPECIAL_LEVEL_KEY) $(SPECIAL_TYPE_KEY)" ] env: - name: SPECIAL_LEVEL_KEY valueFrom: configMapKeyRef: name: special-config key: special.how - name: SPECIAL_TYPE_KEY valueFrom: configMapKeyRef: name: special-config key: special.type restartPolicy: Never
When this pod is run, the output from the test-container container will be:
very charm
18.3.3. Consuming in Volumes
A ConfigMap can also be consumed in volumes. Returning again to the following example ConfigMap:
apiVersion: v1kind: ConfigMapmetadata: name: special-config namespace: defaultdata: special.how: very special.type: charm
apiVersion: v1kind: ConfigMap
OpenShift Dedicated 3 Developer Guide
238
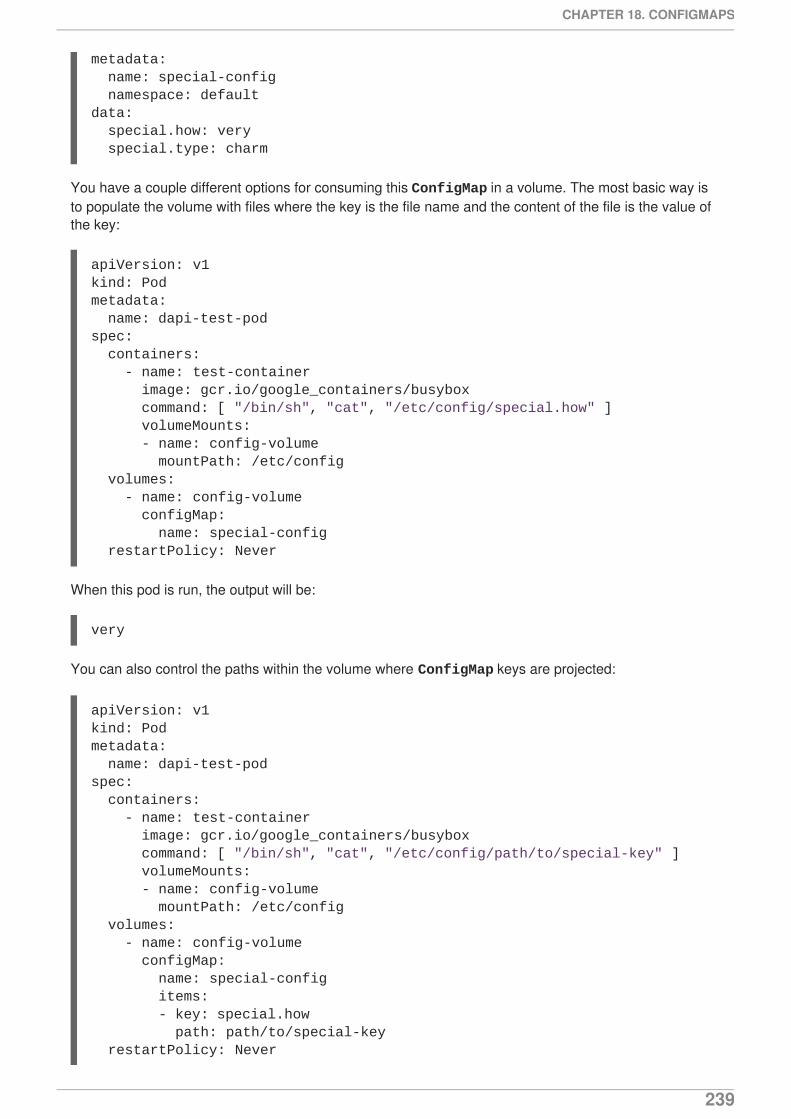
You have a couple different options for consuming this ConfigMap in a volume. The most basic way isto populate the volume with files where the key is the file name and the content of the file is the value ofthe key:
When this pod is run, the output will be:
very
You can also control the paths within the volume where ConfigMap keys are projected:
metadata: name: special-config namespace: defaultdata: special.how: very special.type: charm
apiVersion: v1kind: Podmetadata: name: dapi-test-podspec: containers: - name: test-container image: gcr.io/google_containers/busybox command: [ "/bin/sh", "cat", "/etc/config/special.how" ] volumeMounts: - name: config-volume mountPath: /etc/config volumes: - name: config-volume configMap: name: special-config restartPolicy: Never
apiVersion: v1kind: Podmetadata: name: dapi-test-podspec: containers: - name: test-container image: gcr.io/google_containers/busybox command: [ "/bin/sh", "cat", "/etc/config/path/to/special-key" ] volumeMounts: - name: config-volume mountPath: /etc/config volumes: - name: config-volume configMap: name: special-config items: - key: special.how path: path/to/special-key restartPolicy: Never
CHAPTER 18. CONFIGMAPS
239
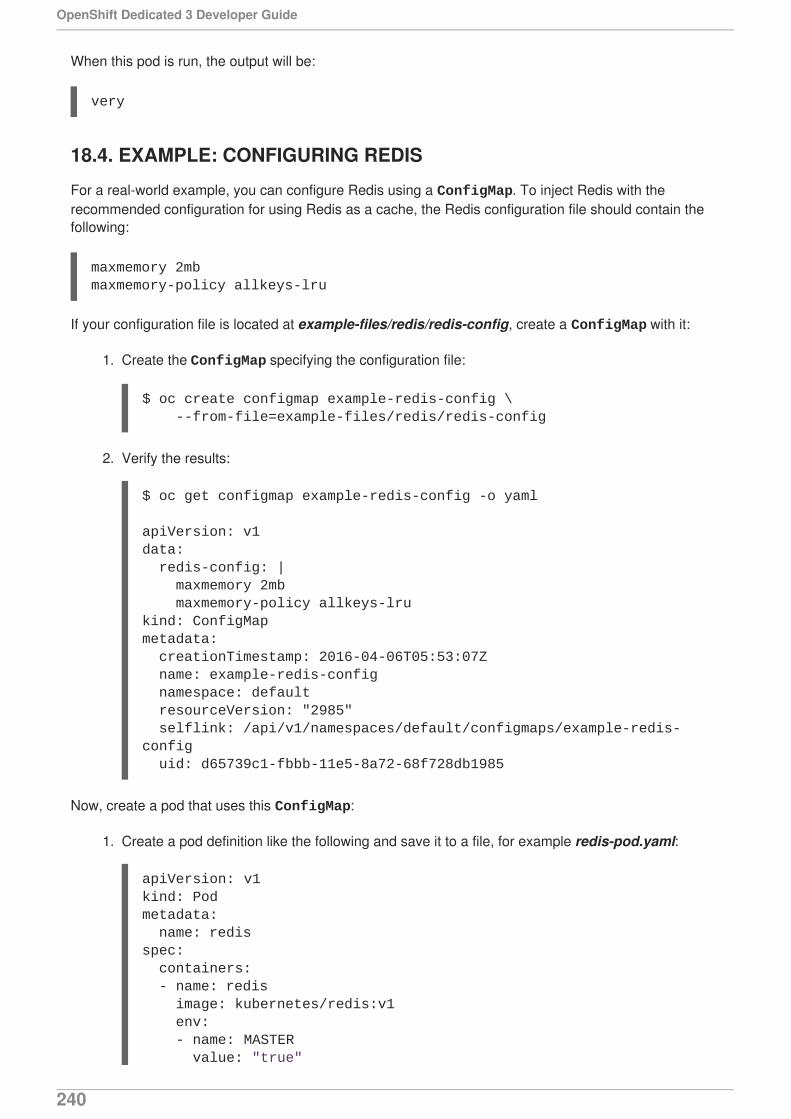
When this pod is run, the output will be:
very
18.4. EXAMPLE: CONFIGURING REDIS
For a real-world example, you can configure Redis using a ConfigMap. To inject Redis with therecommended configuration for using Redis as a cache, the Redis configuration file should contain thefollowing:
maxmemory 2mbmaxmemory-policy allkeys-lru
If your configuration file is located at example-files/redis/redis-config, create a ConfigMap with it:
1. Create the ConfigMap specifying the configuration file:
$ oc create configmap example-redis-config \ --from-file=example-files/redis/redis-config
2. Verify the results:
$ oc get configmap example-redis-config -o yaml
apiVersion: v1data: redis-config: | maxmemory 2mb maxmemory-policy allkeys-lrukind: ConfigMapmetadata: creationTimestamp: 2016-04-06T05:53:07Z name: example-redis-config namespace: default resourceVersion: "2985" selflink: /api/v1/namespaces/default/configmaps/example-redis-config uid: d65739c1-fbbb-11e5-8a72-68f728db1985
Now, create a pod that uses this ConfigMap:
1. Create a pod definition like the following and save it to a file, for example redis-pod.yaml:
apiVersion: v1kind: Podmetadata: name: redisspec: containers: - name: redis image: kubernetes/redis:v1 env: - name: MASTER value: "true"
OpenShift Dedicated 3 Developer Guide
240
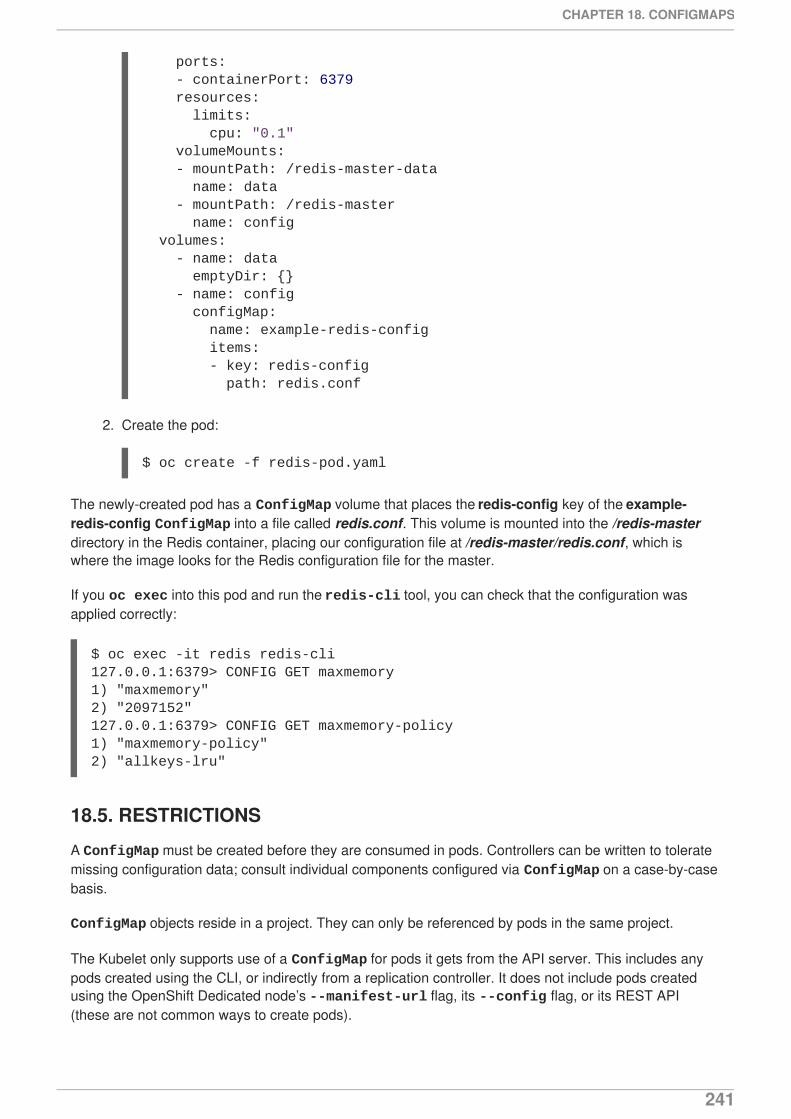
2. Create the pod:
$ oc create -f redis-pod.yaml
The newly-created pod has a ConfigMap volume that places the redis-config key of the example-redis-config ConfigMap into a file called redis.conf. This volume is mounted into the /redis-masterdirectory in the Redis container, placing our configuration file at /redis-master/redis.conf, which iswhere the image looks for the Redis configuration file for the master.
If you oc exec into this pod and run the redis-cli tool, you can check that the configuration wasapplied correctly:
$ oc exec -it redis redis-cli127.0.0.1:6379> CONFIG GET maxmemory1) "maxmemory"2) "2097152"127.0.0.1:6379> CONFIG GET maxmemory-policy1) "maxmemory-policy"2) "allkeys-lru"
18.5. RESTRICTIONS
A ConfigMap must be created before they are consumed in pods. Controllers can be written to toleratemissing configuration data; consult individual components configured via ConfigMap on a case-by-casebasis.
ConfigMap objects reside in a project. They can only be referenced by pods in the same project.
The Kubelet only supports use of a ConfigMap for pods it gets from the API server. This includes anypods created using the CLI, or indirectly from a replication controller. It does not include pods createdusing the OpenShift Dedicated node’s --manifest-url flag, its --config flag, or its REST API(these are not common ways to create pods).
ports: - containerPort: 6379 resources: limits: cpu: "0.1" volumeMounts: - mountPath: /redis-master-data name: data - mountPath: /redis-master name: config volumes: - name: data emptyDir: {} - name: config configMap: name: example-redis-config items: - key: redis-config path: redis.conf
CHAPTER 18. CONFIGMAPS
241
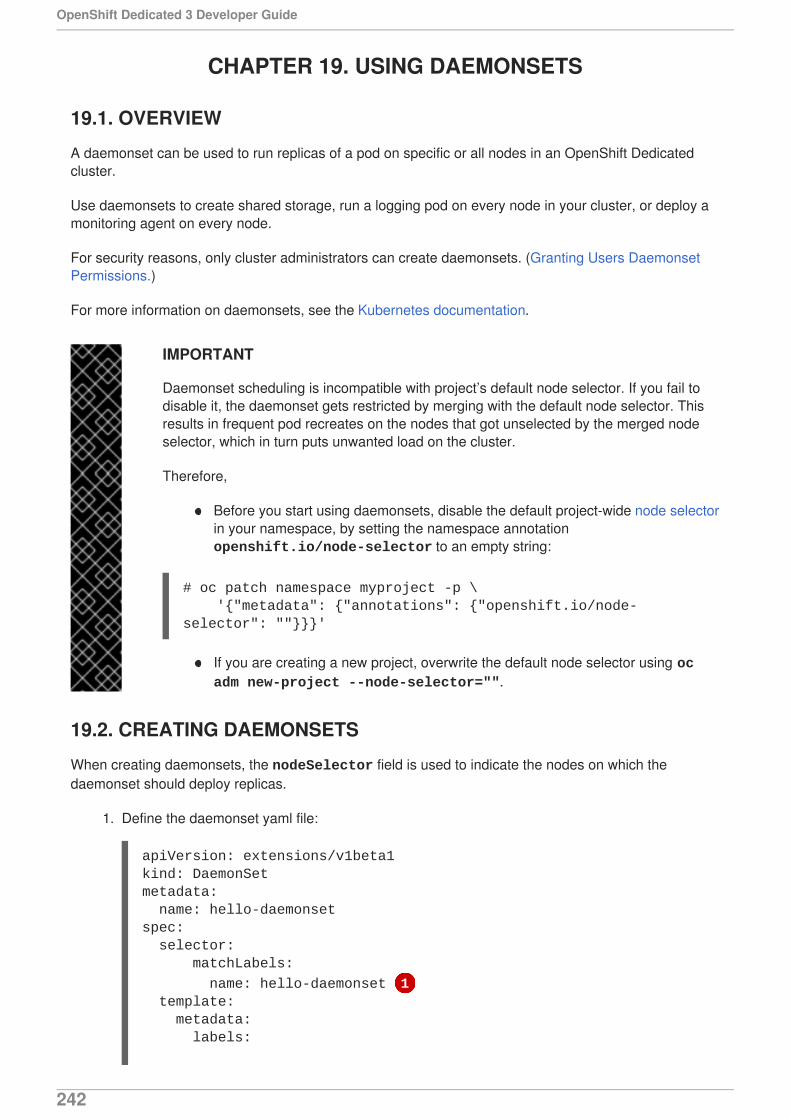
CHAPTER 19. USING DAEMONSETS
19.1. OVERVIEW
A daemonset can be used to run replicas of a pod on specific or all nodes in an OpenShift Dedicatedcluster.
Use daemonsets to create shared storage, run a logging pod on every node in your cluster, or deploy amonitoring agent on every node.
For security reasons, only cluster administrators can create daemonsets. (Granting Users DaemonsetPermissions.)
For more information on daemonsets, see the Kubernetes documentation.
IMPORTANT
Daemonset scheduling is incompatible with project’s default node selector. If you fail todisable it, the daemonset gets restricted by merging with the default node selector. Thisresults in frequent pod recreates on the nodes that got unselected by the merged nodeselector, which in turn puts unwanted load on the cluster.
Therefore,
Before you start using daemonsets, disable the default project-wide node selectorin your namespace, by setting the namespace annotation openshift.io/node-selector to an empty string:
# oc patch namespace myproject -p \ '{"metadata": {"annotations": {"openshift.io/node-selector": ""}}}'
If you are creating a new project, overwrite the default node selector using oc adm new-project --node-selector="".
19.2. CREATING DAEMONSETS
When creating daemonsets, the nodeSelector field is used to indicate the nodes on which thedaemonset should deploy replicas.
1. Define the daemonset yaml file:
apiVersion: extensions/v1beta1kind: DaemonSetmetadata: name: hello-daemonsetspec: selector: matchLabels:
name: hello-daemonset 1 template: metadata: labels:
OpenShift Dedicated 3 Developer Guide
242
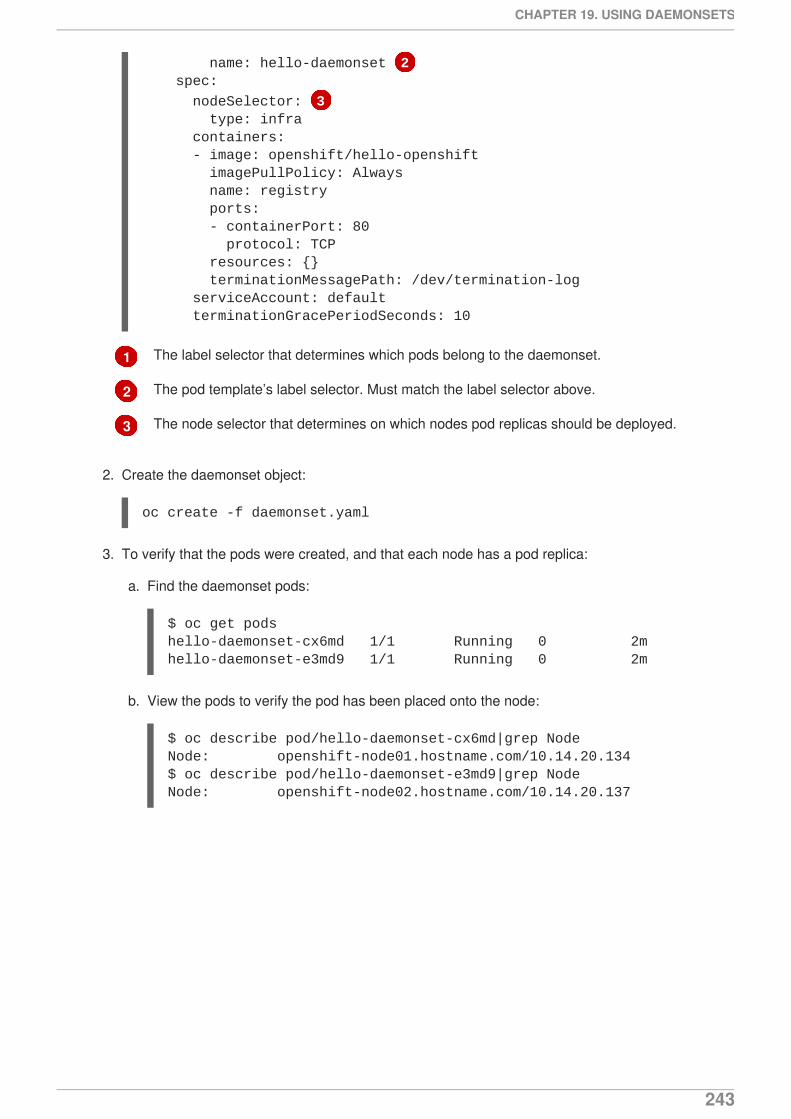
1
2
3
name: hello-daemonset 2 spec:
nodeSelector: 3 type: infra containers: - image: openshift/hello-openshift imagePullPolicy: Always name: registry ports: - containerPort: 80 protocol: TCP resources: {} terminationMessagePath: /dev/termination-log serviceAccount: default terminationGracePeriodSeconds: 10
The label selector that determines which pods belong to the daemonset.
The pod template’s label selector. Must match the label selector above.
The node selector that determines on which nodes pod replicas should be deployed.
2. Create the daemonset object:
oc create -f daemonset.yaml
3. To verify that the pods were created, and that each node has a pod replica:
a. Find the daemonset pods:
$ oc get podshello-daemonset-cx6md 1/1 Running 0 2mhello-daemonset-e3md9 1/1 Running 0 2m
b. View the pods to verify the pod has been placed onto the node:
$ oc describe pod/hello-daemonset-cx6md|grep NodeNode: openshift-node01.hostname.com/10.14.20.134$ oc describe pod/hello-daemonset-e3md9|grep NodeNode: openshift-node02.hostname.com/10.14.20.137
CHAPTER 19. USING DAEMONSETS
243

IMPORTANT
If you update a DaemonSet’s pod template, the existing pod replicas are notaffected.
If you delete a DaemonSet and then create a new DaemonSet with a differenttemplate but the same label selector, it recognizes any existing pod replicas ashaving matching labels and thus does not update them or create new replicasdespite a mismatch in the pod template.
If you change node labels, the DaemonSet adds pods to nodes that match thenew labels and deletes pods from nodes that do not match the new labels.
To update a DaemonSet, force new pod replicas to be created by deleting the old replicasor nodes.
OpenShift Dedicated 3 Developer Guide
244
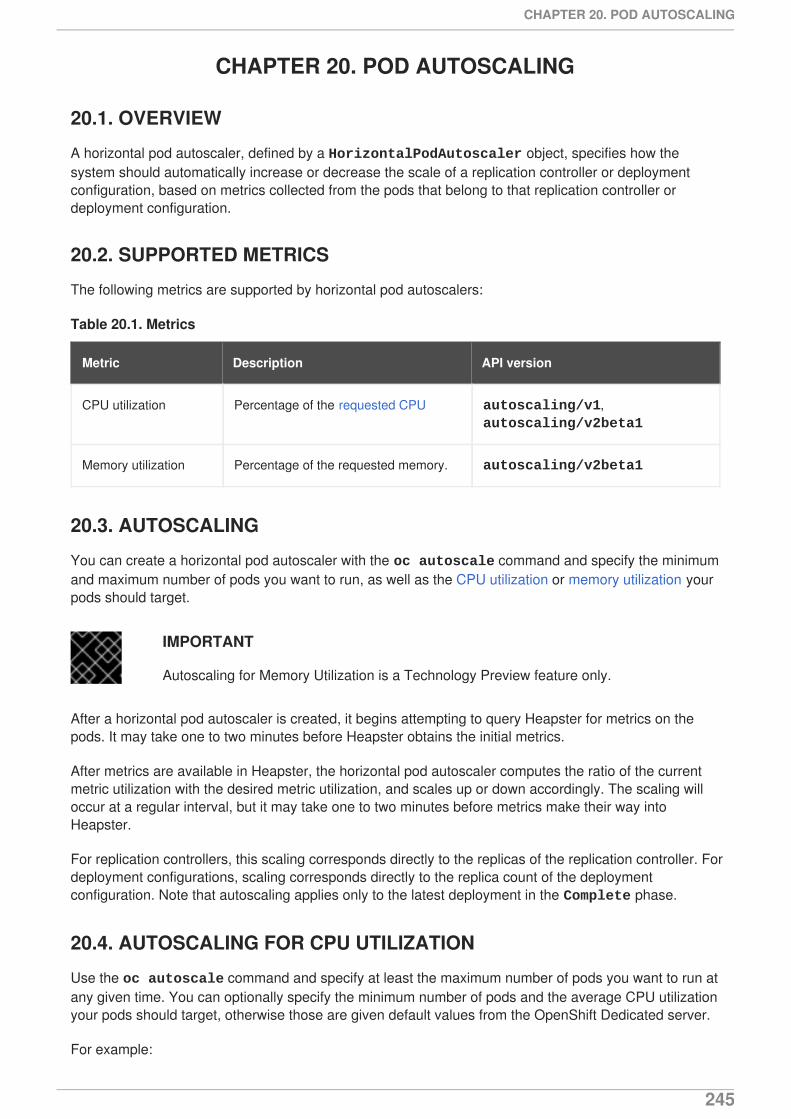
CHAPTER 20. POD AUTOSCALING
20.1. OVERVIEW
A horizontal pod autoscaler, defined by a HorizontalPodAutoscaler object, specifies how thesystem should automatically increase or decrease the scale of a replication controller or deploymentconfiguration, based on metrics collected from the pods that belong to that replication controller ordeployment configuration.
20.2. SUPPORTED METRICS
The following metrics are supported by horizontal pod autoscalers:
Table 20.1. Metrics
Metric Description API version
CPU utilization Percentage of the requested CPU autoscaling/v1, autoscaling/v2beta1
Memory utilization Percentage of the requested memory. autoscaling/v2beta1
20.3. AUTOSCALING
You can create a horizontal pod autoscaler with the oc autoscale command and specify the minimumand maximum number of pods you want to run, as well as the CPU utilization or memory utilization yourpods should target.
IMPORTANT
Autoscaling for Memory Utilization is a Technology Preview feature only.
After a horizontal pod autoscaler is created, it begins attempting to query Heapster for metrics on thepods. It may take one to two minutes before Heapster obtains the initial metrics.
After metrics are available in Heapster, the horizontal pod autoscaler computes the ratio of the currentmetric utilization with the desired metric utilization, and scales up or down accordingly. The scaling willoccur at a regular interval, but it may take one to two minutes before metrics make their way intoHeapster.
For replication controllers, this scaling corresponds directly to the replicas of the replication controller. Fordeployment configurations, scaling corresponds directly to the replica count of the deploymentconfiguration. Note that autoscaling applies only to the latest deployment in the Complete phase.
20.4. AUTOSCALING FOR CPU UTILIZATION
Use the oc autoscale command and specify at least the maximum number of pods you want to run atany given time. You can optionally specify the minimum number of pods and the average CPU utilizationyour pods should target, otherwise those are given default values from the OpenShift Dedicated server.
For example:
CHAPTER 20. POD AUTOSCALING
245
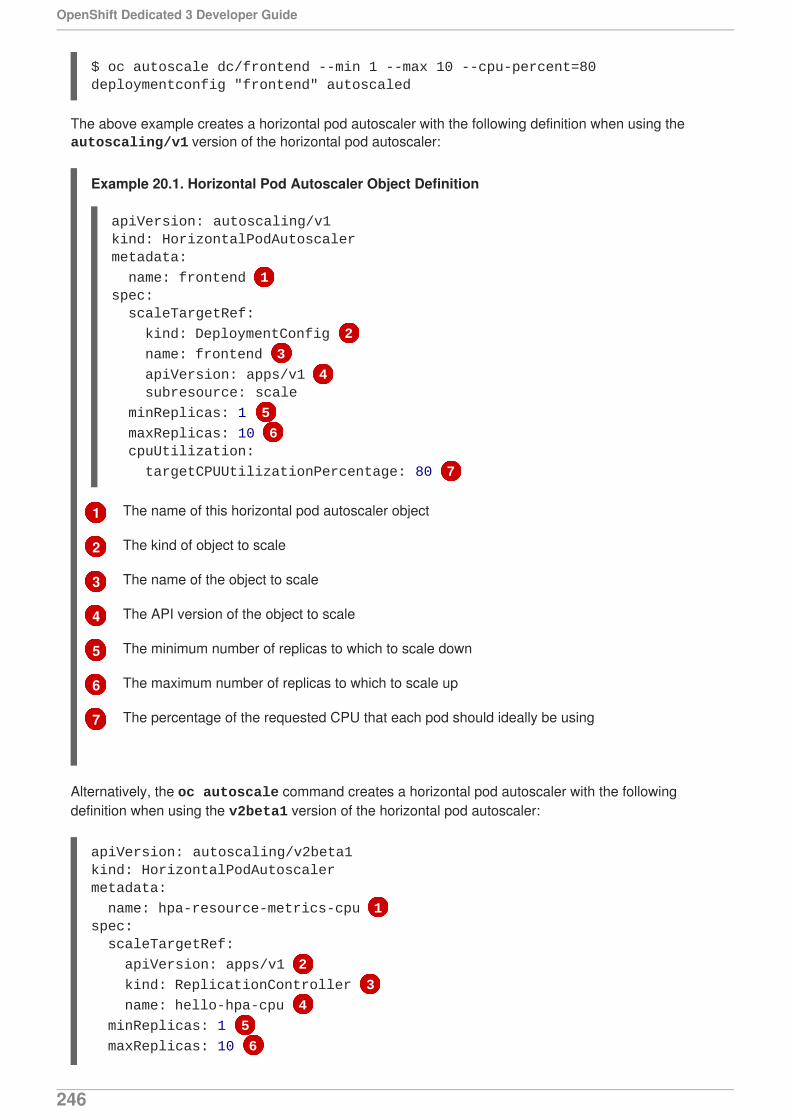
1
2
3
4
5
6
7
$ oc autoscale dc/frontend --min 1 --max 10 --cpu-percent=80deploymentconfig "frontend" autoscaled
The above example creates a horizontal pod autoscaler with the following definition when using the autoscaling/v1 version of the horizontal pod autoscaler:
Example 20.1. Horizontal Pod Autoscaler Object Definition
The name of this horizontal pod autoscaler object
The kind of object to scale
The name of the object to scale
The API version of the object to scale
The minimum number of replicas to which to scale down
The maximum number of replicas to which to scale up
The percentage of the requested CPU that each pod should ideally be using
Alternatively, the oc autoscale command creates a horizontal pod autoscaler with the followingdefinition when using the v2beta1 version of the horizontal pod autoscaler:
apiVersion: autoscaling/v1kind: HorizontalPodAutoscalermetadata:
name: frontend 1spec: scaleTargetRef:
kind: DeploymentConfig 2
name: frontend 3
apiVersion: apps/v1 4 subresource: scale
minReplicas: 1 5
maxReplicas: 10 6 cpuUtilization:
targetCPUUtilizationPercentage: 80 7
apiVersion: autoscaling/v2beta1kind: HorizontalPodAutoscalermetadata:
name: hpa-resource-metrics-cpu 1spec: scaleTargetRef:
apiVersion: apps/v1 2
kind: ReplicationController 3
name: hello-hpa-cpu 4
minReplicas: 1 5
maxReplicas: 10 6
OpenShift Dedicated 3 Developer Guide
246
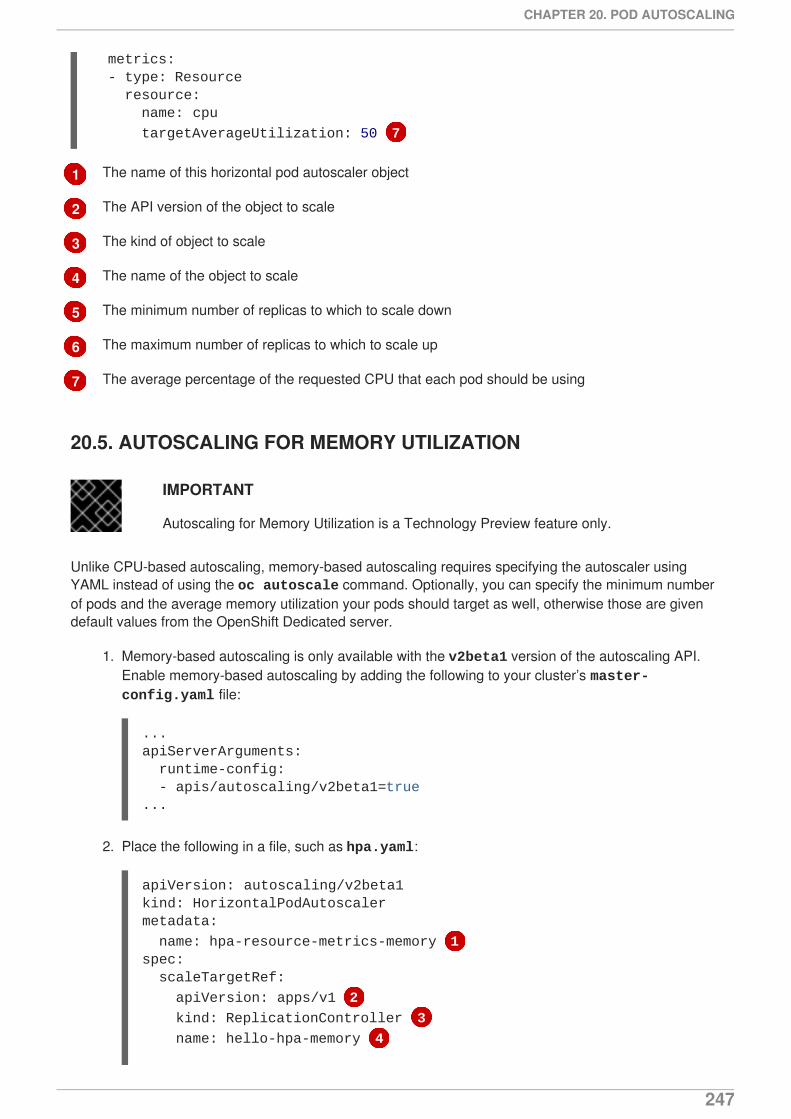
1
2
3
4
5
6
7
The name of this horizontal pod autoscaler object
The API version of the object to scale
The kind of object to scale
The name of the object to scale
The minimum number of replicas to which to scale down
The maximum number of replicas to which to scale up
The average percentage of the requested CPU that each pod should be using
20.5. AUTOSCALING FOR MEMORY UTILIZATION
IMPORTANT
Autoscaling for Memory Utilization is a Technology Preview feature only.
Unlike CPU-based autoscaling, memory-based autoscaling requires specifying the autoscaler usingYAML instead of using the oc autoscale command. Optionally, you can specify the minimum numberof pods and the average memory utilization your pods should target as well, otherwise those are givendefault values from the OpenShift Dedicated server.
1. Memory-based autoscaling is only available with the v2beta1 version of the autoscaling API.Enable memory-based autoscaling by adding the following to your cluster’s master-config.yaml file:
2. Place the following in a file, such as hpa.yaml:
metrics: - type: Resource resource: name: cpu
targetAverageUtilization: 50 7
...apiServerArguments: runtime-config: - apis/autoscaling/v2beta1=true...
apiVersion: autoscaling/v2beta1kind: HorizontalPodAutoscalermetadata:
name: hpa-resource-metrics-memory 1spec: scaleTargetRef:
apiVersion: apps/v1 2
kind: ReplicationController 3
name: hello-hpa-memory 4
CHAPTER 20. POD AUTOSCALING
247
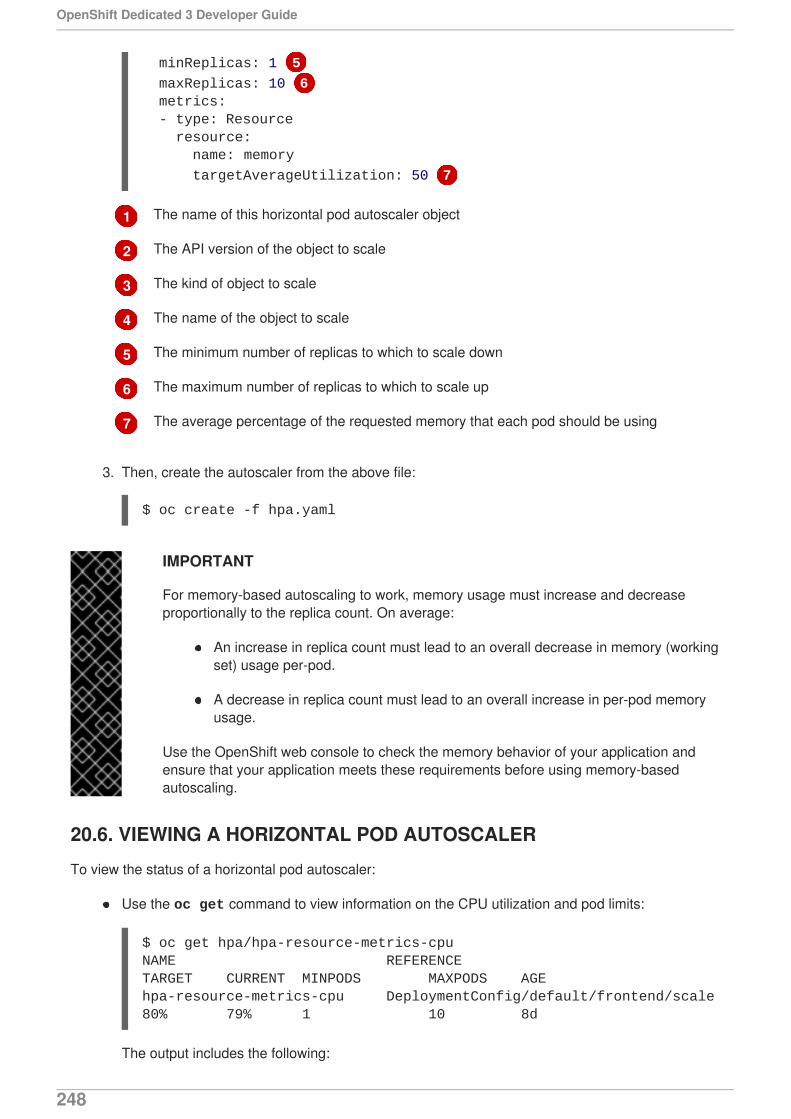
1
2
3
4
5
6
7
The name of this horizontal pod autoscaler object
The API version of the object to scale
The kind of object to scale
The name of the object to scale
The minimum number of replicas to which to scale down
The maximum number of replicas to which to scale up
The average percentage of the requested memory that each pod should be using
3. Then, create the autoscaler from the above file:
$ oc create -f hpa.yaml
IMPORTANT
For memory-based autoscaling to work, memory usage must increase and decreaseproportionally to the replica count. On average:
An increase in replica count must lead to an overall decrease in memory (workingset) usage per-pod.
A decrease in replica count must lead to an overall increase in per-pod memoryusage.
Use the OpenShift web console to check the memory behavior of your application andensure that your application meets these requirements before using memory-basedautoscaling.
20.6. VIEWING A HORIZONTAL POD AUTOSCALER
To view the status of a horizontal pod autoscaler:
Use the oc get command to view information on the CPU utilization and pod limits:
$ oc get hpa/hpa-resource-metrics-cpuNAME REFERENCE TARGET CURRENT MINPODS MAXPODS AGEhpa-resource-metrics-cpu DeploymentConfig/default/frontend/scale 80% 79% 1 10 8d
The output includes the following:
minReplicas: 1 5
maxReplicas: 10 6 metrics: - type: Resource resource: name: memory
targetAverageUtilization: 50 7
OpenShift Dedicated 3 Developer Guide
248
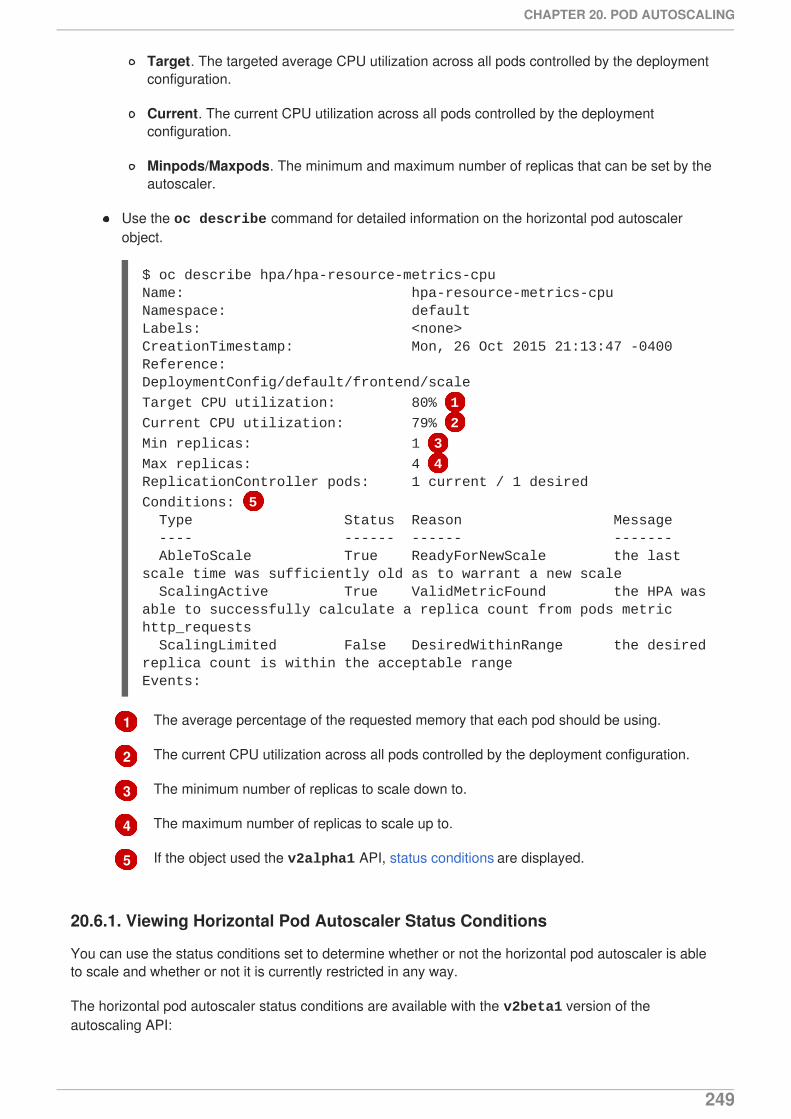
1
2
3
4
5
Target. The targeted average CPU utilization across all pods controlled by the deploymentconfiguration.
Current. The current CPU utilization across all pods controlled by the deploymentconfiguration.
Minpods/Maxpods. The minimum and maximum number of replicas that can be set by theautoscaler.
Use the oc describe command for detailed information on the horizontal pod autoscalerobject.
$ oc describe hpa/hpa-resource-metrics-cpuName: hpa-resource-metrics-cpuNamespace: defaultLabels: <none>CreationTimestamp: Mon, 26 Oct 2015 21:13:47 -0400Reference: DeploymentConfig/default/frontend/scale
Target CPU utilization: 80% 1
Current CPU utilization: 79% 2
Min replicas: 1 3
Max replicas: 4 4ReplicationController pods: 1 current / 1 desired
Conditions: 5 Type Status Reason Message ---- ------ ------ ------- AbleToScale True ReadyForNewScale the last scale time was sufficiently old as to warrant a new scale ScalingActive True ValidMetricFound the HPA was able to successfully calculate a replica count from pods metric http_requests ScalingLimited False DesiredWithinRange the desired replica count is within the acceptable rangeEvents:
The average percentage of the requested memory that each pod should be using.
The current CPU utilization across all pods controlled by the deployment configuration.
The minimum number of replicas to scale down to.
The maximum number of replicas to scale up to.
If the object used the v2alpha1 API, status conditions are displayed.
20.6.1. Viewing Horizontal Pod Autoscaler Status Conditions
You can use the status conditions set to determine whether or not the horizontal pod autoscaler is ableto scale and whether or not it is currently restricted in any way.
The horizontal pod autoscaler status conditions are available with the v2beta1 version of theautoscaling API:
CHAPTER 20. POD AUTOSCALING
249
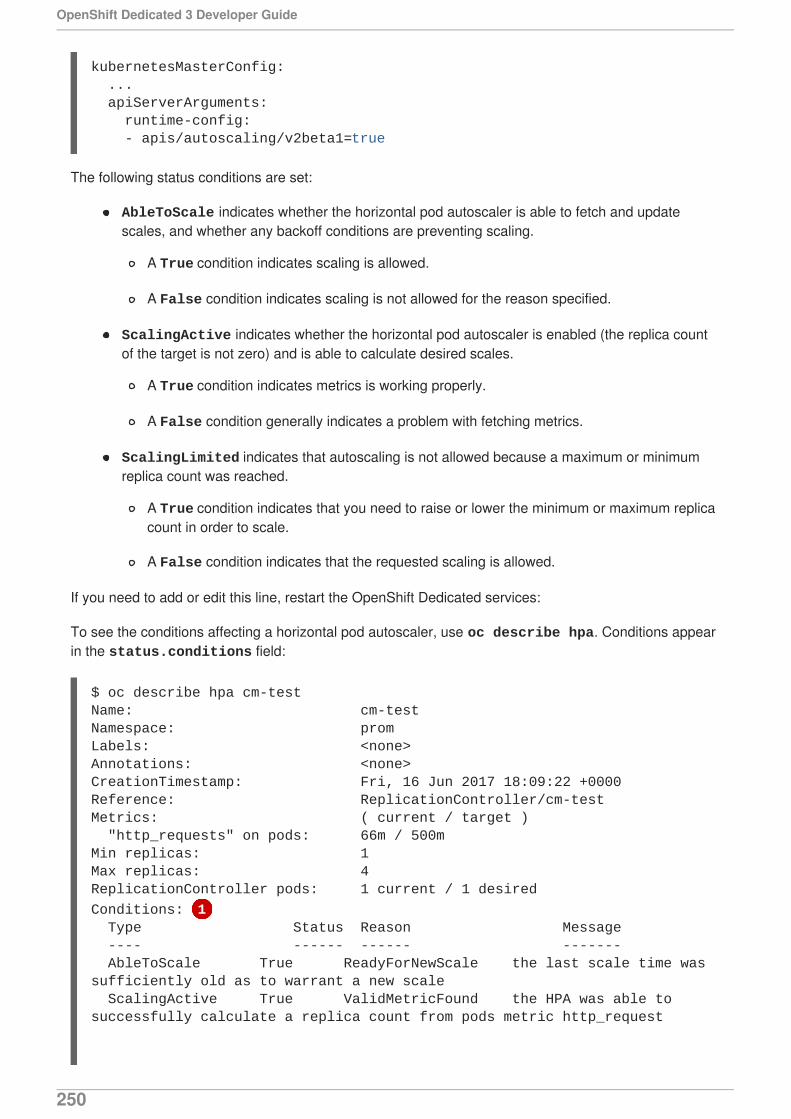
The following status conditions are set:
AbleToScale indicates whether the horizontal pod autoscaler is able to fetch and updatescales, and whether any backoff conditions are preventing scaling.
A True condition indicates scaling is allowed.
A False condition indicates scaling is not allowed for the reason specified.
ScalingActive indicates whether the horizontal pod autoscaler is enabled (the replica countof the target is not zero) and is able to calculate desired scales.
A True condition indicates metrics is working properly.
A False condition generally indicates a problem with fetching metrics.
ScalingLimited indicates that autoscaling is not allowed because a maximum or minimumreplica count was reached.
A True condition indicates that you need to raise or lower the minimum or maximum replicacount in order to scale.
A False condition indicates that the requested scaling is allowed.
If you need to add or edit this line, restart the OpenShift Dedicated services:
To see the conditions affecting a horizontal pod autoscaler, use oc describe hpa. Conditions appearin the status.conditions field:
$ oc describe hpa cm-testName: cm-testNamespace: promLabels: <none>Annotations: <none>CreationTimestamp: Fri, 16 Jun 2017 18:09:22 +0000Reference: ReplicationController/cm-testMetrics: ( current / target ) "http_requests" on pods: 66m / 500mMin replicas: 1Max replicas: 4ReplicationController pods: 1 current / 1 desired
Conditions: 1 Type Status Reason Message ---- ------ ------ ------- AbleToScale True ReadyForNewScale the last scale time was sufficiently old as to warrant a new scale ScalingActive True ValidMetricFound the HPA was able to successfully calculate a replica count from pods metric http_request
kubernetesMasterConfig: ... apiServerArguments: runtime-config: - apis/autoscaling/v2beta1=true
OpenShift Dedicated 3 Developer Guide
250
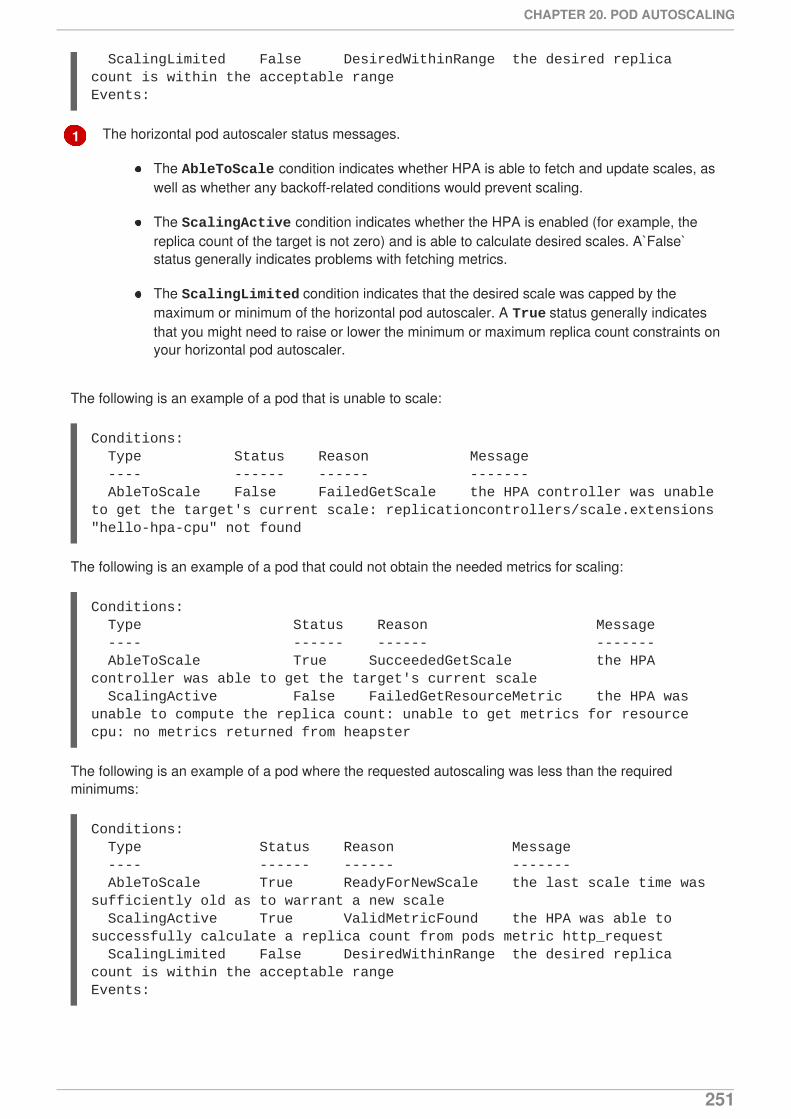
1
ScalingLimited False DesiredWithinRange the desired replica count is within the acceptable rangeEvents:
The horizontal pod autoscaler status messages.
The AbleToScale condition indicates whether HPA is able to fetch and update scales, aswell as whether any backoff-related conditions would prevent scaling.
The ScalingActive condition indicates whether the HPA is enabled (for example, thereplica count of the target is not zero) and is able to calculate desired scales. A`False`status generally indicates problems with fetching metrics.
The ScalingLimited condition indicates that the desired scale was capped by themaximum or minimum of the horizontal pod autoscaler. A True status generally indicatesthat you might need to raise or lower the minimum or maximum replica count constraints onyour horizontal pod autoscaler.
The following is an example of a pod that is unable to scale:
Conditions: Type Status Reason Message ---- ------ ------ ------- AbleToScale False FailedGetScale the HPA controller was unable to get the target's current scale: replicationcontrollers/scale.extensions "hello-hpa-cpu" not found
The following is an example of a pod that could not obtain the needed metrics for scaling:
Conditions: Type Status Reason Message ---- ------ ------ ------- AbleToScale True SucceededGetScale the HPA controller was able to get the target's current scale ScalingActive False FailedGetResourceMetric the HPA was unable to compute the replica count: unable to get metrics for resource cpu: no metrics returned from heapster
The following is an example of a pod where the requested autoscaling was less than the requiredminimums:
Conditions: Type Status Reason Message ---- ------ ------ ------- AbleToScale True ReadyForNewScale the last scale time was sufficiently old as to warrant a new scale ScalingActive True ValidMetricFound the HPA was able to successfully calculate a replica count from pods metric http_request ScalingLimited False DesiredWithinRange the desired replica count is within the acceptable rangeEvents:
CHAPTER 20. POD AUTOSCALING
251

CHAPTER 21. MANAGING VOLUMES
21.1. OVERVIEW
Containers are not persistent by default; on restart, their contents are cleared. Volumes are mounted filesystems available to pods and their containers which may be backed by a number of host-local ornetwork attached storage endpoints.
To ensure that the file system on the volume contains no errors and, if errors are present, to repair themwhen possible, OpenShift Dedicated invokes the fsck utility prior to the mount utility. This occurs wheneither adding a volume or updating an existing volume.
The simplest volume type is emptyDir, which is a temporary directory on a single machine.Administrators may also allow you to request a persistent volume that is automatically attached to yourpods.
NOTE
emptyDir volume storage may be restricted by a quota based on the pod’s FSGroup, ifthe FSGroup parameter is enabled by your cluster administrator.
You can use the CLI command oc volume to add, update, or remove volumes and volume mounts forany object that has a pod template like replication controllers or deployment configurations. You can alsolist volumes in pods or any object that has a pod template.
21.2. GENERAL CLI USAGE
The oc volume command uses the following general syntax:
$ oc volume <object_selection> <operation> <mandatory_parameters> <optional_parameters>
This topic uses the form <object_type>/<name> for <object_selection> in later examples.However, you can choose one of the following options:
Table 21.1. Object Selection
Syntax Description Example
<object_type> <name> Selects <name> of type <object_type>.
deploymentConfig registry
<object_type>/<name> Selects <name> of type <object_type>.
deploymentConfig/registry
<object_type>--selector=<object_label_selector>
Selects resources of type <object_type> that matchedthe given label selector.
deploymentConfig--selector="name=registry"
<object_type> --all Selects all resources of type <object_type>.
deploymentConfig --all
OpenShift Dedicated 3 Developer Guide
252
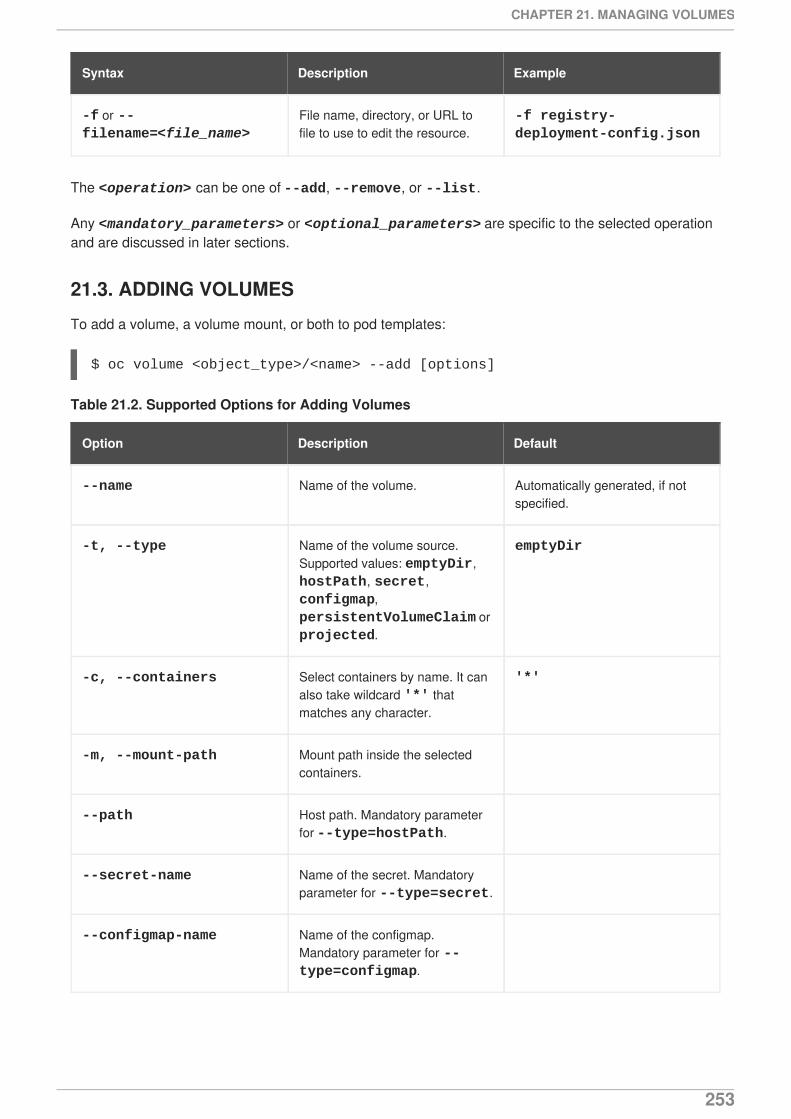
-f or --filename=<file_name>
File name, directory, or URL tofile to use to edit the resource.
-f registry-deployment-config.json
Syntax Description Example
The <operation> can be one of --add, --remove, or --list.
Any <mandatory_parameters> or <optional_parameters> are specific to the selected operationand are discussed in later sections.
21.3. ADDING VOLUMES
To add a volume, a volume mount, or both to pod templates:
$ oc volume <object_type>/<name> --add [options]
Table 21.2. Supported Options for Adding Volumes
Option Description Default
--name Name of the volume. Automatically generated, if notspecified.
-t, --type Name of the volume source.Supported values: emptyDir, hostPath, secret, configmap, persistentVolumeClaim orprojected.
emptyDir
-c, --containers Select containers by name. It canalso take wildcard '*' thatmatches any character.
'*'
-m, --mount-path Mount path inside the selectedcontainers.
--path Host path. Mandatory parameterfor --type=hostPath.
--secret-name Name of the secret. Mandatoryparameter for --type=secret.
--configmap-name Name of the configmap.Mandatory parameter for --type=configmap.
CHAPTER 21. MANAGING VOLUMES
253
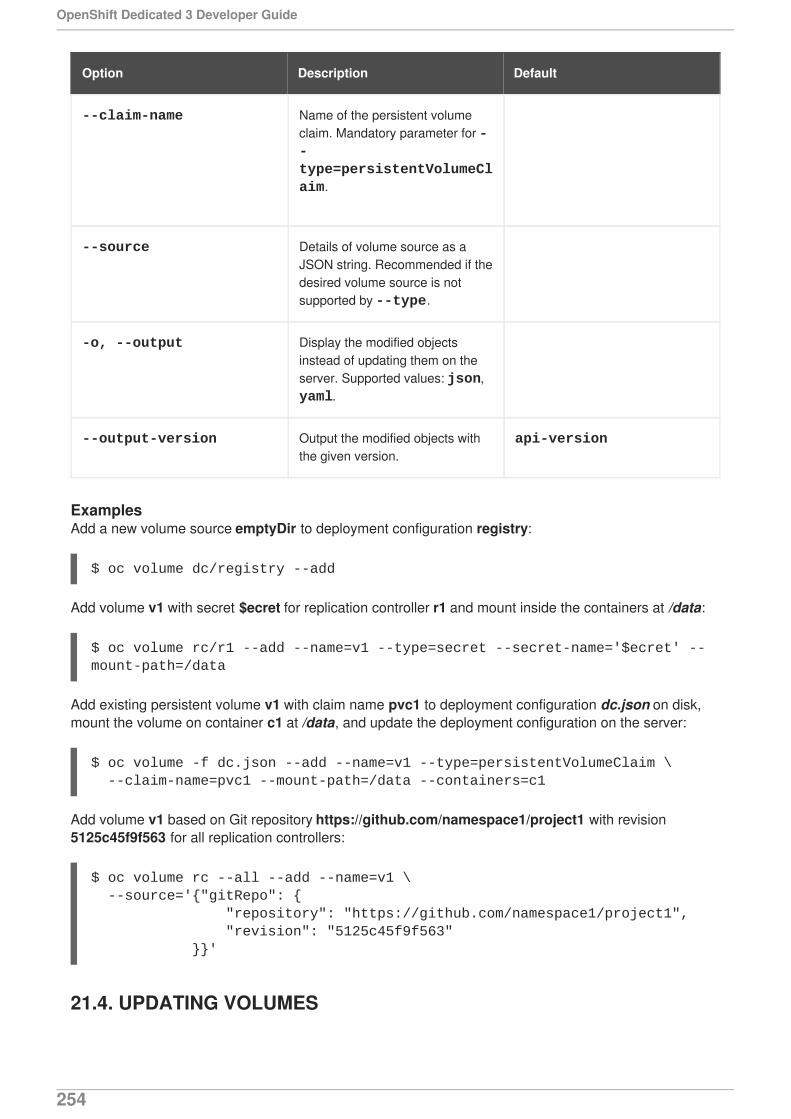
--claim-name Name of the persistent volumeclaim. Mandatory parameter for --type=persistentVolumeClaim.
--source Details of volume source as aJSON string. Recommended if thedesired volume source is notsupported by --type.
-o, --output Display the modified objectsinstead of updating them on theserver. Supported values: json, yaml.
--output-version Output the modified objects withthe given version.
api-version
Option Description Default
ExamplesAdd a new volume source emptyDir to deployment configuration registry:
$ oc volume dc/registry --add
Add volume v1 with secret $ecret for replication controller r1 and mount inside the containers at /data:
$ oc volume rc/r1 --add --name=v1 --type=secret --secret-name='$ecret' --mount-path=/data
Add existing persistent volume v1 with claim name pvc1 to deployment configuration dc.json on disk,mount the volume on container c1 at /data, and update the deployment configuration on the server:
$ oc volume -f dc.json --add --name=v1 --type=persistentVolumeClaim \ --claim-name=pvc1 --mount-path=/data --containers=c1
Add volume v1 based on Git repository https://github.com/namespace1/project1 with revision5125c45f9f563 for all replication controllers:
$ oc volume rc --all --add --name=v1 \ --source='{"gitRepo": { "repository": "https://github.com/namespace1/project1", "revision": "5125c45f9f563" }}'
21.4. UPDATING VOLUMES
OpenShift Dedicated 3 Developer Guide
254

Updating existing volumes or volume mounts is the same as adding volumes, but with the --overwrite option:
$ oc volume <object_type>/<name> --add --overwrite [options]
ExamplesReplace existing volume v1 for replication controller r1 with existing persistent volume claim pvc1:
$ oc volume rc/r1 --add --overwrite --name=v1 --type=persistentVolumeClaim --claim-name=pvc1
Change deployment configuration d1 mount point to /opt for volume v1:
$ oc volume dc/d1 --add --overwrite --name=v1 --mount-path=/opt
21.5. REMOVING VOLUMES
To remove a volume or volume mount from pod templates:
$ oc volume <object_type>/<name> --remove [options]
Table 21.3. Supported Options for Removing Volumes
Option Description Default
--name Name of the volume.
-c, --containers Select containers by name. It canalso take wildcard '*' thatmatches any character.
'*'
--confirm Indicate that you want to removemultiple volumes at once.
-o, --output Display the modified objectsinstead of updating them on theserver. Supported values: json, yaml.
--output-version Output the modified objects withthe given version.
api-version
ExamplesRemove a volume v1 from deployment configuration d1:
$ oc volume dc/d1 --remove --name=v1
Unmount volume v1 from container c1 for deployment configuration d1 and remove the volume v1 if it isnot referenced by any containers on d1:
CHAPTER 21. MANAGING VOLUMES
255
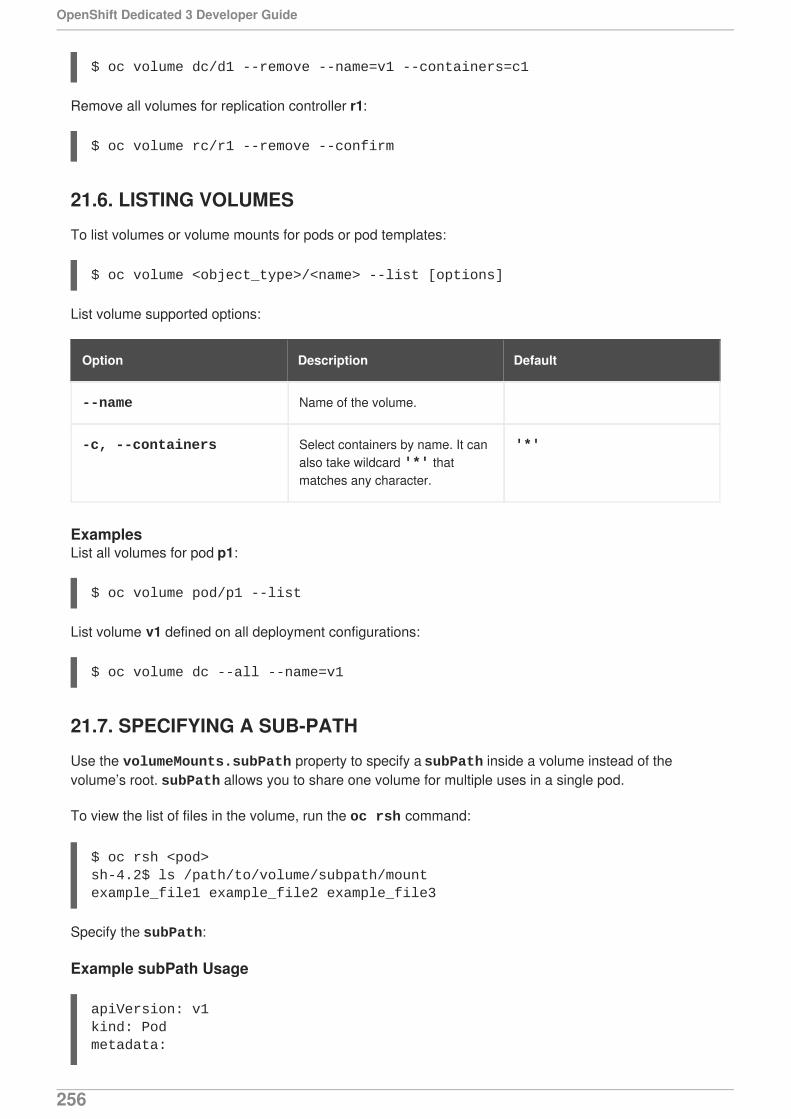
$ oc volume dc/d1 --remove --name=v1 --containers=c1
Remove all volumes for replication controller r1:
$ oc volume rc/r1 --remove --confirm
21.6. LISTING VOLUMES
To list volumes or volume mounts for pods or pod templates:
$ oc volume <object_type>/<name> --list [options]
List volume supported options:
Option Description Default
--name Name of the volume.
-c, --containers Select containers by name. It canalso take wildcard '*' thatmatches any character.
'*'
ExamplesList all volumes for pod p1:
$ oc volume pod/p1 --list
List volume v1 defined on all deployment configurations:
$ oc volume dc --all --name=v1
21.7. SPECIFYING A SUB-PATH
Use the volumeMounts.subPath property to specify a subPath inside a volume instead of thevolume’s root. subPath allows you to share one volume for multiple uses in a single pod.
To view the list of files in the volume, run the oc rsh command:
$ oc rsh <pod>sh-4.2$ ls /path/to/volume/subpath/mountexample_file1 example_file2 example_file3
Specify the subPath:
Example subPath Usage
apiVersion: v1kind: Podmetadata:
OpenShift Dedicated 3 Developer Guide
256
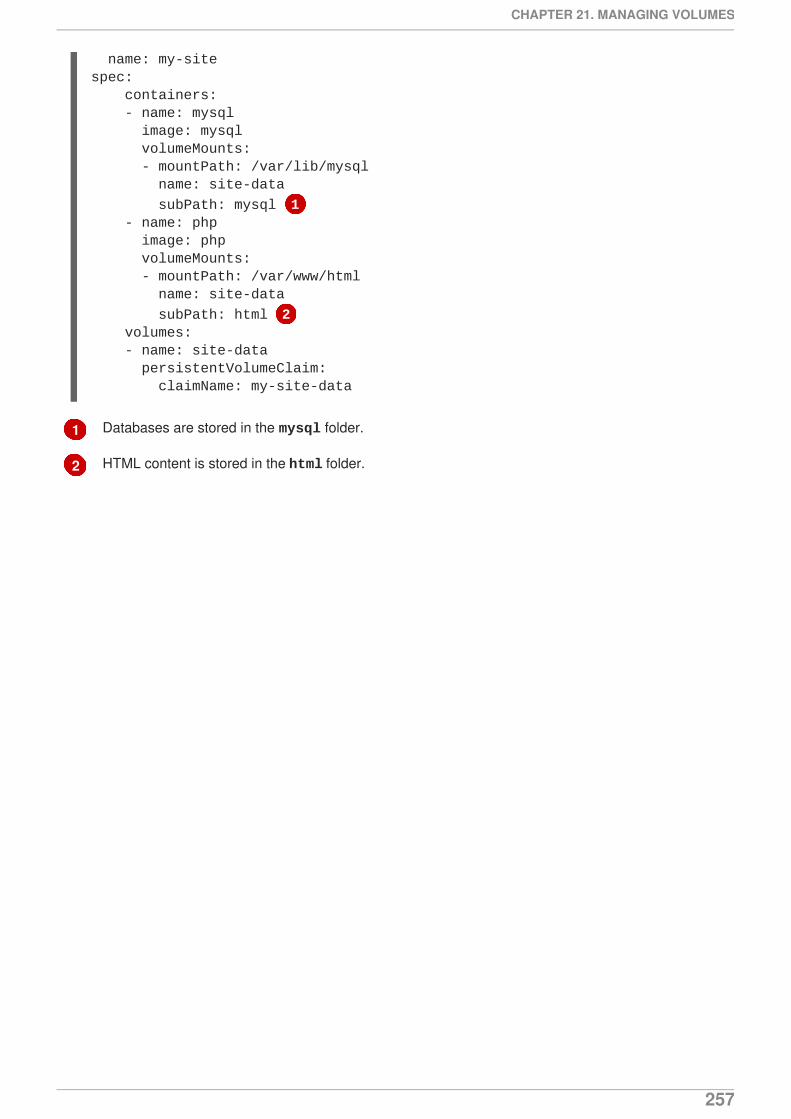
1
2
name: my-sitespec: containers: - name: mysql image: mysql volumeMounts: - mountPath: /var/lib/mysql name: site-data
subPath: mysql 1 - name: php image: php volumeMounts: - mountPath: /var/www/html name: site-data
subPath: html 2 volumes: - name: site-data persistentVolumeClaim: claimName: my-site-data
Databases are stored in the mysql folder.
HTML content is stored in the html folder.
CHAPTER 21. MANAGING VOLUMES
257
CHAPTER 22. USING PERSISTENT VOLUMES
22.1. OVERVIEW
A PersistentVolume object is a storage resource in an OpenShift Dedicated cluster. Storage isprovisioned by your cluster administrator by creating PersistentVolume objects from sources such asGCE Persistent Disk, AWS Elastic Block Store (EBS), and NFS mounts.
Storage can be made available to you by laying claims to the resource. You can make a request forstorage resources using a PersistentVolumeClaim object; the claim is paired with a volume thatgenerally matches your request.
22.2. REQUESTING STORAGE
You can request storage by creating PersistentVolumeClaim objects in your projects:
Persistent Volume Claim Object Definition
22.3. VOLUME AND CLAIM BINDING
A PersistentVolume is a specific resource. A PersistentVolumeClaim is a request for a resourcewith specific attributes, such as storage size. In between the two is a process that matches a claim to anavailable volume and binds them together. This allows the claim to be used as a volume in a pod.OpenShift Dedicated finds the volume backing the claim and mounts it into the pod.
You can tell whether a claim or volume is bound by querying using the CLI:
$ oc get pvcNAME LABELS STATUS VOLUMEclaim1 map[] Bound pv0001
$ oc get pvNAME LABELS CAPACITY ACCESSMODES STATUS CLAIMpv0001 map[] 5368709120 RWO Bound yournamespace / claim1
22.4. CLAIMS AS VOLUMES IN PODS
apiVersion: "v1"kind: "PersistentVolumeClaim"metadata: name: "claim1"spec: accessModes: - "ReadWriteOnce" resources: requests: storage: "1Gi" volumeName: "pv0001"
OpenShift Dedicated 3 Developer Guide
258
A PersistentVolumeClaim is used by a pod as a volume. OpenShift Dedicated finds the claim withthe given name in the same namespace as the pod, then uses the claim to find the correspondingvolume to mount.
Pod Definition with a Claim
22.5. VOLUME AND CLAIM PRE-BINDING
If you know exactly what PersistentVolume you want your PersistentVolumeClaim to bind to,you can specify the PV in your PVC using the volumeName field. This method skips the normalmatching and binding process. The PVC will only be able to bind to a PV that has the same namespecified in volumeName. If such a PV with that name exists and is Available, the PV and PVC will bebound regardless of whether the PV satisfies the PVC’s label selector, access modes, and resourcerequests.
Example 22.1. Persistent Volume Claim Object Definition with volumeName
apiVersion: "v1"kind: "Pod"metadata: name: "mypod" labels: name: "frontendhttp"spec: containers: - name: "myfrontend" image: openshift/hello-openshift ports: - containerPort: 80 name: "http-server" volumeMounts: - mountPath: "/var/www/html" name: "pvol" volumes: - name: "pvol" persistentVolumeClaim: claimName: "claim1"
apiVersion: "v1"kind: "PersistentVolumeClaim"metadata: name: "claim1"spec: accessModes: - "ReadWriteOnce" resources: requests: storage: "1Gi" volumeName: "pv0001"
CHAPTER 22. USING PERSISTENT VOLUMES
259
IMPORTANT
The ability to set claimRefs is a temporary workaround for the described use cases. Along-term solution for limiting who can claim a volume is in development.
You may also want your cluster administrator to "reserve" the volume for only your claim so that nobodyelse’s claim can bind to it before yours does. In this case, the administrator can specify the PVC in thePV using the claimRef field. The PV will only be able to bind to a PVC that has the same name andnamespace specified in claimRef. The PVC’s access modes and resource requests must still besatisfied in order for the PV and PVC to be bound, though the label selector is ignored.
Persistent Volume Object Definition with claimRef
Specifying a volumeName in your PVC does not prevent a different PVC from binding to the specifiedPV before yours does. Your claim will remain Pending until the PV is Available.
Specifying a claimRef in a PV does not prevent the specified PVC from being bound to a different PV.The PVC is free to choose another PV to bind to according to the normal binding process. Therefore, toavoid these scenarios and ensure your claim gets bound to the volume you want, you must ensure thatboth volumeName and claimRef are specified.
You can tell that your setting of volumeName and/or claimRef influenced the matching and bindingprocess by inspecting a Bound PV and PVC pair for the pv.kubernetes.io/bound-by-controller annotation. The PVs and PVCs where you set the volumeName and/or claimRefyourself will have no such annotation, but ordinary PVs and PVCs will have it set to "yes".
When a PV has its claimRef set to some PVC name and namespace, and is reclaimed according to a Retain or Recycle reclaim policy, its claimRef will remain set to the same PVC name andnamespace even if the PVC or the whole namespace no longer exists.
apiVersion: v1kind: PersistentVolumemetadata: name: pv0001spec: capacity: storage: 1Gi accessModes: - ReadWriteOnce nfs: path: /tmp server: 172.17.0.2 persistentVolumeReclaimPolicy: Recycle claimRef: name: claim1 namespace: default
OpenShift Dedicated 3 Developer Guide
260
CHAPTER 23. EXECUTING REMOTE COMMANDS
23.1. OVERVIEW
You can use the CLI to execute remote commands in a container. This allows you to run general Linuxcommands for routine operations in the container.
IMPORTANT
For security purposes, the oc exec command does not work when accessing privilegedcontainers except when the command is executed by a cluster-admin user. See theCLI operations topic for more information.
23.2. BASIC USAGE
Support for remote container command execution is built into the CLI:
$ oc exec <pod> [-c <container>] <command> [<arg_1> ... <arg_n>]
For example:
$ oc exec mypod dateThu Apr 9 02:21:53 UTC 2015
23.3. PROTOCOL
Clients initiate the execution of a remote command in a container by issuing a request to the KubernetesAPI server:
/proxy/minions/<node_name>/exec/<namespace>/<pod>/<container>?command=<command>
In the above URL:
<node_name> is the FQDN of the node.
<namespace> is the namespace of the target pod.
<pod> is the name of the target pod.
<container> is the name of the target container.
<command> is the desired command to be executed.
For example:
/proxy/minions/node123.openshift.com/exec/myns/mypod/mycontainer?command=date
Additionally, the client can add parameters to the request to indicate if:
CHAPTER 23. EXECUTING REMOTE COMMANDS
261
the client should send input to the remote container’s command (stdin).
the client’s terminal is a TTY.
the remote container’s command should send output from stdout to the client.
the remote container’s command should send output from stderr to the client.
After sending an exec request to the API server, the client upgrades the connection to one that supportsmultiplexed streams; the current implementation uses SPDY.
The client creates one stream each for stdin, stdout, and stderr. To distinguish among the streams, theclient sets the streamType header on the stream to one of stdin, stdout, or stderr.
The client closes all streams, the upgraded connection, and the underlying connection when it is finishedwith the remote command execution request.
OpenShift Dedicated 3 Developer Guide
262
CHAPTER 24. COPYING FILES TO OR FROM A CONTAINER
24.1. OVERVIEW
You can use the CLI to copy local files to or from a remote directory in a container. This is a useful toolfor copying database archives to and from your pods for backup and restore purposes. It can also beused to copy source code changes into a running pod for development debugging, when the running podsupports hot reload of source files.
24.2. BASIC USAGE
Support for copying local files to or from a container is built into the CLI:
$ oc rsync <source> <destination> [-c <container>]
For example, to copy a local directory to a pod directory:
$ oc rsync /home/user/source devpod1234:/src
Or to copy a pod directory to a local directory:
$ oc rsync devpod1234:/src /home/user/source
24.3. BACKING UP AND RESTORING DATABASES
Use oc rsync to copy database archives from an existing database container to a new databasecontainer’s persistent volume directory.
NOTE
MySQL is used in the example below. Replace mysql|MYSQL with pgsql|PGSQL or mongodb|MONGODB and refer to the migration guide to find the exact commands for eachof our supported database images. The example assumes an existing databasecontainer.
1. Back up the existing database from a running database pod:
$ oc rsh <existing db container># mkdir /var/lib/mysql/data/db_archive_dir# mysqldump --skip-lock-tables -h ${MYSQL_SERVICE_HOST} -P ${MYSQL_SERVICE_PORT:-3306} \ -u ${MYSQL_USER} --password="$MYSQL_PASSWORD" --all-databases > /var/lib/mysql/data/db_archive_dir/all.sql# exit
2. Remote sync the archive file to your local machine:
$ oc rsync <existing db container with db archive>:/var/lib/mysql/data/db_archive_dir /tmp/.
CHAPTER 24. COPYING FILES TO OR FROM A CONTAINER
263
1
3. Start a second MySQL pod into which to load the database archive file created above. TheMySQL pod must have a unique DATABASE_SERVICE_NAME.
$ oc new-app mysql-persistent \ -p MYSQL_USER=<archived mysql username> \ -p MYSQL_PASSWORD=<archived mysql password> \ -p MYSQL_DATABASE=<archived database name> \
-p DATABASE_SERVICE_NAME='mysql2' 1$ oc rsync /tmp/db_archive_dir new_dbpod1234:/var/lib/mysql/data$ oc rsh new_dbpod1234
mysql is the default. In this example, mysql2 is created.
4. Use the appropriate commands to restore the database in the new database container from thecopied database archive directory:
MySQL
$ cd /var/lib/mysql/data/db_archive_dir$ mysql -u root$ source all.sql$ GRANT ALL PRIVILEGES ON <dbname>.* TO '<your username>'@'localhost'; FLUSH PRIVILEGES;$ cd ../; rm -rf /var/lib/mysql/data/db_backup_dir
You now have two MySQL database pods running in your project with the archived database.
24.4. REQUIREMENTS
The oc rsync command uses the local rsync command if present on the client’s machine. Thisrequires that the remote container also have the rsync command.
If rsync is not found locally or in the remote container, then a tar archive will be created locally and sentto the container where tar will be used to extract the files. If tar is not available in the remote container,then the copy will fail.
The tar copy method does not provide the same functionality as rsync. For example, rsync createsthe destination directory if it does not exist and will only send files that are different between the sourceand the destination.
NOTE
In Windows, the cwRsync client should be installed and added to the PATH for use withthe oc rsync command.
24.5. SPECIFYING THE COPY SOURCE
The source argument of the oc rsync command must point to either a local directory or a pod directory.Individual files are not currently supported.
When specifying a pod directory the directory name must be prefixed with the pod name:
OpenShift Dedicated 3 Developer Guide
264
<pod name>:<dir>
Just as with standard rsync, if the directory name ends in a path separator (/), only the contents of thedirectory are copied to the destination. Otherwise, the directory itself is copied to the destination with allits contents.
24.6. SPECIFYING THE COPY DESTINATION
The destination argument of the oc rsync command must point to a directory. If the directory does notexist, but rsync is used for copy, the directory is created for you.
24.7. DELETING FILES AT THE DESTINATION
The --delete flag may be used to delete any files in the remote directory that are not in the localdirectory.
24.8. CONTINUOUS SYNCING ON FILE CHANGE
Using the --watch option causes the command to monitor the source path for any file system changes,and synchronizes changes when they occur. With this argument, the command runs forever.
Synchronization occurs after short quiet periods to ensure a rapidly changing file system does not resultin continuous synchronization calls.
When using the --watch option, the behavior is effectively the same as manually invoking oc rsyncrepeatedly, including any arguments normally passed to oc rsync. Therefore, you can control thebehavior via the same flags used with manual invocations of oc rsync, such as --delete.
24.9. ADVANCED RSYNC FEATURES
The oc rsync command exposes fewer command line options than standard rsync. In the case thatyou wish to use a standard rsync command line option which is not available in oc rsync (forexample the --exclude-from=FILE option), it may be possible to use standard rsync 's --rsh (-e)option or RSYNC_RSH environment variable as a workaround, as follows:
$ rsync --rsh='oc rsh' --exclude-from=FILE SRC POD:DEST
or:
$ export RSYNC_RSH='oc rsh'$ rsync --exclude-from=FILE SRC POD:DEST
Both of the above examples configure standard rsync to use oc rsh as its remote shell program toenable it to connect to the remote pod, and are an alternative to running oc rsync.
CHAPTER 24. COPYING FILES TO OR FROM A CONTAINER
265
CHAPTER 25. PORT FORWARDING
25.1. OVERVIEW
OpenShift Dedicated takes advantage of a feature built-in to Kubernetes to support port forwarding topods.
You can use the CLI to forward one or more local ports to a pod. This allows you to listen on a given orrandom port locally, and have data forwarded to and from given ports in the pod.
25.2. BASIC USAGE
Support for port forwarding is built into the CLI:
$ oc port-forward <pod> [<local_port>:]<remote_port> [...[<local_port_n>:]<remote_port_n>]
The CLI listens on each local port specified by the user, forwarding via the protocol described below.
Ports may be specified using the following formats:
5000 The client listens on port 5000 locally and forwards to 5000 in the pod.
6000:5000 The client listens on port 6000 locally and forwards to 5000 in the pod.
:5000 or 0:5000
The client selects a free local port and forwards to 5000 in the pod.
For example, to listen on ports 5000 and 6000 locally and forward data to and from ports 5000 and 6000in the pod, run:
$ oc port-forward <pod> 5000 6000
To listen on port 8888 locally and forward to 5000 in the pod, run:
$ oc port-forward <pod> 8888:5000
To listen on a free port locally and forward to 5000 in the pod, run:
$ oc port-forward <pod> :5000
Or, alternatively:
$ oc port-forward <pod> 0:5000
25.3. PROTOCOL
Clients initiate port forwarding to a pod by issuing a request to the Kubernetes API server:
OpenShift Dedicated 3 Developer Guide
266
/proxy/minions/<node_name>/portForward/<namespace>/<pod>
In the above URL:
<node_name> is the FQDN of the node.
<namespace> is the namespace of the target pod.
<pod> is the name of the target pod.
For example:
/proxy/minions/node123.openshift.com/portForward/myns/mypod
After sending a port forward request to the API server, the client upgrades the connection to one thatsupports multiplexed streams; the current implementation uses SPDY.
The client creates a stream with the port header containing the target port in the pod. All data written tothe stream is delivered via the Kubelet to the target pod and port. Similarly, all data sent from the pod forthat forwarded connection is delivered back to the same stream in the client.
The client closes all streams, the upgraded connection, and the underlying connection when it is finishedwith the port forwarding request.
CHAPTER 25. PORT FORWARDING
267
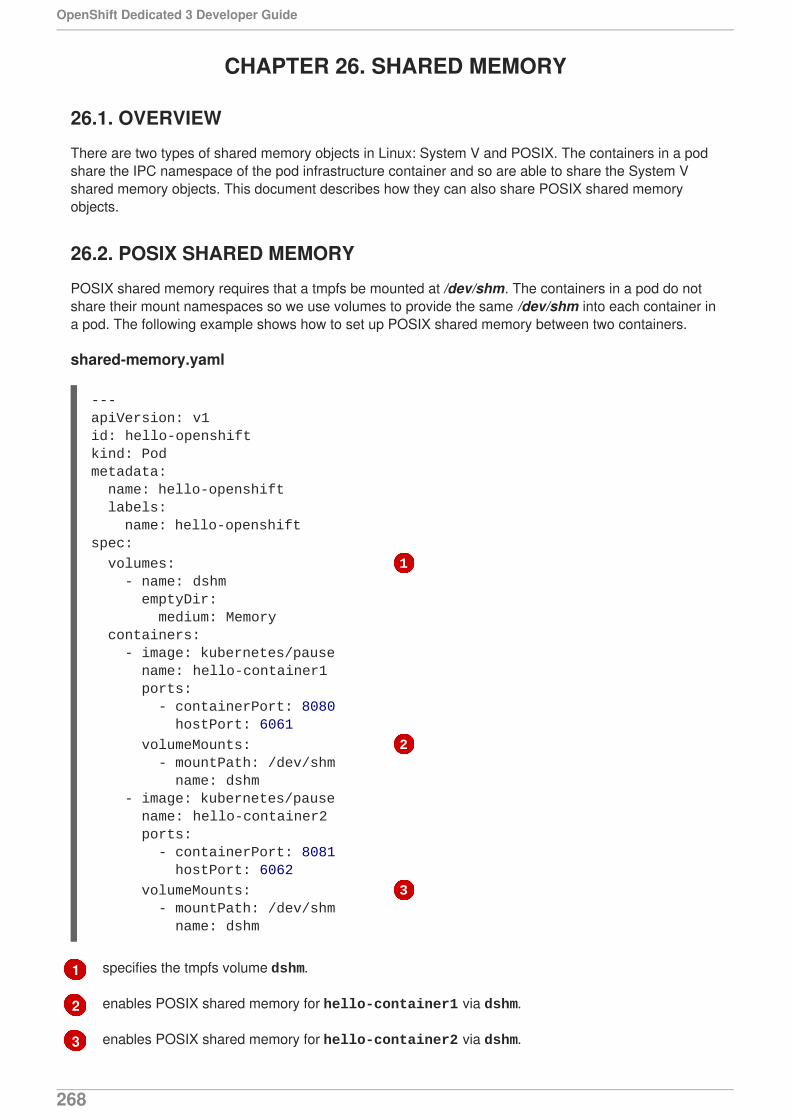
1
2
3
CHAPTER 26. SHARED MEMORY
26.1. OVERVIEW
There are two types of shared memory objects in Linux: System V and POSIX. The containers in a podshare the IPC namespace of the pod infrastructure container and so are able to share the System Vshared memory objects. This document describes how they can also share POSIX shared memoryobjects.
26.2. POSIX SHARED MEMORY
POSIX shared memory requires that a tmpfs be mounted at /dev/shm. The containers in a pod do notshare their mount namespaces so we use volumes to provide the same /dev/shm into each container ina pod. The following example shows how to set up POSIX shared memory between two containers.
shared-memory.yaml
specifies the tmpfs volume dshm.
enables POSIX shared memory for hello-container1 via dshm.
enables POSIX shared memory for hello-container2 via dshm.
---apiVersion: v1id: hello-openshiftkind: Podmetadata: name: hello-openshift labels: name: hello-openshiftspec:
volumes: 1 - name: dshm emptyDir: medium: Memory containers: - image: kubernetes/pause name: hello-container1 ports: - containerPort: 8080 hostPort: 6061
volumeMounts: 2 - mountPath: /dev/shm name: dshm - image: kubernetes/pause name: hello-container2 ports: - containerPort: 8081 hostPort: 6062
volumeMounts: 3 - mountPath: /dev/shm name: dshm
OpenShift Dedicated 3 Developer Guide
268

Create the pod using the shared-memory.yaml file:
$ oc create -f shared-memory.yaml
CHAPTER 26. SHARED MEMORY
269
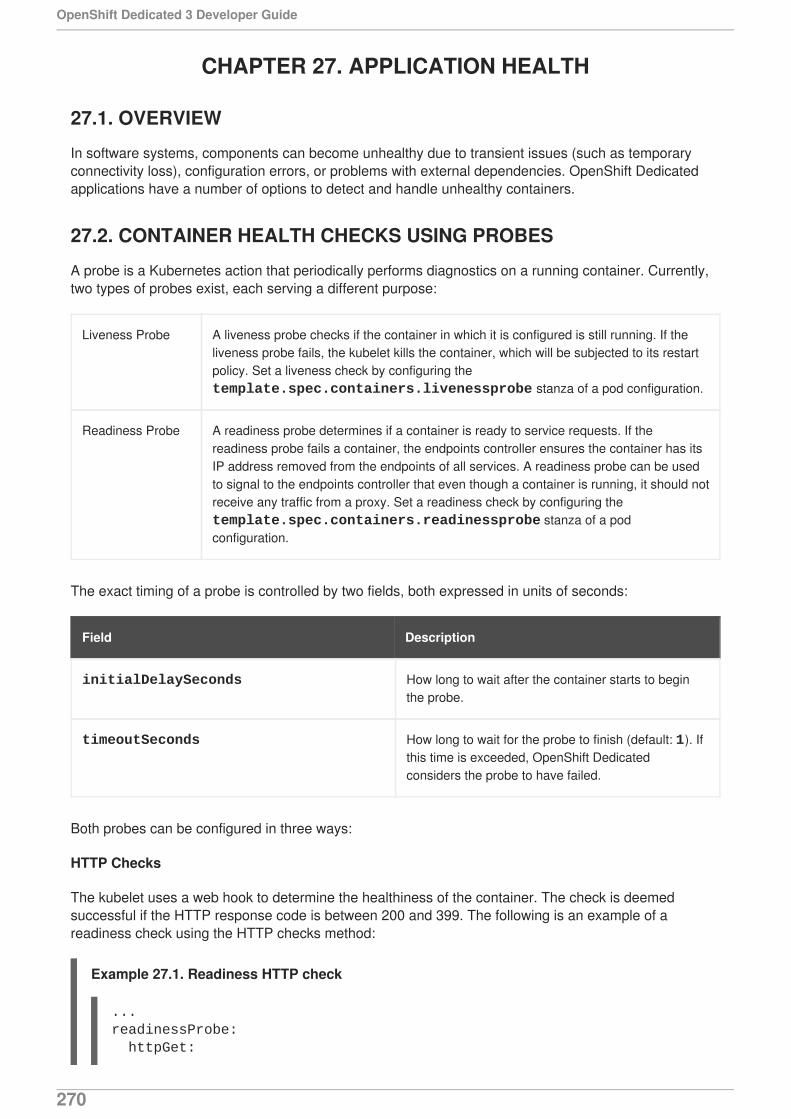
CHAPTER 27. APPLICATION HEALTH
27.1. OVERVIEW
In software systems, components can become unhealthy due to transient issues (such as temporaryconnectivity loss), configuration errors, or problems with external dependencies. OpenShift Dedicatedapplications have a number of options to detect and handle unhealthy containers.
27.2. CONTAINER HEALTH CHECKS USING PROBES
A probe is a Kubernetes action that periodically performs diagnostics on a running container. Currently,two types of probes exist, each serving a different purpose:
Liveness Probe A liveness probe checks if the container in which it is configured is still running. If theliveness probe fails, the kubelet kills the container, which will be subjected to its restartpolicy. Set a liveness check by configuring the template.spec.containers.livenessprobe stanza of a pod configuration.
Readiness Probe A readiness probe determines if a container is ready to service requests. If thereadiness probe fails a container, the endpoints controller ensures the container has itsIP address removed from the endpoints of all services. A readiness probe can be usedto signal to the endpoints controller that even though a container is running, it should notreceive any traffic from a proxy. Set a readiness check by configuring the template.spec.containers.readinessprobe stanza of a podconfiguration.
The exact timing of a probe is controlled by two fields, both expressed in units of seconds:
Field Description
initialDelaySeconds How long to wait after the container starts to beginthe probe.
timeoutSeconds How long to wait for the probe to finish (default: 1). Ifthis time is exceeded, OpenShift Dedicatedconsiders the probe to have failed.
Both probes can be configured in three ways:
HTTP Checks
The kubelet uses a web hook to determine the healthiness of the container. The check is deemedsuccessful if the HTTP response code is between 200 and 399. The following is an example of areadiness check using the HTTP checks method:
Example 27.1. Readiness HTTP check
...readinessProbe: httpGet:
OpenShift Dedicated 3 Developer Guide
270
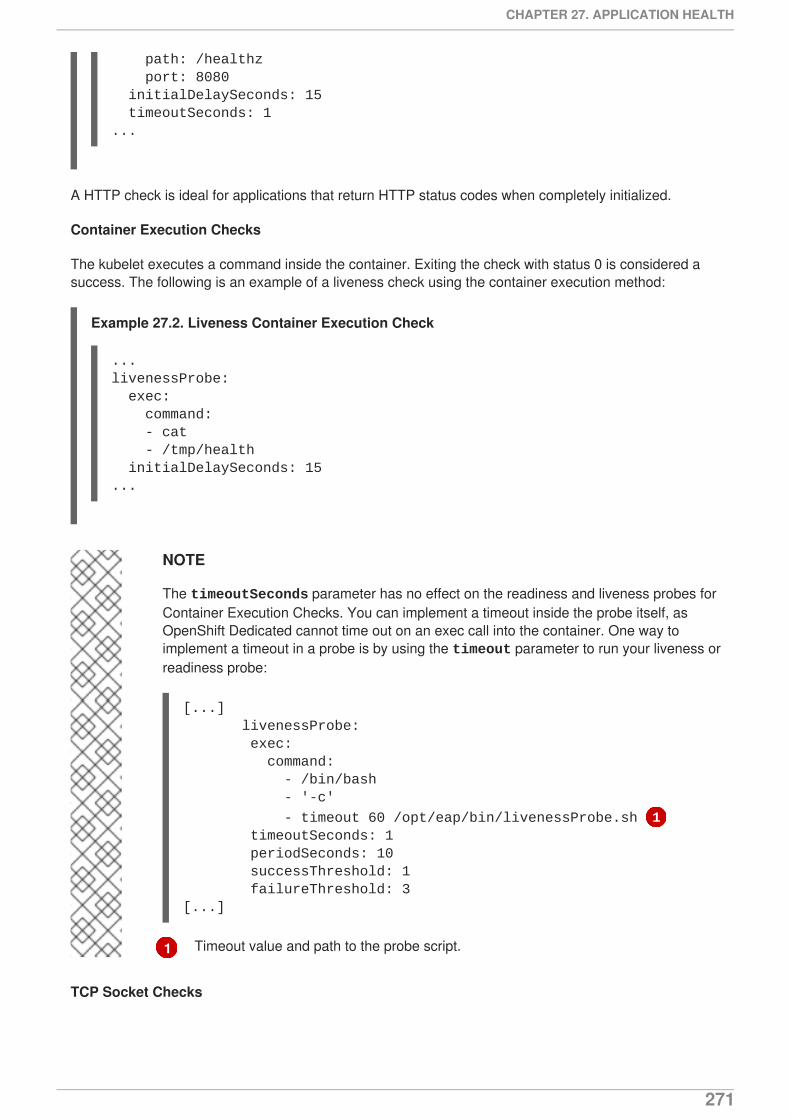
1
path: /healthz port: 8080 initialDelaySeconds: 15 timeoutSeconds: 1...
A HTTP check is ideal for applications that return HTTP status codes when completely initialized.
Container Execution Checks
The kubelet executes a command inside the container. Exiting the check with status 0 is considered asuccess. The following is an example of a liveness check using the container execution method:
Example 27.2. Liveness Container Execution Check
...livenessProbe: exec: command: - cat - /tmp/health initialDelaySeconds: 15...
NOTE
The timeoutSeconds parameter has no effect on the readiness and liveness probes forContainer Execution Checks. You can implement a timeout inside the probe itself, asOpenShift Dedicated cannot time out on an exec call into the container. One way toimplement a timeout in a probe is by using the timeout parameter to run your liveness orreadiness probe:
[...] livenessProbe: exec: command: - /bin/bash - '-c'
- timeout 60 /opt/eap/bin/livenessProbe.sh 1 timeoutSeconds: 1 periodSeconds: 10 successThreshold: 1 failureThreshold: 3[...]
Timeout value and path to the probe script.
TCP Socket Checks
CHAPTER 27. APPLICATION HEALTH
271
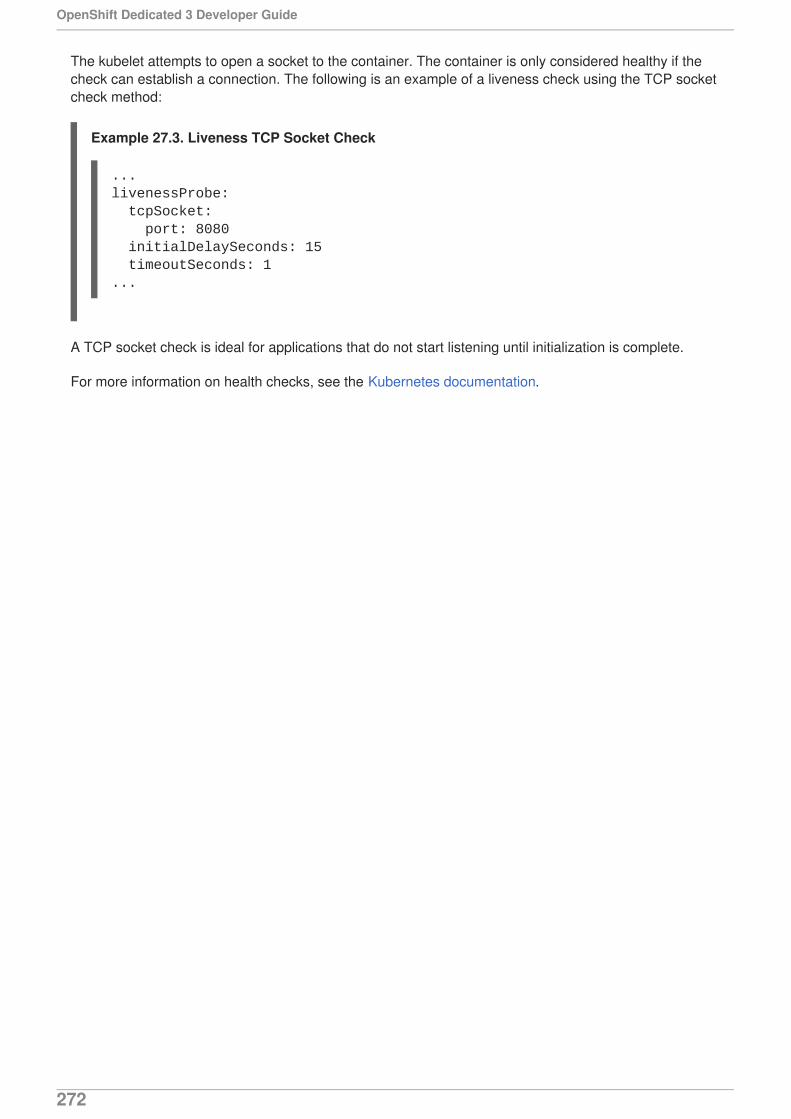
The kubelet attempts to open a socket to the container. The container is only considered healthy if thecheck can establish a connection. The following is an example of a liveness check using the TCP socketcheck method:
Example 27.3. Liveness TCP Socket Check
...livenessProbe: tcpSocket: port: 8080 initialDelaySeconds: 15 timeoutSeconds: 1...
A TCP socket check is ideal for applications that do not start listening until initialization is complete.
For more information on health checks, see the Kubernetes documentation.
OpenShift Dedicated 3 Developer Guide
272

CHAPTER 28. EVENTS
28.1. OVERVIEW
Events in OpenShift Dedicated are modeled based on events that happen to API objects in an OpenShiftDedicated cluster. Events allow OpenShift Dedicated to record information about real-world events in aresource-agnostic manner. They also allow developers and administrators to consume information aboutsystem components in a unified way.
28.2. VIEWING EVENTS WITH THE CLI
You can get a list of events in a given project using the following command:
$ oc get events [-n <project>]
28.3. VIEWING EVENTS IN THE CONSOLE
You can see events in your project from the web console from the Browse → Events page. Many otherobjects, such as pods and deployments, have their own Events tab as well, which shows events relatedto that object.
28.4. COMPREHENSIVE LIST OF EVENTS
This section describes the events of OpenShift Dedicated.
Table 28.1. Configuration Events
Name Description
FailedValidation
Failed pod configuration validation.
Table 28.2. Container Events
Name Description
BackOff Back-off restarting failed the container.
Created Container created.
Failed Pull/Create/Start failed.
Killing Killing the container.
Started Container started.
Preempting Preempting other pods.
CHAPTER 28. EVENTS
273

ExceededGracePeriod
Container runtime did not stop the pod within specified grace period.
Name Description
Table 28.3. Health Events
Name Description
Unhealthy Container is unhealthy.
Table 28.4. Image Events
Name Description
BackOff Back off Ctr Start, image pull.
ErrImageNeverPull
The image’s NeverPull Policy is violated.
Failed Failed to pull the image.
InspectFailed
Failed to inspect the image.
Pulled Successfully pulled the image or the container image is already present on themachine.
Pulling Pulling the image.
Table 28.5. Image Manager Events
Name Description
FreeDiskSpaceFailed
Free disk space failed.
InvalidDiskCapacity
Invalid disk capacity.
Table 28.6. Node Events
Name Description
FailedMount Volume mount failed.
OpenShift Dedicated 3 Developer Guide
274
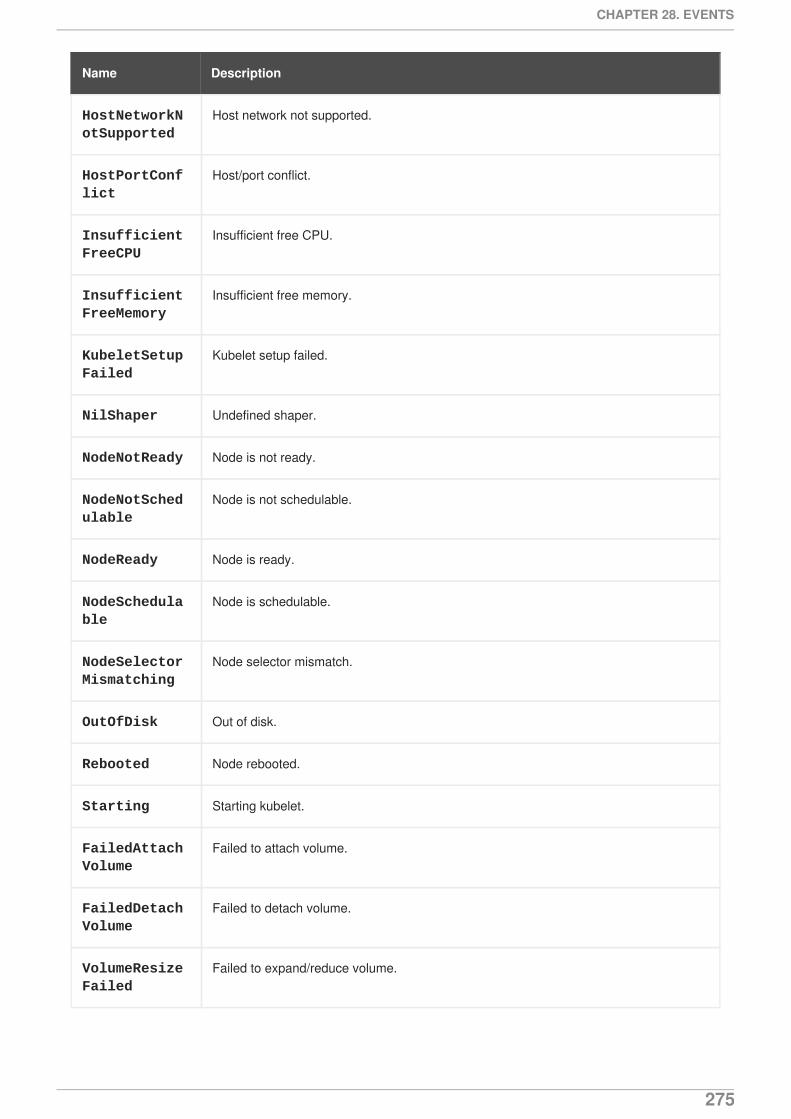
HostNetworkNotSupported
Host network not supported.
HostPortConflict
Host/port conflict.
InsufficientFreeCPU
Insufficient free CPU.
InsufficientFreeMemory
Insufficient free memory.
KubeletSetupFailed
Kubelet setup failed.
NilShaper Undefined shaper.
NodeNotReady Node is not ready.
NodeNotSchedulable
Node is not schedulable.
NodeReady Node is ready.
NodeSchedulable
Node is schedulable.
NodeSelectorMismatching
Node selector mismatch.
OutOfDisk Out of disk.
Rebooted Node rebooted.
Starting Starting kubelet.
FailedAttachVolume
Failed to attach volume.
FailedDetachVolume
Failed to detach volume.
VolumeResizeFailed
Failed to expand/reduce volume.
Name Description
CHAPTER 28. EVENTS
275
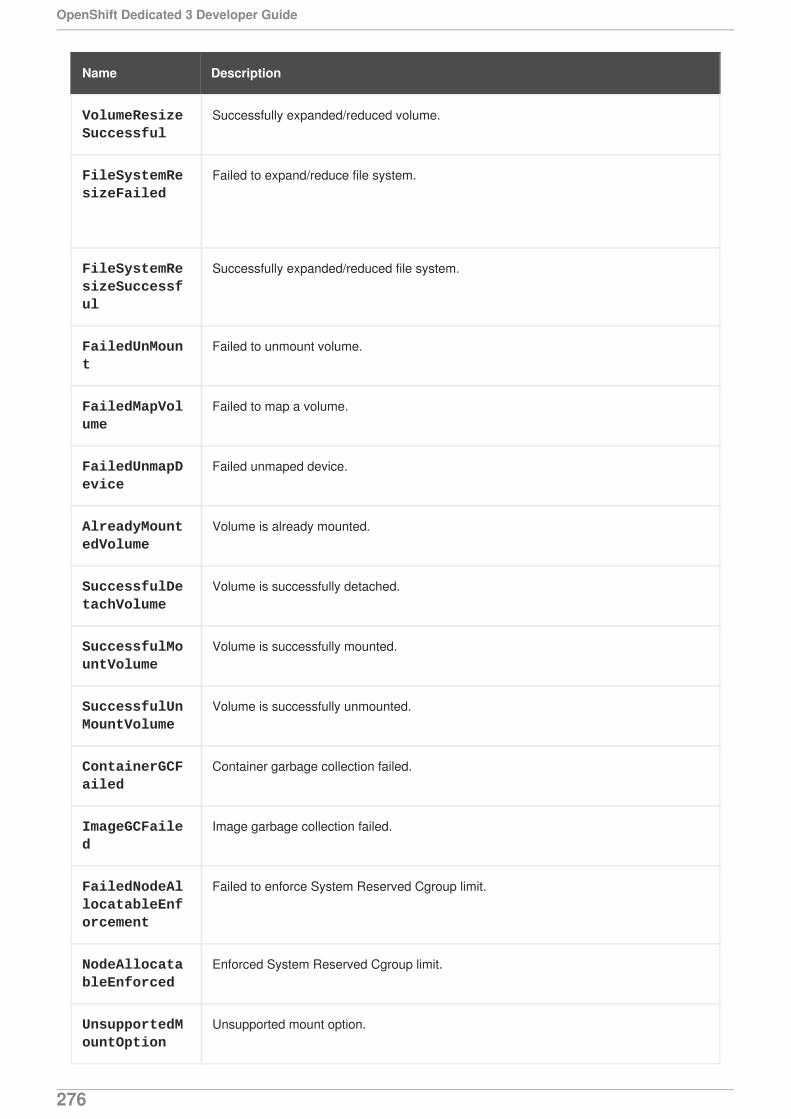
VolumeResizeSuccessful
Successfully expanded/reduced volume.
FileSystemResizeFailed
Failed to expand/reduce file system.
FileSystemResizeSuccessful
Successfully expanded/reduced file system.
FailedUnMount
Failed to unmount volume.
FailedMapVolume
Failed to map a volume.
FailedUnmapDevice
Failed unmaped device.
AlreadyMountedVolume
Volume is already mounted.
SuccessfulDetachVolume
Volume is successfully detached.
SuccessfulMountVolume
Volume is successfully mounted.
SuccessfulUnMountVolume
Volume is successfully unmounted.
ContainerGCFailed
Container garbage collection failed.
ImageGCFailed
Image garbage collection failed.
FailedNodeAllocatableEnforcement
Failed to enforce System Reserved Cgroup limit.
NodeAllocatableEnforced
Enforced System Reserved Cgroup limit.
UnsupportedMountOption
Unsupported mount option.
Name Description
OpenShift Dedicated 3 Developer Guide
276
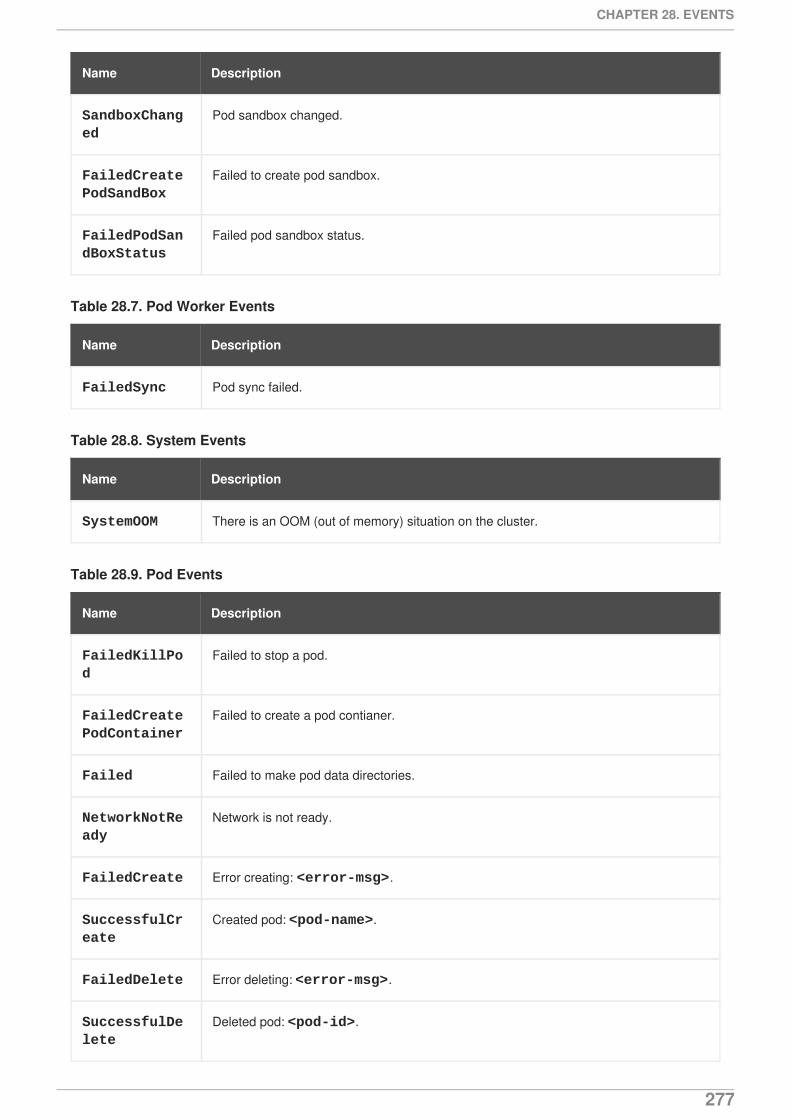
SandboxChanged
Pod sandbox changed.
FailedCreatePodSandBox
Failed to create pod sandbox.
FailedPodSandBoxStatus
Failed pod sandbox status.
Name Description
Table 28.7. Pod Worker Events
Name Description
FailedSync Pod sync failed.
Table 28.8. System Events
Name Description
SystemOOM There is an OOM (out of memory) situation on the cluster.
Table 28.9. Pod Events
Name Description
FailedKillPod
Failed to stop a pod.
FailedCreatePodContainer
Failed to create a pod contianer.
Failed Failed to make pod data directories.
NetworkNotReady
Network is not ready.
FailedCreate Error creating: <error-msg>.
SuccessfulCreate
Created pod: <pod-name>.
FailedDelete Error deleting: <error-msg>.
SuccessfulDelete
Deleted pod: <pod-id>.
CHAPTER 28. EVENTS
277
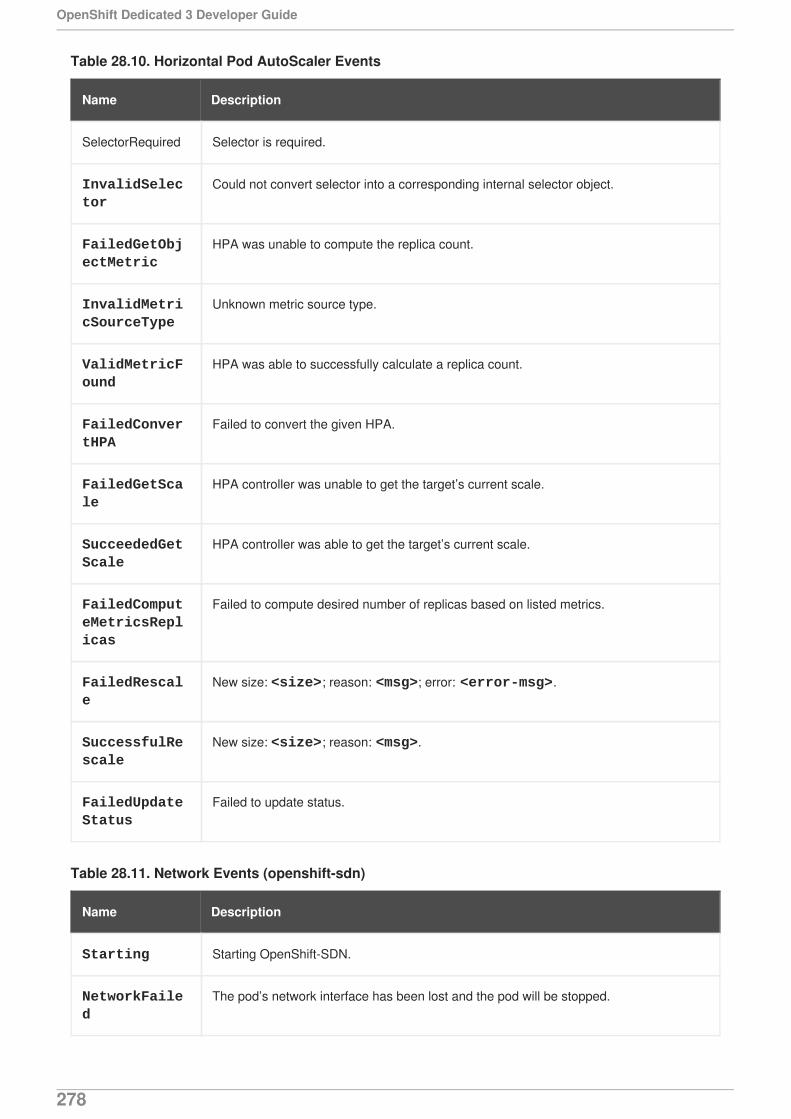
Table 28.10. Horizontal Pod AutoScaler Events
Name Description
SelectorRequired Selector is required.
InvalidSelector
Could not convert selector into a corresponding internal selector object.
FailedGetObjectMetric
HPA was unable to compute the replica count.
InvalidMetricSourceType
Unknown metric source type.
ValidMetricFound
HPA was able to successfully calculate a replica count.
FailedConvertHPA
Failed to convert the given HPA.
FailedGetScale
HPA controller was unable to get the target’s current scale.
SucceededGetScale
HPA controller was able to get the target’s current scale.
FailedComputeMetricsReplicas
Failed to compute desired number of replicas based on listed metrics.
FailedRescale
New size: <size>; reason: <msg>; error: <error-msg>.
SuccessfulRescale
New size: <size>; reason: <msg>.
FailedUpdateStatus
Failed to update status.
Table 28.11. Network Events (openshift-sdn)
Name Description
Starting Starting OpenShift-SDN.
NetworkFailed
The pod’s network interface has been lost and the pod will be stopped.
OpenShift Dedicated 3 Developer Guide
278
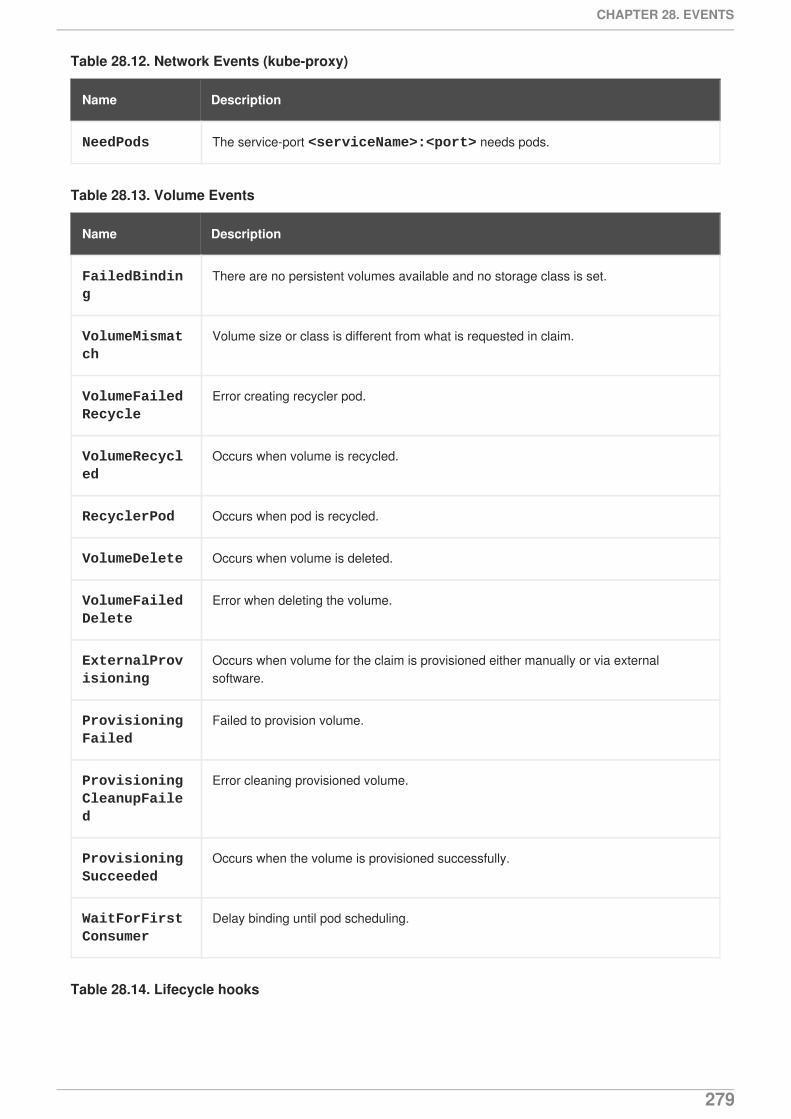
Table 28.12. Network Events (kube-proxy)
Name Description
NeedPods The service-port <serviceName>:<port> needs pods.
Table 28.13. Volume Events
Name Description
FailedBinding
There are no persistent volumes available and no storage class is set.
VolumeMismatch
Volume size or class is different from what is requested in claim.
VolumeFailedRecycle
Error creating recycler pod.
VolumeRecycled
Occurs when volume is recycled.
RecyclerPod Occurs when pod is recycled.
VolumeDelete Occurs when volume is deleted.
VolumeFailedDelete
Error when deleting the volume.
ExternalProvisioning
Occurs when volume for the claim is provisioned either manually or via externalsoftware.
ProvisioningFailed
Failed to provision volume.
ProvisioningCleanupFailed
Error cleaning provisioned volume.
ProvisioningSucceeded
Occurs when the volume is provisioned successfully.
WaitForFirstConsumer
Delay binding until pod scheduling.
Table 28.14. Lifecycle hooks
CHAPTER 28. EVENTS
279
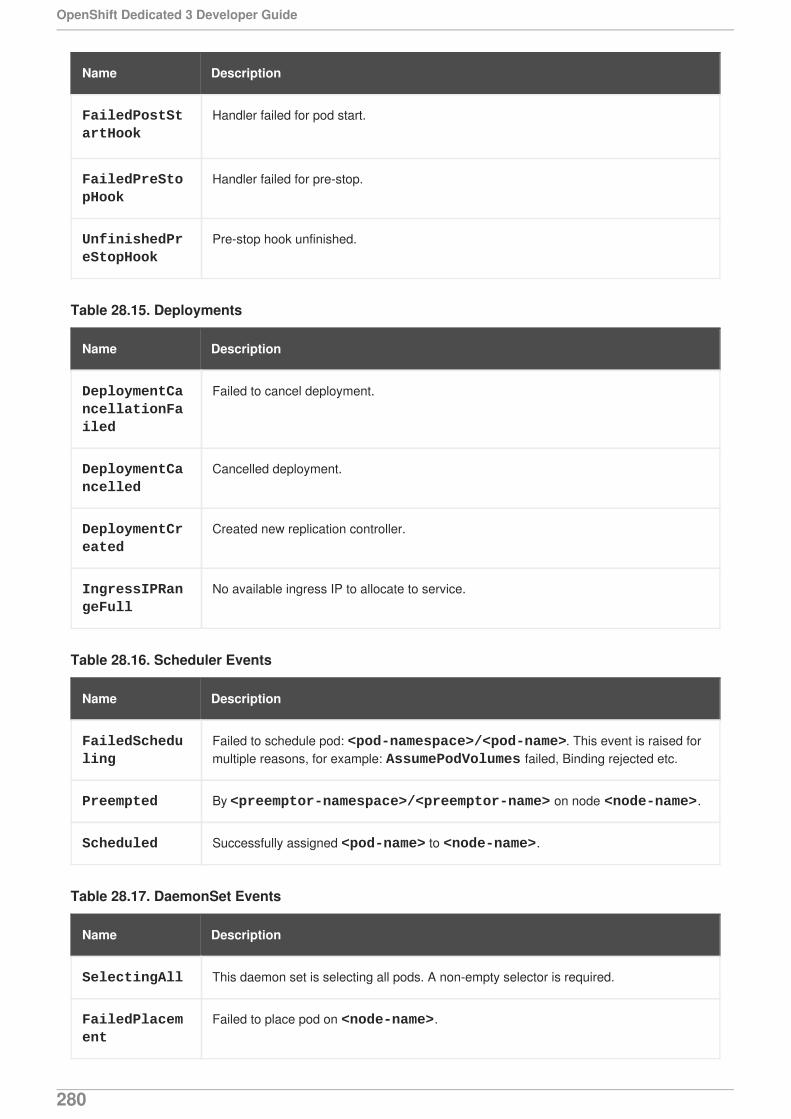
Name Description
FailedPostStartHook
Handler failed for pod start.
FailedPreStopHook
Handler failed for pre-stop.
UnfinishedPreStopHook
Pre-stop hook unfinished.
Table 28.15. Deployments
Name Description
DeploymentCancellationFailed
Failed to cancel deployment.
DeploymentCancelled
Cancelled deployment.
DeploymentCreated
Created new replication controller.
IngressIPRangeFull
No available ingress IP to allocate to service.
Table 28.16. Scheduler Events
Name Description
FailedScheduling
Failed to schedule pod: <pod-namespace>/<pod-name>. This event is raised formultiple reasons, for example: AssumePodVolumes failed, Binding rejected etc.
Preempted By <preemptor-namespace>/<preemptor-name> on node <node-name>.
Scheduled Successfully assigned <pod-name> to <node-name>.
Table 28.17. DaemonSet Events
Name Description
SelectingAll This daemon set is selecting all pods. A non-empty selector is required.
FailedPlacement
Failed to place pod on <node-name>.
OpenShift Dedicated 3 Developer Guide
280

FailedDaemonPod
Found failed daemon pod <pod-name> on node <node-name>, will try to kill it.
Name Description
Table 28.18. LoadBalancer Service Events
Name Description
CreatingLoadBalancerFailed
Error creating load balancer.
DeletingLoadBalancer
Deleting load balancer.
EnsuringLoadBalancer
Ensuring load balancer.
EnsuredLoadBalancer
Ensured load balancer.
UnAvailableLoadBalancer
There are no available nodes for LoadBalancer service.
LoadBalancerSourceRanges
Lists the new LoadBalancerSourceRanges. For example, <old-source-range> → <new-source-range>.
LoadbalancerIP
Lists the new IP address. For example, <old-ip> → <new-ip>.
ExternalIP Lists external IP address. For example, Added: <external-ip>.
UID Lists the new UID. For example, <old-service-uid> → <new-service-uid>.
ExternalTrafficPolicy
Lists the new ExternalTrafficPolicy. For example, <old-policy> → <new-ploicy>.
HealthCheckNodePort
Lists the new HealthCheckNodePort. For example, <old-node-port> → new-node-port>.
UpdatedLoadBalancer
Updated load balancer with new hosts.
LoadBalancerUpdateFailed
Error updating load balancer with new hosts.
CHAPTER 28. EVENTS
281

DeletingLoadBalancer
Deleting load balancer.
DeletingLoadBalancerFailed
Error deleting load balancer.
DeletedLoadBalancer
Deleted load balancer.
Name Description
OpenShift Dedicated 3 Developer Guide
282

CHAPTER 29. MANAGING ENVIRONMENT VARIABLES
29.1. SETTING AND UNSETTING ENVIRONMENT VARIABLES
OpenShift Dedicated provides the oc set env command to set or unset environment variables forobjects that have a pod template, such as replication controllers or deployment configurations. It can alsolist environment variables in pods or any object that has a pod template. This command can also be usedon BuildConfig objects.
29.2. LIST ENVIRONMENT VARIABLES
To list environment variables in pods or pod templates:
$ oc set env <object-selection> --list [<common-options>]
This example lists all environment variables for pod p1:
$ oc set env pod/p1 --list
29.3. SET ENVIRONMENT VARIABLES
To set environment variables in the pod templates:
$ oc set env <object-selection> KEY_1=VAL_1 ... KEY_N=VAL_N [<set-env-options>] [<common-options>]
Set environment options:
Option Description
-e, --env=<KEY>=<VAL> Set given key value pairs of environment variables.
--overwrite Confirm updating existing environment variables.
In the following example, both commands modify environment variable STORAGE in the deploymentconfig registry. The first adds, with value /data. The second updates, with value /opt.
$ oc set env dc/registry STORAGE=/data$ oc set env dc/registry --overwrite STORAGE=/opt
The following example finds environment variables in the current shell whose names begin with RAILS_and adds them to the replication controller r1 on the server:
$ env | grep RAILS_ | oc set env rc/r1 -e -
The following example does not modify the replication controller defined in file rc.json. Instead, itwrites a YAML object with updated environment STORAGE=/local to new file rc.yaml.
CHAPTER 29. MANAGING ENVIRONMENT VARIABLES
283
$ oc set env -f rc.json STORAGE=/opt -o yaml > rc.yaml
29.3.1. Automatically Added Environment Variables
Table 29.1. Automatically Added Environment Variables
Variable Name
<SVCNAME>_SERVICE_HOST
<SVCNAME>_SERVICE_PORT
Example Usage
The service KUBERNETES which exposes TCP port 53 and has been allocated cluster IP address10.0.0.11 produces the following environment variables:
KUBERNETES_SERVICE_PORT=53MYSQL_DATABASE=rootKUBERNETES_PORT_53_TCP=tcp://10.0.0.11:53KUBERNETES_SERVICE_HOST=10.0.0.11
NOTE
Use the oc rsh command to SSH into your container and run oc set env to list allavailable variables.
29.4. UNSET ENVIRONMENT VARIABLES
To unset environment variables in the pod templates:
$ oc set env <object-selection> KEY_1- ... KEY_N- [<common-options>]
IMPORTANT
The trailing hyphen (-, U+2D) is required.
This example removes environment variables ENV1 and ENV2 from deployment config d1:
$ oc set env dc/d1 ENV1- ENV2-
This removes environment variable ENV from all replication controllers:
$ oc set env rc --all ENV-
This removes environment variable ENV from container c1 for replication controller r1:
$ oc set env rc r1 --containers='c1' ENV-
OpenShift Dedicated 3 Developer Guide
284
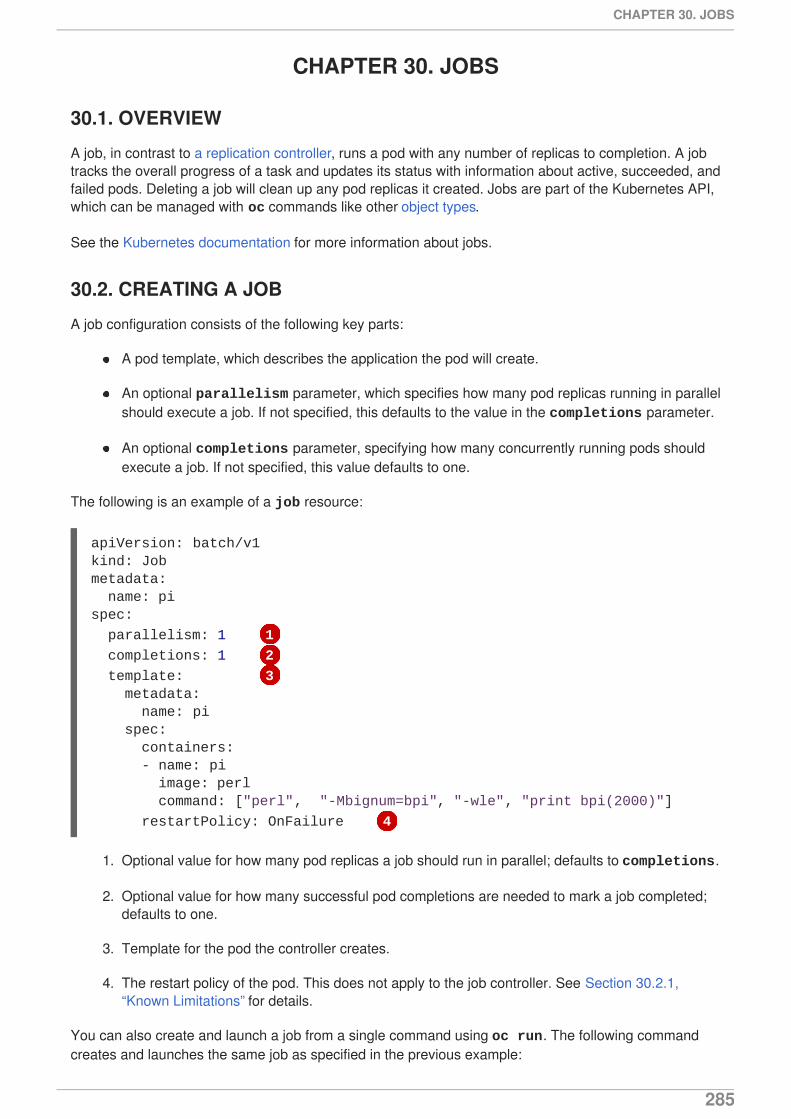
CHAPTER 30. JOBS
30.1. OVERVIEW
A job, in contrast to a replication controller, runs a pod with any number of replicas to completion. A jobtracks the overall progress of a task and updates its status with information about active, succeeded, andfailed pods. Deleting a job will clean up any pod replicas it created. Jobs are part of the Kubernetes API,which can be managed with oc commands like other object types.
See the Kubernetes documentation for more information about jobs.
30.2. CREATING A JOB
A job configuration consists of the following key parts:
A pod template, which describes the application the pod will create.
An optional parallelism parameter, which specifies how many pod replicas running in parallelshould execute a job. If not specified, this defaults to the value in the completions parameter.
An optional completions parameter, specifying how many concurrently running pods shouldexecute a job. If not specified, this value defaults to one.
The following is an example of a job resource:
1. Optional value for how many pod replicas a job should run in parallel; defaults to completions.
2. Optional value for how many successful pod completions are needed to mark a job completed;defaults to one.
3. Template for the pod the controller creates.
4. The restart policy of the pod. This does not apply to the job controller. See Section 30.2.1,“Known Limitations” for details.
You can also create and launch a job from a single command using oc run. The following commandcreates and launches the same job as specified in the previous example:
apiVersion: batch/v1kind: Jobmetadata: name: pispec:
parallelism: 1 1
completions: 1 2
template: 3 metadata: name: pi spec: containers: - name: pi image: perl command: ["perl", "-Mbignum=bpi", "-wle", "print bpi(2000)"]
restartPolicy: OnFailure 4
CHAPTER 30. JOBS
285
$ oc run pi --image=perl --replicas=1 --restart=OnFailure \ --command -- perl -Mbignum=bpi -wle 'print bpi(2000)'
30.2.1. Known Limitations
The job specification restart policy only applies to the pods, and not the job controller. However, the jobcontroller is hard-coded to keep retrying jobs to completion.
As such, restartPolicy: Never or --restart=Never results in the same behavior as restartPolicy: OnFailure or --restart=OnFailure. That is, when a job fails it is restartedautomatically until it succeeds (or is manually discarded). The policy only sets which subsystem performsthe restart.
With the Never policy, the job controller performs the restart. With each attempt, the job controllerincrements the number of failures in the job status and create new pods. This means that with eachfailed attempt, the number of pods increases.
With the OnFailure policy, kubelet performs the restart. Each attempt does not increment the number offailures in the job status. In addition, kubelet will retry failed jobs starting pods on the same nodes.
30.3. SCALING A JOB
A job can be scaled up or down by using the oc scale command with the --replicas option, which,in the case of jobs, modifies the spec.parallelism parameter. This will result in modifying thenumber of pod replicas running in parallel, executing a job.
The following command uses the example job above, and sets the parallelism parameter to three:
$ oc scale job pi --replicas=3
NOTE
Scaling replication controllers also uses the oc scale command with the --replicasoption, but instead changes the replicas parameter of a replication controllerconfiguration.
30.4. SETTING MAXIMUM DURATION
When defining a Job, you can define its maximum duration by setting the activeDeadlineSecondsfield. It is specified in seconds and is not set by default. When not set, there is no maximum durationenforced.
The maximum duration is counted from the time when a first pod gets scheduled in the system, anddefines how long a job can be active. It tracks overall time of an execution and is irrelevant to the numberof completions (number of pod replicas needed to execute a task). After reaching the specified timeout,the job is terminated by OpenShift Dedicated.
The following example shows the part of a Job specifying activeDeadlineSeconds field for 30minutes:
spec: activeDeadlineSeconds: 1800
OpenShift Dedicated 3 Developer Guide
286

30.5. JOB BACKOFF FAILURE POLICY
A Job can be considered failed, after a set amount of retries due to a logical error in configuration orother similar reasons. To specify the number of retries for a job set the .spec.backoffLimit property.This field defaults to six. Failed Pods associated with the Job are recreated by the controller with anexponential backoff delay (10s, 20s, 40s …) capped at six minutes. The limit is reset if no new failedpods appear between controller checks.
CHAPTER 30. JOBS
287
CHAPTER 31. OPENSHIFT PIPELINE
31.1. OVERVIEW
OpenShift Pipelines give you control over building, deploying, and promoting your applications onOpenShift. Using a combination of the Jenkins Pipeline Build Strategy, Jenkinsfiles, and the OpenShiftDomain Specific Language (DSL) (provided by the OpenShift Jenkins Client Plug-in), you can createadvanced build, test, deploy, and promote pipelines for any scenario.
31.2. OPENSHIFT JENKINS CLIENT PLUG-IN
The OpenShift Jenkins Client Plug-in must be installed on your Jenkins master so the OpenShift DSL willbe available to use within the JenkinsFile for your application. This plug-in is installed and enabled bydefault when using the OpenShift Jenkins image.
31.2.1. OpenShift DSL
The OpenShift Jenkins Client Plug-in provides a fluent-styled DSL for communicating with the OpenShiftAPI from within the Jenkins slaves. The OpenShift DSL is based on Groovy syntax and providesmethods for controlling the lifecycle of your application such as create, build, deploy, and delete.
The full details of the API are embedded within the plug-in’s online documentation within a runningJenkins instance. To find it:
Create a new Pipeline Item.
Click Pipeline Syntax below the DSL text area.
From the left navigation menu, click Global Variables Reference.
31.3. JENKINS PIPELINE STRATEGY
In order to take advantage of the OpenShift Pipelines within your project, you will must use the JenkinsPipeline Build Strategy. This strategy defaults to using a jenkinsfile at the root of your sourcerepository, but also provides the following configuration options:
An inline jenkinsfile field within your BuildConfig.
A jenkinsfilePath field within your BuildConfig that references the location of the jenkinsfile to use relative to the source contextDir.
NOTE
The optional jenkinsfilePath field specifies the name of the file to use, relative to thesource contextDir. If contextDir is omitted, it defaults to the root of the repository. If jenkinsfilePath is omitted, it defaults to jenkinsfile.
For more detailed information about the Jenkins Pipeline Strategy, see Pipeline Strategy Options.
31.4. JENKINSFILE
OpenShift Dedicated 3 Developer Guide
288
The jenkinsfile utilizes the standard groovy language syntax to allow fine grained control over theconfiguration, build, and deployment of your application.
The jenkinsfile can be supplied in one of the following ways:
A file located within your source code repository.
Embedded as part of your build configuration using the jenkinsfile field.
When using the first option, the jenkinsfile must be included in your applications source coderepository at one of the following locations:
A file named jenkinsfile at the root of your repository.
A file named jenkinsfile at the root of the source contextDir of your repository.
A file name specified via the jenkinsfilePath field of the JenkinsPiplineStrategysection of your BuildConfig, which is relative to the source contextDir if supplied, otherwise itdefaults to the root of the repository.
The jenkinsfile is executed on the Jenkins slave pod, which must have the OpenShift Client binariesavailable if you intend to use the OpenShift DSL.
31.5. TUTORIAL
For a full walkthrough of building and deploying an application with Jenkins Pipeline, see JenkinsPipeline Tutorial.
31.6. ADVANCED TOPICS
31.6.1. Disabling Jenkins AutoProvisioning
When a Pipeline build configuration is created, OpenShift checks to see if there is currently a Jenkinsmaster pod provisioned in the current project. If no Jenkins master is found, one is automatically created.If this behavior is not desirable, or if you would like to use a Jenkins server external to OpenShift, youcan disable it.
31.6.2. Configuring Slave Pods
The Kubernetes Plug-in is also pre-installed in the official Jenkins image. This plug-in allows the Jenkinsmaster to create slave pods on OpenShift and delegate running jobs to them to achieve scalability aswell as providing pods with specific runtimes for specific jobs.
For more detailed information on configuring slave pods using the Kubernetes Plug-in, see KubernetesPlug-in.
CHAPTER 31. OPENSHIFT PIPELINE
289
CHAPTER 32. CREATE FROM URL
32.1. OVERVIEW
Create From URL is a function that allows you to construct a URL from an image stream, image tag, ortemplate.
Create from URL only works with image streams or templates from namespaces that have beenexplicitly whitelisted. The whitelist contains the openshift namespace by default.
You can define custom buttons.
These buttons leverage a defined URL pattern with an appropriate query string. The user is prompted toselect the project. Then, the Create from URL workflow continues.
32.2. USING AN IMAGE STREAM AND IMAGE TAG
32.2.1. Query String Parameters
Name Description Required Schema Default
imageStream The value metadata.name as defined in theimage stream to beused.
true string
imageTag The value spec.tags.name as defined inthe image streamto be used.
true string
namespace The name of thenamespacecontaining theimage stream andimage tag to use.
false string openshift
name Identifies theresources createdfor this application.
false string
OpenShift Dedicated 3 Developer Guide
290
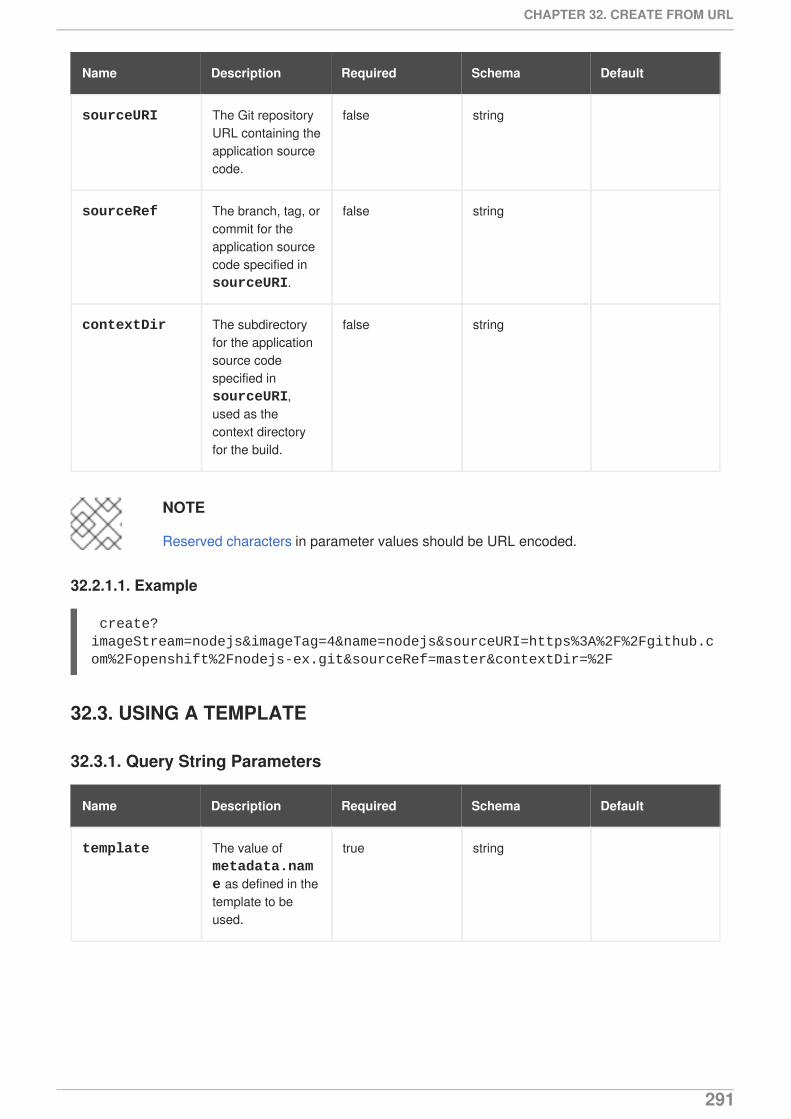
sourceURI The Git repositoryURL containing theapplication sourcecode.
false string
sourceRef The branch, tag, orcommit for theapplication sourcecode specified in sourceURI.
false string
contextDir The subdirectoryfor the applicationsource codespecified in sourceURI,used as thecontext directoryfor the build.
false string
Name Description Required Schema Default
NOTE
Reserved characters in parameter values should be URL encoded.
32.2.1.1. Example
create?imageStream=nodejs&imageTag=4&name=nodejs&sourceURI=https%3A%2F%2Fgithub.com%2Fopenshift%2Fnodejs-ex.git&sourceRef=master&contextDir=%2F
32.3. USING A TEMPLATE
32.3.1. Query String Parameters
Name Description Required Schema Default
template The value of metadata.name as defined in thetemplate to beused.
true string
CHAPTER 32. CREATE FROM URL
291
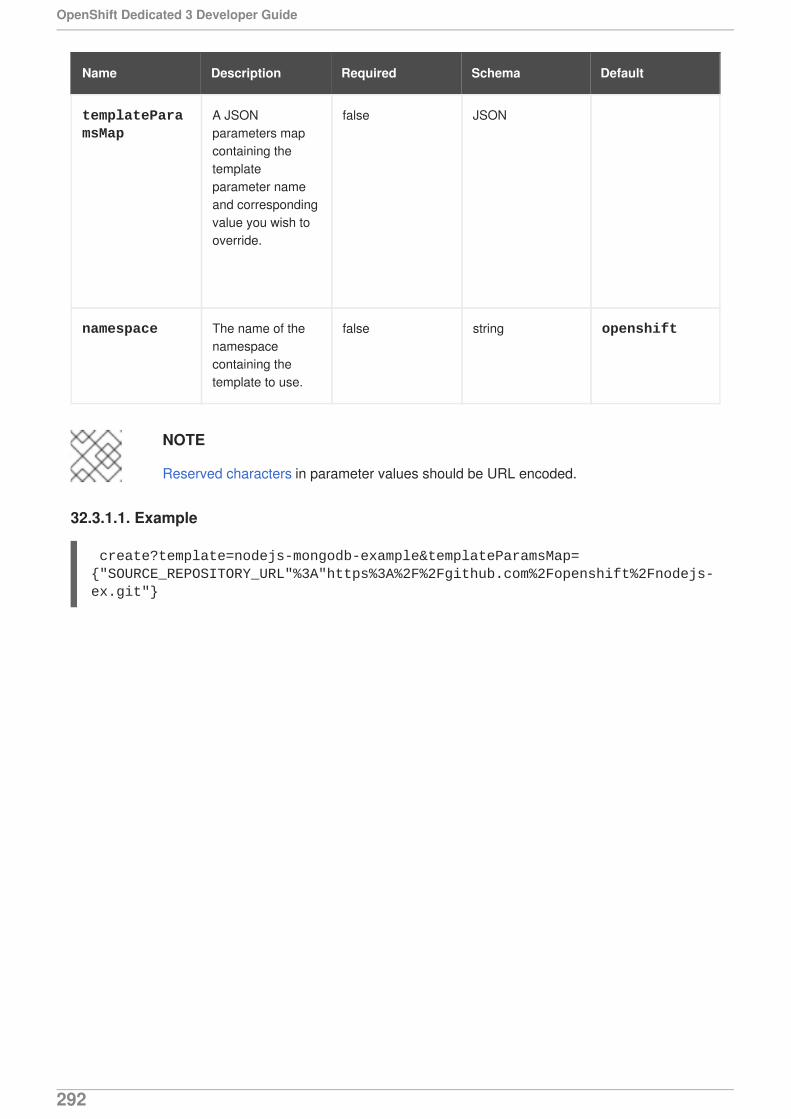
templateParamsMap
A JSONparameters mapcontaining thetemplateparameter nameand correspondingvalue you wish tooverride.
false JSON
namespace The name of thenamespacecontaining thetemplate to use.
false string openshift
Name Description Required Schema Default
NOTE
Reserved characters in parameter values should be URL encoded.
32.3.1.1. Example
create?template=nodejs-mongodb-example&templateParamsMap={"SOURCE_REPOSITORY_URL"%3A"https%3A%2F%2Fgithub.com%2Fopenshift%2Fnodejs-ex.git"}
OpenShift Dedicated 3 Developer Guide
292
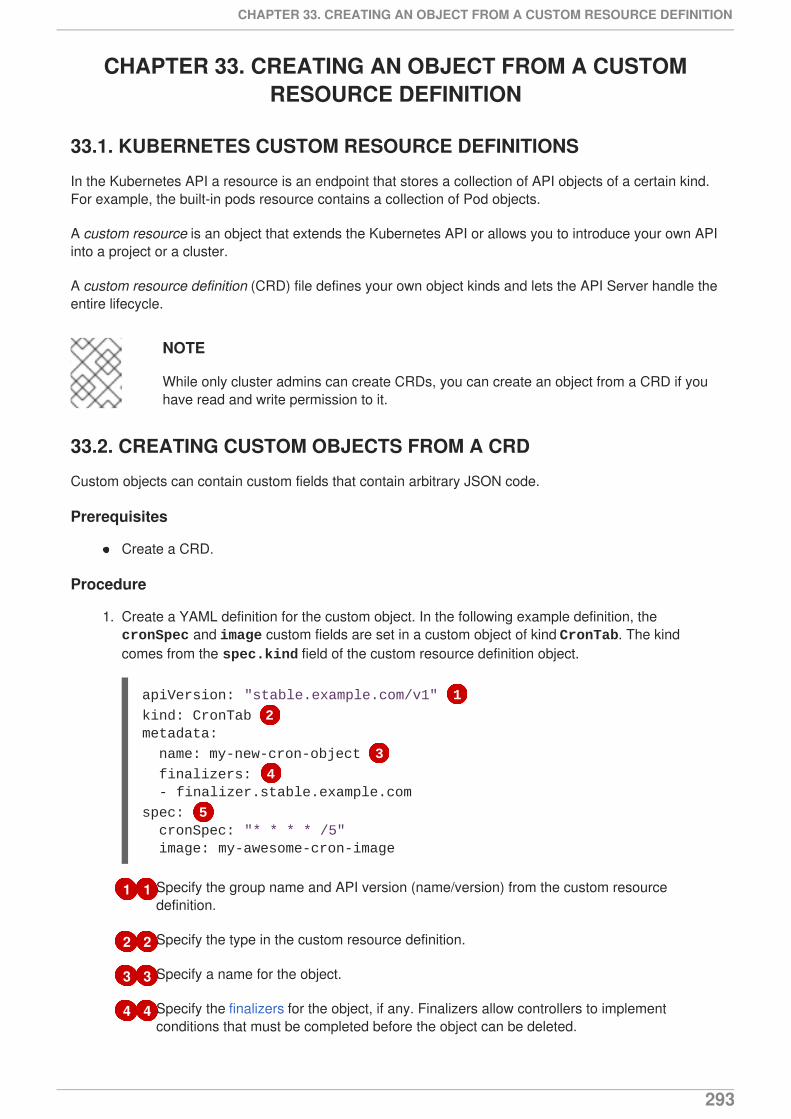
1 1
2 2
3 3
4 4
CHAPTER 33. CREATING AN OBJECT FROM A CUSTOMRESOURCE DEFINITION
33.1. KUBERNETES CUSTOM RESOURCE DEFINITIONS
In the Kubernetes API a resource is an endpoint that stores a collection of API objects of a certain kind.For example, the built-in pods resource contains a collection of Pod objects.
A custom resource is an object that extends the Kubernetes API or allows you to introduce your own APIinto a project or a cluster.
A custom resource definition (CRD) file defines your own object kinds and lets the API Server handle theentire lifecycle.
NOTE
While only cluster admins can create CRDs, you can create an object from a CRD if youhave read and write permission to it.
33.2. CREATING CUSTOM OBJECTS FROM A CRD
Custom objects can contain custom fields that contain arbitrary JSON code.
Prerequisites
Create a CRD.
Procedure
1. Create a YAML definition for the custom object. In the following example definition, the cronSpec and image custom fields are set in a custom object of kind CronTab. The kindcomes from the spec.kind field of the custom resource definition object.
Specify the group name and API version (name/version) from the custom resourcedefinition.
Specify the type in the custom resource definition.
Specify a name for the object.
Specify the finalizers for the object, if any. Finalizers allow controllers to implementconditions that must be completed before the object can be deleted.
apiVersion: "stable.example.com/v1" 1
kind: CronTab 2metadata:
name: my-new-cron-object 3
finalizers: 4 - finalizer.stable.example.com
spec: 5 cronSpec: "* * * * /5" image: my-awesome-cron-image
CHAPTER 33. CREATING AN OBJECT FROM A CUSTOM RESOURCE DEFINITION
293
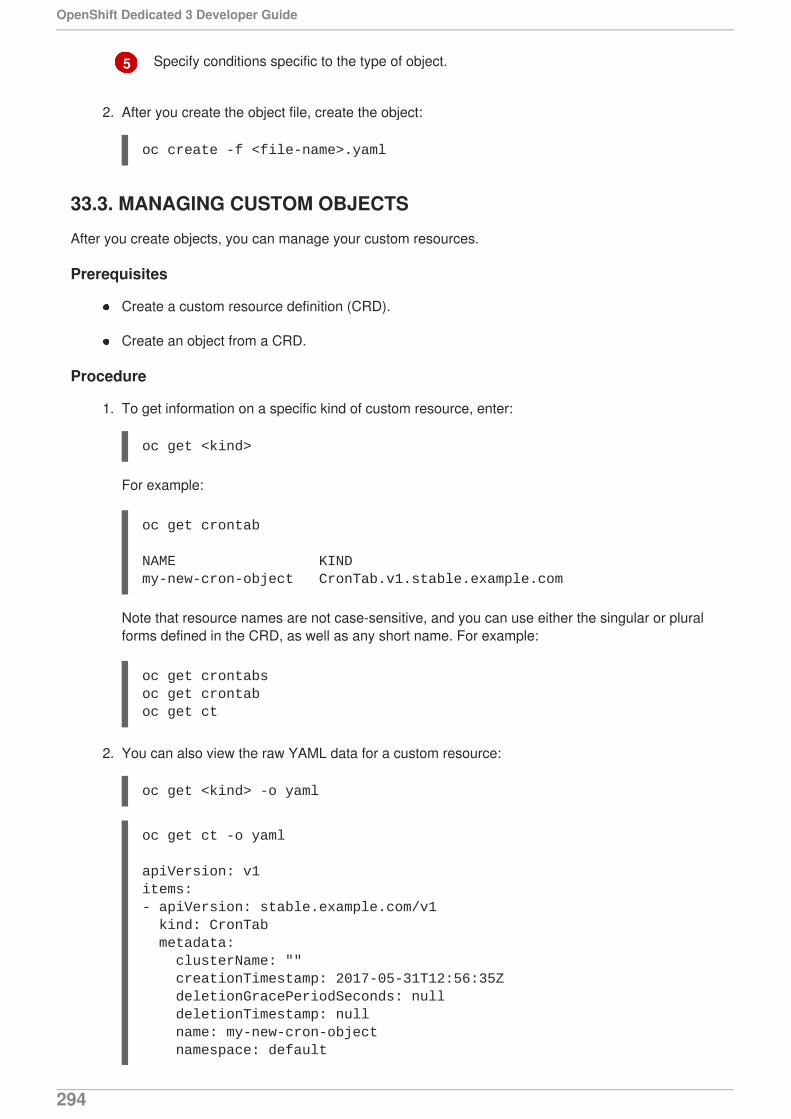
5 Specify conditions specific to the type of object.
2. After you create the object file, create the object:
oc create -f <file-name>.yaml
33.3. MANAGING CUSTOM OBJECTS
After you create objects, you can manage your custom resources.
Prerequisites
Create a custom resource definition (CRD).
Create an object from a CRD.
Procedure
1. To get information on a specific kind of custom resource, enter:
oc get <kind>
For example:
oc get crontab
NAME KINDmy-new-cron-object CronTab.v1.stable.example.com
Note that resource names are not case-sensitive, and you can use either the singular or pluralforms defined in the CRD, as well as any short name. For example:
oc get crontabsoc get crontaboc get ct
2. You can also view the raw YAML data for a custom resource:
oc get <kind> -o yaml
oc get ct -o yaml
apiVersion: v1items:- apiVersion: stable.example.com/v1 kind: CronTab metadata: clusterName: "" creationTimestamp: 2017-05-31T12:56:35Z deletionGracePeriodSeconds: null deletionTimestamp: null name: my-new-cron-object namespace: default
OpenShift Dedicated 3 Developer Guide
294
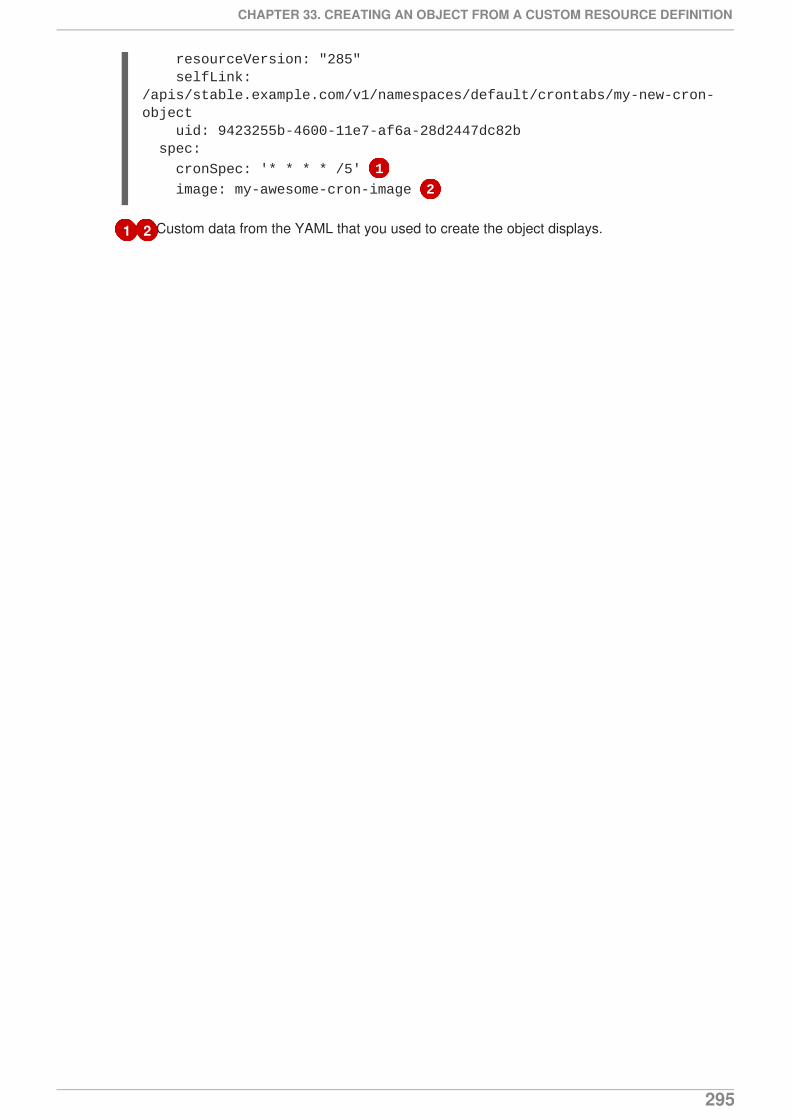
1 2
resourceVersion: "285" selfLink: /apis/stable.example.com/v1/namespaces/default/crontabs/my-new-cron-object uid: 9423255b-4600-11e7-af6a-28d2447dc82b spec:
cronSpec: '* * * * /5' 1
image: my-awesome-cron-image 2
Custom data from the YAML that you used to create the object displays.
CHAPTER 33. CREATING AN OBJECT FROM A CUSTOM RESOURCE DEFINITION
295
CHAPTER 34. APPLICATION MEMORY SIZING
34.1. OVERVIEW
This page is intended to provide guidance to application developers using OpenShift Dedicated on:
1. Determining the memory and risk requirements of a containerized application component andconfiguring the container memory parameters to suit those requirements.
2. Configuring containerized application runtimes (for example, OpenJDK) to adhere optimally tothe configured container memory parameters.
3. Diagnosing and resolving memory-related error conditions associated with running in acontainer.
34.2. BACKGROUND
It is recommended to read fully the overview of how OpenShift Dedicated manages Compute Resourcesbefore proceeding.
For the purposes of sizing application memory, the key points are:
For each kind of resource (memory, cpu, storage), OpenShift Dedicated allows optional requestand limit values to be placed on each container in a pod. For the purposes of this page, we aresolely interested in memory requests and memory limits.
Memory request
The memory request value, if specified, influences the OpenShift Dedicated scheduler. Thescheduler considers the memory request when scheduling a container to a node, thenfences off the requested memory on the chosen node for the use of the container.
If a node’s memory is exhausted, OpenShift Dedicated prioritizes evicting its containerswhose memory usage most exceeds their memory request. In serious cases of memoryexhaustion, the node OOM killer may select and kill a process in a container based on asimilar metric.
Memory limit
The memory limit value, if specified, provides a hard limit on the memory that can beallocated across all the processes in a container.
If the memory allocated by all of the processes in a container exceeds the memory limit, thenode OOM killer will immediately select and kill a process in the container.
If both memory request and limit are specified, the memory limit value must be greater thanor equal to the memory request.
Administration
The cluster administrator may assign quota against the memory request value, limit value,both, or neither.
The cluster administrator may assign default values for the memory request value, limitvalue, both, or neither.
OpenShift Dedicated 3 Developer Guide
296
The cluster administrator may override the memory request values that a developerspecifies, in order to manage cluster overcommit. This occurs on OpenShift Online, forexample.
34.3. STRATEGY
The steps for sizing application memory on OpenShift Dedicated are as follows:
1. Determine expected container memory usageDetermine expected mean and peak container memory usage, empirically if necessary (forexample, by separate load testing). Remember to consider all the processes that may potentiallyrun in parallel in the container: for example, does the main application spawn any ancillaryscripts?
2. Determine risk appetiteDetermine risk appetite for eviction. If the risk appetite is low, the container should requestmemory according to the expected peak usage plus a percentage safety margin. If the riskappetite is higher, it may be more appropriate to request memory according to the expectedmean usage.
3. Set container memory requestSet container memory request based on the above. The more accurately the request representsthe application memory usage, the better. If the request is too high, cluster and quota usage willbe inefficient. If the request is too low, the chances of application eviction increase.
4. Set container memory limit, if requiredSet container memory limit, if required. Setting a limit has the effect of immediately killing acontainer process if the combined memory usage of all processes in the container exceeds thelimit, and is therefore a mixed blessing. On the one hand, it may make unanticipated excessmemory usage obvious early ("fail fast"); on the other hand it also terminates processes abruptly.
Note that some OpenShift Dedicated clusters may require a limit value to be set; some mayoverride the request based on the limit; and some application images rely on a limit value beingset as this is easier to detect than a request value.
If the memory limit is set, it should not be set to less than the expected peak container memoryusage plus a percentage safety margin.
5. Ensure application is tunedEnsure application is tuned with respect to configured request and limit values, if appropriate.This step is particularly relevant to applications which pool memory, such as the JVM. The restof this page discusses this.
34.4. SIZING OPENJDK ON OPENSHIFT DEDICATED
The default OpenJDK settings unfortunately do not work well with containerized environments, with theresult that as a rule, some additional Java memory settings must always be provided whenever runningthe OpenJDK in a container.
The JVM memory layout is complex, version dependent, and describing it in detail is beyond the scope ofthis documentation. However, as a starting point for running OpenJDK in a container, at least thefollowing three memory-related tasks are key:
1. Overriding the JVM maximum heap size.
CHAPTER 34. APPLICATION MEMORY SIZING
297
2. Encouraging the JVM to release unused memory to the operating system, if appropriate.
3. Ensuring all JVM processes within a container are appropriately configured.
Optimally tuning JVM workloads for running in a container is beyond the scope of this documentation,and may involve setting multiple additional JVM options.
34.4.1. Overriding the JVM Maximum Heap Size
For many Java workloads, the JVM heap is the largest single consumer of memory. Currently, theOpenJDK defaults to allowing up to 1/4 (1/-XX:MaxRAMFraction) of the compute node’s memory to beused for the heap, regardless of whether the OpenJDK is running in a container or not. It is thereforeessential to override this behaviour, especially if a container memory limit is also set.
There are at least two ways the above can be achieved:
1. If the container memory limit is set and the experimental options are supported by the JVM, set -XX:+UnlockExperimentalVMOptions -XX:+UseCGroupMemoryLimitForHeap.This sets -XX:MaxRAM to the container memory limit, and the maximum heap size (-XX:MaxHeapSize / -Xmx) to 1/-XX:MaxRAMFraction (1/4 by default).
2. Directly override one of -XX:MaxRAM, -XX:MaxHeapSize or -Xmx.This option involves hard-coding a value, but has the advantage of allowing a safety margin tobe calculated.
34.4.2. Encouraging the JVM to Release Unused Memory to the Operating System
By default, the OpenJDK does not aggressively return unused memory to the operating system. Thismay be appropriate for many containerized Java workloads, but notable exceptions include workloadswhere additional active processes co-exist with a JVM within a container, whether those additionalprocesses are native, additional JVMs, or a combination of the two.
The OpenShift Dedicated Jenkins maven slave image uses the following JVM arguments to encouragethe JVM to release unused memory to the operating system: -XX:+UseParallelGC -XX:MinHeapFreeRatio=5 -XX:MaxHeapFreeRatio=10 -XX:GCTimeRatio=4 -XX:AdaptiveSizePolicyWeight=90. These arguments are intended to return heap memory to theoperating system whenever allocated memory exceeds 110% of in-use memory (-XX:MaxHeapFreeRatio), spending up to 20% of CPU time in the garbage collector (-XX:GCTimeRatio). At no time will the application heap allocation be less than the initial heap allocation(overridden by -XX:InitialHeapSize / -Xms). Detailed additional information is available TuningJava’s footprint in OpenShift (Part 1), Tuning Java’s footprint in OpenShift (Part 2) , and at OpenJDK andContainers.
34.4.3. Ensuring All JVM Processes Within a Container Are AppropriatelyConfigured
In the case that multiple JVMs run in the same container, it is essential to ensure that they are allconfigured appropriately. For many workloads it will be necessary to grant each JVM a percentagememory budget, leaving a perhaps substantial additional safety margin.
Many Java tools use different environment variables (JAVA_OPTS, GRADLE_OPTS, MAVEN_OPTS, and soon) to configure their JVMs and it can be challenging to ensure that the right settings are being passed tothe right JVM.
OpenShift Dedicated 3 Developer Guide
298
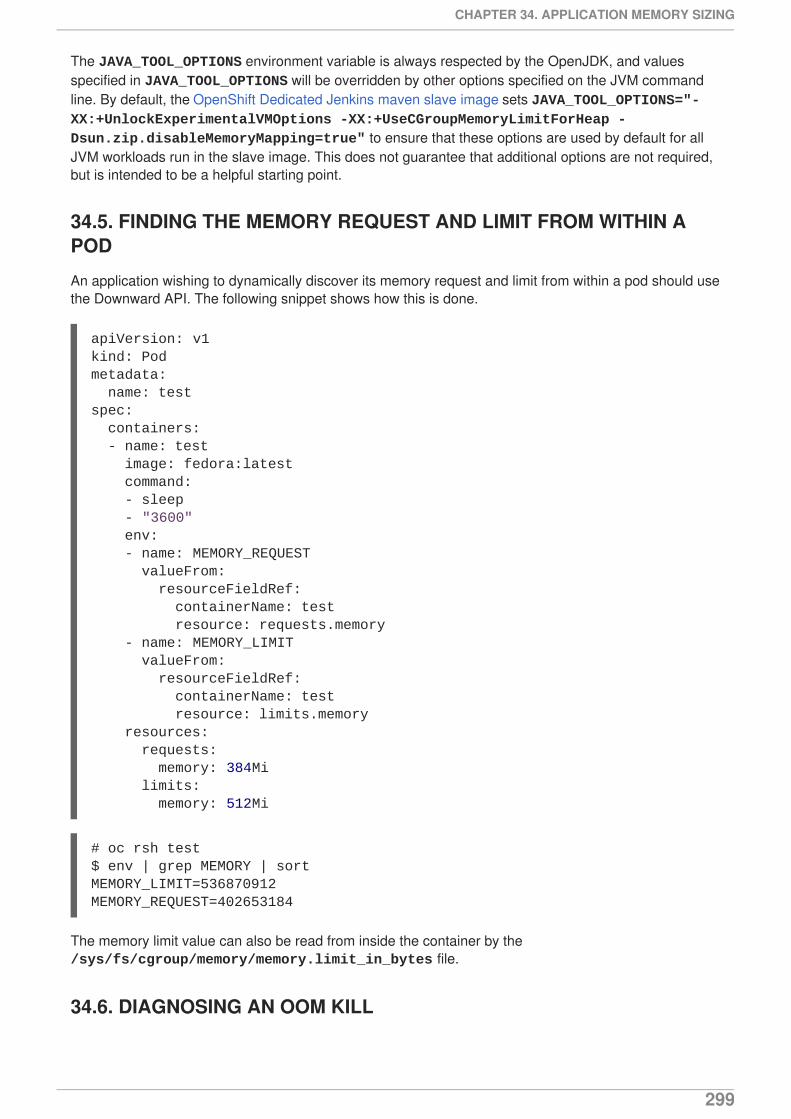
The JAVA_TOOL_OPTIONS environment variable is always respected by the OpenJDK, and valuesspecified in JAVA_TOOL_OPTIONS will be overridden by other options specified on the JVM commandline. By default, the OpenShift Dedicated Jenkins maven slave image sets JAVA_TOOL_OPTIONS="-XX:+UnlockExperimentalVMOptions -XX:+UseCGroupMemoryLimitForHeap -Dsun.zip.disableMemoryMapping=true" to ensure that these options are used by default for allJVM workloads run in the slave image. This does not guarantee that additional options are not required,but is intended to be a helpful starting point.
34.5. FINDING THE MEMORY REQUEST AND LIMIT FROM WITHIN APOD
An application wishing to dynamically discover its memory request and limit from within a pod should usethe Downward API. The following snippet shows how this is done.
# oc rsh test$ env | grep MEMORY | sortMEMORY_LIMIT=536870912MEMORY_REQUEST=402653184
The memory limit value can also be read from inside the container by the /sys/fs/cgroup/memory/memory.limit_in_bytes file.
34.6. DIAGNOSING AN OOM KILL
apiVersion: v1kind: Podmetadata: name: testspec: containers: - name: test image: fedora:latest command: - sleep - "3600" env: - name: MEMORY_REQUEST valueFrom: resourceFieldRef: containerName: test resource: requests.memory - name: MEMORY_LIMIT valueFrom: resourceFieldRef: containerName: test resource: limits.memory resources: requests: memory: 384Mi limits: memory: 512Mi
CHAPTER 34. APPLICATION MEMORY SIZING
299
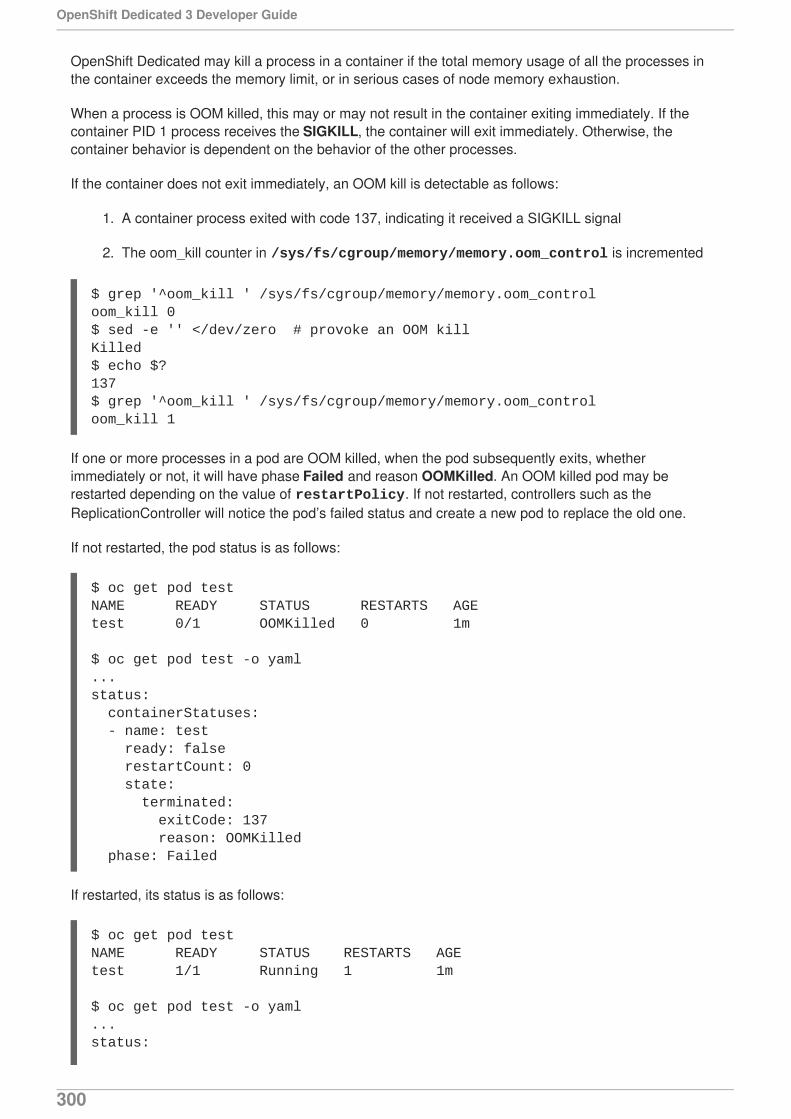
OpenShift Dedicated may kill a process in a container if the total memory usage of all the processes inthe container exceeds the memory limit, or in serious cases of node memory exhaustion.
When a process is OOM killed, this may or may not result in the container exiting immediately. If thecontainer PID 1 process receives the SIGKILL, the container will exit immediately. Otherwise, thecontainer behavior is dependent on the behavior of the other processes.
If the container does not exit immediately, an OOM kill is detectable as follows:
1. A container process exited with code 137, indicating it received a SIGKILL signal
2. The oom_kill counter in /sys/fs/cgroup/memory/memory.oom_control is incremented
$ grep '^oom_kill ' /sys/fs/cgroup/memory/memory.oom_controloom_kill 0$ sed -e '' </dev/zero # provoke an OOM killKilled$ echo $?137$ grep '^oom_kill ' /sys/fs/cgroup/memory/memory.oom_controloom_kill 1
If one or more processes in a pod are OOM killed, when the pod subsequently exits, whetherimmediately or not, it will have phase Failed and reason OOMKilled. An OOM killed pod may berestarted depending on the value of restartPolicy. If not restarted, controllers such as theReplicationController will notice the pod’s failed status and create a new pod to replace the old one.
If not restarted, the pod status is as follows:
$ oc get pod testNAME READY STATUS RESTARTS AGEtest 0/1 OOMKilled 0 1m
$ oc get pod test -o yaml...status: containerStatuses: - name: test ready: false restartCount: 0 state: terminated: exitCode: 137 reason: OOMKilled phase: Failed
If restarted, its status is as follows:
$ oc get pod testNAME READY STATUS RESTARTS AGEtest 1/1 Running 1 1m
$ oc get pod test -o yaml...status:
OpenShift Dedicated 3 Developer Guide
300
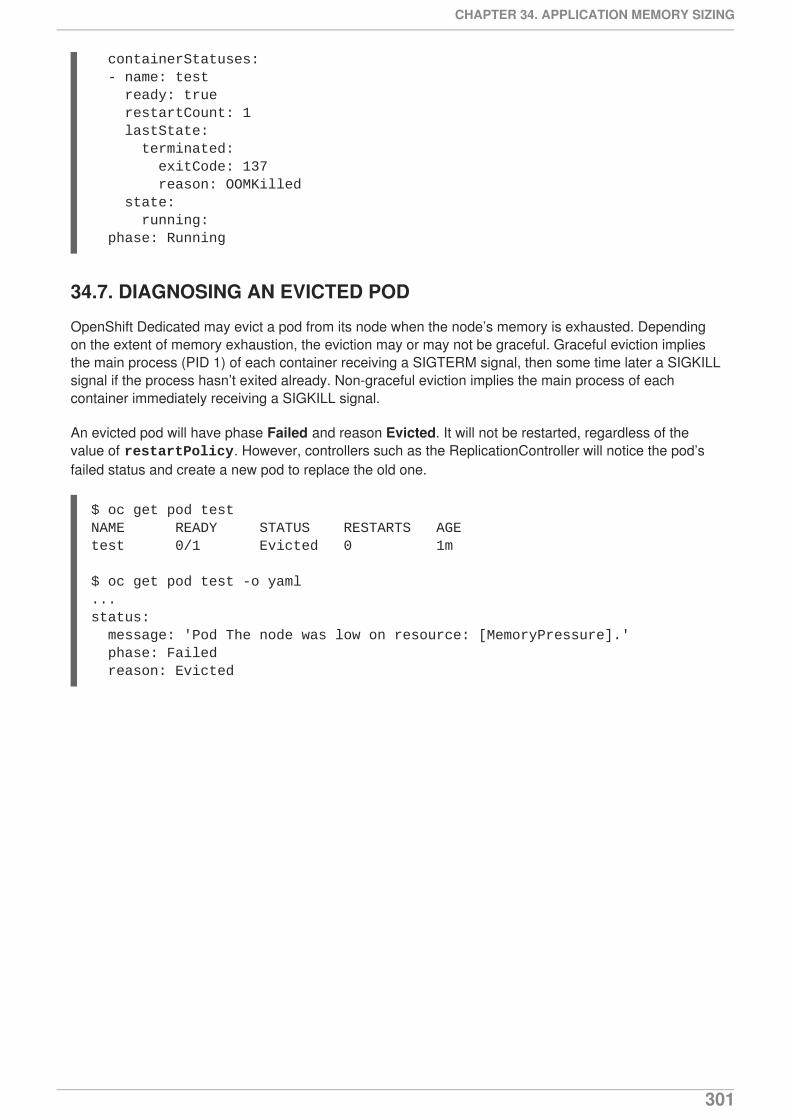
containerStatuses: - name: test ready: true restartCount: 1 lastState: terminated: exitCode: 137 reason: OOMKilled state: running: phase: Running
34.7. DIAGNOSING AN EVICTED POD
OpenShift Dedicated may evict a pod from its node when the node’s memory is exhausted. Dependingon the extent of memory exhaustion, the eviction may or may not be graceful. Graceful eviction impliesthe main process (PID 1) of each container receiving a SIGTERM signal, then some time later a SIGKILLsignal if the process hasn’t exited already. Non-graceful eviction implies the main process of eachcontainer immediately receiving a SIGKILL signal.
An evicted pod will have phase Failed and reason Evicted. It will not be restarted, regardless of thevalue of restartPolicy. However, controllers such as the ReplicationController will notice the pod’sfailed status and create a new pod to replace the old one.
$ oc get pod testNAME READY STATUS RESTARTS AGEtest 0/1 Evicted 0 1m
$ oc get pod test -o yaml...status: message: 'Pod The node was low on resource: [MemoryPressure].' phase: Failed reason: Evicted
CHAPTER 34. APPLICATION MEMORY SIZING
301


