20
The energy you need Operating instruc- tions Betacom 4 24c -A 30c -A GB, IE

The energy you need
Operating instruc-tionsBetacom 4
24c -A30c -A
GB, IE

Contents
2 Operating instructions Betacom 4 0020238423_02
Contents
1 Safety ............................................ 3
1.1 Action-related warnings ................. 31.2 Intended use .................................. 31.3 General safety information............. 42 Notes on the documentation ...... 62.1 Observing other applicable
documents ..................................... 62.2 Storing documents......................... 62.3 Applicability of the instructions....... 63 Product description..................... 7
3.1 CE label ......................................... 7
3.3 Serial number ................................ 73.4 Information on the identification
plate ............................................... 73.5 Product design............................... 83.6 Overview of the operator control
elements ........................................ 83.7 Description of the display............... 93.8 Description of button functions ...... 93.9 Timer............................................ 103.10 Operating levels........................... 104 Operation.................................... 10
4.1 Starting up the product ................ 104.2 Basic display................................ 104.3 Checking the heating system
pressure....................................... 104.4 Filling the heating installation....... 114.5 Selecting the operating mode...... 114.6 Setting the hot water
temperature ................................. 114.7 Setting the heating flow
temperature ................................. 124.8 Product settings ........................... 124.9 Setting the timer........................... 124.10 Switching the product to
standby mode .............................. 124.11 Frost protection............................ 135 Troubleshooting ........................ 13
5.1 Detecting and rectifying faults...... 135.2 Fault codes in the display ............ 13
6 Care and maintenance .............. 13
6.1 Maintenance ................................ 136.2 Caring for the product .................. 146.3 Checking the condensate drain
pipework and tundish................... 147 Decommissioning...................... 14
7.1 Temporarily decommissioningthe product................................... 14
7.2 Permanently decommissioningthe product................................... 14
8 Recycling and disposal............. 14
9 Guarantee and customerservice ........................................ 14
9.1 Guarantee.................................... 149.2 Customer service......................... 14Appendix ............................................... 15
A Operator level – overview ......... 15
B Troubleshooting ........................ 15
3.2 Benchmark ................................... 7
Safety 1
3
1 Safety
1.1 Action-related warnings
Classification of action-re-lated warningsThe action-related warningsare classified in accordancewith the severity of the pos-sible danger using the followingwarning signs and signal words:Warning symbols and signalwords
Danger!Imminent danger to lifeor risk of severe personalinjuryDanger!Risk of death from electricshockWarning.Risk of minor personalinjuryCaution.Risk of material or envir-onmental damage
1.2 Intended use
There is a risk of injury or death to the user or others, or of dam-age to the product and other property in the event of im-proper use or use for which itis not intended.The product is intended as a heat generator for closed cent-
0020238423_02 Betacom 4 Operating instructions
ral heating installations and forhot water generation.Intended use includes the fol-lowing:– observance of the operating
instructions included for theproduct and any other systemcomponents
– compliance with all inspectionand maintenance conditionslisted in the instructions.
This product can be used bychildren aged from 8 yearsand above and persons withreduced physical, sensory ormental capabilities or lack ofexperience and knowledge ifthey have been given supervi-sion or instruction concerninguse of the product in a safe wayand understand the hazards in-volved. Children must not playwith the product. Cleaning anduser maintenance work mustnot be carried out by childrenunless they are supervised.Any other use that is not spe-cified in these instructions, oruse beyond that specified in thisdocument shall be consideredimproper use. Any direct com-mercial or industrial use is alsodeemed to be improper.Caution.Improper use of any kind isprohibited.
1 Safety
4 Operating instructions Betacom 4 0020238423_02
1.3 General safetyinformation
1.3.1 Installation by skilledtradesmen only
The installation, inspection,maintenance and repair of theproduct, as well as the gas ratiosettings, must only be carriedout by a competent person.
1.3.2 Danger caused byimproper operation
Improper operation may presenta danger to you and others, andcause material damage.▶ Carefully read the enclosed
instructions and all other ap-plicable documents, particu-larly the "Safety" section andthe warnings.
▶ Only carry out the activitiesfor which instructions areprovided in these operatinginstructions.
1.3.3 Risk of death fromescaping gas
What to do if you smell gas inthe building:▶ Avoid rooms that smell of
gas.▶ If possible, open doors and
windows fully and ensureadequate ventilation.
▶ Do not use naked flames (e.g.lighters, matches).
▶ Do not smoke.
▶ Do not use any electricalswitches, mains plugs, door-bells, telephones or othercommunication systems inthe building.
▶ If it is safe to do so, close theemergency control valve orthe main isolator.
▶ If possible, close the gas isol-ator cock on the product.
▶ Warn other occupants in thebuilding by yelling or bangingon doors or walls.
▶ Leave the building immedi-ately and ensure that othersdo not enter the building.
▶ Notify the gas supply com-pany or the EmergencyService Provider+44 (0) 800 111999 by tele-phone once you are outsideof the building.
1.3.4 Risk of death due to ablocked or leaking fluegas pipe
What to do if you smell flue gasin the property:▶ Open all accessible doors
and windows fully to provideventilation.
▶ Switch off the product.▶ Inform a competent person.
1.3.5 Risk of death fromescaping flue gas
If you operate the product withan empty condensate siphon,

Safety 1
0020238423_02 Betacom 4 Operating instructions 5
flue gas may escape into theroom air.▶ In order to operate the
product, ensure that the con-densate siphon is always full.
1.3.6 Risk of death due toexplosive and flammablematerials
▶ Do not use or store explosiveor flammable materials (e.g.petrol, paper, paint) in the in-stallation room of the product.
1.3.7 Risk of death due to lackof safety devices
A lack of safety devices (e.g.expansion relief valve, expan-sion vessel) can lead to poten-tially fatal scalding and otherinjuries, e.g. due to explosions.▶ Ask a competent person
to explain how the safetydevices work and where theyare located.
1.3.8 Risk of death dueto changes to theproduct or the productenvironment
▶ Never remove, bridge orblock the safety devices.
▶ Do not tamper with any of thesafety devices.
▶ Do not damage or removeany seals on components.
▶ Do not make any changes:
– The product itself– to the gas, air, water and
electricity supplies– to the entire flue gas install-
ation– to the entire condensate
drain system– to the expansion relief valve– to the drain pipework– to constructional condi-
tions that may affect theoperational reliability of theproduct
1.3.9 Risk of injury andmaterial damage due tomaintenance and repairscarried out incorrectly ornot carried out at all
▶ Never attempt to carry outmaintenance work or repairson your product yourself.
▶ Faults and damage shouldbe immediately rectified by acompetent person.
▶ Adhere to the maintenanceintervals specified.
1.3.10 Risk of corrosiondamage due tounsuitable combustionand room air
Sprays, solvents, chlorinatedcleaning agents, paint, adhes-ives, ammonia compounds,dust or similar substances may

1 Safety
6 Operating instructions Betacom 4 0020238423_02
lead to corrosion on the productand in the air/flue pipe.▶ Ensure that the supply of
combustion air is always freeof fluorine, chlorine, sulphur,dust, etc.
▶ Ensure that no chemical sub-stances are stored at the in-stallation site.
1.3.11 Risk of materialdamage caused byfrost
▶ Ensure that the heating in-stallation always remains inoperation during freezing con-ditions and that all rooms aresufficiently heated.
▶ If you cannot ensure the op-eration, have a competentperson drain the heating in-stallation.
2 Notes on thedocumentation
2.1 Observing other applicabledocuments
▶ You must observe all operating instruc-tions enclosed with the system compon-ents.
2.2 Storing documents
▶ Keep this manual and all other applic-able documents safe for future use.
2.3 Applicability of theinstructions
These instructions apply only to:Product article number
Article num-ber
Gas CouncilNumber
BETACOM 424c -A (H-GB)
0010021204 47-019-52
BETACOM 430c -A (H-GB)
0010021205 47-019-53
These products are only designed for nat-ural gas systems.

Product description 3
7
3 Product description
3.1 CE label
The CE label shows that the products comply with the basic requirements of the applicable directives as stated on the iden-tification plate.The declaration of conformity can be viewed at the manufacturer's site.
3.2 BenchmarkGlow-worm is a licensed member of the Benchmark Scheme.Benchmark places responsibilities on both manufacturers and installers. The purpose is to ensure that customers are provided with the correct equipment for their needs, that it is installed, commissioned and serviced in accordance with the manu-facturer’s instructions by a competent person approved at the time by the Health and Safety Executive and that it meets the requirements of the appropriate Building Regulations.The Benchmark Checklist can be used to demonstrate compliance with Building Regulations and should be provided to the customer for future reference. Installers are required to carry out installation, commissioning and servicing work in accordance with the Benchmark Code of Practice which is available from the Heating and Hotwater Industry Council who manage and promote the Scheme. Benchmark is managed and promoted by the Heating and Hotwater Industry Council
3.3 Serial number
1 2
The serial number is located on the identi-fication plate (1) and in the short operating instructions (2) (→ Page 7).
3.4 Information on the identification plate
The identification plate is mounted on the underside of the product in the factory.The identification plate keeps record of the country in which the product is to be installed.Information on the identification plate(→ Page 7)Informationon the identi-fication plate
Meaning
Barcode with serial number
Serial number For quality control purposes;3rd and 4th digits = year ofproductionFor quality control purposes;5th and 6th digits = week ofproductionFor identification purposes;7th to 16th digits = productarticle numberFor quality control purposes;17th to 20th digits = place ofmanufacture
Betacom 4 Product designationXX, Gxx –xx mbar(x kPa)
Gas group and gas connec-tion pressure as set at thefactory
Cat. Approved gas category
0020238423_02 Betacom 4 Operating instructions
For more information visit www.benchmark.org.uk.

3 Product description
8 Operating instructions Betacom 4 0020238423_02
Informationon the identi-fication plate
Meaning
Condensingtechnology
Efficiency of the boiler inaccordance with directive92/42/EWG
Type: Xx3(x) Approved flue gas connec-tions
PMS Maximum water pressure inheating mode
PMW Maximum water pressure inhot water handling mode
V/Hz Electric connectionW Max. electrical power con-
sumptionIP Level of protection
Heating mode
Hot water generation
Pn Nominal heat output rangein heating mode
Pnc Nominal heat output rangein heating mode (condensingtechnology)
P Nominal heat output rangein hot water handling mode
Qn Nominal heating load rangein heating mode
Qnw Nominal heating load rangein hot water handling mode
Tmax. Max. flow temperatureNOx NOx class for the productCode (DSN) Specific product codeGC no. Gas council number
3.5 Product design
1
1 Control elements
3.6 Overview of the operatorcontrol elements
1
2
34
5
1 Display2 button3 button
4 button5 button

Product description 3
0020238423_02 Betacom 4 Operating instructions 9
3.7 Description of the display
1
2
3
1 Operating in-formation
2 Active operatingmode, selectingand confirmingthe operatingmode
3 Display showingthe current heat-ing flow temper-ature, the fillingpressure in theheating install-ation, the oper-ating mode or afault code
Symbol Meaning
Burner operating correctly– Burner onHeating installation fillingpressure– Permanently on: Filling
pressure in the permittedrange.
– Flashing display: Fillingpressure is outside of thepermissible range or thepurging function has beenactivated.
DHW mode– Permanently on: Hot wa-
ter activated– Flashing: Burner on in
draw-off modeEco hot water handlingmode– Hot water temperature <
50 °C– Normal operating temper-
ature
Symbol Meaning
Heating mode– Permanently on: Heating
mode activated– Flashing: Burner on in
heating modeDisplay flashing:– Switching on the product– FaultSetting confirmed
/ Fault in the product– Appears instead of the
basic display.OFF – Appears when the
product goes into standbymode.
3.8 Description of buttonfunctions
Button Meaning
– Selecting the operating mode– Confirm the operating mode– Confirm setting– Increase the display contrast
or – Setting the hot water temperat-ure
– Setting the heating flow tem-perature
– Increase or decrease the selec-ted setting
– Increase the display contrast– Activate the product: On/off
(standby)– Reset the product
Adjustable values flash on the display.You must confirm any change to a value.Only then is the new setting saved.If you do not press any buttons for fiveseconds, the displays switches back tothe basic display.If you do not press any buttons for oneminute, the display contrast decreases.

10 Operating instructions Betacom 4 0020238423_02
4 Operation3.9 TimerYou can control the heating mode using the timer.
Position forthe selectionswitch
Functionality
0 Heating mode permanentlyswitched offHeating mode intervals inaccordance with the timer
I Heating mode permanentlyswitched on
▶ Set the timer. (→ Page 12)
3.10 Operating levels
The product has two operating levels:
– The operator level shows the most im-portant information and offers set-upoptions which do not require any specialprior knowledge.
– Specialised knowledge is required in or-der to use the installer level (access forcompetent persons). This is thereforeprotected by an access code.
Operator level – overview (→ Page 15)
4 Operation
4.1 Starting up the product
4.1.1 Opening the isolator devices
Conditions: The competent person who installedthe unit will explain where the isolator devices areand how to handle them.
▶ Ensure that the gas isolator cock is fullyopen.
▶ Ensure that the stop cocks in the heat-ing installation's flow and return areopen.
▶ Ensure that the cold water stop cock isopen.
4.1.2 Starting up the product
12
▶ Press the (2) button.◁ When the unit is switched on, the
"Basic display" is shown in thedisplay (1).
4.2 Basic display
The filling pressure in the heating installa-tion and the operating mode are shown inthe display's basic display.To return to the basic display:– Wait more than five seconds without
pressing any buttons.If a fault message is present, the basicdisplay switches to the fault code.
4.3 Checking the heating systempressure
1. Once a month, check that the pressurein the central heating system, whichis displayed on the user interface,is between 0.1 MPa and 0.15 MPa(1.0 bar and 1.5 bar).◁ If the filling pressure is correct, no
action needs to be taken.▽ If the filling pressure is too low, add
more water to the heating installa-tion.

Operation 4
0020238423_02 Betacom 4 Operating instructions 11
NoteIf the heating flow temperatureis shown in the display, pressand hold the and buttonsat the same time for longer thanfive seconds, or temporarilydeactivate heating mode inorder to display the pressure.
2. Fill the heating installation. (→ Page 11)
4.4 Filling the heating installation
Caution.Risk of material damage dueto heating water that is ex-tremely calciferous or corros-ive or contaminated by chem-icals.
Unsuitable tap water damagesthe seals and diaphragms,blocks components in theproduct and heating installationthrough which the water flowsand causes noise.▶ Only fill the heating install-
ation with suitable heatingwater.
▶ In case of doubt, ask a com-petent person for details.
NoteThe competent person is respons-ible for filling the heating installa-tion the first time, any subsequenttop-ups and the water quality.The operator alone is respons-ible for topping up the water in theheating installation.
1. Open all radiator valves (thermostaticradiator valves) of the heating installa-tion.
2. Slowly open the filling cock, as shownto you by the competent person.
3. Fill with water until the required fillingpressure is reached.
4. Check the filling pressure in thedisplay.
5. Close the filling cock after filling.
4.5 Selecting the operating mode
NoteThe unit is always activated withthe preselected operating mode.
▶ Press repeatedly until the displayshows the required operating mode.Symbol Operating mode
+Heating + hot water
Heating only
Hot water only
‒ No requirement
4.6 Setting the hot watertemperature
Conditions: The temperature is controlled by theboiler
▶ Set the hot water temperature on theboiler (→ Page 12).
Conditions: The temperature is controlled by thecontroller
▶ Set the hot water temperature on thecontroller.
NoteIf you press the or button,the display shows the sym-bol.

4 Operation
12 Operating instructions Betacom 4 0020238423_02
4.7 Setting the heating flowtemperature
Conditions: Temperature controlled by the boiler,with heating mode activated
▶ Set the heating flow temperature on theboiler (→ Page 12).
NoteThe competent person mayhave adjusted the maximumpossible temperature.
Conditions: Temperature controlled by the control-ler, with heating mode activated
▶ Set the maximum heating flow temper-ature on the boiler (→ Page 12).
▶ Set the room temperature on the con-troller.◁ The actual heating flow temperature
is set automatically by the controller.Conditions: Outside temperature sensor connectedto the boiler, with heating mode activated
▶ When you press the , or but-ton.◁ The display shows the heating flow
temperature calculated by the boiler.◁ The actual heating flow temperature
is set automatically by the boiler.
4.8 Product settings
NoteThe sequence in which the avail-able settings are shown dependson the operating mode selected.If the Domestic hot water + Heat-ing operating mode is selected,the hot water temperature must beconfirmed in order to set the flowtemperature of the heating.
1. Press the or button to set the tem-perature.
2. Press the button to confirm.
4.9 Setting the timer
Applicability: Timer, Great Britain
1
5
6
2
3
4
1. Turn the minute hand (4) clockwiseuntil the arrow (2) points to the currenttime on the 24-hour dial (3).
2. Slide the pin for the time interval, inwhich the heating mode should beswitched on, outwards (6).
3. Slide the pin for the time interval, inwhich the heating mode should beswitched off, inwards (5).
4. Set the selection switch (1) to the mid-position .
4.10 Switching the product tostandby mode
▶ Press the button for less than threeseconds.◁ Once the requirement currently in
use has finished, the display willshow OFF and go out.
◁ The product is now in standby mode.◁ The product's frost protection func-
tion is activated.◁ The main power supply is not inter-
rupted. The product continues to besupplied with power.

Troubleshooting 5
0020238423_02 Betacom 4 Operating instructions 13
4.11 Frost protection
4.11.1 The product's frostprotection function
The frost protection function switches onthe boiler and the pump as soon as theprotection temperature in the heating cir-cuit is reached.– Protection temperature: 12 ℃
The pump stops once the minimum wa-ter temperature in the heating circuit isreached.– Minimum water temperature: 15 ℃
If the burner ignition temperature in theheating circuit is reached, the burnerswitch is switched on and continuesto operate until the burner anti-cyclingtemperature is reached.– Burner ignition temperature: 7 ℃– Burner anti-cycling temperature: 35 ℃
The hot water circuit (cold and hot water)is not protected by the boiler.Frost protection for the system can only beguaranteed by the boiler.A controller is required to control the tem-perature of the system.
4.11.2 Frost protection for thesystem
NoteEnsure that the product's powerand gas supply are working cor-rectly.
Conditions: If you are away from home for severaldays, Without controller
▶ Switch the product to standby mode.(→ Page 12)
Conditions: If you are away from home for severaldays, With controller
▶ Program the number of days you willbe away in the controller to activate thefrost protection devices.
Conditions: If you are away from home for a pro-longed period
▶ Contact a qualified competent person,who can completely drain the system orprotect the heating circuit by adding aspecial frost protection agent for heatinginstallations.
5 Troubleshooting
5.1 Detecting and rectifying faults
▶ If problems occur whilst operating theproduct, you can carry out certain self-checks with the aid of the table in theappendix.Troubleshooting (→ Page 15)
▶ If the product still does not functionwithout problems after the checks havebeen carried out using the table, con-tact your competent person to rectifythe problem.
5.2 Fault codes in the display
Fault codes have priority over all other dis-plays. If several faults occur at the sametime, the corresponding codes are dis-played alternately for two seconds each.▶ If your product displays a fault code
(F.xx), contact a competent person.
6 Care and maintenance
6.1 Maintenance
An annual inspection of the product carriedout by a competent person is a prerequis-ite for ensuring that the product is perman-ently ready and safe for operation, reliable,and has a long working life.
7 Decommissioning
14 Operating instructions Betacom 4 0020238423_02
6.2 Caring for the product
Caution.Risk of material damagecaused by unsuitable clean-ing agents.
▶ Do not use sprays, scouringagents, detergents, solventsor cleaning agents that con-tain chlorine.
▶ Clean the casing with a damp cloth anda little solvent-free soap.
6.3 Checking the condensatedrain pipework and tundish
The condensate drain pipework and tun-dish must always be penetrable.▶ Regularly check the condensate drain
pipework and tundish for faults and,particularly, for blockages.
You must not be able to see or feel anyobstructions in the condensate drain pipe-work and tundish.▶ If you notice a fault, have it rectified by
a competent person.
7 Decommissioning
7.1 Temporarily decommissioningthe product
▶ Temporarily decommission the productonly if there is no risk of frost.
▶ Switch off the product via the mainswitch provided on-site.◁ The display goes out.
▶ When decommissioning for an exten-ded period (e.g. holiday), you shouldalso close the gas isolator cock and thecold water stop cock.
7.2 Permanentlydecommissioning the product
▶ Have a competent person permanentlydecommission the product.
8 Recycling and disposal
▶ The competent person who installedyour product is responsible for the dis-posal of the packaging.
If the product is identified with thissymbol:▶ In this case, do not dispose of the
product with the household waste.▶ Instead, hand in the product to a collec-
tion centre for old electrical or electronicappliances.
If the product contains batteries thatare marked with this symbol, these bat-teries may contain substances that arehazardous to human health and the envir-onment.▶ In this case, dispose of the batteries at
a collection point for batteries.
9 Guarantee and customerservice
9.1 Guarantee
For information on the manufacturer'sguarantee, you can write to the contactaddress that is provided on the back page.
9.2 Customer service
For contact details for our customer ser-vice department, you can write to the ad-dress that is provided on the back page, oryou can visit www.glow-worm.co.uk.

Appendix
0020238423_02 Betacom 4 Operating instructions 15
AppendixA Operator level – overview
Setting level Values Unit Increment, select Default set-tingMin. Max.
Heating installationPressure in the heating in-stallation
Current value bar 0.11 1.5
Heating flow temperature Current value ℃ 1 6010 Preset
in thesystem
Hot water generationHot water temperature Current value ℃ 1 55
35 60Eco hot water temperature Current value ℃ 1
35 50
B Troubleshooting
Fault Cause Measure
Product does notstart up:– No hot water– Heating does
not heat up
The gas isolator cock installed on-siteand/or the gas isolator cock on theproduct is closed.
Open both gas isolator cocks.
The cold water stop cock is closed. Open the cold water stop cock.The power supply in the building is dis-connected.
Check the fuse in the build-ing. The product automaticallyswitches on after the powersupply is restored.
The product is switched off. Switch on the product (→ "Switch-ing on the product" section).
The heating flow temperature or hotwater temperature has been set toolow.
Set the heating flow temperat-ure and hot water temperature (→"Setting the heating flow temper-ature" section/→ "Setting the hotwater temperature" section).
The system pressure is insufficient.Low water pressure in the heating in-stallation (fault code: F.22).
Fill the heating installation (→"Filling the heating installation"section).If the pressure drops frequently,contact your competent personabout this.
The system pressure is too high. Purge a radiator in order to re-duce the pressure in the heatinginstallation, or contact your com-petent person about this.
Appendix
16 Operating instructions Betacom 4 0020238423_02
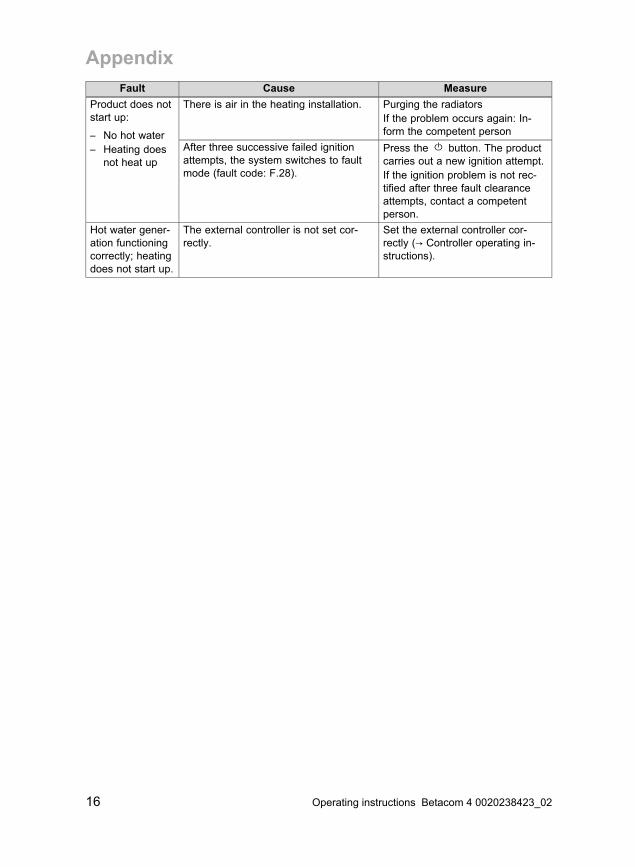
Fault Cause Measure
Product does notstart up:– No hot water– Heating does
not heat up
There is air in the heating installation. Purging the radiatorsIf the problem occurs again: In-form the competent person
After three successive failed ignitionattempts, the system switches to faultmode (fault code: F.28).
Press the button. The productcarries out a new ignition attempt.If the ignition problem is not rec-tified after three fault clearanceattempts, contact a competentperson.
Hot water gener-ation functioningcorrectly; heatingdoes not start up.
The external controller is not set cor-rectly.
Set the external controller cor-rectly (→ Controller operating in-structions).


The energy you need
Manufacturer/supplierGlow-wormNottingham Road ‒ Belper ‒ Derbyshire DE56 1JTTelephone 01773 824639 ‒ Technical helpline 0330 100 7679After sales service 0330 100 3142www.glow-worm.co.uk
0020238423_02 ‒ 05.08.2019
© These instructions, or parts thereof, are protected by copyright and may be reproduced or distributed only with the manufacturer's written consent.We reserve the right to make technical changes.
0020238423_02


![[ Advanced Excel Fun~tions and Procedures ]](https://static.documents.pub/doc/80x56/616a2fc911a7b741a34fc155/-advanced-excel-funtions-and-procedures-.jpg)

