Schneider Electric IT Corporation Legal DisclaimerThe information presented in this manual is not warranted by the Schneider Electric IT Corporation to be authoritative, error free, or complete. This publication is not meant to be a substitute for a detailed operational and site specific development plan. Therefore, Schneider Electric IT Corporation assumes no liability for damages, violations of codes, improper installation, system failures, or any other problems that could arise based on the use of this Publication.
The information contained in this Publication is provided as is and has been prepared solely for the purpose of evaluating data center design and construction. This Publication has been compiled in good faith by Schneider Electric IT Corporation. However, no representation is made or warranty given, either express or implied, as to the completeness or accuracy of the information this Publication contains.
IN NO EVENT SHALL SCHNEIDER ELECTRIC IT CORPORATION, OR ANY PARENT, AFFILIATE OR SUBSIDIARY COMPANY OF SCHNEIDER ELECTRIC IT CORPORATION OR THEIR RESPECTIVE OFFICERS, DIRECTORS, OR EMPLOYEES BE LIABLE FOR ANY DIRECT, INDIRECT, CONSEQUENTIAL, PUNITIVE, SPECIAL, OR INCIDENTAL DAMAGES (INCLUDING, WITHOUT LIMITATION, DAMAGES FOR LOSS OF BUSINESS, CONTRACT, REVENUE, DATA, INFORMATION, OR BUSINESS INTERRUPTION) RESULTING FROM, ARISING OUT, OR IN CONNECTION WITH THE USE OF, OR INABILITY TO USE THIS PUBLICATION OR THE CONTENT, EVEN IF SCHNEIDER ELECTRIC IT CORPORATION HAS BEEN EXPRESSLY ADVISED OF THE POSSIBILITY OF SUCH DAMAGES. SCHNEIDER ELECTRIC IT CORPORATION RESERVES THE RIGHT TO MAKE CHANGES OR UPDATES WITH RESPECT TO OR IN THE CONTENT OF THE PUBLICATION OR THE FORMAT THEREOF AT ANY TIME WITHOUT NOTICE.
Copyright, intellectual, and all other proprietary rights in the content (including but not limited to software, audio, video, text, and photographs) rests with Schneider Electric It Corporation or its licensors. All rights in the content not expressly granted herein are reserved. No rights of any kind are licensed or assigned or shall otherwise pass to persons accessing this information.
This Publication shall not be for resale in whole or in part.
Read the instructions carefully to become familiar with the equipment before trying to install, operate, service, or maintain it. The following special messages may appear throughout this manual or on the equipment to warn of potential hazards or to call attention to information that clarifies or simplifies a procedure.
The addition of this symbol to a Danger or Warning safety label indicates that an electrical hazard exists which will result in personal injury if the instructions are not followed.
This is the safety alert symbol. It is used to alert you to potential personal injury hazards. Obey all safety messages that follow this symbol to avoid possible injury or death.
DANGER
DANGER indicates an imminently hazardous situation which, if not avoided, will result in death or serious injury.
WARNING
WARNING indicates a potentially hazardous situation which, if not avoided, can result in death or serious injury.
CAUTION
CAUTION indicates a potentially hazardous situation which, if not avoided, can result in minor or moderate injury.
NOTICE
NOTICE addresses practices not related to physical injury including certain environmental hazards, potential damage or loss of data.
1EcoBreeze System Operation and Maintenance
General Information
OverviewThe EcoBreeze™ is a modular indirect evaporative and air-to-air heat exchanger cooling solution. The EcoBreeze has the ability to switch automatically between air-to-air and indirect evaporative heat exchange to consistently provide cooling to data centers in the most efficient way. The design of the EcoBreeze is able to reduce energy consumption by leveraging temperature differences between outside ambient air compared to IT return air to provide economized cooling to the data center. The EcoBreeze meets ASHRAE 90.1/TC 9.9 requirements for efficiency and economization with multiple Frame sizes with varying voltages and phases to address the cooling needs of any data center.
The EcoBreeze not only provides multiple types of air economization, its modular design allows the unit to adapt to the future cooling needs of the data center. These features, coupled with the fact that the unit uses outside air and is able to automatically switch to the most efficient of cooling modes, set the EcoBreeze apart from other cooling solutions.
The EcoBreeze is available in individual 50kW Modules that can be grouped up to four Modules (200kW) or eight Modules (400kW) of sensible cooling. This modular, scalable approach enables purchasing only what is needed to meet current cooling requirements while giving the ability to increase cooling capacity at any time as the data center grows. This system of multiple Modules provides redundancy for critical components such fans, pumps, controllers, and sensors to minimize single-point failure from Module-to-Frame level and ensures availability of the system even through maintenance and service intervals. Power, water, air flow distribution and communication connections are centralized to the Frame simplifying installation requirements. Additionally, as the unit is located outside the perimeter of the data center, the EcoBreeze takes up zero whitespace in the data center, enabling IT managers to utilize the space to increase capacity without needing to use any of that space for additional cooling units.
Frame
The Frame is the housing and common support infrastructure for up to either four or eight Modules. The Frame provides the components and subsystems needed to support the water supply to and from the Modules for indirect evaporative cooling. Basic features of the Frame water system include redundant pumps and flow monitor, redundant makeup water supply, basin drain and blow-down, conductivity monitoring and control along with chemical free water treatment.
The Frame provides the interface between the main power connection and power distribution for each Module. This Module power distribution is protected with overload protection and can be isolated at the Module level for servicing or removing Modules from the Frame.
The Frame and its interface between each Module facilitates air distribution between the building ducts used for return and supply air.
The Frame is also where the dual master controllers are located. Dual master controllers create redundancy for the system. Both controllers are identical and monitor all Modules and external user interfaces the same way. The difference is that only the acting master controller sends execution commands to Modules based on the information collected.
EcoBreeze System Operation and Maintenance2
Module(s)
Modules are fully self-contained cooling apparatus, with the exception of common Frame based water system for support of indirect evaporative cooling. Each Module has a degree of autonomy supported by its own integral controller. Each Module regulates the supply air temperature for its own outdoor air (OA) fan and compressor.
If a Module loses communication with the Frame master controller, the Module keeps the last instruction received from the Frame acting master controller, and maintains the supply air temperature at the last received setpoint.
System
The system consists of a Frame and one or more EcoBreeze Modules.
Features
Basic cooling sequence
EcoBreeze is designed to provide sensible cooling while using a minimal amount of compressor energy over the course of an operating year. This is facilitated by using natural heat exchange process across an air-to-air heat exchanger. The heat transfer process may be enhanced by indirect evaporative cooling, leveraging the outdoor wet-bulb temperature rather than the higher outdoor dry-bulb temperature. The balance of thermal energy not accommodated within the air-to-air heat exchanger is removed with a DX system integral to each Module comprising the system.
The acting master controller is part of the EcoBreeze Indirect Evaporative Cooler (IEC) Frame. It monitors data center differential pressure as sensed between cool supply air and hot return air serving the IT equipment within the IT space. The speed of IT fans is regulated as needed to maintain the pressure differential setpoint. Setpoint regulation is accomplished by means of a user-tunable, proportional, integral algorithm (PI) loop. The physical sensing points for differential pressure are located at the Frame supply and return plenum, data center cool supply and hot return air plenums and across row based containment boundaries.
Economizer selection options
The Frame master controller allows the user to select the operation of the water economizer.
Normally, the Frame controller favors wet operation (water) over dry operation (OA fans only). By enabling the water saver mode, you can direct the Frame controller to use a minimal amount of water. This selection can result in using less water at the expense of increased OA fan energy.
3EcoBreeze System Operation and Maintenance
Air-to-air heat exchange
The Module outdoor fan is used to move the ambient air, used as the cooling medium, across the air-to-air heat exchanger and condenser coil. The fan is controlled through a Modbus interface with the Module controller.
• When the ambient air temperature drops below 4.4°C (40°F), the system water is dumped to prevent freezing or dumped after 24 hours (user adjustable setting) of spray free operation.
• Only fans are required to move the air. • Cool air passes over the outside of the heat exchanger channels, cooling the hot IT air
flowing inside the heat exchange channels.
Indirect evaporative cooling (IEC)
The spray apparatus wets the outer surface of the heat exchanger and cools it to the wet-bulb temperature of the outdoor air. The inner surface of the heat exchanger is a conduit through which the air to be cooled is passed in thermal communication with the outer surface cooling medium.
• Heat is removed from the IT air by evaporating water on the outside of the heat exchanger channels.
• Water is supplied evenly over the heat exchanger channels via spray nozzles.• Maintains the adjustable IT supply air setpoint.
Water Saver mode
The EcoBreeze control system offers a water saver mode. With the water saver set to On, water system operation is suspended as soon as dry operation can facilitate the cooling demand. This may be a significantly higher ambient air temperature than the normal 40°F transition to dry. The consequence of this action will be a higher outdoor air fan speed with corresponding greater energy consumption. In most cases the most economical mode of operation will be the factory default with water saver set to Off.
Proportional DX cooling
During normal operating conditions the effectiveness of the IEC alone may not be adequate to achieve the desired supply air temperature. During these periods, some Modules will have their compressors activated to provide the needed additional cooling. The acting Frame master controller calculates the quantity of compressors needed while allowing the compressor capacity control to operate as closely to the midpoint as possible.
• Variable speed compressor combined with an electronic thermal expansion valve allows for optimal efficiency
• Supplements evaporative cooling to maintain the supply air setpoint• Designed for 60% of nominal full rated capacity• Uses R410a refrigerant• Micro-channel condenser coil coated for use in harsh environments
EcoBreeze System Operation and Maintenance4
Basic system operation using HACS and a raised floor
• Hot air from the servers is controlled through Hot Aisle Containment Systems (HACS).• The hot air rises to the ceiling plenum and feeds into the return ducting of the EcoBreeze.• The IT air is then cooled and returned to the data center through a raised floor plenum or
cold aisle diffusers if a raised floor is not used. • The cool air is forced through the perforated tiles in front of the server racks and used to
keep the servers at a safe operating temperature.
Basic system operation using RACS and no raised floor
• Hot air from the servers is controlled through ducting connected to the racks.• The hot air rises to the ceiling plenum and feeds into the return ducting of the EcoBreeze.• IT air is cooled and returned to the data center through cold aisle diffusers. The diffusers
discharge sends air down the cold aisle.
Condenser coil freeze detection and prevention
The condenser coil is mounted on the top of the Module cabinet and exposed to the elements. It is potentially subject to partial obstruction as a consequence of snow and ice. The Module Frame controller detects an obstruction by monitoring the performance of the IEC heat exchanger on each Module.
When the ambient temperature is below 0°C (32°F) and an obstruction is sensed, the controller commands the outdoor fan to maximum speed for a period of one minute. If the obstruction is not cleared, the fan speed is reduced to 50% and the compressor started and operated at a speed of 50 Hz for a period of six minutes. Additionally, the indoor IT fans are set to maximum speed during the compressor de-ice operation. The compressor de-ice sequence for a Module is not exercised more often than once per hour. Should both methods fail to establish normal power versus speed, an "IEC Performance Degradation Alarm" is asserted by the controller. If the ambient temperature is above 0°C (32°F) and the controller detects an obstruction, an "IEC Performance Degradation Alarm" is asserted by the controller immediately.
Door safety interlock
To avoid exposure to moving equipment and sections of the Module that have positive pressure, the indoor air fan access door and the evaporator coil access door are equipped with door safety interlock switches. The Module controller monitors the status of the switch. If a safety interlock opening is detected when the Module is off-line, a warning alarm is generated for the door opened. If a door is opened during Module operation an alarm is generated and the fans are stopped. The fans are returned to normal operation after the door has been closed for five seconds.
5EcoBreeze System Operation and Maintenance
Configuration
Modules
The EcoBreeze is comprised of up to eight identical Modules contained in a common Frame. These Modules are fully self-contained cooling apparatus, with the exception of a common Frame-based water system for support of indirect evaporative cooling (IEC). Each Module has a degree of autonomy supported by its own integral controller. Coordination of the Modules is handled by the master controller located in the Frame.
Frame
Each 12-meter (40-ft) Frame can accommodate up to eight Modules.Each 6-meter (20-ft) Frame can accommodate up to four Modules.
The Frame controls the common water system to support the indirect evaporative cooling mode.The Frame distributes power from the mains to the Modules.
The Frame master controllers collect all sensor information, including outside air temperature, outside air humidity, supply air differential pressure, basin level, and water conductivity. The controllers collect status information for all digital inputs, including supply water pressure, remote run/stop status, and isolation damper switch. They open/close digital relay outputs, including power on/off to the two pumps and water treatment electric box, turn on/off two basin solenoid valves, turn on/off blow-down drain solenoid valve, turn on/off the drain solenoid valve, turn on/off air pump for the basin level sensors, turn on/off the alarm contact and open/close isolated damper switch.
Frame controllers have a communication port that supports Modbus RTU for Building Management Systems (BMS) and a port for a Controller Area Network (CAN) for inter-Module communication.
SUPPLY
BLOWER
ACCESS
COIL
ACCESS
SUPPLY
BLOWER
ACCESS
COIL
ACCESS
SUPPLY
BLOWER
ACCESS
COIL
ACCESS
SUPPLY
BLOWER
ACCESS
COIL
ACCESS
na34
55a
EcoBreeze System Operation and Maintenance6
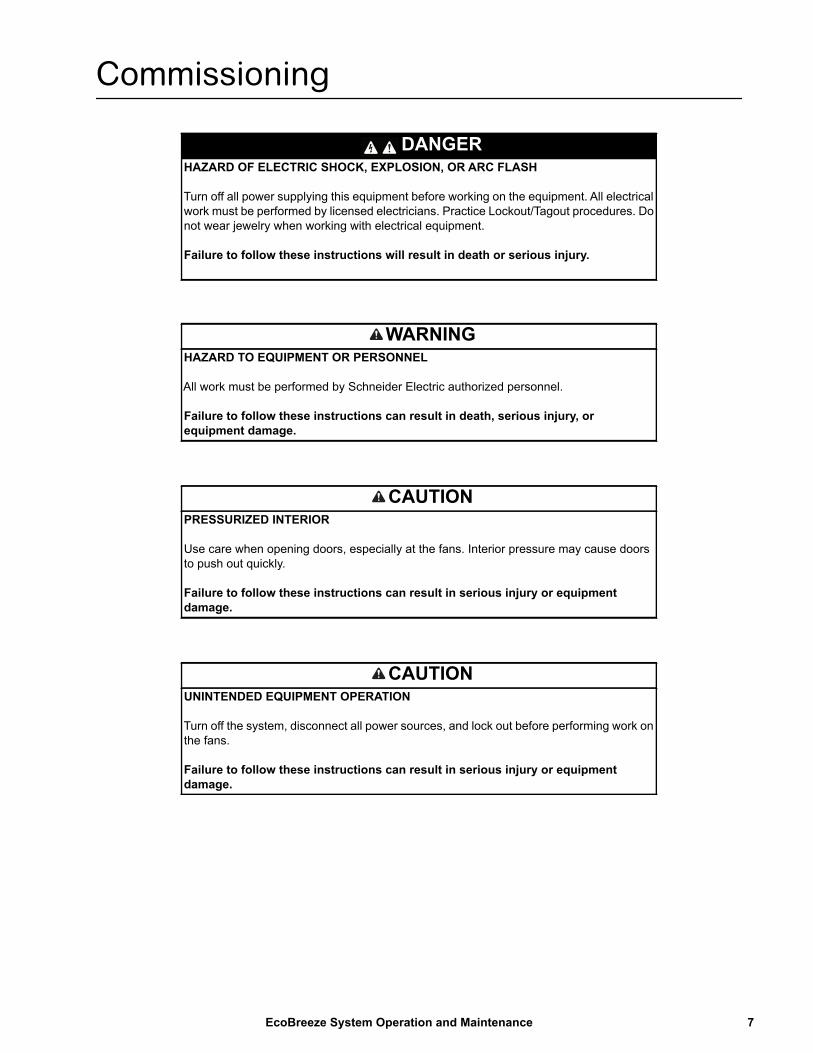
Commissioning
DANGERHAZARD OF ELECTRIC SHOCK, EXPLOSION, OR ARC FLASH
Turn off all power supplying this equipment before working on the equipment. All electrical work must be performed by licensed electricians. Practice Lockout/Tagout procedures. Do not wear jewelry when working with electrical equipment.
Failure to follow these instructions will result in death or serious injury.
WARNINGHAZARD TO EQUIPMENT OR PERSONNEL
All work must be performed by Schneider Electric authorized personnel.
Failure to follow these instructions can result in death, serious injury, or equipment damage.
CAUTIONPRESSURIZED INTERIOR
Use care when opening doors, especially at the fans. Interior pressure may cause doors to push out quickly.
Failure to follow these instructions can result in serious injury or equipment damage.
CAUTIONUNINTENDED EQUIPMENT OPERATION
Turn off the system, disconnect all power sources, and lock out before performing work on the fans.
Failure to follow these instructions can result in serious injury or equipment damage.
7EcoBreeze System Operation and Maintenance
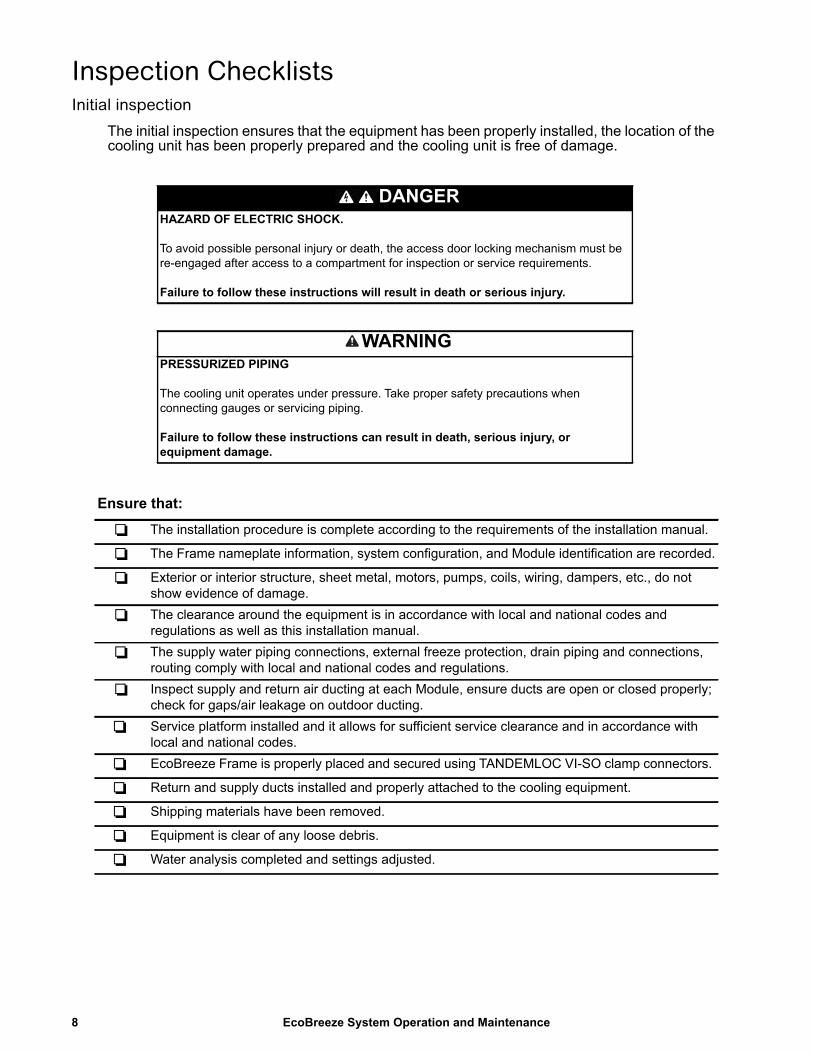
Inspection ChecklistsInitial inspection
The initial inspection ensures that the equipment has been properly installed, the location of the cooling unit has been properly prepared and the cooling unit is free of damage.
DANGERHAZARD OF ELECTRIC SHOCK.
To avoid possible personal injury or death, the access door locking mechanism must be re-engaged after access to a compartment for inspection or service requirements.
Failure to follow these instructions will result in death or serious injury.
WARNINGPRESSURIZED PIPING
The cooling unit operates under pressure. Take proper safety precautions when connecting gauges or servicing piping.
Failure to follow these instructions can result in death, serious injury, or equipment damage.
Ensure that:
The installation procedure is complete according to the requirements of the installation manual.
The Frame nameplate information, system configuration, and Module identification are recorded.
Exterior or interior structure, sheet metal, motors, pumps, coils, wiring, dampers, etc., do not show evidence of damage.
The clearance around the equipment is in accordance with local and national codes and regulations as well as this installation manual.
The supply water piping connections, external freeze protection, drain piping and connections, routing comply with local and national codes and regulations.
Inspect supply and return air ducting at each Module, ensure ducts are open or closed properly; check for gaps/air leakage on outdoor ducting.
Service platform installed and it allows for sufficient service clearance and in accordance with local and national codes.
EcoBreeze Frame is properly placed and secured using TANDEMLOC VI-SO clamp connectors.
Return and supply ducts installed and properly attached to the cooling equipment.
Shipping materials have been removed.
Equipment is clear of any loose debris.
Water analysis completed and settings adjusted.
EcoBreeze System Operation and Maintenance8
Electrical inspection checklist
The electrical inspection verifies that all electrical connections are secure and correct and that the equipment is properly grounded.
CAUTIONELECTRICAL HAZARD
• All electrical wiring must comply with local and national codes and regulations. • The equipment must be grounded (do not use a water-pipe ground).
Failure to follow these instructions can result in injury or equipment damage.
Ensure that the:
Incoming voltages match the phase and voltage listing on the nameplate.
Electrical wiring complies with local and national codes and regulations.
Equipment is properly grounded.
Electrical connections are tight, including contactors, terminal blocks, controllers, switches, relays, auxiliary devices, and field connections.
Check wiring to the pump motors and water treatment system.
Main power branch is sized appropriately for the unit.
Main electric supply is properly wired to power source and frame.
Remote interface panel is mounted and wired to the frame.
Field wiring has been installed for (optional) Modbus, alarm contact and remote shutdown if applicable.
9EcoBreeze System Operation and Maintenance
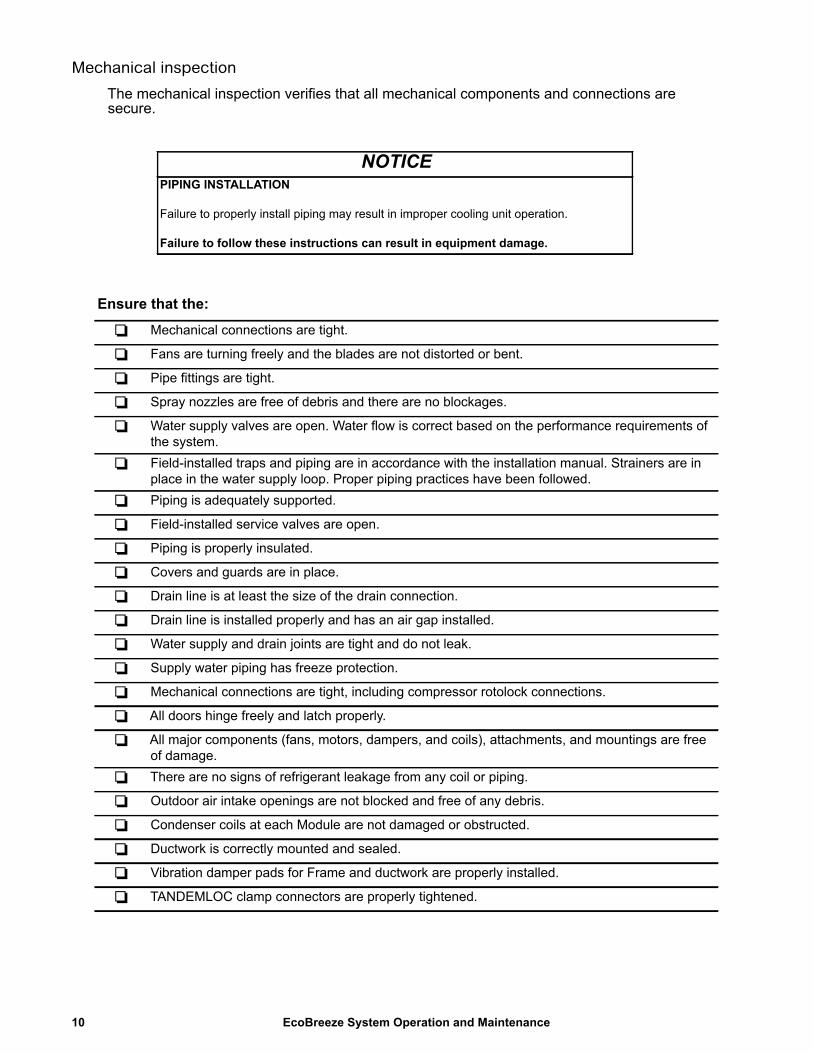
Mechanical inspection
The mechanical inspection verifies that all mechanical components and connections are secure.
NOTICEPIPING INSTALLATION
Failure to properly install piping may result in improper cooling unit operation.
Failure to follow these instructions can result in equipment damage.
Ensure that the:
Mechanical connections are tight.
Fans are turning freely and the blades are not distorted or bent.
Pipe fittings are tight.
Spray nozzles are free of debris and there are no blockages.
Water supply valves are open. Water flow is correct based on the performance requirements of the system.
Field-installed traps and piping are in accordance with the installation manual. Strainers are in place in the water supply loop. Proper piping practices have been followed.
Piping is adequately supported.
Field-installed service valves are open.
Piping is properly insulated.
Covers and guards are in place.
Drain line is at least the size of the drain connection.
Drain line is installed properly and has an air gap installed.
Water supply and drain joints are tight and do not leak.
Supply water piping has freeze protection.
Mechanical connections are tight, including compressor rotolock connections.
All doors hinge freely and latch properly.
All major components (fans, motors, dampers, and coils), attachments, and mountings are free of damage.
There are no signs of refrigerant leakage from any coil or piping.
Outdoor air intake openings are not blocked and free of any debris.
Condenser coils at each Module are not damaged or obstructed.
Ductwork is correctly mounted and sealed.
Vibration damper pads for Frame and ductwork are properly installed.
TANDEMLOC clamp connectors are properly tightened.
EcoBreeze System Operation and Maintenance10
User interface inspection checklist
The user interface inspection verifies that the sensors and internal communication links are installed properly.
Start-up inspection
The start-up inspection ensures that the equipment is operating properly after the initial start-up. This inspection verifies that all modes of operation are working correctly and that the cooling unit is ready for normal operation.
of
Final inspection
The final inspection verifies that the system is clean, and the start-up form has been sent to Schneider Electric.
Ensure that:
The CAN is connected to each Module and the bus is terminated at each end.
Building management system is connected correctly and a terminator is wired into the final unit.
Configure the settings for remote interface panel and input/output contacts.
While the equipment is operating, ensure that:
The Modules are free from malfunctions, including water leaks, unusual vibrations, or other irregularities, in each mode of operation.
The current draw is within the ratings.Record the current at the main power connection of the main circuit breaker.Record all current draws on the load side of any circuit breakers used for each Module.Compare the circuit breaker setting for each Module to the actual current measured and the full load amps of the Module to verify that the current draws are acceptable.
Indoor and outdoor fans are functioning properly.
While in DX cooling mode, check supply and return temperatures.
The spray pattern is proper. There is no debris in the water screen.
Suction and discharge pressure and temperature sensor readings are recorded.
Air filters are clean and free of debris.
The clogged filter alarm is operating properly. Cover 1/3 of the filter area to initiate the alarm.
Ensure that:
The system is clean and free from debris.
Module door seals and latches are operational.
Packaging materials are disposed of properly.
The start-up form was completed and sent to Schneider Electric.
11EcoBreeze System Operation and Maintenance
Operation
Controllers
Controller redundancy
The Frame system uses dual master controllers: a main Module and a redundant Module. The controllers are identical and monitor all Modules and external user interfaces. Only the acting master sends execution commands to Modules. The main controller sends the redundant controller a message periodically indicating its health. If the redundant controller has not received a message for a consecutive number of periods it will assume the role of master controller and generate a controller fault alarm. The redundant Module will return control to the main Module when the redundant Module receives health messages from the main Module.
Module controllers
Module controllers are connected via CAN to each other and to the main and redundant controllers. Data collected by the Module controllers is sent to the master controller.
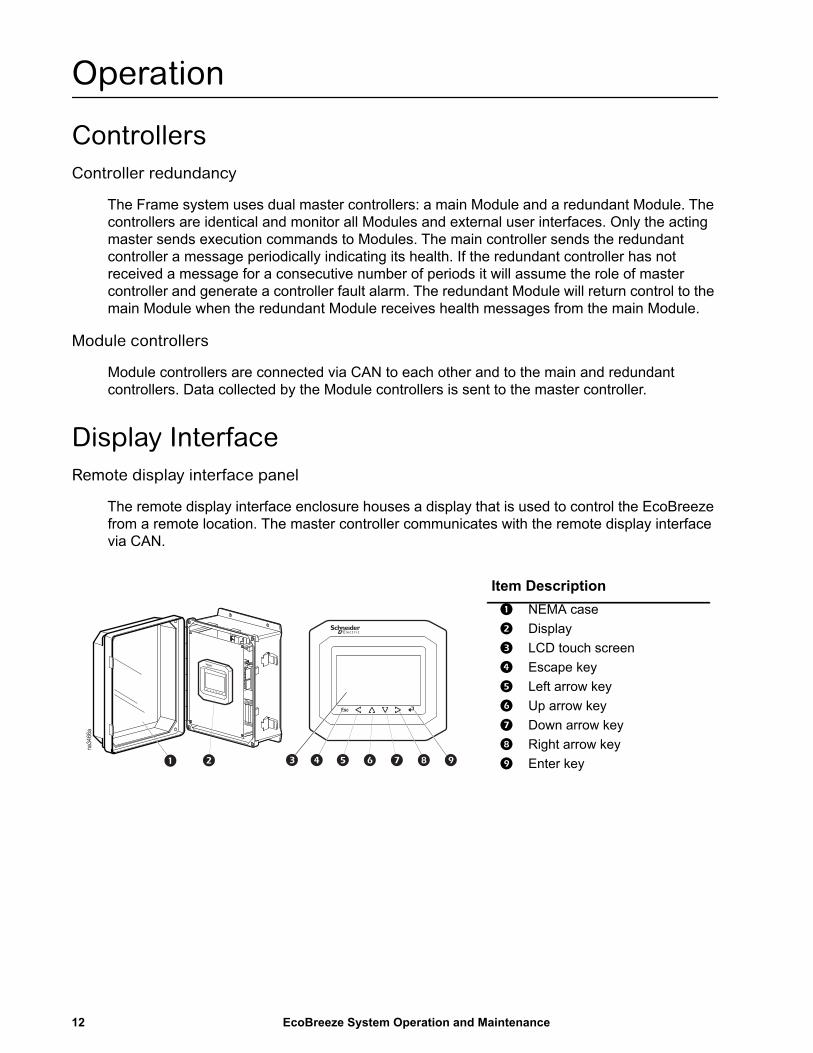
Display Interface
Remote display interface panel
The remote display interface enclosure houses a display that is used to control the EcoBreeze from a remote location. The master controller communicates with the remote display interface via CAN.
na34
66a
Esc
Esc
Item Description NEMA case Display LCD touch screen Escape key Left arrow key Up arrow key Down arrow key Right arrow key Enter key
EcoBreeze System Operation and Maintenance12
Using the Display Interface
There are two primary user interfaces: a graphical user interface (GUI) and the Modbus interface. The GUI is the human-to-machine interface and is the local interface to the system. The Modbus interface is the machine-to-machine interface and is the remote interface to the system.
Scrolling status screens
The display interface scrolls automatically and continuously through the following screens of status information.
Status Screen Information Displayed1 • Active Controller - MIM
• Time / Date• Contact Name - Unknown• Active Alarm(s) - (Flashes if alarms are
present)2 • Operating Mode - Off/On
• Outdoor Air - °F (°C)• Outdoor Humidity - % RH• Supply Air Setpoint - °F (°C)• Supply Air - °F (°C)• Return Air - °F (°C)
3 • IEC Air - °F (°C)• Containment DP - 00.0 Pa• Compressor Power - 0 kW• IT Air Flow - 0 CFM• Basin Water Level - 00.0 in
13EcoBreeze System Operation and Maintenance
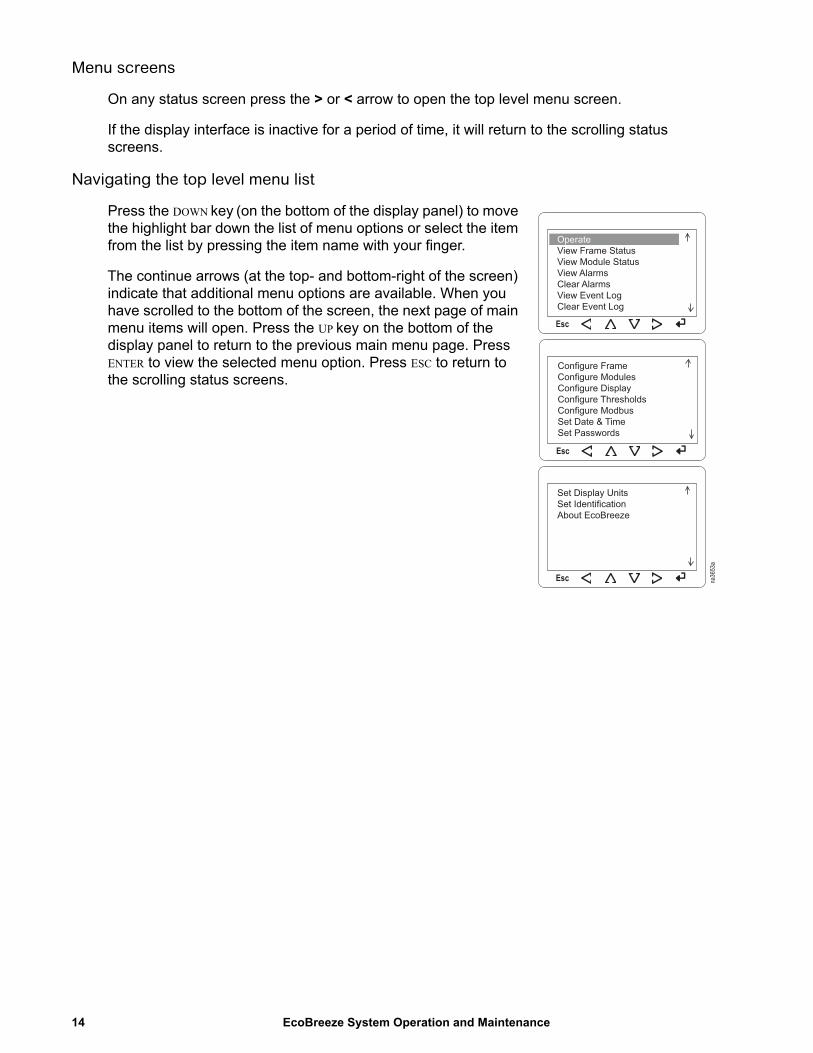
Menu screens
On any status screen press the > or < arrow to open the top level menu screen.
If the display interface is inactive for a period of time, it will return to the scrolling status screens.
Navigating the top level menu list
Press the DOWN key (on the bottom of the display panel) to move the highlight bar down the list of menu options or select the item from the list by pressing the item name with your finger.
The continue arrows (at the top- and bottom-right of the screen) indicate that additional menu options are available. When you have scrolled to the bottom of the screen, the next page of main menu items will open. Press the UP key on the bottom of the display panel to return to the previous main menu page. Press ENTER to view the selected menu option. Press ESC to return to the scrolling status screens.
na36
53a
Esc
Esc
Configure FrameConfigure ModulesConfigure DisplayConfigure ThresholdsConfigure ModbusSet Date & TimeSet Passwords
Esc
Set Display UnitsSet IdentificationAbout EcoBreeze
You select the main menu item by pressing the ENTER key. The screen that opens is a sub menu item. In the illustration, the Set Date & Time menu item was selected. On the sub menu page, the changes can be made.
Press ENTER to move the highlight box across each increment of the date and time. Press the UP or DOWN keys to change the increment. AM or PM is also adjusted with the UP or DOWN keys.
Passwords
Path: Main > Set Passwords
The default passwords for the display interface:
• Operate Access: 0 A password of 0 indicates no protection. A password may be installed to prohibit accidentally shutting down the system.
• Device Access: 9 For users who need to change basic and environmental settings.
• Admin Access: 9 For users who need to change advanced options or modify settings that control the components in the system.
When you try to change any of the settings, the display prompts you to enter your password. Press ENTER. To enter your password, use the UP or DOWN keys to scroll through the numbers. At the desired number, press ENTER to submit your password.
The password range of the display interface is from -32768 to 32767. To change a password, use the UP or DOWN keys to move the highlight box to the desired password type. Press ENTER. The highlight box will begin to flash indicating it is ready to accept your input. Use the UP or DOWN keys to change the password. When finished, press ENTER to save the change. Press ESC to leave the page.
See “The Embedded Display Menus” on page 18 for information on setting the password timeout.
Configure FrameConfigure ModulesConfigure ModbusConfigure ThresholdsSet Date & TimeSet PasswordsSet Display Units
15EcoBreeze System Operation and Maintenance
Start the System
Path: Main > Operate > On/Off
To start the System from the scrolling status screen, press the RIGHT key, select the Operate option on the list and press the ENTER key.
NOTE: If the Operate Access password is non-zero, the password screen will be presented after ENTER is pressed.
The screen changes to show Operate Off. Press ENTER to select Off. The highlighted box around the word Off will start to flash. Press the UP key to change the setting to On. Press ENTER to confirm the change. The system will run according to the current settings. Press ESC to return to the previous screen.
Stop the System
Path: Main > Operate > On/Off
To stop the System, press the RIGHT key, select Operate, then press ENTER. The screen changes to show only Operate On. Press the DOWN key to change the setting to Off. Press ENTER to confirm the change. The system will shut down. Press ESC to return to the previous screen.
Set date and time
Path: Main > Date & Time
Select Date & Time from the main menu. The changes can be made on the sub menu page.
Press the RIGHT arrow to move the highlight box across each part of the date and time. Press the UP or DOWN key to change the increment. AM or PM is also adjusted with the UP or DOWN key. See the illustration at “Navigating sub menus” on page 15.
See “The Embedded Display Menus” on page 18 for information on setting the display format of the date and time.
Set display units
Path: Main > Display Units
This information is password protected. Select to display information in US or metric units.
Set identification
Path: Main > Identification > Name
This information is password protected. Add system or emergency information your installation requires. The display interface can hold up to 21 alphanumeric characters in the selected entry. Use the UP and DOWN keys to move through the characters. Press ENTER to select the character. Use the RIGHT and LEFT keys to move to the next character space.
EcoBreeze System Operation and Maintenance16
About EcoBreeze
Path: Main > About EcoBreeze
This is a “view only” screen. No password is required. The screen displays the versions and revision levels of the firmware used in the Frame and Module controllers.
• About Frame– HW Mask 481 v6.2– MIM App Rev 1.X.X– RIM App Rev 1.X.X
• About Modules > Module #– Select the Module from the list: The highlight bar will be located on the >> in the
Select column. Press the UP or DOWN keys or press >> on the screen to select the Module you wish to view.
• HW Mask 480 v1.2• MIM App Rev 1.X.X
– Press Prev... at the bottom left of the screen to return to the Module list or press ESC to return to the main menu.
17EcoBreeze System Operation and Maintenance
The Embedded Display Menus
Some settings are only available by accessing the embedded display for the interface. Confine any changes to configuration and time out delays. Do not make other changes to the embedded menus.
The network status screen
To open the network status screen, press and hold the ENTER and LEFT keys for about three seconds. The password screen will open. The default password is -12. Press ENTER to cause the highlighted box to flash, then press the DOWN key. When you get to -12, press ENTER again and the menu screen will open.
• These settings are configured at the factory and should not be changed. • Note the settings for each node. These are the settings you will use if the display
interface must be replaced. • Press the arrows in the more column to open more pages for each item in the local
column.NOTE: Changing the settings can make Module controller data inaccessible to the remote
Press >> at the top of the far right column (Address Status Mode) of the screen to display the main menu of the item you wish to view.
Select Parameters to change:
• Beep Mode: Produces a beep when a button is pressed.
– 0 = No Beep– 1 - 2 = Loudness
• Password Timeout: 0 - 240 seconds (the default is 60). If the specified amount of time since the last operation with the interface display elapses, the password will need to be re-entered before accessing the interface menus.
• I/O Timeout: Not used.• Time Char Separator: A character used to separate
the time fields.• Date Char Separator: A character used to separate the date fields.NOTE: The other parameters in the embedded menu do not impact the Frame or Module
controllers. Do not use the ExpBus, Modbus, Digital I/O, or Real date and time menus.
na36
87a
Esc
TM168DGB Parameters Contrast ExpBus Modbus Digital I/O InfoReal date and time
The Frame distributes power from the mains to the Modules and its master controllers collect all sensor information.
The Frame also supplies the water to and from the Modules. The water system is used to wet the outer surface of the indirect evaporative cooling (IEC) heat exchangers. Basic features of the Frame water system include redundant pumps and flow monitor, redundant makeup water supply, basic drain and blow-down, conductivity monitoring and control along with chemical free water treatment.
See the water system manual for more information.
Path: Main > View Frame Status
Measurements will be visible inside a highlighted box when the screen opens. Press ENTER to open the Measurement screen or press the DOWN key to move to the next menu option and press ENTER to select your choice.
Measurements:
• Outdoor Temperature: °F/°C - The outdoor air temperature.• Outdoor Humidity: %R.H. - The outdoor relative humidity.• Supply Temperature: °F/°C - The temperature of the conditioned air.• Return Temperature: °F/°C The temperature of the air to be conditioned.• IEC Air Temperature: °F/°C - The temperature of the indirect evaporative cooled air.• Containment DP: Pa - The differential pressure sensed between the supply air and
return.• IT Air Flow: CFM / L/s - The volume of air flowing into the IT space.• Compressor Power: kW - The rate at which the EcoBreeze is consuming energy to run
compressors.• Water Conductivity: uS/cm - The conductivity of the water in the storage basin.• Water Level: in./cm - The level of the water in the storage basin.
This is a view only screen. No changes can be made to any settings on this page.
CAUTIONAUTHORIZED PERSONNEL ONLY
Procedures in this section must be performed by Schneider Electric authorized personnel.Changing the settings incorrectly can cause serious malfunctions and damage to your system. Only qualified service personnel should make changes to these settings.
Failure to follow these instructions can result in injury or equipment damage.
EcoBreeze System Operation and Maintenance20
Active Flow Controller (AFC) status will be visible inside a highlighted box when the screen opens. Press ENTER to open the AFC screen.
ActiveFlowCtrl:
• HACS or CACS selection• AFC Setpoint• Current Fan Speed• AFC Commanded IT Fan Speed• Minimum and Maximum Group DP Reading• AFC Sensor Status• Number of AFCs• AFC Altitude• AFC Lamp Test• AFC AirFlow Status• AFC ModComm• AFC Door• AFC CANComm• Slave Mod ID
This is a view only screen. No changes can be made to any settings on this page.
21EcoBreeze System Operation and Maintenance
Run Hours:
• Pump A: - 0 Hrs• Pump B: - 0 Hrs• Water Treatment: - 0 Hrs• Module 1 Compressor• Module 2 Compressor• Module 3 Compressor• Module 4 Compressor• Module 5 Compressor• Module 6 Compressor• Module 7 Compressor• Module 8 Compressor• IT Fan 1 (each Module)• IT Fan 2 (each Module)• OA fan (each Module)• Reset Run Hours
Reset Run Hours can be accessed from this screen and will be in the highlighted box when the screen opens.
To Reset Run Hours. Press ENTER. The password screen opens. Press ENTER and enter your device or admin password. The next screen displays the items for which run hours may be reset.
• Pump A• Pump B • Water Treatment• Module 1 Compressor• Module 2 Compressor• Module 3 Compressor• Module 4 Compressor• Module 5 Compressor• Module 6 Compressor• Module 7 Compressor• Module 8 Compressor• IT Fan 1 (each Module)• IT Fan 2 (each Module)• OA fan (each Module)
Select your choice by moving the highlight bar down the list with the DOWN arrow. Press ENTER to open the Reset screen.
EcoBreeze System Operation and Maintenance22
Reset (Option) Run HoursEnter Yes to confirm ESC to exitYes/No
No will be in the highlighted box on the screen. Press ENTER to cause the box to flash. Then press the UP key to change the No to Yes. Press ENTER to save your change. Press ESC to return to the option selection screen.
• Fan Speed: 20% - The speed of the IT fans. This setting only applies when IT Fan Mode is set to Manual (see “Air Setup” on page 24).
The Supply Air setting is in the highlighted box when the screen opens. Move the highlight box down the list to select the setting and press ENTER to select it. The box will start to flash. Use the UP or DOWN key to change the setting. Press ENTER to save the setting. Press the DOWN key to select another setting to adjust or press ESC to go back to the Configure Frame screen.
23EcoBreeze System Operation and Maintenance
Water Controls. (Requires device password)
• Lead Pump: A or B• Pri Water Src: A or B• Drain Basin: Basin Draining - When this menu item is selected, if the Frame is off
(Operate = Off), the basin will be drained.Use the UP or DOWN keys to move the highlight box to your selection and press ENTER to select it. The box will start to flash. Use the UP or DOWN arrows to change the setting. Press ENTER to save the setting. If you select Drain Basin, when ENTER is pressed, the confirmation screen opens.
Enter Yes to confirm ESC to exitYes/No
No will be in the highlighted box on the screen. Press ENTER to cause the box to flash. Then press the UP arrow to change the No to Yes. Press ENTER to save your change. Press ESC to return to the option selection screen.
Air Setup. (Requires admin password):
• IT Fan Mode: – AUTO: Air flow is automatically controlled by the unit via a user tuned PID. This
requires that a user supplied differential pressure sensor be connected to the remote interface panel and configured via the DP Sensor Sel, DP Sensor Min and DP Sensor Max properties or AFC is attached to the EcoBreeze.
– Manual: The air flow is fixed to the value of the Fan Speed property (see “Air Controls” on page 23).
– Elevation: -46 - 914 m x 10 (-150 - 3000 ft x 10): Elevation above sea level. This is important for the EcoBreeze controller to be able to accurately estimate coil performance.
• Damper Present: No/Yes - When set to Yes, the controller will automatically control a user supplied air isolation damper.
• Containment Gain: 0 - 100% /Pa - When the IT Fan Mode is set to Auto, this property is the proportional multiplier (gain) for the actuator. The proportional multiplier adjusts for the difference (error) between the measured value and the setpoint.
• Containment Reset: 0 - 999/sec - When the IT Fan Mode is set to Auto, this property is the integral multiplier (reset rate) for this actuator. The integral multiplier adjusts for error measurement and the amount of time that the error has existed. The integral multiplier adds to or subtracts from the output in small increments to correct for the offset error caused by the proportional contribution (0 - 999 sec). Note that setting the Reset to 0 secs will disable reset, effectively making the controller a gain only controller. This mode can be useful for PID tuning.
EcoBreeze System Operation and Maintenance24
• DP Sensor Sel: – None: No differential pressure (DP) measurements are to be supplied to the unit.– 4-20 mA, 0-10 VDC: A user supplied DP sensor of the selected type has been
connected to the remote interface panel.– BMS: DP measurements are to be input via the Modbus interface.– AFC: DP measurements are to be controlled by the AFC.
• DP Filter Coef: 0.0 - 1.0 - This parameter is a filtering coefficient for the DP sensor. The larger the value of this parameter, the more weight is given to previous sensor readings. If sensor readings fluctuate excessively, increase the value. If the sensor is not responding quickly enough to changes, reduce the value.
• DP Sensor Min: -2491.0 - 2491.0 Pa - When DP Sensor Sel is set to 4-20 mA or 0-10 VDC, this property specifies the minimum value that the sensor will generate. For example, if the sensor is a 4-20mA device, this value represents the differential pressure that the device will report at 4mA.
• DP Sensor Max: -2491.0 - 2491.0 Pa - When DP Sensor Sel is set to 4-20 mA or 0-10 VDC, this property specifies the maximum value that the sensor will generate. For example, if the sensor is a 4-20 mA device, this value represents the differential pressure that the device will report at 20 mA.
The IT Fan Mode setting will be in the highlighted box on the screen. Use the DOWN key to move the highlight box to your selection and press ENTER to select it. Press ENTER to cause the box to flash. Then press the UP or DOWN keys to change the setting. Press ENTER to save your change. Press ESC to return to the option selection screen.
Water Setup. (Requires admin password)
• Pump Rot Intvl: (0 (never switch) - 15 days) - This property is the amount of run time that the lead water pump will be allowed to accumulate before switching to the lag pump.
• Water Saver: Off/On• Dry Op Delay: 24 Hrs - If the water system has not operated for the time specified by this
property, the basin will be drained.The Pump Rotation Interval setting will be in the highlighted box on the screen. Use the Down arrow to move the highlight box to your selection and press ENTER to select it. Press ENTER to cause the box to flash. Then press the arrow buttons to change the setting. Press ENTER to save your change. Press ESC to return to the previous screen.
25EcoBreeze System Operation and Maintenance
Water Service. (Requires admin password)
• Setpoint: 500 - 15000 uS/cm• Deadband: 25 - 15000 uS/cm• Conductivity Min/Max: Select the range that corresponds to the selection made on the
• ServiceCmplt: No/Yes - Select Yes to clear the Water Treatment System Maintenance Required alarm and to set the Last Service date to the current date.
• Last Service: 01/01/2001- Displays the last time the water treatment system was serviced.
The Setpoint setting will be in the highlighted box on the screen. Use the DOWN key to move the highlight box to your selection and press ENTER to select it. Press ENTER to cause the box to flash. Then press the UP OR DOWN keys to change the setting. Press ENTER to save your change. Press ESC to return to the previous screen. The Last Service setting cannot be changed from this screen.
Discrete I/O Setup. (Requires admin password)
• Digital I/O Normal States: Sets the normal state of the contact (Open or Closed). The input/output will become active when its state is opposite the normal state.
– Remote Run/Stop: Open– Isolation Damper: Open– Alarm Contact: Open
The Remote Run/Stop setting will be in the highlighted box on the screen. Use the DOWN key key to move the highlight box to your selection and press ENTER to select it. Press ENTER to cause the box to flash. Then press the UP or DOWN keys to change the setting. Press ENTER to save your change. Press ESC to return to the previous screen.
Map Alarms. (Requires admin password) Choose to have the system announce all alarms or only critical alarms.
• Activate Alarm Relay on:– Any Alarm / Critical Alarm
The current choice will be in the highlighted box when the screen opens. Use the UP or DOWN keys to change the setting. Press ENTER to save the change. Press ESC to return to the previous screen.
EcoBreeze System Operation and Maintenance26
ActiveFlowCtrl Setup. Configure AFC settings.
• Edit Config– Enable/Disable (set to Enable before changing any configuration)
• ApplyNewConfig– Yes / No (select Yes to accept changes to configuration settings)
• Select HACS/CACS• AFC Setpoint
– Positive / SlightPos / Zero / SlightNeg / Negative• Number of AFCs
– 1 to 40• EnableLampTest
– Yes / No• AFC modbus ID
– 1 to 12
27EcoBreeze System Operation and Maintenance
View Setup. Press the UP or DOWN keys to view all sensor information being collected by the Frame controllers. No password is required to view this screen.
• Supply Air Setpt: 75.0°F/°C• Contain Setpt: 100.0 Pa• Fan Speed: 0%• Conduct Setpt: 2500 uS/cm• Conduct Dedbnd: 1000uS/cm• Lead Pump: A• Pri (Primary) Water Src: A• IT Fan Mode: Auto• Elevation: ftx10/mx10• Damper Present: No• Contain Gain: 0.000%/Pa• Contain Reset: 0.0011 sec• DP Sensor Select: None• DP Sensor Min: 0.0 Pa• DP Sensor Max: 0.0 Pa• Pump Rot Intvl: 2 Days• Water Saver: On/Off• Dry Op Delay: 24 hrs• Conduct: Range - 500-2500 uS/cm• Remote Run/Stop: N.O.• Isolation Damper: N.O.• Alarm Contact: N.O.• AFC HACS/CACS Sel: HACS• AFC Setpoint: Zero• Number of AFCs: 0• Enable Lamp Test: No• AFC Modbus ID: 0• AFC Altitude: 0m
EcoBreeze System Operation and Maintenance28
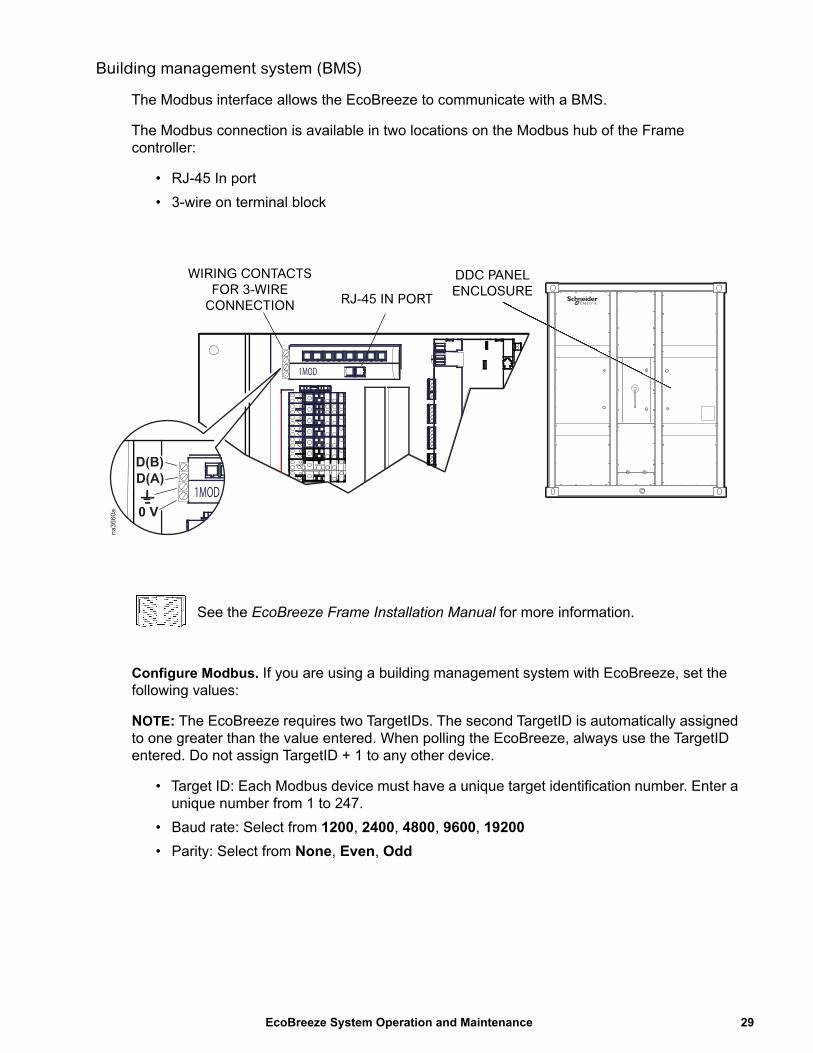
Building management system (BMS)
The Modbus interface allows the EcoBreeze to communicate with a BMS.
The Modbus connection is available in two locations on the Modbus hub of the Frame controller:
• RJ-45 In port• 3-wire on terminal block
See the EcoBreeze Frame Installation Manual for more information.
Configure Modbus. If you are using a building management system with EcoBreeze, set the following values:
NOTE: The EcoBreeze requires two TargetIDs. The second TargetID is automatically assigned to one greater than the value entered. When polling the EcoBreeze, always use the TargetID entered. Do not assign TargetID + 1 to any other device.
• Target ID: Each Modbus device must have a unique target identification number. Enter a unique number from 1 to 247.
• Baud rate: Select from 1200, 2400, 4800, 9600, 19200• Parity: Select from None, Even, Odd
1MOD
1MOD
D(B)D(A)
0 V
na36
60a
WIRING CONTACTS
FOR 3-WIRE
CONNECTIONRJ-45 IN PORT
DDC PANEL
ENCLOSURE
29EcoBreeze System Operation and Maintenance
Module Configuration
The Module configuration settings define which components are available and how the Module should operate. Up to eight Modules can be housed in a common Frame. The Modules are fully self contained with the exception of the common Frame-based water system to support the indirect evaporative cooling. Each Module has its own controller. The controllers in the Modules are coordinated by the Frame active master controller.
View Module status
Path: Main > View Module Status > Measurements > Select Module (N) > Module (N) Sensors
• These sensor readings cannot be changed on this screen: it is view only. No password is required to view Module Status. Module status is divided into two menus:
Fans & air
• Supply Air: °F/°C - The temperature of the conditioned air.• Supply Humidity: %R.H. - The relative humidity of the conditioned air.• Return Air: °F/°C - The temperature of the air to be conditioned.• Return Humidity: %R.H. - The relative humidity of the air to be conditioned.• IT Air Flow: CFM / L/s - The volume of IT air supplied by the Module.• IT Fan Power: W - The rate of energy consumed by the Module IT fans.• OA Fan Speed: rpm - The rotational speed of the OA fan.• OA Fan Power: W - The rate of energy consumed by the Module OA fan.• IEC Air: °F/°C - The temperature of the indirect evaporative cooled air. • Filter DP: Pa - The differential pressure across the air filter.
CAUTIONAUTHORIZED PERSONNEL ONLY
Procedures in this section must be performed by Schneider Electric authorized personnel.The settings are defined at the factory. Changing the settings incorrectly can cause serious malfunctions and damage to your system. Only qualified service personnel should make changes to these settings.
Failure to follow these instructions can result in injury or equipment damage.
EcoBreeze System Operation and Maintenance30
DX components
• Discharge Pres.: psi/kPa - The pressure at the discharge port of the compressor.• Discharge Temp.: °F/°C - The temperature of the refrigerant at the discharge port of the
compressor.• Suction Pressure: psi/kPa - The pressure at the suction port of the compressor.• Suction Temp.: °F/°C - The temperature of the refrigerant at the suction port of the
compressor.• Compressor Power: kW - The rate of energy consumed by the compressor.• VFD Frequency: Hz - The motor frequency command to the compressor.• Compressor Speed: rpm - The rotational speed of the compressor.• Superheat: °F/°C - The temperature above saturation of the refrigerant entering the
suction port of the compressor.• EEV Position: % - The position of the electronic expansion valve.• Liquid Temp: °F/°C - The temperature of the refrigerant in the liquid line.
Select Prev... in the lower left corner of the screen to return to the Select Module (N) screen. From the Select Module screen, select the next Module in the list to view the status of its sensors.
Configure Modules
Path: Main > Configure Modules
Map Modules. This function tells the Frame controller whether or not a specific Module is populated and active within the Frame. This is the only option under mapping. You must enter your device or admin password to change the setting.
• Module # - Present - Yes/No Yes or No will be visible inside a highlighted box. Press ENTER to cause the highlighted box to flash. Press the UP or DOWN keys to change the setting. Press ENTER again to save your changes.
Operate Modules. Allows the user to designate Modules to be on or off when the system is operating. You must enter your device or admin password to change the setting.
• Module # – Press the UP or DOWN keys to select the Module # then press ENTER.– Operate - Off/On
Off or On will be visible inside a highlighted box. Press ENTER to cause the highlighted box to flash. Press the UP or DOWN keys to change the setting. Press ENTER again to save your changes (or select Prev... to return to the previous page and select another Module to view).
31EcoBreeze System Operation and Maintenance
View Setup. This is a read-only view of the above configurations. No password is required.
• Module # - Available - Yes/No– Press the UP or DOWN keys to move the highlighted box to the Module # you want to
select, then press ENTER.
Operate - On/Off
The display screen only shows if the Module is Off or On.Select Prev... in the lower-left corner of the screen to return to the previous screen. From there, select the next Module in the list to view.
EcoBreeze System Operation and Maintenance32
Environment Control
The EcoBreeze can sense ambient temperature and automatically switch between DRY and WET mode to optimize efficiency. The Frame controls the Modules to provide the conditioned air to the computer room.
Air-to-air heat exchange
Air-to-air heat exchange is the DRY mode and only requires the power of the fans to move the air (extremely energy efficient). All water in the system is dumped during dry operation to prevent freezing and the energy efficient outside air fan modulates airflow across the heat exchanger to maintain the IT supply air setpoint.
• When ambient air drops below 4.4°C (40°F) the system water is dumped to prevent freezing. The system water will also be dumped after 24 hours (user adjustable setting) of spray-free operation.
• Only the fans are required to move the air.• Cool air passes over the outside of the heat exchanger channels, cooling the hot IT air
flowing inside.
Indirect evaporative cooling (IEC)
Indirect evaporative cooling is the WET mode and allows for economizing in hot, dry climates. Unevaporated water is collected and recirculated through the chemical-free water treatment system. The conductivity meter in the water basin maintains optimal water-makeup.
• Heat is removed from the IT air by evaporating water on the outside of the heat exchanger channels.
• Water is supplied evenly over the heat exchanger channels via spray nozzles.• Maintains the adjustable IT supply air setpoint.
Proportional DX cooling
If ambient conditions do not allow evaporative cooling to meet the supply air setpoint, the proportional refrigerant circuit will start automatically at a varying capacity to help cool to the setpoint.
The refrigerant circuit is only designed to handle 60% of the load for each Module. This means that at least 40% of the cooling will always be handled by the IEC heat exchanger.
• Variable speed compressors allow for optimal efficiency.• Supplements evaporative cooling to maintain the supply air setpoint.• Designed for 60% of full load.• Uses R410a refrigerant.
Setpoints
Setpoints are the target values each mode will maintain. User setpoints are at the Frame level, not separate for each Module
33EcoBreeze System Operation and Maintenance
The setpoint for each mode must be within the following ranges:
• Supply Air - 75.0°F (See “Air Controls” on page 23.)• Containment - 100.0 Pa (See “Air Controls” on page 23.)
Configure thresholds
A threshold is used to trigger an alarm. For example, if you want to be notified when the supply air temperature exceeds 32°C (90°F), then set the supply temperature high threshold to 90°F. The controller will generate an alarm when the supply air temperature exceeds the threshold. The thresholds may be viewed or changed from this screen. The device password is required to change the threshold setting.
• Contain DP High - 00.0 Pa - Can be set between the Containment Setpoint and DP Sensor Max (see “Air Setup” on page 24)
NOTE: Once the alarm is triggered, the differential pressure must fall below half way between the Contain DP High threshold and the Containment Setpoint for the alarm to clear.
• Contain DP Low - 00.0 Pa - Can be set between DP Sensor Min and Contain DP High.• Return Temp High - Can be set between Return Temp Low threshold and (212°F).• Return Temp Low - Can be set between -40°F (-40°C) and Return Temp High threshold.• Supply Temp High - Can be set between Supply Air Setpoint (see “Air Controls” on
page 23) and 100°C (212°F).• Supply Temp Low - Can be set between -40°C (-40°F) and Supply Temp High
threshold.The Contain DP High setting will be in the highlighted box on the screen. Use the DOWN key to move the highlight box to your selection and press ENTER to select it. Press ENTER to cause the box to flash. Then press the UP or DOWN keys to change the setting. Press ENTER to save your change. Press ESC to return to the previous screen.
EcoBreeze System Operation and Maintenance34
Event Log
The event log saves status information and a message each time a change in the system is detected. Alarms and events are recorded in the log.
View log
Path: Main > View Event Log
The Event Log Screen contains
• The event index number in the log, and the device (Frame/Module) to which it applies. • The severity level of the alarm is also listed (Warning/Critical).• The time and date the event occurred.• The name and description of the event.
To view the next event in the log, navigate to Prev.., then press ENTER. Another method of navigating the list is to press the word Last at the bottom of the screen to go to the last entry or Prev... to go to the previous entry in the event log.
Clear log
Path: Main > Clear Event Log
Erase all of the events in the log. The device password must be entered to erase the log. When the screen opens, you will see the following:
• Clear Event Log?– Press ENTER to Confirm– ESC to exit
35EcoBreeze System Operation and Maintenance
Respond to Alarms
When an alarm is triggered, the display alerts you through the following methods:
• The screen will flash Active Alarm(s) on the bottom of the main screen.• Alarm and event logs
View alarms
Path: Main > View Alarms
To view the next alarm, navigate to Next..., then press ENTER. Another method of navigating the alarm list is to press the word First at the bottom of the screen to go to the first entry or Next... to go to the next entry in the alarm list.
Clear alarms
Path: Main > Clear Alarms
• Clear Alarms: Yes/No - Select Yes to clear all of the alarms in the list.• Reset Pump A Fault: Yes/No - Select Yes to reset a fault on water pump A.• Reset Pump B Fault: Yes/No - Select Yes to reset a fault on water pump B.• Reset Air Pump Fault: Yes/No - Select Yes to reset a fault on the air pumps.
If the conditions that caused the alarm still exist, those conditions will cause the alarm to be regenerated. A device password must be entered to erase the alarm list.
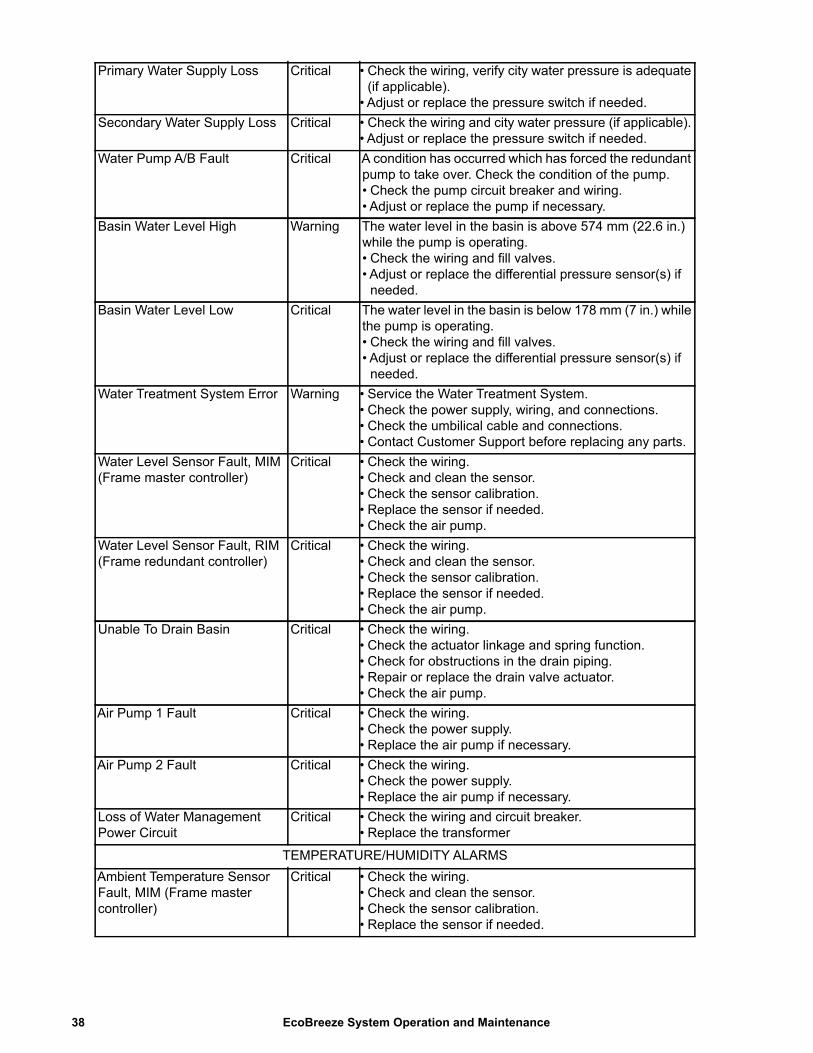
Frame alarms
• “AIRFLOW ALARMS” on page 36• “COMMUNICATION ALARMS” on page 37• “WATER SYSTEM ALARMS” on page 37• “TEMPERATURE/HUMIDITY ALARMS” on page 38• “MISCELLANEOUS ALARMS” on page 39
Critical • Replace the AFC.• For assistance, contact Schneider Electric Customer
Support. AFC Door Open Warning • Close the aisle containment system door.
• Check for proper operation of aisle containment door switches.
• For assistance, contact Schneider Electric Customer Support.
AFC CAN Communication Error Critical • Check CAN cables between AFC sensors.• Power or Sensor failure of AFCs.• For assistance, contact Schneider Electric Customer
Support.
EcoBreeze System Operation and Maintenance36
AFC ModBus Communication Error
Critical • Check ModBus cable between AFC master sensor and EcoBreeze frame controller.
• Power or Sensor failure of AFC master sensor.• For assistance, contact Schneider Electric Customer
Support.Insufficient Airflow Warning • Ensure plenums are clear of obstructions.
• Ensure air ports on AFC are clear of obstructions.• Ensure sufficient cooling capacity exists for the load.• For assistance, contact Schneider Electric Customer
Support. Data Center Airflow Control Differential Pressure High/Low
Warning The pressure differential at the sensor is outside of the defined range. Verify that the sensor is functioning properly.• Verify that the air intake is not obstructed.• Check the tubes, sensor, sensor configuration, and
wiring. • Replace the field installed sensor.
COMMUNICATION ALARMSModule #[1…N] Not Responding
Critical Module N (Number) Not Responding.• Check the wiring and CAN connections. • Remove power from then restore power to the Module.• Replace the controller if necessary.
UI Expansion IO Not Responding
Critical • Check the wiring and CAN connections.• Replace the expansion IO Module if necessary.
MIM Fault Critical • Check the wiring. • Reboot the controller, check the ERR LED for fault
codes. • Consult the controller documentation for additional
troubleshooting and diagnosis.• Download new firmware. • Repair or replace the MIM controller.
RIM Fault Critical • Check the wiring. • Reboot the controller, check the ERR LED for fault
codes. • Consult the controller documentation for additional
troubleshooting and diagnosis.• Download new firmware.• Repair or replace the RIM controller.
Module # [1…N] Inoperable Critical Identify and correct the fault at the Module.
WATER SYSTEM ALARMSSupply Basin Water Conductivity High
Warning The water conductivity at the sensor is outside of the defined range. If the sensor is functioning properly, the conductivity of the water must be addressed. • Calibrate the conductivity sensors. • Verify the drain solenoid valve is operating properly. • Check the wiring.• Replace the water conductivity sensor or drain solenoid
valve actuator if needed.• See the Water System manual for more information.
Water Treatment System Maintenance Required
Warning Specified maintenance should be performed at this time. Resetting of the maintenance alarm should only be done by the service technician after maintenance has been performed.
37EcoBreeze System Operation and Maintenance
Primary Water Supply Loss Critical • Check the wiring, verify city water pressure is adequate (if applicable).
• Adjust or replace the pressure switch if needed.Secondary Water Supply Loss Critical • Check the wiring and city water pressure (if applicable).
• Adjust or replace the pressure switch if needed.Water Pump A/B Fault Critical A condition has occurred which has forced the redundant
pump to take over. Check the condition of the pump. • Check the pump circuit breaker and wiring. • Adjust or replace the pump if necessary.
Basin Water Level High Warning The water level in the basin is above 574 mm (22.6 in.) while the pump is operating.• Check the wiring and fill valves. • Adjust or replace the differential pressure sensor(s) if
needed.Basin Water Level Low Critical The water level in the basin is below 178 mm (7 in.) while
the pump is operating.• Check the wiring and fill valves. • Adjust or replace the differential pressure sensor(s) if
needed.Water Treatment System Error Warning • Service the Water Treatment System.
• Check the power supply, wiring, and connections.• Check the umbilical cable and connections.• Contact Customer Support before replacing any parts.
Water Level Sensor Fault, MIM (Frame master controller)
Critical • Check the wiring. • Check and clean the sensor.• Check the sensor calibration.• Replace the sensor if needed.• Check the air pump.
Water Level Sensor Fault, RIM(Frame redundant controller)
Critical • Check the wiring. • Check and clean the sensor.• Check the sensor calibration.• Replace the sensor if needed.• Check the air pump.
Unable To Drain Basin Critical • Check the wiring. • Check the actuator linkage and spring function.• Check for obstructions in the drain piping.• Repair or replace the drain valve actuator.• Check the air pump.
Air Pump 1 Fault Critical • Check the wiring. • Check the power supply.• Replace the air pump if necessary.
Air Pump 2 Fault Critical • Check the wiring. • Check the power supply.• Replace the air pump if necessary.
Loss of Water Management Power Circuit
Critical • Check the wiring and circuit breaker. • Replace the transformer
TEMPERATURE/HUMIDITY ALARMSAmbient Temperature Sensor Fault, MIM (Frame master controller)
Critical • Check the wiring. • Check and clean the sensor.• Check the sensor calibration.• Replace the sensor if needed.
EcoBreeze System Operation and Maintenance38
Ambient Temperature Sensor Fault, RIM (Frame redundant controller)
Critical • Check the wiring. • Check and clean the sensor.• Check the sensor calibration.• Replace the sensor if needed.
Warning • Check the wiring. • Check and clean the sensor.• Check the sensor calibration.• Replace the sensor if needed.
Ambient Humidity Sensor Fault, RIM (Frame redundant controller)
Warning • Check the wiring. • Check and clean the sensor.• Check the sensor calibration.• Replace the sensor if needed.
High Return Temperature Warning • Verify the sensor(s) readings.• Check the wiring. • Check and clean the sensor.• Check the sensor calibration.• Replace the sensor(s) if necessary.
Low Return Temperature Warning • Verify the sensor(s) readings.• Check the wiring. • Check and clean the sensor.• Check the sensor calibration.• Replace the sensor(s) if necessary.
High Supply Temperature Warning • Verify the sensor(s) readings.• Check the wiring. • Check and clean the sensor.• Check for other alarms and failure modes.• Check the sensor calibration.• Replace sensors as necessary.
Low Supply Temperature Warning • Verify the sensor(s) readings.• Check the wiring. • Check and clean the sensor.• Check the sensor calibration.• Replace the sensor if necessary.
MISCELLANEOUS ALARMSMotorized Damper Fault Critical (This is an Optional assembly.) If installed, the alarm is
asserted if the air isolation damper has not been opened/closed in two minutes after commanded to open/close. • Verify that the damper is not obstructed.• Check the wiring.• Service the damper. • Replace the (field installed) actuator if needed.
Differential Pressure Sensor Fault
Critical • Check the wiring. • Ensure that the sensor tubing is connected properly and
the tubing is not damaged. • Check the sensor calibration.• Replace the sensor if needed.
Conductivity Sensor FaultMIM/RIM (Frame master and redundant controllers)
Warning The conductivity sensor not is functioning properly, • Check the wiring. • Replace the sensor if needed.
Module # [1…N] DX Not Available
Critical Identify and correct the DX fault within the Module.
Conductivity Sensors not Calibrated
Warning • Service and calibrate the conductivity sensors.• Consult the documentation for the conductivity
transmitter for additional troubleshooting and diagnosis.
39EcoBreeze System Operation and Maintenance
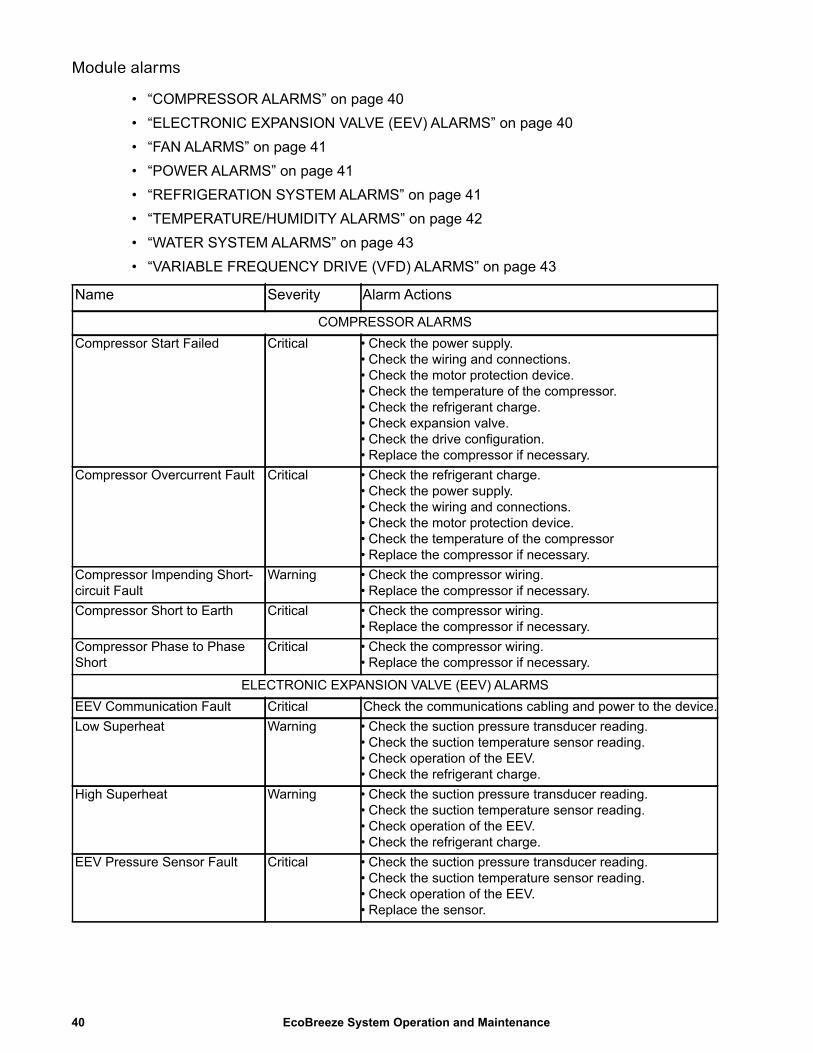
Module alarms
• “COMPRESSOR ALARMS” on page 40• “ELECTRONIC EXPANSION VALVE (EEV) ALARMS” on page 40• “FAN ALARMS” on page 41• “POWER ALARMS” on page 41• “REFRIGERATION SYSTEM ALARMS” on page 41• “TEMPERATURE/HUMIDITY ALARMS” on page 42• “WATER SYSTEM ALARMS” on page 43• “VARIABLE FREQUENCY DRIVE (VFD) ALARMS” on page 43
Name Severity Alarm Actions
COMPRESSOR ALARMSCompressor Start Failed Critical • Check the power supply.
• Check the wiring and connections.• Check the motor protection device.• Check the temperature of the compressor.• Check the refrigerant charge. • Check expansion valve. • Check the drive configuration. • Replace the compressor if necessary.
Compressor Overcurrent Fault Critical • Check the refrigerant charge. • Check the power supply.• Check the wiring and connections.• Check the motor protection device.• Check the temperature of the compressor• Replace the compressor if necessary.
Compressor Impending Short-circuit Fault
Warning • Check the compressor wiring.• Replace the compressor if necessary.
Compressor Short to Earth Critical • Check the compressor wiring.• Replace the compressor if necessary.
Compressor Phase to Phase Short
Critical • Check the compressor wiring.• Replace the compressor if necessary.
ELECTRONIC EXPANSION VALVE (EEV) ALARMSEEV Communication Fault Critical Check the communications cabling and power to the device.Low Superheat Warning • Check the suction pressure transducer reading.
• Check the suction temperature sensor reading.• Check operation of the EEV.• Check the refrigerant charge.
High Superheat Warning • Check the suction pressure transducer reading. • Check the suction temperature sensor reading.• Check operation of the EEV.• Check the refrigerant charge.
EEV Pressure Sensor Fault Critical • Check the suction pressure transducer reading. • Check the suction temperature sensor reading.• Check operation of the EEV.• Replace the sensor.
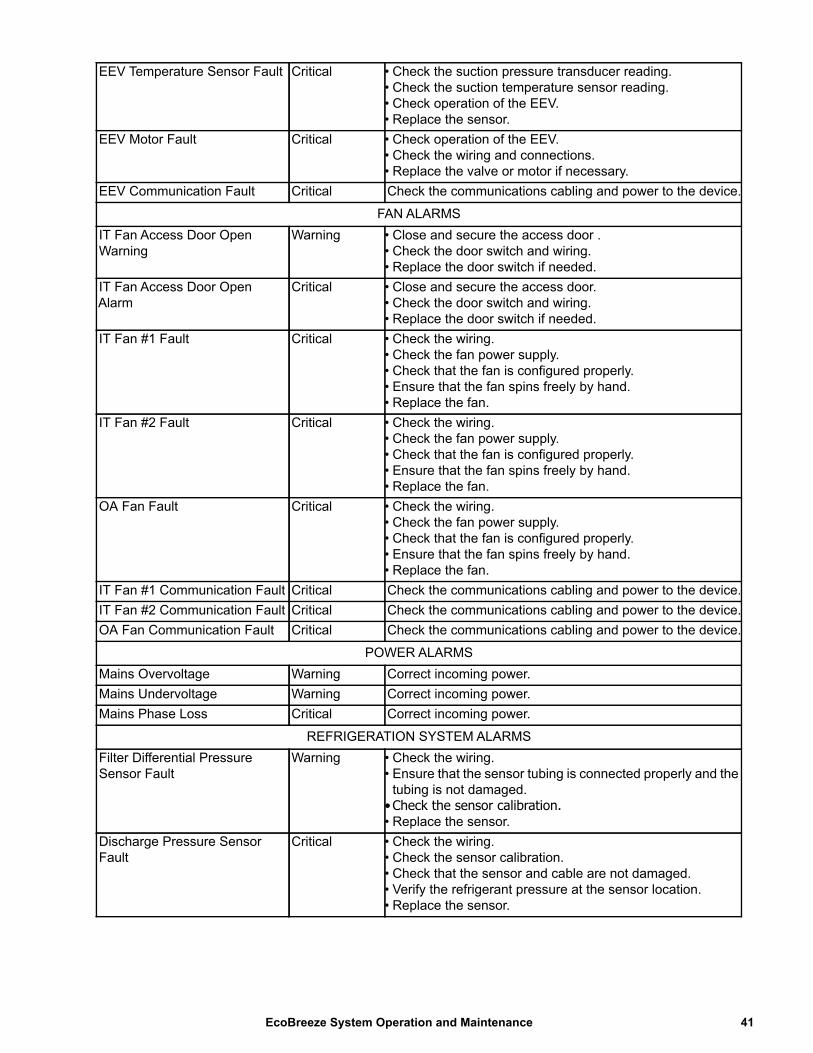
EcoBreeze System Operation and Maintenance40
EEV Temperature Sensor Fault Critical • Check the suction pressure transducer reading. • Check the suction temperature sensor reading.• Check operation of the EEV.• Replace the sensor.
EEV Motor Fault Critical • Check operation of the EEV.• Check the wiring and connections.• Replace the valve or motor if necessary.
EEV Communication Fault Critical Check the communications cabling and power to the device.
FAN ALARMSIT Fan Access Door Open Warning
Warning • Close and secure the access door .• Check the door switch and wiring. • Replace the door switch if needed.
IT Fan Access Door Open Alarm
Critical • Close and secure the access door. • Check the door switch and wiring. • Replace the door switch if needed.
IT Fan #1 Fault Critical • Check the wiring.• Check the fan power supply.• Check that the fan is configured properly.• Ensure that the fan spins freely by hand.• Replace the fan.
IT Fan #2 Fault Critical • Check the wiring.• Check the fan power supply.• Check that the fan is configured properly.• Ensure that the fan spins freely by hand.• Replace the fan.
OA Fan Fault Critical • Check the wiring.• Check the fan power supply.• Check that the fan is configured properly.• Ensure that the fan spins freely by hand.• Replace the fan.
IT Fan #1 Communication Fault Critical Check the communications cabling and power to the device.IT Fan #2 Communication Fault Critical Check the communications cabling and power to the device.OA Fan Communication Fault Critical Check the communications cabling and power to the device.
POWER ALARMSMains Overvoltage Warning Correct incoming power.Mains Undervoltage Warning Correct incoming power.Mains Phase Loss Critical Correct incoming power.
REFRIGERATION SYSTEM ALARMSFilter Differential Pressure Sensor Fault
Warning • Check the wiring. • Ensure that the sensor tubing is connected properly and the
tubing is not damaged.•Check the sensor calibration.• Replace the sensor.
Discharge Pressure Sensor Fault
Critical • Check the wiring. • Check the sensor calibration.• Check that the sensor and cable are not damaged.• Verify the refrigerant pressure at the sensor location.• Replace the sensor.
41EcoBreeze System Operation and Maintenance
Discharge Temperature Sensor Fault
Warning • Check the wiring. • Check and clean the sensor.• Check the sensor calibration.• Replace the sensor.
Refrig Liquid Temperature Sensor Fault
Warning • Check the wiring. • Check and clean the sensor.• Check the sensor calibration.• Replace the sensor.
Condenser Coil De-Ice Active Warning • Monitor the situation. • Clear the ice and snow if needed.
Filter Access Door Open Warning
Warning • Close and secure the access door. • Check the door switch and wiring. • Replace the door switch if needed.
Filter Access Door Open Alarm Critical • Close and secure access door.• Check door switch and wiring. • Replace door switch if needed.
High Head Pressure Critical • Check the outdoor air openings (clear obstructions). • Check the refrigerant charge.• Check operation of the outdoor fan.• Check the condenser coil for obstructions.• Reset the high pressure switch.
Low Suction Pressure Warning • Check the refrigerant charge. • Check IT airflow.• Ensure that air dampers are open.• Check the condition of the air filters.• Check the condition of the evaporator coil.
Low Suction Pressure Lockout Critical • Check the refrigerant charge. • Check the IT airflow.• Determine the cause of the low suction pressure.• Reset the controller.
Cap Fault or Motor Overload or Overspeed
Critical Capacitor pre-charge fault, motor overload or motor overspeedCheck the Alarm Code at the VFD Display: CrF = Capacitor pre-charge fault - Reset the drive. Replace the drive if necessary.OLF = Compressor overload fault - Check the refrigerant charge. Replace the compressor if necessary. SOF = Compressor over speed fault - Check the drive configuration.
TEMPERATURE/HUMIDITY ALARMSReturn Humidity Sensor Fault Warning • Check the wiring.
• Check and clean the sensor.•Check the sensor calibration.• Replace the sensor.
Supply Humidity Sensor Fault Warning • Check the wiring. • Check and clean the sensor.•Check the sensor calibration.• Replace the sensor.
Return Temperature Sensor Fault
Warning • Check the wiring. • Check and clean the sensor.•Check the sensor calibration.• Replace the sensor.
EcoBreeze System Operation and Maintenance42
Supply Temperature Sensor Fault
Critical • Check the wiring. • Check and clean the sensor.•Check the sensor calibration.• Replace the sensor.
WATER SYSTEM ALARMSIEC Temperature Sensor Fault Warning • Check the wiring.
• Check and clean the sensor.• Check the sensor calibration.• Replace the sensor.
IEC Performance Degradation Warning • Check the strainers for obstruction.• Check the outdoor air openings for obstructions. • Check for adequate supply water.• Check the spray nozzle for an obstruction.• Check the IEC for cleanliness.• Check the condenser coil for obstructions.
Loss of IEC Spray Water Critical • Check the IEC water spray nozzles for blockage. Clear blockage.
• Check the water strainer basket (clean if needed). • Check the water pressure switch (replace if needed). • Check the valve actuator (replace if needed).• Check the Module to Frame water connection.• Check for leaks in the water system piping.
Dirty Filter Warning Replace the filter.
VARIABLE FREQUENCY DRIVE (VFD) ALARMSDC Bus Overvolt or Compressor Phase Loss
Critical Check Alarm Code at the VFD Display: ObF = DC bus over voltage - Check the drive configuration. OPF = Compressor phase loss - Check the compressor wiring. Check the drive configuration. Replace the compressor if necessary.
VFD Overheating Critical • Check the drive configuration.• Check the VFD for proper air circulation.• Replace the drive if necessary.
VFD EEPROM Memory Fault Critical Replace the drive.VFD Internal Fault Critical Replace the drive.Invalid VFD Configuration Critical Check the drive configuration.VFD External Fault Critical Check the compressor and control wiring to the drive.VFD Auto-tuning Fault Warning Check the drive configuration.VFD Brake Control Fault Warning • Check the compressor wiring and windings.
• Check the drive configuration.VFD Communication Fault Critical Check the communications cabling and power to the device.Frequent VFD Faults Critical Check alarm log for VFD faults and take action based on
those faults.
43EcoBreeze System Operation and Maintenance
TroubleshootingNOTE: The EcoBreeze operates using controllers to control internal functions along with variable frequency drives (VFDs). If either detects a problem, it will go into an alarm mode. Refer to the remote display panel active alarms and status screens for additional help.
Problem Possible Cause Corrective ActionModule # will not run
• No power
• Module address not configured
• Check that the disconnect switch on the Module control panel has not been shut off.
• Check Module address configuration.Basin has excessive sediment
• Conductivity setting requires adjustment
• Basin drain is blocked by dirt or debris
• Consult the water treatment specialist for alternate conductivity settings.
• Check the basin drain for blockage.Check for open areas of the basin. Replace basin covers.
Scale buildup on heat exchangers.
• Conductivity setting requires adjustment.
• Consult the water treatment specialist for alternate conductivity settings.
Water spray system pump will not run
• Pump is not receiving power• Water level is too low
• Pump motor protection device is tripped
• Pump is shut off and the basin is empty. (The ambient temperature is below 4.4°C (40°F).)
• Check the power supply, then the pump contactor.
• Check that the fill, fill vent, and basin drain valves are working properly.
• Reset the pump motor.
• No action required. System is working properly.
Water spray system pump runs but spray does not cover the heat exchanger
• Strainer clogged.• Spray nozzle obstruction
• Clean the strainer.• Clean the spray nozzle.
VFD protection trips
• VFD fault • Check the fault code on the VFD. Refer to the VFD manual for more information.
Airflow too low • Supply airflow restriction• Air filters are clogged
• Check the return and supply air damper positions.
• Replace air filters.Evaporator coil ices
• Dirty or blocked evaporator coil• Air filters are clogged• Low IT air flow rate and low
refrigerant charge
• Clean the evaporator coil.• Replace the air filters.• Check operation of the IT fans• Check the refrigerant charge
Compressor fails to start
• VFD fault• No power to the compressor• Minimum Off delay timer active• Another Critical Alarm is active
• Check the fault code on the VFD.• Check the power supply to the compressor.• Wait for the minimum Off time to expire.• Check for other critical alarms.
Head pressure too high
• Air cooled condenser malfunction
• Erroneous sensor reading
• Check and clean the condenser coil. Check the OA fan operation and settings.
• Check the pressure and temperature sensors.
Head pressure too low
• Low refrigerant charge
• Erroneous sensor reading
• Check for proper subcooling. Repair any leak and recharge the system.
• Check the OA fan operation during low ambient temperature.
• Check the pressure and temperature sensors.
EcoBreeze System Operation and Maintenance44
Module powered but will not operate
• System is off• Remote shutdown or input
contact is active• System is in alarm
• Turn the System on.• Check input contact configuration settings.
• Check for active system alarms.Suction pressure too low
• Dirty or blocked evaporator coil• Low refrigerant charge
• Clean evaporator coil.• Check for proper subcooling. Repair leak and
recharge the system.• Check for excessive pressure drop. Replace the
filter drier if necessary.• Check expansion valve operation.• Check pressure and temperature sensor
operation.
Problem Possible Cause Corrective Action
45EcoBreeze System Operation and Maintenance
Maintenance
General Task Descriptions
Fans
• Verify that the fan hardware is tight.• Verify that electrical connection is secure.
Filters
Clean/replace air filters. Regular filter maintenance is vital to proper unit operation. Excessive dirt accumulation will inhibit the flow of air resulting in a decrease in system efficiency.
Remove and clean the outdoor air fan inlet screen.
Water system
Winter protection.
• Snow should not be allowed to accumulate at the air inlets on the lower front of each Module.
• The heat trace circuit should be regularly tested and inspected during freezing temperatures to prevent possible damage to the makeup water system.
Water pump. Inspect the water pump. Remove power from the pump. Check for silt buildup. Inspect for evidence of microbial contamination. Adjust the flush frequency as necessary.
Spray strainers. Remove power from the Module. Strainers are located inside upper right. Inspect for debris accumulation. Remove each strainer, remove debris from the strainer, clean, and reinstall as necessary.
Test Fill/Fill Vent and Basin Drain Valve. It is important to ensure that the fill line drain valve opens when the fill valve closes and that the basin drain opens. Failure of the fill line drain valve to open could result in water freezing and causing the pipe to rupture. Failure of the basin valve to open could result in freezing and damaging the unit.
To test, first locate the fill and fill line drain valves. Shut the main disconnect off. A small amount of water should come out of the pipe exiting the fill line drain valve. The basin should start draining as witnessed by the water level dropping. Allow the water level to drop about 50 mm (2 in.). Once this occurs, you can apply power to the unit. Observe the water level to ensure the basin is refilling.
WARNINGUNINTENDED EQUIPMENT OPERATION
Turn off the system, disconnect all power sources, and Lockout before performing work on the fans.
Failure to follow these instructions can result in serious injury or equipment damage.
Inspecting the Heat Exchangers. Inspect heat exchangers Module by Module. Remove power from the Module to be inspected. Be certain that the branch circuit feeding the Module is turned off. Open the access panels. Remove one section of mist eliminators from the upper portion of the Module. Inspect the top of the heat exchangers for buildup of mineral deposits, dirt, or microbial contamination. If any evidence of contamination is found, the IEC core may need to be removed to perform a thorough inspection of the IEC core tubes. If additional contamination is found on the IEC core tubes, the water collectors should be cleaned.
Water pulse power treatment system. Inspect the AC power supply for visible damage that might affect water treatment system safety and operation. This visible inspection should ensure that no wires have been cut or are exposed.
• Inspect the umbilical cable for visible damage that might affect the safety and operation of the water treatment system. This visual inspection should ensure that no wires have been cut or are exposed.
• Inspect the umbilical cable connectors at both the signal generator and treatment Module umbilical cable for corroded or damaged pins.
• Inspect the treatment Module ventilation ports to verify that they are clear. • Inspect the signal generator to ensure that it is firmly secured. • Inspect the signal generator fan filters and ventilation exhaust/filter to verify that they are
clear. • Cleaning: In a dusty environment, the ventilation filters of the signal generator and the
ventilation ports on the treatment Module may need to be periodically cleaned. If for any reason the outward surface of the signal generator requires cleaning, clean the outside surface with a damp, clean cloth. Wipe clean with a soft cloth. Let it air dry.
Electrical
Check the electrical panels and controls: Turn off the main disconnect on the control panel.
• Make a general check for possible problems: frayed wires, loose relays, overheated parts, loose terminal connections, etc.
• The access door is secured with bolts to prevent unauthorized access. Replace the bolts after installation or servicing. The control panel door has an electrical disconnect to shut off power to the entire unit.
• Check that the wires are color-coded or numbered at both ends and that the terminal block connection points are numbered. These markings correspond with the electrical diagram provided in the operating and maintenance manual.
• Check for any signs of damage.• Check the location and mounting of the user interface. Check the operation of the display
and key pad.
47EcoBreeze System Operation and Maintenance
General cleaning
Inspect and clean the EcoBreeze system on a regular basis. Do not use cleaners, chemicals, or other materials with strong fumes or odors. Thoroughly remove all cleaning solution residue from interior surfaces.
• Remove any debris.• Exterior: Spray wash the exterior with low pressure water and a mild detergent. All
detergent must be removed with clean water.• Coils (evaporative and condenser): Clean the fins with steam or a non-corrosive solvent
and water hose to remove oil, pollen, dust, and soil. Do not use a direct high-pressure blast as damage to the coil may occur. Do not spray water into any compartment not equipped with a floor drain. Excessive accumulations of water could leak or cause damage.
• Dump and flush the basin. Ensure the fill line drain valve opens when the fill valve closes and that the basin drain opens.
Monthly Preventive Maintenance
Prepared By: _________________________________
Model Number: _______________________________
Serial Number: _______________________________
Date: ______________________________________
Mechanical
Functional tests
Verify that the water treatment specialist has made the monthly site visit (when applicable). NOTE: Some regions do not require monthly checks of the water treatment system.• Conductivity settings are in proper range.• Fill, drain, and blow down functions are operating properly.• Water dip slide test for biologicals, calibration of conductivity sensor verified, and conductivity of
inlet water check have all been performed.
Check the condenser coil. Remove debris. Check the condition of the spray nozzles and strainers in each Module. Check the top surfaces of heat exchanger.
Check the IT containment temperature and air flow. Adjust system settings as needed.
Check the water pump and flow switch operation.
Check the outdoor air fan. Remove debris from the fan guard. Check and clean the fan blade.
Check the location and mounting of the user interface. Check operation of display and key pad. Check alarms, record component run time hours, reset maintenance interval alarm
Remove and clean the water screen in each Module during the months of wet operation.
49EcoBreeze System Operation and Maintenance
Quarterly Preventive Maintenance
* Perform all the Monthly Preventive Maintenance items and the items below.
Prepared By: _________________________________
Model Number: _______________________________
Serial Number: _______________________________
Date: ______________________________________
Mechanical
Functional tests
Check the condition of the trough and basin water level sensors. Check and record the outdoor air temperature and humidity sensor readings.
Verify that the quarterly basin water sample has been taken and sent to a qualified lab for biological testing (including Legionella).
Check the wiring in the frame electrical panels. Check for loose connections, hardware, and components.
Measure and record indoor and outdoor fan amperages.
Inspect the supply and return air ducts. Ensure the ducts are open. Check for gaps or air leaks on outdoor ducts.
Clean or replace the air filters.
Measure and record suction and discharge pressure and temperature sensor readings.
Verify the DX cooling operation mode is functioning properly.
Check condition of inlet water screen, remove, and clean.
Check and clean the outdoor air fan inlet screen.
EcoBreeze System Operation and Maintenance50
Semi-Annual Preventive Maintenance* Perform all the Monthly and Quarterly Preventive Maintenance items and the items below.
Prepared By: _________________________________
Model Number: _______________________________
Serial Number: _______________________________
Date: _______________________________________
Cleanliness
Annual Preventive Maintenance
* Perform all the Monthly, Quarterly, and Semi-Annual Preventive Maintenance items and the items below.
Prepared By: _________________________________
Model Number: _______________________________
Serial Number: _______________________________
Date: ______________________________________
Cleanliness
Check the cleanliness of the evaporator coil. Clean if required.
Check condenser coil, remove debris; check top surfaces of the IEC.
Check condition of trough and basin water level sensors; check and record outdoor air temperature and humidity sensor readings.
Annual trough inspection has been performed. A Module was removed to gain access to the trough. (The best Module for removal is one of the two closest to the pumps.)
51EcoBreeze System Operation and Maintenance
Worldwide Customer SupportCustomer support is available at no charge via e-mail or telephone. Contact information is available at www.apc.com/support/contact.