RV Products Division OPERATION & MAINTENANCE INSTRUCTIONS FOR 230/240 VAC, 1ø, 50Hz 47000 SERIES RV ROOF TOP AIR CONDITIONER/HEAT PUMP AND REMOTE CONTROLLER Service Contact: Coast to Coast RV Services Pty Ltd. PO BOX 415 REGENTS PARK DC NSW 2143 Australia Tel: +61-2-9645 7600 [email protected]Coleman is a registered trademark of The Coleman Company, Inc. used under license. Mach is a registered trademark. More information https://www.caravansplus.com.au
These instructions are a general guide for operating and maintaining the 47000 Series, 230/240 VAC, 50Hz,
Coleman®-Mach
® roof top heat pumps and remote hand held controller.
This appliance is not intended for use by persons (including children) with reduced physical, sensory or
mental capabilities, or lack of experience and knowledge, unless they have been given supervision or
instruction concerning use of the appliance by a person responsible for their safety. Children should be
supervised to ensure that they do not play with the appliance and Cleaning and user maintenance shall not
be made by children without supervision.
I. Model & Serial Number Your air conditioner or heat pump has been designed for years of safe, dependable operation. These
instructions contain a general description on the operation of the unit, how to set up and operate the
controller, and a list of routine maintenance items.
The first thing you should do is to write down the model number and serial number of the unit. Both
numbers can be found on the data label on the unit.
Model No. ________________________ Serial No.________________________
II. Operating Guidelines The air conditioner is designed to provide cooling and dehumidification. A heat pump reverses the
refrigerant cycle to provide heating in cool weather. The performance of both units can be optimized by
following the simple guidelines:
Keep doors and windows closed to prevent the loss of conditioner air.
Keep the curtains closed to reduce heat gain.
Set the temperature to a reasonable temperature.
A low fan speed will reduce sound level and improve dehumidification when the unit is cooling.
Properly adjust the air flow with the slides on the front and rear of the ceiling assembly.
Never obstruct the air flow to the ceiling assembly.
Do not spray water or any cleaning fluid into the ceiling assembly. The ceiling assembly should be
cleaned with a damp cloth.
Do not put any object, including your hands, into the openings of the ceiling assembly. -2-
More information https://www.caravansplus.com.au
III. Adjusting the Air Flow The conditioned air is distributed through the ceiling assembly. Slides on the front and rear of the ceiling
assembly can be moved to adjust the air flow to the front and rear.
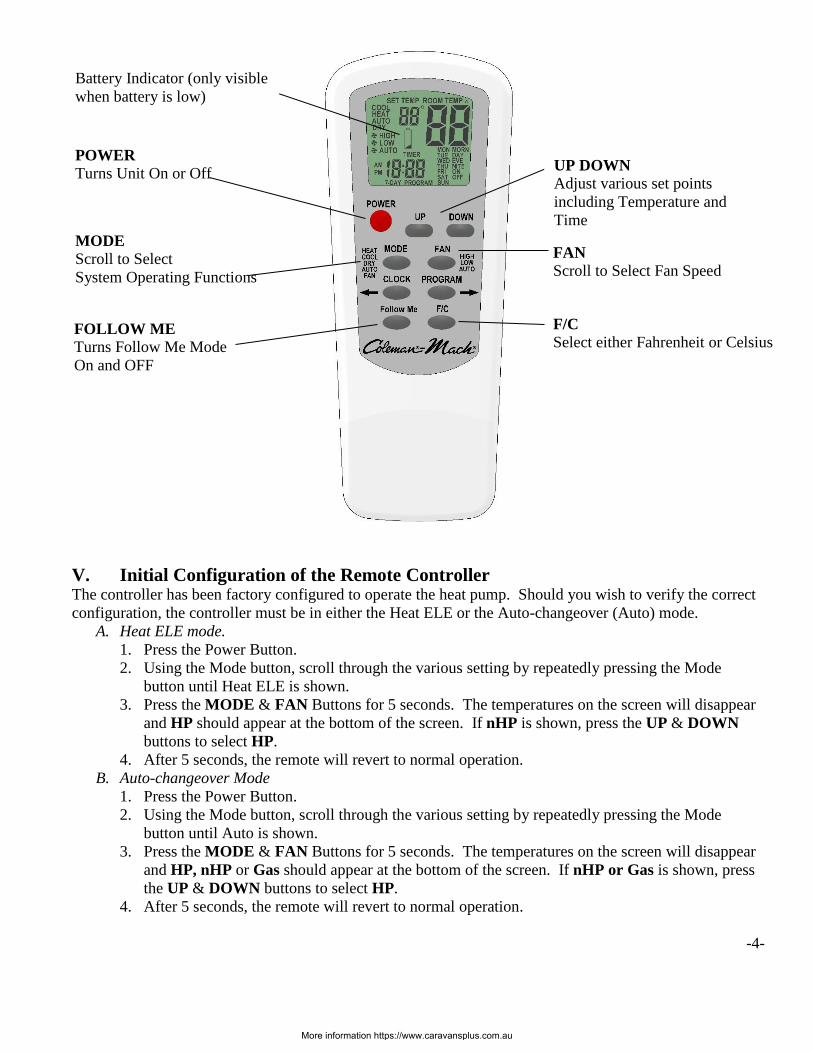
IV. Hand Held Controller The remote controller controls the operation of the air conditioner or heat pump with an infrared signal to a
sensor on the ceiling assembly. For the best reception, the remote should be pointing at the ceiling assembly
when changing set points and configuring the air conditioner or heat pump.
Note: Should the remote be lost, the air conditioner or heat pump can be controlled by buttons on the
ceiling assembly.
-3-
Back slide
Front Slide Return Air Louver
Return Air
Louver Back Slide
More information https://www.caravansplus.com.au
V. Initial Configuration of the Remote Controller The controller has been factory configured to operate the heat pump. Should you wish to verify the correct
configuration, the controller must be in either the Heat ELE or the Auto-changeover (Auto) mode.
A. Heat ELE mode.
1. Press the Power Button.
2. Using the Mode button, scroll through the various setting by repeatedly pressing the Mode
button until Heat ELE is shown.
3. Press the MODE & FAN Buttons for 5 seconds. The temperatures on the screen will disappear
and HP should appear at the bottom of the screen. If nHP is shown, press the UP & DOWN
buttons to select HP.
4. After 5 seconds, the remote will revert to normal operation.
B. Auto-changeover Mode
1. Press the Power Button.
2. Using the Mode button, scroll through the various setting by repeatedly pressing the Mode
button until Auto is shown.
3. Press the MODE & FAN Buttons for 5 seconds. The temperatures on the screen will disappear
and HP, nHP or Gas should appear at the bottom of the screen. If nHP or Gas is shown, press
the UP & DOWN buttons to select HP.
4. After 5 seconds, the remote will revert to normal operation.
-4-
POWER
Turns Unit On or Off
MODE
Scroll to Select
System Operating Functions
FOLLOW ME
Turns Follow Me Mode
On and OFF
UP DOWN
Adjust various set points
including Temperature and
Time
FAN
Scroll to Select Fan Speed
F/C
Select either Fahrenheit or Celsius
UP DOWN
Adjust various set points
including Temperature and
Time
Battery Indicator (only visible
when battery is low)
More information https://www.caravansplus.com.au
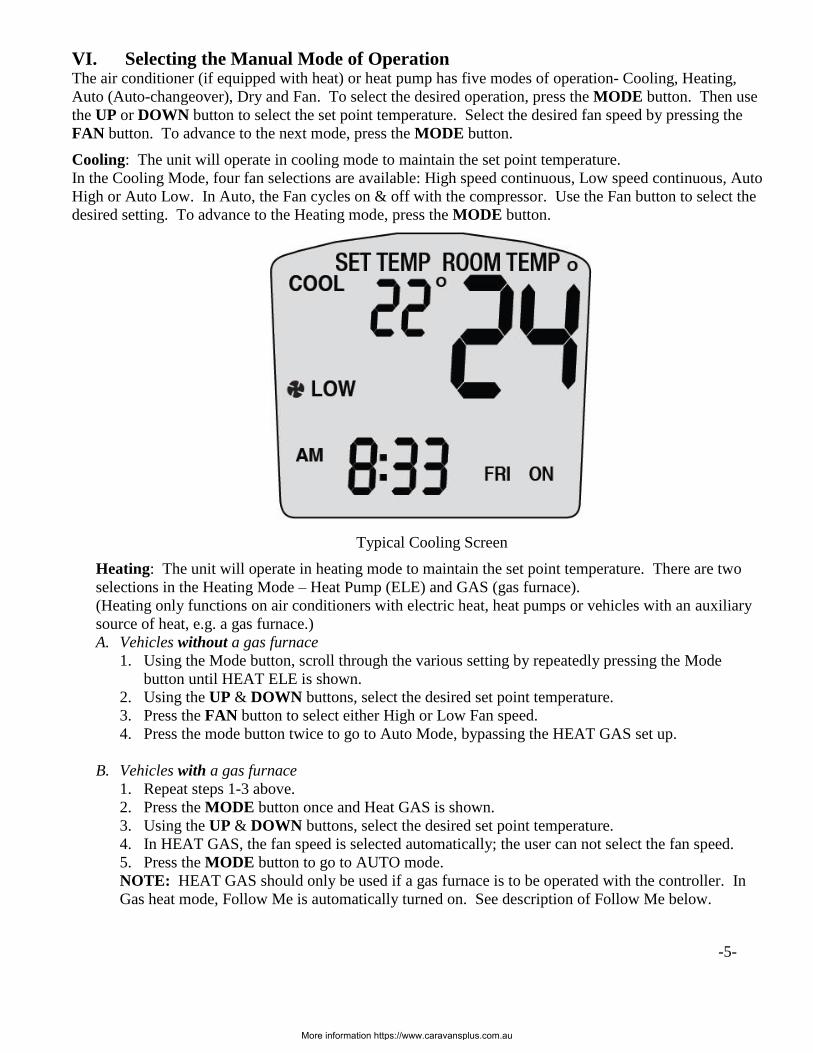
VI. Selecting the Manual Mode of Operation The air conditioner (if equipped with heat) or heat pump has five modes of operation- Cooling, Heating,
Auto (Auto-changeover), Dry and Fan. To select the desired operation, press the MODE button. Then use
the UP or DOWN button to select the set point temperature. Select the desired fan speed by pressing the
FAN button. To advance to the next mode, press the MODE button.
Cooling: The unit will operate in cooling mode to maintain the set point temperature.
In the Cooling Mode, four fan selections are available: High speed continuous, Low speed continuous, Auto
High or Auto Low. In Auto, the Fan cycles on & off with the compressor. Use the Fan button to select the
desired setting. To advance to the Heating mode, press the MODE button.
Typical Cooling Screen
Heating: The unit will operate in heating mode to maintain the set point temperature. There are two
selections in the Heating Mode – Heat Pump (ELE) and GAS (gas furnace).
(Heating only functions on air conditioners with electric heat, heat pumps or vehicles with an auxiliary
source of heat, e.g. a gas furnace.)
A. Vehicles without a gas furnace
1. Using the Mode button, scroll through the various setting by repeatedly pressing the Mode
button until HEAT ELE is shown.
2. Using the UP & DOWN buttons, select the desired set point temperature.
3. Press the FAN button to select either High or Low Fan speed.
4. Press the mode button twice to go to Auto Mode, bypassing the HEAT GAS set up.
B. Vehicles with a gas furnace
1. Repeat steps 1-3 above.
2. Press the MODE button once and Heat GAS is shown.
3. Using the UP & DOWN buttons, select the desired set point temperature.
4. In HEAT GAS, the fan speed is selected automatically; the user can not select the fan speed.
5. Press the MODE button to go to AUTO mode.
NOTE: HEAT GAS should only be used if a gas furnace is to be operated with the controller. In
Gas heat mode, Follow Me is automatically turned on. See description of Follow Me below.
-5-
More information https://www.caravansplus.com.au
Auto: The unit will automatically heat and cool, depending on the set point temperature. (Heating only
functions on air conditioners with electric heat, heat pumps or vehicles with an auxiliary source of heat,
e.g. a gas furnace). Use the UP & DOWN buttons to select the desired set point temperature. In the
Auto mode, the fan speed is selected automatically. To advance to the Dry mode, press the MODE
button.
Dry: This mode is for dehumification when the vehicle is not in use. The unit will operate in the
cooling mode to provide dehumidification. Use the UP & DOWN buttons to select the desired set point
temperature. If the room temperature in is above the set point, the unit will operate for 15 minutes and
then turn off for 3 minutes. If the room temperature is below the set point, the unit will operate for 6
minutes and then turn off for 15 minutes. In the Dry mode, the fan speed is selected automatically. To
advance to the Fan mode, press the MODE button.
FAN: The indoor fan is run to circulate air, but the compressor does not operate. In the Fan Mode, two
fan selections are available: High speed continuous or Low speed continuous. Use the FAN button to
select.
VII. Follow Me
In normal operation a temperature sensor in the ceiling assembly senses the temperature and controls the
operation of the Air Conditioner or Heat Pump. Follow Me switches this control to a temperature sensor on
the hand held controller. To activate Follow Me, press the Follow Me button for 3 seconds and release. On
or Off will flash on the screen. Press the Follow Me button again to change the setting. In Gas heat mode,
Follow Me is automatically turned on.
VIII. F/C Selects whether the temperature is displayed in Fahrenheit or Celsius. Press and hold the F/C button for
3 seconds and release. CEL or FAH will be displayed. Press the F/C button again to change the
selection.
IX. Time and Day Set Up Press the CLOCK button and hold for 3 seconds.
The hour and AM or PM will flash. To change the hour, press the UP or DOWN button.
To change the minute, press and release the PROGRAM button. To change the minute, press the UP or
DOWN button.
To change the day, press and release the PROGRAM button. To change the day, press the UP or
DOWN button.
Press the CLOCK button to return to the normal screen.
X. 7-Day Programming The 7-day program schedule allows different set point temperatures for different times of each day of
the week. The schedule includes four periods– Morning, Day, Evening and Night- for each day of the
week. Each period has a start time, a set point temperature for Heat, Cool and Auto modes. For 7-day
programming:
Press the CLOCK and PROGRAM buttons simultaneously and hold for three seconds.
The first selection is for the day of the week. Press the UP or DOWN button to select Monday (MON).
Press the PROGRAM button to select the settings for the Morning period. Press the UP or DOWN
button to select Morning.
Press the PROGRAM button to select the hour for the period to begin. Use the UP and DOWN button
to select the hour.
Press the PROGRAM button to select the minute for the period to begin. Use the UP and DOWN
button to select the minute.
-6-
More information https://www.caravansplus.com.au
Press the PROGRAM button to select the set point temperature for Cooling. Press the UP or DOWN
button to select the desired temperature.
Press the PROGRAM button to select the set point temperature for Heating. Press the UP or DOWN
button to select the desired temperature.
Press the PROGRAM button to select the set point temperature for Auto. Press the UP or DOWN
button to select the desired temperature.
Repeat this procedure to select the start times and set point temperatures for Monday Day, Monday
Evening and Monday Night.
Repeat this procedure for the remaining days of the week.
If the unit is in the COOL, HEAT, or AUTO mode, it can be run in either the Manual Run mode or the
7-Day Preprogrammed Run mode. Pushing the PROGRAM button will toggle between the Manual
Run mode and 7- Day Preprogrammed Run mode. While in the 7-Day Preprogrammed Run mode,
PROGRAM will appear at the bottom of the screen. The set point temperatures maybe changed by
pushing the UP & DOWN buttons. The manually set temperature will remain in effect until the start of
the next preprogrammed period. The 7-Day preprogrammed mode is not available in the Fan only or
Dry mode.
XI. LED lights and buttons on the ceiling assembly. The ceiling assembly has a two color LED to indicate if the unit is in Cooling or Heating. Two manual
override buttons - one for cooling the other for heating – can be used if the remote controller is lost or
malfunctions.
-7-
Manual override buttons
for Heating & Cooling
Infrared receiver
Two color LED
Red for Heating
Blue for Cooling
More information https://www.caravansplus.com.au
XII. Routine Maintenance
The ceiling assembly and the outside shroud can be cleaned with a damp cloth. When required a mild
detergent can be used.
There are two washable filters in the ceiling assembly, one behind each return air louvers. To access the
filters, pull on the tabs on the return air grilles. The filters should be washed in warm water or vacuumed
clean and replaced. The filters should be inspected once a month and cleaned as required. Note: If the unit
is operated in a dusty environment, the filters should be inspected and cleaned more frequently.
-8-
Tabs to access filter
Tabs to access filter
More information https://www.caravansplus.com.au
XIII. WARRANTY
Coast RV Pty Ltd trading as Coast to Coast RV Services
ABN 49 097 104 492 - ACN 101 461 330 PO Box 415, Regents Park NSW 2143
1.1 This warranty covers goods supplied by Coast RV Pty Ltd T/A Coast to Coast RV Services ("Supplier") to the Client ("Goods") and relates to any defects in materials and workmanship under normal use and maintenance (“Defect”).
2 WHAT THE SUPPLIER WILL DO TO HONOUR THE WARRANTY
2.1 The Supplier will:
(i) replace or repair the Goods or the defective part of the Goods free of charge;
(ii) arrange for the Goods or the defective part of the Goods to be repaired or replaced by a qualified repairer free of charge.
2.2 The Supplier reserves the right to replace defective parts of the Goods with parts and components of similar quality, grade or composition where an identical part or component is not available.
2.3 Goods presented for repair may be replaced by refurbished goods of the same type rather than being repaired. Refurbished parts may be used to repair the goods.
3 WHAT THE CLIENT MUST DO TO CLAIM THE WARRANTY
3.1 To claim the benefit of the warranty, the Client will need to (sequentially):
(i) first contact the Supplier; and
(ii) present the defective Goods to the Supplier for inspection, including inspection for defective workmanship, or otherwise provide evidence of the claimed Defect, accompanied by evidence of proof of purchase and date of delivery, and if applicable, evidence of maintenance performed in accordance with the relevant maintenance schedules.
3.2 The claim listed in clause 3.1 may be made in person, or the claim may be sent to the address listed on this form, including the particulars required under clauses 3.1(i) and 3.1(ii).
3.3 The appropriate form for making a claim for warranty is as attached.
4 DURATION OF WARRANTY
4.1 This warranty will cease:
(i) where the Goods are purchased already fitted in or as a component of a vehicle or RV: from the date that is twelve (12) months after the Client takes delivery of the vehicle or RV; and
(ii) where the Goods are purchased separately or as an after-market item: from the date that is twelve (12) months from the date of purchase..
4.2 If a Defect does not materialise in the Goods prior to the date provided in clause 4.1, the Supplier will have no liability to the Client under this warranty.
-9-
More information https://www.caravansplus.com.au
5 RESPONSIBILITY FOR COSTS OF CLAIM UNDER THIS WARRANTY
5.1 The Supplier is responsible for the costs directly associated with repairing or replacing the Goods in accordance with clause 2.1 only.
5.2 Any works required to be completed in addition to fixing the Defect are the responsibility of the Client. Additional works includes any costs associated with any testing or repair of the Goods or any goods to which they are fitted, undertaken by a third party in relation to any defect without prior authorisation from the Supplier.
5.3 Where it is determined that the Goods do not have a Defect, the Client will be charged a GST exclusive inspection fee of forty-five dollars ($45.00AUD in Australia or $45.00NZD in New Zealand) plus freight costs for the return of the Goods, this is subject to change without notice.
5.4 The cost of delivery and insurance of the Goods to and from the Supplier, travel costs to and from the Supplier, and the cost of inspecting and testing the Goods are the sole responsibility of the Client.
6 WARRANTY LIMITATIONS
6.1 The Supplier makes no warranties or representations other than those set out in this warranty document except as is required by law.
6.2 The Supplier will not be liable under this warranty:-
(i) to the Client or any other person for any consequential, direct or indirect loss, damage or costs incurred or suffered by the Client or any other person, including but not limited to damage to persons, other property, loss of turnover, loss of profits, loss of business or goodwill;
(ii) to the Client for transportation or travel costs which are the Client's responsibility;
(iii) for damage or defects in any Goods caused by improper transportation, storage or any other misuse, neglect or accident.
(iv) for the installation of the Goods. Any fault or defect due to installation should be referred to the installer. The Goods must be installed in accordance with the Manufacturer’s instructions and any relevant legislation or code.
6.3 This warranty covers the Client only and it is not transferrable if the Goods are sold by the Client during the warranty period.
7 WARRANTY EXCLUSIONS
7.1 This warranty will not apply where:
(i) the Goods have been improperly modified or repaired or the Good's defect has arisen due to the Client's failure to properly install, fit, maintain, service or use the Goods in accordance with the specifications and instructions provided by the Manufacturer, including a failure to comply with the relevant maintenance schedule (where applicable);
(ii) the Supplier cannot establish any Defect in the Goods after testing;
(iii) the Goods have been used other than for the purpose for which they were designed;
(iv) the Goods have been subject to abnormal conditions, including but not limited to temperature, pressure, stress, load or similar;
(v) the Client or installer have used or fitted non-genuine or non-approved parts and accessories to the Goods or have failed to use recommended parts and accessories;
(vi) the Good's defect has arisen due to abuse, misuse, neglect or accident;
(vii) the Goods have not been installed in accordance with the relevant instructions;
(viii) the Good’s defect is caused by use or fair wear and tear of the Goods (or expendable parts).
8 RIGHTS AT LAW
8.1 The benefits given to the Client under this warranty are in addition to other rights and remedies of the Client at law in relation to the Goods.
8.2 In Australia our Goods come with guarantees that cannot be excluded under the Australian Consumer Law. You are entitled to a replacement or refund for a major failure and for compensation for any other reasonably foreseeable loss or damage. You are also entitled to have the Goods repaired or replaced if the Goods fail to be of acceptable quality and the failure does not amount to a major failure.
-10-
More information https://www.caravansplus.com.au
WARRANTY CLAIM FORM
Warranty Providers Name: Coast RV Pty Ltd trading as Coast to Coast RV Services
ABN 49 097 104 492 - ACN 101 461 330
Warranty Providers Address: PO Box 415 Regents Park NSW 2143 Australia OR;
PO Box 58-054 Botany AUCKLAND 2163 New Zealand
Client:
Contact No.
Description of Goods provided:
Receipt enclosed: (tick box) Yes No
Receipt No:
Description of defects (Give as much detail as possible. Use a separate page if required):
Date of purchase/services provided:
I hereby declare that the information provided above is true and correct and to the best of my knowledge and belief and I have complied with all the conditions of the warranty.


![CT102 - Minikon za podporo/Key/KEY_CT102... · Unidade para um motor 230 Vac (120 Vac), para portão de correr ou portão basculante Centrala do silnika 230 Vac (120 Vac),QDS G]DMFHJRSU]HVXZQEUDP](https://static.documents.pub/doc/80x56/5bf4656f09d3f25b6f8c5395/ct102-minikon-za-podporokeykeyct102-unidade-para-um-motor-230-vac-120.jpg)


![CT102 - beltoc-shop.de · Unidade para um motor 230 Vac (120 Vac), para portão de correr ou portão basculante Centrala do silnika 230 Vac (120 Vac),QDS G]DMFHJRSU]HVXZQEUDP RJURG]HQLRZOXE](https://static.documents.pub/doc/80x56/5c632ebb09d3f281208c12ad/ct102-beltoc-shopde-unidade-para-um-motor-230-vac-120-vac-para-portao.jpg)
