20
Imara S10 & S6 DMX Operation Manual Part No. 3100051 Rev B 07-19-2012 ® Imara S10 DMX Yoke Mount Imara S10 DMX Pole-Op

Imara S10 & S6 DMX
Operation Manual
Part No. 3100051 Rev B 07-19-2012
®
Imara S10 DMX Yoke Mount
Imara S10 DMX Pole-Op

2
Imara Fixtures
IMR-S10-120 Imara S10 DMX Yoke Mount, 120VAC
IMR-S10-230 Imara S10 DMX Yoke Mount, 230VAC
IMR-S6-120 Imara S6 DMX Yoke Mount, 120VAC
IMR-S6-230 Imara S6 DMX Yoke Mount, 230VAC
IMR-S10-P120 Imara S10 DMX Pole-Op, 120VAC
IMR-S10-P230 Imara S10 DMX Pole-Op, 230VAC
IMR-S6-P120 Imara S6 DMX Pole-Op, 120VAC
IMR-S6-P230 Imara S6 DMX Pole-Op, 230VAC
Imara DMX Yoke Mount
Imara DMX Pole-Op
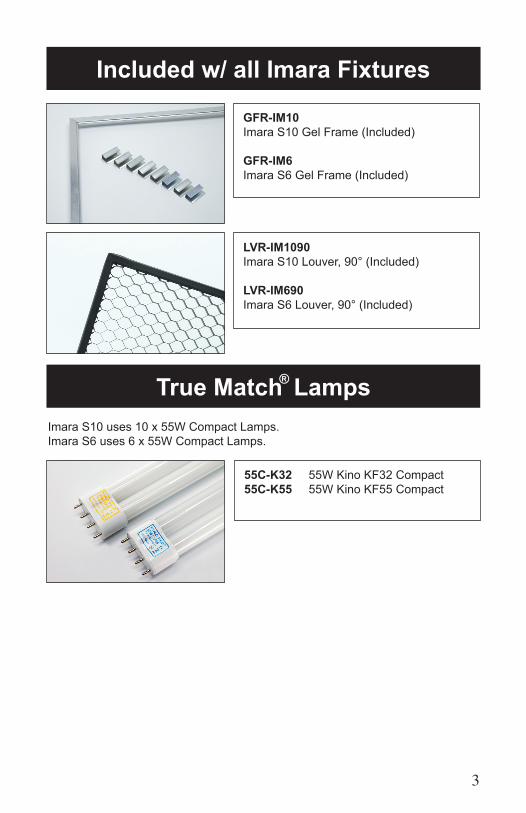
Included w/ all Imara Fixtures
3
GFR-IM10 Imara S10 Gel Frame (Included)
GFR-IM6 Imara S6 Gel Frame (Included)
LVR-IM1090 Imara S10 Louver, 90° (Included)
LVR-IM690 Imara S6 Louver, 90° (Included)
True Match Lamps
55C-K32 55W Kino KF32 Compact55C-K55 55W Kino KF55 Compact
®
Imara S10 uses 10 x 55W Compact Lamps.Imara S6 uses 6 x 55W Compact Lamps.
4
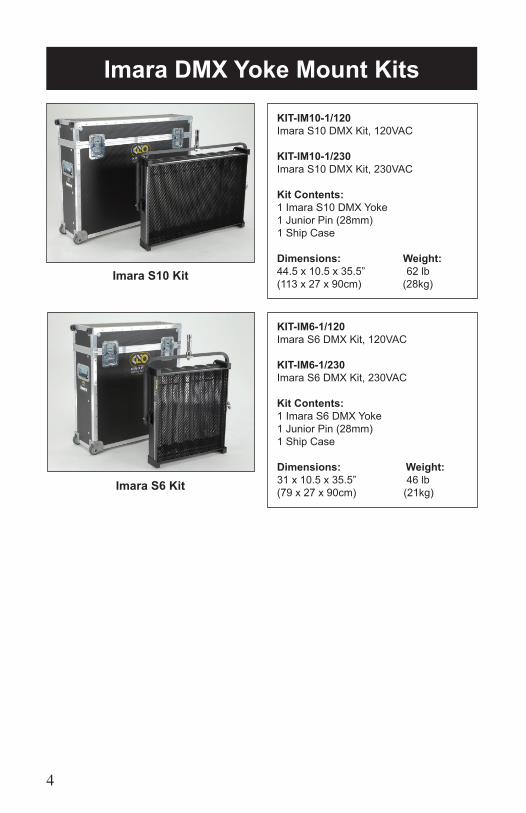
Imara DMX Yoke Mount Kits
KIT-IM10-1/120Imara S10 DMX Kit, 120VAC
KIT-IM10-1/230Imara S10 DMX Kit, 230VAC
Kit Contents:1 Imara S10 DMX Yoke1 Junior Pin (28mm)1 Ship Case
Dimensions: Weight:44.5 x 10.5 x 35.5” 62 lb (113 x 27 x 90cm) (28kg)
KIT-IM6-1/120Imara S6 DMX Kit, 120VAC
KIT-IM6-1/230Imara S6 DMX Kit, 230VAC
Kit Contents:1 Imara S6 DMX Yoke1 Junior Pin (28mm)1 Ship Case
Dimensions: Weight:31 x 10.5 x 35.5” 46 lb (79 x 27 x 90cm) (21kg)
Imara S10 Kit
Imara S6 Kit

5
Inserting Louver or Gel FrameThe Imara includes spring loaded accessory holders and two channels to hold the Gel Frame and Honeycomb Louver.
Place the long edge of the Gel Frame Louver into the lower channel. Press down on the left and right corners and slip the upper edge into the upper channel. To remove, reverse the procedure.
Note: Do not press down along the top center portion of the Gel Frame or Louver.Doing so may deform the Gel Frame or Louver over repeated usage.
Inserting Lamps
Open hinged reflector door.
Close reflector door.
Insert lamp base into lamp connector.
To release lamps, press red button and lift lamp base out.
Insert lamp tip into lamp clip.

6
Position the Top and Bottom Doors. Align the three thumbscrews with the receptacle holes in the fixture and insert into place. Lock the barndoors by turning the silver thumbscrew. To remove, reverse the procedure.
Applying Gel to Frame
Mounting Barndoors
Option 1 – The Gel Frame comes with Gel Clips. Cut the gel to size and use the Clips to fasten the gel to the Frame. Note: It is recommended to attach one clip on all four sides and two clips near all four corners of the Gel Frame.
Option 2 – Apply transfer tape directly to the Gel Frame. The clips are not neces-sary when taping the gel.
Position the Side barndoors alongside the side edge of the fixture. Align the thumbscrew with the receptacle hole in the fixture and insert into place. Lock the barndoors by turning the silver thumbscrew. To remove, reverse the procedure.
Top & Bottom Doors
Side Doors

Adjust the hinge tension with a Phillips head screwdriver.
Hinge Tension Adjustment
7
Imara Yoke Mount
The Yoke has a ½” hole to accept industry standard mounting hardware.
The Imara S10 and S6 Yoke Mount can mount to a stand or hang from a studio grid via a standard junior pin or Junior Pin Assembly for Yoke (MTP-I80), sold separately.
Note: Loop the safety chain around the yoke.
The Yoke Mount is also designed with two holes to allow the yoke bracket to be placed in one of two positions. The additional option is useful when hanging the units in a studio with a low ceiling.
Warning: Use only M5 X 10mm screws (supplied) to mount yoke. Note that threads on the fixture are self-locking and may seem tight. Replacement screws: Part No. 2020127
Recommended torque setting: USA: 18 lb-inMetric: 2 Nm
MTP-I80
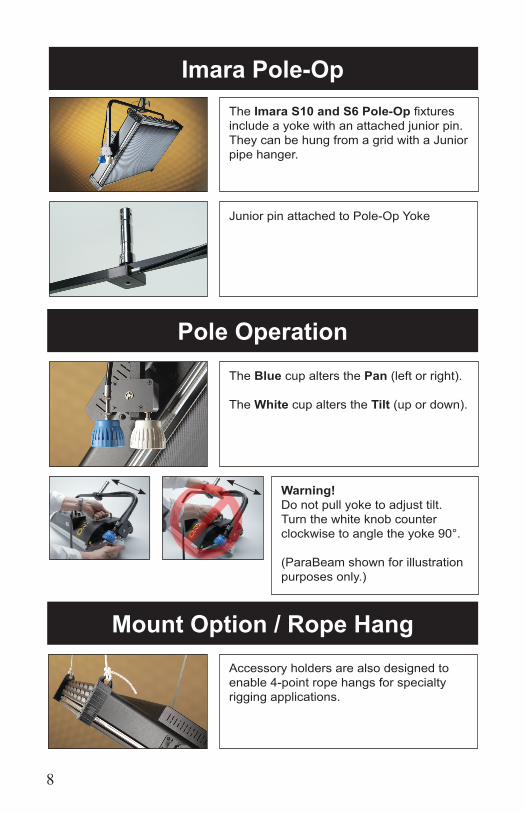
Imara Pole-Op
Pole Operation
Mount Option / Rope Hang
The Imara S10 and S6 Pole-Op fixtures include a yoke with an attached junior pin. They can be hung from a grid with a Junior pipe hanger.
The Blue cup alters the Pan (left or right).
The White cup alters the Tilt (up or down).
Accessory holders are also designed to enable 4-point rope hangs for specialty rigging applications.
Junior pin attached to Pole-Op Yoke
Warning!Do not pull yoke to adjust tilt. Turn the white knob counter clockwise to angle the yoke 90°. (ParaBeam shown for illustration purposes only.)
8
9
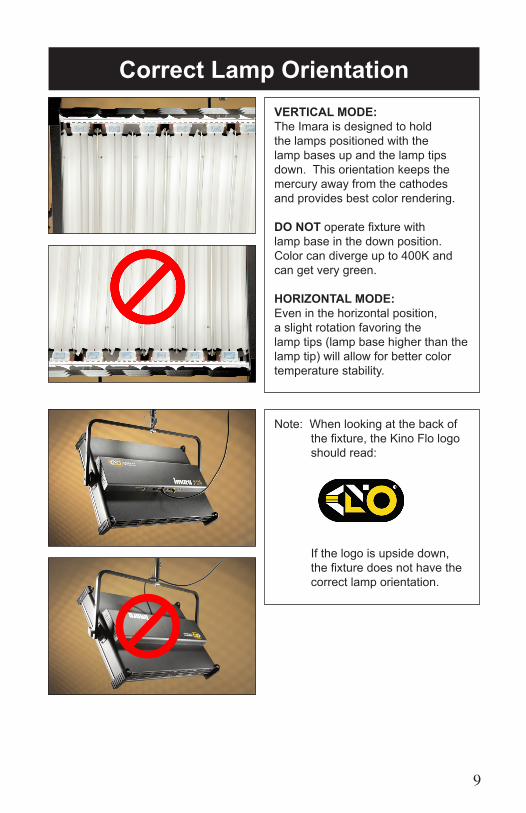
Correct Lamp Orientation
Note: When looking at the back of the fixture, the Kino Flo logo should read:
If the logo is upside down, the fixture does not have the correct lamp orientation.
VERTICAL MODE:The Imara is designed to hold the lamps positioned with the lamp bases up and the lamp tips down. This orientation keeps the mercury away from the cathodes and provides best color rendering.
DO NOT operate fixture with lamp base in the down position. Color can diverge up to 400K and can get very green.
HORIZONTAL MODE:Even in the horizontal position, a slight rotation favoring the lamp tips (lamp base higher than the lamp tip) will allow for better color temperature stability.

10
Fixture OperationWarning! To Ensure Proper Operation
ALWAYS TURN OFF THE FIXTURE BEFORE connecting or disconnecting lamps. After the lamps are properly installed, the switch can turn on the fixture. Avoid operating in temperatures above 125°F (51°C) or below 60°F (15°C).
Cold Temperature Operation
In cold temperatures below 60°F or 15°C, the fixture may not strike. If lamps do not strike within 5 seconds, switch the fixture to OFF and try again. Check that the lamps are properly seated and the dimmer is up full, then restrike. If temperatures are too low, try to warm up the fixture to at least 60°F (15°C). Lamps will turn on at preset dimmer settings as long as the temperature is above 60°F or 15°C.
Imara DMX Control Panel
A) DMX Dim Channels: Sets the fixture to use 1 DMX channel to dim all 10 lamps or 5 DMX channels to control lamps in sets of 2. (Imara S6 has 1 or 3 DMX channels.)B) DMX Address: Sets DMX address of fixture.C) DMX Indicator: Lights if valid DMX signal is present.D) DMX-In & DMX-Out: DMX-In receives signals from Dimmer Board. DMX-Out relays DMX signal through to other fixtures or instruments. (Note: Each Imara fixture has an “AUTO TERMINATE” feature. The last fixture that does not have an XLR cable attached to the DMX “Out” port will automatically terminate.)E) Fuse: Provides circuit protection. Note: If fuse is “blown” or “open”, replace with same type of fuse rating as marked.F) Power Switch: Turns fixture on and off. Has built-in indicator light to detect if AC power is present in power cord. “O” = OFF position.G) Dimmer Knob: Manual dimming controlH) Lamp Select Switches: Turns lamps on manually in sets of 2.
A B C D FE G
Note: The Imara S10 is shown throughout this operation manual for example purposes.
H

11
Manual Operation
IMARA S10 has 5 manual LAMP SELECT switches. Each switch turns on/off lamps in sets of 2. See diagram below for lamp switching sequence.
IMARA S6 has 3 manual LAMP SELECT switches. Each switch turns on/off lamps in sets of 2. See diagram below for lamp switching sequence.
IMARA S6 Lamp Sequence
The onboard dimmer dial can manually dim lamps.
2
2
4
4
6
6
810
IMARA S10 Lamp Sequence
Note: All manual controls are disabled as soon as the DMX cable is applied. For Manual control with DMX cables plugged in, set address to “000”.
There is a 5 second delay when switching between DMX and Manual control.

12
DMX Operation
DMX Addressing
Prior to hanging any instruments, set the DMX address of each fixture.
Push the tabs above or below the number window to set the address. (Valid addresses range from 001 to 512.) The light above the address block will illuminate if a DMX signal is present.
IMPORTANT!The dimmer board/light console should have its channel set to LINEAR light output response. (LINEAR response is the default setting on most dimmer boards.)
DMX Dim ChannelsThe DMX DIM CHANNELS feature allows the user to select lamps for DMX dimming control.
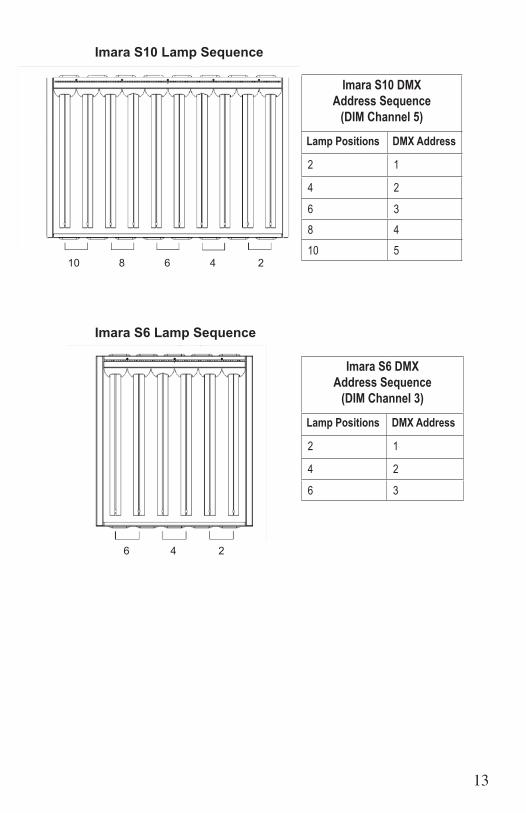
IMARA S10 operates on 1 or 5 DMX addresses.
On DIM Channel 1, one DMX address controls/dims all 10 lamps on one dimmer channel.
On DIM Channel 5, five DMX addresses control/dim 10 lamps in sets of 2.
IMARA S6 operates on 1 or 3 DMX addresses.
On DIM Channel 1, one DMX address controls/dims all 6 lamps on one dimmer channel.
On DIM Channel 3, three DMX addresses control/dim 6 lamps in sets of 2.
See configurations on the following page for lamp sequence.
13
Imara S10 Lamp Sequence
Imara S6 Lamp Sequence
Imara S10 DMX Address Sequence
(DIM Channel 5)
Lamp Positions DMX Address
2 1
4 2
6 38 410 5
Imara S6 DMX Address Sequence
(DIM Channel 3)
Lamp Positions DMX Address
2 1
4 2
6 3
2
2
4
4
6
6
810

14
Auto Terminate Feature
Each Imara DMX fixture has an “AUTO TERMINATE” feature. The last fixture that does not have an XLR cable attached to the DMX “Out” port will automatically terminate.
Any theatrical lighting board with DMX512 protocol can be used to individually turn on/off lamps in a fixture. Imara fixtures can be jumpered using the IN and OUT ports. As many as 100 fixtures can be jumpered on one chain as long as the DMX cable run remains under 1000 feet or 40 x 25ft DMX cables.
DMX Cables
Cable must comply with EIA-485 (RS485).
The fixture uses five-pin XLR male and female connec-tors to receive DMX signals from the Dimmer Board and jumper the fixtures in a series. DMX pin-out wiring follows the USITT DMX512 standard:
Pin 1: ShieldPin 2: Data –Pin 3: Data +Pin 4: Spare –Pin 5: Spare +
Note: Pin four and five in the Fixture are connected internally as Pin four to four and Pin five to five. Connecting Pin four and five as the pass-thru allows secondary data to be passed through other
Note: When operating fixtures at great distances from the dimmer board, it is recommended to use Opto-Isolators to provide DMX signal amplification.
Do Not use Microphone Cables and other general purpose, two-core cables designed for audio or signaling use. They are not suitable for DMX512. Problems due to incorrect cabling may not be immediately apparent. Microphone cables may appear to work fine, but systems built with such cables may fail or be prone to random errors. Cable must comply with EIA-485 (RS485).
Note: If a Fixture loses its DMX signal, it will hold its last DMX command. For this reason, it is important to turn the Fixture off using the DMX commands. For example, if you try to turn off the lights by turning off the dimmer board, the lights will remember their last DMX command and stay on. The Fixtures require a DMX “Off” or “Black-out” command in order to turn off.

15
TroubleshootingLamps Fail to Light:
• With the power switch in the ON position, the red light should be on. If it is not, voltage is not present. Check the power feed. Check the fuse on the fixture and replace if “blown” or “open” with same type of fuse rating.
• Each ballast operates 2 lamps. If one or both lamps do not light, replace with new lamps that have been tested to work. If tested lamps still do not light, replace ballast.
• After having checked that lamps and ballasts are working properly, turn off power to the fixture for 60 seconds and restart.
• With DMX cable connected, if yellow light is off, there is no DMX signal. Establish a valid DMX signal.
• With DMX cable plugged in and yellow indicator on: 1. Address must be between 001 and 512.
( Note: 0 or 513 and higher are invalid addresses.)
2. The dimmer setting on the lighting board must be up in the full mode.

16
Accessories and Parts
GFR-IM10 Imara S10 Gel Frame
GFR-IM6 Imara S6 Gel Frame
BRD-IM10 Imara S10 Barndoors (Set of 4)
BRD-IM6 Imara S6 Barndoors (Set of 4)
LVR-IM1090 Imara S10 Louver, 90°LVR-IM1060 Imara S10 Louver, 60°
LVR-IM690 Imara S6 Louver, 90°LVR-IM660 Imara S6 Louver, 60°
XLR-525 DMX Cable 5-Pin XLR, 25ft
XLR-515 DMX Cable 5-Pin XLR, 15ft
MTP-I80 Junior Pin Assembly for Yoke (28mm)
7010023 Imara S10 Pole-Op Assembly
7010022 Imara S6 Pole-Op Assembly

17
Cases
Part Number Description Dimensions Weight(Empty)
Holds
KAS-IM10-1 Imara S10 Ship Case 44.5 x 10.5 x 35.5”(113 x 27 x 90cm)
32 lb (14.5kg)
Imara S10
KAS-IM6-1 Imara S6 Ship Case 31 x 10.5 x 35.5”(79 x 27 x 90cm)
25 lb (11kg)
Imara S6
KAS-CL6 6-Lamp Carry Case (55W Compact)
24 x 7 x 2.5”(61 x 18 x 6.5cm)
0.8 lb (0.4kg)
55W Compact Lamps (6)
KAS-IM10-1 KAS-CL6
True Match Lamps
55C-K32 55W Kino KF32 Compact 55C-K55 55W Kino KF55 Compact
®

18
Imara S6 DMX Yoke
IMR-S6-120 Imara S6 DMX Yoke Mount, 120VAC Input Voltage: 120VAC 50/60HzOutput Frequency: 30kHz Amperage: 3.2A at 120VAC Lamp Switching: 2/4/6 Dimming Range: 100%~5% Weight w/ lamps: 21 lb (9.5kg) Dimensions: 28 x 27 x 7” (71 x 68.5 x 18cm) Lamp Type: 55W Compact w/ 2G11 Base
IMR-S6-230 Imara S6 DMX Yoke Mount, 230VAC Input Voltage: 230VAC 50/60HzOutput Frequency: 30kHz Amperage: 1.5A at 230VAC Lamp Switching: 2/4/6 Dimming Range: 100%~5% Weight w/ lamps: 21 lb (9.5kg) Dimensions: 28 x 27 x 7” (71 x 68.5 x 18cm) Lamp Type: 55W Compact w/ 2G11 Base
Imara S10 DMX Yoke
IMR-S10-120 Imara S10 DMX Yoke Mount, 120VAC Input Voltage: 120VAC 50/60HzOutput Frequency: 30kHz Amperage: 5.2A at 120VAC Lamp Switching: 2/4/6/8/10 Dimming Range: 100%~5% Weight w/ lamps: 31 lb (14kg) Dimensions: 41 x 27 x 7” (104 x 68.5 x 18cm) Lamp Type: 55W Compact w/ 2G11 Base
IMR-S10-230 Imara S10 DMX Yoke Mount, 230VAC Input Voltage: 230VAC 50/60HzOutput Frequency: 30kHz Amperage: 2.6A at 230VAC Lamp Switching: 2/4/6/8/10 Dimming Range: 100%~5% Weight w/ lamps: 31 lb (14kg) Dimensions: 41 x 27 x 7” (104 x 68.5 x 18cm) Lamp Type: 55W Compact w/ 2G11 Base
Fixture Specifications

19
Imara S10 DMX Pole-Op
IMR-S10-P120 Imara S10 DMX Pole-Op, 120VAC Input Voltage: 120VAC 50/60HzOutput Frequency: 30kHz Amperage: 5.2A at 120VAC Lamp Switching: 2/4/6/8/10 Dimming Range: 100%~5% Weight w/ lamps: 31 lb (14kg) Dimensions: 41.5 x 27 x 7” (105 x 68.5 x 18cm) Lamp Type: 55W Compact w/ 2G11 Base
IMR-S10-P230 Imara S10 DMX Pole-Op, 230VAC Input Voltage: 230VAC 50/60HzOutput Frequency: 30kHz Amperage: 2.6A at 230VAC Lamp Switching: 2/4/6/8/10 Dimming Range: 100%~5% Weight w/ lamps: 31 lb (14kg) Dimensions: 41.5 x 27 x 7” (105 x 68.5 x 18cm) Lamp Type: 55W Compact w/ 2G11 Base
Imara S6 DMX Pole-Op
IMR-S6-P120 Imara S6 DMX Pole-Op, 120VAC Input Voltage: 120VAC 50/60HzOutput Frequency: 30kHz Amperage: 3.2A at 120VAC Lamp Switching: 2/4/6 Dimming Range: 100%~5% Weight w/ lamps: 21 lb (9.5kg) Dimensions: 28.5 x 27 x 7” (72 x 68.5 x 18cm) Lamp Type: 55W Compact w/ 2G11 Base
IMR-S6-P230 Imara S6 DMX Pole-Op, 230VAC Input Voltage: 230VAC 50/60HzOutput Frequency: 30kHz Amperage: 1.5A at 230VAC Lamp Switching: 2/4/6 Dimming Range: 100%~5% Weight w/ lamps: 21 lb (9.5kg) Dimensions: 28.5 x 27 x 7” (72 x 68.5 x 18cm) Lamp Type: 55W Compact w/ 2G11 Base

20
For latest Warranty information and Certifications, see Kino Flo website at www.kinoflo.com.
Environmental: Disposal of Old Electrical & Electronic Equipment.
This symbol on the product or on its packaging indicates that this product shall not be treated as household waste. This product is made of recyclable materials and should be disposed of in accordance with governmental regulations.
Kino Flo, Inc. 2840 N. Hollywood Way, Burbank, CA 91505, USATel: 818 767-6528 website: www.kinoflo.com


