16
SB-E-2-990 ISS.01 Operation Manual AGMDPRO – Automatic Spray Gun EN

SB-E-2-990 ISS.01
Operation Manual AGMDPRO – Automatic Spray Gun
EN

© 2012 Finishing Brands UK Ltd. 2
Table of Contents
Topic Page
Specification and Materials of Construction 3
EC Declaration of Conformity 3
Safety Precautions 4
Model Part Numbers 5
Table 1 - Air Caps, Table 2 – Fluid Needles and Nozzles 5
Exploded View 6
Parts List 7
Dimensions 8
Connections 9
Operation and Maintenance 10
A. Gun Removal and Mount 10
B. Indexing Air Cap 10
C. Nozzle and Needle Removal 11
D. Packing Removal 11
E. Cam Removal 12
F. Piston and Spring Removal 12
Troubleshooting 13
A. Spray Pattern 13
B. Leakages 14
C. Assembly Faults 14
Accessories 15
Warranty 16
© 2012 Finishing Brands UK Ltd. 3
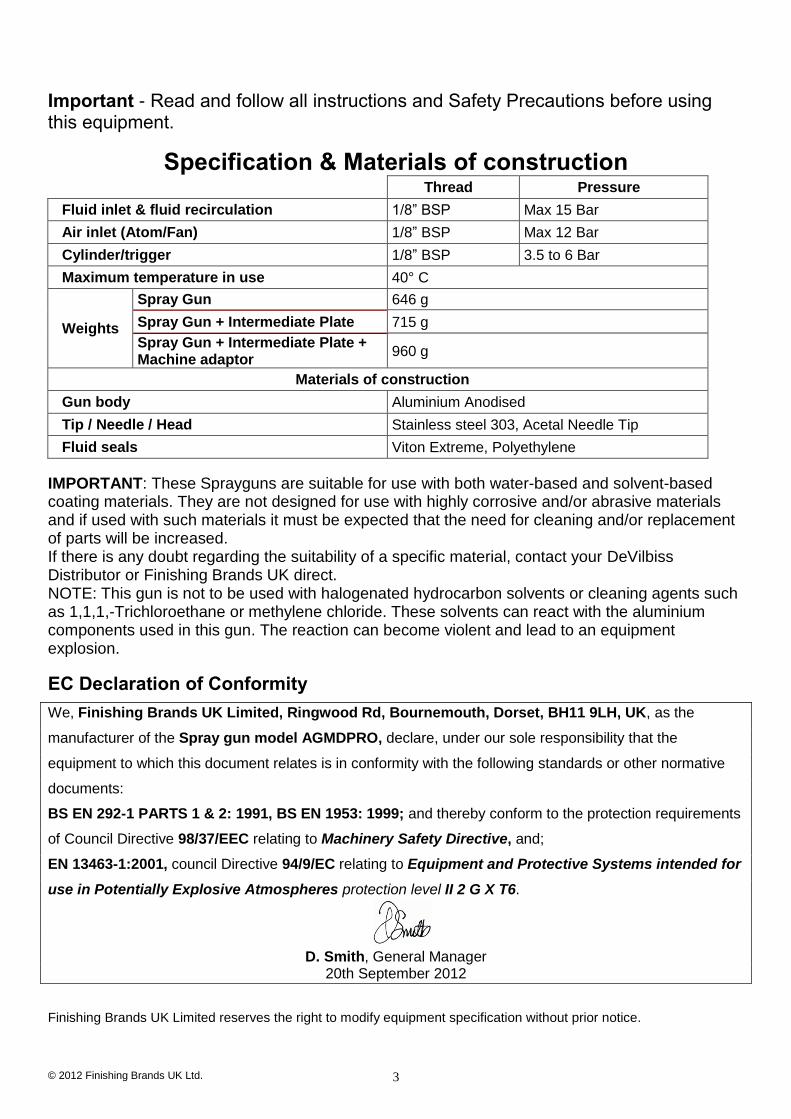
Important - Read and follow all instructions and Safety Precautions before using this equipment.
Specification & Materials of construction Thread Pressure
Fluid inlet & fluid recirculation 1/8” BSP Max 15 Bar
Air inlet (Atom/Fan) 1/8” BSP Max 12 Bar
Cylinder/trigger 1/8” BSP 3.5 to 6 Bar
Maximum temperature in use 40° C
Weights
Spray Gun 646 g
Spray Gun + Intermediate Plate 715 g
Spray Gun + Intermediate Plate + Machine adaptor
960 g
Materials of construction
Gun body Aluminium Anodised
Tip / Needle / Head Stainless steel 303, Acetal Needle Tip
Fluid seals Viton Extreme, Polyethylene
IMPORTANT: These Sprayguns are suitable for use with both water-based and solvent-based coating materials. They are not designed for use with highly corrosive and/or abrasive materials and if used with such materials it must be expected that the need for cleaning and/or replacement of parts will be increased. If there is any doubt regarding the suitability of a specific material, contact your DeVilbiss Distributor or Finishing Brands UK direct. NOTE: This gun is not to be used with halogenated hydrocarbon solvents or cleaning agents such as 1,1,1,-Trichloroethane or methylene chloride. These solvents can react with the aluminium components used in this gun. The reaction can become violent and lead to an equipment explosion.
EC Declaration of Conformity
We, Finishing Brands UK Limited, Ringwood Rd, Bournemouth, Dorset, BH11 9LH, UK, as the
manufacturer of the Spray gun model AGMDPRO, declare, under our sole responsibility that the
equipment to which this document relates is in conformity with the following standards or other normative
documents:
BS EN 292-1 PARTS 1 & 2: 1991, BS EN 1953: 1999; and thereby conform to the protection requirements
of Council Directive 98/37/EEC relating to Machinery Safety Directive, and;
EN 13463-1:2001, council Directive 94/9/EC relating to Equipment and Protective Systems intended for
use in Potentially Explosive Atmospheres protection level II 2 G X T6.
D. Smith, General Manager
20th September 2012
Finishing Brands UK Limited reserves the right to modify equipment specification without prior notice.

© 2012 Finishing Brands UK Ltd. 4
SAFETY WARNINGS
Fire and explosion
Solvents and coating materials can be highly flammable or combustible when sprayed. ALWAYS refer to the coating material supplier’s instructions and COSHH sheets before using this equipment.
Users must comply with all local and national codes of practice and insurance company requirements governing ventilation, fire precautions, operation and house-keeping of working areas.
This equipment, as supplied, is NOT suitable for use with Halogenated Hydrocarbons.
Static electricity can be generated by fluid and/or air passing through hoses, by the spraying process and by cleaning non- conductive parts with cloths. To prevent ignition sources from static discharges, earth continuity must be maintained to the spray gun and other metallic equipment used. It is essential to use conductive air and/or fluid hoses.
Personal Protective Equipment
Toxic vapours – When sprayed, certain materials may be poisonous, create irritation or are otherwise harmful to health. Always read all labels, safety data sheets and follow any recommendations for the material before spraying. If in doubt, contact your material supplier.
The use of respiratory protective equipment is recommended at all times. The type of equipment must be compatible with the material being sprayed.
Always wear eye protection when spraying or cleaning the spray gun.
Gloves must be worn when spraying or cleaning the equipment.
Injection Hazard – Spray from the gun, hose leaks or ruptured components can inject fluid
through skin into the body and cause extremely serious injury including poisoning. GET IMMEDIATE MEDICAL ATTENTION. INFORM THE DOCTOR WHAT TYPE OF MATERIAL WAS INJECTED.
Do not put fingers or hand over the spray tip.
Replace all worn, damaged or loose parts immediately.
Training – Personnel should be given adequate training in the safe use of spraying equipment.
Misuse
Never aim a spray gun at any part of the body.
Never exceed the max. Recommended safe working pressure for the equipment.
The fitting of non-recommended or non-original spares may create hazards.
Before cleaning or maintenance, all pressure must be isolated and relieved from the equipment.
The product should be cleaned using a gun-washing machine. However, this equipment should not be left inside gun-washing machines for prolonged periods of time.
Noise Levels
The A-weighted sound level of spray guns may exceed 85 dB (A) depending on the set-up being used. Details of actual noise levels are available on request. It is recommended that ear protection is worn at all times when spraying.

© 2012 Finishing Brands UK Ltd. 5
Model part numbers
AGMDPRO # - #### - ## #
TABLE 1 - Air Cap Range
AIR CAP TYPE AIR CAP PART NO. TECHNOLOGY MARKING ON CAP
TE30 AGMDPRO-102-TE30C-K High Efficiency TE30C
TE40 AGMDPRO-102-TE40C-K High Efficiency TE40C
TE50 AGMDPRO-102-TE50C-K High Efficiency TE50C
TABLE 2 - Fluid Nozzle and Needle Range
NOZZLE SIZE
(MM)
FLUID NOZZLE PART No.
STANDARD PLASTIC TIP FLUID NEEDLE
STAINLESS STEEL FLUID NEEDLE
0.85 PRO-205-085-K AGMDPRO-301P-085-10-K AGMDPRO-301-085-10-K
1.0 PRO-205-10-K
1.2 PRO-205-12-K AGMDPRO-301P-12-14-K AGMDPRO-301-12-14-K
1.4 PRO-205-14-K
e.g. AGMDPRO-TE30-12P Where:- TE30 = Air Cap 12P = 1.2 Nozzle with Plastic tipped Needle e.g. AGMDPROU-TE30-12 Where:- U= Fluid Recirculation TE30 = Air Cap 12 = 1.2 Nozzle with Stainless Steel Needle
Type of Gun
U = Fluid Recirculation
Air Cap Type See Table 1
Fluid Nozzle Size See Table 2
None = Stainless Steel P = Plastic Tipped Needle

© 2012 Finishing Brands UK Ltd. 6

© 2012 Finishing Brands UK Ltd. 7
PARTS LIST
REF DESCRIPTION PART NO. QTY
1 AIR CAP & RING SEE TABLE 1 1
2 RETAINING RING & SEALS PRO-420-K 1
3 RETAINING RING - 1
4 SHIM - 1
5 RETAINING RING SEAL - 1
6 AIR CAP - 1
7 FLUID NOZZLE SEE TABLE 2 1
8 INDEXING HEAD ASSY AGMDPRO-11-K 1
9 INDEXING SPRAY HEAD - 1
10 SPRAY HEAD GASKET - 1
11 HEAD AGMDPRO-1-K
1 HEAD - RECIRCULATION AGMDPRO-1-U-K
12 O-RING (KIT OF 5) AGMDPRO-29X-K5 5
13 HEAD GASKET (KIT OF 2) AGMDPRO-9-K2 1
14 PACKING (KIT OF 5) AGMDPRO-8-K5 1
15 BODY - 1
*16 RETAINING SCREW - 1
*17 CAM - 1
18 CAP HEAD SCREWS (KIT OF 4) AGMDPRO-10-K4 4
19 PISTON ASSEMBLY AGMDPRO-404-K 1
20 O-RING - 1
21 O-RING - 1
22 PISTON - 1
23 PISTON SPRING - 1
24 FLUID NEEDLE SEE TABLE 2 1
25 NEEDLE SPRING ASSEMBLY AGMDPRO-405-K 1
26 NEEDLE SPRING - 1
27 SPRING BUTTON - 1
28 END PLATE - 1
29 END CAP AGMDPRO-13-K 1
SERVICE KITS
CAM KIT (PARTS MARKED WITH * INCLUDED IN KIT)
AGMDPRO-406-K

© 2012 Finishing Brands UK Ltd. 8
Dimensions (all dimensions in mm)
Gap
Important: The spray gun must be earthed to dissipate any electrostatic charges which may be created by fluid or air flows. This can be achieved through the spray gun mounting, or conductive air/fluid hoses. Electrical bond from the spray gun to earth should be checked with an Ohm meter. A resistance of less than 106 Ohms is recommended

© 2012 Finishing Brands UK Ltd. 9
Connections
Supply Connection Size
Atom Atom Air 1/8” x 8mm
Fan Fan Air 1/8” x 8mm
CYL Cylinder Air 1/8” X 6mm
Mat Fluid 1/8” BSP
Mat R Fluid Recirculation 1/8” BSP
Stage 2 ‘Captive’
Rotate clockwise to stop
Stage 1 ‘Locked’
Rotate anti-clockwise Until clamped
Fan
Mat R
Atom
CYL
Mat
Mat
Fan
Atom
CYL
Mat R
Fan
Mat R
Fan
Atom
CYL

© 2012 Finishing Brands UK Ltd. 10
OPERATION
Gun Removal and Gun Mount
Indexing Air Cap 90°
Make sure indexing legs and slots are engaged before tightening the Air Cap ring.
5mm

© 2012 Finishing Brands UK Ltd. 11
MAINTENANCE
Nozzle and Needle Removal
Packing Removal
Warning – Check all air and fluid pressure is removed before starting maintenance.
Lubricate with Grease AGMD-010
Use 10mm socket wrench. Tighten to a torque of 18.1-20.35 Nm (13.4-15 lbf.ft)
3 Component direction arrow for dis-assembly and sequence number. Note: Reverse sequence to assemble.
3mm
1.8-2.2 Nm
1.3-1.6 lbf.ft

© 2012 Finishing Brands UK Ltd. 12
MAINTENANCE
Cam Removal
Piston and Spring Removal
3mm
3mm
3mm
5mm
1.8-2.2 Nm
1.3-1.6 lbf.ft

© 2012 Finishing Brands UK Ltd. 13
Troubleshooting
Possible Problems in Operation
CONDITION CAUSE CORRECTION
Spray Pattern
Heavy top or bottom pattern.
Heavy right or left side pattern.
Horn holes plugged. Obstruction on top or bottom of fluid nozzle. Cap and/or nozzle seat dirty. Left or right side horn holes plugged. Dirt on left or right side of fluid nozzle.
Clean with non-metallic point. Clean. Clean. Clean with non-metallic point. Clean.
Remedies for the top-heavy and bottom-heavy patterns: 1. Determine if the obstruction is on the air cap or the fluid nozzle. Do this by making a test spray pattern. Then, rotate the cap one-half turn and spray another pattern. If the defect is inverted, obstruction is on the air cap. Clean the air cap as previously instructed. Also check for dried paint just inside the cap centre hole opening; remove by washing with solvent. 2. If the defect is not inverted, it is on the fluid nozzle. Clean nozzle. If problem persists, renew nozzle.
Heavy centre pattern.
Fan Air pressure set too low. Material too thick.
Increase Fan Air pressure to achieve correct pattern. Thin to correct consistency.
Split spray pattern.
Fluid Flow set too low. Fan Air pressure set too high.
Increase Fluid Flow to achieve correct pattern. Decrease Fan Air pressure to achieve correct pattern.
Jerky or fluttering spray.
Material level too low.
Obstruction in fluid passage.
Refill.
Back flush with solvent.
Fluid Starved spray pattern.
Inadequate material flow.
Increase Fluid Flow.
Change to larger fluid nozzle size.
Check hose for blockage.

© 2012 Finishing Brands UK Ltd. 14
Possible Problems in Operation (cont.)
Excessive overspray.
Air pressure too high.
Gun too far from work surface.
Reduce air pressure.
Adjust to correct target distance.
Dry spray.
Air pressure too high.
Gun too far from work surface.
Gun motion too fast.
Fluid flow too low.
Reduce air pressure.
Adjust to correct distance.
Slow down.
Increase Fluid Flow or use larger nozzle size.
Runs and sags.
Too much material flow.
Material too thin.
Motion too slow.
Reduce Fluid Flow or change to smaller fluid nozzle and fluid needle size.
Mix correctly or apply light coats.
Increase Gun Traverse speed.
Leakages
Fluid leaking from Packing.
Packing or Fluid Needle worn. Replace.
Fluid leaking or dripping from front of gun.
Fluid nozzle or fluid needle worn or damaged.
Foreign matter in fluid nozzle.
Fluid needle dirty or stuck in needle packing.
Wrong size fluid needle or fluid nozzle.
Replace fluid nozzle and fluid needle.
Clean.
Clean.
Replace fluid nozzle and fluid needle.
Fluid leaking between the Spray Gun and the Intermediate Plate.
O-Rings damaged or missing.
Locking Cam not locked or worn.
Replace O-Rings using AGMDPRO-29X-K5. Lock Cam or replace using AGMDPRO-406-K.
Assembly Faults
Spray Gun does not locate onto Intermediate Plate.
Locking Cam is not in the Unlock position
Turn Locking Cam to The Unlock position using a 5mm key.
Spray Gun is loose when assembled onto Intermediate Plate.
Locking Cam has not been tightened.
Locking Cam has worn.
Turn Locking Cam fully to the lock position using a 5mm key. Replace using Cam service kit AGMDPRO-406-K
Spray Gun cannot be removed from Intermediate Plate.
Locking Cam is not in the Unlock position.
Turn Locking Cam to The Unlock position using a 5mm key.

© 2012 Finishing Brands UK Ltd. 15
ACCESSORIES
AGMDPRO-402-K INTERMEDIATE PLATE
AGMDPRO-403-K MACHINE ADAPTOR
Note: Further Machine adaptors and Robot Mounted adaptors available on request.
REF DESCRIPTION PART NO. QTY
1 Intermediate Plate - 1
2 * Locking Pin - 1
3 Air Tube (Kit of 2) AGMDPRO-52-K2 2
4 O-Rings (Kit of 5) AGMDPRO-29X-K5 5
5 Screw AGMD-142 3
REF DESCRIPTION PART NO. QTY
1 Machine Adaptor - 1
2 Screw SSF-2048 1
3 Air Connector 1/8” x 6 AGMD-126 1
4 Air Connector 1/8” x 8 AGMD-127 2
Removable location Pin – Can be removed so Intermediate Plate can be fitted to existing Special machine adaptors without modification.
*Included in Cam Kit AGMDPRO-406-K

© 2012 Finishing Brands UK Ltd. 16
Warranty This product is covered by Finishing Brands UK Limited one year warranty.
Finishing Brands UK Limited, Ringwood Road, Bournemouth, BH11 9LH, UK. Tel.No.: +44 (0)1202) 571111 Fax No.: +44 (0)1202) 581940, Website address: http:// www.finishingbrands.eu Registered office: Finishing Brands UK Limited, 400, Capability Green, Luton, Bedfordshire, LU1 3AE, UK. Registered in England: No. 07656273 VAT No.: GB 113 5531 50


![STANDOX RENAULT 2010 [Kompatibilitätsmodus]info.pages.color.tc/Yellowpages/SX/RENAULT/RENAULT Colour Info.pdf · RENAULT MODELS / MODELLE 01 VIN / TYPENSCHILD VIN PLATE LOCATION](https://static.documents.pub/doc/80x56/5b97c3cd09d3f253748b5c45/standox-renault-2010-kompatibilitaetsmodusinfopagescolortcyellowpagessxrenaultrenault.jpg)

![STANDOX TOYOTA 2010 [Kompatibilitätsmodus]info.pages.color.tc/Yellowpages/SX/TOYOTA/TOYOTA Colour Info.pdf · TOYOTA MODELS / MODELLE VIN / TYPENSCHILD 01 Corolla Corolla Fielder](https://static.documents.pub/doc/80x56/5b5543817f8b9a575f8de257/standox-toyota-2010-kompatibilitaetsmodusinfopagescolortcyellowpagessxtoyotatoyota.jpg)