48
WARNING BEFORE USING THIS FIREARM, READ AND FOLLOW THE WARNINGS AND INSTRUCTIONS CONTAINED IN THIS MANUAL. Operational Manual Compact, Pro Carry & Ultra Carry

WARNINGBEFORE USING THIS FIREARM, READ AND
FOLLOW THE WARNINGS AND INSTRUCTIONSCONTAINED IN THIS MANUAL.
Operational Manual
Compact, Pro Carry& Ultra Carry
2
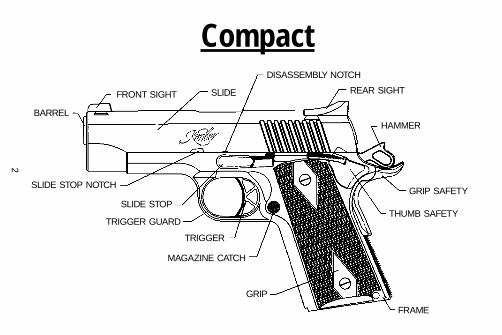
Compact
FRONT SIGHT SLIDE
DISASSEMBLY NOTCH
REAR SIGHT
HAMMER
GRIP SAFETY
THUMB SAFETY
FRAME
GRIP
MAGAZINE CATCH
TRIGGER
TRIGGER GUARD
SLIDE STOP
SLIDE STOP NOTCH
BARREL

3
Pro Carry FRONT SIGHT SLIDE
DISASSEMBLY NOTCH
REAR SIGHT
HAMMER
GRIP SAFETY
THUMB SAFETY
FRAME
GRIP
MAGAZINE CATCH
TRIGGER
TRIGGER GUARD
SLIDE STOP
SLIDE STOP NOTCH
BARREL

4
Ultra Carry FRONT SIGHT
SLIDE
DISASSEMBLY NOTCH
REAR SIGHT
HAMMER
GRIP SAFETY
THUMB SAFETY
FRAME
GRIP
MAGAZINE CATCH
TRIGGER
TRIGGER GUARD
SLIDE STOP
SLIDE STOP NOTCH
BARREL

TABLE OF CONTENTSWarning . . . . . . . . . . . . . . . . . . . . . . . . . . . . 6Main Features and Tech Info . . . . . . . . . . . . . . . 7Spring Replacement Chart . . . . . . . . . . . . . . . .7Rules of Safety . . . . . . . . . . . . . . . . . . . . . . . . 8Lead Warning . . . . . . . . . . . . . . . . . . . . . . . . 12Safety Features . . . . . . . . . . . . . . . . . . . . . . . 12Chamber Indicators . . . . . . . . . . . . . . . . . . . .13Ammunition . . . . . . . . . . . . . . . . . . . . . . . . . 18Loading . . . . . . . . . . . . . . . . . . . . . . . . . . . . 22Unloading . . . . . . . . . . . . . . . . . . . . . . . . . . 25Break-in Period . . . . . . . . . . . . . . . . . . . . . . .26Firing . . . . . . . . . . . . . . . . . . . . . . . . . . . . . 27Series II Models . . . . . . . . . . . . . . . . . . . . . . .28Disassembly . . . . . . . . . . . . . . . . . . . . . . 29&32Assembly . . . . . . . . . . . . . . . . . . . . . . . . . . . 33Recoil Spring Replacement . . . . . . . . . . . . . . .34Cleaning & Lubrication . . . . . . . . . . . . . . . . . 35Warranty Information . . . . . . . . . . . . . . . . . . 38Instructions for Warranty Repairs . . . . . . . . . . .40Spare Parts . . . . . . . . . . . . . . . . . . . . . . . . . 40Custom Shop . . . . . . . . . . . . . . . . . . . . . . . . 41Parts Illustration Compact . . . . . . . . . . . . . . . 42Parts List Compact . . . . . . . . . . . . . . . . . . . . 43Parts Illustration Pro Carry . . . . . . . . . . . . . . . 44Parts List Pro Carry . . . . . . . . . . . . . . . . . . . . 45Parts Illustration External Extractors . . . . . . . .46
5

WARNING:This product is classified as a lethal weapon.Failure to read and properly execute the instruc-tions and warnings in this manual could result inserious injury, death or damage to property.
Do not attempt to practice loading or unloadingwith live ammunition without a thorough under-standing of the safe operation of this pistol.
Always treat a firearm as if it were fully loaded.
Always store and carry this product empty, withthe hammer forward on an emptied chamber.Failure to do so could result in an unintentionaldischarge.
Keep out of reach of children.
When you squeeze the trigger, you must expectthe pistol to fire and take full responsibility foryour actions.
Read through the entire manual before attempt-ing to use this product.
6

MAIN FEATURES TECHNICAL INFORMATION
Compact Pro Carry Ultra Carry
Available calibers: .45 ACP & .40 S&W & .38 Super (Pro only)
Barrel Length: 4" 4" 3"
Overall Length: 7.7" 7.7" 6.9"
Weight Unloaded: 34 oz. Steel — 31 oz. Steel28 oz. Alum. 28 oz. 25 oz. Alum.
Frame: Steel, Stainless Steel, or Aluminum
Magazine Capacity: 7 7 7
Finish: Blue or Stainless
Sights: (Rear) Fixed Fixed Fixed(Front) Fixed Fixed Fixed
SPRING REPLACEMENT CHART
Compact & Pro Models:Recoil Spring: .45 ACP & 40 S&W/22 lbs., .38 Super/18 lbs.CHANGE EVERY 800 rounds.Firing Pin Spring: HD, CHANGE EVERY 5000 rounds.Mainspring: 23 lbs., CHANGE EVERY 5000 rounds.
Ultra Carry Models:Recoil Spring: 18 lbs., CHANGE EVERY 1800 rounds.Firing Pin Spring: HD, CHANGE EVERY 5000 rounds.Mainspring: 23 lbs., CHANGE EVERY 5000 rounds.
7

RULES OF SAFETY
NOTICE: Kimber Mfg., Inc. shall not be responsiblefor any death, physical injury or property damagethat is the result of the proper or improper use ofthis product.
1. Always treat this and any other firearm as if itwere loaded.
2. Never point this or any other firearm at anythingyou do not intend to shoot. Keep muzzlepointed in a safe direction.
3. Never take anyone’s word that a firearm isunloaded. Clear it yourself with finger off thetrigger and the muzzle pointed in a safe direction. Remove the magazine, lock theslide open and visually check to ensure thatno round is chambered.
4. Always make sure the pistol is unloaded andthe slide is latched open before laying it downor handing it to someone else.
5. Safe Carrying Condition: Never carry thispistol cocked, loaded and ready to fire as thispractice could easily result in an unintentionaldischarge. Do not carry a loaded gun with a
8

live round in the chamber while walking, runningor crossing any obstacle, where there is anypossibility of slipping or falling as this couldlead to a possible unintentional discharge.
6. Always make sure that this firearm is in topworking condition and that no internal partshave been damaged as a result of corrosion,improper maintenance or dropping. If evidenceof these conditions exist, have them inspectedby a competent gunsmith prior to use.
7. Never leave a loaded pistol unattended.
8. Make sure that your backstop is adequate tostop your bullets prior to shooting.
9. Make sure all other shooters and bystandersare well away from the ejection port. Emptycases are ejected under force and may causeinjury if someone is struck.
10. Obey all range rules at all times.
11. Always wear adequate hearing and eyeprotection when using any firearm.
12. While on the range, be sure to carry this pistolcleared, with slide locked open and muzzlepointed in a safe direction until ready to shoot.
9
13. Always ensure that barrel and action are clearof obstructions. Shooting a blocked firearm canresult in serious injury or death and damageto the weapon.
14. Never drink alcoholic beverages or take drugsprior to or during shooting or handling of this orany other firearm.
15. Seek a doctor’s advice if you are taking medicine prior to engaging in any shooting activity.
16. Keep safety on when pistol is loaded andcocked until ready to fire. Immediately unloadand clear this pistol when shooting sequencehas been completed.
17. Never shoot at any hard or flat surface, such asrock or water. The resulting ricochets couldresult in physical injury, death or propertydamage.
18. Never put your finger in the trigger guard untilyou are ready to fire.
19. Always make sure pistol is unloaded beforecleaning.
10

20. Never force a jammed action. This could causea round to explode resulting in physical injuryand damage to the pistol.
21. If firearm fails to fire when trigger is pulled, as aresult of slow primer ignition (hangfire), keepmuzzle pointed downrange for a minimum of30 seconds. If the round does not fire, removethe magazine, clear the weapon and examinethe ejected, unfired cartridge. If the indentfrom the firing pin is off center, light or absent,take the pistol to a competent gunsmith. Ifthe indent appears normal compared to otherrounds, assume a faulty round, separate fromother cartridges, reload and continue shooting.
22. Never use this pistol in any manner other thanthat for which it was specifically intended.
23. Never indulge in “horseplay” while holding anyfirearm.
11
12
LEAD WARNINGDischarging firearms in poorly ventilated areas,cleaning firearms, or handling ammunition mayresult in exposure to lead and other chemicalsknown to cause birth defects, reproductive harm,cancer, and other serious physical injury. Haveadequate ventilation at all times. Wash hands thoroughly after exposure.
SAFETY FEATURESThis Kimber firearm is equipped with several safetyfeatures which, if properly employed, can minimizethe danger of accidental discharge.
NOTE: Never rely on mechanical safeties to overcome improper maintenance or unsafe handling practices. Always point the muzzle in asafe direction.
TRIGGER GUARD
The trigger guard is a loop of metal that surroundsthe trigger, protecting it from damage or accidentaldischarge.
13
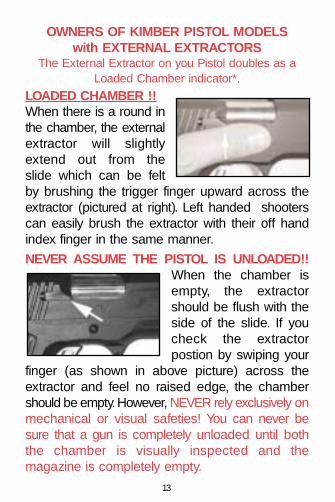
OWNERS OF KIMBER PISTOL MODELS with EXTERNAL EXTRACTORS
The External Extractor on you Pistol doubles as aLoaded Chamber indicator*.
LOADED CHAMBER !!When there is a round inthe chamber, the externalextractor will slightlyextend out from theslide which can be feltby brushing the trigger finger upward across theextractor (pictured at right). Left handed shooterscan easily brush the extractor with their off handindex finger in the same manner.
NEVER ASSUME THE PISTOL IS UNLOADED!!When the chamber isempty, the extractorshould be flush with theside of the slide. If youcheck the extractor postion by swiping your
finger (as shown in above picture) across theextractor and feel no raised edge, the chambershould be empty.However, NEVER rely exclusively onmechanical or visual safeties! You can never besure that a gun is completely unloaded until boththe chamber is visually inspected and the magazine is completely empty.

14
LOADED CHAMBER INDICATOR PORT® NEVER
ASSUME THE PISTOL IS UNLOADED!!
LOADED CHAMBER INDICATOR PORT*: Asmall opening on the top of the barrel hood provides a visual indication as to whether or not around is in the chamber. When a round is in the chamber, you should be able to see the rim ofthe shell casing ( Note the placement of the arrowin the above photo).
**These loaded chamber indicators are moreexamples of Kimber's commitment to safety.However, ALWAYS abide by the NRA RULES FORSAFE GUN HANDLING as seen on the rear of ourOperational Manuals. NEVER rely exclusively onmechanical or visual safeties! You can never besure that a gun is completely unloaded until boththe chamber is visually inspected and the magazine is completely empty. **Please see specific models for availability.

15
SAFETY LOCK OR THUMB SAFETY
The thumb safety is located on the left side of theframe immediately forward of the hammer. Tooperate, pull slide to its most rearward position andrelease. Then push the thumb safety upward until itfully engages the slide lock notch. The slide isthereby prevented from moving rearward and aninternal cam surface engages the sear preventingthe hammer from moving forward. The thumbsafety cannot be engaged unless the hammer is fully cocked and the slide is fully forward. To disengage, move safety fully downward until it iscompletely down.
SLIDE LOCK NOTCH
FIGURE 2-SAFETY LOCK
HAMMER THUMB SAFETYDISENGAGED
THUMBSAFETYENGAGED
HAMMERFULLYCOCKED

16
GRIP SAFETY
The grip safety is located on the upper rear portionof the frame immediately below the hammer and isautomatically engaged through spring pressure. Itprevents the rearward movement of the trigger. Todisengage, grip the pistol grip firmly. This will allowgrip safety to move out of contact with rear oftrigger, allowing the gun to fire.
DISCONNECTOR
The disconnector prevents a round from beingfired prior to being properly seated in the chamberwith the slide and barrel locked. If the slide is notfully forward, the disconnector is depressed anddisengages the sear so that the hammer cannotdrop if the trigger is pulled. With the slide fully forward and the barrel locked, a spring pushes thedisconnector into a recess in the bottom of theslide. The disconnector now engages the sear sothat the hammer can move forward when the trigger is pulled.
17
HAMMER SAFETY STOP
The hammer safety stop is a notch on the hammer which prevents it from falling fully forwardin the event of primary sear notch failure. It alsoprevents fingers slip from the slide or hammerwhile cocking the pistol, provided the hammer hasbeen moved past the stop. The safety stop is nota manual safety! Do not under any circumstancesuse the safety stop as a “half cock” position. Thismisuse can result in damage to the sear, and/or unintentional discharge of the pistol. The safetystop position is an automatically engaging safetyfeature and should never be engaged by hand!
INERTIA FIRING PIN
The firing pin is held in a rearward position byspring tension. Being shorter than the housing, itcannot protrude through the face of the slide untilthe spring tension and inertia of the pin itself isovercome by the force of the falling hammer.

18
AMMUNITION1. Use only high quality, original factory-
manufactured ammunition. Don’t oil cartridges.Don’t spray aerosol type lubricants,preservatives, or cleaners directly onto cartridges or where excess spray may flowinto contact with cartridges. Lubricant or otherforeign matter on cartridges can cause potentially dangerous ammunition malfunction.Use only ammunition of the caliber for whichyour firearm is chambered. The proper caliberis permanently engraved on the barrel of yourfirearm. Never attempt to use ammunition ofany other caliber.
2. The use of reloaded, “remanufactured”, hand-loaded or other non-standard ammunitionvoids all warranties. Reloading is a scienceand improperly loaded ammunition can beextremely dangerous. Severe damage to thefirearm and serious injury to the shooter or toothers may result. Always use ammunition thatcomplies with the industry performance standards established by the Sporting Armsand Ammunition Manufacturers’ Institute, Inc. ofthe United States (SAAMI). For best results, werecommend the use of jacketed round nose“BALL” ammunition.

19
3. Firearms may be severely damaged, and serious injury to the shooter or others mayresult from any condition causing excessivepressure inside the chamber or barrel duringfiring. Excessive pressure can be caused byobstruction in the barrel, propellant powderoverloads, or by the use of incorrect or defectively assembled cartridges. In addition,the use of a dirty, corroded or damaged cartridge can lead to a burst cartridge caseand consequent damage to the firearm andpersonal injury from the sudden escape ofhigh-pressure propellant gas within thefirearm’s mechanism.
4. Immediately stop shooting and check the barrel for a possible obstruction whenever:
– You have difficulty in, or feel unusual resistance in chambering a cartridge, or
– A cartridge misfires (does not go off), or
– The mechanism fails to extract a fired cartridge case, or
– Unburned grains of propellant powder arediscovered spilled in the mechanism, or
– A shot sounds weak or abnormal.

20
– In such cases it is possible that a bullet islodged part way down the barrel. Firing a subsequent bullet into the obstructed barrelcan damage the firearm and cause seriousinjury to the shooter or bystanders.
5. Bullets can become lodged in the barrel:
– If the cartridge has been improperly loadedwithout propellant powder, or if the powderfails to ignite. (Ignition of the cartridge primeralone will push the bullet out of the cartridgecase, but usually does not generate sufficientenergy to expel the bullet completely from thebarrel), or– If the bullet is not properly seated tightly inthe cartridge case. When such a cartridge isextracted from the chamber without beingfired, the bullet may be left behind in thebore at the point where the rifling begins.Subsequent chambering of another cartridgemay push the first bullet further into the bore.
6. If there is any reason to suspect that a bullet isobstructing the barrel, immediately unload thefirearm, rack the slide and look through thebore. It is not sufficient to merely look in thechamber. A bullet may be lodged some
21
distance down the barrel where it cannot easilybe seen. If a bullet is in the bore, do not attemptto shoot it out by using another cartridge, or byblowing it out with a blank or one from whichthe bullet has been removed. Such techniquescan generate excessive pressure, damage thefirearm and cause serious personal injury.
If the bullet can be easily removed with awood or brass dowel, (using hand pressureonly, never “hammer” a bullet lodged in thebore) clean any unburned powder grains fromthe bore, chamber and mechanism beforeresuming shooting. If the bullet can not be dislodged by tapping it with a rod, take thefirearm to a gunsmith.
7. Dirt, corrosion, or other foreign matter on acartridge can impede complete chamberingand may cause the cartridge case to burstupon firing. The same is true of cartridgeswhich are damaged or deformed.
8. Don’t oil cartridges, and be sure to wipe thechamber clean of any oil preservative beforecommencing to shoot. Oil interferes with thefriction between cartridge case and chamber wall that is necessary for safe functioning,
22
and subjects the firearm to stress similar tothat imposed by excessive pressure.
9. Use lubricants liberally on the moving parts ofyour firearm. Avoid excessive spraying of anyaerosol gun care product, especially where itmay get on ammunition. All lubricants, andaerosol spray lubricants in particular, can penetrate cartridge primers and cause misfires.Some highly penetrative lubricants can alsomigrate inside cartridge cases and causedeterioration of the propellant powder; on firing, the powder may not ignite. If only theprimer ignites, there is a danger that the bulletmay become lodged in the barrel.
LOADING
Keep muzzle pointed in safe direction and followall safety procedures at all times.
Practice these steps with an unloaded pistol ordummy ammo until you are completely familiar andcomfortable with the procedures. Use live ammoonly when you are prepared to shoot. Always useclean, dry high quality ammunition (of the propercaliber) that meets industry performance standards.
23
1. To release the empty magazine from the frame,hold hand under magazine and push the magazinecatch which is located on the left side of theframe behind the trigger. This will cause themagazine to fall free of the magazine well.
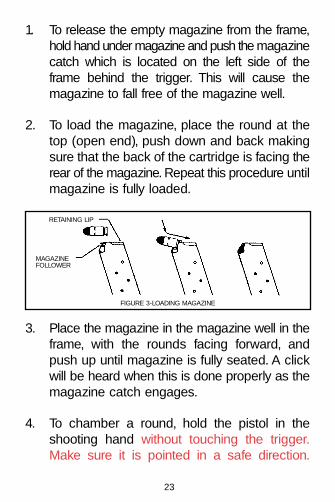
2. To load the magazine, place the round at thetop (open end), push down and back makingsure that the back of the cartridge is facing therear of the magazine. Repeat this procedure untilmagazine is fully loaded.
3. Place the magazine in the magazine well in theframe, with the rounds facing forward, andpush up until magazine is fully seated. A clickwill be heard when this is done properly as themagazine catch engages.
4. To chamber a round, hold the pistol in theshooting hand without touching the trigger.Make sure it is pointed in a safe direction.
RETAINING LIP
MAGAZINE FOLLOWER
FIGURE 3-LOADING MAGAZINE
24
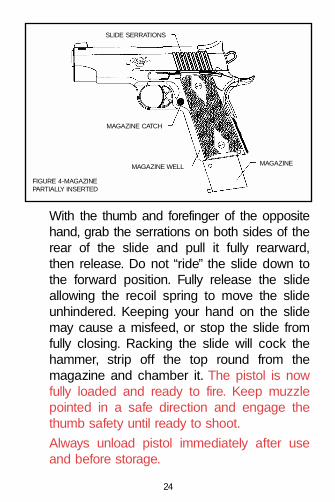
With the thumb and forefinger of the oppositehand, grab the serrations on both sides of therear of the slide and pull it fully rearward,then release. Do not “ride” the slide down tothe forward position. Fully release the slideallowing the recoil spring to move the slideunhindered. Keeping your hand on the slidemay cause a misfeed, or stop the slide fromfully closing. Racking the slide will cock thehammer, strip off the top round from themagazine and chamber it. The pistol is nowfully loaded and ready to fire. Keep muzzlepointed in a safe direction and engage thethumb safety until ready to shoot.
Always unload pistol immediately after useand before storage.
FIGURE 4-MAGAZINEPARTIALLY INSERTED
SLIDE SERRATIONS
MAGAZINE CATCH
MAGAZINE WELL MAGAZINE
25
NOTE: 1911 style handguns in 45 ACP weredesigned to function best with bullets that have asmooth, round contoured nose.
When cartridges fail to feed, check the following:
A. Substandard ammunition.
B. Cartridge overall length too short or too long.
C. Bullet nose too blunt.
D. Slide is short stroking. Ammo charge is not toSAAMI specs for 45 ACP.
UNLOADING1. To unload, first remove magazine as in step 1
of previous section.
2. If all of the rounds from the magazine havebeen fired, slide will automatically lock in theopen position. If not, repeat step 4.If magazine is not removed prior to this procedure, any rounds left in it will be chambered, which could lead to an unintentional discharge. The pistol will fire witha round chambered and the magazineremoved.
3. If slide has not automatically locked in therearward position as a result of firing the lastround from the magazine, do it manually and
26
visually inspect the chamber to ensure that itis clear.
4. Release slide forward onto the empty chamberby pulling slide fully rearward and releasing orby manually rotating the slide stop downwardpast the slide stop notch. Repeatedly allowingthe slide to slam closed on an empty chamber will cause premature wear and loosening on a match grade 1911 such as theKimber. Ease the slide closed.
5. Pull the trigger allowing the hammer to fallforward on the empty chamber. Do not“ease” the hammer down by holding orblocking it. Doing so may mar the sear tipwhich will result in a substandard trigger pull.
6. To remove any remaining rounds from themagazine, push the cartridges forward untilthey clear the retaining lips.
BREAK-IN PERIOD
Before firing the pistol for the first time, Field Stripand clean the firearm following proper procedures(see DISASSEMBLY, CLEANING and LUBRICATION and ASSEMBLY Instructions in thisManual). Kimbers firearms are quality custompieces. Our firearms are hand fitted to tight
27
tolerances. For proper Break-in of the firearmshoot 400-500 rounds of Quality Factory Ball(230g. FMJ). Ammunition, cleaning and lubricatingthe gun every 100-150 rounds.
FIRING
Always wear eye and hearing protection whenshooting.
1. Point muzzle in a safe direction.
2. Load pistol as previously directed.
3. Grip the frame firmly, depressing the grip safety.
4. With your finger well clear of the trigger, rotatethumb safety downward.
5. Place index finger on trigger, take aim andgently squeeze rearward until hammer isreleased and falls forward striking the firing pin.Be prepared for loud noise and recoil.
Note: This is a semi-automatic pistol and willrecock the hammer, eject the empty cartridgeand chamber a new round and it will continueto fire with each subsequent pull of the triggeruntil all rounds in the magazine have beenfired.
6. Continue procedure until magazine is emptyand slide is locked open.
28
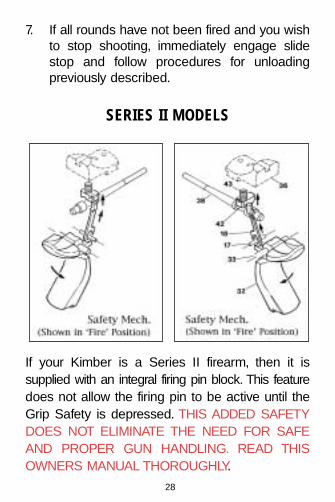
SERIES II MODELS
If your Kimber is a Series II firearm, then it is supplied with an integral firing pin block. This featuredoes not allow the firing pin to be active until theGrip Safety is depressed. THIS ADDED SAFETYDOES NOT ELIMINATE THE NEED FOR SAFEAND PROPER GUN HANDLING. READ THISOWNERS MANUAL THOROUGHLY.
7. If all rounds have not been fired and you wishto stop shooting, immediately engage slidestop and follow procedures for unloadingpreviously described.

29
Please follow the simple procedures below fordisassembly of the slide.
1. Visually inspect chamber to make surefirearm is unloaded.
2. Follow standard disassembly procedures foundin this Owners Manual, with the exception that special observation should be given thatthe grip safety is not to be engaged whenremoving the slide.
If the Grip Safety is depressed while attempting toremove the slide, the push rod for the firing pinstop will be activated. Activating the Grip Safetywill not allow the slide to be removed, if forced,damage could occur to the firearm, which will notbe covered under Warranty.
DISASSEMBLY (FIELD STRIPPING)
This product should be cleaned after every use andwhen exposed to dirt, sand, etc. When not in use,clean at least twice per year.
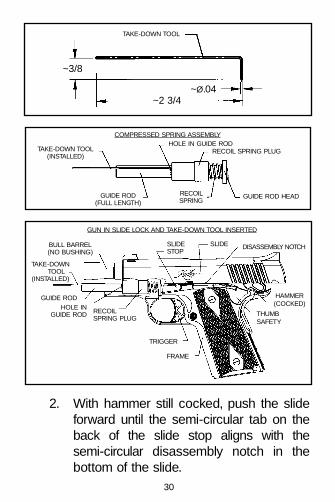
1. With the pistol unloaded and the magazineremoved, retract and lock back the slide.Locate the exposed small hole in the recoilspring guide rod. Insert the take down tool inthe hole in the guide rod and carefullyrelease the slide stop. (See diagram)
30
TAKE-DOWN TOOL
~3/8
~2 3/4~Ø.04
COMPRESSED SPRING ASSEMBLYHOLE IN GUIDE ROD
RECOIL SPRING PLUG
GUIDE ROD HEAD
SLIDESLIDE STOP
BULL BARREL(NO BUSHING)
TRIGGER
FRAME
RECOILSPRING PLUG
GUIDE ROD
TAKE-DOWN TOOL
(INSTALLED)
HOLE IN GUIDE ROD
DISASSEMBLY NOTCH
THUMB SAFETY
HAMMER(COCKED)
GUN IN SLIDE LOCK AND TAKE-DOWN TOOL INSERTED
RECOILSPRING
GUIDE ROD (FULL LENGTH)
TAKE-DOWN TOOL(INSTALLED)
2. With hammer still cocked, push the slideforward until the semi-circular tab on theback of the slide stop aligns with the semi-circular disassembly notch in thebottom of the slide.

31
3. Push inward on the end of the slide stop shafton the right side of the pistol and remove theslide stop from the left side.
4. Remove the slide by sliding it forward off theframe.
5. Tip the barrel link forward to clear the recoil springtunnel. Then pull the barrel clear of the slide.
The pistol is now disassembled for cleaningpurposes (field stripped).
Do not drop the hammer while slide is removedfrom the pistol.
BARREL LINK FORWARD RECOILSPRING GUIDE RECOIL SPRING
SLIDE

32
ALTERNATE DISASSEMBLY METHOD
1. Wear eye protection before proceeding.
2. With the pistol unloaded and the magazineremoved, retract the slide and line up the slidestop with the slide stop disassembly notch.
3. Push inward on the end of the slide stop shafton the right side of the pistol and remove theslide stop from the left side.
4. Remove the slide by sliding it forward off theframe. Note: Do not depress the grip safetywhen attempting to remove the slide.
5. Push forward on the head of the guide rod toexpose the takedown pin hold in the guide rod.
6. Insert the small end of the takedown pin inthe guide rod hole, and slowly release tensionon the recoil spring.
7. The recoil spring/guide rod assembly is nowcaptive.
8. Remove the recoil spring guide assembly bywithdrawing it toward the rear of the slide.
9. Remove the barrel by first tipping the barrellink forward to clear the recoil spring tunnel inthe slide, then slide the barrel out toward thefront of the slide.

33
ASSEMBLYTo reassemble, follow steps in reverse order. Themost difficult procedure is often the alignment ofthe barrel link with the slide latch hole in the frame.The alignment can be seen through the hole andlink can be aligned by moving the slide very carefully back and forth until it drops into place Donot try aligning the link and the semi-circulardisassembly notch and top of the slide stop at thesame time. Align the link first, insert the slide stopshaft and then rotate the slide stop upward until italigns with the disassembly notch. Then push theslide stop inward until it is properly seated.
1. Re-assemble by inserting the barrel then thecompressed spring assembly, (take down toolfirst) into the front of slide.
2. Replace the slide and slide stop.
3. Rack the slide, by hand, letting the take downtool drop out.
DISASSEMBLY NOTCH
(PIN)
SLIDE STOP

34
RECOIL SPRING REPLACEMENT &BARREL REMOVAL FROM SLIDE
1. With the takedown tool in place, slide theguide rod assembly into the spring tunnel ofthe slide.
2. With the guide rod assembly in the slide, firmlygrasp the slide with your hand. (The ejectionport should be facing the palm of your hand.)
3. While grasping the slide place both yourthumbs firmly against the head of the guiderod. Push the rod forward releasing pressureon the takedown pin tool. Let takedown pinfall clear.
4. Carefully back the guide rod out relieving thespring pressure.
5. Remove the old recoil spring from the guiderod.
6. Clean and lubricate all components. Placenew recoil spring with recoil spring plug backonto the guide rod (closed end of the springgoes on the rod first).
7. Once again grasp the slide firmly in yourhand. Push the guide rod forward until takedown pin hole is visible.

35
8. Place the takedown pin tool securely in thehole and relieve spring pressure (sometimes ithelps to have someone else insert the takedown pin).
9. The compressed spring and Guide RodAssembly is now ready for reassembly intoyour slide.
RECOIL SPRING REPLACEMENT–ULTRA CARRYThe custom shop will replace both springs if yousend in the complete assembly to Yonkers,however, the double spring assembly is normallyreplaced as a complete unit.
CLEANINGAlways run the cleaning rods from the chamberend.
1. Disassemble pistol as described in previoussection.
2. Run a wet patch through the bore. Let soak afew minutes. (Always read the manufacturers’directions of the bore cleaner you are using.)
3. Run a dry patch through to remove loosecrud/deposits.
36
4. Run a wet bore brush through the chamberend of the barrel a few passes.
5. Run a dry patch to remove the dirt.
6. Repeat steps 4 and 5 a few times until thepatch comes out clean.
7. Lightly oil the barrel. NOTE: Run a dry patchthrough the barrel before firing to remove oil.
8. Wipe off all dirt on all bearing surfaces onslide and frame.
7. Clean breech face and all parts (an oldtoothbrush or similar nylon brush works well).
10. Follow lubrication directions before re-assembling.
LUBRICATION1. Use a High Tech Gun oil such as Shooters
Choice FP-10 or similar quality oil (greaseis not recommended). If oil contains Teflon besure to shake well before using as the Teflonsettles when left overnight.
2. Lubricate the following internal parts of thepistol: a. Slide and Frame rails - Oil. Do not over oil!

37
b. Disconnector on top of frame - Small drop.c. Barrel Hood - two drops, spread on hood.d. Barrel Locking lugs inside Slide and on
Barrel - one drop on each lug.e. Barrel Link- one drop behind link.f. Slide Stop pin - one drop, spread with finger.g. Outside of Barrel - Oil. Do not over oil,
spread with fingertip.h. Cock Hammer - one drop in between the
hammer and frame.i. Assemble gun. Rack the Slide 5-6 times,
dry fire. Wipe off excess oil from gun.j. Make sure, if you have stored the gun with
oil in the barrel and chamber, that you runa dry patch through the barrel to clear it ofthe oil before you fire the gun.
3. Reassemble as previously described.
The key is moderation. Not enough oil and yourgun may not function properly and lead to undowear. Too much oil and you risk attracting damagingdirt and debris to the bearing surfaces causingundo wear and potential functioning problems. Allmetal parts even Stainless Steel should be lightlylubricated because
RUST IS NEGLECT!
A cloth impregnated with Silicone is good for thispurpose.

38
WARRANTY INFORMATION
This “Limited Warranty” has been drafted to complywith the Magnuson-Moss Warranty Federal TradeCommission Improvement Act which is effectivefor goods manufactured on or after December 31,1995.
Kimber Mfg., Inc. firearms are warranted to be freefrom defects in material and workmanship for one(1) year after the date of original new gun retail purchase, the Manufacturer agrees to correct byrepair or replacement (with the same or comparablequality model) your firearm, without charge, ifreturned prepaid with a copy of the bill of sale.
Kimber Mfg., Inc. assumes no responsibility forproduct malfunction or for physical injury or propertydamage resulting in whole or in part from criminalor negligent use of the product, improper or carelesshandling, unauthorized modifications, use of defective, improper, hand-loaded ammunition,customer abuse or neglect of the product, or otherinfluences beyond Kimber Mfg., Inc.’s control. Thiswarranty does not apply to normal wear of anyparts, including metal, wood, plastic, rubber andother material’s surfaced finish or if unauthorized

39
repair and/or alteration has been performed.
This warranty does not cover repairs related tounreasonable use, corrosion (corrosion is neglect),failure to provide proper maintenance, damaged orshopworn display guns, gun barrels damaged byan obstructed bore or guns damaged in return shipment due to improper packing and handling.Kimber Mfg., Inc. reserves the right to inspect anyproduct before making any adjustment covered bythis warranty.
Under no circumstances shall Kimber Mfg., Inc. beliable for incidental or consequential damages withrespect to economic loss or injury or propertydamage whether the result of breach of express orimplied warranty.
Some states do not allow the exclusion ofconsequential or incidental damages so thelimitation may not apply to you. This warrantygives only the original retail purchaser specificlegal right. Other rights may also be availablewhich may vary from state to state.
The terms of the warranty cannot be changedexcept in writing by an officer of Kimber Mfg., Inc.
40
The Kimber Factory in Yonkers, New York is theonly authorized repair location.
INSTRUCTIONS FOR WARRANTY REPAIRS
Return handguns to KMI, 1 Lawton St., Yonkers,NY, 10705 Attn: Warranty Repairs. Send via UPSNext Day Saver or FedEx. Securely attach complete letter to handgun inside of package. Thecontents of the letter must include: your name,complete return mailing address (not a P.O.address), telephone number (daytime), serial number of gun sent and a complete description ofthe problem.There must be a person over 18 yearsof age to sign for the package.
SPARE PARTS
Only use genuine Kimber spare parts. Use of inferior aftermarket parts can create unsafe conditions. Use of aftermarket parts voids all guarantees and warranties. Modifications andalterations of the pistol or its parts voids all guarantees and warranties.

41
CUSTOM SHOP
The Kimber Custom Shop was established at therequest of Kimber Customers who asked to havetheir Kimbers professionally modified. As well as shooters interested in purchasing Kimberaccessories. Factory installed parts maintain theoriginal warrantee.
Call 914-964-0742 (or fax 914-964-9340) for information or visit the Kimber Web Site atwww.kimberamerica.com. Most products can beordered on-line from the Kimber Web Site.
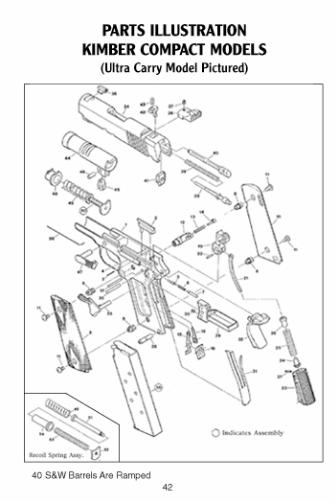
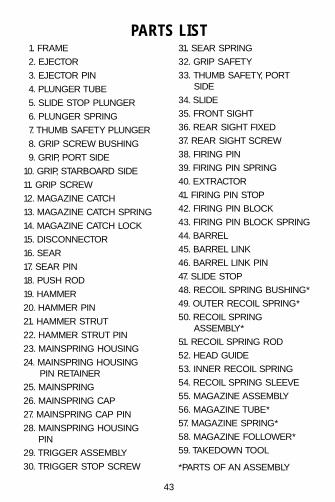
43
1. FRAME
2. EJECTOR
3. EJECTOR PIN
4. PLUNGER TUBE
5. SLIDE STOP PLUNGER
6. PLUNGER SPRING
7. THUMB SAFETY PLUNGER
8. GRIP SCREW BUSHING
9. GRIP, PORT SIDE
10. GRIP, STARBOARD SIDE
11. GRIP SCREW
12. MAGAZINE CATCH
13. MAGAZINE CATCH SPRING
14. MAGAZINE CATCH LOCK
15. DISCONNECTOR
16. SEAR
17. SEAR PIN
18. PUSH ROD
19. HAMMER
20. HAMMER PIN
21. HAMMER STRUT
22. HAMMER STRUT PIN
23. MAINSPRING HOUSING
24. MAINSPRING HOUSING PIN RETAINER
25. MAINSPRING
26. MAINSPRING CAP
27. MAINSPRING CAP PIN
28. MAINSPRING HOUSING PIN
29. TRIGGER ASSEMBLY
30. TRIGGER STOP SCREW
31. SEAR SPRING
32. GRIP SAFETY
33. THUMB SAFETY, PORTSIDE
34. SLIDE
35. FRONT SIGHT
36. REAR SIGHT FIXED
37. REAR SIGHT SCREW
38. FIRING PIN
39. FIRING PIN SPRING
40. EXTRACTOR
41. FIRING PIN STOP
42. FIRING PIN BLOCK
43. FIRING PIN BLOCK SPRING
44. BARREL
45. BARREL LINK
46. BARREL LINK PIN
47. SLIDE STOP
48. RECOIL SPRING BUSHING*
49. OUTER RECOIL SPRING*
50. RECOIL SPRING ASSEMBLY*
51. RECOIL SPRING ROD
52. HEAD GUIDE
53. INNER RECOIL SPRING
54. RECOIL SPRING SLEEVE
55. MAGAZINE ASSEMBLY
56. MAGAZINE TUBE*
57. MAGAZINE SPRING*
58. MAGAZINE FOLLOWER*
59. TAKEDOWN TOOL
*PARTS OF AN ASSEMBLY
PARTS LIST

44
PARTS ILLUSTRATIONKIMBER PRO CARRY
40 S&W Barrels Are Ramped
45
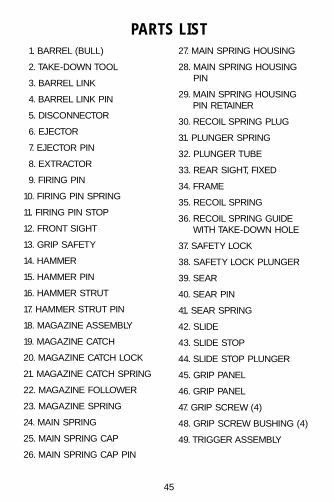
PARTS LIST1. BARREL (BULL)
2. TAKE-DOWN TOOL
3. BARREL LINK
4. BARREL LINK PIN
5. DISCONNECTOR
6. EJECTOR
7. EJECTOR PIN
8. EXTRACTOR
9. FIRING PIN
10. FIRING PIN SPRING
11. FIRING PIN STOP
12. FRONT SIGHT
13. GRIP SAFETY
14. HAMMER
15. HAMMER PIN
16. HAMMER STRUT
17. HAMMER STRUT PIN
18. MAGAZINE ASSEMBLY
19. MAGAZINE CATCH
20. MAGAZINE CATCH LOCK
21. MAGAZINE CATCH SPRING
22. MAGAZINE FOLLOWER
23. MAGAZINE SPRING
24. MAIN SPRING
25. MAIN SPRING CAP
26. MAIN SPRING CAP PIN
27. MAIN SPRING HOUSING
28. MAIN SPRING HOUSING PIN
29. MAIN SPRING HOUSINGPIN RETAINER
30. RECOIL SPRING PLUG
31. PLUNGER SPRING
32. PLUNGER TUBE
33. REAR SIGHT, FIXED
34. FRAME
35. RECOIL SPRING
36. RECOIL SPRING GUIDEWITH TAKE-DOWN HOLE
37. SAFETY LOCK
38. SAFETY LOCK PLUNGER
39. SEAR
40. SEAR PIN
41. SEAR SPRING
42. SLIDE
43. SLIDE STOP
44. SLIDE STOP PLUNGER
45. GRIP PANEL
46. GRIP PANEL
47. GRIP SCREW (4)
48. GRIP SCREW BUSHING (4)
49. TRIGGER ASSEMBLY

46
1e
2e
3e
4e
PARTS ILLUSTRATIONALL KIMBER MODELS WITH
EXTERNAL EXTRACTORS
PARTS1e - EXTRACTOR PLUG2e - EXTRACTOR SPRING3e - EXTRACTOR PLUNGER4e - EXTRACTOR

47
NOTES

BASIC NRA RULES FOR SAFE GUN HANDLING
1. ALWAYS KEEP THE GUN POINTEDIN A SAFE DIRECTION.
2. ALWAYS KEEP YOUR FINGERS OFF THE TRIGGER UNTIL READY TO SHOOT.
3. ALWAYS KEEP THE GUN UNLOADEDUNTIL READY TO USE.
4. ALWAYS TREAT YOUR GUN AS IF IT IS LOADED AND READY TO DISCHARGE.
Kimber Mfg., Inc.1 Lawton StreetYonkers, NY 10705
Sales — 888-243-4522Customer Service — 914-964-0771
Fax — 914-964-9340Web Address — www.kimberamerica.com
4/03-1000014


