208
Oracle8i Backup and Recovery Guide Release 2 (8.1.6) December 1999 Part No. A76993-01

Oracle8 i
Backup and Recovery Guide
Release 2 (8.1.6)
December 1999
Part No. A76993-01

Oracle8i Backup and Recovery Guide, Release 2 (8.1.6)
Part No. A76993-01
Copyright © 1996, 1999, Oracle Corporation. All rights reserved.
Primary Author: Connie Dialeris, Joyce Fee, Lance Ashdown
Contributing Authors: Greg Pongracz, Francisco Sanchez, Steve Wertheimer
Contributors: Richard Anderson, Don Beusee, Bill Bridge, Sandra Cheevers, Mike Cusson, Rick Frank,John Frazzini, Tim Berry-Hart, Wei Hu, Mike Johnson, Joy Kundu, Gordon Larimer, Bill Lee, Juan Loaiza,Diana Lorentz, Eric Magrath, Alok Pareek, Lyn Pratt, Thomas Pystynen, Daniel Semler, Slartibartfast,Bob Thome, Ron Weiss.
Graphic Designer: Valarie Moore
The Programs are not intended for use in any nuclear, aviation, mass transit, medical, or otherinherently dangerous applications. It shall be the licensee’s responsibility to take all appropriatefail-safe, backup, redundancy and other measures to ensure the safe use of such applications if thePrograms are used for such purposes, and Oracle disclaims liability for any damages caused by suchuse of the Programs.
The Programs (which include both the software and documentation) contain proprietary information ofOracle Corporation; they are provided under a license agreement containing restrictions on use anddisclosure and are also protected by copyright, patent, and other intellectual and industrial propertylaws. Reverse engineering, disassembly, or decompilation of the Programs is prohibited.
The information contained in this document is subject to change without notice. If you find any problemsin the documentation, please report them to us in writing. Oracle Corporation does not warrant that thisdocument is error free. Except as may be expressly permitted in your license agreement for thesePrograms, no part of these Programs may be reproduced or transmitted in any form or by any means,electronic or mechanical, for any purpose, without the express written permission of Oracle Corporation.
If the Programs are delivered to the U.S. Government or anyone licensing or using the Programs onbehalf of the U.S. Government, the following notice is applicable:
Restricted Rights Notice Programs delivered subject to the DOD FAR Supplement are "commercialcomputer software" and use, duplication, and disclosure of the Programs including documentation, shallbe subject to the licensing restrictions set forth in the applicable Oracle license agreement. Otherwise,Programs delivered subject to the Federal Acquisition Regulations are "restricted computer software"and use, duplication, and disclosure of the Programs shall be subject to the restrictions in FAR 52.227-19,Commercial Computer Software - Restricted Rights (June, 1987). Oracle Corporation, 500 OracleParkway, Redwood City, CA 94065.
Oracle is a registered trademark, and LogMiner, Net8, Oracle7, Oracle8, Oracle8i, PL/SQL, SQL*Net, andSQL*Plus are trademarks or registered trademarks of Oracle Corporation. All other company or productnames mentioned are used for identification purposes only and may be trademarks of their respectiveowners.
Contents
Send Us Your Comments .................................................................................................................. vii
Preface ............................................................................................................................................................ ix
What’s New in Oracle8i? ....................................................................................................................... xRelease 8.1.6....................................................................................................................................... xRelease 8.1.5....................................................................................................................................... x
Structure .................................................................................................................................................. xiChanges to This Book...................................................................................................................... xi
Audience................................................................................................................................................. xiiKnowledge Assumed of the Reader.................................................................................................. xiiConventions ........................................................................................................................................... xii
Text ................................................................................................................................................... xiiRecovery Manager Syntax Diagrams and Notation................................................................. xiiiCode Examples............................................................................................................................... xiii
How to Use This Guide ...................................................................................................................... xivYour Comments Are Welcome........................................................................................................... xiv
Part I Developing a Backup and Recovery Strategy
1 What Is Backup and Recovery?
What Is Backup and Recovery? ........................................................................................................ 1-2How Oracle Keeps Records of Database Transactions ........................................................... 1-4Backup and Recovery Operations.............................................................................................. 1-4Elementary Backup and Recovery Strategy ............................................................................. 1-5
i
Which Data Structures Are Important for Backup and Recovery? ........................................... 1-6Datafiles.......................................................................................................................................... 1-6Control Files................................................................................................................................... 1-7Rollback Segments........................................................................................................................ 1-8Online Redo Log Files .................................................................................................................. 1-9Archived Redo Log Files ........................................................................................................... 1-10
Understanding Basic Backup Strategy.......................................................................................... 1-12Why Are Backups Important? .................................................................................................. 1-12What Types of Failures Can Occur?......................................................................................... 1-12What Type of Backup Should You Make? .............................................................................. 1-13Should You Make Consistent or Inconsistent Backups?....................................................... 1-16What Is a Redundancy Set? ....................................................................................................... 1-20Which Backup Method Should You Use? ............................................................................... 1-20How Often Should You Make Backups?................................................................................. 1-23
Understanding Basic Recovery Strategy ...................................................................................... 1-24What Is Media Recovery? .......................................................................................................... 1-24Which Recovery Method Should You Use?............................................................................ 1-27
2 Managing Data Structures
Overview of Backup and Recovery Data Structures .................................................................... 2-2Managing the Control File ................................................................................................................ 2-3
Displaying Control File Information.......................................................................................... 2-4Backing Up the Control File After Structural Changes........................................................... 2-5Maintaining Multiple Control Files ........................................................................................... 2-6Recovering from the Loss of Control Files................................................................................ 2-8
Managing the Online Redo Logs ................................................................................................... 2-10Displaying Online Redo Log Information .............................................................................. 2-11Multiplexing Online Redo Log Files ........................................................................................ 2-12
Managing the Archived Redo Logs ............................................................................................... 2-14Displaying Archived Redo Log Information.......................................................................... 2-16Choosing the Database Archiving Mode ................................................................................ 2-17Setting the Archive Mode.......................................................................................................... 2-20Archiving Redo Logs to Multiple Locations........................................................................... 2-21
ii
3 Developing a Backup and Recovery Strategy
Developing a Backup Strategy ......................................................................................................... 3-2Obeying the Golden Rule of Backup and Recovery ................................................................ 3-2Choosing the Database Archiving Mode .................................................................................. 3-4Multiplexing Control Files, Online Redo Logs, and Archived Redo Logs .......................... 3-6Performing Backups Frequently and Regularly ...................................................................... 3-6Performing Backups When You Make Structural Changes ................................................... 3-7Backing Up Often-Used Tablespaces......................................................................................... 3-7Performing Backups After Unrecoverable/Unlogged Operations ....................................... 3-8Performing Whole Database Backups After Opening with the RESETLOGS Option ....... 3-8Archiving Older Backups ............................................................................................................ 3-8Knowing the Constraints for Distributed Database Backups ................................................ 3-9Exporting Data for Added Protection and Flexibility........................................................... 3-10Avoiding the Backup of Online Redo Logs ............................................................................ 3-10
Developing a Recovery Strategy.................................................................................................... 3-11Testing Backup and Recovery Strategies ................................................................................ 3-12Planning Your Response to Non-Media Failures .................................................................. 3-12Planning Your Response to Media Failures............................................................................ 3-15
Part II Performing Operating System Backup and Recovery
4 Performing Operating System Backups
Listing Database Files Before Performing a Backup ................................................................... 4-2Performing Operating System Backups ......................................................................................... 4-3
Performing Whole Database Backups ....................................................................................... 4-3Performing Tablespace and Datafile Backups.......................................................................... 4-5Performing Control File Backups............................................................................................. 4-13
Verifying Backups ............................................................................................................................ 4-16Testing the Restore of Backups................................................................................................. 4-16Using the DBVERIFY Utility..................................................................................................... 4-17
Responding to a Failed Online Tablespace Backup................................................................... 4-17Using Export and Import for Supplemental Protection ............................................................ 4-19
Using Export................................................................................................................................ 4-19Using Import ............................................................................................................................... 4-20
iii

5 Performing Media Recovery
Determining Which Files to Recover .............................................................................................. 5-2Restoring Files ..................................................................................................................................... 5-4
Restoring Backup Datafiles ......................................................................................................... 5-5Re-Creating Datafiles when Backups Are Unavailable........................................................... 5-5Restoring Necessary Archived Redo Log Files ........................................................................ 5-6
Understanding Basic Media Recovery Procedures....................................................................... 5-7Using Media Recovery Statements............................................................................................. 5-7Applying Archived Redo Logs................................................................................................... 5-9Recovering a Database in NOARCHIVELOG Mode............................................................. 5-15Recovering a Database in ARCHIVELOG Mode................................................................... 5-17Performing Media Recovery in Parallel .................................................................................. 5-18
Performing Complete Media Recovery ........................................................................................ 5-19Performing Closed Database Recovery ................................................................................... 5-19Performing Open Database Recovery...................................................................................... 5-22
Performing Incomplete Media Recovery ..................................................................................... 5-25Performing Cancel-Based Recovery......................................................................................... 5-25Performing Time-Based Recovery............................................................................................ 5-28Performing Change-Based Recovery ....................................................................................... 5-30
Opening the Database After Media Recovery ............................................................................ 5-31What Is a RESETLOGS Operation? .......................................................................................... 5-32Determining Whether to Reset the Online Redo Logs .......................................................... 5-33Following Up After a RESETLOGS Operation....................................................................... 5-35Recovering a Pre-RESETLOGS Backup................................................................................... 5-36
6 Media Recovery Scenarios
Understanding the Types of Media Failures ................................................................................. 6-2Recovering After the Loss of Datafiles ........................................................................................... 6-2
Losing Datafiles in NOARCHIVELOG Mode .......................................................................... 6-2Losing Datafiles in ARCHIVELOG Mode................................................................................. 6-3
Recovering Through an ADD DATAFILE Operation.................................................................. 6-3Recovering Transported Tablespaces .............................................................................................. 6-4Recovering After the Loss of Online Redo Log Files................................................................... 6-5
Recovering After Losing a Member of a Multiplexed Online Redo Log Group ................. 6-5Recovering After the Loss of All Members of an Online Redo Log Group ......................... 6-7
iv

Recovering After the Loss of Archived Redo Log Files ............................................................ 6-11Recovering After the Loss of Control Files.................................................................................. 6-12
Losing a Member of a Multiplexed Control File.................................................................... 6-12Losing All Copies of the Current Control File ....................................................................... 6-13
Recovering from User Errors .......................................................................................................... 6-15Performing Media Recovery in a Distributed Environment.................................................... 6-16
Coordinating Time-Based and Change-Based Distributed Database Recovery ............... 6-17Recovering a Database with Snapshots................................................................................... 6-18
7 Performing Operating System Tablespace Point-in-Time Recovery
Introduction to O/S Tablespace Point-in-Time Recovery ........................................................... 7-2TSPITR Advantages ..................................................................................................................... 7-2TSPITR Methods ........................................................................................................................... 7-3TSPITR Terminology.................................................................................................................... 7-4
Planning for Tablespace Point-in-Time Recovery ....................................................................... 7-4TSPITR Limitations ...................................................................................................................... 7-5TSPITR Requirements .................................................................................................................. 7-6
Preparing the Databases for TSPITR .............................................................................................. 7-6Step 1: Determine Whether Objects Will Be Lost..................................................................... 7-7Step 2: Research and Resolve Dependencies on the Primary Database ............................... 7-7Step 3: Prepare the Primary Database ....................................................................................... 7-9Step 4: Prepare the Clone Parameter Files .............................................................................. 7-10Step 5: Prepare the Clone Database ........................................................................................ 7-11
Performing TSPITR.......................................................................................................................... 7-12Step 1: Recover the Clone Database ........................................................................................ 7-12Step 2: Open the Clone Database ............................................................................................ 7-13Step 3: Prepare the Clone Database for Export ..................................................................... 7-13Step 4: Export the Metadata ...................................................................................................... 7-13Step 5: Copy the Recovery Set Clone Files to the Primary Database .................................. 7-13Step 6: Import the Metadata into the Primary Database ..................................................... 7-14Step 7: Prepare the Primary Database for Use ...................................................................... 7-14Step 8: Back Up the Recovered Tablespaces in the Primary Database .............................. 7-14
Performing Partial TSPITR of Partitioned Tables...................................................................... 7-15Step 1: Create a Table on the Primary Database for Each Partition Being Recovered ..... 7-16Step 2: Drop the Indexes on the Partition Being Recovered................................................. 7-16
v

Step 3: Exchange Partitions with Stand-Alone Tables........................................................... 7-16Step 4: Take the Recovery Set Tablespace Offline.................................................................. 7-16Step 5: Create Tables at Clone Database.................................................................................. 7-17Step 6: Drop Indexes on Partitions Being Recovered ............................................................ 7-17Step 7: Exchange Partitions with Stand-Alone Tables........................................................... 7-17Step 8: Export the Clone Database ........................................................................................... 7-17Step 9: Copy the Recovery Set Datafiles to the Primary Database ...................................... 7-17Step 10: Import into the Primary Database ............................................................................. 7-18Step 11: Bring Recovery Set Tablespace Online ..................................................................... 7-18Step 12: Exchange Partitions with Stand-Alone Tables......................................................... 7-18Step 13: Back Up the Recovered Tablespaces in the Primary Database ............................. 7-18
Performing TSPITR of Partitioned Tables When a Partition Has Been Dropped ............... 7-18Step 1: Find the Low and High Range of the Partition that Was Dropped........................ 7-19Step 2: Create a Temporary Table ............................................................................................ 7-19Step 3: Delete Records From Partitioned Table ...................................................................... 7-19Step 4: Take Recovery Set Tablespaces Offline....................................................................... 7-20Step 5: Create Tables at Clone Database.................................................................................. 7-20Step 6: Drop Indexes on Partitions Being Recovered ............................................................ 7-20Step 7: Exchange Partitions with Stand-Alone Tables........................................................... 7-20Step 8: Export the Clone Database ........................................................................................... 7-20Step 9: Copy the Recovery Set Datafiles to the Primary Database ...................................... 7-20Step 10: Import into the Primary Database ............................................................................. 7-21Step 11: Bring Recovery Set Tablespace Online ..................................................................... 7-21Step 12: Insert Stand-Alone Tables into Partitioned Tables.................................................. 7-21Step 13: Back Up the Recovered Tablespaces in the Primary Database ............................. 7-22
Performing TSPITR of Partitioned Tables When a Partition Has Split ................................. 7-23Step 1: Drop the Lower of the Two Partitions at the Primary Database............................. 7-23Steps 2-13: Follow Same Steps as for Partial TSPITR of Partitioned Tablespaces............. 7-23
TSPITR Tuning Considerations ..................................................................................................... 7-23Recovery Set Location Considerations ................................................................................... 7-23Backup Control File Considerations ........................................................................................ 7-24
Performing TSPITR Using Transportable Tablespaces ............................................................. 7-25
Index
vi

Send Us Your Comments
Oracle8 i Backup and Recovery Guide, Release 2 (8.1.6)
Part No. A76993-01
Oracle Corporation welcomes your comments and suggestions on the quality and usefulness of this
publication. Your input is an important part of the information used for revision.
■ Did you find any errors?
■ Is the information clearly presented?
■ Do you need more information? If so, where?
■ Are the examples correct? Do you need more examples?
■ What features did you like most about this manual?
If you find any errors or have any other suggestions for improvement, please indicate the chapter,
section, and page number (if available). You can send comments to us in the following ways:
■ E-mail - [email protected]
■ FAX - (650) 506-7228 Attn: Oracle Server Documentation
■ Postal service:
Oracle Corporation
Server Documentation Manager
500 Oracle Parkway
Redwood Shores, CA 94065
USA
If you would like a reply, please give your name, address, and telephone number below.
If you have problems with the software, please contact your local Oracle Support Services.
vii

viii

Preface
Welcome to the world of Oracle backup and recovery. This guide includes the
conceptual and task-oriented information you need to:
■ Understand what backup and recovery is and how it works.
■ Perform backup, restore, and recovery procedures using operating system
(O/S) commands.
The Oracle8i Backup and Recovery Guide contains information that describes the
features and functionality of the Oracle8i Standard Edition and the Oracle8iEnterprise Edition products. The Standard Edition and Enterprise Edition have the
same basic features, but several advanced features are available only with the
Enterprise Edition, and some of these are optional.
See Also:
■ Oracle8i Recovery Manager User’s Guide and Reference for concepts,procedures, and reference material related to the Recovery Managerutility
■ Oracle8i Standby Database Concepts and Administration for informationabout the standby database
■ Getting to Know Oracle8i for information for the differences betweenOracle8i Standard Edition and the Oracle8i Enterprise Edition and thefeatures and options that are available to you
ix

What’s New in Oracle8 i?This section describes new features in Oracle8i.
Release 8.1.6Oracle release 8.1.6 contains a number of improvements that provide more robust
protections against the following types of data corruption:
■ Logical corruptions. Logical data corruptions are typically caused by software
bugs and are difficult to repair because these corruptions are in the redo stream.
You can prevent most logical corruptions by enabling block checking, which
can detect and roll back changes that corrupt the database. Block checking is
improved in these ways:
– Oracle checks more block types, such as rollback blocks, transaction table
blocks, and segment headers.
– Block checking is more efficient, checking more blocks without increasing
system overhead.
– Block checking is always turned on for the SYSTEM tablespace, regardless
of the setting of the DB_BLOCK_CHECKING initialization parameter.
■ Memory corruptions. If block checking is turned on, then DBWn performs block
checking immediately before writing a block to disk. This check enables Oracle
to catch some memory corruptions and automatically repair corrupted blocks.
■ Physical data corruptions caused by disks or storage systems. Typically, Oracle
detects these corruptions through a checksum. Oracle release 8.1.6 always
performs a checksum in the SYSTEM tablespace, regardless of the DB_BLOCK_
CHECKSUM parameter setting.
If the checksum fails when Oracle reads the control file or redo logs, then Oracle
rereads the data from either a different log or the same member in situations
where previous Oracle releases would not reread. Consequently, Oracle has a
second chance to find a good copy of the data and repair any physical data
corruption.
Release 8.1.5The following backup and recovery features are new in release 8.1.5:
■ You can temporarily suspend and then resume database operations without
shutting down the database (see "Making Backups in SUSPEND Mode" on
page 4-9).
x

■ You can use transportable tablespaces to perform tablespace point-in-time
recovery (TSPITR) (see "Performing TSPITR Using Transportable Tablespaces"
on page 7-25).
■ The LOG_ARCHIVE_DEST_n (where n is an integer from 1 to 5) initialization
parameter allows you to archive to up to 5 locations (see "Archiving Redo Logs
to Multiple Locations" on page 2-21).
StructureThis book contains the following parts and chapters.
Changes to This BookThe following aspects of this manual are new in release 8.1.6:
■ In release 8.1.5, all the backup and recovery documentation was located in the
Oracle8i Backup and Recovery Guide. In release 8.1.6, this documentation is
divided into the following books:
Part / Chapter Contents
PART 1 Developing a Backup and Recovery Strategy
Chapter 1, "What Is Backup and Recovery?" Offers a general overview of backup and recoveryconcepts and methods.
Chapter 2, "Managing Data Structures" Describes how to manage control files, online redo logs,and archived redo logs for backup and recovery.
Chapter 3, "Developing a Backup and RecoveryStrategy"
Provides guidelines for developing a backup andrecovery strategy.
PART 2 Using Operating System Commands for Backup andRecovery
Chapter 4, "Performing Operating System Backups" Provides step-by-step instructions for performingoperating system backups.
Chapter 5, "Performing Media Recovery" Provides step-by-step instructions for performing mediarestore and recovery using operating system andSQL*Plus commands.
Chapter 6, "Media Recovery Scenarios" Describes the procedures for performing media recoveryin several common scenarios.
Chapter 7, "Performing Operating SystemTablespace Point-in-Time Recovery"
Provides planning guidelines and step-by-stepinstructions for manually performing tablespacepoint-in-time recovery.
xi

■ Oracle8i Backup and Recovery Guide
■ Oracle8i Recovery Manager User’s Guide and Reference
■ Oracle8i Standby Database Concepts and Administration
AudienceThis guide is for database administrators (DBAs) who administer the backup,
restore, and recovery operations of an Oracle database system using operating
system commands.
Knowledge Assumed of the ReaderReaders of this guide are assumed to be familiar with relational database concepts
and basic database administration. They are also assumed to be familiar with the
operating system environment under which they are running Oracle.
ConventionsThis section explains the conventions used in this manual including the following:
■ Text
■ Recovery Manager Syntax Diagrams and Notation
■ Code Examples
TextThis section explains the conventions used within the text:
UPPERCASE CharactersUppercase text is used to call attention to tablespace names, initialization
parameters, and SQL keywords.
For example, "If you create a private rollback segment, the name must be included
in the ROLLBACK_SEGMENTS parameter of the initialization parameter file. You
can view this information by issuing a SHOW PARAMETER statement in
SQL*Plus."
xii

Italicized CharactersItalicized words within text are book titles, new vocabulary, emphasized words, or
variables in SQL or Recovery Manager syntax.
For example, "An archived redo log is an online redo log that has been copied offline.
You must run your database in ARCHIVELOG mode to enable this feature. If you
are using Recovery Manager, you can specify an archived redo log in a backupcommand by using the archivelog like '/oracle/archive/arc_*' subclause."
Bold CharactersBold words within text are Recovery Manager keywords.
For example, "Use the Recovery Manager backup command to back up your
database."
Monospaced CharactersFilenames, directories, and operating system commands appear in a monospaced
font. Also, monospaced characters in text preceding a code example indicates a
filename or keyword used in the sample code.
For example, "If you do not want to use a command such as the UNIX cp to
perform the backup of /oracle/dbs/df1.f , then you can execute an RMAN job
as follows:
run { allocate channel c1 type disk; backup datafile ‘/oracle/dbs/df1.f’;}
Recovery Manager Syntax Diagrams and NotationFor information about Recovery Manager syntax conventions, see the Oracle8iRecovery Manager User’s Guide and Reference.
Code ExamplesSQL, SQL*Plus, and Recovery Manager commands and statements appear
separated from the text of paragraphs in a monospaced font. For example:
INSERT INTO emp (empno, ename) VALUES (1000, 'SMITH');ALTER TABLESPACE users ADD DATAFILE 'users2.ora' SIZE 50K;run { allocate channel ch1 type disk; backup database;
xiii

}
When you run RMAN from the command line, the command prompt appears as
RMAN>. When you issue commands from the SQL*Plus command line, the prompt
appears as SQL>. These prompts are displayed in the code examples only when
they are necessary to prevent confusion.
You can execute SQL, SQL*Plus, and RMAN commands in different environments
on different platforms. As much as possible, this guide attempts to provide generic
documentation, that is, documentation that is not specific to any operating system
or interface. Nevertheless, it is sometimes necessary for illustrative purposes to
show how the syntax works at the operating system level. In these cases, this book
uses examples from a UNIX command-line interface and employs the % symbol to
indicate the operating system prompt. For example:
% rman target / rcvcat rman/rman@inst2RMAN> startup
How to Use This GuideEvery reader of this guide is presumed to have read:
■ The beginning of the Oracle8i Concepts manual, which provides an overview of
the concepts and terminology related to Oracle and a foundation for the more
detailed information in this guide. The rest of the Oracle8i Concepts manual
explains the Oracle architecture and features in detail.
■ The chapters in the Oracle8i Administrator’s Guide that deal with managing the
control file, online redo logs, and archived redo logs.
You will often need to refer to the following reference guides:
■ Oracle8i SQL Reference
■ Oracle8i Reference
Your Comments Are WelcomeWe value and appreciate your comments as an Oracle user and reader of our
references. As we write, revise, and evaluate, your opinions are the most important
input we receive. At the front of this reference is a reader’s comment form that we
encourage you to use to tell us both what you like and what you dislike about this
(or other) Oracle manuals. If the form is missing, or you would like to contact us,
please use the following address or fax number:
xiv

Server Technologies Documentation Manager
Oracle Corporation
500 Oracle Parkway
Redwood City, CA 94065
FAX: 650-506-7228
You can also e-mail your comments to the Information Development department at
the following e-mail address: [email protected]
xv

xvi
Part I
Developing a Backup and RecoveryStrategy


What Is Backup and Reco
1
What Is Backup and Recovery?This chapter introduces database concepts that are fundamental to backup and
recovery. It is intended as a general overview. Subsequent chapters explore backup
and recovery concepts in greater detail.
This chapter includes the following topics:
■ What Is Backup and Recovery?
■ Which Data Structures Are Important for Backup and Recovery?
■ Understanding Basic Backup Strategy
■ Understanding Basic Recovery Strategy
very? 1-1

What Is Backup and Recovery?
What Is Backup and Recovery?A backup is a copy of data. This copy can include important parts of your database
such as the control file and datafiles. A backup is a safeguard against unexpected
data loss and application errors; if you lose the original data, then you can use the
backup to reconstruct it.
Backups are divided into physical backups and logical backups. Physical backups,
which are the primary concern of this guide, are copies of physical database files. In
contrast, logical backups contain data that you extract using the Oracle Export
utility and store in a binary file. You can use logical backups to supplement physical
backups. You can make physical backups using either the Oracle8i Recovery
Manager utility or operating system utilities.
To restore a physical backup is to reconstruct it and make it available to the Oracle
database server. To recover a restored datafile is to update it using redo records, that
is, records of changes made to the database after the backup was taken. If you use
Recovery Manager (RMAN), then you can also recover restored datafiles using
incremental backups, which are backups of a datafile that contain only blocks that
changed after the last backup.
Oracle performs crash recovery and instance recovery automatically after an instance
failure. Instance recovery is an automatic procedure that involves two distinct
operations: rolling forward the backup to a more current time by applying online
redo records and rolling back all changes made in uncommitted transactions to their
original state.
In contrast to instance recovery, media recovery requires you to issue recovery
commands. If you use SQL*Plus, then you can issue the RECOVER or ALTER
DATABASE RECOVER statements to apply the archived logs. If you use RMAN,
then you issue the recover command to apply archived redo logs or incremental
backups to the datafiles.
Figure 1–1 illustrates the basic principle of backing up, restoring, and performing
media recovery on a database:
1-2 Oracle8i Backup and Recovery Guide
What Is Backup and Recovery?
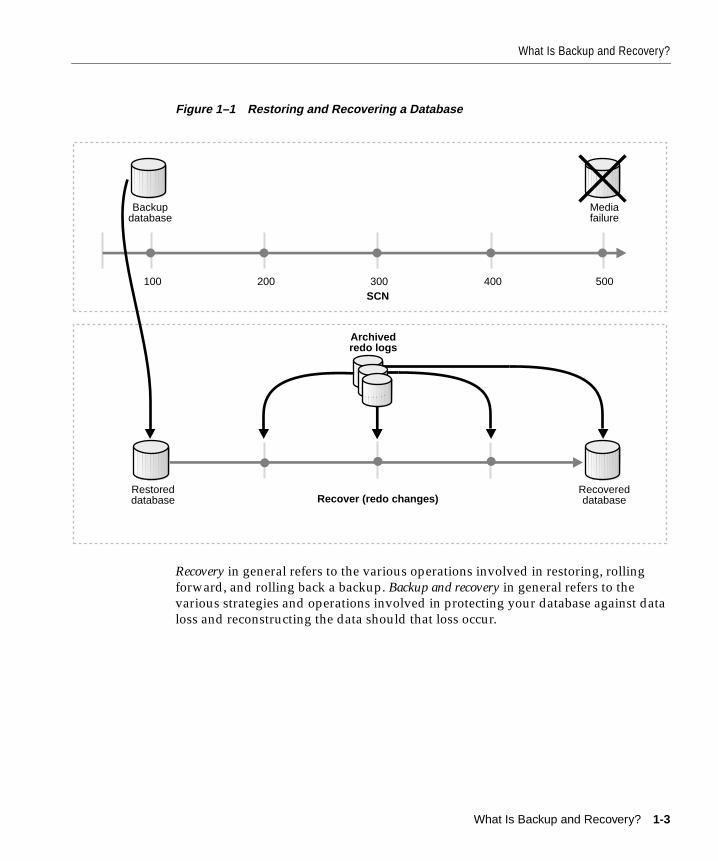
Figure 1–1 Restoring and Recovering a Database
Recovery in general refers to the various operations involved in restoring, rolling
forward, and rolling back a backup. Backup and recovery in general refers to the
various strategies and operations involved in protecting your database against data
loss and reconstructing the data should that loss occur.
Recover (redo changes)Restoreddatabase
Recovereddatabase
Mediafailure
Backupdatabase
100 200 300SCN
400 500
Archivedredo logs
What Is Backup and Recovery? 1-3

What Is Backup and Recovery?
How Oracle Keeps Records of Database TransactionsTo understand the basics of backup and recovery, you need to understand how
Oracle records changes to a database. Every time a change is made, Oracle
generates a record of both the changed and original value in the redo log buffer in
memory. This record is called a redo record. Oracle records both committed and
uncommitted changes in redo log buffers.
Oracle frequently writes the redo log buffers to the on-disk online redo log. The
online redo log contains at least two online redo log files. Oracle writes to these logs
in a circular fashion: first it writes to one log file, then switches to the next available
file when the current log is full, then back to the other file, and so forth.
Depending on whether Oracle runs in ARCHIVELOG or NOARCHIVELOG mode,
the system begins archiving the redo information in the non-current online redo log
file by copying the file to specified locations on disk. The online and archived redo
logs are crucial for recovery because they contain records of all changes to the
database.
Backup and Recovery OperationsA physical backup is a copy of a datafile, tablespace, or database made at a specific
time. If you make periodic backups of a database, then you can perform media
recovery using these backups. During media recovery, you apply redo records or
incremental backups to a restored backup to bring the database forward in time. If
See Also:
■ Chapter 1 of the Oracle8i Recovery Manager User’s Guide and Referencefor an overview of Recovery Manager features.
■ Chapter 4, "Performing Operating System Backups" to learn how tomake backups.
■ Chapter 5, "Performing Media Recovery" to learn how to performmedia recovery using SQL*Plus.
■ Oracle8i Designing and Tuning for Performance to learn about instancerecovery and how to tune performance.
See Also:
■ Oracle8i Concepts for an overview of the online and archived redo logs
■ Oracle8i Administrator’s Guide to learn the basics of administering thesedata structures
■ Chapter 2, "Managing Data Structures" to learn how to manage thesestructures for backup and recovery.
1-4 Oracle8i Backup and Recovery Guide

What Is Backup and Recovery?
the backup is a consistent backup, then you can also restore the backup without
performing recovery.
Oracle enables you to restore an older backup and apply partial redo data, thereby
recovering the database to a specified non-current time or SCN. This type of
recovery is called incomplete recovery. You must open your database with a
RESETLOGS operation after performing incomplete recovery in order to reset the
online redo logs.
An example helps illustrate the concept of media recovery. Assume that you make a
backup of your database at noon. Starting at noon, one change to the database is
made every second. The redo logs switch three times over the next hour, and
because the database runs in ARCHIVELOG mode, these redo logs are archived to
disk. At 1:00 p.m., your disk drive fails. Fortunately, you can restore your noon
whole database backup onto a functional disk drive and, using the archived redo
logs to recover the database to 1:00 p.m., apply the changes so that the database is
back to its pre-failure state.
Elementary Backup and Recovery StrategyAlthough backup and recovery operations can sometimes be complicated, the basic
principles for developing an effective strategy are simple:
1. Maintain multiple identical copies of your online redo logs on different disks.
2. Archive your redo logs to multiple locations or make frequent backups of your
archived redo logs.
3. Maintain multiple, concurrent copies of your control file using Oracle
multiplexing in conjunction with operating system mirroring (see "Control
Files" on page 1-7).
4. Take frequent backups of your datafiles and control file and store them in a safe
place on more than one media.
Most backup and recovery techniques are variations on these principles. So long as
you have backups of your datafiles, control files, and archived redo logs in safe
storage, then even if a fire were to completely destroy your hardware, you can
recreate your original database.
See Also: "Making Consistent Whole Database Backups" on
page 4-4 to learn how to make consistent backups using operating
system methods, and Chapter 5, "Performing Media Recovery" to
learn how to perform media recovery using SQL*Plus.
What Is Backup and Recovery? 1-5

Which Data Structures Are Important for Backup and Recovery?
A sophisticated and effective disaster prevention technique is to maintain a standby
database, which is an exact replicate of your production database that you can
update automatically with archived redo logs propagated through a Net8
connection.
Which Data Structures Are Important for Backup and Recovery?Before you can begin thinking seriously about backup and recovery strategy, you
need to understand the physical data structures that are relevant for backup and
recovery operations. This section addresses the following topics:
■ Datafiles
■ Control Files
■ Rollback Segments
■ Online Redo Log Files
■ Archived Redo Log Files
This manual covers these topics in more detail in subsequent chapters.
DatafilesEvery Oracle database has one or more physical datafiles. A database's datafiles,
which belong to logical structures called tablespaces, contain the database data. The
datafile is divided into smaller units called data blocks. The data of logical database
structures such as tables and indexes is physically located in the blocks of the
datafiles allocated for a database.
The first block of every datafile is the header. The header includes important control
information such as file size, block size, tablespace, creation timestamp, and
See Also:
■ Chapter 3, "Developing a Backup and Recovery Strategy" to learnmore about developing a backup and recovery strategy
■ Oracle8i Standby Database Concepts and Administration to learn how tomanage a standby database
■ Chapter 2, "Managing Data Structures" to learn more about managingimportant data structures such as the online redo logs
See Also: Oracle8i Concepts for a complete overview of the
Oracle8i architecture, and Oracle8i Administrator’s Guide to learn
how to manage these data structures.
1-6 Oracle8i Backup and Recovery Guide

Which Data Structures Are Important for Backup and Recovery?
checkpoint SCN (see "System Change Number (SCN)" on page 1-10). Whenever you
open a database, Oracle checks the datafile header information against the
information stored in the control file to determine whether recovery is necessary.
The Use of DatafilesOracle reads the data in a datafile during normal operation and stores it in the
in-memory buffer cache. For example, assume that a user wants to access some data
in a table. If the requested information is not already in the buffer cache, Oracle
reads it from the appropriate datafiles and stores it in memory.
The background process DBWn, known as the database writer or db writer, writes
modified buffers to disk. Typically, a time lapse occurs between the time when an
Oracle server process changes a block in the buffer cache and the time when DBWnwrites it to disk. The more data that accumulates in memory without being written
to disk, the longer the instance recovery time, because a crash or media failure
forces Oracle to apply redo data from the current online log to recover those
changes. Minimizing this time, known as the mean time to recover (MTTR), is an
important aspect of backup and recovery strategy.
Control FilesEvery Oracle database has a control file. A control file is an extremely important
binary file that contains the operating system filenames of all other files constituting
the database. It also contains consistency information that is used during recovery,
such as:
■ The database name.
■ The timestamp of database creation.
■ The names of the database's datafiles and online and archived redo log files.
■ The checkpoint, that is, a record indicating the point in the redo log such that all
database changes prior to this point have been saved in the datafiles.
■ Information on backups (when using the Recovery Manager utility).
When multiplexing the control file, you configure Oracle to write multiple copies of
it in order to protect it against loss. If your operating system supports disk
mirroring, you can also mirror the control file, that is, configure the operating system
to write a copy of the control file to multiple disks.
See Also: Oracle8i Designing and Tuning for Performance for more
information on parameters that you can use to influence the MTTR.
What Is Backup and Recovery? 1-7

Which Data Structures Are Important for Backup and Recovery?
The Use of Control FilesEvery time you mount an Oracle database, its control file is used to identify the
datafiles and online redo log files that must be opened for database operation. If the
physical makeup of the database changes, for example, a new datafile or redo log
file is created, then Oracle modifies the database's control file to reflect the change.
The control file also contains crucial checkpoint information. The checkpoint
records the highest SCN of all changes to blocks such that all data blocks with
changes below that SCN have been written to disk by DBWn. The control file also
contains a record of the checkpoint SCN contained in the header of each datafile in
the database. Whenever a discrepancy occurs between the SCN that is actually in a
datafile header and the datafile header SCN listed in the control file, Oracle requires
media recovery.
The control file is absolutely crucial for database operation. Back up the control file
whenever the set of files that makes up the database changes. Examples of
structural changes include adding, dropping, or altering datafiles or tablespaces
and adding or dropping online redo logs.
Rollback SegmentsEvery database contains one or more rollback segments, which are logical structures
contained in datafiles. Whenever a transaction modifies a data block, a rollback
segment records the state of the information before it changed.
The Use of Rollback SegmentsOracle uses rollback segments for a variety of operations. In general, the rollback
segments of a database store the old values of data changed by uncommitted
transactions. For example, if DBWn writes an uncommitted change to a data block
and a session accesses the block in a query, then a rollback segment is used to
display the pre-change value to the user.
See Also: "Maintaining Multiple Control Files" on page 2-6 for
more information about multiplexing and mirroring the control file,
and Oracle8i Administrator’s Guide for general information about
managing the control file.
See Also: "Backing Up the Control File After Structural Changes"
on page 2-5 to learn how to back up the control file.
1-8 Oracle8i Backup and Recovery Guide
Which Data Structures Are Important for Backup and Recovery?
Oracle can use the information in a rollback segment during database recovery to
undo any uncommitted changes applied from the redo log to the datafiles, putting
the data into a consistent state.
Online Redo Log FilesEvery Oracle database has a set of two or more online redo log files. Oracle assigns
every redo log file a unique log sequence number to identify it. The set of redo log
files for a database is collectively known as the database's redo log. Oracle uses the
redo log to record all changes made to the database.
Oracle records every change in a redo record, which is an entry in the redo buffer
describing what has changed. For example, assume a user updates a column value
in a payroll table from 5 to 7. Oracle records the change to the datafile block (new
value of 7) and rollback segment (old value of 5) in a redo record. Because the redo
log stores every change to the database, the redo record for this transaction actually
contains three parts:
■ The change to the transaction table of the rollback segment.
■ The change to the rollback segment data block.
■ The change to the payroll table data block.
Each atomic change in a redo record is called a change vector. A redo record is
composed of all the change vectors involved in a change. For example, if you
update all the values in a multi-column row in a table, then Oracle generates a redo
record containing change vectors for all the changed blocks corresponding to each
updated value.
If you then commit the update, Oracle generates another redo record and assigns the
change an SCN. In this way, the system maintains a careful watch over everything
that occurs in the database.
Circular Use of Redo Log FilesThe log writer background process (LGWR) writes to online redo log files in a
circular fashion: when it fills the current online redo log, LGWR writes to the next
available inactive redo log. LGWR cycles through the online redo log files in the
database, writing over old redo data. Filled redo log files are available for reuse
depending on whether archiving is enabled:
■ If archiving is disabled, a filled online redo log is available after the changes
recorded in the log have been saved to the datafiles.
What Is Backup and Recovery? 1-9

Which Data Structures Are Important for Backup and Recovery?
■ If archiving is enabled, a filled online redo log is available after the changes
have been saved to the datafiles and the file has been archived.
System Change Number (SCN)The system change number (SCN) is an ever-increasing internal timestamp that
uniquely identifies a committed version of the database. Every time a user commits
a transaction, Oracle records a new SCN. You can obtain SCNs in a number of ways,
for example, from the alert log. You can then use the SCN as an identifier for
purposes of recovery. For example, you can perform an incomplete recovery of a
database up to SCN 1030.
Oracle uses SCNs in control files, datafile headers, and redo records. Every redo log
file has both a log sequence number and low and high SCN. The low SCN records
the lowest SCN recorded in the log file, while the high SCN records the highest SCN
in the log file.
The Use of Online Redo LogsRedo logs are crucial for recovery. For example, suppose that a power outage
prevents Oracle from permanently writing modified data to the datafiles. In this
situation, you can use an old version of the datafiles combined with the changes
recorded in the online and archived redo logs to reconstruct what was lost.
To protect against redo log failure, Oracle allows the redo log to be multiplexed.When Oracle multiplexes the online redo log, it maintains two or more copies of the
redo log on different disks. Note that you should not back up the online redo log
files, nor should you ever need to restore them; you keep redo logs by archiving
them.
Archived Redo Log FilesAn archived redo log is an online redo log that Oracle has filled with redo entries,
rendered inactive, and copied to one or more destinations specified in the
parameter file. You can run Oracle in either of two archive modes:
See Also:
■ "Managing the Online Redo Logs" on page 2-10 for more informationon managing the online redo log for backup and recovery
■ Oracle8i Administrator’s Guide for more information on managing theonline redo log for backup and recovery
■ "Avoiding the Backup of Online Redo Logs" on page 3-10 to learn whybacking up redo logs is dangerous.
1-10 Oracle8i Backup and Recovery Guide

Which Data Structures Are Important for Backup and Recovery?
Running the database in ARCHIVELOG mode has the following consequences:
■ You can completely recover the database from both instance and media failure.
■ You can perform a hot backup, that is, a backup made while the database is open
and available for use.
■ You can transmit and apply archived redo logs to a standby database, which is an
exact replica of your primary database.
■ You have more recovery options, for example, you can perform incomplete
recovery and tablespace point-in-time recovery (TSPITR).
■ You have to perform additional administrative operations to store the archived
redo logs.
■ You require extra disk space to store the archived logs.
Running the database in NOARCHIVELOG mode has the following consequences:
■ You can only back up the database while it is completely closed after a clean
shutdown.
■ Typically, your only media recovery option is to restore the whole database. You
lose all changes made after the last whole database backup.
■ Because no archived redo log is created, no additional administration is
necessary.
ARCHIVELOG Oracle archives the filled online redo log files beforereusing them in the cycle.
NOARCHIVELOG Oracle does not archive the filled online redo log filesbefore reusing them in the cycle.
Note: The only time you can recover a database while operating in
NOARCHIVELOG mode is when you have not already overwritten
the online log files that were current at the time of the most recent
backup.
See Also: "Managing the Archived Redo Logs" on page 2-14 for
more information on archiving redo logs, and Oracle8i StandbyDatabase Concepts and Administration for more information about the
standby database option.
What Is Backup and Recovery? 1-11

Understanding Basic Backup Strategy
Understanding Basic Backup StrategyA physical backup is a copy of a datafile, control file, or archived redo log that you
store as a safeguard against data loss. When thinking about a backup strategy,
consider these questions:
■ Why Are Backups Important?
■ What Types of Failures Can Occur?
■ What Type of Backup Should You Make?
■ How Often Should You Make Backups?
■ What Is a Redundancy Set?
■ Which Backup Method Should You Use?
■ How Often Should You Make Backups?
Why Are Backups Important?Imagine the magnitude of lost revenue—not to mention the degree of customer
dissatisfaction—if the production database of a catalog company, express delivery
service, bank, or airline suddenly becomes unavailable, even for just 5 or 10
minutes. Alternatively, imagine that you lose important payroll datafiles due to a
hard disk crash and cannot restore or recover them because you do not have a
backup. Depending on the size and value of the lost information, the results can be
devastating.
By making frequent backups, you ensure that you can restore at least some of your
lost data. If you run you database in ARCHIVELOG mode, then you can apply redo
to restored backups in order to reconstruct all lost changes.
What Types of Failures Can Occur?You can lose or corrupt data in a variety of ways; you should consider these various
possibilities when developing your backup strategy. The most common types of
failures causing data loss are:
Statement failure A logical failure in the handling of a statement in anOracle program.
Process failure A failure in a user process accessing Oracle, for example,an abnormal disconnection or process termination.
1-12 Oracle8i Backup and Recovery Guide
Understanding Basic Backup Strategy
What Type of Backup Should You Make?When developing your backup strategy, you need to know which types of backups
you can perform. In each type of physical backup you either back up a file or group
of files. This section defines and describes:
■ Whole Database Backups
■ Tablespace Backups
■ Datafile Backups
■ Control File Backups
Logical backups, also known as exports, are described in detail in Oracle8i Utilities.
Whole Database BackupsA whole database backup should include backups of the control file along with all
datafiles. Whole database backups are the most common type of backup.
Whole database backups do not require you to operate the database in a specific
archiving mode. Before performing whole database backups, however, be aware of
the implications of backing up in ARCHIVELOG and NOARCHIVELOG modes
(see "Choosing the Database Archiving Mode" on page 2-17).
Figure 1–1 illustrates the various options available to you when performing whole
database backups:
Instance failure A problem that prevents an Oracle instance, that is, theSGA and background processes, from continuing tofunction.
User or application error A user or application problem that results in the loss ofdata. For example, a user can accidentally delete data froma payroll table.
Media failure A physical problem that arises when Oracle tries to writeor read a file that is required to operate the database. Acommon example is a disk head crash that causes the lossof all data on a disk drive.
See Also: "Planning Your Response to Non-Media Failures" on
page 3-12 and "Planning Your Response to Media Failures" on
page 3-15 to learn about the most common type of failures affecting
the database.
What Is Backup and Recovery? 1-13

Understanding Basic Backup Strategy
Figure 1–2 Whole Database Backup Options
Whole database backups can be consistent or inconsistent. Whether or not the
backup is consistent determines whether you need to apply redo logs after restoring
the backup.
Tablespace BackupsA tablespace backup is a backup of the datafiles that constitute the tablespace. For
example, if tablespace TBS_2 contains datafiles 2, 3, and 4, then a backup of
tablespace TBS_2 backs up these three datafiles.
Tablespace backups, whether online or offline, are only valid if the database is
operating in ARCHIVELOG mode. The reason is that redo is required to make the
restored tablespace consistent with the other tablespaces in the database.
The only time a tablespace backup is valid for a database running in
NOARCHIVELOG mode is when the tablespace is currently read-only or
offline-normal. These cases are exceptions because no redo is required to recover
them. For example, take the scenario depicted in Figure 1–3:
See Also:
■ "How Often Should You Make Backups?" on page 1-23 to learn aboutthe difference between consistent and inconsistent backups
■ Chapter 4, "Performing Operating System Backups" for detailedprocedures for backing up a database using operating systemcommands
■ Oracle8i Recovery Manager User’s Guide and Reference for detailedprocedures for backing up a database using RMAN commands
Whole database backups
inconsistentconsistent, closed
NOARCHIVELOGARCHIVELOG NOARCHIVELOG(not valid)
ARCHIVELOG
openclosed
1-14 Oracle8i Backup and Recovery Guide

Understanding Basic Backup Strategy
1. You take tablespace TBS_2 offline normal at some time during day t.
2. You make a backup of TBS_2 at day t + 5.
3. You restore tablespace TBS_2 at day t + 10 using the backup made at day t + 5.
4. You make tablespace TBS_2 read-write at day t + 15.
Figure 1–3 Tablespace Backups in NOARCHIVELOG Mode
Because there were necessarily no changes to the offline tablespace between t + 5and t + 10, Oracle does not require media recovery. If you make the tablespace
read-write at t + 15 and then subsequently attempt to restore the t + 5 backup,
however, Oracle requires media recovery for the changes after t + 15. Consequently,
you are only be able to open the database if all necessary redo is located in the
online redo logs.
Datafile BackupsA datafile backup is a backup of a single datafile. Datafile backups, which are not as
common as tablespace backups, are valid in ARCHIVELOG databases.
5t 10 15
read-writeoffline-normaloffline-normaloffline-normal
TBS_2TBS_2TBS_2TBS_2
offline-normal
TBS_2
Backup
TBS_2
Restore
What Is Backup and Recovery? 1-15

Understanding Basic Backup Strategy
The only time a datafile backup is valid for a database in NOARCHIVELOG mode
is if every datafile in a tablespace is backed up. You cannot restore the database
unless all datafiles are backed up. The datafiles must be read-only or offline-normal.
Control File BackupsIf the database is mounted, you can make a binary backup up your control file
using the ALTER DATABASE statement. You can also back up the control file to a
trace file. Note that trace file backups have one major disadvantage: they have no
record of any previous backups made with the old control file.
Should You Make Consistent or Inconsistent Backups?You can use RMAN or operating system commands to make an inconsistent or a
consistent backup. An inconsistent backup is a backup of one or more database files
that you make while the database is open or after the database has been shut down
abnormally. A consistent backup is a backup of one or more database files that you
make after the database has been closed cleanly. Unlike an inconsistent backup, a
consistent backup does not require instance recovery after it is restored.
Whether you make consistent or inconsistent backups depends on a number of
factors. If your database must be open and available all the time, then inconsistent
backups are your only option. If there are recurring periods of minimal use, then
you may decide to take regular consistent backups of the whole database and
supplement them with online backups of often-used tablespaces.
Consistent BackupsA consistent backup of a database or part of a database is a backup in which all
read-write datafiles and control files have been checkpointed with respect to the
same SCN. In addition, all the online, read-write datafiles are not fuzzy, that is, do
not contain changes beyond the SCN in the header. Oracle determines whether a
restore backup is consistent by checking all the datafile headers against the datafile
header information contained in the control file.
Oracle makes the control files and datafiles consistent during a database checkpoint.
The only tablespaces in a consistent backup that are allowed to have older SCNs are
read-only and offline normal tablespaces, which are still consistent with the other
See Also: "Backing Up the Control File After Structural Changes"
on page 2-5 to learn how to make control file backups using
SQL*Plus, and "Performing Control File Backups" on page 4-13 to
learn how to make control file backups using SQL commands.
1-16 Oracle8i Backup and Recovery Guide
Understanding Basic Backup Strategy
datafiles in the backup because no changes have been made to these tablespaces
and so no recovery is required. If the offline datafile's checkpoint SCN matches the
offline-SCN in the control file, then Oracle know the datafile needs no redo.
The important point is that you can open the database after restoring a consistent
whole database backup without applying redo logs because the data is already
consistent: no action is required to make the data in the restored datafiles correct.
Consequently, you can restore a year-old consistent backup of your database
without performing media recovery and without Oracle performing instance
recovery.
The only way to make a consistent whole database backup is to shut down the
database using the NORMAL or IMMEDIATE options and make the backup while
the database is closed. If a database is not shut down cleanly, for example, an
instance fails or you issue a SHUTDOWN ABORT statement, the database's
datafiles are always inconsistent—unless you opened the database in read-only
mode. Instance recovery will be required at open time.
A consistent whole database backup is the only valid backup option for databases
running in NOARCHIVELOG mode, because otherwise redo will need to be
applied to create consistency—and in NOARCHIVELOG mode Oracle overwrites
redo records without archiving them first.
To make a consistent database backup current or to take it to a non-current point in
time, perform media recovery. If you use a current control file for recovery, Oracle
starts media recovery beginning at the lowest checkpoint SCN in the datafile
headers. If you use a backup control file, then Oracle starts media recovery using
the lowest of the following: the control file SCN and the lowest SCN in the datafile
headers.
To perform media recovery either apply archived redo logs or, if you are using
Recovery Manager, apply incremental backups and/or archived logs. All redo data
is located in the archived and online redo logs.
WARNING: Only use a backup control file created during aconsistent whole database backup if you are restoring the wholedatabase backup and do not intend to perform recovery. If youintend to perform recovery and have a current control file, do notrestore an older control file—unless performing point-in-timerecovery to a time when the database structure was different fromthe current structure.
What Is Backup and Recovery? 1-17

Understanding Basic Backup Strategy
Inconsistent BackupsAn inconsistent backup s a backup in which all read-write datafiles and control files
have not been checkpointed with respect to the same SCN. For example, one
read-write datafile header may contain an SCN of 100 while others contain an SCN
of 95. Oracle cannot open the database until these SCNs are consistent, that is, until
all changes recorded in the online redo logs have been made to the datafiles.
If your database must be up and running 24 hours a day, 7 days a week, then you
have no choice but to perform inconsistent backups of a whole database. For
example, a backup of an offline tablespace in an open database is inconsistent with
other tablespaces because portions of the database are being modified and written
to disk while the backup of the tablespace is progressing. The datafile headers for
the online and offline datafiles may contain inconsistent SCNs. You must run your
database in ARCHIVELOG mode to make open backups.
If you run the database in ARCHIVELOG mode, then you can construct a whole
database backup using backups of datafiles taken at different times. For example, if
your database contains seven tablespaces, and you back up the control file as well
as a different tablespace each night, in a week you will back up all tablespaces in the
database as well as the control file. You can consider this backup as a whole
database backup.
Inconsistent Closed Backups You have the option of making inconsistent closed
backups if a database is backed up after a system crash or SHUTDOWN ABORT.
This type of backup is valid if the database is running in ARCHIVELOG mode,
because both online and archived redo logs are available to make the backup
consistent.
If you run your database in NOARCHIVELOG mode, only back it up when you
have closed it cleanly using the IMMEDIATE or NORMAL options. Inconsistent
whole database backups of databases running in NOARCHIVELOG mode are
usable only if the redo logs containing the changes made prior to the backup are
available when you restore it—an unlikely occurrence.
The reason that NOARCHIVELOG inconsistent backups are not recommended is
that the datafile headers of the backed up files contain different SCNs (a normal
shutdown guarantees the consistency of these SCNs), and because the database is in
NOARCHIVELOG mode, no archived redo logs are available to apply the lost
Note: Oracle recommends that you do not make inconsistent,
closed database backups in NOARCHIVELOG mode.
1-18 Oracle8i Backup and Recovery Guide
Understanding Basic Backup Strategy
changes. For this reason, RMAN does not allow you to back up a database that has
been running in NOARCHIVELOG mode and shut down abnormally because the
backup is not usable for recovery.
The moral is: if you run your database in NOARCHIVELOG mode, always have a backupthat is usable without performing any recovery. This aim is defeated if you need to
apply redo from logs to recover a backup. If you need redo data to make a database
consistent, operate in ARCHIVELOG mode.
Archiving Unarchived Redo Log Files After open or inconsistent closed backups, always
guarantee that you have the redo necessary to recover the backup by archiving the
unarchived redo logs. When the database is open, issue the following SQL
statement to force Oracle to switch out of the current log and archive it as well as all
other unarchived logs:
SQL> ALTER SYSTEM ARCHIVE LOG CURRENT;
When the database is mounted, open, or closed, issue the following SQL statement
to force Oracle to archive all non-current redo logs:
SQL> ALTER SYSTEM ARCHIVE LOG ALL;
When the database is mounted, open, or closed, issue the following SQL statement
to archive a specified log group, where integer is the number of the group:
SQL> ALTER SYSTEM ARCHIVE LOG GROUP integer;
Backing Up the Archived Logs and the Control File After open or inconsistent closed
backups, back up all archived redo logs produced since the backup began. This
operation ensures that you can use the backup and also allows you to delete the
original archived logs from disk. If you do not have all archived redo logs produced
during the backup, you cannot recover the backup because you do not have all the
redo records necessary to make it consistent.
Also, make a binary backup up your control file using the ALTER DATABASE
statement.
See Also: "Performing Control File Backups" on page 4-13 for
more information about backing up the control file using SQL
statements.
What Is Backup and Recovery? 1-19
Understanding Basic Backup Strategy
What Is a Redundancy Set?The set of files needed to recover from the failure of a database file—a datafile,
control file, or online redo log—is called the redundancy set. The golden rule of
backup and recovery is: the set of disks or other media that contain the redundancy setshould be separate from the disks that contain the datafiles, online redo logs, and controlfiles. This strategy ensures that the failure of a disk that contains a datafile does not
also cause the loss of the backups or redo logs needed to recover the datafile.
Which Backup Method Should You Use?In Oracle8i, you have a choice between these basic methods for making backups:
■ Use the Recovery Manager (RMAN), which is a utility that establishes a
connection with a server session and manages the movement for data for
backup and recovery operations.
■ Back up your database manually by executing commands specific to your
operating system.
■ Use the Oracle Export utility to make logical backups. The utility writes data
from an Oracle database to operating system files in a proprietary format. You
can later import this data into a database.
See Also: "Backing Up Online Tablespaces and Datafiles" on
page 4-5 to learn how to make online backups using operating
system methods, and Oracle8i Recovery Manager User’s Guide andReference to learn how to use RMAN to make backups.
See Also: "Obeying the Golden Rule of Backup and Recovery" on
page 3-2 to learn more the redundancy set and how to maintain it.
Note: RMAN is only compatible with Oracle databases of release
8.0 or higher. Use the Enterprise Backup Manager (EBU) for
Oracle7 databases.
1-20 Oracle8i Backup and Recovery Guide
Understanding Basic Backup Strategy
Table 1–1 describes the version and system requirements for the these methods:
Making Recovery Manager Backups and Image CopiesRMAN is a powerful and versatile program that allows you to make a backup or
image copy of your data. When you specify files or archived logs using the RMAN
backup command, RMAN creates a backup set as output.
A backup set is one or more datafiles, control files, or archived redo logs that are
written in an RMAN-specific format; it requires you to use the RMAN restorecommand for recovery operations. In contrast, when you use the copy command to
create an image copy of a file, you do not need to invoke RMAN to restore or recover
it.
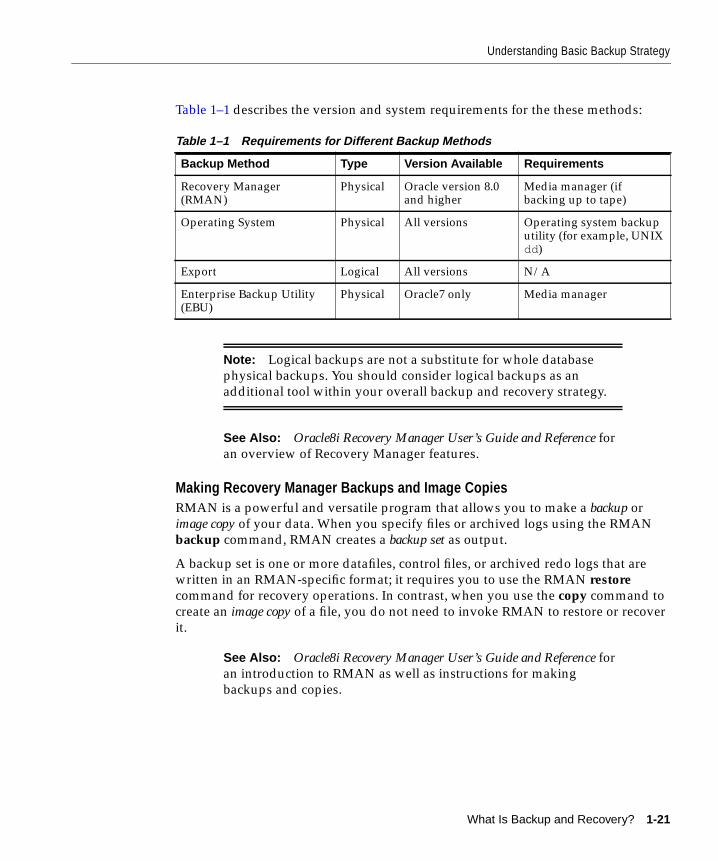
Table 1–1 Requirements for Different Backup Methods
Backup Method Type Version Available Requirements
Recovery Manager(RMAN)
Physical Oracle version 8.0and higher
Media manager (ifbacking up to tape)
Operating System Physical All versions Operating system backuputility (for example, UNIXdd)
Export Logical All versions N/A
Enterprise Backup Utility(EBU)
Physical Oracle7 only Media manager
Note: Logical backups are not a substitute for whole database
physical backups. You should consider logical backups as an
additional tool within your overall backup and recovery strategy.
See Also: Oracle8i Recovery Manager User’s Guide and Reference for
an overview of Recovery Manager features.
See Also: Oracle8i Recovery Manager User’s Guide and Reference for
an introduction to RMAN as well as instructions for making
backups and copies.
What Is Backup and Recovery? 1-21

Understanding Basic Backup Strategy
Making Operating System BackupsIf you do not want to use RMAN, you can use operating system commands such as
the UNIX cp command to make backups. You can also automate backup operations
by writing scripts.
You can make a backup of the whole database at once or supplement a whole
database backup with backups of individual tablespaces, datafiles, control files, and
archived logs. You can use operating system commands to perform these backups.
Using the Export Utility for Supplemental Backup ProtectionYou can supplement physical backups by using the Export utility to make logical
backups of your data. Logical backups store information about the schema objects
created for a database. The Export utility writes data from a database into Oracle
files in a proprietary format. You can then import this data into a database using the
Import utility.
Feature Comparison of Backup MethodsTable 1–2 compares the features of the different backup methods:
See Also: Chapter 4, "Performing Operating System Backups" to
learn how to make operating system backups.
See Also: To learn how to use the Export and Import utilities, see
Oracle8i Utilities.
Table 1–2 Feature Comparison of Backup Methods (Page 1 of 2)
Feature Recovery Manager Operating System Export
Closed database backups Supported. Requiresinstance to be mounted.
Supported. Not supported.
Open database backups Do not use BEGIN/ENDBACKUP statements.
Use BEGIN/ENDBACKUP statements.
Requires RBS to generateconsistent backups.
Incremental backups Supported. Not supported. Not supported.
Corrupt block detection Supported. Identifiescorrupt blocks and writesto V$BACKUP_CORRUPTION orV$COPY_CORRUPTION.
Not supported. Supported. Identifiescorrupt blocks in theexport log.
1-22 Oracle8i Backup and Recovery Guide

Understanding Basic Backup Strategy
How Often Should You Make Backups?Tailor your backup strategy to the needs of your business. For example, if you can
afford to lose data in the event of a disk failure, then you may not need to perform
backups very often. The advantage of taking infrequent backups is that you free
Oracle's resources for other operations. The disadvantage is that you may end up
losing data or increasing recovery time.
In a different scenario, if your database must be available twenty-four hours a day,
seven days a week, then you should make online backups of your database
frequently. In this case, you may decide to take daily hot backups, multiplex (that is,
have multiple copies of) your online redo logs, and archive your redo logs to
several different locations. You can even maintain a standby database in a different
city that is a constantly updated replica of your original database.
Automatic backup Supported. Establishes thename and locations of allfiles to be backed up(whole database,tablespace, datafile orcontrol file backup).
Not supported. Files to bebacked up must bespecified manually.
Supported. Performseither full, user, or tablebackups.
Backup catalogs Supported. Backups arecataloged in the recoverycatalog and in the controlfile, or just in the controlfile.
Not supported. Not supported.
Backups to sequentialmedia
Supported. Interfaces witha media manager. RMANalso supports proxy copy,a feature that allows themedia manager to managethe transfer of data.
Supported. Backup to tapeis manual or managed by amedia manager.
Supported.
Backs up initializationparameter file andpassword files
Not supported. Supported. Not supported.
Operating systemindependent language
Supported (uses PL/SQLinterface).
Not supported. Supported.
Table 1–2 Feature Comparison of Backup Methods (Page 2 of 2)
Feature Recovery Manager Operating System Export
What Is Backup and Recovery? 1-23

Understanding Basic Recovery Strategy
Understanding Basic Recovery StrategyBasic media recovery involves two parts: restoring a physical backup and updating
it with database changes. The most important aspect of recovery is making sure that
all datafiles are consistent with respect to the same SCN. Oracle has integrity checks
that prevent you from opening the database until all datafiles are consistent with
one another.
When preparing a recovery strategy, make sure you understand the answers to
these questions:
■ What Is Media Recovery?
■ Which Recovery Method Should You Use?
What Is Media Recovery?Media recovery uses redo records or (if you use RMAN) incremental backups to
recover restored datafiles either to the present or to a specified non-current time.
When performing media recovery, you can recover the whole database, a
tablespace, or a datafile. In any case, you always use a restored backup to perform
the recovery.
This section contains the follow topics:
■ Complete Recovery
■ Incomplete Recovery
■ Opening the Database with the RESETLOGS Option
Complete RecoveryComplete recovery involves using redo data or incremental backups combined with
a backup of a database, tablespace, or datafile to update it to the most current point
in time. It is called complete because Oracle applies all of the redo changes to the
backup. Typically, you perform media recovery after a media failure damages
datafiles or the control file.
See Also: Chapter 3, "Developing a Backup and Recovery
Strategy" to learn important considerations for an effective backup
strategy.
1-24 Oracle8i Backup and Recovery Guide

Understanding Basic Recovery Strategy
Requirements for Complete Recovery You can perform complete recovery on a
database, tablespace, or datafile. If you are performing complete recovery on the
whole database, then you must:
■ Mount the database.
■ Ensure that all datafiles you want to recover are online.
■ Restore a backup of the whole database or the files you want to recover.
■ Apply online or archived redo logs, or a combination of the two.
If you are performing complete recovery on a tablespace or datafile, then you must:
■ Take the tablespace or datafile to be recovered offline if the database is open.
■ Restore a backup of the datafiles you want to recover.
■ Apply online or archived redo logs, or a combination of the two.
Incomplete RecoveryIncomplete recovery uses a backup to produce a non-current version of the
database. In other words, you do not apply all of the redo records generated after
the most recent backup. You usually perform incomplete recovery when:
■ Media failure destroys some or all of the online redo logs.
■ A user error causes data loss, for example, a user inadvertently drops a table.
■ You cannot perform complete recovery because an archived redo log is missing.
■ You lose your current control file and must use a backup control file to open the
database.
To perform incomplete media recovery, you must restore all datafiles from backups
created prior to the time to which you want to recover and then open the database
with the RESETLOGS option when recovery completes. The RESETLOGS operation
creates a new incarnation of the database—in other words, a database with a new
stream of log sequence numbers.
See Also: "Performing Complete Media Recovery" on page 5-19
to learn how to perform complete media recovery using operating
system methods, and Oracle8i Recovery Manager User’s Guide andReference to learn how to perform complete recovery with RMAN.
What Is Backup and Recovery? 1-25

Understanding Basic Recovery Strategy
Tablespace Point-in-Time Recovery The tablespace point-in-time recovery (TSPITR)
feature enables you to recover one or more tablespaces to a point-in-time that is
different from the rest of the database. TSPITR is most useful when you want to:
■ Recover from an erroneous drop or truncate table operation.
■ Recover a table that has become logically corrupted.
■ Recover from an incorrect batch job or other DML statement that has affected
only a subset of the database.
■ Recover one independent schema to a point different from the rest of a physical
database (in cases where there are multiple independent schemas in separate
tablespaces of one physical database).
■ Recover a tablespace on a very large database (VLDB) rather than restore the
whole database from a backup and perform a complete database roll-forward
(see "Planning for Tablespace Point-in-Time Recovery" on page 7-4 before
making any decisions).
Media Recovery Options Because you are not completely recovering the database to
the most current time, you must tell Oracle when to terminate recovery. You can
perform the following types of recovery.
See Also: Chapter 7, "Performing Operating System Tablespace
Point-in-Time Recovery" to learn how to perform O/S TSPITR, and
Oracle8i Recovery Manager User’s Guide and Reference to learn how to
perform TSPITR using RMAN.
Type of Recovery Function
Time-based recovery Recovers the data up to a specified point in time.
Cancel-based recovery Recovers until you issue the CANCEL statement (not availablewhen using Recovery Manager).
Change-based recovery Recovers until the specified SCN.
Log sequence recovery Recovers until the specified log sequence number (onlyavailable when using Recovery Manager).
See Also: Oracle8i Recovery Manager User’s Guide and Reference to
learn how to perform incomplete recovery with RMAN, and
"Performing Incomplete Media Recovery" on page 5-25 to learn
how to perform incomplete media recovery using SQL*Plus.
1-26 Oracle8i Backup and Recovery Guide
Understanding Basic Recovery Strategy
Opening the Database with the RESETLOGS OptionWhenever you perform incomplete recovery or perform complete or incomplete
recovery using a backup control file, you must reset the online redo logs when you
open the database. The new version of the reset database is called a new incarnation.
All archived redo logs generated after the point of the RESETLOGS on the old
incarnation are invalid in the new incarnation.
Which Recovery Method Should You Use?You have a choice between two basic methods for recovering physical files. You can:
■ Use the RMAN utility to automate restore recovery.
■ Restore backups using operating system utilities, and then recover your
database manually by executing SQL/SQL*Plus statements.
Whichever method you choose, you can recover a database, tablespace, or datafile.
Before performing media recovery, you need to determine which datafiles to
recover. Often you can use the fixed view V$RECOVER_FILE.
Recovering with SQL*PlusIf you do not use RMAN, follow these basic steps:
1. Restore backups of files permanently damaged by media failure. If you do not
have a backup, it is sometimes possible to perform recovery if you have the
necessary redo logs dating from the time when the datafiles were first created
and the control file contains the name of the damaged file.
If you cannot restore a datafile to its original location, relocate the restored
datafile and change the location in the control file.
2. Restore any necessary archived redo log files.
3. use the SQL*Plus utility to restore and recover your files. You can execute:
■ The SQL*Plus RECOVER statement (recommended)
See Also: "Opening the Database After Media Recovery" on
page 5-31 to learn how to restart the database in RESETLOGS
mode.
See Also: Chapter 5, "Performing Media Recovery" to learn how
to perform operating system recovery, and Oracle8i RecoveryManager User’s Guide and Reference to learn how to perform recovery
with RMAN.
What Is Backup and Recovery? 1-27

Understanding Basic Recovery Strategy
■ The SQL ALTER DATABASE RECOVER statement
Recovering with RMANThe basic RMAN recovery commands are restore and recover. Use RMAN to
restore datafiles from backup sets or from image copies on disk, either to their
current location or to a new location. You can also restore backup sets containing
archived redo logs. Use the RMAN recover command to perform media recovery
and apply incremental backups. RMAN completely automates the procedure for
recovering and restoring your backups and copies.
See Also: SQL*Plus User’s Guide and Reference to learn more about
the RECOVER statement.
1-28 Oracle8i Backup and Recovery Guide
Managing Data Struc
2
Managing Data StructuresThis chapter describes how to manage data structures that are crucial for successful
backup and recovery. It includes the following topics:
■ Overview of Backup and Recovery Data Structures
■ Managing the Control File
■ Managing the Online Redo Logs
■ Managing the Archived Redo Logs
See Also:
■ Oracle8i Concepts for a conceptual overview of these data structures
■ Oracle8i Administrator’s Guide for detailed administration information
■ Oracle8i Parallel Server Documentation Set: Oracle8i Parallel ServerConcepts; Oracle8i Parallel Server Setup and Configuration Guide; Oracle8iParallel Server Administration, Deployment, and Performance if you areusing Oracle with the Parallel Server
tures 2-1

Overview of Backup and Recovery Data Structures
Overview of Backup and Recovery Data StructuresThe single most useful strategy in backup and recovery is planning ahead. To
prevent data loss, you must anticipate the various ways that data can be lost and
develop your defense accordingly.
An important aspect of planning ahead is the intelligent management of database
data structures. For example, what can you do to prevent a database crash if your
control file become corrupted? What can you do to prevent the loss of archived redo
logs if a disk failure occurs? Besides the datafiles, the data structures that are most
important for developing a backup and recovery strategy are:
■ Control files
■ Online redo logs
■ Archived redo logs (if you run in ARCHIVELOG mode)
If these structures become corrupted or unavailable, then you may find yourself
unable to recover lost data.
If you have sufficient resources, then you can help protect yourself from data loss
by following this basic data management strategy:
■ Mirror datafiles at the operating system or hardware level.
■ Maintain at least two current control files on different disks by Oracle
multiplexing or operating system mirroring, or both at the same time.
Operating system or hardware mirroring ensures that you can recover from any
one media failure while the system is fully available.
■ Maintain at least three online redo log groups with two members each. Place
each member of the group on a different disk and on a different disk controller.
■ Archive redo logs to multiple destinations and back them up frequently to
different media. It is advisable to take multiple backups to multiple different
media devices.
Note: This chapter assumes that you understand the function of
the control file, online redo logs, and archived redo logs as well as
the basics of how to administer them. If you do not, refer to the
relevant chapters in Oracle8i Concepts and the Oracle8iAdministrator’s Guide.
2-2 Oracle8i Backup and Recovery Guide
Managing the Control File
Managing the Control FileThe control file is a small binary file containing a record of the database schema. It is
one of the most essential files in the database because it is necessary for the
database to start and operate successfully. Oracle updates the control file
continuously during database use, so it must be available for writing whenever the
database is mounted. If for some reason the control file is not accessible, then the
database cannot be mounted and recovery is difficult.
A control file contains information about the associated database that is required for
the database to be accessed by an instance, both at startup and during normal
operation. Only the Oracle database server can modify a control file's information;
no user can edit a database's control file directly.
The control file has various properties that make it crucial for backup and recovery.
For example, the control file:
■ Identifies the database name (taken from either the name specified by the
initialization parameter DB_NAME or the name used in the CREATE
DATABASE statement).
■ Records the names and locations of associated datafiles and online redo log
files.
■ Records the names and locations of archived redo logs.
■ Stores checkpoint and log sequence information for all database files required
for the synchronization of the database.
■ Stores information on Recovery Manager backups (if you use Recovery
Manager). The recovery catalog optionally used by RMAN obtains its essential
information from the control file.
■ Must be accessible for the database to be mounted, opened, and maintained.
This section addresses the following topics relating to control file management:
■ Displaying Control File Information
■ Backing Up the Control File After Structural Changes
■ Maintaining Multiple Control Files
■ Recovering from the Loss of Control Files
Managing Data Structures 2-3

Managing the Control File
Displaying Control File InformationYour first step in managing the control file is learning how to gain information
about it. The following data dictionary views contain useful information:
For example, the following query displays the database control files:
SELECT name FROM v$controlfile;
NAME--------------------------------------------------------------------------------/vobs/oracle/dbs/cf1.f/vobs/oracle/dbs/cf2.f2 rows selected.
To display the control file type, query the V$DATABASE view:
SELECT controlfile_type FROM v$database;
CONTROL------------BACKUP
The following useful statement displays all control files, datafiles, and online redo
log files for the database:
SELECT member FROM v$logfileUNION ALLSELECT name FROM v$datafileUNION ALLSELECT name FROM v$controlfile;
MEMBER--------------------------------------------------------------------------------/vobs/oracle/dbs/rdo_log1.f/vobs/oracle/dbs/rdo_log2.f/vobs/oracle/dbs/tbs_01.f/vobs/oracle/dbs/tbs_02.f/vobs/oracle/dbs/tbs_11.f/vobs/oracle/dbs/tbs_12.f/vobs/oracle/dbs/tbs_21.f
Views Description
V$CONTROLFILE Lists the control file filenames.
V$DATABASE Indicates whether the control file is current or a backup, whenthe control file was created, and the last timestamp in the controlfile if it is a backup.
2-4 Oracle8i Backup and Recovery Guide

Managing the Control File
/vobs/oracle/dbs/tbs_22.f/vobs/oracle/dbs/tbs_13.f/vobs/oracle/dbs/cf1.f/vobs/oracle/dbs/cf2.f11 rows selected.
Backing Up the Control File After Structural ChangesEach time that a user adds, renames, or drops a datafile or an online redo log file
from the database, Oracle updates the control file to reflect this physical structure
change. Oracle records these changes so that it can identify:
■ The datafiles and online redo log files that it needs to open during database
startup.
■ The files that are required or available in case database recovery is necessary.
Therefore, if you make a change to your database's physical structure, immediatelyback up the control file. If you do not, and your control file is corrupted or
destroyed, then the backup control file will not accurately reflect the state of the
database at the time of the failure.
Generate a binary copy of the control file or back up to a text trace file (with the
destination specified by the USER_DUMP_DEST initialization parameter). You can
run the script in the text trace file to re-create the control file. Back up the control file
after you issue any of the following statements:
■ ALTER DATABASE [ADD | DROP] LOGFILE
■ ALTER DATABASE [ADD | DROP] LOGFILE MEMBER
■ ALTER DATABASE [ADD | DROP] LOGFILE GROUP
■ ALTER DATABASE [ARCHIVELOG | NOARCHIVELOG]
■ ALTER DATABASE RENAME FILE
■ CREATE TABLESPACE
■ ALTER TABLESPACE [ADD | RENAME] DATAFILE
■ ALTER TABLESPACE [READ WRITE | READ ONLY]
■ DROP TABLESPACE
See Also: Oracle8i Reference for more information on the dynamic
performance views.
Managing Data Structures 2-5

Managing the Control File
To learn how to back up the control file, see "Performing Control File Backups" on
page 4-13.
Maintaining Multiple Control FilesAs with online redo log files, Oracle allows you to multiplex control files, that is,
configure Oracle to open and write to multiple, identical copies. Oracle writes the
same data to each copy of the control file. You can also mirror them, that is, allow
the operating system to write a copy of a control file to two or more physical disks.
Oracle corporation recommends that you both multiplex and mirror the control
files.
Mirroring at the operating system level is often better than multiplexing at the
Oracle level because operating system mirroring usually tolerates failure of one of
the mirrors, whereas Oracle multiplexing does not. With Oracle multiplexing, if any
mirror fails, then the instance shuts down. The user then has to either:
■ Repair the failed disk, copy a good control file into the old location, and restart.
■ Copy a good control file to a new location and edit the CONTROL_FILES
parameter of the initialization parameter file accordingly.
With operating system or hardware mirroring, you achieve the same redundancy
that you do with multiplexing, but in many cases you do not have to pay with a loss
in availability when a failure occurs.
The permanent loss of all copies of a database's control file is a serious problem. If
any copy of a control file fails during database operation, then the instance aborts
and media recovery is required. If you do not multiplex or mirror the control file,
then recovery is more complex. Therefore, you should use multiplexed or mirrored
control files with each database.
See Also: Oracle8i Administrator’s Guide for more information on
managing the control file, and "Backing Up the Control File to a
Trace File" on page 4-14 for a sample scenario involving editing a
trace file.
2-6 Oracle8i Backup and Recovery Guide

Managing the Control File
Figure 2–1 Multiplexing and Mirroring the Control File
Multiplexing the Control FileBy storing multiple control files for a single database on different disks, you
safeguard against a single point of failure. If a single disk containing a control file
crashes, then the instance fails when Oracle attempts to access the damaged control
file.
If the control file is multiplexed, other copies of the current control file are available
on different disks. After repairing the bad disk, you can then copy a good control
file to the old location and restart the instance easily without having to perform
media recovery. If you cannot repair the disk, then you can edit the CONTROL_
FILES initialization parameter to specify a new location and copy the good control
file copy to this location.
The only disadvantage of multiplexing control files is that operations that update
the control files such as adding a datafile or checkpointing the database can take
Oracle
disk 2
control file
disk 3
control file
disk 1
control file
Oracle
Multiplexing Mirroring
disk 2
control file
disk 3disk 1
O/S
Managing Data Structures 2-7

Managing the Control File
slightly longer. This increase in performance overhead is usually insignificant,
however, especially for operating systems that can perform multiple, concurrent
writes. A slight performance loss does not justify using only a single control file.
Note the following characteristics of multiplexed control files:
■ At least two filenames are listed for the initialization parameter CONTROL_
FILES in the database's parameter file.
■ The first file listed in the CONTROL_FILES parameter is the only file read by
the Oracle database server during database operation.
■ If any of the control files becomes unavailable during database operation, then
the instance becomes inoperable and aborts. Copy a good control file to the bad
control file's location or, if media failure makes the disk inaccessible, copy a
good control file to a new location and edit the initialization parameter file.
Mirroring the Control FileIf your operating system supports disk mirroring, then the operating system allows
for mirrored disk storage. Mirrored disk storage makes several physical disks look like
a single disk to Oracle. Oracle writes the data once, then the operating system
writes it to each of the underlying physical disks. Each file is a mirror, that is, an
exact duplicate, of the others.
The advantage of disk mirroring is that if one of the disks becomes unavailable,
then the other disk or disks can continue to function without interruption.
Therefore, your control file is protected against a single point of failure. Note that if
you store your control file on a mirrored disk system, then you only need Oracle to
write one active copy of the control file.
Oracle recommends that you multiplex at least two copies of the control files on
mirrored disks. This precaution allows transparent recovery of single failures, and
retains fast recovery of the control file data in the case of double failure.
Recovering from the Loss of Control FilesFollowing are scenarios where you may need to recover or re-create the control file:
Note: Oracle strongly recommends that you maintain a minimum
of two control files on different disks.
2-8 Oracle8i Backup and Recovery Guide

Managing the Control File
■ The control file is corrupted or lost due to media failure. If you multiplex or
mirror your control files on different disks, you significantly minimize this risk.
■ You change the name of a database. Because the control file records the name of
the database, you need to re-create it.
To recover from control file corruption using a current control file copy:
This procedure assumes that one of the control files specified in the CONTROL_
FILES parameter is corrupted, the control file directory is still accessible, and you
have a current multiplexed copy.
1. With the instance shut down, use an operating system command to overwrite
the bad control file with a good copy:
% cp '/disk2/copy/cf.f' '/disk1/oracle/dbs/cf.f';
2. Start SQL*Plus and mount or open the database:
SQL> STARTUP MOUNT
To recover from permanent media failure using a current control file copy:
This procedure assumes that one of the control files specified in the CONTROL_
FILES parameter is inaccessible due to a permanent media failure, and you have a
current multiplexed or mirrored copy.
1. With the instance shut down, use an operating system command to copy the
current copy of the control file to a new, accessible location:
% cp '/disk2/copy/cf.f' '/disk3/copy/cf.f';
2. Edit the CONROL_FILES parameter in the initialization parameter file to
replace the bad location with the new location:
CONTROL_FILES = '/oracle/dbs/cf1.f','/disk3/copy/cf.f'
3. Start SQL*Plus and mount or open the database:
SQL> STARTUP MOUNT
Managing Data Structures 2-9
Managing the Online Redo Logs
Managing the Online Redo LogsPerhaps the most crucial structure for recovery operations is the online redo log,
which consists of two or more pre-allocated files that store all changes made to the
database as they occur. Every instance of an Oracle database has an associated
online redo log to protect the database in case of an instance failure.
Each database instance has its own online redo logs groups. These online redo log
groups, multiplexed or not, are called an instance's thread of online redo. In typical
configurations, only one database instance accesses an Oracle database, so only one
thread is present. When running the Oracle Parallel Server, however, two or more
instances concurrently access a single database; each instance has its own thread.
WARNING: Oracle recommends that you do not back up acurrent online log, because if you restore that backup, the backupwill appear at the end of the redo thread. Because additional redomay have been generated in the thread, when you attempt toexecute recovery by supplying the redo log copy, recovery willerroneously detect the end of the redo thread and prematurelyterminate, possibly corrupting the database.
Note: This manual describes how to configure and manage the
online redo log when the Oracle Parallel Server is not used. Thus,
the thread number can be assumed to be 1 in all discussions and
examples of commands. For complete information about
configuring the online redo log with the Oracle Parallel Server, see
Oracle8i Parallel Server Documentation Set: Oracle8i Parallel ServerConcepts; Oracle8i Parallel Server Setup and Configuration Guide;Oracle8i Parallel Server Administration, Deployment, and Performance.
See Also: Oracle8i Concepts for a conceptual overview of the
online redo log, and Oracle8i Administrator’s Guide for detailed
information about managing the online redo logs.
2-10 Oracle8i Backup and Recovery Guide

Managing the Online Redo Logs
Displaying Online Redo Log InformationThe following data dictionary views contain useful information about the online
redo logs:
For example, the following query displays which online redo log group requires
archiving:
SELECT group#, sequence#, status, archived FROM v$log;
GROUP# SEQUENCE# STATUS ARC---------- ---------- ---------------- --- 1 43 CURRENT NO 2 42 INACTIVE YES2 rows selected.
Table 2–1 displays status information that can be crucial in a recovery situation:
Views Description
V$LOG Identifies the online redo log groups, the number of membersper group, and which logs have been archived.
V$LOGFILE Displays filenames and status information about the redo loggroup members.
Table 2–1 Status Column of V$LOG
Status Description
UNUSED The online redo log has never been written to.
CURRENT This is the current redo log and that it is active. The redo log canbe open or closed.
ACTIVE The log is active, that is, needed for instance recovery, but is notthe current log.It may be in use for block recovery, and may ormay not be archived.
CLEARING The log is being recreated as an empty log after an ALTERDATABASE CLEAR LOGFILE command. After the log iscleared, the status changes to UNUSED.
CLEARING_CURRENT The current log is being cleared of a closed thread. The log canstay in this status if there is some failure in the switch such as anI/O error writing the new log header.
INACTIVE The log is no longer needed for instance recovery. It may be inuse for media recovery, and may or may not be archived.
Managing Data Structures 2-11
Managing the Online Redo Logs
To display the members for each log group, query the V$LOGFILE view:
SELECT group#, member FROM v$logfile;
GROUP# MEMBER-------- -------------------------------------------------------------------------------- 1 /oracle/dbs/t1_log1.f 2 /oracle/dbs/t1_log2.f2 rows selected.
Multiplexing Online Redo Log FilesOracle provides the capability to multiplex an instance's online redo log files to
safeguard against damage. When multiplexing online redo log files, LGWR
concurrently writes the same information to multiple identical online redo log files,
thereby eliminating a single point of failure. You can also mirror redo logs at the
operating system level, but in so doing you run the risk of operating system or
hardware induced corruption. In most cases, multiplexing of online logs is best.
Oracle recommends multiplexing the online redo log on separate physical disks or
possibly different file systems. If the file systems or disk subsystems support
mirroring, this operation adds another level of redundancy. The online redo log is
the source of your recovery data. Loss of all copies of an online log can mean the
loss of committed transaction data.
See Also: Oracle8i Reference for more information on the data
dictionary views.
WARNING: Oracle strongly recommends that you multiplexyour redo log files or mirror them at the operating system level;the loss of the redo data can be catastrophic if recovery isrequired.
2-12 Oracle8i Backup and Recovery Guide

Managing the Online Redo Logs
Figure 2–2 Multiplexed Online Redo Log Files
The corresponding online redo log files are called groups. Each online redo log file in
a group is called a member. In Figure 2–2, files A_LOG1 and B_LOG1 are both
members of Group 1; A_LOG2 and B_LOG2 are both members of Group 2, and so
forth. Each member in a group must be the exact same size.
Notice that each member of a group is concurrently active, that is, concurrently
written to by LGWR, as indicated by the identical log sequence numbers assigned
by LGWR. In Figure 2–2, first LGWR writes to file A_LOG1 in conjunction with B_LOG1, then A_LOG2 in conjunction with B_LOG2, etc. LGWR never writes
concurrently to members of different groups, for example, to A_LOG1 and B_LOG2.
Responding to Online Redo Log FailureWhenever LGWR cannot write to a member of a group, Oracle marks this member
as stale and writes an error message to the LGWR trace file and to the database's
alert log to indicate the problem with the inaccessible files. LGWR reacts differently
when certain online redo log members are unavailable, depending on the reason for
the unavailability.
Disk BDisk A
1, 3, 5, ...
2, 4, 6, ...
������
Group 1
Group 2
����B_LOG1����
B_LOG2
����A_LOG1����
A_LOG2
LGWR
Group 1
Group 2
Managing Data Structures 2-13

Managing the Archived Redo Logs
Managing the Archived Redo LogsIf you run your database in ARCHIVELOG mode, Oracle allows you to save filled
groups of online redo log files, known as archived redo logs, to one or more offline
destinations. Archiving is the operation of turning online redo logs into archived
redo logs.
Use archived logs to:
■ Recover a database.
If... Then...
LGWR can successfully write to atleast one member in a group
Writing proceeds as normal; LGWR simply writes tothe available members of a group and ignores theunavailable members.
LGWR cannot access the nextgroup at a log switch because thegroup needs to be archived
Database operation temporarily halts until the groupbecomes available, that is, until the group is archived.
All members of the next group areinaccessible to LGWR at a logswitch because of disk failures
Oracle returns an error and the database instanceshuts down. In this case, you may need to performmedia recovery on the database from the loss of anonline redo log file.
All members of the next group areinaccessible and the databasecheckpoint has moved beyond thelost redo log
Media recovery is not necessary because Oracle hassaved the data recorded in the redo log to thedatafiles. Simply drop the inaccessible redo loggroup.
You want to drop an unarchivedredo log when in ARCHIVELOGmode
Issue ALTER DATABASE CLEAR UNARCHIVEDLOG to disable archiving before the log can bedropped.
All members of group becomeinaccessible to LGWR while it iswriting to them
Oracle returns an error and the database instanceimmediately shuts down.
In this case, you may need to perform mediarecovery. If the media containing the log is notactually lost — for example, if the drive for the logwas inadvertently turned off — media recovery maynot be needed. In this case, you only need to turn thedrive back on and let Oracle perform instancerecovery.
See Also: Oracle8i Administrator’s Guide for more information
about configuring multiplexed online redo logs.
2-14 Oracle8i Backup and Recovery Guide

Managing the Archived Redo Logs
■ Update a standby database.
■ Gain information about the history of a database through the LogMiner utility.
An archived redo log file is a copy of one of the identical filled members of an
online redo log group: it includes the redo entries present in the identical members
of a group and also preserves the group's unique log sequence number. For
example, if you are multiplexing the online redo logs, and if Group 1 contains
member files A_LOG1 and B_LOG1, then the ARCn process will archive one of these
identical members. Should A_LOG1 become corrupted, then ARCn can still archive
the identical B_LOG1.
If you enable archiving, LGWR is not allowed to re-use and hence overwrite an
online redo log group until it has been archived. Therefore, the archived redo log
contains a copy of every online redo group created since you enabled archiving. The
best way to back up the contents of the current online log is always to archive it,
then back up the archived log.
By archiving your online redo logs, you save a copy of every change made to the
database since you enabled archiving. If you suffer a media failure, then you can
recover the lost data by using the archived redo logs.
This section contains the following topics:
■ Displaying Archived Redo Log Information
■ Choosing the Database Archiving Mode
■ Setting the Archive Mode
■ Archiving Redo Logs to Multiple Locations
See Also: Oracle8i Administrator’s Guide for complete procedures
for managing archived redo logs as well as for using the LogMiner,
and Oracle8i Standby Database Concepts and Administration to learn
how to manage a standby database.
Managing Data Structures 2-15

Managing the Archived Redo Logs
Displaying Archived Redo Log InformationThe following data dictionary views contain useful information about the archived
redo logs:
For example, the following query displays which online redo log group requires
archiving:
SELECT group#, archived FROM sys.v$log;
GROUP# ARC---------- ---1 YES2 NO
To see the current archiving mode, query the V$DATABASE view:
SELECT log_mode FROM sys.v$database;
LOG_MODE------------NOARCHIVELOG
The SQL*Plus statement ARCHIVE LOG LIST also shows archiving information for
the connected instance:
ARCHIVE LOG LIST;
Database log mode ARCHIVELOGAutomatic archival ENABLEDArchive destination /oracle/logOldest online log sequence 30Next log sequence to archive 31
Views Description
V$DATABASE Identifies whether the database is in ARCHIVELOG orNOARCHIVELOG mode.
V$ARCHIVED_LOG Displays archived log information from the control file.
V$ARCHIVE_DEST Describes the current instance, all archive destinations, and thecurrent value, mode, and status of these destinations.
V$LOG Displays all online redo log groups for the database andindicates which need to be archived.
V$LOG_HISTORY Contains log history information such as which logs have beenarchived and the SCN range for each archived log.
2-16 Oracle8i Backup and Recovery Guide

Managing the Archived Redo Logs
Current log sequence number 33
This display tells you all the necessary information regarding the archived redo log
settings for the current instance:
■ The database is currently operating in ARCHIVELOG mode.
■ Automatic archiving is enabled.
■ The destination of the archived redo log (operating system specific).
■ The oldest filled online redo log group has a sequence number of 30.
■ The next filled online redo log group to be archived has a sequence number of
31.
■ The current online redo log file has a sequence number of 33.
You must archive all redo log groups with a sequence number equal to or greater
than the Next log sequence to archive, yet less than the Current log sequence number. For
example, the display above indicates that the online redo log groups with sequence
numbers 31 and 32 need to be archived.
Choosing the Database Archiving ModeThis section describes the issues you must consider when choosing to run your
database in NOARCHIVELOG or ARCHIVELOG mode, and includes the following
topics:
■ Running a Database in NOARCHIVELOG Mode
■ Running a Database in ARCHIVELOG Mode
Running a Database in NOARCHIVELOG ModeWhen you run your database in NOARCHIVELOG mode, you disable the archiving
of the online redo log. The database's control file indicates that filled groups are not
required to be archived. Therefore, after a filled group becomes inactive after a log
switch, the group is available for reuse by LGWR.
Running your database in NOARCHIVELOG mode has the following
consequences:
See Also: Oracle8i Reference for more information on the data
dictionary views.
Managing Data Structures 2-17
Managing the Archived Redo Logs
■ You can only restore (not recover) the database to the point of the most recent
full database backup. You cannot apply archived logs to the backup because
there are no archived logs to be applied.
■ You can only perform an operating system backup of the database when it is
shut down cleanly.
■ You can only restore a whole database backup and then open the database
when the backup was taken while the database was closed cleanly. The only
time you can restore an inconsistent backup is when the redo logs are
undamaged and contain all redo generated since the backup was made.
■ You cannot perform online tablespace backups. Furthermore, you cannot use
online tablespace backups previously taken while the database operated in
ARCHIVELOG mode.
Running a Database in ARCHIVELOG ModeWhen you run a database in ARCHIVELOG mode, Oracle requires the online redo
log to be archived. You can either perform the archiving manually or enable
automatic archiving.
In ARCHIVELOG mode, the database control file indicates that a group of filled
online redo log files cannot be used by LGWR until the group is archived. A filled
group is immediately available to ARCn after a log switch occurs. After the group
has been successfully archived, Oracle can reuse the group.
Figure 2–3 illustrates the basic principle of archiving. LGWR writes to a log and
then ARCn archives it. Each new write is assigned a new log sequence number, so
the log sequence numbers increment by 1.
See Also: "Backing Up a NOARCHIVELOG Database" on
page 3-4
2-18 Oracle8i Backup and Recovery Guide

Managing the Archived Redo Logs
Figure 2–3 Online Redo Log File Use in ARCHIVELOG Mode
The archiving of filled groups has these advantages:
■ A database backup in conjunction with all (possibly backed up) archived logs
and the current online redo logs guarantees that you can recover all committed
transactions.
■ You can recover the database to a specified time, SCN, or log sequence number.
■ You can take tablespace backups while the database is open.
■ You can recover offline tablespaces while the database is open.
■ You can keep a standby database current with its original database by
continually applying the original's archived redo logs to the standby.
LGWR
ARC0 ARC0 ARC0
LGWR LGWR
0001
0002
0001
0002
0003
TIME
LGWR
ArchivedRedo Log Files
OnlineRedo LogFiles
Log0004
Log0003
Log0002
0001 0002
0001
0003
0002
0001
Log0001
Managing Data Structures 2-19

Managing the Archived Redo Logs
Setting the Archive ModeTo switch a database’s archiving mode between NOARCHIVELOG and
ARCHIVELOG mode, use the SQL statement ALTER DATABASE with the
ARCHIVELOG or NOARCHIVELOG option. The following statement switches the
database’s archiving mode from NOARCHIVELOG to ARCHIVELOG:
ALTER DATABASE ARCHIVELOG;
Before switching the database’s archiving mode, perform the following operations:
1. Shut down the database instance.
2. Back up the database.
3. Restart the instance and mount but do not open the database.
4. Issue ALTER DATABASE ARCHIVELOG or ALTER DATABASE
NOARCHIVELOG to switch the database’s archiving mode.
Enabling Automatic ArchivingTo enable automatic archiving of filled groups, include the initialization parameter
LOG_ARCHIVE_START parameter in the database’s parameter file and set it to
TRUE:
LOG_ARCHIVE_START=TRUE
The new value takes effect the next time you start the database.
To enable automatic archiving of filled online redo log groups without shutting
down the current instance, use the SQL statement ALTER SYSTEM with the
ARCHIVE LOG START parameter:
ALTER SYSTEM ARCHIVE LOG START;
If you use the ALTER SYSTEM method, then you do not need to shut down and
restart the instance to enable automatic archiving.
See Also: Oracle8i Administrator’s Guide to learn how to enable
ARCHIVELOG mode and enable automatic archiving, and Oracle8iStandby Database Concepts and Administration for information about
the managed recovery option for standby databases.
See Also: Oracle8i Administrator’s Guide for complete procedures
for changing the archiving mode and enabling automatic archiving.
2-20 Oracle8i Backup and Recovery Guide
Managing the Archived Redo Logs
Archiving Redo Logs to Multiple LocationsYou can specify a single destination or multiple destinations for the archived redo
logs. Oracle recommends archiving your logs to different disks to guard against file
corruption and media failure.
Specify the number of locations for your archived logs by setting either of two
mutually exclusive sets of initialization parameters:
■ LOG_ARCHIVE_DEST_n (where n is an integer from 1 to 5)
■ LOG_ARCHIVE_DEST in conjunction with the optional initialization
parameter LOG_ARCHIVE_DUPLEX_DEST
The first method is to use the LOG_ARCHIVE_DEST_n parameter to specify from
one to five different destinations for archival. Each numerically-suffixed parameter
uniquely identifies an individual destination, for example, LOG_ARCHIVE_DEST_
1, LOG_ARCHIVE_DEST_2, etc. Use the LOCATION keyword to specify a
pathname or the SERVICE keyword to specify a net service name (for use in
conjunction with a standby database).
The second method, which allows you to specify a maximum of two locations, is to
use the LOG_ARCHIVE_DEST parameter to specify a primary archive destination
and the LOG_ARCHIVE_DUPLEX_DEST to determine an optional secondarylocation. Whenever Oracle archives a redo log, it archives it to every destination
specified by either set of parameters.
To set the archiving destination using LOG_ARCHIVE_DEST_ n:
1. Edit the LOG_ARCHIVE_DEST_n parameter to specify from one to five
archiving locations. For example, enter:
LOG_ARCHIVE_DEST_1 = 'LOCATION=/disk1/arc/'LOG_ARCHIVE_DEST_2 = 'LOCATION=/disk2/arc/'LOG_ARCHIVE_DEST_3 = 'LOCATION=/disk3/arc/'
2. Edit the LOG_ARCHIVE_FORMAT parameter, using %s to include the log
sequence number as part of the filename and %t to include the thread number.
Use capital letters (%S and %T) to pad the filename to the left with zeros. For
example, enter:
LOG_ARCHIVE_FORMAT = arch%t_%s.arc
Note: You can also mirror your archived logs at the operating
system level.
Managing Data Structures 2-21
Managing the Archived Redo Logs
For example, this setting results in the following files for log sequence numbers
100-102 on thread 1:
/disk1/arc/arch1_100.arc, /disk1/arc/arch1_101.arc, /disk1/arc/arch1_102.arc,/disk2/arc/arch1_100.arc, /disk2/arc/arch1_101.arc, /disk2/arc/arch1_102.arc,/disk3/arc/arch1_100.arc, /disk3/arc/arch1_101.arc, /disk3/arc/arch1_102.arc
3. If the database is open, start a SQL*Plus session and shut down the database.
For example, enter:
SHUTDOWN IMMEDIATE
4. Mount or open the database to enable the settings. For example, enter:
STARTUP
To set archiving destinations with LOG_ARCHIVE_DEST and LOG_ARCHIVE_DUPLEX_DEST:
1. Edit the initialization parameter file, specifying destinations for the LOG_
ARCHIVE_DEST and LOG_ARCHIVE_DUPLEX_DEST parameter. If the
database is open, then you can also edit the parameter dynamically using the
ALTER SYSTEM statement.
For example, change the parameter to read:
LOG_ARCHIVE_DEST = '/disk1/arc'LOG_ARCHIVE_DUPLEX_DEST_2 = '/disk2/arc'
2. Edit the LOG_ARCHIVE_FORMAT parameter, using %s to include the log
sequence number as part of the filename and %t to include the thread number.
Use capital letters (%S and %T) to pad the filename to the left with zeroes. If the
database is open, you can alter the parameter using the ALTER SYSTEM
statement.
For example, enter:
LOG_ARCHIVE_FORMAT = arch_%t_%s.arc
For example, this setting will result in the following files for log sequence
numbers 300-302 on thread 1:
/disk1/arc/arch_1_300.arc, /disk1/arc/arch_1_301.arc, /disk1/arc/arch_1_302.arc,/disk2/arc/arch_1_300.arc, /disk2/arc/arch_1_301.arc, /disk2/arc/arch_1_302.arc
3. If the database is open, start a SQL*Plus session and shut down the database.
For example, enter:
SHUTDOWN IMMEDIATE
2-22 Oracle8i Backup and Recovery Guide

Managing the Archived Redo Logs
4. Mount or open the database to enable the settings in the initialization
parameter file. For example, enter:
STARTUP
Oracle provides you with a number of useful archiving options. See the Oracle8iAdministrator’s Guide for a complete account of how to:
■ Obtain status information for each archive destination. For example, you can
determine whether there was a problem archiving to a specific destination.
■ Specify archiving to a local disk or to either a local or remote standby database
site.
■ Specify the minimum number of destinations to which Oracle must successfully
archive.
■ Specify when and how often ARCn attempts to re-archive to a failed
destination.
■ Specify up to ten ARCn processes for each database instance to parallelize
archiving operations.
■ Use the LogMiner utility to analyze the contents of online and archived redo
logs.
Managing Data Structures 2-23

Managing the Archived Redo Logs
2-24 Oracle8i Backup and Recovery Guide

Developing a Backup and Recovery Str
3
Developing a Backup and RecoveryStrategy
This chapter offers guidelines and considerations for developing an effective
backup and recovery strategy. It includes the following topics:
■ Developing a Backup Strategy
■ Developing a Recovery Strategy
ategy 3-1

Developing a Backup Strategy
Developing a Backup StrategyBefore you create an Oracle database, decide how to protect the database against
potential media failures. If you do not develop a backup strategy before creating
your database, you may not be able to perform recovery if a disk failure damages
the datafiles, online redo log files, or control files.
This section describes general guidelines that can help you decide when to perform
database backups and which parts of a database you should back up. Of course, the
specifics of your strategy depend on the constraints under which you are operating.
No matter which backup strategy you implement, however, follow these guidelines
whenever possible:
■ Obeying the Golden Rule of Backup and Recovery
■ Choosing the Database Archiving Mode
■ Multiplexing Control Files, Online Redo Logs, and Archived Redo Logs
■ Performing Backups Frequently and Regularly
■ Performing Backups When You Make Structural Changes
■ Backing Up Often-Used Tablespaces
■ Performing Backups After Unrecoverable/Unlogged Operations
■ Performing Whole Database Backups After Opening with the RESETLOGS
Option
■ Archiving Older Backups
■ Knowing the Constraints for Distributed Database Backups
■ Exporting Data for Added Protection and Flexibility
■ Avoiding the Backup of Online Redo Logs
Obeying the Golden Rule of Backup and RecoveryThe set of files needed to recover from the failure of any Oracle database file—a
datafile, control file, or online redo log—is called the redundancy set. The
redundancy set contains:
■ The last backup of all the database files
■ All archived redo logs generated after the last backup was taken
3-2 Oracle8i Backup and Recovery Guide
Developing a Backup Strategy
■ A duplicate of the online redo log files generated by Oracle multiplexing,
operating system mirroring, or both
■ A duplicate of the current control file generated by Oracle multiplexing,
operating system mirroring, or both
■ Configuration files such as initialization parameter file, tnsnames.ora , and
listener.ora
The golden rule of backup and recovery is: the set of disks or other media that containthe redundancy set should be separate from the disks that contain the datafiles, online redologs, and control files. This strategy ensures that the failure of a disk that contains a
datafile does not also cause the loss of the backups or redo logs needed to recover
the datafile. Consequently, a minimal production-level database requires at least
two disk drives: one to hold the files in the redundancy set and one to hold the
main database files.
Always keep the redundancy set separated from the primary files in every way
possible: on separate volumes, separate file systems, and separate RAID devices.
These systems are very reliable, but they can and do fail. Keeping the redundancy
set separate ensures that you can recover from a failure without losing committed
transactions.
You can implement a system that follows the golden rule in several different ways.
Oracle recommends following these guidelines:
■ Multiplex the online redo log files and current control file at the Oracle level,
not only at the operating system or hardware level. Multiplexing at the Oracle
level has the advantage that an I/O failure or lost write should only corrupt one
of the copies.
■ Use operating system or hardware mirroring for at least the control file, because
Oracle does not provide complete support for control file multiplexing: if one
multiplexed copy of the control file fails, then Oracle shuts down.
■ Use operating system or hardware mirroring for the primary datafiles if
possible to avoid having to apply media recovery for simple disk failures.
■ Keep at least one copy of the entire redundancy set—including the most recent
backup—on hard disk. With disk prices steadily dropping, this strategy is
economical for many installations.
If the redundancy copy is generated by splitting a mirror, then it is not as good
as a backup generated through operating system or RMAN commands because
it relies on the mirroring subsystem for both the primary files and redundancy
Developing a Backup and Recovery Strategy 3-3

Developing a Backup Strategy
set copy. The last real file backup, such as the last backup to tape, is the
redundancy set copy. Therefore, keep archived redo logs starting with this copy.
■ If your database is stored on a RAID device, then place the redundancy set on a
set of devices that is not in the same RAID device.
Choosing the Database Archiving ModeBefore you create an Oracle database, decide how you plan to protect it against
potential failures. Answer the following questions:
■ Is it acceptable to lose any data if a disk failure damages some of the files thatconstitute a database? If not, run the database in ARCHIVELOG mode, ideally
with a multiplexed online redo log, a multiplexed control file, and multiplexed
archive redo logs. If you can afford to lose a limited amount of data, you can
operate in NOARCHIVELOG mode and avoid the extra maintenance chores.
■ Will you need to recover to a non-current time? If you need to perform
incomplete recovery to correct an erroneous change to the database, run in
ARCHIVELOG mode and perform control file backups whenever making
structural changes. Incomplete recovery is helped by having a backup control
file reflecting the database structure at the desired time.
■ Does the database need to be available at all times? If so, do not operate the
database in NOARCHIVELOG mode because the required whole database
backups, taken while the database is shutdown, cannot be made frequently, if at
all. Therefore, high-availability databases always operate in ARCHIVELOG
mode to take advantage of open datafile backups.
Once you have answered these questions and have determined which mode to use,
follow the guidelines for either:
■ Backing Up a NOARCHIVELOG Database
■ Backing Up an ARCHIVELOG Database
Backing Up a NOARCHIVELOG DatabaseIf you operate your database in NOARCHIVELOG mode, Oracle does not archive
filled groups of online redo log files. Therefore, the only protection against a disk
failure is the most recent whole backup of the database. Follow these guidelines:
■ Plan to make whole database backups regularly, according to the amount of
work that you can afford to lose. For example, if you can afford to lose the
amount of work accomplished in one week, make a consistent whole database
backup once per week. If you can afford to lose only a day's work, make a
3-4 Oracle8i Backup and Recovery Guide

Developing a Backup Strategy
consistent whole database backup every day. For large databases with a high
amount of activity, you usually cannot afford to lose work. In this case, you
should operate the database in ARCHIVELOG mode.
■ Whenever you alter the physical structure of a database operating in
NOARCHIVELOG mode, immediately take a consistent whole database
backup. A whole database backup fully reflects the new structure of the
database.
Backing Up an ARCHIVELOG DatabaseIf you run your database in ARCHIVELOG mode, ARCn archives groups of online
redo log files. Therefore, the archived redo log coupled with the online redo log and
datafile backups can protect the database from a disk failure, providing for
complete recovery from a disk failure to the instant that the failure occurred (or, to
the desired non-current time). Following are common backup strategies for a
database operating in ARCHIVELOG mode:
■ Perform a whole database backup of the entire database after you create it. This
initial whole database backup is the foundation of your backups because it
provides backups of all datafiles and the control file of the associated database.
■ Make open database or tablespace backups to keep your database backups
up-to-date. Subsequent whole database backups are not required, and if a
database must remain open at all times, whole database backups while the
database is closed are not feasible.
■ Make open or closed datafile backups to update backed up information for the
database. Doing so supplements the initial whole database backup. In
particular, back up the datafiles of extensively used tablespaces frequently to
reduce database recovery time. If a more recent datafile backup restores a
damaged datafile, you need to apply less redo data (or incremental backups) to
the restored datafile to roll it forward to the time of the failure.
Whether you should take open or closed datafile backups depends on the
availability requirements of the data. Open datafile backups are the only choice
if the data being backed up must always be available.
Note: When you perform this initial whole database backup,
make sure that the database is in ARCHIVELOG mode first.
Otherwise, the backup control files will contain the
NOARCHIVELOG mode setting.
Developing a Backup and Recovery Strategy 3-5

Developing a Backup Strategy
You can also use a datafile copy taken while the database is open and the
tablespace is online to restore datafiles. You must apply the appropriate redo
log files to these restored datafiles to make the data consistent and bring it
forward to the specified point in time.
■ Make a control file backup every time you make a structural change to the
database. If you are operating in ARCHIVELOG mode and the database is
open, use either RMAN or the ALTER DATABASE statement with the BACKUP
CONTROLFILE option.
Multiplexing Control Files, Online Redo Logs, and Archived Redo LogsThe control file, online redo log, and archived redo log are crucial files for backup
and recovery operations. The loss of any of these files can cause you to lose data
irrevocably. You should maintain:
■ At least two copies of the control file on different disks mounted under different
disk controllers. You can either use Oracle to multiplex the copies or your
operating system to mirror them.
■ Two or more copies of your online redo log on different disks. The online redo
data is crucial for instance, crash, and media recovery.
■ Two or more copies of your archived redo log on different disks and, if possible,
different media.
Performing Backups Frequently and RegularlyFrequent backups are essential for any recovery scheme. Base the frequency of
backups on the rate or frequency of database changes such as:
■ Addition and deletion of tables.
■ Insertions and deletions of rows in existing tables.
■ Updates to data within tables.
If users generate a significant amount of DML, database backup frequency should
be proportionally high. Alternatively, if a database is mainly read-only, and updates
are issued only infrequently, you can back up the database less frequently.
See Also: Chapter 2, "Managing Data Structures" to learn how to
integrate data structure management into your backup and
recovery strategy, and Oracle8i Concepts for a thorough conceptual
overview of all Oracle data structures.
3-6 Oracle8i Backup and Recovery Guide
Developing a Backup Strategy
Use either Recovery Manager or operating system methods to create backup scripts.
RMAN scripts, which are stored in the recovery catalog, are an especially efficient
method for performing routine, repetitive backup operations.
Performing Backups When You Make Structural ChangesAdministrators as well as users make changes to a database. If you make any of the
following structural changes, then perform a backup of the appropriate portion of
your database immediately before and after completing the alteration:
■ Create or drop a tablespace.
■ Add or rename a datafile in an existing tablespace.
■ Add, rename, or drop an online redo log group or member.
The part of the database that you should back up depends on your archiving mode:
Backing Up Often-Used TablespacesMany administrators find that regular whole database backups are not in
themselves sufficient for a robust backup strategy. If you run in ARCHIVELOG
mode, then you can back up the datafiles of an individual tablespace or even a
single datafile. This option is useful if a portion of a database is used more
extensively than others, for example, the SYSTEM tablespace and tablespaces that
contain rollback segments.
By making more frequent backups of the extensively used datafiles of a database,
you avoid a long recovery time. For example, you may make a whole database
backup once a week on Sunday. If your database experiences heavy traffic during
the week, a media failure on Friday can force you to apply a tremendous amount of
redo data during recovery. If you had backed up your most frequently accessed
See Also: Oracle8i Recovery Manager User’s Guide and Reference to
learn how to create, delete, replace, and print stored scripts.
Mode Action
ARCHIVELOG Make a control file backup (using the ALTER DATABASEstatement with the BACKUP CONTROLFILE option) beforeand after a structural alteration. Of course, you can back upother parts of the database as well.
NOARCHIVELOG Make a consistent whole database backup immediately beforeand after the modification.
Developing a Backup and Recovery Strategy 3-7

Developing a Backup Strategy
tablespaces three times a week, you can apply a smaller number of changes to roll
the restored file forward to the time of the failure.
Performing Backups After Unrecoverable/Unlogged OperationsIf users are creating tables or indexes using the UNRECOVERABLE option, make
backups after the objects are created. When tables and indexes are created as
UNRECOVERABLE, Oracle does not log redo data, which means that you cannot
recover these objects from existing backups.
Performing Whole Database Backups After Opening with the RESETLOGS OptionAfter you have opened a database with the RESETLOGS option, Oracle
recommends that you immediately perform a whole database backup. If you do
not, and a disaster occurs, then you lose all changes made after opening the
database.
Archiving Older BackupsYou should store older backups for two basic reasons:
■ An older backup is necessary for perform incomplete recovery to a time before
your most recent backup.
■ Your most recent backup is corrupted.
If you want to recover to a non-current time, then you need a database backup that
completed before the desired time. For example, if you make backups on the 1st and
14th of February, then decide at the end of the month to recover your database to
February 7th, you must use the February 1st backup.
Note: If using RMAN, then you can make an incremental backup.
See Also: Oracle8i SQL Reference for information about the
UNRECOVERABLE option of the CREATE TABLE ... AS SELECT
and CREATE INDEX statements.
See Also: "What Is a RESETLOGS Operation?" on page 5-32 for
more information about RESETLOGS operations, and "Recovering
a Pre-RESETLOGS Backup" on page 5-36 to learn the special
circumstances that allow you to recover a pre-RESETLOGS backup.
3-8 Oracle8i Backup and Recovery Guide

Developing a Backup Strategy
For a database operating in NOARCHIVELOG mode, the backup that you use
should be a consistent whole database backup. Of course, you cannot perform
media recovery using this backup. For a database operating in ARCHIVELOG
mode, your whole database backup:
■ Does not need not be consistent because redo is available to recover it.
■ Should have completed before the intended recovery time (the control file
should reflect the database's structure at the point-in-time of recovery).
■ Should have all archived logs necessary to recover the datafiles to the required
point-in-time.
For added protection, keep two or more database backups (with associated
archived redo logs) previous to the current backup. Thus, if your most recent
backups are not usable, you will not lose all of your data.
Knowing the Constraints for Distributed Database BackupsIf your database is a node in a distributed database, all databases in the distributed
database system should operate in the same archiving mode. Note the following
consequences and constraints:
WARNING: After you open the database with the RESETLOGSoption, you cannot use existing backups for subsequent recoverybeyond the time when the logs were reset. You should thereforeshut down the database and make a consistent whole databasebackup. Doing so will enable recovery of database changes afterusing the RESETLOGS option.
Mode Constraint Consequence
ARCHIVELOG Closed cleanly. Backups at each node can be performedautonomously, that is, individually and withouttime coordination.
NOARCHIVELOG Closed cleanly. Consistent whole database backups must beperformed at the same global time to plan forglobal distributed database recovery. For example,if a database in New York is backed up atmidnight EST, the database in San Franciscoshould be backed up at 9 PM PST.
Developing a Backup and Recovery Strategy 3-9

Developing a Backup Strategy
Exporting Data for Added Protection and FlexibilityBecause the Oracle Export utility can selectively export specific objects, consider
exporting portions or all of a database for supplemental protection and flexibility in
a database's backup strategy. This strategy is especially useful for recovery catalog
backups when using RMAN.
Note that Database exports are not a substitute for whole database backups and
cannot provide the same complete recovery advantages that the built-in
functionality of Oracle offers.
Avoiding the Backup of Online Redo LogsAlthough it may seem that you should back up online redo logs along with the
datafiles and control file, this technique is dangerous. You should not back up
online redo logs for the following reasons:
■ The best method for protecting the online logs against media failure is by
multiplexing them, that is, having multiple log members per group, on different
disks and disk controllers.
■ If your database is in ARCHIVELOG mode, then ARCn is already archiving the
redo logs.
■ If your database is in NOARCHIVELOG mode, then the only type of backups
that you should perform are closed, consistent, whole database backups. The
files in this type of backup are all consistent and do not need recovery, so the
online logs are not needed.
The danger in backing up online redo logs is that you may accidentally restore them
while not intending to. A number of situations are possible in which restoring the
online logs cause significant problems to the database. Following are two scenarios
that illustrate how restoring backed up online logs severely compromises recovery.
Scenario 1: Unintentionally Restoring Online Redo Logs When a crisis occurs, it is easy to
make a simple mistake. DBAs and system administrators frequently encounter
See Also: "Opening the Database After Media Recovery" on
page 5-31 to learn about performing media recovery in distributed
systems, and Oracle8i Distributed Database Systems for concepts and
administration relating to distributed systems.
See Also: Oracle8i Utilities for a complete account of the Export
utility.
3-10 Oracle8i Backup and Recovery Guide

Developing a Recovery Strategy
dangers during a database restore. When restoring the whole database, you can
accidentally restore the online redo logs, thus overwriting the current logs with the
older, useless backups. This action forces you to perform an incomplete recovery
instead of the intended complete recovery, thereby losing the ability to recover
valuable transactions contained in the overwritten redo logs.
Scenario 2: Erroneously Creating Multiple Parallel Redo Log Timelines You can
unintentionally create multiple parallel redo log timelines for a single instance
database. You can avoid this mistake, however, by making it so that the online logs
cannot be restored. You must open the database with the RESETLOGS option,
which effectively creates the new redo logs, and also a new database incarnation.
If you face a problem where the best course of action is to restore the database from
a consistent backup and not perform any recovery, then you may think it is safe to
restore the online logs and thereby avoid opening the database with the
RESETLOGS option. The problem is that the database eventually generates a log
sequence number that was already generated by the database during the previous
timeline.
If you then face another disaster and need to restore from this backup and roll
forward, you will find it difficult to identify which log sequence number is the
correct one. If you had reset the logs, then you would have created a new
incarnation of the database. You could only apply archived redo logs created by this
new incarnation to this incarnation.
For example, say that the most recent archived log for database PROD has a log
sequence number of 100. Assume that you restore a backup of the database along
with backed up online redo logs and then do not open with the RESETLOGS option.
Assume also that the restored online log is at log sequence 50. Eventually, the
database archives a log with the log sequence number of 100—so you now have two
copies of log 100 with completely different contents. If you are forced to recover this
database, then you may inadvertently restore the wrong series of archived logs,
thereby corrupting the database.
Developing a Recovery StrategyOracle provides a variety of procedures and tools to assist you with recovery. To
develop an effective recovery strategy, do the following:
Note: Recovery Manager and EBU do not back up online redo
logs.
Developing a Backup and Recovery Strategy 3-11

Developing a Recovery Strategy
■ Testing Backup and Recovery Strategies
■ Planning Your Response to Non-Media Failures
■ Planning Your Response to Media Failures
Testing Backup and Recovery StrategiesPractice backup and recovery techniques in a test environment before and after you
move to a production system. In this way, you can measure the thoroughness of
your strategies and minimize problems before they occur in a real situation.
Performing test recoveries regularly ensures that your archiving, backup, and
recovery procedures work. It also helps you stay familiar with recovery procedures,
so that you are less likely to make a mistake in a crisis.
If you use Recovery Manager, use the duplicate command to create a test database
using backups of your production database. To learn how to duplicate a database,
see Oracle8i Recovery Manager User’s Guide and Reference.
Planning Your Response to Non-Media FailuresAlthough media recovery is your primary concern when developing your recovery
strategy, you should understand the basic types of non-media failures as well as the
causes and solutions for each:
■ Statement Failure
■ User Process Failure
■ User Error
■ Instance Failure
Statement FailureA statement failure is a logical failure in the handling of a statement in an Oracle
program. The Oracle database server or the operating system usually returns an
error code and a message when a statement failure occurs. Table 3–1 shows typical
causes and resolutions for statement failures.
Table 3–1 Typical Causes and Resolutions for Statement Failures
Problem Solution
A logical error occurred in anapplication.
Fix the program that generated the error so that itslogic flows correctly. You may need to enlist theaid of developers to solve this type of problem.
3-12 Oracle8i Backup and Recovery Guide

Developing a Recovery Strategy
User Process FailureA user process failure is any failure in a user program accessing an Oracle database.
User processes can fail for a wide variety of reasons. Some typical scenarios include:
■ A user performed an abnormal disconnection in the session.
■ The user's session was abnormally terminated. For example, the user rebooted
the client while connected to a database in a client-server configuration.
■ The user's program raised an address exception that terminated the session.
In most cases, you do not need to act to resolve user process failures: the user
process simply fails to function but does not affect Oracle and other user process.
The PMON background process is usually sufficient for cleaning up after an
abnormally terminated user process.
User ErrorUsers errors are any mistakes that users make in adding data to or deleting data
from the database. Typical causes of user error are:
■ A user accidentally drops or truncates a table.
■ A user deletes all rows in a table.
■ A user commits data, but discovers an error after the data is committed.
A user attempted to enter illegal datainto a table.
Modify the illegal SQL statement and reissue it.
A user attempted an operation withinsufficient privileges, for example,attempting to insert data into a tablewhen the user has only SELECTprivileges.
Provide the necessary database privileges for theuser to complete the statement successfully.
A user attempted to create a table butexceed the allotted quota limit.
Issue an ALTER USER statement to change thequota limit.
A user attempted a table INSERT orUPDATE, causing an extent to beallocated without sufficient free spacein the tablespace.
Add space to the tablespace. You can also use theRESIZE and AUTOEXTEND options for datafiles.
Table 3–1 Typical Causes and Resolutions for Statement Failures
Problem Solution
Developing a Backup and Recovery Strategy 3-13
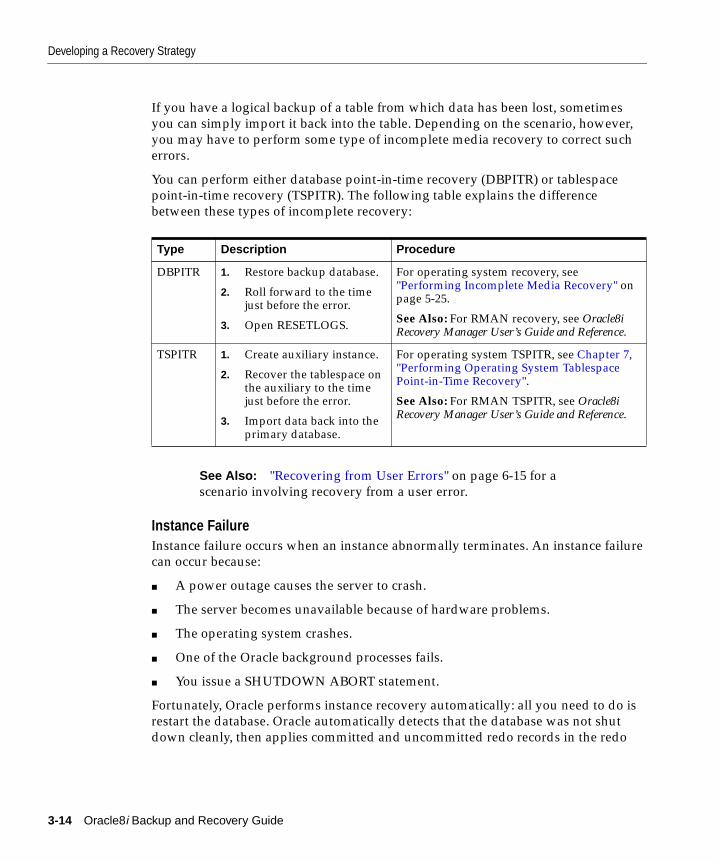
Developing a Recovery Strategy
If you have a logical backup of a table from which data has been lost, sometimes
you can simply import it back into the table. Depending on the scenario, however,
you may have to perform some type of incomplete media recovery to correct such
errors.
You can perform either database point-in-time recovery (DBPITR) or tablespace
point-in-time recovery (TSPITR). The following table explains the difference
between these types of incomplete recovery:
Instance FailureInstance failure occurs when an instance abnormally terminates. An instance failure
can occur because:
■ A power outage causes the server to crash.
■ The server becomes unavailable because of hardware problems.
■ The operating system crashes.
■ One of the Oracle background processes fails.
■ You issue a SHUTDOWN ABORT statement.
Fortunately, Oracle performs instance recovery automatically: all you need to do is
restart the database. Oracle automatically detects that the database was not shut
down cleanly, then applies committed and uncommitted redo records in the redo
Type Description Procedure
DBPITR 1. Restore backup database.
2. Roll forward to the timejust before the error.
3. Open RESETLOGS.
For operating system recovery, see"Performing Incomplete Media Recovery" onpage 5-25.
See Also: For RMAN recovery, see Oracle8iRecovery Manager User’s Guide and Reference.
TSPITR 1. Create auxiliary instance.
2. Recover the tablespace onthe auxiliary to the timejust before the error.
3. Import data back into theprimary database.
For operating system TSPITR, see Chapter 7,"Performing Operating System TablespacePoint-in-Time Recovery".
See Also: For RMAN TSPITR, see Oracle8iRecovery Manager User’s Guide and Reference.
See Also: "Recovering from User Errors" on page 6-15 for a
scenario involving recovery from a user error.
3-14 Oracle8i Backup and Recovery Guide

Developing a Recovery Strategy
log to the datafiles and rolls back uncommitted data. Finally, Oracle synchronizes
the datafiles and control file and opens the database.
Planning Your Response to Media FailuresMedia failure is the biggest threat to your data. A media failure is a physical
problem that occurs when a computer unsuccessfully attempts to read from or write
to a file necessary to operate the database. Common types of media problems
include:
■ A disk drive that holds one of the database files experiences a head crash.
■ A datafile, online or archived redo log, or control file is accidentally deleted,
overwritten, or corrupted.
The technique you use to recover from media failure depends heavily on the type of
media failure that occurred. For example, the strategy you use to recover from a
corrupted datafile is different from the strategy for recovering from the loss of your
control file.
The basic steps for media recovery are:
■ Determine which files to recover.
■ Determine the type of media recovery required: complete or incomplete, open
database or closed database.
■ Restore backups or copies of necessary files: datafiles, control files, and the
archived redo logs necessary to recover the datafiles.
■ Apply redo records (and/or incremental backups when using Recovery
Manager) to recover the datafiles.
■ Reopen the database. If you perform incomplete recovery, then you must open
the database in RESETLOGS mode.
Note: If you do not have a backup, then you can still perform
recovery if you have the necessary redo log files and the control file
contains the name of the damaged file. If you cannot restore a file to
its original location, then you must relocate the restored file and
inform the control file of the new location.
Developing a Backup and Recovery Strategy 3-15

Developing a Recovery Strategy
Determine Which Files to RecoverThe first step is to determine what to recover. Some types of failure are obvious: for
example, the hardware crashes and you need to recover the entire database. In other
cases, a single datafile becomes corrupted. Often you can use the table
V$RECOVER_FILE to determine what requires recovery.
Choose a Type of RecoveryWhen you perform media recovery, you choose either complete recovery or
incomplete recovery. Following is a list of media recovery operations:
■ Complete media recovery
Complete media recovery includes the application of all necessary redo or
incremental backups ever generated for the particular incarnation of the
database being recovered. Complete media recovery can be performed on
offline datafiles while the database is open. Types of complete media recovery
are:
■ Closed database recovery
■ Open-database, offline-tablespace recovery
■ Open-database, offline-tablespace, individual datafile recovery
■ Incomplete Media Recovery
Incomplete media recovery, also called point-in-time recovery (PITR), produces
a version of the database as it was at some time in the past. Incomplete media
recovery must either continue on to become complete media recovery, or be
terminated by a RESETLOGS operation that creates a new incarnation of the
database. The database must be closed for incomplete media recovery
operations. You can perform:
■ time-based recovery, which recovers the data up to a specified point in time.
■ cancel-based recovery, which recovers until you issue the CANCEL statement.
■ change-based recovery, which recovers up to a specified SCN.
■ log sequence recovery, which recovers up to a specified log sequence number.
See Also: Oracle8i Recovery Manager User’s Guide and Reference to
learn how to perform media recovery using RMAN, and Chapter 5,
"Performing Media Recovery" to learn how to perform media
recovery using operating system methods.
3-16 Oracle8i Backup and Recovery Guide

Developing a Recovery Strategy
One important and special type media recovery is tablespace point-in-time recovery(TSPITR). TSPITR enables you to recover one or more tablespaces to a point-in-time
that is different from the rest of the database.
The type of recovery method you use depends on the situation. Table 3–2 displays
typical scenarios and strategies.
Table 3–2 Typical Media Failures and Recovery Strategies
Lost Files Archiving Mode Status Strategy
One or more datafiles NOARCHIVELOG Closed Restore whole database from a consistent databasebackup. The control file and all datafiles arerestored from a consistent backup and thedatabase is opened. All changes made after thebackup are lost.
Note: The only time you can recover a database inNOARCHIVELOG is when you have not alreadyoverwritten the online log files that were currentat the time of the most recent backup.
One or more datafiles andan online redo log
NOARCHIVELOG Closed Restore whole database from consistent backup.You will lose all changes made since the lastbackup.
One or more datafiles andall control files
NOARCHIVELOG Closed Restore whole database and control file fromconsistent backup. You will lose all changes madesince the last backup.
One or more datafiles ARCHIVELOG Open Perform tablespace or datafile recovery while thedatabase is open. The tablespaces or datafiles aretaken offline, restored from backups, recovered,and placed online. No changes are lost and thedatabase remains available during the recovery.
One or more datafiles andan online redo logrequired for recovery
ARCHIVELOG Closed Perform incomplete recovery of the database up tothe point of the lost online redo log.
Developing a Backup and Recovery Strategy 3-17

Developing a Recovery Strategy
Restore Backups of Datafiles and Necessary Archived Redo LogsThe method you use to restore backups depends on whether you use RMAN or
operating system methods to back up your data. If you use operating system
methods, then you need to identify which files need to be restored and manually
copy the backups to their necessary location. If you use RMAN, then issue a restorecommand and let RMAN take over the transfer of data.
If the database is shut down and you restore one of the datafiles with a backup,
either because of a media failure or because for some reason you want to recover
the database to a non-current time, Oracle detects an inconsistency between the
checkpoint SCN in the datafile headers and the datafile header checkpoint SCNs
recorded in the control file at database open time. Oracle then selects the lowest
checkpoint SCN recorded in the control file and datafile headers and asks you to
begin media recovery starting from a specified log sequence number. You cannot
open the database if any of the online datafiles needs media recovery.
There is only one case in which Oracle will tell you that you need to perform media
recovery when you do not. If a tablespace is in hot backup mode because you
issued the ALTER TABLESPACE ... BEGIN BACKUP statement and the system
crashes, then on the next startup Oracle will issue a message stating that media
recovery is required. Media recovery is not really required here, however, since you
did not restore a backup; in this case, avoid media recovery by issuing the ALTER
DATAFILE ... END BACKUP statement. Note that RMAN backups do not have this
problem.
One or more datafiles andan archived redo logrequired for recovery
ARCHIVELOG Open Perform TSPITR on the tablespaces containing thelost datafiles up to the point of the latest availableredo log.
One or more datafilesand/or all control files
ARCHIVELOG Notopen
Restore the lost files from backups and recover thedatafiles. No changes are lost, but the database isunavailable during recovery.
One or more datafilesand/or all control files, aswell as an archived oronline redo log requiredfor recovery
ARCHIVELOG Notopen
Perform incomplete recovery of the database. Youwill lose all changes contained in the lost log andin all subsequent logs.
Table 3–2 Typical Media Failures and Recovery Strategies
Lost Files Archiving Mode Status Strategy
3-18 Oracle8i Backup and Recovery Guide

Developing a Recovery Strategy
Begin Media RecoveryYou have a choice between two basic methods for recovering physical files. You can:
■ Use RMAN to automate recovery.
■ Execute SQL or SQL*Plus statements.
Obviously, the recovery method you choose is contingent on which backup method
you use. For example, if you backed up your files using:
■ The RMAN backup command, then you must use the RMAN restore and
recover commands for recovery, since these backups are in an RMAN-specific
format.
■ The RMAN copy command, then you can use either RMAN or operating
system methods for recovery.
■ Operating system commands, then you must use your operating system utility
for restoring files and the RECOVER (SQL*Plus) or ALTER DATABASE
RECOVER (SQL) statements for recovering them.
Recovering with RMAN RMAN is a powerful tool that can aid in backup and recovery
operations. Using RMAN for recovery allows you to:
■ Restore and recover both file copies and RMAN-specific backup sets.
■ Minimize administration errors by using the recovery catalog.
■ Use RMAN's incremental backup feature to minimize recovery time.
■ Generate comprehensive reports on previous backups, datafile copies,
unrecoverable files, etc.
■ Use scripts stored in the file system or recovery catalog to automate jobs.
■ Cooperate with a media manager to restore backups from tape.
See Also: Oracle8i Recovery Manager User’s Guide and Reference to
learn how to restore backups using RMAN, "Restoring Files" on
page 5-4 to learn how to restore datafiles using operating system
methods.
Note: The only exception is for operating system backups that are
image copies on disk. If you register these image copies as datafile
copies with RMAN, then RMAN can restore them.
Developing a Backup and Recovery Strategy 3-19
Developing a Recovery Strategy
Recovering with the SQL*Plus RECOVER Statement If you do not use RMAN, then you
can use operating system methods to restore your backups and SQL*Plus
statements to perform media recovery. You can use SQL*Plus statements to:
■ Recover both operating system copies and files generated with the RMAN copycommand.
■ Maintain manual control over media recovery.
You can use three basic SQL*Plus statements for recovery:
■ RECOVER DATABASE
■ RECOVER TABLESPACE
■ RECOVER DATAFILE
Note that each of these is also a sub-clause of an ALTER DATABASE statement.
Oracle recommends using the SQL*Plus RECOVER statement rather than the
ALTER DATABASE statement with the RECOVER clause. For more information
about the SQL*Plus RECOVER statement, see SQL*Plus User’s Guide and Reference.
Each statement uses the same criteria to determine whether files are recoverable. If
Oracle cannot get the lock for a file it is attempting to recover, it signals an error.
This signal prevents two recovery sessions from recovering the same file and
prevents media recovery of a file that is in use.
See Also: Oracle8i Recovery Manager User’s Guide and Reference to
learn how to perform RMAN recovery.
See Also: "Using Media Recovery Statements" on page 5-7 to
learn about the differences between the SQL ALTER DATABASE
RECOVER and SQL*Plus RECOVER statements.
3-20 Oracle8i Backup and Recovery Guide
Part II
Performing Operating System Backup andRecovery


Performing Operating System Back
4
Performing Operating System BackupsIf you do not use Recovery Manager, then you can make backups of your database
using operating system utilities and recover datafiles using SQL*Plus. This chapter
explains how to use operating system methods to back up an Oracle database, and
includes the following topics:
■ Listing Database Files Before Performing a Backup
■ Performing Operating System Backups
■ Verifying Backups
■ Responding to a Failed Online Tablespace Backup
■ Using Export and Import for Supplemental Protection
ups 4-1

Listing Database Files Before Performing a Backup
Listing Database Files Before Performing a BackupBefore taking a backup, identify all the files in your database. Then, ascertain what
you need to back up.
To list datafiles, online redo logs, and control files:
1. Start SQL*Plus and query V$DATAFILE to obtain a list of datafiles:
SELECT name FROM v$datafile;
NAME--------------------------------------------------------------------------------/oracle/dbs/tbs_01.f/oracle/dbs/tbs_02.f/oracle/dbs/tbs_03.f/oracle/dbs/tbs_11.f/oracle/dbs/tbs_12.f/oracle/dbs/tbs_21.f/oracle/dbs/tbs_22.f/oracle/dbs/tbs_23.f/oracle/dbs/tbs_24.f9 rows selected.
You can also join the V$TABLESPACE and V$DATAFILE views to obtain a
listing of datafiles along with their associated tablespaces:
SELECT t.name "Tablespace", f.name "Datafile" FROM v$tablespace t, v$datafile f WHERE t.ts# = f.ts# ORDER BY t.name;
Tablespace Datafile--------------------------- --------------------------SYSTEM /oracle/dbs/tbs_01.fSYSTEM /oracle/dbs/tbs_02.fSYSTEM /oracle/dbs/tbs_03.fTBS_1 /oracle/dbs/tbs_11.fTBS_1 /oracle/dbs/tbs_12.fTBS_2 /oracle/dbs/tbs_21.fTBS_2 /oracle/dbs/tbs_22.fTBS_2 /oracle/dbs/tbs_23.fTBS_2 /oracle/dbs/tbs_24.f
2. Obtain the filenames of online redo log files by using the V$LOGFILE view. For
example, issue this query:
SELECT member FROM v$logfile;MEMBER
4-2 Oracle8i Backup and Recovery Guide

Performing Operating System Backups
--------------------------------------------------------------------------------/oracle/dbs/t1_log1.f/oracle/dbs/t1_log2.f2 rows selected.
3. Obtain the filenames of the current control files using the CONTROL_FILES
parameter. For example, issue this query:
SELECT value FROM v$parameter WHERE name = 'control_files ';
VALUE--------------------------------------------------------------------------------/oracle/dbs/cf1.f, /oracle/dbs/cf2.f
4. If you plan to take a control file backup using the ALTER DATABASE statement
with the BACKUP CONTROLFILE TO 'filename' option, save a list of all
datafiles and online redo log files with the control file backup.
Performing Operating System BackupsWhile Recovery Manager is the recommended tool for backing up an Oracle
database, you can also make backups using operating system utilities. The utility
you choose is dependent on your operating system.
This section describes the various aspects of making operating system backups, and
includes the following topics:
■ Performing Whole Database Backups
■ Performing Tablespace and Datafile Backups
■ Performing Control File Backups
Performing Whole Database BackupsTake a whole database backup of all files that constitute a database after the
database is shut down to system-wide use in normal priority. A whole databasebackup taken while the database is open or after an instance crash or SHUTDOWN ABORTis inconsistent. In such cases, the files are inconsistent with respect to the checkpoint
SCN.
You can take a whole database backup if a database is operating in either
ARCHIVELOG or NOARCHIVELOG mode. If you run the database in
NOARCHIVELOG mode, however, the backup must be consistent, that is, you
must shut down the database cleanly before the backup.
Performing Operating System Backups 4-3

Performing Operating System Backups
The set of backup files that result from a consistent whole database backup are
consistent because all files correspond to the same SCN. You can restore the
database without performing recovery. After restoring the backup files, you can
perform additional recovery steps to recover the database to a more current time if
the database is operated in ARCHIVELOG mode. Also, you can take inconsistent
whole database backups if your database is in ARCHIVELOG mode.
Only use a backup control file created during a whole database backup to restore
the other files taken in that backup, not for complete or incomplete database
recovery. The reason is that Oracle recognizes backup control files created with the
ALTER DATABASE BACKUP CONTROLFILE statement as backup control files;
operating system copies of control files look like current control files to Oracle.
Unless you are making a whole database backup, always back up the control file
using a SQL statement.
Making Consistent Whole Database BackupsTo guarantee that a database's datafiles are consistent, shut down the database with
the NORMAL, IMMEDIATE, or TRANSACTIONAL options before making a whole
database backup. Never perform a whole database backup after an instance failure
or after the database is shut down using a SHUTDOWN ABORT statement unless
your database is in ARCHIVELOG mode.
To make a consistent whole database backup:
1. If the database is open, use SQL*Plus to shut down the database with the
NORMAL, IMMEDIATE, or TRANSACTIONAL options:
SHUTDOWN NORMALSHUTDOWN IMMEDIATESHUTDOWN TRANSACTIONAL
Do not make a whole database backup when the instance is aborted or stopped
because of a failure. Reopen the database and shut it down cleanly first.
2. Use operating system commands or a backup utility to make backups of all
datafiles and all control files specified by the CONTROL_FILES parameter of
the initialization parameter file. Also back up the initialization parameter file
and other Oracle product initialization files. To find them, do a search for
*.ora starting in your Oracle home directory and recursively search all of its
subdirectories.
See Also: "Performing Control File Backups" on page 4-13 for
more information about backing up control files.
4-4 Oracle8i Backup and Recovery Guide
Performing Operating System Backups
For example, you might back up the datafiles and control files in the
/disk1/oracle/dbs directory to /disk2/backup as follows:
% cp /disk1/oracle/dbs/*.dbf /disk2/backup% cp /disk1/oracle/dbs/*.cf /disk2/backup
3. Restart the database
STARTUP
Performing Tablespace and Datafile BackupsOnly make tablespace and datafile backups when operating in ARCHIVELOG
mode. You cannot use individual datafile backups to restore a database operating in
NOARCHIVELOG mode because you do not have archived redo logs to recover the
datafiles to the same point in time.
This section contains the topics:
■ Backing Up Online Tablespaces and Datafiles
■ Making Backups in SUSPEND Mode
■ Backing Up Offline Tablespaces and Datafiles
Backing Up Online Tablespaces and DatafilesYou can back up all or specified datafiles of an online tablespace while the database
is open. When you back up an individual datafile or online tablespace, Oracle stops
recording checkpoints in the headers of the online datafiles being backed up.
The ALTER TABLESPACE BEGIN BACKUP statement puts a tablespace into hot
backup mode; as a result, Oracle stops recording checkpoints to the tablespace’s
datafiles. You must put a tablespace in hot backup mode to make operating system
Note: If you are forced to perform a restore operation, you must
restore the control files to all locations specified in the parameter
file. Consequently, it is better to make copies of each multiplexed
control file—even if the control files are identical—to avoid
problems at restore time.
See Also: Oracle8i Administrator’s Guide for more information on
starting up and shutting down a database.
Performing Operating System Backups 4-5
Performing Operating System Backups
datafile backups when the database is open—except when backing up a read-only
tablespace, in which case you can simply back up the online datafiles.
After a hot backup is completed, Oracle advances the file header to the current
database checkpoint, but only after you execute the ALTER TABLESPACE END
BACKUP statement to take the tablespace out of hot backup mode.
When you restore a datafile, the header has a record of the most recent datafile
checkpoint that occurred before the online tablespace backup, not any that occurred
during it. As a result, Oracle asks for the appropriate set of redo log files to apply
should recovery be needed.
To back up online read-write tablespaces in an open database:
1. Before beginning a backup of a tablespace, identify all of the tablespace's
datafiles using the DBA_DATA_FILES data dictionary view. For example,
assume that you want to back up the USERS tablespace. Enter the following:
SELECT tablespace_name, file_nameFROM sys.dba_data_filesWHERE tablespace_name = 'USERS';
TABLESPACE_NAME FILE_NAME------------------------------- --------------------USERS /oracle/dbs/tbs_21.fUSERS /oracle/dbs/tbs_22.f
In this example, /oracle/dbs/tbs_21.f and /oracle/dbs/tbs_22.f are
fully specified filenames corresponding to the datafiles of the USERS tablespace.
2. Mark the beginning of the online tablespace backup. For example, the following
statement marks the start of an online backup for the tablespace USERS:
ALTER TABLESPACE users BEGIN BACKUP;
WARNING: If you forget to mark the beginning of an onlinetablespace backup, or neglect to assure that the BEGIN BACKUPstatement has completed before backing up an online tablespace,then the backup datafiles are not useful for subsequent recoveryoperations. Attempting to recover such a backup is risky and canreturn errors that result in inconsistent data. For example, theattempted recovery operation will issue a "fuzzy files" warning,and lead to an inconsistent database that will not open.
4-6 Oracle8i Backup and Recovery Guide

Performing Operating System Backups
3. Back up the online datafiles of the online tablespace using operating system
commands. For example, UNIX users might enter:
% cp /oracle/dbs/tbs_21.f /oracle/backup/tbs_21.backup% cp /oracle/dbs/tbs_22.f /oracle/backup/tbs_22.backup
4. After backing up the datafiles of the online tablespace, indicate the end of the
online backup using the SQL statement ALTER TABLESPACE with the END
BACKUP option. For example, the following statement ends the online backup
of the tablespace USERS:
ALTER TABLESPACE users END BACKUP;
If you forget to mark the end of an online tablespace backup, and an instance failure
or SHUTDOWN ABORT occurs, then Oracle assumes that media recovery (possibly
requiring archived redo logs) is necessary at the next instance startup. To avoid
performing media recovery in this case, use the following statement, where filenameis any valid system path name:
ALTER DATABASE DATAFILE filename END BACKUP;
To back up online read-only tablespaces in an open database:
1. Before beginning a backup of a read-only tablespace, identify all of the
tablespace's datafiles using the DBA_DATA_FILES data dictionary view. For
example, assume that you want to back up the USERS tablespace. Enter the
following:
SELECT tablespace_name, file_nameFROM sys.dba_data_filesWHERE tablespace_name = 'USERS';
TABLESPACE_NAME FILE_NAME------------------------------- --------------------USERS /oracle/dbs/tbs_21.fUSERS /oracle/dbs/tbs_22.f
In this example, /oracle/dbs/tbs_21.f and /oracle/dbs/tbs_22.f are
fully specified filenames corresponding to the datafiles of the USERS tablespace.
2. Back up the online datafiles of the online tablespace using operating system
commands. You do not have to take the tablespace offline or put the tablespace
in hot backup mode because users are automatically prevented from making
changes to the read-only tablespace. For example, UNIX users can enter:
% cp /oracle/dbs/tbs_21.f /oracle/backup/tbs_21.backup% cp /oracle/dbs/tbs_22.f /oracle/backup/tbs_22.backup
Performing Operating System Backups 4-7

Performing Operating System Backups
Determining Datafile Backup Status To check the backup status of a datafile, query the
V$BACKUP view. This view lists all online files and gives their backup status. It is
most useful when the database is open. It is also useful immediately after a crash,
because it shows the backup status of the files at the time of the crash. Use this
information to determine whether you have left tablespaces in hot backup mode.
V$BACKUP is not useful if the control file currently in use is a restored backup or a
new control file created after the media failure occurred. A restored or re-created
control file does not contain the information Oracle needs to fill V$BACKUP
accurately. Also, if you have restored a backup of a file, this file's STATUS in
V$BACKUP reflects the backup status of the older version of the file, not the most
current version. Thus, this view can contain misleading information about restored
files.
For example, the following query displays the current backup status of datafiles:
SELECT file#, status FROM v$backup;
FILE# STATUS--------- ---------0011 INACTIVE0012 INACTIVE0013 ACTIVE...
In the STATUS column, INACTIVE indicates that the file is not currently being
backed up, whereas ACTIVE indicates that the file is currently being backed up.
Backing Up Multiple Online Tablespaces When backing up several online tablespaces,
use either of the following procedures:
Note: When restoring a backup of a read-only tablespace, take the
tablespace offline, restore the datafiles, then bring the tablespace
online. A backup of a read-only tablespace is still usable if the
read-only tablespace is made read-write after the backup, but the
restored backup will require recovery.
See Also: Oracle8i Reference for more information about the DBA_
DATA_FILES data dictionary view, and SQL*Plus User’s Guide andReference for more information about startup and shutdown
statements.
4-8 Oracle8i Backup and Recovery Guide

Performing Operating System Backups
To back up online tablespaces in parallel:
1. Prepare all online tablespaces for backup by issuing all necessary ALTER
TABLESPACE statements at once. For example, put tablespaces TS1, TS2, and
TS3 in hot backup mode:
ALTER TABLESPACE ts1 BEGIN BACKUP;ALTER TABLESPACE ts2 BEGIN BACKUP;ALTER TABLESPACE ts3 BEGIN BACKUP;
2. Back up all files of the online tablespaces. For example, a UNIX user might back
up tbs_1.f , tbs_2.f , and tbs_3.f as follows:
% cp /oracle/dbs/tbs_1.f /oracle/backup/tbs_1.bak% cp /oracle/dbs/tbs_2.f /oracle/backup/tbs_2.bak% cp /oracle/dbs/tbs_3.f /oracle/backup/tbs_3.bak
3. Indicate that the online backups have been completed:
ALTER TABLESPACE ts1 END BACKUP;ALTER TABLESPACE ts2 END BACKUP;ALTER TABLESPACE ts3 END BACKUP;
To back up online tablespaces serially:
1. Prepare a tablespace for online backup. For example, to put tablespace TBS_1 in
hot backup mode enter:
SQL> ALTER TABLESPACE tbs_1 BEGIN BACKUP;
2. Back up the datafiles in the tablespace. For example, enter:
% cp /oracle/dbs/tbs_1.f /oracle/backup/tbs_1.bak
3. Take the tablespace out of hot backup mode. For example, enter:
SQL> ALTER TABLESPACE tbs_1 END BACKUP;
4. Repeat this procedure for each remaining tablespace until you have backed up
all the desired tablespaces.
Oracle recommends the serial option because it minimizes the time between ALTER
TABLESPACE ... BEGIN/END BACKUP statements. During online backups, more
redo information is generated for the tablespace.
Making Backups in SUSPEND ModeSome third-party tools allow you to mirror a set of disks or logical devices, that is,
maintain an exact duplicate of the primary data in another location, and then split
Performing Operating System Backups 4-9

Performing Operating System Backups
the mirror. Splitting the mirror involves separating the copies so that you can use
them independently.
Using the Oracle8i SUSPEND/RESUME functionality, you can suspend I/O to the
database, then split the mirror and make a backup of the split mirror. This feature,
which complements the hot backup functionality, allows you to quiesce the
database so that no new I/O can be performed. You can then access the suspended
database to make backups without I/O interference.
Understanding the Suspend/Resume Feature The ALTER SYSTEM SUSPEND statement
suspends the database by halting I/Os to datafile headers and data as well as
control files. When the database is suspended, all pre-existing I/O operations can
complete; however, any new database access attempts are queued.
The SUSPEND and RESUME statements operate on the database and not just the
instance. If the SUSPEND statement is entered on one system in an OPS
configuration, then the internal locking mechanisms propagate the halt request
across instances, thereby quiescing all active instances in a given cluster.
Making Backups in a Suspended Database After a successful database suspension, you
can back up the database to disk or break the mirrors. Because suspending a
database does not guarantee immediate termination of I/O, Oracle recommends
that you precede the SUSPEND statement with a BEGIN BACKUP statement to
place the tablespaces in hot backup mode.
You must use conventional operating system backup methods to back up split
mirrors. RMAN cannot make database backups or copies because these operations
require reading the datafile headers. After the database backup is finished or the
mirrors are re-silvered, then you can resume normal database operations using the
RESUME statement.
Backing up a suspended database without splitting mirrors can cause an extended
database outage because the database is inaccessible during this time. If backups are
taken by splitting mirrors, however, then the outage is nominal. The outage time
depends on the size of cache to flush, the number of datafiles, and the time required
to break the mirror.
Note: Some RAID devices benefit from suspending writes while
the split operation is occurring; your RAID vendor can advise you
on whether your system would benefit from this feature.
4-10 Oracle8i Backup and Recovery Guide

Performing Operating System Backups
Note the following restrictions:
■ In an OPS environment, you should not start a new instance while the original
nodes are suspended.
■ No checkpoint is initiated by the SUSPEND or RESUME statements.
■ You cannot issue SHUTDOWN with IMMEDIATE or NORMAL options while
the database is suspended.
■ Issuing SHUTDOWN ABORT on a database that was already suspended
reactivates the database. This operation prevents media recovery or instance
recovery from hanging.
To make a split mirror backup in SUSPEND mode:
1. Place the database tablespaces in hot backup mode using the ALTER
TABLESPACE ... BEGIN BACKUP statement. For example, to place tablespace
USERS in hot backup mode enter:
ALTER TABLESPACE users BEGIN BACKUP;
2. If your mirror system has problems with splitting a mirror while disk writes are
occurring, issue the following:
ALTER SYSTEM SUSPEND;
3. Check to make sure that the database is suspended:
SELECT database_status FROM v$instance;
DATABASE_STATUS-----------------SUSPENDED
4. Split the mirrors at the operating system or hardware level.
5. Issue the following:
ALTER SYSTEM RESUME;
6. Check to make sure that the database is active:
SELECT database_status FROM v$instance;
DATABASE_STATUS-----------------ACTIVE
Performing Operating System Backups 4-11
Performing Operating System Backups
7. Take the specified tablespaces out of hot backup mode. For example, to take
tablespace USERS out of hot backup mode enter:
ALTER TABLESPACE users END BACKUP;
8. Copy the control file and archive the online redo logs as usual for a backup.
Backing Up Offline Tablespaces and DatafilesYou can back up all or some of the datafiles of an individual tablespace while the
tablespace is offline. All other tablespaces of the database can remain open and
available for system-wide use. You must have the MANAGE TABLESPACE system
privilege to take tablespaces offline and online.
To back up offline tablespaces:
1. Before beginning a backup of a tablespace, identify the tablespace's datafiles
using the DBA_DATA_FILES table. For example, assume that you want to back
up the USERS tablespace. Enter the following:
SELECT tablespace_name, file_nameFROM sys.dba_data_filesWHERE tablespace_name = 'USERS';
TABLESPACE_NAME FILE_NAME------------------------------- -----------------USERS /oracle/dbs/users.f
In this example, /oracle/dbs/users.f is a fully specified filename
corresponding to the datafile in the USERS tablespace.
WARNING: Do not use the SUSPEND statement as a substitutefor placing a tablespace in hot backup mode.
See Also: Oracle8i Administrator’s Guide for more information
about the SUSPEND/RESUME feature, Oracle8i SQL Reference for
more information about the ALTER SYSTEM statement with the
RESUME and SUSPEND options.
Note: You cannot take the SYSTEM tablespace or any tablespace
with active rollback segments offline. The following procedure
cannot be used for such tablespaces.
4-12 Oracle8i Backup and Recovery Guide
Performing Operating System Backups
2. Take the tablespace offline using normal priority if possible. Normal priority is
recommended because it guarantees that you can subsequently bring the
tablespace online without the requirement for tablespace recovery. For example,
the following statement takes a tablespace named USERS offline normally:
ALTER TABLESPACE users OFFLINE NORMAL;
After you take a tablespace offline with normal priority, all datafiles of the
tablespace are closed.
3. Back up the offline datafiles. For example, a UNIX user might enter the
following to back up datafile users.f :
% cp /disk1/oracle/dbs/users.f /disk2/backup/users.backup
4. Bring the tablespace online. For example, the following statement brings
tablespace USERS back online:
ALTER TABLESPACE users ONLINE;
After you bring a tablespace online, it is open and available for use.
Performing Control File BackupsBack up the control file of a database after making a structural modification to a
database operating in ARCHIVELOG mode. To back up a database's control file,
you must have the ALTER DATABASE system privilege.
You have these options when backing up the control file:
■ Backing Up the Control File to a Physical File
■ Backing Up the Control File to a Trace File
Backing Up the Control File to a Physical FileThe primary method for backing up the control file is to use a SQL statement to
generate a binary file.
Note: If you took the tablespace offline using temporary or
immediate priority, then you must not bring the tablespace online
unless you perform tablespace recovery.
Performing Operating System Backups 4-13

Performing Operating System Backups
To back up the control file after a structural change:
1. Make the desired change to the database. For example, you might create a new
datafile:
ALTER DATABASE CREATE DATAFILE '/oracle/dbs/tbs_20.f' AS '/oracle/dbs/tbs_4.f';
2. Back up the database's control file. The following SQL statement backs up a
database's control file to /oracle/backup/cf.bak :
ALTER DATABASE BACKUP CONTROLFILE TO '/oracle/backup/cf.bak' REUSE;
The REUSE option allows you to have the new control file overwrite a control
file that currently exists.
Backing Up the Control File to a Trace FileThe TRACE option of the ALTER DATABASE BACKUP CONTROLFILE statement
helps you manage and recover your control file. The TRACE option prompts Oracle
to write SQL statements to the database's trace file rather than generate a physical
backup. The statements in the trace file start the database, re-create the control file,
and recover and open the database appropriately.
Each SQL statement in the trace file is commented. Thus, you can copy the
statements from the trace file into a script file, edit them as necessary, and use the
script to recover the database if all copies of the control file are lost (or to change the
value of control file parameters such as MAXDATAFILES). The trace file is located
in the location specified by the USER_DUMP_DEST initialization parameter.
To back up the control file to a trace file, mount the database and issue the following
statement:
ALTER DATABASE BACKUP CONTROLFILE TO TRACE;
Creating a Trace File: Scenario Assume that you want to generate a script that
re-creates the control file for the SALES database. The database has these
characteristics:
■ Three threads are enabled, of which thread 2 is public and thread 3 is private.
■ The redo logs are multiplexed into three groups of two members each.
■ The database has these datafiles:
■ /diska/prod/sales/db/filea.dbf (offline datafile in online
tablespace)
■ /diska/prod/sales/db/database1.dbf (online)
4-14 Oracle8i Backup and Recovery Guide
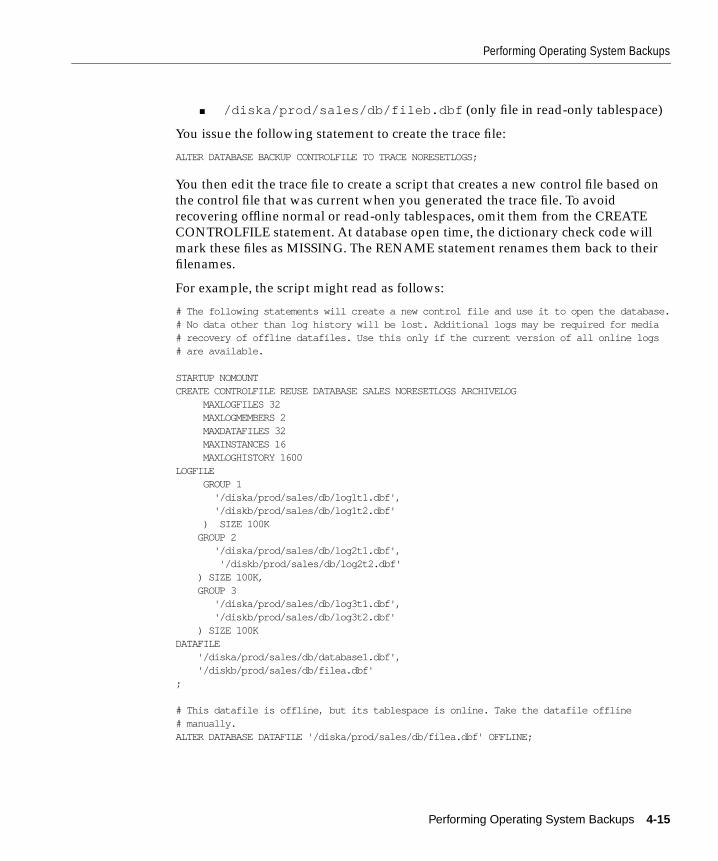
Performing Operating System Backups
■ /diska/prod/sales/db/fileb.dbf (only file in read-only tablespace)
You issue the following statement to create the trace file:
ALTER DATABASE BACKUP CONTROLFILE TO TRACE NORESETLOGS;
You then edit the trace file to create a script that creates a new control file based on
the control file that was current when you generated the trace file. To avoid
recovering offline normal or read-only tablespaces, omit them from the CREATE
CONTROLFILE statement. At database open time, the dictionary check code will
mark these files as MISSING. The RENAME statement renames them back to their
filenames.
For example, the script might read as follows:
# The following statements will create a new control file and use it to open the database.# No data other than log history will be lost. Additional logs may be required for media# recovery of offline datafiles. Use this only if the current version of all online logs# are available.
STARTUP NOMOUNTCREATE CONTROLFILE REUSE DATABASE SALES NORESETLOGS ARCHIVELOG
MAXLOGFILES 32MAXLOGMEMBERS 2MAXDATAFILES 32MAXINSTANCES 16MAXLOGHISTORY 1600
LOGFILEGROUP 1
'/diska/prod/sales/db/log1t1.dbf','/diskb/prod/sales/db/log1t2.dbf'
) SIZE 100KGROUP 2
'/diska/prod/sales/db/log2t1.dbf','/diskb/prod/sales/db/log2t2.dbf'
) SIZE 100K,GROUP 3
'/diska/prod/sales/db/log3t1.dbf','/diskb/prod/sales/db/log3t2.dbf'
) SIZE 100KDATAFILE
'/diska/prod/sales/db/database1.dbf','/diskb/prod/sales/db/filea.dbf'
;
# This datafile is offline, but its tablespace is online. Take the datafile offline# manually.ALTER DATABASE DATAFILE '/diska/prod/sales/db/filea.dbf' OFFLINE;
Performing Operating System Backups 4-15

Verifying Backups
# Recovery is required if any datafiles are restored backups,# or if the most recent shutdown was not normal or immediate.RECOVER DATABASE;
# All redo logs need archiving and a log switch is needed.ALTER SYSTEM ARCHIVE LOG ALL;
# The database can now be opened normally.ALTER DATABASE OPEN;
# The backup control file does not list read-only and normal offline tablespaces so that# Oracle can avoid performing recovery on them. Oracle checks the data dictionary and# finds information on these absent files and marks them 'MISSINGxxxx'. It then renames# the missing files to acknowledge them without having to recover them.ALTER DATABASE RENAME FILE 'MISSING0002' TO '/diska/prod/sales/db/fileb.dbf';
Using the statement without NORESETLOGS produces the same output. Using the
statement with RESETLOGS produces a similar script that includes statements that
recover and open the database, but resets the redo logs upon startup.
Verifying BackupsYou should periodically verify your backups to ensure that they are usable for
recovery. This section contains the following topics:
■ Testing the Restore of Backups
■ Using the DBVERIFY Utility
Testing the Restore of BackupsThe best way to test the usability of backups is to restore them to a separate host
and attempt to open the database, performing media recovery if necessary. This
option requires that you have a separate computer available for the restore
procedure.
See Also: "Restoring Files" on page 5-4 to learn how to restore
files, and "Performing Complete Media Recovery" on page 5-19 to
learn how to recover files.
4-16 Oracle8i Backup and Recovery Guide

Responding to a Failed Online Tablespace Backup
Using the DBVERIFY UtilityDBVERIFY is an external command-line utility that performs a physical data
structure integrity check on an offline database. Use DBVERIFY primarily when
you need to ensure that a backup database or datafile is valid before it is restored or
as a diagnostic aid when you have encountered data corruption problems.
The name and location of DBVERIFY is dependent on your operating system. For
example, to perform an integrity check on datafile tbs_52.f on UNIX, you can
execute the dbv command as follows:
% dbv file=tbs_52.f
DBVERIFY: Release 8.1.5.0.0
(c) Copyright 1998 Oracle Corporation. All rights reserved.
DBVERIFY - Verification starting : FILE = tbs_52.f
DBVERIFY - Verification complete
Total Pages Examined : 250Total Pages Processed (Data) : 4Total Pages Failing (Data) : 0Total Pages Processed (Index): 15Total Pages Failing (Index): 0Total Pages Processed (Other): 29Total Pages Empty : 202Total Pages Marked Corrupt : 0Total Pages Influx : 0
Responding to a Failed Online Tablespace BackupThe following situations can cause a tablespace backup to fail and be incomplete:
■ You did not indicate the end of the online tablespace backup operation using
the ALTER TABLESPACE statement with the END BACKUP option, and the
database was subsequently shut down with the ABORT option.
■ An instance or SHUTDOWN ABORT interrupted the backup.
Upon detecting an incomplete online tablespace backup at startup, Oracle assumes
that media recovery is necessary for startup to proceed.
For example, Oracle may display:
See Also: Oracle8i Utilities for more information about using
DBVERIFY.
Performing Operating System Backups 4-17

Responding to a Failed Online Tablespace Backup
SQL> startupORACLE instance started.Total System Global Area 19839308 bytesFixed Size 63820 bytesVariable Size 11042816 bytesDatabase Buffers 8192000 bytesRedo Buffers 540672 bytesDatabase mounted.ORA-01113: file 12 needs media recoveryORA-01110: data file 12: '/oracle/dbs/tbs_41.f'
To avoid performing media recovery on a tablespace:
1. Use the V$BACKUP view to list the datafiles of the tablespaces that were being
backed up before the database was restarted:
SQL> SELECT * FROM v$backup WHERE status = 'ACTIVE';FILE# STATUS CHANGE# TIME---------- ------------------ ---------- --------- 12 ACTIVE 20863 25-NOV-98 13 ACTIVE 20863 25-NOV-98 20 ACTIVE 20863 25-NOV-98 3 rows selected.
2. Issue the ALTER DATABASE DATAFILE ... END BACKUP statement to end the
hot backup. For example, to take datafiles 12, 13, and 20 out of hot backup
mode enter:
ALTER DATABASE DATAFILE 12,13,20 END BACKUP;
3. Open the database:
ALTER DATABASE OPEN;
To recover the database without using the END BACKUP statement:
1. Mount the database:
STARTUP MOUNT;
2. Recover the database:
RECOVER DATABASE;
WARNING: Do not use ALTER DATABASE DATAFILE ... ENDBACKUP if you have restored any of the affected files from abackup.
4-18 Oracle8i Backup and Recovery Guide

Using Export and Import for Supplemental Protection
3. Use the V$BACKUP view to confirm that there are no active datafiles:
SQL> SELECT * FROM v$backup WHERE status = 'ACTIVE';FILE# STATUS CHANGE# TIME---------- ------------------ ---------- ---------0 rows selected.
Using Export and Import for Supplemental ProtectionExport and Import are utilities that move Oracle data in and out of Oracle
databases. Export writes data from an Oracle database to an operating system file in
a special binary format. Import reads Export files and restores the corresponding
information into an existing database. Although Export and Import are designed for
moving Oracle data, you can also use them to supplement backups of data.
This section describes the Import and Export utilities, and includes the following
topics:
■ Using Export
■ Using Import
Using ExportThe Export utility allows you to back up your database while it is open and
available for use. It writes a read-consistent view of the database's objects to an
operating system file. System audit options are not exported.
Table 4–1 lists available export modes.
See Also: Chapter 5, "Performing Media Recovery" for
information on recovering a database.
See Also: Oracle8i Utilities for information about the Export and
Import utilities.
WARNING: If you use Export to perform a backup, you mustexport all data in a logically consistent way so that the backupreflects a single point in time. No one should make changes to thedatabase while the Export takes place. Ideally, you should run thedatabase in restricted mode while you export the data, so noregular users can access the data.
Performing Operating System Backups 4-19
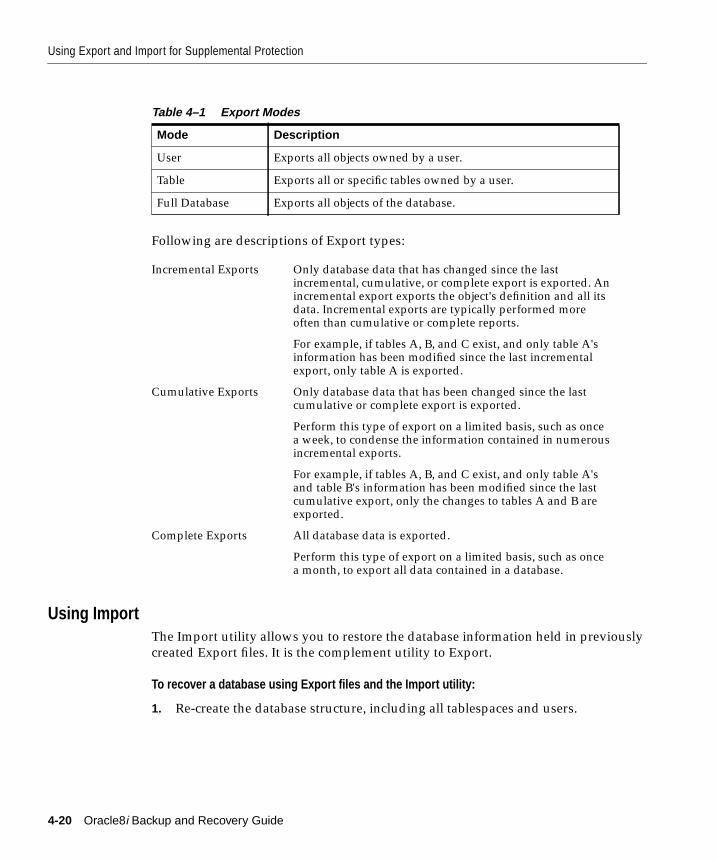
Using Export and Import for Supplemental Protection
Following are descriptions of Export types:
Using ImportThe Import utility allows you to restore the database information held in previously
created Export files. It is the complement utility to Export.
To recover a database using Export files and the Import utility:
1. Re-create the database structure, including all tablespaces and users.
Table 4–1 Export Modes
Mode Description
User Exports all objects owned by a user.
Table Exports all or specific tables owned by a user.
Full Database Exports all objects of the database.
Incremental Exports Only database data that has changed since the lastincremental, cumulative, or complete export is exported. Anincremental export exports the object's definition and all itsdata. Incremental exports are typically performed moreoften than cumulative or complete reports.
For example, if tables A, B, and C exist, and only table A'sinformation has been modified since the last incrementalexport, only table A is exported.
Cumulative Exports Only database data that has been changed since the lastcumulative or complete export is exported.
Perform this type of export on a limited basis, such as oncea week, to condense the information contained in numerousincremental exports.
For example, if tables A, B, and C exist, and only table A'sand table B's information has been modified since the lastcumulative export, only the changes to tables A and B areexported.
Complete Exports All database data is exported.
Perform this type of export on a limited basis, such as oncea month, to export all data contained in a database.
4-20 Oracle8i Backup and Recovery Guide

Using Export and Import for Supplemental Protection
2. Import the appropriate Export files to restore the database to the most current
state possible. Depending on how your Export schedule is performed, imports
of varying degrees will be necessary to restore a database.
Assume that the schedule illustrated in Figure 4–1 is used in exporting data from an
Oracle database
Figure 4–1 A Typical Export Schedule
A complete export was taken on Day 1, a cumulative export was taken every week,
and incremental exports were taken daily. Follow these steps to recover:
1. Recreate the database, including all tablespaces and users.
2. Import the complete database export taken on Day 1.
3. Import the cumulative database export taken on Day 7.
4. Import the incremental database exports taken on Days 8, 9, and 10.
Note: These re-created structures should not have objects in them.
1 2 3 4 5 6 7 8 9 10
FCI = Incremental = Cumulative = Full (Complete)
F I CI I I I I I I
Day
ExportType
Performing Operating System Backups 4-21

Using Export and Import for Supplemental Protection
4-22 Oracle8i Backup and Recovery Guide

Performing Media R
5
Performing Media RecoveryThis chapter describes how to recover a database, and includes the following topics:
■ Determining Which Files to Recover
■ Restoring Files
■ Understanding Basic Media Recovery Procedures
■ Performing Complete Media Recovery
■ Performing Incomplete Media Recovery
■ Opening the Database After Media Recovery
ecovery 5-1

Determining Which Files to Recover
Determining Which Files to RecoverYou can often use the table V$RECOVER_FILE to determine which files to recover.
This view lists all files that need to be recovered, and explains why they need to be
recovered.
The following query displays the file ID numbers of datafiles that require media
recovery as well as the reason for recovery (if known) and the SCN/time when
recovery needs to begin:
SQL> SELECT * FROM v$recover_file;
FILE# ONLINE ERROR CHANGE# TIME---------- ------- ------------------ ---------- --------- 14 ONLINE 0 15 ONLINE FILE NOT FOUND 0 21 OFFLINE OFFLINE NORMAL 0
Query V$DATAFILE and V$TABLESPACE to obtain filenames and tablespace
names for datafiles requiring recovery. For example, enter:
SQL> SELECT d.name, t.name 2 FROM v$datafile d, v$tablespace t 3 WHERE t.ts# = d.ts# 4 AND d.file# in (14,15,21); # use values obtained from V$RECOVER_FILE query
NAME TABLESPACE_NAME---------------------------------- ----------------/oracle/dbs/tbs_14.f TBS_1/oracle/dbs/tbs_15.f TBS_2/oracle/dbs/tbs_21.f TBS_3
You can combine these queries in the following SQL*Plus script (sample output
shown below):
COL df# FORMAT 999COL df_name FORMAT a20COL tbsp_name FORMAT a10COL status FORMAT a7COL error FORMAT a10
Note: The view is not useful if the control file currently in use is a
restored backup or a new control file created since the media failure
occurred. A restored or re-created control file does not contain the
information Oracle needs to fill V$RECOVER_FILE accurately.
5-2 Oracle8i Backup and Recovery Guide

Determining Which Files to Recover
SELECT r.file# AS df#, d.name AS df_name, t.name AS tbsp_name, d.status, r.error, r.change#, r.timeFROM v$recover_file r, v$datafile d, v$tablespace tWHERE t.ts# = d.ts#AND d.file# = r.file#/
SQL> @script
DF# DF_NAME TBSP_NAME STATUS ERROR CHANGE# TIME---- -------------------- ---------- ------- ---------- ----------- ---------- 12 /oracle/dbs/tbs_41.f TBS_4 OFFLINE OFFLINE 0 NORMAL
13 /oracle/dbs/tbs_42.f TBS_4 OFFLINE OFFLINE 0 NORMAL
20 /oracle/dbs/tbs_43.f TBS_4 OFFLINE OFFLINE 0 NORMAL
Besides determining which files to recover, you must also know which files you
should not recover. The following have special implications for media recovery:
■ Unrecoverable Tables and Indexes
■ Read-Only Tablespaces
Unrecoverable Tables and IndexesYou can create tables and indexes using the CREATE TABLE AS SELECT statement.
You can also specify that Oracle create them as unrecoverable. When you create a
table or index as unrecoverable, Oracle does not generate redo log records for the
operation. Thus, you cannot recover objects created unrecoverable, even if you are
running in ARCHIVELOG mode.
Be aware that when you perform media recovery, and some tables or indexes are
created as recoverable while others are unrecoverable, the unrecoverable objects are
marked logically corrupt by the RECOVER operation. Any attempt to access the
unrecoverable objects returns an ORA-01578 error message. Drop the unrecoverable
objects and re-create them if needed.
Note: If you cannot afford to lose tables or indexes created
unrecoverable, then take a backup after the unrecoverable table or
index is created.
Performing Media Recovery 5-3

Restoring Files
Because it is possible to create a table unrecoverable and then create a recoverable
index on that table, the index is not marked as logically corrupt after you perform
media recovery. The table was unrecoverable (and thus marked as corrupt after
recovery), however, so the index points to corrupt blocks. The index must be
dropped, and the table and index must be re-created if necessary.
Read-Only TablespacesMedia recovery with the USING BACKUP CONTROLFILE option checks for
read-only files. You cannot recover a read-only file. To avoid this error, take datafiles
from read-only tablespaces offline before doing recovery with a backup control file.
Use the correct version of the control file for the recovery. If the tablespace will be
read-only when the recovery is complete, then the control file must be from a time
when the tablespace was read-only. Similarly, if the tablespace will be read-write at
the end of recovery, it should be read-write in the control file.
If the appropriate control file is unavailable, execute a CREATE CONTROLFILE
statement as described in "Losing All Copies of the Current Control File" on
page 6-13. If you need to re-create a control file for a database with read-only
tablespaces, issue the following to obtain the procedure that you need to follow:
ALTER DATABASE BACKUP CONTROLFILE TO TRACE;
The procedure is similar to the procedure for offline normal tablespaces, except that
you need to bring the tablespace online after the database is open.
Restoring FilesIf you determine that media recovery is necessary, restore the files necessary to
perform it. Learn how to execute the following tasks:
■ Restoring Backup Datafiles
■ Re-Creating Datafiles when Backups Are Unavailable
■ Restoring Necessary Archived Redo Log Files
See Also: Oracle8i Standby Database Concepts and Administrationfor information about the impact of unrecoverable operations on a
standby database.
See Also: "Backing Up the Control File to a Trace File" on
page 4-14 to learn about taking trace backups of the control file.
5-4 Oracle8i Backup and Recovery Guide
Restoring Files
Restoring Backup DatafilesIf a media failure permanently damages one or more datafiles of a database, you
must restore backups of the damaged datafiles before you can recover the damaged
files. If you cannot restore a damaged datafile to its original location (for example,
you must replace a disk, so you restore the files to an alternate disk), then you must
indicate the new locations of these files to the control file of the associated database.
To restore backup datafiles to their default location:
1. Determine which datafiles to recover using the techniques described in
"Determining Which Files to Recover" on page 5-2.
2. Copy backups of the damaged datafiles to their default location using operating
system commands. For example, to restore tbs_14.f on UNIX you might
issue:
% cp /disk2/backup/tbs_14.bak /disk1/oracle/dbs/tbs_14.f
Re-Creating Datafiles when Backups Are UnavailableIf a datafile is damaged and no backup of the file is available, you can still recover
the datafile if:
■ All archived log files written since the creation of the original datafile are
available.
■ The control file contains the name of the damaged file (that is, the control file is
current, or is a backup taken after the damaged datafile was added to the
database).
To re-create a datafile for recovery:
1. Create a new, empty datafile to replace a damaged datafile that has no
corresponding backup. For example, assume that the datafile disk1:users1has been damaged, and no backup is available. The following statement
re-creates the original datafile (same size) on disk2 :
ALTER DATABASE CREATE DATAFILE 'disk1:users1' AS 'disk2:users1';
This statement creates an empty file that matches the lost file. Oracle looks at
information in the control file and the data dictionary to obtain size
information. The old datafile is renamed as the new datafile.
2. Perform media recovery on the empty datafile. For example, enter:
RECOVER DATAFILE 'disk2:users1'
Performing Media Recovery 5-5

Restoring Files
3. All archived redo logs written since the original datafile was created must be
mounted and reapplied to the new, empty version of the lost datafile during
recovery.
Restoring Necessary Archived Redo Log FilesAll archived redo log files required for the pending media recovery eventually need
to be on disk so that they are readily available to Oracle.
To restore necessary archived redo logs:
1. To determine which archived redo log files you need, query V$LOG_HISTORY
and V$RECOVERY_LOG. You will need all redo information from the time the
datafile was added to the database if no backup of the datafile is available.
2. If space is available, restore the required archived redo log files to the location
specified by LOG_ARCHIVE_DEST_1 or LOG_ARCHIVE_DEST. Oracle locates
the correct log automatically when required during media recovery.
For example, enter:
% cp /disk2/arc_backup/*.arc /disk1/oracle/dbs/arc_dest
3. If sufficient space is not available at the location indicated by the destination
initialization parameter, restore some or all of the required archived redo log
files to an alternate location. Specify the location before or during media
recovery using the LOGSOURCE parameter of the SET statement in SQL*Plus
Note: You cannot re-create any of the datafiles for the SYSTEM
tablespace by using the CREATE DATAFILE clause of the ALTER
DATABASE statement because the necessary redo data is not
available.
View Description
V$LOG_HISTORY Lists all of the archived logs, including their probable names,given the current archived log file naming scheme as set by theinitialization parameter LOG_ARCHIVE_FORMAT.
V$RECOVERY_LOG Lists only the archived redo logs that Oracle needs to performrecovery. It also includes the probable names of the files, usingLOG_ARCHIVE_FORMAT.
5-6 Oracle8i Backup and Recovery Guide
Understanding Basic Media Recovery Procedures
or the RECOVER ... FROM parameter of the ALTER DATABASE statement in
SQL. For example, enter:
SET LOGSOURCE /disk2/temp # set location using SET statementALTER DATABASE RECOVER FROM "/disk2/temp" DATABASE; # set in RECOVER statement
4. After an archived log is applied, and after making sure that a copy of each
archived log group still exists in offline storage, delete the restored copy of the
archived redo log file to free disk space. For example, after making the log
directory your working directory, enter:
% rm *.arc
Understanding Basic Media Recovery ProceduresBefore beginning recovery, familiarize yourself with the following topics:
■ Using Media Recovery Statements
■ Applying Archived Redo Logs
■ Recovering a Database in NOARCHIVELOG Mode
■ Recovering a Database in ARCHIVELOG Mode
■ Performing Media Recovery in Parallel
Using Media Recovery StatementsOracle uses these basic media recovery SQL*Plus statements, which differ only in
the way the system determines the set of files to be recovered:
■ RECOVER DATABASE
■ RECOVER TABLESPACE
■ RECOVER DATAFILE
Each statement uses the same criteria to determine whether files are recoverable.
Oracle prevents two recovery sessions from recovering the same file and prevents
media recovery of a file that is in use.
You can also use the SQL statement ALTER DATABASE RECOVER, although
Oracle strongly recommends you use the SQL*Plus RECOVER statement instead so
that Oracle will prompt you for the names of the archived redo logs.
See Also: Oracle8i Reference for more information about the data
dictionary views.
Performing Media Recovery 5-7

Understanding Basic Media Recovery Procedures
RECOVER DATABASE StatementRECOVER DATABASE performs media recovery on all online datafiles that require
redo to be applied. For example, issue the following at the SQL prompt to recover
the whole database:
RECOVER DATABASE
If you shut down all instances cleanly, and did not restore any backups, issuing
RECOVER DATABASE returns an error indicating that no recovery is required. It
also fails if any instances have the database open, since they have the datafile locks.
To perform media recovery on an entire database, the database must be mounted
EXCLUSIVE and closed.
RECOVER TABLESPACE StatementRECOVER TABLESPACE performs media recovery on all datafiles in the
tablespaces listed. For example, enter the following at the SQL prompt to recover
tablespace TBS_1:
RECOVER TABLESPACE tbs_1
The tablespaces must be offline to perform the recovery. Oracle indicates an error if
none of the files require recovery.
RECOVER DATAFILE StatementRECOVER DATAFILE lists the datafiles to be recovered. For example, enter the
following at the SQL prompt to recover datafile /oracle/dbs/tbs_22.f :
RECOVER DATAFILE '/oracle/dbs/tbs_22.f'
The database can be open or closed, provided that you can acquire the media
recovery locks. If the database is open in any instance, then datafile recovery can
only recover offline files.
See Also: SQL*Plus User’s Guide and Reference for more
information about SQL*Plus RECOVER statements, and Oracle8iSQL Reference for more information about the ALTER DATABASE
RECOVER statement.
See Also: Oracle8i SQL Reference for more information about
media recovery statements.
5-8 Oracle8i Backup and Recovery Guide

Understanding Basic Media Recovery Procedures
Applying Archived Redo LogsDuring complete or incomplete media recovery, Oracle applies redo log files to the
datafiles during the roll forward phase of media recovery. Because rollback data is
recorded in the redo log, rolling forward regenerates the corresponding rollback
segments. Rolling forward proceeds through as many redo log files as necessary to
bring the database forward in time.
As a log file is needed, Oracle suggests the name of the file. For example, if you are
using SQL*Plus, it returns the following lines and prompts:
ORA-00279: Change #### generated at DD/MM/YY HH:MM:SS needed for thread #ORA-00289: Suggestion : logfileORA-00280: Change #### for thread # is in sequence #Specify log: [<RET> for suggested | AUTO | FROM logsource | CANCEL ]
Similar messages are returned when you use an ALTER DATABASE ... RECOVER
statement. However, no prompt is displayed.
Suggested Archived Redo Log FilenamesOracle suggests archived redo log filenames by concatenating the current values of
the initialization parameters LOG_ARCHIVE_DEST_1 or LOG_ARCHIVE_DEST
and LOG_ARCHIVE_FORMAT and using information from the control file. For
example, the following are possible settings for archived logs:
LOG_ARCHIVE_DEST_1 = /oracle/arc_dest/arcLOG_ARCHIVE_FORMAT = r_%t_%s.arc
SQL> SELECT name FROM v$archived_log;
NAME-------------------------------/oracle/arc_dest/arcr_1_467.arc/oracle/arc_dest/arcr_1_468.arc/oracle/arc_dest/arcr_1_469.arc/oracle/arc_dest/arcr_1_470.arc
Thus, if all the required archived log files are mounted at the LOG_ARCHIVE_
DEST_1 or LOG_ARCHIVE_DEST destination, and the value for LOG_ARCHIVE_
FORMAT is never altered, Oracle can suggest and apply log files to complete media
recovery automatically.
To restore archived redo logs to a non-default location:
1. Change the value for this parameter to a new location. For example, enter:
Performing Media Recovery 5-9

Understanding Basic Media Recovery Procedures
LOG_ARCHIVE_DEST_1 = /oracle/new_location
2. Move the log files to the new location. For example, enter:
% cp /oracle/arc_dest/* /oracle/new_location
3. Start a new instance and mount the database:
STARTUP MOUNT
4. Initiate beginning media recovery as usual. For example, enter:
RECOVER DATABASE
In some cases, you may want to override the current setting for the destination
parameter as a source for redo log files. For example, assume that a database is open
and an offline tablespace must be recovered, but not enough space is available to
mount the necessary redo log files at the location specified by the destination
parameter.
To recover using logs in a non-default location:
1. Mount the archived redo logs to an alternate location. For example, enter:
% cp /disk1/oracle/arc_dest/* /disk2/temp
2. Specify the alternate location to Oracle for the recovery operation. Use the
LOGSOURCE parameter of the SET statement or the RECOVER ... FROM
parameter of the ALTER DATABASE statement. For example, enter:
SET LOGSOURCE "/disk2/temp"
3. Recover the offline tablespace:
RECOVER TABLESPACE offline_tbsp
Consider overriding the current setting for the destination parameter when not
enough space is available to mount all the required log files at any one location. In
this case, you can set the log file source to an operating system variable (such as a
logical or an environment variable) that acts as a search path to several locations.
Note: Overriding the redo log source does not affect the archive
redo log destination for filled online groups being archived.
5-10 Oracle8i Backup and Recovery Guide

Understanding Basic Media Recovery Procedures
Applying Logs Automatically Using the SQL*Plus RECOVER StatementWhen using SQL*Plus, use the following statement to automate the application of
the default filenames of archived redo logs needed during recovery:
SET AUTORECOVERY ON
No interaction is required when you issue the RECOVER statement, provided that
the necessary files are in the correct locations with the correct names.
The filenames used when you use SET AUTORECOVERY ON are derived from the
values of the initialization parameters LOG_ARCHIVE_DEST or LOG_ARCHIVE_
DEST_1 in conjunction with LOG_ARCHIVE_FORMAT. If you execute SET
AUTORECOVERY OFF, which is the default option, then you must enter the
filenames manually, or accept the suggested default filename.
To automate the application of archived redo logs:
1. Restore a backup of the offline datafiles. This example restores a consistent
backup of the whole database:
% cp /oracle/work/BACKUP/tbs* /oracle/dbs
2. Make sure the database is mounted. For example, if the database is shut down,
enter:
SQL> STARTUP MOUNT
3. Turn on autorecovery:
SQL> SET AUTORECOVERY ONAutorecovery ON
4. Recover the desired datafiles. This example recovers the whole database:
SQL> RECOVER DATABASE
5. Oracle automatically suggests and applies the necessary archived logs:
ORA-00279: change 53577 generated at 01/26/99 19:20:58 needed for thread 1ORA-00289: suggestion : /oracle/work/arc_dest/arcr_1_802.arcORA-00280: change 53577 for thread 1 is in sequence #802Log applied.ORA-00279: change 53584 generated at 01/26/99 19:24:05 needed for thread 1
See Also: Such functionality is operating system-dependent. See
your operating system-specific Oracle documentation for more
information.
Performing Media Recovery 5-11
Understanding Basic Media Recovery Procedures
ORA-00289: suggestion : /oracle/work/arc_dest/arcr_1_803.arcORA-00280: change 53584 for thread 1 is in sequence #803ORA-00278: log file "/oracle/work/arc_dest/arcr_1_802.arc" no longer needed for thisrecoveryLog applied.ORA-00279: change 53585 generated at 01/26/99 19:24:14 needed for thread 1ORA-00289: suggestion : /oracle/work/arc_dest/arcr_1_804.arcORA-00280: change 53585 for thread 1 is in sequence #804ORA-00278: log file "/oracle/work/arc_dest/arcr_1_803.arc" no longer needed for thisrecoveryLog applied.Media recovery complete.
If you use an OPS configuration, and you are performing incomplete recovery or
using a backup control file, then Oracle can only compute the name of the first
archived redo log file from the first thread. You may have to apply the first log file
from the other threads. Once the first log file in a given thread has been supplied,
Oracle can suggest the names of the subsequent logfiles in those threads.
Applying Logs Individually Using ALTER DATABASE RECOVERWhen you perform media recovery using SQL statements, Oracle does not display a
prompt for log files after media recovery is started. Instead, you must provide the
correct log file using an ALTER DATABASE RECOVER LOGFILE statement. For
example, if a message suggests log1.arc , apply the suggestion using the
following statement:
ALTER DATABASE RECOVER LOGFILE 'log1.arc';
As a result, recovering a tablespace requires several statements, as indicated in the
following example (DBA input is boldfaced; variable information is italicized.):
SQL>ALTER DATABASE RECOVER TABLESPACE users;ORA-00279: Change #### generated at DD/MM/YY HH:MM:SS needed for thread #ORA-00289: Suggestion : logfile1ORA-00280: Change #### for thread # is in sequence #SQL>ALTER DATABASE RECOVER LOGFILE ' logfile1 ';ORA-00279: Change #### generated at DD/MM/YY HH:MM:SS needed for thread # <D%0>ORA-00289: Suggestion : logfile2ORA-00280: Change #### for thread # is in sequence #SQL> ALTER DATABASE RECOVER LOGFILE ' logfile2 ';. . .Repeat until all logs are applied.)Statement processed.SQL> ALTER TABLESPACE users ONLINE;
See Also: Your operating system-specific Oracle documentation
for examples of log file application.
5-12 Oracle8i Backup and Recovery Guide

Understanding Basic Media Recovery Procedures
Statement processed.
Applying Logs Automatically Using ALTER DATABASE RECOVERIn this example, assume that the backup files have been restored, and that the user
has administrator privileges. As in the method you used with SQL*Plus, automatic
application of the redo logs can be started with the following statements, before and
during recovery, respectively:
ALTER DATABASE RECOVER AUTOMATIC ...;ALTER DATABASE RECOVER AUTOMATIC LOGFILEsuggested_log_filename ;
An example of the first statement follows:
SQL> ALTER DATABASE RECOVER AUTOMATIC TABLESPACE users;Statement processed.SQL> ALTER TABLESPACE users ONLINE;Statement processed.
In this example, it is assumed that the backup files have been restored, and that the
user has administrator privileges.
An example of the ALTER DATABASE RECOVER AUTOMATIC LOGFILE
statement follows:
SQL> ALTER DATABASE RECOVER TABLESPACE users;ORA-00279: Change #### generated at DD/MM/YY HH:MM:SS needed for thread #ORA-00289: Suggestion : logfile1ORA-00280: Change #### for thread # is in sequence #SQL> ALTER DATABASE RECOVER AUTOMATIC LOGFILE 'logfile1 ';Statement processed.SQL> ALTER TABLESPACE users ONLINE;Statement processed.
In this example, assume that the backup files have been restored, and that the user
has administrator privileges.
Note: After issuing the ALTER DATABASE RECOVER statement,
you can view all files that have been considered for recovery in the
V$RECOVERY_FILE_STATUS view. You can access status
information for each file in the V$RECOVERY_STATUS view. These
views are not accessible after you terminate the recovery session.
See Also: Oracle8i Reference for information about the content of
all recovery-related views.
Performing Media Recovery 5-13
Understanding Basic Media Recovery Procedures
Successful Application of Redo LogsIf you are using SQL*Plus's recovery options (not SQL statements), each time
Oracle finishes applying a redo log file, the following message is returned:
Log applied.
Oracle then prompts for the next log in the sequence or, if the most recently applied
log is the last required log, terminates recovery.
Unsuccessful Application of Redo LogsIf the suggested file is incorrect or you provide an incorrect filename, Oracle returns
an error message. For example, you may see something similar to the following:
ORA-00308: cannot open archived log "/oracle/work/arc_dest/arcr_1_811.arc"ORA-27037: unable to obtain file statusSVR4 Error: 2: No such file or directoryAdditional information: 3
Recovery cannot continue until the required redo log file is applied. If Oracle
returns an error message after supplying a redo log filename, the following
scenarios are possible:
Interrupting the Application of Redo LogsIf you start a media recovery operation and must then interrupt it, for example,
because a recovery operation must end for the night and resume the next morning,
interrupt recovery at any time by taking either of the following actions:
■ Enter the word CANCEL when prompted for a redo log file.
Error Possible Cause Solution
ORA-27037: unable toobtain file status
Entered wrong filename.
Log is missing.
Re-enter correct filename.
Restore backup archived redo log.
ORA-27047: unable toread the header block offile
The log may have beenpartially written orbecome corrupted.
If you can locate an uncorrupted orcomplete copy of the log, apply thatcopy; you do not need to restartrecovery.
If no copy of the log exists and youknow the time of the last valid redoentry, perform incomplete recovery;in this case, restart recovery from thebeginning, including restoringbackups.
5-14 Oracle8i Backup and Recovery Guide

Understanding Basic Media Recovery Procedures
■ Use your operating system's interrupt signal if you must abort when recovering
an individual datafile, or when automated recovery is in progress.
After recovery is canceled, it must be completed before opening a database for
normal operation. To resume recovery, restart it. Recovery resumes where it left off
when it was canceled.
There are several reasons why, after starting recovery, you may want to restart. For
example, if you want to restart with a different backup or want to use the same
backup but need to change the end time to an earlier point in time than you initially
specified, then the entire operation must recommence by restoring a backup. Failure
to do so may result in "file inconsistent" error messages when attempting to open
the database.
Recovering a Database in NOARCHIVELOG ModeIf a database is in NOARCHIVELOG mode and a media failure damages some or
all of the datafiles, the only option for recovering the database is usually to restore
the most recent whole database backup. If you are using Export to supplement
regular backups, then you can instead restore the database by importing an
exported backup of the database.
The disadvantage of NOARCHIVELOG mode is that to recover your database from
the time of the most recent full backup up to the time of the media failure, you have
to re-enter manually all of the changes executed in that interval. If your database
was in ARCHIVELOG mode, however, the redo log covering this interval would
have been available as archived log files or online log files. Using archived redo logs
would have enabled you to use complete or incomplete recovery to reconstruct
your database, thereby minimizing the amount of lost work.
If you have a database damaged by media failure and operating in
NOARCHIVELOG mode, and you want to restore from your most recent consistent
whole database backup (your only option at this point), follow the steps below.
To restore the most recent whole database backup to the default location:
1. If the database is open, abort the instance:
SHUTDOWN ABORT
2. Correct the media problem so that the backup database files can be restored to
their original locations.
3. Restore the most recent whole database backup using operating system
commands. Restore all of the datafiles and control files of the whole database
Performing Media Recovery 5-15

Understanding Basic Media Recovery Procedures
backup, not just the damaged files. This example restores a whole database
backup:
% cp /oracle/work/BACKUP/tbs* /oracle/dbs # restores datafiles% cp /oracle/work/BACKUP/cf.f /oracle/dbs # restores control file
4. Mimic incomplete database recovery by issuing the following statement:
ALTER DATABASE RECOVER DATABASE UNTIL CANCEL;
5. Open the database and reset the current redo log sequence to 1:
ALTER DATABASE OPEN RESETLOGS;
A RESETLOGS operation invalidates all redo in the online logs. Restoring from
a whole database backup and then resetting the log discards all changes to the
database made from the time the backup was taken to the time of the failure.
To restore the most recent whole database backup to a new location:
1. If the database is open, shut it down:
SHUTDOWN NORMAL
2. If the hardware problem has not been corrected and some or all of the database
files must be restored to alternative locations, restore the most recent whole
database backup to a new location. Restore all of the datafiles and control files
of the whole database backup, not just the damaged files. For example, enter:
% cp /disk2/BACKUP/tbs* /disk3/oracle/dbs% cp /disk2/BACKUP/cf.f /disk3/oracle/dbs
3. If necessary, edit the restored parameter file to indicate the new location of the
control files.
CONTROL_FILES = "/disk3/oracle/dbs/cf.f"
4. Start an instance using the restored and edited parameter file and mount, but
do not open, the database. For example, this statements mounts the database
using the initialization file initPROD1.ora :
STARTUP MOUNT pfile=initPROD1.ora
5. If the restored datafile filenames will be different, rename the restored datafiles
in the control file. For example, you might enter:
ALTER DATABASE RENAME FILE "/disk1/oracle/dbs/tbs1.f" TO "/disk3/oracle/dbs/tbs1.f";
5-16 Oracle8i Backup and Recovery Guide

Understanding Basic Media Recovery Procedures
6. If applicable, rename the online redo log files. For example, enter:
ALTER DATABASE RENAME FILE "/disk1/oracle/dbs/log1.f" TO "/disk3/oracle/dbs/log1.f";
7. Mimic incomplete database recovery by issuing the following statement:
ALTER DATABASE RECOVER DATABASE UNTIL CANCEL;
8. Mimic incomplete database recovery by issuing the following statement:
ALTER DATABASE RECOVER CANCEL;
9. Open the database and reset the current redo log sequence to 1:
ALTER DATABASE OPEN RESETLOGS;
A RESETLOGS operation invalidates all redo in the online logs. Restoring from
a whole database backup and then resetting the log discards all changes to the
database made from the time the backup was taken to the time of the failure.
Recovering a Database in ARCHIVELOG ModeTo begin media recovery operations when your database is running in
ARCHIVELOG mode, use one of the following options:
■ The ALTER DATABASE RECOVER statement
■ The SQL*Plus RECOVER statement (recommended)
To start any type of media recovery, you must adhere to the following restrictions:
■ You must have administrator privileges.
■ All recovery sessions must be compatible.
■ One session cannot start complete media recovery while another performs
incomplete media recovery.
■ You cannot start media recovery if you are connected to the database via a
multi-threaded server process.
See Also: Oracle8i SQL Reference for more information about
ALTER DATABASE RENAME FILE.
See Also: Oracle8i Administrator’s Guide for more information
about renaming and relocating datafiles.
See Also: SQL*Plus User’s Guide and Reference
Performing Media Recovery 5-17
Understanding Basic Media Recovery Procedures
Performing Media Recovery in ParallelUse parallel block recovery to tune the roll forward phase of media recovery. In
parallel block recovery, Oracle uses a "division of labor" approach to allocate
different processes to different data blocks while rolling forward, thereby making
the procedure more efficient. For example, if the redo log contains a substantial
number of entries, spawned process 1 takes responsibility for one part of the log
file, process 2 takes responsibility for another part, process 3 takes responsibility for
a third part, etc.
Use the following SQL*Plus RECOVER statement to perform parallel media
recovery:
RECOVER PARALLEL ... ;
The PARALLEL clause of the RECOVER statement has the following options:
For example, to specify that 5 recovery processes should operate during recovery,
specify as follows:
RECOVER DEGREE 5 ... ;
Note: Typically, recovery is I/O-bound on reads to data blocks.
Consequently, parallelism at the block level may only help recovery
performance if it increases total I/Os, for example, by bypassing
operating system restrictions on asynchronous I/Os. Systems that
have efficient asynchronous I/O typical see little improvement
from using parallel block recovery.
DEGREE integer Specifies the number of recovery processes used to apply redoentries to datafiles on each instance.
DEGREE DEFAULT Indicates that twice the number of datafiles being recovered is thenumber of recovery processes to use.
INSTANCES integer Specifies the number of instances to use for parallel recovery. Thenumber of recovery processes specified with DEGREE is used oneach instance. Thus, the total number of recovery processes is theinteger specified with DEGREE multiplied by the integer specifiedwith INSTANCES. INSTANCES is only pertinent for the OracleParallel Server.
INSTANCESDEFAULT
Has operating system-specific consequences. For more informationabout the default behavior of the INSTANCES DEFAULTspecification, see the Oracle8i Parallel Server Documentation Set:Oracle8i Parallel Server Concepts; Oracle8i Parallel Server Setup andConfiguration Guide; Oracle8i Parallel Server Administration,Deployment, and Performance manual.
5-18 Oracle8i Backup and Recovery Guide
Performing Complete Media Recovery
In a different scenario, assume that you are recovering 10 datafiles. Issue the
following statement to specify that 20 processes should perform recovery:
RECOVER DEGREE DEFAULT;
Performing Complete Media RecoveryWhen you perform complete recovery, you can either recover the whole database at
once or recover individual tablespaces or datafiles. Because you do not have to open
the database with the RESETLOGS option after complete recovery as you do after
incomplete recovery, you have the option of recovering some datafiles at one time
and the remaining datafiles later.
This section describes the steps necessary to complete media recovery operations,
and includes the following topics:
■ Performing Closed Database Recovery
■ Performing Open Database Recovery
Performing Closed Database RecoveryThis section describes steps to perform closed database recovery of either all
damaged datafiles in one operation, or individual recovery of each damaged
datafile in separate operations.
Note: The RECOVERY_PARALLELISM initialization parameter
specifies the number of concurrent recovery processes for instance
or crash recovery only. Media recovery is not affected by this
parameter.
See Also:
■ Oracle8i Designing and Tuning for Performance for more information onparallel recovery
■ Oracle8i Reference for more information about the RECOVERY_PARALLELISM parameter
■ SQL*Plus User’s Guide and Reference for more information about theSQL*Plus RECOVER statement
See Also: Chapter 3, "Developing a Backup and Recovery
Strategy" to familiarize yourself with fundamental recovery
concepts and strategies
Performing Media Recovery 5-19

Performing Complete Media Recovery
Perform the media recovery in these stages:
1. Shut down the database and correct the media damage if possible.
2. Restore the necessary files.
3. Recover the database.
To prepare for closed database recovery:
1. If the database is open, shut it down using the ABORT option:
SHUTDOWN ABORT
2. If you are recovering from a media error, correct it if possible.
3. If the hardware problem that caused the media failure was temporary, and the
data was undamaged (for example, a disk or controller power failure), simply
start the database and resume normal operations:
STARTUP
To restore the necessary files:
1. Determine which datafiles to recover using the techniques described in
"Determining Which Files to Recover" on page 5-2.
2. If files are permanently damaged, identify the most recent backups for the
damaged files. Restore only the datafiles damaged by the media failure: do not
restore any undamaged datafiles or any online redo log files.
For example, if /oracle/dbs/tbs_10.f is the damaged file, you may consult
your records and determine that /oracle/backup/tbs_10.backup is the
most recent backup. If you do not have a backup of a specific datafile, you may
be able to create an empty replacement file that can be recovered.
3. Use an operating system utility to restore the files to their default location or to
a new location. For example, a UNIX user restoring /oracle/dbs/tbs_10.fto its default location might enter:
% cp /oracle/backup/tbs_10.backup /oracle/dbs/tbs_10.f
Follow these guidelines when determining where to restore datafile backups:
5-20 Oracle8i Backup and Recovery Guide

Performing Complete Media Recovery
To recover the restored datafiles:
1. Connect to Oracle with administrator privileges, then start a new instance and
mount, but do not open, the database. For example, enter:
STARTUP MOUNT
2. Obtain the datafile names of all datafiles by checking the list of datafiles that
normally accompanies the current control file or querying the V$DATAFILE
view. For example, enter:
SELECT name FROM v$datafile;
3. Ensure that all datafiles of the database are online. For example, to guarantee
that a datafile named /oracle/dbs/tbs_10.f is online, enter the following:
ALTER DATABASE DATAFILE '/oracle/dbs/tbs_10.f' ONLINE;
If a specified datafile is already online, Oracle ignores the statement. If you
prefer, create a script to bring all datafiles online at once as in the following:
SPOOL onlineall.sqlSELECT 'ALTER DATABASE DATAFILE '''||name||''' ONLINE;' FROM v$datafile;SPOOL OFF@onlineall
4. Issue the statement to recover the database, tablespace, or datafile. For example,
enter:
RECOVER DATABASE # recovers whole databaseRECOVER TABLESPACE users # recovers specific tablespaceRECOVER DATAFILE '/oracle/dbs/tbs_10'; # recovers specific datafile
Follow these guidelines when deciding which statement to execute:
If... Then...
The hardware problem is repairedand you can restore the datafiles totheir default locations
Restore the datafiles to their default locations andbegin media recovery.
The hardware problem persists andyou cannot restore datafiles to theiroriginal locations
Restore the datafiles to an alternative storagedevice. Indicate the new location of these files to thecontrol file. Use the operation described in"Renaming and Relocating Datafiles" in the Oracle8iAdministrator’s Guide, as necessary.
Performing Media Recovery 5-21
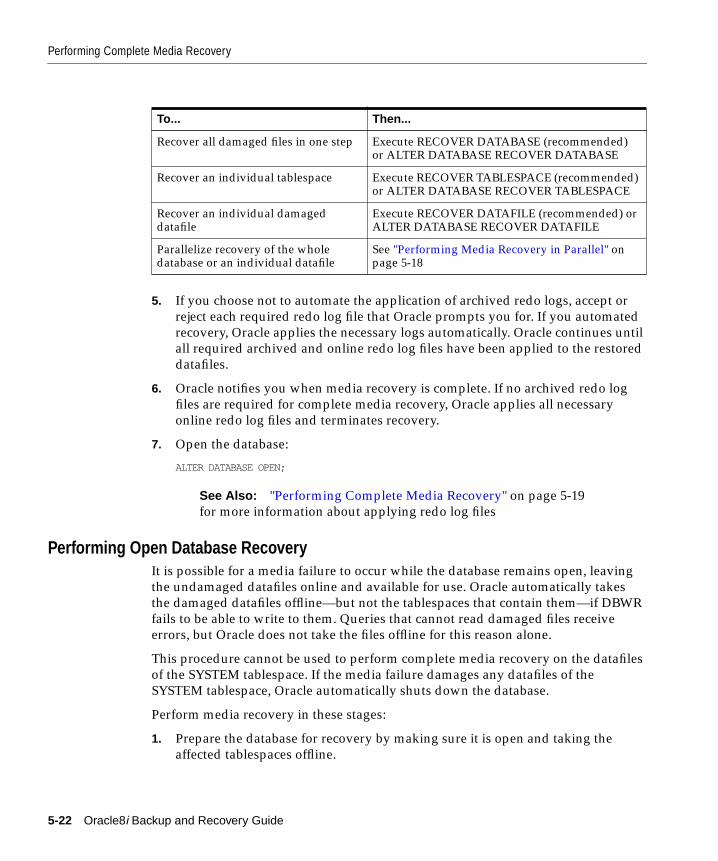
Performing Complete Media Recovery
5. If you choose not to automate the application of archived redo logs, accept or
reject each required redo log file that Oracle prompts you for. If you automated
recovery, Oracle applies the necessary logs automatically. Oracle continues until
all required archived and online redo log files have been applied to the restored
datafiles.
6. Oracle notifies you when media recovery is complete. If no archived redo log
files are required for complete media recovery, Oracle applies all necessary
online redo log files and terminates recovery.
7. Open the database:
ALTER DATABASE OPEN;
Performing Open Database RecoveryIt is possible for a media failure to occur while the database remains open, leaving
the undamaged datafiles online and available for use. Oracle automatically takes
the damaged datafiles offline—but not the tablespaces that contain them—if DBWR
fails to be able to write to them. Queries that cannot read damaged files receive
errors, but Oracle does not take the files offline for this reason alone.
This procedure cannot be used to perform complete media recovery on the datafiles
of the SYSTEM tablespace. If the media failure damages any datafiles of the
SYSTEM tablespace, Oracle automatically shuts down the database.
Perform media recovery in these stages:
1. Prepare the database for recovery by making sure it is open and taking the
affected tablespaces offline.
To... Then...
Recover all damaged files in one step Execute RECOVER DATABASE (recommended)or ALTER DATABASE RECOVER DATABASE
Recover an individual tablespace Execute RECOVER TABLESPACE (recommended)or ALTER DATABASE RECOVER TABLESPACE
Recover an individual damageddatafile
Execute RECOVER DATAFILE (recommended) orALTER DATABASE RECOVER DATAFILE
Parallelize recovery of the wholedatabase or an individual datafile
See "Performing Media Recovery in Parallel" onpage 5-18
See Also: "Performing Complete Media Recovery" on page 5-19
for more information about applying redo log files
5-22 Oracle8i Backup and Recovery Guide

Performing Complete Media Recovery
2. Restore the necessary files.
3. Recover the database.
To prepare for open database recovery when the database is shut down:
1. Start a new instance, and mount and open the database. For example, enter:
STARTUP
2. After the database is open, take all tablespaces that contain damaged datafiles
offline. For example, if tablespace TBS_1 contains damaged datafiles, enter:
ALTER TABLESPACE tbs_1 OFFLINE TEMPORARY;
3. Correct the hardware problem that caused the media failure. If the hardware
problem cannot be repaired quickly, proceed with database recovery by
restoring damaged files to an alternative storage device.
To prepare for recovery in an open database:
1. If the database is open when you discover that recovery is required, take all
tablespaces containing damaged datafiles offline. For example, if tablespace
TBS_1 contains damaged datafiles, enter:
ALTER TABLESPACE tbs_1 OFFLINE TEMPORARY;
2. Correct the hardware problem that caused the media failure. If the hardware
problem cannot be repaired quickly, proceed with database recovery by
restoring damaged files to an alternative storage device.
To restore datafiles in an open database:
1. If files are permanently damaged, restore the most recent backup files of onlythe datafiles damaged by the media failure. Do not restore undamaged
datafiles, online redo log files, or control files. If the hardware problem has been
repaired and the datafiles can be restored to their original locations, do so. If the
hardware problem persists, restore the datafiles to an alternative storage device
of the database server.
See Also: "Performing Closed Database Recovery" on page 5-19
for procedures for proceeding with complete media recovery of
SYSTEM tablespaces datafiles
Performing Media Recovery 5-23

Performing Complete Media Recovery
2. If you restored one or more damaged datafiles to alternative locations, indicate
the new locations of these files to the control file of the associated database by
using the procedure in the Oracle8i Administrator’s Guide.
To recover offline tablespaces in an open database:
1. Connect to the database with administrator privileges. For example, connect as
SYS to database PROD1:
% sqlplus sys/oracle@prod1
2. Start offline tablespace recovery of all damaged datafiles in one or more offline
tablespaces using one step:
RECOVER TABLESPACE tbs_1 # begins recovery on datafiles in tbs_1
3. Oracle begins the roll forward phase of media recovery by applying the
necessary redo log files (archived and online) to reconstruct the restored
datafiles. Unless the applying of files is automated using SET
AUTORECOVERY ON, Oracle prompts for each required redo log file.
Oracle continues until all required archived redo log files have been applied to
the restored datafiles. The online redo log files are then automatically applied to
the restored datafiles to complete media recovery.
If no archived redo log files are required for complete media recovery, Oracle
does not prompt for any. Instead, all necessary online redo log files are applied,
and media recovery is complete.
4. When the damaged tablespaces are recovered up to the moment that media
failure occurred, bring the offline tablespaces online. For example, to bring
tablespace TBS_1 online, issue:
ALTER TALBESPACE tbs_1 ONLINE;
Note: If you do not have a backup of a specific datafile, you can
use ALTER DATABASE CREATE DATAFILE to create an empty
replacement file, which can be recovered.
Note: For maximum performance, use parallel recovery to recover
the datafiles. See"Performing Media Recovery in Parallel" on
page 5-18.
5-24 Oracle8i Backup and Recovery Guide
Performing Incomplete Media Recovery
Performing Incomplete Media RecoveryThis section describes the steps necessary to complete the different types of
incomplete media recovery operations, and includes the following topics:
■ Performing Cancel-Based Recovery
■ Performing Time-Based Recovery
■ Performing Change-Based Recovery
Note that if your database is affected by seasonal time changes (for example,
daylight savings time), you may experience a problem if a time appears twice in the
redo log and you want to recover to the second, or later time. To deal with time
changes, perform cancel-based or change-based recovery to the point in time where
the clock is set back, then continue with the time-based recovery to the exact time.
Performing Cancel-Based RecoveryThis section describes how to perform cancel-based media recovery in these stages:
1. Prepare for recovery by backing up the database and correct any media failures.
2. Restore backup control files (if necessary) and backup datafiles.
3. Perform media recovery on the restored backup using the RECOVER
DATABASE statement, terminating it with a CANCEL.
To prepare for cancel-based recovery:
1. If the database is still open and incomplete media recovery is necessary, abort
the instance:
SHUTDOWN ABORT
2. Make a whole backup of the database—all datafiles, a control file, and the
parameter files of the database—as a precautionary measure in case an error
occurs during the recovery procedure.
3. If a media failure occurred, correct the hardware problem that caused the
failure. If the hardware problem cannot be repaired quickly, proceed with
database recovery by restoring damaged files to an alternative storage device.
See Also: Oracle8i Administrator’s Guide for more information
about creating datafiles.
Performing Media Recovery 5-25

Performing Incomplete Media Recovery
To restore the files necessary for cancel-based recovery:
1. If the current control files do not match the physical structure of the database at
the intended time of recovery, for example, if a datafile was added after the
point in time to which you intend to recover, then restore a backup of the
control file.
The restored control file should reflect the database's physical file structure, that
is, contain the names of datafiles and online redo log files, at the point at which
incomplete media recovery is intended to finish. Review the list of files that
correspond to the current control file as well as each control file backup to
determine the correct control file to use.
If necessary, replace all current control files of the database with the correct
control file backup. Alternatively, create a new control file.
2. Restore backups taken as part of a full or partial backup of all the datafiles of
the database. You must have taken all backup files used to replace existing
datafiles before the intended time of recovery. For example, if you intend to
recover to redo log sequence number 38, then restore all datafiles with backups
completed before redo log sequence number 38.
3. If you do not have a backup of a specific datafile, create an empty replacement
file that can be recovered. If you added a datafile after the intended time of
recovery, you do not need to restore a backup for this file since it will no longer
be used for the database after recovery is complete.
4. If you solved the hardware problem that caused a media failure and can restore
all datafiles to their original locations, then restore the files. If a hardware
problem persists, restore damaged datafiles to an alternative storage device.
Note: If a database control file cannot function or be replaced with
a control file backup, take it out of the CONTROL_FILES parameter
list in the parameter file associated with the database.
Note: Files in read-only tablespaces should be taken offline if you
are using a control file backup. Otherwise, recovery will try to
update the headers of the read-only files.
5-26 Oracle8i Backup and Recovery Guide

Performing Incomplete Media Recovery
To perform cancel-based recovery:
1. Start SQL*Plus and connect to Oracle with administrator privileges. For
example, enter:
% sqlplus sys/change_on_install@prod1
2. Start a new instance and mount the database:
STARTUP MOUNT
3. If you restored one or more damaged datafiles to alternative locations, indicate
the new locations of these files to the control file of the associated database.
4. Begin cancel-based recovery:
RECOVER DATABASE UNTIL CANCEL
If you are using a backup control file with this incomplete recovery, specify the
USING BACKUP CONTROLFILE option in the RECOVER statement.
RECOVER DATABASE UNTIL CANCEL USING BACKUP CONTROLFILE
5. Oracle applies the necessary redo log files to reconstruct the restored datafiles.
Unless the application of files is automated, Oracle supplies the name it expects
to find from LOG_ARCHIVE_DEST_1 or LOG_ARCHIVE_DEST and requests
you to stop or proceed with applying the log file. Note that if the control file is a
backup file, you must supply names of online logs.
6. Continue applying redo log files until the most recent, undamaged redo log file
has been applied to the restored datafiles.
Note: If you do not specify the UNTIL CANCEL clause on the
RECOVER statement, you will not be able to open the database
until a complete recovery is done.
Note: If you use an OPS configuration, and you are performing
incomplete recovery or using a backup control file, then Oracle can
only compute the name of the first archived redo log file from the
first thread. The first redo log file from the other threads must be
supplied by the user. Once the first log file in a given thread has
been supplied, Oracle can suggest the names of the subsequent log
files in those threads.
Performing Media Recovery 5-27

Performing Incomplete Media Recovery
7. Cancel recovery after Oracle has applied the redo log file just prior to the
damaged file:
CANCEL
Oracle returns a message indicating whether recovery is successful. Note that if
you cancel recovery before it is complete and then try to open the database, you
will get an ORA-1113 error if more recovery is necessary for the file.
Performing Time-Based RecoveryThis section describes how to perform the time-based media recovery procedure in
these stages:
1. Back up the database as a precaution and correct any media failures.
2. Restore backup control files (if necessary) and backup datafiles.
3. Perform media recovery on the restored backup using the RECOVER
DATABASE statement with the UNTIL TIME option.
To prepare for time-based recovery:
Follow the same preparation procedure described in the section "Performing
Cancel-Based Recovery" on page 5-28.
To restore the files necessary for time-based recovery and bring them online:
1. If the current control files do not match the physical structure of the database at
the intended time of recovery, restore a backup control file that reflects the
database's physical file structure at the point at which incomplete media
recovery should finish. To determine which control file backup to use:
■ Review the list of files that corresponds to the current control file and each
control file backup to determine the correct control file to use.
■ If necessary, replace all current control files of the database with the correct
control file backup.
■ Alternatively, create a new control file to replace the missing one.
Note: If you are performing time-based, incomplete recovery
using a backup control file and have read-only tablespaces, contact
Oracle Support before attempting this procedure.
5-28 Oracle8i Backup and Recovery Guide

Performing Incomplete Media Recovery
2. Restore backups of all the datafiles of the database. All backups used to replace
existing datafiles must have been taken before the intended time of recovery.
For example, if you intend to recover to January 2 at 2:00 p.m., then restore all
datafiles with backups completed before this time. Follow these guidelines:
3. Start SQL*Plus and connect to Oracle with administrator privileges. For
example, enter:
% sqlplus sys/change_on_install@prod1
4. Start a new instance and mount the database:
STARTUP MOUNT
5. If one or more damaged datafiles were restored to alternative locations in
Step 2, indicate the new locations of these files to the control file of the
associated database. For example, enter:
ALTER DATABASE RENAME FILE "/oracle/dbs/df2.f" TO "/oracle/newloc/df2.f";
Note: If a database control file cannot function or be replaced with
a control file backup, take it out of the CONTROL_FILES parameter
list in the parameter file associated with the database.
If... Then...
You do not have a backup of a datafile Create an empty replacement file, which canbe recovered.
A datafile was added after the intendedtime of recovery
Do not restore a backup of this file, since itwill no longer be used for the database afterrecovery completes.
The hardware problem causing the failurehas been solved and all datafiles can berestored to their default locations
Restore the files and skip Step 5 of thisprocedure.
A hardware problem persists Restore damaged datafiles to an alternativestorage device.
Note: Files in read-only tablespaces should be offline if you are
using a control file backup. Otherwise, the recovery will try to
update the headers of the read-only files.
Performing Media Recovery 5-29

Performing Incomplete Media Recovery
6. Obtain the names of all datafiles requiring recovery by:
■ Checking the list of datafiles that normally accompanies the control file
being used.
■ Querying the V$DATAFILE view.
7. Make sure that all datafiles of the database are online. All datafiles of the
database must be online unless an offline tablespace was taken offline normally.
For example, to guarantee that a datafile named user1 (a fully specified
filename) is online, enter the following statement:
ALTER DATABASE DATAFILE 'users1' ONLINE;
If a backup of the control file is being used with this incomplete recovery (that
is, a control file backup or re-created control file was restored), indicate this in
the dialog box or command used to start recovery. If a specified datafile is
already online, Oracle ignores the statement.
To perform time-based recovery:
1. Issue the RECOVER DATABASE UNTIL TIME statement to begin time-based
recovery. The time is always specified using the following format, delimited by
single quotation marks: 'YYYY-MM-DD:HH24:MI:SS'. The following statement
recovers the database up to a specified time using a control file backup:
RECOVER DATABASE UNTIL TIME '1992-12-31:12:47:30' USING BACKUP CONTROLFILE
2. Apply the necessary redo log files to reconstruct the restored datafiles. Unless
the application of files is automated, Oracle supplies the name it expects to find
from LOG_ARCHIVE_DEST_1 or LOG_ARCHIVE_DEST and requests you to
stop or proceed with applying the log file. If the control file is a backup, you
must supply names of online logs.
3. Apply redo log files until the last required redo log file has been applied to the
restored datafiles. Oracle automatically terminates the recovery when it reaches
the correct time, and returns a message indicating whether recovery is
successful.
Performing Change-Based RecoveryThis section describes how to perform recovery to a specified SCN in these stages:
1. Back up the database as a precaution and correct any media failures.
2. Restore backup control files (if necessary) and backup datafiles.
5-30 Oracle8i Backup and Recovery Guide

Opening the Database After Media Recovery
3. Perform media recovery on the restored backup using the RECOVER
DATABASE statement with the UNTIL CHANGE option.
To prepare for change-based recovery:
Follow the same preparation procedure described in the section "Performing
Cancel-Based Recovery" on page 5-28.
To restore files necessary for change-based recovery:
Follow the same restore procedure described in the section "Performing Time-Based
Recovery" on page 5-28.
To perform change-based recovery:
1. Begin change-based recovery, specifying the SCN for recovery termination. The
SCN is specified as a decimal number without quotation marks. For example, to
recover through SCN 100 issue:
RECOVER DATABASE UNTIL CHANGE 100;
2. Oracle begins the roll forward phase of media recovery by applying the
necessary redo log files (archived and online) to reconstruct the restored
datafiles. Unless the application of files is automated, Oracle supplies the name
it expects to find from LOG_ARCHIVE_DEST_1 or LOG_ARCHIVE_DEST and
requests you to stop or proceed with applying the log file. If the control file is a
backup file, you must supply names of online logs. Oracle continues to apply
redo log files.
3. Continue applying redo log files until the last required redo log file has been
applied to the restored datafiles. Oracle automatically terminates the recovery
when it reaches the correct SCN, and returns a message indicating whether
recovery is successful.
Opening the Database After Media RecoveryWhenever you perform incomplete recovery or perform recovery using a backup
control file, you must reset the online redo logs when you open the database. The
new version of the reset database is called a new incarnation. All archived redo logs
generated after the point of the RESETLOGS on the old incarnation are invalid in
the new incarnation.
If you perform complete recovery, then you do not have to open the database with
the RESETLOGS option: you simply open the database as normal. All previous
Performing Media Recovery 5-31

Opening the Database After Media Recovery
backups and archived logs created during the lifetime of this incarnation of the
database are still valid.
This section contains the following topics:
■ What Is a RESETLOGS Operation?
■ Determining Whether to Reset the Online Redo Logs
■ Following Up After a RESETLOGS Operation
■ Recovering a Pre-RESETLOGS Backup
What Is a RESETLOGS Operation?Whenever you open the database with the RESETLOGS option, all datafiles get a
new RESETLOGS SCN and timestamp. Archived redo logs also have these two
values in their header. Because Oracle will not apply an archived redo log to a
datafile unless the RESETLOGS SCN and timestamps match, the RESETLOGS
operations prevents you from corrupting your datafiles with old archived logs.
Figure 5–1 shows the case of a database that can only be recovered to SCN 2500
because an archived redo log is missing. At SCN 4000, the database crashes. You
restore the SCN 1000 backup and prepare for complete recovery. Unfortunately, one
of your archived redo logs is corrupted. The log before the missing log contains
SCN 2500, so you recover to this point and open with the RESETLOGS option.
As the diagram illustrates, you generate new changes in the new incarnation of the
database, eventually reaching SCN 4000. The changes between SCN 2500 and SCN
4000 for the new incarnation of the database are completely different from the
changes between SCN 2500 and SCN 4000 for the old incarnation. Oracle does not
allow you to apply logs from an old incarnation to the new incarnation. You cannot
restore backups from before SCN 2500 in the old incarnation to the new incarnation.
5-32 Oracle8i Backup and Recovery Guide

Opening the Database After Media Recovery
Figure 5–1 Creating a New Database Incarnation
Determining Whether to Reset the Online Redo LogsThe RESETLOGS option is required after incomplete media recovery or recovery
using a backup control file. Resetting the redo log:
■ Discards any redo information that was not applied during recovery, ensuring
that it will never be applied.
■ Re-initializes the control file information about online redo logs and redo
threads.
■ Clears the contents of the online redo logs.
■ Creates the online redo log files if they do not currently exist.
23
SCN1000
SCN2000
SCN2500
SCN3000
SCN4000
Restoredatabase
Database crashes
Recover databaseto 2500 and thenOPEN RESETLOGS
Generate redo fornew incarnation
SCN10
00
SCN20
00
SCN30
00
4
SCN40
00
1
Performing Media Recovery 5-33

Opening the Database After Media Recovery
■ Resets the log sequence number to 1.
.
Use the following rules when deciding whether to specify RESETLOGS or
NORESETLOGS:
■ Always specify the RESETLOGS option after incomplete media recovery. For
example, you must have specified a previous time or SCN, not one in the
future.
■ Specify the NORESETLOGS option after performing complete media recovery
(unless you used a backup control file). This rule applies when you
intentionally performed complete recovery and when you performed
incomplete recovery but actually recovered all changes in the redo logs anyway.
■ Always specify the RESETLOGS option if you used a backup of the control file
in recovery, regardless of whether you performed complete or incomplete
recovery.
■ Do not specify the RESETLOGS option if you are using the archived logs of the
database for a standby database. If you must reset the online logs, then you
have to re-create the standby database.
Executing the ALTER DATABASE OPEN StatementsTo preserve the log sequence number when opening a database after media
recovery, execute the following statement:
ALTER DATABASE OPEN NORESETLOGS;
To reset the log sequence number when opening a database after recovery, execute
the following statement:
ALTER DATABASE OPEN RESETLOGS;
If you open with the RESETLOGS option, Oracle returns different messages
depending on whether recovery was complete or incomplete. If the recovery was
complete, the following message appears in the alert.log file:
RESETLOGS after complete recovery through change scn
If the recovery was incomplete, this message is reported in the ALERT file:
WARNING: Resetting the redo log discards all changes to thedatabase made since the first discarded redo information.Updates entered after that time must be re-entered manually.
5-34 Oracle8i Backup and Recovery Guide

Opening the Database After Media Recovery
RESETLOGS after incomplete recovery UNTIL CHANGE scn
If you attempt to reset the log when you should not, or if you neglect to reset the log
when you should, Oracle returns an error and does not open the database. Correct
the error and try again.
Following Up After a RESETLOGS OperationThis section describes actions that you should perform after opening the database in
RESETLOGS mode:
■ Making a Whole Database Backup
■ Checking the Alert Log
Making a Whole Database Backup Immediately shut down the database normally and
make a full database backup. Otherwise, you cannot recover changes made after
you reset the logs. Until you take a full backup, the only way to recover is to repeat
the procedures you just finished, up to resetting the logs. You do not need to back
up the database if you did not reset the log sequence.
In general, backups made before a RESETLOGS operation are not allowed in the
new incarnation. There is, however, an exception to the rule: you can restore a
pre-RESETLOGS backup only if Oracle does not need to access archived redo logs
from before the RESETLOGS to perform recovery.
Checking the Alert Log After opening the database using the RESETLOGS option,
check the alert.log to see whether Oracle detected inconsistencies between the
data dictionary and the control file, for example, a datafile that the data dictionary
includes but does not list in the new control file.
If a datafile exists in the data dictionary but not in the new control file, Oracle
creates a placeholder entry in the control file under MISSINGnnnn (where nnnn is
the file number in decimal). MISSINGnnnn is flagged in the control file as being
offline and requiring media recovery.
The actual datafile corresponding to MISSINGnnnn can be made accessible by
renaming MISSINGnnnn so that it points to the datafile only if the datafile was
read-only or offline normal. If, on the other hand, MISSINGnnnn corresponds to a
datafile that was not read-only or offline normal, then the rename operation cannot
be used to make the datafile accessible, because the datafile requires media recovery
See Also: "Recovering a Pre-RESETLOGS Backup" on page 5-36.
Performing Media Recovery 5-35

Opening the Database After Media Recovery
that is precluded by the results of RESETLOGS. In this case, you must drop the
tablespace containing the datafile.
In contrast, if a datafile indicated in the control file is not present in the data
dictionary, Oracle removes references to it from the new control file. In both cases,
Oracle includes an explanatory message in the alert.log file to let you know
what was found.
Recovering a Pre-RESETLOGS BackupIn pre-Oracle8 releases, DBAs typically backed up online logs when performing
cold consistent backups to avoid opening the database with the RESETLOGS option
(if they were planning to restore immediately).
A classic example of this technique was disk maintenance, which required the
database to be backed up, deleted, the disks reconfigured, and the database
restored. DBAs realized that by not restarting in RESETLOGS mode, they would not
have to perform a whole database backup immediately after the database was
restored. This backup was required since it was impossible to perform recovery
using a backup taken before using RESETLOGS—especially if any errors occurred
after resetting the logs.
Restoring Pre-RESETLOGS BackupsIt is possible to restore the following types of pre-RESETLOGS backups in a new
incarnation:
■ Backups of a tablespace made after it was made read-only (only if it was not
made read-write again before the RESETLOGS)
■ Backups of a tablespace after it was taken offline-normal (only if it was not
brought online again before the RESETLOGS)
■ Consistent backups of read-write tablespaces made after recovery ends and
before you open RESETLOGS, that is, you do not perform further recovery or
alter the datafiles between the backup and the RESETLOGS—but only if you
have a control file that is valid after you open the database with RESETLOGS
You are prevented from restoring backups of read-write tablespaces that were notmade immediately before the RESETLOGS. This restriction applies even if no
changes were made to the datafiles in the read-write tablespace between the backup
and the RESETLOGS. Because the checkpoint in the datafile header of a backup will
be older than the checkpoint in the control file, Oracle has to search the archived
logs to determine whether changes need to be applied—and the pre-RESETLOGS
archived logs are not valid in the new incarnation.
5-36 Oracle8i Backup and Recovery Guide
Opening the Database After Media Recovery
Restoring a Pre-RESETLOGS Backup: ScenarioThe following scenario illustrates a situation when you can use a pre-RESETLOGS
backup. Suppose you wish to perform hardware striping reconfiguration, which
requires the database files to be backed up and deleted, the hardware reconfigured,
and the database restored.
On Friday night you perform the following actions:
1. Cleanly shut down the database:
SHUTDOWN IMMEDIATE
2. Perform a whole database backup. For example, enter
% cp /oracle/dbs/* /oracle/backup
3. Perform operating system maintenance.
4. Restore the datafiles and control files from the backup that you just made. For
example, enter:
% cp /oracle/backup/* /oracle/dbs
5. Mount the database:
STARTUP MOUNT
6. Initiate cancel-based recovery:
RECOVER DATABASE UNTIL CANCEL
7. Open the database with the RESETLOGS option:
ALTER DATABASE OPEN RESETLOGS;
On Saturday morning the scheduled batch jobs run, generating archived redo logs.
If a hardware error occurs on Saturday night that requires you to restore the whole
database, then you can restore the backup taken immediately before opening the
database with the RESETLOGS option, and roll forward using the logs produced on
Saturday.
On Saturday night you do the following:
1. Abort the instance (if it still exists):
SHUTDOWN ABORT
Note: At this point you must not reopen the database.
Performing Media Recovery 5-37

Opening the Database After Media Recovery
2. Restore all damaged files from the backup made on Friday night:
% cp /oracle/backup/* /oracle/dbs
3. Begin complete recovery, applying all the archived logs produced on Saturday.
Use SET AUTORECOVERY ON to automate the log application.
SET AUTORECOVERY ONRECOVER DATABASE
4. Open the database:
STARTUP
In this scenario, if you had opened the database after the Friday night backup and
before opening the database with RESETLOGS, or, did not have a control file from
after opening the database, you would not be able to use the Friday night backup to
roll forward. You must have a backup after opening the database with the
RESETLOGS option in order to be able to recover.
Note: If you have the current control file, do not restore it;
otherwise you must restore a control file that was valid after
opening the database with RESETLOGS.
5-38 Oracle8i Backup and Recovery Guide

Media Recovery
6
Media Recovery ScenariosThis chapter describes how to recover from common media failures, and includes
the following topics:
■ Understanding the Types of Media Failures
■ Recovering After the Loss of Datafiles
■ Recovering Through an ADD DATAFILE Operation
■ Recovering Transported Tablespaces
■ Recovering After the Loss of Online Redo Log Files
■ Recovering After the Loss of Archived Redo Log Files
■ Recovering After the Loss of Control Files
■ Recovering from User Errors
■ Performing Media Recovery in a Distributed Environment
Scenarios 6-1
Understanding the Types of Media Failures
Understanding the Types of Media FailuresMedia failures fall into two general categories: permanent and temporary. Use
different recovery strategies depending on the type of failure.
Permanent media failures are serious hardware problems that cause permanent loss
of data on the disk. Lost data cannot be recovered except by repairing or replacing
the failed storage device and restoring backups of the files stored on the damaged
storage device.
Temporary media failures are hardware problems that make data temporarily
inaccessible, but do not corrupt the data. Following are two examples of temporary
media failures:
■ A disk controller fails. Once the disk controller is replaced, Oracle can access the
data on the disk.
■ Power to a storage device is cut off. Once the power is returned, the storage
device and all associated data is accessible again.
Recovering After the Loss of DatafilesIf a media failure affects datafiles, the appropriate recovery procedure depends on:
■ The archiving mode of the database: ARCHIVELOG or NOARCHIVELOG.
■ The type of media failure.
■ The files affected by the media failure.
The following sections explain the appropriate recovery strategies for the database
mode:
■ Losing Datafiles in NOARCHIVELOG Mode
■ Losing Datafiles in ARCHIVELOG Mode
Losing Datafiles in NOARCHIVELOG ModeIf either a permanent or temporary media failure affects any datafiles of a database
operating in NOARCHIVELOG mode, then Oracle automatically shuts down the
6-2 Oracle8i Backup and Recovery Guide

Recovering Through an ADD DATAFILE Operation
database. Depending on the type of media failure, you can use one of the following
recovery methods:
Losing Datafiles in ARCHIVELOG ModeIf either a permanent or temporary media failure affects the datafiles of a database
operating in ARCHIVELOG mode, then the following scenarios can occur.
Recovering Through an ADD DATAFILE OperationIf database recovery rolls forward through an ADD DATAFILE operation, then
Oracle stops recovery when applying the ADD DATAFILE redo record and lets you
confirm the location of the added file.
For example, suppose you create a new tablespace containing two datafiles:
/db/db2.f and /db/db3.f . If you later perform media recovery through the
CREATE TABLESPACE operation, Oracle may signal the following error when
applying the CREATE TABLESPACE redo data:
If the media failure is... Then...
Temporary Correct the hardware problem and restart the database. Usually,instance recovery is possible, and all committed transactionscan be recovered using the online redo log.
Permanent Follow the procedure "Recovering a Database inNOARCHIVELOG Mode" on page 5-15.
Damaged Datafiles Database Status Solution
Datafiles in theSYSTEM tablespace ordatafiles with activerollback segments.
Oracle shuts down. If the hardware problem is temporary, thenfix it and restart the database. Usually,instance recovery recovers losttransactions.
If the hardware problem is permanent,follow the procedure in "PerformingClosed Database Recovery" on page 5-19.
Non-SYSTEM datafilesor datafiles that do notcontain active rollbacksegments.
Oracle takesaffected datafilesoffline, but thedatabase stays open.
If the unaffected portions of the databasemust remain available, then do not shutdown the database. Take tablespacescontaining problem datafiles offline usingthe temporary option, then follow theprocedure in "Performing Open DatabaseRecovery" on page 5-22.
Media Recovery Scenarios 6-3
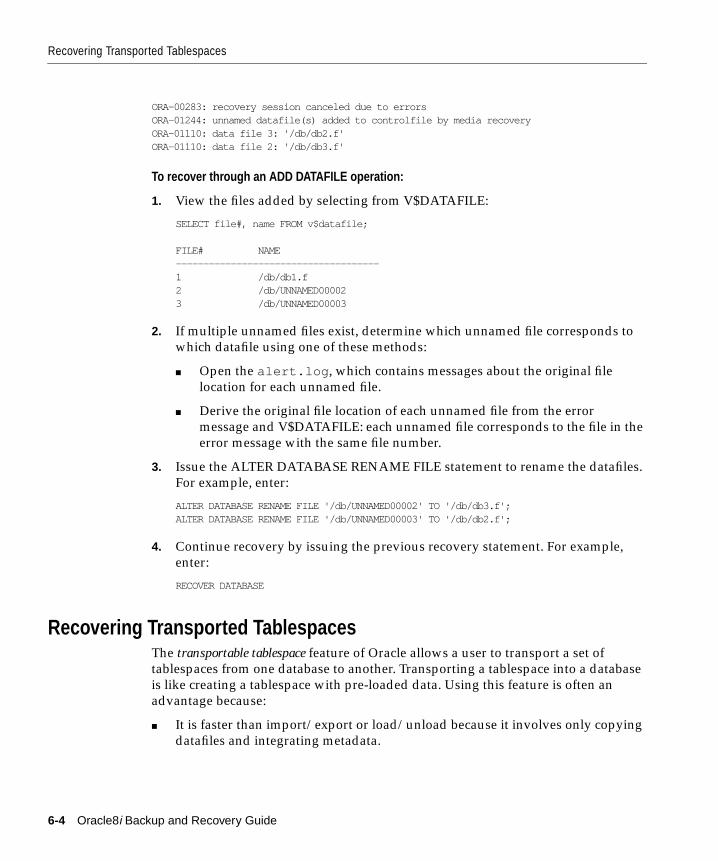
Recovering Transported Tablespaces
ORA-00283: recovery session canceled due to errorsORA-01244: unnamed datafile(s) added to controlfile by media recoveryORA-01110: data file 3: '/db/db2.f'ORA-01110: data file 2: '/db/db3.f'
To recover through an ADD DATAFILE operation:
1. View the files added by selecting from V$DATAFILE:
SELECT file#, name FROM v$datafile;
FILE# NAME-------------------------------------1 /db/db1.f2 /db/UNNAMED000023 /db/UNNAMED00003
2. If multiple unnamed files exist, determine which unnamed file corresponds to
which datafile using one of these methods:
■ Open the alert.log , which contains messages about the original file
location for each unnamed file.
■ Derive the original file location of each unnamed file from the error
message and V$DATAFILE: each unnamed file corresponds to the file in the
error message with the same file number.
3. Issue the ALTER DATABASE RENAME FILE statement to rename the datafiles.
For example, enter:
ALTER DATABASE RENAME FILE '/db/UNNAMED00002' TO '/db/db3.f';ALTER DATABASE RENAME FILE '/db/UNNAMED00003' TO '/db/db2.f';
4. Continue recovery by issuing the previous recovery statement. For example,
enter:
RECOVER DATABASE
Recovering Transported TablespacesThe transportable tablespace feature of Oracle allows a user to transport a set of
tablespaces from one database to another. Transporting a tablespace into a database
is like creating a tablespace with pre-loaded data. Using this feature is often an
advantage because:
■ It is faster than import/export or load/unload because it involves only copying
datafiles and integrating metadata.
6-4 Oracle8i Backup and Recovery Guide
Recovering After the Loss of Online Redo Log Files
■ You can use it to move index data, which allows you to avoid having to rebuild
indexes.
Like normal tablespaces, transportable tablespaces are recoverable. While you can
recover normal tablespaces without a backup, you must have a version of the
transported datafiles in order to recover a plugged-in tablespace.
To recover a transportable tablespace, restore a backup of the transported datafiles
and issue normal recovery commands. The backup can be the initial version of the
transported datafiles or any backup taken after the tablespace is transported. Just as
when recovering through a CREATE TABLESPACE operation, Oracle may signal
ORA-01244 when recovering through a transportable tablespace operation. In this
case, rename the unnamed files to the correct locations using the procedure in
"Recovering Through an ADD DATAFILE Operation" on page 6-3.
Recovering After the Loss of Online Redo Log FilesIf a media failure has affected the online redo logs of a database, then the
appropriate recovery procedure depends on:
■ The configuration of the online redo log: mirrored or non-mirrored.
■ The type of media failure: temporary or permanent.
■ The types of online redo log files affected by the media failure: current, active,
unarchived, or inactive (see Table 2–1 for a description of these log states).
The following sections describe the appropriate recovery strategies for these
situations:
■ Recovering After Losing a Member of a Multiplexed Online Redo Log Group
■ Recovering After the Loss of All Members of an Online Redo Log Group
Recovering After Losing a Member of a Multiplexed Online Redo Log GroupIf the online redo log of a database is multiplexed, and at least one member of each
online redo log group is not affected by the media failure, Oracle allows the
database to continue functioning as normal. Oracle writes error messages to the
LGWR trace file and the alert.log of the database.
See Also: Oracle8i Administrator’s Guide for detailed information
about using the transportable tablespace feature.
Media Recovery Scenarios 6-5

Recovering After the Loss of Online Redo Log Files
Solve the problem by taking one of the following actions:
■ If the hardware problem is temporary, then correct it. LGWR accesses the
previously unavailable online redo log files as if the problem never existed.
■ If the hardware problem is permanent, then drop the damaged member and
add a new member using the procedure below.
To replace a damaged member of a redo log group:
1. Locate the filename of the damaged member in V$LOGFILE. The status is
INVALID if the file is inaccessible:
SELECT group#, status, member FROM v$logfile;
GROUP# STATUS MEMBER------- ----------- ---------------------0001 /oracle/dbs/log1a.f0001 /oracle/dbs/log1b.f0002 /oracle/dbs/log2a.f0002 INVALID /oracle/dbs/log2b.f0003 /oracle/dbs/log3a.f0003 /oracle/dbs/log3b.f
2. Drop the damaged member. For example, to drop member log2b.f from
group 2, issue:
ALTER DATABASE DROP LOGFILE MEMBER '/oracle/dbs/log2b.f';
3. Add a new member to the group. For example, to add log2c.f to group 2,
issue:
ALTER DATABASE ADD LOGFILE MEMBER '/oracle/dbs/log2c.f' TO GROUP 2;
If the file you want to add already exists, then it must be the same size as the
other group members, and you must specify REUSE:
ALTER DATABASE ADD LOGFILE MEMBER '/oracle/dbs/log2b.f' REUSE TO GROUP 2;
Note: The newly added member provides no redundancy until
the log group is reused.
6-6 Oracle8i Backup and Recovery Guide

Recovering After the Loss of Online Redo Log Files
Recovering After the Loss of All Members of an Online Redo Log GroupIf a media failure damages all members of an online redo log group, different
scenarios can occur, depending on the type of online redo log group affected by the
failure and the archiving mode of the database.
If the damaged log group is inactive, then it is not needed for instance recovery; if it
is active, then it is needed for instance recovery.
Your first task is to determine whether the damaged group is active or inactive.
To determine whether the damaged groups are active:
1. Locate the filename of the lost redo log in V$LOGFILE and then look for the
group number corresponding to it. For example, enter:
SELECT group#, status, member FROM v$logfile;
GROUP# STATUS MEMBER------- ----------- ---------------------0001 /oracle/dbs/log1a.f0001 /oracle/dbs/log1b.f0002 INVALID /oracle/dbs/log2a.f0002 INVALID /oracle/dbs/log2b.f0003 /oracle/dbs/log3a.f0003 /oracle/dbs/log3b.f
2. Determine which groups are active. For example, enter:
SELECT group#, members, status, archived FROM v$log;
If the group is... Then... And you should...
Inactive It is not needed for instancerecovery
Clear the archived or unarchivedgroup.
Active It is needed for instance recovery Attempt to issue a checkpoint andclear the log; if impossible, thenyou must restore a backup andperform incomplete recovery up tothe most recent available log.
Current It is the log that Oracle iscurrently writing to
Attempt to clear the log; ifimpossible, then you must restore abackup and perform incompleterecovery up to the most recentavailable log.
Media Recovery Scenarios 6-7
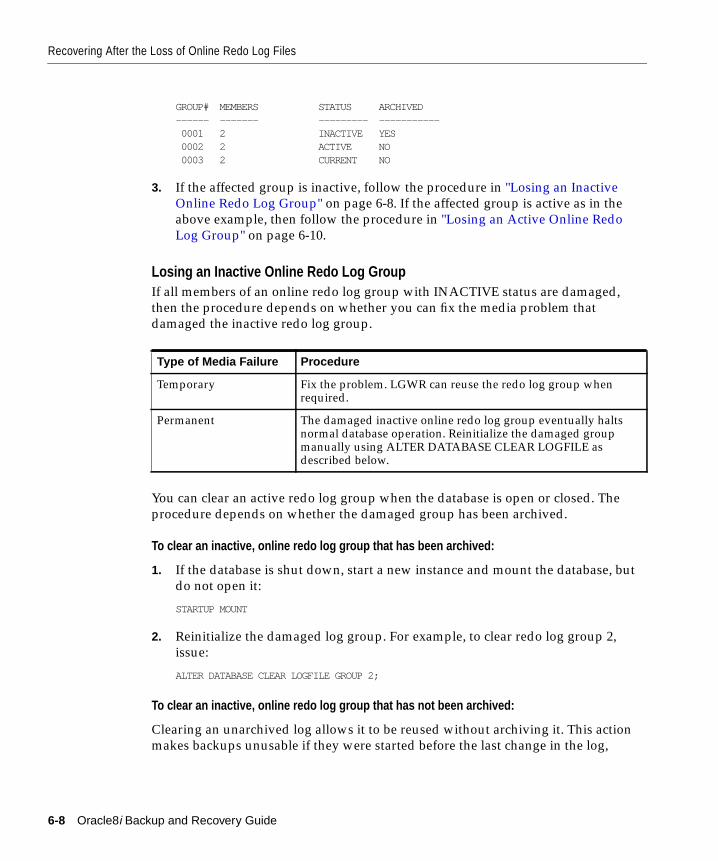
Recovering After the Loss of Online Redo Log Files
GROUP# MEMBERS STATUS ARCHIVED------ ------- --------- ----------- 0001 2 INACTIVE YES 0002 2 ACTIVE NO 0003 2 CURRENT NO
3. If the affected group is inactive, follow the procedure in "Losing an Inactive
Online Redo Log Group" on page 6-8. If the affected group is active as in the
above example, then follow the procedure in "Losing an Active Online Redo
Log Group" on page 6-10.
Losing an Inactive Online Redo Log GroupIf all members of an online redo log group with INACTIVE status are damaged,
then the procedure depends on whether you can fix the media problem that
damaged the inactive redo log group.
You can clear an active redo log group when the database is open or closed. The
procedure depends on whether the damaged group has been archived.
To clear an inactive, online redo log group that has been archived:
1. If the database is shut down, start a new instance and mount the database, but
do not open it:
STARTUP MOUNT
2. Reinitialize the damaged log group. For example, to clear redo log group 2,
issue:
ALTER DATABASE CLEAR LOGFILE GROUP 2;
To clear an inactive, online redo log group that has not been archived:
Clearing an unarchived log allows it to be reused without archiving it. This action
makes backups unusable if they were started before the last change in the log,
Type of Media Failure Procedure
Temporary Fix the problem. LGWR can reuse the redo log group whenrequired.
Permanent The damaged inactive online redo log group eventually haltsnormal database operation. Reinitialize the damaged groupmanually using ALTER DATABASE CLEAR LOGFILE asdescribed below.
6-8 Oracle8i Backup and Recovery Guide

Recovering After the Loss of Online Redo Log Files
unless the file was taken offline prior to the first change in the log. Hence, if you
need the cleared log file for recovery of a backup, you cannot recover that backup.
1. If the database is shut down, then start a new instance and mount the database,
but do not open it:
STARTUP MOUNT
2. Clear the log using the UNARCHIVED keyword. For example, to clear log
group 2, issue:
ALTER DATABASE CLEAR LOGFILE UNARCHIVED GROUP 2;
If there is an offline datafile that requires the cleared unarchived log to bring it
online, then the keywords UNRECOVERABLE DATAFILE are required. The
datafile and its entire tablespace have to be dropped because the redo necessary
to bring it online is being cleared, and there is no copy of it. For example, enter:
ALTER DATABASE CLEAR LOGFILE UNARCHIVED GROUP 2 UNRECOVERABLE DATAFILE;
3. Immediately back up the database using an operating system utility. Now you
can use this backup for complete recovery without relying on the cleared log
group. For example, enter:
% cp /disk1/oracle/dbs/*.f /disk2/backup
4. Back up the database's control file using the ALTER DATABASE statement. For
example, enter:
ALTER DATABASE BACKUP CONTROLFILE TO '/oracle/dbs/cf_backup.f';
Failure of CLEAR LOGFILE Operation The ALTER DATABASE CLEAR LOGFILE
statement can fail with an I/O error due to media failure when it is not possible to:
■ Relocate the redo log file onto alternative media by re-creating it under the
currently configured redo log file name.
■ Reuse the currently configured log file name to recreate the redo log file because
the name itself is invalid or unusable (for example, due to media failure).
In these cases, the CLEAR LOGFILE statement (before receiving the I/O error)
would have successfully informed the control file that the log was being cleared and
did not require archiving. The I/O error occurred at the step in which CLEAR
LOGFILE attempts to create the new redo log file and write zeros to it.
Media Recovery Scenarios 6-9

Recovering After the Loss of Online Redo Log Files
Losing an Active Online Redo Log GroupIf the database is still running and the lost active log is not the current log, then
issue the ALTER SYSTEM CHECKPOINT statement. If successful, your active log is
rendered inactive, and you can follow the procedure in "Losing an Inactive Online
Redo Log Group" on page 6-8. If unsuccessful, or if your database has halted,
perform one of these procedures, depending on the archiving mode.
Note that the current log is the one LGWR is currently writing to. If a LGWR I/O
fails, then LGWR terminates and the instance crashes. In this case, you must restore
a backup, perform incomplete recovery, and open the database with the
RESETLOGS option.
To recover from loss of an active online redo log group in NOARCHIVELOG mode:
1. If the media failure is temporary, correct the problem so that Oracle can reuse
the group when required.
2. Restore the database from a whole database backup using an operating system
utility. For example, enter:
% cp /disk2/backup/*.f /disk1/oracle/dbs
3. Mount the database:
STARTUP MOUNT
4. Open the database using the RESETLOGS option:
ALTER DATABASE OPEN RESETLOGS;
5. Shut down the database normally:
SHUTDOWN IMMEDIATE
6. Make a whole database backup. For example, enter:
% cp /disk1/oracle/dbs/*.f /disk2/backup
To recover from loss of an active online redo log group in ARCHIVELOG mode:
1. If the media failure is temporary, then correct the problem so that Oracle can
reuse the group when required.
2. Perform incomplete media recovery. Use the procedure given in "Performing
Incomplete Media Recovery" on page 5-25, recovering up through the log
before the damaged log.
6-10 Oracle8i Backup and Recovery Guide

Recovering After the Loss of Archived Redo Log Files
3. Ensure that the current name of the lost redo log can be used for a newly
created file. If not, rename the members of the damaged online redo log group
to a new location. For example, enter:
ALTER DATABASE RENAME FILE "/oracle/dbs/log_1.rdo" TO "/temp/log_1.rdo";ALTER DATABASE RENAME FILE "/oracle/dbs/log_2.rdo" TO "/temp/log_2.rdo";
4. Open the database using the RESETLOGS option:
ALTER DATABASE OPEN RESETLOGS;
Loss of Multiple Redo Log GroupsIf you have lost multiple groups of the online redo log, then use the recovery
method for the most difficult log to recover. The order of difficulty, from most
difficult to least, follows:
1. The current online redo log
2. An active online redo log
3. An unarchived redo log
4. An inactive online redo log
Recovering After the Loss of Archived Redo Log FilesIf the database is operating in ARCHIVELOG mode, and the only copy of an
archived redo log file is damaged, then the damaged file does not affect the present
operation of the database. The following situations can arise, however, depending
on when the redo log was written and when you backed up the datafile.
Note: All updates executed from the endpoint of the incomplete
recovery to the present must be re-executed.
If you backed up... Then...
All datafiles after the filled online redolog group (which is now archived) waswritten
The archived version of the filled online redo loggroup is not required for complete mediarecovery operation.
A given datafile before the filled onlineredo log group was written
If the corresponding datafile is damaged by apermanent media failure, use the most recentbackup of the damaged datafile and performincomplete recovery up to the damaged log.
Media Recovery Scenarios 6-11

Recovering After the Loss of Control Files
Recovering After the Loss of Control FilesIf a media failure has affected the control files of a database (whether control files
are multiplexed or not), the database continues to run until the first time that an
Oracle background process needs to access the control files. At this point, the
database and instance are automatically shut down.
If the media failure is temporary and the database has not yet shut down, avoid the
automatic shutdown of the database by immediately correcting the media failure. If
the database shuts down before you correct the temporary media failure, however,
then you can restart the database after fixing the problem and restoring access to the
control files.
The appropriate recovery procedure for media failures that permanently prevent
access to control files of a database depends on whether you have multiplexed the
control files. The following sections describe the appropriate procedures:
■ Losing a Member of a Multiplexed Control File
■ Losing All Copies of the Current Control File
Losing a Member of a Multiplexed Control FileUse the following procedures to recover a database if all the following conditions
are met:
■ A permanent media failure has damaged one or more control files of a
database.
■ At least one control file has not been damaged by the media failure.
WARNING: If you know that an archived redo log group hasbeen damaged, immediately back up all datafiles so that you willhave a whole database backup that does not require the damagedarchived redo log.
Note: If all control files of a multiplexed control file configuration
have been damaged, follow the procedure in "Losing All Copies of
the Current Control File" on page 6-13.
6-12 Oracle8i Backup and Recovery Guide

Recovering After the Loss of Control Files
To restore a control file to its default location:
1. If the instance is still running, abort it:
SHUTDOWN ABORT
2. Correct the hardware problem that caused the media failure. If you cannot
repair the hardware problem quickly, you can proceed with database recovery
by restoring damaged control files to an alternative storage device.
3. Use an intact multiplexed copy of the database's current control file to copy
over the damaged control files. For example, to replace bad_cf.f with good_cf.f , you might enter:
% cp /oracle/good_cf.f /oracle/dbs/bad_cf.f
4. Start an instance and open the database:
STARTUP
To restore a control file to its non-default location:
1. If the instance is still running, abort it:
SHUTDOWN ABORT
2. If you cannot correct the hardware problem that caused the media failure, copy
the intact control file to alternative locations. For example, to rename good_cf.f as new_cf.f you might issue:
% cp /oracle/dbs/good_cf.f /oracle/dbs/new_cf.f
3. Edit the parameter file of the database so that the CONTROL_FILES parameter
reflects the current locations of all control files and excludes all control files that
were not restored. For example, to add new_cf.f you might enter:
CONTROL_FILES = '/oracle/dbs/good_cf.f', '/oracle/dbs/new_cf.f'
4. Start a new instance and open the database:
STARTUP
Losing All Copies of the Current Control FileIf all control files of a database have been lost or damaged by a permanent media
failure, but all online redo logfiles remain intact, then you can recover the database
by creating a new control file.
Media Recovery Scenarios 6-13
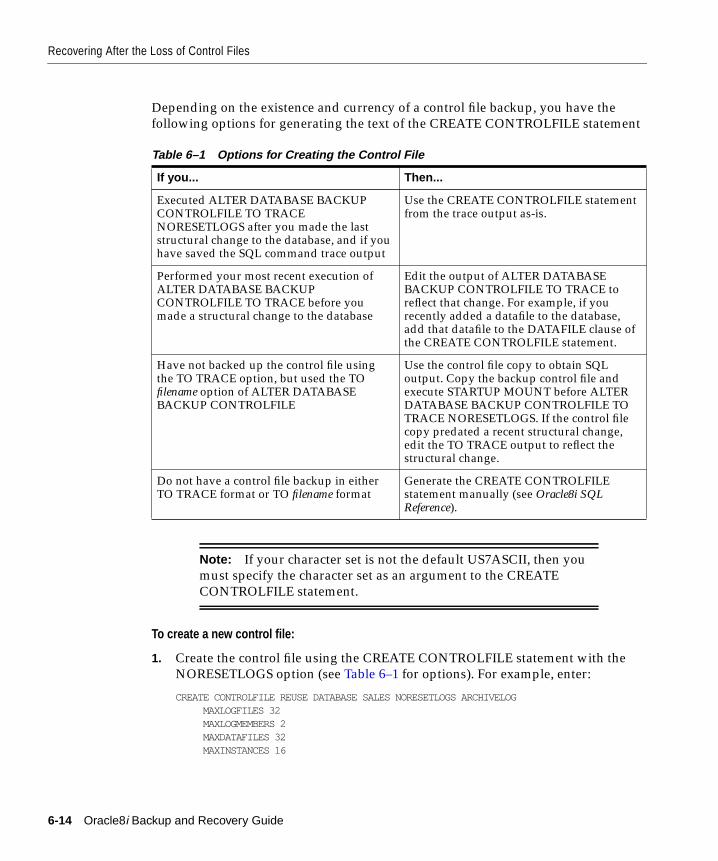
Recovering After the Loss of Control Files
Depending on the existence and currency of a control file backup, you have the
following options for generating the text of the CREATE CONTROLFILE statement
To create a new control file:
1. Create the control file using the CREATE CONTROLFILE statement with the
NORESETLOGS option (see Table 6–1 for options). For example, enter:
CREATE CONTROLFILE REUSE DATABASE SALES NORESETLOGS ARCHIVELOGMAXLOGFILES 32MAXLOGMEMBERS 2MAXDATAFILES 32MAXINSTANCES 16
Table 6–1 Options for Creating the Control File
If you... Then...
Executed ALTER DATABASE BACKUPCONTROLFILE TO TRACENORESETLOGS after you made the laststructural change to the database, and if youhave saved the SQL command trace output
Use the CREATE CONTROLFILE statementfrom the trace output as-is.
Performed your most recent execution ofALTER DATABASE BACKUPCONTROLFILE TO TRACE before youmade a structural change to the database
Edit the output of ALTER DATABASEBACKUP CONTROLFILE TO TRACE toreflect that change. For example, if yourecently added a datafile to the database,add that datafile to the DATAFILE clause ofthe CREATE CONTROLFILE statement.
Have not backed up the control file usingthe TO TRACE option, but used the TOfilename option of ALTER DATABASEBACKUP CONTROLFILE
Use the control file copy to obtain SQLoutput. Copy the backup control file andexecute STARTUP MOUNT before ALTERDATABASE BACKUP CONTROLFILE TOTRACE NORESETLOGS. If the control filecopy predated a recent structural change,edit the TO TRACE output to reflect thestructural change.
Do not have a control file backup in eitherTO TRACE format or TO filename format
Generate the CREATE CONTROLFILEstatement manually (see Oracle8i SQLReference).
Note: If your character set is not the default US7ASCII, then you
must specify the character set as an argument to the CREATE
CONTROLFILE statement.
6-14 Oracle8i Backup and Recovery Guide

Recovering from User Errors
MAXLOGHISTORY 1600LOGFILE
GROUP 1'/diska/prod/sales/db/log1t1.dbf','/diskb/prod/sales/db/log1t2.dbf'
) SIZE 100KGROUP 2
'/diska/prod/sales/db/log2t1.dbf','/diskb/prod/sales/db/log2t2.dbf'
) SIZE 100K,DATAFILE
'/diska/prod/sales/db/database1.dbf','/diskb/prod/sales/db/filea.dbf'
;
2. Recover the database as normal:
RECOVER DATABASE
Recovering from User ErrorsAn accidental or erroneous operational or programmatic change to the database can
cause loss or corruption of data. Recovery may require a return to a state prior to
the error.
To recover a table that has been accidentally dropped:
1. If possible, keep the database that experienced the user error online and
available for normal use. Back up all datafiles of the existing database in case an
error is made during the remaining steps of this procedure.
2. Restore a database backup to an alternative location, then perform incomplete
recovery using a restored backup control file to the point just before the table
was dropped (see "Performing Incomplete Media Recovery" on page 5-25 for
the procedure).
See Also: "Backing Up the Control File to a Trace File" on
page 4-14.
Note: If you have granted powerful privileges (such as DROP
ANY TABLE) to only selected, appropriate users, user errors that
require database recovery are minimized.
Media Recovery Scenarios 6-15

Performing Media Recovery in a Distributed Environment
3. Export the lost data from the temporary, restored version of the database using
the Oracle utility Export. In this case, export the accidentally dropped table.
4. Import the exported data into the permanent copy of the database using the
Oracle Import utility.
5. Delete the files of the temporary, reconstructed copy of the database to conserve
space.
Performing Media Recovery in a Distributed EnvironmentThe manner in which you perform media recovery depends on whether your
database participates in a distributed database system. The Oracle distributed
database architecture is autonomous. Therefore, depending on the type of recovery
operation selected for a single, damaged database, you may have to coordinate
recovery operations globally among all databases in the distributed database
system.
Table 6–2 summarizes different types of recovery operations and whether
coordination among nodes of a distributed database system is required.
Note: System audit options are exported.
See Also: Oracle8i Utilities for more information about the Import
and Export utilities.
6-16 Oracle8i Backup and Recovery Guide

Performing Media Recovery in a Distributed Environment
Coordinating Time-Based and Change-Based Distributed Database RecoveryIn special circumstances, one node in a distributed database may require recovery
to a past time. To preserve global data consistency, it is often necessary to recover all
other nodes in the system to the same point in time. This operation is called
coordinated, time-based, distributed database recovery. The following tasks should be
performed with the standard procedures of time-based and change-based recovery
described in this chapter.
1. Recover the database that requires the recovery operation using time-based
recovery. For example, if a database needs to be recovered because of a user
error (such as an accidental table drop), recover this database first using
time-based recovery. Do not recover the other databases at this point.
2. After you have recovered the database and opened it using the RESETLOGS
option, look in the alert.log of the database for the RESETLOGS message.
If the message is, "RESETLOGS after complete recovery through change xxx",
then you have applied all the changes in the database and performed a
complete recovery. Do not recover any of the other databases in the distributed
system, or you will unnecessarily remove changes in them. Recovery is
complete.
Table 6–2 Recovery Operations in a Distributed Database Environment
If you are... Then...
Restoring a whole backup for a database thatwas never accessed from a remote node
Use non-coordinated, autonomousdatabase recovery.
Restoring a whole backup for a database thatwas accessed by a remote node
Shut down all databases and restorethem using the same coordinated fullbackup.
Performing complete media recovery of one ormore databases in a distributed database
Use non-coordinated, autonomousdatabase recovery.
Performing incomplete media recovery of adatabase that was never accessed by a remotenode
Use non-coordinated, autonomousdatabase recovery.
Performing incomplete media recovery of adatabase that was accessed by a remote node
Use coordinated, incomplete mediarecovery to the same global point in timefor all databases in the distributeddatabase.
Media Recovery Scenarios 6-17
Performing Media Recovery in a Distributed Environment
If the message is, "RESETLOGS after incomplete recovery UNTIL CHANGExxx", you have successfully performed an incomplete recovery. Record the
change number from the message and proceed to the next step.
3. Recover all other databases in the distributed database system using
change-based recovery, specifying the change number (SCN) from Step 2.
Recovering a Database with Snapshots If a master database is independently recovered to a past time (that is, coordinated,
time-based distributed database recovery is not performed), any dependent remote
snapshot that was refreshed in the interval of lost time will be inconsistent with its
master table. In this case, the administrator of the master database should instruct
the remote administrators to perform a complete refresh of any inconsistent
snapshot.
6-18 Oracle8i Backup and Recovery Guide

Performing Operating System Tablespace Point-in-Time Rec
7
Performing Operating System TablespacePoint-in-Time Recovery
This chapter describes how to perform O/S tablespace point-in-time recovery
(TSPITR), and includes the following topics:
■ Introduction to O/S Tablespace Point-in-Time Recovery
■ Planning for Tablespace Point-in-Time Recovery
■ Preparing the Databases for TSPITR
■ Performing Partial TSPITR of Partitioned Tables
■ Performing TSPITR of Partitioned Tables When a Partition Has Been Dropped
■ Performing TSPITR of Partitioned Tables When a Partition Has Split
■ TSPITR Tuning Considerations
■ Performing TSPITR Using Transportable Tablespaces
overy 7-1

Introduction to O/S Tablespace Point-in-Time Recovery
Introduction to O/S Tablespace Point-in-Time RecoveryTablespace Point-in-Time Recovery (TSPITR) enables you to quickly recover one or
more non-SYSTEM tablespaces to a time that is different from that of the rest of the
database. Like a table export, TSPITR enables you to recover a consistent data set;
however, the data set is the entire tablespace rather than just one object.
TSPITR is most useful for recovering:
■ An erroneous DROP TABLE or TRUNCATE TABLE operation.
■ A table that is logically corrupted.
■ An incorrect batch job or other DML statement that has affected only a subset of
the database.
■ A logical schema to a point different from the rest of the physical database
when multiple schemas exist in separate tablespaces of one physical database.
■ A tablespace in a VLDB (very large database) when TSPITR is more efficient
than restoring the whole database from a backup and rolling it forward (see
"Planning for Tablespace Point-in-Time Recovery" on page 7-4 before making
any decisions).
This section contains the following topics:
■ TSPITR Advantages
■ TSPITR Methods
■ TSPITR Terminology
TSPITR AdvantagesPrior to Oracle8, point-in-time recovery could only be performed on a subset of a
database by:
1. Creating a copy of the database.
2. Rolling the copied database forward to the desired point in time.
3. Exporting the desired objects from the copied database.
4. Dropping the relevant objects from the production database.
5. Importing the objects into the production database.
7-2 Oracle8i Backup and Recovery Guide

Introduction to O/S Tablespace Point-in-Time Recovery
There was a performance overhead associated with exporting and importing large
objects, however, which created a need for a new method. TSPITR enables you to do
the following:
1. Make a temporary copy of the database, called a clone database.
2. Recover a subset of a clone database.
3. Copy the relevant datafiles from the recovered database to the production
database using an operating system utility.
4. Export data dictionary metadata about the datafile's content (for example, the
recovered segments within the file) from the clone database to the production
database. The copied file is also added to the production database through a
special import option.
TSPITR MethodsYou can perform O/S TSPITR in two different ways:
The major difference between the two methods is that performing TSPITR through
transportable tablespaces relaxes some of O/S TSPITR's special procedures. For
example, if you restore backups to a different host separate from the primary
database, then you can start the clone database as if it were the primary database
using the normal database MOUNT statement instead of the clone database
MOUNT statement.
Method Consequence
Traditional O/S TSPITR You must follow special procedures for creating cloneinitialization parameter files, mounting the clone database, etc.The procedures provide error checks to prevent the corruptionof the primary database on the same computer while recoveringthe clone database.
TSPITR using thetransportable tablespacefeature
This method differs from standard O/S TSPITR mainly in usingtransported tablespaces to perform the last step of TSPITR. Youmust set the COMPATIBLE initialization parameter to 8.1 orhigher to use this method.
See Also: Oracle8i Administrator’s Guide for more information
about the transportable tablespace feature.
Performing Operating System Tablespace Point-in-Time Recovery 7-3

Planning for Tablespace Point-in-Time Recovery
TSPITR TerminologyFamiliarize yourself with the following terms and abbreviations, which are used
throughout this chapter:
TSPITRTablespace point-in-time recovery
Clone DatabaseThe copied database used for recovery in TSPITR. It has various substantive
differences from a regular database.
Recovery SetTablespaces that require point-in-time recovery to be performed on them.
Auxiliary SetAny other items required for TSPITR, including:
■ Backup control file
■ System tablespaces
■ Datafiles containing rollback segments
■ Temporary tablespace (optional)
A small amount of space is required by export for sort operations. If a copy of the
temporary tablespace is not included in the auxiliary set, then provide sort space
either by creating a new temporary tablespace after the clone has been started or by
setting AUTOEXTEND to ON on the SYSTEM tablespace files.
Transportable TablespaceA feature that enables you to take a tablespace from one database and plug it into
another database. For more information, see "Recovering Transported Tablespaces"
on page 6-4. For a detailed account, see the Oracle8i Administrator’s Guide.
Planning for Tablespace Point-in-Time RecoveryTSPITR is a complicated procedure and requires careful planning. Before
proceeding you should read this chapter thoroughly.
WARNING: You should not perform TSPITR for the first time ona production system, or during circumstances where there is atime constraint.
7-4 Oracle8i Backup and Recovery Guide

Planning for Tablespace Point-in-Time Recovery
TSPITR LimitationsThe primary issue you should consider is the possibility of application-level
inconsistencies between tables in recovered and unrecovered tablespaces due to
implicit rather than explicit referential dependencies. Understand these
dependencies and find the means to resolve any possible inconsistencies before
proceeding.
This section deals with the following topics:
■ General Restrictions
■ Data Consistency and TSPITR
General RestrictionsTSPITR has several restrictions. You cannot do the following:
■ Recover a SYSTEM tablespace.
■ Recover dropped tablespaces.
■ Recover a tablespace that has been dropped and re-created with the same name.
■ Remove a datafile that has been added to the wrong tablespace. If the file was
added after the point to which the tablespace is being recovered, then the file
will still be part of the tablespace (and be empty) after TSPITR is complete.
■ Execute DML statements on the clone database—the clone database is for
recovery only.
■ Use existing backups of the recovery set datafiles for recovery after TSPITR
completes. Instead, you must take fresh backups of the recovered files. If you
attempt to recover using a backup taken prior to performing TSPITR, then
recovery fails.
■ Recover optimizer statistics for objects that have had statistics calculated on
them; statistics must be re-calculated after performing TSPITR.
■ Include any of the following object types within the TSPITR recovery set:
– Replicated master tables
– Snapshot logs
– Snapshot tables
If any of these objects are included, you must drop them before TSPITR.
Performing Operating System Tablespace Point-in-Time Recovery 7-5

Preparing the Databases for TSPITR
Data Consistency and TSPITRTSPITR provides views that can detect any data relationships between objects that
are in the tablespaces being recovered and objects in the rest of the database.
TSPITR cannot successfully complete unless you manage these relationships, either
by removing or suspending the relationship or by including the related object
within the recovery set.
TSPITR RequirementsSatisfy the following requirements before performing TSPITR.
■ Ensure that all files constituting the recovery set tablespaces are in the recovery
set on the clone database, otherwise the export phase of TSPITR fails.
■ Create the control file backup in the auxiliary set using the following SQL
statement:
ALTER DATABASE BACKUP CONTROLFILE TO 'controlfile_name ';
This control file backup must be created at a later time than the backup that is
being used. If it is not, then you may encounter an error message (ORA-01152,file 1 was not restored from a sufficiently old backup ).
■ Allocate enough disk space to accommodate the clone database.
■ Provide enough real memory to start the clone instance.
Preparing the Databases for TSPITRThis section describes how to prepare the clone database for TSPITR, and includes
the following steps:
■ Step 1: Determine Whether Objects Will Be Lost
■ Step 2: Research and Resolve Dependencies on the Primary Database
■ Step 3: Prepare the Primary Database
■ Step 4: Prepare the Clone Parameter Files
■ Step 5: Prepare the Clone Database
See Also: "Step 2: Research and Resolve Dependencies on the
Primary Database" on page 7-7.
See Also: "Step 4: Prepare the Clone Parameter Files" on
page 7-10.
7-6 Oracle8i Backup and Recovery Guide
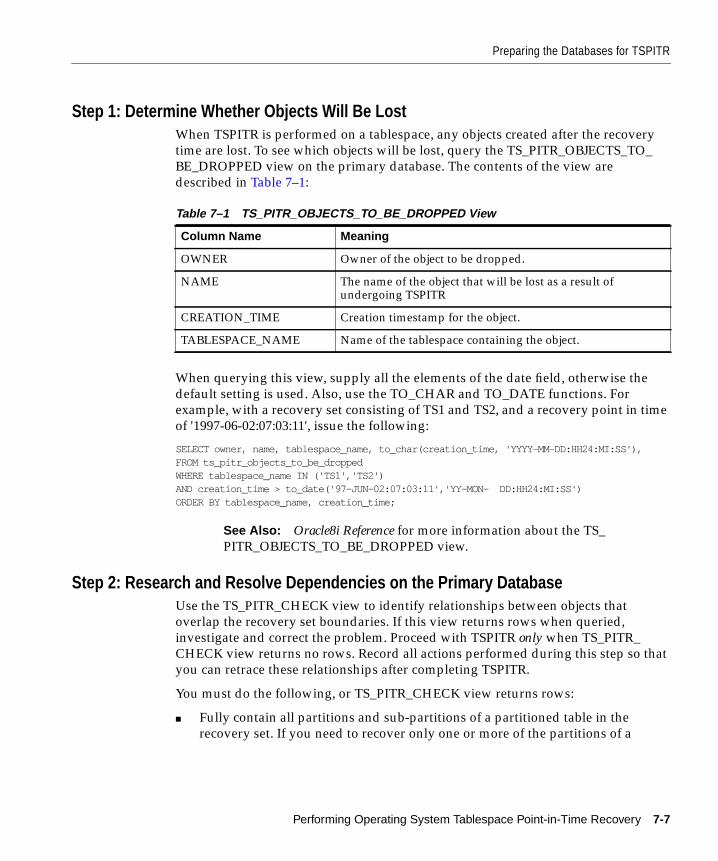
Preparing the Databases for TSPITR
Step 1: Determine Whether Objects Will Be LostWhen TSPITR is performed on a tablespace, any objects created after the recovery
time are lost. To see which objects will be lost, query the TS_PITR_OBJECTS_TO_
BE_DROPPED view on the primary database. The contents of the view are
described in Table 7–1:
When querying this view, supply all the elements of the date field, otherwise the
default setting is used. Also, use the TO_CHAR and TO_DATE functions. For
example, with a recovery set consisting of TS1 and TS2, and a recovery point in time
of '1997-06-02:07:03:11', issue the following:
SELECT owner, name, tablespace_name, to_char(creation_time, 'YYYY-MM-DD:HH24:MI:SS'),FROM ts_pitr_objects_to_be_droppedWHERE tablespace_name IN ('TS1','TS2')AND creation_time > to_date('97-JUN-02:07:03:11','YY-MON- DD:HH24:MI:SS')ORDER BY tablespace_name, creation_time;
Step 2: Research and Resolve Dependencies on the Primary DatabaseUse the TS_PITR_CHECK view to identify relationships between objects that
overlap the recovery set boundaries. If this view returns rows when queried,
investigate and correct the problem. Proceed with TSPITR only when TS_PITR_
CHECK view returns no rows. Record all actions performed during this step so that
you can retrace these relationships after completing TSPITR.
You must do the following, or TS_PITR_CHECK view returns rows:
■ Fully contain all partitions and sub-partitions of a partitioned table in the
recovery set. If you need to recover only one or more of the partitions of a
Table 7–1 TS_PITR_OBJECTS_TO_BE_DROPPED View
Column Name Meaning
OWNER Owner of the object to be dropped.
NAME The name of the object that will be lost as a result ofundergoing TSPITR
CREATION_TIME Creation timestamp for the object.
TABLESPACE_NAME Name of the tablespace containing the object.
See Also: Oracle8i Reference for more information about the TS_
PITR_OBJECTS_TO_BE_DROPPED view.
Performing Operating System Tablespace Point-in-Time Recovery 7-7

Preparing the Databases for TSPITR
partitioned table, convert them to stand-alone tables (see "Performing Partial
TSPITR of Partitioned Tables" on page 7-15).
■ Fully contain the following in the recovery set:
– Tables (and their indexes, partitioned or non-partitioned)
– Clusters (and their indexes, partitioned or non-partitioned)
– Primary key and foreign key relationships
– All elements of a LOB (LOB segment, LOB index, and LOB locator)
■ Exclude the following object types from the recovery set:
– Replicated master tables
– Snapshot logs
– Snapshot tables
Supply a four-line predicate detailing the recovery set tablespace to query the TS_
PITR_CHECK view. For example, with a recovery set consisting of TS1 and TS2, the
SELECT statement against TS_PITR_CHECK would be as follows:
SELECT * FROM sys.ts_pitr_checkWHERE (ts1_name IN ('TS1','TS2') AND ts2_name NOT IN ('TS1','TS2'))OR (ts1_name NOT IN ('TS1','TS2') AND ts2_name IN ('TS1','TS2'));
Because of the number and width of the columns in the TS_PITR_CHECK view, you
may want to format the columns as follows:
column OBJ1_OWNER heading "own1"column OBJ1_OWNER format a4column OBJ1_NAME heading "name1"column OBJ1_NAME format a5column OBJ1_SUBNAME heading "subname1"column OBJ1_SUBNAME format a8column OBJ1_TYPE heading "obj1type"column OBJ1_TYPE format a8 word_wrappedcolumn TS1_NAME heading "ts1_name"column TS1_NAME format a8column OBJ2_NAME heading "name2"column OBJ2_NAME format a5column OBJ2_SUBNAME heading "subname2"column OBJ2_SUBNAME format a8column OBJ2_TYPE heading "obj2type"column OBJ2_TYPE format a8 word_wrappedcolumn OBJ2_OWNER heading "own2"column OBJ2_OWNER format a4column TS2_NAME heading "ts2_name"
7-8 Oracle8i Backup and Recovery Guide

Preparing the Databases for TSPITR
column TS2_NAME format a8column CONSTRAINT_NAME heading "cname"column CONSTRAINT_NAME format a5column REASON heading "reason"column REASON format a57 word_wrapped
If the partitioned table TP has two partitions, P1 and P2, which exist in tablespaces
TS1 and TS2 respectively, and there is a partitioned index defined on TP called
TPIND, which has two partitions ID1 and ID2 (that exist in tablespaces ID1 and ID2
respectively), you would get the following output when TS_PITR_CHECK is
queried against tablespaces TS1 and TS2 (assuming appropriate formatting):
own1 name1 subname1 obj1type ts1_name name2 subname2 obj2type own2 ts2_name cname reason--- ---- ----- ------ ------- ---- ------ -------- --- -------- --- ------SYSTEM TP P1 TABLE TS1 TPIND IP1 INDEX PARTITION PARTITION SYSID1 Partitioned Objects not fully contained in the recovery set
SYSTEM TP P1 TABLE TS1 TPIND IP2 INDEX PARTITION PARTITION SYSID2 Partitioned Objects not fully contained in the recovery set
The table SYSTEM.TP has a partitioned index TPIND that consists of two partitions,
IP1 in tablespace ID1 and IP2 in tablespace ID2. Either drop TPIND or include ID1
and ID2 in the recovery set.
Step 3: Prepare the Primary DatabasePerform the following tasks:
1. Archive the current online redo log:
ALTER SYSTEM ARCHIVE LOG CURRENT;
2. Take offline any rollback segments in the recovery set (you do not have to take
auxiliary set rollback segments offline):
ALTER ROLLBACK SEGMENTsegment_name OFFLINE;
3. Take the recovery set tablespaces on the primary database offline normal. Use
the OFFLINE FOR RECOVER option if you cannot write to the file due to I/O
errors or if the file is unavailable. You can use OFFLINE FOR RECOVER for
performance reasons, for example, if you have a large number of datafiles and
you do not care about updating the file headers since they are being recovered
back to a point in time anyway:
See Also: Oracle8i Reference for more information about the TS_
PITR_CHECK view.
Performing Operating System Tablespace Point-in-Time Recovery 7-9

Preparing the Databases for TSPITR
ALTER TABLESPACEtablespace_name OFFLINE FOR RECOVER;
This statement prevents changes being made to the recovery set before TSPITR
is complete.
Step 4: Prepare the Clone Parameter FilesCreate a brand new initialization parameter file rather than copying and then
editing the production database initialization parameter file. Save memory by using
low settings for parameters such as:
■ DB_BLOCK_BUFFERS
■ SHARED_POOL_SIZE
■ LARGE_POOL_SIZE.
If the production parameter files are used for the clone database, however, reducing
these parameters can prevent the clone database from starting when other
parameters are set too high—for example, the parameter ENQUEUE_RESOURCES,
which allocates memory from within the shared pool.
Set the following parameters in the clone initialization parameter file:
Note: If there is a subset of data that is not physically or logically
corrupt that you want to query within the recovery set tablespaces,
alter the recovery set tablespaces on the primary database as READ
ONLY for the duration of the recovery of the clone. Take the
recovery set tablespaces offline before integrating the clone files
with the primary database (see "Step 5: Copy the Recovery Set
Clone Files to the Primary Database" on page 7-13).
See Also: Oracle8i SQL Reference for more information about the
ALTER SYSTEM and ALTER ROLLBACK SEGMENT statements.
Parameter Purpose
CONTROL_FILES Identifies clone control files. Set to the name andlocation of the clone control files.
LOCK_NAME_SPACE Allows the clone database to start even though it has thesame name as the primary database. Set to a uniquevalue, for example, = CLONE.
Note: Do not change the DB_NAME parameter.
7-10 Oracle8i Backup and Recovery Guide

Preparing the Databases for TSPITR
Step 5: Prepare the Clone DatabasePerform the following tasks to prepare the clone database for TSPITR:
1. Restore the auxiliary set and the recovery set to a location different from that of
the primary database.
2. Configure your environment so that you can start up the clone database. For
example, on UNIX, set ORACLE_SID to the name of the clone.
3. Start the clone database without mounting it, specifying the parameter file if
necessary:
STARTUP NOMOUNT PFILE=/path/initCLONE.ora;
4. Mount the clone database:
ALTER DATABASE MOUNT CLONE DATABASE;
At this point, the database is automatically taken out of ARCHIVELOG mode
because it is a clone. All files are offline.
5. If you did not set DB_FILE_NAME_CONVERT and LOG_FILE_NAME_
CONVERT, then rename the files to reflect their new locations:
ALTER DATABASE RENAME FILE ' name_of_file_in_primary_location 'TO ' name_of_corresponding_file_in_clone_location ';
DB_FILE_NAME_CONVERT Converts datafile filenames. Set to new values ifnecessary.
LOG_FILE_NAME_CONVERT Renames redo logs files. For example, if the datafiles ofthe primary database reside in the directory/ora/primary , and the clone resides in /ora/clone ,set DB_FILE_NAME_CONVERT to "primary","clone".
Note: You can also rename the redo logs with theALTER DATABASE RENAME FILE statement. See "Step5: Prepare the Clone Database" on page 7-11.
Note: It is possible, although not recommended, to place the
recovery set files over their corresponding files on the primary
database. For more information see "Performing Partial TSPITR of
Partitioned Tables" on page 7-15.
Parameter Purpose
Performing Operating System Tablespace Point-in-Time Recovery 7-11
Performing TSPITR
If you did set DB_FILE_NAME_CONVERT and LOG_FILE_NAME_CONVERT
but there are files that have been restored to different locations, then rename
them.
6. Even if you have set DB_FILE_NAME_CONVERT and LOG_FILE_NAME_
CONVERT, do not assume that all the files of the clone database are in the
specified locations—some clone files may have been restored to different
locations due to constraints of disk space. Bring online all recovery set and
auxiliary set files using the following SQL statement:
ALTER DATABASE DATAFILE ' datafile_name ' ONLINE;
;
Performing TSPITRThis section describes how to execute TSPITR, and includes the following steps:
■ Step 1: Recover the Clone Database
■ Step 2: Open the Clone Database
■ Step 3: Prepare the Clone Database for Export
■ Step 4: Export the Metadata
■ Step 5: Copy the Recovery Set Clone Files to the Primary Database
■ Step 6: Import the Metadata into the Primary Database
■ Step 7: Prepare the Primary Database for Use
■ Step 8: Back Up the Recovered Tablespaces in the Primary Database
Step 1: Recover the Clone DatabaseRecover the clone database to the desired point by specifying the USING BACKUP
CONTROLFILE option. Use any form of incomplete recovery as follows:
RECOVER DATABASE USING BACKUP CONTROLFILE UNTIL TIME ' YYYY-MM-DD:HH24:MI:SS ';RECOVER DATABASE USING BACKUP CONTROLFILE UNTIL CANCEL;
If the clone database files are not online, Oracle issues an error message.
Note: the export phase of TSPITR will not work if all the files of
each recovery set tablespace are not online.
7-12 Oracle8i Backup and Recovery Guide

Performing TSPITR
Step 2: Open the Clone DatabaseOpen the clone database with the RESETLOGS option using the following
statement:
ALTER DATABASE OPEN RESETLOGS;
Because the database is a clone database, only the SYSTEM rollback segment is
brought online at this point, which prevents you from executing DML statements
against any user tablespace. Any attempt to bring a user rollback segment online
fails and generates an error message.
Step 3: Prepare the Clone Database for ExportPrepare the clone database for export using the TS_PITR_CHECK view and
resolving the dependencies just as you did for the primary database (see "Step 2:
Research and Resolve Dependencies on the Primary Database" on page 7-7). Only
when TS_PITR_CHECK returns no rows will the export phase of TSPITR complete.
Step 4: Export the MetadataExport the metadata for the recovery set tablespaces using the following statement:
exp sys/ password point_in_time_recover=yrecovery_tablespaces= tablespace_1 , tablespace_2 , tablespace_n
If the export phase fails and generates an error message, then:
1. Re-query TS_PITR_CHECK.
2. Resolve the problem.
3. Re-run the export.
Perform the export phase of TSPITR as the user SYS, otherwise the export fails.
Shut down the clone database after a successful export:
SHUTDOWN IMMEDIATE
Step 5: Copy the Recovery Set Clone Files to the Primary DatabaseIf any recovery set tablespaces are read-only on the primary database, then you
should take them offline. Use an operating system utility to copy the recovery set
files from the clone database to the primary database, taking care not to overwrite
any auxiliary set files on the primary database.
Performing Operating System Tablespace Point-in-Time Recovery 7-13
Performing TSPITR
Step 6: Import the Metadata into the Primary DatabaseImport the recovery set metadata into the primary database using the following
statement:
imp sys/ password point_in_time_recover=true
This import also updates the copied file's file headers and integrates them with the
primary database.
Step 7: Prepare the Primary Database for UseTo prepare the primary database for use, follow these steps:
1. Bring the recovery set tablespaces online in the primary database.
2. Change the recovery set tablespaces to read-write (if they had been altered to
read-only, see "Step 3: Prepare the Primary Database" on page 7-9).
3. Undo all the steps taken to resolve dependencies. For example, rebuild indexes
or re-enable constraints (see "Step 2: Research and Resolve Dependencies on the
Primary Database" on page 7-7).
4. If statistics existed on the recovery set objects before TSPITR was performed,
you need to recalculate them. For partitioned tables, you have to exchange the
stand-alone tables into the partitions of their partitioned tables (for more
information, see "Performing Partial TSPITR of Partitioned Tables" on
page 7-15).
Step 8: Back Up the Recovered Tablespaces in the Primary DatabaseAfter TSPITR on a tablespace is complete, use an operating system utility to back up
the tablespace.
Note: Object name conflicts may arise if objects of the same name
exist already in primary database. Resolve these conflicts explicitly.
See Also: Oracle8i Designing and Tuning for Performance for more
information about Export.
7-14 Oracle8i Backup and Recovery Guide

Performing Partial TSPITR of Partitioned Tables
Performing Partial TSPITR of Partitioned TablesThis section describes how to perform partial TSPITR of partitioned tables that have
a range that has not changed or expanded, and includes the following steps:
■ Step 1: Create a Table on the Primary Database for Each Partition Being
Recovered
■ Step 2: Drop the Indexes on the Partition Being Recovered
■ Step 3: Exchange Partitions with Stand-Alone Tables
■ Step 4: Take the Recovery Set Tablespace Offline
■ Step 5: Create Tables at Clone Database
■ Step 6: Drop Indexes on Partitions Being Recovered
■ Step 7: Exchange Partitions with Stand-Alone Tables
■ Step 8: Export the Clone Database
■ Step 9: Copy the Recovery Set Datafiles to the Primary Database
■ Step 10: Import into the Primary Database
■ Step 11: Bring Recovery Set Tablespace Online
■ Step 12: Exchange Partitions with Stand-Alone Tables
■ Step 13: Back Up the Recovered Tablespaces in the Primary Database
WARNING: You must back up the tablespace, because otherwiseyou might lose it. For example, a media failure occurs, but thearchived redo logs from the last backup of the database do notlogically link to the recovered tablespaces. If you attempt torecover any recovery set tablespaces from a backup taken beforeTSPITR, the procedure fails.
Performing Operating System Tablespace Point-in-Time Recovery 7-15

Performing Partial TSPITR of Partitioned Tables
Step 1: Create a Table on the Primary Database for Each Partition Being RecoveredThis table should have the exact same column names and column datatypes as the
partitioned table you are recovering. Create the table as follows:
CREATE TABLEnew_table AS SELECT * FROM partitioned_table WHERE 1=2;
These tables are used to swap each recovery set partition (see "Step 3: Exchange
Partitions with Stand-Alone Tables" on page 7-16).
Step 2: Drop the Indexes on the Partition Being RecoveredDrop the indexes on the partition you wish to recover, or create identical,
non-partitioned indexes that exist on the partition you wish to recover. If you drop
the indexes on the partition being recovered, then you need to drop them on the
clone database (see "Step 6: Drop Indexes on Partitions Being Recovered" on
page 7-17). Rebuild the indexes after TSPITR is complete.
Step 3: Exchange Partitions with Stand-Alone TablesExchange each partition in the recovery set with its associated stand-alone table
(created in Step 1) by issuing the following statement:
ALTER TABLE table_name EXCHANGE PARTITION partition_name WITH TABLE table_name ;
Step 4: Take the Recovery Set Tablespace OfflineOn the primary database, take each recovery set tablespace offline:
ALTER TABLESPACEtablespace_name OFFLINE IMMEDIATE;
This prevents any further changes to the recovery set tablespaces on the primary
database.
Note: Often you have to recover the dropped partition along with
recovering a partition whose range has expanded. See "Performing
TSPITR of Partitioned Tables When a Partition Has Been Dropped"
on page 7-18.
7-16 Oracle8i Backup and Recovery Guide

Performing Partial TSPITR of Partitioned Tables
Step 5: Create Tables at Clone DatabaseAfter recovering the clone and opening it with the RESETLOGS option, create a
table that has the same column names and column data types as the partitioned
table you are recovering. Create a table for each partition you wish to recover. These
tables are used later to swap each recovery set partition.
Step 6: Drop Indexes on Partitions Being RecoveredDrop the indexes on the partition you wish to recover, or create identical,
non-partitioned indexes that exist on the partition you wish to recover (on the table
created in Step 1).
Step 7: Exchange Partitions with Stand-Alone TablesFor each partition in the clone database recovery set, exchange the partitions with
the stand-alone tables (created in Step 5) by issuing the following statement:
ALTER TABLE partitioned_table_name EXCHANGE PARTITION partition_nameWITH TABLE table_name ;
Step 8: Export the Clone DatabaseExecute export against the clone database for the recovery set tablespaces using the
following statement:
exp sys/ password point_in_time_recover=yrecovery_tablespaces= tablespace_1 , tablespace_2 , tablespace_n
If the export phase fails with the error message ORA 29308 view TS_PITR_CHECK failure , re-query TS_PITR_CHECK, resolve the problem, and re-run the
export. Perform the export phase of TSPITR as the user SYS, otherwise the export
fails with the error message ORA-29303: user does not login as SYS . Shut
down the clone database after a successful export.
Step 9: Copy the Recovery Set Datafiles to the Primary DatabaseIf any recovery set tablespaces are READ ONLY on the primary database, change
them to OFFLINE. Copy the recovery set datafiles from the clone database to the
primary database, taking care not to overwrite auxiliary set files on the primary
database.
Performing Operating System Tablespace Point-in-Time Recovery 7-17

Performing TSPITR of Partitioned Tables When a Partition Has Been Dropped
Step 10: Import into the Primary DatabaseImport the recovery set metadata into the primary database using the following
command:
imp sys/ password point_in_time_recover=true
This import also updates the copied file's file headers and integrates them with the
primary database.
Step 11: Bring Recovery Set Tablespace OnlineAt the primary database, bring each recovery set tablespace online:
ALTER TABLESPACEtablespace_name ONLINE;
Step 12: Exchange Partitions with Stand-Alone TablesFor each recovered partition on the primary database, swap its associated
stand-alone table using the following statement:
ALTER TABLE table_name EXCHANGE PARTITION partition_name WITH TABLE table_name ;
If the associated indexes have been dropped, re-create them.
Step 13: Back Up the Recovered Tablespaces in the Primary DatabaseBack up the recovered tablespaces on the primary database. Failure to do so results
in loss of data in the event of media failure.
Performing TSPITR of Partitioned Tables When a Partition Has BeenDropped
This section describes how to perform TSPITR on partitioned tables when a
partition has been dropped, and includes the following steps:
WARNING: You must back up the tablespace, because otherwiseyou might lose it. For example, a media failure occurs, but thearchived redo logs from the last backup of the database do notlogically link to the recovered tablespaces. If you attempt torecover any recovery set tablespaces from a backup taken beforeTSPITR, the procedure fails.
7-18 Oracle8i Backup and Recovery Guide

Performing TSPITR of Partitioned Tables When a Partition Has Been Dropped
■ Step 1: Find the Low and High Range of the Partition that Was Dropped
■ Step 2: Create a Temporary Table
■ Step 3: Delete Records From Partitioned Table
■ Step 4: Take Recovery Set Tablespaces Offline
■ Step 5: Create Tables at Clone Database
■ Step 6: Drop Indexes on Partitions Being Recovered
■ Step 7: Exchange Partitions with Stand-Alone Tables
■ Step 8: Export the Clone Database
■ Step 9: Copy the Recovery Set Datafiles to the Primary Database
■ Step 10: Import into the Primary Database
■ Step 11: Bring Recovery Set Tablespace Online
■ Step 12: Insert Stand-Alone Tables into Partitioned Tables
■ Step 13: Back Up the Recovered Tablespaces in the Primary Database
Step 1: Find the Low and High Range of the Partition that Was DroppedWhen a partition is dropped, the range of the partition above it expands
downwards. Therefore, there may be records in the partition above that should
actually be in the dropped partition after it has been recovered. To ascertain this,
issue the following statement at the primary database:
SELECT * FROM partitioned_table WHERE relevant_key BETWEEN low_range_of_partition_that_was_dropped AND high_range_of_partition_that_was_dropped ;
Step 2: Create a Temporary TableIf any records are returned, create a temporary table in which to store these records
so that if necessary they can be inserted into the recovered partition later.
Step 3: Delete Records From Partitioned TableDelete all the records stored in the temporary table from the partitioned table.
Performing Operating System Tablespace Point-in-Time Recovery 7-19
Performing TSPITR of Partitioned Tables When a Partition Has Been Dropped
Step 4: Take Recovery Set Tablespaces OfflineAt the primary database, take each recovery set tablespace offline:
ALTER TABLESPACEtablespace_name OFFLINE IMMEDIATE;
Step 5: Create Tables at Clone DatabaseAfter opening the clone with the RESETLOGS option, create a table that has the
exact same column names and column datatypes as the partitioned table you are
recovering. Create a table for each partition you wish to recover. These tables will be
used later to swap each recovery set partition.
Step 6: Drop Indexes on Partitions Being RecoveredDrop the indexes on the partition you wish to recover, or create identical,
non-partitioned indexes that exist on the partition you wish to recover.
Step 7: Exchange Partitions with Stand-Alone TablesFor each partition in the clone recovery set, exchange the partitions into the
stand-alone tables created in Step 5 by issuing the following statement:
ALTER TABLE partitioned_table_name EXCHANGE PARTITION partition_nameWITH TABLE table_name ;
Step 8: Export the Clone DatabaseExecute export against the clone database for the recovery set tablespaces using the
following statement:
exp sys/ password point_in_time_recover=yrecovery_tablespaces= tablespace_1 , tablespace_2 , tablespace_n
If the export phase fails with the error message ORA 29308 view TS_PITR_CHECK failure , re-query TS_PITR_CHECK, resolve the problem, and re-run the
export. You need to perform the export phase of TSPITR as the user SYS, otherwise
the export fails with the error message ORA-29303: user does not login asSYS. Shut down the clone database after a successful export.
Step 9: Copy the Recovery Set Datafiles to the Primary DatabaseIf any recovery set tablespaces are READ ONLY on the primary database, you
should change them to OFFLINE. Copy the recovery set datafiles from the clone
7-20 Oracle8i Backup and Recovery Guide

Performing TSPITR of Partitioned Tables When a Partition Has Been Dropped
database to the primary database, taking care not to overwrite any auxiliary set files
on the primary database.
Step 10: Import into the Primary DatabaseImport the recovery set metadata into the primary database using the following
command:
imp sys/ password point_in_time_recover=true;
This import also updates the copied file's file headers and integrates them with the
primary database.
Step 11: Bring Recovery Set Tablespace OnlineOnline each recovery set tablespace at the primary database by issuing the
following statement:
ALTER TABLESPACEtablespace_name ONLINE;
Step 12: Insert Stand-Alone Tables into Partitioned TablesAt this point you must insert the stand-alone tables into the partitioned tables; you
can do this by first issuing the following statement:
ALTER TABLE table_name SPLIT PARTITION partition_name AT ( key_value ) INTO(PARTITION partition_1_name TABLESPACE tablespace_name ,PARTITION partition_2_name TABLESPACE tablespace_name );
Note that at this point, partition 2 is empty because keys in that range have already
been deleted from the table.
Issue the following statement to swap the stand-alone table into the partition:
ALTER TABLE EXCHANGE PARTITION partition_name WITH TABLE table_name ;
Now insert the records saved in Step 2 into the recovered partition (if desired).
Performing Operating System Tablespace Point-in-Time Recovery 7-21
Performing TSPITR of Partitioned Tables When a Partition Has Been Dropped
Step 13: Back Up the Recovered Tablespaces in the Primary DatabaseBack up the recovered tablespaces in the primary database. Failure to do so results
in loss of data in the event of media failure.
Note: If the partition that has been dropped is the last partition in
the table, add it using the ALTER TABLE ADD PARTITION
statement.
WARNING: You must back up the tablespace, because otherwiseyou might lose it. For example, a media failure occurs, but thearchived redo logs from the last backup of the database do notlogically link to the recovered tablespaces. If you attempt torecover any recovery set tablespaces from a backup taken beforeTSPITR, the procedure fails.
Note: As described in "TSPITR Limitations" on page 7-5, TSPITR
cannot be used to recover a tablespace that has been dropped.
Therefore, if the associated tablespace of the partition has been
dropped as well as the partition, you cannot recover that partition
using TSPITR. You have to perform ordinary export/import
recovery. Specifically, you have to:
■ Make a copy of the database
■ Roll it forward
■ Open the database
■ Exchange the partition for a stand-alone table
■ Make a table-level export of the stand-alone table
Import the table into the primary database and insert it into the
partitioned table using the ALTER TABLE SPLIT PARTITION or
ALTER TABLE ADD PARTITION statements.
7-22 Oracle8i Backup and Recovery Guide

TSPITR Tuning Considerations
Performing TSPITR of Partitioned Tables When a Partition Has SplitThis section describes how to recover partitioned tables when a partition has been
split, and includes the following sections:
■ Step 1: Drop the Lower of the Two Partitions at the Primary Database
■ Steps 2-13: Follow Same Steps as for Partial TSPITR of Partitioned Tablespaces
Step 1: Drop the Lower of the Two Partitions at the Primary DatabaseFor each partition you wish to recover whose range has been split, drop the lower
of the two partitions so that the higher expands downwards. In other words, the
higher partition has the same range as before the split. For example, if P1 was split
into partitions P1A and P1B, then P1B must be dropped, meaning that partition P1A
now has the same range as P1.
For each partition that you wish to recover whose range has split, create a table that
has exactly the same column names and column datatypes as the partitioned table
you are recovering:
CREATE TABLEnew_tableAS SELECT * FROM partitioned_tableWHERE 1=2;
These tables will be used to exchange each recovery set partition in Step 3.
Steps 2-13: Follow Same Steps as for Partial TSPITR of Partitioned TablespacesFollow steps 2-13 in the procedure for "Performing Partial TSPITR of Partitioned
Tables" on page 7-15.
TSPITR Tuning ConsiderationsThis section describes tuning issues relevant to TSPITR, and includes the following
topics:
■ Recovery Set Location Considerations
■ Backup Control File Considerations
Recovery Set Location ConsiderationsIf space is at a premium, it is possible to recover the recovery set files "in place". In
other words, recover them over their corresponding files on the primary database.
Performing Operating System Tablespace Point-in-Time Recovery 7-23
TSPITR Tuning Considerations
Note that the recommended practice is to restore the files to a separate location and
then copy across before the import phase of TSPITR is complete (see "Step 6: Import
the Metadata into the Primary Database" on page 7-14).
Advantages and Disadvantages of Recovering to a Separate LocationThe advantages of recovering to a separate location are:
■ Greater availability and flexibility. If recovery is abandoned at a point before
integrating the recovery set with the primary database, then there is no need to
restore the recovery set files on the primary database and recover them using
normal means.
■ The recovery set tablespaces can be accessible on the primary database while
recovery occurs on the clone. For example, there may be a subset of undamaged
data within the recovery set tablespaces that you wish to access (see "Step 3:
Prepare the Primary Database" on page 7-9). If so, change the recovery set
tablespaces to READ ONLY on the primary database. If the files are recovered
in place, this option is not available.
The disadvantage of recovering to a separate location is that more space is required
for the clone database.
Advantages and Disadvantages of Recovering in PlaceThe advantage of recovering in place is that the amount of space taken up by the
recovery set files is saved. After recovery of the clone is complete, there is no need
to copy the recovery set files over to the primary database.
The disadvantage is that if the recovery is abandoned at a point before integrating
the recovery set with the primary database (see "Step 6: Import the Metadata into
the Primary Database" on page 7-14), then you must restore the overwritten
recovery set files of the primary database from a backup and recover by normal
means, prolonging data unavailability. You cannot query any undamaged data
within the recovery set tablespaces during recovery.
Backup Control File ConsiderationsThe error ORA-01152 file 1 was not restored from a sufficientlyold backup appears when no recovery is performed on the clone before grafting it
to the primary. For example, if a backup is taken at time A, and a database at time B
requires TSPITR to be done on a particular tablespace to take that tablespace to time
A, what actually happens is that the clone database is opened RESETLOGS without
7-24 Oracle8i Backup and Recovery Guide

Performing TSPITR Using Transportable Tablespaces
any recovery having been done. When recovering the clone, the SQL*Plus
statements would be:
RECOVER DATABASE USING BACKUP CONTROLFILE UNTIL CANCEL;CANCEL;OPEN DATABASE RESETLOGS;
At this point no redo logs have been applied, but we wish to open the database.
However, since we save checkpoints to the control file in Oracle 8, it is a
requirement for clone and standby databases that the backup control files need to
be taken at a point after the rest of the backup was taken. Unless this is the case,
Oracle issues ORA-01152 file 1 was not restored from asufficiently old backup at open time, not because file 1 is too recent
(because it is synchronized with the rest of the database), but because it is more
recent than the control file.
Performing TSPITR Using Transportable TablespacesYou can use the transportable tablespace feature to perform tablespace point-in-time
recovery. This method is similar to the O/S TSPITR described in previous sections,
except you use the transportable tablespace feature to move recovered tablespaces
from the clone database to the primary database. To learn how to transport
tablespaces between databases, see the Oracle8i Administrator’s Guide.
The major difference between O/S TSPITR and TSPITR through transportable
tablespaces is that for the former you must follow the special procedures for
creating clone initialization parameter files, mounting the clone database, etc. O/S
TSPITR assumes that the user may place the clone database on the same computer
as the primary database; the special clone database commands provide error checks
to prevent the corruption of the primary database on the same computer while
recovering the clone database.
Performing TSPITR through transportable tablespaces relaxes this requirement. If
you restore backups to a different computer separate from the primary database,
you can start the clone database as if it were the primary database, using the normal
database MOUNT statement instead of the clone database MOUNT statement. If
you restore backups on the same computer as the primary database, however,
Note: A RESETLOGS would work with a regular database if a
clean, consistent backup and an old backup control file is used.
Otherwise, the behavior would not be compatible with existing
backup scripts.
Performing Operating System Tablespace Point-in-Time Recovery 7-25

Performing TSPITR Using Transportable Tablespaces
follow the special procedure to create the clone database as described in O/S
TSPITR, since this procedure helps prevent accidental corruption of the primary
database while recovering the clone database on the same computer.
TSPITR through transportable tablespaces provides basically the same functionality
as O/S TSPITR, but is more flexible since:
■ You can recover dropped tablespaces, which you cannot do using O/S TSPITR.
■ You can transport the recovered tablespaces from the clone database to a
different database to test the procedure before making permanent changes to
the primary database.
To perform TSPITR using the transportable tablespace feature:
1. Restore the backup to construct the clone database. Create the clone database on
the same computer as the primary database or on a different computer.
2. If you create the clone database using the special clone database procedure,
place all recovery set and auxiliary set files online:
ALTER DATABASE DATAFILE ' datafile_name ' ONLINE;
If you create the clone database as a normal database (on a computer different
from the primary database), take all datafiles not in the recovery and auxiliary
set offline:
ALTER DATABASE DATAFILE ' datafile_name ' OFFLINE;
3. Recover the clone database to the specified point in time.
4. Open the clone database with the RESETLOGS option.
5. Make the tablespaces in the recovery set read-only by issuing the ALTER
TABLESPACE ... READ ONLY statement.
6. Generate the transportable set by running EXPORT. Include all tablespaces in
the recovery set.
7. In the primary database, drop the tablespaces in the recovery set through the
DROP TABLESPACE statement.
8. Plug in the transportable set into the primary database by running IMPORT.
9. If necessary, make the recovered tablespaces read write by issuing the ALTER
TABLESPACE READ WRITE statement.
7-26 Oracle8i Backup and Recovery Guide
Index
AABORT optionSHUTDOWN statement, 1-17, 5-15, 5-16, 5-25,
6-13
active online redo log
loss of group, 6-10
alert log, 6-17
checking after RESETLOGS, 5-35
ALTER DATABASE statement
BACKUP CONTROLFILE clause, 1-19, 4-4, 4-14
TO TRACE option, 4-14
CLEAR LOGFILE clause, 6-9
CLEAR UNARCHIVED LOGFILE clause, 2-14
DATAFILE ONLINE option, 5-30
NORESETLOGS option, 4-16, 5-34
RECOVER ... FROM option, 5-6, 5-10
RECOVER AUTOMATIC LOGFILE
option, 5-13
RECOVER LOGFILE option, 5-12
RESETLOGS option, 4-16, 5-16, 5-17, 5-34
ALTER SYSTEM statement
ARCHIVE ALL option
using to archive online redo logs, 1-19
RESUME option, 4-11
SUSPEND option, 4-11
ALTER TABLESPACE statement
BEGIN BACKUP option, 4-5, 4-9
END BACKUP option, 4-9
applications
errors
recovery after, 1-12
applying log files
SQL*Plus, 5-11
archived redo logs, 2-14, 2-23
ALTER SYSTEM ARCHIVE ALL
statement, 1-19
applying during media recovery, 5-9, 5-12
automating application, 5-11
definition, 1-10
deleting after recovery, 5-7
displaying information, 2-16
enabling automatic archival, 2-20
errors during recovery, 5-14
location during recovery, 5-9
loss of, 6-11
multiplexing, 2-21
normal transmission of, 2-23
restoring to disk, 5-6
specifying destinations for, 2-21
standby transmission of, 2-23
status information, 2-4, 2-16
transmitting, 2-23
using for recovery
in non-default location, 5-10
ARCHIVELOG mode, 2-18
advantages, 2-19
archiving, 2-17
backup strategies when using, 3-5
datafile loss in, 6-3
definition of, 2-18
distributed databases, 3-9
overview, 1-11
running in, 2-18
strategies for backups in, 3-5
archiving
advantages, 2-17
after inconsistent closed backups, 1-19
Index-1
after open backups, 1-19
ALTER SYSTEM ARCHIVE ALL
statement, 1-19
disadvantages, 2-17
viewing information on, 2-4, 2-16
AS SELECT option
CREATE TABLE statement, 5-3
AUTORECOVERY option
SET statement, 5-11
avoiding dangerous backup techniques, 3-10
Bbackup and recovery
definition, 1-3
BACKUP CONTROLFILE clause
ALTER DATABASE statement, 1-19, 4-3
BACKUP CONTROLFILE TO TRACE clause
ALTER DATABASE statement, 4-3, 4-14
backup methods, 1-20, 1-22
comparison of, 1-22
backup strategy
overview, 1-12 to 1-23
backups
after OPEN RESETLOGS option, 3-8
after structural changes to database, 3-7
ARCHIVELOG mode in, 3-5
choosing a strategy, 3-4 to 3-11
closed, 4-4
consistent, 1-23, 4-3
whole database, 1-16
control file, 2-6, 2-8, 4-13
datafile, 1-15
DBVERIFY utility, 4-16
definition, 1-2
distributed databases, 3-9
ARCHIVELOG mode, 3-9
NOARCHIVELOG mode, 3-9
Export utility, 3-10
frequency, 1-23, 3-6
golden rule, 3-2
guidelines, 3-2 to 3-12
distributed database constraints, 3-9
Export utility, 3-10
frequency, 3-6
multiplexing files, 3-6
often-used tablespaces, 3-7
storing old backups, 3-8
structural changes, 3-7
testing strategies, 3-12
unrecoverable objects, 3-8
whole database backups after OPEN
RESETLOGS, 3-8
importance, 1-12
inconsistent, 1-23, 4-3
closed database, 1-18
in NOARCHIVELOG mode, 1-18
whole database, 1-18
listing files needed, 4-2
logical, definition, 1-2
methods, 1-20
NOARCHIVELOG mode, in, 3-4
offline, 3-6
online, 3-6
online redo logs, 3-10
operating system, 1-22
physical, definition, 1-2
planning before database creation, 3-2
procedures, 4-3 to 4-20
offline datafiles, 4-12
offline tablespaces, 4-12
restoring whole database backup, 5-15
status
checking backup, 4-8
storing, 3-8
tablespace, 3-7, 4-8
techniques to avoid, 3-10
test strategies, 3-12
types, 1-13, 4-3 to 4-20
using Recovery Manager, 1-21
whole database, 1-13, 4-3
backup control files and, 1-17
preparing to take, 4-4
BEGIN BACKUP option
ALTER TABLESPACE statement, 4-5
Ccancel-based media recovery
definition, 3-16
Index-2

procedures, 5-22, 5-25, 5-28
change vectors
redo records, 1-9
change-based media recovery, 5-30
coordinated in distributed databases, 6-17
definition, 3-16
checkpoints
recorded in control file, 1-7
CLEAR LOGFILE clause
ALTER DATABASE statement, 6-9
clearing redo log files, 2-14
clone databases
exporting, 7-13
opening, 7-13
preparing for TSPITR, 7-11
preparing parameter files for, 7-10
recovering, 7-12
closed backups, 1-18
cold backups, 1-18
whole database backups, 4-3
commands, SQL
ALTER DATABASE, 5-6, 5-10, 5-12
commands, SQL*Plus
RECOVER, 5-8
UNTIL TIME option, 5-30
RECOVER DATAFILE, 5-8
RECOVER TABLESPACE, 5-8
SET, 5-6, 5-10, 5-11
complete export, 4-20
complete recovery
definition, 1-24, 3-16
procedures, 5-19
consistent backups
definition, 1-5, 1-23
whole database, 1-16, 4-4
control files, 2-3 to 2-6
backing up, 2-5, 4-3, 4-13
backing up to trace file, 4-14
contents, 1-7, 2-3
creating, 6-14
definition, 1-7
finding filenames, 4-3
incomplete recovery, 5-26
loss of, 6-12
all copies, 6-13
maintaining backups, 2-6, 2-8
mirrored, 2-8
loss of, 6-12
multiplexed, 2-6, 2-7, 2-8
number of, 2-8
overview, 1-7
purpose, 1-8
recovering from loss of, 2-8
restoring
to default location, 6-13
to non-default location, 6-13
setting the CONTROL_FILES initialization
parameter, 2-8
time-based recovery, 5-28
updating, 2-5
CONTROL_FILES initialization parameter, 2-8,
4-3, 6-13
coordinated time-based recovery
distributed databases, 6-17
CREATE DATAFILE clause
ALTER DATABASE statement, 5-5
CREATE TABLE statement
AS SELECT option, 5-3
CREATE TABLESPACE statement, 6-3
cumulative export, 4-20
current redo log, 1-9
Ddata dictionary views, 4-6, 4-7, 4-12
database structures
datafiles, 1-6
online redo log, 1-9
overview, 1-6 to 1-11
physical, 1-6 to 1-11
redo log files, 1-9
rollback segments, 1-8
database writer process (DBWn), 1-7
databases
listing for backups, 4-2
media recovery procedures, 5-1 to 5-31
media recovery scenarios, 6-1
name stored in control file, 2-3
physical structure, 1-6 to 1-11
recovery
Index-3

after control file damage, 6-13
after OPEN RESETLOGS option, 5-36
suspending, 4-9
whole database backups, 4-3
datafile headers
importance for recovery, 1-6
DATAFILE ONLINE option
ALTER DATABASE statement, 5-30
datafiles, 1-6
backing up, 1-15
offline, 4-12
checking backup status, 4-8
listing
for backup, 4-2
losing, 6-2
in ARCHIVELOG mode, 6-3
in NOARCHIVELOG mode, 6-2
named in control files, 2-3
overview, 1-6
recovery
without backup, 5-5
re-creating, 5-5
renaming
after recovery, 6-4
restoring
to default location, 5-5
usage, 1-7
viewing
backup status, 4-8
files needing recovery, 5-2
DBA_DATA_FILES view, 4-6, 4-7, 4-12
DBVERIFY utility, 4-16
disk failures, 1-13
distributed databases
backups, 3-9
change-based recovery, 6-17
coordinated time-based recovery, 6-17
media recovery and snapshots, 6-18
recovery, 6-16
taking backups, 3-9
EExport utility
backups, 3-10, 4-19
export types, 4-20
read consistency, 4-19
exports
complete, 4-20
cumulative, 4-20
incremental, 4-20
modes, 4-19
Ffailures
disk, 1-13
hardware, 1-12
instance, 1-13
media, 1-13
multiplexed online redo logs, 2-12
process, 1-12
statement, 1-12
system, 1-12
types, 1-12
user errors, 1-13
features, new
data corruption protection, x
LOG_ARCHIVE_DEST_n parameter, xi
suspend/resume database operations, x
transportable tablespaces, xi
filenames
listing for backup, 4-2
Ggolden rule
of backup and recovery, 3-2
groups
archived redo log, 6-6, 6-7
online redo log, 6-6, 6-7
guidelines
backups
distributed database constraints, 3-9
Export utility, 3-10
frequency, 3-6
multiplexing files, 3-6
often-used tablespaces, 3-7
storing old backups, 3-8
structural changes, 3-7
Index-4

testing strategies, 3-12
unrecoverable operations, 3-8
whole database backups after OPEN
RESETLOGS, 3-8
Hhardware failures, 1-12
hot backup mode
for online operating system backups, 4-6
hot backups, 3-6
inconsistent whole database backups, 1-18
Iimage copies
definition, 1-21
Import utility, 4-19
database recovery, 4-20
procedure for using, 4-20
inactive online redo log
loss of, 6-8
incomplete media recovery
change-based, 5-30
definition, 1-25, 3-16
in OPS configuration, 5-12
procedures for, 5-25
time-based, 5-28 to 5-30
using backup control file, 5-12
incomplete recovery
definition, 1-5
inconsistent backups
definition, 1-23
whole database
definition, 1-18
incremental export, 4-20
initialization parameters
CONTROL_FILES, 6-13
LOG_ARCHIVE_DEST, 2-21, 5-6, 5-9, 5-27, 5-30
LOG_ARCHIVE_DEST_n, 2-21, 5-6, 5-9
LOG_ARCHIVE_DUPLEX_DEST, 2-21
LOG_ARCHIVE_FORMAT, 5-6, 5-9
RECOVERY_PARALLELISM, 5-19
instance failure, 1-12, 1-13
interrupting media recovery, 5-14
Llog sequence numbers
requested during recovery, 5-9
log sequence recovery, 3-16
log switches
multiplexed redo log files and, 2-14
waiting for archiving to complete, 2-14
log writer process (LGWR)
multiplexed redo log files and, 2-13
trace files and, 2-13
LOG_ARCHIVE_DEST initialization
parameter, 5-6, 5-9, 5-27, 5-30
specifying destinations using, 2-21
LOG_ARCHIVE_DEST_n initialization
parameter, 2-21, 5-6, 5-9
LOG_ARCHIVE_DUPLEX_DEST initialization
parameter
specifying destinations using, 2-21
LOG_ARCHIVE_FORMAT initialization
parameter, 5-6, 5-9
LOGSOURCE variable
SET statement, 5-6, 5-10
loss of
inactive log group, 6-8
Mmedia failure
archived redo log file loss, 6-11
complete recovery, 5-19 to 5-25
control file loss, 6-12, 6-13
datafile loss, 6-2
definition, 1-13
description, 6-2
disk controller, 6-2
NOARCHIVELOG mode, 5-15
online redo log group loss, 6-7
online redo log loss, 6-5
online redo log member loss, 6-5
permanent, 6-2
recovery, 5-19 to 5-31
distributed databases, 6-16
recovery procedures
examples, 6-2
Index-5

understanding types, 6-2
media recovery, 5-1 to 5-38
ADD DATAFILE operation, 6-3
after control file damage, 6-13
after OPEN RESETLOGS operation, 5-36
applying archived redo logs, 5-9
cancel-based, 3-16, 5-22, 5-25, 5-28
change-based, 3-16, 5-25, 5-30
complete, 1-24, 3-16, 5-19 to 5-25
completion of, 5-22, 5-24
datafiles
without backup, 5-5
deciding which files need recovery, 5-2
distributed databases, 6-16
coordinated time-based, 6-17
error messages, 5-14
errors with redo log files, 5-14
incomplete, 3-16, 5-25
definition, 1-25
interrupting, 5-14
log sequence recovery, 3-16
lost files
lost archived redo log files, 6-11
lost control files, 6-12
lost datafiles, 6-2
lost mirrored control files, 6-12
methods
choosing, 3-19
NOARCHIVELOG mode, 5-15
offline tablespaces in open database, 5-22
online redo log files, 6-5
opening database after, 5-34
overview, 1-24
restarting, 5-14
restoring
archived redo log files, 5-6
damaged files, 5-4
whole database backups, 5-15
resuming after interruption, 5-14
roll forward phase, 5-9
See also recovery
snapshots, 6-18
successfully applied redo logs, 5-14
SYSTEM tablespace, 5-22
time-based, 5-25
transportable tablespaces, 6-4
types
distributed databases, 6-16
undamaged tablespaces online, 5-22
unsuccessfully applied redo logs, 5-14
using Import utility, 4-20
mirrored files, 2-8
control files, 2-8
loss of, 6-12
online redo log, 2-13
loss of, 6-5
splitting, 4-9
suspend/resume mode, 4-9
mirroring
compared to multiplexing, 2-6
control files, 1-7
modes
ARCHIVELOG, 1-11
choosing between ARCHIVELOG and
NOARCHIVELOG, 2-17
NOARCHIVELOG, 1-11
recovery from failure, 5-15
setting archiving, 2-20
MOUNT option
STARTUP statement, 5-27, 5-29
MTTR (mean time to recover), 1-7
multiplexing
archived redo logs, 2-21
compared to mirroring, 2-6
control files, 1-7, 2-6, 2-7, 2-8
redo log files, 2-12
groups, 2-13
multi-threaded recovery, 5-12
Nnew features
data corruption protection, x
LOG_ARCHIVE_DEST_n parameter, xi
suspend/resume database operations, x
transportable tablespaces, xi
NOARCHIVELOG mode
archiving, 2-17
datafile loss in, 6-2
definition, 2-17
Index-6

disadvantages, 5-15
distributed database backups, 3-9
inconsistent closed backups in, 1-18
overview, 1-11
recovery, 5-15
running in, 2-17
strategies for backups in, 3-4
NORESETLOGS option
ALTER DATABASE statement
backing up control file, 4-16
Ooffline backups, 3-6
online backups, 3-6
online redo logs, 1-4, 1-9, 6-8
active group, 6-6, 6-7
applying during media recovery, 5-9
archived group, 6-6, 6-7
backing up, 2-10, 3-10
clearing
failure, 6-9
clearing inactive logs
archived, 6-8
unarchived, 6-8
current group, 1-9, 6-6, 6-7
determining active logs, 6-7
inactive, 1-9
inactive group, 6-6, 6-7
listing log files for backup, 4-2
loss of
active group, 6-10
all members, 6-7
group, 6-7
mirrored members, 6-5
recovery, 6-5
multiple group loss, 6-11
multiplexed, 1-10
overview, 1-9
recorded in control file, 2-3
replacing damaged member, 6-6
responding to failures, 2-13
status of members, 6-6, 6-7
unintentional restore of, 3-10
operating system backups, 1-22, 4-3 to 4-21
ORA-01578 error message, 5-3
Pparallel recovery, 5-19
partitioned tables
and dropped partitions, 7-18
and split partitions, 7-23
performing partial TSPITR, 7-15
performing backups after unrecoverable
operations, 3-8
physical database structures, 1-6 to 1-11
point-in-time recovery
tablespace, 7-1 to 7-26
primary databases
preparing for use, 7-14
process failures, 1-12
definition, 1-12
Rread consistency
Export utility, 4-19
read-only tablespaces
effect on recovery, 5-4
recovering, 5-4
RECOVER ... FROM option
ALTER DATABASE statement, 5-6, 5-10
RECOVER AUTOMATIC LOGFILE option
ALTER DATABASE statement, 5-13
RECOVER statement
DATABASE option, 5-8
DATAFILE option, 5-8
TABLESPACE option, 5-8
unrecoverable objects and standby
databases, 5-3
UNTIL TIME option, 5-30
recovered tablespaces
backing up, 7-14
recovery
ADD DATAFILE operation, 6-3
after loss of control file, 2-8
automatically applying archived logs, 5-11
cancel-based, 5-22, 5-25, 5-28
change-based, 5-30
Index-7

control files, 2-8, 6-12
datafiles, 6-2
ARCHIVELOG mode, 6-3
NOARCHIVELOG mode, 6-2
datafiles needing, 5-2
distributed databases
with snapshots, 6-18
dropped table, 6-15
Import utility, 4-20
media, 5-1, 6-1
complete, 3-16
incomplete, 3-16
methods, 1-27
multi-threaded, 5-12
online redo logs, 6-5
losing member, 6-5
loss of group, 6-7
parallel processes for, 5-19
read-only tablespaces, 5-4
See also media recovery
setting number of processes to use, 5-19
strategies
determining when media recovery is
necessary, 3-18
time-based, 3-16, 5-28 to 5-30
transportable tablespaces, 6-4
user errors, 6-15
using logs in non-default location, 5-10
using Recovery Manager, 1-28
using SQL*Plus, 1-27
Recovery Manager
backups and copies, 1-21
See also Recovery Manager User’s Guide andReference
recovery sets
copying to primary database, 7-13
importing into primary database, 7-14
recovery strategy
overview, 1-24
RECOVERY_PARALLELISM initialization
parameter, 5-19
redo log buffers, 1-4
redo logs, 1-9
"fuzzy" data in backups and, 3-6
archived, 2-17
advantages of, 2-14
contents of, 2-15
clearing, 2-14
files named in control file, 2-3
groups, 2-13
members, 2-13
inactive, 1-9
listing files for backup, 4-2
members, 2-13
mirrored
log switches and, 2-14
multiplexed, 2-12
diagrammed, 2-13
groups, 2-13
if all inaccessible, 2-14
if some members inaccessible, 2-14
purpose of, 1-10
naming, 5-9
overview, 1-9
redo records
change vectors, 1-9
definition, 1-9
redundancy set
definition, 1-20
RESETLOGS option
ALTER DATABASE statement, 5-16, 5-17, 5-34
backing up control file, 4-16
database backups after using, 3-8
multiple timelines for redo logs, 3-11
recovery of database after using, 5-36
restoring
archived redo logs, 5-6
backups, 5-4
of online redo logs, 3-10
control files
to default location, 6-13
to non-default location, 6-13
database
to default location, 5-15
to new location, 5-16
datafiles
to default location, 5-5
whole database backups, 5-15
RESUME option
ALTER SYSTEM statement, 4-11
Index-8

resuming recovery after interruption, 5-14
rollback segments, 1-8
SSCN (system change number), 1-7
definition, 1-10
use in control files, 1-8
use in distributed recovery, 6-18
SET statement
AUTORECOVERY option, 5-11
LOGSOURCE variable, 5-6, 5-10
SHUTDOWN statement
ABORT option, 4-7, 5-15, 5-16, 5-25, 6-13
consistent whole database backups, 1-17
snapshots
distributed database recovery, 6-18
media recovery and, 6-18
specifying destinations
for archived redo logs, 2-21
splitting mirrors
suspend/resume mode, 4-9
SQL statements
applying log files, 5-12
for recovering tablespace, 5-12
SQL*Plus
applying log files, 5-11
STARTUP statement
MOUNT option, 5-27, 5-29
statement failures, 1-12
definition, 1-12
strategies
backup, 3-4 to 3-11
ARCHIVELOG mode, 3-5
NOARCHIVELOG mode, 3-4
recovery
determining when media recovery is
necessary, 3-18
SUSPEND option
ALTER SYSTEM statement, 4-11
suspending a database, 4-9
suspend/resume mode, 4-9
system change number. See SCN
system failures, 1-12
SYSTEM tablespace
recovery of, 5-22
system time
changing
effect on recovery, 5-25
Ttables
recovery of dropped, 6-15
tablespace point-in-time recovery, 7-25
advantages, 7-2
clone database, 7-4
different methods, 7-25
introduction, 7-2
limitations, 7-5
methods, 7-3
O/S, 7-3
performing, 7-1 to 7-26
planning for, 7-4
preparing, 7-6
procedures for using transportable tablespace
feature, 7-26
requirements, 7-6
restrictions, 7-5
terminology, 7-4
transportable tablespace method, 7-3, 7-25
tuning considerations, 7-23
backup control files, 7-24
recovery set location, 7-23
tablespaces
backing up, 3-7, 4-8
frequency, 3-7
offline, 4-12
online, 4-8
read-only
backing up, 4-7
effect on recovery, 5-4
recovery, 5-4
read-write
backing up, 4-6
recovering offline in open database, 5-22
testing
backup strategies, 3-12
time format
RECOVER DATABASE UNTIL TIME
Index-9

statement, 5-30
time-based recovery, 5-28 to 5-30
coordinated in distributed databases, 6-17
definition, 3-16
trace files
backing up control file, 4-14
control file backups to, 4-14
log writer process and, 2-13
transactions
how Oracle records, 1-4
rollback, 1-8
uncommitted, 1-8
transmitting archived redo logs, 2-23
in normal transmission mode, 2-23
transportable tablespaces
recovery, 6-4
TSPITR and, 7-3
Uunrecoverable objects
and RECOVER operation, 5-3
recovery
unrecoverable objects and, 5-3
unrecoverable operations
performing backups after, 3-8
UNTIL TIME option
RECOVER statement, 5-30
user errors
database failures, 1-13
definition, 1-12
recovery from, 6-15
USER_DUMP_DEST initialization parameter, 4-14
USING BACKUP CONTROLFILE option
RECOVER statement, 5-27
VV$ARCHIVE view, 2-16
V$BACKUP view, 4-8
V$CONTROLFILE view, 2-4
V$DATABASE view, 2-4, 2-16
V$DATAFILE view, 4-2, 5-30
listing files for backups, 4-2
V$LOG view, 2-16
displaying archiving status, 2-11, 2-16
V$LOG_HISTORY view
listing all archived logs, 5-6
V$LOGFILE view, 6-6, 6-7
displaying information about online logs, 2-11
listing files for backups, 4-2
listing online redo logs, 4-2
V$RECOVER_FILE view, 1-27, 5-2
determining which files to recover, 3-15
V$RECOVERY_LOG view
listing logs needed for recovery, 5-6
V$TABLESPACE view, 4-2
views
data dictionary, 4-6, 4-7, 4-12
Wwarning
archiving mode for first backup, 3-5
consistency and Export backups, 4-19
whole database backups, 4-3
ARCHIVELOG mode, 4-3
consistent, 1-16
backup control files and, 1-17
using SHUTDOWN ABORT statement, 1-17
definition, 1-13
inconsistent, 1-18, 4-3
NOARCHIVELOG mode, 4-3
preparing to take, 4-4
restoring from, 5-15
Index-10


