106
Oracle® Communications ASAP System Administrator's Guide Release 7.2 E18879-01 April 2012

Oracle® Communications ASAPSystem Administrator's Guide
Release 7.2
E18879-01
April 2012

Oracle Communications ASAP System Administrator's Guide, Release 7.2
E18879-01
Copyright © 2012, Oracle and/or its affiliates. All rights reserved.
This software and related documentation are provided under a license agreement containing restrictions on use and disclosure and are protected by intellectual property laws. Except as expressly permitted in your license agreement or allowed by law, you may not use, copy, reproduce, translate, broadcast, modify, license, transmit, distribute, exhibit, perform, publish, or display any part, in any form, or by any means. Reverse engineering, disassembly, or decompilation of this software, unless required by law for interoperability, is prohibited.
The information contained herein is subject to change without notice and is not warranted to be error-free. If you find any errors, please report them to us in writing.
If this is software or related documentation that is delivered to the U.S. Government or anyone licensing it on behalf of the U.S. Government, the following notice is applicable:
U.S. GOVERNMENT RIGHTS Programs, software, databases, and related documentation and technical data delivered to U.S. Government customers are "commercial computer software" or "commercial technical data" pursuant to the applicable Federal Acquisition Regulation and agency-specific supplemental regulations. As such, the use, duplication, disclosure, modification, and adaptation shall be subject to the restrictions and license terms set forth in the applicable Government contract, and, to the extent applicable by the terms of the Government contract, the additional rights set forth in FAR 52.227-19, Commercial Computer Software License (December 2007). Oracle America, Inc., 500 Oracle Parkway, Redwood City, CA 94065.
This software or hardware is developed for general use in a variety of information management applications. It is not developed or intended for use in any inherently dangerous applications, including applications that may create a risk of personal injury. If you use this software or hardware in dangerous applications, then you shall be responsible to take all appropriate fail-safe, backup, redundancy, and other measures to ensure its safe use. Oracle Corporation and its affiliates disclaim any liability for any damages caused by use of this software or hardware in dangerous applications.
Oracle and Java are registered trademarks of Oracle and/or its affiliates. Other names may be trademarks of their respective owners.
Intel and Intel Xeon are trademarks or registered trademarks of Intel Corporation. All SPARC trademarks are used under license and are trademarks or registered trademarks of SPARC International, Inc. AMD, Opteron, the AMD logo, and the AMD Opteron logo are trademarks or registered trademarks of Advanced Micro Devices. UNIX is a registered trademark of The Open Group.
This software or hardware and documentation may provide access to or information on content, products, and services from third parties. Oracle Corporation and its affiliates are not responsible for and expressly disclaim all warranties of any kind with respect to third-party content, products, and services. Oracle Corporation and its affiliates will not be responsible for any loss, costs, or damages incurred due to your access to or use of third-party content, products, or services.
iii
Contents
Preface ................................................................................................................................................................ vii
Audience...................................................................................................................................................... viiRelated Documents .................................................................................................................................... vii
1 Starting and Stopping ASAP
Starting ASAP ........................................................................................................................................... 1-1Starting All ASAP Servers ................................................................................................................ 1-2Starting the Control Server ............................................................................................................... 1-4Starting the ASAP Daemon .............................................................................................................. 1-4
Starting ASAP Daemon Using a Start Command .................................................................. 1-5Starting ASAP Daemon Using a Wrapping Script................................................................. 1-5
Confirming that ASAP Started Successfully .................................................................................. 1-5Stopping ASAP ......................................................................................................................................... 1-6
2 Setting Up and Managing ASAP Security
Overview of Setting Up ASAP Security Features .............................................................................. 2-1Configuring WebLogic Server Security ............................................................................................... 2-1
About ASAP WebLogic Users, Groups, Roles, and Methods ..................................................... 2-2Understanding OCA Client Group Permissions.................................................................... 2-3Configuring Virtual Network Operator Authorization for OCA Users ............................. 2-5
Configuring Authentication Providers for ASAP ......................................................................... 2-6Configuring an External Lightweight Directory Access Protocol Server........................... 2-6Configuring a Primary Authentication Provider in WebLogic Server ............................... 2-6
Managing WebLogic Server ASAP User Security ........................................................................ 2-7Configuring the WebLogic Server Change Password Utility Page..................................... 2-8Setting WebLogic Server ASAP Password Policies .............................................................. 2-9Changing WebLogic Server ASAP User Passwords........................................................... 2-11Disabling the Change Password Feature in the OCA Client............................................. 2-13Managing Locked-out User Accounts .................................................................................. 2-13Updating Methods Role Assigned to a Group or User in WebLogic............................... 2-14
Configuring ASAP Server and Database Credential Security ..................................................... 2-15About Credential Store Factory Wallet Secure Data Management ......................................... 2-15
Setting up and Maintaining Secure Data Storage ............................................................... 2-15Data Encryption ...................................................................................................................... 2-15
Using the Credential Store Factory Wallet with ASAP Utilities and Scripts ......................... 2-16

iv
Changing Database Passwords in the Credential Store Factory Wallet ................................. 2-16Configuring Security for Network Elements Communication ................................................... 2-17
Understanding the Custom Secure Data Structure.................................................................... 2-17Managing Custom Secure Data..................................................................................................... 2-18
Setting up and Maintaining Secure Data Storage ............................................................... 2-19Encrypting Data During Network Element Provisioning ................................................. 2-19Understanding Key Distribution for Custom Secure Data................................................ 2-19Caching Secure Data on Local Servers.................................................................................. 2-20
Securing Network Element Credentials with the Security Administration Tool .................. 2-20Additional Security Considerations .................................................................................................. 2-22
Setting Secure Diagnostic Levels .................................................................................................. 2-22Setting the Network Element Dialog Diagnostic Configuration Parameter .................. 2-22Setting Work Order Information Diagnostic Levels........................................................... 2-23
Securing Java or State Table NEP or JNEP to NE Connection Implementations ................. 2-24Setting SRP or JSRP to SARM Security Properties ..................................................................... 2-24Setting Security Between Servers.................................................................................................. 2-24Enabling Schema Validation for the JSRP JMS Interface........................................................... 2-24
3 Monitoring and Managing ASAP
Overview of Monitoring and Managing ASAP ................................................................................. 3-1Configuring System Events and Alarms Using Stored Procedures ............................................... 3-2
Configuring Alarm Centers for Alarm Notification and Escalation .......................................... 3-3Configuring System Alarms ............................................................................................................. 3-3Configuring System Events .............................................................................................................. 3-5
Defining System Events ............................................................................................................. 3-5Setting Database Thresholds ..................................................................................................... 3-6
Sample Alarm Program - admin.sh................................................................................................. 3-6Sample Alarm Output ................................................................................................................ 3-7
Sample Alarm Program - POTS Cartridge Sample Code............................................................. 3-8Understanding Default System Events................................................................................................ 3-8
API System Events ............................................................................................................................. 3-8SARM System Events ........................................................................................................................ 3-9Control Server Events..................................................................................................................... 3-10NEP System Events......................................................................................................................... 3-10
Configuring and Reading Log and Diagnostic Files...................................................................... 3-11About Log Files ............................................................................................................................... 3-12About Diagnostic Files ................................................................................................................... 3-12
Using ASAP Diagnostic Tools................................................................................................ 3-13Configuring and Reading WebLogic-based Log and Diagnostic Files....................................... 3-13
Defining Severity Levels ................................................................................................................ 3-13Configuring the Severity Levels ................................................................................................... 3-14Configuring the log4j.xml File....................................................................................................... 3-15Using the log4jAdmin Web Page.................................................................................................. 3-16Checking the Current Logging Levels ......................................................................................... 3-17
Enabling Stored Procedure Error Messages ..................................................................................... 3-18
v
4 Improving ASAP Performance
About Improving ASAP Performance.................................................................................................. 4-1Tuning ASAP Performance with Pre-tuned ASAP Configuration Files ....................................... 4-1
About Pre-tuned ASAP Configurations ......................................................................................... 4-1Installing a Pre-tuned Configuration ....................................................................................... 4-2Using a Pre-tuned Configuration with a New ASAP Installation....................................... 4-2Generating Pre-tuned Configuration Files.............................................................................. 4-2Merging Pre-tuned File Settings into an Existing Installation ............................................. 4-2Example Pre-tuned Configuration Performance.................................................................... 4-2
Troubleshooting and Monitoring ASAP Performance ..................................................................... 4-4Understanding Sysmon Output Files.............................................................................................. 4-4
Troubleshooting the Connection Pool ..................................................................................... 4-4Troubleshooting the Message Queue....................................................................................... 4-6
Manually Tuning ASAP Performance ................................................................................................. 4-7Tuning Guidelines.............................................................................................................................. 4-7Setting System Limits ........................................................................................................................ 4-8Determining the Size of Your System ............................................................................................. 4-8Tuning Message Queue Guidelines ................................................................................................ 4-9Tuning ASAP Server Message Queues ........................................................................................ 4-10
Tuning JSRP and SRP Message Queues .............................................................................. 4-10 Tips for Tuning the SRP ......................................................................................................... 4-12Tuning SARM Message Queues ............................................................................................ 4-12Tips for Tuning the SARM ..................................................................................................... 4-16Tuning NEP Message Queues................................................................................................ 4-16Tips for Tuning NEP................................................................................................................ 4-18
Other Performance Issues .............................................................................................................. 4-19Local Versus NFS-mounted File Systems for Diagnostic Files ......................................... 4-19Server Diagnostic Levels ........................................................................................................ 4-19Diagnostic Messages Output.................................................................................................. 4-20Query Optimization ................................................................................................................ 4-20
5 Backing Up and Restoring ASAP Files and Data
About Backing Up and Restoring Files and Data .............................................................................. 5-1ASAP System Backup and Restore.................................................................................................. 5-1Database Backup and Recovery....................................................................................................... 5-1
Database Backup Strategy ......................................................................................................... 5-2Database Backup in a Distributed Environment.................................................................... 5-2
ASAP WebLogic Server Domain Back Up ..................................................................................... 5-2
6 Managing the Database and File System
Overview of Managing the Database and File System..................................................................... 6-1Configuring Kernel and Database Initialization Parameters.......................................................... 6-1About Monitoring Database Segment and File System Size .......................................................... 6-2
Configuring File System Thresholds............................................................................................... 6-3Configuring Database Thresholds................................................................................................... 6-4
Database Management and Tuning Recommendations ................................................................... 6-5

vi
Enabling Automated ASAP Database Administration Options..................................................... 6-6Purging the Database and File System ................................................................................................ 6-6
Purging the Database ........................................................................................................................ 6-6Sample Database Purge Script .................................................................................................. 6-8Sample Cron Script for Clearing Alarms, Events, and Process Information .................. 6-10
Purging Test Systems ..................................................................................................................... 6-12
7 Troubleshooting ASAP
Overview of Troubleshooting ASAP.................................................................................................... 7-1Troubleshooting Checklist ..................................................................................................................... 7-1Using Error Logs to Troubleshoot ASAP ............................................................................................. 7-2Understanding Error-Message Syntax.................................................................................................. 7-2Collecting Diagnostic Information ....................................................................................................... 7-2Common ASAP Problems and Solutions ............................................................................................ 7-2
Problem: ASAP Servers Do Not Start - Database Tablespaces Used Up ................................... 7-3Problem: ASAP Servers Do Not Start - Interfaces File Empty or Missing................................. 7-3Problem: ASAP Servers Do Not Start - No Information In Interfaces File ................................ 7-3Problem: ASAP Servers Do Not Start - Wrong ASAP User Owner and Permissions ............. 7-4Problem: ASAP Servers Processes Do Not Start - Database Server Processes Used................ 7-4Problem: ASAP Servers Processes Do Not Start - Database Server Sessions Used.................. 7-4Problem: ASAP Servers Do Not Start - Insufficient Server User Connections Defined ......... 7-4Problem: ASAP Servers Do Not Start - Insufficient Number of Threads .................................. 7-5Problem: Control Server Crashes - No Free Messages ................................................................. 7-5Problem: JNEP Server Does Not Start - Wrong Database Connection Information ................ 7-5Problem: JNEP Server Does Not Start - Invalid Server Port Numbers ...................................... 7-6Problem: NEP Server Does Not Start - Problem with JNEP Java Process Start Script............. 7-6Problem: WebLogic Server Fails to Detect Passive RAC Database During Failover ............... 7-6
Component Failure Scenarios ................................................................................................................ 7-7WebLogic Administration and Managed Server Failure and Recovery Scenarios .................. 7-7SRP Failure Scenario .......................................................................................................................... 7-7SARM Failure Scenario...................................................................................................................... 7-7NEP Failure Scenario ......................................................................................................................... 7-7Control Server Failure Scenario ....................................................................................................... 7-8Database Failure Scenario ................................................................................................................. 7-8NE Unavailability Scenario............................................................................................................... 7-8SRP and SARM Failure Scenario...................................................................................................... 7-8SARM and NEP Failure Scenario..................................................................................................... 7-8
Getting Help with ASAP Problems ...................................................................................................... 7-8Before You Contact Global Support ................................................................................................ 7-8Reporting Problems ........................................................................................................................... 7-9
A ASAP Directory Structure
ASAP Directory Structure and Contents ............................................................................................ A-1

vii
Preface
This document describes how to start and stop Oracle Communications ASAP, configure security for ASAP, and manage and monitor ASAP. It also includes information about improving ASAP performance, managing the database and file system, backing up and restoring ASAP, and troubleshooting ASAP.
AudienceThis document is intended for system administrators, system integrators, and other individuals who need to maintain and work with ASAP.
Related DocumentsFor more information, see the following documents in the Oracle Communications ASAP 7.2 documentation set:
■ Oracle Communications ASAP Release Notes
■ Oracle Communications ASAP Concepts
■ Oracle Communications ASAP Service Request Translator User's Guide
■ Oracle Communications ASAP Order Control Application User's Guide
■ Oracle Communications ASAP Server Configuration Guide
■ Oracle Communications ASAP Installation Guide
■ Oracle Communications ASAP Cartridge Developer’s Guide
■ Oracle Communications ASAP Security Guide
■ Oracle Communications ASAP Developer’s Guide
Note: To download the Oracle Communications ASAP Developer’s Guide from the Oracle software delivery Web site, you must select Oracle Communications Service Activation Developer Documentation Pack. You can visit the Oracle software delivery Web site at:
http://edelivery.oracle.com

viii

1
Starting and Stopping ASAP 1-1
1Starting and Stopping ASAP
This chapter describes how to start and stop Oracle Communications ASAP.
Starting ASAPThe Control server creates a list of ASAP processes for each ASAP territory and system. The list enables the components of all ASAP systems in a territory to be specified and maintained in a single database.
In a particular ASAP implementation, there can be many territories. A territory is the geographical area served by the ASAP system. A Control server manages all applications and processes within the territory. Territories are generally mutually exclusive because there is no communication between ASAP systems in different territories.
The Control server determines each application’s details from the static database table tbl_appl_proc. This table specifies whether each application is a client or a server and specifies whether each application process should start automatically or manually, the sequence in which applications are to be started, and the diagnostic details of the process.
When ASAP is started, the Control servers on each machine in the network are started first. The primary Control server then either starts each ASAP application process individually (or sequentially) on its local machine, or instructs one of the secondary Control servers to start the application process on its machine. Every Control server determines the application details from a static database configuration table.
To shut down an ASAP application, you must submit a request to the Control server that manages the shutdown.
Using the Control server for all startup and shutdown activities provides a consistent approach to starting and stopping the system, and provides the ability to start ASAP processes on remote machines when ASAP is in a distributed environment.
Oracle recommends that you restart ASAP when:
■ adding, updating, or deleting configuration information
■ adding, updating, or deleting service definitions
■ loading database schemas
■ rolling back the system clock (for example, to adjust for daylight savings time).
Scripts are provided to start up and shut down an entire ASAP instance or individuals application components.

Starting ASAP
1-2 ASAP System Administrator's Guide
When the Control server is requested to start an ASAP application, the Control server performs the following steps:
■ If the local Control server is not the same as the Control server for the application as defined in the application process table (that is, this application server should be started by a remote Control server), the local Control server opens a network connection to the remote Control server. The remote Control server then starts the application on the remote machine before returning a successful indication back to the requesting client.
■ If the application server’s Control server is the local Control server, this local Control server first verifies that the UNIX program executable file for the application server is located in the $PROGRAMS directory and is executable. If it is executable, the Control server then instructs the fork agent process to spawn a child process which in turn overlays itself with the application executable. At this point, the application process starts up and the fork agent returns details of the application back to the Control server.
If the spawned application is a server, the parent Control server process goes into a retry loop and attempts to open a network connection to the newly created application process. If the connection to the application process is not established, a system event is issued and the Control server terminates the application server.
Starting All ASAP ServersUse the start_asap_sys script located in the ASAP_home/scripts folder to start all ASAP servers (where ASAP_home is location of the ASAP installation).
After you start the WebLogic Server domain for ASAP and the ASAP database instance, you can call the start_asap_sys script to start the entire ASAP system.
This script does the following:
■ Starts the ASAP Control server from the command line.
■ Verifies that the Control server is running.
■ Starts all configured ASAP application components in the ASAP system and territory in the sequence defined in the database.
Usage
start_asap_sys [-d] [ -U ] [ -P ] [ -n ][ -a ] [ -m] [ SlaveCtrl ... ][ -C ]
or
Note: You must define the server application name within the brackets [ ] in the header for each Server Configuration Parameters section in the ASAP.cfg file. You must define the server application name for each section, for example, the CTRL, SRP, SARM, NEP, and ADMIN. There can be no empty brackets [ ] in any of the sections in the Server Configuration Parameters, otherwise system errors occur.
Note: The start_asap_sys script must be started from the host that the primary Control server resides on. However, if you want to start ASAP remotely, R-shell into the host where the primary Control server resides.

Starting ASAP
Starting and Stopping ASAP 1-3
start_asap_sys -h
Table 1–1 lists and describes the arguments for the start_asap_sys script.
When you start the ASAP servers, you must observe the following logic:
■ If you do not specify the master Control server in the command, the script obtains the master server specification from the environment variable $MASTER_CONTROL. You specify the master Control server in the command line using the -m option otherwise the script uses the $MASTER _CONTROL environment variable.
■ If you do not specify a Control server name, the slave Control servers identified in the environment variable $SLAVE_CONTROL_ SERVERS are started. $SLAVE_CONTROL_SERVERS should provide the real names of the slave Control servers as follows:
SLAVE_CONTROL_SERVERS=”SlaveCtrl1[:Host1] ... SlaveCtrlN[:hostN]” export SLAVE_CONTROL_SERVERS
If $SLAVE_CONTROL_SERVERS is not set, only the master Control server is started.
For example:
SLAVE_CONTROL_SERVERS=”CTRLSVR1:192.168.10.251CTRLSVR1:192.168.10.252”
■ If the host is not specified with a Slave Control server, the interfaces file $SYBASE/interfaces is searched to find the host for that server.
■ If the host for a slave server is not given or cannot be determined by looking in the interfaces file, the Control server is not started.
■ If an ASAP profile is specified in the command line, it is sourced before starting the Slave Control servers.
■ If no ASAP profile is specified, the profile specified in the environment variable Environment_Profile is sourced before starting the Control servers.
■ If Environment_Profile is not set, Slave Control servers are not started.
Table 1–1 start_asap_sys Arguments
Argument Description
-d Development mode. If used, do not specify -U or -P options.
- U The control database user ID.
- P The password for the user ID.
- n Indicates that no Control server should be started as a result of running this script, however, any other lapsed server should restart.
- a An ASAP profile to be sourced before starting up Remote or Slave Control servers.
- m The master Control server. This option is specified with -m. The -p option can be used to specify compatibility with a previous version of this script.
SlaveCtrl The slave Control server(s) to start.
- C Starts ASAP services concurrently, rather than sequentially.
-h Displays command help.
Starting ASAP
1-4 ASAP System Administrator's Guide
■ To start a Control server on a host, the ASAP user must have permission to use rsh to the host from the current host.
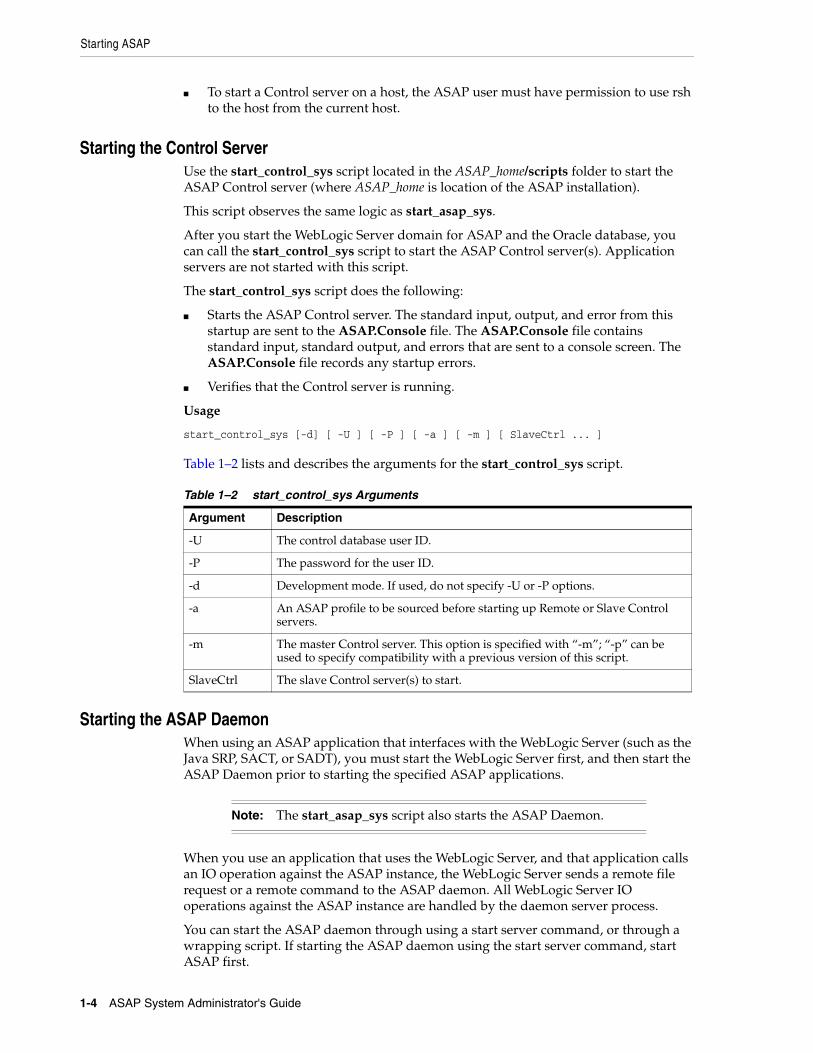
Starting the Control ServerUse the start_control_sys script located in the ASAP_home/scripts folder to start the ASAP Control server (where ASAP_home is location of the ASAP installation).
This script observes the same logic as start_asap_sys.
After you start the WebLogic Server domain for ASAP and the Oracle database, you can call the start_control_sys script to start the ASAP Control server(s). Application servers are not started with this script.
The start_control_sys script does the following:
■ Starts the ASAP Control server. The standard input, output, and error from this startup are sent to the ASAP.Console file. The ASAP.Console file contains standard input, standard output, and errors that are sent to a console screen. The ASAP.Console file records any startup errors.
■ Verifies that the Control server is running.
Usage
start_control_sys [-d] [ -U ] [ -P ] [ -a ] [ -m ] [ SlaveCtrl ... ]
Table 1–2 lists and describes the arguments for the start_control_sys script.
Starting the ASAP DaemonWhen using an ASAP application that interfaces with the WebLogic Server (such as the Java SRP, SACT, or SADT), you must start the WebLogic Server first, and then start the ASAP Daemon prior to starting the specified ASAP applications.
When you use an application that uses the WebLogic Server, and that application calls an IO operation against the ASAP instance, the WebLogic Server sends a remote file request or a remote command to the ASAP daemon. All WebLogic Server IO operations against the ASAP instance are handled by the daemon server process.
You can start the ASAP daemon through using a start server command, or through a wrapping script. If starting the ASAP daemon using the start server command, start ASAP first.
Table 1–2 start_control_sys Arguments
Argument Description
-U The control database user ID.
-P The password for the user ID.
-d Development mode. If used, do not specify -U or -P options.
-a An ASAP profile to be sourced before starting up Remote or Slave Control servers.
-m The master Control server. This option is specified with “-m”; “-p” can be used to specify compatibility with a previous version of this script.
SlaveCtrl The slave Control server(s) to start.
Note: The start_asap_sys script also starts the ASAP Daemon.

Starting ASAP
Starting and Stopping ASAP 1-5
Starting ASAP Daemon Using a Start CommandOracle recommends that you start the ASAP daemon using the following command.
After you have started ASAP, type:
startc -d $DAEM
The ASAP daemon is started.
Starting ASAP Daemon Using a Wrapping ScriptYou can optionally use the following script to start the ASAP daemon server:
asapd -start -d | -password control_password -port port [-asap_base asap_base_dir] [-sybase sybase_dir]
Use the following script to stop the ASAP daemon server:
asapd -stop -d | -password control_password -url host:port
The following command displays help information (see Table 1–3):
asapd -h
For more information on configuring the ASAP daemon, refer to ASAP Developer’s Guide.
Confirming that ASAP Started SuccessfullyTo verify the status of each server process, use the following procedure:
1. From a UNIX terminal, source the ASAP_home/Environment_Profile (where ASAP_home is location of the ASAP installation).
Table 1–3 asapd Arguments
Argument Description
-d Used in development mode only.
-port=[port number] Specifies a port number on which the ASAP daemon listens for requests from the WebLogic applications in the current ASAP instance. On the WebLogic Server, the daemon client configuration must contain an identical port number. In other words, when starting an ASAP Daemon server, the port number must be identical to the port that is referenced in the WebLogic Server jmx_connector descriptor.
-password=[control password] This optional argument specifies the control password for authentication purposes. In a development environment, if the password is missing, the script attempts to obtain the password from the environment.
-asap_base=[ASAP base directory]
This optional argument specifies the ASAP base path that the current ASAP instance works on. In a development environment, if the base path is missing, the script attempts to obtain the path from the environment.
-sybase=Sybase interfaces directory
This optional argument specifies the parent directory of the Sybase interfaces file used by the current ASAP instance. In a development environment, if this reference is not specified, the script will attempt to obtain the path from the environment.
help Displays a help screen.

Stopping ASAP
1-6 ASAP System Administrator's Guide
. ./Environment_Profile
2. Enter the following command:
status
**** ASAP Application Status **** # CPU PID Program Application Location-- --------- -------- ------------------------------ ----------- --------1 0:01 796 $ASAP_BASE/programs/ctrl_svr CTRLdc2 LOCAL2 0:01 900 $ASAP_BASE/programs/fork_agent CTRLdc2 LOCAL3 0:01 978 $ASAP_BASE/programs/admn_svr ADM_dc2 LOCAL4 0:01 1019 $ASAP_BASE/programs/srp_emul SRP_dc2 LOCAL5 0:05 993 java DAEMdc2 LOCAL6 0:11 945 java JNEP_dc2 LOCAL7 0:02 960 $ASAP_BASE/programs/asc_nep NEP_dc2 LOCAL8 0:02 984 $ASAP_BASE/programs/sarm SARMdc2 LOCAL **** End of Application Status ****
3. Verify that all the server processes you wanted to start appear in the output from the status command.
Stopping ASAPTo shut down ASAP, a script called stop_asap_sys is provided in the ASAP_home/scripts folder (where ASAP_home is location of the ASAP installation). This script terminates the ASAP applications in the inverse order to which they were started.
In the distributed environment, the Control servers must be stopped separately on each machine in the network. This is supported by the stop_asap_sys script.

2
Setting Up and Managing ASAP Security 2-1
2Setting Up and Managing ASAP Security
This chapter describes the security features for Oracle Communications ASAP.
Overview of Setting Up ASAP Security FeaturesASAP security is designed to provide maximum confidentiality and data integrity, while ensuring on-demand access to services for authorized users. ASAP security is designed for three essential functions: managing ASAP WebLogic-based users, securing data, and protecting diagnostics files.
ASAP provides these security functions in the following locations:
■ Oracle WebLogic Server security
The WebLogic Server contains default users, groups, and roles that support the various WebLogic-based ASAP functionality, like the Order Control Application (OCA) clients, the Service Activation Configuration Tool (SACT), the Service Activation Deployment Tool (SADT). Java Service Request Processor (JSRP) clients also need WebLogic Server credentials to connect to the JSRP interfaces.
■ ASAP server and database credential security
The ASAP environment contains a credential store factory (CSF) wallet that stores the ASAP schema user names and passwords, and the WebLogic Server user name and password. These credentials are called class A secure data. Each ASAP server can use this wallet to obtain these credentials. The CSF wallet provides both secure storage and encryption for these credentials.
■ Network Element (NE) credential security for Network Element Processor (NEP) to NE communication
The ASAP Control database stores credentials required for NEPs to access NEs. These credentials are called class B secure data. You can use a security tool to add, change, or delete credential information, and also to enable encryption.
■ ASAP system configuration parameters
Some ASAP system configuration parameters can have a significant impact on security. Parameters settings, such as diagnostic levels and server security attributes should be configured correctly to ensure data security.
Configuring WebLogic Server SecurityASAP uses the embedded Lightweight Directory Access Protocol (LDAP) server included with the WebLogic Server software to manage default ASAP users, groups,

Configuring WebLogic Server Security
2-2 ASAP System Administrator's Guide
roles, and methods. For more information on this embedded LDAP sever, see the WebLogic Server documentation.
About ASAP WebLogic Users, Groups, Roles, and MethodsUser security is managed with the WebLogic Server. For more information, see
http://download.oracle.com/docs/cd/E13222_01/wls/docs103/security.html
The WebLogic Server provides the following features:
■ ASAP OCA client users can change their passwords. For more information, refer to the ASAP Order Control Application User's Guide.
■ ASAP Administrators can use the WebLogic Administration Console to add, delete, or edit users or user groups.
■ ASAP Administrators can use the WebLogic Administration Console to assign or unassign permissions to users or user groups.
The administrator uses security roles, method names, and principal names to configure permissions using the WebLogic Administration Console.
For information on migrating security from a previous version of ASAP, refer to the ASAP Installation Guide.
You can create, delete, and modify ASAP users and groups in WebLogic Server. For more information, see
http://download.oracle.com/docs/cd/E13222_01/wls/docs103/security.html
Table 2–1 lists and describes the default ASAP users.
Note: ASAP requires that WebLogic user passwords have eight characters or more.
Table 2–1 Default ASAP WebLogic Users
Default Users Description
WebLogic_Admin This is the WebLogic Server administrator account, where WebLogic_admin is the user name you selected when you created your WebLogic Server.
ASAP_admin This is the default OCA client user. This user can create OCA orders, manage fallout orders, and view audit log reports in the OCA client. For more information about OCA permissions for this user, see "Understanding OCA Client Group Permissions".
This user is a member of the ASAP_VNOS and ASAP_Operators groups.
ASAP_monitor This is a default OCA client user that can be used to view OCA audit logs and reports. For more information about OCA permissions for this user, see "Understanding OCA Client Group Permissions".
This user is a member of ASAP_Guests group.

Configuring WebLogic Server Security
Setting Up and Managing ASAP Security 2-3
Table 2–2 lists and describes the default ASAP groups.
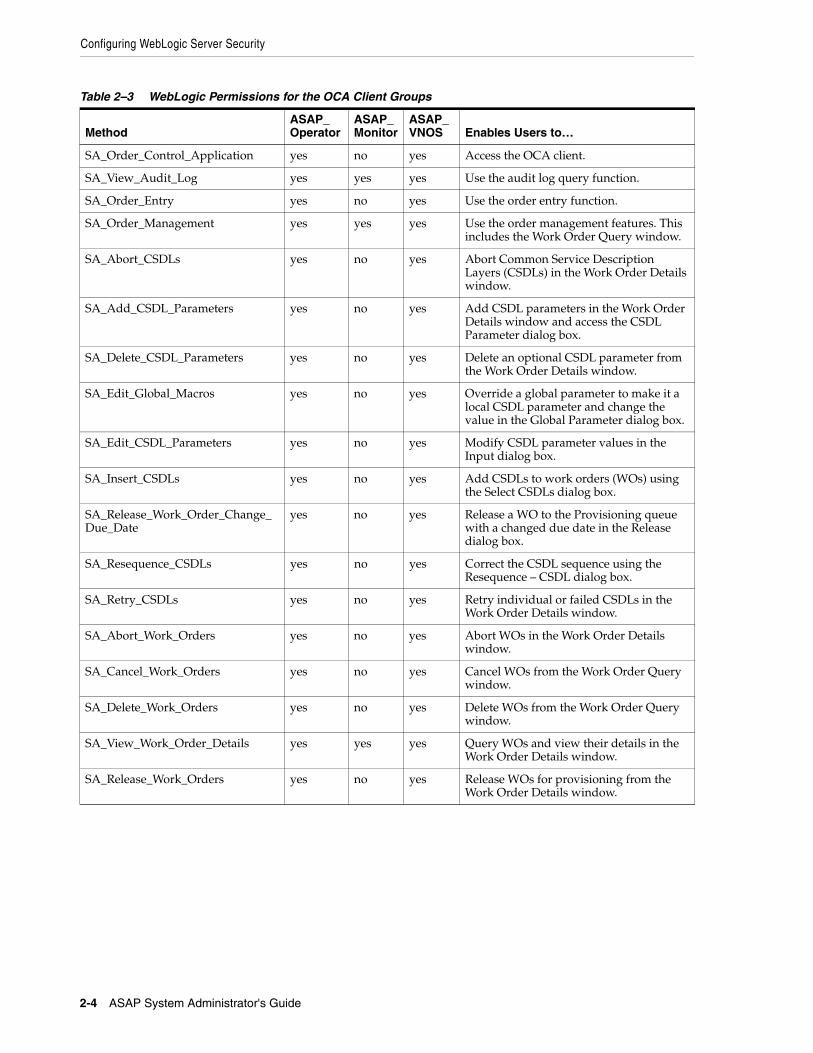
Understanding OCA Client Group PermissionsTable 2–3 list and describes the ASAP permissions for OCA client groups.
ASAP_operator This is a default OCA client user. This user can create OCA orders, manage fallout orders, and view audit log reports in the OCA client. For more information about OCA permissions for this user, see "Understanding OCA Client Group Permissions".
This user is a member of the ASAP_Operators group.
asap_ws_user User who has access to ASAP_WS_USERS_GROUP.
Cartridge_Management_WebService_MDB User who has access to Cartridge_Management_WebService group.
cmws_studio User who has access to Cartridge_Management_WebService group.
OracleSystemUser Oracle application software system user.
Table 2–2 Default ASAP WebLogic Groups
Default Groups Description
AdminChannelUsers AdminChannelUsers can access the admin channel.
Administrators Administrators can view and modify all resource attributes and start and stop servers.
AppTesters AppTesters group.
ASAP_Guests Allows an OCA user to login to OCA and access various methods.
ASAP_Monitors Allows an OCA user to view OCA audit logs and reports in the OCA client.
ASAP_Operators Allows an OCA user to creates orders, manage fallout orders, and view audit logs and reports in the OCA client.
ASAP_VNOS The virtual network operator (VNO) group ID must be included as a member of ASAP_VNOS group. The group will be the parent of all VNO groups. This group enables the OCA client to identify and recognize a group ID as VNO group ID and therefore authorize a user as VNO user.
ASAP_WS_USERS_GROUP Group to use role ASAP_WS_USERS.
Cartridge_Management_WebService Group to use role CARTRIDGE_MANAGEMENT_WEBSERVICE.
CrossDomainConnectors CrossDomainConnectors can make inter-domain calls from foreign domains.
Deployers Deployers can view all resource attributes and deploy applications. DefaultAuthenticator.
Monitors Monitors can view and modify all resource attributes and perform operations not restricted by roles. DefaultAuthenticator.
Operators Operators can view and modify all resource attributes and perform server lifecycle operations. DefaultAuthenticator.
OracleSystemGroup Oracle application software system group. DefaultAuthenticator.
Table 2–1 (Cont.) Default ASAP WebLogic Users
Default Users Description
Configuring WebLogic Server Security
2-4 ASAP System Administrator's Guide
Table 2–3 WebLogic Permissions for the OCA Client Groups
MethodASAP_Operator
ASAP_Monitor
ASAP_VNOS Enables Users to…
SA_Order_Control_Application yes no yes Access the OCA client.
SA_View_Audit_Log yes yes yes Use the audit log query function.
SA_Order_Entry yes no yes Use the order entry function.
SA_Order_Management yes yes yes Use the order management features. This includes the Work Order Query window.
SA_Abort_CSDLs yes no yes Abort Common Service Description Layers (CSDLs) in the Work Order Details window.
SA_Add_CSDL_Parameters yes no yes Add CSDL parameters in the Work Order Details window and access the CSDL Parameter dialog box.
SA_Delete_CSDL_Parameters yes no yes Delete an optional CSDL parameter from the Work Order Details window.
SA_Edit_Global_Macros yes no yes Override a global parameter to make it a local CSDL parameter and change the value in the Global Parameter dialog box.
SA_Edit_CSDL_Parameters yes no yes Modify CSDL parameter values in the Input dialog box.
SA_Insert_CSDLs yes no yes Add CSDLs to work orders (WOs) using the Select CSDLs dialog box.
SA_Release_Work_Order_Change_Due_Date
yes no yes Release a WO to the Provisioning queue with a changed due date in the Release dialog box.
SA_Resequence_CSDLs yes no yes Correct the CSDL sequence using the Resequence – CSDL dialog box.
SA_Retry_CSDLs yes no yes Retry individual or failed CSDLs in the Work Order Details window.
SA_Abort_Work_Orders yes no yes Abort WOs in the Work Order Details window.
SA_Cancel_Work_Orders yes no yes Cancel WOs from the Work Order Query window.
SA_Delete_Work_Orders yes no yes Delete WOs from the Work Order Query window.
SA_View_Work_Order_Details yes yes yes Query WOs and view their details in the Work Order Details window.
SA_Release_Work_Orders yes no yes Release WOs for provisioning from the Work Order Details window.

Configuring WebLogic Server Security
Setting Up and Managing ASAP Security 2-5
Configuring Virtual Network Operator Authorization for OCA UsersThe ASAP administrator should create WebLogic Server user accounts for VNO fallout managers and include their user login names under one of VNO groups. The login name of any VNO user must be a member of one or more VNO groups and one ASAP group. Below is an example of "User_A" created as a VNO operator for the "Telco 1" group and "User_B" created as a VNO monitor for "Telco 1" and "Telco 2" groups.
Table 2–4 lists and describes possible VNO user and group settings.
Do the following:
■ Create VNO groups with unique names and add VNO groups as members to ASAP_VNOS group.
■ Add OCA user login names as members to one or more VNO groups. Ordinarily, an OCA user is added to one VNO group.
■ Add each OCA user's login name as a member to one ASAP group (ASAP_Operators or ASAP_Monitors).
VNO functionality is available to divide OCA user groups into geographic regions using the VNO_ID_DEFAULT and VNO_ID_STRIP parameters of the ASAP.cfg file.
Refer to the discussion about the Service Request Processor (SRP) Emulator Server Configuration Parameters in the ASAP Server Configuration Guide.
SA_Stop_Work_Orders yes no yes Stop single or multiple WOs from the Work Order Query window.
SA_Change_Password yes yes N/A Change their user passwords.
SA_All yes no yes Access all OCA functionality (see note below) and to unlock WOs that have been locked by other users.
Note: SA_All excludes SA_Change_Password. You must include the SA_Change_Password method in addition to SA_All to grant a user complete access to all OCA functionality. If you do not include SA_Change_Password, the Change Password option in the Security menu will be disabled.
Table 2–4 Sample VNO Authorization
Login Name Is a Member of Group
User_A is a member of... ASAP_Operators
Telco 1
User_B is a member of... ASAP_Monitors
Telco 1
Telco 2
Table 2–3 (Cont.) WebLogic Permissions for the OCA Client Groups
MethodASAP_Operator
ASAP_Monitor
ASAP_VNOS Enables Users to…
Configuring WebLogic Server Security
2-6 ASAP System Administrator's Guide
Configuring Authentication Providers for ASAPDuring the ASAP installation process, the ASAP installer creates default ASAP users, groups, roles, and methods in the embedded LDAP authentication provider included with WebLogic Server. You can use this authentication provider to configure the default ASAP users, groups, roles, and methods, or add, delete, or modify your own users, groups, roles, and methods. You can also integrate an external LDAP server for ASAP users, groups, roles, and methods to your WebLogic Server.
You must perform the following steps to integrate an external LDAP server with ASAP:
1. Configuring an External Lightweight Directory Access Protocol Server
2. Configuring a Primary Authentication Provider in WebLogic Server
Configuring an External Lightweight Directory Access Protocol ServerTo configure an external LDAP server for use with ASAP, use the following procedure:
1. Create an Administrators group in the LDAP server.
2. Create a user in LDAP that can be used as an administrator login for Oracle WebLogic Server.
3. Add the newly created user to the Administrators group.
4. Create the following user groups for ASAP:
■ ASAP_Guests
■ ASAP_Monitors
■ ASAP_Operators
■ ASAP_VNOS
■ ASAP_WS_USERS_GROUP
■ Cartridge_Management_WebService
■ everyone
5. Create users in the LDAP server and add them to the groups created in step 4.
For detailed instructions on configuring LDAP, see the LDAP documentation specific to your LDAP Authentication provider.
Configuring a Primary Authentication Provider in WebLogic ServerTo configure the external LDAP server in Oracle WebLogic Server:
1. Configure the following authentication providers on the WebLogic Administration Console:
■ Default Authentication provider
Note: You must ensure that the ASAP_VNO group name is defined in the external LDAP server.
Note: You may provide custom group names in the LDAP server corresponding to the seven groups mentioned in step 4.

Configuring WebLogic Server Security
Setting Up and Managing ASAP Security 2-7
■ LDAP Authentication provider
See the WebLogic Server documentation for information on configuring authentication providers.
2. Set the control flag as follows:
■ For Default Authenticator provider, set SUFFICIENT.
■ For LDAP Authentication provider, set REQUIRED.
See the WebLogic Server documentation for information on configuring authentication providers.
3. Reorder the authentication providers.
See the WebLogic Server documentation for information on reordering authentication providers.
Managing WebLogic Server ASAP User Security These procedures apply to user security that is maintained using WebLogic Server and ASAP, and assume that myrealm is the only active security realm. These procedures do not support other realms supported by WebLogic Server, such as the LDAP realm. When an administrator configures WebLogic Server with security realms other than myrealm, all features described in this section are disabled, including the change password menu in the OCA client.
ASAP administrators can configure user password policies through the WebLogic Administration Console and the Password Policy Utility page. Password policies defined in the WebLogic Administration Console include:
■ Minimum password length
■ Lockout enabled
■ Lockout duration
■ Reset duration
■ Lockout cache
Password policies defined in the Password Policy Utility page include:
■ Password aging
■ Password expiration warning period
■ Enabling/disabling password policies
If your ASAP installation includes the OCA client, observe the restrictions described in Table 2–5.
Note: Ensure that the Default Authentication provider is above the LDAP Authentication provider.
Table 2–5 ASAP Client Password Restrictions
Feature OCA Client Description
Password change Supported If the administrator has enabled password policies, users must change passwords in the OCA client.

Configuring WebLogic Server Security
2-8 ASAP System Administrator's Guide
The procedure for changing end user passwords is contained in the ASAP Order Control Application User's Guide.
Configuring the WebLogic Server Change Password Utility Page
Password change at first login
Supported If the administrator has enabled password policies, users must change passwords in the OCA client.
Password length Supported Passwords must be between 6 and 21 characters in length.
Password aging Supported If the administrator has enabled password policies, users must change passwords in the OCA client.
Password syntax Supported Password syntax.
Reuse of previously-used passwords
Supported Enforced when the user specifies a new password in the OCA client.
Lockout features Supported Lockout features.
Note: Secure Shell (SSH) must be enabled on the WebLogic Server in order for the Password Policy and Change Password Utility Java server pages (JSPs) to be reachable.
To enable SSH on the WebLogic Server:
1. Log in to the WebLogic Administration Console.
2. Click Lock & Edit if not already selected. See the WebLogic Server online Help for more information.
3. In the Domain Structure, click on the domain.
4. On the Control tab, select Servers.
5. In the Servers table, click the name of the server to be configured.
6. Select the SSL Listen Port Enabled checkbox.
7. Provide an appropriate SSL listen port number in the SSL Listen Port field (that is BEA_SSL_PORT from the Installation Values in the ASAP Installation Guide). Ensure that this is not the same as the server listen port (that is BEA_PORT).
8. Click Release Configuration.
9. Restart your WebLogic Server.
Table 2–5 (Cont.) ASAP Client Password Restrictions
Feature OCA Client Description

Configuring WebLogic Server Security
Setting Up and Managing ASAP Security 2-9
The Password Policy page and Change Password Utility page are JSPs accessed through a web browser at the following URLs:
■ https://hostname:BEA_SSL_PORT/security/PasswordPolicy.jsp
■ https://hostname:BEA_SSL_PORT/security/ChangePassword.jsp
Note that the SSL Listen Port (configured above) is used, not the BEA_PORT value.
Setting WebLogic Server ASAP Password Policies Administrators must set password policies using both the WebLogic Administration Console and the Password Policy page.
To define lockout conditions:
1. In the WebLogic Administration Console, click Lock & Edit if not already selected. See the WebLogic Server online Help for more information.
2. In the Domain Structure panel of the Change Center in the WebLogic Administration Console, click Security Realms.
The Summary of Security Realms screen appears.
3. In the Realms list, click the name of the security realm to be configured.
The Settings screen for the selected realm appears.
4. Select the Configuration tab, and the User Lockout sub-tab to access user lock-out settings.
5. On the User Lockout tab, complete the following fields:
■ Lockout Enabled: Requests the locking of a user account after invalid attempts to log in to that account exceed the specified Lockout Threshold. By default, this attribute is enabled.
■ Lockout Threshold: The number of failed user password entries that can be tried before that user account is locked. Any subsequent attempts to access the account (even if the username/password combination is correct) raise a Security exception. The account remains locked until the System Administrator unlocks it or another login attempt is made after the lockout
Note: You must configure the BEA_WLS_HOST and BEA_WLS_PORT variables of these JSPs in ASAP.cfg. The ASAP installer populates these variables automatically during the installation process.
Configuring WebLogic Server Security
2-10 ASAP System Administrator's Guide
duration period ends. Invalid login attempts must be made within a span defined by the Lockout Reset Duration attribute.
■ Lockout Duration: The number of minutes that a user's account remains inaccessible after being locked in response to several invalid login attempts within the amount of time specified by the Lockout Reset Duration attribute.
■ Lockout Reset Duration: The number of minutes within which invalid login attempts must occur for the user's account to be locked. An account is locked if the number of invalid login attempts defined in the Lockout Threshold attribute occurs within the amount of time defined by this attribute.
■ Lockout Cache Size: The number of minutes within which invalid login attempts must occur for the user's account to be locked. An account is locked if the number of invalid login attempts defined in the Lockout Threshold attribute occurs within the amount of time defined by this attribute.
6. Click Save.
7. Click Release Configuration.
To set password policies:
1. In the WebLogic Administration Console, click Lock & Edit if not already selected. See the WebLogic Server online Help for more information.
2. In the Domain Structure panel of the Change Center in the WebLogic Administration Console, click Security Realms.
The Summary of Security Realms screen appears.
3. In the Realms list, click the name of the security realm to be configured.
The Settings screen for the selected realm appears.
4. Select the Providers tab and then the Authentication subtab.
5. In the Authentication Providers list, select DefaultAuthenticator. (The WebLogic Authentication provider is configured in the default security realm with the name DefaultAuthenticator. If you have configured a different authentication provider, select it instead.)
The Settings for DefaultAuthenticator screen appears.
6. Make any required configuration on the Configuration tab, including Minimum Password Length.
7. Click Save.
8. Click Release Configuration.
9. Access the Password Policy Utility page by entering the following URL in your web browser:
https://WebLogic_Host:BEA_SSL_PORT/security/PasswordPolicy.jsp) to access.
The Enter Network Password dialog appears.
10. Enter the WebLogic administrator username and password and click OK.
The Password Policy Utility screen appears.

Configuring WebLogic Server Security
Setting Up and Managing ASAP Security 2-11
11. Complete the following fields:
■ PasswordPolicyEnabled: Enables or disables the following password security features:
– Password change, including password change upon first login, passwords being changed to a previously-used password
– Password aging
■ Expiration Days: Specifies the period of time, in days, for which the password is valid
■ Warning Days: The number of days prior to password expiration that the user is notified of impending password expiration. The user is prompted to change the password.
■ Keep Password History: The number of previously-used passwords that are tracked in history. If the password policy is enabled, users are unable to reuse passwords tracked in history.
12. Click Submit.
Changing WebLogic Server ASAP User PasswordsASAP Administrators can change user passwords at any time using the Change Password Utility JSP, provided that the system uses the WebLogic Server as the user security repository.
An administrator can also change passwords through the WebLogic Administration Console. Oracle does not recommend this because the underlying password policies, such as password length and syntax, cannot be enforced and the administrator is not notified of the policy violation.
Note: The following security features are always enabled:
■ Lockout
■ Password length of 6 characters or more, but no longer than 20 characters
■ Inclusion of at least one special character and one number
If you disable the password policy, the password history is deleted.

Configuring WebLogic Server Security
2-12 ASAP System Administrator's Guide
Use of the Change Password JSP is not applicable if you are using the WebLogic Server LDAP Realm as the user security repository.
To access the Change Password JSP, you will need the following information:
■ Protocol for the WebLogic Server – Use of https is required to provide security.
■ The Change Password URL is:
https://hostname:BEA_SSL_PORT/security/ChangePassword.jsp
■ Root context for Security Service – By default, the ASAP installer sets security as the root context of the Security Service.
For information on the SECURITY_SERVICE configuration variable in the ASAP.cfg file, see the ASAP Server Configuration Guide.
JPasswords must contain at least one uppercase character and one number as well as one special character (that is ~ ! @ # $ % ^ & * ( ) _ + { } | [ ] \ : " ; ' < > ? , . /). This is an internal feature and is not subject to configuration.
To change user passwords:
1. Type the URL for the JSP, for example,
https://hostname:BEA_SSL_PORT/security/ChangePassword.jsp
The Enter Network Password dialog opens.
2. In the User Name field, type your user name.
3. In the Password field, type your password. Click OK.
The Change Password Utility window opens.
4. In the User ID field, type the user name of the user whose password you want to change.
5. In the Old Password field, type the user’s current password.
Configuring WebLogic Server Security
Setting Up and Managing ASAP Security 2-13
6. In the New Password field, type the user’s new password.
7. In the Confirm Password field, type the user’s new password again.
8. In the Admin User Id field, enter the user ID of the Oracle WebLogic Server administrator.
9. In the Admin Password field, enter the password of the Oracle WebLogic Server administrator.
10. In the Confirm Admin Password field, enter the password of the Oracle WebLogic Server administrator again.
11. Click Submit. A confirmation message appears.
Disabling the Change Password Feature in the OCA ClientTable 2–6 lists the permission that applies only to the Change Password menu item in the OCA client. This feature lets ASAP Administrators disable the change password feature in the OCA client.
If the new ACL is not defined in WebLogic Server, the Change Password menu item in the OCA client is disabled.
Managing Locked-out User AccountsWebLogic user accounts have settings which automatically lock out the user for a period of time after a number of login attempts which fail due to an incorrect password. These settings are modifiable by the administrator.
To access WebLogic user settings:
In the Domain Structure panel of the Change Center in the WebLogic Administration Console, click Security Realms. In the Summary of Security Realms window, click the name of the security realm to be configured.
Select the Configuration tab, and the User Lockout sub-tab to access user lock-out settings.
See "Setting WebLogic Server ASAP Password Policies" for more details.
Settings include:
■ Lockout Threshold – Number of failed password entries before the account is locked. The account remains locked until it is unlocked by the system administrator, or the lockout duration period ends. The default is 5 failed password entries.
■ Lockout Duration – Number of minutes that a user's account remains inaccessible after being locked after Lockout Threshold invalid login attempts. The default is 30 minutes.
■ Lockout Reset Duration – Number of minutes within which invalid login attempts must occur in order for the user's account to be locked. The default is 5 minutes.
To unlock a locked user account:
Table 2–6 Change Password Permission ACL
ACL Permission
ServiceActivation.ASAP.ENV_ID. ASAP_Provisioning_Management
ChangePassword

Configuring WebLogic Server Security
2-14 ASAP System Administrator's Guide
1. In the Change Center of the WebLogic Administration Console, click Lock & Edit if not already clicked. See WebLogic Server online Help for more information.
2. In the Domain Structure panel of the Change Center in the WebLogic Administration Console, click the name of the domain.
3. Select the Security tab, then the Unlock User sub-tab.
4. Enter the name of the user to unlock and click Save.
5. In the Change Center of the WebLogic Administration Console, click Release Configuration.
Updating Methods Role Assigned to a Group or User in WebLogicThis section provides information on how to update methods in an ASAP role assigned to a group or a user in WebLogic Server. You can use the information defined in deployment descriptors to grant security roles and define security policies.
You can update the deployment descriptors by using WebLogic Workshop (Eclipse component) or by editing the ejb-jar.xml and weblogic-ejb-jar.xml files manually.
To edit the XML files manually:
1. Navigate to WebLogic_domain/servers/WebLogic_server/upload/asapENV_ID/app (where the WebLogic_domain is the installation directory for your WebLogic Server domain, WebLogic_server is the name of your WebLogic Server domain, and ENV_ID is the ASAP environment ID.
2. Do the following:
jar xvf asapENV_ID.ear ssam.jar jar xvf ssam.jar META-INF/ejb-jar.xml jar xvf ssam.jar META-INF/weblogic-ejb-jar.xml
3. Edit ejb-jar.xml and weblogic-ejb-jar.xml to add, remove, or modify roles to users or groups.
For example, you may remove the following three methods from the Monitor Role in ejb-jar.xml file:
<method> <ejb-name>ASAPSecurityServices</ejb-name> <method-name>SA_Aborted_Work_Order_Report</method-name> </method> <method> <ejb-name>ASAPSecurityServices</ejb-name> <method-name>SA_Activity_Report</method-name> </method>
Note: On a Managed Server, you cannot unlock a locked account through the WebLogic Administration Console. The unlock information is propagated through a multicast message which is only configured in a cluster environment. Instead, use the following command:
java weblogic.Admin -url url -username adminuser -password adminuserpassword -type weblogic.management.security.authentication.UserLockoutManager-method clearLockout lockedusername
Alternatively, wait until the Lockout Duration time has passed.
Configuring ASAP Server and Database Credential Security
Setting Up and Managing ASAP Security 2-15
<method> <ejb-name>ASAPSecurityServices</ejb-name> <method-name>SA_ASDL_Report</method-name> </method>
4. Do the following:
jar uvf ssam.jar META-INF/ejb-jar.xml jar uvf ssam.jar META-INF/weblogic-ejb-jar.xml jar uvf asapENV_ID.ear ssam.jar
5. Redeploy the asapENV_ID.ear file.
Configuring ASAP Server and Database Credential SecuritySecure data must be stored in a secure location and distributed to authorized users. The ASAP security system governs how secure data is managed and the ASAP diagnostics files are secured:
■ Secure Data Storage
The ASAP security administrator pre-defines the nature and accessibility of secure data for each ASAP server. Class A secure data is stored in the CSF wallet during the initial ASAP installation procedures (see the ASAP Installation Guide for more information). The ASAP installer distributes this wallet to each server during the ASAP installation.
■ Secure Data Encryption
The CSF wallet encrypts all data contained in it and obtained from it. In addition, the CSF wallet file (cwallet.sso) has restricted access permissions.
Many ASAP utilities and scripts use the passwords contained in the CSF wallet. For more information about how these utilities and scripts use the CSF wallet security feature, see "Using the Credential Store Factory Wallet with ASAP Utilities and Scripts"
Your ASAP security administrator creates the class A secure data while installing ASAP. Your administrator can also modify ASAP Server passwords using the ModifyPasswords script (see "Changing Database Passwords in the Credential Store Factory Wallet").
About Credential Store Factory Wallet Secure Data ManagementSecure data management in ASAP involves:
■ Setting up and maintaining secure data storage
■ Encrypting secure data during provisioning
Setting up and Maintaining Secure Data StorageDuring the ASAP installation procedure, your ASAP security administrator must enter a predefined user name and password for each ASAP server. The administrator must also enter the WebLogic Server, and Oracle database user names and passwords. ASAP stores these user names and passwords in the CSF wallet (class A secure data).
Data Encryption The CSF wallet provides transparent encryption features that protect all credentials it stores and transmits.

Configuring ASAP Server and Database Credential Security
2-16 ASAP System Administrator's Guide
Using the Credential Store Factory Wallet with ASAP Utilities and ScriptsWhen the ASAP security feature is configured (security level of the Master Control server is not 0), every ASAP utility (scripts or programs) that require access to the ASAP server or database are prompted to enter a password based on the target.
The following utilities have optional arguments -P and -d for ASAP security (see Table 2–7 for more information about these arguments).
■ asap_recompile
■ asap_utils
■ start_asap_sys
■ start_control_sys
■ startc
■ starts
■ stop_asap_sys
■ stopc
■ stops
You can use either the -P and -d option. However, when both options are used, the -d option overrides -P.
For example:
start_asap_sys -P control_database_passwordstart_asap_sys => User needs to enter control_database_passwordstart_asap_sys -d => Retrieve password the CSF wallet
Changing Database Passwords in the Credential Store Factory WalletThe cwallet.sso file is found in the ASAP_Home/install directory. This file contains security information for installation purposes and includes the ASAP database schema user names and passwords, the Oracle DBA user name and password, and the WebLogic Server domain user name and password. The ASAP installer creates this file during the installation process.
To change the CSF Wallet passwords, use the following procedure:
Table 2–7 ASAP Security Arguments
Argument Description
-P Used to specify the control database password and used in production.
-d The utilities retrieve password information from the CSF wallet. The ASAP installer creates the CSF wallet during the installation of ASAP. You can modify the passwords using the ModifyPassword script (see Changing Database Passwords in the Credential Store Factory Wallet).
WARNING: The functionality to include your password in the command line when using ASAP utilities and scripts is a security risk. This functionality has been deprecated and will be removed in a future release. You can avoid this risk by omitting the password, and entering it only when you are prompted to enter it.

Configuring Security for Network Elements Communication
Setting Up and Managing ASAP Security 2-17
1. Source the Environment_Profile located in the ASAP_Home/ directory.
2. Set the TNS_ADMIN UNIX variable to the location of your tnsname.ora file.
export TNS_ADMIN=/home/examplelocation/
3. From ASAP_Home/scripts directory run the ModifyPassword tool.
4. Enter the DBA user name and password.
5. Enter and modify the ASAP database user names and passwords as required.
Configuring Security for Network Elements Communication NE credentials (also called custom secure class B data) used primarily by NEPs to establish network connections to NEs must be stored in a secure location and distributed to authorized users.
The ASAP security tool supports the following features to protect NE credentials:
■ Secure Data Storage
An administrator can use the ASAP security tool to create NE credentials and store these credentials in a central repository on the Master Control server. The Master Control server distributes these credentials to SRPs, JSRPs, NEP, or Java-enabled NEPs (JNEPs).
ASAP stores NE credentials in the Master Control server in the tbl_classB_secu database table.
■ Secure Data Encryption
The Master Control server uses a symmetric secret key encryption method to achieve data confidentiality for custom secure data.
■ Key Distribution
The Master Control server acts as a key distribution server, and distributes custom secure data to every ASAP server during provisioning. To acquire the custom secure data, ASAP server has a pre-defined key distribution protocol.
Understanding the Custom Secure Data StructureYour ASAP security administrator can define class B custom secure data through application programming interfaces (APIs) or action functions used by the customized SRP, JSRPs, NEP, and JNEPs. Your ASAP security administrator can also set up your custom secure data using the ASAP security tool.
The class B custom secure data typically includes the user names and password for the NEs and should only be used by custom NEPs, JNEPs, SRPs, or JSRPs.
The Master Control server contains the secure data that has name, value, creation date, and description fields. The Master Control server distributes the secure data to each ASAP server during provisioning.
Table 2–8 provides a detailed description of a secure data entry in the secure data storage. The Security Level, Alg (sdu), and Audit Level fields apply only to ASAP secure data.

Configuring Security for Network Elements Communication
2-18 ASAP System Administrator's Guide
For custom secure data storage, the required fields are Name, Value, Creation Date, and Desc.
Managing Custom Secure DataSecure data management in ASAP involves:
■ Setting up and maintaining secure data storage
■ Encrypting secure data during provisioning
■ Key distribution (for custom secure data)
■ Local caching of custom secure data, for improved system performance
Table 2–8 Secure Data Entry
Field Type Length Encryption Description
Name Char 80 No The name field of a secure data entry. This is used as a key to retrieve the secure data entry.
Value Char 80 Yes The encrypted value of the secure data entry.
Security Level
Integer No This field is only applicable to ASAP secure data (the class field value is 1). If the name is an ASAP server name (for example NEPab12), then this controls the level of ASAP security; otherwise this is ignored. Possible values:
■ 0 – Turn off security feature (default).
■ 1 – Turn on security feature.
The security level of the Master Control server controls the level of the entire ASAP security. The security level of each ASAP server is only applicable when the security level of the Master Control server is not 0.
Cache Integer 1 No This field is only applicable to ASAP secure data (the class field value is 1. If the name is an ASAP server name, then this controls caching ASAP secure data; otherwise this is ignored. Possible values:
■ 0 – Turn Off cache feature (default).
■ 1 – Turn On cache feature.
Audit Level
Integer No Reserved for future use.
Creation Date
Date No The creation date.
Alg Integer No The deployed secret key algorithm. The default value is 1 (BLOWFISH_ALGORITHM). The applies to the ASAP secure data only.
Class Integer No The secure data classes are:
■ ASAP secure data
■ Custom secure data
The custom SRP, JSRP, NEP, and JNEP only manipulates custom secure data.
Desc Char 255 No The description of the secure data entry.
Configuring Security for Network Elements Communication
Setting Up and Managing ASAP Security 2-19
Setting up and Maintaining Secure Data StorageYour administrator can set up the initial custom secure data storage repository and can predefine this custom secure data. ASAP stores this data in a central repository: the Master Control server.
Encrypting Data During Network Element ProvisioningTo protect custom secure data during provisioning, symmetric or secret key encryption is used. You can use the ASAP APIs and action functions to:
■ Retrieve ASAP secure data and custom secure data
■ Update or add custom secure data
To control the security-sensitive messages that come from state table action functions, use the ACT_FUNC_SEC state table variable.
The following example shows how to use ACT_FUNC_SEC.
BEGIN TEST_PROG110 CONCAT 'ACT_FUNC_SEC = 1'110 DMS_LEN '%FORMAT_LEN = %MCLI:%NXX:%LEN'120 CONCAT 'ACT_FUNC_SEC = 0'130 CONCAT '%MY_LEN = %LEN'END TEST_PROG
The NEP diagnostic file does not show the CSDL parameter values of NXX, LEN, and MCLI from 110 because ACT_FUNC_SEC is set to 1. The value of MY_LEN (for example, 6742727 from CSDL parameter LEN) appears in the NEP diagnostic since ACT_FUNC_SEC is set to 0 on line 120.
Any State Table action function can be placed between two CONCAT statements, but only the following action functions support the security feature:
■ CONCAT
■ DMS_FEATS
■ DMS_LEN
■ EXEC
■ EXEC_RPC
■ GET
■ GET_INCPT
■ GET_LTG
■ SEND
■ SENDECHO
■ SUBSTR
Understanding Key Distribution for Custom Secure DataThe Master Control server provides key distribution to every ASAP server to ensure the secure transmission of custom secure data. To acquire the secure data, the ASAP server must follow the pre-defined key distribution protocol. The Master Control server does the following:
■ Ensures that the implementation details of the secure data storage, such as the physical media, file location, and content, are transparent to ASAP server. By
Configuring Security for Network Elements Communication
2-20 ASAP System Administrator's Guide
following pre-defined key distribution protocol set up by your ASAP security administrator, each ASAP server can acquire the necessary secure data.
■ Ensures that the secure data is accessible only to authorized users. Before requesting secure data from the key distribution server, each ASAP server authenticates itself using the session ID given by the Master Control server.
■ Provides a central location for secure data storage.
The Master Control server uses a one-time password named as a session ID to authenticate the requester. The session ID is the unique integer value per instance of the Master Control server.
Caching Secure Data on Local ServersBy default, each ASAP server retrieves the secure data from the Master Control server. In addition, to provide better performance in retrieving secure data, you can configure a cache that contains recently-used secure data in the local ASAP server. In this case, the ASAP server checks the local cache first, then follows the key distribution protocol. A cache provides better performance in retrieving secure data, but it can reveal secure data to unauthorized users. For example, the attacker may kill the process to generate core file and retrieve secure data from the core file.
Securing Network Element Credentials with the Security Administration ToolYou can use the command line ASAP security administration tool to set up and maintain the secure data.
asap_security_tool [–u CtrlUserID][-p CtrlPasswd][operation_option][-c ctrl_svr_name][-l diag_level][-f diag_file_name][-h]
Table 2–9 lists and describes the ASAP security tool arguments.
All arguments are optional. When the operation_option is omitted from the command line, a menu is provided, displaying all the available operations.
The ASAP Security Utility Script provides the following options:
***** ASAP Security Utility Script *****
1. Initialize the secure data storage
Table 2–9 ASAP Security Administration Tool Arguments
Arguments Description
-u The login ID of the ASAP security administrator (Control Database User).
-p The password of the ASAP security administrator (Control Database Password).
operation_option One of the operations in the Detailed Operation section that follows.
-c The name of the Control server for the application (can be omitted).
-l The diagnostic level for the application. The default value is LOW_LEVEL. For more information on diagnostic levels, see "Server Diagnostic Levels".
-f The name of the diagnostic file for the application. The default is ASC_SECU.diag.
-h Displays a help page.

Configuring Security for Network Elements Communication
Setting Up and Managing ASAP Security 2-21
10. Add/Modify secure data entry 11. Delete secure data entry 12. Query secure data entry
20. Import secure data from file to the secure storage 30. Change current security level 40. Flush secure data cache for each ASAP server
100. Display usage message for this Tool
Enter Choice <Q - Quit>:
Table 2–10 lists and describes the ASAP security tool operations.
Note: Selecting option 1 to initialize the secure data storage, deletes all the security data in the class A CSF wallet and the class B table. There is no way of restoring the deleted data using the ASAP security administration tool.
You can use option 1 if you want to use password encryption for class B custom secure data. Class A CSF wallet data is always encrypted.
Table 2–10 ASAP Configuration Tool Operations
Operations Description
-i Initializes secure data storage. With this option, the ASAP security administrator can set up class B custom secure data.
Note: This operation is only available when ASAP is not running.
Note: Selecting option 1 to initialize the secure data storage, deletes all the security data in the class A CSF wallet and class B table.
-x Checks and changes the current security level.
Note: this operation is only available when ASAP is not running.
-e Flushes the secure data cache for each ASAP server.
-a data Adds or modifies a secure data entry.
■ ASAP data format:
name:value:class:secu_level:cache_mode:audit_level: alg:description
■ Custom data format:
name:value:description
You can add customer secure data while the Control server is running. When the addition of data is complete, the asap_security_tool requests the Control server to flush cached secure data.
-d data Deletes a secure data entry.
■ Data format:
name:class
You can delete customer secure data while the Control server is running. When the deletion of data is complete, the asap_security_tool requests the Control server to flush cached secure data.

Additional Security Considerations
2-22 ASAP System Administrator's Guide
The cache functionality is controlled by the value of the cache_mode defined for the control database login and password. The caching functionality can be changed through menu option 10 in the asap_security_tool by modifying the control database login. If the value of the cache mode for the control database login is 0, then the Control server caches the secure data. Otherwise, the Control server retrieves the secure data from the database as required.
Additional Security ConsiderationsIn addition to the other security features, observer the following guidelines described in this section.
Setting Secure Diagnostic LevelsThe ASAP diagnostic files contain information logs on provisioning activity and confidential provisioning information such as WO parameters and NE dialog as plain text. The secure ASAP diagnostic feature addresses the following key provisioning data:
■ NE dialog to control the content of diagnostic file
■ WO parameter
Setting the Network Element Dialog Diagnostic Configuration Parameter The ASAP NEP diagnostic file contains switch-sensitive information sent and received from the NE. In production environments, Oracle recommends that the audit level is set to SANE so that switch-sensitive information is not included in diagnostics files. Oracle also recommends that you delete old archives and/or store archives in a secure manner.
In addition to setting the audit level to SANE, you can also enable or disable the configurable variable, NE_DIALOG_OFF, in ASAP.cfg. This variable controls the source code to print out all NE dialog messages from NEP diagnostic file. All the output NE dialog in the NEP application checks against the value of NE_DIALOG_OFF, and cuts off the message if the NE_DIALOG_OFF is set to 1.
Table 2–11 lists and describes the NE_DIALOG_OFF option.
-q data Queries a secure data entry.
■ Data format
name:class
-r filename Imports secure data to the secure data storage. To import a large amount ASAP or custom secure data into the ASAP secure storage, compose a flat file containing the essential secure data. The data format is the same as that of adding secure data. For example, a data file may contain the following secure data. Examples of custom secure data entries:
TOR_NE:password1:1:0:Class B NE login infoENG_NE:password2:1:0:Class B NE login info
The value field in the data file should be clear text. The ASAP security tool encrypts the data when necessary. Lines in the file starting with "#" are treated as comments.
Table 2–10 (Cont.) ASAP Configuration Tool Operations
Operations Description
Additional Security Considerations
Setting Up and Managing ASAP Security 2-23
Although the NE dialog from the state table action function can be controlled by the action statement, some NE dialogs are not related to any action function, and in this case the NE_DIALOG_OFF is used to hide NE information.
Setting Work Order Information Diagnostic LevelsWork orders typically contain business sensitive information. The WO is processed by several components, like Service Request Processor (SRP), Service Activation Request Manager (SARM), OCA; consequently, the WO information is exposed to different diagnostic files. For this reason, Oracle recommends that the diagnostic level be set to SANE in productions environments to avoid unnecessarily exposing sensitive information. As well, any archival diagnostics files should be stored in a secure manner. For more information on diagnostic levels, see "Server Diagnostic Levels".
In addition to setting the audit level to SANE, you can also enable or disable the configurable variable, WO_SECURITY_PROP, in the ASAP WO. This variable controls the source code to print out the information messages from all ASAP diagnostic files for a particular WO.
Table 2–12 lists and describes the WO_SECURITY_PROP option.
The WO information is output through a generic diagnostic function call, which can also output other information in addition to the WO information. A filter list controls the output. When WO_SECURITY_PROP = 1 and the message type is contained in the filter list, there is no output to diagnostic file.
All possible output message function calls that are scattered in several ASAP applications must be examined.
Table 2–11 NE_DIALOG_OFF Configuration Variable
ASAP Configuration Variable Default Description
NE_DIALOG_OFF 0 Controls the NE dialog message in the diagnostic file. Possible values are:
■ 0 – NE dialog messages appear in the diagnostic file.
■ 1 – Secure the NE dialog. No NE dialog messages appear in the diagnostic file.
Table 2–12 ASAP Work Order Properties
ASAP Work Order Property Default Description
WO_SECURITY_PROP 0 Controls the WO message in the diagnostic file. Possible values are:
■ 0 – Output WO information in the diagnostic file
■ 1 – Secure WO information. No work order messages appear in the diagnostic file.
Note: This security measure also applies to WO information that is fetched from the SARM database.

Additional Security Considerations
2-24 ASAP System Administrator's Guide
Securing Java or State Table NEP or JNEP to NE Connection Implementations Since the NEP and the JNEP are designed to communicate with a variety of NEs, there are various methods used for NEP or JNEP to NE security. You can implement the Login State Table or equivalent Java method to retrieve a user_id and password from the NEP or JNEP database. The connection to the NE can then be opened with the correct identification.
Advanced State Table or Java programmers can also implement a password timeout and automatic password change functionality as requested by the switch vendor and company policies.
Setting SRP or JSRP to SARM Security PropertiesEach WO within ASAP can be authorized prior to its acceptance in the SARM. The user_id and password properties are compared against the SARM database table tbl_uid_pwd.
■ User_id (optional) – The user_id that the SARM uses for security validation. The user_id is required if the SARM’s security validation feature is enabled in the SECURITY_CHECK configuration parameter. By default, the security validation feature is turned off.
■ User Password (optional) – Indicates the password which the SARM uses for security validation. The User Password is required if the SARM’s security validation feature is enabled in the SECURITY_CHECK configuration parameter.
Setting Security Between ServersTo increase security between Open Servers, the configuration variable CLIENT_SECURITY_ON determines whether to authorize every connection made to the Open Server. When a client (or another server) establishes a connection to a server, the user_id and password used by that connection is employed to open a connection to the SQL server. If the connection to the SQL server is successful, then the connection is accepted; otherwise it is rejected.
Enabling Schema Validation for the JSRP JMS InterfaceYou can enable the JSRP to validate incoming Java Message Service (JMS) XML messages at the JSRP JMS interface against the ASAP schemas that enforces xml WO message formation. Enabling schema validation helps to secure the JSRP JMS interface against invalid XML messages, but also incurs a performance impact.
To enable schema validation, set the VALIDATION_ENABLED parameter to True in the ejb-jar.xml file from srp.jar file of Domain_home/servers/server_name/upload/asapenvid.ear deployment (where server_name is the name of your WebLogic server instance, and envid is the environment ID for your ASAP instance.
3
Monitoring and Managing ASAP 3-1
3Monitoring and Managing ASAP
This chapter describes monitoring and managing Oracle Communications ASAP.
Overview of Monitoring and Managing ASAPASAP provides the following management and monitoring capabilities:
■ ASAP process monitoring – The ASAP Control server starts, stops, and monitors all processes in ASAP. Upon startup, each ASAP application (client or server) establishes a connection to the Control server. The Control server immediately installs a disconnection handler on that connection. When the connection is lost, a callback function is triggered in the Control server, indicating an abnormal termination of the process. A controlled shutdown of ASAP applications does not trigger this callback. When the process termination is detected, the Control server immediately attempts to restart the process (if configured).
■ ASAP database monitoring – The ASAP Control server periodically monitors the use of database tables and database devices. The frequency of this database monitoring task is defined using the DB_MONITOR_TIME attribute in the ASAP.cfg configuration file (see "About Monitoring Database Segment and File System Size" for more information on this attribute). The Control server reads a configuration table that lists the database use threshold values and issues a system event if a particular threshold is exceeded. A custom routine can then be called to perform clean-up tasks and notify the system administrators. For more information on configuring these thresholds and system events, see "Configuring System Events".
■ ASAP file system monitoring – ASAP periodically monitors the use of UNIX file systems. The frequency of this monitoring task is defined using the FS_MONITOR_TIME attribute in the ASAP.cfg configuration file (see "About Monitoring Database Segment and File System Size" for more information on this attribute). The Control server compares the file system usage against the configuration table, and issues a system event if any threshold value exceeds. A custom routine can then be called to perform clean-up tasks and notify the system administrators. For more information on configuring system events, see "Configuring System Events". For more information on configuring this thresholds, see the ASAP Developer’s Guide.
■ ASAP process information – Each ASAP application server logs process performance information (for example, CPU utilization, memory usage) and periodically stores it in the database. This data can then be used to determine periods of low activity suitable for maintenance. For more information, see the chapter about the ASAP utility in the ASAP Server Configuration Guide.

Configuring System Events and Alarms Using Stored Procedures
3-2 ASAP System Administrator's Guide
■ ASAP database admin process – Each ASAP server can perform administration tasks within its application database. At a user-configured time, the server administration thread connects to its primary database to perform database archiving, purging, and integrity checks. This thread is also responsible for executing database administration commands to optimize all query plans for the database procedures. This activity ensures that ASAP database performance is not affected by large changes in data volumes. See "Managing the Database and File System" for more information.
■ ASAP diagnostic and system events – ASAP is equipped with diagnostic call and system activity events that monitor its internal health. ASAP events can be mapped to various alarm categories to generate alarms viewable through a user-defined management console. For more information, see "Configuring System Events and Alarms Using Stored Procedures".
Configuring System Events and Alarms Using Stored ProceduresSystem events range from informational events to critical error events. When an ASAP client or server generates a system event, the event is transmitted to the Control server which then saves the event. The Control server determines if the event requires an alarm to be triggered. The Control server determines the alarm centers that are mapped to the alarm and the alarm program to call. This alarm program can be a shell script, a UNIX executable, or a Linux executable to send the alarm to email or print.
Figure 3–1 Alarm Process
The Control server also monitors each application process within ASAP. If an application process terminates, the Control server issues an Abnormal Process Termination event that is mapped to a user-defined alarm program. Abnormal Process Termination events are written to both the application diagnostic file and the database.
Each event can be configured to enable or disable a system alarm. Every alarm has an associated alarm level (such as MAJOR, MINOR, or CRITICAL) and Auto Clear flag. The Auto Clear flag specifies that the alarm should be automatically cleared upon generation. If the alarm is configured as non-auto clearing, it is generated every five minutes until you reset it using the asap_utils administrative remote procedure call

Configuring System Events and Alarms Using Stored Procedures
Monitoring and Managing ASAP 3-3
(RPC) interface (function 60). If configured as auto-clearing, the alarm is generated only once.
For more information on asap_utils, see ASAP Server Configuration Guide.
An alarm can map to up to five alarm centers which trigger alarm programs to alert users of the system alarm. Typically, such alarms can email an administrator, print reports to an alarm center, page a particular individual, or communicate with a network management system.
Configuring Alarm Centers for Alarm Notification and EscalationAlarm centers can be pagers, email accounts, printers, network management systems, and so forth. Alarm centers are notified of alarms by means of a UNIX program, or shell script.
To create an alarm center, specify the UNIX program, or shell script that ASAP executes when the alarm is generated. For example, assume there are two alarm centers: a general ADMIN center, which receives messages on a printer, and another center called ADMINPGR, which receives pager notifications. To notify these alarm centers, you must develop two shell scripts or programs.
Alarm center information is contained in tbl_alarm_center. Alarm centers are later mapped to system alarms in tbl_system_alarm. If you are defining a system event that does not map to an alarm, proceed to "Configuring System Events".
Use the following stored procedures to define, list, or delete alarm centers:
■ CSP_new_center – Defines an alarm center to which alarm notifications must be sent by the Control server.
■ CSP_list_center – Lists an alarm center definition from the control database.
■ CSP_del_center – Deletes an alarm center definition from the control database.
For more information on these stored procedures and tbl_alarm_center, refer to the ASAP Developer’s Guide.
Configuring System AlarmsSystem alarms identify system events, such as component malfunction. System events can be mapped to operations which enable, disable, or log alarms.
Alarms in ASAP can be routed to multiple alarm centers, based on the time of day.
The types of alarms that can be configured in ASAP are:
■ Continuous alarm – The continuous alarm is issued periodically until your system administrator manually disables it or ASAP issues a system event to disable the alarm.
■ Single initiation alarm – The single initiation alarm is generated once each time the system event is issued.
Table 3–1 lists and describes alarms and what action is required in response to the alarm.
Table 3–1 System Alarms
Alarm Action
Abnormal Process Termination
This alarm indicates that a component of ASAP has shut down. You can immediately save the log file and take the appropriate steps to restart the process.
Configuring System Events and Alarms Using Stored Procedures
3-4 ASAP System Administrator's Guide
General System Error This is a general purpose system alarm. The description of the error from the ASC_event() call should give sufficient details of the error. If ASAP is otherwise running properly, you can simply note this alarm and deal with it at a convenient time.
General System Warning
A general warning event, not an error situation. This event can be used to indicate errors or exceptions in external systems, for example, Port Bind Failure, Network Element (NE) in Maintenance Mode, and Stored Procedure Deadlock Victim. You can note this alarm and deal with it at your convenience.
General System Information
System information such as thread spawning, process startup, and graceful shutdown, work order (WO) time-outs, Host CLLI in Busy State, etc. These alarms typically do not require user intervention.
Process Termination Error
This error is generated by an application process whenever an internal condition is encountered. This causes the application process to log the system event in the database and then terminate the application process in an orderly manner. This is a critical error. You must immediately determine the problem and restart the process.
Operating System Disk File Error
This is a critical error. This error is generated when an error is encountered when creating, reading, or writing an operating system file. For example, the Network Element Processor (NEP) is unable to create a file to insert the NE response log, and the Service Request Processor (SRP) is unable to create a file for WO completions. You must deal with this alarm immediately.
Critical Database Resource Error
This can be a serious error. The event is issued by inv_rpc() and other RPC calls if a database or transaction log is full, the database is corrupt, etc. You must attend to this alarm immediately, although you can continue to use the system.
Invocation Application Remote/Registered Procedure Failed
This alarm is issued if the RPC or registered procedure fails. The text in the ASC_event() gives the invocation details. If ASAP is otherwise running properly, you can note this alarm and address it at your convenience.
UNIX System Call Error
This is a critical error that is issued if an application encounters a UNIX system call error. You must deal with this alarm immediately.
Application Network Error
This is a serious error. (Unable to connect to the SQL/ Application server, connection to server goes down, etc.). You should save the log file immediately and deal with this situation.
Open Server Application Object Access Error
This error is issued if ASAP is unable to create, remove, lock, unlock, or access Open Server object (Mutex, message queue, etc.). If ASAP is otherwise running properly, you can note this alarm and deal with it at your convenience.
Work Order In Progress Longer Than Specified Threshold
System information event. Indicates that a WO has been in progress longer than a specified threshold time. The description of the error from the ASC_event() call provides information on the error. If ASAP is otherwise running properly, you can note this alarm and deal with it at your convenience.
Work Order Routing Error
This error is generated when the Service Action Request Manager (SARM) is unable to correctly determine the Host NE to which a WO should be routed. The description of the error from the ASC_event() call provides the routing data (Directory Number (DN) or MCLI ). Updates to the routing tables are required.
Network Element Has Gone Into Maintenance Mode
An informational alarm. This alarm is generated when an NE enters maintenance mode. If the alarm persists, investigate the reason.
Table 3–1 (Cont.) System Alarms
Alarm Action

Configuring System Events and Alarms Using Stored Procedures
Monitoring and Managing ASAP 3-5
Each system event can be optionally mapped to a system alarm in tbl_system_alarm.
You can specify the system alarm level: MINOR, MAJOR, or CRITICAL. Each alarm is either self auto-clearing or non-auto-clearing, and may or may not define one or more alarm centers to which the alarm is to be transmitted.
If the alarm is configured as non auto-clearing, it is generated every five minutes until you reset the alarm. If the alarm is configured as an auto-clearing alarm, it is only generated once.
After you have defined the alarm centers for the system, you can define the alarms. An alarm code is used to identify uniquely each alarm in ASAP. You can configure an alarm level for each alarm and up to five different alarm routes. The alarm routes are used to specify daily time intervals for an alarm to be generated at up to five alarm centers and to specify the time period in minutes between a regeneration of the alarm.
Use the following stored procedures to define, list, or delete system alarms:
■ CSP_new_alarm – Defines an alarm within ASAP, and optionally, the associated “alarm code” that may be associated with the event.
■ CSP_list_alarm – Lists system alarm codes and their definitions.
■ CSP_del_alarm – Deletes a system alarm code.
For more information on these stored procedures and tbl_system_alarm, refer to the ASAP Developer’s Guide.
Configuring System EventsIn ASAP, each application can generate system events from within the application code. In addition, you can configure system events to generate an alarm in certain circumstances [for example, Common Service Description Layer (CSDL) failure, SARM to SRP notifications, database, and file system thresholds being exceeded, and so on] using certain static tables within ASAP.
Each system event is configured in the control database and can be mapped to a particular system alarm. Each alarm can, in turn, be mapped to one or more alarm centers. Each alarm center can then execute a user-supplied alarm program to perform the relevant user-determined alarm notification.
Defining System EventsCore and customer-specific subsystems can generate system events. System events are defined in the control database table tbl_event_type.
Events can be associated with an alarm code. In addition, the event can enable or disable the alarm.
Use the following stored procedures to define, list, or delete system events:
■ CSP_new_event – Defines an event type within ASAP, and optionally, the associated “alarm code” that may be associated with the event.
■ CSP_list_event – Lists database threshold definitions.
■ CSP_del_event – Deletes a database threshold definition.
Note: You can define system events in custom code. The system events you define do not have to be mapped to core system events. To generate alarms, ensure that the event you have defined is mapped to an alarm in the Event/Alarm Configuration function.
Configuring System Events and Alarms Using Stored Procedures
3-6 ASAP System Administrator's Guide
For more information on these stored procedures and tbl_event_type, refer to the ASAP Developer’s Guide.
Setting Database ThresholdsThe Control server monitors database and transaction log sizes during normal operation. You must configure the database and transaction log thresholds for each database and ASAP environment and the system events that trigger an alarm. When the threshold is exceeded, ASAP can issue the system event to trigger an alarm.
Use the following stored procedures to define, list, or delete database thresholds:
■ CSP_new_db_thresh – Defines database and/or transaction log thresholds to be used by the Control server.
■ CSP_list_db_thresh – Lists database threshold definitions.
■ CSP_del_db_thresh – Deletes a database threshold definition.
Database thresholds are defined in tbl_db_threshold.
For more information on these stored procedures and tbl_db_threshold, refer to the ASAP Developer’s Guide.
Sample Alarm Program - admin.shThe ASAP_Home/scripts/admin.sh sample script is a UNIX shell script. In this example, the admin.sh and adminp.sh scripts are linked copies of each other. Alarm scripts can also be a UNIX executable program. You must copy this script from the ASAP_Hhome/scripts folder to the ASAP_Home/programs folder in order for a control server alarm center to use it.
System events can be issued for critical, major, and minor system errors, system warnings, and system information.
## SCCS Id: @(#) admin.sh 1.1@(#)## Script to perform alarm notification.# ## Note that this script should be placed in the $PROGRAMS directory in order# for the Control Server to pick it up.#TMPFILE=/tmp/alarm.$$PERMFILE=$LOGDIR/ASAP_Alarm_logUSR=oper1DEVICE=consolewhile getopts i:n:e:E:d:f:l:a:s: cdocase $c ini) event_id=$OPTARG;;n) alarm_name=$OPTARG;;e) event_code=$OPTARG;;E) event_desc=$OPTARG;;d) event_text=$OPTARG;;f) source_file=$OPTARG;;l) source_line=$OPTARG;;a) level=$OPTARG;;s) application=$OPTARG;;\?) ;;esac

Configuring System Events and Alarms Using Stored Procedures
Monitoring and Managing ASAP 3-7
doneshift `expr $OPTIND - 1`echo "\n\*************************************************************************\n\ASAP Alarm Issued @ `date` \n\Alarm Program = $0\n\*************************************************************************\n\\n\Arguments:\n\Event Id = $event_id\n\Alarm Name = $alarm_name\n\Event Code = $event_code\n\Event Desc = $event_desc\n\Event Text = $event_text\n\Source File = $source_file\n\Source Line = $source_line\n\Alarm Level = $level\n\Application = $application\n\\n\Additional Parameters = $*\n\n\** End of Alarm **\n" > $TMPFILEcase `basename $0` in "admin.sh") cat $TMPFILE >> $PERMFILEbreak;;"adminp.sh") cat $TMPFILE | mail $USRcat $TMPFILE | write $USR $DEVICEcat $TMPFILE >> $PERMFILEbreak;;esacrm -f $TMPFILEexit 0
If the script name is admin.sh, the alarm message is appended to the alarm log file. This alarm program is only called for minor errors, and therefore does not have to be sent to the users immediately.
If the script name is adminp.sh, the alarm message is appended to the alarm log file, written to oper1 on the system console and mailed to oper1 as well. This alarm program sends a beep to the console and is only called for major alarms such as a process crashing.
Sample Alarm OutputThis section contains sample alarm output.
**************************************************************************ASAP Alarm Issued @ Wed Aug 7 21:00:29 ADT 2002 Alarm Program = /ASAP/PRODUCTION/programs/adminp.sh**************************************************************************Arguments:Event Id = 71457Alarm Name = ABNORMALEvent Code = ABNORMALEvent Desc = Abnormal Process Termination - ApplicationEvent Text = Warning: Abnormal Termination of Process LU62SENDSource File = process.cSource Line = 701Alarm Level = CRITICALApplication = CONTROL
Additional Parameters =

Understanding Default System Events
3-8 ASAP System Administrator's Guide
** End of Alarm **
The output specifies the time and date of the alarm, the script called by the alarm, together with the following information:
Sample Alarm Program - POTS Cartridge Sample CodeASAP provides a working sample cartridge that you can install if you select the POTS Service Activation Model installation option. This cartridge contains the ASAP_Home/samples/sadt/DemoInstall/Nortel/DMS/POTS/control/PLSQL/demo_control.sql script that populates alarm definitions and creates an alarm center mapped to the ASAP_Home/programs/control_prog script. The ASAP installer automatically runs the demo_control.sql script if you select the POTS Service Activation Model installation option.
The alarm center created by the demo_control.sql script runs the control_prog script when it received an alarm or event notification. The control_prog script creates an alarm log file located in ASAP_Home/DATA/logs/ControlProgramOutput that records the alarm output.
Understanding Default System EventsThe static table tbl_event_type contains the system events that the ASAP application can generate and, if required, the system alarm code associated with that event. You can modify existing system events in this table or add custom events.
For information on adding alarms and events, see "Configuring System Alarms" and "Configuring System Events".
Each system event must have a record in tbl_event_type.
The following tables contain the system events that are contained in tbl_sys_event and are generated by the application. You can update the static text, alarm level, and description of these system events and add custom events.
API System EventsTable 3–3 lists and defines the system events included in the core application programming interface (API).
Table 3–2 Alarm Output
Alarm Name Description
Event ID Unique ID for the event that generated the alarm.
Alarm Name Alarm code associated with the system event.
Event Code ASAP event generated by the application.
Event Desc Brief description of the event.
Event Text Brief description of the reason for the system event within the source code.
Source File Line in the source file where the event was generated.
Source Line Source file name where the event was generated.
Alarm Level Possible values: MINOR, MAJOR, or CRITICAL.
Application Logical name of the ASAP application server that generated the system event

Understanding Default System Events
Monitoring and Managing ASAP 3-9
SARM System EventsTable 3–4 lists and describes the events that the SARM can issue.
Table 3–3 Core API System Events
Event Static Text Alarm Level Description
ABNORMAL Abnormal process termination as the application process terminated unexpectedly.
Critical. Non auto-clearing.
Event issued by the Control server if any process (server or client) it monitors has terminated unexpectedly.
DISK_ERR Operating system disk file error. Critical. Auto-clearing.
Event issued when an error is encountered creating, reading, or writing an operating system file.
NTWK_ERR Application network connection error.
Minor. Auto-clearing.
Unable to connect to SQL/Application server, connection to server gone down, etc.
RPC_ERR Invocation of application remote/registered procedure failed.
Minor. Auto-clearing.
Event issued if RPC/Reg Proc fails. The text in ASC_event() gives the invocation details.
RPCSPACE Critical database resource error. Critical. Non auto-clearing.
Event issued by inv_rpc() and RPC calls if the database full, transaction logs full, database corrupt, etc.
SRVOBJER Open Server Application object (Msg Queue, Mutex, etc.) access error.
Minor. Auto-clearing.
Unable to create, remove, lock, unlock, or access Open Server Object (Mutex, message queue, etc.).
SYS_ERR General system error. Major. Auto-clearing.
General purpose system error. The description of the error from the ASC_event() call gives sufficient details of the error.
SYS_INFO General system information notification.
None. System information such as thread spawning, process startup, and graceful shutdown, WO Timeouts, Host CLLI in Busy State, and administrative flushing of data from memory.
SYS_TERM Process termination event. Critical. Auto-clearing.
This event is called by an application process when an internal condition is encountered. The event causes the application process to log the system event in the database and then terminate the application process in an orderly manner.
SYS_WARN General system warning. Minor. Auto-clearing.
Warning event, not an error situation. This event can be used to indicate errors or exceptions in external systems, for example, Port Bind Failure, Host LU6.1/LU6.2 Bridge Down, NE in Maintenance Mode, and Stored Procedure Deadlock Victim.
UNIX_ERR UNIX system call error. Minor. Auto-clearing.
Event issued if application encounters UNIX system call error. For example, the NEP is unable to create a file to insert the NE response log or the SRP is unable to create a file for WO completions

Understanding Default System Events
3-10 ASAP System Administrator's Guide
Control Server EventsTable 3–5 lists and describes the events that the Control server can issue.
NEP System EventsTable 3–6 lists and describes the events that the NEP can issue.
Table 3–4 SARM System Events
Event Static Text Alarm Level Description
ROUT_ERR WO routing error. Major. Auto-clearing.
Notifies when the SARM process is unable to determine the correct NE to which a particular WO should be routed. The routing data (MCLI or DN) is included in the event text.
WOINPROC WOs in progress longer than specified threshold.
Informational. Determined by individual customer.
Informs when one or more WOs are in progress for more than the specified threshold time.
Table 3–5 Control Server Events
Event Description
APP_ERR ASAP application start-up error.
APP_STRT ASAP application local or remote start-up.
APP_STOP ASAP application local or remote shutdown.
Table 3–6 NEP System Events
Event Static Text Alarm Level Description
BIND_ERR Port binding error event.
Minor. Auto-clearing. Unable to allocate device to connect to NE if, for instance, the maximum number of connections to the NE is exceeded. Each device in ASAP has a command processor thread that is always running. When there is a connection request for an NE, the session manager tries to obtain an enabled and unbinded (available) device. If the session manager cannot obtain such a device, the session manager will throw a BIND_ERR event.
CONN_ERR NE connection error event.
Minor. Auto-clearing. NE connection attempt failed.
DIAL_ERR Dialup error event. Minor. Auto-clearing. The dial-up program to connect to NE has failed. After a connection is established to a dialup type device, but before the NE_LOGIN (or LOGIN) is performed, a state table named DIALUP is executed. If the DIALUP state table fails, then DIAL_ERR event is thrown.
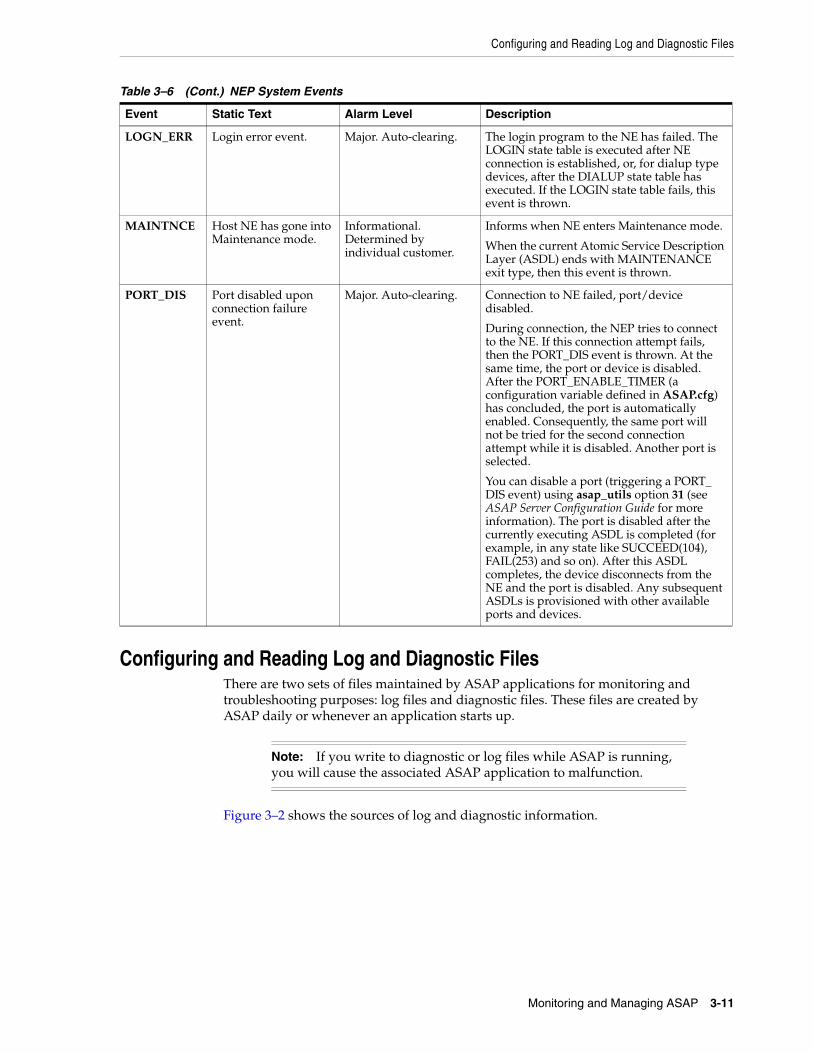
Configuring and Reading Log and Diagnostic Files
Monitoring and Managing ASAP 3-11
Configuring and Reading Log and Diagnostic FilesThere are two sets of files maintained by ASAP applications for monitoring and troubleshooting purposes: log files and diagnostic files. These files are created by ASAP daily or whenever an application starts up.
Figure 3–2 shows the sources of log and diagnostic information.
LOGN_ERR Login error event. Major. Auto-clearing. The login program to the NE has failed. The LOGIN state table is executed after NE connection is established, or, for dialup type devices, after the DIALUP state table has executed. If the LOGIN state table fails, this event is thrown.
MAINTNCE Host NE has gone into Maintenance mode.
Informational. Determined by individual customer.
Informs when NE enters Maintenance mode.
When the current Atomic Service Description Layer (ASDL) ends with MAINTENANCE exit type, then this event is thrown.
PORT_DIS Port disabled upon connection failure event.
Major. Auto-clearing. Connection to NE failed, port/device disabled.
During connection, the NEP tries to connect to the NE. If this connection attempt fails, then the PORT_DIS event is thrown. At the same time, the port or device is disabled. After the PORT_ENABLE_TIMER (a configuration variable defined in ASAP.cfg) has concluded, the port is automatically enabled. Consequently, the same port will not be tried for the second connection attempt while it is disabled. Another port is selected.
You can disable a port (triggering a PORT_DIS event) using asap_utils option 31 (see ASAP Server Configuration Guide for more information). The port is disabled after the currently executing ASDL is completed (for example, in any state like SUCCEED(104), FAIL(253) and so on). After this ASDL completes, the device disconnects from the NE and the port is disabled. Any subsequent ASDLs is provisioned with other available ports and devices.
Note: If you write to diagnostic or log files while ASAP is running, you will cause the associated ASAP application to malfunction.
Table 3–6 (Cont.) NEP System Events
Event Static Text Alarm Level Description
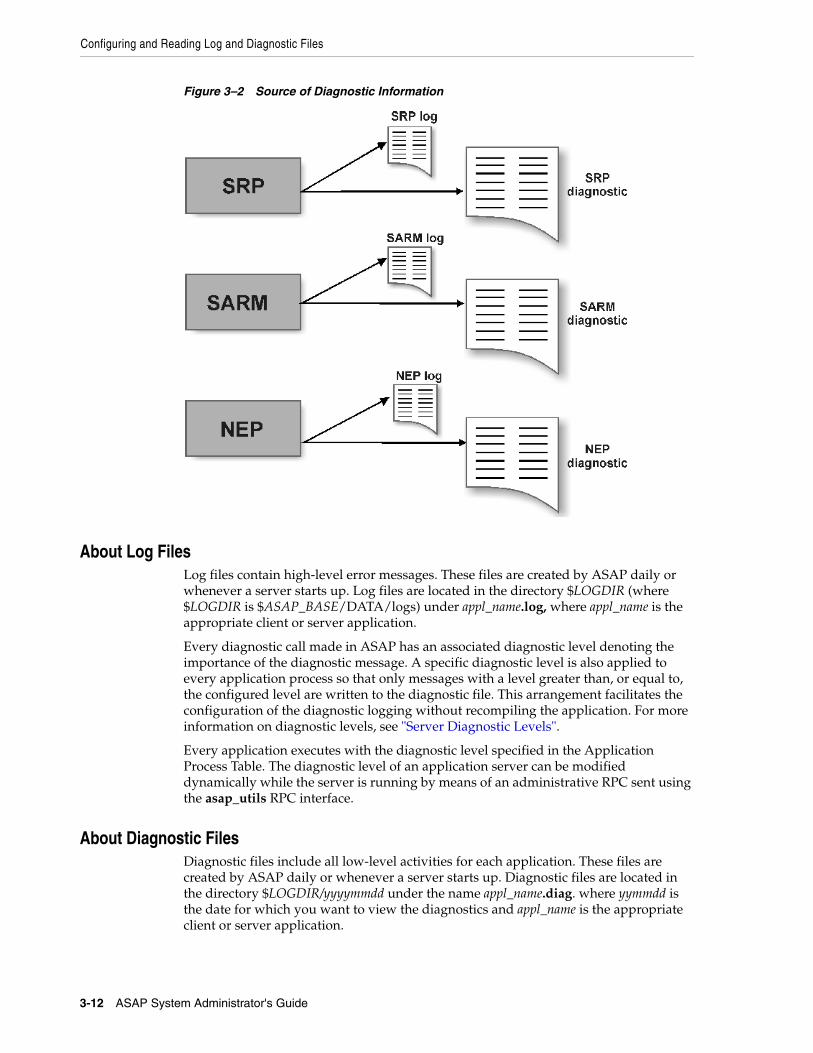
Configuring and Reading Log and Diagnostic Files
3-12 ASAP System Administrator's Guide
Figure 3–2 Source of Diagnostic Information
About Log FilesLog files contain high-level error messages. These files are created by ASAP daily or whenever a server starts up. Log files are located in the directory $LOGDIR (where $LOGDIR is $ASAP_BASE/DATA/logs) under appl_name.log, where appl_name is the appropriate client or server application.
Every diagnostic call made in ASAP has an associated diagnostic level denoting the importance of the diagnostic message. A specific diagnostic level is also applied to every application process so that only messages with a level greater than, or equal to, the configured level are written to the diagnostic file. This arrangement facilitates the configuration of the diagnostic logging without recompiling the application. For more information on diagnostic levels, see "Server Diagnostic Levels".
Every application executes with the diagnostic level specified in the Application Process Table. The diagnostic level of an application server can be modified dynamically while the server is running by means of an administrative RPC sent using the asap_utils RPC interface.
About Diagnostic FilesDiagnostic files include all low-level activities for each application. These files are created by ASAP daily or whenever a server starts up. Diagnostic files are located in the directory $LOGDIR/yyyymmdd under the name appl_name.diag. where yymmdd is the date for which you want to view the diagnostics and appl_name is the appropriate client or server application.
Configuring and Reading WebLogic-based Log and Diagnostic Files
Monitoring and Managing ASAP 3-13
The diagnostic file rolls over to a new file whenever the maximum diagnostic file size is reached. This file size is configurable using the MAX_DIAG_FILE configuration parameter. You can also configure the number of diagnostic files to be created. This field, together with the maximum file size, limits the amount of disk space that may be used by diagnostic files. When the file limit is reached, the API closes the existing file and opens a new one.
The value of the MAX_DIAG_FILE parameter may depend on the level of diagnostic messages written by the application and the available disk space.
Using ASAP Diagnostic ToolsThe diag_filt and diag_filt1 scripts are diagnostic tools contained in the $SCRIPTS directory allow you to view the diagnostic files to filter out the diagnostic messages from a particular thread. You can use this feature to follow the operation of just one thread. Usually, however, it is the interaction of multiple threads with each other that is of most interest to programmers.
diag_filt diagnostic_file thread_number [thread_number ...] > output_file
where:
diagnostic_file is the name of the diagnostic file.
thread_number is the thread number
output_file is the name of an output file
For example, to filter out the diagnostic messages of thread number 7 and 21 from the SARM.diag file and insert the result into the 7_21.out file, enter the following:
diag_filt SARM.diag 7 21 > 7_21.out
Configuring and Reading WebLogic-based Log and Diagnostic FilesASAP uses log4j to generate and manage the log messages from ASAP's WebLogic components. It does not affect any logs generated by ASAP's C-based (SARM, NEP, Control (CTRL) server) components. The generated log messages are stored in the asap.log file located in WebLogic_domain.
Through the use of log4j, you can develop and maintain a logging strategy that minimizes the overall impact of logging operations on the application's resources. log4j does this by letting you control the volume of log messages generated.
You also have the ability, when necessary, to dynamically change the level and detail of the logged messages. This feature helps you to, for example, increase the level and detail of logged messages to help analyze performance problems within a production environment.
To read more about log4j, refer to Apache Web site:
http://logging.apache.org/log4j
Defining Severity LevelsTo control the volume of log messages generated and written to the output destinations (the console and the WebLogic log file, which are referred to as Appenders by log4j), you assign severity levels to the various areas of the application that generate their own, discreet messages (these areas are referred to as Categories by log4j. If an event occurs inside a given category that triggers a message below the
Configuring and Reading WebLogic-based Log and Diagnostic Files
3-14 ASAP System Administrator's Guide
severity level assigned to the category (that is, less severe than the assigned level), log4j does not generate the message.
Example
If you assigned the severity level Warning to a given category, log4j does not generate any messages for that category that are flagged in the ASAP code as Debug or Info level messages. log4j will, however, generate all messages that are flagged as Warning, Error, and Fatal.
You can further control the number of messages written to the output destinations, or Appenders, by also assigning a severity level to them. When you assign a severity level to an Appender, it rejects messages below that severity level, even if log4j passes the message to it.
Example
If you configure the console to the Warning severity level, and one of the Categories is configured with the Info level, the console will not display the Info message, even though log4j generates the message and passes it on to the console, because the message's severity level falls below the threshold for which the Appender is configured. If, however, that same Category later generates an Error level message, the console will accept and display the message, because it carries a severity level equal to or higher than the console's threshold.
By default, the console and the WebLogic log file accept all error messages, from the least severe to the most severe.
The Levels
The following is an ascending list of the severity levels, starting with the least severe:
■ Debug – (Least severe) Designates fine-grained informational events that are most useful to debug an application
■ Info – Designates informational messages that highlight the progress of the application at coarse-grained level
■ Warning – Designates potentially harmful situations
■ Error – Designates error events that might still allow the application to continue running
■ Fatal – (Most severe) Designates very severe error events that will presumably lead the application to abort
Configuring the Severity LevelsThere are two methods by which you can configure the severity levels:
■ log4j.xml – The log4j.xml file is located in asap$ENV_ID.ear:APP-INF/lib/asaplibcommon.jar. This method allows you to modify the log4j configuration (like log message format, name of the log file, volume of the log files, how many are saved, and so on) and requires you to stop, then restart the servers before the changes will to take effect. For more information, see "Configuring the log4j.xml File".
■ log4jAdmin – The log4jAdmin Web page lets you to dynamically change the severity levels while the servers are running. The changes take effect immediately. As the changes are persisted to the database the severity levels remain at the new level when you restart the server. For more information, see "Using the log4jAdmin Web Page".
Configuring and Reading WebLogic-based Log and Diagnostic Files
Monitoring and Managing ASAP 3-15
The logging levels configured in the database take precedence; all other configuration is controlled by the log4j.xml configuration file embedded inside asap$ENV_ID.ear:APP-INF/lib/asaplibcommon.jar.
Configuring the log4j.xml FileUse this method to modify the log4j configuration as described in "Configuring the Severity Levels". To change the log4j configurations later, you must stop the server, modify the log4j.xml file, then restart the server. In most cases, therefore, if you need to modify the logging levels, you should use the log4jAdmin Web page, as described in "Using the log4jAdmin Web Page".
There are two sections of the log4j.xml file that you need to look at when configuring this file:
■ Appenders – This section defines the output destination for the messages. At installation, the Appenders section contains two entries:
■ Console – From this entry, you control the level of messages that the WebLogic console accepts.
■ WebLogic – From this entry, you control the level of messages that the WebLogic log file accepts.
■ Categories – This section contains references to all of the ASAP categories that generate messages and gives you the ability to control the level of messages they generate.
To configure the log4j.xml file:
1. Unpack the asap.ear or the srt.ear file, depending on the application for which you are configuring logging parameters.
■ The asap.ear file is found in the $ASAP_BASE/lib directory. After the .ear file is unpacked, unpack APP-INF/lib/asaplibcommon.jar. The log4j.xml file is located in the root directory.
■ The srt.ear files is found in the $ASAP_BASE/SRT/lib directory. After the .ear file is unpacked, unpack APP-INF/lib/asaplibcommon.jar. The log4j.xml file is located in the root directory.
2. In the Appenders section of the log4.xml file, search for the following string, which appears at the top of the Appenders section:
<!-- Append messages to the console -->
The Console entry governs what level of messages are written to the console.
3. If necessary, change the threshold level. By default, it is configured to DEBUG, allowing the console to display all messages sent to it. If you want to restrict the number of messages displayed, change the threshold entry to the severity level appropriate for your installation (see "Severity levels" above, for a description of the severity levels).
In the example below, the level is changed from DEBUG to INFO.
Before
<param name="Threshold" value="DEBUG"/>After
<param name="Threshold" value="INFO"/>
4. In the Appenders section, search for the following string:

Configuring and Reading WebLogic-based Log and Diagnostic Files
3-16 ASAP System Administrator's Guide
<!-- Append messages to the weblogic's log file-->
The Weblogic log file entry governs what level of messages are written to the WebLogic log file.
5. If necessary, change the threshold level as described in Step 3.
6. Go to top of the file and search for the following string:
category name
This takes you to the first category entry in the file.
7. Review each of the categories in this section, changing the severity level where necessary. In the example below, the level is changed from INFO to WARNING.
Before
<category name="com.mslv.system"> <priority value="info"/> </category>
After
<category name="com.mslv.system"> <priority value="warning"/> </category>
8. When you finish updating the categories, save and close the log4j.xml file.
9. Repack the .ear file.
10. Redeploy the .ear file:
■ For Java Service Request Processor (JSRP):
In $ASAP_BASE/lib, run the following commands:
ModDeployDescriptor -u <WebLogic Admin Id>java weblogic.Deployer -adminurl http://$WLS_HOST:$WLS_PORT-user $WLS_USER -password $WLS_PASSWORD -name asap$ENV_ID -removejava weblogic.Deployer -adminurl http://$WLS_HOST:$WLS_PORT -user $WLS_USER -password $WLS_PASSWORD -upload -source $ASAP_BASE/lib/asap$ENV_ID.ear -name asap$ENV_ID -targets $TARGET_WLS_SERVER -activate
■ For SRT:
In $ASAP_BASE/SRT run the following commands:
ant -f install.xml undeployant -f install.xml deploy
Using the log4jAdmin Web PageUse log4jAdmin Web page to check the current logging levels or to change the logging levels dynamically.
The changes you make to the logging severity levels using this method are persisted to the database in the table tbl_code_list on the Control server.
Note: You can only use this method to change the severity levels of the Categories. To change the Appender's levels, you must reconfigure the log4j.xml file. See "Configuring the log4j.xml File" for an explanation of the Categories, the Appenders, and how to configure the XML file.

Configuring and Reading WebLogic-based Log and Diagnostic Files
Monitoring and Managing ASAP 3-17
Checking the Current Logging LevelsYou can use the Filter Loggers feature at the top of the page to check the logging level of specific categories or subcomponents. If you know the name of the category or subcomponent that you want to check, you can use the filter to display only that category, or related, categories.
To check logging levels:
1. Open the log4jAdmin Web page by entering the following path in the browser's address line (the URLs are case sensitive):
■ JSRP:
http://BEA_HOST:BEA_PORT/ASAP_ENVID/log4jAdmin.jsp
or
https://BEA_HOST:BEA_SSL_PORT/ASAP_ENVID/log4jAdmin.jsp
■ SRT:
http://BEA_HOST:BEA_PORT/ASAP_ENVID/SRT/log4jAdmin.jsp
or
https://BEA_HOST:BEA_SSL_PORT/ASAP_ENVID/SRT/log4jAdmin.jsp
2. In the Filter Loggers field, enter the beginning of the name or a part of the name.
3. Do one of the following:
■ Click Begins With to filter on the beginning of the name.
■ Click Contains to filter on part of the name.
The list displays the categories and subcategories that match the entry in the Filter Loggers field.
■ (Optional) To change the logging level do the following:
a. Scan the entries in the left-hand column and find the category or sub-component which you want to change.
b. Scan across the row to the severity levels. The level that currently is selected is highlighted in a different color from the other levels and appears in the Effective Level column.
c. Click the logging level which you want to change:
To change an entire category, click the category name.
To change the subcomponent, click the sub-component name.
The change takes place immediately.
d. When you finish making the changes, close the page.
Note: Because log4jAdmin is bundled with the core, it shares the core session timeout configuration.

Enabling Stored Procedure Error Messages
3-18 ASAP System Administrator's Guide
Enabling Stored Procedure Error MessagesTo enable stored procedure error messages for a sqlplus session, use the following procedure:
1. From a UNIX terminal, source your ASAP ASAP_home/Environment_Profile.
. ./Environment_Profile
2. Log into your sqlplus session for the database you want to run stored procedures on. For example:
sqlplus $CTRL/password
Where password is the password for your ASAP server database schema.
3. Run the following command to enable stored procedure error messages.
set serveroutput on;
For an error message example, see the following error message in bold:
var retval number; exec :retval := SSP_new_comm_param('T', 'TEL_HOST','COMMON_DEVICE_CFG','HOST_USERID','asapXXX','userid'); Host TEL_HOST For Device Type T And Parameter HOST_USERID Does Not Exist, No Comm Param Inserted. . PL/SQL procedure successfully completed. . SQL> print retval; . RETVAL ---------- 0
4
Improving ASAP Performance 4-1
4Improving ASAP Performance
This chapter describes ways to improve Oracle Communications ASAP performance.
About Improving ASAP PerformanceThis chapter is intended to aid those who have prior knowledge of the ASAP configuration and UNIX operating systems. Before starting the tuning exercises described in this chapter, you should be familiar with the following items:
■ Location of ASAP diagnostic files and the UNIX utilities that are used to view and manipulate them such as grep, tail, pg, top, vmstat, sar, prstat, glance (on HP), and so on.
■ Location of the ASAP configuration files (ASAP.cfg, ASAP.properties, Environment_Profile, NEP.jinterpreter, config.xml, startWebLogic.sh), how to use an editor such as vi, how to modify the configuration files, the layout of configuration files, for example, server specific versus global variables.
■ How to use UNIX utilities, such as top and sar to monitor the resources being used by ASAP.
For more information, consult your system’s online documentation about UNIX utilities or the ASAP documentation.
Tuning ASAP Performance with Pre-tuned ASAP Configuration FilesStock configuration files are shipped with the product for varying sizes of ASAP installations. You can choose to use one of these versions of the ASAP.cfg file as-is, or as a starting point for additional changes.
This section provides you with tools and guidelines to properly select a default configuration.
About Pre-tuned ASAP ConfigurationsASAP ships with pre-tuned configurations for small, medium and large installations. (Definitions of small, medium and large configurations in this chapter are consistent with those in the planning chapter of the ASAP Installation Guide.)
Details are given below for these stock configurations, with sample performance figures. Your results will vary depending on your hardware and other configuration choices you may have implemented.

Tuning ASAP Performance with Pre-tuned ASAP Configuration Files
4-2 ASAP System Administrator's Guide
Installing a Pre-tuned ConfigurationThe pre-tuned configuration files are generated by a script which is run as part of the installation process for new installs only. The files are placed in ASAP_Home/samples/sample_configs, where ASAP_Home is the directory in which ASAP is installed.
Table 4–1 lists and described the pre-tuned configuration files.
Using a Pre-tuned Configuration with a New ASAP InstallationAfter the installation of ASAP is complete, back up the following files:
■ ASAP_Home/config/ASAP.cfg
■ ASAP_Home/ASAP.properties
■ ASAP_Home/Environment_Profile
Replace these files with the appropriate three files corresponding to the desired pre-tuned configuration from ASAP_Home/samples/sample_configs.
Generating Pre-tuned Configuration FilesFor upgrade installations, the pre-tuned configuration files are not generated. However, the generation script can be run manually:
$ASAP_BASE/scripts/generate_sample_configs.ksh $ASAP_BASE
This will generate the pre-tuned configuration files to ASAP_home/samples/sample_configs.
Merging Pre-tuned File Settings into an Existing InstallationIf you have already made changes to the ASAP.cfg, ASAP.properties, or Environment_Profile files, you will have to manage the differences between your altered files and the pre-tuned files. For example, simply copying over the pre-tuned files will overwrite any changes you have made. To merge the pre-tuned file settings with your existing settings, compare the differences between your existing files and the pre-tuned files and manually add in the changes from the pre-tuned files.
Example Pre-tuned Configuration PerformanceTable 4–2, Table 4–3 and Table 4–4 provide example performance results on hardware. Your actual results will vary.
Table 4–1 Pre-tuned Configuration Files
Default Configuration File Small Medium Large
ASAP.cfg file ASAP.cfg.small ASAP.cfg.medium ASAP.cfg.large
ASAP.properties file ASAP.properties.small ASAP. properties.medium
ASAP. properties.large
Environment_Profile file Environment_Profile.small
Environment_Profile.medium
Environment_Profile.large
Performance 50,000 orders/day
1 order/sec
7 ASDL/sec
500,000 orders/day
11.5 orders/sec
80.5 ASDL/sec
20.95 orders/sec
146.65 ASDL/sec
DB connections 52 89 145
Log level SANE SANE SANE

Tuning ASAP Performance with Pre-tuned ASAP Configuration Files
Improving ASAP Performance 4-3
Table 4–2 Small Installation Pre-tuned Configuration Performance
- - CPU, % of server CPU, % of 1 proc RAM, MB
V880 Service Activation Request Manager (SARM)
0.79 3.16 43
V880 Network Element Processor (NEP)
1.39 5.56 37
V880 JENEP 0.64 2.56 181
sclust01 WebLogic Server 4.73 9.46 261
Compaq Oracle 1.65 13.2 N/A
N/A Total ASAP (SARM, NEP, JENEP, etc.) memory
N/A N/A 350
N/A WebLogic Server memory N/A N/A 261
N/A N/A N/A Total 611
Table 4–3 Medium Installation Pre-tuned Configuration Performance
- - CPU, % of server CPU, % of 1 proc RAM, MB
V880 SARM 12.86 51.44 52
V880 NEP 15.63 62.52 44
V880 JENEP 7.49 29.96 376
sclust01 WebLogic Server 24.23 48.46 750
Compaq Oracle 10.14 81.12 N/A
N/A Total ASAP (SARM, NEP, JENEP etc.) memory
N/A N/A 550
N/A WebLogic Server memory N/A N/A 750
N/A N/A N/A Total 1300
Table 4–4 Large Installation Pre-tuned Configuration Performance
- - CPU, % of server CPU, % of 1 proc RAM, MB
V880 SARM 28.71 114.84 64
V880 NEP1 13.04 52.16 41
V880 JENEP1 9.22 36.88 374
N/A NEP2 18.03 72.12 43
N/A JENEP2 13.73 54.92 375
sclust01 WebLogic Server 51.54 103.08 750
Compaq Oracle 18.74 147.76 N/A
N/A Total ASAP (SARM, NEP, JENEP, etc.) memory
N/A N/A 1050
N/A WebLogic Server memory N/A N/A 750
N/A N/A N/A Total 1800

Troubleshooting and Monitoring ASAP Performance
4-4 ASAP System Administrator's Guide
Troubleshooting and Monitoring ASAP PerformanceThe ASAP utility script (asap_utils) is a menu driven utility that provides access to a set of monitoring and troubleshooting tools for ASAP. These tools provide information that is relevant to the performance tuning of an ASAP system.
This section describes the ASAP utility script option 109 for Real-Time System Monitoring and its uses with respect to troubleshooting and monitoring ASAP performance. This option calls the Sysmon tool that gathers performance data and stores this data in the ASAP_home/DATA/logs directory (where ASAP_home is the location of the ASAP installation).
Additional information about the Sysmon tool is contained in the section describing the ASAP utility script in ASAP Server Configuration Guide.
The WebLogic Administration Console can be used to monitor the Java Service Request Processor (JSRP).
Understanding Sysmon Output FilesAlthough Sysmon output files can be very large, only a small part of the information contained in the file is used to tune the system. During the tuning process, the main areas of interest in the Sysmon output file are:
■ Connection Pool
■ Message Queue
Troubleshooting the Connection PoolThe following Sysmon sample output illustrates the cause of a slowdown in production. When the number in the “all connections in use (count)” row grows continually, the system is waiting for a free connection and is not being used to its maximum capacity.
-------------------------Tuning - Connection Pool-------------------------Description Count Total Min Max Average Mean Deviation----------- ----- ----- --- --- ------- ----- ---------Application Pool add connections 2 4.0 2.0 2.0 2.0 2.0 0.0 all connections in use (count) 250 allocate wait-time 34454 1276 0.1 26.2 37.1 4386.3 4355.4 connections in use 34454 1817.0 1.0 9.0 5.3 5.9 1.3 pool size 6 42.0 5.0 9.0 7.0 7.3 0.7 Remove connection (count) 4 Returned (count) 34453
To correct this situation, do one of the following:
Increase the value of the configuration variable, APPL_POOL_SIZE to make more connections available.
Caution: Running the Sysmon tool against an ASAP system in production causes a 20 to 25% degradation in system performance.

Troubleshooting and Monitoring ASAP Performance
Improving ASAP Performance 4-5
Enable the auto-tuning option of ASAP using the configuration variable, CPM_OPTIMIZE_POOLS in the ASAP configuration file (ASAP.cfg), so that connections can be added automatically when necessary.
If a stored procedure fails, the thread running the procedure goes to sleep for the time determined by the RPC_RETRY_SLEEP configuration parameter. ASAP then tries to execute the procedure with the number of times determined by the RPC_RETRY_COUNT configuration parameter. All of these attempts may fail. Since the thread cannot be released for the entire duration of this error retry process, poor performance is reported, increasing the number of connections in the use and long waiting times.
Table 4–5 lists and describes terms used in the Sysmon connection pool output.
Table 4–5 Sysmon Connection Pool Output Terms
Column/Row Heading Name Description
Row Add Connections Only appears if auto-tuning is enabled. Provides information regarding the addition of connections to the pool by the auto-tuning process during the time period that the Sysmon data was collected.
Row All Connections In Use Counts the number of times the system had to wait for connections to become available in the pool. It only appears if this condition occurred during the time period that the Sysmon data was collected.
Row Allocate Wait-time Measures the amount of time it took ASAP to acquire a connection from the pool during the time period that the Sysmon data was collected. This measurement is highly correlated with the “all connections in use” parameter, as ASAP must wait until a connection becomes free if none are available.
Row Connections In Use Measures the number of connections in use by ASAP during the time period that the Sysmon data was collected, and calculated as connections are retrieved from the pool.
Row Pool Size Only appears if auto-tuning is enabled. Provides information regarding the size of the connection pool during the time period that the Sysmon data was collected.
Row Remove Connection Only appears if auto-tuning is enabled. Counts the number of times connections were removed from the pool by the auto-tuning process during the time period that the Sysmon data was collected.
Row Returned Counts the number of times a connection was returned to the pool for re-use during the time period that the Sysmon data was collected.
Column Count For rows where data is presented for Min, Max, Average, Mean and Deviation, this number represents the number of data points that were used to calculate the listed statistics. For all other rows, count presents the data collected for the row. In other words, count represents the sample size.
Column Total The total of the collected values for the corresponding row heading.
Column Min The lowest collected value for the corresponding row heading.
Column Max The highest collected value for the corresponding row heading.
Column Average Calculated as the Total / Count for the corresponding row heading.
Column Mean An estimate of the mean for the corresponding row heading. Calculated as the (Min + Max + 4 * Average)/6.
Column Deviation An estimate of the standard deviation for the corresponding row heading. Calculated as the Min + Max /6.

Troubleshooting and Monitoring ASAP Performance
4-6 ASAP System Administrator's Guide
Troubleshooting the Message QueueThe following Sysmon output section demonstrates the use of the Sysmon tool, and illustrates a condition which can degrade the responsiveness of ASAP.
The Group Manager Msg Q size has maximum, average, and mean sizes that are greater than required. For tunable message queues in ASAP, a non-zero size less than 5 is optimal, but not always achievable. In this case, messages are building up as they wait for processing by the group manager threads.
----------------------Tuning - Message Queue----------------------Description Count Total Min Max Average Mean Deviation------------ ------ ------ ---- ----- ------- ----- ----------ASDL Provision Queue message read wait time 1056 5995.5 0.9 62.2 5.68 14.30 10.22 messages sent (count) 1056 queue idle-time (ms) 1056 59705.0 0.0 114.2 56.54 56.73 19.03 queue size (count) 1056 0.0 0.0 0.0 0.0 0.0 0.0 ...
Group Manager Msg Q message read wait time 2469 38896.8 2.5 290.5 15.75 59.33 48.0 messages sent (count) 2469 queue idle-time (ms) 2469 1870.6 0.0 718.3 0.758 120.22 119.72 queue size (count) 2469 27184.0 0.0 27.1 11.01 11.86 4.5 ...
To decrease the length of the queue and enhance the responsiveness of the system, increase the number of group manager threads in the system.
This is a simplified example of how to use the Sysmon tool to tune a message queue. Refer to the sections on the SRP, NEP, and SARM tuning for further details.
Table 4–6 lists and describes terms used in Sysmon output.
Table 4–6 Sysmon Output Terms
Column/Row Heading Name Description
Row Message Read Wait-time
The time, in milliseconds, that a message was sitting in the message queue waiting for processing, during the time period that the Sysmon data was collected.
Row Messages Sent The number of messages put into the queue during the time period that the Sysmon data was collected.
Row Queue Idle Time The time, in milliseconds, required for a message to enter the queue for processing during the period when the Sysmon data was collected.
Row Queue Size The number of messages in the queue during the period when the Sysmon data was collected. The reported number is decreased when the queue length is recalculated after a message leaves the queue.
Column Count The number of messages added to the queue.
Column Total The total collected values for the corresponding row heading.
Column Min The minimum collected value for the corresponding row heading.
Column Max The maximum collected value for the corresponding row heading.
Column Average The total of the collected values for the corresponding row heading.
Column Min The lowest collected value for the corresponding row heading.
Manually Tuning ASAP Performance
Improving ASAP Performance 4-7
Manually Tuning ASAP Performance The performance of an ASAP system is governed by the available hardware, installation, and configuration decisions made during the initial installation phase. Due to the multi-threaded nature of ASAP, fine-tuning the system to will help you to obtain the maximum benefits from the allocated resources.
This section provides you with tools and guidelines to tune your ASAP system in a short period of time. It covers the following topics:
■ A recommended approach to tuning.
■ A list of system limits that must be monitored to ensure that they are not exceeded during tuning.
■ Guidelines to tune the JSRP/ SRP, SARM, and NEP processes.
Tuning GuidelinesIf you wish to go beyond the provided pre-tuned configurations, there are many ways to tune an ASAP system. However, the following technique has been verified by the internal Oracle Communications testing team. You can use it to optimize a simple ASAP configuration in less than half a day. A simple configuration consists of all ASAP components residing in the same system with small numbers of individual components, for example, fewer than five NEPs and one or two SRPs.
The following steps are the order in which the tuning process is carried out:
1. Setting a Target
Select a performance target that is based on realistic throughput (work orders (WOs) per second) or resource consumption early in the process. Without a goal, an iterative process, such as tuning, could continue indefinitely.
2. Using Simple Work Orders
To achieve consistent results, use simple familiar WOs during the tuning process. Use a repeatable test and pick a scenario such as batches, or workflows. Once tuning is complete, verify the performance with realistic data.
3. Starting with Minimum Configuration Values
Start with minimum configuration values because it is easier to detect and correct bottlenecks than it is to determine where excess resources are being consumed.
4. Following Work Order Flow
The tuning process follows the same flow that WOs take through the system. Tuning starts at the SRP (that is CSRP or JSRP depending on your implementation) proceeds
Column Max The highest collected value for the corresponding row heading.
Column Average Calculated as the Total divided by the Count for the corresponding row heading.
Column Mean An estimate of the mean for the corresponding row heading. Calculated as the (Min + Max + 4 * Average)/6.
Column Deviation An estimate of the standard deviation for the corresponding row heading. Calculated as the Min + Max /6.
Table 4–6 (Cont.) Sysmon Output Terms
Column/Row Heading Name Description

Manually Tuning ASAP Performance
4-8 ASAP System Administrator's Guide
through to the SARM and then to the NEP (that is CNEP or Java-enabled NEP (JNEP) depending on your implementation) and on to the NE, then it returns back through the same steps.
5. Checking for Bottlenecks
Bottlenecks that can develop as resources are shifted among the components which make up an ASAP system. Bottlenecks may occur in areas that were previously optimized. When you move to a new area of the system, you should review the servers that have already been tuned to ensure that their configurations have remained optimal. For example, if you tune the NEP after the SRP and SARM have been optimized, review the SRP and SARM after you have finished tuning the NEP to ensure that they have remained optimized.
Setting System LimitsDuring the tuning process, you must change configuration variable settings to levels that are higher than their defaults. These increases have two direct effects which you must monitor during the tuning process:
■ Increased demands are placed on the hardware allocated to the ASAP system. You must use a utility, such as top to continually monitor the ASAP system in order to ensure that it is not consuming more resources than planned.
■ If system limits are exceeded, increased ASAP resource consumption may cause errors to be reported in the systems diagnostic files. Monitor the diagnostic files closely during the tuning process so that these limits can be altered to higher values when required.
This section details errors which may appear in the diagnostic files and the configuration variables used to control system limits. Configuration variables are located in the ASAP.cfg file. The following are the configuration variables used for tuning.
■ APPL_POOL_SIZE
■ CONTROL_POOL_SIZE
■ MAX_CMD_DBPROCS
■ MAX_CONNECTIONS
■ MAX_CORE_DBPROCS
■ MAX_MSGPOOL
■ MAX_MSGQUEUES
■ MAX_SERVER_PROCS
■ MAX_THREADS
■ MAX_ORDERS_IN_PROGRESS
■ WO_AUDIT_LEVEL
For more information on configuration variables, refer to the chapter describing configuration parameters in the ASAP Server Configuration Guide.
Determining the Size of Your SystemRefer to the ASAP Installation Guide for detailed information on sizing small, medium and large system configuration.

Manually Tuning ASAP Performance
Improving ASAP Performance 4-9
Tuning Message Queue GuidelinesThe optimum balance between throughput and response time for ASAP operation is achieved when all tunable message queues in the system are stable, short, and non-zero. When message queues are short and stable, threads operate more efficiently and are able to keep up with the flow of incoming messages.
Queue lengths depend on the quantity of threads that are either added or removed from the queue. To decrease the length of a queue, either decrease the rate at which messages are added to the queue or increase the rate at which they are removed. To increase the length of the queue, reverse the process.
Workload balancing is an end-to-end process. Bottlenecks can occur anywhere along the message processing path, reducing the message flow over the remainder of the path. For example, to avoid bottlenecks, the SRP must have a sufficient number of translation threads to handle the WO volume rate and enough SARM drivers to send WOs to the SARM as fast as they are generated. The SARM must also have enough Work Order Handler threads to handle the incoming Common Service Description Layer (CSDL) commands. By this point enough NEPs should be configured to efficiently secure the network elements (NEs). The following section guides you in tuning an ASAP system to achieve the ideal operation outlined above.
To tune an ASAP system:
1. Submit a representative batch of WOs into the system – Enough for about ten minutes of work.
2. Monitor the OS with top and sar. Make sure the system has enough idle CPU cycles to prevent being choked (approximately 15% idle).
3. Execute the Sysmon Tool on the appropriate server(s).
4. Examine the thread message queue section of the Sysmon output file for queues that are growing or that are consistently zero in length.
5. Modify the ASAP configuration variables which control the addition and/or removal rates for the queue.
6. Repeat steps 1 to 4 until the tunable message queues in the server have the desired queue lengths and then move onto the next server, for example, from the SRP to the SARM or from the SARM to the NEP.
To help you execute the tuning process, a standard set of information is presented for each message queue that you can tune in each ASAP component. This information includes:
■ Name of the queue.
■ Tool/Process used to monitor the queue. The tool used is: asap_utils, Real-time System Monitoring (option 109), Target Server.
■ Addition rate configuration variable(s), which is the parameter that controls the rate at which messages are added to the queue (description, ASAP configuration variable, small/medium/large initial values).
■ Removal rate configuration variable, which is the parameter that controls the rate at which messages are removed from the queue (description, ASAP configuration variable, small/medium/large initial values).
Table 4–7 is an example of this information in a table format.

Manually Tuning ASAP Performance
4-10 ASAP System Administrator's Guide
Tuning ASAP Server Message QueuesThe following sections contains the ASAP servers that can be tuned:
■ JSRP/SRT
■ SRP
■ SARM
■ NEP
■ JNEP
■ WebLogic domain
Tuning JSRP and SRP Message Queues The purpose of tuning the SRP is to provide WOs at a rate that creates an even flow to the downstream SARM process.
Figure 4–1 illustrates the schematic flow of the SRP.
Table 4–7 Queue Name
Item Description
Tool asap_utils option server name
Parameter Controlling Message Addition Rate to Queue
description
configuration variable
Variable size:
■ small
■ medium
■ large
Parameter Controlling Message Removal Rate from Queue
description
configuration variable
Variable size:
■ small
■ medium
■ large
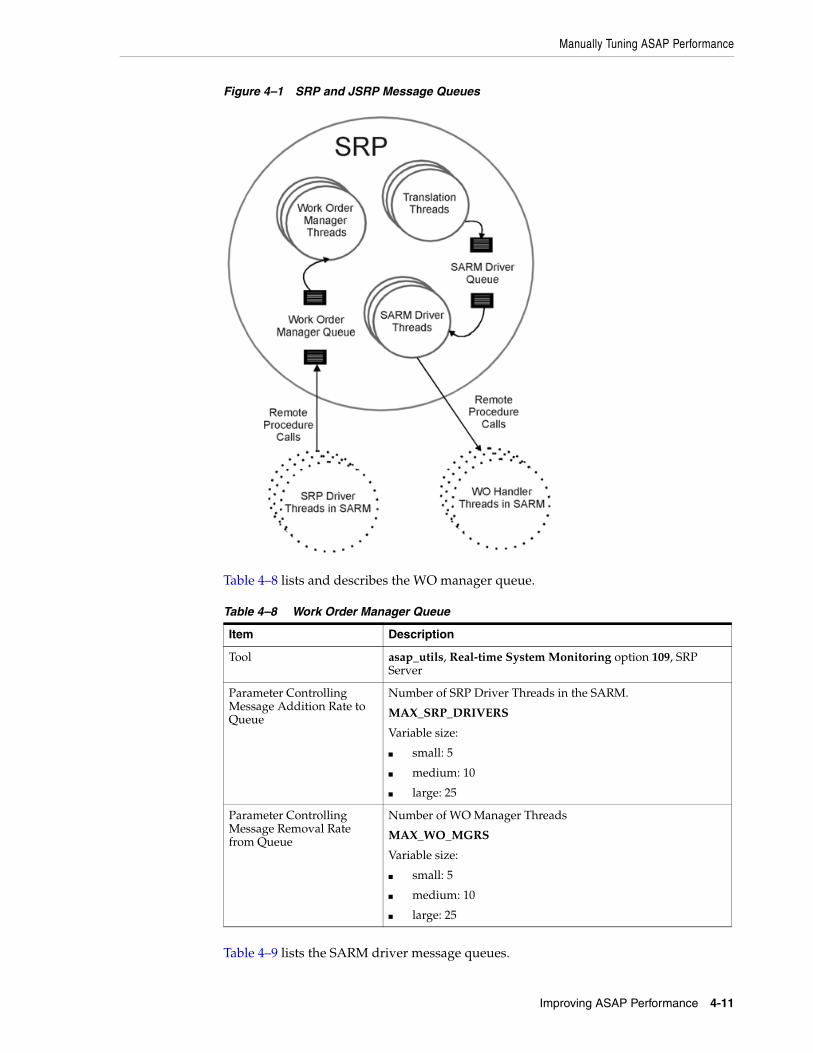
Manually Tuning ASAP Performance
Improving ASAP Performance 4-11
Figure 4–1 SRP and JSRP Message Queues
Table 4–8 lists and describes the WO manager queue.
Table 4–9 lists the SARM driver message queues.
Table 4–8 Work Order Manager Queue
Item Description
Tool asap_utils, Real-time System Monitoring option 109, SRP Server
Parameter Controlling Message Addition Rate to Queue
Number of SRP Driver Threads in the SARM.
MAX_SRP_DRIVERS
Variable size:
■ small: 5
■ medium: 10
■ large: 25
Parameter Controlling Message Removal Rate from Queue
Number of WO Manager Threads
MAX_WO_MGRS
Variable size:
■ small: 5
■ medium: 10
■ large: 25

Manually Tuning ASAP Performance
4-12 ASAP System Administrator's Guide
Tips for Tuning the SRPTo tune the SRP, use the following:
■ As an initial estimate, set the number of WO Manager Threads (MAX_WO_MGRS) in the SRPs equal to the number of configured MAX_SRP_DRIVERS threads in the SARM. The initial setting can be modified depending upon the complexity of the WO (number of CSDLs and parameters), and the number of events defined to return to the SRP. Monitor the WO Manager queue(s) in the SRP(s) and the SRP driver queue in the SARM to verify these configuration variables.
■ The sum of all MAX_SARM_DRIVER threads in the operating SRPs must be equal to the number of configured MAX_WO_HANDLERS threads in the SARM.
■ The number or existence of translation threads is entirely dependent upon the customized implementation of the SRP at your site. If multiple translation threads are available and the SARM Driver queue is consistently empty, consider increasing the number of translation threads. However, increasing these threads may have a negative affect on the downstream process. You must examine the system for downstream bottlenecks.
■ You must disable all unnecessary notifications being sent to the SRP by updating tbl_asap_srp in the SARM database.
■ During production, you can use sanity level diagnostics.
■ If the save and dump WO features, which are enabled by using configuration variables SAVE_SARM_DATA and DUMP_WO_FLAG, are not needed, disable them.
Tuning SARM Message QueuesThe purpose of tuning the SARM is to:
■ Provide the Atomic Service Description Layer (ASDL) commands to the NEPs.
■ Send event notices back to the SRPs at an even rate to both the upstream and downstream processes.
Since only one SARM process exists in an ASAP system, the performance of the SARM cannot be enhanced by spreading the load across multiple Central Processing Units (CPUs) or systems. Therefore, the SARM must be well tuned to get high performance from ASAP.
Table 4–9 SARM Drive Queue
Item Description
Tool asap_utils, Real-time System Monitoring option 109, SRP Server
Parameter Controlling Message Addition Rate to Queue
Number of Translation Threads (implementation dependent).
Parameter Controlling Message Removal Rate from Queue
Number of SARM Driver Threads
MAX_SARM_DRIVER
Variable size:
■ small: 5
■ medium: 10
■ large: 25

Manually Tuning ASAP Performance
Improving ASAP Performance 4-13
Figure 4–2 illustrates the flow of messages through the SARM.
Figure 4–2 SARM Message Queues
Table 4–10 lists and describes the group Mgr message queue.
Table 4–10 Group Mgr Message Queue
Item Description
Tool asap_utils Real-time System Monitoring option (109), SARM Server

Manually Tuning ASAP Performance
4-14 ASAP System Administrator's Guide
Table 4–11 lists and describes the WO Mgr message queues.
Table 4–12 lists and describes the WO provision queue.
Parameter Controlling Message Addition Rate to Queue
The number of WO Handler threads and number of NEPs in the system are fixed for the purpose of Group Manager message queue tuning. Do not configure them at this time.
Parameter Controlling Message Removal Rate from Queue
Number of Group Manager Threads.
MAX_GROUP_MGRS
Variable size:
■ small: 1
■ medium: 5
■ large: 10
Table 4–11 Work Order Mgr Message Queues
Item Description
Tool asap_utils, Real-time System Monitoring option (109), SARM Server
Parameter Controlling Message Addition Rate to Queue
The number of WO Handler Threads and Number of NEPs in the system are fixed for the purpose of WO Manager message queue tuning. Do not configure them.
Parameter Controlling Message Removal Rate from Queue
Number of WO Manager Threads
MAX_WO_MGRS
Variable size:
■ small: 5
■ medium: 10
■ large: 25
Table 4–12 Work Order Provision Queue
Item Description
Tool asap_utils, Real-time System Monitoring option (109), SARM Server
Parameter Controlling Message Addition Rate to Queue
Number of Group Manager threads
MAX_GROUP_MGRS
Variable size:
■ small: 1
■ medium: 5
■ large: 10
Parameter Controlling Message Removal Rate from Queue
Number of WO Provision threads
MAX_WO_HANDLERS
Variable size:
■ small: 5
■ medium: 10
■ large: 25
Table 4–10 (Cont.) Group Mgr Message Queue
Item Description
Manually Tuning ASAP Performance
Improving ASAP Performance 4-15
Table 4–13 lists and describes the ASDL Provision Message Queues.
Table 4–14 lists and describes the NEP driver message queues.
There is one NEP Driver Queue for each NEP in the system.
Table 4–15 lists and describes the SRP driver message queues.
Table 4–13 ASDL Provision Message Queues
Item Description
Tool asap_utils, Real-time System Monitoring option (109), SARM Server
Parameter Controlling Message Addition Rate to Queue
Number of WO Provision Threads
MAX_WO_HANDLERS
Variable size:
■ small: 5
■ medium: 10
■ large: 25
Parameter Controlling Message Removal Rate from Queue
Number of ASDL Provision Threads
MAX_PROVISION_HANDLERS–(Less) MAX_WO_HANDLERS
Variable size:
■ small: 10
■ medium: 20
■ large: 50
Example If you have five (5) WO Handlers and you want ten (10) ASDL Provision Threads, set the MAX_PROVISION_HANDLERS to fifteen (15). The difference is the ten (10) that you wanted.
Table 4–14 NEP Driver Message Queues
Item Description
Tool asap_utils Real-time System Monitoring option (109), SARM Server
Parameter Controlling Message Addition Rate to Queue
Number of ASDL Provision Threads
MAX_PROVISION_HANDLERS (less) MAX_WO_HANDLERS
Variable size:
■ small: 10
■ medium: 20
■ large: 50
Parameter Controlling Message Removal Rate from Queue
Number of NEPs in the system (dependent on throughput requirements and machine resources).
Table 4–15 SRP Driver Message Queues
Item Description
Tool asap_utils, Real-time System Monitoring option (109), SARM Server

Manually Tuning ASAP Performance
4-16 ASAP System Administrator's Guide
There is one SRP Drive Queue for each SRP in the system.
Tips for Tuning the SARM To tune the SARM, use the following:
■ The number of WO threads (MAX_WO_HANDLERS) in the SARM must be equal to the sum of all SARM Driver Threads (MAX_SARM_DRIVER) in all of the SRPs.
■ The total number of configured handler threads (MAX_WO_MGRS) in all SRPs must be equal to the driver threads (MAX_SRP_DRIVERS) in the SARM.
■ All event notifications not used by any customized SRP implementation must be turned off.
■ Sanity level diagnostics during production should be used.
■ The configured number of provision handlers (ASDL and WO) must be no less than the sum of the number of handler threads (MAX_WO_HANDLERS) and the number of operating NEP servers. Start tuning with a ratio of 1:3 of WO Manager Threads to provision handlers (ASDL and WO).
Tuning NEP Message QueuesThe purpose of tuning a NEP is to provide:
■ ASDLs to the NEs
■ Remote Procedure Call (RPC) responses back to the SARM at a rate that does not cause excessive buildup in any of the SARM Notify, Session Manager, or NE Command queues.
Figure 4–3 illustrates the schematic flow of the NEP.
Parameter Controlling Message Addition Rate to Queue
Nearly every thread in the SARM can add messages to this queue. Therefore, it is not possible to control the number of messages that are added.
Parameter Controlling Message Removal Rate from Queue
Number of SRP Driver Threads.
MAX_SRP_DRIVERS
Variable size:
■ small: 5
■ medium: 10
■ large: 25
Table 4–15 (Cont.) SRP Driver Message Queues
Item Description

Manually Tuning ASAP Performance
Improving ASAP Performance 4-17
Figure 4–3 NEP Message Queues
Table 4–16 lists and describes the SARM notify message queue.
Table 4–16 SARM Notify Message Queues
Item Description
Tool asap_utils Real-time System Monitoring option (109), NEP Server
Parameter Controlling Message Addition Rate to Queue
Session Manager Thread for the NE. Non-configurable

Manually Tuning ASAP Performance
4-18 ASAP System Administrator's Guide
You can manage this queue indirectly by decreasing the number of NEs supported by the NEP (usually by increasing the absolute number of NEPs, if machine resources permit) or by balancing the load between NEPs (by moving a busy NE from a busy NEP to a less busy NEP).
Table 4–17 lists and describes the NE command queue.
You can manage this queue indirectly by increasing or decreasing NE response times (faster response times decrease the length of the queue).
Table 4–18 lists and describes the session manager queue for the NE.
You can manage this queue indirectly using the NE response times (fast responses increase the length of the queue). However, depending on communication and switch technology, this may not be configurable.
Tips for Tuning NEPTo tune the NEP, use the following:
■ Unless machine resources are limited, target for a ratio of 50 NEs per NEP.
■ If possible, group similar NE technologies and switch software loads on a single NEP. This reduces the number of ASDL programs held in memory because each NEP caches its own copy of every ASDL command that it has been asked to perform.
Parameter Controlling Message Removal Rate from Queue
SARM Notify Thread for the NEP. Non-configurable
Table 4–17 NE Command Message Queues
Item Description
Tool asap_utils, Real-time System Monitoring option (109), NEP Server
Parameter Controlling Message Addition Rate to Queue
Session Manager Thread for the NE. Non-configurable
Parameter Controlling Message Removal Rate from Queue
Command Processor Thread for the NE. Non-configurable
Table 4–18 Session Manager Message Queues for the NE
Item Description
Tool asap_utils, Real-time System Monitoring option (109), NEP Server
Parameter Controlling Message Addition Rate to Queue
Command Processor Thread of the NE - NEP Driver thread in the SARM for the NEP. Non-configurable
Parameter Controlling Message Removal Rate from Queue
Session Manager Thread for the NE. Non-configurable
Table 4–16 (Cont.) SARM Notify Message Queues
Item Description

Manually Tuning ASAP Performance
Improving ASAP Performance 4-19
■ Balance the load on each NEP by distributing your busy NEs across several NEPs. You must determine the expected load based on both the number and complexity of the ASDL commands being serviced.
Other Performance IssuesYou must take into consideration other factors that can affect performance. This section covers the diagnostic levels and query optimization that you need in the tuning process.
The topics in this section include:
■ Local versus NFS-Mounted File Systems for Diagnostic Files
■ Server Diagnostic Levels
■ Diagnostic Messages Output
■ Query Optimization
■ Table Partitioning
Local Versus NFS-mounted File Systems for Diagnostic FilesASAP diagnostic files on NFS-mounted file systems increase network traffic and slow down disk I/O. For production systems, the log directories should be local, not NFS mounted.
Server Diagnostic Levels Low-level server diagnostic levels increase disk I/O. Oracle recommends that you set the diagnostic level for the production system at either PROGRAM_LEVEL or SANITY_LEVEL.
In the Control server database table tbl_appl_proc, set the diagnostics level (column diag_level) to SANE.
Diagnostic levels set in the tbl_appl_proc are persistent through reboots. For more information on tbl_appl_proc, see the ASAP Developer’s Guide.
To set a diagnostic level temporarily, use asap_utils parameter 107. See the ASAP Server Configuration Guide for more information.
Diagnostic levels are defined as follows in the common.h file. Both diagnostics and C/C++ code values are provided.
Table 4–19 Diagnostic Levels
Diagnostic level
C/C++ Code Value Description
KERNEL _LEVEL KERN Used by the kernel to generate diagnostic messages. It is only to be used by the core libraries for very low-level debugging of core code.
LOW_LEVEL LOW Used by the application to generate low-level diagnostic messages from any of its functions. Such messages should enable the programmer to debug an application. Once debugged, the diagnostic level of the application should be elevated above LOW_ LEVEL.
FUNCTION_LEVEL
FUNC Used by the application at the beginning and end of each function to track the operation of the application. This is generally not used in the core application.
RPC_LEVEL RPC Used by the application to produce remote procedure call (RPC) diagnostic messages.
Manually Tuning ASAP Performance
4-20 ASAP System Administrator's Guide
The most commonly used diagnostic levels are LOW_LEVEL, SANITY_LEVEL, and PROGRAM_LEVEL.
Diagnostic Messages OutputOutput of diagnostic messages can be written to disk line-by-line or buffered by the UNIX I/O subsystem. Buffered output results in diagnostics being written to disk in pages, which results in optimal performance.
To disable diagnostic line flushing, set the configuration parameter DIAG_LINE_FLUSH (in the common application programming interface (API) section of the ASAP.cfg file) to “0.” The default value is 1.
Query OptimizationOracle RDBMSs use a cost-based query optimizer to determine query access paths. The optimizer is primarily influenced by table and index statistics (number or rows, data distribution, etc.) available to it in the system catalogue tables. These statistics can be updated manually (usually when the amount and distribution of data in a table changes significantly) using utilities provided by the RDBMS. Keeping these statistics current is extremely important since the optimizer will make default assumptions in the absence of these statistics. The quality of the database optimizer decisions depends on the accuracy of these statistics, and hence, directly affects the performance of the ASAP application.
Updating the statistics on large tables (over 1 million rows) can take a long time. This can affect your online response time or induce rollover to small error messages.
SANITY_LEVEL SANE Used by the application for high-level diagnostics. This level of diagnostic messages provides user information about the processing of the system.
PROGRAM_LEVEL
PROG Only error messages will be logged. This is primarily used to generate error messages when the ASAP system is running in a high performance production environment.
FATAL_LEVEL SHUT Used for fatal error conditions if the process is terminated. You only use this level if an error condition occurs within the application so that if the application were to continue, more errors would occur and compound the problem. For instance, if a stored procedure is missing from the database, then the application terminates and manual intervention is required.
Note: Oracle highly recommends that you do not use diagnostic line flushing for production systems. Flushing diagnostic messages to disk in lines results in high disk I/O frequency.
Note: When the Oracle statistics are collected on the SARM schema, you should also collect the histograms on the TBL_WKR_ORD.WO_STAT column.
Table 4–19 (Cont.) Diagnostic Levels
Diagnostic level
C/C++ Code Value Description

5
Backing Up and Restoring ASAP Files and Data 5-1
5Backing Up and Restoring ASAP Files andData
This chapter describes Oracle Communications ASAP backup and restore strategies for the file system and the database.
About Backing Up and Restoring Files and DataAs an ASAP system administrator, you should observer the following guidelines for backing up and restoring your ASAP system and databases:
■ ASAP System Backup and Restore
■ Database Backup and Recovery
ASAP System Backup and RestoreBackup the ASAP environment, Oracle WebLogic Server, and Oracle database schemas in the following situations:
■ After you successfully install ASAP
■ Before you upgrade ASAP in case you need to rollback your upgrade
■ After you successfully upgrade ASAP
See the ASAP Installation Guide for procedures to backup your ASAP system.
In addition to these ASAP system backup scenarios, you should also follow the database backup schedule and procedures described in "Database Backup and Recovery".
See the section about rolling back your ASAP system in the ASAP Installation Guide to restore your ASAP system. These roll back procedures described in the ASAP Installation Guide will return your ASAP system to the initial installation state and post or pre upgrade state. To recover lost data, restore your database backups described in "Database Backup and Recovery".
Database Backup and RecoveryASAP application databases must be protected in the event of corruption or failure.
The Service Activation Request Manager (SARM) and Service Request Processor (SRP) databases should be backed up daily. The Control and Network Element Processor (NEP) databases can be backed up less often since they contain only static and monitoring data. The schedule of transaction dumps is dictated by the amount of space available for the transaction logs.

About Backing Up and Restoring Files and Data
5-2 ASAP System Administrator's Guide
The Administrative database does not need to be backed up because it only contains performance statistics.
Database Backup StrategyBackup procedures must be performed periodically and should be fully automated by the System Administrator and Database Administrator. Cron scripts can be written which will dump the ASAP application databases, and associated transaction logs to disk and then to tape. In the case of Oracle, these cron scripts should backup to tape all data files, the control file, and archive logs to tape. For Oracle databases the Database Administrator should first decide whether to employ hot backups of the tablespaces or a full cold backup. It is recommended that a cold backup be done at least once a week in addition to a full database export. The backup strategy you choose will be determined primarily by the amount of data loss that can be tolerated in the event of failure.
The ASAP databases are as follows:
■ Control – Can be recreated from the data on the switches, but may be backed up if required.
■ SRP – Should be backed up daily.
■ SARM – Should be backed up daily.
■ NEP – Can be recreated from the data on the switches, but may be backed up if required.
■ Admin – Not necessary to back up because it contains only performance statistics.
Database Backup in a Distributed EnvironmentBackup in a distributed environment should be no different than a non-distributed environment, except that tapes may have to be placed in numerous machines.
ASAP WebLogic Server Domain Back UpYou can archive domain configurations:
■ Automatically to other media (such as tapes or disks)
■ Manually by copying files to another directory, and preferably, other machines
You should regularly back up the following:
■ Configuration data
■ Security data
■ Deployed applications
Configuration Data
Back up configuration data, including the config.xml file and the config.xml.booted file from the Domain_home/config/ directory. The config.xml.booted file is created when you successfully start the administration server and can serve as backup in the event that the config.xml file becomes unusable. You can overwrite the config.xml file
Note: Backup in a distributed environment is no different than in a non-distributed environment, except that tapes have to be placed in numerous machines.

About Backing Up and Restoring Files and Data
Backing Up and Restoring ASAP Files and Data 5-3
with the config.xml.booted file to restore the domain to the last successful startup configuration.
Security Data
Back up the Administration Server security data for a domain. The security data that you should archive includes:
■ Security Configuration Data
■ WebLogic LDAP Repository
■ SerializedSystemIni.dat and Security Certificates
For more information on administering domains, refer to
http://download.oracle.com/docs/cd/E13222_01/wls/docs103/admin.html

About Backing Up and Restoring Files and Data
5-4 ASAP System Administrator's Guide
6
Managing the Database and File System 6-1
6Managing the Database and File System
This chapter provides information about managing your Oracle Communications ASAP database and file system.
Overview of Managing the Database and File SystemThe Oracle database and file system management tasks include:
■ Configuring the operating system kernel and Oracle database initialization parameters for optimal system performance.
■ Monitoring database segment and file system size by defining maximum thresholds for both.
■ Using Oracle database management tools to maintain and tune your database.
■ Enabling automated ASAP database administration features.
■ Using scripts to purge the Oracle database tables, clear system events, alarms, and process information, and, in a test environment, to periodically purge all data.
Configuring Kernel and Database Initialization ParametersThis sections outline some important issues for implementing ASAP. These issues are listed in point form for easy scanning. For a complete reference on the subjects, refer to the appropriate Oracle documentation.
■ Before installing the Oracle instance ensure that the default values for kernel and resource settings for the server are set to provide enough shared memory and semaphores. Specifically, check the project.max-shm-memory resource.
See the Oracle Installation Guide for more details.
■ You can change the Oracle Server configuration parameters from their default values to suit the requirements of ASAP. To view the Oracle Server parameters, select from the V$PARAMETER table or look in the INITsid.ora file for the server. Most of the changes to the parameters must be accompanied by shutting down the server and restarting it, in order for the change to take effect.
■ Oracle works best with ASAP when given sufficient resources. There are four parameters that are extremely important to configure correctly: DB_BLOCK_SIZE, DB_BLOCK_BUFFERS, SHARED_POOL_SIZE, and SESSIONS.
1. DB_BLOCK_SIZE
Set the DB_BLOCK_SIZE – 8K is the default. ASAP benefits from a larger block size. This must be done during database creation and cannot be changed.

About Monitoring Database Segment and File System Size
6-2 ASAP System Administrator's Guide
2. DB_BLOCK_BUFFERS
DB_BLOCK_BUFFERS is the area of the SGA that is used for the storage and processing of data in memory. As users request information, the information is put into memory. If the DB_BLOCK_BUFFERS parameter is set too low, the least recently used data will be flushed from memory. Set this value between 3000 to 5000 depending on the memory limitations of your machine. A value of 5000 with a block size of 8K uses approximately 40MB of memory.
3. SHARED_POOL_SIZE
SHARED_POOL_SIZE is used to process the procedures, packages, and triggers, as well as the library and data dictionary cache. If the SHARED_POOL_SIZE is set too low, you will not get the full advantage of your DB_BLOCK_BUFFERS. Set this value between 90MB to 150MB. For most installations this should be sufficient. Again this value should be adjusted depending on the memory limitations of your machine. Setting the SHARED_POOL_SIZE too high can cause your system to swap excessively.
4. SESSIONS
SESSIONS determines the number of user connections that ASAP can establish. Configure 150-200 sessions for each ASAP environment, more if you are running multiple Service Request Processor (SRP) and Network Element Processors (NEPs). Be sure to allocate enough semaphores at the UNIX level to accommodate the amount of sessions.
In all the cases above, the values given as examples only. The appropriate value for your installation will depend on the machine characteristics and limitations.
■ Oracle, like all databases, benefits significantly by spreading the I/O among it’s data files across multiple controllers and drives. You must place your SYSTEM, TEMP, and ROLLBACK tablespaces on separate drives and controllers from your DATA and INDEX. SARM_DATA and SARM_INDEX will benefit the most from I/O optimization since a lot of activity occurs on these files. In addition, employing optimal striping and data placement of hot files will greatly enhance your database performance. Since minimizing I/O is the primary goal of most database tuning, this point cannot be emphasized enough.
About Monitoring Database Segment and File System SizeThe Control server has a background thread that monitors database table and log segment sizes. This thread reads a static configuration database table to determine database size thresholds. Should a particular threshold be exceeded, the thread issues the system event specified in the static table tbl_db_threshold in the Control database. This feature provides a warning to the operations center should the threshold be exceeded.
In addition, the Control server has a background thread that monitors operating system file sizes. This thread reads a static configuration database table to determine file system size thresholds. Should a particular threshold be exceeded, the thread issues the system event specified in the static table tbl_fs_threshold in the Control database. This feature allows ASAP to warn the operations center whenever the free disk space drops below the minimum threshold set by you.
The monitoring thresholds function is used to specify thresholds for ASAP databases and transactions affecting it. When these thresholds are defined, an ASAP Control server can monitor the specified database data and transaction log sizes at intervals specified in the ASAP environment variable DB_MONITOR_TIME. If any of the

About Monitoring Database Segment and File System Size
Managing the Database and File System 6-3
thresholds are exceeded, the Control server issues the system event defined by the user. The event can trigger an alarm or be logged.
See "Configuring System Events and Alarms Using Stored Procedures" for more information on configuring alarms.
An ASAP environment can be partitioned on various machines, and each machine can be monitored by its respective Control server. Typically, one ASAP installation has multiple databases and the ASAP environment can be distributed on one machine or multiple machines. The database and transaction log threshold need to be specified for each database to be monitored.
You can use the DB_MONITOR_TIME and FS_MONITOR_TIME parameters to configure the Control server database and file system monitoring capabilities. For more information about these parameters, see the chapter about the ASAP parameter configuration file (ASAP.cfg) in the ASAP Server Configuration Guide.
Configuring File System ThresholdsTo configure file system thresholds:
1. Open a UNIX terminal to your ASAP environment.
2. Using a text editor, set the FS_MONITOR_TIME parameter in ASAP_home/config/ASAP.cfg to a time interval in seconds. For example 120 seconds.
3. Using sqlplus, connect to the Control server.
sqlplus CTRL$/password
Where password is the password for your Control server.
4. Populate the Control server tbl_fs_threshold database table. The syntax is:
INSERT INTO "TEST"."TBL_FS_THRESHOLD" (ASAP_SYS, FILE_SYSTEM, FULL_THRESHOLD, FULL_EVENT) VALUES ('envID', 'fs_path', 'fs_threshold', 'event_type');COMMIT;
Where the values for the tbl_fs_threshold columns are:
■ envid: The ASAP environment ID. The Control server only reads records from the table with values of asap_sys equal to the currently defined ASAP_SYS environment variable.
■ fs_path: The name of the file system.
■ fs_threshold: The threshold above which the system event is issued (in percentage 0-100).
■ event_type: Specifies the system event you want to trigger. Enter an event listed in the the Control server tbl_event_type table (see the ASAP Developer Guide).
5. Populate the Control server tbl_component database table. The syntax is:
INSERT INTO "TEST"."TBL_COMPONENT" (TERRITORY, SYSTEM, COMPONENT) VALUES ('envID', 'territory', 'path');COMMIT;
Where the values for the tbl_component columns are:
■ envid: The ASAP environment ID.
■ territory: Usually the same name as the ASAP environment ID.
■ fs_path: The path to the file system you want to monitor.
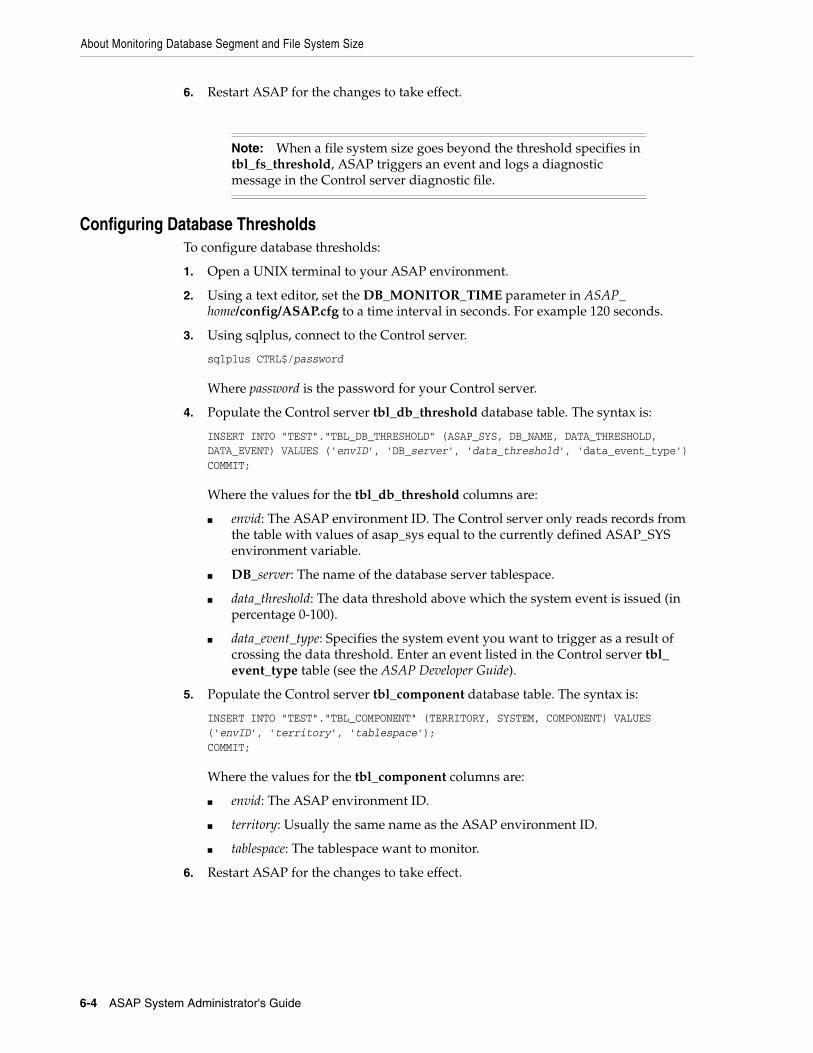
About Monitoring Database Segment and File System Size
6-4 ASAP System Administrator's Guide
6. Restart ASAP for the changes to take effect.
Configuring Database ThresholdsTo configure database thresholds:
1. Open a UNIX terminal to your ASAP environment.
2. Using a text editor, set the DB_MONITOR_TIME parameter in ASAP_home/config/ASAP.cfg to a time interval in seconds. For example 120 seconds.
3. Using sqlplus, connect to the Control server.
sqlplus CTRL$/password
Where password is the password for your Control server.
4. Populate the Control server tbl_db_threshold database table. The syntax is:
INSERT INTO "TEST"."TBL_DB_THRESHOLD" (ASAP_SYS, DB_NAME, DATA_THRESHOLD, DATA_EVENT) VALUES ('envID', 'DB_server', 'data_threshold', 'data_event_type')COMMIT;
Where the values for the tbl_db_threshold columns are:
■ envid: The ASAP environment ID. The Control server only reads records from the table with values of asap_sys equal to the currently defined ASAP_SYS environment variable.
■ DB_server: The name of the database server tablespace.
■ data_threshold: The data threshold above which the system event is issued (in percentage 0-100).
■ data_event_type: Specifies the system event you want to trigger as a result of crossing the data threshold. Enter an event listed in the Control server tbl_event_type table (see the ASAP Developer Guide).
5. Populate the Control server tbl_component database table. The syntax is:
INSERT INTO "TEST"."TBL_COMPONENT" (TERRITORY, SYSTEM, COMPONENT) VALUES ('envID', 'territory', 'tablespace');COMMIT;
Where the values for the tbl_component columns are:
■ envid: The ASAP environment ID.
■ territory: Usually the same name as the ASAP environment ID.
■ tablespace: The tablespace want to monitor.
6. Restart ASAP for the changes to take effect.
Note: When a file system size goes beyond the threshold specifies in tbl_fs_threshold, ASAP triggers an event and logs a diagnostic message in the Control server diagnostic file.

Database Management and Tuning Recommendations
Managing the Database and File System 6-5
Database Management and Tuning Recommendations■ Oracle can run in two modes ARCHIVELOG or NOARCHIVELOG mode. It is
very important to run your production database in the ARCHIVELOG mode. This ensures that you are able to recover up to the minute in case of failure. Oracle uses logs to record transaction information in order to recover from instance and data file failures. Be sure to multi-plex these redo log data files and place them on separate disks and controllers.
■ Oracle offers both online and offline database backup choices. Which one you choose will depend on how much downtime your ASAP installation can tolerate. Online backups involve backing up at the tablespace level and require more planning and consideration. Offline backup involves shutting down the database and backing up the data files, control file, and archive log files to tape. While this is occurring, ASAP is down.
■ Monitor your tablespaces for index and block fragmentation on a regular basis. Index fragmentation occurs due to the deletion and updating of table rows. Rebuilding the index using the ALTER INDEX name REBUILD (where name is the name of the index) can resolve this problem. Block fragmentation can occur due to PCTFREE and PCTUSED parameters set inappropriately. This results in migrated and chained rows which affect database I/O performance.
■ Update your table and index statistics on a regular basis for those tables whose data distributions change dynamically. As mentioned in a previous section, the query optimizer is primarily influenced by these statistics. If a query or transaction that was running fine appears to suddenly slowdown or hang, chances are the table and index statistics need to be updated.
■ Tune any custom SQL statements you introduce to your ASAP installation, since they involve both your application and database. To analyze your SQL statements you will need to:
1. Add the line to your initsid.ora file: timed_statistics=true
2. Restart your database.
3. Start the sql tracing for your session using the ALTER SESSION SET SQL_TRACE=TRUE.
4. Run your application
5. Run tkprof against the tracefile created by your application: tkprof tracefile outputfile EXPLAIN=username/passwd
6. Look at the formatted output of the trace command and make sure that your SQL statements are using indexes correctly. You must run explains on the SQL statements to determine the access path they are using.
Refer to the Oracle Tuning Guide for more detailed information on tuning SQL statements.
■ Use the UTLBSTAT and UTLESTAT scripts provided by Oracle to monitor your Oracle instance, and diagnose performance problems. These scripts are located in the Oracle_Home/rdbms/admin directory in a UNIX environment. These scripts
Note: When a tablespace size goes beyond the threshold specifies in tbl_db_threshold, ASAP triggers an event and logs a diagnostic message in the Control server diagnostic file.
Enabling Automated ASAP Database Administration Options
6-6 ASAP System Administrator's Guide
create a report file report.txt which shows differences in the statistics from the time UTLBSTAT was submitted, until the time that UTLESTAT was submitted. To obtain time-based statistics from UTLBSTAT and UTLESTAT, the TIMED_STATISTICS parameter must be set to TRUE.
Statspack
Statspack is an alternative to the UTLBSTAT/UTLESTAT tuning scripts. Statspack collects more information, storing performance statistics data permanently in the database for later use in analysis and reporting. The data collected can be analyzed using the report provided, which includes an instance health and load summary page, high resource SQL statements, as well as the traditional wait events and initialization parameters.
For more information, see Oracle 11g Database Performance Tuning Guide and Reference Guide.
Enabling Automated ASAP Database Administration OptionsThe Control application programming interface (API) provides a background thread that performs database administration tasks within ASAP. At a user-configured time of day, every application server process connects to its primary database and calls a user-defined function that performs the following tasks:
■ Gathers customer-defined statistics related to ASAP processing.
■ Archives data about to be purged from the database, if required.
■ Purges data older than a date and time specified by the user.
■ Performs an “orphan” purge of orphaned records to confirm the database’s integrity.
The ASAP configuration variable, DB_ADMIN_ON, enables and disables the database administration procedures. This feature is of value to users who may have many application servers defaulting to the same database and do not want them performing database administration procedures independently on it.
For more information on the Control API, refer to the ASAP Developer’s Guide.
Purging the Database and File SystemTo keep disk usage at an acceptable level the ASAP administrator should regularly purge the diagnostic and log files generated by ASAP, as well as the work orders (WOs) received from the service order system. Database purging is controlled by database administrator stored procedures that are automatically executed daily.
The diagnostic files are located in the directory ASAP_home/DATA/logs (where ASAP_home is the ASAP installation directory). The flat files of service orders are usually located in the ASAP_home/DATA directory in a dated file.
Purging the Database Database purging can be performed for the SRP, Service Activation Request Manager (SARM), and control databases, but is most commonly performed in the SARM as this is where the majority of the WO information is stored. The SRP and SARM databases maintain a history of all WOs received, while the ASAP control database maintains a history of alarms, events, performance, and process information.
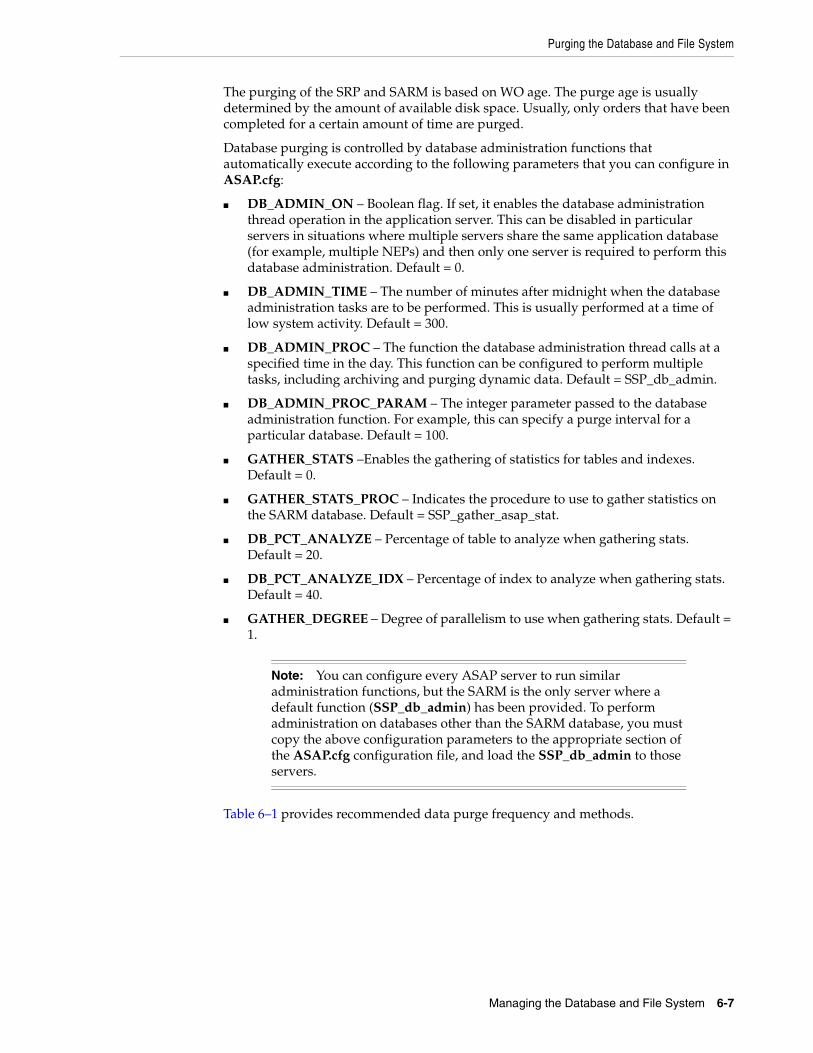
Purging the Database and File System
Managing the Database and File System 6-7
The purging of the SRP and SARM is based on WO age. The purge age is usually determined by the amount of available disk space. Usually, only orders that have been completed for a certain amount of time are purged.
Database purging is controlled by database administration functions that automatically execute according to the following parameters that you can configure in ASAP.cfg:
■ DB_ADMIN_ON – Boolean flag. If set, it enables the database administration thread operation in the application server. This can be disabled in particular servers in situations where multiple servers share the same application database (for example, multiple NEPs) and then only one server is required to perform this database administration. Default = 0.
■ DB_ADMIN_TIME – The number of minutes after midnight when the database administration tasks are to be performed. This is usually performed at a time of low system activity. Default = 300.
■ DB_ADMIN_PROC – The function the database administration thread calls at a specified time in the day. This function can be configured to perform multiple tasks, including archiving and purging dynamic data. Default = SSP_db_admin.
■ DB_ADMIN_PROC_PARAM – The integer parameter passed to the database administration function. For example, this can specify a purge interval for a particular database. Default = 100.
■ GATHER_STATS –Enables the gathering of statistics for tables and indexes. Default = 0.
■ GATHER_STATS_PROC – Indicates the procedure to use to gather statistics on the SARM database. Default = SSP_gather_asap_stat.
■ DB_PCT_ANALYZE – Percentage of table to analyze when gathering stats. Default = 20.
■ DB_PCT_ANALYZE_IDX – Percentage of index to analyze when gathering stats. Default = 40.
■ GATHER_DEGREE – Degree of parallelism to use when gathering stats. Default = 1.
Table 6–1 provides recommended data purge frequency and methods.
Note: You can configure every ASAP server to run similar administration functions, but the SARM is the only server where a default function (SSP_db_admin) has been provided. To perform administration on databases other than the SARM database, you must copy the above configuration parameters to the appropriate section of the ASAP.cfg configuration file, and load the SSP_db_admin to those servers.
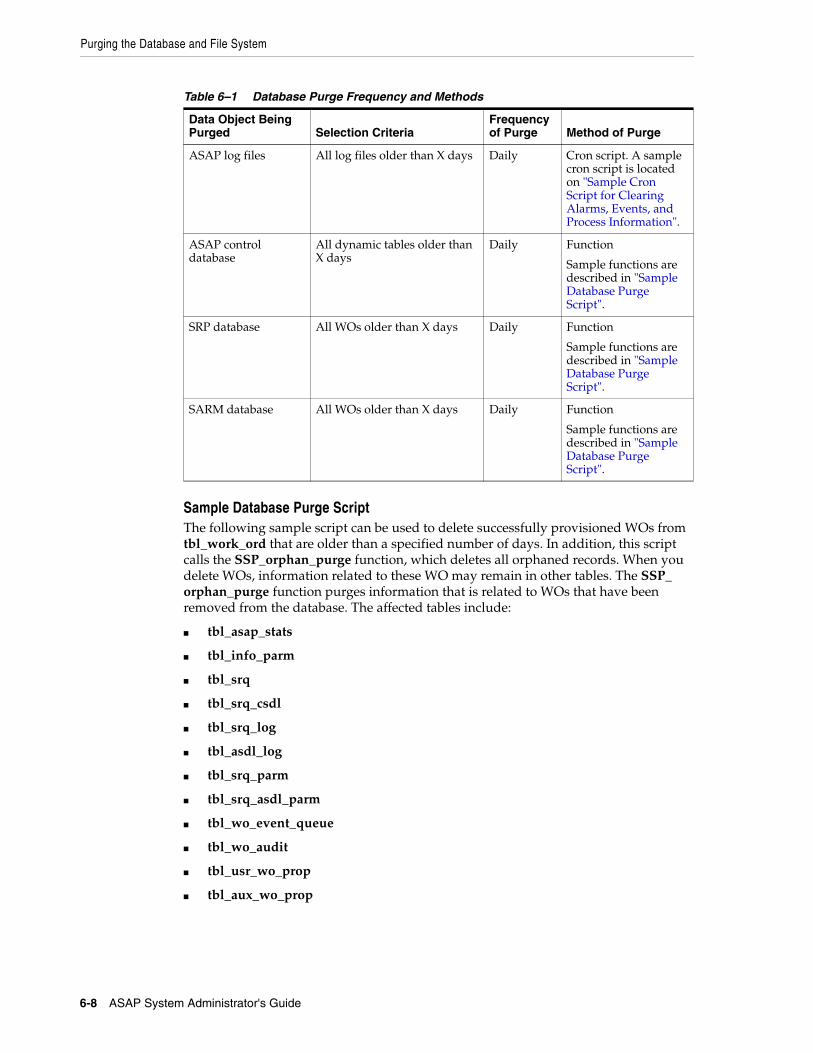
Purging the Database and File System
6-8 ASAP System Administrator's Guide
Sample Database Purge ScriptThe following sample script can be used to delete successfully provisioned WOs from tbl_work_ord that are older than a specified number of days. In addition, this script calls the SSP_orphan_purge function, which deletes all orphaned records. When you delete WOs, information related to these WO may remain in other tables. The SSP_orphan_purge function purges information that is related to WOs that have been removed from the database. The affected tables include:
■ tbl_asap_stats
■ tbl_info_parm
■ tbl_srq
■ tbl_srq_csdl
■ tbl_srq_log
■ tbl_asdl_log
■ tbl_srq_parm
■ tbl_srq_asdl_parm
■ tbl_wo_event_queue
■ tbl_wo_audit
■ tbl_usr_wo_prop
■ tbl_aux_wo_prop
Table 6–1 Database Purge Frequency and Methods
Data Object Being Purged Selection Criteria
Frequency of Purge Method of Purge
ASAP log files All log files older than X days Daily Cron script. A sample cron script is located on "Sample Cron Script for Clearing Alarms, Events, and Process Information".
ASAP control database
All dynamic tables older than X days
Daily Function
Sample functions are described in "Sample Database Purge Script".
SRP database All WOs older than X days Daily Function
Sample functions are described in "Sample Database Purge Script".
SARM database All WOs older than X days Daily Function
Sample functions are described in "Sample Database Purge Script".
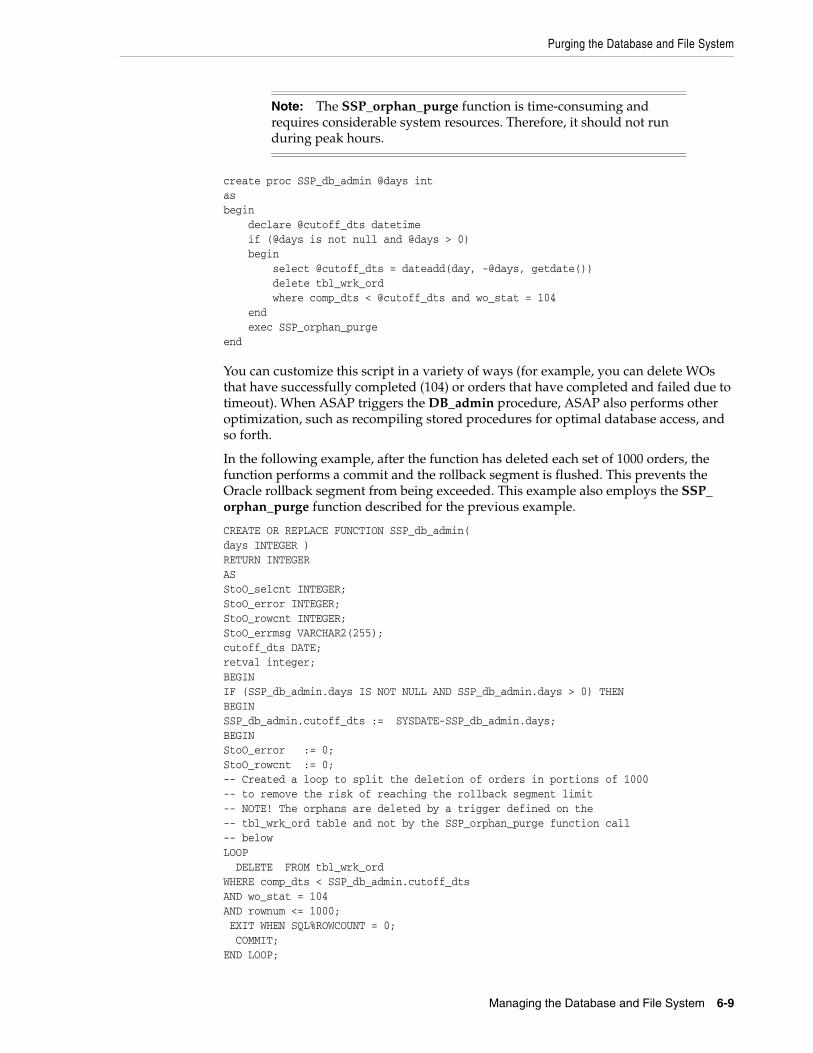
Purging the Database and File System
Managing the Database and File System 6-9
create proc SSP_db_admin @days intasbegin declare @cutoff_dts datetime if (@days is not null and @days > 0) begin select @cutoff_dts = dateadd(day, -@days, getdate()) delete tbl_wrk_ord where comp_dts < @cutoff_dts and wo_stat = 104 end exec SSP_orphan_purgeend
You can customize this script in a variety of ways (for example, you can delete WOs that have successfully completed (104) or orders that have completed and failed due to timeout). When ASAP triggers the DB_admin procedure, ASAP also performs other optimization, such as recompiling stored procedures for optimal database access, and so forth.
In the following example, after the function has deleted each set of 1000 orders, the function performs a commit and the rollback segment is flushed. This prevents the Oracle rollback segment from being exceeded. This example also employs the SSP_orphan_purge function described for the previous example.
CREATE OR REPLACE FUNCTION SSP_db_admin(days INTEGER )RETURN INTEGERASStoO_selcnt INTEGER;StoO_error INTEGER;StoO_rowcnt INTEGER;StoO_errmsg VARCHAR2(255);cutoff_dts DATE;retval integer;BEGINIF (SSP_db_admin.days IS NOT NULL AND SSP_db_admin.days > 0) THENBEGINSSP_db_admin.cutoff_dts := SYSDATE-SSP_db_admin.days;BEGINStoO_error := 0;StoO_rowcnt := 0;-- Created a loop to split the deletion of orders in portions of 1000-- to remove the risk of reaching the rollback segment limit-- NOTE! The orphans are deleted by a trigger defined on the-- tbl_wrk_ord table and not by the SSP_orphan_purge function call-- belowLOOP DELETE FROM tbl_wrk_ordWHERE comp_dts < SSP_db_admin.cutoff_dtsAND wo_stat = 104AND rownum <= 1000; EXIT WHEN SQL%ROWCOUNT = 0; COMMIT;END LOOP;
Note: The SSP_orphan_purge function is time-consuming and requires considerable system resources. Therefore, it should not run during peak hours.
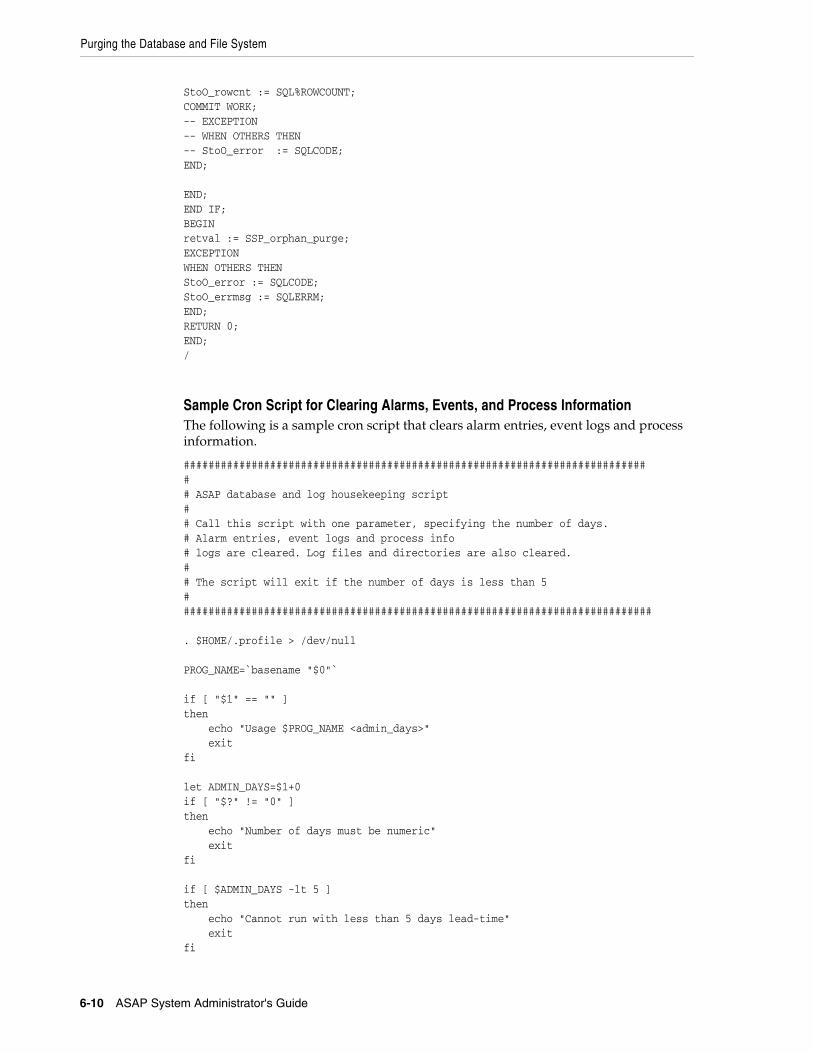
Purging the Database and File System
6-10 ASAP System Administrator's Guide
StoO_rowcnt := SQL%ROWCOUNT;COMMIT WORK;-- EXCEPTION-- WHEN OTHERS THEN-- StoO_error := SQLCODE;END;
END;END IF;BEGINretval := SSP_orphan_purge;EXCEPTIONWHEN OTHERS THENStoO_error := SQLCODE;StoO_errmsg := SQLERRM;END;RETURN 0;END;/
Sample Cron Script for Clearing Alarms, Events, and Process InformationThe following is a sample cron script that clears alarm entries, event logs and process information.
############################################################################# ASAP database and log housekeeping script## Call this script with one parameter, specifying the number of days. # Alarm entries, event logs and process info# logs are cleared. Log files and directories are also cleared.## The script will exit if the number of days is less than 5#############################################################################
. $HOME/.profile > /dev/null
PROG_NAME=`basename "$0"`
if [ "$1" == "" ]then echo "Usage $PROG_NAME <admin_days>" exitfi
let ADMIN_DAYS=$1+0if [ "$?" != "0" ]then echo "Number of days must be numeric" exitfi
if [ $ADMIN_DAYS -lt 5 ]then echo "Cannot run with less than 5 days lead-time" exitfi
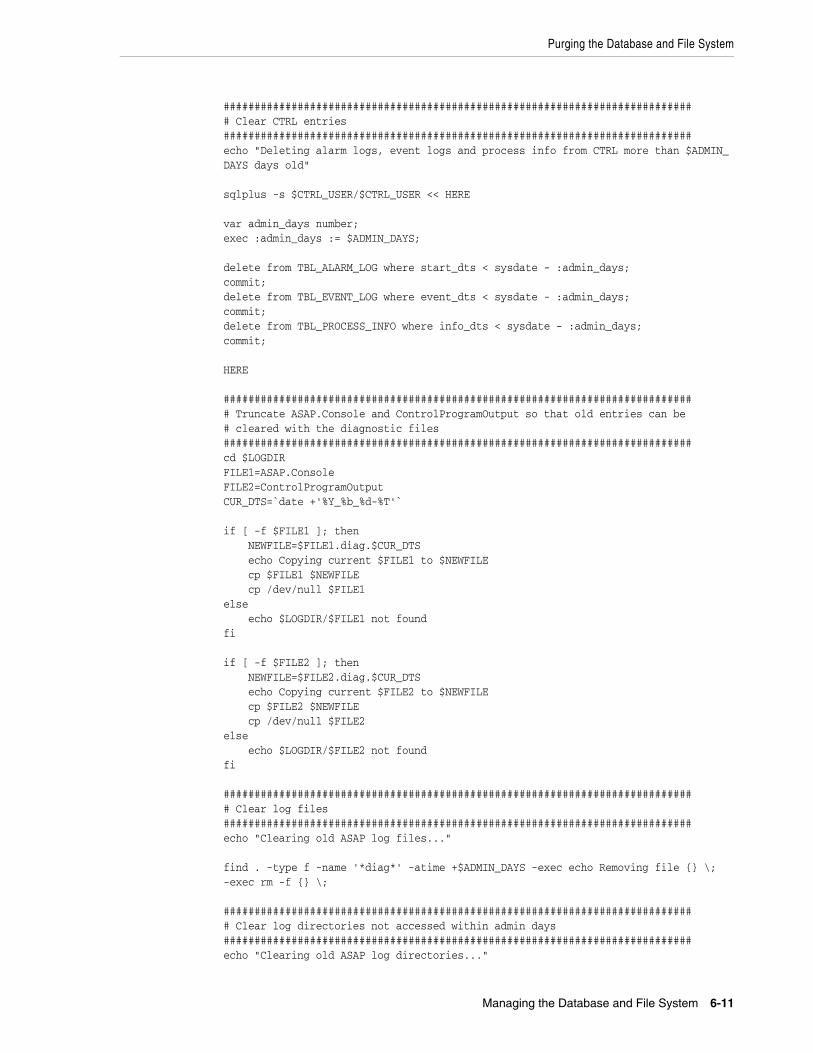
Purging the Database and File System
Managing the Database and File System 6-11
############################################################################# Clear CTRL entries############################################################################echo "Deleting alarm logs, event logs and process info from CTRL more than $ADMIN_DAYS days old"
sqlplus -s $CTRL_USER/$CTRL_USER << HERE
var admin_days number;exec :admin_days := $ADMIN_DAYS;
delete from TBL_ALARM_LOG where start_dts < sysdate - :admin_days;commit;delete from TBL_EVENT_LOG where event_dts < sysdate - :admin_days;commit;delete from TBL_PROCESS_INFO where info_dts < sysdate - :admin_days;commit;
HERE
############################################################################# Truncate ASAP.Console and ControlProgramOutput so that old entries can be# cleared with the diagnostic files############################################################################cd $LOGDIRFILE1=ASAP.ConsoleFILE2=ControlProgramOutputCUR_DTS=`date +'%Y_%b_%d-%T'`
if [ -f $FILE1 ]; then NEWFILE=$FILE1.diag.$CUR_DTS echo Copying current $FILE1 to $NEWFILE cp $FILE1 $NEWFILE cp /dev/null $FILE1else echo $LOGDIR/$FILE1 not foundfi
if [ -f $FILE2 ]; then NEWFILE=$FILE2.diag.$CUR_DTS echo Copying current $FILE2 to $NEWFILE cp $FILE2 $NEWFILE cp /dev/null $FILE2else echo $LOGDIR/$FILE2 not foundfi
############################################################################# Clear log files############################################################################echo "Clearing old ASAP log files..."
find . -type f -name '*diag*' -atime +$ADMIN_DAYS -exec echo Removing file {} \; -exec rm -f {} \;
############################################################################# Clear log directories not accessed within admin days############################################################################echo "Clearing old ASAP log directories..."

Purging the Database and File System
6-12 ASAP System Administrator's Guide
find . -type d -name '2*' -atime +$ADMIN_DAYS -exec echo Removing directory {} \; -exec rm -rf {} \;
cd -
echo "$PROG_NAME finished"
Purging Test SystemsThe cleandata script is designed to clean data from the test system during system testing. It is intended for use in development environments.
Usage
cleandata [-d]
The -d option instructs the script to retrieve password information from the credential store factory (CSF) wallet, located in ASAP_Home/install/cwallet.sso file, where ASAP_Home is the directory in which ASAP is installed. The cwallet.sso file is typically used only in development environments.
This script does the following:
■ Deletes events, process information, and alarms from the Control (CTRL) database (specifically, truncates tbl_event_log, tbl_process_info, tbl_alarm_log, tbl_unid)
■ deletes WOs from the ASAP database and executes an orphan purge (specifically, truncates tbl_wrk_ord, truncates tbl_ne_monitor, tbl_ne_event, tbl_unid, tbl_label_value, tbl_srt_correlation, tbl_srt_ctx, temp_wrk_ord)
Note: The tbl_ne_monitor table has been deprecated from ASAP 4.6.x onwards.
■ Deletes WOs from the SRP database (tbl_wrk_ord)
■ Deletes performance data from Admin database (truncates tbl_perf_order, tbl_perf_csdl, tbl_perf_asdl, tbl_perf_ne, tbl_perf_ne_asdl, tbl_aims_rpc, tbl_aims_rpc_param, tbl_aims_rpc_dest, tbl_aims_audit_log)
■ Deletes Java Message Service (JMS) messages from the Admin database
■ Deletes diagnostic and log files
Note: You must stop the Oracle WebLogic Server before running the cleandata script. Otherwise, a JDBCStoreException is thrown, and a WebLogic Server error is logged.
Note: Restart the WebLogic Server for the domain after running the cleandata script.

7
Troubleshooting ASAP 7-1
7Troubleshooting ASAP
This chapter provides troubleshooting information for Oracle Communications ASAP.
Overview of Troubleshooting ASAPAs an ASAP system administrator, you can perform the following tasks:
Troubleshooting ChecklistWhen any problems occur, it is best to do some troubleshooting before you contact Oracle Global Support:
■ You know your installation better than Oracle Global Support does. You know if anything in the system has been changed, so you are more likely to know where to look first.
■ Troubleshooting skills are important. Relying on Global Support to research and solve all of your problems prevents you from being in full control of your system.
If you have a problem with your Product system, ask yourself these questions first, because Oracle Global Support will ask them of you:
■ What exactly is the problem? Can you isolate it? For example, if it is a problem with an application, does it occur on one instance of the application, or all instances?
■ Oracle Global Support needs a clear and concise description of the problem, including when it began to occur.
■ What do the log files say?
■ This is the first thing that Oracle Global Support asks for. Check the error log for the Product component you’re having problems with.
■ Have you read the documentation?
■ Look through the list of common problems and their solutions in Diagnosing some common problems with Product.
■ Has anything changed in the system? Did you install any new hardware or new software? Did the network change in any way?
■ Have you read the Release Notes?
■ The Release Notes include information about known problems and runarounds.
■ Does the problem resemble another one you had previously?
■ Has your system usage recently jumped significantly?
Using Error Logs to Troubleshoot ASAP
7-2 ASAP System Administrator's Guide
■ Is the system otherwise operating normally?
■ Has response time or the level of system resources changed?
■ Are users complaining about additional or different problems?
■ Can you run clients successfully?
■ Are any other processes on the system hardware functioning normally?
If you still can’t resolve the problem, contact Oracle Global Support as described in "Getting Help with ASAP Problems".
Using Error Logs to Troubleshoot ASAPASAP error log files provide detailed information about system problems. If you’re having a problem with ASAP, look in the log files.
Log files include errors that need to be managed, as well as errors that do not need immediate attention (for example, invalid login attempts). To manage log files, you should make a list of the important errors for your system, as opposed to errors that do not need immediate attention.
Understanding Error-Message SyntaxFor more information about error message syntax, see "About Log Files".
Collecting Diagnostic InformationFor more information about collecting diagnostic information, see "About Diagnostic Files".
Common ASAP Problems and SolutionsThis section describes the following problems, and how to resolve them:
■ Problem: ASAP Servers Do Not Start - Database Tablespaces Used Up
■ Problem: ASAP Servers Do Not Start - Interfaces File Empty or Missing
■ Problem: ASAP Servers Do Not Start - No Information In Interfaces File
■ Problem: ASAP Servers Do Not Start - Wrong ASAP User Owner and Permissions
■ Problem: ASAP Servers Processes Do Not Start - Database Server Processes Used
■ Problem: ASAP Servers Processes Do Not Start - Database Server Sessions Used
■ Problem: ASAP Servers Do Not Start - Insufficient Server User Connections Defined
■ Problem: ASAP Servers Do Not Start - Insufficient Number of Threads
■ Problem: Control Server Crashes - No Free Messages
■ Problem: JNEP Server Does Not Start - Wrong Database Connection Information
■ Problem: JNEP Server Does Not Start - Invalid Server Port Numbers
■ Problem: NEP Server Does Not Start - Problem with JNEP Java Process Start Script
■ Problem: WebLogic Server Fails to Detect Passive RAC Database During Failover

Common ASAP Problems and Solutions
Troubleshooting ASAP 7-3
Problem: ASAP Servers Do Not Start - Database Tablespaces Used UpNone or some of the ASAP servers can start as the database tablespace used by the server is used up and there is no free space. Error messages like the following are generated to indicate that writing to the database failed:
Error: RPC 'CSP_system_event' Failed
To resolve this issue increase the tablespace sizes. You may also set autoextend for the tablespaces.
Problem: ASAP Servers Do Not Start - Interfaces File Empty or MissingASAP servers are configured properly in database tables but information for all servers is missing in the file $SYBASE/interfaces file. If Control server information is missing, then no process will start when ASAP is restarted.
The following messages are generated:
■ at the UNIX console
"Failed to start Master Control Server CTRLH720"
■ in UTILITY.diag file:
'ct_connect(): directory service layer: internal directory control layer error: Requested server name not found.'
■ in ASAP.Console file:
CTRLH720 Server: Fatal Server Error:Open Server Error # [16013] Severity [20] State [0] Error Text [Could not find server name 'CTRLH720' in interfaces file]CTRLH720: srv_run() Failed
Make sure that $SYBASE/interfaces file exists and contains correct information for all ASAP servers configured.
Problem: ASAP Servers Do Not Start - No Information In Interfaces File$SYBASE/interfaces file has only Control server information, but none of the other servers. However all servers are defined in the server configuration tables in Control server database (tables tbl_appl_proc, tbl_component, etc.).
The Control server will start successfully. For example:
Starting Master Control Server CTRLH720...Successful Startup of Master Control CTRLH720
The following messages are generated:
■ at the UNIX console
Error : ASAP server is already running, or can not start one of ASAP server
■ in UTILITY.diag file, messages are logged for each server that had no info in interfaces file For example:
"Local Startup Error: Can't Startup Server NEP_H720 ...'
■ in ASAP.Console file:
Open Server Error # [16013] Severity [20] State [0] Error Text [Could not find

Common ASAP Problems and Solutions
7-4 ASAP System Administrator's Guide
server name 'NEP_H720' in interfaces file]NEP_H720: srv_run() FailedFailed to start Application [NEP_H720]SARMH720 Server: Fatal Server Error:Open Server Error # [16013] Severity [20] State [0] Error Text [Could not find server name 'SARMH720' in interfaces file]SARMH720: srv_run() FailedFailed to start Application [SARMH720]
Make sure that $SYBASE/interfaces file exists and contains correct information.
Problem: ASAP Servers Do Not Start - Wrong ASAP User Owner and PermissionsOwner and file permissions might have been changed preventing the ASAP servers record data to the file system. For example, file or folder owner changes or file permission changes for DATA and its subfolders may cause this issue.
The following error message is generated:
/oracle/user1/A720_I/scripts/start_control_sys: line 197: /oracle/user1/A720_I/DATA/logs/ASAP.Console: cannot create [Permission denied]
Make sure that all the folders and files under ASAP installation folder are owned by the ASAP user and the user has all the required file permissions. For example, it should have read/write for everything under DATA folder otherwise it cannot create the server diagnostic files.
Problem: ASAP Servers Processes Do Not Start - Database Server Processes UsedThe following error message will be seen in the control or other server diagnostic files:
ORA-00020: maximum number of processes (%s) exceeded
Increase the value of the PROCESSES initialization parameter.
Problem: ASAP Servers Processes Do Not Start - Database Server Sessions UsedThe following error message will be seen in the control or other server diagnostic files:
Error - ORA-00018: maximum number of sessions exceeded
Increase the value of the SESSIONS initialization parameter.
Problem: ASAP Servers Do Not Start - Insufficient Server User Connections Defined Some ASAP servers do not start and a message like the following is observed in the Control server diagnostic file:
"Configuration of 70 connections has been exceeded, connection rejected."
Each ASAP server started establishes a defined number of connections to the Control server. There is an open server configuration parameter named MAX_CONNECTIONS which can be used by any open server application to limit the maximum number of connections from client applications. This problem is usually encountered when additional Network Element Processor (NEP) servers are configured as each additional NEP server means more connections to the Control server.
The solution is to increase the value of the parameter MAX_CONNECTIONS for the Control server in the ASAP_home/config/ASAP.cfg file. You can also set a value in the

Common ASAP Problems and Solutions
Troubleshooting ASAP 7-5
global section for all ASAP servers. Note that when adjusting this parameter, you may need to adjust additional parameters (see "Improving ASAP Performance").
Problem: ASAP Servers Do Not Start - Insufficient Number of ThreadsASAP servers cannot start with the reason being indicated as some remote procedure calls (RPCs) are not defined. For example:
Error : RPC install_exit_handler Not DefinedError: Unable to Spawn Service Thread TORONTO - Insufficient ResourcesSARMH720 Server: Information: Error 16115 Severity 10 State 0'Could not start threadError: Unable to Spawn Service Thread WO Mgr 2 - Insufficient Resources
ASAP Servers are configured to have a maximum number of threads in the ASAP_home/config/ASAP.cfg file. If this number is not big enough, when a thread is tried to be started, the server process will generate an error message and terminate.
Adjust the value of the parameter MAX_THREADS in the ASAP.cfg, globally or for a specific server.
Note that when adjusting this parameter, you may need to adjust additional parameters (see "Improving ASAP Performance").
Problem: Control Server Crashes - No Free MessagesControl server crashes with the following messages in the Control server diagnostic file:
153957.532:48:PROG:Fatal Thread Error :1429:main.cCTRLPRD1 Server: Fatal Thread Error:Open Server Error # [16016] Severity [15] State [0] Error Text [No free messages.]>> 153957.928:48:PROG:Fatal Thread Error :1436:main.cError: [CTRLPRD1] Fatal Thread Error - Terminating
Message resources were used up during high volume WO provisioning because MAX_MSGPOOL is not big enough for Control server.
Increase the value of MAX_MSGPOOL for the Control server in the ASAP_home/config/ASAP.cfg file. This should be done in the CTRL section as otherwise it will affect all the servers.
The minimum value of this configuration value is MAX_MSGQUEUES*256. You may need to adjust additional parameters (see "Improving ASAP Performance")
Problem: JNEP Server Does Not Start - Wrong Database Connection InformationThe database connection information (DB_CONNECT) in ASAP.properties was wrong and as a result JNEP was unable to connect to database while starting.
While NEP server java process (JNEP) was creating a pool of database connections, it failed with the exception message :
"The Network Adapter could not establish the connection"java.sql.SQLException: Io exception: The Network Adapter could not establish the connectionat oracle.jdbc.driver.DatabaseError.throwSqlException(DatabaseError.java:125)at oracle.jdbc.driver.DatabaseError.throwSqlException(DatabaseError.java:162)at oracle.jdbc.driver.DatabaseError.throwSqlException(DatabaseError.java:274)at oracle.jdbc.driver.T4CConnection.logon(T4CConnection.java:319)at oracle.jdbc.driver.PhysicalConnection.(PhysicalConnection.java:344)

Common ASAP Problems and Solutions
7-6 ASAP System Administrator's Guide
at oracle.jdbc.driver.T4CConnection.(T4CConnection.java:148)at oracle.jdbc.driver.T4CDriverExtension.getConnection(T4CDriverExtension.java:32)at oracle.jdbc.driver.OracleDriver.connect(OracleDriver.java:545)at oracle.jdbc.pool.OracleDataSource.get>>
Database connection information in ASAP.properties file is wrong. Correct it as below and restart the NEP server.
DB_CONNECT=(DESCRIPTION = (ADDRESS_LIST = (ADDRESS = (PROTOCOL = TCP)(HOST = xx.xx.xx.xx)(PORT = 1521))) (CONNECT_DATA = (SERVICE_NAME = orcl)))
HOST, PORT or SERVICE_NAME could be wrong in this property.
Problem: JNEP Server Does Not Start - Invalid Server Port NumbersNEP server does not start with an error message in the Control server diagnostic file. A port number outside the range might have been assigned to the NEP server in $SYBASE/interfaces. If the port number is within the range, it might have been bound by another process. Or the issue could be with the listener port that is assigned to the NEP java process. It could be out of range or already bound by another process.
Correct the port number for the NEP server in $SYBASE/interfaces file to be inside the range. If the port number is bound by another process already, it can not be used by the NEP server. A free, unused port number should be assigned for the NEP server.
Make sure that the port number assigned to the NEP java process (table tbl_listeners in Control server database) is also within the range and not bound by any other process.
Problem: NEP Server Does Not Start - Problem with JNEP Java Process Start ScriptThe NEP server java process is started by a script named $NEP_jinterpreter which is under $ASAP_BASE/programs folder. This script may not have proper execute permissions.
Give the proper execution permission for the script.
Problem: WebLogic Server Fails to Detect Passive RAC Database During FailoverIn a development environment, when testing Oracle RAC failover capabilities, it is possible to experience the following WebLogic error:
weblogic.jms.common.JMSException: weblogic.messaging.kernel.KernelException: Error persisting message
The starting point for this scenario involves the following configuration:
■ A running ASAP server environment and active WebLogic server instance (ASAP Environment).
■ A running active Oracle RAC database (RAC1).
■ A passive Oracle RAC database that is shutdown (RAC2).
To achieve the error message listed above, you must complete the following steps:
1. Manually startup RAC2.
2. Manually shutdown RAC1 within four minutes of starting RAC2.
The ASAP Weblogic server instance requires up to four minute to detect RAC2. Shutting down RAC1 within this time period will prevent ASAP from failing over

Component Failure Scenarios
Troubleshooting ASAP 7-7
to RAC2 because the ASAP WebLogic server has not had enough time to detect the presence of RAC2.
This error message is possible in a specific scenario that is unlikely to happen in a production environment.
Component Failure ScenariosThis section describes the behavior of ASAP in the event of component failure.
WebLogic Administration and Managed Server Failure and Recovery ScenariosIf the administration server shuts down while the managed server is running, the administration server regains control of the domain upon restart without having to restart the managed server.
If the administration server cannot be restarted following a failure, you must restore the administration server on another machine.
Restarting the WebLogic Managed Server
If the administration server is running, the managed server retrieves configuration data from the administration server. If the administration server is unavailable, the managed server retrieves its configuration and security information from the filesystem.
SRP Failure ScenarioIf the Service Request Processor (SRP) fails, the Service Activation Request Manager (SARM) and NEP provision all orders that are saved in the database and are awaiting provisioning. The SARM saves the order notification RPCs in the SARM database. It then sends periodic “heartbeat” messages to the failed SRP to check for availability. When the SRP starts again, the SARM retrieves and processes all order notification RPCs saved on disk before processing new orders.
SARM Failure ScenarioIf the SARM fails, the SRP can neither send orders to the SARM nor receive notifications from the SARM, although the SRP is running and receiving orders from the upstream. Therefore, the SRP cannot process orders and remains idle until the SARM is restarted.
NEPs complete the processing of Atomic Service Description Layer (ASDL) requests currently in progress, and then it becomes idle.
The SRP and NEPs send periodic “heartbeat” messages to determine when the failed SARM becomes available.
NEP Failure ScenarioIn the event of NEP failure, the SRP continues to translate and send orders to the SARM, which continues to provision ASDLs scheduled to be provisioned by any operational NEP. All ASDLs to be provisioned by NEs managed by the failed NEP are added to SARM Provisioning Pending Queue. The SARM sends periodic “heartbeat” messages to determine when the failed NEP becomes available.

Getting Help with ASAP Problems
7-8 ASAP System Administrator's Guide
Control Server Failure ScenarioIf the Control server is shut down, all other ASAP applications controlled by it are also shut down.
Database Failure ScenarioIf the SRP database fails, the SRP is shut down if it relies on the SRP database. For example, the C SRP server. Similarly, the SARM and NEP servers shut down whenever their respective databases fail. If the Control database fails, the Control server is shut down, taking down all other ASAP applications controlled by it. In a distributed environment, if the primary Control server goes down, the secondary Control servers detect this and shut down.
If the SQL Server is down, all databases fail and the entire system is shut down.
NE Unavailability ScenarioIf an NE becomes unavailable, all ASDLs to the unavailable NE queue up in the SARM. The SARM will not take new work orders (WOs).
If the asdl_timeout parameter is set for an ASDL, and the timeout parameter exceeds asdl_retry_number parameter, the WO to which the ASDL belongs fails and rolls back.
If the request_timeout parameter (an NE timeout parameter) is set for the WO to which an ASDL belongs, and the request_retry_number (an NE timeout parameter) exceeds, the WO fails and rolls back.
If neither ASDL nor NE timeout parameters are set, and the WO timeout parameters exceed, all orders with ASDLs going to the unavailable NE fail due to timeout.
SRP and SARM Failure ScenarioIf both the SRP and SARM fail, each NEP completes its processing of ASDL requests currently in progress. The NEP then closes all connections to NEs and then remains idle.
SARM and NEP Failure ScenarioIf the SARM and NEP fail, the SRP cannot send orders or receive notifications from the SARM. No order provisioning is possible.
Getting Help with ASAP ProblemsIf you can’t resolve your ASAP problem, contact Oracle Global Support.
Before You Contact Global SupportProblems can often be fixed by shutting down ASAP and restarting the computer that the ASAP system runs on. To shut down and restart ASAP, see "Starting and Stopping ASAP".
If that doesn’t solve the problem, the first troubleshooting step is to look at the error log for the application or process that reported the problem. See "Using Error Logs to Troubleshoot ASAP". Be sure to observe the checklist for resolving problems with ASAP before reporting the problem to Oracle Global Support. See "Troubleshooting Checklist".

Getting Help with ASAP Problems
Troubleshooting ASAP 7-9
Reporting ProblemsIf the checklist for resolving problems with ASAP does not help you to resolve the problem, write down the pertinent information:
■ A clear and concise description of the problem, including when it began to occur.
■ Relevant portions of the relevant log files.
■ Relevant configuration files.
■ Recent changes in your system, even if you don’t think they are relevant.
■ List of all ASAP components and patches installed on your system.
When you are ready, report the problem to Oracle Global Support.

Getting Help with ASAP Problems
7-10 ASAP System Administrator's Guide

A
ASAP Directory Structure A-1
AASAP Directory Structure
This appendix describes the Oracle Communications ASAP directory structure.
ASAP Directory Structure and ContentsTable A–1 lists and describes the ASAP directories.
Table A–1 ASAP Directories
Directory Description
ASAP_home/activationModels Contains installed SAR files. When you first install ASAP, the ASAP installer automatically installs the Nortel_DMS_POTS.sar. All additional SAR files that you upload using Service Activation Deployment Tool (SADT) or the installCartridge.sh script are added to this folder.
ASAP_home/config This folder contains important configuration files such as ASAP.cfg and OCA.cfg.
ASAP_home/DATA Contains the logs directory.
ASAP_home/DATA/logs Location of all server logs and the ASAP.console log files. The ASAP.Console file contains standard input, standard output, and errors that are sent to a console screen. The ASAP.Console file records any startup errors.
ASAP_home/DATA/logs/ne_logs Contains NE log files.
ASAP_home/DATA/logs/yyyymmdd These folders are created by ASAP daily or whenever a server starts up. Diagnostic files are located here and contain appl_name.diag files (where yyyymmdd is the date for which you want to view the diagnostics and appl_name is the client or server application.)
ASAP_home/isql Contains sql scripts for ASAP database upgrades. The sql scripts with the words procs contain stored procedures, functions, and triggers and should be used when upgrading ASAP. The ASAP installer uses the other scripts when you first install ASAP and should not be run manually.
ASAP_home/db_migration Contains database sql and korn shell scripts for upgrading the ASAP database.
ASAP_home/include Contains ASAP C header files.
ASAP_home/include/csolsrp Contains the Service Request Processor (SRP) emulator C header files.
ASAP_home/include/asc_oo_fw Contains object oriented ASAP C++ header files.
ASAP_home/install Contains files related to the ASAP installation.

ASAP Directory Structure and Contents
A-2 ASAP System Administrator's Guide
ASAP_home/JLIB Contains java archive (jar) files used by the ASAP Java components.
ASAP_home/ant Contains the ant tool and related subdirectories used in the Java software build process.
ASAP_home/JRE Contains the Java runtime environment and all related sub folders.
ASAP_home/lib Contains jar file and Enterprise Archive (.ear) files for WebLogic based ASAP tools and servers.
ASAP_home/nawk_progs This folder contains nawk programs.
ASAP_home/objects Contains ASAP Server application programming interface (API) libraries
ASAP_home/oca_sys_if This folder contains various Order Control Application (OCA) client and OCA client related sub folders.
ASAP_home/oca_sys_if/client This folder contains the OCA client sub folders.
ASAP_home/oca_sys_if/client/java This folder contains the OCA client sub folders.
ASAP_home/oca_sys_if/client/java/config OCA client configuration files.
ASAP_home/oca_sys_if/client/java/scripts OCA client execution scripts.
ASAP_home/oca_sys_if/client/java/src OCA client source files and directories.
ASAP_home/oca_sys_if/client/java/utils OCA applet splash page.
ASAP_home/oca_sys_if/idls This interface description languages (IDLs) folder contains a CORBA ASC interface file used by the OCA client.
ASAP_home/oca_sys_if/sample This directory contains a sample external validation server for the OCA SRP.
ASAP_home/oca_sys_if/sample/ validationServer
This sample program illustrates how to create a user defined external validation server in Java. You can configure the OCA SRP server to validate work orders (WOs) with this external validation server. For more information about the sample external validation server, read the README contained in this directory.
ASAP_home/oracle_communications Folder reserved for future use.
ASAP_home/oracle_communications/asap Folder reserved for future use.
ASAP_home/patch This folder contains various patch files installed automatically when you install or upgrade ASAP.
ASAP_home/profile This folder contains various profiles that ASAP uses for the different ASAP installation and configuration options.
ASAP_home/programs This file contains various programs used to run ASAP utilities, scripts, and servers.
ASAP_home/samples This folder contains various sample servers, service models, sar files, and server configurations.
ASAP_home/samples/ASDL_ROUTE This sample folder contains the files and instructions for running sample user defined stored procedures to route WOs.
ASAP_home/samples/CsolSrp This folder contains a sample C-based SRP.
ASAP_home/samples/CsolSrp/csolsrp_sample
This folder contains the files and instructions for implementing the most basic functions of an SRP.
Table A–1 (Cont.) ASAP Directories
Directory Description
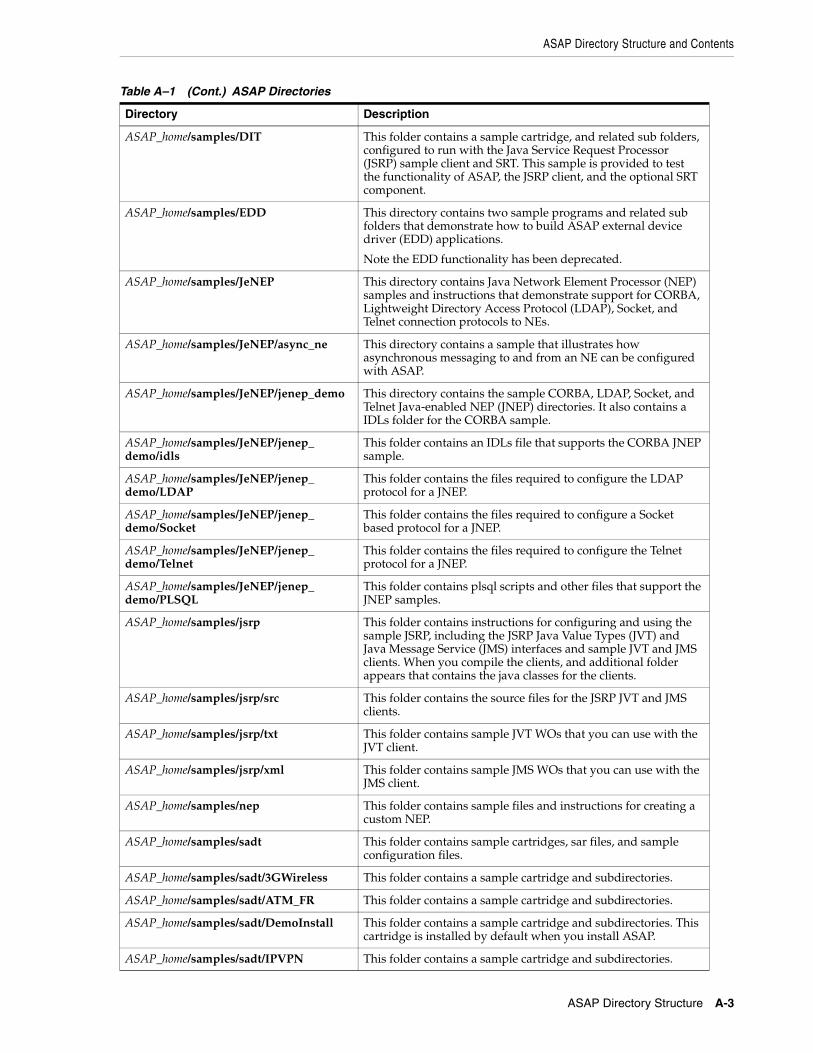
ASAP Directory Structure and Contents
ASAP Directory Structure A-3
ASAP_home/samples/DIT This folder contains a sample cartridge, and related sub folders, configured to run with the Java Service Request Processor (JSRP) sample client and SRT. This sample is provided to test the functionality of ASAP, the JSRP client, and the optional SRT component.
ASAP_home/samples/EDD This directory contains two sample programs and related sub folders that demonstrate how to build ASAP external device driver (EDD) applications.
Note the EDD functionality has been deprecated.
ASAP_home/samples/JeNEP This directory contains Java Network Element Processor (NEP) samples and instructions that demonstrate support for CORBA, Lightweight Directory Access Protocol (LDAP), Socket, and Telnet connection protocols to NEs.
ASAP_home/samples/JeNEP/async_ne This directory contains a sample that illustrates how asynchronous messaging to and from an NE can be configured with ASAP.
ASAP_home/samples/JeNEP/jenep_demo This directory contains the sample CORBA, LDAP, Socket, and Telnet Java-enabled NEP (JNEP) directories. It also contains a IDLs folder for the CORBA sample.
ASAP_home/samples/JeNEP/jenep_demo/idls
This folder contains an IDLs file that supports the CORBA JNEP sample.
ASAP_home/samples/JeNEP/jenep_demo/LDAP
This folder contains the files required to configure the LDAP protocol for a JNEP.
ASAP_home/samples/JeNEP/jenep_demo/Socket
This folder contains the files required to configure a Socket based protocol for a JNEP.
ASAP_home/samples/JeNEP/jenep_demo/Telnet
This folder contains the files required to configure the Telnet protocol for a JNEP.
ASAP_home/samples/JeNEP/jenep_demo/PLSQL
This folder contains plsql scripts and other files that support the JNEP samples.
ASAP_home/samples/jsrp This folder contains instructions for configuring and using the sample JSRP, including the JSRP Java Value Types (JVT) and Java Message Service (JMS) interfaces and sample JVT and JMS clients. When you compile the clients, and additional folder appears that contains the java classes for the clients.
ASAP_home/samples/jsrp/src This folder contains the source files for the JSRP JVT and JMS clients.
ASAP_home/samples/jsrp/txt This folder contains sample JVT WOs that you can use with the JVT client.
ASAP_home/samples/jsrp/xml This folder contains sample JMS WOs that you can use with the JMS client.
ASAP_home/samples/nep This folder contains sample files and instructions for creating a custom NEP.
ASAP_home/samples/sadt This folder contains sample cartridges, sar files, and sample configuration files.
ASAP_home/samples/sadt/3GWireless This folder contains a sample cartridge and subdirectories.
ASAP_home/samples/sadt/ATM_FR This folder contains a sample cartridge and subdirectories.
ASAP_home/samples/sadt/DemoInstall This folder contains a sample cartridge and subdirectories. This cartridge is installed by default when you install ASAP.
ASAP_home/samples/sadt/IPVPN This folder contains a sample cartridge and subdirectories.
Table A–1 (Cont.) ASAP Directories
Directory Description

ASAP Directory Structure and Contents
A-4 ASAP System Administrator's Guide
ASAP_home/samples/sadt/ NetworkManager
This folder contains a sample cartridge and subdirectories.
ASAP_home/samples/sadt/ SampleCommonConfig
This folder contains sample server configuration xml files. You can use these sample files to modify, delete, or add ASAP servers with Service Activation Configuration Tool (SACT).
ASAP_home/samples/sadt/sar This file contains the SAR files for the sample cartridges.
ASAP_home/samples/sadt/sample_configs This file contains sample ASAP.cfg, ASAP.properties files for small, medium, and large ASAP deployments.
ASAP_home/scripts This folder contains various scripts. Some scripts are available for ASAP users (for example, asap_utils, start_asap_sys, and so on), and some scripts are only used by the ASAP installer.
ASAP_home/SYBASE This folder contains Sybase open sever and client subfolder. This folder also contains the interface file that contains IP and port configuration information for ASAP server.
ASAP_home/SYBASE/characterset This folder contains subfolders for supported Sybase charactersets.
ASAP_home/SYBASE/config This folder contains Sybase configuration files.
ASAP_home/SYBASE/locales This folder contains Sybase language and localization information.
ASAP_home/SYBASE/OCS-15_0 This folder contains the Sybase software development kit (SDK) and subfolders.
ASAP_home/sys_test Legacy test tools for C-baed cartridges.
ASAP_home/_uninstall This folder contains files used to uninstall the ASAP UNIX servers. Note that the file to uninstall the WebLogic ASAP server components (asap_uninstall_WLS) is located in the ASAP_home/scripts directory.
ASAP_home/XERCES This folder contains the Xerces libraries. ASAP uses Xerces to parse, validate, and manipulat XML.
ASAP_home/xml This folder contains XML based files.
ASAP_home/xml/xsd This folder contains the XML schemas that ASAP uses to validate data structures and formats for ASAP server components, SAR files, service models, and so on.
ASAP_home/xml/xslt This folder contains xslt style sheets used by various scripts to transform xml documents into new xml documents. The export_tool.sh script located in the ASAP_home/scripts directory uses these files to convert database data into xml content that can be used by SACT.
Table A–1 (Cont.) ASAP Directories
Directory Description


![Oracle Communications Platform® Communications Platform TPD Initial Product ... [2] Oracle Integrated ...](https://static.documents.pub/doc/80x56/5afcad0d7f8b9a994d8c6cf9/oracle-communications-platform-communications-platform-tpd-initial-product-2.jpg)


